For an open canoe, 16′ is the most versatile and popular length. When paddled by two people, a 16-footer offers enough space to carry gear for a week of camping, or even a third person. Depending on the design and fabrication, it can be optimized for straight-line flatwater paddling or have sufficient rocker to enable it to be twisted down a rocky stream. Sixteen-footers can also be paddled solo, which is hard in longer canoes. Furthermore, longer canoes are harder to load on cars or portage solo. Old Town Canoe of Maine, the most prolific of all North American canoe manufacturers, records that 32 percent of their entire canoe production from 1905 to 1978 consisted of 16-footers.
Newfound Woodworks of Bristol, New Hampshire, offers the sporty Chestnut Kruger, a 16-footer based on one of the classic wood-and-canvas Cruiser models designed and originally built by the Chestnut Canoe Company. Located in Fredericton, New Brunswick, Chestnut started business in 1904 and closed in 1978; during those 70 years, it was Canada’s largest canoe company. The Kruger was one of Chestnut’s first models, and I was intrigued by the unlikely-sounding name. Some quick research revealed that, in the early 1900s, to ensure accuracy in telegraphed orders, canoe companies assigned code names to their models, choosing titles that evoked a specific quality. The Kruger was named for Paul Kruger, State President during the South African War (1899–1902), in which his underdog Boer forces earned considerable respect from British and colonial forces—among them soldiers from Canada.
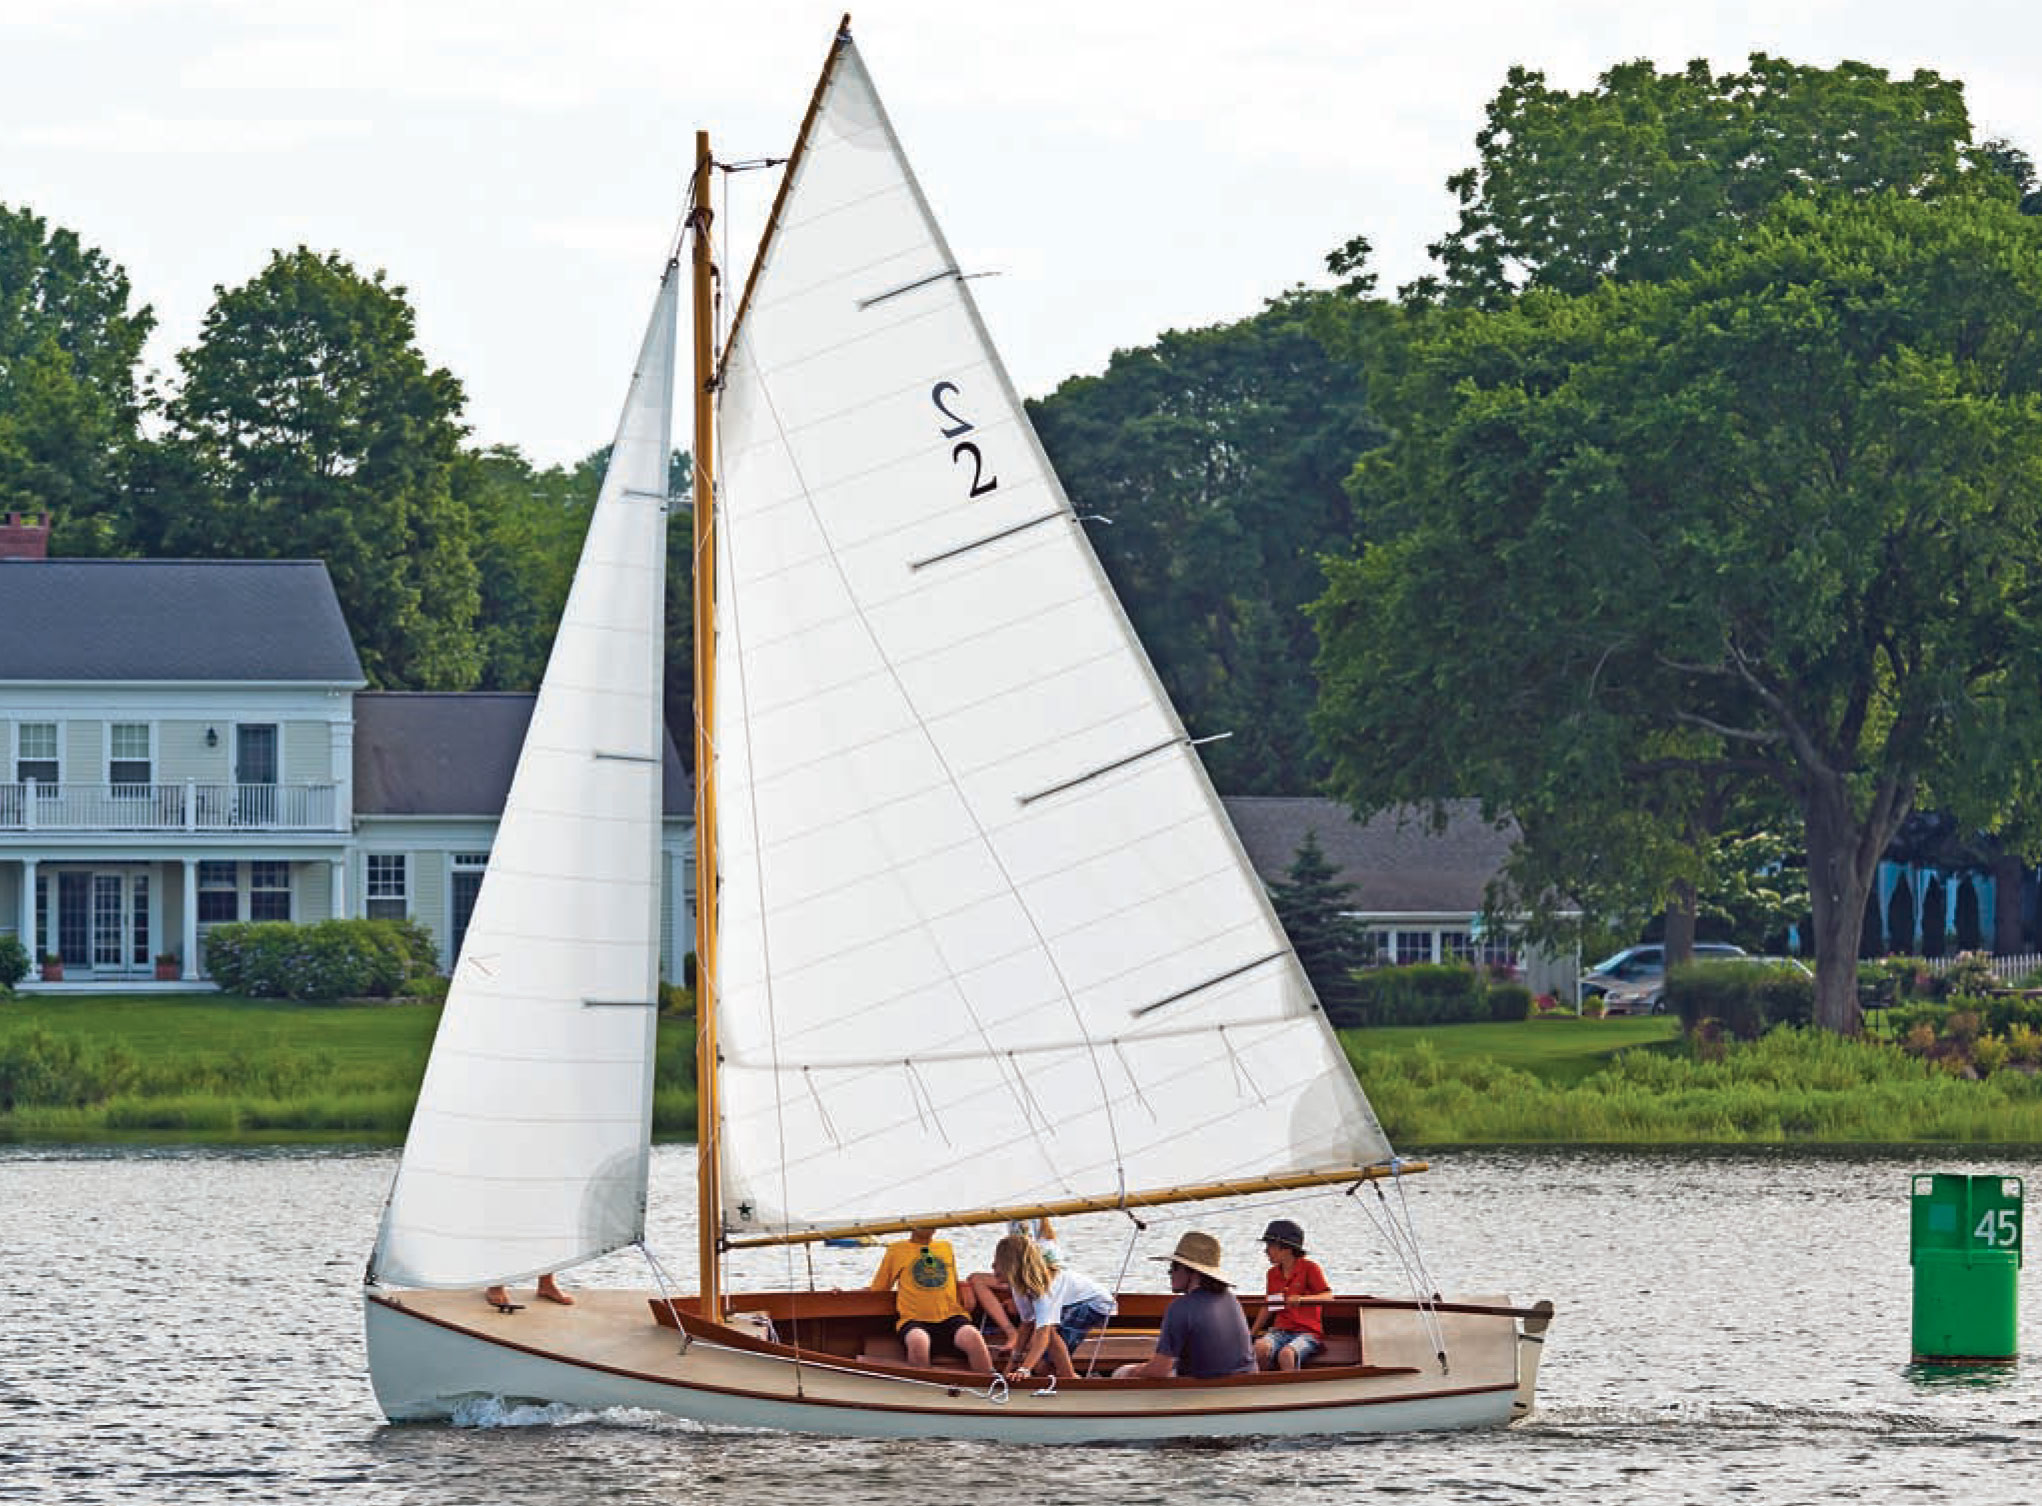
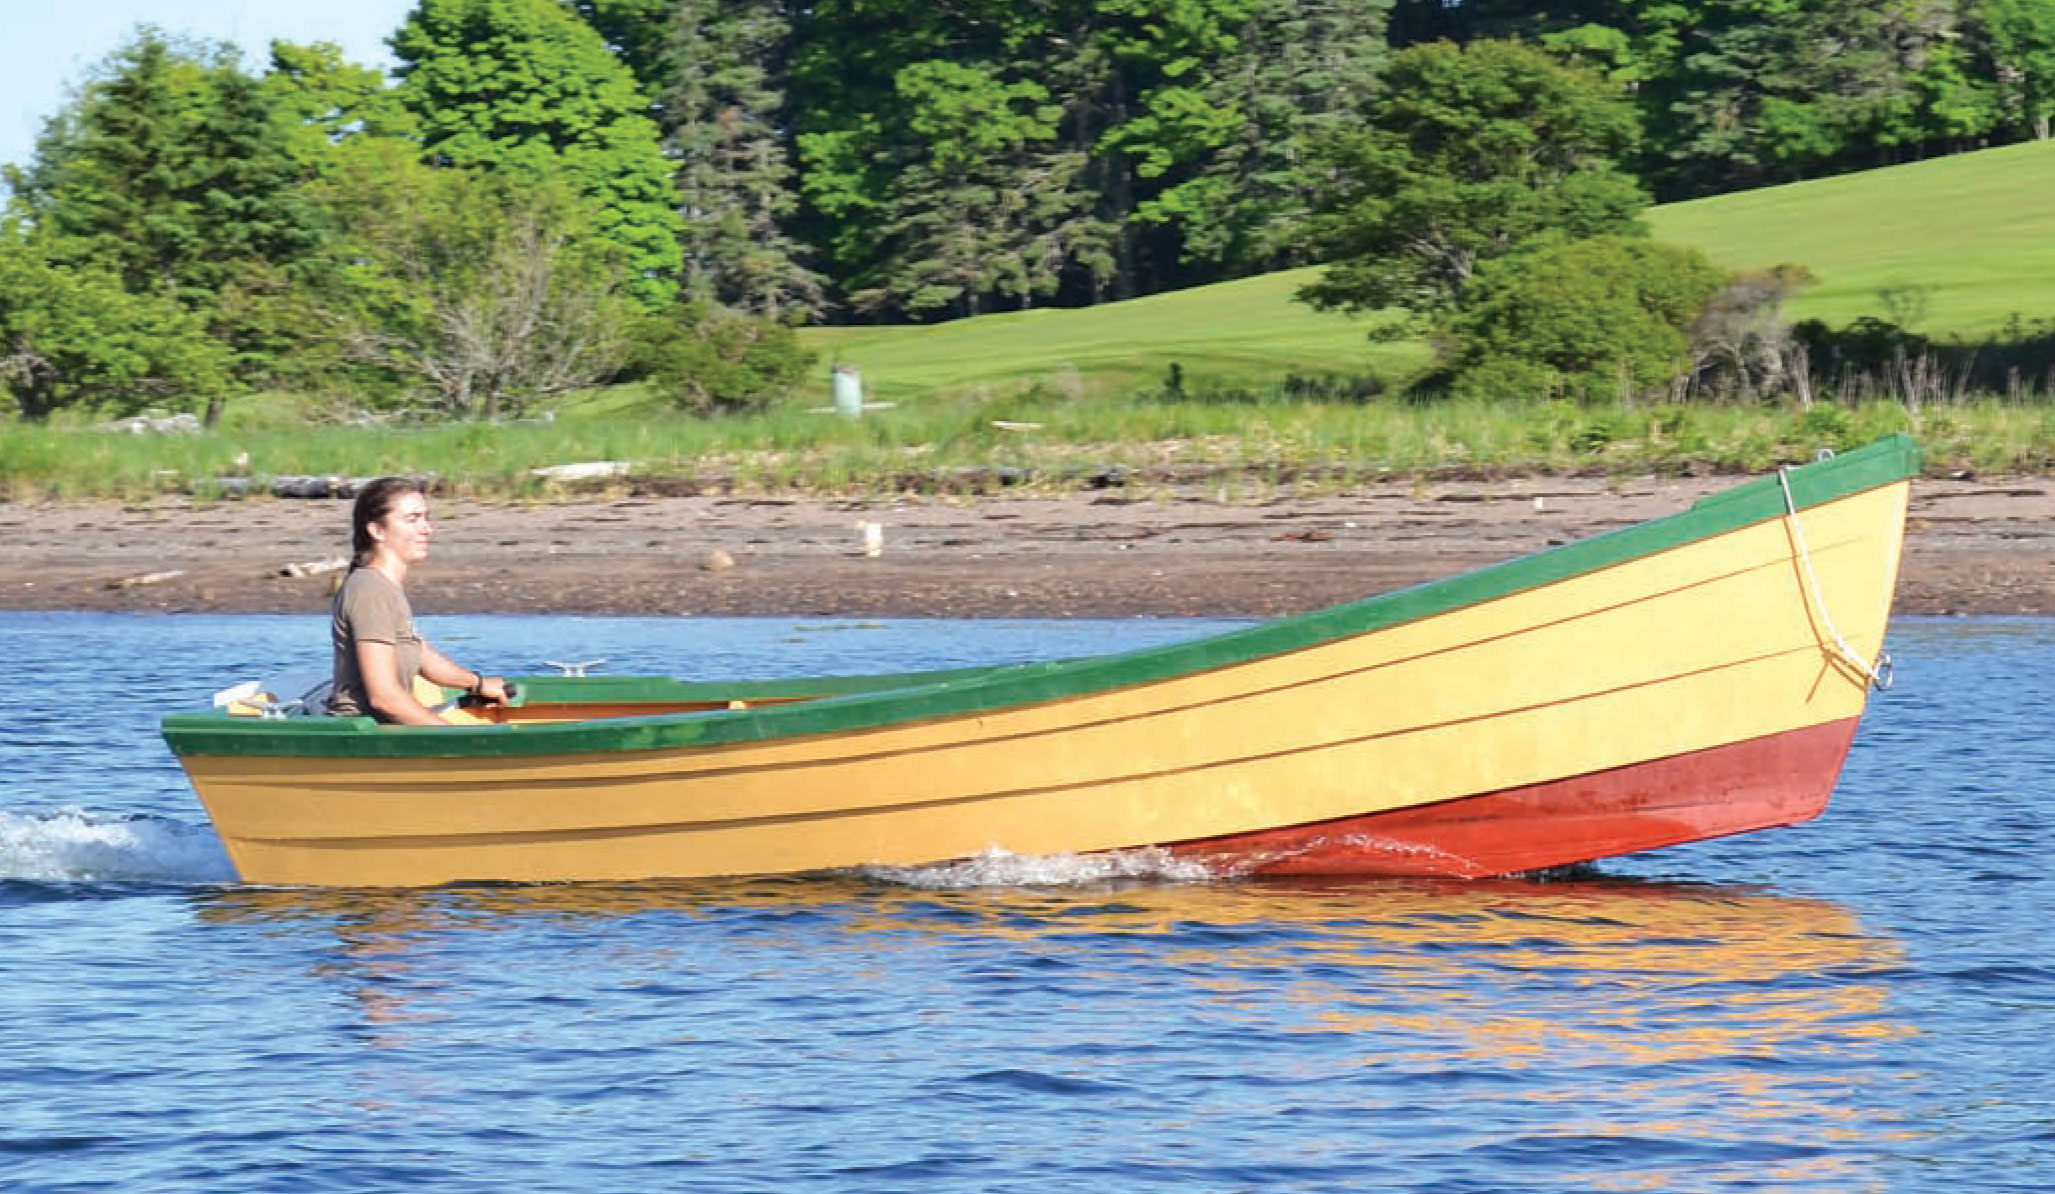
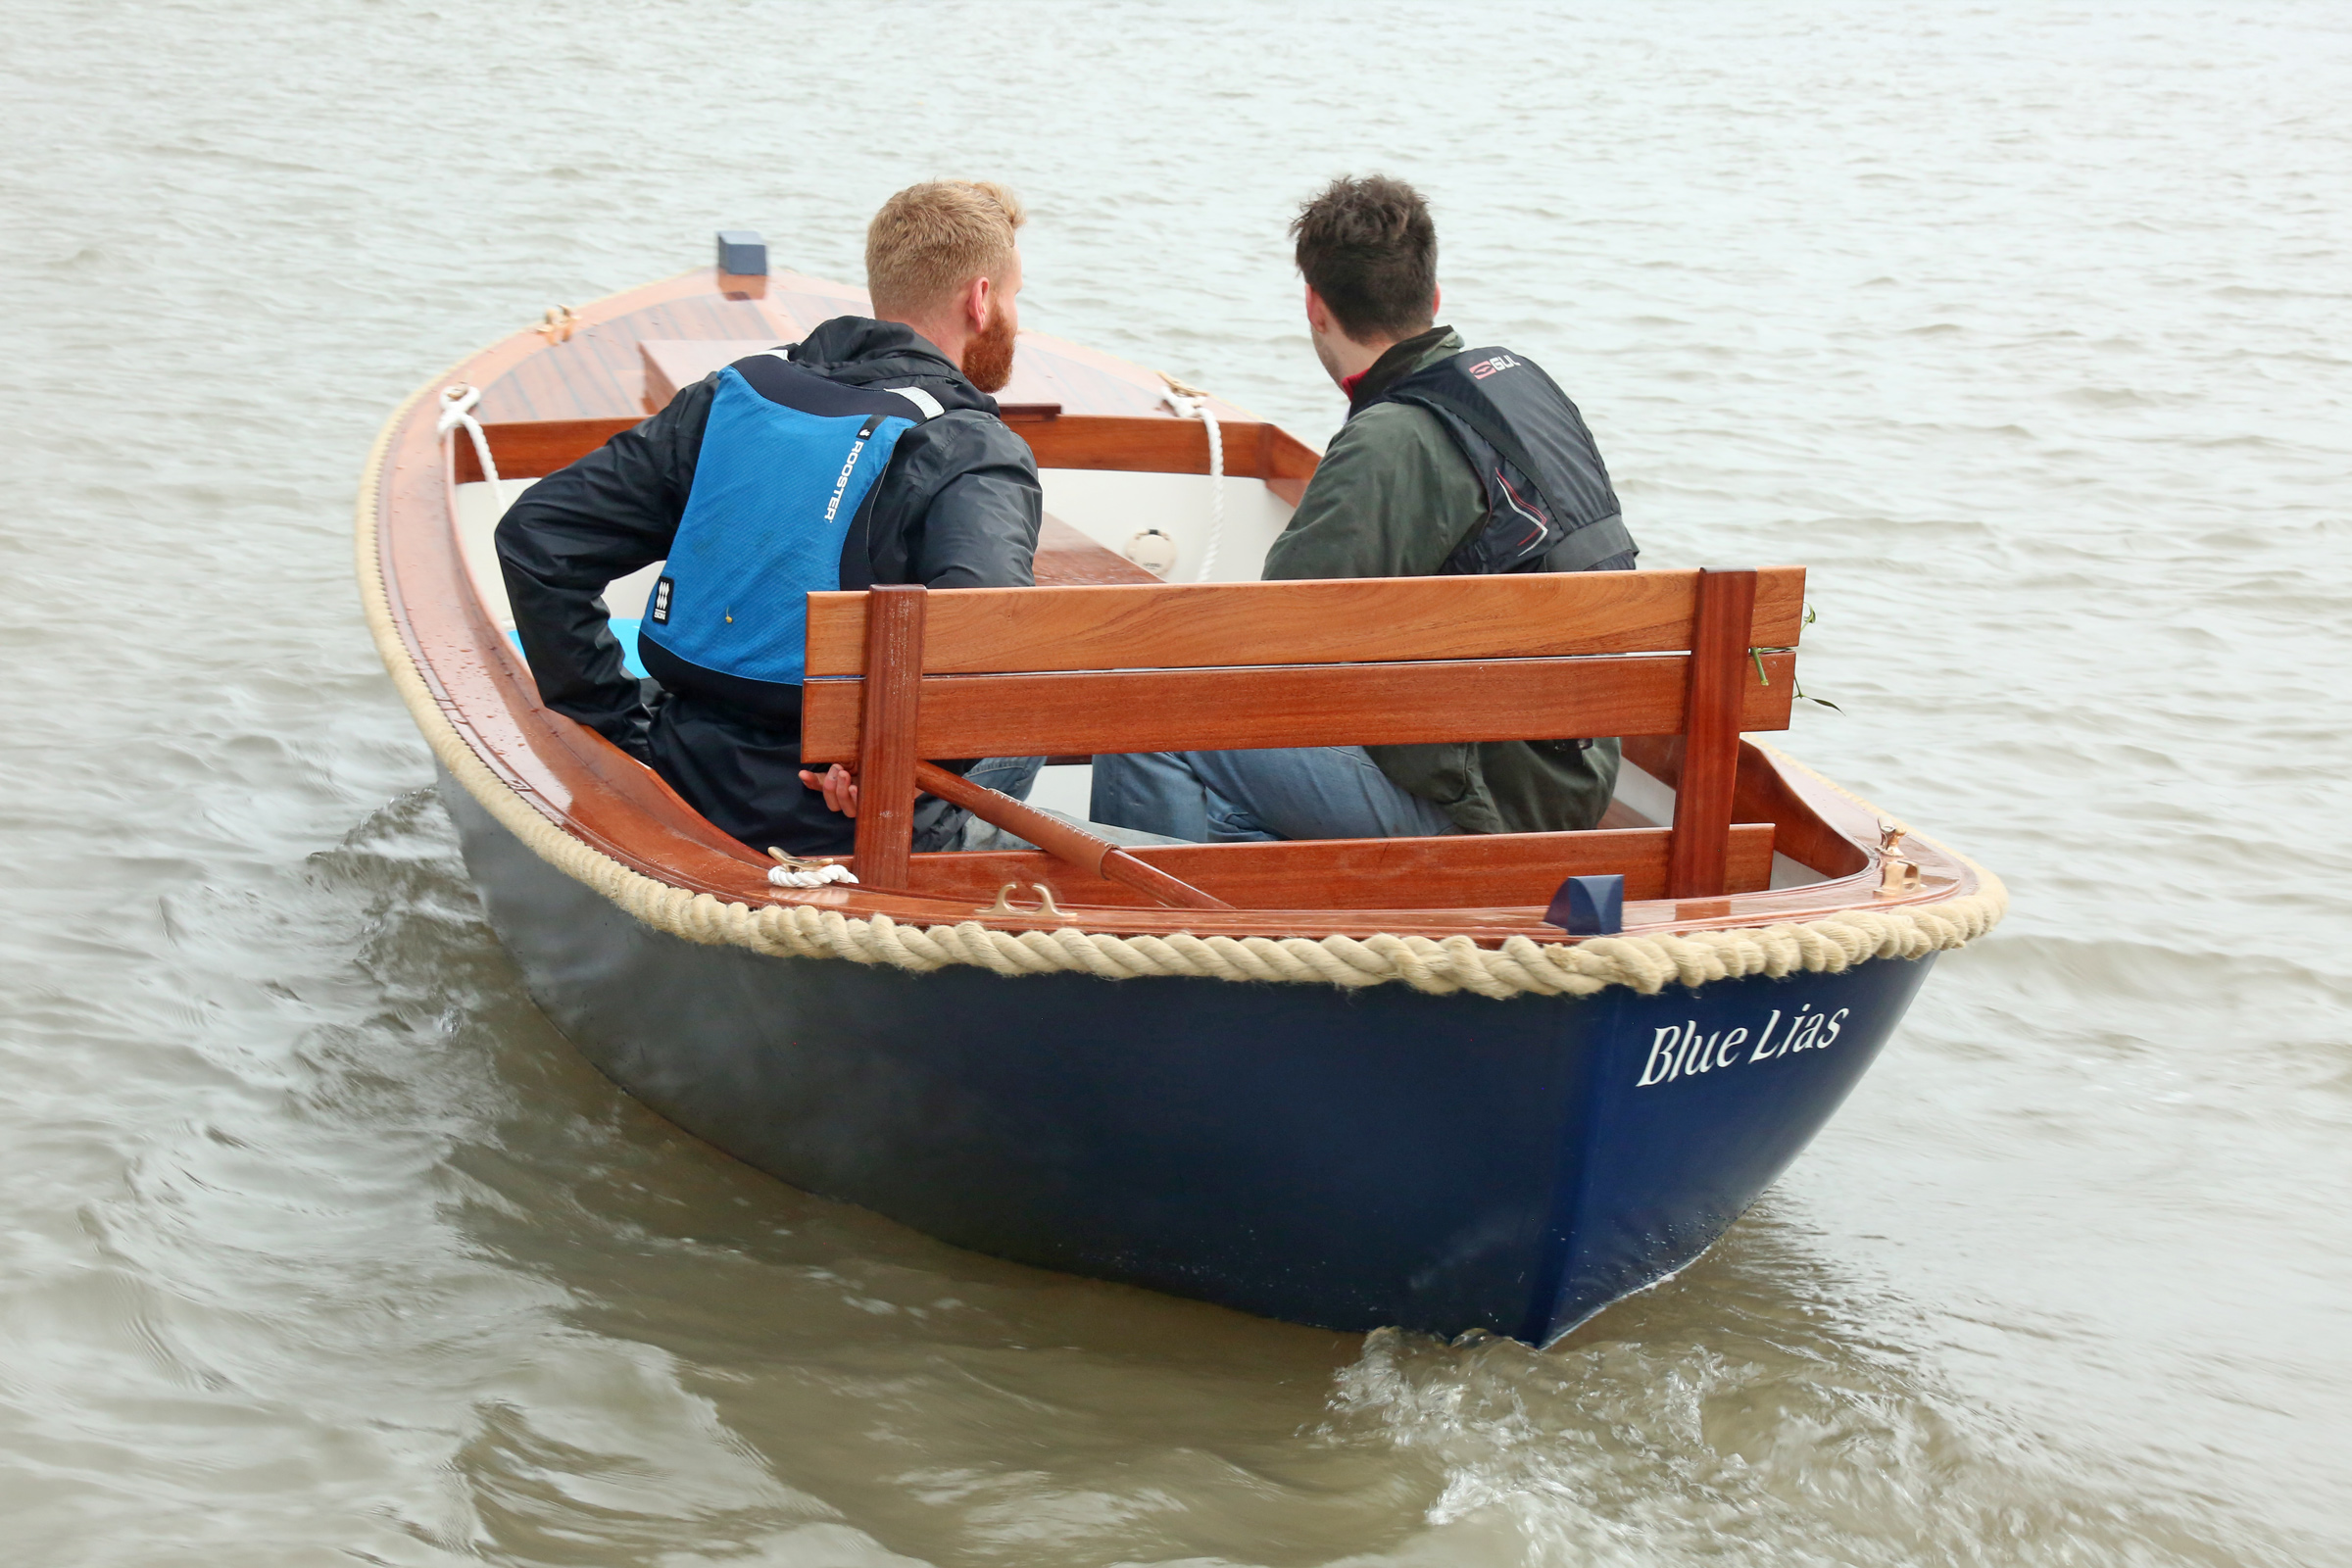
Photographs by Jenny Bennett
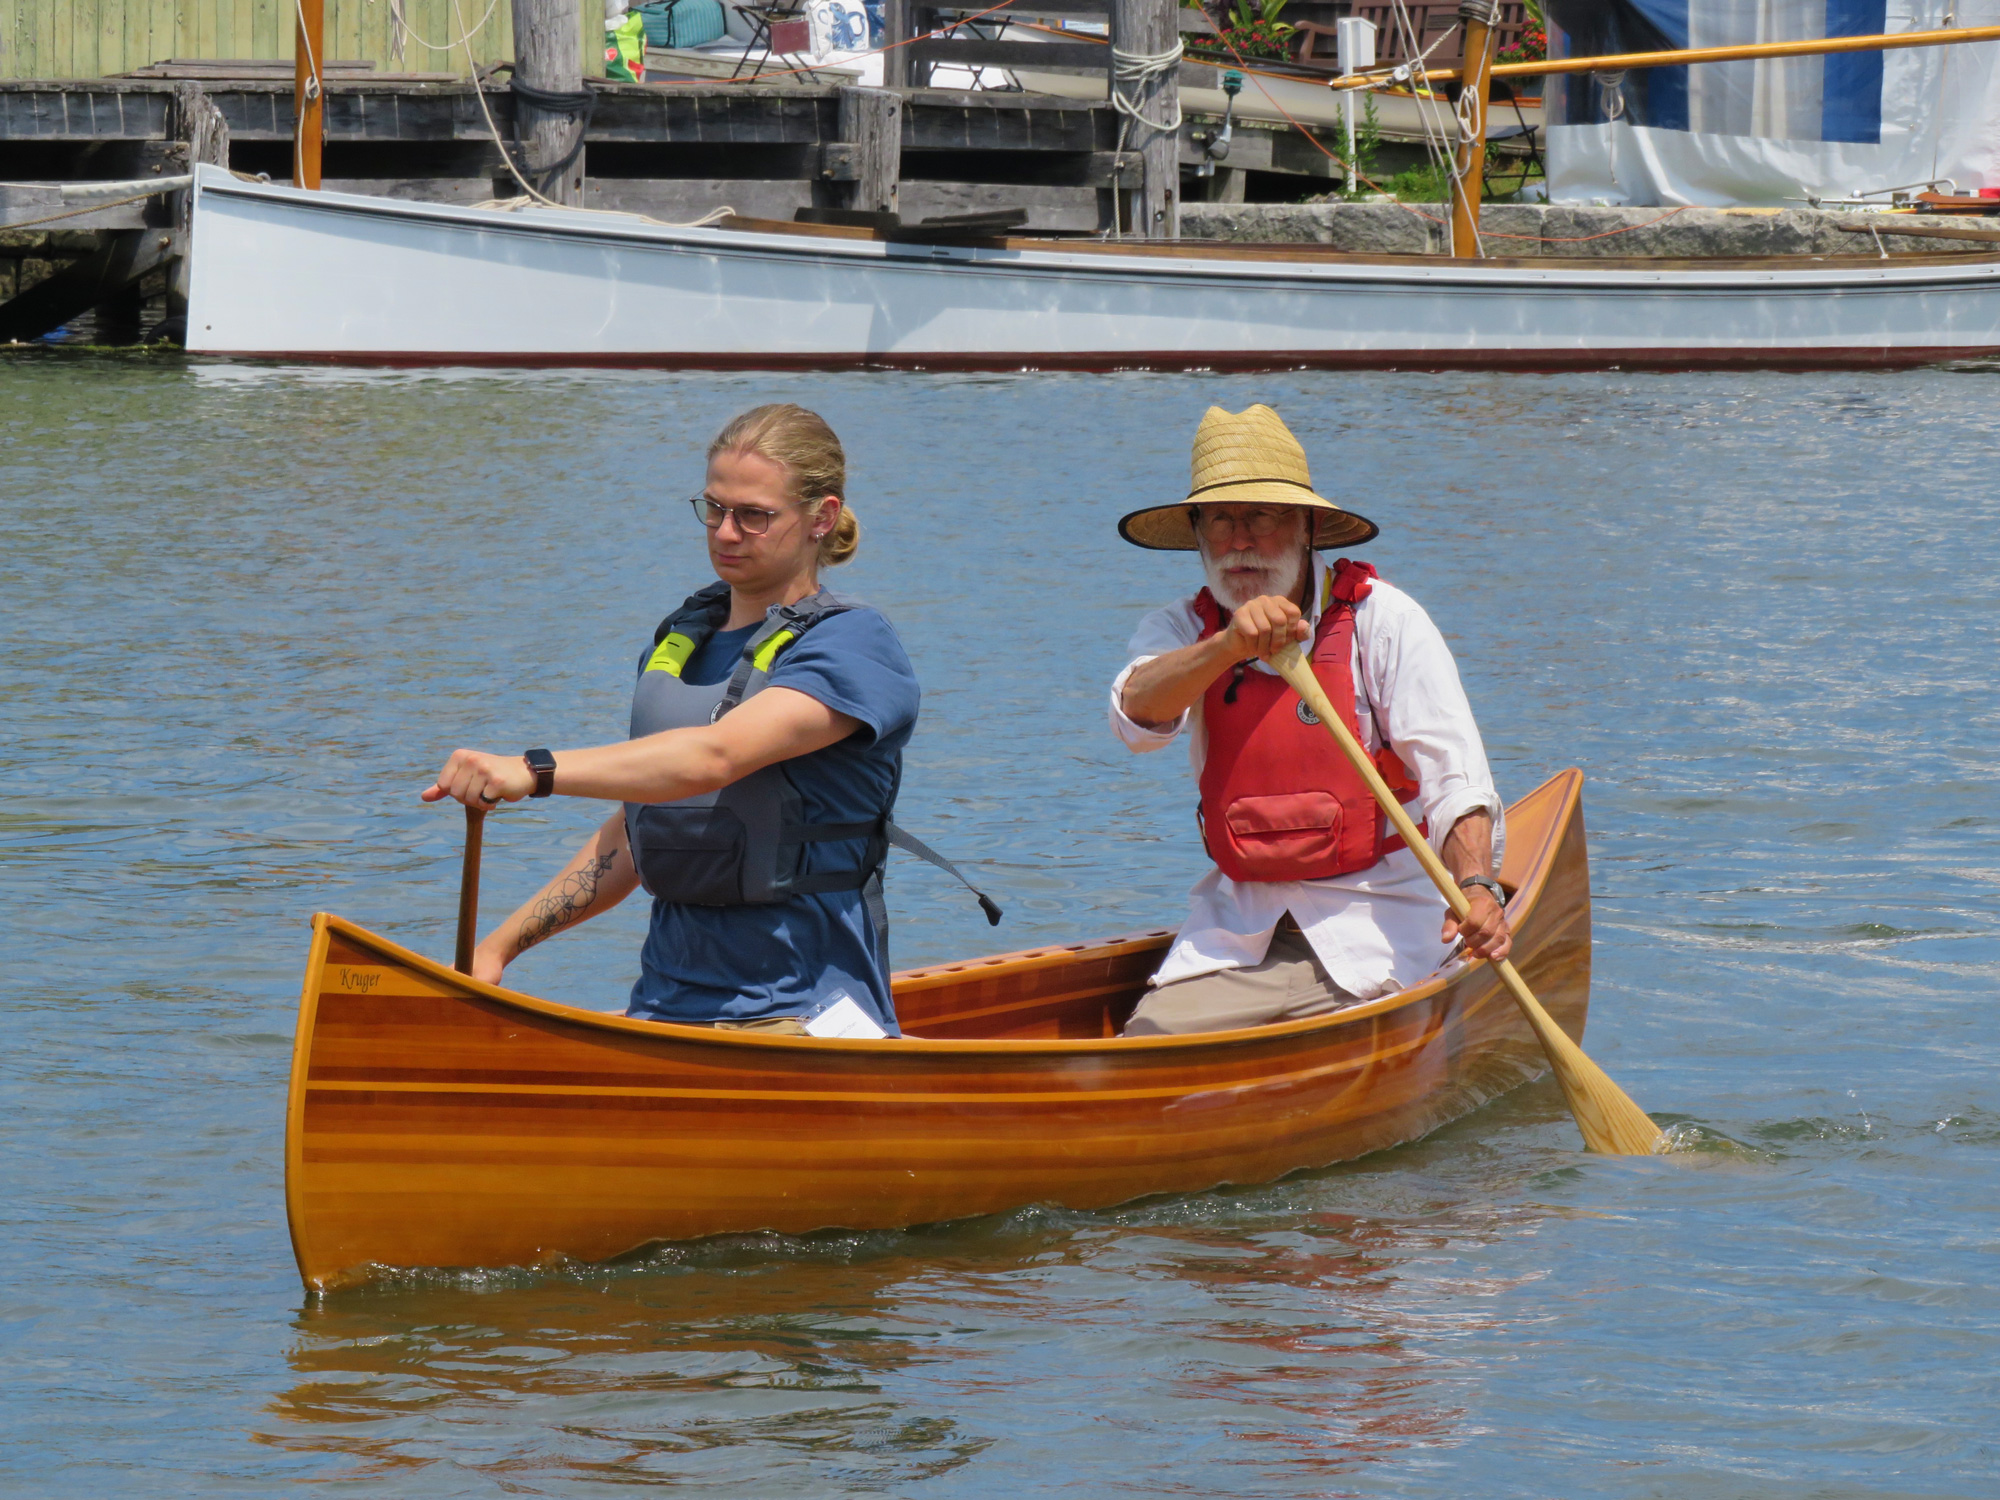
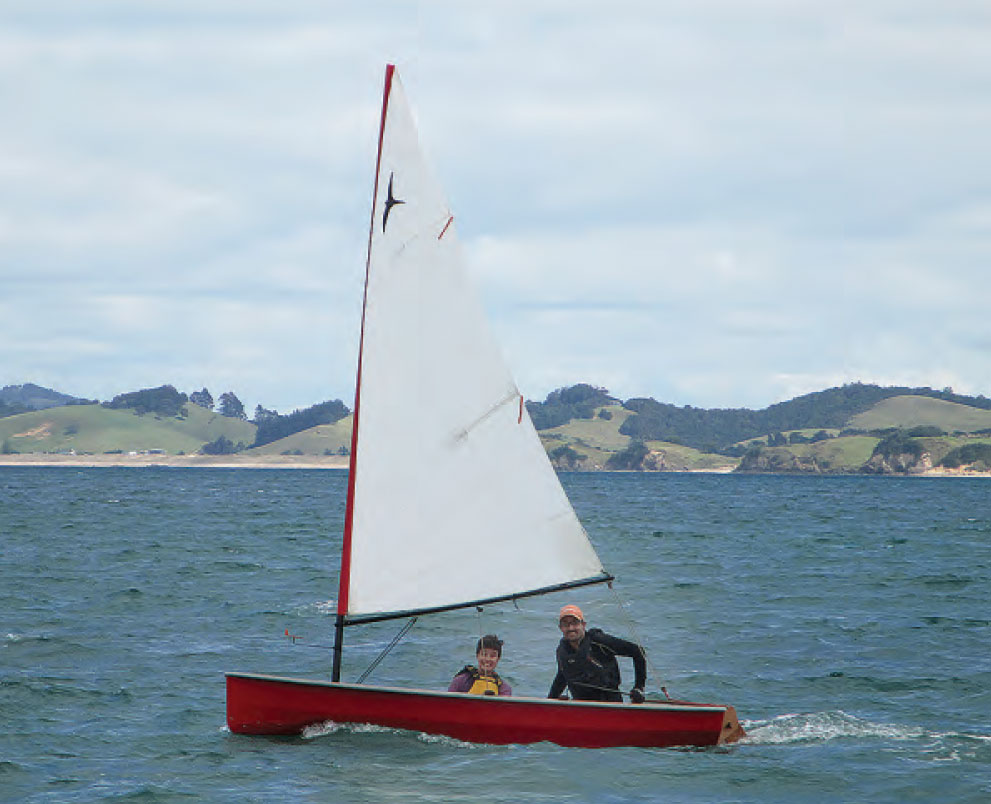
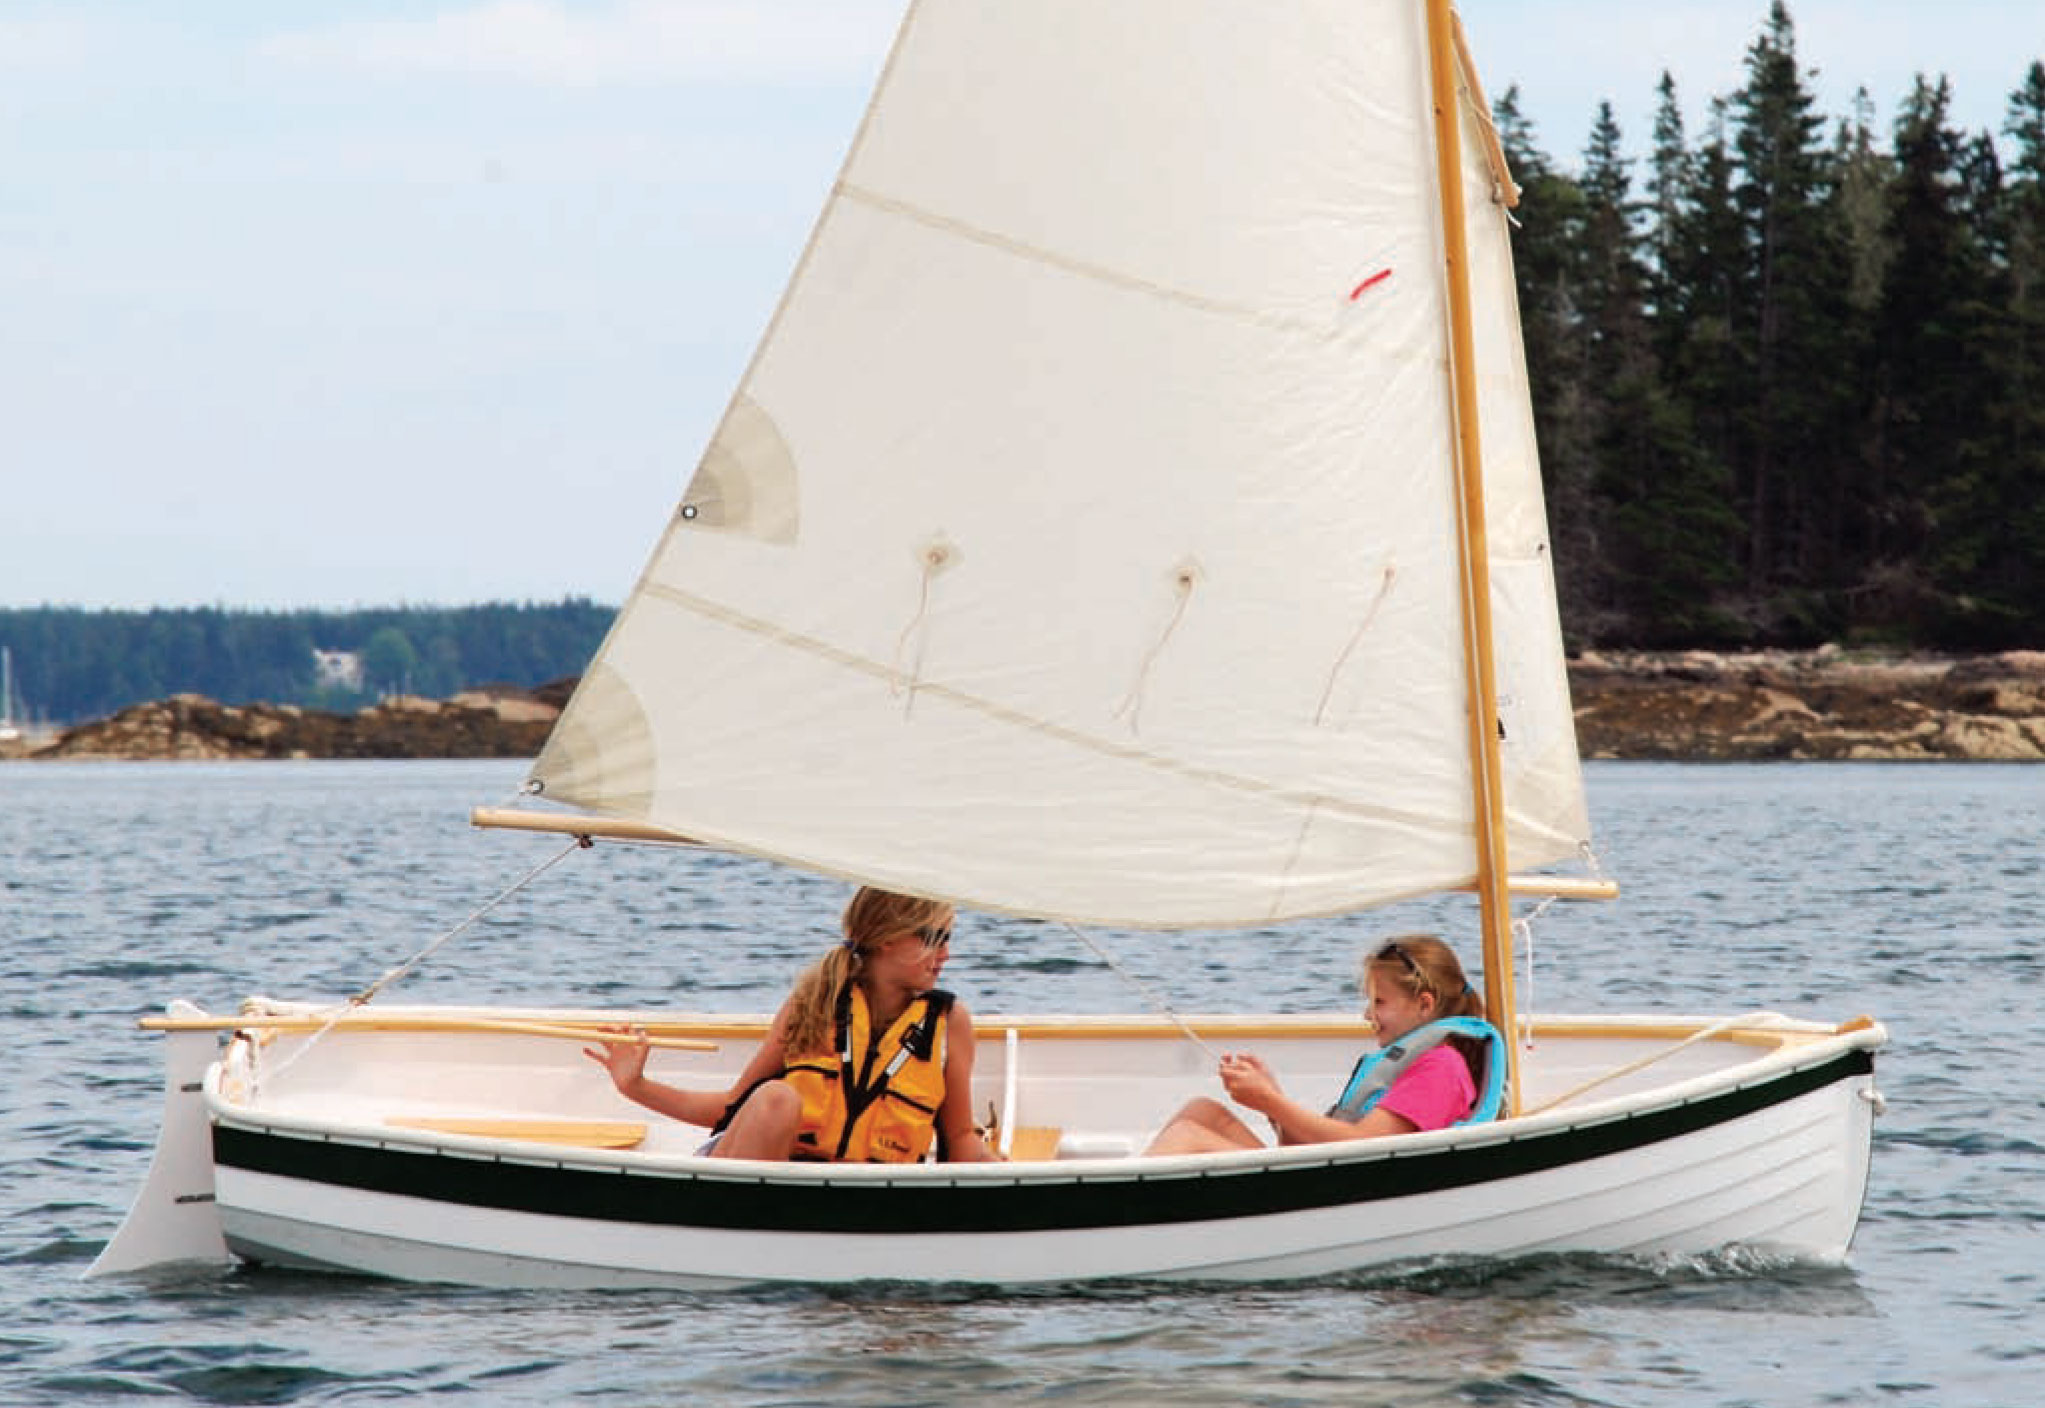
The Chestnut Kruger is a responsive canoe and, with a rated capacity of 450 lbs, can easily carry two paddlers and their camping gear.
From Chestnut Canoe to Newfound Woodworks
In the 1908 Chestnut catalog there is a description of the Cruiser line of canoes, of which the Kruger was the smallest: “Whenever heavy rapids and swift running rivers have to be navigated, we can easily carry off the palm with this model. We claim that it is the best canoe ever draughted for rapid water and general river work, and a trial will convince the most skeptical. It is not straight on the bottom, but rises a little towards the ends, and consequentially can be turned quickly. This is of utmost importance in running rapids. It is rounder on the bottom than the Pleasure model consequently slightly faster and consequently not quite so steady. It is an easy paddler and the best poling canoe known.”
Seventy years later, the company’s final catalog described the Cruisers: “designed for whitewater and stock model racing… sharper bow and stern, narrower beam and more rounded bottom than the pleasure models, making them extremely quick to the paddle… Alertness to paddle and lively forward motion are features that the racing enthusiast desires making this design the number one choice in Canada for stock model canoe racing.”
The Newfound Woodworks kits for the Chestnut Kruger include western red cedar strips for the planking along with northern white cedar and aspen strips to be used as accent pieces.
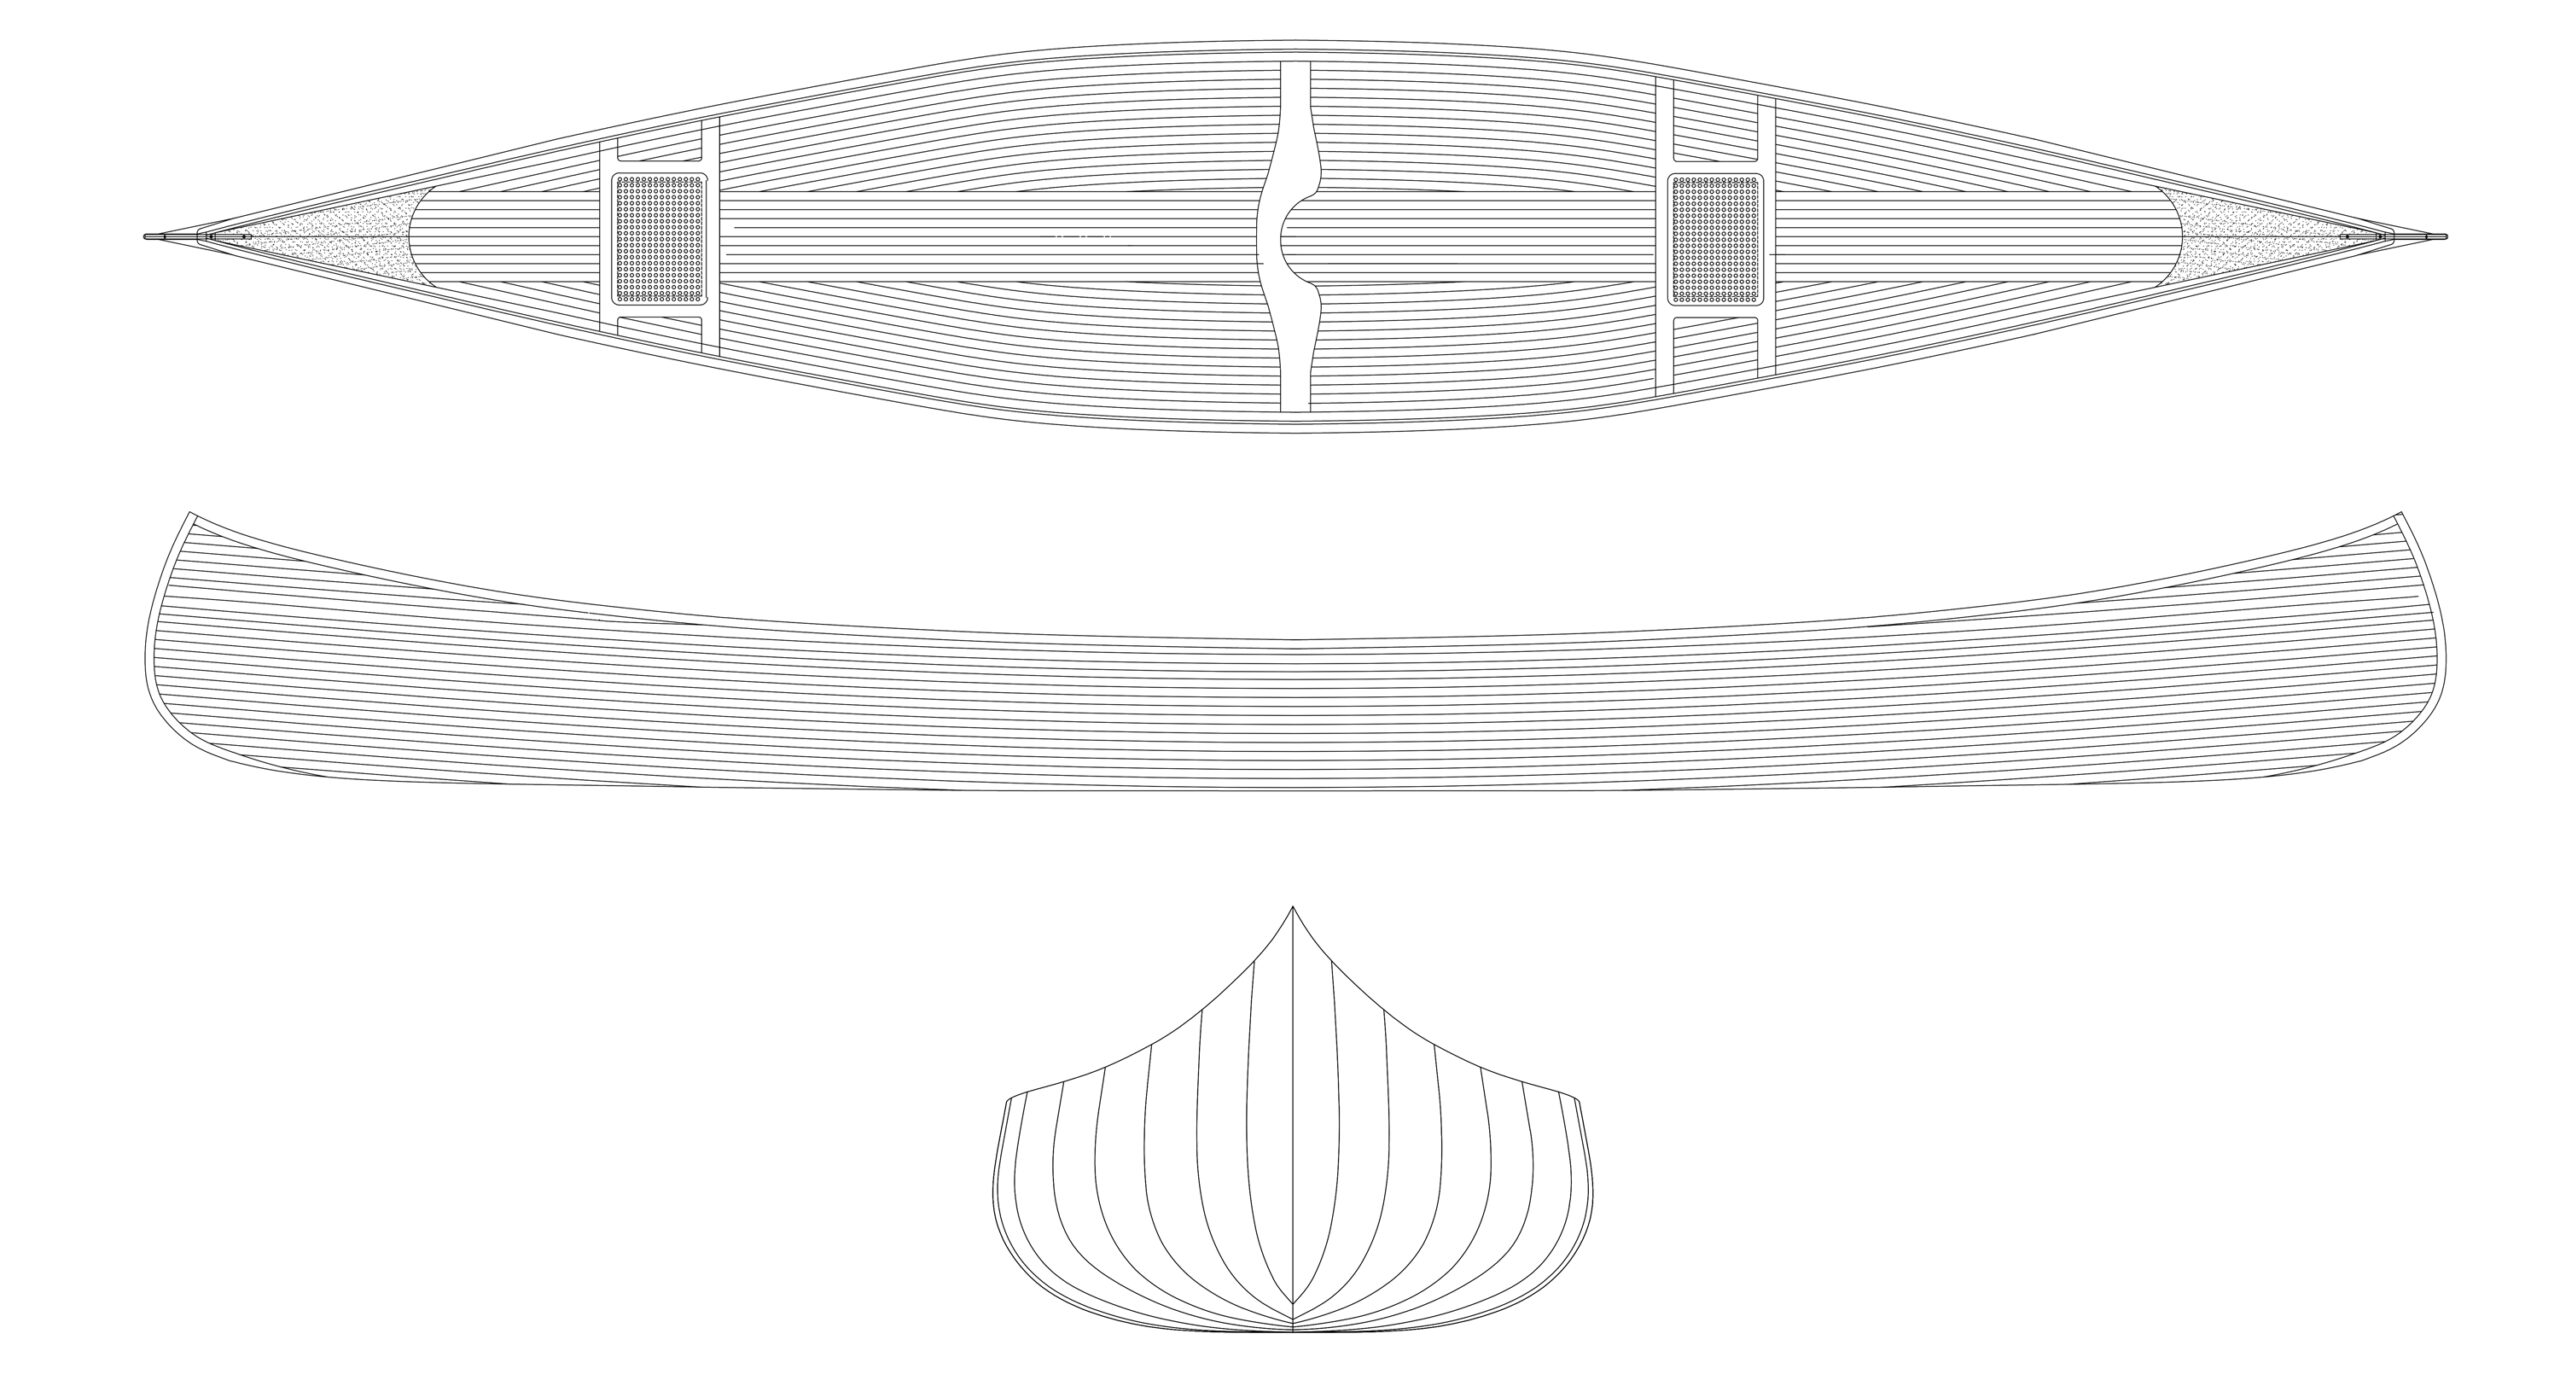
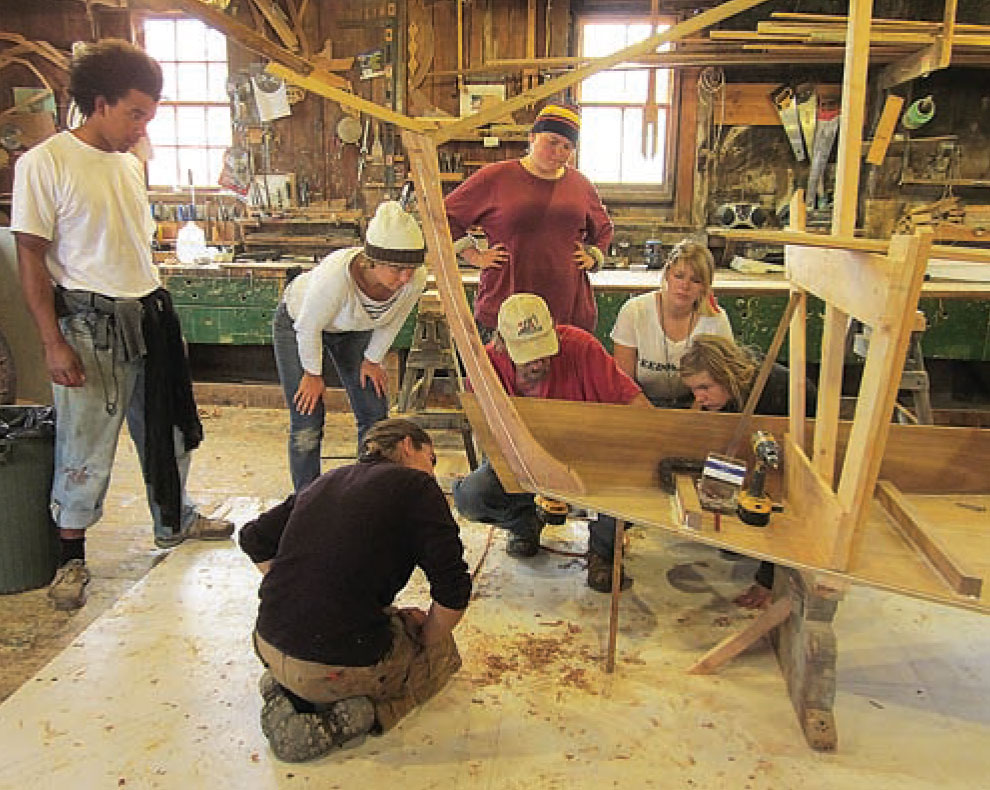
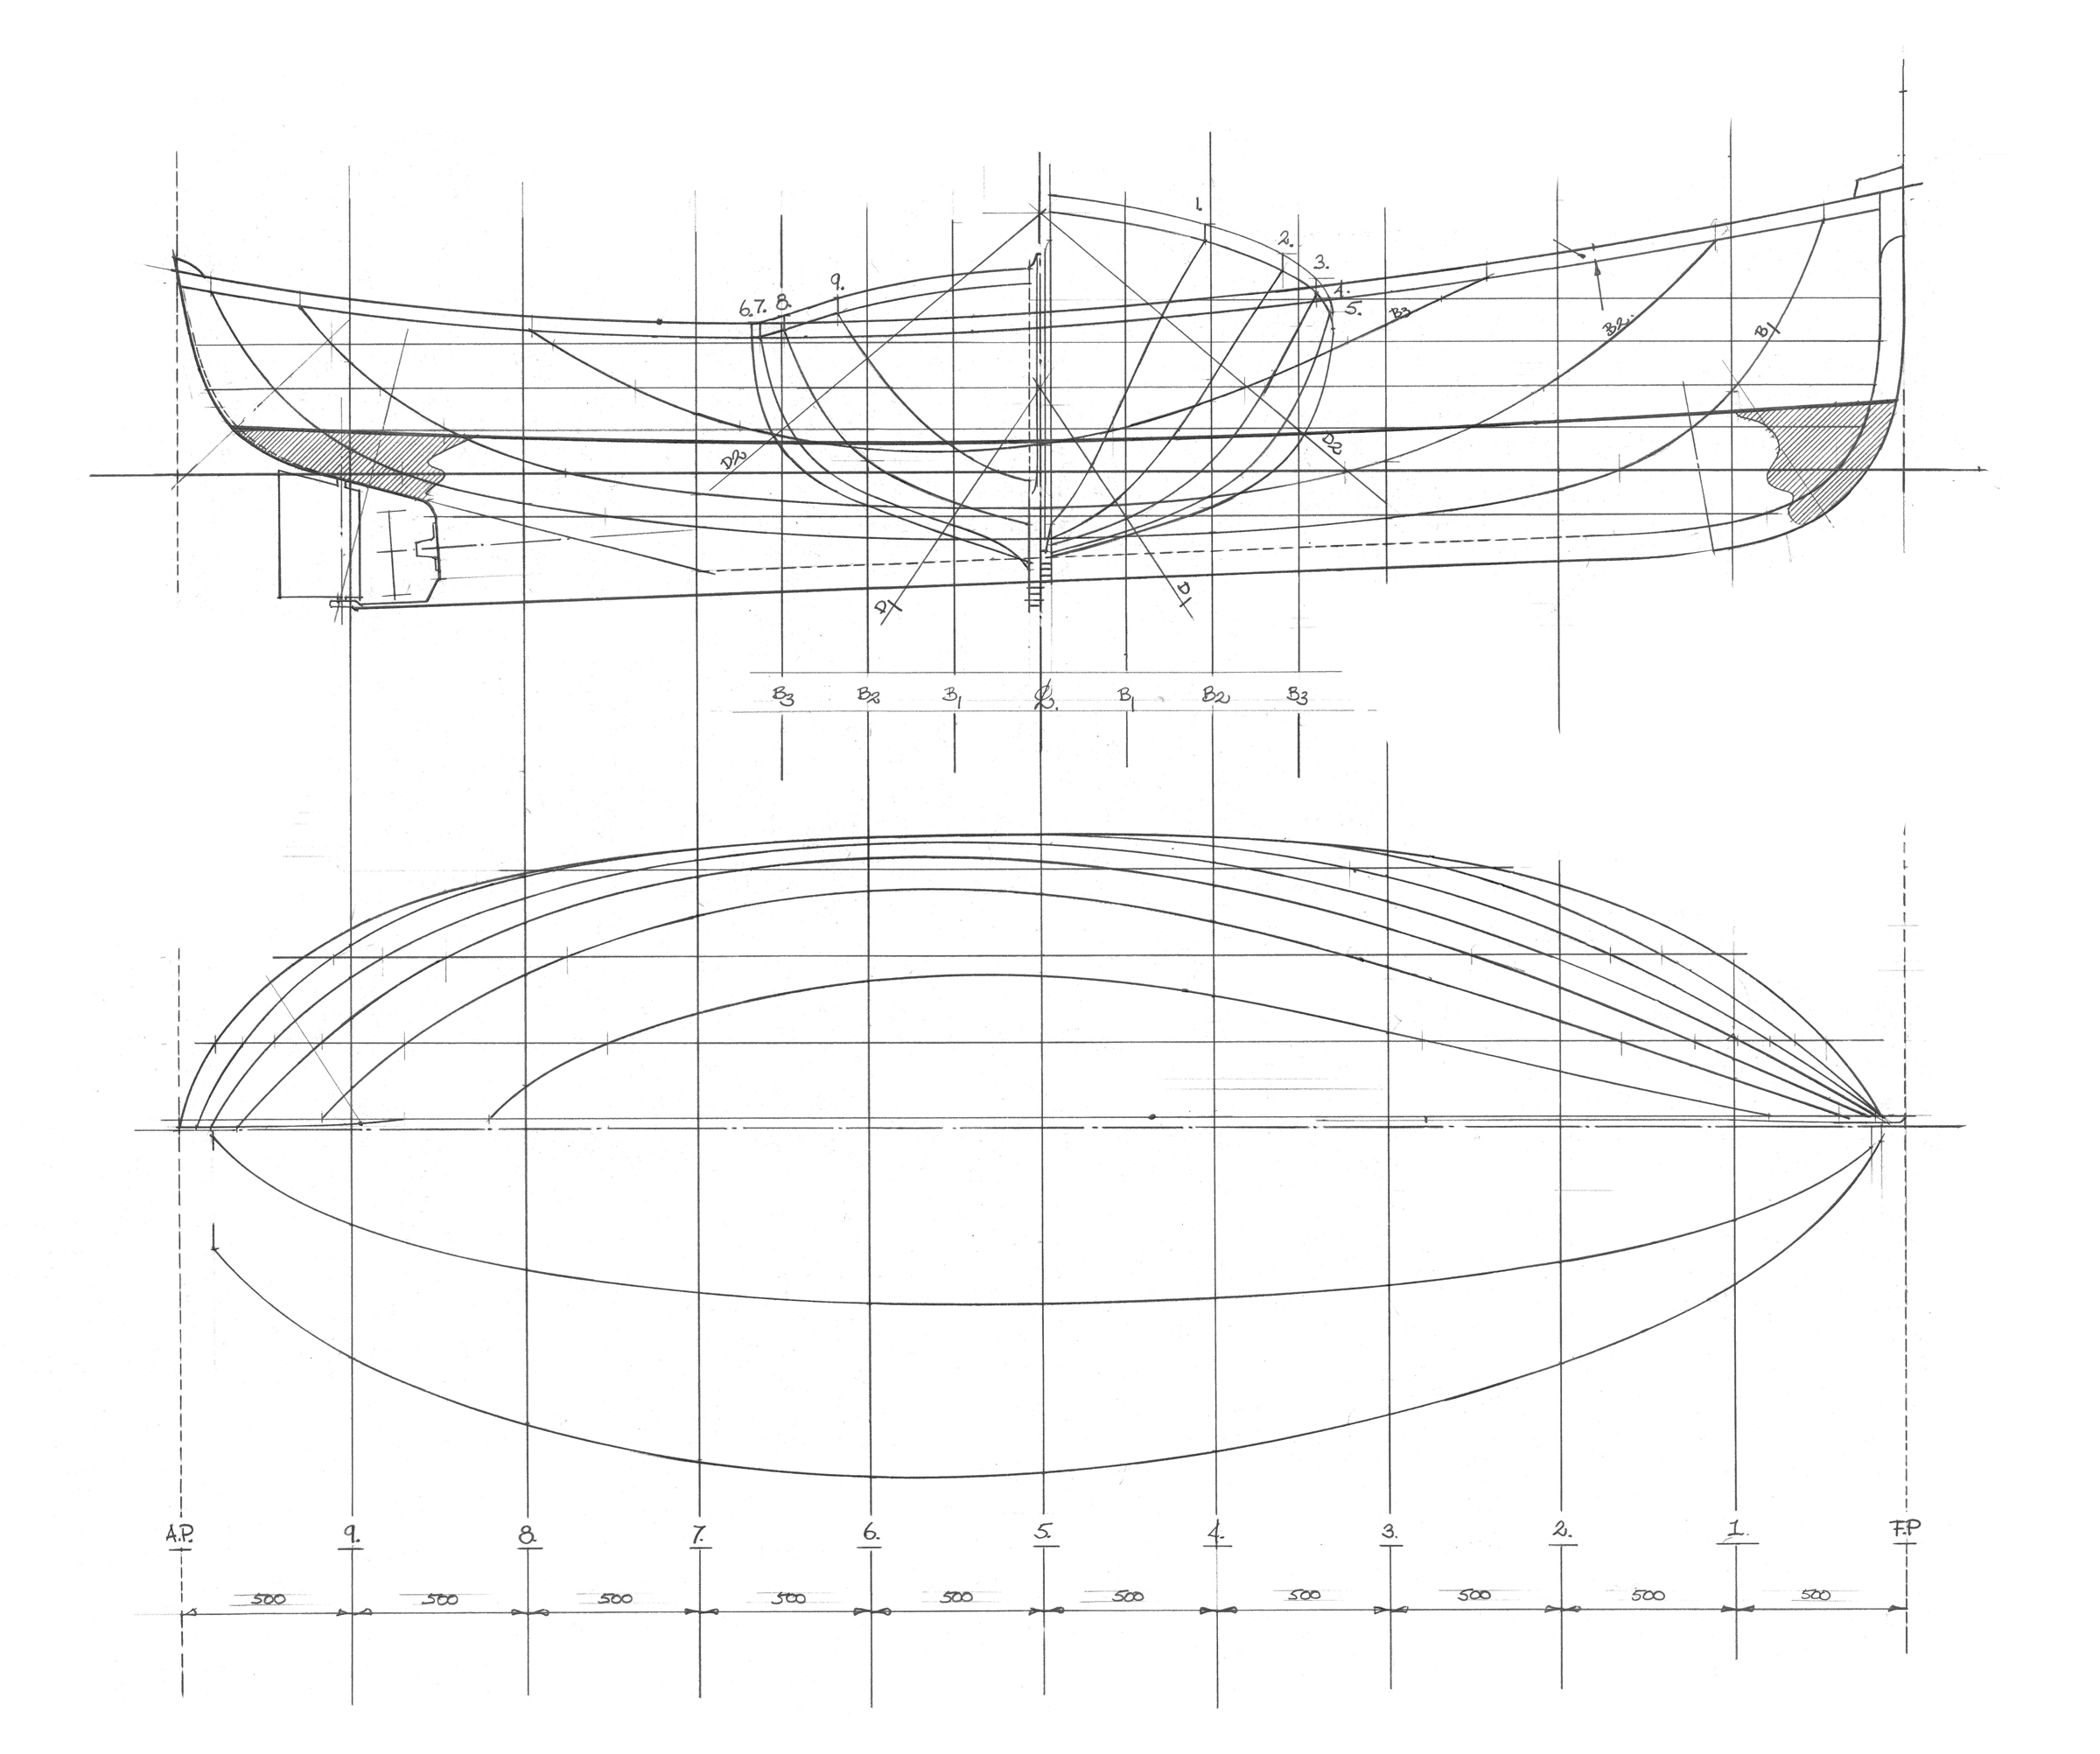
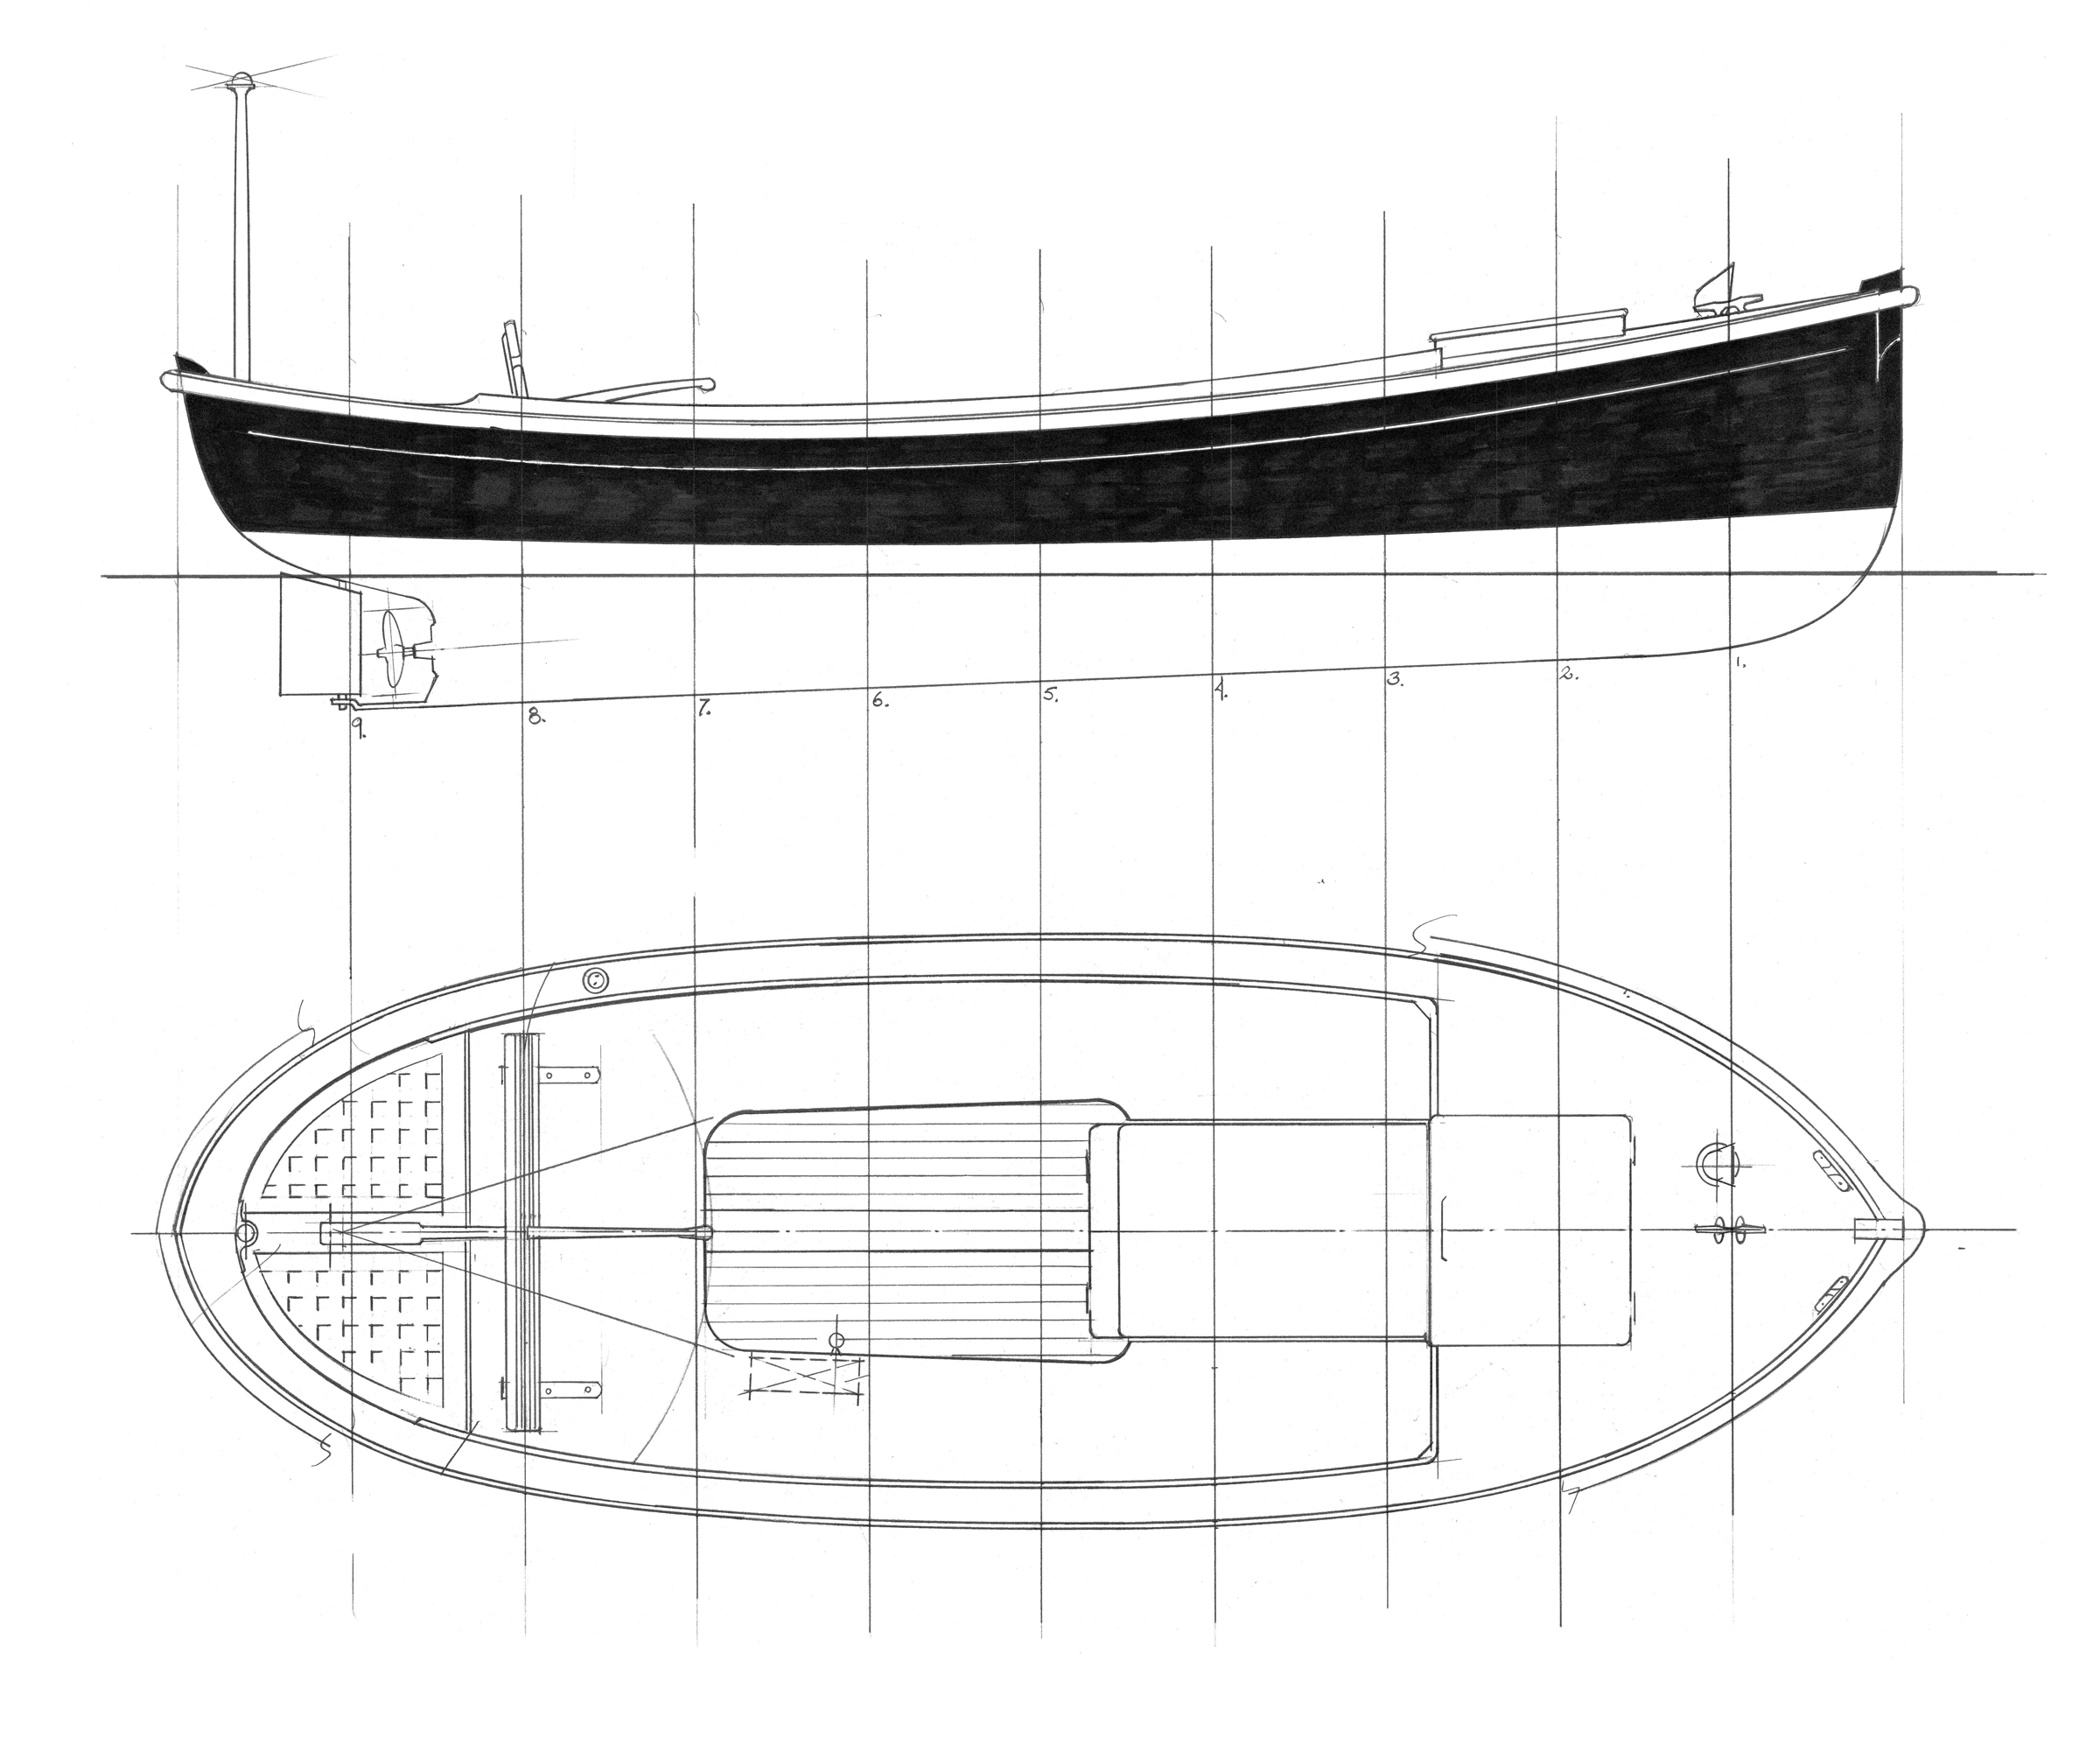
The late Chestnut Canoe historian, Roger MacGregor, took the lines from an original Kruger and sent them to illustrator Sam Manning. Sam created lines plans of the Kruger and several other canoes for Roger’s history of the Chestnut Company, When the Chestnut was in Flower, published in 1999. Working with Sam’s drawings, Rose Woodward and Alan Mann of Newfound Woodworks built their own version of the Kruger—strip-planked and 10 lbs lighter than the original wood-and-canvas canoe—and launched it in May 2003. It was, indeed, a performance boat.
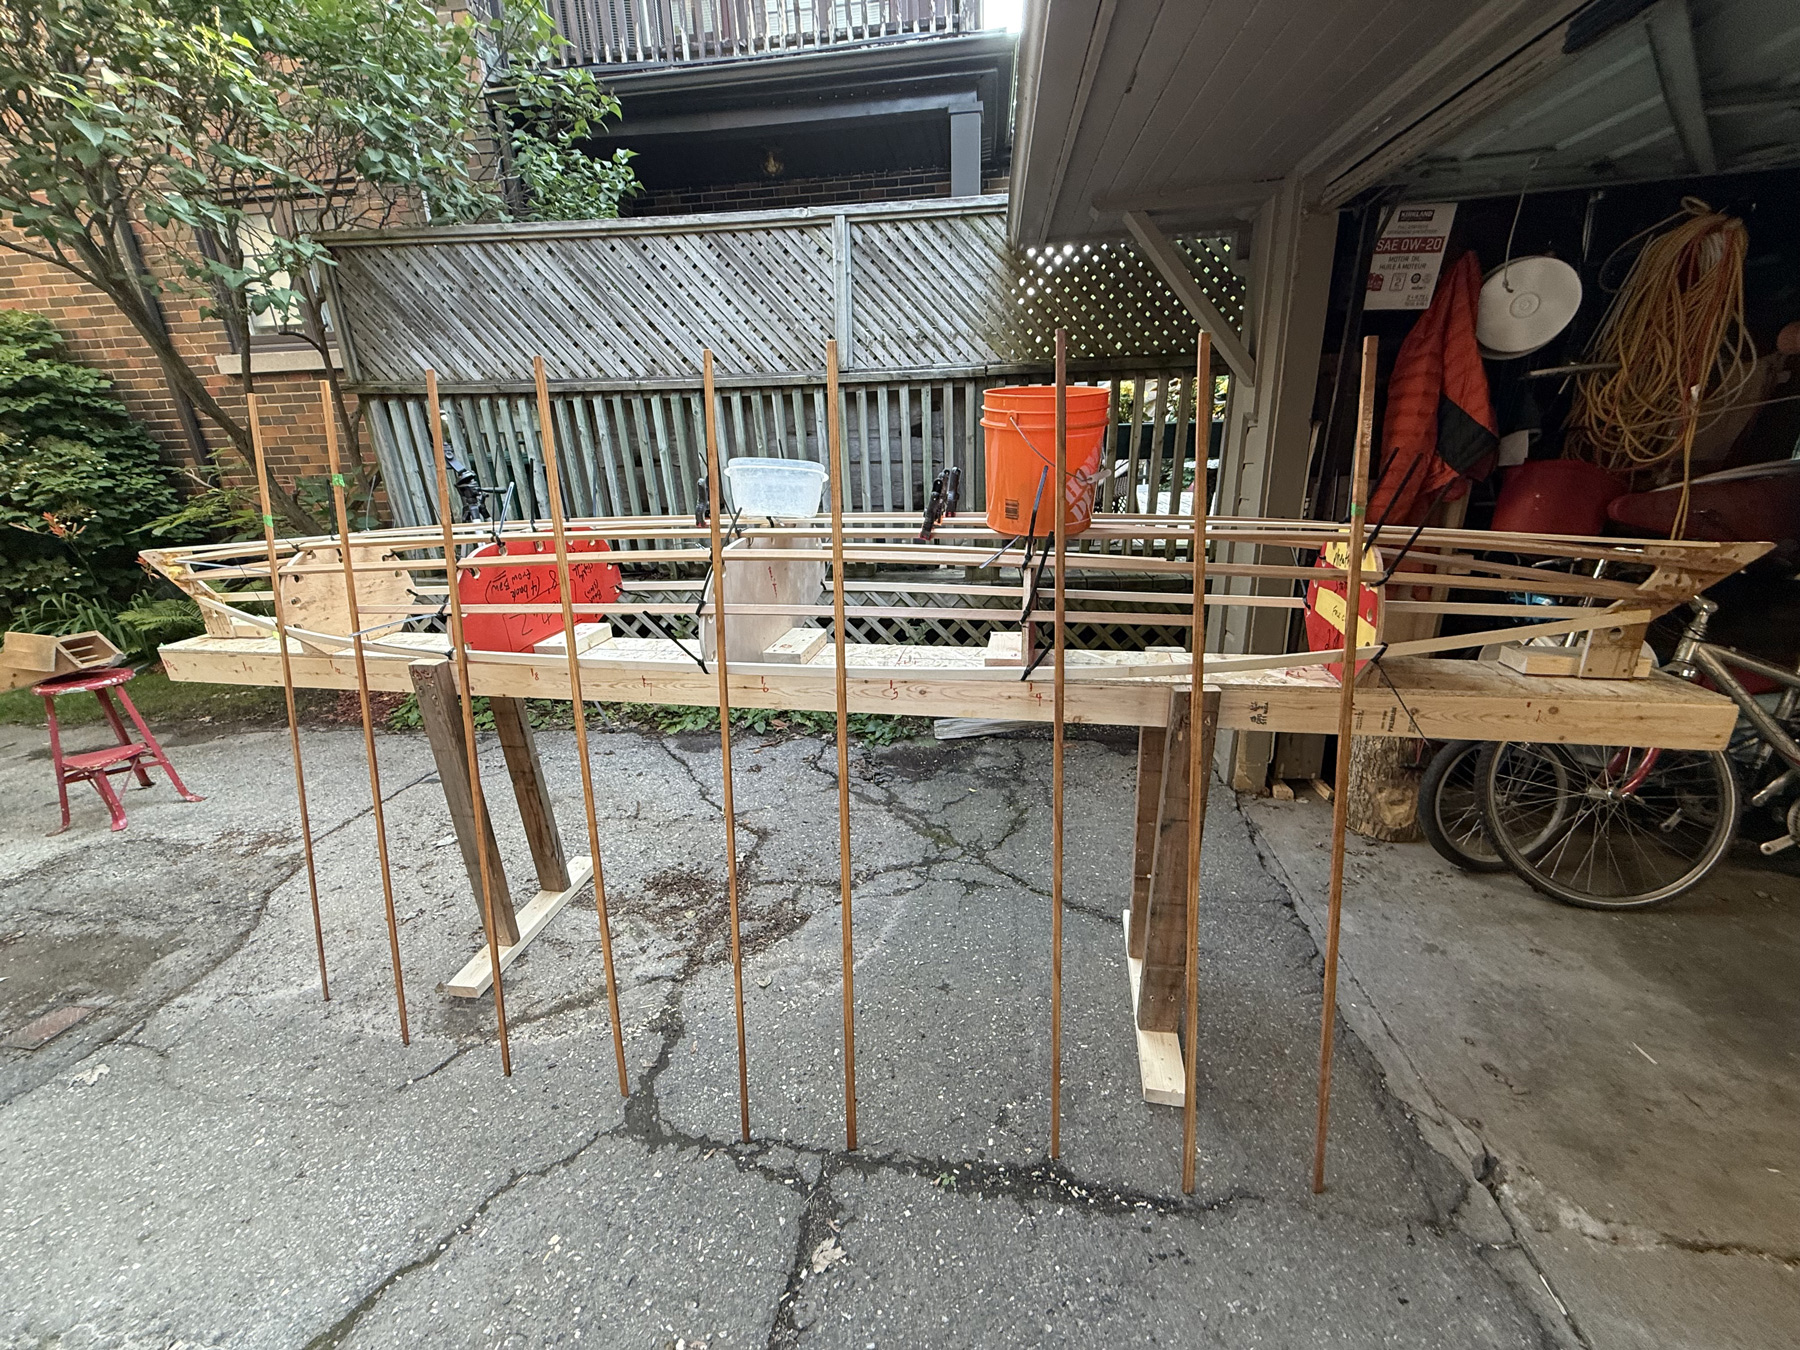
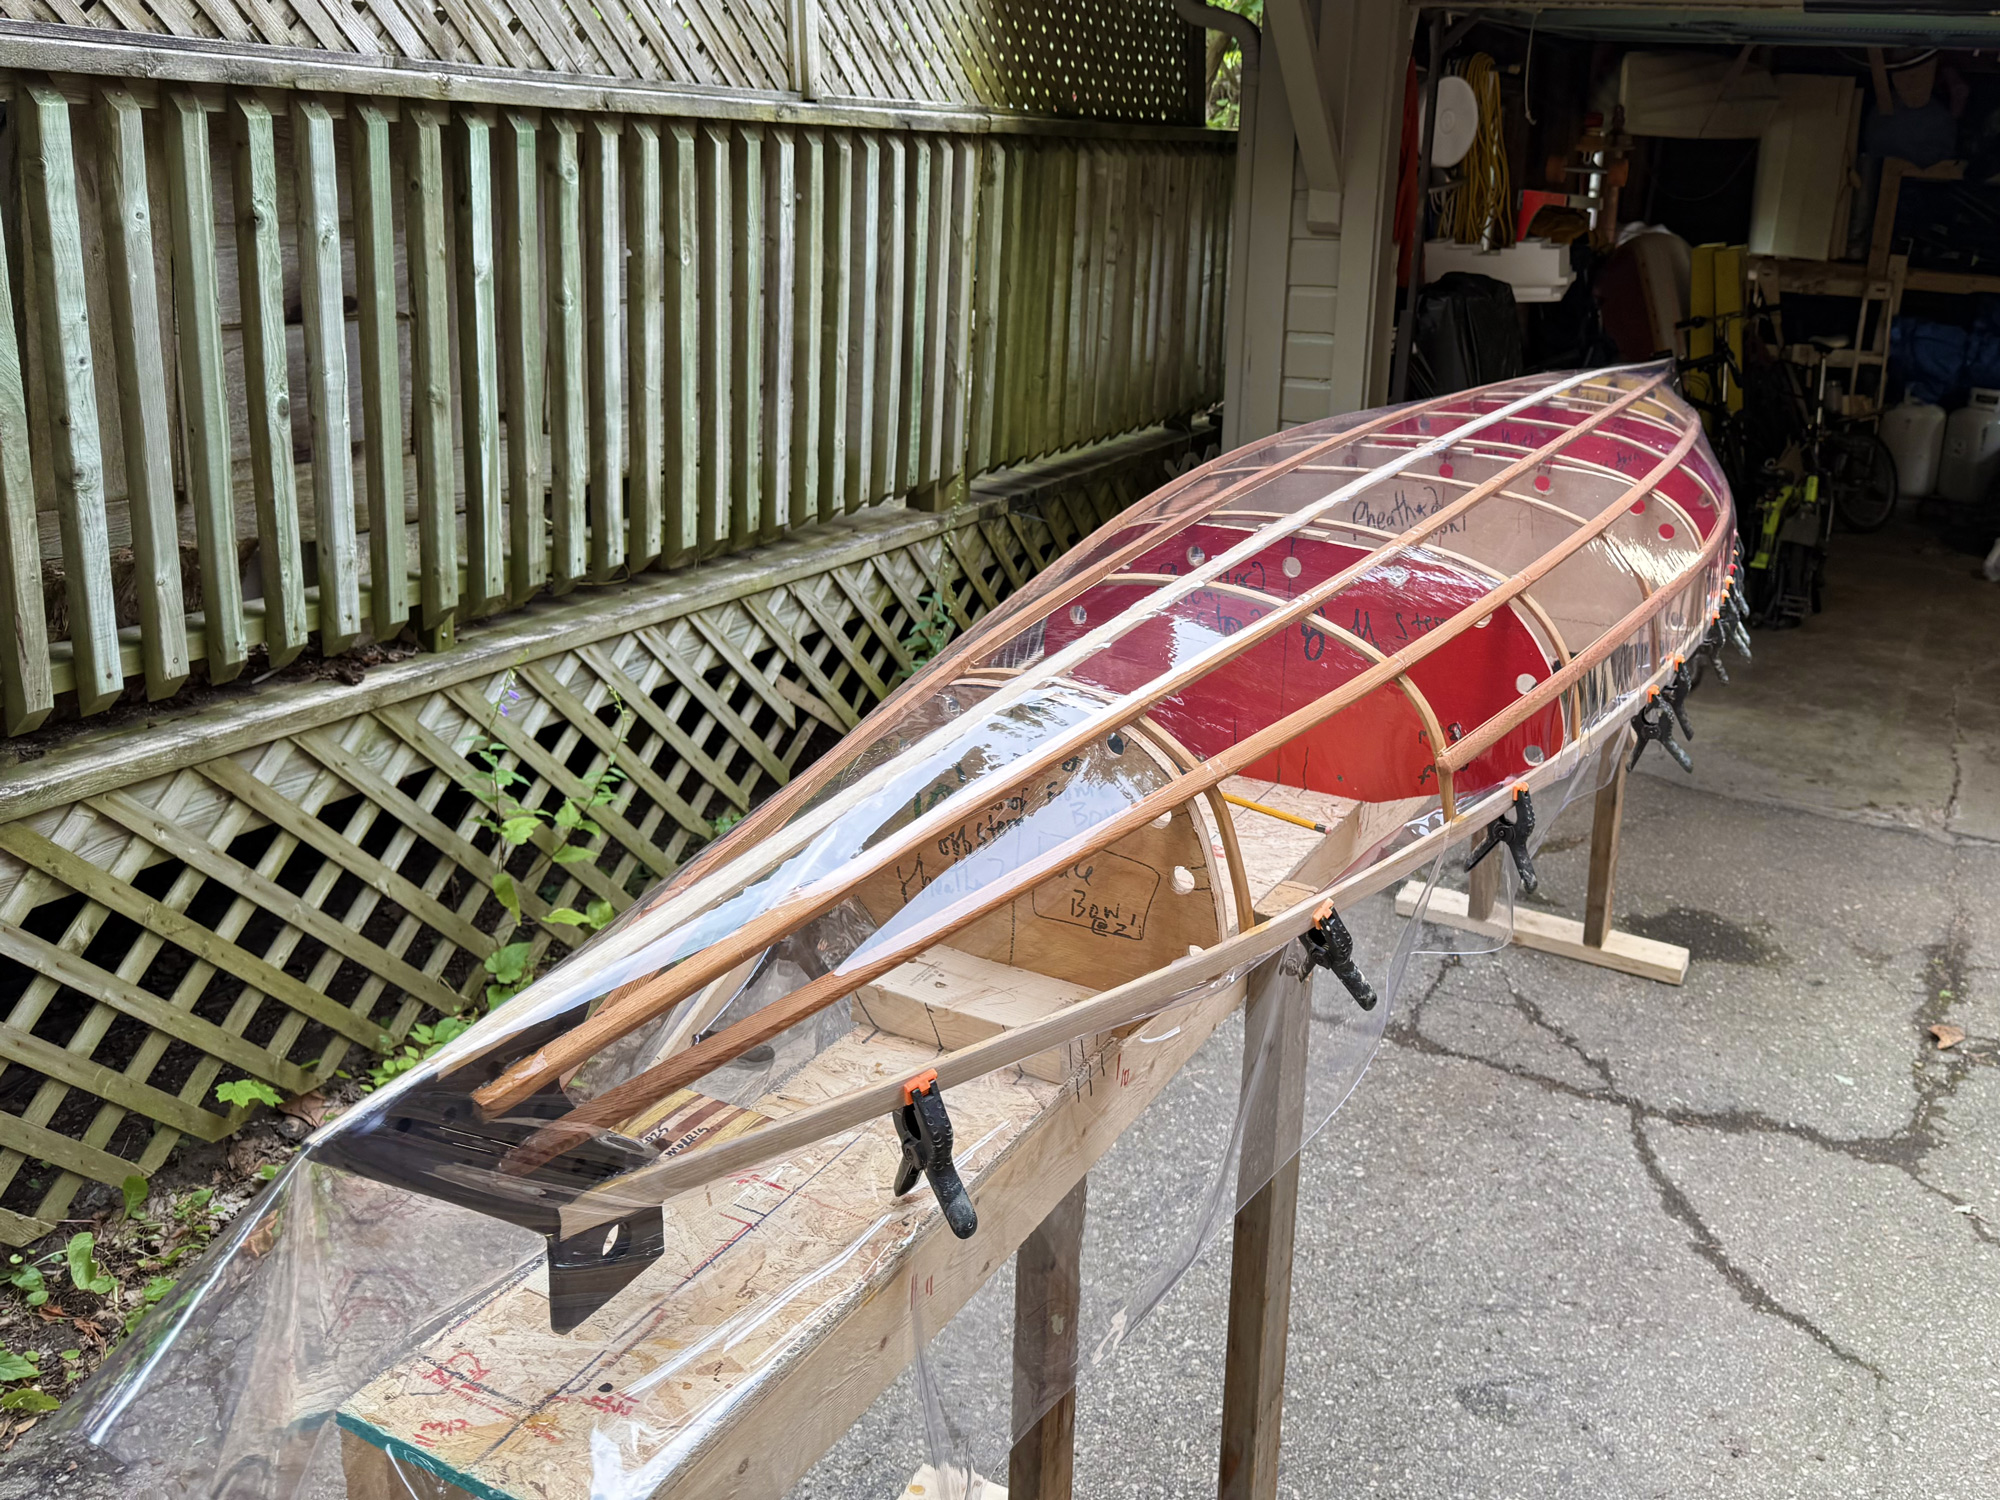
Since building that first Kruger, Rose and Alan have developed a strip-planked kit, named the Chestnut Kruger. As with all Newfound kits, the Chestnut Kruger can be customized according to the order, but if a complete kit is purchased it will contain everything one needs to build the canoe: plans, notes on the method of strip-building a boat, CNC-cut forms (including clamping grooves so the canoe can be built without staples), and a selection of photographs showing canoes at various stages of construction. The strips—all milled to order from air-dried western red cedar at the Newfound facility—are coved and beaded, with at least 30 percent being full length. Also in the kit are some 6′ to 10′ lengths of northern white cedar strips for color contrast, and four aspen strips for accents. Finally included are the ash outwales, scuppered inwales, stem laminations, and thwart, the cane-and-ash seats, cedar seat cleats, fiberglass, epoxy, epoxy-application tools, and varnish—in short, a canoe in a box.
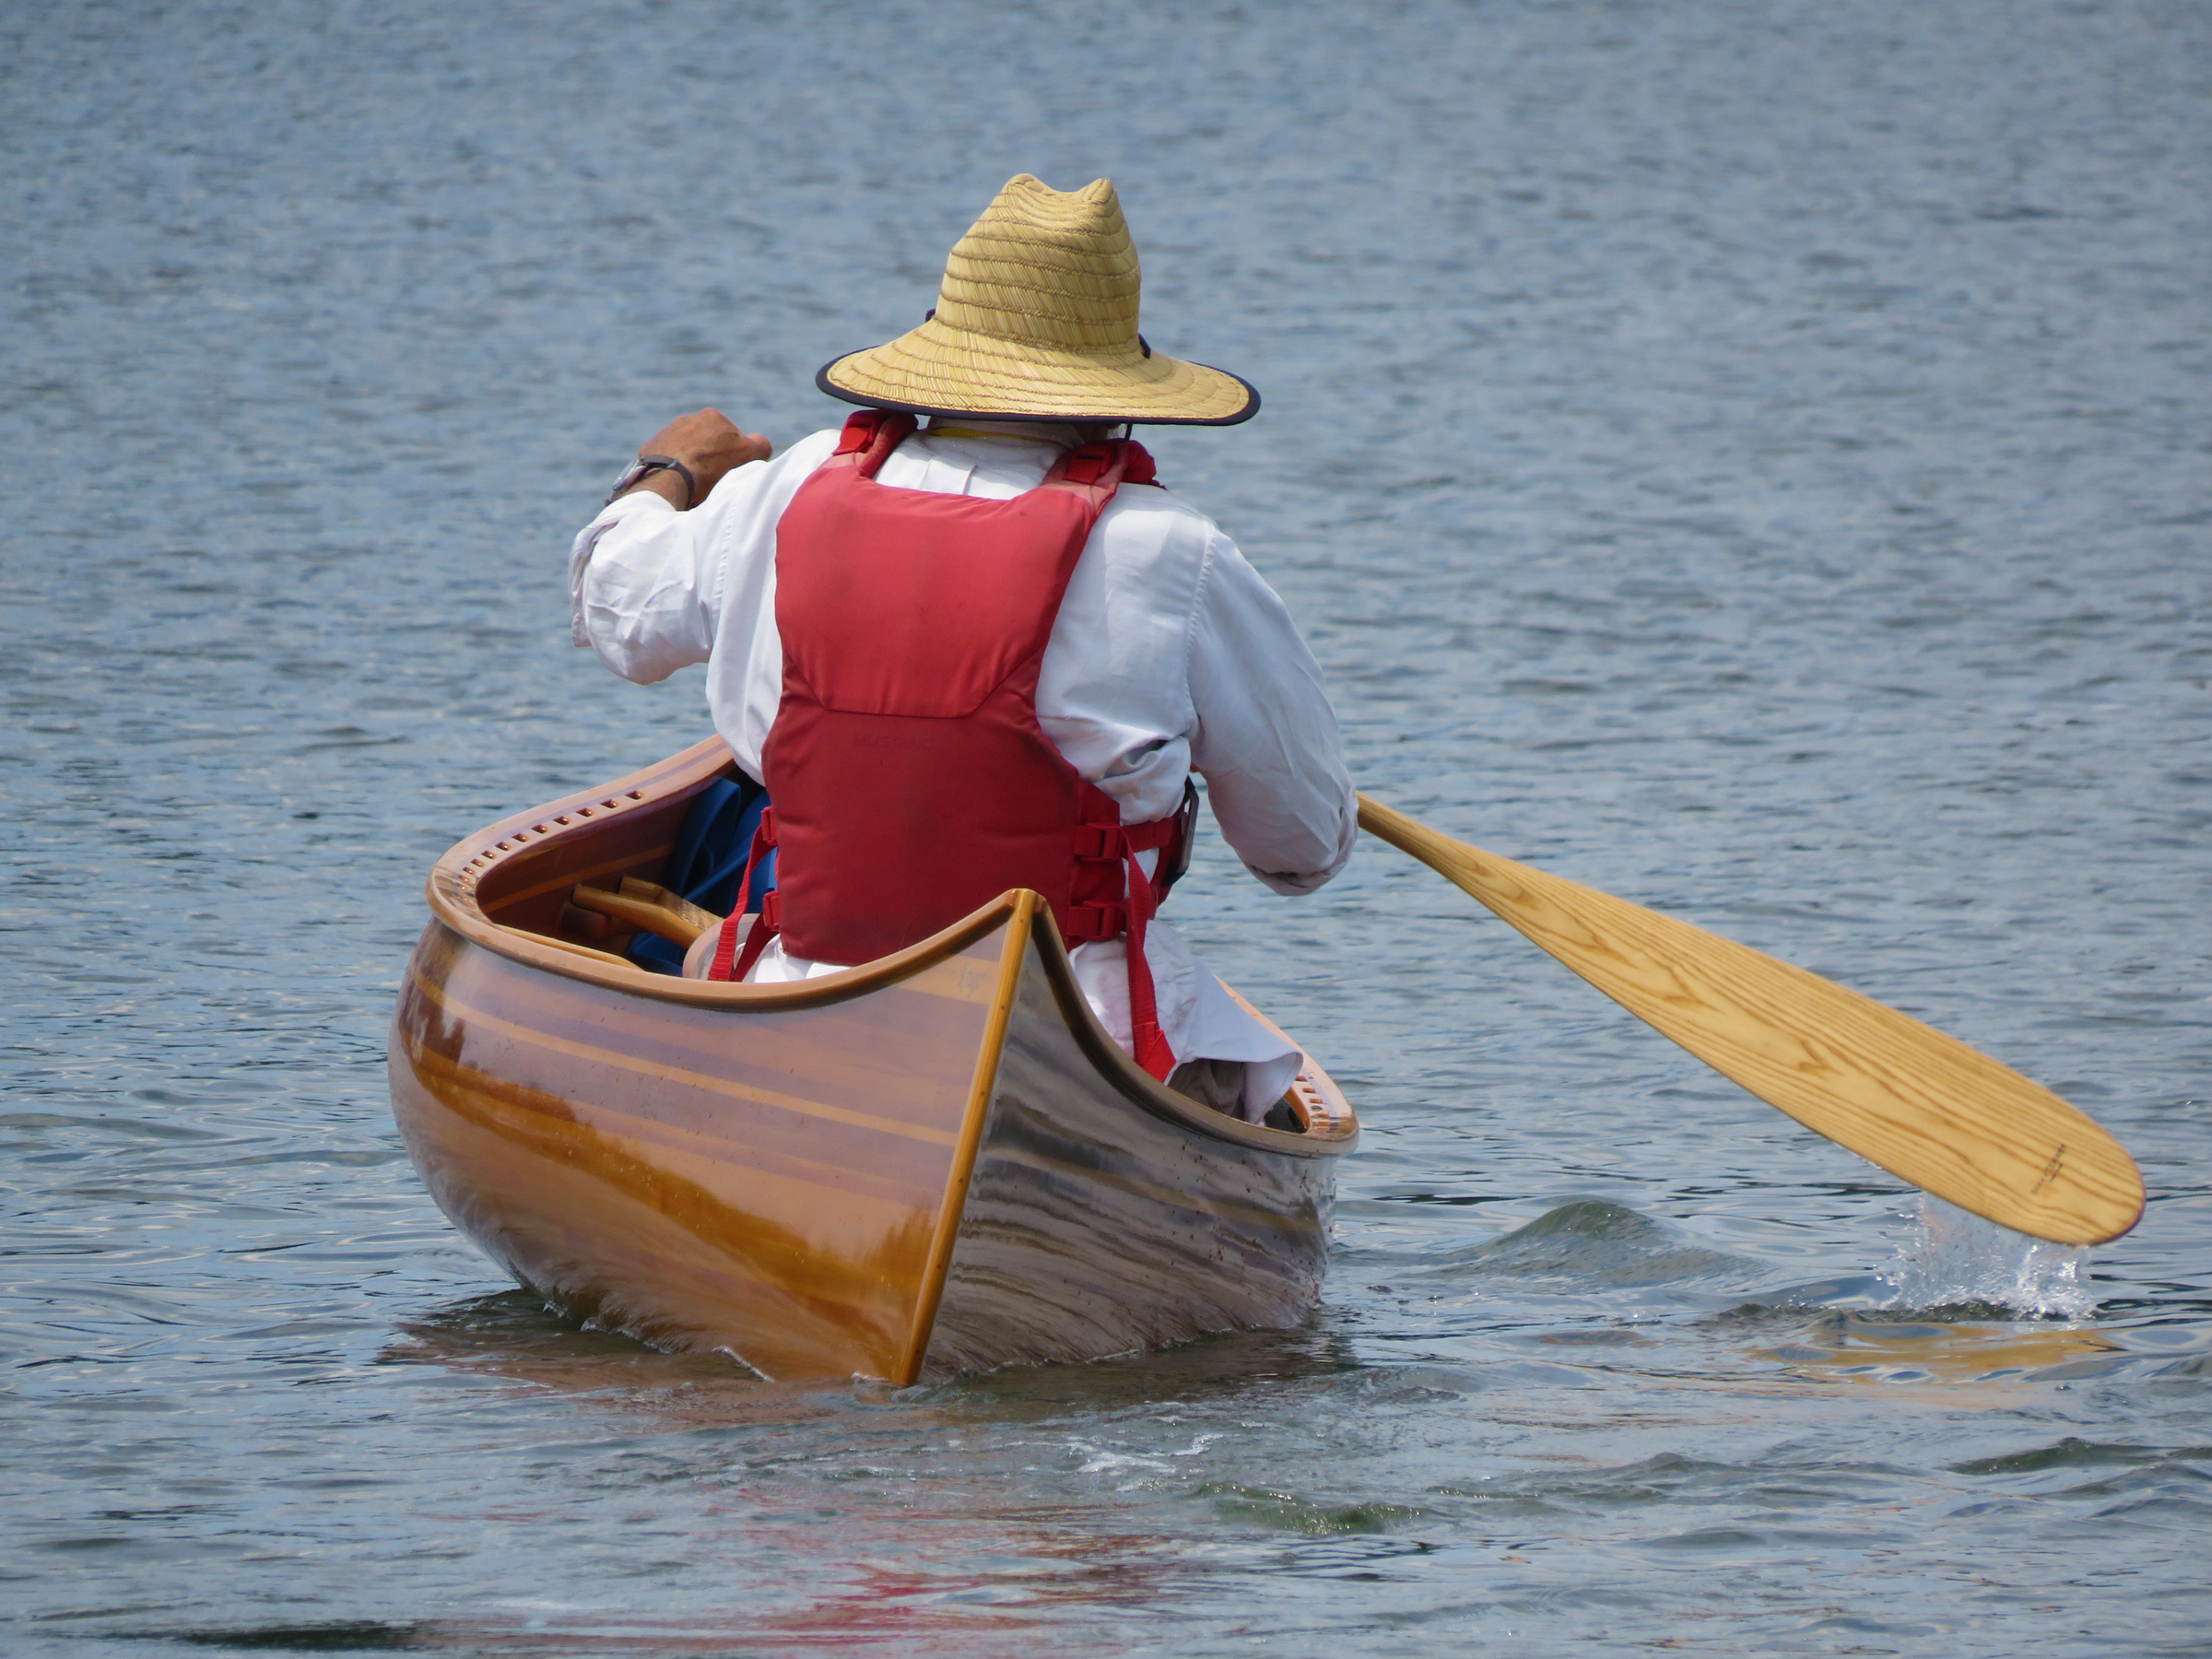
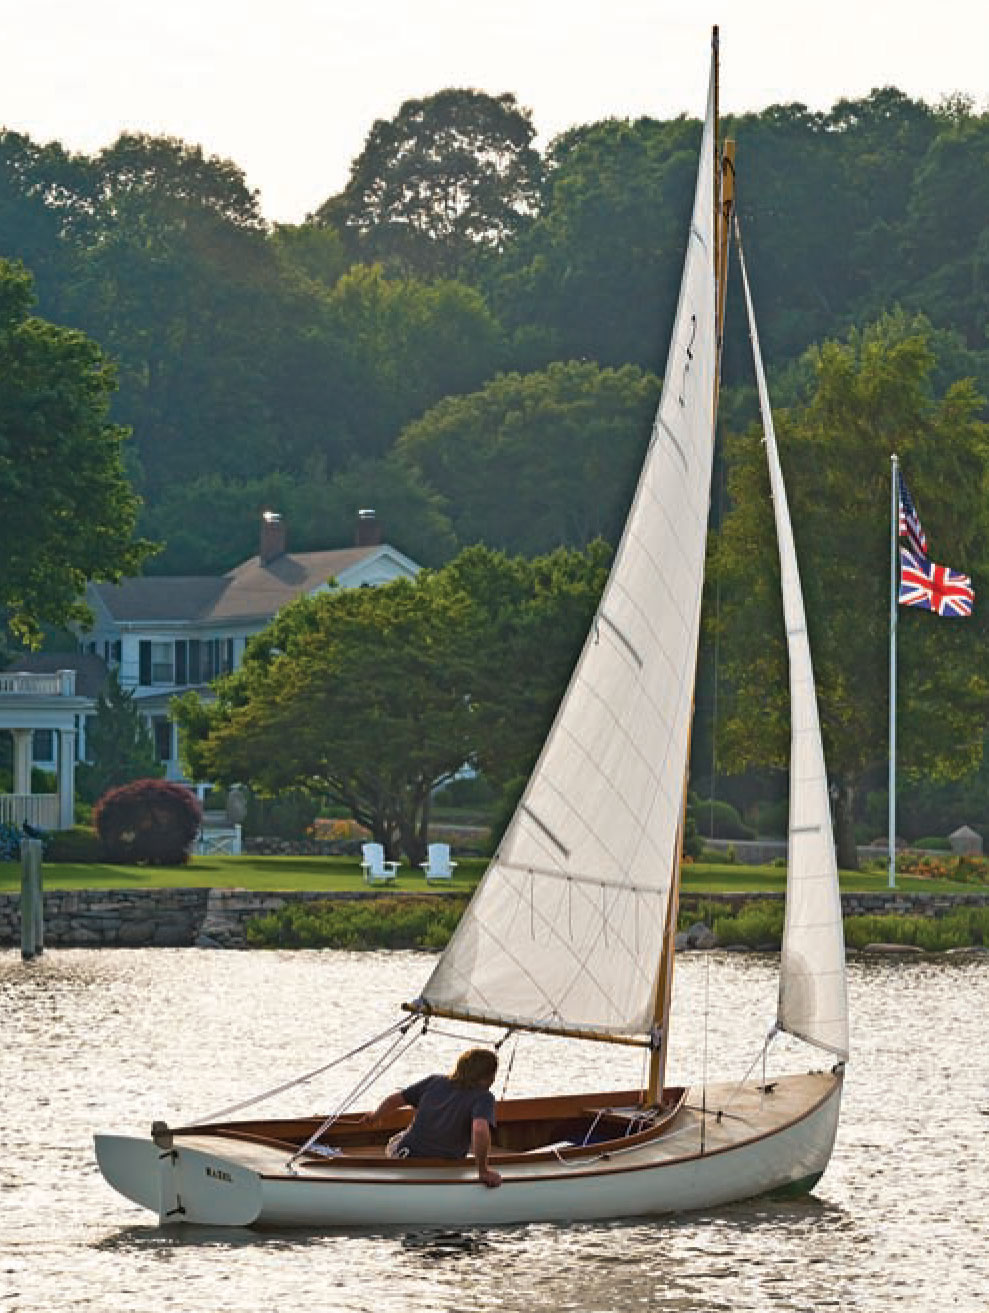
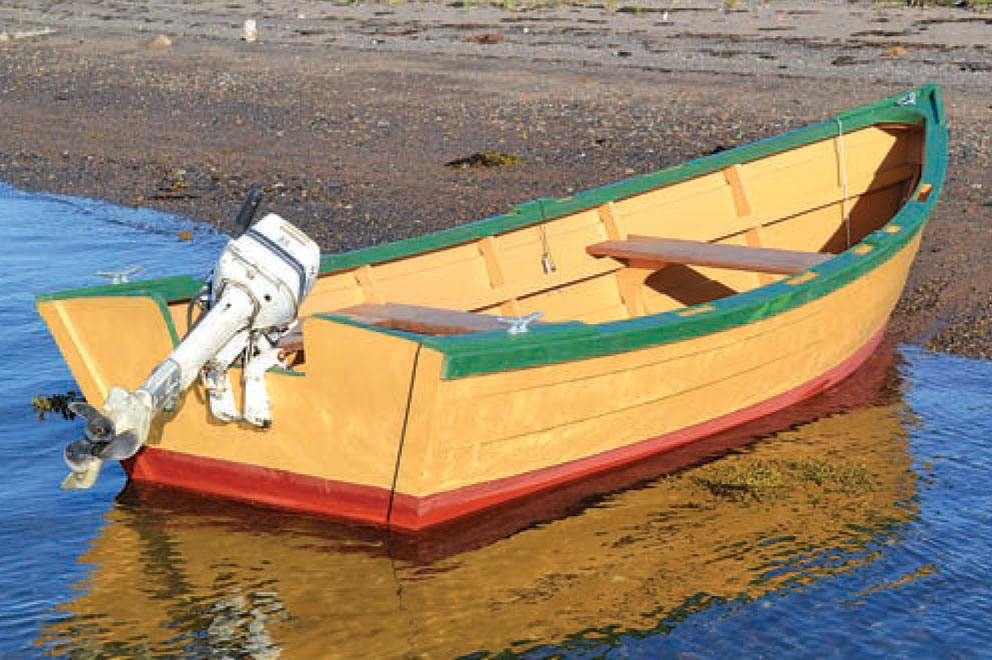
While the canoe’s narrow beam does make it initially somewhat tippy, with weight kept low, it quickly steadies as it gets underway.
The Chestnut Kruger’s Performance
When I paddled Newfound Woodworks’ newly built Kruger at the WoodenBoat Show last June, I knew nothing of the design’s prestigious history but was familiar with the quality of Rose and Alan’s productions, having visited their stand at the show for many years, and having solo-paddled their smaller Otter earlier in the day. True to form, the Kruger build was flawless: Rose and Alan’s attention to detail is second to none, and the materials included in their kits are all high quality. A visit to their website confirms their exemplary customer service and their willingness to help the less experienced builders among their customers.
I was joined for my test paddle by Gabriel, a young man working at The WoodenBoat Store for the season. He had paddled a good deal in his childhood, but had done little recently.
Though designed for two paddlers, the Chestnut Kruger’s 16′ length can be handled easily by a solo paddler with some experience. However, with just myself on board the bow had a tendency to ride high, so I added two filled water jugs in the forward end, and the issue was resolved.
The Kruger has a narrow, 29″, waterline beam and arced bottom and, as anticipated, we found the canoe to be somewhat tippy when boarding, but it steadied as soon as we got underway. Since Gabriel and I hadn’t paddled together, it took a little time for us to find a rhythm. We decided not to do any heeled turns or braces, but even when flat, the Kruger’s 1 1⁄2″ of rocker allowed the canoe to spin fast with both of us doing draw strokes. After some practice we did some crossbow turns, with equally satisfactory results, and working together we easily hit 4 knots when paddling straight. For inexperienced paddlers, the Kruger is a canoe that asks for time and practice, but its potential performance will definitely reward such efforts.
Gabriel’s duties called him back to the WoodenBoat booth, so I took the canoe out for a solo paddle. The Kruger’s bow seat is positioned to be the perfect placement for a solo paddler, and the canoe can be efficiently paddled stern-first. Initially, my weight, aft of amidships, caused the bow to ride high, but after placing a couple of full water jugs in the bow, it leveled out well. Sitting on the seat, I was able to hold the canoe on a straight line with a J- or, indeed, any underwater recovery strokes. I had brought a selection of paddles with me—with blades ranging from 5″ to 6 3⁄4″ wide—and found that my Northwoods paddle with its 29″ × 6 3⁄4″ blade was the best fit for the boat.
While paddling solo, I heeled the canoe and found that it was easy to spin it through a tight circle but I could also maintain a straight course with little effort.
After paddling solo from the seat, I tried kneeling and heeling the canoe, and found that with my weight lowered the canoe became delightfully rock solid. When heeled it was even easier to run the canoe in a straight line or spin it through a tight circle.
As the old Chestnut catalogs promised, this is a canoe for experienced paddlers or for those who want a canoe that will reward them as they polish their skills. Indeed, twisting it down a Class II rapid would be a delight. I had anticipated a canoe that would be fun and rewarding for two paddlers, and was not disappointed; what surprised me was just how much fun it was to paddle it solo.
Ben Fuller, curator emeritus of the Penobscot Marine Museum in Searsport, Maine, has been messing about in small boats for a very long time. He is owned by a dozen or more boats: kayaks, canoes, a skiff, a ducker, and a sail-and-oar boat.
Chestnut Kruger Particulars
LOA: 16′
Beam: 33 1⁄2″
Beam at waterline: 29″
Weight: 55 lbs
Displacement/capacity: 450 lbs
Draft at capacity: 3 1⁄8″
Center depth: 12 5⁄8″
Rocker: 1 1⁄2″
The Chestnut Kruger is available from Newfound Woodworks. Kits can be customized, but a full kit as described here is $3,275 plus shipping.
Is there a boat you’d like to know more about? Have you built one that you think other Small Boats readers would enjoy? Please email us your suggestions.
For more boat profiles by Ben Fuller see…
Hatch Cove Kayak, a single-person kayak designed by David Wyman and available from Chase Small Craft.
The Delaware Ducker, a working boat evolved for duck-hunting, the ducker lends itself to solo camping and two-person daysailing; Ben Fuller has owned his ducker for more than 30 years.
Newfound Woodwork’s Otter, a strip-planked canoe that can be paddled with a single- or double-bladed paddle.
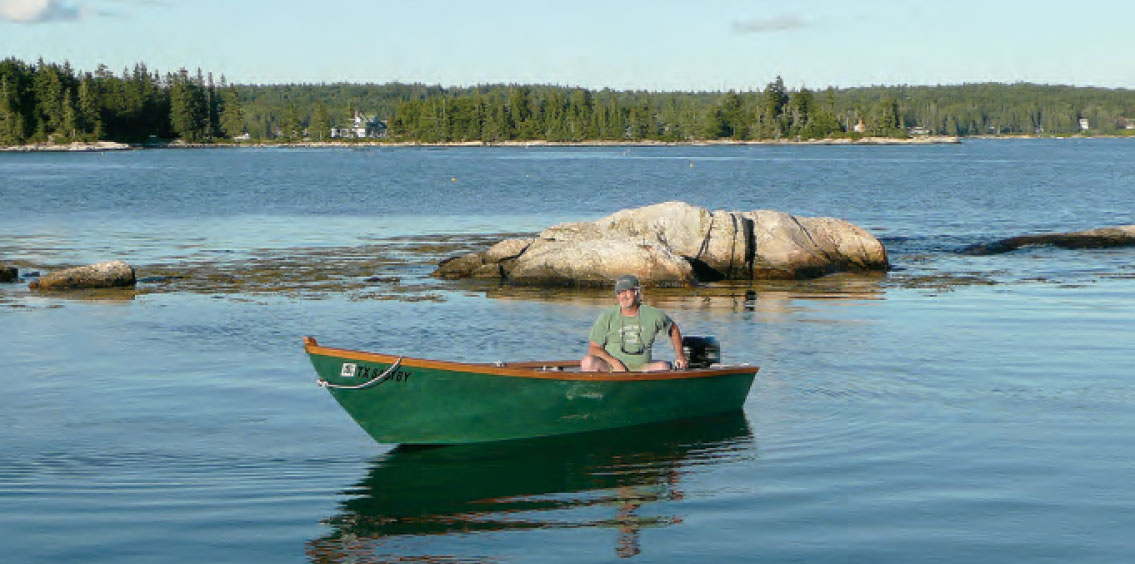
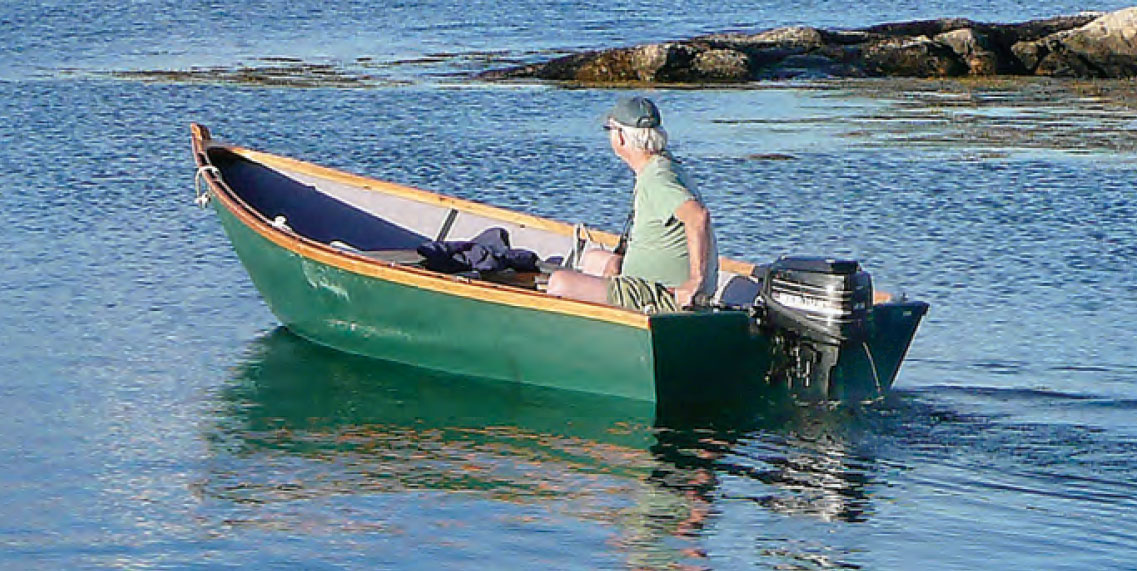
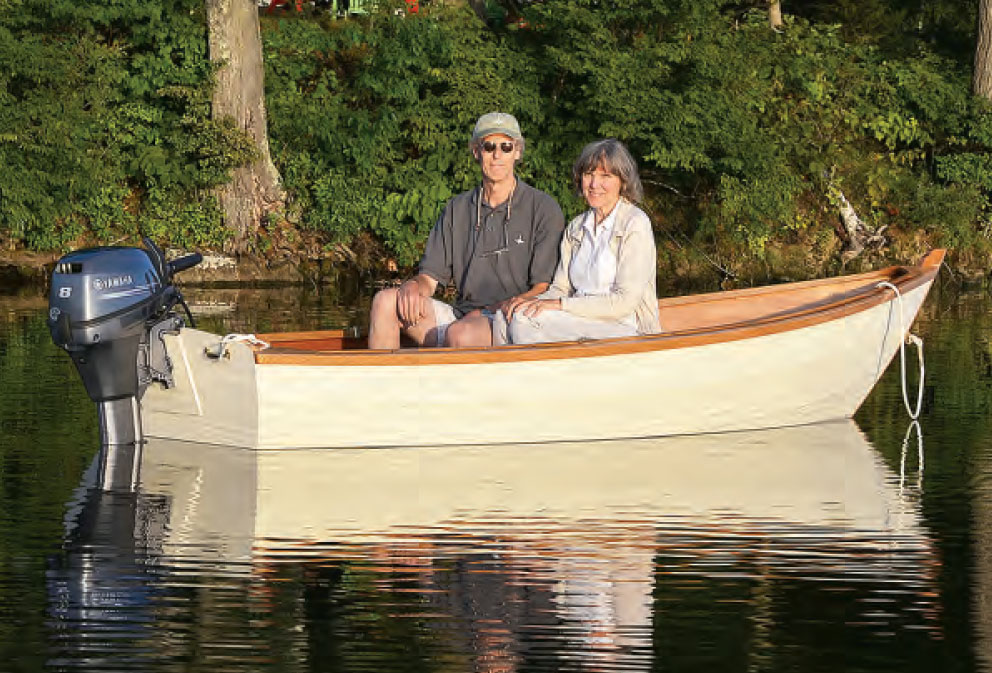
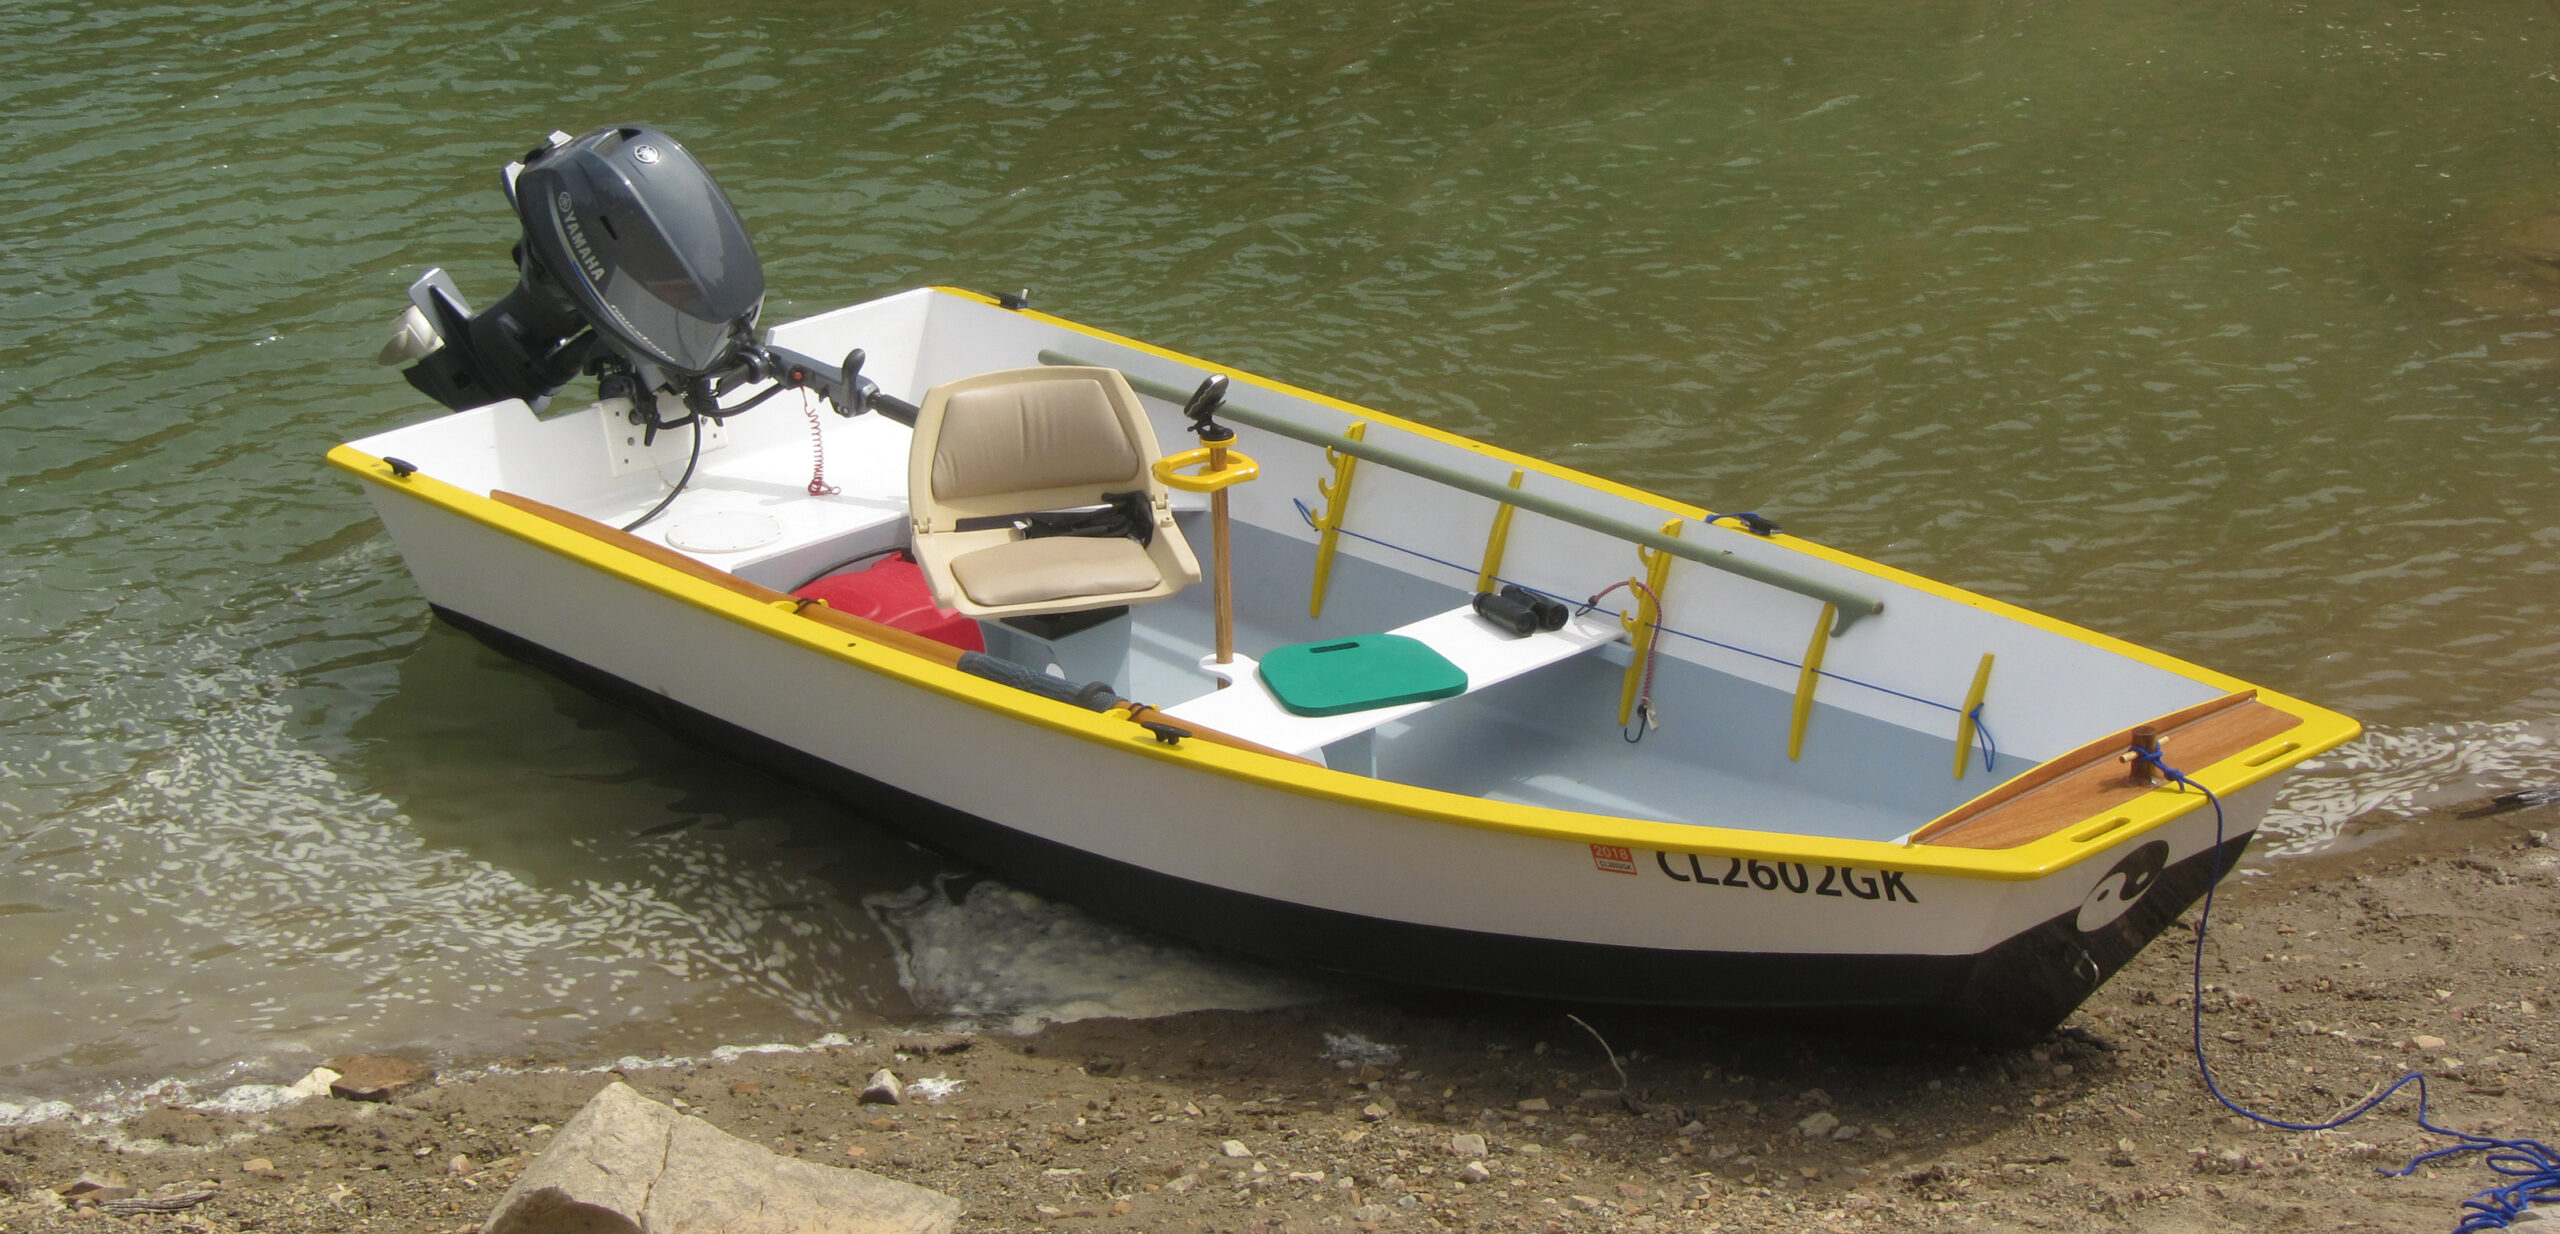
Following directions from John Gardner’s The Dory Book, Dave Van Stone built this semi-dory flatiron skiff in about two years. He used 3⁄8″ Douglas fir marine plywood for the hull, and two pieces of laminated 1⁄2″ Douglas fir for the transom. The frames, rails, backbone, and seats were cut from white oak. The fastenings are silicon-bronze and stainless-steel screws. After finishing the hull construction, Dave sheathed the boat in a layer of 7-oz fiberglass cloth, then painted her inside and out. Dave estimates material costs of about $1,000.
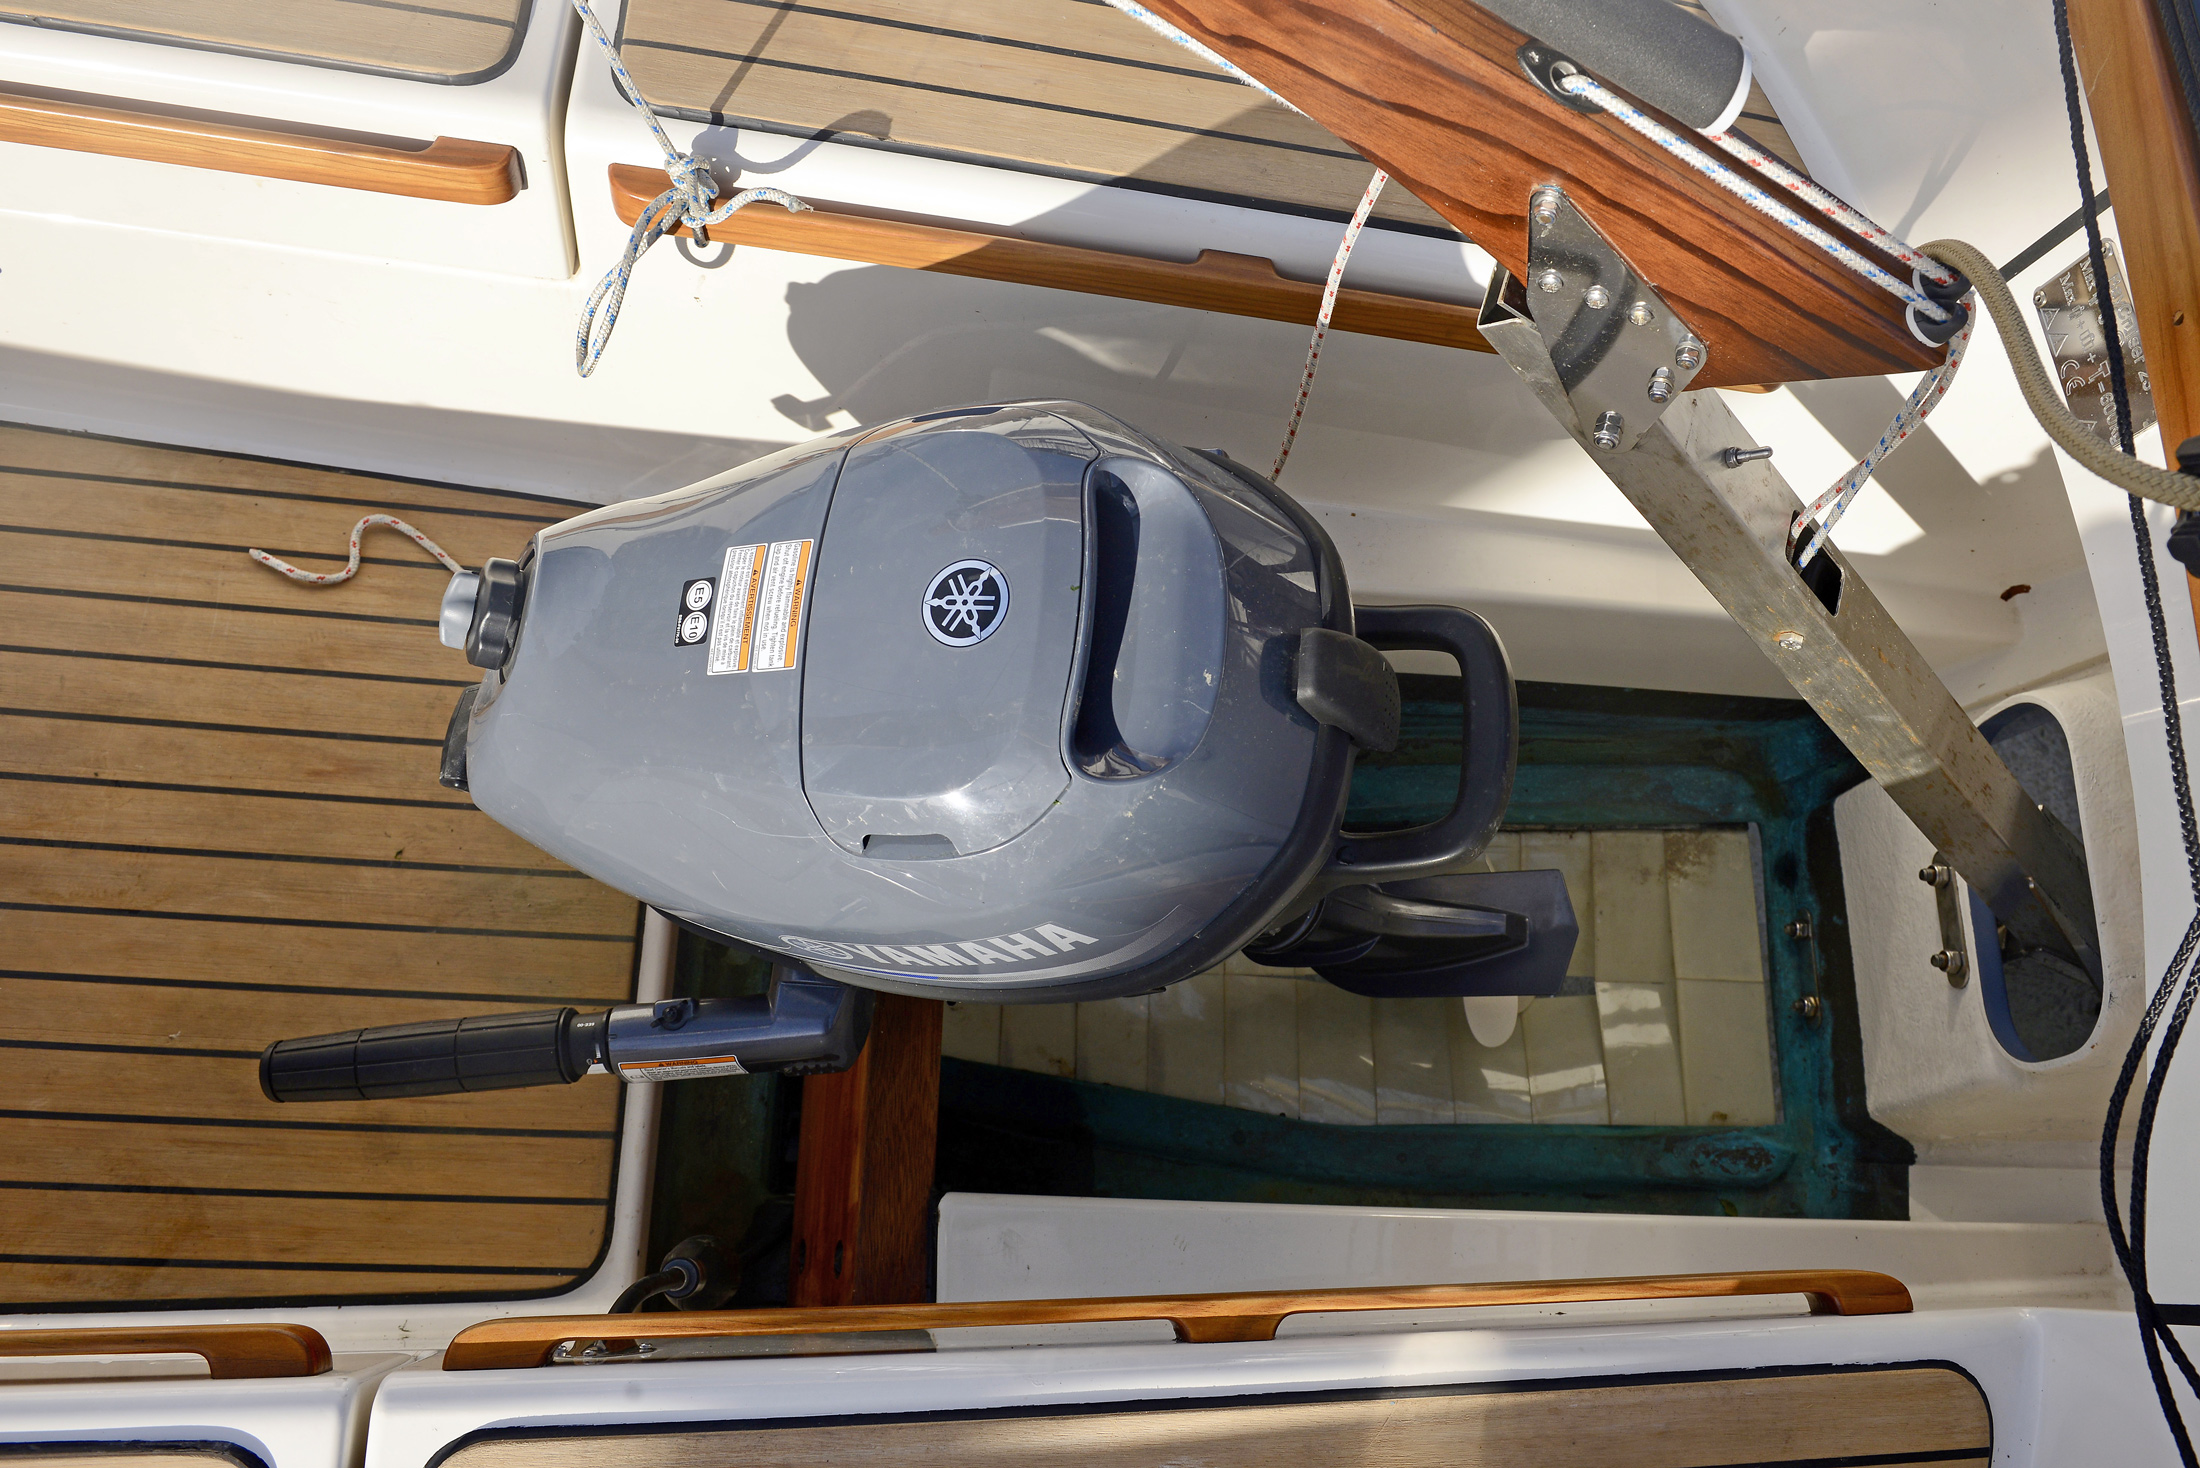
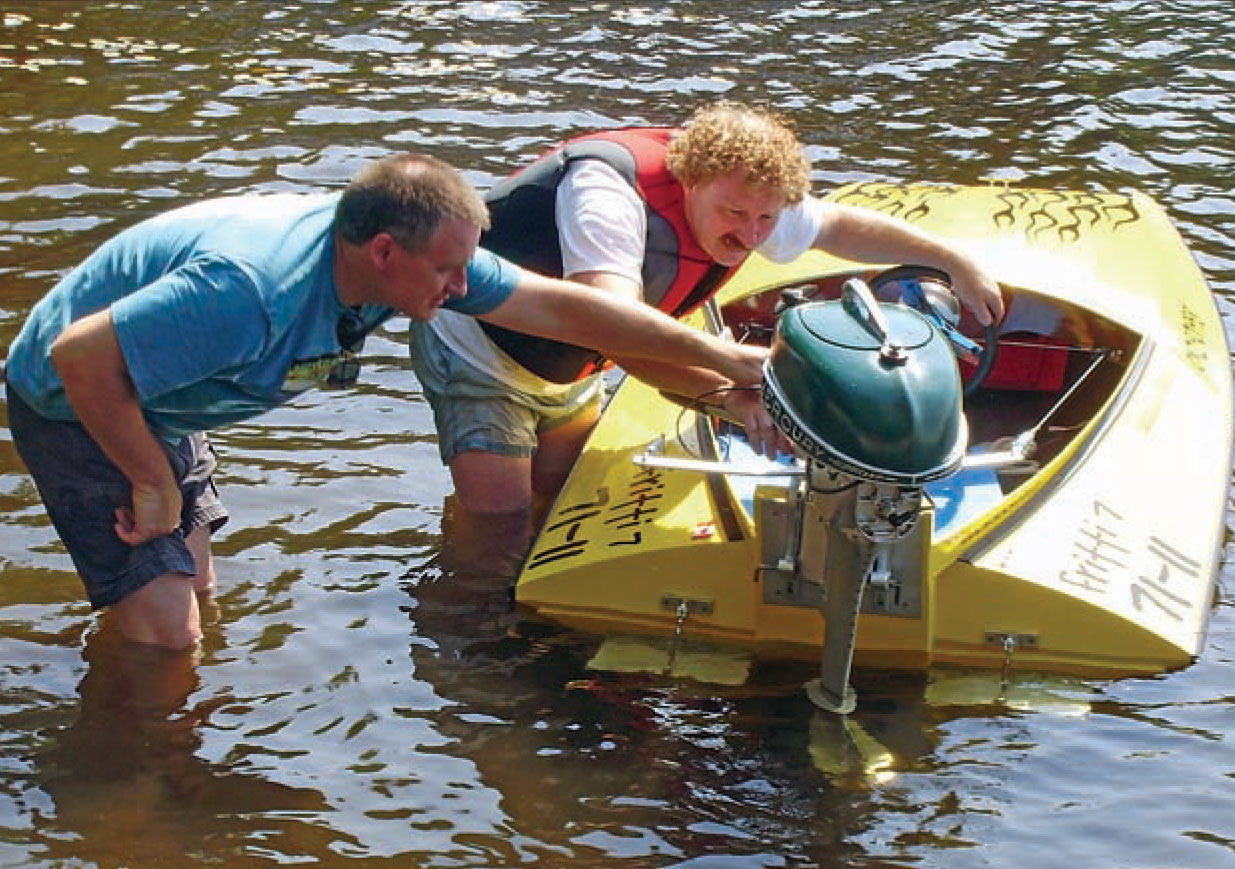
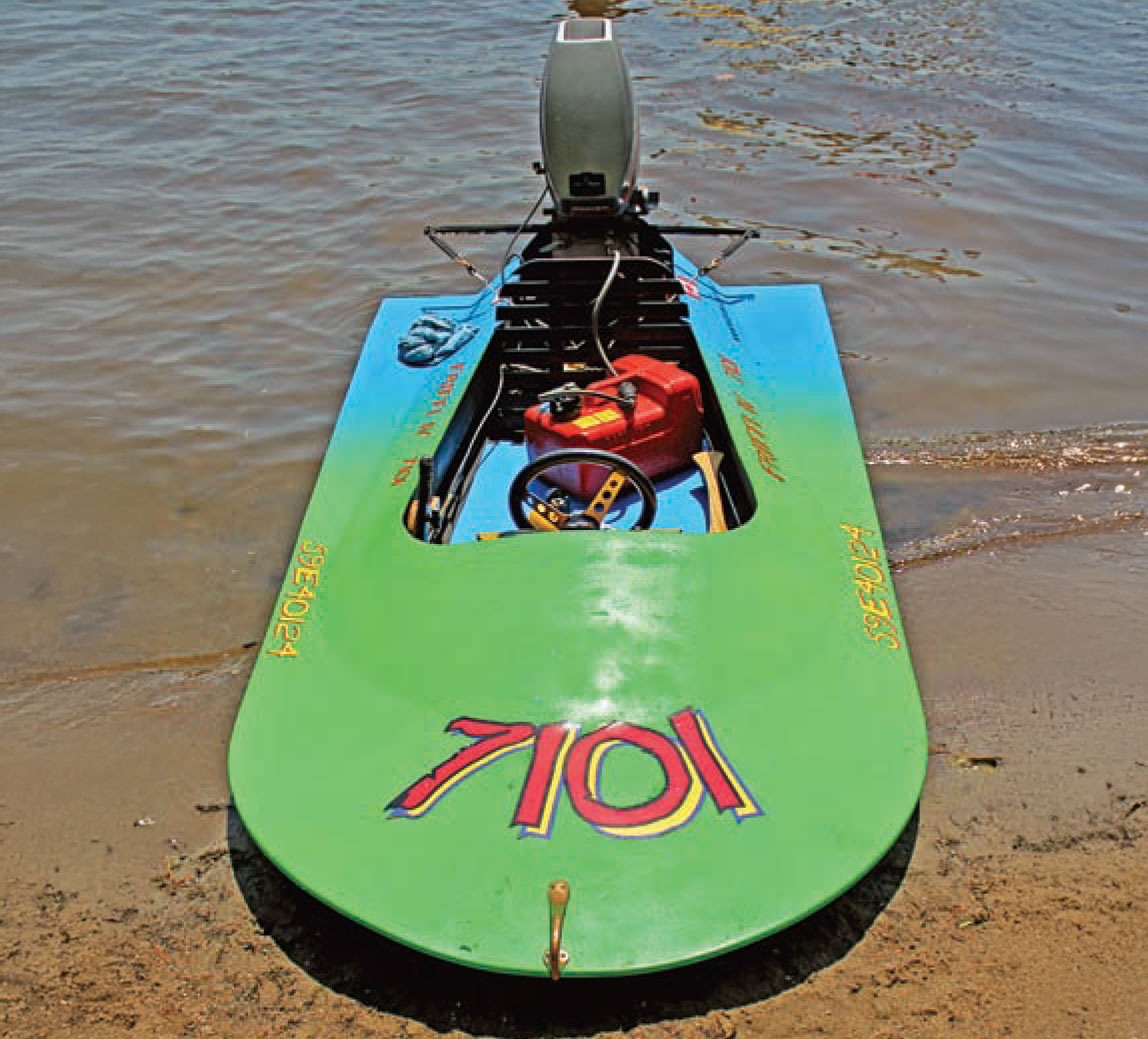
Dave lives in Texas most of the time, but vacations in Maine during the summer. These pictures were taken in Boothbay Harbor. He powered his skiff with a 1997, two-stroke 9.9-hp Mercury outboard. She had a top speed of 17 mph with just him aboard, which drops to 10 mph with a couple more passengers. Dave reports that due to her light hull, she is easy to trailer and launch, and inexpensive to operate. Since launching the flatiron, Dave has kept busy in the shop, building a Simmons Sea Skiff.
Swift
Photos by William Cruthers (above) and Matt Morello (below)
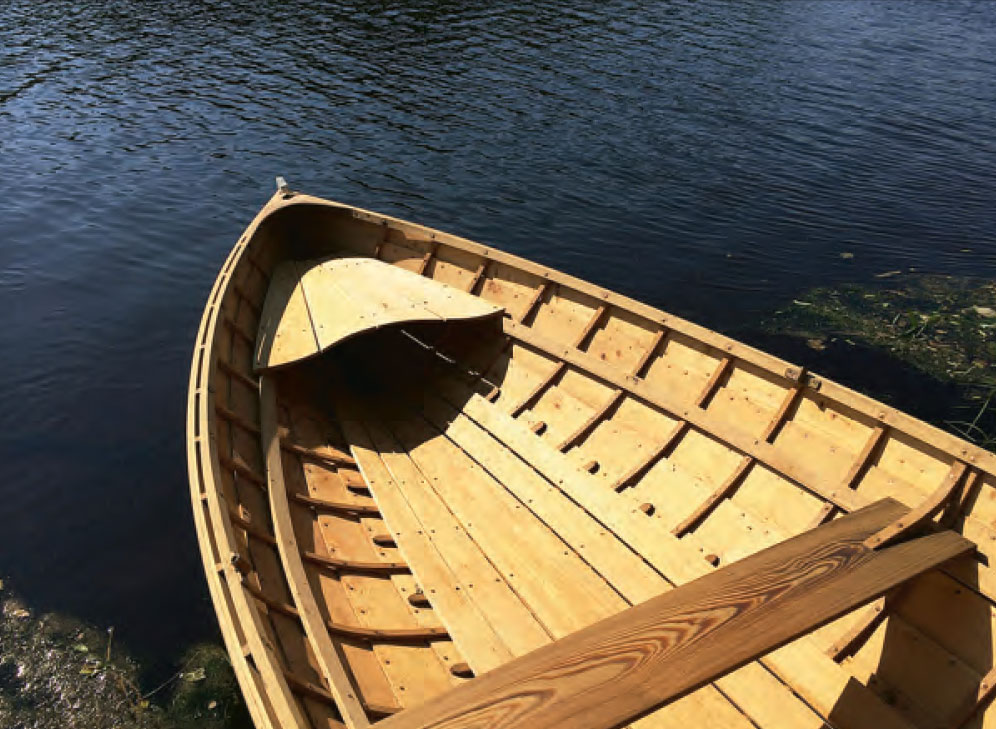
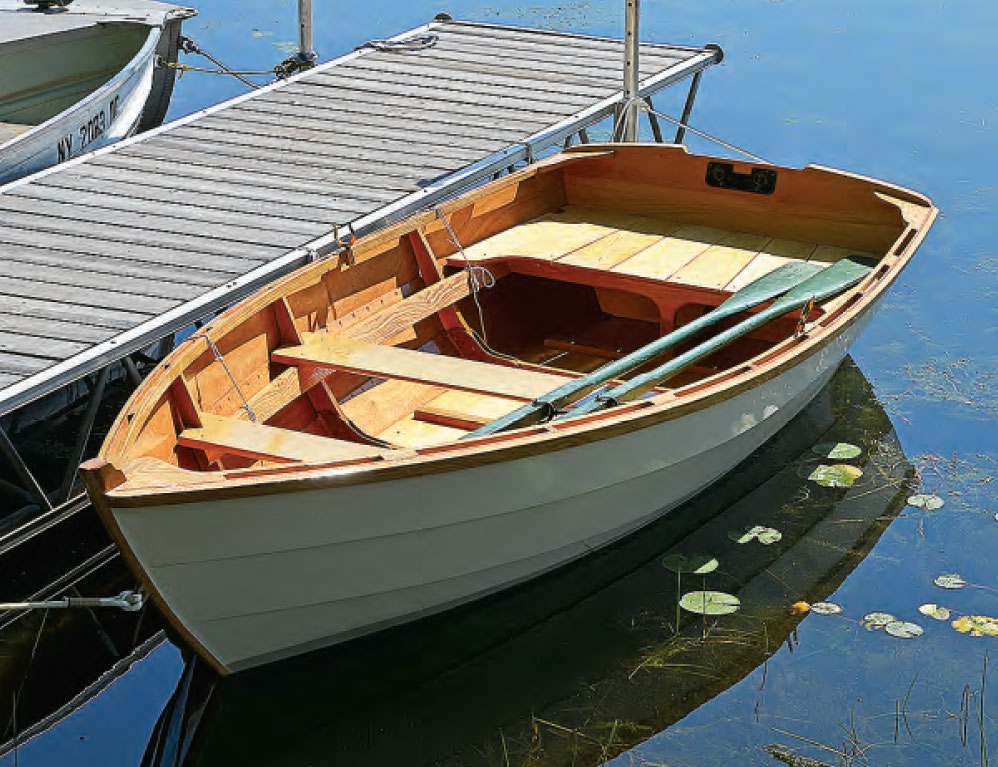
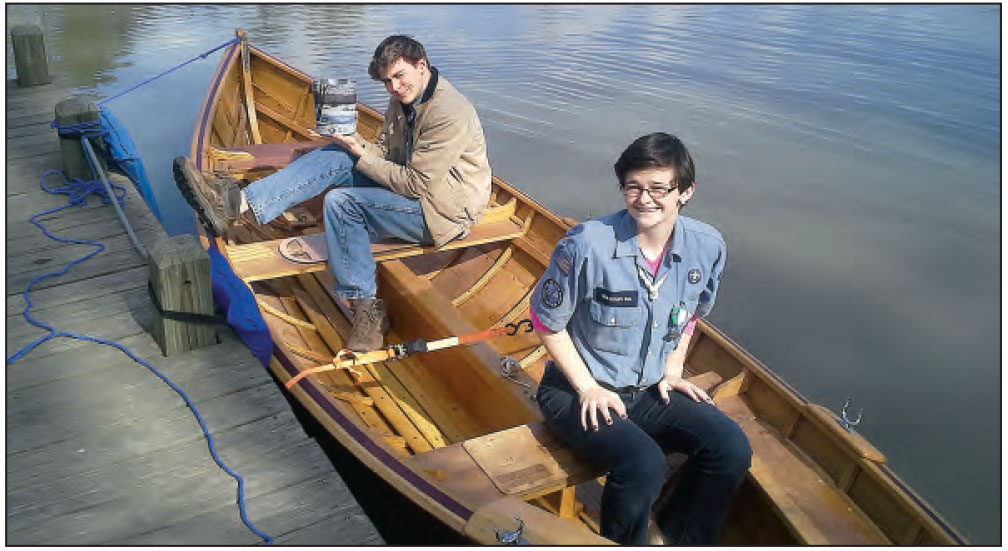
Evelyn Ansel of Mystic, Connecticut, comes from a shipbuilding family. Her father, Walt, and grandfather, Willits, have worked at Mystic Seaport for decades and both have contributed to WoodenBoat from time to time. Evelyn is pursuing a career in wooden boats herself, with experience so far working on the recent restoration of the CHARLES W. MORGAN, documenting Venetian small craft in Italy, and most recently conducting research as a Fulbright Scholar at the Vasa Museum in Stockholm, Sweden.
After deciding on Paul Gartside’s Bob pulling boat, Design #115 at Gartside Boats, Evelyn and her father lofted it and built the backbone during the winter of 2008. The next spring, while taking leave from college, she moved herself and the bare bones of SWIFT to work on it with her grandfather at his home in Georgetown, Maine. When fall came, Evie went back to college and after that was able to work on her boat only during college breaks. After graduating in 2011, Evie apprenticed on the MORGAN restoration at Mystic Seaport, and worked on her own boat nights and weekends.
Gartside had specified a strip-planked hull, but after much discussion, the Ansels decided on a more traditional build of 3⁄16″ cedar lapstrake planks on steam-bent oak frames fastened with copper rivets. All of the wood in the construction came from offcuts from restoration projects—including a breasthook made from a walnut crook bookmatched end for end, and thwarts from salvaged cypress. After five years of work, Evie launched SWIFT last September in Old Mystic, Connecticut, cheered on by friends and family.
DJANGO
Photo by Mariza Garcia; inset: Yair Lichtenstein
DJANGO is an Ebihen 15 named after Django Reinhardt, whose music kept the builder, Yair Lichtenstein, company during construction. Designer François Vivier kindly modified his standard standing-lug rig at Yair’s request by adding a boom to make solo downwind sailing easier.
Yair writes that she sails beautifully, is remarkably stable, and will heave-to perfectly with a raised centerboard. He finds the 14′ 9″ × 6′ boat to be perfect for fishing and daysailing in Aruba with his family and friends (human and canine varieties).
DJANGO has glued-lapstrake planking of sapele plywood. Other woods include mahogany, teak, and Port Orford cedar. Yair is a WoodenBoat School alumnus who took a course on building glued-lapstrake boats, which he found very helpful in the construction of DJANGO.
Little Lizzie
Photos by Larry Joyner (above) and Lauren Vicars (below)
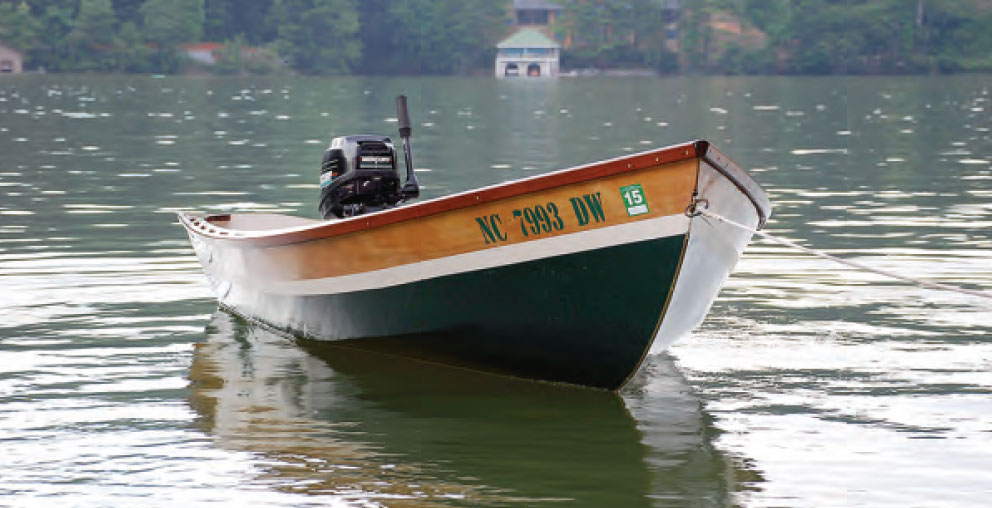
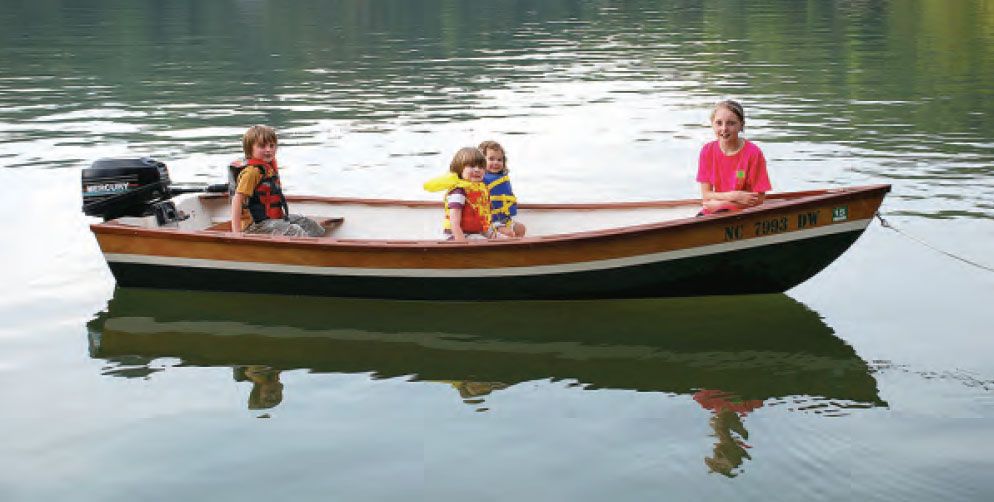
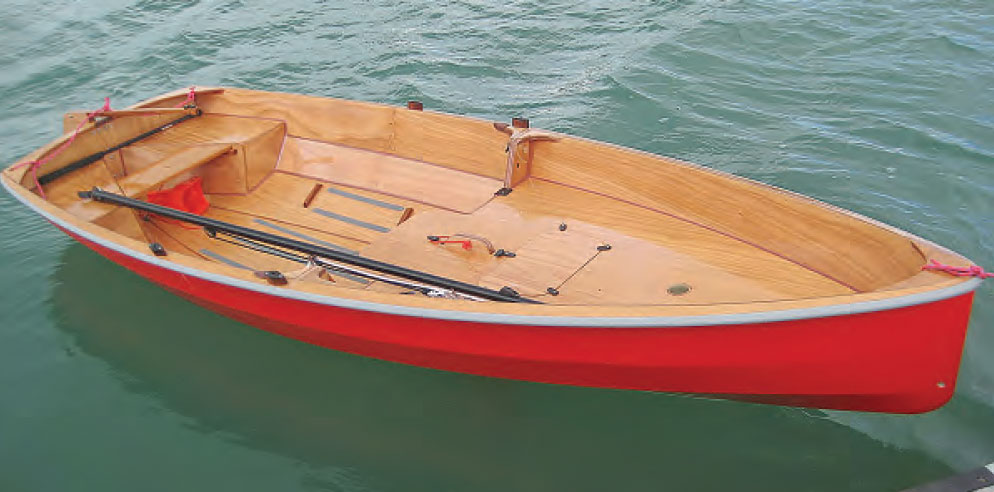
As part of his 60th birthday celebration, Larry Joyner launched LITTLE LIZZIE on Lake Summit in North Carolina. Though she is the first boat he’s ever built, Larry has loved wooden boats forever and has always wanted to build one.
After some research, he decided to build a Glen-L stitch-and-glue Power Skiff 14. Larry reports that the folks at Glen-L were very helpful with his questions. He also made use of their forum and some of the other resources on the Glen-L website.
Larry built his skiff from okoume marine plywood with mahogany seats, rails, and trim. He took the fullsized plans to a local woodworker to have him cut the big sections out of plywood. Then he brought the pieces back home and wired them together. After the hull was glued up, Larry covered it with 6-oz fiberglass, adding an extra layer on the bottom to protect the hull. LITTLE LIZZIE, 13′ 10″ long with a beam just over 5′, is powered by an 8-hp Mercury outboard. Larry hopes this won’t be his last boat, as he thoroughly enjoyed the construction process.
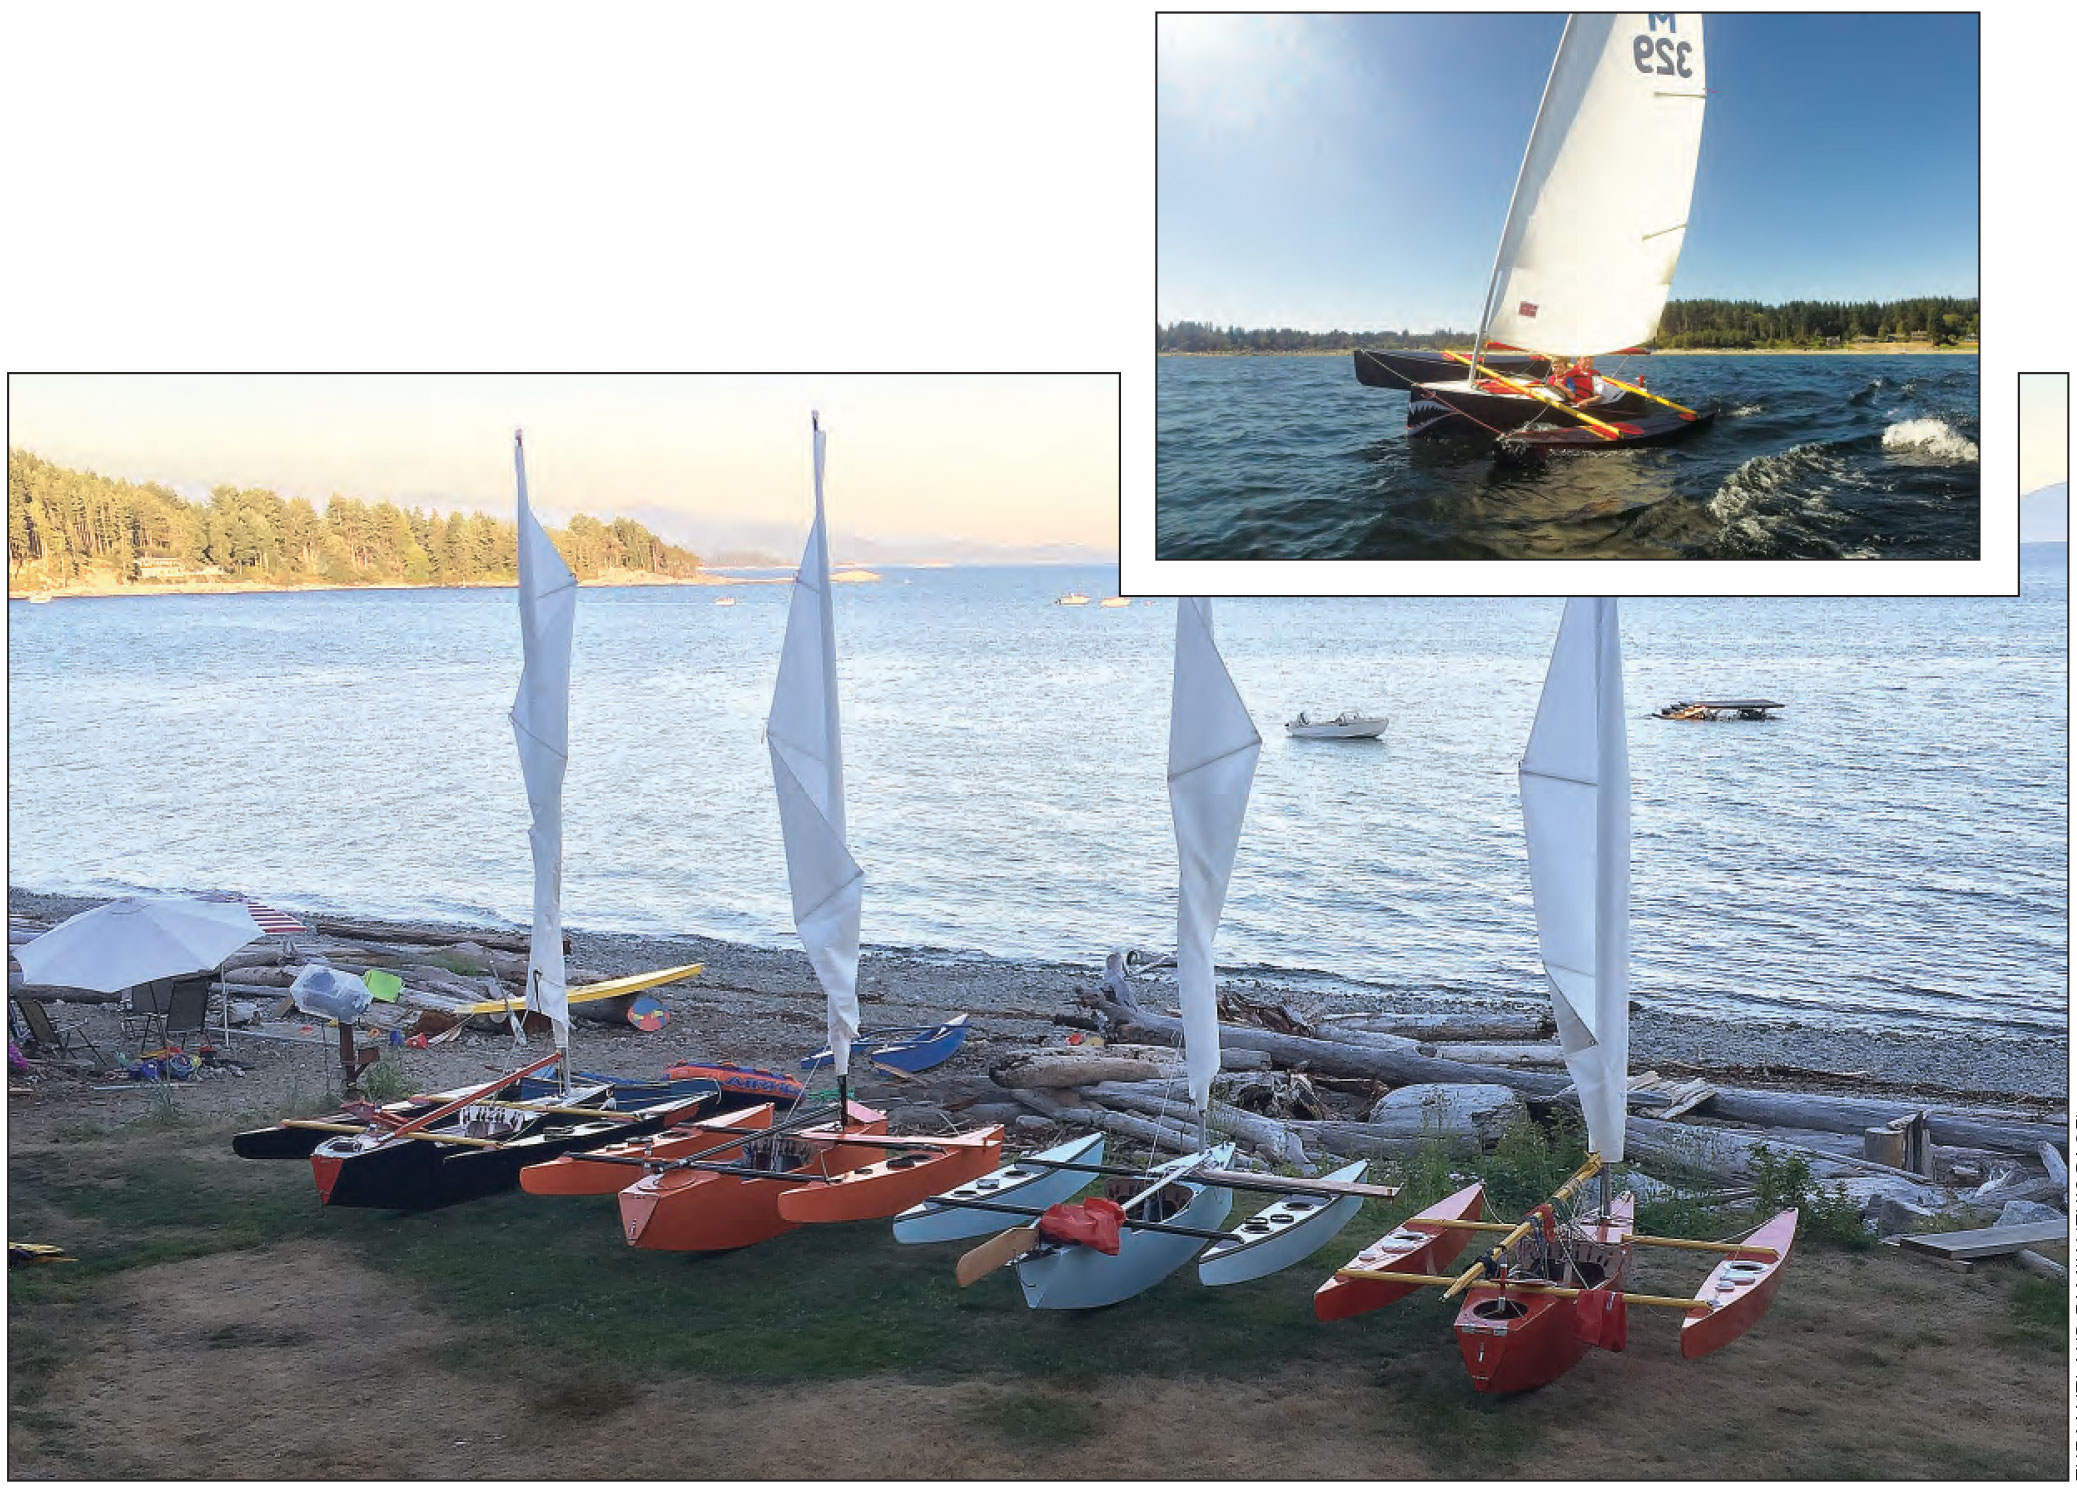
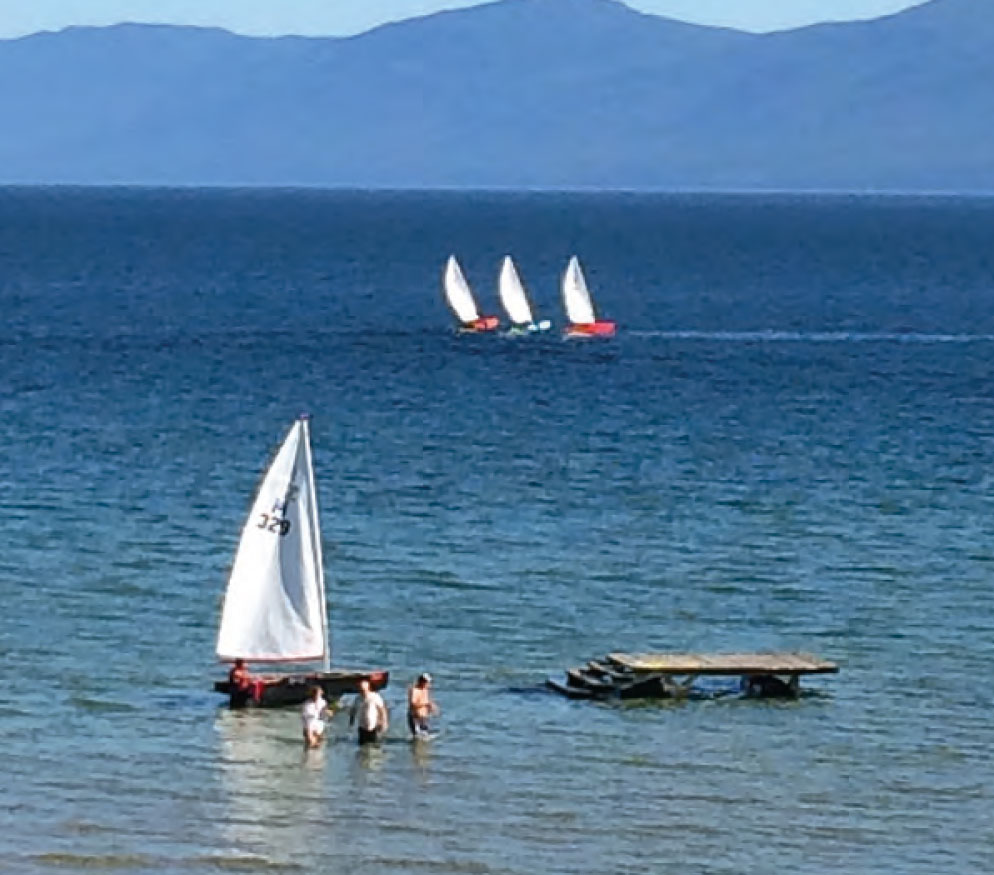
Four Seaclipper 10 Trimarans
Photos by the Maitland Family
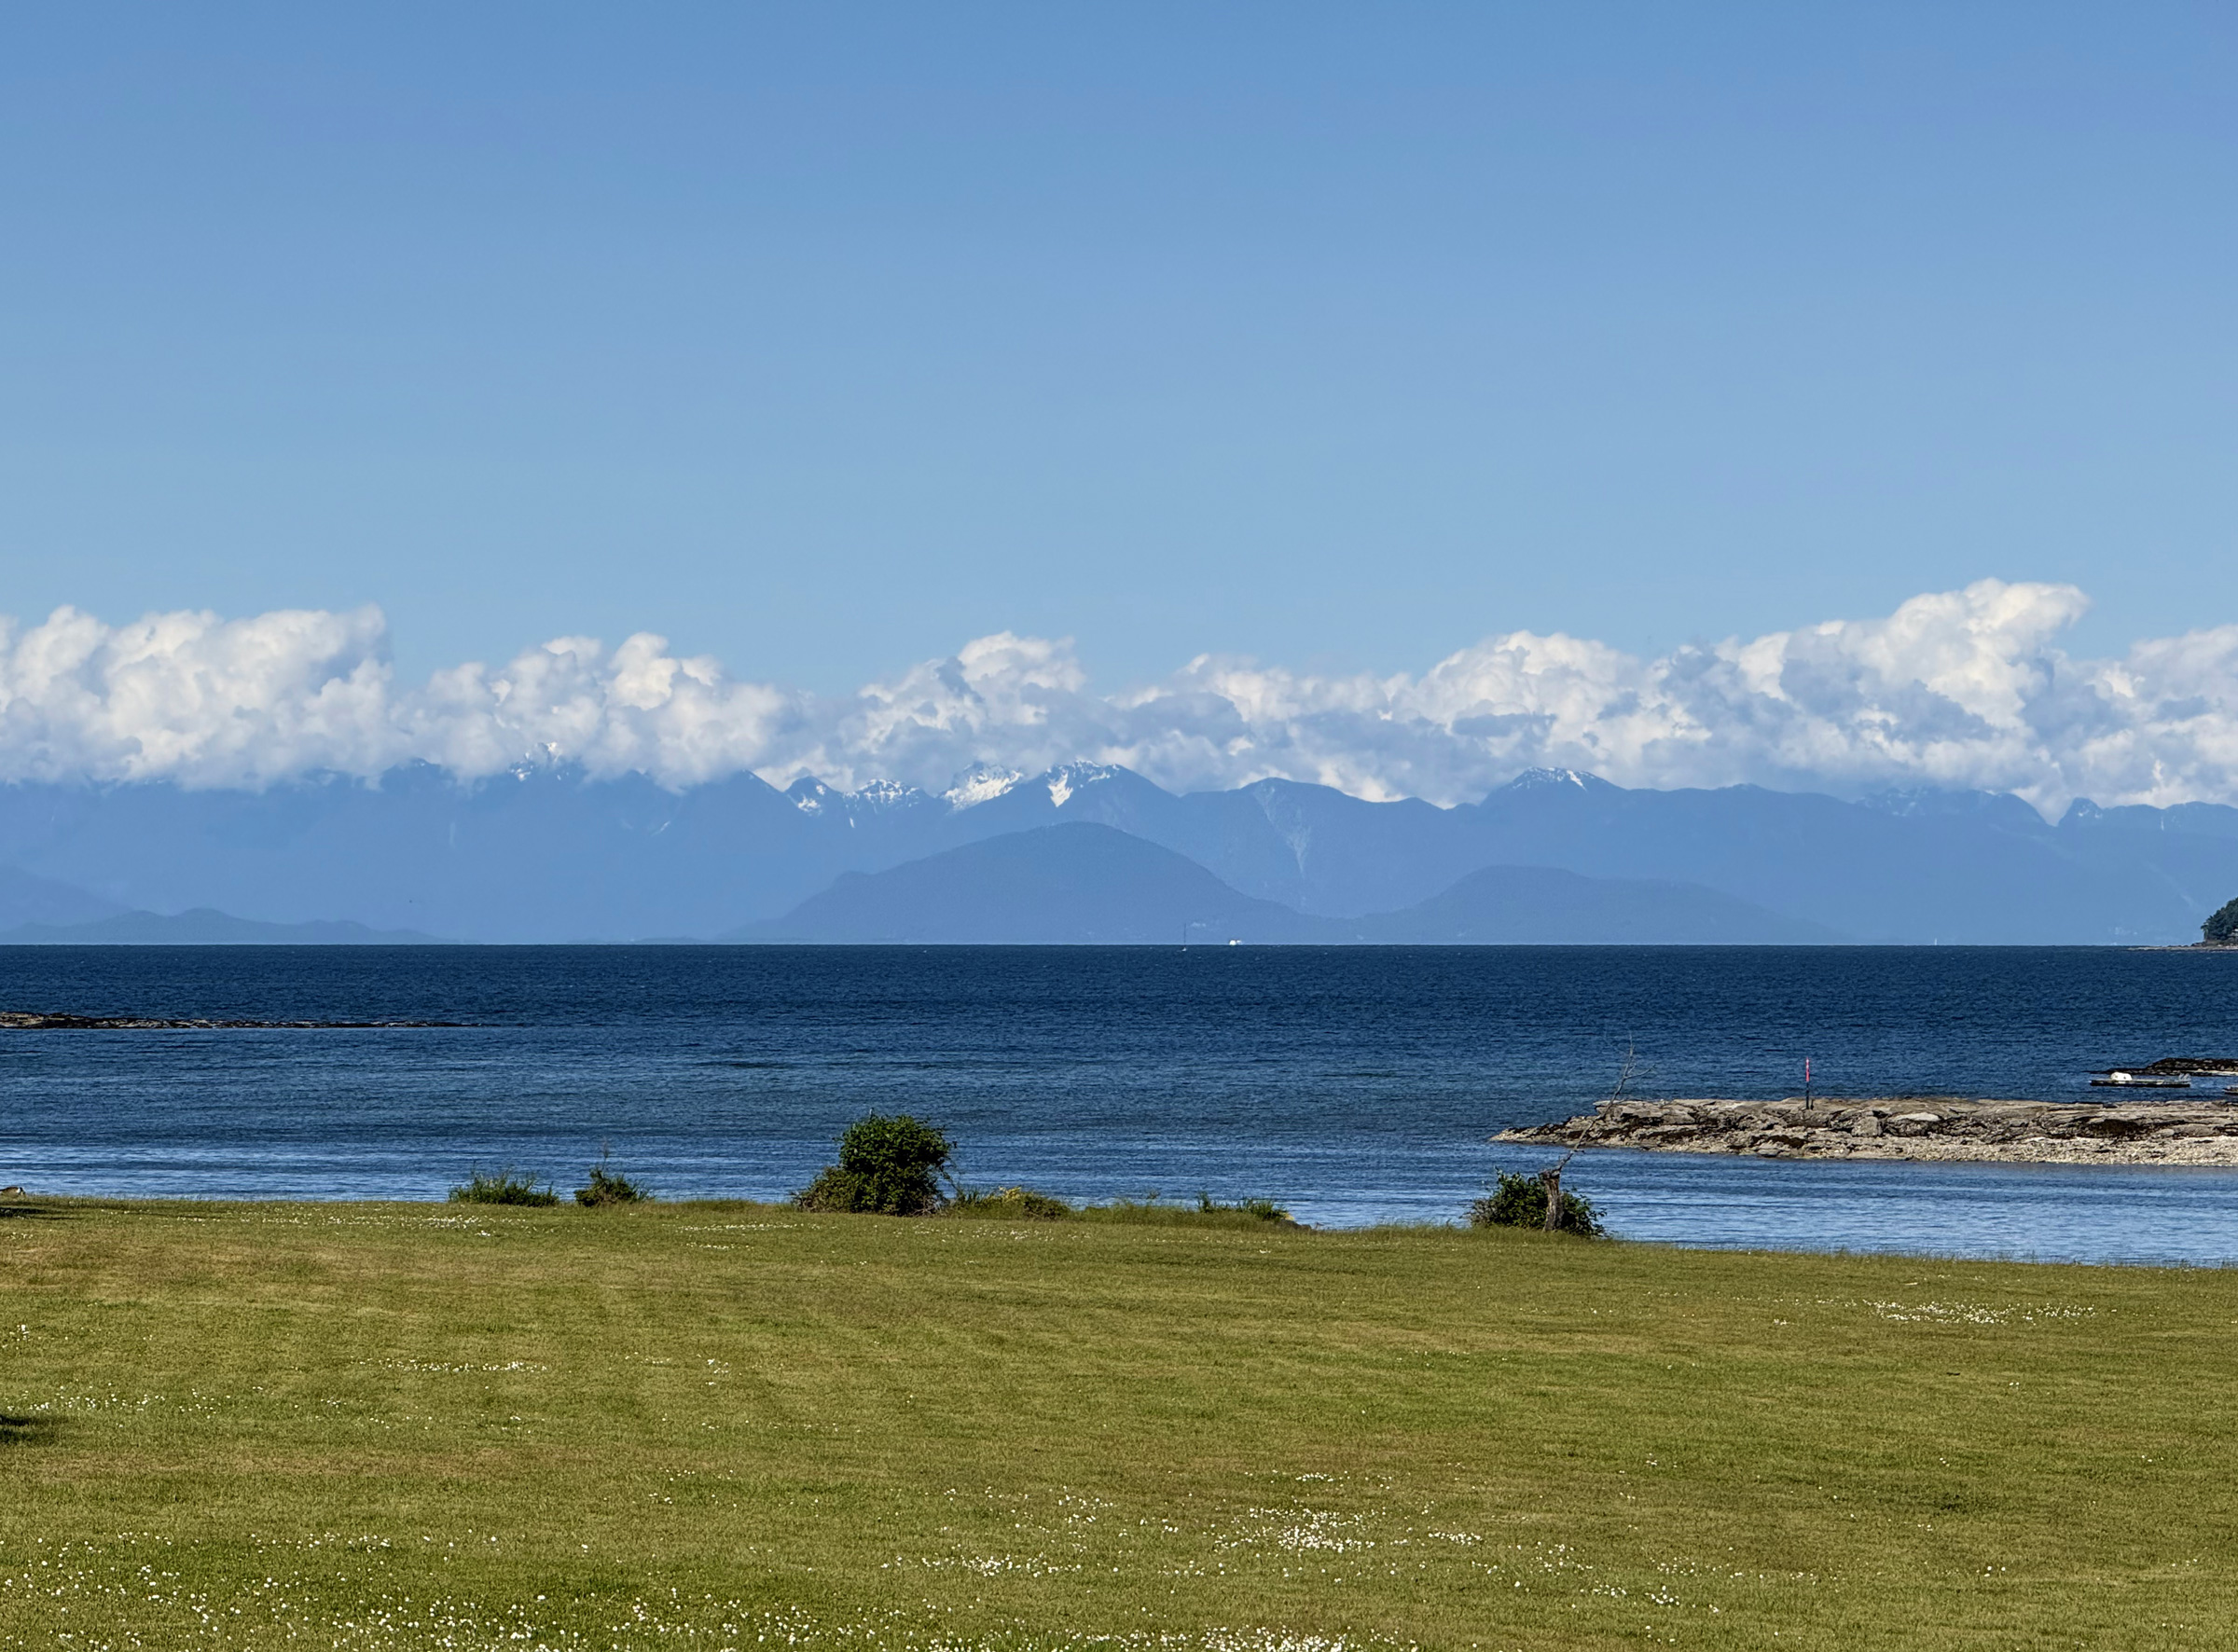
In a quadruple launching, four brothers launched four Seaclipper 10s together in Lang Bay, British Columbia, in August 2014. The four Maitland brothers—Pete, Rory, Bill, and Rick—each ordered Seaclipper 10 plans from designer John Marples, and built them independently at their own homes before trailering them to the family home in Lang Bay. Rick came the farthest, all the way from Calgary, hauling his black and red boat GOODENUF.
Construction time was about 200 hours to build the 10′-long, 8′-wide plywood-and-epoxy trimarans (see WoodenBoat magazine No. 227 for more on this design). The brothers conferred with each other during construction but did not see their respective boats until launch day. Each had followed the designer’s instructions but added his own personal flair to his project to make it stand out from the others. Pete, an engineer, modified the rig on his red hull, INSTIGATOR, hoping to get an edge on his brothers. It didn’t work, and he went back to the original rig the next day.
After launching, the brothers had just one day to learn the boat, tweak their gear, and practice for the Maitlands’ First Annual Seaclipper Race. Bill won the race in his orange WILL RUN RIOT, and was awarded a trophy created by his sister, Kit. Bill and twin brother Rory, who built the light blue STORMIE NORMIE, both live in Powell River, so Bill may have had a homefield advantage.
GRACE
Photos by Eisa Quelette
Simon Kendall built this PT11 nesting dinghy in his living room in Auckland, New Zealand. He started with a kit designed by Russell Brown of Port Townsend, Washington. Simon reports that the construction was surprisingly simple, as the CNC-cut pieces fit easily together without any forcing or twisting.
The living room carpet protected his knees, and the couch close by provided a good place to sit and work out each step of construction. Having the boat in his living room was a big incentive to get finished quickly, and after four months of nights and weekends, Simon finished GRACE.
Simon plans to use this dinghy as a tender for his 40′ yacht. He reports that he’s owned smaller nesting dinghies but they were too much of a hassle to connect together regularly.
The PT11 is designed to be connected or disconnected by one person in about 30 seconds. The hull is built from okoume marine plywood, with parts in Sitka spruce, Douglas fir, cedar, and mahogany. The pieces are covered with fiberglass cloth and epoxied together.
Dual-Cockpit Runabout
Photo by Jason Oleham
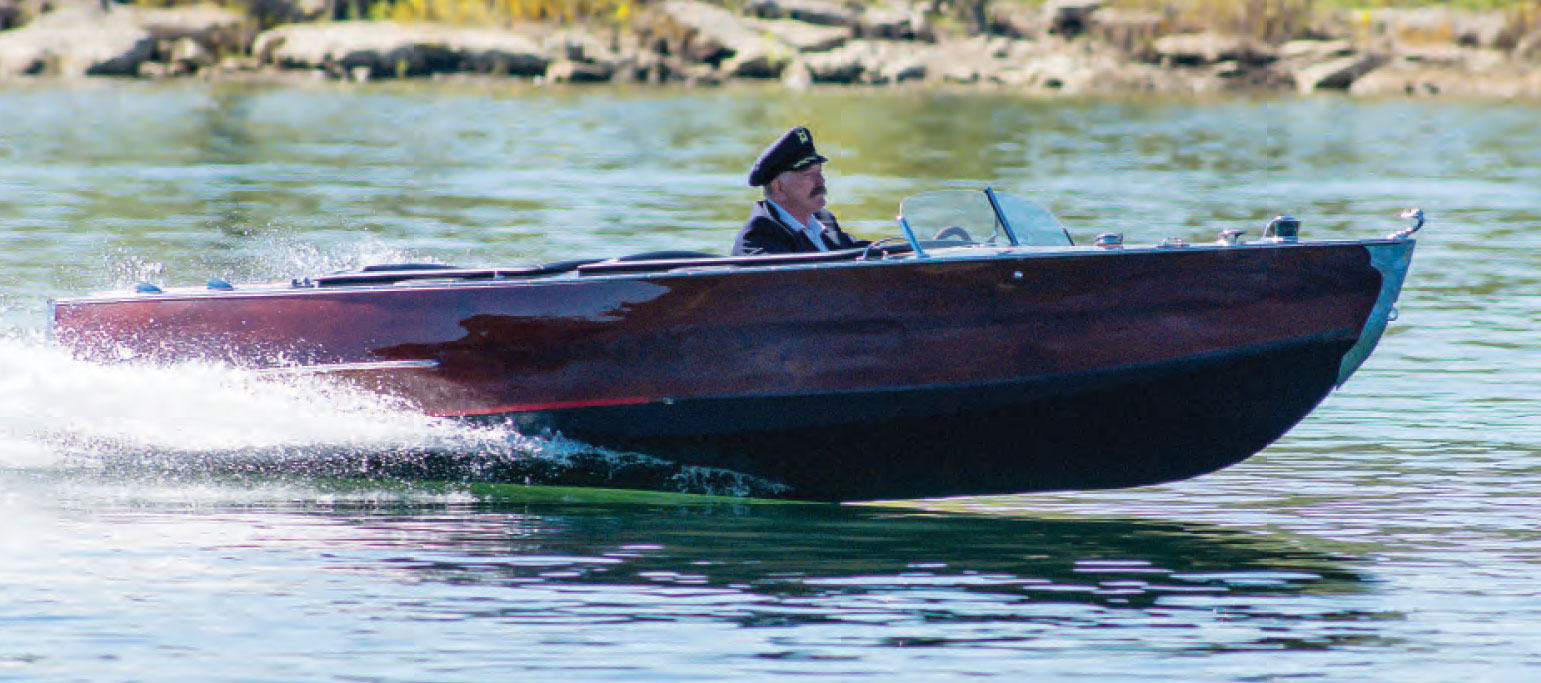
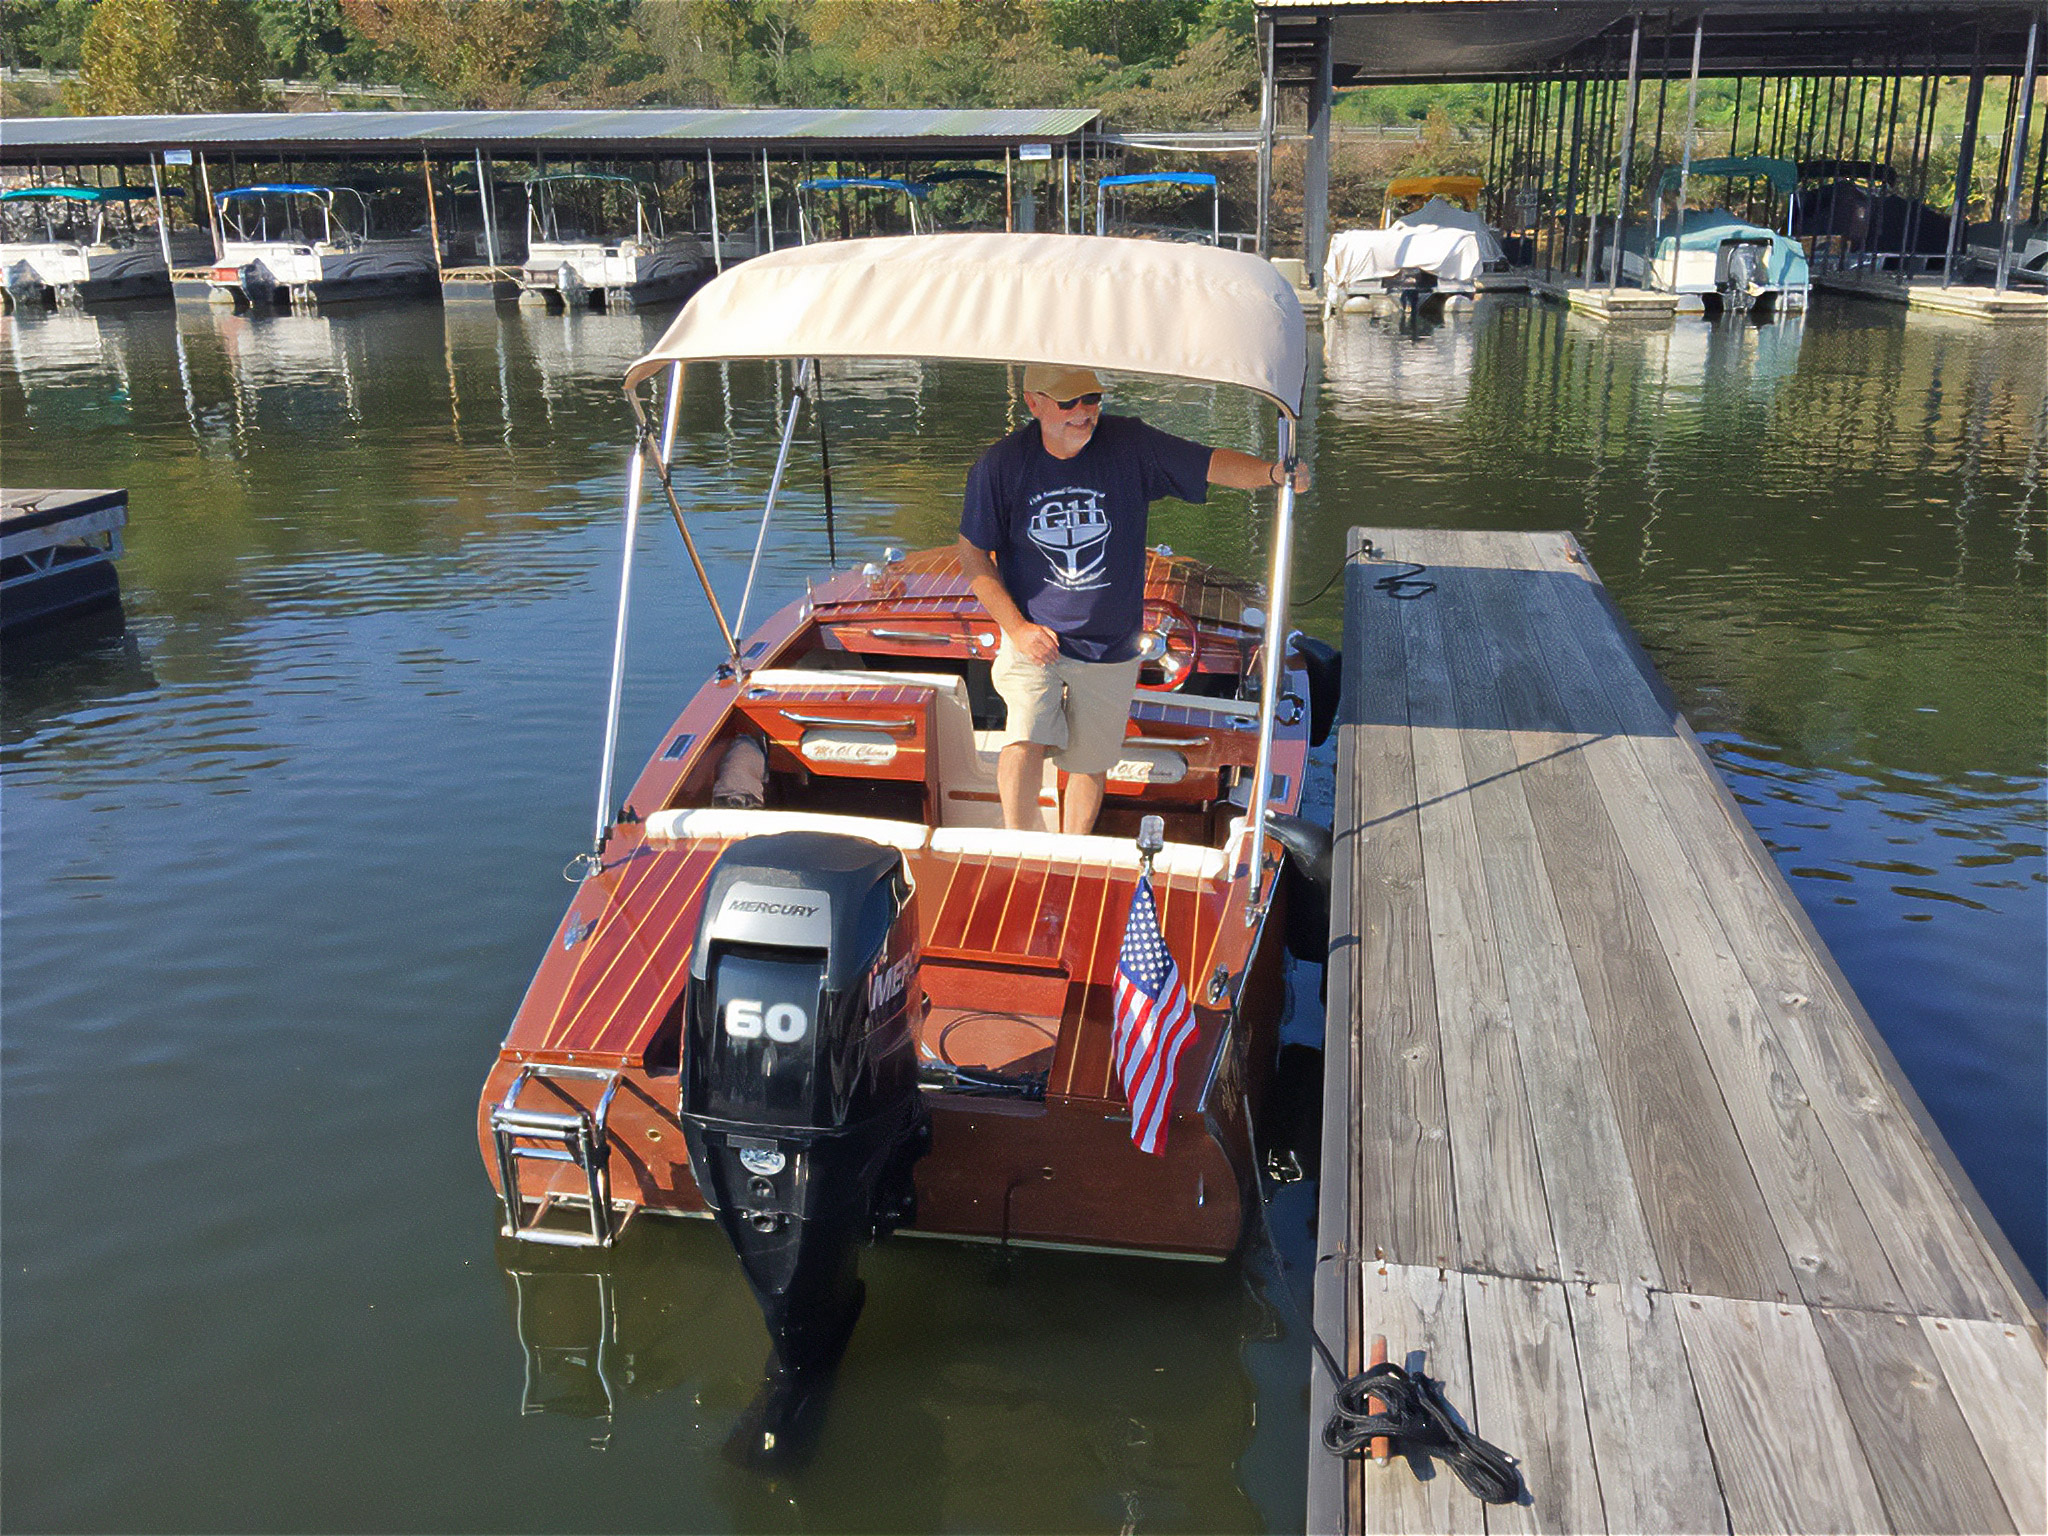
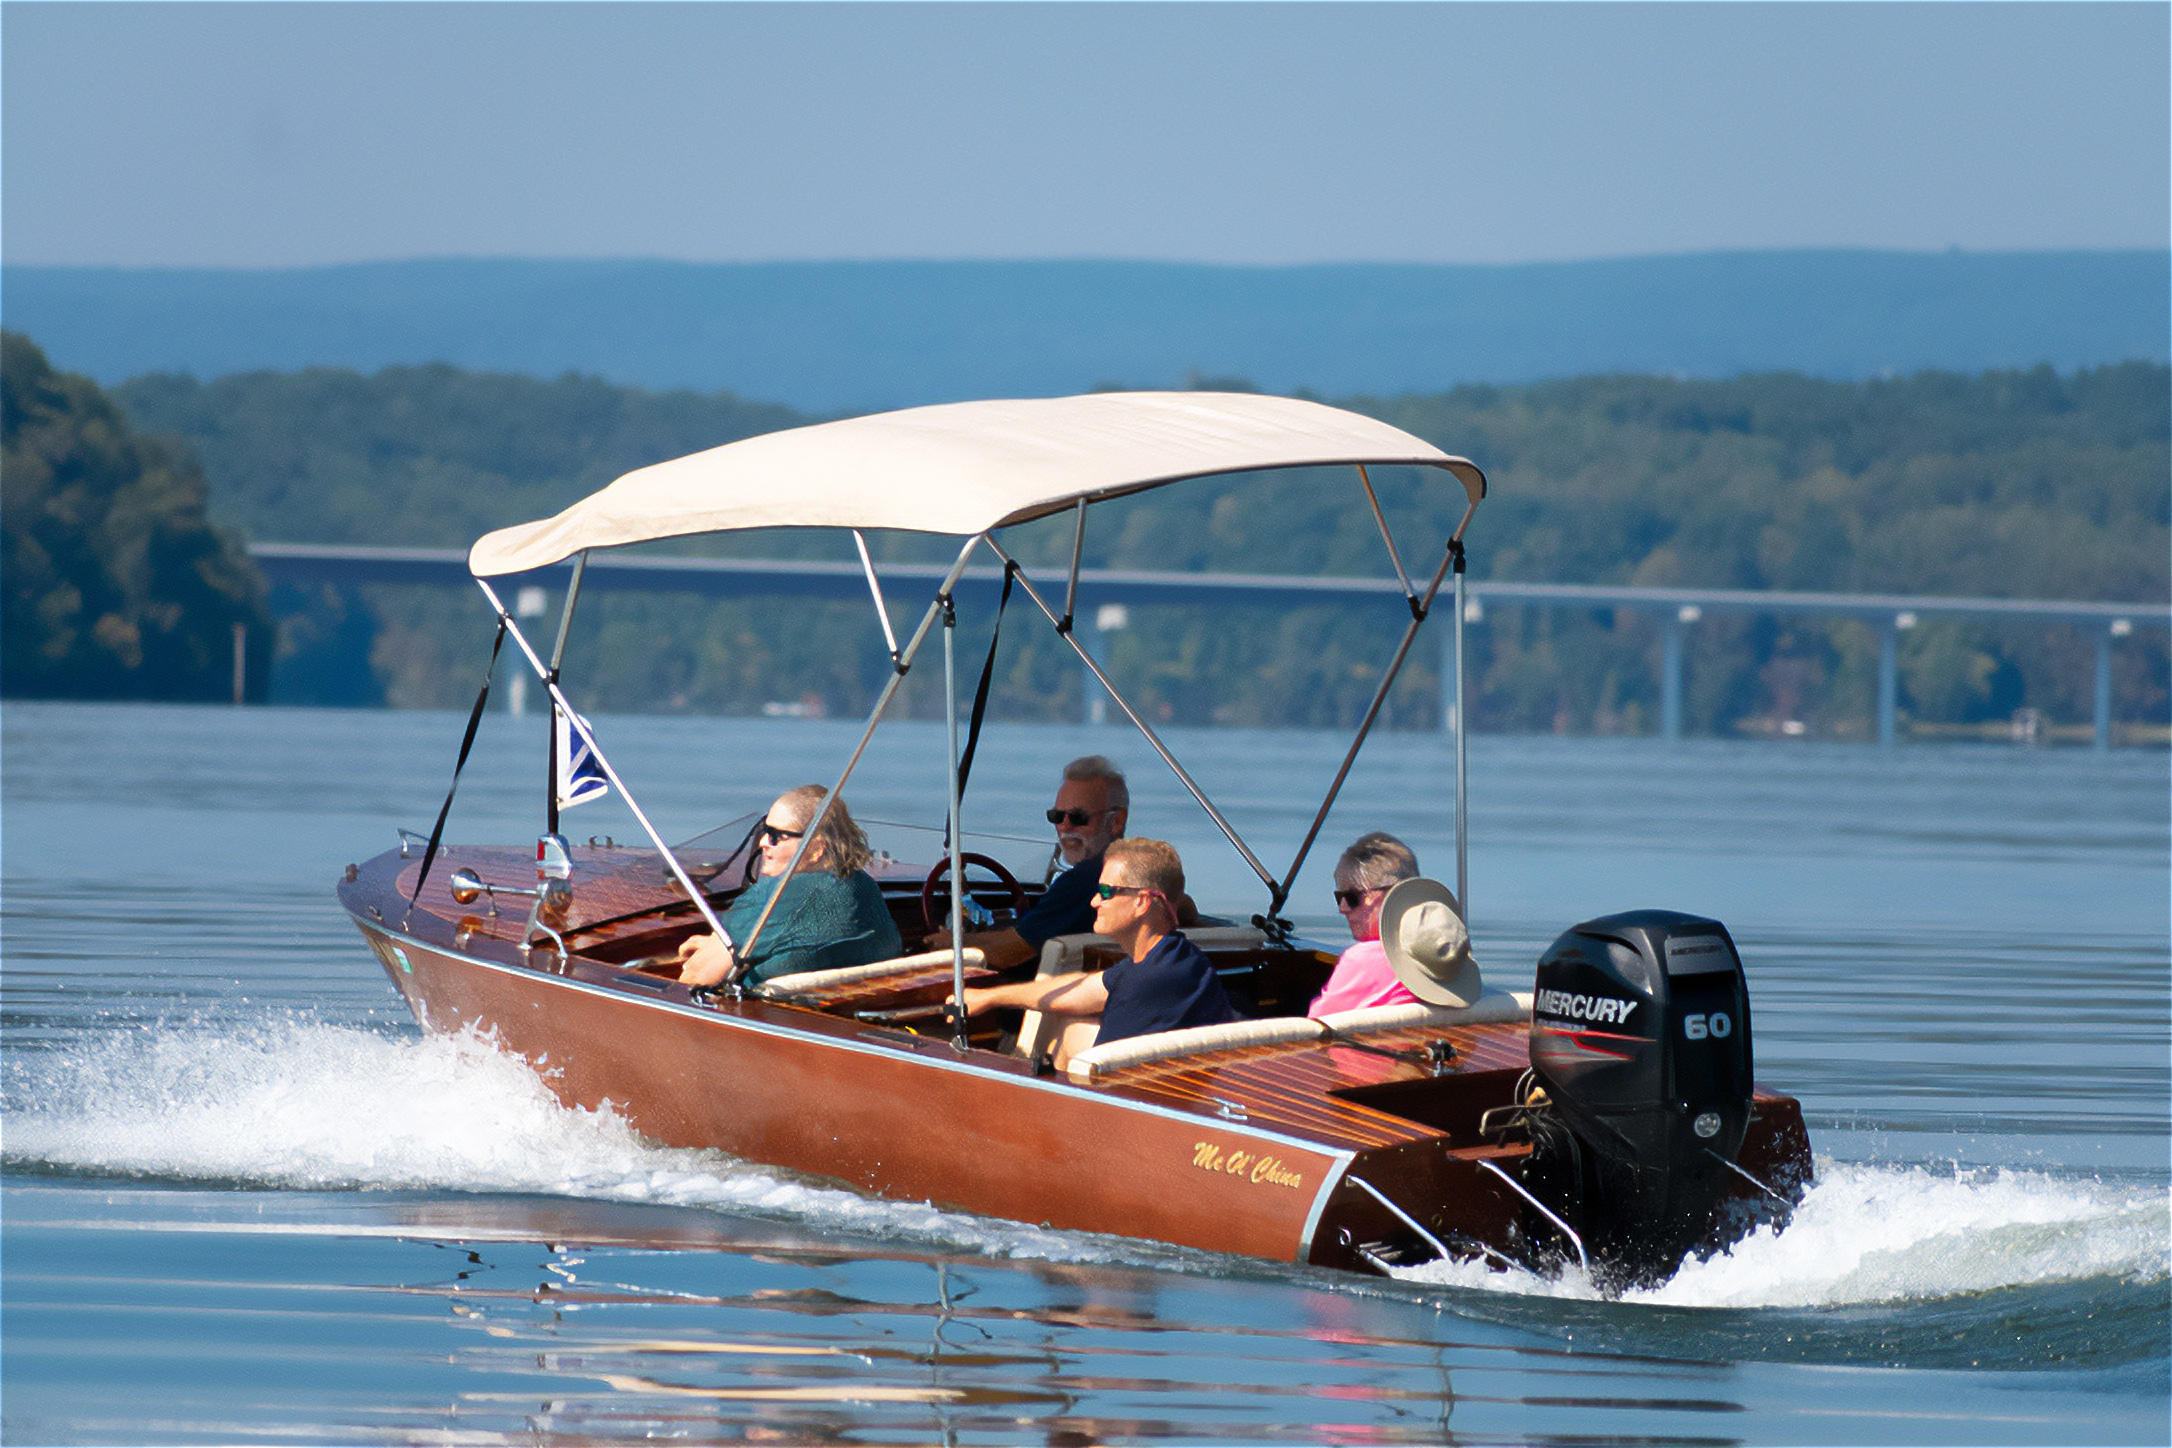
Dale Hamilton of Boomslang Boats in Murfreesboro, Tennessee, has recently launched another of his mahogany dual-cockpit runabouts. He is a retired physician, now building boats as his second career. His favorite boats are the 1930s classic mahogany runabouts by Chris-Craft, Hacker, and Ditchburn, which he considers among the most beautiful boats ever built.
Dale does his best to emulate those boats in his own construction. He chose a 15′ sport runabout design by Ray Sargent (formerly of Bristol Engineering in North Hero, Vermont) after reading about Ray’s conversion of a Subaru engine for marine use in WoodenBoat No. 134. He has built nearly a dozen boats since finishing his first one in 1999.
On his latest boat, Dale planked the hull with 3⁄8″ plywood on the bottom, and 1⁄4″ okoume plywood on the sides, which were then covered with 10-oz fiberglass E-cloth and epoxy. He faired the hull until it was as “slick as steel.” The deck is made from 3⁄16″ mahogany strips, which had originally been intended for use in WWII PT-boats by Higgins Industries. The boat is powered by a 100-hp, four-cylinder Mercury.
QUEEN MARY
Photos by Phil Schirmer (above) and Jordan Gable (below)
After attending John Karbott’s Introduction to Boatbuilding class at WoodenBoat School in August 2013, Phil Schirmer decided to build his own boat. Working weekends and evenings over the winter of 2013–14, he built a Karbott-designed 12′ 6″ semi-dory skiff, using marine plywood, white oak, and pine.
Recently retired from WoodenBoat, where he served as our associate art director, Phil is an artist who recently had an egg tempera painting on exhibit in the Smithsonian Institution. He brought those exacting skills to his boatbuilding, reworking each piece until he had a near-perfect fit.
In August 2014, Phil and his wife, Mary, launched their boat at their summer cottage on White Fish Lake in Ontario and christened it the QUEEN MARY.
NIAMH
Photos by Angela Nickich (above) and John Mansolillo (below)
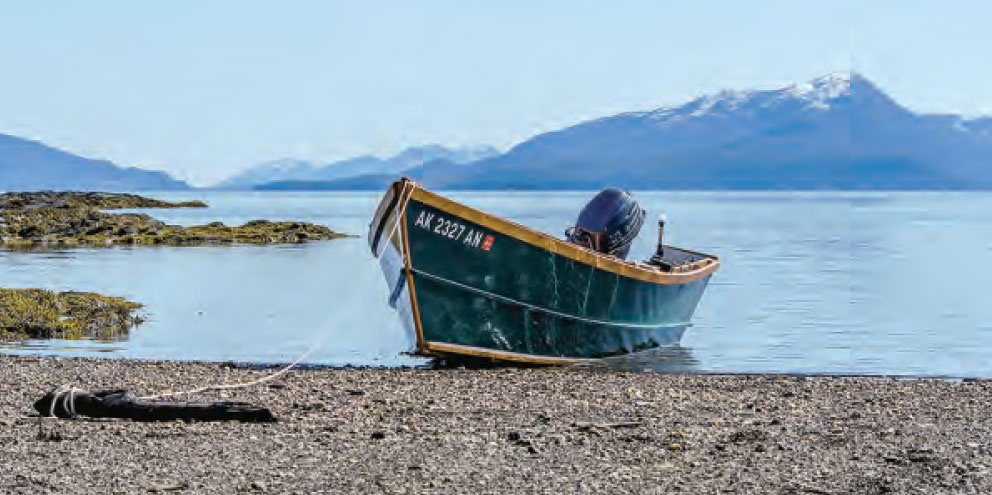
While John Mansolillo was stationed in Ketchikan, Alaska, with the Coast Guard, he built a boat for fishing and hunting during his off-hours. John chose a 16′ San Juan Dory designed by Dave Roberts of Nexus Marine.
John had built two boats before, but the San Juan was a bit more complicated. He bought fir marine plywood and common lumber from the local lumberyard. He built most of the boat alone except for when he attached the sides. The hull, 1⁄2″ plywood on Douglas fir frames, was covered with epoxy and a layer of fiberglass on the bottom.
NIAMH is powered by a 20-hp Yamaha four-stroke engine, and tops out at 23 knots on a calm day. John reports that she handles well on turns, tracks well, and is very stable. John made many fishing trips in NIAMH, sometimes traveling over 60 miles along various inlets in waterways in southeast Alaska.
JARLS OF ORKNEY
Photos by Laura Smith
Steve Smith has dreamt of building a boat for years. Inspired by Small Boats 2012 and the opportunity of a nine-month sabbatical, Steve finally turned that dream into reality. After much research, he decided on Ross Lillistone’s Phoenix III design (see WoodenBoat Nos. 236 & 238 and Small Boats 2013). He officially started construction on May 1, 2013, and sailed her for the first time exactly eight months later in Lake D’Arbonne, Louisiana.
Steve expected to build the boat alone, but his wife, Laura, and three sons—David, Cris, and Josh—helped with the project along the way. In particular, Steve got three weeks of intensive help from David as the pair worked 14-hour days planking the 15′ hull with okoume marine plywood and epoxy. The hull is trimmed out with 100-year-old cypress. Though this is his first boat, Steve adapted the design slightly, in consultation with Ross Lillistone, changing the side decks to open gunwales.
During the build, David had done family genealogical research, and discovered they were direct descendants of the first Vikings in the British Isles, who set themselves up as earls (jarls) in the Orkney Islands. Steve and David aptly named their new boat JARLS OF ORKNEY.
MELISSA
Photos by Melissa O’Shea
After five years of work, Tim O’Shea of Queensland, Australia, launched his 7′ 8″ Auk, MELISSA, on Australia Day in traditional Norse style, with red wine instead of champagne. He sails her on the canals and lakes behind Burleight Heads on Australia’s Gold Coast.
MELISSA was designed by Iain Oughtred, whose charming glued-lap plywood designs have introduced hundreds of people to the joys of building wooden boats. Tim admired the beauty of the Auk, but also chose her because she was small enough to fit in his available building space. Tim had little in the way of carpentry skills when he started building MELISSA. He learned so much along the way, he is now teaching the students at his school to build and sail wooden boats. Plans for many Oughtred boats are available from the WoodenBoat Store.
Tim reports that MELISSA sailed very well indeed, and he believes she’ll row very well too, once he makes the oars. He adds, “The sound of the water working its way along the hull was nothing short of magic, as was her light and nimble handling. Iain Oughtred draws boats that not only look pretty, but sail pretty well too. She is named in honor of my beautiful wife, who has quietly let me go about finishing this build and has occasionally helped out when there simply weren’t enough clamps.”
HUKA LUGI
Photos by Karin Pfitzner
Rowan Buelow, age 12, has always wanted to build a boat. His dream came true on May 11, 2014, when he launched this 5′ 6″-long plywood rowboat that he built with his dad.
Rowan designed the boat himself. He did all of the measuring and most of the cutting. His father held the pieces for him while he fastened everything together. The hull is made from fir plywood with cedar frames.
It took Rowan just eight months from initial idea to final launch. Rowan named her HUKA LUGI. He plans to use her close to shore in the protected ocean waters and lakes of southern Vancouver Island in British Columbia, Canada.
REVEILLE
Photos by Sea Scout Ship 1332
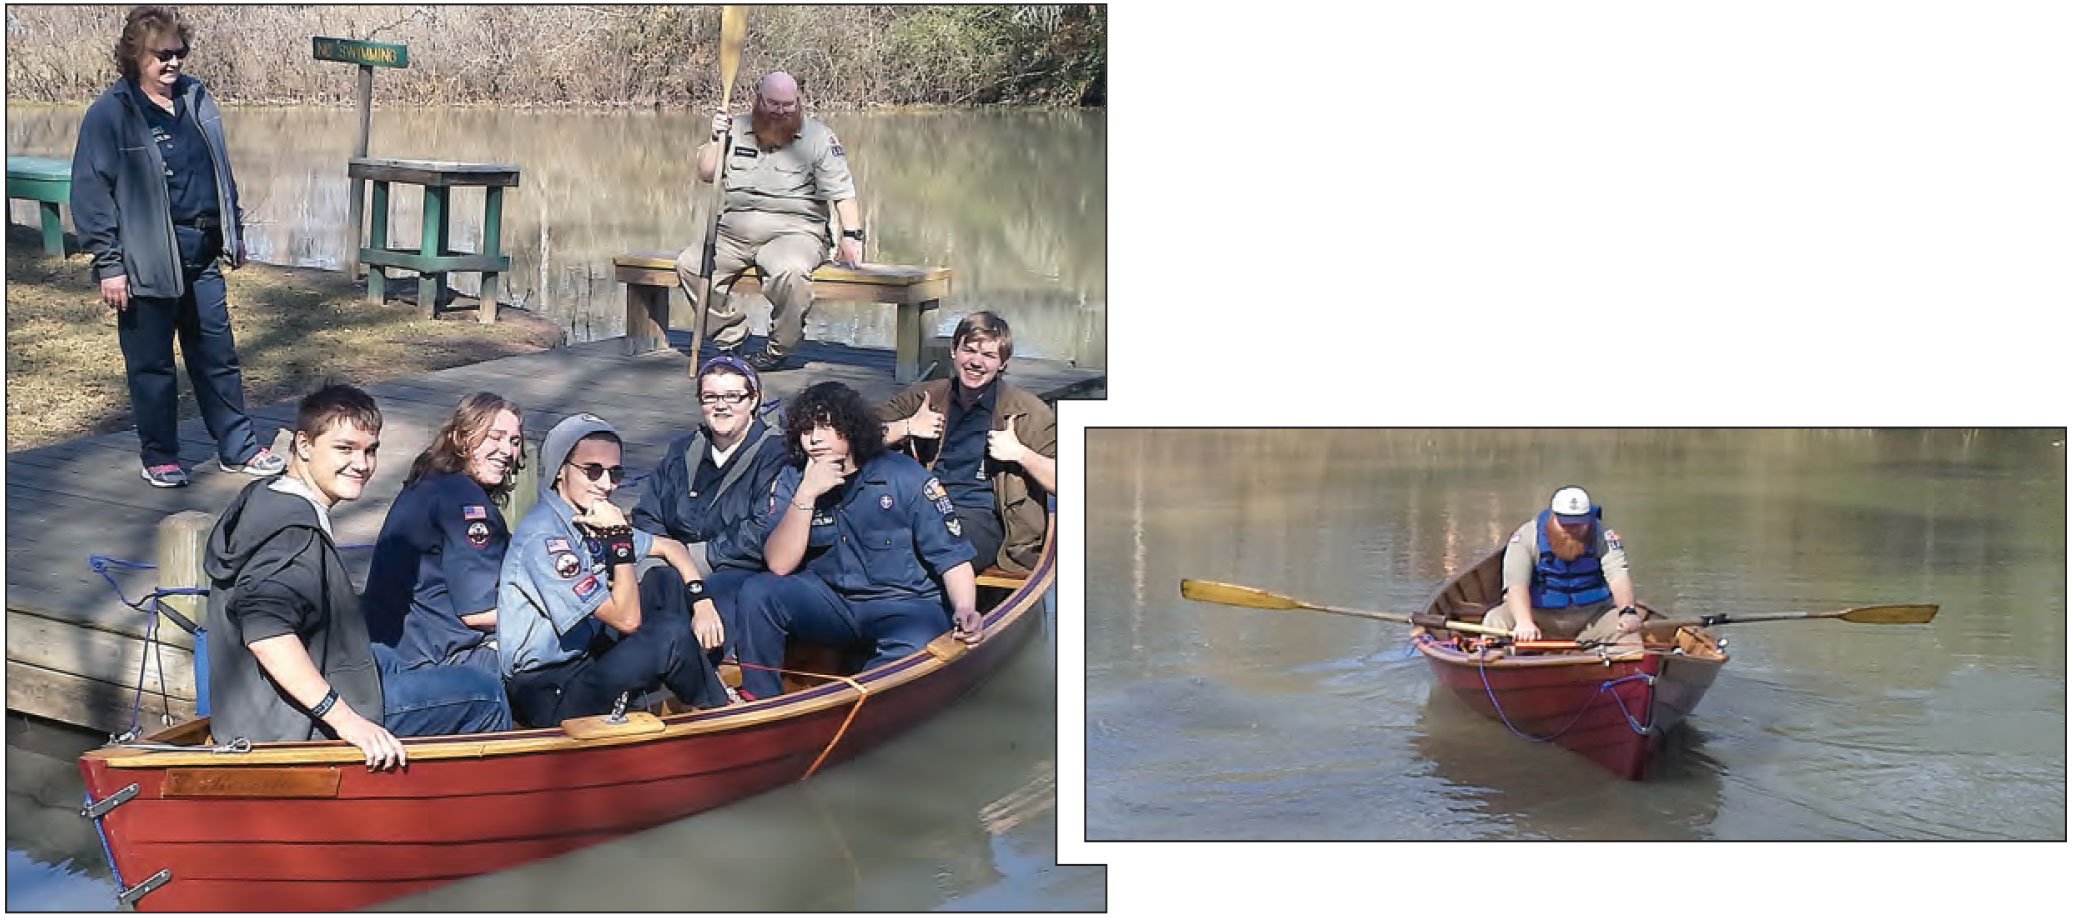
John Nichols, a professor at Texas A&M University, had his Structural Analysis class last year build a Walt Simmons–designed 15′ 6″ Matinicus Double-Ender. Out of a class of 128 students, a team of five managed the build—raising necessary funds, and ensuring their classmates worked their required number of hours on the boat. Professor Nichols notes that 128 people worked on this double-ender, and of that group, only two had ever touched a boat before. The class started the boat in late September and finished her at the beginning of December. They also built six oars. This was the second of eight boats built in this class.
The hulled is planked with steamed white oak planking, fastened with copper rivets and roves. The frames are laminated from pieces of 3mm oak. The centerboard trunk and seats are also oak, and the gunwale is purple heart. The students laser-cut the university logo into the seat, and painted the hull with Texas A&M maroon paint from the Kirby Paint Company. The boat is named REVEILLE after the American collie mascot of Texas A&M.
When the boat was finished, the class gave it to Sea Scout Ship 1332, based in Houston, Texas. Sea Scout Skipper Alan Cross put the double-ender to the test right away, filling her with seven scouts as they launched her in the Buffalo Bayou. The crew hopes to compete in rowing races with other scouts around the state.
Have you recently launched a boat? Please email us. We’d like to hear about it and share your story with other Small Boats readers.
Check out these other reader-built small boats…
Building a Piranha, a young Polish woodworker tackles his first boatbuilding project
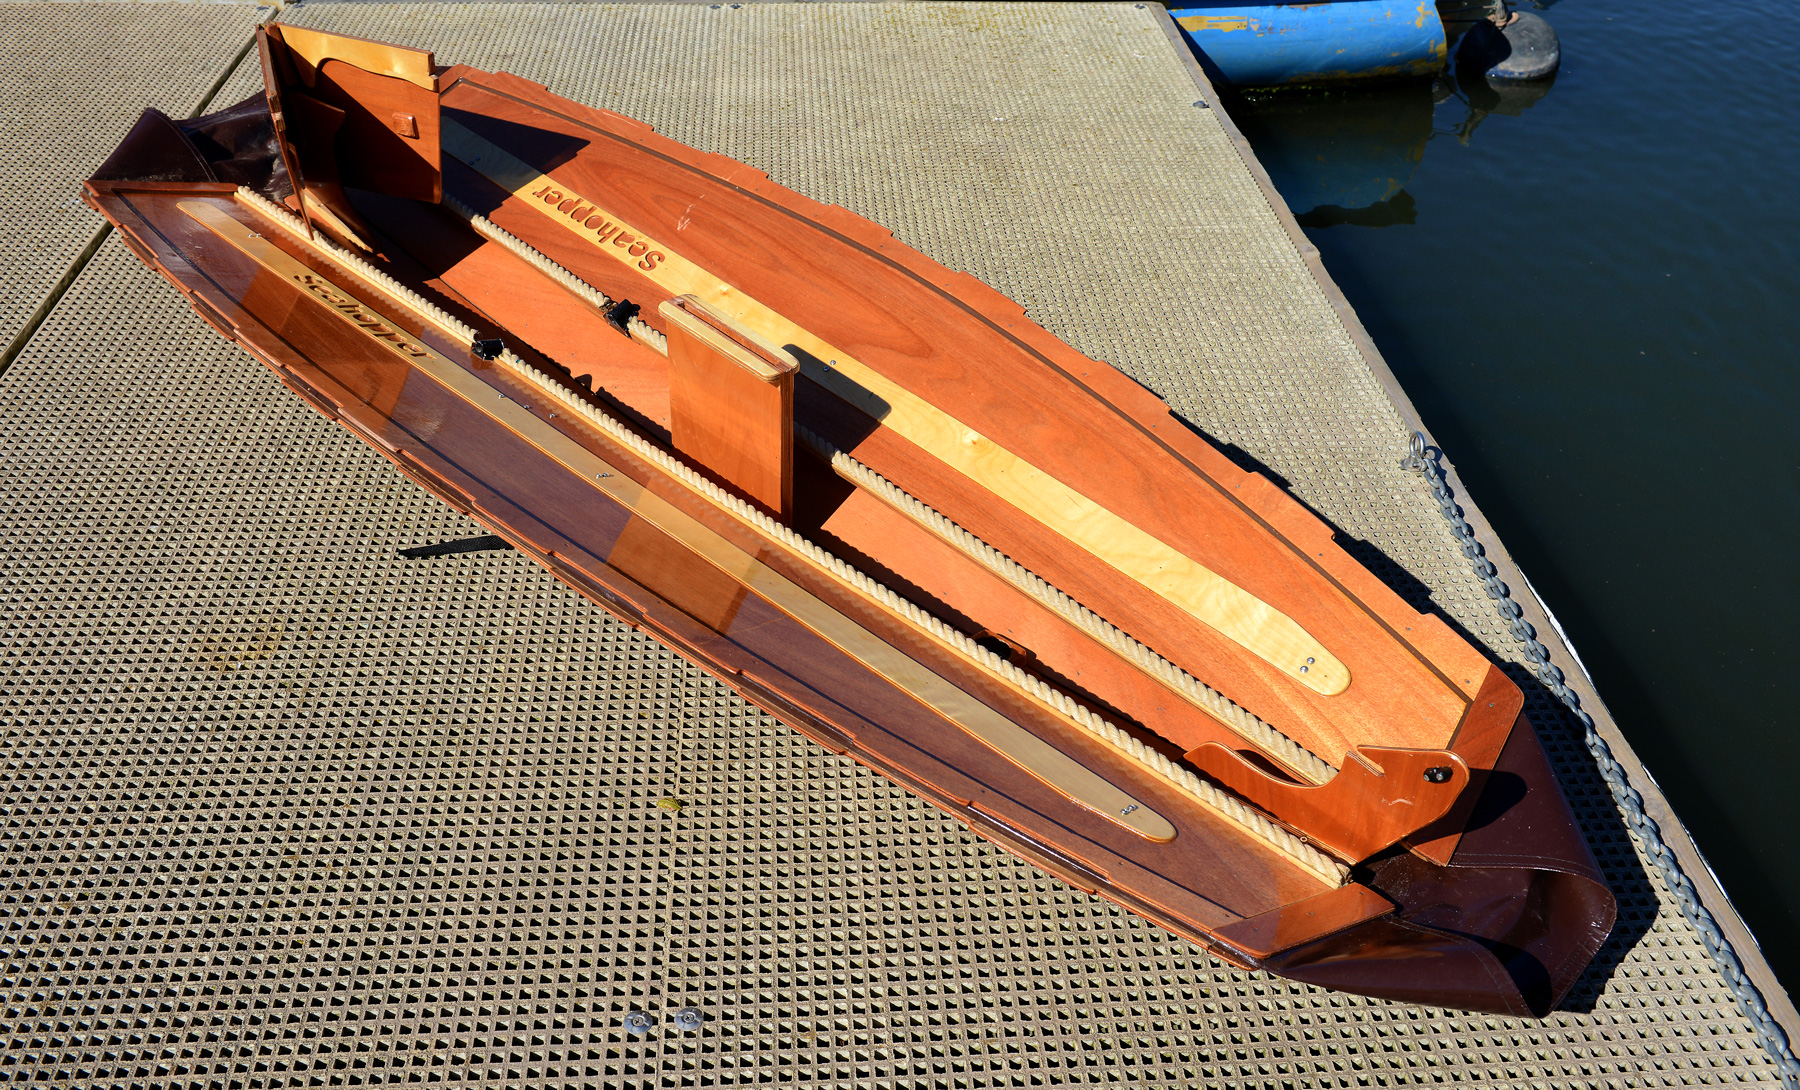
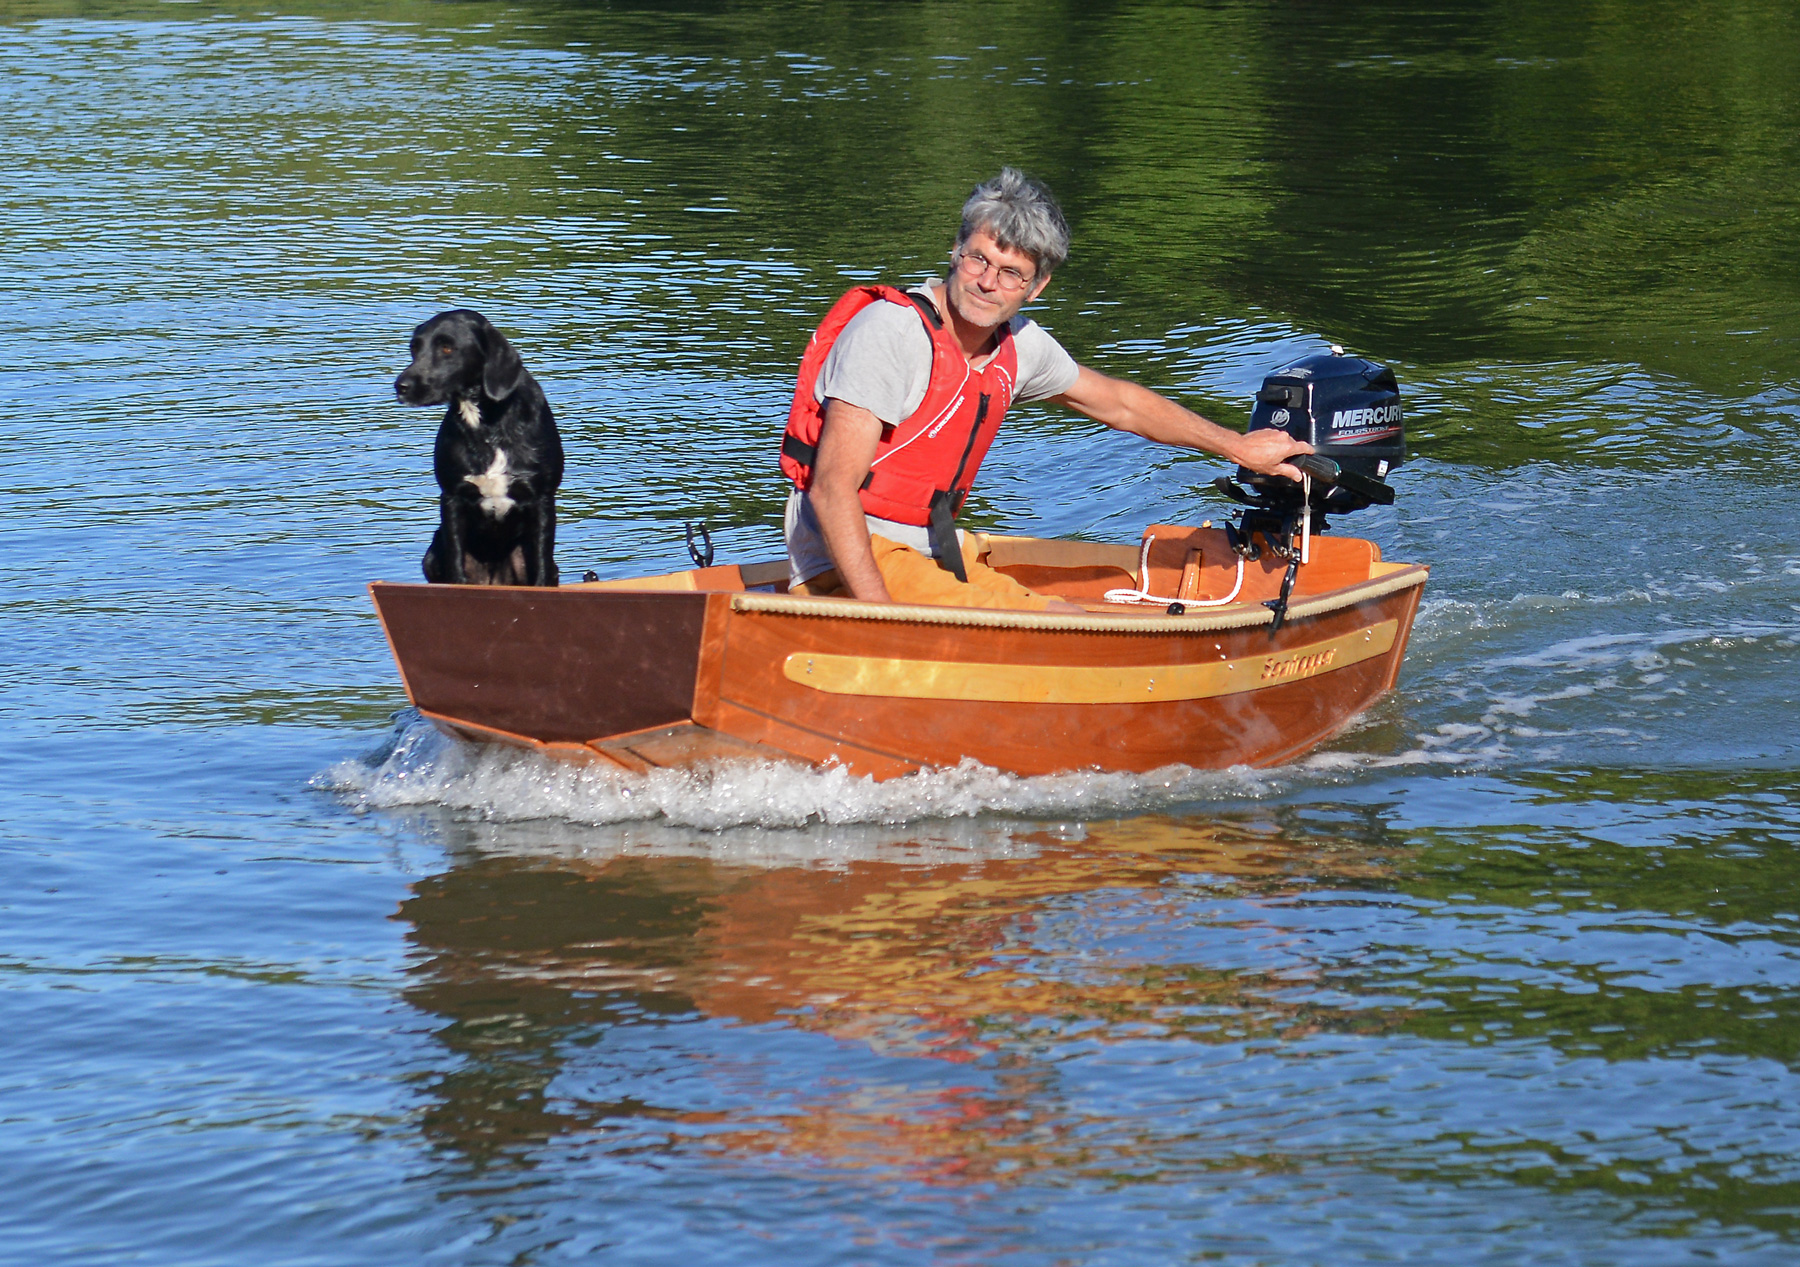
One day in early summer a friend invited me to join him and a group of like-minded boat nuts for a birthday cruise. He was proposing a mini-adventure: a 3-mile voyage under sail and oar down the River Avon to Bantham, a small village with a large sandy beach on the south coast of Devon, U.K. It was the kind of excursion I love, and it so happened that I had just borrowed a 7′ 10″ Lighter, the mid-size boat in a range of three folding dinghies built by the British company Seahopper. The birthday cruise would be the ideal opportunity to try out the boat in a real-life situation that was probably at the limit of what it was designed for. I accepted the invitation.
Fifty years of folding boats
Seahopper was established in 1974 and over the years has developed a solid reputation for building high-quality collapsible boats, starting with the 6′ 8″ Scamp and the 7′ 10″ Lighter (aka the Nifty Fifty) and then, from 1997 onwards, the 10′ Kondor (ex-Kontender). According to the company’s records, more than 7,600 boats have been sold since its inception, making it one of the best-selling wooden-boat builders in the U.K. What’s more, nearly a quarter (22 percent) of recent sales have gone to the U.S.
Anna Kisby Compton
The Seahopper Lighter makes a compact package when folded, and the wheel built into the skeg makes it easier to manage its 75-lb weight.
In 2024, the company’s 50th-anniversary year, Seahopper was bought by Alec Bates and Vera de Ruiter, who live on a narrowboat near Rugby in Warwickshire. Despite living about as far from the sea as you can in the U.K., Alec and Vera were working as professional SCUBA diving instructors when they decided to go into boatbuilding.
“We were looking for a lifestyle change,” says Alec. “I’ve been sailing since I was a kid, and working with wood. We looked at several possibilities in Devon and Cornwall, but when we saw the Seahopper we fell in love with it right away.”
Design and production had been fine-tuned by the company’s previous owner, so there was little to do other than continue where he had left off and move the workshop from Devon to Rugby. Alec and Vera’s main innovation so far has been to offer the transom vinyls in different colors. Their own display boat, a Kondor, has pink transoms and pink sails—the perfect present for the princess in your life.
Assembling and sailing the Seahopper Lighter
The day of the birthday cruise arrived. We gathered in Aveton Gifford, a village at the top of the navigable reaches of the Avon estuary. As soon as we arrived in the parking lot we could see that we had misjudged the tide, and that there was barely 6″ of water in places. No matter: in the true spirit of adventure, we decided to carry on regardless. So, while the others pumped up two inflatables and rigged a small aluminum dinghy, I assembled the Lighter for the first time.
Nic Compton
The Seahopper Lighter’s assembly design is ingenious: as the hull is unfolded, the boat’s form is automatically established. Here the first unfold has occurred, opening up the bottom of the boat to reveal the upright stem, daggerboard trunk, and folded stern transom panel. Next, the two side panels will be unfolded, which will, in turn, spread the two vinyl transoms. Athwartships tension will then be introduced by the center thwart.
The boat’s design is nothing if not ingenious and shows the benefits of 50 years’ development. The central keel—about 4″ wide—is made of three layers of 6mm plywood, giving a rigid 18mm-thick centerline on which everything else is hinged. Either side of the centerline are two longitudinal 5mm plywood panels—making up the hull’s bottom and sides—hinged together with durable fabric, their joints strengthened by a series of wide, interlocking teeth cut into the plywood. The two transom ends are made of vinyl, stiffened internally with plywood panels.
Packed away, the longitudinal panels, daggerboard trunk, and fabric transoms fold into themselves along the centerline. To assemble the boat, you unfold the bottom boards, and then the side panels. The aft transom’s inner plywood panel is built onto the keel and simply unfolds along its ’midships centerline. As it does so, it pushes the side panels out. The main lateral stiffener is the center thwart, which is hinged in the middle. To open the boat fully, the ends of the thwart are placed into locating brackets on the inside of the side panels, and the seat is then pushed down firmly on its hinge until flat; it is then locked in place in the brackets with spring-loaded latch clamps. The fit of the thwart is snug, and its placement effectively holds the sides of the boat open while they, in turn, keep the thwart in place. Next the bow transom plywood panel is slid into position, and the forward and after thwarts are clicked into place. And with that, you have a boat.
The world record for assembling a Seahopper is held by one of the company’s previous owners, Steve Rea, and stands at 1 minute, 45 seconds. With the help of my wife and kids, I managed to assemble the hull in about 10 to 15 minutes; with practice I eventually got it down to less than 5 minutes—plus another 10 minutes or so for the rig.
Once the boat was assembled, we headed from the parking lot to the launching area using the boat’s sturdy launching wheel that is permanently fitted to the after end of the skeg. This simple addition means that one person can easily move the boat around, both folded and fully assembled.
Anna Kisby Compton
Despite being only 7′ 10″ long, the Seahopper Lighter has remarkable load-carrying capacity and yet is small enough to be handled by younger crewmembers.
For our Avon cruise, there were five of us hoping to catch a ride on the Lighter: myself, my wife, our two children, and our dog, Winnie. And then there was all the gear, including a generous picnic and plenty of liquid refreshments.
With the tide rapidly ebbing, there was no way we could all fit on the boat without dragging the keel on the riverbed, so we took turns sitting on board while the rest of the family waded in the river, pulling the boat along by the painter; Winnie, meanwhile, busied herself hunting for fish.
In the shallows, the inflatables had the advantage as they sat higher on the water. But as soon as we reached deeper water, we all climbed on board; here the Lighter’s better rowing qualities began to show, and we pulled slowly ahead. Even loaded with the whole family, there was still plenty of freeboard and the boat never felt tippy. Once down at the estuary’s mouth, we experimented with the simple lug rig provided but struggled to make any headway against the stiffening onshore breeze and incoming tide.
We had a better time on the way back when, fully laden once again, the Lighter romped back up the river, well ahead of the other three boats. It was a trip of mixed fortunes, but the Lighter had shown its surprisingly good load-carrying abilities and its sailing potential, at least with a following breeze. More importantly, perhaps, at no point did I feel like it couldn’t cope with the demands we were putting on it, and I was most impressed by the boat’s steady manner under way and the surprising rigidity of the hull.
Our second test sail with the borrowed Lighter proved much more successful than our first. The boat came together more quickly, and we had exchanged the basic lugsail for the more effective gunter rig—an option from Seahopper. I also swapped the 5′ 6″ oars that had come as standard (and which fit neatly under the thwarts) for a 6′ 6″ pair, and the transformation was complete. (The Seahopper Lighter is now supplied with 6′ oars as standard.) The Lighter maintained way under sail, even in the fading breeze, and was fun to row, and even when I pulled hard there was no sense of the hull flexing beneath me. When I relinquished the boat to my seven-year-old son, he was soon speeding along, and performing spectacular U-turns.
Anna Kisby Compton
The Seahopper Lighter performs well under sail, or powered by an outboard motor hung on the optional stern bracket. I used a 6-hp outboard, which was larger than the recommended 2-hp. While the boat performed well, the oversized motor caused the stern transom to flex somewhat under the weight.
From family to singlehanded sailing
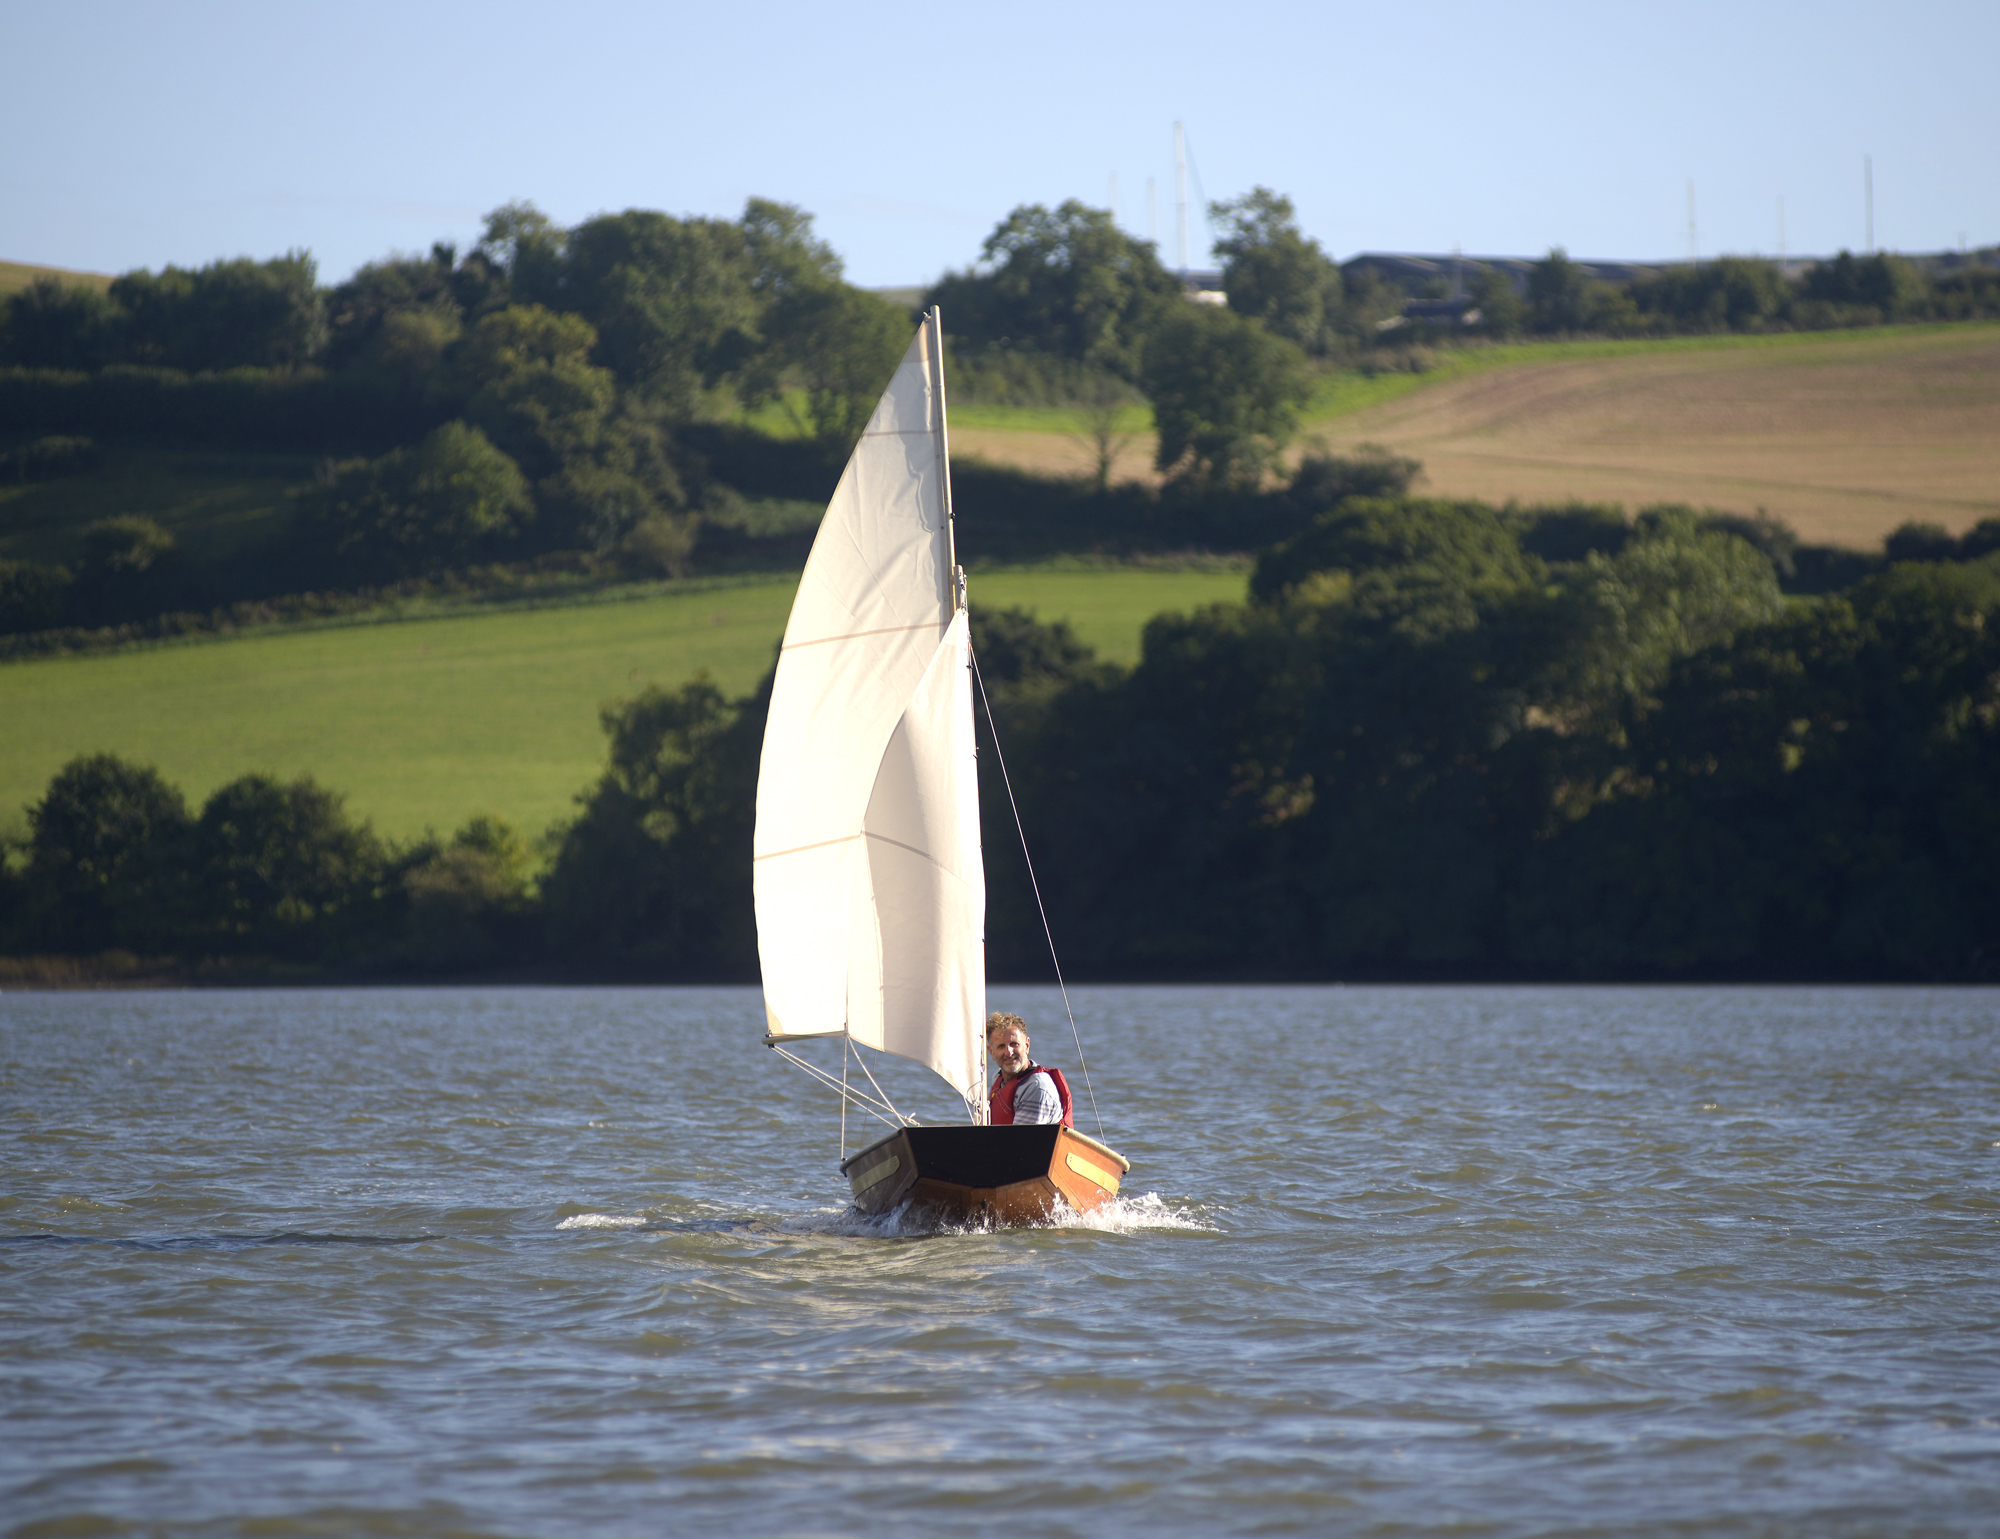
My third outing—with just me and a friend—was even better. With a brisk 15-knot breeze blowing, the Lighter skimmed across the river and never felt over-pressed or in danger of capsizing—which was just as well, as I hadn’t installed the buoyancy bags that were supplied with the pack. It was a fun sail and the gunter rig performed well, even though James and I later discovered that we had put the maststep in the wrong position. When sailing singlehanded, I found the boat light and nimble. The boom is quite low, so I did have to be careful to duck my head when tacking or jibing, but in a such a small boat that is to be expected. It is also sensitive to weight placement, and it paid to keep the boat well balanced and trimmed.
However, despite all the positives, it should be stated that, since you can’t tune the rig as you might on a more rigid boat, the Seahopper does not offer performance sailing like an Optimist or Mirror dinghy does. Also, being short, beamy, and light, it does not carry its way under oar as might be expected in a conventional tender of similar length. But it will certainly row and sail considerably better than any inflatable dinghy on the market, and with the low position of the painter eye contributing to directional stability, owners have reported that it tows well. Under power—an optional plywood outboard bracket can be fitted to the transom, bracketing over the top and bolting onto the skeg below—the 6-hp outboard I used was probably overpowered and over-heavy, causing the transom to flex somewhat under the weight (Alec recommends 2 hp or thereabouts), but it did push the boat along at a fair clip.
Pricewise, the Lighter is inexpensive for a wooden boat, but costs more than a generic inflatable dinghy. However, its design is very carefully thought through, and the component parts are well made and a pleasure to use. What’s more, with its woody finish, it’s unexpectedly pretty and drew admiring glances from several passersby.
Nic Compton
The Seahopper Lighter has two rig options: a simple lug rig on an unstayed mast and a gunter sloop rig (seen here) with shrouds and a forestay. Performance was definitely better with the sloop rig, but it was a lengthier process to get the boat ready to sail.
When folded the boat is 8′ 4″ long by 20″ wide and about 5″ thick—the version I tested was fitted with a rope fender, which looks great and will protect a mother ship’s topsides, but adds another 2″ to the folded thickness. Finding deck space to assemble it on board a small boat could prove an issue, and I had thought the Lighter would be too big for a 26-footer, but have since heard of people using it on much smaller boats and loving it. With a hull weight of just 53 lbs, it’s ideal for carrying on a car roof rack.
The Lighter would be a great boat to keep in an apartment or house with limited storage, or to carry atop a camper to give water access while traveling. And, providing you can find a safe place to stow it onboard, it would provide a lot of fun as a tender too. Just avoid trying to row down a shallow river on a falling tide!
A regular contributor to Small Boats, Nic Compton is a freelance writer and photographer based in Devon, England. He has written about boats and the sea for more than 30 years and has published 16 nautical books, including a biography of the designer Iain Oughtred. He currently sails a 14′ Nigel Irens skiff and a 33′ Freedom cat-ketch.
The Lighter is available from Seahopper; prices start at £3,375 for a rowing version, plus tax and shipping; Seahopper is offering 50 percent off transportation costs through February 2026.
Is there a boat you’d like to know more about? Have you built one that you think other Small Boats readers would enjoy? Please email us your suggestions.
For more folding boats see…
The Fliptail 7, a mostly vinyl sailing dinghy from Wooden Widget reviewed by Matthew McGregor-Mento
In Tasmania, Australia’s island state, there is a community of wooden-boat enthusiasts who, since 1998, have come together under the auspices of the Living Boat Trust to promote the maritime heritage of Tasmania, preserve wooden boats, and engage in water-based group activities. Every two years, the Trust organizes the Tawe Nunnugah Raid (Tawae Nunnugah means “traveling by canoe” in the local Palawa language, and the phrase was chosen by the Trust in homage to the indigenous Tasmanian people). The Raid is a fully catered 10-day small-boat expedition that starts with a welcome dinner in Franklin on the Huon River, 15 miles inland from Tasmania’s southeast coast, and finishes in Hobart, 21 miles to the northeast as the crow flies. The goal is to arrive in time for the opening of the biannual Australian Wooden Boat Festival in Hobart. In July 2024, I signed up to take part in the 2025 Raid in my Cygnet 20, RUST NEVER SLEEPS; Andrew, a fellow Cygnet 20 owner, would sail with me.
Trailering the boat, we drove to Franklin and arrived in time for the welcome dinner the night before the start of the Raid at Recherche Bay. We joined some 120 others who had come from across Australia, New Zealand, England, Scotland, the Netherlands, Canada, the USA, Spain, and France. The fleet consisted of 34 boats ranging in size from 12′ to 28′. There were sailboats, rowboats, boats with and without motors; all were wooden, with the exception of my own boat, a 20′ fiberglass gaff-rigged sailboat.
Jan Kent
The launching ramp into the Catamaran River allowed just one boat at a time to be backed down into the water, but for each one there was a gathering of helpful onlookers eager to share their advice. Here, Andrew and I are about to launch my Cygnet 20, RUST NEVER SLEEPS.
The following morning, we drove the boats to Recherche Bay, just 7 miles from Tasmania’s southernmost point, along roads that wound through farmland and rolling hills crowned by blue gum trees and radiata-pine plantations. The area borders Tasmania’s South West National Park, home to wallabies, Tasmanian devils, wombats, and the elusive platypus. At the end of a single-lane asphalt road we congregated at the Catamaran River boat ramp. Boats were eased into the water one at a time and as each trailer made its way down the lane to the ramp, there was a general buzz, punctuated by the inevitable helpful directions: “Watch the trees, to your right! No! Your other right!”
Andrew and I readied the boat in the parking lot, raising the mast, securing the standing rigging, attaching fenders, and stowing our gear. There was a light wind rustling in the gum trees and fishbone ferns, and we were excited to get afloat. At last, it was our turn to launch and, like those who had gone before us, we negotiated the ramp, climbed aboard, motored upriver, and anchored. The morning was calm, the river a deep emerald green, the gum trees at the water’s edge standing tall, silver-barked and straight. Later, when the fleet had all launched and vehicles and trailers had been taken care of, we sailed in company to Pigsties Cove and the Moss Glen campground, a mere 1 ½ miles to the north. There was plenty of sheltered water for those of us who anchored off, but with no beach, the smaller boats simply moved into the shallows and tied up to trees on the foreshore so that their crews could step ashore to set up camp on the gentle slope above. We had arrived at our first overnight rendezvous.
Jan Kent
Once RUST NEVER SLEEPS was safely anchored in the river, I swam back ashore to tend to the car and trailer, leaving Andrew in charge of the boat.
The start of the 2025 Tawe Nunnugah
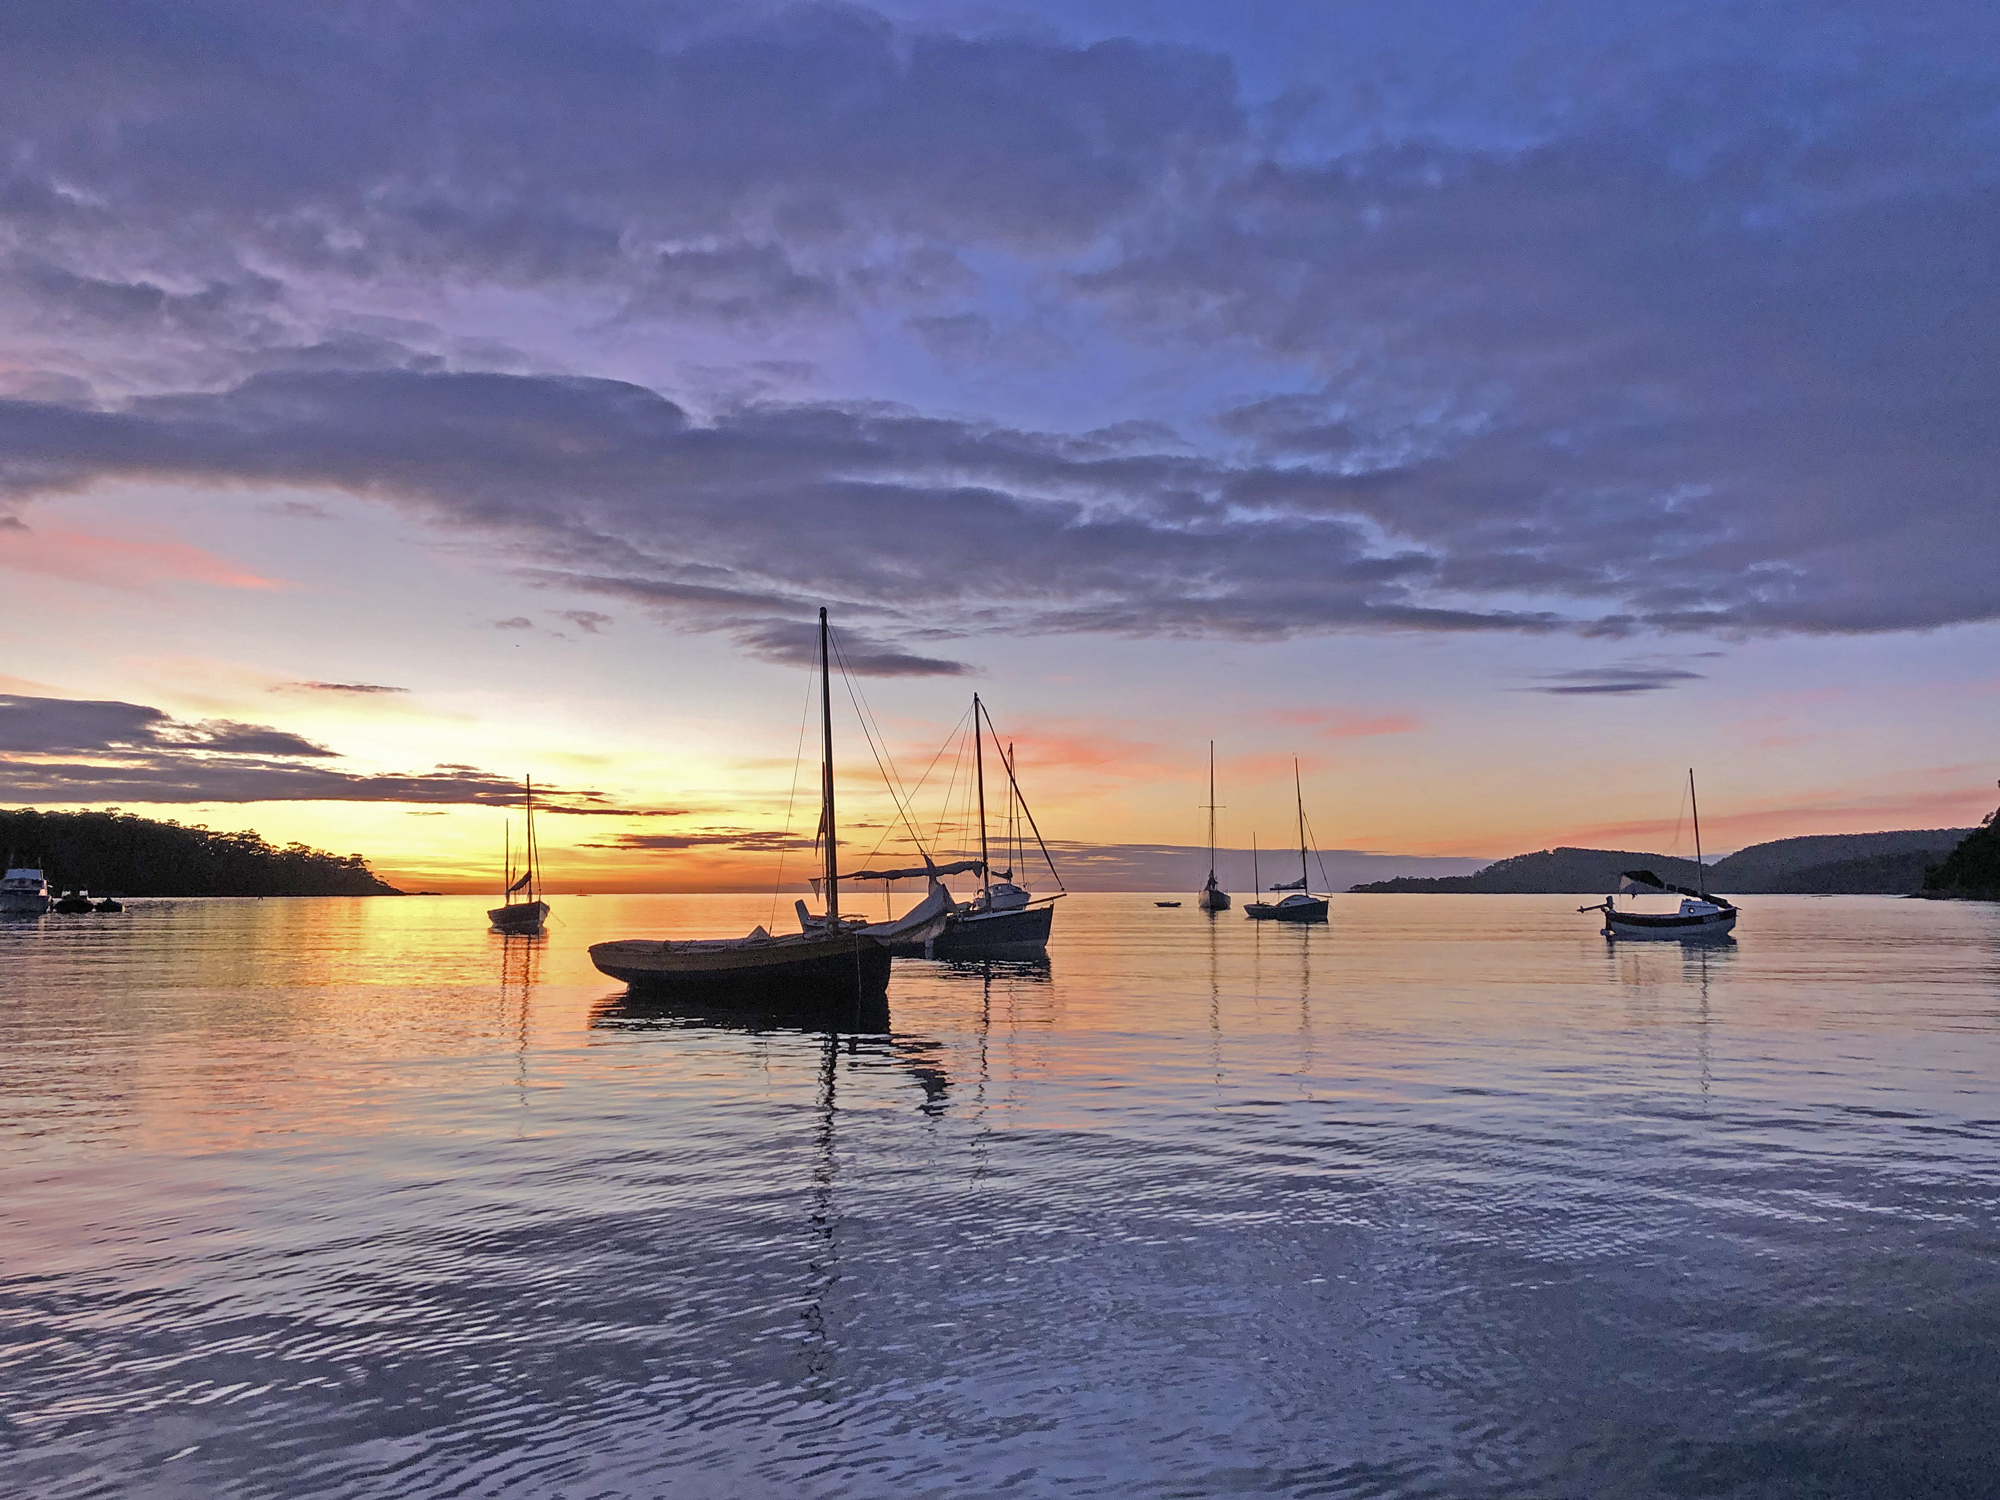
Early the next morning, I sat quietly in the cockpit, enjoying the stillness and watching the sunrise paint the sky with hues of yellow, pink, and tangerine. The sounds of the bush were all around: the guttural squawk of a wattlebird, the zit zit whorl of a thornbill, the chortling deep-throated trill of magpies. From time to time a red-breasted cockatoo with pearl-gray wings passed by.
We went ashore for breakfast and to hear the plan for the day: a short 4-mile shakedown cruise south across Recherche Bay to Cockle Creek, which would allow crews to work out any kinks before we headed north. As we sailed down the cove to Shag Rock, gateway to Recherche Bay, the wind slowly built to a gentle westerly breeze. We adjusted course and set a waypoint for the red “danger” mark atop Denmark Reef, about 1 ½ miles away. There was a slight chop and the occasional white cap but nothing the boat couldn’t handle efficiently—we were cruising comfortably, and on a broad reach we passed many of the boats that had weighed anchor before us. Andrew and I spent the next hour checking everything and getting to know one another’s sailing habits. Arriving at Cockle Creek the fleet anchored or ran up on the beach for lunch. The food and company were good, and we both took time to relax before setting sail again in mid-afternoon. Andrew and I settled into sharing the helming and sail-trimming duties, alternating between being on duty and enjoying the view. As we arrived back in Pigsties Cove for a second night at Moss Glen, we were both content.
Jan Kent
Our first morning afloat dawned bright and calm in Pigsties Cove. I spent some time sitting in the cockpit soaking up the sights and sounds of the Tasmanian coast.
The first day of the expedition dawned. Our destination was Southport, about 11 nautical miles to the north. We motored out of Pigsties Cove and past The Images, a group of low-lying, blue-gray rocky outcrops covered in scraggly, khaki-colored bushes. Beyond the channel, in the open sea, there was a southeast breeze of about 6 knots and we raised sail. The sky was lightly overcast, the air temperature 65°F. We set a course to the northeast, heading for Southport on a broad starboard reach. To our east was nothing but 700 nautical miles of Southern Ocean stretching away to New Zealand. To our west was the coast of Tasmania, and a conservation reserve indented by windswept sandy beaches and undulating hills crowned by eucalypts, tea trees, and coastal heath.
We skirted the submerged rocks of Bowdens Mistake, their presence indicated by a mere hint of breaking whitewater, and passed Actaeon Island and its lighthouse 3 miles off our starboard bow.
Roger Siebert
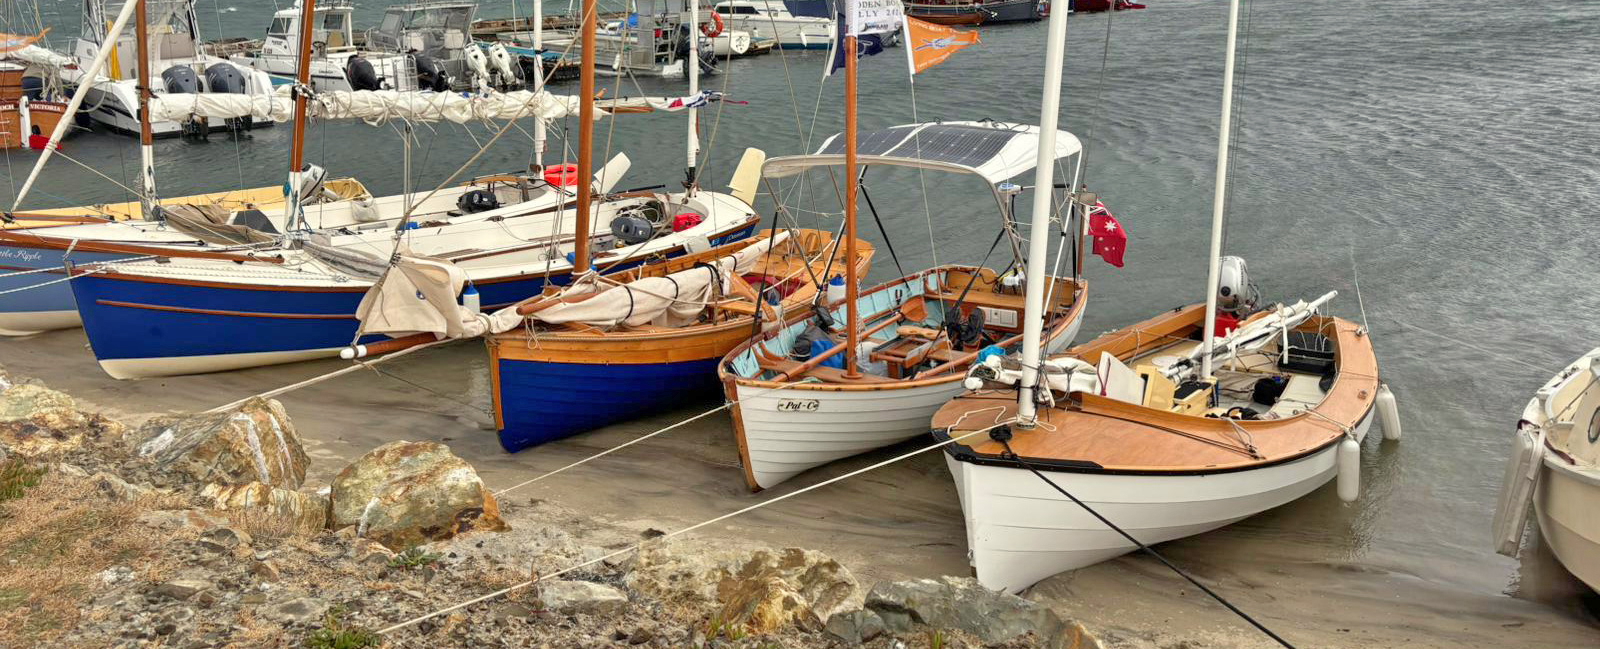
.
Three-and-a-half miles farther on, near George III Rock, a jagged granite cairn visible only in a heavy sea swell, we caught up with several boats that had departed before us. Close inshore, all were making good progress: EMMELINE, an open skiff with two rowers; IMAGINE, an 80-year-old restored naval pinnace crewed by four rowers, a helmsperson with an oar sweep, and another rower resting in the bow; and PAT C, a singlehanded open skiff. Farther out, the wind was holding steady, but within the hour it had started to increase. Our speed rose with it to a comfortable 4 knots, and just two-and-a-half hours after leaving the anchorage in Pigsties Cove we were slipping through the 100-yard gap between Southport Island and Southport Bluff. We rounded up, started the outboard, furled the jib, flaked the main, and motored along the crescent-shaped beach for 100 yards, past the Settlement Creek outlet, and dropped the anchor. We had sailed 10 1⁄2 nautical miles, and I was well pleased with our maiden sail along the Tasmanian coast.
Over the next two hours the anchorage slowly filled with the rest of the fleet. Rowboats beached and the all-volunteer water-based support crew (ranging from eight to six people as some returned to work) helped to ferry crews off anchored boats to shore. The catering team had already arrived and set up in a grassy paddock next to Settlement Creek. As crews came in, we helped to set up tables and chairs, found refreshments, and chatted about the day’s sailing until the dinner gong sounded.
Southport to Dover
At around 10 a.m. the following morning we raised anchor and set sail for Dover. It was 7 miles due north of us, but thanks to the east-northeast breeze, and the extra miles to navigate the passages out of Southport and into Dover, the voyage would total 18 miles. As we set off through Southport Bay, the wind was fickle. The tree-covered hills to windward created irregular lulls and shifts, but within the hour we had rounded Herriots Point, a rugged, scrubby-forested cape with exposed rocky cliffs, and were out in D’Entrecasteaux Channel, the 37-mile-long, north–northeast passage between Bruny Island and the Tasmanian mainland. The wind freshened, blowing straight into our faces. Over the next two hours, we tacked five times up the 3-mile-wide channel. To the east were the ochre-colored cliffs of Bruny Island’s Labillardiere Peninsula crowned by tea trees, the bright yellow burst of wattle, and the silvery-soft green leaves of gum trees.
Jan Kent
Sailing to and from Dover, the islands of Faith (seen here), Hope, and Charity are never far away. Beyond, on the mainland, rising up above the lowlands we could see the distinctive 4,000′-high Adamsons Peak.
As we approached Scott Point to our west, sailing closehauled on our fifth tack, we spotted two large fish pens less than a mile ahead. Salmon-farm pens are typically circular, constructed of steel mesh, with floating platforms and overhead netting to deter hungry birds. They are anchored to the seabed. As we came closer, we saw that these pens were unusually oblong in shape, lying end-to-end and separated by about 200 yards of water; each was about 700 yards long and 100 yards wide. They were clearly marked with exclusion pylons and floating yellow warning marks. We observed the warnings, and negotiated a course between the pens, being careful not to get too close to either one.
Three miles farther on, we eased the sheets and changed our course to the west and the islands of Faith, Hope, and Charity. Hope, the largest of the three but still only 1⁄2 mile long, was once a burial ground for convicts. It was later briefly used for farming but is now a reserve overrun by rabbits. At the island’s eastern tip stands a 30′-tall navigation beacon. To our west, the distinctive triangular shape of Adamsons Peak, 4,000′ tall and 10 miles inland, rose above the horizon, a scattering of cumulus clouds beyond it.
The small fishing port of Dover lay a mile before us, straddling the western coastline of Port Esperance. The afternoon breeze was steady and the sun was warm. We could make out small bays and sandy beaches along the shore. With the boat flying along at 5.8 knots we took our time to enjoy the day, glancing back from time to time to see the rest of the fleet appear as they entered Port Esperance.
Jan Kent
We were one of the first to arrive in Alonnah, and after making sure everything was shipshape on board, we stuffed some essentials into drybags and swam in to the beach, leaving RUST NEVER SLEEPS at anchor.
By late afternoon we were anchored off Dover Beach, below the Port Esperance Sailing Club. Beyond, the township extended for just two blocks, bordered inland by the state highway. It was a sheltered anchorage and, for those boats landing onshore, the sandy beach had a gentle incline. We settled in for another quiet night.
Sunday morning dawned with mill-pond conditions, blue skies, a scattering of clouds, and a clear view across the bay as we enjoyed breakfast. Our destination for the day was Alonnah on Bruny Island, 10 miles away. We would stay there for two nights. Andrew and I were in no rush and relaxed as we watched the fleet motor away from the anchorage, the rowboats gliding past us through the still-calm waters. Then it was our turn: we fired up the motor and weighed anchor. Within 15 minutes, a light breeze had filled in, and we raised sail and settled in on a port tack headed for Charity Island, a 50-yard-wide wooded islet, then onto starboard for a mile towards Faith Island, half the size of Charity, and finally another port tack for Hope.
As we sailed towards Hope, the wind frustratingly light, the other boats began to catch up, some passing by with friendly shouts of, “No, it’s not a race!”
At last, after almost an hour of light winds, we escaped the shelter of Port Esperance, and entered the Channel with a clear view east to Bruny Island. The wind had risen and settled from the southeast and we once more overhauled the fleet as we set course for the small township of Alonnah, about 8 miles due east.
Courtesy of Jan Kent
The swim from RUST NEVER SLEEPS to the beach was refreshing, but so too were the cold beers at the Alonnah Sailing Club beach bar. Andrew (right) and I (left) were given a warm welcome, and there was no more relaxing spot from which to watch the arrival of the rest of the fleet.
With less than a mile to go, we rounded the northern tip of Satellite Island, a mile-long landmass that, if viewed from above, bears the shape of a sperm whale lying on its side. Once the home of a reclusive writer, painter, and poet, the island is now an exclusive, privately owned holiday retreat. In its lee, we drifted for half a mile past several small circular fish pens, and in towards the beach at Alonnah. The early afternoon sun had burned away the morning’s light cloud cover. We quickly packed a change of clothes, our wallets, and phones into waterproof bags, changed into board shorts, and jumped into the water. It was a leisurely swim from the boat to the beach—the water was crisp, clear, and refreshingly cool—and we were greeted warmly at the beach bar of the Alonnah Sailing Club. Through the rest of that balmy summer afternoon, in temperatures that peaked at 75°F, we sat at the bar and watched the rest of the flotilla arrive. Some boats, like RUST NEVER SLEEPS, anchored off the beach, while others maneuvered inside the breakwater or ran up onto the sandy shore.
A well-timed stay at Alonnah
The following day was a layover. Multiple outings had been planned, but we decided to stay local and walk along the coastal path—open on our left to the Channel’s blue-green waters, and bordered on our right by stunted coastal trees long bent by the prevailing westerly winds. The Raid leader, Martin, had reported that a weather system with winds forecast 35 to 45 knots was due the next day so we would be staying put for today and tomorrow. He encouraged those of us who were anchored out in the bay to put out storm ground tackle or, if we preferred, to relocate inside the breakwater. Throughout the day, the ever-willing support crew and their outboard-powered RHiBs towed the smaller craft around the breakwater and beached them, bow-first. The crews buried their anchors into the sand and stowed their sails and loose items. We followed the fleet inside the breakwater and, along with two other boats, rafted up to a local yacht.
Jan Kent
With an overnight storm building, the support crew helped the smaller boats to beach in Alonnah while encouraging the larger boats to anchor or raft up with resident moored boats inside the breakwater.
That night, as I closed up the companionway, the wind picked up, and alongside us the yacht’s halyards began to slap against its mast. I strapped on my LED headlamp, grabbed a spare mainsail tie, clambered across to locate the offending lines, and tied them off to the shrouds. The slapping ceased. I headed back to my sleeping bag and instantly fell asleep.
When I awoke the next morning and made my way to breakfast, I heard from Andrew and fellow sailors who had spent the night camped ashore that the wind had blown hard and loud throughout the night—after the calming of the halyards, I had heard nothing. The weather, though, had surely changed. The wind was still strong, and the sky was overcast and gray; beyond the bay, wind-whipped waves marched across the channel. We congregated in the community hall. Some found voice and a couple of guitars; others retreated to quiet corners, losing themselves in books as the gray clouds scudded north, the occasional shower drumming down on the corrugated tin roof of the hall.
At the end of the day, after dinner, John Welsford (the small-boat designer from New Zealand who was sailing with a friend on a Navigator, one of John’s designs) gave an impromptu talk on boat design, the challenges of boatbuilding, and one or two entertaining New Zealand sailing adventures.
From Alonnah to Quarantine Bay
The storm abated on the second night, and we awoke to a blue sky with scattered clouds, and a gentle southwesterly breeze. Our destination for the day was more than 15 miles to the north and the support crew worked hard to launch all the beached boats as quickly as possible. We helped to cast off the two boats that had rafted up with us, before slipping our own lines and motoring out beyond the breakwater. We raised the mainsail, unfurled the jib, and stopped the engine. We were off: a bow wave whispered along the hull as we gathered speed, the boat heeled over, and we headed out into the channel’s open waters.
Courtesy of Jan Kent
As we came into Ralphs Bay, we could see Hobart—our destination for the following day—to the northwest. Rising high above the city, its peak shrouded by clouds, was Mount Wellington.
It was a great morning for sailing; the sky was clear with scattered clouds, the temperature was a mild 61°F, and a 7- to 8-knot breeze from the southwest propelled us on a broad reach up the D’Entrecasteaux Channel. We headed north to our first waypoint, a red lateral beacon about 4 1⁄2 miles ahead, off the township of Middleton. To the west, rolling hills rose from the sea; farther away, to the southwest, the distant blue-green Hartz Mountains were starkly outlined against the vibrant blue sky. To the east, the low hills and sandstone cliffs of Bruny Island rose steeply from sandy beaches. As we passed Middleton and headed for North Bruny Island, we counted off the headlands and bays that studded the island’s west coast. At Roberts Point we jibed east to skirt the ferry terminal and sailed into Barnes Bay. Immediately, we fell into the lee of Roberts Point and jibed again to find clear air out in the channel.
We were now sailing in company with several of the other boats all similarly affected by the fickle wind. We jibed first one way then the other as the southwesterly was alternately blanketed or deflected by the hills. But, at last, we made it to Shelter Cove, with its lee shore completely exposed to the southwesterlies, at the northern end of Barnes Bay. As we tacked to the southeast, Barnes Bay opened before us, the coastline a mixture of cleared farmland running down to a rocky shoreline, with the occasional farmhouse and isolated stands of gum trees and plantation pine trees dotted across the rolling hills. The breeze, though steady in its direction, continued to rise and fall as we sailed towards Lodge Bay, and Quarantine Bay beyond. By early afternoon we were 100 yards from the Lodge Bay rocky shoreline directly ahead. We tacked to port and sailed north again, towards Quarantine Point and the bay that lay to starboard. The breeze continued to rise and fall, our speed reduced to 2 knots, and at 1:30 p.m. we dropped anchor at the head of Quarantine Bay and furled the sails. We had been sailing for nearly five hours in the light winds and were happy now to sit and watch as the support team helped shepherd in the stragglers slowly making their way into the anchorage.
Philip Lyne
On our last morning there was an eerie calm in Ralphs Bay—later we’d encounter some of the strongest winds we’d faced under sail.
Once used as a prisoner internment camp during World War I and then as a quarantine station during the 1918 influenza epidemic, Quarantine Bay today operates as a plant quarantine station with a small visitor center and basic campground. The campers set up on the gently sloping hillside, and before long we were tucking into a fine dinner of barbecued steak and sausages, salad, fruit salad, and ice cream—good food was definitely a perk of sailing in company.
The Tawe Nunnugah’s final push to Hobart
Our last full day of sailing dawned bright and clear, but the hours ahead were expected to be challenging. The distance from Quarantine Bay to a campsite at Rokeby, once a farming community and now an outer suburb of Hobart, was roughly 15 miles and the weather forecast was for very light northeasterly winds in the morning, building to gusts of up to 25 knots by lunchtime. By the afternoon the wind direction was expected to have shifted first to the east and then the southeast—typical of a summer day on the coast of southern Tasmania, but not great for us: the morning northeasterlies would be on the nose as we headed up the channel to the Derwent River.
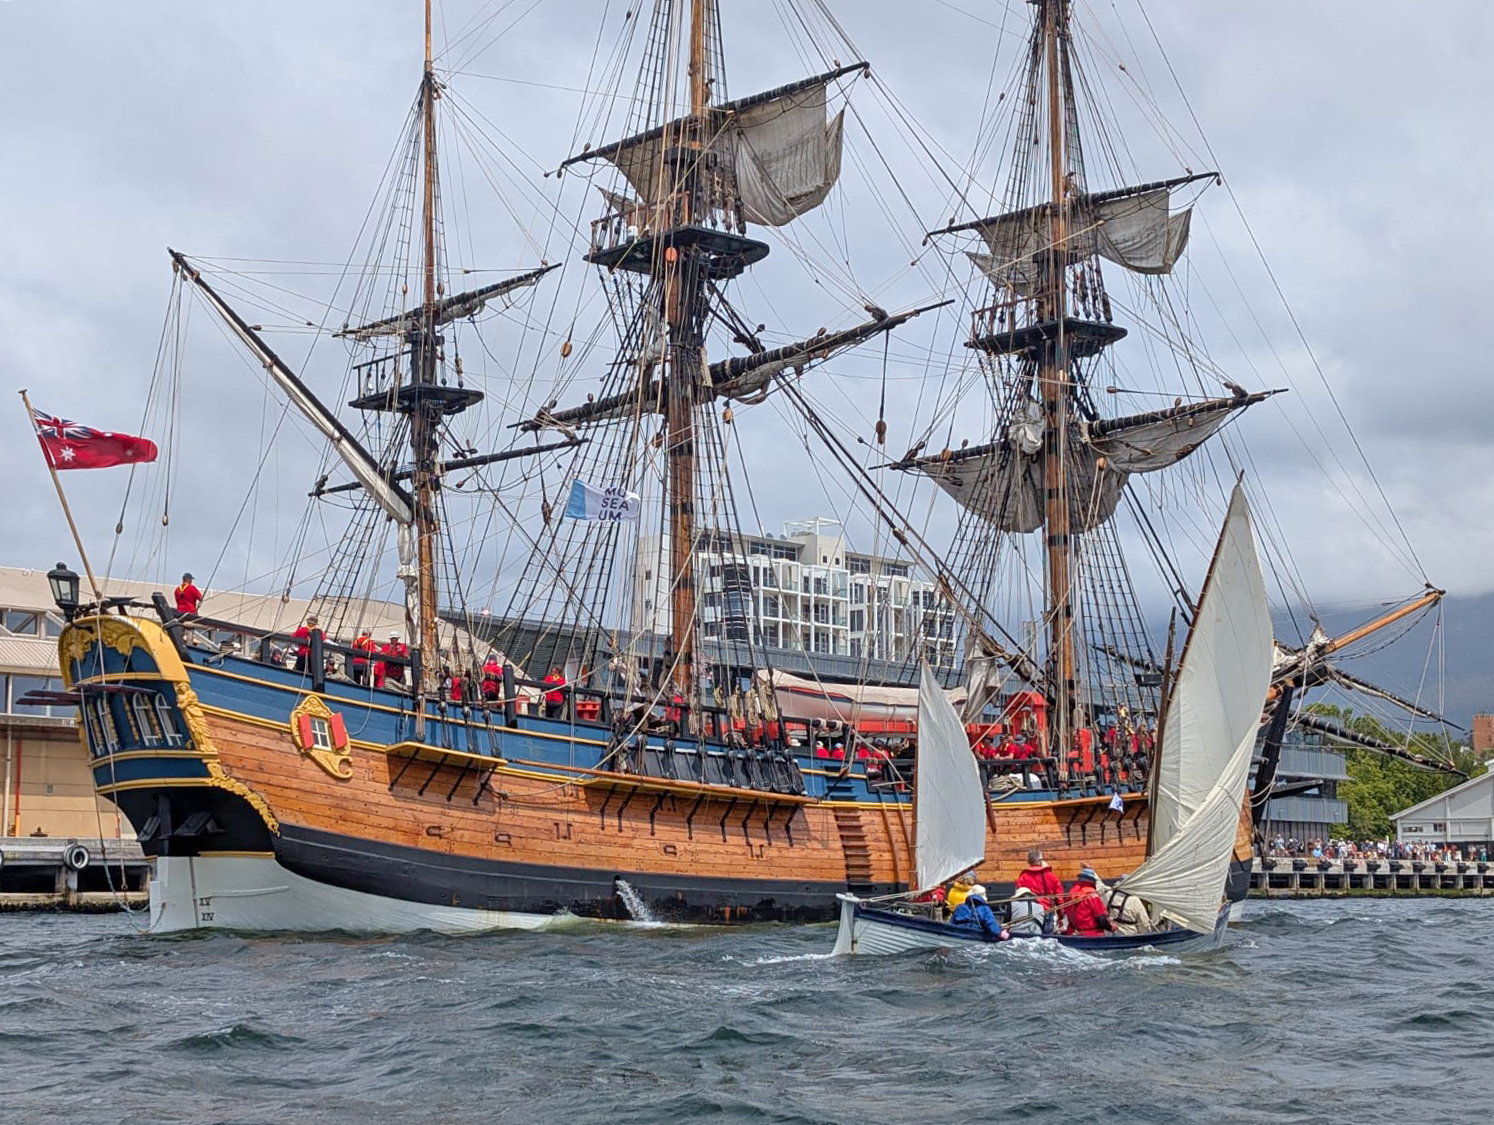
Tom Stevens
RUST NEVER SLEEPS fairly flew across the River Derwent on our final leg into Hobart. Anchored in the distance is the Australian-built replica of HM Bark ENDEAVOUR, Lieutenant Cook’s vessel of discovery.
Nevertheless, we had a date with a festival and were out of extra time. We made an early start, and by 7 a.m. most of the boats were underway in waters that were flat, calm, and glassy, just as forecast. Several of the smaller boats without motors requested a tow over the radio, and we took a line from Geoff Turnbull on STIRLING, a beautiful lapstrake dinghy, and set off with him in tow. About 1 1⁄2 miles beyond Quarantine Point, as the wind picked up, we both raised sail, cast off the towline, and waved our goodbyes. Once more we were headed out to the D’Entrecasteaux Channel.
The wind continued to rise. Sailing closehauled, we made our way up the channel, hugging the tree-lined west coast of North Bruny Island. We passed Rat Bay, home to a number of holiday homes and an occasional farm, and skirted the rocky shelf and khaki-colored bull kelp beds exposed by the morning’s low tide off Bligh Point, named after Captain William Bligh—governor of New South Wales from 1806 to 1808—who visited and anchored off Bruny Island several times. As we passed the hamlet at Dennes Point—a grassy headland just 20′ above sea level, and the northernmost tip of Bruny—we eased our sheets for a close reach, entered the River Derwent and headed east, for the western shore of the South Arm Peninsula. From there, as we once more turned north, still with a full set of sail, we hugged the coast for the next 4 miles, in an attempt to shelter from the strengthening northeasterly winds.
Tom Stevens
ENDEAVOUR is a frequent visitor at the Australian Wooden Boat Festival in Hobart. The annual festival attracts boats large and small from far and wide. Regularly taking part is the fleet of boats taking part in the Living Boat Trust’s Tawe Nunnugah Raid. As the TN boats—such as the 27′ MONTY, an ex-naval whaler owned by the Living Boat Trust—join others arriving in Hobart, the waters in and around the festival become quite tight.
By the time we had cleared Gellibrand Point, the northernmost tip of the peninsula, the city of Hobart and its southern suburbs were clearly visible to the west. We furled our sails and motored directly into the headwind, a stiff 1′ chop on our bow, across Ralphs Bay to the Rokeby campsite. It was still only noon, but with Ralphs Bay fully exposed to the northeasterly wind now gusting up to 20 knots, it took some time to settle on a suitable anchor site as other boats continued to arrive and jockeyed for space. We anchored in 10′ of water, just 100 yards off the beach, packed up the boat, and went ashore—Andrew to pitch his tent, me to find my wife and sister.
Tom Stevens
The TN25 fleet rafted up in Hobart for the festival. Being the only non-wooden boat of the fleet, RUST NEVER SLEEPS was docked away from the festivities at the Bellerive Yacht Club, but we made it back overland to the festival to join our fellow sailors in celebrating the end of a successful expedition.
Our arrival was perfectly timed: the following day, Hobart would celebrate the opening of the Australian Wooden Boat Festival, and the TN25 fleet was invited to participate in the official Parade of Sail and later to join the flotilla of wooden craft and tall ships on display at the Hobart docks. Being a fiberglass boat, RUST NEVER SLEEPS could not be included in the festival, so we made our way to the Bellerive Yacht Club for the weekend, going back into town to join our fellow Raiders later that afternoon. It had been an exceptional 10 days; I had made new friends, explored new sailing grounds, and developed an appreciation for extended cruising in a small boat. And throughout, RUST NEVER SLEEPS, regardless of her hull material, had done me proud.
Jan Stephen Kent is the eldest of three children of Polish migrants who arrived in Australia in the early 1950s. Born and raised in Hobart, Tasmania, his love for the ocean came when he began surfing aged 14. He has surfed in Hawaii, Peru, Portugal, South Africa, and most of Australia. He and his wife have traveled extensively to the United States, Peru, Chile, Argentina, southern Africa, most of Europe, and parts of Asia, and have sailed off Croatia and Sardinia. Retiring at the end of 2023, he is still surfing, and messing around in boats has become his passion.
If you have an interesting story to tell about your adventures with a small boat, please email us a brief outline and a few photos.
Looking for more Australian boats? See…
Jan Stephen Kent’s Boat Profile, Cygnet 20, a trailer-sailer ideal for gunkholing
Ian Hamilton’s Boat Profile, First Mate, a Lillistone beach cruiser for sail, oars, and outboard
Nigel Sharpe’s Boat Profile, The Paroz Tender, a Queensland-built dinghy for oars, outboard, and towing
The last two kayaks I built were for casual day paddles: a Nick Schade–designed Petrel Play for my wife, Caroline, and an Eric Schade–designed Shearwater 14 for myself. Our excursions often involve coasting while looking around, and perhaps taking some photos or raising binoculars to identify a bird. The wind is usually light, the water a protected spot in a bay or at the narrow end of a lake. We are decidedly in no hurry and have no need for a high degree of maneuverability, but rather, favor having good directional stability.
However, we found that while both kayaks would hold a course well when we got them moving, when the paddling was paused, they tended to yaw left or right. And this, of course, is annoying when you’re trying to get the camera aimed at that showy hooded merganser or sunbathing painted turtle. Just as you’re getting the shot lined up, the kayak turns you away from the target.
Photographs by the author
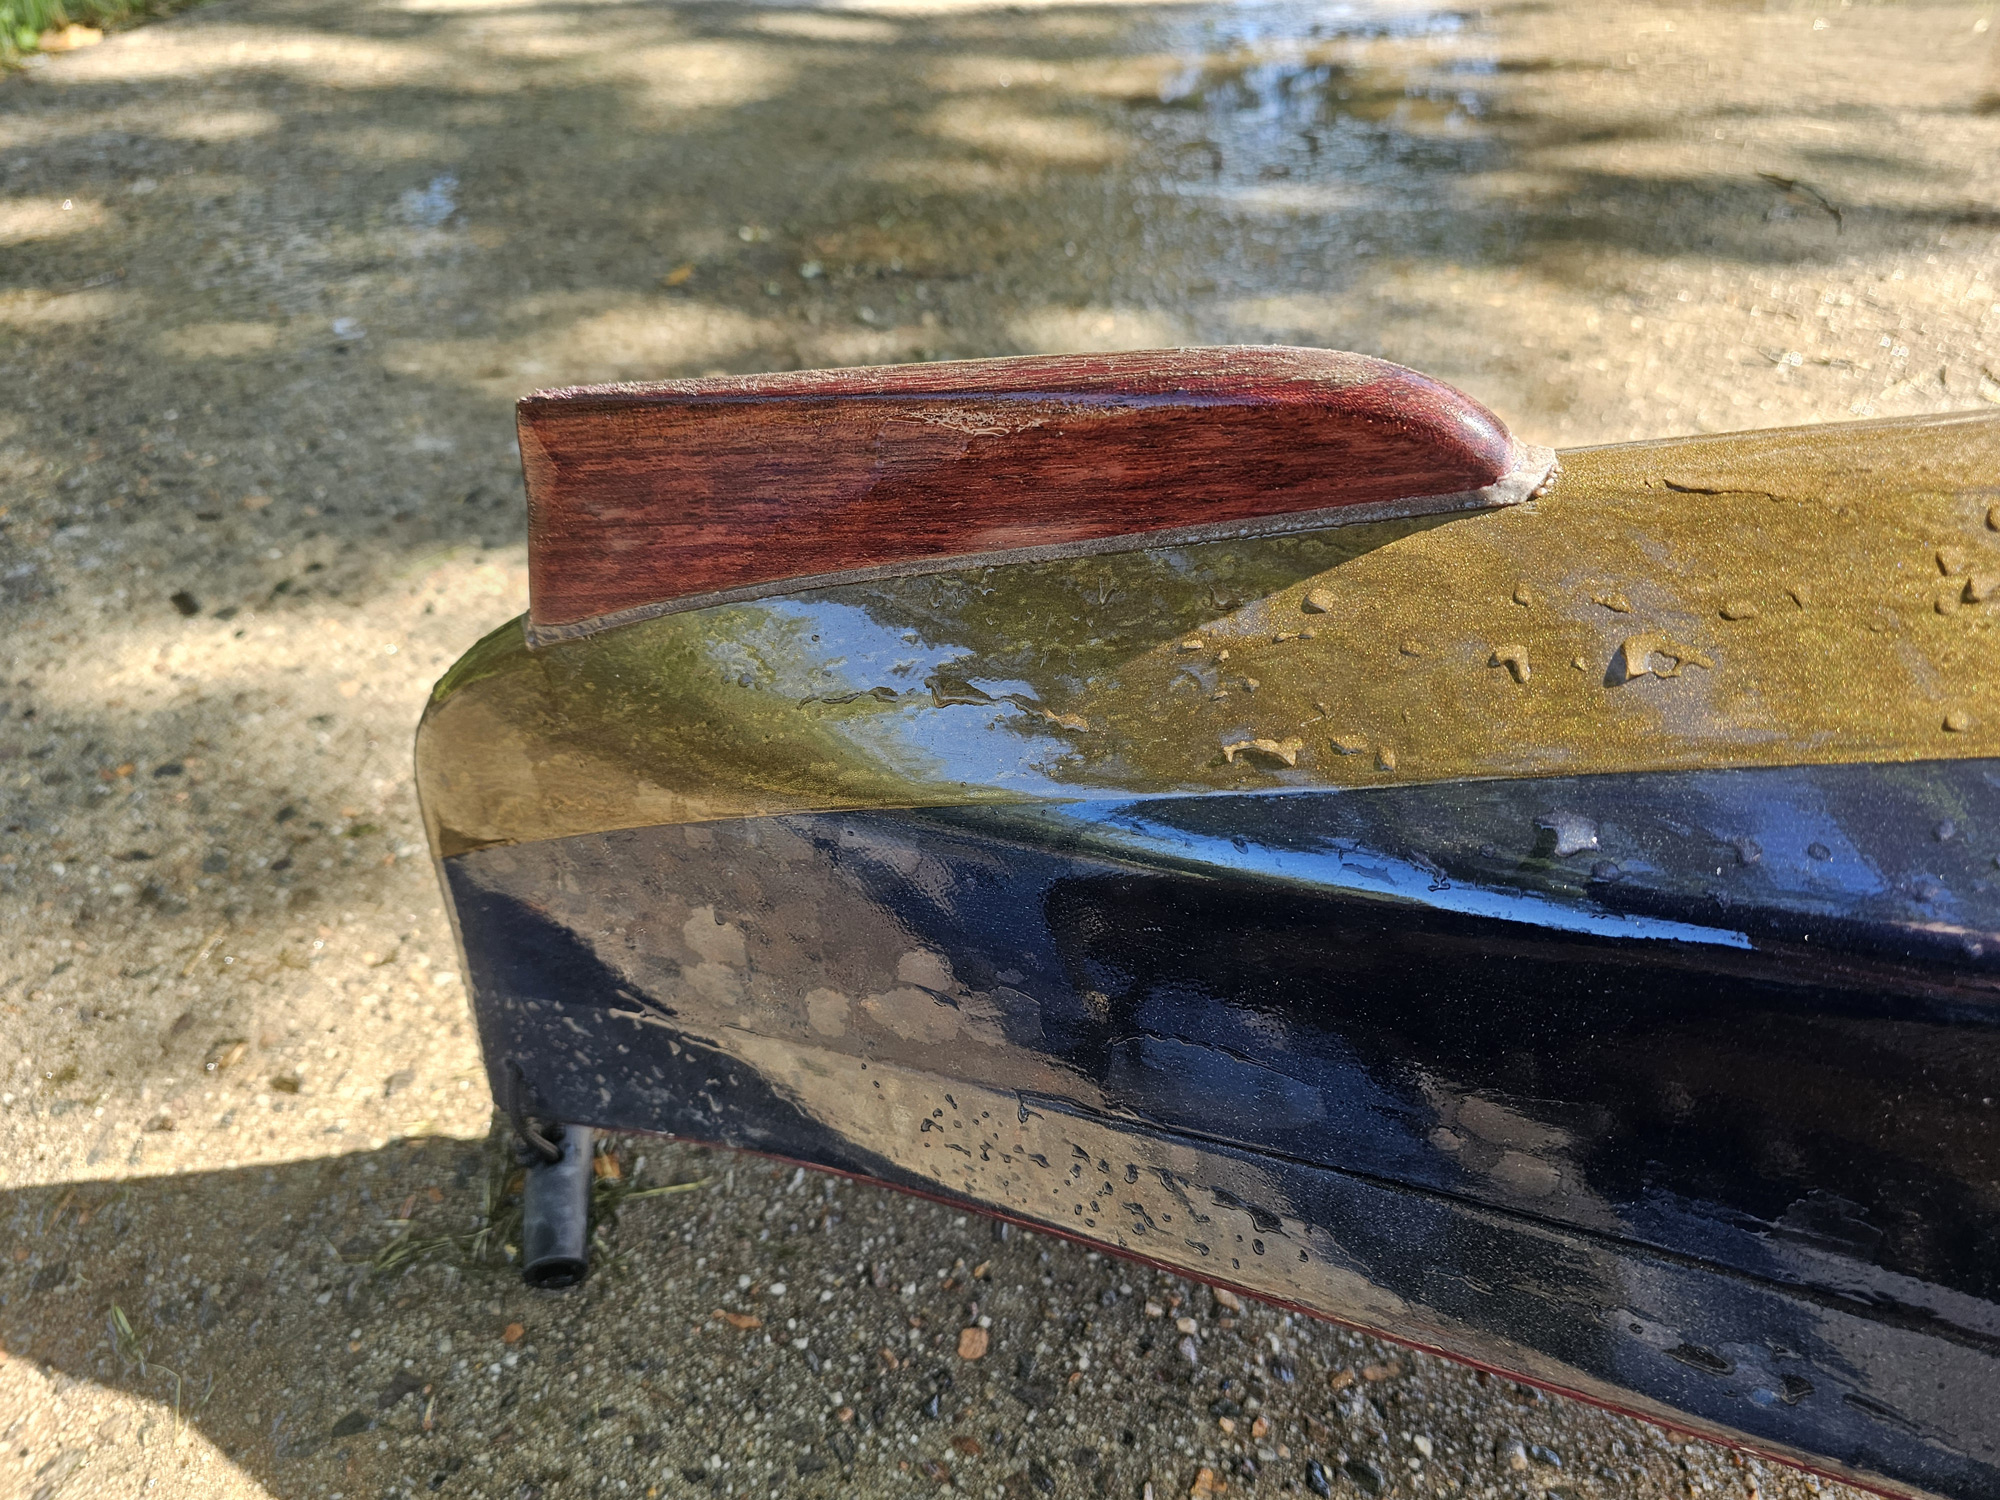
This skeg, on my Shearwater 14, is 3⁄4″ wide at the top and tapers to about 1⁄4″ along the bottom edge. It has held up over two years of regular use and has done a good job protecting the kayak’s finish at the stern, a common wear point.
I could have attached retractable rudders or built pivoting skegs with their boxes. But these are simple kayaks for quick and easy trips. The object was to keep everything as uncomplicated as possible. So, rather than deal with the complexity of either a pivoting skeg or a rudder, my solution was to attach a short, fixed skeg to each kayak. It was a relatively quick and easy add-on, and a surprisingly small skeg can keep a kayak from yawing without seriously affecting its ability to turn. An added benefit is that the skeg can prevent the stern from getting scraped when putting in and taking out.
For both kayaks, I used small blocks of hardwood that I had on hand: a chunk of purpleheart for the Petrel Play and a piece of reclaimed Brazilian cherry—a hardwood more properly called jatoba—for the Shearwater. Both woods are dense and tightly grained; any dense hardwood would be suitable.
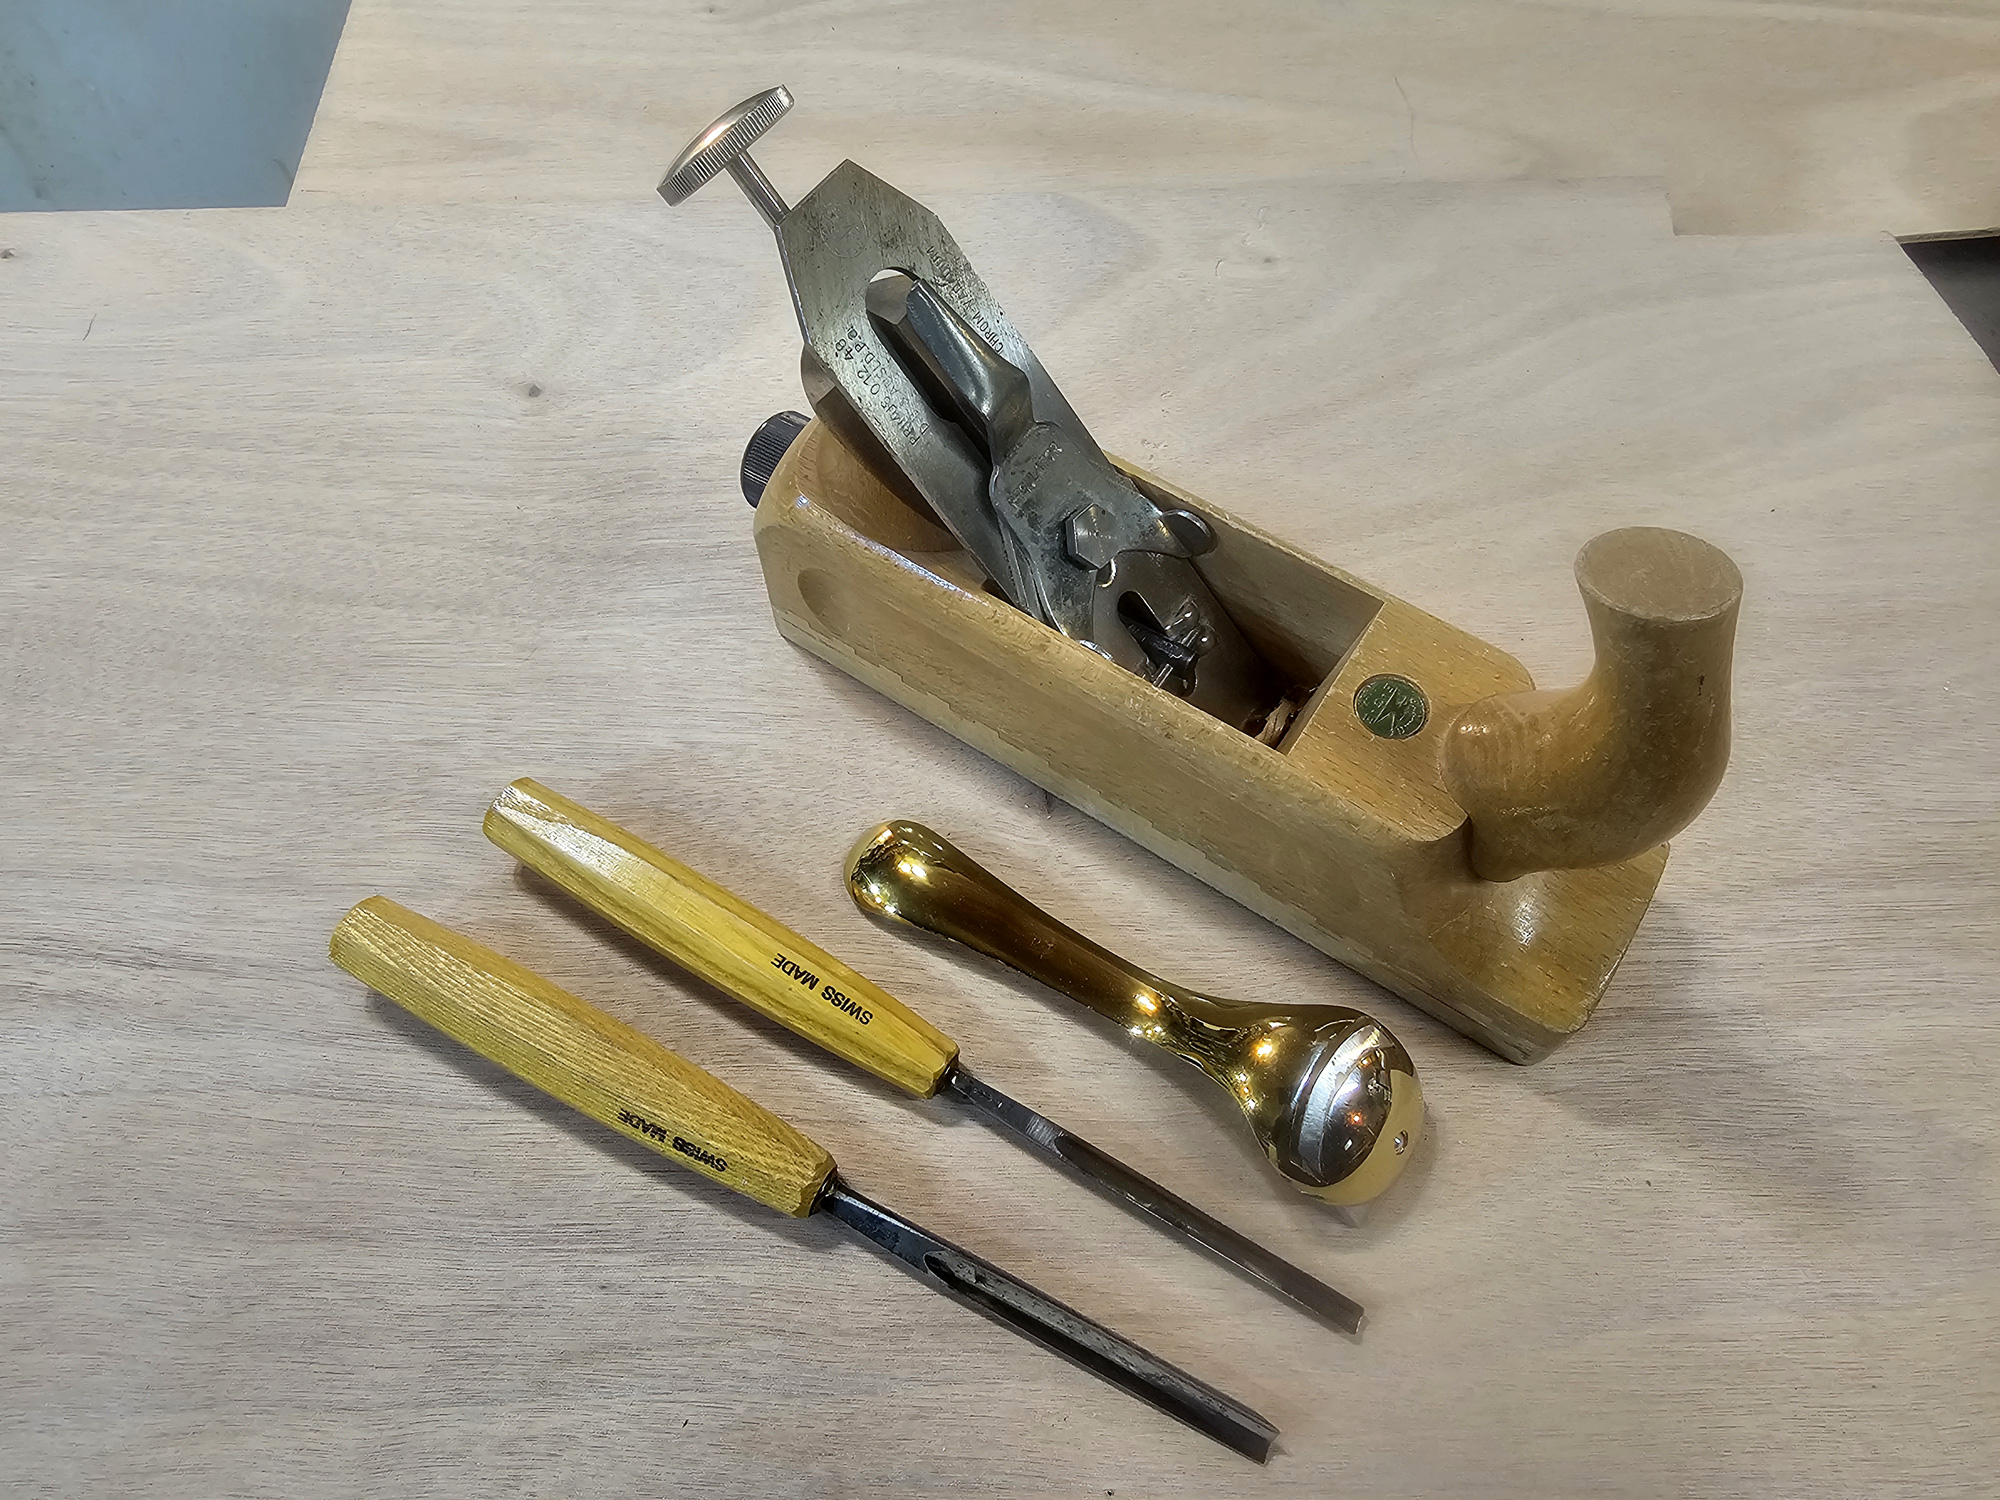
Few tools were required. I used a bandsaw, planes, gouges, and a stationary belt sander to shape mine, but a handsaw, some rasps, and some sandpaper would also do the job.
I used a bench plane, spoon plane, and a couple of gouges to shape the skeg before taking it to the roller end of a stationary belt sander.
How to make and fit a fixed skeg to a kayak
Decide how much correction you want to introduce
The Petrel Play has a flatter, broader underbody than average, so I went with a 9″-long skeg. The Shearwater has a more traditional V-bottom and tracks fairly well, so I made a shorter, 7″ skeg for that kayak. Both skegs are 2″ deep—I found this was sufficient for the tracking I was trying to achieve. If I had made them deeper they would have increased the draft, compromising the great advantage kayaks have in shoal waters.
Keep in mind that after the skeg is on the kayak, it can be easily trimmed down with a plane or saw, so if in doubt, a larger skeg is the way to start.
The other decision is where to place the skeg. Attaching it farther back makes it more effective for maintaining direction, but in any kind of chop it will often be out of the water. Bringing it forward keeps it submerged and working more of the time, but now the skeg is deeper in the water and will probably have more impact on the kayak’s draft. Because we use our kayaks in mild conditions, I placed the skegs well aft.
Take two measurements off the kayak
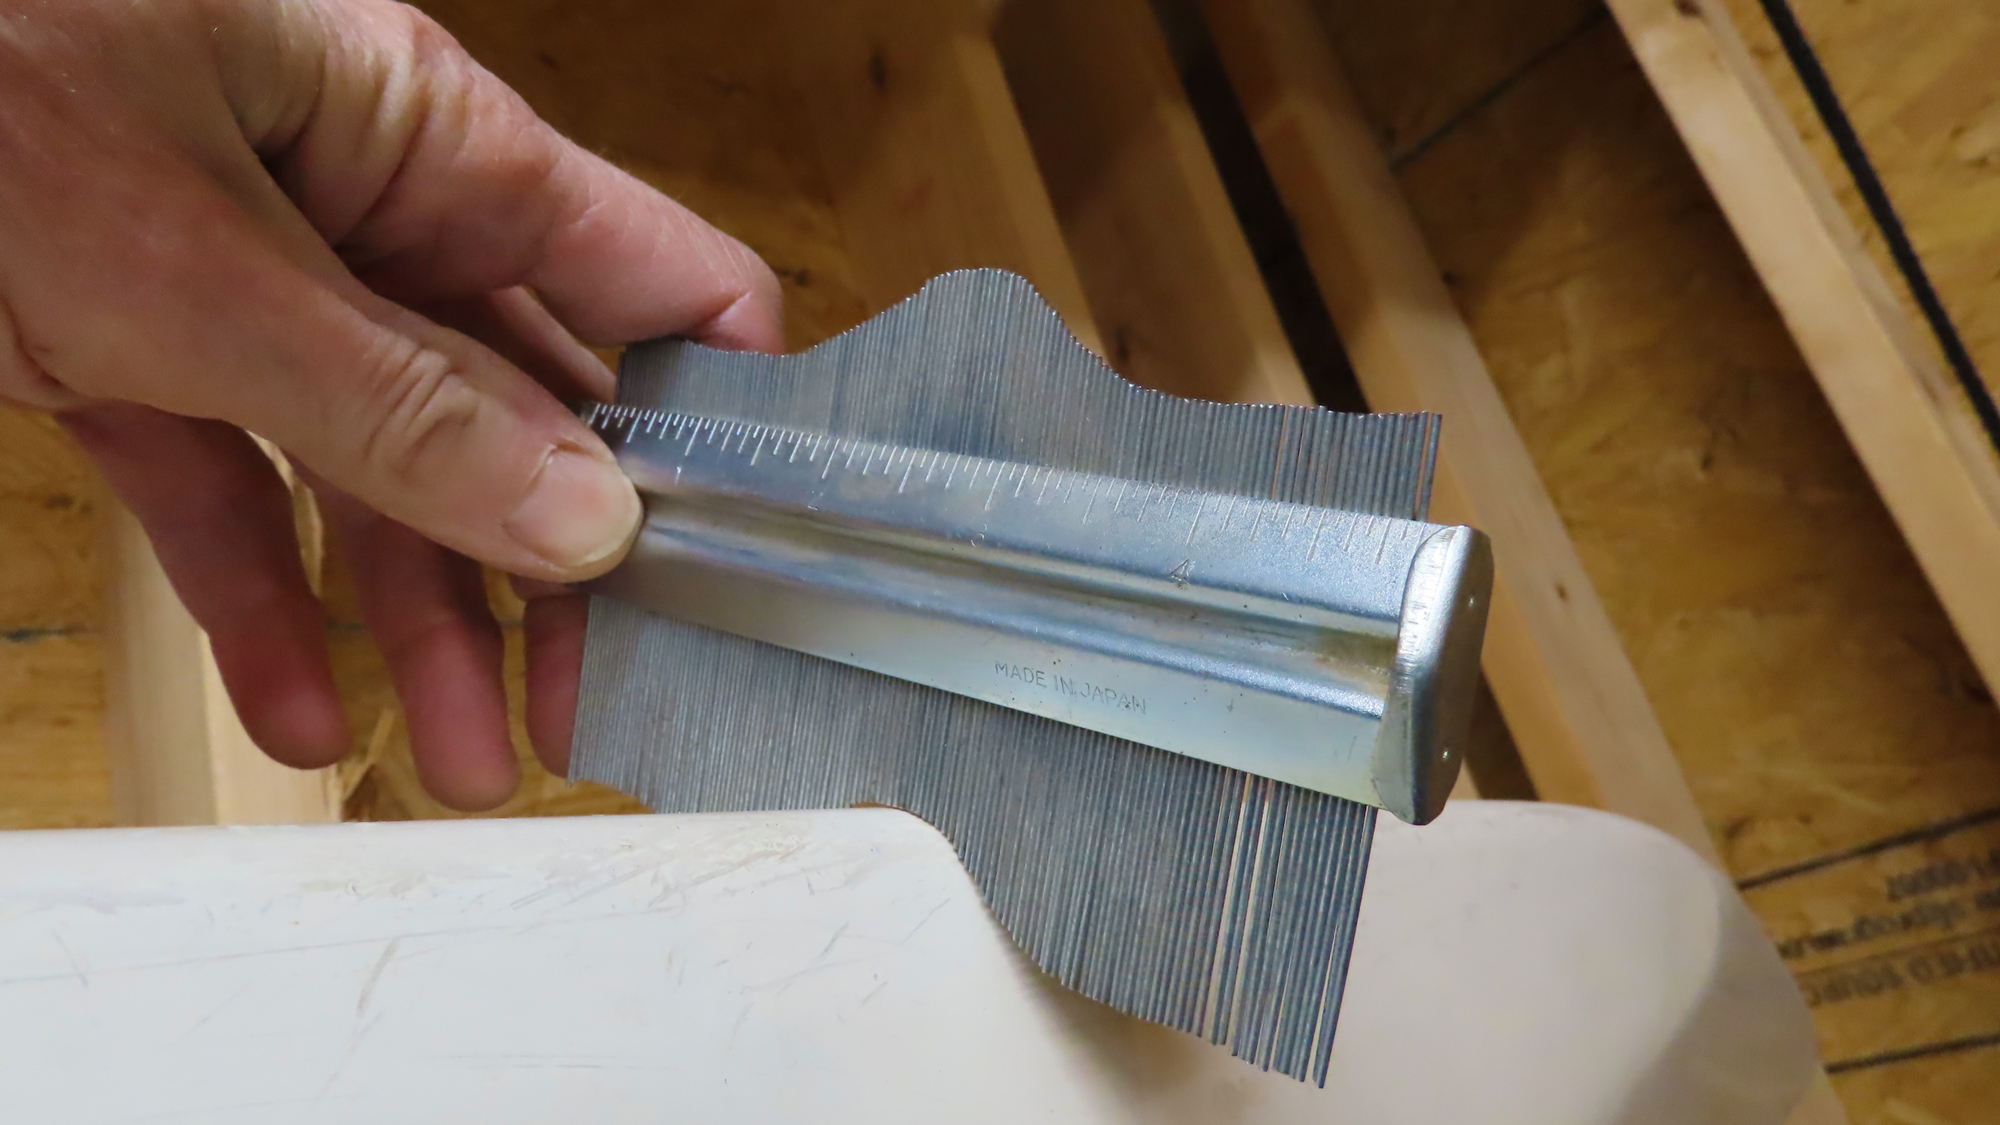
Using a contour gauge to record the profile of the keel.
After deciding where you will place your skeg, place the kayak on the floor and measure the gap between the keel and floor where the skeg will fit. By using a sliding T-bevel or by cutting out a cardboard template, establish the shape and size of the skeg. Most kayaks have enough rocker to make this work. A skeg with a bottom edge that runs parallel with the ground will work well in most cases and will protect the kayak when launching and retrieving. Next, using a contour gauge, record the athwartship curve of the keel in the same location (see below for option if you don’t have a contour gauge).
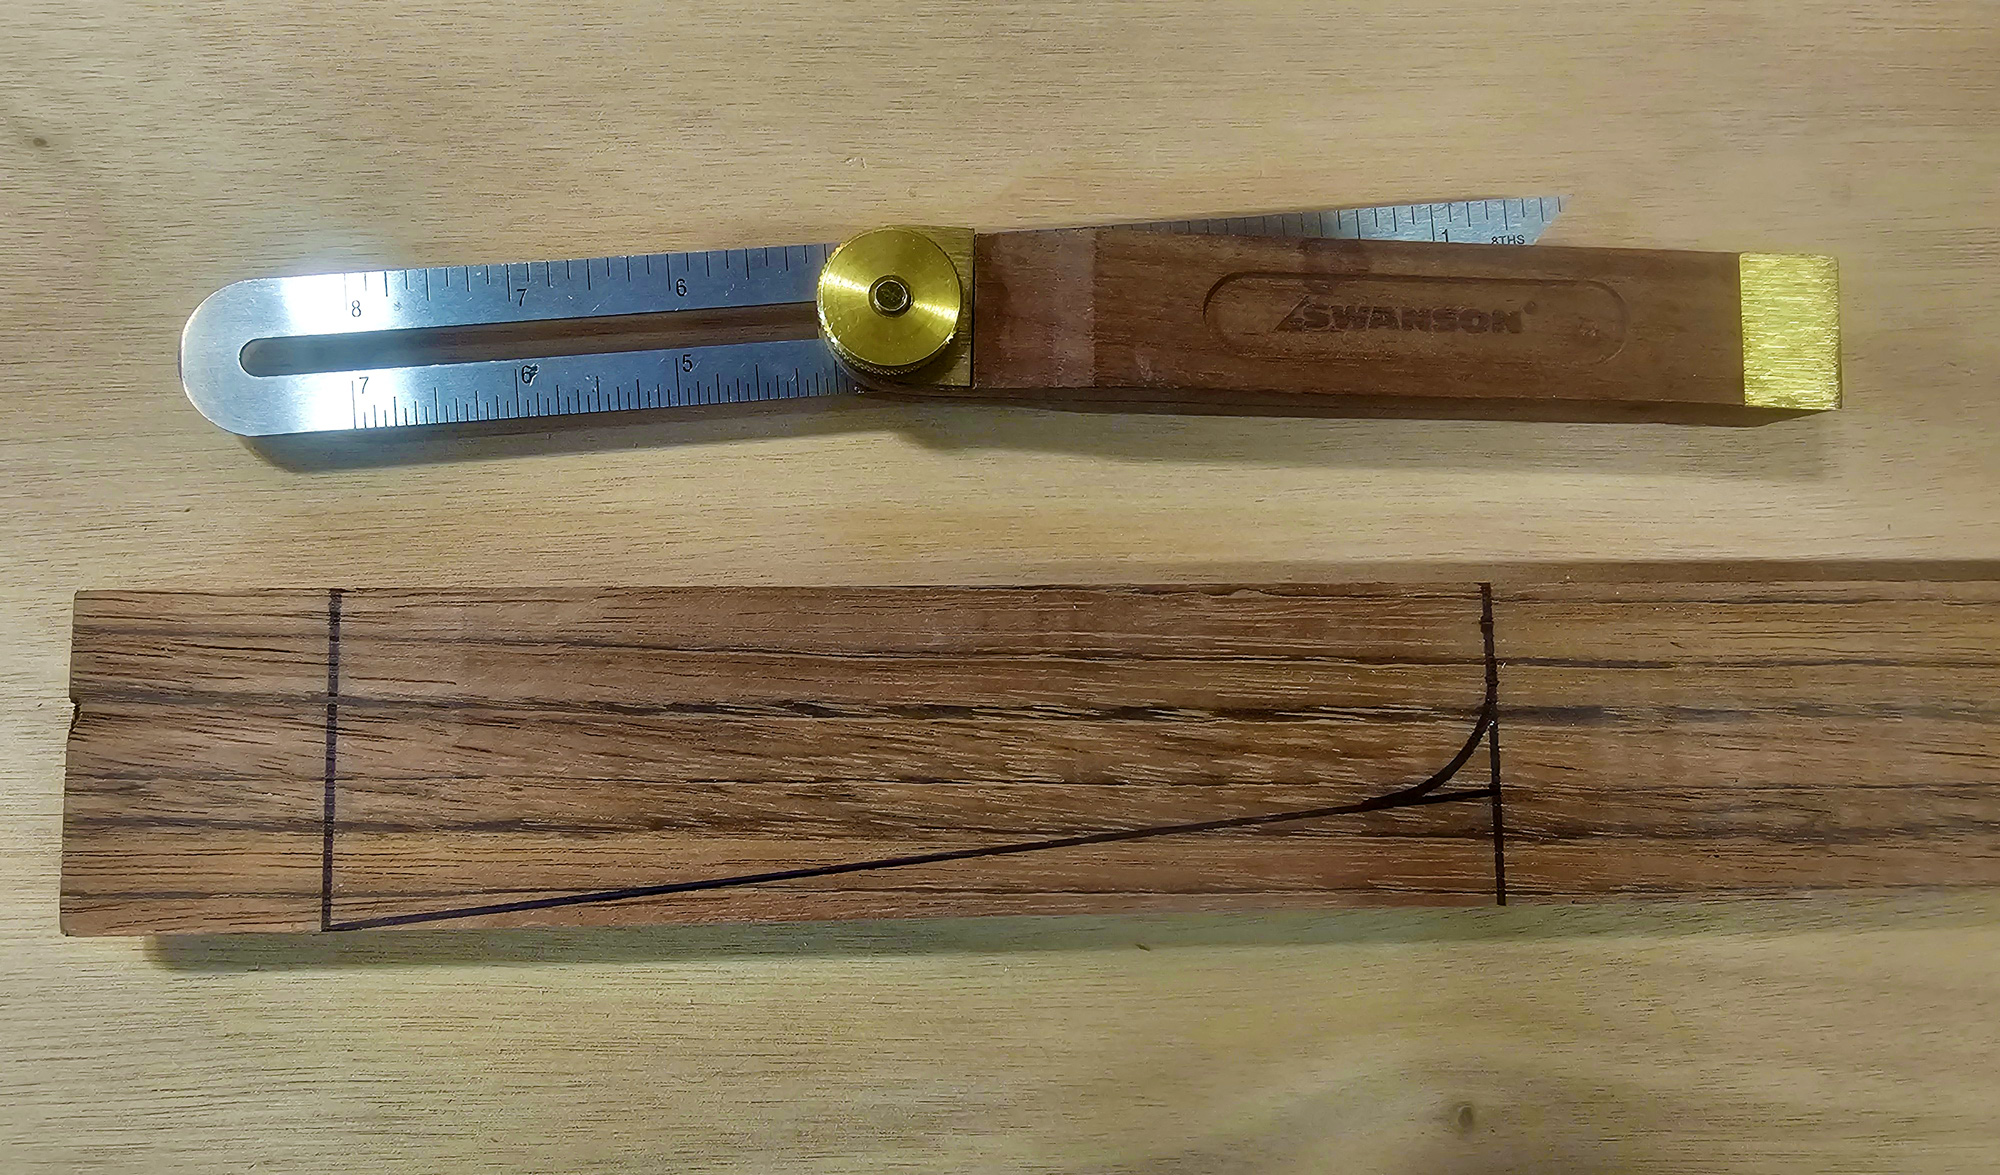
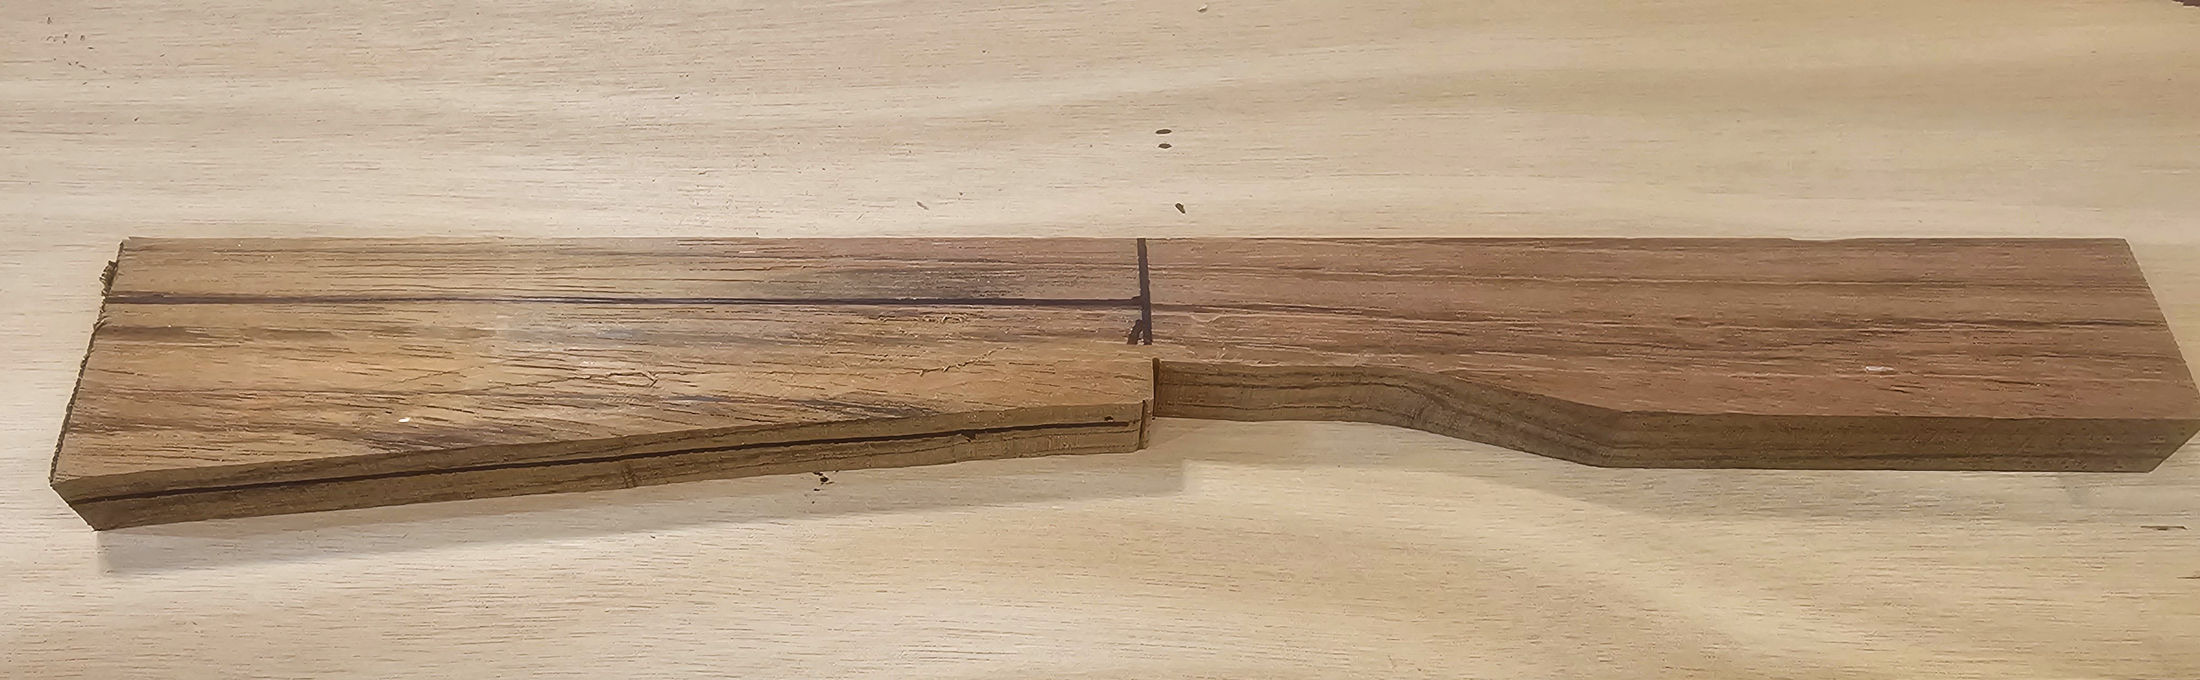
Draw the keel angle onto the stock
Mark the angle you measured between the rise of the keel above the floor as a baseline on the stock and draw out the shape. Or, if you created a cardboard template, trace it onto the stock. This skeg is 2″ by 7″ on an offcut of 3⁄4″-thick jatoba flooring.
A piece of 3⁄4″-thick hardwood works well. Leave a “handle” on the forward end of the marked shape so you have something to clamp securely into a vise while shaping the skeg.
Shape the skeg
Start by turning the rectangular sectional shape of the stock into a V. Don’t over-thin the bottom edge of the skeg—it will need to take some abuse. And don’t thin the top of the skeg as this will be where it bonds to the boat; you need the full 3⁄4″ width for good adhesion.
The profile has been cut out, leaving a “handle” on the right, which can be secured in a vise to simplify shaping. The centerline is marked on the bottom edge for reference. The horizontal line at left marks the transition to the taper.
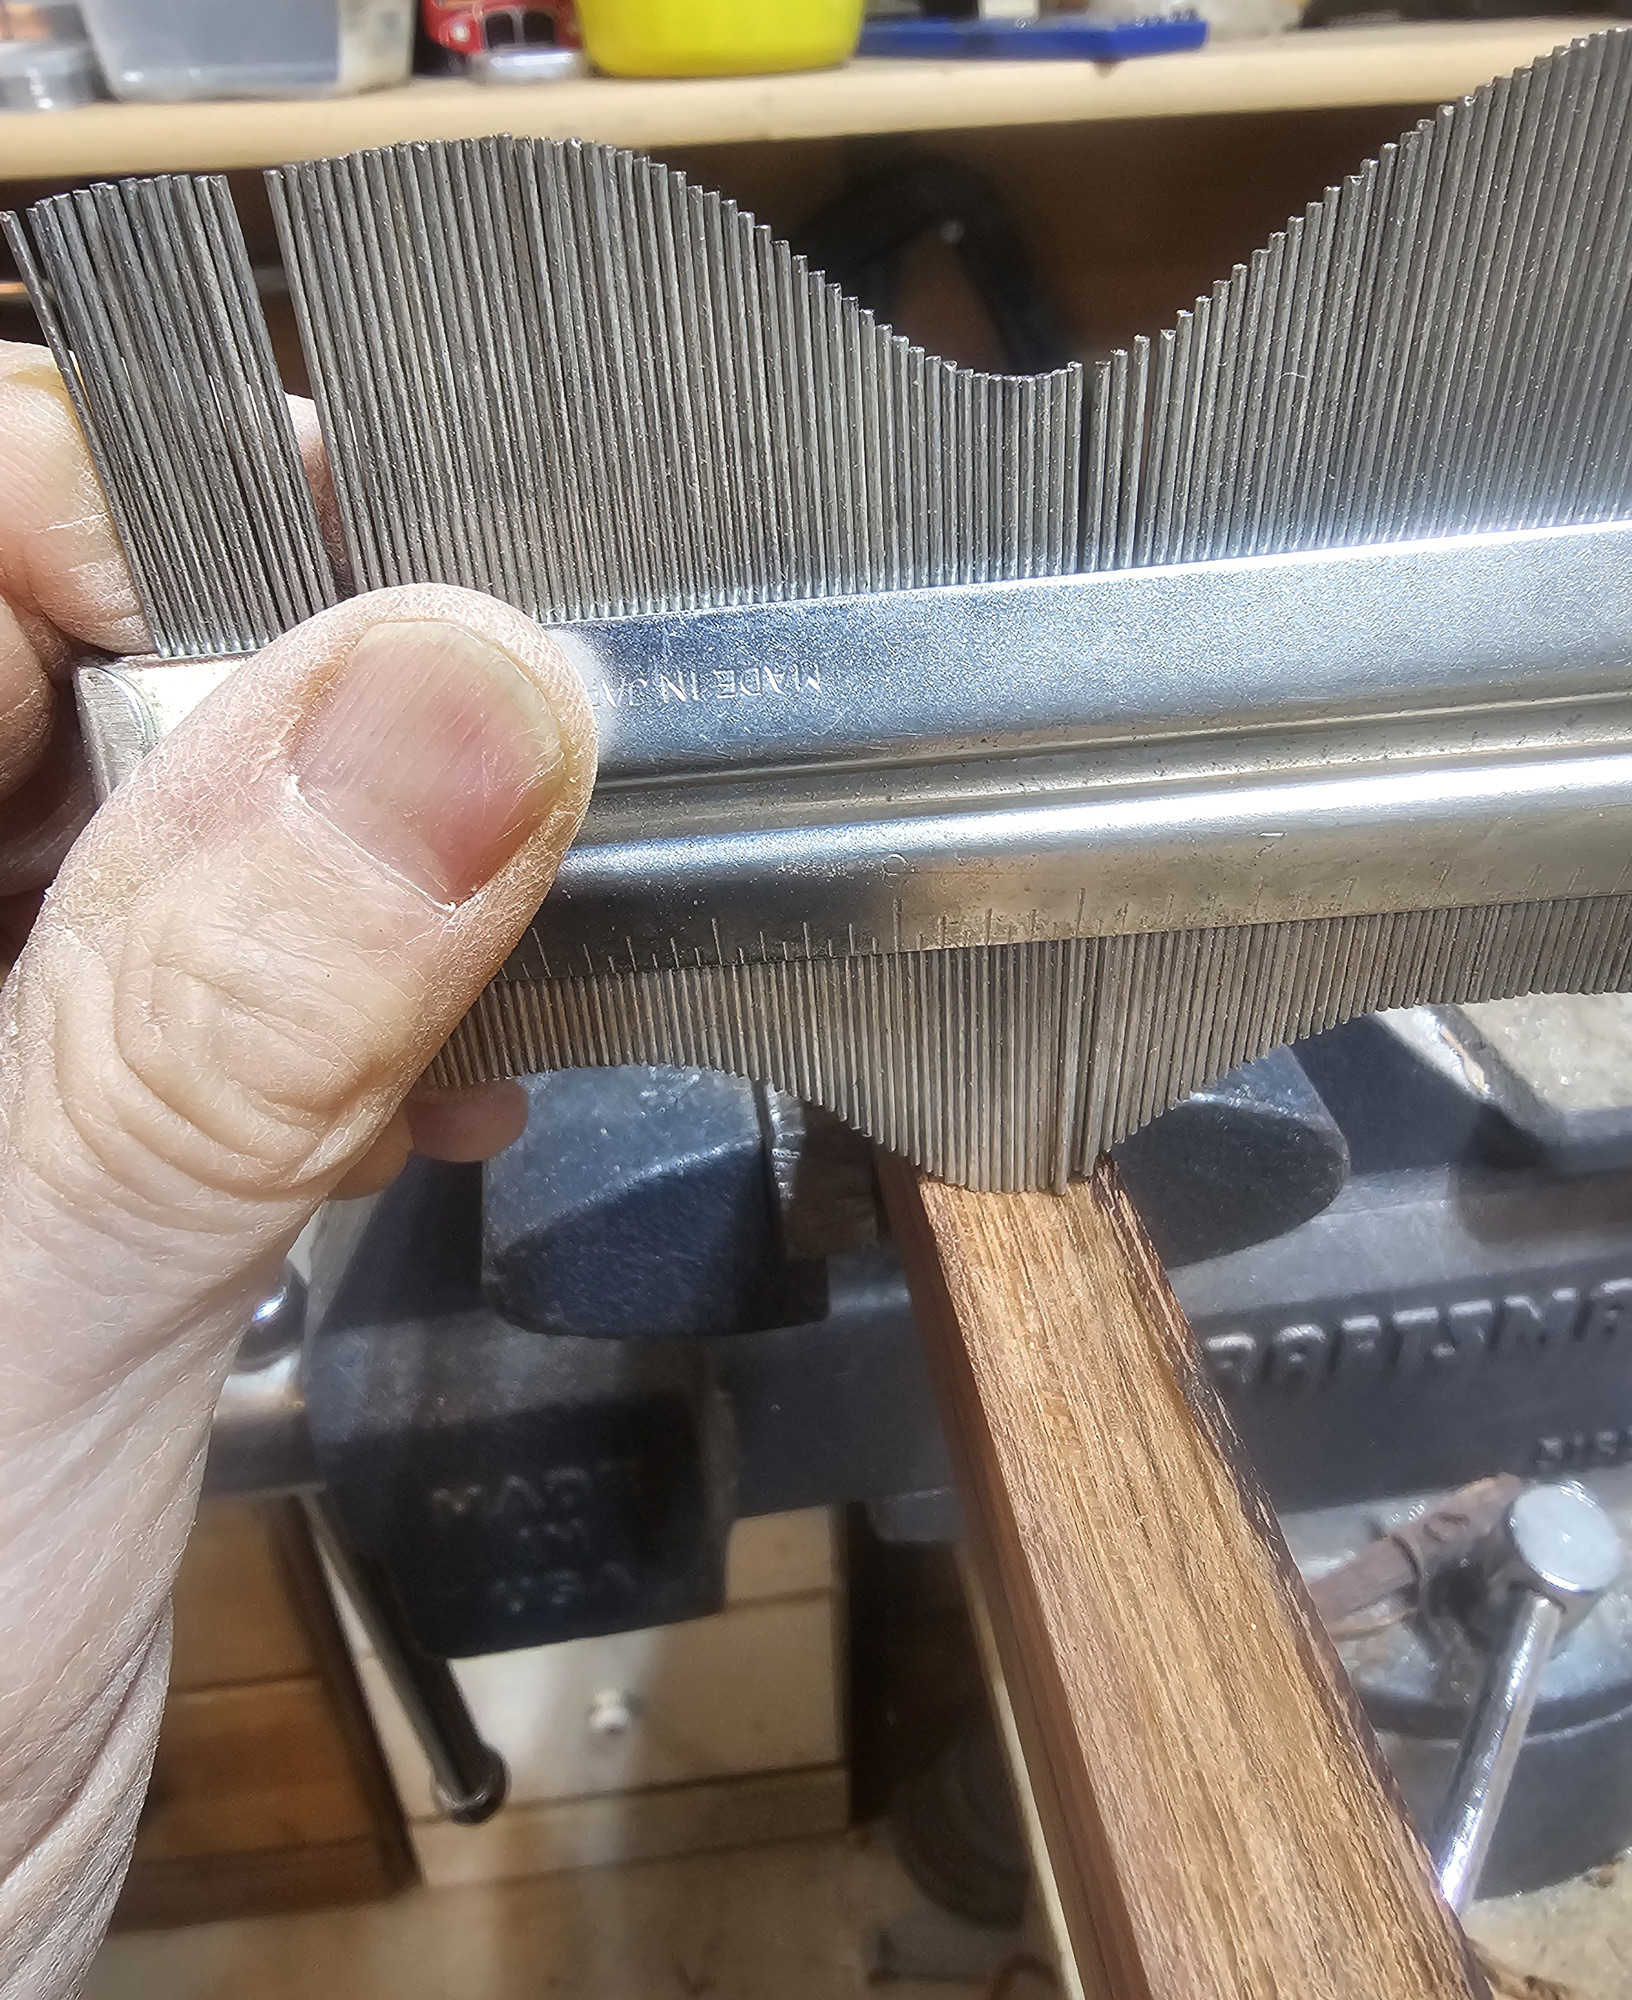
Cut some hollow into the sides of the skeg
I used a brass spoon plane, but a half-round rasp or the idler roller on a stationary belt sander will also work.
Cut a channel into the top edge
Checking the shape of the keel groove with the contour gauge.
Using a gouge, cut a channel into the top edge of the skeg to match the shape recorded with the contour gauge.
Cut the skeg free from the “handle”
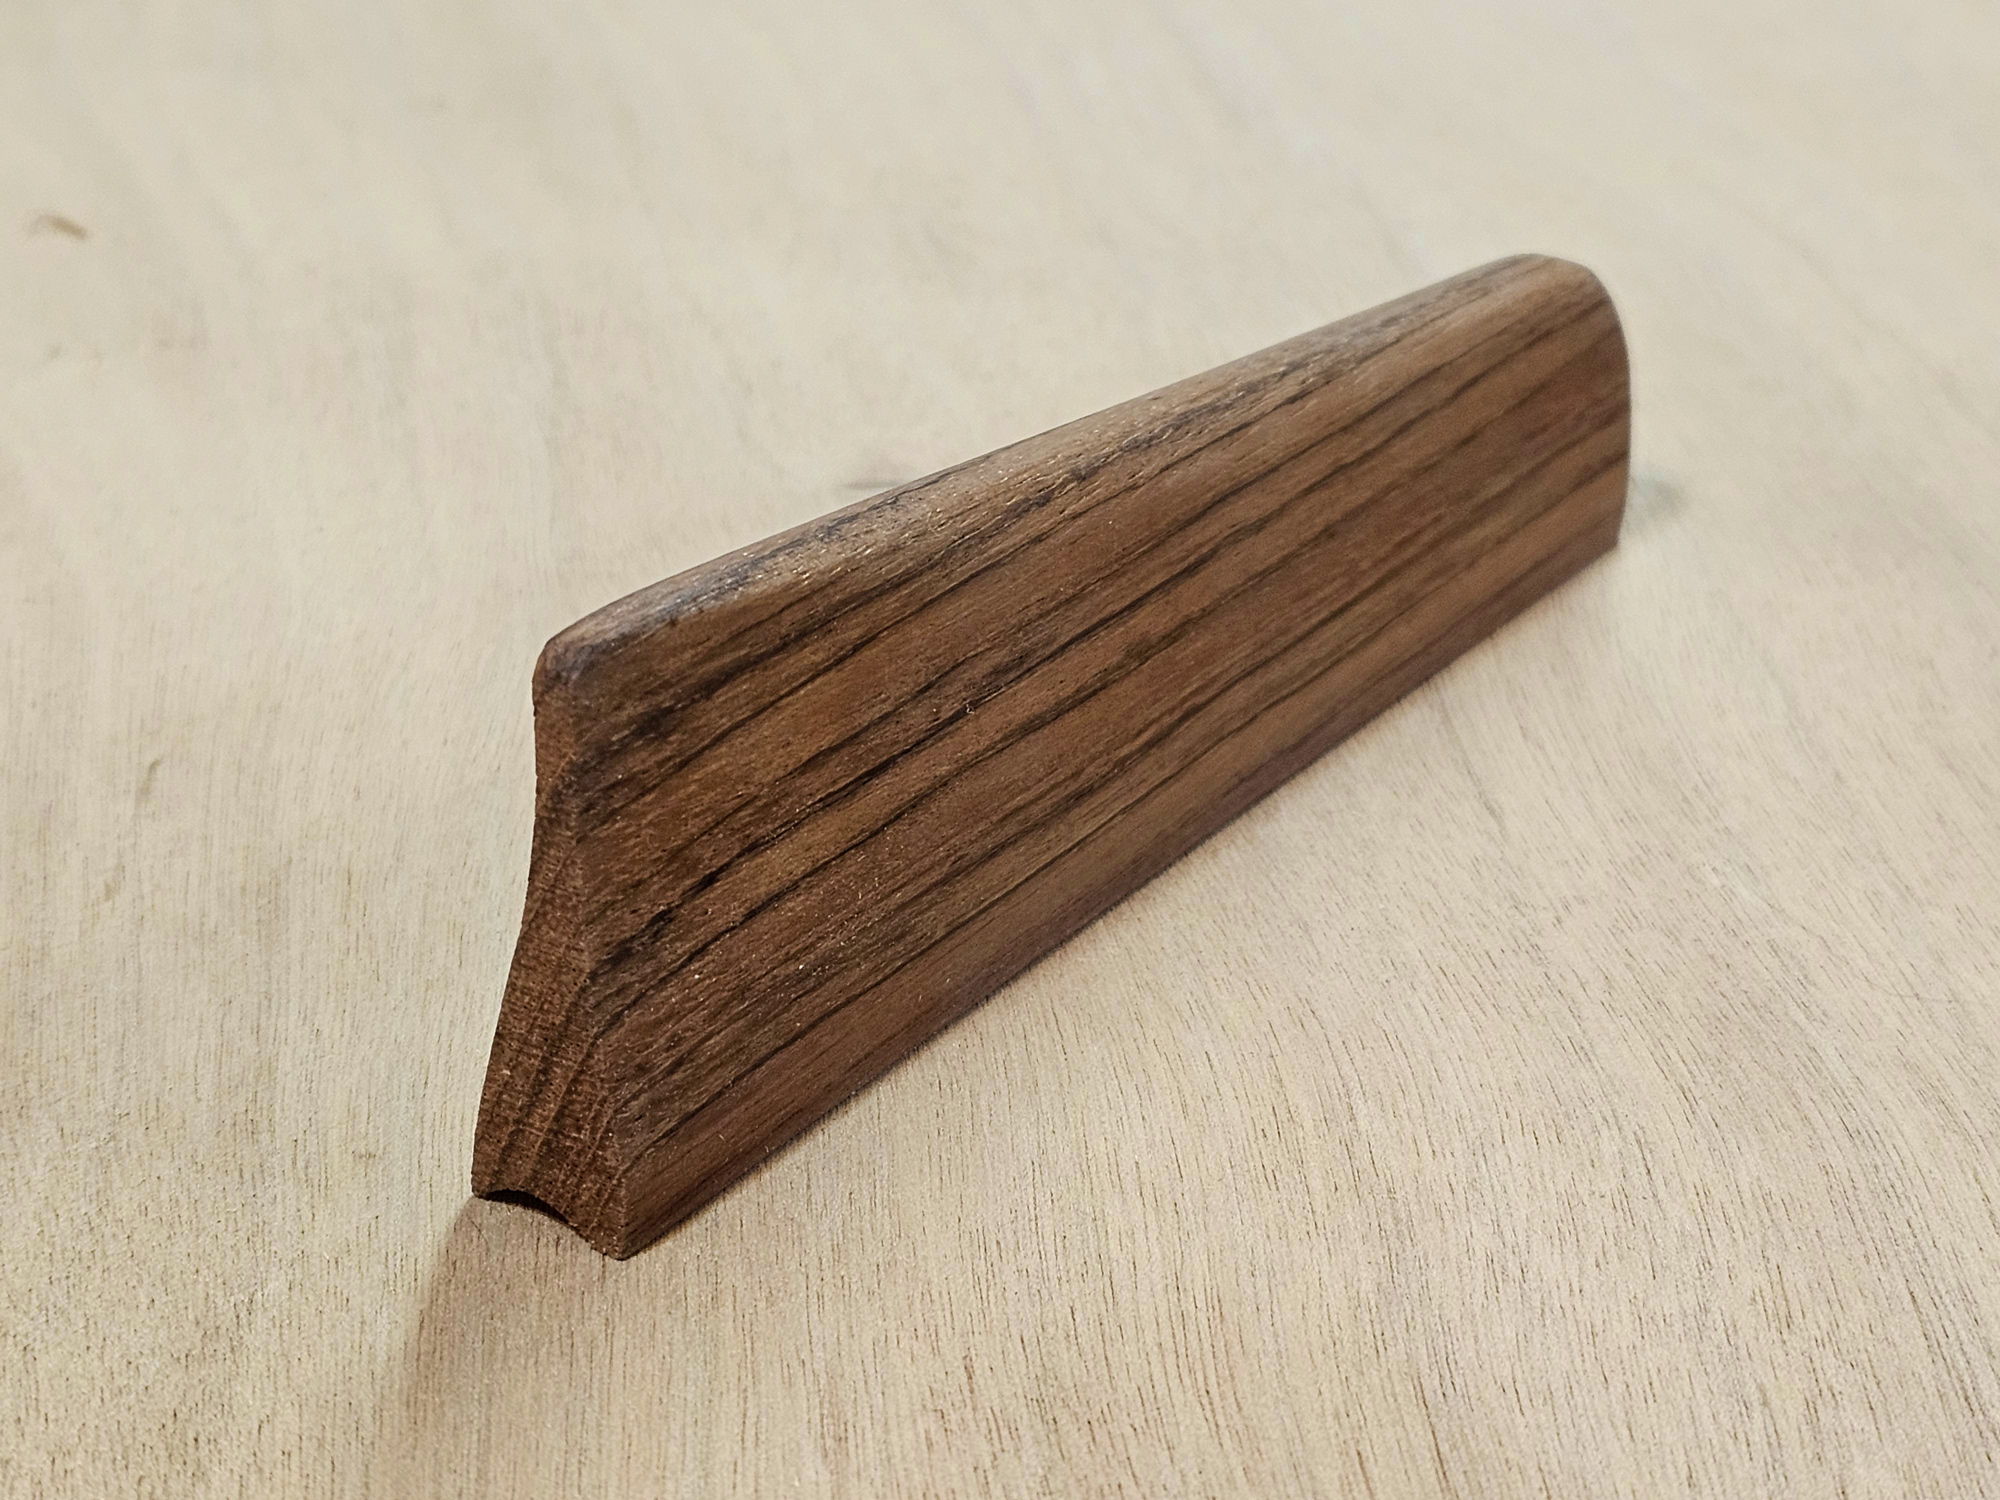
Once the skeg is formed, cut it free from the stock’s handle, and finish shaping and sanding until it has the shape of a fin. Remember, don’t make it delicate—leave some thickness on the trailing and bottom edges so that bumps and grinds on rocks won’t damage it. Don’t worry about added drag—I guarantee you won’t feel any increased resistance when paddling your kayak.
The completed skeg, ready to be mounted.
Finish the skeg however you like
You could saturate your skeg with epoxy and then apply layers of varnish, or just wipe it with some tung oil. Kayaks don’t live in the water full time, so if you’ve used a dense hardwood there should be no need to worry about rot.
This skeg—9″ long and 3⁄4″ wide—has a bullnose leading edge and well-tapered trailing edge, which help to minimize drag while maintaining the skeg’s strength.
Fasten the skeg to the boat
To fasten our skegs I used thickened epoxy, but if you don’t want yours to be a permanent fixture there are other options. Hot-melt glue will hold it in place but allow removal with the sharp whack of a mallet. A marine adhesive sealant such as 3M 5200 will work for a more permanent connection. High-strength, double-sided auto-body tape should work too, although I haven’t tested that yet. If your boat is made of roto-molded polyethylene, getting good adhesion may be more problematic, but West System’s G-Flex epoxy and products like 3M 5200 would be the best options here.
David Dawson lives in Pennsylvania but stretches his passion for boating up and down the East Coast, paddling and sailing the waters between Maine to Florida. Since retiring in 2012, he has built six kayaks and a sailboat.
Editor’s note
When measuring the athwartship curve of the keel, if you don’t have a contour gauge, fold a 6″ square of aluminum foil in half three times to create eight layers, then press it smooth across the keel. Remove it and handle it gently as you use it to shape the skeg’s groove.
Christopher Cunningham
To measure the keel without a contour gauge, fold a 6″ square of aluminum foil in half three times and press it down across the kayak keel. Carefully remove the pressed foil to reveal a useable template. Crinkling the foil before flattening and folding it helps the template to hold its shape.
You can share your tips and tricks of the trade with other Small Boats readers by sending us an email.
For more kayak material from David Dawson see…
TheShrikeKayaks, a review of CNC’s modern kayaks steeped in Inuit tradition, available as plans for amateur builders.
We needed to buy pants. When we moved from Florida to Virginia in 2021 we left the land of year-round shorts and sunshine and arrived in a part of the country that had four seasons. For the first time ever we found ourselves in need of socks, and learned that zippers on light jackets do actually have a function. We didn’t need foulweather pants (we already had some Third Reef Foulies from West Marine), but we did need long pants that would be suitable for our small-boat adventures.
We both knew we wanted pants with a loose fit and made from material that would dry quickly. We also wanted versatility—we had taken up trail walking in our local park, so multifunctioning gear was on our list of wants. We had long had some Columbia-brand shirts and were happy with those, so when we visited our local sporting goods store we homed in on the Columbia clothing—and there we found the Silver Ridge Convertible Pants.
Photographs by the authors
Columbia Silver Ridge pants have an outer shell of nylon and an inner lining of polyester. They feature six pockets—four with secure closings—and a partially elastic waistband with an integral adjustable web belt.
Silver Ridge pants are lightweight—the men’s pants with waist 36″ and length 32″ weigh approximately 0.7 lb (a pair of denim jeans of the same size weighs 1.8 lbs)—and they roll up into a small ball, making them a great choice for stowing on a small boat. The pants are made of Columbia’s branded Omni-Wick fabric—100 percent nylon with 100 percent polyester lining. The breathable material pulls moisture away from the wearer’s skin and out to the surface of the fabric, speeding up evaporation. Thanks to the Omni-Wick technology the pants dry very quickly when wet, and we find that we stay dry, cool, and comfortable when wearing them. Even after a splashing in the river, our pants are usually dry within 15 to 20 minutes. The wicking also helps to keep us dry during hikes, and whether afloat or ashore, neither of us has suffered any chafing from the smooth polyester lining.
The pants have an abundance of pockets: two front, two rear with hook-and-loop tab closures, and one on the side of each thigh. The upper pockets—front and back—are lined with mesh fabric. The thigh pockets have secure closures—one with a nylon zipper, the other with a flap and hook-and-loop tabs.
Below the knee a nylon zipper connects the upper and lower portions of the pant leg. The lower portion can be quickly removed to convert the pants from long-leg to short-leg—still with six pockets.
A feature of the Silver Ridge design that we particular like is the convertibility. The lower portion of each leg is connected to the upper with a nylon zipper, and can be quickly removed to convert from full-length pants to shorts just above the knee. This is particularly handy for a small-boat user: you can unzip to wade through the shallows when launching, but re-zip to keep both sun and skeeters away from your legs. With its tight weave and modified fibers, Columbia’s Omni-Wick material offers Omni-Shade UPF 50, and we find that wearing the long pants is more comfortable than shorts with sunscreen.
The pants have a partially elastic waistband and an integral adjustable web belt. They come in styles for both men—from waist size 28″ to 54″ and inseam from 30″ to 34″—and women, sizes 2 to 18, in short, regular, and long. We both prefer a longer leg length so that the pants bunch a little on top of our shoes when we’re standing but still cover our ankles when we are seated.
The Silver Ridge pants come in a range of sizes for women and men, and their Omni-Wick (fast-drying) Omni-Shade (sun-blocking) fabric makes them an ideal choice for warm-weather use in small boats.
All in all we have been very satisfied with the Columbia Silver Ridge Convertibles. We have been wearing ours for four years and they have proved to be hard-wearing, comfortable, and ideal for all our outdoor activities—a good addition to our gear locker.
Audrey and Kent Lewis mess about in the Tidewater Region of Virginia. Their sea stories are logged at smallboatrestoration.blogspot.com.
Silver Ridge pants are available from multiple online outlets and high-street stores, and also direct from Columbia Sportswear, priced between $70 and $80 depending on size and style.
Is there a product that might be useful for boatbuilding, cruising, or shore-side camping that you’d like us to review? Please email your suggestions.
Woodworking machines produce a lot of dust, which needs to be kept out of our lungs. Over the 49 years that I’ve been building boats, I’ve become increasingly aware of the health risks posed by wood dust, and have taken many steps to gather it at source. I have a dust collector connected to my table saw, jointer, and downdraft table, as well as shop vacs connected to my 12″ disc sander, 6″ × 48″ belt sander, 14″ bandsaw, drum sander, and other benchtop and handheld power-sanding tools.
However, in the past, for quick tasks I would often forgo dust collection because it was simply too much bother to turn on and off two machines in different locations in the shop. It was easier—though less healthy—to go without. Then, some years back, I solved the problem with a couple of automatic vacuum switches, one for the dust collector and another for a shop vac.
Photographs by the author
The Automatic Vacuum Switch is quite simple. Its plug goes into a workshop wall outlet for power, and it has two receptacles—one for a tool and one for a dust collector. As the receptacles are marked only A and B, I further identified them, Tool and Dust, to remind myself which was which when switching between table saw and jointer.
The Automatic Vacuum Switch from Etoolcity has one outlet for a dust collector and another for a tool, which for me is most often the table saw. When I turn on the tablesaw, there is a 1-second delay before the Automatic Vacuum Switch turns on the dust collector. This delay staggers the surge of electricity that each motor requires when starting up. When I turn off the table saw, the switch lets the dust collector run for another 7 seconds. That delay allows lingering dust to be collected and kept out of the shop’s atmosphere. I’ve screw-fastened the switch to the shop wall so that, with one hand, I can easily change plugs from table saw to jointer. I’ve been using the Automatic Vacuum Switch for five years and it has worked flawlessly.
The Ortis Vacuum Switch is more sophisticated than the Automatic Vacuum Switch: it can connect two tools to a single dust-collection device, and its rocker switch offers three options for the vacuum function—On, Off, and Auto—giving the user more control.
Recently, I purchased the Ortis Vacuum Switch, also from Etoolcity. It is a more versatile switch that I use to connect my belt sander and bandsaw to the shop vac. Like the Automatic model, it delays the vacuum by 1 second when starting up and by 7 seconds when shutting down. In addition to the outlet for the vacuum, the Ortis has two outlets for two machines, so I can have the belt sander and the bandsaw plugged in at the same time and have the vacuum respond to either one. The Ortis has a rocker switch that can be set to “Auto” so that the vacuum will be turned on whenever a tool is in use; “Off” so a tool can run without the vacuum, for example when I want to replace and track a bandsaw blade or a sanding belt; or “On” to run the vacuum on its own. With the bandsaw and the belt sander each connected to the shop vac by a long, flexible hose, I can fire up the vacuum by itself, disconnect a hose from the dust port on either machine, and clean up any stray dust in the area.
The vacuum receptacle on the Ortis switch has a 15-amp capacity and I reasoned that a work light could be connected at the same time as a vacuum if the total power requirement is equal to or less than 15 amps. I used a three-way adapter that doesn’t obstruct the rocker switch.
A final detail on the Ortis Vacuum Switch is the label next to the top socket, which notes that it has a capacity of 15 amps. My belt sander has long needed a light and so, as my 6-gallon shop vac pulls only 7 amps and my 9-watt LED work light less than 1 amp, I have plugged a three-way outlet adapter into that top socket so that I can now operate both a work light and my belt sander from the Ortis Switch. A cube-shaped adapter enables me to plug in the vacuum and the light without overlapping the rocker switch.
The Etoolcity Vacuum Switches remove the previously inconvenient step of going back and forth to activate my dust-collection systems, and prevent me from taking shortcuts that could jeopardize my health.
Christopher Cunningham is Small Boats’ editor at large.
Matt Morris lives in Waterloo, Ontario, part of the landlocked twin city of Kitchener-Waterloo, a metropolis of some 700,000 people about 60 miles west of Toronto. Lakes Ontario, Erie, and Huron are all less than 75 miles away, but for Matt, the much smaller, 5 1⁄2-acre lake in Victoria Park is his go-to place for boating adventures. Park and lake are within an easy bike ride from Matt’s house, and in 2021, when he stumbled upon a municipal sign that suggested the small body of water could be used for boating, he set about designing and building a three-section skin-on-frame nesting rowboat that he could trailer behind his bike. Christened UB1000, it was the first of Matt’s “Urban Boats” and weighed 36 lbs.
Photographs courtesy of Matt Morris
Matt built PHEATHER 2 on five stations. Before installing the ash frames (seen here leaning against the port gunwale), he had fitted the four full-length and two half-length western red cedar stringers as well as the ash keel and gunwales. The nine frames—previously soaked and steamed—would be installed in two hours.
Eighteen months later Matt was back at the drawing board. UB1000 had served him well—especially after he had designed and built a custom trailer to pull it behind his bike—but he had decided he preferred to look forward when he was on the water, and he wanted something lighter for easier towing. He set out to create a 12′ canoe that would weigh less than 20 lbs. After many hours of research and design—both on paper and in model form—in September 2023, in just four days, Matt built his UB2000, PHEATHER, a skin-on-frame canoe of ash frames, gunwales, and keel, maple stems, and western red cedar stringers, all skinned with 9-oz Dacron. She was 11′ 11″ long, with a beam of 31″ and a depth of 13 1⁄4″. On the waterline, she was 27 1⁄4″ long, and her dry-weight draft was just 2″. She had no sheer and little rocker, but, said Matt, she did have “an enthusiastic tumblehome to make solo paddling comfortable.” PHEATHER weighed 20.6 lbs.
A year later, Matt was at it again. This time he wanted to build a canoe that was not only lighter but also see-through. Writing on his blog, Matt said, “I envisioned sliding effortlessly over the water while watching fish swim beneath me! And the lighter weight would make it even easier to tow behind my bicycle.”
Once the hull’s frame was finished, it was time to apply the clear vinyl skin. Matt applied HH-66 adhesive to both the keel and the vinyl, allowing it to become tacky before placing the vinyl in position. He tensioned the vinyl by stretching it down to the gunwales and holding it taut with spring clamps.
Using his UB2000 as the design foundation, and acknowledging that his new canoe would be strictly for use in calm waters, Matt drew up a list of “wants”: less freeboard; clear skin; fewer frames and stringers; no Kevlar rovings; reverse-raked stems; thinner gunwales and keel; 1″ negative sheer; and just under 2″ of rocker. To make it towable he’d use the UB1000’s towing system: two longboard wheels mounted on a narrow board fixed to the aft stem of the canoe, with a swivel-mount receptacle beneath the saddle of his bike where the forward stem connects.
Matt was focused on reducing weight. His early rough calculations estimated the canoe would weigh around 15 lbs. One way to make it lighter was to remove structural elements: fewer stringers and frames would mean less weight. He started with the stringers, working first on paper and then using the original PHEATHER to visualize possible placements. “The new hull shape would be very similar to my original boat, but lower. I decided to grab some painter’s tape and experiment with different stringer positions on my original boat. It was very quickly apparent what would work and what wouldn’t.” While he was intent on reducing weight, Matt didn’t want to sacrifice stiffness in the new canoe. As he worked, he saw that he had plenty of strength in the ends, but needed more structure in the middle. “I came up with the idea of a half (70″-long) stringer that would be placed amidships between the uppermost full-length stringer and the inwale.”
To fix the skin at the stems, Matt applied adhesive to both stem and vinyl and then pulled tension into the vinyl manually, wrapping it around the stem from both sides and holding it taut with as many clamps as he could fit. The meranti marine plywood stem was designed for lightness and strength. Protruding beyond the gunwale is the stem bracket that will join with the trailer hitch on Matt’s bike.
The biggest shape difference between PHEATHER and PHEATHER 2 was in the sheer. On PHEATHER the sheer was flat but, says Matt, “I decided to introduce some negative sheer. If you heel a canoe it always floods first at the center—the bow and stern are never the first to go. For a canoe working in big waves it makes sense to have high ends, but this boat is for calm waters only. That realization motivated me to lower the ends, save weight, maintain function, and maybe even look cool.”
Freeboard was next to go. Studying videos and photographs of PHEATHER underway, he was confident that he could reduce the freeboard of the new canoe from 13″ to 9″ but still keep the water out. He also flattened the athwartship curve of the bottom to provide more stability.
On launching day Matt towed PHEATHER 2 to the lake at Victoria Park and stood his bike beside the sign that first inspired his urban boating journey back in 2021.
For the build Matt made five stations: one central and two on either side, identified from bow to stern as 3-2-1-2-3. In PHEATHER the forward and aft versions of stations 2 and 3 were identical, but in PHEATHER 2 he made some changes: “I wanted to play a little with making the boat somewhat asymmetrical. The idea was ‘sleek on the front end’ to cut through the water and ‘slightly bulbous behind the seat’ for more buoyancy.” He built the stations out of plywood and drilled 1″ holes into each to receive releasable zip-ties that would hold the stringers, keel, and gunwales in place until the frames were glued in. For stringers he used 12′ lengths of western red cedar left over from the original PHEATHER project, four to each side. He made the stems out of 1⁄2″ plywood, designing them to rake into the boat in order to maintain the waterline length, and saving some weight by shortening the chines and gunwales. While the resulting shape is reminiscent of the sturgeon-nosed canoes of the First Nation peoples of the Northwest, Matt’s interpretation is less exaggerated and includes solid stems to which the stringers are glued.
The keel and gunwales were of scarfed lengths of ash, and once Matt was sure he had the shapes of his stems right, he zip-tied everything together—stations, keel, gunwales, stringers—in preparation for installing the frames. There would be nine 3⁄4″ × 3⁄16″ ash frames. Matt had soaked the stock in his cistern for several days and on the day of installation steamed each frame for 16 minutes. As he bent them in place, he first clamped them and then zip-tied them to the stations, stringers, and keel—all nine frames were installed in two hours. The following day, Matt glued the frames in place. Later, after one of the epoxied ash-to-cedar joins broke, he would also apply waxed polyester lashings throughout.
After Matt lowered PHEATHER 2 into the water at Victoria Park, he was delighted to see her floating with no sign of any leaks.
After installing small decks in either end—“for strength and looks”—it was finally time to apply the transparent skin. Matt had been experimenting with different materials—20-gauge vinyl and 4-oz Dacron—and application techniques, testing the adherence of vinyl to wood, and trying different methods of waterproofing and heat-shrinking Dacron. In the end he decided to use 20-gauge clear vinyl—12.9 oz per square yard—with HH-66 adhesive to secure it to the frame.
Wishing to avoid inhaling too many of the adhesive’s solvent vapors, he moved the project out of the shop and into the driveway and began by rolling out and centering the 5 yards of vinyl over the bottom of the inverted canoe, still supported by the five stations. When he was confident that the vinyl was centered, he applied painter’s tape to the fabric where it rested on the keel. This allowed him to remove the vinyl but still see the centerline so that he could apply glue to both the keel and the vinyl. After curing the glue for several minutes he carefully lifted the vinyl back into place and pressed it down onto the keel. He then left it to fully cure for 24 hours before moving onto the attachment at the gunwales. To stretch the vinyl across the frame of the canoe and around the stems, Matt decided against using heat. Instead he simply pulled the vinyl into place, each time marking the spot with painter’s tape, releasing the vinyl, applying the glue to both parts and, when the glue was tacky, bringing the vinyl back into place and holding it taut with many spring clamps. It was a time-consuming process but not one that Matt wanted to rush—after all, if the vinyl didn’t hold or was too loose, all his hard work would have been in vain.
As he paddles PHEATHER 2 around Victoria Lake, Matt can now enjoy the view above and below the water.
Matt launched PHEATHER 2 on July 19, 2025. He had awoken early and made a list of all that he still had to do: take off the clamps, install the seat, and put on the longboard wheels, along with a number of other minor items. And before he headed for the park, he had one last thing to do, weigh her. The scale settled at 11.6 lbs, with the seat installed. With PHEATHER 2 in tow, he set off on his bike. At the park, he carefully set the canoe into the water and climbed on board. “It initially felt weird, but I’d almost expected that,” he says. “Had I designed it tippy or was it that I wasn’t used to its characteristics? It quickly proved to be the latter, and I set off for two loops of the lake. What a blast! It worked! It didn’t sink! It didn’t tip me out and it didn’t leak!”
Since last July, Matt and PHEATHER 2 have returned to the lake on multiple occasions. “The mood of the park changes,” he says, from “quiet misty mornings to loud crowds.” He’s connected with friends old and new beside the lake, “the same senior woman pushing her walker down the trail, the same people sitting on the same bench, kids feeding fish from the bridge… The wildlife has also gotten used to me. I have a working relationship with the resident swans, Otis and Ophelia; mid-July to mid-August schools of fish gather under a mulberry tree that overhangs the water…” And all the while, Matt paddles silently by, taking delight in seeing the water break around the bow from within the canoe; pausing to watch a downy feather float past his knees; gazing at a fish as it swims by beneath his feet. “She wouldn’t last a minute in big waves or a fast-flowing river,” he says of his creation, “but as a source of exercise and a little serenity in a bustling city, she’s hard to beat.”
Jenny Bennett is editor of Small Boats.
Do you have a boat with an interesting story? Please email us. We’d like to hear about it and share it with other Small Boats readers.
Interested in space-saving or lightweight boats? See…
A Nesting Dinghy, a stylish 11′ sailboat that divides in two to fit in the back of a small pickup truck.
A Twin Cities Boat, Matt Morris’s first Urban Boat project—a boat that could fit in the trunk of his car or be trailered behind his bike.
The Hazel 18 is an elegant plank-on-frame daysailer from Gannon & Benjamin of Martha’s Vineyard, Massachusetts. With plenty of room for a party of adults or a gaggle of kids, she fills the niche between small daysailer and small pocket cruiser.
The Hazel 18 is an elegant plank-on-frame daysailer. Her designer, Nat Benjamin, is co-proprietor of the Vineyard Haven, Massachusetts-based boatyard Gannon & Benjamin Marine Railway, which built her. This yard has a well-earned reputation as one of the finest builders of plank-on-frame hulls in the United States; they’ve built boats ranging from small dinghies to a 65′ oceangoing schooner—most of them to Benjamin’s designs. Included in that output is a series of fine daysailers. The new boat is meant to fill a vacant niche in the daysailer line—something between G & B’s 14′ Quista (an enlargement of the well-known Beetle Cat) and their 21′ Bella-class sloop.
“I call it an intergenerational boat,” says Benjamin of Hazel. “It’s something that adults and kids can sail separately or together.”
Hazel is Benjamin’s design No. 78, and hull No. 63 for the yard. The intent behind the boat was a simply rigged, simply maintained, and simply sailed day boat—something along the lines of a Rhodes 19. Its only varnish is on the spars; the interior is oiled, and everything else painted. It was also meant to be easy to set up and rig.
“Just pick up the mast and stick it in,” says Benjamin. “I was after simplicity. You don’t need a whole lot of stuff to go sailing, and in fact it’s more enjoyable if you don’t have too much.”
This boat first caught my eye when I saw its sail plan in one of Gannon & Benjamin’s advertisements in WoodenBoat magazine. It was hanging on the wall of our production department, and I was immediately struck by the boat’s size, rig, and style. It seems that this sort of boat—a decked, plank-on-frame daysailer of this size with classical good looks—was absent not only from G & B’s line of offerings, but also from most contemporary ones. I made a mental note to seize any opportunity to inspect the boat in the coming season, and that chance arrived in late June.
“Do you think you’ve hit the mark?” I asked when I met the designer for a long-anticipated outing at The WoodenBoat Show at Mystic Seaport. “I do,” he said. “It’s very well balanced. A young person or an old person could sail it.” That assertion would be proved handily when we went sailing a few hours later.
Benjamin Mendlowitz
Designer Nat Benjamin drew two sail plans for the Hazel 18: a gaff rig, and a Bermudan one. At the time of this writing, the gaff option had just been launched, and the Bermudan was being rigged.
Designing and building the Hazel 18
The Hazel 18 is planked in 5⁄8″ cedar on steambent oak frames. The sheerstrakes, broadstrakes, and garboards are of wana—a South American species that’s nearly as dense as teak, and which provides extra strength and screw-holding where required. The decks have the usual deckbeams, and are covered in plywood sheathed in canvas. The canvas is coated in a magical goop called Vulkem, a formulation meant for parking lots and football stadiums. Some years ago, Gannon & Benjamin discovered that this stuff seals canvas completely, and its color looks good, to boot.
“We’d given up on canvas until 15 years ago,” says Benjamin of the Vulkem epiphany. “I don’t think that deck will have to be painted for 10 years.”
The spars are of spruce, and the mast is hollow. The sails, built by Roy Downs of Danvers, Massachusetts, continue with the “simple” philosophy. The jib was set up like that of a Herreshoff 12 1/2, which is to say that it rides on a jibboom, and is self-tending. Set it and go. The mainsail is laced to the mast. Benjamin designed the boat with a marconi rig, but Steve Corkery, a boat broker and mentor to many on traditional boat details, suggested a gaff-rig option. Benjamin obliged, and drew that rig, too.
G & B built the first two boats on speculation, one gaff-rigged, and one marconi. They’re for sale for $65,000. Skilled would-be builders with more time than money should take heart: At the time of this writing, Benjamin said he’d be willing to sell plans for the boat, though at that point he did not have a detailed construction drawing. At present, the lines, sail plan, and scantling sheet are the extent of the package.
The boat carries 171 sq ft of sail, and weighs 1,900 lbs. The blades—centerboard and rudder—are built of plywood, and the centerboard has 25 lbs of lead cast into it; this weight keeps the board where it belongs when it’s lowered, but allows it to rise in the event of a grounding. The hardware is simple, too: A bronze Reineck swivel cam cleat belays the mainsheet, and all other blocks are of Tufnol and were purchased from R&W Rope Warehouse.
While Gannon & Benjamin are specialists in plank-on-frame construction, many home-based builders would likely be interested in other construction techniques— methods that require less skill than plank-on-frame, or whose materials are more available and workable in the average home-based shop than live-edge cedar and bending-quality white oak. Benjamin said he would not be opposed to developing the construction for glued-lap—the technique whereby lapstrake planks are cut from sheet plywood rather than from solid wood, and glued together with epoxy rather than riveted. It’s a tantalizing option. But after sailing the boat, I can’t help but think that something would be lost in this translation, as there’s a warmth and timelessness to the cedar-planked prototype. And it smells good, too.
Benjamin Mendlowitz
Nat Benjamin calls the Hazel 18 an “intergenerational boat.” She’ll be fun and interesting for sailors young, old, and in-between.
Taking the Hazel 18 for a spin
My outing in the Hazel 18 began with an awkward departure dictated by a narrow boat-show slip with the wind blowing right into it. We handed the boat out past our neighbors; once we had searoom, we bore away and she immediately settled into the groove, with just two fingers on the tiller. Benjamin had said before we departed that the boat was “nice to sail… responsive and well balanced.” I couldn’t have agreed more when I took the helm. She proved to be quick in stays as we shorttacked down the Mystic River, and she was well mannered as we reached back to the show—smoothly jibing twice.
I was delighted with the finely proportioned tiller, too. While this may seem a rather mundane observation, consider that the tiller completes the human connection to the boat. It’s a very important detail, I think, and one that’s often overlooked. I find it incredibly disappointing to grasp a heavy, clunky chunk of a tiller on an otherwise fine sailing boat.
The boat’s easy ergonomics struck me next. Simple bench seats run down either side of the boat, and the deep coamings are properly angled for good and comfortable back support. I recall hearing many years ago that a certain fast-food chain designed its seats to be uncomfortable after about 15 minutes, in order to promote turnover. Whether that’s true or not, it seems that many boats are similarly designed to promote short outings. Not so the Hazel 18. She’s no McDaysailer; I could have sailed her all day.
Benjamin Mendlowitz
Simplicity is a hallmark of the new daysailer. The boat’s only varnish is on the spars; all other surfaces are oiled or painted. Lacing attaches the sails to the spars, and the hardware is minimal.
But I didn’t sail her all day, because schedule dictated our return to shore. Nat Benjamin and Ross Gannon were to be celebrated that night at a dinner honoring their 32 years of boatbuildling accomplishments. So we headed toward the party’s venue, where we’d turn the boat over to a youthful crew of Gannon & Benjamin family members and friends who hollered to us from shore as we approached. As we neared our landing area, Steve Corkery, the boat broker, stood on the deck of Nat Benjamin’s schooner, CHARLOTTE. Knowing that Steve is a gimlet-eyed observer of details, Nat and Ross looked at each other, chuckled, and acknowledged quietly that Hazel’s gaff peak needed to be raised. Corkery, they said, was going to say something. They’d barely got those words out when we heard Corkery’s voice roll across the water, aimed at no one as if he were thinking out loud: “peak up that gaff.” Someone jumped to the halyard.
Ross noticed an open granite wall near the party venue and suggested I bring the boat in there. Hmmmm… granite meets cedar, I thought as I approached the wall. We’d left the fenders back at the boat’s show slip. How much way would she carry into the wind, I wondered? How tight a circle would she carve? I made a nice wide turn, keeping a little bit of wind angle in the bank, in case she needed a little goose at the end. I needn’t have worried. With that long waterline and four grown men aboard, she carried plenty of way. In fact, I came in just a little hot, but Ross was able to effortlessly arrest the extra speed with his hands. The adults all piled out of the boat, and a crew of six or seven kids piled in and were off.
Later that night, as the party celebrating Gannon & Benjamin got underway, the boat continued to sail, well past sunset, with that gaggle of kids aboard, and crews coming and going. The sight was a beautiful visual tribute to a fine partnership that continues to turn out timeless classics. An intergenerational boat, indeed.
Finished boats and plans are available from Gannon & Benjamin Marine Railway, Box 1095, Beach Rd., Vineyard Haven, MA 02568; 508–693–4658.
Firm bilges, shallow draft, and modest beam make Hazel both stable and fast. The marconi and gaff sail plans each have a combined area of 171 sq ft.
Nat Benjamin
Nat Benjamin designed the Hazel 18 as a wholesome daysailer that fits in the same niche as the popular Rhodes 19. The profile shows the influence of classic New England boats.
Taking inspiration from New England boat designs
Classic boat designs that originated in New England inspired many modern boatbuilders. Here are a few other boats rooted in New England tradition.
Brockway Skiff, a budget-friendly skiff for professional and recreational watermen designed and built by Earl Brockway of Old Saybrook, Connecticut Haven 12 1⁄2, a trailerable daysailer designed by Joel White of Brooklin, Maine, in 1985, but based on N.G. Herreshoff’s original Herreshoff 12 1⁄2 designed in Bristol, Rhode Island in 1914- Hampton Sloop, a family boat based on a century-old original developed for fishing in and around Hampton, New Hampshire
Is there a boat you’d like to know more about? Have you built one that you think other Small Boats Magazine readers would enjoy? Please email us!
Form follows function: the Cross Island Skiff is built to carry cargo. With one person aboard, the bow rides high, but add a few friends and their gear, and it comes into trim.
The Cross Island skiff is a sturdy, reliable, and rugged boat built for the often boisterous waters of the open Atlantic coast of Nova Scotia. The boat is named for an island that lies at the mouth of Lunenburg Bay; indeed, the expressions “inside” or “outside of Cross” are local navigational references. To the south of Cross the next reasonable landfall is Bermuda, some 720 nautical miles away; just to the north of Cross is Hounds Ledges. The water between Cross and its neighboring island of East Point shoals up dramatically and on many a day can produce some rather startling sea states. For all but a few short weeks late in the summer, the water temperature here is somewhere between freezing and cold. If you are looking for a capable boat under 20′ that is easily beachable, I can hardly think of a better choice than the Cross Island skiff. It’s a true native of Lunenburg Bay.
The Cross Island skiff is an evolutionary step or two from the legendary Lunenburg Banks dory; it’s really an outboard motorboat, and not a rowboat—though it can be rowed. A Banks dory with a sailing rig or under oars would have been a common sight among these islands for most of the last century. But as outboards became more reliable, some clever dory builder decided to widen the old tombstone transom and change the sheer, and came up with the Cross Island skiff. The construction is unmistakably “dory” with its flat bottom, lapstrake construction, and utilitarian straight sides, but with it’s strong sheerline it’s still a fine-looking boat. Unfortunately, the historical details of this boat’s first builder have been lost in the fog bank lingering just off the coast.
Historically, most of Nova Scotia’s coastal islands were inhabited at some point by small communities working the local inshore fishing grounds, or in the case of Cross Island, maintaining the lighthouse. There are many local boats unique to their home waters and their builders all along this coast. The one common boat, though, is the dory. Men and boys would regularly make trips to the Banks aboard the great fishing schooners, and from those schooners “Banks dories” were launched and from those boats the real fishing was done. Thus the dory became a well-known and trusted boat, the logical and comfortable choice for a boat when back home among the coastal islands. Today many of these islands only have summer camps and seasonal visitors, but the surrounding waters remain unchanged—as does the need to dependably and safely travel back and forth from the mainland with friends and supplies. Thus the Cross Island skiff still has a place today.
A few years back, a very aged version of this skiff found its way to the Lunenburg Dory Shop, a venerable yet vibrant boatbuilding business located on the Lunenburg waterfront and in continual operation building wooden boats since 1917. That old skiff was too far gone to warrant anything other than palliative care, but the boat so struck lead builder Jay Langford that he took the lines off her before euthanizing the old gal. A few of these boats have now been built, and the results have, not so surprisingly, been wonderful. The one we see in the accompanying photographs is the outcome of a collaboration between students attending last fall’s Bosun School (a part of the educational work of the Lunenburg-based barque PICTON CASTLE) and Jay. The students of the Bosun School had no previous boatbuilding experience and little woodworking experience—all of which, I think, helps illustrate just how buildable such a boat is. With a little guidance from Jay or from The Dory Book by John Gardner, you could find yourself the proud builder of a very versatile and easily maintained boat. If building a boat is not on your “to do” list, I would imagine that Jay and the Dory Shop would be glad to build one for you.
Susan Corkum-Greek
Under the tutelage of Jay Langford, seven students from Picton Castle Bosun School built this Cross Island Skiff at the Lunenburg Dory Shop in October 2011, launching her after just two and a half weeks.
Building the Cross Island Skiff
The construction of the Cross Island skiff is much like that of other types of dories. The Dory Shop generally planks their boats with pine, but with this one silverballi left over from another project was used for the planking. The bottom is flat but for a little rocker, and planked fore-and-aft with oak cleats running athwartships holding all together. Once the bottom is built and carefully beveled to receive the garboard planks, it is pushed down onto preset blocking to get its curved rocker just right. An inner stem, building molds, and the transom are all set up on the bottom before planking begins. There are four strakes per side, each lapped to the previous strake, particularly at the ends of the boat where they are let in flush in the last 6″ or so. This enables the planking to lie flat against the stem and transom even at the laps. Once the sheerstrake is in place, five pairs of bent-knee frames are fit carefully over the plank laps. Gunwales, a breasthook, quarter knees, and a seat riser all but complete the boat.
The beauty of a dory lies partially in its simplicity, exemplified by the generous use of grown knees. In pairs, they form frames and as hanging knees they support the thwarts. There are also knees used to support the transom and gunwales. A builder could laminate these knees, but a dory is not that kind of a boat. The effort in tracking down some grown knees would be well worth it. These are straightforward traditional boats that are accustomed to working in less than idyllic conditions and with less than museum-like care. Most dories are painted, a few are soaked inside in pine tar and linseed oil—this is no place for varnish.
To me, the appeal of a dory lies in its accessibility. A builder can use locally available woods; a trip to your neighborhood sawmill would probably provide you with just what you’ll need. Keep it simple and traditional; a dory does not need to be built out of exotic woods (this one just happens to be) or fastened with expensive bronze screws. These are not the sort of boats where you would feel the need to remove your shoes before stepping aboard. And that is a big part of the appeal of such a boat: You are not going to spend a lot of time fussing with them; what you are going to do is spend a lot of time enjoying them. For exploring backwaters and uncharted beaches and islands, if there is an “all-terrain vehicle” of the marine world, this boat might well be it.
Michael Higgins
Dories are traditional working craft with a tough, painted finish. This means you can spend more time enjoying them and less time fussing with them.
The Cross Island skiff is not intended to row too much, and this one built out of silverballi is a little heavier than the standard pine edition. That being said, rowing is possible for short stretches or in a pinch, but that is not where a boat like this shines. Where a Cross Island skiff excels is in its ability to carry cargo, and lots of it. Like many dories, they are a little tender when empty, but fill them up with a load of gear and supplies, or cod and flounder, and the ride only gets better and better. Scooting around Lunenburg Harbor with only one person in the boat seated all the way aft to operate the outboard, the bow has a tendency to ride up, preventing the boat from getting up on a plane. If you were to run empty a lot of the time, a few hefty flat beach stones would make great company right up forward. When you get to your destination to load the boat with your friends and gear, the beach stones will be right at home when you leave them at their new beach.
With a modest, by today’s standards, 15-hp outboard motor, the Cross Island skiff will move right along, and if you are really looking to haul a cargo of cement or gravel out to the construction site on the island, the skiff would be able to handle a little more horsepower as long as when she was empty you had a way to keep the bow down. At some point, though, additional horsepower would only lead to a bigger rooster tail and increased fuel consumption.
One of the more charming anomalies with dories is that they are identified by the length of their bottoms, not their length overall. So to be true to that tradition, the Cross Island skiff is a 14′ dory, although overall she is 16′. Her beam is 6′ 1″, and her draft is the better part of not much. Most people speculate that this version weighs close to 400 lbs, but built out of pine she would weigh much closer to 300 lbs. This boat will reward the owner with years of loyal service while demanding very little in return. If you can keep the rainwater out of her for the most part during the summer and the snow off her for the winter, and give her a little pine tar and or paint from time to time, you will have a very happy dory.
Plans and completed boats available from The Dory Shop.
Cross Island Skiff Particulars
LOA: 16′
Beam: 6′ 1″
Draft: not much
Displacement: 300–400 lbs
Power: 15 hp
Jay Langford
Dories are identified by the length of their bottoms, not their length overall. With her bottom 14′ long, the Cross Island Skiff is a 14′ dory skiff, though her total length is 16′.
Is there a boat you’d like to know more about? Have you built one that you think other Small Boats readers would enjoy? Please email us your suggestions.
More student-built boats
It’s great seeing the product of hard work put in by people taking to the craft of boatbuilding. Read these other stories about boats built by students.
Selway Fisher’s 15′ 8″ strip-planked Prospector canoe takes its name from a model built by the Canadian Chestnut Canoe Company beginning in 1905. Its roots lie in Native American birchbark canoes, whose construction evolved into production-built canvas-covered models like the Chestnut Prospector. The early Prospector was developed to carry a load of gear, to cope with choppy waters, and to be maneuverable.
Nigel Sharp
ELLAJEN is a 15′ 8″ strip-planked Prospector Canoe from the U.K.–based company Selway Fisher. The boat is based on a century-old model from the Canadian Chestnut Canoe Company.
Selway Fisher introduced a design for the stitch-and-glue Prospector about 20 years ago, basing it on the iconic Chestnut boat but giving it a modest gunter rig and rudder. Subsequently, they modified the hull for strip-planked construction. It has become the most popular of the company’s canoe range. Its generous rocker, flat bottom, round bilges, tumblehome, full bow and stern sections, and good freeboard amidships give it attributes similar to its namesake’s.
Building the ELLAJEN Prospector Canoe
Before Chris Smith began the nine-month Boatbuilding, Maintenance, and Support course at the Lyme Regis Boatbuilding Academy in September 2010, he went on a canoeing holiday with his girlfriend, Colleen, and their dog, Callie, on the River Tamar in southwest England. They enjoyed it so much that, knowing there might be an opportunity to build a boat for himself during the course, Chris decided he would like his own canoe. The criteria for his boat were: It would have room for two people, a dog, and some camping gear; and it would have a sailing rig to take some of the effort out of longer trips. After a great deal of research, he chose the Selway Fisher Prospector.
Chris planked his hull in 1⁄4″ × 7⁄8″ western red cedar strips, as specified by Selway Fisher’s design. However, whereas the plans called for the planks to be wired together and then epoxied to each other at the ends of the boat, instructor Justin Adkin suggested that a stem and “sternpost” should be fitted, and the result is much tidier. The builder had some difficulty in ensuring that the port and starboard planks met neatly, and he thinks this was due to the cumulative effect of very small variations in the widths of planks, or in slight differences in how tightly the planks were fastened to each other. Chris was greatly encouraged by Justin to make sure it looked right, and it does, although there was a certain amount of “cheating” involved with small filler pieces of wood being let in.
Chris Smith
ELLAJEN’s strip-planked construction employs bead-and-cove strips glued together over a building jig. The planked hull is sheathed in fiberglass inside and out and clear-coated in epoxy. It is then varnished, for UV-resistance.
The hull was sheathed inside and out with woven ’glass cloth set in epoxy. Chris is happy with the finish on the inside, which was resin-infused. But on the outside, which was laid up by hand, nobody noticed that two bits of ’glass had been accidentally pulled apart until the epoxy had cured, and the result is a disappointing “horrible cloudy strip.” The long-term solution may be to paint the outside.
The gunwales, inwales, seats, and mast partners were all constructed from white oak, as were the forward and after decks (below which there are small buoyancy compartments), which also had sapele inlaid seams. Selway Fisher’s design shows the pivot bolts for the leeboards going through the hull sides, but as Chris was keen for the boat to look just like a simple paddling canoe when she wasn’t sailing, he came up with another solution: a removable leeboard support structure that clamps to the inwales.
The foils are all of Douglas fir and are ’glassed over, and their bottom edges have a solid epoxy strip to reduce damage if coming ashore carelessly. The lifting rudder blade is set in a plywood stock with a conventional dinghy-type tiller in laminated white oak and sapele, but sailing trials would later show that this needs to be modified.
The Prospector’s standard rig consists of a gunter mainsail and a jib on a stayed mast. Other types of rig are available in the Selway Fisher range, and they are, effectively, interchangeable. For the sake of simplicity, Chris devised his own unstayed mast with a spritsail, giving it the same sail area and center of effort as Selway Fisher’s sail plan. The three spars are made from carbon-fiber tube. When it became apparent just before Launch Day that the section for the mast was, for some undetermined reason, too short, it had to be lengthened with a piece of Sitka spruce. While that was a disappointment at first, Chris has grown to like its quirkiness. He made the sail himself while doing a short sailmaking course—an optional extra in the Academy’s curriculum. The sail is a very light Kevlar scrim, a cloth normally used for spinnakers; it has a strength equivalent to Dacron’s, while being a tenth of the weight.
In common with many of the other students, Chris had to work increasingly long hours toward the end to be ready for Launch Day. This included a period when he and another student worked a shift system to ensure they got enough varnish on the boat. Chris recalls sleeping on a sofa at the college and getting up at 2 a.m. when it was time to apply another coat.
Nigel Sharp
A strip-planked canoe may be fitted out simply with a minimum of detail, or its joinery and personalization may be taken to a high level, as we see here.
Getting ELLAJEN on the water
Chris’s canoe was launched on June 7, 2011, along with 11 other boats built by his fellow students (see LUCIE). She was named ELLAJEN in memory of Chris and Colleen’s grandmothers, both of whom had died during the previous month. The conditions on Launch Day were quite blustery, and so Chris and Colleen, with Callie on board too, initially only paddled ELLAJEN inside the sheltered harbor. However, when some of the other boats started to sail, they were encouraged to hoist their spritsail and venture out into Lyme Bay.
“The performance of the boat exceeded expectations on Launch Day,” said Chris. “The instructors were really surprised too and kept commenting on how well she was sailing.”
I got the chance to try ELLAJEN a year later, when we arranged to meet at the picturesque and sheltered village of Dittisham on the River Dart in Devon. During the time since he’d launched the boat, Chris’s further studies had prevented all but very limited use of his canoe. We were lucky enough to enjoy some gentle and unthreatening conditions on the Dart, where ELLAJEN slipped though the water effortlessly under sail. However, both Chris and I thought the tiller and mainsheet arrangement was awkward: It was difficult to know how to sit in the boat, or how to move while tacking, when it was particularly difficult to reach out and hold the tiller hard over. We discussed possible solutions, probably the best of which would be to have either a fore-and-aft push-pull tiller, or a simple continuous steering line, connected to an athwartships yoke on the rudder stock. This would also allow the mainsheet to be modified by having its 2:1 tackle at the very aft end of the boom and taking it along the boom to a block near the gooseneck. The helmsman would then be able to sit inside the canoe facing forward at all times.
ELLAJEN’s generous rocker allows her to be very maneuverable, but when Chris and I tried paddling her we found that she would occasionally veer off one way or the other and would be reluctant to return to a straight course. We thought this may have been partly due to our inexperience of paddling canoes, but designer Paul Fisher later told me that one answer would be to heel the boat over on one side so a bilge dug into the water. He also said that the Prospector has better directional stability when more laden—which ELLAJEN will be on future camping trips.
Nigel Sharp
One of builder Chris Smith’s requirements for his new boat was that it be able to carry his dog. It seems to meet that demand handily.
Some sailing Prospectors are built with crossarms and floats in order to improve their sailing stability. In fact, one boat so-equipped sails regularly in the notoriously rough Bristol Channel. As Chris’s intention was to stick to sheltered estuaries, he decided not to have them. But in one of his initial outings, he did have one capsize as a result of which he is now contemplating fitting the floats. He’s also encountered an unusual challenge that adds to the boat’s inherent instability: “Callie is obsessed with water,” Chris told me. “She fixates on waves and will suddenly start jumping from side to side in an unpredictable way.” Perhaps it is time to fit those floats.
Plans are available from Selway Fisher Design, 15 King St., Melksham, Wiltshire SN12 6HB, U.K.; +44 (0)1225 705074.
Prospector Canoe Particulars
LOA: 15′ 7″
LWL: 32′ 6″
Beam: 12′ 6″
Draft: Not much
Weight: 60 lbs
Capacity: 700 lbs
Ample keel rocker makes the Selway Fisher Prospector a maneuverable boat, while firm bilges make it stable. The gunter sail plan shown here was drawn for the boat; Chris Smith, builder of ELLAJEN, chose a gaff-headed rig from the Selway Fisher catalog.
Is there a boat you’d like to know more about? Have you built one that you think other Small Boats readers would enjoy? Please email us your suggestions.
When talking to Small Boats readers and prospective readers, one question comes up more than others: “How small is a small boat?” I think what is meant by the query is “How big can a small boat be?” It’d be great to reply with some specific numbers: “So long by so wide.” But the real answer is neither so cut-and-dried, nor so succinct. A small boat, by our definition, is a boat that can be maintained and stored at home—in a driveway, garage, barn. It can be, if not cartopped, trailered behind an average family car. It can be launched and recovered without the need of commercial lifts or outside assistance. In short, the size range of small boats is broad and flexible.
This first issue of the new year highlights this diversity perfectly. At one end of the scale we have boats designed by Tracy O’Brien and built by Steve Wenger in Colorado. O’Brien’s designs for plywood-construction open boats for amateur builders are simple, well suited to their purpose, and yes, some of them are quite small. But at the other end of the scale we have the BayCruiser 23, a sophisticated fiberglass sailboat with accommodations for four. With its 23′ length and 8′ beam, the BayCruiser could be considered quite large and out of sync with our prerequisites. But the BayCruiser is water-ballasted and while its maximum weight might be 2,972 lbs, its unballasted weight is 1,870 lbs, making it a boat that can be launched and recovered by a single person, trailered behind an average-sized car, and easily stored in a driveway or small barn for at-home maintenance.
Small Boats
BABY BLUES is a well-loved and much-used Phil Bolger–designed Idaho sharpie. At 31′ she might not be everyone’s idea of “small,” but thanks to her shoal draft and flat bottom she’s a fast, roomy beach cruiser, and her light hull weight means she can be trailered behind a family SUV.
And the range can be even more exaggerated. Take, for example, Tyler Ellis’s diminutive STELLA ROSE, a runabout for the back of the car, featured in last month’s issue, or AVANTI featured in May 2021—with overall lengths of 6′ 10″ and 7′ 2″ respectively, both are most definitely “small.” While, at the opposite end of the premise is BABY BLUES, a trailerable Phil Bolger Idaho sharpie (seen above), which at 31′ LOA may not be small in length but, with a beam of just 5′ 3″ and a minimal draft of 6″, is clearly “small” at heart.
New Life for a Regifted Canoe
From Maine, Small Boats’ proofreader, Jane Crosen, sent us a family story that ended our year on a hopeful note. She writes:
“Some years ago my brother, Glenn Crosen, had been gifted a vintage Old Town canoe in thanks for helping a neighbor through a challenging situation. After moving to Standish, Maine, where he had little storage space and a runabout better suited to his boating style and Sebago Lake’s big waters, he decided to pass the canoe on to someone who would enjoy and take care of it, and asked me to reach out to my friends and colleagues in Maine’s wooden-boat community. He sent me photos and a few details of the canoe—a graceful classic, green with bright trim and interior—which on a May morning I forwarded to a few friends who might be interested: Restored 1946 Old Town Otca canoe, 17′ with 34″ beam, wood and canvas, hull #176046.
“I heard back right away from Tom Jackson, WoodenBoat’s associate editor, who knew a special canoe when he saw one. Then, a few hours later, I received a reply from my friend Steve Keith, a canoe builder in Grand Lake Stream, Maine. Steve had an amazing story of serendipity and, it seemed, destiny.
Courtesy of the Crosen family
When Glenn Crosen moved to Maine, he had little storage space and, with a runabout better suited to his boating wishes, wanted to pass his 1946 Old Town canoe on to someone who would appreciate and take good care of it.
“That very morning, Steve had gotten a call from Jenny Land Mackenzie, a young teacher at St. Johnsbury Academy in Vermont, who had owned two canoes that Steve had built—identical 17′ wood-and-canvas canoes designed by Rollin Thurlow. The first had been built for Jenny as a 1996 college graduation present from her parents; after plenty of adventures on lakes and rivers, it had been destroyed in a 2020 barn fire at her home in Peacham. The next year, Steve had helped Jenny replace her beloved canoe by putting her in touch with his friend Fred Morrison, for whom he had built the other canoe. Fred had rarely used it, mostly paddling a different canoe—one he didn’t have to worry about scuffing—and was willing to let her buy it. Jenny and her husband John rebuilt their historic barn and stored the second canoe aloft with a pulley system. It, too, had some nice adventures. Then, in July 2024 Hurricane Beryl flooded their stream, washing their barn and canoe, their cars, and most of their yard downstream, and wrecking their house. Now, having finally recovered from the flood disaster, on this May 2025 morning Jenny had called Steve asking if he would build her a new canoe. And there, in Steve’s inbox, were pictures of just the kind of canoe she was looking for, being offered as a pass-along gift to someone who would appreciate it.
“Meanwhile, however, Glenn had quickly said yes to Tom Jackson as the first taker.
“When I relayed Steve’s email with Jenny’s story, it became clear to all that the serendipitous timing pointed to Jenny as someone well deserving of a regifted canoe, who had loved and lost and would treasure this one. Glenn and Tom did the right thing, and in late summer Jenny and John came to Standish to pick up the canoe, lingering to visit like old friends and paddle the canoe in the Songo River. Back in Vermont, Jenny wrote to Steve, ‘You and Glenn rescued me… The beautiful old canoe is enjoying lakes near our home in Craftsbury.’”
Courtesy of Jenny Land Mackenzie
Having loved and lost two wood-and-canvas canoes, Jenny Land Mackenzie gratefully took ownership of Glenn’s canoe and returned with it to Vermont. She has since used it extensively on the lakes around her home in Craftsbury.
In closing, Jane let us know that Glenn sadly passed away shortly after Jenny and John picked up the canoe. But, she said, Glenn felt great about passing the canoe along to Jenny, and having a special visit with them just before he died made the gift all the more meaningful.
From everyone at Small Boats, we wish Jane, Jenny, and all our readers a happy new year filled with peace, promise, and paddling, wherever you are.
Back in 2006, I was invited to join a panel of judges for the annual Classic Boat Design Competition. That year’s challenge was to design a boat suitable for the increasing number of Raids then proliferating in Europe and North America. One of the entries was CRAIC, a 21′ 10″ slippery half-decker with a ketch rig, water ballast, and space enough for four crew to sail and row. She was designed by Matt Newland who had recently joined Swallow Boats, his father’s business in Wales, making kit boats. CRAIC was placed second in the contest, and Matt went on to repurpose the design with more beam and slightly less sail area, as the basis for Swallow Boats’ first production boat: the BayRaider 20, launched the following year. The boat was an immediate success, and two years later the company launched a cabin version, with higher freeboard and more draft. Matt admits that the BayCruiser 20 was slightly “dumpy,” so when a client asked him to build the same boat but 3′ longer, he jumped at the opportunity. Thus, the BayCruiser 23 was born.
Since the first BayCruiser 23 was launched in 2013, the design has proven remarkably popular, with nearly 100 boats built to date, about half of which have gone to the U.K. and the rest as far afield as North America, Germany, and The Netherlands. Apart from three plywood boats—the first two U.K. boats and one built under license by Denman Marine in Tasmania—all the BayCruiser 23s have fiberglass hulls with molded deck and cabintop and wood trim.
Photographs by the author
The plumb stem and simulated wide-strake fiberglass hull with wood trim give the BayCruiser 23 traditional appeal, while the versatile water-ballast system, fully-battened mainsail, and carbon-fiber mast combine to give a fast and agile performance akin to a dinghy.
Versatility from water ballast
According to Matt, the key to the design’s success—and indeed to the whole Swallow Yachts (as the company is now called) product line—is the water ballast held in two tanks beneath the V-berth and cockpit floor.
“We like to say that with the BayCruiser 23, you get two boats for the price of one,” says Matt. “You’ve got this fast boat that will do 7–8 knots off the wind when it’s unballasted, so if you have mates who are prepared to move around—who are basically dinghy sailors—then you’re going to have some great fun in it. But you’ve also got a safe, cruising mode when the water-ballast tanks are full. And even with the tanks full, you probably won’t notice it. On a calm day, you might sail a quarter of a knot slower and be less quick to accelerate, but as soon as a gust hits, you’ll be grateful for the extra stability.”
The cockpit is spacious and comfortable. The angled sides provide ergonomic backrests, while the hinged, wide seat tops cover generous storage lockers with room enough for fenders, docklines, and more.
The other great advantage of the water ballast is that you can get rid of it when you no longer need it, such as when trailering the boat. When the tanks are full, the water adds 1,102 lbs (500kg) low in the hull, producing a healthy 35 percent ballast ratio. But, when empty, the hull and rig combine to a relatively lightweight 1,870 lbs (850kg) which, coupled with a trailer (total weight approximately 1.4 tons), can be towed by a standard-sized family car. This lightness, combined with a carbon-fiber rig—half the weight of a conventional one—means that the BayCruiser 23 can not only be sailed singlehanded, but also rigged, launched, and recovered by a single person. According to Swallow Yachts, the boat can be fully rigged in about 30 minutes.
Sailing the BayCruiser 23
After admiring the BayCruiser 23 for years, I finally got to sail one at the end of a long, dreamy summer, just as everyone else was packing up for the winter. The weather was kind, and in mellow autumn sunshine I drove to the Swallow Yachts workshop overlooking the Teifi estuary in Wales, where the test boat was awaiting me.
As I stepped aboard Hull #72, built in 2020, my first impressions were how steady it felt and what a spacious cockpit it had—it turned out the two things were not unrelated. In common with many modern boats, the BayCruiser 23 has a wide transom and beam taken far aft. The result is a large cockpit and an increase in form stability when compared to a more traditional hull shape. As Matt pointed out, that initial stability is reassuring to both experienced and inexperienced sailors alike.
The outboard engine sits beneath the tiller and, thanks to a large aperture, can be tilted all the way up to bring its propeller out of the water. The hole is closed (but not watertight) with Mylar flaps to reduce drag.
With only a light breeze blowing, we set off with empty ballast tanks, and the BayCruiser 23 really did feel like an overgrown dinghy: responsive and light to the touch. The fully-battened mainsail is set on a deck-stepped carbon-fiber mast, and there is a fractional headsail; all the running lines lead back to the cockpit. As the sun lit up the waters of the Teifi, the boat did everything it was supposed to do. It sailed well close to the wind and flew along as soon as we eased the sheets to go on a reach, quickly clocking up 5.8 knots in about 10 knots of breeze. It’s no exaggeration to say the boat was completely vice-free in the gentle conditions.
As with a dinghy, however, you do have to watch the wind and keep the mainsheet uncleated, ready to be released if you are hit by a sudden gust. The centerboard has 154 lbs (70kg) of lead on its bottom edge, so when lowered it does provide some stabilizing weight. But with the ballast tanks empty, there is the possibility of capsize, even if the boat feels relatively stiff—something that may come as a surprise to anyone used to sailing traditional long-keeled boats.
Later, we filled the ballast tanks by simply opening a seacock and allowing the water to flow in. From start to finish—empty to full—the operation takes about 12 minutes. To prevent the water from sloshing around, the tanks must be filled completely. While the boat slowed down a little after filling, it was immediately more docile in the gusts. It was, indeed, like having two boats to play with. The only catch I could see was the possibility of being caught out with empty tanks and having to reballast in a squall; heaving-to in such conditions would require a calm skipper and good boat-handling skills. The tanks can be emptied when underway by activating the bilge pump, or when hauling out by opening the seacock and allowing the water to drain.
Down below, the off-white paneling and ceiling with light-colored wood trim and bright-blue cushions give a feeling of light and space. The folding table tops the centerboard trunk.
One of the most noticeable features of the BayCruiser 23 (which does take a bit of getting used to) is the large outboard well in the back of the cockpit beneath the tiller. It is designed to allow the outboard to be tilted up clear of the water, but doing so opens a large hole in the back of the boat. While Mylar flaps cover the slot beneath the raised outboard and reduce drag, Matt told me that some owners have retrofitted hinged plywood flaps to fully close the aperture when it’s not in use. If the hole is left open, it’s disconcerting to see water sloshing around in the aperture, though as one BayCruiser 23 owner told me, it does mean that the boat has one of the best-drained cockpits of any boat of its size. In practice, when the boat heels, a small amount of water does creep into the cockpit from the outboard well, but it immediately drains as soon as the BayCruiser 23 rights itself.
A comfortable cabin
Below decks, the cabin is divided along the centerline by the table-topped centerboard trunk and maststep post; despite this, the interior feels remarkably spacious for a 23′ boat. This is partly due to the light, modern decor—all-white panels set off by wood trim and vibrant blue cushions—and also thanks to some clever use of space. The open-plan cabin has sitting headroom only but is comfortable for a couple cruising or even, in a pinch, four people for short periods. On either side of the centerboard trunk there is a settee berth with storage beneath. A galley unit—complete with stainless-steel sink and pumped water, and space for a stove—is built into the forward end of the port berth, while to starboard is an easily accessed storage unit. These areas separate the main cabin from the fo’c’s’le where there is a V-berth with more storage beneath. Although this double berth is full length, for taller crew members the footroom forward looks pretty tight.
With the mainsheet traveler mounted aft, the cockpit is kept as uncluttered as possible. Lazyjacks for the mainsail and roller furling for the jib make it easy to lower the sails without fuss. The raised bulwarks—especially forward of the coach roof—make for a safer working environment when going forward to handle lines or the anchor. A samson post on the foredeck adds a functional touch of the traditional.
There are some nice design options, such as in Hull #72, a solid oak table atop the centerboard trunk. The tabletop is hinged on both sides of a center piece, folding up into an elegant, narrow table with a carved lip about 1⁄2″ high. At the forward end of the table—accessible whether it is open or closed—is a small hollowed-out cup to hold keys, coins, and other odds and ends. The biggest drawback below is the lack of an enclosed head, but at 23′ LOA and with a draft of just 1′ (centerboard up) you can’t expect miracles.
The BayCruiser 23 is a great option for sailors looking for a light, trailerable boat that will provide gratifying performance and comfort but will also look after them and their families when the going gets tough.
A regular contributor to Small Boats, Nic Compton is a freelance writer and photographer based in Devon, England. He has written about boats and the sea for more than 30 years and has published 16 nautical books, including a biography of the designer Iain Oughtred. He currently sails a 14′ Nigel Irens skiff and a 33′ Freedom cat-ketch.
The BayCruiser 23 is available from Swallow Yachts. Starting price is £55,000 plus tax (around $73,500), while optional extras include an asymmetric spinnaker with carbon bowsprit, a fridge installed beneath the companionway, a porta-potti, and more. Swallow Yachts has exported dozens of boats to the United States and says the process is “generally hassle-free.”
Is there a boat you’d like to know more about? Have you built one that you think other Small Boats readers would enjoy? Please email us your suggestions.
More small cabin-boat profiles
Selway-Fisher Heron 15, a hard-chined stitch-and-glue sloop, reviewed by Ram Sudama Eun Mara, a trailerable coastal cruiser designed by Iain Oughtred, reviewed by Steve Borgstrom Banjo 20, a compact outboard cruiser designed by Sam Devlin, reviewed by Christopher Cunningham
Paul Gartside’s 5.0 Meter Motor Launch, Design #261, is a 16′ 5″ stretched version of an earlier 13′ double-ender, LOOPEN, designed as a tender for a Dutch barge conversion. Early on, Gartside refined the 13-footer, moving the rudder from outboard to inboard “to move the helmsman weight farther forward, which is desirable in these double-ended hulls”—and ultimately it would become his Design #178, which, he says, “proved enduringly popular.” When Gartside was contacted by a customer asking for a similar boat to use on the Swiss lakes, the designer thought a larger and more substantial craft would be needed to cope with possible williwaws blowing down the steep surrounding hills. The customer’s workshop limited the length to just over 16′, and so Gartside returned Design #178 to the drawing board and created Design #261.
Like #178, the new design was a double-ender with plumb stem, sweet sheer with considerable rise to the bow, open cockpit, foredeck, and tucked canoe stern. For power, Gartside suggested a Yanmar 1GM diesel, and for construction, two layers of glued fore-and-aft western red cedar planking, with the inner layer “12mm, lined out for appearance, edge glued, with bronze screws into frames” and the outer layer “3mm, allowed to run off at sheer, glued and stapled.” The hull’s interior should be sheathed in 1,800gsm fiberglass with epoxy resin, and the decks double-skinned in western red cedar, with the inner layer laid diagonal and the outer fore and aft, giving a total thickness of 12mm. Beams should be of Douglas fir or pine, while he suggested European oak for the frames and floors, and unspecified hardwood for the horn timber, hog, keel, and stem.
Photographs by the author
The lines and general arrangement of the open launch, recently finished at the Boat Building Academy in Lyme Regis, U.K., are as designed by Paul Gartside. The method of hull construction—double-diagonal veneer over strip plank—and electric motor are, however, significantly different. Nevertheless, the overall appearance, feel, and weight of the double-ended launch have been maintained.
Building Design #261
When Ben Sims enrolled in the 40-week course at the Boat Building Academy in Lyme Regis, U.K., his father agreed to sponsor the building of a boat, and they both agreed that Design #261 would be suitable for use on the River Thames near their home at Wallingford in South Oxfordshire. Rather than follow the designer’s recommendation for double fore-and-aft planked construction, Ben opted to strip-plank the hull and finish it with an outer sheathing of two opposed diagonal cold-molded layers. Course tutors Mike Broome and Joe Blathwayt were on hand to help determine the various scantlings and other details for this method of construction.
After the lines were lofted and a ladder frame built, the nine molds were set up vertically, upside down. The inner parts of the sapele centerline components—the laminated stem and horn timber and the solid-wood hog—were then let into notches in the molds. Also let into the molds around the sheer was the 5⁄8″ Douglas-fir harpin—essentially a combination of a beam shelf and a base for the covering board. The inclusion of the harpin meant that the molds had to be collapsible to allow later removal.
Then it was time to start the planking. Yellow cedar was machined into 13⁄16″ × 7⁄16″ strips with bead-and-cove edges and scarfed together to give the required lengths. A batten was laid around the molds in the area of the waterline to find a position where it would lie naturally and thus determine where the planking should start. Once the first plank was fitted, the process continued upward toward the keel and downward toward the sheer. The planks were glued to each other with polyurethane adhesive, and to the centerline components and harpin—to which they were also temporarily screwed—with epoxy. All of the planks were allowed to over-run the stems before being trimmed to length. Most were easily bent into place, but the three strips nearest the sheer needed a damp rag applied to their after ends to help bring them into place.
The engine box, designed for a Yanmar 1GM diesel, provided plenty of room for an electric motor with room to spare for the batteries to power it.
Once all the strips were in place, the outside of the hull was long-boarded fair before the two layers of 7⁄64″ sapele veneers were applied. These were glued with epoxy, and initially held in place with plastic staples. Once the second veneer was faired, the outer parts of the centerline components were fitted, thereby sealing the ends of the now-trimmed planking layers: a laminated section at the stern, a solid keel, and a solid outer stem in three parts. The hole for the 1″-diameter shaft was bored through a sapele shaftlog that connects the horn timber and aft end of the hog. Copper-based antifouling paint was applied to the underwater areas, and the topsides were given a couple of coats of primer.
About half of the molds were removed while the hull was still upside down. It was not until the boat was right-side up, and the builders were sure the harpin would hold the shape during fit-out, that the remaining molds were removed. Then the inside of the hull was faired and ’glassed with two layers of 300gsm biaxial glass cloth and epoxy. Ten floors of 2″-thick sapele, three 5⁄8″-plywood frames, and two 5⁄8″-plywood bulkheads—the forward one being full height, the after one seat height—were all then fitted. While the plans for the rudder indicate a blade made of layers of vertical-grain Douglas fir over a 20mm bronze rod, Ben made his of two layers of 1″ plywood that sandwich a 7⁄8″-diameter stainless-steel rudderstock set in a fiberglass tube.
The boat can be trailered behind an average family-sized car. The 1 1⁄2″ rope fender adds an aesthetic touch of tradition.
The solid Douglas-fir foredeck beams establish the deck’s camber and are notched on their outer ends to be fastened to the underside of the harpin. Instead of the 12mm double-skin red cedar called for in the plans, a 1⁄4″-thick plywood subdeck was fitted to Ben’s boat and 3⁄8″ sapele covering boards were laid all around the sheer on top of the harpins; then 3″ × 1⁄4″ khaya deck planks were laid on the foredeck. Storage space beneath the foredeck is accessed via an amply sized hatch with hinged cover.
The 1 3⁄4″ × 7⁄8″ gunwales were fitted all around the sheer and then hollowed out to allow later fitting of the 1 1⁄2″-diameter three-strand rope fendering. The 4″-wide by 1⁄2″-thick coamings were installed around the cockpit; for most of their length they rise 2 1⁄2″ above the deck level, but in line with the after thwart, they are trimmed down to 2″, and ultimately continue, steam-bent, around the curve in the stern and flush with the covering board.
All of the interior fit-out is in sapele. There are two fixed 7⁄8″-thick sole boards either side of the centerline, with the outer ones divided into sections between frames and glued in, and the inner ones screwed in place to allow occasional access to the bilge. Seating is provided by an after thwart with high backrest, and benches that line both sides of the cockpit and end at the forward bulkhead. The combined engine and battery box is forward and incorporates wine stowage—designed by Ben—with space for four bottles in its after end.
With the rudder hung inboard, the classic lines of the canoe stern are uninterrupted. The tiller extends between the seat-back slats and has a leather sleeve to protect the varnish. The helmsperson can relax against the angled backrest, moving forward only if the full swing of the tiller is needed to make a tight turn.
Design #261 underway
Paul Gartside’s original concept was for the launch to have an electric motor, but he says, “considerations of cost and the limited range quickly blunted that enthusiasm,” and he now recommends the 9-hp Yanmar 1GM diesel engine. Nevertheless, Ben will be using his boat on the Upper Thames where, he decided, there are sufficient charging points to make an electric motor entirely practical. He has installed a Water World 4 kW motor, which is powered by two 3.4 kW/hr lithium-ion-phosphate batteries driving a three-bladed 10″-diameter propeller. During our brief trials on Launch Day at the Boat Building Academy, we found that with four adults on board, we were able to get up to approximately 5.5 knots while using 4 kW, 4.3 knots at 1.2 kW, and 1.5 knots at 250 watts. Further trials will, no doubt, reveal more accurate figures, but Water World’s expectation is that at a constant speed of 3.2 knots, the engine will run for about seven hours, allowing the boat to travel just over 22 nautical miles. By contrast, at the maximum power output of 4 kW, the motor would only run for about 90 minutes, giving a distance traveled of perhaps 8 miles. It is possible that further trials will reveal advantages if the pitch and/or diameter of the propeller are altered. Battery recharging time with the current 35-amp charger (installed under the forehatch) takes about four-and-a-half hours.
The comfortable open cockpit is spacious enough for four people to ride in style. The cover for the engine box has the height designed for the diesel, but the extra space wasn’t needed for the electric motor and, instead, was used to hold a rack for wine bottles.
With an all-up weight of just over half a ton, the boat is easily trailerable, and on launching day two people were able to float it off and haul it back on to the immersed trailer without difficulty. The boat is easily driven and, when going forward, turns 360° in about twice its length. As is to be expected of a boat with inboard motor and rudder, it is less easy to steer astern at slow speeds, but when speed picks up maintaining a course is straightforward. The cockpit is spacious and there is ample room for four adults to sit together, with space to squeeze in a couple more. It is particularly delightful to sit on the after thwart, leaning against the backrest—set at 11° for maximum ergonomic comfort—and steer the boat with the tiller, which extends between the slats of the backrest. When you need to swing the tiller through its maximum arc, you do have to momentarily shuffle forward, but this happens rarely. And, of course, the relative silence afforded by the electric motor will be a joy for leisurely travel and wildlife spotting on the Thames.
However this boat is built and powered, its eye-catching lines, sweeping sheer, and canoe stern are sure to turn heads, and give owners and their friends relaxed enjoyment on sheltered waters anywhere.
Nigel Sharp spent 35 years working in the boatbuilding industry before starting to write about nautical matters in 2010. Since then he has had numerous articles and eight books published.
Plans for Paul Gartside’s Design #261 are available from the designer. Study plans are $20, while the full set of six sheets are $150 for electronic delivery, $220 for printed (shipping and taxes not included).
Is there a boat you’d like to know more about? Have you built one that you think other Small Boats readers would enjoy? Please email us your suggestions.
More designs by Paul Gartside
WAYWARD, an efficient canal and river cruiser, reviewed by Harry Bryan. A 17′ Outboard Runabout, a sleek 1950s-styled motorboat for inshore waters, reviewed by Nigel Sharpe. Centerboard Lugger, an fine-lined beach-cruiser for sail, oar, and power, reviewed by Scott Sadil.
Early one morning in late May, under a cool overcast sky, I pulled in the docklines on CAMAS MOON, my 18′ gaff yawl, and motored quietly out of the marina in Sidney, near the south end of Vancouver Island. I was embarking on a planned month-long cruise, and was happy to be underway.
As I made it safely past the busy ferry routes feeding the Swartz Bay terminal—about 5 miles and two hours from the launch ramp—I could feel my whole body loosen, like a long exhalation after a deep subconsciously held breath. The clouds began to thin, and the slopes of the Salt Spring Island hills were still a verdant spring green. Few boats were out that weekday morning, and I felt like I had the whole area to myself.
Photographs by the author
Looking east across Haro Strait to Mount Baker in the early morning of the first day, I was encouraged by the calm conditions.
My planned 50-nautical-mile route led north through the idyllic cruising grounds of the Gulf Islands with their many sheltered coves, sand spits, anchorages, passages, parks, and small towns. From there, a 20-mile crossing of the Strait of Georgia, which separates south-central Vancouver Island from the British Columbia mainland, would—wind and tides permitting— position me for a 35-mile side trip up Jervis Inlet: a fjord that winds its way deep into the high mainland mountains to the smaller Princess Louisa Inlet, a land of high tumbling waterfalls and forest-clad mountains. Finally, I hoped to cruise the Discovery Islands of Desolation Sound at the north end of the Strait of Georgia. Everything would have to go right for this ambitious plan to succeed.
The weather in the Gulf Islands at the end of May can range from summer-like settled to late-winter boisterous. On that first morning, the winds were light and the waters calm, disturbed only by swirls of current and rafts of floating seabirds. For hours the steady drone of the outboard motor lulled me to a drowse…until suddenly the motor hesitated, spluttered, and quit. I checked the usual suspects—fuel line not blocked, tank’s air vent open; all seemed OK, and when I tried it again, the motor started right away, and continued to run steadily. I was perplexed, and the momentary failure was worrisome—the motor was practically new, with under a dozen hours of use.
From Sidney through Dodd Narrows
Seven hours of uninterrupted motoring later, I arrived in Conover Cove on Wallace Island, a marine park, where I stopped for the night. This tiny, rock-encircled cove was once a former resort, and with its tree-shaded trails on shore, it remains very popular in summer, but the near-empty park dock in May was a welcoming spot in which to spend a quiet night.
The evening of the first day was as tranquil as the early morning had been, and CAMAS MOON lay peacefully alongside the dock in Conover Cove.
Following a second day of uneventful motoring, I was another 14 miles to the northwest and anchored in De Courcy Island’s Pirates Cove, a handy staging spot for my planned transit of the tidal pass of Dodd Narrows at slack the following day. The more-protected north part of the cove is private land, with docks for the boats of the island residents, while the rest of the cove is a park anchorage, but not a spacious one. The useful anchorage area is about 440 yards long by about 120 yards at its widest. At the height of summer, boats generally tie up to the shore stern-to to make more room, but off-season, there is usually room enough to swing at anchor, and such was the case that day.
There was a light breeze when I weighed anchor the next morning. I motored out of Pirates Cove, rounded the southern tip of De Courcy, and turned north to run downwind to the narrows. Dodd Narrows appears deceptively benign to the inexperienced; bordered by low, tree-covered rocky points, it is only 200 yards long and, at its narrowest, 80 yards wide. However, a lot of water moves through it, and the last mile of the southern approach funnels from a half-mile width to that 80-yard constriction, accelerating the current to a turbulent 9 knots on big flood tides. Almost everyone transits Dodd at slack tide.
The second morning dawned as calm as the first and, taking advantage of the conditions, I motored through Houston Channel north of Salt Spring Island.
I approached at least a dozen other boats, slowly converging on the pass for the forthcoming midday slack. The wind fell away, so I dropped the sails and joined the procession to motor through. Sometimes, when going through the narrows, faster powerboats get impatient and pass slower boats, but that day everyone was well behaved, lining up in north- and south-bound files to navigate through the pinch point. Local residents viewed the parade of boats from lawn chairs set up on the east point. I motored through at a steady 4 knots, and at the far end, relaxed and ate some lunch as I continued motoring north up the Northumberland Channel between Gabriola Island and Vancouver Island. The air was still, the water mirror-calm.
Suddenly, just as I was stowing the lunch fixings, the wind gusted up from dead ahead, rising from 0 to 20 knots in under three minutes. There was nowhere close to take shelter, and it was too late to transit back through the narrows against the flood. I increased the revs and pushed CAMAS MOON into the waves, which built almost as quickly as the wind. I left the sails stowed—with her gaff rig, relatively lightweight hull, and slab-sided bows, CAMAS MOON isn’t at her best when going to windward in larger waves and I wasn’t sure what headway I could make, slamming upwind under sail. But, in these far from idyllic conditions I was also still not completely confident the motor wouldn’t act up again.
We carried on slowly. The pounding was uncomfortable, but we were at least making some headway. The wind stayed steady at about 20 knots, and the waves stopped building at around 2′ or 3′. Spray from the plunging bow sparkled as it flew over the cabintop toward me, often directly in my face. I did a lot of ducking. I was astonished when CAMAS MOON dove deeply into one bigger wave, which broke clean over the high bow, sending green water up against the cabin windows. I was glad I had built the forward hatch with a double coaming. I hunched lower behind the cabin and tightened my grip on the tiller.
The docks at Saysutshun were by no means full, but we had company during our stay. With everything safely stowed and her bow pointed outward from her berth, CAMAS MOON was ready for an easy departure.
Jack Point, where I could turn across the wind and waves toward Nanaimo Harbour, was now only 3 1⁄2 miles away. I continued on, CAMAS MOON falling and rising, pounding and spraying. The other boats that had come through the pass were all bigger and making much better time—I watched them haul away with some envy. An hour later, when I finally pulled into the flatter waters of Nanaimo Harbour, the wind was still gusty and strong, but as I motored through the moored boats and up to the docks of Sayshutsun (Newcastle Island) Marine Park, I at last found shelter. I would wait there, safe alongside the dock, tucked in among other waiting boats, both power and sail, until the wind died down enough for CAMAS MOON to cross the Strait of Georgia.
An extended stay on Saysutshun
Saysutshun is a roughly trapezoidal 900-acre island about 1 3⁄4 miles long, separated from the small city of Nanaimo by a channel, 1 1⁄4 miles long by 300 yards, its western shore crowded by marinas. For millennia, the island was the site of a winter village for the local First Nations people. When European settlers arrived they sank shafts to mine the underground coal seams, extracted sandstone from shoreside quarries, operated herring salteries, and built shipyards that utilized the island’s timber. Little remains of this industrial past, and in the 1930s Saysutshun became a park owned by a steamship company. Today, the island is mostly covered by second-growth forest, and with its walking trails, wildlife, and park camping amenities, it is a surprisingly tranquil refuge that also has access to downtown Nanaimo via a passenger ferry. If I needed supplies or fancied a restaurant meal, it would be an easy hop across. I was happy to be there.
Five days later, I was less happy to be there. For all of that time, the northwesterly wind persisted, day and night, never dropping below 20 knots at nearby Entrance Island lighthouse in the Strait of Georgia, a half-mile from Gabriola. It was too much for CAMAS MOON—she may have an enclosed cabin, but she is still a small boat. And so, I waited.
On the east side of Saysutshun Island, the beach at Brownie Bay is gravelly. Above the tideline are driftwood logs, which are so common in this area. Beyond the sheltering arm of the cove is the Strait of Georgia.
I filled the time by walking the trails and enjoying the spring sounds of coastal birds. Unexpectedly, I spotted a “blonde” raccoon among a troupe of normal gray and black ones, all digging for clams. Such leucistic variants are more common on the island than elsewhere, but even so, they are rarely seen. On one walk by the 200-yard-wide lake in the island’s interior, I was surprised to find dozens of broad patches of yellow flag iris growing in the shallows. Contrasting with the many hues and shades of green typical of British Columbia’s coastal forest, the bright yellow blooms made a vibrant display, nodding and swaying in the wind that filtered through the trees. All day, every day, a colony of purple martins loudly defended their individual territories among the many nest boxes mounted on the marina’s pilings. And so, I explored, read books, sketched, practiced on my guitar, and talked to other boaters who came and went, or like me, stayed on to wait for gentler winds. Twice I took the ferry across to town, sampled the restaurants, did some laundry, and checked out the shops.
The forecast for the sixth day promised a narrow window of low winds, which just might allow me to cross the Strait. I got up early, motored around Saysutshun, and started the crossing by 7 a.m. I raised the sails and set off on a close reach. At first, CAMAS MOON moved well in the low waves that hit forward of the beam, but conditions soon began to change. The wind slowly increased, the chop turned into 2′ to 4′ waves, and the reach turned into a beat. The cloud cover built, and what little warmth had come from the morning sun, which had occasionally peeked through the gathering clouds, was gone. I added another insulating layer under my jacket. The boat felt pressed, so I lowered the main and carried on under jib and mizzen; the motion eased. A short time later, I started the outboard so I could motorsail and maintain speed.
Roger Siebert
.
Two hours into the crossing, when I checked my anemometer, the wind had risen to a steady 14 knots with higher gusts—it had increased by 2 knots every half hour. The sea state was also deteriorating, and ranks of whitecaps were now marching steadily towards me. I was still making headway, but my speed had dropped, and it was harder to hold the course with every wave knocking the bow off. Sailing was becoming uncomfortable, and spray was coming across the cockpit about every third wave. The boat was pounding heavily, and I was beginning to tire. I was not quite halfway across. I faced a choice: Should I carry on, at reduced speed, exposing myself to potentially higher winds for longer? Or should I be cautious, and turn back before conditions grew even worse? CAMAS MOON might be able to take the weather, but I was no longer having fun. I turned around to a reciprocal course, which was now a broad reach, nearly a run. The motion was easier and I was able to shut off the outboard. Even without it, my speed doubled and I was back at the Saysutshun dock before lunchtime.
The updated forecast called for strong northwest winds for the foreseeable future. I had had enough of waiting and decided to head home. The next day, I had a strong tailwind on my way to catch the afternoon slack at Dodd Narrows, and once through, I sailed into a different world. The wind dropped to under 8 knots, and I passed a leisurely afternoon jibing south, downwind in the sunshine. I returned to Pirates Cove, intending to go through Gabriola Passage to Silva Bay the next day to visit with Tad Roberts, who had designed CAMAS MOON.
Standing on the east side of Saysutshun and looking across the Strait of Georgia toward the mainland mountains north of Howe Sound, I could tell it was still too windy for me and CAMAS MOON to make a crossing—no matter what this picture might suggest.
The wind dropped away to a gentle breeze outside the cove. I lowered the sails and slowly motored in through the narrow entrance formed by a small island, which protects the private dock on the west side, and a long rock reef exposed at low tide on the east side. Like my visit the week before, only half a dozen boats were at anchor, and we all had plenty of space to swing.
From calm to restless night in Pirates Cove
As soon as I was safe at anchor the north wind died completely. The mirror-still water doubled the power of the afternoon sun, heating the air in the cove and wafting the distinctive dry-leaf-dusty smell out from the adjacent mixed Douglas-fir and arbutus forest. After supper, the wind began to pick up once more from the northwest. It was just a light breeze but enough to set all the boats sheering slowly back and forth on their anchor rodes. The forecast was unchanged, but the same strong northerly wind that had been reported farther north all day had produced only light winds in this sheltered anchorage. I anticipated a quiet night. As night fell, the wind picked up a little more, but not enough to concern me. High tide would be at 1:40 a.m., about 3 1⁄2 hours later. Before I turned in, I switched on the chartplotter to check the depth sensor, and let out a little more rode as a precaution.
Pirates Cove was calm the afternoon I arrived and anchored up; little suggested the windy, disturbed night ahead, except, perhaps, the high mares’ tails gathering in the sky above.
A violent motion and a heavy thumping sound jarred me awake at about 1:20 a.m. In my half-asleep state, I couldn’t make out what the noise was. I sat up in my bunk and listened. There it was again, and again. Eventually I worked it out: it was the centerboard, which has enough play around the pivot pin that it clunks back and forth when not fully raised. I must have forgotten to bring it all the way up. In the few hours that I had been asleep, the wind had strengthened considerably and there was now significant wave action in the anchorage. I threw on a jacket and went out into the cockpit. The sky was clear, the stars sharp points of light above me, and the moon was only five days from full. The scene was so well lit I didn’t need my headlamp.
This close to high tide, the reef at the entrance to the cove was fully submerged, and short steep waves were rolling straight into the anchorage. The wind had also backed a little to blow directly through the entrance. Around me all the anchored boats were yawing, bouncing, and tugging at their anchor lines. My anchor hadn’t dragged but I worried that it might, so I let out more scope. I winched up the centerboard the last few inches and the clunking immediately stopped. I got out the anemometer—the wind in the cove had risen to 20–22 knots.
When I did sail, I experimented with CAMAS MOON’s sail plan and found that sailing downwind under jib and mizzen was quiet, lazy, and comfortable.
I had not previously dealt with winds this strong at anchor in CAMAS MOON and was worried that the anchor might drag, or some piece of gear might fail. Did I have the right anchor? Had I sized it, the chain, and the line properly? Had I made the splice and thimble correctly? Were my homemade hardwood mooring cleats and fairlead big enough? None had been tested like this before.
I watched for a while; the boat seemed safe, despite the severe motion, but I also fretted that other boats, upwind of me, might drag their anchors and drift down onto me. I briefly considered raising the anchor and moving around to the south side of the cove, but reckoned the risks involved in doing that in the poor light would be worse than staying put, at least while the anchor held. I went below to my bunk, fully dressed, in case I had to get up again. The motion was such that I was afraid I might become seasick. I dug out the anti-nausea pills, took one, and lay back down, worrying, unable to sleep. The night seemed interminable.
During my longer-than-anticipated stays in harbor I was happy to have my folding bicycle. It greatly extended the possibilities and range of my on-land cruising.
I must have dozed off, as I started fully awake at 3 a.m. to another new noise. The wind was coming from astern, and the waves were slamming into the transom. What was going on? Again, I jumped out into the cockpit. The moon was surrounded by a thin haze, diffusing its light and making the scene even brighter. The wind had risen even more and strong gusts were whistling through what little rigging CAMAS MOON has. I immediately saw what had happened. I had built CAMAS MOON with the anchor locker in the starboard quarter. When I anchor, I initially do so by the stern, then I run a tag line from the bow aft, and tie it to the anchor rode with a rolling hitch. I then let out the anchor rode so that the boat streams aft from the bow by the tag line. Now, on this rough night, my tag line’s rolling hitch had come adrift, and the boat had swung around to lie stern-to the wind. I could have left things as they were—the anchor still seemed to be holding—but the motion was very uncomfortable.
I went forward, pulled in the tag line, led it aft, retrieved a loop of anchor line with difficulty, and retied the rolling hitch, doubling it this time. But when I let everything out again, the boat didn’t swing around bow to the wind. Instead, she stopped, broadside on. Maybe the wind and current were holding the boat in that position. I got out the oars and tried to help it around; nothing doing. Then I raised the mizzen, hoping to use it to help the boat swing. Still nothing happened. CAMAS MOON was stuck beam-on to the wind. I was perplexed. Looking around in confusion, I at last saw the problem: the tag line was snagged on a gunwale cleat, effectively forming a bridle that was centered amidships. As soon as I freed it, CAMAS MOON obediently swung around to point her bow into the wind. Immediately the motion eased, but now thoroughly anxious, I let out even more anchor line, so that the scope was nearly 8:1.
In Chemainus, I went ashore to explore the area inland, enjoying the quiet backroads and the ability to stretch my legs on the bike.
Sorting the anchor had taken half an hour. I went below, pleased that at least it was not raining, which would have made my maneuvers downright miserable. I went to sleep and woke again at 6 a.m. The motion had subsided, the wind was still blowing 20 knots, but the falling tide had exposed the reef so that it was now blocking the waves. I considered my options: if I stayed, and the wind remained strong, once the tide rose again I would have a second night of uncomfortable motion and fretful sleep. I decided to leave.
I had to think carefully about what steps I would take in order to stay in control between weighing anchor and getting underway. I started the motor and left it in neutral with the helm centered while I began to recover the anchor. It was hard, slow work. When I got to the end of the nylon rode and brought the first few feet of chain into the boat, the anchor was still holding. I was amazed—the scope was very nearly 1:1. I put the motor in gear at idle and finally broke loose the anchor, hauling it up as quickly as I could while I steered in a tight circle. As the anchor approached the surface, I could make out the shank but nothing else—it was one big ball of mud. The Rocna anchor had lived up to its reputation and had buried itself ever deeper the longer the pull lasted.
As I motored out of the cove I trailed the anchor below the boat to clean off the worst of the mud. Then, when we were out in clear water, I hove to and cleaned everything before stowing it back in the anchor locker. The wind had now dropped to about 15 knots, but according to a text message from Tad, it was much stronger in Silva Bay. I abandoned any thought of going there, raised the mizzen, rolled out the jib, and set off downwind.
In the spring shoulder season, the municipal marina at Chemainus, where I stopped on the way south, had ample room for CAMAS MOON.
As I sailed, grateful to have come through the night unscathed, I thought of two things I should have remembered before deciding to stay the night in Pirates Cove: I had once spent a night in the south cove of the marine park in my first sail-and-oar boat, HORNPIPE, a Kurylko-designed Alaska. The cove had been sheltered from a strong overnight north wind and remained quiet, but I later met a powerboater who had been in the north cove at the time. He described a night like the one I had just experienced, when some larger boats dragged their anchors. My second recollection was reading a single line in a guidebook that had described how exposed the north cove can be in a certain northerly wind, especially at high tide. My many experiences of more benign conditions there had lulled me into complacency, and I had ignored the warnings. Had I been more wary, I would not have chosen that anchorage in those conditions. It was a salutary reminder always to remain vigilant, even in familiar settings.
Meandering home to Sidney
Now, with neither distant destination nor self-imposed schedule, I had all the time in the world to return home. I decided to make the best of it and revisit places on the east coast of Vancouver Island along the way.
For a week, I alternated lazy sailing days with days ashore. I ate gelato in the shade on a hot day in Ladysmith. I pulled out the folding bike from under the starboard berth and went for a ride on quiet back roads behind Chemainus. I hiked up a trail to a lookout point on Mount Tzouhalem behind Maple Bay. I sampled local brews in the restaurants…I enjoyed myself.
On the last day, I sailed south through Sansum Narrows, a 4 1⁄2-mile-long meandering passage between Vancouver and Salt Spring islands.
Finally, on the last day, I left the marina in Maple Bay to sail south through Sansum Narrows—a 4-mile-long zigzag passage between Vancouver and Salt Spring islands—and around the 3-1⁄2-mile-long curve of Satellite Channel to the west of Vancouver Island’s Saanich Peninsula. I kept a sharp focus in Colburne Passage, the half-mile gap separating Piers Island from the north end of the Saanich Peninsula, to avoid the ferries in front of the Swartz Bay terminal. The final navigational challenge was contending with the flooding tide while threading the tricky passage through the islands north of Tsehum Harbour, but I arrived safely at my assigned slip at the marina. With CAMAS MOON securely tied to the dock, my shortened cruise was at an end. It wasn’t what I had planned, but what did that matter? Learning a little more about the boat and myself always makes for a rich and rewarding experience.
Alex Zimmerman is a retired executive and engineering consultant who became enamored with the sea and sailing after he learned basic seamanship in the Royal Canadian Navy. From his home in Victoria, he has put in several thousand miles along the coast of British Columbia in various small boats he has built for himself. His book, Becoming Coastal, chronicles many of those journeys. He continues to write about wooden boats and the people who build and sail them.
If you have an interesting story to tell about your adventures with a small boat, please email us a brief outline and a few photos.
More articles by Alex Zimmerman
The Heart of a Cruiser, one man’s journey from long-distance rowing to shorter motor-sailing cruises Anchor-Rode Markings, how to mark your anchor rode for water depth and scope Jetboil Flash, cooking aboard, quicker and safer
On a recent multi-day paddling trip in my Fox canoe, I found myself pondering (and ultimately solving) one of the small issues I’ve always had with open canoes and sailboats and, to some extent, kayaks: the presence and inconvenience of water in the bilge. The process of getting into and paddling small boats inevitably brings water on board. Any gear lying in the bottom of the boat then sits in that water and things that should stay dry get wet. Of course, one way to avoid the problem is to keep everything in dry bags, but most days when I’m only going out for a short time—and often combining my waterborne excursion with some hiking—I prefer to use a daypack.
Photographs by the author
By placing blocks between the slats, you can ensure their regular spacing.
To elevate my gear off the bottom of the boat, I had toyed with the idea of small, lightweight, removable floorboards for the Fox—one behind the seat and one in the forward end of the cockpit—but I’d never thought the need justified the effort of building them. This past summer, however, as I paddled across a lake, feet braced against a dry bag wedged up against the forward bulkhead, I realized that a forward floorboard—if it included an angled upright—would also serve as an excellent foot brace. While I’ve never installed foot braces in my Fox, there is no doubt that bracing feet to help translate the power of paddle strokes into forward momentum provides a definite advantage, especially on longer outings.
Over the next hour or so of paddling, I worked out the details and did a few sketches. Placement and size of the after floorboard was easily determined—it would fill the space between the after bulkhead and the seat. The forward floorboard needed to be long enough to be useful for gear and to serve as a foot brace. I took measurements and noted them on my sketches.
With the after edge of the forward assembly beveled, a precut cedar board can be attached and will rest at an angle that makes it suitable for use as a foot brace. It also serves to keep smaller items in place on the floorboards.
Back in the shop, I milled some salvaged eastern white cedar: 11⁄16″ for the supports that would rest on the boat’s bottom and 5⁄16″ for the slats that would span those supports. Having previously established the placement for my floorboards, I started assembling the forward one. I measured the width of the boat’s bottom in the appropriate location, and cut three supports to the necessary lengths. These I laid, equally spaced, across the flat bottom, temporarily holding them in place with double-sided tape. Next, I took some of the 11⁄16″ slats and cut five to length—the outer two were shaped to follow the contours of the hull. I then laid out the five slats on the supports and, once I was happy with their placement, added a drop of Titebond III glue at each joint, drilled and countersunk holes through the boards and into the supports, and drove in temporary #6 × 3⁄4″ steel wood screws. Then, I removed the assembled panel from the boat and, using a low-angle block plane, beveled its aft-facing end, slats and support. To this I glued and screwed the 3″ × 5⁄16″ cedar slat that would serve as a heel brace.
The number of slats and the gaps between them can be adjusted to fit the space for the floorboard. In the Fox canoe, the after floorboard, with widely spaced slats, sits neatly between the seat’s backrest and the bulkhead.
Once the glue had cured, I removed the steel screws and replaced them with #8 silicon-bronze round-head wood screws. Bronze screws are softer than steel, but the latter are more easily driven in during the assembly process. If you choose smaller #6 screws for the temporary assembly, the larger permanent #8 screws will bind well. Once all the screws were replaced, I sanded and eased the edges. I then assembled the after floorboard in the same manner but with only four slats and no foot-brace bevel. Once everything was finished, I set both boards back into the boat—in the Fox the floorboards fit snugly athwartship and against the cockpit bulkheads, so it is not necessary to secure them to the hull.
The finished floorboards don’t have to be fixed in the boat and so can be easily put in and taken out. Because they are not permanently left onboard, where they would be exposed to water and weather, the cedar boards can be left untreated. They will silver with time, but that will simply give them more character.
This simple floorboard installation would work well in many small boats where bilgewater can be a nuisance—this winter I plan to make some removable floorboards, possibly with foot braces, for our Shellback Dinghy. If the boat is flat-bottomed, like the Fox and the Shellback, the process is easy; for a V- or round-bottomed boat, time would need to be taken to establish the lower profile for each of the supports, but otherwise the process would remain the same.
While I don’t insert the floorboards every time I go out in the Fox, I’m finding I use them more and more, and every time I do, I recognize them for what they are: a simple but effective addition to a small boat.
Bill Thomas has been a custom woodworker, designer, boatbuilder, and teacher for more than 40 years. Despite Bill’s addition of floorboards to keep gear out of the wet, he does still sometimes use dry bags, especially the Project M23 Waterproof Fieldbag, which he reviewed in September 2025, and in which he carries his camera when he’s afloat.
You can share your tips and tricks of the trade with other Small Boats readers by sending us an email.
Some weeks ago, faced with a boring household chore, I went in search of a podcast that would keep me company and distract me from the mundanity of my task. I stumbled upon “A Short History of… Shackleton,” from the Noiser Network. I tuned in. While it didn’t help me with the task in hand—barely 10 minutes in I had, instead, settled into a comfortable chair with a cup of tea—it did remind me of the extraordinary challenges that Sir Ernest Shackleton and his crew had faced and survived more than 100 years ago. Once the podcast was over, I went to my bookshelf to find Shackleton’s Boat Journey, Frank Worsley’s account of how Shackleton and five of his crew—Captain Frank Worsley, Ship’s Carpenter H. McNeish, Second Officer Tom Crean, and Able-Bodied Seamen J. Vincent and Timothy Macarty—sailed one of the ship’s lifeboats across nearly 800 miles of Southern Ocean from Elephant Island to South Georgia.
The story of Shackleton’s Imperial Trans-Antarctic Expedition, of which the “boat journey” is just a part, is well known and, despite being one of arguable failure, is one of the most heroic maritime survival stories of the 20th century. Shackleton and crew had left England on the barkentine ENDURANCE in August 1914. The expedition’s goal was to cross the Antarctic continent from the Weddell Sea to the Ross Sea via the South Pole. But by January 1915, ENDURANCE had become trapped in the pack ice at the southern extreme of the Weddell Sea, and by late October, the crew of 28 men—seamen and scientists—had to abandon ship. Less than four weeks later, ENDURANCE succumbed to the crushing ice and sank.
Photographs by Frank Hurley, as published in Shackleton’s Boat Journey by F. A. Worsley
After dragging the three ship’s boats across the ice and then rowing and sailing them for 60 miles, the ENDURANCE crew made landfall on Elephant Island on April 15, 1916.
For a month, the men dragged their equipment, supplies, and three boats across the ice until they established Patience Camp in late December. There they would live for three and a half months until, in April 1916, with the floe breaking apart beneath their feet, they launched the three boats—the JAMES CAIRD and DUDLEY DOCKER, both 22′ 6″ long with a 6′ beam, and the STANCOMB WILLS, 20′ 8″ by 5′ 6″—and set sail for Elephant Island, 60 miles to the northwest. Six days later, having weathered massive seas, strong and often adverse winds, and ice that closed up and broke apart around them, they made landfall.
It was inevitable that Shackleton, as leader of the expedition, would be remembered through the century since ENDURANCE foundered and, while some have pointed out that it was his own recklessness that brought his crew to their life-threatening predicament, none has argued that his leadership qualities were anything but exemplary. But to remember only Shackleton is to do considerable disservice to the memories of some truly remarkable men; first among them the captain of ENDURANCE, Frank Worsley, author of Shackleton’s Boat Journey.
The JAMES CAIRD was made as seaworthy as possible for the 780-mile voyage from Elephant Island to South Georgia. Harry McNeish, the ship’s carpenter—who would be part of the JAMES CAIRD’s six-man crew—covered the space between the decks with sled runners, lids of boxes, and old canvas. A mast from one of the other boats was bolted along the keelson to prevent the CAIRD’s back being broken in heavy seas; and the mast and sail from the STANCOMB WILLS were cut down to make a mizzenmast and its lug sail. Frank Worsley, inset top right, was the captain of ENDURANCE and navigator of the JAMES CAIRD.
Worsley’s skills as a navigator were truly extraordinary. Shortly before ENDURANCE sank, he had worked out the courses and distances from and to the various nearest landfalls: South Georgia, the Falklands, Cape Horn, Elephant Island. It was a foresight that stood him and the other men in good stead, and as they reached the edge of the ice floe, Shackleton trusted Worsley to get them to Elephant Island. But courses and distances, when you can see the sun and stars and know the speed and directions of currents, are one thing; when you have none, or at best, only a few of those aids to hand, navigating a small boat across storm-tossed ocean waters to land on a 30-mile-long island 60 miles away is no small feat. On the relatively short voyage from the ice pack to Elephant Island, Worsley wrote, “I can never forget my acute anxiety for the next two days. If there was a mistake in my sights, which were taken under very difficult conditions, twenty-eight men would have sailed out to death. Fortunately the sights proved correct.” Thanks to Worsley, all the men made it to Elephant Island, and 10 days later, six of them set sail again on the JAMES CAIRD, this time bound for the island of South Georgia, 780 miles away.
Worsley’s firsthand account of that voyage from Elephant Island, written from memory and his own log records, is both humble and humbling. Most readers (myself among them) cannot possibly fathom the discomfort of being soaked to the bone for 15 days in sub-zero temperatures, while crammed into a storm-tossed boat with waves that frequently rise to more than 30′ and at least once to more than 50′. Worsley, while not making light of their predicament or discomfort, nevertheless has such a pared-down matter-of-fact style that you are left in no doubt that what you are reading is true; there is no hyperbole to make you doubt the author, no moments of self-congratulation that question his authenticity. Page after page, his power of description—always exact and occasionally poetic—puts you right there in the thick of it, even as you hunker down in your warm, dry, comfortable armchair.
While Elephant Island was, indeed, solid land, its beach was narrow and bleak, and landing or launching through the surf was not easy.
On the third day out from Elephant Island, Worsley writes that the wind “blew a hard west-southwest gale with snow squalls. Great torn cumulus and nimbus raced overhead. Heavy westerly seas rushing up on our port quarter swept constantly over the boat, pouring into the ‘cockpit’ and coming through the canvas in little torrents, soaking everything… I took observations of the sun for position, but the boat pitched, rolled, and jerked so heavily that I could take them only by kneeling on the after-thwart, with Macarty and Vincent clinging to me on either side, to prevent me pitching overboard, sextant and all… Stormy, snowy weather. Rolling, pitching, and tumbling we laboured before the roaring grey-green seas that towered over us, topped with hissing white combers that alas! Always caught us. Bruised and soaked, with never a long enough interval for our bodies to warm our streaming clothes, in zero weather we now fully gauged the misery and discomfort of our adventure.”
Five days later, conditions were even worse: “The boat leaped and kicked like a mad mule; she was covered fifteen inches deep in a casing of ice like a turtleback, with slush all over where the last sea was freezing. First you chopped a handhold, then a kneehold, and then chopped off ice hastily but carefully, with an occasional sea washing over you. After four or five minutes—‘fed up’ or frostbitten—you slid back into shelter and the next man took up the work… This fierce, cold gale had lasted at its height for forty-eight hours.”
Twenty of the twenty-two men left behind on Elephant Island after the JAMES CAIRD and its crew of six departed on April 24, 1916. Not pictured are the steward, A. Blackborrow, and Frank Hurley, the man responsible for the extraordinary photographic record of the ill-fated Imperial Trans-Antarctic Expedition. Behind the men can be seen the canvas-covered up-turned hulls of the DUDLEY DOCKER and STANCOMB WILLS. These would be bedroom, smoke room, dining room, operating theater, and hospital for the men for more than four months. All the men would be rescued on August 30, 1916.
Throughout, Worsley navigated. South Georgia, just 90 miles from end to end, was but a pin-prick; if they missed it, they would sail on into the Southern Atlantic where there would be no hope for them or for the 22 men left behind on Elephant Island. His books and log, Worsley writes, “were in a pitiable state—soaked through, stuck together, illegible, and almost impossible to write in. They were not paper pulp, but something like it, and it took me all my time to open them without completely destroying all chance of navigating to land.” But, against all odds, after 15 days at sea, having managed to get a sun sight just four times in the first 13 days, “two of these being mere snaps or guesses through slight rifts in the clouds,” Worsley brought the boat and its six-man crew to the west coast of South Georgia.
Still their trials were not over. As they lurched along the lee shore, desperately searching for a place to land, they were hit by the worst wind they had encountered thus far. “For nine hours,” writes Worsley, “we had fought at its height a hurricane so fierce that, as we heard later, a 500-ton steamer from Buenos Aires to South Georgia had foundered in it with all hands, while we, by the grace of God, had pulled through in a twenty-two-foot boat.” Despite the ferocity of the weather over the final 24 hours, Worsley’s account continues with his trademark precision and lack of sentimentality. Just once does he touch on what must have been utter fear and desperation when he writes: “The thoughts of the others I did not know—mine were regret for having brought my diary and annoyance that no one would ever know we had got so far.”
Worsley’s account is not long. My paperback edition, published by Birlinn Ltd, in 2007, runs to just 143 pages, and covers the story from ENDURANCE becoming trapped to the escape to Elephant Island, the “boat journey,” and the subsequent climb made by Shackleton, Worsley, and Crean across mountainous South Georgia to get help. It is a story that captivates from the first page to the last; knowing the author survives takes away none of the suspense.
Jenny Bennett is editor of Small Boats.
Shackleton’s Boat Journey by F.A. Worsley, published by W.W. Norton, is currently available through most book outlets, price $20.
Is there a product that might be useful for boatbuilding, cruising, or shore-side camping that you’d like us to review? Please email your suggestions.
Many of the stoves I use for camp-cruising are fueled by pressurized canisters of either butane, propane, or a propane/isobutane mix. Compared to the white-gas-fueled camp stoves that were popular when I started camping in the 1960s, canisters are much easier to use, but their convenience comes at a cost. The canisters themselves are expensive—about 80% of the purchase price is for the canister, not the fuel—and when the fuel is used up it is difficult to dispose of the canister responsibly.
When I prepare for a cruise, I usually pack a full canister and return home with it partially full. At my latest count I’ve accumulated nine 8-oz canisters of butane and fourteen 1-lb canisters of propane, most containing an unknown quantity of fuel. I can’t dispose of them until they’re empty, and even then, canisters must be taken to a hazardous-materials disposal site or a store that collects them for recycling. Unfortunately, in the U.S., many of the 40 to 60 million 1-lb propane canisters sold annually wind up in landfills.
Photographs by the author
I can use the Growler to fuel my nCamp multi-fuel stove, Gas One Mini, and Zodi Hot Shower.
It’s worth noting that although there are many online videos demonstrating how to refill common 1-lb propane canisters, they are not intended for that purpose. While federal law does not prohibit the practice, 1-lb canisters carry a warning: “Federal Law prohibits transportation if refilled. Penalty of up to $500,000 fine and 5-year imprisonment.” You can buy refillable versions of the 14.1-oz and 1-lb canisters, but to fill them you also need a large propane tank, a stand on which to hold it inverted, and an attachment to connect it to a canister.
The Growler works with the dual-fuel Gas One Mini because the Mini’s adapter hose (its end seen here) can be connected to the Growler’s hose. For stoves that accept only bayonet-type canisters, there is an adapter compatible with the Growler hose; I haven’t yet purchased or tested it.
To avoid the cost, disposal problems, and waste of the single-use canisters, I recently bought a refillable Gas Growler 3.8, the smallest of the propane tanks made by Ignik, a company headquartered in Washington State. The tank is 10 1⁄4″ tall, 8 1⁄4″ in diameter, and weighs 8.2 lbs empty and 11.4 lbs full. It holds 3.8 lbs (0.9 gallon) of propane, and like larger propane tanks, is refillable at many gas stations and hardware stores. When I first filled the Growler, the gas-station attendant stopped at 0.68 gallon—a judgment call, I believe, based on what the Growler valve was venting. I was charged the 1-gallon minimum of $4.99, but that was still a significant saving when compared to the purchase of a new 1-lb canister, which holds just 0.236 gallons and sells for $6 to $7.
The end of the Ignik hose (left) accepts fittings (right) that connect with typical propane cannisters, but the pins in the center of those fittings are not all the same. This one is chamfered and others may be unchamfered or rounded. All will fit the Ignik hose, but some, especially the unchamfered, require much more force to make the connection.
The Growler comes with a 4′ hose that connects to a valve on top of the tank. The tank-to-hose connector has an excess-flow protecting valve that stops the flow of gas if a device is disconnected while the tank valve is open. On the other end of the hose is a brass connector that is compatible with devices fueled by 1-lb canisters or the taller 14.1-oz canisters typically used with propane torches. The Growler’s hose can also be connected to other devices by means of an adapter. Both my dual-fuel Gas One Mini Stove and my Camp Multi-Fuel Stove have hoses with fittings that will connect to the Growler, allowing me to switch from butane to propane and from propane/isobutane to propane respectively. Many of the propane-fueled Coleman camp stoves also have fittings compatible with the Growler hose. If the connector that comes with the Growler is not compatible with a particular device, there are many adapters on the market. For example, I found an adapter that would allow my oldest butane-fueled portable gas ranges to be converted to propane. This type of stove uses butane canisters with bayonet or magnetic fittings, and the adapter is said to work with both, but I haven’t tried it because I will be retiring the stoves.
It is easy to connect the hose for the nCamp stove to the Ignik hose using the adapter—propane canister to Lindal EN417—seen here at right. It costs around $10.
While the Ignik hose does have the excess-flow protecting valve, it does not have a regulator. There are similar hoses from other sources that have them, but Ignik notes that regulators are not required for the Growlers. Like most camping propane canisters, the Growler 3.8 has an operating pressure of between 100 and 200 psi, the same as that of propane tanks. When fueled by the Growler and its hose, all of my torches—a simple brass one, and two BernzOmatic torches with built-in igniters—operated as they do when connected to a tall 14.1-oz torch canister or a 1-lb camping canister. With the valves on both tank and torch fully opened, there is no sign of the pressure exceeding that produced by canisters. The same was true of my stoves. Their flames were nearly identical whether fed by canisters or the Growler.
While the size of the Ignik Growler might be a deterrent where space and weight are of concern, with the right adapters it can be used in lieu of a variety of non-refillable fuel canisters including those for propane/isobutane, butane, and propane. I weighed the Ignik tank when empty and recorded the weight on the inside of the shield (3,708 g—Ignik lists 3,628 g). Now, by weighing the tank when filled and after use, I can determine how much propane is in it.
The Growler is bigger and heavier than the canisters it’s replacing, but the three boats I use for cruising have plenty of room to accommodate its use and storage. It will encourage me to indulge in both baking and preparing dishes that require longer cooking times. When fueling torches for metalwork, especially fillet brazing thick brass or bronze, the Growler can easily handle jobs that require long heating times, and having the torch connected to a flexible hose will make it easier to hold and angle to the work.
I will continue to work through my old fuel canisters and may occasionally buy a new one if I intend to prepare a hot meal on a day trip aboard one of my smaller boats, but when it comes to cooking aboard my cruising boats and metalwork in my shop, I will be relying more on Ignik’s Gas Growler 3.8.
Christopher Cunningham is editor at large of Small Boats.
Like many amateur builders, Steve Wenger came to boatbuilding gradually. But having arrived at his first project in 2014, he was well and truly caught by the bug. To date, he has built five boats ranging in size from 12′ to 15′. Steve’s love of boats stems from childhood when, in the 1960s, his father was working as a park ranger at Lake Mohave in Arizona and the family had access to a cabin cruiser with an inboard diesel engine. Decades later on a trip to Canada, Steve met a boatbuilder who had a plywood sailboat, and the concept of building his own boat was sparked in his mind. He had, he says, already designed and built two campers—one for a small pickup truck, the other a conversion of an early Toyota Four-Runner—and had been canoeing for several years; building a wooden boat seemed a natural progression. And yet, Steve still didn’t take the plunge. Six years later, he did buy plans for the Tracy O’Brien-designed Headwater 14, a Rogue River drift boat…but still he didn’t build.
Photographs courtesy of Steve Wenger
Steve’s first Tracy O’Brien build was the Headwater 14, a Rogue River drift boat. He chose it for its suitability on local Colorado rivers and because he “loved looking at that wild sheer.”
“Those plans sat around for a couple of years,” Steve says. “Partly because getting marine plywood to Colorado seemed insurmountable, but mostly because of the inertia of life in general.” Nevertheless, not only did the dream not go away, it became ever more persistent. “I became obsessed with the idea of building a boat I could sleep on, and purchased two more plan sets for larger boats from O’Brien.”
For Steve, Tracy O’Brien’s plans were the perfect antidote and fodder for his dream: “It was easy to build scale models from Tracy’s offsets,” he says. Using artist’s mat board and Scotch tape, Steve built hulls scaled to 1 1⁄2″ to the foot. “I’m sure I could have built a whole full-sized boat in the time I spent daydreaming about those designs and others.” Finally, however, Steve’s modelmaking and testing led him to decide that if he were to build a full-sized boat, it should be something smaller, a boat he could use on local Colorado rivers. His dreaming came full circle when his musings brought him back to the very first plans he’d bought: the Headwater 14 drift boat.
Space was tight in Steve’s garage workshop, but after his first two successful builds he moved on to a stretched version of O’Brien’s Transport 9.9.
In 2014, the time to build had come at last. As it turned out, Steve decided to build two boats: the Headwater and Harry Bryan’s Fiddlehead. He would build them simultaneously, side-by-side. He reasoned that if one construction had to pause—when glue was curing, for example, or if waiting for materials—he could work on the other. Furthermore, he could reduce the cost of shipping quality marine plywood to Colorado by ordering enough material for three builds at once. It was an ambitious move, but one he does not regret.
Neither of those two building projects caused Steve much angst. The Fiddlehead was finished in November 2015 without problems, and the larger Headwater was launched in September 2016. Of the latter, he says, he appreciated the “straightforward building sequence and O’Brien’s key to the plans with parts numbered and illustrated.” And there were details in O’Brien’s design that appealed. “I particularly liked his use of ‘riblets’—short ribs that help to stiffen the upper topsides and, on the Headwater, tuck in between the gunwales and inwales to give the appearance of a scuppered rail.” And then there was the sweeping sheer. “I loved looking at that wild sheer; there was so much shape in that boat.”
SWIFT, Steve’s stretched Transport 9.9, benefited from some personal touches including the rod-and-oar racks and pedestal seat. Steve also extended the spray-deflecting outwales around the bow to provide two carrying handles.
With two successful builds under his belt and that extra plywood on hand, Steve was soon moving on to a third construction boatbuilding project. He had long decided that a cabin cruiser would be impractical for western Colorado, and besides, his garage shop couldn’t accommodate anything big. “And,” he adds, “my wife is a landlubber at heart, so I looked for an outboard boat that could carry two adults, a dog, and our camping gear.” He considered O’Brien’s Transport 9.9, a cartopped pram dinghy, but worried that it was too small at just 9′ 10″. Nevertheless, he kept returning to the Transport, and after studying other designs and building yet more models, decided to stretch the design. “I feel bad that I didn’t run the changes by O’Brien. His 9.9′ V-bottomed Garvey became 13′ 7″ × 5′—I enlarged it overall by 25 percent and added 15″ to the straight run aft to even out the proportions. It’s a high-volume boat, but I find that volume comforting; it performs like a larger boat.” Steve powered the boat with a 25-hp Yamaha four-stroke outboard, which he says might be more than it would need at sea level, but it serves him well in western Colorado where elevations of 6,000–8,000′ starve engines of air.
The modified Transport 9.9 was a hit with the family: Steve’s wife, who is “essentially a landlubber,” enjoys camp-cruising in it, and the dog was always happy to be on board.
“Besides enlarging the design,” Steve says, “I added many custom features until I was almost embarrassed by my indulgence. I built a seat pedestal so I could use a tiller extension on the outboard; some oar and fishing-pole racks; a ‘chicken-post’ handhold that can be height adjusted; and I extended the spray rail around the bow transom to provide two handles.” Together with his wife and their dog, Steve has used the boat to beach-camp in Colorado, Arizona, and British Columbia. “The dog was always eager to hop in—and even more eager to hop ashore.”
Steve’s most recent O’Brien build is a sailboat. The Nemah, a 14′ flat-bottomed sharpie, equipped with a daggerboard and a maststep and partner, appealed to Steve because it can be rowed and motored as well as sailed.
For his most recent build—his fifth (he has also made a skin-on-frame canoe for his wife)—Steve turned to another O’Brien design. The Nemah is a sailboat, a 14′ flat-bottomed sharpie. Once more, Steve considered other designs but ultimately chose the Nemah because of his prior experience building O’Brien’s designs which, he says, combine ease of construction with more than a touch of elegance. He had originally bought the Nemah plans for their own sake, because he “liked the look. But then the idea grew on me. I had no sailing experience, so I liked that the boat could also be rowed or powered with a small motor; and I already had an electric trolling motor.”
RUBY—the 14′ sharpie seen here with a wishbone-spritsail rig—has the truncated frames (“riblets”) that O’Brien favors for giving strength and stiffness to the plywood topsides while maintaining an uncluttered cockpit.
Construction, he says, was typical “straightforward O’Brien stitch-and-glue. Laminating and shaping the mast was interesting, as was sanding the daggerboard and rudder blade to their foil shapes.” But despite the apparent simplicity of the build, the hull was not without its challenges. “The stitch-and-glue construction,” Steve says, “requires a lot of sanding and fairing, which tested my ability to let go of my perfectionism. I developed a mantra: ‘It’s a boat, not a work of art.’” But all that sanding also indulged one of Steve’s favorite aspects of wooden boat building. “I love the tactile experience. I faired by hand mostly, because of my poorly lit, off-grid shop. If I could feel a blemish, then there was more work to do. All that touching of the boat, milling and sanding all the parts, feeling for smoothness, running my hand along the rail as I walked away…it has all connected me to my boats in a way that few other creating projects have. I build myself into the boat.”
Steve’s love for his boats has caused something of a problem. “It’s hard to let go of a boat you’ve built. We still have all five. I’ve given up the idea of a ‘sleep-aboard,’ but I do think there might be another boat in me.” In part, however, any future projects will depend on Steve’s wife: “She’s given me an ultimatum: no more new builds until I sell one or two.”
Jenny Bennett is editor of Small Boats.
Do you have a boat with an interesting story? Please email us. We’d like to hear about it and share it with other Small Boats readers.
More reader-built boats for oar and power
YEAH BUOY, a plywood skiff built for drift-fishing and family boating LADY LOUISE, a Candlefish 13 GENERATIONS, a family-built Bevins skiff
Developed in the late-19th century for Maine lake fishing camps, the Rangeley type has long been admired as a capable small craft with excellent rowing characteristics.
In 1977, Bruce Malone began working on a Rangeley boat in his living room, moving the furniture out and bringing in a strongback, molds, and a planking bench. The engineer-turned-boatbuilder had been working at the Newbert & Wallace Shipyard in Thomaston, Maine, when he read about Rangeley boats in a reprint of a National Fisherman article by John Gardner, who also included the type in his book, Building Classic Small Craft. Gardner praised the boat’s “handsome shape and superior performance” and noted its “fairly simple” construction. Malone, who grew up rowing a beamy 14′ skiff on Lake Winnipesaukee in Wolfeboro, New Hampshire, was immediately drawn to the Rangeley’s graceful lines, lapstrake hull, and reputation as a dream for rowing and fishing.
“I had enjoyed rowing in boats that didn’t row well, so I thought, ‘What would it be like to row a real rowboat?’” Malone recently reflected. Except for a hydroplane he built in his youth, the 17′ Rangeley, planked with cedar over steam-bent white oak frames, was the first boat Malone had built for himself. He put over 500 hours into its construction, including driving 2,886 rivets. His girlfriend, Barbara, bucked the back of each rivet as he peened them over. “Despite that, she did eventually become my wife,” he chuckled.
Malone lofted the boat—which is 17′ LOA with a 4′ beam and a depth of 15″, measured from the bottom of the keel to the top of the lowest point of the sheerline—following the plans from Gardner’s article. The wineglass- shaped transom would allow the boat to carry a small outboard without compromising its fine rowing characteristics. Malone constructed the hull right-side up, installing the keel, inner stem, transom, and transom knee first, then setting up seven hull station molds. The stem and keel both had outer and inner pieces, which made the sometimes-complicated task of cutting keel and stem rabbets unnecessary.
Starting with the garboards, he installed 11 planks per side, each 5⁄16″ thick. Where necessary, strakes were made of shorter pieces scarf-jointed together and glued with epoxy, and Malone used polysulfide bedding compound in the plank laps. He riveted the laps as the planking was installed, leaving space for the frames to be bent into position and riveted after the boat was planked up. The frames, 3⁄4″ wide, 3⁄8″ thick, and spaced 2 11⁄16″ apart, were steam-bent.
Barbara A. Malone (left), Donnie Mullen (right)
Left—In the late 1970s, Bruce Malone visited Herb Ellis (at right), whose transom-sterned—“square-sterned” in lake parlance—boat was documented by small-craft historian John Gardner. Right—Malone’s first boat used bench thwarts. He followed the light, closely spaced framing of the original boats, though in his later hulls he favored wider frames more widely spaced.
Characteristically, Rangeley boats had round, stoollike seats mounted atop recessed thwarts, a style unique to these boats, which were originally used by fishing guides to take paying clients out on the Rangeley Lakes of western Maine (see WB No. 225). For his boat, Malone decided instead to use common bench-style thwarts.
Next came the gunwales, breasthook, and the outer stem, all of white oak. Rangeley boats had unique trunnion-mounted oarlocks, which are rare today, so Malone used bronze round-socket rowlocks as the closest approximation he could find.
Legacy of the Rangeley
When Malone launched his Rangeley, he found his dream realized. He had never rowed anything like it. He still has—and still uses—the boat. Over the years, the Rangeley has taken him on camping and fishing expeditions across interior and coastal Maine, easily carrying Malone and his wife, and eventually their daughter, with all their gear. Malone found that it rowed well with one or two people aboard, tracked well, and was fast. When fishing, standing up to cast was no trouble, and the boat handled rough water with ease.
Since founding Malone Boatbuilding in 1980, he has built some 20 Rangeleys for customers. With experience, he began making modifications and simplifications. By his second boat, he determined that rivets were too much work to install and were stronger than necessary, so he switched to using copper clench nails, similar to the iron clench nails used in the original boats. He increased the width of the frames to 1″ and spaced them farther apart, to 4″ on center. Before long, he had cut his original construction time in half. He developed a 1 3⁄4″-wide, single-piece keel and a 1 1⁄4″ wide, single-piece stem, learning to cut the rabbets by eye. He found that building the boat upside-down was easier. Instead of an oak breasthook, he started installing a short cedar foredeck, and he used cast bronze thwart braces instead of white-oak thwart knees.
“Building Rangeleys was really a labor of love,” Malone said. Most of his work these days involves larger boats, but he is still drawn to the graceful lines of a lapstrake Rangeley hull.
Rangeley Performance on the Water
On a recent summer day, I joined Malone for a row. The Rangeley’s 17′ length, which easily accommodates two, was the result of year of refinement on the lakes of western Maine, where a variety of innovative builders made their own contributions to the type. This evolution of design played out before my eyes as Malone slid his 35-year-old boat into the water. With his succinct oar strokes, the Rangeley smoothly picked up speed, tracking like an arrow in protected cove and choppy bay alike, a virtue of the boat’s long, straight keel. In fact, the Rangeley was designed to cut through large waves that were characteristic of some of Maine’s largest lakes while keeping the passenger comfortable and dry. On a brief stint ashore, I marveled at the boat’s arcing sheer against the backdrop of nearby Mount Megunticook.
Donnie Mullen
With a block-and-tackle rigged to a gallows frame and the keel sliding on an inclined beam, Malone can haul his 17’ Rangeley boat in the back of his pickup truck.
When I took a turn at the oars, I was immediately struck by the boat’s swiftness and remarkable stability. The hull required some patience to turn—a flip side to that long, straight keel’s advantage in tracking. But it was such a pleasure to row, I hardly felt inconvenienced. At one point, I stopped rowing long enough to dip my hand in the water. I was surprised to find the boat only grew more stable as my weight shifted toward the gunwale. While muscling back to shore against a headwind, I felt like I was working a lot harder than Malone had under similar conditions. I had to make regular corrections, as the bow was a tad proud. Malone later explained that shifting to the boat’s forward rowing station could help balance the hull in such wind. He added that shifting the weight of the passenger, a second rower, or gear can also keep the boat in proper trim fore-and-aft.
Malone loaded the Rangeley into his pickup unassisted, thanks to a shop-made carrying rack. He uses a trailer winch to haul the 200-lb boat along a keel-support beam rising diagonally from the tailgate toward the roof of the cab. As we parted ways, I thought about asking Malone if he would help me build a Rangeley, but then quickly decided I was getting ahead of myself. Instead, I savored the simple joy of a few hours spent on the water. As though on cue, Malone concurred.
“A morning like this reminds me of why I got into the boat business,” he said, before he started his truck and headed back to his shop.
Plans for the Rangeley boat shown here were published in John Gardner’s Building Classic Small Craft, Volume 1 (International Marine, first published in 1977), which is available from The WoodenBoat Store.
In the 1970s, John Gardner included the Herb Ellis transom-sterned Rangeley boat in his Building Classic Small Craft. Ellis built the boat in the 1930s, and Gardner took the lines in the late 1960s. Before the outboard-motor era, Rangeley boats were built double-ended.
Is there a boat you’d like to know more about? Have you built one that you think other Small Boats readers would enjoy? Please email us your suggestions.
More Designs from Building Classic Small Craft
Building Classic Small Craft by John Gardner combines two out-of-print books: Building Classic Small Craft and More Building Classic Small Craft. The current edition includes plans and instructions for building 47 small boats. Here are a few others from the book that Small Boats has profiled.
Down East Workboat, a Gardner-designed powerboat that blends seakeeping ability with speed Lawton Tender, a classic tender for strip-plank construction by Newfound Woodworks Herreshoff/Gardner 17, a lightweight, fixed-seat rowboat for one or two people
In seeking a tender for his cruising ketch, Maine-based author Bill Mayher sought a boat that would tow, sail, and row well, and carry a larger-than-average person in the stern sheets. A web search turned up the Drifter design from Harwood Watercraft in western Ontario.
Defining the Ideal Dinghy
ZANCUDO is a glued-lapstrake plywood sailing dinghy that I hoped would serve many purposes in my family for generations to come. Sometime in the middle of May she arrived at my house in Maine, upside down on a flatbed utility trailer, all the way from Canada.
The business of acquiring her had gotten underway in February of the previous year, when I started dreaming about a new tender. In the dead of winter, after all, with the snow knee high and trees rattling and cracking in the woods under the force of ferocious gales, thoughts of boats come through most clearly as dreams. But then as the miracle of gathering light spread ever stronger across the southern sky and sap flowed at last in both man and tree, those dreams morphed into thoughts and then thoughts into specific notions.
This dinghy would be shorter than 11′. It would be light enough for my wife and me to lug up the beach above the high-water mark, so that when we set off on island rambles we wouldn’t be worrying about it as the tide came in. Because we often cruise in the early spring and then again well into the fall, and regularly end up anchoring in deserted spots along the wild edges of the Maine coast, it is important to have a real boat under us as a tender. Especially when the wind blows through rolling anchorages. A low-freeboard dinghy, no matter how speedy under oar or sail, will not do.
On our cruises, we enjoy calling it quits early if only because this gives us a chance to set off on exploratory dinghy sails among the nooks and crannies of favorite destinations. Accordingly, the craft emerging in my imagination needed to be a proper sailing dinghy with rudder and daggerboard. As a sailing dinghy it must go to windward and tack smartly in a stiff breeze. It needed to be safe as a sail trainer for our grandchildren, and it needed to be sufficiently buoyant to comfortably float a person of larger-than-average size in the sternsheets. But this boat would have to row well, too— so well that my grandchildren would find the sweet groove of rowing a great little boat early on in their lives, and therefore enjoy that pleasure for a lifetime, just as I have.
Why Glued-Lapstrake Plywood
To fulfill these requirements, it seemed clear that I should be looking into something built with glued-lapstrake plywood planking, which is both light and strong. The maintenance of such a boat would be minimal, because high-grade marine plywood is stable and holds paint well, and thus doesn’t call for annual painting to achieve the good-enough level of finish that I find acceptable these days. Also, plywood laps don’t call for steam-bent frames, which become such a time-and effort nuisance when sanding and painting is called for. Another advantage is that a plywood boat will not suffer the stresses that drying-out puts a small boat through if she is not launched every season. Although a glued-lap boat is not quite as righteous-looking as a traditionally framed dinghy, these advantages I’ve just detailed were crucial in the equation that was working itself out in my mind: Light, strong, a smart sailer that would tow well in a seaway, easily sponged out, and tough enough to endure the naval warfare grandchildren often subject small boats to down in the cove. A glued-lap dinghy it would be.
Jenny Mayher
Mayher’s Drifter is named ZANCUDO. Her simple lug rig is ideal for a tender, as the spars all stow within the length of the boat when she’s being towed.
Discovering the Drifter
With mind made up and without further ado, I checked the Internet to see what was out there all built and available. It was on the web that I happened upon Mark and Karen Harwood of Harwood Watercraft, a vest-pocket enterprise deep in the backwoods hell-and-gone of western Ontario, somewhere east of Georgian Bay. Too far for me to go for a boat, for sure, but why not make the call anyway?
Talking to Mark on the phone was great. He is smart, funny, down home, and filled with the humility of a talented and original jack-of-all trades who had stumbled into boatbuilding and liked it and was good at it. On the web the boats he was building looked good to my eye, especially his Drifter model, a 10′ 6″ sailing dinghy that he described as an Iain Oughtred Acorn derivative whose design he had beefed up in the aft sections, perfect for a 6′ 2″-plus person of healthy proportions.
Studying the boat on the Harwood Watercraft website, I could picture myself in the sternsheets, or even scrunching in passable comfort, forward of the daggerboard trunk, with a grandchild at the tiller. I could picture kids rowing this boat out of the cove and could see them hoisting sail when the breeze served. Crucially, as far as the kids were concerned, the standing-lug rig with its relatively short spars seemed especially manageable on those occasions when the afternoon southwest breeze sprung up in earnest. These pictures bloomed and multiplied into a pleasant slide show of watery delights. I couldn’t get this boat out of my mind, and this was a problem.
As we all know, awakening the “I’ve-gotta-have-this boat” Princess from her winter-long slumber can be an expensive proposition. But when Mark mentioned he had a used Drifter that he would be able to let go at a discounted figure, the Princess and I sat down for a talk. After this discussion, the Princess seemed pleased, as she usually does when things go her way.
And so on to the plan: “How’d you like to drive the boat over to Maine for a trial?” I offered. “I’ll help with gas money and you can spend a week in our guest cabin. Maybe I could send you some pictures of the place? Comfy digs, Victorian parlor stove, boats to see, wooden-boat people to meet at the yards around town and at the magazine…. I’m betting the ice is barely out in Canada, anyway…. A pre-season vacation with a payoff at the end if everything goes according to plan. Whaddyathink?”
Jenny Mayher
In addition to its utility, the lug rig has proven to be a great training rig for grandchildren and friends. Here, ZANCUDO sails in company with a Nutshell pram.
From these tentative beginnings I could tell Mark was interested—and his wife, Karen, even more so. Among other things, she does fancy ropework. Floor mats, monkey-fist door stoppers, that sort of thing. Back in Canada in the summers they fill their pickup truck with her work and load a rowboat onto the little trailer and go around to farmers’ markets and the like peddling their wares. A trip over to Maine seemed like just one more adventure to them.
Needless to say, if things hadn’t worked out so splendidly, I wouldn’t be writing this piece. But splendid hardly describes the pleasures of last summer. As a tender she tows easily behind VITAL SPARK. She is just right for short sails around Center Harbor or out to the islands when there are interesting boats to see or the chance to picnic with friends. My wife and I had some memorable dinghy sails farther afield during summer cruises whenever we needed to get to a town or to a trailhead on an island or just for a change of scene. But the best thing is how my granddaughter Essie, aged 11, took to her.
Living with ZANCUDO
Everything I had hoped for in terms of ease of handling and seaworthiness was evident immediately, and soon enough I’d spy Essie and a friend taking the new dinghy out into Eggemoggin Reach, often to sail in company with her brother and his buddy in the family’s Nutshell pram. The Nutshell, built for the children’s mother 30 years earlier, was perfect for that moment in time so many years ago. Now the Drifter, named ZANCUDO (Spanish for mosquito) by Essie, is perfect for this later moment. She is easy to carry up the beach, simple to rig and get underway from alongside VITAL SPARK , she tows straight and true in the ocean, she rows beautifully, and can carry four people ashore. Her sailing performance exceeds even my rosiest hopes. And, finally, with varnished ash gunwales, breasthook, and quarter knees in combination with varnished pine thwarts and stern sheets, she is elegant enough for my purposes—yet at the same time easy to care for.
But the best thing is what she means to Essie. Last summer, ZANCUDO became Her Boat. At the threshold of seventh grade with its social terrors and fearsome cliques in the offing, Essie had a boat to focus her energy and her dreams upon. It centered her in a set of challenges and accomplishments throughout the summer, and when it came time to return to school in the fall, it was reported that she slung her backpack over one shoulder, smiled broadly, and marched into the maelstrom.
Jenny Mayher
The author’s granddaughter at the helm. “At the threshold of seventh grade…she had a boat to focus her energy and dreams upon.”
Mark Harwood
Designer-builder Mark Harwood developed his Drifter design as an able yacht tender.
Mark Harwood
She has wider after sections than a fine rowboat would: This feature favors buoyancy and stability over pure rowing—a worthy tradeoff in a tender.
Plans for the Drifter designed by Harwood Water Craft in Muskoka, Ontario are not currently for sale, but you can email them with questions at: [email protected]
Is there a boat you’d like to know more about? Have you built one that you think other Small Boats readers would enjoy? Please email us your suggestions.
What it’s all about: a Minimax Sea Flea at speed with one hand on the wheel and the other on the throttle.
It couldn’t get much simpler, really: two sheets of plywood, a bit of lumber, some nails and screws, a little glue and paint, and an outboard motor. If you put these together in the right order, you end up with a Sea Flea–type outboard hydroplane, your ticket to a thrilling ride. Along with the Boston Whaler, the Laser, and the Sunfish, the Sea Flea is among the boats that have gotten the greatest number of people out on the water.
The urge to go fast on the water in an outboard-powered boat likely dates to shortly after the first practical outboard motors were built in the early years of the 20th century. It got a lot easier to satisfy that urge in the early 1960s when naval architect William D. Jackson drew the Minimax and Minimost, possibly the most frequently built of the Sea Flea–type designs. Originally published in Science and Mechanics in 1962, the plans for the Minimax and Minimost have been circulating from hand to hand via dog-eared and yellowed copies of the magazines, photocopies, and Internet downloads ever since. Magazines such as Popular Mechanics, Modern Mechanix and Inventions, The Mechanical Package Magazine, and the Sports Afield Boatbuilding Annual fed the boating dreams of thousands as they offered plans, instructions, and encouragement for building anything from a tiny dinghy to a substantial power cruiser or inboard sailboat, and often included designs for small, fast, outboard boats. There’s no telling how many of these little hydroplanes have been constructed, but their appeal is as fresh now as it was 50 years ago, and they continue to inspire builders.
There isn’t actually one particular design called a Sea Flea. That term was coined by Toronto athlete and sportsman Lou Marsh (1879–1936), who began racing small outboard hydroplanes in the 1920s in Toronto, Ontario, and it has come to be generally applied to this type of boat. Along with the Minimax and Minimost, some of the evocatively named designs considered Sea Fleas include the Hasty Hydro, Hydro Kart, Spitfire, Flying Saucer, Pewee, Dragonfly, Mini Hydro, Yellow Jacket, and Skeeter. The Sea Flea spirit is also alive and well in the Cocktail Class Skuas (see WB No. 213), which is also available in kits from Chesapeake Light Craft.
John Summers
A young driver gets some tips before his first ride.
Building the Sea Flea
The Sea Fleas are all constructed in the same manner. According to the original article, “Most boat for the least money is this happy little hot rod racing dish. One weekend of work, or even one day if you’re experienced, will have you ready for the water for under $20. Clamp on a small outboard and go….” If my own boatbuilding projects are anything to go by, the promise of “one weekend of work” is probably a little optimistic, and I’d be very surprised if you could still build one for “under $20.” These details aside, however, a Sea Flea is still a simple, easy, and relatively inexpensive boat to build. The boats can be put together anywhere you can fit a sheet of plywood, and they have been built in basements, garages, living rooms, and carports. Their construction requires only the most basic tools and materials, and they would make an ideal first boatbuilding project. They are also a perennial favorite project for a parent and child to share, both to build and enjoy afterwards.
John Summers
A family gathering of Sea Flea designs. From front to rear, the designs are a Glen-L Tiny Titan and four Minimax hulls, the oldest of which, at the rear, was constructed in 1962 and is still in regular use.
The construction of the Minimax is typical of the Sea Flea type. The basis of the hull is two sheets of ¼″ plywood, reinforced with stringers cut from standard dimensional lumber such as 1×8 and 2×4 hemlock, pine, or spruce. Fastenings are flathead wood screws, ring nails, and epoxy, and the materials list is rounded out by fiberglass tape and cloth, filler, and paint. There’s no reason why boats can’t be built with A/C fir, or even underlayment, but better plywood will probably produce a longer-lasting boat for the same amount of effort, especially if a bright-finished deck is desired. One piece of plywood gets a half circle at one end with a gore in the middle that will later be used to introduce some deadrise at the bow. No extra lumber is required for a building form, as the framing is erected right on the bottom sheet. The deck is cut to the same semicircle at the bow as the hull, and the cockpit opening is also cut and marked. The gore in the bottom is closed up by a band clamp or Spanish windlass and secured with a metal strap. Clearcoating all surfaces with epoxy, especially those that will later be part of enclosed compartments, will greatly extend the boat’s life.
The main longitudinals are the hull sides and cockpit sides, the latter also extending to the transom to support the motor board. A web strut under the foredeck and a bulkhead at the front of the cockpit round out the framing members. These pieces are all built from scraps of plywood left over from the deck and hull with nailing strips added on top and bottom. Although the original plans show “lightening holes” of graduated size in the cockpit sides, many builders omit these and make the side deck spaces watertight for use as buoyancy. If they are enclosed, the plans promise that the resulting buoyancy will support 900 lbs if the boat is swamped. Similarly, the original plans call for fiberglass tape only on the hull seams, but a layer of cloth on the hull, and even on the deck, would increase abrasion resistance for boats that are often hauled up on the beach. Paint schemes are as individual as the builders and owners, but from my brief examination of Sea Flea pictures, hot rod flames do seem to be a recurring (and entirely appropriate) motif.
John Summers
Part of the fun is tinkering with the boats and motors, especially when running an antique power plant such as this 1951 7.5-hp Mercury KG4.
Finished boats weigh in the neighborhood of 65–85 lbs without a motor, and are easily cartopped or carried in the back of a pickup. Ideal crew weight is one average-sized adult or one adult and a small child, and motors from 3 to 20 hp can be used depending on the age, weight, and skill level of the driver.
Performance
To run a Sea Flea, you sit or kneel in the tiny cockpit. Once the motor is running, and assuming that you’re not using an antique clutchless “start-and-go” motor like the 1950s Mercury shown in the photo above, your right hand goes on the throttle and your left hand on the wheel, though there’s nothing to say you couldn’t rig the boat with the throttle on the left if you wished. Getting up on plane takes a bit of practice—as you throttle up, you also move toward the bow, leaning over the foredeck. As the hull begins to climb out of the water, you lean back and ease the throttle a little, and soon the boat pops up on plane and takes off.
For those of us accustomed to the feeling of security offered by strong sheerlines and seaworthy bows rising up in front of us, it is a little disconcerting to be driving a boat at what feels like high speed with a bow that seems to go down like a scoop just waiting to pick up water. And scoop it will, especially through chop and wakes; but if it does, all you will get is a little wet. This is definitely a boat for summertime and warm water. Slowing down also requires a bit of care lest you get pooped and swamped by your own stern wave.
Ben Summers
The Minimax is the essence of powerboating: Just enough hull to float you, a power plant, a gas tank, the wheel, and a throttle, all in 8′ of boat.
And how fast do they go? The Minimax I drove had a 20-hp motor on it, approaching the upper end of reasonable power for an 8′-long boat. Heading downwind, according to the speedometer on the dash I was running over 30 mph, and occasionally hit 33 or 34. That is almost immaterial, however, as it felt like I was going about 100, and that was a large part of the fun. The yammering of the outboard, the occasional jolts to the knees as I went through chop, and the haze of water droplets shimmering just ahead and to either side of that downward-pointing bow were mesmerizing, and even meditative in a kind of noisy, twostroke way.
Turning takes some planning, as there’s really nothing in the water other than the lower unit of the outboard. It’s really more of a controlled drift, but by leaning, easing the throttle into the turn, and throttling up going straight again, you soon figure it out. Essential safety equipment includes either a kill-switch lanyard and/or a deadman’s springloaded throttle and a PFD; and essential courtesy includes being mindful of local boating regulations about how fast you can go at what distance from shore.
Sea Flea hulls aren’t competitive in contemporary outboard racing, but building and driving one would be a good stepping stone into more formal American Power Boat Association competition if you were really bitten by the racing bug. This is really a summer vacation boat, perfect for high-speed excursions on sheltered water and perhaps the occasional brief fantasy that turns your 8′ plywood Sea Flea into a thundering unlimited hydro, at least until you have to head back to the beach and return the boat to the 12-year-old from whom you borrowed it.
Science and Mechanics magazine
The designs for the Minimax and Minimost were originally published in Science and Mechanics magazine in 1962.
Copies of the original building plans for a variety of Sea Flea–style designs, including the Minimax and Minimost, can be downloaded from www.muskokaseaflea.ca, where you will also find photos of other Sea Fleas, building sequences and instructions, videos of the boats underway, safety and operating tips, and a whole lot of enthusiasm for these little boats, as well as information about the annual FleaFest rendezvous in the Muskoka region north of Toronto, Ontario.
Sea Flea Particulars
LOA: 8′ to 10′
Beam: 48″ to 59″
Draft Propeller: depth
Power: 3–20 hp
Take a look at a few other tiny racer boat profiles
Midget Flyer, A smart little runabout from 1938 designed by Bruce N. Crandall
RETRO-ROCKET, Glen-L’s Super Spartan makes a splash
I am regularly impressed and often amazed by the ingenuity and dogged determination of Small Boats’ contributors and readers. Take two young men featured in this month’s issue. Both had boating dreams and self-devised ambitions, and against considerable odds, both achieved their goals. The obvious similarities end there, however, for their quests, though both challenging, were of very different natures.
Tyler Ellis (featured in this month’s Reader Built Boats), a recent graduate with a degree in Ocean Engineering from Virginia Tech, was just starting out in pursuit of a career in naval architecture. He didn’t have the money to indulge in extras. But Tyler wanted a boat. And not just any boat; Tyler wanted a classic boat. He had nowhere to store such a boat, no ability to transport such a boat, and certainly not enough funds to buy such a boat. But Tyler wasn’t about to give in to all the negatives. Instead, he designed a new boat: a classic wooden runabout, complete with electric motor and lightweight dolly, that fits in the trunk of his car. He designed it, built it, and now, when the weather is calm, he uses it on the lakes around D.C.
At almost exactly the same time as Tyler was planning and designing, Owen Alfonso (author of this month’s Adventures feature) was considering something entirely different: an adventure under oars. He knew how to row and had a suitable boat, but he had never before rowed on sea or ocean. Nevertheless, Owen imagined rowing the eastern shore of the Baja California Peninsula, and no lack of experience was going to stop him. In May 2022, he set off on a 33-day odyssey, rowing 650 miles alone, northward along the Sea of Cortez from La Paz to San Felipe. He faced dangers and experienced joys, marveled at the intricacies of nature, and lost himself in the grandeur of distant land- and seascapes. He took exquisite photographs (like the one above) and lived to tell some extraordinary tales.
Tyler’s and Owen’s big adventures could not have been more different and yet, for me, both are examples of how, if a person has the determination, passion, and belief in self, a small boat can transform lives and turn dreams into realities.
So long and thank you
Behind every production there are unsung heroes—the people who work hard to make things as near perfect as possible. Their efforts go largely unseen by the audience but for co-workers their contributions are immeasurable.
WoodenBoat Publications
For many years Pat Lown was WoodenBoat’s librarian. For the past five years she’s worked diligently for Small Boats, a valued team member and friend.
At WoodenBoat Publications, Pat Lown has been one of the unseen, unsung champions for more than three decades. Pat came to WoodenBoat in 1993, working in the store, on the editorial staff of Professional BoatBuilder, and in the circulation customer-service department. By 1997, she had been snapped up by the WoodenBoat Library where she worked alongside Anne Bray helping countless readers, writers, and editors with research requests. With a young family at home and a genuine love for what she was doing in the library there were, surely, too few hours in the day; nevertheless, Pat found time to contribute to myriad in-house projects and for many years helped out at the annual WoodenBoat Show. In the earliest days of social media, it was Pat who helped to establish WoodenBoat’s Facebook presence and online voice.
Pat has been an ever quiet, calm, essential cog in the WoodenBoat wheel; a valued colleague for whom no job has been too small, no request too big.
In March 2020, Pat joined Small Boats as the copyeditor. Her work continued behind the scenes with the same diligence as ever. While readers would never know of her contribution, writers and editors alike have been very aware of the typos she’s caught, the sentences she’s smoothed, the information she’s clarified, and the pertinent questions she’s posed.
Now, after more than 30 years with WoodenBoat, and five years with Small Boats specifically, Pat is hanging up her hat. She’s leaving behind a legacy of good writing, accurate information, and reassured editors. We will miss her for her work, her patience, and her friendship.
Several years ago, I was watching a TV show that featured a Riva Aquarama, and I remember thinking that the luxury runabout was perhaps the most beautiful boat I had ever seen and wondered if I could buy one. I soon realized that even if I could find one to buy, I certainly couldn’t afford it. But during my Riva research I stumbled upon the Glen-L Marine website and started thinking: maybe I could build something that resembled the Aquarama, but at considerably less cost.
Since 1953, Glen-L Marine has been producing designs for amateur builders, and their creations have been built all over the world; their website features hundreds of successful builds. After sifting through about 300 designs of extraordinary variety, I landed on the page for the Malahini, a classic 16′ runabout designed by Glen L. Witt in the 1950s. It spoke to my runabout imaginings, and I studied the online drawings closely: It was powered by an outboard, which appealed to me as I was somewhat intimidated by the idea of installing an inboard; and its V-bottomed hard-chined hull was developed for plywood construction, which sounded a lot simpler for a beginner than cold-molding or carvel planking. I am an IT guy by trade and have only a few carpentry skills, but I had built a simple johnboat a few years earlier so did have a few tools and a little experience. I ordered the plans.
Simon Foord
The build of the Malahini begins with the strongback onto which are mounted the stem, transom, and frames. Before fitting the bottom panel, the chine logs and the battens that stiffen and strengthen the bottom of the hull are also fitted. At this stage in the construction, it is easy to see the sharp V-entry and how it contrasts with the flat, beamy sections in the stern.
The delivered package included complete plans with full-sized patterns for the stem, breasthook, transom knee, and chine-blocking, as well as half-section patterns for the frames and transom. There was an eight-page instruction manual, broken down into very detailed sections that cover every aspect of the build including a comprehensive bill of materials and fastening schedule. In addition, there are five illustrated sheets with clear descriptions and dimensions. The build calls for hundreds of screws (I chose silicon-bronze), fiberglass cloth, epoxy (the company does offer both a fiberglass and a fastening kit), oak or mahogany for the boat’s backbone, framing, and transom, and marine plywood for the hull sides and bottom, stem, floorboards, seats, and decks. I was unable to find good marine plywood where I live in Tennessee and instead used good-quality exterior fir plywood. As per the plans, I used 3⁄8″ for the bottom planking and 1⁄4″ for the sides and sub-decks.
Building the Malahini
The build begins with the construction of the strongback onto which are mounted the transom, stem, breasthook, and frames. The plans and instruction manual thoroughly explain how to build each component and the order of operations. I used red oak for the frames, not realizing when I began the project that it is more susceptible to rot than the specified white oak. Rather than replace all the frames, I thoroughly encapsulated them in epoxy resin and later applied plenty of bilge paint below the waterline. Eight years later, the frames are still like new. However, having learned of the superior qualities of white oak, I switched to that for the rest of the build. After the frames were all in place, I installed the keel, bottom battens, sheer clamps, and chine logs.
Once all the structural pieces are complete, the hull’s bottom and topsides panel can be fitted. I scarfed the plywood sheets to get the required lengths, and then the installation of the panels was relatively straightforward using thickened epoxy and a ton of screws. The tighter bends in the bow area did need a little encouragement, but the shaping was achieved by dampening the plywood with towels soaked in boiling water. I stained all the plywood panels a mahogany color before sheathing the exterior with fiberglass cloth and epoxy resin.
Simon Foord
When the hull structure was complete, but before the deck was fitted, I painted the bilges throughout. The plans call for the cockpit sole to be made of plywood, but I installed 5 1⁄2″ pine floorboards, spaced to let water pass through to the bilge, instead. Limber holes in the floor timbers let water flow aft to be collected in the open area in the stern.
I recruited and bribed friends and neighbors to help flip the boat right-side up onto its trailer. It was an exciting, if nerve-racking, moment, but the operation was successful and went without incident.
Before proceeding with any of the fit-out, I painted the bilge while it was still exposed and accessible. Then I installed the sole boards so that it would be easier to move around within the boat. For the sole, the plans call for plywood sections, but I opted to use 5 1⁄2″ pine boards with 3⁄16″ spaces between them to allow for drainage to the bilge. I encapsulated the boards with epoxy and varnish, and applied strips of clear nonskid tape for safety.
The plans suggest several ways to finish the decks and covering boards. I chose to use 1⁄4″ fir plywood as sub-decks onto which I laid hardwood veneers—first, 1⁄4″-thick mahogany for the covering boards and kingplank, then book-matched strips of 2 1⁄2″-wide by 1⁄4″-thick mahogany alternating with 1⁄4″ × 1⁄4″ maple to simulate classic deck planking with caulked seams. I temporarily screw-fastened the strips while the epoxy cured. After removing the screws, I counterbored the holes and filled them with mahogany plugs for a traditional look. I had seen this method used by other builders, and thought it attractive.
The Malahini cockpit layout
Next, I worked on the cockpit. After selecting good-quality mahogany boards, I installed the coamings and dashboard. The plans leave the layout of the dashboard and the number of gauges and switches to suit the builder. I laid my gauges out in a straight row with the various switches (for lights and bilge pump) beneath. To add a little flare, I inlaid two strips of maple across the dashboard.
Lisa Foord
The layout of the cockpit is close to the design, but I wanted to get as much weight forward as possible, so while the fuel tank and battery would ordinarily be carried beneath the afterdeck, I moved them forward and installed them beneath the foredeck. In turn this gave me storage space beneath the afterdeck, where I made the bench seat easily removable and attached the backrests with strong magnets. The motorwell is self-draining and large enough to allow the motor to be fully tilted.
The plans offer several options for steering, the position of the remote controls, and how to run the cables. I mounted the throttle control on the starboard coaming and ran the wiring harness with the steering cable beneath the side deck to the transom.
To construct the benches, I followed the plan dimensions but with a few changes. I wanted to get as much weight forward as possible, so I moved the dashboard and steering bench forward 6″ and installed a 19-gallon fuel tank and battery beneath the foredeck (Glen-L positions these beneath the stern deck). This alteration provided me with storage space beneath the afterdeck, so I made the stern bench seat easily removable, and attached its backrests with powerful magnets so they can be folded down or removed for quick access. I also reduced the width of the walkthrough cutout in the forward bench backrest to give a middle passenger better back support. All the seat bases are hinged and have generous storage beneath them. Despite the fuel tank and battery under the foredeck, there is still plenty of foot room for passengers, with places to stow bags and life jackets.
The plans include a schematic of the transom and self-draining motorwell with a table of various dimensions to cover a variety of motors from a 5.5-hp short shaft to an 85-hp long shaft. I made the recommended modifications to suit a new Mercury 60-hp four-stroke long shaft. The well is sized so the motor can be fully tilted up. To satisfy the warranty conditions, the motor was installed by the dealer. It has been reliable, has ample power, and is relatively quiet.
Michael Maddox
For four adults, the Malahini’s cockpit is spacious. For extra comfort I mounted chrome grab handles in front of each seat. The bimini is not specified by Glen-L, but this production 8′-long, four-hooped version that I found online works well. While the boat is designed to accommodate an 85-hp outboard, the 60-hp motor here provides ample power, though the addition of trim tabs helps the boat to get on plane quicker when there is a full crew on board.
Little information is given regarding the electrical system. I ran all 12-volt wiring back to a convenient flip-down fuse panel beneath the dashboard. Finishing up the electrics, gauges, and controls took several months. The plans do give some brief details on the upholstery, and l considered doing it myself but instead found a professional shop to custom-make everything for me.
After a good deal of fairing and sanding I applied more than 10 coats of varnish to the topsides, interior and decks, and then installed chrome and stainless-steel fittings to complete the classic look. The windshield shown in the plans is a fixed Plexiglass type. I bought cast-aluminum frames from a foundry in Pennsylvania, and cut the windshields from 1⁄4″ clear Plexiglass sheets. Although a bimini is not specified, my wife and I were keen to have one. I found a production 8′ four-hoop bimini online that has worked well.
Working evenings and weekends, and with support from my wife, the build took me two and a half years.
Malahini on the water
At rest the Malahini is very stable, which makes it easy to get aboard and move around, especially with the walk-through forward bench. I added a bracket in each side deck for boarding poles, which some passengers find reassuring. There is comfortable seating for four adults. To achieve optimum trim, I always try to seat lighter passengers on the aft bench. The Malahini drives like a sports car and is exceptionally maneuverable, carves through turns without skidding, tracks straight, and is quick to get on plane. The boat’s top speed is a little over 33 mph, and it will cruise comfortably at 25 mph; with the full-length spray rails, long and slightly radiused foredeck, and windshield it is a fairly dry boat. After using the boat for a while, I added trim tabs to the transom, and these have significantly helped to get on plane when the boat is fully laden. The boat performs best in calm waters, but while it does have a tendency to pound a bit in a chop, I have full confidence in the strength of the hull.
Michael Maddox
Even at speed and crossing the wake of another boat, the Malahini is a dry boat. The spray rails at the chines direct water out and away from the hull.
Above all, the Malahini is an extremely good-looking boat and always attracts plenty of attention and compliments. The construction project is best suited to builders with some experience, but the support from Glen-L’s plans and instructions is excellent, and I also appreciated the wealth of information to be found online in the Glen-L forum and elsewhere. On the occasions that I called Glen-L Marine they happily answered all my questions.
Simon Foord is a retired IT systems engineer, born and raised in England. He moved to California almost 40 years ago and now lives in Tennessee. Simon has owned and built several boats over the years, and has a special passion for wooden boats. He enjoys running about in the Malahini and sailing his Glen-L 19 sloop on Percy Priest Lake near Nashville, Tennessee.
Plans and accessories for the Malahini are available from Glen-L Marine. Prices range from $149 to $690 depending on the options chosen.
Is there a boat you’d like to know more about? Have you built one that you think other Small Boats readers would enjoy? Please email us your suggestions.
More powerboats from Glen-L Marine
Glen-L Zip: A twin-cockpit runabout, reviewed by Ted Gauthier
Glen-L Sea Knight: A 1957-vintage outboard cabin cruiser, reviewed by Chuck Black
The Glen-L Utility: Classic 1950s style in a boat that’s simple to build and a joy to use, reviewed by Michael S. Maddox
Fifty-plus years ago, while living in California, I met some folks from Washington who told me about commercial fishing in Alaska. The idea took hold, and along with a buddy and my dog, I hitchhiked to Northwest Washington in search of jobs on the water. It took a while, with a few rabbit trails, but I settled into a 20-year stretch of commercial fishing for salmon, shrimp, herring, and Dungeness and king crab, as well as a stint working as a shipwright. I fell in love with boats of all sorts, mainly working craft, and dreamed of building one. I had my WoodenBoat magazine subscription and bought any book I could find on the subject of boatbuilding. But dreams often get hijacked by reality, and a family, a mortgage, and a construction business put that particular fantasy on hold.
Fast-forward 50 years and I’m retired, the kids are grown, and the mortgage is paid. Now, I have time. One day, with clarity, it hit me: I would build a boat. I started looking at plans and setting parameters to make sure I could pull it off. It had to be a design and a method of construction that I could be sure of starting and finishing in a predictable time frame—I didn’t want an incomplete project to be staring at me for years. It had to be built in the space I had available—one-half of my two-car garage. It needed to be challenging and to include lofting; there would be no templates or kits. I was drawn to the lines and construction of Nexus Marine Corporation’s 16’ San Juan Dory. Of all the designs I considered, I felt it had the fairest lines and its construction seemed more traditional than others. I also had much of the necessary material. All the framing and removable deck grates could be built from clear vertical-grain (CVG) Douglas fir that I had salvaged from a church remodel and stored for the past 40 years. I purchased one 16’ piece of CVG Douglas fir for the chine logs. The plans call for white oak for the guards, inwales, spray rails, and trim, but I substituted repurposed decking—a tropical hardwood marketed as tigerwood (Goncalo alves)—leftover from a previous job.
Nick Ivancovich
The ladder frame on which the San Juan Dory is built can be used in the early stages of the project to support a plywood lofting table (seen here at left leaning against the workshop shelves). The frames, chine logs, and stem are all Douglas fir.
Building the San Juan Dory
David Roberts, owner of Nexus Marine, designed the 16′ San Juan Dory for a client some 30 years ago; it was based on a 21′ cuddy-cabin dory he was then building. It has been one of his best-sellers both in finished boats and plans. Throughout my building of the boat, he was extremely helpful, filling in whatever details I asked for. The plans for the San Juan Dory include three 24″ × 36″ pages showing profile, body, and plan views as well as seven 8 1⁄2 × 11 pages of specifications, a table of offsets, a detailed list of lumber and fastenings (hardware choices such as hinges, latches, and oarlocks are left to the builder), offsets for spray rail and waterline, ladder frame measured drawings, frame section and bevel drawings, and a bibliography of suggested reading. While I didn’t choose them, Mylar templates are offered, which make lofting unnecessary.
The plans call for 1⁄4″ okoume plywood for the boat’s sides and 3⁄8″ for the bottom, scarfed for length and coated with epoxy resin—three coats per side—before cutting. I used approximately 4 gallons of WEST System 105 epoxy resin, mixed with 206 slow hardener, throughout the build for sealing all components and for gluing, using their 403 microfiber adhesive filler. To begin the build, I cut out the Douglas-fir frame parts, assembled them, then set them aside. I built the ladder frame and set it on sawhorses that supported a white-painted 1⁄8″ sheet of plywood to serve as a lofting table. With the Douglas-fir frame sections drawn full scale, cutting and assembling them was easy and accurate. The transom, bow, stem, and splash well were also constructed using the full-scale drawings on the lofting table. Once all the components were completed, the lofting plywood was removed, the ladder frame was lowered to the floor, and assembly could begin. First the frames, transom-splash-well assembly, and stem were set up, plumbed, leveled, braced, and quadruple checked, and then the chine logs could be installed.
Nick Ivancovich
The hull is heavy enough to require a few helping hands when it was time to turn it upright for finishing the exterior. The plans specified the locations for the spray rail and the waterline, so those features could be applied after the hull was painted and before it was rolled over.
Next came the plywood bottom and side panels. The instructions suggest having two people for installing the panels, but I found that by clamping a 2×4 across the breadth of the boat at the sheer near the stern, I could support the plywood panels as I screwed them in place starting at the stem and moving aft one frame at a time. Once cut to fit, the sides and bottom are glued to the frames, stem, and transom with epoxy and screwed with stainless-steel fastenings. I added another coat of epoxy to all exterior and interior surfaces including framing after installing the white-oak chine logs, runners, and skeg. I then coated the outside of the hull with two coats of epoxy primer and four coats of Interlux Toplac. Because my boat would be trailered, I did not use an antifouling bottom paint.
When it came time to turn the hull over, a few willing neighbors helped and the task was accomplished without a hitch. I modified the interior layout to fit my needs. The designer’s specifications state that no interior bulkheads are required, and the plans call for a cockpit configuration that leaves little open space. As I would be using the boat for sportfishing and crabbing, space for crab pots was important. In the stern quarters, where the plans show fixed side benches, I substituted hinged benches that fold down flush against the frames when they are not needed. There’s still plenty of seating for four or five people, which is all you’d ever want, and then only in calm weather. Next, I installed four interior bulkheads, creating a bow locker, storage under the ’midship thwart, and more storage either side of the splash well. Again, I deviated from the plans, which called for foam flotation in most of the enclosed spaces; I wanted lots of storage so significantly reduced the amount of foam. Discussing this with David I learned that the main reason for the flotation—other than the obvious safety factor—was to meet Coast Guard requirements if the boat were built commercially. My decision to reduce the flotation was personal and may not be for everyone, but the storage was important.
Nick Ivancovich
As designed, the San Juan Dory has fixed benches connected to a wide thwart near the stern. However, the layout can be adapted, and designer David Roberts is willing to discuss ideas and answer questions. My dory’s side benches are hinged so that they can be folded down when not needed, and I removed the thwart to provide more space aft.
Next, I painted the entire interior with a marine enamel, then I turned to the solid-wood parts of the build, all of which I would leave bright-finished to complement the painted hull. Tigerwood is a beautiful deep amber red with contrasting streaks of black; it’s also strong and resistant to rot. On the negative side it can be brittle and difficult to bend, but on the San Juan Dory there are no extreme bends. I used grown black locust crooks for the breasthook and quarter knees. Fitting these was probably the most demanding part of the construction, but it was also the moment when the boat really started to take on an identity. I’ve had years of carpentry and finishwork experience, which made the task possible, but I think without that I would have struggled with this aspect of the construction. Having the right tools is key: Essentials include a good tablesaw with plenty of room fore and aft, because some of the components are 16’ long; a handheld circular saw (I used it for cutting most of the plywood); a miter saw and bandsaw; block planes; a jack plane for scarfs and straight edges; a bevel square; and plenty of sharp pencils.
Once everything was built and fitted, I treated the hardwood components with six coats of varnish. There were still things to be done, but the hull was finished. From receiving plans to the last stroke of the brush had taken five months. It was a full-time job, but the challenge and satisfaction were worth every minute. I asked David for his evaluation of the build’s difficulty level. I estimated it as moderately difficult for a first-time builder. But I liked his evaluation better: “It’s instructional. You’ll learn a lot building this boat.”
Mark Ouellette
At speed, the San Juan Dory planes but does ride high in the bow. The weight of a passenger seated forward brings the bow down without noticeably affecting the speed.
The San Juan Dory on the water
I haven’t weighed the boat, but David estimates the finished boat to be between 450 and 500 lbs. The specs call for a 25-hp (maximum) outboard. I purchased a Tohatsu 20-hp, EFI, tiller-steered motor with electric start and power tilt. It weighs approximately 110 lbs. With two 3-gallon fuel tanks, the boat and all its equipment weigh approximately 650 lbs.
With myself and my first mate, Khodi, in the stern, I’ve had the San Juan Dory running at 23 mph. It gets up on plane but rides a little high at the bow. An additional passenger forward brings the bow down with no real change in maximum speed. The boat handles well in a 1′ chop at half-throttle and stays dry while setting and retrieving crab pots. While hand-hauling and lifting pots over the side with two additional people on board, it is stable and comfortable, provided that attention is given to weight distribution.
Mark Ouellette
The San Juan Dory handles well in a chop and stays dry, the rails being well placed to deflect most incoming spray.
I’ve set up my dory with manual outriggers for both freshwater lakes and saltwater trolling. I will also be designing a custom davit for hauling crab and shrimp pots. I have in mind doing day trips and overnight island camping in the San Juan Islands for which the design is named. I have called the boat ŽIVJELI, Croatian for “Live Life.” For me, building the San Juan Dory was exactly that.
Nick Ivancovich, 74, is a retired general contractor and former commercial fisherman. He lives in Northwest Washington with his wife Debra and their two dogs. His hobbies are hunting, fishing and woodworking, and he spends time working with a competitive youth clay-target shooting team.
Is there a boat you’d like to know more about? Have you built one that you think other Small Boats readers would enjoy? Please email us your suggestions.
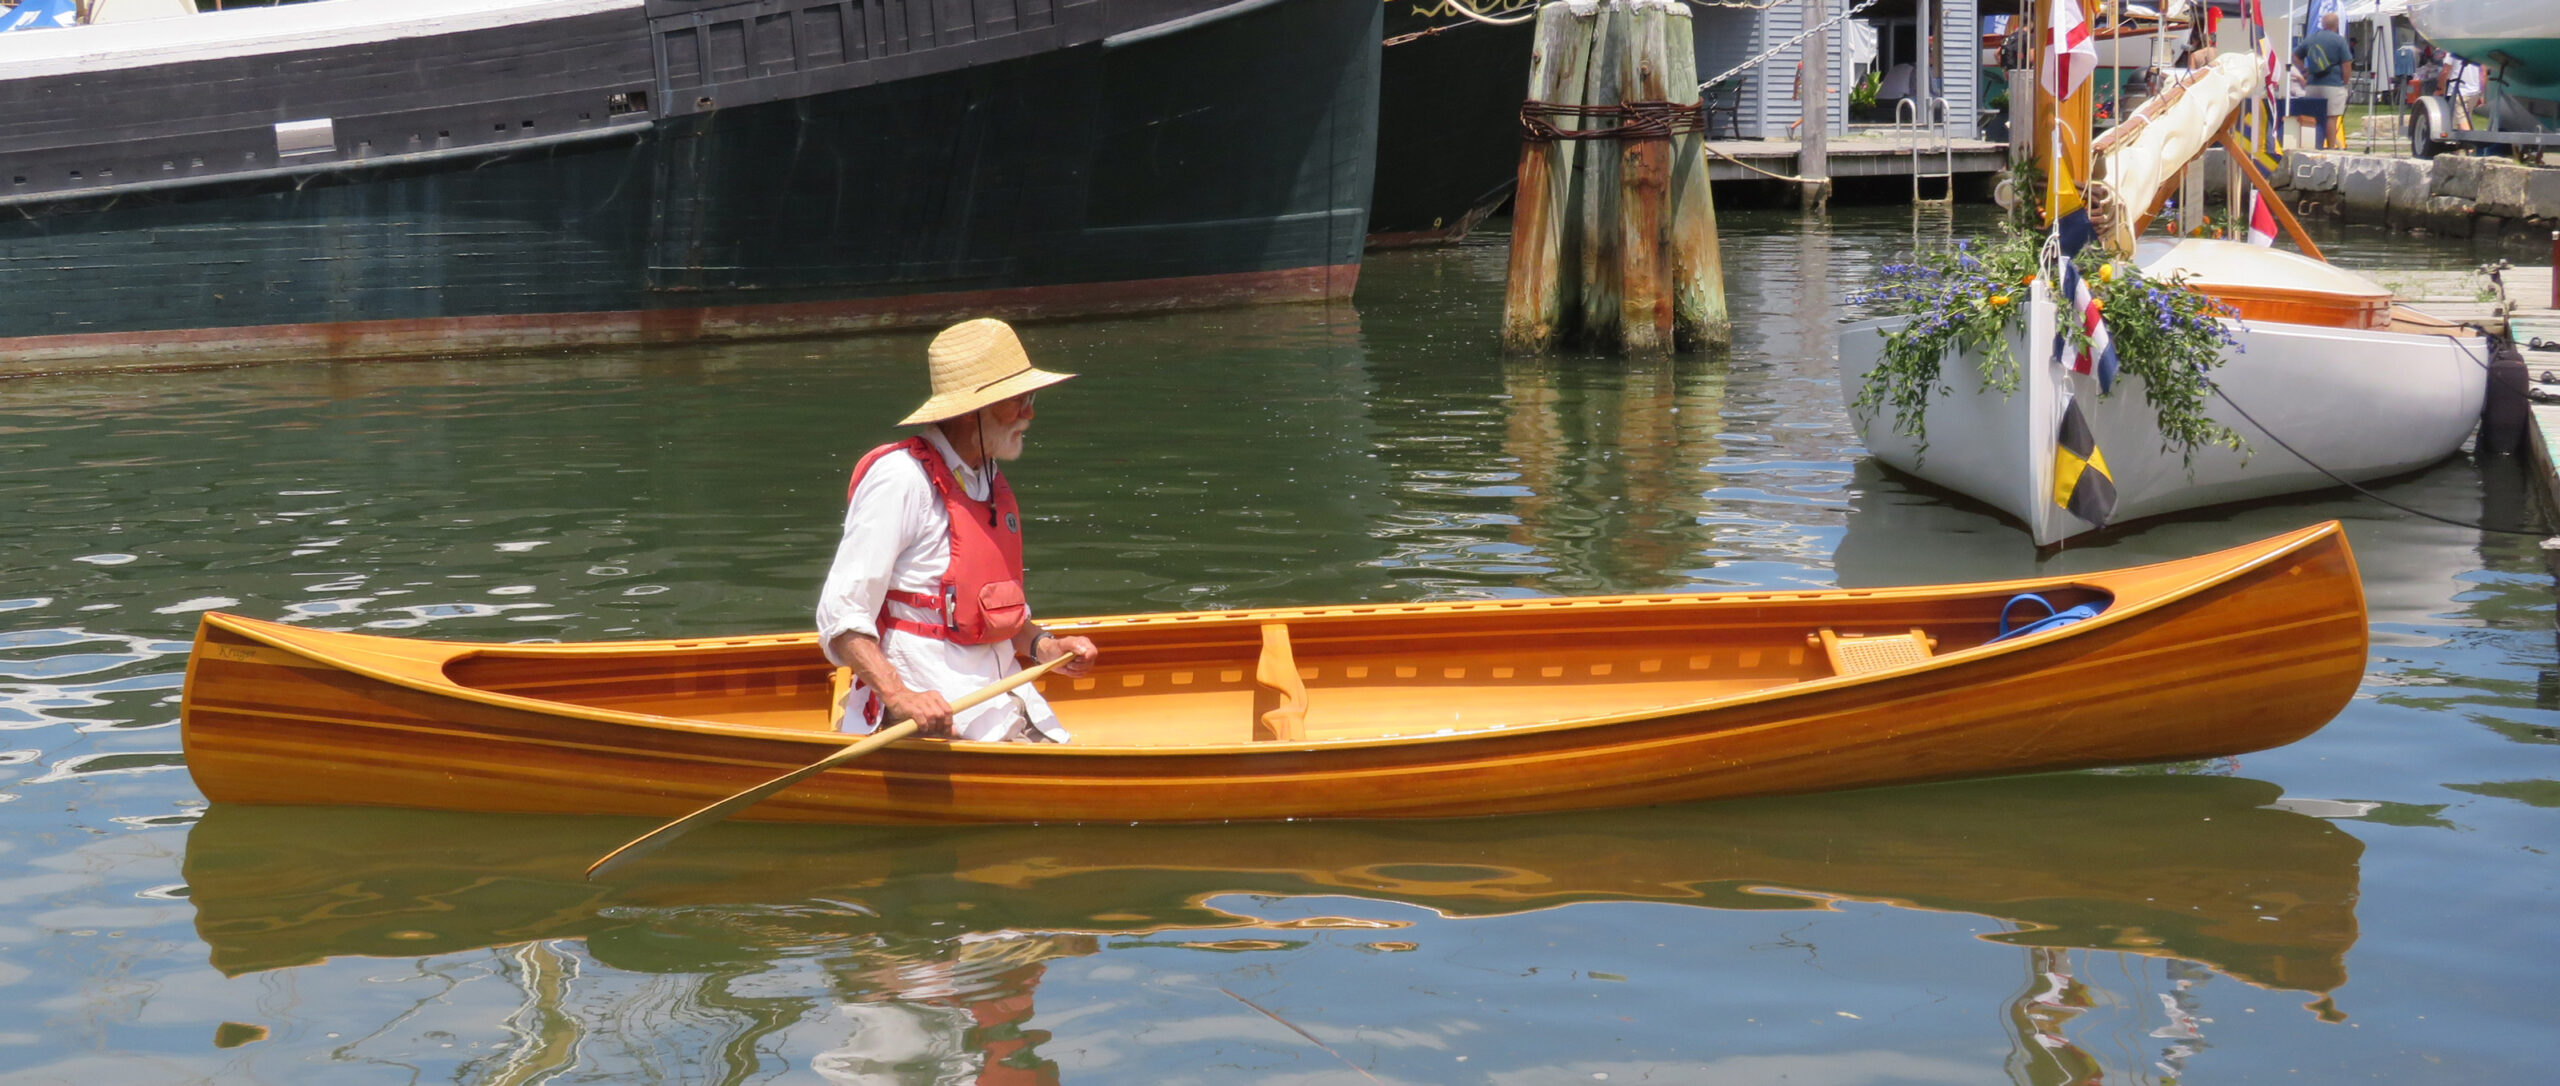
 Photographs by Jenny Bennett