There are few techniques as efficacious and expeditious as using steam to plasticize wood—especially when bending planks. The technology is simple: you need a steambox, a high-capacity steam generator, plenty of fast-action deep-throated clamps, a gaggle of small wooden clamping pads, and hopefully, some reliable helpers to assist with bending the plank to the vessel. Once planks are removed from a steambox, they immediately begin to lose their pliability, and every second counts. For two or more people working in concert, this can lead to a bit of a scramble—even with extensive preparation and experience. For a lone builder, it can be a nightmare.
As luck would have it, there’s an alternative—the trusted, boil-in-the-bag technique where you bring the steambox to the boat, not the plank to the steambox.
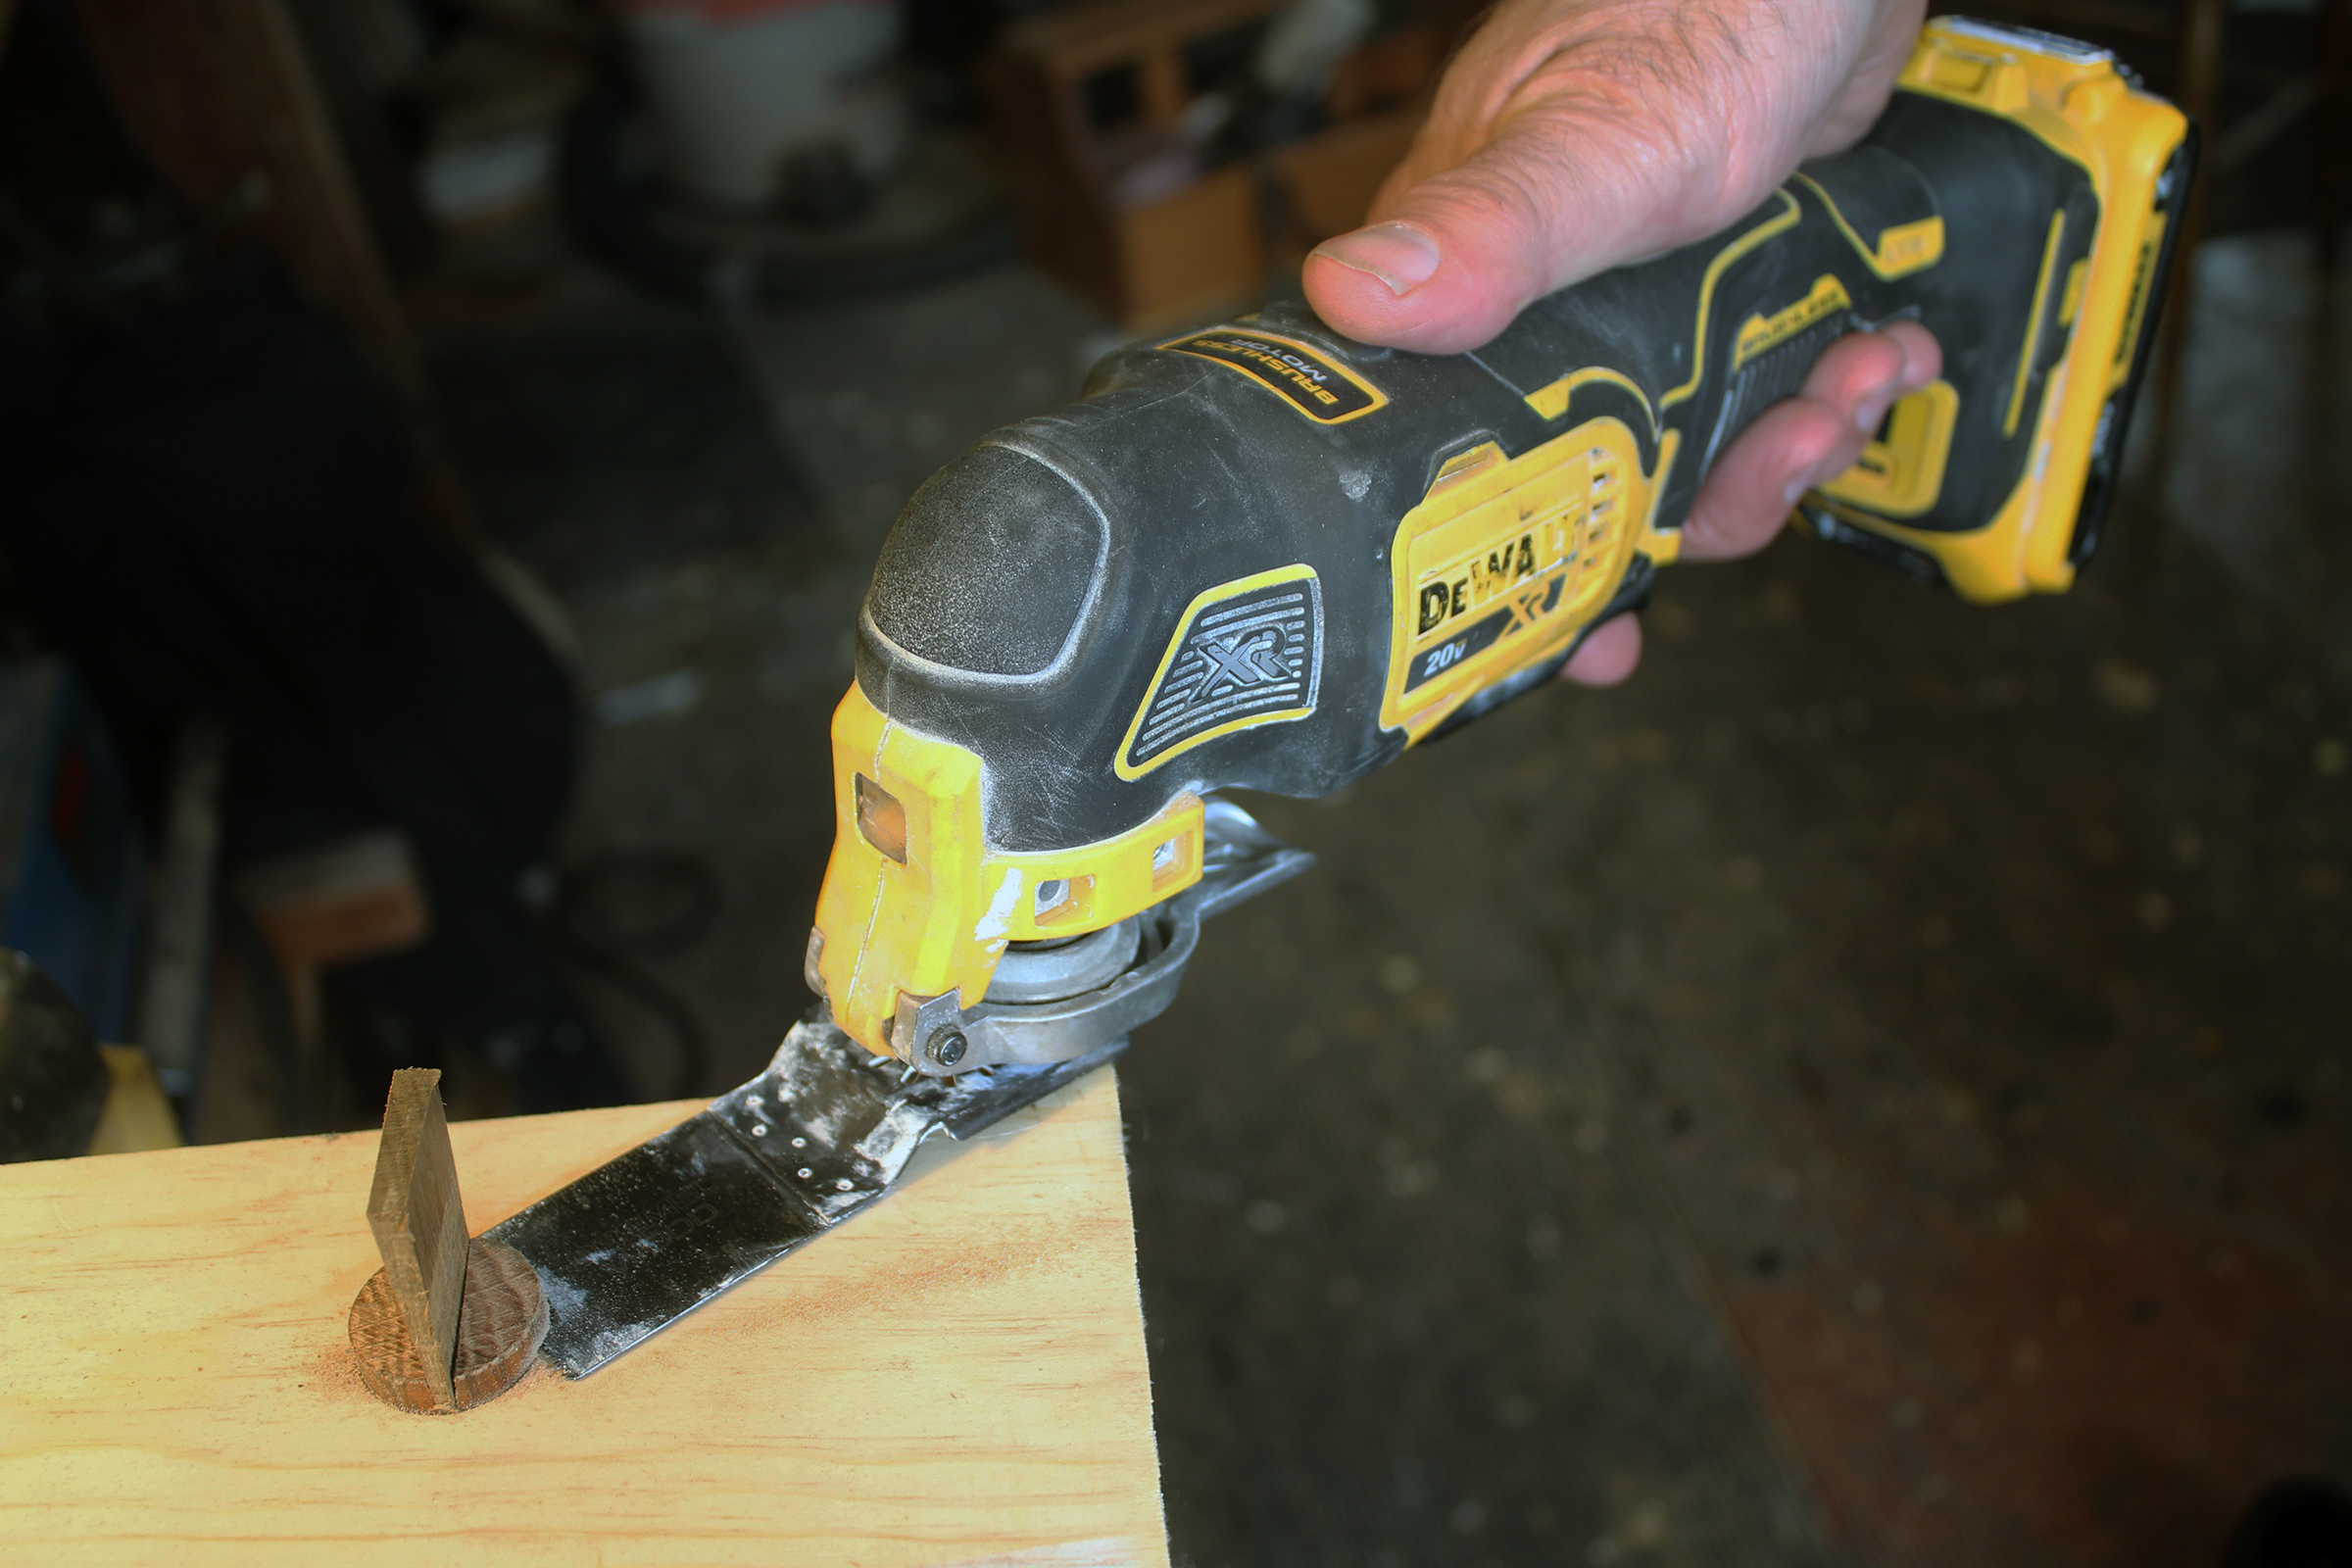
For most small craft, the critical twist in a plank is at one end, typically the bow (or in both ends if the boat is a double-ender). In the middle, the run is relatively flat and straight. Thus, when it comes to steaming, you don’t need to work on the whole length of the plank but only on the hood ends (where the plank fits into the stem or sternpost rabbets).
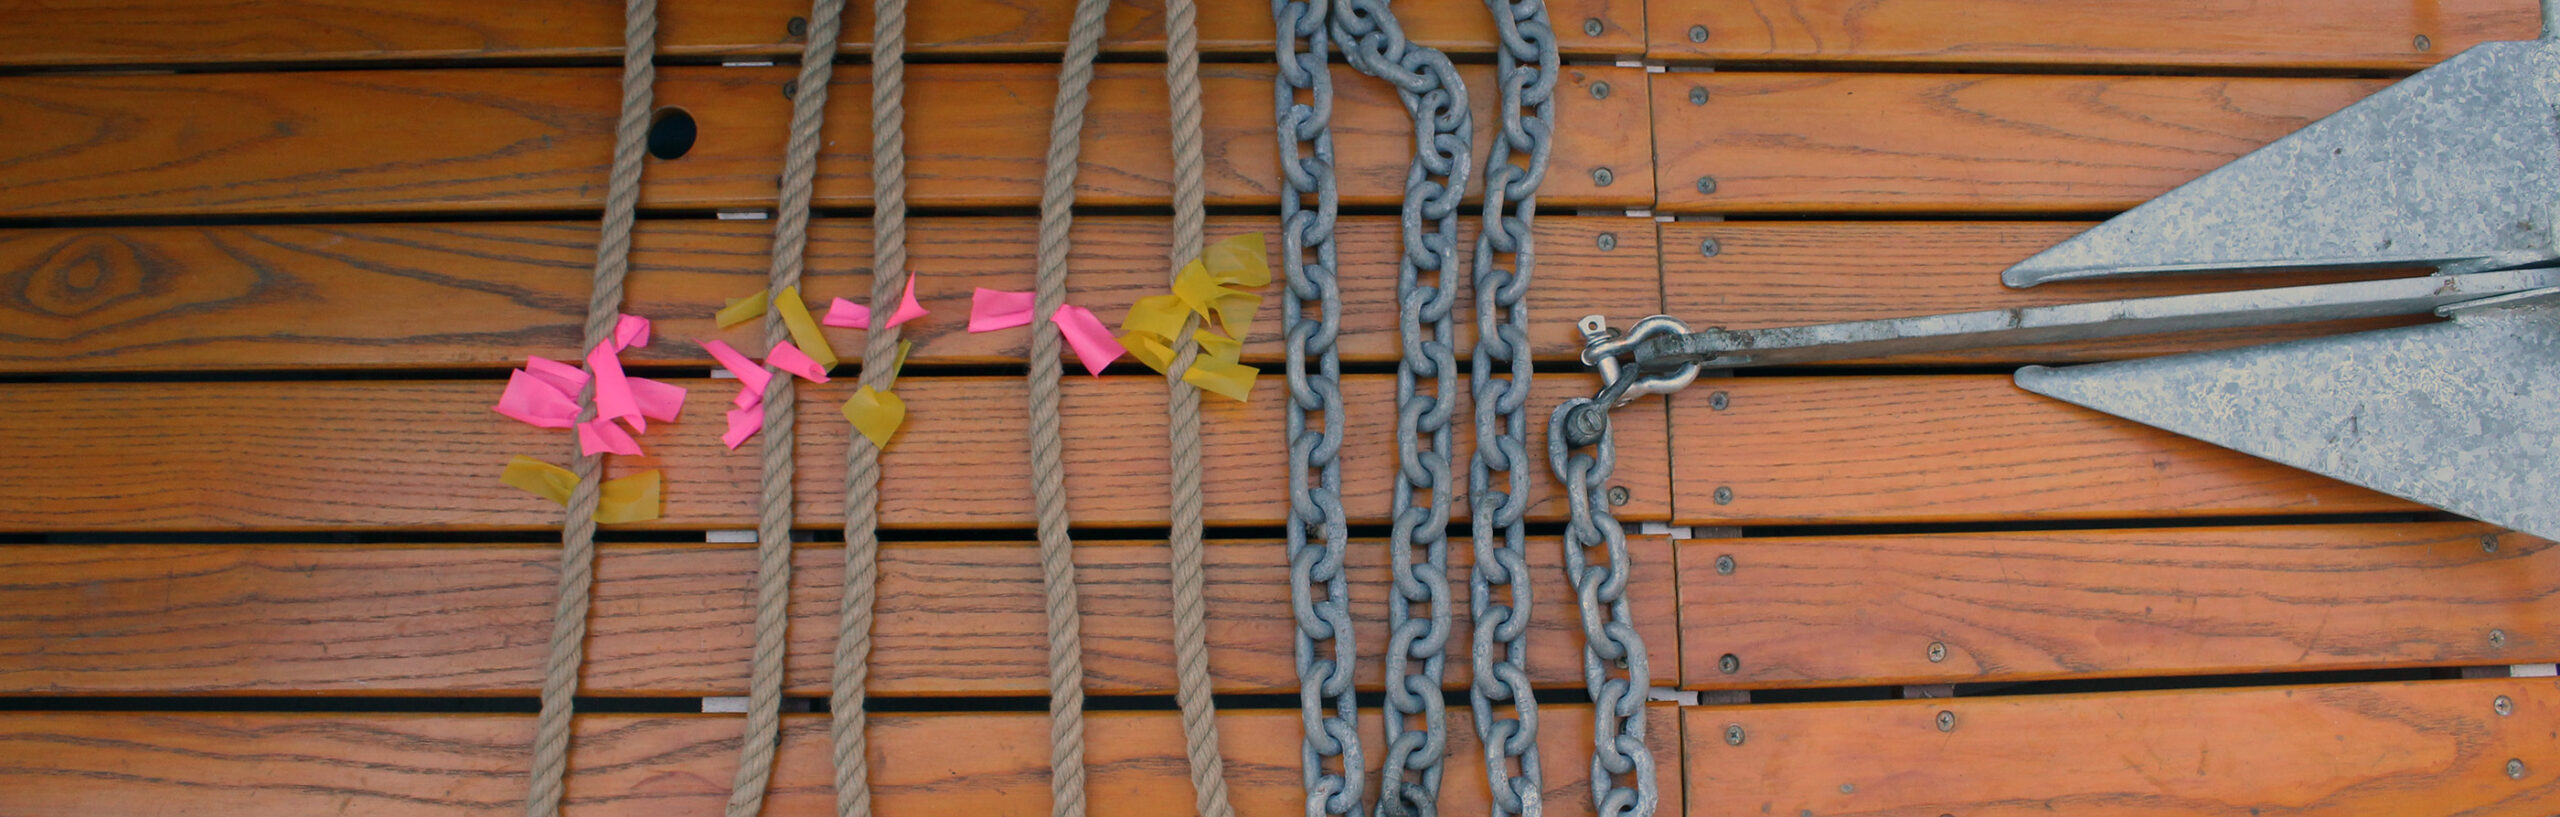
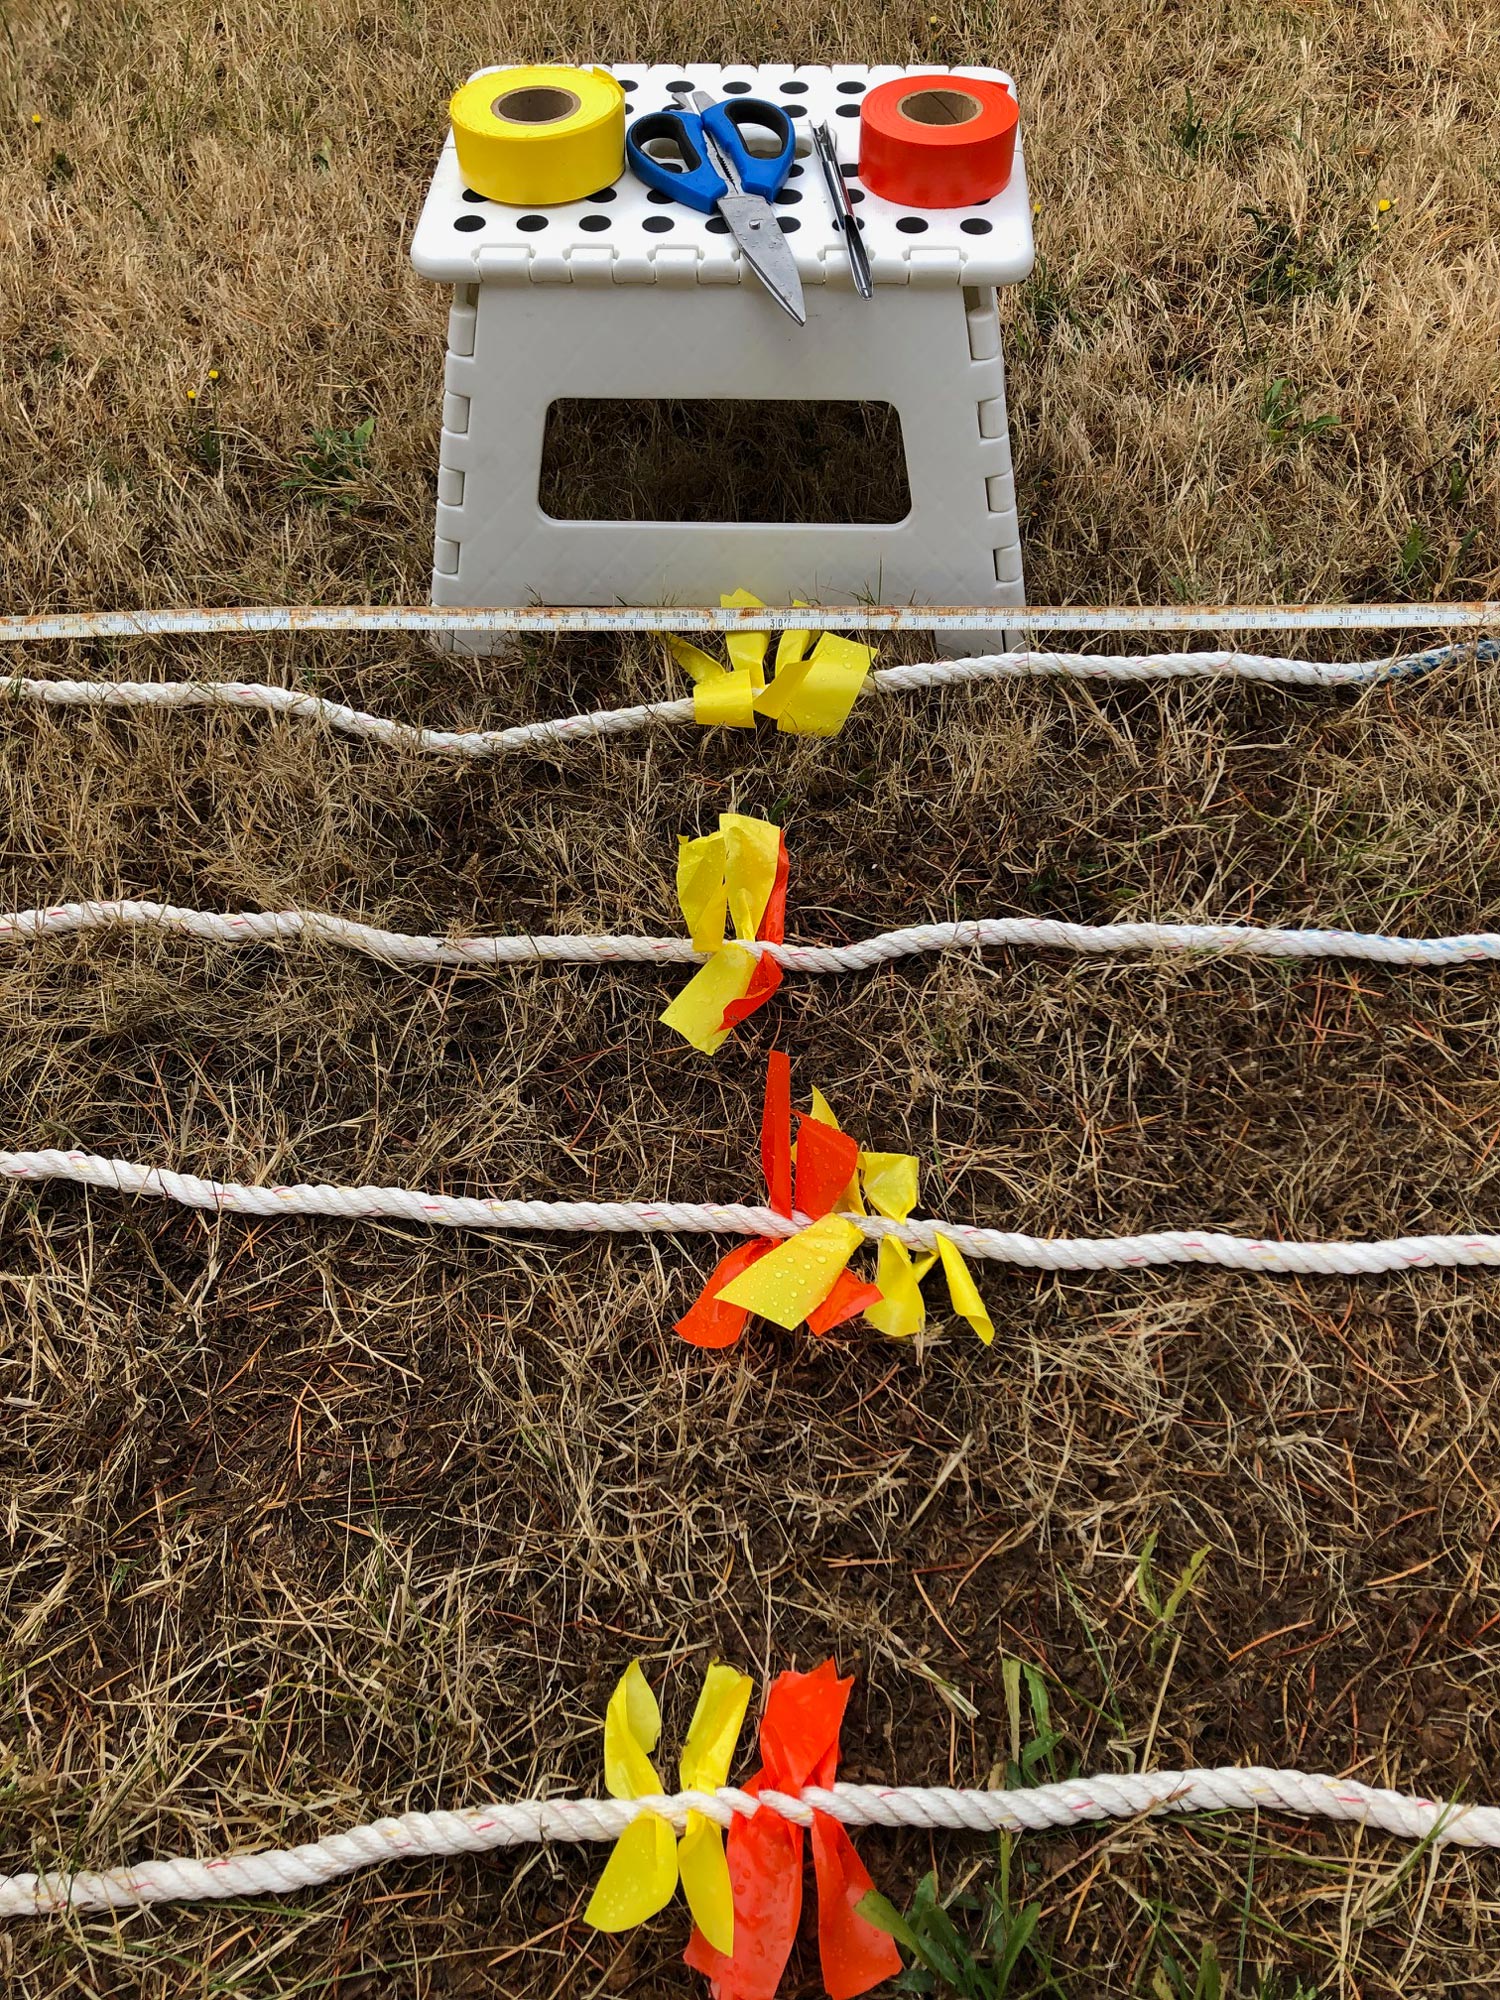
To steam your plank ends singlehanded, you will need a contractor trash bag, or any long closable plastic “sock”; some string or masking tape; heat-resistant gloves, such as welding gloves; a 5-gallon bucket; and a steam generator such as an electric wallpaper steamer or purpose-built wood steamer with a long hose.
Photographs Isaac Robbins
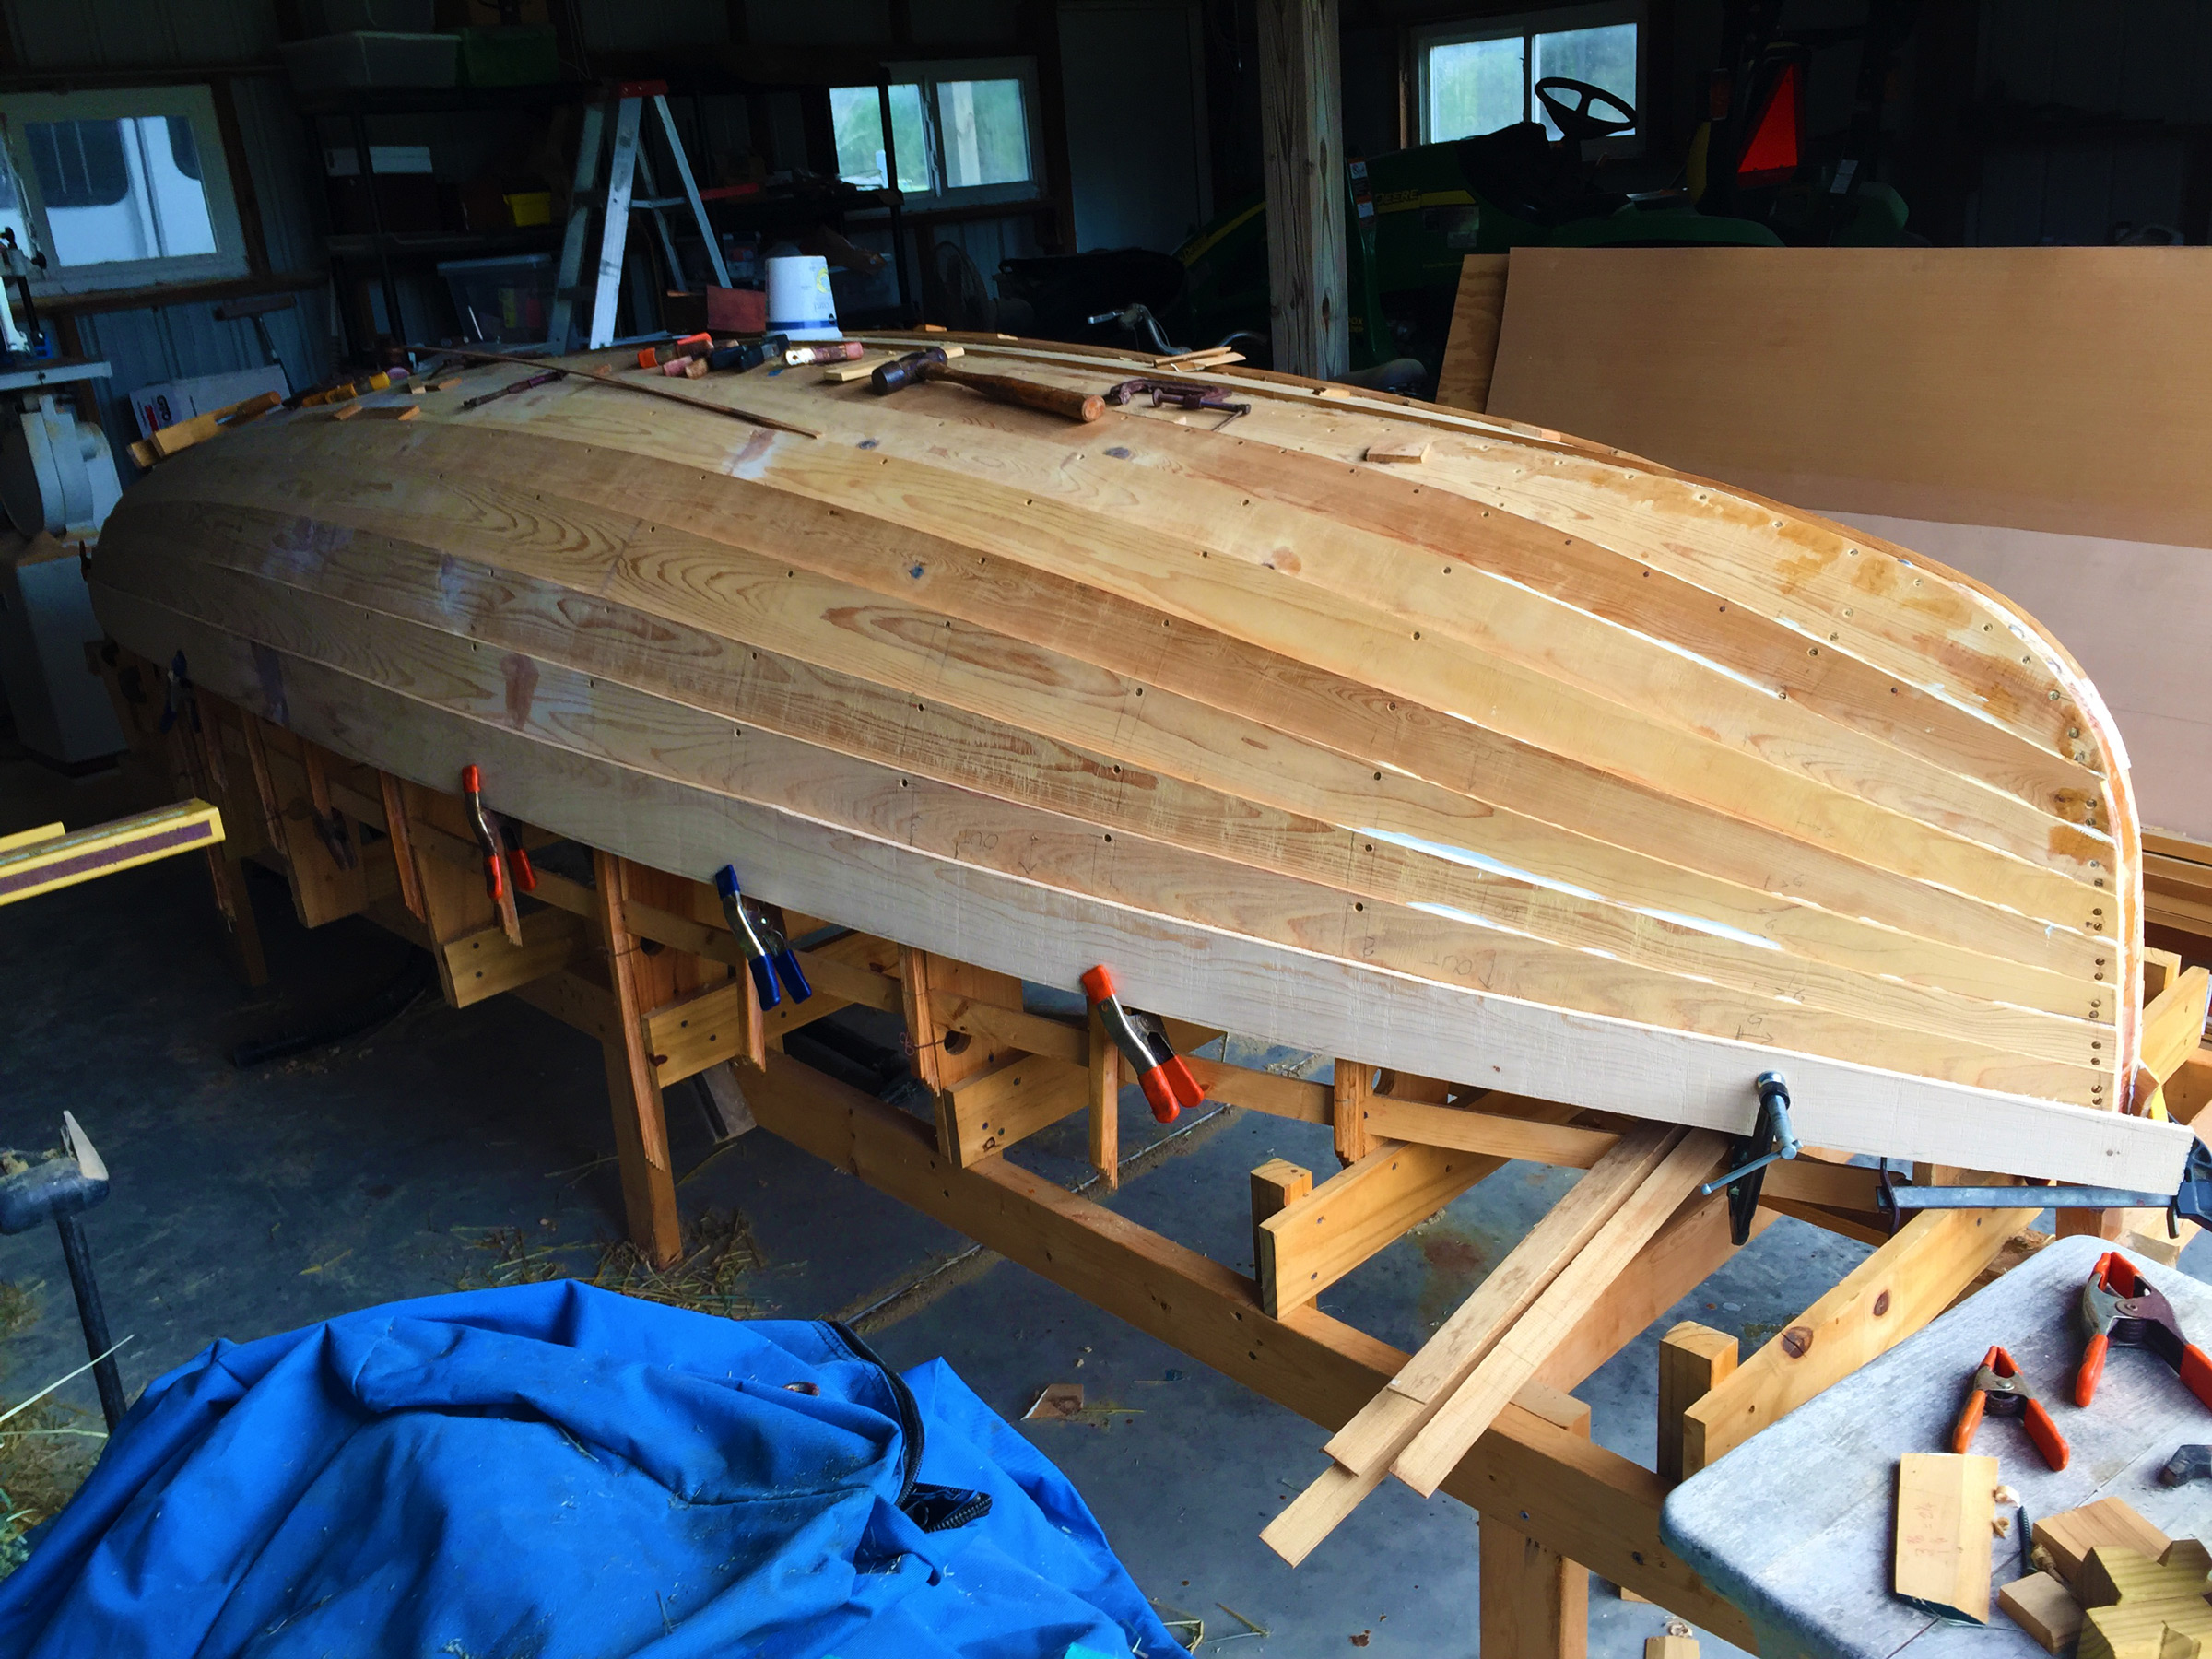
The new plank is clamped in place, its hood end sticking out at a tangent. To bring it into the stem rabbet requires considerable bending, which if done cold will undoubtedly split the wood.
Step 1.
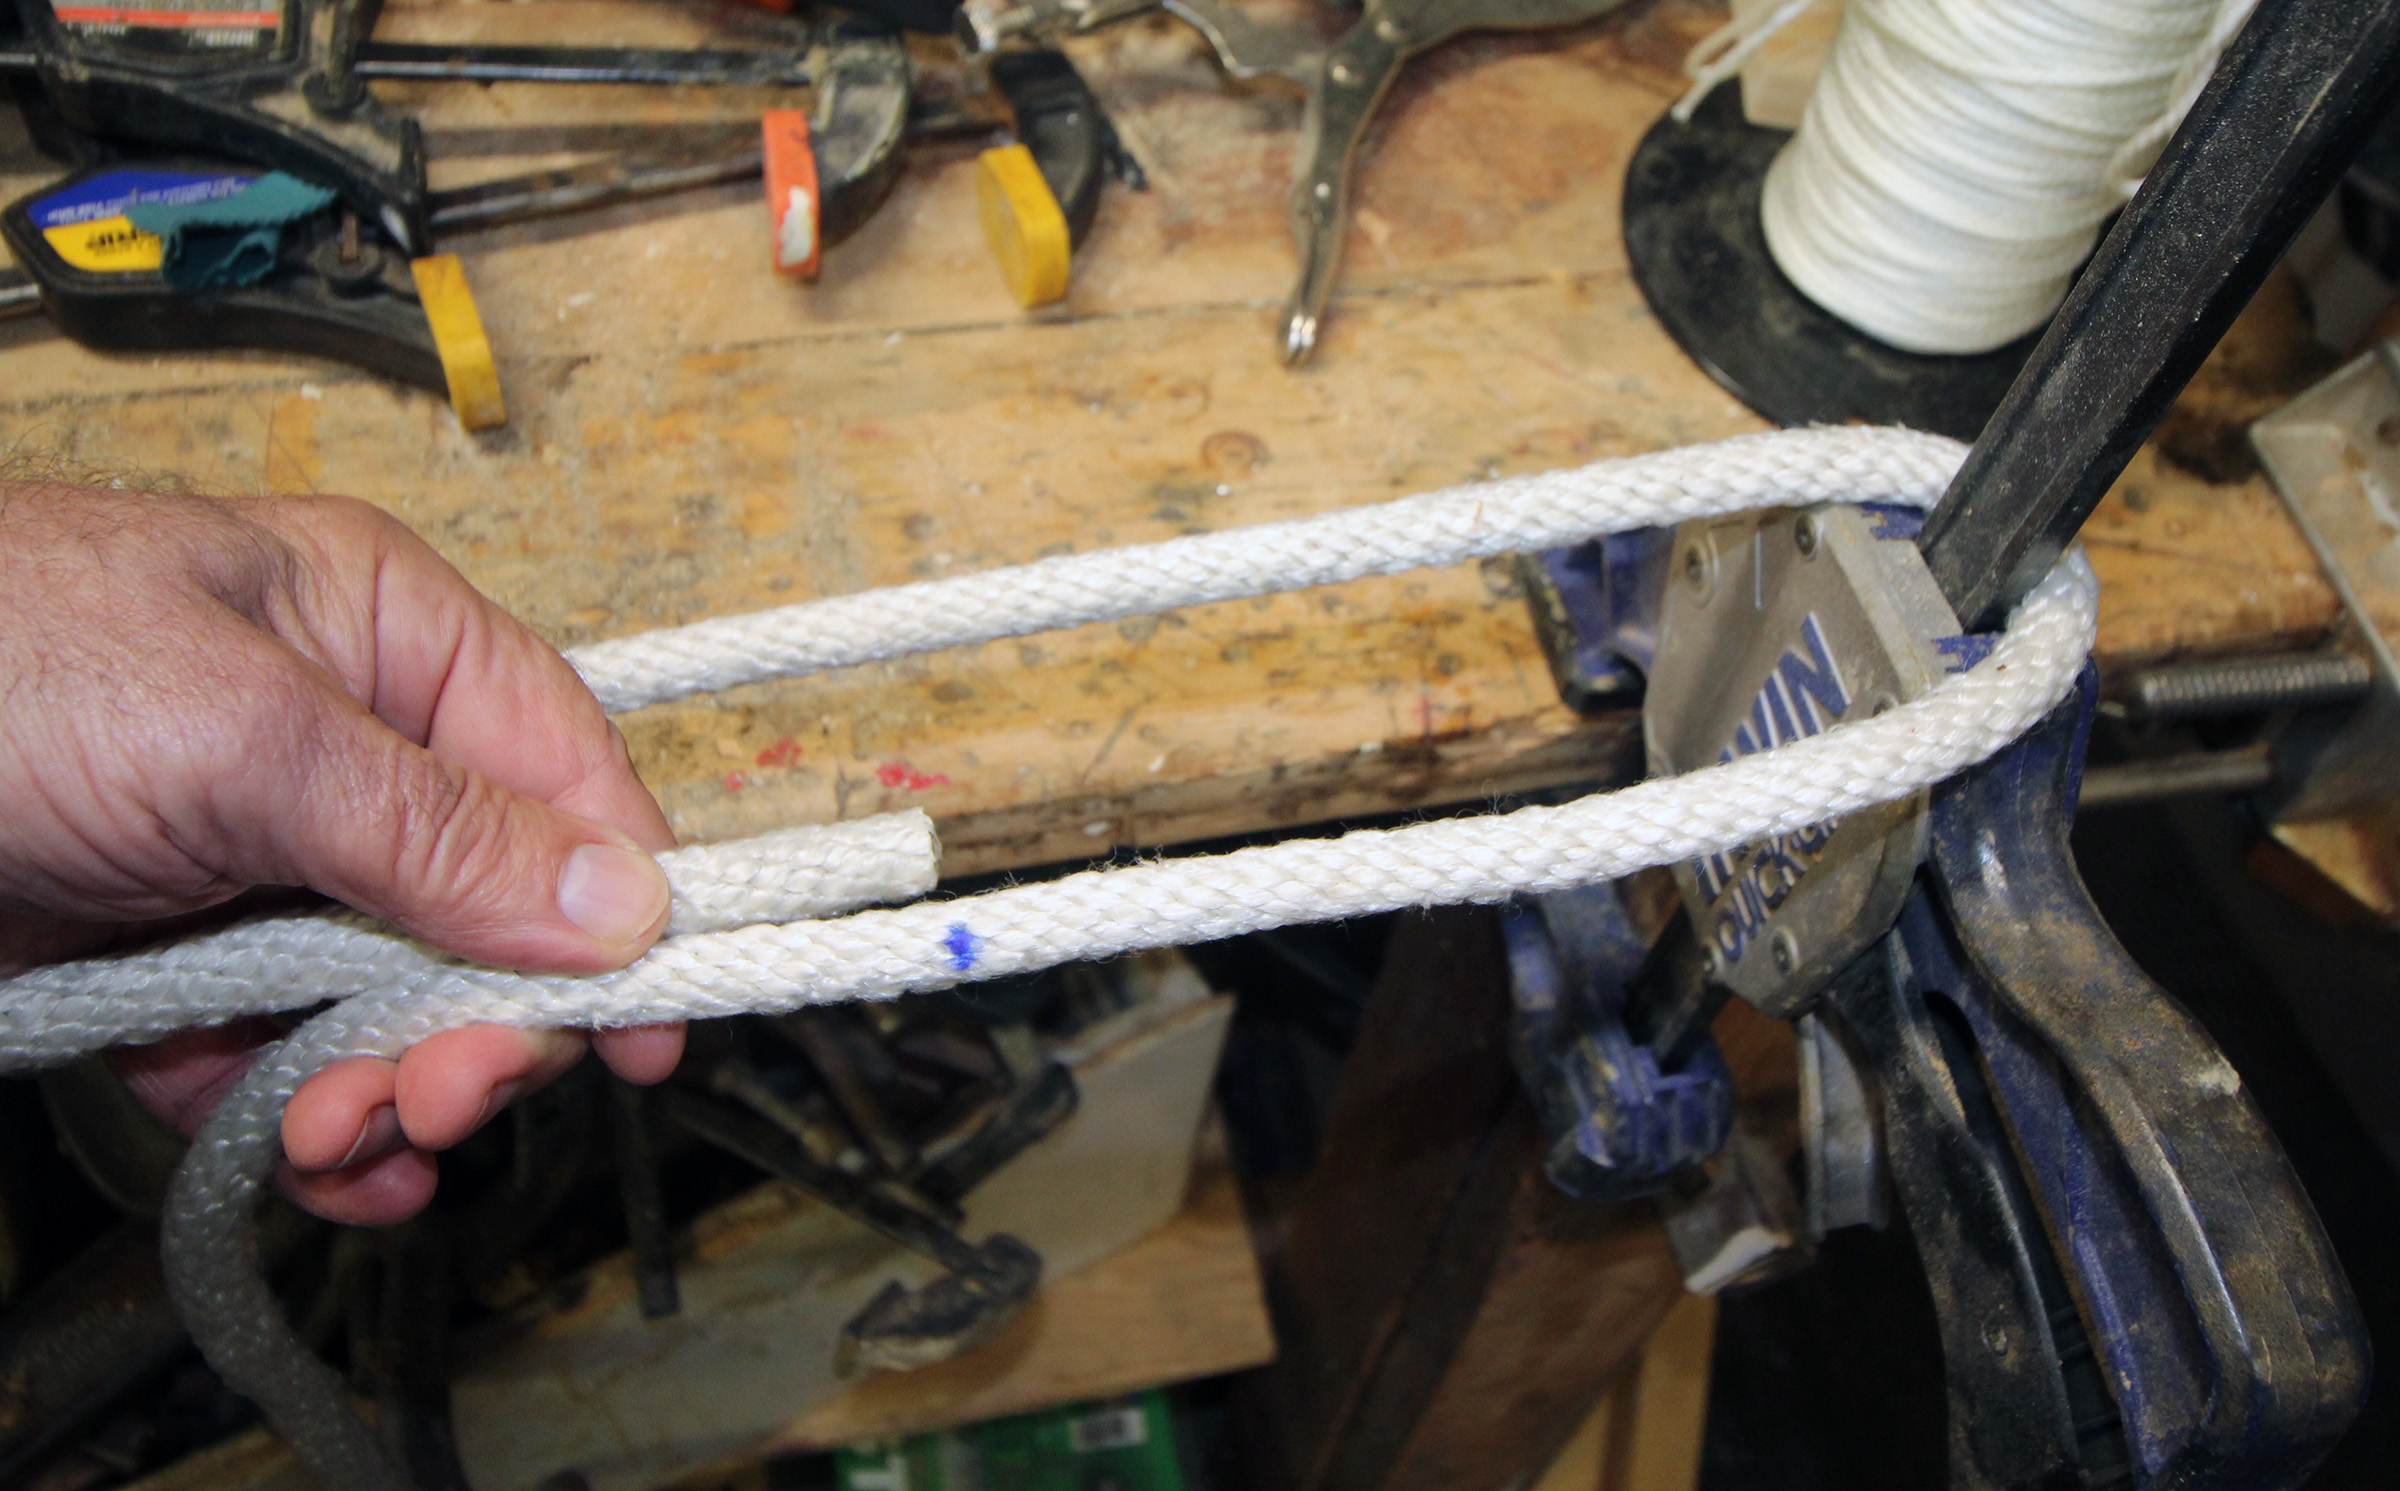
Clamp the pre-fashioned plank in its proper location on the hull. To align the plank, it helps to make an index line on it to indicate a station mold or frame.
Step 2.
Assemble the necessary clamps and pads that will be used to hold the plank once it is bent into place.
Step 3.
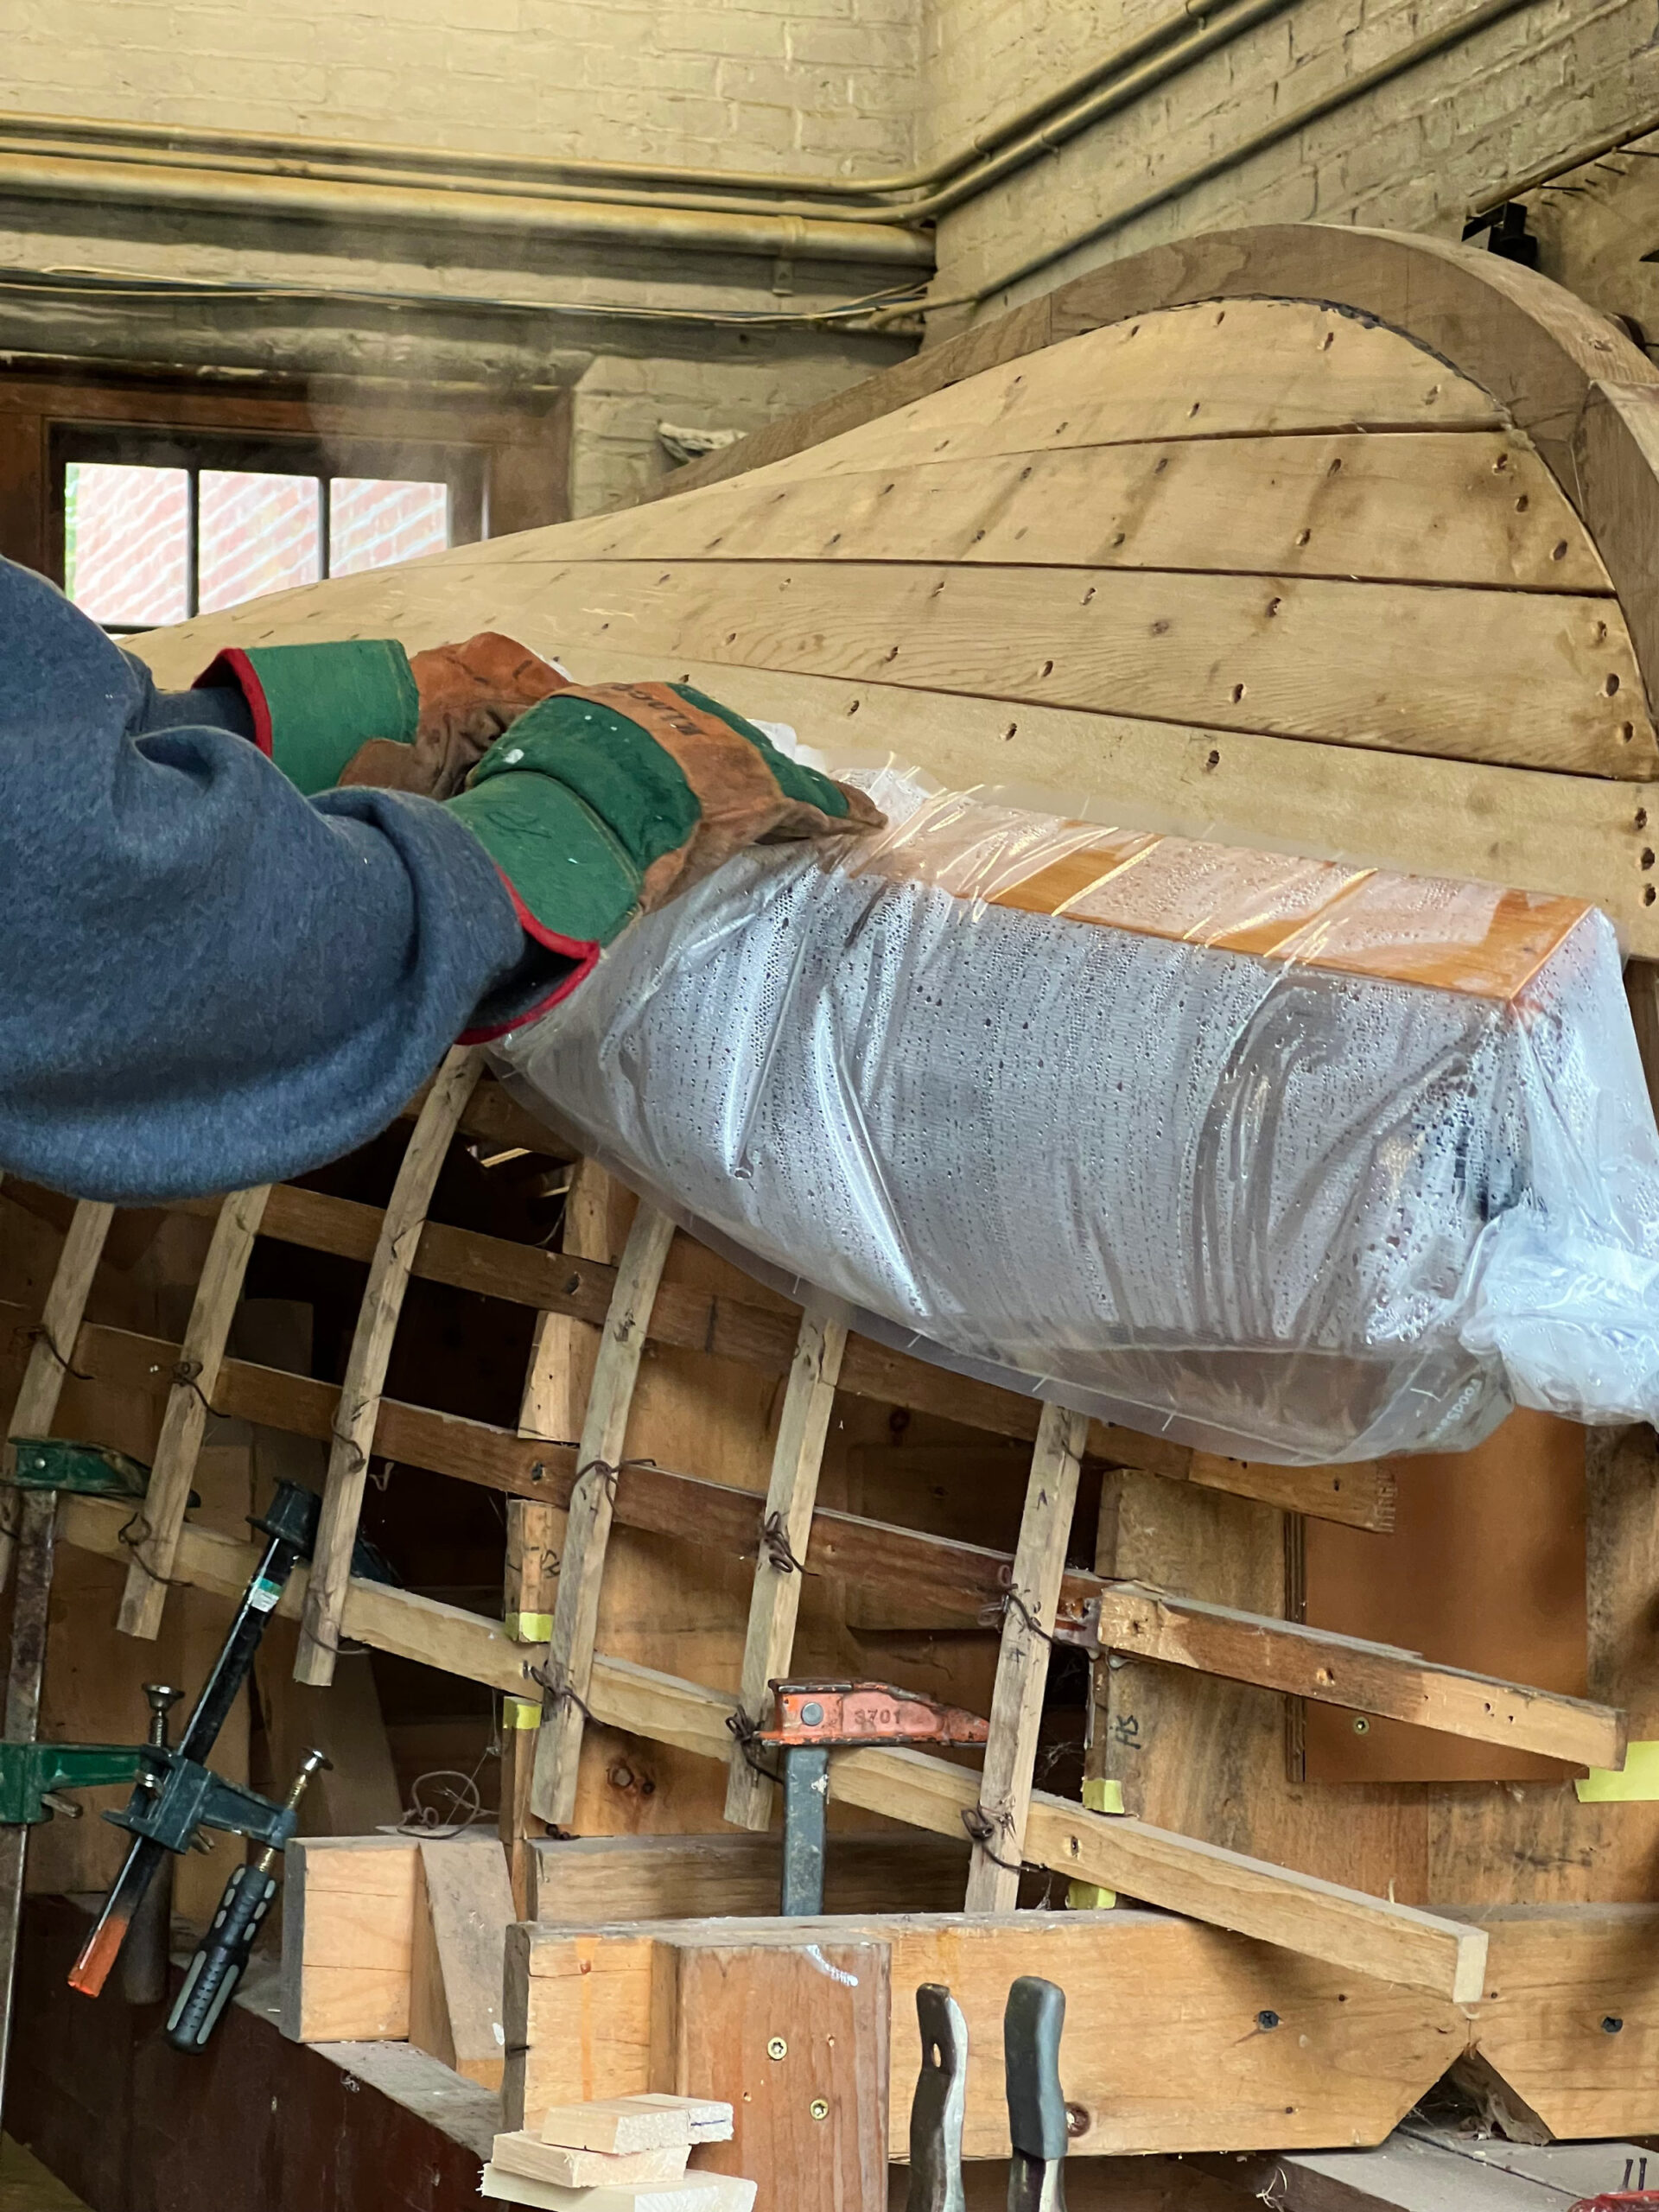
Slide the bag over the hood end of the plank, which is likely sticking out from your setup at a bit of a tangent. Slide the end of the steam hose into the bag along with the plank, then close the bag around the hose and the plank with string or masking tape. Make a couple of holes in the top and bottom of the bag. The top ones will allow the cooled vapor to escape the bag; the lower ones will allow the condensed steam to drip out. Place the bucket beneath the bag to catch the drips.
Step 4.
Plug in the steamer and set your timer for the requisite time—typically 1⁄2 hour for a 1⁄2″ plank, 3⁄8 hour for 3⁄8″, and so on. This timeframe is consistent for both hard- and softwood, although most small boats will be planked in softwood. As the steam fills the bag it will inflate like a hot-air balloon. Adjust the position of the bucket to catch the drips. Sit back, have a cup of coffee, and wait for the magic to unfold.
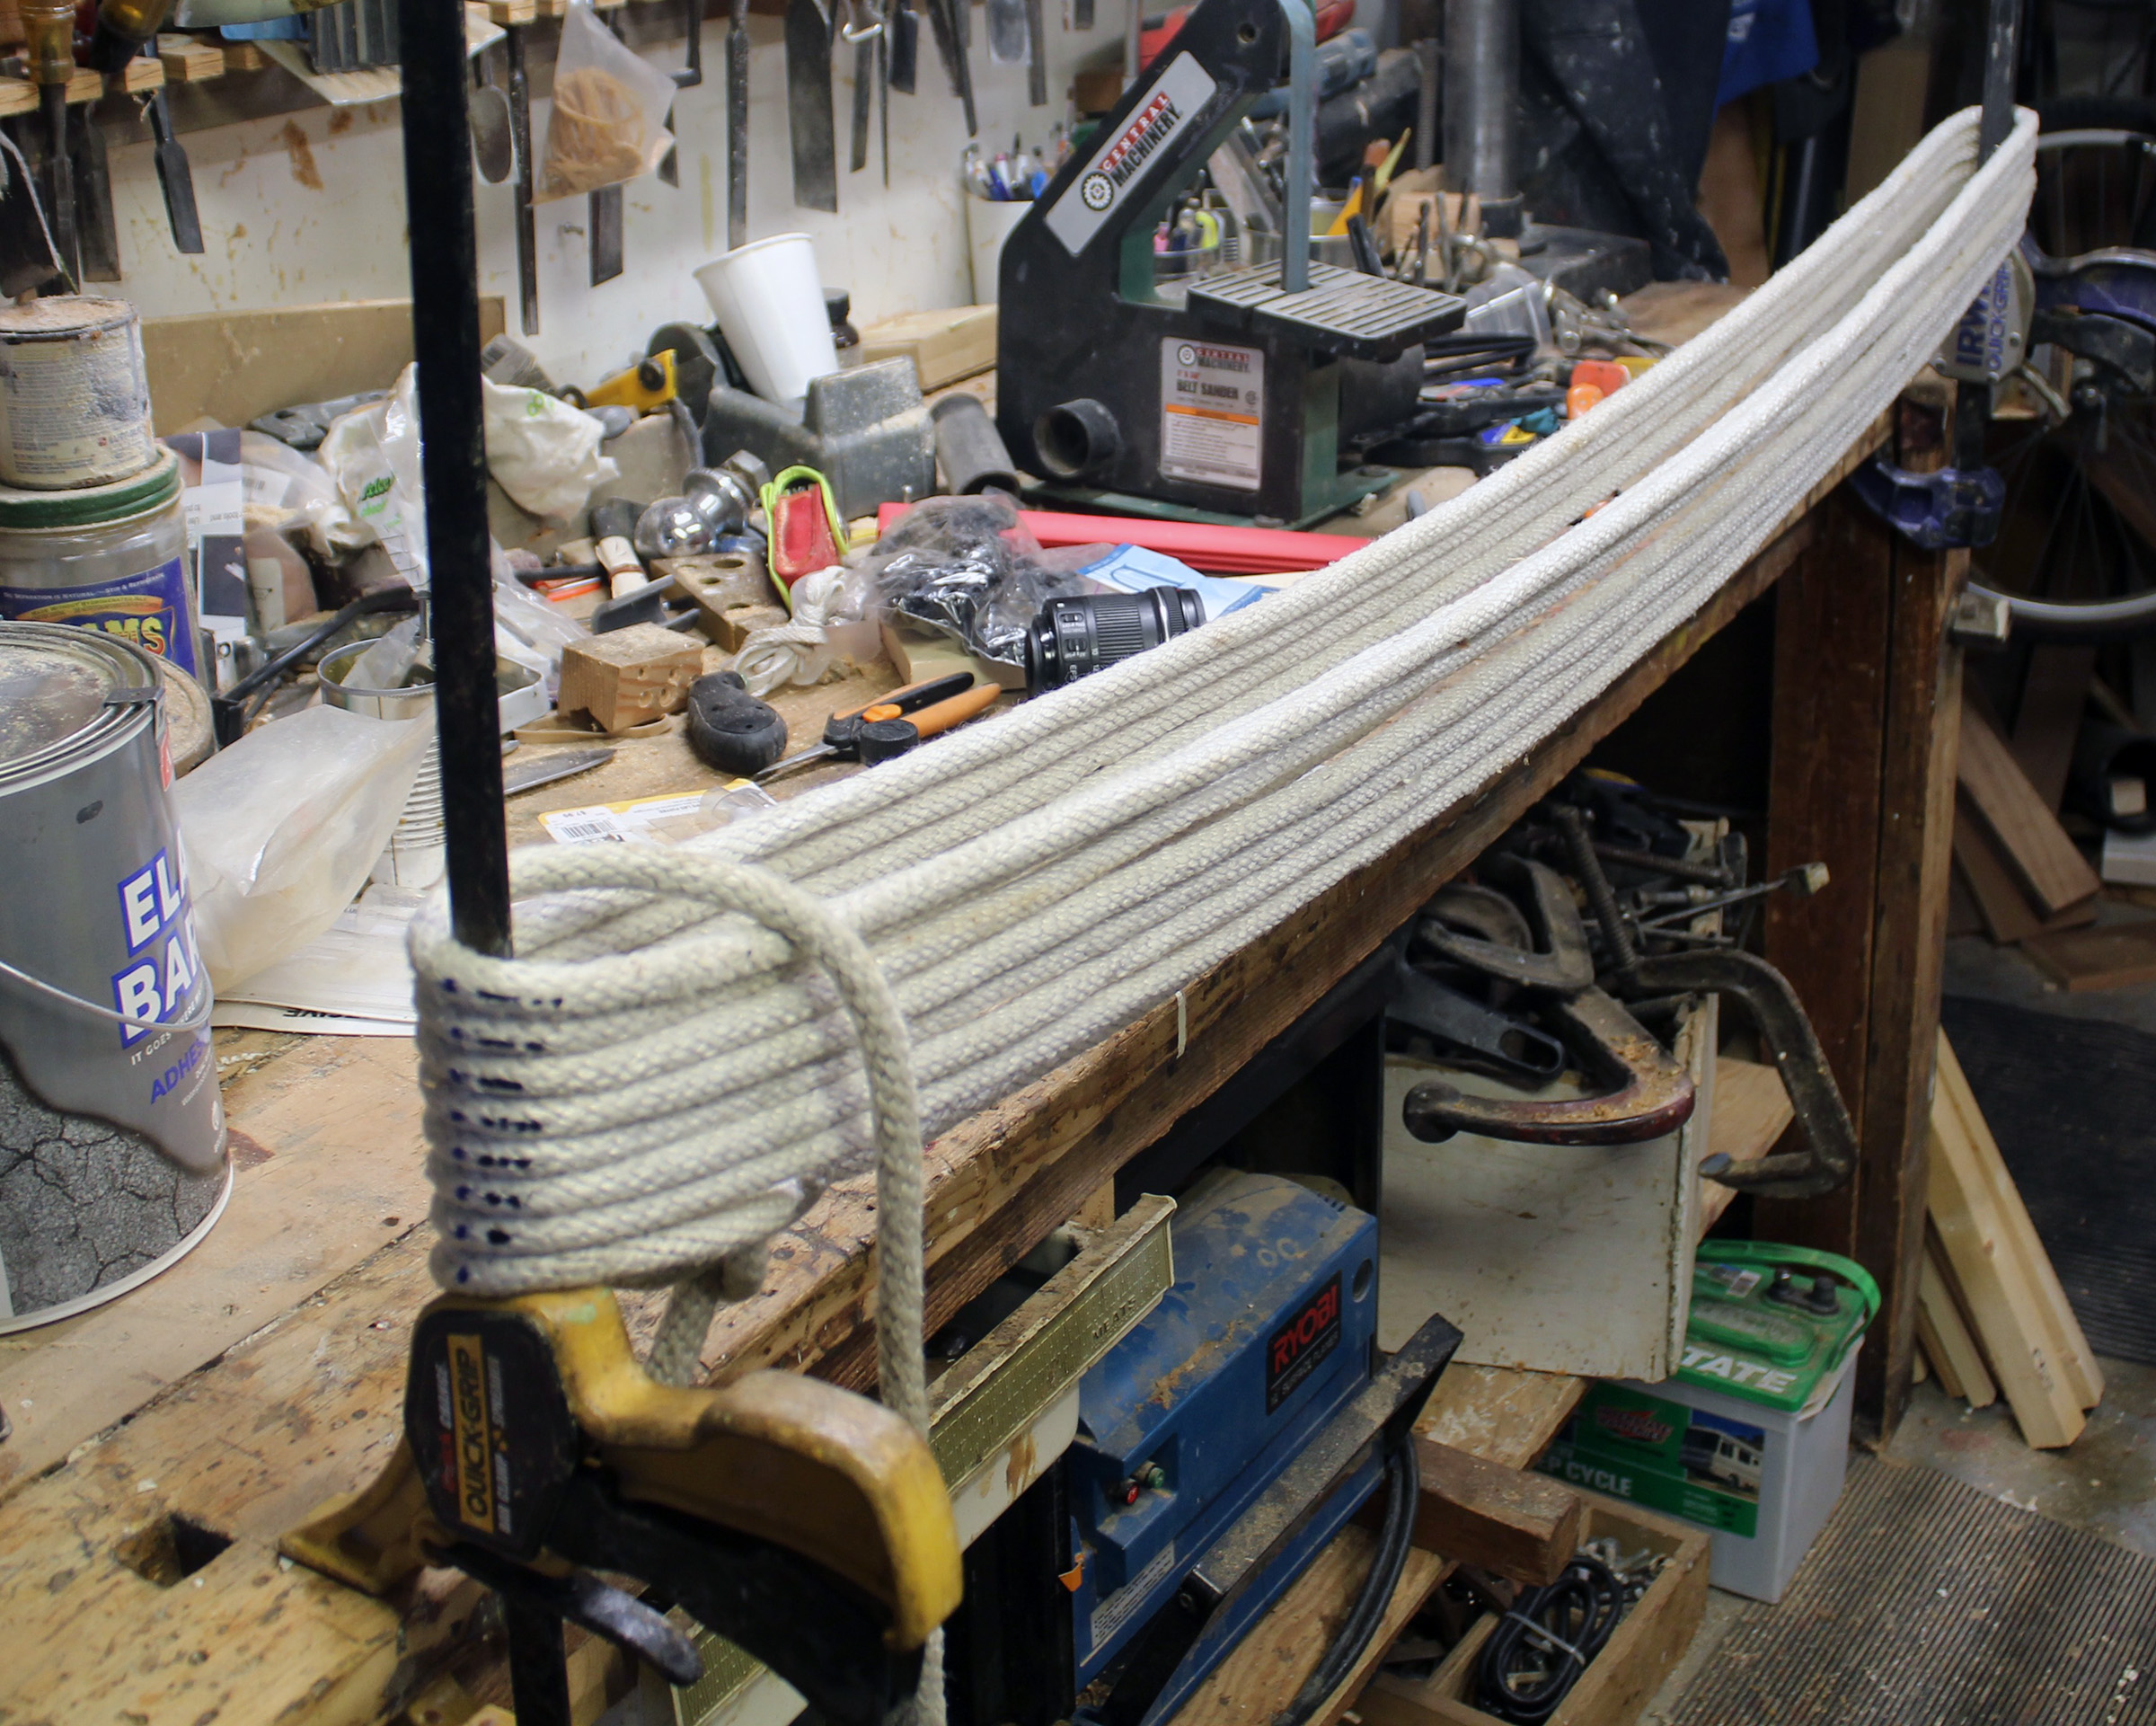
The plank is wrapped in plastic, the steamer’s hose fed into one end. Steam has been filling the bag and, as it cools, it has condensed and pooled inside. If holes had been made in the bottom of the bag, the condensation would have dripped away. Now, however, the builder must be careful not to spill the pooled condensation while removing the steamer and bag from the plank.
Step 5.
Once the time is up, don your heat-resistant gloves (the bag and its contents will be plenty hot), release the closure, and slide the hot, waterlogged bag into the bucket. Twist and press the now-limber plank into place and clamp it down. Let it cool into shape.
Step 6.
Make any final clamping adjustments to snug the plank into its correct location, add bedding between the stem and plank, and fasten.
After steaming, the pliable plank can be twisted and clamped into place. It is then allowed to cool before being permanently bedded and fastened into the stem.
For small boats where a false stem is added later in construction (for example, dories, semi-dories, skiffs), the plank can be run past the stem to be trimmed off later.
For carvel planking, pay special attention to the placement and clamping of the plank: the end of the hood can run long, landing on the face of the stem beyond the rabbet instead of in it. To avoid this, when you clamp the plank into place, set it roughly 1⁄4″ aft of its index location (see Step 1), then steam and bend in the plank. Once it is cool, slightly back off the clamps and, with a wooden mallet, lightly tap the aft end of the plank to advance it to its final resting place in the rabbet. Retighten the clamps, snug up the plank, and fasten it into place.
This simple steaming technique can prevent disaster in many boatbuilding operations: when a partially fastened but reluctant outwale is threatening to snap, or cranky chines just won’t make the final bend, or the “other” end of a peapod’s plank won’t fall into place, the mobile steamer and bag will save the day. All it takes is thinking out of the (steam) box.
Greg Rössel is a builder of small boats and a long-time instructor at WoodenBoat School. He is the author of Building Small Boats, Boat Builder’s Apprentice, Half Hull Modeling, and a regular contributor to WoodenBoat magazine. He is also a member of WoodenBoat’s Mastering Skills video crew, and the presenter of World of Music on WERU-FM.
You can share your tips and tricks of the trade with other Small Boats readers by sending us an email.
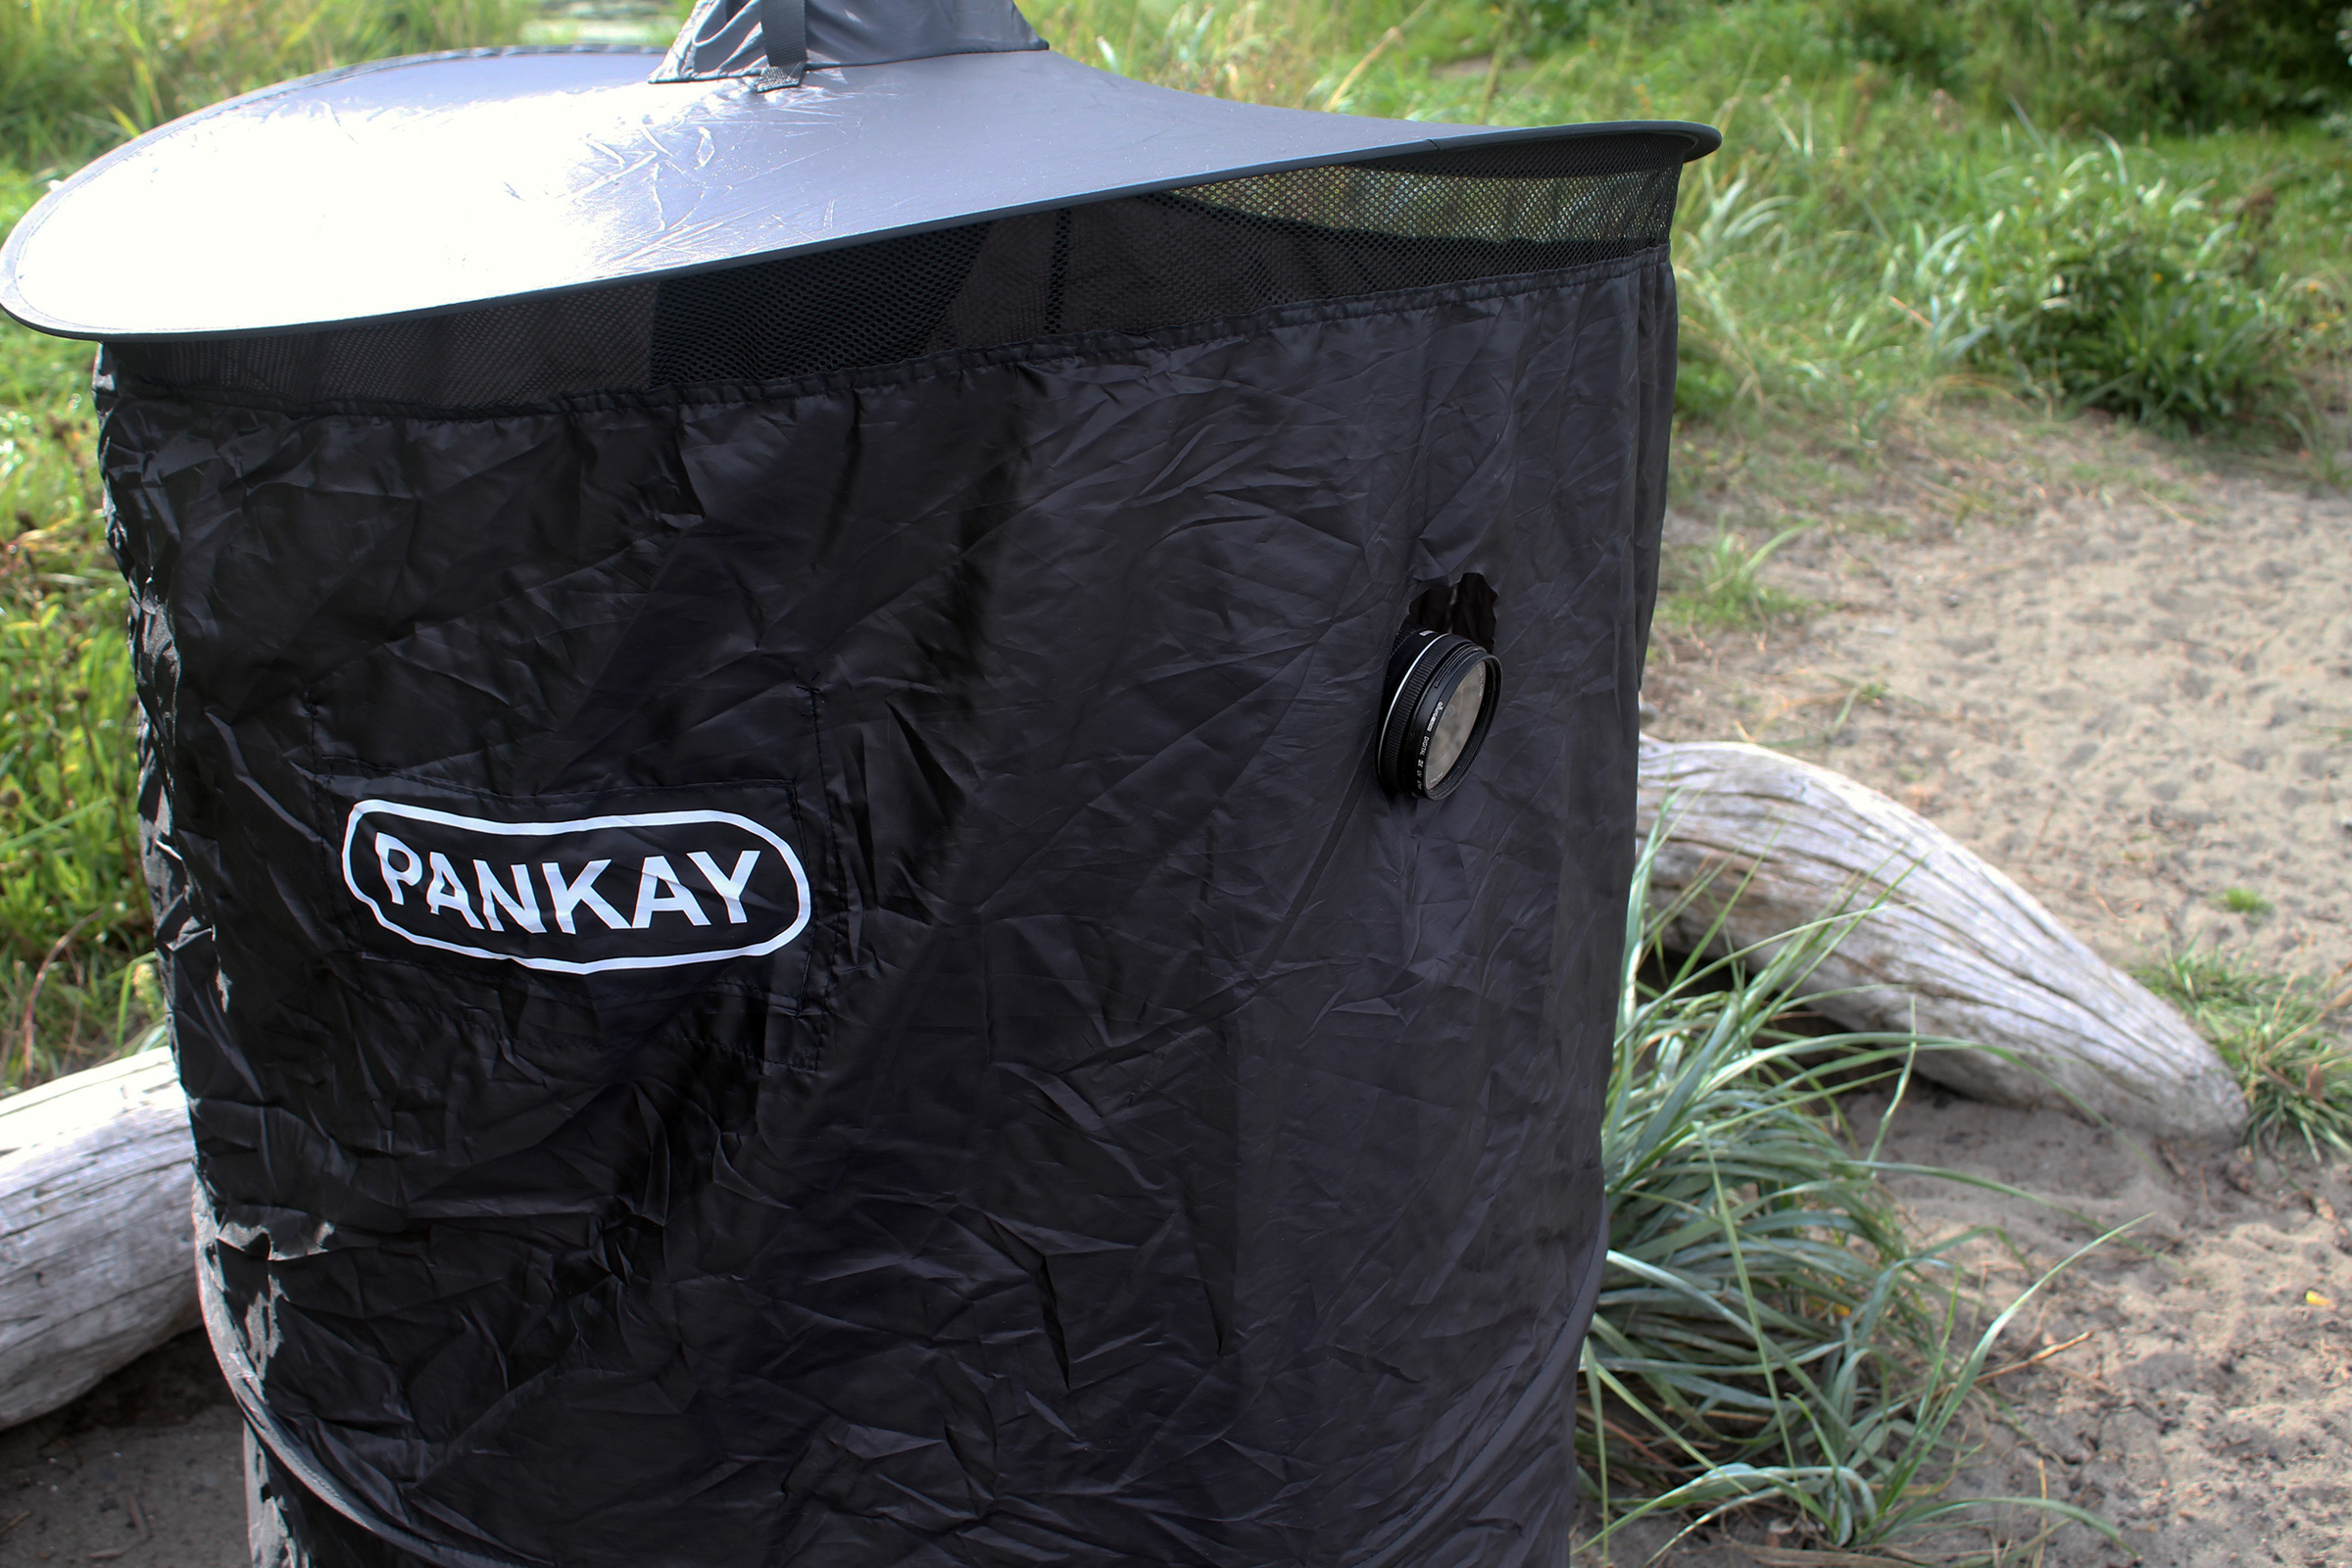
At last year’s Wooden Boat Festival in Port Townsend, Washington, the only places I found to change into and out of my boating clothes were the portable restrooms—exceptionally awkward and unpleasant changing spaces. In anticipation of this year’s gathering, I shopped online for pop-up camp shower tents. I bought one, but it was too bulky and heavy when folded and provided much more room than I needed when set up. I continued my search and found Pankay’s offering, billed as a “Pop Up Privacy Tent, Portable Outdoor Camping Bathroom Toilet Tent, Collapsible Shelter for Camping & Emergency.”
Photographs by Christopher Cunningham
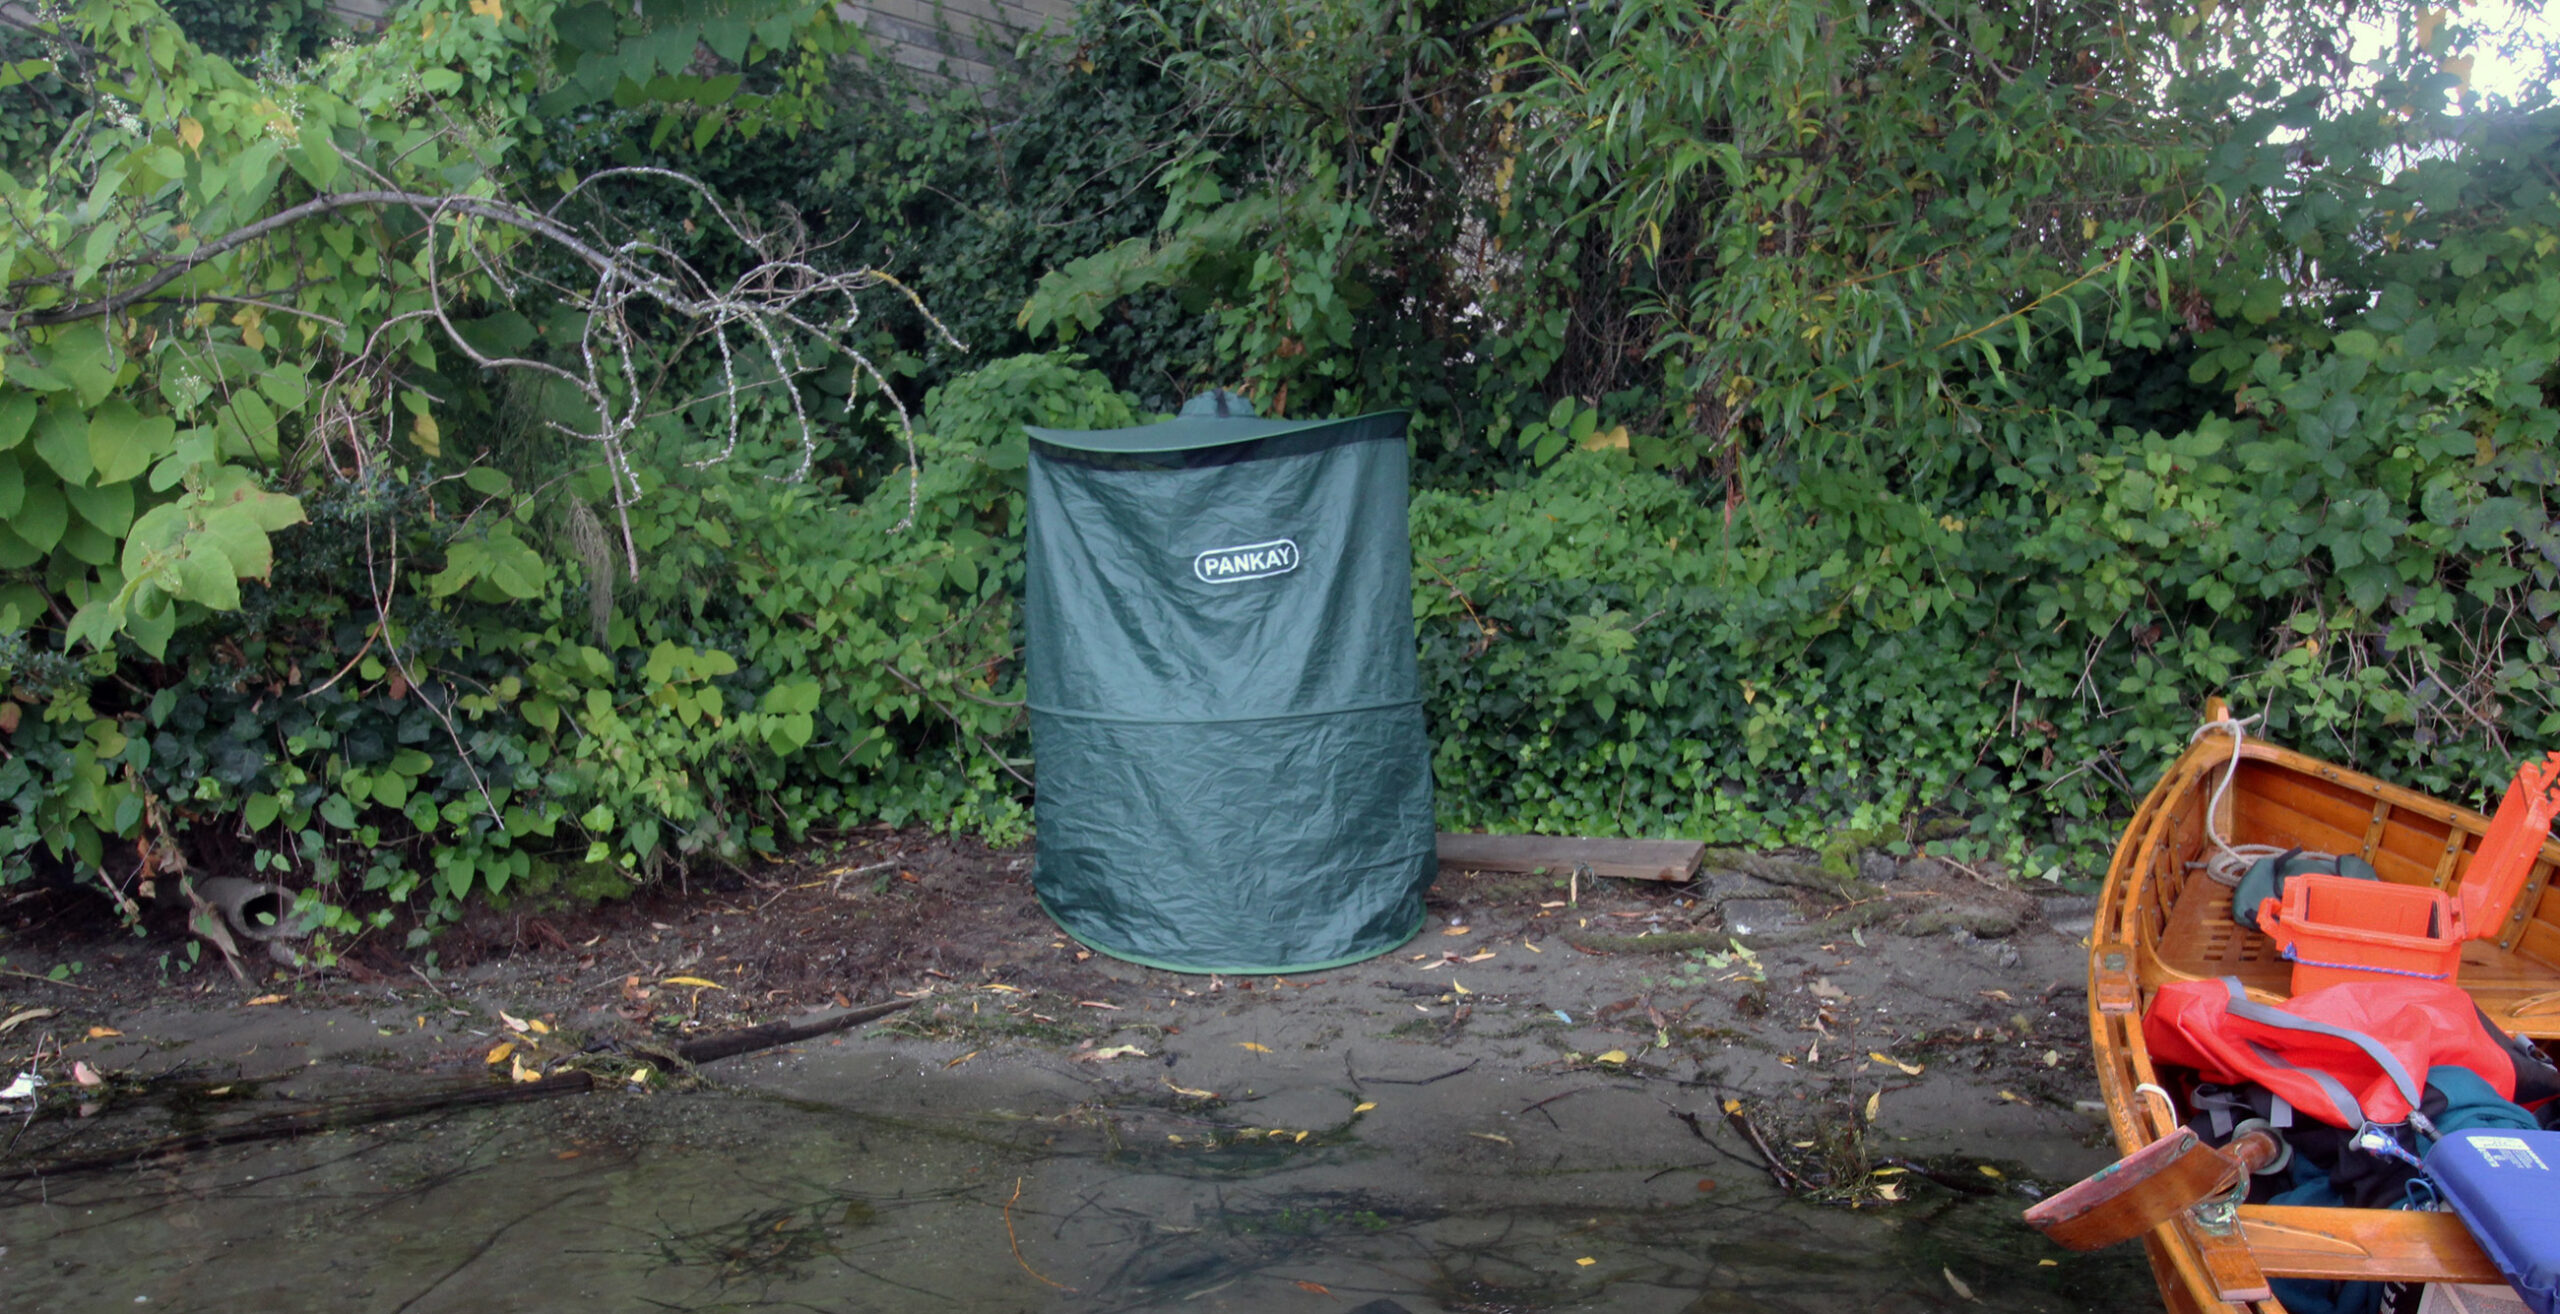
Most privacy tents are made to accommodate stand-up showering—this one is 74 1⁄2″ tall, and much larger than what I was hoping to find. When stowed in its 23 1⁄2″ bag (seen here on the ground to the right), this larger tent weighs 4 lbs 10 oz. By contrast, the 51″-tall Pankay pop-up tent, which fits into the smaller green bag seen here, folds down to 14″ in diameter and weighs just 1 lb 1 oz.
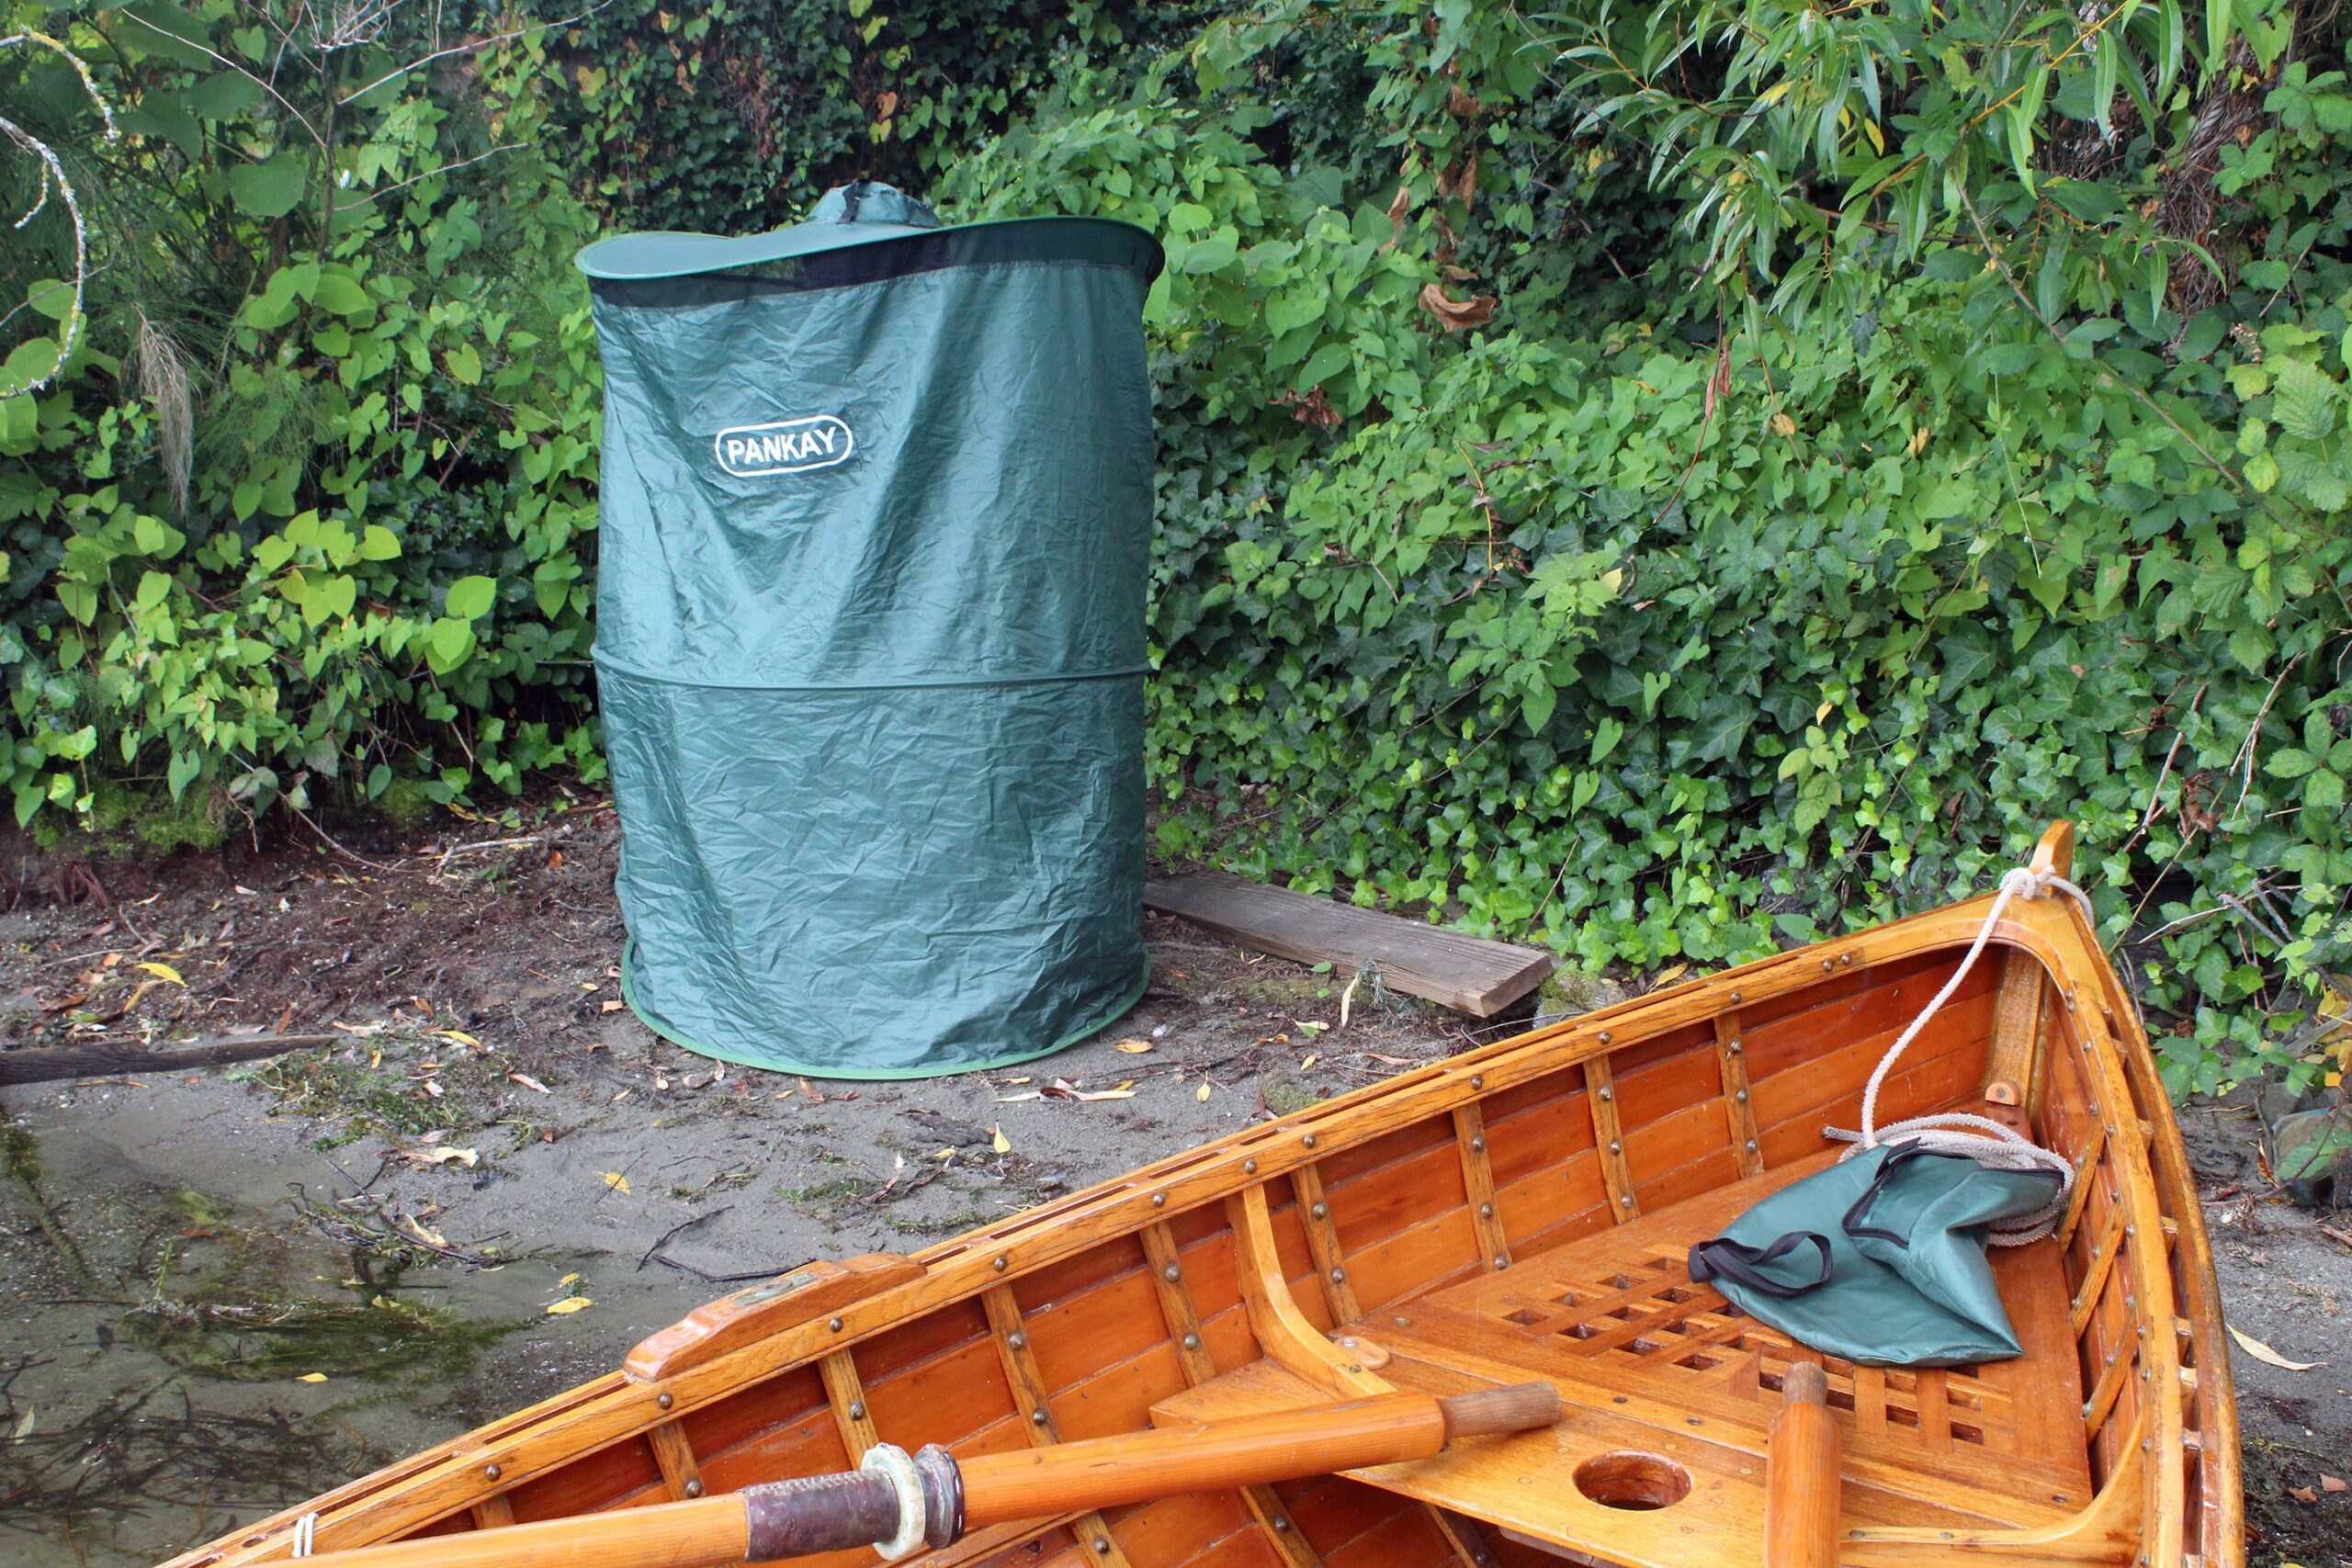
The tent is made of a lightweight 190T (T = threads per inch) polyester fabric. The sides are 51″ tall and the top has a diameter of 36″. The hat-like crown adds about 2 1⁄2″ to the overall height and rests on top of the occupant’s head without restricting mobility—I can easily turn my head to see out in every direction without having the whole tent rotate. A 2″-tall band of black mesh between the top and sides provides ventilation and a view out without compromising privacy. There is a webbing strap over the crown so that the tent can be hung up if a fixed location is desired. Three flexible hoops give the tent its cylindrical shape; the touch of a magnet indicates they are all made of steel.
The Pankay pop-up is just the right size to carry on board a small, open boat. It takes only 20 seconds to set up, from opening its bag to having it in place. Taking it down and getting it zipped back in its bag takes 40 seconds.
When the tent is collapsed to be put away, the side’s three hoops, brought together, can be twisted and folded to reduce their diameter from 36″ to about 14″. Pankay provides an illustration and a video on the folding technique: it’s a bit like folding a bandsaw blade but different enough that it took me a while to get the knack. In its zippered storage bag, the tent makes a compact, easily stowed package that weighs under 17 oz.
The tent, along with my retractable portable toilet as a seat, made a very comfortable dressing room at the boat festival. I set up behind a booth, out of the main flow of foot traffic but not entirely hidden from view. While I was seated, the sides of the tent rested on the ground, providing complete coverage. Having the tent resting on my head wasn’t at all a nuisance. I could pull T-shirts off and on without trouble.
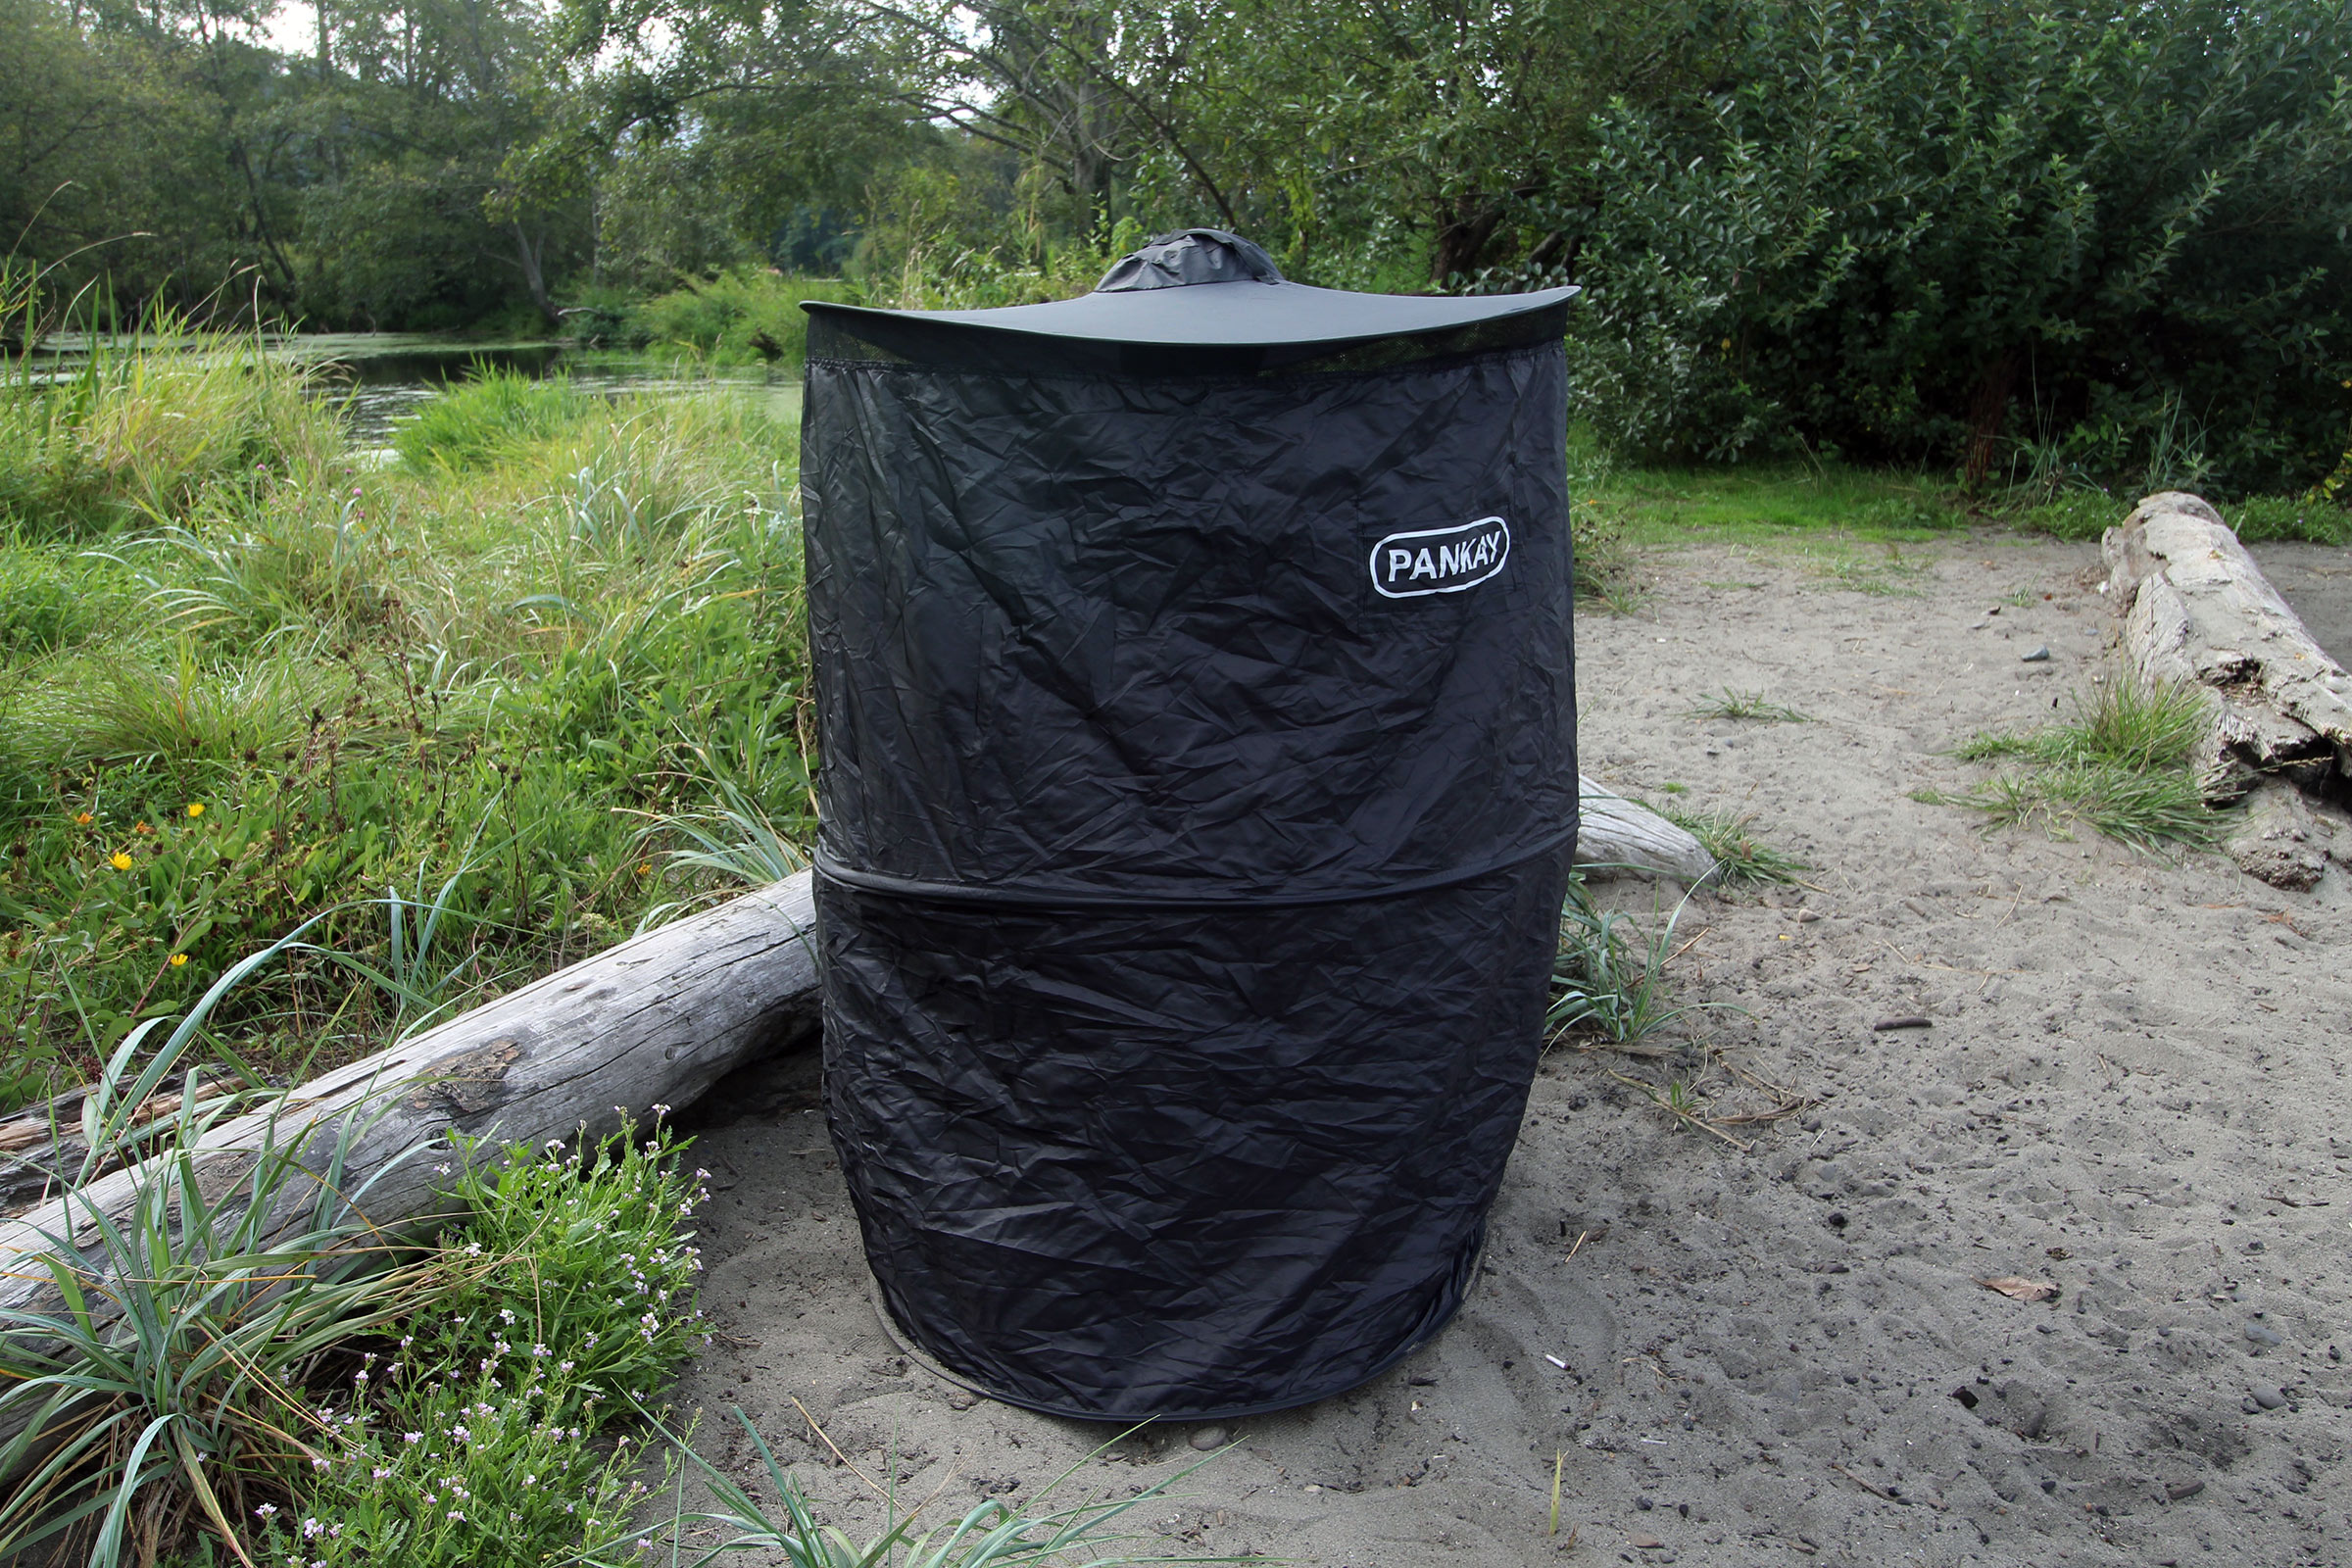
While the green tent required only seam sealer applied to the crown’s seams, the black pop-up’s top wasn’t made from waterproof material and needed an application of water-repellent treatment to keep the inside dry when subjected to a garden-hose shower.
While I was using the tent I discovered that it was a rather pleasant place to be. The air inside was still, and the mesh provided an all-around view. After the festival, I used it to sit in the rain and enjoyed the tent’s warm interior and the sound of the raindrops on its top. On other occasions I discovered how easy it was to use my phone while I was shielded from the glare of the sky, whether it was clear or cloudy. In that small, protected space with my hands free, I could comfortably have a bite to eat, write notes, or work with my camera. All I needed to shoot photos was to create a small circular hole in the side, so I used a hot knife to cut and seal the fabric edge. There was room in the tent for me to set up my camera on its tripod to hold the lens at the hole while I viewed its display screen. The hole hasn’t been a problem in my rainfall tests, so I’ve left it without a cover.
The tent is available in both green and black. I bought both, believing the company’s promotional material indicating that both versions were waterproof. The tents did, indeed, keep a light rainfall at bay, but when I later created an artificial deluge with a garden-hose sprayer in my backyard, the seams of the crowns, which are neither taped nor coated by the manufacturer, quickly leaked.
I cut and sealed a small hole in the side of the black tent for taking photos, thinking I might get some good wildlife shots while hidden from view. I plan to make a similar hole in the green tent for safely using my camera when it’s raining.
I first tried a water-based urethane seam sealer without good results and scrubbed it off. I did achieve leak-free seams using GearAid’s Aqua Seal +FD although this thicker sealant doesn’t flow into the seams and needs to be brushed on thoroughly. After the first application, shower tests revealed a few stray leaks that required a second application of the Aqua Seal. (It’s important to dust cured Aqua Seal to keep it from sticking to itself; I used crushed blackboard chalk.)
With the crown seams fully sealed, my home-made monsoon tests were successful for the green tent. Water streaming off the tent’s top flowed over the edge, away from the mesh, leaving the interior dry. Angled spray, simulating wind-blown rain, could be kept out of the tent by tilting the top in the direction of the spray to block it.
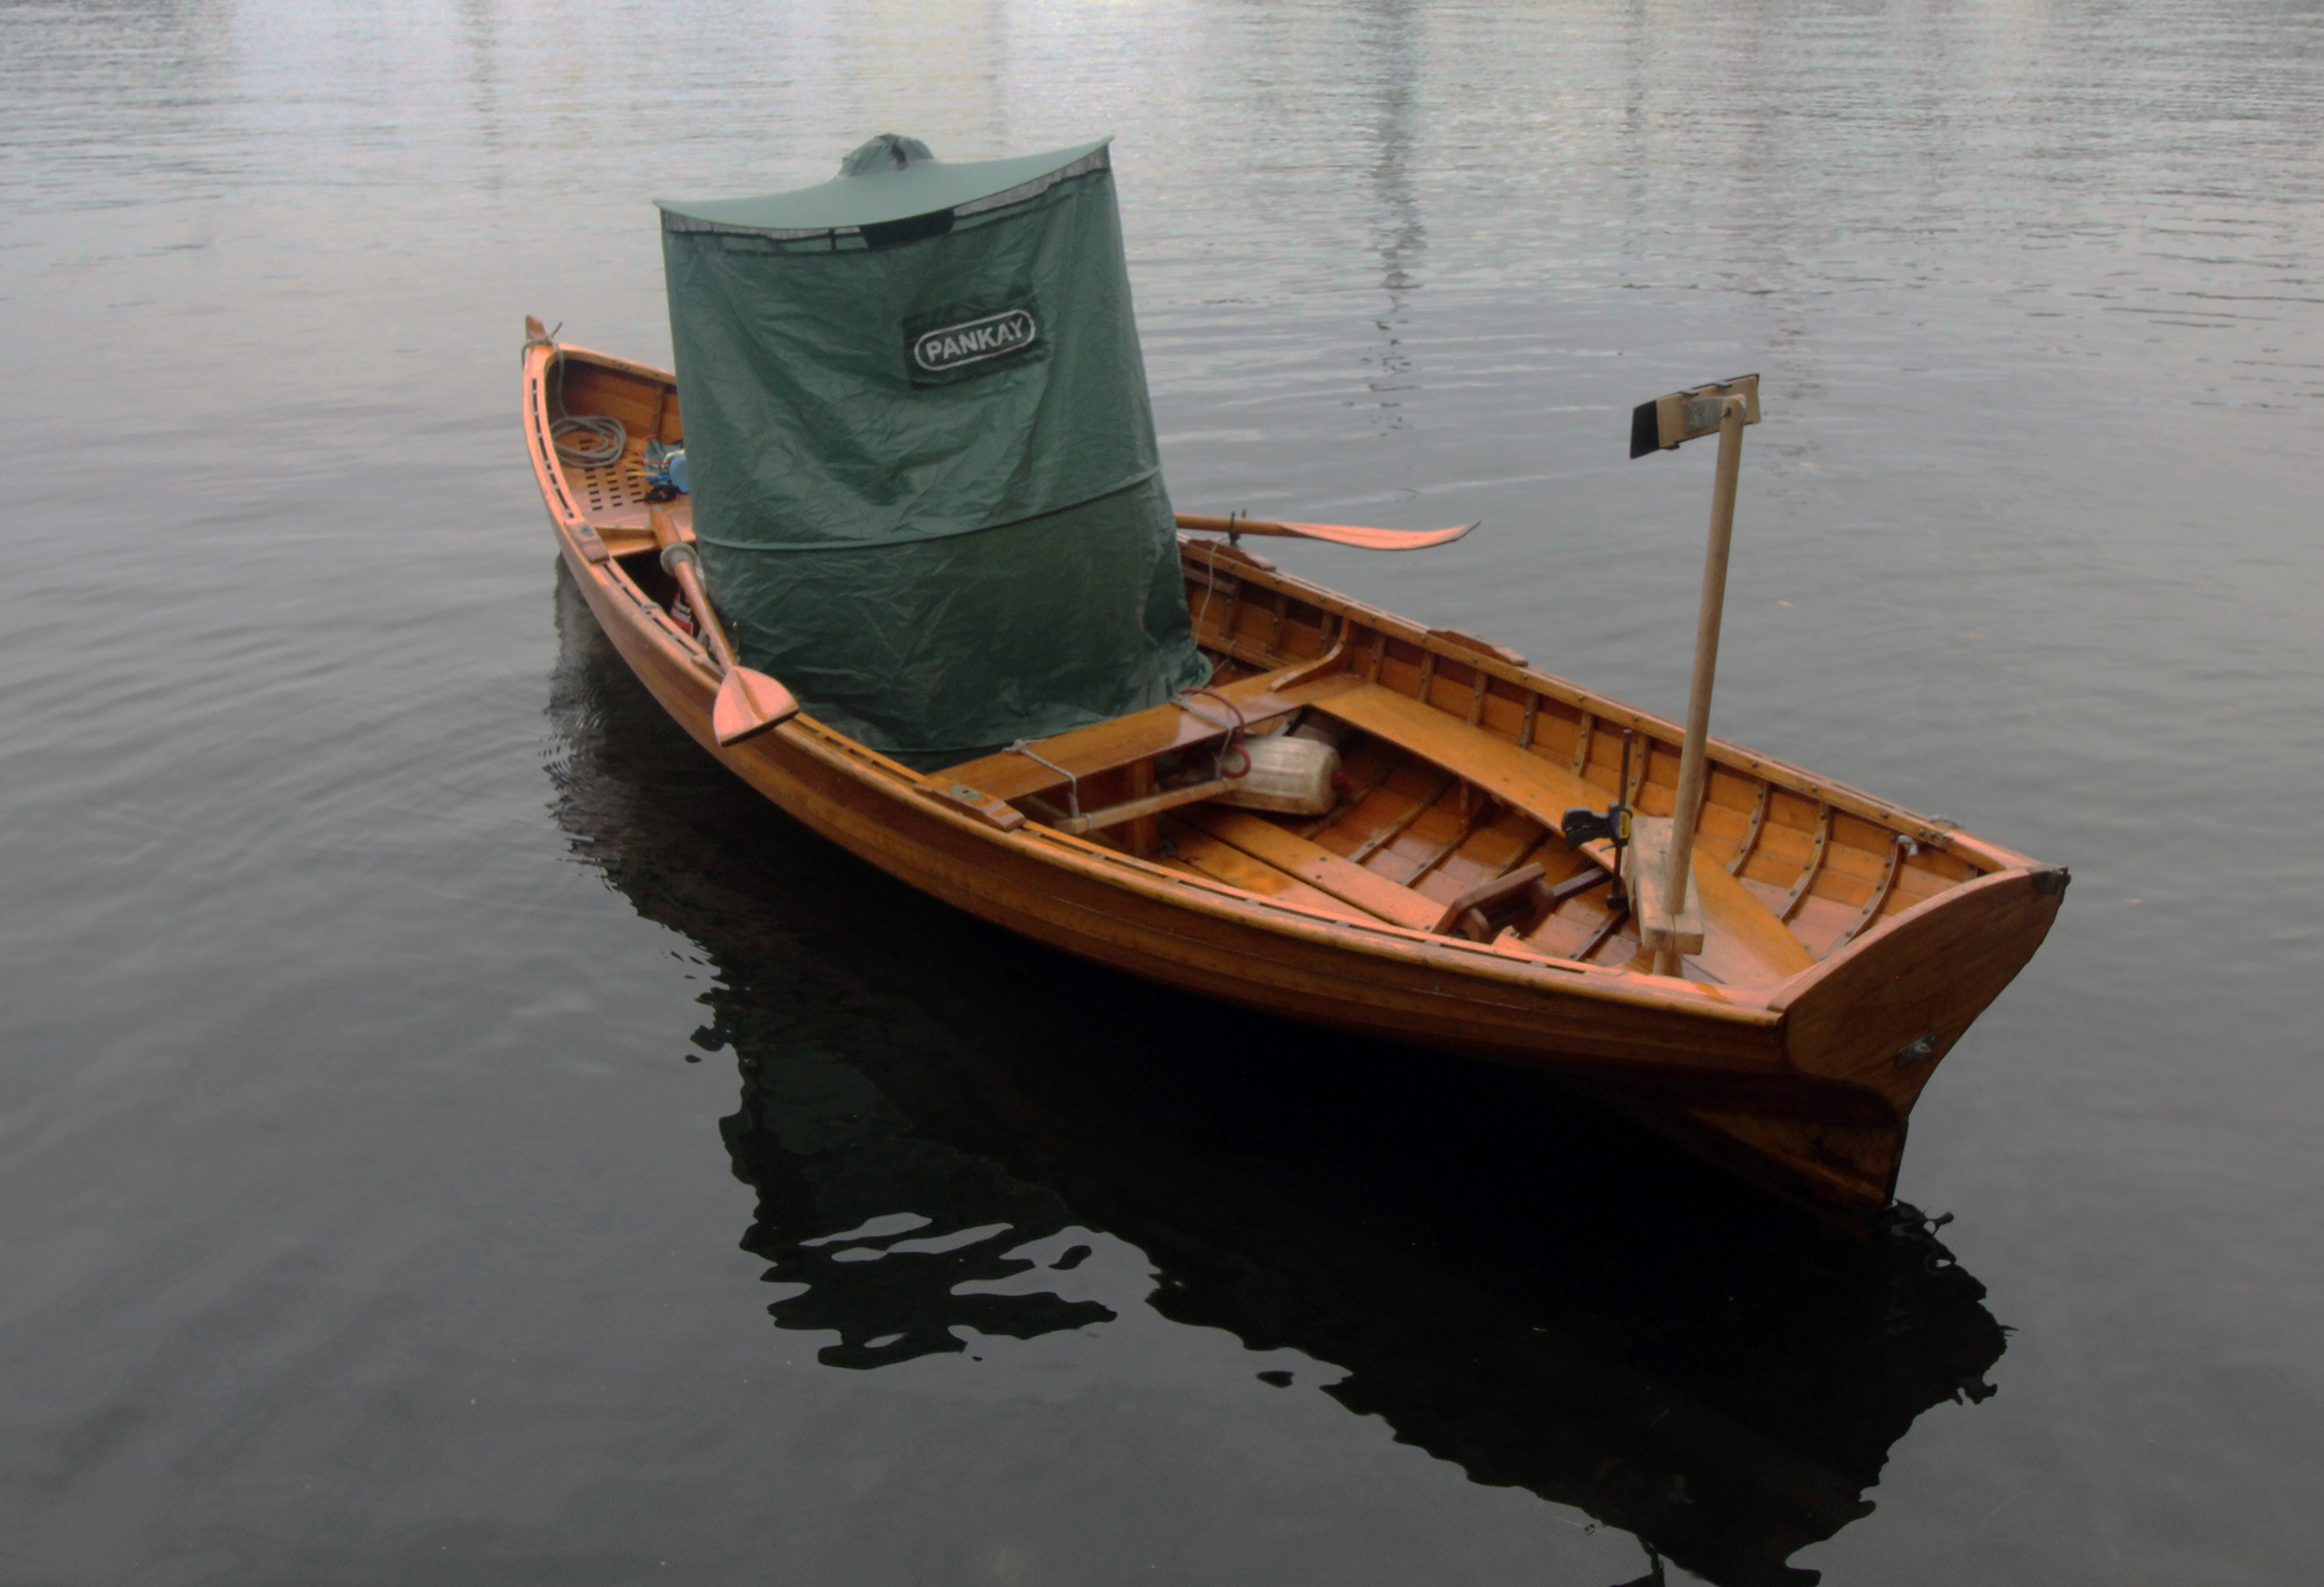
I made a rain canopy for my Whitehall, but it takes a lot of time to set up and take down. The pop-up tent is much quicker to assemble and provides better protection from the elements.
The seams of the black tent no longer leaked, but the underside of the brim glistened with minute beads of water. There were no drips, but the fabric was evidently not as waterproof as the brim of the green tent. I took a deeper look at the technical details and for the black version there were these two lines: “Water Resistance Level/Waterproof” and “Is Waterproof/False.” The details for the green version had “True” instead of “False.”
To increase the black tent’s effectiveness in wet weather, I treated the top with a water-repellent spray that is free of silicone and PFOA (Perfluorooctanoic acid, a harmful “forever chemical”). The spray dries quickly, and I applied it twice. While that seems to have remedied the transmission of water, I’d recommend the green tent.
In weather foul or fair, the green version of Pankay’s collapsible shelter is a good match for small open boats. Easily stowed and deployed in seconds, it will provide privacy and a refuge from the elements. If you think you’ll look silly using the pop-up, you can avoid embarrassment by fleeing the scene while continuing to wear it, thus making your escape unrecognized.
Christopher Cunningham is editor at large for Small Boats.
Pankay’s Pop Up Tent is available from Amazon for $18.79 in two colors: green (waterproof) and black.
Is there a product that might be useful for boatbuilding, cruising, or shore-side camping that you’d like us to review? Please email your suggestions.
When I was growing up in the 1960s and ’70s, one of my best friends had a Victorinox Swiss Army Knife. He was justifiably proud of it, and I coveted it for its bright red color, multiple blades, the toothpick and tweezers that slotted into the end of the case, the folding scissors…and that Swiss-flag shield logo gave it a touch of European class.
Despite my early longings, I have never owned a Swiss Army Knife, but some years ago I discovered that Victorinox makes other knives of lesser complexity, and I am now the proud owner of five.
Photographs by the author
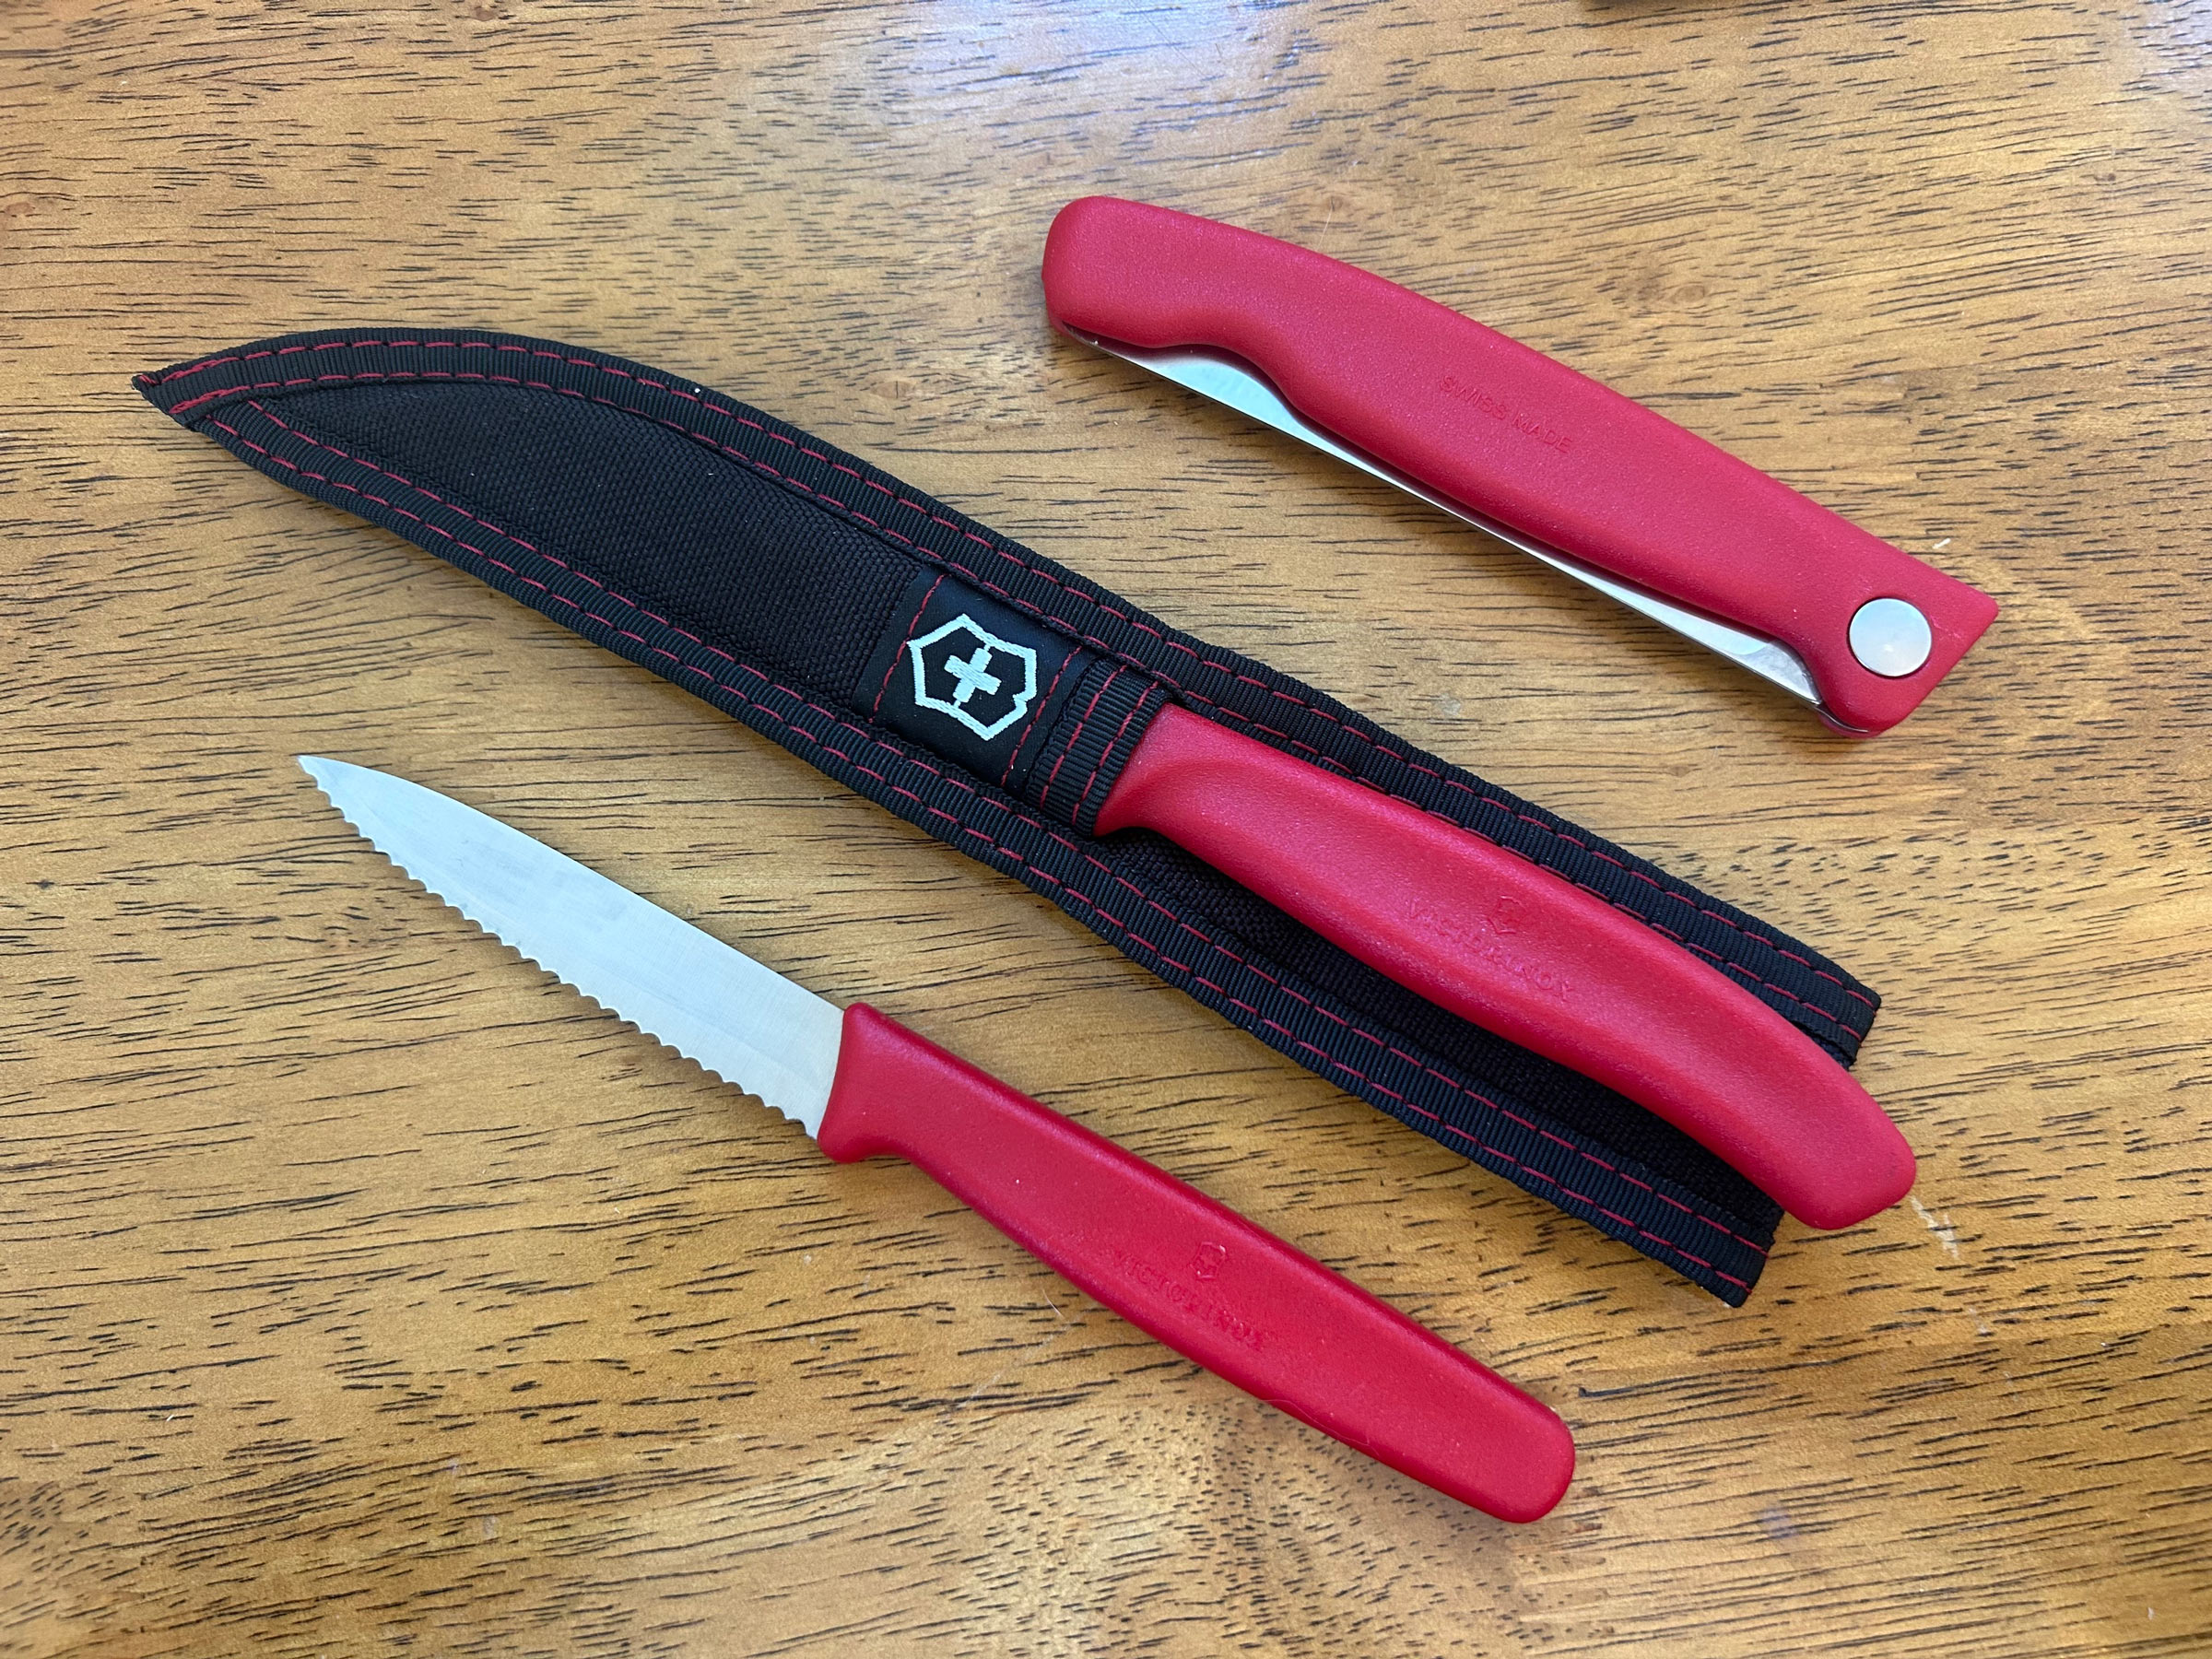
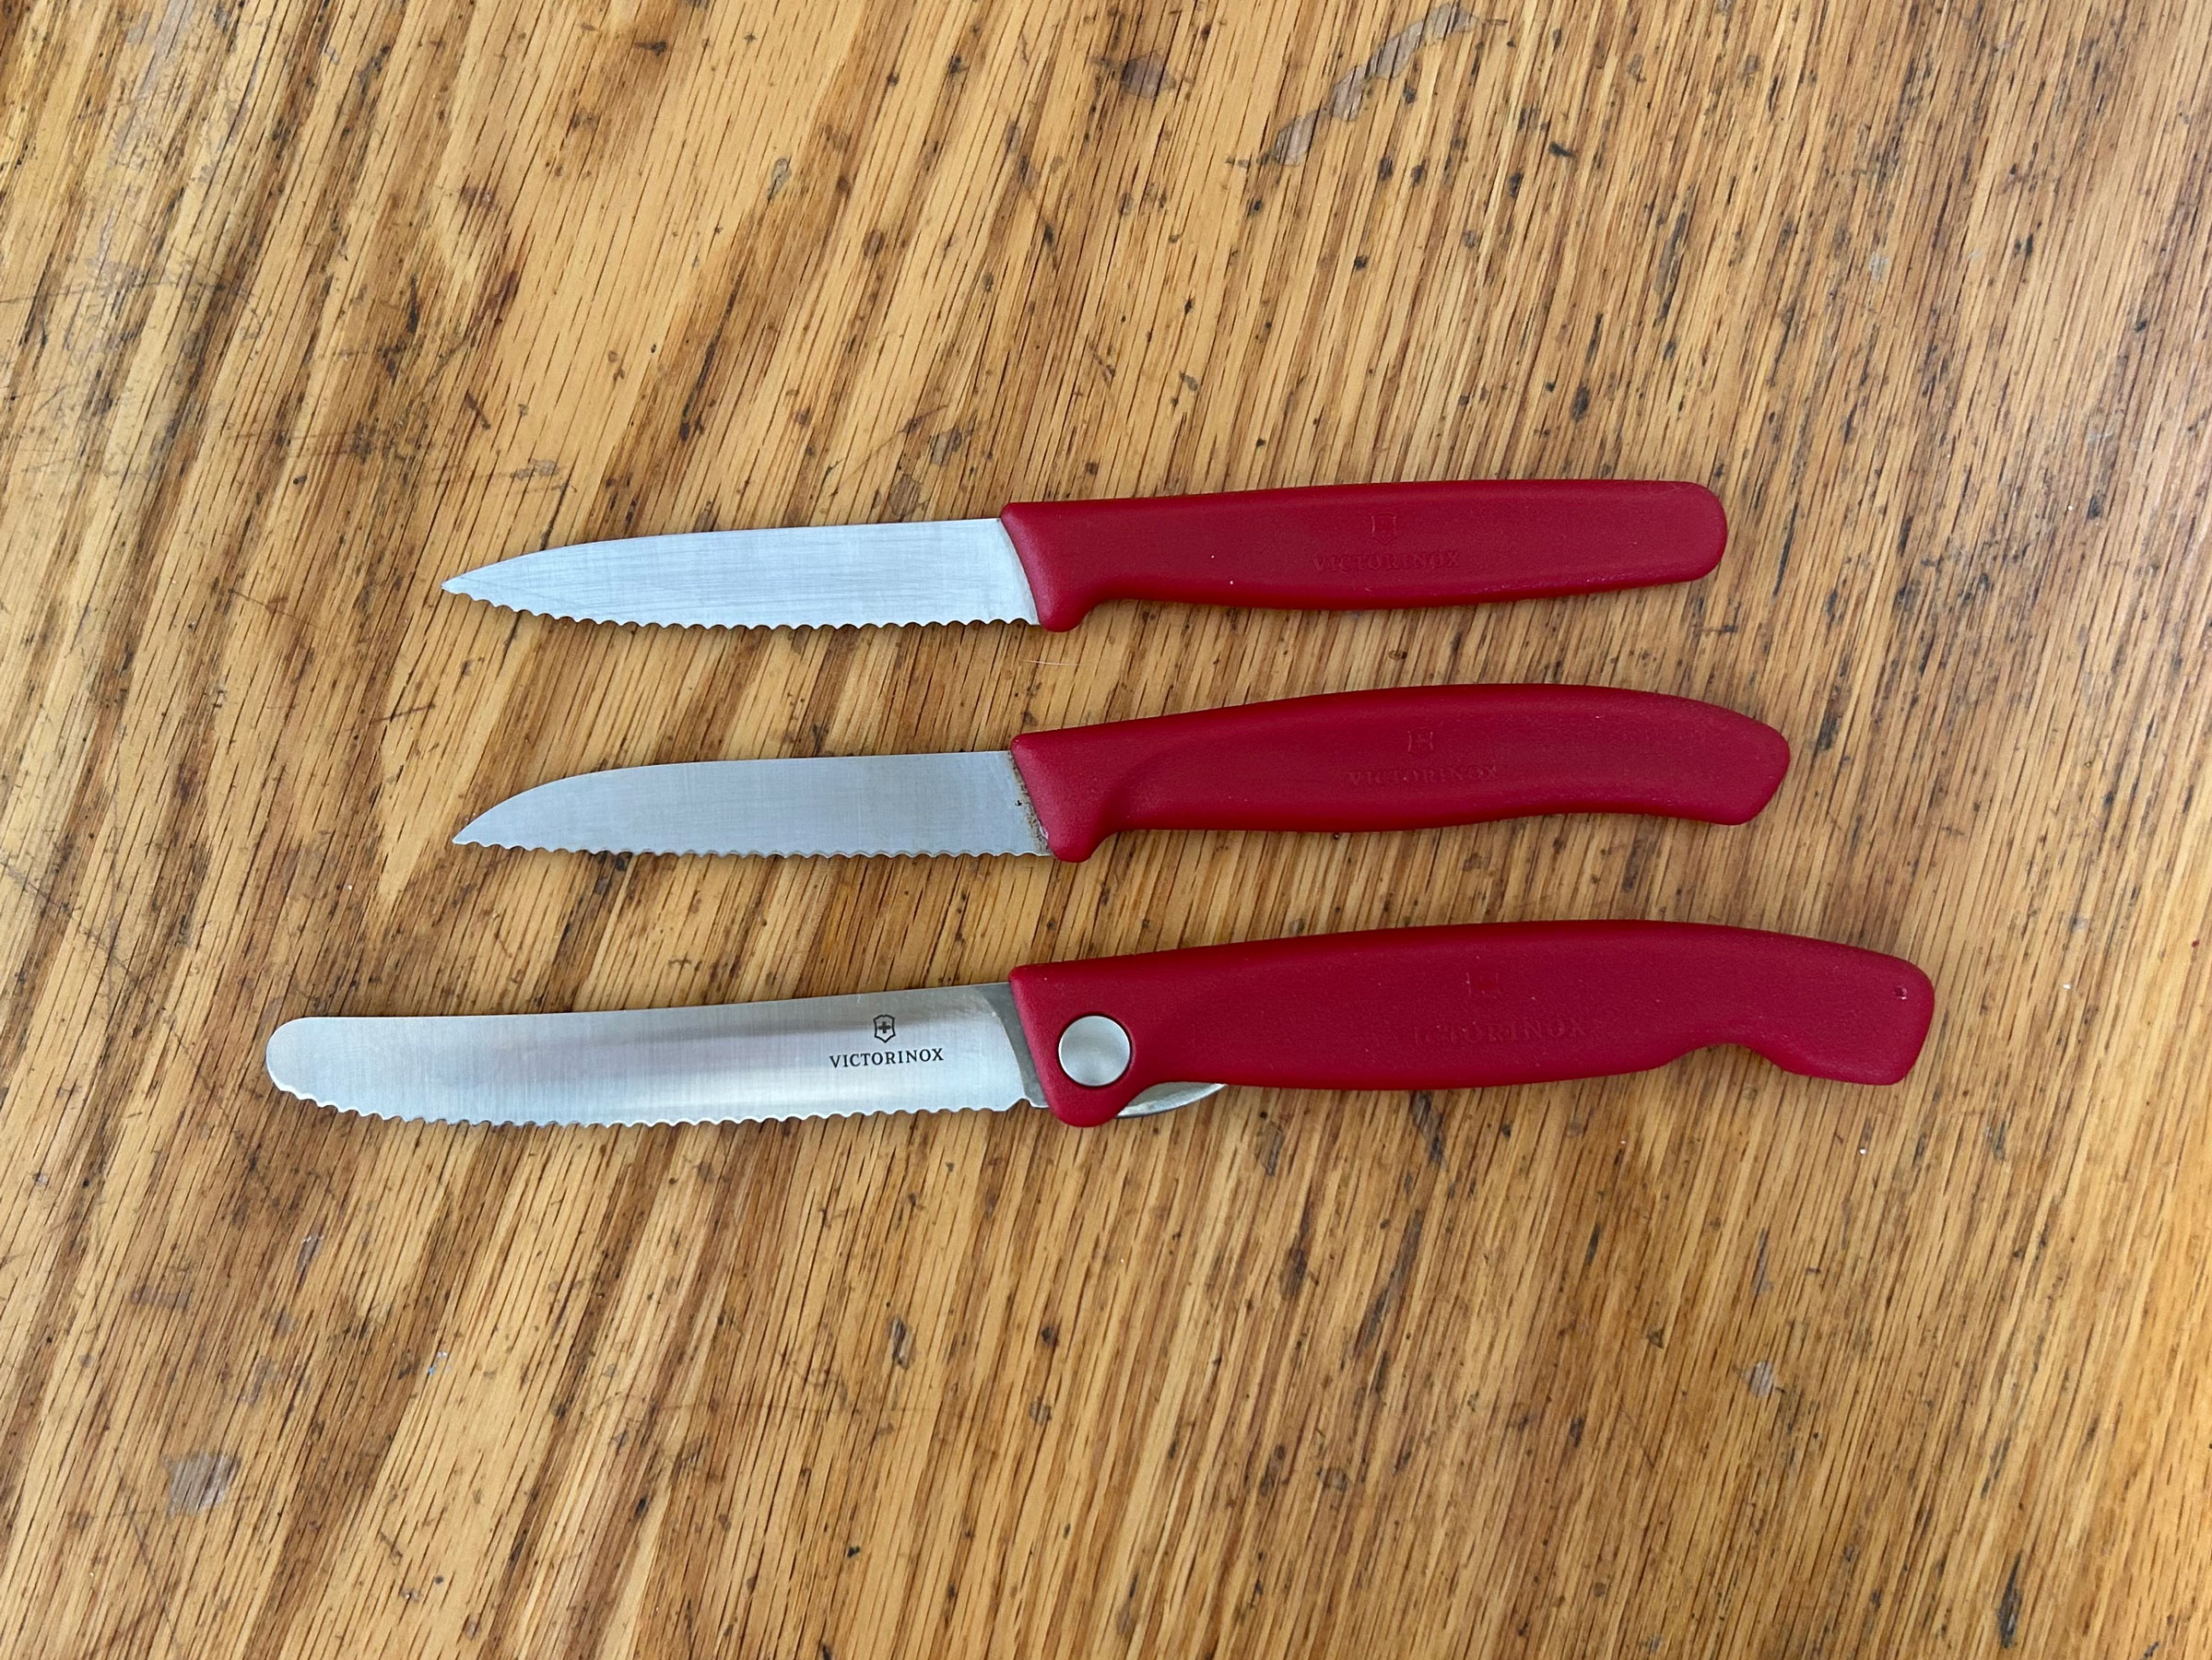
The fixed-blade knives can be safely stowed in the made-for-purpose pouch, while the folding picnic knife offers a more compact solution.
Five years ago, on a visit to a local boatyard store, I spotted samples of a fixed-blade knife with a serrated stainless-steel blade and a bright-red polypropylene handle. I asked about them and was told they were Victorinox Swiss Classic Paring Knives, a favorite with local commercial fishermen and the yard’s own crew, and that they would cut through almost anything. The price tag was around $5. I bought one.
I still have it. It lives in a bucket on my 16′ sailboat and has been used for cutting everything from nylon three-strand rope and small bits of softwood to apples and rags. It remains sharp, and its handle has retained its vivid color. A couple of years after buying that first one, I found a second, tangled up in a pile of seaweed in the tidal zone near our mooring. It’s in equally good shape despite the unknown time it spent slewing around in the saltwater. It lives in the car. There is a third one in the kitchen that has become a family-favorite prep knife, and a fourth lives in the garage toolbox.
The paring knife’s handle is polypropylene with a molded valley along its length that fits my thumb when cutting. It feels comfortable in the hand and its textured finish is just enough to make the grip secure even when it’s wet. The overall length of the knife is 7 1⁄8″, the cutting edge is 3 3⁄16″ long, and at its maximum width the blade measures 1⁄2″. The blade is 1⁄16″ thick at the shaft, and the overall weight is just 0.6 oz.
The Swiss Classic Paring Knife comes in a wide range of handle colors, and a variety of blades: edges can be straight or serrated (called “wavy” by Victorinox), and the blade profiles are either spearpoint or sheepsfoot. My two fixed-blade paring knives (both serrated, but each of the different blade profile) reveal an evolution in Victorinox’s handle design: my original knife’s handle is almost straight along its upper edge, while the more recent acquisition has a pronounced curve, which is more comfortable to hold.
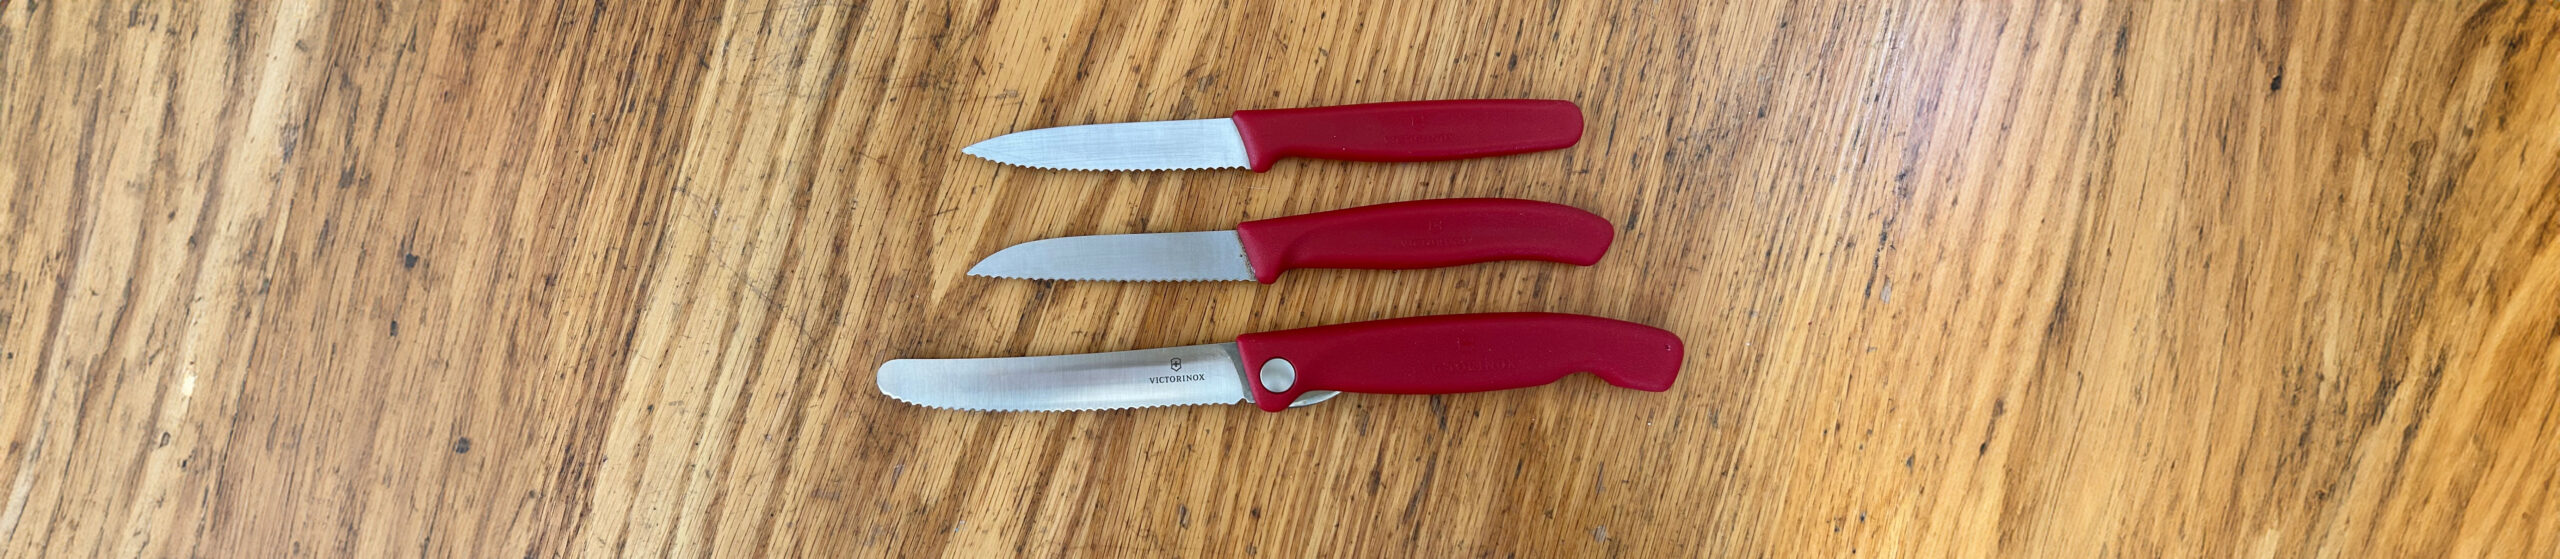
The three knives are clearly of the same family but with variations. From top to bottom are the serrated spearpoint knife, which after five years of use both on and off the boat is only slightly less sharp than it was when new; the sheepsfoot knife was found in the tidal zone and is as good as new except for some slight discoloring of the blade at the handle end; the picnic knife with serrated edge and rounded end is good for both cutting and spreading.
Thanks to the bright color of the knife’s handle, it is easy to spot in the dark recesses of a toolbox or drawer, and for anyone who wants a touch of safety there is an optional extra nylon sheath (or pouch) that has a covered metal tension belt clip, and an inner plastic liner. It is designed for the Victorinox paring knives but would fit any knife with a blade length of up to 3 1⁄4″, and an approximate width of 5⁄8″.
The most recent addition to my Victorinox collection is the Classic Picnic Knife, a foldable version of the paring knife. Made with the same polypropylene handle and stainless-steel serrated edge, the knife weighs 1.525 oz. Its blade is 4″ long with a rounded tip, 11⁄16″ at its widest, and folds into a 5 1⁄8″-long handle. It has the same excellent cutting quality, but with its blunt end is well suited to spreading. The liner lock that holds the blade open is more easily operated left-handed and was a little awkward to operate at first.
All Victorinox knives are Swiss made and guaranteed for life. They remain my go-to knives and are still the most affordable either on the boat or in the kitchen.
Jenny Bennett is editor of Small Boats.
Victorinox Swiss Classic Paring Knives are available through many marine stores, including Hamilton Marine where they are marketed as Net and Twine Knives, or direct from Victorinox. The classics are priced at $8, the pouch is $9, and the folding picnic knife is $24.
Is there a product that might be useful for boatbuilding, cruising, or shore-side camping that you’d like us to review? Please email your suggestions.
From childhood, Geoff Hart has been interested in boats and boatbuilding. His father, an amateur builder of small boats, built a skin-on-frame boat that he kept upside down in the yard of the family home in Miami. “A neighborhood kid, a little older and bigger than me,” recalls Geoff, “was running up and down on the upturned boat and put his foot right through the bottom. My father was fit to be tied. After that he only ever built in plywood.” Indeed, his father went on to build a couple of sailboats, an outboard runabout, and a 9′ pram dinghy with a Bermudan rig that he built for Geoff as a Christmas gift. As a teenager, Geoff helped his father from time to time and remembers that he “never bothered with lofting but instead would work straight from the table of offsets.”
Geoff took his first class at WoodenBoat School more than 20 years ago, joining a team of students building a traditional Norwegian pram with Bob Elliott. He returned some years later for the Fundamentals of Boatbuilding and then Advanced Fundamentals of Boatbuilding with Greg Rössel. He followed those with Elements of Boat Design with Paul Gartside, and finally Bronzecasting for Boatbuilders with Michael Saari, commenting, “Casting is like snow-skiing—way more difficult than it looks.”
Geoff Hart
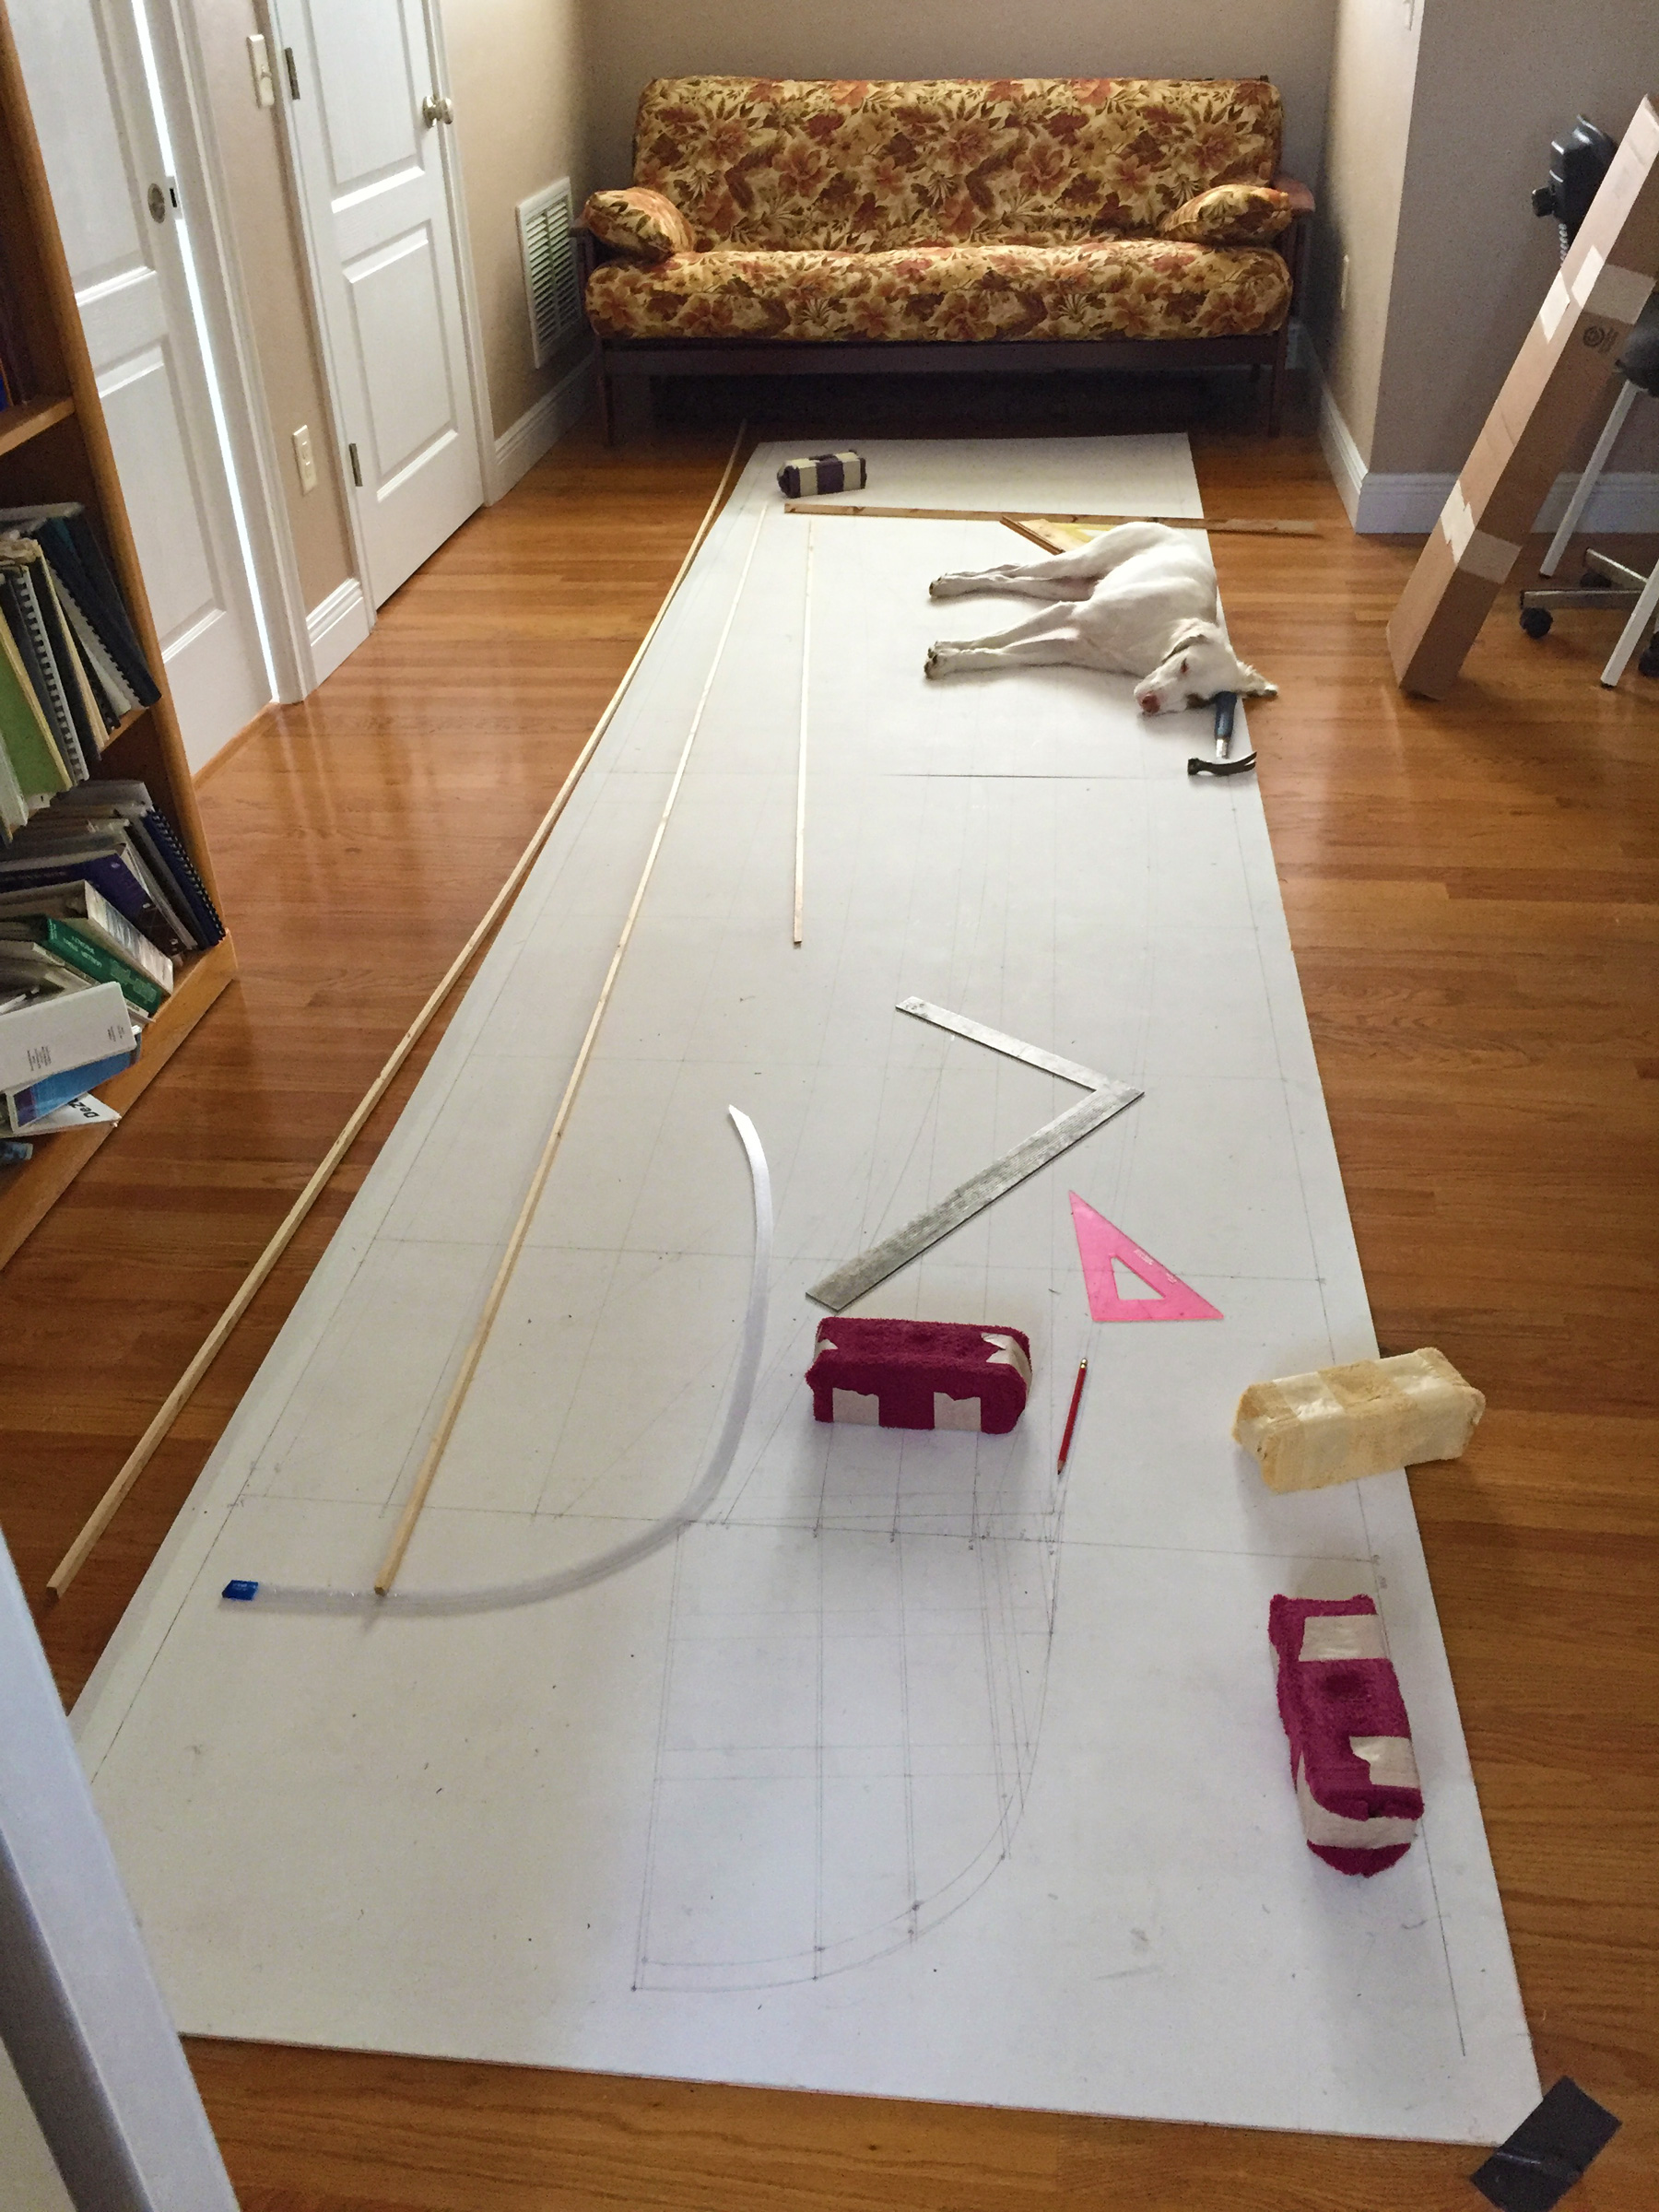
Geoff’s office floor became the ideal space for lofting, although the family English setter was not always the most efficient assistant.
While he was accumulating knowledge through the classes, Geoff was building and dreaming on his own. He built a strip-planked Wee Lassie but wanted to try his hand at traditional construction. He acquired some rudimentary plans for a 12′ × 4′ 7 1⁄2″ Snow Bird, a 1932 Frostbite dinghy designed by C.D. Mower. They had been published in a 1955 issue of How to Build 20 Boats by the editors of The Rudder magazine (reprinted from the April 1933 issue of the magazine itself), and consisted of offsets and drawings on two 6″ × 9″ pages along with the advice that “Anyone who has had any experience building round-bottom clinker-built dinghies will find sufficient information on these pages to enable him to build a Snow Bird for himself.”
Geoff had no “round-bottom clinker-built” experience but decided to give it a go. He enlarged the plans. “In the originals,” he says, “some of the numbers were so small you couldn’t possibly read them. Even enlarged, the plans were very basic. What was there was good, but there was almost no detail.” Geoff thought back to his father’s habit of building from offsets and decided, “There was no way. I would have to loft it full size.” He laid out several sheets of plywood on the floor of his office and spent “a couple of weeks wearing kneepads, crawling around on the floor, and shifting the sleeping English setter who kept me company.”
Once lofted, he moved the project out to a bay in the barn near the house. It would be there for the next four years. “I’d leave it for a couple of months here and there, but it was very involved and there was a steep learning curve at every stage.”
Geoff Hart
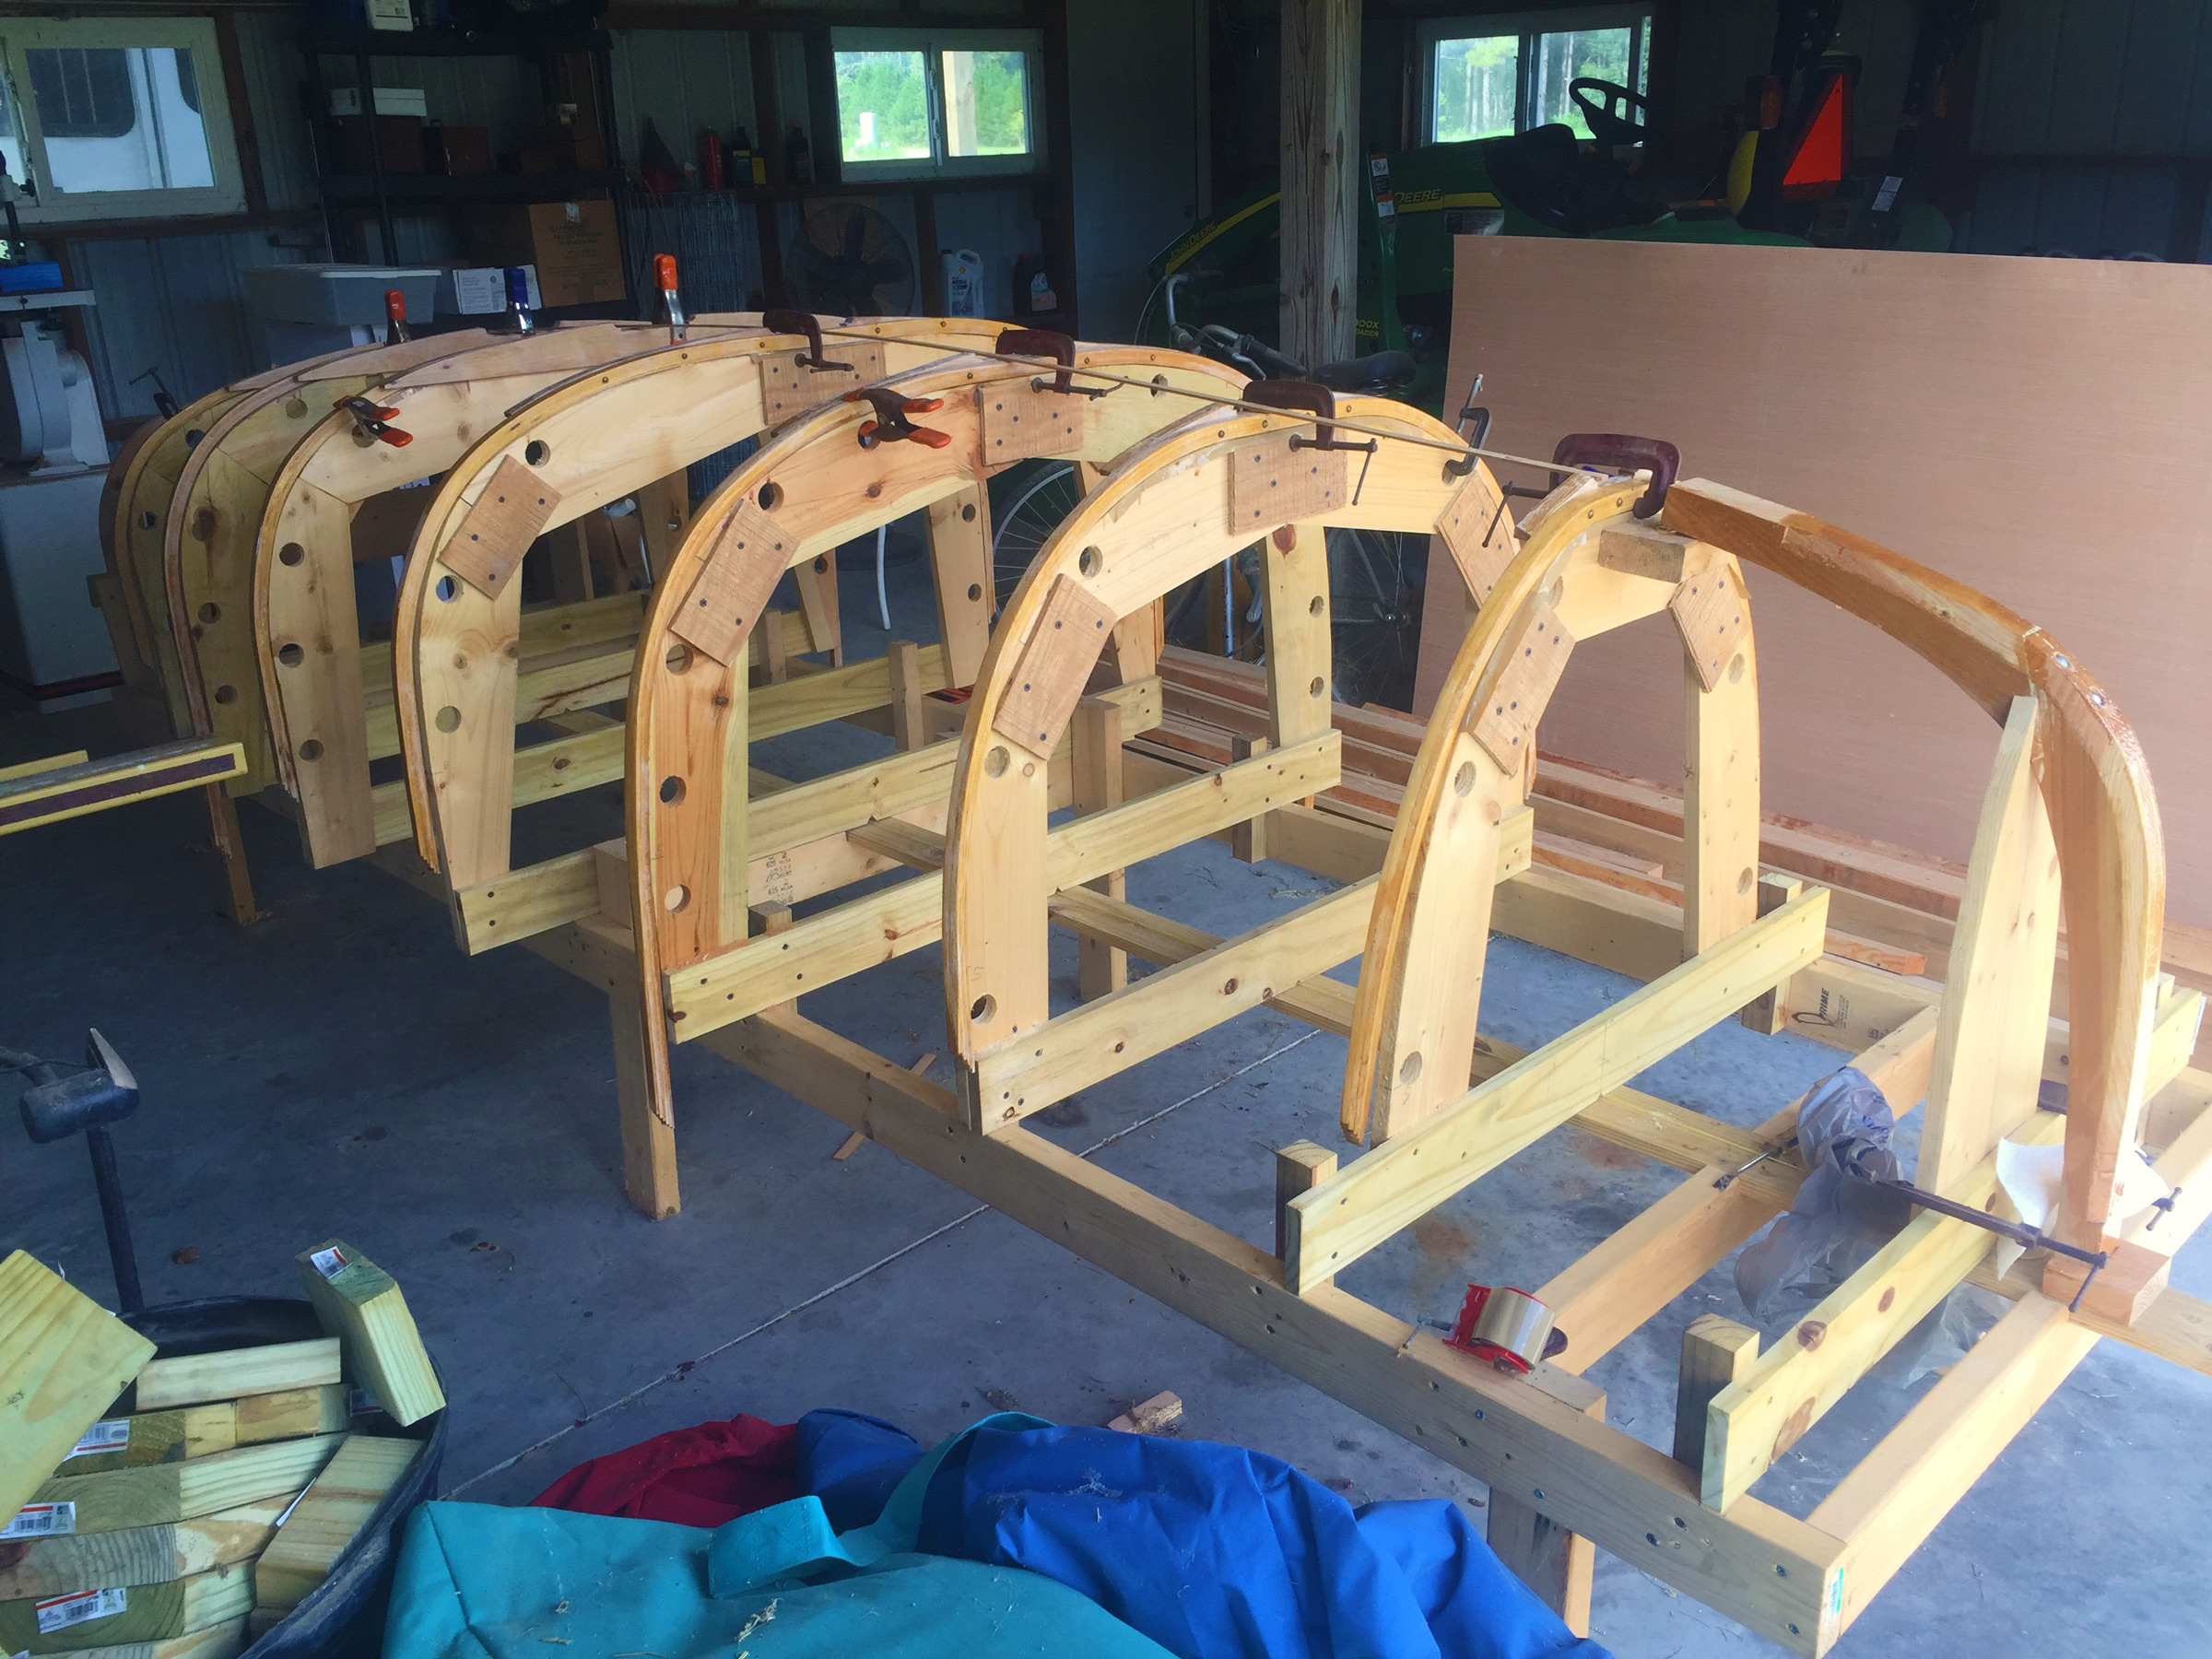
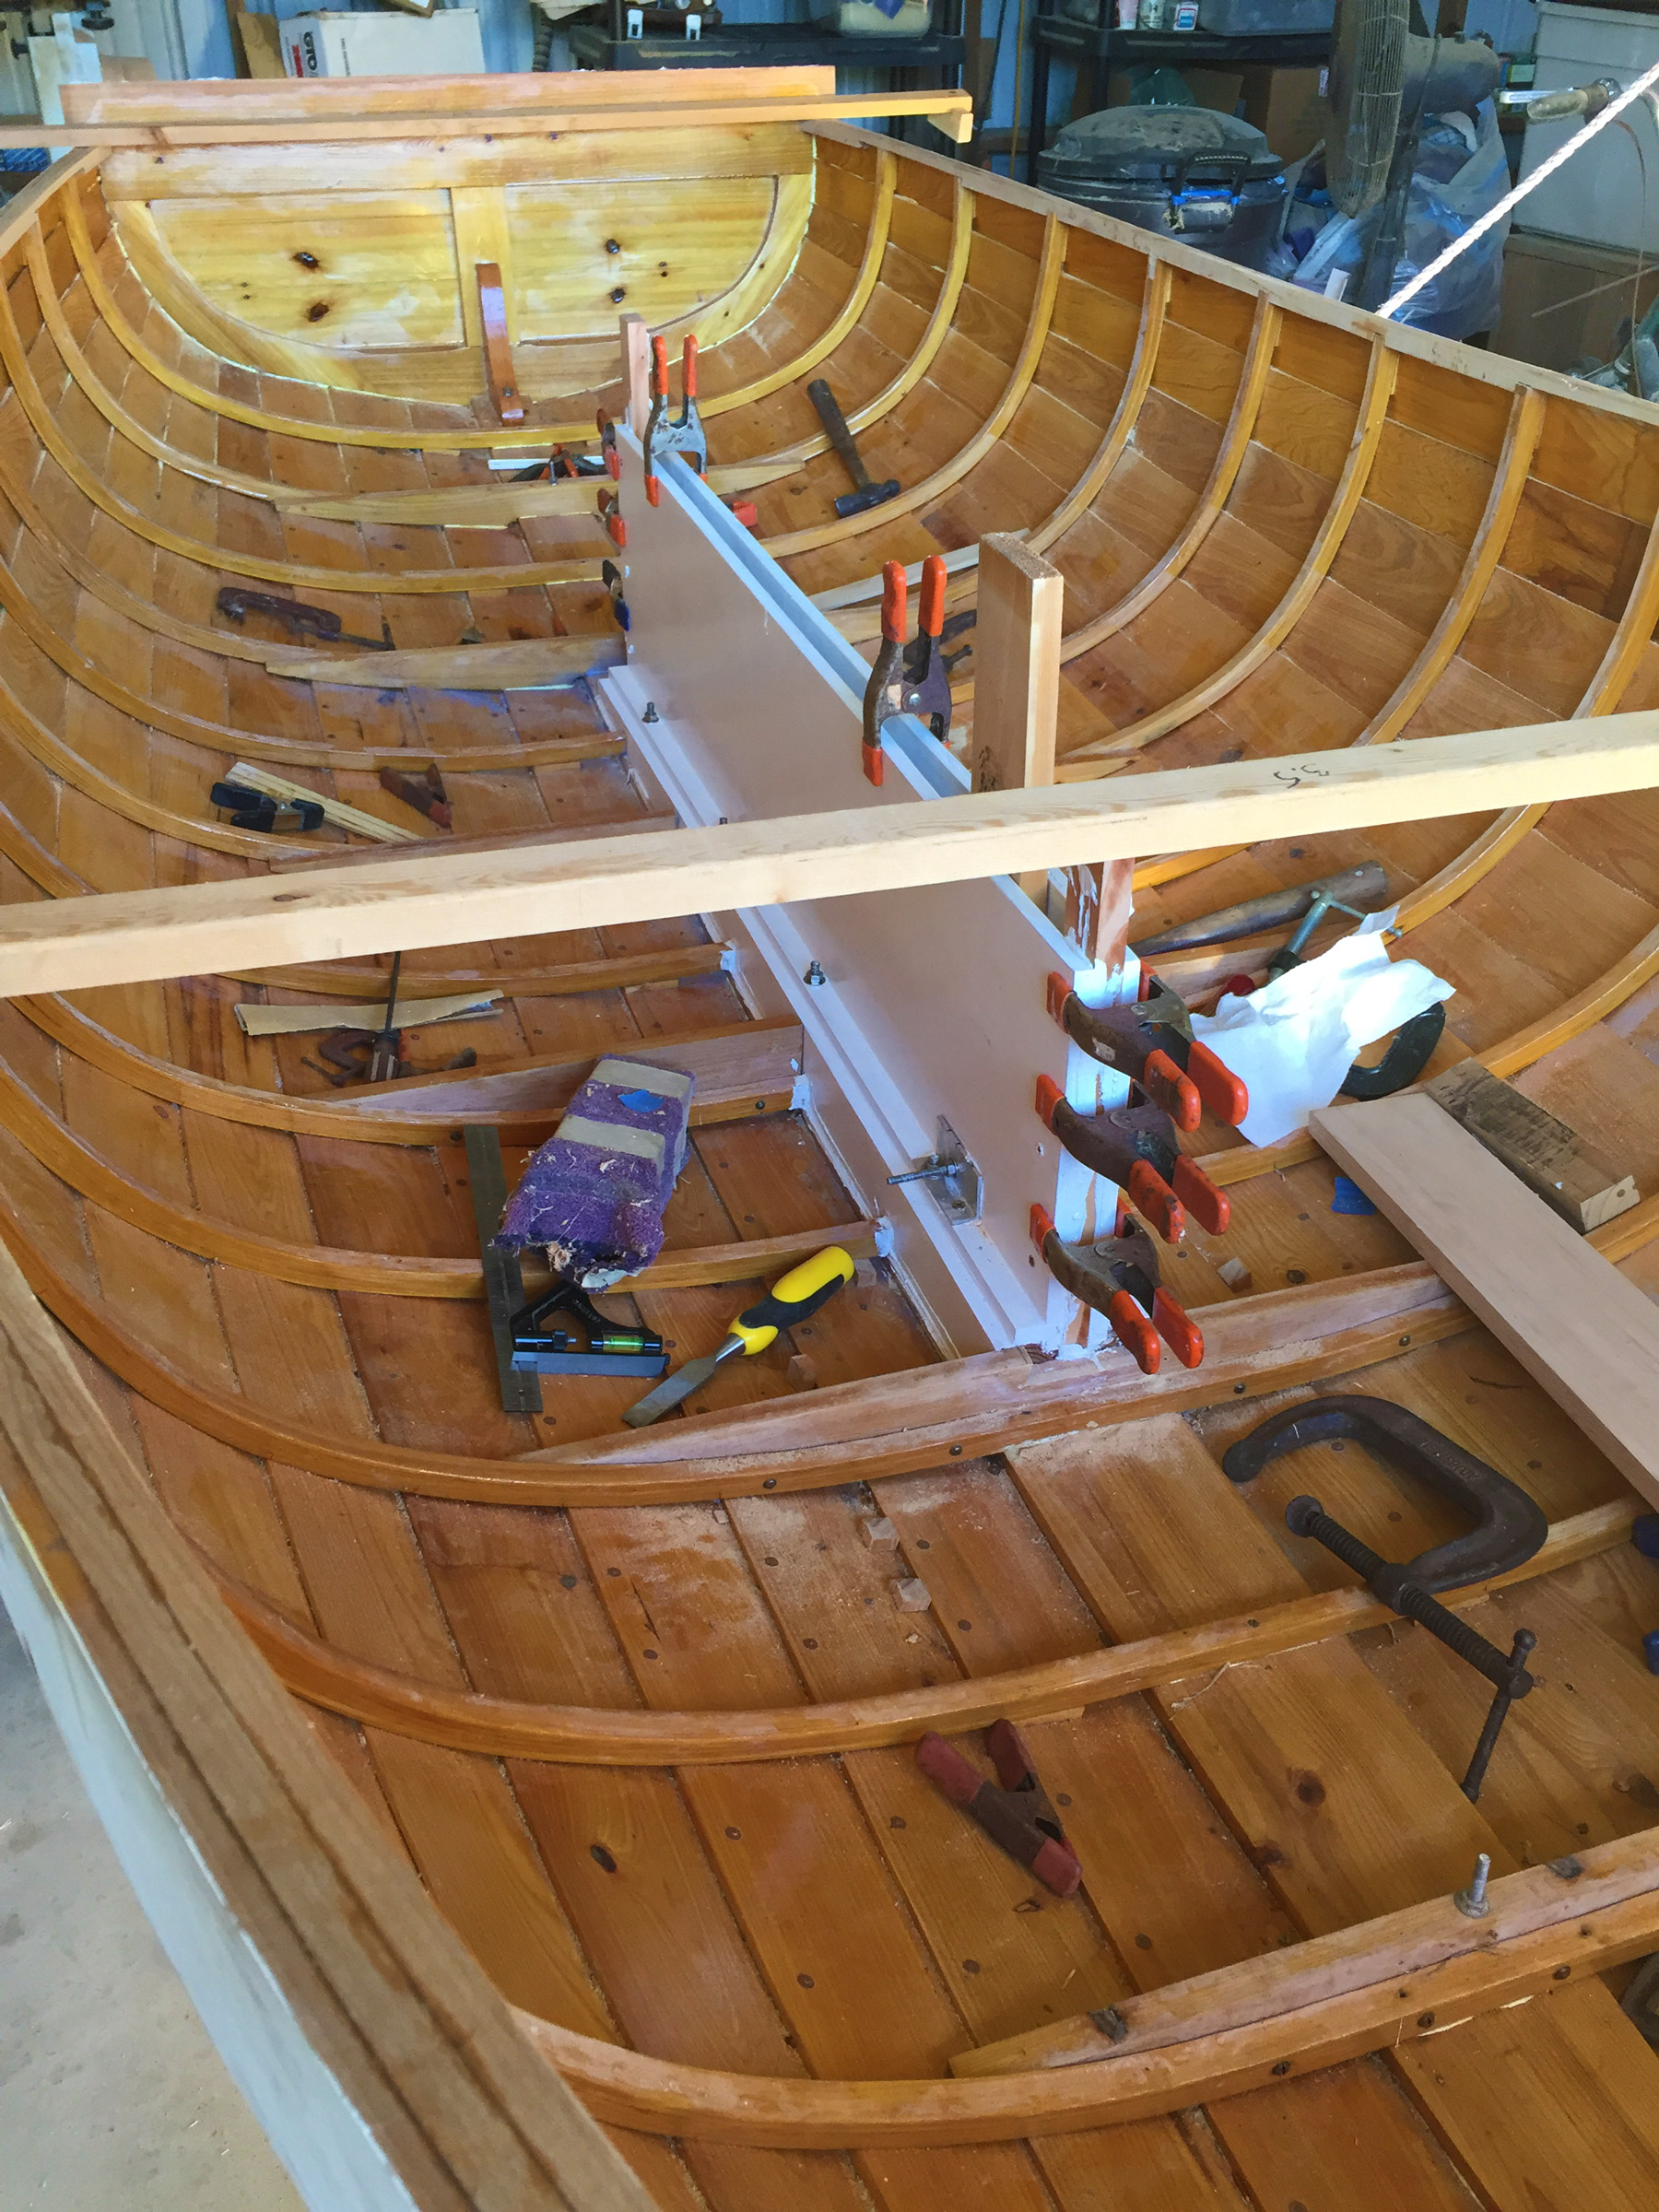
Geoff set up the molds and then laminated frames around them. Subsequently he set up ribbands and installed the remaining laminated frames at 8 1⁄2″ centers.
Geoff built the hull upside down on molds. The plans suggested white oak for the keel and frames and cedar for the planking. But, unable to find white oak locally, Geoff decided to laminate the frames out of bald cypress. “They’re 3⁄4″ × 3⁄4″ spaced at 8 1⁄2″ centers, and there are a lot of them,” he says. “But not as many as the original—those were narrower and spaced every 6″. I made mine wider so I could screw into them.” He also added floor timbers at every other frame. “I wanted extra strength in the bottom, mostly because the boat was going to live on a trailer.” For the planks he used 5⁄16″× 6″ cypress boards, nearly all of which had to be scarfed for length.
For Geoff, the project was constantly challenging. “I truly did spend as much time thinking as I did building. The first time I attempted to fit the garboard, it broke. I remembered Greg Rössel’s steaming tips and bought a wallpaper steamer.” But before he even started planking, Geoff had to figure out how many planks he was going to need. He drew a full-scale diagram and figured out he could use 9, 10, or 11 planks per side. “If I’d used 11, they would have been too narrow to take two screws to the stem, and nine planks would have been too wide in the garboard and at the turn of the bilge.” He settled on 10 per side.
The original boat was very lightly built, Geoff says. The planking was in cedar and Geoff’s cypress would be slightly heavier but also stronger. He decided not to rivet the entire hull. “I knew where the stress would be greatest, so I riveted the full length of the garboard and two broadstrakes, but the other planks I riveted only from the bow to just aft of the maststep.” His wife stepped in to help with the riveting in the bottom of the hull. “A little of that went a long way with her,” he says. “She told me she was going to file a grievance with the Under-Boat Workers of America.”
Geoff Hart
The planking almost complete, the sheerstrake is clamped in place. Riveting has also begun in the bottom planks.
Geoff fastened all the plank laps to the frames with bronze screws (mostly inherited from his father) and, on the outside of the hull, applied adhesive caulk to the inside corners of the laps to seal the seams. “The climate here in Florida is pretty humid—wooden boats don’t dry out like they might in the Northeast if you haul them for the winter. I wasn’t worried about the planks splitting.” When he launched SNOW BIRD, Geoff says, “she didn’t leak a drop.”
Knowing that his choice of wood had added weight to the hull, Geoff sought ways to reduce weight elsewhere. The transom, he says, was designed for 3⁄4″ oak; he used 7⁄16″ cypress. He fashioned the centerboard from fiberglass, 7 lbs lighter than the specified metal. He hand-laid the board on a mold to the same basic dimensions as the original. When finished, it weighed 16 lbs, which he thought would be heavy enough to overcome its own buoyancy. “At the dock it went down just fine, but once I got going, the board just wouldn’t sink.” He took it out, cut a 6″-diameter hole near the bottom, and had a local metal shop fabricate a 3⁄8″-thick mild-carbon steel plate, which he ’glassed into the hole. It added 2 lbs of weight and, says Geoff, “worked like a charm.”
Geoff Hart
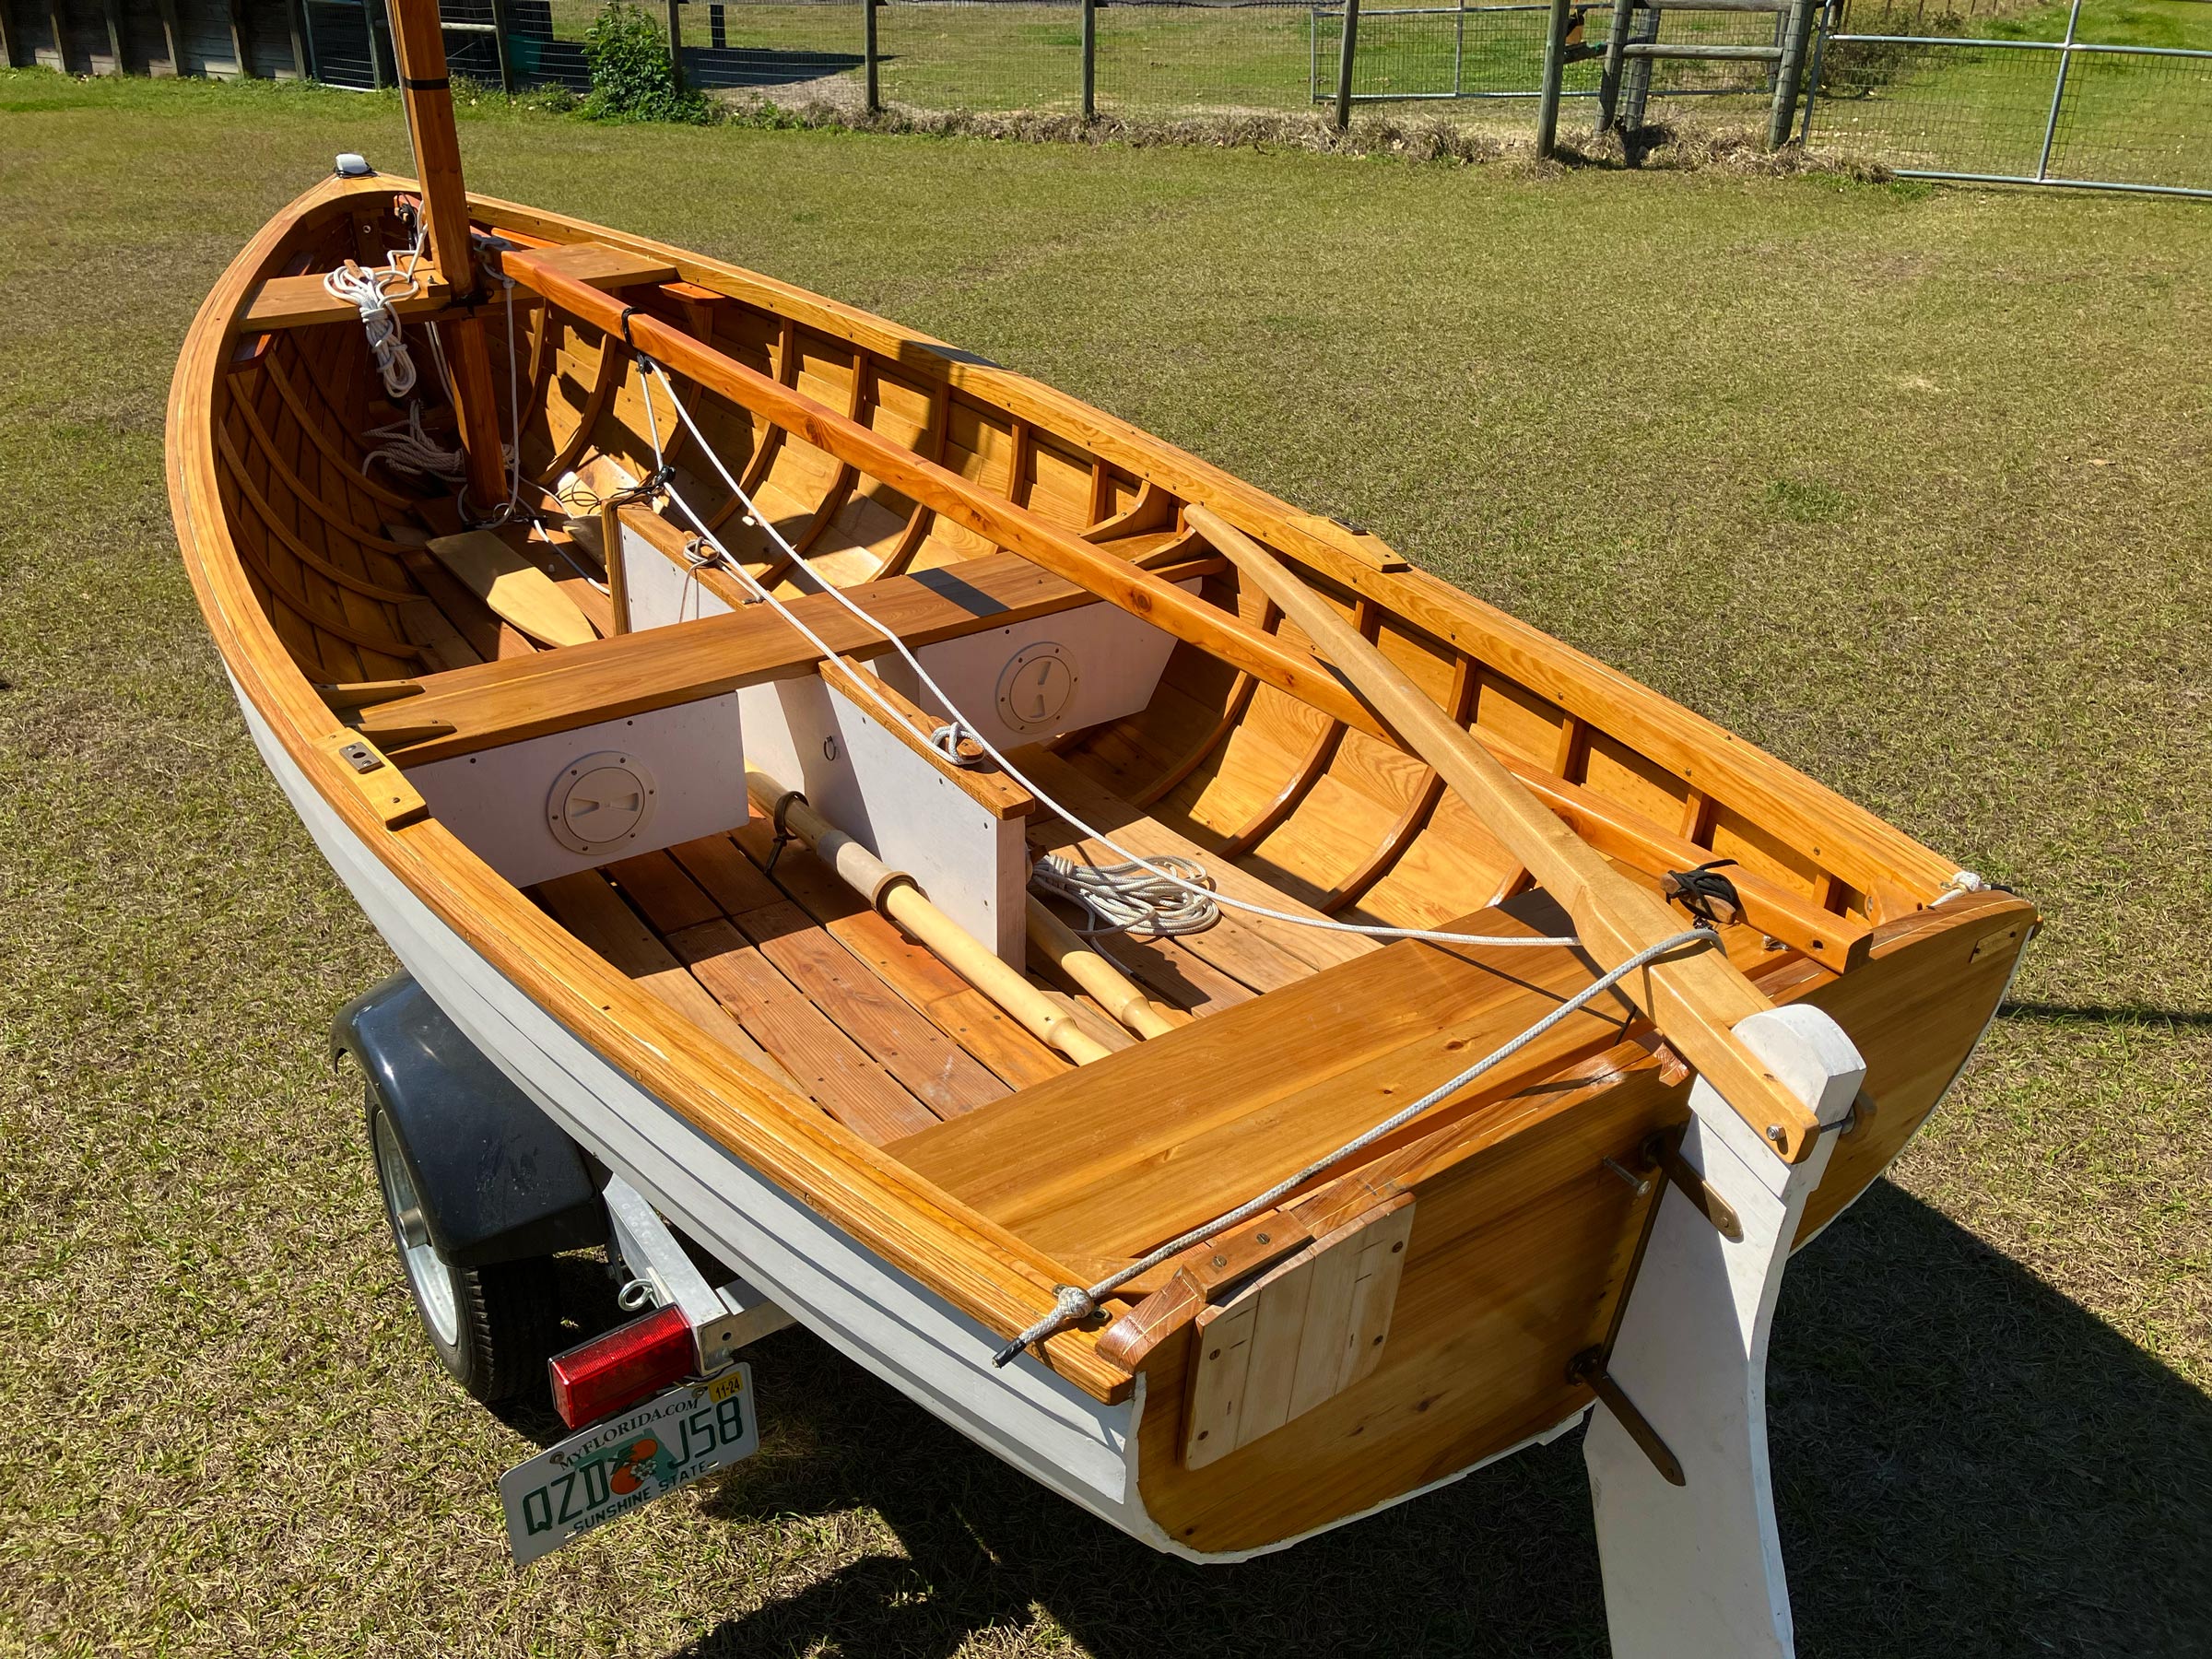
With the hull fully planked up, Geoff turned the boat over and began the fit-out. He built the centerboard trunk to the plans although, knowing he would be laying up a fiberglass board with squared off bottom edge, he also squared off the aft end of the trunk.
Mower’s design adhered to the 1930s Frostbite class rules. The boats were required to have three thwarts plus a mast thwart. “In a 12′ boat that’s pretty tight. It doesn’t leave room to turn around. I took out the forward thwart. The rules also specified small buoyancy tanks. They were probably big enough to keep the boat stable and upright after a capsize, but I decided to increase them, making them as large as possible while still fitting under the center thwart.”
The rig, says Geoff, is essentially as designed, although he increased the sail’s luff by a foot, which changed the area from 72 sq ft to 80 sq ft but didn’t alter the longitudinal center of effort. He also lengthened the mast from 11′ to 12′ 6″ to accommodate the taller sail. “I built it box-section out of Douglas fir rather than the original solid spruce, so it’s lighter but stronger. It’s tapered in both directions, which made it hard to build. I had one joint that was horrible, and I decided I couldn’t live with it. I spent four hours with a heat gun popping the epoxy glue loose and taking it apart so I could clean it out and redo it.”
Patty Hart
The original Snow Bird design showed smaller buoyancy tanks, more frames, and a removable forward thwart, otherwise Geoff’s new build would have looked like her sisters of the early 1930s.
While Geoff has been sailing since he was a child, the lug rig was new to him and, like everything else in this project, “involved a lot of learning. I’m still fiddling with it, trying to get it just right. Every time we use the boat, I raise the sail a little higher and adjust the downhaul, looking for that perfect set.”
Sail-setting aside, SNOW BIRD has more than lived up to Geoff’s hopes. After four years in the barn, she emerged and was launched in the summer of 2023, and, two summers on, Geoff is very happy with her. “I haven’t sailed her in more than 10 knots of wind,” he says, “but she’s surprisingly fast on a close reach.” When sailing, he sits on the cockpit sole, “because that’s how I learned.” He uses the center thwart when rowing, and the sternsheets when motoring. He has made the aft thwart removable. “If I didn’t have the motor, I’d probably just take it out, but it is nice if there are two people and one is rowing, it’s somewhere for the passenger to sit. We’ll see.”
Patty Hart
Geoff increased the sail’s luff by a foot, which increased the sail area by 8 sq ft—that extra canvas helps SNOW BIRD to move in even the lightest of breezes.
Like so many other builders of small boats, Geoff will no doubt go on tinkering and looking for things to improve, adjust, or tweak. But that is surely part of the fun. For now, SNOW BIRD sits on her trailer ready to go for a sail whenever the skipper and the riveter have some free time.
Jenny Bennett is editor of Small Boats.
Do you have a boat with an interesting story? Please email us. We’d like to hear about it and share it with other Small Boats readers.
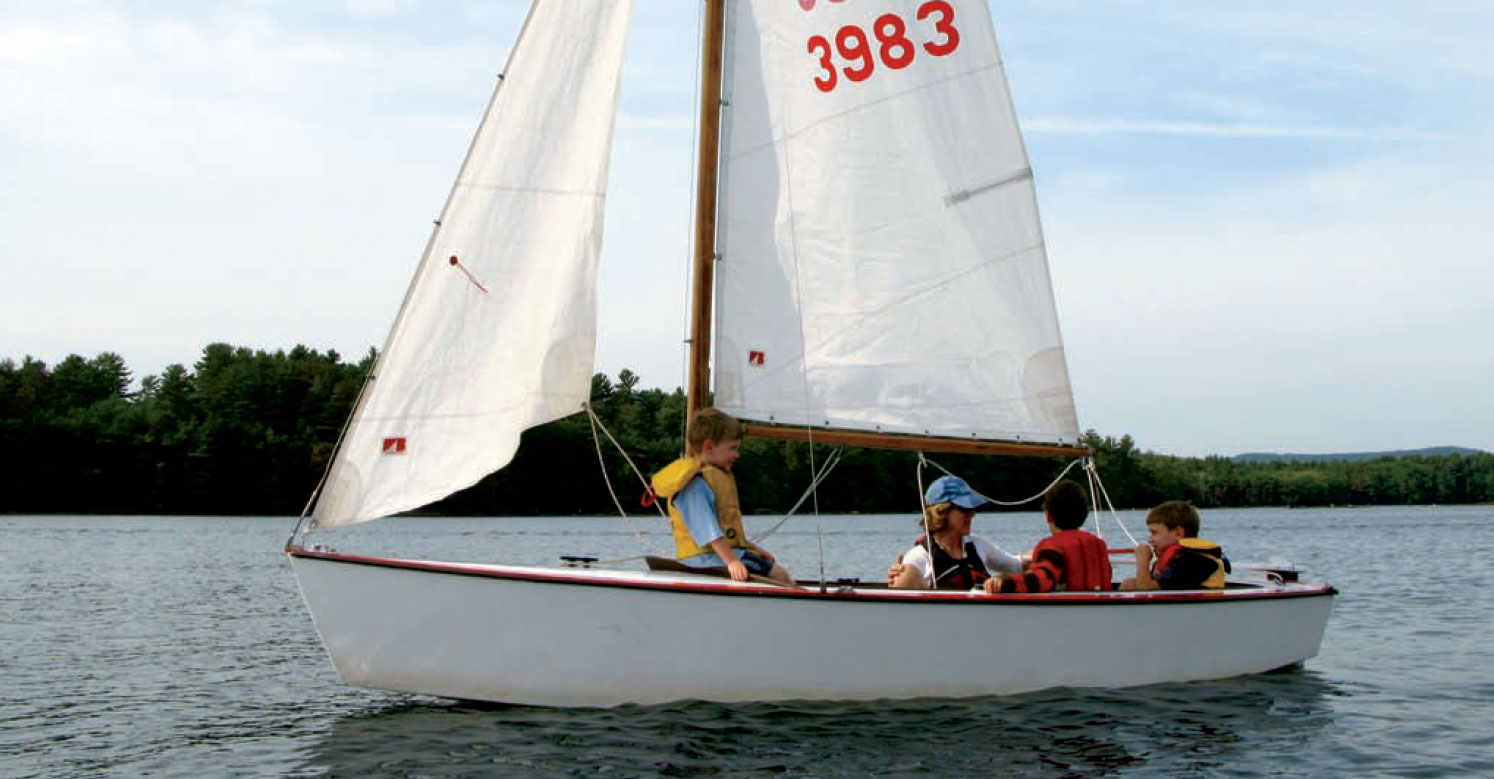
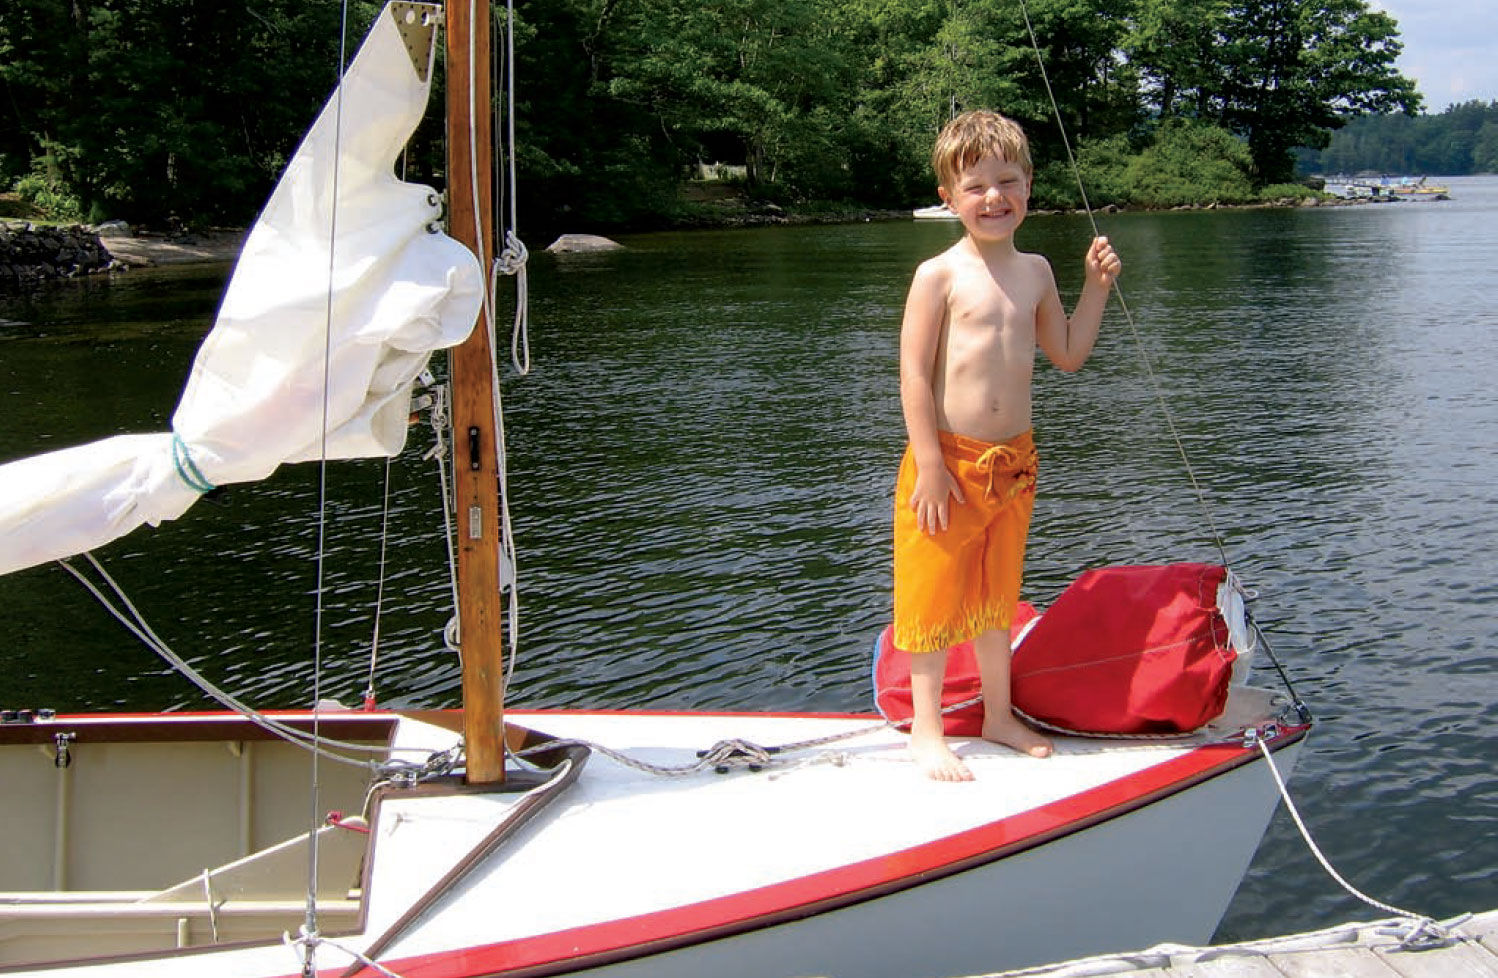
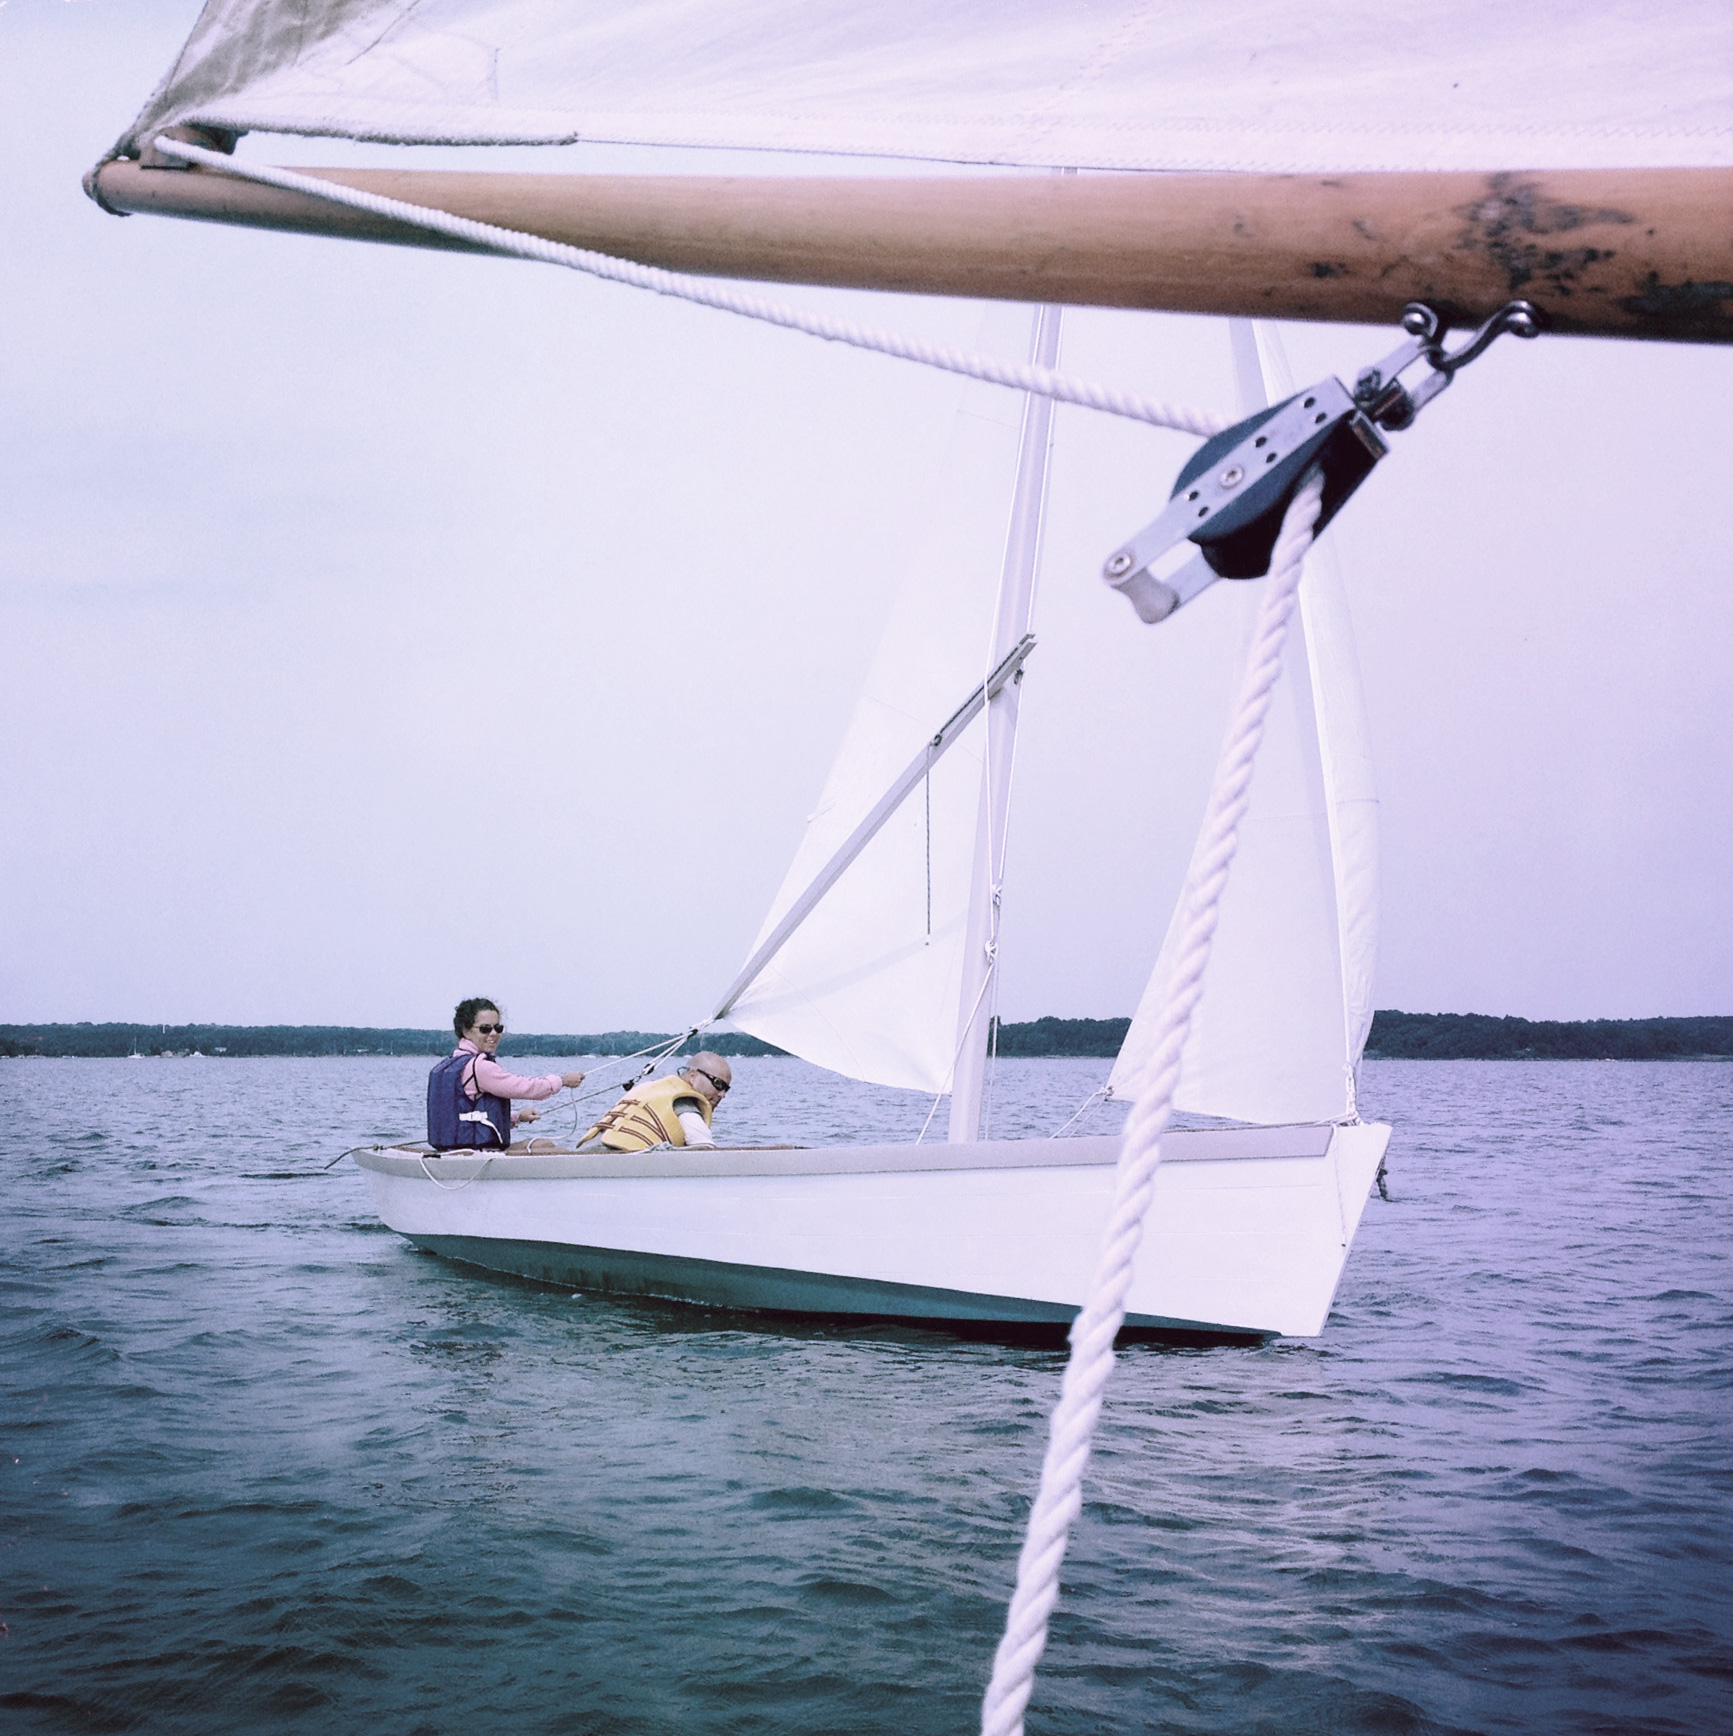
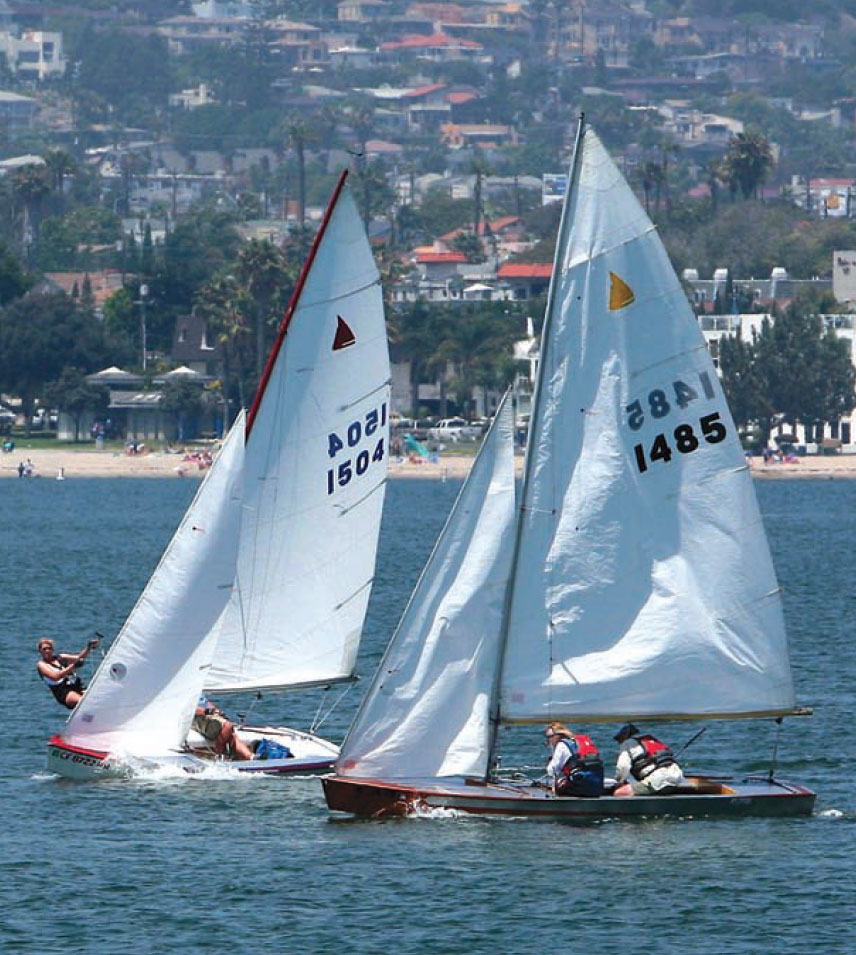
The Blue Jay–class sloop was designed in 1947 as a junior trainer. Today, the fleet numbers over 7,000, and the boats are sailed by adults and kids alike.
It was blowing like stink, and my perch on the bow of the modern go-fast raceboat was precarious. The spinnaker jibe was not going well. I looked back at Randy, the skipper, who was grinning through the chaos; it was the same grin he had on his face when we capsized my Blue Jay–class sloop nearly 45 years before. I realized then that we’d live through this particular screw-up just like we’d lived through that one. And eventually we’d laugh about it.
If the only thing that Blue Jay taught me those many years ago was to laugh through the small calamities, it would have been enough, but I learned much, much more. Most important, I learned the love of sailing and the love of the Blue Jay class of sailboat. BANZAI, my Blue Jay, has proved to be the boat of a lifetime.
History of the Blue Jay-Class Sloop
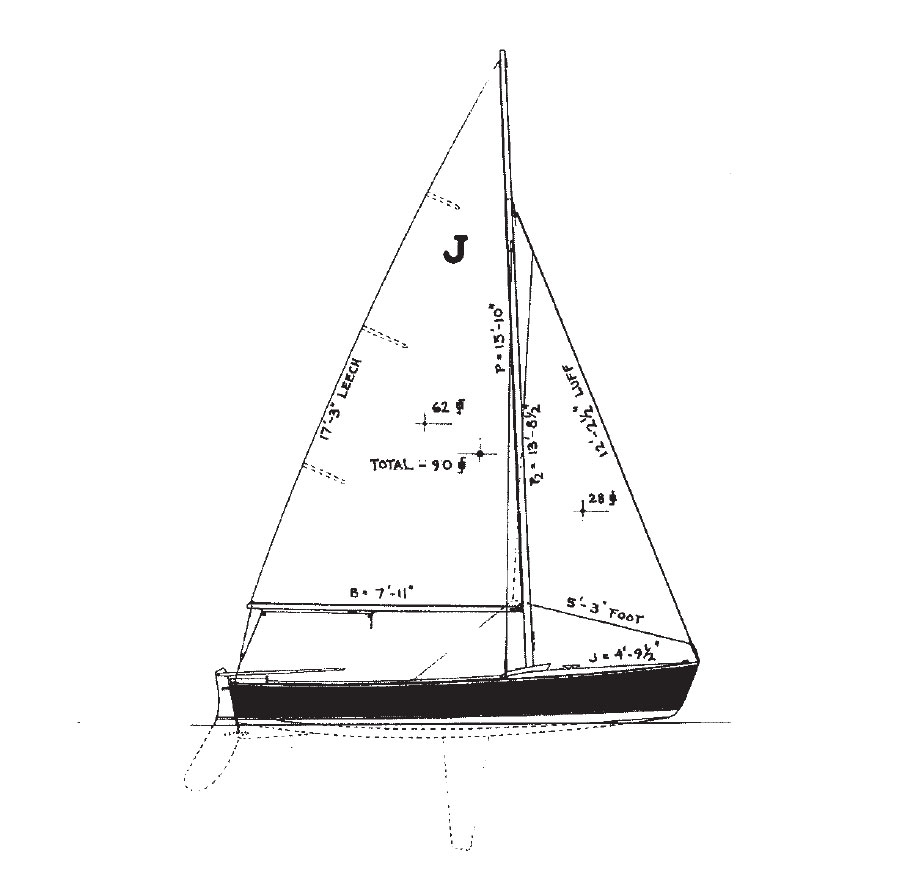
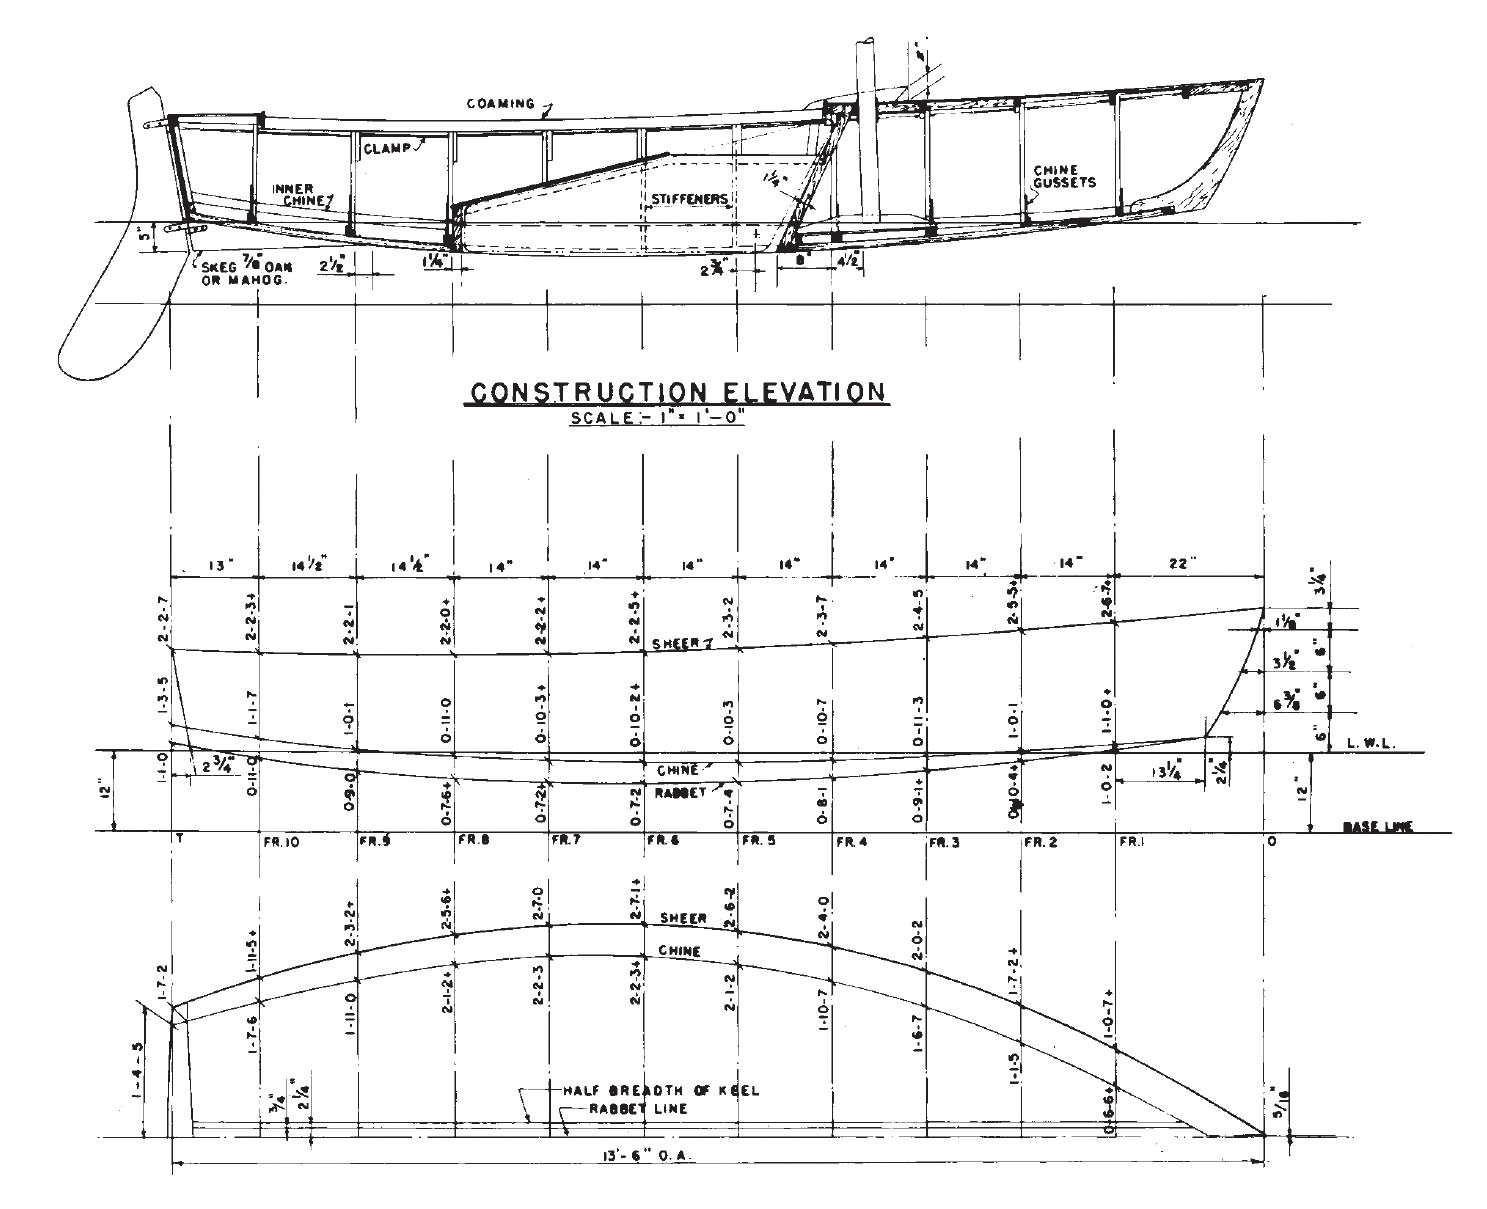
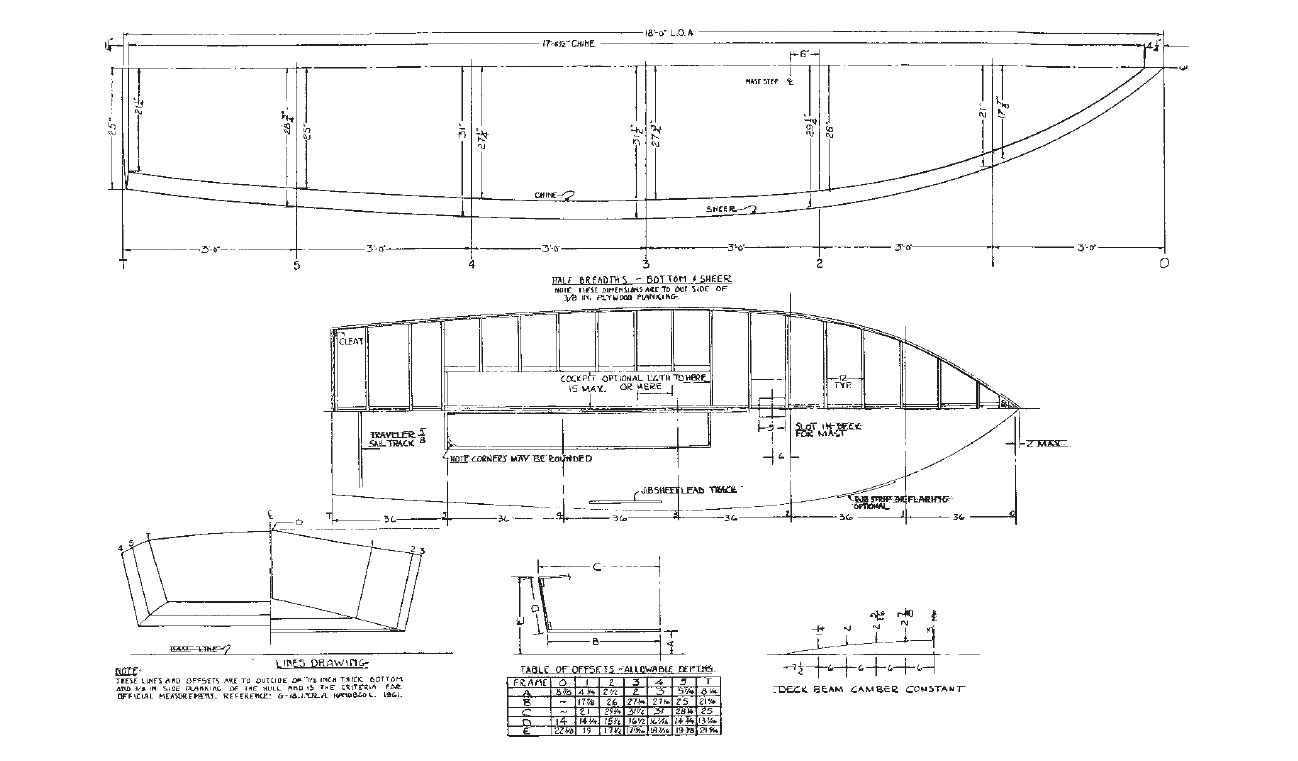
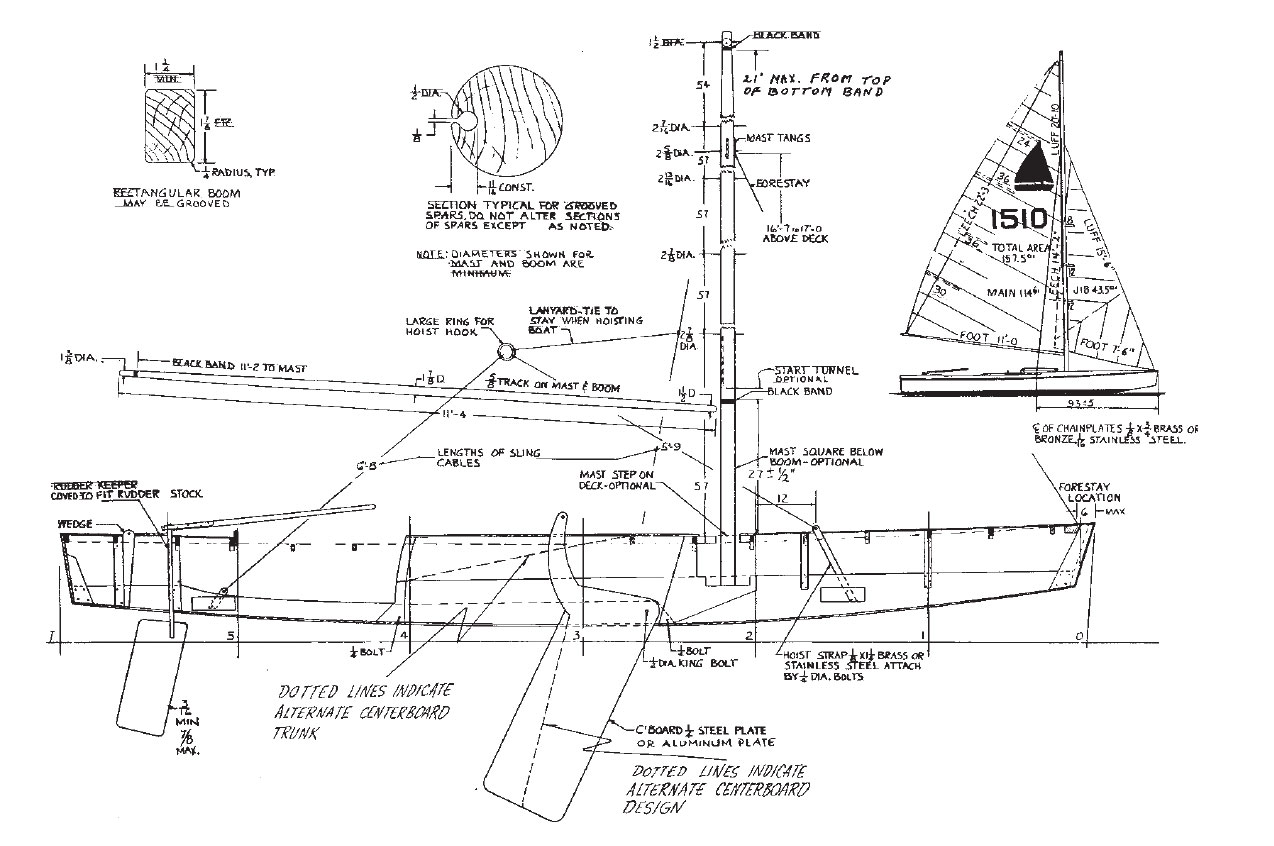
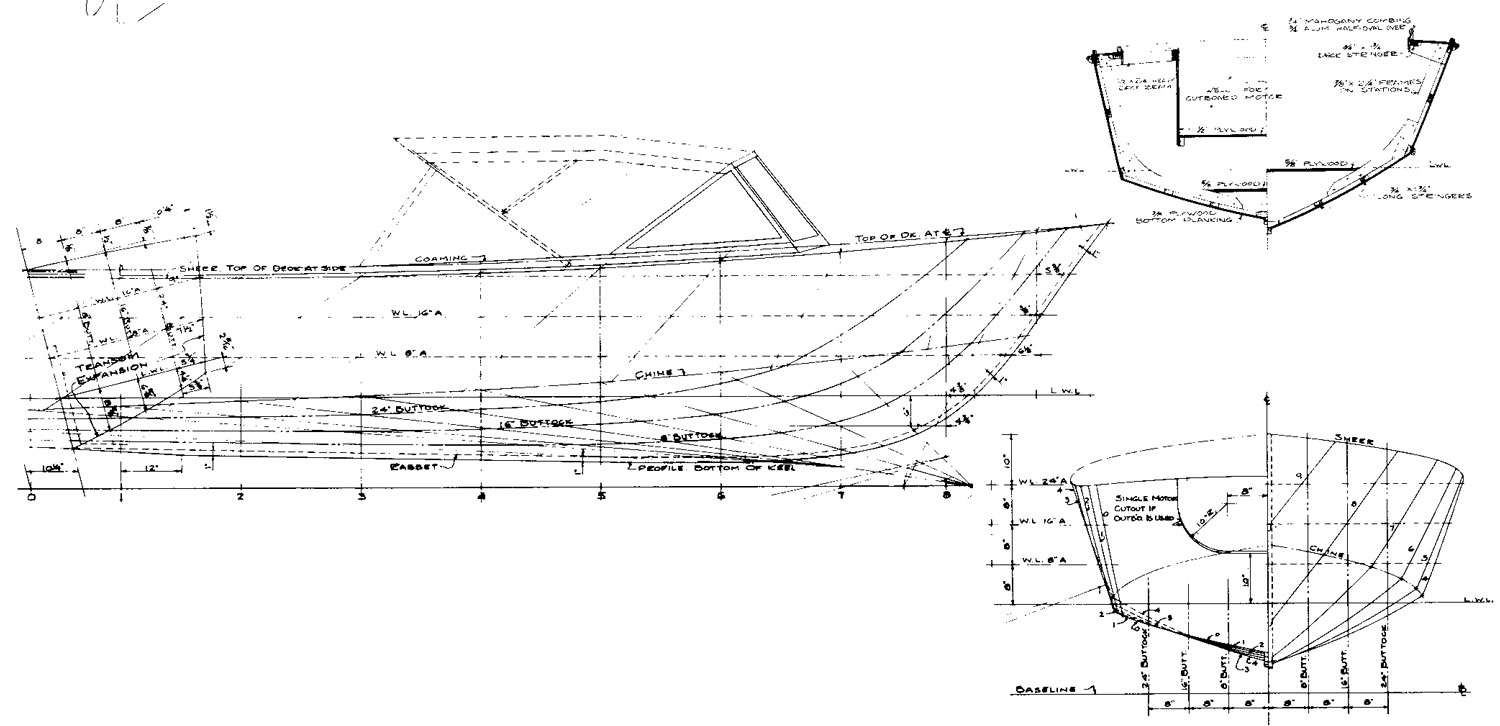
The Blue Jay is a classic little sloop designed by Sparkman & Stephens (S&S) in 1947. It’s a hard-chined daysailer, 13′ 6″ long, 5′ 2″ at the beam, and weighs a minimum of 275 lbs. It carries 90 sq ft of sail in a main, jib, and spinnaker. While its sheer is relatively flat, its bottom is slightly veed and sweeps up nicely toward the stern. It is a very pretty little boat both under sail and at a mooring. While the design is now 60 years old, the Blue Jay’s appearance is still up-to-date.
S&S forged its reputation with fast, deep-draft ocean-crossing yachts, but they designed smaller boats, too. Their Lightning-class sloop is a 19′ centerboarder designed in the days before World War II; it found immediate favor with the growing numbers of middle-class families drawn to sailing, and boats are still being built to this design for active class-racing worldwide. In 1947, S&S designed the Blue Jay as a “baby Lightning”—a junior trainer for the growing hordes of baby-boomer sailors. My twin sister and I were a part of those hordes.
We grew up on the Shrewsbury River, Monmouth County, New Jersey. The Shrewsbury is a shallow river separated from the ocean by a string of sandbar towns. It joins the Navesink River, and the two flow into Sandy Hook Bay just south of New York City. During the mid-1960s, there were fleets of Blue Jays on both rivers, and the annual Junior Sweepstakes Regattas held on the Navesink were drifting matches with dozens upon dozens of Blue Jays, and double the dozens of young teens testing their skills against each other. Lifelong friendships like mine with Randy were formed in regattas like this one.
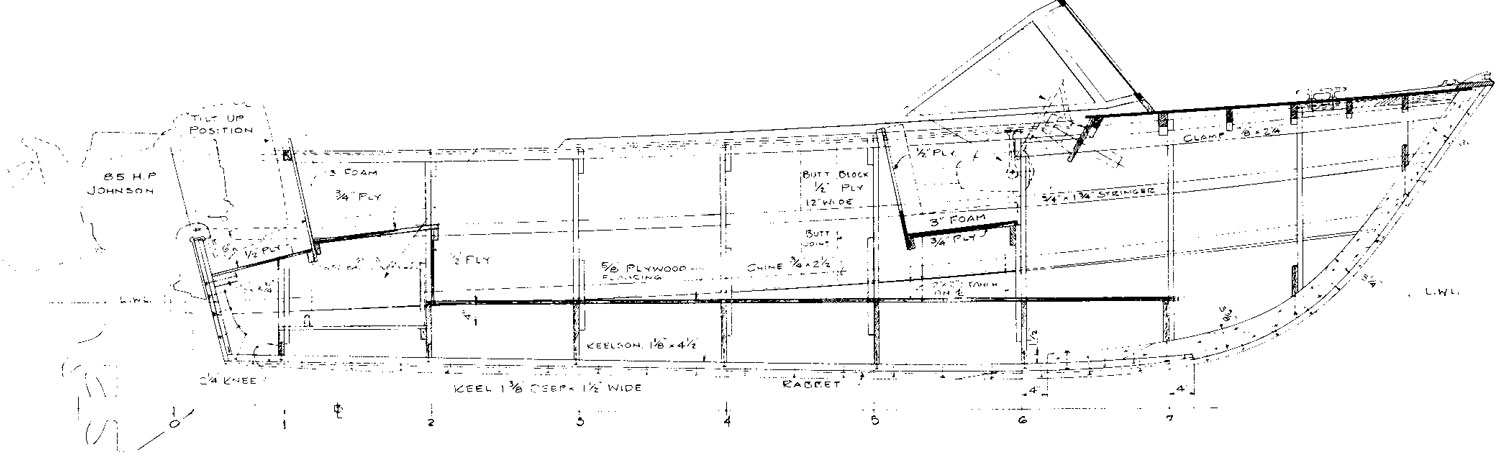
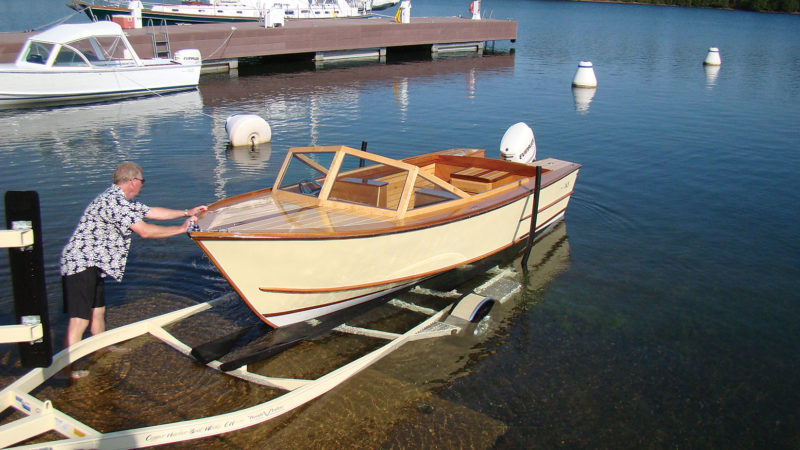
Ours wasn’t a family of sailors. But we lived on a river, and my parents thought that sailing was something the kids should learn. In 1963, we drove down to Bay Head, New Jersey, to the Hubert Johnson Boat Yard. The unfinished Blue Jay we went to look at that day was the yard’s first, and it looked little compared to the other boats in the shop; a deal was struck, and months later BANZAI was delivered.
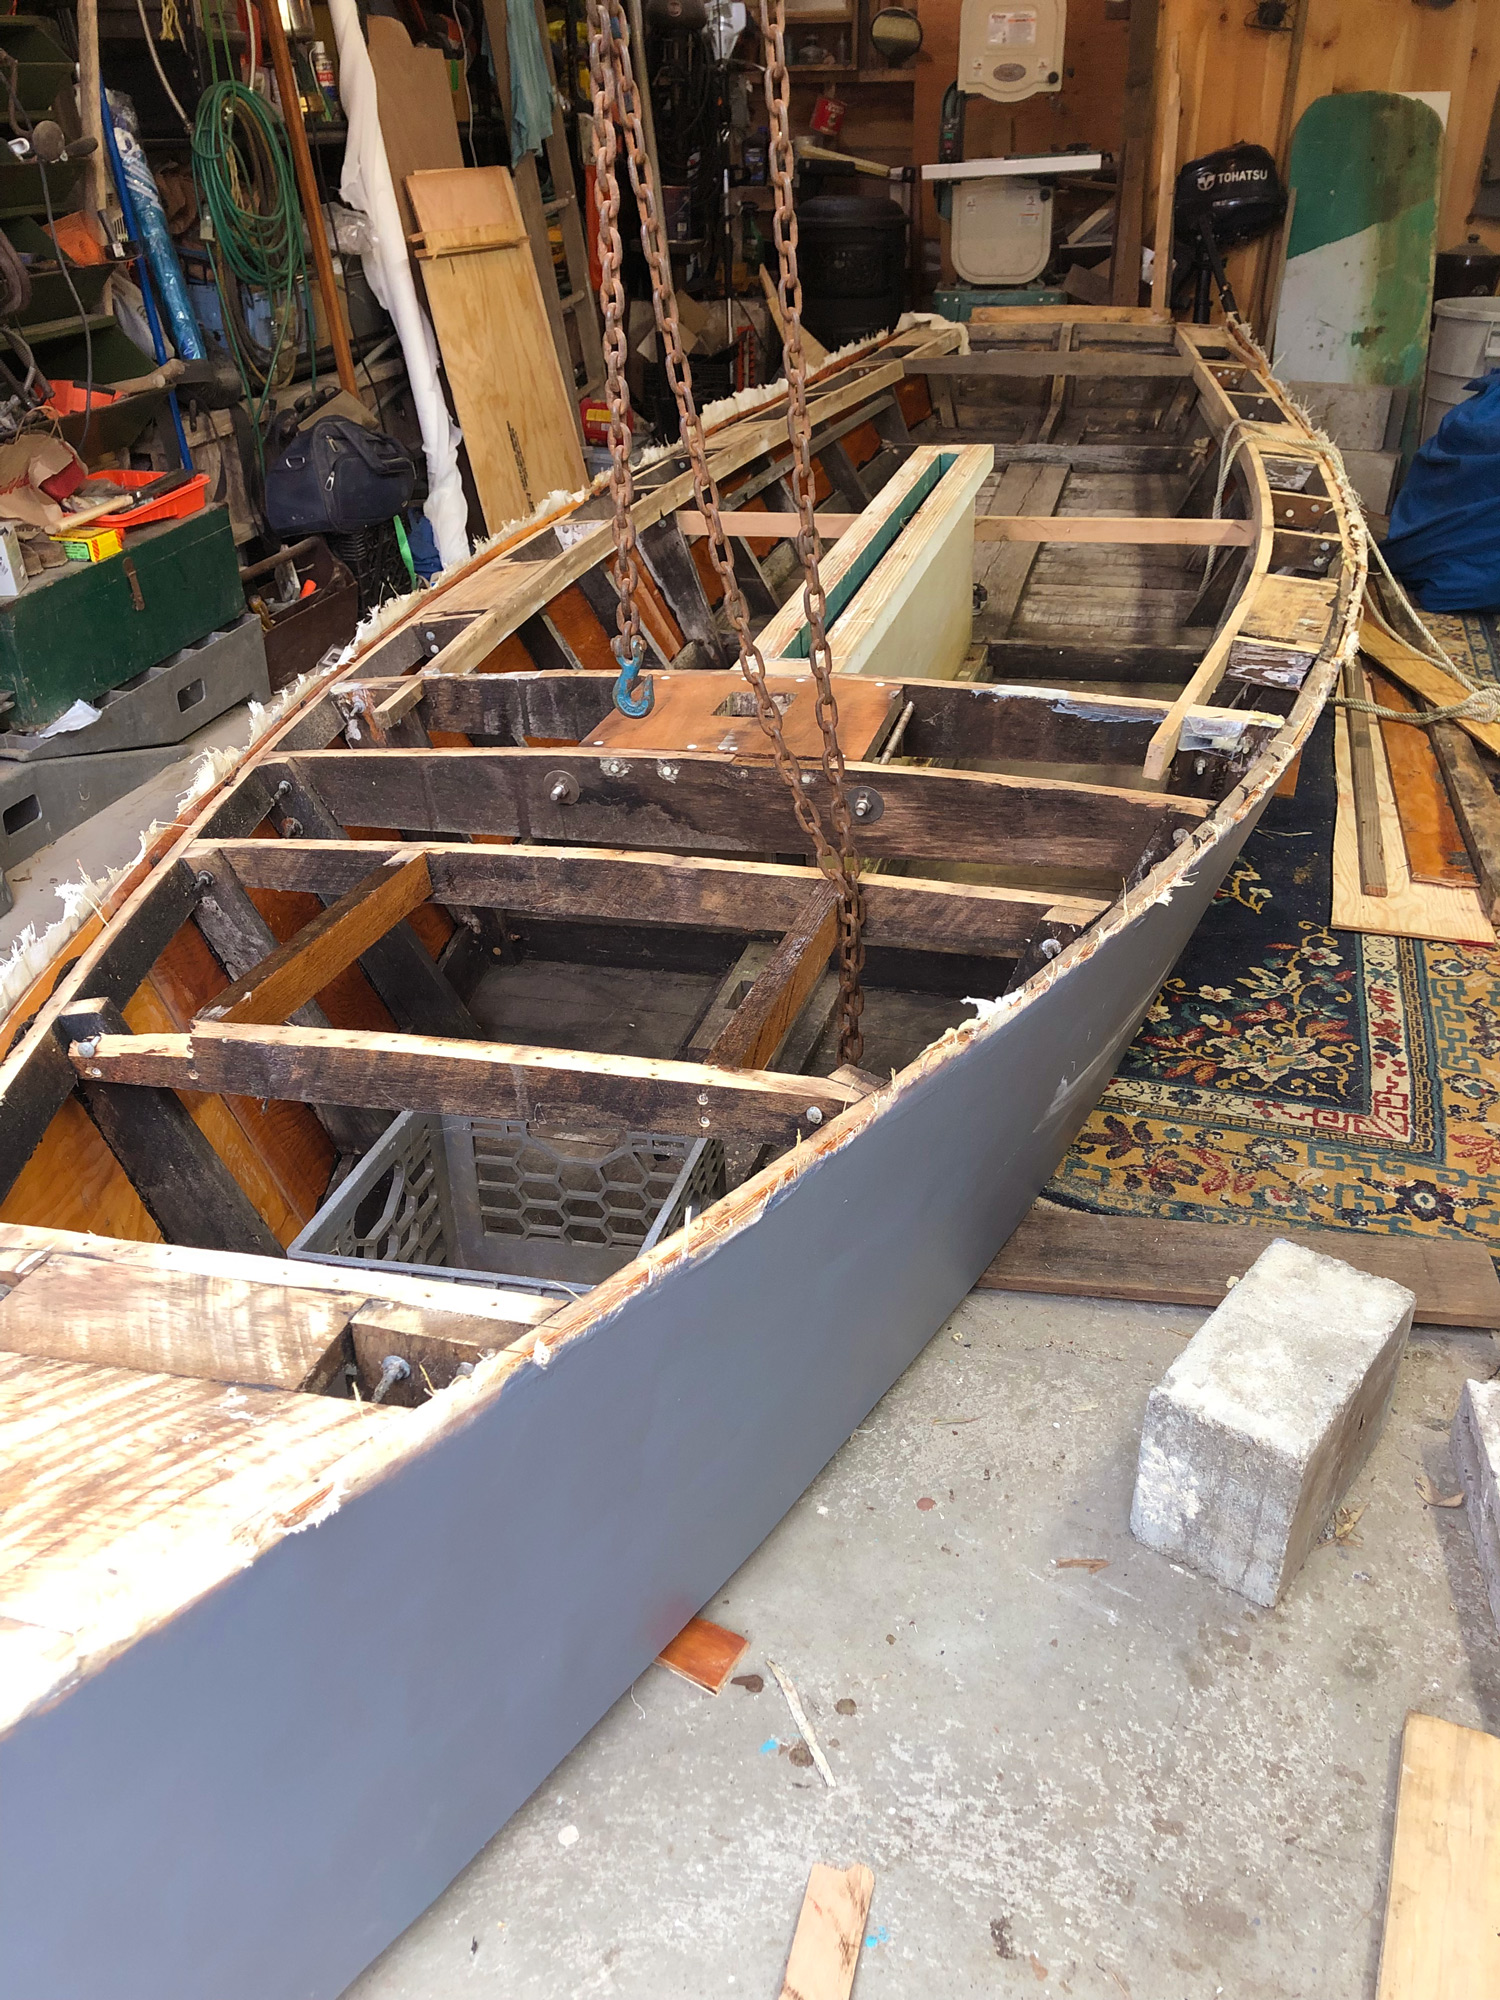
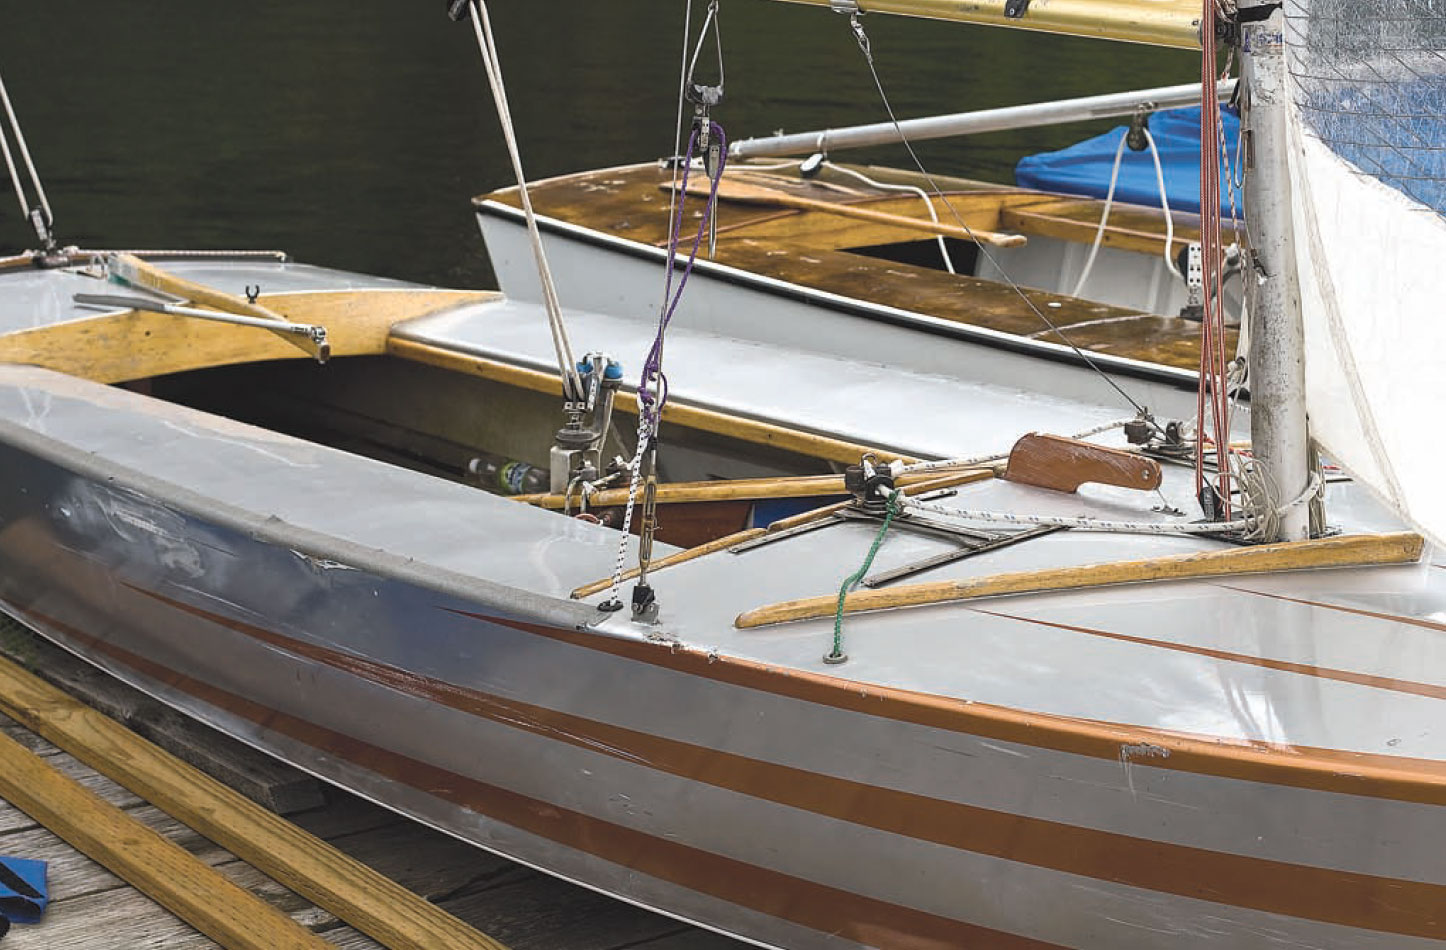
The International Blue Jay was built by many small yards like Hubert Johnson, and by many individuals as well. A significant chapter in the early history of the Blue Jay class was community boatbuilding. The boat was designed to be built in plywood over sawn frames and chines. From the late 1940s through the ’60s, yacht clubs, youth groups, camps, and neighborhood families built many boats for their sailing programs. While most of these boats were intended for children, a number were for adults from the beginning.
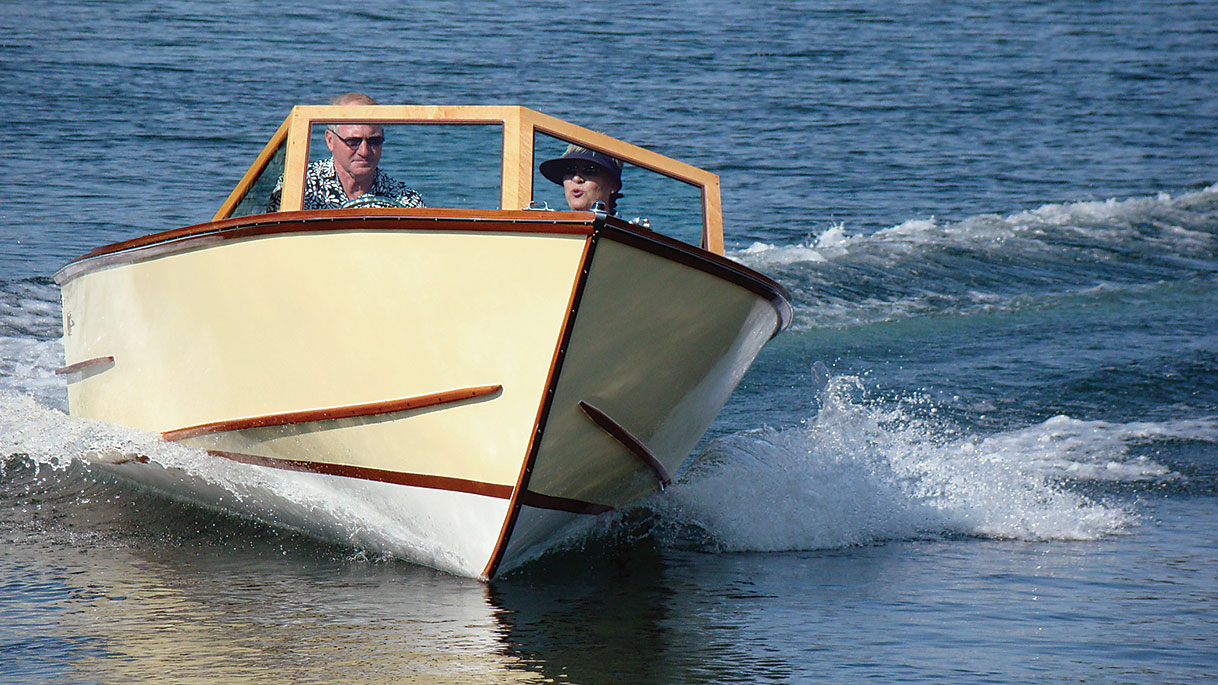
The Blue Jay is a great junior trainer. It can be raced with two teens, sailed with three or four littler kids, or a parent and a couple kids. It is rigged with a main, jib, and spinnaker and in the right wind and in the right hands, it can really get up and go. The cockpit is big and deep, and long enough for the not-so-tall to stretch out and sleep. While most of my early time in the boat was spent racing or training for racing, some of my favorite memories have BANZAI beached on a sandy island.
While the boat is a thoroughbred one-design with great balance, and is close-winded and quick, it is also fairly forgiving—though as my young friend Randy and I learned on that gusty day 45 years ago, it is not a totally forgiving boat. A moment of inattention left us upside down with the mast stuck in the soft Shrewsbury River mud. After learning that insurance would cover most of the damage, and when the blood returned to my father’s face, we could laugh about our misadventure.
Our family kept the Blue Jay for a few years. In that span of time, I had become totally boat-besotted and under the spell of the great Danish sailor Paul Elvstrom, who had won four consecutive Olympic gold medals in the singlehanded sailing events. I had to have a Finn dinghy like him. The Blue Jay was sold. I went to college and my dreams of representing the U.S.A. at the Olympics drifted away into the haze.
Jamie Bloomquist
Drake Sparkman, one of the founding partners of the venerable design firm Sparkman & Stephens, specified wood construction for the Blue Jay. In the 1960s, the fleet began to allow boats built of fiberglass—though wooden boats are still being built, too.
During the 1970s, the Blue Jay lost its preeminent position as the junior sail trainer to the fiberglass 420. This French design was faster than the Blue Jay, and it had a trapeze. It was modern, it was hip, it was ’glass. The Blue Jay, although now available in fiberglass, seemed like it was beginning to become passé—though many clubs have stayed with the boat because of its good manners and versatility.
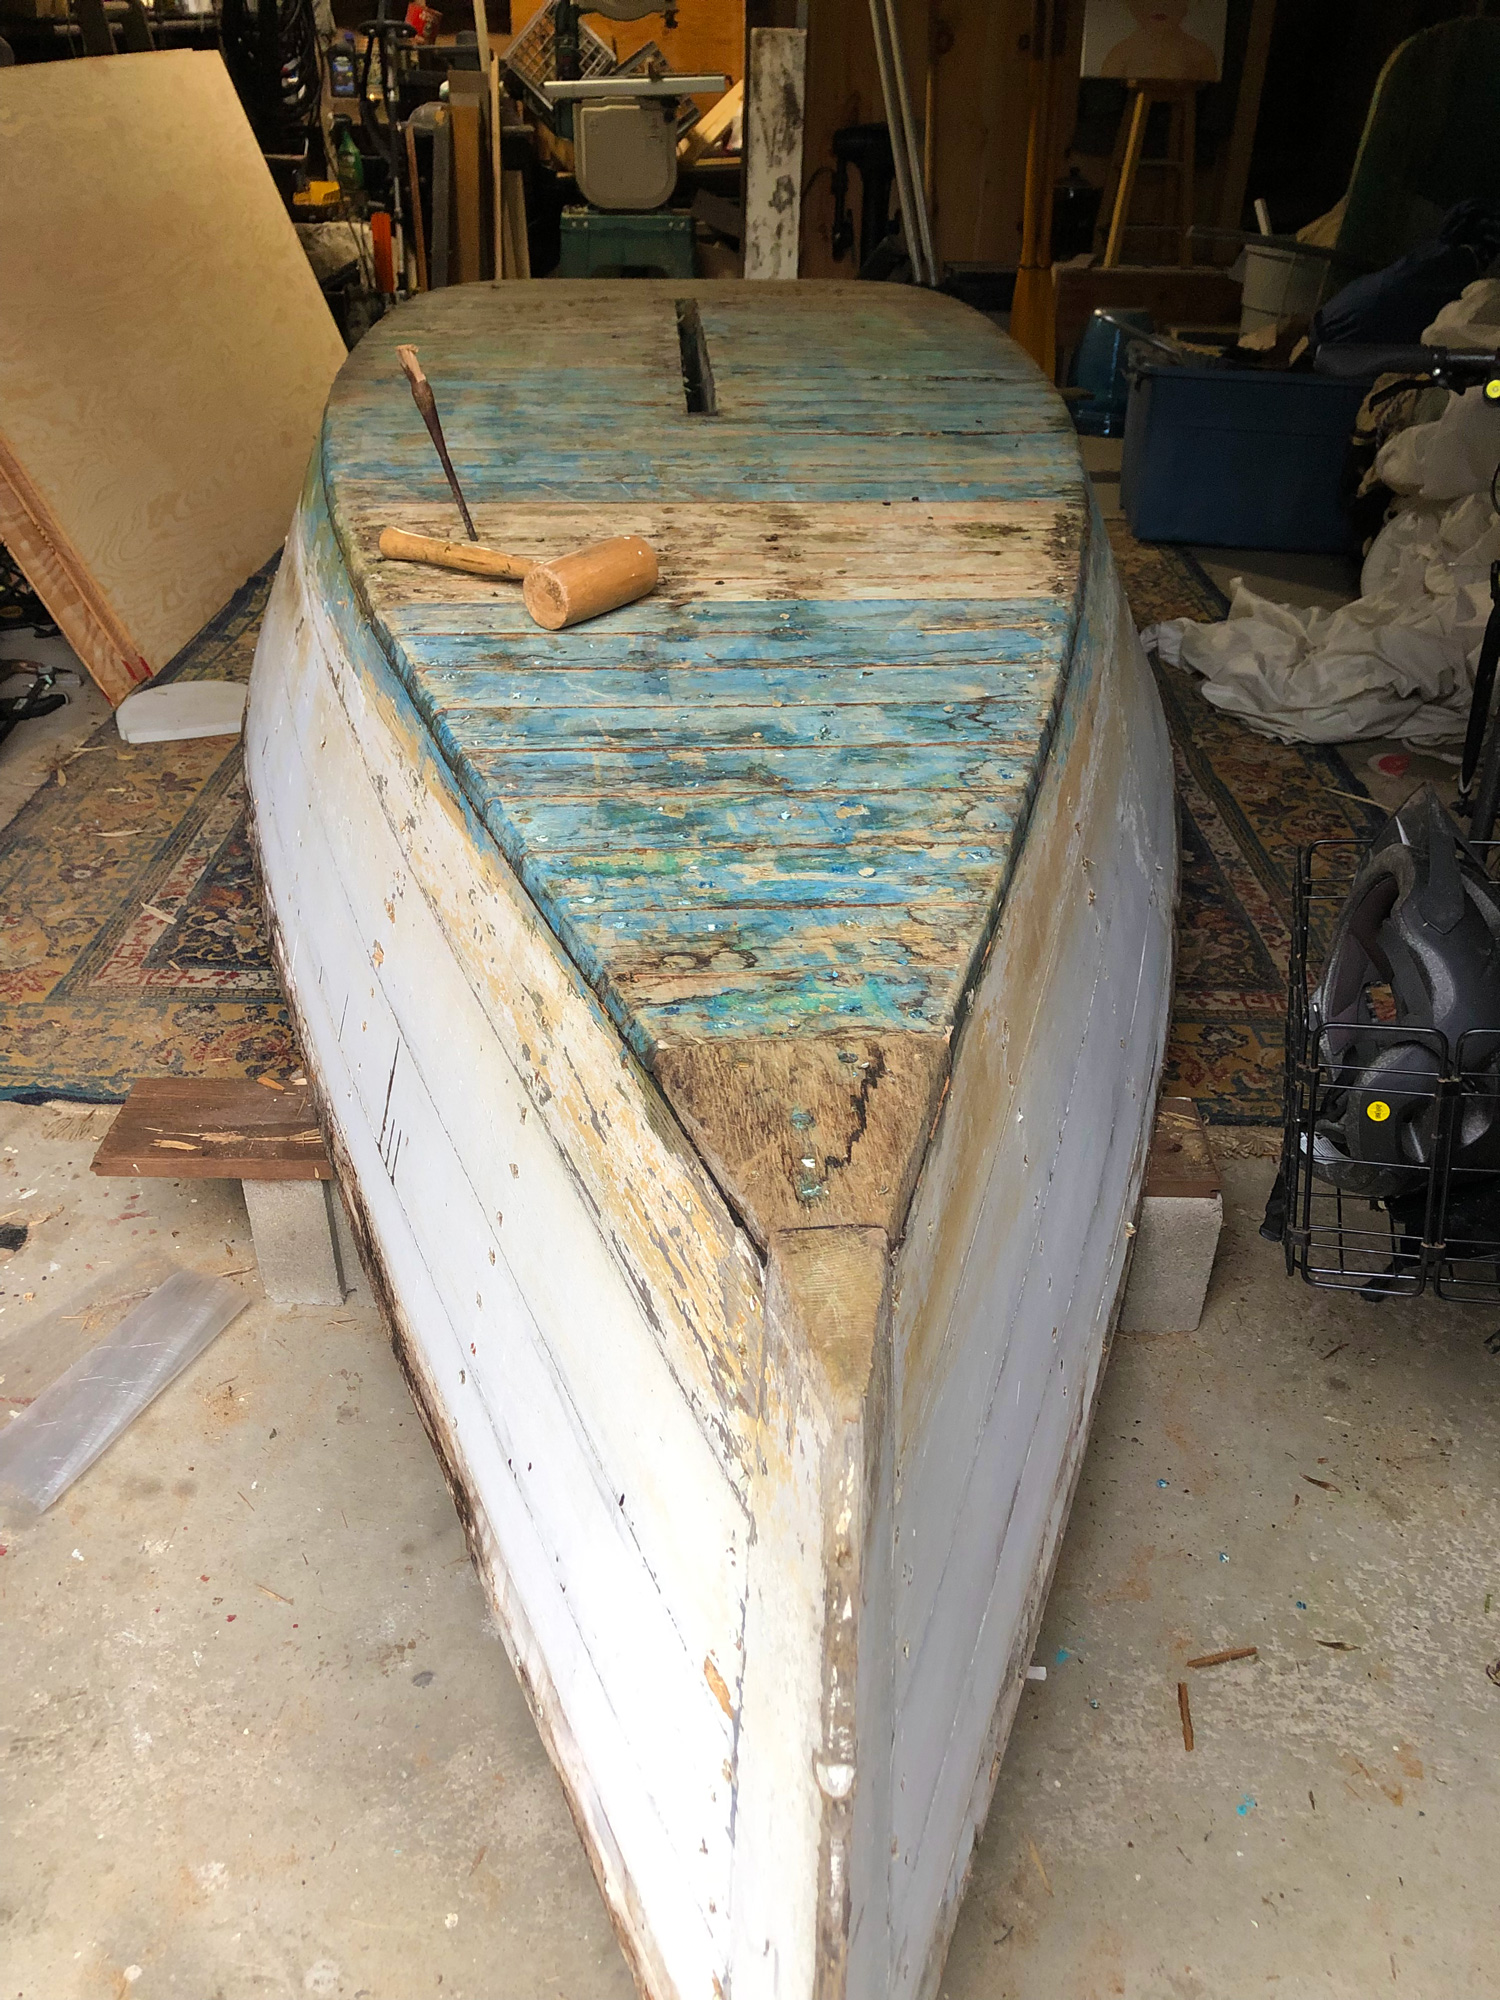
Rediscovering the Blue Jay
Many years after we sold BANZAI, my mother found her on the side of the road, looking forlorn and with a hole in the bottom. We got it back for free. I loaded the boat into the back of my beat-up yellow Ford truck and brought it back to Maine, where I was now living. With subsequent renovations BANZAI was able to race again and we finished third in the WOOD Regatta series at the 1992 WoodenBoat Show. Today, we still do some fun races, but most often we daysail—usually with crews of kids and dogs. Sometimes I sail gloriously alone.
I’m not alone in my experience: many adults who were brought up in the Blue Jay are being attracted back to the boat. On the class’s website are requests from people across the country trying to find the boats they used to own, or ones of the same vintage.
The big cockpit that swallowed up all those little kids is just right for a couple of getting-larger middle-aged folk to have a comfortable day sail. I find it still has the same sprightly performance I recall from childhood, although the tiller seems to be a lot lower today. Adult newcomers enjoy the boat, too.
John Hanson
Many sailors who were raised in the Blue Jay class are today trying to relocate their childhood boats. Sam Hanson, seen here, is lucky: His dad found his old boat, inspiring a new generation of Blue Jay aficionados in the Hanson family.
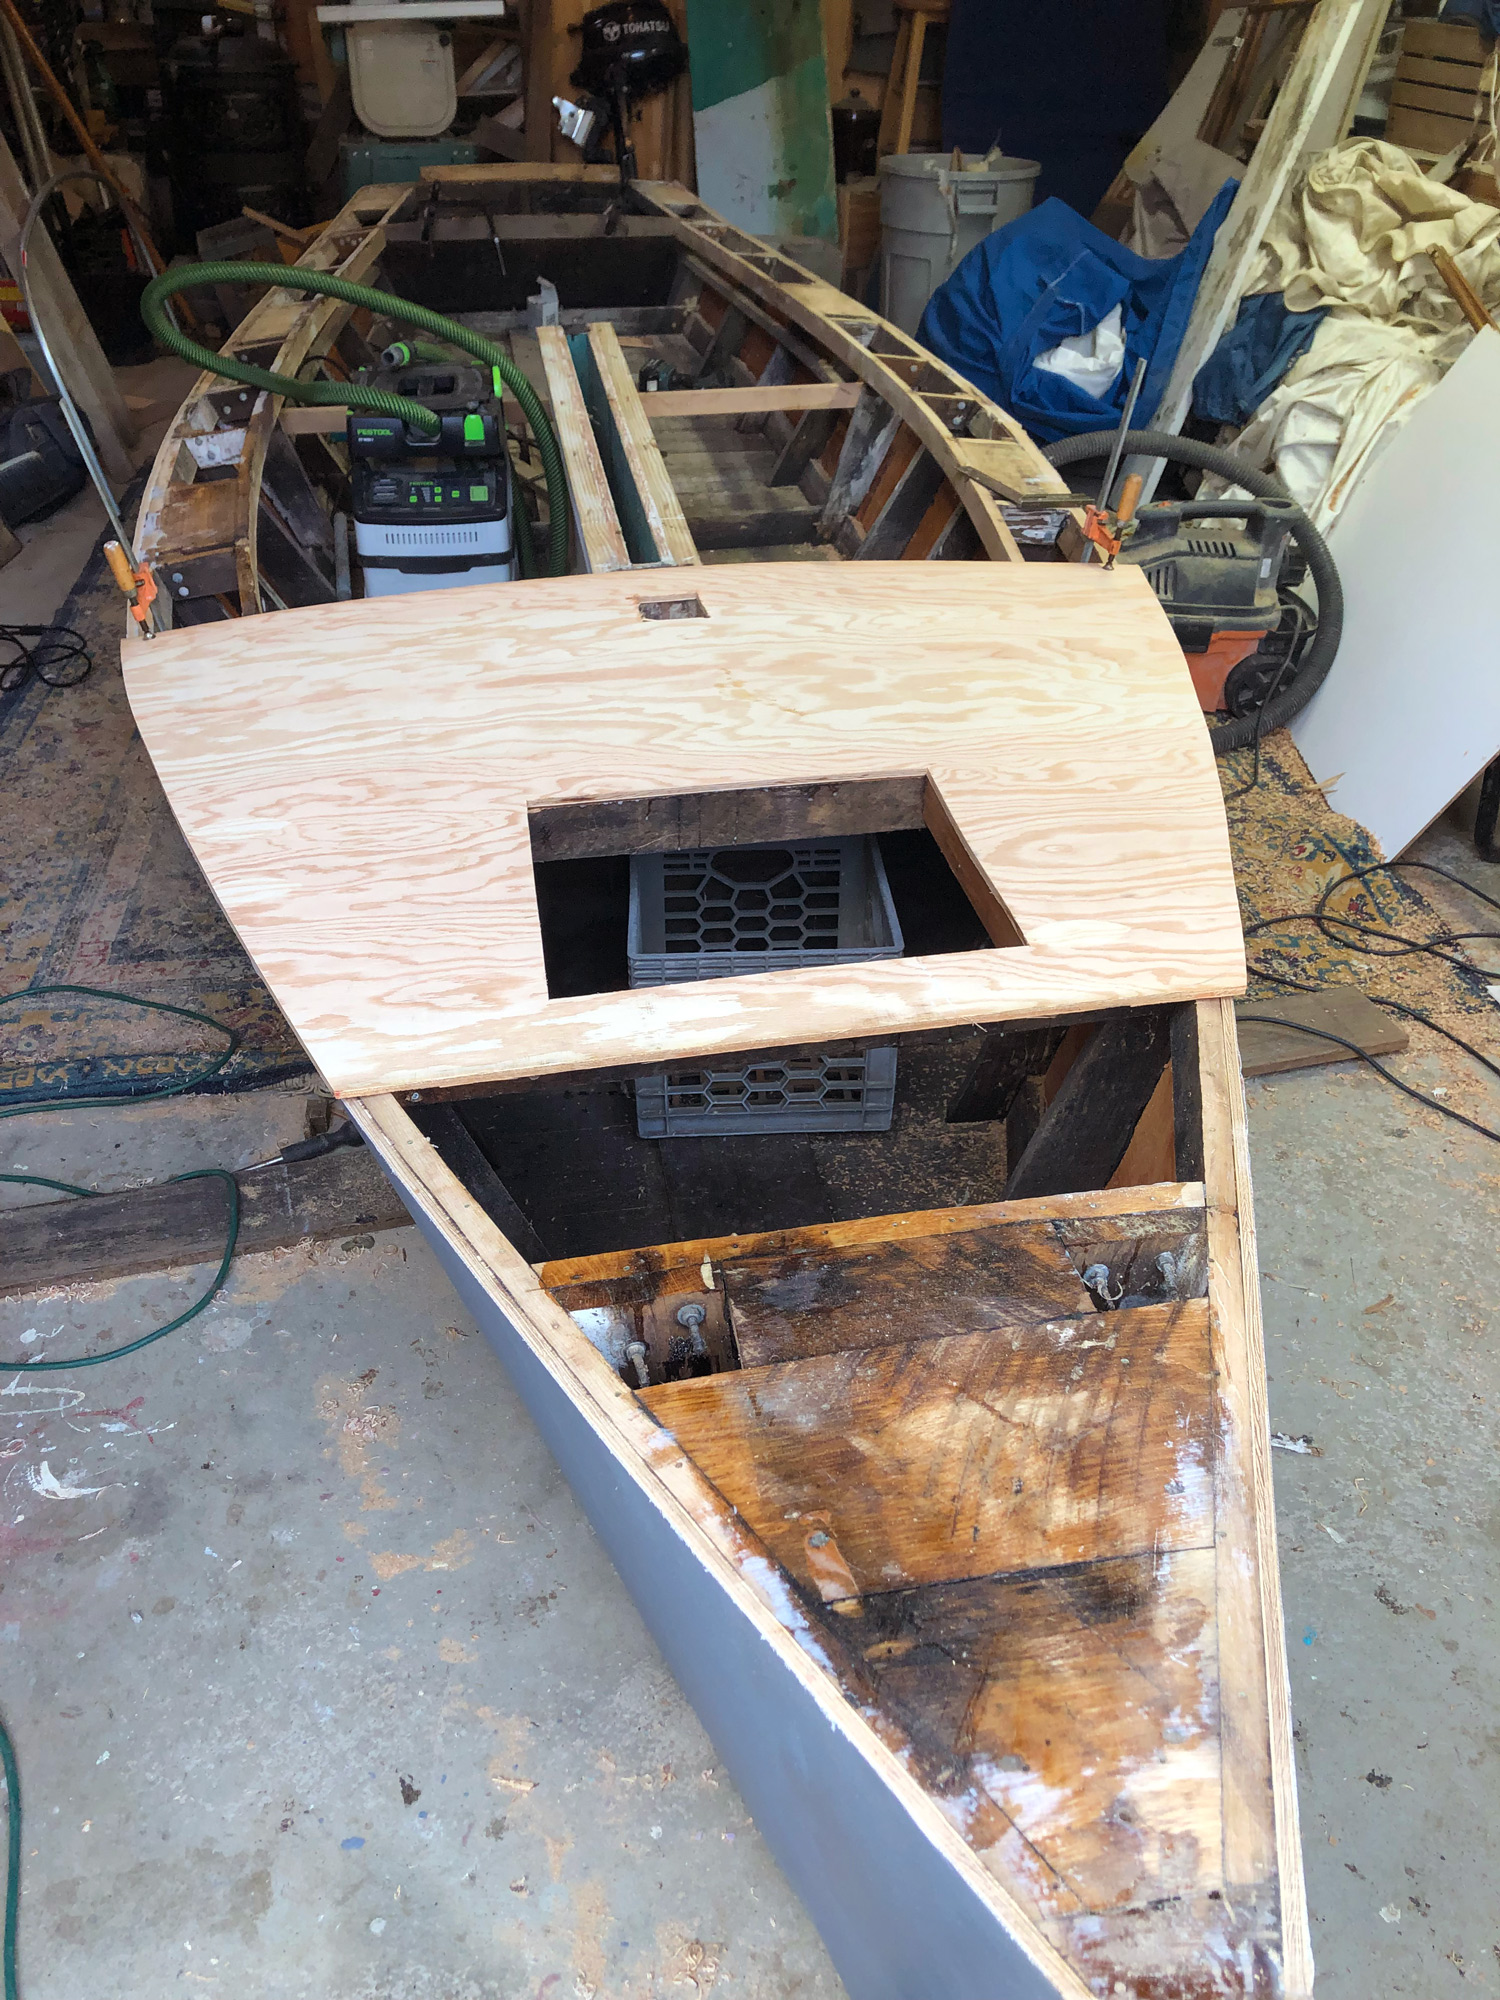
The Blue Jay has a few faults. The plywood construction of the past did not have the benefits of modern epoxies, and the decade-old plywood panels can get a little beat. It is hard to fix the centerboard trunk leaks brought on by old age. If you are looking at older boats, look for signs of delamination and ask a professional to check the boat over. Don’t let a little damage kill a good deal, though: a lot of age-related deficiency can be repaired with a little skill, money, or both.
On the water some of the boat’s benefits are drawbacks as well. The big, beautiful deep cockpit is not self-bailing, which means rainwater can be a pain, and with the narrow side decks and no flotation, the boats can capsize. While they will not sink completely, older Blue Jays cannot be sailed out of a capsize as can, say, a Laser or a 420. The up-side is that this does teach caution.
These flaws are minor compared to the joys of owning and sailing a classic yacht from the boards of one of the world’s most prestigious yacht design firms. Today on the classic-yacht-racing circuits of Europe, sailing a Sparkman & Stephens boat is ne plus ultra. You can’t get much better. Olin Stephens, the firm’s cofounder, died at age 100 in September. With an International Blue Jay, you too can be pretty swank, sailing your own Sparkman & Stephens classic. And you can laugh about it.
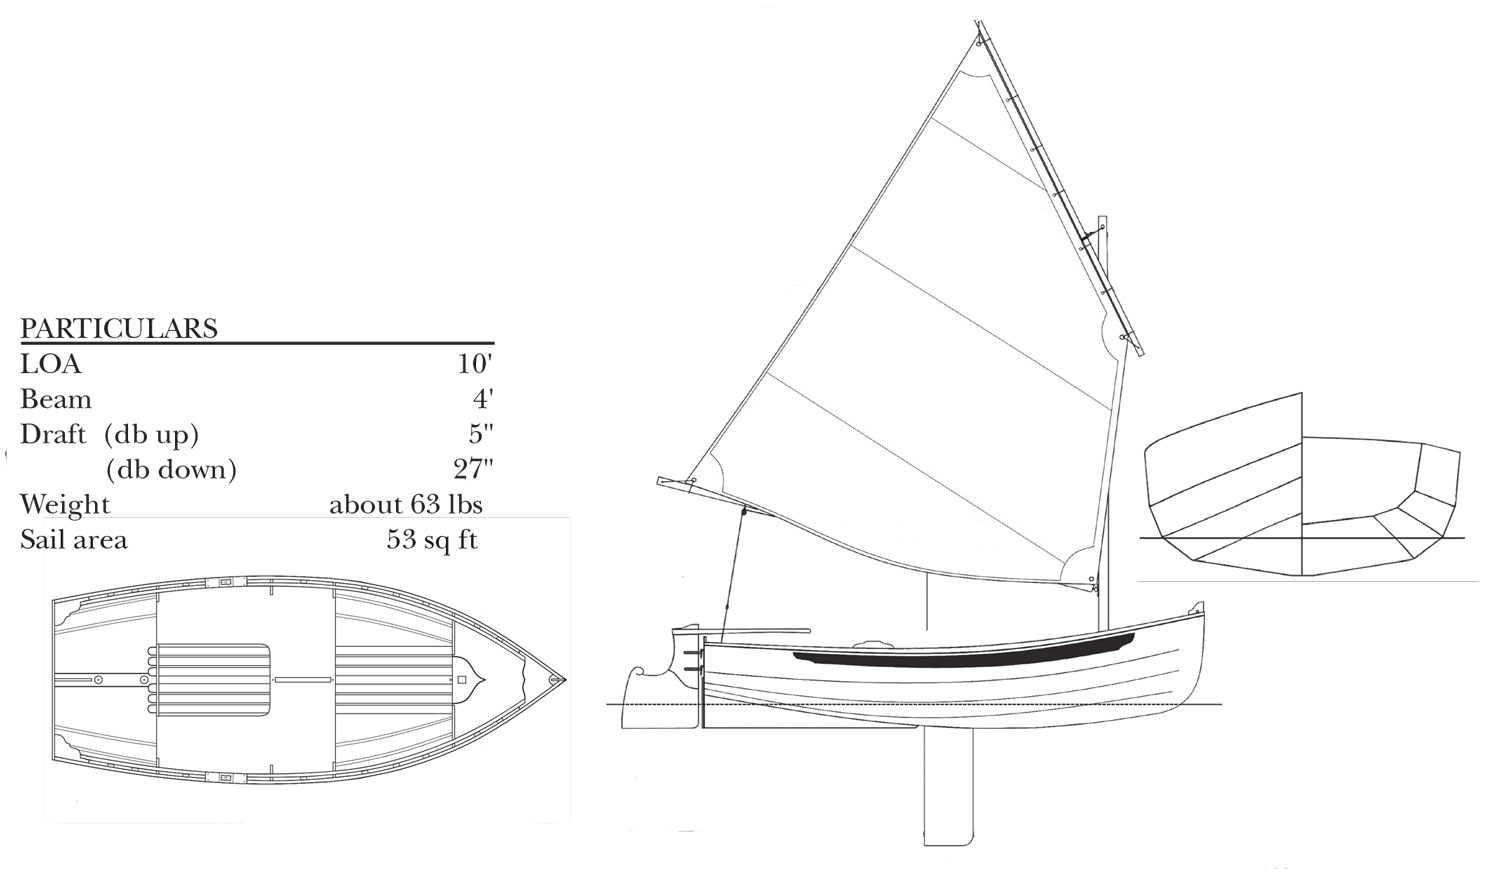
LOA 13′ 6″
Beam 5′ 2″
Sail area 90 sq ft
Draft (board down) 4′ 0″
Draft (board up) 6″
Weight (with motor) 275 lbs
The Blue Jay’s lineage should be apparent to those who know classic one-designs.
The boat is a “baby Lightning”—a diminutive version of one of the world’s most popular classes.
Is there a boat you’d like to know more about? Have you built one that you think other Small Boats readers would enjoy? Please email us your suggestions.
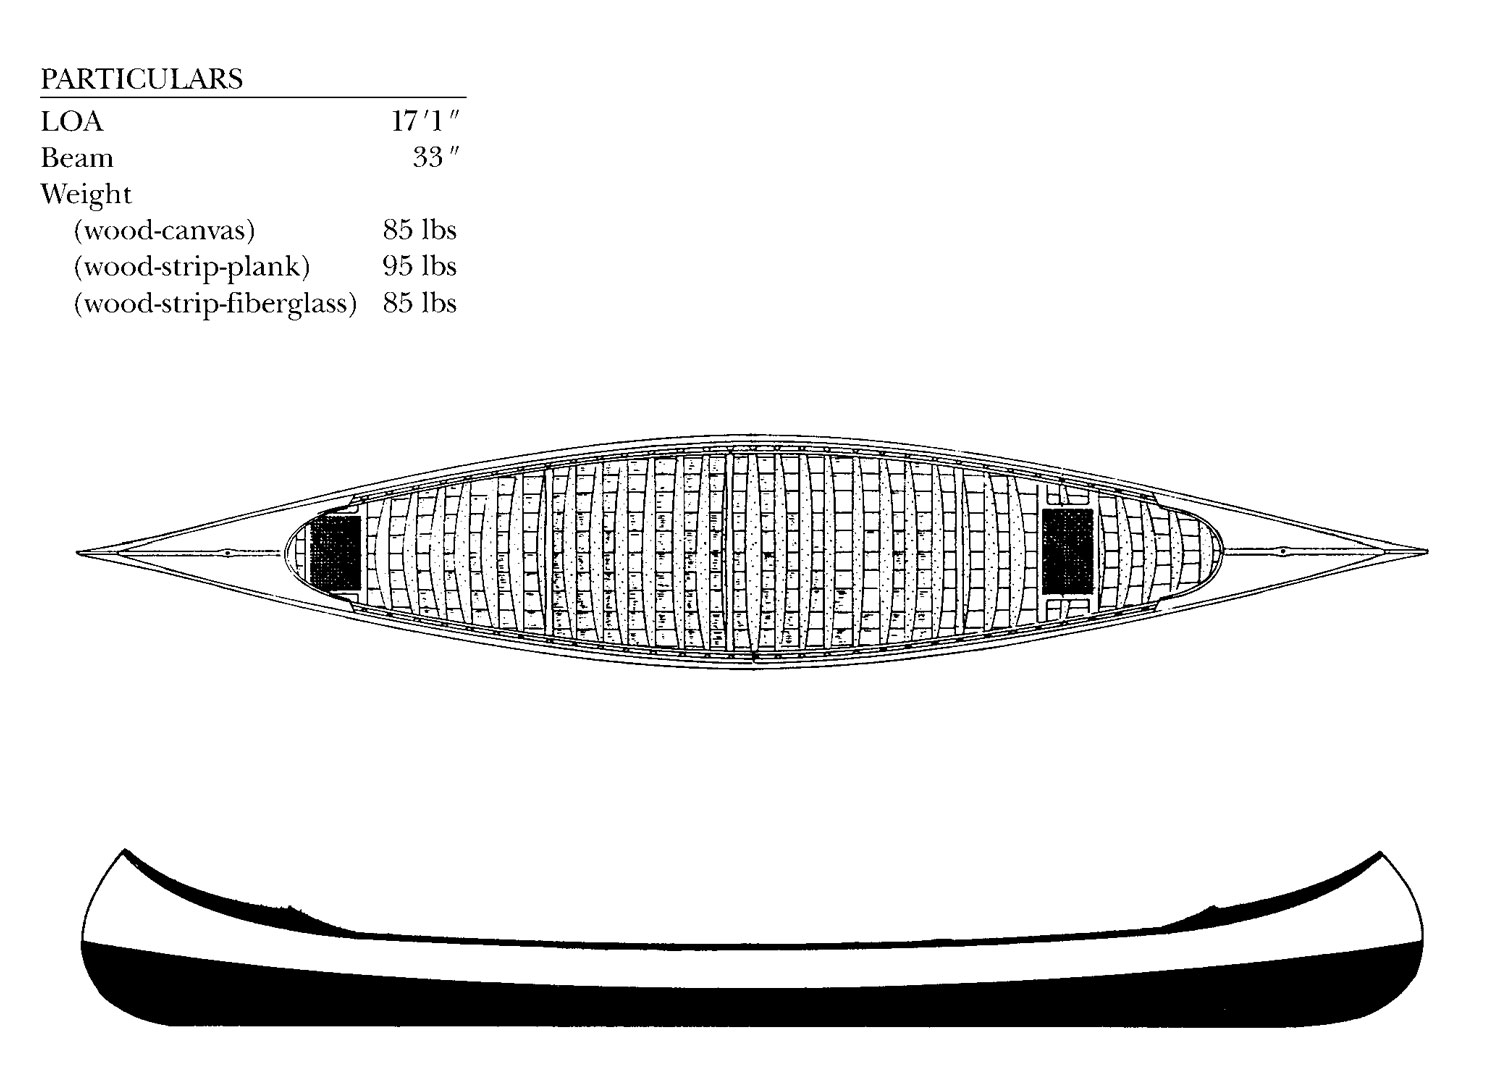
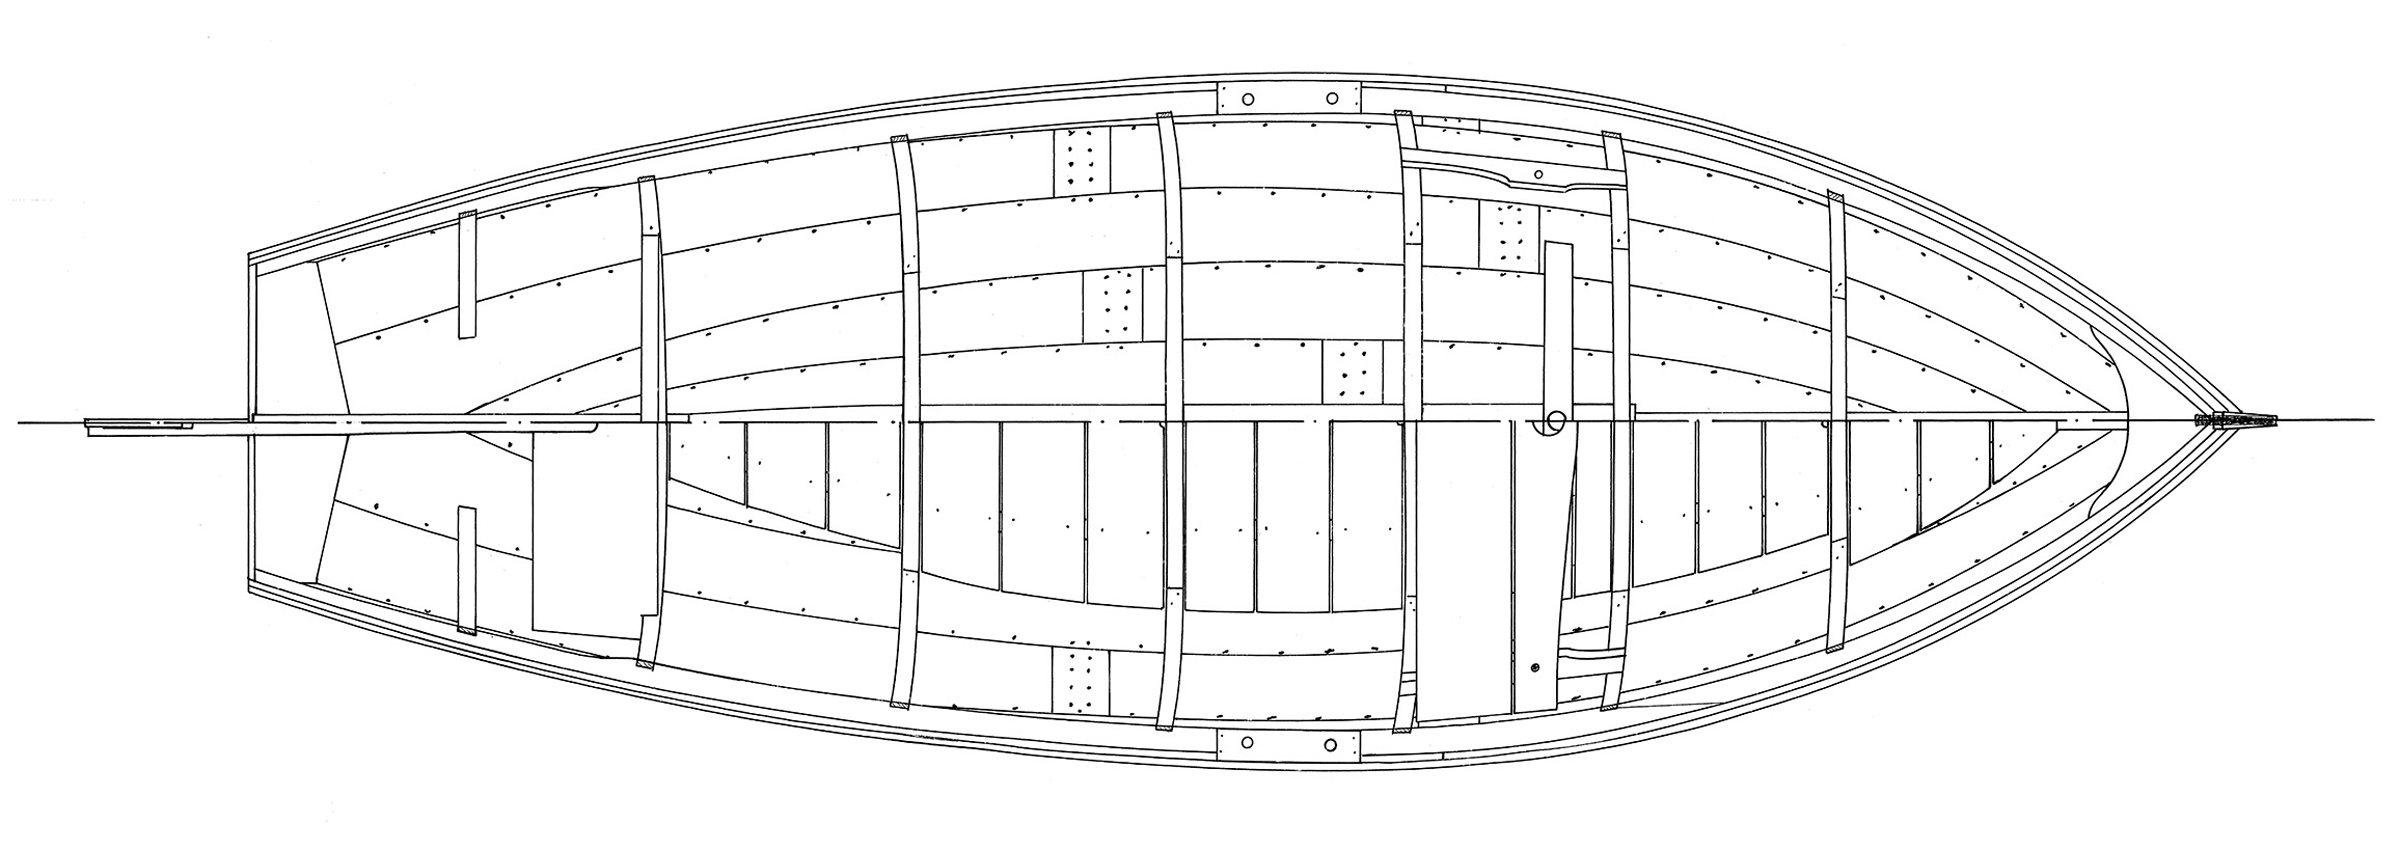
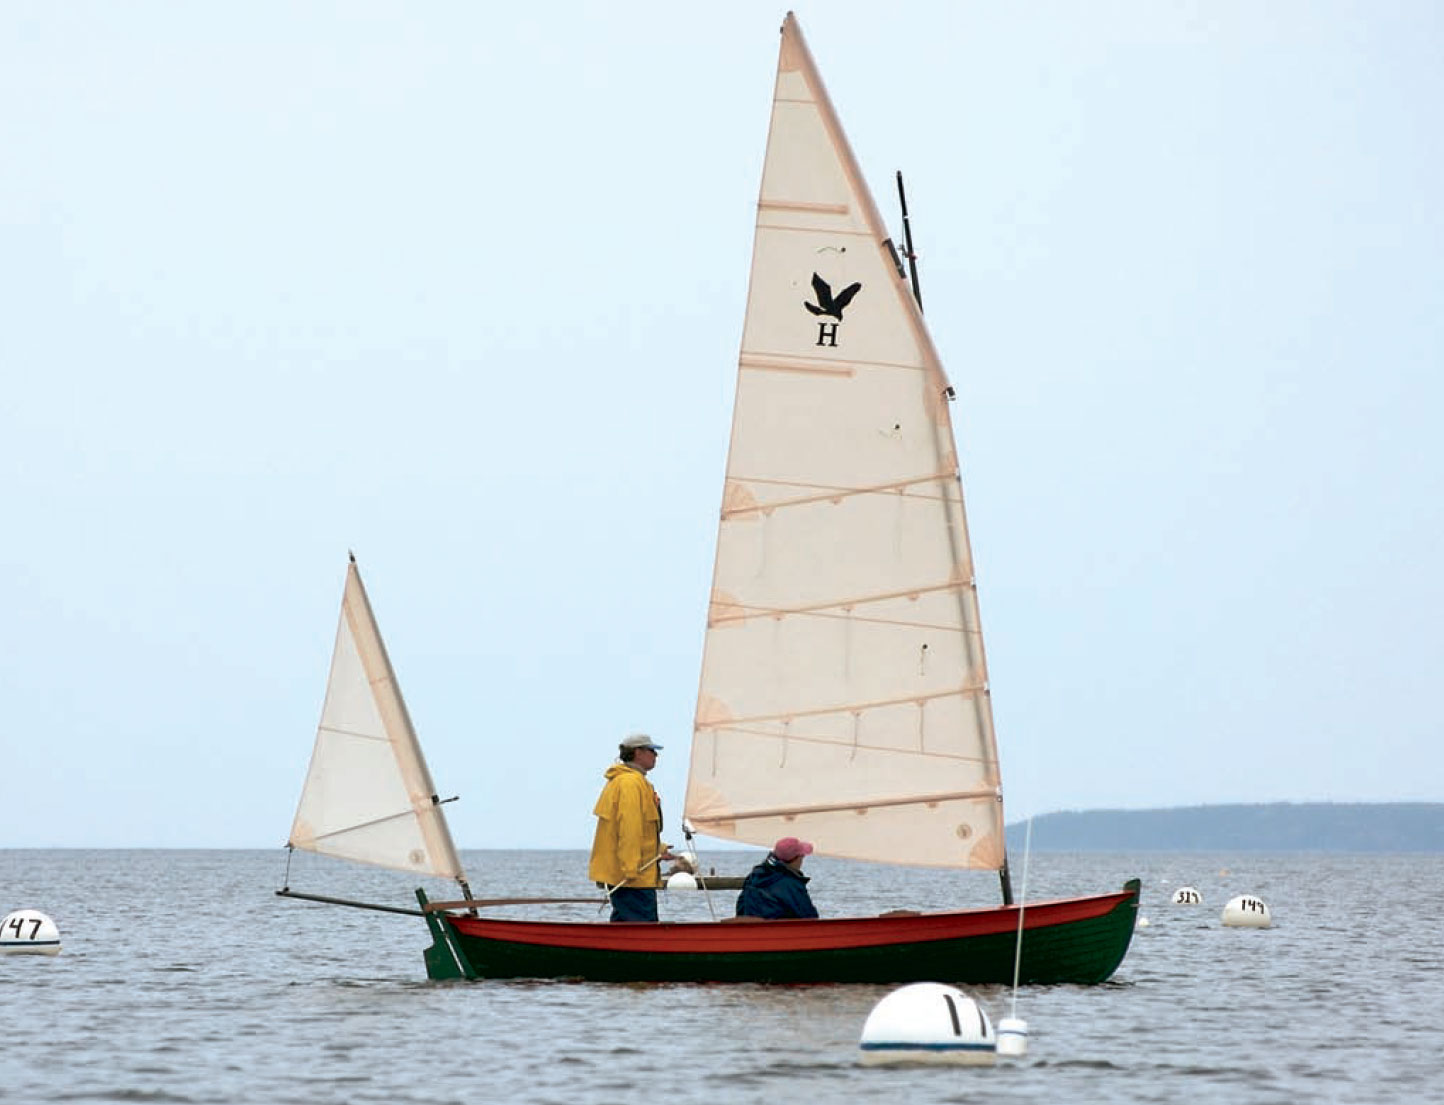
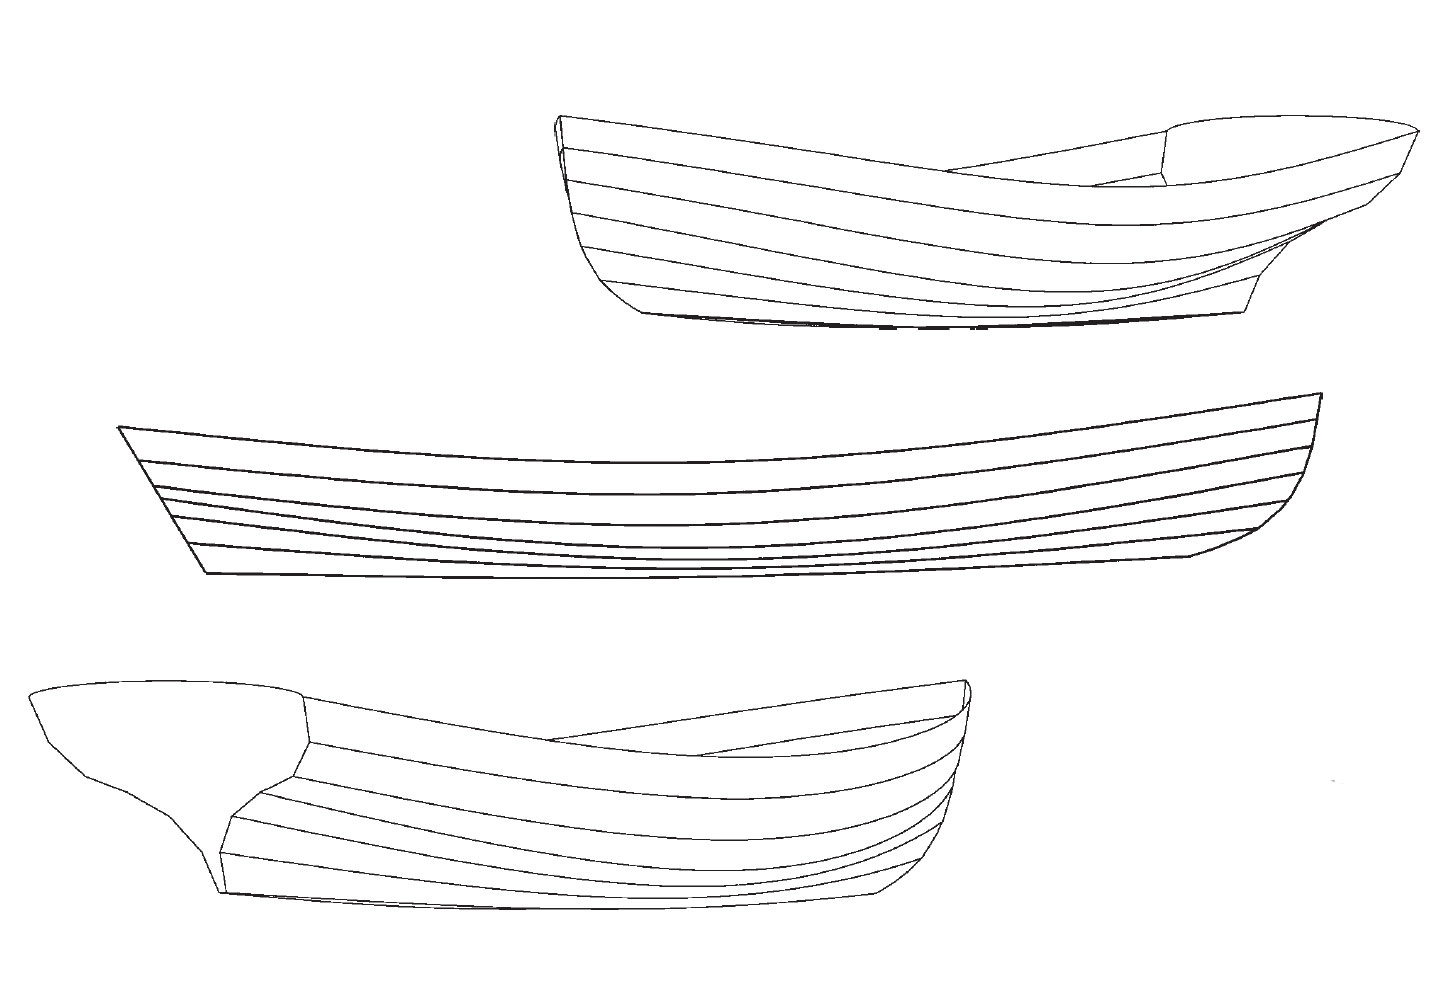
Designer/builder Rollin Thurlow took the lines shown here from a surviving 17′ B. N. Morris canoe (Model A-64, Type 3) that had been built in 1908. According to the builder’s catalog, the Morris Model A canoe combined “the most important features that are required in an all-round canoe … great stability, good speed, good paddling qualities, together with a remarkable carrying capacity on slight draught.” “Type 3” indicated that this canoe had longer decks and other details that marked it as being top of the line.
The 1908 Morris A-64, Type 3: perhaps the canoe in which Grandpa courted Grandma.
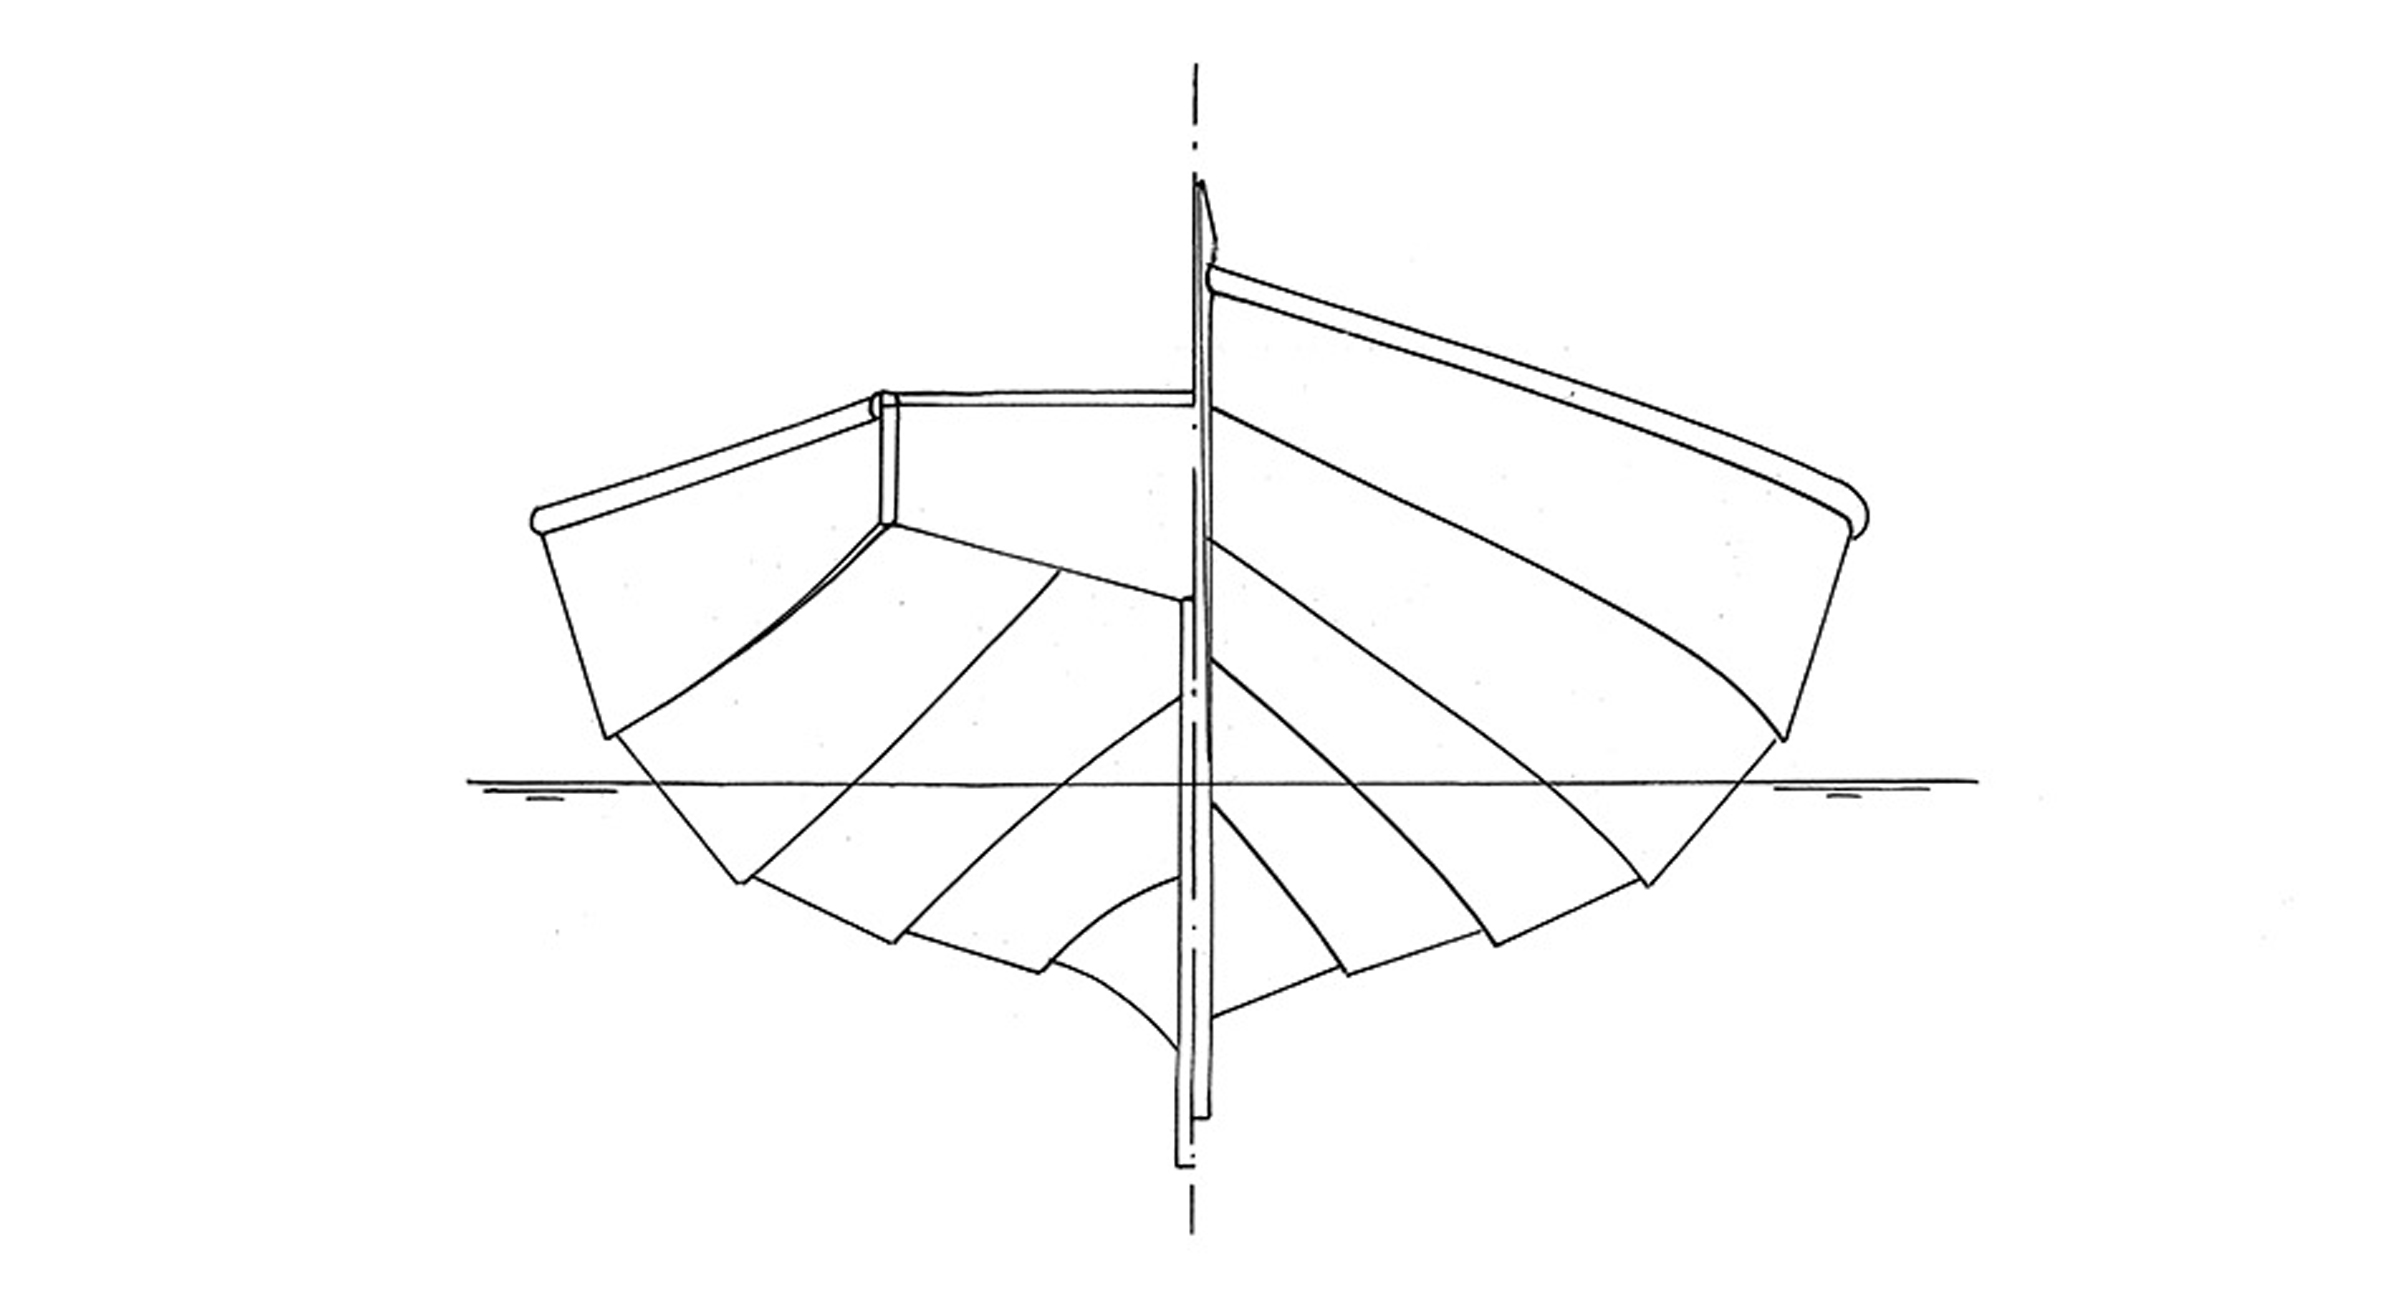
Paddlers with salt water in their veins might question this design—and, for that matter, most other “Indian” or Canadian canoes. Look at all that tumble home (the sides curve toward the boat’s centerline as they near the rails). Won’t it invite green water aboard, and won’t it reduce secondary stability? And what about the seats located high up in the ends of the boat? Doesn’t this arrangement put the paddlers’ weight up where it shouldn’t be for rough-water work? The answer to all of the above is, “Yes, but….”
Wood-and-canvas construction. The distinctive lay of the planking allows fast and economical building.
Tumblehome keeps the rails clear of the paddlers’ knuckles, and this allows more efficient strokes. Also, the hull tends to be structurally stiffer because it approaches the tubular configuration of a decked canoe. As for the seats, their height permits more powerful strokes. And their far forward and aft locations provide better steering.
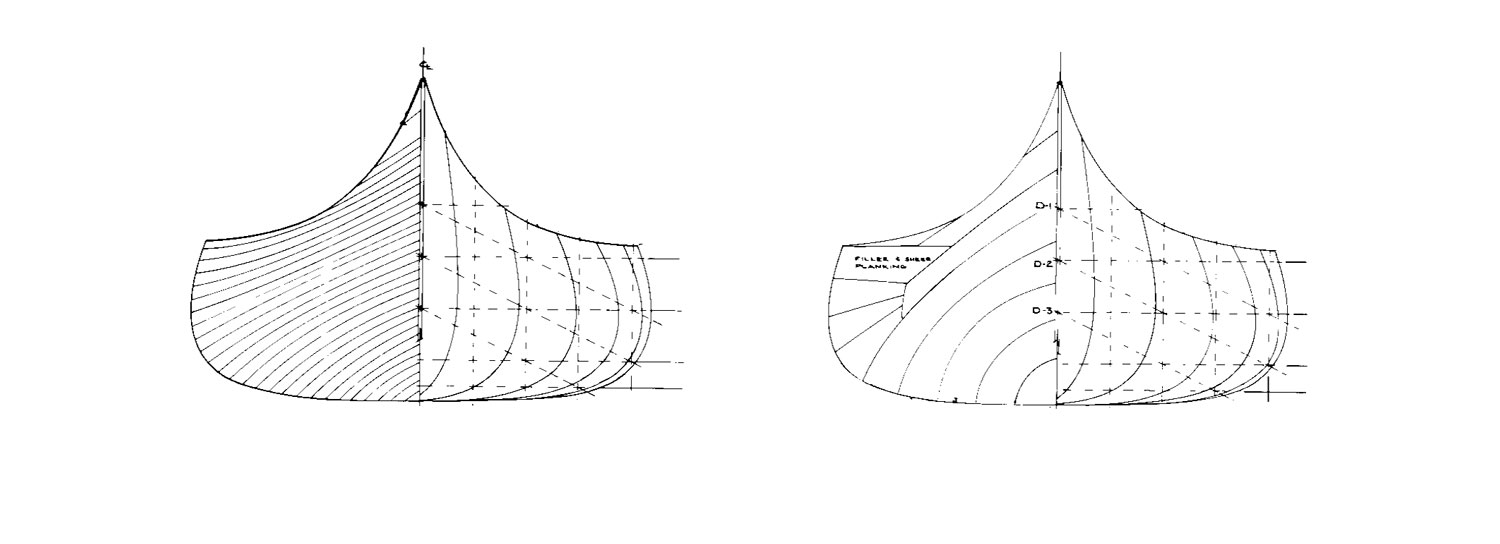
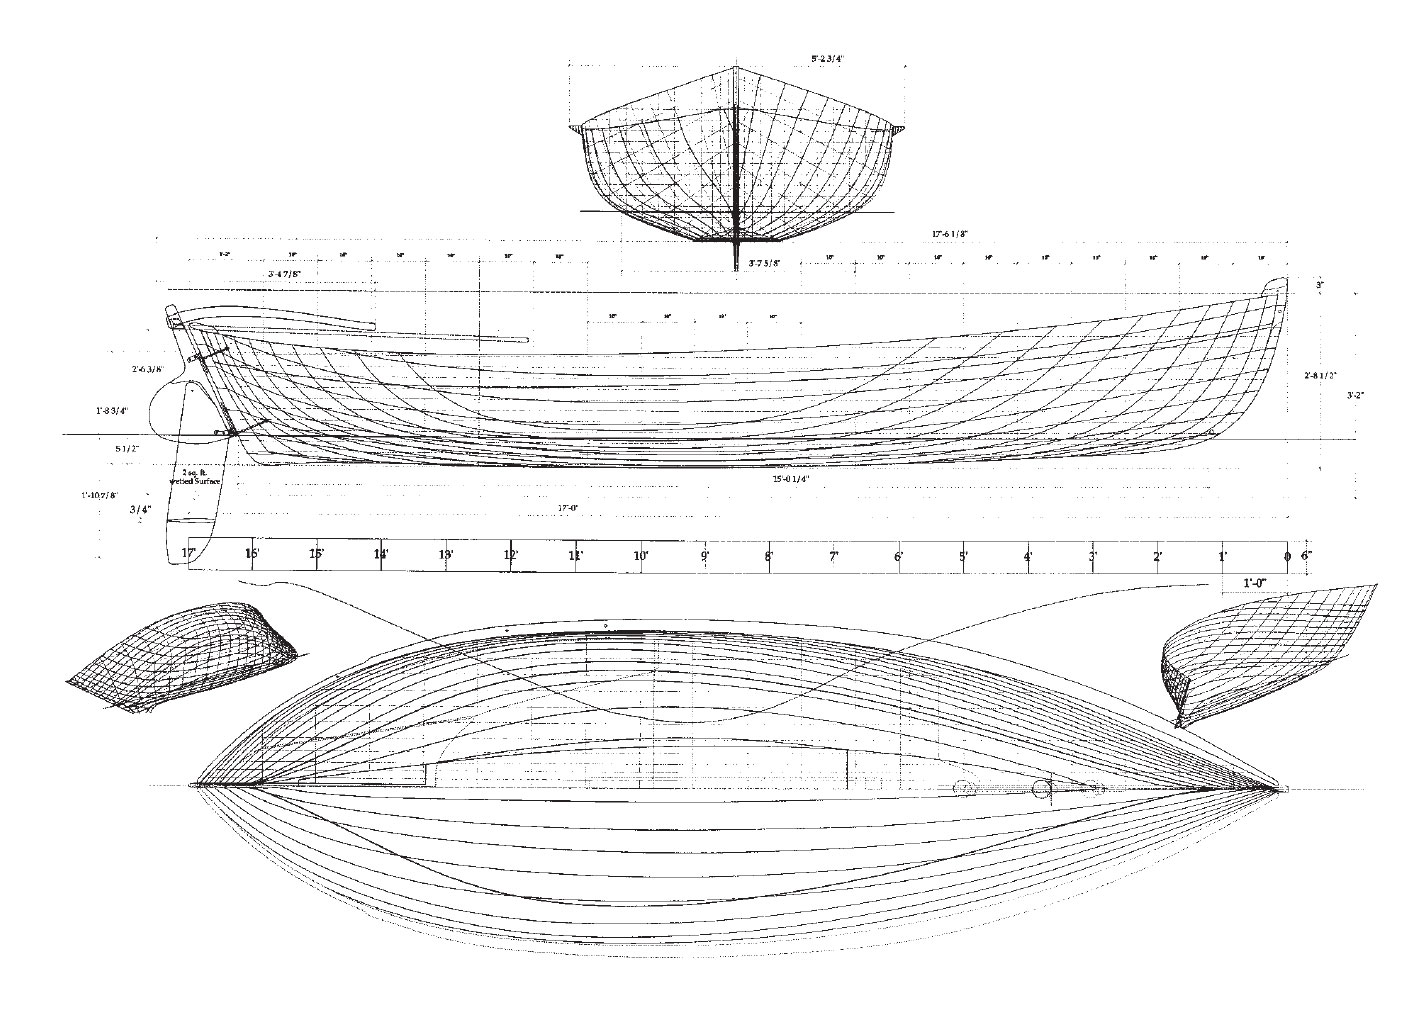
Body plans
This historic Morris canoe will carry a larger load than any comparable decked competitor, and it will do so while giving sharp control in shallow and tight streams. Most necessary repairs can be made with materials at hand. Used in its native inland Maine waters for its intended purposes, old Model A-64, Type 3 seems to approach perfection.
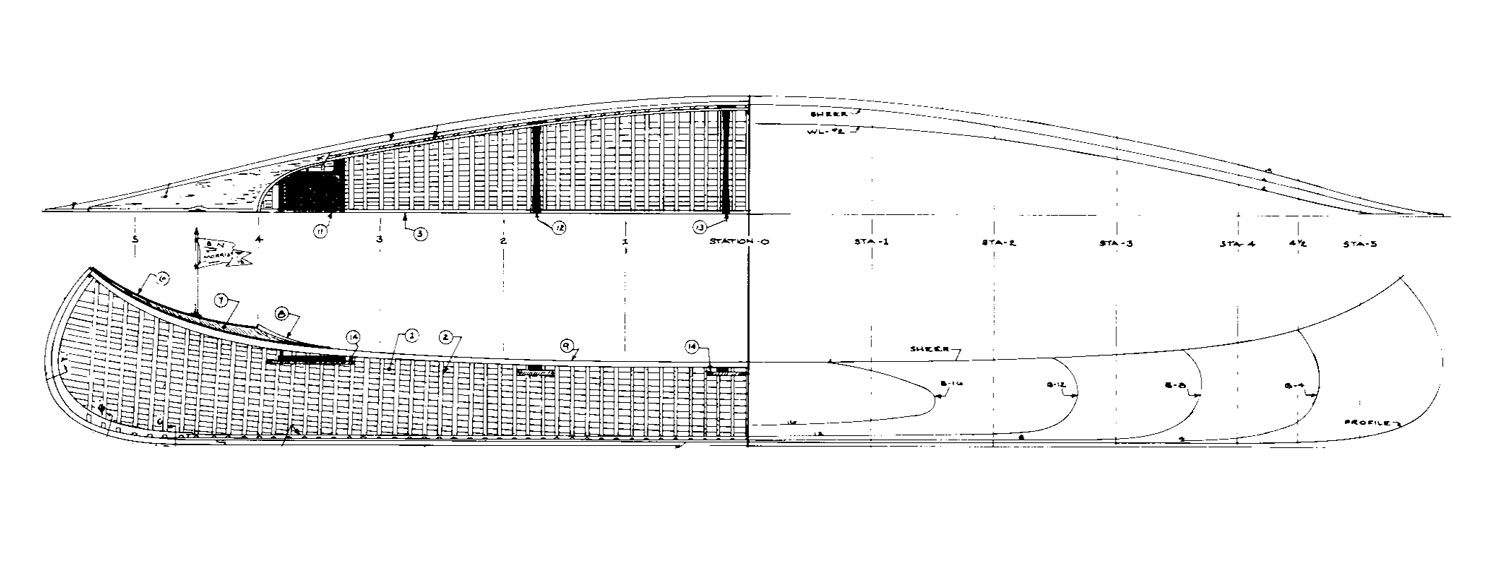
All-wood, strip-on-frame Peterborough construction is elegant and labor-intensive.
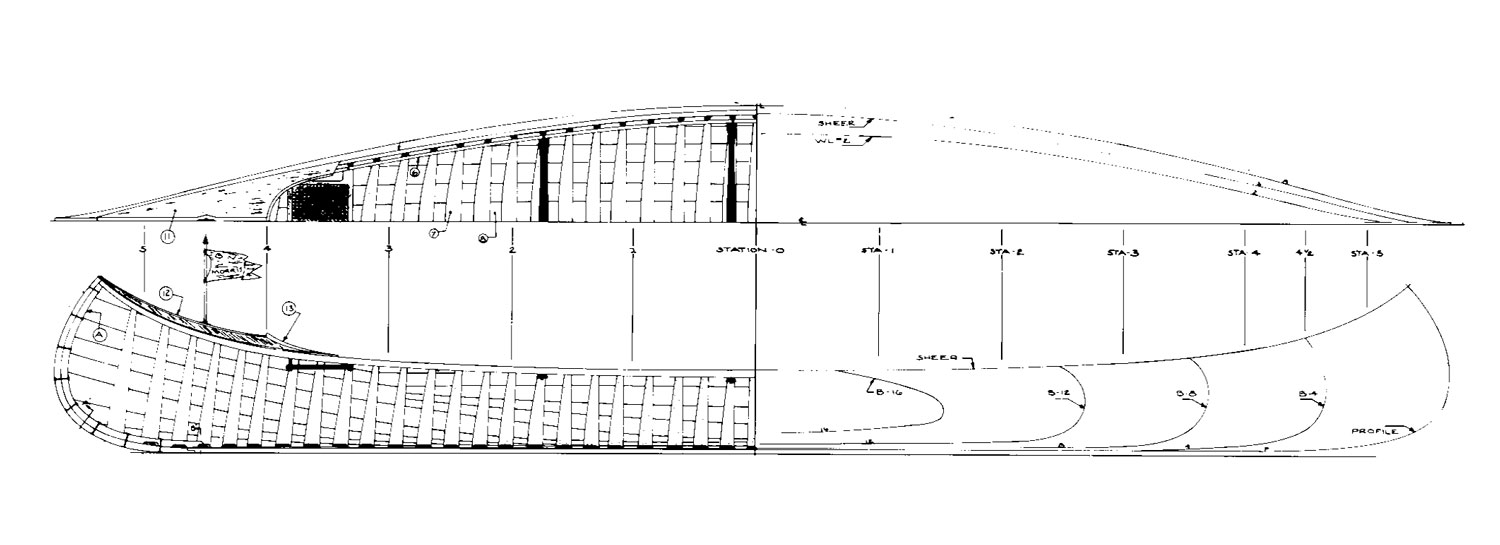
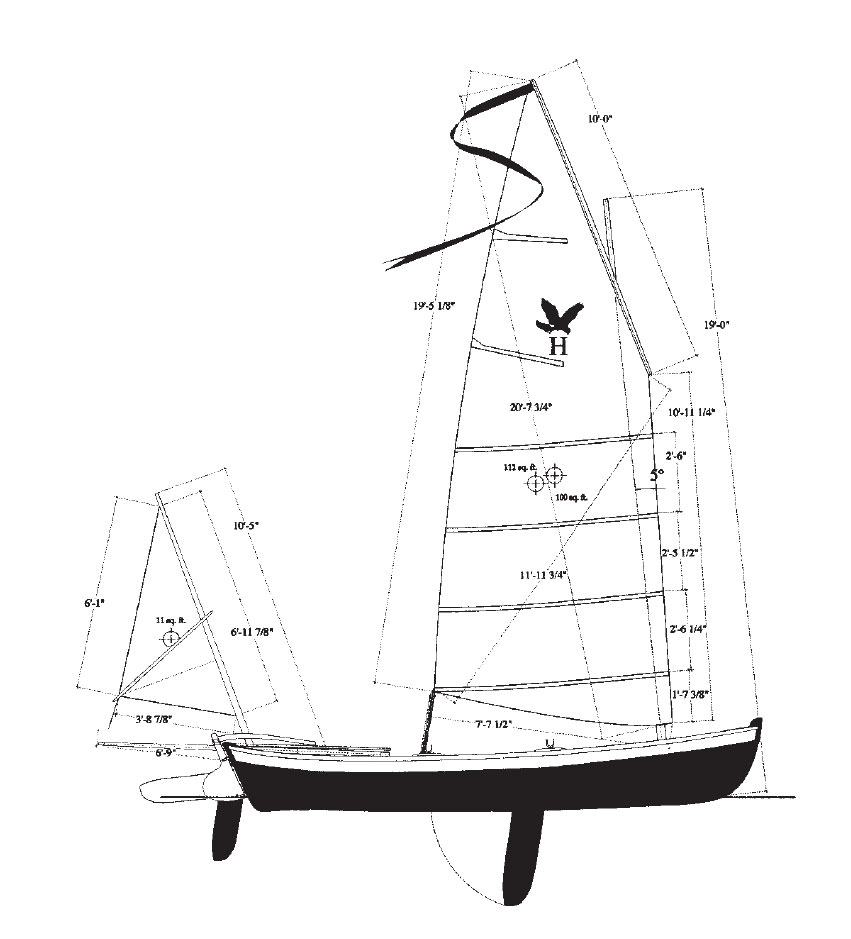
Thurlow’s beautifully detailed drawings describe three different construction methods for this canoe: traditional wood-and-canvas; all-wood strip-on-frame; and wood-strip fiberglass. Plans for the B.N. Morris canoe consist of eight sheets and include full-sized mold patterns and construction details for each canoe, as well as lines and offsets for the wood-and-canvas and allwood strip-on-frame versions. WoodenBoat Plan No. 96, $60.00.
PERFORMANCE
* Suitable for: Protected waters
* Intended capacity: 1-3
Trailerable or cartoppable
Propulsion: Paddle, pole
BUILDING DATA
Skill needed: Intermediate
Lofting required: No
* Alternative construction: As described
PLANS DATA
No. of sheets: 8
Level of detail: Above average
Cost per set: $60.00
WB Plan No. 96
* See page 96 for further information
Completed B. N. Morris Canoe Images
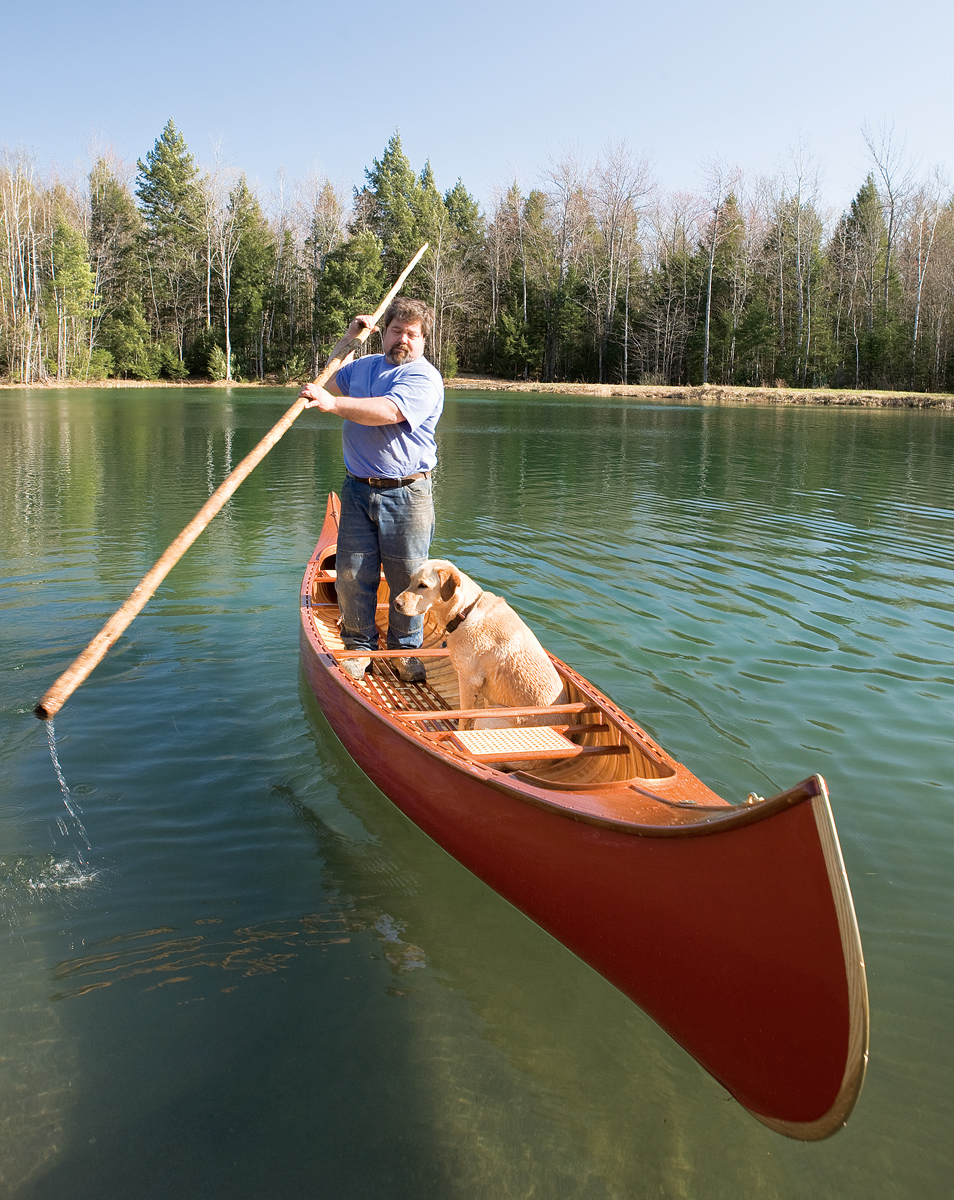
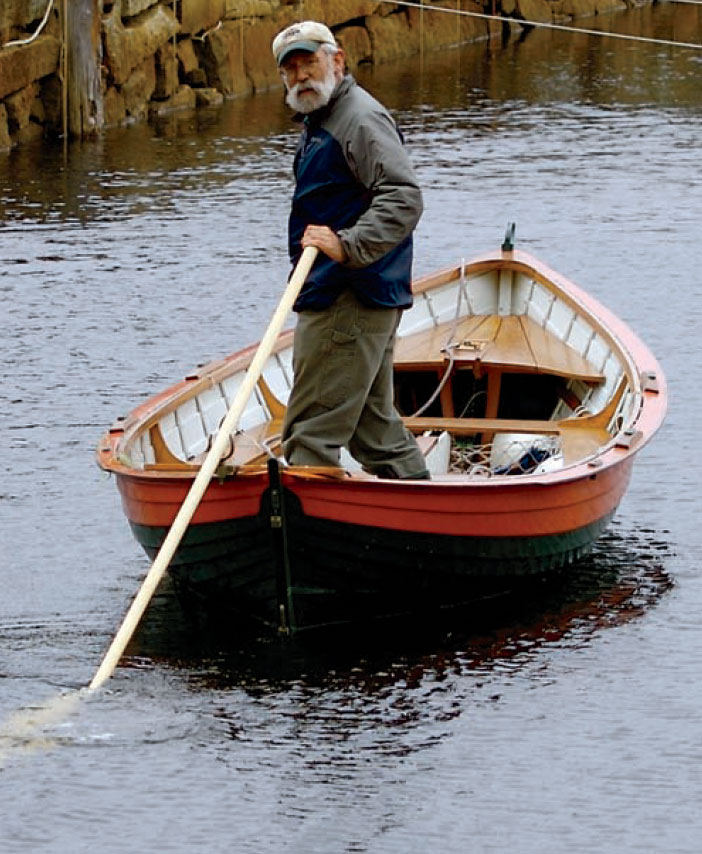
Poling is a popular pastime among canoe enthusiasts.The Morris’s weight combined with her relatively flat bottom gives her good initial stability.This makes her an excellent choice for poling or for general use in calm waters.
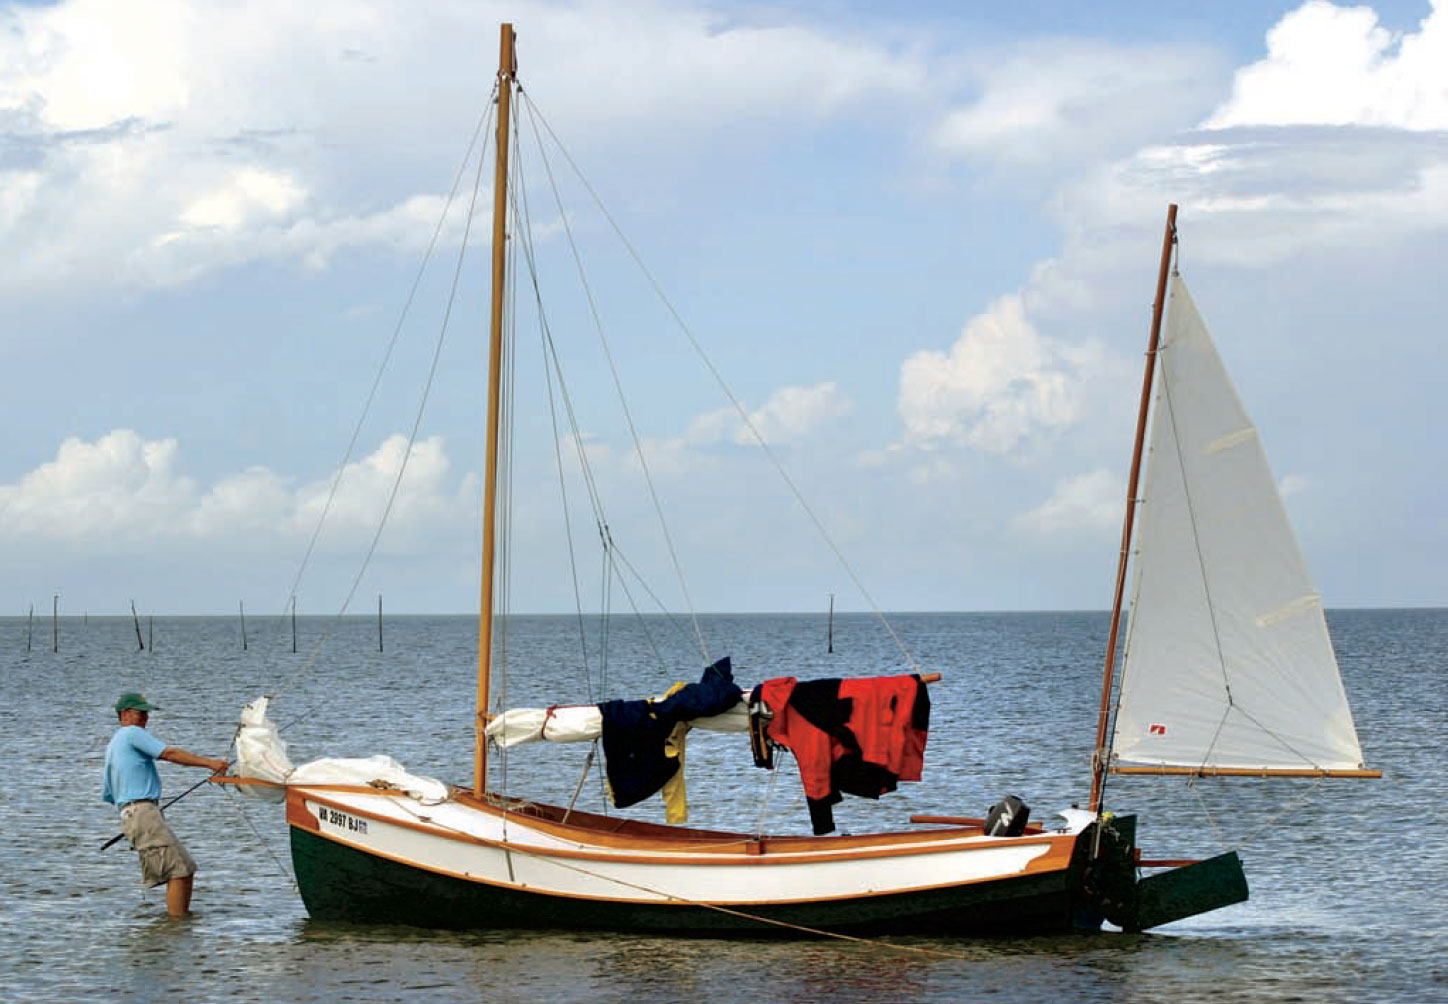
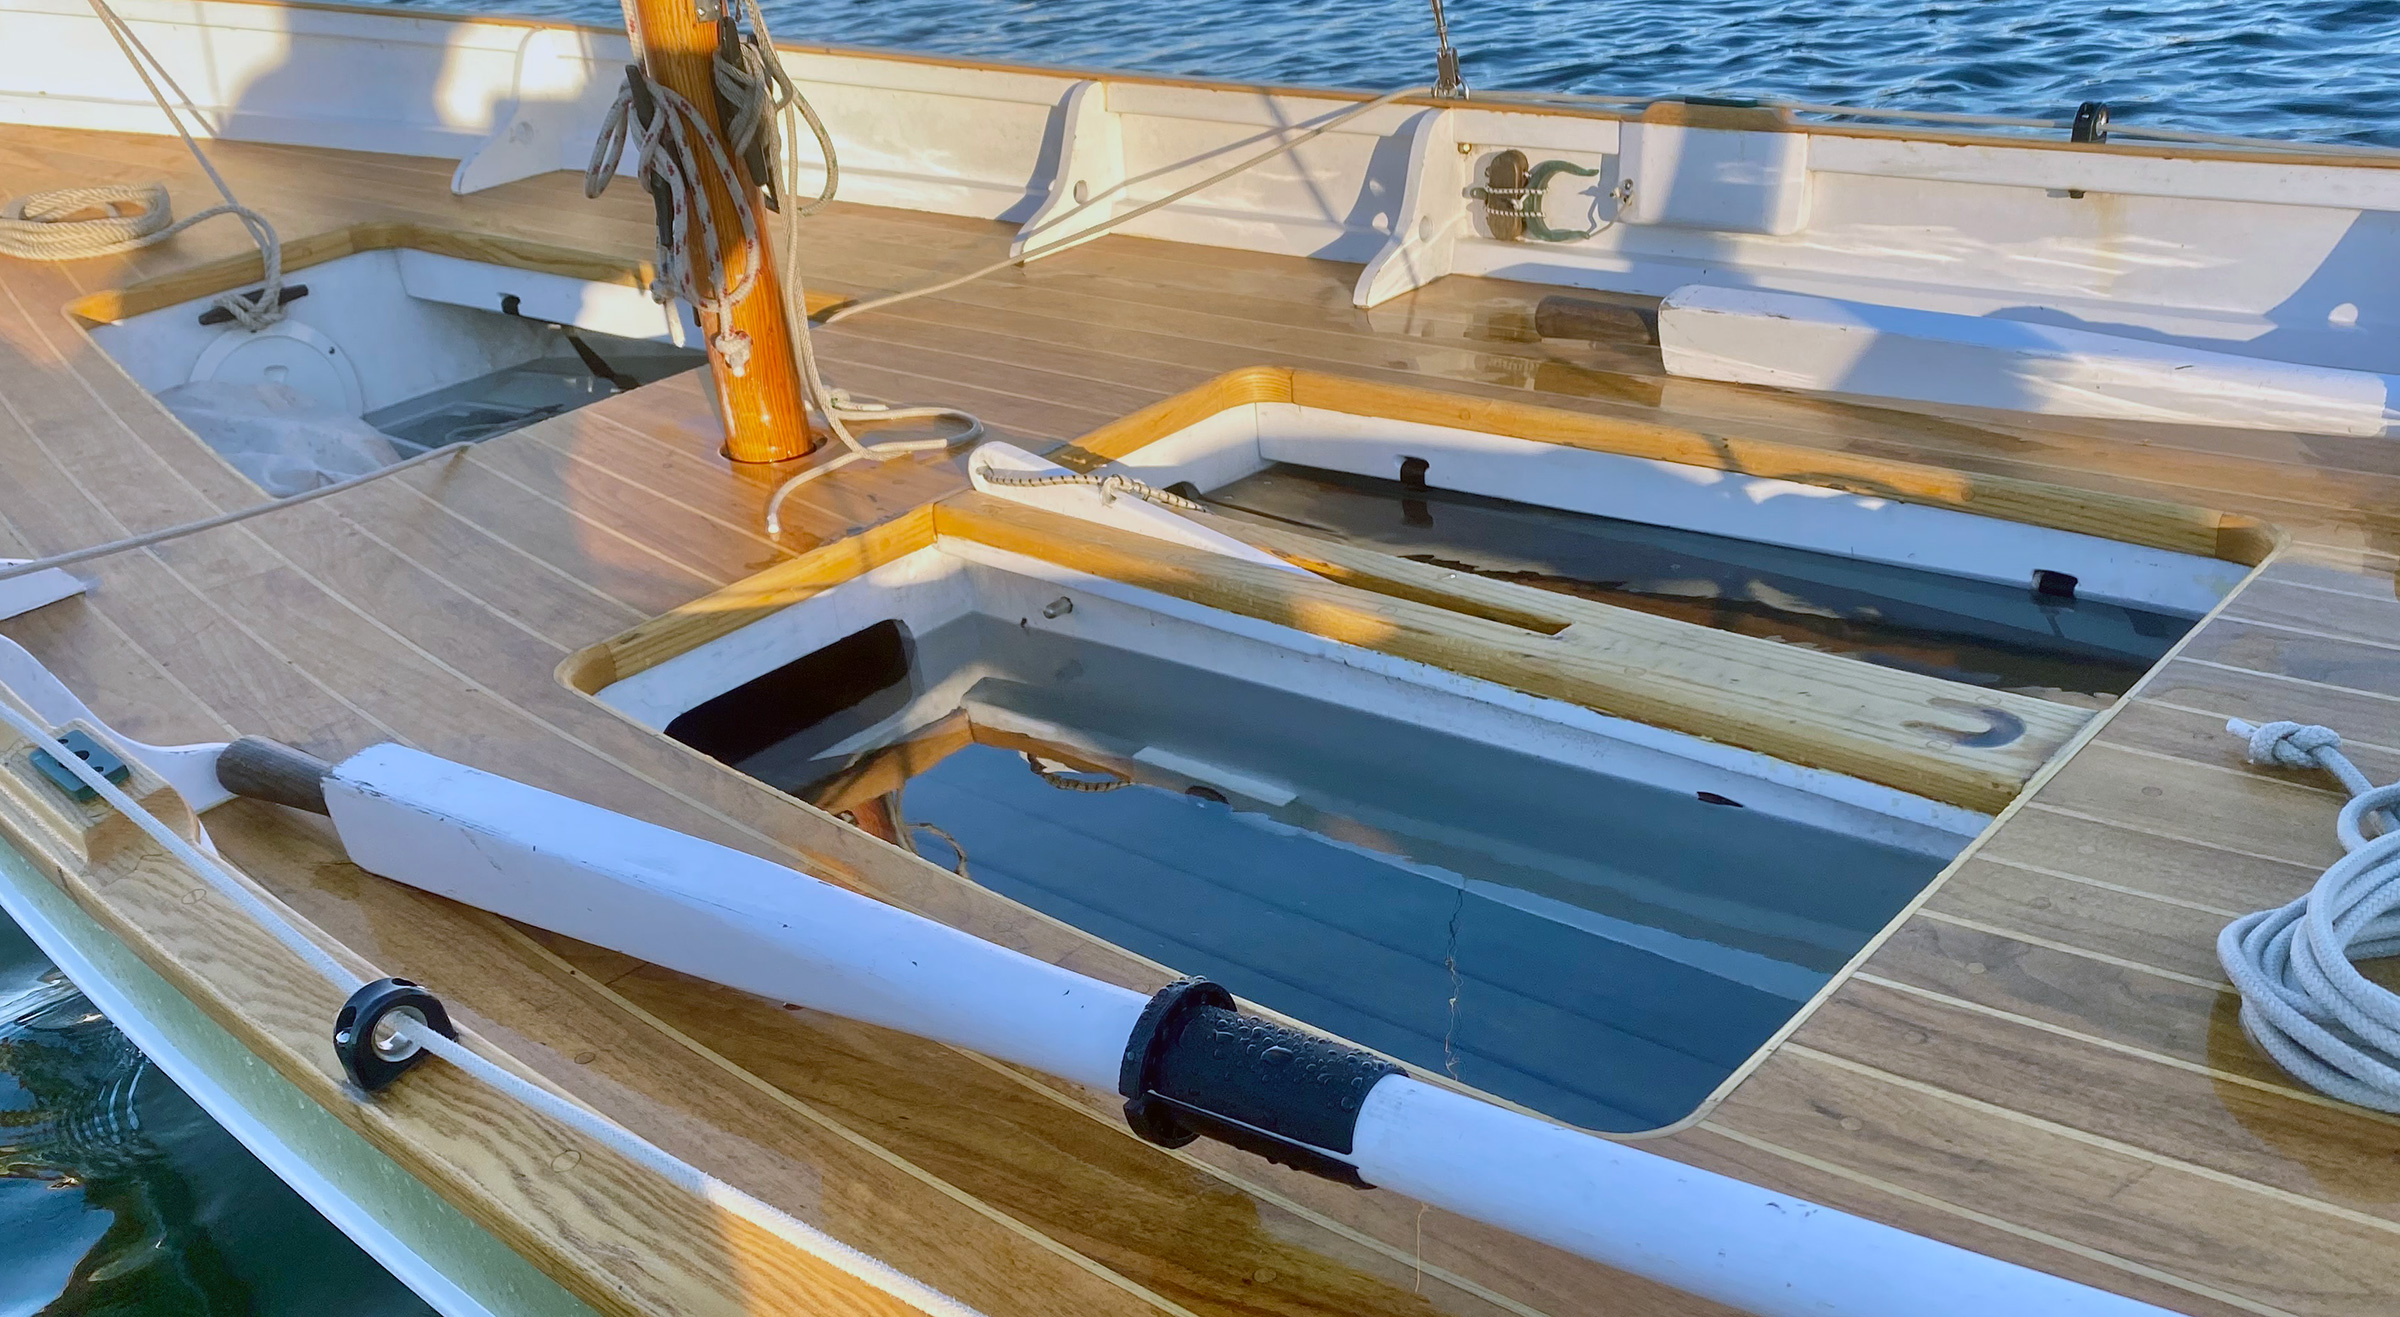
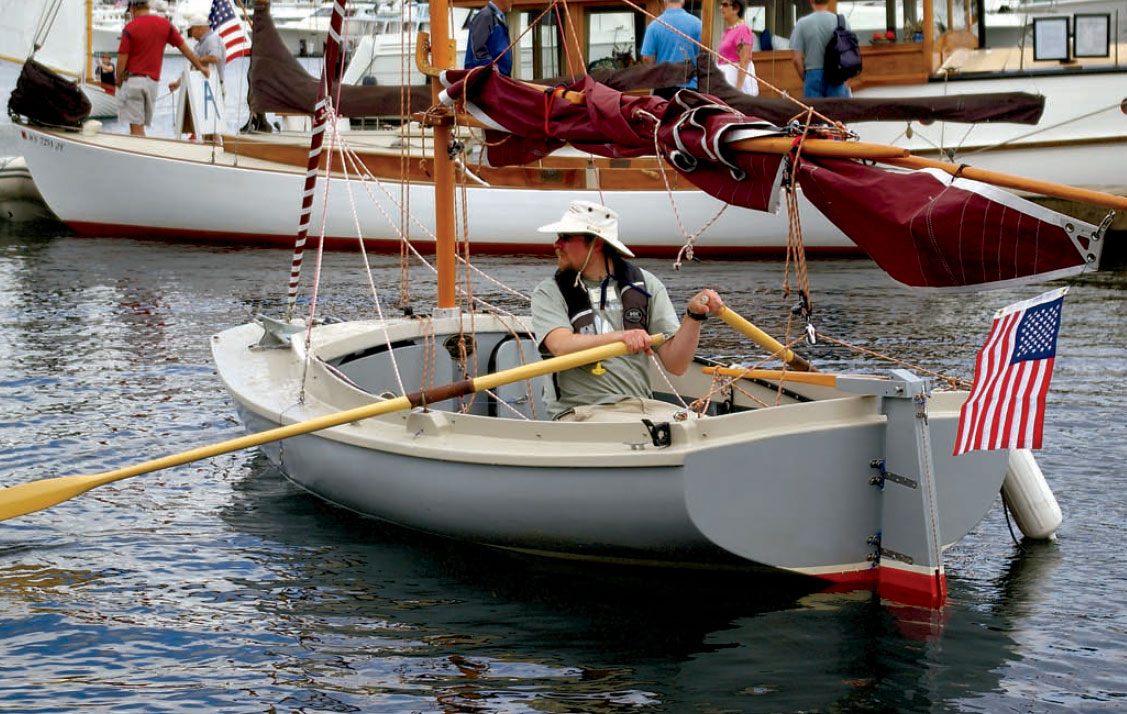
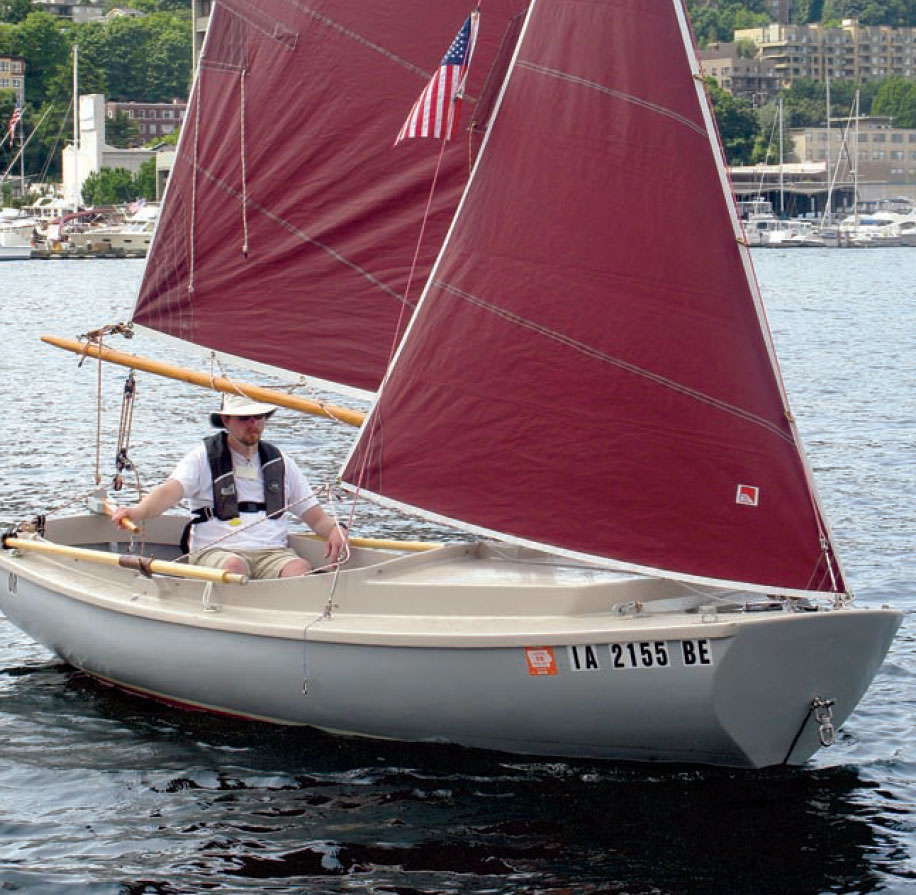
The 17′ 4″ Pathfinder yawl, designed by John Welsford, is meant for serious cruising. One owner-builder in the designer’s New Zealand home waters spent 10 months living on his boat while exploring.
The Pathfinder, an open-cockpit yawl from New Zealand designer John Welsford, is a dinghy meant for some serious cruising. The 17′ 4″ LOD boat combines the classic looks of a lapstrake hull, the speed of a modern underbody, and the simplicity of a split rig to suit the singlehanded sailor. Any backyard boatbuilder with the desire to pack up some gear and head out onto the water for a few days would do well to take a look at this boat.
SPARTINA is the name of my Pathfinder. I don’t claim to be a boatbuilder or even a woodworker, but after 20 months of night and weekend work, the varnish glows brightly on her Douglas-fir masts, and a rich mahogany coaming rises to a peak on the foredeck. A dark green hull sets off the white sheer plank and the bright white main, mizzen, and jib made in a loft in Maine. If I can build a Pathfinder, just about anybody can.
Welsford is an ardent supporter of open-cockpit cruising, and he made his mark with the Navigator design, a 14′ 9″ yawl, a tried-and-true cruiser. About 600 sets of Navigator plans are in the hands of home boatbuilders, and about 250 of the boats are on the water worldwide. Another New Zealander, David Perillo, has done some of the most celebrated sailing in a Navigator, spending 10 months (that’s right, 10 months!) cruising the Fiji Islands in his Navigator yawl, the MARGARET H. His stories, full of adventure, knockdowns, and wide-open sailing, have drawn sailors to Welsford’s designs. Some of those sailors wanted something just a bit larger than the Navigator. Welsford says he had requests asking for a faster boat with more storage and a greater range. His answer was the Pathfinder.
From bowsprit to boomkin, Welsford has drawn the Pathfinder with safety, comfort, and storage in mind. The heritage for this design, Welsford tells me, comes from the cobles and other traditional boats of the northeast coast of England. Those lapstrake boats are launched off the beach and sailed well out into the waters of the North Sea, “a seriously rough part of the world,” he says. The Pathfinder pays homage to those classic North Sea boats with a narrow forefoot that slices through the water, a hull that broadens amidships for stability, and a nice tumblehome as the upper planks slope inward from thwart to the slightly raked transom. Beneath the waterline, Welsford has borrowed some of the shape used on his transatlantic racers to give the Pathfinder some speed.
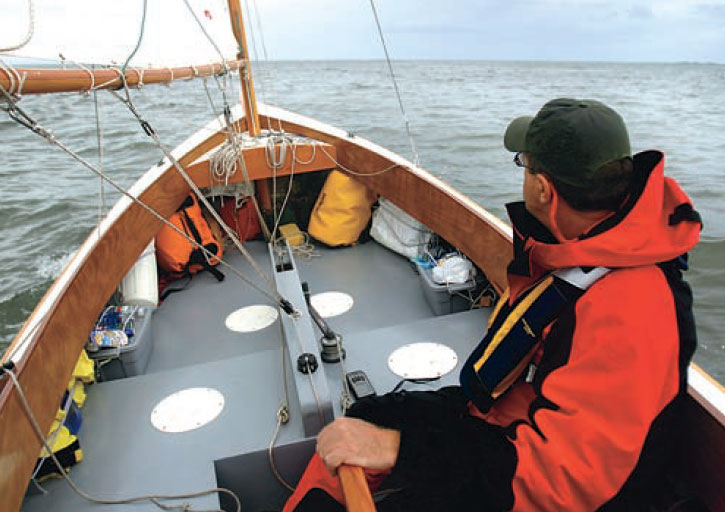
Steve Earley
Bruce Hollingsworth at the tiller of SPARTINA on Core Sound.
For safety, Welsford has built an incredible amount of buoyancy into the Pathfinder, with watertight compartments in the bow and beneath the seats of the aft cockpit, the thwart, and forward cockpit sole. These watertight spaces serve double duty as storage areas accessible through deck plates. Under the aft cockpit seats of SPARTINA, I store my first-aid kit, batteries, extra line, spare fittings, spark plugs, and fishing tackle and still have plenty of room left over. The thwarts provide the largest watertight storage, the perfect spot for food, clothes, books, and cameras. Just forward of the thwart, two more deck plates give access to the ballast area where there is extra room for the tool kit, spare anchor, and almost 10 gallons of water.
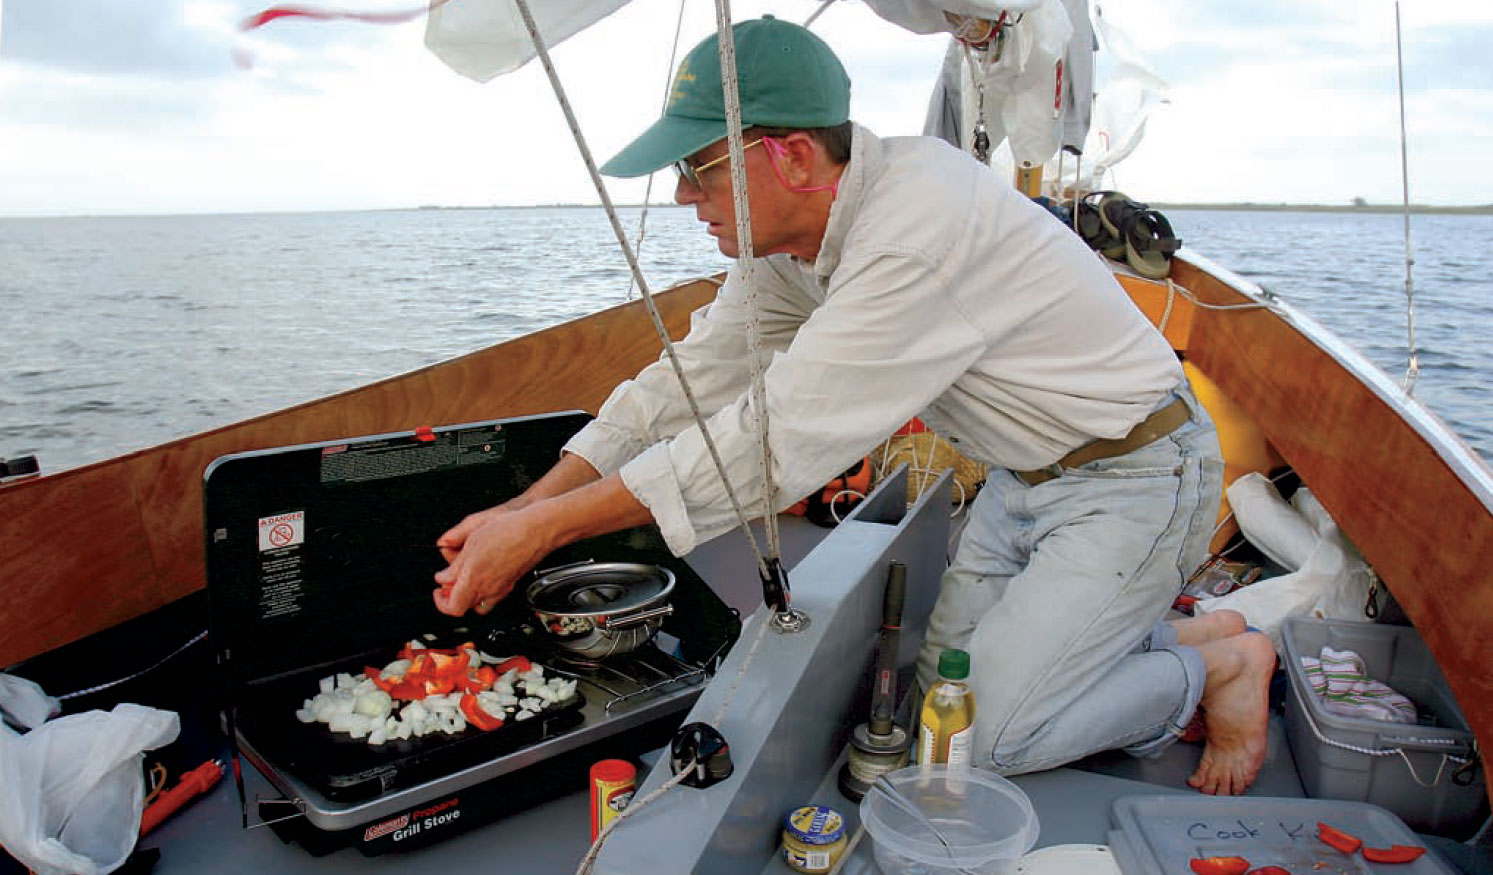
Bruce Hollingsworth
Steve Earley cooks dinner for two on board SPARTINA on Core Sound, North Carolina.
The Pathfinder’s wide side decks and coaming hide cruising gear from the sun and salt spray. I keep my foulweather gear, cook kit, oar, boathook, camp stove, and fenders lashed up along the hull under the side decks. Beneath the foredeck is room for the anchor, portable toilet, boom tent, and sleeping bag. It is amazing how much storage Welsford has crafted into this boat. Room to keep things tucked away is more than just convenience on a small boat; it is a matter of safety. I’ve got a clear path forward to the halyards and anchor, with no worries about tripping over gear. An inboard well for the auxiliary outboard preserves the graceful lines of the lapstrake hull. While this keeps the classic look of the hull, I see it as yet another safety feature. I don’t have to lean out over the transom to add fuel or change a spark plug. All of that can be done from inside the cockpit.
Just as Welsford brought traditional styling to a modern hull, he also adapted traditional boatbuilding to suit the garage boatbuilder. In his plans, he shows how common tools, marine-grade plywood, and epoxy can be used by someone like me, a complete amateur, to build a fine boat. Welsford tells his builders, “Don’t sweat over the last tiny bit; build your boat, paint it, and go sailing.” Knowing well that many of his builders don’t have skills or patience for hair-thin tolerances, he says a fair curve is more important than a millimeter or two here or there.
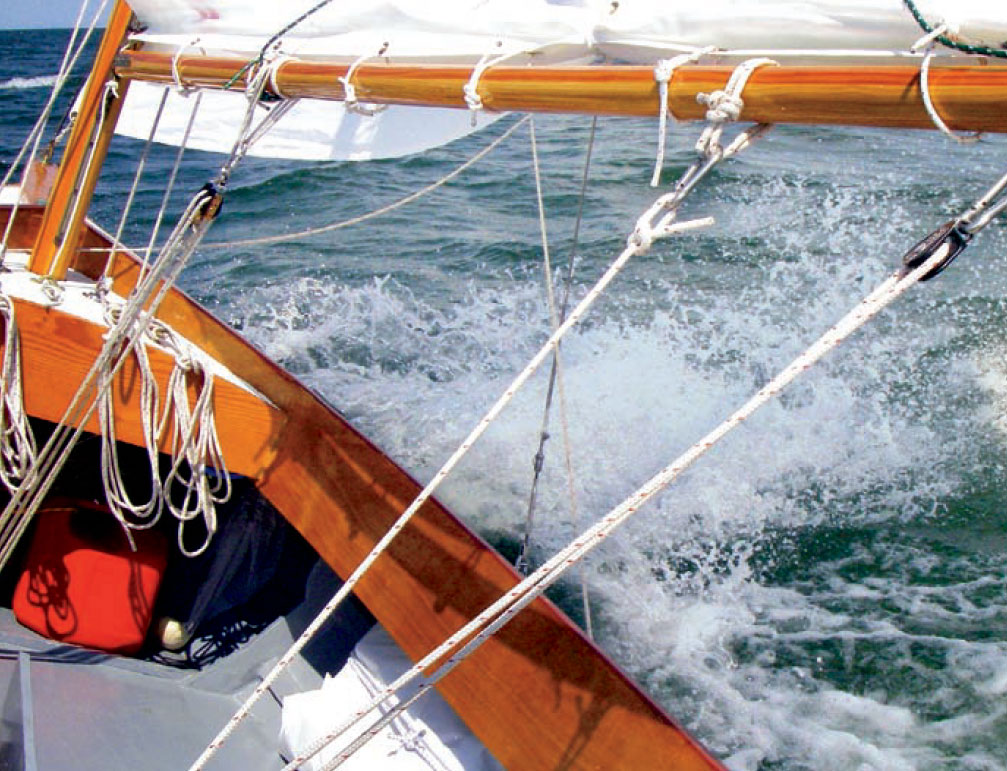
Steve Earley
Sailing under a small-craft warning on Tangier Sound.
A metric tape measure is probably the first tool worth buying, as Welsford’s plans are in metric measurements. Beyond that, mostly common tools are used in Pathfinder’s construction. Screwdrivers, hammer, drill, jigsaw, hand plane, sander, and a bucket full of clamps will get you going.
The 12 sheets of drawings in the Pathfinder plans have scaled drawings for seven frames to be cut from plywood. The frames and centerboard trunk are then mounted on a bottom panel scarfed from two sheets of plywood. The promise of a boat shows as stringers are bent into place around the frames. Plywood planks are dry-fitted to the stringers and trimmed to fit from the bottom of one stringer to the top of the stringer above. The most challenging plank is the garboard between the first bulkhead and the stem where there is a reverse curve in the lowest stringer. Getting the plywood to match that curve is a matter of strength, leverage, and patience. But once the plank is drawn into place, there is that beautiful forefoot that cleaves the water with a slight hollow as it flares upward to the next overlapping plank. Once that plank is epoxied in place, the rest is easy. With the hull completed, I barely looked at the plans and simply cut the decks, seats, and cockpit sole to fit.
Need advice in the middle of the build? Go to the John Welsford builders group at Groups.yahoo.com/-group/jwbuilders. Past, current, and prospective builders all take part in the discussion of understanding plans, techniques, and design for Welsford’s boat. Ask a question, and more likely than not Welsford himself will chime in with advice or opinion.
In fact, the discussion group is the place to talk with the designer about changes to his plans. I made a handful of changes to suit my tastes and sailing experience. I left out the bow anchor well on my boat. The well is 4′ from the cockpit—farther than I would want to stretch to reach the anchor in rough water. I find it simpler to keep the anchor in a bucket under the foredeck. For increased ballast and stability, I substituted a 1⁄ 2″-thick, 100-lb steel plate for the weighted wooden centerboard shown on the plans. The masts and spars in the plans are made of aluminum tubing, but a classic-looking hull like the Pathfinder deserves wood. So, like many Welsford builders, I built wooden masts, booms, and gaff from Douglas-fir.
The Pathfinder performs better than I had hoped it would. With a light breeze, she moves along nicely; with a stiff breeze, she flies. The hull, feeling much wider than it really is, has a solid feel as the boat heels to a comfortable angle and holds her position. The narrow forefoot cuts through the water, the flare of the bow pushes the spray out and away on all but the roughest of days.
SPARTINA has proven herself time and again. I’ve sailed across miles of deep water during small-craft warnings, a single reef tucked in the main, and felt perfectly safe. I’ve sailed backwards—a nice trick that can be done with a yawl under mizzen only—across shallow sand flats. A good friend and I have packed the boat with food, water, tents, sleeping bags, clothes, cameras, and fishing rods for a sixday, 100-mile cruise in the sounds of North Carolina. All that gear on board, and we still had plenty of space. Whether miles from shore or in shallow water along a barrier island, the Pathfinder feels at home. I can’t imagine a better design—especially one that I could build—for open-boat cruising.
LOA 17′ 4″
Beam 6′ 5″
Weight (with motor) 485 lbs
Sail area 162 sq ft
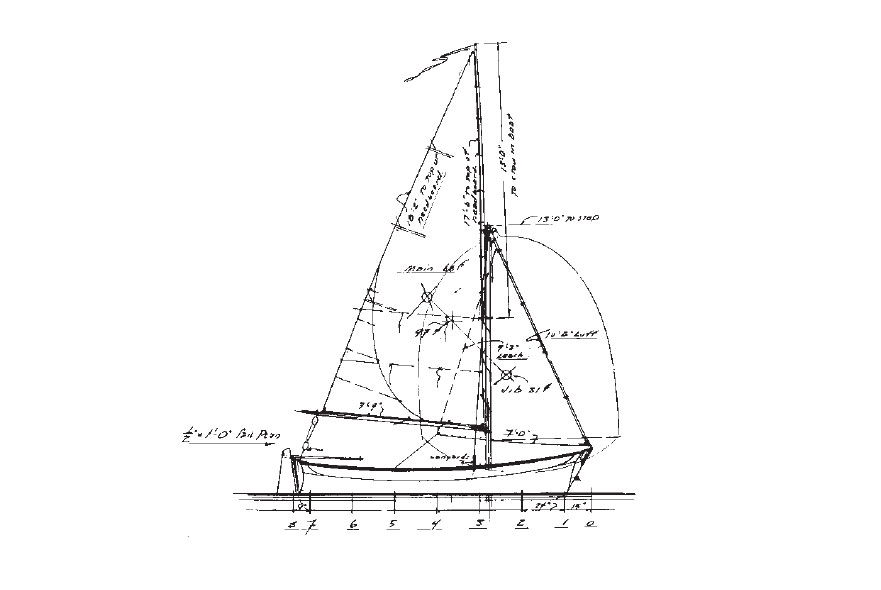
John Welsford
John Welsford drew the Pathfinder as a yawl—a more versatile and maneuverable rig than a sloop.
John Welsford
Welsford’s plans include a sloop option, for those desiring greater speed and windward ability.
Is there a boat you’d like to know more about? Have you built one that you think other Small Boats readers would enjoy? Please email us your suggestions.
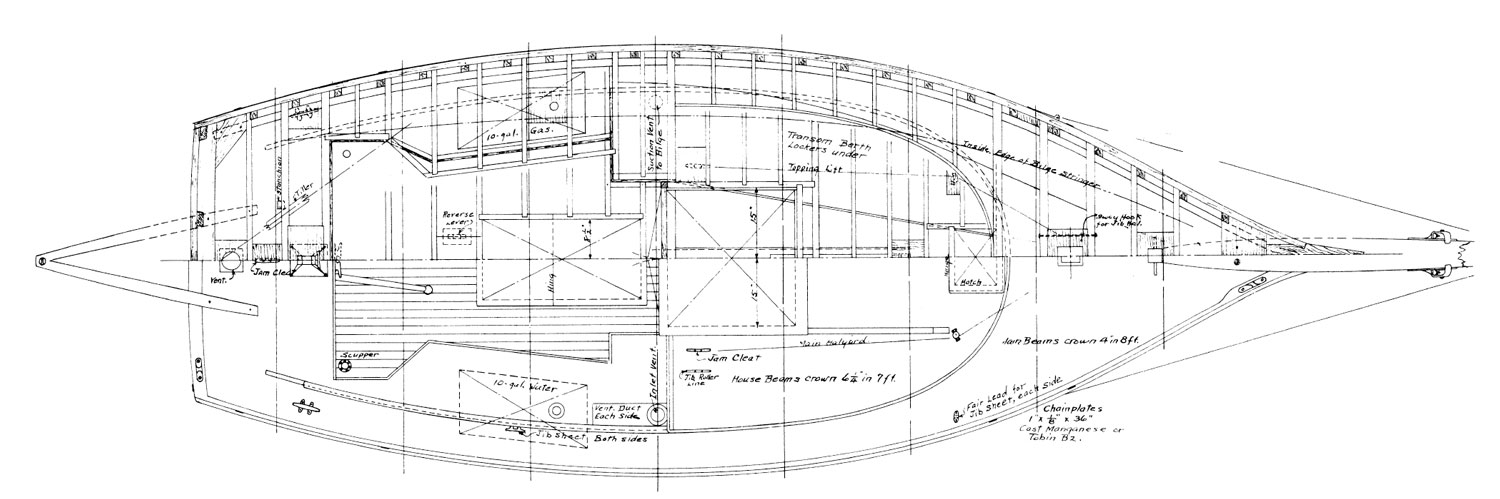
Sam Crocker’s design work was highly regarded by his peers, and by those who built, brokered, maintained, or cruised his yachts. The yawl Sallee Rover, drawn in 1953, shows why this is so.
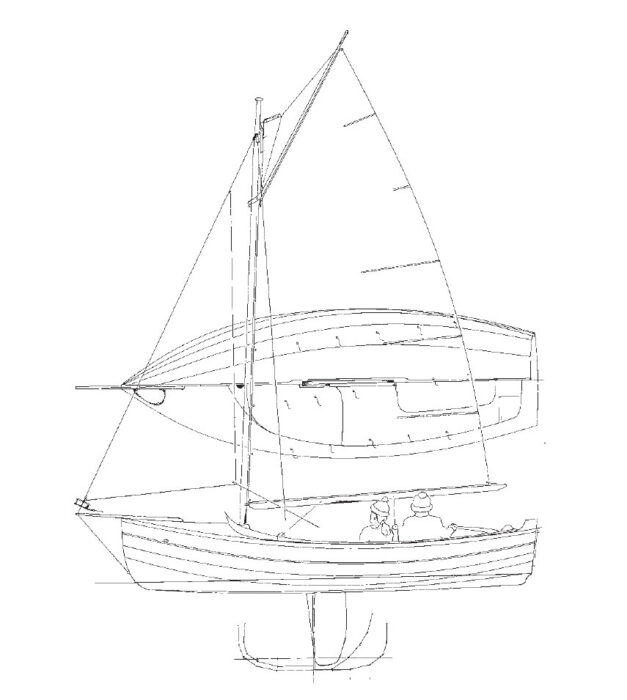
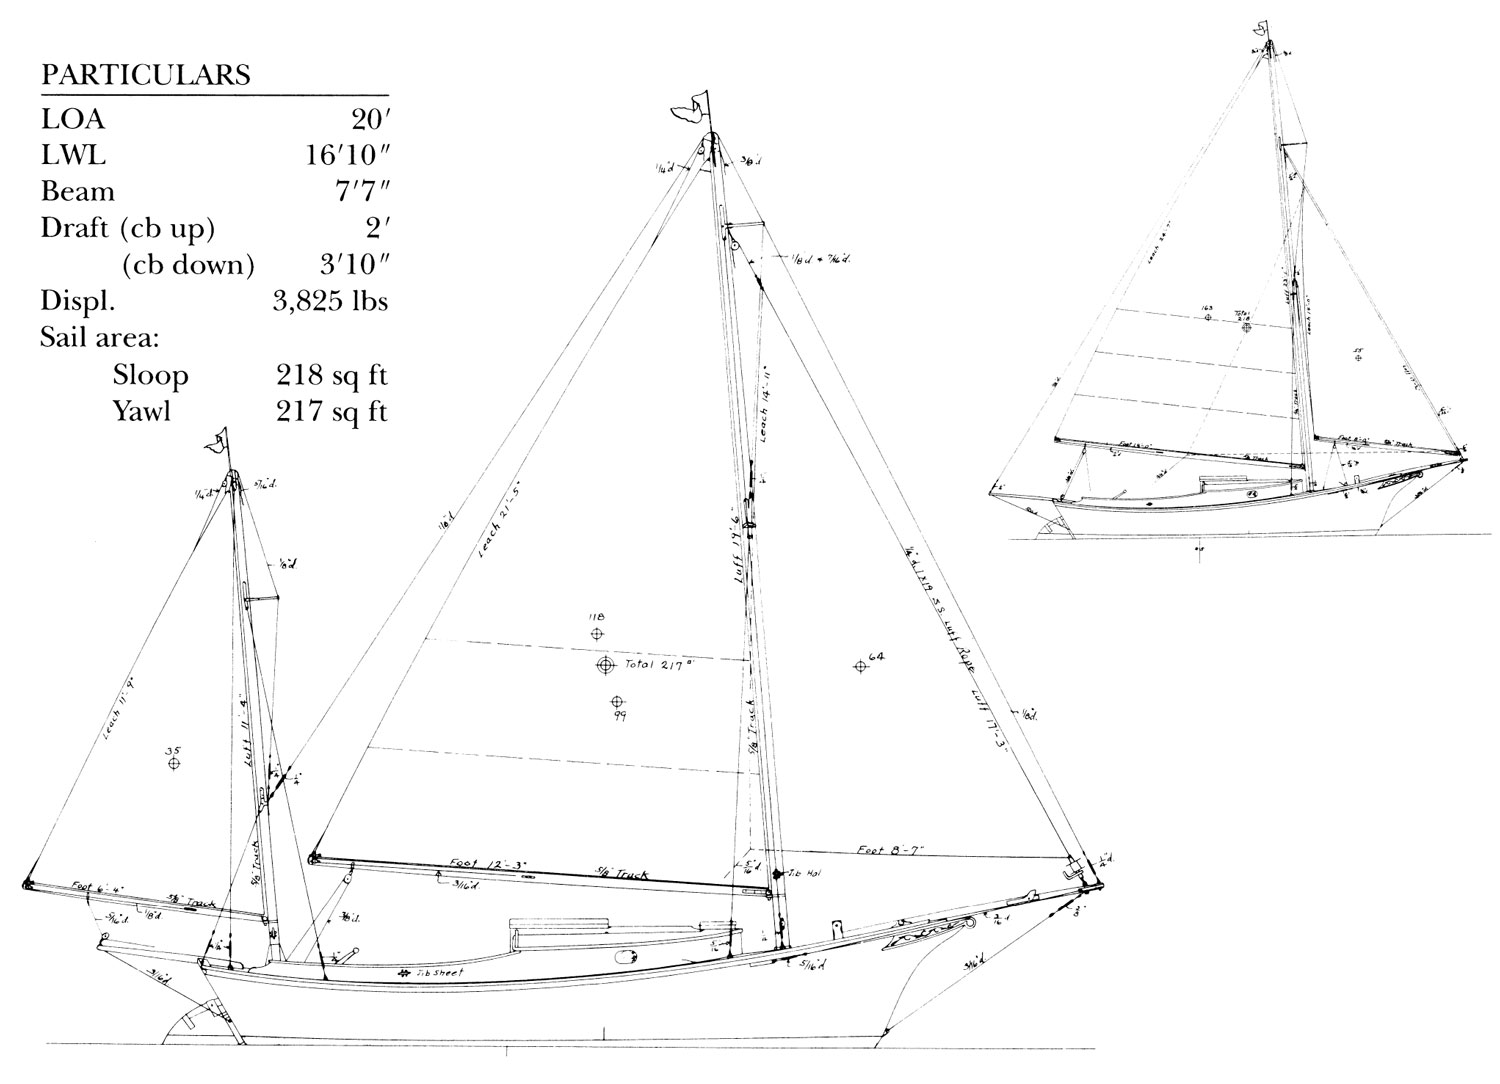
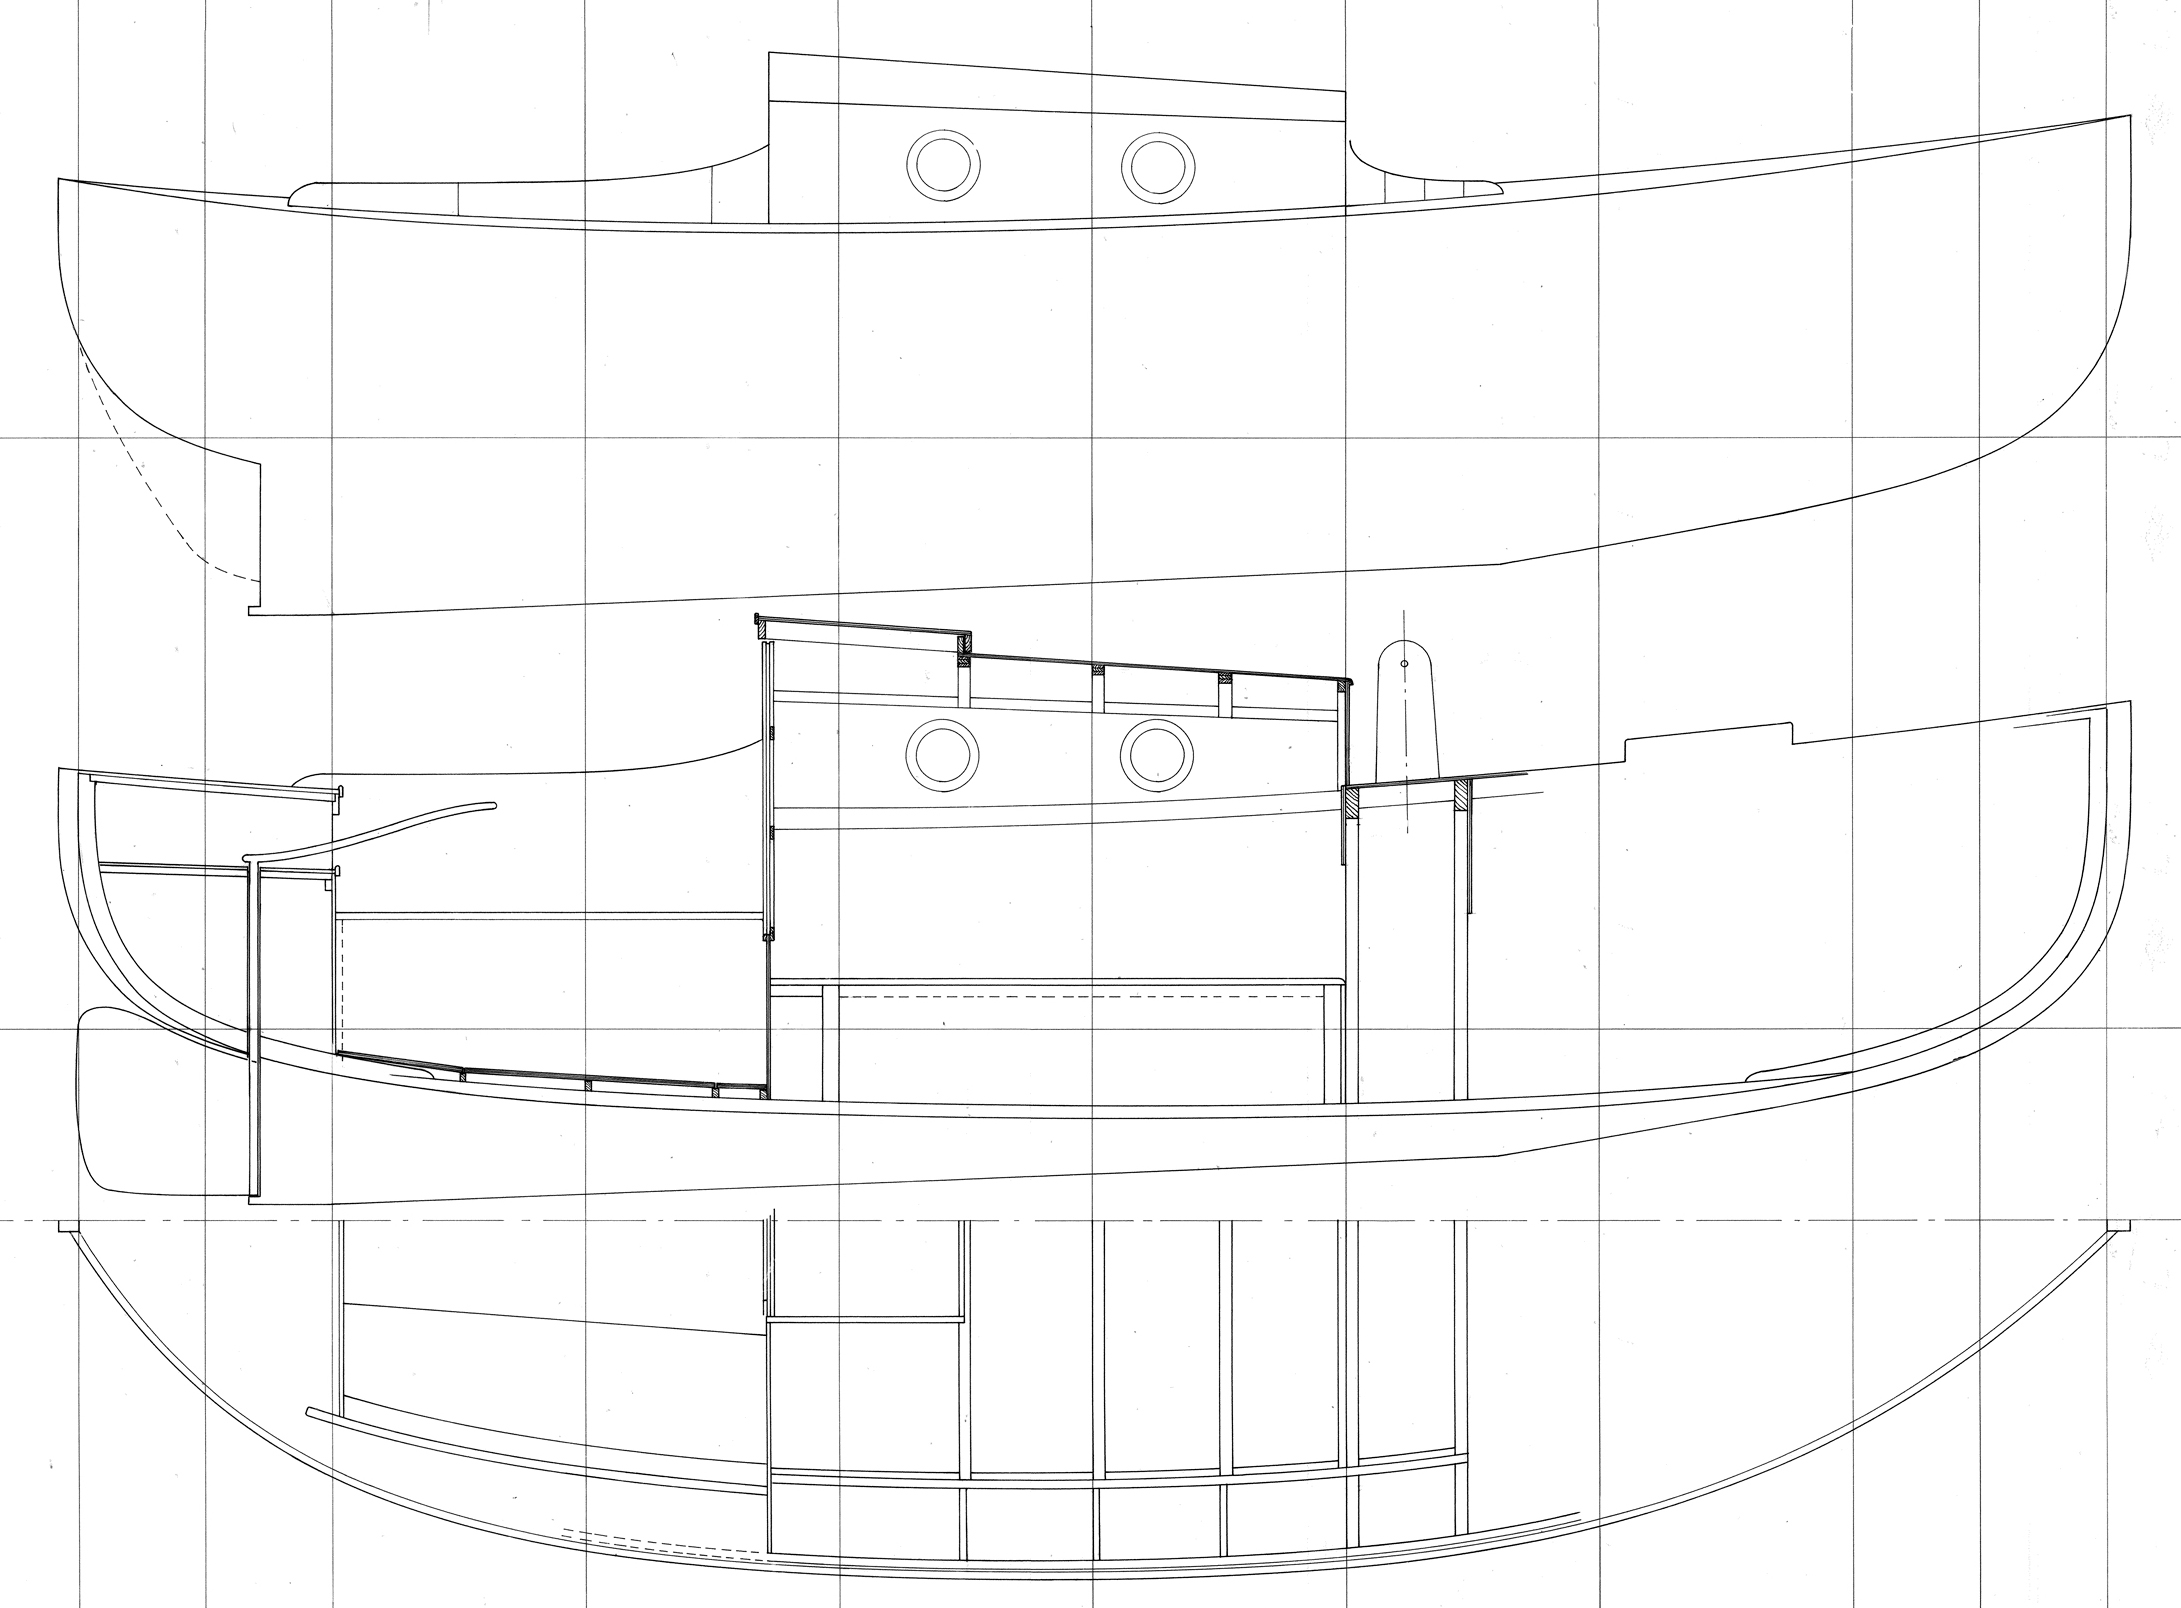
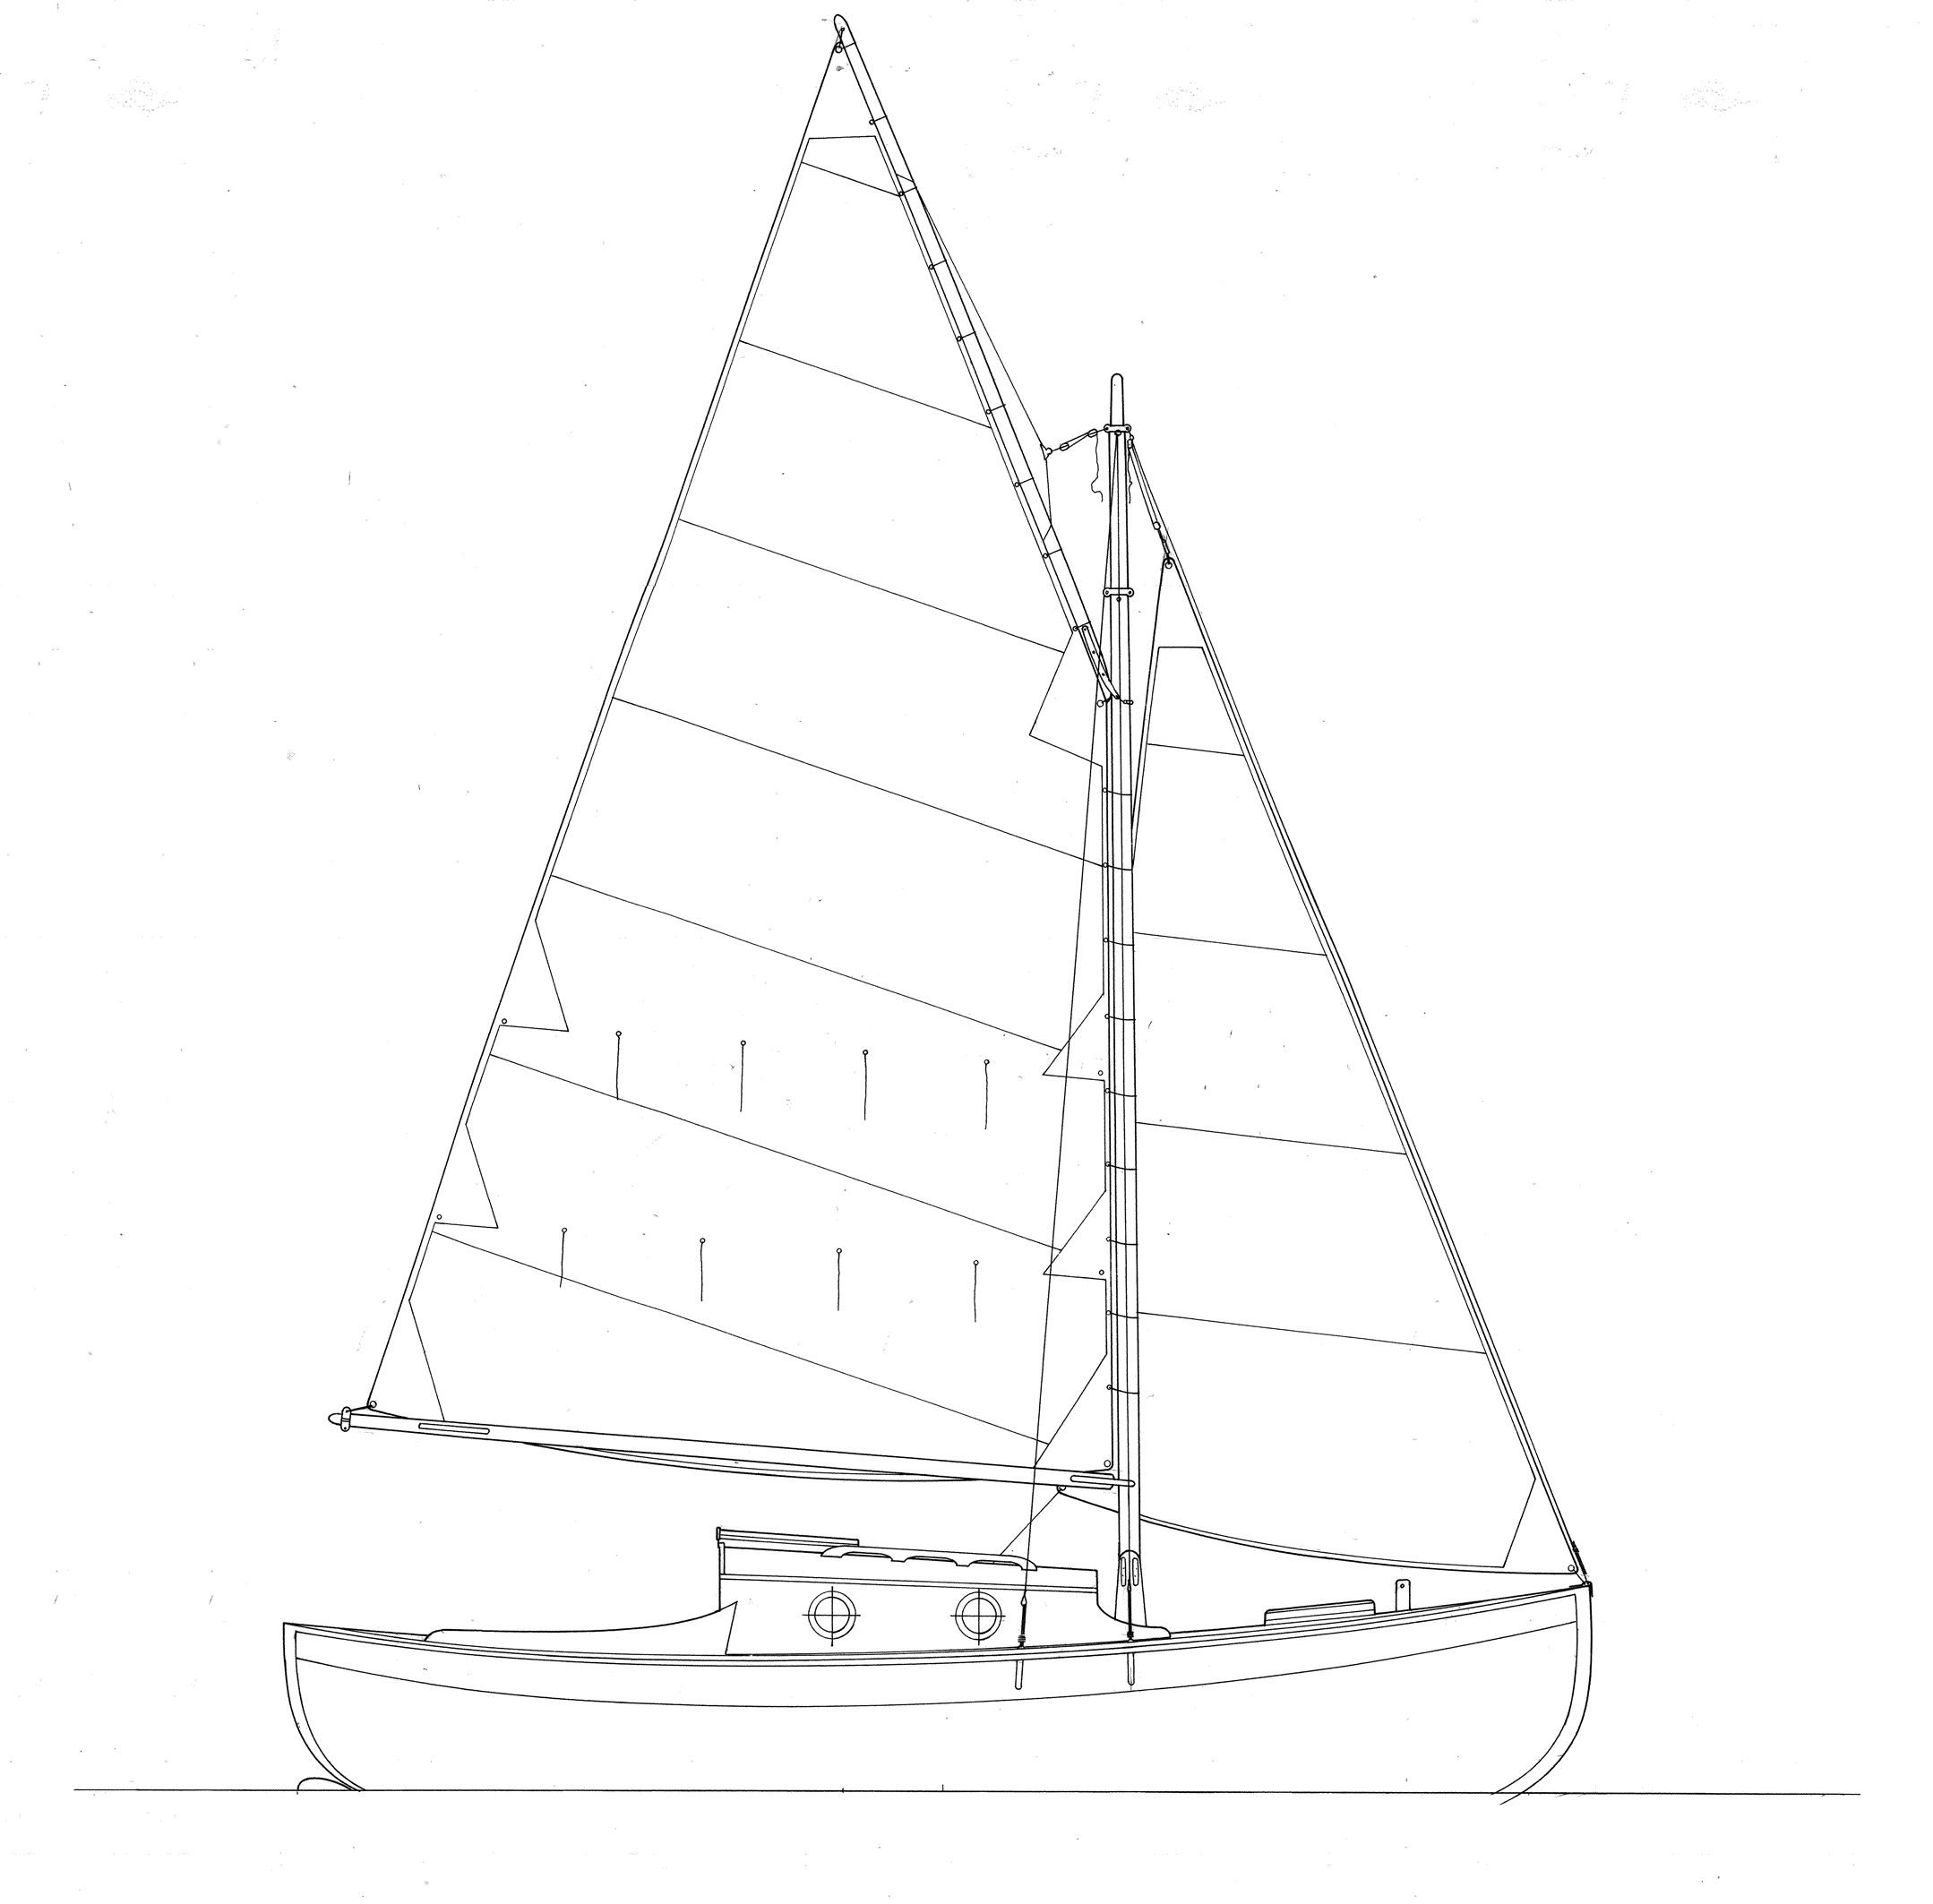
Crocker has recombined a remarkable assemblage of elements here into one small boat, but the result is so superbly proportioned that no one item overpowers the overall design. Joel White, who built the sloop version of this boat, aptly describes the hull, with its shallow draft and broad beam, as a cross between a catboat and a Muscongus Bay sloop. She has a very strong sheer, extended at the ends by her steeved bowsprit and boomkin; a big outboard rudder; a clipper bow; and a round-fronted cabin trunk which combines with a high coaming carried well aft. But for all the traditional detailing, the sail plan is a modern marconi rig of manageable size, in both the yawl and sloop versions.
Here, too, it is a credit to Crocker’s skill that he could set those sails on this hull and still keep it all in character.
You can build SALLEE ROVER as a sloop or yawl.
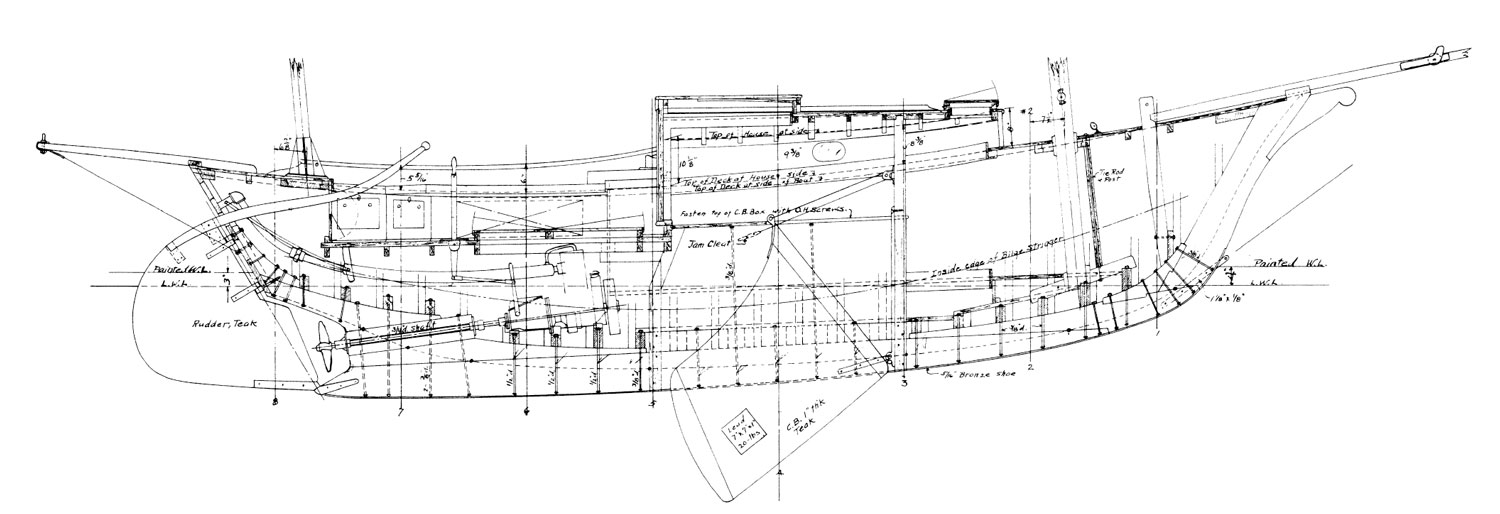
More about this hull: Sallee Rover’s scantlings are substantial for so small a vessel. Her keel, for example, is 7 x 9″ oak; other structural members are sized accordingly. Crocker used the hull itself—particularly the heavy backbone—to ballast this boat, and thereby simplified construction by eliminating a ballast keel. Her down-low weight and wide body, plus some inside ballast and the sensible sail plan, make this a stiff boat in strong winds.
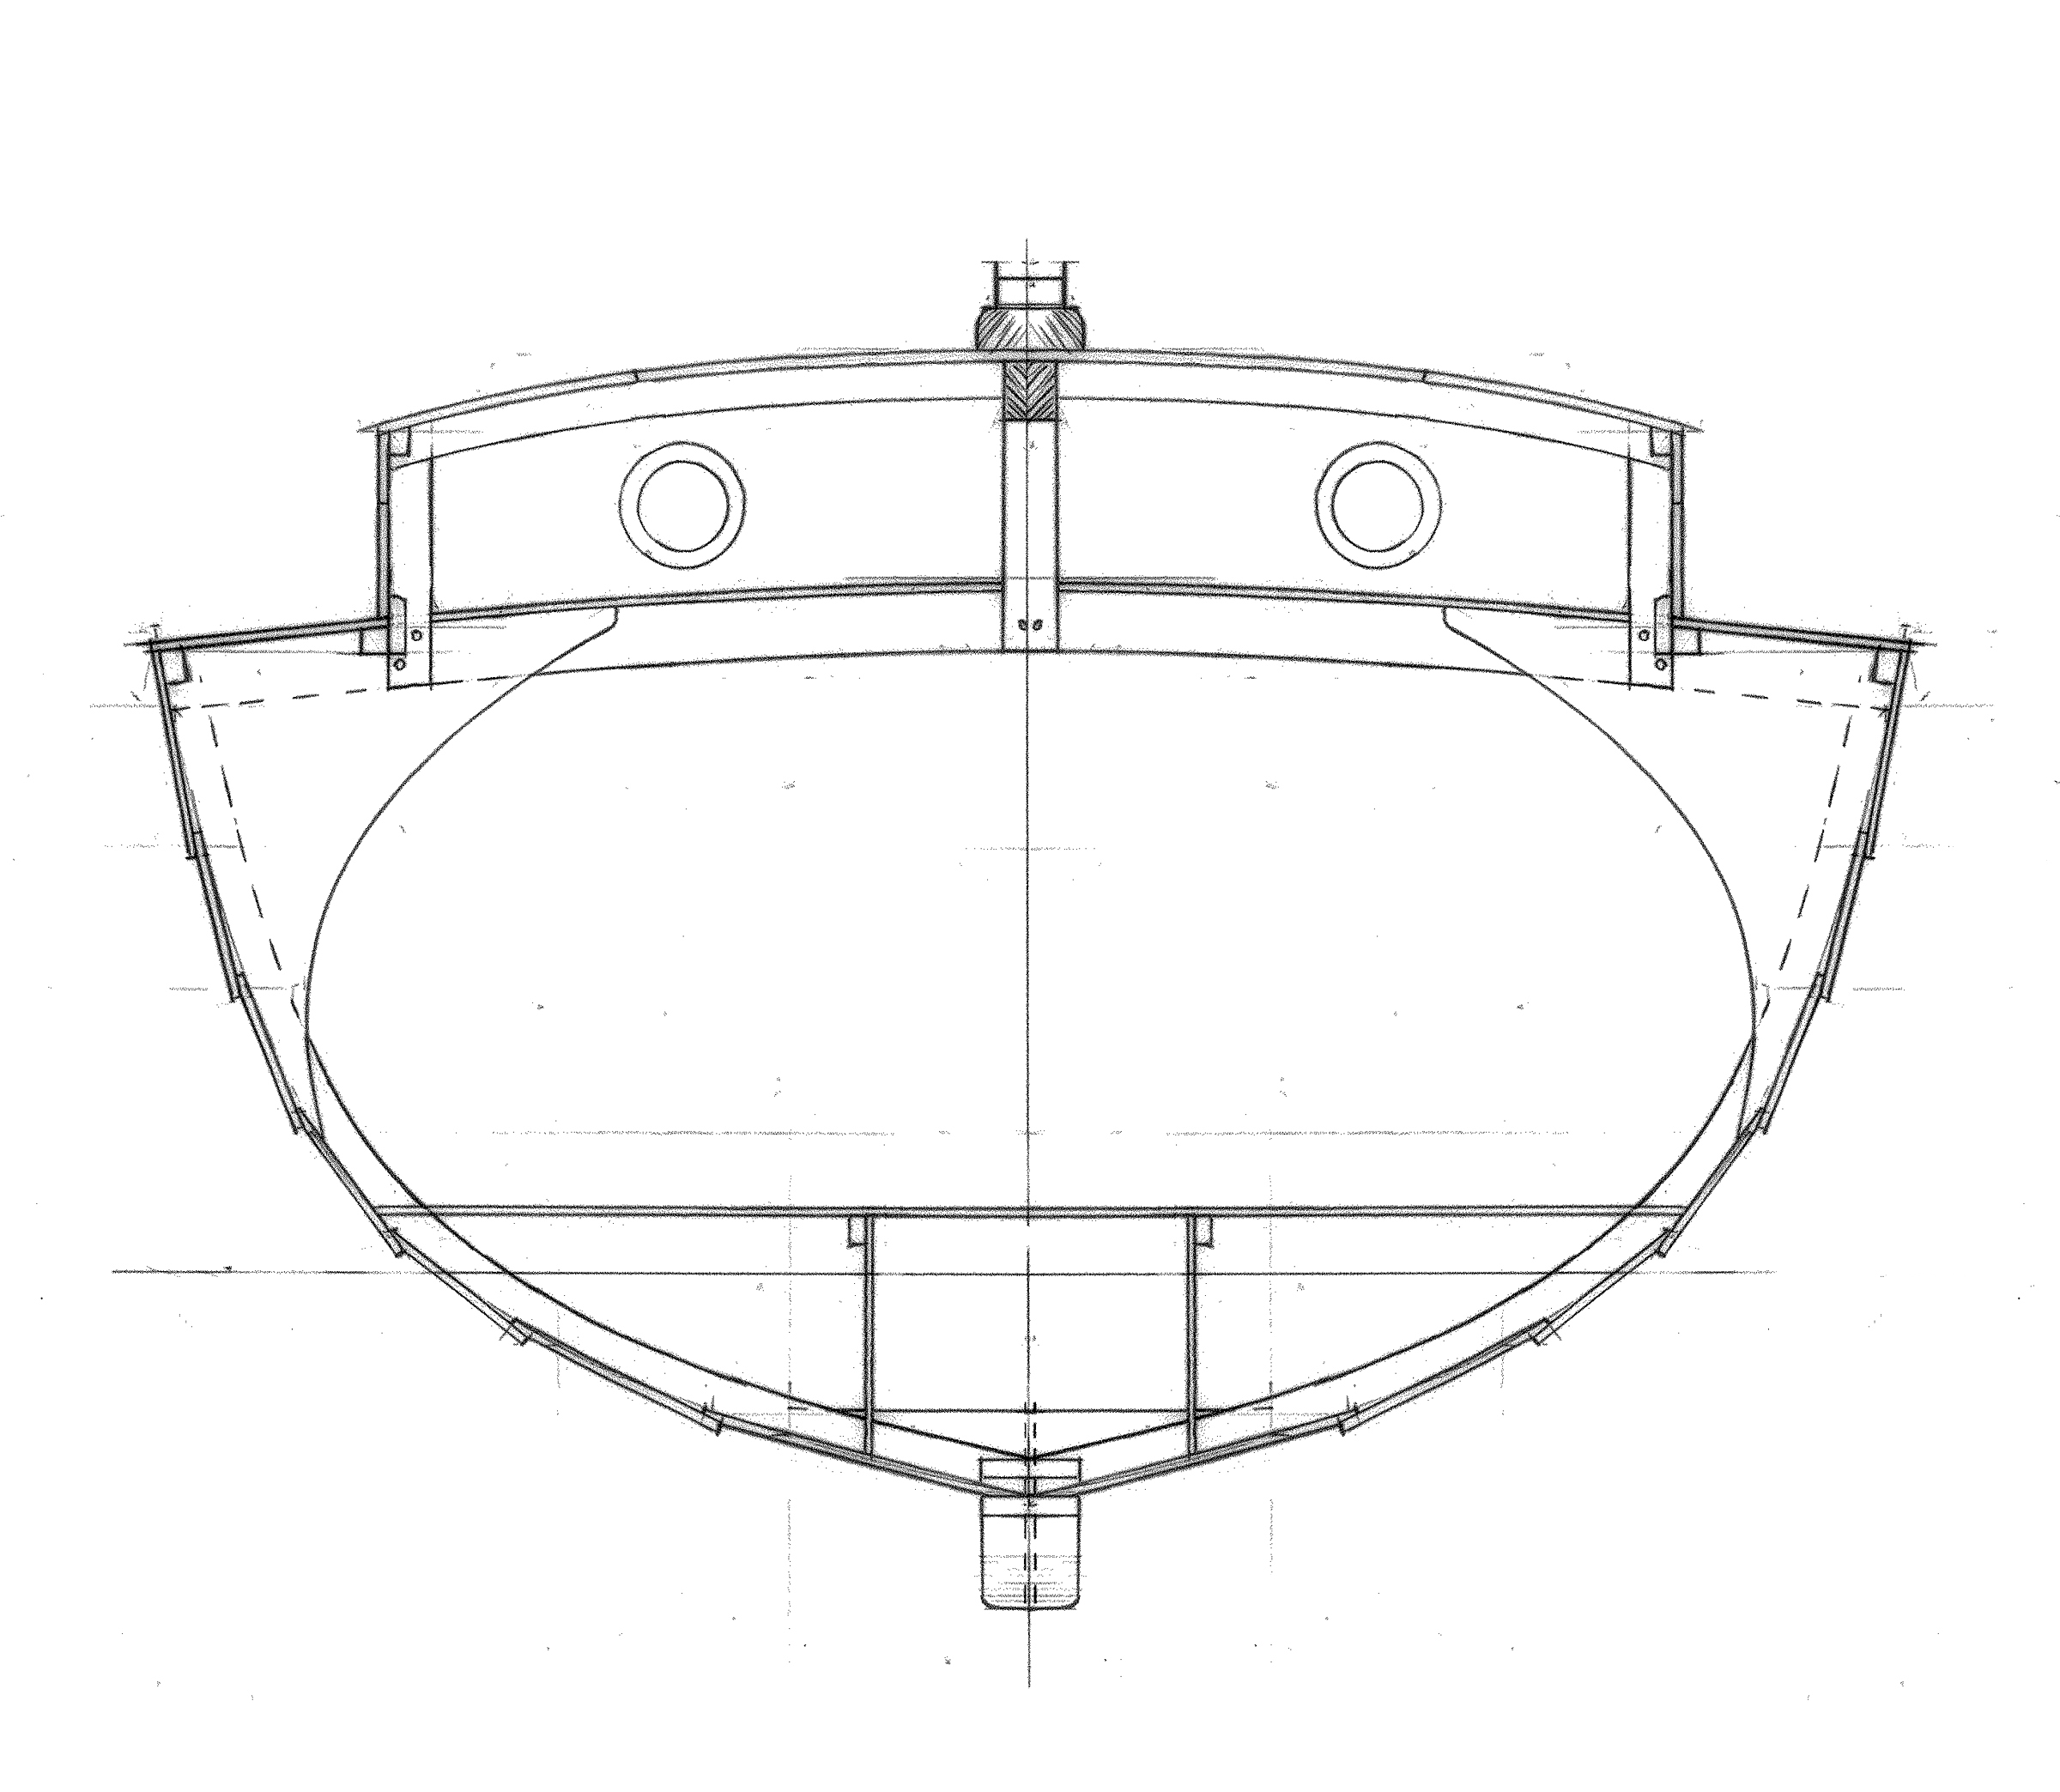
Profile
Her cockpit is self-bailing and the footwell is jogged, thus adding space and making good use of the coaming, cabin, and afterdeck for assorted seating under sail or at anchor. There are no below-deck accommodations shown, other than two transom berths with lockers under, and a platform for stowage forward of the mast—but the little cabin provides an airy and adequate shelter for camp-cruising. The recommended inboard auxiliary power is less than 10 hp and accessible through a large hatch in the cockpit sole.
Heavy scantlings, inside ballast, and firm bilges give Sallee Rover the stability she needs.
She’s special, Sallee Rover—a small wonder. She’s the craft chosen to demonstrate, and celebrate, the anatomy of a wooden boat in a series of perspective drawings by Sam Manning for the 10th anniversary issue of WoodenBoat magazine (WoodenBoat No. 60).
An extraordinarily comfortable cockpit and spartan cruising accommodations.
Plans for the 20′ Crocker Yawl, Sallee Rover, include lines and offsets, construction and sail plans for both the yawl and sloop versions, spars, wire rigging, tankage, and specifications. WB Plan No. 65. $150.00.
Sallee Rover Plan Details
DESCRIPTION
Hull type: Round-bottomed, keel/ch boat
Rig: Marconi yawl or sloop
Construction: Carvel planked over steamed frames
Headroom/cabin (between beams): About 3 8
Featured in Design Section: WB No. 62
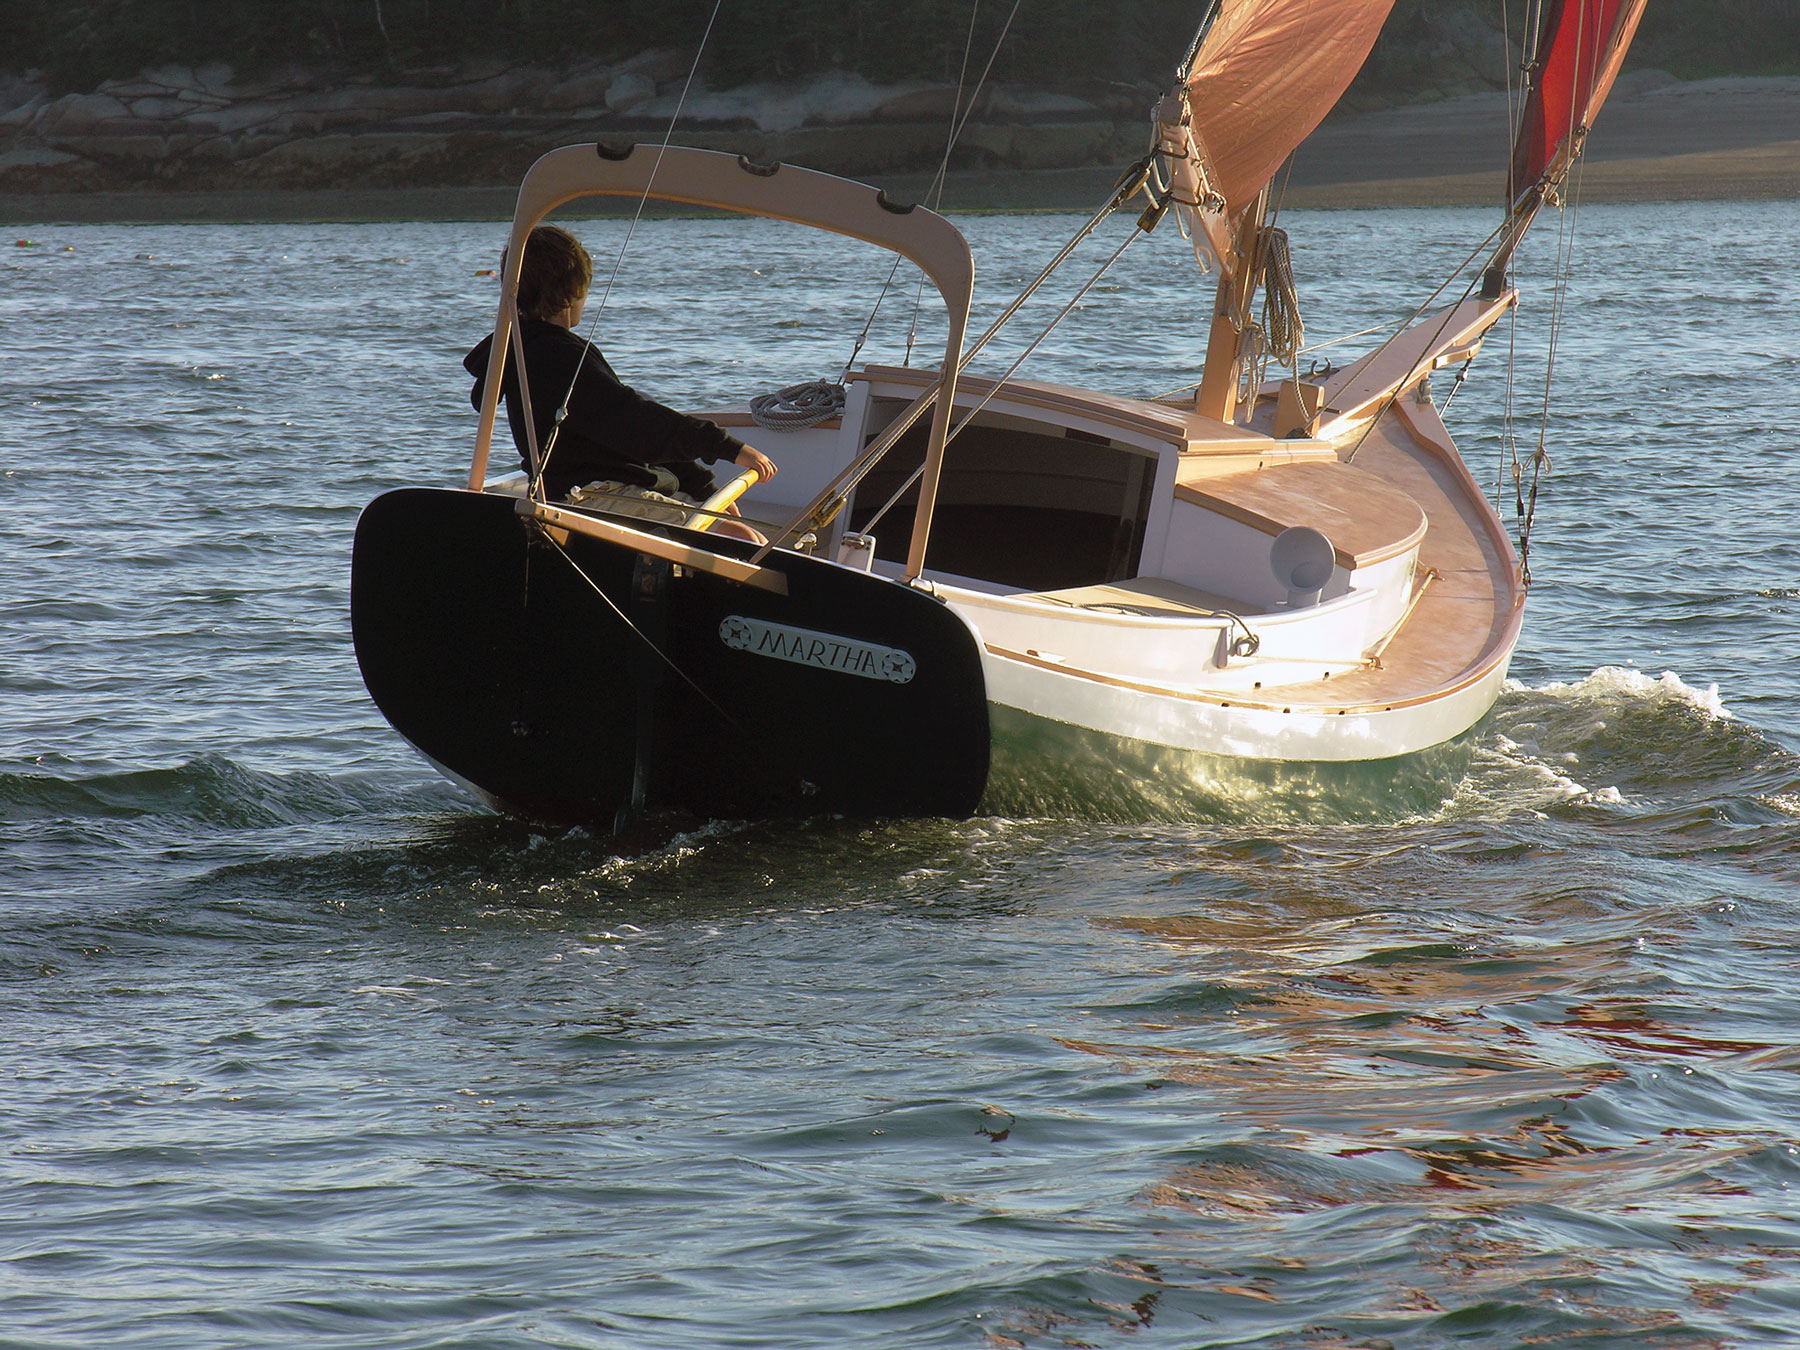
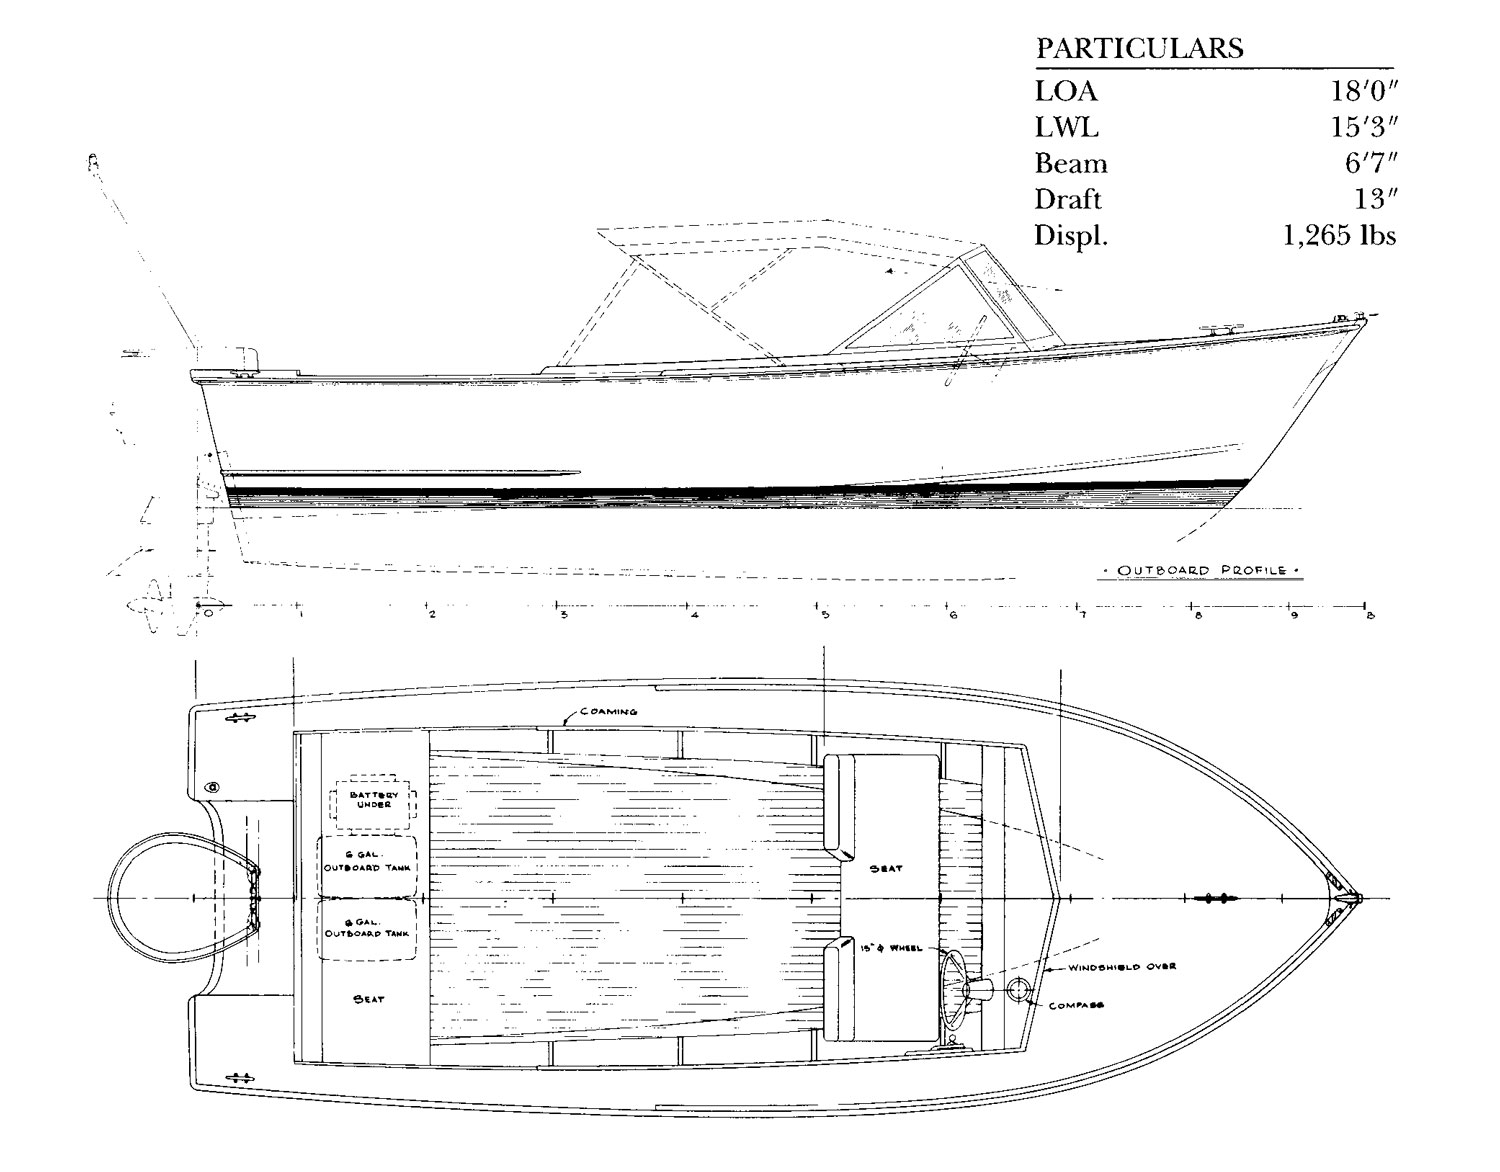
Although she’s only 20′ long and displaces about two tons, MARTHA feels like a big boat and will accommodate two for a weekend excursion. At the end of the season, you can haul her home with a small truck.
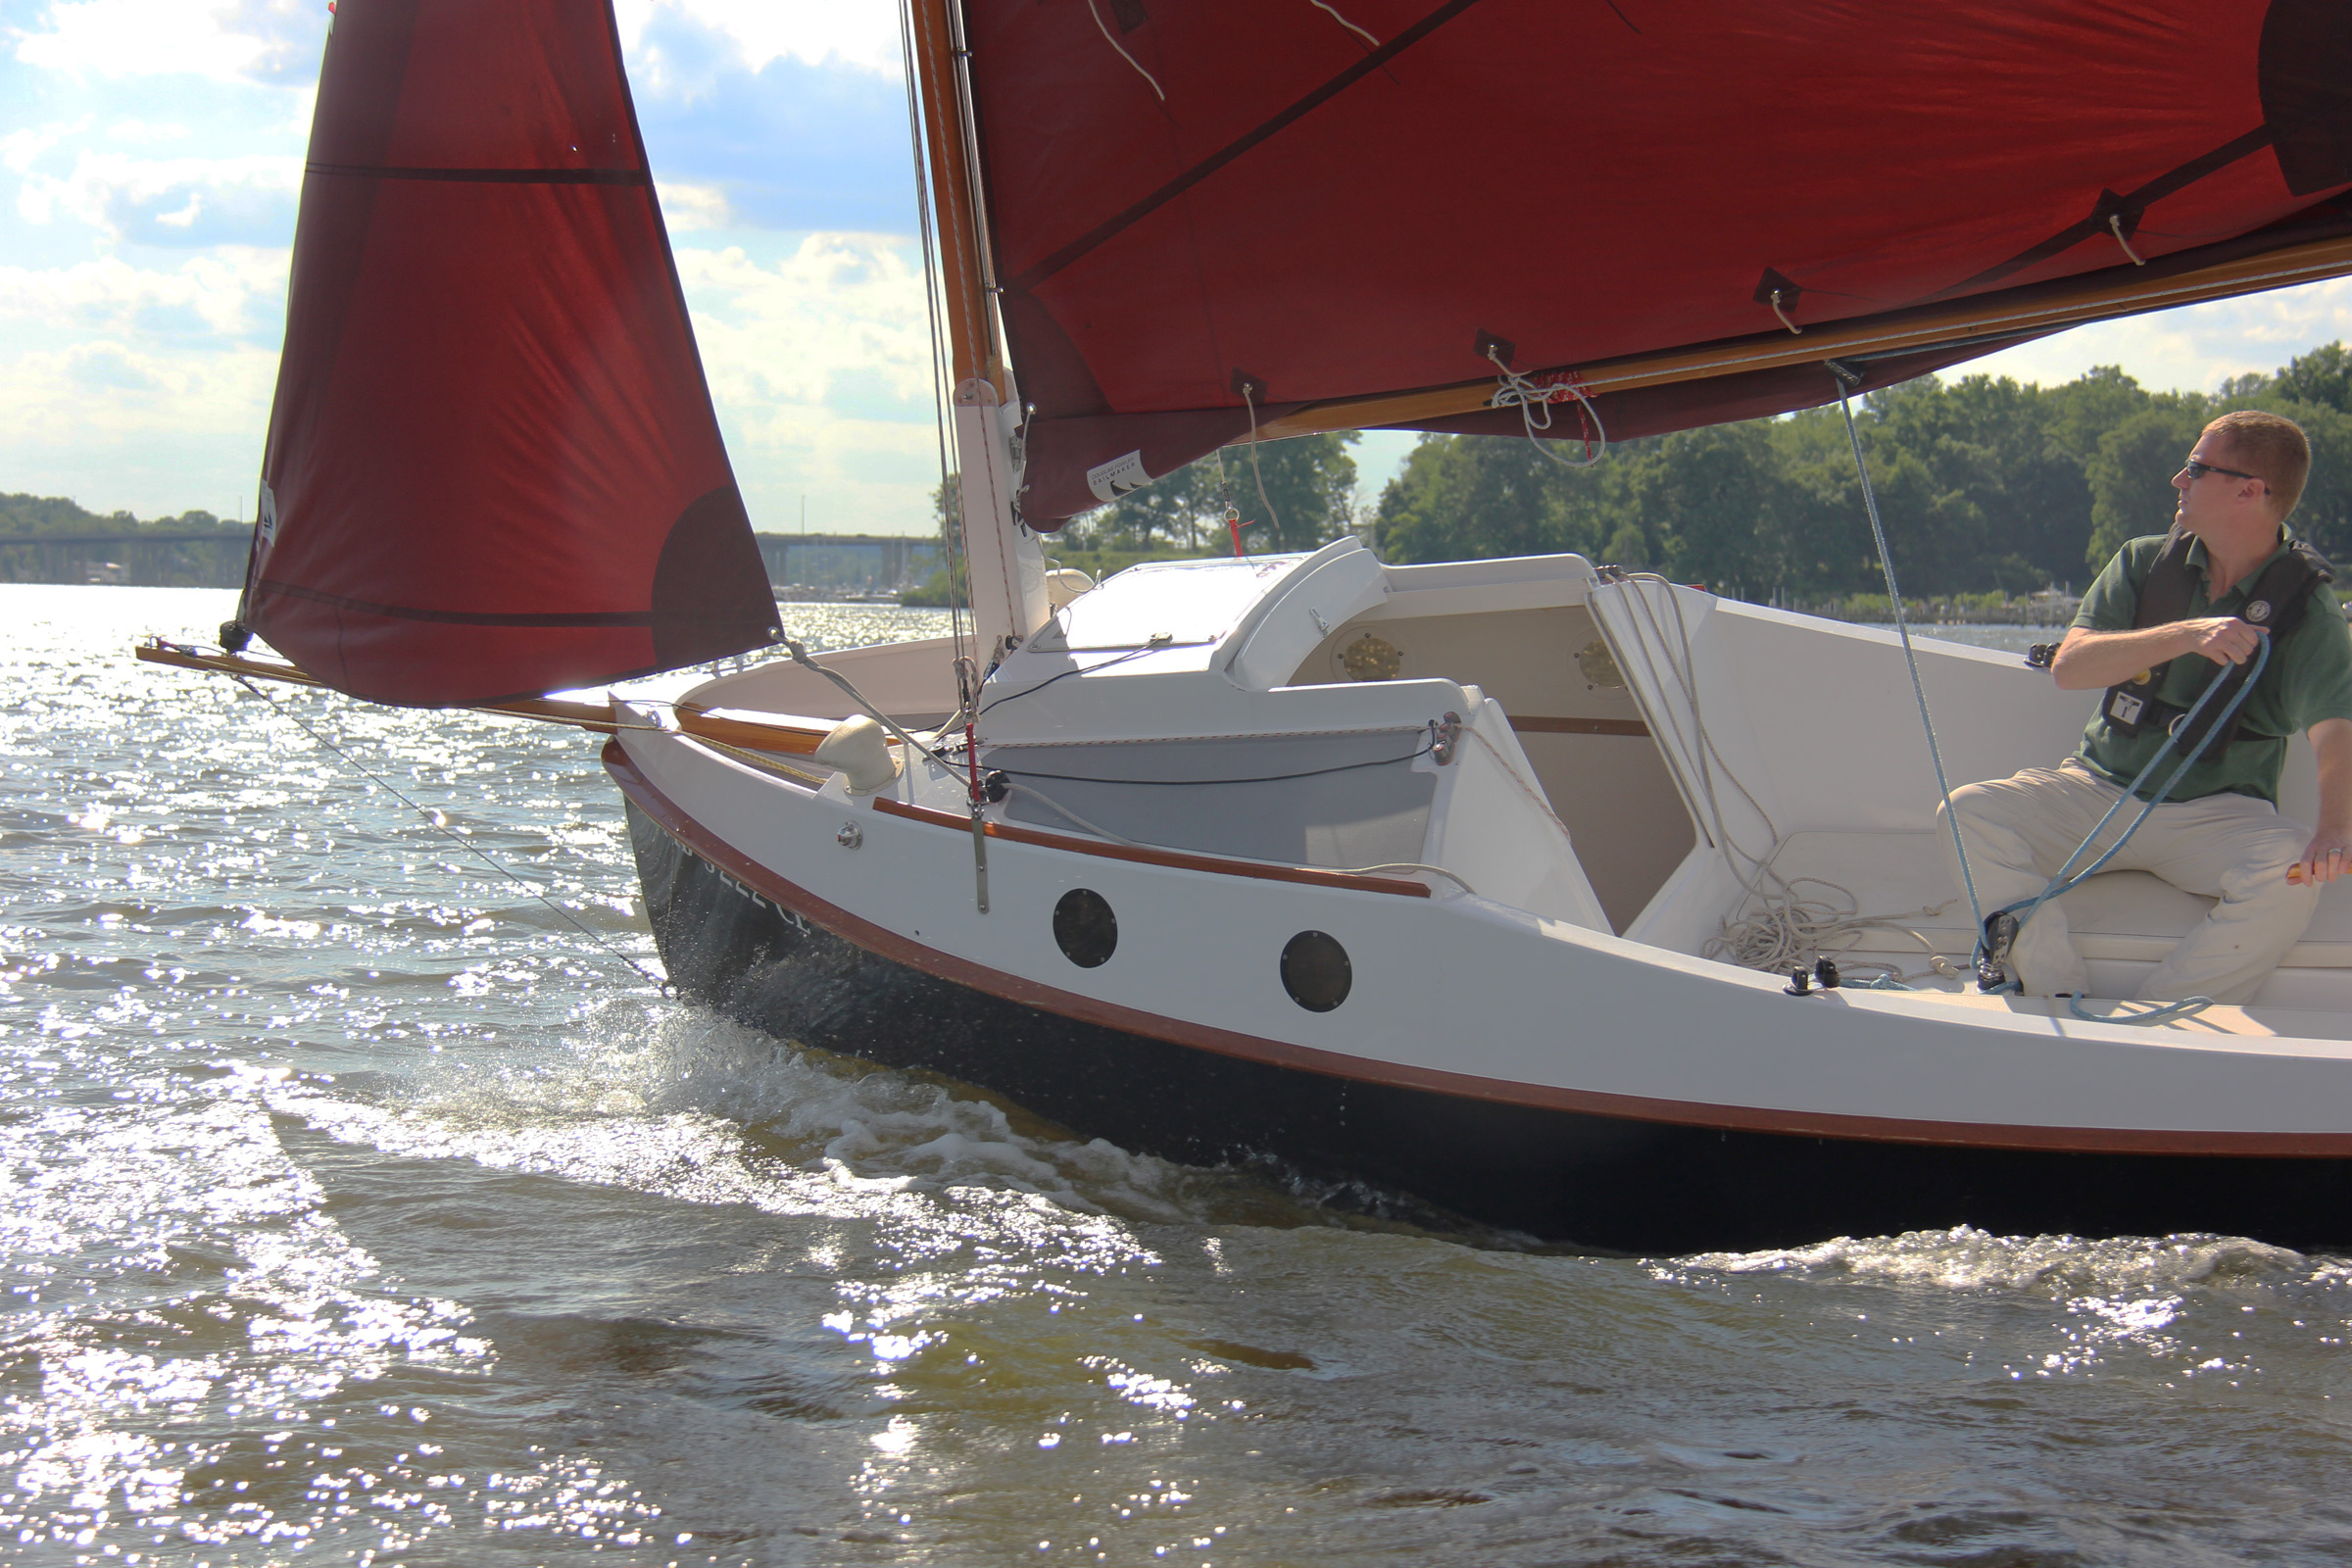
"Is that a PocketShip?” Even though it was the first time I had ever launched my PocketShip, it was not the first time a stranger had approached me to ask about it. This stranger turned out to be very familiar with the design, having followed it since Chesapeake Light Craft introduced it. What would prove to be the usual suite of questions followed: Did I build it myself? Plans or kit? How long did it take? How does it sail? He expressed his enthusiasm for the PocketShip and his dream to build one.
Jon Lee
The PocketShip was designed to be towed by a modest car with a four-cylinder engine. The full-sized sedan here is more than up to the task.
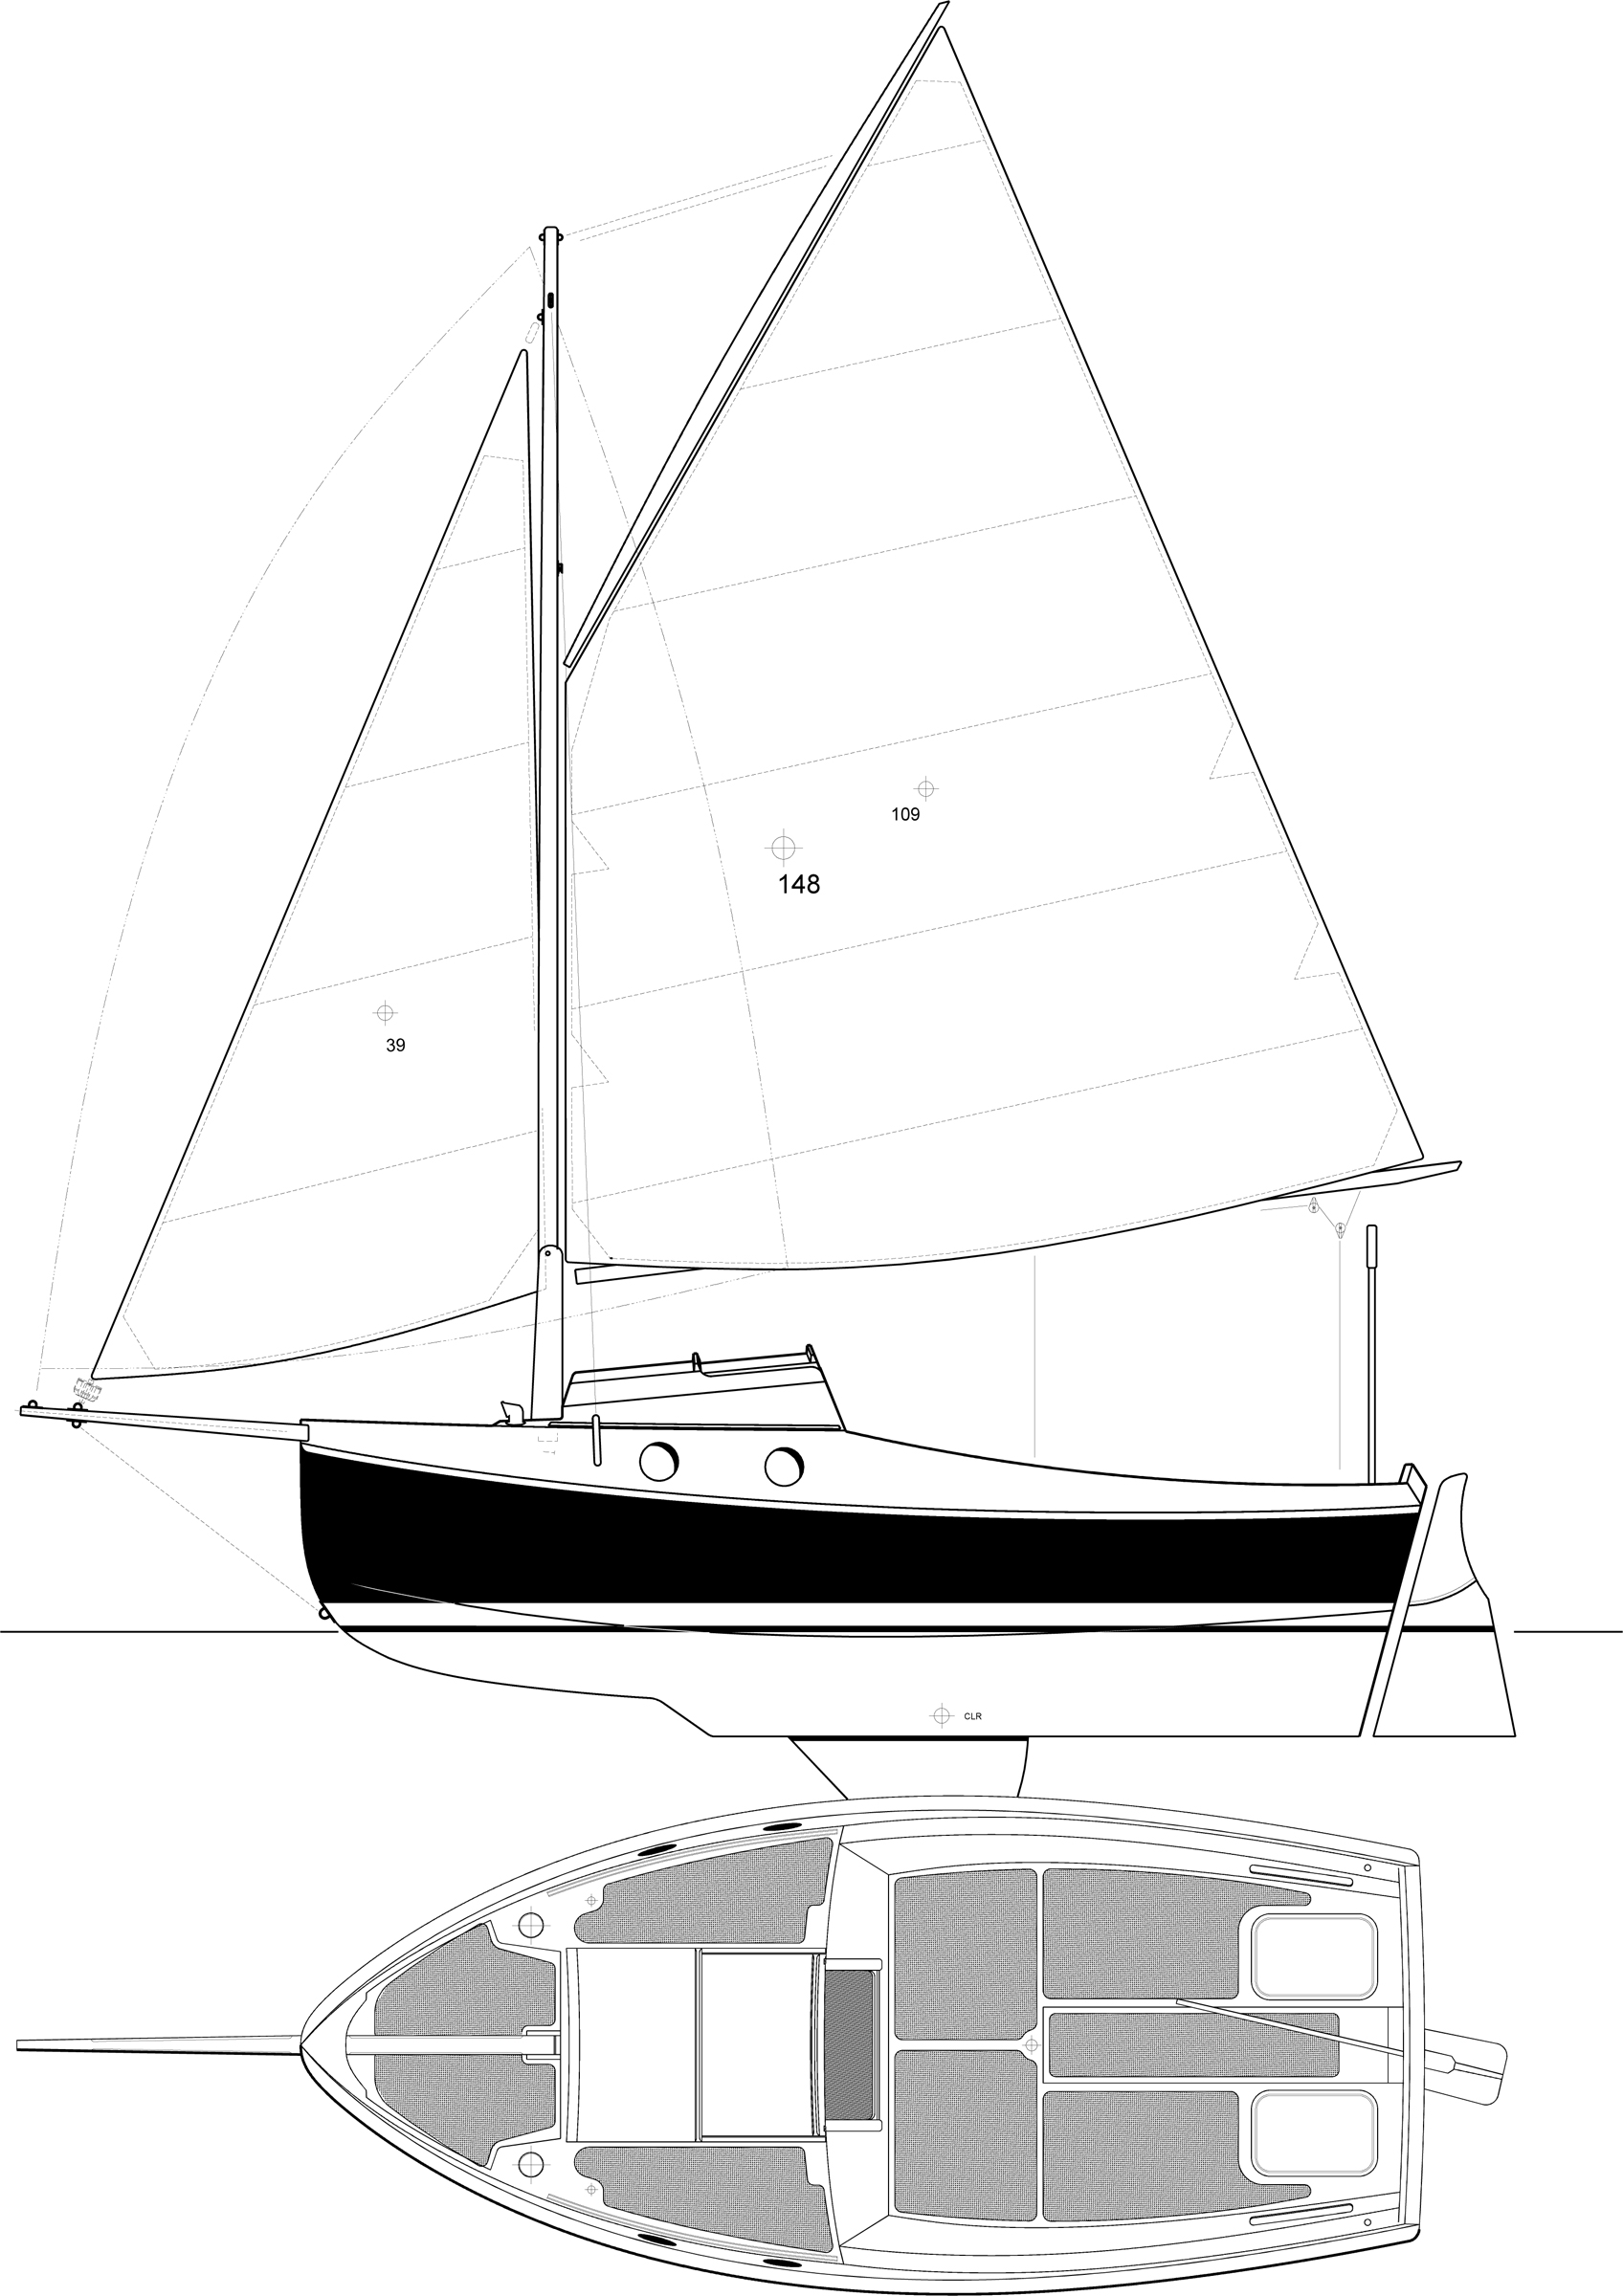
John Harris, the proprietor of and chief designer for Chesapeake Light Craft, designed the PocketShip as his personal boat. “I’d owned a production fiberglass pocket cruiser, which sailed well but was hellish uncomfortable,” he explained. “I had a hunch that I could design a sailboat with a 15′ length-on-deck that not only sailed extremely well, but was ergonomic for someone of my 6′ 1″ height.” The boat had to be light enough to tow to Florida behind his four-cylinder car, fast and seaworthy enough to sail overnight to the Bahamas, and commodious enough for a week’s cruising once there. He drew a centerboard gaff sloop with a doughty profile. The waterline length is 13′ 8″, and the boat weighs around 1,200 lbs when rigged, ballasted, and loaded with provisions. John packed a lot of boat into a small, well-balanced package.
Jon Lee
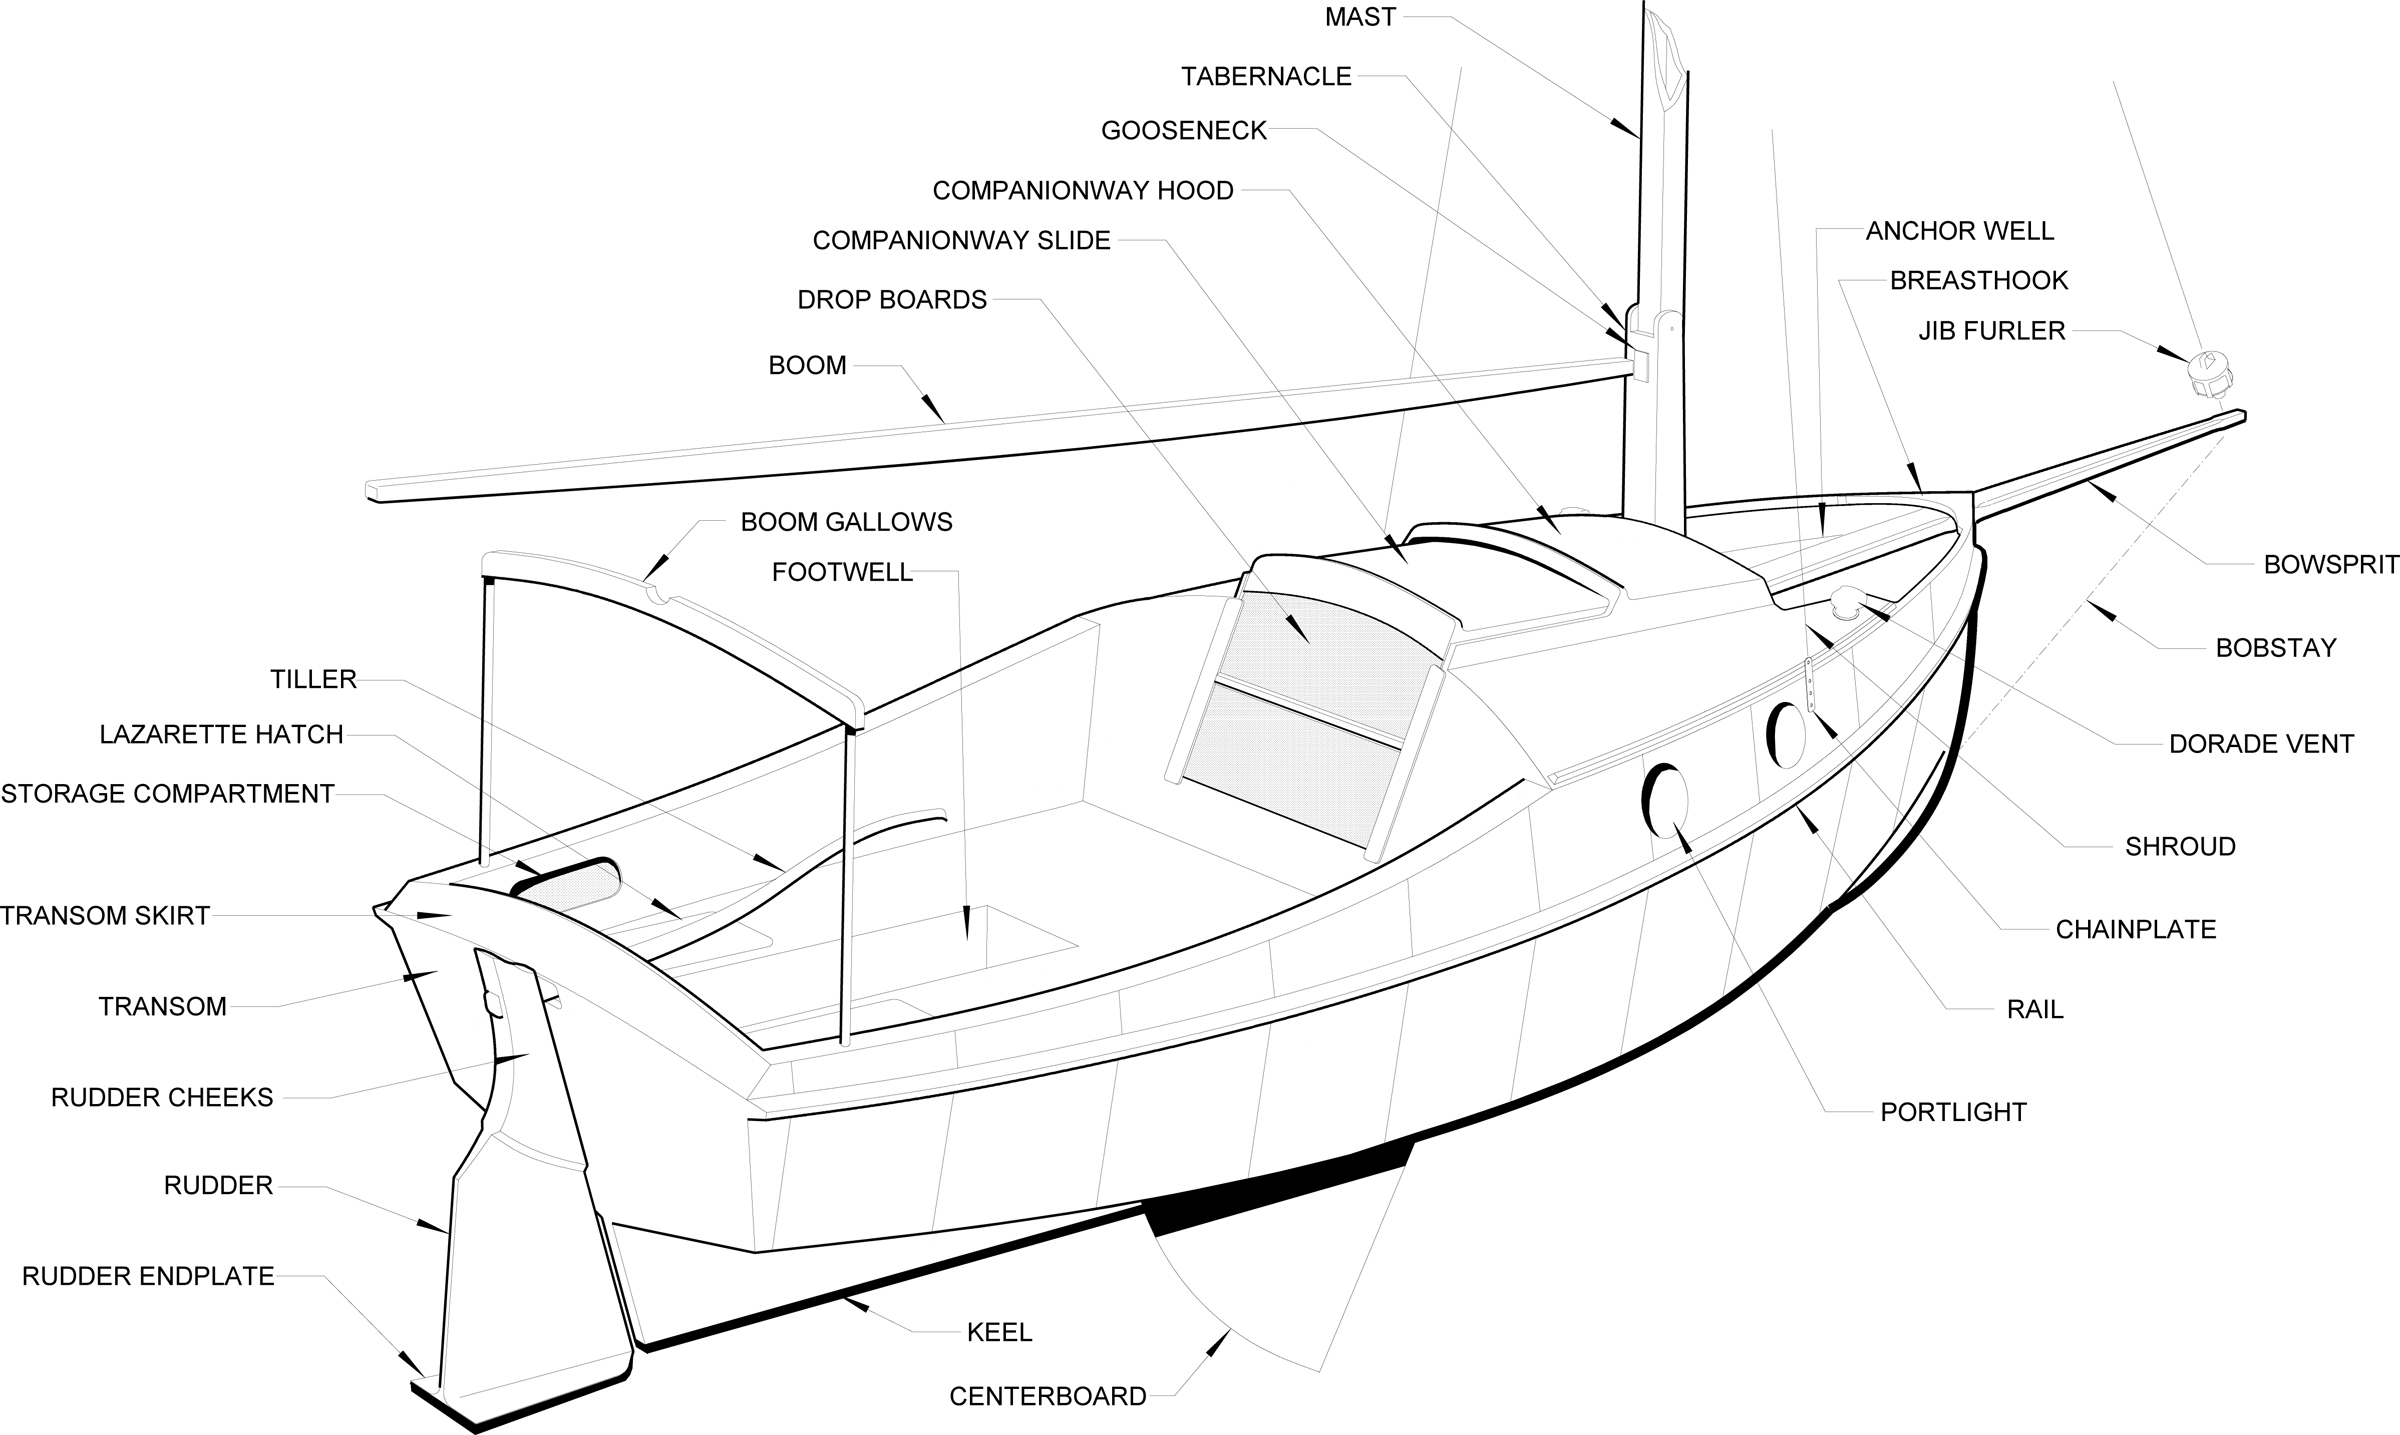
The boom gallows catches the boom and gaff when the main is lowered.
The PocketShip struck a chord with amateur boatbuilders, and a flurry of interest from potential customers led John to add the design to the CLC offerings. The promise of big-boat cruising adventure in a petite, built-it-yourself, trailerable package proved irresistible to many, and at last update more than 300 kits and plans have shipped to locations around the world.
The PocketShip is a do-it-yourself project with a scope and complexity that a handy amateur can readily contemplate. It is available as a kit with CNC-cut plywood parts, epoxy, epoxy thickeners, fiberglass, drawings, and manual. Hardware, timber, and sails are available as optional packages. I built from CLC’s plans, huge rolls of paper with full-sized patterns for nearly all parts. The 280-page manual is a masterpiece, with minutely detailed instructions, readable prose, and clear photographs and illustrations. While PocketShip is best for the intermediate-level amateur, the quality of the manual has enabled complete novices to build fine PocketShips.
I built my PocketShip in a one-car garage over the course of two years. When I decided to order plans instead of a kit, I felt that I had to cut out all the wood myself in order to claim I had built my own boat. If I were to do it over again, I would build from a kit; it would get the build started faster, produce more precise work, and still require enough labor to provide a legitimate claim to a self-built boat.
Jon Lee
The 2.5 hp four-stroke outboard is the maximum recommended auxiliary power. A larger outboard would add an unnecessary burden to the transom.
The PocketShip is constructed using the stitch-and-glue plywood method. Having built two kayaks before the PocketShip, the basic techniques were familiar to me, and the hull went together much like a giant, complex kayak. I picked up some new skills such as scarfing plywood (the kit uses CNC-cut puzzle joints), melting lead for the keel, and rigging the sheets, halyards, and stays. The manual always kept things from getting intimidating; it breaks down the building into a series of small, achievable tasks, most of which can be completed in weeknight sessions. Some things, such as the big fiberglass jobs, are best reserved for weekends.
courtesy of Chesapeake Light Craft
For the performance-minded sailor, the optional spinnaker adds power for sailing off the wind.
Construction begins with the keel assembly, which includes the centerboard trunk and has two compartments, one at each end of the trunk, that are filled with 108 lbs of lead, melted and poured in. (Another 150 to 200 lbs of ballast—bags of lead-shot—will later get set in the bilges of the completed boat.) The finished keel assembly is dropped into a building cradle made of two female molds. The hull bottom and sides are then dropped in and wired together with temporary 18-gauge-steel wire stitches. Next, an array of plywood bulkheads and floors are stitched in place. The joints are then permanently bonded with big epoxy fillets and the entire interior is sheathed in fiberglass. The decks and topsides are also stitched, glued, and ’glassed. There are a few fiddly bits of carpentry along the way, where timber needs to be cut at a complex angle, but these tasks tend to be welcome breaks from the epoxy work.
The mast is a tapered hollow box, built up from four 16′ spruce staves. The bowsprit, boom, and gaff are all solid timber with rectangular sections, milled down to attractive tapers. While traditional in appearance, the rig is fairly modern in the details, including a roller-furling jib and sail track for the main. Rigging requires a wide variety of blocks, cleats, and eyestraps, and careful routing of the running rigging.
Getting the PocketShip to the launch site and out sailing is a breeze. For easy trailering, the mast is stepped in a tabernacle and folds down onto the boom gallows. On reaching the launching ramp, you start by casting off the tie down that secures the mast to the boom gallows. The bobstay also must be shackled to the bow eye, unless the geometry of your trailer permits it to remain attached. Standing in the cockpit, you thrust the mast upward toward vertical and haul in on the jib halyard, which does double duty as a forestay, pivoting the mast into place. Once the boat is in the water, drop the centerboard and slide the mainsail onto its track. When this process is well-rehearsed, it is possible to be underway within 10 minutes of arriving at the ramp.
The boat is designed with singlehanding in mind, with all lines, including the jib’s roller-furler line, led to the cockpit. For a relatively heavy displacement boat with a 13′ 8″ waterline and 6′ 3″ beam, the PocketShip has surprisingly inspired sailing qualities. John Harris likes his PocketShip to sail fast, and worked hard to get as much speed as he could out of this little vessel. The hull lines are fairly refined and carry a good dose of racing dinghy in them. The boat has a single hard chine, a V bottom, and a surprisingly fine entrance. If it were not for the 268-lbs of ballast required to keep her on her feet, it could probably be induced to plane quite readily. The ample sail area adds to performance; with a 109-sq-ft main and a 39-sq-ft jib, the boat has no shortage of power.
courtesy of Chesapeake Light Craft
The prudent reefing and PocketShip’s ballast, over 250 lbs divided between the keel and bilge, lets the skipper sail while safely seated in the cockpit.
For a gaff-rigged boat, the PocketShip is close-winded, able to sail to within right around 50 degrees of the wind. A beam reach is where it really shines. The boat almost effortlessly plunges forth at a sprightly 5-ish knots and settles into a groove that yields delightful sailing. At speed, the PocketShip will plow jauntily through chop, and is stable and confident in rough conditions. Full sail can be carried up until the wind hits 10 to 12 knots; above that, a single reef will calm the boat down substantially without sacrificing any speed.
With its large sail area, a PocketShip will propel itself in even the lightest of airs. If currents are a fact of life in your home waters, however, a 2- to 2.5-hp outboard motor, hung on a mount fixed to the transom, is essential. The boat is easily driven and zips along under power. The manual notes that a pair of oars and a yuloh are auxiliary power options, good for a couple of knots, and though accommodations for them are not included, they would be easy enough for the builder to add.
Jon Lee
The cockpit foot well is kept to a minimal but functional size to make more room in the cabin for storage and sleeping.
The cockpit is roomy enough to accommodate three or four adults. It is an expansive and comfortable space, almost as well suited to lounging about as a living-room couch. The narrow, shallow footwell is a compromise with the sleeping accommodations below it, but the PocketShip’s cockpit is perfectly functional.
Jon Lee
The cabin provides sleeping quarters with the extensions, to left, under the cockpit seats.
The cabin has an open layout; you sit or sleep directly on the floorboards, with legs extended aft under the cockpit. At the forward end of the cabin there is a large storage area, and additional space aft, below the cockpit decks. There are comfortable sleeping accommodations for two full-grown adults. Though the cabin is small, it is possible to spend time below without discomfort, as I discovered during one very rainy weekend.
Jon Lee
The PocketShip performs well in light air, and when the winds fail, it is light enough to be propelled by sculling or rowing if the builder choses to rig the boat for oars.
There is a degree of celebrity that comes with sailing a PocketShip. A PocketShip owner gets used to being photographed out on the water, complimented at the dock, and peppered with questions at boat ramps. On a recent trip to Friday Harbor in Washington’s San Juan Islands, my PocketShip looked Lilliputian moored next to the long rows of enormous, glittering, white production cruisers. Yet, the tourists walking the docks were inevitably drawn to my little red boat. I had to abandon my plan to lie about and read, and instead respond to the stream of questions and compliments that the boat drew. While the monster yachts that surrounded me had galleys, settees, even televisions, one little boy stood wide-eyed, marveling that such a little boat could have windows!
The PocketShip has indeed gained a following. With stout and shippy good looks, delightful sailing performance, and micro-cruising comforts all rolled into one built-it-yourself package, it is a following that is well-earned.
Jon Lee of Everett, Washington, is a full-time engineer, sometime amateur boat builder, not-enough-time sailor. He built his first boat, a self-designed rowboat, during grad school. In the years since, more boats followed, while Jon swore he could quit anytime he wants. His greatest claim to fame is successfully leading his boatbuilding team to two successive last-place finishes in the Edensaw Boatbuilding Challenge at the Wooden Boat Festival, and loving it.
This issue marks the 10th anniversary of the launch of Small Boats in September 2014. With this September issue, the number of articles published has risen to around 1,000, all of them available to subscribers under “Issues” in the menu bar above. This ever-growing resource for our community is both for our readers and from our readers. Almost without exception, the articles are written by boaters who have some hands-on experience or knowledge that they have been moved to share with our community. A majority of our contributors have never before written for publication. Their sense of shared purpose, at the heart of what we call Small Boats Nation, has allowed this publication to thrive over the past 10 years. Your participation is as welcome as it is essential for guiding Small Boats through the decades to come. All it takes is an email.
A Change of Watch
In February 2014, I received an email from Matt Murphy, the editor of WoodenBoat. The subject line read: “If asked, would you serve?” I had an answer even before I opened the email—WoodenBoat had been my favorite magazine since I built my first boat in 1977. “For some time now,” Matt wrote, “I’ve been thinking of how WB might adapt our print annual Small Boats content into a digital magazine–a monthly, perhaps. The idea is gaining traction here.” He provided a brief outline of the content of the new publication and asked if I was interested in being its editor. I was already quite proud to have had several articles published by WoodenBoat and to have been an instructor at WoodenBoat School. Working for WoodenBoat as an editor focusing on small boats was beyond what I’d ever dreamed of. And Matt’s use of the word “serve” struck home. By accepting, I’d be taking on not just a new job but an opportunity to be a part of something I believed in and admired.
Matt had emailed his invitation shortly after I’d launched my last issue as the editor of Sea Kayaker magazine. That job had also started with an invitation from an editor. That one came in a phone call in 1989 from John Dowd, Sea Kayaker’s founding editor, asking me to take over the magazine, then in its fifth year. I’d only written one article for Sea Kayaker, and I knew nothing about editing or publishing, but John had evidently been impressed with the editing I’d done of my own work. I took the chance and then stayed on for almost 25 years, until Sea Kayaker ceased publication in 2014.
As much as I’ve enjoyed my somewhat accidental 35-year-long career as an editor, at the age of 71, I’m now ready to spend a little less time at my desk and more time in my shop, aboard my boats, and with loved ones. But I have so valued working with the WoodenBoat crew, my connections to Small Boats readers and contributors, and the broader community of designers, builders, and users of small boats that I’ll remain on board as Editor-at-Large and continue to write articles.
Jenny Bennett, who has been the managing editor of Small Boats since 2022, will be taking over as editor. She has been an editor with Classic Boat, The Boatman, Maritime Life and Traditions, and WoodenBoat. She grew up sailing small boats and taught sailing in England, Greece, and at WoodenBoat School. Now living on an island on the Maine coast, she owns an 8′ skiff, an 11′ sailing dinghy, and an old 16′ gaff sloop. Small Boats will continue on a steady course with Jenny at the helm.
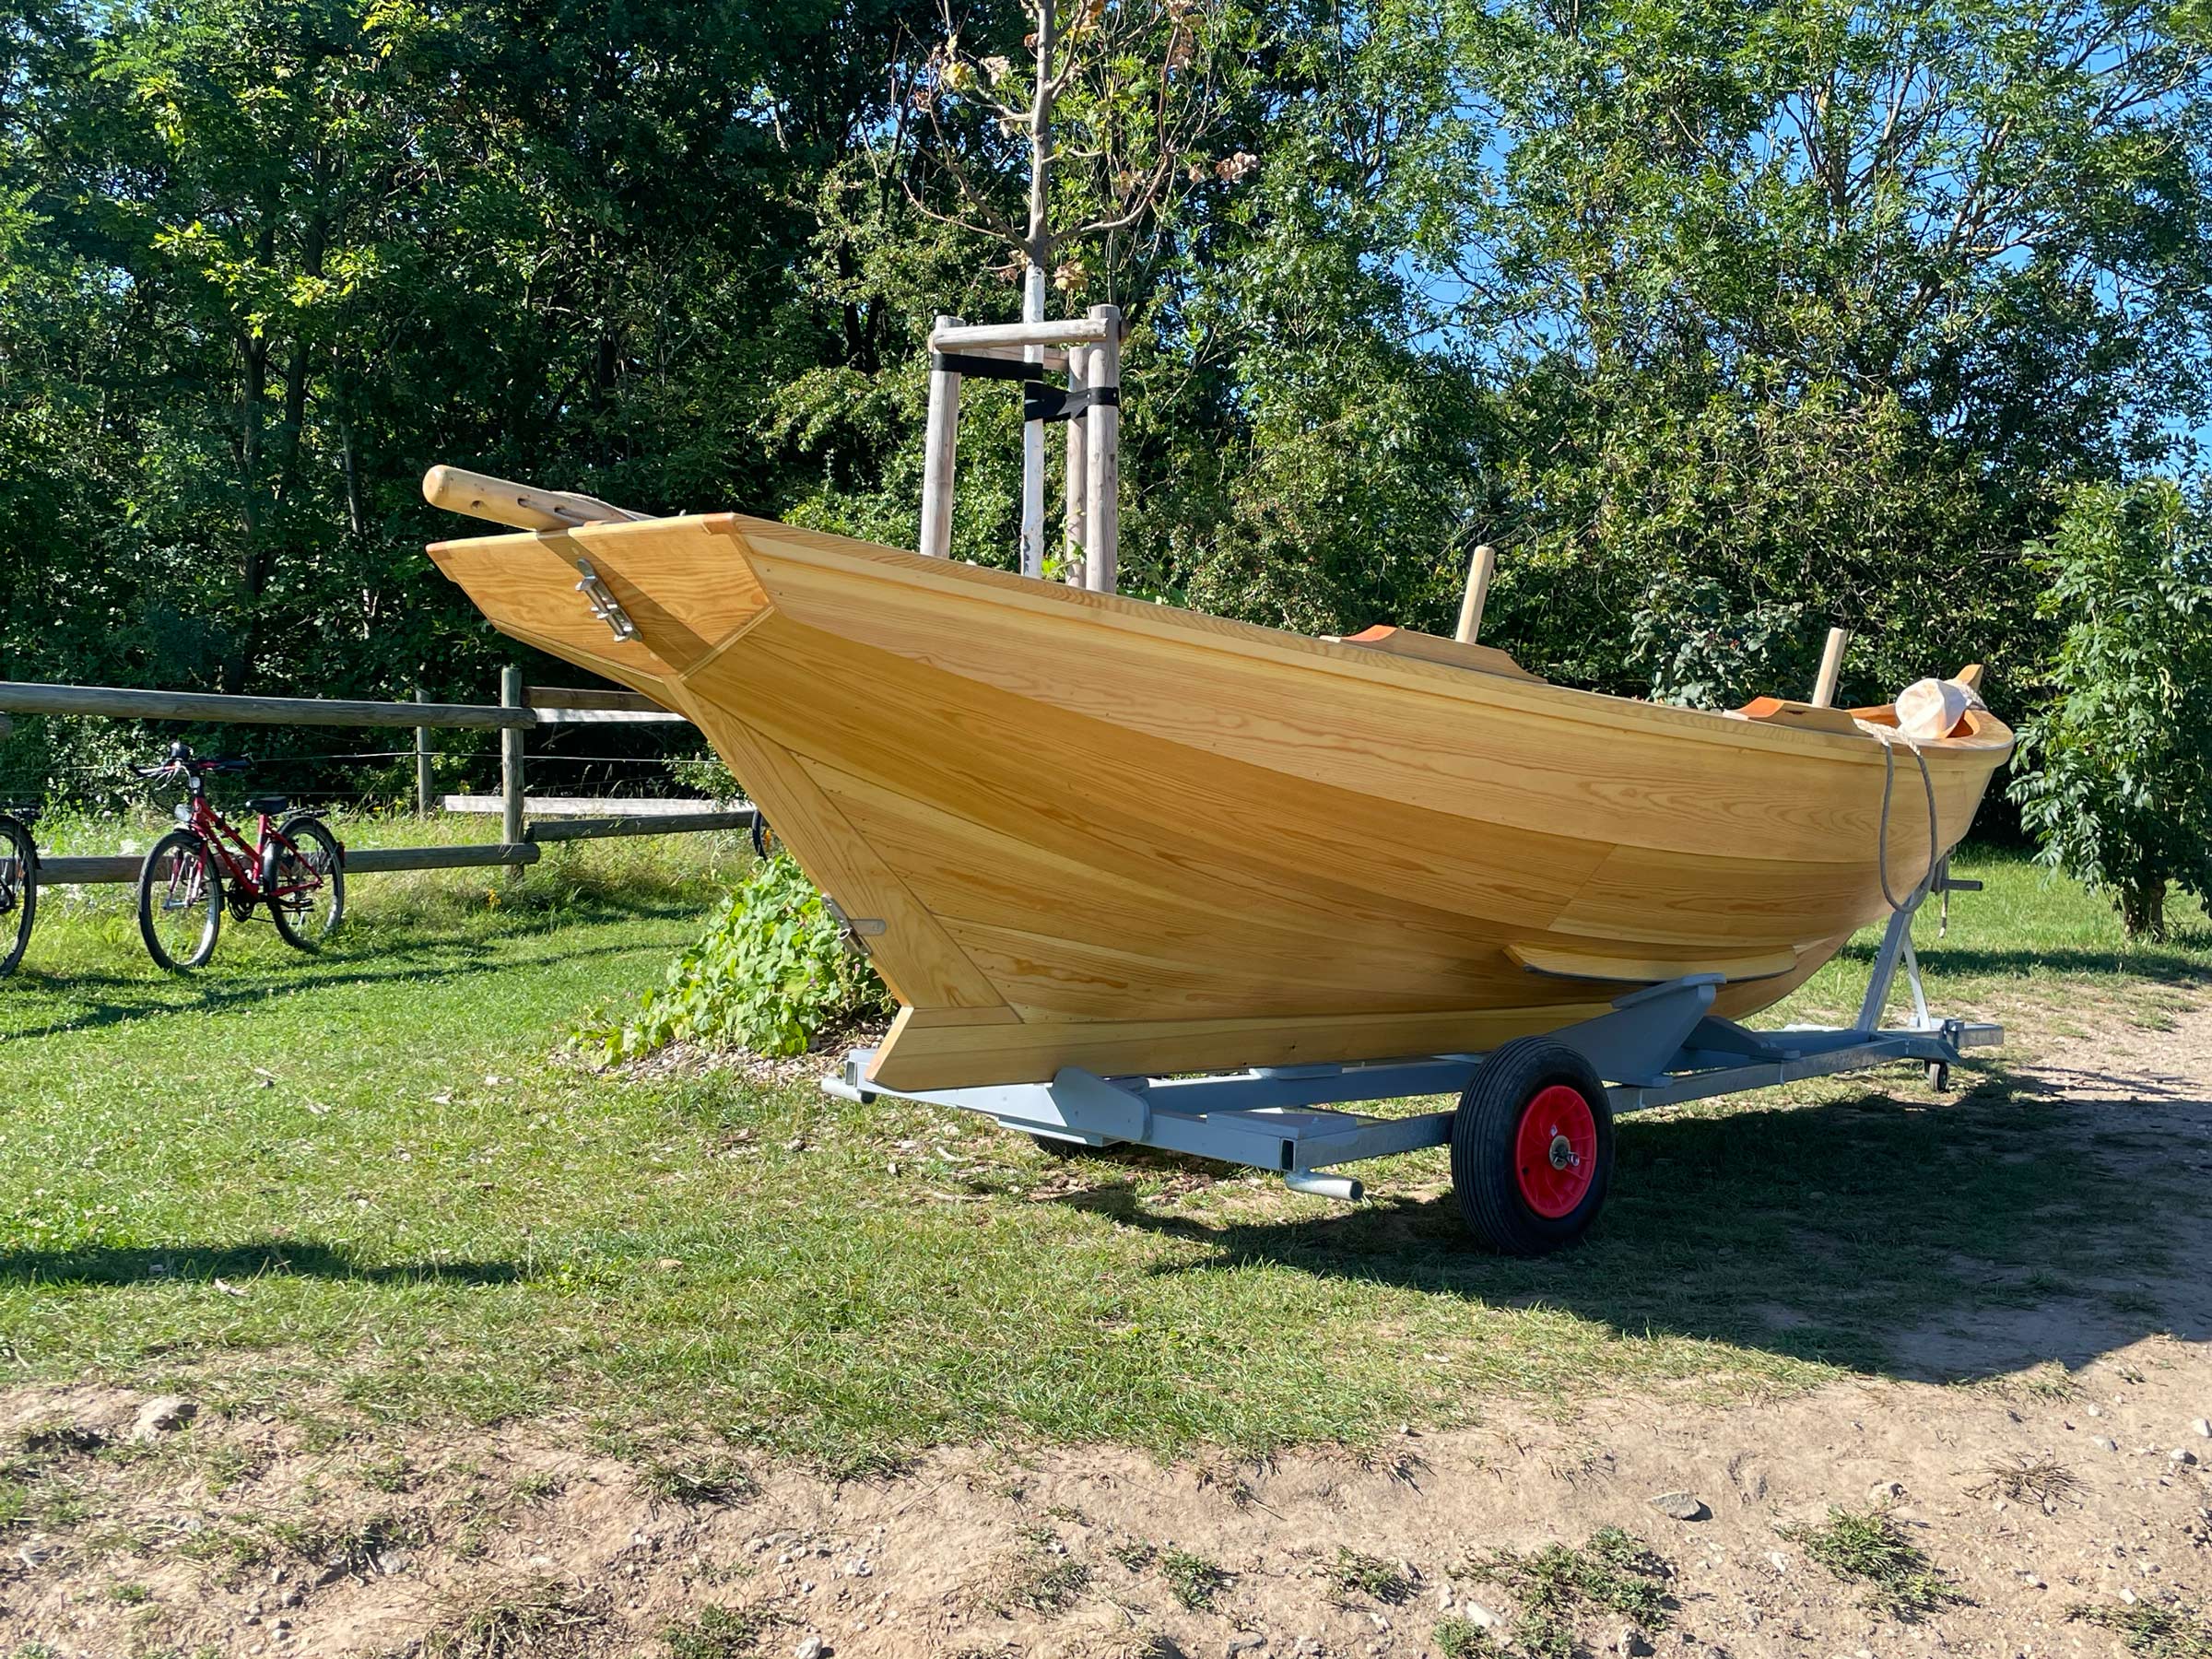
The Blekingseka is a traditional boat that has its origins in the Blekinge archipelago near Karlskrona on Sweden’s east coast. Eka is the Swedish term for an open boat characteristic of the region, typically featuring a small, raked transom above the waterline. These boats generally have ranged in length from 14′ to 23′.
The original 14′ eka, on which today’s building plans are based, was built by Bröderna Mårtenssons Båtbyggeri (Mårtenssons Brothers Boatbuilding) on the island of Östra Hästholmen, an island 6 miles to the southeast of Karlskrona. The boat was commissioned in 1970 by Hans Hanson, a resident of the island. He had ordered it with a motor but removed that shortly after the eka was delivered to him in 1972. The eka was measured and documented by Swedish boatbuilder Bertil Andersson. His plans show how the boat would have been constructed without a motor.
Sebastian Schröder
The original ekas were built of oak lapstrake planking on oak frames. I built mine glued lapstrake using 9mm Vendia plywood and pine. The construction technique removes the need for frames although I did fit timbers to support the floorboards, and hanging knees to support the gunwales.
The plans include four sheets of information about the eka’s origin and its equipment, such as oars, sails, and motor specifications. The sheets show the lines taken off by Andersson drawn at a scale of 1:10. In lieu of measured drawings or a table of offsets there is a PDF file meant to be printed out at full size (165″ × 36″) to produce full-sized patterns—with planking marked—for the keel, stem, sternpost, transom, rudder, and six frames.
The ekas were originally built entirely of oak. I decided to construct a glued-lapstrake hull using Finnish-made 9mm Vendia Marine Planking, and pine. I drew the frames as molds, which would be removed after planking, and installed floor timbers to support the floorboards, and hanging knees to support the gunwales. I used Iain Oughtred’s Clinker Plywood Boatbuilding Manual as a guide for the more contemporary construction. To facilitate the build on an upside-down frame with molds, I created a 3D model and slightly shifted the frames. I also added a removable third middle thwart to allow for rowing without interfering with the mast. Instead of using the mast stays indicated in the drawings, I opted for a slightly larger mast diameter of 90mm.
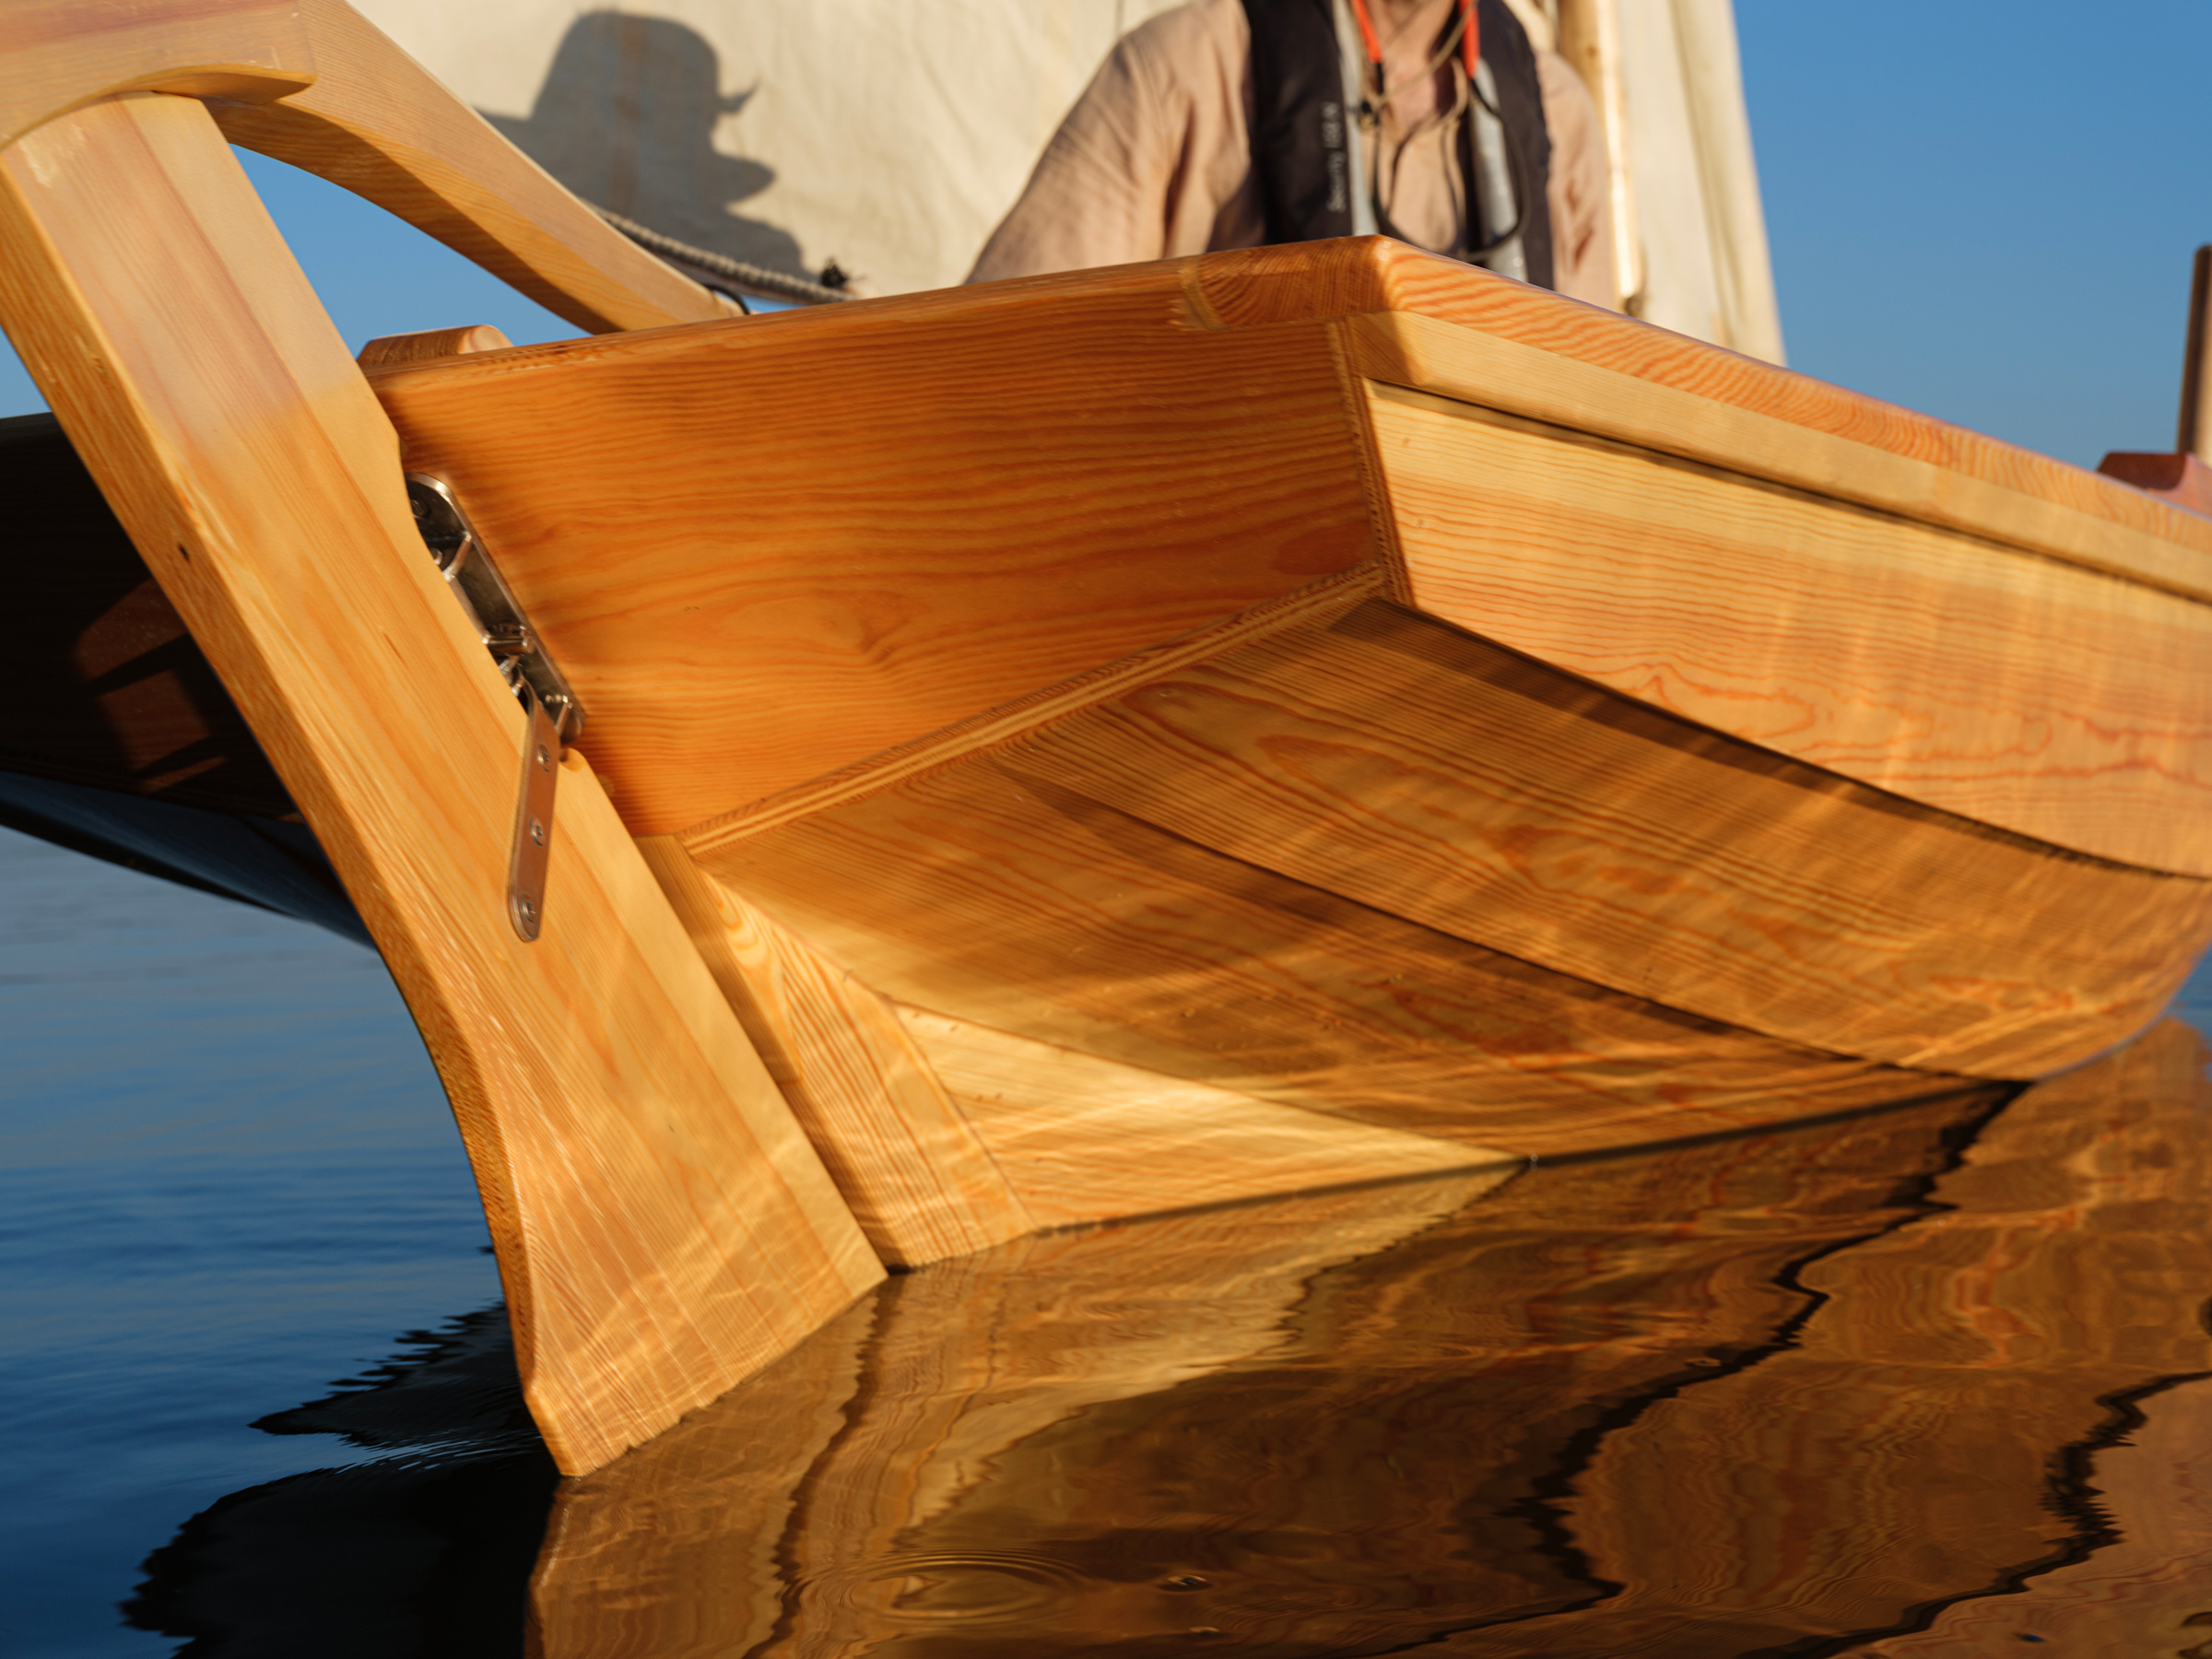
The one-piece sternpost is designed to run outside the boat below the waterline but inside the transom above the waterline, adding complexity to the construction—making it more suitable for experienced builders. Fitting the transom requires precise cutting, and the garboards have a strong twist aft. A heat gun worked very well to bend the 9mm Vendia.
Sebastian Schröder
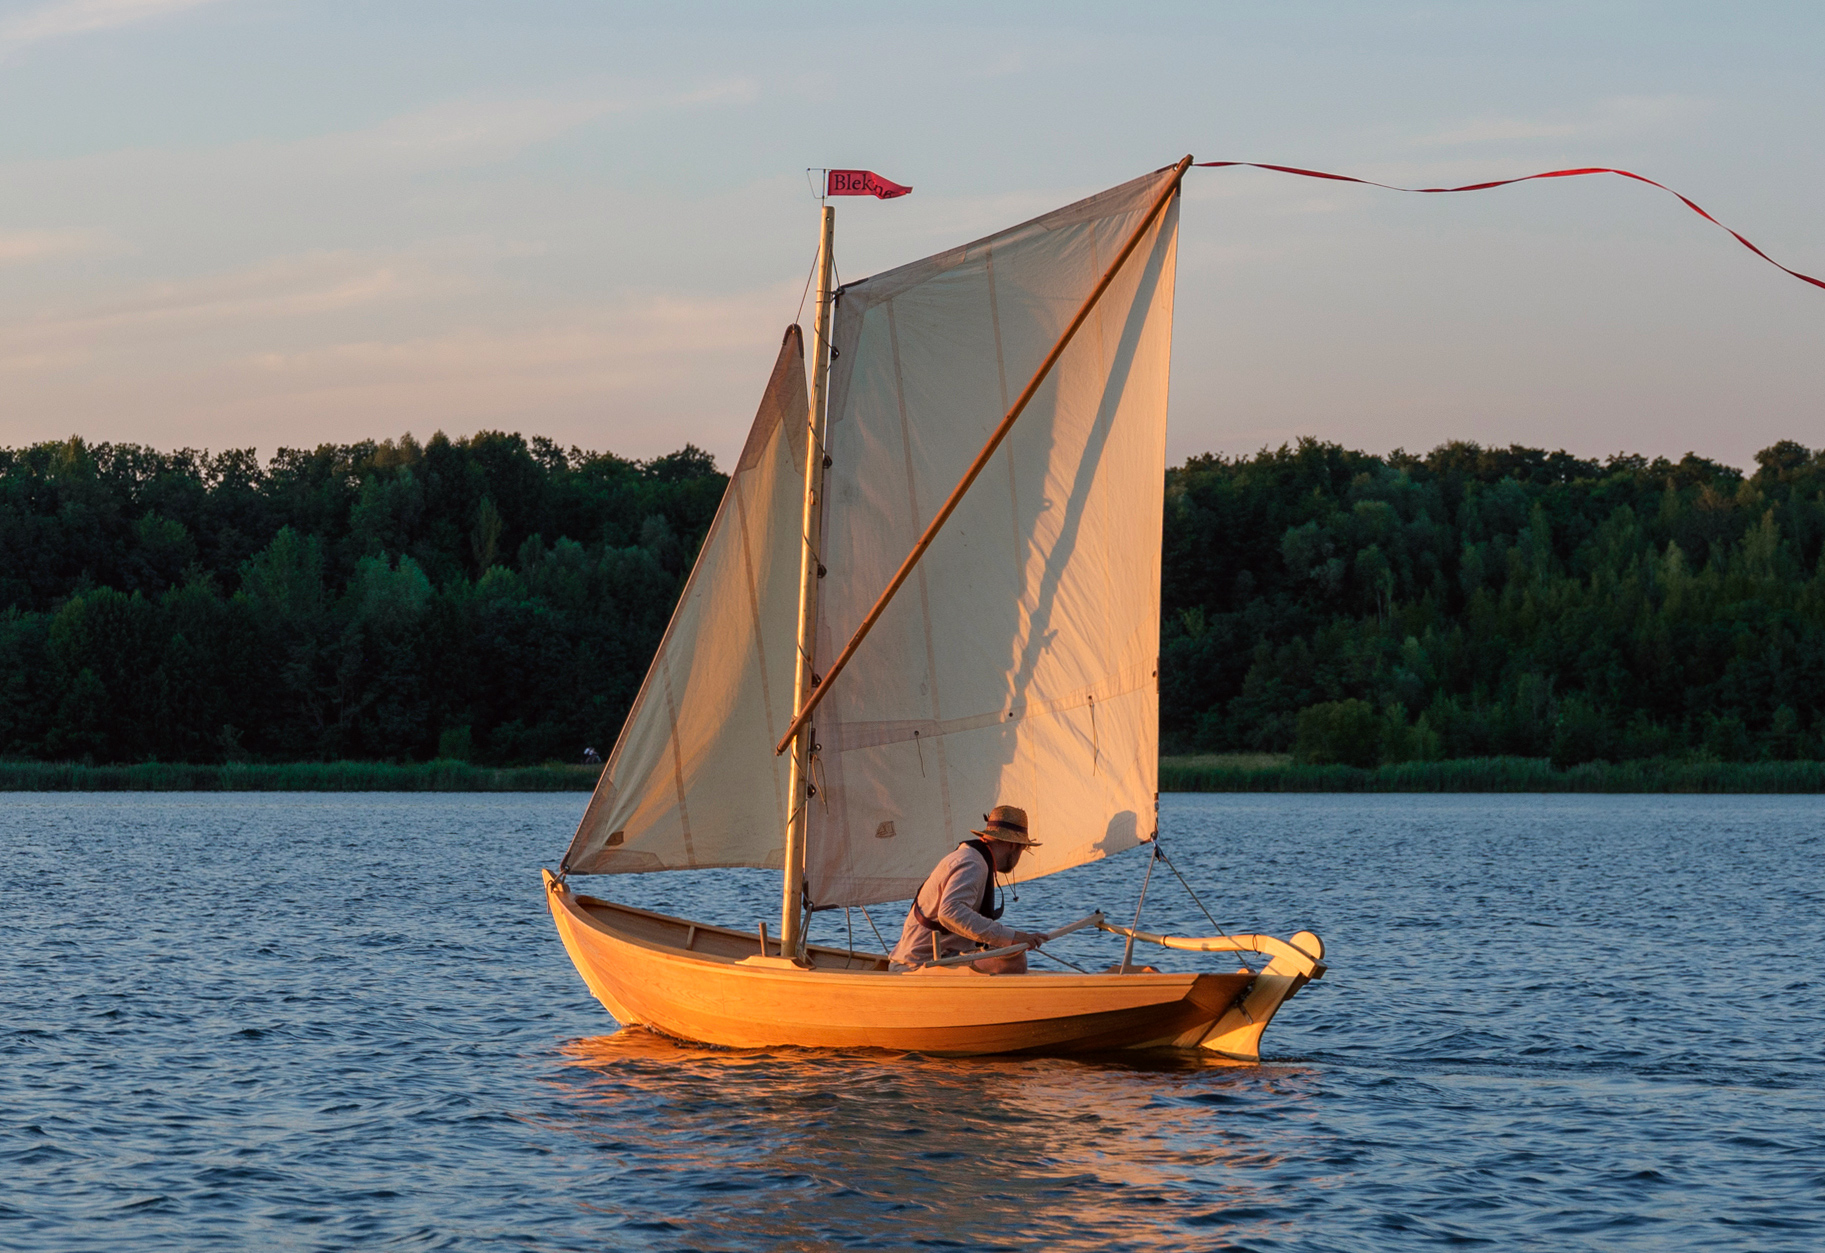
There is no centerboard or leeboard. Instead, the eka gets its fine tracking ability from its deep-V sections and its prominent keel. While not close-winded, it can comfortably tack through 120°. Its draft is only 15″ so it can be sailed in shallow water but when beached it won’t sit upright.
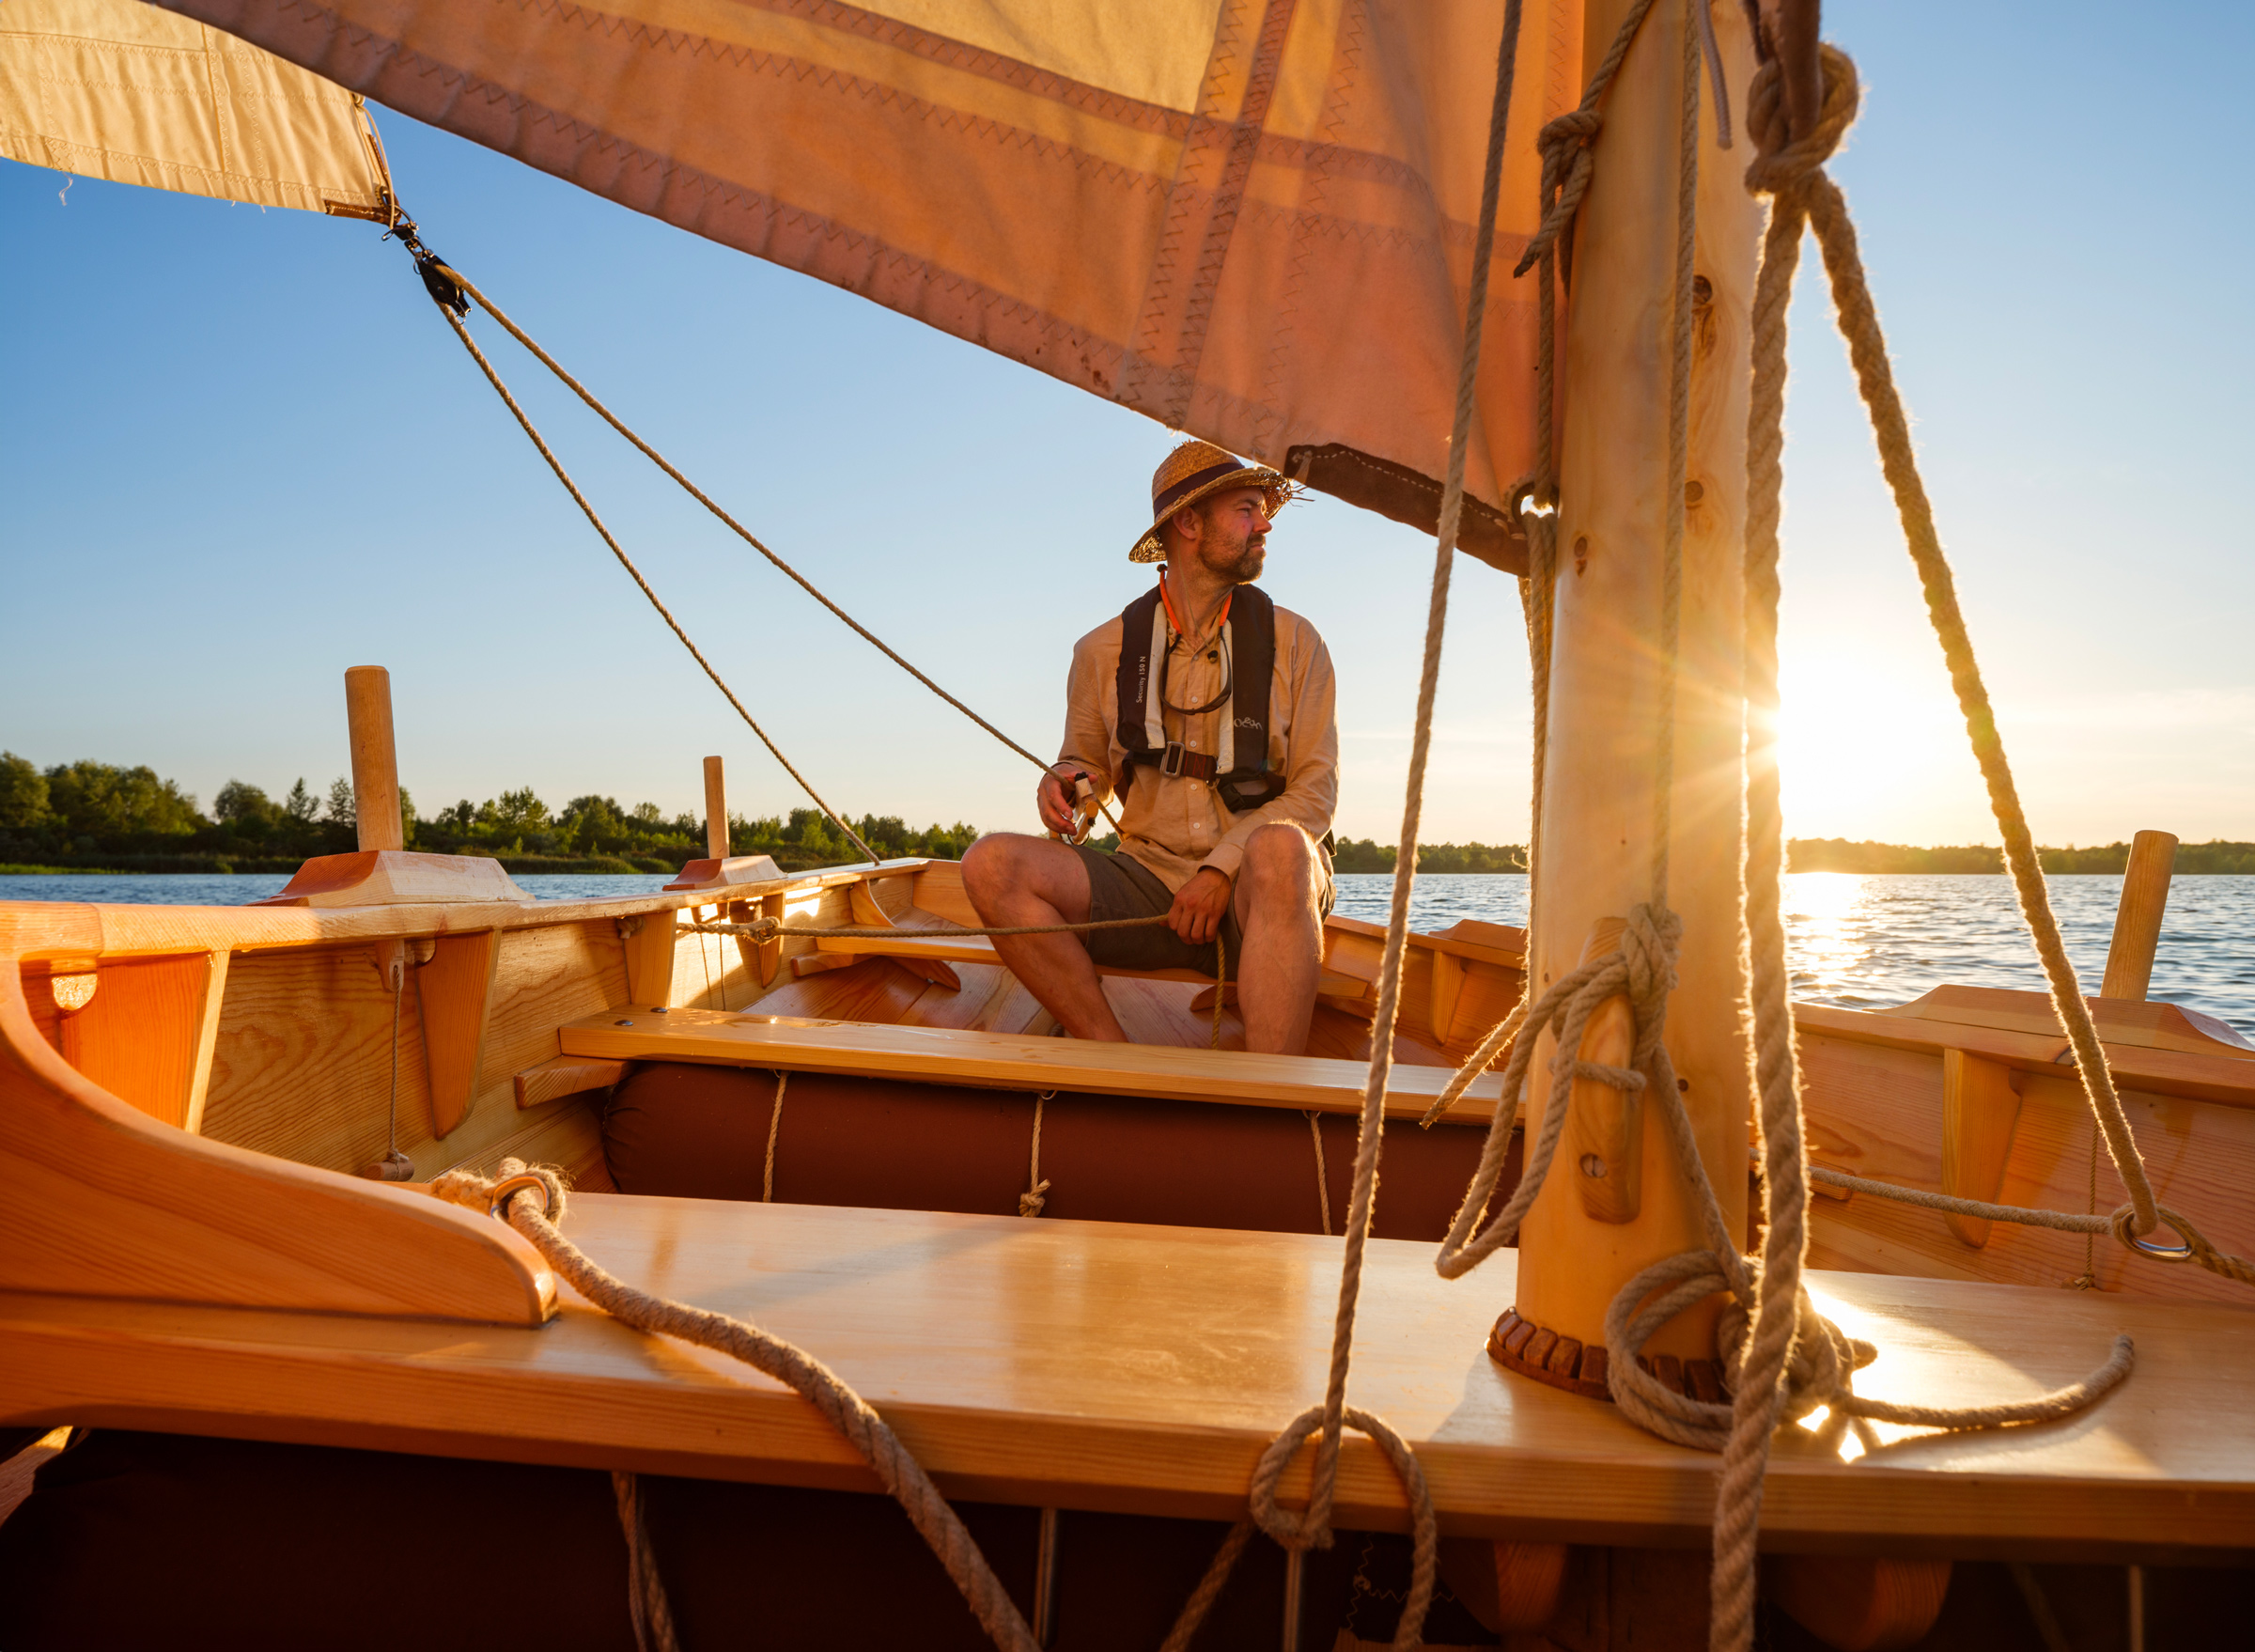
The finished boat is light and compact, making it easy to trailer. Rigging the unstayed 12′ 6″ mast is straightforward: the sprit mainsail remains furled and lashed to the mast, which just needs to be raised and set in a simple hole in the thwart that serves as a mast partner. The heel of the mast fits in a square hole in the transverse maststep, a block of plywood glued to the keel. The sprit has a groove at its upper end, allowing it to be set up while standing next to the trailer without needing to climb into the boat. Within 15 minutes, the boat can be launched with the mainsail set. To lower the sail while on the water, you can stand behind the mast, take the sprit out, furl the sail, and secure it.
As the open eka lacks built-in flotation, I use a set of inflatable rollers covered with fabric underneath the mast thwart and the removable middle thwart. Seating is comfortable, even on the floorboards, and the boat can accommodate up to three adults. A curved tiller allows for easy steering and is long enough for the skipper to sit well forward to balance the boat from amidships.
Christoph Busse
The rig is traditional and simple, the unstayed mast stands in a hole in the forward thwart. The maststep is shown in the plans as a transverse floor timber with a hole for the mast’s heel in its upper edge. There is no built-in flotation, so I tied buoyancy bags to the underside of the center and forward thwarts. The plans suggest paired thole pins for the oars, I elected to use single pins with rope grommets.
Both the main and the jib can be easily trimmed from the helm, whether you’re sitting on the middle thwart or the floorboards. The low-hanging sails can sometimes obstruct your forward view, but you can easily lift the bottom of the boomless spritsail for a better view. I especially like that the boomless sail also flaps harmlessly overhead while coming about.
Sailing this boat is a real pleasure, as it tracks beautifully. The characteristic gurgling sound of the lapstrake hull accompanies the curved bow as it smoothly rides over waves rather than cutting through them. The boat is eager to head into the wind in a gust, with almost no force needed at the tiller.
It feels fast and stable, responding immediately with moderate heeling as it accelerates. In winds of 12 to 15 knots, the boat can reach speeds of up to 5 1⁄2 knots. When pointing to windward, it maintains a speed of around 3 1⁄2 to 4 knots, as measured by the GPS. Even in 20-knot winds, the boat remains comfortable on a lake, though its performance in larger waves is yet to be tested. In winds up to 17 knots with a crew of two, the rig can be sailed with both the jib and mainsail. In stronger winds, it would be necessary to take down the jib and reef the mainsail.
Christoph Busse
The rudder is hung on the transom and the sternpost. The fixed blade is shallower than the keel and its lower leading edge is protected by the aft end of the keel.
In moderate winds, there is minimal spray over the bow. Tacking is smooth without significantly slowing the boat, but the crew needs to be ready to balance during a jibe, as the rail can dip into the water. Counter-heeling can be easily managed by adjusting the seating position on the thwarts or sitting at the gunwale.
Instead of a daggerboard, the boat is equipped with a large rudder and a wide keel area under the transom, giving it a tacking angle of around 120°. The short hull is highly responsive to changes in longitudinal seating, so the crew must avoid sitting too far aft. For solo sailing, I would recommend adding an extra 88 lbs of ballast.
I use a single pair of Norwegian-style oars with a single wooden tholepin as the oarlock. Swedish oars with long, narrow, flat blades are specified in the plans. While sailing, the oars can be kept secured to the tholes with short lines. There are no foot braces, and with the mast standing, only one of the two rowing stations can be used comfortably.
For longer distances, a crew of two could either remove the mast or lay it down, with one person rowing from the first station and the other steering or also rowing. With a crew of three, one person would be in the bow, another rowing at the middle thwart, and the third steering at the helm. In calm waters, one person can easily row a crew of three, even with the sails set. Adding a long-shaft outboard instead of oars would crowd the small boat and require a modification to the raked transom.
Christoph Busse
While double-enders are common among traditional Scandinavian boats, the eka working boats of the Blekinge archipelago on Sweden’s east coast had distinctive five-sided transoms. The ekas ranged in length from 11′ to 45′.
The unique lines and small inclined transom of the Blekingseka make the building process enjoyable. Once on the water, the ease of rigging and the boat’s direct response to steering and wind make sailing an exhilarating adventure. With a draft of only 15″ when empty, my boat can be beached bow-first on a sandy shore and heel over on the bilge rubbing strips I added. The Blekinge Eka is best suited for protected waters and will appeal to builders with small workshops or limited storage space who have some prior experience in boatbuilding. The boat is most enjoyable when sailed by a crew of two and, with the absence of a daggerboard, even a family of three can be comfortable.
Sailing the Baltic Sea became a dream for Sebastian Schröder while kayaking around the Danish island of Bornholm in 1996. Since then, coastal cruising in small, open, traditional wooden boats has become a passion. Living close to Leipzig in the southeast of Germany, he frequently sails the nearby region of Neuseenland where old open-pit coal mines have been flooded to create lakes. His work as an illustrator in creativity workshops and conferences gives him the opportunity to sail and kayak the Baltic Sea and to build wooden boats in traditional Scandinavian style as Feinspiel.
Blekingseka Particulars
Length: 14′
Beam: 57 3⁄4″
Draft: 15″
Sail area: Main 60 sq ft Jib 22 sq ft
Is there a boat you’d like to know more about? Have you built one that you think other Small Boats readers would enjoy? Please email us your suggestions.
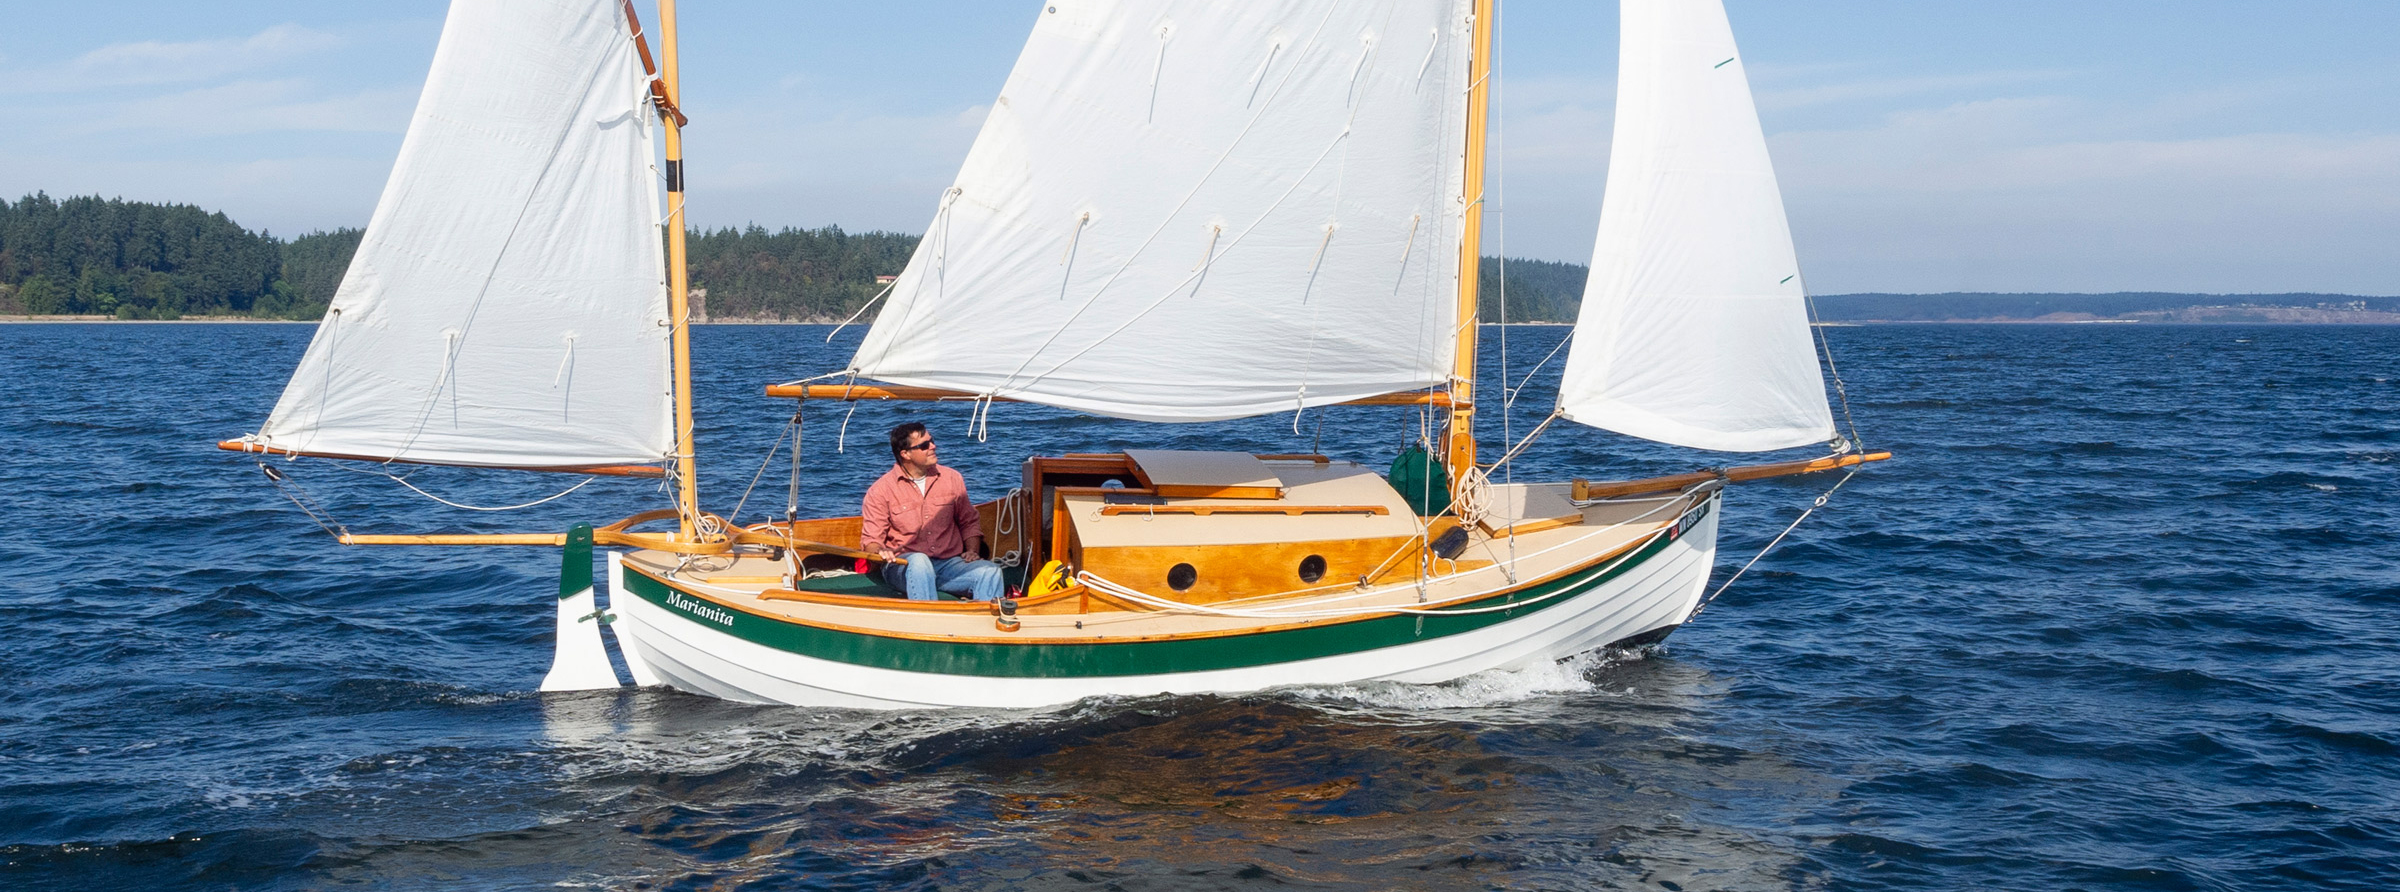
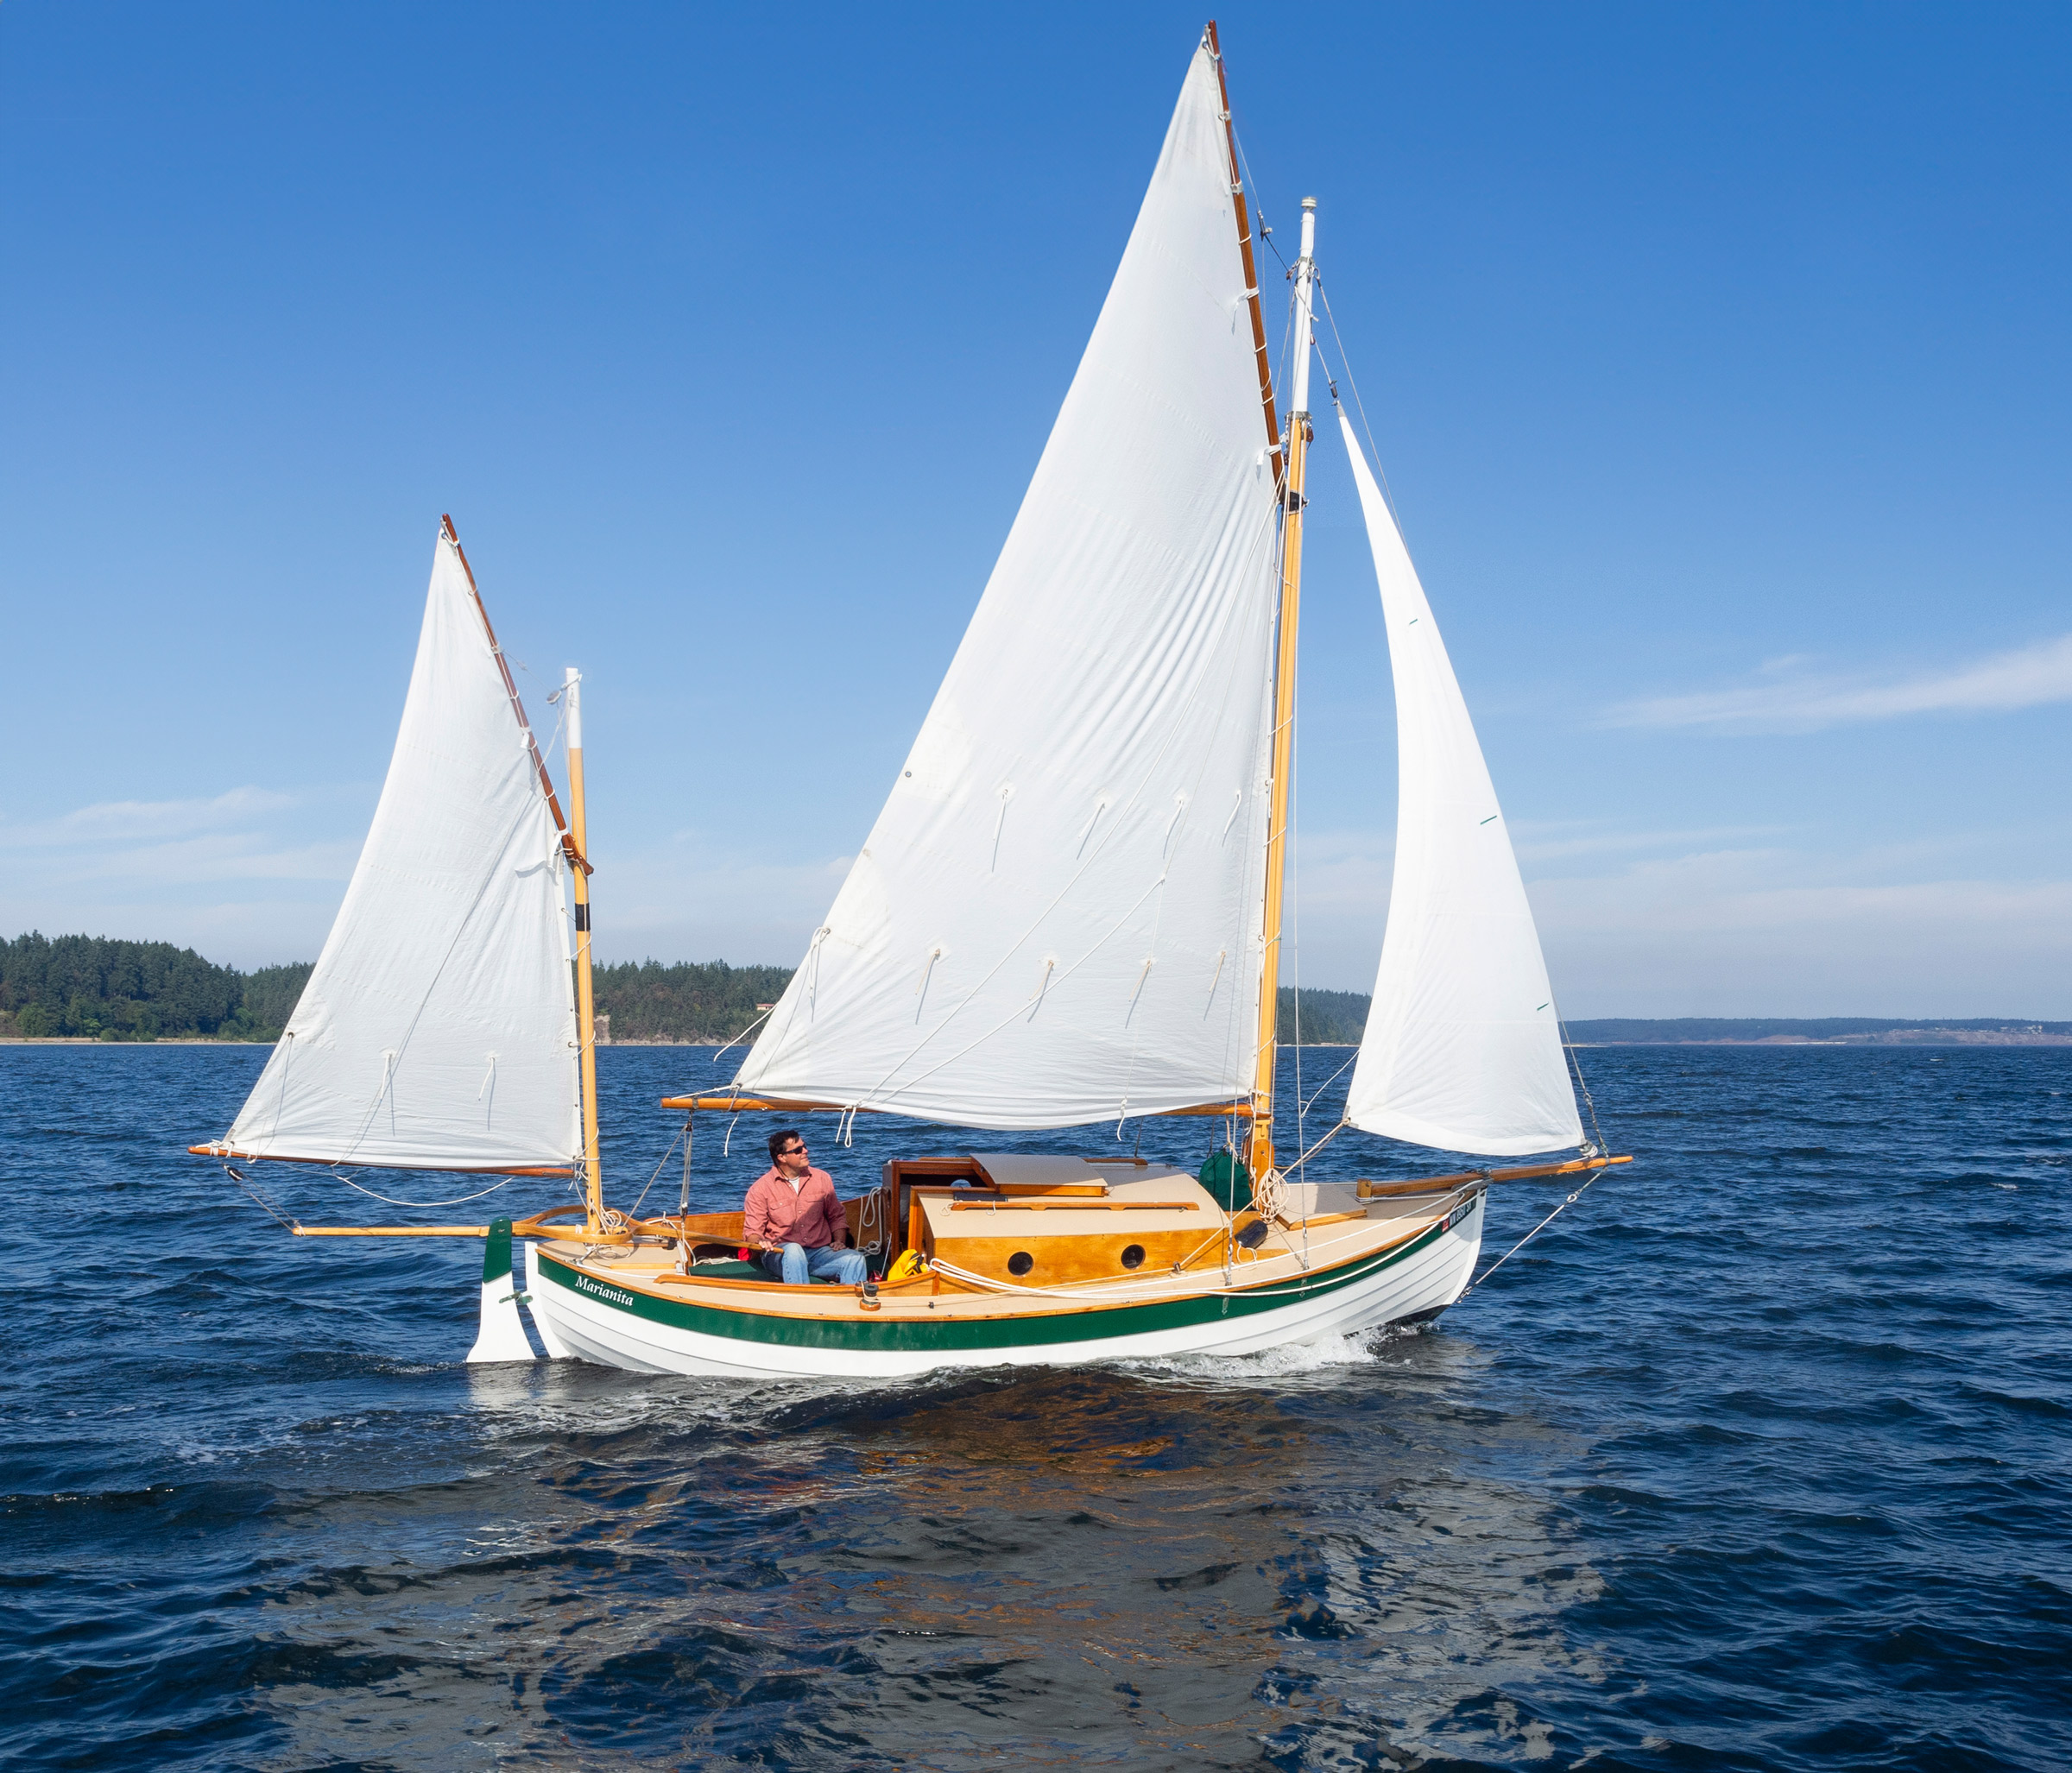
In the late 1990s, the prolific small-boat designer Iain Oughtred worked with his friend Brice Avery to design a trailerable coastal cruiser. With inspiration drawn from canoe yawls of yore, the resulting craft would be known as Eun Mara. A gaff-rigged yawl, it has a 19′ 9″ length on deck, a 6′ 8″ beam, and draws 1′ 5″ bilgeboards up and 3′ 4″ with them down. The twin bilgeboard trunks are integrated into the interior furniture, leaving the spartan but spacious cabin more open than it would otherwise be with a traditional centerboard trunk dividing the space.
The plans include a centerboard option paired with an inboard rudder and self-draining cockpit as well as a sloop rig. The 11 pages of drawings come with a table of offsets for lofting the boat but also include full-sized patterns for the molds with the plank lands drawn in. The hull is glued-lapstrake construction using 3⁄8″ marine-plywood planks and decking with dimensional lumber used for the backbone, keel, and a pair of laminated frames to help support the deck-stepped mainmast. There are approximately 400 lbs of lead in the keel, and the two bilgeboards are 3⁄4″-thick steel plate, each weighing about 100 lbs, for roughly 600 lbs of ballast.
Dieter Loibner
The plans offer an option for an inboard rudder with a tiller forward of the mizzenmast, but for the outboard rudder, which is also offered by Oughtred, a split tiller that loops around the mizzenmast is required.
Auxiliary propulsion is provided by an outboard located in a small well built into the aft end of the cockpit/afterdeck area and offset to one side of the mizzenmast. Most owners have found 6 hp to be adequate for the roughly 2,500-lb boat. The mainmast of the gaff rig is stepped on deck in a tabernacle. The standing rigging is a forestay with upper and lower shrouds. The unstayed gaff-rigged mizzen is stepped through the aft deck to the sternpost. A small jib flies from the bowsprit; whether it hanks to the forestay or uses a furler is left to the builder. The bowsprit and boomkin each add about 4′ to the overall length and the mizzen boom extends a couple of feet past the boomkin, so you’ll need about 30′ of dock space to moor your 19′ 9″ LOD Eun Mara.
Steve Borgstrom
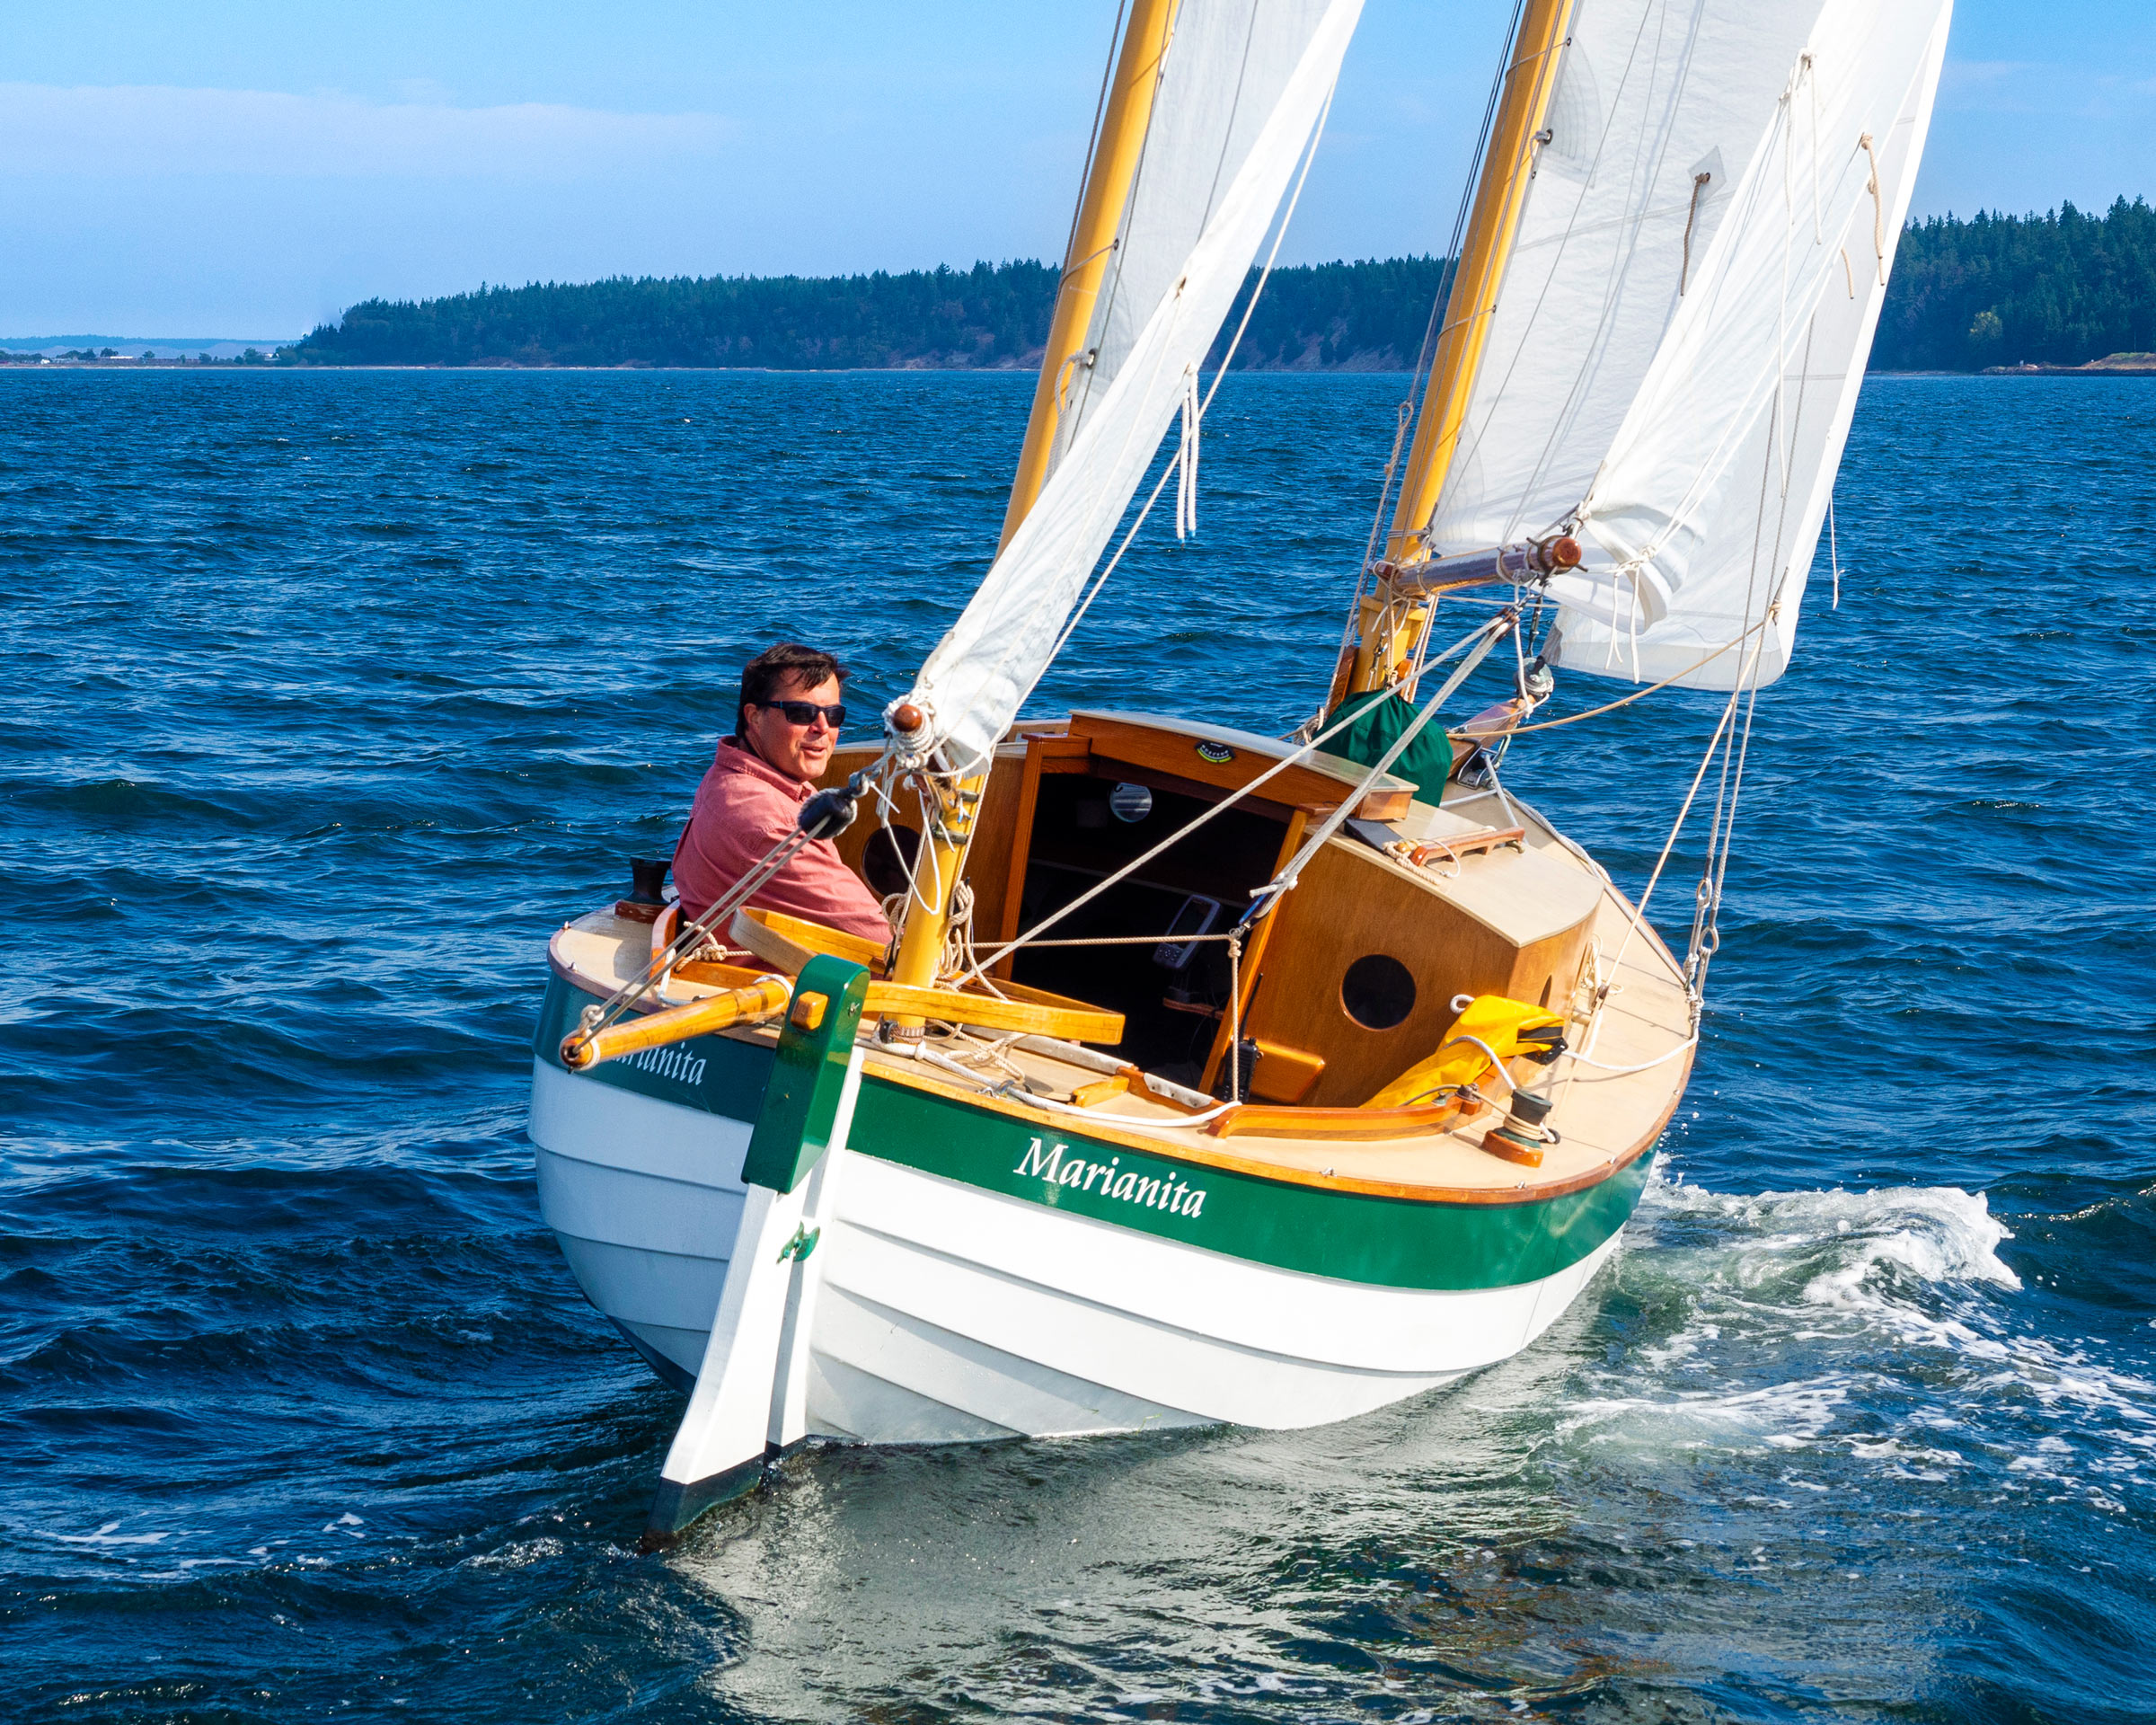
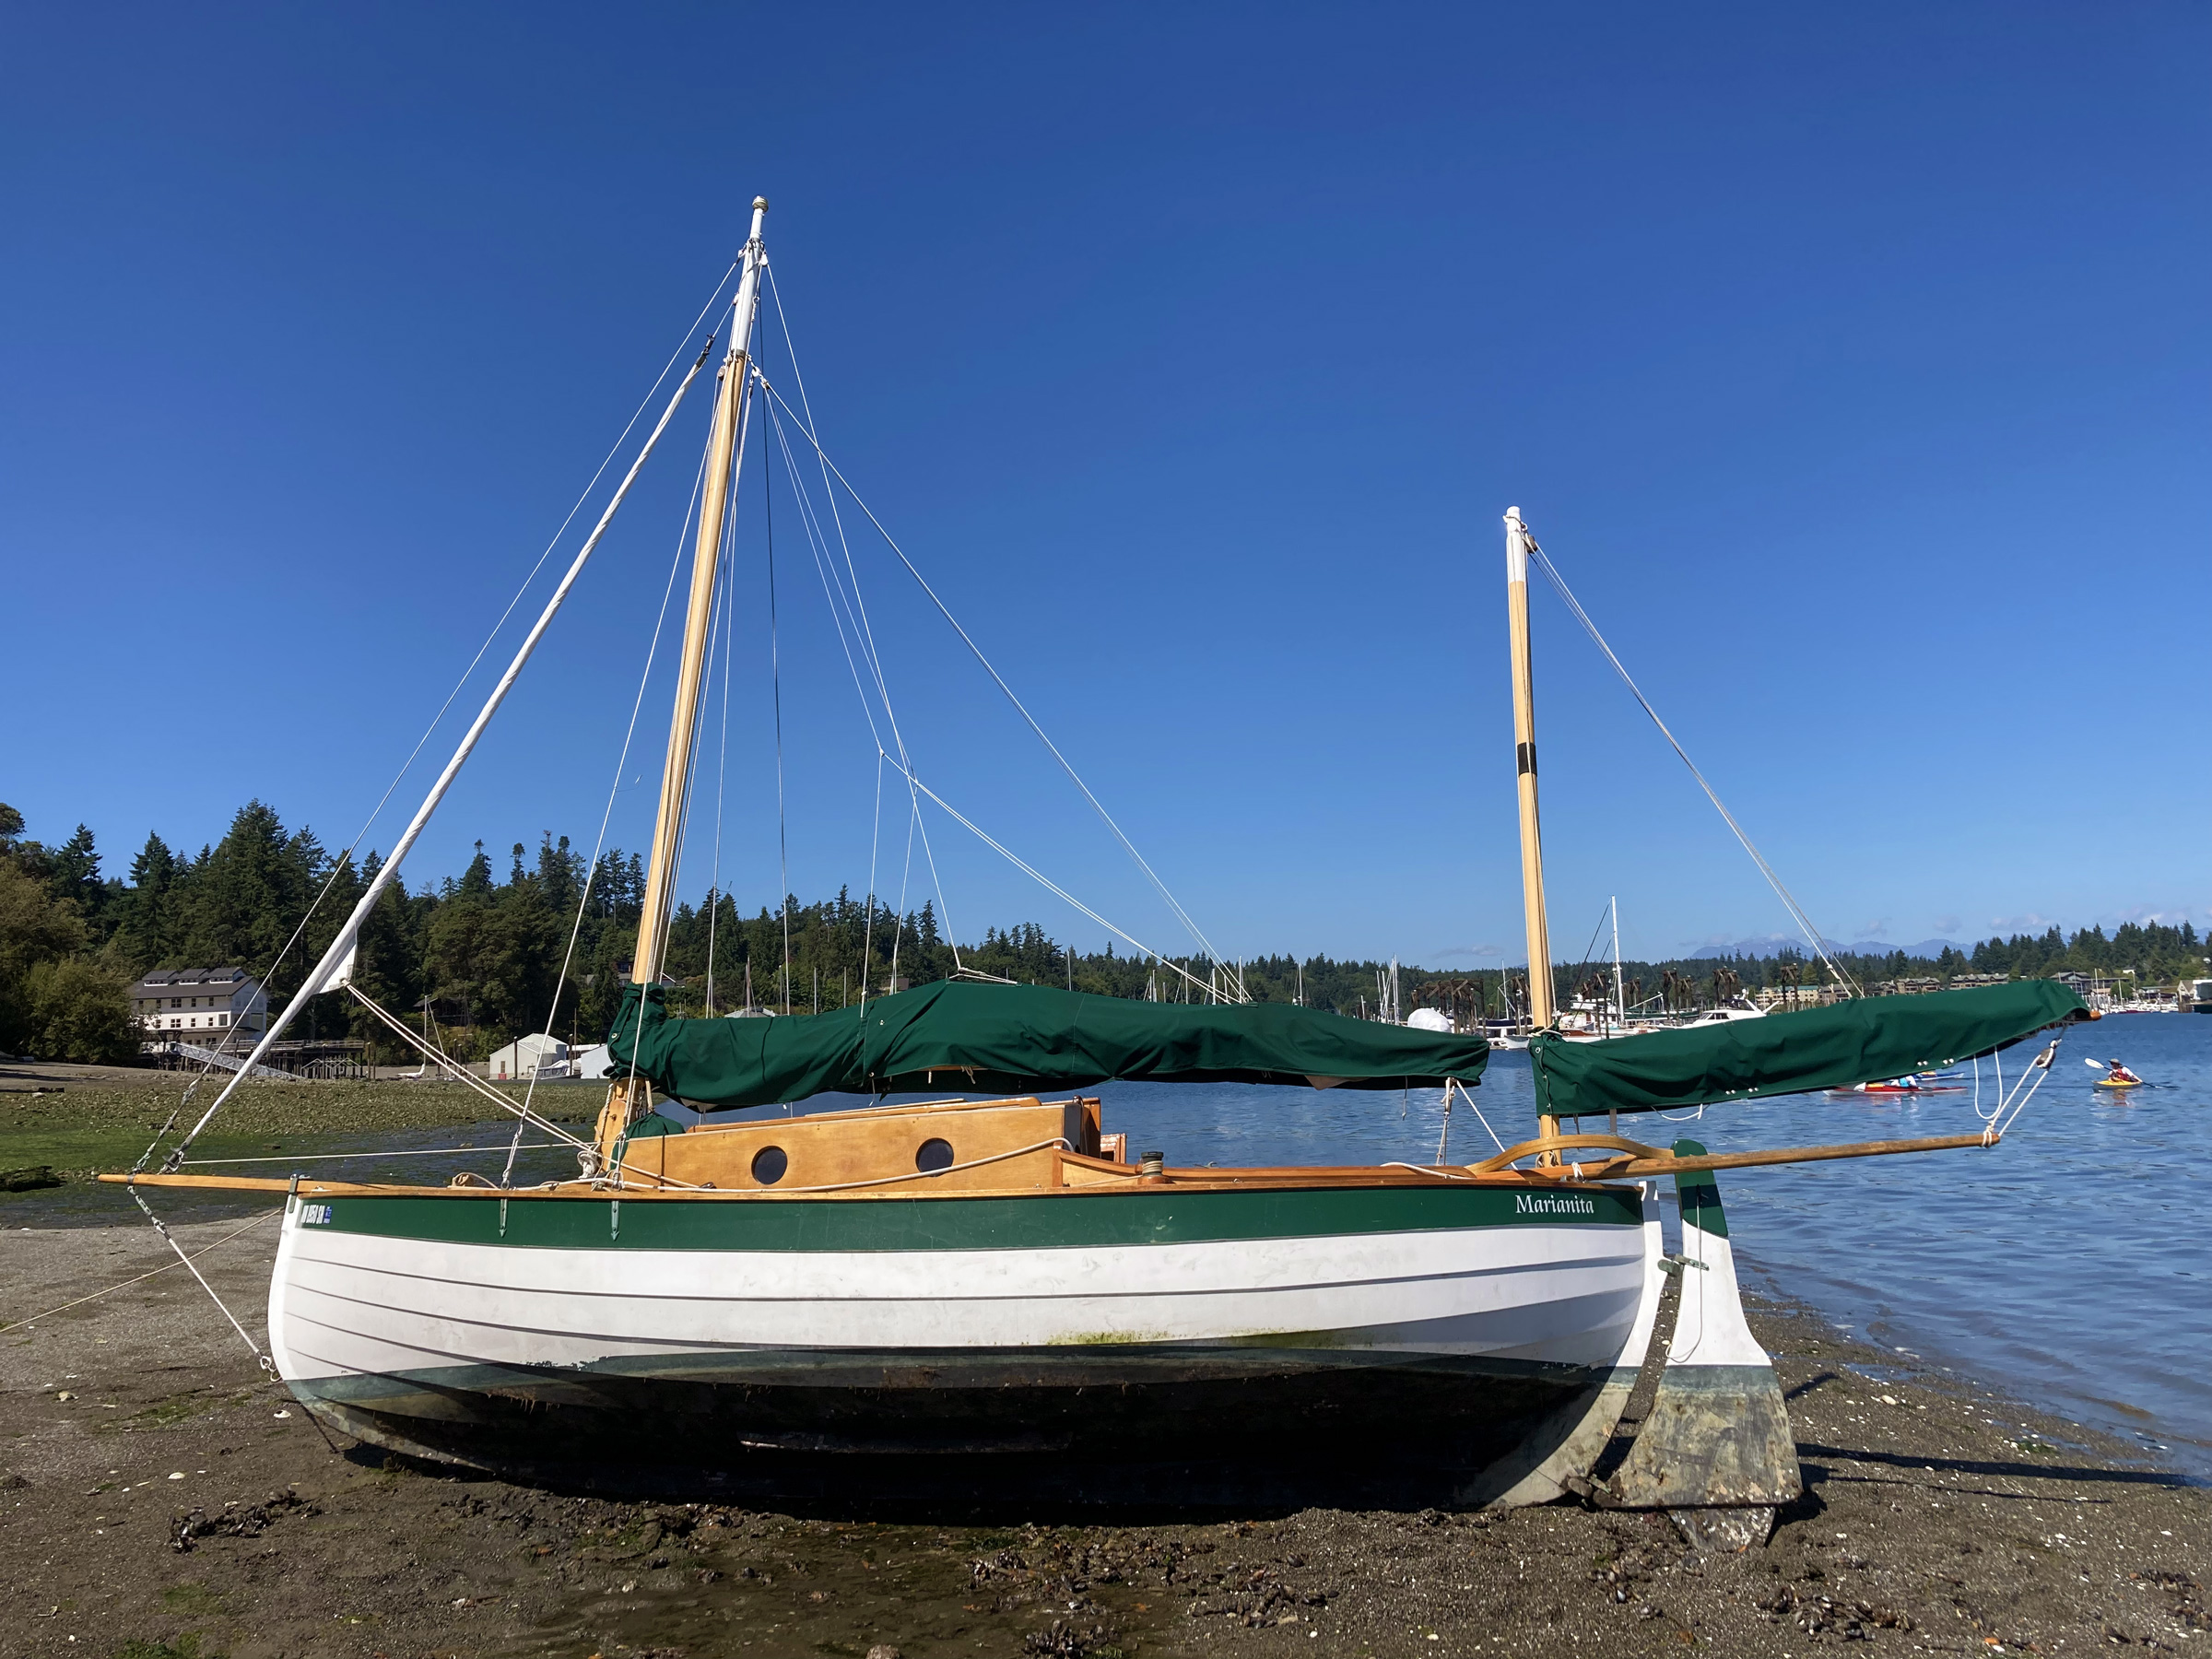
The Eun Mara can be beached upright by partially lowering the bilge keels, but if I need to access the bottom, I can retract the bilge keels, and let the boat heel as it dries out. The outboard rudder is designed with a drop-down blade, here seen lowered, to get a purchase in the water below the keel. The line seen hanging against the side of the rudder is for retracting the blade.
The boat was intended to be a “trailerable coastal cruiser,” and while the Eun Mara is indeed trailerable, setting up and striking the yawl rig rules out casual daysailing. It’s more likely to be used as a long-weekend or week-long cruising boat. My Eun Mara, MARIANITA, lives in the water, and I only need about 10 minutes to put the motor in the well and stow the sail covers. But getting her from road-ready to launched is about a two-hour process. The deck-stepped mainmast pivots in a tabernacle; a block-and-tackle running from the bowsprit to the forestay is adequate to lift the mast into place, and I’ve raised and lowered the mast both on the water and on the trailer by myself, but it is certainly easier with extra hands. The unstayed mizzenmast simply slides into a hole in the after deck. With the companionway open, all of the spars, except mainmast, fit in the boat. I lace the sails on, but hoops or robands might be faster for somebody who moves the boat on and off a trailer more frequently. With its shoal draft, the boat sits low enough on the trailer so that it can be launched from most boat ramps; a crane isn’t needed.
Steve Borgstrom
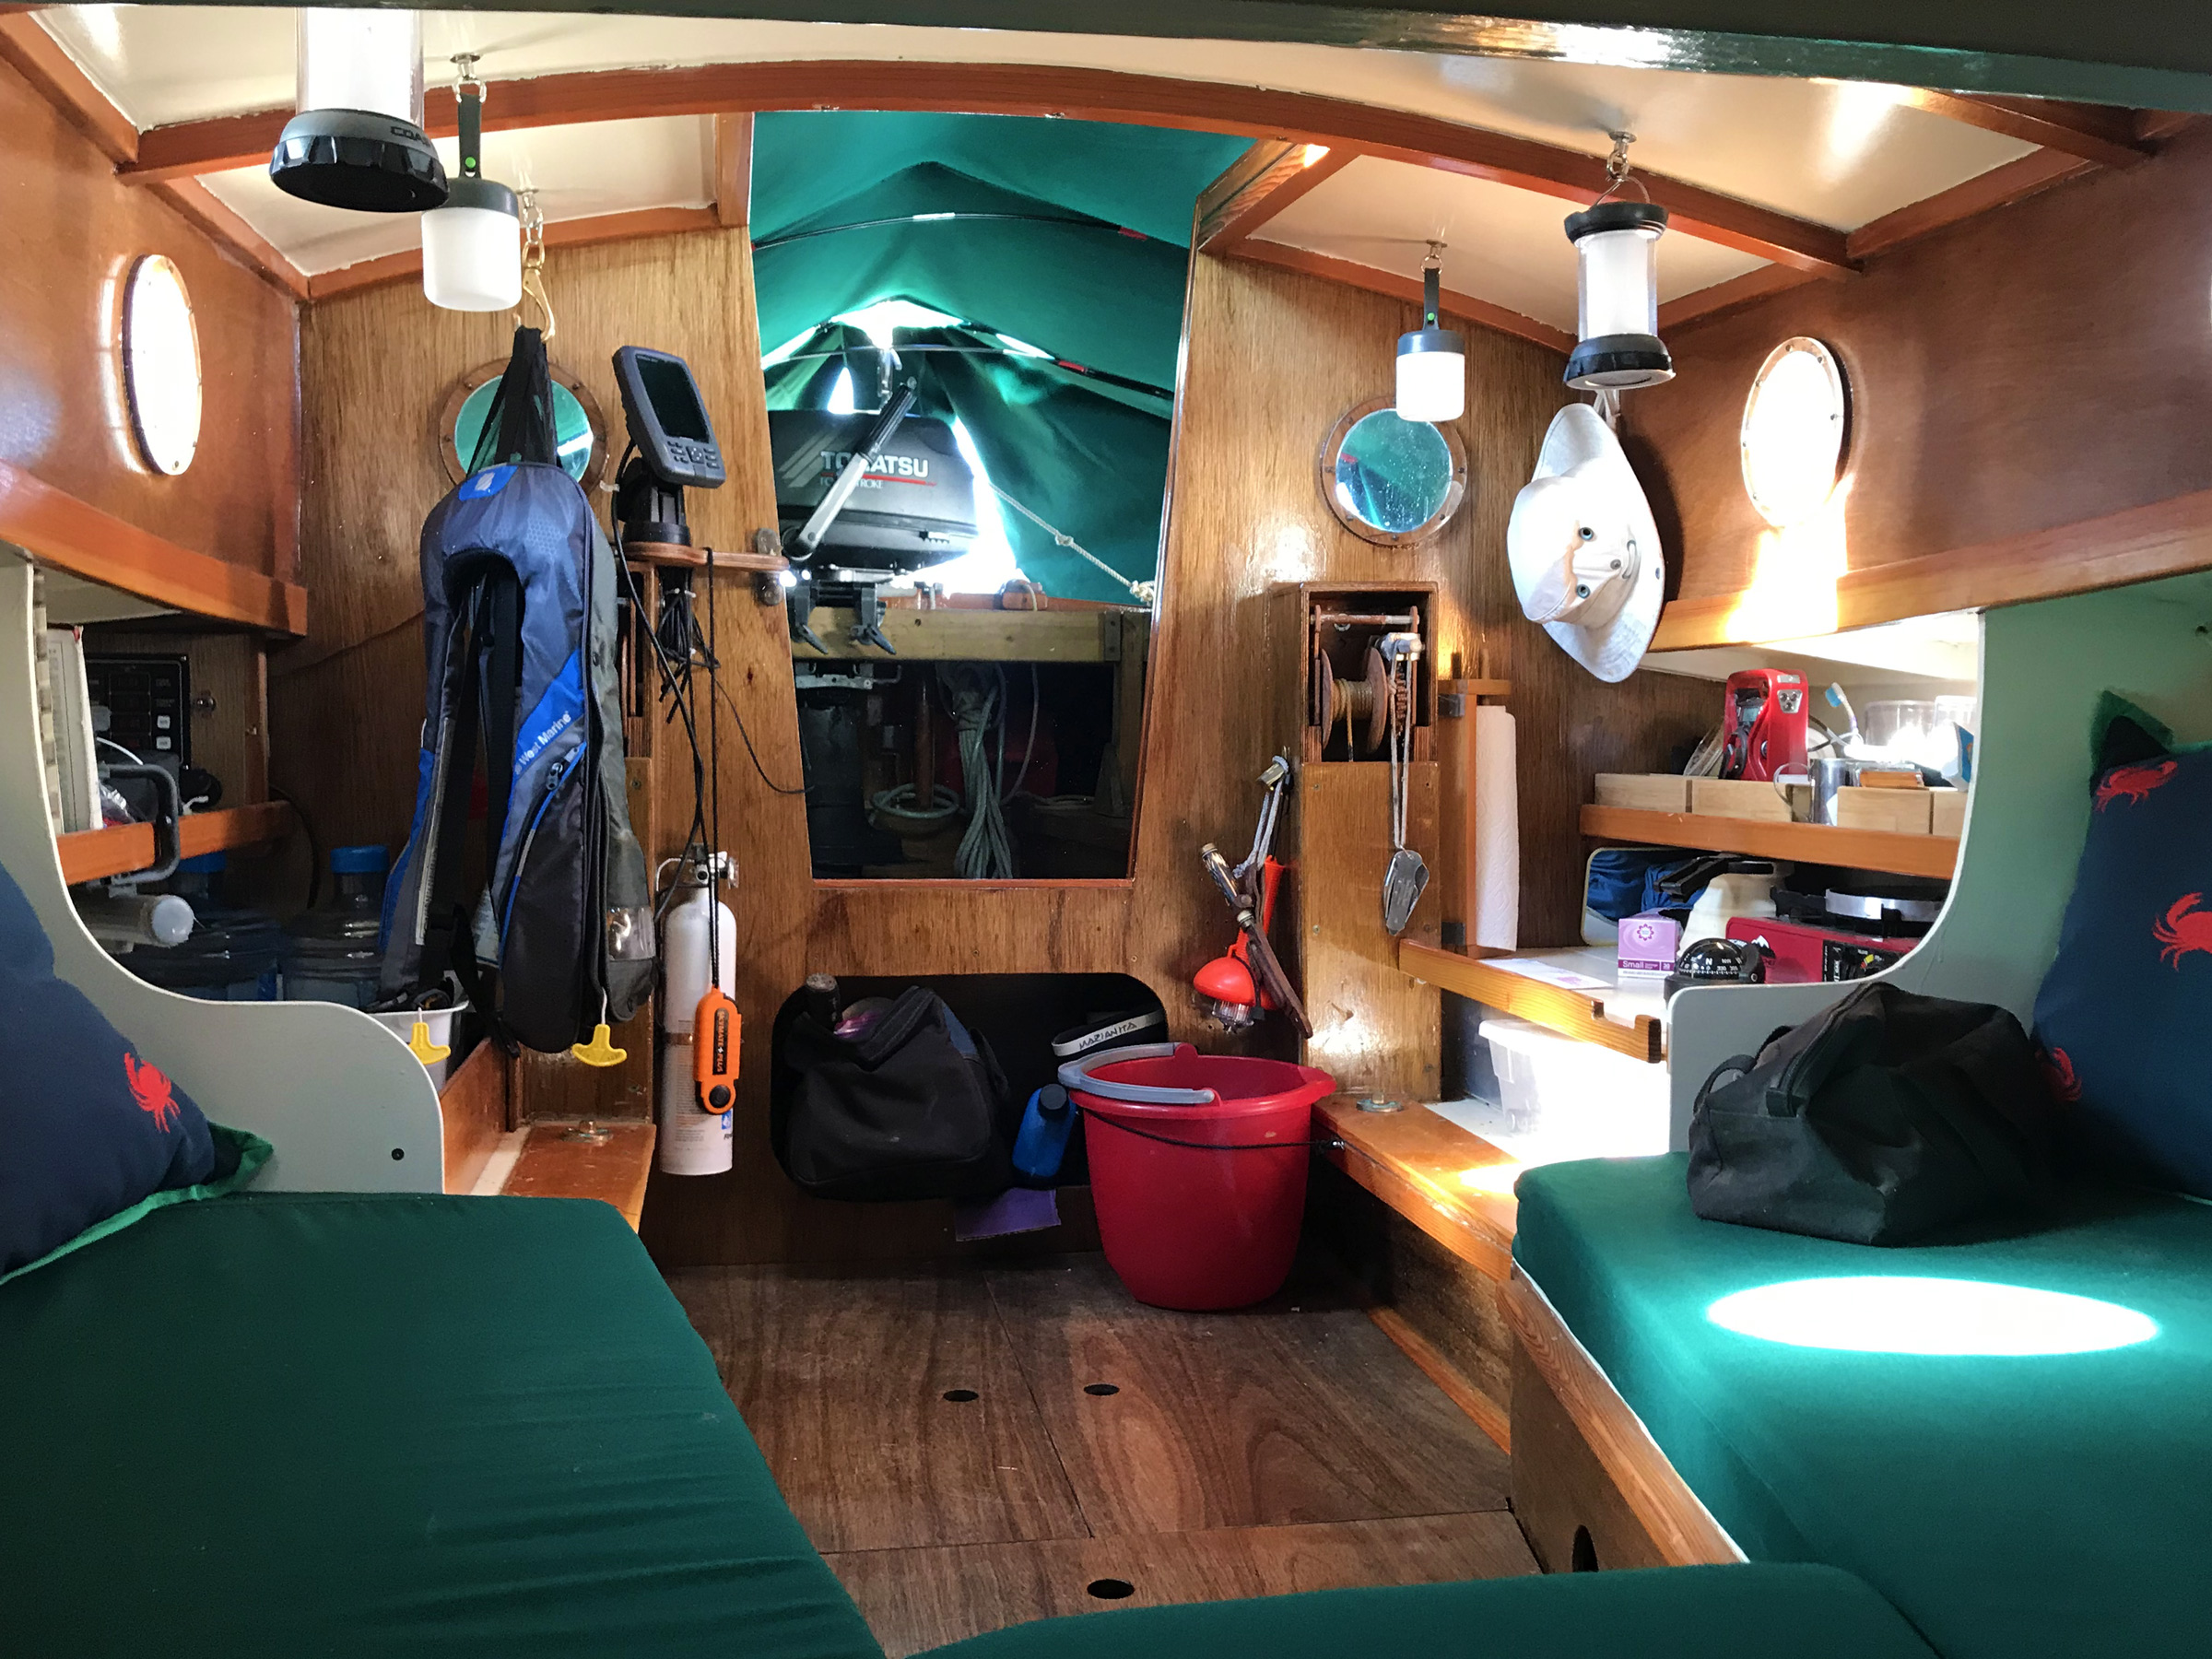
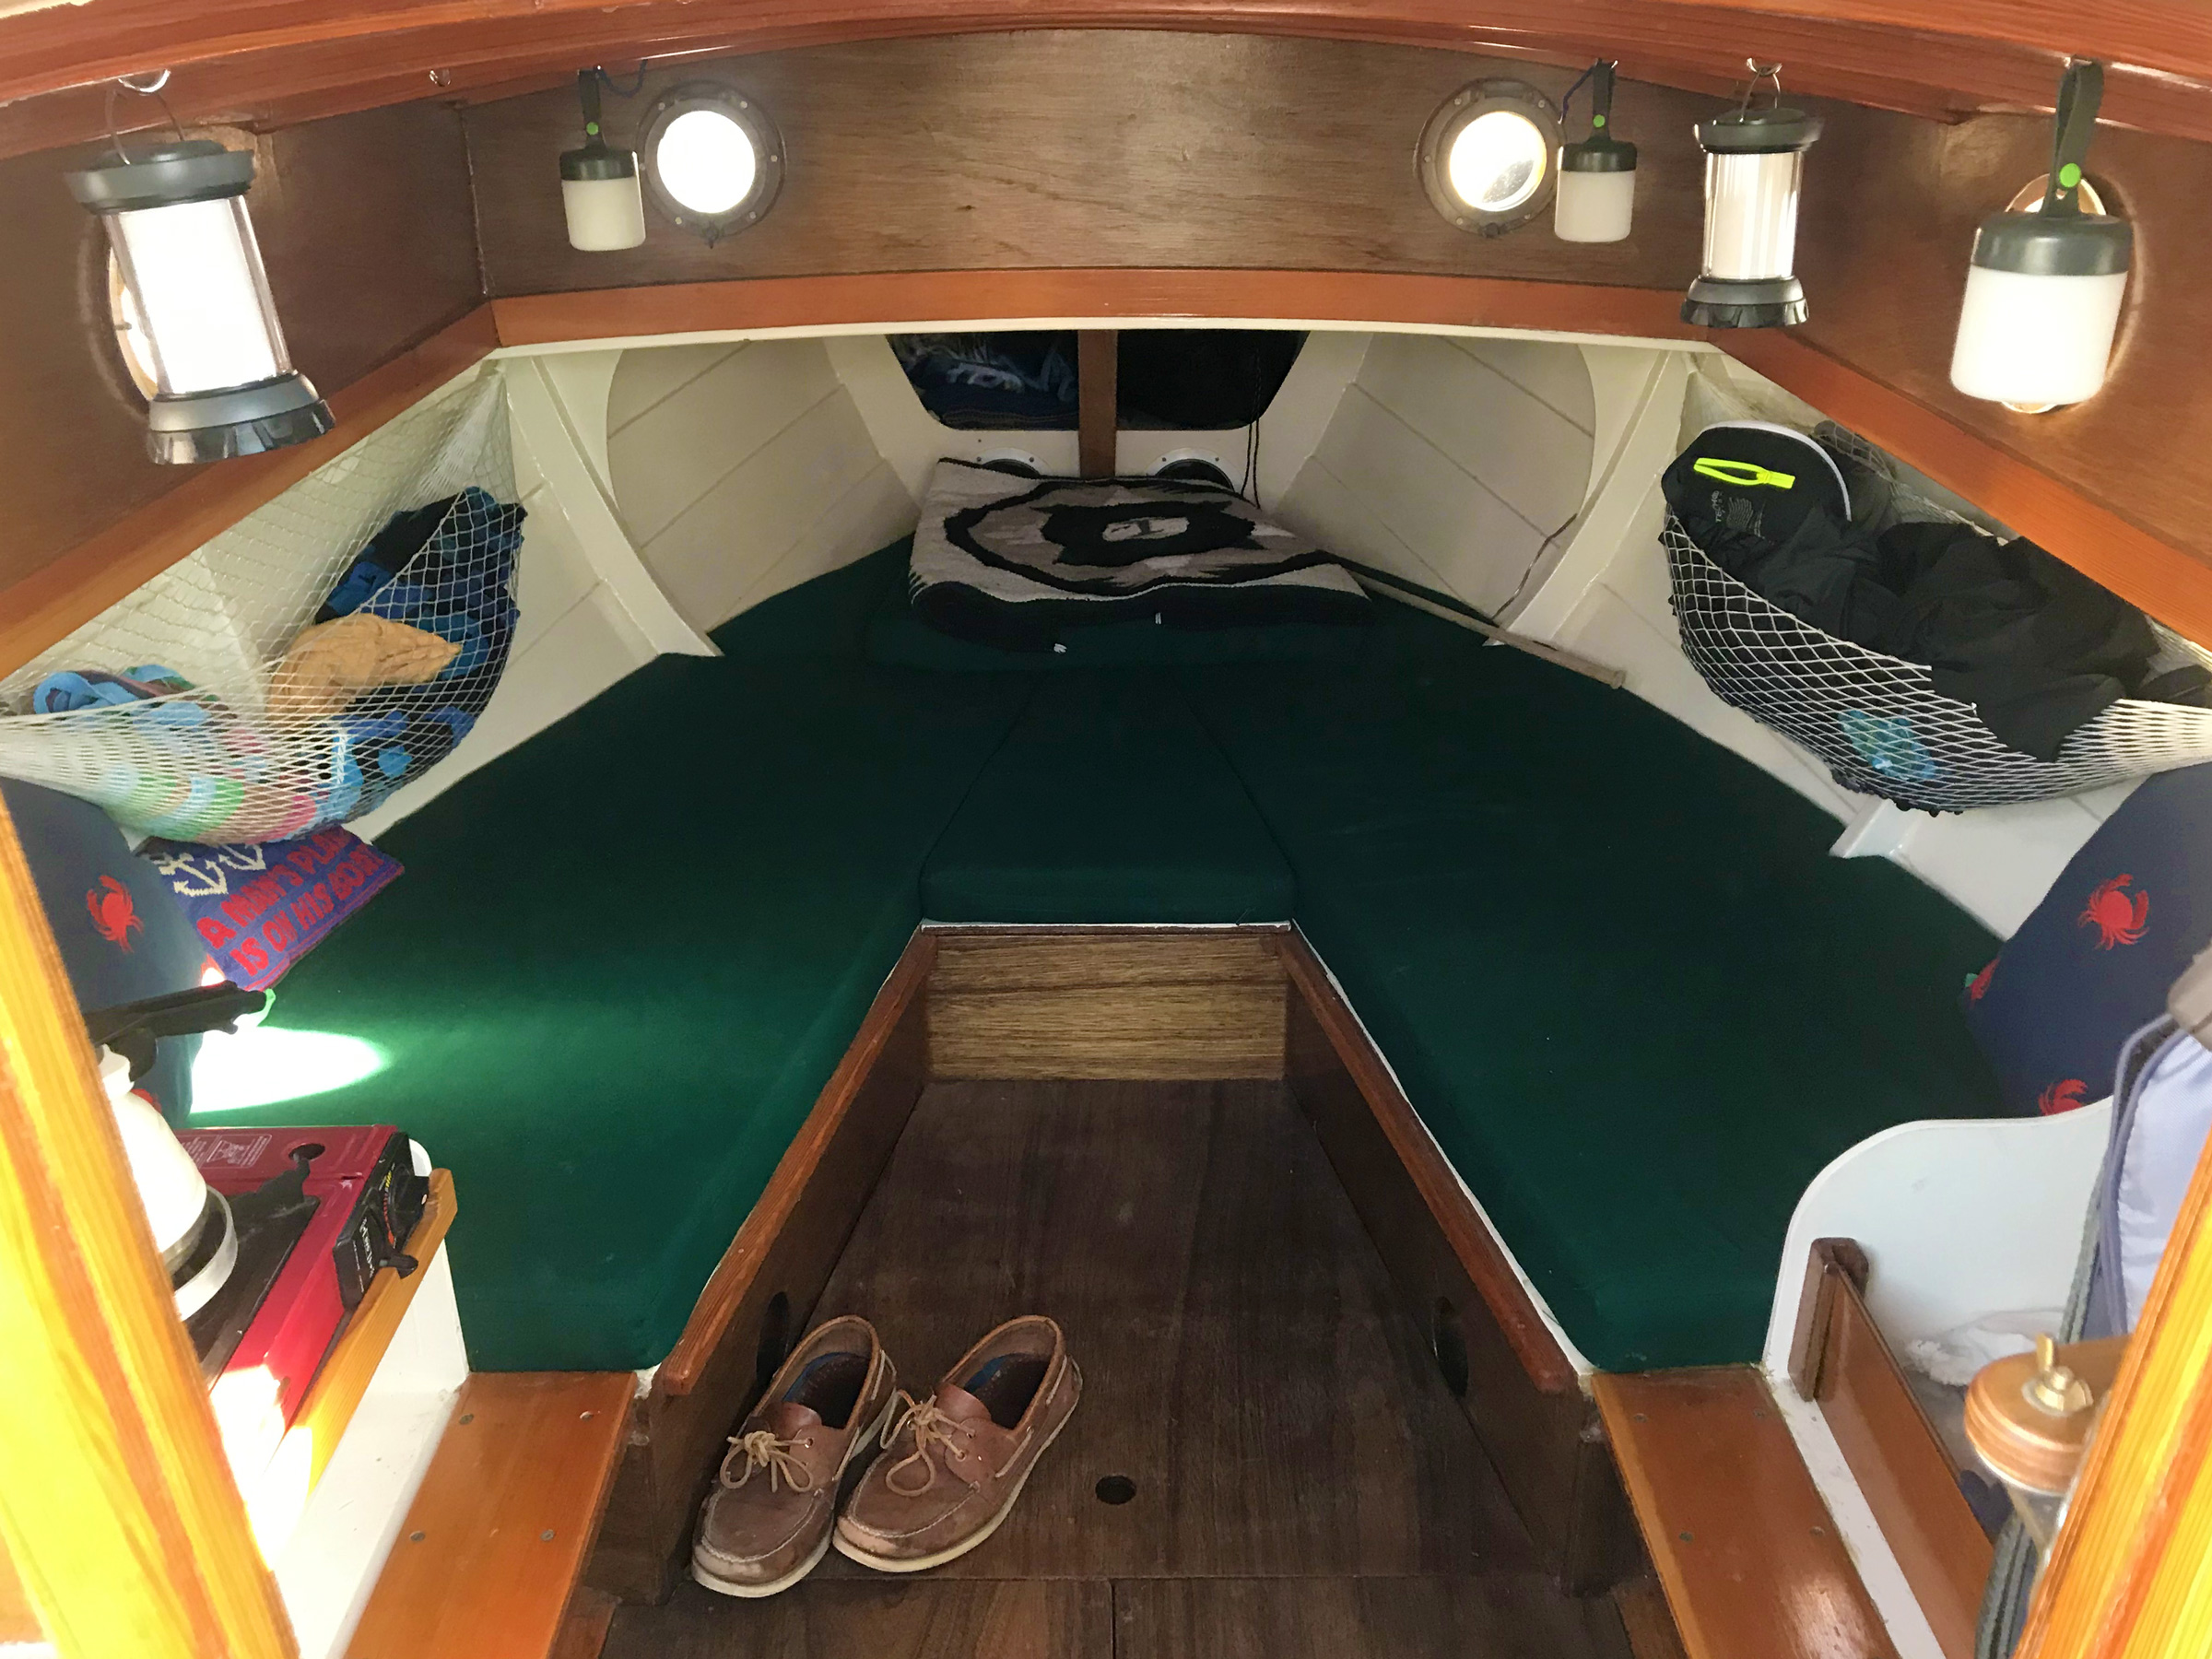
For a boat that has a hull only 19′ 9″ long, the Eun Mara’s cabin is surprisingly spacious. The bilge keels are housed in trunks that support the V berths, their lifting winches are housed in boxes built on the bulkhead either side of the companionway.
On the water, the double-ended cruiser has an old-school feel with a cockpit that is on the small side by modern standards, but with the non-self-bailing configuration, is comfortably deep: you sit in the boat, not on it, and for the singlehander everything you need is within reach. Benches on either side can be configured as spacious lockers, although too much weight aft will drop her stern quickly.
An outboard rudder demands a tiller that finds its way around the mizzenmast; the specified single-sided stick bent around the mast, or a hoop will work. Either is an opportunity to fire up the steambox and bend some wood. With Iain Oughtred’s blessing, I played with a Norwegian push-pull setup, but the boat is a little too big for this style of tiller. As designed, the rudder is a bit of a barn door with a drag-inducing 3″ squared-off trailing edge. I have replaced it with a more up-to-date NACA (National Advisory Committee for Aeronautics) foil, and it has proven worth the effort. I also gave the bilgeboards, which are square-edged in the plans, as much shape as their 3⁄4″ thickness allowed by adapting the Pollock pattern Michael Storer uses on his Oz Goose.
Steve Borgstrom
Up forward, the deck-stepped mainmast is supported by an oversized deckbeam so there is no compression post taking up room in the cabin. The V-berth can be converted to a double by lifting the cabin sole and setting it onto the support ledges on either side of the V.
Down below is a spacious cabin with 7′ V-berths and comfortable sitting headroom. There is space for a galley on one side and a navigation/library/ship’s stores area on the other. The bilgeboard trunks are beneath the berths and, with the deck-stepped mast supported by a beam instead of a compression post, the cabin feels very open. The center section of the cabin sole can be fitted between the V-berths to create a queen-sized sleeping platform. The cabin is a comfortable place to sleep, though it is worth noting that the bilgeboard trunk caps are 1″ above the waterline and roughly 22″ outboard of the centerline: when the boat rolls port and starboard, water sometimes slaps the bottom of the trunk lids. Keeping the bow into the waves will help quiet things down. To line up with the waves I either use the mizzen as a riding sail or set a stern anchor.
The plywood berth tops are epoxy-filleted to the hull, creating a stiff structure that can have any number of hatches cut-in for shallow storage options or positive flotation. There is a small watertight compartment forward and another aft, which the designer notes in the plans might be just enough to keep the boat afloat but not much more. There is no provision for a head; I use a folding toilet seat with WAG bags and stash the used bags in a sealed container in one of the cockpit lockers.
Dieter Loibner
The Eun Mara design was influenced by the popular canoe yawls of the late 19th and early 20th centuries. The gaff-yawl rig offers versatility in a wide range of wind strengths, and when I’m singlehanding, the mizzen acts as a useful crewmember, holding the bow close to the wind as I raise and set the main and jib.
I sewed the sails from a Sailrite kit. When I’m ready to get sailing, I hoist the mizzen and sheet it in hard; the boat will lay about 20 to 30 degrees off the wind while I go forward to get the main up, then it’s back to the cockpit, raise the jib, and I’m off. In high-wind conditions it’ll sail reasonably well under just the jib and mizzen, coming close to hitting hull speed without a lot of drama. As a gaffer, it doesn’t point particularly well, but ease the sheets a bit and it’ll take off. Beamy and lightweight, the Eun Mara suffers when going to windward in choppy conditions and pounding through the waves really slows it down. The flatter the water, the better it sails. I’ve had some ripping sailing in a harbor where there isn’t enough fetch for much chop to develop. The mizzen is big enough to balance the helm. Easing it while tacking helps prevent getting caught in irons. To speed coming about, I backwind the jib a touch. Under power, I can cruise along with the fuel-sipping 6-hp outboard at 4 knots all day. The motor can take the boat over 5 knots but with a lot more sound and fury. Retracting the bilgeboards when motoring is good for at least 1⁄2 knot.
Overall, the Eun Mara meets the design brief of a comfortable, capable, coastal cruiser. The foredeck stays dry, and the cockpit does a wonderful job of creating a safe, snug sailing area. Down below is a fine place to spend the night or take shelter from the weather with plenty of room for a captain, first mate, and maybe a small child. But where the boat excels is as a singlehanded cruiser. There’s plenty of room for stores, and with a simple, flexible sail plan the Eun Mara takes care of the crew. The little mizzen sail is like an extra crew member when you most need one, holding the boat steady while hoisting sail, putting in a reef, or dealing with the anchor. I built MARIANITA over the course of two-and-a-half years in a converted two-car garage. The plans are excellent but this is a big project and having some prior experience in building smaller boats will help.
Steve Borgstrom, a self-described serial builder, lives on Bainbridge Island in Washington State. With a 1,500-sq-ft shop and 1,500-sq-ft house he lives a balanced life, supporting his boatbuilding habit by working as a firefighter in a nearby city. Not content with the half-dozen boats he has built so far, he’s accumulating plans and materials for the next three.
Eun Mara plans and kit are available from Oughtred Boats.
Is there a boat you’d like to know more about? Have you built one that you think other Small Boats readers would enjoy? Please email us your suggestions.
Owing to her light weight and refined shape, Harrier is exceptional under oar or sail. Designer Dias rows the boat here with author Bennett.
RANTAN was built to Tony Dias’s Harrier design, which is, in part, a development of an earlier design of his, Marsh Hawk. But Tony will tell you that Harrier was drawn specifically for Ben Fuller, for campcruising, with a good deal of input from Ben himself. A small-boat aficionado, Ben comes from a background of rowing boats and sailing canoes—he has an interest in just about any small boat that rows and sails fast, and he is unafraid of high-tech. But he also knows and appreciates tradition better than anyone—he has been curator at Mystic Seaport and Chesapeake Bay Maritime Museum, and is now curator of the Penobscot Marine Museum in Searsport, Maine. He came to Tony with his ideas, and together they created the Harrier double-ender.
Tony takes up the story: “We started with Marsh Hawk, a round-bottomed double-ender with an external keel, but Ben wanted a boat that would beach easily. We were both very interested in the plank-bottomed wherry shape—there’s a Piscataqua wherry in the collection at Mystic; it reminds me of working boats I’ve seen in Portugal. So, our idea was to take Marsh Hawk, chop off the keel, flatten out the bottom like a wherry. In a Banks dory or a mackerel seine boat, the shape, and therefore the way the boat behaves, makes you feel at home, even though you’re in an open boat in rough water—that’s what I think we were after.”
At Rockport, Maine, we have loaded two pairs of oars into the boat and Tony is laying the daggerboard across the aft benches to act as a temporary rowing thwart. “With two people rowing you want an aft thwart, but you don’t want a permanent seat cluttering up the cockpit for sailing—the daggerboard is the perfect width and length for the job.” We pull away from the dock and immediately are up to speed, tracking easily through the harbor, the water chuckling against the lapstrake hull. We sight-see for a while but are anxious to get sailing and return to the dock to step the mast and raise sail.
Kmehlsphotography.com
A high-peaked, fully battened mainsail set on carbon-fiber spars gives Harrier great power and stability. The mizzen balances the rig and adds maneuverability to the boat’s many virtues.
The Harrier carries a standing-lug yawl rig, high-peaked and fully battened in the main—an eye-catching blend of old and new technology. For years the lug rig was overlooked by all but European working-boat enthusiasts and designers of small sailing dinghies looking for a simple rig that could be used by children, required minimal standing rigging, could be stored within the boat’s own length, and was not aspiring to any form of “high performance.” Then came the Nigel Irens designed ROXANNE— a slippery 29′ 6″ yawl with a high-peaked standing-lug main carried on an unstayed carbon-fiber mast. “That rig, and its performance, fascinated me. For Harrier I originally drew up three or four different rigs with wooden spars, but it seemed only natural to use carbon fiber. Ben isn’t afraid of carrying sail, so isn’t concerned by a big, tall rig, and we found that if you use carbon fiber, which reduces weight aloft, you really don’t need to reef sail if you’re prepared to be athletic about it. You can reef if you want to, but the boat isn’t overpowered by the rig.”
There are other interesting features in the mainsail: the tack is low on the mast, the clew higher, and so the sail is self-vanging; there is a highly efficient downhaul to control draft; and in the lower part of the sail there are full-length battens giving stiffness (especially just above the foot) without the disadvantages that come with a boom. The battens, however, are a “work in progress.” The right level of stiffness is crucial: it has to be stiff enough so that when you’re off the wind, it doesn’t belly off like crazy and create too deep a pocket, but at the same time it has to be limber enough not to totally flatten when you’re close-hauled. As for the mizzen, it is a diminutive jib-headed spritsail that helps balance the rig, keeping the load on the helm lighter, and as Ben was to later point out, keeps the boat’s bow into the wind when reefing or at anchor. But it has uses beyond the usual: “Ben’s interested in camp-cruising, and you can use the mainmast as a ridge-pole for a tent awning—you lay the heel down against the stem and tie the head up on the mizzenmast; you almost have standing headroom in the stern.” And, as Tony was to demonstrate later, it is the perfect backrest for the idle skipper.
The joy of the carbon-fiber mast becomes apparent the minute you rig the boat. One reasonably fit person can lift the mast, one-handed, and stand it through the mast thwart into the step—and that’s all there is to it. To raise the sail there is just the one halyard counter-tensioned by the downhaul, and thanks to the boomless foot, the sail can be raised with the wind coming from any direction.
With two adults aboard, the Harrier seems bigger than her 17′ 6″ by 5′, and despite her lightweight construction (6mm plywood planking and a hull weight of about 200 lbs) she feels stiff and stable. Tony tells me that at the 2007 Small Reach Regatta on Eggemoggin Reach, Maine, they had three on board. “It was great—one person sits up forward, one amidships, and one right aft. With the boat more heavily loaded, it does make sense to reef down for a drier ride and less strain on the boat and the rig. When the boat’s lightly loaded, she’ll just go faster in stronger air and ride higher and drier.”
We have sailed away from the landing and are picking up zephyrs across the harbor. We are without the mizzen, for we have forgotten the boomkin. In this configuration, RANTAN is tricky to tack in the light airs, but she will respond to, on occasion, a momentary backing of the mainsail. Tony demonstrates the boat’s stability by standing at the helm and shifting his weight as if on a surfboard; I settle comfortably on the center thwart.
Kmehlsphotography.com
Ben Fuller, whose vision gave rise to the Harrier design, sculls the boat at Rockport, Maine.
When Ben returns with the boomkin, we reach back to meet him and set full sail. RANTAN is in her element. We run, wing-and-wing, down the harbor, Tony dipping beneath the mainsail every so often to check his path, me tucking lines out of the way, stowing extra clothes beneath the foredeck, and thinking about the options for sleeping aboard—on the flat floorboards either side of the daggerboard case (the center thwart is removable), or up on the seats with an infill for the aft cockpit. As we near the harbor mouth, we turn close-hauled and catch one of the few big gusts of the day. RANTAN heels to the wind, seems to take a big gulp, and then comes back; never once do you get the feeling that she might just keep going. I was sorry there was not more wind, as it would have been fun to sit out on the wide side-wales and hike out. Tony concedes that, as with any unballasted boat, it is possible to capsize her, but even if the boat is swamped the flotation bags will keep her floating with the water level just below the top of the daggerboard case so you can bail it out.
We switch positions. I quickly become used to the tiller arrangement—not quite a “push-pull” in the Scandinavian sense, but with a rigid elbow and tiller extension that works conventionally—though with a dog leg to get it around the mizzen—and learn that she is remarkably responsive to the helm. We dip beneath sterns and shoot across bows as we pick our route through the moored boats back up the harbor. And as the occasional gust raises our speed, so we carry our way ever closer to the wind.
It is lunchtime. We head for a sandy beach on the seaward side of the town landing and, as we approach, raise the daggerboard. With no crew and no board, RANTAN draws about 6″; even laden, we manage to run far enough up the beach that I can disembark without getting my feet wet. The tide is falling so we leave RANTAN where she is, moored to a low tree branch. Some time later we will return to slide her down the beach on a couple of rollers and pull away from the little cove under oar. It has been a fine introduction to the boat—one that has left me hungry for more—and when I hear that RANTAN will again be at the Small Reach Regatta later in the summer, I am delighted to think that I may get to try her in different conditions.
Harrier Double-Ender Particulars
LOA: 17′ 6″
Beam: 5′
Draft: 6″/ 3′ 6″
Weight (unladen): 200 lbs
Weight (laden): 250 lbs
Designed by Tony Dias
Prototype built by The Apprenticeshop, Rockport, Maine
For plans information, contact Antonio Dias by e-mail at [email protected].
Antonio Dias
Exceptional detail and artful rendering are hallmarks of Tony Dias’s design style.
Antonio Dias
While Harrier is not a simple boat to build, her plans are exceptionally well detailed and within the reach of a beginner with aptitude.
Is there a boat you’d like to know more about? Have you built one that you think other Small Boats readers would enjoy? Please email us your suggestions.
Launching into Washington State’s Bellingham Bay from the skinny Fairhaven launch ramp, I was optimistic about having a relaxed trip over the next few days in the middle of May. My plan was simple: make for the northern string of islands in the San Juans that stand as diminutive guards against the Strait of Georgia, and spend a few days on the water shaking down the camp-cruising setup onboard my family’s 25-year-old Haven 12 1⁄2, LAZYDOG. With the forecast predicting only a 10-knot southerly under sunny skies and a progressively diminishing breeze over the following two days, I was eager to make the most of this early-season weather window, with lots to test out on LAZYDOG before it would be all-systems-go for longer trips over the summer months.
Photographs by the author
LAZYDOG reaches across Rosario Strait with Matia Island in the distance. The large watertight bulkhead forward of the mast gives peace of mind in rough seas. but has no access for gear. Anything that doesn’t fit in a small aft compartment must sit on the floorboards between the helm and the halyards.
After an easy launch, I slowly sailed out into the bay past the blue-and-white Alaska ferry, docked at its southern terminus and sporting the Big Dipper and Polaris on its smokestack. Out past the industrial Fairhaven docks I set the beige marconi main and self-tacking jib for a close reach across Bellingham Bay toward Hale Passage, the 1-nautical-mile-wide gap between Portage and Lummi islands. Before long, the crumbly white bluffs along Portage’s south shore loomed above me and I cracked off my course, letting the jib club swing over to windward as LAZYDOG settled into a wing-and-wing run northbound. For the next 5 miles LAZYDOG romped down the passage, first nearing the steep and densely forested evergreen slopes of Lummi Island before jibing back toward The Portage, a slender sandy spit linking Portage Island to the Lummi Reservation on the mainland. Playing downwind with small puffy clouds shining against the blue sky overhead and hardly anyone out on the water, I couldn’t have been more pleased with how this shakedown cruise had begun.
Roger Siebert
.
When I rounded the dark seaweed-strewn rocks of Point Migley at the northern end of Lummi Island and entered Rosario Strait, the hands-on sailing began. My time in Hale Passage had been leisurely with downwind sailing in 10 knots, but now LAZYDOG’s bow was punching through the waves on her new beam-reach course. The 15- to 20-knot southerly was battling against a northerly ebb current that combined for a steep and tightly packed wave pattern that sent spray high enough off the bow to clear the varnished mahogany coaming and soak me at the helm. With the mellow forecast, I hadn’t planned on tasting salt on my lips during this passage. Rosario Strait has a reputation as a body of water with little sympathy for small open boats, or their soaked skippers, so I turned to a broad reach and left the helm to a tiller bungee while I pulled on more layers and boots. Now more properly attired, I set about crossing the 4 miles of open water at the northern mouth of the Strait. I dropped the centerboard, brought the bow up onto a close westward reach, and set my sights on my next obstacle: crossing the Rosario shipping lane. As I neared the boundary, a tug-and-tow passed by, crushing the swell with its bow as it churned north. Otherwise, it seemed to be a sleepy day for commercial traffic, and I only had to duck behind the stern of a lone northbound tug during my crossing. While LAZYDOG remained remarkably stable, not heeling excessively while still under full sail, she required quick and constant working of the mainsheet, and taking the waves directly on the beam gave me a chilly soaking every few minutes. My only recourse from the steepest sets, which came through in groups of nine to ten larger waves every few minutes, was to diverge from my beam-reach course and run downwind with the waves before correcting my course again.
Rolfe Cove, my destination for the day, lies just around the Matia Island headland, visible under the boom. The jib is flown with a club, which keeps the foot stretched out for downwind sailing. It is particularly handy when running wing-on-wing.
I occasionally retrieved my phone from the drybag clipped near my feet to use a charts app to check our heading, confirm buoy sightings, and get a gauge of speed over ground.
As LAZYDOG romped across the Strait at a steady 6 knots, hitting upward of 8 knots running down the steepest waves, I fell into the rhythm of each passing set, first easing off the sheet to gently bear down with the swell and, once it had stopped rushing under the hull, turning back up again to keep the boat speed up. It felt like linking ski turns through a steep mogul field. LAZYDOG’s buoyant bow danced among the waves with plenty of responsiveness on the helm, though I inevitably slipped up on my steering through an extra-tall set that slapped the windward corner of the transom as I belatedly steered the bow down. The spray smacked the back of my head and soaked my hat. I looked backward more frequently for the approaching sets for the remainder of the passage. Mesmerized in this ritual for about an hour, I soon saw that the yellow buoy marking the center of the shipping lane now lay off my starboard quarter, indicating that I had cleared the channel. I pressed on into the lee of the towering ridge of Orcas Island’s 2,400′-tall Mount Constitution; the wind dropped to 10 knots.
After the trying crossing of Rosario Strait, I arrived exhausted on Matia Island. The sandy beach in Rolfe Cove was a very welcoming place to beach the boat. On the horizon beyond the mouth of the cove is Sucia Island.
With the lighter wind the waves slackened, and the steeper sets no longer threatened to overtop the gunwale. I ran wing-on-wing once more and passed under the longer southern side of Matia Island to reach the entrance of Rolfe Cove on the western end. I short-tacked into the cove and found the dock was crowded with nine white-hulled cruising sailboats rafted up two and three across. I had planned to spend the night at anchor but was nevertheless surprised to see the cove so busy only a few weeks into May. In between the tall rocky flanks of the cove the wind died, so I dropped the sails and rowed the last 250 yards toward the beach. About 50′ before the shore, I tossed out my first anchor to let it settle in the mud before rowing ashore. Just as the keel grounded gently with a shushing sound, I stepped off the bow into 1′ of water. I set my second anchor high in the sand just beneath the mossy ground at the edge of the treeline.
While this old-growth western red cedar was slightly worse off than most of its peers, it was still alive despite the fire damage to its lower trunk. As part of the preservation efforts on Matia Island, a state park and national wildlife refuge, campfires and wood collecting are banned.
During the windy crossing of Rosario, I’d strewn spare clothing layers, food bags, and a rat’s nest of lines on the floorboards. The mess was a reminder that I’d be safer if I kept the boat tidy while underway. I coiled sheets, corralled loose water bottles, and rearranged the cockpit to prepare for the night ahead. It didn’t take long—everything is within arm’s reach in LAZYDOG’s 7′-long cockpit. I was desperately hungry after the bouncy hands-on crossing that had left me no time for snacking. In the quiet shelter of Rolfe Cove’s high-walled shoreline, I extracted from a salt-encrusted dry bag an apple and home-baked cranberry-molasses bread and quickly devoured them.
With things tidied up onboard and my hunger at bay, I went ashore to explore Matia. The 1⁄4-square-mile island’s only trail is a loop that twists 1 mile through the western red cedars and Douglas firs. Long and skinny ridgelines topping out at over 150′ run the length of the island and can be seen from the trail below them in the moss-covered valley. In this old-growth forest the crowns of massive trees with trunks that would require several people to encircle them rise well clear of Matia’s ridgelines. Within the valley, the epiphyte-laden boughs of the big-leaf maples and the grand fir saplings poking up from mossy nurse logs are undisturbed by the wind in the Straits, yet I could smell the salt in the still air that hung in the valley. I sat on a fallen log deep in the valley amid the waxy-deep green of the abundant salal and celeste-green of the fir needles shimmering overhead. A varied thrush chick alighted on a log not 10′ away. With baby down feathers still interspersed between its developing orange and black plumage, it eyed me from different angles as it hopped along the log. After a few minutes of exchanged glances, the thrush flew noiselessly away into the dense underbrush, and I carried on my own way down the loamy path.
Seen from the cliffside trail along the cove, LAZYDOG cuts a diminutive figure compared to the cruising boats at the park dock.
Farther along the trail, I met a family of three who had crossed Rosario Strait about an hour before me in their Pelican dinghy in similar windy conditions. They told me about a dicey jibe they’d experienced in the steep and crowded waves when the peak of their gaff-rigged mainsail had unexpectedly backwinded across the mast and left the boom on the opposite side of the boat. They were planning to relax for a few days on Matia before heading out again, and after hearing about their travails I couldn’t blame them for taking a long break. LAZYDOG had fully displayed her seaworthiness by sparing me a similar experience, and further proved to me that despite most Haven 12 1⁄2s never venturing far from their home ports, they do in fact make seaworthy sail-and-oar cruising boats.
Back in Rolfe Cove, I chatted with the gaggle of around 20 sailors on the dock. They were a cruising club from Bellingham, who open their season with a cleanup trip to Matia every spring. I was heartened to know that local cruisers are embracing a duty of care to help preserve the San Juan Islands. They had watched LAZYDOG sail into the cove and invited me to their dockside potluck.
My somewhat flappy tarp over the boom did offer me a view of the sun setting beyond a thick layer of clouds hanging above Canada’s Gulf Islands. Rolfe Cove is narrow and has steep, high sides that offered good protection from the strong southerly that had blown all day.
After a while, I left their company and waded back out to LAZYDOG for the night. The tide had fallen throughout the evening and the 18″ keel was gently lodged in the sand. I had been unsure before the trip if my sailing boots would be tall enough to keep my feet dry while leaving and returning to LAZYDOG on beaches, but they had 2″ to spare before they would become overtopped. A gentle push set the boat floating again. Once I had hopped aboard the foredeck and stepped into the cockpit, it was time to move to deeper water for the night. I paid out the shoreside anchor rode while hauling in the one set deeper in the mud-bottomed cove until LAZYDOG was in about 15′ of water. With only an 8′ tidal swing coming overnight, I would rest easy.
I set about rigging my test tarp over the boom. It was an unwieldly 12′ square poly-tarp originally purchased for car-camping trips, but it was the only one I had on hand when pulling gear together in my tiny apartment. Folding it in half and then folding up one-fourth of the length gave me a tarp of 6′ by 9′, about the right size to sit over LAZYDOG’s boom, which was held by a taller-than-normal crutch I had made. I ran tiedowns as best I could from stem to stern, but my origami cover was far from taut. As darkness fell upon the cove, the exhaustion of a long day set in, and I was soon tucked alongside the centerboard trunk. Having never slept aboard prior to this trip I was thankful that the sleeping pad and my 6′ 2″ frame fit as well in practice as my shoreside tests had suggested.
LAZYDOG sits afloat between her two anchors. A 4-lb anchor sits in the mud about 60′ behind the boat, and a 2.5-pounder is some 40’ up the beach deep in the sand. Since the keel prevents her from being fully beached, I left her with a couple of feet of water under the bow.
The tarp flapped throughout the night, but despite its incessant addition to the sound of lapping water, I awoke well rested to a dawn chorus of robins and chickadees. I peered west out of the triangular opening between the tarp and transom and saw a 10-knot westerly rolling into the mouth of the cove from the sunrise-lit hills of Sucia Island. The breeze was far greater than the light air forecast for the day, and I immediately knew I could not let it go to waste. I was quick with my breakfast, packed up my bedding, and pulled LAZYDOG back to the beach. I was soon striding along the loop trail to check conditions in Rosario Strait. From Matia’s southeastern bluffs I trained binoculars on the flanking sloped shores of Lummi and Orcas islands and saw consistent but not overly large whitecaps rolling across the Strait. The sea state was much friendlier than the day before, thanks to the morning’s ebb current running with the wind. With unexpectedly lovely conditions for making miles to the south, but such a dismal forecast of variable light wind still predicted for my final day, I’d need to visit Sucia and Patos islands another time. Instead, I set my sights on a visit to Vendovi Island, 12 sea miles to the southeast, before spending the night in Lummi’s Inati Bay, which would leave me only a short jump to Bellingham the following day.
I was soon back onboard LAZYDOG and short-tacked out of Rolfe Cove until I rounded the angled slabs of guano-stained rock protruding from Matia’s western point. Once clear of the cove, I bore off on a broad reach to the southeast and it didn’t take long for LAZYDOG to put the island far off the port quarter. The recreational shrimp-fishing season had just opened, and with the favorable sea state multitudes of small aluminum motor craft dotted the water around me as the shrimpers deployed their traps with yellow buoys.
Just after departing Rolfe Cove, I sailed on a reach in the morning breeze toward Orcas Island. The mountain-ridge knob to the right of the starboard-most halyard is the summit of Mount Constitution. Soon after this I hoisted the spinnaker to head south down Rosario Strait.
I continued to ease off from the wind as LAZYDOG neared the skinny pairing of Clark and Barnes islands, so I raised the white spinnaker, and we were soon sweeping past the long white-sand beaches on their south ends. To the west, the stone tower high up on top of Mount Constitution was clearly visible but from such a height LAZYDOG must appear truly miniature. Mount Constitution often casts a large wind shadow when a west or southwest breeze blows across the San Juan Islands. The spinnaker buckled and drooped as we coasted out of reach of the westerly, and I doused it in anticipation of the light and shifty winds ahead. With 10 to 15 knots visible as a dark swath of water just a few miles away around Sinclair Island, I only had to get there before it died too. I pursued catspaws from every which way during my escape from under Constitution’s ridgeline, yet of the hour I spent ghosting along, I only shipped the oars for the final few minutes to round Orcas Island’s Lawrence Point into the new breeze.
I docked on Vendovi Island just as the fickle wind died. Access to the island and time allowed at the dock are limited, so my stay would be a short one.
Picking up the new wind from Bellingham Channel I was making consistent progress once more—first on a tight reach, and then beating upwind to finally nose around Vendovi’s 150′ breakwater. I had initially been concerned about sailing into such a small enclosure, in case other boats were maneuvering in the cove, but seeing the dock nearly empty I first lowered the jib, followed by the main before stepping off onto the concrete dock just as LAZYDOG’s momentum faded. I’d made it just in time too, for the breeze that had carried me the last few miles died as I ate a late lunch overlooking Rosario Strait. If I was going anywhere without rowing, I had some time to kill. With the hope that the southerly would return, I set off to explore the island’s arching pebble beaches and sword-fern-lined paths to a bluff viewpoint looking south toward Guemes and Samish islands.
I hiked the one-mile trail to Vendovi’s southern bluffs where there is an expansive view of Guemes Island and many other small islands dotting the protected waters of Padilla Bay.
A few hours later I was back at my lunch overlook and watching as dainty catspaws dotted the glassy surface between Vendovi and Eliza islands. The signs of the breeze were a sure signal that it was time to hoist the sails and get on with the day, so I headed back to the dock and was soon underway. Purple martins, perched at the holes of their dockside nest boxes, eyed me as I cast off. Yet I was soon out of their gaze, delicately coaxing the spinnaker to hold the whispering southerly breeze as the afternoon turned into evening.
LAZYDOG rips back into Bellingham Bay under her spinnaker. The impending rain clouds to the right brought great sailing for the end of the trip and blew themselves out before dousing us.
As a new 10- to 15-knot wind built from the southwest, the spinnaker no longer required my babying to stay full and carried LAZYDOG toward the mouth of Bellingham Bay at a purposeful pace. Cruising past the homes dotting the eastern side of privately owned Eliza Island, I had a decision to make about how to conclude my shakedown trip. My original plan had been to make the short jaunt west to Inati Bay only 1 ½ miles farther northwest and spend another night at anchor. The updated forecast for the next day was for variable winds less than 5 knots, meaning a long and hot row across Bellingham Bay in the morning. LAZYDOG is a 1,600-lb boat before gear or passengers are added, and rowing her for over an hour, even in calm conditions, is a backbreaking endeavor. As LAZYDOG pressed downwind toward Fairhaven, the decision to return home a day early was an easy one to make. I have always been a sailor first, and took the opportunity to finish my trip under a full spinnaker and following seas.
As I sailed the final leg into Bellingham Bay, clouds stacked up behind the building wind and doused Lummi Island with rain, which formed a gray mist across its 1,400′-high ridge. Yet the clouds never caught LAZYDOG as she raced downwind. Eventually, the spinnaker had to come down in the lee of the steep and rocky Chuckanut Hills. After reaching around Post Point, I jibed toward the Fairhaven ramp.
Closer to shore I doused the sails to coast gently into the launch-ramp dock and stepped off LAZYDOG, pleased with my two-day spin to Matia and back. With everything onboard functioning as intended, I was looking forward to the summer cruising season.
Sean Grealish lives and sails in Bellingham, Washington, where he is an environmental science master’s student at Western Washington University studying the impacts of estuary restoration on invertebrates. He grew up racing dinghies before completing two Transpac races and skippering the (then) youngest team ever to finish the R2AK in 2018. He now enjoys a calmer sailing lifestyle, squeezing in trips to the San Juan Islands whenever he can on his family’s Haven 12 ½, LAZYDOG.
If you have an interesting story to tell about your adventures with a small boat, please email us a brief outline and a few photos.
If you’d like to extend your cruising season, putting a roof over the your head to block the rain, and placing windows around you to divert the wind, can make manning the helm in inclement weather tolerable and perhaps even pleasant. Phil Thiel equipped his Friend-Ship canal cruiser with a shelter for the shoulder seasons; it comes apart in sections and stows aboard the boat for trailering and for passing under low bridges. The outboard motor is mounted in a recess in the transom and covered with an easily removed box to reduce its noise. Flanked by a pair of storage boxes, it serves as part of an 8′ long bench for passengers to keep the skipper company.
Thiel’s Friend-Ship is ideal for cruising sheltered inland waters.
At the end of the day’s travel, find a snug spot for the night where there’s enough water to accommodate the boat’s 9″ draft, and go below for supper in the main cabin. There’s room for four at the table. The galley has a countertop with plenty of room for a recessed portable stove and a sink on top and a cooler or two tucked underneath.
At lights-out a couple can retreat to a 4′-wide double berth aft, and a second couple, guests perhaps, can lower the dinette table for another double berth. Forward, there is a pair of single berths. The head is in a compartment on the port side of the aft companionway, set apart by a plywood door. Curtains will offer a measure of privacy for the three sleeping areas.
Flotation materials
The 1/2″ plywood bottom will easily take the gentle curves rising up from a flat midsection to the bow and stern transoms. The curves for the cabin and helm shelter roofs are easily made from 1/4″ plywood. The outwales running the length of the hull are there to protect it; they also add a strong curved visual element that is, in the words of the designer, “the chief means of changing a box into a boat.” Assembling the rest of the Friend-Ship calls for straight lines, right angles, and basic carpentry skills.
The Friend-Ship canal cruiser’s 14 sheets of plans include construction details, options for windows, and instructions for the sequence of assembly.
Outboard profiles
Plan 152-009
DESCRIPTION
Hull type: Flat-bottomed, transom sterned
Construction: Plywood
PERFORMANCE
Suitable for quiet, protected waters
Intended capacity: 1-6
Trailerable
Propulsion: 5–10-hp outboard
BUILDING DATA
Skill needed: Basic
Lofting required: No
PLANS DATA
No. of sheets: 13
Supplemental information: 1 page
Level of Detail: Above average
Plans Format: Print or Digital
Cost per set: $75
Related Publications:
WoodenBoat No. 222
For those who prefer open-air boating, the plans include an option for a folding bimini in lieu of the wheelhouse. The transom ladder and folding swim step are an individual addition.
Whenever I decide to spend a night on board at anchor, there are two problems I have to solve. The first is determining the depth in an anchorage. In areas with big tidal ranges, it’s especially important. Handheld electronic depthsounders are available but I, like many other open-boat cruisers, don’t own one. The second problem is deciding how much scope I have out. I can get pretty close by measuring the rode in arm spans, but it takes longer than just feeding it out and is a nuisance when I lose track and have to start again.
Alex Zimmerman
Plastic flagging tape is inexpensive, easily threaded between the strands of a three-strand rope, and in my experience, stands up well showing little or no deterioration after six years and several hundred anchorings.
I came up with a single, simple, cheap solution to these problems, one that I have used on three boats so far. I insert small strips of colored plastic flagging tape into the anchor line to mark lengths, so that I know how much line I am letting out. When I feel the last of the chain coming to rest on the bottom, the marked rode then serves as a lead line: the length of the rode that I’ve paid out, minus the 21′ of chain gives me the depth. When I know the depth, I can take the local conditions into account, decide how much rode to use, and pay it out using the markers. They take the chain into account and directly indicate the scope.
Alex Zimmerman
Laying out the anchor rode alongside a measuring tape makes it easy to measure and keep track when inserting the flagging tape, but it’s not essential. The anchor and 21′ of chain are at the top of this picture, and are counted as the first 21′ to the first set flags: three yellow flags at 30′. The red flags nearest to the camera are the marks for 50′ (one red flag) and 100′ (two red flags).
My three-strand nylon anchor line makes it easy to insert strips of tape between the strands. The marking scheme I use is to insert one strip of yellow tape at 10′, with an additional strip of yellow tape every subsequent 10′ increment: two for 20′, three for 30′, and four for 40′. At 50′ I insert a single strip of red tape. Then 60′ gets one red and one yellow, 70′ gets one red and two yellow, and so on. At 100′ there are two strips of red, and the pattern continues. I have a lead line marked this same way.
Of course you could use any intervals that make sense to you: feet, fathoms, meters, or whatever aligns with the charts you use; and any colors of flagging tape that you prefer. I chose yellow and red for good visibility in low light or near darkness. Flagging tape is inexpensive and easily obtainable. It is also easy to renew if it becomes too tattered with use, but I have found that it lasts quite well. With this system in FIRE-DRAKE, my previous sail-and-oar boat, I anchored several hundred times over six years, both for short stops and overnights, and the original tape was still in place.
Alex Zimmerman is a retired executive and engineering consultant who became enamored with the sea and sailing after he learned basic seamanship in the Royal Canadian Navy. From his home in Victoria, along the coast of British Columbia, he has put several thousand miles under the keels of the various small boats he has built for himself. His book, Becoming Coastal, chronicles many of those journeys. He continues to write about wooden boats and the people who build and sail them.
Editor’s Note:
The 1⁄2″ solid-braided nylon line I’ve been using as an anchor rode doesn’t take well to having bits of flagging tape inserted. It can’t be twisted open like three-strand, and the braid is too tight to open with a hollow fid. After a brief struggle, I was able to pick up one loop on the outside of the braid with a Swedish fid, but then the edge of the fid severed the fibers.
I switched to heat-shrink tubing for markers. I bought a marine-grade version that came in a package that included two 4′ lengths of tubing—one black, the other red—both with a heat-activated adhesive. The tubing is listed as 1⁄2″, but had an inside diameter of 9⁄16″, which made it easy to slide over my 1⁄2″ line. My heat gun effectively shrank the tubing. It was done when I could see the texture of the braid showing through and a bit of the clear adhesive emerging from the ends of the tubing.
The applied tubing compresses the rode a bit, but its edges stand proud, enough that I can easily feel them but not get scratched. I also used it for some quick whippings on the rode’s ends. The tubing also works on twisted line and other types of braided line of similar diameter.
Christopher Cunningham
I measured out 10′ of my rode with a tape measure and made the blue mark seen here. I set two bar clamps on the edge of my workbench about 5′ apart, with the bars up, then looped one end of the rode around them. The braided line curves around the bars, so a 5′ spacing between them makes a loop of line longer than 10′. I shifted one of the clamps until the end of the line was even with the mark I’d made.
Christopher Cunningham
I tied a loop in the end of the line in the same way I’d tie it to the end of an anchor chain and set the loop over one of the bar clamps. I will use the rode markings to measure depth directly when I feel the last of the chain come to rest on the bottom. Alex includes the chain in his markings, so he subtracts the chain length from the length of rode payed out and measures scope directly from the markings. I made blue marks for each 10′ in the middle of each bend around the bar and added black marks as indicators of length from the end—dots to tally multiples of one and bars to tally multiples of five.
Christopher Cunningham
I cut pieces of the heat-shrink tubing—longer pieces of black for 50′ increments and short pieces of red for 10′—and slipped them over one end of the line in the order I’d use them.
Christopher Cunningham
Once the sections of tubing were in the right positions, I shrank them with a heat gun. I used a couple of extra pieces as “whippings” on the ends of the rode.
You can share your tips and tricks of the trade with other Small Boats readers by sending us an email.
I keep a glued-lapstrake Penobscot 17 oar-and-sail boat on a mooring on the coast of Maine. For simplicity’s sake, we leave it uncovered. While that saves a lot of time fussing with a tarp, the downside is that when we get a big rain, the open hull collects water, and I need to bail her. Sometimes it’s just a few inches, but there have been times after a big storm when I have found a foot of water in her. The boat, built of wood and fitted out with plenty of foam insulation for flotation, is in no danger of sinking, but it can be a long chore to bail her out.
Photographs by the author
After some big rains, I would find our Penobscot 17 filled to almost bench-level. The boat was never in danger of sinking, but it did lead to time-consuming bailing before we could get off the mooring.
I wondered if there was a better way to keep her bailed and if I might be able to cobble together a small solar-charged, battery-operated bilge pump with a switch. I have done a lot of basic wiring in our homes, but this seemed like a different sort of electrical knowledge. When I wandered the marine stores, the choices and options were overwhelming. Not having a great electrical mind, I didn’t know where to start, so I called a good friend who’s an electrical engineer and a fellow boater. He came across the EasyBailer online and suggested it seemed a good solution at a good price.
After I checked the site, I learned that the designer of EasyBailer, John Bianchi, had stopped making the units several years ago but now offers plans. The 22-page PDF I received from the EasyBailer website by return email was detailed with clear step-by-step instructions, advice, photos, and a parts list, which made the entire project seem doable. John had experimented with different pumps and switches over the years to find components that were the simplest and most reliable. I had most of the tools—pliers, crimpers, heat gun, drill bits—and I found most of the electrical connectors at a hardware or big-box store. No soldering is needed. The pump, switch, battery, solar panel, and a few of the electrical connectors were easily ordered online and all came from Amazon suppliers in one package. I did find an inexpensive bilge hose from Walmart that seems fine. John’s PDF has a complete list of materials with helpful details on how he determined the reliability of each component, which makes it evident that he experimented for years to find the best parts and arrangement. I won’t detail the process here because the PDF does such a good job of it. The unit can be built in an afternoon or evening. I spent about $160 in parts for my EasyBailer.
The assembled unit sits in a customized battery dry box. The switch can be seen beneath the bundled wires. On its face, not visible in this picture, is the activating panel that activates the pump when an electrical connection is made by rising water. The round hole cut in the side of the box allows water in to trigger the switch and gives access for manually testing the switch by touching its contacts. Dielectric grease is used throughout to ensure all the crimped connections remain water resistant.
When assembled, the components—pump, switch, battery, fuse, and all connections—are contained in a small dry box (approximately 7″ × 11″ × 5″). Altogether it weighs just a few pounds. The box specified in the plans is inexpensive, available online, and its main function is to contain the parts. The assembled unit is placed in the lowest spot in the bottom of the boat and the solar panel, which is connected by approximately 6′ length of wire, can sit anywhere that’s unobstructed. I use a short line to tie the bilge hose to the gunwale. When I want to row or sail, I stow the panel and hose with the pump box under the deck.
The pump is activated by 2″ of water and shuts off when there’s about 3⁄4″ left at the bottom of the EasyBailer box. When I first get onboard after a rain, I sit positioned so my weight pools the remaining water around the pump. After a couple of minutes, most of the remaining water has been pumped out; following up with a little old-fashioned sponge work mops up the rest.
The tiny pump specified by John is rated for 500 gallons per hour (8.3 gallons per minute) and moves a lot of water out of the boat quickly. He initially experimented with less expensive float switches but found that debris floating about in a boat’s bilge inevitably gets caught up in the switch, which can prevent it from turning the pump on. He specifies an electronic switch, which has two points that activate the pump when in contact with water (or one’s fingers to test).
The box holding the pump assembly sits comfortably in the maststep locker with the solar panel resting on the deck above. To make sure the hose end stays overboard while we’re not there, we lash it to a shroud.
I’ve only had a couple of small issues so far. My first solar panel apparently failed after a year or so: the red/green indicator light wasn’t functioning, and I couldn’t tell if the panel was charging or not. I bought another (approximately $20) and it has been working fine. The solar panel is a 1.8-watt trickle-charger that’s completely sealed to be waterproof, rugged, and durable (according to the manufacturer). John suggests putting a bead of marine-grade silicone caulk around the glass panel for extra weather protection. The other component I’ve considered replacing is the battery. John recommends a small, inexpensive, lead-acid battery. I’ve seen lithium batteries with similar dimensions that are far lighter and should have more power, but they are closer to $50 so I’ve held off investing in one. I’ve noticed that after a heavy rain the battery I have seems a bit weak: the pump still runs but sounds a little slower to me. I’ve not tested the battery to see how quickly it recharges.
John clearly states the unit is designed for bailing occasional rainwater from boats up to 17′ and not boats that leak and need constant pumping. I believe the EasyBailer was designed more than a decade ago, so it’s also entirely possible that solar panel and battery technologies have evolved and there might be more advanced alternatives. Even so, I think the basic concept and design are still solid, the instructions are applicable to materials available now, and it seems like a worthy investment for most small boats. It’s also a nice opportunity to learn something new and have a simple project to complete that is truly useful.
Jim Root splits his time between a home in Barrington Hills, Illinois, and Round Pond in mid-coast Maine. He is now retired after a career in communications and advertising. He enjoys being out in either a Pygmy sea kayak, restored Old Town canoe, Hylan Beach Pea, or Penobscot daysailer. He also paddles two skin-on-frame Greenland kayaks, per Christopher Cunningham’s book. Jim’s mother says he has too many boats. He also paints and finds subjects in Maine and Illinois to fuel his passion for painting. You can see his work on his website.
Plans in PDF format for the EasyBailer pump are available from EasyBailer for a minimum $25 donation to prostate cancer research.
You can share your tips and tricks of the trade with other Small Boats readers by sending us an email.
It has been about 10 years since I bought my first oscillating multi-tool, a Ryobi that I’ve used mostly for sanding in tight spaces and not much else; it’s a hobbyist’s tool. Last year I acquired (see the footnote at the end of this article for how) a DeWalt DCS356 Atomic 20V MAX multi-tool, a heavy-duty tool for more arduous work. The first time it proved its worth was when my furnace gave up the ghost last winter and I had to cut away a section of wall to have it removed and replaced. It cut through drywall quickly with minimal dust and cut through 2×4 framing in a space too small for any other saw. More recently, I’ve been using the multi-tool to repair and restore a Bolger pirogue. I’m doing the work in the backyard and every task is easier without having electrical cords in the way.
Photographs by the author
Most multi-tool blades are offset to make flush cuts possible. The DeWalt muti-tool got through this 1″ oak dowel in 8 seconds. It took me 14 seconds with my Japanese kugihiki flush-cut saw.
The DCS356 is a cordless version of the DeWalt DWE315. It’s powered by a 20-volt battery and has a brushless motor. The tool, without battery, weights 2 lbs 4.8 oz. It has a switch in its base for three speed ranges, and within each setting, the tool’s trigger has variable speed. The top speed is 20,000 oscillations per minute. A soft pull on the trigger turns a light on at the front of the tool, illuminating the work area. The light goes off 20 seconds after the trigger is released. The trigger has a lock, which comes in handy in tight quarters when it’s not possible to hold the tool with a finger on the trigger.
Equipped with a sanding pad and hook-and-loop sandpaper, the multi-tool is well-suited for getting into sharp corners.
The business end of the multi-tool has a spring-loaded quick release for installing and removing blades. Universal blades, designed to fit a wide variety of oscillating multi-tools, are slotted and slip into place before getting locked in position. For blades without slots, there is a threaded hole to attach them with a machine screw. The blades and other accessories can be positioned at various angles to the tool to best suit the work.
The built-in light effectively illuminates work areas.
Neither the DeWalt website nor the tool’s manual specify the oscillation arc for the DCS3536, but many retailers list it as 1.6°. The angle I measured was 3.5° to 4°. At the cutting end of the blade the length of that arc is about 4mm, which makes a difference for wood-cutting teeth that are about 2mm apart. I don’t think a movement of just 1.6°—with an arc length not quite 2mm—would cut effectively. With one of the high-carbon-steel wood-cutting blades I sawed through a 1″ oak dowel in eight seconds and with a bimetal blade for metal I cut through a 1⁄4″ steel machine screw in about one minute.
The blades can be set at different angles to accommodate tight workspaces. To cut off long bolt ends in this storage compartment, I could lock the trigger to keep the tool running while I changed my grip to a less awkward position.
The 20-volt 2Ah has plenty of long-lasting power. Its back end has a state-of-charge indicator with three lights that come on with the push of its button. When there’s only one light left, the battery is down to 25% charge. The indicator works even if the battery is not connected to the tool. The lithium-ion battery has a charge time of 35 minutes and weighs 12.5 oz. There are larger batteries with longer run times but they’re heavier. I haven’t felt the need for one.
The quick-release device on the DeWalt DCS356 Atomic works with universal multi-tool blades that have slotted attachment points. It’s a real time-saver over the bolt-on system of early multi-tools.
The assortment of attachments I bought for the DeWalt includes 10 types of saw blades for wood, chisel-edged scraper blades, and two sanding pads with precut abrasive patches. There are carbide- and diamond-grit blades for other materials. I’ll buy more blades as I find other jobs that the DCS3536 multi-tool can do more easily or faster than any other tool in my shop.
Is there a product that might be useful for boatbuilding, cruising, or shore-side camping that you’d like us to review? Please email your suggestions.
Stolen tools
My pickup truck was stolen a year ago and was missing for about a month until I got a call from a police officer some 35 miles away: the truck had been located and I could retrieve it. The cab and the bed were chock-full messes, and it was evident that the thief had been using the truck to steal tools from construction sites. The officer I met at the scene said I could do as I pleased with whatever was in the truck. None of the tools had any marks to identify the owners. I searched for their serial numbers on Stolen Register and Power Tool Safe and none of the tools I’d acquired had been registered as stolen. If the owners had recorded the serial numbers, they could have registered them at these websites, and I could have returned their tools. —CC
Harald Hefel first sailed 15 years ago, in 2009, at his father-in-law’s birthday celebration. In a cove by the gathering was a little sailing skiff, and Harald took it out. He was hooked. Some years later he found himself with a whole lot of spruce wood and no project in mind. “We’d sold our house. We’d had a lot of animals—goats and chickens and all—and I’d put up a lot of fencing. The new owner asked that I take it all down. So, I did, and stored it away.”
Photographs by Harald Hefel
JANIE JANE, seen here in her early days, more than lived up to the sharpie’s reputation for being both fast and seaworthy. Harald often sailed singlehanded, but with her sloop rig there was plenty to do; the open cockpit had more than enough room to bring a crew aboard.
And that’s when the seed of an idea began germinating. Harald decided to turn the old fence rails into a boat. “I talked to a lot of people, including some local Connecticut boatbuilders. I told them I was looking for a simple design to build and sail, and they suggested a sharpie—it was fast and easy to build, and fast on the water.”
He found a design by Reuel Parker: the Sharpie 19, described by Parker as a “half-size reproduction of the sharpie type common to Ohio, the Florida Keys, and East Coast fisheries during the late nineteenth century. The rig is classic.”
After eight years of sailing and two more of resting on a trailer in the yard, JANIE JANE’s cross-planked spruce bottom was in surprisingly good shape. Harald determined that he could save it if he took it back to bare wood and covered it in polyester cloth and epoxy.
Parker advised building the boat with “cold-molded plywood covered with epoxy-impregnated polyester.” But Harald had all that spruce fencing. He decided to build his sharpie with carvel-planked sides on white-oak frames. In the fall of 2012, he started work on the boat. He ripped and planed the fencerails down from 1″ to 5⁄8″. “It wasn’t ideal, as the thickness didn’t leave much room for a bevel and caulking but 3⁄4″ was too thick to take the bend at the bow.” He cross-planked the bottom using 1×8 spruce boards and built the deck in Douglas-fir wainscoting. He painted the deck and finished the interior with a mix of linseed oil and turpentine.
Harald launched JANIE JANE in 2013 and sailed her for the next eight years until “she was leaking too much, so I brought her ashore and left her in the front yard with the sails up—she became known in the neighborhood as the ‘Yard Schooner.’”
Once work on the bottom was complete and the new topsides were in place, Harald turned JANIE JANE over to work on the interior and deck. He removed the old deck and fitted framing to add a foredeck hatch, which would allow access to the newly designed dry storage and anchor locker.
Within two years, Harald’s longing to be afloat had returned and he started looking for a suitable replacement boat. Then one day in 2023 he walked past JANIE JANE and stopped. “Her foredeck and the topside planking were rotting, but the frames and bottom looked solid, so I decided to rebuild her.”
He moved JANIE JANE into his workshop, set her up on stands, and began the careful process of dismantling her. The original construction had silicon-bronze fastenings, 1,200 total, and he removed them all. He had bedded many of them in tar but, as he removed them, found they were all “a little pinkish and weak, and many of the heads were damaged as they came out.” He determined that they were not suitable for reuse and instead decided to use galvanized screws that would “hold up forever, especially when protected by epoxy.” As he took the planking off the sides, he confirmed that the white-oak frames and spruce bottom had survived the time of standing in the yard collecting rainwater, thanks, he thinks, to the liberal application of linseed oil and turpentine during his sailing years. He flipped the boat upside down, sanded the bottom, cleaned up the outside faces of the frames, and rebuilt the topsides with 3⁄8″ marine plywood.
The new deck—3⁄8″ Douglas-fir marine plywood—would, like the hull, be covered with epoxy-saturated polyester cloth.
Before fitting a new deck, Harald constructed two watertight bulkheads for flotation compartments. He installed the first about 5′ aft of the stem, and the other about 20″ forward of the transom. The overall length of the boat is 19′ 6″, and while Harald was eager to introduce the flotation, he also wanted to maintain enough space in the cockpit to accommodate comfortable camp-cruising. The new interior layout, he says, “still gives me room to sleep alongside the centerboard trunk with my feet under the foredeck. That space is about 6′ 6″ long and about 20″ wide, and there’s still plenty of cockpit aft of that.”
The new enclosed compartment beneath the foredeck would double as dry storage. “There’s 18″ of space beneath the foredeck that’s covered but not enclosed, and I use that for storing things I might need during the day; but forward of the bulkhead, in the enclosed compartment, I stow my cooker, food, anchor, shovel and hatchet, kerosene lantern, my 500kW electric motor (which weighs about 14 lbs), and my bedding. Everything stays dry and is not underfoot in the cockpit when I’m sailing. It works great.”
After he had laid the deck, also 3⁄8″ Douglas-fir marine plywood, Harald coated the exterior of the hull and deck in polyester cloth saturated in epoxy. “Polyester was recommended by Reuel Parker, and I loved it. It takes a lot of resin, but it doesn’t itch, it’s really easy to cut, and it conformed to every curve very easily.” He left the interior without a coat of epoxy but, as he had when he first built JANIE JANE, liberally applied a concoction of linseed and turpentine to preserve the wood. “It served her well before,” he says, “and I like the smell. When I sleep on her it’s like sleeping in an old shipyard.”
Harald designed and built a tent for JANIE JANE’s new life as a cruiser. He made it in two sections so that it can be deployed over half the cockpit in warmer weather or the whole cockpit on colder or wetter nights.
Like the bottom and the frames, the sailing rig had stood up well. “I made the mast out of construction-grade spruce. It came in 16′ lengths, so I scarfed it with the elongated V of a clothespin scarf to get the required 24′ length. The sprit came from an older sailboat. I was poking around the yard of a shipwright friend, looking for useful material or advice, and told him I needed something suitable for my sprit. He said, ‘How about that?’ and handed me a pole.” Harald had been looking for a 10′ 6″ sprit; his friend’s pole was 10′ 6″. “All I had to do was cut a notch in one end for the snotter and stick a pin in the other end for the clew. It was the perfect match.”
All that was left was for Harald to build the sleeping tent. He designed and constructed a folding frame that collapses to nestle on the foredeck aft of the mast when underway. Built in two sections, the frame can be set up to support canvas over half of the cockpit length for shade or overnight protection in warm weather, or all of the cockpit if the weather is inclement or colder. When raised, the canvas is snap-fastened to the foredeck, and laced along the sides of the boat to hooks tucked beneath the rubrails.
Harald can sail with the tent lowered and resting on the cockpit coaming aft of the mast; at the end of a long sailing day the shelter can be set up quickly and easily. JANIE JANE can be sculled, using the notch mounted on the stern deck, and rowed, with the rower sitting on the aft end of the centerboard trunk.
Harald relaunched JANIE JANE in the spring of 2024 and has since used her extensively for day-sailing and cruising with the Northeast chapter of the North American Group of the UK-based Dinghy Cruising Association (DCA). With no shrouds or stays it takes him about 10 minutes to get her rigged up and ready to go. She rows very well, he says, although he did reposition the oarlocks. As built back in 2012, they were “a good foot aft of the centerboard trunk. I moved them forward, so they are even with the aft end of the trunk, which I sit on, and it’s much better for the trim.” All up, JANIE JANE weighs about 1,100 lbs—considerably more than the estimated 325-lb weight of the boat if built cold-molded—and Harald says it takes some effort to get going under oars, but “once she starts, she’s easy to row and carries her way with style.”
Under sail she’s even more impressive. “I once overhauled a Bayraider 20 to windward,” Harald reports with pride. “The skipper said he’d never underestimate a sharpie again!” For the most part, Harald sails alone with just his miniature dachshund, Trapper John MD (Trapper for short), for crew. Together they have been stalwart participants of many of the DCA cruises on the Connecticut River, around Narragansett, and in Long Island Sound, and the sharpie is the perfect boat for longer expeditions.
While the topsides, decks, forward and after flotation compartments, and framed camping tent are new, JANIE JANE’s overall appearance is as ever—a simple, sleek, no-nonsense sharpie.
But for daysailing, Harald concedes that JANIE JANE is on the heavy side. “I want something smaller and lighter for our short trips,” he says. “Around 15′ and under 300 lbs.”
So, Harald has returned to the workshop. He’s found what he thinks will be the perfect boat: “The Mississippi Sharpie is another of Reuel Parker’s designs. This time around I’m building with plywood and epoxy. If build it right, it’ll weigh less than 200 lbs. I hope to have it ready to take to Georgia for the winter. Then Trapper and I can have fun exploring the coast down there.”
For now, JANIE JANE is laid up for the winter, but she’ll be back out next year for more camp-cruising in style.
Jenny Bennett is managing editor of Small Boats.
Do you have a boat with an interesting story? Please email us. We’d like to hear about it and share it with other Small Boats readers.
With excitement and speed the primary objectives, athletic sailing abilities will pay off in the Geary 18, just as in other racing dinghies fitted out with trapeze gear.
Afew years ago, I was puttering on the docks at The Center for Wooden Boats in Seattle, Washington, when a fellow member of the Center asked if I would like to go out in the Flattie, the original and apt nickname of the one-design sloop officially known as the Geary 18. It was a warm summer afternoon, and the wind engine on Lake Union was running at a good 15 knots, so of course I said yes.
As I walked down the docks, one of the Center’s inveterate sailors looked at my shorts and said, “I hope you’re ready to get wet.”
Moments later, I was holding a jibsheet like a stallion’s rein as we peeled the boat on to a broad reach. The boat leapt from jog to gallop, the centerboard took to humming like a cyclotron, and a solid spray turned me into a human dodger. I’m sure I’ve gone faster on a sailboat before or since, but nothing felt as fast as this. And while there are certainly faster dinghies out there, few match the history and simplicity of the Geary 18.
The boat is the diminutive brainchild of L.E. “Ted” Geary, the talented and prolific Seattle-bred naval architect whose résumé includes far bigger Prohibition-era rum chasers, the first diesel-powered tugboat in the United States, actor John Barrymore’s 120′ fantail cruiser, and PIRATE (WoodenBoat No. 192), the R-boat, now based at the Center, that became the first West Coast designed and -built boat to compete in an East Coast yacht race. The race just happened to be the national championship, and it won.
Geary turned out the design for the Flattie just two years after PIRATE was built, aiming to produce a safe sailtrainer “that anyone with little or no boating experience can build and race.” It started out at the Seattle Yacht Club, whose junior members were looking for a fast but safe class boat. Fleets soon appeared in Vancouver, British Columbia, and Oregon, and Geary himself introduced the boat to Lake Arrowhead, California, and Acapulco, Mexico. In 1938, it was named the official boat of the Sea Scouts. Writing about Geary’s oeuvre in WoodenBoat No. 138, Thomas G. Skahill said, “the Geary 18 is a fine manifestation of Ted Geary’s basic tenet of simplicity, practicality, and longevity.”
More than 1,500 boats have been built over the past eight decades, with many sailed hard in fleets scattered around the West. Until even recently, a dedicated racer with a four-cylinder car, a trailer, and yen for adventure could tow a 525-lb Geary 18 to regattas from Mission Bay, San Diego, to Vancouver, Washington. Trailer oriented competition now focuses largely on the Coos Bay Yacht Club in Lakeside, Oregon, says Deb Eckrote, executive secretary of the Geary 18 International Yacht Racing Association and a third-generation Geary sailor.
George Cardas
Since its beginnings in the late 1930s, the Geary 18 has introduced many sailors to dinghy racing with a rig and fittings meant to be simple and comparatively inexpensive.
One of the largest fleets is just around the corner from the boat’s birthplace, on the western shore of Lake Washington in the well-to-do neighborhood of Laurelhurst. Microsoft co-founder Bill Gates learned to swim there at the Laurelhurst Beach Club, but the club’s more enduring claim to fame is a long-running tradition of campaigning Geary 18s. As one veteran used to say, “the kids in Laurelhurst grew up in the Flattie fleet rather than the Boy Scouts.”
On any Monday night in summer, you can find as many as 20 Flatties out racing, all by Laurelhurst Beach Club members, says Charlie Hanson, a second-generation LBC racer. In the ’60s and ’70s, some club owners would have as many as three boats at one time. “People would hoard boats,” says Hanson.
Hanson’s own boat is SMALL KRAFT III, built in 1961 of plywood on oak stems. Hanson’s father, Pete, bought it in the early ’70s from Ken Kraft, one of the top Geary 18 sailors in the West, and routinely sailed across the lake to Kirkland and back. He taught Charlie by example, even when it came to displaying the legendary ease with which the boat will capsize.
“He didn’t tell me that was how it was going to go down,” Hanson recalls, “but that’s how you learn.”
While Hanson was off to college, the boat fell off the dock and was smashed against a breakwater. He continued with college, married, had three kids, lived in Idaho, then returned to find the boat in a carport where he had put it 18 years earlier. He had Steve Evavold, a local boatwright now at Jensen Motor Boat, rebuild the boat. “Now I’m taking my kids,” says Hanson. “I’ve capsized with them, too.”
Of course, the class has seen better days. The international association is down to about 50 dues-paying members. Hanson figures the heyday was the ’40s and ’50s. The ’60s and ’70s saw the arrival of fiberglass and other composites and more competitive boats like Lasers.
It was time for a change, says Eckrote. “If they didn’t do something with the class, it was going to die out.”
George Cardas
Racing is the central purpose for the Geary 18, and races are held annually from California to British Columbia.
The 18’s sail area was increased, from about 160 to 200 sq ft between the jib and main, and the centerboard was made smaller, making the boat more maneuverable. The increased sail area necessitated the introduction of a trapeze, giving racers the heart-in-the-throat thrill of hovering supine over the water as the boat gets up on a plane.
The class has its devotees, says Hanson and others, for several reasons. Hanson says the Geary 18 offers “the greatest amount of fun for the boat.”
Someone “in the first half of talent as far as building boats”—meaning a beginner to someone with a fair amount of experience—can handle its construction, Hanson says. The original design calls for cedar planks, one piece on the side and cross-planked on the bottom, but later versions take advantage of marine plywood. It has few frames and, with a hard chine, no compound curves to wrestle with.
A good sailor can singlehand the boat. Hanson compares it to sailing while sitting on a couch. “You can very easily have a beer on your lap, chat about oil prices, and be racing very comfortably,” he says.
The lack of a spinnaker further reduces the need for crew and the hassle of dousing a massive wall of canvas while rounding a mark. In general, the boat’s simplicity reduces the arms race that makes racing larger craft an exercise in high finance.
Geary meant it that way, says Ken Kraft in an oral history posted on the Laurelhurst website. A new rule for a different jib may make the boat sail better, but it also means everyone has to buy a new jib. Kraft said he once heard Geary himself remark that “he knew 20 ways to make it faster, but he wouldn’t recommend any of them.”
As a minimalist racer, Hanson says, the boat reduces competition “to seamanship and talent.” Be at the right place on the course at the right time. Hit the start just right. Watch your trim.
On the downside, he acknowledges, “it is a wet boat.” The helmsman, he says, stays about 90 percent dry. But a dearth of freeboard brings a certain, uh, “intimacy” with the water. For the crew, sitting farther forward in the bow wave’s way, that means getting drenched.
But this is a late spring and summer boat. In the Pacific Northwest, that means light air and a dry sail. Such was the case this May when John Watkins, an experienced racer, took me out on The Center for Wooden Boats’s Geary 18 for a spin in the Duck Dodge, the classic Tuesday night pickup race on Lake Union. The boat was on the backside of its maintenance cycle, with antique sails and a furry bottom, but it leapt to life with little prompting. “Not bad for a boat from 1928,” Watkins said.
On the downwind leg, chasing pockets of wind past the Sleepless in Seattle houseboat, the Flattie found itself in a duel with a composite-sailed Tasar and managed to
stay ahead to the end.
And as noted earlier, in heavier air, it’s a wild sail. With crew out on a trapeze and enough wind, Hanson says, the boat will plane going to weather. But it’s best on a broad reach, planing at about 15 knots. That basically means that, if there are whitecaps, you’re flying. Hanson has a way of doing that formula one better, bringing his boat along Seattle’s Evergreen Point Floating Bridge, which can have a mile of flat water in its lee in spite of marvelously big wind. “You can go out there in 20 knots,” says Hanson, “and you feel like you’ve died and gone to heaven.”
Plans for the Geary 18 are available from the Geary International Yacht Racing Association, P.O. Box 4763, Federal Way, WA 98063 4763. The plans, at $20, are only available to people who register for association membership for at least one year at $40.
Geary 18 Particulars
LOA 18′
Beam 5′ 3″
Sail area 168 sq ft
Weight 525 lbs (minimum)
L.E. "Ted" Geary/Geary International Yacht Racing Association
The reason for the Geary 18’s nickname—the “Flattie”—certainly is evident in her plans.
L.E. "Ted" Geary/Geary International Yacht Racing Association
The hull construction is straightforward plywood boatbuilding emphasizing sailing performance and simple, inexpensive construction. The plans are accompanied by a detailed instruction booklet.
Is there a boat you’d like to know more about? Have you built one that you think other Small Boats readers would enjoy? Please email us your suggestions.
The best of Norway’s small craft approach aesthetic and functional perfection. Iain Oughtred chose to not tamper with the results of evolution when designing Elf and her larger cousin, Elfyn. He simply drew traditional Norwegian faering (four-oared) hulls for plywood-epoxy lapstrake construction, thereby making these timeless boats more accessible to amateur builders.
Particulars
When building either of these faerings, we’ll need to make and set up a more-or-less conventional backbone. (If this task seems too daunting, or if we simply prefer the advantages of a narrow flat bottom, we might build one of Oughtred’s handsome Skerrieskiffs.) The hull’s strakes must be shaped and beveled, but the strength and gap-filling properties of epoxy might help to fill in for perfection. Of course, that doesn’t mean we shouldn’t try to get everything just right! Many years experience with this construction at the WoodenBoat waterfront have proven boats of such manufacture to be strong, light, and easy to keep.
Although Oughtred’s drawings show auxiliary sailing rigs, these faerings are primarily wonderful pulling boats meant for rowing in calm and rough water. Each has a strong sheerline that sweeps down to amidships from a bold stem and sternpost. The body plan shows a narrow waterline. Both ends of the hull are fine (sharp) below the water but gain volume, hence buoyancy, dramatically above the waterline. Elf and Elfyn are smart enough to slice through small waves and to climb over the big ones.
Heights and half-breadths.
In keeping with the primary means of propulsion, Oughtred details an appropriate pair of 9’6″ oars with blades that are long (3′) and narrow (3″). After rowing Elf, the designer tells us: “She handles well in seriously rough water. I’ve had her in steep, tall waves where few boats her size could live. She tracks extraordinarily well.”
These double-enders go together easily, yet they retain the practical elegance of their forebears.
Glued plywood-lapstrake construction brings this sophisticated hull within range for an amateur builder.
The 16′ 6″ Elfyn faering design plans include 7 sheets plus 17 pages of additional notes from the designer. No lofting is required, and this one is ideal for an intermediate builder.
Under oars, the Elfyn slides effortlessly with proper longitudinal trim. Rowing alone, some ballast, about 20 to 30 lbs, put where it’s needed, whether in the bow or stern, will keep the keel level.
Rami Salle
The centerboard case is located a bit off-center, alongside the full-length keel. If you choose to install the daggerboard, its trunk will take up space in the middle of the boat. On the after edge of the forward thwart you can see the cleats we added, one for the rope shroud and the other for the halyard, doubling as the other shroud. Another wooden cleat was installed in the after edge of the center thwart for the sheet.
The Wineglass Wherry, a plywood pulling boat, takes its inspiration from the beach-launched working craft of Seabright, New Jersey, and Penobscot Bay, Maine.
Paddling for long stretches of time has never been my thing. I like the convenience of my kayak perched atop the car or near the water, ready to go at a moment’s notice. Likewise, I have fond memories of kayaking expeditions to Maine islands, with all of my essentials tucked away in dry bags and stowed neatly under decks. When paddling for over an hour, however, I invariably find myself craving more leg space, or shifting my weight to restore restricted blood flow. I also find myself craving cookies, and want to dig out one of those dry bags while underway, to get to the Mint Milanos stuffed in beneath my polar fleece.
Avid paddlers, please do not take offense at this admission; it’s my shortcoming, not yours or your sport’s. You who are more sophisticated kayak folk than I might chafe at my chafing, and might suggest that I pack the cookies more thoughtfully, within arm’s reach in the cockpit. Fair enough. But still the fact remains: While paddling my kayak for long periods, I always find myself asking why I am not rowing instead.
And so I’ve been curious for years to test the Wineglass Wherry from Pygmy Boat Co. of Port Townsend, Washington. Pygmy is highly regarded for its beautiful and beautifully precise plywood kayak kits. Its boats are built by the stitch-and-glue method, whereby panels are literally sewn together with copper wire, the resulting seams then reinforced with fiberglass tape set in epoxy. By following the directions carefully, anyone can build a Pygmy kit. The resulting kayak will rival or exceed what you can buy off the shelf—in terms of both weight and performance. And you’ll have built it yourself.
In designing the Wineglass Wherry, Pygmy’s founder, John Lockwood, used the same construction techniques as those of his kayaks. But in developing the boat’s shape, he looked back in time to salmon wherries from Maine’s Penobscot Bay and blended their features with New Jersey’s Seabright skiffs. The signature Seabright feature is the so-called box garboard. Study the photo at the top of the next page. See how the boat’s bottom is narrow and flat in the after regions, and is bordered by the two lowest planks—the garboards? That’s what I’m talking about. This feature allows the boat to stand bolt upright on the beach, and it provides a handy sump for bilgewater. The boat’s topside profile, meanwhile, bespeaks its Maine genes.
Pygmy’s headquarters are located within the grounds of the annual Port Townsend Wooden Boat Festival. So, on Sunday during the 2008 show, I disappeared from the booth for a few morning hours and took a Wineglass Wherry for a spin. Here are some impressions.
Pygmy Boats
Box garboards form the hollow keel seen here in the boat’s stern, which serves as a narrow sump for bilgewater. They also allow the boat to sit upright on the beach.
The Wineglass Wherry transports effortlessly over-land on a two-wheel dolly. Balancing its 90 lbs over the wheels, I was able to push the boat along the blacktop, down the ramp, and into the water alone, without any strain. With oars in position, I navigated the slalom of rafted boats and made my way out into calm Port Townsend Bay. The boat was reassuringly stable. With its double-ended waterline, it carried well between strokes with clean water astern and, despite its light weight, the motion in waves was not corky.
The wind built to about 12 knots during my outing, and I set courses at various relative angles. The boat was well mannered on all points of sail, tracking dead straight. This was especially impressive on a beam reach, when one might expect the boat to round up, or “weathercock.” There was none of this behavior. (Of course, I use the phrase “points of sail” figuratively. The boat has no rig, and Pygmy’s Dave Grimmer cautioned that it’s too tender for such use. “It’s essentially a pulling boat,” he said.)
The Wineglass Wherry has been a popular seller for Pygmy. Grimmer tells me that over 1,000 of the boats have been built. At least one of those was for designer Lockwood himself who, with his wife and daughter, made a four-week, 206-mile trip in 1995. The family explored numerous lakes, rivers, and creeks on the trip, and portaged between these waterways on flat trails using a two-wheeled dolly. They carried 150 lbs of gear, and report that they passed every canoe they encountered. Note that it’s the boat’s plywood construction that makes such an expedition possible. Were this boat traditionally built, with bent hardwood frames and cedar planking, it might weigh as much as 250 lbs. It would be a delight to row, still, but two people of average build could not easily lift it from the water and onto a dolly and wheel it down a narrow woods trail.
One of the joys of building your own boat is the ability to fit it out to your own requirements. My test boat in Port Townsend was a dedicated demo unit, and clearly it had seen some miles. A critique of its details would, therefore, be patently unfair. But the blank slate of this boat did give me ideas of how I might fit out my own, were I to build one.
The first thing I’d add would be a sculling notch, for the sake of versatility in tight spaces, and to allow an elegant recovery in the event of a dropped oar. The second thing I’d do would be to paint the interior, rather than leave it bright. As with my opening rant about long kayak trips, that’s just me. I prefer large expanses to be painted, and for bright surfaces to be reserved for accents and contrast. And, finally, I’d add some subtle detailing to the knees and breasthook—perhaps undercut them a little bit, for visual refinement. The ability to add such personal touches is what makes building your own boat so rewarding.
Michael Berman
The Wineglass Wherry, at 90 lbs, is easily transported and beach-launched for day outings. It has also proven itself as a camp-cruiser; its designer, John Lockwood, built his own example of the design and made a month-long expedition in it—with his family, no less—in 1995.
If you’ve built a stitch-and-glue kayak, then you already know how to build a Wineglass Wherry. You won’t need a strongback or forms; the panels are simply sewn together right on the shop floor, quickly yielding the shape of a boat. It seems to me that this boat would be a logical next step for a kayak builder. I said so to Dave Grimmer, and he told me that it’s actually worked out both ways: kayak builders have indeed gone on to build Wineglass Wherries, but just as many Wherry builders have gone on the build kayaks. Go figure.
This boat turns heads. A sailboat motored by during my test on Port Townsend Bay. “Nice boat,” shouted the skipper as he passed abeam. “Did you build it?”
“No,” I admitted. “Just borrowing it.”
You, however, with a little time and effort, could answer yes—and paint it any way you like.
Pygmy Boats recently closed its doors and no longer sells Wineglass Wherry kits.
Is there a boat you’d like to know more about? Have you built one that you think other Small Boats readers would enjoy? Please email us your suggestions.
When it comes to building a small wooden boat it’s hard to beat a skin-on-frame (SOF) for economy of time and materials, and ease of use when the boat is finished. Dave Gentry’s 10’ SOF-built Annabelle skiff is for sailing and rowing. Weighing just 63 lbs, it’s well suited for cartopping, and about as easy to carry and launch as a kayak. Your boating won’t be limited by access to ramps and trailer parking.
The hull is built around the stem, four frames, and the transom. The keel, chines (three to a side), and gunwales create the shape that supports the fabric skin. While any SOF boat can be built quite plainly, Gentry has added some elegant decorative touches and specified high-quality woods that are too pretty to hide under paint. SOF boats don’t have planking to brace the structure the way plywood braces the framing of a house, so the longitudinals can’t be sprung into place: Over time, they’ll straighten out and spoil the boat’s shape. Gentry keeps Annabelle’s shape by laminating the outwales in a stack of three pieces and he prebends the keel by soaking it in water, supporting its ends on sawhorses, and putting weights in the middle.
The 8-oz polyester fabric is draped over the frame, drawn taut, and secured with stainless-steel staples. A hot iron will shrink the fabric and work out any puckers. Before painting the fabric you can spread a film of construction adhesive in areas subject to wear and then three or four coats of oil-based enamel or spar varnish finish the job. Gentry recommends oil for the frame—it’s a lot easier than paint or varnish to apply and maintain.
The Annabelle Skiff is a 10′ skin-on-frame boat for sailing and rowing.
Annabelle is well suited to solo sailing: The daggerboard, tiller, and sheet for the 53 sq ft standing-lug sail are all that need to be attended to. The U-shaped seating arrangement is a mirror image of the usual stern sheets; they open not at the forward end, but at the aft end. To come about you won’t have to crawl across the boat and around the tiller; just slide forward on the bench and across the middle.
The skiff is rated for 400 lbs, and has room for carrying a passenger. A pair of 6′ 6″ oars will slide under the seats and get you home if the wind fails.
Plan 161
DESCRIPTION
Hull type: Round-bottomed, transom sterned
Construction: Skin on frame
PERFORMANCE
Suitable for protected waters
Intended capacity: 1-2
Trailerable
Propulsion: Sail, oars
BUILDING DATA
Skill needed: Basic
Lofting required: No
PLANS DATA
No. of sheets: 2
Supplemental information: 34 pages
Level of Detail: Above average
Plans Format: Print or Digital
Cost per set: $55
Completed 10′ Annabelle Images
At just 63 lbs, the Annabelle Sailing Skiff is well suited for cartopping, and about as easy to carry and launch as a kayak.
The Annabelle Sailing Skiff is rated for 400 lbs. and has room for carrying a passenger.
The Downeaster 18 is arguably the all-American boat in this catalog of boat plans, the kind of craft one sees on any major body of water here-fresh or salty-or on the road heading for it. However, at least three features distinguish Downeaster from most production powerboats in the 18′ range, currently in circulation.
Particulars and outboard profile
First, we think she is much better looking. Second, she is certainly more versatile-as a hull for all waters, especially choppy ones; and in the two arrangements available (a runabout with split windshield and convertible top, or a center-console fisherman with canvas dodger).
Third, she can be built at home using standard plywood construction over sawn frames, and requiring no steam bending or complex carpentry. Moreover, WoodenBoat documented the building of a Downeaster in three successive issues of the magazine (WoodenBoat Nos. 73, 74, and 75), amounting to a virtual how-to-build workbook for this boat.
Arrangement plan
In the standard outboard runabout version, Downeaster also features full-width seats forward and aft (with plenty of open space in between), a self-bailing motorwell, and sufficient decking forward and along the sides to help keep the interior, the crew, and the day’s gear reasonably dry. Power range is 40-100 hp; a 75-hp unit can readily deliver 30 mph. The same characteristics that make the boat swift and responsive (narrow, deep-V hull) make her very suitable for waterskiing, as well. With an appropriate tow-bar setup, Downeaster will make an excellent ski boat.
The boat has satisfied these critical design criteria: handsome appearance; economy and durability of construction; and a hull form that gives good performance underway, at all speeds and in a variety of sea conditions. In addition, the Downeaster 18 is burdensome in the best sense: this boat will carry six persons-safely and comfortably.
Inboard profile
The 18′ Downeaster Runabout plans are well detailed on five sheets: lines and offsets, construction sections, a construction plan, and arrangements for both the utility runabout and center console models. WoodenBoat Plan No. 71. $90.00.
Sheer and body plans
Plan 71
DESCRIPTION
Hull type: V-bottomed
Construction: Plywood planking over sawn frames
PERFORMANCE
Suitable for: Somewhat protected waters
Intended capacity: 2-6 day cruising
Trailerable: Yes
Propulsion: 40-100 hp outboard
Speed: 26-40 mph
BUILDING DATA
Skill needed: Basic to intermediate
Lofting required: Yes
Alternative construction: None
“How to build” instructions: WoodenBoat Nos. 73, 74 & 75
PLANS DATA
No. of sheets: 5
Level of detail: Above average
Cost per set: $90.00
WB Plan No. 71
Completed 18′ Downeaster Images
George D. Jepson
The Manitou 18, a contemporary rendition of the Downeaster 18, is built by Copper Harbor Boat Works.
George D. Jepson
The runabout handles Lake Superior nicely, providing a dry, comfortable ride.
The author’s initial outings in his boat, ADVENTURE, were on Western rivers. In the summer of 2009, he plans an expedition along the Maine coast. The boat sleeps two and has ample dry stowage.
As my new boat, ADVENTURE, slid gracefully through the waters of Puget Sound, a light summer breeze off her starboard quarter, the many dollars and hours of labor I had expended over the past four years seemed like just so much flotsam on the stern wake trailing behind. Now it seems inevitable that I would have chosen this design, but it was not always so.
The great Pacific Northwest boat designer William Garden wrote in his book Yacht Designs II that “the right sort of boat that will make one happy is a nice sort of problem to have.” He’s right. But narrowing down one’s choices is still a problem.
I grew up on a 32′ carvel-planked wooden tugboat designed by Garden and named MAGGIE B, after my mother. So when I decided to build a boat myself, at least I had the designer in mind from the start. I discovered, however, that William Garden is one of the most prolific boat designers to ever live. While his 106′ brigantine design was not within my price range, there were still dozens of his boats that interested me. I decided to contact Mr. Garden, who is retired, for advice. He was very kind and encouraging. In order to narrow down my options, I stated the following requirements:
1. I live in Sioux City, Iowa, and that dictated a trailerable boat. I also needed a wooden boat that could withstand months out of the water.
2. The size of my garage and my finances dictated a small boat.
3. I liked the idea of learning to sail.
4. I wanted a boat that would make a good tender to MAGGIE B, but that could also hold her own camp-cruising for extended periods of time.
After reviewing a number of designs, I discovered the “Commodore Trunion Class 14′ x 6′ Sailing Pram” in Yacht Designs II. It had been designed as a daysailer for the purpose of teaching sailing to beginners. This pram was unlike anything I had ever seen before. The boat had a gunter-sloop sailing rig. A gunter rig, at first blush, looks like a typical marconi sloop. Closer inspection reveals rig details more akin to gaff configuration—but with a gaff so highly peaked as to be nearly vertical. The Trunion class’s mast was stepped forward, so it looked sort of like a catboat. It had great interior volume, and also looked as if it would move well through the water.
Garden had designed her to be round-bilged, built on plywood frames, and planked in 9⁄ 16″ cedar strips. Something just seized me about this design: stable, roomy, compact, safe, a good companion for MAGGIE B, and able to hold her own. I would give my new boat the name ADVENTURE, which seemed to me perfect for a boat designed for exploring rivers, backwaters, and coasts.
Of the time required to build this boat, Garden says “we missed by a mile our nod towards reasonable cost of building, this due to the amount of work involved in these one-off wooden boats.” Unfazed by this, in late spring 2005 I traveled back home to Washington state and quickly became the neighborhood sideshow as I built the construction jig, slowly traced the patterns for ADVENTURE’s frames from the loft floor, and mounted the frames on the jig. ADVENTURE’s frames were sawn from 3⁄4″ marine plywood, which was one of the easier jobs on her construction; the pram bow and transom, however, were a different story. The bow and transom are curved, raked, and wineglass-shaped. I had to build curved jigs and then laminate thin sheets of plywood over those jigs to get the desired shape. My dad then helped me place one thin cedar plank after the other, each one kissing the frames of plywood and the bow and transom, to enclose the hull.
Then I began the process of fairing the hull. I love my round-bilged boat, and she looks gorgeous, but one must be prepared for the agony of fairing to achieve such a thing. Just when I was sure I had the hull perfectly round, I was shown more hollows to be filled and bumps to be sanded down. After an entire summer of 10-hour days, all I had was a bare hull.
Garden’s original plans did not call for a deck, but with the approval of another designer, Paul Gartside, whom Bill Garden had recommended to me, ADVENTURE received a deck, coaming, and small cuddy cabin, all laminated out of 1⁄4″ marine ply. The deck presented more of a challenge than I had anticipated, due to its com-pound curvature. But it was well worth the effort: The deck and cuddy cabin keep water out in a chop, and provide dry storage space.
Cameron Kane
Bill Garden’s Commodore Trunion-class sloop is a 14′, pram-bowed daysailer of exceptional capacity. The author, with the assistance of designer Paul Gartside and approval of Bill Garden, modified the boat for camp-cruising by adding a deck and cuddy.
On July 29, 2007, with Douglas-fir spars stepped and carrying tanbark sails, ADVENTURE slipped off the trailer for the first time and into the cool green waters of Port Susan. The sound of water slapping against her hull and echoing throughout her bilge, after years of construction, told me like nothing else that I had done it: I had started out to build a round-bilged wooden boat from scratch and did it. MAGGIE B now had a little sister.
Despite a few hitches in her shake-down cruises, ADVENTURE has performed beautifully. Garden himself noted that the design was supposed to be stable, have fair performance under sail, and have enough buoyancy to float the crew if swamped. Thankfully I have never had to test that last one, but ADVENTURE is stable. She’s not a speed demon, but she is, as my sailor friend Steve Coyne says, “very well behaved.” She also goes well to windward, as proven during an outing on Lewis & Clark Lake in Yankton, South Dakota. The lake is long and narrow, and its winds are shifty. ADVENTURE, however, was responsive to alert steering, and she got us home.
Why go through all the trouble of the round bilge and curved, raked pram bow and transom? For one thing, these elements look cool. There are, however, more practical reasons for them. The March/April 2008 issue of WoodenBoat (No. 201) had a great article about hull forms. Although round-bilged boats are generally more difficult to build than flat-bottomed or V-bottomed ones, the article states that the shape of a round-bilged boat “responds to the undulations of water more gracefully than any other type of small boat.”
I reviewed a design for a Whitehall-style boat, and although this Whitehall was the same length as ADVENTURE, it had only about a 4′ maximum beam. I would roughly estimate that ADVENTURE has, with her pram bow, wide beam, and large transom, about three times the interior volume of that Whitehall. I packed her water-tight storage compartments full with clothes, blankets, air mattresses, tools, and cooking utensils, and still found plenty of room left over. She can comfortably sleep two and in a pinch can sleep three on the insert that converts her horseshoe-shaped seats into a big berth.
Garden acknowledged that the gunter rig is a complication; however, it is not without its compensations. The short spars make trailering easier because they can be stowed inside the boat, rather than on top of it, and the long sprit provides a great support for a tent.
ADVENTURE has auxiliary power in the form of oars and a small electric outboard motor, though she is happiest sailing. She loads fairly easily on a trailer, is not hard to beach, and fits into a standard 20′ x 10′ self-storage unit for the winter. She is, in short, a very capable, comfortable, and manageable camp-cruiser.
Plans for the Commodore Trunion Class Dinghy appear in the book Yacht Designs II, by William Garden (Mystic Seaport Museum, 1992).
Bill Garden
Bill Garden’s original drawings for the Commodore Trunion-class sloop show a surprisingly curvaceous little craft
Bill Garden
The spars of the gunter rig will stow easily inside the boat
Is there a boat you’d like to know more about? Have you built one that you think other Small Boats readers would enjoy? Please email us your suggestions.
Continue Reading - Enter your email to log in or subscribe
New to Small Boats? Create a free account to get our weekly emails and two free articles each month.
Time to upgrade!
You've read all of your free content for the month. Upgrade to a paid subscription for unlimited access.
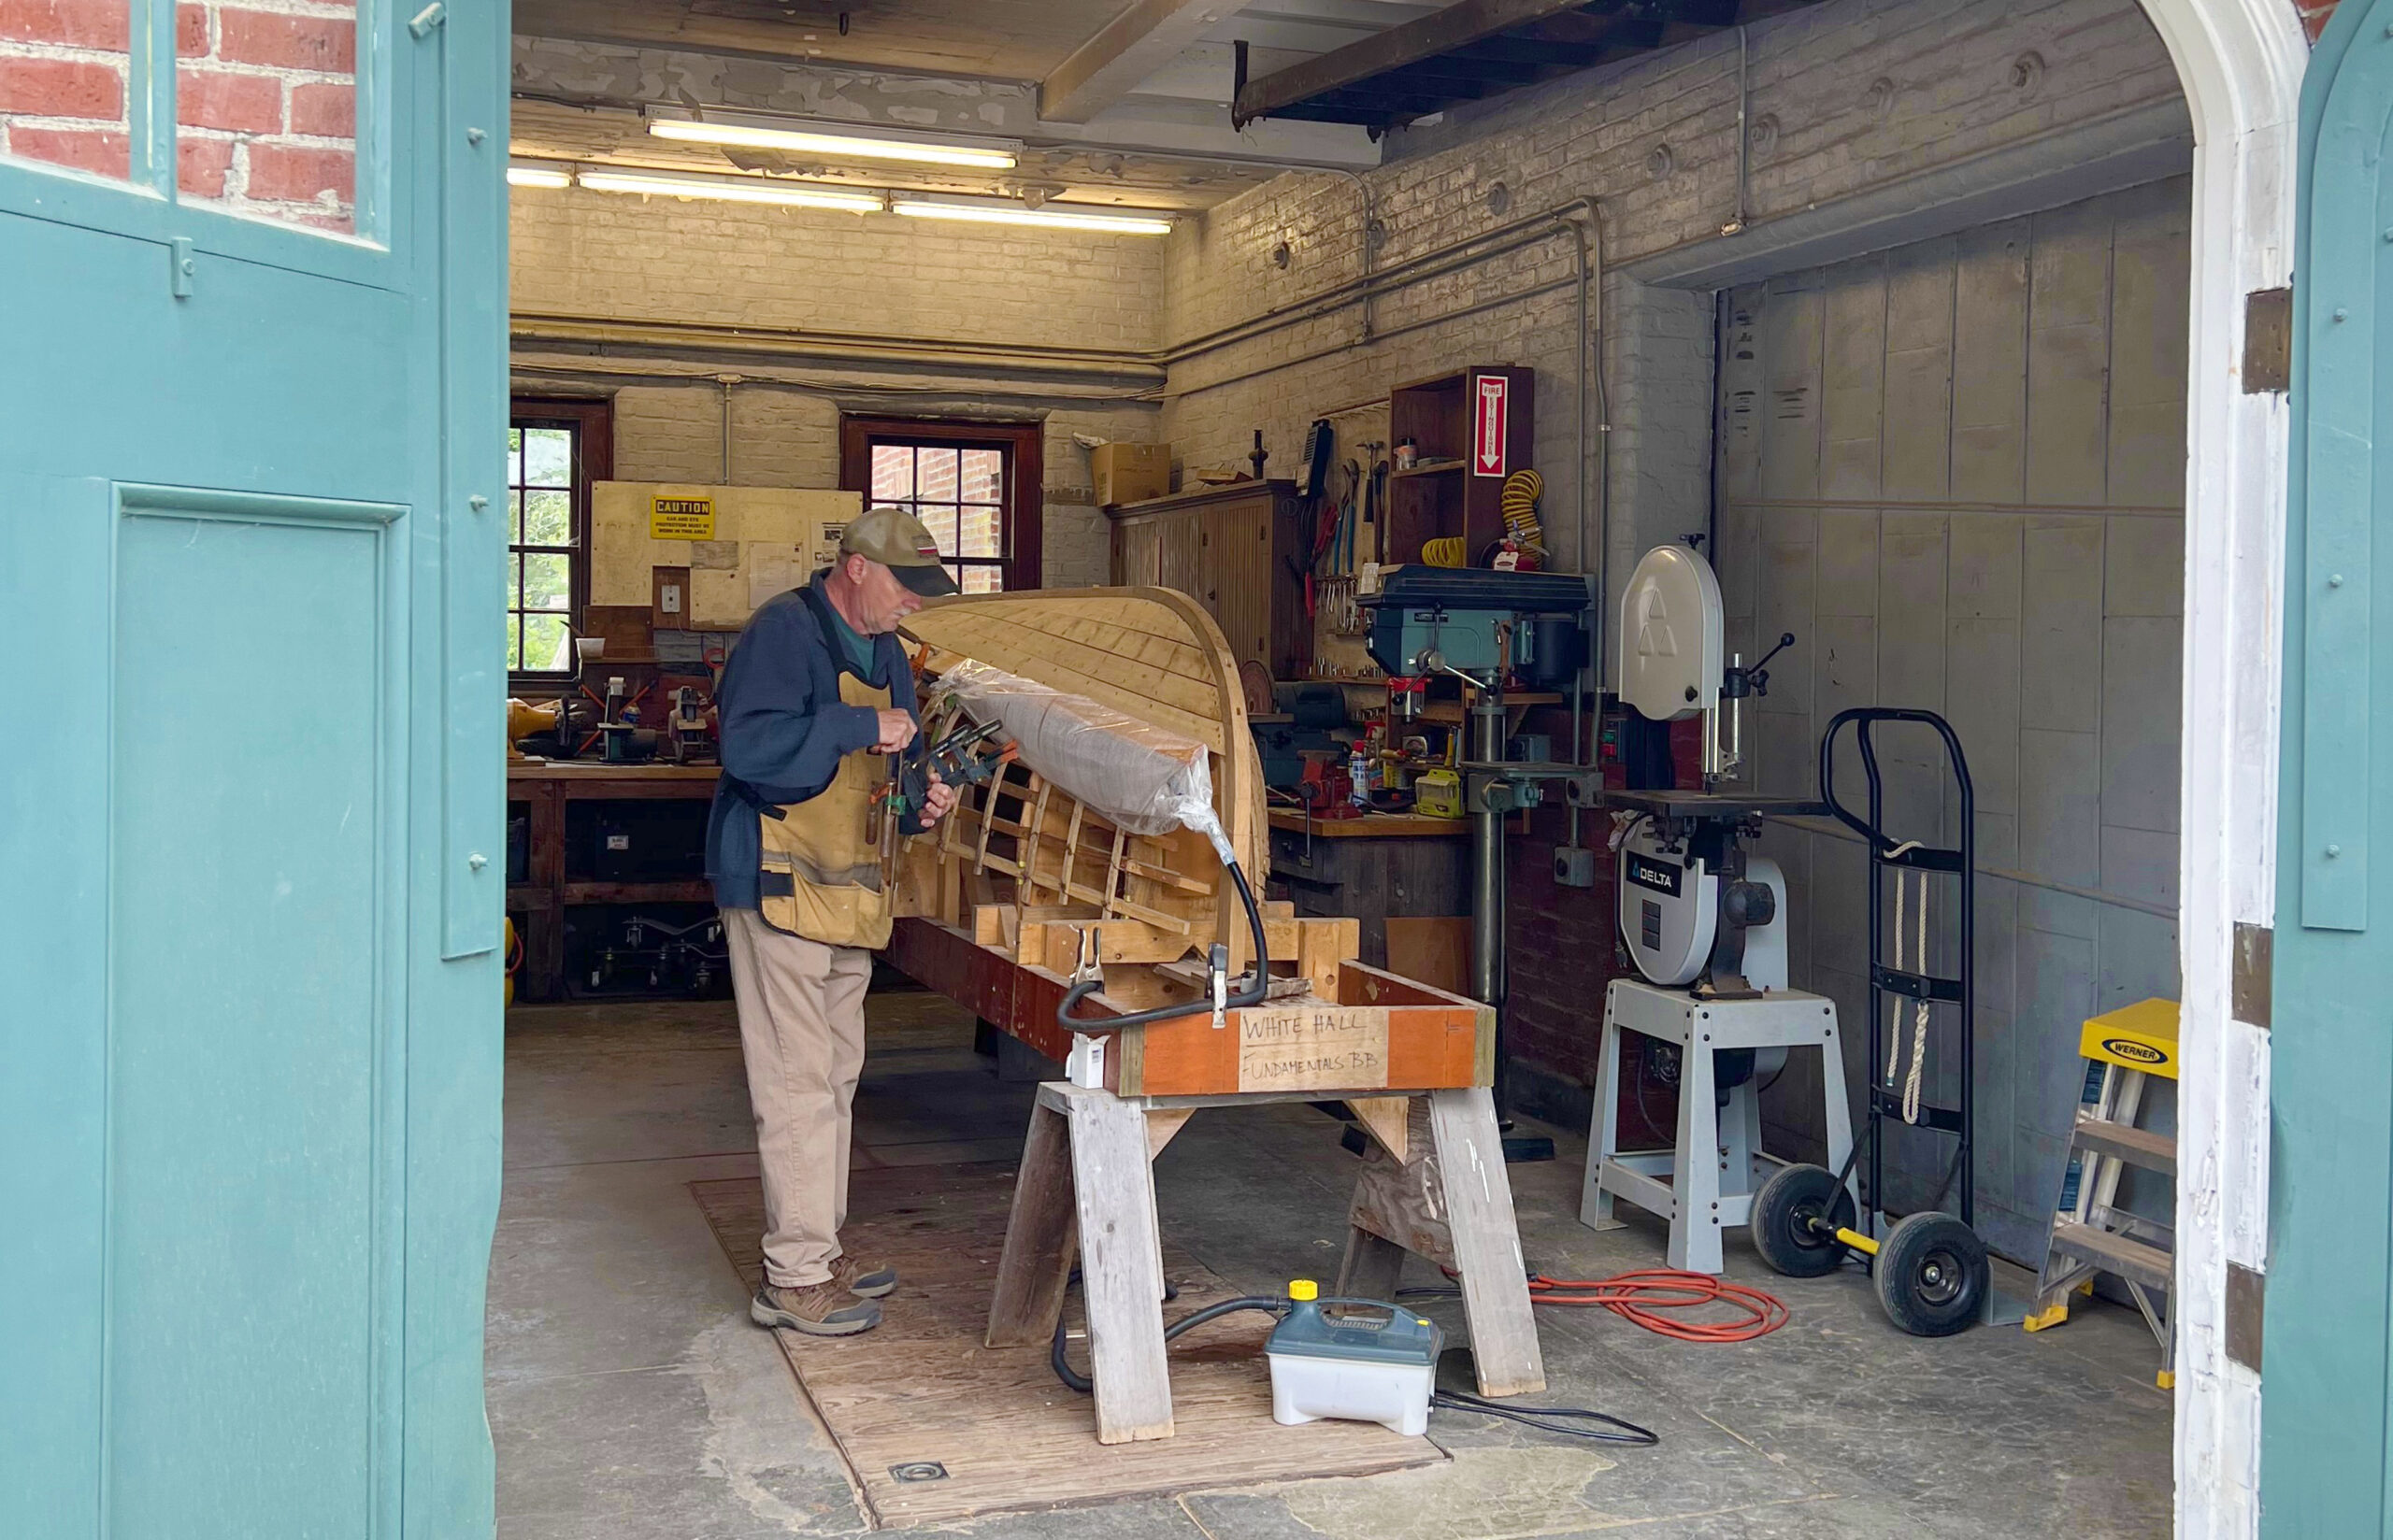
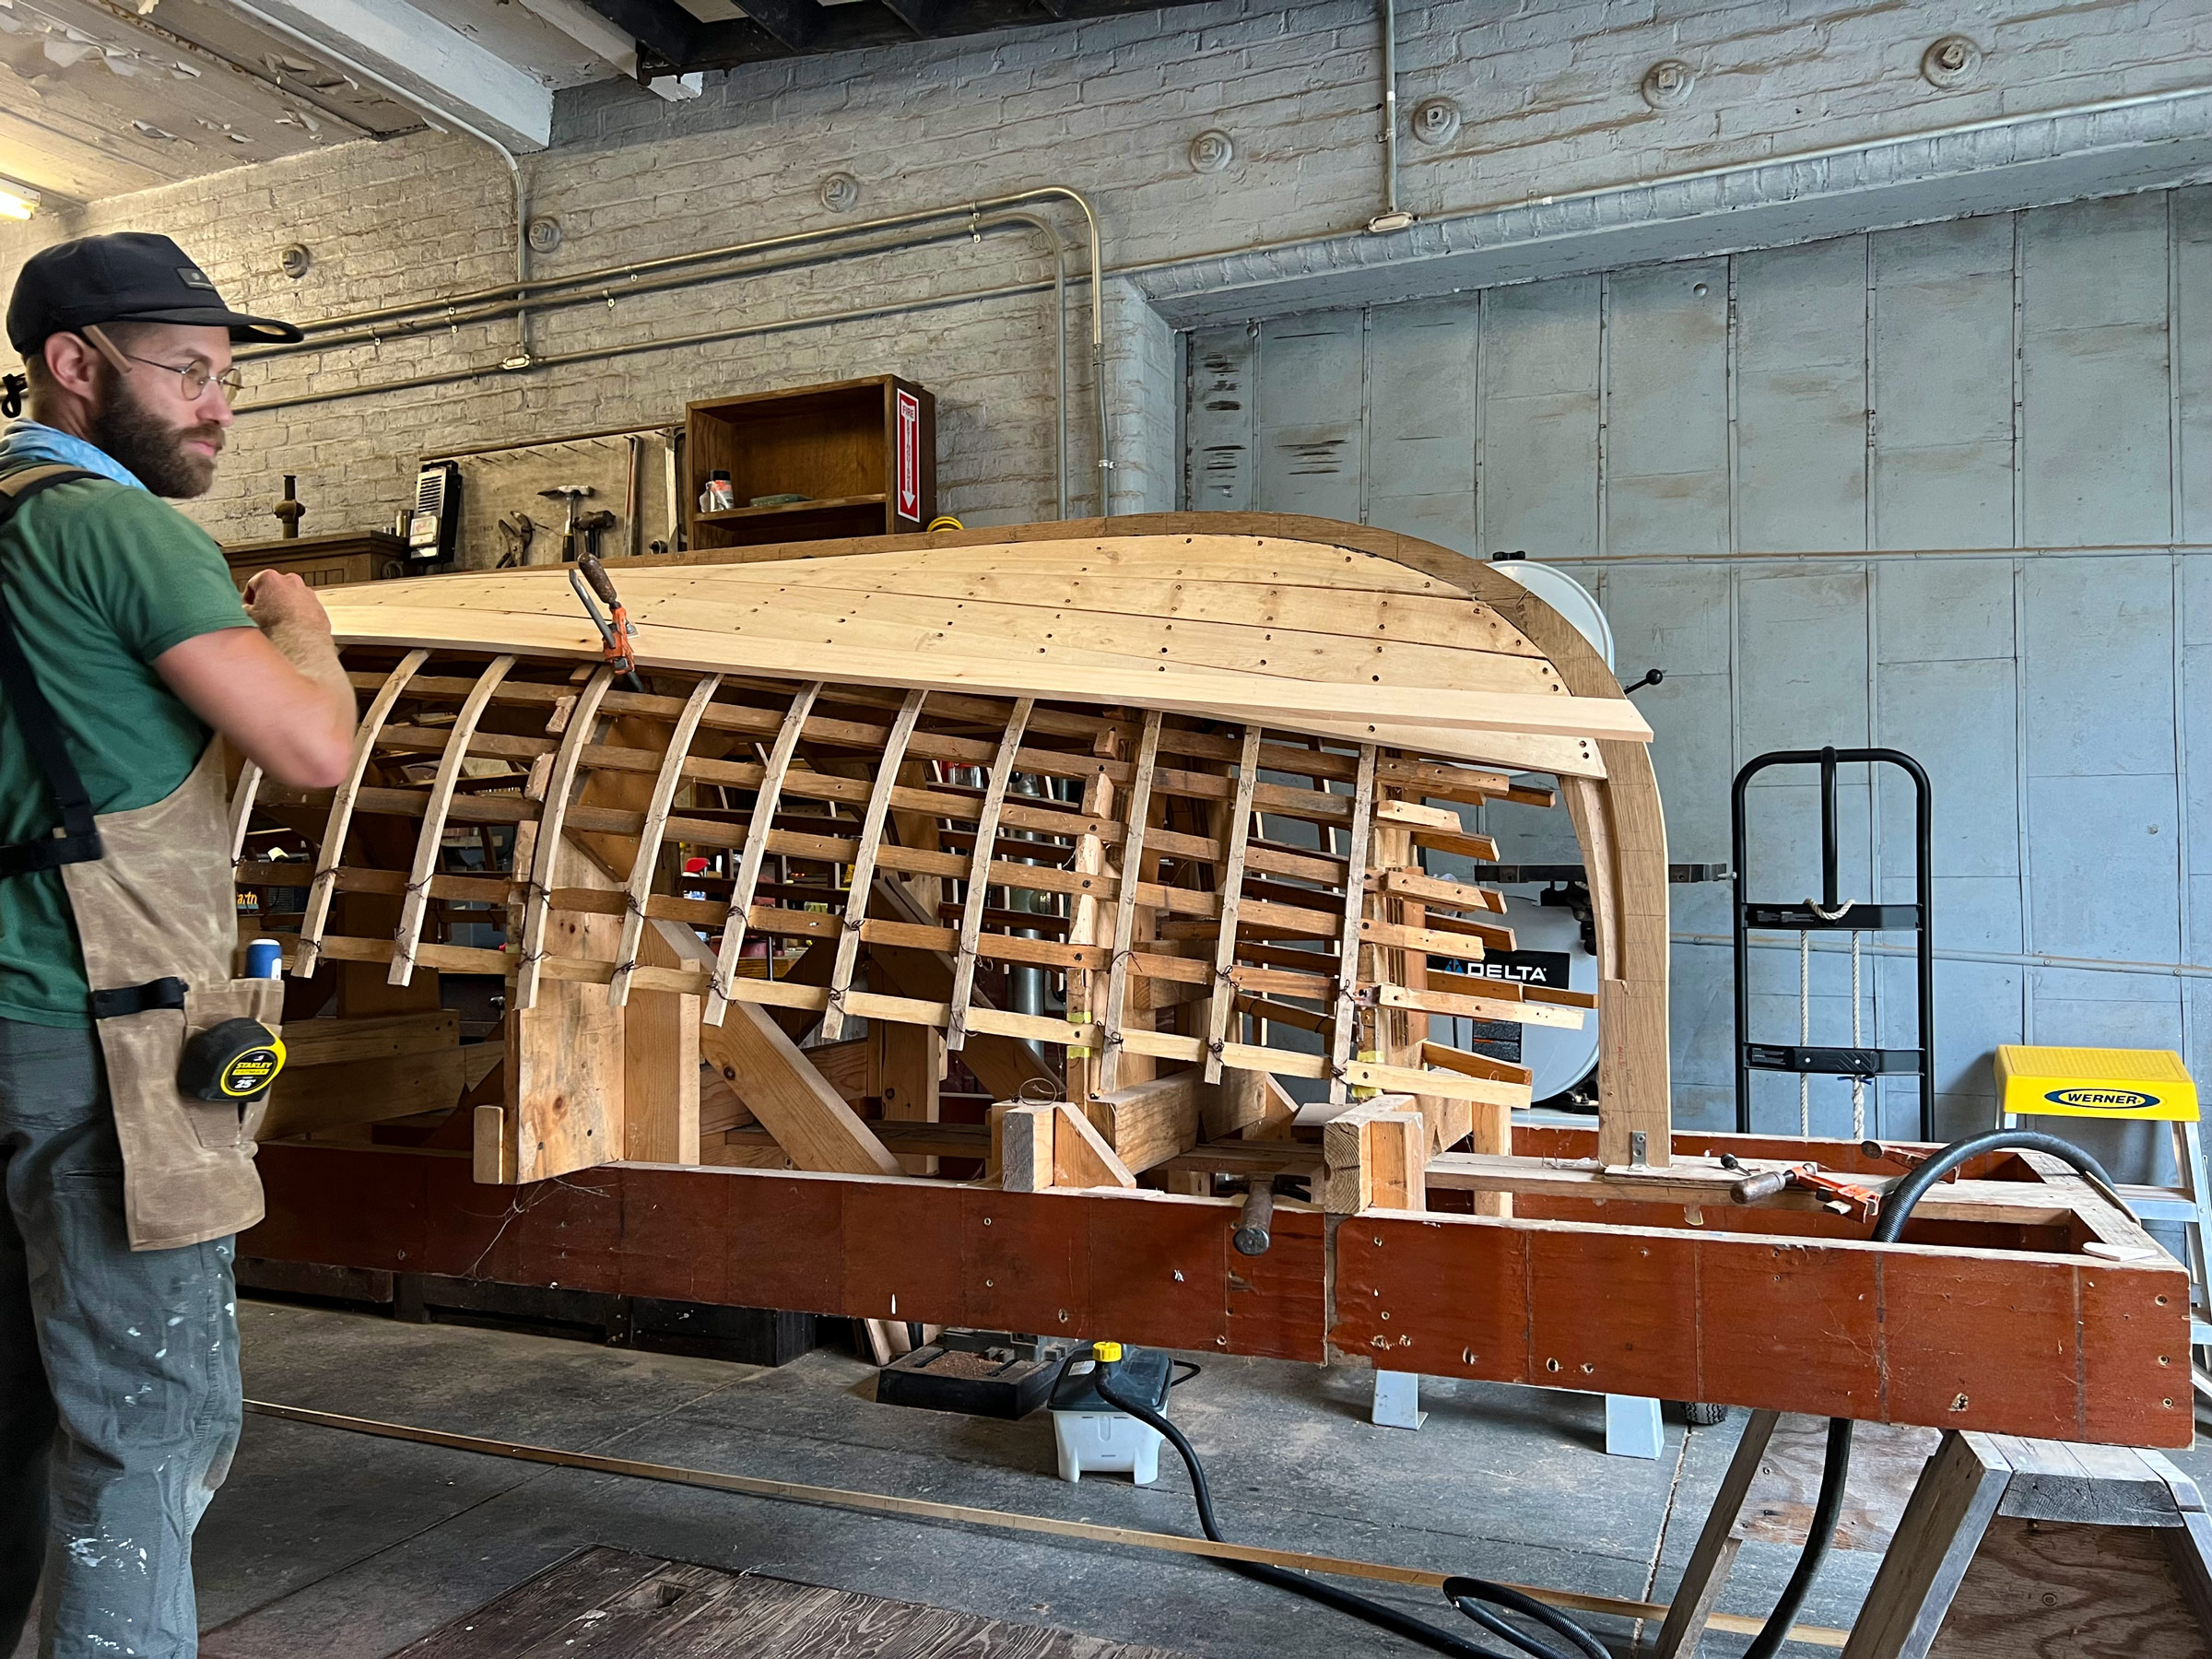 Photographs Isaac Robbins