I spent the last week of August in Washington, D.C., visiting colleges with my daughter, a senior in high school. Coming, as we do, from a very small coastal town in Maine, a big-city visit is always a treat. But as the days progressed, the weather endlessly warm and dry, we found our footsteps mysteriously taking us ever nearer the Potomac River. We never quite made it to the edge, but occasional glimpses of water at the bottom of a dead-end street or beneath a bridge were refreshing to our spirits.
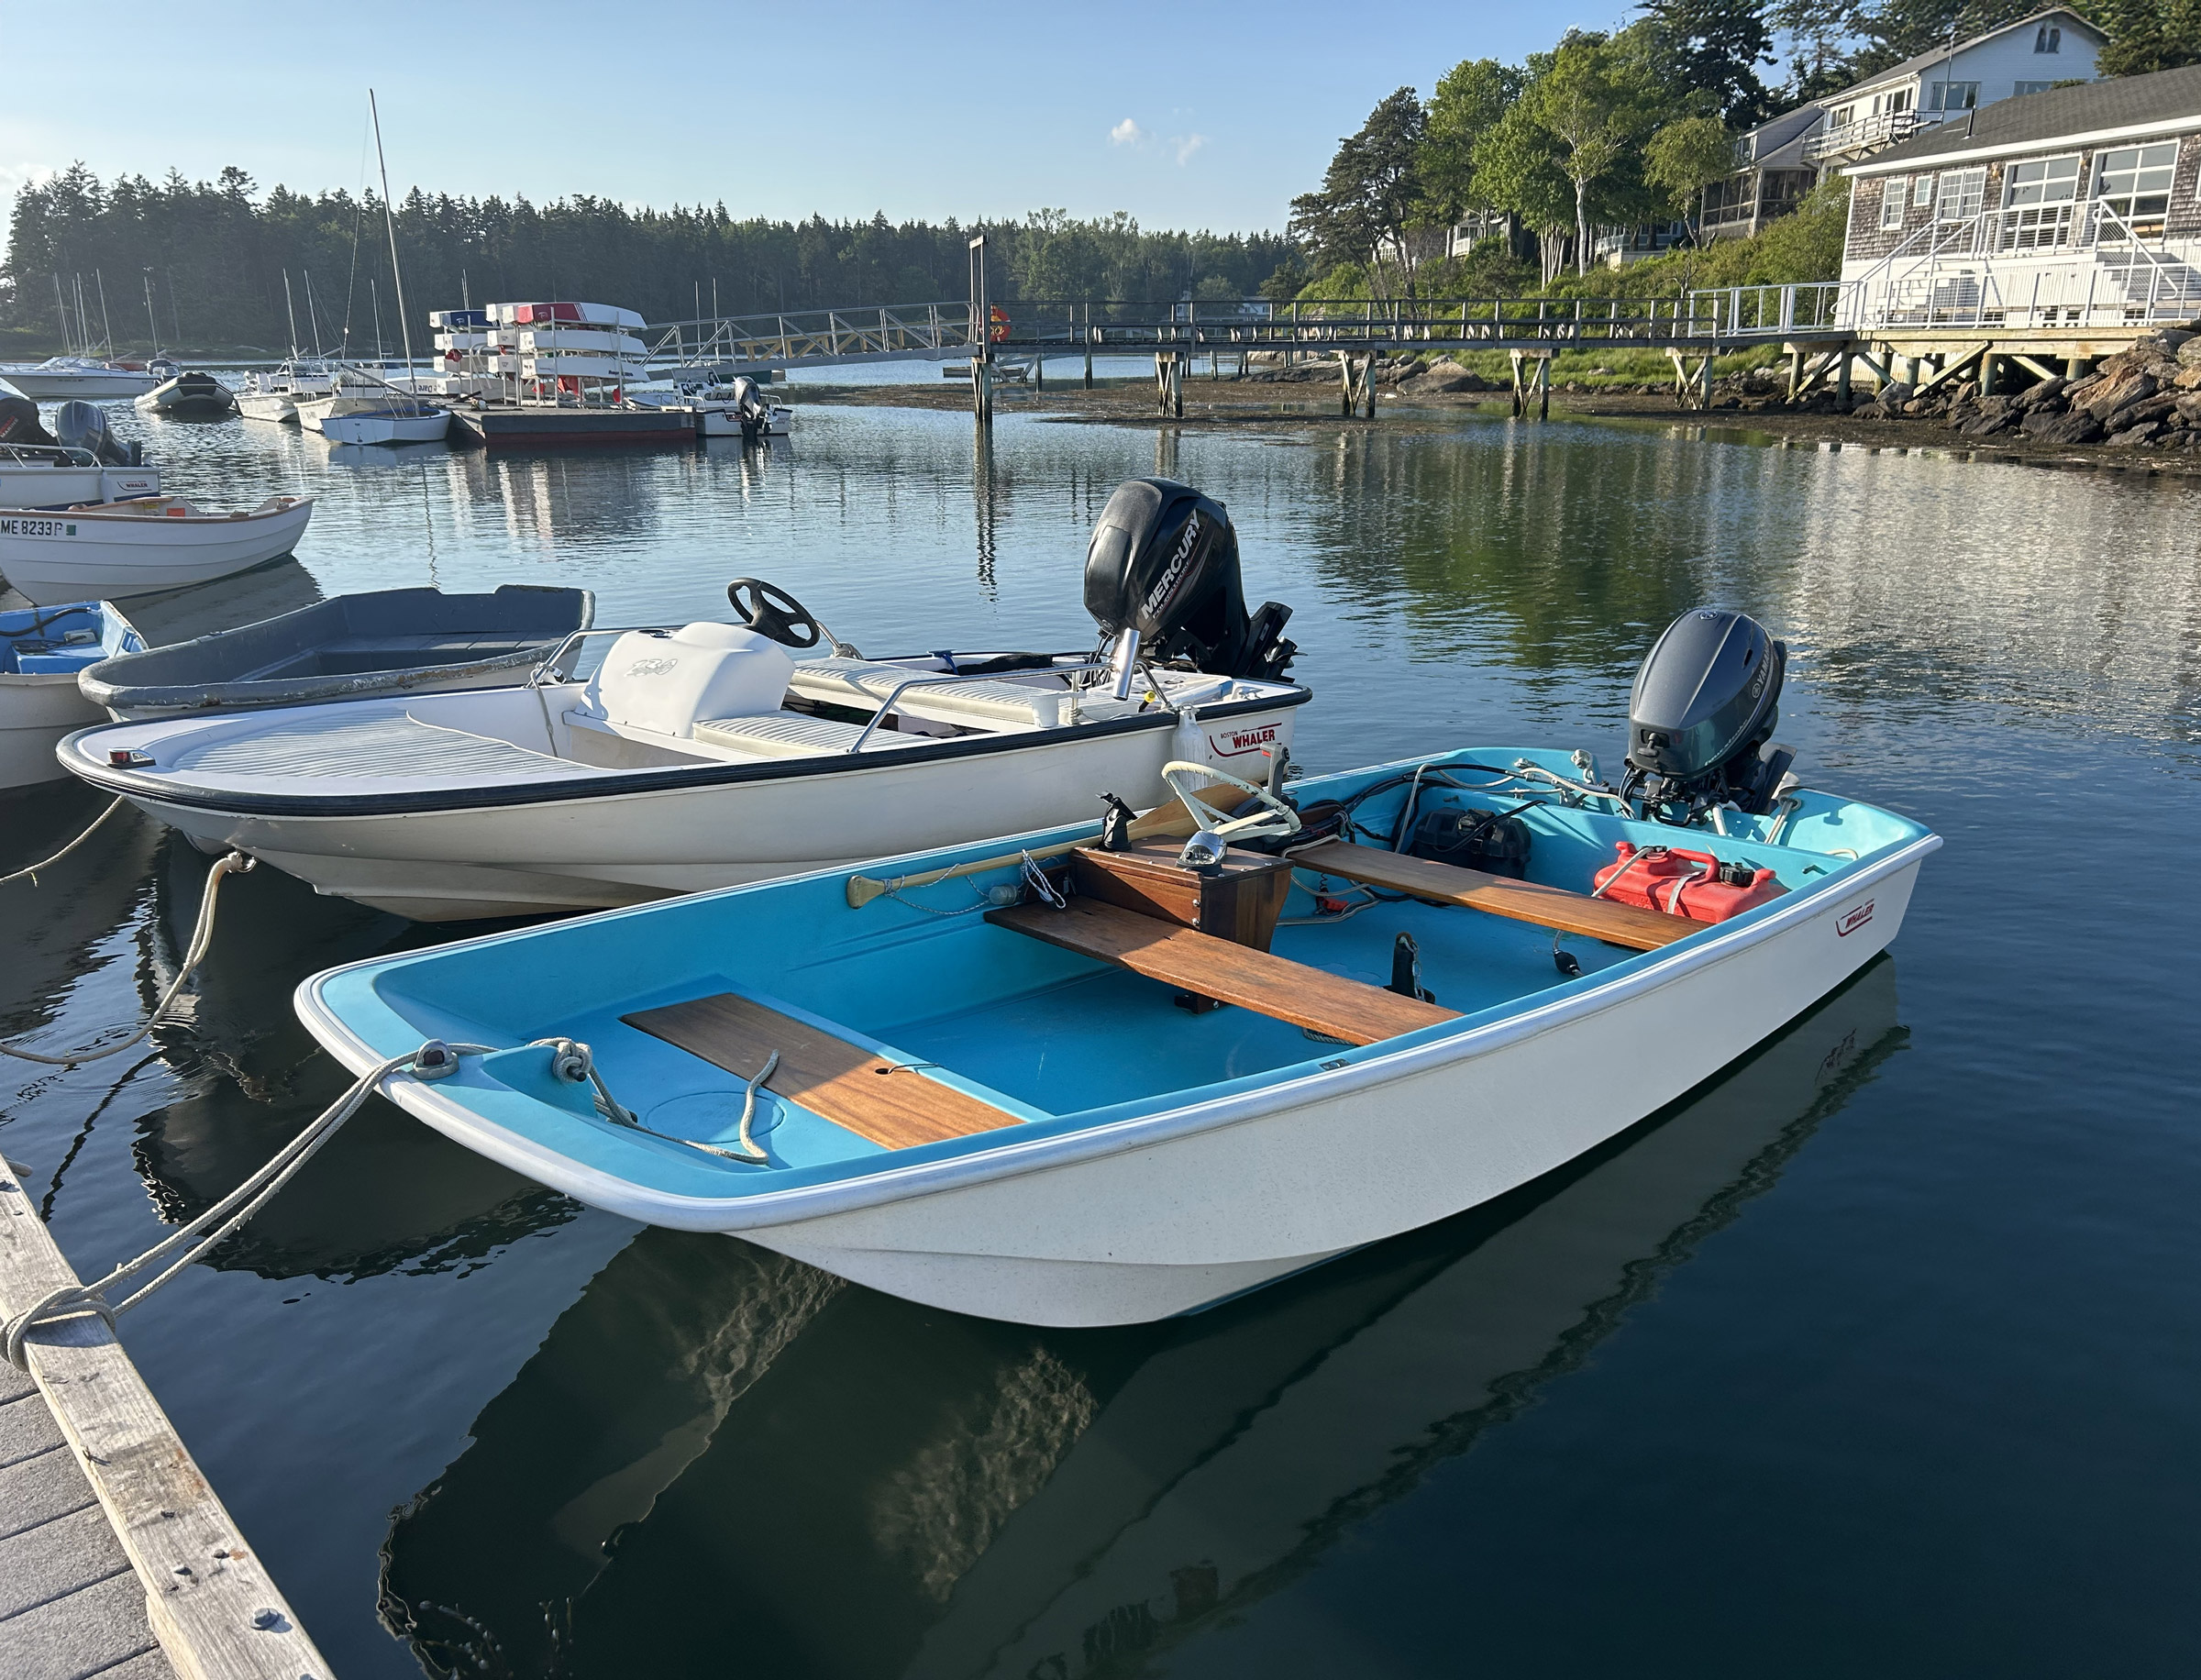
We flew back to Maine on that Friday, and as we exited the Portland airport terminal I fancied I could smell the ocean, perhaps even taste the salt in the air. I breathed deep. We arrived home in the dark and rain but when the next day dawned cloudless and calm, I made my way down to the harbor. It was still only late summer, but probably a third of the moored boats had been hauled out for the winter during the week we’d been away, and of the boats that did remain, only two—apart from the working lobsterboats—were over 20′ in length.
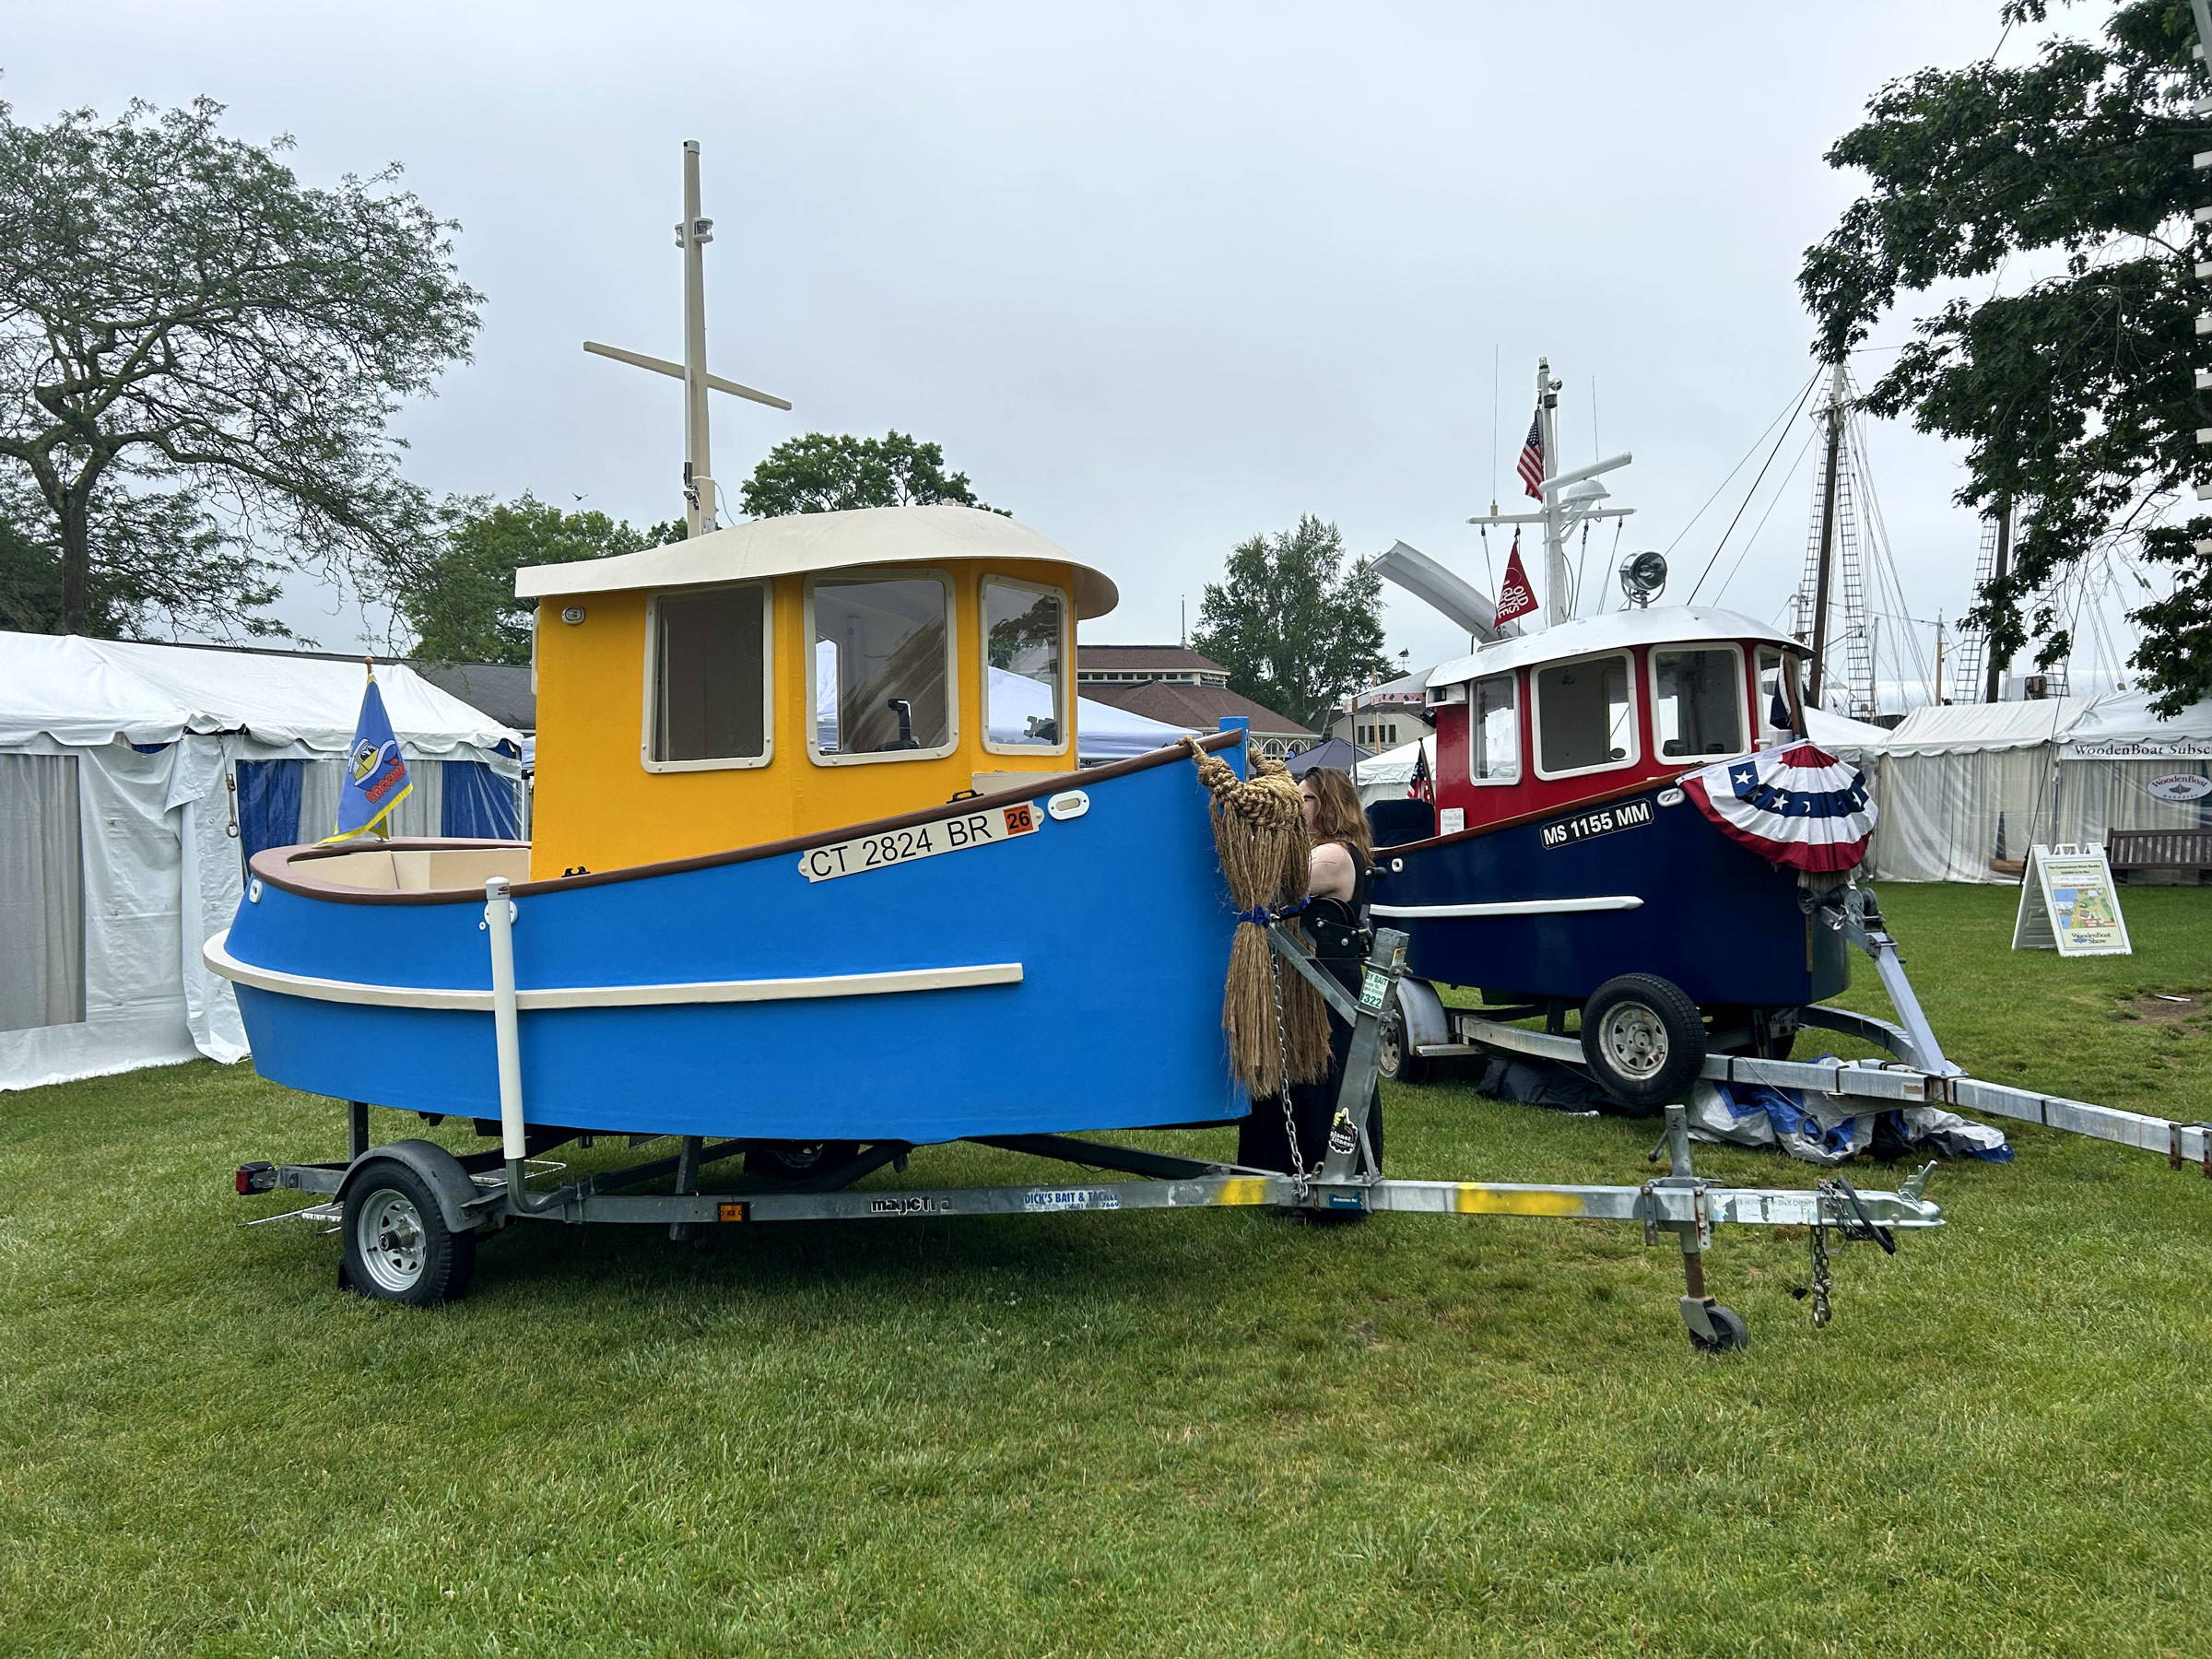
Jenny Bennett
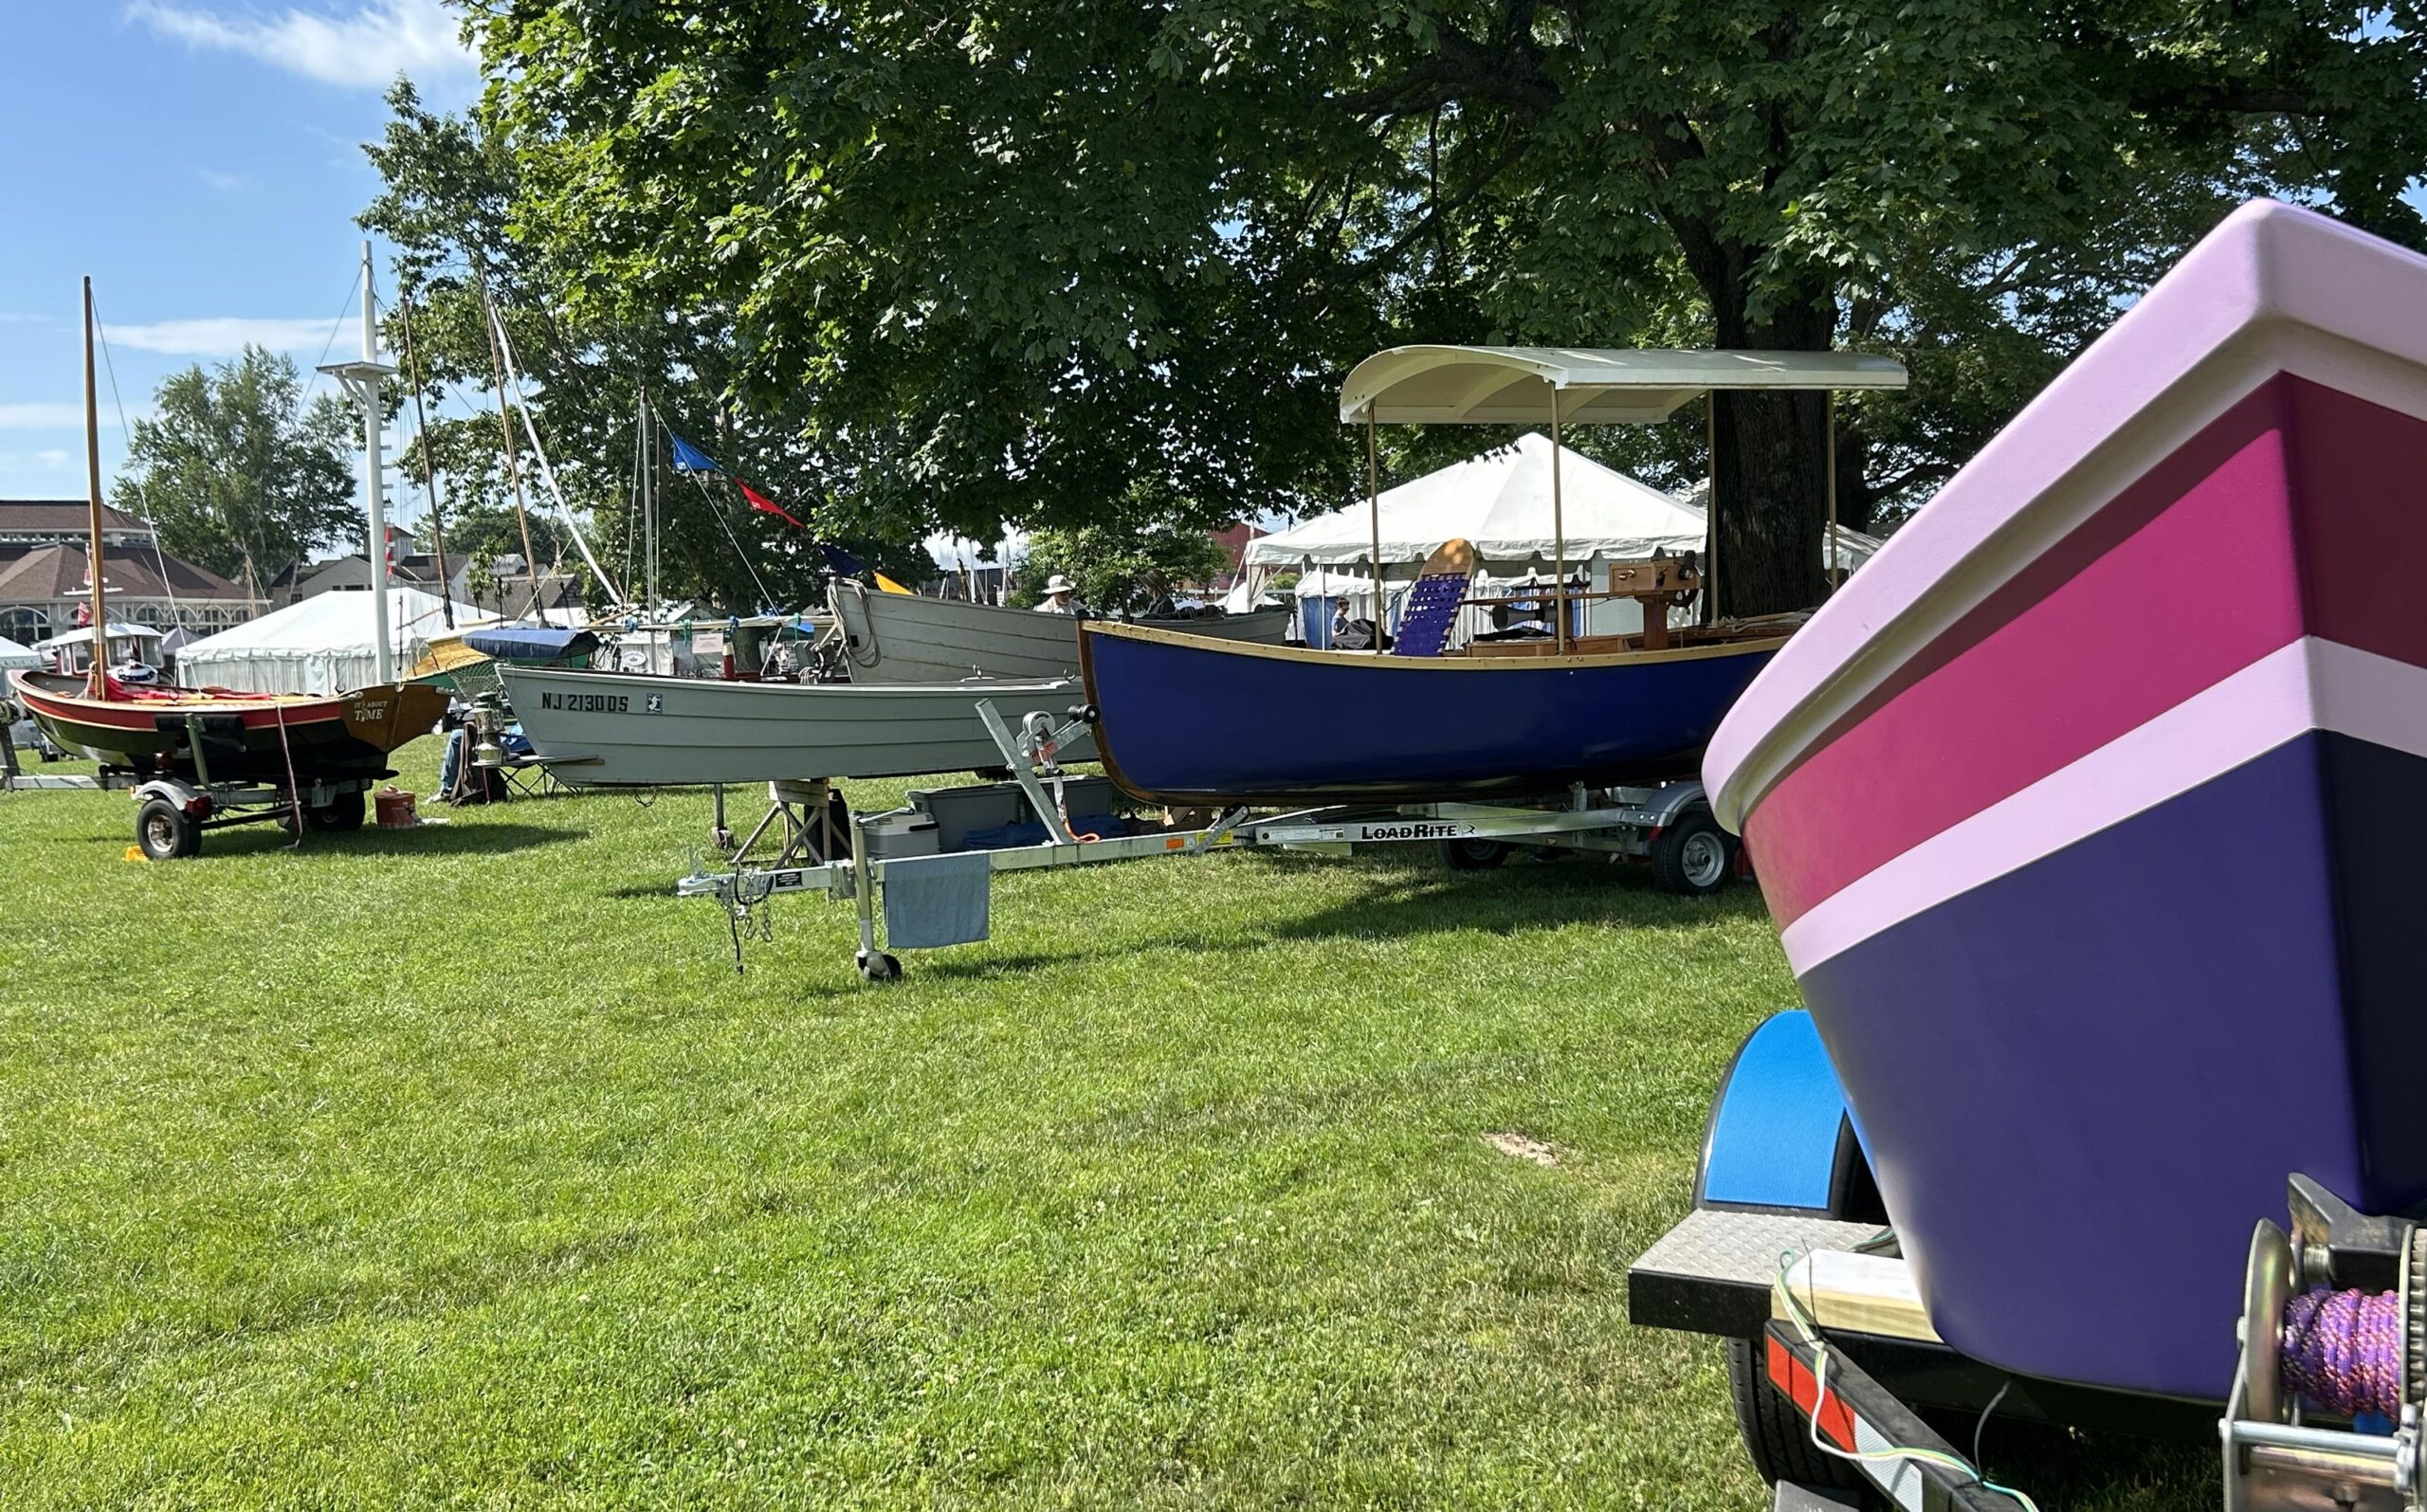
I occasionally find a home-built boat at the dinghy dock (such as the Shellback Dinghy seen here, five boats from the bottom of the picture) although, of course, many of their owners may prefer to keep their beloved projects away from the crowd.
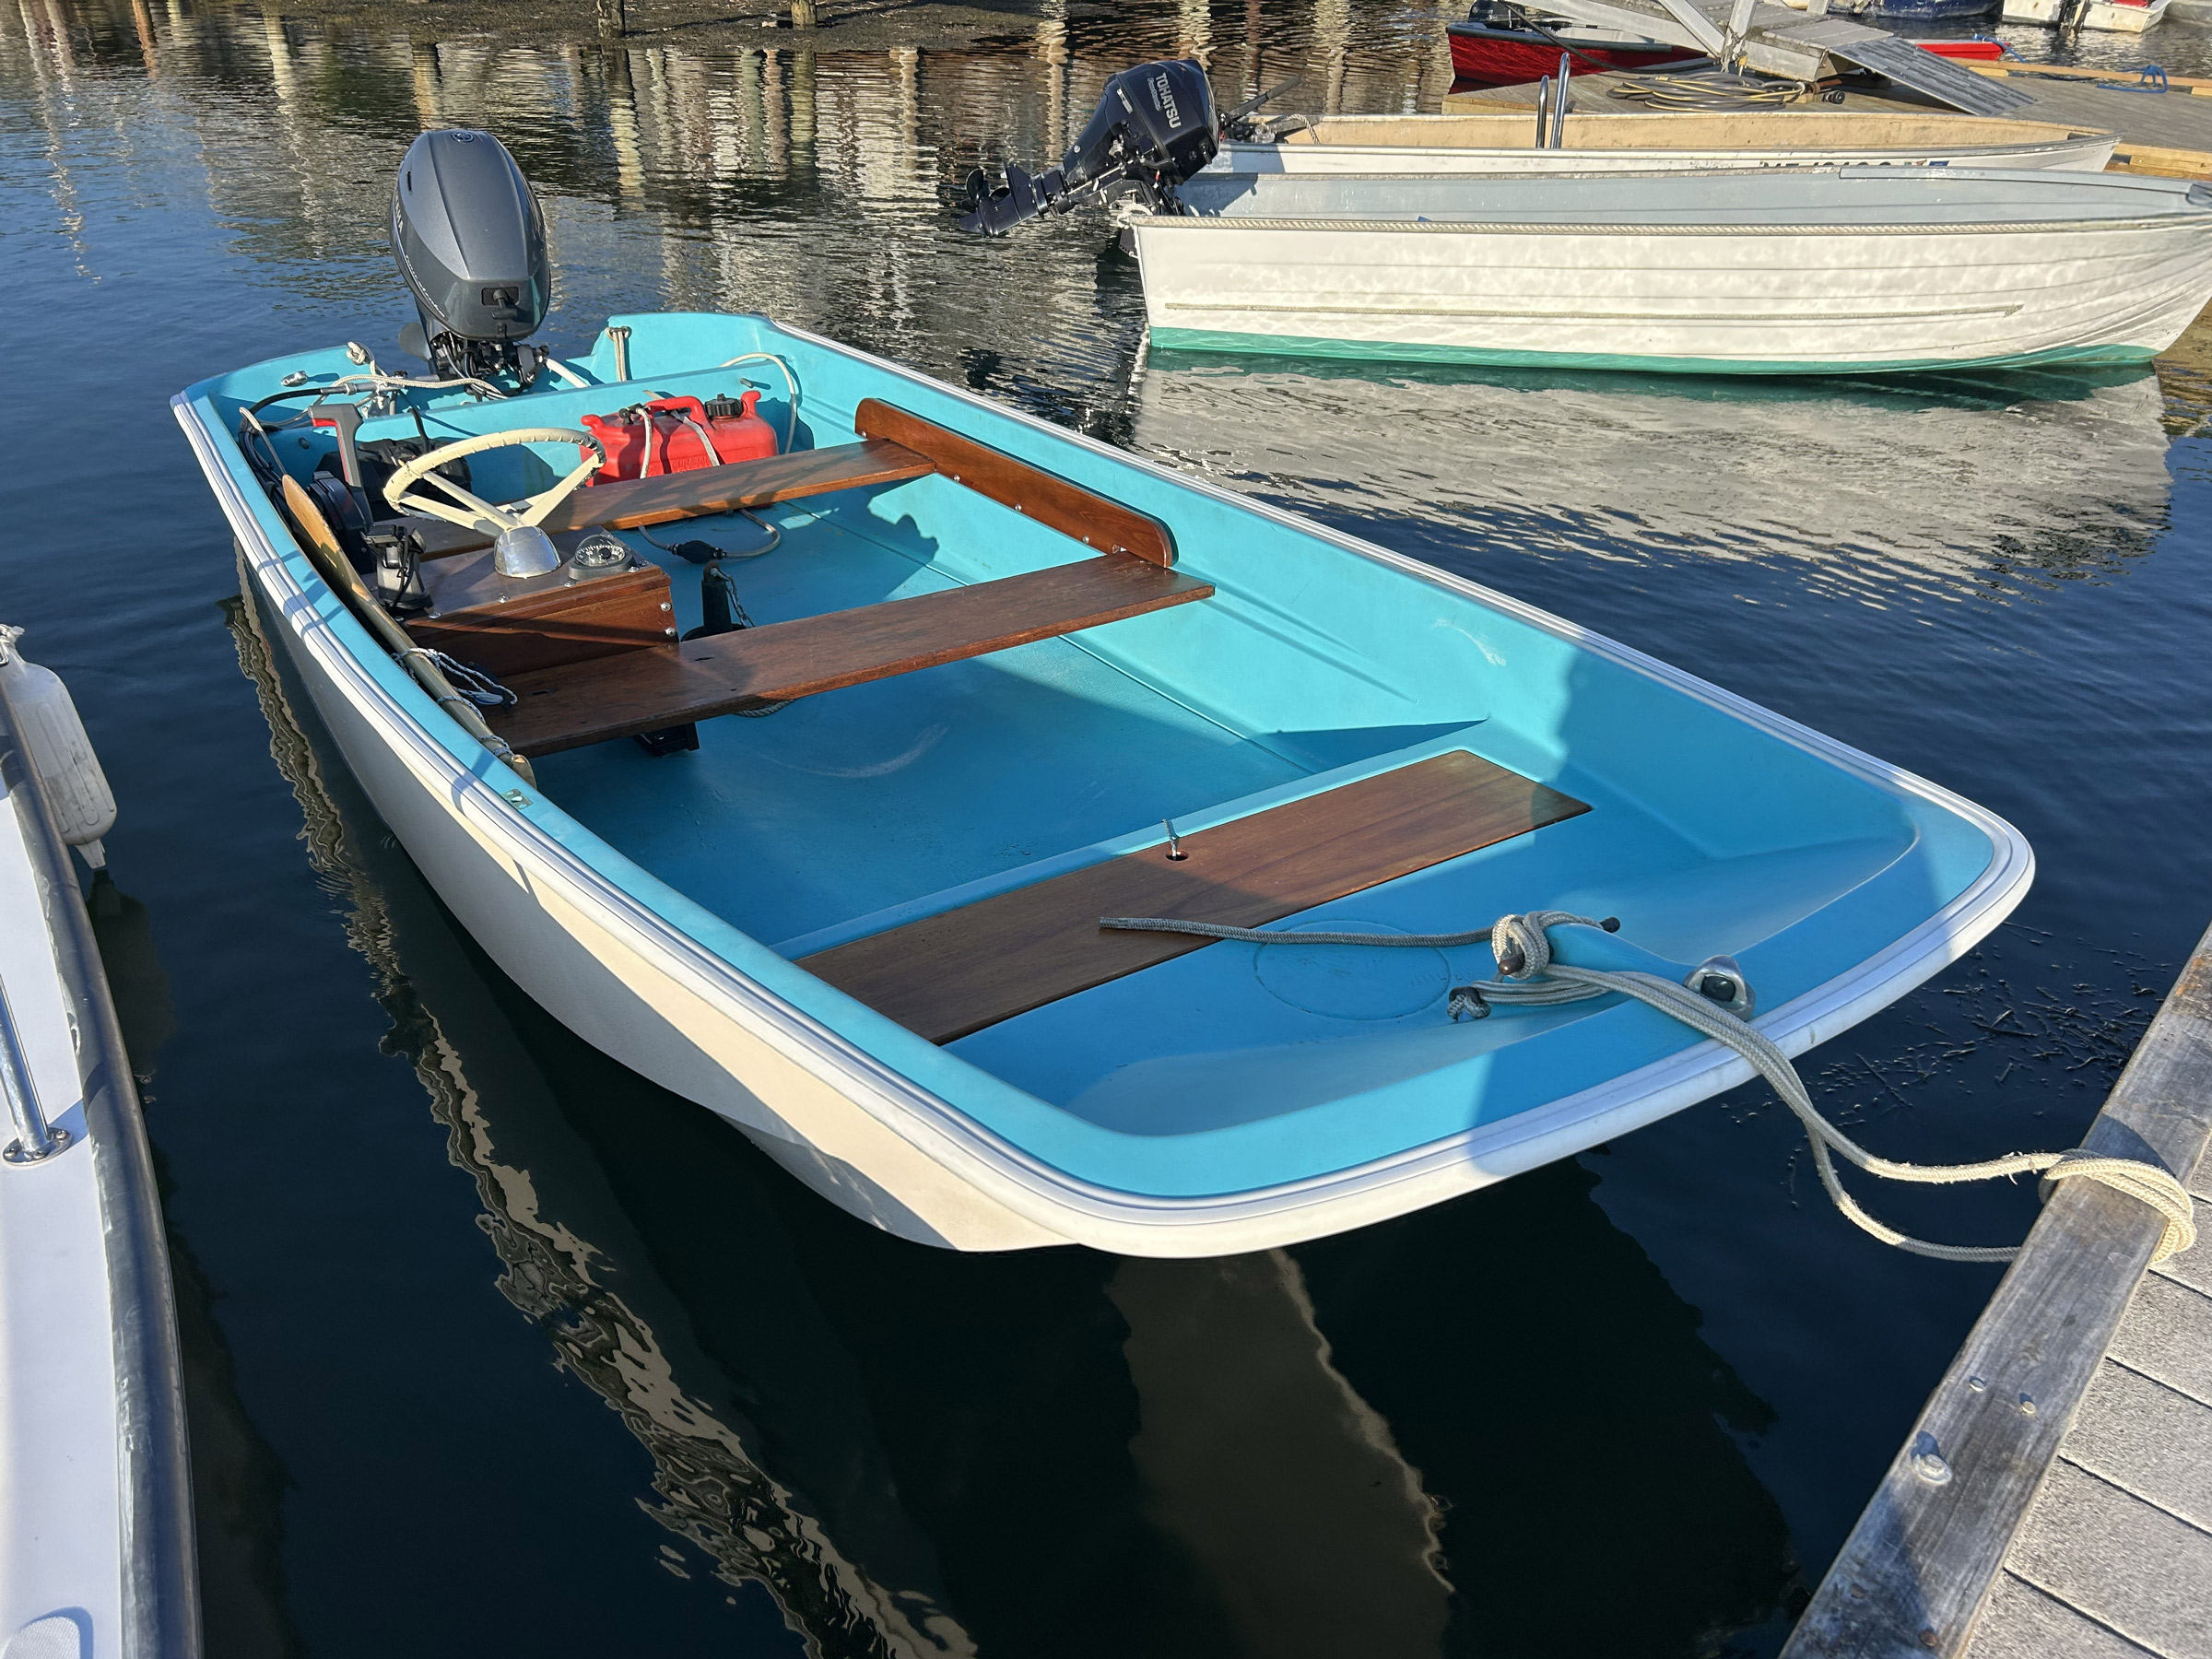
Conversely, the dinghy dock was as full as ever, and as I sat in my rowboat and bailed the previous night’s rainfall, I mused on the differences of small and large boats and, in particular, the planning and forethought required by big-boat ownership when one is dependent on yard schedules and commercial storage spaces. Even the weekend residents pull out their big boats as soon as the long family vacation is at an end; after all, who wants to leave thousands of dollars of boat and systems unattended on a swinging mooring? Better, surely, to have them safely stored ashore.
But the small boats on the dock tell a different story. A Maine winter can be cold and stormy, but on the dock, dinghies can be kept afloat well into the fall to be used on weekends or holidays or whenever the summer folk have time to return. And even if they don’t make it back more than once or twice, the mere knowledge that the boat is there, ready to be used, is perhaps enough to sustain their owners as they head inexorably into a landlocked winter.
I thought, too, of all the ways one can get into small-boat ownership these days. As ever, you can buy new or secondhand, and for the latter there are many online markets that even 20 years ago were few and far between. But the greatest changes have, surely, been in the opportunities for home boatbuilding.
Christopher Cunningham
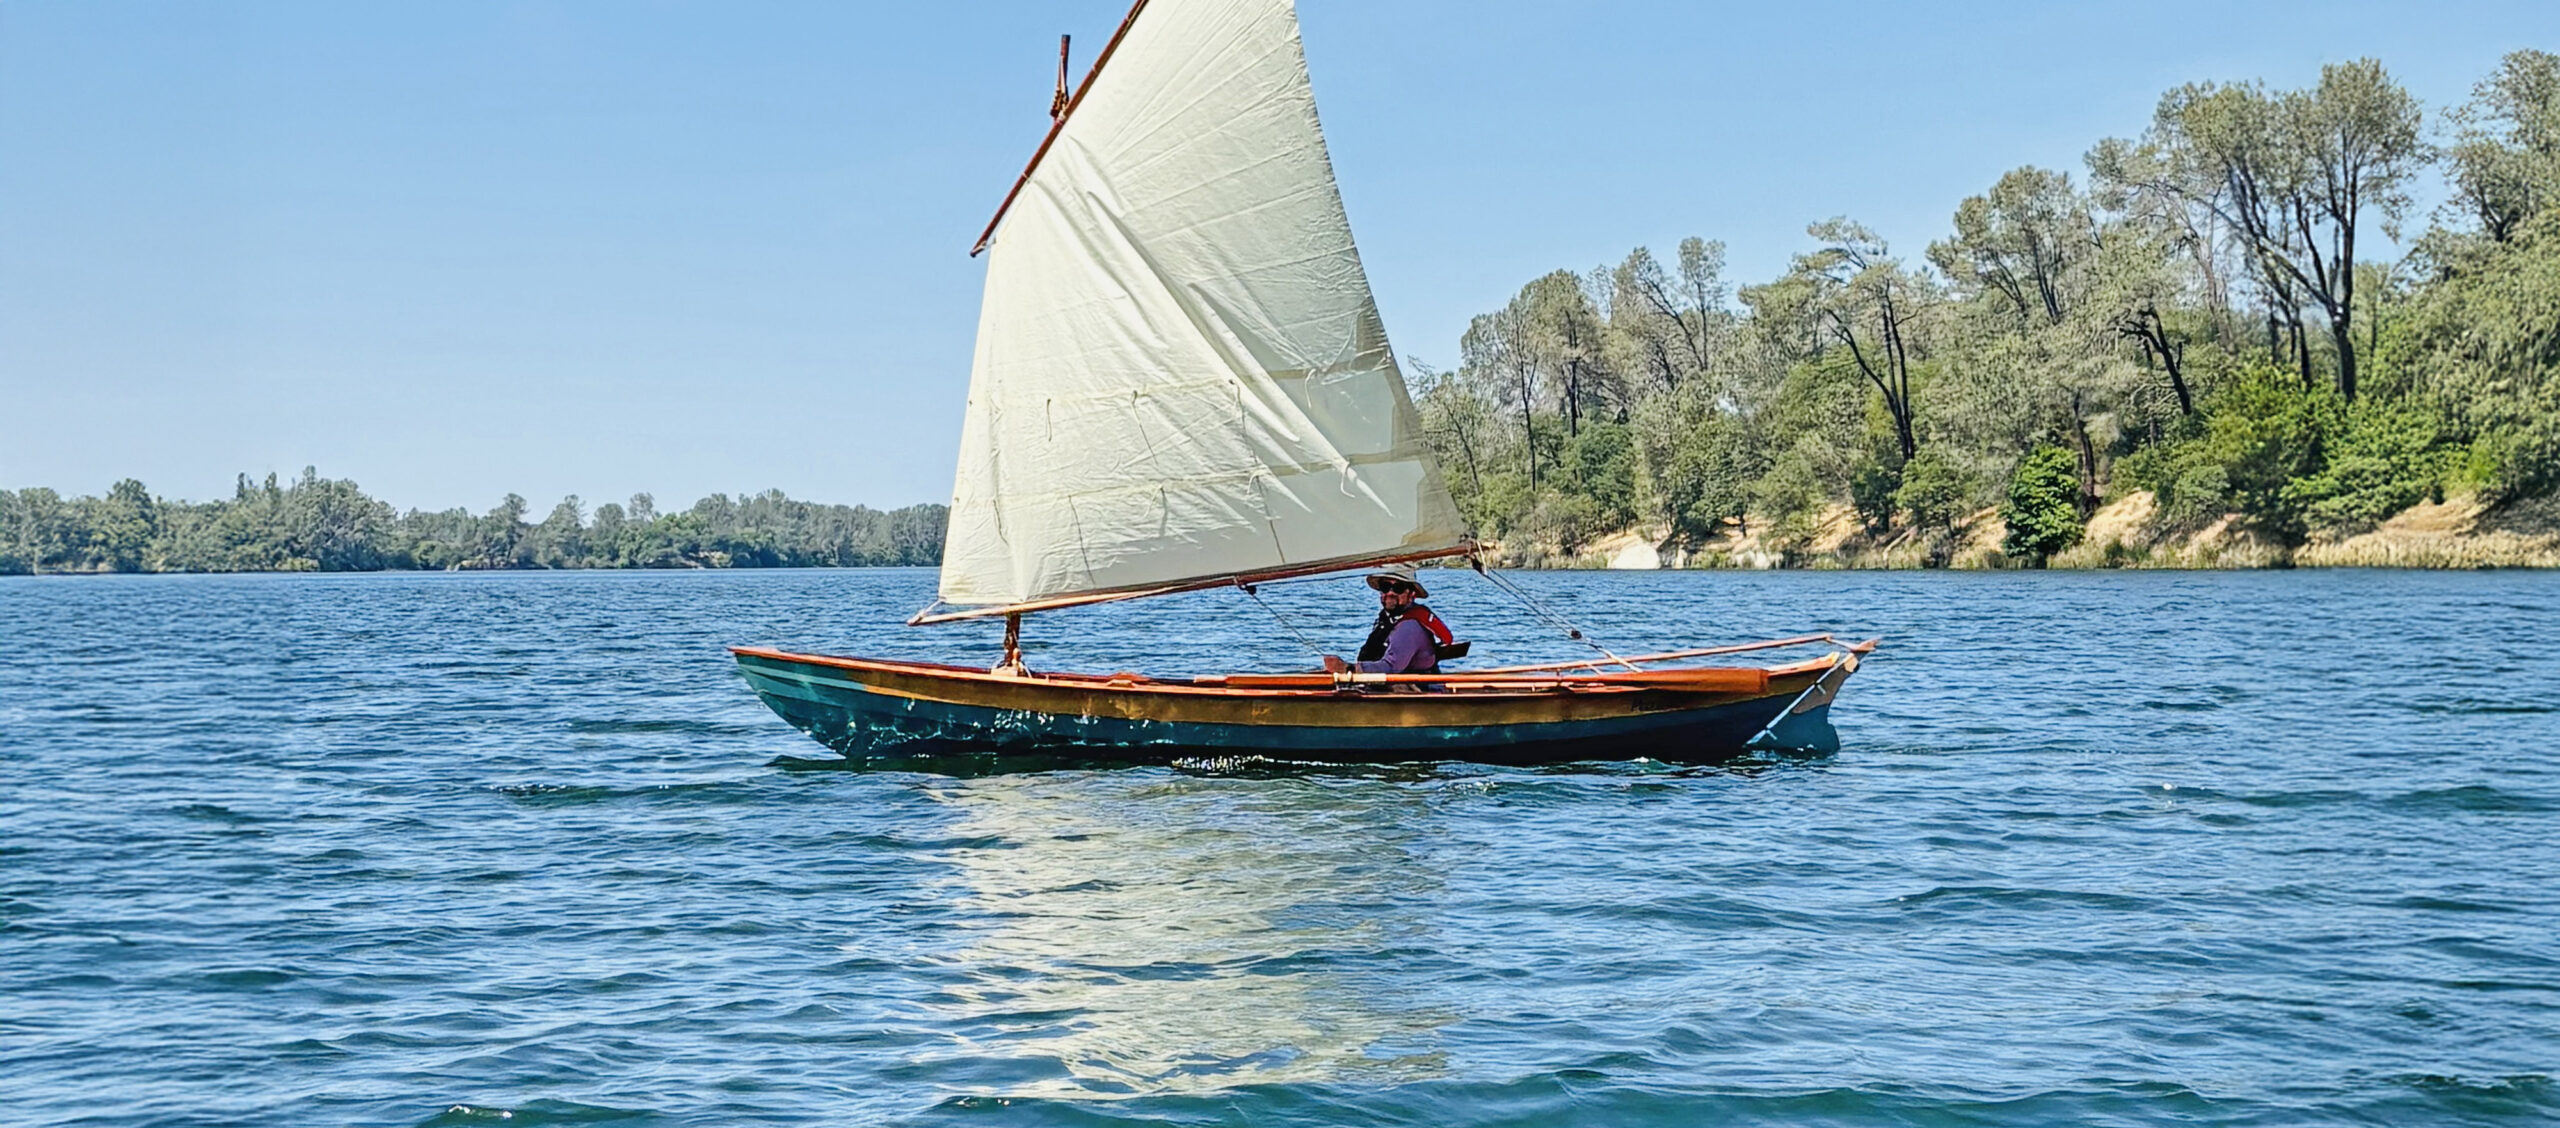
This traditional faering was under construction at the Aspoya Boats shop in Anacortes, Washington, in 2020. Such a project may be out of reach for many potential builders but thanks to the innovative work of designers like Iain Oughtred and producers like Chesapeake Light Craft, today’s amateur builder can find many boats based on traditional designs and re-conceived for modern, more easily achieved, building techniques.
For a century, someone wanting to build their own boat has been able to buy plans, but for much of that century to actually complete the construction of anything more than the simplest hull design required specialist knowledge, the skills to loft lines, steam planks; and the time and money to invest in traditional materials. As technology has raced ahead, however, those requirements have diminished. First came new materials: plywood, glues, fiberglass, fast-curing and forgiving finishes. Then came sophisticated hand-held power tools and computer software. Today, with CAD programs and CNC routers, the ability to build a boat is within most anyone’s reach.
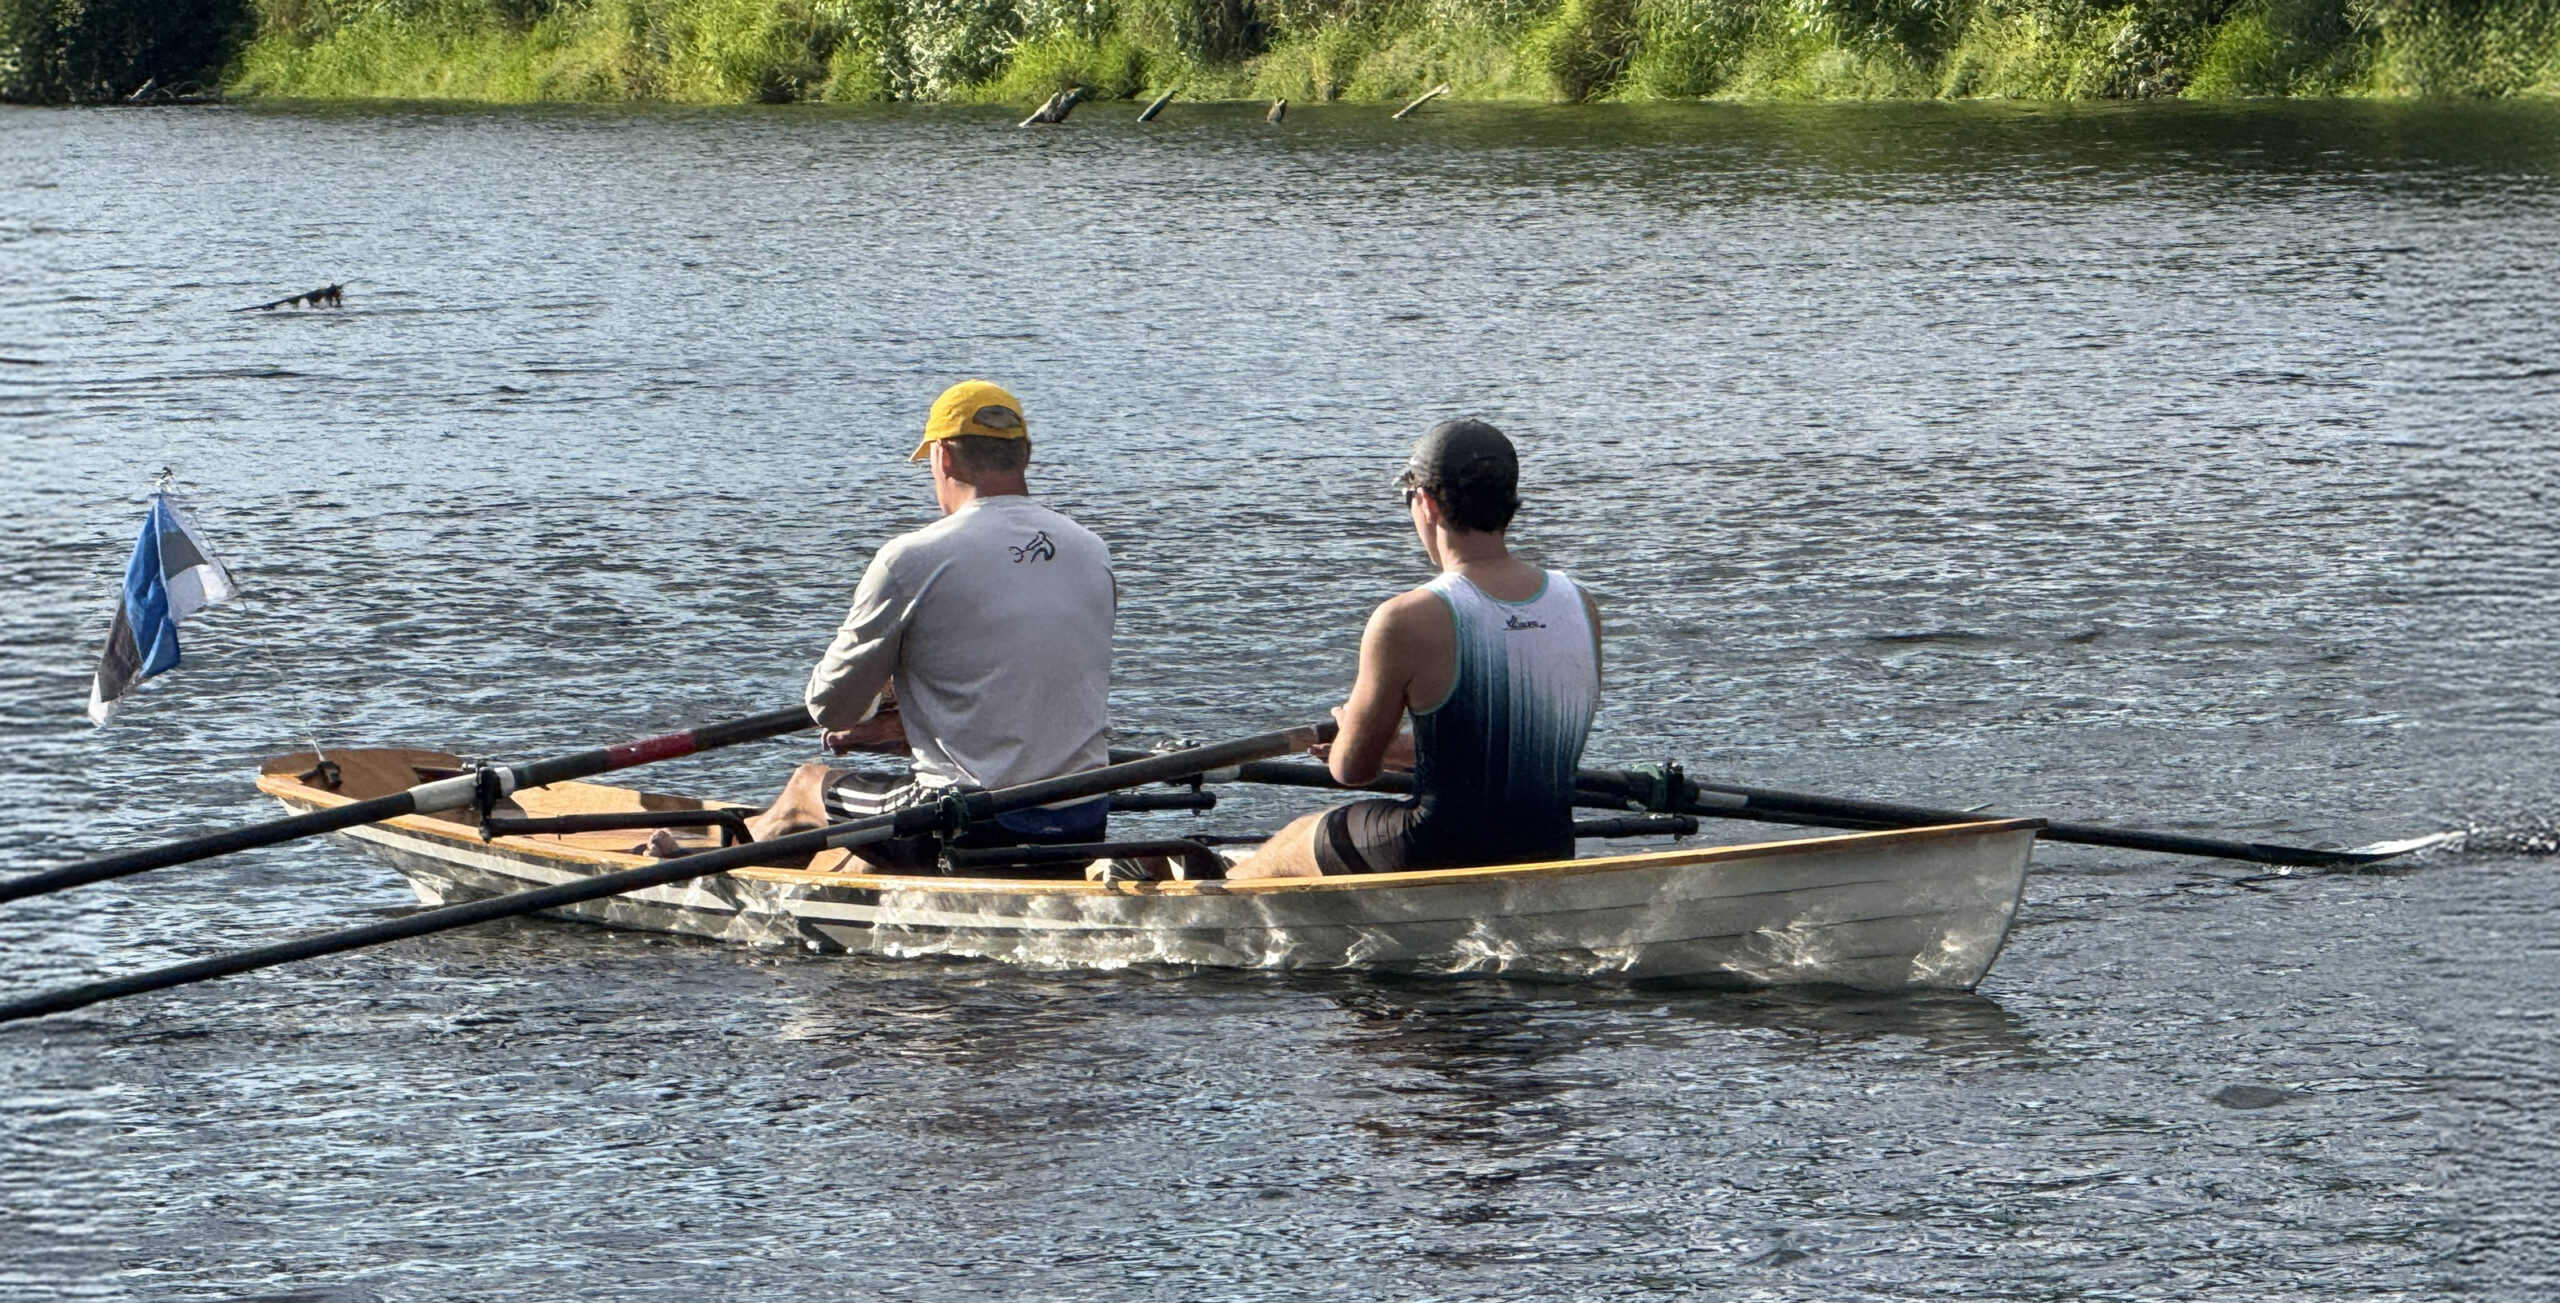
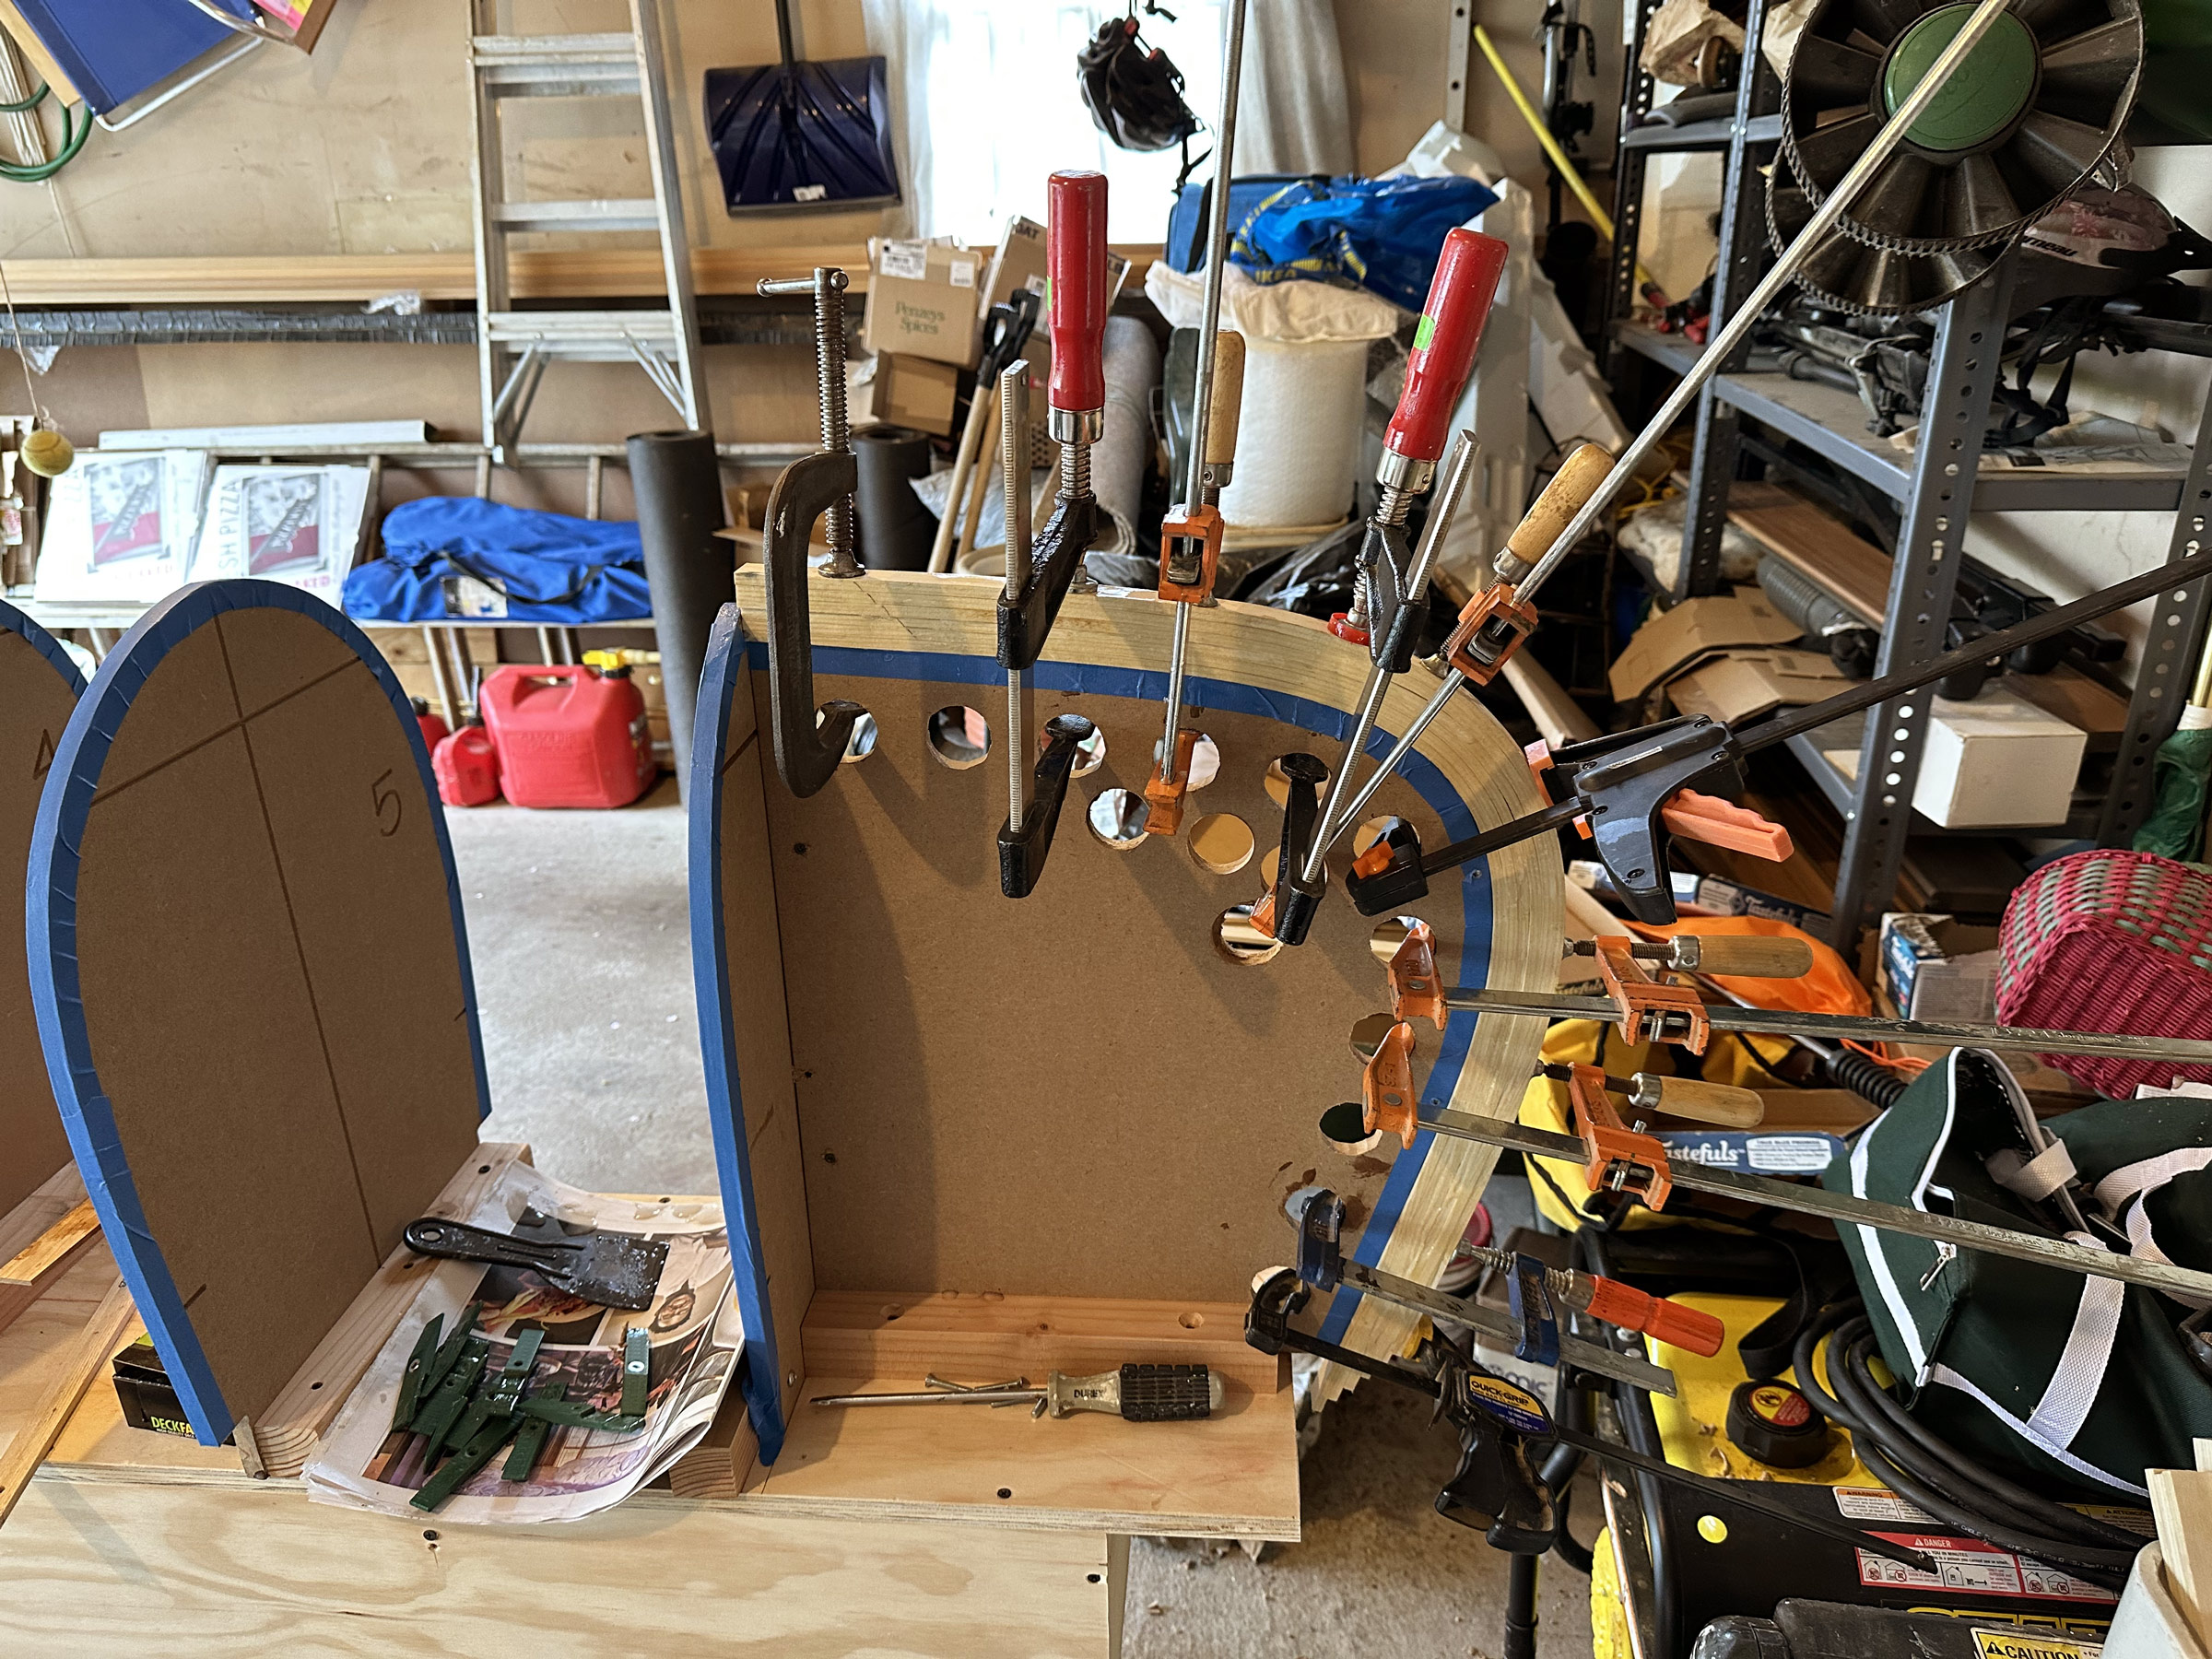
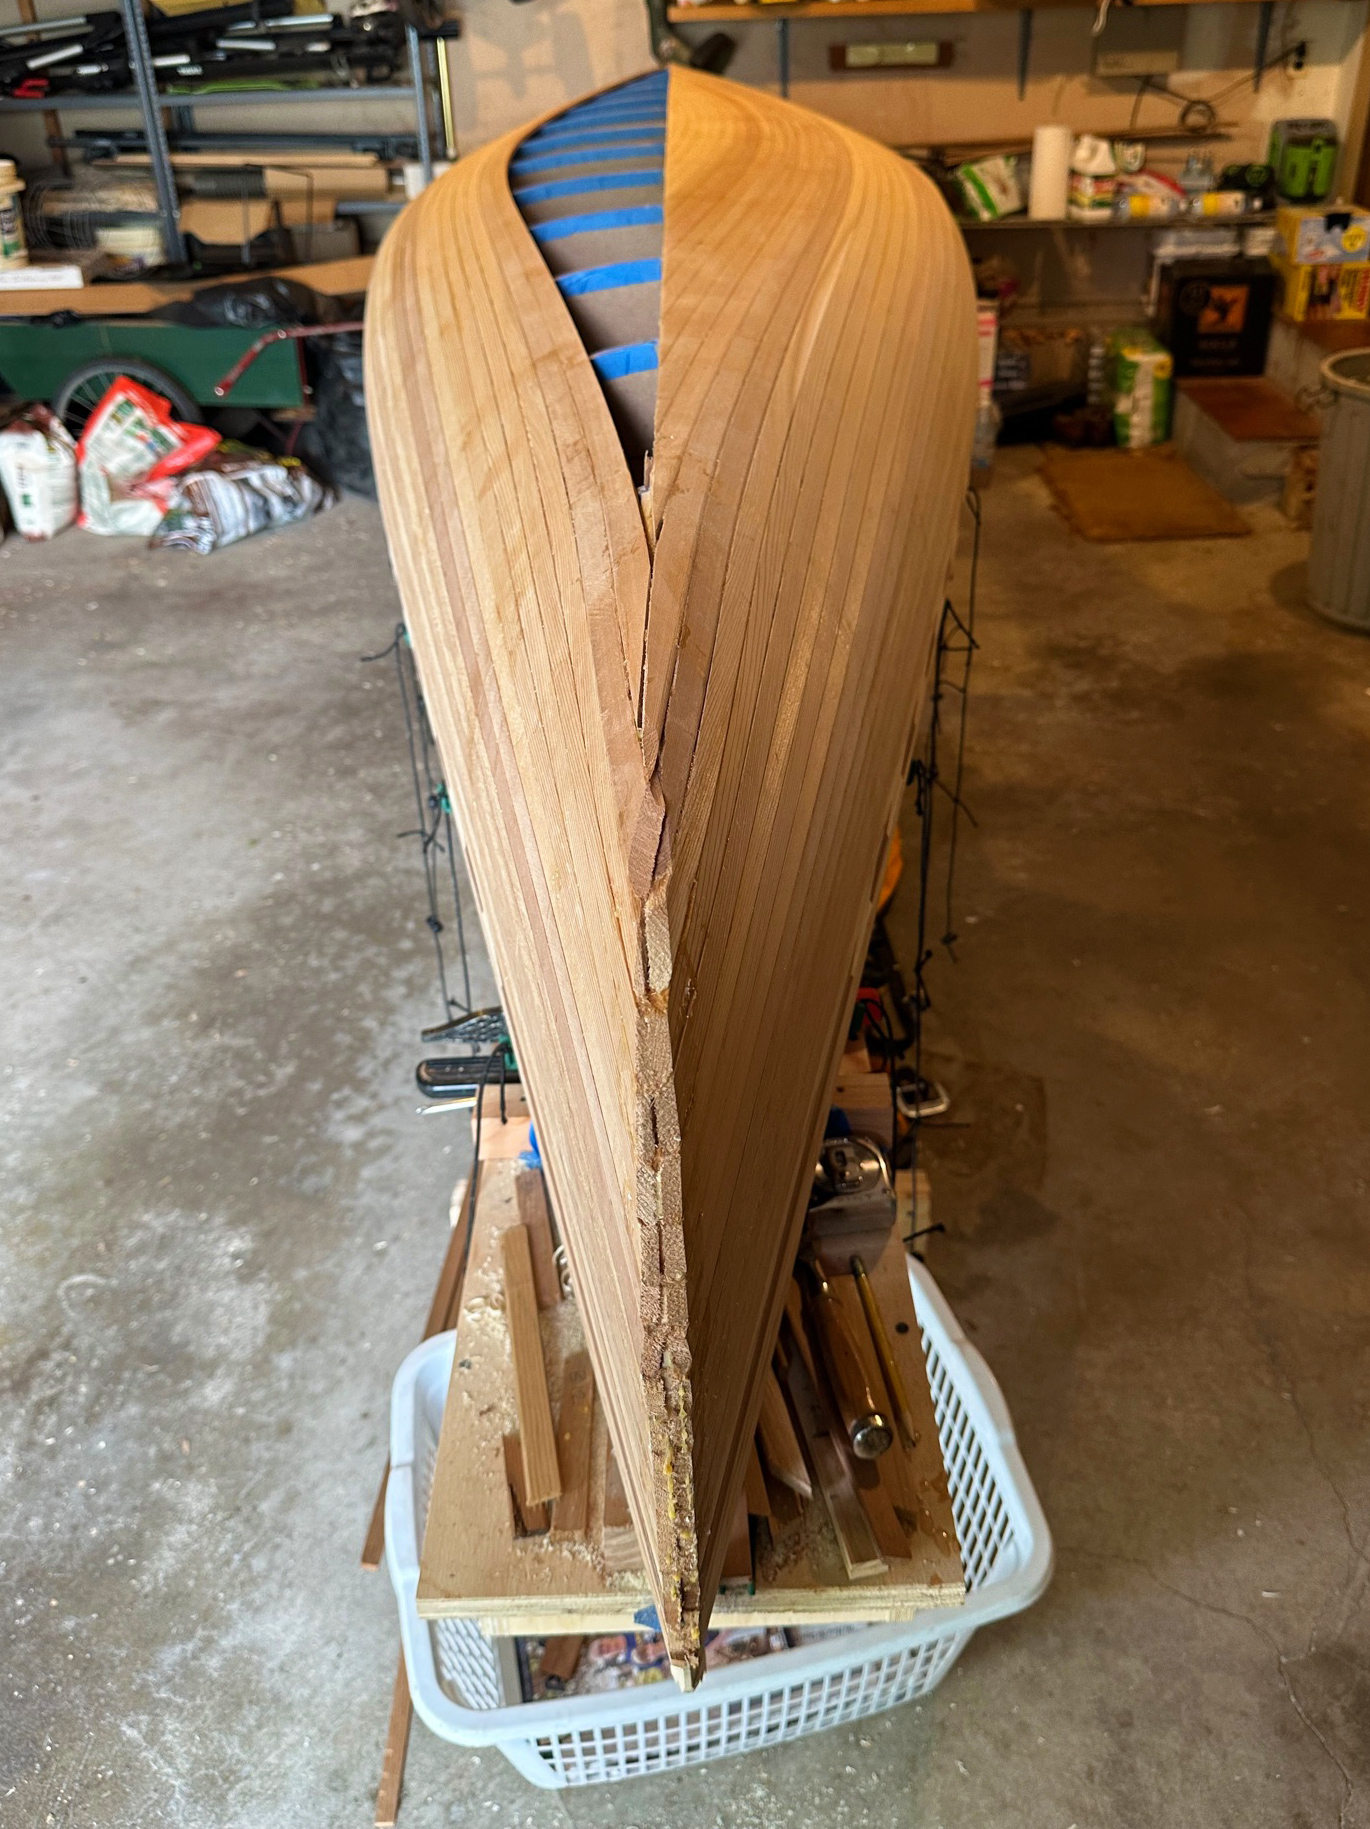
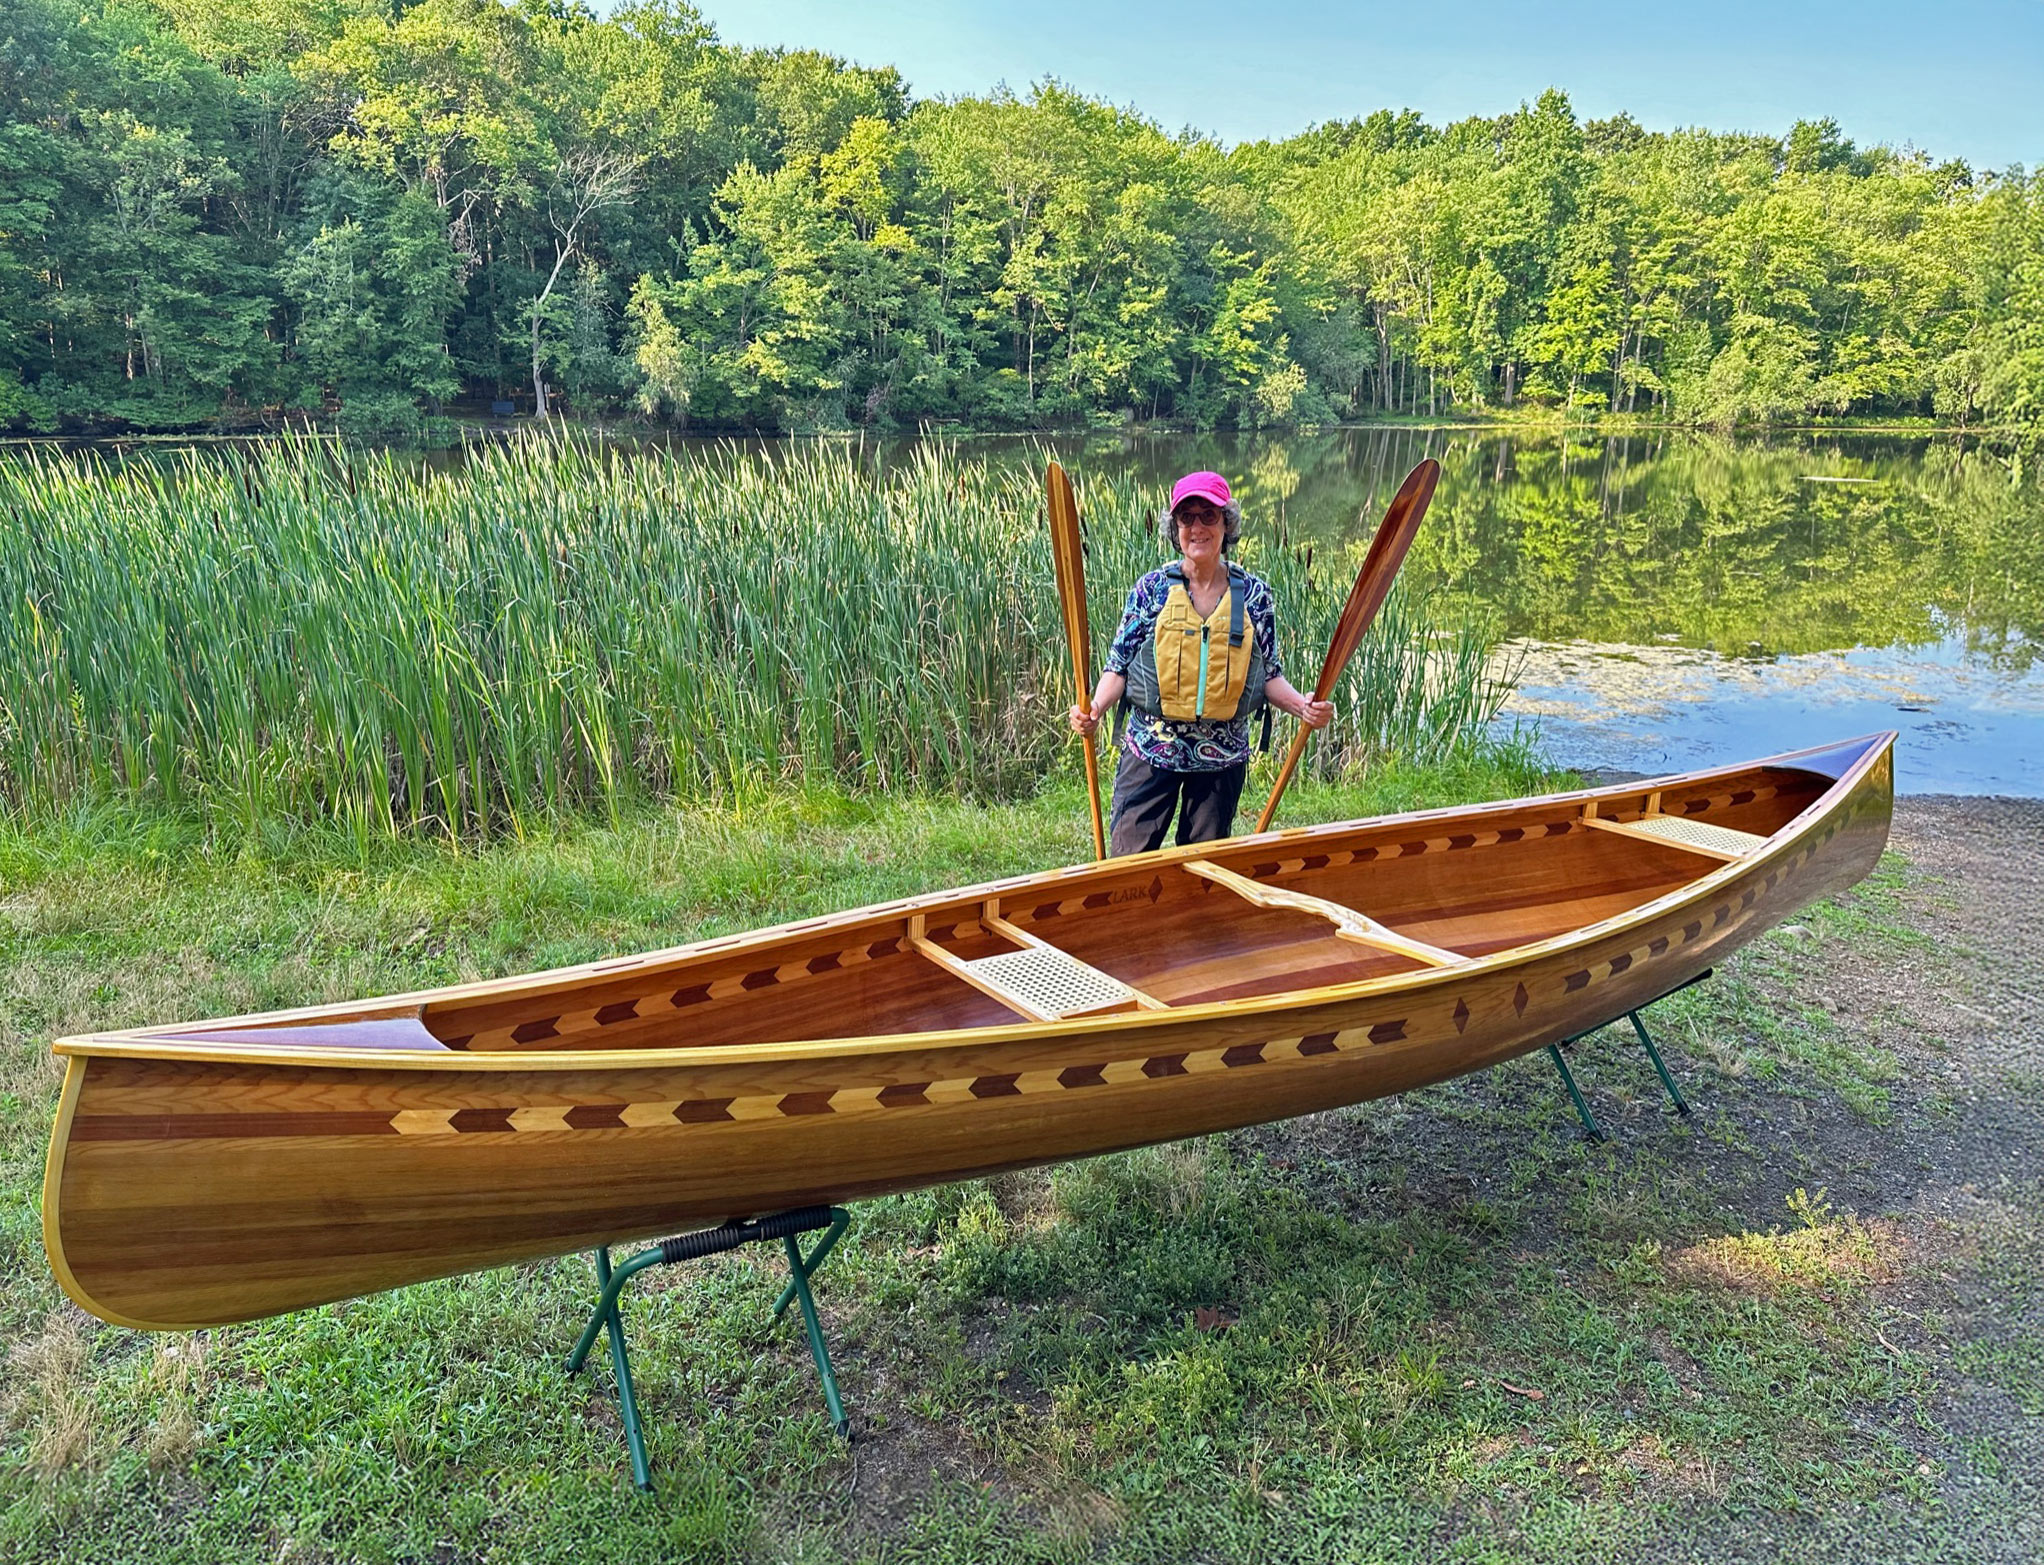
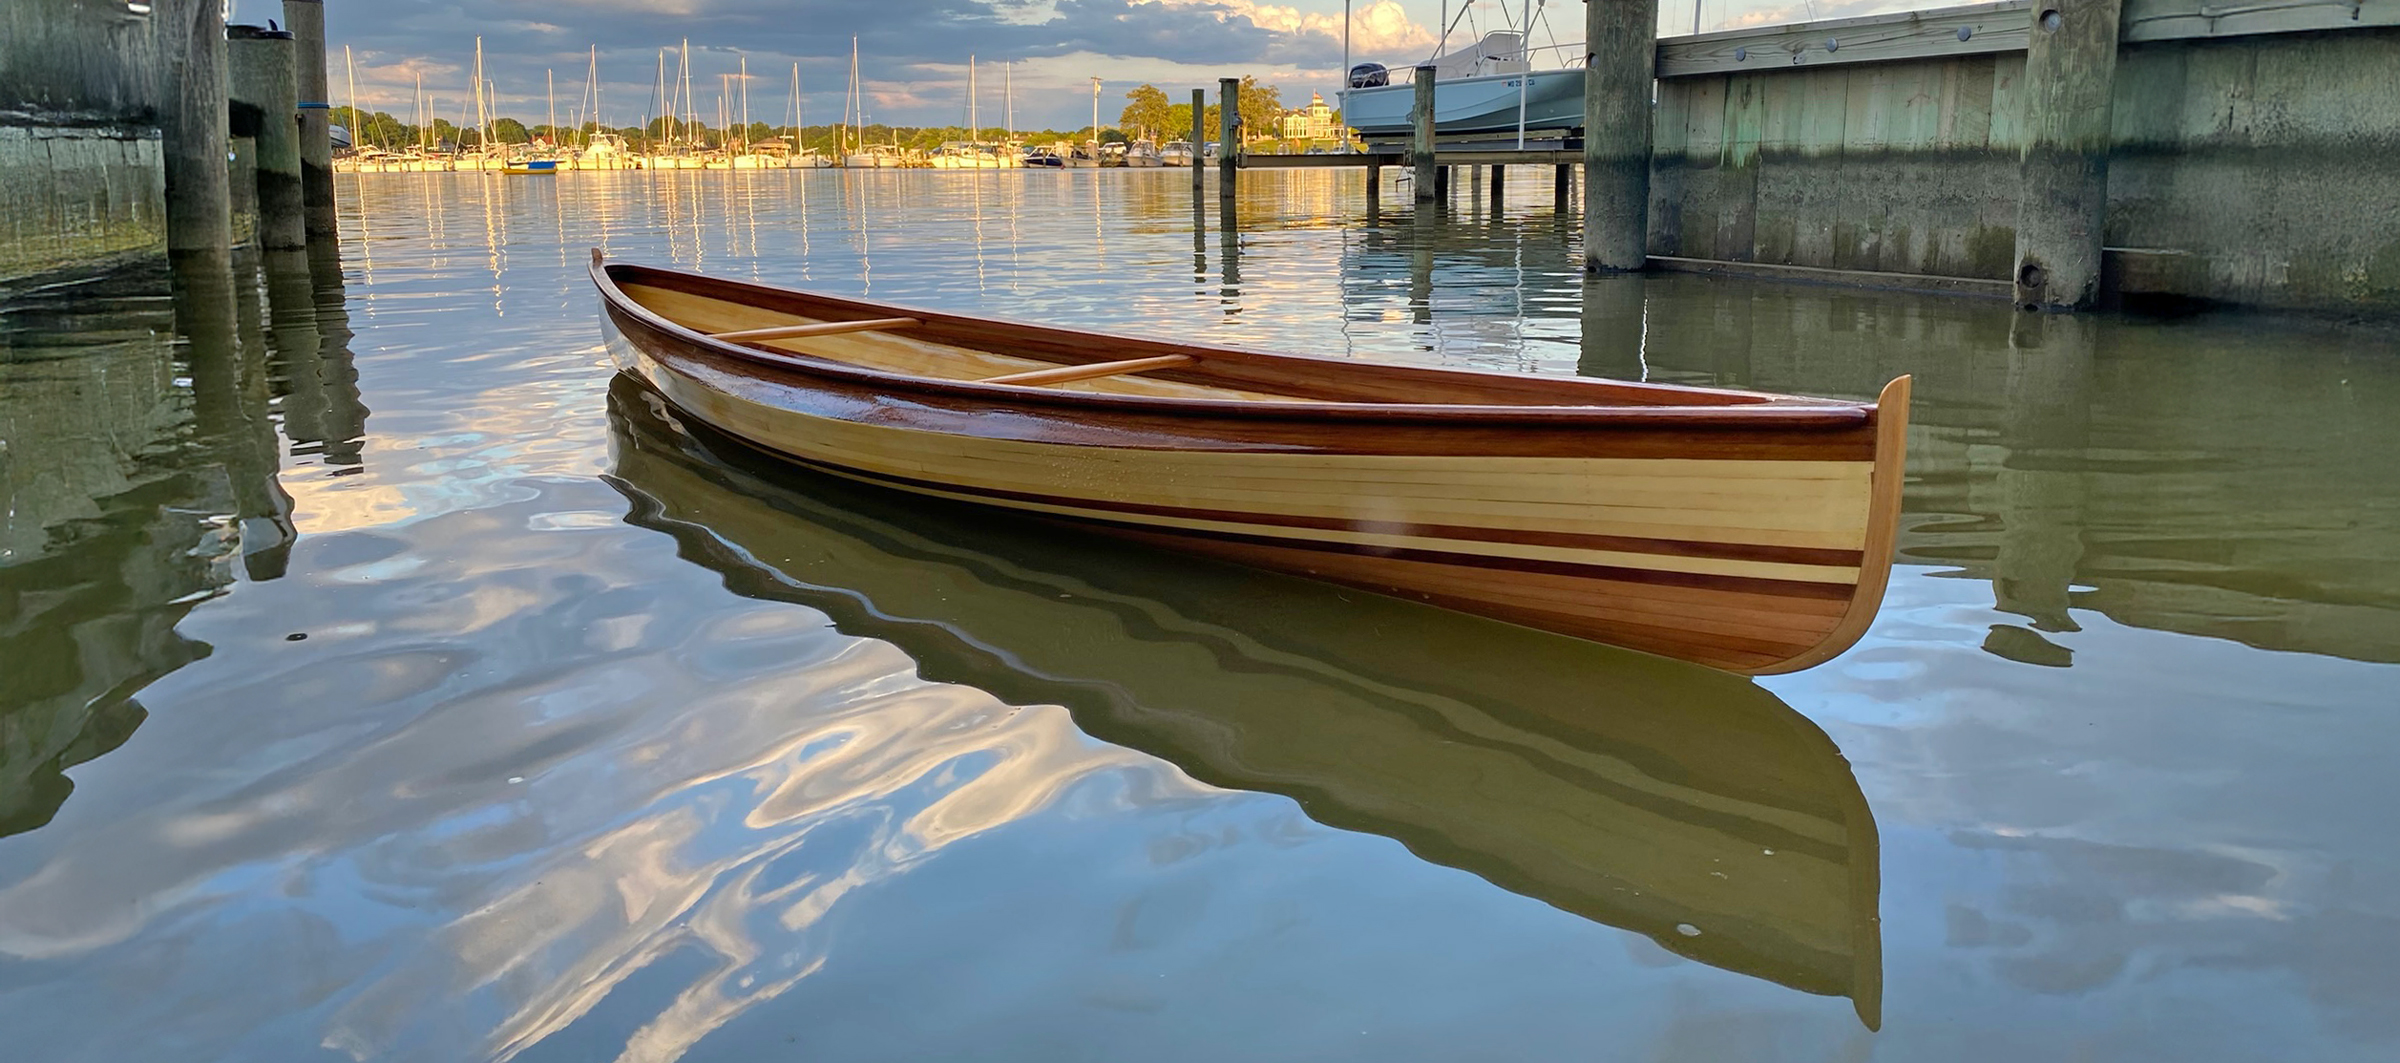
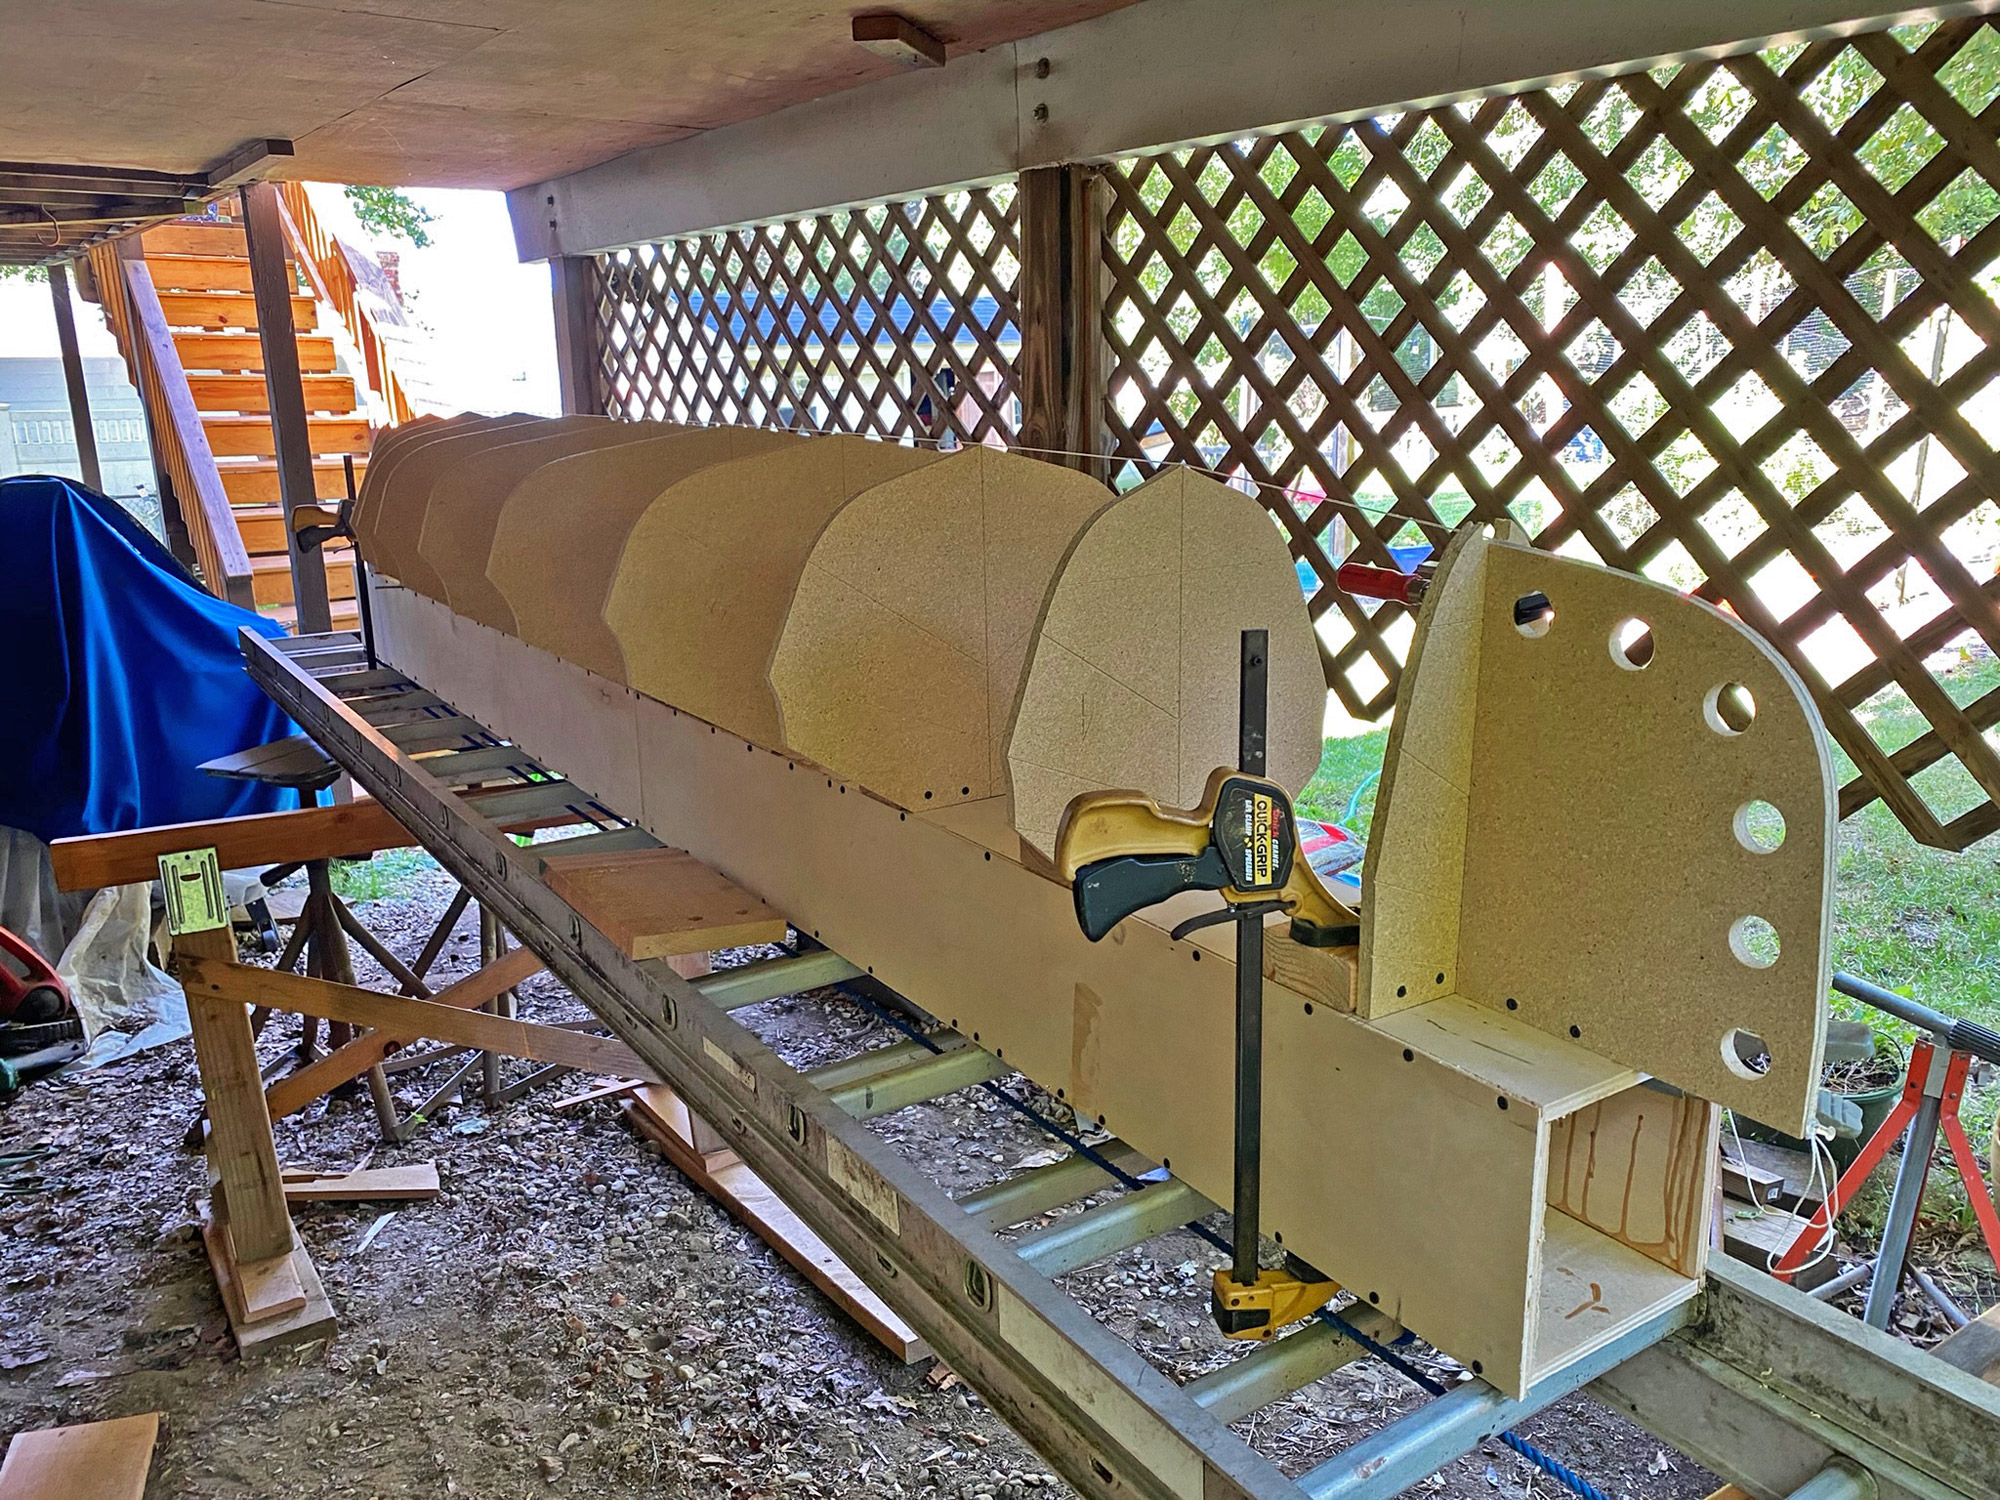
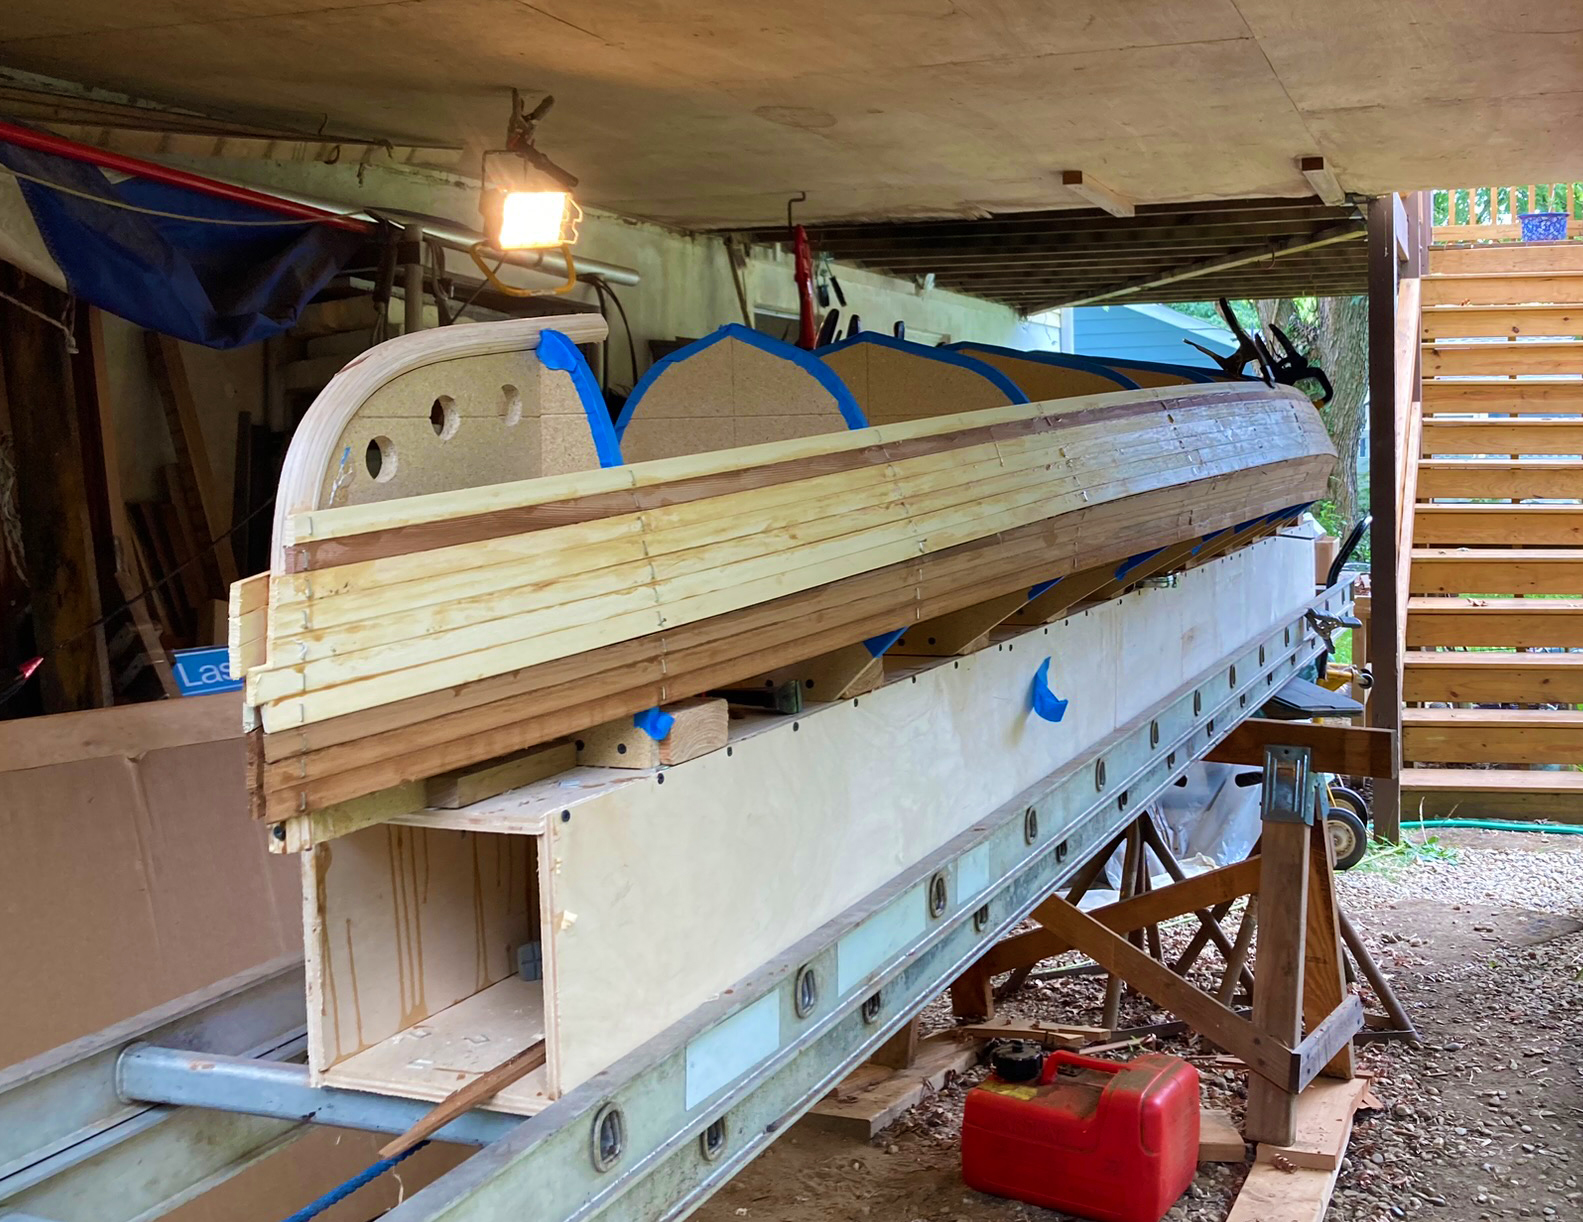
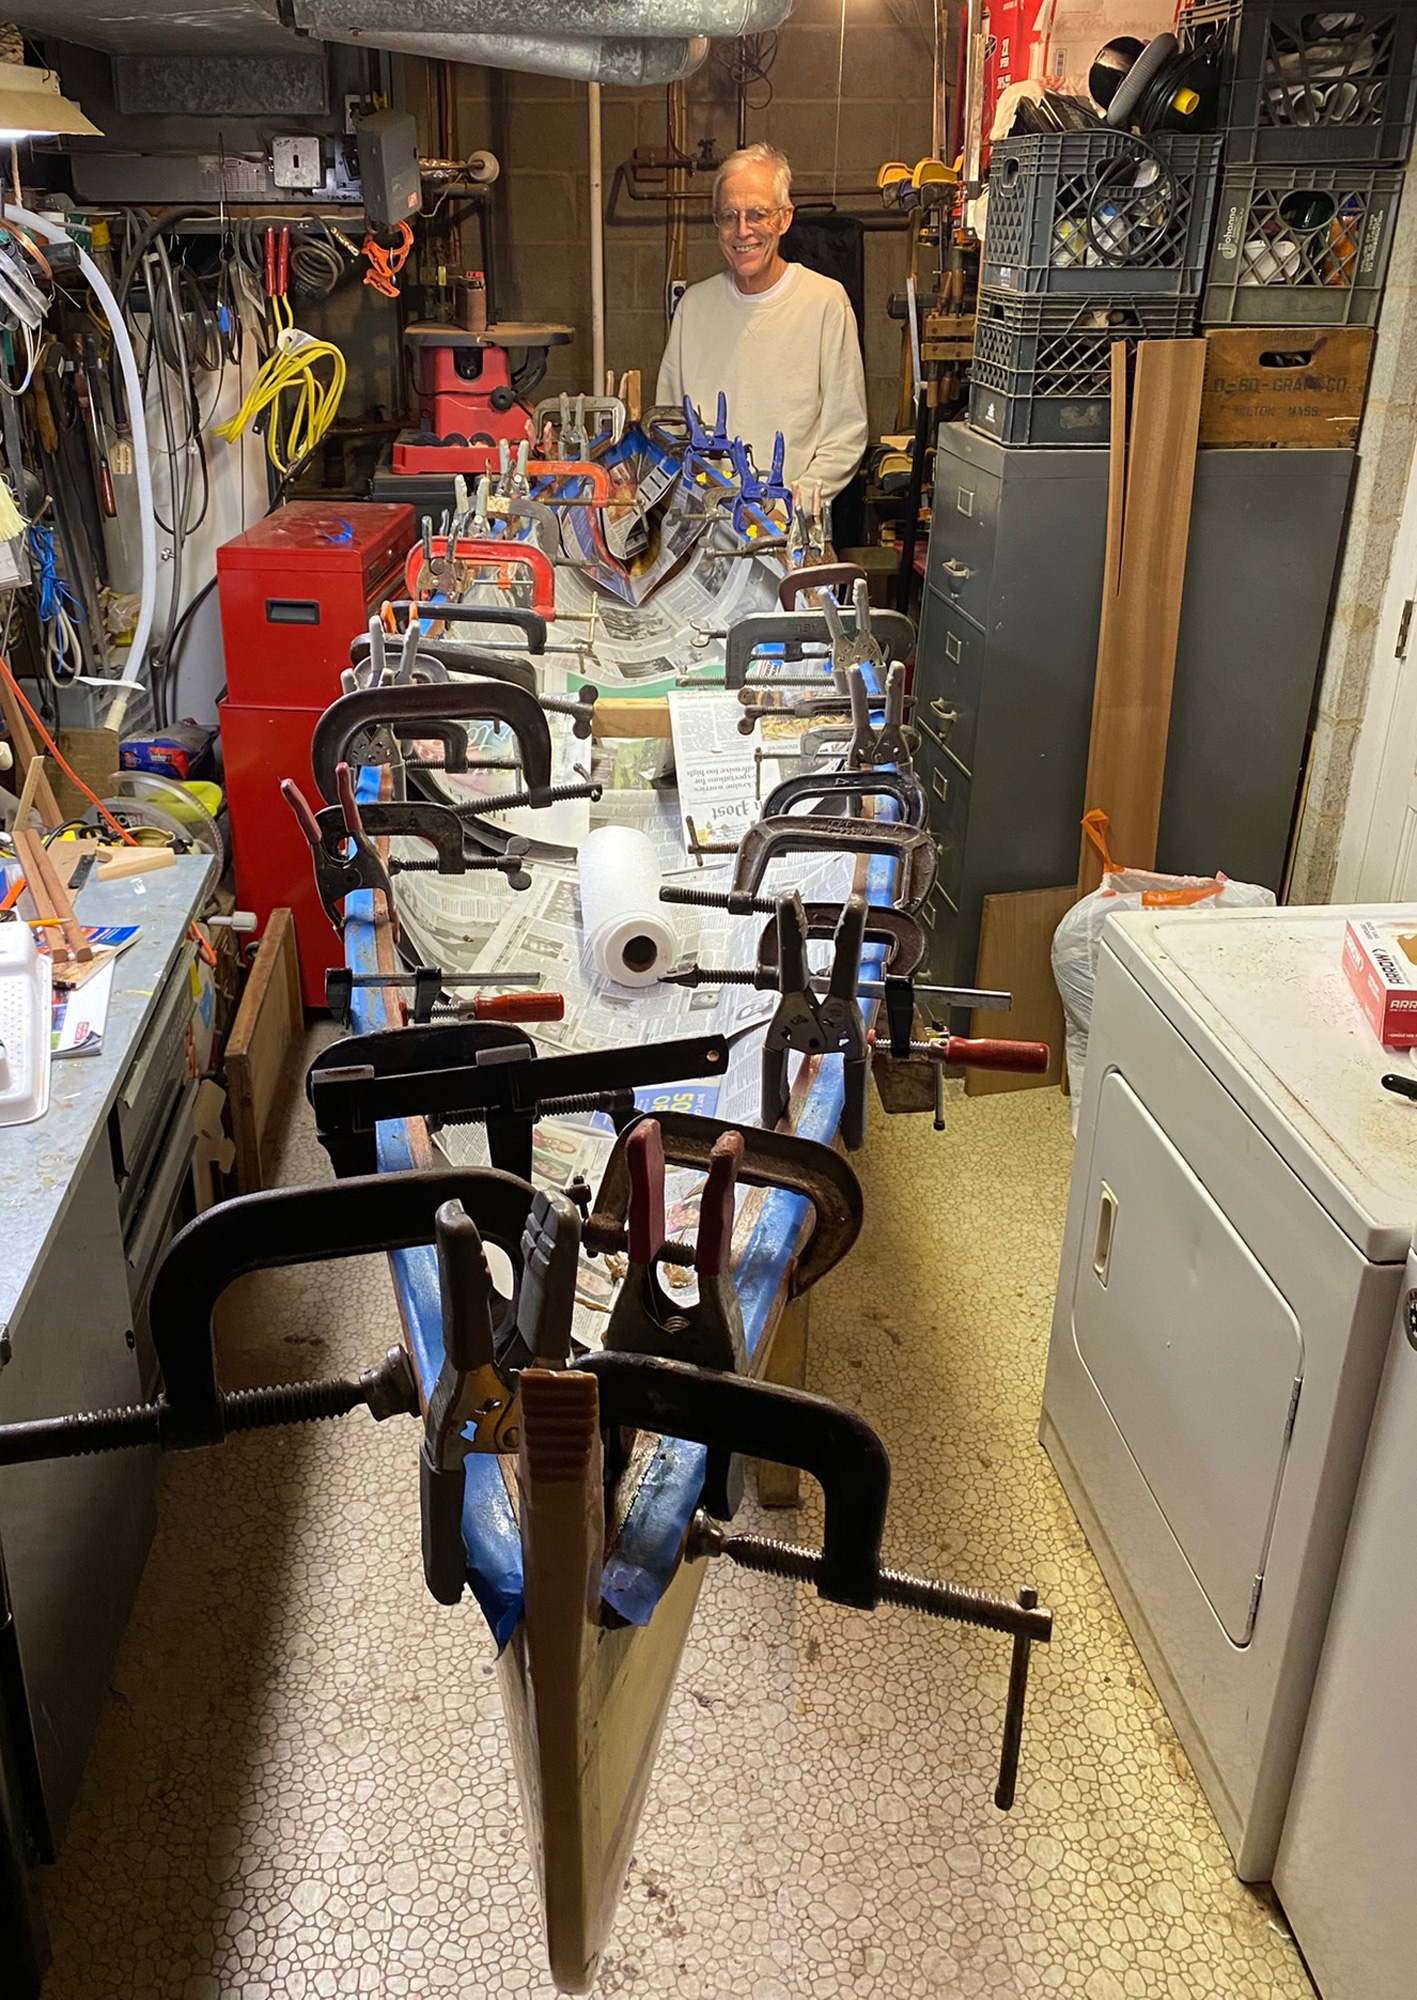
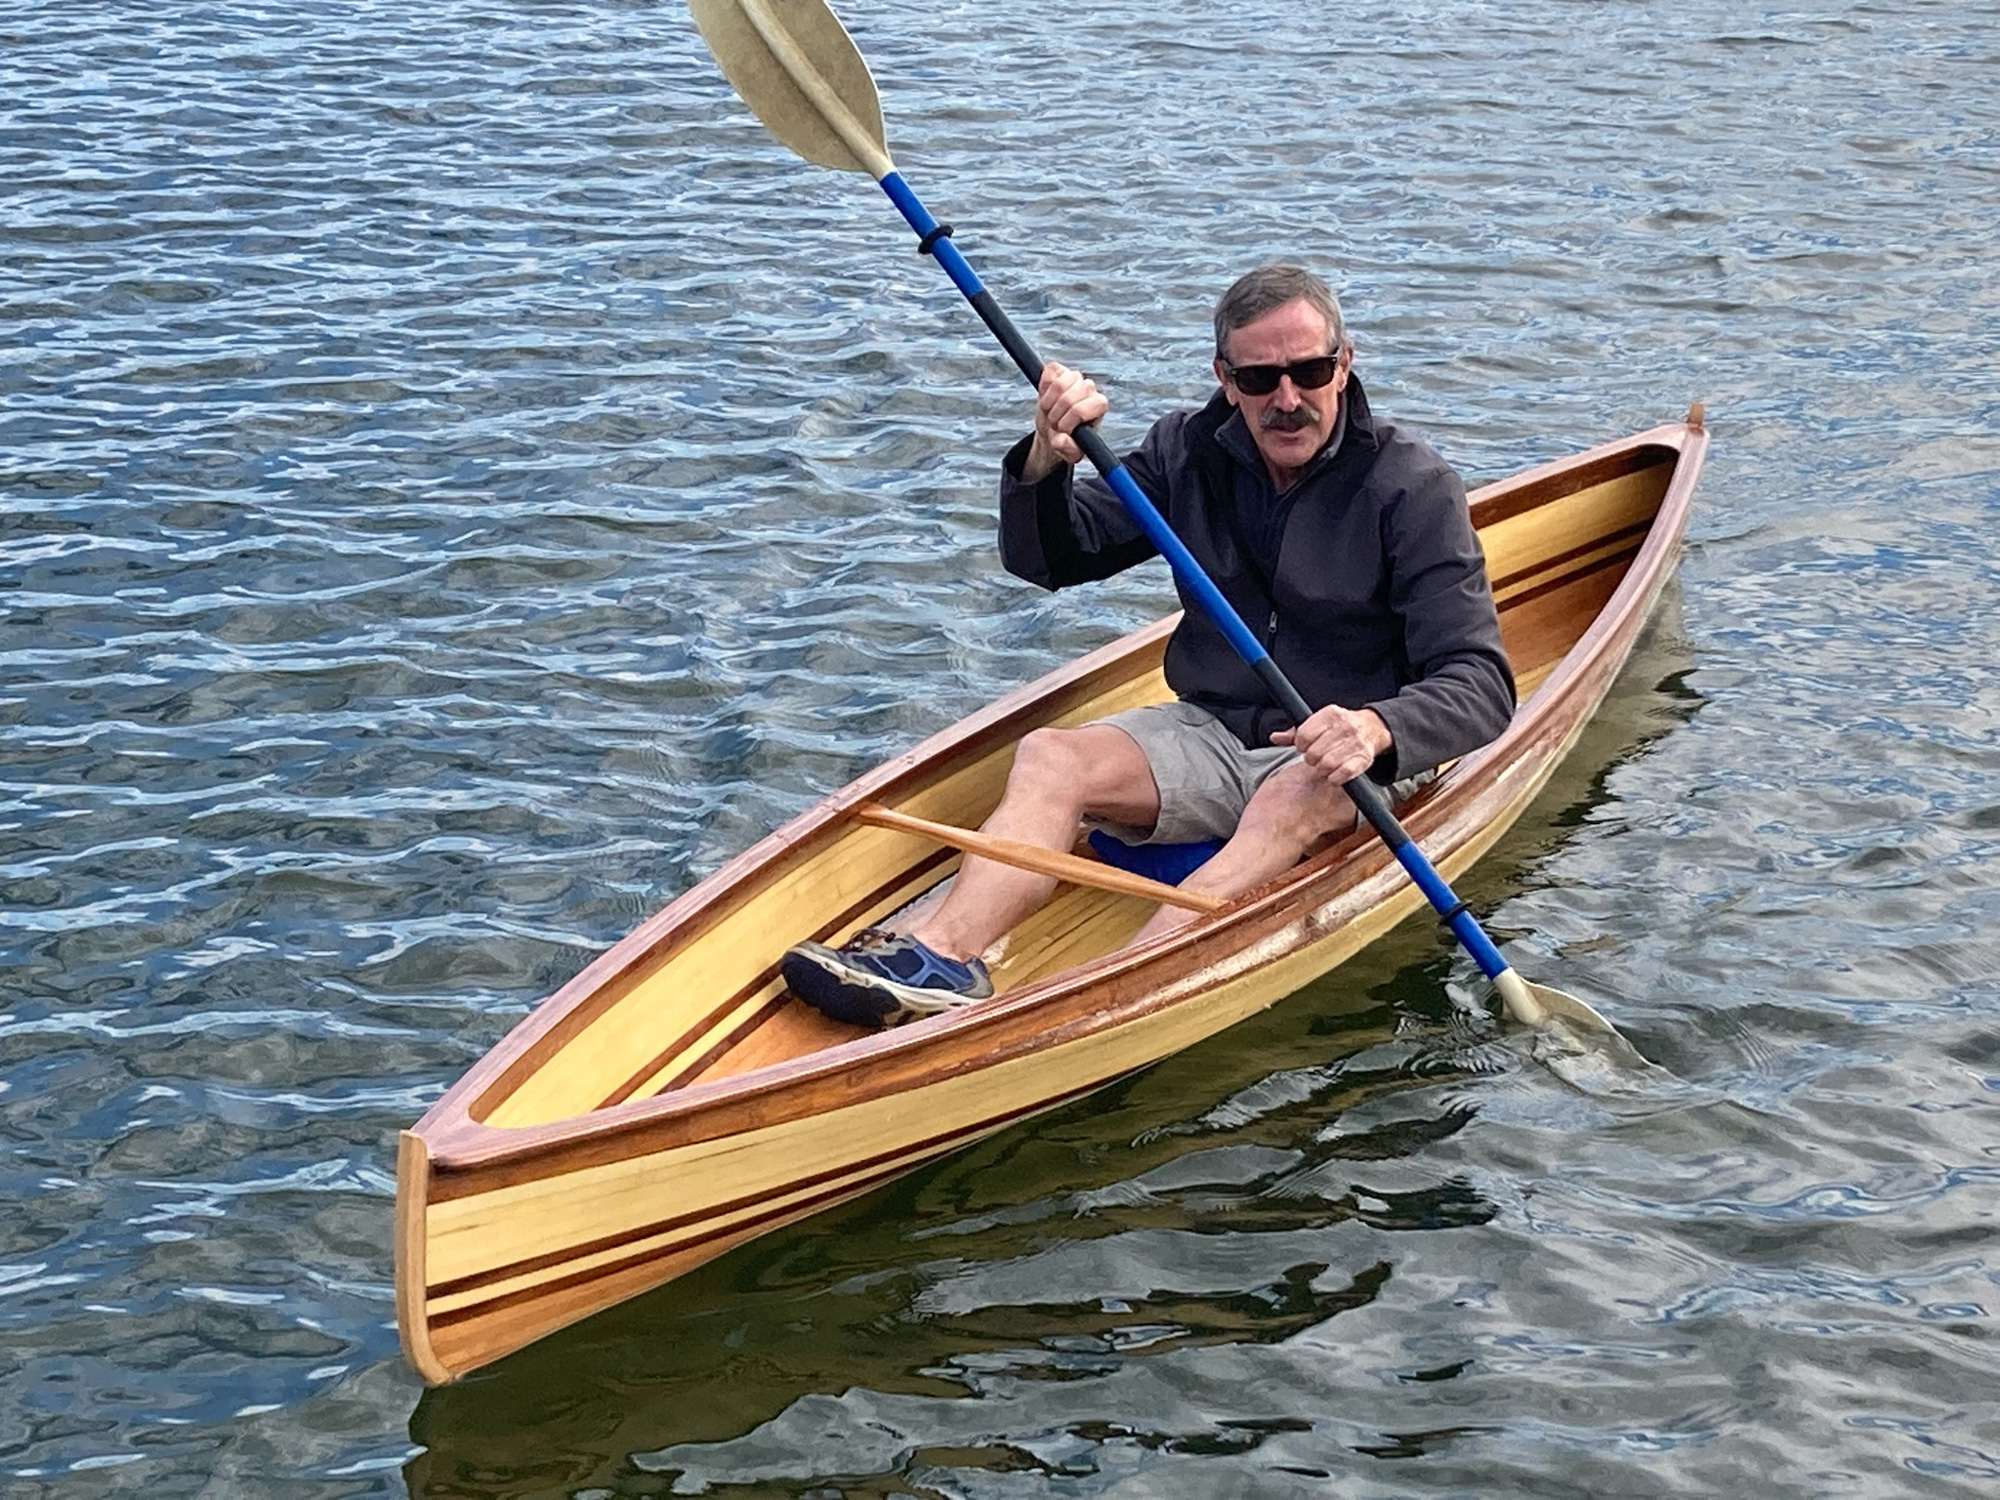
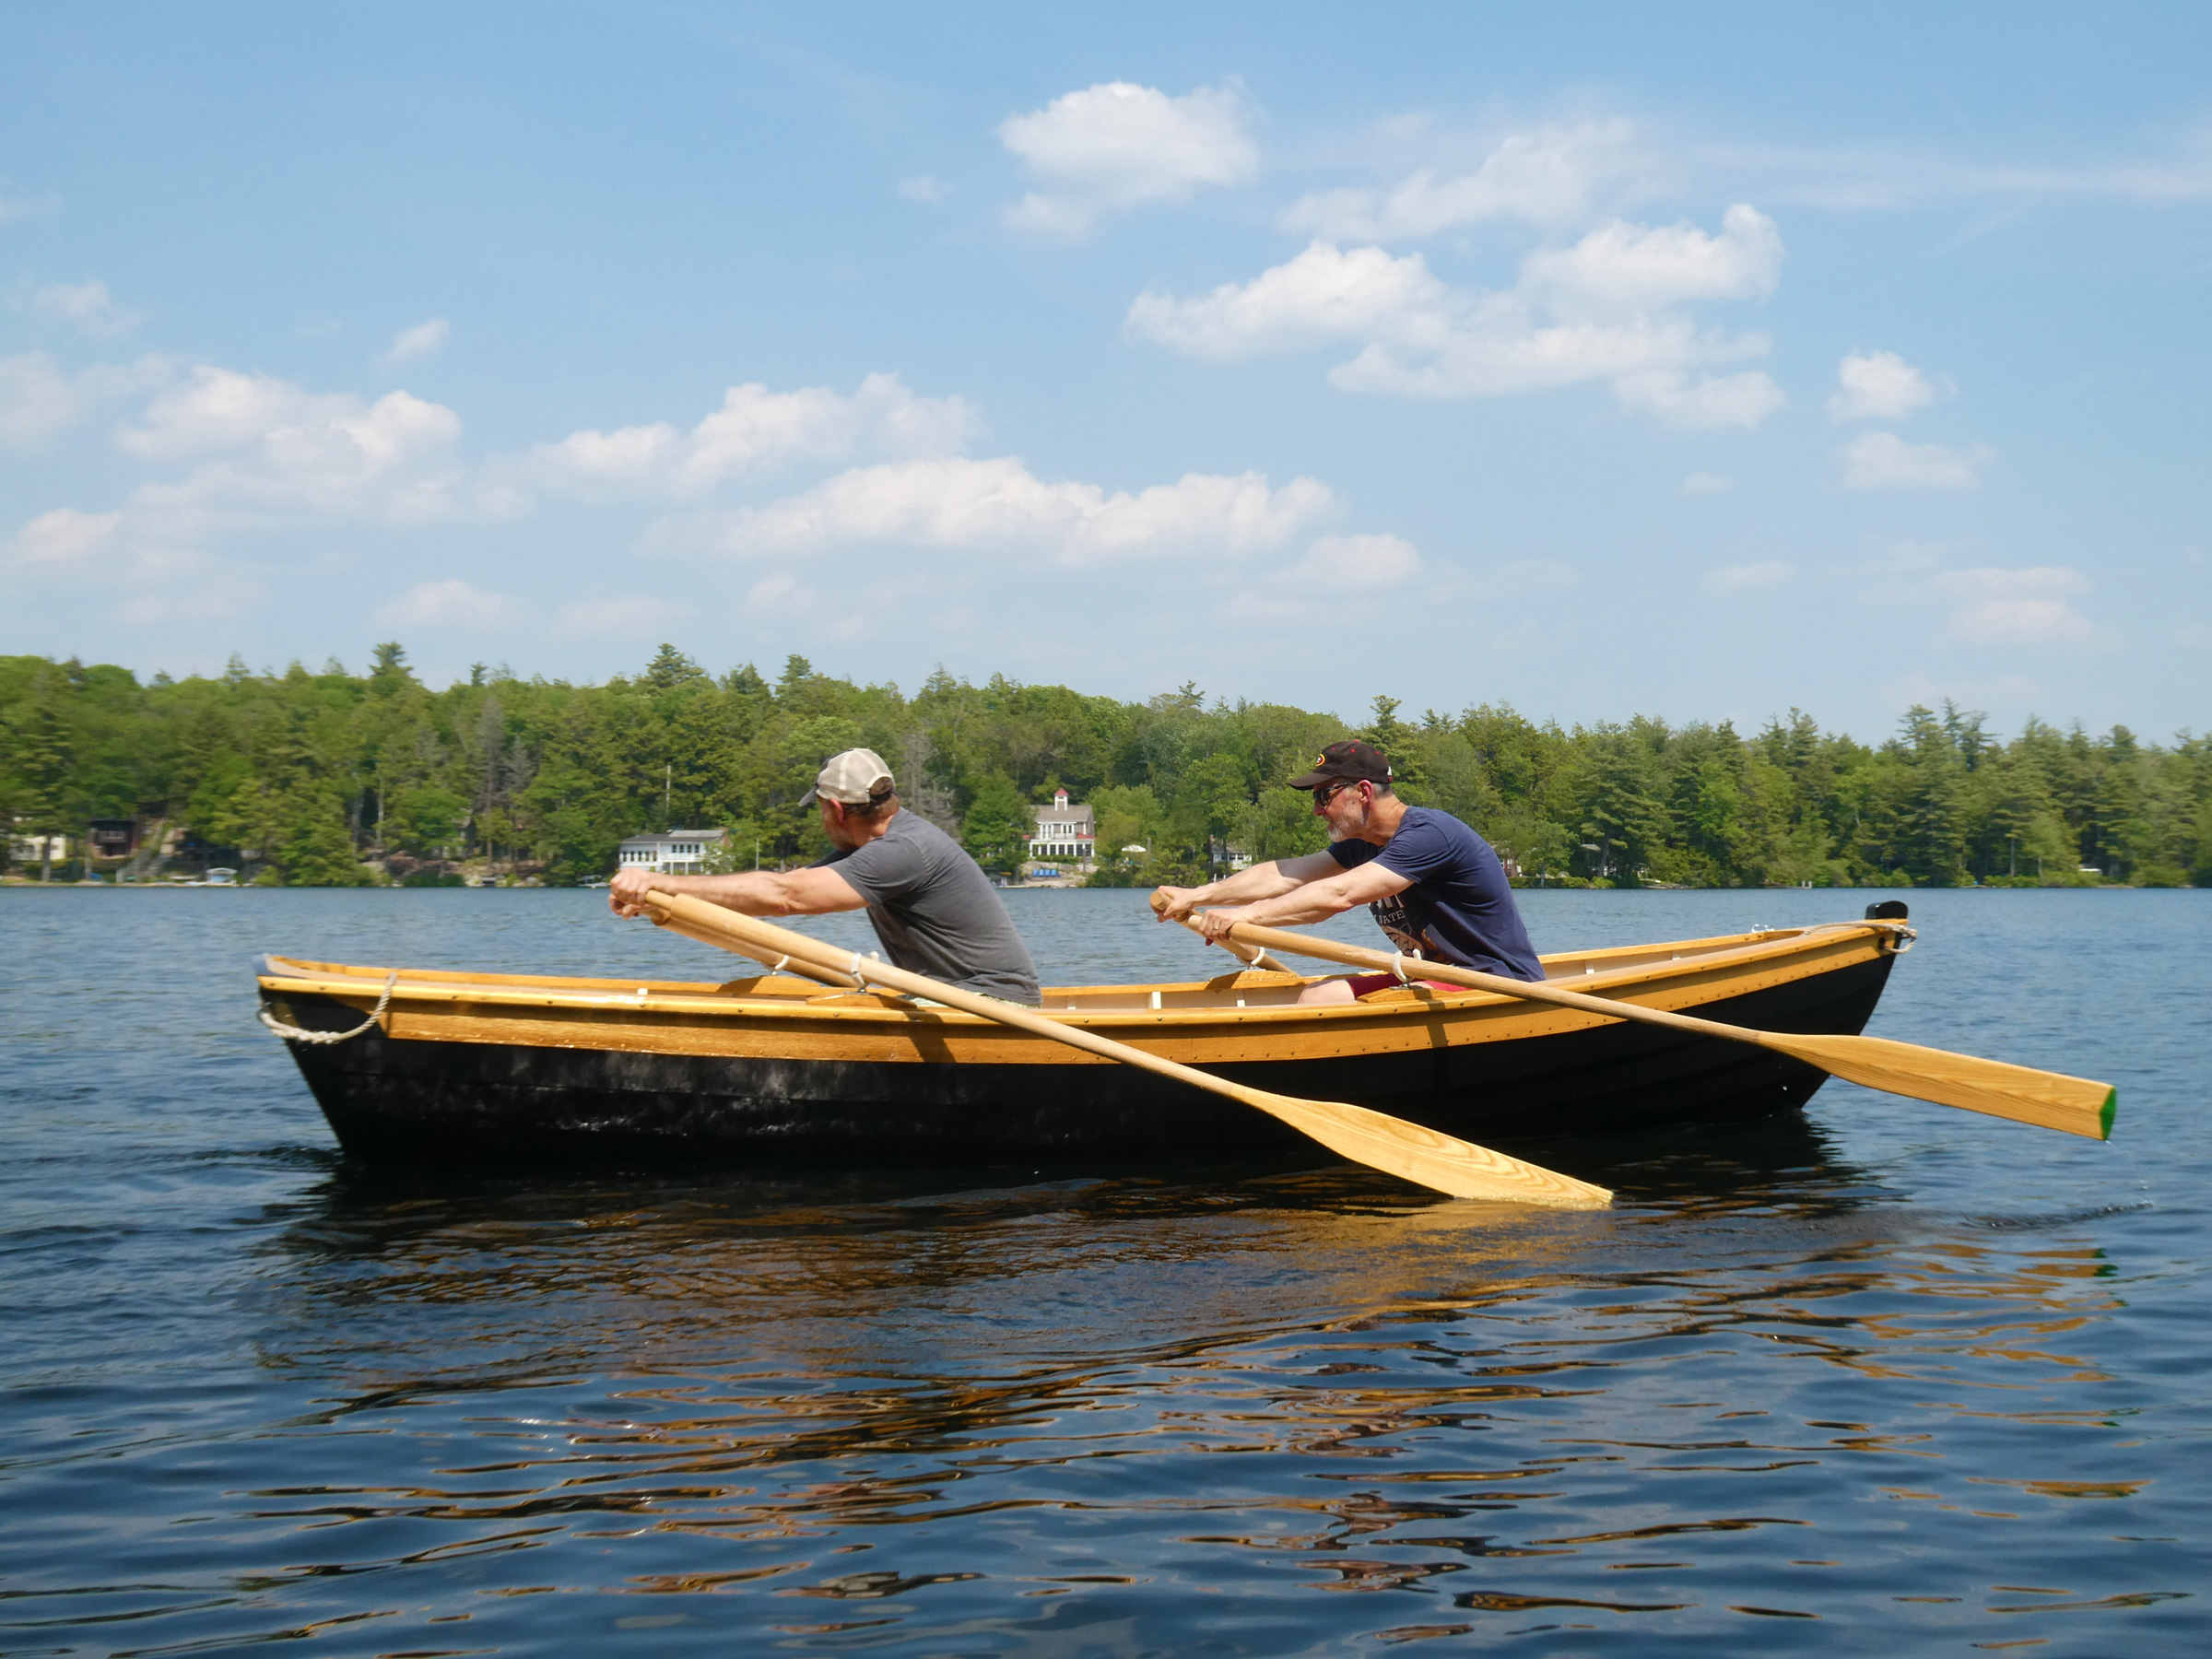
Of course, for those wanting to rise to the challenge of doing it the hard way, opportunities still abound. But for others looking for the satisfaction of building their own boat with little or no previous experience, there is a vast range of attainable alternatives. Take, for example, two projects featured in this month’s Small Boats. At one end of the lineup is NELI, an Annapolis Wherry Tandem from Chesapeake Light Craft built and reviewed by John Carey. At the other is LARK, a strip-planked 15′ canoe built by John and Justine Diamond. What makes these two projects disparate are not the boats themselves (although they are significantly different) but the approaches taken by their builders. Both John Carey and the Diamonds were first-time builders. But where the Diamonds sought the challenge of doing everything themselves, from selecting the cedar boards to building the strongback, seats, and paddles, John Carey chose to “assemble” his first boat from a highly-sophisticated kit of pre-cut plywood pieces, that came with everything except epoxy, finishes, and the required basic power tools. Yet, despite their obvious dissimilarities, these two approaches share commonalities: both projects were made possible by modern materials and technologies (even building from scratch, the Diamonds benefited from CAD files for the molds, which they cut out with a CNC router); both projects were greatly assisted by first-class support from the respective companies; and both projects, like many other thousands, ultimately resulted in small-boat ownership at affordable prices.
Jenny Bennett
Designed by Joel White in 1989, the Shellback Dinghy is a modern design with traditional appeal. Before the advent of good-quality plywood and effective waterproof glues, such a build would have been beyond the means of most home builders. Today, the Shellback is available in an all-inclusive kit.
Homebuilt boats may yet be in the minority at a dinghy dock or launching ramp, but thanks to the myriad products from plans to all-inclusive kits and everything in between, they are a growing breed.
To build a boat is truly a breathtaking achievement, mastered by a special breed of people. But when I reached the point in life when I wanted to “build” my own boat, I quickly seized upon the benefits of innovation and the technology of precision-cut CNC components brought together by epoxy and the stitch-and-glue process. I would assemble a boat rather than build one.
After months of intermittent reading and ruminating, I settled on the Chesapeake Light Craft (CLC) Annapolis Wherry Tandem. The boat can be used for fixed- or sliding-seat rowing, can accommodate a single rower or two, and is beautiful in all respects. The design is based on the 19th-century working livery wherries of England’s River Thames, and the folks at CLC produce CNC-cut planks of marine-grade plywood to echo the originals’ lapstrake hulls. CLC’s interpretation is a safe and swift boat in which to stay fit on the water, and to carry a passenger for the day or gear for a week. CLC’s owner and designer, John Harris, has refined the wherry design into a true masterpiece of precision parts ready for assembly.
John Carey
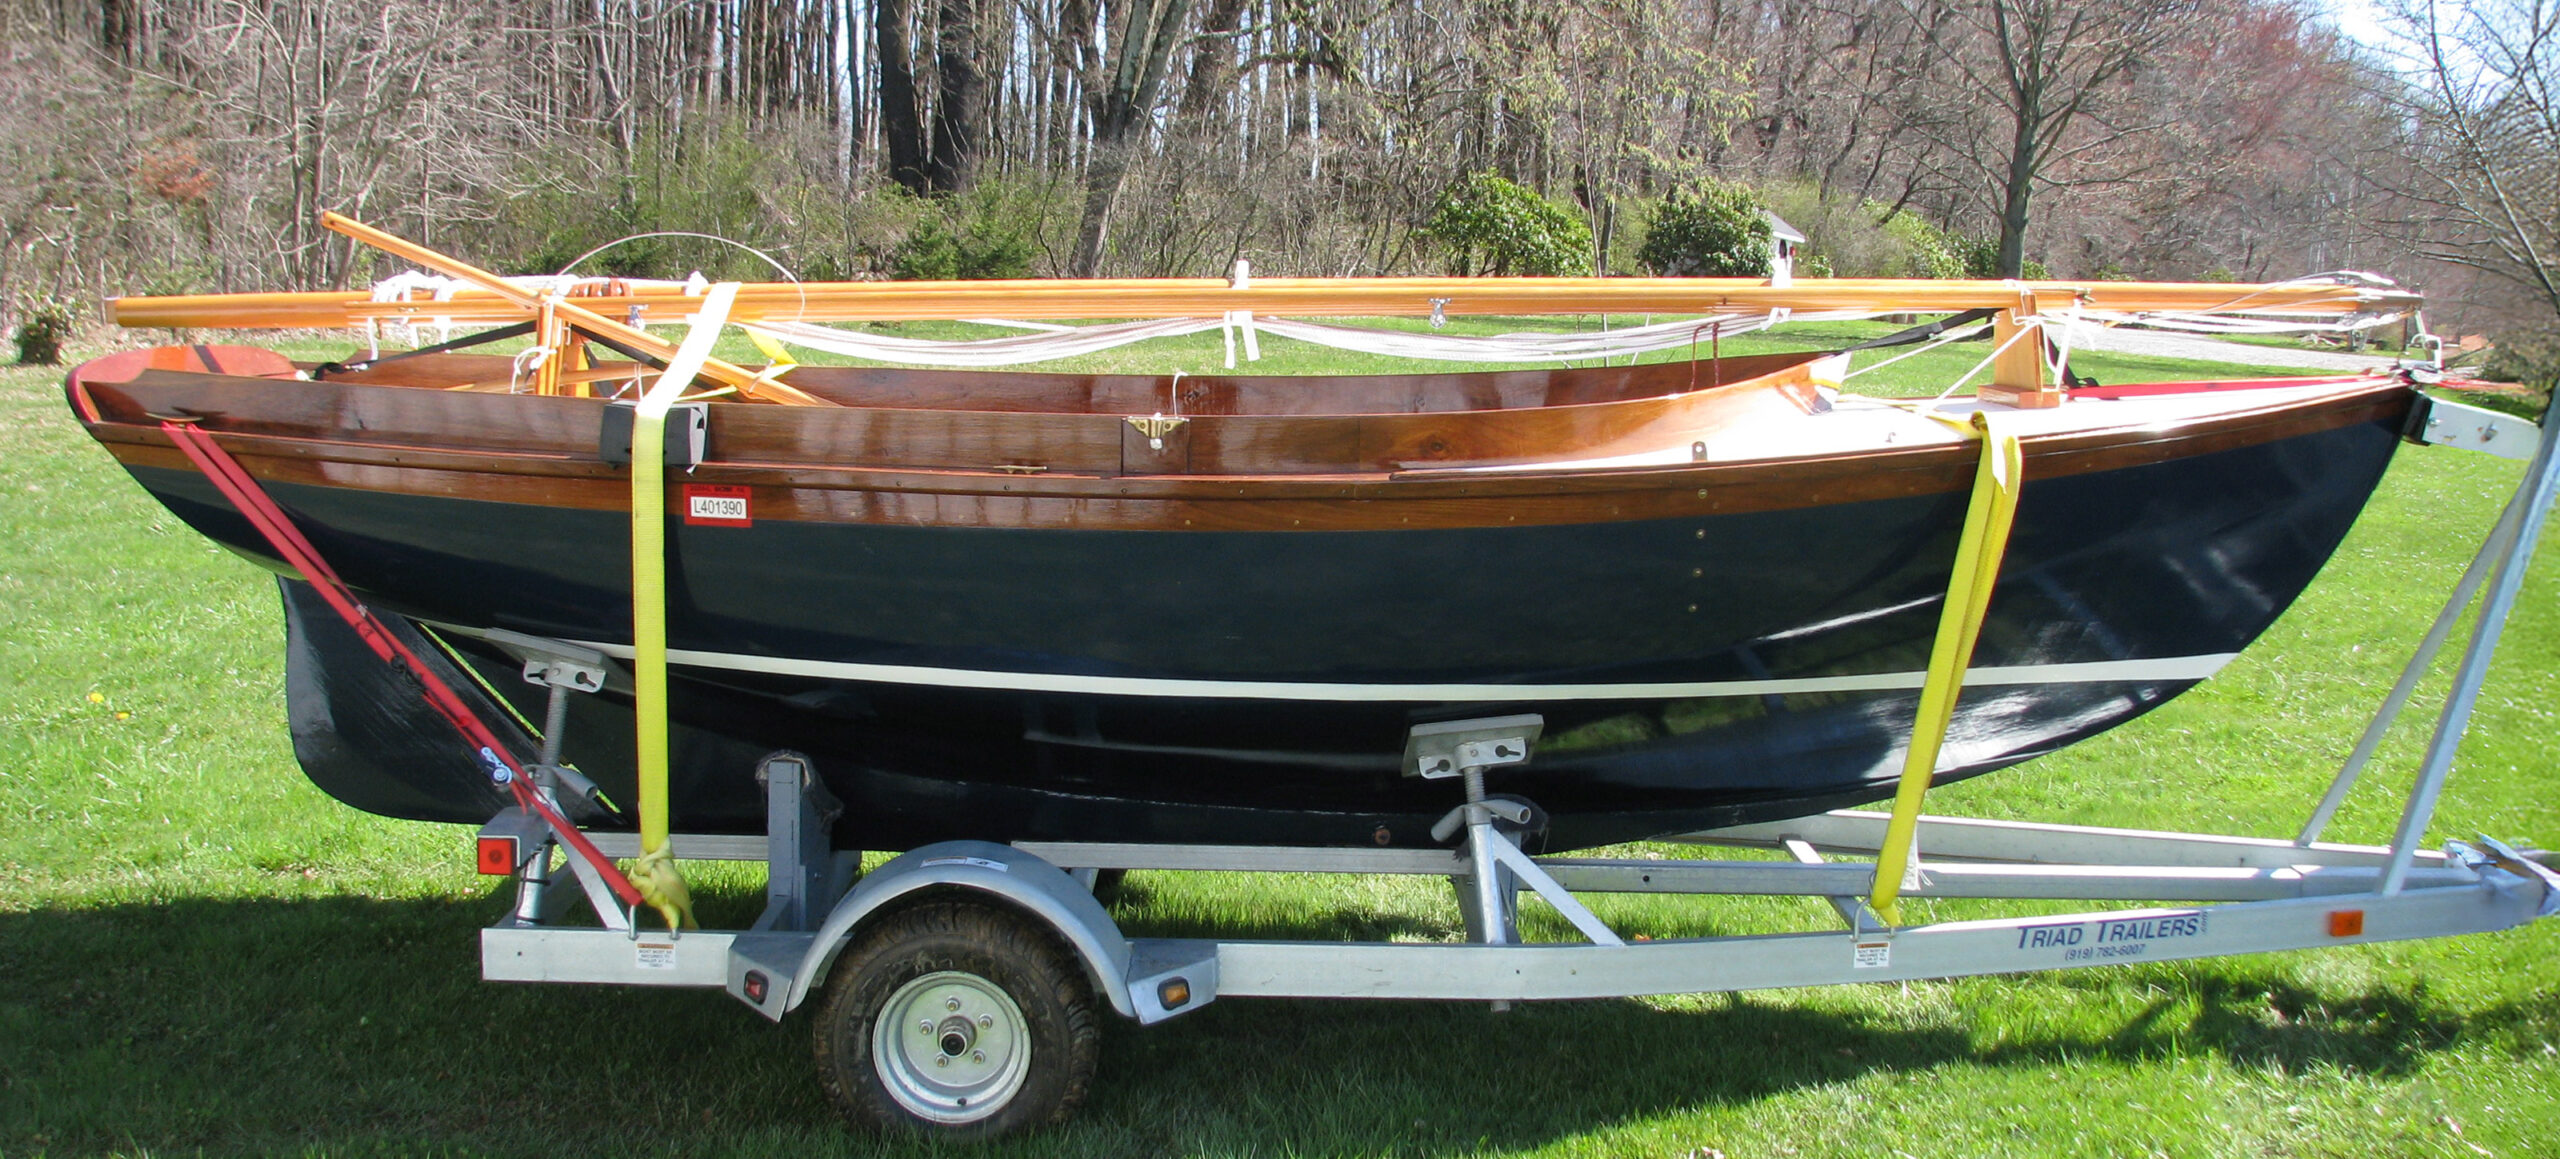
The Wherry’s length of 19′ 10″ does mean that it overhangs an average family car, but its hull weight of 90 lbs makes it suitable for car-topping. A canoe loader/support mounted in the trailer-hitch receiver provides more stability and support for the Wherry than the car’s closely-spaced factory roof racks can.
When searching for a boat to build/assemble, if at all possible, try an example before you write the check. Yes, you can read endlessly, and you should. But the rowing community is out there and often willing to meet up. I have had my boat for seven years and have encouraged many interested people to take it for a spin. CLC understands this. When I was still looking, I stopped by their display at that year’s WoodenBoat Show in Mystic, Connecticut, and they allowed me to “test-drive” several boats. The first few strokes in the harbor and the first slow row out to the drawbridge and back in an Annapolis Wherry sold me. All I needed to do was purchase an Annapolis Wherry Tandem kit, which could be loaded onto my car’s roof rack.
The all-inclusive kit
Unpacking the kit from its neatly arranged 8′-long box was the beginning of discovering a thoughtful design. With the exception of finishes and epoxy, everything is provided. No tools are needed beyond the basics—quite a few 3″ spring clamps, a palm sander, jigsaw, drill, and a flexible Japanese ryoba saw. The construction manual is superb, one of the best pieces of project documentation I have seen. It is a well-written sequenced narrative with useful photos, and lists of parts and materials; its pages are sturdy and spiral-bound. Who wants to refer to a tablet screen in the shop, or shuffle a pile of printed sheets while your warming cup of epoxy is waiting?
The CNC-cut okoume-plywood planks are in three pieces, each ending in a curvy puzzle joint that matches its corresponding mate. These joints are glued together to create the full-length planks and bottom panel. The frames, transom, and forward and after flotation-chamber panels are all cut with extreme precision and include tabs and slots for aligning the bulkheads’ angled joints, tiny holes for copper-wire stitches, and curved profiles. The assembly is straightforward and requires almost no fastenings. The planks, bottom, and transom are stitched together with a hundred or so copper-wire twist-ties—enough for the entire hull. While the original Annapolis Wherry was designed with a skeg and garboards that curve upward to meet the transom, the Tandem’s garboards are “boxed”; that is, they run straight to the stern and twist in their ends to meet each other vertically beneath the transom. The arrangement is self-aligning, adds volume and buoyancy, and gives the hull a tracking ability much like that of a double-ender. A small skeg on the Tandem further enhances the tracking and protects the garboards. The overlapping plank lands are filled, inside and out, with epoxy mixed with wood flour, to create extremely strong bonds when cured. When all the epoxy has cured, the wire ties are snipped away, and below the waterline the hull is sheathed, inside and out, in 6-oz fiberglass cloth and epoxy.
The only design decision that has to be made prior to installing the four structural frames is how you wish to row. While the frames are cut and profiled for specific locations, additional blocks must be installed to accommodate a sliding-seat rig. My wherry, NELI, has a drop-in Piantedosi rowing station (I borrow a second whenever I am joined by a rowing partner) that elegantly attaches to two cleats with two stainless-steel bolts and wingnuts. Many Annapolis Wherry builders opt to construct fixed-seat rowing stations with stretchers. The 119-page manual includes clear narrative and photographs on the steps required to accommodate either sliding-seat rigs or fixed thwarts.
John Carey
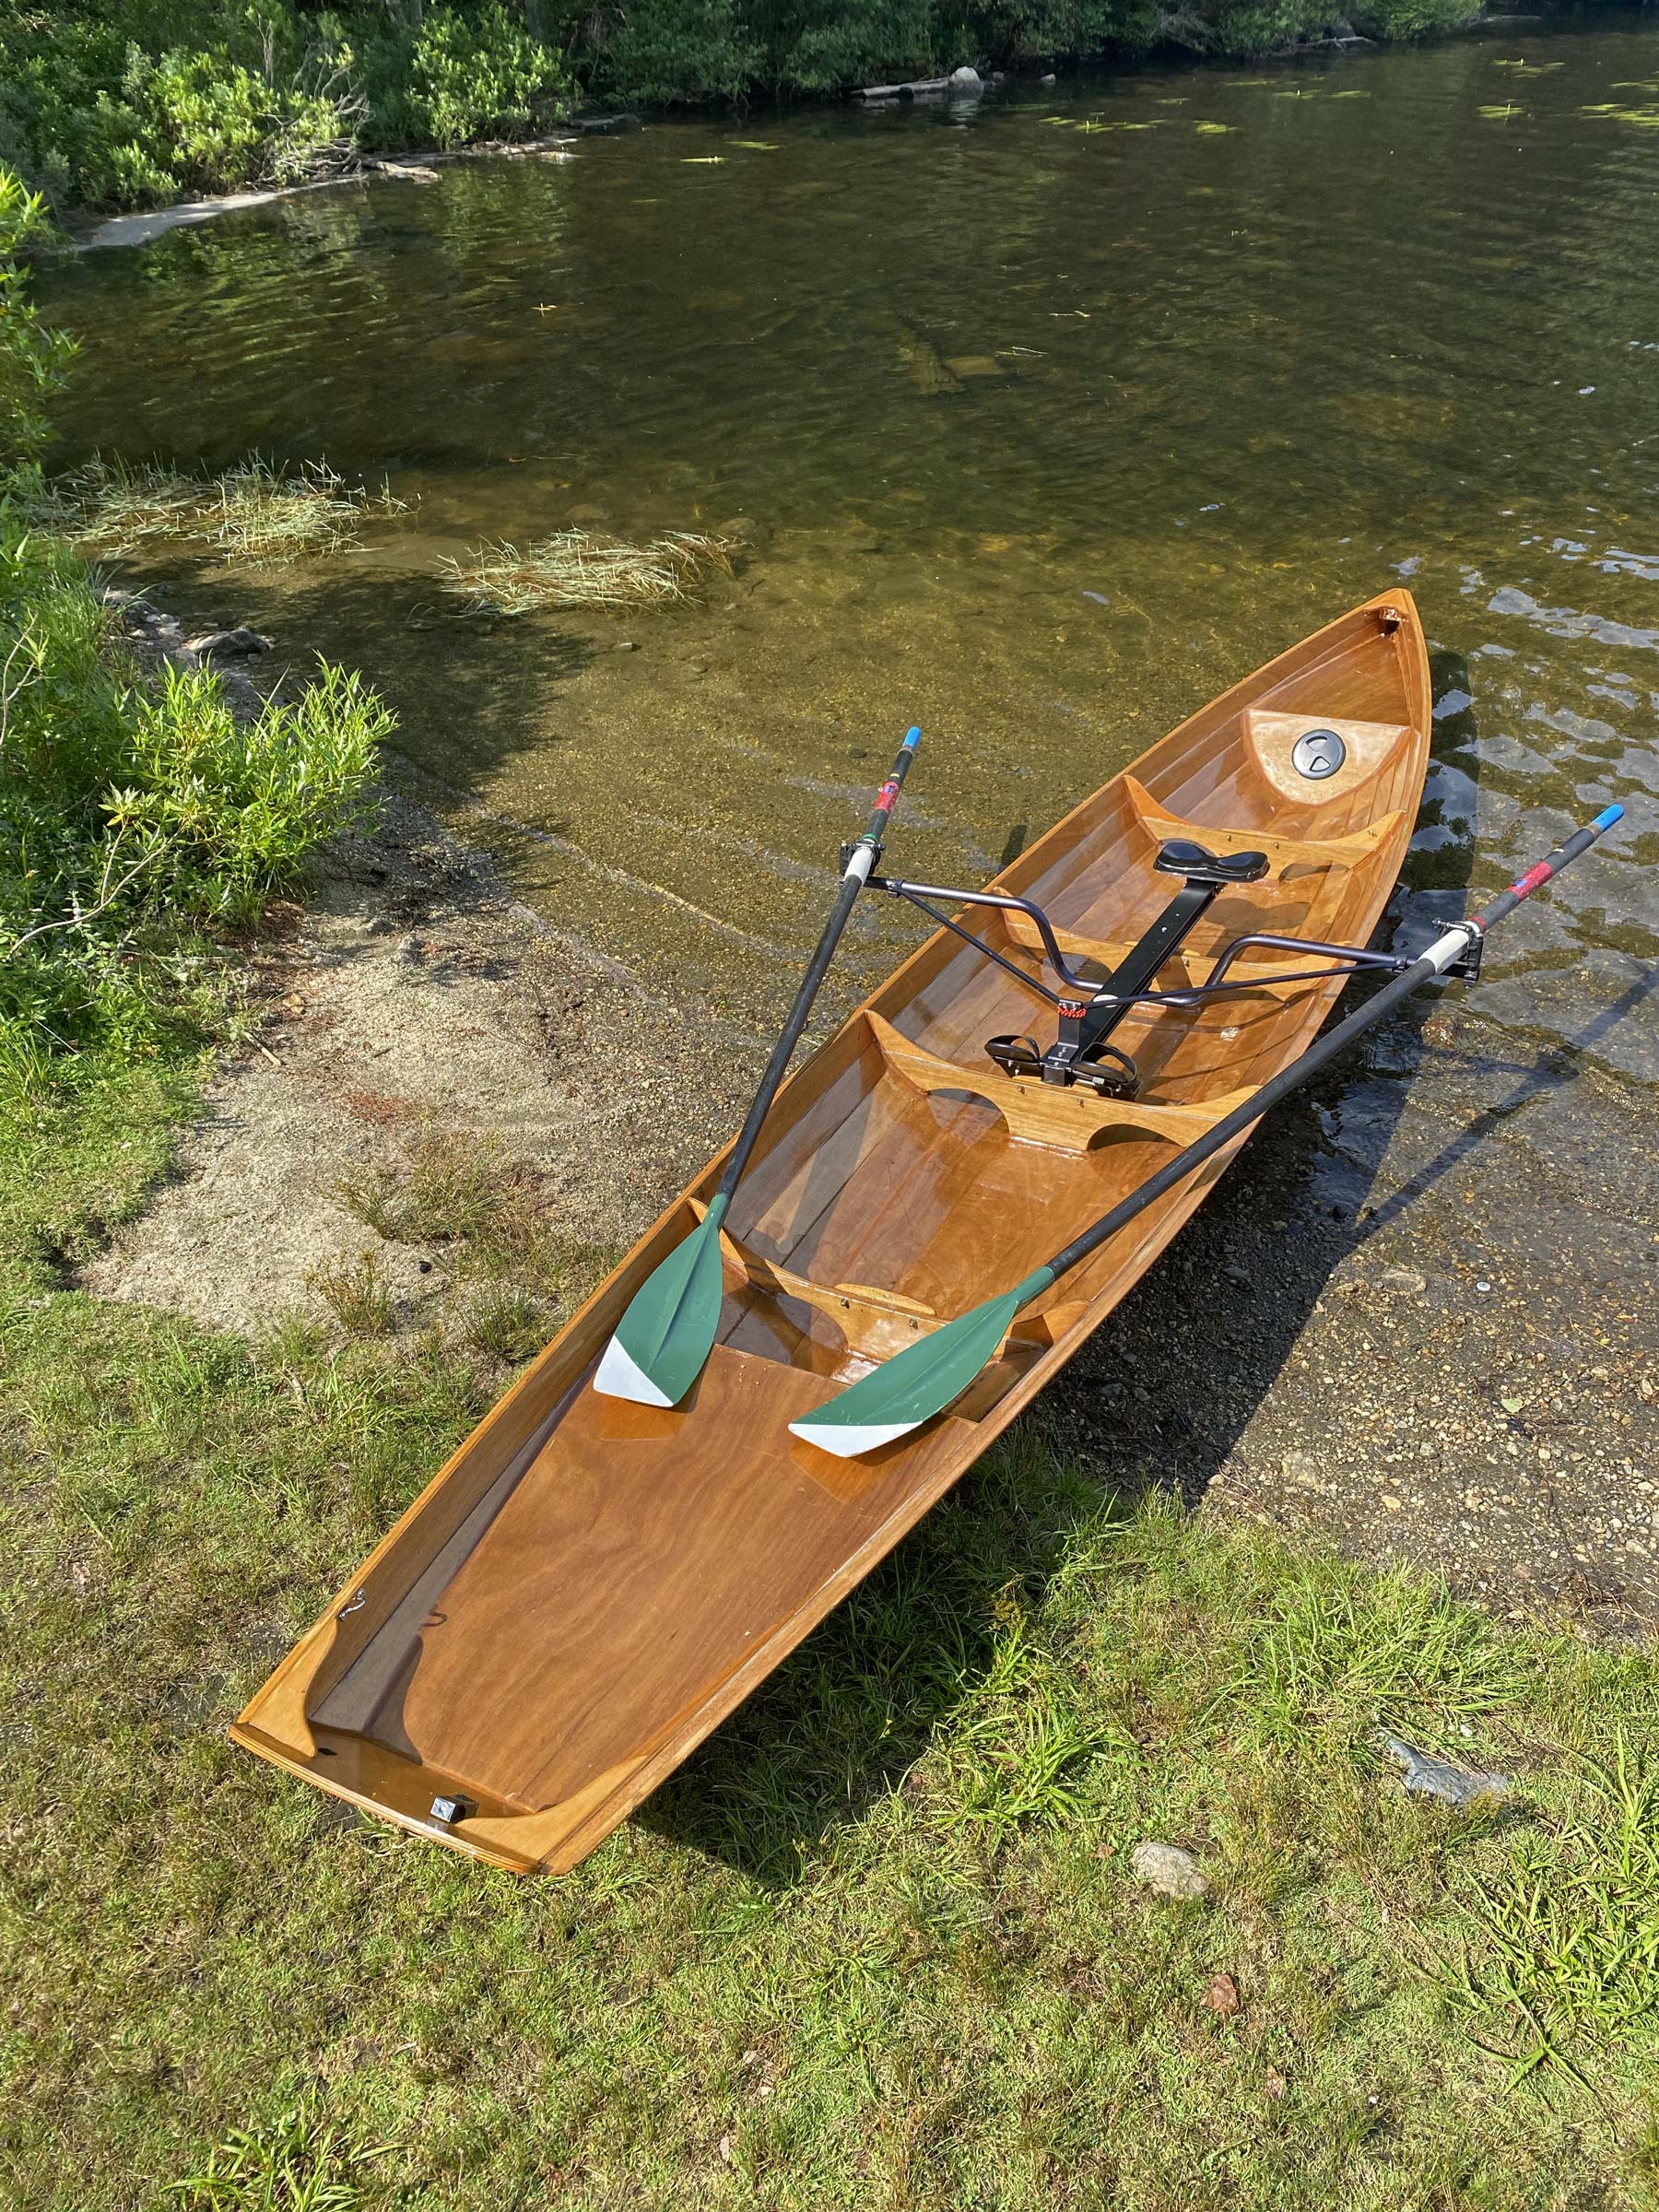
The frames are cut for specific locations, regardless of whether the ultimate use will include fixed-thwart or sliding-seat rowing rigs. An extra block is attached to the forward face of each frame to accommodate the sliding-seat rig. Here, the Tandem Wherry is set up for a single rower. When two are rowing, this rig moves forward to the front two frames and a second is installed between the after two frames.
Closely following the manual and sticking to the described process rewards the builder with a boat ready for finish and hull paint. From unpacking to completion, the assembly took me 58 hours over the course of a month.
Moving the boat from the barn to home strapped to a station-wagon’s roof rack was a harbinger of great things. The bare boat without the Piantedosi drop-in unit weighs 92 lbs. Fully rigged with the unit installed and carrying carbon-fiber Macon-blade sculls, the wherry tips the scales at 114.5 lbs. Though I have carefully balanced and walked the boat on my (padded) head, and rolled it into knee-deep water a number of times, there always seems to be a person around who is glad to put hands on the stern and walk it to the water’s edge with me. CLC also sells a lightweight aluminum Trailex trailer, which is the perfect size for the boat. For now, my aim is cartopping to ponds, rivers, and shorelines, and garage storage on a custom-built wall rack. In my older years, I’ll spring for the trailer and cover.
The Annapolis Wherry in action
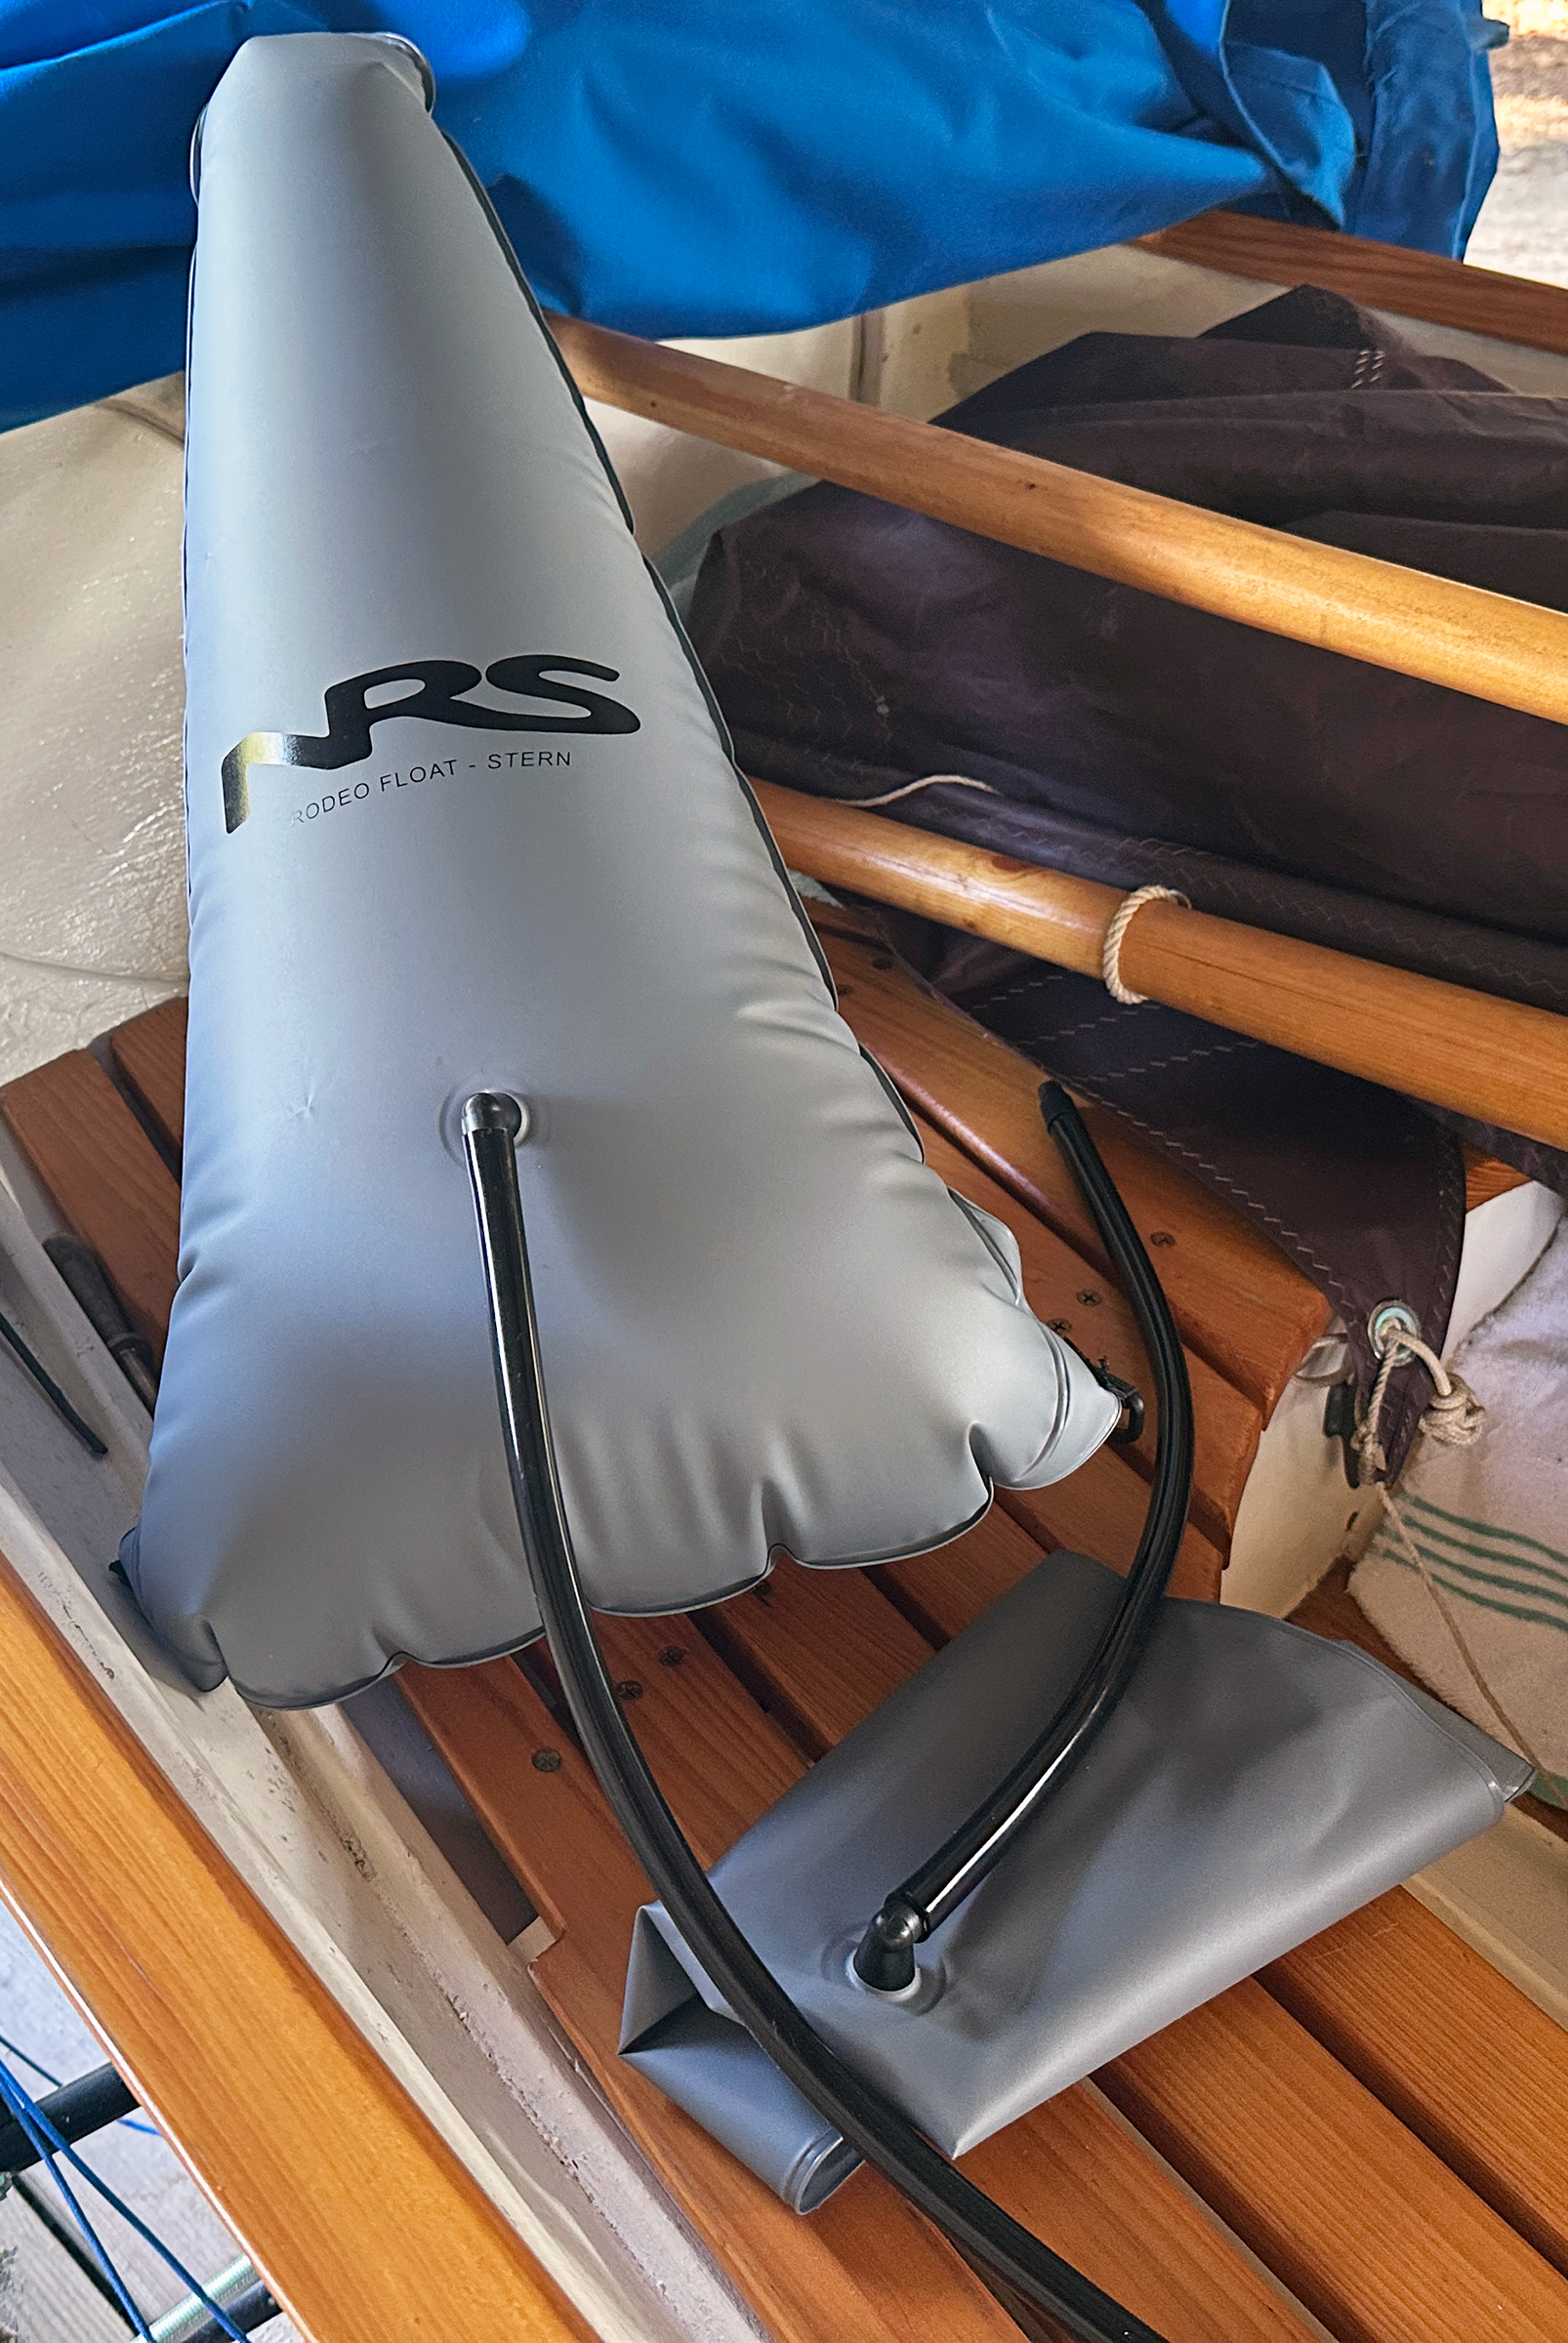
Having built the Wherry as a simple sliding-seat boat for one or two Piantedosi stations, I use the open space in bow and stern to carry gear. A cooler, PFDs, and a small battery-operated bilge pump—useful when rowing in ocean swells—are among the items I’ve carried. The two flotation compartments are large, and I installed a standard round hatch with cover in the bow compartment so I can use it for dry storage of the essentials. A similar hatch could be installed in the stern, but for now I have left it enclosed. Many owners create clever and comfortable passenger setups in the stern—and there is plenty of room to do so.
Robert Englehardt
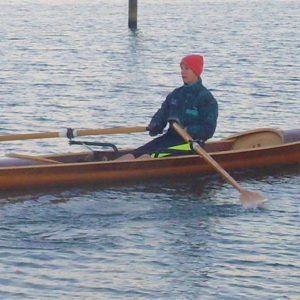
I am 6′ 5″ and weigh more than 200 lbs but have found rowing the Wherry comfortable and stable. While rowing with a smaller partner—as I am here with University of Massachusetts varsity oarsman Luke Shamaly—the Wherry is best trimmed if I row stroke.
At 19′ 10″, the boat has the length to maintain speed without porpoising as the rower’s weight shifts back and forth on the slide. I am 6′ 5″, weigh 207 lbs, and have a long stroke; in shorter rowing boats porpoising has sometimes been an issue. Though I’ve never measured it, I trust CLC’s published cruising speed of 5 to 6 knots. Compared to most sport-sculling or racing shells, the boat is rock steady, requiring no effort to set (or keep on) an even keel during each recovery when the oar blades are not in the water and the hull alone provides the stability. When rowing with a skilled partner, I agree with CLC’s own description: “With two rowers aboard, top speeds are definitely in the ‘racing’ category.” Indeed, I have raced NELI with a partner three times in the 20-mile Blackburn Challenge; each of us weighs more than 200 lbs, and she slips confidently along; her specified carrying capacity is 650 lbs. Our best estimate with this year’s finish time of 3 hours and 20 minutes, was an average speed of 6 knots given the course steered; the conditions were near-perfect. In 2024, the conditions were less than perfect—2′+ swells and an 8-knot breeze—and we had to bail frequently.
Mostly, however, the sharp entry seems to help the boat track its course, and the flare in the bow knocks away spray. The boxed garboard and wooden skeg are adequate for tracking.
Robert Englehardt
The Wherry’s sharp entry assists with its tracking, while the flare in the bow deflects spray away from the boat in most conditions. When rowing through 2′ swells and into a headway—far from optimal conditions—my partner and I did need to bail.
With a bright-white hull and varnished interior, gunwales, and breasthook, the Annapolis Wherry Tandem is a head-turner. From astern, abeam, on the water, or dragged up on a beach, complimentary commentary from strangers is a constant. The functional beauty of a gentle and traditional sheer above a lapstrake hull takes the mind and heart somewhere else. “Just look at it,” said a passerby recently. With time and space, perhaps a partner to work with, some drive, and a little courage for the first-timer (like me), you, too, can assemble a truly fine boat.
John Carey has rowed competitively and recreationally for 38 years, coaching high school and college crews. He is an educator at a technical high school in western Massachusetts and was inspired by his students to build his first boat.
The Annapolis Wherry Tandem complete kit from Chesapeake Light Craft is $1,935; plans and manual are $139.
For information on the Annapolis Wherry Solo, go to The Annapolis Wherry by Mike O’Brien.
Is there a boat you’d like to know more about? Have you built one that you think other Small Boats readers would enjoy? Please email us your suggestions.
To build a boat is truly a breathtaking achievement, mastered by a special breed of people. But when I reached the point in life when I wanted to “build” my own boat, I quickly seized upon the benefits of innovation and the technology of precision-cut CNC components brought together by epoxy and the stitch-and-glue process. I would assemble a boat rather than build one.
After months of intermittent reading and ruminating, I settled on the Chesapeake Light Craft (CLC) Annapolis Wherry Tandem. The boat can be used for fixed- or sliding-seat rowing, can accommodate a single rower or two, and is beautiful in all respects. The design is based on the 19th-century working livery wherries of England’s River Thames, and the folks at CLC produce CNC-cut planks of marine-grade plywood to echo the originals’ lapstrake hulls. CLC’s interpretation is a safe and swift boat in which to stay fit on the water, and to carry a passenger for the day or gear for a week. CLC’s owner and designer, John Harris, has refined the wherry design into a true masterpiece of precision parts ready for assembly.
John Carey
The Wherry’s length of 19′ 10″ does mean that it overhangs an average family car, but its hull weight of 90 lbs makes it suitable for car-topping. A canoe loader/support mounted in the trailer-hitch receiver provides more stability and support for the Wherry than the car’s closely-spaced factory roof racks can.
When searching for a boat to build/assemble, if at all possible, try an example before you write the check. Yes, you can read endlessly, and you should. But the rowing community is out there and often willing to meet up. I have had my boat for seven years and have encouraged many interested people to take it for a spin. CLC understands this. When I was still looking, I stopped by their display at that year’s WoodenBoat Show in Mystic, Connecticut, and they allowed me to “test-drive” several boats. The first few strokes in the harbor and the first slow row out to the drawbridge and back in an Annapolis Wherry sold me. All I needed to do was purchase an Annapolis Wherry Tandem kit, which could be loaded onto my car’s roof rack.
The all-inclusive kit
Unpacking the kit from its neatly arranged 8′-long box was the beginning of discovering a thoughtful design. With the exception of finishes and epoxy, everything is provided. No tools are needed beyond the basics—quite a few 3″ spring clamps, a palm sander, jigsaw, drill, and a flexible Japanese ryoba saw. The construction manual is superb, one of the best pieces of project documentation I have seen. It is a well-written sequenced narrative with useful photos, and lists of parts and materials; its pages are sturdy and spiral-bound. Who wants to refer to a tablet screen in the shop, or shuffle a pile of printed sheets while your warming cup of epoxy is waiting?
The CNC-cut okoume-plywood planks are in three pieces, each ending in a curvy puzzle joint that matches its corresponding mate. These joints are glued together to create the full-length planks and bottom panel. The frames, transom, and forward and after flotation-chamber panels are all cut with extreme precision and include tabs and slots for aligning the bulkheads’ angled joints, tiny holes for copper-wire stitches, and curved profiles. The assembly is straightforward and requires almost no fastenings. The planks, bottom, and transom are stitched together with a hundred or so copper-wire twist-ties—enough for the entire hull. While the original Annapolis Wherry was designed with a skeg and garboards that curve upward to meet the transom, the Tandem’s garboards are “boxed”; that is, they run straight to the stern and twist in their ends to meet each other vertically beneath the transom. The arrangement is self-aligning, adds volume and buoyancy, and gives the hull a tracking ability much like that of a double-ender. A small skeg on the Tandem further enhances the tracking and protects the garboards. The overlapping plank lands are filled, inside and out, with epoxy mixed with wood flour, to create extremely strong bonds when cured. When all the epoxy has cured, the wire ties are snipped away, and below the waterline the hull is sheathed, inside and out, in 6-oz fiberglass cloth and epoxy.
The only design decision that has to be made prior to installing the four structural frames is how you wish to row. While the frames are cut and profiled for specific locations, additional blocks must be installed to accommodate a sliding-seat rig. My wherry, NELI, has a drop-in Piantedosi rowing station (I borrow a second whenever I am joined by a rowing partner) that elegantly attaches to two cleats with two stainless-steel bolts and wingnuts. Many Annapolis Wherry builders opt to construct fixed-seat rowing stations with stretchers. The 119-page manual includes clear narrative and photographs on the steps required to accommodate either sliding-seat rigs or fixed thwarts.
John Carey
The frames are cut for specific locations, regardless of whether the ultimate use will include fixed-thwart or sliding-seat rowing rigs. An extra block is attached to the forward face of each frame to accommodate the sliding-seat rig. Here, the Tandem Wherry is set up for a single rower. When two are rowing, this rig moves forward to the front two frames and a second is installed between the after two frames.
Closely following the manual and sticking to the described process rewards the builder with a boat ready for finish and hull paint. From unpacking to completion, the assembly took me 58 hours over the course of a month.
Moving the boat from the barn to home strapped to a station-wagon’s roof rack was a harbinger of great things. The bare boat without the Piantedosi drop-in unit weighs 92 lbs. Fully rigged with the unit installed and carrying carbon-fiber Macon-blade sculls, the wherry tips the scales at 114.5 lbs. Though I have carefully balanced and walked the boat on my (padded) head, and rolled it into knee-deep water a number of times, there always seems to be a person around who is glad to put hands on the stern and walk it to the water’s edge with me. CLC also sells a lightweight aluminum Trailex trailer, which is the perfect size for the boat. For now, my aim is cartopping to ponds, rivers, and shorelines, and garage storage on a custom-built wall rack. In my older years, I’ll spring for the trailer and cover.
The Annapolis Wherry in action
Having built the Wherry as a simple sliding-seat boat for one or two Piantedosi stations, I use the open space in bow and stern to carry gear. A cooler, PFDs, and a small battery-operated bilge pump—useful when rowing in ocean swells—are among the items I’ve carried. The two flotation compartments are large, and I installed a standard round hatch with cover in the bow compartment so I can use it for dry storage of the essentials. A similar hatch could be installed in the stern, but for now I have left it enclosed. Many owners create clever and comfortable passenger setups in the stern—and there is plenty of room to do so.
Robert Englehardt
I am 6′ 5″ and weigh more than 200 lbs but have found rowing the Wherry comfortable and stable. While rowing with a smaller partner—as I am here with University of Massachusetts varsity oarsman Luke Shamaly—the Wherry is best trimmed if I row stroke.
At 19′ 10″, the boat has the length to maintain speed without porpoising as the rower’s weight shifts back and forth on the slide. I am 6′ 5″, weigh 207 lbs, and have a long stroke; in shorter rowing boats porpoising has sometimes been an issue. Though I’ve never measured it, I trust CLC’s published cruising speed of 5 to 6 knots. Compared to most sport-sculling or racing shells, the boat is rock steady, requiring no effort to set (or keep on) an even keel during each recovery when the oar blades are not in the water and the hull alone provides the stability. When rowing with a skilled partner, I agree with CLC’s own description: “With two rowers aboard, top speeds are definitely in the ‘racing’ category.” Indeed, I have raced NELI with a partner three times in the 20-mile Blackburn Challenge; each of us weighs more than 200 lbs, and she slips confidently along; her specified carrying capacity is 650 lbs. Our best estimate with this year’s finish time of 3 hours and 20 minutes, was an average speed of 6 knots given the course steered; the conditions were near-perfect. In 2024, the conditions were less than perfect—2′+ swells and an 8-knot breeze—and we had to bail frequently.
Mostly, however, the sharp entry seems to help the boat track its course, and the flare in the bow knocks away spray. The boxed garboard and wooden skeg are adequate for tracking.
Robert Englehardt
The Wherry’s sharp entry assists with its tracking, while the flare in the bow deflects spray away from the boat in most conditions. When rowing through 2′ swells and into a headway—far from optimal conditions—my partner and I did need to bail.
With a bright-white hull and varnished interior, gunwales, and breasthook, the Annapolis Wherry Tandem is a head-turner. From astern, abeam, on the water, or dragged up on a beach, complimentary commentary from strangers is a constant. The functional beauty of a gentle and traditional sheer above a lapstrake hull takes the mind and heart somewhere else. “Just look at it,” said a passerby recently. With time and space, perhaps a partner to work with, some drive, and a little courage for the first-timer (like me), you, too, can assemble a truly fine boat.
John Carey has rowed competitively and recreationally for 38 years, coaching high school and college crews. He is an educator at a technical high school in western Massachusetts and was inspired by his students to build his first boat.
The Annapolis Wherry Tandem complete kit from Chesapeake Light Craft is $1,935; plans and manual are $139.
For information on the Annapolis Wherry Solo, go to The Annapolis Wherry by Mike O’Brien.
Is there a boat you’d like to know more about? Have you built one that you think other Small Boats readers would enjoy? Please email us your suggestions.
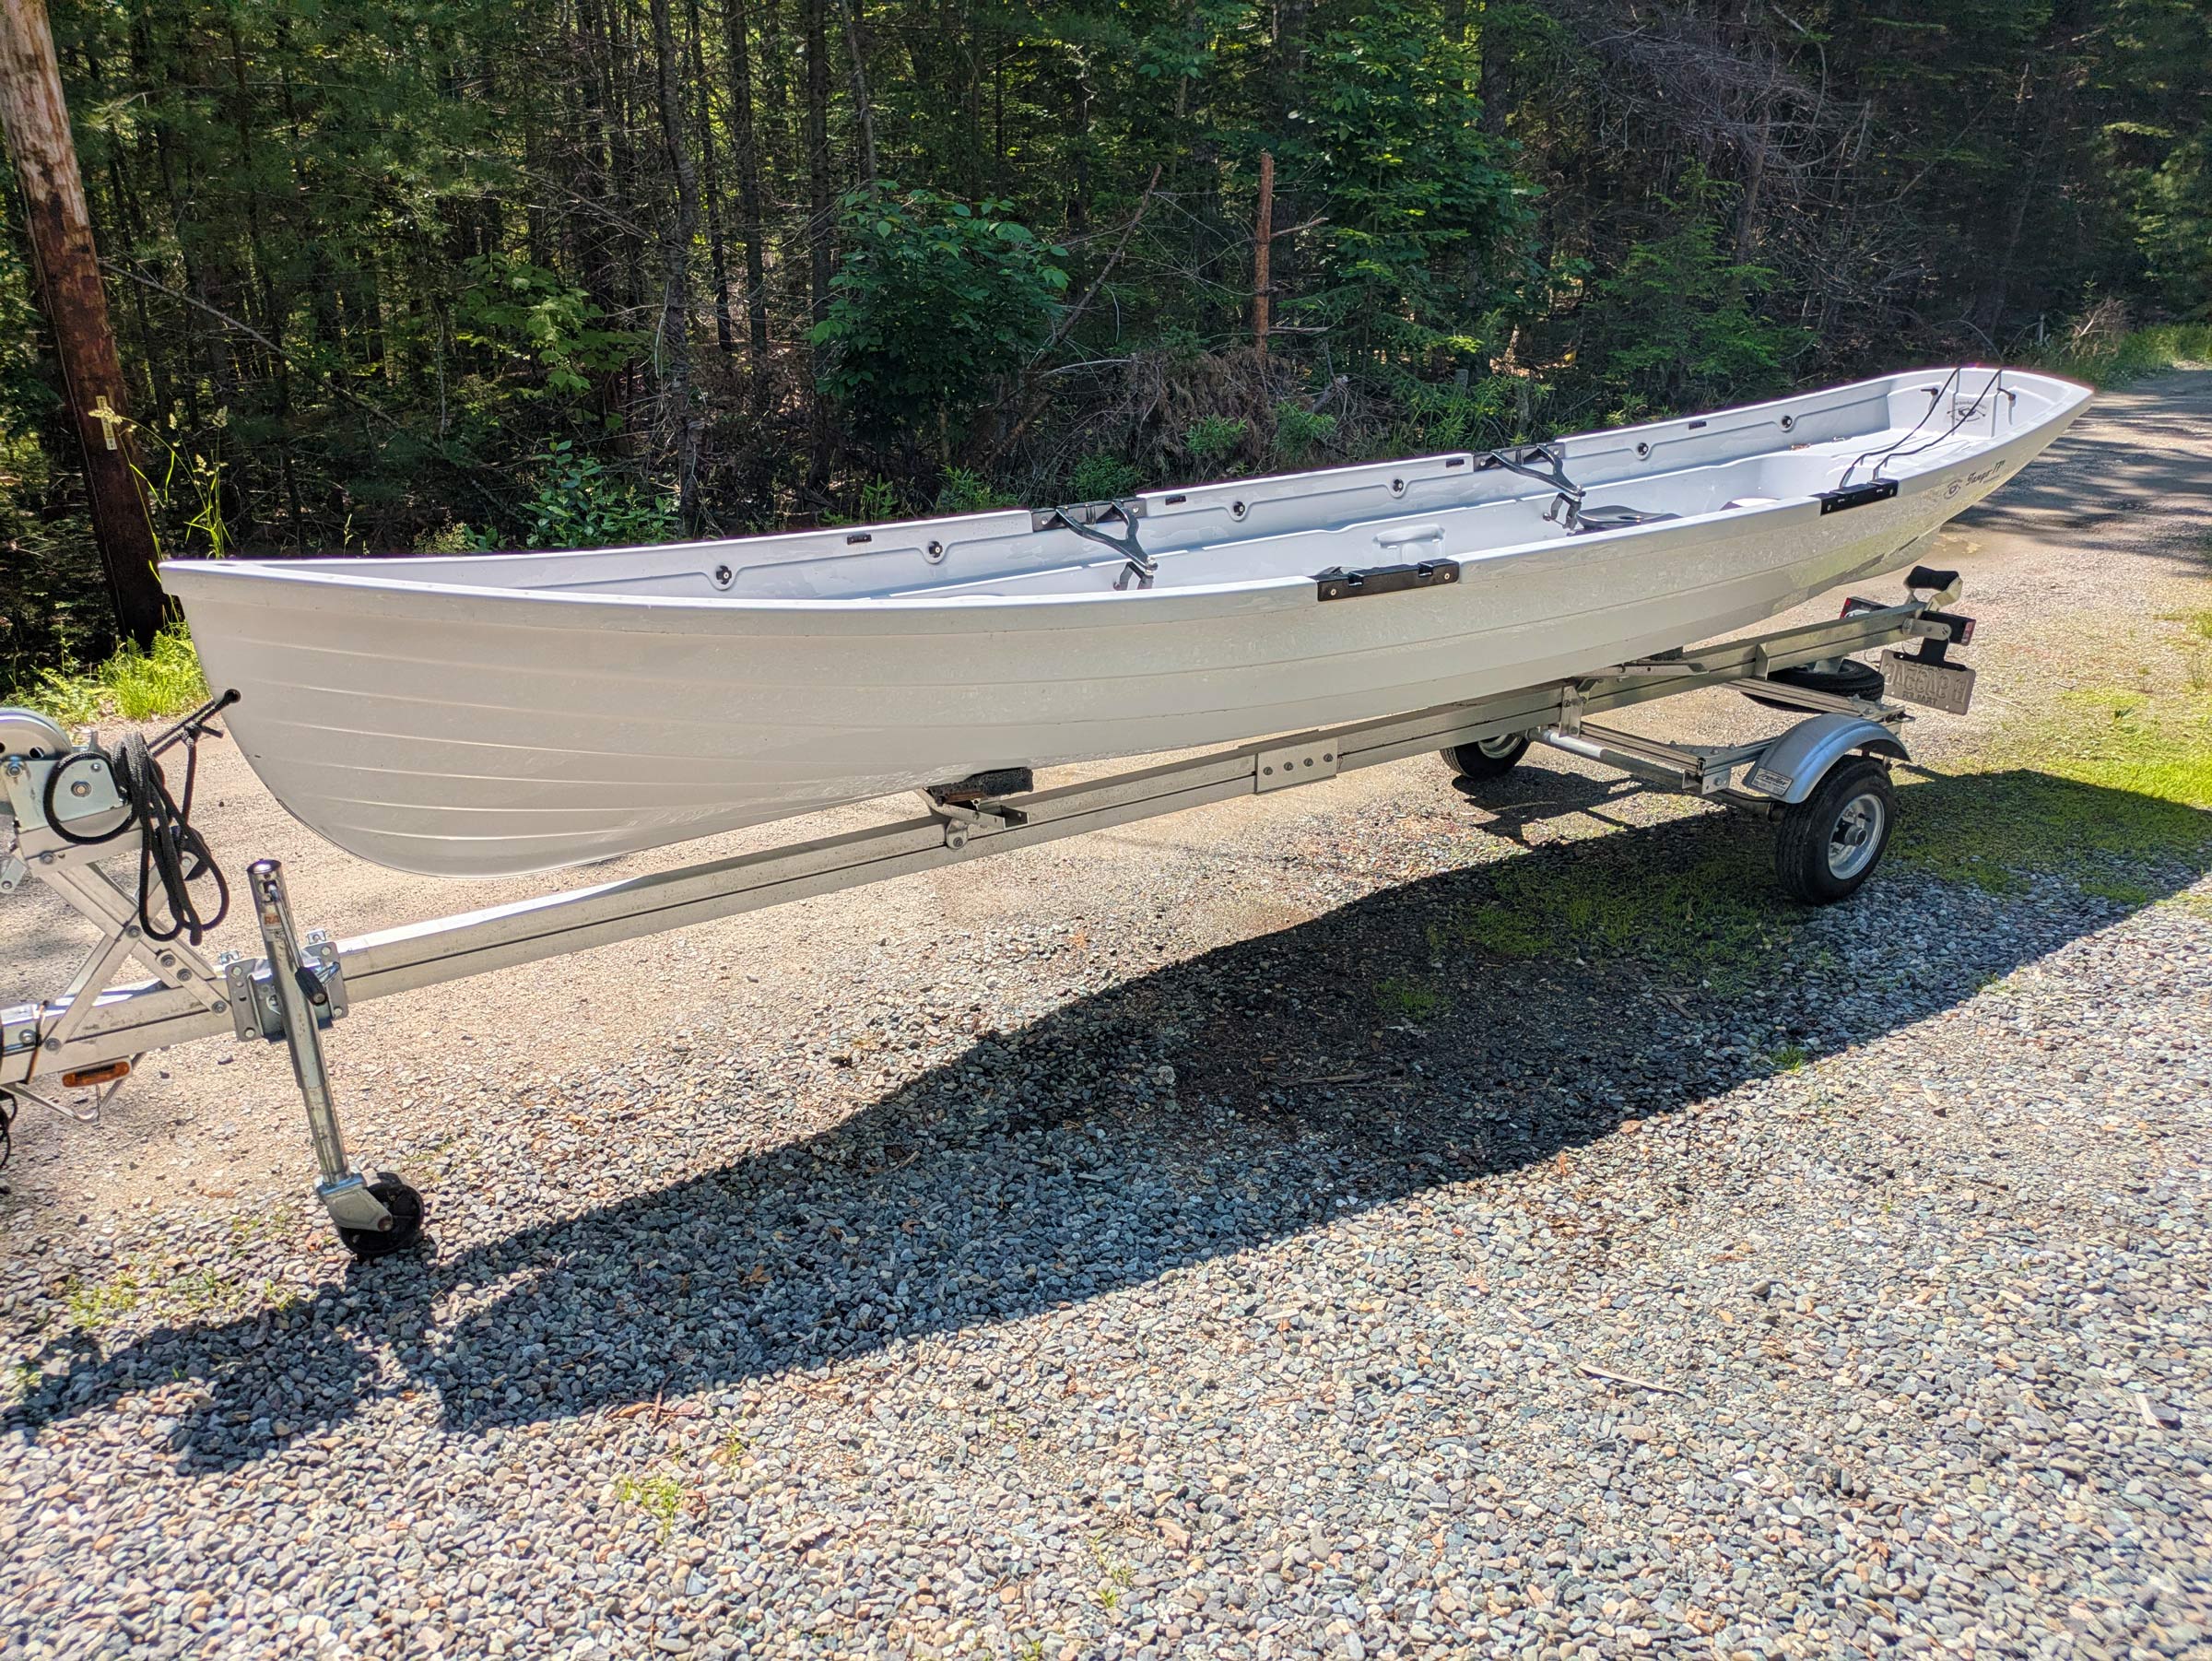
As a sail-training boat, the Turnabout/N-10 has not had the success of, say, the Optimist. The 9′ 8″ cat-rigged dinghy was once a staple of junior programs in yacht clubs along the New England coast and on lakes of the Northeast, but there are, today, just a handful of clubs that still support a fleet. Yet, at those clubs, the Turnabout/N-10 is loved and cherished for what it is: a safe training boat that offers a good grounding in techniques and an excellent means of fostering the joys of social sailing. About 10 years ago, when chatting with John Hanson, the founder of Maine Boats Homes and Harbors magazine, I mentioned that my new-to-sailing daughter was embarking on her first full season in a Turnabout. He sighed with an obvious longing for simpler days. “You know,” he reminisced, “I met one of my best friends sailing Turnabouts as a kid. We shared what seemed like endless summer days laughing at crude jokes and armpit farts, and somewhere along the way, without realizing it was happening, we learned to sail.” As praise for a kid’s boat, that’s hard to beat.
Photographs by the author
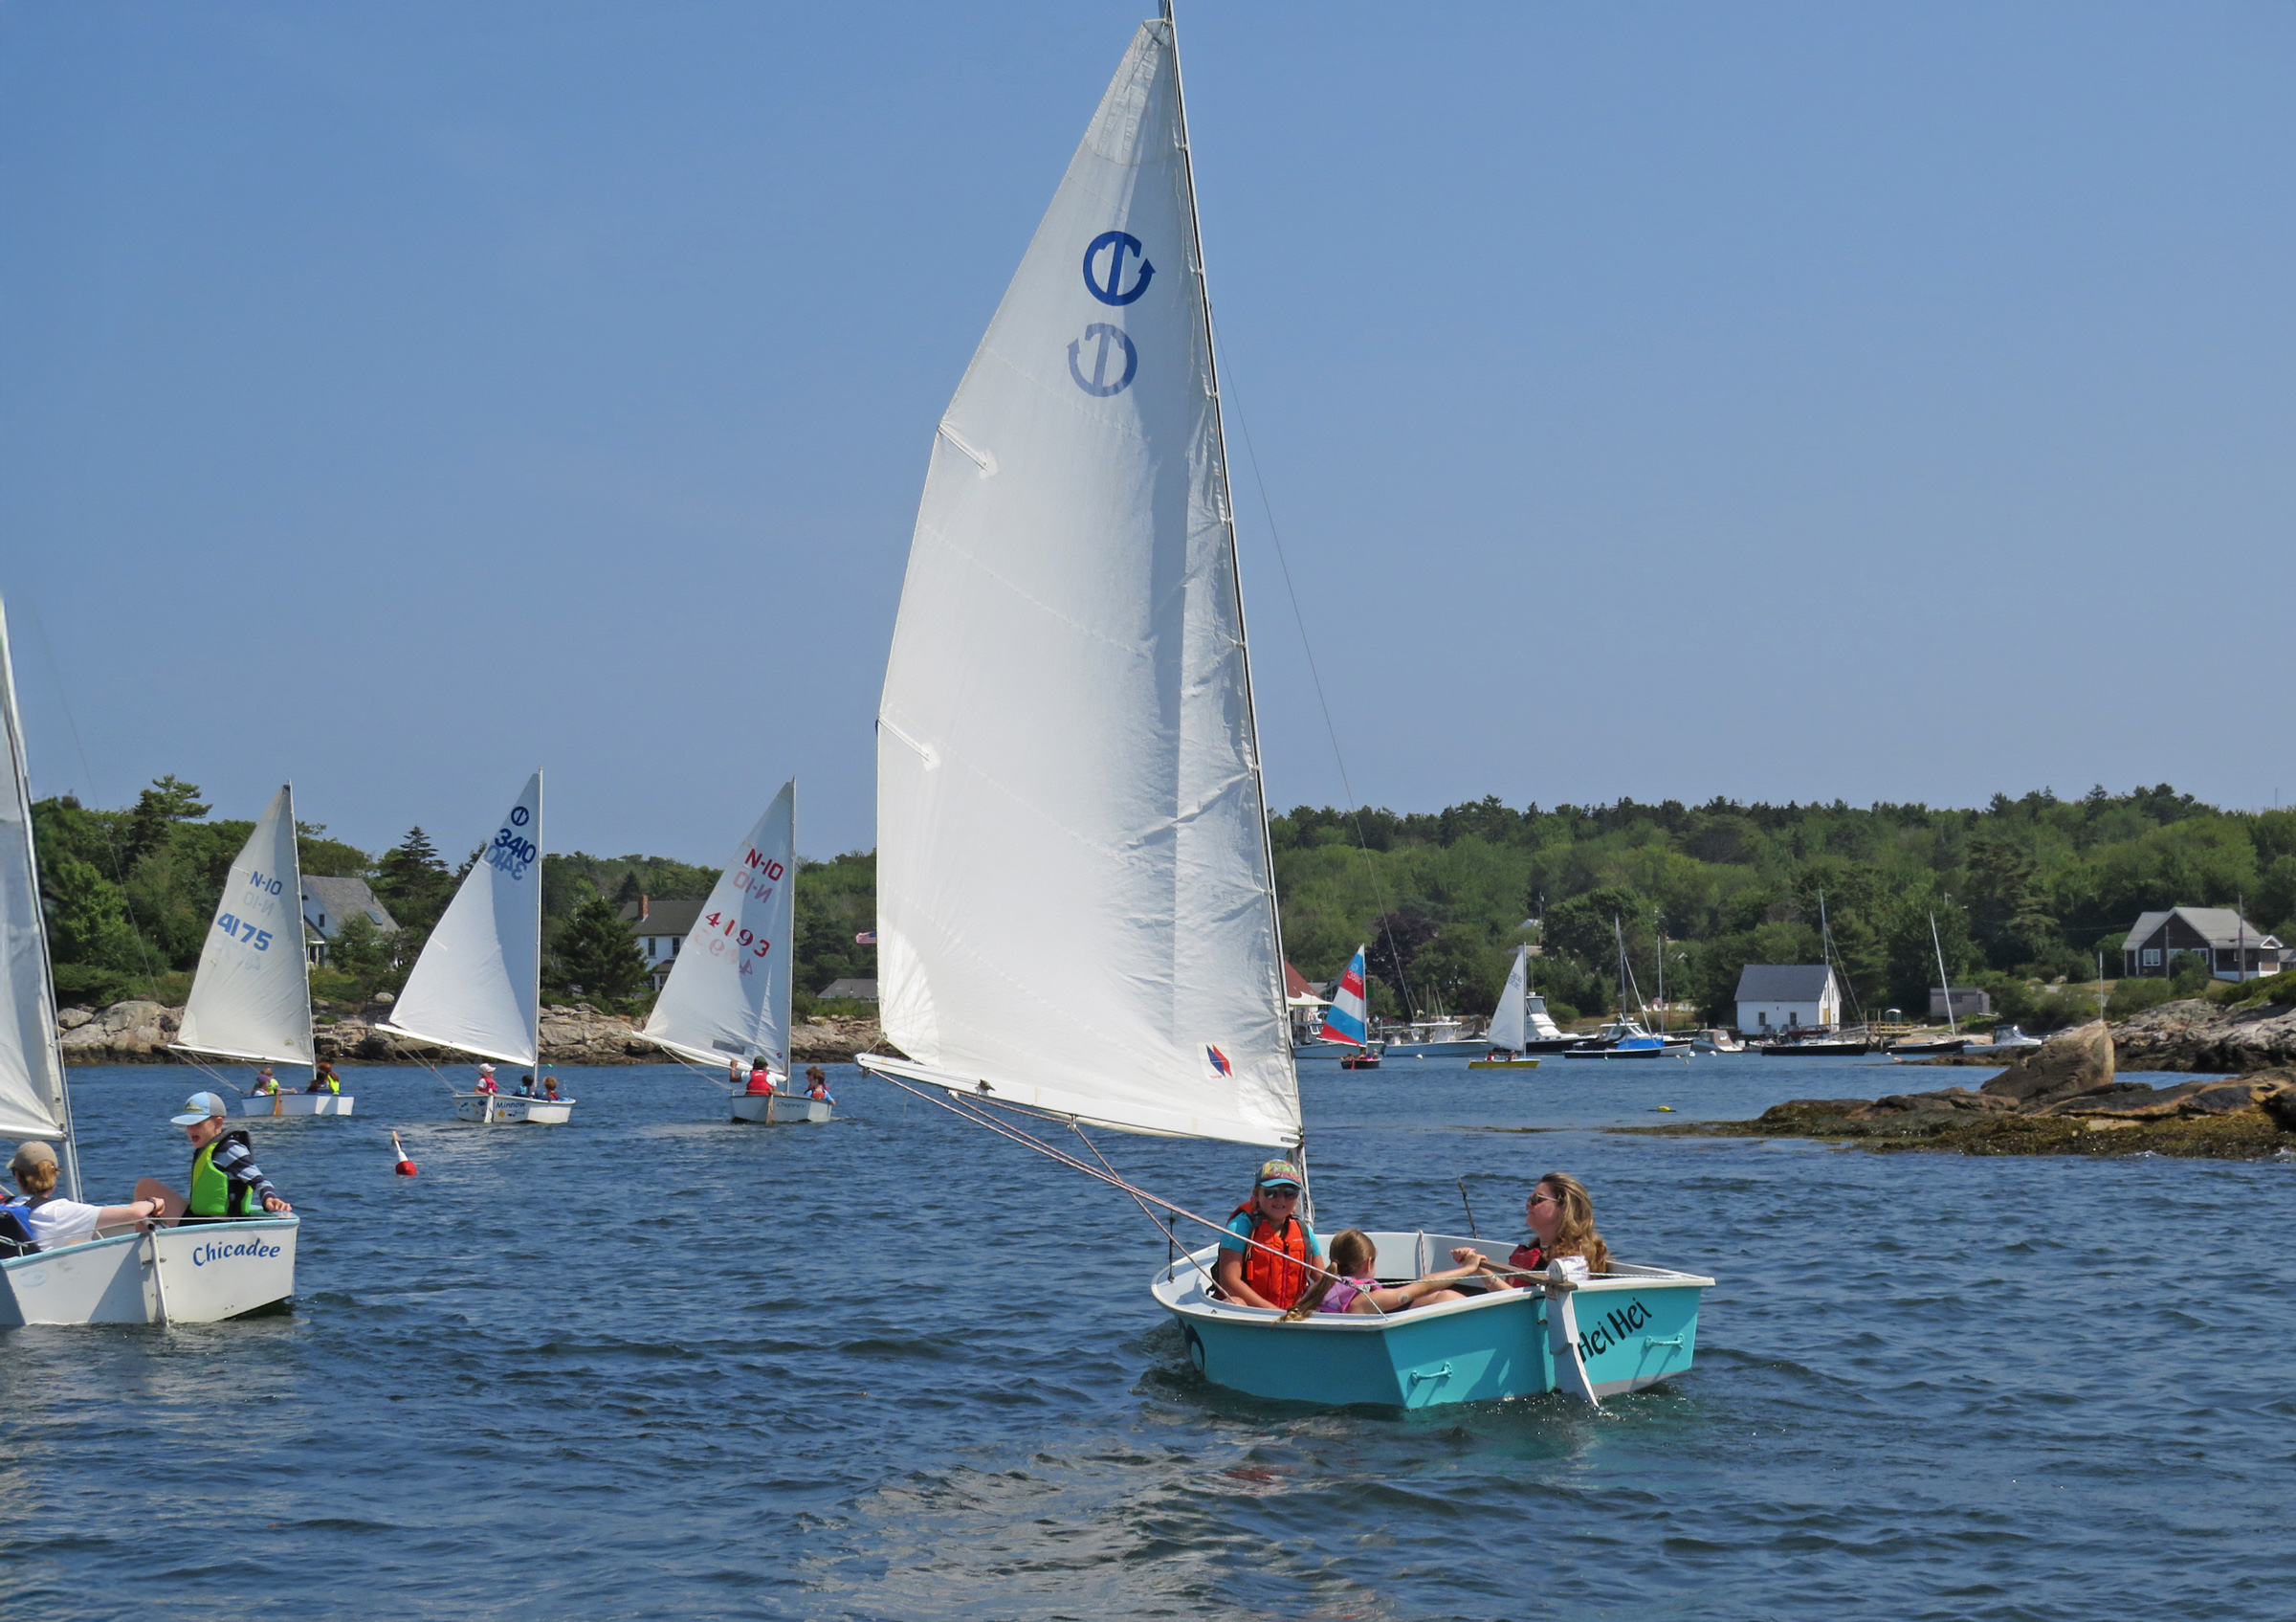
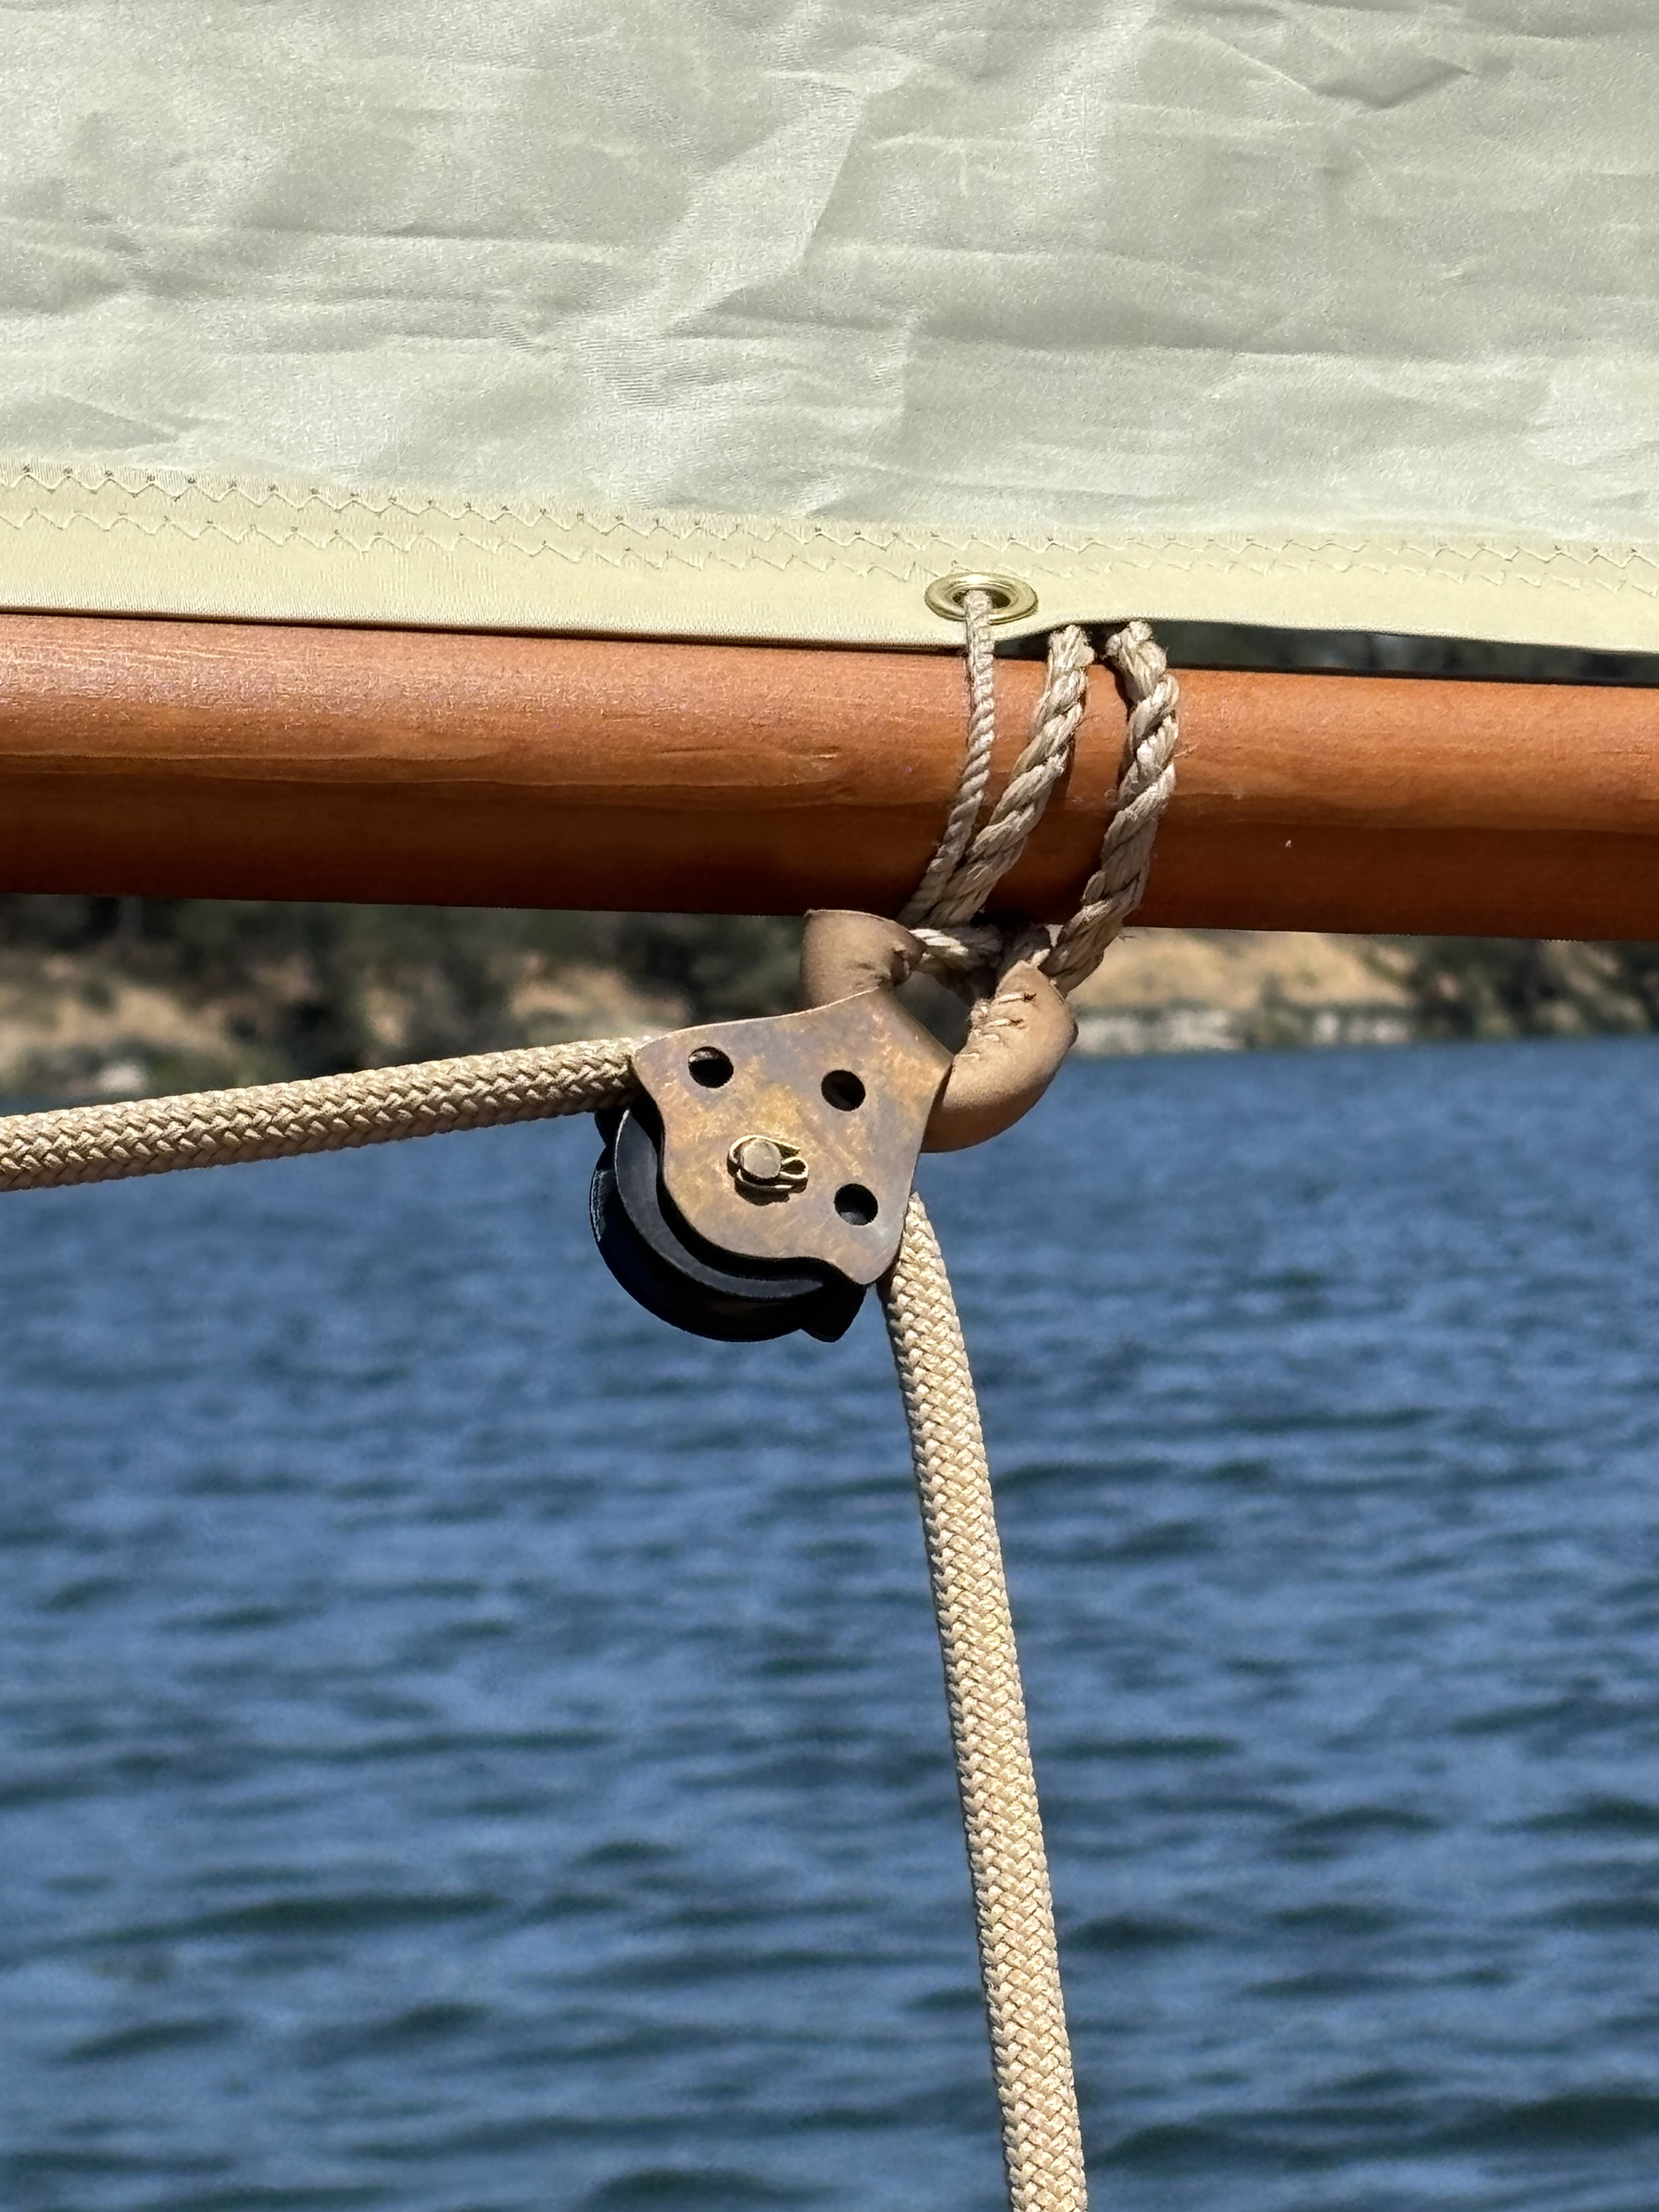
With a newer, well-trimmed sail, the N-10 is quite close-winded, although it never pays to over-sheet the mainsail; keeping the boom just over the inside of the stern quarter is optimal.
The Origins of the Turnabout
The Turnabout was designed, and originally built, in about 1950 by Harold Turner of Parker River, Massachusetts, and was adopted as a class by the Ipswich Bay Yacht Club whose members were seeking a new training boat that could cope with strong tidal currents and often choppy seas. Turner’s cat-rigged boat was constructed of plywood, fastened with nails and glue. The class suited Ipswich Bay well and before long it had spread to other clubs and programs along the east coast. By the mid-1960s, Turner’s boatyard had built more than 2,000 of the dinghies, some of which are still in commission.
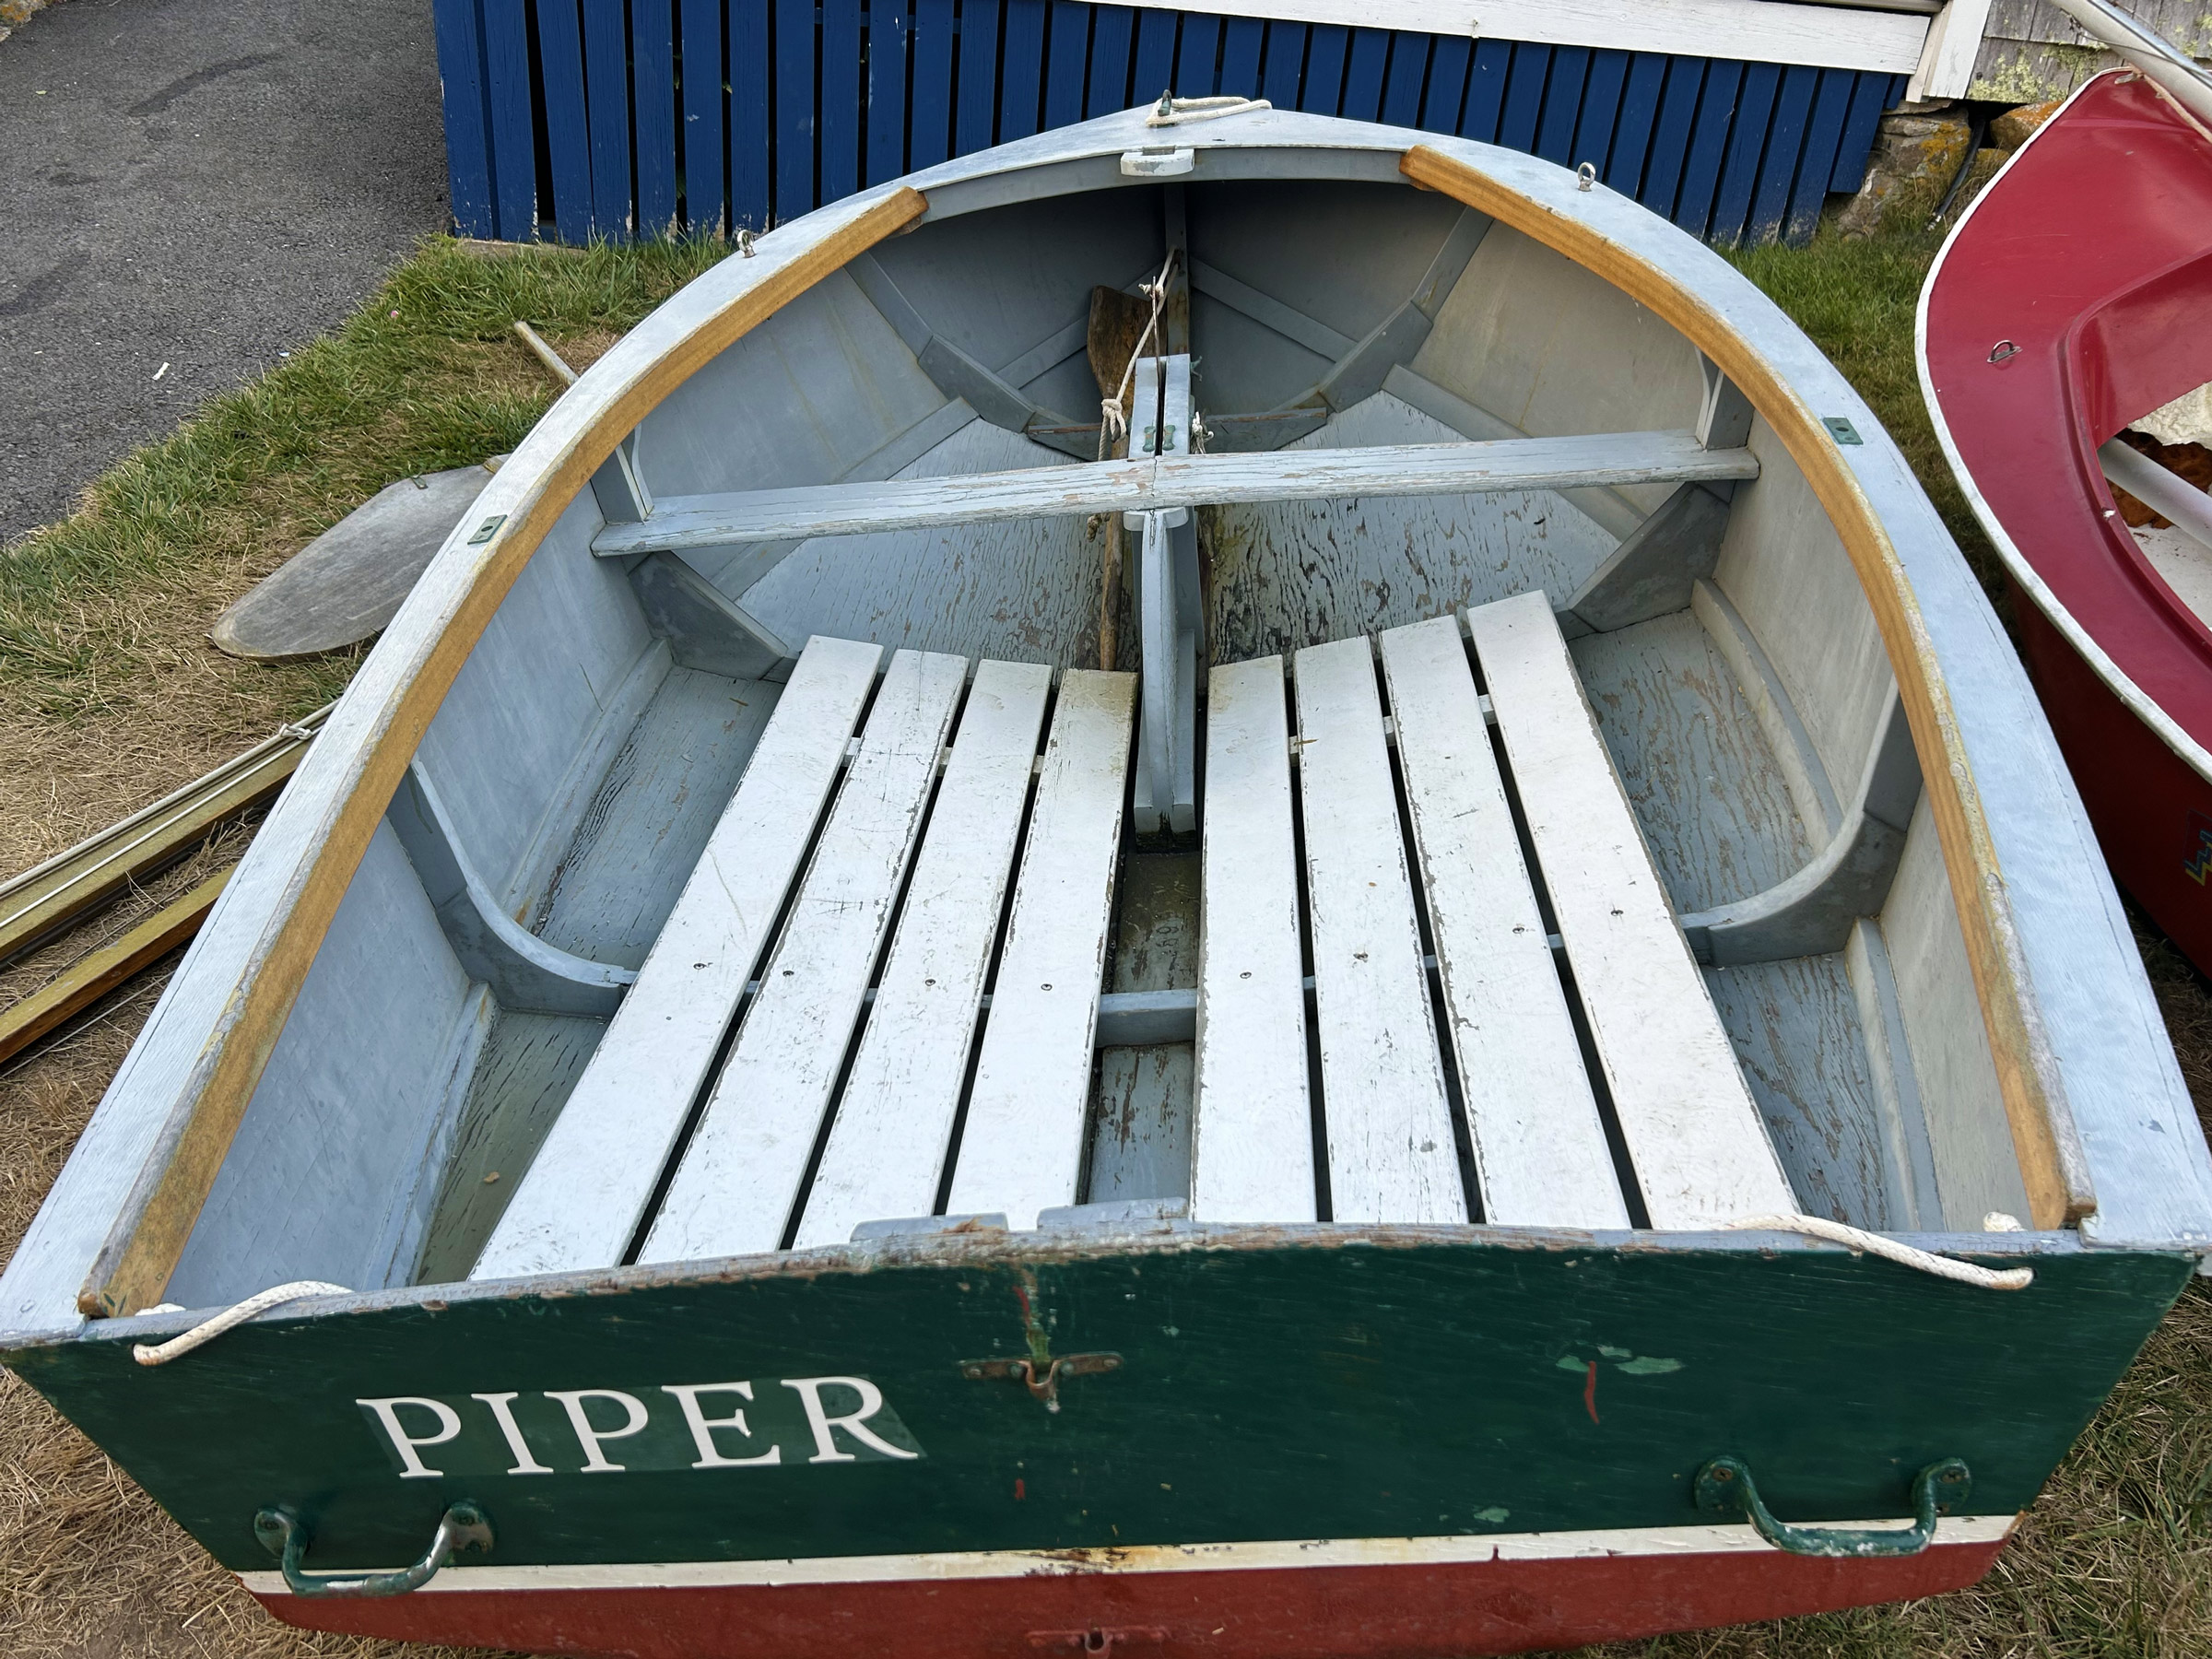
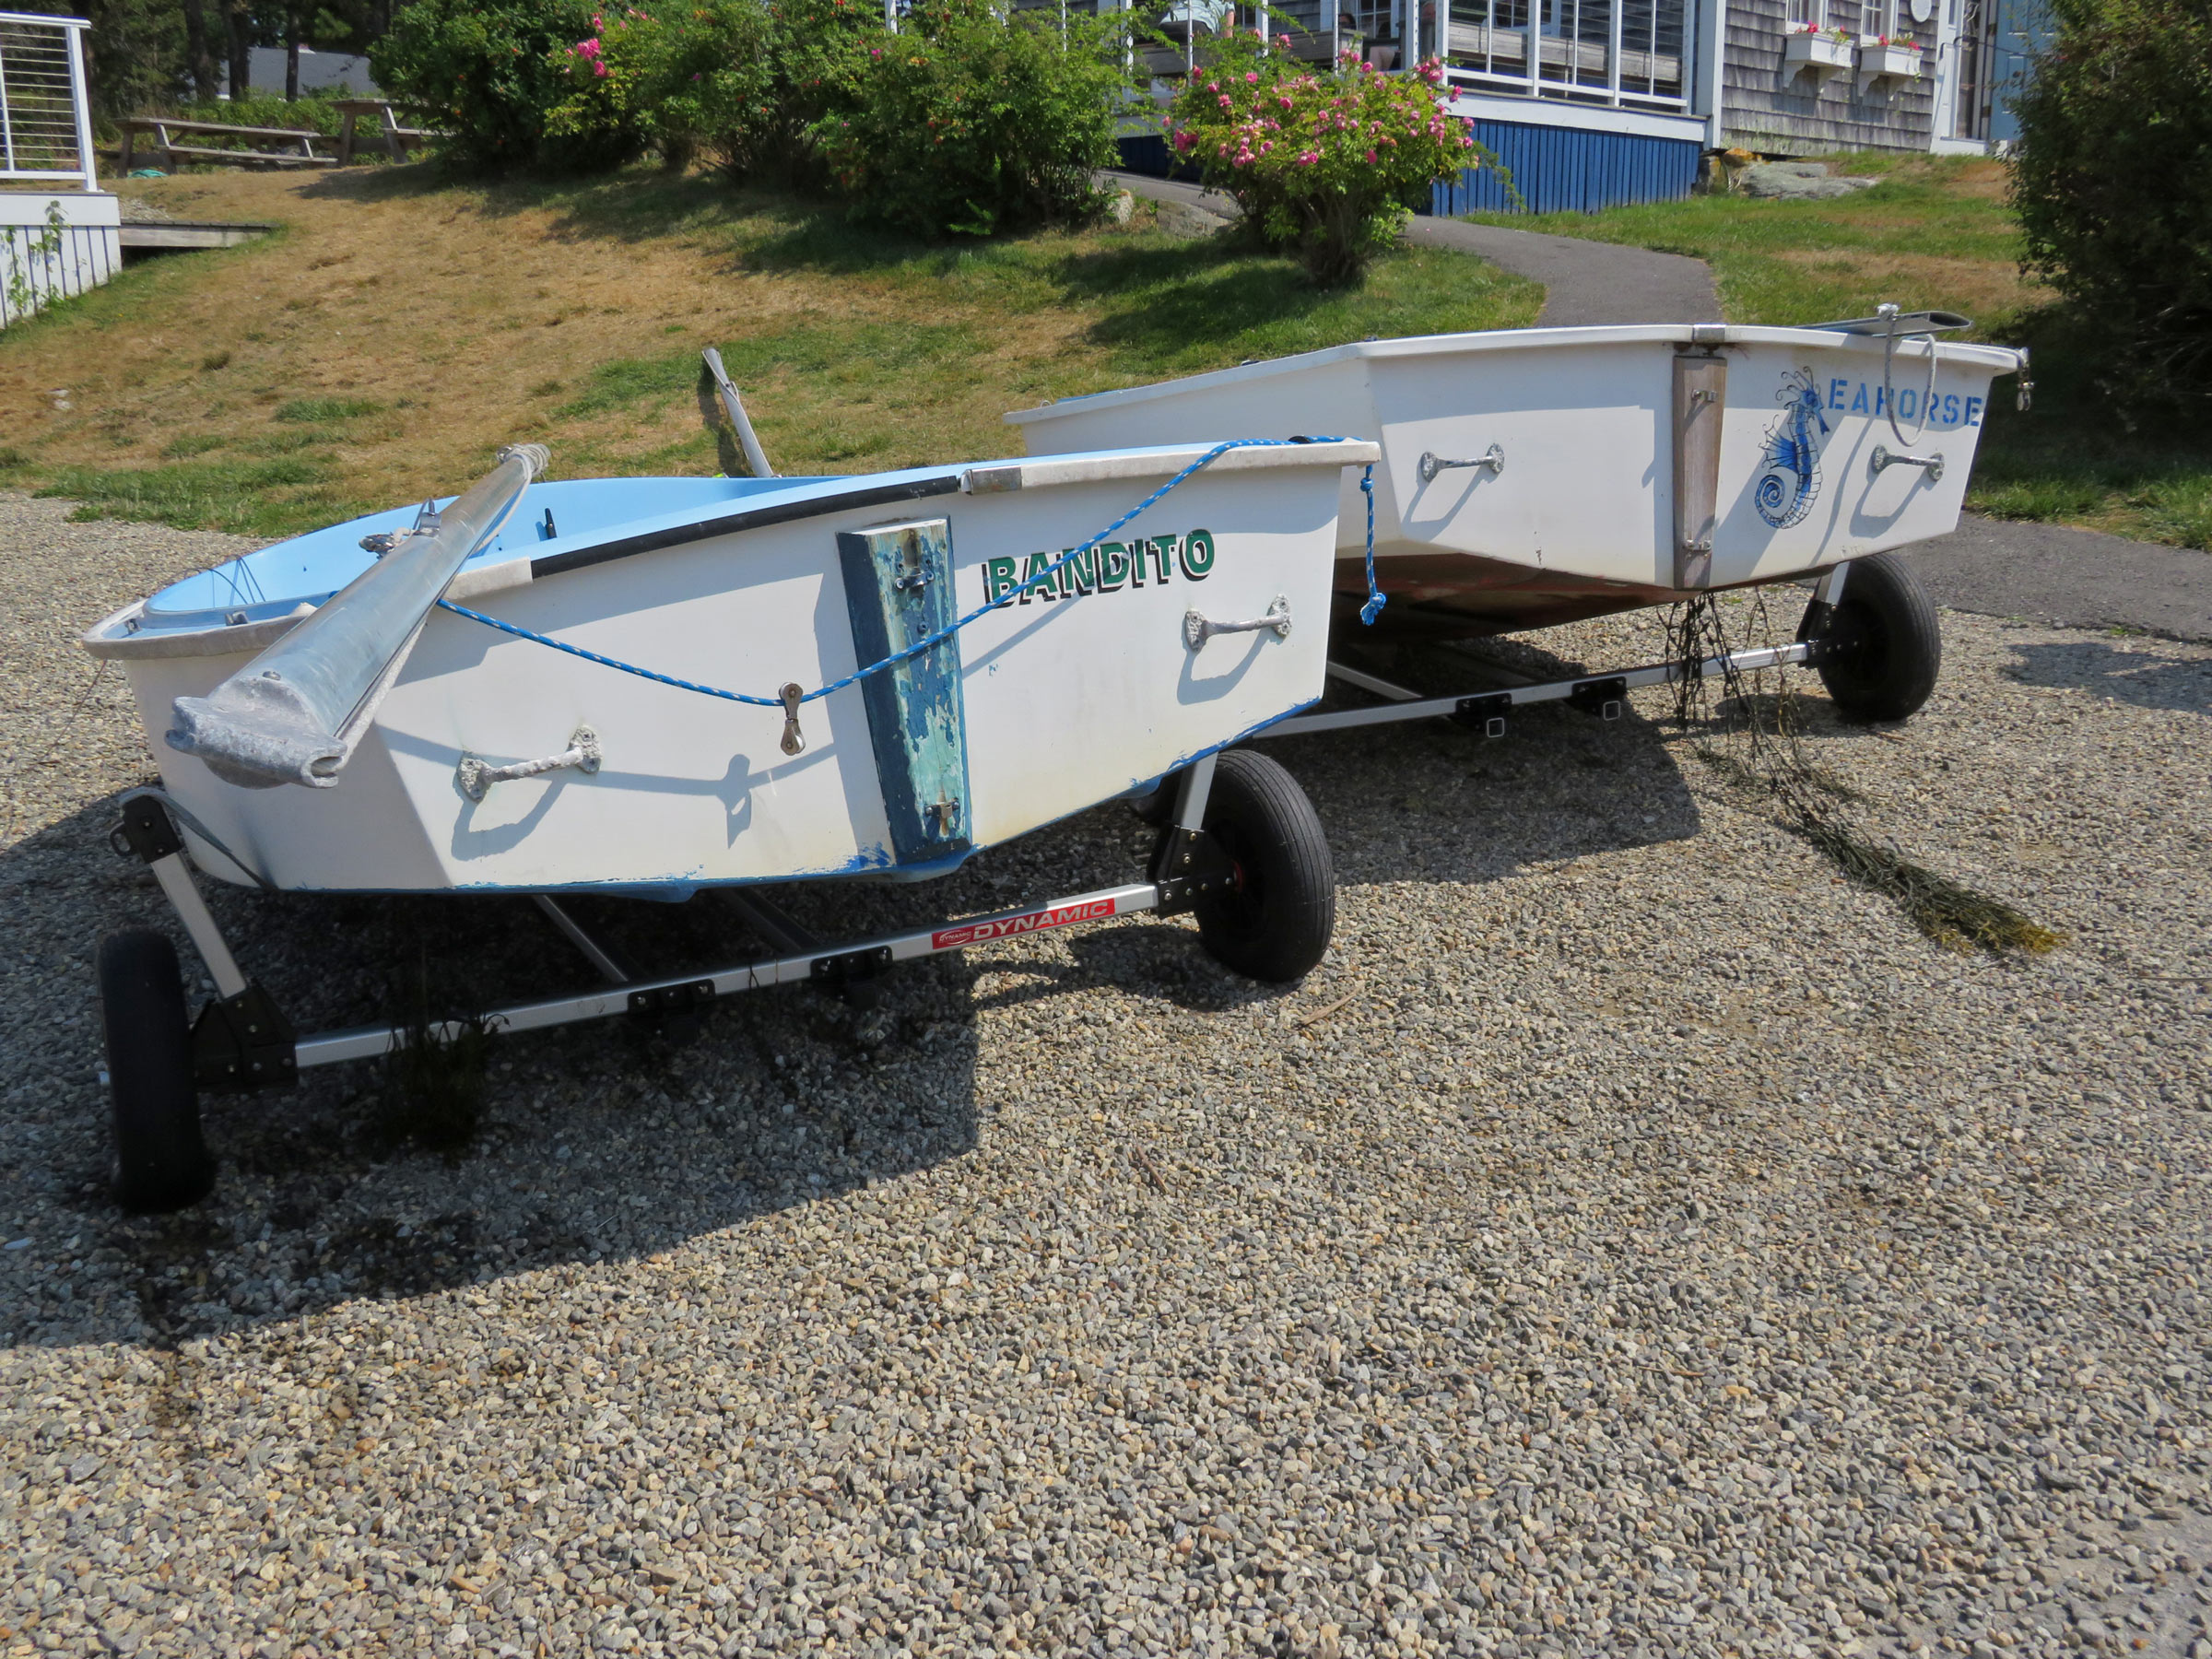
PIPER is an original plywood Turnabout, hull number 1568. The floorboards are typical and help to keep skipper and crew dry when seated in the bottom of the boat. Note her oarlock sockets; the red fiberglass N-10, just visible to the right, has none.
Toward the end of the ’60s Turner’s yard began producing Turnabouts in fiberglass but they were not a success. More expensive than the wooden versions and thought by many to be slower, production was limited. Then, in 1972, Joe Duplin, one-time Star-class champion, took a mold off a fast wooden Turnabout, produced a new fiberglass hull with a balsa core, and rigged it with aluminum spars. But Turner would not give up the name and so the new boats, built by Duplin Marine, were dubbed National 10s (N-10s). For the ensuing 50 years the two boats have coexisted in sail-training fleets across the Northeast. In 1990, production was taken up by Steve Winkler formerly of Duplin Marine, in Winthrop, Massachusetts, and in 2002 by Jack Gannon of J.G. Marine in Burlington, Massachusetts. A few years ago, Jack ceased building new boats (the combined Turnabout/N-10 class is currently up to hull number 4256), but he still sells parts and would like to sell the molds so that production of new hulls could resume.
Among the older N-10s an area of weakness has been beneath the rudder fittings on the transom; owners often introduce more strength by through-bolting a solid-wood pad on the transom under the gudgeons.
At 9′ 8″ LOA and 5′ 3″ in the beam, the Turnabout/N-10 boasts a well-raked stem, vertical transom, and a shallow-V underwater shape that quickly broadens out to its maximum beam. The hull has a hard chine with, in the Turnabout, an interior chine log. While the Turnabout has three plywood structural frames, the N-10 has none and the cockpit is unobstructed save for the centerboard trunk and a thwart that is part of the deck molding. The rig consists of a single Bermudan sail set on a mast stepped through the foredeck and supported by two shrouds and a forestay. Its sheet leads from the end of the boom down to a running block on a rope traveler atop the transom, back along the boom and down to a cleat typically mounted on the thwart. There is a pivoting metal centerboard and a fixed-blade rudder. The only unusual feature is a spinnaker, which on a boat so small and low-key seems incongruous but has, I suspect, done much to keep the class alive, as it introduces new challenges as sailors become comfortable on the water.
The Turnabout/N-10 Today
Over the past two decades, many clubs have moved away from Turnabouts in favor of the International Optimist, but there are still fleets in New Jersey, Rhode Island, Massachusetts, and Maine. At Monmouth Boat Club in Red Bank, New Jersey, and Newport Yacht Club in Newport, Rhode Island, N-10s are enthusiastically sailed by adults in a Frostbite season. In Southport, Maine, the yacht club has been a proponent of the boat since the junior sailing program was established there in the 1960s. The founding director of the program favored the Turnabout for its easy reassuring performance for new sailors, and for its contribution to “social sailing.” As my daughter said when she was eight years old and it was suggested by an instructor that she might like to move into the Optimist fleet: “Why? I don’t want to sail on my own. What’s the fun in that?”
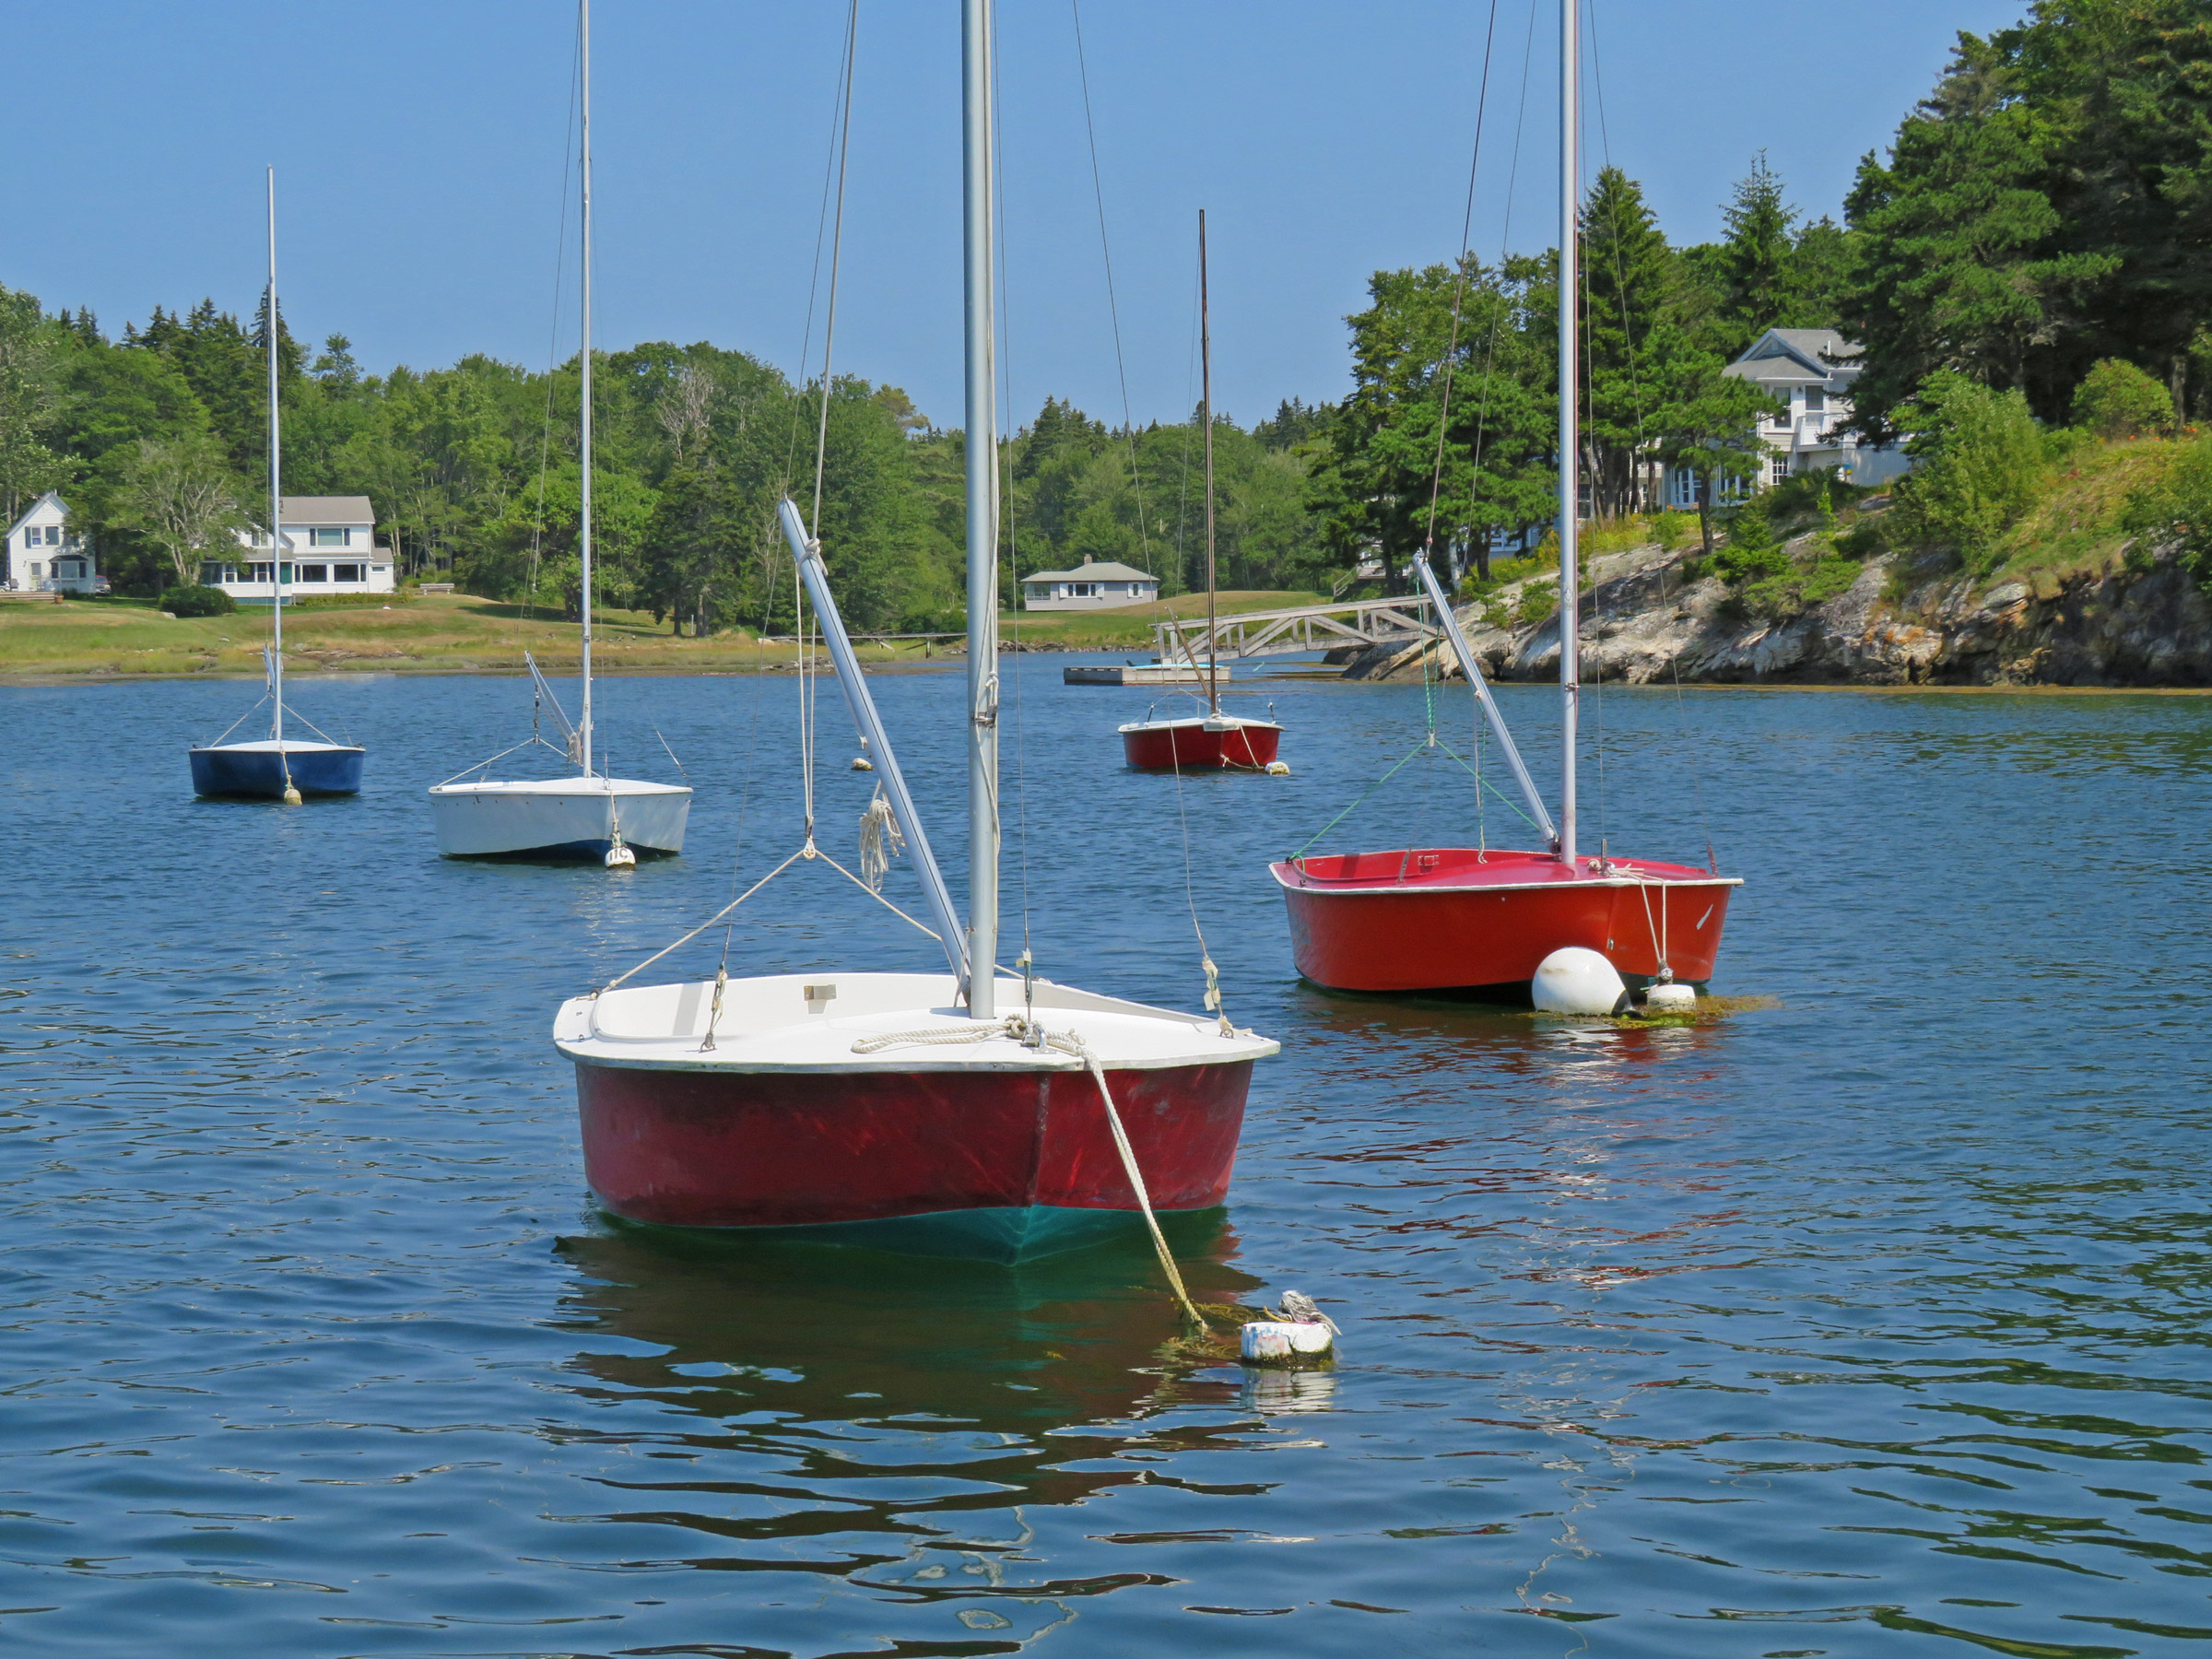
So similar are the N-10s and the Turnabouts that their sails are interchangeable. While the hulls here are all N-10s, two of the nearer sails bear the Turnabout insignia.
The Turnabout/N-10 has a versatility that other small training boats lack. They are neither fast nor elegant, but they are hard to beat as a sailboat for the very young that can also be sailed and enjoyed by adults. They are robust, safe, have few moving parts, and can sail in virtually no wind up to 20 knots, they can also be rowed (although some of the later N-10s do not have oarlock sockets). They perform better with weight carried forward, but in high winds have a tendency to bury the bow, and at such times, crews can be seen quickly shifting aft in an attempt to keep water out of the boat. Their volume—which has gained them the nickname of “Turnatubby”—can comfortably accommodate as many as four children (often three new students and an instructor) or two adults. Fully laden or sailed singlehanded they are, quite simply, unsophisticated and fun.
N-10s often have a towing eye low down on the stem, but typically a deck-mounted cleat or handle and cleat are used when making fast the mooring line.
The year my daughter eschewed the idea of moving out of Turnabouts and into Optimists was the year we bought our own N-10. We named her MOUSE, and she quickly became a favorite in the fleet. Our plan had been to keep her for the three or four years until my daughter moved into the 420 fleet but somehow, 10 years later, MOUSE is still part of the family, and has continued to be used in the yacht club’s sailing program every summer. Her sails are not as pristine as they were, and her tiller (not her original) has been through a few iterations, but she is still much loved. My daughter doesn’t sail her so much anymore, but I take her out from time to time either alone or with a friend.
Sailing the Turnabout/N-10
From stepping aboard to leaving the mooring takes well under 10 minutes. When derigged, we use the main halyard as a topping lift, stabilizing it with the rope traveler and sheet. I tend to leave it that way while I lower the centerboard and install the rudder. Once those two steps are taken, it’s time to raise the sail. The halyard is detached from the boom and reattached to the head of the sail. The foot is loose, tacked down with a simple pin at the gooseneck, and clewed out to a track-mounted block at the after end of the boom, cleated off a couple of feet forward. The luff has slugs that slide in a groove, but it’s easy to feed them in and hoist the sail singlehanded. Once the sail is raised, its luff snugged down tight with a single-line downhaul led through a jam cleat, all that remains to be done is to cast off and set sail. Our mooring field is tight, but the Turnabout/N-10 picks up speed fast, is surprisingly close-winded, and if necessary, sails backward well, making maneuvering in close quarters easy.
Main halyards are used as topping lifts to raise the booms out of the boats when on the mooring.
Despite the speckled texture set into the interior gelcoat of some boats, the inside of an N-10 can get slippery when wet. Various approaches have been used to combat this in different boats—from nonskid tape to wooden slatted floorboards—but we’ve had the best success with nonskid paint applied in two strips on either side of the centerline. There are few other hazards when sailing. If singlehanding, the skipper will change sides with each tack or jibe, sitting to windward on a breezy day or to leeward on a calm day. Two children will usually change sides together each tack, but when sailing with two adults on anything but the windiest of days, the easiest method is to stay put, one on either side; if you don’t have to move to trim the boat, there is ample room for two adults aft of the thwart, but it can get congested if you start moving around. Smaller (and more agile) sailors can sit forward of the thwart and the smallest of all can sit on top of the thwart, but for the most part, sailing a Turnabout/N-10 is done seated on the bottom of the boat or, on a breezy day, up on the windward rail.
There is no built-in buoyancy in either the Turnabout or the N-10. Some owners fill the space beneath the small foredeck with Styrofoam blocks, buoyancy bags, or airtight plastic bottles. On MOUSE we have laced in closed-cell Styrofoam boards—as sold for home insulation projects—along both sides of the cockpit; not only does it add a modicum of flotation, but it also makes for a comfortable backrest when sitting on the floor leaning back on the hull side.
While four teenagers are making the most of a fair breeze to fly the spinnaker on MOUSE, with so much weight forward and the spinnaker pulling well, the boat is unquestionably down by the bow.
Like everything else on the Turnabout/N-10, the setup for the spinnaker is unsophisticated. There are two sheets and a halyard: no pole, no uphaul or downhaul. It’s not a big sail, but newer sailors still struggle to master raising and lowering it, setting it, and keeping it filled. The jury is out as to how much value it brings in terms of speed, but in terms of training it’s unquestionably worthwhile. As one of the 420 coaches in the Southport sailing program commented last summer, “You can always tell which sailors grew up in the Opti fleet rather than the Turnabouts—the Opti kids have no clue when it comes to the spinnaker; the Turnabout kids are all over it.”
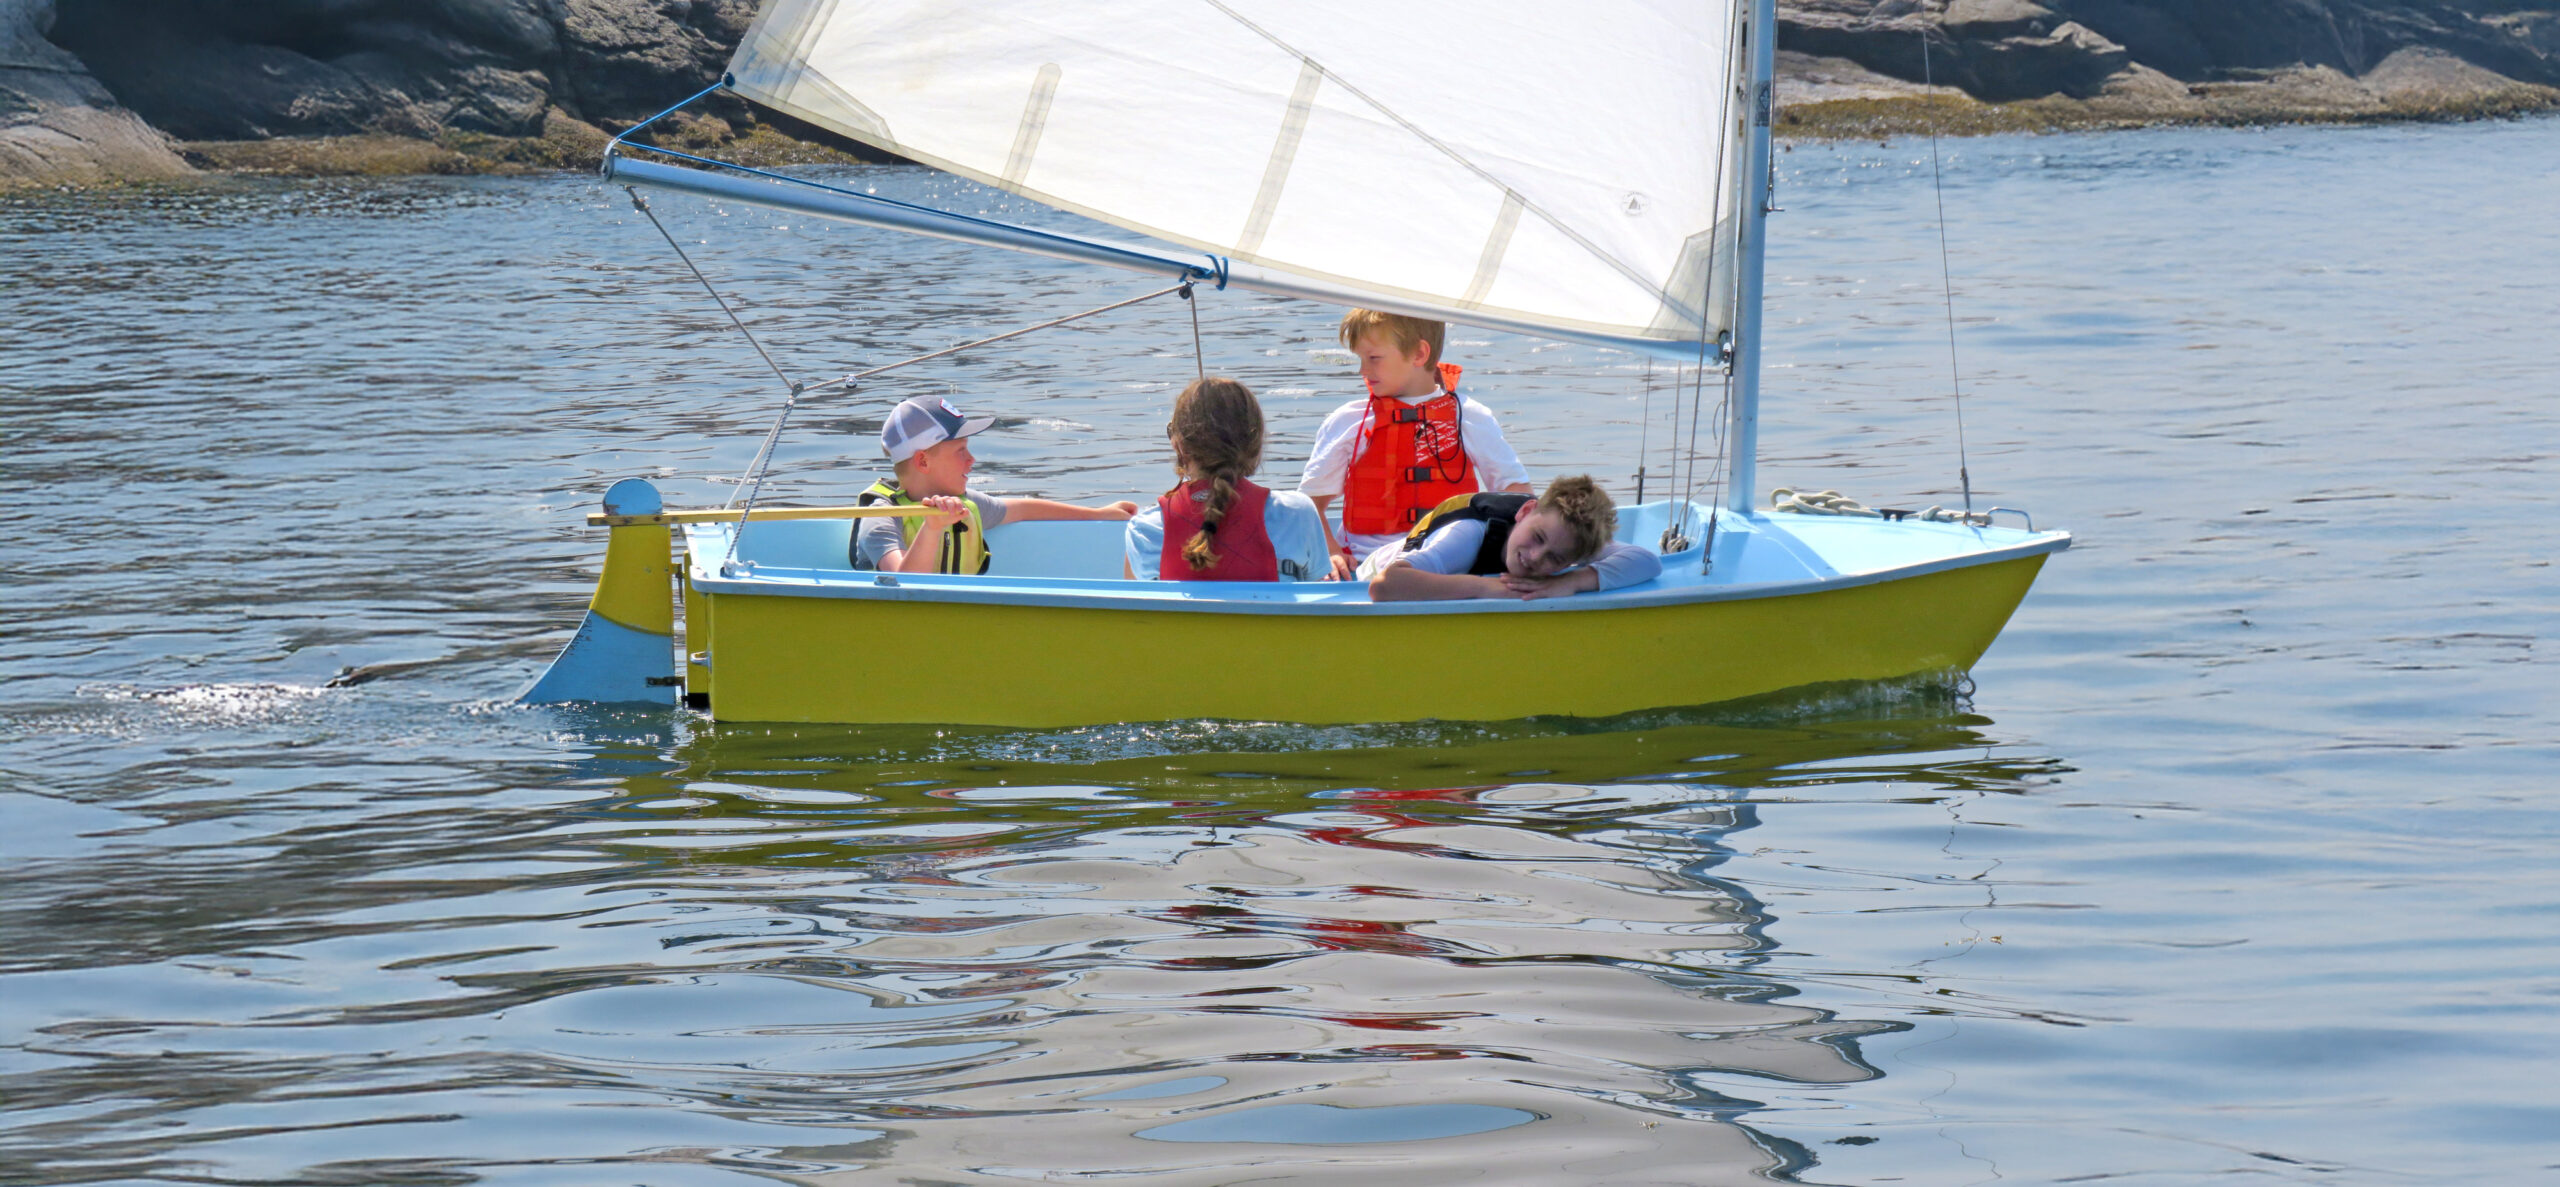
In a Turnabout or N-10 there is ample room for three younger children and an older teen. Here the teen, amidships, and skipper are both seated on the cockpit floor, while the two other children are sitting up on the thwart, either side of the centerboard.
On any given summer weekday, the Southport sailing program can have up to 15 Turnabouts out sailing. They will be crewed by two to three new sailors, some of whom are the second or third generations of kids learning to sail in a Turnabout, sometimes the same Turnabout. They will be laughing and squealing, singing and telling jokes, and somewhere along the way, without even knowing it, they’ll be learning to sail. Because it’s cool, the more experienced among them will make fun of their fat little boats and declare them to be slow and ugly, but one day, when they’re older, and they’re racing their Turnabout with an adult friend on a Saturday afternoon, they’ll realize: this simple little boat has earned a place in their hearts, and with good reason.
Jenny Bennett is editor of Small Boats.
Turnabout/N-10 Particulars
LOA: 9′ 8″
Beam: 5′ 3″
Sail area: 61 sq ft (spinnaker approx. 28 sq ft where luff is 9′ and half girth is 3′ 6″)
Displacement: 255 lbs
The most recent builder of the N-10, J.G. Marine, continues to sell parts for N-10s and Turnabouts and is hoping to sell the molds so construction of the hulls can resume: contact Jack Gannon at [email protected].
Is there a boat you’d like to know more about? Have you built one that you think other Small Boats readers would enjoy? Please email us your suggestions.
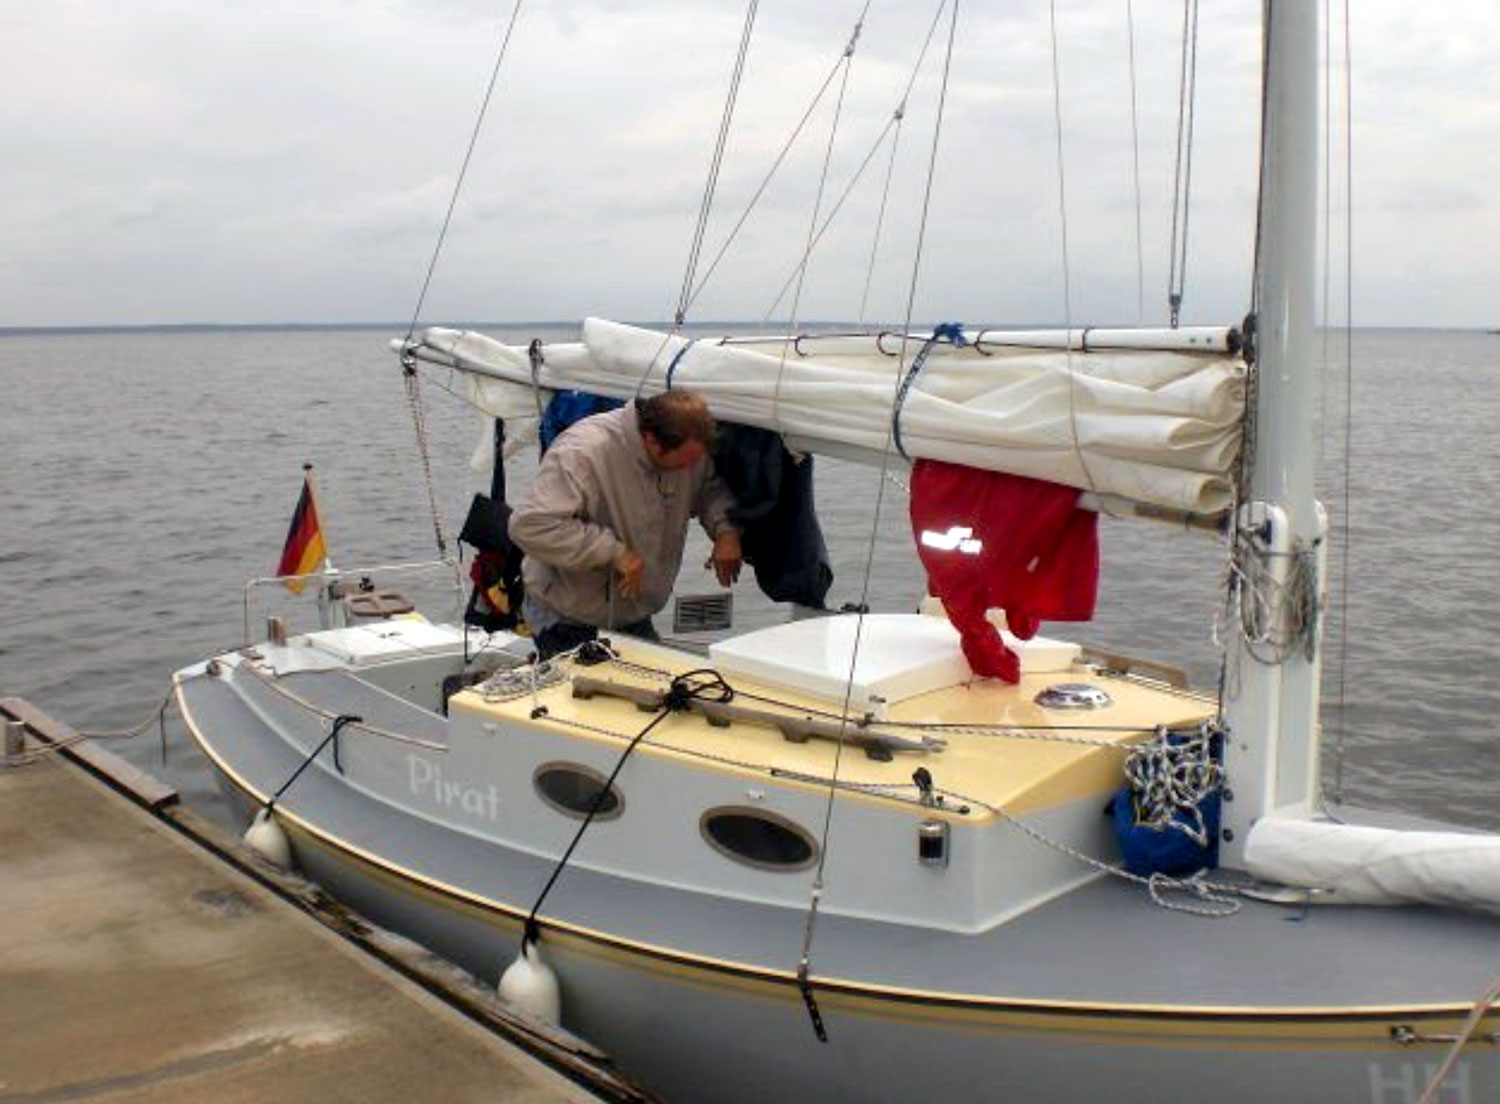
CRAACK! And then nothing. Well, not nothing. I was in 15 to 18 knots of wind in the shallow waters of Tampa Bay. The sun was high in the sky, but the occasional spray of salt water over the bow was keeping me cool. The boat was doing some considerable bucking and jiving up and down and side to side in steep 1′ to 2′ waves, even though the rudder felt steady and I was holding my course as close to the wind as I could. I wasn’t totally sure what I’d heard or where the noise had come from. I looked around the boat. Both masts were standing firm, even though they were working hard. The starboard ama was spending most of the time out of the water and appeared to be in good shape; the port one was mostly submerged but looked the same. The akas also showed no visible changes.
I looked down into the water just off the starboard beam. Ah, I had heard a crack: the bottom half of the centerboard was sticking out at a right angle to the boat and was waving at me just beneath the water, swinging back and forth in the opposing forces of boat and waves. It must have been hanging on by threads of fiberglass cloth and epoxy. What the heck! I’d worked hard on that centerboard—I wasn’t about to let it float away. I reached down, grabbed its forward edge, and pulled back. I stuck it under the rowing wing across the two seats of the cockpit. What now?
Roger Siebert
.
I was out on the shakedown cruise of my new boat—an Angus RowCruiser that I had built over 18 months of part-time construction. During the six months prior to the build I had studied many designs, searching for a boat I could sleep on, that would sail and row efficiently, looked good, and wasn’t so complex that I’d spend the rest of my retirement years building it. So far, I had been pleased with my choice. The boat had gone together well and the support from the designer, Colin Angus, had been outstanding. But my dreams don’t always coincide with reality, and the principal objective of this first cruise was to see how my image, perception, and understanding of the boat dovetailed with actual experience. I was also excited to explore Tampa Bay by water and to get away from the “urban jungle” of too many cars, people, and noise.
Now here I was with a broken centerboard. I had left Davis Islands, in the southeast of Tampa, just a mile and 20 minutes ago. I could sail back to the launching ramp, and call it a wasted day. But I was reluctant. Maybe I didn’t have the centerboard, I reasoned, but I had everything else. There was no real emergency. Neither the boat nor I were in any danger. I was well outside the shipping lane. I should be able to tuck in to and sail along the spoil island just ahead, which should break up the wave action and allow me to get farther out into the bay. Besides, if I couldn’t get anywhere because of the headwind, I could always turn around and get home fast with the wind behind me. I went for it.
Photographs by the author
When I awoke on my first morning afloat, conditions were calm. I sat and drank my coffee and watched the rising sun’s light illuminate the clouds.
Sailing but no headway
The spoil island, maybe a mile in length, was upwind, but too far away for me to take advantage of its lee. I could see its scrubby undergrowth with a narrow beach along the shoreline. The boat struggled to make headway against the wind: without the centerboard, we were being blown sideways even though my boat speed remained fast. I tracked the sideways progress against the wreck of a 40′ cruiser sitting in the mud and sand 1⁄4 mile off the shore: I was making little headway and major leeward slip. I tried to tack, but without the centerboard things quickly became tricky. I tried to build speed before putting the helm hard alee. No deal. I bore away, picked up speed and tried again, only this time I rowed like hell with the leeward oar to push the boat around. I finally made it, but I’d lost a lot of ground in the process. Next time, I wore around, pulling the tiller hard to windward and jibing. It worked but, again, I lost a lot of ground.
An hour passed—the wreck was still there. I had gone nowhere. It was getting late, I was tired, and I needed to figure out where to anchor for the night. The wind was starting to ease as I headed west to the spoil island. If I could anchor close to shore, I reasoned, I would be out of the worst of the wind and waves. I struggled on and, as time passed, the wind died. At last, I let go the sheets, slid the oars out of their stowed position, and set to rowing. It felt good to make way in the direction I wanted to go.
Docking at Apollo Beach to have lunch at Finn’s Dockside Bar and Grill was challenging. The finger docks and slips were not designed with a trimaran in mind. Eventually, I set a stern anchor and tied the bow to one of the very few ladders. During lunch, I was able to keep an eye on the boat and the weather.
As I rowed, the wind and waves continued to calm. Out of the corner of my eye, maybe 50’ away, a fish soared out of the water. It flew, briefly, fully clear of the now 6″ waves, looking like a tiny Concorde jet and, in an instant, dove back down with a perfect 10.0 landing. A manta ray—the first I’d ever seen. I rowed on, my heart rate slowly returning to normal. As I neared the island, I was guided by sight as well as the raucous sound of birds. The shoreline was alive with terns and gulls, skimmers, and oystercatchers. I might be serenaded a little too loudly for good sleeping.
I pulled into shoal water and dropped the anchor. I had made it. For the first time since the centerboard broke, I breathed easily, and realized I was both hungry and thirsty. I dug around in the food bags and found a cold dinner of crackers, dried pineapple, and nuts, chased down with some lukewarm water. Not a three-star dinner, but it’d been a long day, and I was beat.
As I get older, I’m amazed—sometimes confounded—by the things I don’t plan for. No more than a couple of weeks earlier, I had realized that it might be a challenge to rig and de-rig the Angus RowCruiser once afloat. Each fully battened sail has a sail sleeve in the luff into which the sectional mast is inserted. The mast is then brought upright, lifted into the boat, and stepped into its keel-mounted maststep. The boom is then attached to the mast, and the sail is tacked down with a deck-mounted downhaul, and clewed out on the boom. Finally, the sheet is clipped to the end of the boom, and the boom vang is attached. It is a straightforward procedure. However, to de-rig the sails, one must do all this in reverse and, if anchoring off, one must do it while afloat, with little room to move in the narrow cockpit. I began to think it might not be so easy. I could not wrap the sails because of their battens. The only way to de-rig was to take everything down. I wondered if the mast sections would float if I messed up.
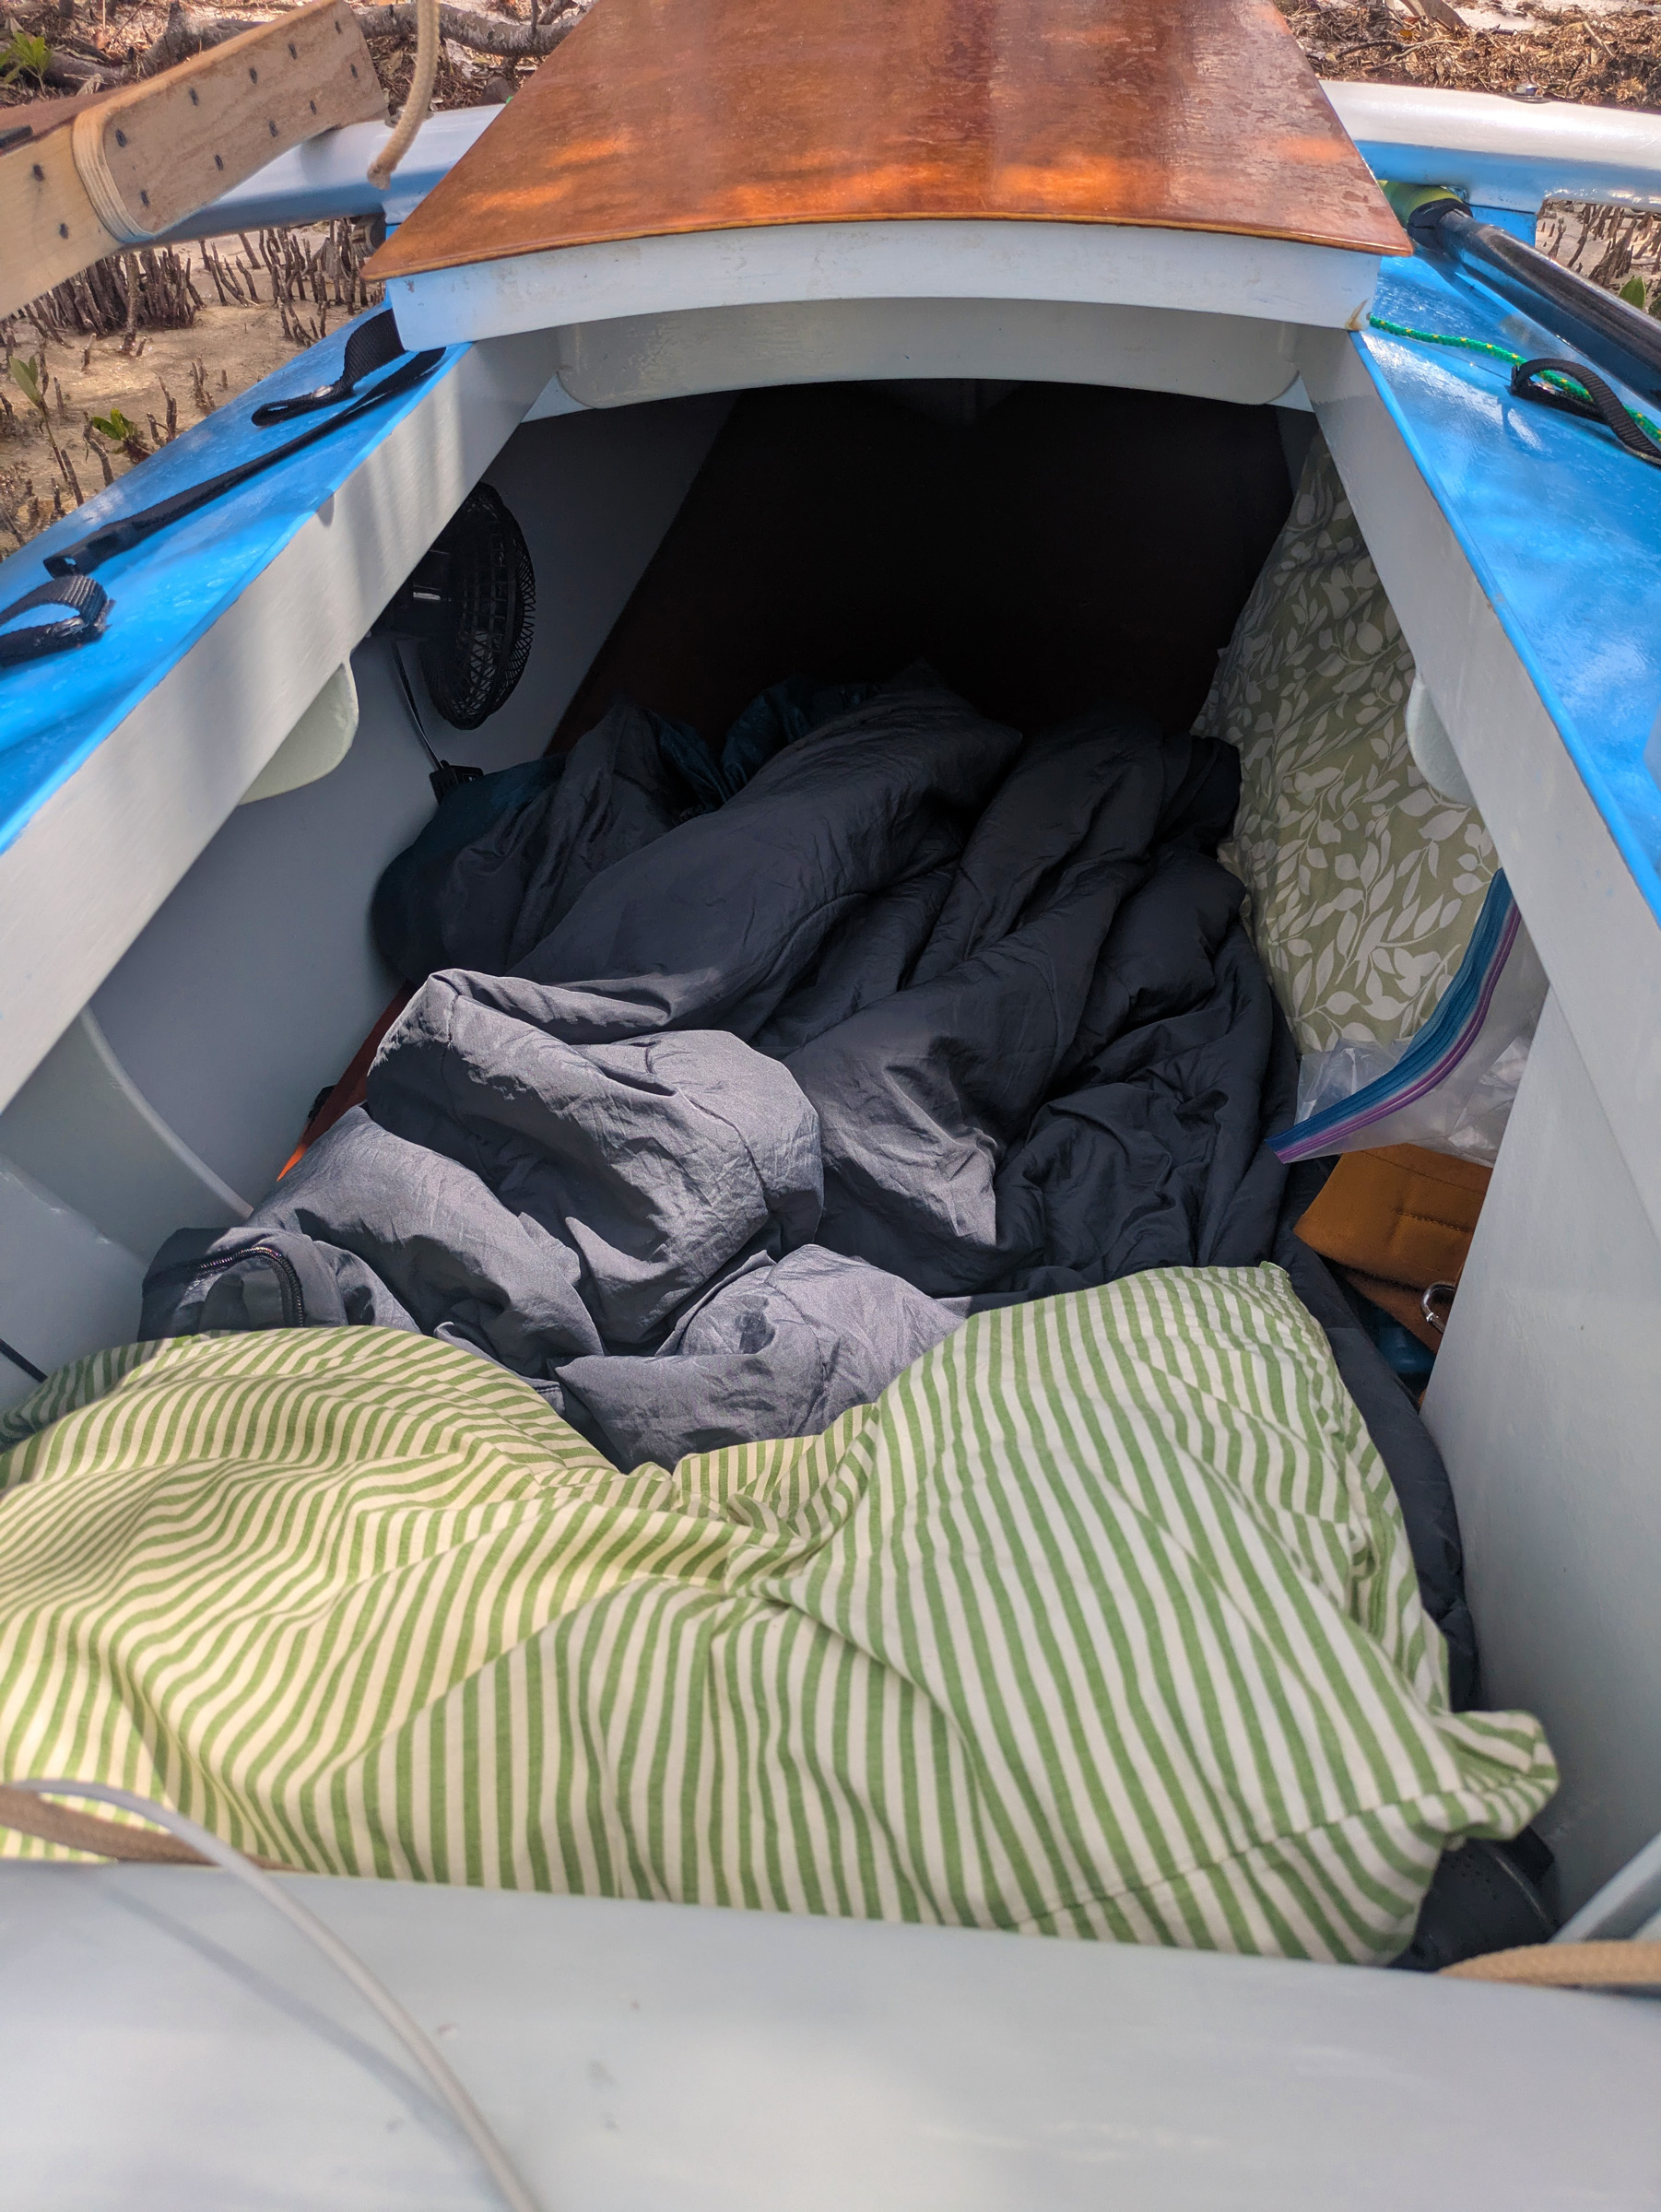
The cockpit was the perfect length for me. I could sit facing aft with my back against the cabin and my feet up against the after bulkhead. For sailing, I reversed this position. On the horizon over the stern are the high-rise buildings of Tampa. The previous day I had rowed from there against short steep waves and into a 17-knot headwind.
I was tired, very tired. I was anchored in the lee of the island. The wind had died to almost nothing. The water was calm. I decided to leave the sails up. I let go the sheets, took off my still-wet spray-drenched shirt and shorts, and slid awkwardly into the little cabin to sleep.
Most small-boat mariners have been kept awake by water slapping against a hull: my boat had three hulls. It was downright loud; there was just enough wind and tiny waves to slap, jingle, and jabble against all three hulls. Adding to the cacophony were the sails slatting back and forth, and the mainsheet dragging across the cabin roof above my head. The birds, at least, were silent, they must have gone to sleep. Not me, but I was too tired and lazy to do anything to help myself. I lay awake, glad that it wasn’t too hot and that the tiny breeze was keeping the mosquitoes away. Sometime in the middle of the night, the natural forces quieted, and so, at last, did I.
From the Spoiler Island to Finn’s Dockside
The day I’d left for my cruise, my friend Pete had texted, “Hey… Let’s meet for lunch at Finn’s. They have a dock.” Why not? Finn’s Dockside Bar & Grill in Apollo Beach was only 5 miles to the south; even without the centerboard it should be no problem. After finding the stove, the coffee, and a granola bar, I sat in the cockpit and enjoyed the early morning. The sun was just coming up, lighting the clouds in subtle shades of pink. The temperature was pleasant, the air still, the water flat calm. It was hard to believe I was barely 5 miles from the city. An occasional seabird squawked or cried. I heard the screech-chirp of an osprey, and spotted it flying high, hunting over the water. It looked like it would be a great day for rowing.
Typically, I love being out of cell-service range when I’m adventuring. But when I came upon these horseshoe crabs, having a signal allowed me to access the internet and learn about the mating habits of horseshoe crabs on Tampa Bay beaches.
And it was. The sails were still raised but with the rudder set amidships, the boat moved along easily at 2 1⁄2 to 3 knots. Once I got up to speed, the repetitions of the sliding seat and the oars moving through the water felt good. Pelicans flew by. From time to time, they would tuck their wings and plummet to the water at seemingly breakneck speed. Almost immediately, they bobbed back to the surface, like giant corks. Sometimes, the water still dripping from their heads, they tipped their bills high into the air and gulped down their unfortunate prey. Other times, with barely a pause, as if embarrassed that failure might be witnessed, their wings immediately flapped, and they were off.
Occasionally, sportfishing boats flashed by with fishing rods glinting in the sun. As I approached the point off Apollo Beach, I saw a splash in the water. I stopped rowing. Two bottlenose dolphins were zooming back and forth, up and down, back and forth, close to the surface of the water, occasionally breaking the surface with a dorsal fin or tail. I saw there was a third, smaller dolphin, in the mix. Then I saw some action on the water—the surface was crinkly and shimmering with the baitfish just below. One of the larger dolphins immediately peeled off, the other stayed with the young one. Whoosh! The big one screamed through the baitfish, water spraying from its side. Then the other two followed, side by side. I sat and watched the fun. Days later, I told a fisherman friend what I’d seen, and he said that it was likely parents teaching a young one how to hunt and feed.
By the time I’d rowed to Finn’s, my hands were starting to feel some rub spots—in spite of my repurposed bicycle gloves. The long timber dock had multiple raised finger pontoons with open slips, but none was wide enough to accommodate my boat, nor did there appear to be any ladders to climb up to the pontoons. I was perplexed. How was I to moor, let alone disembark? Eventually, I spotted a ladder, and figured it out: I set a stern anchor, tied a bow line to the ladder, and stepped off the bow. I was reasonably sure that the bow wouldn’t bump against the ladder or pilings, but planned to sit where I could keep watch just in case.
My centerboard broke barely 20 minutes out from Davis Island, so I couldn’t sail westward and downwind as that would have meant an upwind return involving a lot of rowing. I proceeded instead along the eastern side of Tampa Bay, which offered spectacular sunsets over the city of St. Petersburg.
I wandered up to the restaurant to find Pete. Through a lunch of fish tacos, I glanced repeatedly down to the boat and harbor. The wind was starting to build. Without the centerboard I didn’t want to attempt to sail in the close confines of the harbor; it was time to be gone. I shook Pete’s hand, thanked him for lunch, and made my way back to the boat. A crowd of restaurant patrons watched as I cast off and pulled out on the anchor; I managed to complete the maneuver without embarrassing myself.
I had been right about the wind: it was building but there was still no significant wave action in the harbor. I rowed the 3⁄4 mile to the entrance and as I neared the open water both wind and waves built and became challenging. Nevertheless, I planned to row southwest for 4 miles, away from the built-up shoreline, tuck in behind a point, and anchor for the night. The sails were still up and slatted in the 15-knot headwind, the steep chop impeded progress, and the day was heating up to more than 90°; the sun was merciless. When I stopped to rest or drink some water, I was blown back, undoing the progress of the previous 15 or 20 minutes of rowing. It was a battle of sore hands and shoulders, weary body, and stubbornness; soon it was sore hands, exhausted body, and sheer stubbornness.
During my slow progress from the harbor, I followed a line of signs that said, “MANATEE PROTECTION AREA! SLOW SPEED! MINIMUM WAKE!” All had been quiet within the zone but then, not far inshore of the line, a speedboat zipped through at close to 30 mph. Almost simultaneously, about 50′ from me, a manatee snout came out of the water for a breath. It was swimming toward the shore, on a path across the boat’s wake. The University of South Florida reports that between 100 and 130 manatees are killed by motorboats every year.
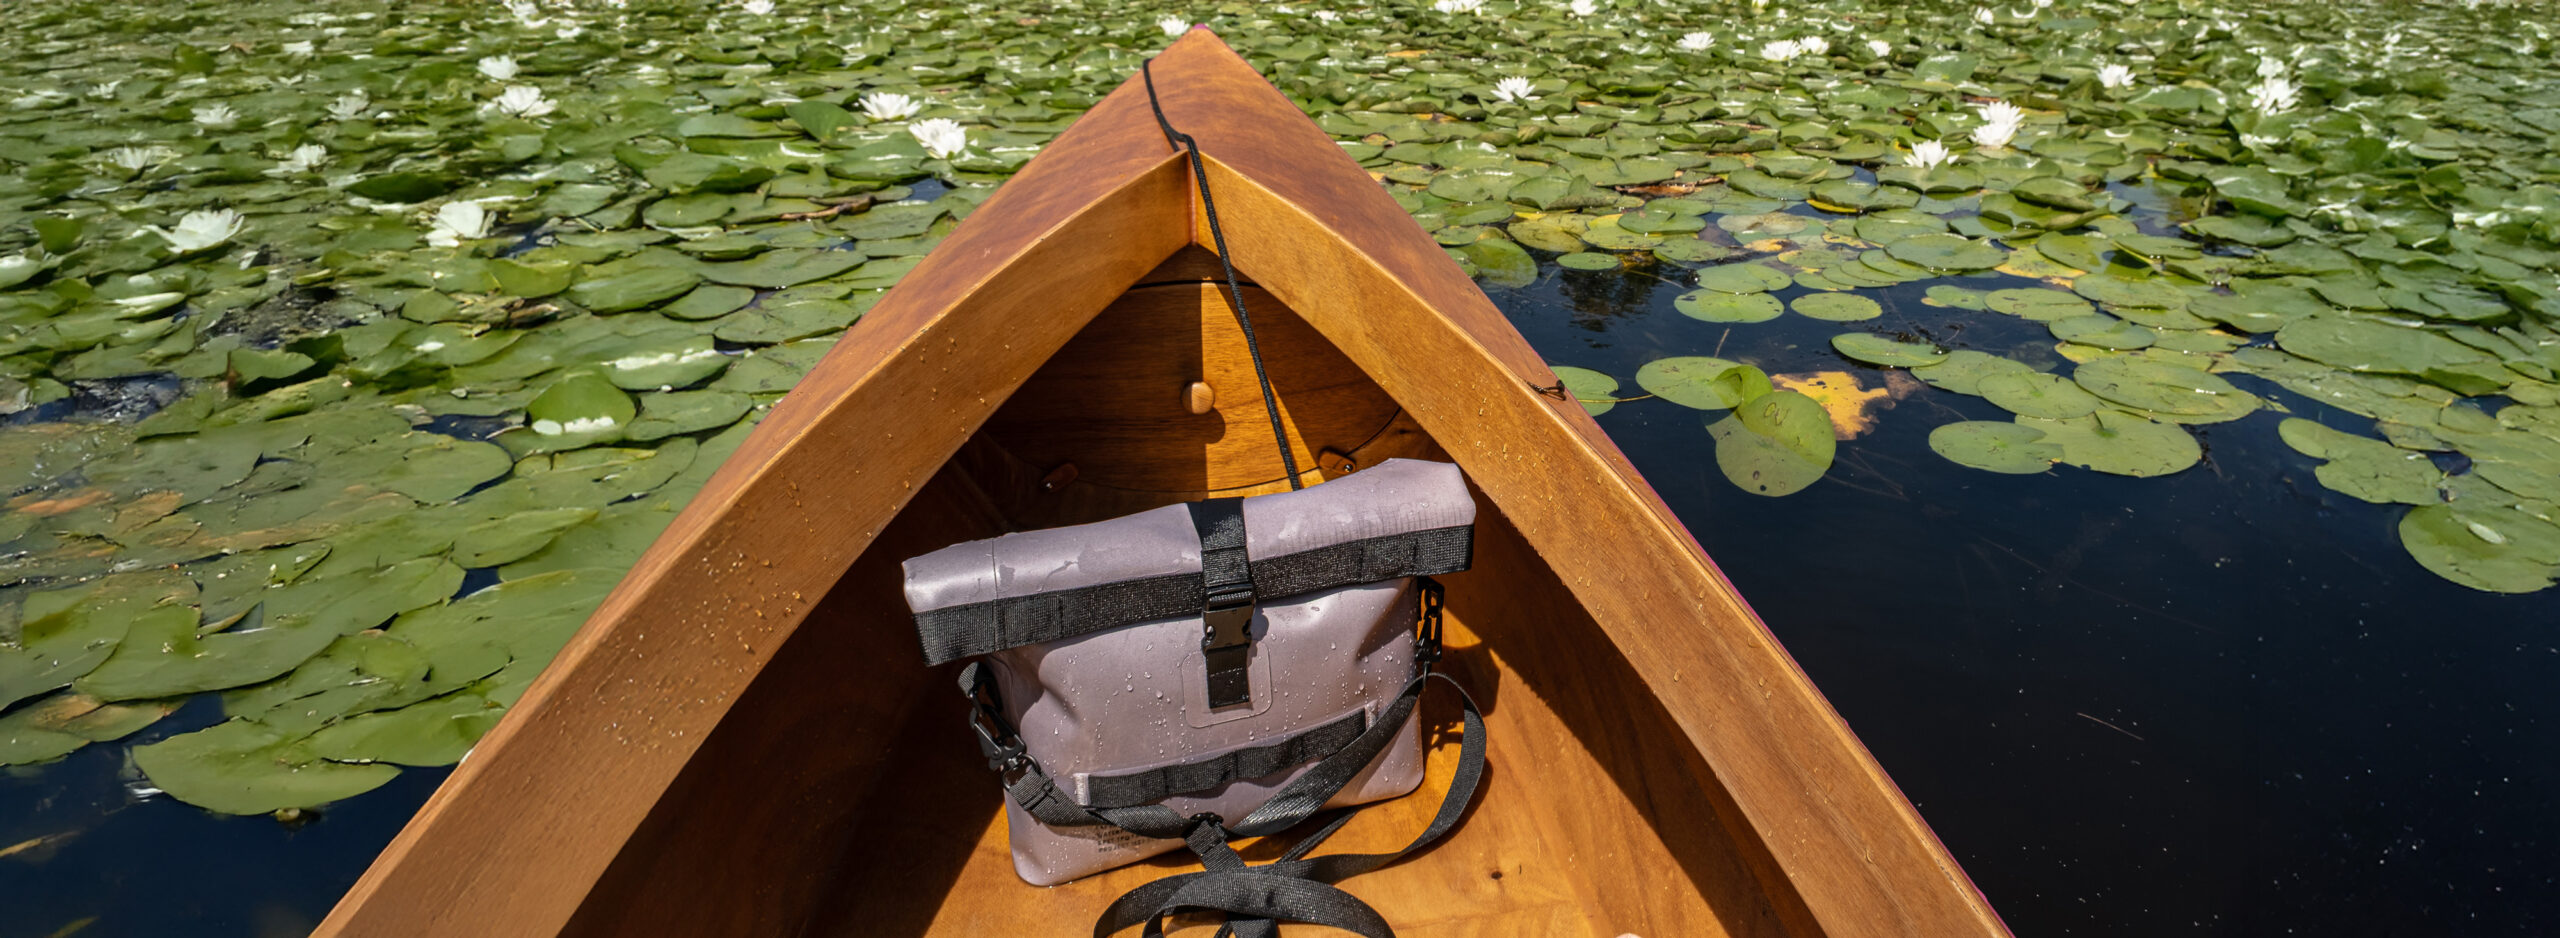
I have plenty of storage space under the stern deck, accessed through two circular deck hatches. However, my smallest cooler is too large to fit through either of them, so it spent the trip resting atop the cabin roof and leaning against the solar-panel platform. I was pleased with the solar panel; it produced enough power to run lights, a fan, and the autopilot, and to charge my cellphone.
In the wind and short, steep waves, it was challenging to row my fully laden boat with sails raised and amas on either side. Sometimes the amas but not the hull were affected by waves; sometimes one ama but not the other was; sometimes all three were. I would get knocked off course when the edge of one of the sails caught the wind. Then, with a wave slapping into the windward ama, I would struggle to keep the boat moving and back on course. And there was no way I could take a break.
Despite it all, after three hours of hard work in which I covered just 4 miles, I reached my goal. It wasn’t pretty. My hands were blistered, my shoulders ached, and my brain was mush. In normal circumstances, with no sails up, I might have rowed there in half the time. I anchored as far as possible from the mangroves, in hopes that I would not be pestered all night by mosquitoes, and took stock. It was a pretty little cove. The thick leaves and twisted trunks of mangrove extended into the water. I pulled out the stove and heated water for a ramen bowl, stirred in a can of chicken, and settled down to eat, topping off dinner with some cookies and a cup of box wine. I watched the pinks and reds of the sunset climb into the western sky across the bay.
The cabin is far from luxurious, but it accommodates my 6′ 4″ frame and is surprisingly comfortable. However, at 70 years old, I do find getting in and out of the close quarters somewhat awkward.
Somewhere above me came the familiar call of an osprey. I scanned the sky until at last, I saw it, flying low, laboring to carry a fish half as big as itself up to its nest in a tree standing tall above the mangrove. There were few other sounds during the evening, save the occasional slap of a mullet’s tail as it flicked a sharp turn through the surface of the water. After the previous night’s terrible sleep and the tough row of the afternoon, I was bone-tired and called it a day. I arranged the mosquito netting over the open hatch cover and, as the wind died and the water leveled to a flat calm, listened to the rising monotone of mosquitoes above me. It mattered not; I slept like the dead.
The lure of a campground
Once again the day dawned sunny. I didn’t need to look at the forecast on my phone to know it was going to be hot, but I did anyway. Today’s forecast high, 95°. After coffee and oatmeal, I carefully clambered forward to weigh anchor. It was another task I had underestimated when thinking about the boat. Although the boat as a whole is very stable with the outriggers, the narrow hull is difficult to move around. On all fours, keeping my knees and hands spread to the sides of the central hatch cover, I carefully climbed over the forward aka where the hull narrows still more, and the boom and rigging blocks of the foresail are an extra hazard. The deck was also slippery—I had, perhaps, worked a little too hard on the paint finish. Fortunately, there was only 12′ of rode to pull up, but it was far from ideal.
I spotted this small beach among the mangroves and stopped for a rest and to stretch my limbs. When I landed, there was almost no wind, but when the breeze filled in from the west, it pinned the boat and entangled it in the mangroves—it made for an ungainly departure.
Anchor raised, I looked at the blisters on my hands and was relieved I wouldn’t need to row. A light easterly was settling in and, with just a gentle pull on the sheets, the boat was moving off downwind along the east–west shore. I relaxed into the easy motion until, just 30 minutes later, I saw some small beaches among the mangroves. They were perfect to pull into, and it was too tempting, so I beached the boat and checked it out. Flush toilets! A picnic area with shade! While the air temperature was still under 90°, I put on my walking shoes and strolled around.
I had landed at the E.G. Simmons campground within the conservation park of the same name. There was a protected swimming area marked by a line of buoys, a boat launch (in rough shape after Hurricane Helene), and two camping sites next to the water. Other than the occasional sportsfisherman casting from a beach, I saw few people. I walked a couple of miles, mostly along the park roads, to get my blood going. Then I returned to lay out my camp chair, a book, some snacks, and a bottle of water in the shade under the picnic roof. There was a light breeze blowing onshore—a warm breeze, for sure, but at least it was some air movement. I spent the day reading and writing while keeping cool with a wet bandanna, and used the hose spigot to wash the salt out of yesterday’s clothes.
Late in the afternoon, I went back to the boat. Next to it a cluster of horseshoe crabs was half buried in the sand, half submerged in the water. There was one large one and a number of smaller ones scrabbling over each other. It was, evidently, mating season.
At Pine Key I was happy to find some shade in which to sit and read a book for a while. The 90° temperatures and cloudless skies were relentless.
With time on my hands and space on the flat sandy beach, I finally de-rigged before anchoring out for the night. For once there would be no slapping sails and, again, I slept well.
The next morning, I had coffee on the boat and then rowed into the beach to eat breakfast at a picnic table. The wind was a steady 12 knots out of the east, and I raised the sails and set off to the southwest. For two and a half hours, with the wind picking up to 15 to 18 knots on the beam, it was downright fun. With each gust, the boat dug in the leeward ama and leaped forward. I was aiming for Bishop Harbor, about 10 miles south, and I almost made it—the GPS recorded that we covered 11.3 miles in 2 hours and 40 minutes with an average speed of 4 1⁄4 knots and a top speed of 8 1⁄2 knots. But as the afternoon wore on, the wind veered more and more to the south, forcing me onto an ever-closer reach. Bishop Harbor could wait; I’d done enough fighting on this trip.
In 2024 Pine Key was hit hard by Hurricane Milton’s 100-mph winds. Many of the trees in the shoreside woods were downed or tangled up with one another, and the beach was strewn with debris.
I turned around and spied a perfect 30′-long beach tucked into the mangroves where some shade promised a modicum of respite from the heat. I sailed in but, just before making land, the wind shifted, and I was on a lee shore. Without the centerboard the boat refused to turn, and in a very short time the bow was nudged into a forest of mangrove branches hanging over the water. There was no room to use the oars; the forward mast was nestled between a couple of branches. For a few minutes, I thought we might be tangled in the mangrove forever. But, at last, using an oar as a pole I managed to push back out of the branches and turn around. I rowed away and, 20 minutes later, rounded a small headland and tucked in behind an island. I was just happy there had been no witnesses to such an inept sideshow.
With no wind, the sun was merciless. I headed back to Simmons Park, where I knew there would be shade and breeze. The wind was still blowing 15 to 20 knots out in the bay, and 90 minutes later I reached the park; it was time to call it a night. I watched a glorious sunset directly over the city of St. Petersburg on the far side of Tampa Bay, and swatted way too many mosquitoes off my legs.
These pilings at Pine Key, stripped bare by the hurricane, have become a popular resting place for terns and pelicans. At the left, in the near distance beyond the pilings, is a navigational light marking the shipping channel, while in the far distance is the city of Tampa.
A fast sail home
The next day, in the same 15 to 20 knots of wind, I sailed for “Beer Can Island,” officially Pine Key. One of the more famous (or infamous) islands in the bay, it is known for being a haunt of fancy boats, bronzed bodies, and lots of alcohol. The wind had piped up and with it now blowing 18 knots from the southeast, we arrived in what seemed like no time at all. I beached the boat to check it out. Pine Key was severely impacted by Hurricanes Helene and Milton, and there are now few trees to provide shelter from the sun. With the island pretty much blown away, there were no other boats. I stretched my legs with a walk around the perimeter, coming across remnants of makeshift drinking bars and downed trees. Back on the boat, in two hours and 20 minutes and with an average speed of of almost 5 knots, I turned the corner into the Davis Island Yacht Club basin, where I had started just five days ago.
The run home to the Davis Island Yacht Club basin was the best sailing of the trip. The autopilot steered, the boat surfed at up to 9 knots, and no water came over the rail. It was a fun ending to the adventure.
It had been an eventful five days. I had learned a good deal about the boat, had proved that she was a lot of fun, rowed well, and sailed like a rocket. Above all, I had learned that I wasn’t getting any younger: clambering around on a narrow boat, and climbing in and out of her small cabin, was not as easy as it might have been 10 years ago. I had a new list of things to do and/or figure out how to do. I needed to build a new centerboard; figure out a way to anchor from the cockpit; design a mechanism to raise and lower the rudder without having to lean over the stern; adjust the distance between the autopilot and tiller; and find a way to shorten or lower the sail while on board. As shakedown cruises go, it was possibly more exciting than it should have been, but the valuable lessons were second to none and the fun I’d had for those five days in a boat that I built myself—well, that was unbeatable.
Bill Hutton likes to build, sail, row, paddle, and drive small boats. Over the years, he also worked with mostly Native Alaskan students in Alaska schools, fished commercially for halibut and salmon, walked the mountains, ran rivers, bicycled multi-day routes, and enjoyed adventures with his wife and family. He now lives in Florida for most of the year.
For more Florida adventuring with Bill Hutton see “Thwarted.”
If you have an interesting story to tell about your adventures with a small boat, please email us a brief outline and a few photos.
This article was originally published on WoodenBoat Mastering Skills website
It’s a luxury to work on a boat in the controlled environment of a shed. But sufficient indoor space for a moderate-sized boat is a rare commodity in most locales, and it can be downright expensive to rent for a long-term project.
For temporary needs, construction of a permanent shed is not practical. Conversely, for perennial storage, a temporary shelter may not be economical in the long run. To address this range of needs, here are three buildings that have caught our eye over the years. Each one fits a specific niche: The half-lobster-pot shed was designed as an add-on to an existing shop, although it will also stand on its own; the bow-frame shed is a free-standing temporary shelter; and the boat barn is a no-nonsense, permanent shed.
The descriptions of these buildings are meant more as inspiration than as step wise construction details, as size of project, site of building, duration of storage, and a host of other factors will dictate much customization. We hope these examples provide good ideas for your own shed.
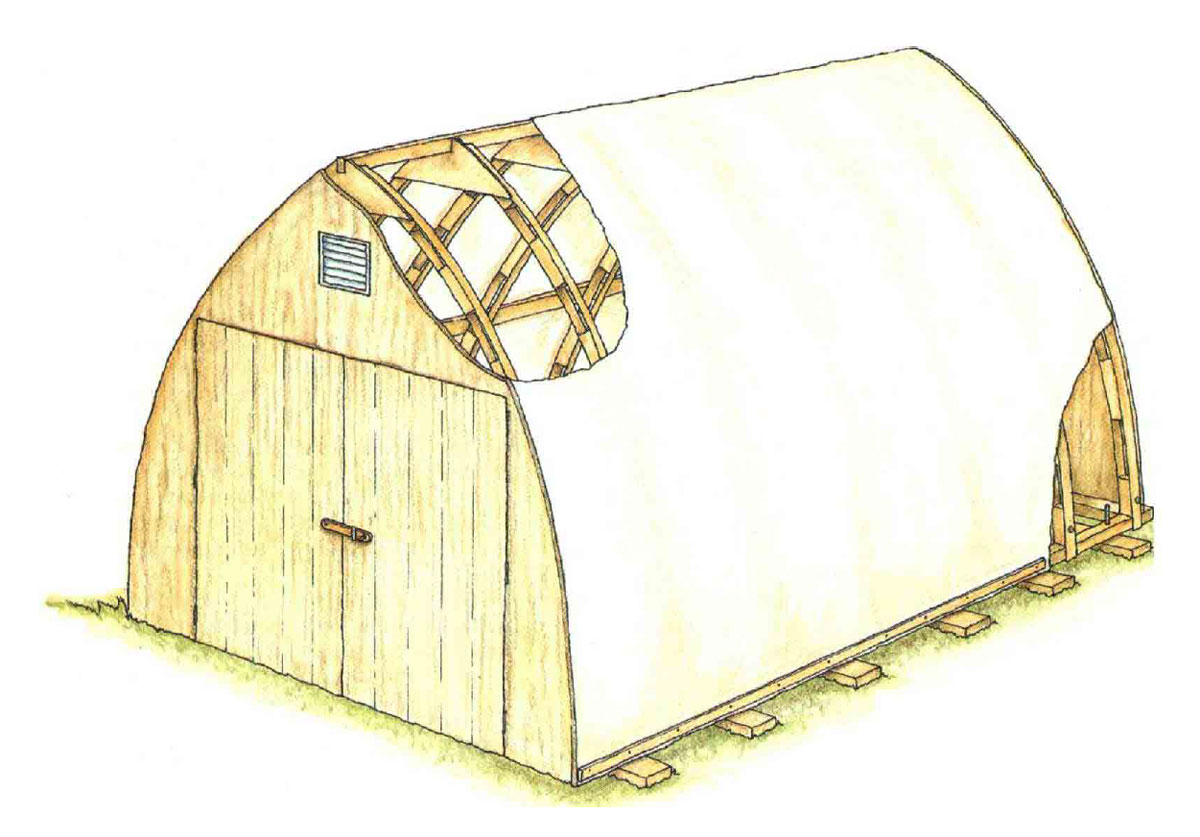
Kathy Bray
This shed was designed as a temporary add-on to an existing building. However, it has also been used as a free-standing structure with some modification.
A Double-Sawn-Frame Lobster-Pot Boathouse
by Greg Rössel
I developed this shelter in a moment of exigency one January for the accommodation of a large mahogany speedboat that had been delivered to me for repairs to damage suffered in a major storm. I had space beside my shop for the boat, but it was unsheltered. What to do?
Casting about for an idea, my eyes lit upon a sepia photo on the wall of an old office. On the ways were a series of tugboats with their stout double-sawn frames securely set up with ribbands wrapped about them, serenely awaiting their planking. But, of course! For a boat shelter, I could build what amounted to half-double-sawn frames on the shop floor, production fashion. The frames could be built from scrap lumber, and fastened together with drywall screws and glue. These identical arches then could be erected like flying buttresses over the boat.
The frames are relatively light and easily assembled. After the arches are set into place, they need only to be joined together with wooden strapping and sheathed in plastic. And when the boat project is finished, the strapping can be quickly removed and the arches stacked—knocked down like a deck of cards to await the next project. How many frames will a building require?Consider them like roof rafters—the bigger the building and/or the greater the expected snow load, the more you will need.
To build the frames, begin by calculating the height and width of the structure. In my case, the height was the distance from the ground to just below the eaves of the shop roof. The width at the base was what was needed to allow for working space around the boat. With the building’s dimensions established, clear a space on the shop floor to draw the curve. Start by drawing a baseline and erecting a perpendicular, much as if you were setting up to draw a body plan on the lofting floor. After driving nails at the ends to work against, spring a flexible batten out into a curving arch similar to the midsection of a boat. How does it look? Is there enough slope near the top to shed snow and rain, yet still allow headroom to work on deck? Tweak it until it looks right (sketch in your boat, if it helps), then draw the curve. That will be the outside of the curve. Next, draw the inside face of your arch (6″ to 8″ of depth works well).
The frames, or arches, are composed of two layers of 1″-thick wood, cut with the proper curve and fitted to shape. The joints between the individual pieces should fit tightly, at near right angles to the curve, and be staggered (i.e., those on the top layer should fall roughly halfway between those of the bottom layer). When laying out your joints, check that the full depth of the frame can be gotten out of your lumber. (The joints may need to be closer in the “turn of the bilge” region.)
When it looks right, the drawn shapes can be transferred to the wood. You can do this by the process described in WoodenBoat No. 137 (“Setting Up a Building Jig”), or you can lay nails at 12″ intervals along the curve, and press the board onto these, thus transferring the points of the curve.
Cut out the first pieces on the bandsaw, and continue this process until you have made and labeled all the pieces for the bottom layer of the frame. Then repeat the steps for the pieces of the top layer of the frame. This time, the joints should fall roughly halfway between the joints of the bottom half. Now it’s time for mass production. Using the original master pieces as templates, trace and cut duplicate futtocks for as many frames as needed, until you’ve got a whole stack of pieces prepared for assembly. Fasten a series of keeper blocks along the curve drawn on the floor. These blocks will help keep things lined up during assembly.
Plug all the pieces for the bottom layer of frame No. 1 into place. They should fit snugly between the keeper blocks. For extra security, spread yellow carpenter’s glue atop the first tier. Then plug in the pieces for the top layer. Drive plenty of drywall screws through the top layer into the bottom one. The completed frame can then be lifted out of the keepers, and a new one started.
With all the frames built, determine the location of the fore-and-aft strapping, or ribbands, that will tie the whole business together. Align the whole stack of arches so they are dead square, one atop the other. Placement of strapping is basically by eyeball, but the idea is to have it fall at regular intervals along the curve of the frame. The more ribbands, the stronger the building. You should have more near the top where the greater snow load will be, less on the sides. Use a scrap piece of ribband to mark the locations along the outer corner of the top arch, then transfer these marks onto the rest of the stack of frames using a square. The ribbands should be flush with the outside edge of the curve; the easiest way to accomplish this is to bend ribband-sized strips snugly between the ribbands. If the curve is severe, cut kerfs in the backs of these strips to ease the bend.
When using the frames against an existing structure as I did, sockets made of plywood—or steel rafter brackets from the lumberyard—are needed to support the tops of the arches. And a sill board is needed, too. It must be as long as the building and blocked level to support the bottoms of the frames.
It’s best to begin construction with the center frame. Hoist it up, plug it into the socket on the building. Then swing the frame out until it is perpendicular with the building, screw-fasten the lower end to the sill board, and temporarily brace it plumb with diagonals. This arch will be the keystone of the operation, as the remaining frames will be braced from it, with ribbands added as needed to aid alignment. When all the frames are set up plumb and perpendicular, fasten them with screws. Fasten a few diagonal braces internally to stiffen the structure and prevent wracking. The ends can be customized by adding doors, access ports for lumber, or whatever. Don′t forget the ribbands.
What about using the trusses in a free-standing structure? It can be done. Vertical legs must be added to replace the strength afforded by the adjoining building. And hefty gussets and diagonal bracing are important here to resist downward pressure of snow load; also, plenty of cross bracing on the back wall is required. As with any free-standing plastic building, thought should be given to placement. It should only be used in sheltered locations, and be well anchored, either to the ground or the boat.
Several products work well for sheathing, and these are described on page 75. I prefer the plastic specifically designed for greenhouses. It is rugged, difficult to tear, and quite resistant to UV breakdown from the sun. It is also extremely flexible at low temperatures, and it seems plenty slippery to let snow slide off.
How does this building work as a shop? Quite nicely. Plenty of room for workbench and storage racks on the vertical wall, lots of space to work on deck, and enough solar heating and sunlight in February to make you feel like you’re in the Bahamas even if you’re in Maine.
Greg Rössel, a boatbuilder and WoodenBoat School teacher, is a frequent contributor to WoodenBoat.
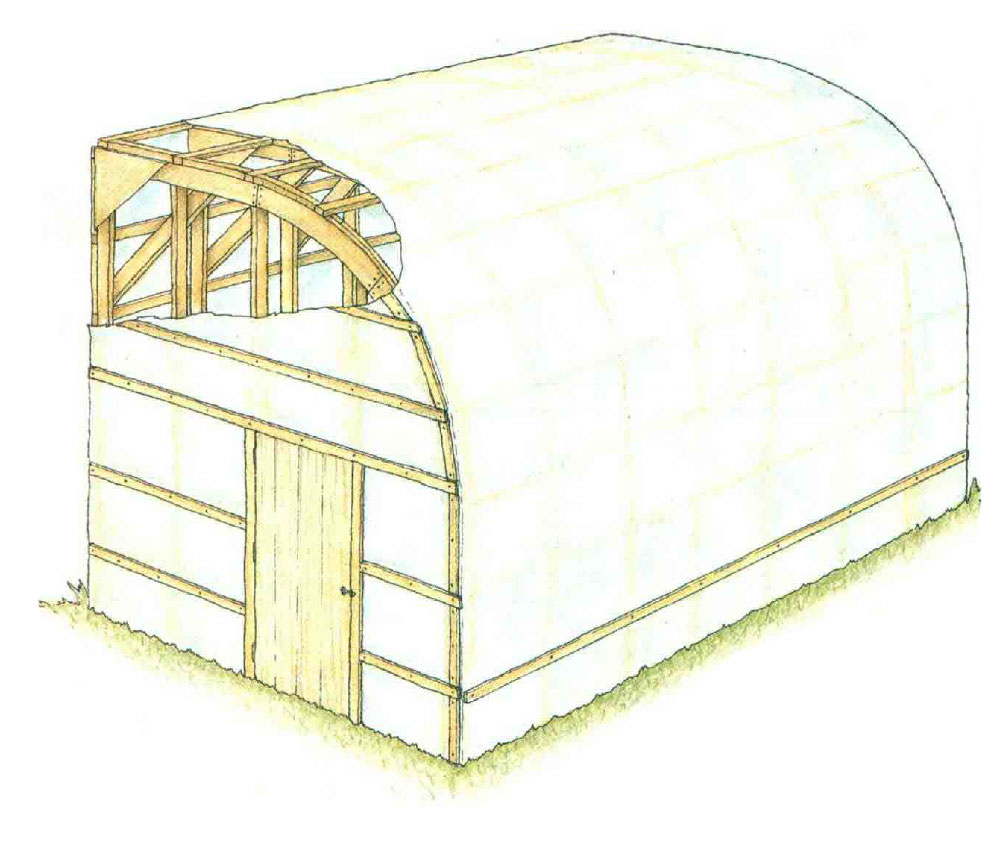
Kathy Bray
A well-built bow-roof shed, with a good foundation, end walls, and covering, will last for many years.
The Bow-Roofed Shed
by Matthew P. Murphy
The origin of the bow-roofed shed is somewhat apocryphal; the concept has appeared in various pieces of boatbuilding literature for a number of years—including this magazine, back in issue No. 48. But the idea of this building is so elegant—and cost-effective—that an article on boat sheds would be incomplete without it.
The idea is simple: Trussed bows are preformed by bending furring strips (1 x 3″ strapping) around a series of 2 x 3″ spacer blocks that are temporarily fixed to the shop floor; the resulting bow experiences very little springback. Paired bows are then set up on level sills to form an arch, a ridgepole is fastened, the structure is braced longitudinally and diagonally, and covered. But there are many variations—some of which can turn this big ol’ tent into a semi-permanent shed.
For example, many inexpensive bow-frame sheds use simple stakes to support the sills; longer-lasting structures are built on kneewalls of wood or concrete. Solid end-walls, collar ties, and a partial sheathing of plywood will also solidify things.
To house a short-term boatbuilding or repair project, boatbuilder David Stimson has designed a 14 x 32′ bow-roofed shed, expandable to 20 x 60′ overall. He sells plans for this, as well as a 25-page instruction manual (information below). I used Stimson’s instruction as a departure point when I built my own shed, but I wanted a few modifications.
The original Stimson plans suggested assembling the bows with drywall screws as fasteners. This is fine for a temporary building—and inexpensive. But, within a year, several of the spacer blocks in my bows had cracked across the grain as a result of this construction. Dave now suggests through-fastening all of the spacer blocks.
To allow for quick disassembly, I used plywood gussets to join my “half bows,” and notched these to receive a ridgepole. I thought I was being original until I learned in reading The Gougeon Brothers on Boat Construction that I’d been beat by 15 years. However unoriginal, the concept works well, and has the added benefit of fulfilling the role of collar ties, as well.
Simple collar ties, however, are also a good option. A few years ago, Brooklin Boat Yard erected a bow-frame shed to house a 60′ P-class sloop. At 20′ high, this building was probably the maximum height for this type of construction, considering available lengths of lumberyard strapping. This shed would break apart into two 18 x 30′ units. Despite generous diagonal strapping, the finished building was a bit limber in a blow. Collar ties stiffened the structure considerably, although they also lowered the controlling height of the shed.
Here at WoodenBoat, our Friendship sloop, BELFORD GRAY, spends its winters in one of these buildings—probably the best example I’ve seen. The kneewalls, about 3′ high, are staked into the grassy substrate with generous lengths of rebar. The building is covered in white heat-shrink plastic, except for the first 4′ of the sides. These are sheathed in plywood, which adds great rigidity to the structure, as do the plywood endwalls, complete with hinged barn doors. These features also add a degree of permanence, which may or may not be desirable.
Heat-shrink plastic is marvelous stuff for a shed cover; well applied, it can be downright elegant. But there are other options, and David Stimson has laid down a few estimates of longevity: clear polyethylene, six months; reinforced poly tarp, one year; greenhouse plastic, three to six years; and canvas, five to ten years. But I’d stick with heat-shrink plastic; it looks great, shrinks very tight (the thunder of a loose-fitting cover can be unnerving and distracting), and lasts…well, the shed here at WoodenBoat is going on three years, and there are no signs of failure.
Since plastic has virtually no thermal mass, heating one of these buildings can be inconsistent. I haven’t tried this yet, but I think a sheathing of plastic on the inside of the building would create a good dead air space, making the building more energy-efficient.
A plastic-wrapped structure is essentially a sealed bubble, and condensation is a major issue; the shed must be ventilated. BELFORD GRAY’s home uses store-bought vents mounted in the endwalls.
My materials cost to build a bow-roofed shed was about$1 per sq ft in 1993, which is a substantial savings over many manufactured systems—which run from $4 to $15 per sq ft. My total labor time, with two people working, was about 20-25 hours.
Plans for a bow-roof shed are available from Stimson Marine, RR I Box 524, River Rd., Boothbay, MT 04537; 207-633-7252.
Kathy Bray
This boat barn is a no-nonsense permanent building with good access and ventilation.
A Boat Barn for All Seasons
by Ken Textor
Creating my own building for the storage, maintenance, and construction of wooden boats was quite different from other homes and barns I’ve built. The criteria for my “boat barn” had to take into consideration some special needs of wooden boat ownership: a space with adequate light and ventilation that wouldn’t create excessive drying; a handy and easily used working space with year-round access; and long-term thrift.
Oddly enough, thrift was one of the prime considerations for building my 22 x 38′ boat barn. Before the barn, I always relied on fitted canvas covers to preserve my three wooden boats through Maine’s long winters. As the cover for my 30′ sailboat began to wear out, I priced a replacement. Around $2,500 was the average quote. Looking 20 years into the future, I could easily see $10,000 being spent on several new covers for each of the boats. From my experience in residential construction, I knew I could build the shell of a building for less than that. Moreover, such a building would add permanent value to our property. Thus was born the idea of a boat barn.
Special boat-oriented design considerations were the driving forces behind the construction plan details. From the experience of other wooden boat owners who store their vessels indoors, I knew a concrete foundation was ill-advised. Concrete floor and sills will draw moisture out of the air, making the boat’s seams open up more than they would during open storage, one owner told me. Moreover, keeping a concrete floor clean is an impossible chore. And working on a concrete floor is hard on your feet, knees, and back.
So I opted for a gravel floor with a crushed stone surface. The gravel stays slightly moist year ’round, which helps keep drying of the boat to a minimum. There’s also just enough “give” in the crushed stone to keep chronic feet, knee, and back problems from developing. And, the gravel resists frost-heaving much better than the exposed ground Mother Nature usually provides. And the crushed stone on top of the gravel also prevents gobs of sand, sawdust, etc., from attaching to your shoes and being tracked around the shop or into the car and home. Most sawdust just falls between the stones.
For a foundation, I sunk creosoted posts 6′ into the ground. This is not only cheaper than concrete posts, it actually will increase the longevity of the structure. That’s because after you fasten 6 x 10″ hemlock sill beams between the posts, the wooden poles eliminate moisture problems. Concrete posts tend to “sweat” in the summer, forming a perpetually soggy spot where the beams and posts join. Wooden posts don’t sweat and, in my experience, they don’t wear out any more quickly than concrete.
Although 6 x 10″ sill beams may sound a bit excessive, my engineering tables called for at least that size because of other special boat barn considerations. First, I knew I had to build a structure without any center supports. Tractor-trailer boat haulers have enough problems maneuvering in relatively small spaces without adding more structures they must avoid. So posts were out. Additionally, I knew the barn’s loft floor would have to be at least 14′ above the stone-and-gravel floor, again to accommodate a large trailered boat. Thus all the weight of the barn had to be supported by the sills under the outer walls. With the creosoted posts set 8′ apart, the 6 x 10″ sills were a little better than adequate.
The cavernous open interior space also created other problems, not the least of which were large wind-loading surfaces, plus a long and potentially expensive clearspan for the loft floor. I solved these problems by using a solution from my days of building post-and-beam structures: the diagonal brace. Although I had ruled out a post-and-beam structure as too expensive, the diagonals normally used in such a building became extremely valuable. Sticking with 2 x 6″ spruce studs for the walls, I used cut-in 1 x 6″ diagonal oak braces at all the exterior corners, both uppers and lowers. Likewise, the 2 x 10″ spruceloft joists were locked in place with more interior 2 x 6″ spruce diagonal bracing. This added more strength to the entire building and has prevented any wracking from strong coastal winds. The diagonals also reduced the unsupported clearspan from 22′ to 14′ and made the loft floor available for all kinds of gear stowage and (someday!) a heated, dust-free paint and varnish room.
Having once worked in busy farm barns, I knew my boat barn’s design would have to include serious ventilation. A haymow in July is the last stop before Hades itself, and all that hull-drying heat can usually be felt throughout an ordinary barn. But in my boat barn, I specified the use of shiplap boards for the walls and a large cupola in the middle of the roof. This has worked extremely well. Even on the hottest summer days, the barn’s upper floor is no hotter than the air outside. The hotter it gets outside, the more the cupola literally sucks the air out of the building. Moreover, that open gravel floor constantly cools and moistens air that seeps in through the shiplap boards. Thus, the barn actually stays cooler than the air outside, sometimes by as much as 10°.
Without the worry of excessive drying, I didn’t hesitate to put lots of large, multipaned windows in my boat barn—ones I had salvaged from a local school. I was specifically looking for such multipane, thermally inefficient windows for two reasons. First, lots of small panes mean the occasional breakage common in heavily used woodworking areas is cheaper and quicker to fix. Additionally, thermally inefficient glass will tend to keep interior temperatures down.
With these school windows, there was the added bonus of the glass being extra thick, which keeps breakage to a minimum. The windows also allow some solar heating in the winter when I close the cupola and the morning sun shines bright and early.
Finally, in designing a building, 1 knew it would be impossible to foresee everything, particularly when jockeying boats around to best advantage. So I specified large access doors on three of the four walls. The biggest are the two hinged doors on the north side, which have a combined opening of 12′ wide and 13′ high. A 10 x 10′ sliding door on the east side has allowed me to remove the small boats when late winter frost heaves still block the north side opening. And a smaller hinged door (4 x 8′) on the south side allows me to put items like saw horses, sheets of plywood, and staging planks temporarily outside while I rearrange the work area inside.
Total construction time for this boat barn was 10 weeks. I built it alone, working about 60 hours a week on it. The total materials cost was $8,700 in 1994, including the hired bulldozer operator who spread the gravel and stone, and the post-hole digger who was a local power company subcontractor. The cupola was added after the first winter. It was built on the ground, disassembled, and then reassembled on the roof. A 4 x 4′ trapdoor positioned in the loft floor above the cockpit of our sailboat makes annual gear removal very easy. Access to the barn is gained through our potting shed, which is attached to another barn, which is attached to the house. Thus I no longer have to work on boats while exposed to the wind and weather.
Ken Textor, a writer and woodworker from Arrowsic, Maine, wrote about refastening in WoodenBoat No. 135.
A Final Note
Be sure to check local building codes and regulations before beginning any of these projects.
Small boat winterization guide
There are some important steps you need to complete before you move your boat into its winter storage. Follow our complete boat winterization guide for more ways to protect your craft from the elements and more.
Back in the 1970s I bought my first International Canoe (I named it HARM’S WAY because it was meant to be sailed fast). To move it around, I needed a long, narrow trailer and found one made by the R.J. Cox Company of Ohio that, with a little modification, would suit my needs well. Using dimensional lumber, I fitted it up with crossbars to which I could lash the spars and seat, and even double-stack it with the canoe below and a kayak or two above. HARM’S WAY has passed into other hands, but I still have the Cox trailer. I’ve renewed its double decking and, by adding 2×6 boards, turned it into a platform trailer that can handle anything: a skiff, a dory, a ducker, a faering, even an iceboat. The raised crossbar system can support whatever I can lift up onto it.
Making a trailer suitable for multiple boats
Photographs by the author
The overall look of my trailer may not be pretty, but the modifications are inexpensive and practical. The carpeted walkways allow boats to slide across the boards and make for safer walking when the trailer is wet. Note the two wood blocks near the front of the boards; these are beveled to catch the chines of my dory and skiff so that they are more easily centered on the trailer; the blocks are bolted to the boards and easily removed. The T-shirt-covered fenders on the back posts help to guide and center a boat as it is pulled up onto the trailer, while also protecting it from being damaged against the posts. The T-shirts prevent the fenders from rubbing against and potentially scuffing the boat’s paint.
My modifications to the trailer are sturdy enough that shallow-keel boats, such as my faering (which measures 18″ from the bottom of the keel to the turn of the bilge), can self-guide with gunwale-to-post contact, and be supported by the posts without the need of bunks. It’s a setup that can be built using readily available timber and galvanized decking hardware. The key is two 4×4 crosspieces U-bolted to the trailer frame, front and back. Shallow notches lock them to the frame of the trailer. At the ends of these crosspieces, vertical 4×4 posts are held in place, at the bottom, with BC post caps through-bolted in place. On each side of the trailer, each post is braced with 1×2s led diagonally between the posts, lag-bolted into place, top to bottom. Each of the four posts is further braced with a short 1×2 diagonal lag-bolted about 2′ from the bottom and about 2’ in from the end of the crosspiece. The top of the vertical posts are half-lapped to receive a 2×4 crosspiece bolted into place whenever a second tier is needed, for spars perhaps, or a second boat (these crosspieces can be easily set up and removed depending on need).
The top of each post is half-lapped to accept a 2×4 crosspiece bolted into place whenever a second tier is needed.
The posts can support an upper tier, serve as guides when retrieving a boat from the water, provide raised locations for lights, and offer steadying holds if you need to stand up on the trailer.
Making a walkway platform
Over the years I have also modified the bed of the trailer so that it can be used as a flatbed on which to move a snowblower, and so I can walk out onto the trailer when launching or retrieving a boat when I don’t want to immerse the wheels and their bearings. The sturdy, wide platform makes it easy to walk out along the trailer in order to lift and push the boat into the water.
I have left a gap between the boards on either side of the bunks so that I can raise them if I’m transporting a round- or V-bottomed boat that needs more support. Here the bunks are angled upward to make them more visible. When in use, they are set parallel with the boards and raised just enough to make contact with the hull.
The 4×4 crosspieces that were previously bolted to the trailer to support the vertical posts are notched in the center to take a carpeted 2×4. This does the job once done by the central rollers that came with the trailer, but which were poorly suited to supporting a lightly built boat. The roller brackets were, however, ideally placed to support a 2×4 laid flat on top of them. Once the 2×4 was bolted in place, I extended the platform on either side of it with lengths of 2×6 that I had left over from another project. These boards are screwed with #9 GRK 2 1⁄2″ framing screws to the 4×4 crosspieces front and back. I laid them so that between the boards placed on either side of the trailer’s bunks there is a 3″ gap—large enough for the bunks to be raised if needed, say, to support the bilges of a round- or V-bottomed boat. Raising the bunks does mean spending some time on my back beneath the trailer. Near the front end of the platform, I have removable lag-bolted blocks that catch the chine of my dory or skiff, allowing them to center themselves when pulled up. The whole affair is carpeted with indoor-outdoor carpet remnants and boat-bunk carpet. Finally, the back-end posts are protected with T-shirt-covered fenders, which don’t improve the overall look but do help to center a boat and guide it into place—the T-shirts prevent paint from being rubbed off by the fenders.
With the upper 2×4 crosspieces installed the trailer can be used to transport multiple items and boats. Here a peapod is carried on the upper beams above a Penobscot Salmon Wherry, which is resting on the flatbed bottom. Modifying a trailer with wooden additions makes it easy to add extras, such as the wooden cleat seen here.
With a little imagination and rudimentary skills, boat trailers can be modified to be more versatile and user-friendly. Sturdy posts let you carry more gear while also raising the taillights to keep them out of the water at the ramp and make them more visible to following traffic on the road. Walkways and platforms allow you to walk around dry-shod and with improved stability. Just because a stock trailer wasn’t designed to be a workhorse for all of your boats and gear, doesn’t mean that it can’t become one.
Ben Fuller, curator emeritus of the Penobscot Marine Museum in Searsport, Maine, has been messing about in small boats for a very long time. He is owned by a dozen or more boats: kayaks, canoes, a skiff, a ducker, and a sail-and-oar boat.
For several years, I’ve been on the hunt for the ideal camera bag, one I can use safely in small open boats. I often carry my Fuji XE 3—a midsize DSL mirrorless camera—and three zoom lenses, none of which is overly large, but neither are they small. I also like to carry an ND filter with adapters, a cable release, a few spare batteries, and a basic cleaning kit. Lots of bags can handle a setup like this, but I was looking for one that was as small as possible, well-padded, and easily accessed. And I needed it to be completely waterproof—this last requirement was what stalled the search.
Photographs by the author
The Camera Block is designed to fit snuggly inside the Waterproof Field Bag. The Block comes with dividers, although the yellow ones seen here are my personal dividers. Like the originals, they are attached by hook-and-loop fabric and can be moved or removed. The Block’s lid has a handle and a zippered closure, which I don’t use if the Block is inside the Field Bag and I want easier access to my camera gear.
Eventually, I came upon the solution: a messenger-style bag with a removable inner padded bag from Expedition/Units, a Bali-based company that offers several styles of packs and bags as well as associated accessories. I’d never heard of the company before I stumbled onto its website, but the Project M23 Waterproof Field Bag seemed like it might work for me. Actually, they pretty much had me at “waterproof.” I ordered one, and while I was at it, I also ordered the Project C40 Camera Block, a padded insert for the Field Bag. Both arrived in a little over a week. From ordering to delivery, communication was good.
Detachable straps on the back of the Field Bag transform it from a messenger bag to a bicycle handlebar bag; it can be opened and its contents accessed without removing the bag from the bike. There is a daisy-chain strap on the back as well as the front of the bag.
The construction of the Field Bag seems robust. The bag is made of waterproof AWPE 600 Ecofabric—a rugged material developed by Expedition/Units from recycled plastics—with welded seams. Wherever fittings are permanently fixed to the bag, such as the nylon-web straps, they are bonded as well as sewn. There is an interior pocket with an open pouch and a zippered section, which can still be accessed when the Camera Block is in place. For my intended use the size of the bag is near perfect: 11″ wide, 9.8″ tall when rolled down, and 3 1⁄2″ deep. The bag uses a roll-top closure. Here, the manufacturer has improved on this most simple of designs by attaching nylon webbing along the top edges, beneath which are two sets of magnets that help to line up the edges and crisply snap them together. For casual use I fold the top one time and use the single strap and plastic buckle to secure the opening. For a more secure and completely waterproof seal, I add a couple more rolls and cinch up on the adjustable strap.
The bag has a detachable 1″ nylon-webbing shoulder strap, which can be clipped to D-rings on either side of the bag. There are daisy chains on both the front and back of the bag and detachable straps on the back that allow the bag to be hung on the handlebar of a bicycle. The empty bag weighs 8.8 oz and is available in four colors—black, gray, sand, and olive green.
With the top simply turned over for quicker access to the contents, the Field Bag is very water resistant. If I’m worried about it being exposed to persistent rain or spray, however, I will put in at least two rolls and cinch down on the closing strap, then it is completely waterproof, whether standing upright or not.
The lightly padded Camera Block is made of recycled PET plastic that is flexible, lightweight, and water-resistant. It can be used independently and has a carrying handle on the top, but it is probably most useful when combined with the Field Bag. It fits snugly inside the bag, so it is best to insert it before loading it with gear. It has a zippered top, but I tend to leave it unzipped as the process of sealing the roll top of the outer bag snugs the lid down securely. The Camera Block is lined with a soft, padded, synthetic fabric and has three dividers secured by hook-and-loop, which can be moved around or removed entirely.
The combination and versatility of this two-bag system has worked well for me. I don’t always take my full camera kit on trips, but when I do I can’t think of a better way to keep it close at hand, safe, and dry.
Bill Thomas has been a custom woodworker, designer, boatbuilder, and teacher for more than 40 years. He’s also a Maine Guide and has taught sea kayaking in Maine and other locations. While on the water he takes many photographs to document his travels, illustrate his online posts, and provide images for his annually produced desktop calendar.
When you spend time on a small boat, you typically don’t expect luxury. You give up a plush couch for a well-worn, often damp cushion; swap cool air conditioning for the salty sea air; and fully accept that an overnight stay might mean using a lifejacket as a makeshift pillow. Life aboard a small boat might not be glamorous, but in my opinion, that’s all part of the magic.
Every now and then, however, you come across something that changes the expectation of “roughing it”; a small tool, trick, or product that slightly elevates your life on the water without making it too over-the-top. For my husband and me, aboard our wooden sailboat this summer, the Harpswell Island Designs pillow has been that something. It may seem like a small thing, but in our boat, where space is limited and every item needs to earn its keep, small things can make all the difference.
Photographs by the author
Harpswell Island Designs offers many stock patterns such as appliqué nautical signal flags and yacht club burgees as well as embroidered designs like the compass rose seen here on a 20″ × 20″ pillow.
The idea that one could maximize comfort without sacrificing function is what inspired Ann Mayer Grout to launch Harpswell Island Designs in 2022 in Harpswell, Maine. Ann is a local business owner who, like me, enjoys working on wooden boats and cruising around Quahog Bay. She’s combined a lifelong interest in nautical flags and burgees, a long career in the textile and production industry, and a desire for comfort, beauty, and practicality afloat, to come up with a product where form most decidedly follows function, but sacrifices nothing in so doing.
Like many boat owners, I’ve always been cautious about bringing fabric items onboard. Between the damp (and, in our situation, salty) air, small enclosed quarters, and rainstorms that sometimes leak through our wooden deck, fabric has a way of trapping moisture. However, Ann’s pillow covers are made exclusively from water-resistant Sunbrella fabric. Sunbrella is as durable as it is stylish, and has long been used for the covering of many boat cushions. It’s crafted to withstand harsh conditions under the sun, and to be on the water year after year. And it’s easy to clean: for smaller spills (even a cup of coffee) the pillows can be spot cleaned with a sponge and soap; if a more substantial clean is needed, they can be machine-washed.
The pillows come in two sizes, 20″ × 20″ × 6 1⁄2″ and 22″ × 14″ × 5 1⁄2″. Designs are either embroidered or appliquéd and can be ordered from stock or custom-created. The covers are zipper-closed, made of water- and stain-resistant Sunbrella, and easily cleaned.
The pillows come in an extensive range of styles and colors, making choice challenging. Stock designs include yacht club burgees, International Code flags, nautical-themed patterns, and Maine-inspired designs. They can also be custom-made with applique and embroidered designs. They are available in two sizes, 20″ × 20″ × 6 1⁄2″—perfect for sleeping aboard—and 22″ × 14″ × 5 1⁄2″, for hanging out in the cockpit. All the fabric edges are heat-sealed, all the covers are removable—fastened with a YKK zip—and the inserts are of non-allergenic, water-resistant microfiber.
Quality and comfort are at the heart of every pillow. Ann is committed to using USA-sourced materials, ensuring exceptional quality and durability that holds up season after season.
Putting the boat away at the end of the season is always a sad time, but this year we’ll be able to bring the pillows back home and use them through the winter months, bringing a little piece of the boat with us through the dark and cold.
Juliet Frederick and her husband Keith Frederick have restored NEREUS, a 21′ John Alden Sloop built by Harry Bryan in 2006 and enjoy sailing her from Harpswell, Maine. They frequently log their adventures on Instagram: @sailingthenereus.
For 30 years John Diamond has been a hobby woodworker, building furniture for the family: beds and bedside tables for his daughters, a desk, a dresser, an entertainment center, a music stand. But about five years ago, he and his wife, Justine, started watching YouTube videos of people building boats. “First we watched videos of people building wooden sailboats,” says Justine, “then we found cedar-strip canoes.” They were captivated. “We didn’t think we’d be able to use a sailboat or a rowboat, but a canoe was approachable, and we could see ourselves using it.”
Photographs courtesy of Justine and John Diamond
After several hours of searching through the stacks at the lumberyard, John (seen here) and Justine had found five beautiful western red cedar boards, which they were able to mill into 72 strips to build the hull of their Bob’s Special.
They began searching for a suitable design, something they could build at home, that was short and light enough to be car-toppable, but long enough to accommodate two paddlers. They settled on Bob’s Special, a 15′ canoe developed from the Chestnut Special, a 50-lb canoe advertised in the 1950 catalog of the Chestnut Canoe Company in Fredericton, New Brunswick. In 1993 Ted Moores of Bear Mountain Boats took the lines off an original Chestnut Special, and the following year Steve Killing modified and redrew the lines for the homebuilder. It is one of Bear Mountain Boats’ popular designs. “Of all the canoes we looked at,” says John, “it checked all the boxes, and was recommended as one of the most stable.”
Growing up in Westchester County, New York, Justine had paddled canoes as a youngster during family summer holidays in Nova Scotia, but John was less familiar with them. “He’d been in a canoe once, while on a family holiday in France,” says Justine. “He had no idea if he’d even like it.” But they were determined the canoe would be their next project and before they had even ordered the plans, they visited a nearby lumberyard where they were invited to take their pick from the stack of western red cedar boards. They spent hours pulling out boards, inspecting them for grain, color, and knots until they had five 17′ to 18′ flawless boards that the yard agreed to deliver free of charge.
John built the strongback in the basement workshop before he and Justine carried it up the stairs, outside, and around the house to their two-car garage. There they assembled it upside down before turning it over and leveling it.
From the outset, Justine and John had agreed that they would build their boat from scratch—no kit, no pre-milled strips. John had a well-equipped workshop with a table saw, router, and planer and the challenge of doing it all for themselves appealed to them. John had never milled his own lumber and nor had they worked with strip planking before but, John says, “YouTube is a wonderful and instructive resource.”
Building the extras
In August 2022, the cedar was delivered, and so were the plans along with CAD files for the molds. Justine is on the staff at Bergen Makerspace, a community learning center in Hackensack, New Jersey, where they had just taken delivery of a Shopbot CNC router. It had not yet been assembled, indeed was still in its packing case as a set of parts, but the center agreed that the Diamonds’ molds could be the first items to be cut. As they prepared the CNC router, which they built with assistance from another member of staff, John and Justine worked on preparing as many other parts as they could.
The stems (each composed of an inner and an outer stem) were laminated of ash. John steamed the ¼” strips and then, working quickly, bent them around the stem form. After they had cooled and the curve was set, he removed the laminates, applied epoxy to create the inner and outer stems, and reclamped both to the form with a layer of masking tape between them. The hull was strip-planked to the inner stems; the outer stems were fitted after planking was complete.
First came the business of turning the five cedar boards into 72 strips each with a bead and cove molding. Their basement workshop had its constraints. The only access was via an internal staircase or through some small ground-level windows. The room was 33′ long, giving only just enough space to mill boards 16′ long. After the boards came down through a window, they were planed to a thickness of 13⁄16″ and strips were then cut to a thickness of 1⁄4″; each was routered with a cove and bead. As they worked, John and Justine numbered each strip according to the board and the position on that board from which it came. “When we built the boat,” John says, “we book-matched each strip to the next, so the grain of any two neighboring strips was mirrored.” The finished strips went back out through the window and around to the two-car garage where the canoe would be built. John built the plywood strongback in the basement, constructing it in two halves so that he and Justine could carry it up the basement stairs to the garage, where they assembled it on adjustable legs to ensure that it was precisely level.
They also built as many other parts as they could: a pair of paddles with ash shafts and beaver blades and grips laminated of basswood and cedar; a pair of seats with ash frames and synthetic cane; the ash gunwales; and the decorative accent strips for either side of the canoe, which, says John, “took a lot of time, each strip has about 100 pieces.” John tried to get all the ash components out of a single board, but in the end there wasn’t enough wood for both halves of the gunwales, so he fashioned the outwales out of a 9′ board with a long scarf joint.
John and Justine decided not to use staples when planking the hull. Instead, each strip was glued to the one below, clamping blocks were placed inside the upper cove to protect its vulnerable edges, and then a bungee cord—attached to a clip—was wrapped around all the laid strips and tightened to apply pressure to the new plank as the glue cured.
As soon as the CNC router was assembled at the Makerspace, the Diamonds went over with their CAD files and, with the assistance of family friend Alan Zenreich and fellow staff member Dave Beckerx, cut the 13 molds and two stem molds out of MDF. They were ready to build the hull.
Planking the hull
John and Justine had decided to plank the hull without the use of staples. “We wanted to avoid the staple marks, but it did make the build more fiddly,” says John. With a 3-D printer he created some spring clips with hooks, to which he attached thin bungee cord. As each strip was glued to the strip below, it was held in place with the clips, clamping blocks were placed into the cove of the uppermost strip, and the bungee cord was wrapped down around the lowest strip and back up, applying pressure as the glue cured. John says he later learned that instead of the bungee they could have used painter’s tape; “it’s simpler and would have worked just as well.”
They stripped each side of the hull simultaneously, but as they neared the centerline they worked on just one side. Rather than weaving the two sides together herringbone fashion, the Diamonds had decided they would end with a straight line down the middle. The first side was straightforward: they laid all the strips, overlapping the centerline, and then, with an oscillating multitool, cut the straight line down the middle of the bottom. Each of the strips coming in from the second side, however, had to be cut to length and shaped with a block plane before being glued into place. For the final center gap (the whiskey plank), they glued two strips together, shaped it into the required elongated football, and glued it in.
As the strips neared the final layup, John and Justine stopped planking on the port side and instead planked only the starboard side. Then John cut the ends of the starboard planks in a straight line along the centerline of the hull. The port side was then finished until there was only an elongated gap into which John dropped a pre-fashioned two-strip “whiskey plank.”
Next, John and Justine had to cut the strip ends back to the stems. John fashioned a plywood guide with the same profile as the real stem, set it up alongside, and attached a piece of wood to the block plane so that, as he moved the plane down the strips, it followed the guide and correctly shaped the ends of the strips.
At last, they had a fully planked hull. Before turning it over, they sanded the outside using longboards with 80-grit paper and then applied 6-oz ’glass cloth saturated in epoxy. They spread the resin using mohair rollers and squeegees, applying four coats, sanding between each coat.
On launching day, Justine stands ready with the beavertail paddles, which John made. The two paddles are identical save in length: Justine’s is roughly an inch shorter to better fit her. The feature strip includes two diamonds, one each for John and Justine Diamond.
About a year after they had bought the cedar boards, the Diamonds turned over their finished hull and laid it in carpeted slings suspended from a pair of stands. There was still much to do, but they had something that looked like a boat. They sanded the interior with a random-orbit sander and laid 6-oz cloth with one coat of resin so that the weave of the cloth could still be felt, providing a slight non-slip surface inside the hull. Then all that remained to be done was fitting the seats, the gunwales, the thwart, and the cherry decks, and of course, sanding and varnishing, varnishing and sanding. By Thanksgiving 2023 the canoe was finished. The weather had turned and rather than launch in the cold, they took the canoe to the Makerspace to give a presentation on the build, and then tucked it away in the garage.
A delayed launching
The following spring, they pulled it out for the big launching. It was the perfect day: the sun shone, and the breeze was minimal. As they launched the canoe into the water for the first time, they spotted a 2″ blister in the epoxy in the middle of the interior. Then they saw another, and another. Their hearts sank. As the warmth of the sunlight hit the canoe, blisters were appearing in a 4′ section through the middle of the boat, gunwale to gunwale. It became evident that in that one area the epoxy resin had failed to cure properly. They took the boat home.
Not to be daunted, the Diamonds did the only thing they could; they fixed it. “We cut the fiberglass cloth at each end of the failed section, peeled it off, scraped off the remaining uncured resin, sanded back to bare wood, laid some new cloth, and applied fresh resin and varnish. It took us about six weeks and if you don’t know to look for it, the repair is barely visible.”
With two people aboard—here John and his daughter Kate—the canoe is well balanced. When a single paddler is on board, the canoe’s direction of travel is reversed, and the forward seat here, which is nearer to the center of the boat, becomes the paddler’s seat.
In June 2024, John and Justine relaunched LARK—“we’d built her on a lark,” says Justine, “so it seemed a good name.” Since then, they’ve had no further maintenance issues. They’ve taken LARK to lakes, reservoirs, rivers, and canals in New Jersey, New York, and Massachusetts, and they exhibited her at The WoodenBoat Show in Mystic Seaport, where they were awarded the honorable mention in the Owner-Built category. They are, Justine says, “continually exploring new water, often on a weekly basis.” And to the evident relief of both of them, John is as enamored of the boat as Justine is. “Paddling,” she says, “has become a passion for us both.”
Jenny Bennett is editor of Small Boats.
In late 2023 John and Justine Diamond gave a presentation at the Bergen Makerspace; it was videotaped and uploaded to YouTube as LARK—Building a Strip Canoe.
Do you have a boat with an interesting story? Please email us. We’d like to hear about it and share it with other Small Boats readers.
For the world of small boats, the past two months have seen both highs and lows. To begin with a high: During last month’s WoodenBoat Show, I got talking to Pieter Roos, curator of the Wells Boat Hall at Mystic Seaport Museum. Founded in 1929 as the Marine Historical Association, Mystic Seaport Museum has long been a leader in maritime history and preservation. Yet for the first two years of its existence, it had not one boat in its collection. That changed in 1931 with the arrival of ANNIE, an 1881 sandbagger whose 28′ hull supported a sail plan that stretched 68′ from the tip of its bowsprit to the end of its boom. From ANNIE, the museum’s boat collection has grown ceaselessly. It now holds more than 450 small American watercraft ranging from working boats to speedboats, from one-design sailboats to indigenous kayaks. Probably the oldest is an 1824 dugout canoe, the newest a Mini-Transat racer. For decades a few of the boats have been visible in the museum and shipyard and even on the waterfront where some can be sailed by visitors, but most of the collection has been kept in storage, most recently in the 19th-century Rossie Velvet Mill building across the street from the museum’s principal campus. Visitors could see the boats by appointment, but the museum had no way of displaying them. That is about to change.
Photographs by the author
Not all the boats in Mystic Seaport’s collection are traditionally built, but they all tell a story, such as the development of leisure and one-design sailing in the U.S. as revealed through sailboats such as the Sunfish and Jetwind dinghies seen here in the Rossie Mill building.
Since 2024, work has been on-going to convert 34,000 sq ft of the Rossie Mill into the Wells Boat Hall, which will house a permanent exhibit of some 170 of the museum’s small boats along with many of its 450 engines. Pieter has his work cut out for him. Not least of his challenges has been selecting the boats that will be included in the exhibit, “Even 34,000 sq ft gets gobbled up pretty quickly when your smallest artifact is a 6′ pram,” he says. “The treasure is so extensive, so wide, and so deep that you have to figure out how to present it. From the start, the concept has been to break it down into manageable ‘neighborhoods,’ each of which will be its own exhibit. So, for example, we’ll have ‘Sailing for Pleasure and Speed,’ ‘Evolution of Design,’ and a whole area devoted to engines. And we’ll be making use of technology so visitors can dig deeper if they want to. All the labels will have between 50 and 100 words, but for about 70% of the exhibits there’ll also be a QR code, which visitors will be able to scan to see history, photographs, drawings, even video.”
One of the more recent acquisitions, EVERGREEN, is a 20’-long 1910 E.M. White motorized canoe. Her 6-hp, two-cylinder inboard Eagle engine is original.
When I spoke to Pieter in June, he was excited to report that the hall’s renovation is nearly finished, and the plan is to open the Wells Boat Hall to the public as soon as fundraising can be completed. It will give Mystic Seaport Museum an interactive year-round offering and, says Pieter, will “allow us to tell stories that, thus far, we’ve not been able to share. For example, in the 19th and early 20th centuries the maritime world was a male domain, but there were a lot of women participating and we want to tell their stories. One of my favorites is about the first one-design sailboat race. A race for North Haven Dinghies held in North Haven, Maine, in 1887, it was called the Grand Dinghy Race. It was sponsored, advertised, there was a judge…pretty much all the things we’d recognize in a modern regatta. But there were only three contestants: two guys (both very experienced racers) and Ellen Hayward, who was an experienced sailor but didn’t have much racing experience. As soon as the race started, the guys got into a tacking and covering duel and totally missed the fact that Miss Ellen was about to eat their lunch…the first one-design race anywhere in the world was won by a woman.” It’s just one of the many small-boat stories that Pieter and Mystic Seaport Museum look forward to sharing with visitors.
The museum has 450 engines in its collection, many of them outboards. While there are a few foreign classics (I spotted at least one mid-20th-century British Seagull), most of the engines are American made. The Wells Boat Hall will have an exhibit devoted entirely to engines, which will include video and interactive displays.
On a less happy note, in early July came word that after 25 years, Duckworks Boat Builders Supply was closing its doors. The current management wrote, “This decision has not come easily. Rising costs, increased tariffs, slimmer margins, and increasingly complex shipping logistics have made it unsustainable to continue operating the business at break-even levels.” Sommer Ueda of Duckworks’ sister company, Gig Harbor Boat Works, added, “Duckworks has always been about more than just plans and supplies—it’s been a hub for creativity, craftsmanship, and community.” As designer John Welsford shared on the WoodenBoat Forum, “since way back…it’s been the go-to place for small-craft plans, fittings, and materials.”
As the Duckworks announcement filtered through the small-boat community around the world, many expressed sadness that there would no longer be an easily accessed and reliable source for plans. But, in the last week or so, there has emerged better news: Chuck Leinweber, who founded Duckworks back in 1999, has purchased the website’s domain name and will be reopening to sell plans and sails. When Chuck and his wife, Sandra, started Duckworks it was as an online magazine (a free-access archive can be found at duckworksmagazine.com). But four years in, he says, “we were making no money with it so started selling sailcloth, boat plans, and hardware. It was a great success, and on the advice of John Welsford, we soon separated the store from the magazine.”
Courtesy of Chuck Leinweber
Chuck and Sandra Leinweber started constructing their home in the Texas Hill Country in 1980 and, says Chuck, they’re still working on it. Part of the blue addition, seen here to the right, became the original Duckworks warehouse. Within a year of first selling parts, plans, and sails, Chuck and Sandra had moved the business to a 2,500-sq-ft building.
Chuck sold the business eight years ago but continued to help out part-time, mostly in customer support. When the decision was made to close he was, he says, “caught off guard. Almost all the designers whose plans we sold were friends of mine, people I’ve known for 20 years.” But it looks like the loss—at least of plans and sails—will be short-lived. Chuck hopes that the website, duckworks.com, will be live by September 1, 2025, but until then is happy to take orders for plans via email; contact him at [email protected]. “We’ll be offering both custom and ready-made sails,” he says, “and the biggest collection of boat plans in the universe.” A happier ending and the promise of a bright future for Duckworks customers everywhere.
Of all human senses, it is said that smell is the most evocative: the unexpected waft of perfume that brings back the long-missed presence of a loved one, the subtle odor of mustiness that transports you to a little-used summer camp of childhood, the lingering hint of newly baked bread that recalls a grandmother’s kitchen…. For Dylan Spaulding, the smell of fresh-cut cedar carries him straight back to childhood memories of his father.
Dylan grew up in rural New Mexico, a state with little association with boats or boatbuilding, but from an early age he shared a love of woodworking and then of boats with his father. His father had grown up in New England and before moving to New Mexico in the 1970s had worked as a carpenter at South Street Seaport and the Metropolitan Museum of Art in New York. When he moved west, he continued working with wood but, says Dylan, “mostly doing carpentry and shop displays; work that didn’t satisfy his creative side.”
Photographs by Dylan Spaulding
There is an old adage among boatbuilders that you can never have too many clamps and when it came to fitting the outwales and inwales on his Northeaster Dory, Dylan proved the saying true, using a combination of long bar clamps and individual spring clamps. The puzzle joints—visible in the starboard strakes—are standard in CLC kits; they are easy to align, and require minimal clamping pressure during assembly.
When Dylan was in third grade, the family moved to Essex, England, to live on a 31′ 6″ Maurice Griffiths–designed Golden Hind his parents had bought there. For a year, the four of them—Dylan, his mother, father, and 15-year-old brother—sailed the cutter up and down England’s East Coast, across the English Channel, north to Copenhagen, and, for the winter, to northern Holland to tie up alongside a sailing barge in a canal. “My brother hated being cooped up on a boat with us, and my mother, who was a New Mexico native and had no prior sailing experience, had had ideas of Mediterranean cruising, not Baltic winters. In retrospect, I realize my father also had very little experience. It was before the digital age, and our only source of weather forecasts was the crackly BBC radio broadcasts; navigation was all dead-reckoning and paper; and we had an analog depthsounder on which the needle went round—and round—and if you didn’t know how many rotations it had done you couldn’t be sure if you were about to hit bottom or were in deep water. We frequently ran aground.” For eight-year-old Dylan, the year on that wooden boat in Europe was “a formative adventure.”
Once construction was complete, Dylan turned the boat over to paint the hull and fit a bronze half-round strip to protect the skeg when beaching.
Some five years after their return to New Mexico, when Dylan was 13, he and his father decided to build a Rushton Wee Lassie. The building process had been documented in a 1991 article by Mac McCarthy published in WoodenBoat magazine, and they had found a table of offsets in Atwood Manley’s book, Rushton and His Times in American Canoeing. Dylan lofted the patterns for the molds, and he and his father built the canoe of strip-planked cedar. “I spent much of my eighth-grade spring break gluing cedar strips together,” recalls Dylan. “To this day, the smell of freshly sawn cedar takes me back to my dad’s shop and that project.” Dylan still owns the canoe. It hangs in his garage, above his own boatbuilding workspace.
A few years after they built the canoe, father and son tried their hands at some stitch-and-glue construction and built a Cape Charles Sea Kayak, referencing two more articles in WoodenBoat magazine. When finished, they used the boats together, forging memories far beyond the workshop. “One of the memorable trips,” says Dylan, “was to the upper lakes of Glacier National Park, where my father and I floated silently, the lake to ourselves, watching bald eagles in the trees, and camping.”
On launching day in November 2024, Dylan’s son—who had not been born when Dylan embarked on the building project—was proud to be PETRICHOR’s first passenger.
Twenty years later, in 2015, Dylan’s father passed away from cancer. Almost immediately Dylan decided to build another boat. “It felt like something I needed to do, partly in his memory.” He wanted to build something more substantial than a canoe or kayak, but remembered the enjoyment gleaned from a small boat. “I wanted to sail, but also recalled how great it was to cartop a lightweight boat and travel to locations farther from home,” he says.
He settled on the Chesapeake Light Craft (CLC) Northeaster Dory. Although it would need to be transported by trailer rather than on top of a car, Dylan believed the design ticked the rest of his boxes: it would be suitable for use on the various bodies of water within a few hours’ drive of his home in northern California, and was large enough for “serious boat camping and bigger water” but light for its size and capacity. He ordered a bare-hull kit from CLC.
During the years spent on the project there were periods when Dylan was unable to work on the hull itself. He used those times to pay attention to the details and to learn new skills: metalwork so he could fashion his own hardware; marquetry so he could add complementary padauk inlays in the thwarts and mast partner; and sparmaking.
“I hadn’t done any real woodworking since I was a teenager, so I decided to assemble the hull from the kit but make the rest from scratch to allow room for customization and creativity, and to challenge and develop my skills. I started out with very few tools, but finished with the equivalent of a simple woodshop crammed into a single-car garage.” Much of the work, he says, spilled out into the driveway, “to the amusement and confusion of our neighborhood.”
For the most part, when fitting out the bare hull, Dylan followed CLC’s design—spacered inwales, balanced lug rig, daggerboard and rudder assembly—but added his own touches to suit his taste and to give the boat traditional appeal. “In a way, stitch-and-glue felt like cheating, because the CLC kits go together so easily, even for beginners. I wanted to reacquaint myself with the skills my dad had taught me as a child but also to learn hand-tool skills that I hadn’t gotten from him. It led me to overthink at times and render some parts of the project more elaborately than they needed to be. For instance, I didn’t like how the CLC outwales were simply rounded off at the bow, so instead I brought them together with a compound miter joint.” He installed wooden belaying pins for the lugsail’s halyard and downhaul, wrapped the tiller with decorative knotwork, leathered the mast collar, and used bronze cleats where cleats were necessary. His spars came out of a single spruce pole—“salvaged from a San Francisco fireman’s ladder and gifted by a friend.”
To achieve a more traditional look, Dylan fashioned silicon-bronze-cheeked blocks, handworked anti-chafing leather parts, and used Duckworks’ Raid Braid for the running rigging; elsewhere he stained three-strand synthetic line to simulate manila rope.
Inspired by correspondents on CLC’s online forum, and by articles in Small Boats, he added sliding side seats to create a sleeping platform. The seats can also be removed so that, following designer John Harris’s advice, Dylan can sit on the floor to steer; he has yet to decide whether he prefers the seats or the floor. He added extra tiedowns for dry bags, stained synthetic line for his painter and anchor rode, made his own bronze-cheeked blocks, and fashioned a leather bailer as described by Ben Fuller.
Dylan began building his Northeaster Dory in 2017, but it would be 2024 before he was finished. Life, it seems, rather than lack of skills, was the prime delayer in the project. “I enjoyed the building, but I couldn’t always find uninterrupted blocks of time to work on it. I got married, we purchased our first home and had a child, I changed jobs, and then, like everyone else, waded through the pandemic.” At times, he says, the slow pace was frustrating, but it was also good to have the project in times of stress—“coming back to the boat was always a relief.” In the beginning, he reflects, it was “somewhat daunting to take on a project of this magnitude without my woodworking father behind me,” and when he found himself adjusting to fatherhood in his own right, building the boat seemed all the more poignant. And, says Dylan, when he wasn’t physically working on the boat, he was mentally planning next steps. “Building the finicky parts from scratch required honing my skills, learning many new techniques, and mastering tools my father had managed, one by one as they became necessary.”
Courtesy of David Leonard
PETRICHOR and Dylan making the most of a gentle breeze at the start of their first summer together.
The boat was launched in Sacramento, California, in November 2024. Dylan’s son, who had grown up enough to help with some of the final sanding, was proud to be the boat’s first passenger. The aroma of wood, glue, and paint no longer hangs in the garage, but when Dylan came to name the dory, it was another scent from childhood that came to mind. “Growing up in the desert, the scent of earth after rain brings me a sense of relief; this build did that too. The scientific name for that scent is Petrichor—it seemed appropriate.”
Jenny Bennett is editor of Small Boats.
Do you have a boat with an interesting story? Please email us. We’d like to hear about it and share it with other Small Boats readers.
When I arrived in Maine 30 years ago, I realized one is never far from water: dozens of rivers, thousands of ponds and lakes, and more than 3,000 miles of coastline beckon the small boater. After sampling kayaking, canoeing, and sailing, I finally settled on sailboats as my primary form of waterborne conveyance, challenge, and fun. But over the years, as my bones and joints (particularly my knees) became creakier, I realized that land-based fitness options were fading, and I should look for an on-water alternative. It was time to try rowing.
There are many production rowboats available, so I had plenty of choices. My most important criteria were seaworthiness and durability: I wanted to take the boat out on the ocean and be able to handle some swell and chop, but I also wanted to land on rocky shores without worrying about banging up gelcoat or epoxy. The boat needed to be big enough to handle sufficient gear for a week of not-too-rugged camping, and a sliding seat would be great both for a full-body workout and because the power generated would allow me to travel lengthy distances despite having a heavier boat. After a good deal of research, the Whitehall Spirit Tango 17 seemed like the perfect boat for me, and I purchased one in 2020.
Photographs by the author
The Tango 17’s lines—narrow beam, fine entry, deep skeg—help to give it excellent performance under oar, and despite such slenderness I’ve also found that there’s more than enough space on board for me and all my gear when I’m camp-cruising.
Modern construction with traditional heritage
The lines of the Tango 17 reflect the traditional Whitehall boats that inspired it. Beginning in the 1820s, Whitehalls were the water taxis of New York City where both speed and seaworthiness were valued. Like its classic forebears, the Tango 17 features a fine entry, a steep stem, and a shallow full-length keel that ends in a slightly raked wineglass transom. The thermoformed copolymer hull is molded to mimic traditional lapstrake construction and the overall result is an easily driven, seaworthy boat that is also beautiful. My Tango 17 almost always draws curious onlookers and compliments at a dock or boat ramp.
Manufactured by Whitehall Rowing & Sail in Victoria, British Columbia, the Tango 17 comes in at an even 17′ overall with a waterline length of 16′ 5″, and a beam of 3′ 10″. It has an overall height of 26″, hull depth of 18″, draft of 6″, and displaces 200 lbs when empty. Whitehall Rowing & Sail makes a 14′ version called the Solo 14, with a single rowing station, but I wanted to be able to row with another person and to carry more gear when camping solo (the published carrying capacity of 800 lbs allows for more than enough food and equipment).
With two people rowing, we managed to settle into an easy stroke that propelled the boat at a comfortable 4.65 knots. In a sprint, we reached 5.09 knots—even with our modicum of rowing skill.
The hull’s copolymer plastic, an almost maintenance-free material, requires no painting, waxing, or other treatment. The manufacturer describes it as being very tough—my boat has banged up against enough things to verify that this is, indeed, the case—and an optional reinforced keel with stainless-steel keel strip is also offered. The trade-off for such tough material is weight: the Tango 17’s 200 lbs is hefty compared to some other similarly sized fiberglass or wooden boats. However, with only 46″ of beam and the traditional full keel, it can still cut through the water at a decent speed. The boat’s weight means that it is far from cartoppable, and it takes two fit adults to lift it from the ground onto a trailer, but it is easily launched and recovered using, for example, a Trailex SUT-350 trailer. I use a small truck to tow my boat and trailer, but the combination could easily be pulled by a considerably smaller vehicle.
The biggest contributor to speed and distance covered is the Tango 17’s sliding-seat gear. Plastic, ergonomically shaped seats mount on rails affixed to molded supports; the plastic stretchers can be adjusted to accommodate the height, fitness, and shoe-size of the rower; hook-and-loop straps hold the rower’s feet to the stretchers. The gated oarlocks are outrigger mounted, with a pin-to-pin width of 63″. Carbon-fiber sculling oars are highly recommended for the Tango 17, and I opted for the 9′ 6″ oars with hatchet-style blades. The first time I used them, I was amazed at the power they can generate with so little weight—each oar weighs only 1.43 lbs.
When rowing solo and with no gear on board, I like to use the forward rowing position and balance the boat’s fore-and-aft trim with two or three 5-gallon buckets of water.
The boat includes many well-conceived details: the sliding seats can be removed and replaced by two fixed seats that snap into place on two molded risers; when not in use the seats stow flush to the floor beneath the sliding seats. The cockpit floor, decks, and fixed seats have generous nonskid patches. Small brackets—four on each side—are screwed to the interior face of the hull to hold the plastic battens that support the (optional) boat cover. There are recessed mooring eyes in both bow and stern. An easily accessed plugged drain hole in the center of the boat facilitates cleaning and ensures that water does not collect in the boat if left upright and uncovered. Numerous small mushroom cleats and tie-downs—suitable for up to 3⁄8″ line—are placed inside the boat beneath the gunwales and on the small bow and stern decks; I would prefer these to be slightly bigger to accept thicker lines, but Whitehall Rowing & Sailing does offer suitably sized fenders and dock lines as optional extras. Finally, there is an optional transom motor mount for an outboard motor of up to 25 lbs in weight.
The only significant modification that I’ve made to my Tango 17 is to build a stowable sleeping deck. The mounts for the sliding seats obstruct the usable floor space and would seem to preclude sleeping on the Tango 17, but about 3″ beneath the inwale is a 2″-wide lip, wide enough and strong enough to support a sleeping platform made of 1×6 tongue-and-groove pine boards held together by shock cord. With the sleeping deck so high in the boat, I was concerned that stability would be an issue, but it is not so. The boat’s initial stability is certainly a little low (though it’s not nearly as tippy as a canoe, kayak, or racing shell), but it firms up nicely after 10° or 15°, and stability has never been a problem for me while sleeping on board. The 6′ platform sits flush with the 2′-deep stern deck, creating an 8′-long sleeping space. I use a one-person backpacking tent and have a single board several feet forward of the sleeping deck to serve as a table. While I have rowed with the deck in place, it raises the center of gravity and noticeably decreases stability while under way, so I don’t make it a practice; it folds and stows easily.
The Tango 17 fits the Trailex SUT-250 trailer well, and although the boat is not light—to load it onto the trailer on land requires two fit adults—retrieving and launching on my own is straightforward.
The Tango 17 performance
The Tango 17 performs well. Last summer I found myself in a heavy chop combined with a 3’ swell: the boat handled it well, rising and falling gracefully with the waves and, with more than enough freeboard to weather the chop from any direction, did not take on any water. The hull tracks beautifully in flat or choppy water. The boat’s double-hull construction gives it positive flotation when swamped or capsized and, while I’ve not swamped it—unintentionally or otherwise—I have re-entered from the water by climbing over the side when the boat has been both fully laden and almost empty.
To measure speed, a friend and I conducted time trials on a local pond. Heading into a wind of about 12 knots with a very slight chop, the two of us (reasonably fit but with only a modicum of rowing skill) sprinted for 200 yards at 5.09 knots, close to the manufacturer’s claimed top speed of 5.5 knots, while a stretch of comfortable rowing at an all-day pace only dropped us down to 4.65 knots. For one person with gear, we measured the sprint at 4.21 knots, and the comfortable rowing at 3.78 knots. With no wind, I’ve been able to solo row a 4-mile passage at 4.17 knots. When I row by myself and without significant gear, I balance the boat fore-and-aft by using the forward rowing position and placing two or three 5-gallon buckets of water in the stern.
The Tango 17 checked a lot of my boxes: sliding seats for a full-body workout; two rowing stations so I can row solo or with a companion; built-in flotation for safety; rugged hull materials for beach landing; plenty of room for all my gear when camp-cruising; and the sweet lines of the classic Whitehalls that inspired its design.
With its long-straight keel, maneuverability is not a forte of the Tango 17, and the 9′ 6″ oars are not immediately graceful for the novice rower, but I have found that with practice, I can effectively work the oars to turn the boat in not much more than its own length. Furthermore, on a trip in 2024 along Maine’s Bagaduce River, well-laden with gear and quite often rowing against wind and tide, I was happy with the boat’s pace—the speed and confidence generated by the Tango 17 make it a joy to row in a wide variety of conditions.
I will never forget my first outing in the Tango 17. After an hour of rowing, I hopped out into the shallows of a local pond, fully expecting the usual soreness that comes with middle age and decades of pushing my body hard. I was amazed: no pain, no aches, just the satisfying sense of having accomplished a great workout. Since then, I’ve had many beautiful days and nights on the water, happy in the knowledge that I’m in my Tango 17, a safe, fun, and capable boat.
Davis Taylor lives in Bar Harbor, Maine, where he has sailed and rowed for the past 30 years. He enjoys being on any kind of boat, but has definitely found that the smaller the boat, the more it gets used and enjoyed. You can read about his adventures camp-cruising in his Tango 17, AURELIUS, in “The Bagaduce River by Rowboat.”
The Tango 17 is available from Whitehall Rowing & Sail of Victoria, British Columbia; price before options $18,193 CAD/$12,995 USD.
Is there a boat you’d like to know more about? Have you built one that you think other Small Boats readers would enjoy? Please email us your suggestions.
In the 1970s boatbuilders used polyester resins to build fast racing canoes and very light recreational ones—it was not unusual for a modern canoe to weigh about half of the then-common wood-and-canvas canoes and the ubiquitous Grumman aluminum canoes. As the decade unfolded, boatbuilding materials and techniques developed fast, nowhere more so than in the art of cedar-strip building. In 1975 came David Hazen’s newsprint booklet and plan set, The Stripper’s Guide to Canoe-Building, and a year later Gil Gilpatrick’s Building a Strip Canoe was published. But it was the Gougeon brothers’ development of user-friendly, wood-compatible epoxy, along with their seminal book, The Gougeon Brothers on Boat Construction, also published in 1979, that propelled strip building into the mainstream of amateur boatbuilding. Small companies providing strip-planked boats, strip-building manuals, canoe plans, and kits began to appear.
In 1983, Ted Moores of Bear Mountain Boats produced a canoe kit for home builders and published Canoecraft—a comprehensive guide to building fine strip-planked canoes. A year later in Bristol, New Hampshire, Michael Vermouth founded Newfound Woodworks. To begin with, Vermouth’s focus was on the manufacture of custom doors, windows, cabinets, and furniture. But, when he came upon Ted Moores’s book and built two canoes from accompanying plans, he moved out of furniture making and into boatbuilding. As interest in strip building grew, Vermouth began milling cedar strips for amateur builders and for other suppliers like Bear Mountain Boats. Then he started selling epoxy, fiberglass, ash for gunwales, before ultimately deciding to supply full boatbuilding kits to people who “wanted to build their own boat but didn’t have all the millwork equipment necessary to produce quality strips, gunwales, decks, stems, etc.”
Photographs by Jenny Bennett
Even at 79 years old, I can comfortably carry, launch, and recover the Otter by myself.
Forty years later, Newfound Woodworks—now owned and run by Rose Woodyard and Alan Mann—continues to sell quality milled cedar strips, epoxy, fiberglass, building tools, plans, instructional books and CDs, and complete kits for nine canoes, sixteen kayaks, and nine rowboats. Among the canoes, the second smallest is the 11′ 9″ Otter designed by Hans Friedel of Sweden, who has also designed four of Newfound Woodworks’ kayaks.
The Otter’s design
For several years, I have admired the Newfound Woodworks booth at the annual WoodenBoat Show in Mystic, Connecticut. Rose and Alan always have several of their completed boats on display, and I have been struck by the quality of their workmanship; indeed, they have received the award for Best in Show, Professionally Built Manually Powered Boat for the past six years in a row. So, when I was invited to try out the Otter at the 2025 show, I jumped at the chance.
Thanks to the Otter’s generous beam, boarding from a floating dock is relatively easy—even for a less nimble paddler. From here, I picked up one of the paddles to use as a stabilizing bridge to the dock, and turned through 90° to sit on the canoe’s seat.
The Otter is a solo canoe measuring 11′ 9″ × 32 1⁄2″ and weighing just 35 lbs. It has a load capacity of 340 lbs, so is well-suited for larger paddlers. The ’midship depth is a little more than 11 1⁄3″ and the boat’s sheer rises at both ends to a height of 17 1⁄8″—high enough to give a pleasing appearance, but not so high that a paddler will be badly affected by wind. With 1″ of rocker on the hull’s modest length, the Otter spins easily.
The canoe is available as a complete kit, which includes plans, construction notes, mold forms, construction pictures, coved-and-beaded 6′–10′ northern white cedar strips, full-length western red cedar strips, aspen strips for accents, ash outwales and inwales, ash thwart, cane-and-ash seat, seat cleats and hardware, ash stem, cedar deck material, fiberglass, epoxy, epoxy-application tools, and varnish. You can also buy just the plans, or the plans and the strips and complete your own outfitting.
The seat is hung from the gunwale in traditional canoe style, and I was able to kneel in front of it, resting my sit bones on its forward edge and tucking my feet beneath.
The morning of my trial paddle was calm. Alan and I walked the canoe from the booth to the float via a narrow walkway. Although the two of us worked together, the boat is so small and light that one person could easily carry it slung on a shoulder. Together we lowered the boat into the water. We were mindful that it was a display boat and didn’t want to risk damaging it, but, again, I could have easily put it in by myself, picking it up by one of the gunwales amidships.
The Otter’s relatively generous beam lends a stability that allows a less nimble paddler (at almost 80, I am one of these) to board easily while bridging a paddle to a float or to the land. A paddler could also straddle the canoe in the stern and then drop into place on the caned seat.
While I was paddling from the seat, a single-blade paddle gave me good control of the boat. I did notice a difference in performance when using either the big-bladed or the smaller paddle—the latter required less correction when running straight. Nevertheless, the canoe was responsive and maneuverable with either paddle.
The seat is hung from the gunwales in traditional canoe fashion, which allows for paddling while seated or while kneeling with sit bones braced against the forward edge of the seat. Other small solo canoes, including the two Wee Lassies in the Newfound lineup, have no space for kneeling because their low seats are fixed to the bottom of the hull; in such boats only double-bladed paddles are used for propulsion.
Otter has quite a flat bottom and felt pretty steady when I got in. When I leaned, her firm bilge came into play, making it difficult to put the gunwale into the water. I was happier kneeling because I felt more attached to the canoe and could control heel easily.
Sitting high on the seat, I tried the Otter with my Greenland-style double-bladed paddle. Its performance was impressive for a canoe so small—with only a modicum of effort I was able to hit 4 knots and could turn it almost 90° with just a single stroke.
Kneeling and seated paddling
I had with me a couple of single-bladed paddles: a 63″-long Wabanaki-style paddle with a 29″ × 6 3⁄4″ Beavertail blade; a 58″-long small Beavertail with a 26″ × 5″ blade; and a double-bladed take-apart Greenland-style paddle measuring 113″ with 35″ × 3 1⁄2″ blades. I first tried the boat from a kneeling position, leaning back against the forward edge of the seat and paddling with a single blade. Rose and Alan suggest that the canoe might require a small external keel to improve tracking with lighter loads, so I was surprised by how easy it was to keep it running straight with a modest J stroke. The breeze was quite light so I was unable to judge the effect of wind on the canoe, but I could easily push it along at about 3 knots. The real fun, however, was in taking advantage of its maneuverability. As the old saying goes: the Otter would turn on a dime and give you change. Otter is a dancer; if I had good freestyle technique, I’m sure I could have done some fancy turns with the gunwale just above water. Kneeling did let me easily heel the boat to help in the turns, although unlike when solo-paddling larger canoes—either solo or tandem—I didn’t need to heel the canoe to get in a decent stroke when going either straight or turning.
Next, I sat up on the seat and continued to single-blade. I’m not a big fan of using canoe seats other than in a traditional wood-and-canvas canoe where there are some ribs on which to brace my heels. In a smooth-finished boat such as the strip-built Otter and molded composite canoes, there are no such ribs, and I missed having even those small edges against which to brace. Were I to build an Otter, I might build-in a little heel brace. Nevertheless, I single-paddled from the seat for a while and found the Otter as responsive as before.
The open gunwale makes it easy to drain any accumulated water.
I could easily paddle with either blade, but I found the longer, big-bladed Wabanaki paddle overpowered the canoe a little, needing a bigger correction J to run straight. The smaller paddle was much more satisfactory whether doing a J or various underwater recovery strokes.
Double-blade versus single-blade performance
I then put together my double blade. Single-blade techniques require a steering element that shortens the time through which propulsion can be applied, so I wasn’t surprised that I could now keep the canoe running somewhere above 3 knots. What did surprise me, however, was that I was able to hit 4 knots by leaning into the stroke a little. Such speed shouldn’t be possible in a boat this short, but there is enough volume in the ends to keep it from squatting. When it came to maneuvering, I was gratified to find that, with the long double-bladed paddle, I was able to turn almost 90° with a single stroke.
Returning to the dock to meet up with Alan, I noticed that despite my best efforts there was some water in the boat; it had no doubt dripped from the paddle. What little there was I could have sponged out, but with the open-gunwale construction, it would be easily drained once the boat was on land. As we lifted the canoe out, I realized that had I wished to leave it in the water, there was nowhere to attach a bow or stern line. Were the boat mine, I would drill small holes into the decks to take painters—a minor addition to a sweet boat.
The Otter is light enough for a solo carry, roomy enough for one person and their gear or even a small passenger, and sweet enough for easy overnight trips on isolated ponds or quiet creeks.
The Otter would be an ideal little canoe for poking up creeks, marshes, and estuaries; dropping a fishing line on a calm lakeside evening or morning; or for carrying into a remote pond like the pack canoes of a century or more ago. I greatly appreciated being able to choose between sitting or kneeling and with the generous carrying capacity, the Otter could easily handle a light overnight pack or a calm dog or child.
Ben Fuller, curator emeritus of the Penobscot Marine Museum in Searsport, Maine, has been messing about in small boats for a very long time. He is owned by a dozen or more boats: kayaks, canoes, a skiff, a ducker, and a sail-and-oar boat.
The Otter solo canoe is available as a complete kit from Newfound Woodworks, $2,250. Plans with full-sized multiple drawing sheets that can be contact-cemented to 1⁄2″ MDF and then cut to size are also available, $110.
Is there a boat you’d like to know more about? Have you built one that you think other Small Boats readers would enjoy? Please email us your suggestions.
Some things I was able to imagine: I imagined that training for the race would be a bonding opportunity for me and my 38-year-old son Ben; I imagined a fine-lined rowboat slicing through lumpy seas and skimming over flat water; I imagined a test of physical and mental endurance; I imagined that, at the age of 69, rowing 70 miles would be unpleasant and painful.
What I was not able to imagine was the fire in my palms, the thickness in my thighs, the blaring in my back. Nor did I foresee the anticipated relief of the final approach to the finish turning into the most grueling leg of the race.
In the hours before the race, Ben and I had focused on rigging each piece of gear. Nineteen family members and friends had gathered on a pebbly beach, bubbling with laughter, their faces lit with excitement. Surrounding us, nearly 100 human-powered boats were organizing for the starting horn that would announce the 48-hour period in which they had to complete the 70-mile course. We had made it; we were part of the 2025 SEVENTY48.
The long road to Tacoma
I had first thought of taking part in the SEVENTY48 when my father and I attended the Port Townsend Wooden Boat Festival in 2019. He and I were building a wooden gaff cutter at the time, but when I heard about the second annual SEVENTY48—a time-limited race from Tacoma, Washington, to Port Townsend, Washington; 70 miles within 48 hours—I was captivated. There were only two barriers between me and the start line: I didn’t know how to row, and I had no boat in which to learn. But I was hooked.
Janine Herbertson
This model, at a scale of 1:4, was the last in a series of development models that enabled me to visualize the design and refine the lines. Thin wooden battens helped to produce fair curves, and the station molds generated patterns for the full-sized molds. My father, Gary (left), was interested in the process and always happy to discuss the pros and cons.
In my mind I ran rowing simulations of quartering into the waves, or feeling them rolling in off the beam, or surfing down their faces. I saw ripples, rollers, breakers. I imagined the worst conditions in which a boat could possibly be rowed, and how a rockered hull with full bilges would bob over the waves. I envisioned a long boat rowing through glassy conditions, and how the water would split open at the bow, gurgle along the sides, then heal together as the stern passed by. A boat design slowly came together in my mind, and I looked for it among the many plans offered online. Established boats did include some of the features I had visualized, but none of them had everything. I would have to design and build my own.
I fantasized for four years and then, eventually, spent several months drawing lines and building increasingly large models until, at last, I had what I considered the perfect boat for the occasion: a 22′ rowing wherry strip-planked in 1⁄4″ poplar, and sheathed with 6-oz fiberglass cloth set in epoxy both inside and out. It had high fore and stern decks, a plywood coaming, accessible flotation compartments fore and aft, and a breakaway skeg. It was built for two rowers, but could be used for solo rowing during training. I installed Piantedosi RowWing rigs, which have seats that remain fixed while the outriggers and stretchers slide—they promised a powerful rowing stroke without causing the boat to pitch out of trim.
Samantha Stettler
Ben, left, and I coated the 1⁄8″ plywood decks in 6-oz fiberglass cloth set in WEST Systems epoxy. The hull’s fiberglass-wrapped monocoque skin distributes loads without the need of frames other than four bulkheads—two in the bow, two in the stern. These enclose airtight flotation compartments in both ends, accessible by waterproof deck hatches. During the race, we used these compartments to store tools and spare parts.
We launched OTTER in Lake Mendocino, the closest body of water to my home in Ukiah in Northern California. Ben and I were exuberant as we climbed aboard. But instead of rowing, our oars clashed as if in some aquatic sword fight. We couldn’t even row away from shore. We each tried to row on our own, only to prove that neither of us could manage the 9′ 6″ oars in their sliding riggers. We had had no idea that rowing would be so challenging.
We persevered. After six practice sessions I thought, “I will eventually learn how to do this.” After 15 sessions I realized, “I’m starting to get this.” Then came Ben’s unexpected heart surgery, a devastating setback, but eventually we would be grateful for another year of training.
At last, we were in Tacoma and felt ready. Ben and I stowed all of our gear for hydration, navigation, safety, and foul weather. Then six of us lifted OTTER off her stands and into the cold water. Ben and I stepped aboard.
Ben, rowing stroke, gave the command, and we nosed our way toward the race fleet. It felt like the end of a long migration, finally settling in with the gaggle of boats to which we belonged. A canoe slid by with more than a dozen young women singing as they paddled; near us was a decked catamaran with four people seated on an elongated bike frame ready to peddle their way to Port Townsend. Racers with backpacks stood casually on paddleboards. Kayak paddles flashed like dragonfly wings. Rowboats held position in the gentle current.
The shouts and cheers of onlookers grew louder, climaxing with the final countdown to the 7 p.m. starting horn. We were off. The waterway burst into a frenzy of paddling, pedaling, and pulling as the motley flotilla surged toward the open water of Tacoma’s Commencement Bay.
The 2025 race
Ben and I leaned into our oars. Each pull accompanied one complete exhalation, each recovery stroke a full inhalation. Despite the cool of the evening, my skin prickled with sweat. We found our rhythm quickly, and pulled with more vigor than on most of our training rows. We planned to spend the first hour in Zone 3 cardio (70–80% of MHR—maximum heart rate), and in our excitement we easily locked into that level of effort. We used chest-strap heart-rate monitors that displayed on our separate smartphones, Ben’s mounted in the navigation console, mine attached to my rowing rig.
Mark Cole
The 2025 SEVENTY48 race hosted a strong field of 99 teams, of which 72 finished. The weather was calmer than it has been some years, but it was also hot. The winning boat, a Carbonology Triple Surfski paddled by Rich Long, Rob Pelkey, and Dave Jensen (seen here at center bottom), finished the 70-mile race in 10 hours, 9 minutes. The last finisher was Taylor Harper rowing a Northeaster Dory, who came home in 44 hours and 33 minutes.
An hour brought us near Owen Beach, the first checkpoint where all boats were required to pass between an anchored powerboat and the close shore. Supporters rang cowbells and cheered us on. We rounded the checkpoint and headed into the broad waters beyond. The sun disappeared into wooded hills. Only a handful of boats were visible ahead or behind. Ben and I dropped into Zone 2 cardio (60–70% MHR) and settled in for the long haul.
Dusk and the rising moon accompanied us into Colvos Passage. In the moonlight we could easily see both the shores of Vashon Island to our starboard and the Kitsap Peninsula a little less than a mile away to port. In the 14-mile-long, 1-mile-wide passage there was an eerie quiet. Reflections of the lights on shore stretched across the water in bright parallel lines. Our narrow wake murmured quietly away. Behind us in the shiny water we dragged a long, narrow V dotted with two pairs of widening rings created by our oars, a beaded necklace that stretched out in the moonlight as far as we could see.
From his aft position, Ben consulted the route-plan spreadsheet mounted on OTTER’s navigation console. Illuminated with red lights, the plan detailed the buoys we would encounter, the bearing to each one, the color and timing of their flashing lights, and our anticipated time of arrival at these waypoints at three different boat speeds. The console also held our VHF radio, compass, binoculars, and the phone that displayed both our GPS location and Ben’s heart rate. Ben frequently twisted around in his seat to look forward and make decisions about our course. Then he could use our forward-view mirror to maintain that course. Navigation in the unfamiliar waters challenged us throughout the night.
Roger Siebert
.
As we left the confines of Colvos Passage and pulled out into the 6-mile-wide expanse of Puget Sound, a brightly lit ferry bore down upon us. Our course put us directly in its path, so we backed up and waited. We believed our radar reflector would light us up as a vessel to be avoided, but we were not about to test the theory. That encounter was the first of six ferry routes that brought confusing dangers through the night.
We passed Blake Island to port at 11:55 p.m. We had rowed without ceasing for almost five hours. To maintain the rhythm of rowing, we had established a protocol that would give us each a specified time in which to attend to our personal needs. On each hour and half hour Ben would call out the time, and I would ship my oars. I could drink 4 oz of water mixed with maltodextrin and electrolytes, sip some more water or coffee, pee, pull on a warm layer of clothing…do whatever I needed in three to five minutes. Then I rejoined Ben for a few strokes, before he shipped his oars to do what he needed. Thus, we kept the boat moving without interruption all night.
Beyond Blake Island
On our next break, Ben asked me to check the tracker app. Each SEVENTY48 crew rents a tracker from the race organizers, Northwest Maritime, which shows every boat’s position on an app or web browser. Our supporters on shore could follow us in real time and we could keep track of our competitors. I duly checked the app and discovered that only 13 boats had rounded Blake Island before us. Our route plan showed that our pace to Blake Island had been 5 knots.
We headed into more open water, crossing to the southern tip of Bainbridge Island, the one-third waypoint for the course.
Basin Herbertson
OTTER can be rigged for single or double rowing, whether training or racing. Here she is rigged as a single for competition, complete with navigation console. On the mast are a front-view mirror, nighttime running lights, a radar reflector, and a video-camera mount.
From my bow seat, I looked east to the lights of Seattle. Towering buildings, covered in shiny gold scales, were topped by bands of colored lights: red, blue, purple. I watched as the crown of one of the buildings waxed and waned from red to blue to red. The 605′-tall Space Needle stood majestically alone, its slender tower and flying-saucer-like top sparkling in the darkness. The dense play of light in the surrounding blackness captivated me. Then, as I watched, the lights of Seattle began to turn off. Skyscraper after skyscraper shut down, blackness relentlessly devoured the cityscape. Was I witnessing the apocalypse? Incredulous, I watched the entire city fall into utter blackness. Perhaps I was hallucinating from sleep deprivation and fatigue. Then the southernmost skyscraper winked back on, then another, and another. As the city lit up once more, I realized there had been no apocalypse: a dark cargo ship had passed between our little boat and the far shore.
Relieved, I looked to the west. The moon was dropping into the hills of Kitsap Peninsula. The tops of pine trees, silhouetted by the bright disk, looked like the teeth of a sawblade cutting toward the south, chewing the bottom of the moon smaller and smaller. From the shore to our boat the last direct light of the moon slithered like a snake across the black water. Impulsively I gushed out loud, “I am so in love with life right now!” Through all the planning and construction, the hours of training and practicing technique, I had never imagined such inky beauty.
As we came up on Bainbridge Island, our next milestone was the course’s halfway point. Yet we seemed to be making little progress. Half-hour blocks ticked by like a metronome. We could see the shores of Bainbridge going by, so we knew we were moving, but reaching the midpoint of the row became defined by physical discomfort and emotional discouragement. By the time we reached the 35-mile mark just after 4 a.m., our average speed had dropped to 4.4 knots. We were tired, but the hardest miles were yet to come.
Leece Hillegas
For the most part I trained solo on Lake Mendocino in California. After repeated speed trials at various stroke rates and cardio zones, I learned that, as a single, OTTER’s sweet spot is 4.5 knots as the fastest speed for the most easily sustained effort. Rowing harder and harder increases the speed by less and less. This was a crucial realization in understanding endurance racing. When rowed as a double the sweet spot is almost 1 knot faster.
After each half-hour break, my palms were hot as I regripped the oar handles. Every muscle in my back chain—traps, lats, glutes, hamstrings, calves—complained about the demands being inflicted on them. My lower back, pivoting back and forth upon the pelvis, became rusty. Where the sit bones of my pelvis pushed into my seat, skin chafed from a pendulum of abrasion. Ben and I had anticipated that physical pain and mental strain would be our companions in the boat, but I was unprepared for the actual sensations.
Each stroke became an irritation. Twenty-two times per minute, our muscles were stretched then contracted. Thirteen hundred times an hour, we inhaled deep breaths to oxygenate the blood coursing through our lungs.
My attention turned inward. A symphony of sensations accompanied each part of the stroke, playing an endlessly repeating chorus. Feathering the oar blades tightened the forearms. Dipping them into the water tensed the upper arms. Loading the blades with the weight of the boat inflamed the back. Pushing off the footplates felt like performing a standing broad jump with stiff and swollen legs. Vague discomfort coalesced into a constellation of local pains.
Basin Herbertson
The navigation console is lined with hook-and-loop fasteners so that most of the instruments can be rearranged for easy use. Shown here are, from left to right: phone for heart-rate readouts, handheld GPS, VHF radio, compass, and the route-plan spreadsheet. The wrap-around roof protects the equipment from spray, rain, and glare. Not clearly visible here are the red LED lights that illuminate the console, as well as red lights in the cockpit for nighttime gear management. When I designed the console I concentrated on reducing windage as much as possible.
My world collapsed into a small bubble that contained the rhythmic sound of oars slipping into water, then back out, dripping. The splashes bracketed the shush-shush of the riggers rolling back and forth in their tracks. My field of vision narrowed, filled by Ben’s back.
Rowing 70 miles is obviously a physical feat; it is at least as much an emotional challenge. The mind cannot actually understand what it means to row for so long, so one’s emotions swirl into confusion and dismay. Blocking time into half-hour chunks helped to stem the bedlam of thoughts and feelings while allowing us to keep the boat moving.
Our simple strategy was captured by our motto, “Stay in the boat and keep rowing.” For the first half of the race, that plan had clearly worked: miles ticked by; landmarks were sighted, made, and left behind. But in the second half, our minds and hearts became less able to perceive such progress. Stroke after interminable stroke, pull after unrelenting pull, breath after endless breath, the two-thirds location near Point No Point receded ahead of us like a mirage. No matter how many repetitions we put in, it seemed to grow no closer. Our effort and pain seemed pointless, and the name of the landmark took on a grim irony.
Samantha Stettler
Before launching OTTER for the race, we sat her in folding boat stands and got her ready to go. Ben stepped the mast in its tabernacle while I attached the SEVENTY48 burgee to the stern-mounted staff. Someone asked me if the flags had a function crucial to the race, to which I replied, “Of course! They’re festive! If you’re going to be looking at the back of the boat for hours on end, it helps to have something delightful to look at.”
Daylight over the Sound
It began as a hint of gray in the black sky. Then, in the east, sheets of low clouds gradually took on hues of salmon, dusty rose, and peach. The colors dropped into the waters below, until sky and water gleamed. I joked to Ben, “I’ve pulled all-nighters before, but I’ve never before pulled all night.” The lifting of the dark inspired a sense of optimism. We kept rowing.
Finally, Point No Point was abeam. I expected a surge of relief. Instead, anticlimactically, we simply rounded the point and headed into the largest body of most exposed water yet. We had been rowing hard without stopping for more than 11 hours, averaging almost 4.8 miles per hour over 47 miles. I could not imagine rowing half as far again.
Our next destination was the Port Townsend Shipping Canal, an engineered channel between the mainland and Indian Island. If we arrived early enough, we would be carried by a 4-knot current through the length of the cut and out into the bay that held the finish line.
As daylight gained in strength, we could see the two-person rowboat that the tracker app identified as our companion through the night. Since leaving Tacoma, they had been just ahead of us. During each half hour we nearly caught up to them. But during our adjustment periods, with only one of us rowing, they would pull ahead again. Their taunting presence provided incentive to keep our adjustment breaks as short as possible.
Samantha Stettler
Family and friends helped to splash OTTER minutes before the race started. During training I would launch OTTER on my own from her trailer, or Ben and I would carry her to the water. But, when the boat was fully burdened with race gear, we needed a small group of willing helpers to get her into the water—entering into the spirit of the day, they all wore headbands crocheted by my spouse, Leece, in the HerbertSons team colors.
The morning was fresh, wind conditions light, the water easy to row. Ben’s competitive nature kicked in. With enthusiasm in his voice, he proposed that we use the next couple of hours to lean in hard and overtake our competition. He suggested that we both skip our next adjustment period, and pull harder through the full hour; I leaned in. My heart rate climbed, and I began to sweat in the cool morning. Working harder was somehow a welcome distraction to the pulsing pain. Our world collapsed even tighter; no more sightseeing; my universe consisted of a single stroke, the one I was in.
After an hour, it became clear that our move had inspired our competitors to pull harder as well, but to our surprise and delight, we judged we were on a more efficient course. We were cutting more sharply toward Indian Island, and the current was gradually slotting us into the right approach. Instead, they had aimed for the canal, and the current had taken them farther off course. We were rowing faster and straighter. Ben implored us to “empty our tanks” since the ride home after the cut would be a breeze. We pressed into our oars. Facing backwards, the rowers in the other boat could see every stroke of our surge, encouraging them to even greater effort. Both boats peaked at their maximum speeds, and held it. What Ben and I had begun in Tacoma as a survival event, became a race.
Despite our strenuous efforts, we entered the canal behind them. To our confusion and astonishment, the current was streaming against us…fiercely. We had arrived later than I had projected, and the current in the channel boiled. We hugged the shore to port, our blades nearly hitting dry land. To make progress, we had to ramp up to even more effort than the race pace of the past couple of hours. The banks of the cut slowly crept by. We were barely making way.
Samantha Stettler
Ben and I took our first strokes toward the fleet of human-powered boats gathering at the start line. Six years of dreaming and two years of building and training had led us to this spot at this moment—the blast of the starting air horn and the waving of a green flag were about to change the imagining into reality.
A canoe with a dozen paddlers entered the canal near the other bank, singing as they passed us by. When a jumble of large rocks forced us into the current, we struck out for that other shore as well. The waters spiraled and snaked as we crossed. My mind was as jumbled as the water. Where was the free ride I’d expected? Why was the current flowing against us? Why did we have to keep fighting so hard when we were so tired?
The situation on the other shore was no better. My hands burned, and I knew that blisters were erupting on my palms and fingers. My legs were thick, heavy, and hot. My back begged me to stop, but as we passed beneath the bridge and the canal finally opened to the bay, there was no respite. The current remained strong against us. Our fight increased as we encountered the first strong winds of the trip, also against us. Building across the fetch of Port Townsend Bay, waves smashed into our hull, splashed up, and sprayed onto my back.
A wave on one side of the boat would swallow an oar blade and hold it down. I would punch down on that oar handle to free the blade from the water’s grip. As I struggled with that oar, the other might angle down and down into a trough, unable to find water at all. The next stroke could be the opposite…or not. The rhythm of rowing vanished. Each stroke was unpredictable.
Janine Herbertson
As OTTER’s bow ground onto the pebble beach at the race finish, Ben threw his arms exuberantly into the air. I barely had enough energy to ship the oars, and was unable to stand upright as I struggled to get out of the boat.
Whenever we aimed for the finish line, the waves came from abeam and washed over the gunwale. Water sloshed in the bottom of the boat, adding to our load. Our only option was to head away from the finish line, quartering into the wind. Heading up was drier, but took us farther off course. We kept easing back toward our destination until we took on water, then headed away to reduce the influx. After 45 minutes, I looked back at the shore we had been trying to leave and said to Ben, “I don’t think we’re making any progress.”
He replied, “We are…but it’s so slow.”
“Do you have any ideas of what we can do differently?”
He paused for a long moment, then replied, “Nope. Keep rowing.”
Perhaps delirium tempered the pain. Perhaps not. It actually no longer mattered. We could see the final shore…miles away. Our only respite would come when we touched the bow to the land. We pushed with our legs. We pivoted back on our seats. We pulled with our arms. We fought the oars out of the confused seas. We gasped for air.
At last, we could see a crowd on shore. We heard cheers and cowbells. We straightened our course for the beach. A loudspeaker called our name: Team HerbertSons. Another loud cheer. OTTER’s nose ground noisily into the gravel. Ben raised his hands in the air. I shipped my oars. I lifted a leg out of the boat and struggled to raise the other leg over the gunwale. I moved to stand, but couldn’t. I tried to straighten my back, but couldn’t. Ben grabbed me as I staggered.
Samantha Stettler
In the weeks before the race, Leece wisely observed, “Regardless of what happens, you will be talking about this race for the rest of your lives.” We finished 16th overall, and fifth out of the 45 rowboats. Our goal had always been to finish, and our team motto had been: “Stay in the boat, and keep rowing.” In the end we kept OTTER underway, nonstop, for 16 1⁄2 hours.
Someone thrust a signboard in our hands: 16th place overall; 16 1⁄2 hours. Volunteers in yellow vests swarmed about us. I tried to walk out of the water to ring the finish bell on shore, but my legs wouldn’t move. A friend carried the bell to me to ring. My wife waded in. I leaned on her, dragged my heavy legs, and shuffled onto land.
The medic asked me if I was dizzy. No. The medic asked if I was hydrated. Yes. She pinched the skin on the back of my hand. She pressed her fingers into my wrist to feel my pulse. Strong. She asked if I was dizzy. No.
Dry gravel. I sat down and cried on my wife’s shoulder. My entire body began to tremble uncontrollably. The shaking wouldn’t stop. The medic asked if I was dizzy. No. She took my pulse. Strong.
Ben sat down next to me. I cried on his shoulder. We’d done it. We had rowed some 13,800 strokes without stopping. We had completed the SEVENTY48. Some things I had imagined. But this? This had been unimaginable.
Basin Herbertson is a wellness and vitality coach at CoachBasin.com, helping people get past somewhere they feel stuck. He documented the design and build of OTTER in “OTTER: An open-water endurance rowboat.” After the ordeal of the SEVENTY48, it would take him a week to think clearly again, three weeks to heal the blisters on his palms, and a month before he recovered his physical energy. While he is gratified and satisfied to have met the challenge, he keeps shaking his head, and saying, “Seventy miles is too long to row.” Ben says that if he does the race again, he wants to be facing forward. Basin and his father finished building their Cape Cutter 19 in 2020, sailing it in the San Francisco Bay, Tomales Bay, Lake Tahoe, and Puget Sound.
For more SEVENTY48 adventures see “SEVENTY48” and “TAMO.”
If you have an interesting story to tell about your adventures with a small boat, please email us a brief outline and a few photos.
When I was building my Haven 12 1⁄2, one of the big questions that loomed over the much-anticipated launching day was: “How do I carry the spars while I’m trailering the boat to the launch ramp?”
Ballentine’s Boat Shop in Cataumet, Massachusetts, builders of the Doughdish (the fiberglass version of the Herreshoff 12 1⁄2), makes spar carriers for that boat. They gave me permission to share my spar carrier build inspired by their design.
My boat has four spars: mast, boom, gaff, and jib club. The 4′ 8″ jib club can be transported behind the seat of my truck, but the others must go in the boat.
Photographs by the author
The stern deck stand is considerably larger than the foredeck stand. In part this is because it supports all three of HEY JUDE’s principal spars, but also because the stern deck is several inches lower than the foredeck. Note the carved groove in the foredeck-stand foot, which goes under the deck cleat, and the large-diameter hole in the stern-deck stand, which accommodates the 12 1⁄2’s tiller.
Designing and building a DIY spar carrier
For my custom spar carrier, I built two vertical stands—one for the foredeck, one for the after deck. Each is a piece of 1⁄2″ plywood with semicircular cutouts in the top edge and multiple drilled holes for tying the spars to the stand and the stand to the boat. (For the 12 1⁄2, the after stand also features a hole for the tiller, which passes through it.)
When designing spar carriers, it’s handy if you can use the boat’s existing hardware to support them. On my boat, I determined that the forward stand could slide under and be anchored by the after horn of the deck cleat, while the after stand would line up with my tiller tie-off pad-eyes on either side of the deck.
All drawings from sketches by the author
To calculate the required height for the stands a string is run stem to stern, clearing all items such as the cockpit coaming and tiller. The string shows the position of the bottom of the largest-diameter spar.
When determining the height of each stand, all the spars must rest above any part of the boat. In my case, the bottom edge of the mast (the longest and largest-diameter of the spars) had to clear the coaming, stem head, and transom. I clamped pieces of scrap wood to the stem and transom and stretched a length of string between them. Measuring from the string down to the decks gave me the desired height-above-deck of the bottom of the mast. To this I added one half of the mast’s diameter (the amount of spar that would rest in the stand) plus 1⁄4″ for additional depth and thus support. This gave me the overall height of each stand. In the 12 1⁄2, the foredeck is higher than the afterdeck, so the forward stand is 9 3⁄8″ tall (plus 1⁄8″ foam glued to the bottom of the base), while the after stand is 14″ tall (plus 1⁄4″ foam—extra to accommodate the greater weight carried).
While the measurements in this, and subsequent, drawings are suitable for the Haven 12 1⁄2, the plan can be adapted for other boats.
To determine the overall width of the stands—including their bases—two factors come into play: the size and number of the spars to be carried, and how each stand will be supported. In my case, the forward stand would support the mast and boom and be held down and stabilized by the deck cleat, thus requiring no additional support other than tie-downs to prevent it sliding aft. The after stand would have no deck cleat to anchor it, and would support all three spars (the forward end of the gaff rests on the cockpit sole) so would require a more substantial base to stabilize it.
The stands would be cut out of 1⁄2″ marine plywood. To find the width of the top edge of each carrier, I established the diameters of the spars’ holding cups and spaced them 1 1⁄2″ to 2″ apart. This gave me 14″ for the after stand, and 11″ for the forward stand.
I started with the foredeck stand, the simpler of the two, which I had determined would be 9 3⁄8″ top to bottom and 11″ wide at the top. To give it a wide, stable stance, I made the base 14″ wide. The bottom of the plywood would slot into a dado cut into a solid piece of 2 x 4 Douglas fir which, to accommodate the slight crown in the deck, would need a shallow arc in the bottom, rising to 1⁄16″ in the middle.
After I cut out the plywood trapezoid, I drew the cups by placing my compass point 1⁄4″ below the top of the plywood, drawing a semicircle below that, and extending each side of the arc straight up to the top. I then cut the spar cups into the top edge using the bandsaw’s 3⁄8″ blade, and drilled out the 1⁄2″-diameter holes for the tie-downs.
Next, I cut a groove into the Douglas fir, which would form the base of the stand. Using a tablesaw, I cut a 3⁄4″-deep groove, making repeated cuts to slowly widen it so that the plywood fit snugly. (Do not assume that plywood advertised as 1⁄2″ is that exact thickness—mine measured 0.570″.)
When making a spar carrier it’s useful if you can employ existing hardware on the boat. On my 12 ½ I use the tiller tie-down pad-eyes on the stern deck and here, on the foredeck, I use the deck cleat to tie down both the stand itself and the boom. I also drilled some extra holes in the forward stand for additional tie-downs that I’ll use if a long highway trip is in our future.
Because I was using the deck cleat to locate the stand, I next chiseled out a channel in the top of the fir so that it could slide under the horn of the cleat.
I glued the plywood into the groove of the base with epoxy. I rounded all the edges and sanded everything using a piece of sandpaper wrapped around a scrap of dowel to sand out the inside of the tie-down holes.
I finished everything with epoxy—paying particular attention to soak the plywood edges—and several coats of marine varnish.
Finally, I glued 1⁄8-thick closed-cell-foam padding to the bottom of the base to protect the boat deck, and glued some leather strips into the spar cups.
With the foredeck stand complete, I turned my attention to the after stand. I cut out the 1⁄2″ plywood face to the desired dimensions: 18 1⁄2″ × 14″. I then glued and screwed one of the longer sides between two 1 3⁄8″-square × 18 1⁄2″ pieces of dimensional lumber. When the glue had cured, I glued and screwed the whole assembly into two 1 1⁄2″ × 1 3⁄8″ x 9″-long Douglas-fir feet, into which I had precut 3⁄4″-deep × 3 1⁄4″ recesses.
I cut the spar cups and drilled for the tie-downs as before, marked up and cut the tiller hole, and again coated the assembly with epoxy and several coats of marine varnish. I protected the bottom of the stand with 1⁄4″ closed-cell foam.
Having all of HEY JUDE’s spars supported and stable in their custom carrier has simplified the set-up for trailering.
Each stand needs at least four tie-down locations: side to side and fore and aft. I use 1″ strapping with quickly adjustable Double D rings and snaphooks wherever possible.
The spars are tied into the cups by lacing two strands of 1⁄8″ cord up and over the spars and down through holes in the stand, crossing on the top of the spars as they go. I have drilled extra holes in each stand in case I want to use more or different tie-downs.
Simple to make of inexpensive materials, the spar carrier has worked well through two-plus seasons of semi-local day-sailing.
Noank is a village in southeast Connecticut that looks out over Fishers Island Sound and the Mystic River. In the 19th century it was a major shipbuilding center, and about 700 wooden sailing ships came down the ways in shipyards in this picturesque little town. Noank is also the name given to an 18′ 2″ pulling boat designed by Nick Schade, whose small-boat shop is about a mile, as the gull flies, from the village. He is well known for his line of Guillemot kayaks, strip-built in wood, then ’glassed, varnished, and made show-room pretty.
photographs by the author
The seat support rail is designed for the Piantedosi sliding seat rowing rig. Under each deck is a sealed compartment for dry storage and flotation. The manual includes instructions for making the hatches from plywood.
The Noank, also strip-built, is his first boat with a sliding seat. It is a half-decked recreational boat, beamy at 36″, with generous freeboard, and designed for exposed, choppy water. Schade also intends this to be a light and fast camp-cruiser, so the bow and stern have large, dry compartments for camping gear.
Like Schade’s other designs, this is a pretty boat, such is the judgment of five of us, all local rowers, who took it out for a spin. Tom Sanford, Janis Mink, Biddle Morris, Tom Tobin, and I are all members of Mystic River Rowing, and collectively, we have about 140 years of experience rowing in boats with sliding seats. All of us have seat-time in both recreational and racing boats, and most have taught sculling using boats similar to the Noank. Biddle has done hundreds of miles of distance rowing-camping and is our go-to guy on open-water rowing.
With the rowing rig occupying the space along the centerline, the rower has to get aboard with a foot planted slightly off to one side.
Beyond good looks, what does the Noank offer? How well will it handle in the afternoon southerly that’s common to Fishers Island Sound, the place the designer had in mind when he went to his drawing board? How is its calm-water performance? Does it track well? Turn easily? Is it slow or will it go? Is it fragile? Would it be hard to build? The short answer is that the Noank does well what it set out to do. It is fun to row, forgiving, and tougher than it looks.
The specifications call for planking of 3/16″ x 3/4″ cedar strips, shaped over forms cut from 1/2″ MDF or plywood and spaced at 12″ intervals on a strongback. The stripped hull is sheathed inside and out with 4-oz fiberglass cloth set in epoxy, and the ’glass is doubled on the bottom. Built to the designed specifications, this will be a strong, tough boat. The high crown of the decking helps stiffen the hull without adding much weight.
The Noank was designed with the Piantedosi rowing rig and conventional sculls in mind. For rowers new to sculling, the 6″ overlap of the oar handles will take some getting used to.
Schade notes that the Noank could be built without the decks and bulkheads if a lighter boat for protected water is the goal. The reverse transom keeps the waterline length almost the same as the overall length for speed’s sake. He says, “I really like the arched reverse transom, but it is a bit complicated. You could just have a flat vertical transom without changing the performance significantly.” A paper template, wrapped around the stern, indicates where it is to be cut to accommodate the curved transom panel. The stern is planked extra-long to make modifications possible.
The seat-support rail is designed to fit a Piantadosi rowing rig and adds significant strength to the hull. It is a wooden box beam 3-1/2″ x 4″ x 8′ 5″, with cutouts to reduce weight and provide drainage and ’glassed inside and out for rigidity. The anodized aluminum monorail of the rowing rig is held to the seat-support rail by two machine screws that are removable without tools. The rig weighs 22 lbs, and it can be put in the boat or taken out in less than a minute. It is designed to be rowed with racing sculls, which have a standard length of 284 to 290 cm (around 9′6″)
In a sprint, the Noank will do about 6 knots.
When completed, the Noank should come in around 53 lbs and all up, with rowing rig, weigh 75 lbs. For those of us who are not power lifters, loading a boat of this weight and girth onto a cartop carrier would be a two-person task. If it is to be beach-launched solo, a dolly or trailer is in order.
Getting in and out of wide rowing wherries can be awkward—for some it’s a long reach to get their weight planted over the centerline. The complication in getting onboard Noank is that you can’t put a foot on the centerline—the seat-support rail is in the way. Most of us just put a foot up against the box beam, held onto the oars, and accepted a quick heel angle as we shifted our weight onto the inboard leg. There is enough static stability in the Noank for this maneuver and for a rower to exit sideways, swinging both legs over the side to stand up in shallow water. The boat heeled sharply, but did not bury its rail. We tried the “Look Ma, no hands” routine while seated, letting go of the oar handles, and while this will result in a quick swim in most shells, the Noank only wobbled and did not flip. If you lashed the oar handles together in the middle of this boat—they overlap by 6″, the standard for sculling boats—the boat could look after itself while you eat lunch or take pictures.
The Noank would put beginning scullers on an easy learning curve. We would expect a novice to feel comfortable by the second or third lesson. That is largely because of the boat’s inherent dynamic stability: It wants to run on an even keel and if it is rocking side to side as it moves along, this is the rower’s fault for not sitting up straight and keeping the oar handles level. With its long skeg, Noank tracks straight, but is still easy to turn. In a moderate crosswind, a rower should have no problem dialing in a crab angle and maintaining a compass course.
Hobby-horsing can be a significant issue for most boats with sliding seats. The rower’s weight is two or three times the weight of the boat and rowing rig, and with that much mass moving back and forth, around 2’ with each stroke, the bow and stern want to bob up and down, killing speed. The goal is to keep the boat running level, and to that end this hull is designed with little rocker in the keel (only about 1”) and an almost uniformly rounded cross-sectional shape throughout the long cockpit of the boat. That provides needed buoyancy under the rower at both ends of the slide. Another speed killer, wetted surface, is kept in check by narrowing the beam at the waterline. The Noank has a beam of 36″ at the rail amidships; at the waterline it is 23”. The narrow waterline and arc cross section cuts down the area of skin subject to friction as it moves through the water. It also reduces lateral stability, but the flared sides above the waterline give the Noank an abundance of reserve stability when heeled.
Scullers like to talk about speed. None will admit that their own boat is a slowpoke, and many of us tend to boast a bit, claiming speeds too good to believe—“stretchers,” as Mark Twain called them. For the Noank, our numbers come from an impartial GPS during speed trials on a light-wind day with calm seas and no current. It takes a few pulls to get the boat going, but once up to speed the boat carries and glides well. This is a 4-5-6 boat: In the hands of an experienced sculler, rowing leisurely at a pace that can be held indefinitely, it will run at 4 knots. To reach 5 knots calls for rowing at a racing pace that’s sustainable over a 2,000-meter course. And 6 knots calls for a sprint, a “Power Ten” in crew parlance, and holding that speed for any distance would involve serious pain. The Noank moves as well as could be expected for a displacement hull with its 17.7′ waterline length. Once the Noank exceeds its theoretical maximum speed of 5.63 knots, even super-athletes are going struggle to make it move faster for very long. We found nothing to complain about in the Noank’s speed curve.
Building a Noank will call for time and patience, requirements for any high-quality, strip-built boat, whether the builder starts with plans or a kit. Both are available for the Noank. The finished product will require a reasonable amount of maintenance, but the construction is sturdy, and unless the boat is abused or neglected, it should outlive its builder. The five of us rowers agreed that the Noank is an all-round performer that rates well in its class. Tom Tobin even bought the plans and intends to build one.
Carl Kaufmann trained to be a naval architect and marine engineer, but a career in journalism paid the bills for five decades. He has always had a second career: making things out of wood. Most of his time has been spent building boats from scratch, 10 in all. His current family fleet ranges from a 12-ton, 40’ yawl down to a 34-lb cedar shell. For variety’s sake, he made some mandolins and acoustic guitars. His home is on Block Island, off the coast of Rhode Island, but he spends a lot of time at his winter address in Mystic, Connecticut. He has a workshop in each place, so he is never at a loss for something to do in retirement.
In my 40-plus years of working in boatyards in Florida, radical changes have occurred in the tools and materials used. When I started out, most painting was done with a brush, red lead was the primer of choice, the cordless screwdriver was a brace fitted with a screwdriver bit, and most of the fastenings were slotted silicon-bronze screws. However, some things have remained constant, and not least among them is the countersink made by the W.L. Fuller Company of Warwick, Rhode Island.
Photographs by the author
During my more than four decades of boatbuilding I have purchased myriad countersinks and drill bits from W.L. Fuller, not because they break or wear out and need to be replaced, but because I have needed many different sizes. From the oldest to the newest, the quality of the tools has been of consistently high quality.
In 1930, Warren Fuller Sr. set up a boatbuilding shop in his car dealership. When he encountered wood that split as he applied wood screws, he created a tool to save time and heartache. “He took to the grinding wheel,” says granddaughter Debbie Fuller, “and invented the four-fluted countersink.” Fifteen years later, Warren was joined by his son, Warren Jr., who established W.L. Fuller, Inc. and introduced the company’s first catalog. Today the company makes more than 450 tools including a dizzying array of specialized tools for drilling holes. But its most famous tools are still tapered drill bits with the adjustable countersinks that made its name. These effective tools have been developed and improved over the years and are now offered in a wide range of sizes and sets, but they continue to be of the same high quality that Warren Fuller Sr. would recognize. The company buys U.S.-made steel drill bits and reshapes them for different purposes, perfects them to work in wood, plastic, and metal, and makes the carbon-steel countersinks to go with them.
The plug cutters in any W.L. Fuller set are as high quality as the countersinks and will, in my experience, get almost as much use. If you let the tines cut to their full depth, the cutter will round over the ends of the plugs, as seen here, making it easier to insert them into the countersink holes.
While bits and countersinks can be purchased individually, more typically they are sold in sets such as the No. 6, for use with wood screw sizes #5 through #9; or the No. 8, which will fulfill the needs of most small-boat projects. It includes five tapered drill bits and matching countersinks for screw sizes #6, #8, #10, #12, and #14, as well as two plug cutters (sizes 3⁄8″ and 1⁄2″), matching stop collars to control depth, and a 3⁄32″ hex key all packaged in a sturdy Fuller-made cherry box to protect your investment. The quality is unbeatable and, as fourth-generation family employee Lisa Fuller says, “The only issue we have is, you buy one of our sets, you don’t have to buy it again.” The tools do, indeed, last a lifetime—I have had many of my Fuller countersinks and plug cutters for 40 years. They can be resharpened, and Fuller offers a resharpening service for all their tools. The only items that don’t stay around forever are the hex keys…they can and do vanish into thin air.
When drilling with a countersink it’s important to match the right bit and countersink with the screw. Here the pilot holes for a #8 bronze wood screw are drilled out with a C8 countersink and the 11⁄64″ bit that fits into it.
The countersink usually match the screw size: a #8 screw, for example, uses the 11⁄64″ drill bit with the C8 countersink. When drilling/countersinking for a traditional wood screw the tapered drill bit works well, giving the proper clearance hole and the correct pilot hole for the fastening. However, among today’s common fastenings is the stainless-steel self-tapping screw, which has neither solid shank nor taper in the solid shaft; indeed, even some bronze wood screws have no taper. While this does not necessarily mean that a tapered drill bit will not work—in many cases it will work perfectly—it’s important to do a few tests to find what works best. For example, you might use the C8 countersink with its 11⁄64″ tapered drill bit, but if fastening a bronze wood screw into a spruce frame, I would set the drill bit depth 1⁄8″ short to ensure the threads fully engage; in an oak frame I would set the depth a little long to avoid over-stressing the screw, or step up to a C9 countersink with its 3⁄16″ drill bit…in the shop, it is a matter of trial and error.
As well as the tapered drill bits with countersinks, the No. 8 set also includes two stop collars and two plug cutters, each in 3⁄8″ and 1⁄2″. The stop collars may be the least used items, but there will be times when you will be glad they are available whether setting screw heads flush at the wood surface, or countersinking them to be plugged. Conversely, the plug cutters (or bung cutters) will be used a good deal, but do require a drill press. These four-pronged cutters allow you to make straight-sided plugs out of scraps from your workpiece so that they match the grain and color of your work.
Isaac Robbins/WoodenBoat Publications
W.L. Fuller’s No. 8 countersink set will suit many small-boat building projects. Matching the quality of the tools are the American-made cherry boxes in which the sets are sold.
After 95 years in the marketplace, W.L. Fuller remains a family-owned and -operated business. As if to emphasize the consistency of its history, the company’s trademark color remains the distinctive orange established by Warren Fuller Sr. during the Second World War—in an effort to save money, Warren found a good deal on orange paint for his small V-bottomed plywood boats. When visiting the Fuller booth at The WoodenBoat Show, at Mystic Seaport, Connecticut, I was greeted by Debbie Fuller. Her pride in the family company and the quality of their products is infectious. Today, W.L. Fuller, Inc. has a 50-page catalog featuring the company’s own tools and other quality brands, all made in the U.S. And, if you call to purchase a set or seek advice, chances are you’ll be talking to a member of the family.
A lifelong resident of Florida’s Gulf Coast, Michael Jones spent his career as a boat carpenter working on the full spectrum of yachts from traditional to high-end luxury cruisers to sportfishing boats. Past president of the Traditional Small Craft Association, he is a collector of small craft and is, he says, “still boat crazy after all these years.”
For prices and to see the entire range of drills and countersinks, go to the W.L. Fuller website. The No. 8 set is also available from The WoodenBoat Store for $169.
Is there a product that might be useful for boatbuilding, cruising, or shore-side camping that you’d like us to review? Please email your suggestions.
Not all small boats have built-in flotation, and its absence can lead to trouble in the event of a swamping. Even in a boat that does have sealed compartments there is the possibility of a leak or an ill-fitting access hatch. But if there is additional flotation in place it will limit the amount of water coming in, improve buoyancy, increase the chance of self-rescue, and reduce the amount of bailing.
Photographs by the authors
Two NRS Rodeo Split Stern Float Bags laid side by side fit the stern compartment of our Penobscot 14 very well. Wherever you stow the bags, it is important that they are firmly secured; if not, during a swamping they will float away. Here, the bags will be held down by a removable seat panel, which will be tied down with the cord seen here and a second cord anchored to the cleat mounted on the bulkhead.
When we built our Penobscot 14 we decided we wanted some extra flotation that could be easily installed and just as easily removed, and decided to try some Northwest River Supplies (NRS) float bags.
NRS was founded by Bill Parks in 1972, and in 2014 was sold to its employees. Today, the company continues to be employee owned and offers excellent customer service while furthering Bill’s mission to help “people pursue passions on the water.” Among the many products NRS offers is a range of float bags designed primarily for kayaks and canoes. Some are built of 10-gauge urethane, which NRS says will neither leak nor delaminate, while others are 70-denier urethane-coated nylon, which offers resistance to abrasion and UV rays. All have a lifetime warranty.
The NRS Rodeo Split Stern Float Bags are made of 10-gauge urethane with welded seams. Each corner has a D-ring attached by a loop of webbing sewn into the bag’s flanges.
For our Penobscot we chose a pair of Rodeo Split Stern Float Bags. These are 10-gauge urethane wedge-shaped bags designed to fit on either side of support pillars typical in short freestyle kayaks. Fully inflated, each bag measures 28″ L × 9″ D × 13″ W, and 3″ W at tip. When deflated the bag is small enough to fit through a 5″ deck plate opening. The inflation/deflation tube is 20″ long, so the bag can be placed into its compartment and then inflated. The inflation air valve closes securely. The ease with which the bag can be inflated and deflated makes installing and removing them from tight spaces relatively easy.
We keep our Penobscot 14 on a trailer and always remove the bags after outings to allow free movement of air in the boat’s compartments, and so we can check the bags for proper inflation—testing that they stay inflated for at least 24 hours. Each bag has, on its three corners, D-rings attached by UV-resistant nylon webbing straps so that it can be secured inside a compartment or under a thwart.
Thanks to the 20″-long inflation tube, a Float Bag can be installed in a tight place before being inflated from without. If we have gear to carry in the compartment, we put it in first and then inflate the float bag over it. This keeps the gear’s weight where it belongs—down low and centered.
So impressed have we been with the float bags that we are now measuring our other boats to see what sizes they can accommodate. Our Drascombe Lugger, for example, could have a bag strapped to either side of the centerboard trunk and, while the bags can be shared from boat to boat, we plan to purchase dedicated bags for each one.
Audrey and Kent Lewis sail, row, paddle, and motor the Tidewater Region of southeast Virginia. Their adventures are logged at smallboatrestoration.blogspot.com.
NRS Float bags are available in multiple sizes, singly or in sets. Find the range, along with accessories, on their website. A pair of Rodeo Split Stern Float Bags is $79.95 (price includes shipping).
Bill Griffin’s first boating memory is of paddling a wooden canoe on a New York lake as a young child. The first family-owned boat, he says, was a 17′ aluminum Grumman paddling and sailing canoe. It was followed by Sunfish dinghies, larger daysailers, and still larger cruising sailboats. One after another they inspired in Bill a love of boats and boating that eventually led him into a career in the marine industry, for many years at a marine hardware store in Annapolis and more recently as a rep for a marine paint manufacturer. As Bill puts it, his work life now consists of “calling on boatyards, retailers, and builders, talking boats, and getting paid to do it.”
For all his experience, however, Bill had never built a boat for himself. He had helped his friend and neighbor, Charlie Flanagan, to restore a 1935 Herreshoff 12 1⁄2 and a 1973 Beetle Cat and on both occasions, he brought his professional expertise to the table, advising Charlie on the best paints to use and how to apply them.
Bill Griffin
Once Bill and Charlie had built the box beam—laid atop an aluminum ladder on two leveled horses—they set up the building molds over which they would plank up the hull.
He also helped Charlie to build a Chesapeake Light Craft (CLC) Lighthouse Tender, which introduced him to the world of kit building. Then, after Bill saw a Nick Schade–designed kayak at the Chesapeake Bay Maritime Museum and subsequently read Schade’s book, Building Strip-Planked Boats, the seeds were sown—it was time to build. He ordered a CLC kit for Nick Schade’s strip-planked 12′ canoe, Nymph. He chose the Nymph, Bill says, because he wanted a canoe, wanted to build strip-plank, likes to use a double-blade paddle, and was intrigued by the prospect of paddling a canoe that weighs just 25 lbs.
So began what Bill has come to see as a series of lessons learned.
Bill Griffin
Prior to planking, Bill had carefully mapped out the order in which the strips would be used, so establishing the hull’s ultimate color-and-pattern scheme. He had also laminated the four stems—two inner, set in place before planking began, and two outer. Finally, Bill and Charlie covered the outer edges of the molds with masking tape so the planks wouldn’t be unintentionally stuck to the molds.
Lesson 1: A project of this size should be tackled in small step-by-step increments. “It’s overwhelming if you look down the road at all that is to come,” Bill says. “It’s important to tackle one challenge at a time.”
Lesson 2: Find a good place to work. Building a boat, says Bill, “always seems to take longer than expected, so you need a suitable workspace that won’t be needed for other things; you don’t want to be moving the boat while it’s being built.”
Bill Griffin
The outer stem would be glued and clamped into place. The gap seen here was reduced to almost nothing and what remained was filled with thickened epoxy.
Bill talked to Charlie, who “has a sheltered dirt-floor workshop where a project can be undisturbed for months. With the space, inevitably, came Charlie, as a willing helper and collaborator. Despite his years of restoring and building boats, Charlie had never done any strip building and was eager to be involved.
In August 2023, when both Bill and Charlie had a week of vacation time, the two friends started work. They reread Nick Schade’s book, went to CLC to pick up the parts for the boat, and built a plywood box beam to serve as a building platform. “It was tricky to get it level on the uneven ground,” says Bill, “so in the end we leveled some horses, laid an aluminum ladder across them, and placed the beam on top of that.”
The kit from CLC included building notes, western red and Alaska yellow cedar bead-and-cove strips (as well as a few in walnut), mahogany for the rails and decks, spruce for the thwarts, and precut molds. Over the course of their week off, as well as setting up the box-beam strongback and molds, Bill and Charlie glued up and placed the inner stems, and laid out the strips to figure out how they looked next to each other and to pick out the places in the hull where they’d look best. “We took our time and sketched out the hull’s color scheme.”
Bill Griffin
The hull was lifted off the molds and carried out into the yard. The amount of cleaning and sanding that would be needed was daunting, but Bill was excited by the very light weight of the hull.
After the flurry of the first week, the project moved steadily but slowly with Bill and Charlie only able to build during weekends, and not every week. They applied strips carefully, a few at a time, stapling them to the forms, which they had masked with tape so they wouldn’t inadvertently glue the strips to them. As they worked, they figured out how to cut the scarf joints and how best to staple the strips, often supplementing the staples with packing tape.
Soon, Bill says, they came to Lesson 3: Sometimes the next step just doesn’t make sense. “When we got to the sharp turn to the tumblehome in Nymph’s topsides, we were met with a complex bevel, and we spent time figuring out how to fashion the required shape on the bandsaw. Our method—which we applied time and again when things were complicated—was to read the directions a few times, then just try something. If it didn’t work out, we’d start again, and try another method. This project taught me a new level of patience.”
Charlie Flanagan
Applying the ’glass and epoxy was an exacting task, especially in the hull’s interior where Bill struggled to cut the cloth so that it didn’t pucker in the ends.
The tumblehome bevels mastered, planking the rest of the hull went smoothly. But the next head-scratching step came when it was time to shape the external stems. They deliberated, discussed, tried out some ideas, and sought advice from experienced builders. In the end, Bill says, “I followed my own process and shaped them on a stationary belt sander. The satisfaction I felt from successfully shaping them to fit and look good was one of the best parts of the whole experience.”
Another highlight came when they lifted the glued-up hull off the molds. “It seemed as light as a feather,” recalls Bill, “I knew it would be fun to paddle.”
Lesson 4: Some steps in any boatbuilding project are tedious. The first hint of tedium, Bill says, came when they were closing in the bottom of the canoe. It required a lot of cutting joints and persuading strips to bend and stay put in ways they were not inclined to do. But it was the sanding that truly brought home Lesson 4. “Sanding the inside and the outside of the hull, unavoidably calls for a lot of hand-sanding,” Bill says. “I can’t imagine anyone enjoys a lot of hand-sanding.” As they smoothed, Lesson 5 came to the fore: Be judicious in how much wood glue you use when attaching strips. “Most of the sanding we did,” says Bill somewhat ruefully, “was to remove hardened excess glue.”
Bill Griffin
Once the boat was moved inside to the family laundry room (note the dryer at right) space became tight, but there was still much to do to. When fitting the gunwales Bill and Charlie (seen here) used every clamp they could find.
Before ’glassing the boat, they carefully looked over the hull for any gaps between strips. When a gap was found, they masked around it and filled it with thickened epoxy; when it had cured, they reached for the sandpaper again.
The build called for ’glass sheathing both inside and out. Bill says ’glassing the outside was a good deal easier than the inside. On the outside, “the cloth naturally drapes over the hull. Inside is a challenge because you have to figure out how to cut the cloth to fit it into the ends without puckers or wrinkles. We didn’t get them all out; I know where they are…I just hope no one else will notice!”
Charlie Flanagan
On a mild December day Bill paddled the canoe for the first time. It was a low-key launching, but for Bill, a day long anticipated.
In early November 2023, with the outside temperatures dropping fast, they moved the ’glassed hull into Charlie’s family laundry room where, for several weeks, accessing the washer and dryer meant squeezing by the canoe. By then, says Bill, the canoe looked almost finished, but… Lesson 6: Almost finished isn’t finished. Now came the installation of the gunwales and inwales, the seat, the thwarts, the decks… “These were significant pieces,” says Bill. “They might seem like afterthoughts, but they’re among the first things a viewer sees.” For the rails and decks Bill decided on mahogany, rounding the edges on a table router, and treating them with great care as “though they were parts of a piece of furniture.” It was all tied up in the experience, says Bill. “I really enjoyed taking boxes of wood from CLC and fashioning them into a thing of beauty and function. I didn’t design the boat, but I did have an impact as to how she turned out, looks, and performs.”
Charlie Flanagan
Weighing only 25 lbs and measuring 10′ end to end, the Nymph can be easily lifted and carried by one person.
They finished up in December and, on an unseasonably warm Saturday, they launched the canoe in Duvall Creek on South River, Annapolis. “It looked tiny in the water, but it was stable and seaworthy. I got in and paddled around for a while, savoring the joy of accomplishment.”
Even before the canoe was launched it had been noticed by others. A nearby art space was sponsoring a two-month show of local arts and crafts, and Bill was invited to exhibit the canoe. He did so with pride, and at the show’s January opening he delighted in talking to people about the project. Whether it’s an exhibit in an art show or being used in the water, says Bill, a wooden boat is an “instant conversation starter.” The Nymph would be on display for the next two months.
Bill Griffin
After a short taste of saltwater, the Nymph would be pulled out, dried off, and taken to a nearby art space to be part of a local arts and crafts exhibit for the next couple of months.
The final lesson Bill learned from building his canoe, he says, is that boat projects are best when you have someone to collaborate with. “Many times, Charlie and I discussed how to proceed and even though we’d have different opinions, we’d come to conclusions, and they usually worked. And for extra help, I’d reach out to the staff at CLC, as well as Nick Schade, and always received good counsel. I now have a boat that moves beautifully through the water, but I ended up with so much more. Building the Nymph yielded a lot of challenges, a lot of satisfaction, and a great social experience of collaboration.”
Jenny Bennett is editor of Small Boats.
Do you have a boat with an interesting story? Please email us. We’d like to hear about it and share it with other Small Boats readers.
Mist is a cozy pocket cruiser that combines simple sheet-plywood construction with more than a touch of elegance.
Designer Karl Stambaugh has gone out of his way to ensure that this plywood pocket cruiser doesn’t look like a plywood boat. He drew the stem to stand proud, as it would on a conventionally planked hull. Solid, coved sheerstrakes add to the illusion, as does the severe rounding-over specified for the chines. And the curved, raked transom isn’t exactly standard fare for sheet-plywood boats. In all, this is a handsome little cruiser.
Structural details impart a traditional appearance to this simple plywood hull.
In some ways, Mist awakens old memories of the plywood sloops that filled the pages of Popular Whatever magazines in the years following World War II. Down below, the designer made no attempt to cram in coffin-like quarter berths or an enclosed head. (There is no such thing as privacy aboard a 20′ boat in any case.) Mist’s arrangement is simple and traditional, and it works fine. The relatively-wide cabin sole survives the intrusion of the long centerboard trunk (part of which hides under the bridge deck).
Mist offers good deck space and a self-bailing cockpit.
Mist’s cockpit offers comfortable lounging space, but this will be slightly degraded if you build the optional outboard motorwell. You might consider hanging a removable bracket to the transom or after deck. Better yet, investigate the mysteries of the yuloh (an efficient, curved sculling oar).
Transverse frames and plywood sheathing result in a stiff hull.
With her handsome style, and easily stepped mast (mounted in a tabernacle so that it can pivot up and clown for trailering or low bridges), Mist might be the ideal trailerable cruiser.
Rounded-over chines rely upon ’glass and epoxy to protect plywood edges.
Plans for the 19′ 6″ Sloop Mist design contain six sheets: general information, lines and offsets, construction drawings, construction details, surfaces, and sail plans (gaff-rigged sloop and optional gunter-rigged sloop). WoodenBoat Plan No. 107, $90.00.
Snug accommodations survive the intrusion of a necessarily large centerboard trunk.
19′ 6″ Sloop Mist Design Details
DESCRIPTION
Hull type: V-bottomed, centerboard boat
Rig: Gaff- or gunter-rigged sloop
Construction: Plywood planking over sawn frames
Headroom/ cabin (between beams): About 4′ 2″
Featured in WoodenBoat No. 107
IInboard-powered mahogany runabouts on the water again, and on the increase, after near-extinction in a fiberglass marketplace. Even so, given the new wave of restorations and reproductions, this 16-footer by Zimmer and Hacker remains unique.
The Gentleman’s Runabout is a low-power, moderate-speed inboard runabout for protected waters.
John Hacker was one of this country’s great names in the design and development of pleasure and racing powerboats. Nelson Zimmer, who was informally associated with Hacker after World War II, has to date designed three other small craft for WoodenBoat’s catalog of plans.
The runabout presented here is according to Zimmer, “based on the creative genius of the late John L. Hacker.” She is not an easy boat to build; but then, no runabout worthy of the name ever was, which is why these boats continue to spark interest and hold value.
The Gent’s Runabout is designed for sawn frames and batten-seam planking.
Her construction is conventional for a craft of this type: batten-seam mahogany planking over sawn frames. This is a method that holds up well over time and keeps a dry-sailed boat dry in the water, without the need to wait for swelling to close up her seams.
The Gentleman’s lines: considerable shape for a hard-chined hull.
This is a runabout by an earlier, more elegant, definition of the term: a pleasure boat for gentle men and women. The Zimmer-Hacker craft can take two people out not just for a spin, but for an experience. Powerboating may have become faster than this, but not better. She can do 30 mph max; thus, she is more like a two-seat country roadster of the period than a pounding offshore racer of the present. Strict limitations have been placed on the power plant so that the hull strength will not be exceeded.
Nelson Zimmer draws details with care.
Nelson Zimmer is noted for his attention to detail; in that regard, this homage to Hacker is Zimmer at his best. For example, as a clear aid to construction, he has drawn sections of each of the building-frame stations; and in the interest of authenticity, he has provided measured drawings for the boat’s custom hardware and fittings.
Here, then, is a little beauty deserving of the phrase “for the discerning yachtsman.” And, we might add, “for the discriminating craftsman.”
Please note: the Westerbeke 26G engine specified in the plans is no longer manufactured. Alternatives are to select a similar size from a salvage yard, or with a light-weight Yanmar diesel. You might even try biodiesel for fuel, to save your olfactories.
Five sheets of plans for the Gentleman’s Runabout design include profile and deck arrangement, lines and offsets, construction plan, construction sections, and assorted fittings. WoodenBoat Plan No. 76. $120.00.
Batten-seam construction: strong, tight, and labor-intensive.
Nelson Zimmer designed his Utility Launch to shuttle people between towns and fishing camps in Canada’s North Woods. Like the Gentleman’s Runabout, the Utility Launch might not reach the speeds of modern powerboats. But Zimmer designed her with “an able hull, one which could cope with the chop from a fresh breeze or glide silently through the water to avoid disturbing the fishing grounds.”
One of the unceasing pleasures of working at Small Boats is meeting people who design, build, use, or simply love small boats. Through any given year I meet them individually in myriad places: at launching ramps, on the water, in boatyards, at gas stops on the highway, even in grocery stores far from lake, stream, or ocean. And then, from time to time, I meet many of them en masse, in one place. This past weekend was one of those latter occasions. For three days I crisscrossed Mystic Seaport Museum’s grounds and docks enjoying the company of boating enthusiasts—both amateur and professional—and soaking up the atmosphere of the 2025 WoodenBoat Show.
Photographs by the author
Ben Fuller’s boating kit: paddles, hat, PFD, and unseen but nestling within the traditional basket, a high-tech Maptattoo marine GPS
Rose Woodyard and Alan Mann of Newfound Woodworks brought a selection of their strip-planked canoes to the show and, for the sixth year in a row, won Best in Show in the Professionally Built Manually Powered Boat category.
On the water there were extraordinary yachts whose pristine varnish and high-gloss topsides gleamed in the Connecticut sun, while between them meandered the modest, unsung prams and dories, tenders and skiffs.
No matter what boat you come to the show in, sometimes the best way to get around is in a humble working skiff with a sculling oar.
AWOOGA, a Candu-EZ mini-tugboat with a light-blue hull was built by Adam Riso of Clinton, Connecticut. He was inspired in 2020 when he saw TOOT-TOOT at the show. Back at Mystic again, TOOT-TOOT, with the dark-blue hull, was built by Mike Magnant of Middleboro, Massachusetts.
On land, massive restoration projects in the Henry B. DuPont Preservation Shipyard contrasted with the exquisite craftsmanship of intricate strip-planked canoes and fine-lined daysailers. And spread out across the Village Green in the midst of it all were the amateur boatbuilders who came together to display their work in the “I Built/Restored it Myself” area. Among them, two 14′ mini tugboats sat not far from two 6′ 4″ Cape Cod Frosty sailing dinghies, which stood across from a modified Selway Fisher 14′ 6″ fantail electric launch, a Shellback Dinghy, a 14′ whitewater dory designed to run through the Grand Canyon, and a restored lateen-rigged Sailin’ Surfboard built in 1960 from plans published in the July 1958 issue of Boys’ Life magazine.
Jay Beauchemin built HEY JUDE from Richard Kolin’s 12′ Heidi design. He stretched the length to 14′ but kept the beam to the original 3′ 10 3⁄4″.
One of the Seaport’s Beetle Cats makes its way back to the boathouse. Beyond her, at the dock with her spritsail raised, is SANDY FORD, a 13′ 3″ × 5′ 11″ Woods Hole spritsail catboat.
And then there were the people: friends meeting friends; curious visitors chatting with knowledgeable exhibitors; delighted children sharing amazements with equally delighted parents. Newcomers savored words of wisdom from old hands: Roger Barnes—famed small-boat cruising sailor and author—shared small-boat cruising tips and anecdotes with a dinghy sailor yet to adventure out for an overnight onboard. Ben Fuller—frequent Small Boats contributor and one-time director of the traditional boat program at Mystic—discussed how to effectively reef a spritsail with Jay Beauchemin who finished the build of HEY JUDE in time for the show but not in time to go sailing. And Joe, a museum volunteer of many years, patiently and calmly directed from the dock as a new sailor at the helm of one of the museum’s Beetle Cats attempted to come alongside under sail—too fast, too slow, just right.
Justine and John Diamond built LARK, a 15′ strip-planked canoe designed by Bear Mountain Boats, from plans they bought in 2022. Newcomers to boatbuilding, they built her in reverse, starting with the paddles, then the seats, the gunwales, the inlay-design strips, and finally the hull. Added to their lack of boatbuilding experience, John had only ever once been in a canoe and had no idea if he’d even enjoy it once launched. “We built it on a lark,” says Justine.
During the WoodenBoat Show weekend, the Village Green at Mystic Seaport Museum is home to the “I Built/Restored it Myself” display.
To all who visited, I hope you had as much fun as I did; to everyone I failed to connect with, my apologies; to anyone unable to go this year but thinking of it for next…do it, you won’t regret it.
In the early summer of 1984, when I was 20, I had a summer job directing a children’s sailing program operated from a tiny beach community in Gloucester, Massachusetts. My daily commute consisted of a 15-mile highway sprint in my 1975 Ford Granada to a marina in Gloucester, where my dog and I would board a 13′ Boston Whaler and drive it the few miles north to the mouth of the Annisquam River. There, I’d take a hard turn to port and run along the white-sand beach for a mile to rendezvous with a fleet of O’Day Widgeons and a group of eager students. It was an idyllic situation that lulled me into complacency on the day of my first commute.
The weather was calm and clear. The 1960s-vintage Whaler was fitted with a freshly overhauled 25-hp electric-start Evinrude, which fired right up. I idled out of the slip and into the river, overconfident in the intuition honed from a life-so-far in boats. Clearing the no-wake zone, I brought the boat up on plane and kicked back for the glass-smooth ride to the river’s mouth. The “river” is actually a canal connecting Ipswich Bay with Massachusetts Bay; it makes some hard twists and turns, and I elected to follow its natural trend, paying little heed to navigation aids.
Jenny Bennett
When first launched in 1958, the 13′ Boston Whaler, designed by C. Raymond Hunt, was a breakthrough boat in both its design and construction. Hulls are a sandwich of foam and fiberglass—a durable and unsinkable structure.
I scooted along a wide arcing turn and noticed a flock of seagulls floating ahead of me. As I drew closer, they stood up. Before I could react, the Whaler, at nearly full throttle, came to a skidding halt. The motor stalled. All was quiet. The gulls looked at me quizzically. I looked back at them, and then over the side, where I observed ripples of fine sand just a few inches below the surface. Off to starboard, I spied the green can clearly marking a turn in the channel that curved away from the route I’d been following. I furtively scanned the area for onlookers. Mercifully, there were none. I stepped out of the boat, pushed it off the sandbar, and checked the motor for damage. It was fine, save for a little paint off the propeller. The hull was undamaged, too. I patted the dog on the head and pulled slowly away, munching on a big serving of humble pie, firm hand on the wheel, the giggling gulls laughing behind me.
I confess this lapse in judgement not for absolution, but rather as a testimonial to the bombproof durability of the 13′ Boston Whaler—the flagship “unsinkable” boat that launched a legendary company and which, though introduced in 1958, is still among the most coveted small powerboats on the New England used-boat market.
Jenny Bennett
Early Boston Whalers were offered in two models: the Standard, in which the operator sat on an aft thwart to control a tiller-steered outboard motor, and the Sport (shown), which featured a small ’midship console and three thwarts.
Origins of the Unsinkable Boston Whaler
In 1916, Albert Hickman, a restless and unbridled innovator in powerboats, developed and patented a hull form he named the Hickman Sea Sled. Writing in WoodenBoat in 1991, David Seidman said that the boat “looked like someone had taken a perfectly normal V-bottomed boat and cut it down the centerline, then reassembled it so the original sides looked like they were in the center and the centerlines were on the sides. Sort of like putting your shoes on the wrong feet. The boat had a tunnel forward in the shape of an inverted V that flattened as it went aft. This was enclosed by two outward-turning bows that seemed to be pulling the boat apart right down the middle.”
Liz Duffy
The Boston Whaler was inspired by the Hickman Sea Sled, a wooden boat first built in 1916 in a range of sizes up to 70′. Sea Sleds essentially melded two hulls, like a catamaran, forming a tunnel along the centerline. The Boston Whaler incorporated a third, centerline hull, which eased the outboard-motor propeller cavitation that had challenged operators of the Sea Sleds.
In 1928, Hickman developed a 13′ Sea Sled that won the 260-mile Boston to New York Race. He also developed a 78′ version of the boat that was built by Graves Yacht Yard in Marblehead, Massachusetts, for the Army Air Corps. The small-craft historian John Gardner worked at Graves during the construction of the behemoth Army Air Corps Sea Sled, and recalled its construction as akin to building a giant plywood box.
Three decades later, with World War II in the rear-view mirror, a Marblehead-based builder named Dick Fisher sought a design in which to test his newly conceived foam-cored fiberglass construction technique. Fisher was a nephew and protégé of the yacht designer Frank C. Paine, a legend in racing-sailboat design in Marblehead. Fisher had graduated from Harvard in the 1930s and gone on to co-found a company that manufactured electrical products. Boats were his passion, however, and he’d made early experiments in building lightweight balsa craft, which were of limited utility due to that wood’s softness. Later, in the early 1950s, he lit on the idea of building boats of polyurethane foam—a new invention at the time. While this foam was soft and vulnerable like balsa, he reasoned that it could be sandwiched in a fiberglass shell to produce a hard, unsinkable hull.
Jenny Bennett
Early Boston Whalers have proven to be quite durable and are often the chase boat of choice for many sailing programs. Aftermarket rubrails sometimes replace the hard-rubber original ones. However, one must be cautious not to allow water into the foam-sandwich hull when drilling new holes in the boat. Well-preserved or restored early boats often fetch high prices; for people willing to invest some labor, there are bargains to be found in well-worn hulls.
Fisher tested his theory in a small daysailer, and later struck a royalty deal with Albert Hickman to build Sea Sleds using the method. Hickman, however, sought increased control over the arrangement as negotiations progressed, which ultimately killed the deal. So, Fisher turned to C. Raymond Hunt, whose vast design output includes both the Concordia yawl—one of the most enduringly popular traditional wooden cruising sailboats ever designed—and the deep-V hull, which revolutionized both offshore powerboat racing and recreational boating.
Fisher’s testing showed that the Sea Sled hull generated a mixture of air and water that caused a centerline outboard-motor propeller to cavitate. So, Hunt developed a new form with a centerline “hull” in place of Hickman’s tunnel; this hull, flattened aft, fed clean water to the propeller. While the overall form of the boat, with its maximum beam carried all the way forward and aft, resembled the Hickman Sea Sled in plan and profile views, its underwater details were sufficiently different so as not to infringe on Hickman’s patent. The Fisher-Hunt creation, built in a foam-and-fiberglass sandwich with a distinctive blue interior, was unveiled as the 13′ Boston Whaler in 1958.
Jenny Bennett
The old and the new: An early 13′ Boston Whaler rests alongside a late-model peer. Aside from the obvious difference in interior color, the later boat has a modified hull shape—a more rounded bow, an easing of the chine profile forward—and molded interior components rather than the wooden ones introduced in 1958.
The Whaler’s construction was unique for its time, and became a trademarked process called Unibond. The hull and an interior liner were laid in fiberglass, separately but concurrently. While still curing, they were clamped together, with a resulting void between them. Into this void, at the bow, was injected polyurethane foam, which traveled aft under pressure, expanded, and emerged through a relief hole in the stern, confirming the filling of all voids. The whole deal—polyurethane and fiberglass—cured into one solid piece.
Three years after the Boston Whaler’s introduction, in 1961, Life magazine ran an article on the design, and featured a photograph of Dick Fisher sitting calmly in the stern of one of the boats, while in front of him a pit saw was apparently cutting the hull in half. A subsequent photograph showed Fisher motoring along, dry-shod, in the sawed-off stern section. The article was titled “The Unsinkable Legend.” The visual message was powerful; sales of the boat went through the roof, and variations on the theme of that original story have appeared in Whaler advertising over the years.
A Perfect Harbor Tender
Boston Whaler has been through many chapters and owners since its founding. It remains a solid company building a range of high-quality boats. The classic 13-footer with blue interior remained in production until 1971. The following year, desert tan was introduced for the interior (along with modifications to the hull and liner), and from 1994 to 2000, when production ended, the interiors were white—although 1998 saw a limited-edition model with the original blue interior.
Benjamin Mendlowitz
The versatile 13′ Boston Whaler offers nimble speed when it’s needed, and great load-carrying capacity for larger-vessel support. The boat will carry six average-sized adults on its three thwarts—or fewer people and a load of gear.
My own history of drama in Whalers came full circle a few years ago. For several years I operated a small charter company with a 46′ sloop out of Castine, Maine. On the boat’s very first charter, I received a call from the captain about 15 minutes after they had left the float. The steering was disabled. Did I have any insights? Could I get out to the boat in short order? I was on shore. My dinghy is a 13′ oar-powered peapod, and it does just about everything I want it to. But to get from the harbor to the stranded boat quickly required something else.
I hailed a friend who had a 13′ Whaler at the town landing. Three of us jumped into his boat and scooted out to the mouth of the harbor—a journey that would have taken an hour or so in the peapod, and would have been cramped and slow going with three grown men aboard. In the capacious Whaler it took just a few comfortable minutes. (The steering issue turned out to be an accidental engagement of the autopilot, which was resolved before we arrived.) That brief ride reminded me of the timeless utility of the 13′ Boston Whaler.
At harbor speeds, the boats can carry a load of gear or people; they maintain reasonable if somewhat sluggish maneuverability at displacement speeds. The directional reverse of the outboard motor allows easy handling in close quarters. The boats plane quickly, and steering is nimble when they do. With a 25-hp outboard—the standard for a 13-footer—the top speed is about 26 mph. With the upper limit of 40 hp, the top speed increases to over 30 mph. At those upper speeds, every wavelet is felt by the occupants; larger waves will launch the boat clean out of the water.
Liz Duffy
The 13′ Boston Whaler carries its near-maximum beam all the way to the bow and stern, offering great stability along the length of the boat. Stepping directly aboard in the bow would be perilous in a conventional sharp-bowed boat such as a peapod.
I am still a devoted rower, and I still own a 13′ peapod. My mooring is 3⁄4 mile from the town dock. On a good day, it takes me 20 minutes to row out to it in my peapod; in a foul tide it can take 40 minutes or more. With three adults aboard it’s a safe option, but a chore; six adults is out of the question. By contrast, the 13′ Boston Whaler is rated to carry six adults, perhaps not in ultimate comfort, but certainly safely in calm conditions. As a multipurpose harbor tender that takes up less space in the driveway than a small car, it’s hard to beat. And practicality aside, the 13′ Boston Whaler is a perfect vehicle for a spontaneous island picnic or a joyride to the mouth of the harbor on a warm July evening.
Matthew P. Murphy is editor of WoodenBoat magazine and founder of Small Boats magazine.
Based on the author’s empirical research, there is always a 13′ Boston Whaler for sale somewhere in New England on Facebook Marketplace. Prices for serviceable boats range from $2,500 to over $10,000. Hull weight is critical in assessing the condition of these boats; overweight hulls have likely been breached, and are waterlogged—a non-fatal condition that requires careful and thorough drying of the interior foam and subsequent fiberglass work.
LOA: 13′ 4″
Beam: 5′ 5″
Draft: 6″
Weight: about 275 lbs originally
Power: 9–40 hp
Capacity: 6 people
Is there a boat you’d like to know more about? Have you built one that you think other Small Boats readers would enjoy? Please email us your suggestions.
For some time now my family has spent summer weekends at a camp on a small lake in northern Massachusetts where we’ve kept a ski boat and fishing boat at the dock. On Sunday mornings, early risers shove off with rods and gear to enjoy the sunrise on the water, and in hopes of reeling in some fish for lunch. For years, the boat we fished from was a 16-footer pushed about with an outboard. It was a cold metal hull, a slug to row, and though we tried to tiptoe from aluminum dock to aluminum boat and shove off quietly, the clamor of feet and oars and tackle boxes banging against the hull reverberated around the lake like so many discordant church bells clanging.
Desiring a more pleasant (and neighborly) Sunday morning experience, we needed a new boat—one designed for rowing that would comfortably seat three and occasionally accommodate up to five adult fisherfolk, could be loaded quietly, and could withstand pounding while moored at the dock. This last was a must: on weekdays, the relatively shallow 150-acre lake is dimpled by landing loons and ducks and rippled by fish splashing, but the hot weekends of summer bring out an armada of skiers and wakeboarders, and dockside boats can get thrashed, bucking about like wild broncos. I have two smaller, lightly built wooden rowboats, but we needed a larger, sturdy workboat. I found what I was looking for in John Gardner’s The Dory Book in which he described a “substantial row boat for fishing and general recreational use…a sturdy craft, built for rough treatment.” This was it! A Lowell Dory Skiff!
Photographs by the author
The boat weighs about 130 lbs and can be easily lifted onto a trailer where, thanks to its flat bottom, it sits upright. As designed, without floorboards, the frames serve well as foot braces for rowers.
At 14′ 9″ long and 52″ abeam the Lowell Dory Skiff was as big a boat as I could build in my small shop. I made space for lofting. The whole “recipe” for the boat’s construction is presented on a single 8 1⁄2″ × 11″ book page. The details include a table of offsets and a list of required fastenings and lumber. I had all the wood I needed at hand. The drawings call for 7⁄8″ oak for bottom cross cleats, sawn frames, bent frames (5⁄8″ × 7⁄8″), skeg, and gunwale, 7⁄8″ white pine for bottom and thwarts, and enough white cedar for 9⁄16″ planking. Copper rivets are specified for fastening the bent frames and laps (as I was building the boat specifically for a freshwater lake, I decided that stainless-steel screws and nails would suffice for fastenings).
Though The Dory Book (comprehensively illustrated by Sam Manning) is the preeminent primer on dory construction, some previous experience would certainly help carry a builder through this project with less head-scratching. Nonetheless, with the masterful information in the book’s Part 2, “How to Build a Dory” near at hand, and a desire to draw a good line and cut to it, anyone with time and care can build a good boat the first time around.
Although not shown in Gardner’s design, I made red-cedar floorboards to protect the bottom and to facilitate movement around the boat. The cedar rubrails replaced the designed rope gunwale fender—they are less of a snagging hazard for fishhooks, and have stood up well to being knocked against the dock.
Building the Lowell Dory Skiff
Using four 10″-wide pine boards for the bottom gave me the middle seam as a centerline as indicated in the drawings. Before clamping up and screwing in the cleats, I planed seam bevels. These would be luted and caulked before I painted the bottom. The sawn oak frames came next. For each, I assembled the bottom and two side parts with pairs of 1⁄8″ brass splice plates (the plans call for 3⁄32″ bronze) epoxied and riveted at the dog legs; I cut the frame corners at the angle between the bottom and garboards to create limber holes. Finally, I got out a white-oak inner stem and pine transom—with red-oak cheeks—beveled each, and set up my ladder frame.
I’ve learned to build lapstrake boats upside down. It allows me to plank solo using clench nails. I set up and screwed-in the assembled dory frames at their appropriate stations on the bottom, being mindful to place them on the correct side of the station mark. Every wood-to-wood connection got a smattering of bedding compound. Then, lifting this “skeleton,” I clamped each cross spall to its respective station on the ladder frame. Securing each cross spall to the ladder frame’s cross cleats formed the bottom’s rocker without the need for weights or overhead shores. After the stem and transom were centered and plumbed, everything got squared and braced. The frame bevels were fine-tuned, and planking commenced.
For a solo rower, the central thwart is comfortable and provides perfect hull trim.
Following Gardner’s concise list of steps for planking—“Laying out, lining, and spiling; Getting out, splicing, and beveling; Hanging and fastening”—I worked my way through the first four strakes. I got out planks from 8′ to 10′ boards of 9⁄16″ white cedar. Each plank had one epoxied scarf joint for appropriate length. I nailed the garboards to the bottom with 3″ #12 stainless-steel ring-shank nails and fastened subsequent plank laps with 7⁄8″ clench nails spaced approximately 3″ apart. In addition to the sawn frames to which I screw-fastened the planks, there were also steam-bent frames that would later be riveted to the planking, and I noted this spacing. Before screwing the planks to the stem and transom I laid a bead of adhesive sealant. For strength and looks I chose red oak for the sheerstrake. Turning the hull upright at this stage allowed me to rivet this final plank using #14 copper nails and burrs and gave me a better look at the sweep of the sheer.
After riveting the steam-bent frames I got out and fitted the false stem, breasthook and knees, and made a plywood pattern of the long, curving gunwale. The gunwale itself is made of three lengths of red oak scarfed with epoxy. I spaced the joints to fall under the placement of the oarlock pads. I fashioned rubrails from the cedar planking offcuts and fastened them with screws; the plans show a rope bumper, but we worried that this would snare too many fishhooks. Instead of the outboard motor pad indicated on Gardner’s drawings, I opted for a sternpost to stiffen the transom and keel. I also cut a sculling notch. I followed Gardner’s interior plan for thwarts and wraparound stern bench, all of which are bright-finished white pine.
The Lowell Dory Skiff Performance
What a joy it is to step down into the Lowell Dory Skiff. There’s no need to land dead-center, for while it’s a lively craft, it’s quite stable, and with its 18″ interior depth you feel safe and secure once you’re settled in.
With a passenger seated in the stern, the rower moves forward to the bow rowing station to maintain good trim. Here, the seat and sheer are a little higher, making the angle of entry for the oars slightly steeper, but the stroke is still efficient.
There are two rowing stations with enough room for paired rowing. The center thwart is a comfortably ergonomic 13 1⁄2″ above the bottom (the forward seat is 15″ above). The skiff’s frames are usefully employed as foot braces. In keeping with the workboat heritage, we use 8′ ash oars. A single rower seated on the center thwart can get the hull to move easily with a few strokes and maintain a steady pace with little drag. The skiff’s rockered bottom and moderate skeg afford both maneuverability and an easy glide. And thanks to the two rowing stations, it’s easy to adjust the hull trim when two or more people are aboard.
Our Lowell dory weighs 130 lbs and—with two strong people—can be lifted on or off its trailer when the need arises, and readily rolled upside down to attend to the bottom. The wide, flat gunwales provide a good handhold when lifting. We slide the boat off and onto its trailer at the beginning and end of the summer season from a sloping shore; when it gets rained-on dockside, we use a hand pump and sponge to drain the bilge. The robust sheer has nicely weathered the hard knocks of summer weekends. The cedar rubrails have become worn in places, but if the need eventually arises, replacing them will be simple.
Tina DeVries
The rowing stations are well spaced for double rowing. With two people at the oars, the dory picks up good speed and travels smoothly through calm waters.
It may be my imagination, but in the years since the Lowell Dory Skiff became our Sunday-morning fishing boat, we seem to be getting more good-natured nods from our neighbors at the lake. Maybe some of them have been getting more uninterrupted sleep. These days they even come by with family and guests to get a closer look at the handsome boat at our dock—like so many traditional wooden rowboats, the Lowell Dory Skiff, a good solid workboat, has considerable charm.
Tom DeVries enjoys learning a little bit more about the boatbuilders’ craft with each design he works on. A Finger Lakes Trout Boat might be next…there’s still some wood in the shed.
Lowell Dory Skiff Particulars
LOA: 14′ 9″
Beam: 4′ 6 3⁄8″
The Dory Book by John Gardner is available from The WoodenBoat Store, $29.95.
Is there a boat you’d like to know more about? Have you built one that you think other Small Boats readers would enjoy? Please email us your suggestions.
Continue Reading - Enter your email to log in or subscribe
New to Small Boats? Create a free account to get our weekly emails and two free articles each month.
Time to upgrade!
You've read all of your free content for the month. Upgrade to a paid subscription for unlimited access.
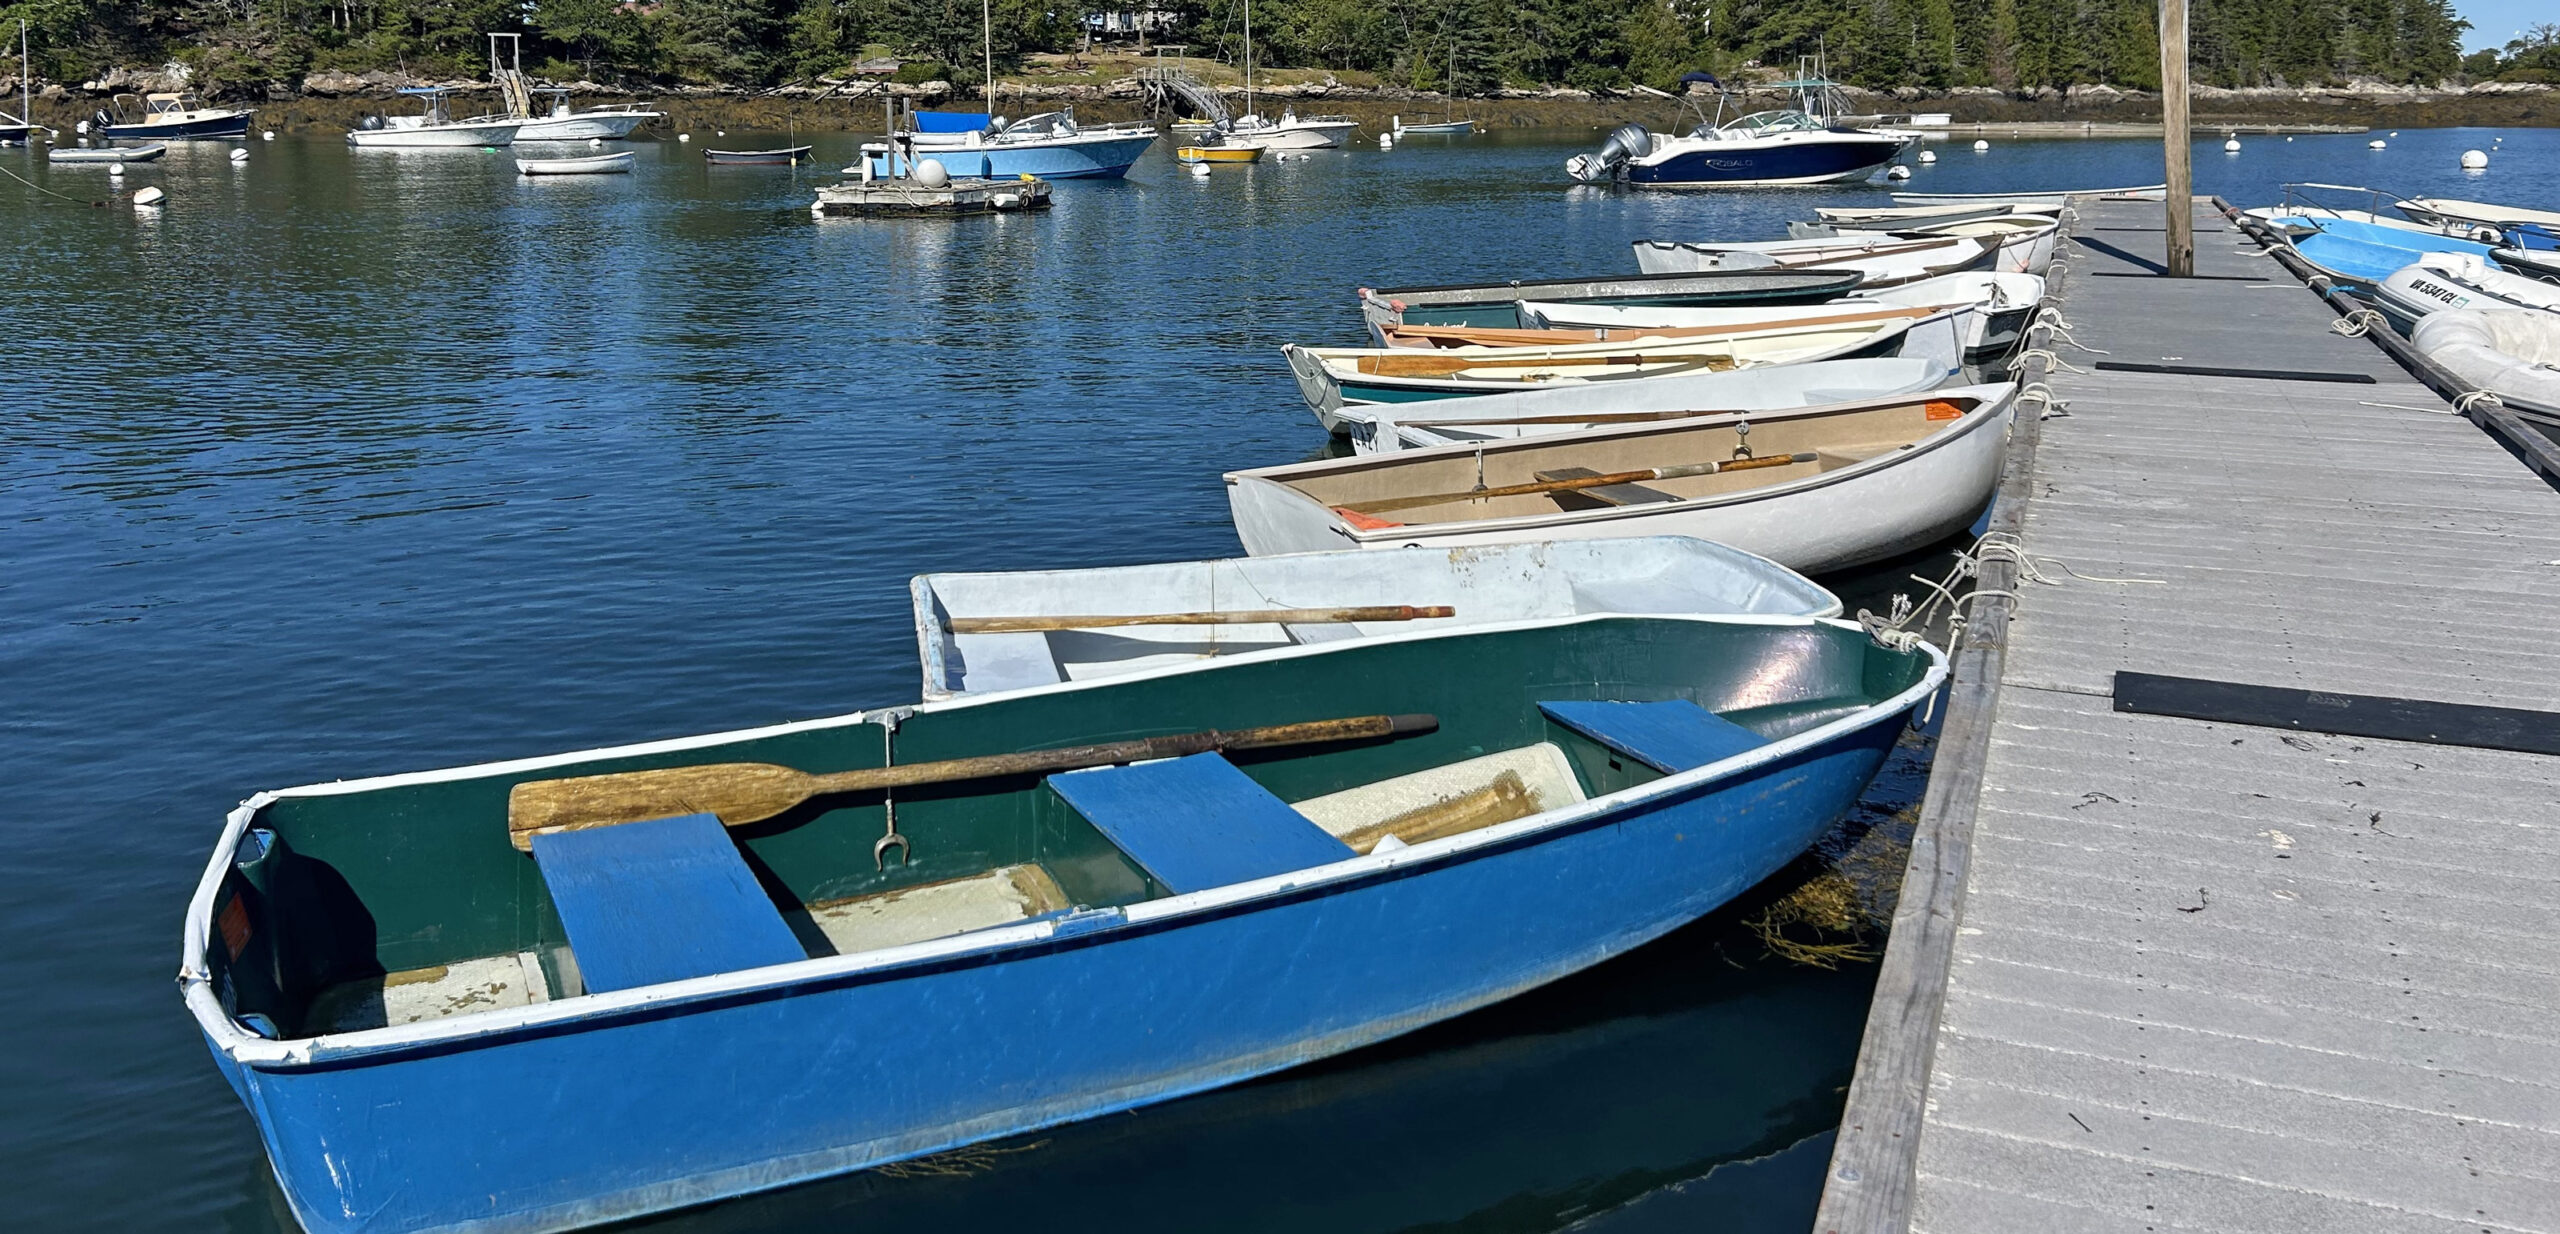
 Jenny Bennett
 Christopher Cunningham
 Jenny Bennett