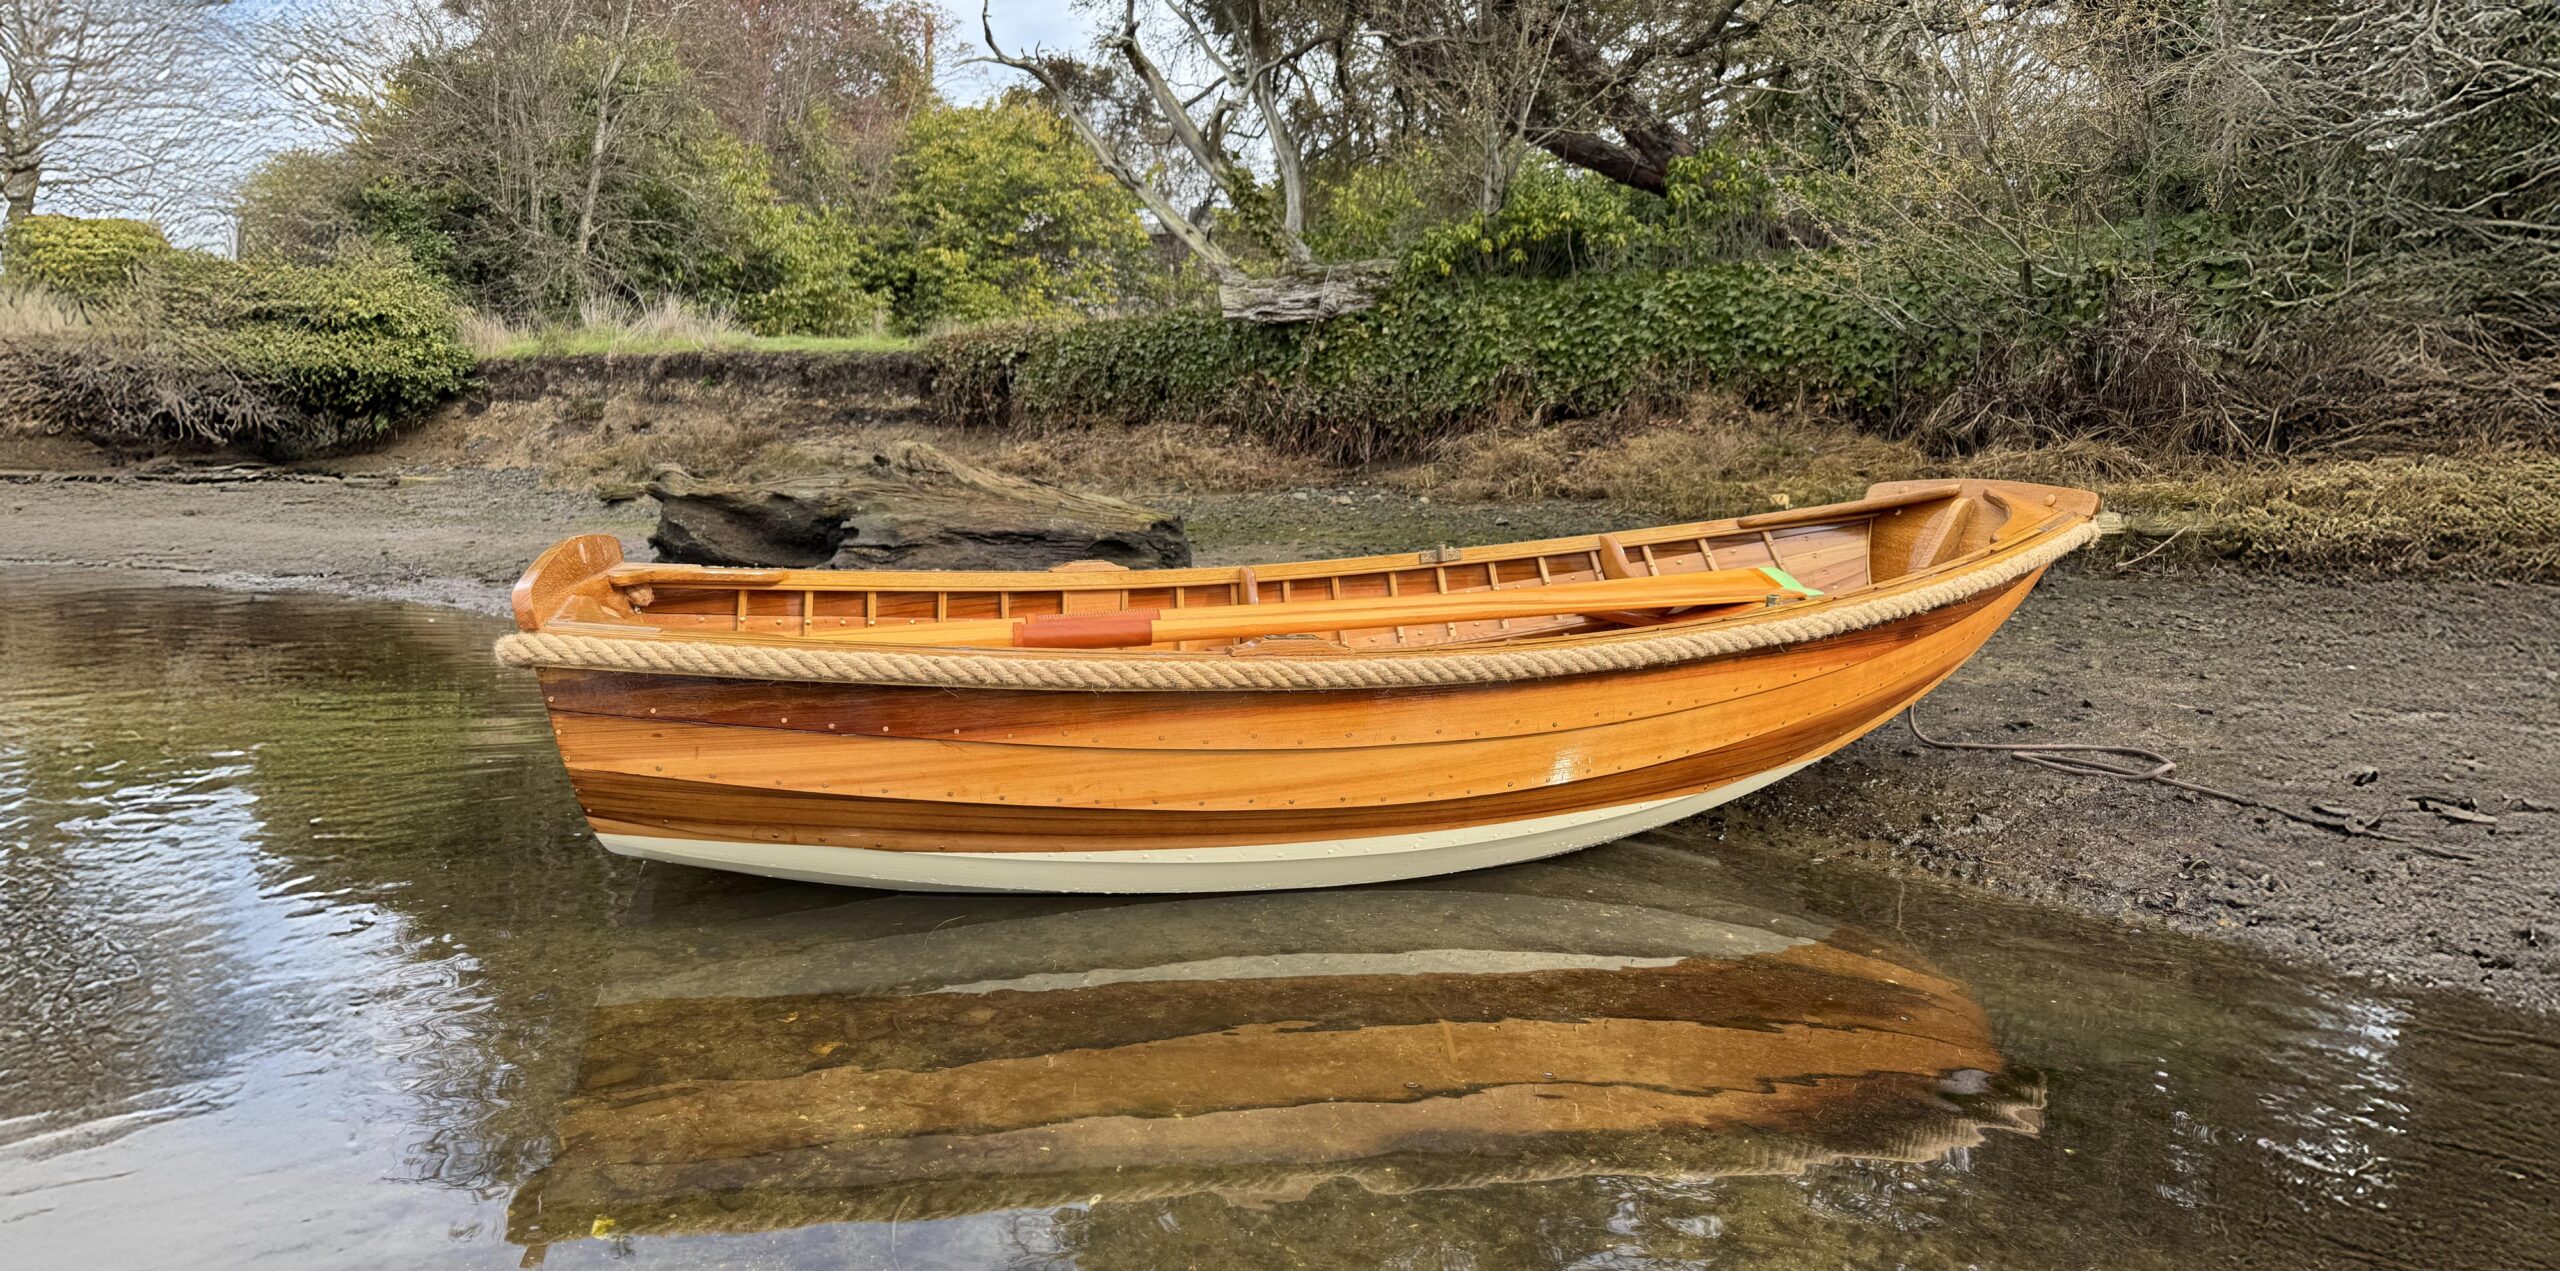
Noank is a village in southeast Connecticut that looks out over Fishers Island Sound and the Mystic River. In the 19th century it was a major shipbuilding center, and about 700 wooden sailing ships came down the ways in shipyards in this picturesque little town. Noank is also the name given to an 18′ 2″ pulling boat designed by Nick Schade, whose small-boat shop is about a mile, as the gull flies, from the village. He is well known for his line of Guillemot kayaks, strip-built in wood, then ’glassed, varnished, and made show-room pretty.
photographs by the author
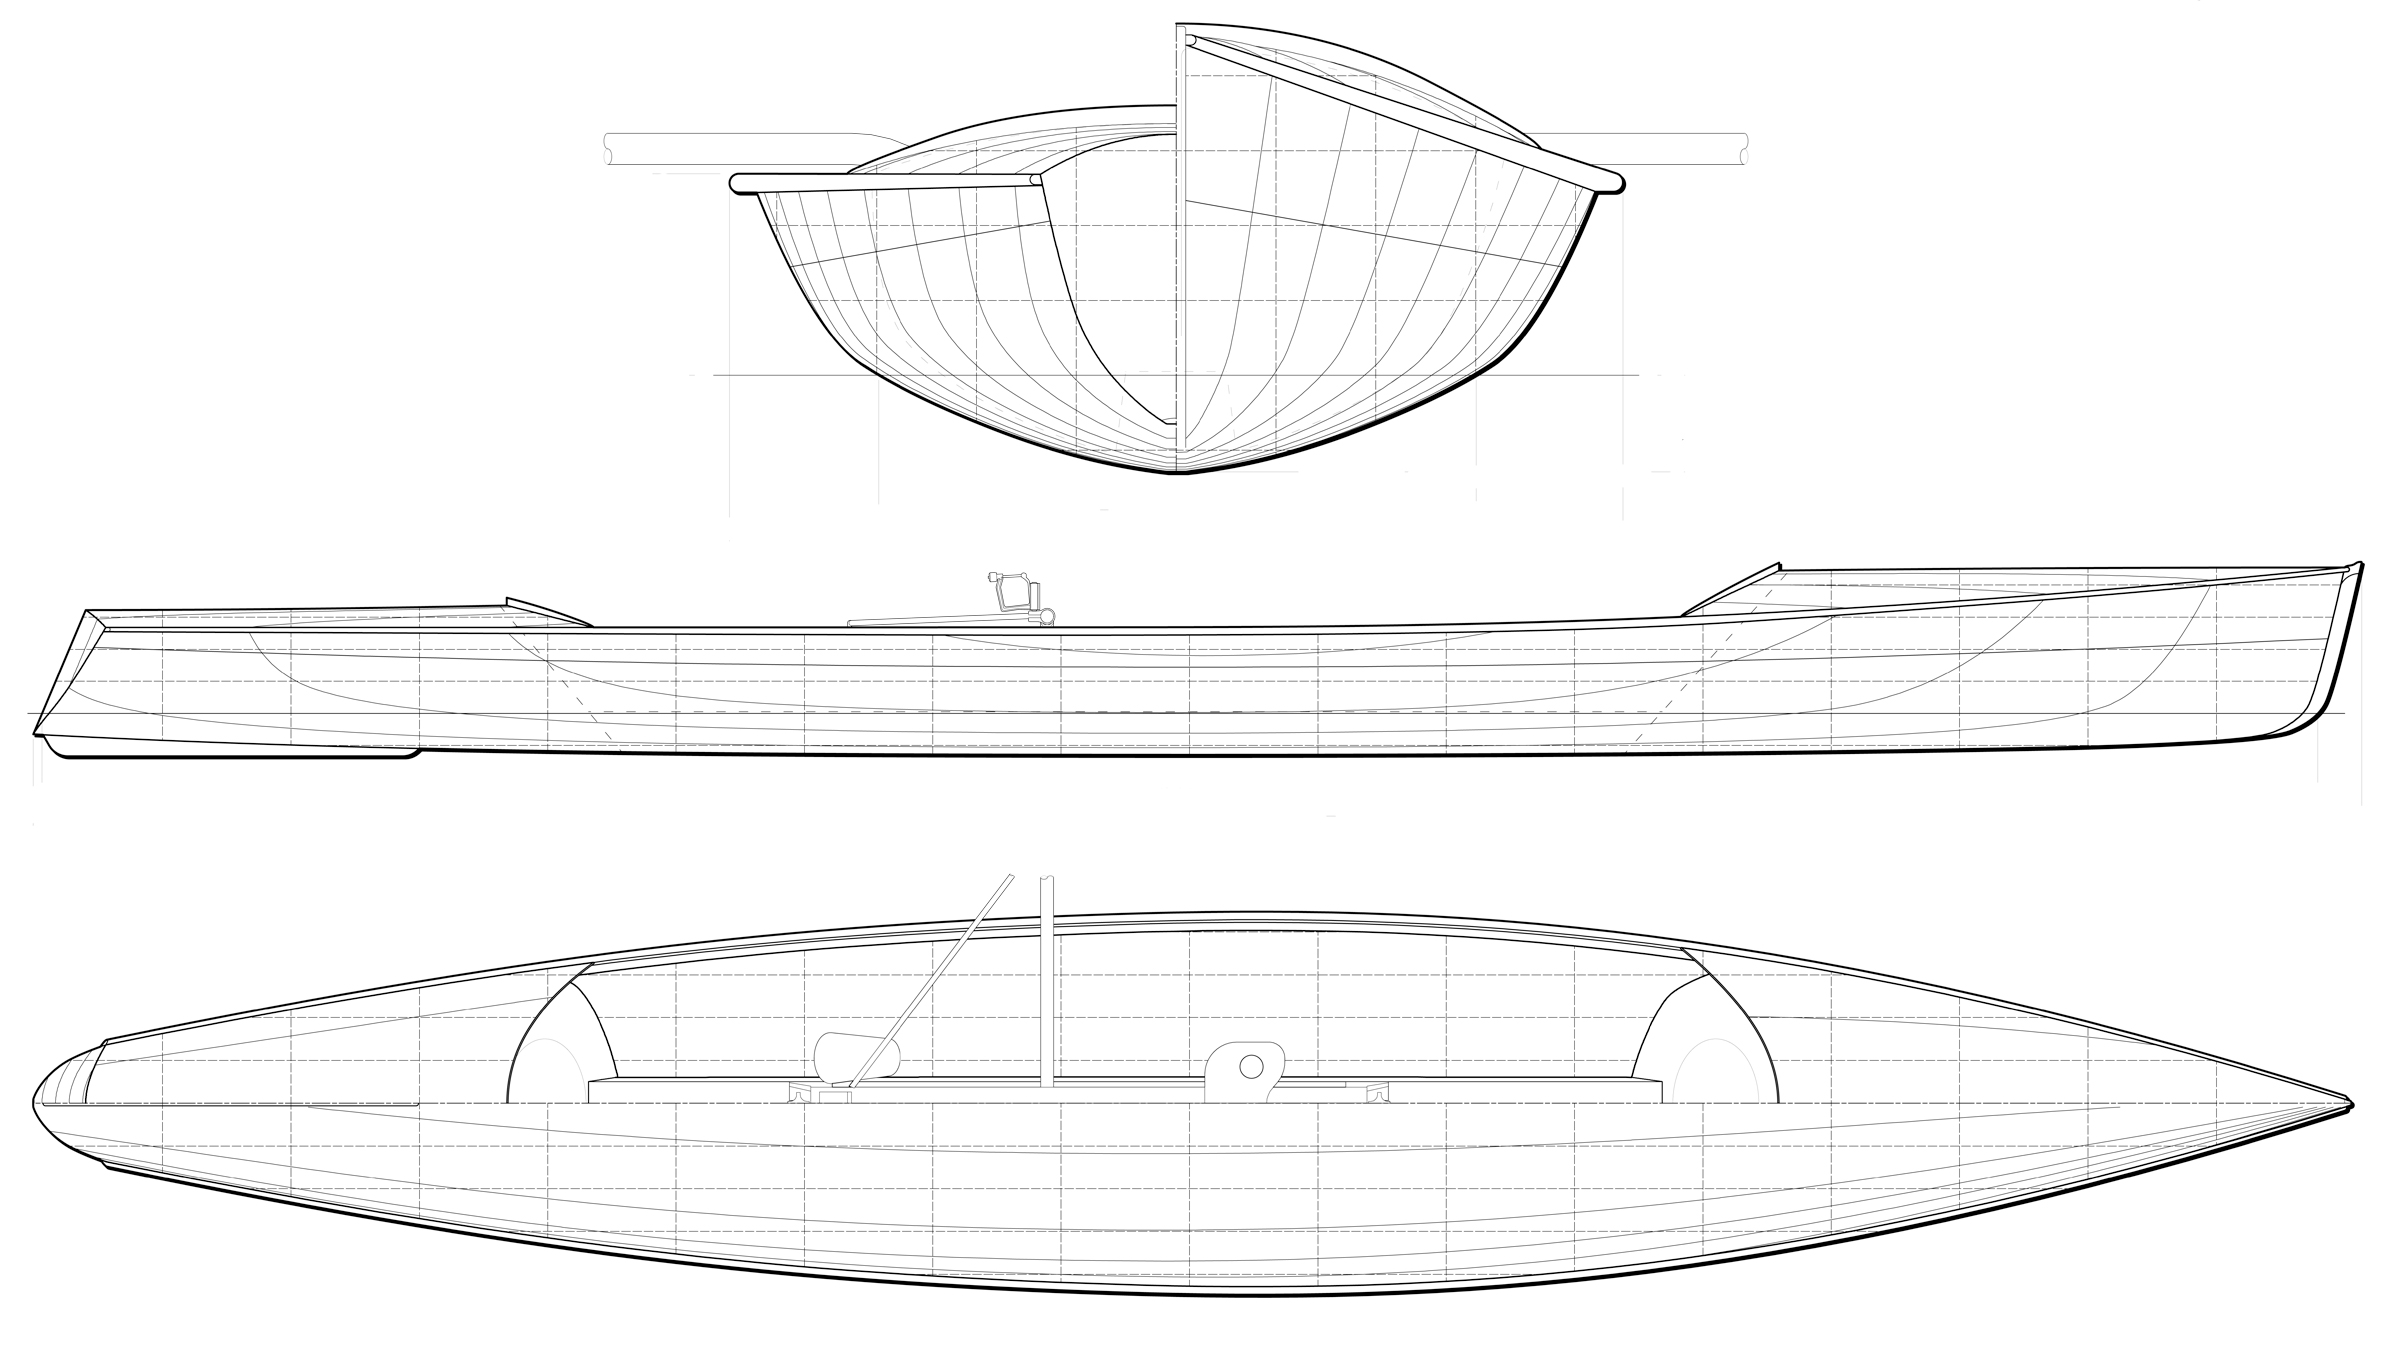
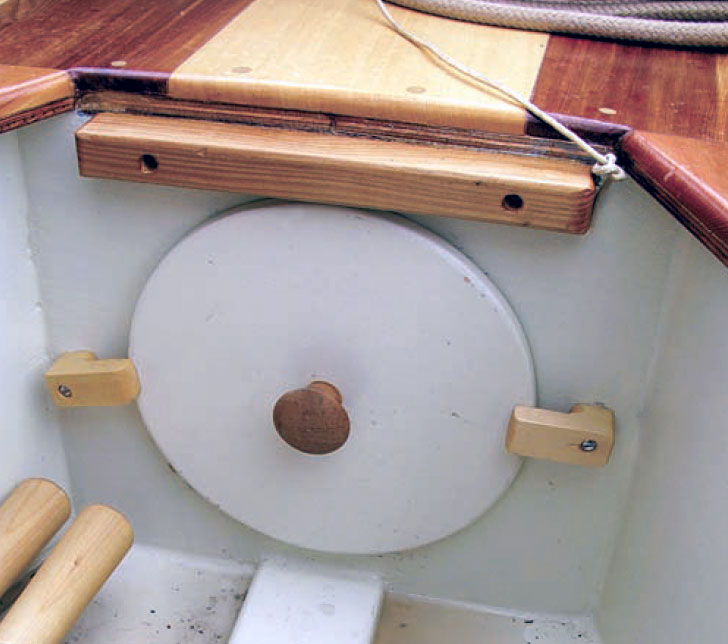
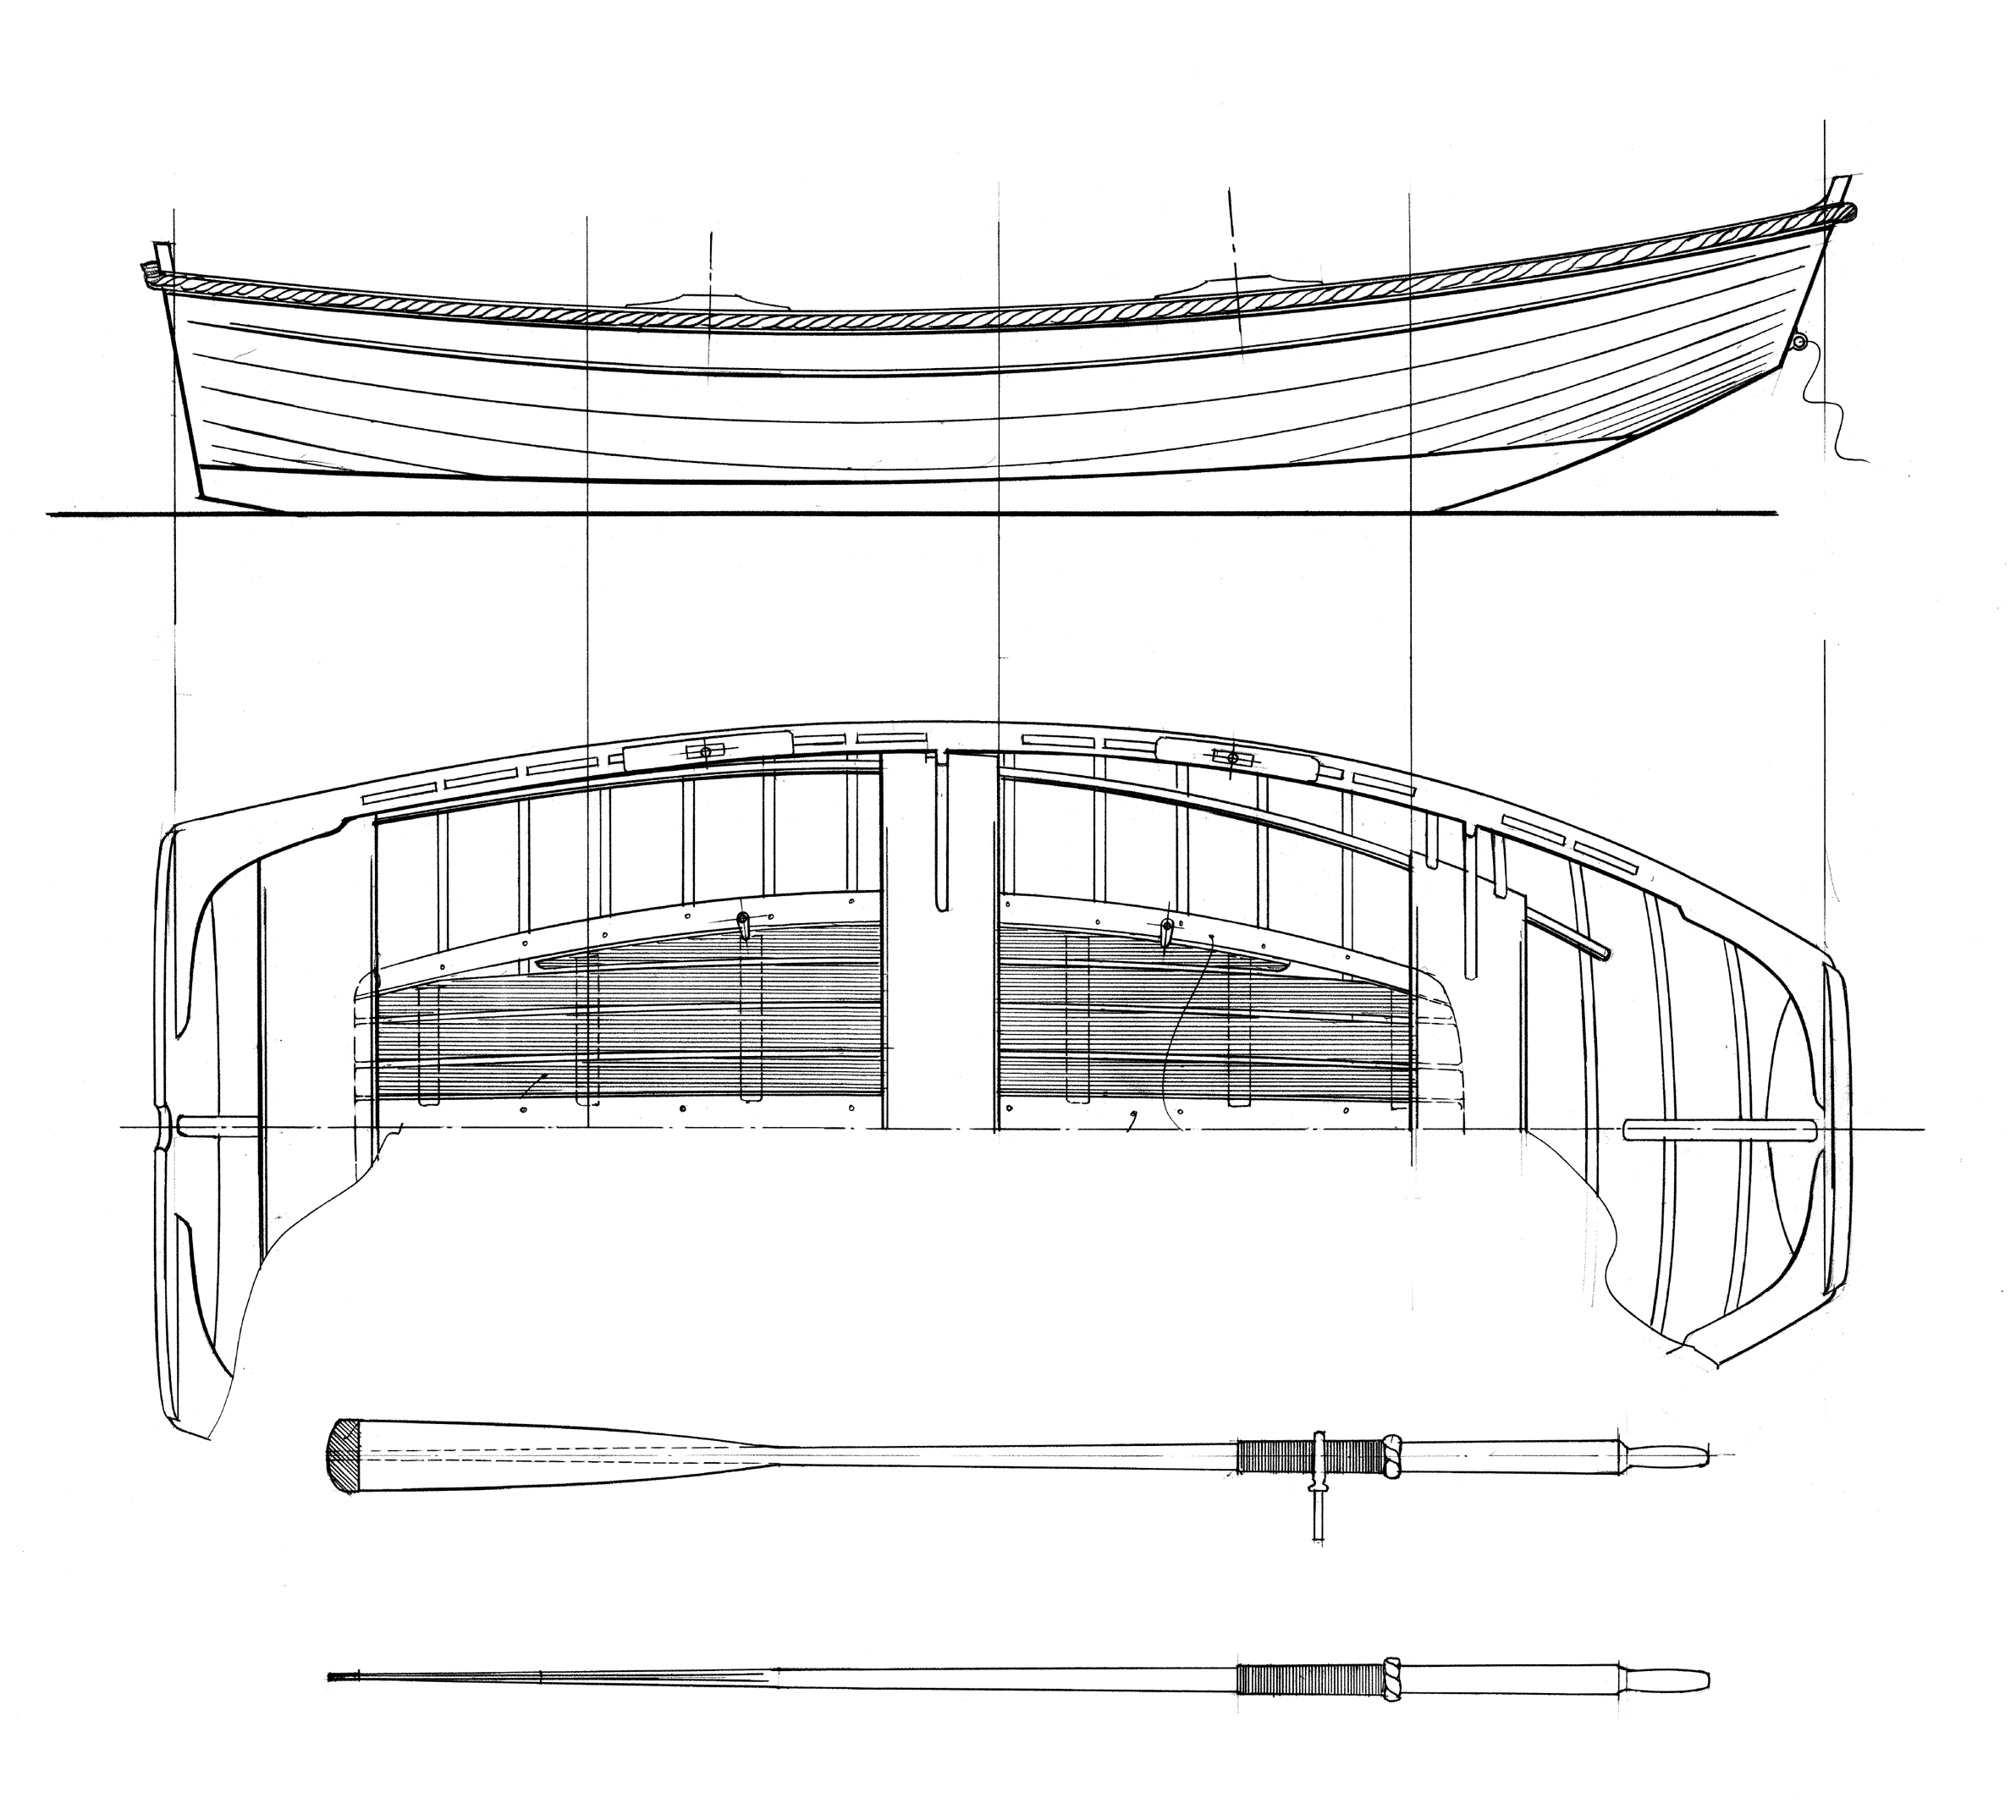
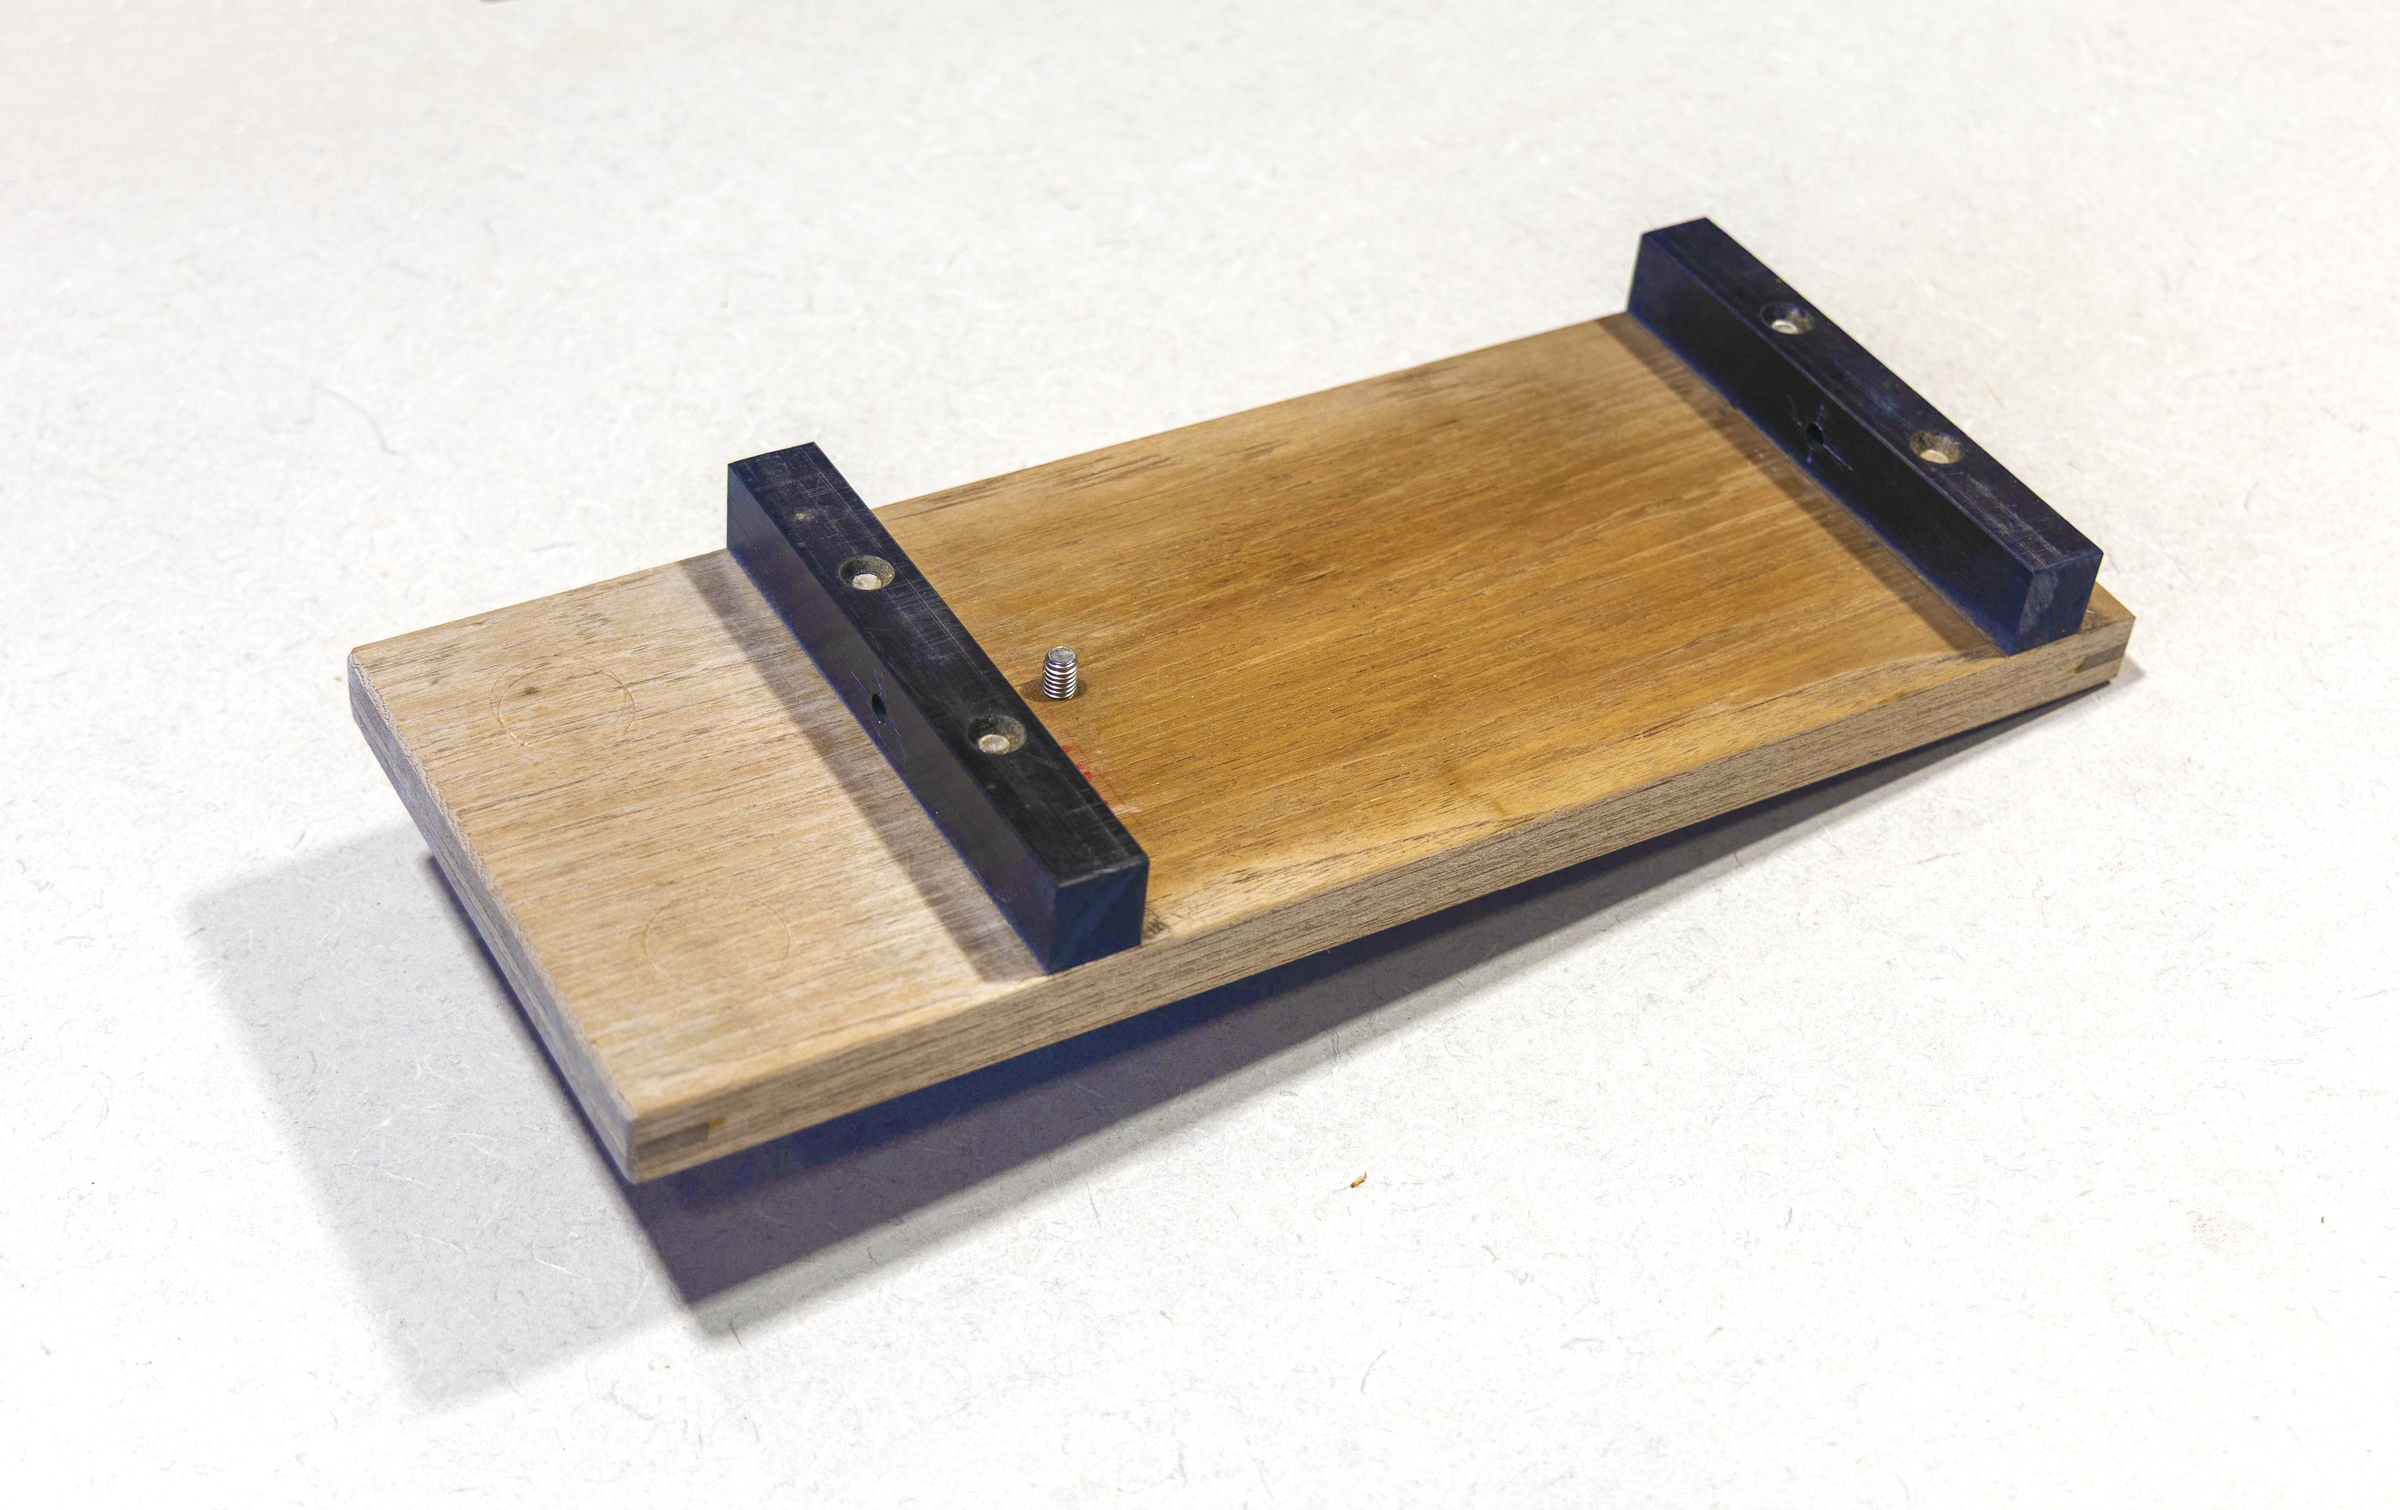
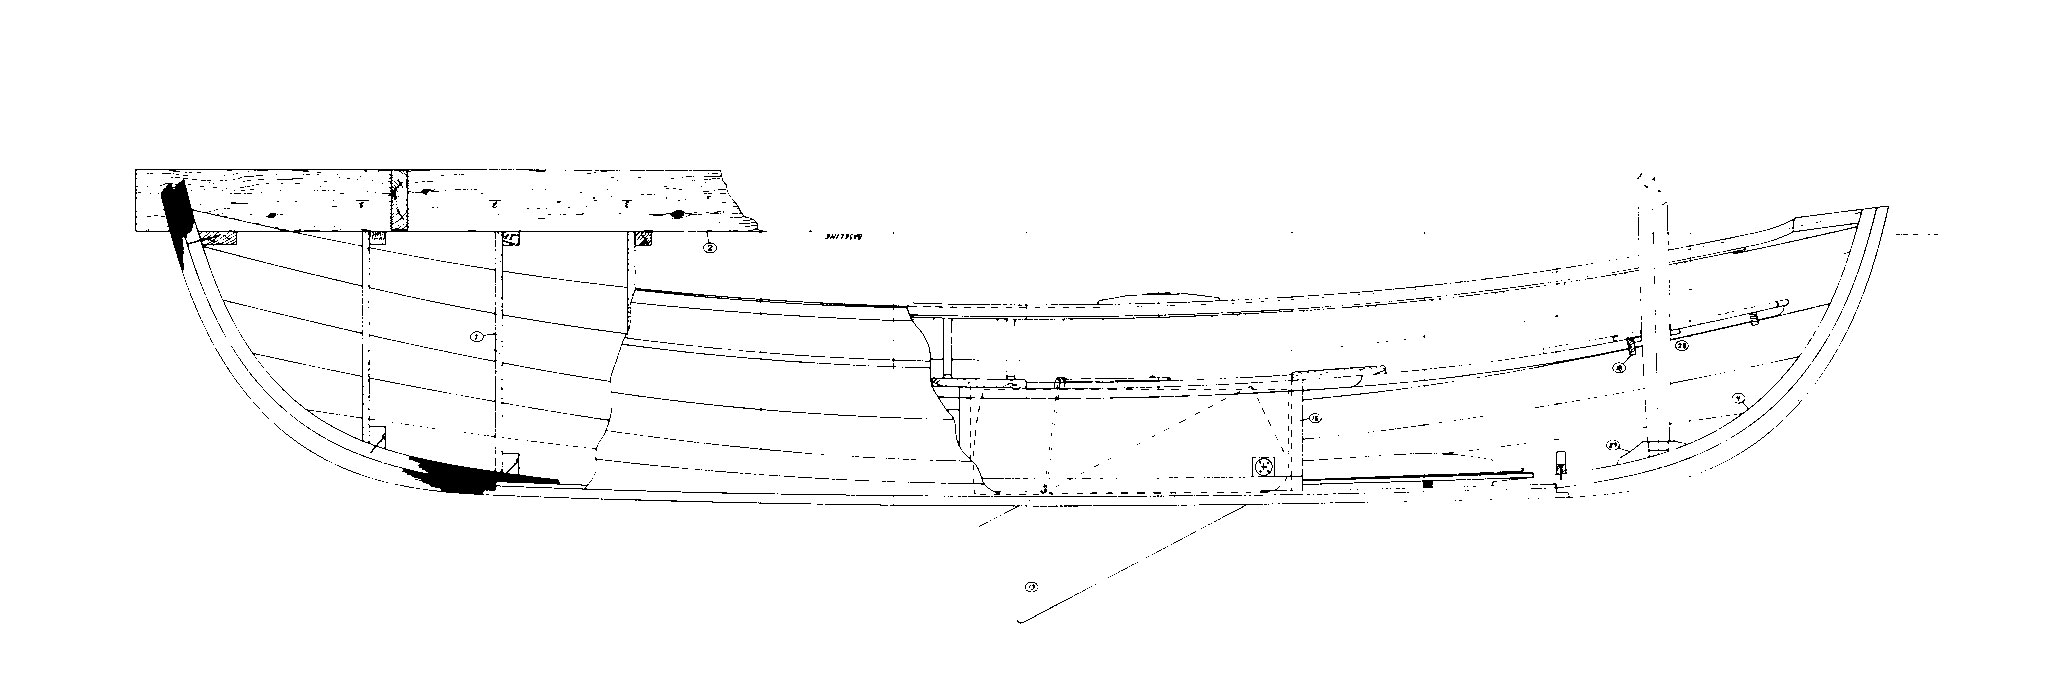
The seat support rail is designed for the Piantedosi sliding seat rowing rig. Under each deck is a sealed compartment for dry storage and flotation. The manual includes instructions for making the hatches from plywood.
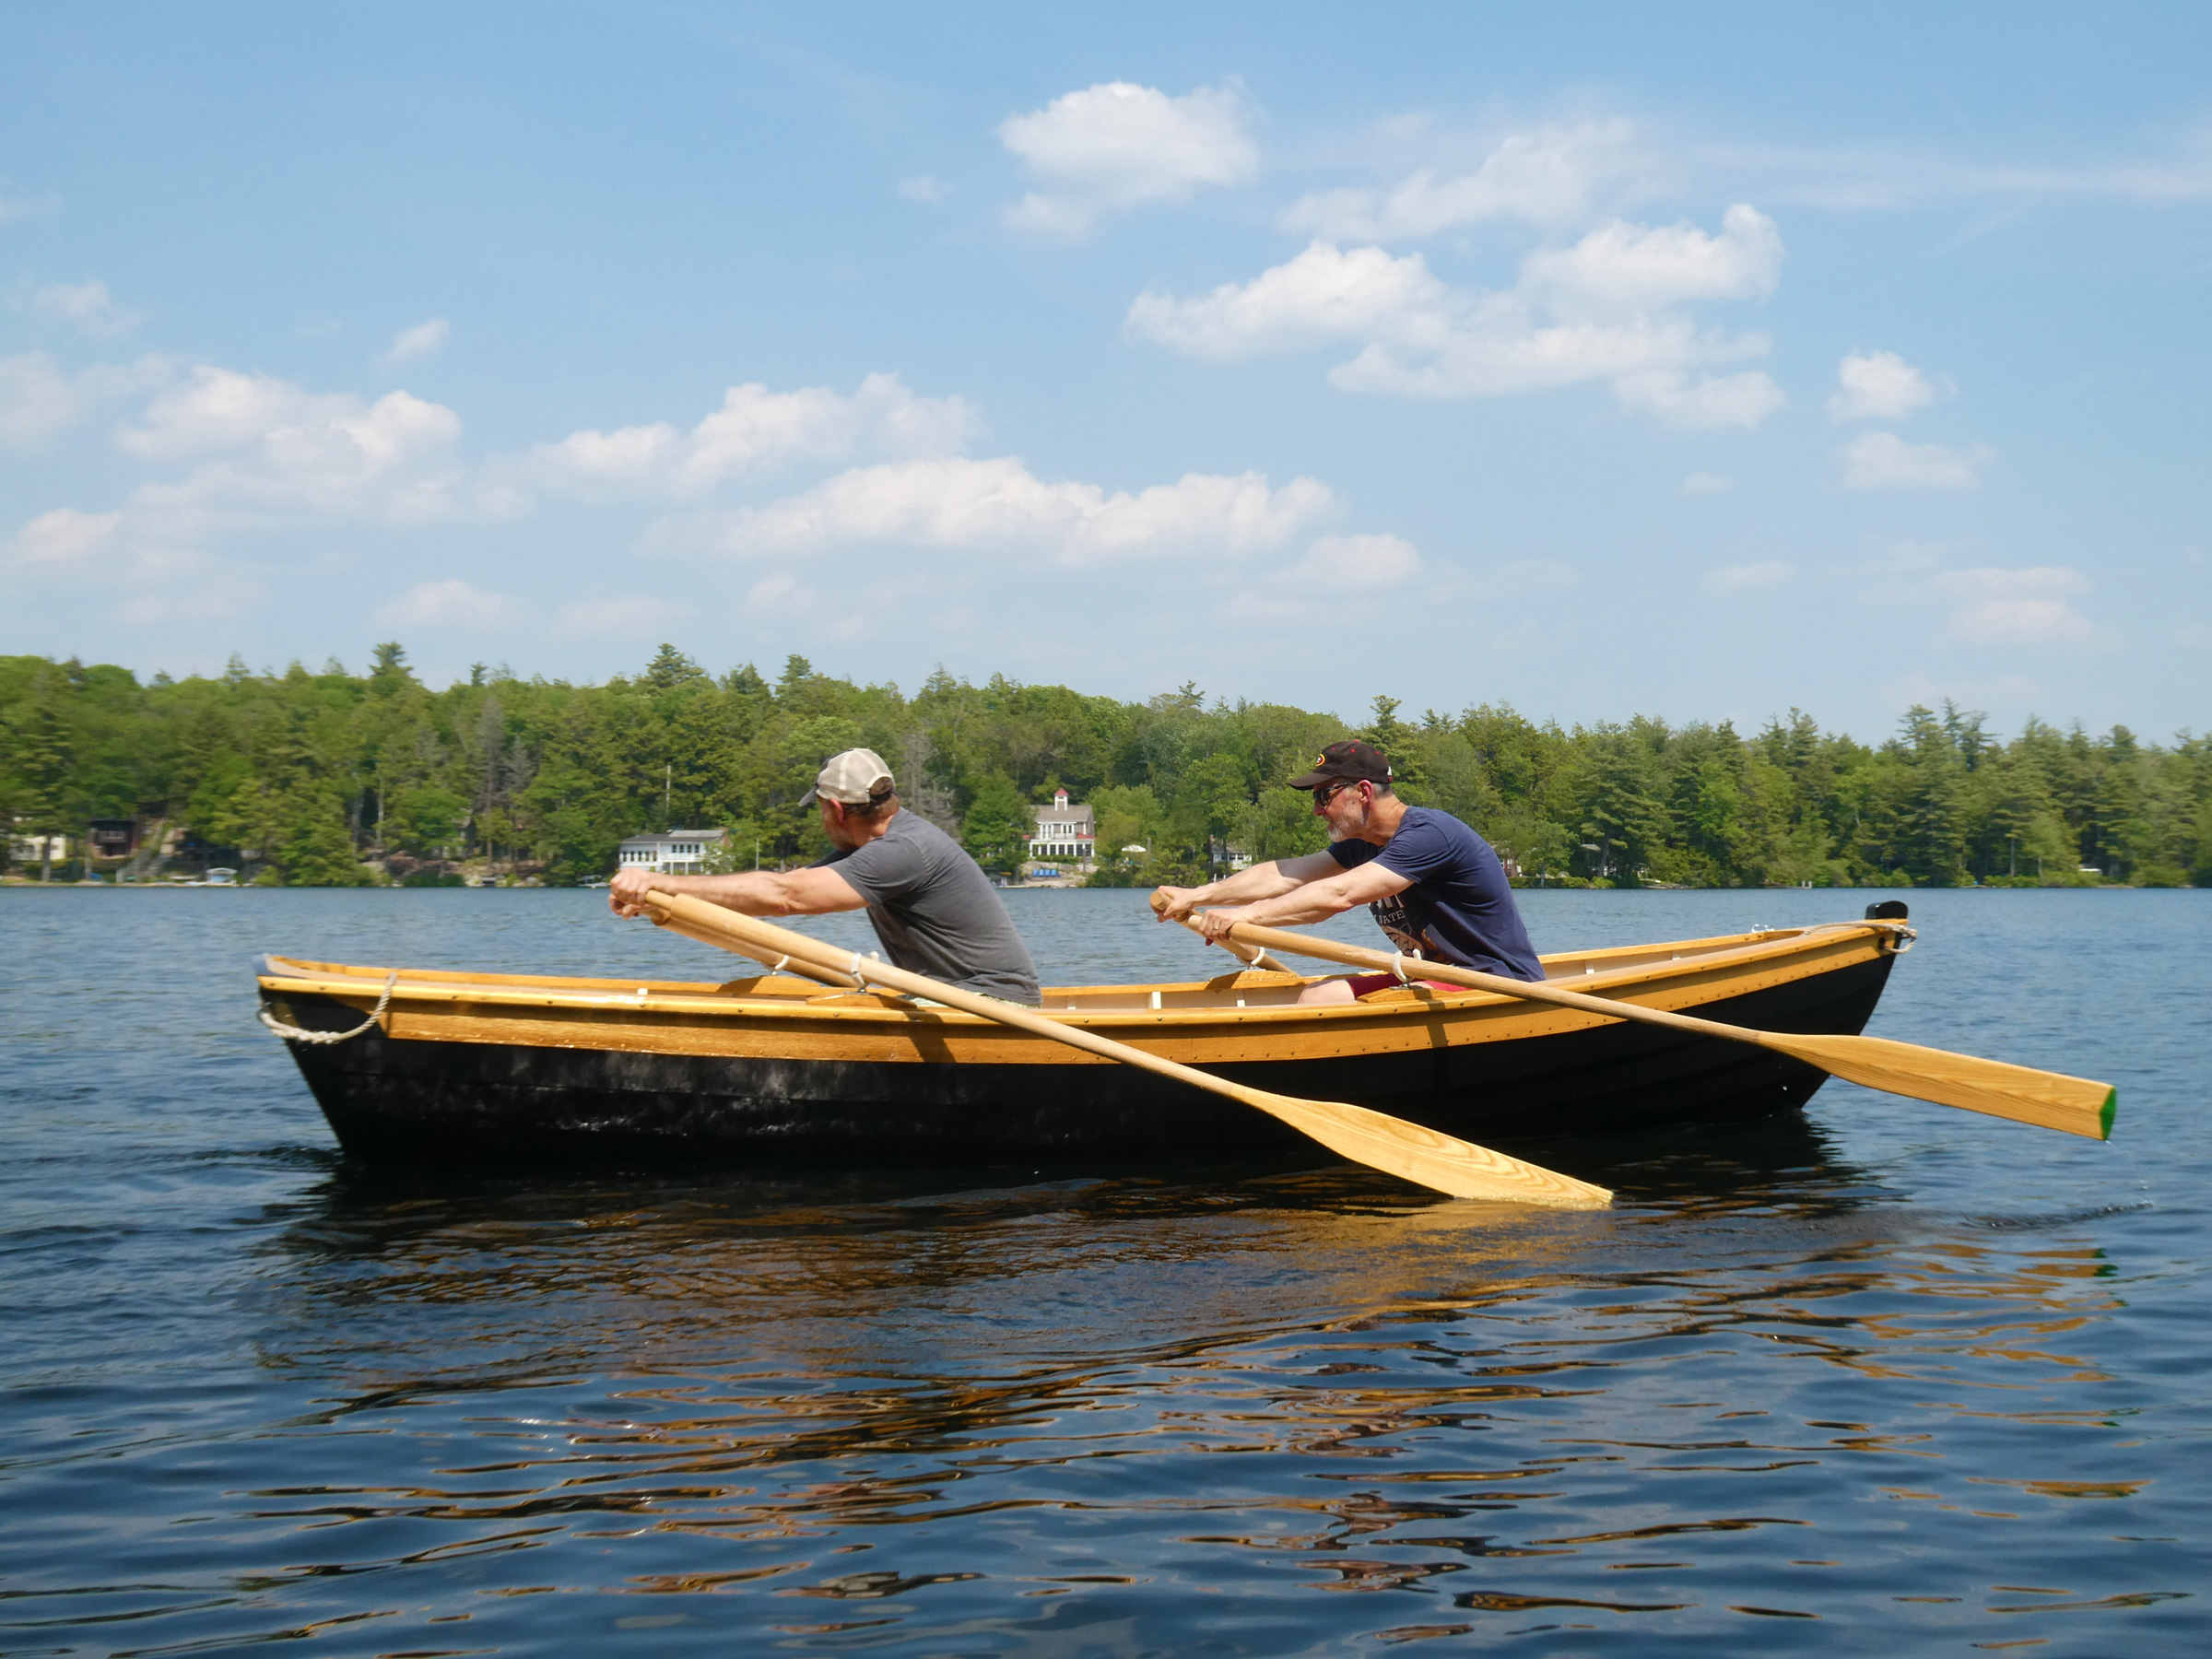
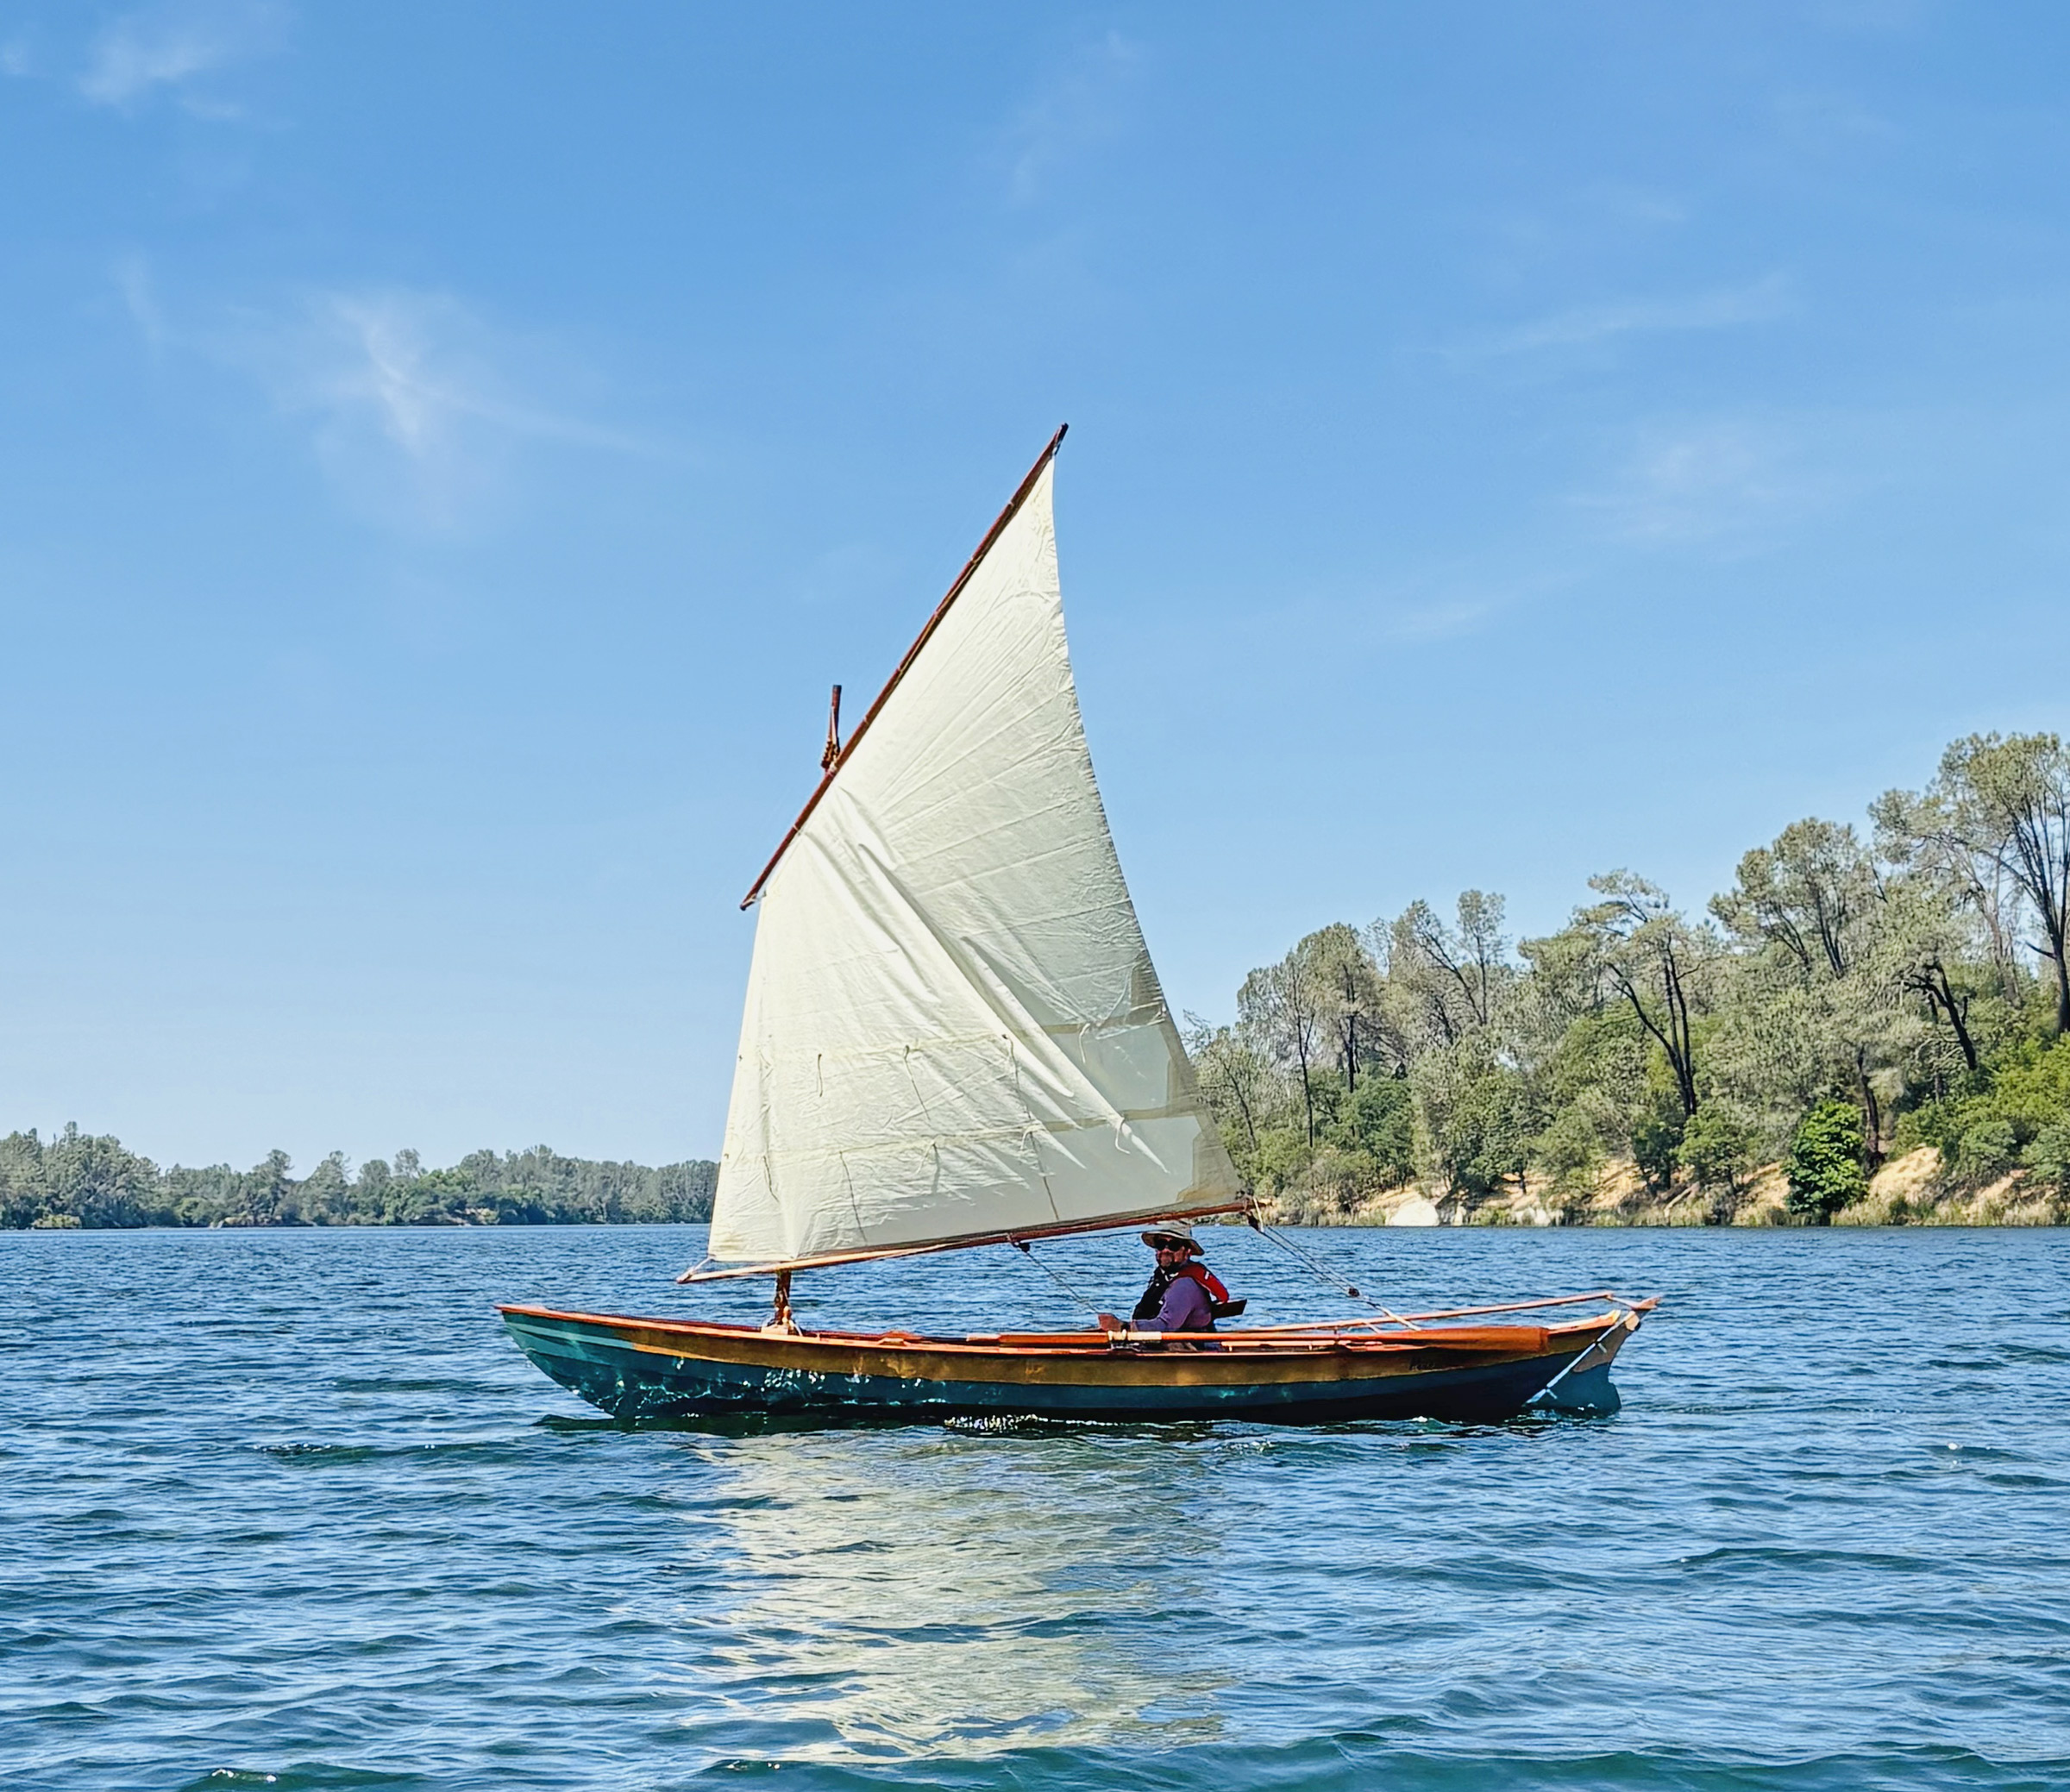
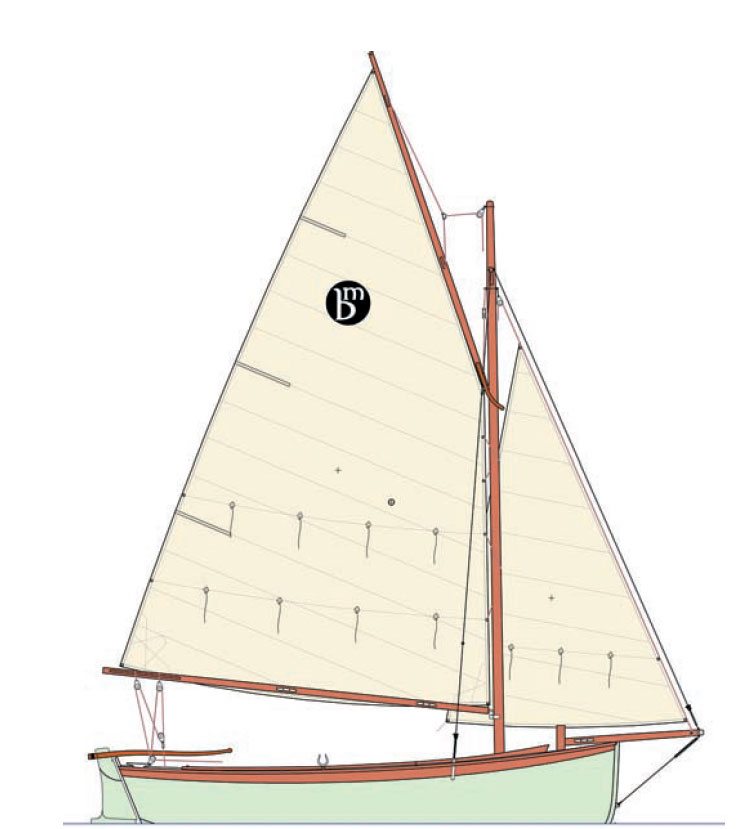
The Noank, also strip-built, is his first boat with a sliding seat. It is a half-decked recreational boat, beamy at 36″, with generous freeboard, and designed for exposed, choppy water. Schade also intends this to be a light and fast camp-cruiser, so the bow and stern have large, dry compartments for camping gear.
Like Schade’s other designs, this is a pretty boat, such is the judgment of five of us, all local rowers, who took it out for a spin. Tom Sanford, Janis Mink, Biddle Morris, Tom Tobin, and I are all members of Mystic River Rowing, and collectively, we have about 140 years of experience rowing in boats with sliding seats. All of us have seat-time in both recreational and racing boats, and most have taught sculling using boats similar to the Noank. Biddle has done hundreds of miles of distance rowing-camping and is our go-to guy on open-water rowing.
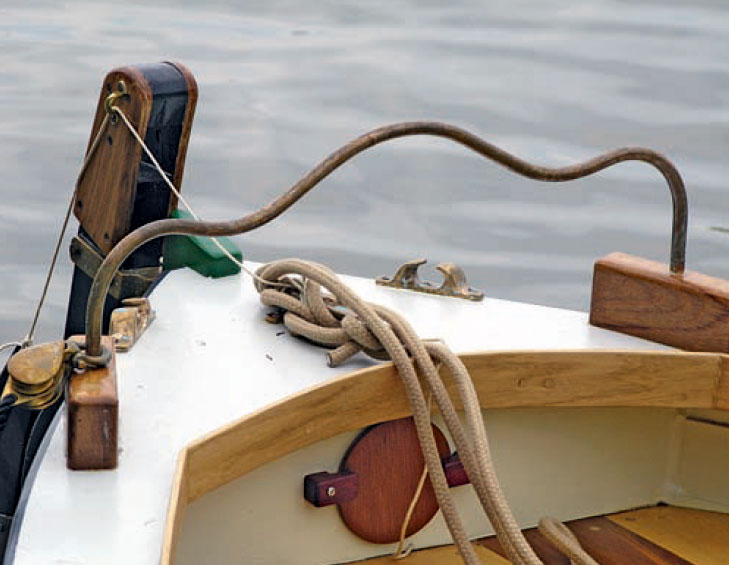
With the rowing rig occupying the space along the centerline, the rower has to get aboard with a foot planted slightly off to one side.
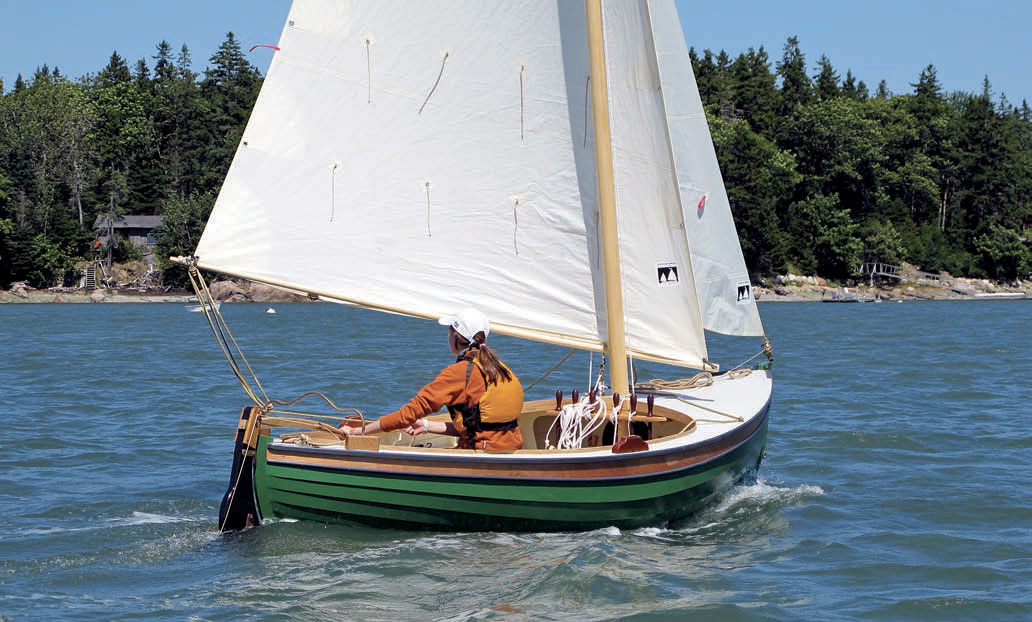
Beyond good looks, what does the Noank offer? How well will it handle in the afternoon southerly that’s common to Fishers Island Sound, the place the designer had in mind when he went to his drawing board? How is its calm-water performance? Does it track well? Turn easily? Is it slow or will it go? Is it fragile? Would it be hard to build? The short answer is that the Noank does well what it set out to do. It is fun to row, forgiving, and tougher than it looks.
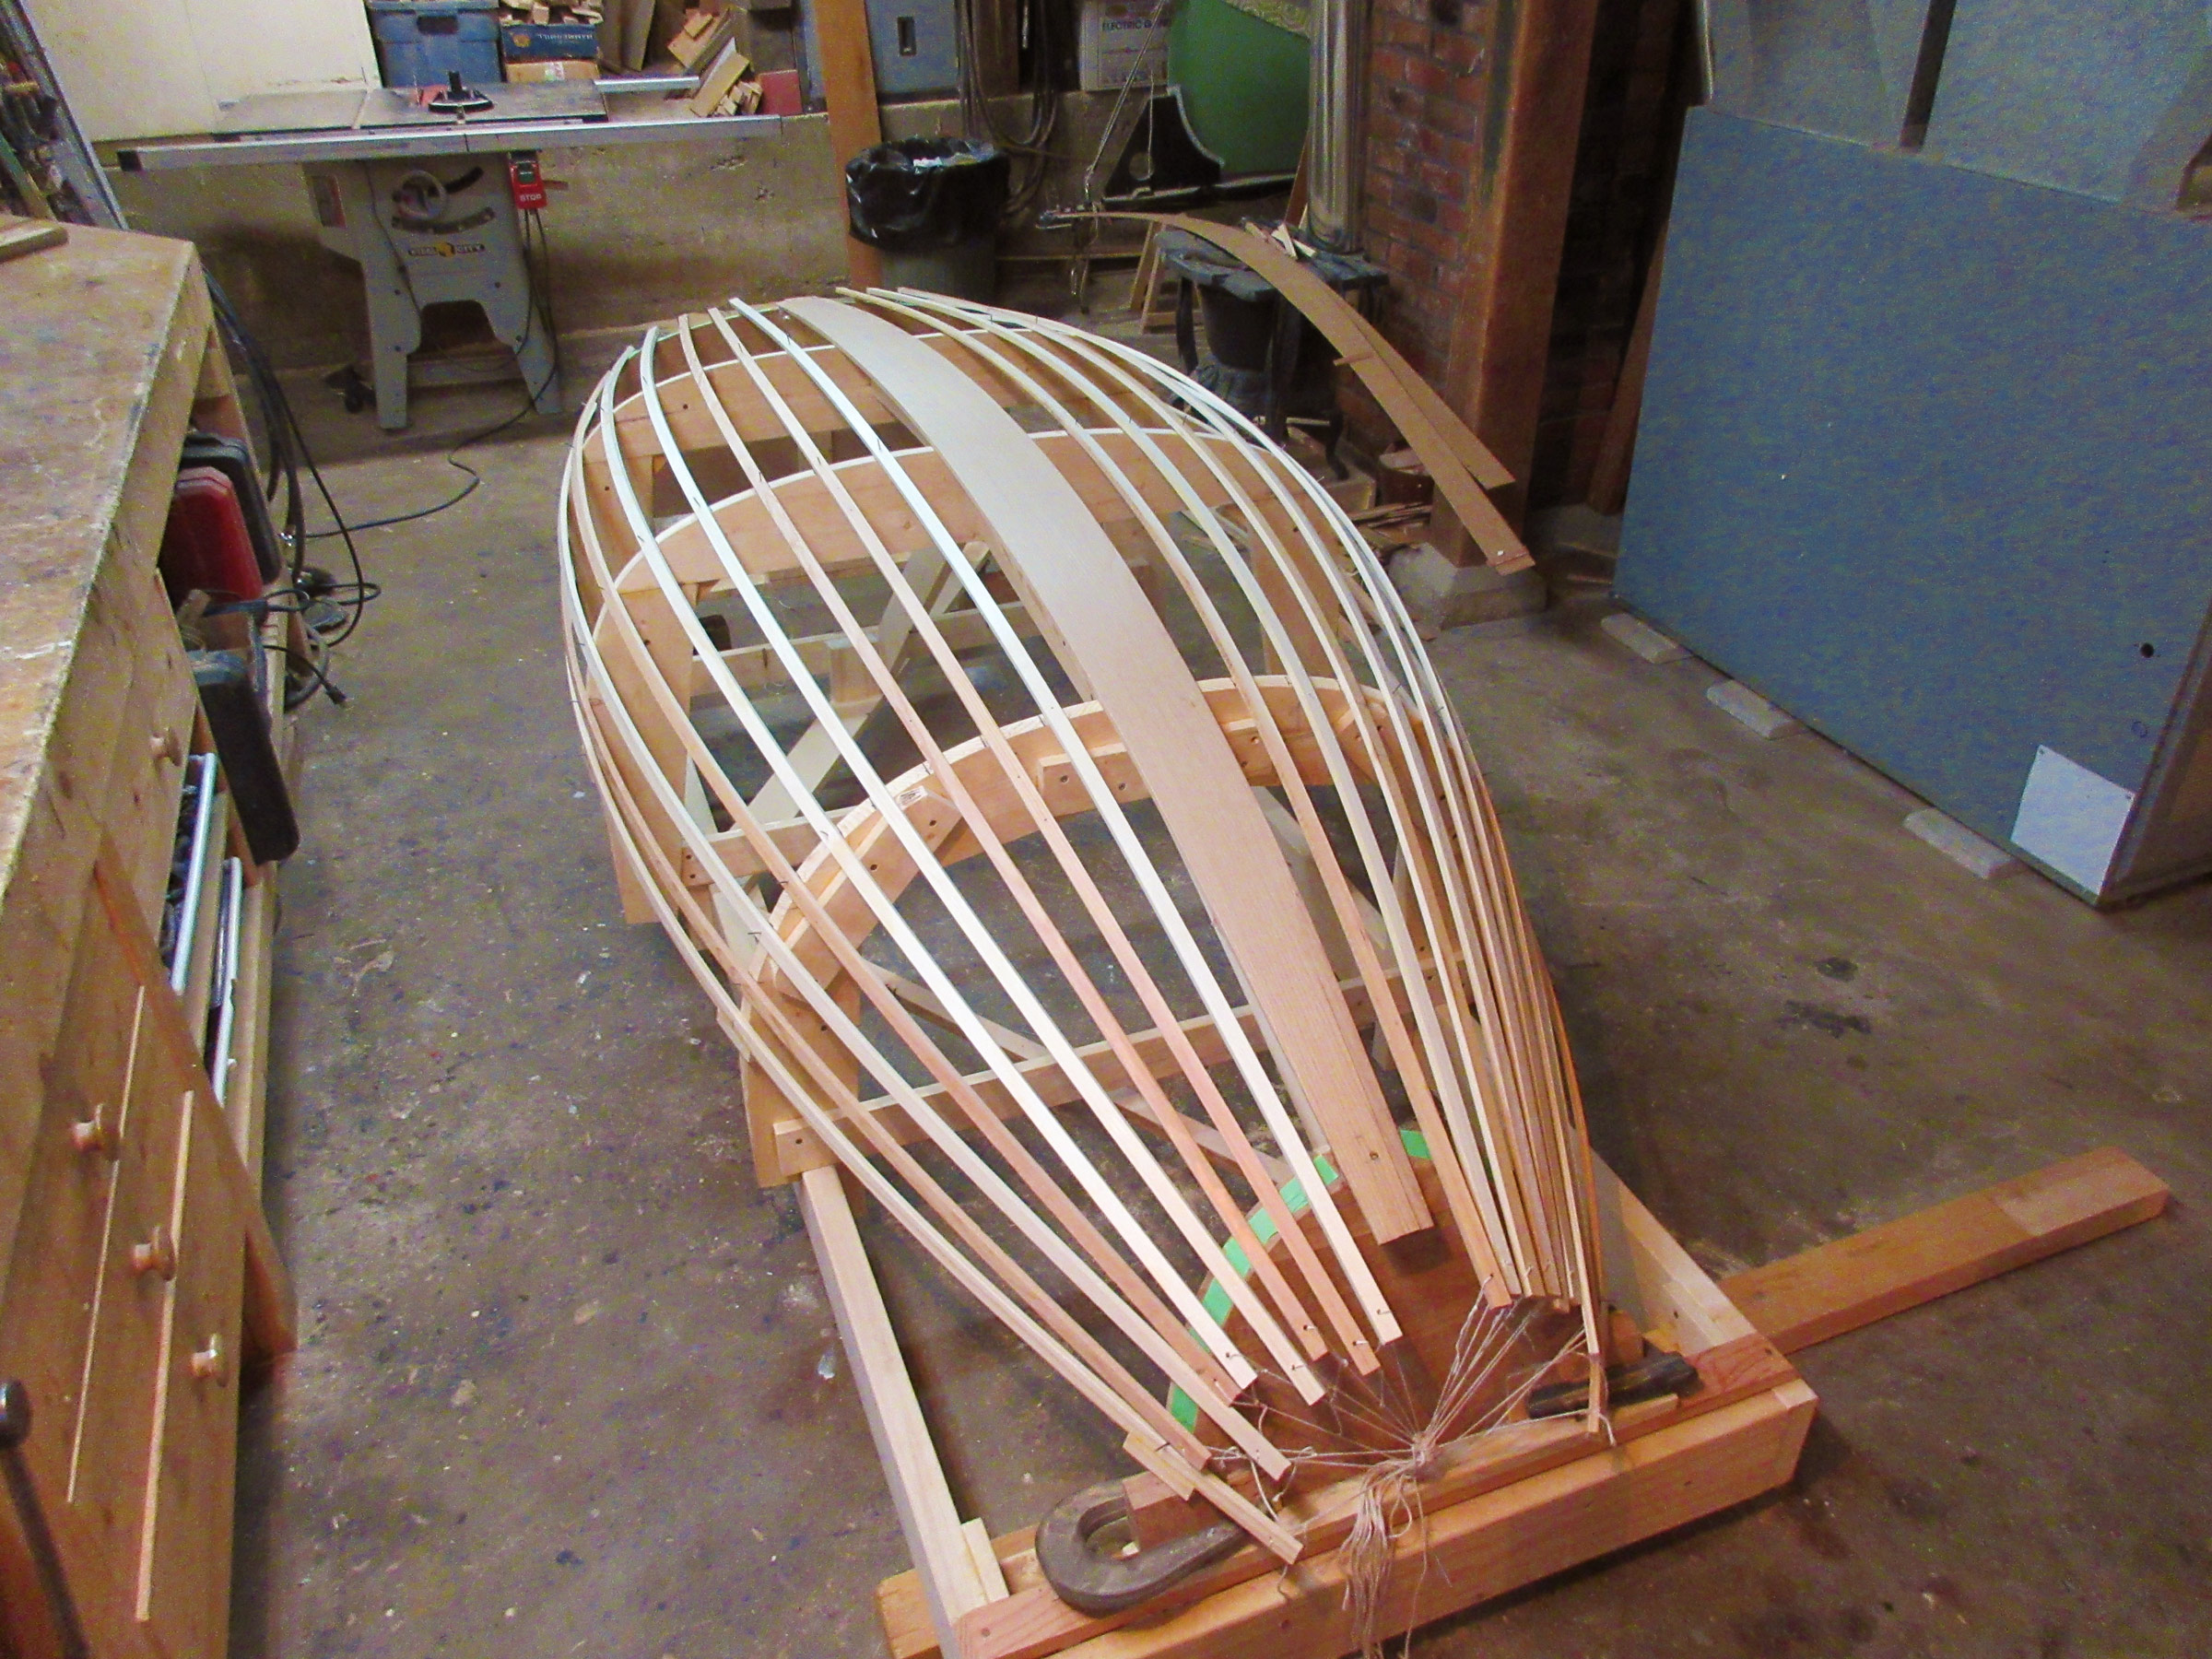
The specifications call for planking of 3/16″ x 3/4″ cedar strips, shaped over forms cut from 1/2″ MDF or plywood and spaced at 12″ intervals on a strongback. The stripped hull is sheathed inside and out with 4-oz fiberglass cloth set in epoxy, and the ’glass is doubled on the bottom. Built to the designed specifications, this will be a strong, tough boat. The high crown of the decking helps stiffen the hull without adding much weight.
The Noank was designed with the Piantedosi rowing rig and conventional sculls in mind. For rowers new to sculling, the 6″ overlap of the oar handles will take some getting used to.
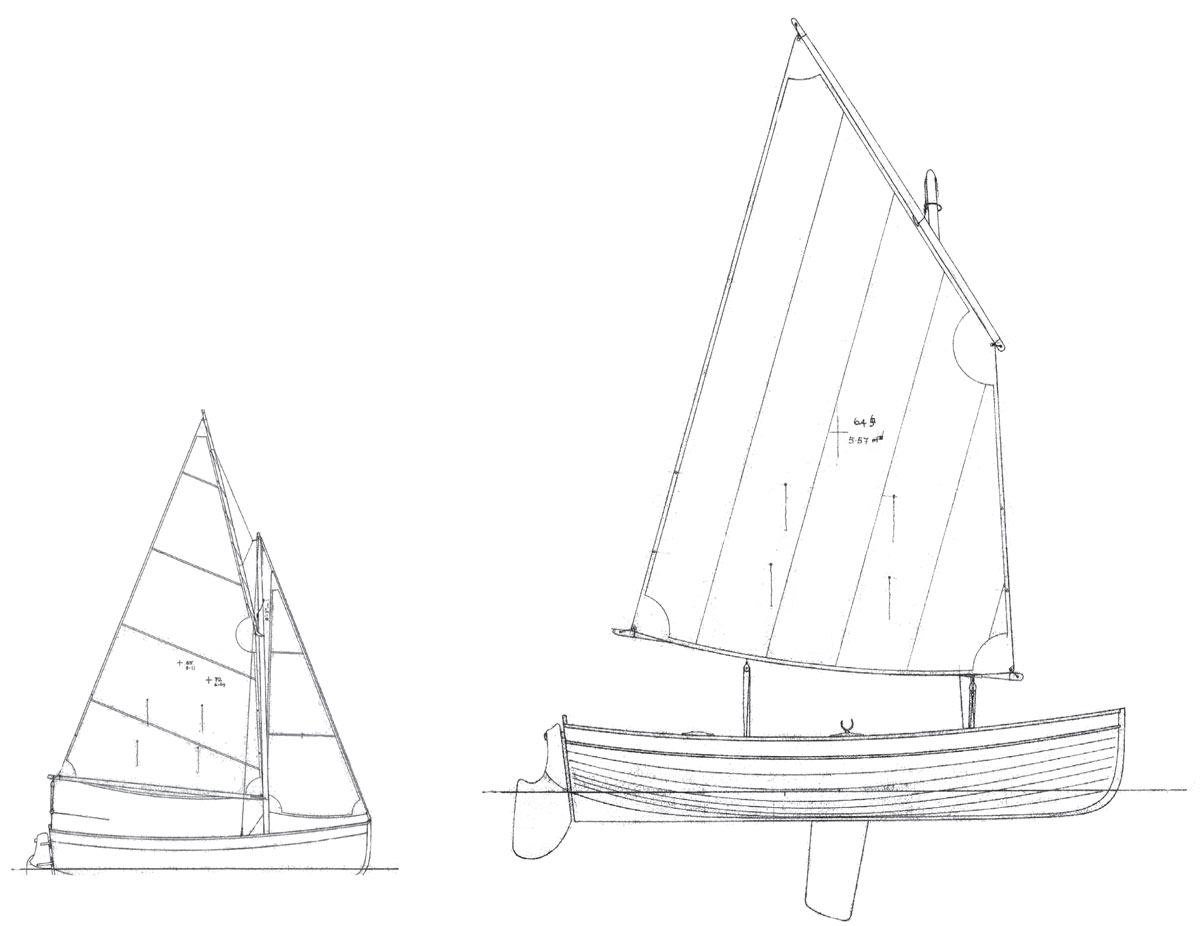
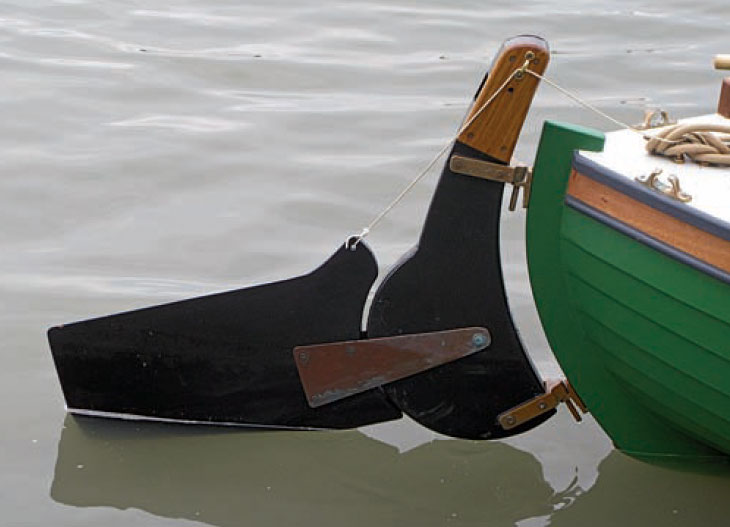
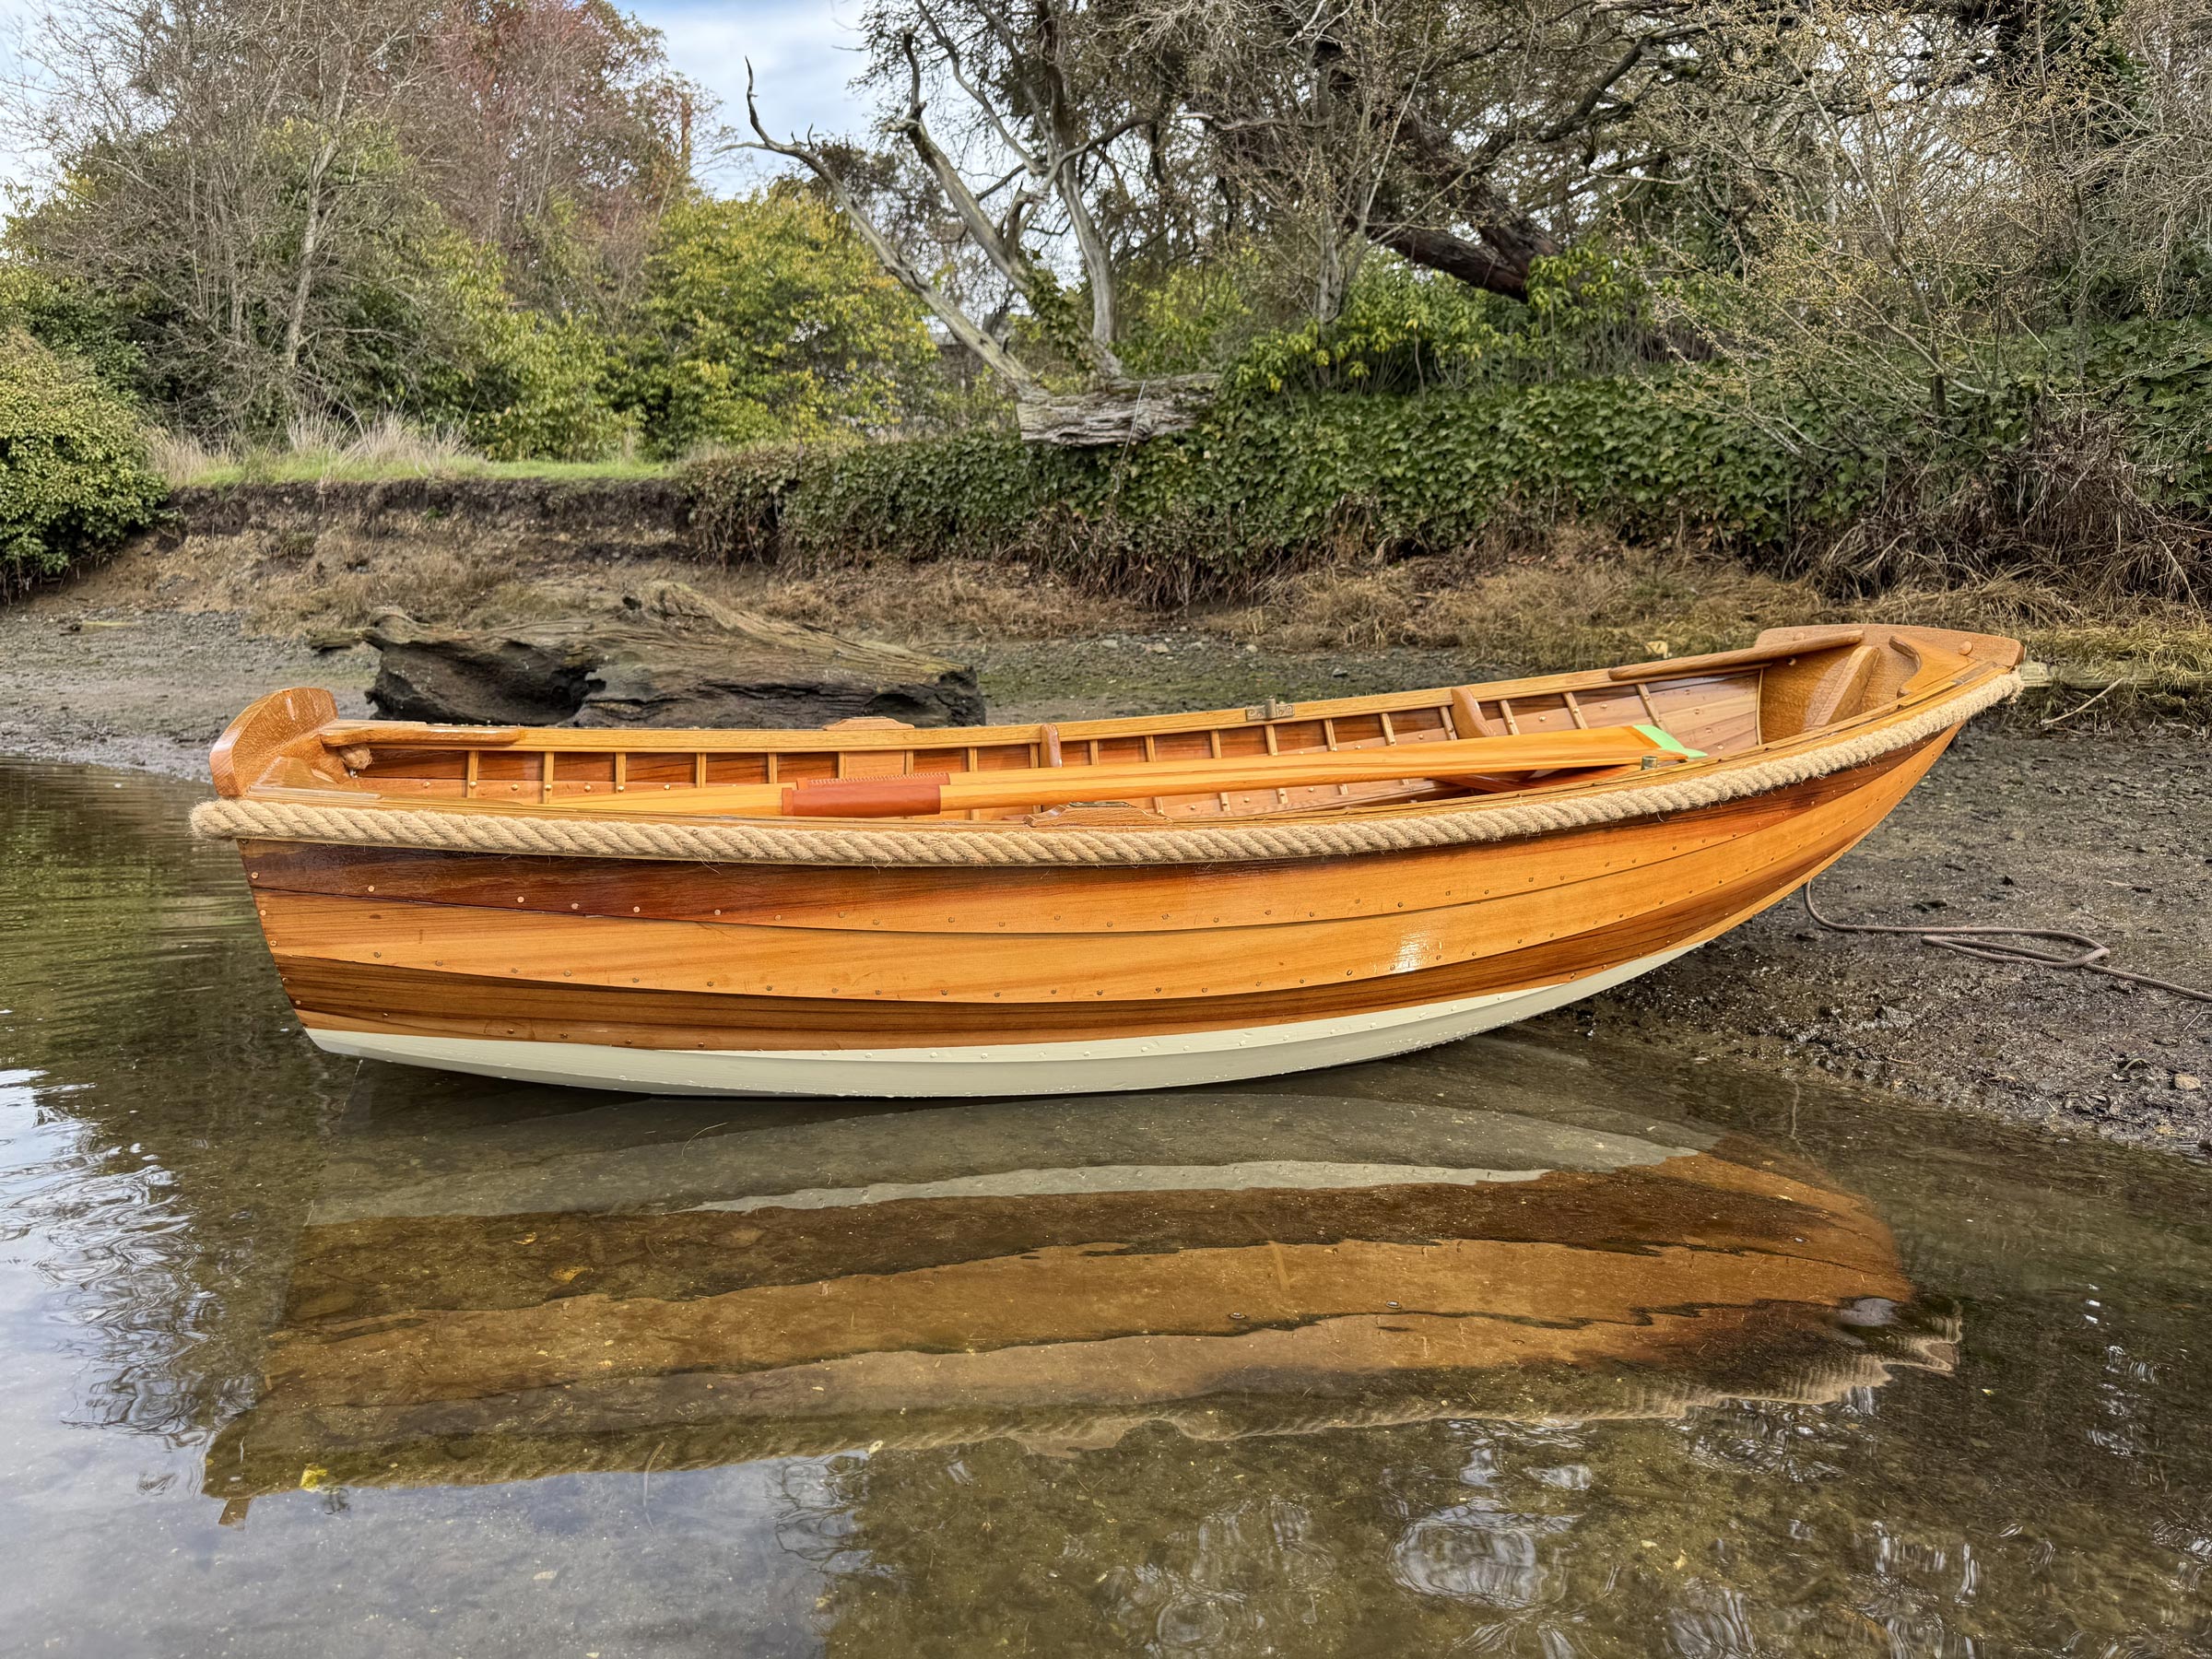
Schade notes that the Noank could be built without the decks and bulkheads if a lighter boat for protected water is the goal. The reverse transom keeps the waterline length almost the same as the overall length for speed’s sake. He says, “I really like the arched reverse transom, but it is a bit complicated. You could just have a flat vertical transom without changing the performance significantly.” A paper template, wrapped around the stern, indicates where it is to be cut to accommodate the curved transom panel. The stern is planked extra-long to make modifications possible.
The seat-support rail is designed to fit a Piantadosi rowing rig and adds significant strength to the hull. It is a wooden box beam 3-1/2″ x 4″ x 8′ 5″, with cutouts to reduce weight and provide drainage and ’glassed inside and out for rigidity. The anodized aluminum monorail of the rowing rig is held to the seat-support rail by two machine screws that are removable without tools. The rig weighs 22 lbs, and it can be put in the boat or taken out in less than a minute. It is designed to be rowed with racing sculls, which have a standard length of 284 to 290 cm (around 9′6″)
In a sprint, the Noank will do about 6 knots.
When completed, the Noank should come in around 53 lbs and all up, with rowing rig, weigh 75 lbs. For those of us who are not power lifters, loading a boat of this weight and girth onto a cartop carrier would be a two-person task. If it is to be beach-launched solo, a dolly or trailer is in order.
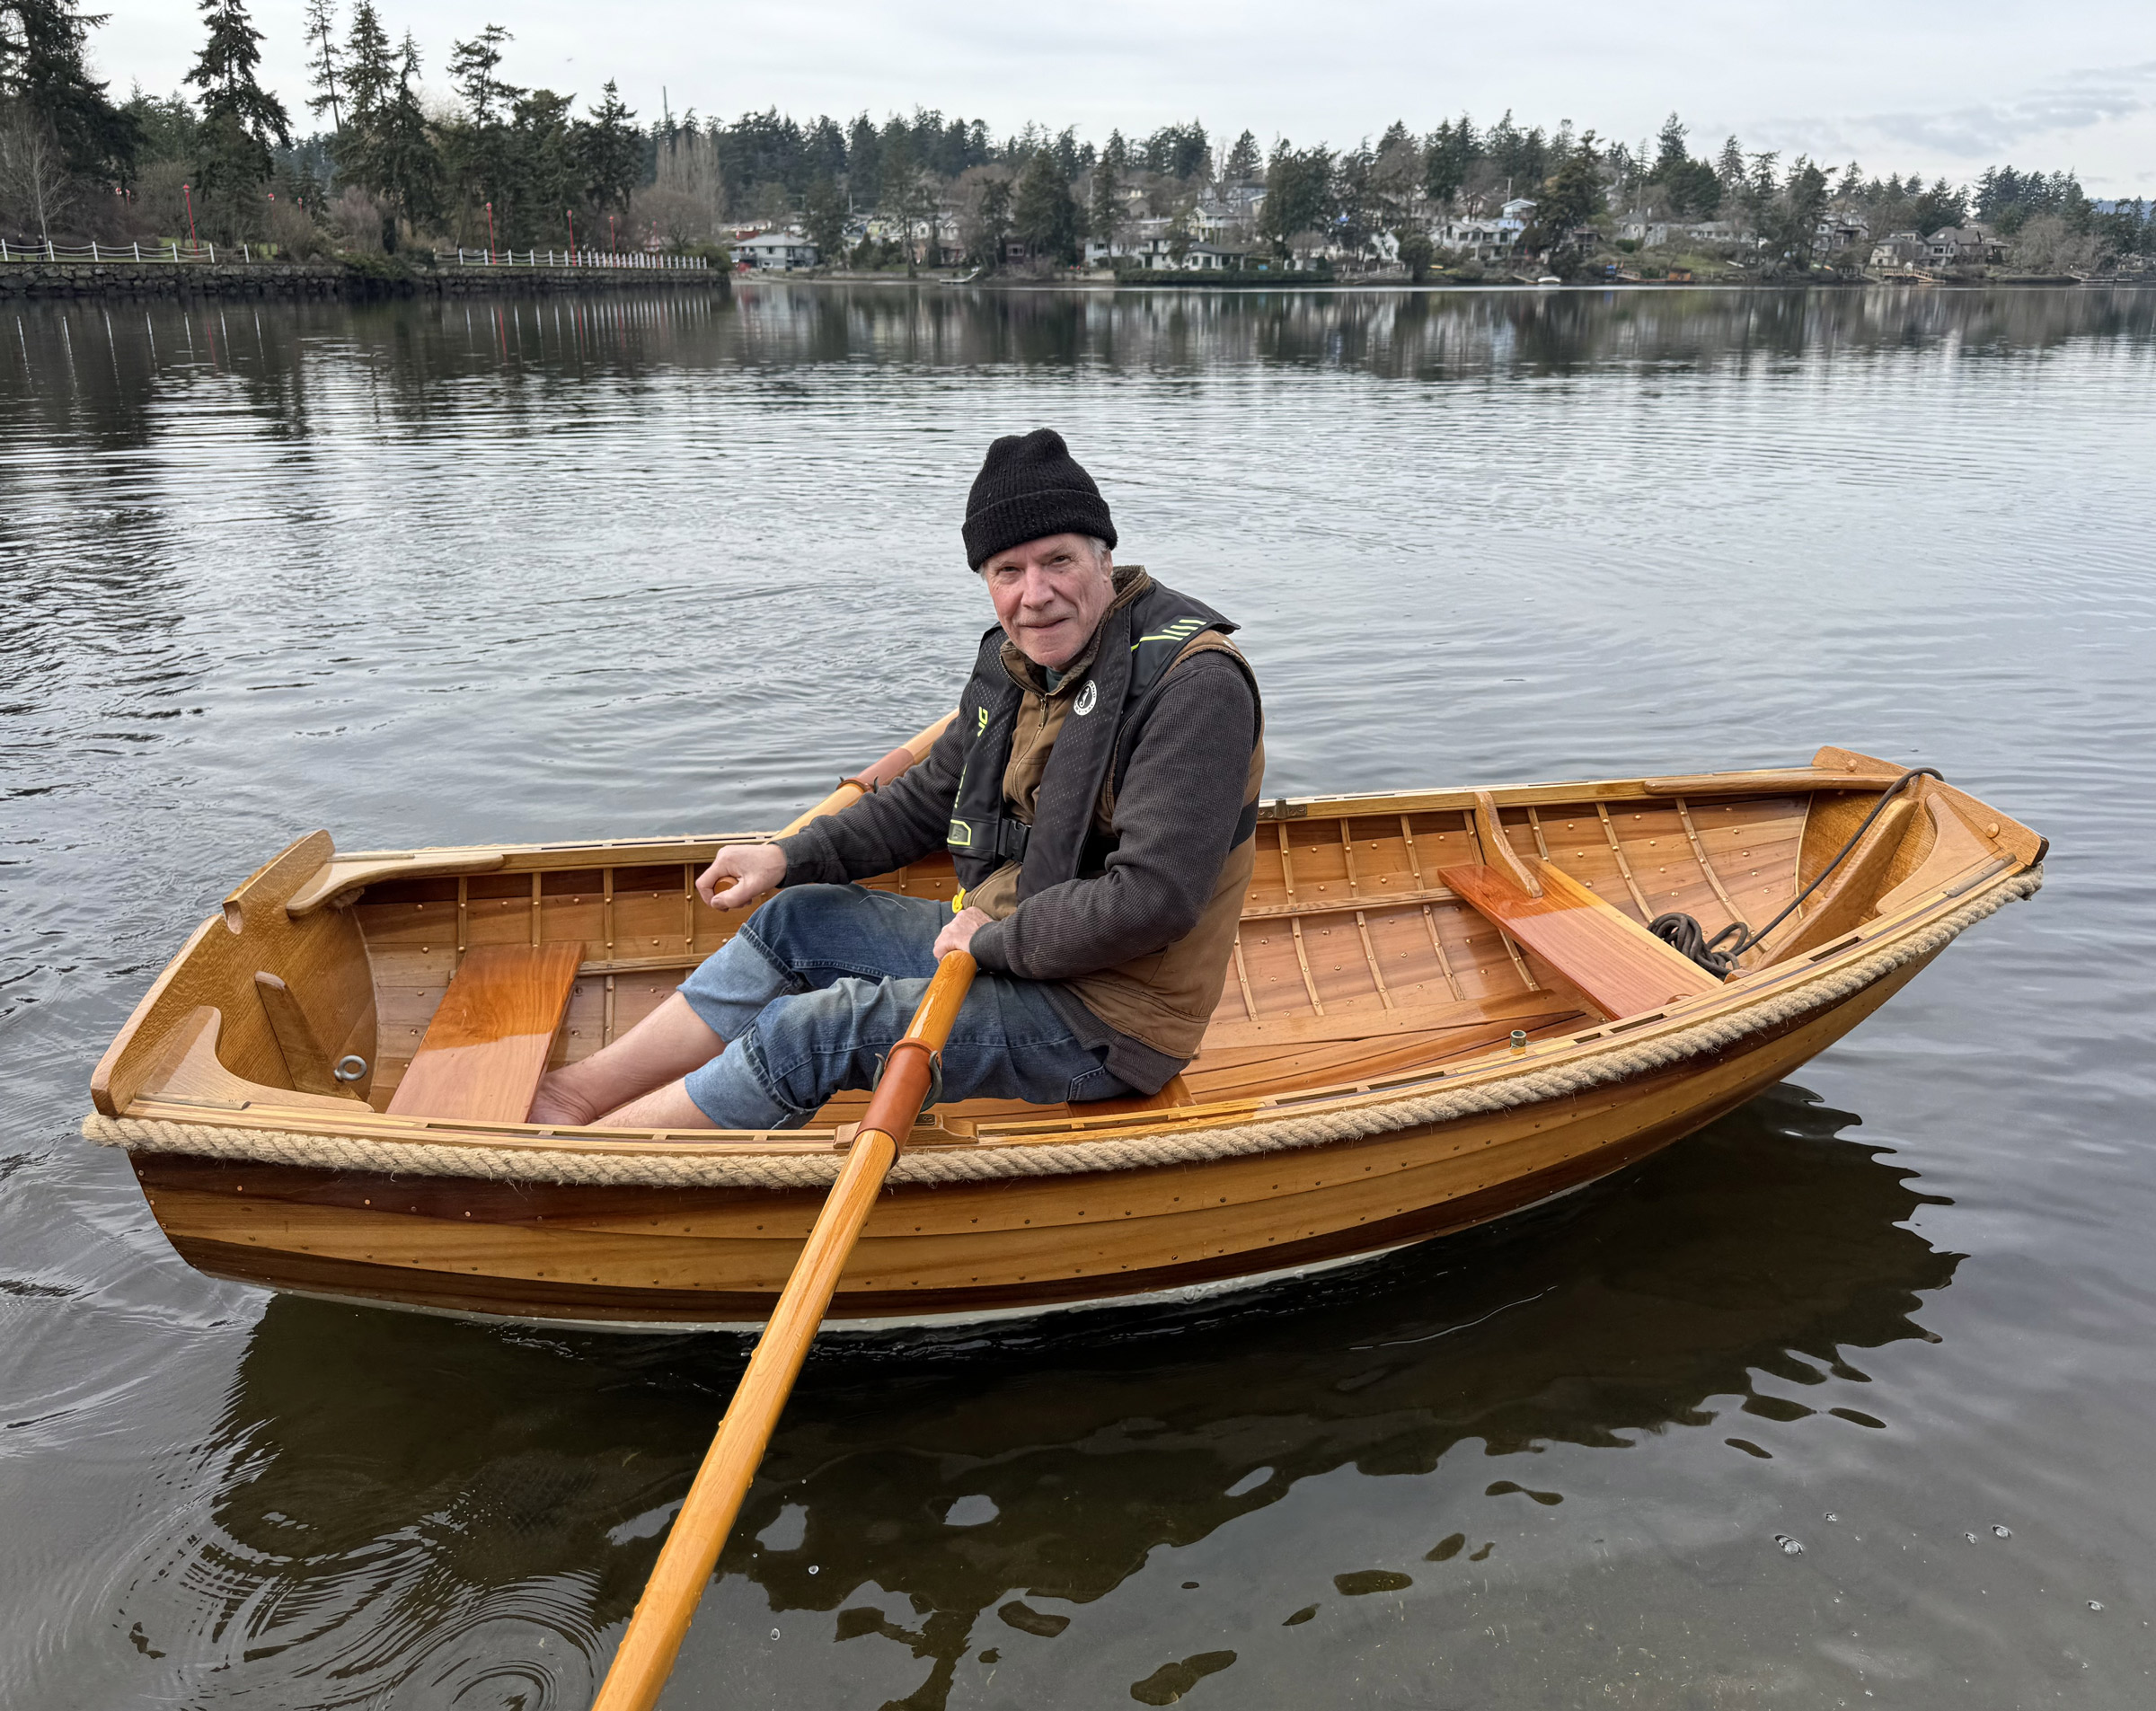
Getting in and out of wide rowing wherries can be awkward—for some it’s a long reach to get their weight planted over the centerline. The complication in getting onboard Noank is that you can’t put a foot on the centerline—the seat-support rail is in the way. Most of us just put a foot up against the box beam, held onto the oars, and accepted a quick heel angle as we shifted our weight onto the inboard leg. There is enough static stability in the Noank for this maneuver and for a rower to exit sideways, swinging both legs over the side to stand up in shallow water. The boat heeled sharply, but did not bury its rail. We tried the “Look Ma, no hands” routine while seated, letting go of the oar handles, and while this will result in a quick swim in most shells, the Noank only wobbled and did not flip. If you lashed the oar handles together in the middle of this boat—they overlap by 6″, the standard for sculling boats—the boat could look after itself while you eat lunch or take pictures.
The Noank would put beginning scullers on an easy learning curve. We would expect a novice to feel comfortable by the second or third lesson. That is largely because of the boat’s inherent dynamic stability: It wants to run on an even keel and if it is rocking side to side as it moves along, this is the rower’s fault for not sitting up straight and keeping the oar handles level. With its long skeg, Noank tracks straight, but is still easy to turn. In a moderate crosswind, a rower should have no problem dialing in a crab angle and maintaining a compass course.
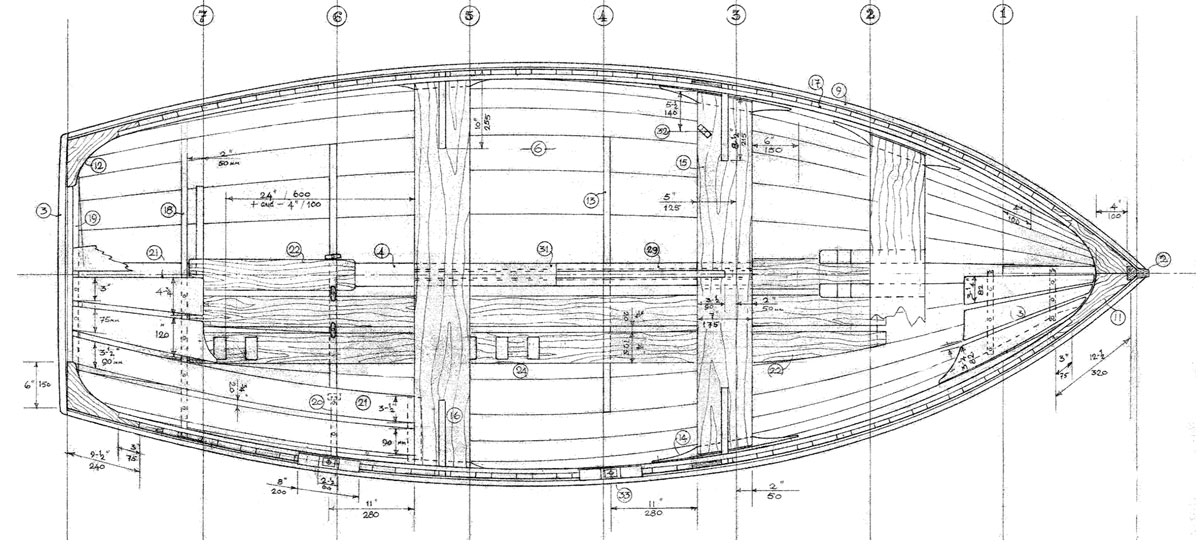
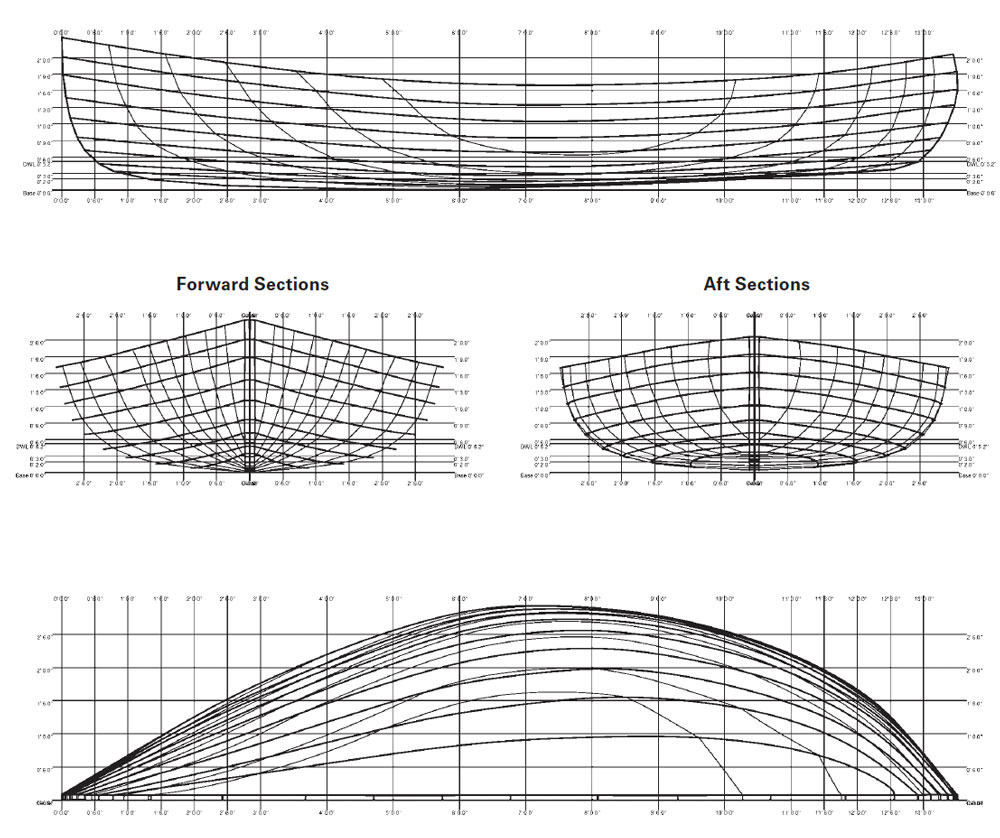
Hobby-horsing can be a significant issue for most boats with sliding seats. The rower’s weight is two or three times the weight of the boat and rowing rig, and with that much mass moving back and forth, around 2’ with each stroke, the bow and stern want to bob up and down, killing speed. The goal is to keep the boat running level, and to that end this hull is designed with little rocker in the keel (only about 1”) and an almost uniformly rounded cross-sectional shape throughout the long cockpit of the boat. That provides needed buoyancy under the rower at both ends of the slide. Another speed killer, wetted surface, is kept in check by narrowing the beam at the waterline. The Noank has a beam of 36″ at the rail amidships; at the waterline it is 23”. The narrow waterline and arc cross section cuts down the area of skin subject to friction as it moves through the water. It also reduces lateral stability, but the flared sides above the waterline give the Noank an abundance of reserve stability when heeled.
Scullers like to talk about speed. None will admit that their own boat is a slowpoke, and many of us tend to boast a bit, claiming speeds too good to believe—“stretchers,” as Mark Twain called them. For the Noank, our numbers come from an impartial GPS during speed trials on a light-wind day with calm seas and no current. It takes a few pulls to get the boat going, but once up to speed the boat carries and glides well. This is a 4-5-6 boat: In the hands of an experienced sculler, rowing leisurely at a pace that can be held indefinitely, it will run at 4 knots. To reach 5 knots calls for rowing at a racing pace that’s sustainable over a 2,000-meter course. And 6 knots calls for a sprint, a “Power Ten” in crew parlance, and holding that speed for any distance would involve serious pain. The Noank moves as well as could be expected for a displacement hull with its 17.7′ waterline length. Once the Noank exceeds its theoretical maximum speed of 5.63 knots, even super-athletes are going struggle to make it move faster for very long. We found nothing to complain about in the Noank’s speed curve.
Building a Noank will call for time and patience, requirements for any high-quality, strip-built boat, whether the builder starts with plans or a kit. Both are available for the Noank. The finished product will require a reasonable amount of maintenance, but the construction is sturdy, and unless the boat is abused or neglected, it should outlive its builder. The five of us rowers agreed that the Noank is an all-round performer that rates well in its class. Tom Tobin even bought the plans and intends to build one.
Carl Kaufmann trained to be a naval architect and marine engineer, but a career in journalism paid the bills for five decades. He has always had a second career: making things out of wood. Most of his time has been spent building boats from scratch, 10 in all. His current family fleet ranges from a 12-ton, 40’ yawl down to a 34-lb cedar shell. For variety’s sake, he made some mandolins and acoustic guitars. His home is on Block Island, off the coast of Rhode Island, but he spends a lot of time at his winter address in Mystic, Connecticut. He has a workshop in each place, so he is never at a loss for something to do in retirement.
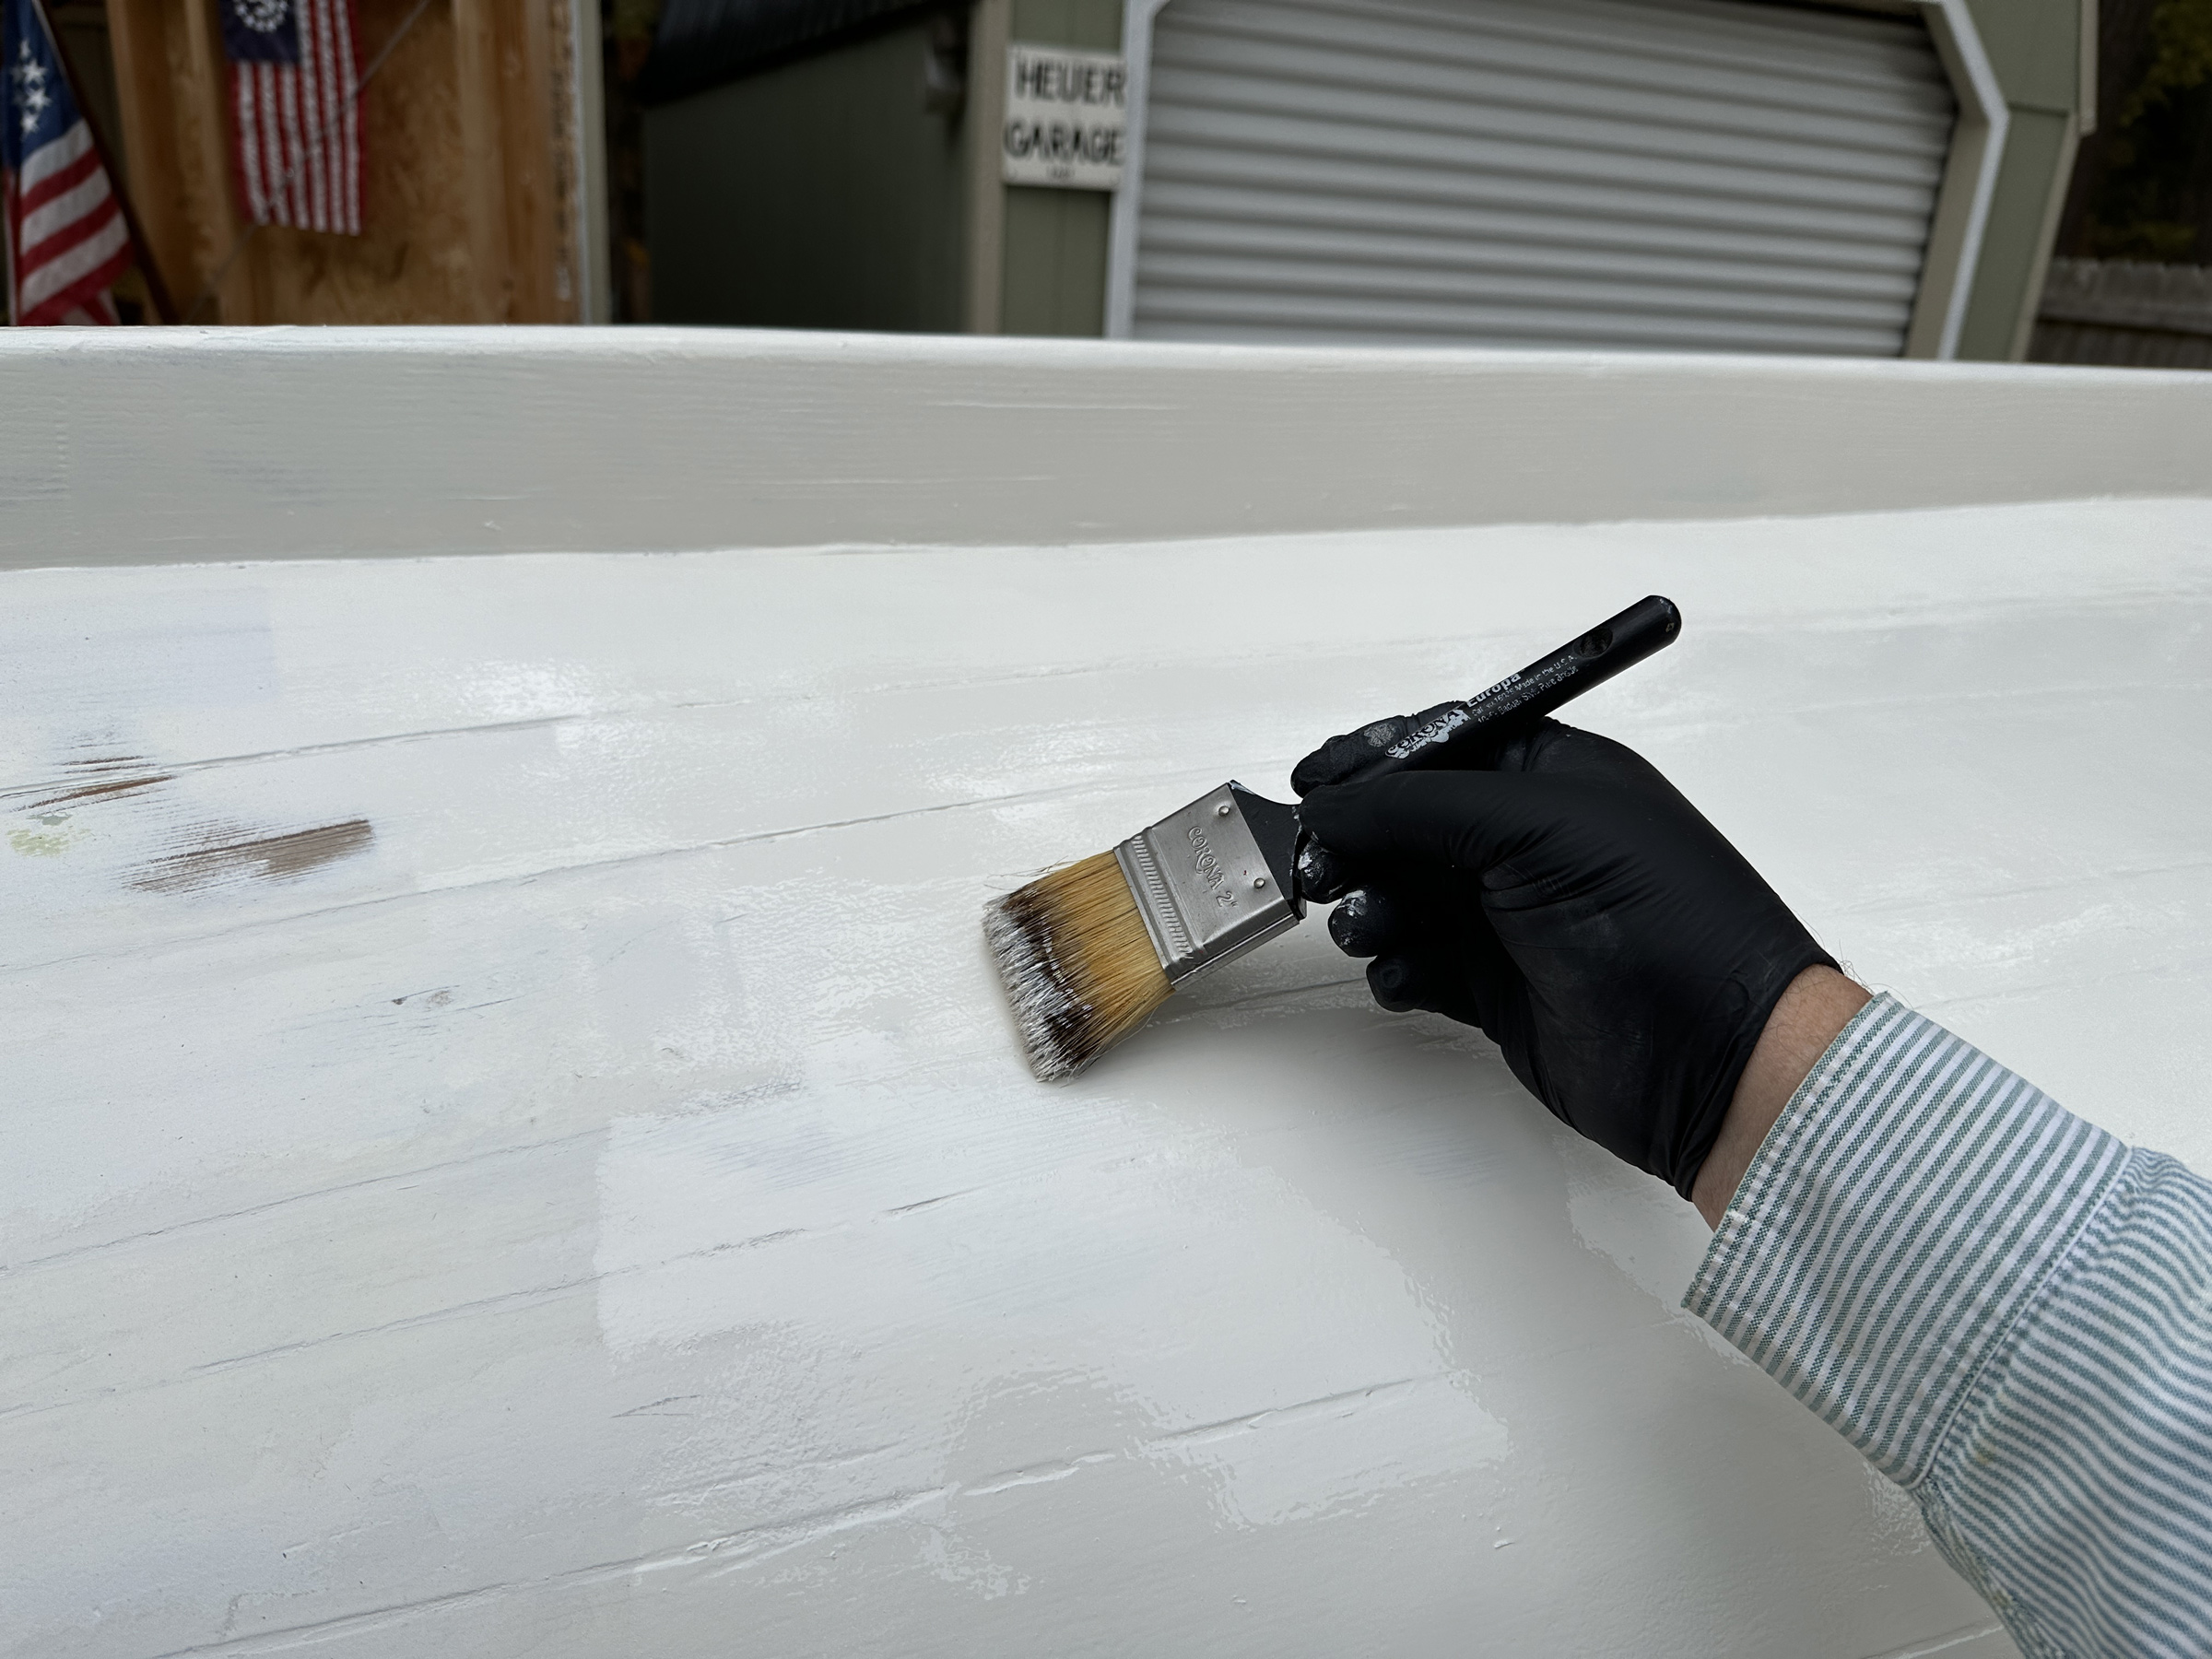
In my 40-plus years of working in boatyards in Florida, radical changes have occurred in the tools and materials used. When I started out, most painting was done with a brush, red lead was the primer of choice, the cordless screwdriver was a brace fitted with a screwdriver bit, and most of the fastenings were slotted silicon-bronze screws. However, some things have remained constant, and not least among them is the countersink made by the W.L. Fuller Company of Warwick, Rhode Island.
Photographs by the author
During my more than four decades of boatbuilding I have purchased myriad countersinks and drill bits from W.L. Fuller, not because they break or wear out and need to be replaced, but because I have needed many different sizes. From the oldest to the newest, the quality of the tools has been of consistently high quality.
In 1930, Warren Fuller Sr. set up a boatbuilding shop in his car dealership. When he encountered wood that split as he applied wood screws, he created a tool to save time and heartache. “He took to the grinding wheel,” says granddaughter Debbie Fuller, “and invented the four-fluted countersink.” Fifteen years later, Warren was joined by his son, Warren Jr., who established W.L. Fuller, Inc. and introduced the company’s first catalog. Today the company makes more than 450 tools including a dizzying array of specialized tools for drilling holes. But its most famous tools are still tapered drill bits with the adjustable countersinks that made its name. These effective tools have been developed and improved over the years and are now offered in a wide range of sizes and sets, but they continue to be of the same high quality that Warren Fuller Sr. would recognize. The company buys U.S.-made steel drill bits and reshapes them for different purposes, perfects them to work in wood, plastic, and metal, and makes the carbon-steel countersinks to go with them.
The plug cutters in any W.L. Fuller set are as high quality as the countersinks and will, in my experience, get almost as much use. If you let the tines cut to their full depth, the cutter will round over the ends of the plugs, as seen here, making it easier to insert them into the countersink holes.
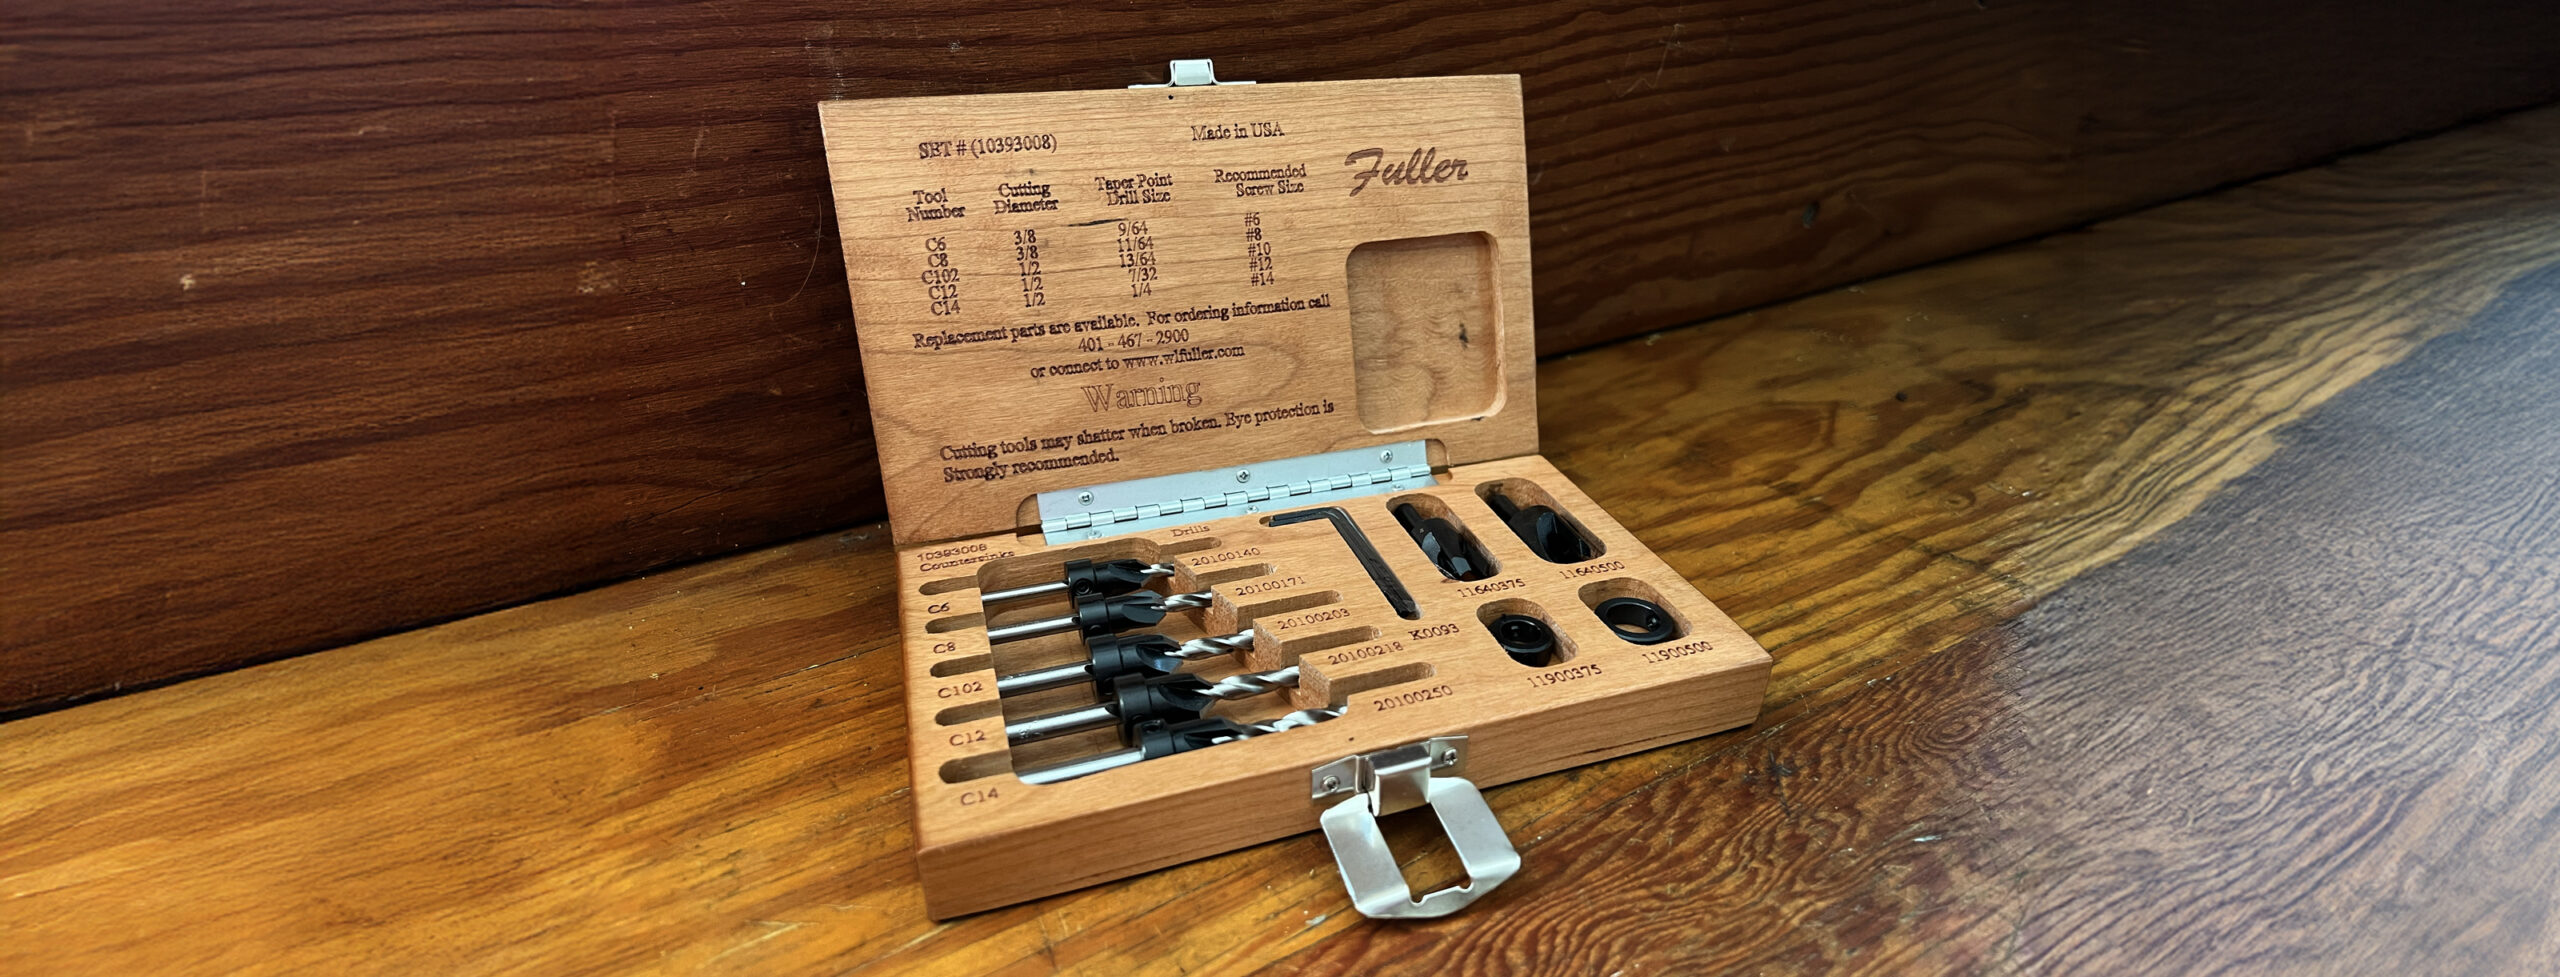
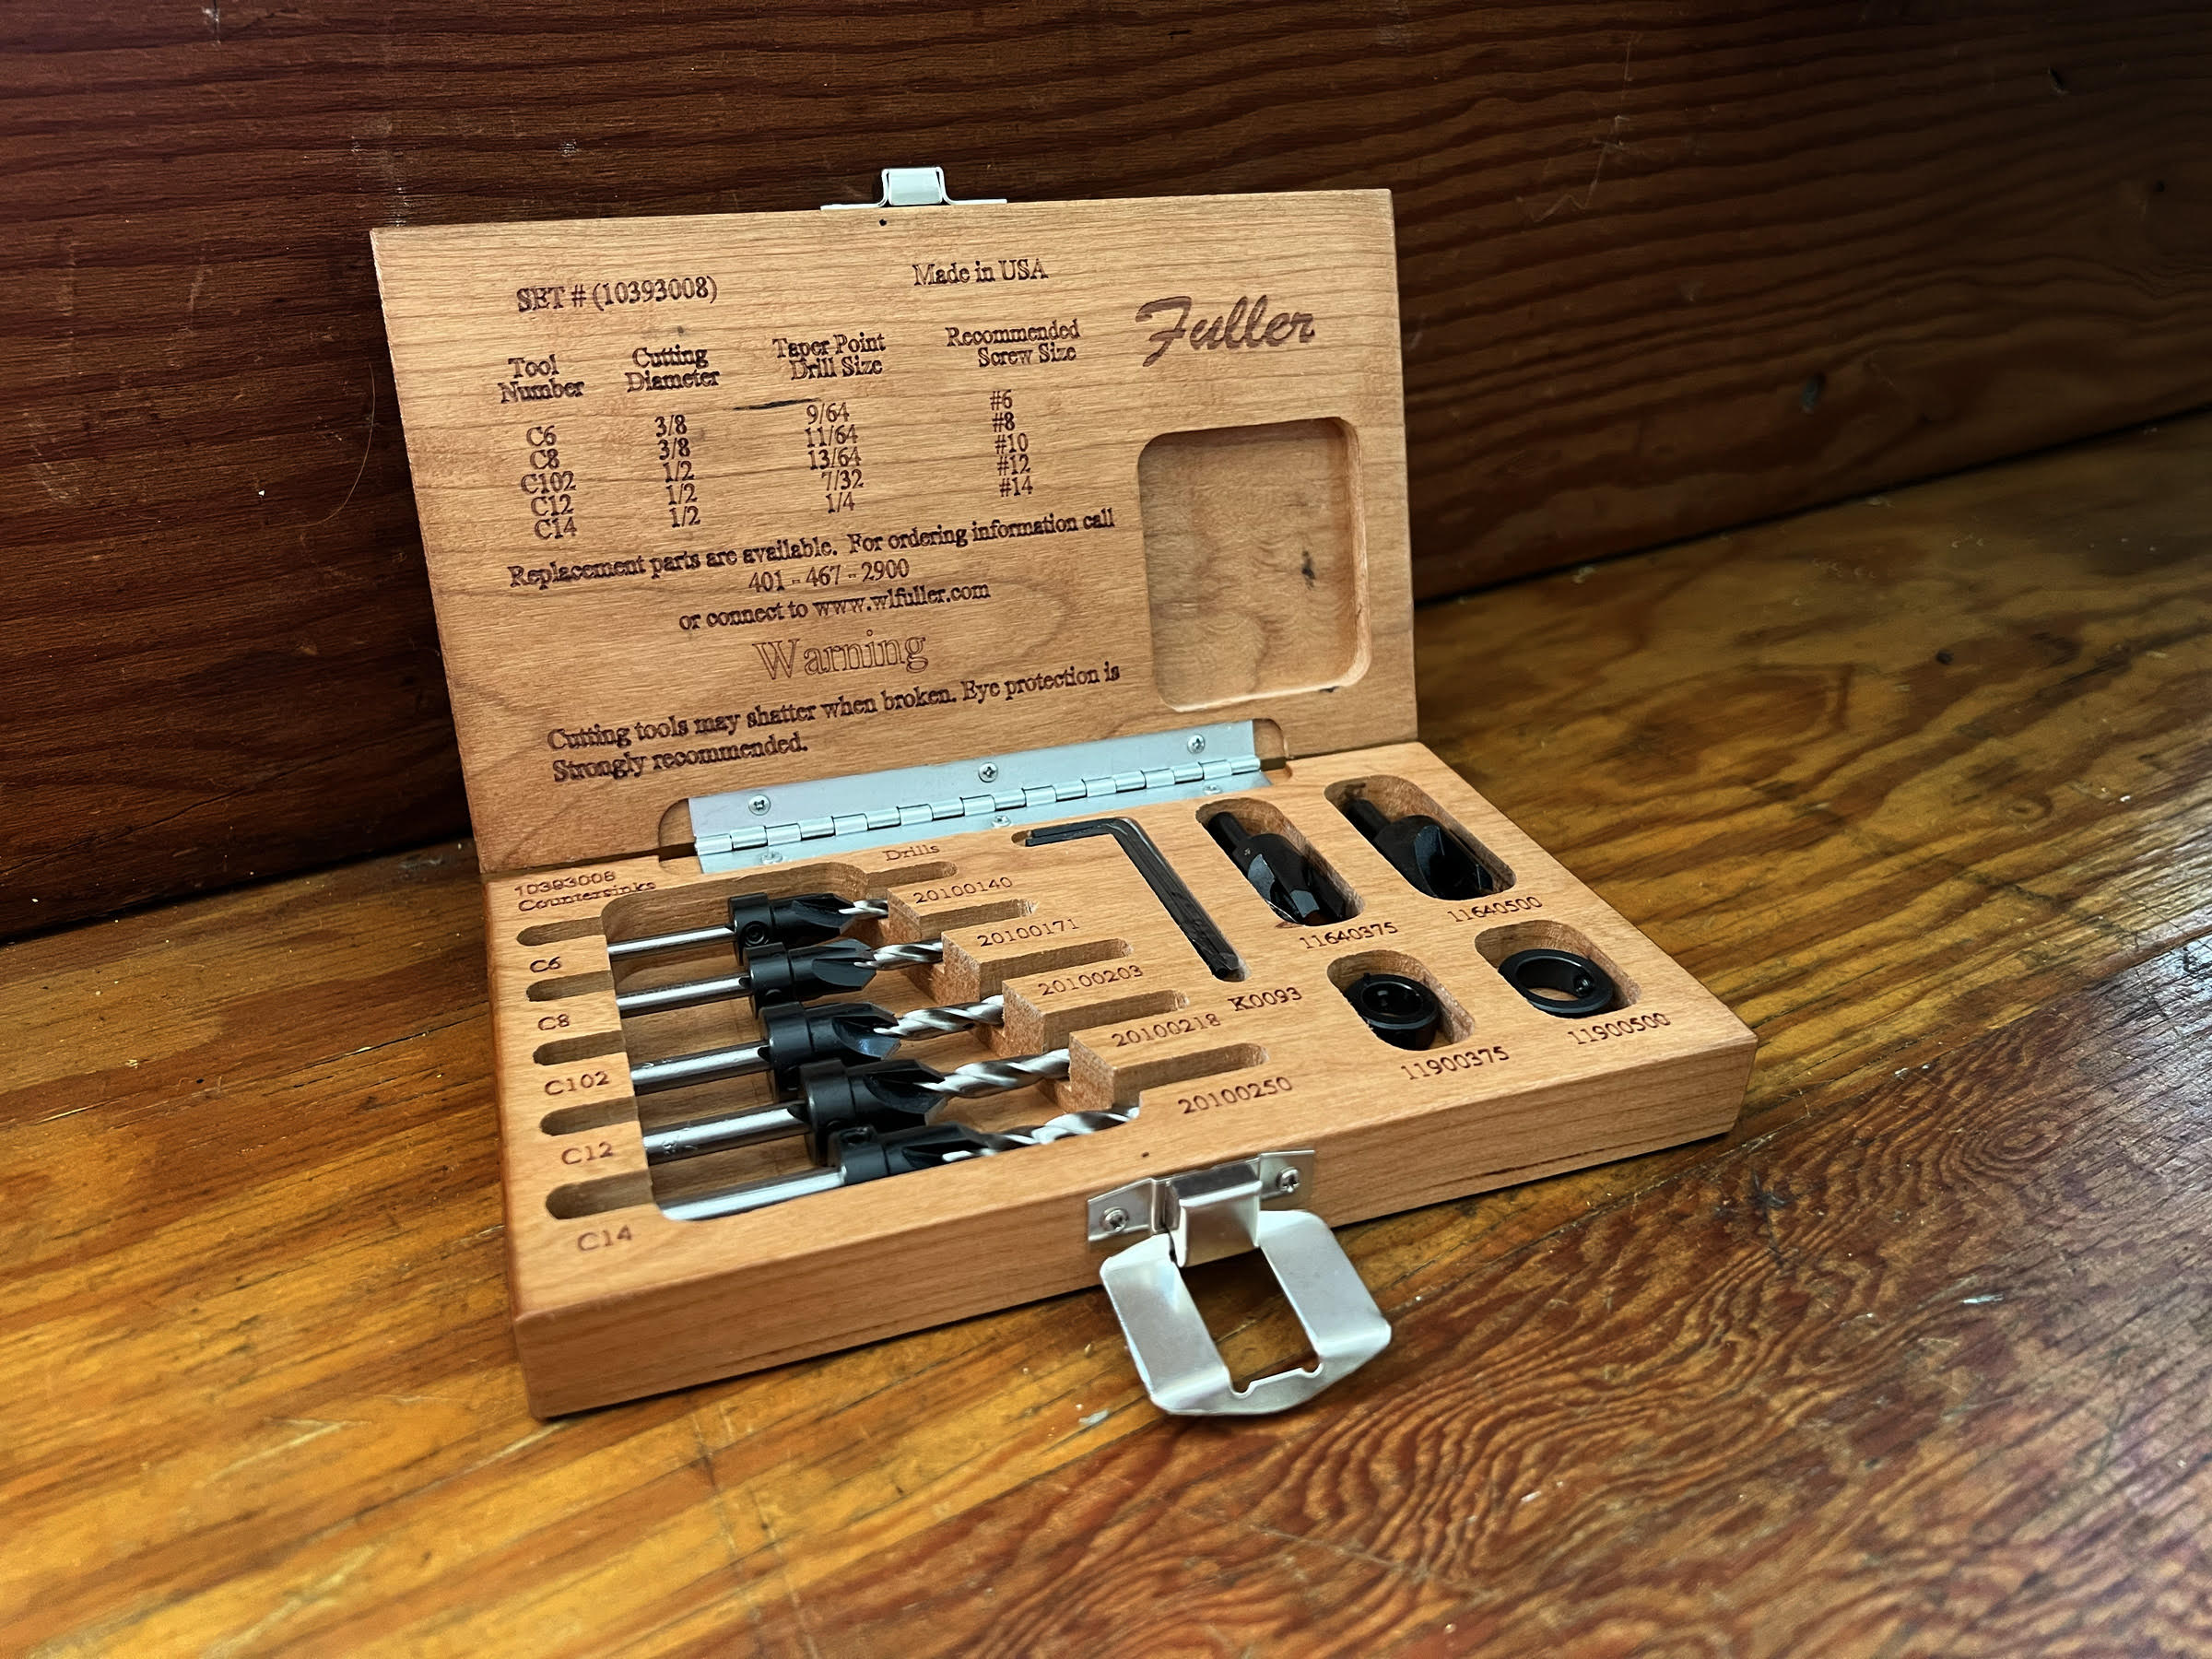
While bits and countersinks can be purchased individually, more typically they are sold in sets such as the No. 6, for use with wood screw sizes #5 through #9; or the No. 8, which will fulfill the needs of most small-boat projects. It includes five tapered drill bits and matching countersinks for screw sizes #6, #8, #10, #12, and #14, as well as two plug cutters (sizes 3⁄8″ and 1⁄2″), matching stop collars to control depth, and a 3⁄32″ hex key all packaged in a sturdy Fuller-made cherry box to protect your investment. The quality is unbeatable and, as fourth-generation family employee Lisa Fuller says, “The only issue we have is, you buy one of our sets, you don’t have to buy it again.” The tools do, indeed, last a lifetime—I have had many of my Fuller countersinks and plug cutters for 40 years. They can be resharpened, and Fuller offers a resharpening service for all their tools. The only items that don’t stay around forever are the hex keys…they can and do vanish into thin air.
When drilling with a countersink it’s important to match the right bit and countersink with the screw. Here the pilot holes for a #8 bronze wood screw are drilled out with a C8 countersink and the 11⁄64″ bit that fits into it.
The countersink usually match the screw size: a #8 screw, for example, uses the 11⁄64″ drill bit with the C8 countersink. When drilling/countersinking for a traditional wood screw the tapered drill bit works well, giving the proper clearance hole and the correct pilot hole for the fastening. However, among today’s common fastenings is the stainless-steel self-tapping screw, which has neither solid shank nor taper in the solid shaft; indeed, even some bronze wood screws have no taper. While this does not necessarily mean that a tapered drill bit will not work—in many cases it will work perfectly—it’s important to do a few tests to find what works best. For example, you might use the C8 countersink with its 11⁄64″ tapered drill bit, but if fastening a bronze wood screw into a spruce frame, I would set the drill bit depth 1⁄8″ short to ensure the threads fully engage; in an oak frame I would set the depth a little long to avoid over-stressing the screw, or step up to a C9 countersink with its 3⁄16″ drill bit…in the shop, it is a matter of trial and error.
As well as the tapered drill bits with countersinks, the No. 8 set also includes two stop collars and two plug cutters, each in 3⁄8″ and 1⁄2″. The stop collars may be the least used items, but there will be times when you will be glad they are available whether setting screw heads flush at the wood surface, or countersinking them to be plugged. Conversely, the plug cutters (or bung cutters) will be used a good deal, but do require a drill press. These four-pronged cutters allow you to make straight-sided plugs out of scraps from your workpiece so that they match the grain and color of your work.
Isaac Robbins/WoodenBoat Publications
W.L. Fuller’s No. 8 countersink set will suit many small-boat building projects. Matching the quality of the tools are the American-made cherry boxes in which the sets are sold.
After 95 years in the marketplace, W.L. Fuller remains a family-owned and -operated business. As if to emphasize the consistency of its history, the company’s trademark color remains the distinctive orange established by Warren Fuller Sr. during the Second World War—in an effort to save money, Warren found a good deal on orange paint for his small V-bottomed plywood boats. When visiting the Fuller booth at The WoodenBoat Show, at Mystic Seaport, Connecticut, I was greeted by Debbie Fuller. Her pride in the family company and the quality of their products is infectious. Today, W.L. Fuller, Inc. has a 50-page catalog featuring the company’s own tools and other quality brands, all made in the U.S. And, if you call to purchase a set or seek advice, chances are you’ll be talking to a member of the family.
A lifelong resident of Florida’s Gulf Coast, Michael Jones spent his career as a boat carpenter working on the full spectrum of yachts from traditional to high-end luxury cruisers to sportfishing boats. Past president of the Traditional Small Craft Association, he is a collector of small craft and is, he says, “still boat crazy after all these years.”
For prices and to see the entire range of drills and countersinks, go to the W.L. Fuller website. The No. 8 set is also available from The WoodenBoat Store for $169.
Is there a product that might be useful for boatbuilding, cruising, or shore-side camping that you’d like us to review? Please email your suggestions.
Not all small boats have built-in flotation, and its absence can lead to trouble in the event of a swamping. Even in a boat that does have sealed compartments there is the possibility of a leak or an ill-fitting access hatch. But if there is additional flotation in place it will limit the amount of water coming in, improve buoyancy, increase the chance of self-rescue, and reduce the amount of bailing.
Photographs by the authors
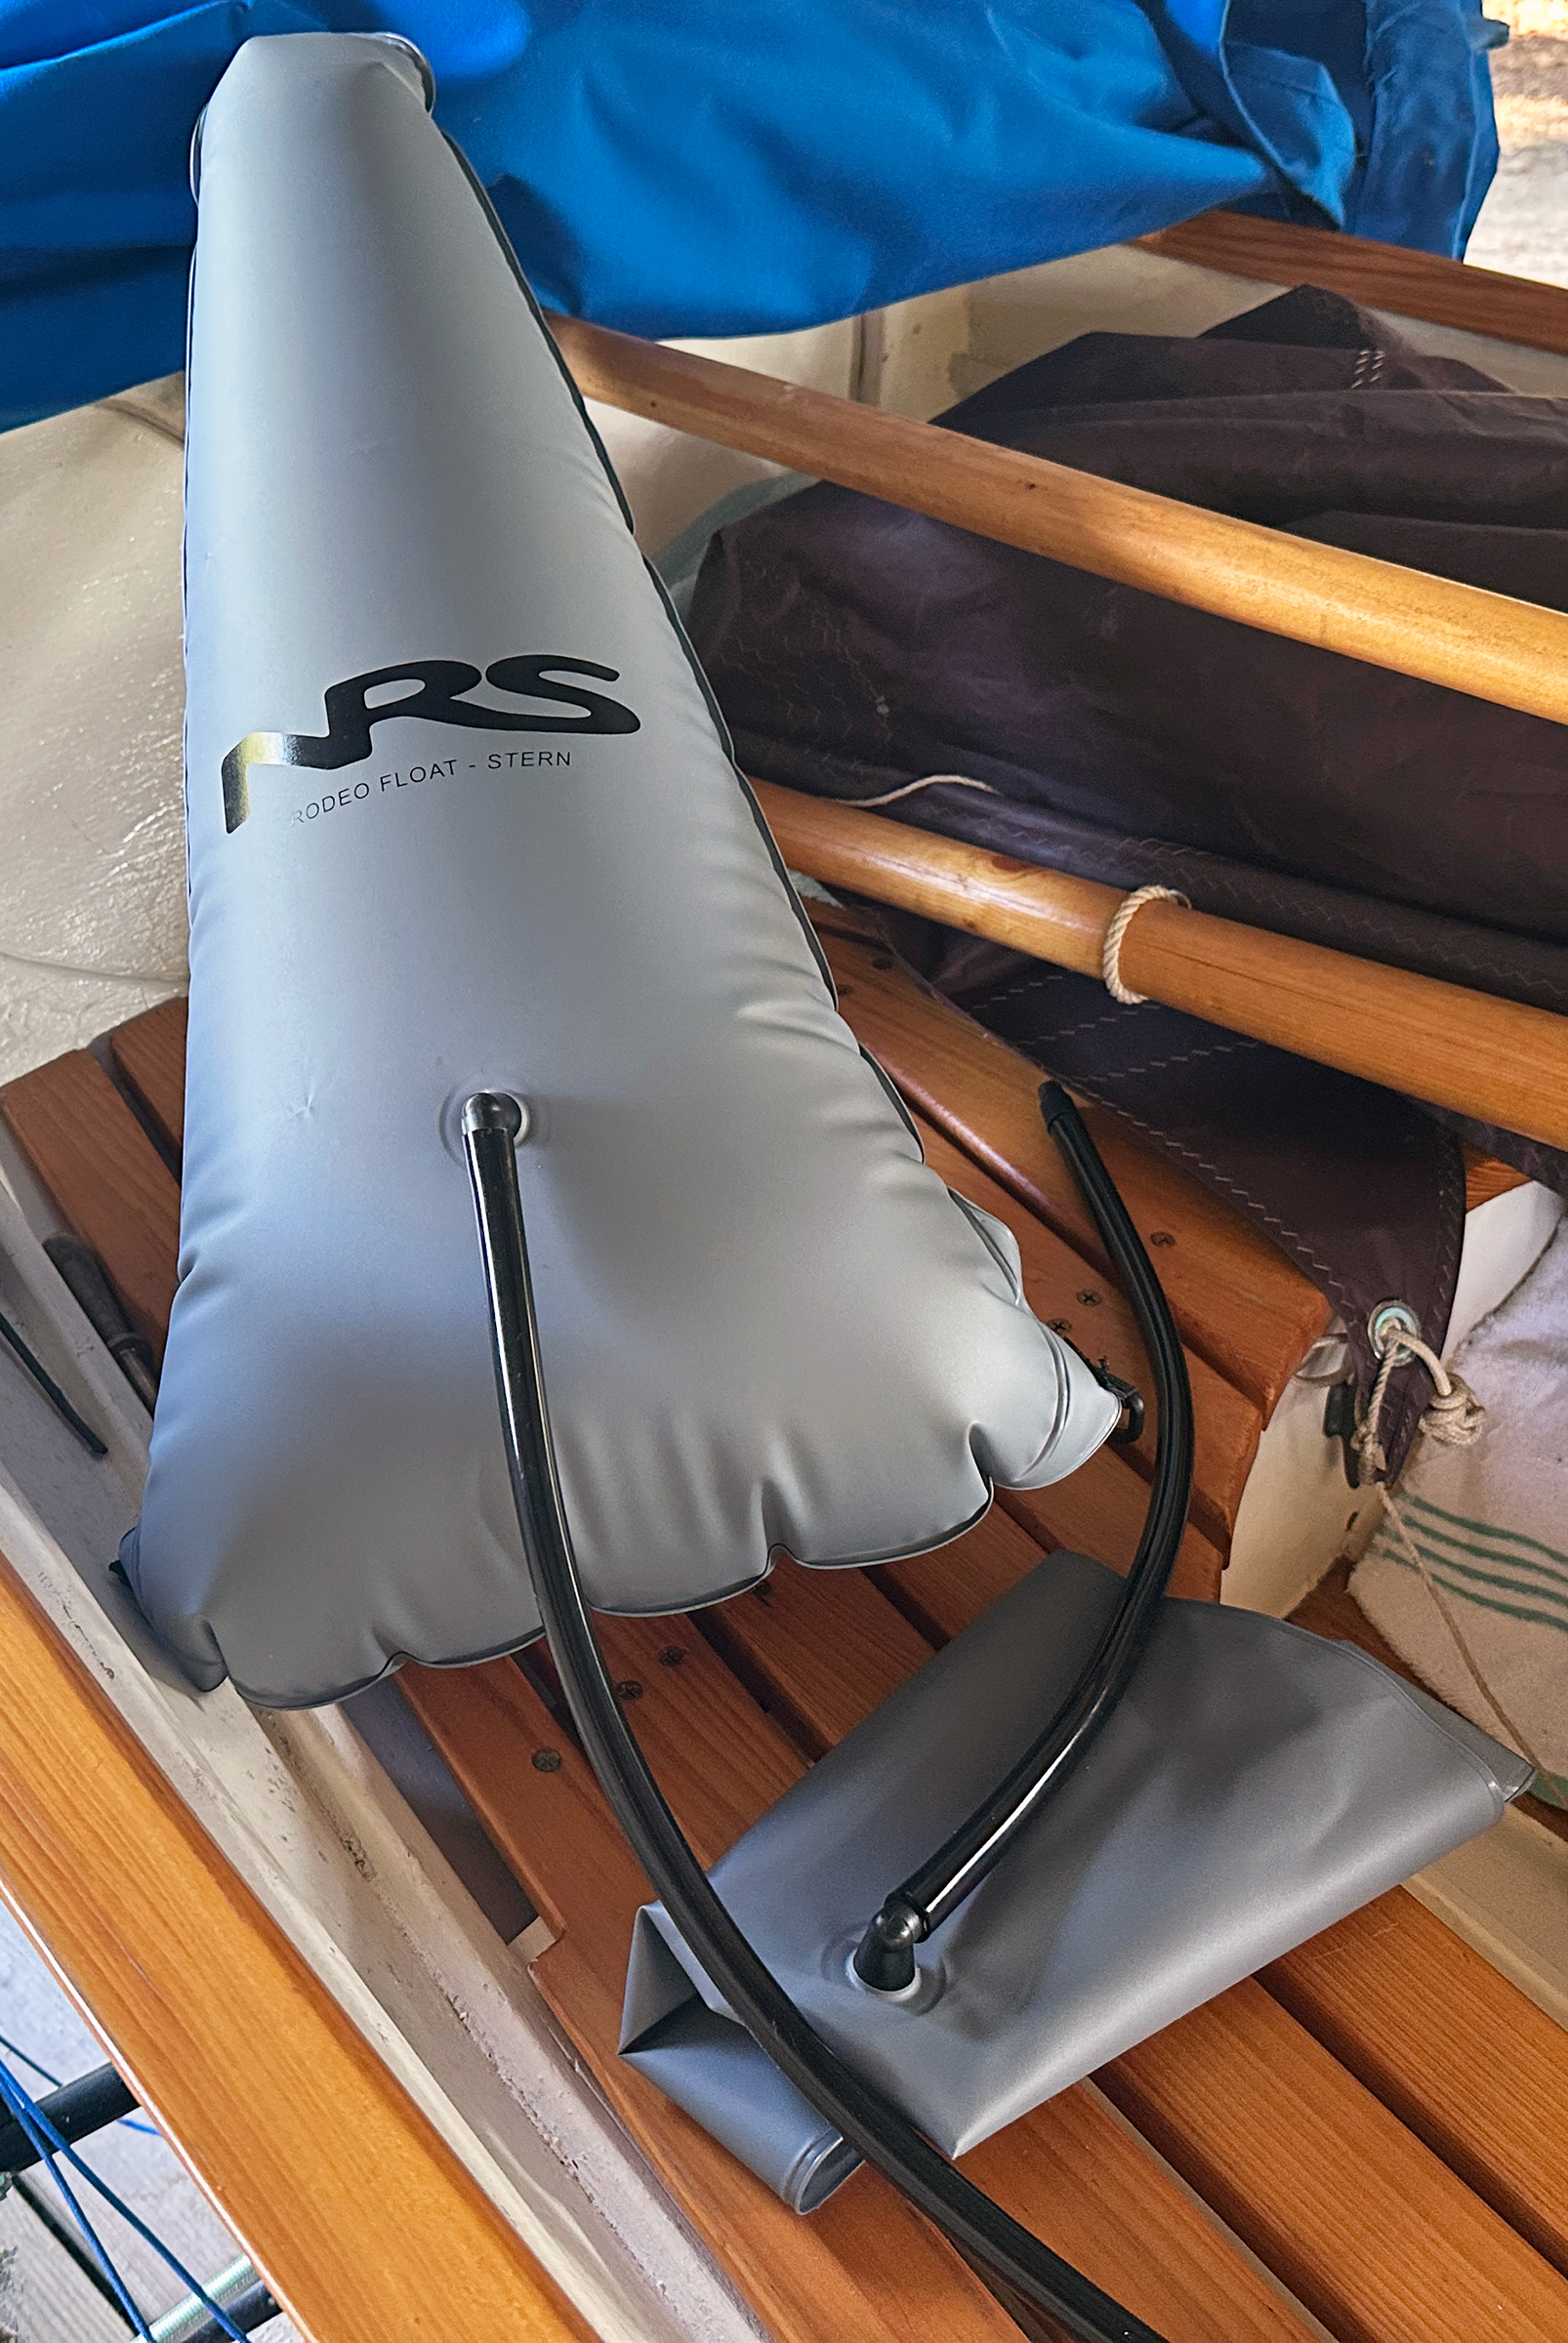
Two NRS Rodeo Split Stern Float Bags laid side by side fit the stern compartment of our Penobscot 14 very well. Wherever you stow the bags, it is important that they are firmly secured; if not, during a swamping they will float away. Here, the bags will be held down by a removable seat panel, which will be tied down with the cord seen here and a second cord anchored to the cleat mounted on the bulkhead.
When we built our Penobscot 14 we decided we wanted some extra flotation that could be easily installed and just as easily removed, and decided to try some Northwest River Supplies (NRS) float bags.
NRS was founded by Bill Parks in 1972, and in 2014 was sold to its employees. Today, the company continues to be employee owned and offers excellent customer service while furthering Bill’s mission to help “people pursue passions on the water.” Among the many products NRS offers is a range of float bags designed primarily for kayaks and canoes. Some are built of 10-gauge urethane, which NRS says will neither leak nor delaminate, while others are 70-denier urethane-coated nylon, which offers resistance to abrasion and UV rays. All have a lifetime warranty.
The NRS Rodeo Split Stern Float Bags are made of 10-gauge urethane with welded seams. Each corner has a D-ring attached by a loop of webbing sewn into the bag’s flanges.
For our Penobscot we chose a pair of Rodeo Split Stern Float Bags. These are 10-gauge urethane wedge-shaped bags designed to fit on either side of support pillars typical in short freestyle kayaks. Fully inflated, each bag measures 28″ L × 9″ D × 13″ W, and 3″ W at tip. When deflated the bag is small enough to fit through a 5″ deck plate opening. The inflation/deflation tube is 20″ long, so the bag can be placed into its compartment and then inflated. The inflation air valve closes securely. The ease with which the bag can be inflated and deflated makes installing and removing them from tight spaces relatively easy.
We keep our Penobscot 14 on a trailer and always remove the bags after outings to allow free movement of air in the boat’s compartments, and so we can check the bags for proper inflation—testing that they stay inflated for at least 24 hours. Each bag has, on its three corners, D-rings attached by UV-resistant nylon webbing straps so that it can be secured inside a compartment or under a thwart.
Thanks to the 20″-long inflation tube, a Float Bag can be installed in a tight place before being inflated from without. If we have gear to carry in the compartment, we put it in first and then inflate the float bag over it. This keeps the gear’s weight where it belongs—down low and centered.
So impressed have we been with the float bags that we are now measuring our other boats to see what sizes they can accommodate. Our Drascombe Lugger, for example, could have a bag strapped to either side of the centerboard trunk and, while the bags can be shared from boat to boat, we plan to purchase dedicated bags for each one.
Audrey and Kent Lewis sail, row, paddle, and motor the Tidewater Region of southeast Virginia. Their adventures are logged at smallboatrestoration.blogspot.com.
NRS Float bags are available in multiple sizes, singly or in sets. Find the range, along with accessories, on their website. A pair of Rodeo Split Stern Float Bags is $79.95 (price includes shipping).
Bill Griffin’s first boating memory is of paddling a wooden canoe on a New York lake as a young child. The first family-owned boat, he says, was a 17′ aluminum Grumman paddling and sailing canoe. It was followed by Sunfish dinghies, larger daysailers, and still larger cruising sailboats. One after another they inspired in Bill a love of boats and boating that eventually led him into a career in the marine industry, for many years at a marine hardware store in Annapolis and more recently as a rep for a marine paint manufacturer. As Bill puts it, his work life now consists of “calling on boatyards, retailers, and builders, talking boats, and getting paid to do it.”
For all his experience, however, Bill had never built a boat for himself. He had helped his friend and neighbor, Charlie Flanagan, to restore a 1935 Herreshoff 12 1⁄2 and a 1973 Beetle Cat and on both occasions, he brought his professional expertise to the table, advising Charlie on the best paints to use and how to apply them.
Bill Griffin
Once Bill and Charlie had built the box beam—laid atop an aluminum ladder on two leveled horses—they set up the building molds over which they would plank up the hull.
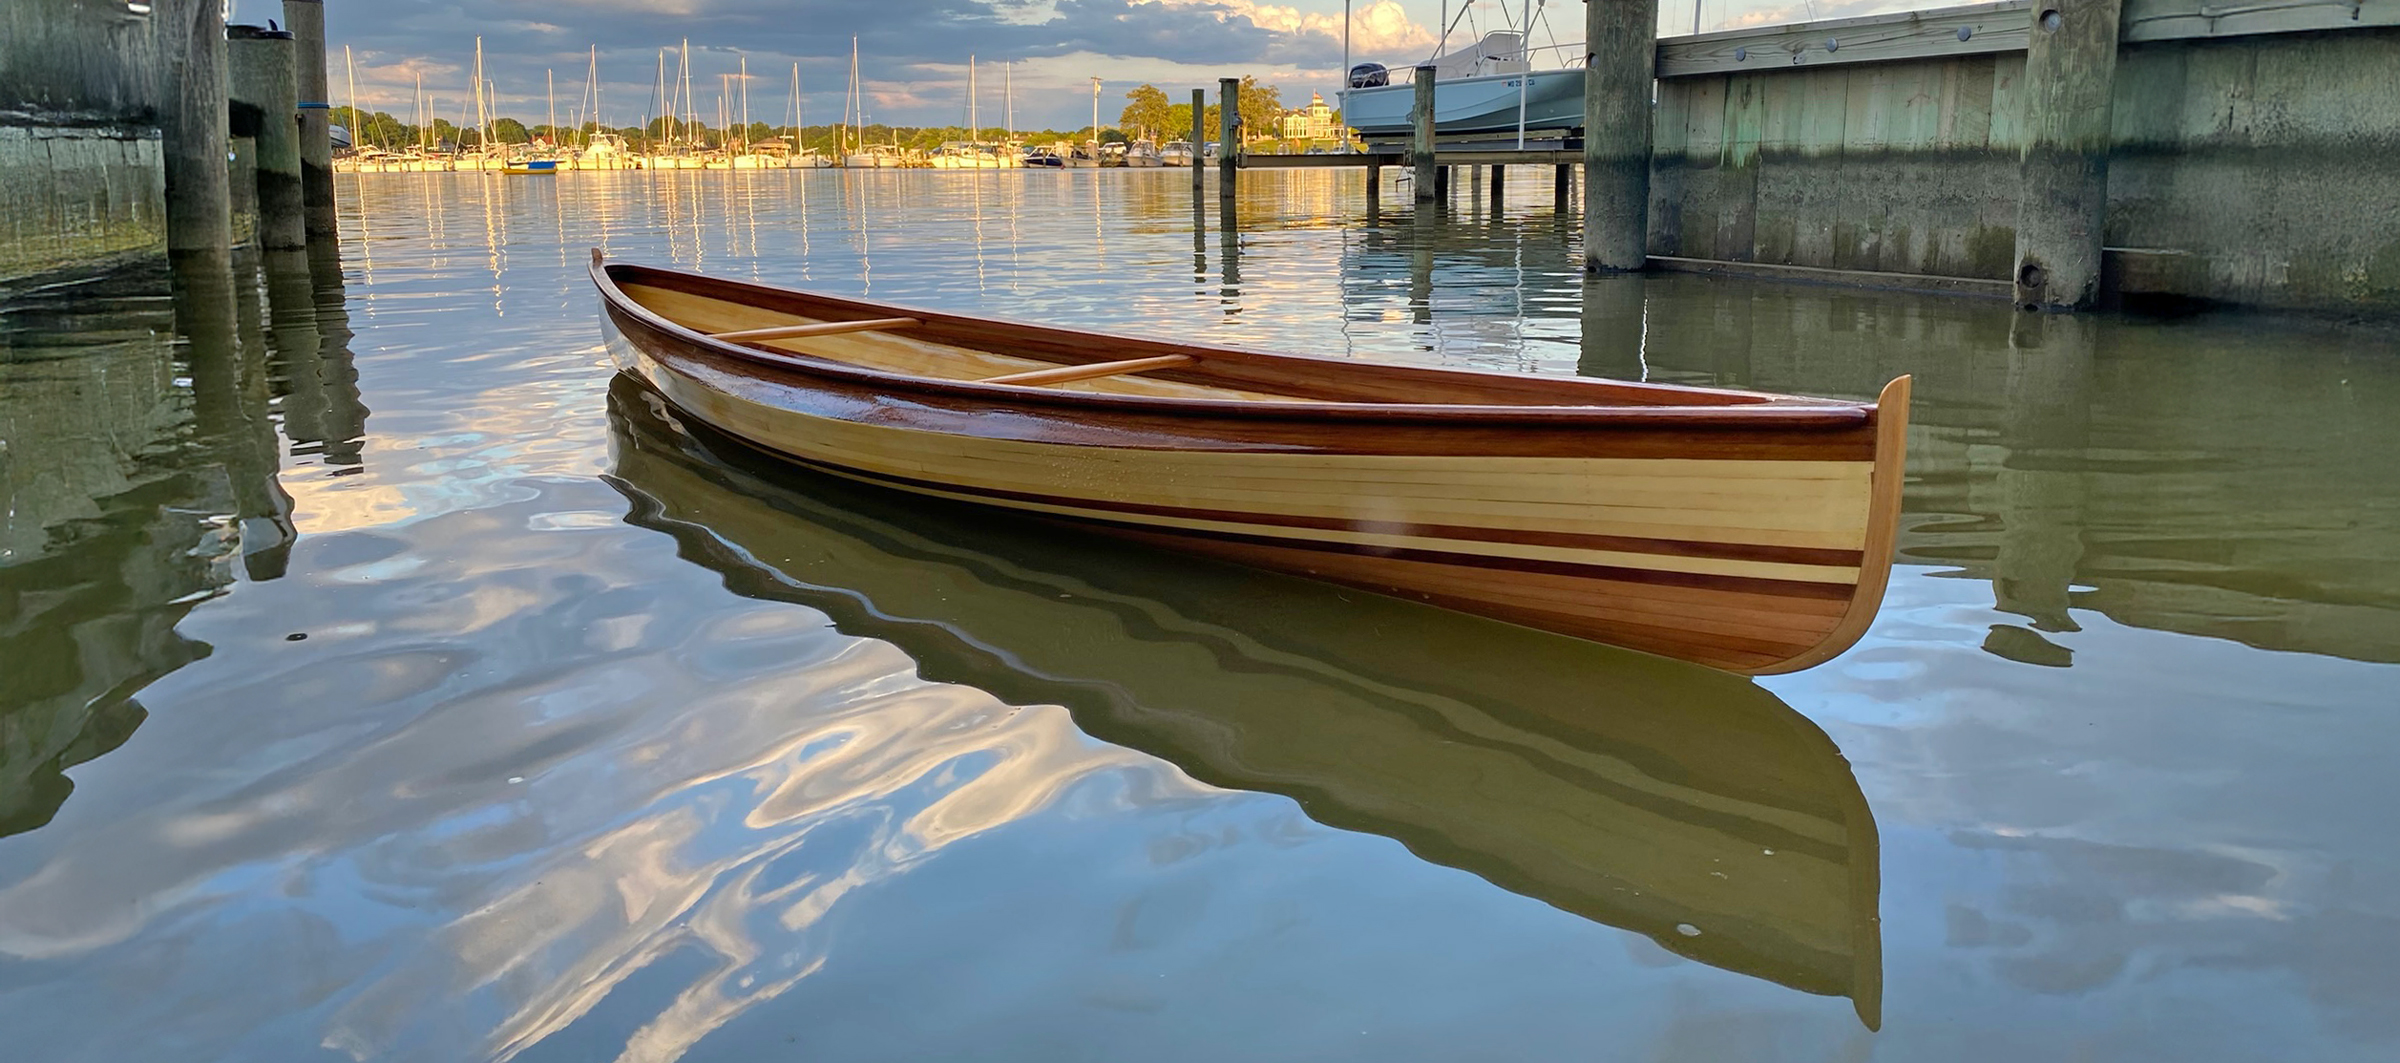
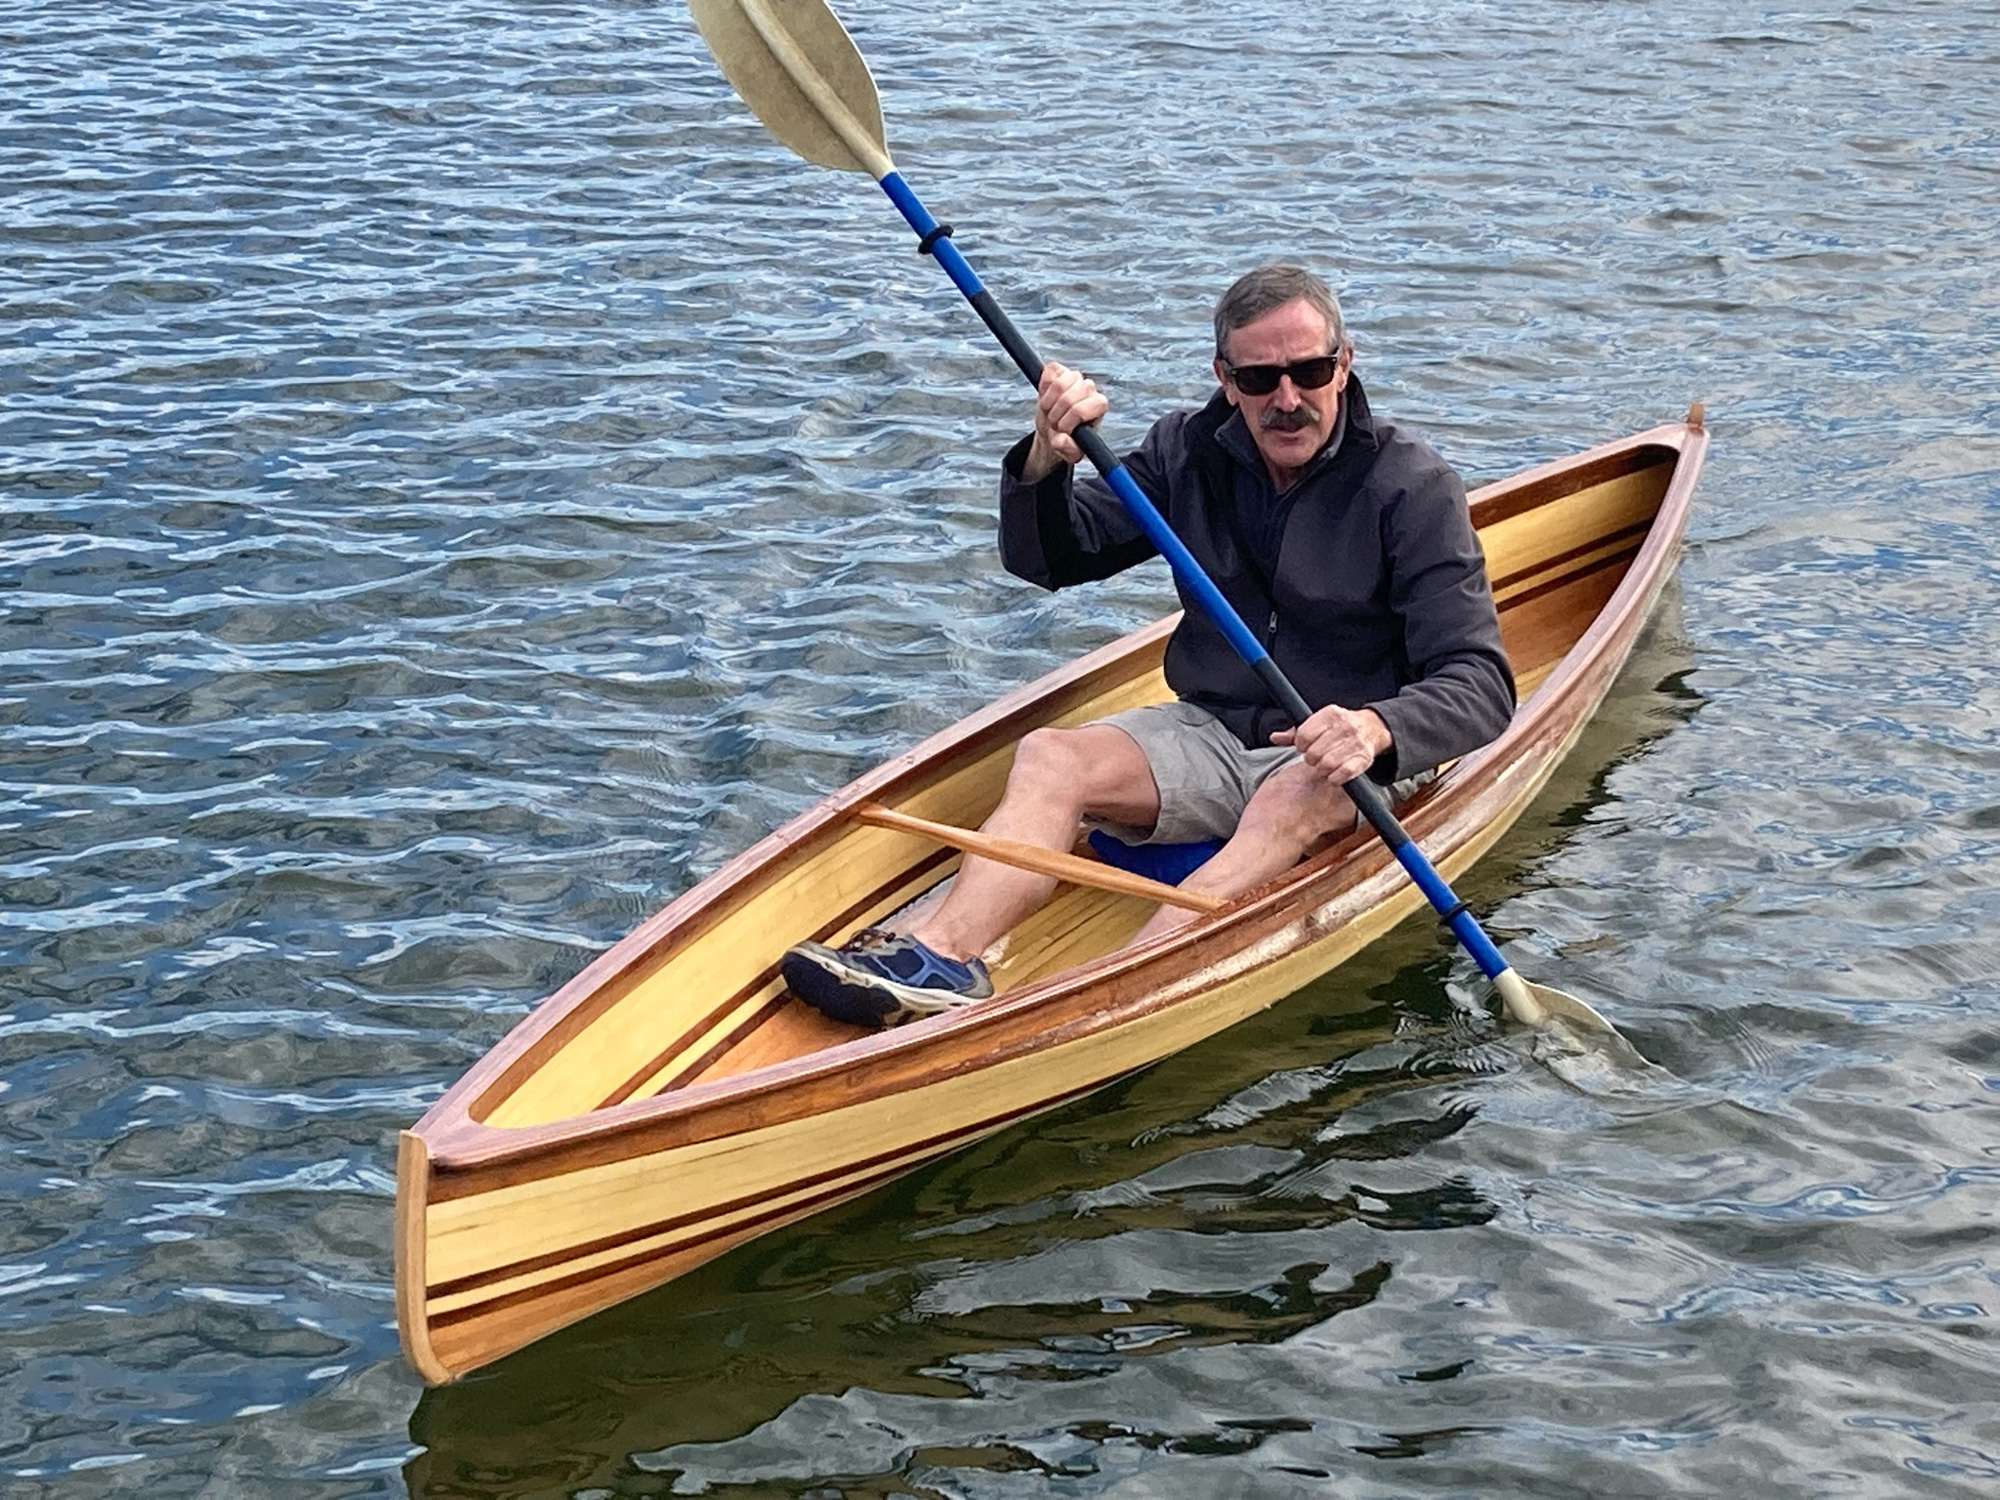
He also helped Charlie to build a Chesapeake Light Craft (CLC) Lighthouse Tender, which introduced him to the world of kit building. Then, after Bill saw a Nick Schade–designed kayak at the Chesapeake Bay Maritime Museum and subsequently read Schade’s book, Building Strip-Planked Boats, the seeds were sown—it was time to build. He ordered a CLC kit for Nick Schade’s strip-planked 12′ canoe, Nymph. He chose the Nymph, Bill says, because he wanted a canoe, wanted to build strip-plank, likes to use a double-blade paddle, and was intrigued by the prospect of paddling a canoe that weighs just 25 lbs.
So began what Bill has come to see as a series of lessons learned.
Bill Griffin
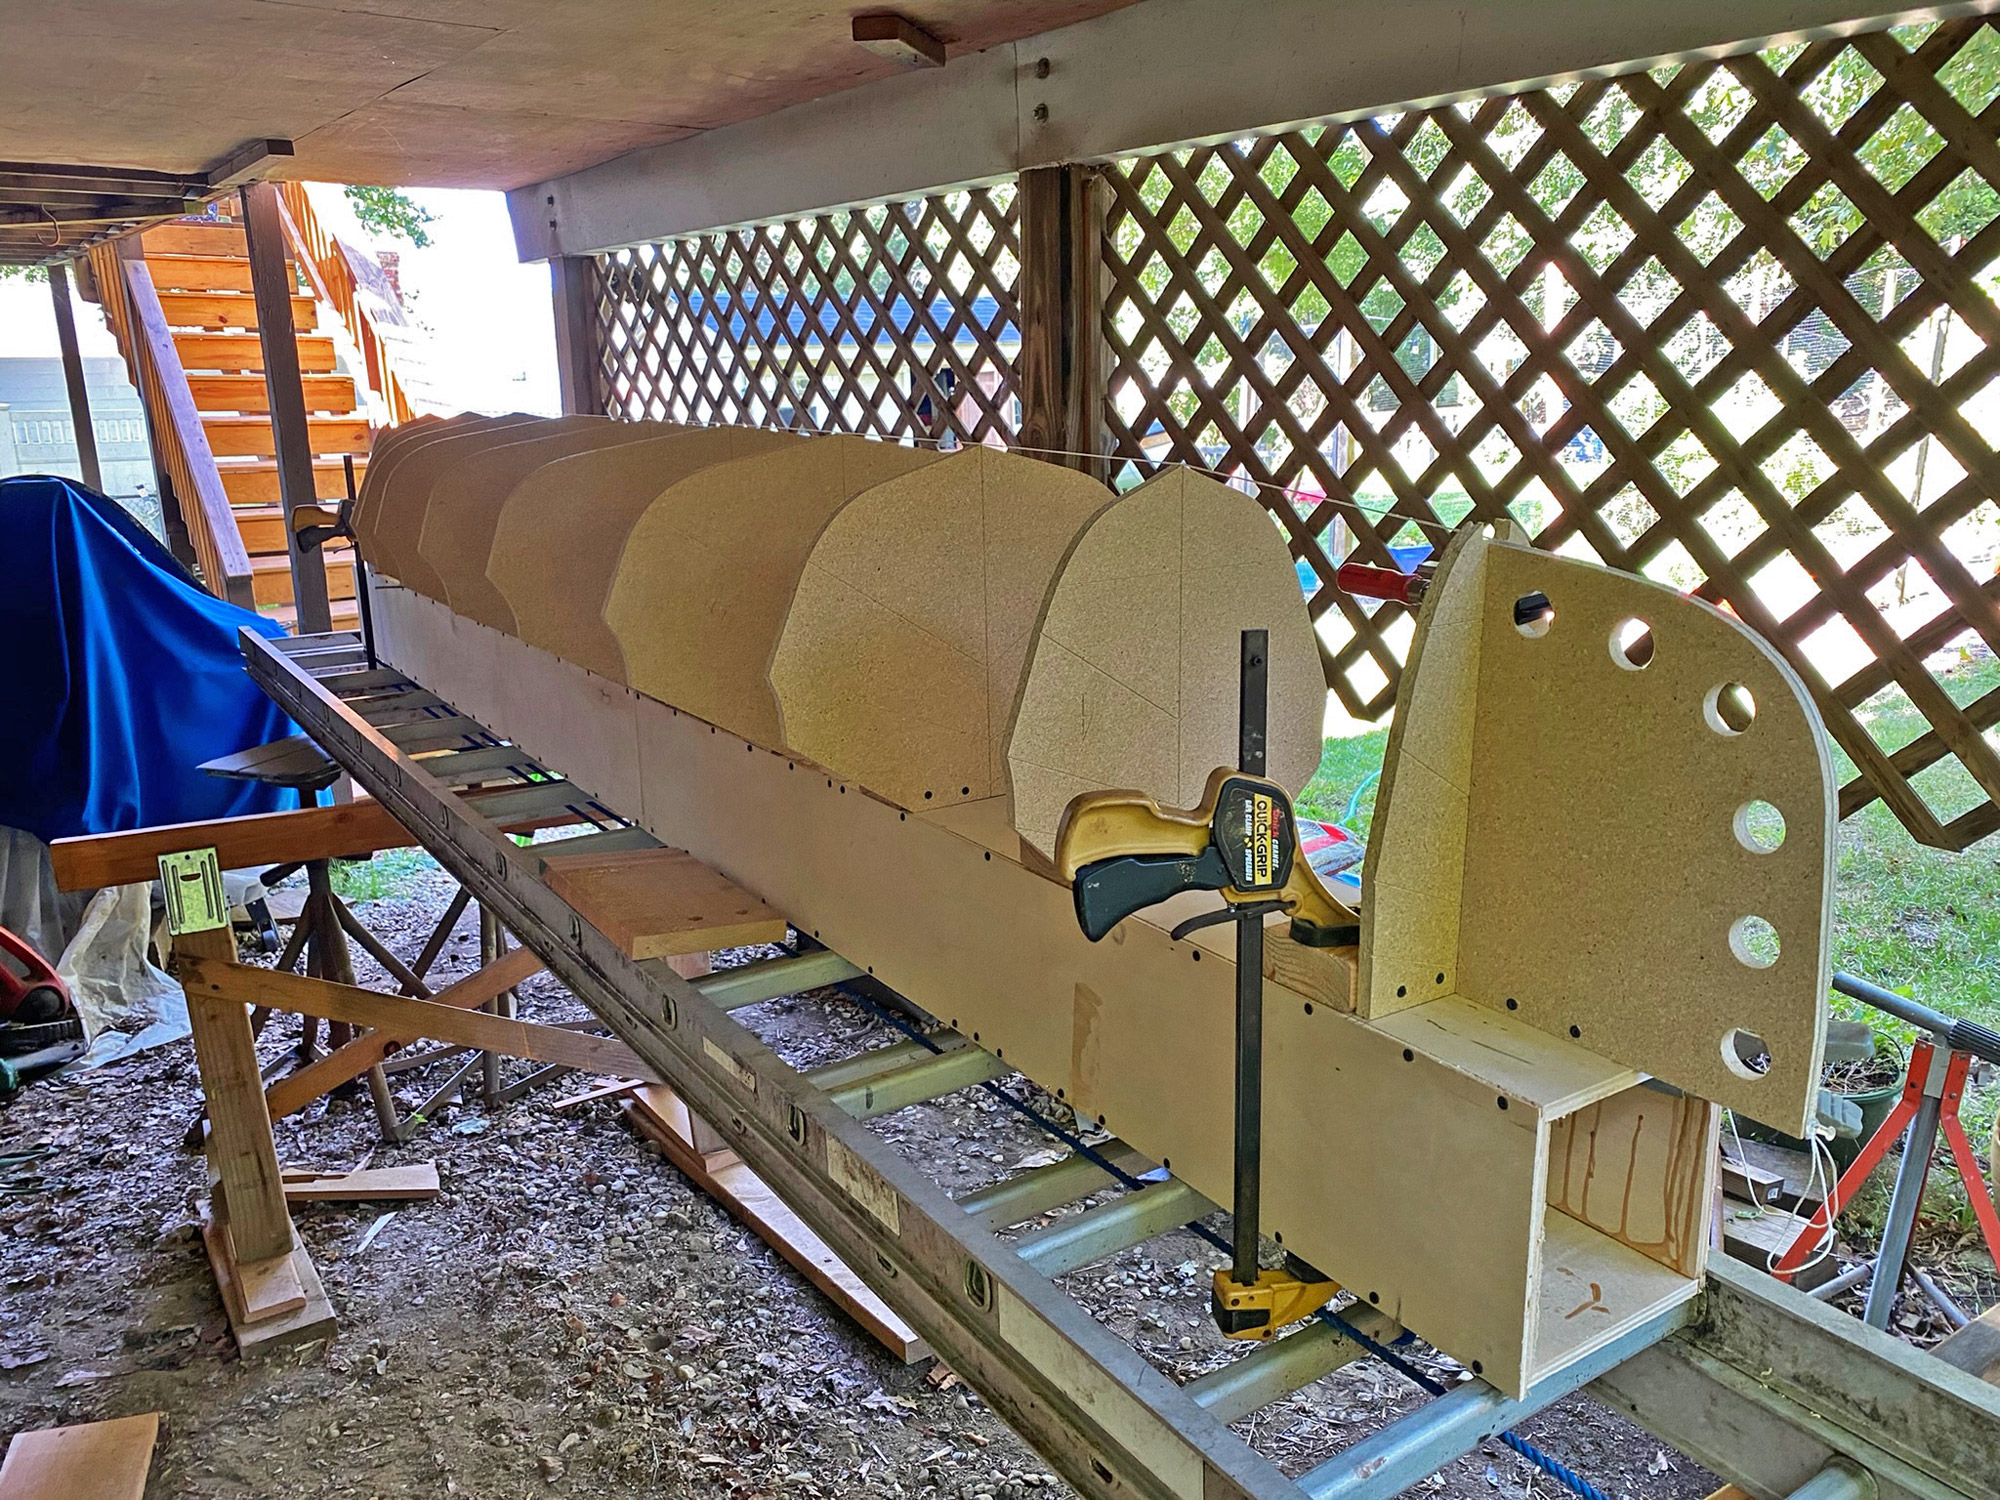
Prior to planking, Bill had carefully mapped out the order in which the strips would be used, so establishing the hull’s ultimate color-and-pattern scheme. He had also laminated the four stems—two inner, set in place before planking began, and two outer. Finally, Bill and Charlie covered the outer edges of the molds with masking tape so the planks wouldn’t be unintentionally stuck to the molds.
Lesson 1: A project of this size should be tackled in small step-by-step increments. “It’s overwhelming if you look down the road at all that is to come,” Bill says. “It’s important to tackle one challenge at a time.”
Lesson 2: Find a good place to work. Building a boat, says Bill, “always seems to take longer than expected, so you need a suitable workspace that won’t be needed for other things; you don’t want to be moving the boat while it’s being built.”
Bill Griffin
The outer stem would be glued and clamped into place. The gap seen here was reduced to almost nothing and what remained was filled with thickened epoxy.
Bill talked to Charlie, who “has a sheltered dirt-floor workshop where a project can be undisturbed for months. With the space, inevitably, came Charlie, as a willing helper and collaborator. Despite his years of restoring and building boats, Charlie had never done any strip building and was eager to be involved.
In August 2023, when both Bill and Charlie had a week of vacation time, the two friends started work. They reread Nick Schade’s book, went to CLC to pick up the parts for the boat, and built a plywood box beam to serve as a building platform. “It was tricky to get it level on the uneven ground,” says Bill, “so in the end we leveled some horses, laid an aluminum ladder across them, and placed the beam on top of that.”
The kit from CLC included building notes, western red and Alaska yellow cedar bead-and-cove strips (as well as a few in walnut), mahogany for the rails and decks, spruce for the thwarts, and precut molds. Over the course of their week off, as well as setting up the box-beam strongback and molds, Bill and Charlie glued up and placed the inner stems, and laid out the strips to figure out how they looked next to each other and to pick out the places in the hull where they’d look best. “We took our time and sketched out the hull’s color scheme.”
Bill Griffin
The hull was lifted off the molds and carried out into the yard. The amount of cleaning and sanding that would be needed was daunting, but Bill was excited by the very light weight of the hull.
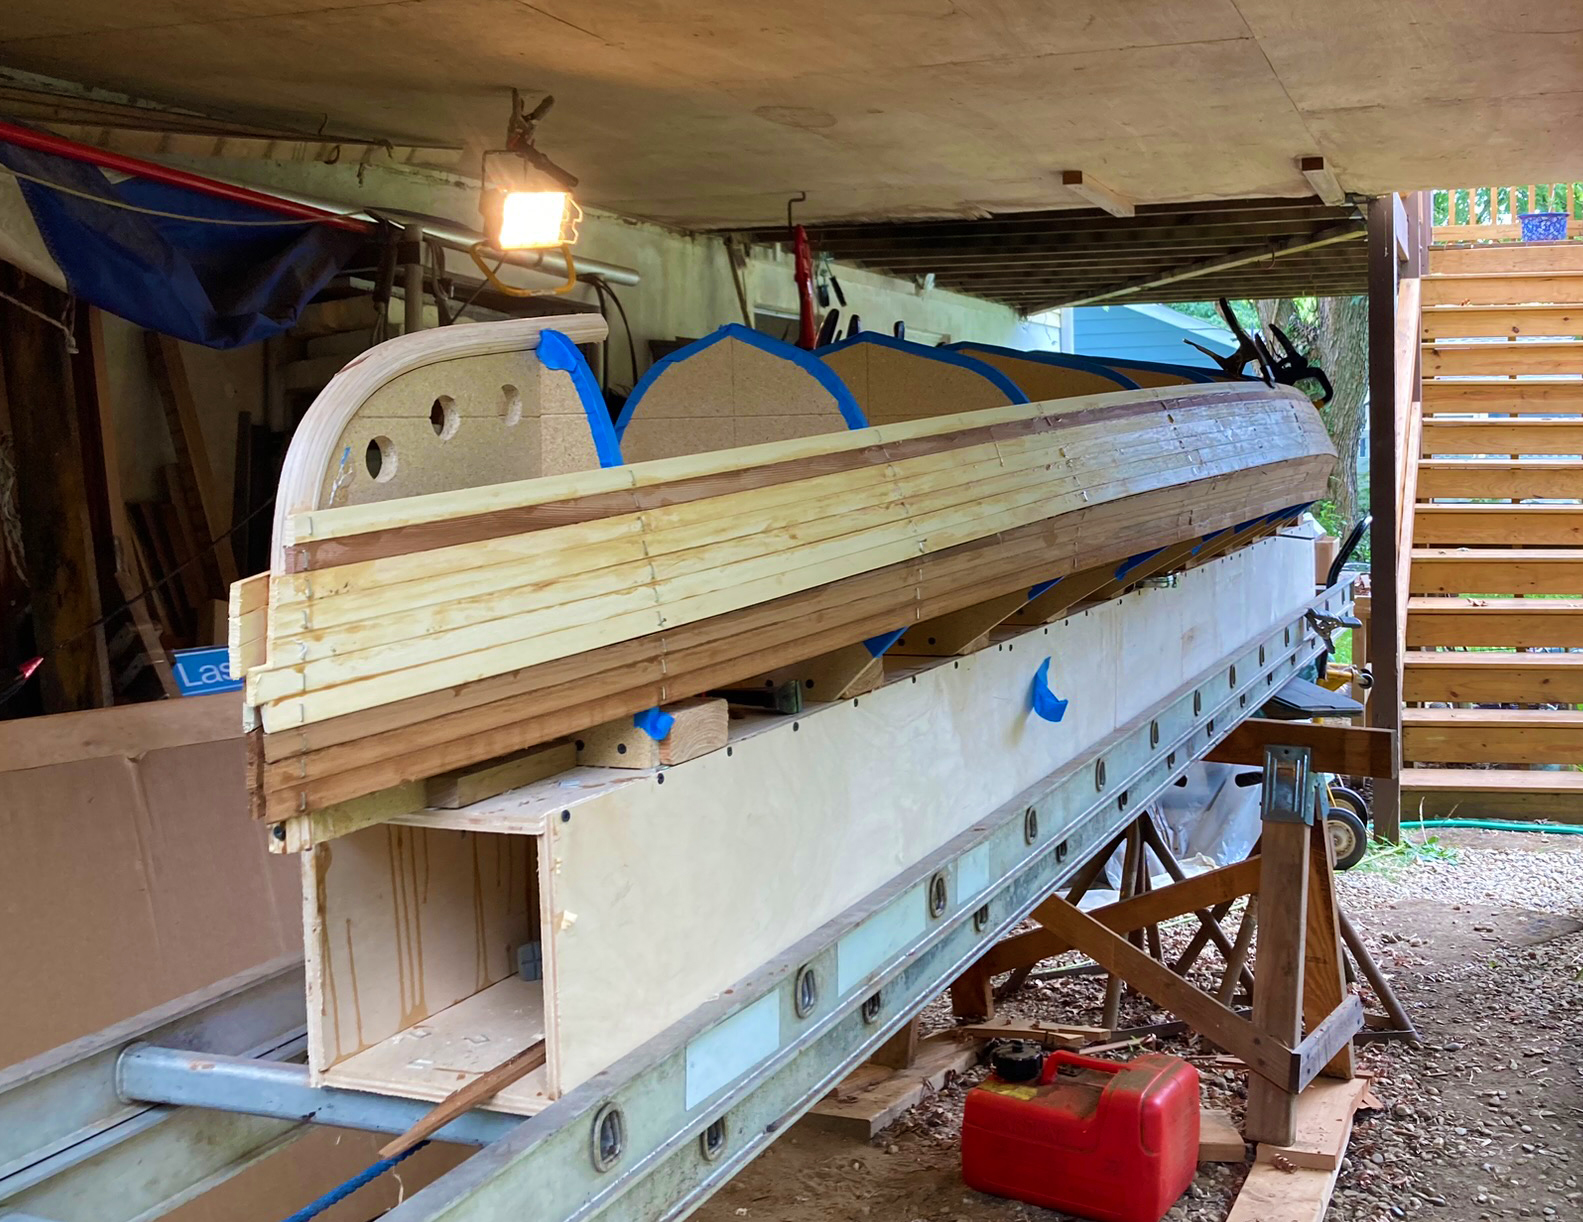
After the flurry of the first week, the project moved steadily but slowly with Bill and Charlie only able to build during weekends, and not every week. They applied strips carefully, a few at a time, stapling them to the forms, which they had masked with tape so they wouldn’t inadvertently glue the strips to them. As they worked, they figured out how to cut the scarf joints and how best to staple the strips, often supplementing the staples with packing tape.
Soon, Bill says, they came to Lesson 3: Sometimes the next step just doesn’t make sense. “When we got to the sharp turn to the tumblehome in Nymph’s topsides, we were met with a complex bevel, and we spent time figuring out how to fashion the required shape on the bandsaw. Our method—which we applied time and again when things were complicated—was to read the directions a few times, then just try something. If it didn’t work out, we’d start again, and try another method. This project taught me a new level of patience.”
Charlie Flanagan
Applying the ’glass and epoxy was an exacting task, especially in the hull’s interior where Bill struggled to cut the cloth so that it didn’t pucker in the ends.
The tumblehome bevels mastered, planking the rest of the hull went smoothly. But the next head-scratching step came when it was time to shape the external stems. They deliberated, discussed, tried out some ideas, and sought advice from experienced builders. In the end, Bill says, “I followed my own process and shaped them on a stationary belt sander. The satisfaction I felt from successfully shaping them to fit and look good was one of the best parts of the whole experience.”
Another highlight came when they lifted the glued-up hull off the molds. “It seemed as light as a feather,” recalls Bill, “I knew it would be fun to paddle.”
Lesson 4: Some steps in any boatbuilding project are tedious. The first hint of tedium, Bill says, came when they were closing in the bottom of the canoe. It required a lot of cutting joints and persuading strips to bend and stay put in ways they were not inclined to do. But it was the sanding that truly brought home Lesson 4. “Sanding the inside and the outside of the hull, unavoidably calls for a lot of hand-sanding,” Bill says. “I can’t imagine anyone enjoys a lot of hand-sanding.” As they smoothed, Lesson 5 came to the fore: Be judicious in how much wood glue you use when attaching strips. “Most of the sanding we did,” says Bill somewhat ruefully, “was to remove hardened excess glue.”
Bill Griffin
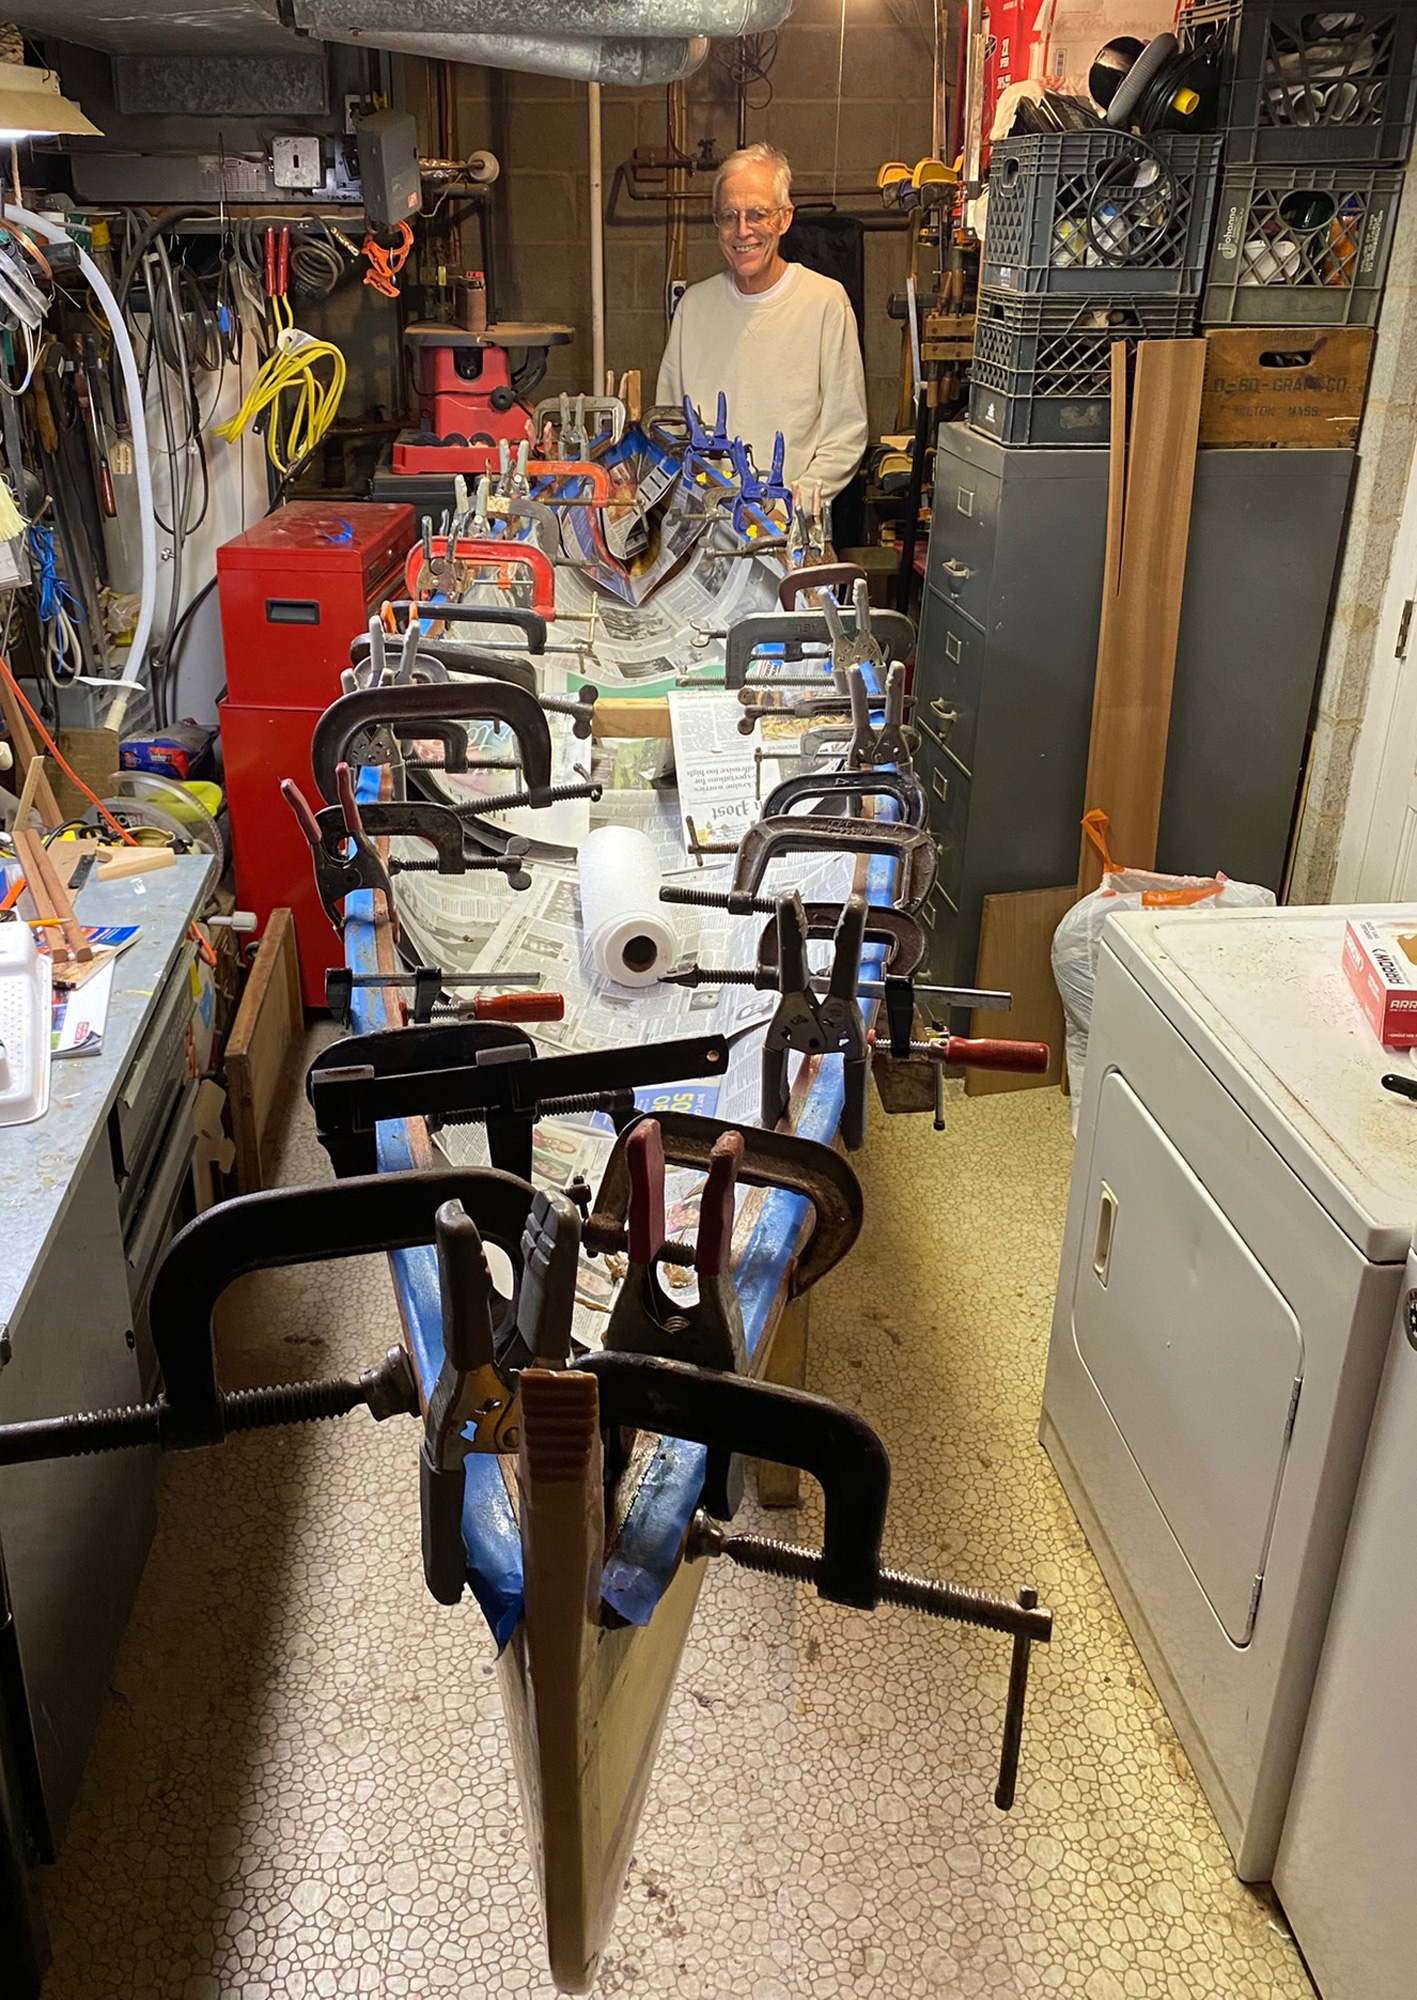
Once the boat was moved inside to the family laundry room (note the dryer at right) space became tight, but there was still much to do to. When fitting the gunwales Bill and Charlie (seen here) used every clamp they could find.
Before ’glassing the boat, they carefully looked over the hull for any gaps between strips. When a gap was found, they masked around it and filled it with thickened epoxy; when it had cured, they reached for the sandpaper again.
The build called for ’glass sheathing both inside and out. Bill says ’glassing the outside was a good deal easier than the inside. On the outside, “the cloth naturally drapes over the hull. Inside is a challenge because you have to figure out how to cut the cloth to fit it into the ends without puckers or wrinkles. We didn’t get them all out; I know where they are…I just hope no one else will notice!”
Charlie Flanagan
On a mild December day Bill paddled the canoe for the first time. It was a low-key launching, but for Bill, a day long anticipated.
In early November 2023, with the outside temperatures dropping fast, they moved the ’glassed hull into Charlie’s family laundry room where, for several weeks, accessing the washer and dryer meant squeezing by the canoe. By then, says Bill, the canoe looked almost finished, but… Lesson 6: Almost finished isn’t finished. Now came the installation of the gunwales and inwales, the seat, the thwarts, the decks… “These were significant pieces,” says Bill. “They might seem like afterthoughts, but they’re among the first things a viewer sees.” For the rails and decks Bill decided on mahogany, rounding the edges on a table router, and treating them with great care as “though they were parts of a piece of furniture.” It was all tied up in the experience, says Bill. “I really enjoyed taking boxes of wood from CLC and fashioning them into a thing of beauty and function. I didn’t design the boat, but I did have an impact as to how she turned out, looks, and performs.”
Charlie Flanagan
Weighing only 25 lbs and measuring 10′ end to end, the Nymph can be easily lifted and carried by one person.
They finished up in December and, on an unseasonably warm Saturday, they launched the canoe in Duvall Creek on South River, Annapolis. “It looked tiny in the water, but it was stable and seaworthy. I got in and paddled around for a while, savoring the joy of accomplishment.”
Even before the canoe was launched it had been noticed by others. A nearby art space was sponsoring a two-month show of local arts and crafts, and Bill was invited to exhibit the canoe. He did so with pride, and at the show’s January opening he delighted in talking to people about the project. Whether it’s an exhibit in an art show or being used in the water, says Bill, a wooden boat is an “instant conversation starter.” The Nymph would be on display for the next two months.
Bill Griffin
After a short taste of saltwater, the Nymph would be pulled out, dried off, and taken to a nearby art space to be part of a local arts and crafts exhibit for the next couple of months.
The final lesson Bill learned from building his canoe, he says, is that boat projects are best when you have someone to collaborate with. “Many times, Charlie and I discussed how to proceed and even though we’d have different opinions, we’d come to conclusions, and they usually worked. And for extra help, I’d reach out to the staff at CLC, as well as Nick Schade, and always received good counsel. I now have a boat that moves beautifully through the water, but I ended up with so much more. Building the Nymph yielded a lot of challenges, a lot of satisfaction, and a great social experience of collaboration.”
Jenny Bennett is editor of Small Boats.
Do you have a boat with an interesting story? Please email us. We’d like to hear about it and share it with other Small Boats readers.
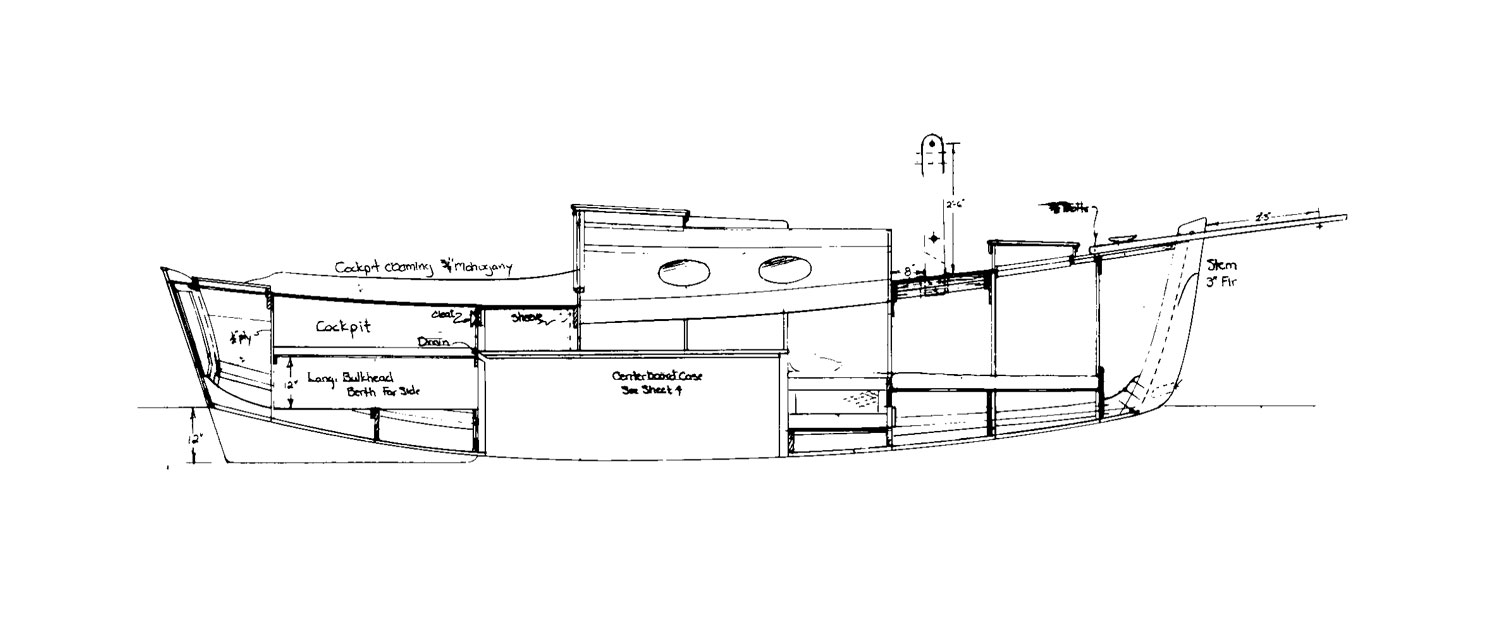
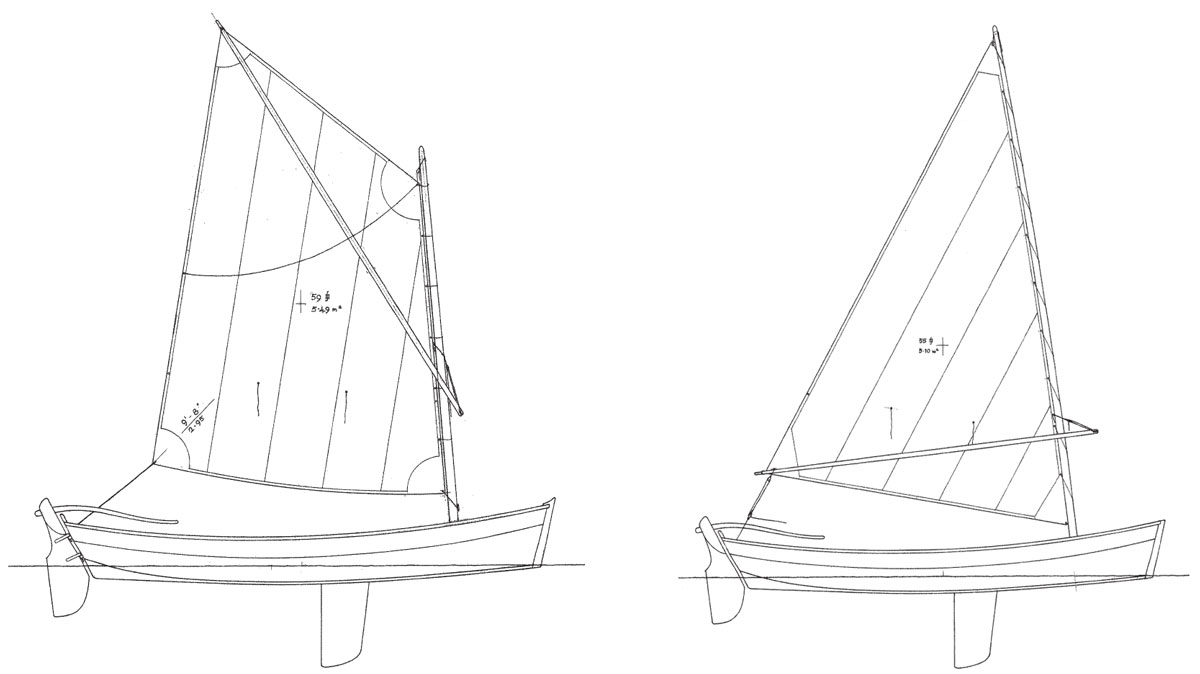
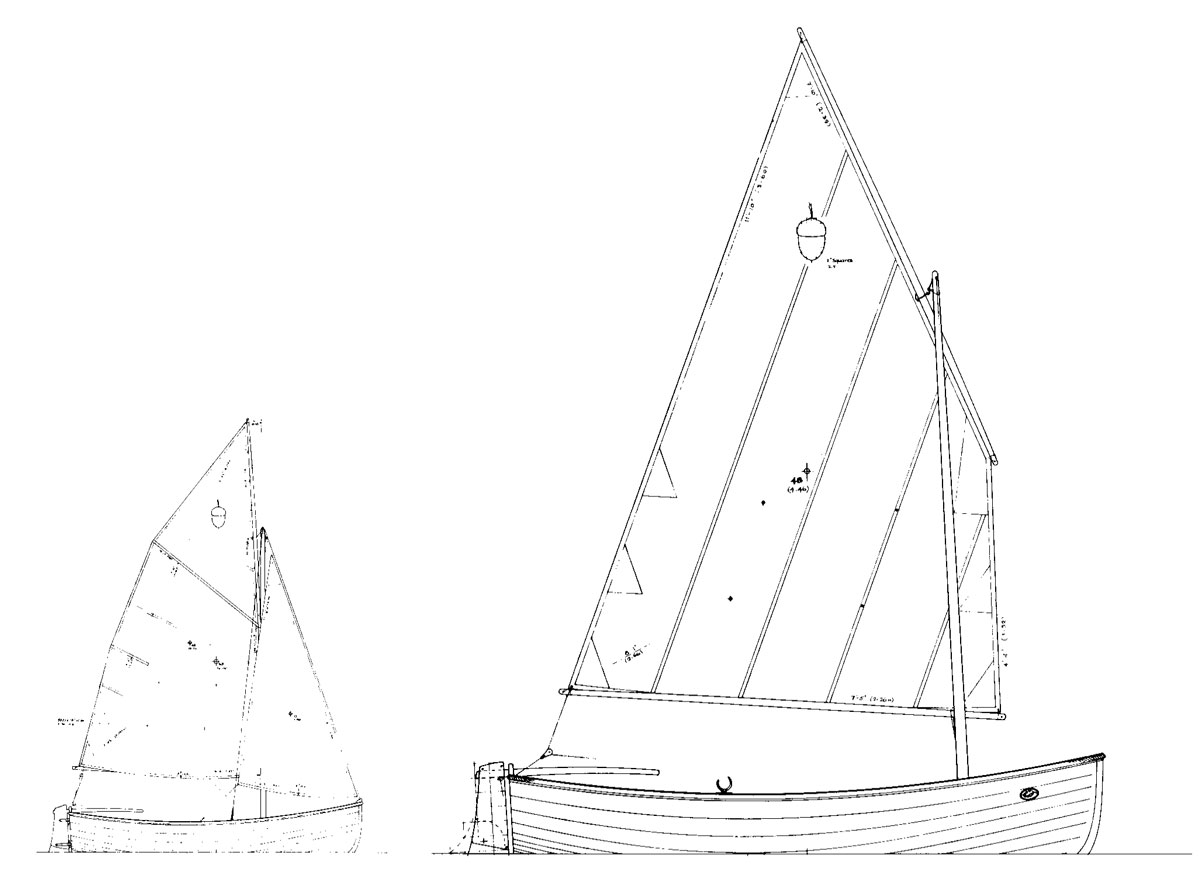
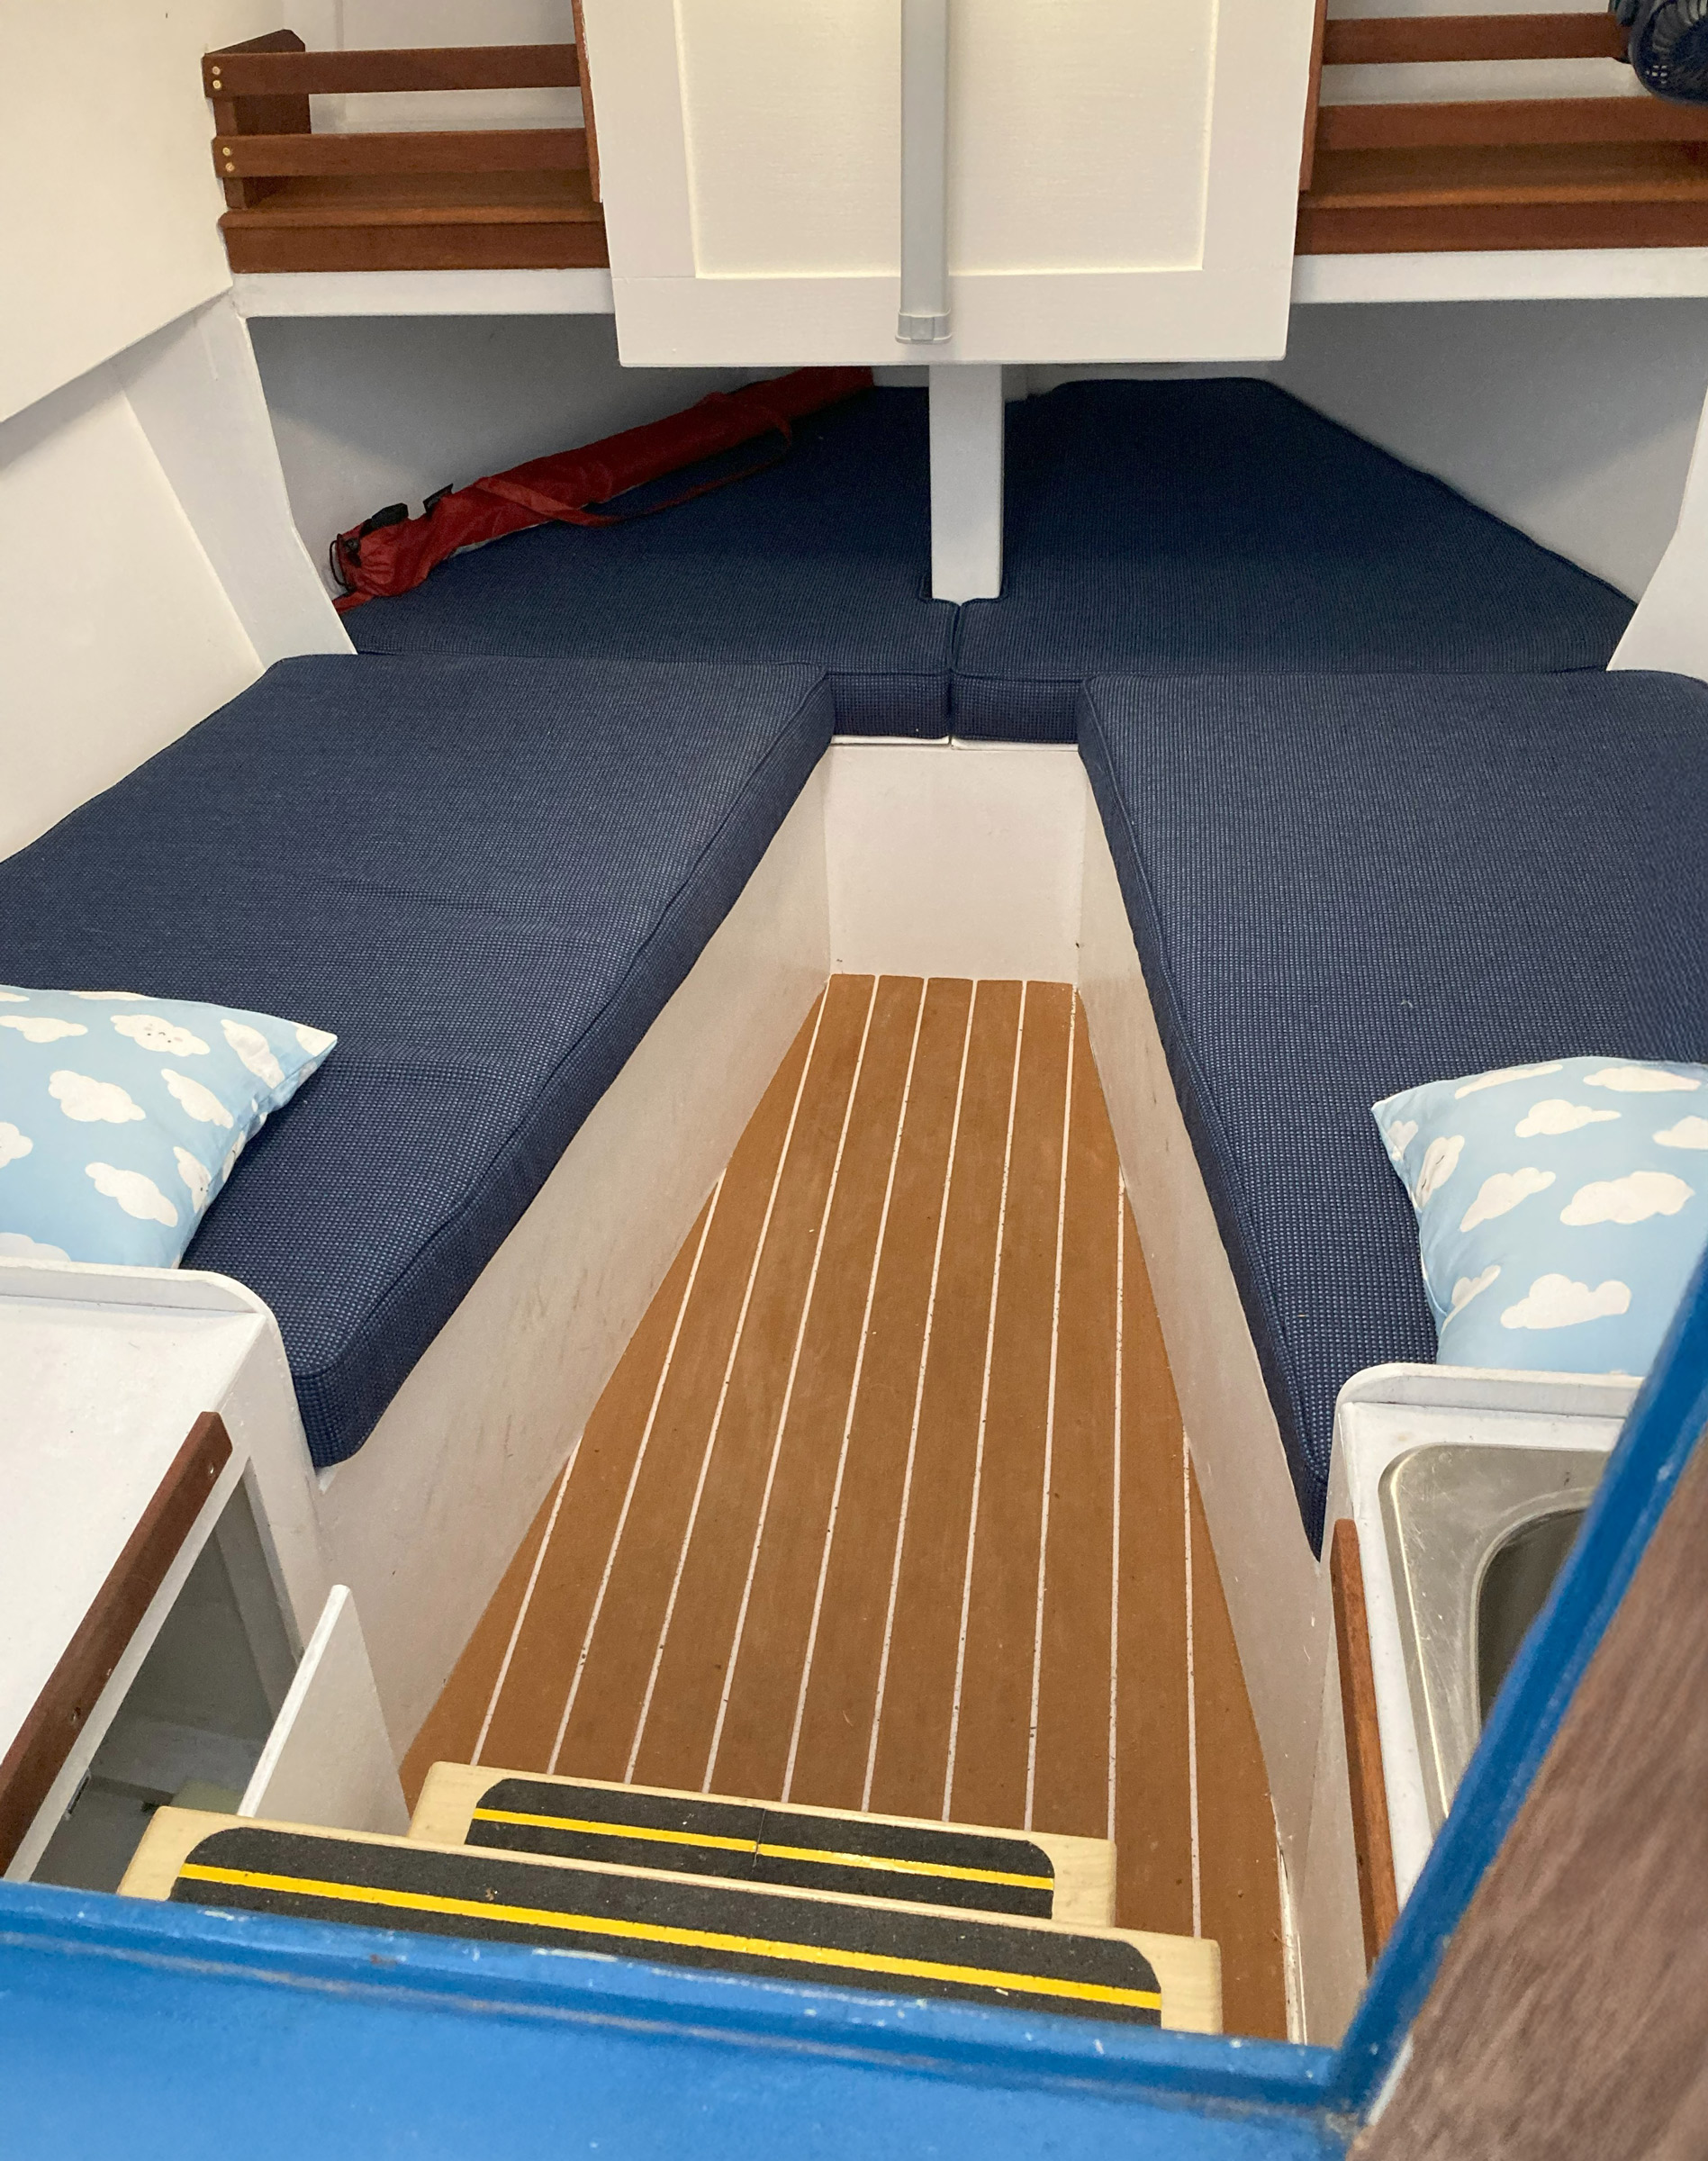
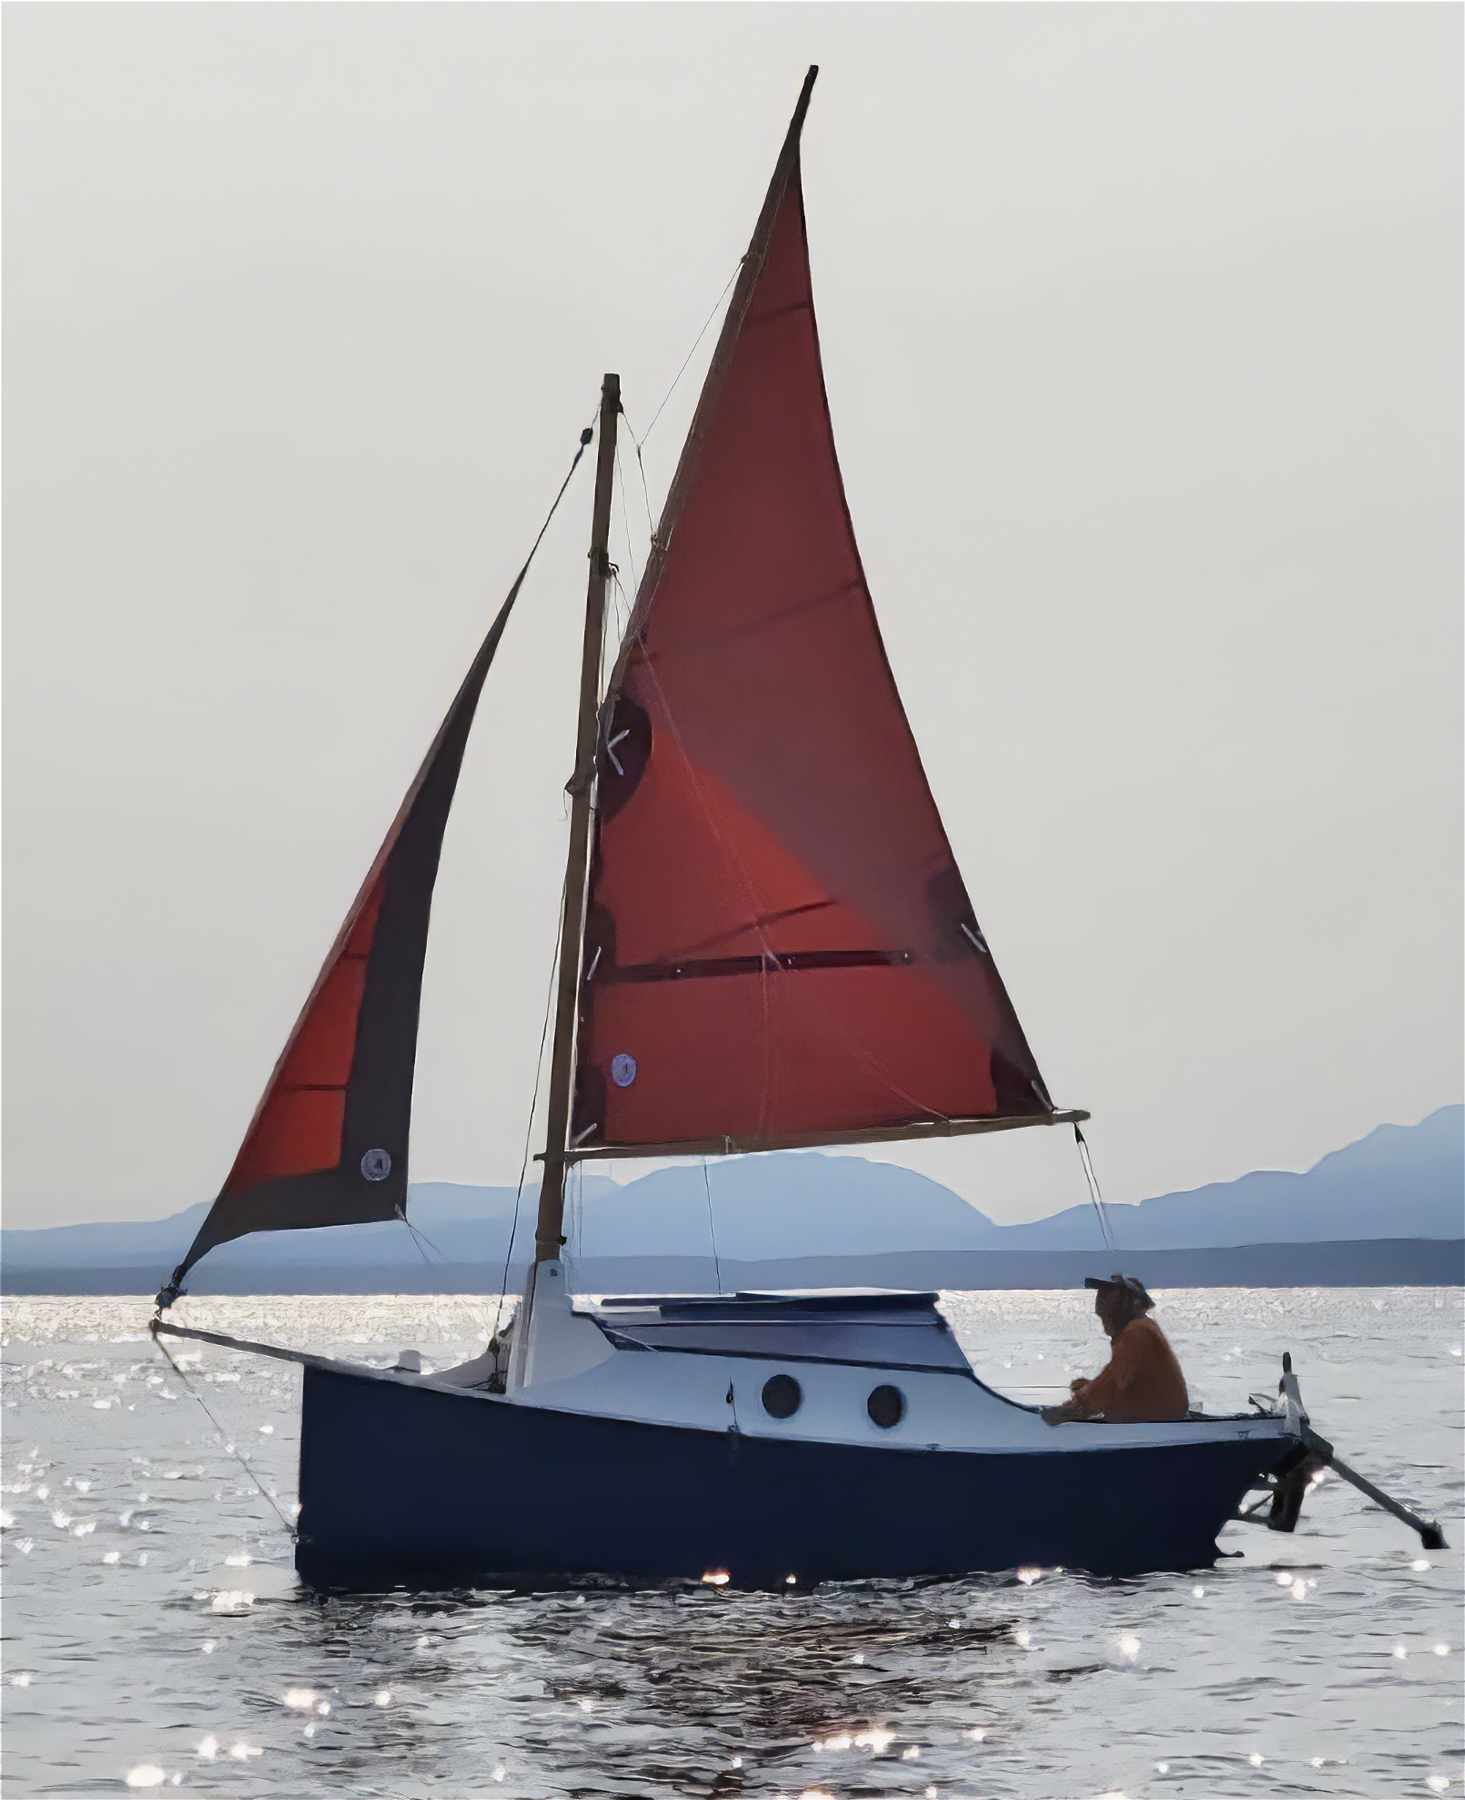
Mist is a cozy pocket cruiser that combines simple sheet-plywood construction with more than a touch of elegance.
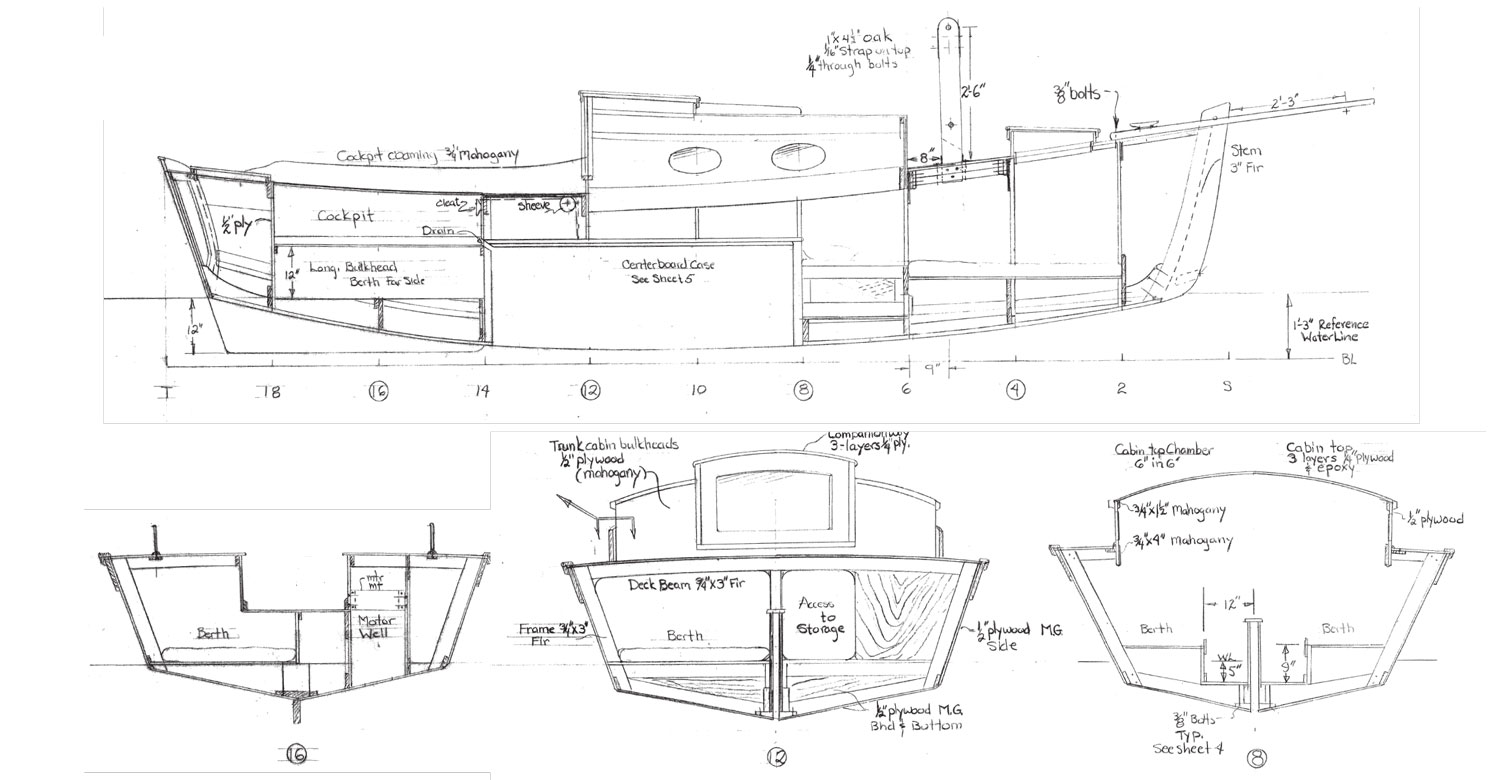
Designer Karl Stambaugh has gone out of his way to ensure that this plywood pocket cruiser doesn’t look like a plywood boat. He drew the stem to stand proud, as it would on a conventionally planked hull. Solid, coved sheerstrakes add to the illusion, as does the severe rounding-over specified for the chines. And the curved, raked transom isn’t exactly standard fare for sheet-plywood boats. In all, this is a handsome little cruiser.
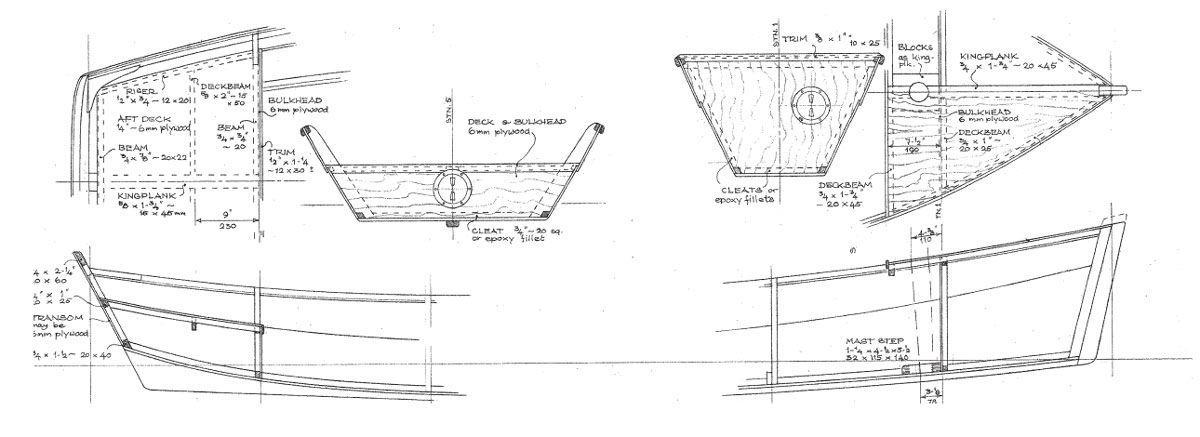
Structural details impart a traditional appearance to this simple plywood hull.
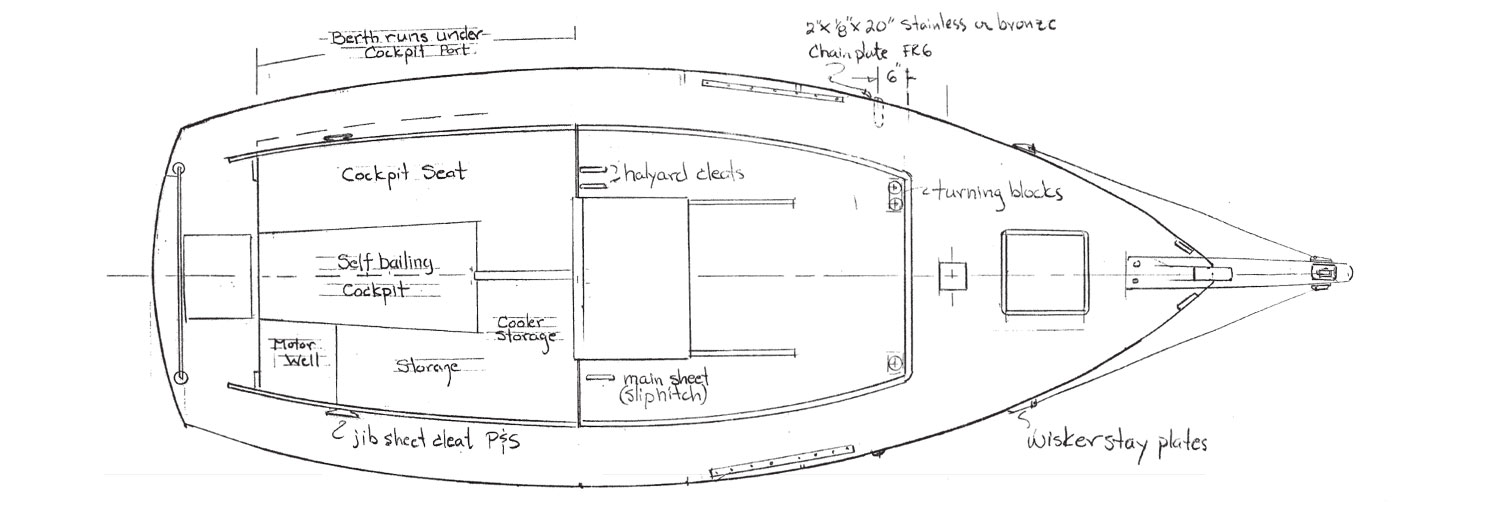
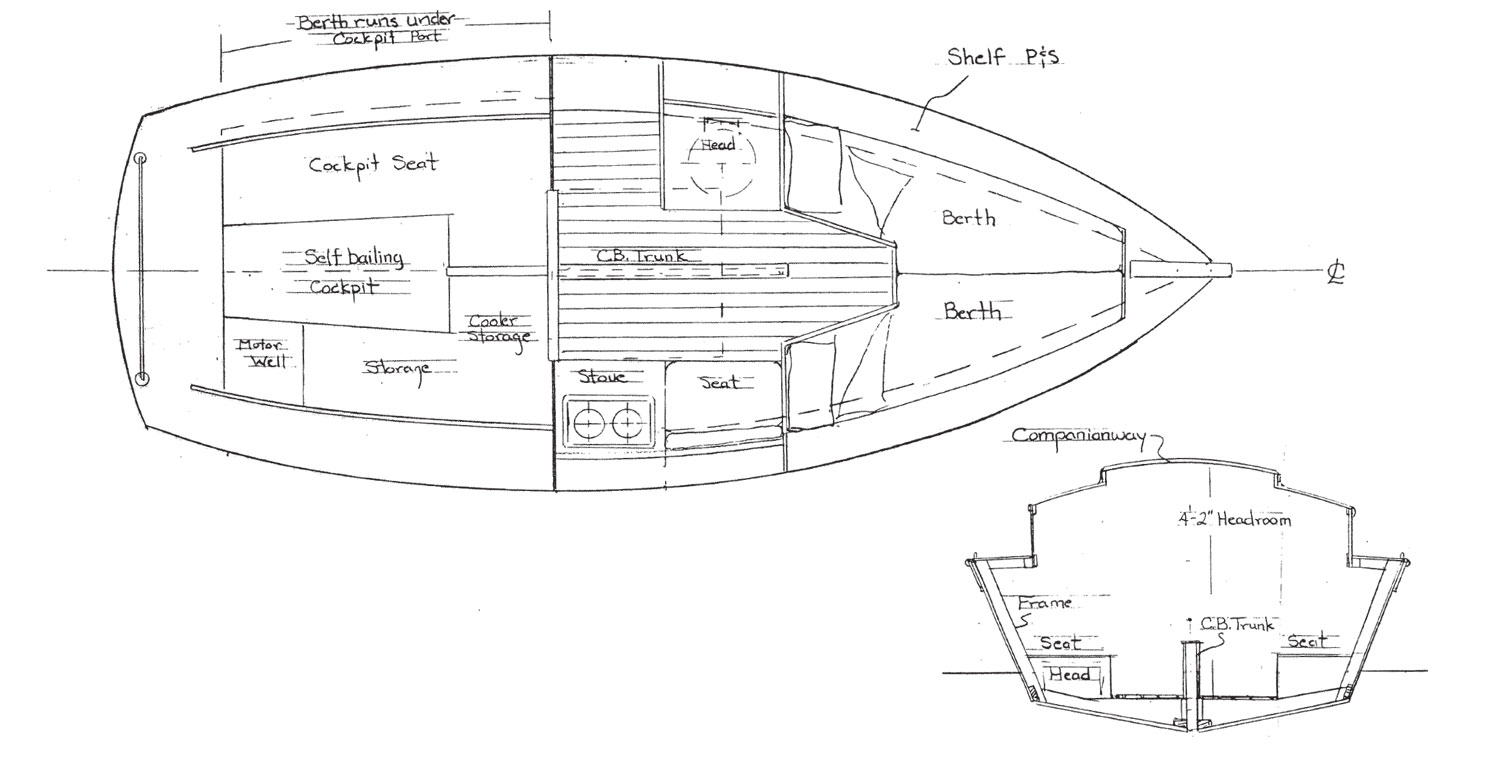
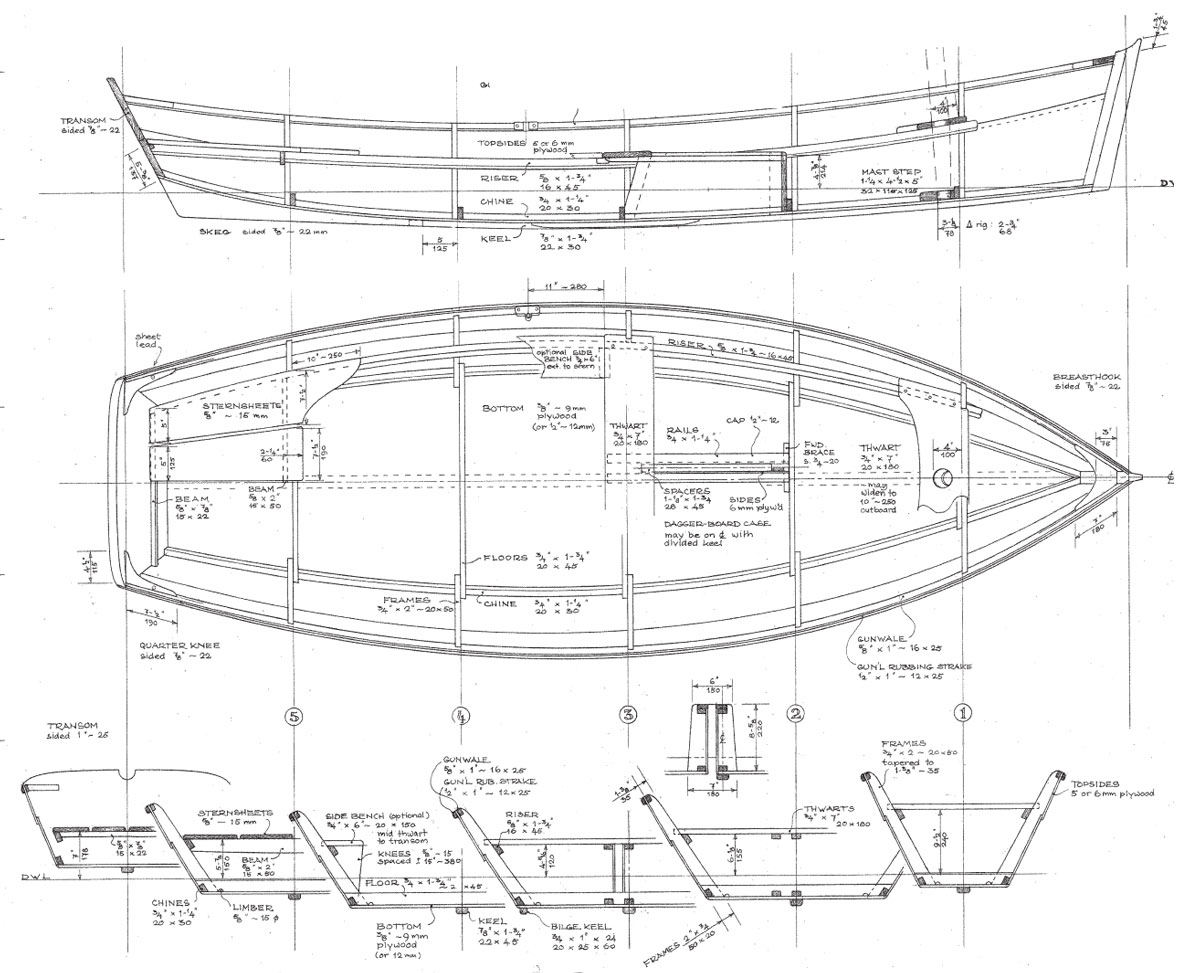
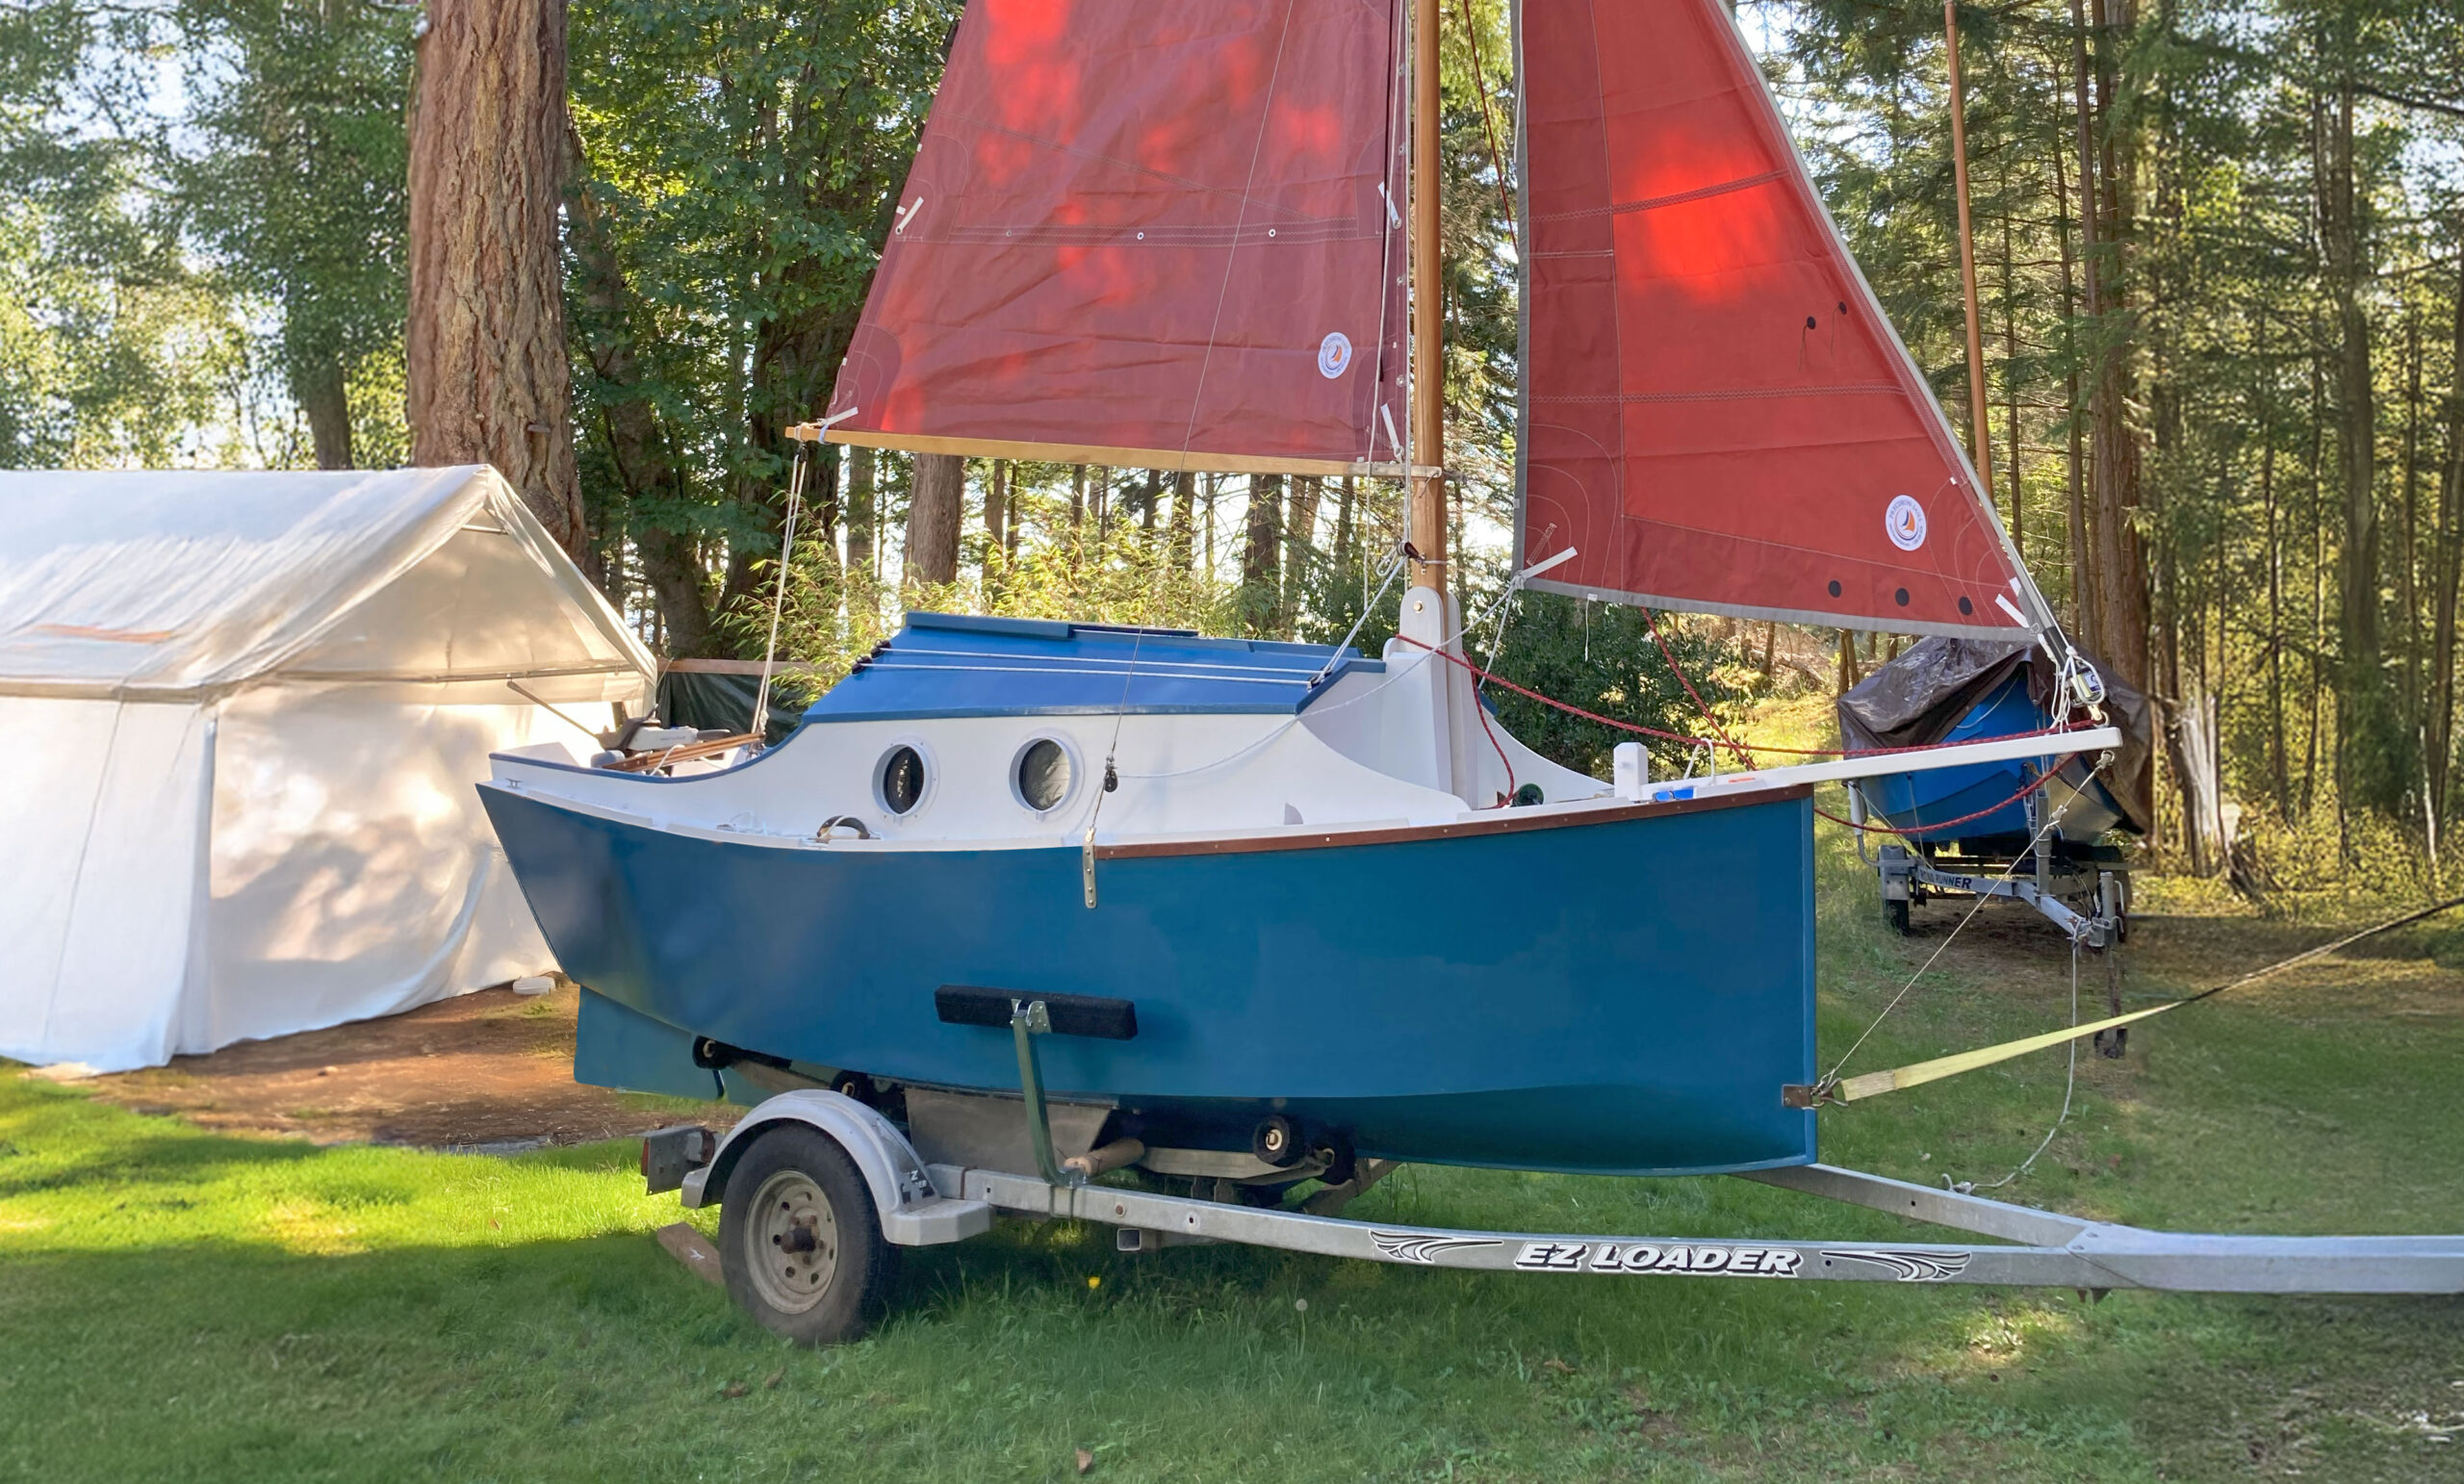
In some ways, Mist awakens old memories of the plywood sloops that filled the pages of Popular Whatever magazines in the years following World War II. Down below, the designer made no attempt to cram in coffin-like quarter berths or an enclosed head. (There is no such thing as privacy aboard a 20′ boat in any case.) Mist’s arrangement is simple and traditional, and it works fine. The relatively-wide cabin sole survives the intrusion of the long centerboard trunk (part of which hides under the bridge deck).
Mist offers good deck space and a self-bailing cockpit.
Mist’s cockpit offers comfortable lounging space, but this will be slightly degraded if you build the optional outboard motorwell. You might consider hanging a removable bracket to the transom or after deck. Better yet, investigate the mysteries of the yuloh (an efficient, curved sculling oar).
Transverse frames and plywood sheathing result in a stiff hull.
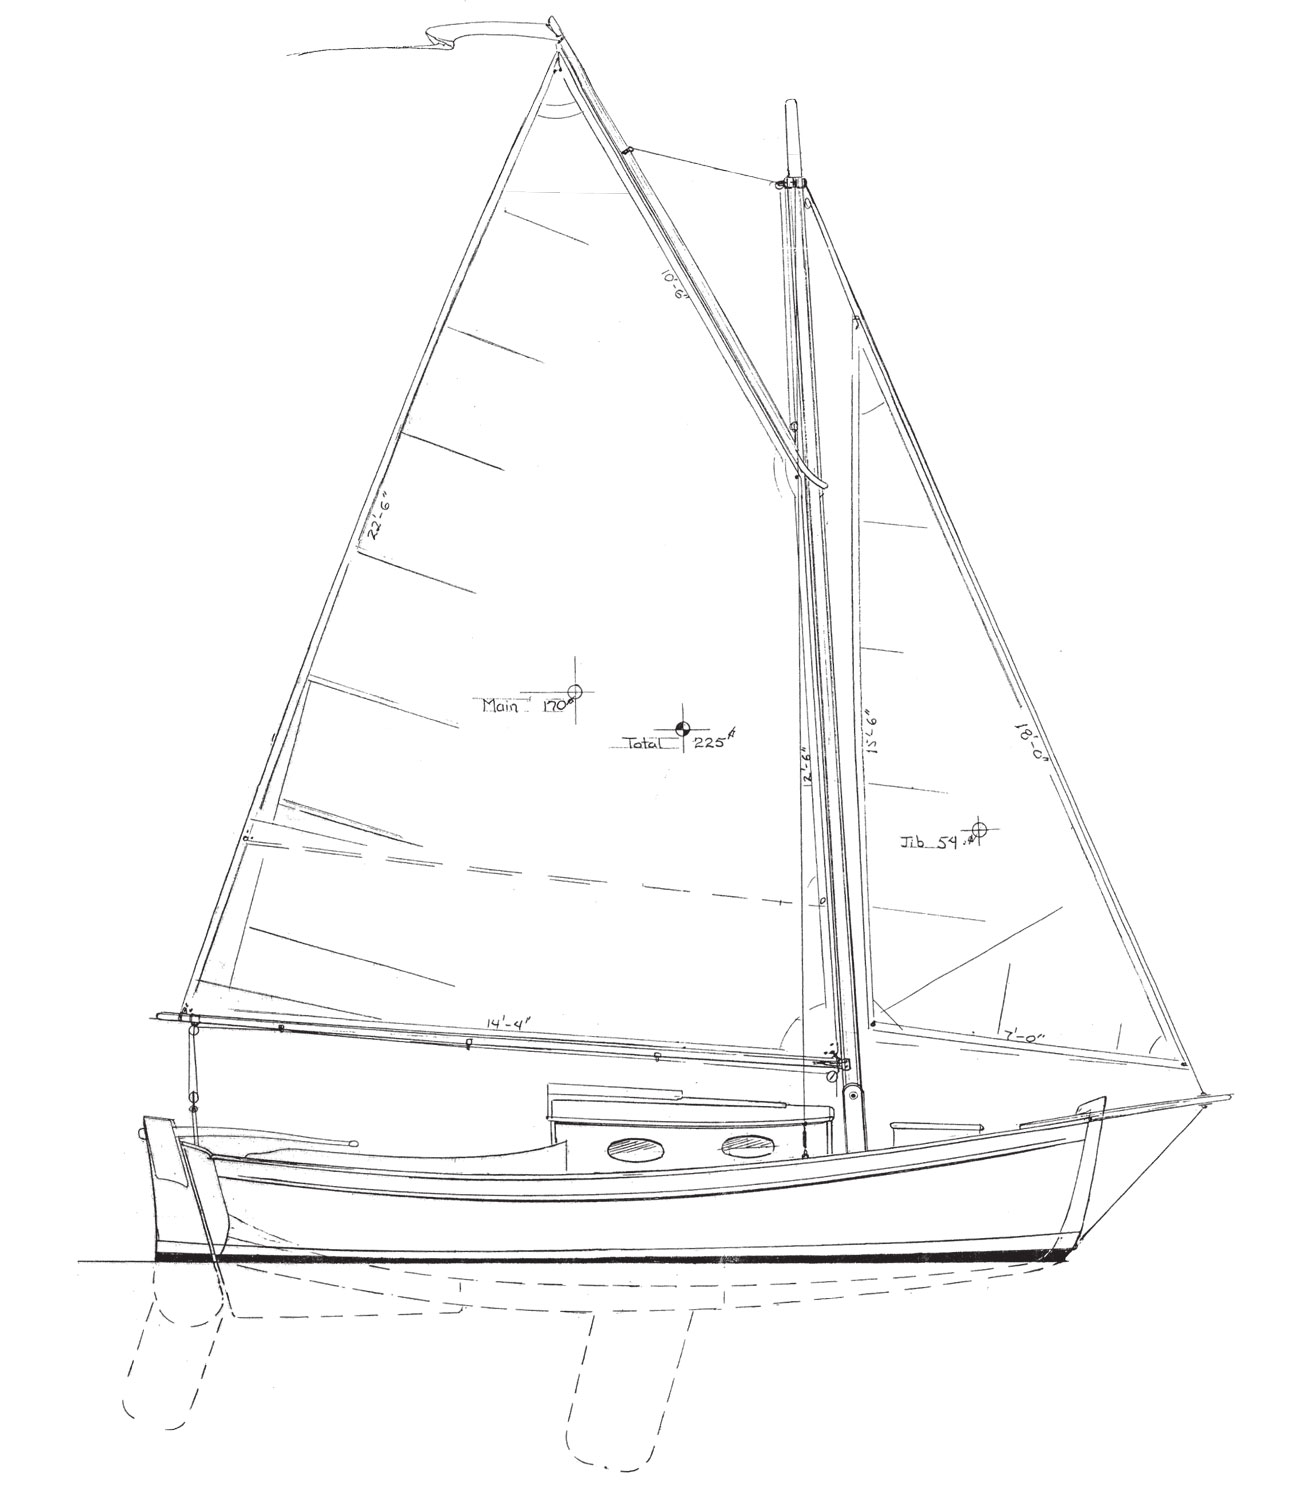
With her handsome style, and easily stepped mast (mounted in a tabernacle so that it can pivot up and clown for trailering or low bridges), Mist might be the ideal trailerable cruiser.
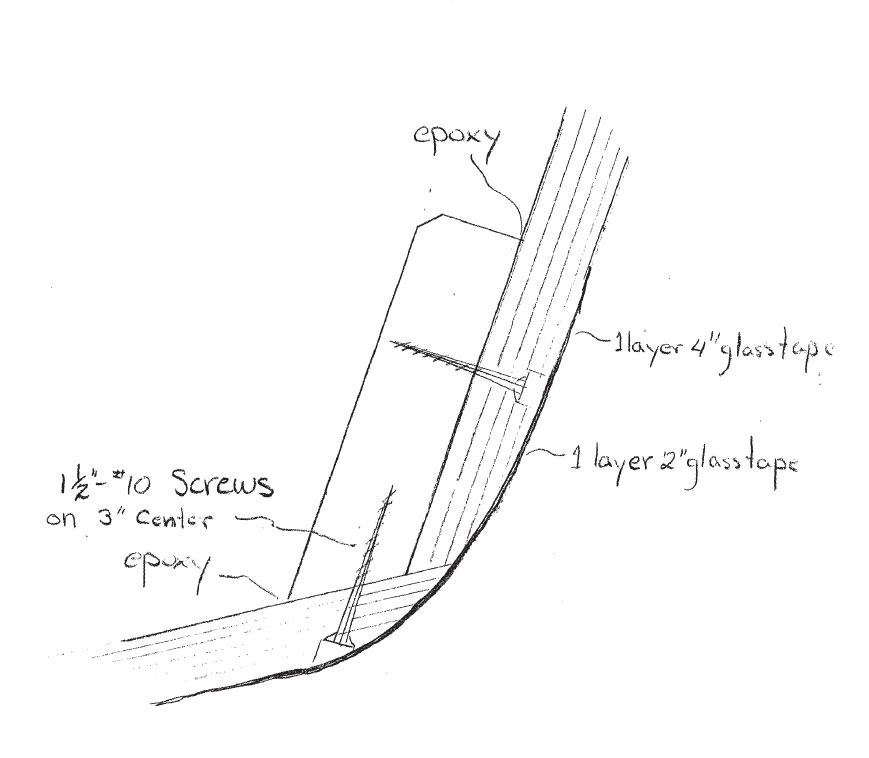
Rounded-over chines rely upon ’glass and epoxy to protect plywood edges.
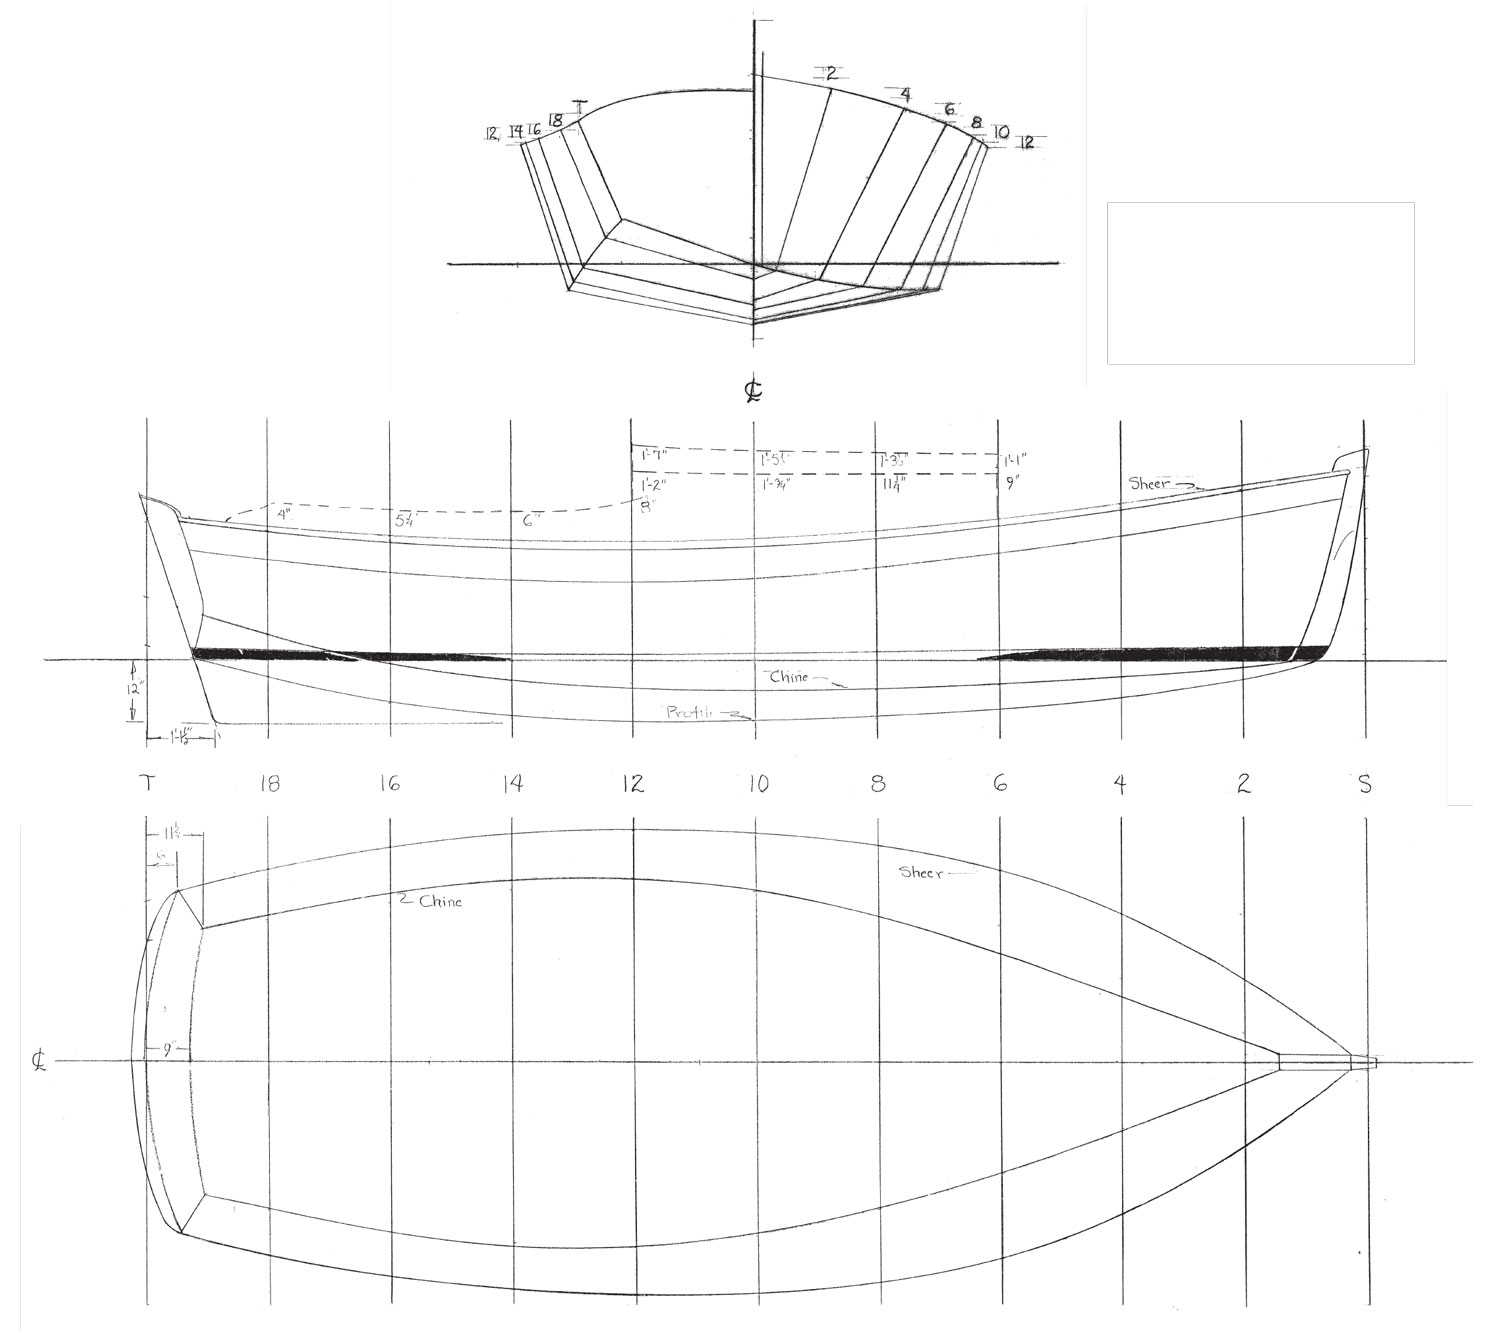
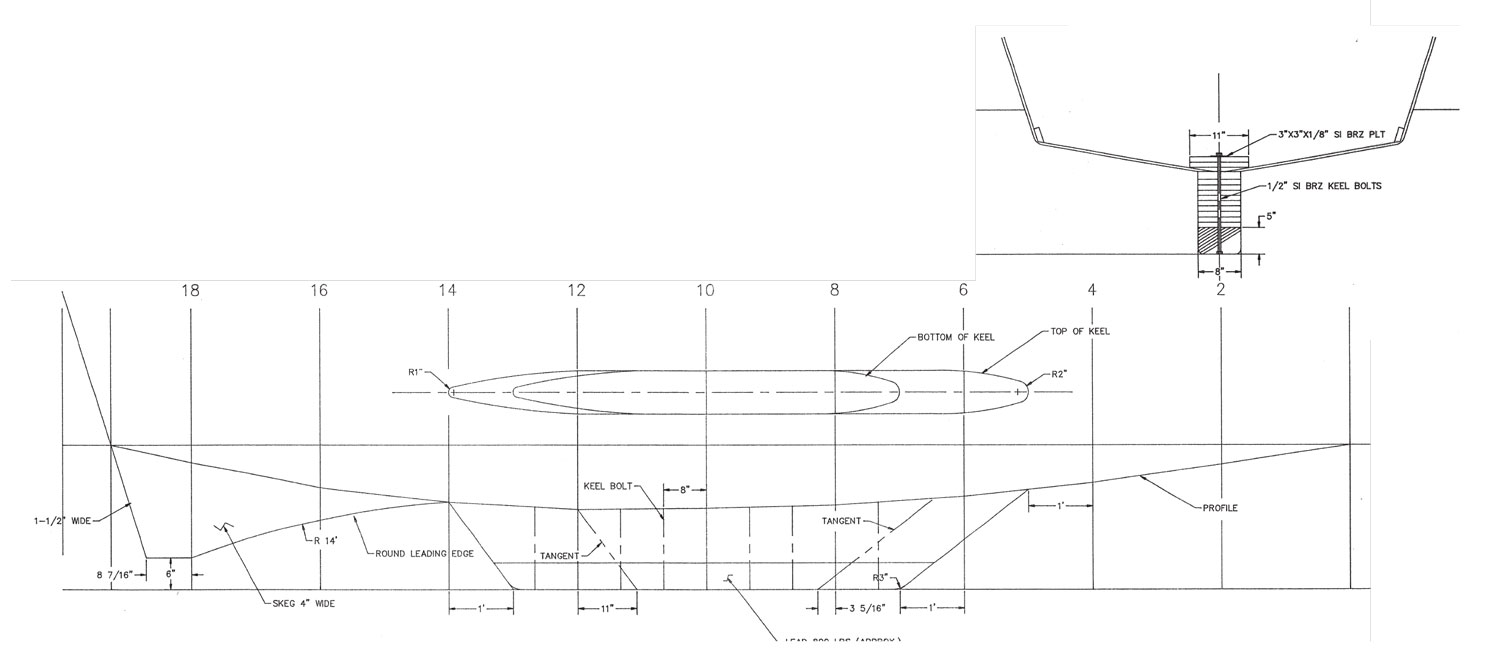
Plans for the 19′ 6″ Sloop Mist design contain six sheets: general information, lines and offsets, construction drawings, construction details, surfaces, and sail plans (gaff-rigged sloop and optional gunter-rigged sloop). WoodenBoat Plan No. 107, $90.00.
Snug accommodations survive the intrusion of a necessarily large centerboard trunk.
19′ 6″ Sloop Mist Design Details
DESCRIPTION
Hull type: V-bottomed, centerboard boat
Rig: Gaff- or gunter-rigged sloop
Construction: Plywood planking over sawn frames
Headroom/ cabin (between beams): About 4′ 2″
Featured in WoodenBoat No. 107
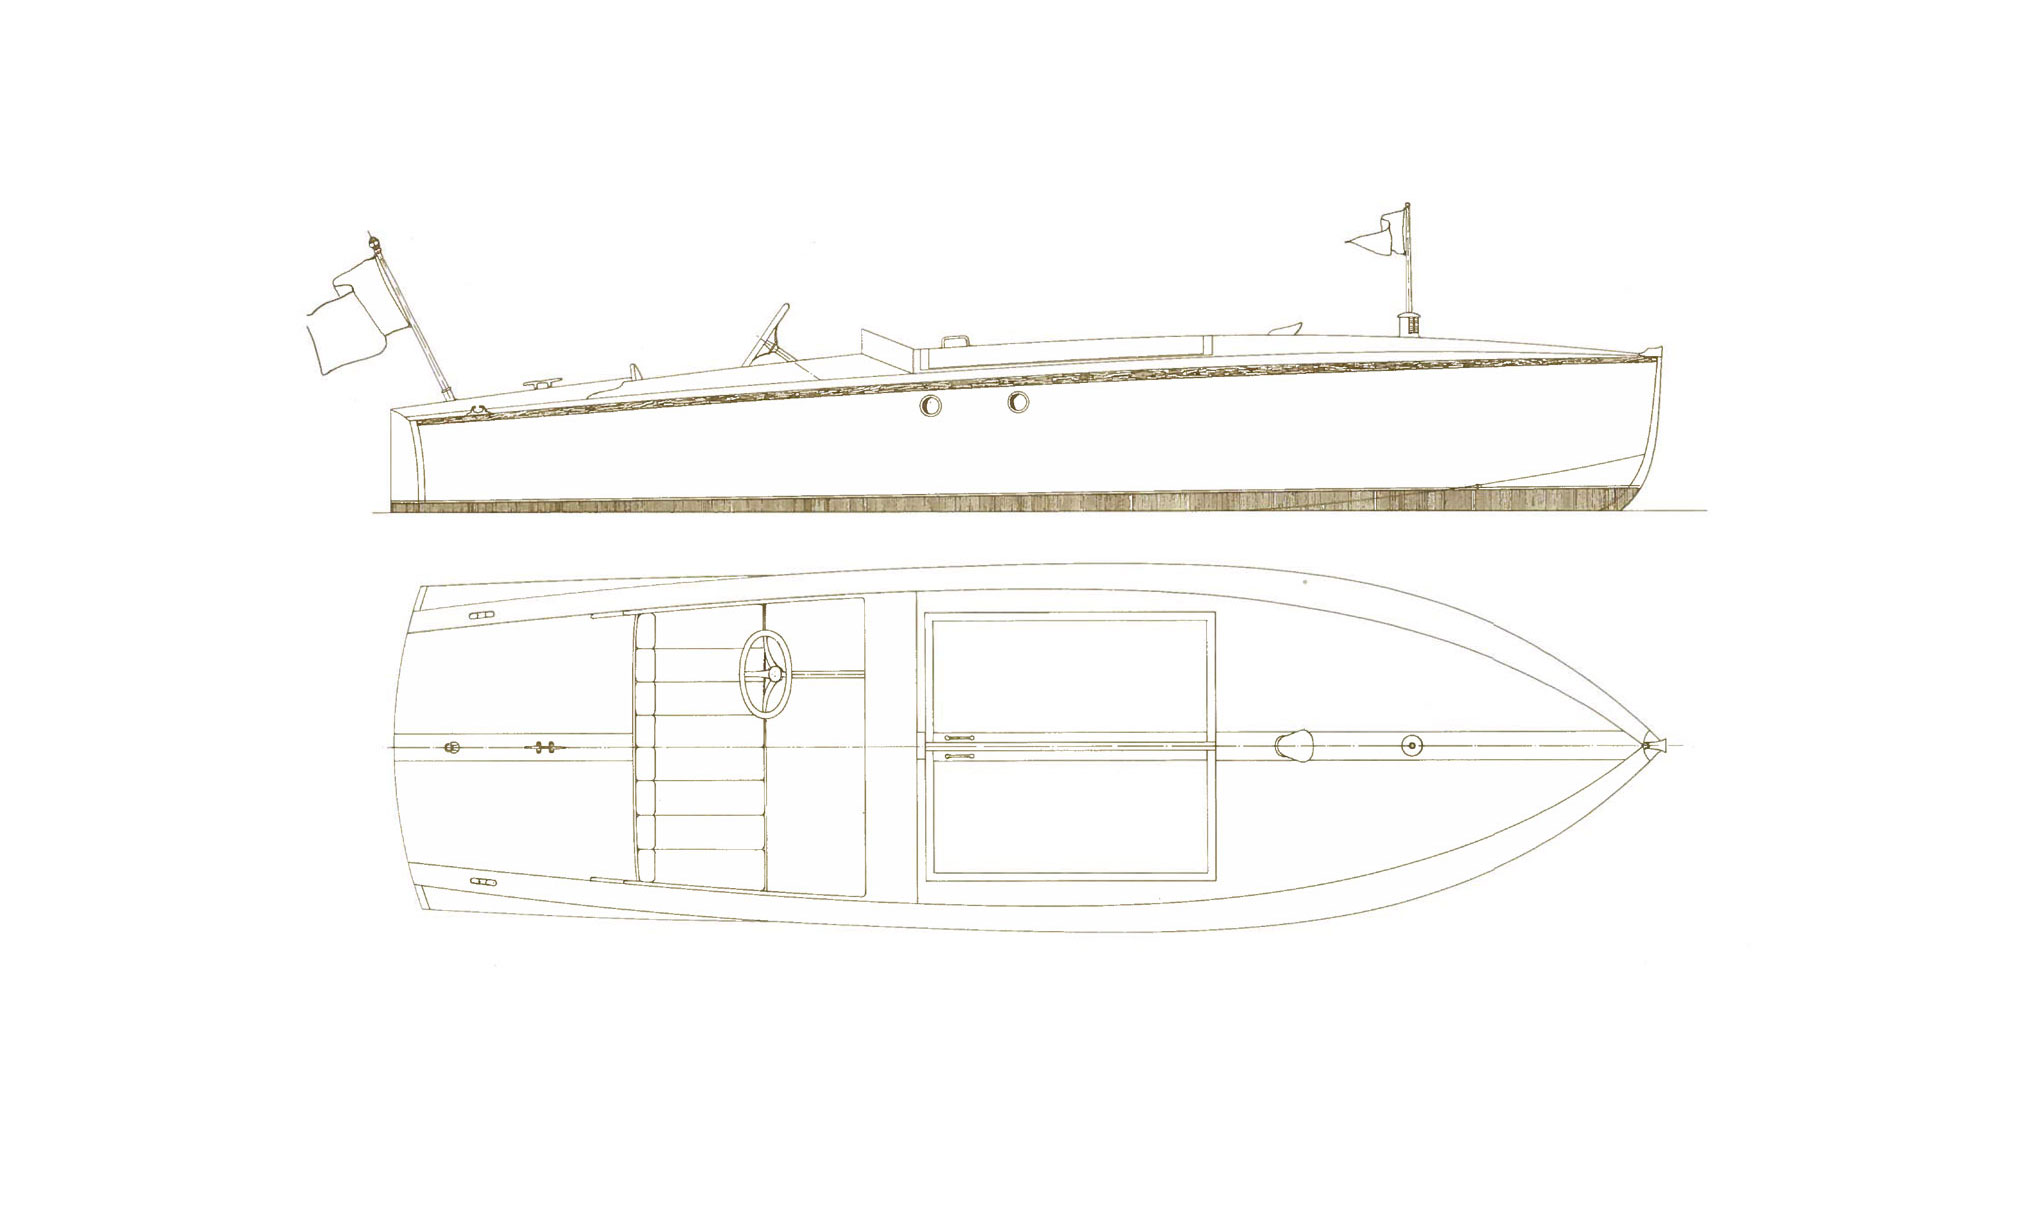
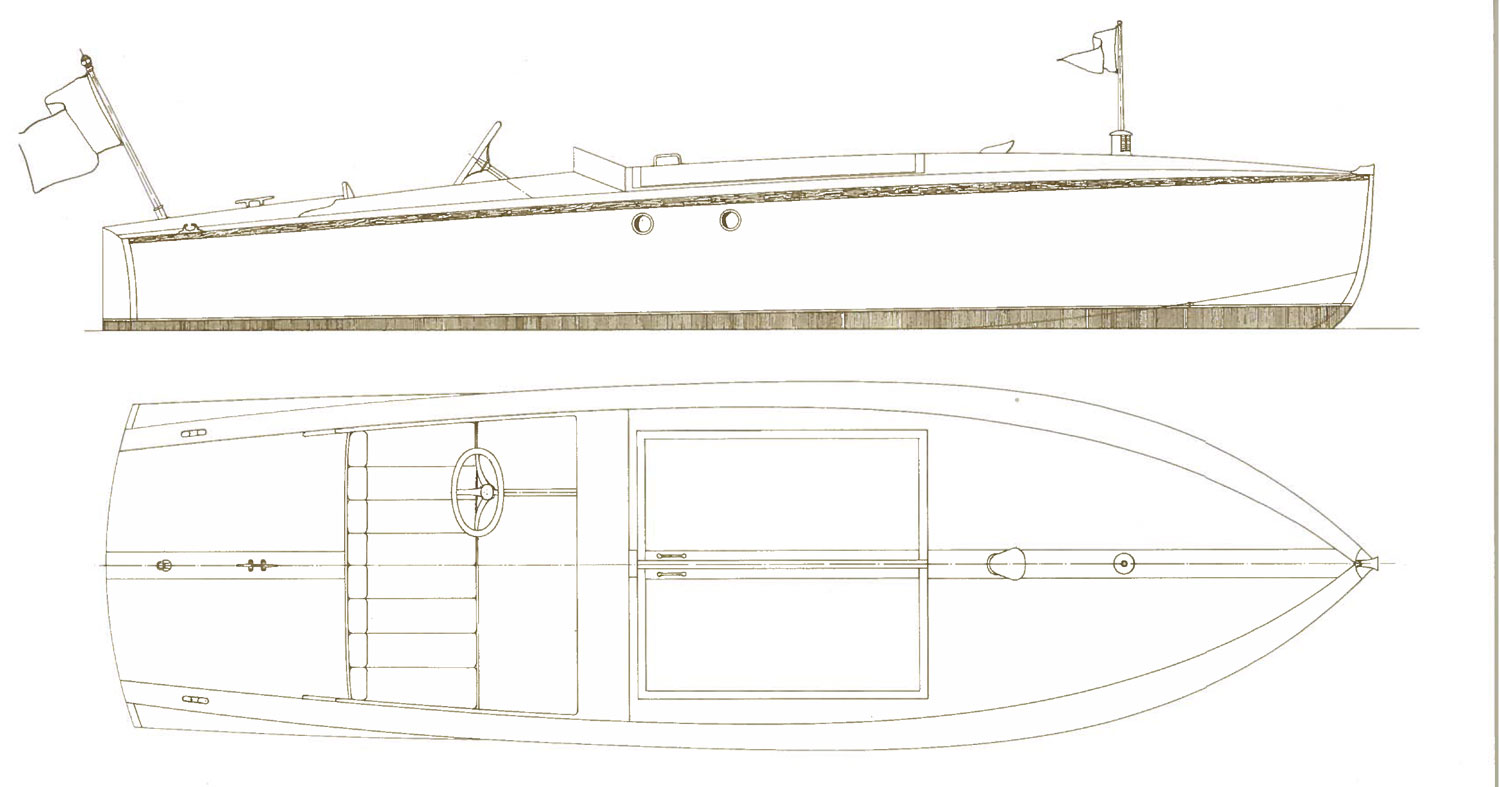
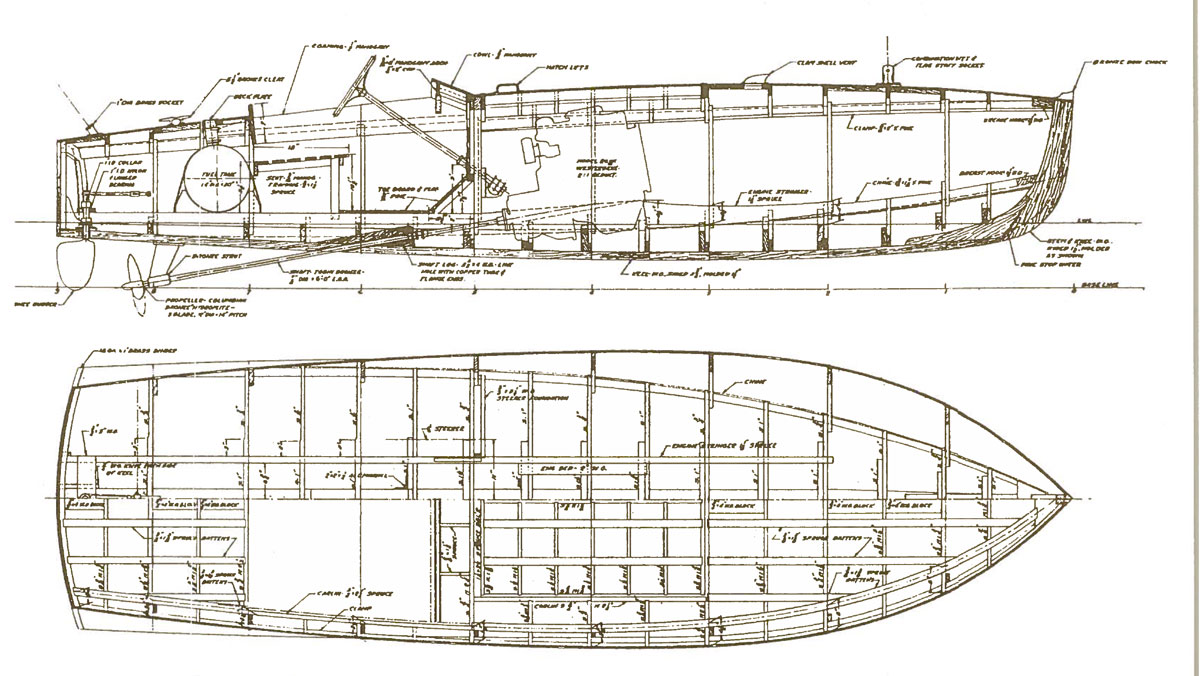
IInboard-powered mahogany runabouts on the water again, and on the increase, after near-extinction in a fiberglass marketplace. Even so, given the new wave of restorations and reproductions, this 16-footer by Zimmer and Hacker remains unique.
The Gentleman’s Runabout is a low-power, moderate-speed inboard runabout for protected waters.
John Hacker was one of this country’s great names in the design and development of pleasure and racing powerboats. Nelson Zimmer, who was informally associated with Hacker after World War II, has to date designed three other small craft for WoodenBoat’s catalog of plans.
The runabout presented here is according to Zimmer, “based on the creative genius of the late John L. Hacker.” She is not an easy boat to build; but then, no runabout worthy of the name ever was, which is why these boats continue to spark interest and hold value.
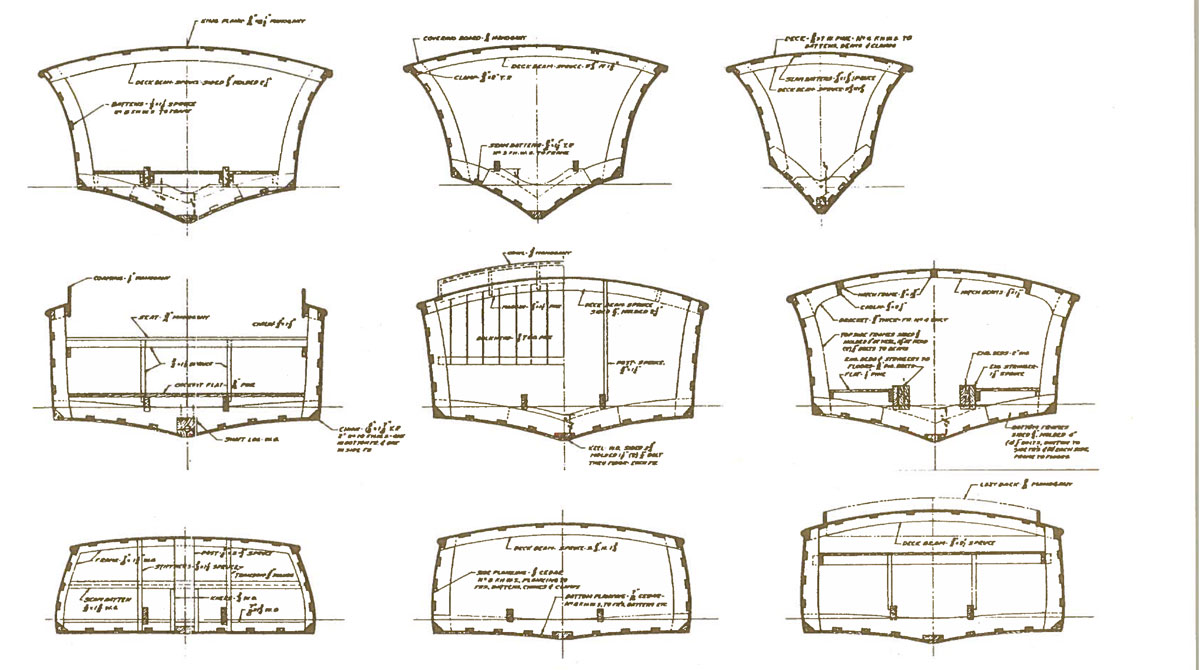
The Gent’s Runabout is designed for sawn frames and batten-seam planking.
Her construction is conventional for a craft of this type: batten-seam mahogany planking over sawn frames. This is a method that holds up well over time and keeps a dry-sailed boat dry in the water, without the need to wait for swelling to close up her seams.
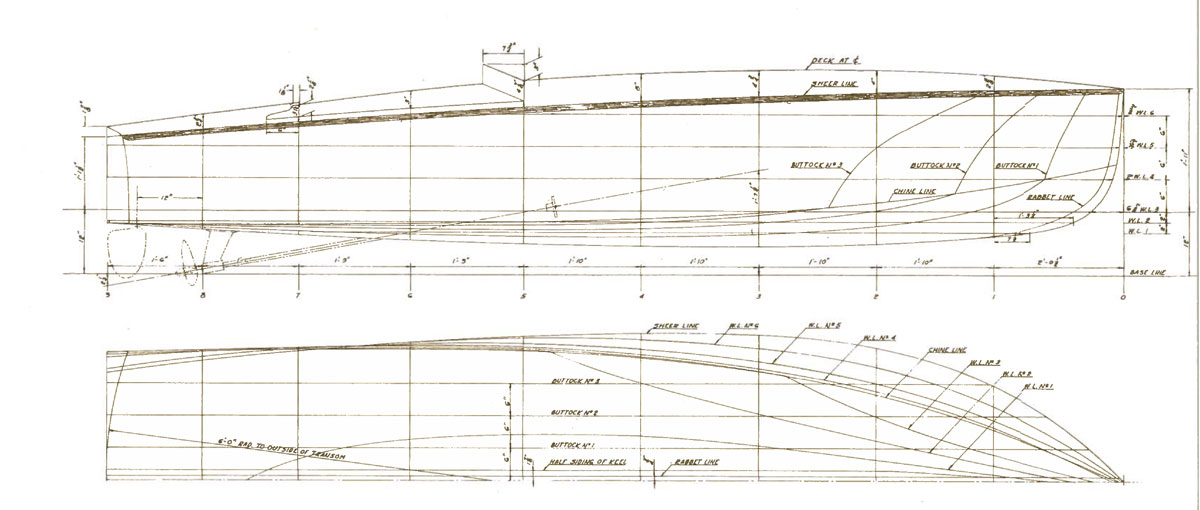
The Gentleman’s lines: considerable shape for a hard-chined hull.
This is a runabout by an earlier, more elegant, definition of the term: a pleasure boat for gentle men and women. The Zimmer-Hacker craft can take two people out not just for a spin, but for an experience. Powerboating may have become faster than this, but not better. She can do 30 mph max; thus, she is more like a two-seat country roadster of the period than a pounding offshore racer of the present. Strict limitations have been placed on the power plant so that the hull strength will not be exceeded.
Nelson Zimmer draws details with care.
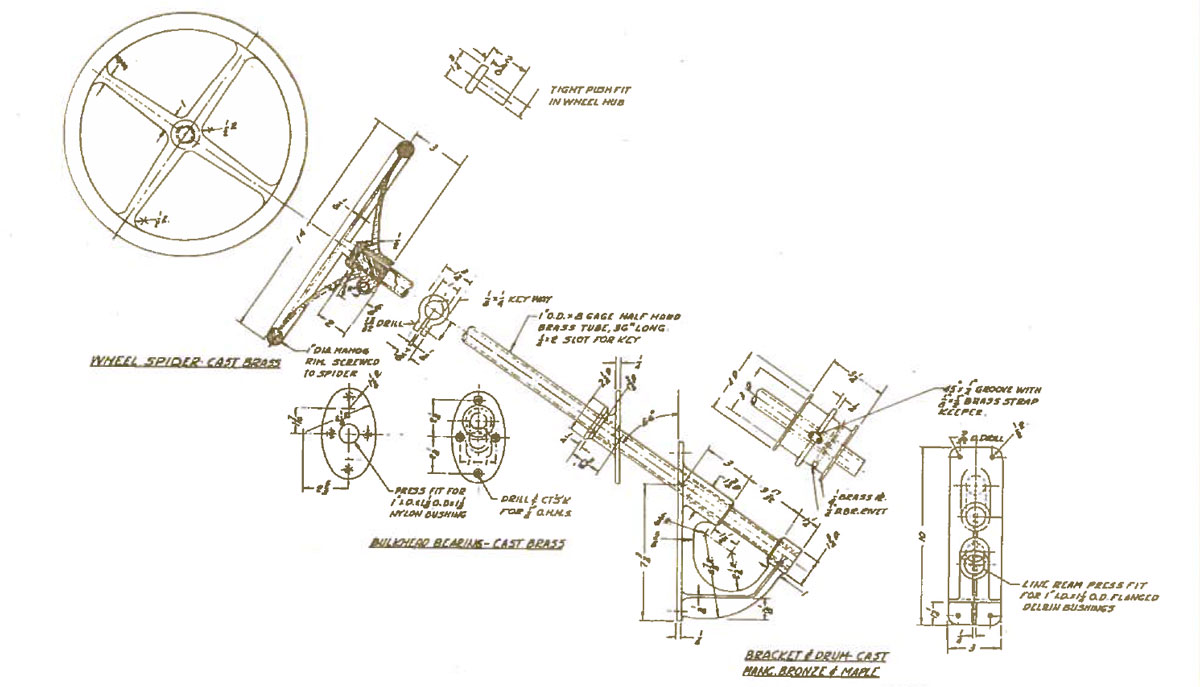
Nelson Zimmer is noted for his attention to detail; in that regard, this homage to Hacker is Zimmer at his best. For example, as a clear aid to construction, he has drawn sections of each of the building-frame stations; and in the interest of authenticity, he has provided measured drawings for the boat’s custom hardware and fittings.
Here, then, is a little beauty deserving of the phrase “for the discerning yachtsman.” And, we might add, “for the discriminating craftsman.”
Please note: the Westerbeke 26G engine specified in the plans is no longer manufactured. Alternatives are to select a similar size from a salvage yard, or with a light-weight Yanmar diesel. You might even try biodiesel for fuel, to save your olfactories.
Five sheets of plans for the Gentleman’s Runabout design include profile and deck arrangement, lines and offsets, construction plan, construction sections, and assorted fittings. WoodenBoat Plan No. 76. $120.00.
Batten-seam construction: strong, tight, and labor-intensive.
Nelson Zimmer designed his Utility Launch to shuttle people between towns and fishing camps in Canada’s North Woods. Like the Gentleman’s Runabout, the Utility Launch might not reach the speeds of modern powerboats. But Zimmer designed her with “an able hull, one which could cope with the chop from a fresh breeze or glide silently through the water to avoid disturbing the fishing grounds.”
One of the unceasing pleasures of working at Small Boats is meeting people who design, build, use, or simply love small boats. Through any given year I meet them individually in myriad places: at launching ramps, on the water, in boatyards, at gas stops on the highway, even in grocery stores far from lake, stream, or ocean. And then, from time to time, I meet many of them en masse, in one place. This past weekend was one of those latter occasions. For three days I crisscrossed Mystic Seaport Museum’s grounds and docks enjoying the company of boating enthusiasts—both amateur and professional—and soaking up the atmosphere of the 2025 WoodenBoat Show.
Photographs by the author
Ben Fuller’s boating kit: paddles, hat, PFD, and unseen but nestling within the traditional basket, a high-tech Maptattoo marine GPS
Rose Woodyard and Alan Mann of Newfound Woodworks brought a selection of their strip-planked canoes to the show and, for the sixth year in a row, won Best in Show in the Professionally Built Manually Powered Boat category.
On the water there were extraordinary yachts whose pristine varnish and high-gloss topsides gleamed in the Connecticut sun, while between them meandered the modest, unsung prams and dories, tenders and skiffs.
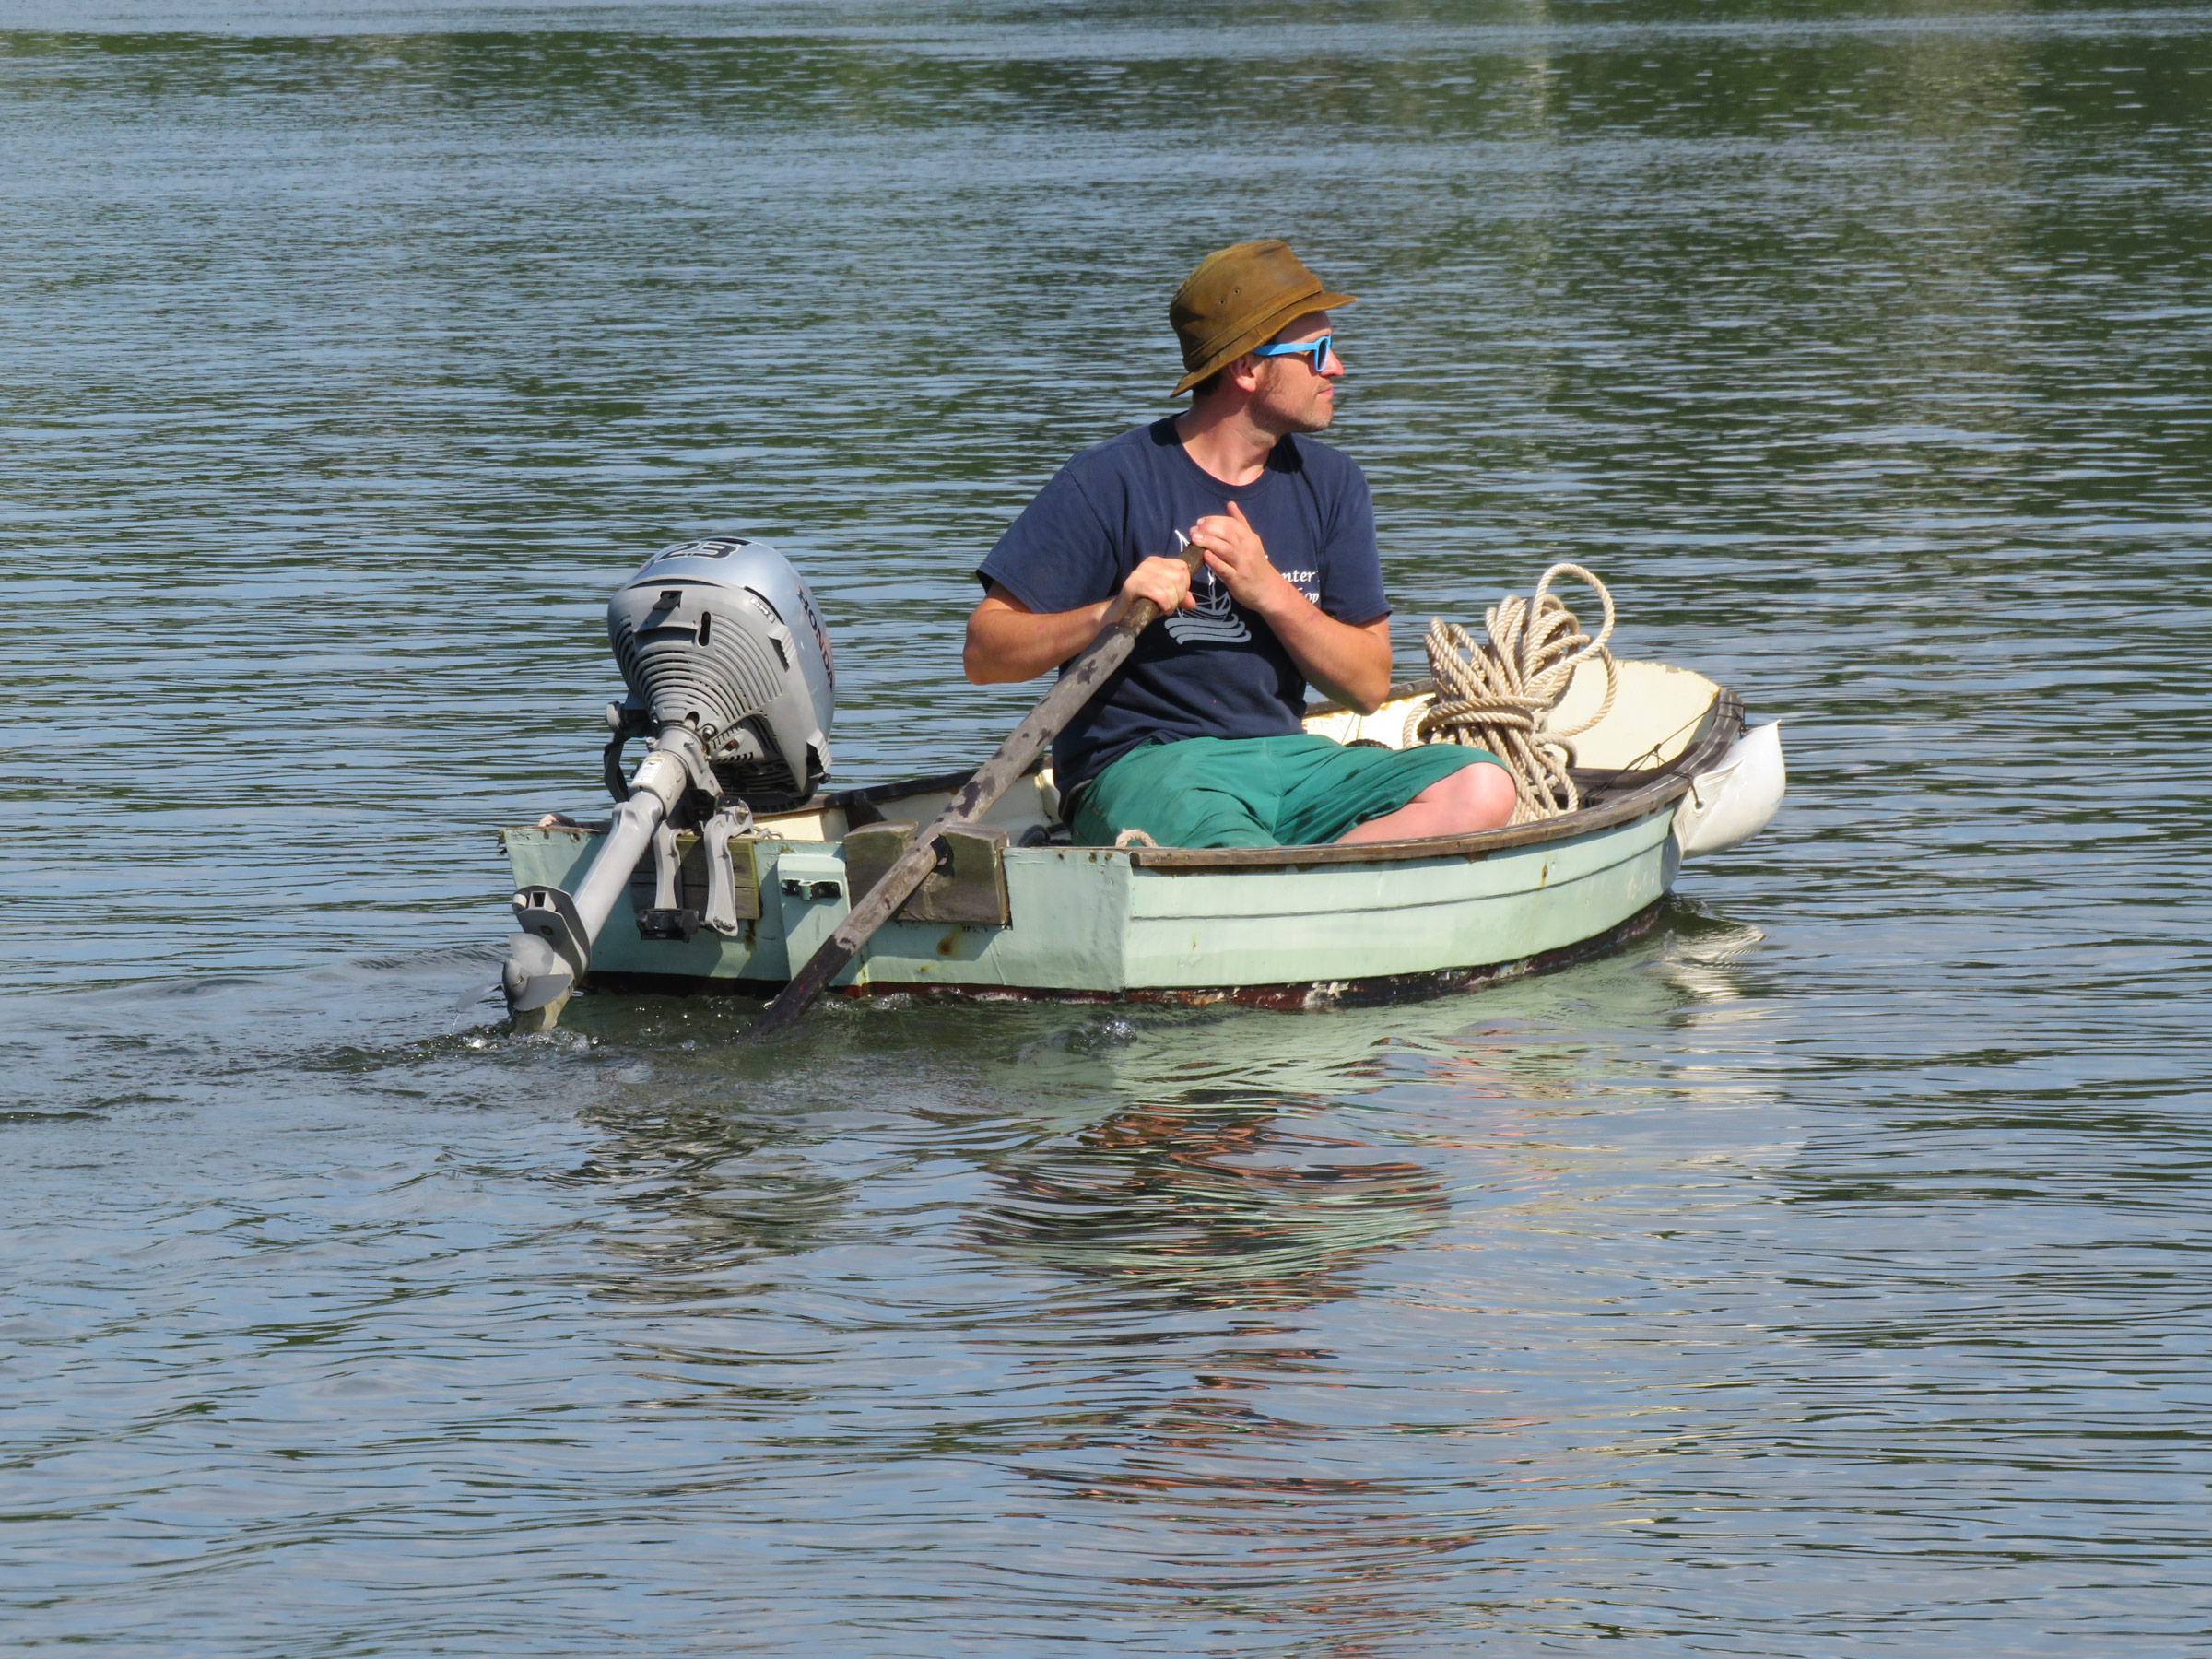
No matter what boat you come to the show in, sometimes the best way to get around is in a humble working skiff with a sculling oar.
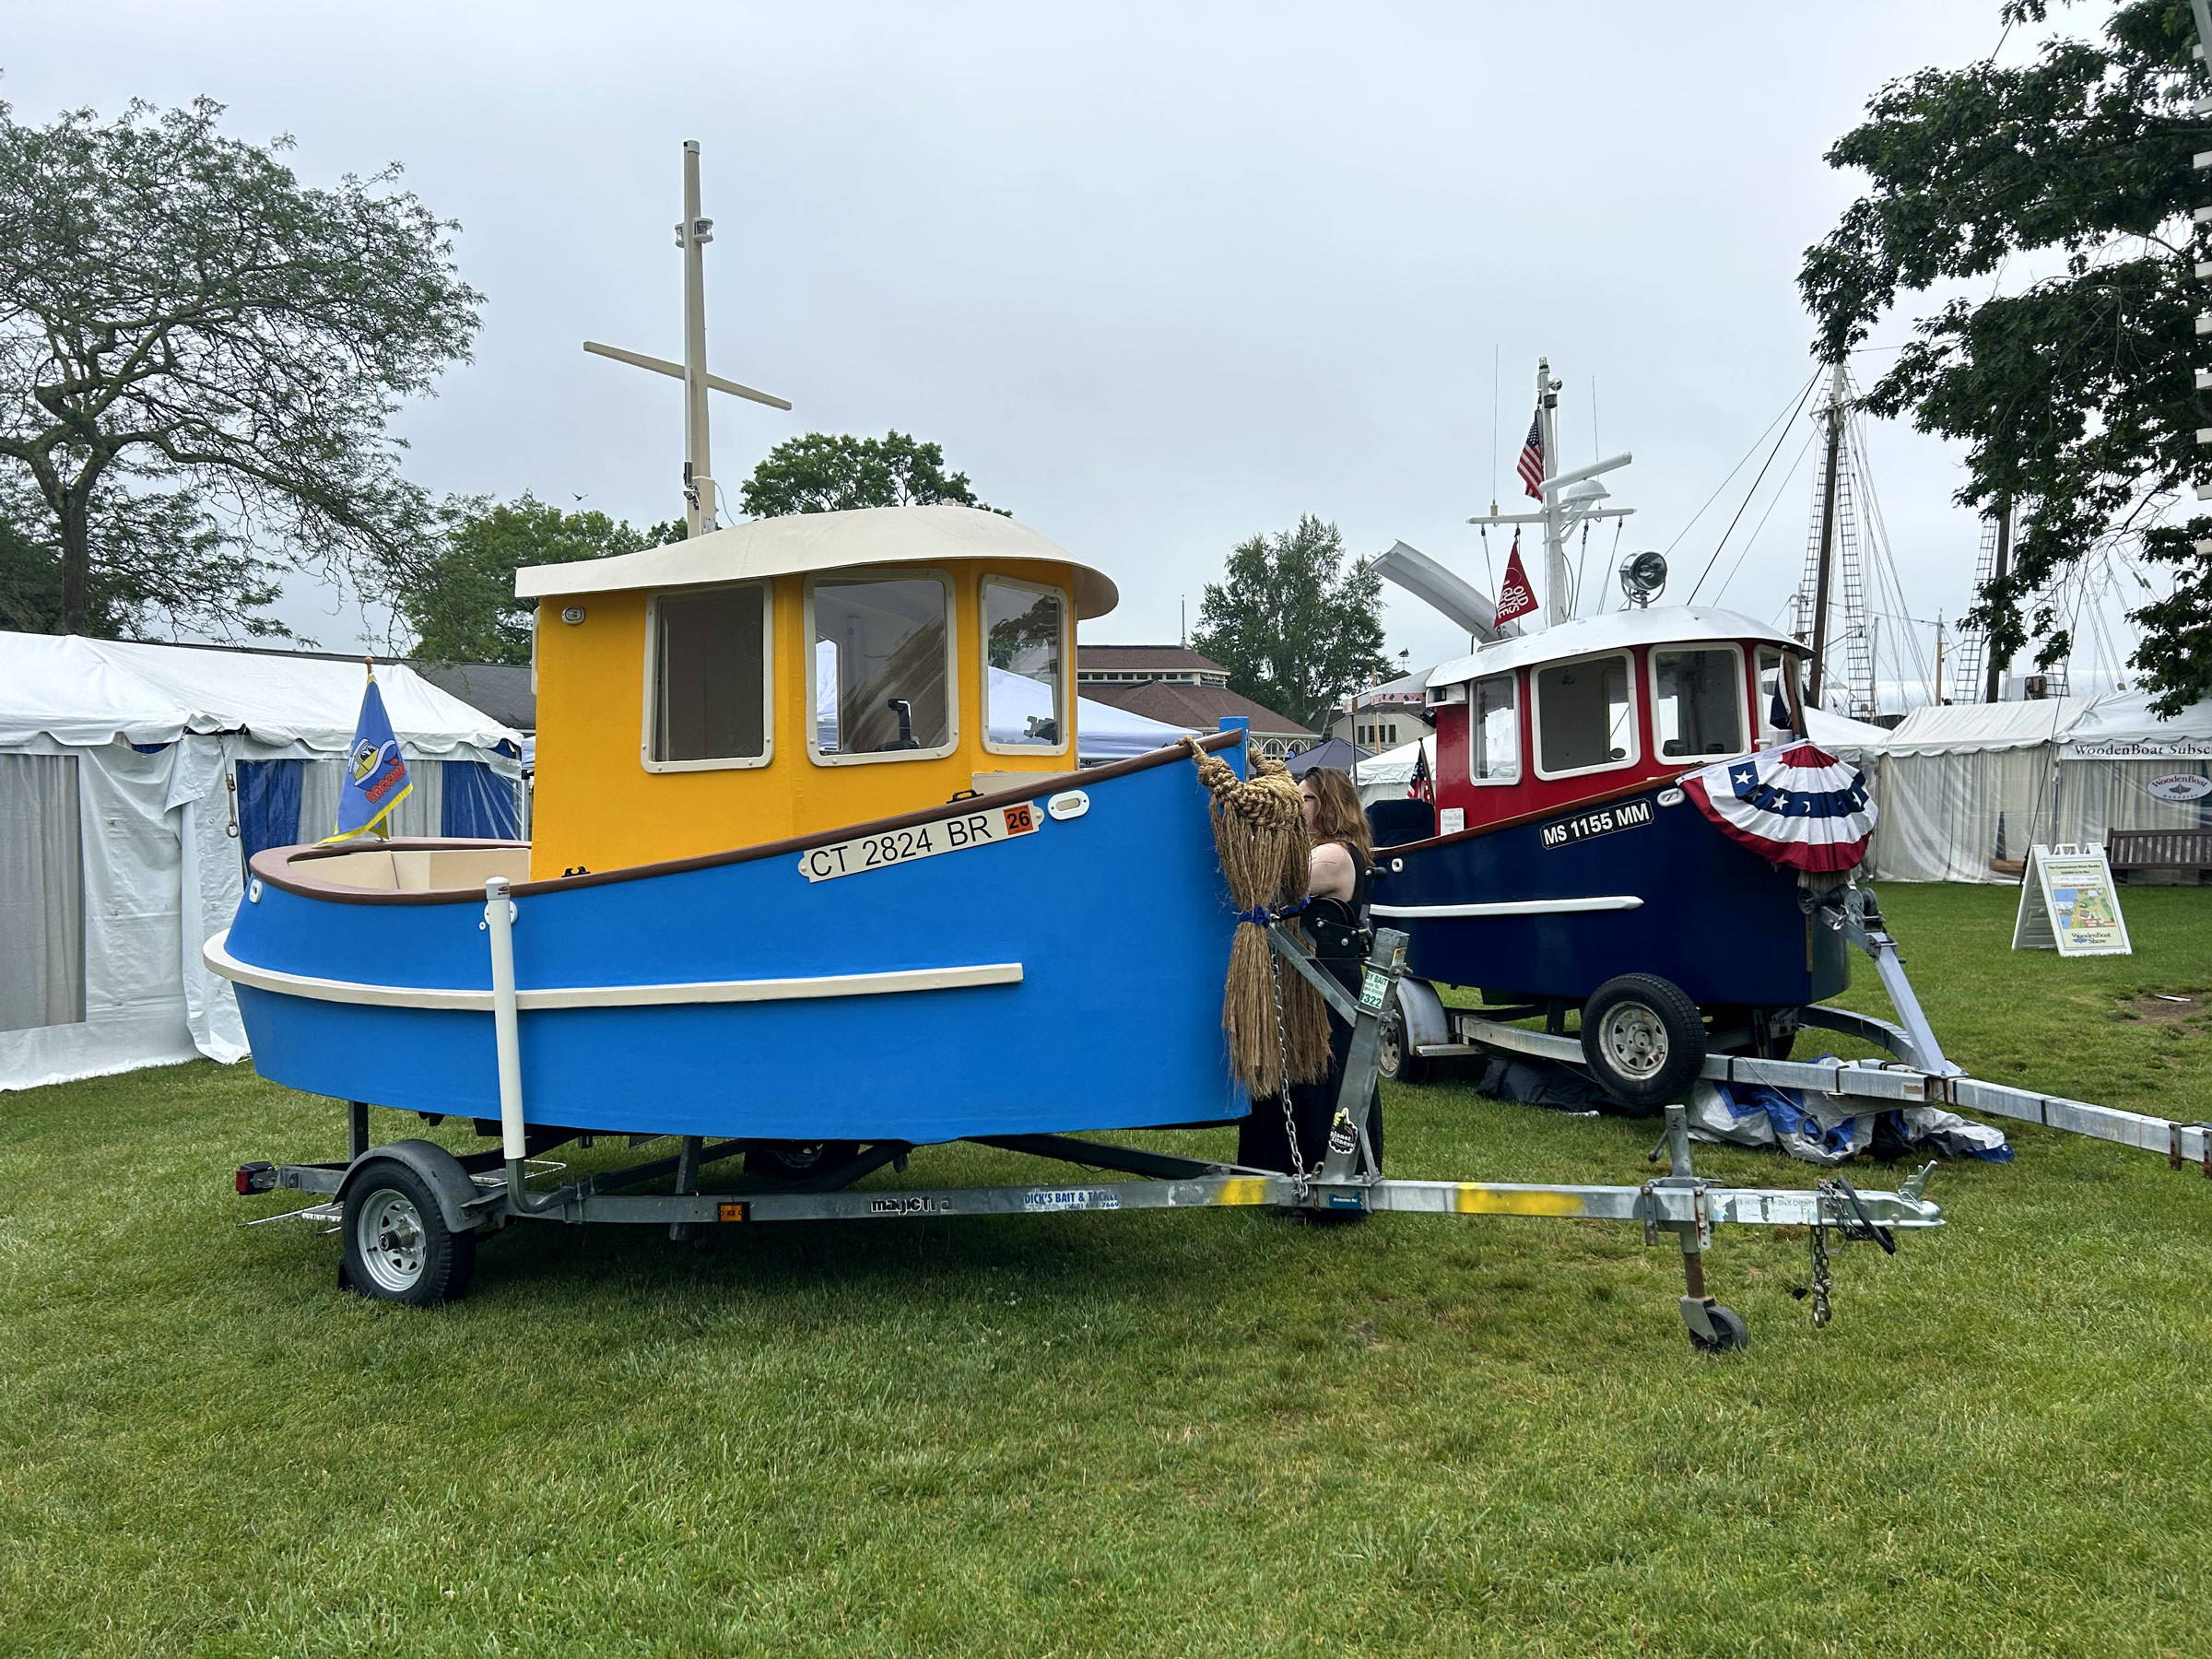
AWOOGA, a Candu-EZ mini-tugboat with a light-blue hull was built by Adam Riso of Clinton, Connecticut. He was inspired in 2020 when he saw TOOT-TOOT at the show. Back at Mystic again, TOOT-TOOT, with the dark-blue hull, was built by Mike Magnant of Middleboro, Massachusetts.
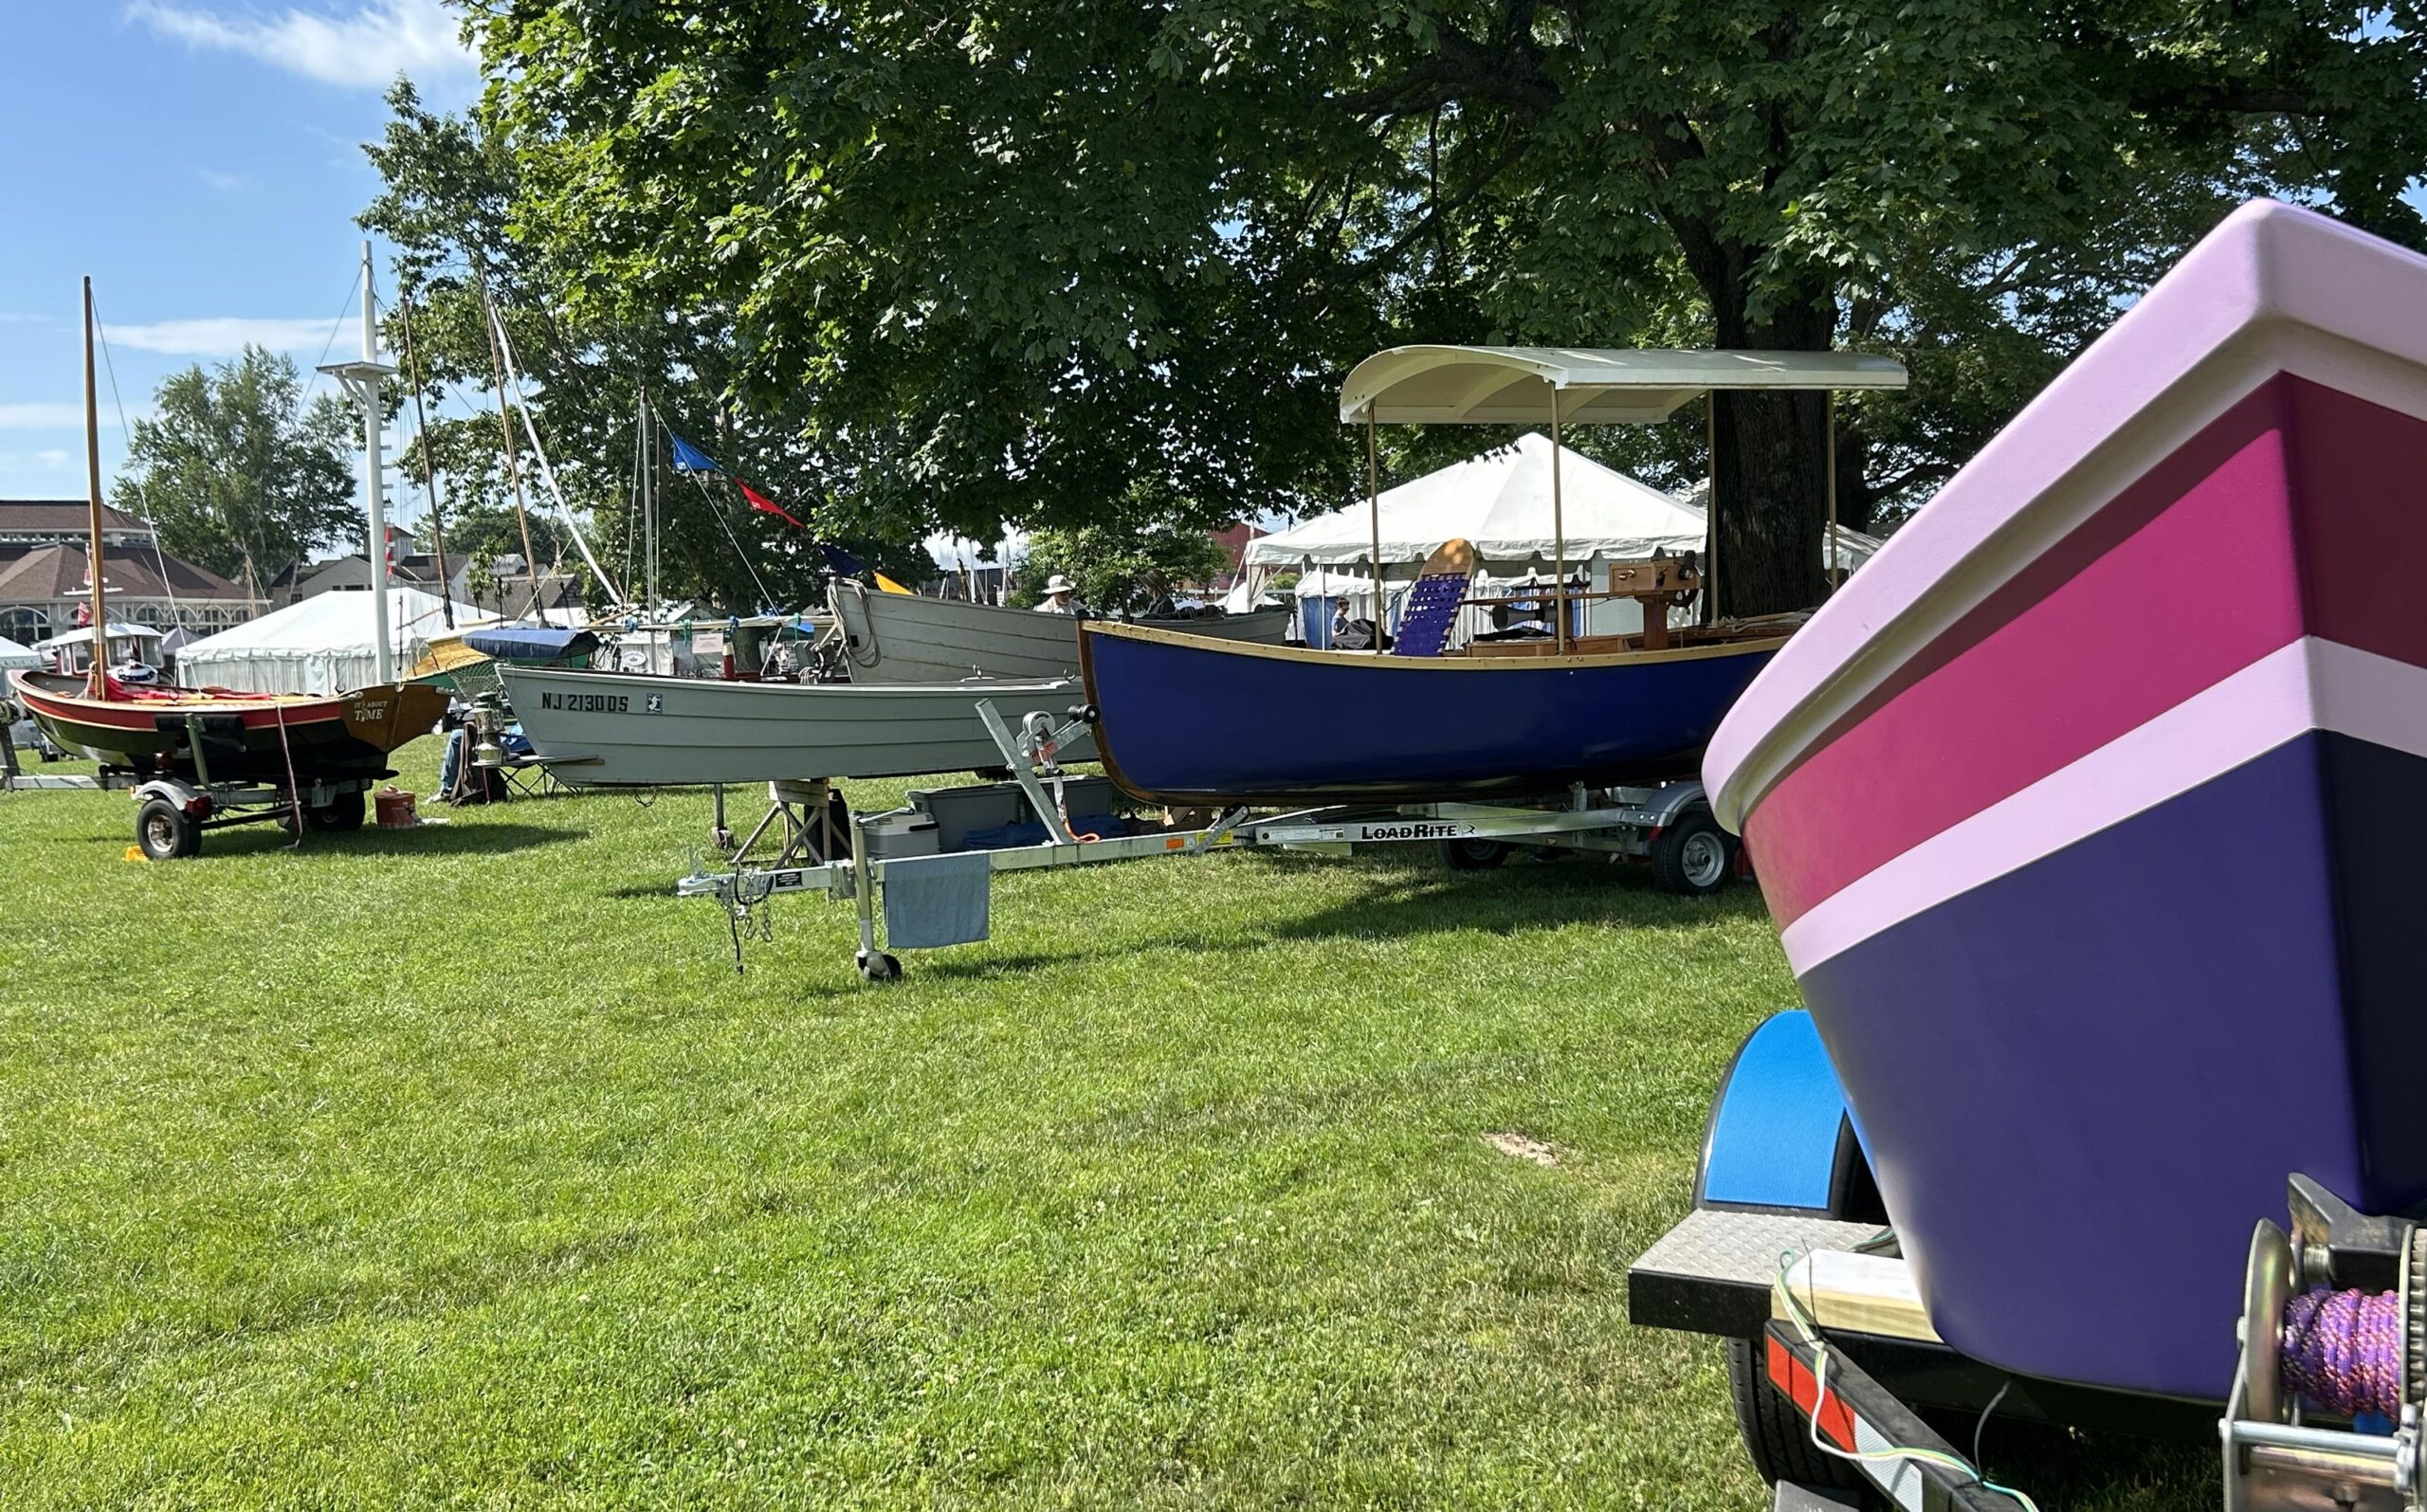
On land, massive restoration projects in the Henry B. DuPont Preservation Shipyard contrasted with the exquisite craftsmanship of intricate strip-planked canoes and fine-lined daysailers. And spread out across the Village Green in the midst of it all were the amateur boatbuilders who came together to display their work in the “I Built/Restored it Myself” area. Among them, two 14′ mini tugboats sat not far from two 6′ 4″ Cape Cod Frosty sailing dinghies, which stood across from a modified Selway Fisher 14′ 6″ fantail electric launch, a Shellback Dinghy, a 14′ whitewater dory designed to run through the Grand Canyon, and a restored lateen-rigged Sailin’ Surfboard built in 1960 from plans published in the July 1958 issue of Boys’ Life magazine.
Jay Beauchemin built HEY JUDE from Richard Kolin’s 12′ Heidi design. He stretched the length to 14′ but kept the beam to the original 3′ 10 3⁄4″.
One of the Seaport’s Beetle Cats makes its way back to the boathouse. Beyond her, at the dock with her spritsail raised, is SANDY FORD, a 13′ 3″ × 5′ 11″ Woods Hole spritsail catboat.
And then there were the people: friends meeting friends; curious visitors chatting with knowledgeable exhibitors; delighted children sharing amazements with equally delighted parents. Newcomers savored words of wisdom from old hands: Roger Barnes—famed small-boat cruising sailor and author—shared small-boat cruising tips and anecdotes with a dinghy sailor yet to adventure out for an overnight onboard. Ben Fuller—frequent Small Boats contributor and one-time director of the traditional boat program at Mystic—discussed how to effectively reef a spritsail with Jay Beauchemin who finished the build of HEY JUDE in time for the show but not in time to go sailing. And Joe, a museum volunteer of many years, patiently and calmly directed from the dock as a new sailor at the helm of one of the museum’s Beetle Cats attempted to come alongside under sail—too fast, too slow, just right.
Justine and John Diamond built LARK, a 15′ strip-planked canoe designed by Bear Mountain Boats, from plans they bought in 2022. Newcomers to boatbuilding, they built her in reverse, starting with the paddles, then the seats, the gunwales, the inlay-design strips, and finally the hull. Added to their lack of boatbuilding experience, John had only ever once been in a canoe and had no idea if he’d even enjoy it once launched. “We built it on a lark,” says Justine.
During the WoodenBoat Show weekend, the Village Green at Mystic Seaport Museum is home to the “I Built/Restored it Myself” display.
To all who visited, I hope you had as much fun as I did; to everyone I failed to connect with, my apologies; to anyone unable to go this year but thinking of it for next…do it, you won’t regret it.
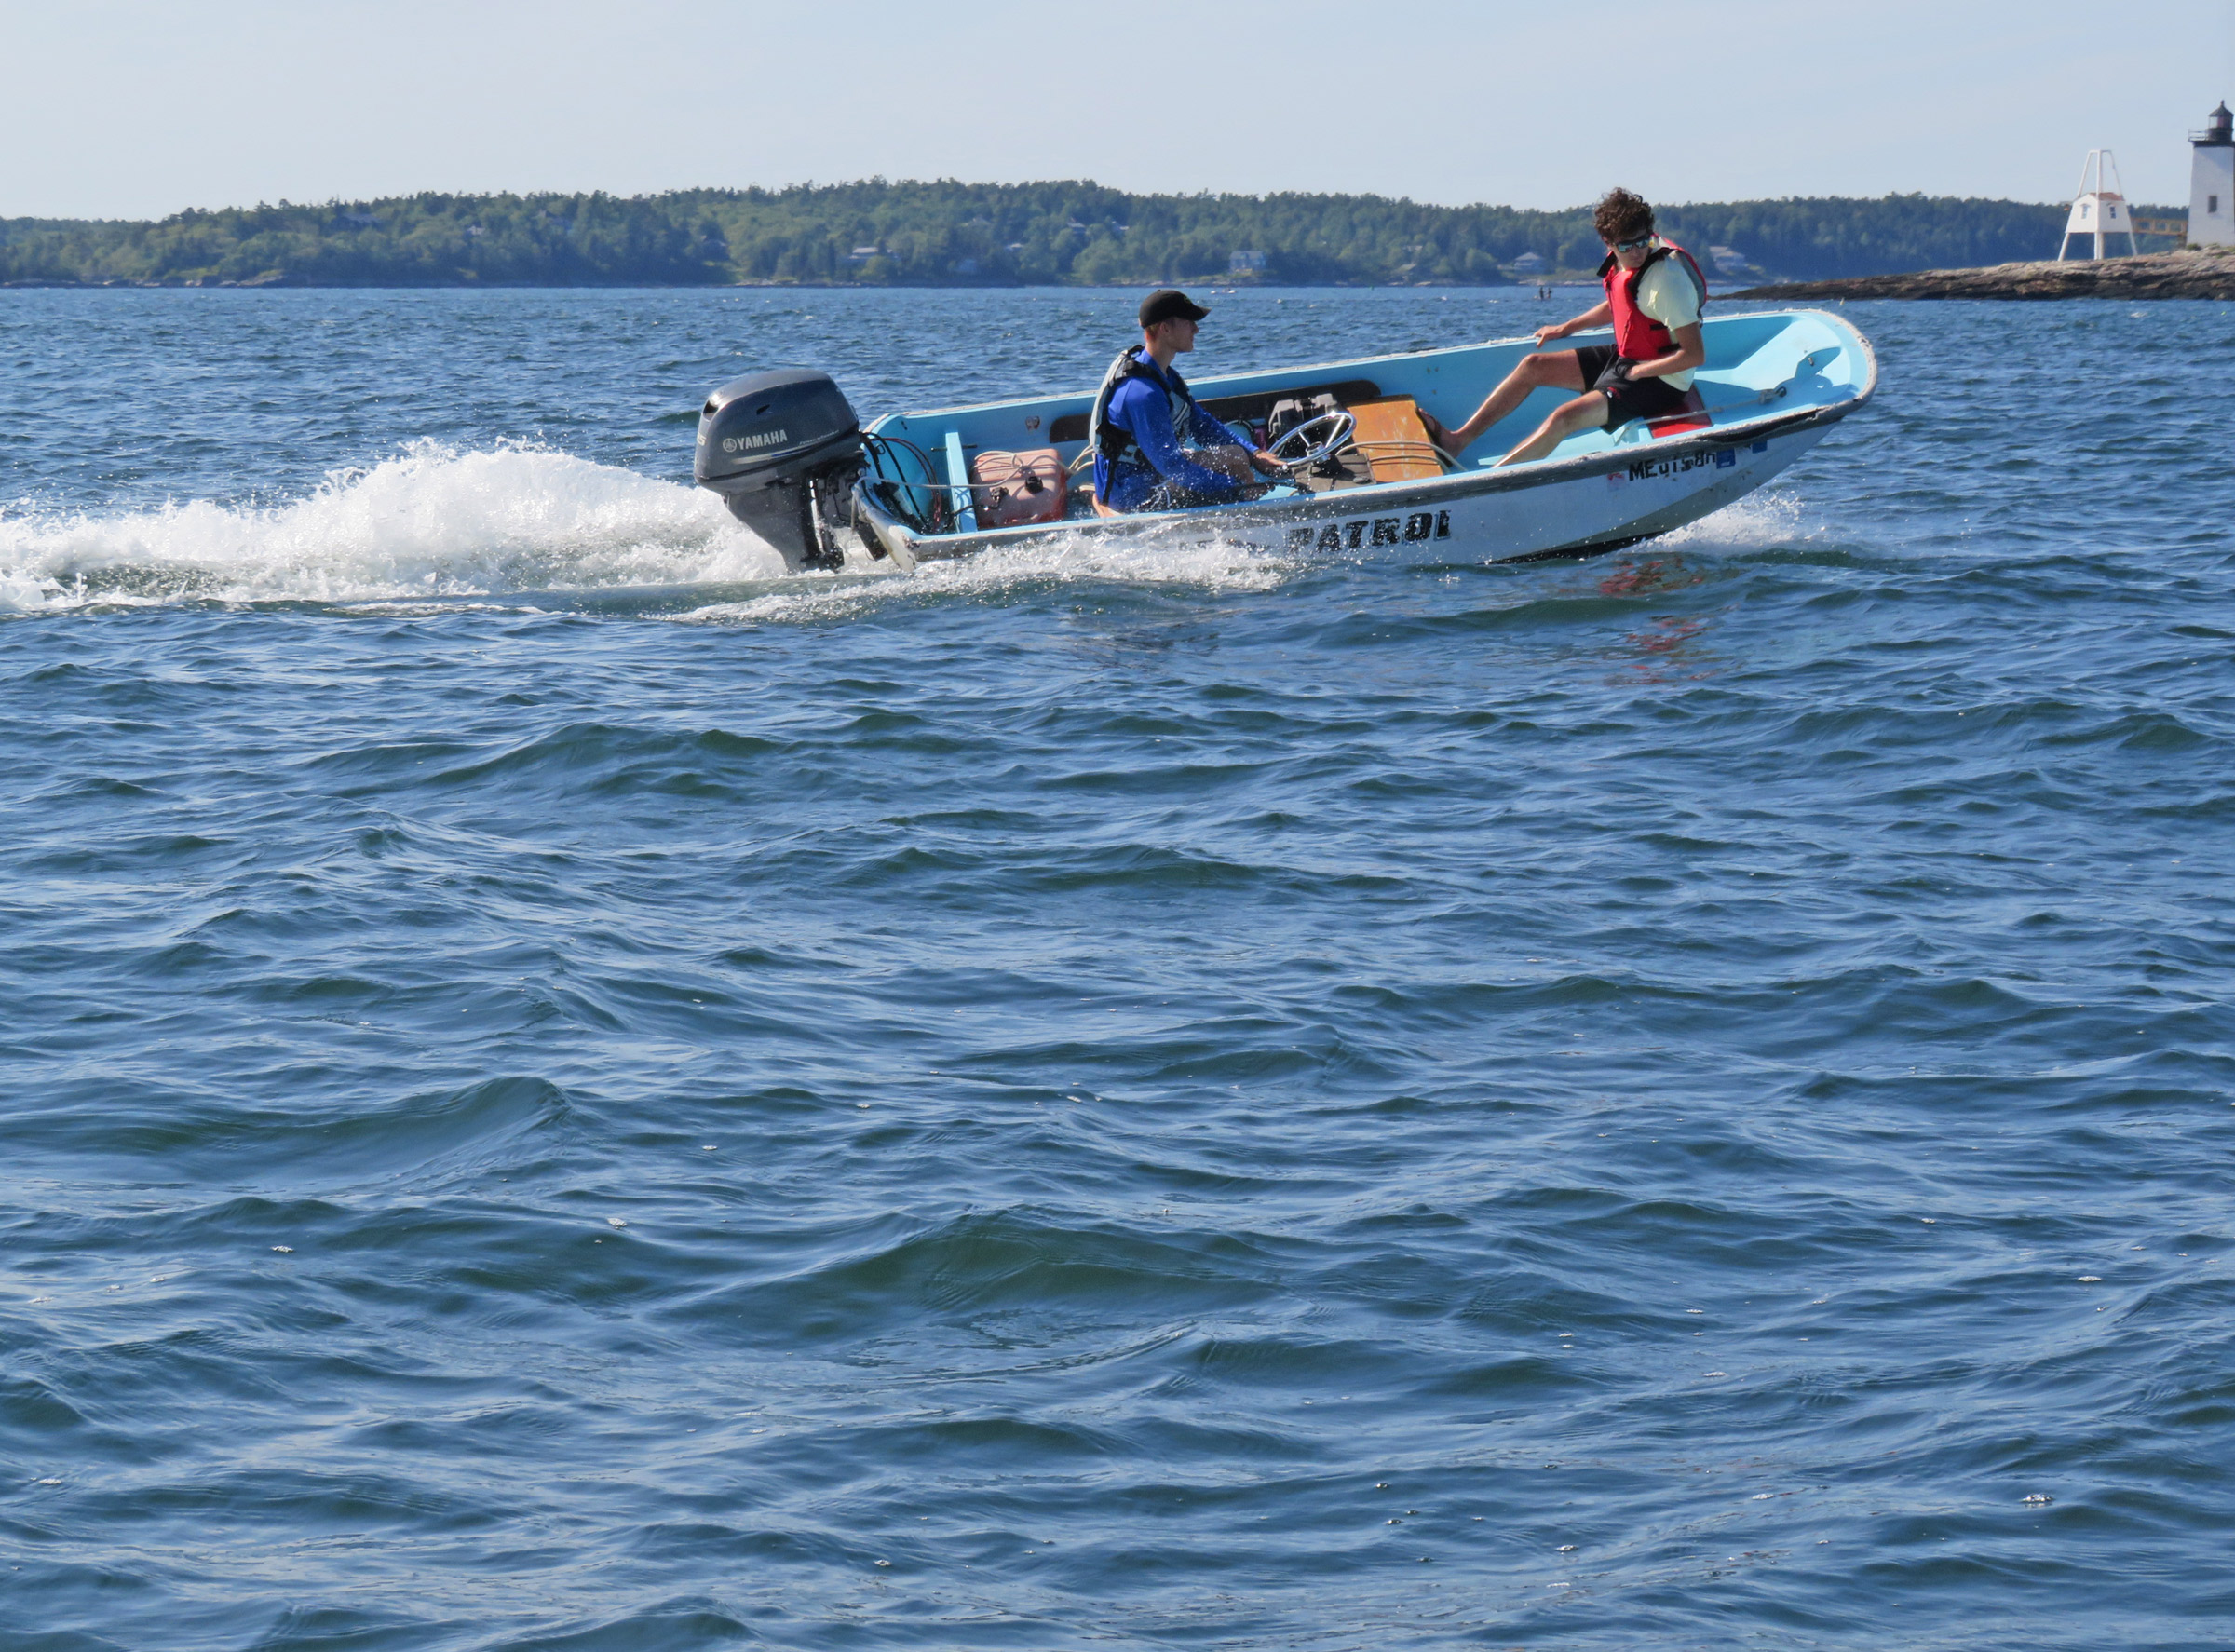
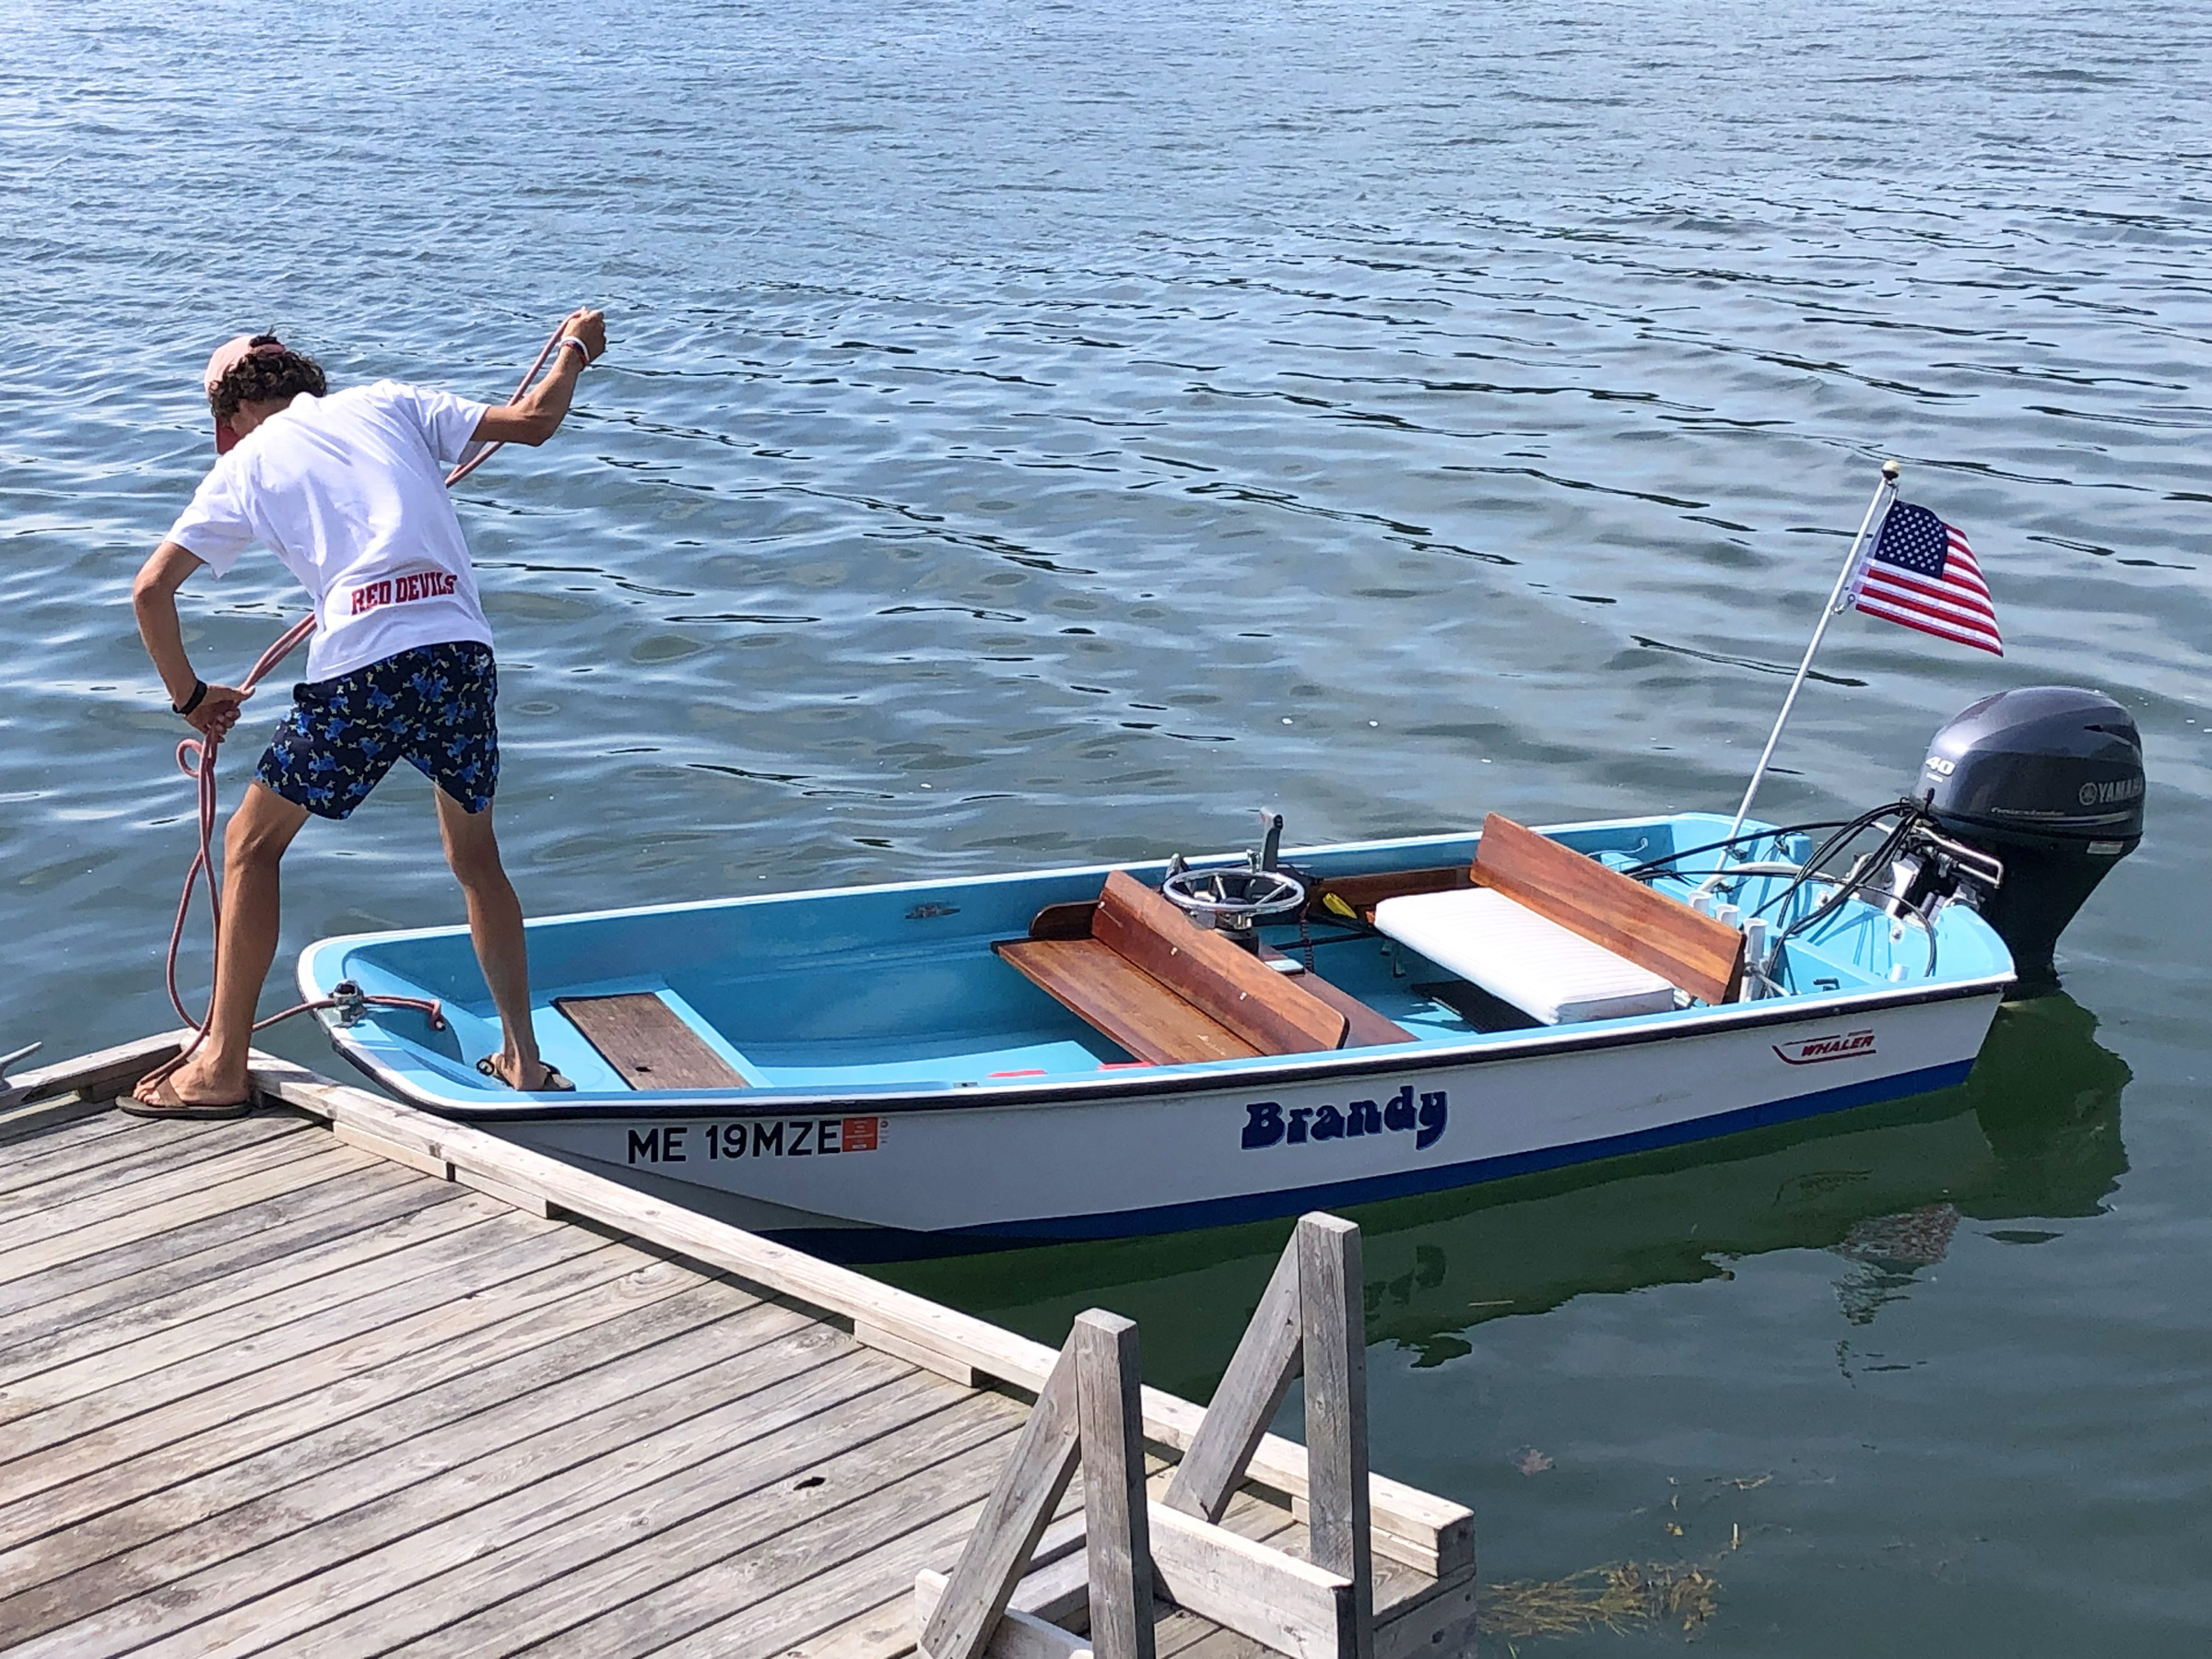
In the early summer of 1984, when I was 20, I had a summer job directing a children’s sailing program operated from a tiny beach community in Gloucester, Massachusetts. My daily commute consisted of a 15-mile highway sprint in my 1975 Ford Granada to a marina in Gloucester, where my dog and I would board a 13′ Boston Whaler and drive it the few miles north to the mouth of the Annisquam River. There, I’d take a hard turn to port and run along the white-sand beach for a mile to rendezvous with a fleet of O’Day Widgeons and a group of eager students. It was an idyllic situation that lulled me into complacency on the day of my first commute.
The weather was calm and clear. The 1960s-vintage Whaler was fitted with a freshly overhauled 25-hp electric-start Evinrude, which fired right up. I idled out of the slip and into the river, overconfident in the intuition honed from a life-so-far in boats. Clearing the no-wake zone, I brought the boat up on plane and kicked back for the glass-smooth ride to the river’s mouth. The “river” is actually a canal connecting Ipswich Bay with Massachusetts Bay; it makes some hard twists and turns, and I elected to follow its natural trend, paying little heed to navigation aids.
Jenny Bennett
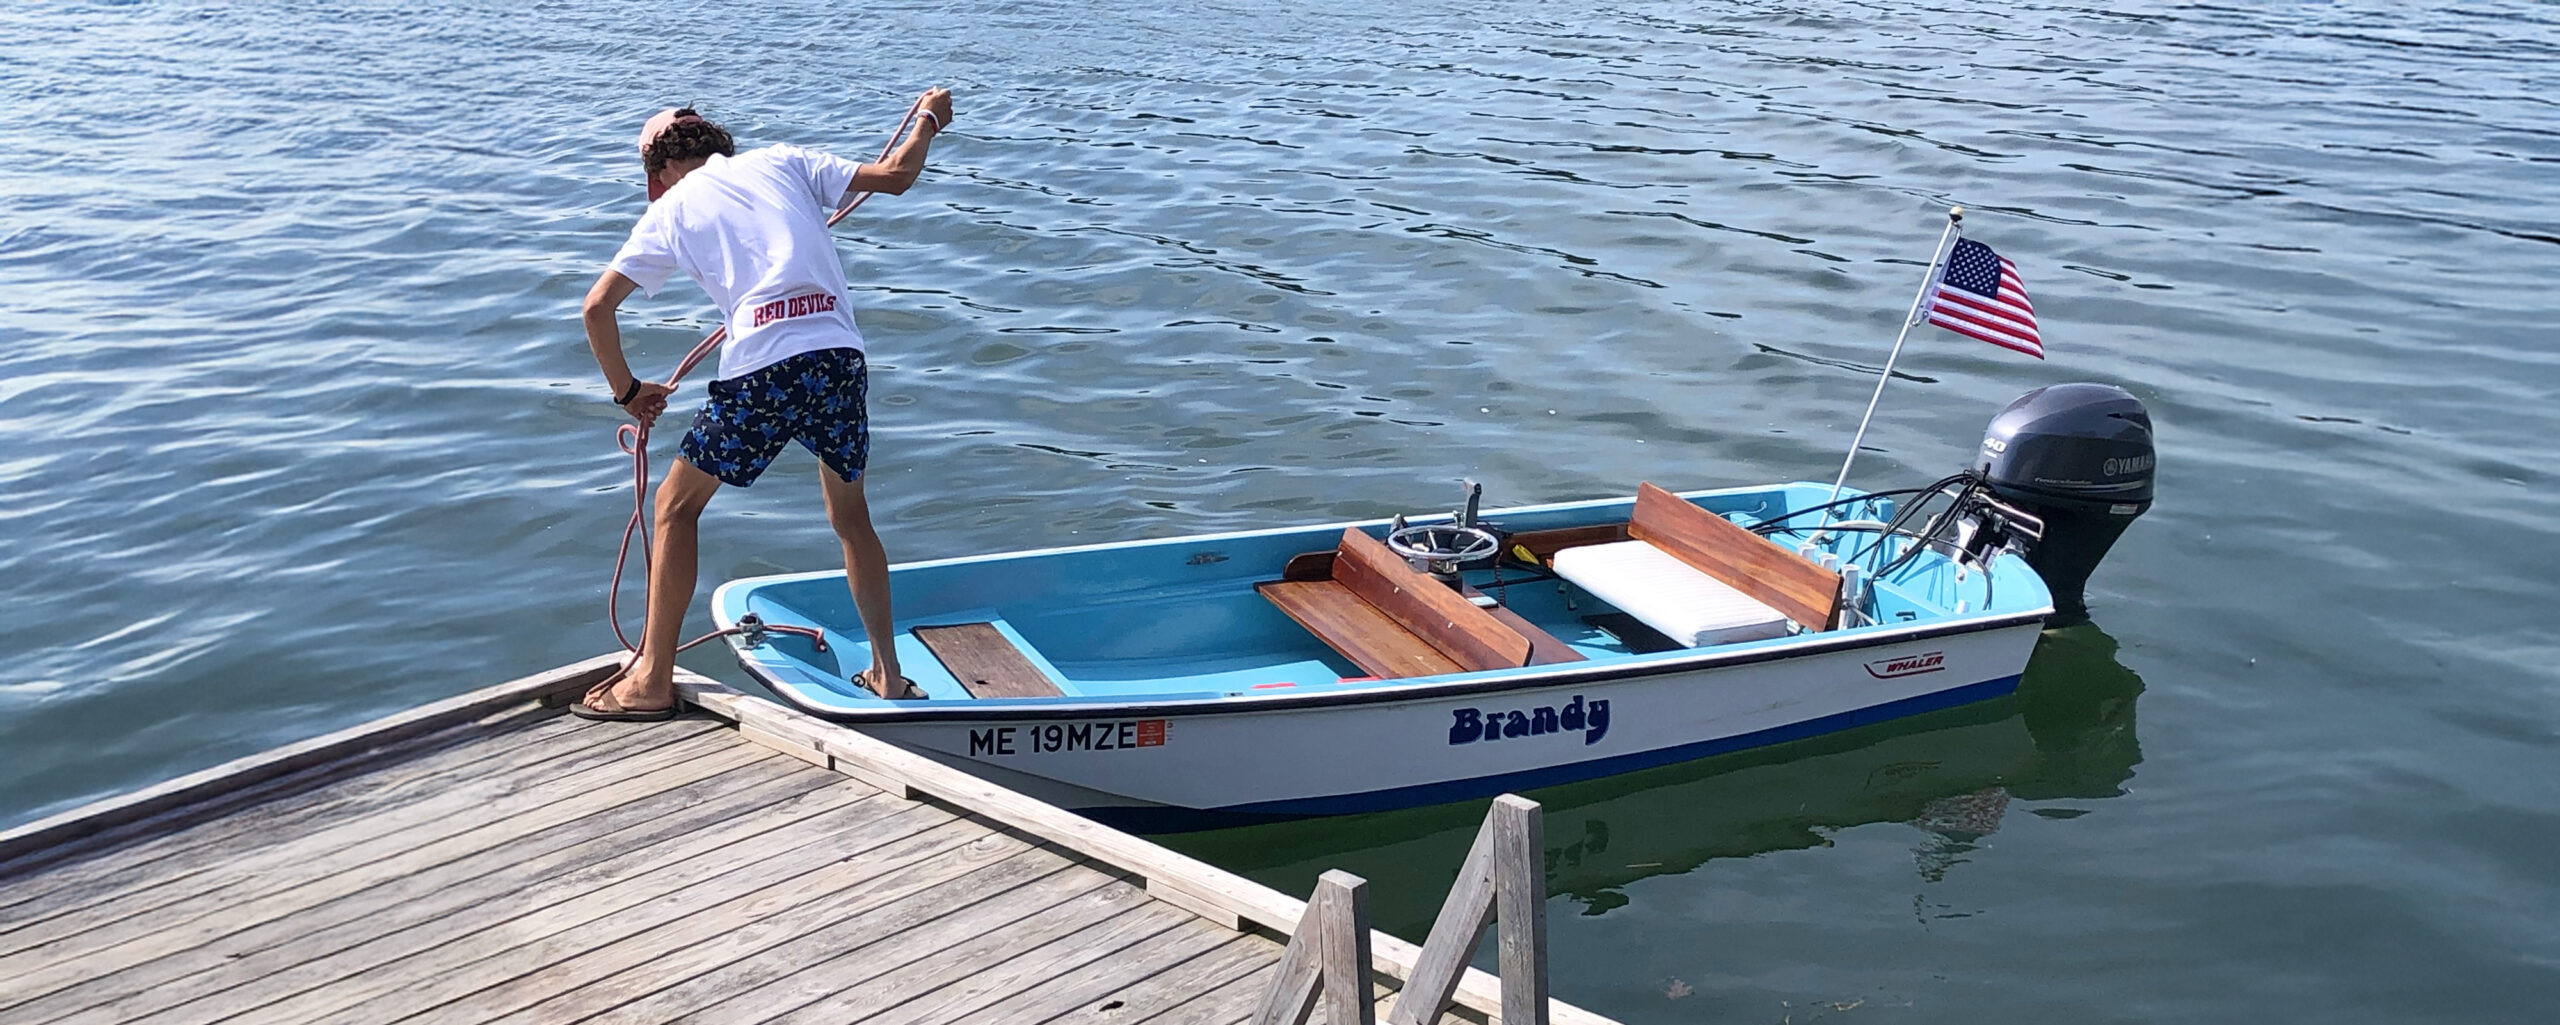
When first launched in 1958, the 13′ Boston Whaler, designed by C. Raymond Hunt, was a breakthrough boat in both its design and construction. Hulls are a sandwich of foam and fiberglass—a durable and unsinkable structure.
I scooted along a wide arcing turn and noticed a flock of seagulls floating ahead of me. As I drew closer, they stood up. Before I could react, the Whaler, at nearly full throttle, came to a skidding halt. The motor stalled. All was quiet. The gulls looked at me quizzically. I looked back at them, and then over the side, where I observed ripples of fine sand just a few inches below the surface. Off to starboard, I spied the green can clearly marking a turn in the channel that curved away from the route I’d been following. I furtively scanned the area for onlookers. Mercifully, there were none. I stepped out of the boat, pushed it off the sandbar, and checked the motor for damage. It was fine, save for a little paint off the propeller. The hull was undamaged, too. I patted the dog on the head and pulled slowly away, munching on a big serving of humble pie, firm hand on the wheel, the giggling gulls laughing behind me.
I confess this lapse in judgement not for absolution, but rather as a testimonial to the bombproof durability of the 13′ Boston Whaler—the flagship “unsinkable” boat that launched a legendary company and which, though introduced in 1958, is still among the most coveted small powerboats on the New England used-boat market.
Jenny Bennett
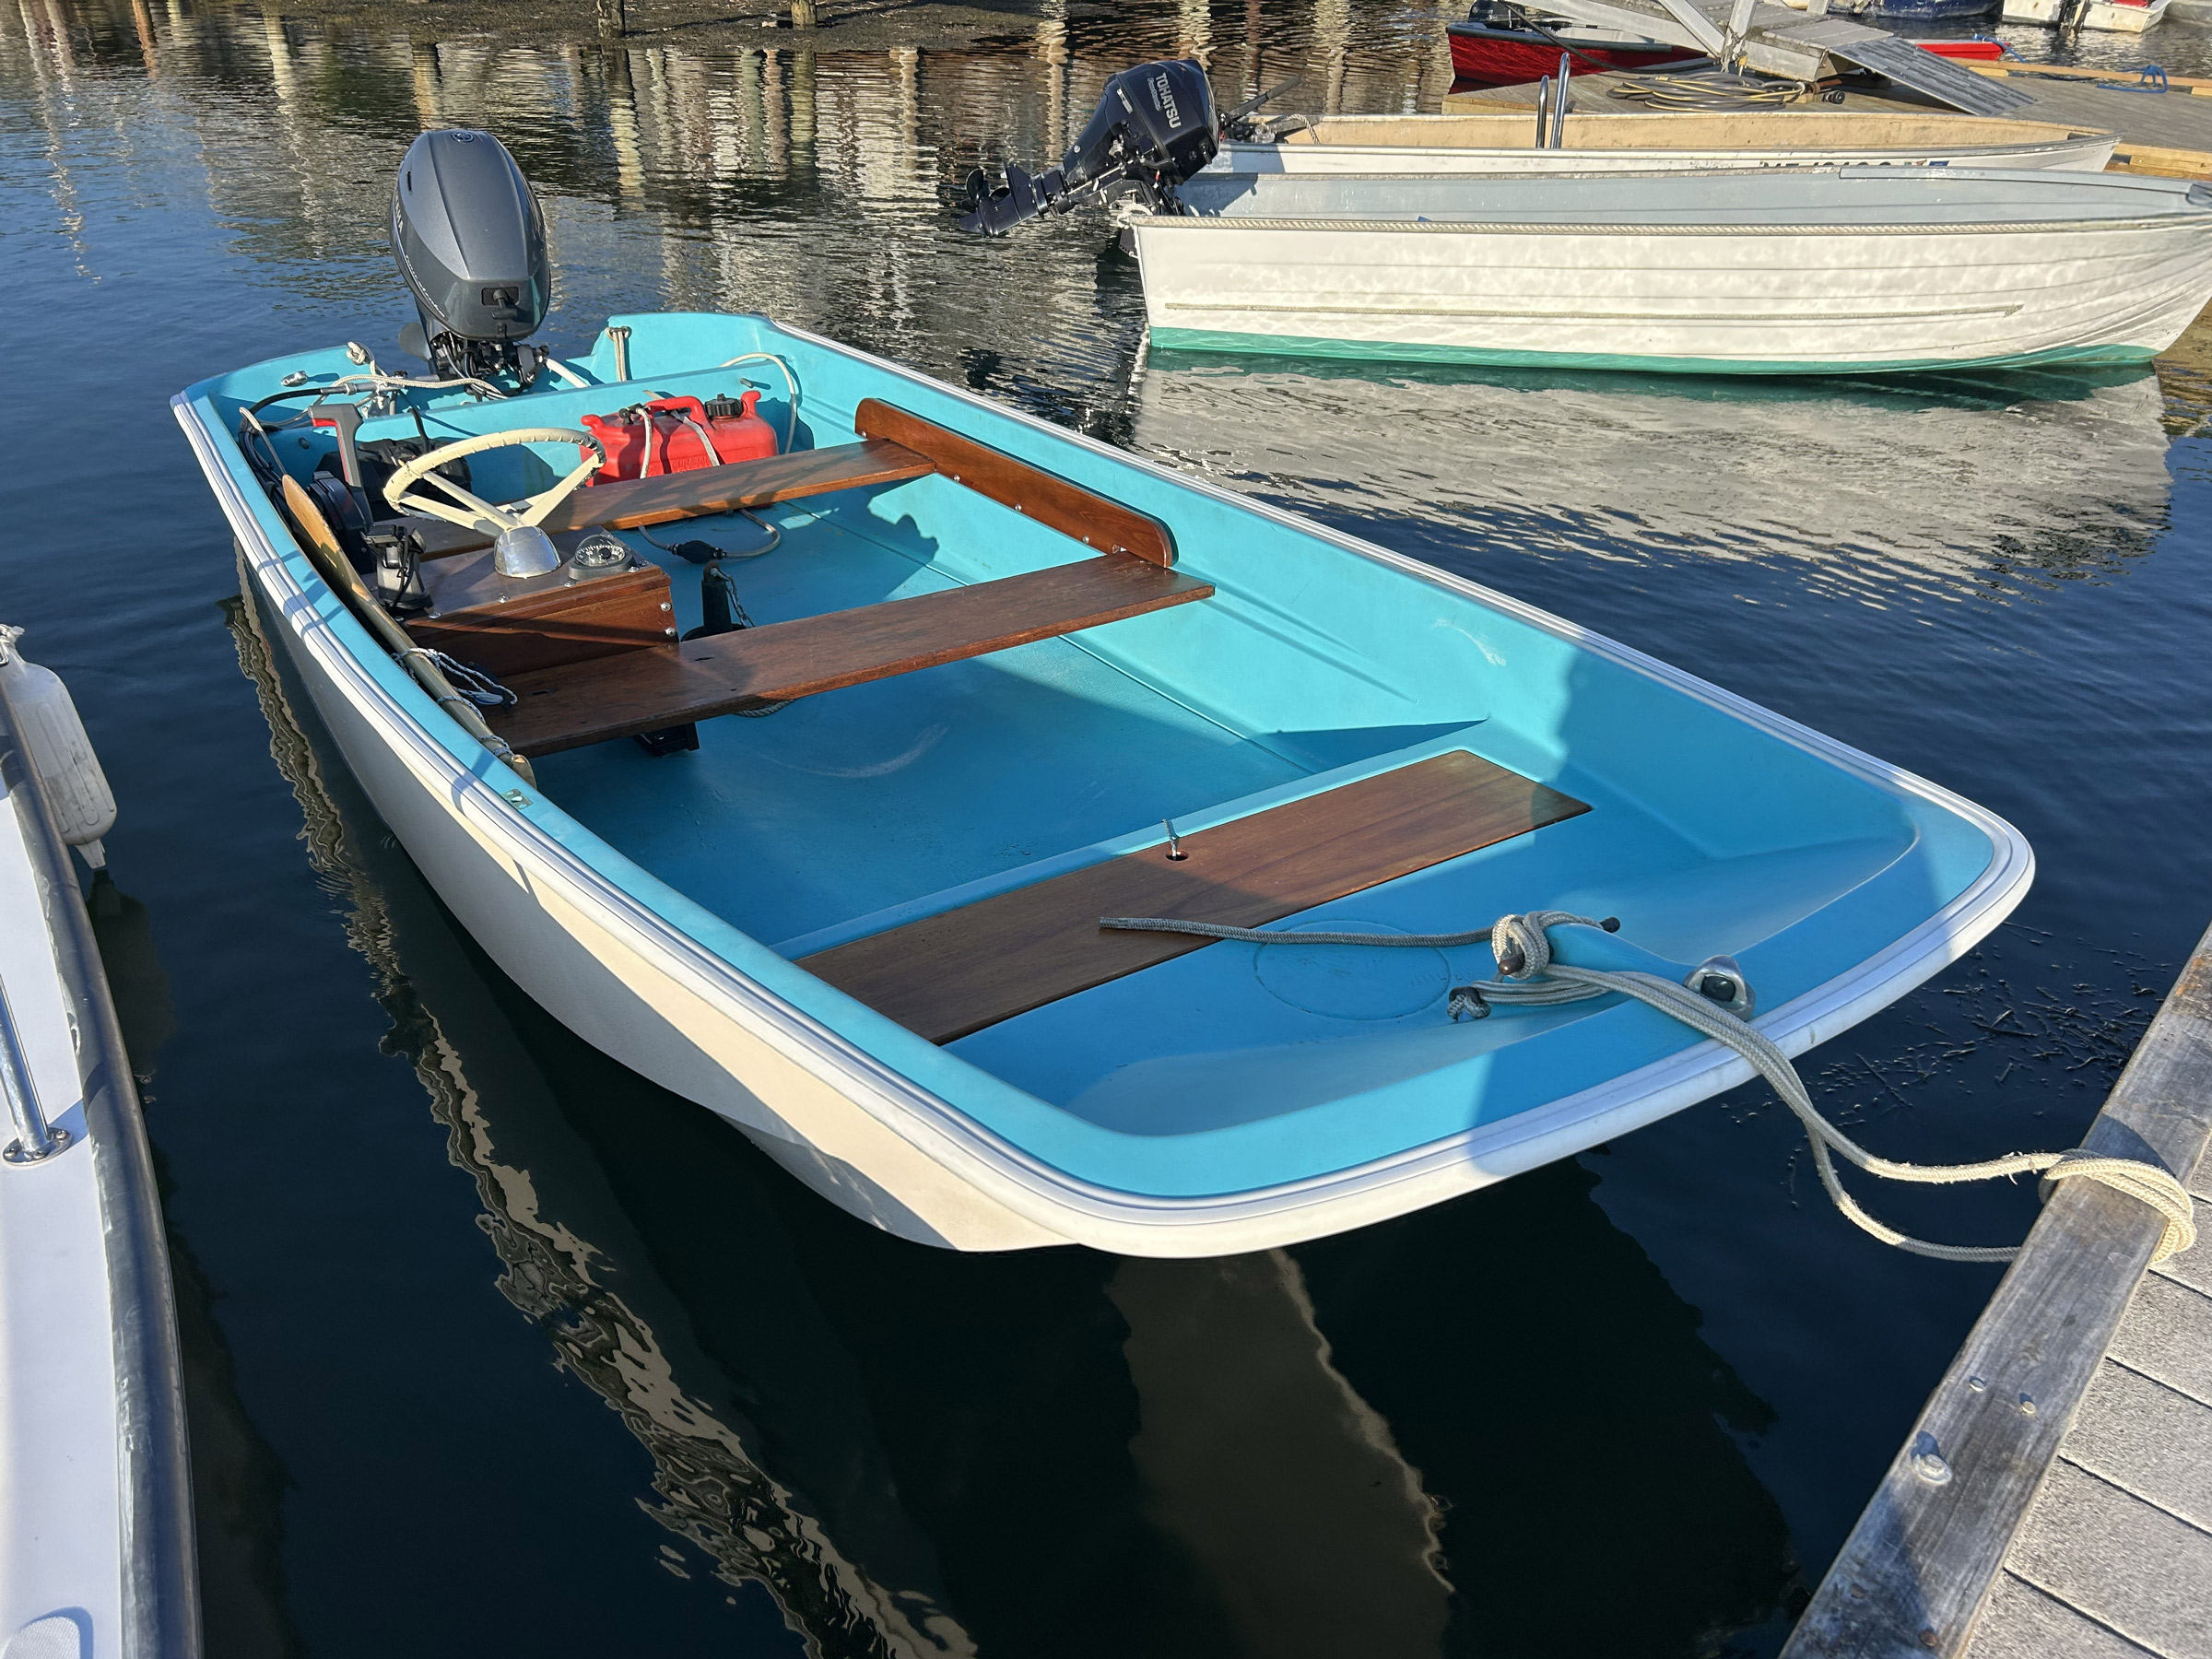
Early Boston Whalers were offered in two models: the Standard, in which the operator sat on an aft thwart to control a tiller-steered outboard motor, and the Sport (shown), which featured a small ’midship console and three thwarts.
Origins of the Unsinkable Boston Whaler
In 1916, Albert Hickman, a restless and unbridled innovator in powerboats, developed and patented a hull form he named the Hickman Sea Sled. Writing in WoodenBoat in 1991, David Seidman said that the boat “looked like someone had taken a perfectly normal V-bottomed boat and cut it down the centerline, then reassembled it so the original sides looked like they were in the center and the centerlines were on the sides. Sort of like putting your shoes on the wrong feet. The boat had a tunnel forward in the shape of an inverted V that flattened as it went aft. This was enclosed by two outward-turning bows that seemed to be pulling the boat apart right down the middle.”
Liz Duffy
The Boston Whaler was inspired by the Hickman Sea Sled, a wooden boat first built in 1916 in a range of sizes up to 70′. Sea Sleds essentially melded two hulls, like a catamaran, forming a tunnel along the centerline. The Boston Whaler incorporated a third, centerline hull, which eased the outboard-motor propeller cavitation that had challenged operators of the Sea Sleds.
In 1928, Hickman developed a 13′ Sea Sled that won the 260-mile Boston to New York Race. He also developed a 78′ version of the boat that was built by Graves Yacht Yard in Marblehead, Massachusetts, for the Army Air Corps. The small-craft historian John Gardner worked at Graves during the construction of the behemoth Army Air Corps Sea Sled, and recalled its construction as akin to building a giant plywood box.
Three decades later, with World War II in the rear-view mirror, a Marblehead-based builder named Dick Fisher sought a design in which to test his newly conceived foam-cored fiberglass construction technique. Fisher was a nephew and protégé of the yacht designer Frank C. Paine, a legend in racing-sailboat design in Marblehead. Fisher had graduated from Harvard in the 1930s and gone on to co-found a company that manufactured electrical products. Boats were his passion, however, and he’d made early experiments in building lightweight balsa craft, which were of limited utility due to that wood’s softness. Later, in the early 1950s, he lit on the idea of building boats of polyurethane foam—a new invention at the time. While this foam was soft and vulnerable like balsa, he reasoned that it could be sandwiched in a fiberglass shell to produce a hard, unsinkable hull.
Jenny Bennett
Early Boston Whalers have proven to be quite durable and are often the chase boat of choice for many sailing programs. Aftermarket rubrails sometimes replace the hard-rubber original ones. However, one must be cautious not to allow water into the foam-sandwich hull when drilling new holes in the boat. Well-preserved or restored early boats often fetch high prices; for people willing to invest some labor, there are bargains to be found in well-worn hulls.
Fisher tested his theory in a small daysailer, and later struck a royalty deal with Albert Hickman to build Sea Sleds using the method. Hickman, however, sought increased control over the arrangement as negotiations progressed, which ultimately killed the deal. So, Fisher turned to C. Raymond Hunt, whose vast design output includes both the Concordia yawl—one of the most enduringly popular traditional wooden cruising sailboats ever designed—and the deep-V hull, which revolutionized both offshore powerboat racing and recreational boating.
Fisher’s testing showed that the Sea Sled hull generated a mixture of air and water that caused a centerline outboard-motor propeller to cavitate. So, Hunt developed a new form with a centerline “hull” in place of Hickman’s tunnel; this hull, flattened aft, fed clean water to the propeller. While the overall form of the boat, with its maximum beam carried all the way forward and aft, resembled the Hickman Sea Sled in plan and profile views, its underwater details were sufficiently different so as not to infringe on Hickman’s patent. The Fisher-Hunt creation, built in a foam-and-fiberglass sandwich with a distinctive blue interior, was unveiled as the 13′ Boston Whaler in 1958.
Jenny Bennett
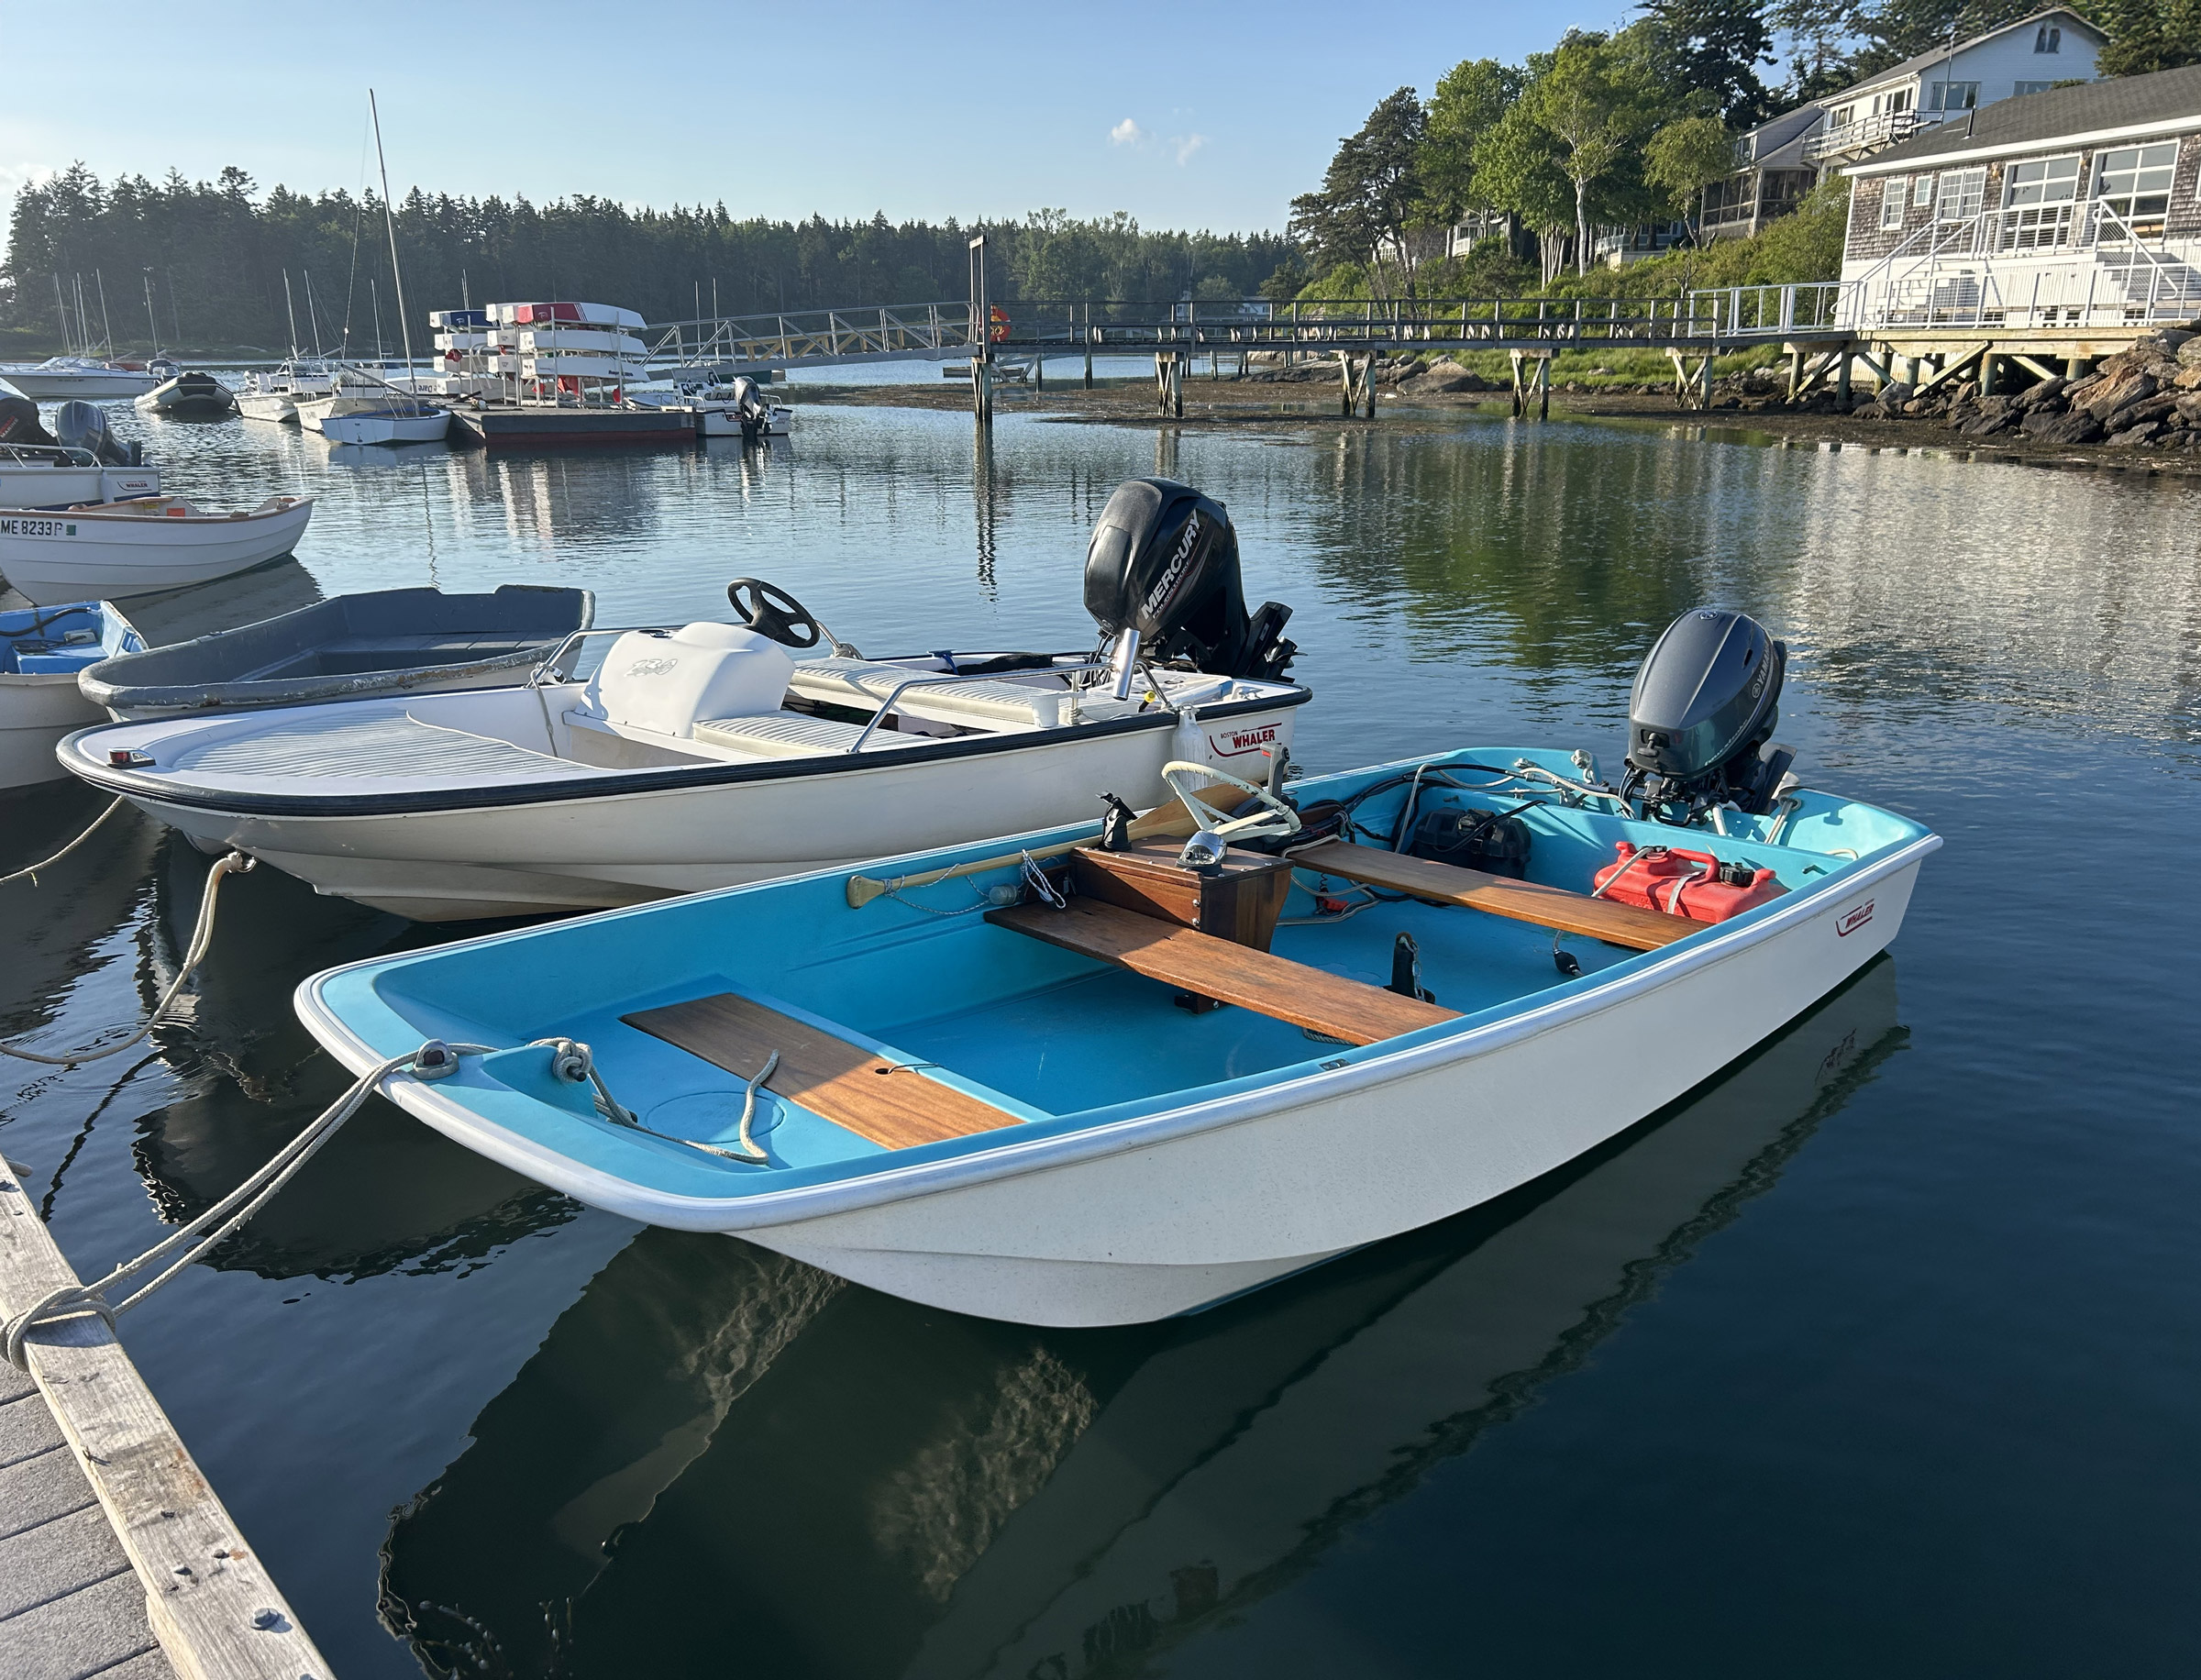
The old and the new: An early 13′ Boston Whaler rests alongside a late-model peer. Aside from the obvious difference in interior color, the later boat has a modified hull shape—a more rounded bow, an easing of the chine profile forward—and molded interior components rather than the wooden ones introduced in 1958.
The Whaler’s construction was unique for its time, and became a trademarked process called Unibond. The hull and an interior liner were laid in fiberglass, separately but concurrently. While still curing, they were clamped together, with a resulting void between them. Into this void, at the bow, was injected polyurethane foam, which traveled aft under pressure, expanded, and emerged through a relief hole in the stern, confirming the filling of all voids. The whole deal—polyurethane and fiberglass—cured into one solid piece.
Three years after the Boston Whaler’s introduction, in 1961, Life magazine ran an article on the design, and featured a photograph of Dick Fisher sitting calmly in the stern of one of the boats, while in front of him a pit saw was apparently cutting the hull in half. A subsequent photograph showed Fisher motoring along, dry-shod, in the sawed-off stern section. The article was titled “The Unsinkable Legend.” The visual message was powerful; sales of the boat went through the roof, and variations on the theme of that original story have appeared in Whaler advertising over the years.
A Perfect Harbor Tender
Boston Whaler has been through many chapters and owners since its founding. It remains a solid company building a range of high-quality boats. The classic 13-footer with blue interior remained in production until 1971. The following year, desert tan was introduced for the interior (along with modifications to the hull and liner), and from 1994 to 2000, when production ended, the interiors were white—although 1998 saw a limited-edition model with the original blue interior.
Benjamin Mendlowitz
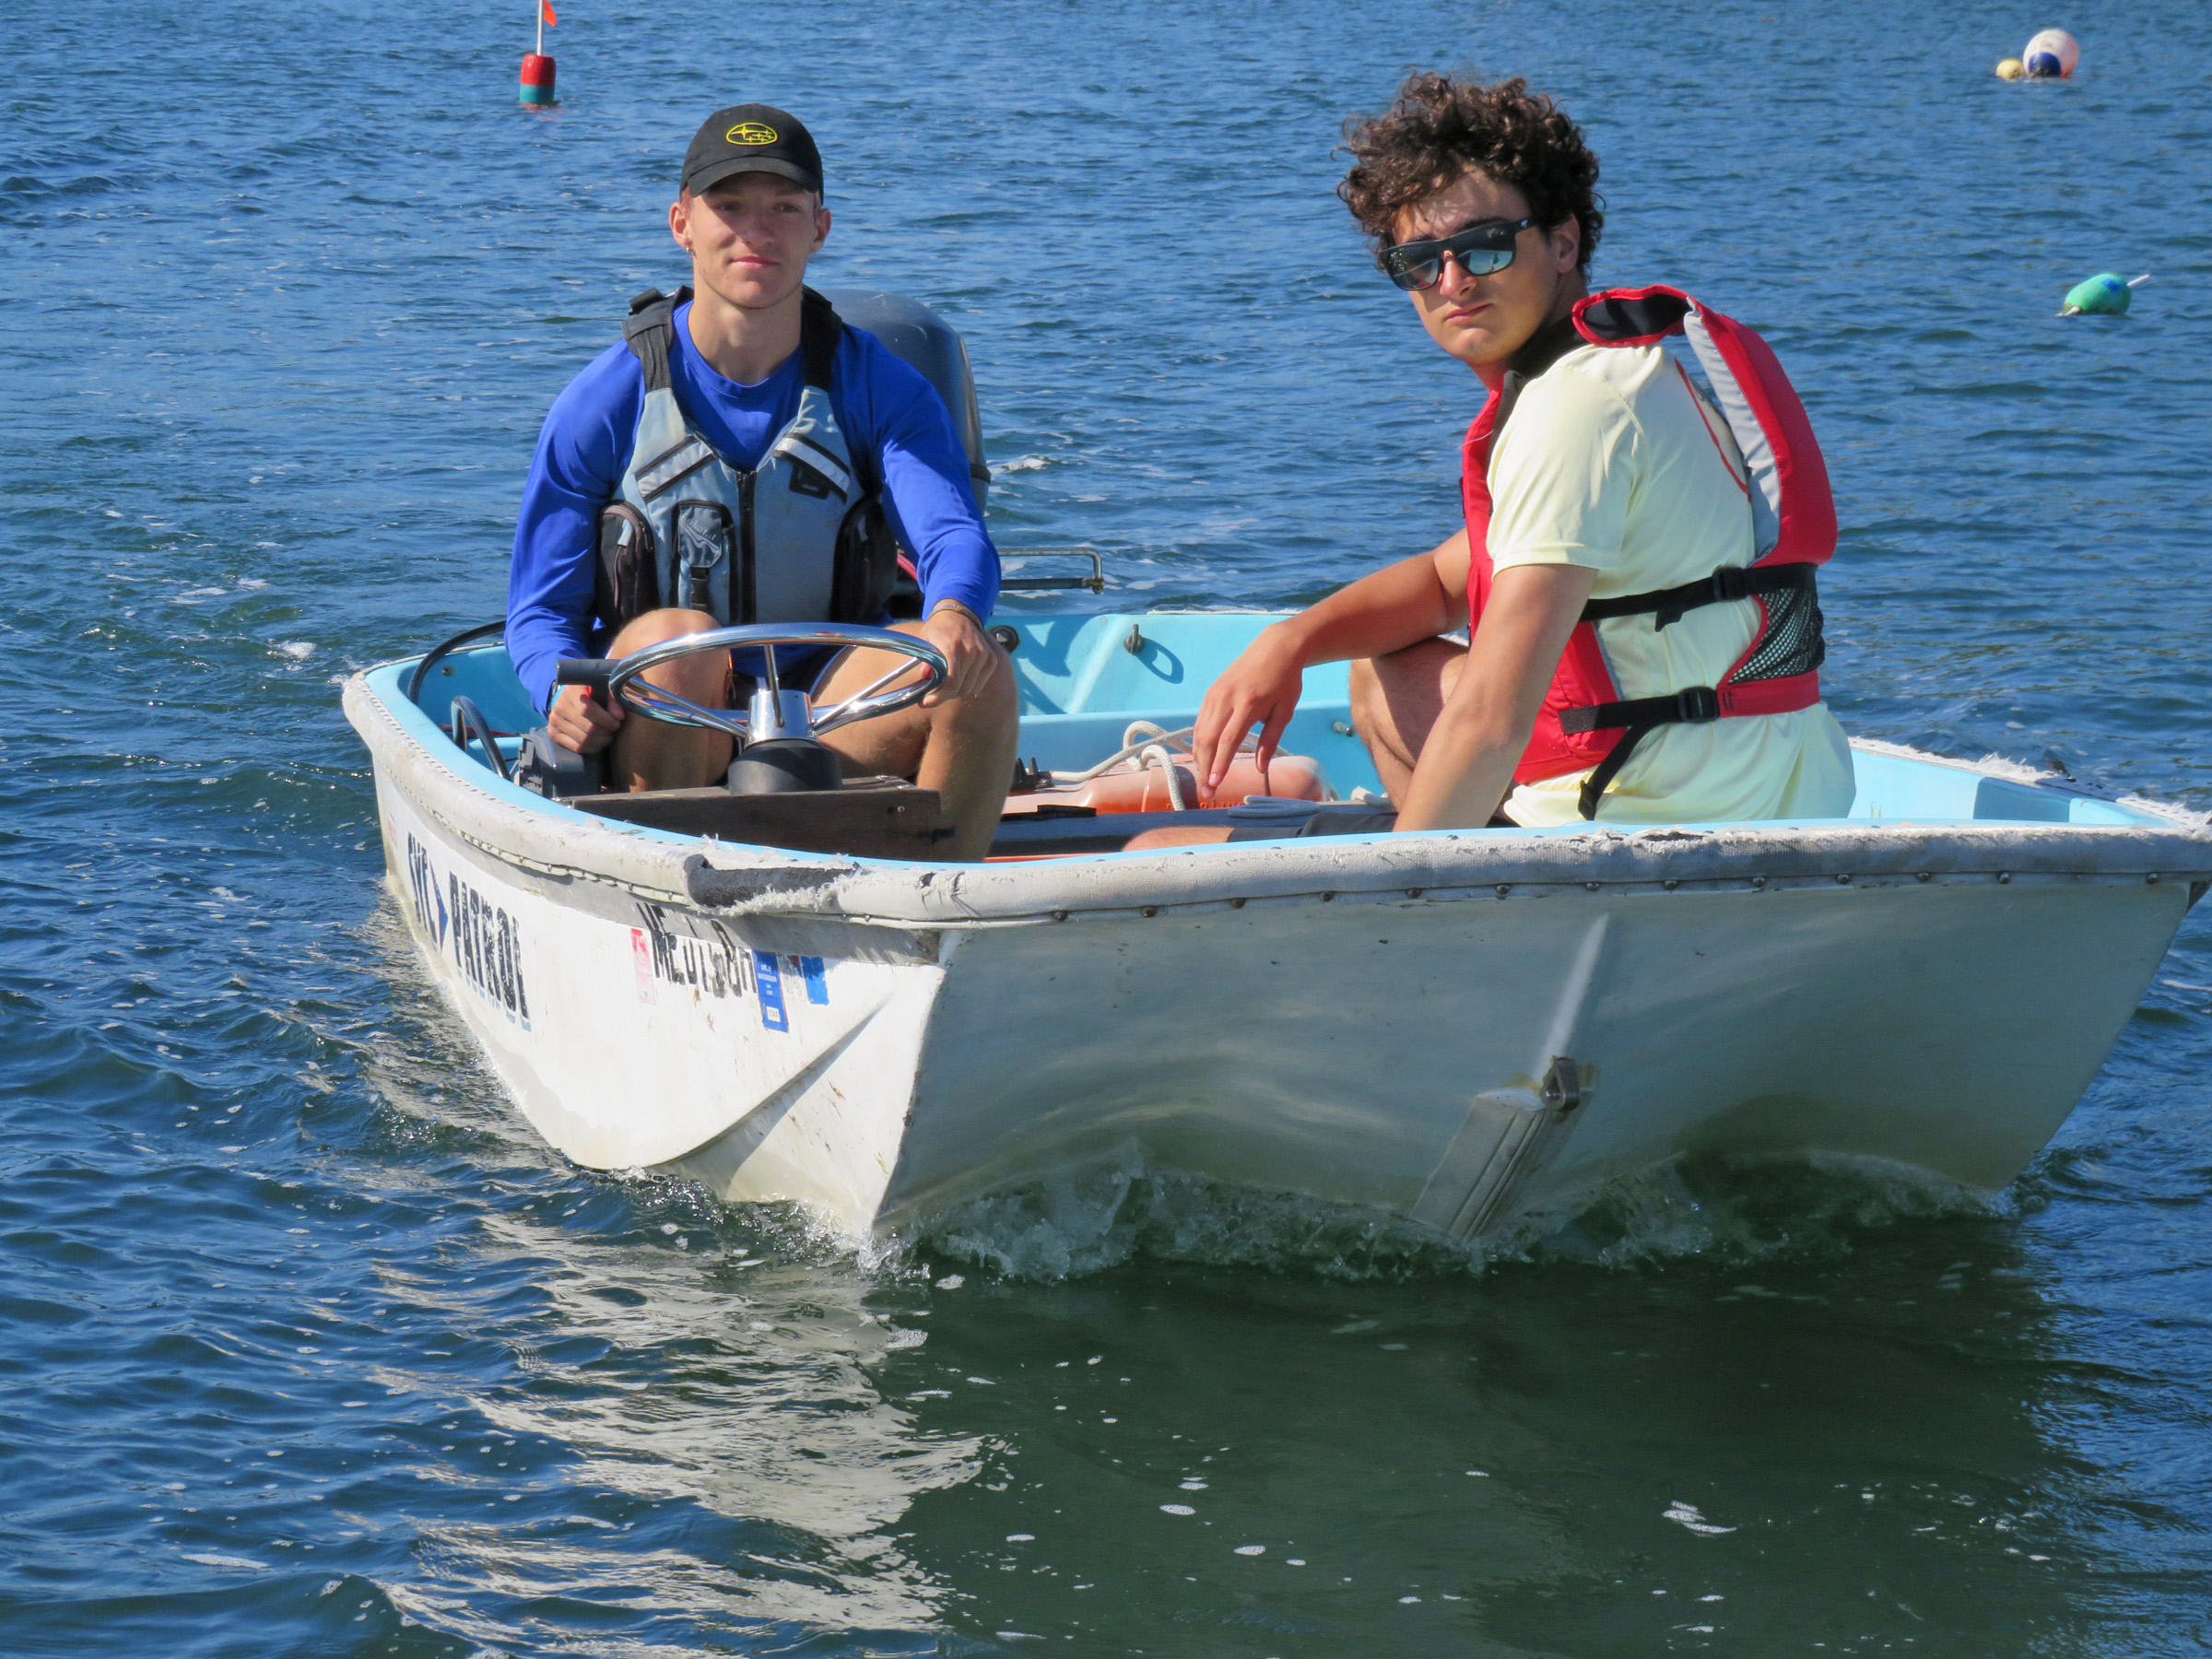
The versatile 13′ Boston Whaler offers nimble speed when it’s needed, and great load-carrying capacity for larger-vessel support. The boat will carry six average-sized adults on its three thwarts—or fewer people and a load of gear.
My own history of drama in Whalers came full circle a few years ago. For several years I operated a small charter company with a 46′ sloop out of Castine, Maine. On the boat’s very first charter, I received a call from the captain about 15 minutes after they had left the float. The steering was disabled. Did I have any insights? Could I get out to the boat in short order? I was on shore. My dinghy is a 13′ oar-powered peapod, and it does just about everything I want it to. But to get from the harbor to the stranded boat quickly required something else.
I hailed a friend who had a 13′ Whaler at the town landing. Three of us jumped into his boat and scooted out to the mouth of the harbor—a journey that would have taken an hour or so in the peapod, and would have been cramped and slow going with three grown men aboard. In the capacious Whaler it took just a few comfortable minutes. (The steering issue turned out to be an accidental engagement of the autopilot, which was resolved before we arrived.) That brief ride reminded me of the timeless utility of the 13′ Boston Whaler.
At harbor speeds, the boats can carry a load of gear or people; they maintain reasonable if somewhat sluggish maneuverability at displacement speeds. The directional reverse of the outboard motor allows easy handling in close quarters. The boats plane quickly, and steering is nimble when they do. With a 25-hp outboard—the standard for a 13-footer—the top speed is about 26 mph. With the upper limit of 40 hp, the top speed increases to over 30 mph. At those upper speeds, every wavelet is felt by the occupants; larger waves will launch the boat clean out of the water.
Liz Duffy
The 13′ Boston Whaler carries its near-maximum beam all the way to the bow and stern, offering great stability along the length of the boat. Stepping directly aboard in the bow would be perilous in a conventional sharp-bowed boat such as a peapod.
I am still a devoted rower, and I still own a 13′ peapod. My mooring is 3⁄4 mile from the town dock. On a good day, it takes me 20 minutes to row out to it in my peapod; in a foul tide it can take 40 minutes or more. With three adults aboard it’s a safe option, but a chore; six adults is out of the question. By contrast, the 13′ Boston Whaler is rated to carry six adults, perhaps not in ultimate comfort, but certainly safely in calm conditions. As a multipurpose harbor tender that takes up less space in the driveway than a small car, it’s hard to beat. And practicality aside, the 13′ Boston Whaler is a perfect vehicle for a spontaneous island picnic or a joyride to the mouth of the harbor on a warm July evening.
Matthew P. Murphy is editor of WoodenBoat magazine and founder of Small Boats magazine.
Based on the author’s empirical research, there is always a 13′ Boston Whaler for sale somewhere in New England on Facebook Marketplace. Prices for serviceable boats range from $2,500 to over $10,000. Hull weight is critical in assessing the condition of these boats; overweight hulls have likely been breached, and are waterlogged—a non-fatal condition that requires careful and thorough drying of the interior foam and subsequent fiberglass work.
LOA: 13′ 4″
Beam: 5′ 5″
Draft: 6″
Weight: about 275 lbs originally
Power: 9–40 hp
Capacity: 6 people
Is there a boat you’d like to know more about? Have you built one that you think other Small Boats readers would enjoy? Please email us your suggestions.
For some time now my family has spent summer weekends at a camp on a small lake in northern Massachusetts where we’ve kept a ski boat and fishing boat at the dock. On Sunday mornings, early risers shove off with rods and gear to enjoy the sunrise on the water, and in hopes of reeling in some fish for lunch. For years, the boat we fished from was a 16-footer pushed about with an outboard. It was a cold metal hull, a slug to row, and though we tried to tiptoe from aluminum dock to aluminum boat and shove off quietly, the clamor of feet and oars and tackle boxes banging against the hull reverberated around the lake like so many discordant church bells clanging.
Desiring a more pleasant (and neighborly) Sunday morning experience, we needed a new boat—one designed for rowing that would comfortably seat three and occasionally accommodate up to five adult fisherfolk, could be loaded quietly, and could withstand pounding while moored at the dock. This last was a must: on weekdays, the relatively shallow 150-acre lake is dimpled by landing loons and ducks and rippled by fish splashing, but the hot weekends of summer bring out an armada of skiers and wakeboarders, and dockside boats can get thrashed, bucking about like wild broncos. I have two smaller, lightly built wooden rowboats, but we needed a larger, sturdy workboat. I found what I was looking for in John Gardner’s The Dory Book in which he described a “substantial row boat for fishing and general recreational use…a sturdy craft, built for rough treatment.” This was it! A Lowell Dory Skiff!
Photographs by the author
The boat weighs about 130 lbs and can be easily lifted onto a trailer where, thanks to its flat bottom, it sits upright. As designed, without floorboards, the frames serve well as foot braces for rowers.
At 14′ 9″ long and 52″ abeam the Lowell Dory Skiff was as big a boat as I could build in my small shop. I made space for lofting. The whole “recipe” for the boat’s construction is presented on a single 8 1⁄2″ × 11″ book page. The details include a table of offsets and a list of required fastenings and lumber. I had all the wood I needed at hand. The drawings call for 7⁄8″ oak for bottom cross cleats, sawn frames, bent frames (5⁄8″ × 7⁄8″), skeg, and gunwale, 7⁄8″ white pine for bottom and thwarts, and enough white cedar for 9⁄16″ planking. Copper rivets are specified for fastening the bent frames and laps (as I was building the boat specifically for a freshwater lake, I decided that stainless-steel screws and nails would suffice for fastenings).
Though The Dory Book (comprehensively illustrated by Sam Manning) is the preeminent primer on dory construction, some previous experience would certainly help carry a builder through this project with less head-scratching. Nonetheless, with the masterful information in the book’s Part 2, “How to Build a Dory” near at hand, and a desire to draw a good line and cut to it, anyone with time and care can build a good boat the first time around.
Although not shown in Gardner’s design, I made red-cedar floorboards to protect the bottom and to facilitate movement around the boat. The cedar rubrails replaced the designed rope gunwale fender—they are less of a snagging hazard for fishhooks, and have stood up well to being knocked against the dock.
Building the Lowell Dory Skiff
Using four 10″-wide pine boards for the bottom gave me the middle seam as a centerline as indicated in the drawings. Before clamping up and screwing in the cleats, I planed seam bevels. These would be luted and caulked before I painted the bottom. The sawn oak frames came next. For each, I assembled the bottom and two side parts with pairs of 1⁄8″ brass splice plates (the plans call for 3⁄32″ bronze) epoxied and riveted at the dog legs; I cut the frame corners at the angle between the bottom and garboards to create limber holes. Finally, I got out a white-oak inner stem and pine transom—with red-oak cheeks—beveled each, and set up my ladder frame.
I’ve learned to build lapstrake boats upside down. It allows me to plank solo using clench nails. I set up and screwed-in the assembled dory frames at their appropriate stations on the bottom, being mindful to place them on the correct side of the station mark. Every wood-to-wood connection got a smattering of bedding compound. Then, lifting this “skeleton,” I clamped each cross spall to its respective station on the ladder frame. Securing each cross spall to the ladder frame’s cross cleats formed the bottom’s rocker without the need for weights or overhead shores. After the stem and transom were centered and plumbed, everything got squared and braced. The frame bevels were fine-tuned, and planking commenced.
For a solo rower, the central thwart is comfortable and provides perfect hull trim.
Following Gardner’s concise list of steps for planking—“Laying out, lining, and spiling; Getting out, splicing, and beveling; Hanging and fastening”—I worked my way through the first four strakes. I got out planks from 8′ to 10′ boards of 9⁄16″ white cedar. Each plank had one epoxied scarf joint for appropriate length. I nailed the garboards to the bottom with 3″ #12 stainless-steel ring-shank nails and fastened subsequent plank laps with 7⁄8″ clench nails spaced approximately 3″ apart. In addition to the sawn frames to which I screw-fastened the planks, there were also steam-bent frames that would later be riveted to the planking, and I noted this spacing. Before screwing the planks to the stem and transom I laid a bead of adhesive sealant. For strength and looks I chose red oak for the sheerstrake. Turning the hull upright at this stage allowed me to rivet this final plank using #14 copper nails and burrs and gave me a better look at the sweep of the sheer.
After riveting the steam-bent frames I got out and fitted the false stem, breasthook and knees, and made a plywood pattern of the long, curving gunwale. The gunwale itself is made of three lengths of red oak scarfed with epoxy. I spaced the joints to fall under the placement of the oarlock pads. I fashioned rubrails from the cedar planking offcuts and fastened them with screws; the plans show a rope bumper, but we worried that this would snare too many fishhooks. Instead of the outboard motor pad indicated on Gardner’s drawings, I opted for a sternpost to stiffen the transom and keel. I also cut a sculling notch. I followed Gardner’s interior plan for thwarts and wraparound stern bench, all of which are bright-finished white pine.
The Lowell Dory Skiff Performance
What a joy it is to step down into the Lowell Dory Skiff. There’s no need to land dead-center, for while it’s a lively craft, it’s quite stable, and with its 18″ interior depth you feel safe and secure once you’re settled in.
With a passenger seated in the stern, the rower moves forward to the bow rowing station to maintain good trim. Here, the seat and sheer are a little higher, making the angle of entry for the oars slightly steeper, but the stroke is still efficient.
There are two rowing stations with enough room for paired rowing. The center thwart is a comfortably ergonomic 13 1⁄2″ above the bottom (the forward seat is 15″ above). The skiff’s frames are usefully employed as foot braces. In keeping with the workboat heritage, we use 8′ ash oars. A single rower seated on the center thwart can get the hull to move easily with a few strokes and maintain a steady pace with little drag. The skiff’s rockered bottom and moderate skeg afford both maneuverability and an easy glide. And thanks to the two rowing stations, it’s easy to adjust the hull trim when two or more people are aboard.
Our Lowell dory weighs 130 lbs and—with two strong people—can be lifted on or off its trailer when the need arises, and readily rolled upside down to attend to the bottom. The wide, flat gunwales provide a good handhold when lifting. We slide the boat off and onto its trailer at the beginning and end of the summer season from a sloping shore; when it gets rained-on dockside, we use a hand pump and sponge to drain the bilge. The robust sheer has nicely weathered the hard knocks of summer weekends. The cedar rubrails have become worn in places, but if the need eventually arises, replacing them will be simple.
Tina DeVries
The rowing stations are well spaced for double rowing. With two people at the oars, the dory picks up good speed and travels smoothly through calm waters.
It may be my imagination, but in the years since the Lowell Dory Skiff became our Sunday-morning fishing boat, we seem to be getting more good-natured nods from our neighbors at the lake. Maybe some of them have been getting more uninterrupted sleep. These days they even come by with family and guests to get a closer look at the handsome boat at our dock—like so many traditional wooden rowboats, the Lowell Dory Skiff, a good solid workboat, has considerable charm.
Tom DeVries enjoys learning a little bit more about the boatbuilders’ craft with each design he works on. A Finger Lakes Trout Boat might be next…there’s still some wood in the shed.
Lowell Dory Skiff Particulars
LOA: 14′ 9″
Beam: 4′ 6 3⁄8″
The Dory Book by John Gardner is available from The WoodenBoat Store, $29.95.
Is there a boat you’d like to know more about? Have you built one that you think other Small Boats readers would enjoy? Please email us your suggestions.
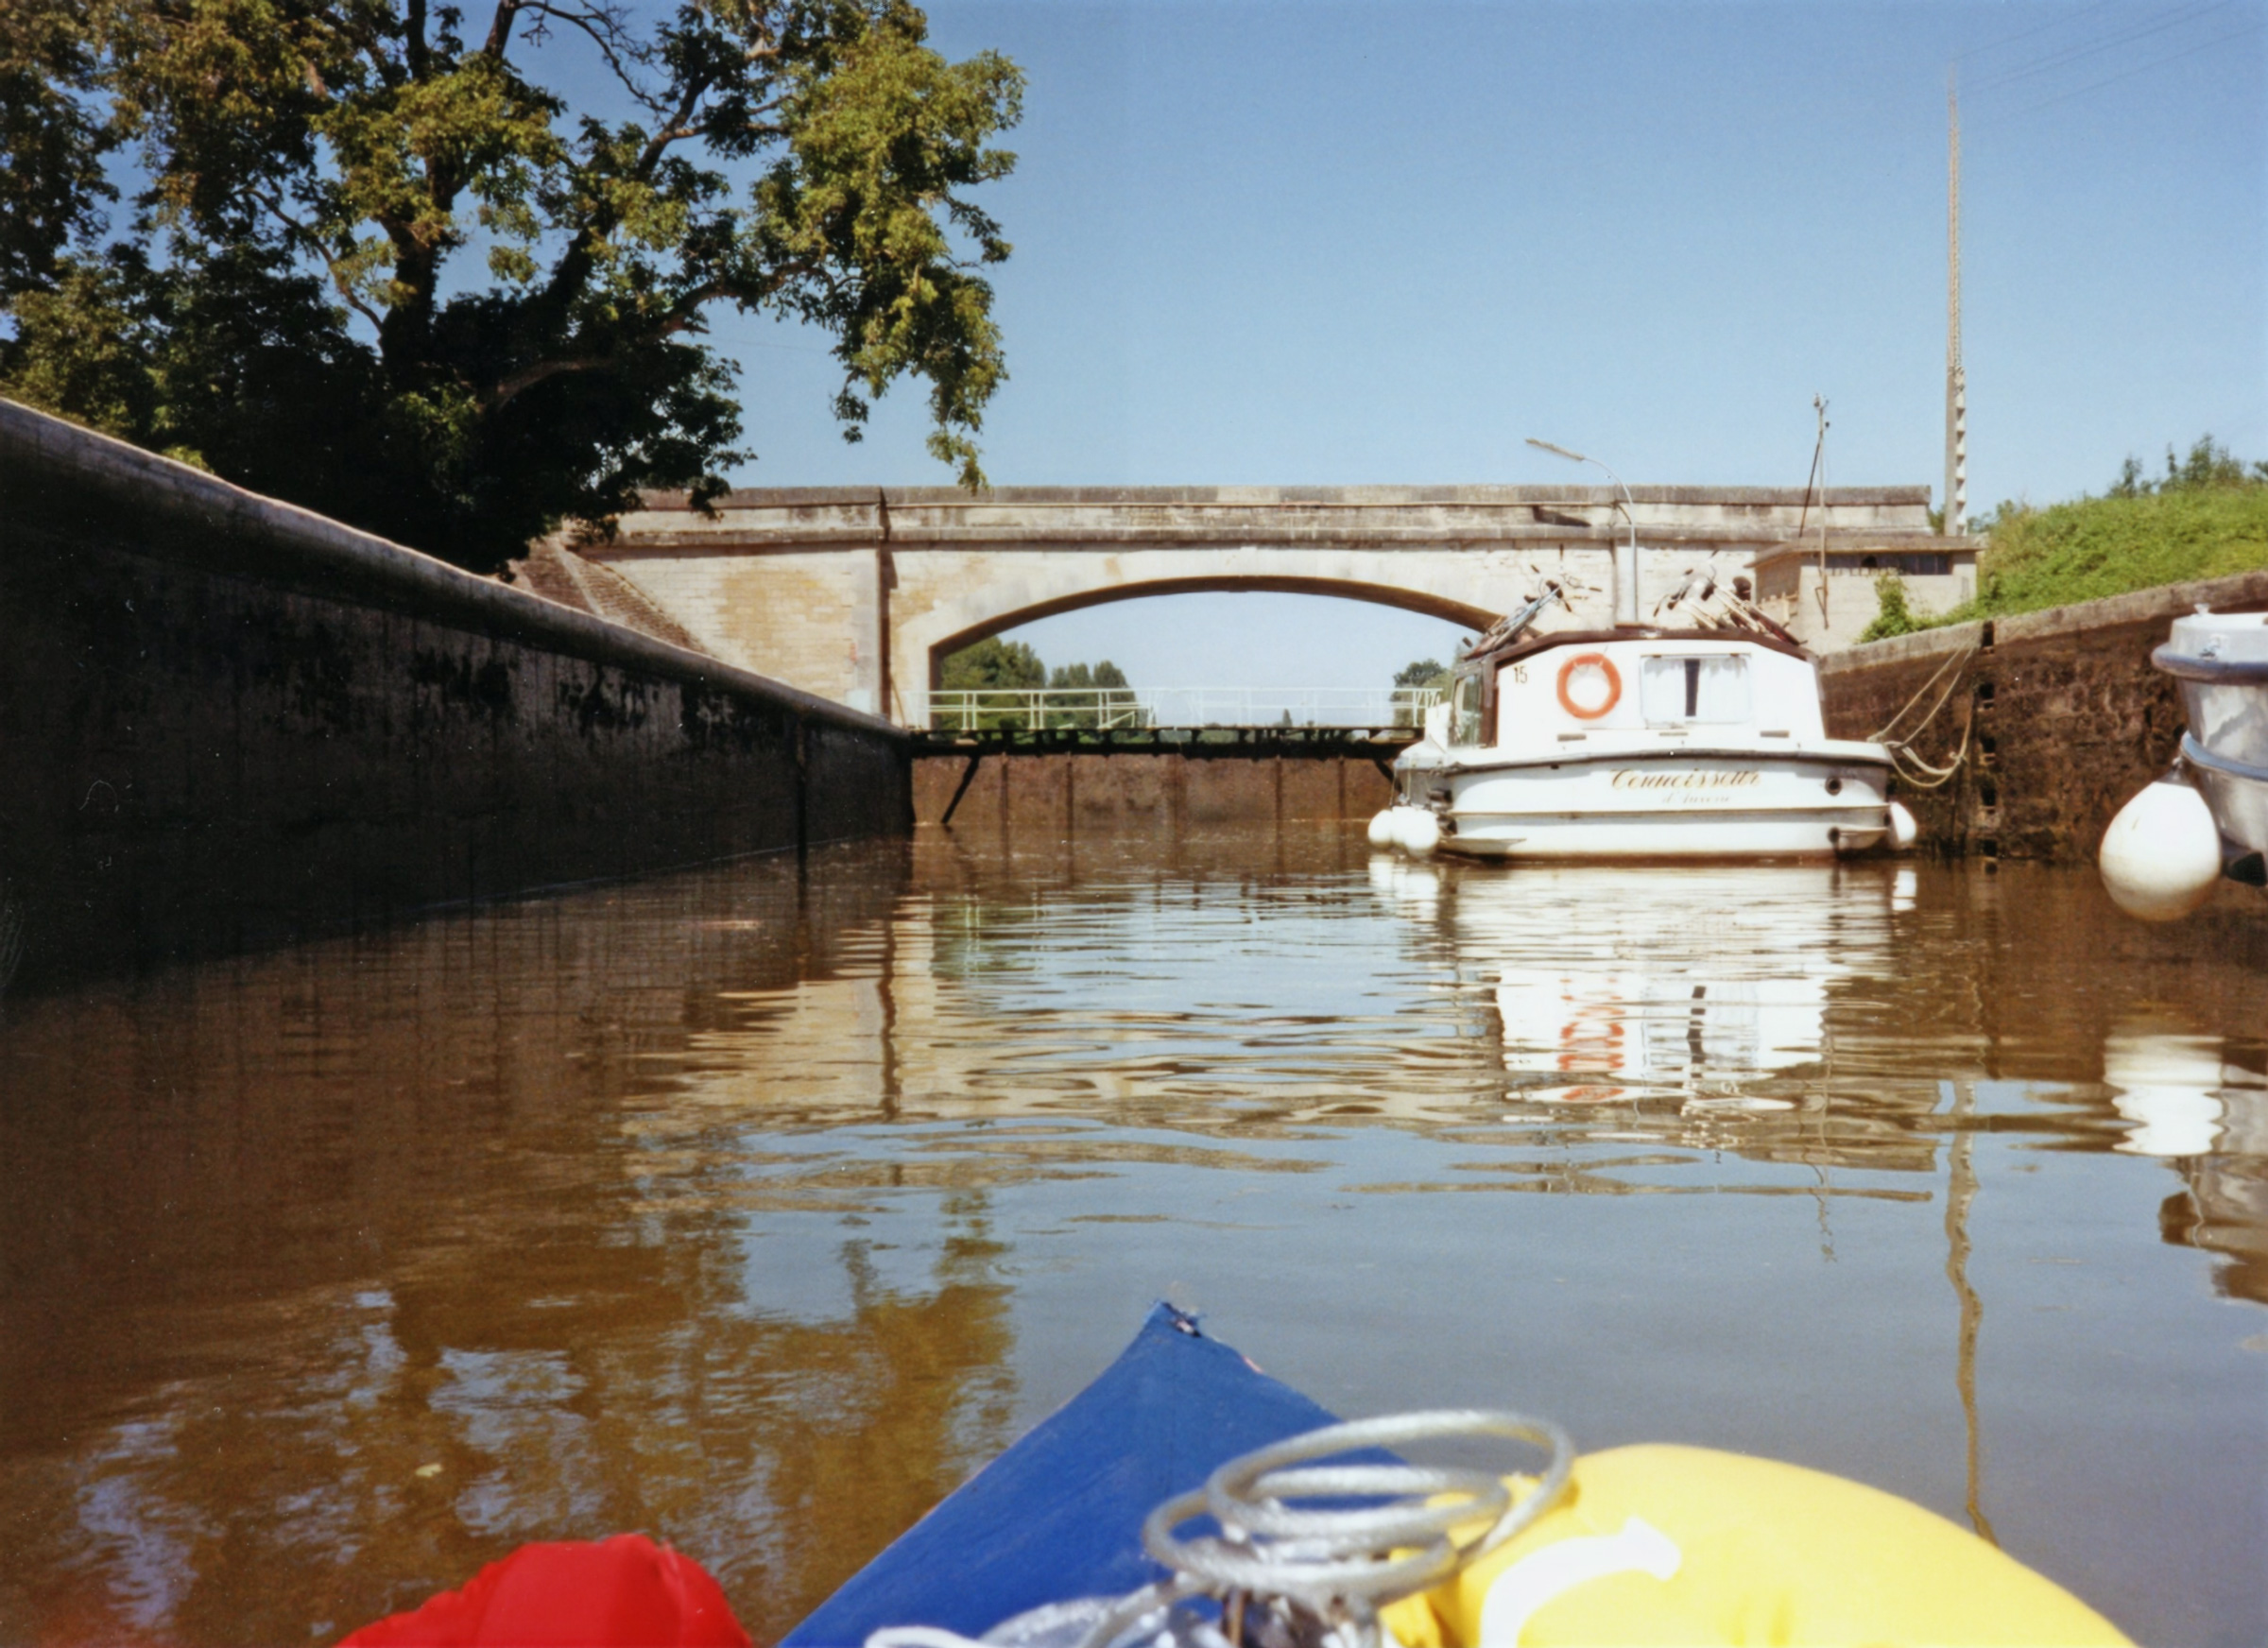
"Non, absolument pas!” The French woman’s crossed arms and set jaw conveyed little room for negotiation. As immobile as the granite walls of the lock she controlled, this graying lockkeeper in shapeless dress and old leather shoes was not going to allow two tourists in a kayak to pass. “Non.”
Photographs by the author
Still dressed in our travel clothes, we were happy to have the kayak fully assembled and ready to launch in the Yonne River. We were tired but excited to be heading off on our leisurely exploration of the Canal du Nivernais. Little did we know we were destined to be thwarted in our plans by the very first lockkeeper.
The warm afternoon sun and flat water promised perfect paddling. We had launched in high spirits only a quarter of an hour before. Now, her rejection deflated us. Taking a stroke here and there to maintain position, just downstream of the Batardeau Lock on the Yonne River, I was making no headway in my schoolboy French. So much for our letter to the Office National de la Navigation in Paris. We had inquired diligently about regulations. Monsieur Viannay’s reply had assured us all would be well, and the rules brochure he enclosed said nothing about kayaks in locks. This veteran lockkeeper had her own interpretation. “Non.”
The Batardeau Lock was the first of dozens of locks we had anticipated in a languid three-week summer cruise through Burgundy and Nivernais. The lure had been quaint villages and majestic chateaux, punctuated by romantic camping in sunflower fields or under the towpaths’ trees, all fueled by fabulous Burgundian food and wine, amidst the region’s rich history.
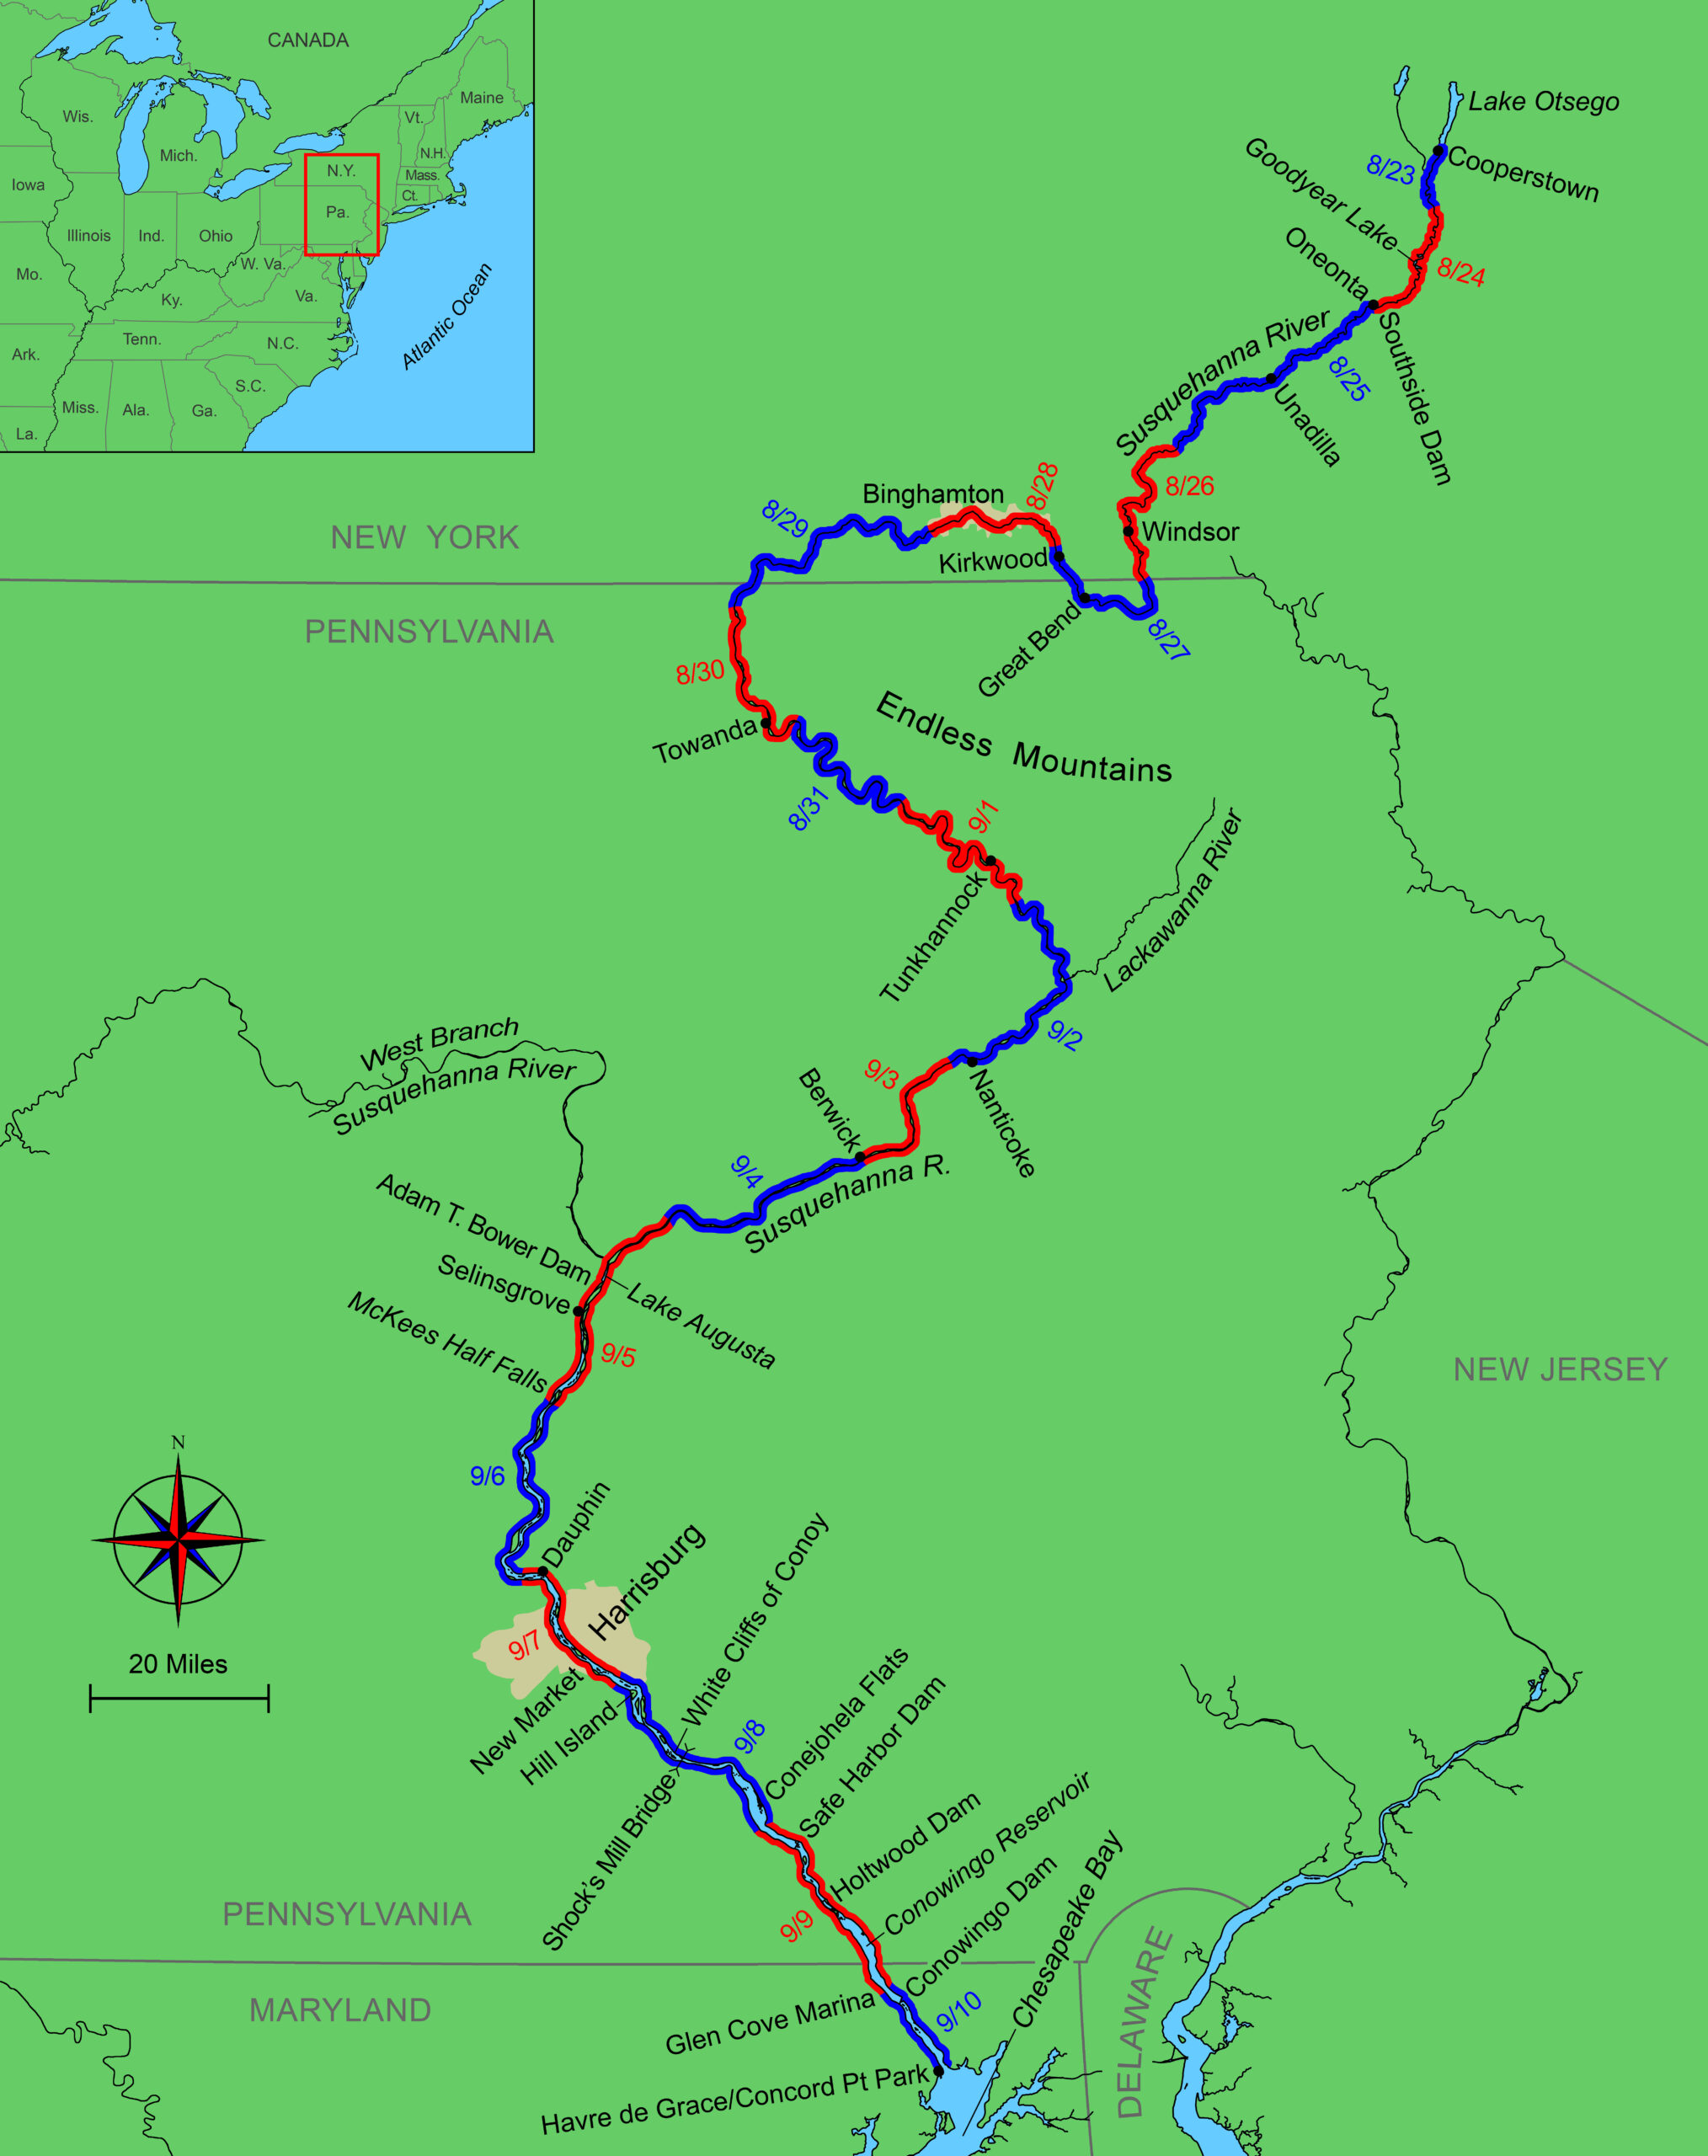
Dejected and beat, our 36-hour day was catching up to us. It had begun with a transatlantic flight from New York to Paris, then a taxi from Orly Airport to the Austerlitz Station, and two trains south to Auxerre, capital of the Yonne department and fourth largest city in Burgundy, where we had assembled our folding double kayak on the banks of the Yonne River. Weighing just 75 lbs, our 17′ Aerius II Klepper packed into two durable green canvas bags. One held the skin, seats, sprayskirts, and miscellaneous frame parts. The other, shaped like a golf bag, held longer frame pieces and the two-part paddles. The longest piece measured 4′ 3″. For overseas travel, we simply checked the bags on commercial flights as oversize baggage.
Now, tails between legs, we reversed course and headed back toward Auxerre. I sat aft, controlling the rudder with foot pedals. Molly had the bow seat. Experienced paddlers, we were proud of our blade work, tight and in unison. Over Molly’s head I could see the majestic Cathedral of Saint Etienne with its Gothic flying buttresses. Framed by trees along each side of the river, it grew closer with every stroke.
“We’re not in Kansas anymore!” Despite being rejected by the keeper of the Batardeau Lock, the view as we paddled back toward the cathedral of St-Etienne in Auxerre lifted our spirits.
Along the city’s waterfront, pleasure canal cruisers (squat, low-powered houseboats) were moored in a row. Péniches, the standard 38.5m-long motorized commercial barges, passed by in the channel; a few historic ones had been tastefully converted into luxury hotel barges. Beyond them sprawled medieval Auxerre. Thwarted by an unhelpful lockkeeper, we were, even so, in France, surrounded by picture-postcard scenery. All would be well.
I was coming off 10 years of knocking about the North Atlantic and Caribbean Sea in big traditional schooners where stunning voyages were always marked by higher highs and lower lows. The thought of a boat trip abroad with no squalls or gales, no wind against tide, no threatening shoals, when the toughest decision might be the choice between Chablis and Chardonnay, had real appeal.
Young and in love in an old French town, we nevertheless needed sleep. A river’s-edge clump of trees and brush would suffice, we hoped, to hide our boat. Rather than disassembling, packing, and lugging the boat with us as we went in search of a bed, we locked it to a tree and took the risk. Near Auxerre’s clocktower, above what had been a gate in the medieval city wall, we found a two-star pension with rooms for 84 francs ($13). It was 1987; neither the Euro nor the internet yet existed.
Auxerre to Canal de Bourgogne
Next morning, drinking coffee near a statue of Saint Nicholas, patron saint of watermen, we changed the plan. We had researched and intended to paddle Canal du Nivernais, supposedly one of the loveliest canals in France, which began in Auxerre, and appropriated the Yonne River as it proceeded south.
Roger Siebert
.
Now, hoping for more understanding lockkeepers, we decided to paddle north on the Yonne toward Canal de Bourgogne. Part of the waterway route connecting the Mediterranean Sea and the English Channel, the Yonne flows into the Seine, which then flows through Paris. We knew little about Canal de Bourgogne, but it was meant to be charming.
The first lock on the Yonne lay only 500 yards away. No lockkeeper appeared as we landed along the bulkhead, unsure of our reception. Portaging might be the answer. Our as-yet-untested Bavarian bootswagen (boat cart) proved itself straight away. Molly pulled the camping gear out of the kayak’s forward section, piling it amidships. We placed the stern over the cart and secured it with straps. This allowed me to heft the bow and push the well-balanced rig easily along the path. We had only 125′ to go; it seemed like a snap.
And so it was, until relaunching time. On the far side of the lock, the water level was 4′ lower. To launch, I perched on a toehold along the top of the sloping lock wall. Heaving together, we launched with a splash. As the boat plunged, I tried to check its momentum with the bow line, and promptly tore the forward eye from the canvas deck. Damn! Lesson learned, from then on, we used our tightly rolled foam sleeping pads as rollers, and took the weight with a strap while relaunching.
The next lockkeeper, an older man, talked on the telephone as we approached. He ignored us. We portaged. A couple fished intently near the lock, without a glance in our direction. No one seemed to care about us or our kayak.
When portaging—as here, early on in the trip while we were still on the Yonne River—I found it easier to push the kayak ahead of me rather than pull it behind. With all our gear moved into the cockpit, the bow became light enough for me to tip the boat back onto the cart and start wheeling.
Intervals between locks were short, no more than a mile or two. We would just get going and then need to stop. A very young woman had charge of the third lock of the day, at Boisseaux. We smiled and waved, but made no attempt to lock through. These Yonne River locks were big. In such a tiny boat it might have been insulting to request an opening. A chatty fisherman offered help, which we accepted, and though the portage was the longest so far—several hundred yards—all worked well. Again, until the relaunch. The drop was simply too far to slide the kayak into the water, even with the rollers, and we didn’t dare pitch it over the edge. We unloaded it entirely, rigged a strap as a sling aft, and attached a bow line forward, right around the boat, before lowering; it worked.
On we paddled with barely a breeze, the summer sun warming the bare skin on our arms and legs. Mallards dabbled along the river’s edges. A cheerful young couple with a six-month-old baby, to whom Molly paid a great deal of attention, staffed the next lock, on the outskirts of Monéteau. When I requested drinking water the man smiled broadly, then insisted that we empty all of our water bottles in exchange for his water—better water, fresher water! A bedraggled 24′ fiberglass sloop whose rig was long gone hove into sight, going our way. It needed to lock through, so we joined them. Finally! Locking was far easier than portaging.
Central Burgundy was our kind of place, a kingdom of waterways where the past was never more than a stone’s throw away. A pastoral landscape that bundled old-fashioned human ingenuity, such as cast-iron lock gear, with remnants of nature. And we liked our teamwork, being dependent on each other. We swung together, feeling a new energy. Paddling north under the bridge carrying the Paris–Lyon A6 highway, with cars and trucks whizzing overhead, modernity intruded, but only briefly. Spirits rising, we paddled on, past the shallow Serein River flowing into the Yonne from the right. Shortly before the road bridge linking the villages of Bassou and Bonnard, a lovely wooden punt lay moored along the bank in water so still it perfectly mirrored the boat. Venerable with age, but well-kept, the little craft’s pumpkin-colored sheerstrake set off its dark green hull; it rode quietly, almost timelessly, a serene scene worthy of Claude Monet.
Nearby, a gentle stretch of level bank presented itself between the waterway and a farmer’s field. It was time to call it a day. A good one, we thought: almost 13 miles with seven locks, two of which we had paddled through.
Our first night’s canal-side campsite amid the tall grass and Queen Anne’s lace beneath the trees was typical of most of our overnight resting spots.
Tall grass and Queen Anne’s lace made a natural cushion for our tent, pitched near a row of old poplar trees, sentinels guarding the canal. It looked tranquil. Boat traffic stopped at night, so we would be undisturbed. Out came the food bag. Voilà! A bottle of Beaujolais would pair nicely with the Époisses, a pungent Burgundian cheese. There were fresh green beans to steam on our camp stove, and slices of Charolais beef in butcher’s paper. My vegetarian paddling partner passed on the beef, but happily tucked into the baguette. It was the perfect end to a fine day.
Of Péniches and a World War
From the tent door next morning we watched the mist rising off the water, filtering the early light. Packing up to the chattering of blackcaps and chaffinches, we discussed the locks: The engineering and ingenuity were impressive; their history intriguing. By frequently interrupting our paddling we would avoid “paddler’s elbow” and wrist problems, but the hassles were real. We had not realized how many locks we would have to portage. Getting out of the boat and stretching a bit was satisfying, but a kayak loaded with camping gear is cumbersome. Steep banks and sloping lock walls had to be negotiated; it compromised the charm.
Transiting our final lock on the Yonne, near its confluence with the Armançon River, we paddled through Laroche-Saint-Cydroine. The town marked the beginning of the Canal de Bourgogne, which stretched 150 miles ahead. If we wanted a goal, there was a 2-mile-long tunnel in Pouilly-en-Auxois 96 miles away along the canal. Carved through solid rock 1,837′ above sea level, it went through a mountain, and to reach it required climbing that mountain—in our boat! I suddenly itched to try.
A former competitive rower, I thought that with determination and luck climbing to Pouilly-en-Auxois might be possible. Molly considered our choices: a slow exploration of Burgundian charms or paddling hellbent uphill for 96 miles, through 102 locks. It was, she said, a no-brainer. And I couldn’t argue. Slow and steady won the day.
This was one of the last commercial péniches still hauling freight on the canals. At one time, a massive fleet existed, all built to conform to the locks’ dimensions. Horse-drawn barges were outlawed in 1970, and the towpaths quickly became the domain of walkers and cyclists.
Miles later, in Brienon-sur-Armançon, we watched grain loading from a modern silo into a stout old péniche, one of the last vessels using this canal commercially. For centuries péniches carried grain, firewood, building materials, timber pit props for mines, and other bulk cargoes crucial to pre-modern France. Built to specifications, one peniche filled an entire lock. Back in the day, some péniches even had a stable aboard (or at least a stall) for their draft animals. But the future was elbowing its way on to the canal. Seventeen years before our trip, horse-drawn barges were outlawed—they impeded motorized vessels—and the towpaths became the domain of walkers and cyclists.
We camped by the canal every night and rarely hauled the kayak. There was no traffic on the canal after dark, and besides, the serene pace at which all canal boats traveled meant there were no troubling wakes—we would pick a place to stop, drive in two tent pegs, one for the bow line, the other astern, and tie up. That was it.
With each passing day we locked through more frequently. As we approached each lock we held back, exchanging pleasantries with the crews of entering powerboats. Once they were settled, we paddled in, tying up to the lock wall, or (with permission) simply hanging on to the rail of a boat as the lock filled and we all rose. Lockkeepers, whom we occasionally tipped, took no special notice of us so long as we went through in the company of motorized pleasure boats.
Charmed by huge fields of sunflowers, sweet villages and imposing estates, and by the wonderful wines, we lost track of the days until one morning when we arrived at the first lock of the day and found it closed. Wednesdays were keepers’ day off. Sufficiently adept now at portaging, this was no hardship for us, but hire-boat crews had to amuse themselves otherwise for a day. We landed, stretched, and scoped out the portage as several older men approached in the sunshine.
Our boat cart worked well, but when offered assistance I was never too proud to accept.
Determining that we were Americans, one fellow boldly asked, “Were your fathers in the war?” (They meant, of course, World War II.)
“Yes,” we replied.
“Then we will carry your boat!”
They insisted. It would have been churlish to refuse. Their appreciation for America’s intervention in the war some 40 years earlier, was still very real.
Cafés, Restaurants, and Boulangeries
Taking our time and pausing at cafés was a happy alternative to sprinting for a distant mountain tunnel. It seemed that rural French folk spent a lot of time in local cafés. They smoked unfiltered Gauloises, drank coffee and kir—two measures white wine, one measure Cassis de Dijon—chatted, and argued. They were joined by cats and dogs: fashionably attired elderly ladies brought cats on leashes; dogs lay docilely at their masters’ feet; other dogs came and went through the open door.
And the café crowds welcomed the silly Americans—warmly, at times.
“You are doing what?”
“We are kayaking the canal to Dijon.”
We provoked laughter and protestations; were offered free drinks or occasionally just shrugs. Temporarily being the center of attention was fine, and memories of the first day’s lockkeeper receded.
We grew to like bivouacking in the wilds along that civilized canal. On the outskirts of Saint-Florentin, however, we pitched our tent in a bona fide campground. Saint-Florentin was the biggest city we had seen since Auxerre, though with only 4,000 inhabitants it presented more as a town. People had lived here a long time. We strolled compact streets under the imposing church, built over several centuries throughout the late Medieval and early Renaissance periods. Two- and three-story homes and shops roofed in brown tiles prevailed, with plenty of trees and flowers.
In Saint-Florentin we came across this rendering of the town’s municipal logo. It was easily 20′ by 40′, re-created in flowering annuals.
On a steep bank of grass, next to an ancient tower, gardeners had planted a rendering of the town logo with red, yellow, purple, and white annuals in bloom. Easily 20′ by 40′, weed-free and precise, it conveyed local pride. Burgundians connected to place in ways we could not fathom. As visitors whose siblings and cousins and aunts and uncles were scattered to the winds back in the United States, we found those rooted inter-generational connections intriguing.
Next morning, insistent roosters greeted the day. I liked the French vernacular for rooster, rendered in English since the Middle Ages as “chanticleer,” literally to sing clearly, from chanter (to sing.) We went in search of café au lait and fresh pastries. On past trips, kayak-camping in Chesapeake Bay, we had been quite content without nice china cups of café au lait. And the 10-day Klepper tour we would make the following summer among Maine’s spruce-clad islands was stunning without fresh pastry. But why do without when Burgundy extended its bounty?
Cozy lockkeepers’ cottages, with well-raked gravel in the dooryard, flowers in profusion, and pollarded poplars were the norm—homes that seemed to scale as if they had always been there. Lockkeepers occasionally offered fresh eggs or vegetables for sale. Some had rabbits in hutches, not as pets, but destined for the pot. No one hurried, the welcome was genuine.
The locks had vertical granite walls and iron mooring posts. A boat heading upstream would enter through the open downstream doors. Ahead of it the closed upstream doors held back canal waters whose surface was higher, sometimes 6′ higher. After the boat was securely tied, the lockkeeper closed the lower doors, then opened a valve to flood the lock, raising its water level to that in the canal ahead. With the downstream doors remaining closed, the upstream ones were opened, and the boat proceeded. All of the gear was operated manually by the lockkeeper, sometimes assisted by boat operators.
For the most part we were given warm welcomes by the locals—none more so than the excited greeting extended by this group of children with whom Molly quickly made friends.
Of Children and Bureaucrats
Stopping along the towpath in one town we were immediately befriended, even swarmed, by a bunch of children six to eight years old. There were no adults in sight, this was their domain, and they had the run of it. The girls wanted to touch Molly’s long light-brown hair. One boy posed on the path, holding my paddle upright and saluting. Full of questions and laughter, they told us that kayakers were not a typical sight.
Straddling the canal ahead, the town of Tonnerre appeared, about the size of Saint-Florentin, but much older. Bronze Age burials preceding the Romans have been uncovered here. Two thousand years ago the Romans called this spot Tornodorum. It oozed antiquity. We could see small houses roofed in thin stone; others with rusty-red roof tiles. As we approached Lock 95 a female lockkeeper, about the age of our mothers, stood near the gate.
Her harangue made the chilly reception of day one seem mild. No, we were not going through the lock! No, we were not going to portage around the lock! I remonstrated, telling her that we had transited about 30 locks so far, paddling or portaging without incident. It did not matter! We could not do this! Our very presence affronted her. She did not care a whit about our welcoming letter from the national office. I asked if I might speak to her supervisor. Through the torrent that followed I determined that the Chef Subdivisionnaire had an office in city hall and would be there later that afternoon. We thanked her, turned back downstream, found a place to leave the boat, and walked into town.
The lockkeepers’ cottages were typically small and neat, with abundant floral displays and well-trimmed lawns. The locks themselves were faced with granite-block walls and often equipped with centuries-old iron mooring bollards, as seen here.
Late in the day, we found the supervisor in his office. About my age, he listened, smiled, asked a few questions, then invited us to his home in two hours to meet his wife and kids and have a drink. “Merci, monsieur. That would be very nice.”
The magical hours we spent in the supervisor’s family garden were to be some of the most memorable of the trip. As crickets chirped and birds settled in to roost, the kids overcame their shyness, befriended by Molly’s smile. Monsieur’s wife served appetizers. He poured wine. They could not have been more gracious. Conversation rolled on, a hybrid of French and English. Mentioning nothing about the keeper at Lock 95, he pointed out that what we were doing was not “conventional.” He did not say it was forbidden.
I repeated that we had transited nearly 30 locks so far without incident; then elaborated. Molly and I had done a lot of sailing and kayak touring. I was a professional seaman, a licensed master mariner who had commanded grandes goélettes (big schooners) in the Atlantic and Caribbean. His eyes widened. I knew that the Tall Ships reference was my ace. People always thought it was romantic.
I extolled the glories of overseas France—Martinique, Guadeloupe, Saint Martin, and Saint Barts in the Caribbean; Saint Pierre and Miquelon in the North Atlantic, near Newfoundland. Had I been to those places, he wanted to know? “Yes, monsieur.” All of them. He knew very few people who had seen those far-flung outposts. As a patriotic Frenchman he was proud of overseas France, and this laughing American sitting in his garden brought those romantic territories closer to home.
When our passage through a lock coincided with one or more powerboats going our way, we would make the most of the company and pass through unchallenged by the lockkeeper. At such times we would always hang back and let the much-larger boats enter the lock ahead of us.
The wine went around. Madame put the children to bed and still we talked, with Molly asking about his career on the canal. He was a functionary in the Ministry of the Environment in charge of that section, he said, a secure government job on which to raise a family.
We left with his promise that if we came to City Hall in the morning, he would issue a permit. He was true to his word.
Next morning, the woman at Lock 95 did not make eye contact. She looked at the permit, and stamped our newly issued passage card. We tipped her 10 francs (about $1.50). Effectively a “Get Out of Jail Free” card, our new customized permit meant no more obstructive lockkeepers.
From a Burgundy Chateau to a Dentist
Five miles beyond Tonnerre, the size and grandeur of the Château de Tanlay surprised us. It is considered the finest great house in Burgundy. Accessed by a bridge over a moat, the sumptuous limestone buildings were constructed in fits and starts between 1555 and 1649. Cylindrical towers on the main house set off the corners of a grand courtyard, all luxury and elegance. One wall on the grounds consisted of a row of shell-headed niches, each easily 25′ tall, flanked by classic pillars.
Tradesmen on scaffolding were working on several stonework sections and the slate roof. I speculated that repairs never ceased; that these men could be the great-great-great-grandsons of masons who had built the chateau. Men from 400 years earlier, who might not have been honored with gravestones, but whose creation endured.
Johann Klepper of Rosenheim, Germany, began marketing collapsible kayaks in 1907, capitalizing on the lure of waterways inaccessible with conventional wooden boats. Sales boomed. By the 1980s, his brilliant design had evolved into a one-piece skin with a Hypalon rubber bottom and canvas deck. Using snap-lock fittings, paddlers could assemble the varnished hardwood skeleton of the boat, and slip it into the skin. My favorite step was the final one, inflating the sponsons that ran the length of the boat, one on each side. Inflation, by mouth, stretched the skin tautly over the frame. Total assembly time: about 15 minutes.
Still ascending the Armançon Valley, we occasionally swam and splashed and fished in the nearby Armançon River, whose waters were clean, cleaner than those of the canal they fed. Though I cast with a light spinning rod, I never landed a fish.
Days slipped by on placid summer waters; there was never much wind. One afternoon, however, a fresh following breeze inspired us to rig Molly’s jacket as a spinnaker. She trimmed, I steered, and we scooted. Pastures of grazing Charolais cattle, wooded stretches, and open fields slipped by effortlessly, punctuated by villages and farms. Secluded campsites were always plentiful, bird life abundant, and the night sky an awning overhead. Life was easy, with simple pleasures.
But the day before we arrived in Buffon—a village I wanted to visit because of the correspondence between the 18th-century naturalist Comte de Buffon and Thomas Jefferson—Molly mentioned a toothache. She never complained, not just on this trip, but in life as a whole. By Buffon, she hurt. During a quick visit to the estate and workrooms of the Comte, we learned that 4 1⁄2 miles ahead, beyond the villages of Saint-Remy and Blaisy, the town of Montbard had a dentist. We double-timed it.
The provincial examination room was not quite a museum, but close. The antiquated dental chair, a bulky porcelain spit-basin, and old-fashioned implements would have been familiar in our grandparents’ youth. For the first time in weeks, we would have preferred a place where the past was not so present. The genial dentist spoke no English. I hoped he had good training. Dictionary in hand, I scrambled to translate.
On most days there was little or no wind, but one afternoon a fresh breeze picked up. Molly’s rain jacket made an effective, if rudimentary, sail, and for a while the paddles were put aside and nature propelled us on our way.
Her situation was rare, he said. The root of her tooth was growing sideways through the gum; he would need to do a root canal.
Molly was firm: “Get pain killers and antibiotics,” she said, “and ask him to stabilize it. No root canal until we’re back in the 20th century.” By the time we left, she was loopy with pain and pills. I tucked her into a nearby hotel and went to retrieve our boat.
We had paddled for more than two weeks, transiting 60 locks and about 80 miles; it had been a pastoral idyll, hassles and all. There were no regrets. But now the paddling was done. I disassembled and packed the Klepper, marveling again at its design, and wheeled it to the hotel on our boat cart.
Work on the 150-mile-long Canal de Bourgogne was started in 1774 and completed in 1832. It links the Yonne River at Migennes to the Saône at Saint-Jean de Losne, and at its highest point at Pouilly-en-Auxois passes through a 2-mile-long tunnel. Once a busy commercial thoroughfare, by the late 20th century the waterway was quiet, and much of the time we had it all to ourselves.
By the time we boarded the train to Dijon next day, Molly’s pills had kicked in and she had reverted to her noncomplaining self. She was up for more adventure, and there would be time for a wonderful tour and wine tasting at Château du Clos Vougeot on the Côte d’Or, and sightseeing in Dijon. But, we agreed, days later as we waited to board the flight back to New York, the real treasures of Burgundy and Nivernais were best accessed by paddling on ancient canals, where charms awaited around every bend.
Jeff Bolster has been afloat in everything from single kayaks to 300-ton schooners, exploring far-flung corners of the North Atlantic, the Caribbean, and the South Pacific. Inspired by a lifetime afloat, his books include Black Jacks: African American Seamen in the Age of Sail and The Mortal Sea: Fishing the Atlantic in the Age of Sail. He lives with his wife, Molly, in Portsmouth, New Hampshire.
French Canals in 2025
I have been asked if one might do a similar trip today. An internet search for the Fédération Française de Canoë Kayak suggests that while canoeing and kayaking are thriving on French rivers as never before, such craft are generally not allowed to pass through locks. Portaging around locks is permitted. Some canal locks, however, appear to be surrounded by thick woods or brush, which would make the hauling and relaunching of a kayak challenging. But rural France is still replete with picturesque villages, vineyards, chateaux, and natural scenes, charmingly presented from the vantage point of a kayak, and intrepid adventurers seeking those charms might do better to investigate paddling rivers such as the Dordogne, the Allier, or the Loire, rather than the canals.—Jeff Bolster
If you have an interesting story to tell about your adventures with a small boat, please email us a brief outline and a few photos.
Wood encapsulation is an almost universal principle in modern boatbuilding. As amateur builders, we feel reassured when our labor of love can be encased in a protective plastic barrier. It just seems wrong to spend hundreds of hours building a boat out of wood only to toss it into water like a sponge into the sink—yet ancient boatbuilding techniques worked with, not against, water absorption.
For seafaring boats of the Pacific Northwest, the enemy is rain rather than salt water. With approximately 80″ of rain per year, freshwater pooling in wooden boats is a microbe haven whereas salt water, in this relatively cool climate, is inherently a preservative. Here, unless a wooden boat is hauled into a shop, it will be bathed in rain or water vapor for eight to nine months per year, and tarping it can spell disaster. Coverings wrapped tightly over the gunwales trap humidity like a greenhouse, promoting new cracks in the wood and fungal stains across the brightwork, under the varnish.
To Coat or Not to Coat
It’s natural to assume that paint or varnish, or especially a few coats of epoxy, will waterproof wood. And to an extent, this approach does work for lightly used pleasure boats. Full encapsulation is inherent in a stitch-and-glue boat where plywood planking has fiberglass-and-epoxy protection inside and out. But for the traditional plywood-on-frame design, ’glassing an interior is unrealistic, and a boatbuilder will struggle to apply a barrier that penetrates all the cracks and crevices created by extensive and awkward framing joints. Once a boat is complete and in use, a proliferation of unseen dings, scratches, rubs, and pokes will perforate a coating of paint, varnish, or epoxy-varnish.
Photographs by the author
Applying water-barrier protection such as ’glass and epoxy to a complicated interior structure is not always practical. For working boats like this Pacific City dory, applying boat soup on an annual basis is an affordable and long-lasting approach. The bilges of KAPETAN, seen here, were treated when new and have been re-treated annually for the past 10 years.
In the Pacific Northwest, many ply-on-frame boats are built of fir marine plywood on fir framing. The materials are easy to work, widely available, and more or less affordable. But fir is soft, and a varnish- or paint-over-epoxy coating is vulnerable due to the softer underlying wood matrix that provides less support to the thin barrier layer. The day-to-day grind will, one way or another, penetrate the coating and, once entrance points are created, water creeps in and under.
Untreated, Douglas fir is rot resistant and can withstand countless cycles of absorption and drying. But around a small puncture a barrier coat will trap water and prevent normal cycles of evaporation.
“Poison It and Oil It”
The life of an Oregon beach-launched semi-dory (or drift boat, on Oregon’s coast-range rivers) is about as hard as it gets, and traditional-boat owners in the region long ago gravitated to a simple approach to preserving the life of their craft: “Don’t paint it, don’t epoxy it, don’t varnish it—poison it and oil it.”
Ideally, the treatment is first applied to bare wood surfaces, when the boat is new, but it can be applied whenever there is bare, untreated wood to be protected.
An important trick when applying boat soup is to warm the boat so that the oil retains its low viscosity, reaching into nooks and crannies, and penetrating deep into the plywood to achieve maximum saturation. A warm sunny day can often provide enough heat to make a significant difference.
Since an oil-and-wood matrix can, by itself, be a beneficial environment for some microorganisms, the local prescription is first to saturate a boat’s interior plywood and framing with an antimicrobial/antifungal preservative—to “poison it.” I use the iodine-based (iodopropynl butylcarbamate, IPBC) Woodlife Classic Clear. Next, once the wood is completely dry, the boat is warmed in the sun or a heated shop to prepare it for oiling. (The warmer wood temperature will help to maintain the oil’s lower viscosity as it penetrates, and also create a temperature gradient that pulls the oil inward.)
Now the boat is ready for the “boat soup” to be applied.
What’s in the Soup?
Boat soup refers to a variety of recipes that include oils and turpentine. In my region, it is commonly a mix approximating 45% turpentine, 45% raw linseed oil, and 10% pine tar and/or tung oil, or similar. Raw linseed oil penetrates far better than boiled, which tends to cure like a varnish, an outcome fundamentally at odds with the goal of oiling plywood. Pine tar promotes a darkening of the plywood over time until, after decades of use, it is essentially black, while tung oil only accentuates the wood grain’s natural color. The boat soup has a low viscosity allowing it to penetrate beyond the surface grain to provide protection while still allowing the wood to breathe.
How to Apply the Boat Soup
Typically, the mix is applied with a large brush. Working on bare wood, a dory owner may apply several coats, requiring two gallons or more for a new 22′ dory’s interior. After this first multi-coat application, the grain begins to fill, and thereafter usually requires only one coat per season.
In damp conditions, such as those experienced in the Pacific Northwest where annual rainfall on the coast can exceed 80″, wrapping a wooden boat in a waterproof tarpaulin can trap humidity in the boat’s interior. To avoid this, it is often better simply to leave the boat uncovered and tilted so that rainwater flows out through an open drain plug.
Does It Hold Up?
Of the oiled Pacific dories I have examined, interior plywood that has been treated with boat soup generally looks remarkably clean for its age, with limited or no checking. In contrast, plywood surfaces that have been painted, varnished, or even epoxy-coated, show significant checking. My assumption is that low viscosity, non-curing boat soup allows the plywood to go through countless temperature and moisture cycles more evenly, in a way that supports the stability of the plywood’s surface layer, and thus mitigates checking. Some local dorymen have suggested that the quality of the plywood also plays a significant role. True AA marine fir plywood would seem to be a thing of the past, and most modern AB plywood does seem to check more easily. Nevertheless, boats whose wood has been saturated with numerous coats of soup early, show significantly less checking and any checking that does appear, appears later in life.
As I enter my sixth season in the Pacific City Dory fishery, my appreciation for this low-tech approach to wood protection has only grown—for its simplicity, its aesthetics, and its longevity. Scores of 50-year-old Pacific City Dories are still in regular use with beautiful, oiled plywood interiors—a tried and tested local adaptation to a challenging environment.
John Goodell is a museum director and wildlife biologist. In 2019 he built his boat, TSHAWYTCHA, a 23′ Glen-L Hunky Dory. He oiled her interior when new, and has continued to renew the oil treatment every year since. He has worked TSHAWYTCHA in the Pacific City Fishing Dory fleet since her launching.
You can share your tips and tricks of the trade with other Small Boats readers by sending us an email.
"Best colors—standard goods since 1846… We custom match an endless selection of classic, as well as modern, colors in a variety of finishes. We have always handcrafted all of our marine paint … premium ingredients and small, handmade batches.” When you see such words on a website, you know you’re in the right place to find a quality boat finish. And, indeed, for the past 179 years, the Kirby family has been mixing some of the world’s finest marine paints, all handmade in small batches. Today, the George Kirby Jr. Paint Company (Kirby’s for short) is run by George Kirby IV (seventh generation) and his wife, Shari, who continue to offer great products and exceptional technical assistance and customer service from their facility in New Bedford, Massachusetts.
Audrey and I came across Kirby’s Marine Topside Hull and Deck Paint about 10 years ago when we were in search of a custom color for a special paint scheme for our Sunfish. George mixed up an international-orange color with just the right amount of red, blue, and yellow pigments, and also sent us a color-chip card of Kirby’s traditional colors.
Kirby’s Topside paints come in three levels of sheen—gloss, semigloss, low-luster—and three sizes—gallon, quart, and pint. They are described by George as “old school” paints blended from alkyd resin, titanium dioxide, zinc oxide, talc, mineral spirits, and bentonite. Thicker than most modern one-part marine topside paints, which have considerably more solvent, Kirby’s Topside is user-friendly, but if you’re new to the product it can take a coat or two to get used to the viscosity.
Photographs by the author
When rolling and tipping, we thin the paint with conditioner to keep a wet leading edge. Here we’re applying the first coat of low-luster Maynard Bray Off White—one of Kirby’s many custom colors made available to all customers—over a single coat of Kirby’s white marine primer.
Applying Kirby’s Topside Paint
Topside can be brushed, rolled, or sprayed on wood, metal, and fiberglass that is properly prepared, dry, and clean. On most of our boats we apply a single coat of Kirby’s White Marine Primer as a bridge coat to ensure proper adhesion, unless we are going over an old coat of Kirby paint, in which case only a light scuff with 120-grit sandpaper is in order. The paint is easy to sand and, if properly hardened, does not clog the paper.
The Kirby gloss paints have fewer solids than the low-luster and, as a result, are typically thinner, but in any of the three available sheens, the opacity is excellent. A fine uniform color finish that completely hides the substrate can usually be achieved with two coats of Topside over one coat of Primer, although if you thin the paint—as we do to get the best viscosity to match specific brushes or roller covers—you may need three. When rolling and tipping we use a 9:1 mix of paint to Kirby’s Conditioner and find that the paint self-levels to a smooth finish with rarely a run or sag; where there are flaws, they are typically due to application error rather than any problem with the paint. A well-applied coat will cure in about 24 hours if temperatures are in the low 70s and humidity is moderate.
The paint has a durable finish. On the Kirby website one happy customer writes that they have not needed to repaint their kayak for 10 years, and we, too, have at least one boat that was painted a decade ago and still looks good. Of course, longevity will vary according to use—a boat on a swinging mooring, exposed to the weather year-round, will need to be repainted sooner than our boats that are stored on land and under cover when not in use. One high-profile customer, the 114′ Sailing School Vessel ERNESTINA-MORRISSEY, was painted three years ago and is still looking shipshape after continuous exposure to the harsh maritime elements of New Bedford, Massachusetts.
Whether standard, existing-custom, or new-custom colors, Kirby paints can be ordered in pints, quarts, or gallons. The conditioner, described by Kirby as a “special, pre-blended solution of thinning agents formulated to control the consistency and flow of paint,” can be ordered in half-pints, pints, and quarts. The Skipper Bahamas Blue seen here, was custom-made for Audrey; the board behind the cans has two coats of the low-luster (satin) finish.
Topside paint is available in 67 standard colors but can be custom-made to just about any color. We recently created Skipper Bahamas Blue for our Bahamian dinghy—having found a color we liked in a range of interior house paints, we sent George the RGB color numbers from that paint’s card and he went to work. Kirby accepts orders for as little as a single pint—popular among modelmakers—and in most cases George will mix the paint the day he receives the order, and ship it the next business day. George keeps records of orders so custom colors can be matched for reordering later.
With nearly two centuries of service behind the company, the depth of knowledge at Kirby’s is second to none. Whether you call seeking advice on how to prepare a surface, apply a paint, or retouch a finish, George is there to help. He can advise on paint, prep tools, or the best brush-and-roller system for any given project. And, while Kirby’s does offer a variety of tools, brushes, and rollers at very competitive prices, there is no hard sell when you call.
Whether you’re looking for that perfect pint of a premium custom color for your historic model, or a couple of quarts for your sailboat, kayak, canoe, or rowboat, give Kirby’s a call—George or Shari will be happy to help.
Kent and Audrey “Skipper” Lewis love the smell of Kirby marine paint and pine tar soap. Their adventures are logged at smallboatrestoration.blogspot.com.
Kirby’s Marine Topside Hull and Deck paints are available in gallons, quarts, and pints, $122.99, $47.99, and $29.99 respectively. Shipping is free on paint orders over $150 within the contiguous U.S.
It’s well known that meals taste better outdoors. For many of the same reasons—fresh air, heightened senses, and reduced stress among them—taking a shower at the end of a day’s cruising, whether at anchor or in camp, is much more enjoyable and restorative than showering at home. As I get older, and perhaps wiser, I have become less eager to make miles and more interested in being comfortable while afloat or ashore. Flextail, the company that makes an air pump that quickly inflates my thickest and most comfortable sleeping pads, has made a submersible water pump that is at the heart of my new system for taking a shower anywhere I might cruise.
Photographs by the author
The Max Shower has three parts—pump, showerhead, and hose—with quick-release connections that make the system easier to pack. While this photograph was taken on a sandy beach, it’s best to keep the system out of sand and dirt to minimize the chances of clogging the water outlet holes.
Flextail’s Max Shower pump measures 4 3⁄4″ × 3 1⁄8″ × 1 5⁄8″ and weighs 11 oz. The hose is 7′ 3″ long, and the showerhead is 2 7⁄8″ across and 3 3⁄4″ front to back and has a folding clip so that the shower can be hung and used hands-free. A 7.4V, 2500mAh battery supplies the power and is recharged via an included type-C USB cable. Fully charged, the battery should power the pump for 70 minutes on high flow or 110 minutes on low.
Flextail’s website specifies the Max Shower’s flow rate as between 2.2 and 3 liters (0.58 and 0.79 gallons) per minute. (The manual included with the device specifies 6–10L/min 1.36–2.27gal/min, which is evidently incorrect.) With the showerhead positioned at the same level as the pump, I measured 2.97 liters (0.78 gallons) per minute on low flow and 3.3 liters (0.87 gallons) per minute on high flow. Typical domestic showerheads deliver a maximum of 6.8 liters (1.8 gallons) per minute. The Max Shower’s rate of flow diminishes the higher the showerhead is above the pump, and while it doesn’t provide the pressure one expects at home, it delivers plenty of satisfying flow for bathing.
The pump is waterproof—its motor, switch, and charging port are rated IPX7—and operates by being fully immersed. I use a collapsible bucket as the reservoir. The pop-up shower tent I use is as much for retaining warmth as it is for privacy.
The Max Shower web page notes the water outlet holes in the showerhead have a diameter of 0.012″, which produce “a strong and invigorating water flow for a truly refreshing and enjoyable shower experience.” While this is true, the holes can get clogged and reduce that flow. The pump’s intake has a stainless-steel-mesh filter, but its openings are about 0.05″ wide, and can allow the passage of particles large enough to block the water outlet holes. The Max Shower is still functional even if some streams are blocked; clogged holes are quickly evident because they either deflect a stream or block it. With the showerhead disconnected, I was able to clear most of the grit by blowing air through a soda straw at the face of the showerhead, or poking the grit back through the holes with a needle, and then flushing it out of the housing with a strong faucet stream. While the showerhead can be disassembled by unscrewing the ring that holds it together, it’s not a good way to remedy clogged outlet holes—it’s difficult to put the head back together so that the interior parts are aligned to provide the proper flow of water.
The Max Shower can be used for more than showers: it can wash dirt off feet, children, dogs, and gear, to mention but a few. While the manual doesn’t specify if the Max Shower can be used with salt as well as fresh water, when queried, Flextail replied it can but they recommend rinsing the system with fresh water after use with salt water.
A pop-up shower tent and a collapsible 2.6-gallon bucket complete my shower system. The shower tent serves not only for privacy but also to retain the warmth provided by the shower spray and eliminate any chilling breeze. With the bucket filled with warm water, heated by camp stove or campfire, there’s more than enough for two thorough showers if you stop and restart the flow between soaping and rinsing. The water can be turned off by either closing the valve on the showerhead or switching off the pump. Using the whole bucketful for one shower is a soothing indulgence.
At the end of a long day on the water, the Max Shower can make the difference between collapsing into bed feeling worn out, or turning in happy, relaxed, and restored.
Christopher Cunningham is editor at large of Small Boats.
The Max Shower is available from Flextail for $56.99 and from online and retail outdoor equipment retailers.
Is there a product that might be useful for boatbuilding, cruising, or shore-side camping that you’d like us to review? Please email your suggestions.
Of all human senses, it is said that smell is the most evocative: the unexpected waft of perfume that brings back the long-missed presence of a loved one, the subtle odor of mustiness that transports you to a little-used summer camp of childhood, the lingering hint of newly baked bread that recalls a grandmother’s kitchen…. For Dylan Spaulding, the smell of fresh-cut cedar carries him straight back to childhood memories of his father.
Dylan grew up in rural New Mexico, a state with little association with boats or boatbuilding, but from an early age he shared a love of woodworking and then of boats with his father. His father had grown up in New England and before moving to New Mexico in the 1970s had worked as a carpenter at South Street Seaport and the Metropolitan Museum of Art in New York. When he moved west, he continued working with wood but, says Dylan, “mostly doing carpentry and shop displays; work that didn’t satisfy his creative side.”
Photographs by Dylan Spaulding
There is an old adage among boatbuilders that you can never have too many clamps and when it came to fitting the outwales and inwales on his Northeaster Dory, Dylan proved the saying true, using a combination of long bar clamps and individual spring clamps. The puzzle joints—visible in the starboard strakes—are standard in CLC kits; they are easy to align, and require minimal clamping pressure during assembly.
When Dylan was in third grade, the family moved to Essex, England, to live on a 31′ 6″ Maurice Griffiths–designed Golden Hind his parents had bought there. For a year, the four of them—Dylan, his mother, father, and 15-year-old brother—sailed the cutter up and down England’s East Coast, across the English Channel, north to Copenhagen, and, for the winter, to northern Holland to tie up alongside a sailing barge in a canal. “My brother hated being cooped up on a boat with us, and my mother, who was a New Mexico native and had no prior sailing experience, had had ideas of Mediterranean cruising, not Baltic winters. In retrospect, I realize my father also had very little experience. It was before the digital age, and our only source of weather forecasts was the crackly BBC radio broadcasts; navigation was all dead-reckoning and paper; and we had an analog depthsounder on which the needle went round—and round—and if you didn’t know how many rotations it had done you couldn’t be sure if you were about to hit bottom or were in deep water. We frequently ran aground.” For eight-year-old Dylan, the year on that wooden boat in Europe was “a formative adventure.”
Once construction was complete, Dylan turned the boat over to paint the hull and fit a bronze half-round strip to protect the skeg when beaching.
Some five years after their return to New Mexico, when Dylan was 13, he and his father decided to build a Rushton Wee Lassie. The building process had been documented in a 1991 article by Mac McCarthy published in WoodenBoat magazine, and they had found a table of offsets in Atwood Manley’s book, Rushton and His Times in American Canoeing. Dylan lofted the patterns for the molds, and he and his father built the canoe of strip-planked cedar. “I spent much of my eighth-grade spring break gluing cedar strips together,” recalls Dylan. “To this day, the smell of freshly sawn cedar takes me back to my dad’s shop and that project.” Dylan still owns the canoe. It hangs in his garage, above his own boatbuilding workspace.
A few years after they built the canoe, father and son tried their hands at some stitch-and-glue construction and built a Cape Charles Sea Kayak, referencing two more articles in WoodenBoat magazine. When finished, they used the boats together, forging memories far beyond the workshop. “One of the memorable trips,” says Dylan, “was to the upper lakes of Glacier National Park, where my father and I floated silently, the lake to ourselves, watching bald eagles in the trees, and camping.”
On launching day in November 2024, Dylan’s son—who had not been born when Dylan embarked on the building project—was proud to be PETRICHOR’s first passenger.
Twenty years later, in 2015, Dylan’s father passed away from cancer. Almost immediately Dylan decided to build another boat. “It felt like something I needed to do, partly in his memory.” He wanted to build something more substantial than a canoe or kayak, but remembered the enjoyment gleaned from a small boat. “I wanted to sail, but also recalled how great it was to cartop a lightweight boat and travel to locations farther from home,” he says.
He settled on the Chesapeake Light Craft (CLC) Northeaster Dory. Although it would need to be transported by trailer rather than on top of a car, Dylan believed the design ticked the rest of his boxes: it would be suitable for use on the various bodies of water within a few hours’ drive of his home in northern California, and was large enough for “serious boat camping and bigger water” but light for its size and capacity. He ordered a bare-hull kit from CLC.
During the years spent on the project there were periods when Dylan was unable to work on the hull itself. He used those times to pay attention to the details and to learn new skills: metalwork so he could fashion his own hardware; marquetry so he could add complementary padauk inlays in the thwarts and mast partner; and sparmaking.
“I hadn’t done any real woodworking since I was a teenager, so I decided to assemble the hull from the kit but make the rest from scratch to allow room for customization and creativity, and to challenge and develop my skills. I started out with very few tools, but finished with the equivalent of a simple woodshop crammed into a single-car garage.” Much of the work, he says, spilled out into the driveway, “to the amusement and confusion of our neighborhood.”
For the most part, when fitting out the bare hull, Dylan followed CLC’s design—spacered inwales, balanced lug rig, daggerboard and rudder assembly—but added his own touches to suit his taste and to give the boat traditional appeal. “In a way, stitch-and-glue felt like cheating, because the CLC kits go together so easily, even for beginners. I wanted to reacquaint myself with the skills my dad had taught me as a child but also to learn hand-tool skills that I hadn’t gotten from him. It led me to overthink at times and render some parts of the project more elaborately than they needed to be. For instance, I didn’t like how the CLC outwales were simply rounded off at the bow, so instead I brought them together with a compound miter joint.” He installed wooden belaying pins for the lugsail’s halyard and downhaul, wrapped the tiller with decorative knotwork, leathered the mast collar, and used bronze cleats where cleats were necessary. His spars came out of a single spruce pole—“salvaged from a San Francisco fireman’s ladder and gifted by a friend.”
To achieve a more traditional look, Dylan fashioned silicon-bronze-cheeked blocks, handworked anti-chafing leather parts, and used Duckworks’ Raid Braid for the running rigging; elsewhere he stained three-strand synthetic line to simulate manila rope.
Inspired by correspondents on CLC’s online forum, and by articles in Small Boats, he added sliding side seats to create a sleeping platform. The seats can also be removed so that, following designer John Harris’s advice, Dylan can sit on the floor to steer; he has yet to decide whether he prefers the seats or the floor. He added extra tiedowns for dry bags, stained synthetic line for his painter and anchor rode, made his own bronze-cheeked blocks, and fashioned a leather bailer as described by Ben Fuller.
Dylan began building his Northeaster Dory in 2017, but it would be 2024 before he was finished. Life, it seems, rather than lack of skills, was the prime delayer in the project. “I enjoyed the building, but I couldn’t always find uninterrupted blocks of time to work on it. I got married, we purchased our first home and had a child, I changed jobs, and then, like everyone else, waded through the pandemic.” At times, he says, the slow pace was frustrating, but it was also good to have the project in times of stress—“coming back to the boat was always a relief.” In the beginning, he reflects, it was “somewhat daunting to take on a project of this magnitude without my woodworking father behind me,” and when he found himself adjusting to fatherhood in his own right, building the boat seemed all the more poignant. And, says Dylan, when he wasn’t physically working on the boat, he was mentally planning next steps. “Building the finicky parts from scratch required honing my skills, learning many new techniques, and mastering tools my father had managed, one by one as they became necessary.”
Courtesy of David Leonard
PETRICHOR and Dylan making the most of a gentle breeze at the start of their first summer together.
The boat was launched in Sacramento, California, in November 2024. Dylan’s son, who had grown up enough to help with some of the final sanding, was proud to be the boat’s first passenger. The aroma of wood, glue, and paint no longer hangs in the garage, but when Dylan came to name the dory, it was another scent from childhood that came to mind. “Growing up in the desert, the scent of earth after rain brings me a sense of relief; this build did that too. The scientific name for that scent is Petrichor—it seemed appropriate.”
Jenny Bennett is editor of Small Boats.
Do you have a boat with an interesting story? Please email us. We’d like to hear about it and share it with other Small Boats readers.
The 11′ 6″ Guillemot design (pronounced gilly-mot) is a shorter cousin to the 15′ 2″ Tammie Norrie. Designer Iain Oughtred drew this robust little boat along the lines of a nineteenth-century ship’s boat or large yacht tender. He tells us, “She floats on her designed waterline with three adults aboard, and can carry a load of gear as well…. Two [adults] plus two children might be a comfortable maximum for pottering about.”
This hull shows a slight hollow at the forefoot. The lines then flow smoothly through particularly firm bilges in the mid-section. Finally they sweep up easily to a nice wineglass transom. This is a burdensome yet shapely hull. Compared to many dinghies, Guillemot has flatter floors, firmer bilges, and more carrying capacity. The designer explains that, while she might not prove so fast as some other tenders, this boat will be “a lot steadier in the water and less flighty.” He notes that she will perform well whether rowing or sailing, and “can happily take a light outboard motor as well.”
Guillemot’s drawings include three sail plans: a standing lug, a balance lug, and a sloop. The boomless standing lug will be the simplest to build and to set up. It might be considered as auxiliary propulsion for a boat that will be driven primarily by oars.
The balance lug offers fine all-around performance and more precise control of sail set. You can vary the amount of twist in the sail by adjusting where the boom and yard secure to mast. Farther aft along the boom and farther up the yard will result in less twist. In light air you can ease up on the main downhaul, which will give fuller shape to the sail. When it breezes on, tighten the downhaul. The resulting “flatter” sail will make for a safer and better handling boat.
The more complex sloop rig might be a good choice for builders who plan to set aside oar and outboard in favor of sailing exclusively.
Guillemot’s hull will go together in glued-lapstrake fashion with high-quality plywood strakes and epoxy. The well-detailed six-sheet plans set includes full-sized patterns for the stem and all molds. For builders who prefer working with solid cedar strakes and bent-oak frames, the designer includes specifications for traditional lapstrake construction.
When drawing this good little boat, Oughtred successfully combined robust stability and pleasant appearance in a small package. Guillemot will earn her keep along most any waterfront.
LOA: 11′ 6″
Beam: 4′ 5″
Draft:
–(cb up) 7″
–(cb down) 2′ 8″
Weight about 140 lbs
Sail area:
–balanced lug 64 sq ft
–standing lug 55 sq ft
–sloop 72 sq ft
Completed Guillemot Images
The mast for the gunter sloop rig is supported by shrouds and a forestay, not a mast partner.
The sloop rig here carries 72 sq ft of sail. The plans include options for single sails: a balanced lug rig, with boom, carrying 64 sq ft of sail; and a standing lug, loose footed, carrying 55 sq ft.
Inspired by the workboats of Brittany, France, François Vivier designed Beg-Meil as a safe and seaworthy daysailer. She can be singlehanded even in windy conditions.
The latest design by French small-craft designer François Vivier (see WoodenBoat No. 212) is called Beg-Meil, a name that derives from a famous fishing village in Brittany, a region whose historic work-boats have deeply inspired the designer over the years. The design is not completely new—it inherits the same hull lines and dimensions of Vivier’s earlier Ilur, of 1988—but it fulfills a very different purpose.
Ilur was designed as an elegant and seaworthy day-sailing and rowing boat, inspired by the traditional lines of small fishing boats of Brittany. The design has proven to be Vivier’s most popular. Nearly a thousand plans have been sold, some of them for use in places as far-flung as lakes in the Alps and islands in the Pacific. Her generous freeboard makes her very able in choppy seas, and her seaworthiness has been demonstrated by some tremendous passages (which the designer does not recommend!) along Brittany’s coastline, which is renowned for rough seas. With 55 gallons of built-in flotation, the boat is unsinkable—but it is still an open boat, without any decking.
Beg-Meil, instead of merely copying Ilur, builds on the earlier design’s concepts of safe and seaworthy sailing but takes them a bit further. To begin with, the new design’s half-decks make it less prone than Ilur to taking on water in rough seas. At the same time, the volume of built-in flotation has been increased to a hefty 100 gallons. The flotation is divided between one water-tight compartment at the stern and a second one at the bow, which leaves room forward of the mast for a locker.
Greater sailing safety was also Vivier’s objective in reconfiguring the centerboard. Instead of the light laminated plywood centerboard of Ilur, Beg-Meil uses a 97-lb steel plate that functions effectively as ballast, not only increasing the boat’s stiffness and stability under sail but also improving her windward sailing abilities.
François Vivier
The designer has the amateur builder in mind. An option for full-sized mold patterns in the plans set allows the builder to bypass lofting, the otherwise necessary task of drawing the plans out full-sized.
The Ilur sail plan, honing closely to her Brittany roots, has always been a variation on traditional lug sails common in France: standing lug (without a boom) or balance lug (with a boom), sometimes in combination with a jib. The standing-lug version became very popular because of its simplicity and efficiency: it has one freestanding mast, one halyard, and only one sheet to handle.
There is no boom nor standing rigging to take care of when sailing with a family or going fishing, although a whisker pole is useful when running downwind. In comparison, Beg-Meil’s sail plan is a gaff sloop rig, and although it offers greater sail area it has a bowsprit and standing rigging supporting its mast, taking it further away from her distant French working-boat origins. The boat has a more “yachty” appearance in comparison with her elder sister. As usual, the penalty for this luxury comes with greater weight—110 lbs more than the earlier design. The free-standing mast of the lug rig also has the advantage of being easily struck to lessen windage under oars—an option not available to the gaff rig, with its shrouds and forestay.
As with most of Vivier’s designs, Beg-Meil, like Ilur, was designed with amateur construction in mind. Both call for either strip-planking or glued-lapstrake plywood construction, in either case with the extensive use of epoxy throughout. Structurally, however, instead of following traditional practice of having steam-bent or laminated frames, Beg-Meil’s planking is glued over plywood bulkheads. Since it is designed to be quite full, the hull has convex outboard surfaces throughout, with no hollows in the forefoot or in her run. This shape makes the planking work comparatively simple, requiring only moderate twist in the planks or strips during installation.
François Vivier
With a high-peaked gaff rig, Beg-Meil looks and handles more like a small yacht than like the workboats that helped inspire her hull design.
To avoid the intricacies of lofting—that task of drawing out the hull lines full-sized, which can sometimes prove daunting to amateurs—Vivier’s plans offer optional full-sized patterns, computer-drawn on very stable polyester sheets. These address critically important shapes, such as the forms of the stem, transom, bulkheads, and many other structural parts, including their bevels. For the plywood-lapstrake version, extremely accurate profiles of every strake are also
drawn out full-size, leaving enough length so that their ends can be trimmed during final installation.
Vivier was one of the founders of Le Chasse-Marée, and that French maritime magazine’s catalog has been carrying his building plans for more than 20 years. He has himself built boats to several of his own designs in order to fully understand the needs and limits of amateur builders. Because of their limited experience, these builders often need more technical and practical information than professionals. By building the boats, Vivier has learned to refine his plans and supplement them with numerous detailed drawings and instructions—for example, details on building the centerboard trunk. Various additional resources, such as a chronological guide, a list of materials and fittings, and step-by-step instruction booklets, help guide beginners safely through to launching day. Vivier also offers help, advice, and consultation by telephone or e-mail without charge.
François Vivier
Hull framing consists entirely of athwartships bulkheads made of plywood. The shallow cutouts alongside the centerboard trunk allow oar stowage below the floorboards.
Beg-Meil is among a number of Vivier designs also available in kit form. The suppliers are various, including Icarai and Grand-Largue in France; in the United States, the supplier is Clint Chase Boat Builder in Portland, Maine; and in Australia, it is South Pacific Boat Company. All kit parts are cut out of marine plywood panels by computer numerically controlled (CNC) routing machines. In addition to plywood pieces, kits can be shipped (based on the individual builder’s preference) either with or without the necessary solid-wood pieces, epoxy resin, sails, and fittings. Plans and instructions sheets have to be ordered separately. The pieces are marked—for example, specifying the plank overlap in the case of lapstrake construction—or they have specific joining systems to aid positioning and alignment. Some scarf joints, however, have to be made on site. Epoxy and paint quantity calculations are based on average estimates. Substitutions for such things as the type of wood used can be made on request.
François Vivier
The “yacht” influence in Beg-Meil’s rig can certainly be taken through her appointments and finishes—which in this instance are far from her workboat roots.
On the water, Beg-Meil inherits all of Ilur’s seakeeping abilities. She’s an excellent choice as a family boat for sailing a few miles for an island picnic or for crossing a bay under oars when the wind dies. She is light enough to be launched and recovered effortlessly from any launching ramp.
She is easy to sail, even singlehanded. Instead of reefing the jib with reef nettles, a roller-furler could be fitted, and the transom can accommodate a small outboard motor if desired. Purists will certainly favor rowing or sculling, and a pair of oars can be stored under the floorboards on each side of the cockpit. The centerboard’s span helps the boat point well to windward when sailing closehauled, and the board lowers easily on a pivot to adjust to any point of sail. Instead of using a steel plate—which is simple but not too hydrodynamically efficient because a flat plate provides little additional lift—the rudder and centerboard both could be given foil cross-sectional shapes. The much higher lift of centerboards so shaped provides better maneuver-ability under sail, more speed in high wind, and less drag in light air.
François Vivier
Beg-Meil sails well on all points of sail, and her rig is easy to reef when the wind pipes up.
Beg-Meil is a perfect companion for all-around navigation. The design promises an affordable little yacht that will still please the eye of a traditionalist. Bronze fittings and varnished coamings may distance her from the working boats of her inspiration, but finished out that way she will have a lot of appeal to anyone with an eye for a boat.
With a generous flotation in chambers, a steel centerboard in effect adding ballast, and ample freeboard, Beg-Meil is intended as a safe and seaworthy all-around daysailer.
François Vivier
The seafaring traditions of Brittany are attractively echoed in the design, but her construction, materials, and performance are all modern.
Is there a boat you’d like to know more about? Have you built one that you think other Small Boats readers would enjoy? Please email us your suggestions.
The double-ended jolles of Denmark and koster boats of Sweden inspired the hull form of the glued-lapstrake plywood Deer Isle Koster Boat, designed by Bruce Elfstrom to be a safe and enticing daysailer for his daughters on Deer Isle, Maine.
Norwegian faerings, those centuries-old, slender, four-oared fishing boats that are fast under oars and surprisingly nimble under sail, have provided a wealth of inspiration for numerous modern small-craft designers. Built lightly using plywood glued-lapstrake construction, designs based on the historical type have proved to be excellent trailerable daysailers that sail well and handle beautifully under oars. They are also beautiful to look at. But there’s no reason why translating the Scandinavian inspiration should stop with faerings.
I think Bruce Elfstrom of East Haddam, Connecticut, is on to something when he looks to the jolles of Denmark (see MARCUS NOER, from Small Boats Annual 2009) and double-enders, such as the koster type from Sweden, for more ideas about how workboat types with generations of success behind them can be reinterpreted for modern uses and construction techniques. This branch of the family may well go on to its own phenomenal success.
Elfstrom is a novice as a designer, but his affair with wooden boats started long ago on Deer Isle, Maine, where his family has long had a summer place. Half Norwegian and half Swedish, he grew up mostly on Deer Isle after running there at the age of 15 to find peace after having lived for four years in Beirut, Lebanon, where his mother worked first as a journalist and later as a United Nations diplomat during that country’s civil war.
Boats became an integral part of the life that Elfstrom found on Deer Isle. Later, he went on to restore a 34′ cutter, and he found himself believing in the process enough to found the Wooden Boat Rescue Foundation, which puts endangered old boats in the hands of those hoping to save them.
Adventure, too, has been part of Elfstrom’s life—he runs a company that leads advanced four-wheel-drive backcountry adventure treks in places like Mongolia, Labrador, and Iceland, and trains drivers (among them Navy Seals) in the finer arts of handling vehicles in rough terrain. So he took notice when “Raids”—a new type of small-craft event involving weeklong series of races for self-contained sail-and-oars boats along scenic coastlines or through archipelagoes—started in Europe (see WoodenBoat No. 187).
He recognized the potential instantly. He has been a regular at the annual Small Reach Regatta in Maine, and soon he was designing his own faering-inspired boats, seeking a fusion of new and old technologies. The first was the NorseWater 19. The second was Raider 18, a slender, glued-lapstrake plywood boat outfitted for trekking.
Tom Jackson
Watertight compartments under the sternsheets not only provide flotation with the hatches locked shut but also provide dry stowage when camp-cruising.
But back at the family place, his daughters, Petra, 14, and Oaklea, 12, began to put Elfstrom in mind of something other than an on-the-edge raceboat that would be safe and yet fun for them. Once again, he found a gap between the performance he wanted and the appearance of the boats he found available, and once again he looked to Scandinavia to find a bridge between function and form.
“I love them,” he said of the boats of that region. “They’re just in my blood. I’ve always loved the stern of a double-ender.
“They outgrew their Optimist dinghies real quick,” Elfstrom said of his daughters. “Oaklea, at 5′10″—you should have seen her in an Opti. She was like a spider in a jar. She didn’t get that she’s grown, like, 3′.”
Designing and Building the Deer Isle Koster Boat
For what became known as the Deer Isle Koster Boat, Elfstrom had in mind a hull form that would be safe and stable and a rig that would be simple and provide an adequate but safe amount of power.
This boat, he thought, needed to be something that the girls would find enjoyable for daysailing, captivating for adventuring as they gained confidence, and attractive enough to keep them interested for many years to come. If they find themselves more daring as they gain years and experience, perhaps the rig could be expanded later.
The resulting boat has a bit of everything in its lineage. “It’s like that Raider boat fused with a jolle, a koster, with a bit of Beetle Cat mixed in,” Elfstrom said. That’s a faering, a beamy double-ender, a large coasting double-ender, and a small New England catboat. At 14′ long, the resulting fusion has an ample beam of 6′, but draws only 5″ with the centerboard up, and about 4′ with the centerboard down.
Tom Jackson
A broad and burdensome hull can still have shallow draft, and the koster boat is readily put ashore.
Too committed to his own business to take the time to build them himself, he ordered a pair from builder Eric Friberg of Bellingham, Washington, whose work he had seen in the WoodenBoat Launchings section, and the test sails came in August 2010. “The underwater profile is more along the lines of a racing dinghy,” Elfstrom said. “It’s kind of a planing hull,” and in its second outing, the boat comfortably made more than 7 knots with the breeze steady at 15 knots and gusting to 20.
The boat has a long foredeck, short afterdeck, and modest sidedecks, with a low-profile coaming. The mast is stepped through the foredeck, which keeps the construction simple. Below the foredeck, a bulkhead with a fitted hatch is installed forward of the mast to provide ample dry storage and built-in flotation. More flotation chambers are situated aft and to the sides below the sternsheets and side seats, doubling as additional dry storage accessed through gasketed hatches.
Tom Jackson
The shaped bronze-rod mainsheet traveler has the distinctive curvature used in Danish jolles.
Some details, notably the high oarlock pads and the curvaceous bronze-rod horse traveler, are taken directly from the jolle type of Denmark. The boat has no exterior keel, instead being strengthened by an inner keelson, but it has a short skeg. The centerboard and rudder are both weighted and will kick up should the boat ground out. With her shallow draft, the boat beaches easily and at about 350 lbs all-up, she’ll be comparatively easy to manhandle up the shore if need be. Elfstrom designed the floorboards to remove and fit between the seats to make a large sleeping platform for adventure cruising.
The rig is not Scandinavian—it’s a balance-lug with a small jib. It’s easy to handle, easy to reef, easy to strike, and easy to stow. The jib is set on a small roller-furler, making it easy to strike from the cockpit. The lug yard hoists on a leathered bronze ring with a hook welded to it. All of the rigging gear is simple. The masts require no stays, so if the boat were trailered it would be quick to set up at the boat ramp ahead of launching or afloat afterward. The hull has no ballast, relying instead on its great beam, crew weight to weather, and conservative sail area to keep her on her feet.
I sailed with Elfstrom—and neither of us is as lithe as a 14-year-old girl—and found the boat stable and responsive in conditions ranging from light air to puffs of up to 10 knots or so. She remained steady as we shifted crew weight, which speaks well of her stability. The boat came about handily and seemed weatherly and responsive. Elfstrom says that he can walk on the foredeck without danger of destabilizing the boat, and the cockpit is uncommonly roomy and comfortable for a 14-footer, giving the sense of being in a much larger boat.
Tom Jackson
A kick-up rudder makes easy work of venturing into shallows.
Elfstrom considers the two boats he had built for his daughters to be prototypes. The planking lines are still being finalized: One boat is built with nine planks per side, the other ten. Some pieces, such as belaying pins and the lines, he selected because they were off-the-shelf and time was running short for the season. The tillers ended up too short. The hulls are built with 6mm okoume plywood covered with Dynel set in epoxy, and they are decked with 3⁄8″ meranti plywood.
Some elements of the initial design and construction were chosen deliberately to keep costs under control. Elfstrom intends to revise and perfect these details— together with finalizing the placement of such things as cam cleats. He and boatbuilder Clint Chase of Portland, Maine, are working to finalize plans and they hope by early 2011 to develop a prototype kit, something that Chase has been doing with his own designs. An experienced builder working from lines could make his own judgments about such things as lining off for planking—which is critical to get right in a boat of this type—or deciding the proportions of the coaming, but a novice might be well advised to await the promise of a kit.
As for the boats themselves, however, their worth is already being proven by Elfstrom’s daughters. “I wanted them to have a big deck to jump off of, climb up on, swim off of—to go out and just Swallows and Amazons stuff,” he said. The side decks are wide enough to sit on, the coaming low enough so it doesn’t interfere with the comfort of sitting that way or hiking out when need be. The cockpit side seats are comfortable, too, and wide enough to grow into—“They can use this boat when they’re 40.”
Plans and kits for the Deer Isle Koster are available Chase Small Craft.
Deer Isle Koster Particulars
LOA: 14′
LWL: 12′ 6″
Beam: 5′ 10″
Draft:
–board up: 5″
–board down 3′
Weight
bare hull: 175 lbs
with rig: 250 lbs
Sail area: 121 sq ft
–main: 101 sq ft
–jib: 20 sq ft
Bruce Elfstrom
The Deer Isle Koster Boat’s designer, Bruce Elfstrom, an amateur with an eye for small-craft design, describes the design as a fusion of Swedish koster boats, Danish jolles, and modern lightweight “Raid” boats, “with a little Beetle cat thrown in.” Some details have been altered—for example, the rudder profile has changed from the one shown in the rendering.
Bruce Elfstrom
Elfstrom worked up his lines in DELFTship software after sketching profiles freehand. (Atypically, these body sections are shown full-width, with forward sections on the left and after sections on the right.)
Check Out These Other Faering Designs
The faerings of western Scandinavia have inspired designs from the likes of Clint Chase, Iain Oughtred, and Joel White. If you like the look of these handsome double-enders, here are a few other articles you might enjoy, including a boat built by one of our readers.
Here’s a classic flat-bottomed skiff updated for modern trouble-free materials. The Spike Skiff design has all the hallmarks of American sharpie-skiffs from a couple of centuries ago—the straight, slightly raking stem; the two wide lapstrake side planks; the bottom’s quick sweep up to the transom, the jaunty sheer.
We can propel Spike with a spritsail (left) or a “sprit-boom bermudan” or a pair of oars.
In the past this skiff would feature solid cedar or pine planks on the topsides, clench-nailed together, and a cross-planked bottom—sturdy and economical, but heavy and prone to drying out if left ashore for any amount of time. Oughtred’s Spike uses marine plywood for a lighter-weight, more dimensionally stable solution. For the weekend builder and boater, the advantages are great—the materials are easily sourced and the boat is much more trailer-friendly.
With her single lap joining the two topside planks on each side, Spike is an excellent entry-level project. She’s not much more complex to build than a box, but she gives her creator the opportunity to learn lapstrake techniques on a simple level. And the end result is far more attractive than a box—shapely enough for a real sense of accomplishment.
This good-looking skiff shows us plenty of flare and a pleasing sheerline.
Spike’s shape reflects a time before the invention of the internal-combustion engine—the rocker of her bottom will make her easy and rewarding to row, but she’ll resist planing under power. If your plans include using an outboard motor, you’ll find the best results with low power—say, a lightweight, 2-hp gasoline motor or a small electric motor. Just don’t expect her to zoom around like a hard-bottomed inflatable tender. At 12′ in length she is big to serve as a tender, but empty, with a bow eye low on the stem to keep her forefoot up, she will tow effortlessly.
The plywood hull goes together inverted on a “building box.”
Oughtred has drawn a nice leg-’o-mutton rig for Spike—simple and in keeping with her sharpie heritage. Her relatively narrow bottom and considerably flared topsides make her easy to row and well-balanced under sail, but her initial stability will be relatively low—you will want to keep the mainsheet in hand in a breeze.
Her daggerboard is a simple and effective choice for a boat in which the space taken up by a pivoting centerboard would be better appreciated for cargo or passengers.
We can build Spike with watertight compartments…
Oughtred’s plans for the Spike Skiff design include full-sized patterns so lofting is unnecessary. The reward versus effort quotient is quite high for this one.
LOA: 12′ 3″
Beam: 4′ 2″
Draft:
–(db up) 6″
–(db down) 2′ 6″
Weight about 130 lbs
Sail area:
–sprit 59 sq ft
–leg-’o-mutton 55 sq ft
Completed Spike Skiff Images
More Boat Designs from Iain Oughtred
Once you’ve got your first Iain Oughtred design built, we have a feeling you will be ready to tackle more. Check out these other popular Oughtred designs to see what strikes your fance.
The Acorn 10-footer by Iain Oughtred is intermediate in size and shape between his longer skiff (WoodenBoat Plan No. 43) and his shorter 7′ 10″ Acorn tender. She is a dinghy designed for seaworthy service and multiple use—in tow behind a yacht, in harbor as a lighter, and in protected waters as a lugger. Alternatively, she can be rigged for added performance under sail, or simply employed as a businesslike utility under oars or outboard power.
Her type is that of a traditional ship’s boat-beamy and burdensome, with good stability and carrying capacity for her length, and a hull that is easily driven if properly handled and trimmed. She is an all-around craft, as versatile a vessel as can be found in this difficult-to-design size range.
Oughtred has not only achieved a good-looking, multi-purpose small-boat design, he has done a great deal to relieve the builder of the difficulty commonly associated with round-bottomed lapstrake construction. And he has managed this in his usual manner: by producing a very comprehensive set of plans (lofting is not required), and by selecting a building system that lends itself to amateur construction.
The building method—glued-seam lapstrake plywood—is further enhanced by a frameless interior that permits faster assembly, reduced maintenance, and adjustable thwart locations.
The basic single-sail rig for the Acorn 10 can be a balanced or standing lug-either one being an easy and efficient sail plan to set up, stow, and operate. A second, enlarged sail plan calls for a gunter-rigged sloop, thereby converting this dinghy into a lively sailer and enabling it to serve as an excellent graduated trainer through the various levels of small-boat handling and seamanship.
Oughtred saves you from guess work by showing precisely how her planking should be lined off.
Choices within the sailing options include leeboard, daggerboard, or centerboard, and a fixed or pivoting rudder. Gunwale and transom choices are also presented in the plans, as are general data and scantlings for those wishing to construct this boat traditionally of solid wood.
The plans packet for the 10′ 2″ Acorn Dinghy design contains: five sheets of drawings, lines, construction, full-sized patterns, lug and sloop rigs; materials list; construction notes for both modern and traditional methods; and a booklet illustrating the plywood building procedure for the Acorn boats. WoodenBoat Plan No. 88.
As signs of summer slowly but surely come to Maine, I have taken to beginning each day with a short, leisurely row around the harbor. It reminds me why I do what I do and that there is life with considerable reward beyond the desk and the computer. My own rowboat not yet quite ready, I have been borrowing one of the sailing club’s courtesy dinghies, a much-used molded-plastic pram of some 8′ in length, with oarlocks that rock precariously in cracked holes, and mismatched oars that, if too much effort is exerted, pop out of their locks when least convenient. No matter, the point of my brief visits to the harbor is not to get exercise (though, truth be told at the end of this long winter, exercise is sorely needed) but rather to enjoy being on the water once more and while I can still have the harbor to myself.
Photographs by the author
Come July, the narrows that lead from Cozy Harbor to the Sheepscot River will be busy with boats, and the shoreline will be a maze of trap buoys of various colors.
Soon, the summer visitors will return to Cozy Harbor, here on Southport Island, and this small body of water sheltered between three islands will become a hive of activity. Seasonal residents of David’s Island to the west will be calling out to one another as they make their way across the water; families will gather on the public dock full of eagerness to be off for their day afloat; the sailing-club floats will be weighed down by enthusiastic young sailors, clamoring to be first into the motorboats that will ferry them to their dinghies. As the weeks come and go, my morning wanderings through the mooring field will be enjoyed ever earlier as I seek the peace and solitude. But for now, between Memorial Day and mid-June, even as late as 8 a.m. I am typically alone.
Some mornings, when a light wind funnels through the narrows to the south, it brings with it a chill from the cold waters of the Gulf of Maine, a freshness that still bites and reminds me that the days on land may be warmer, but on the water, we still have a long way to go. Other mornings, while the sun is still climbing into a blue sky, and the air is still, I pull out into the narrow channel that leads to the Sheepscot River, ship my oars, close my eyes, and listen. The louder, isolated sounds come first: the sudden raucous cry of a gull, the high-pitched staccato whistle of an osprey, the discordant deep-throated bark of a shag. But then I hear the backing chorus from the trees on David’s Island—the songs of American robins, chickadees, yellow warblers—that mingle together in a deconstructed symphony. And beneath it all is the ever-present whispered rhythm of water caressing rocks, an imperceptible swell revealed only where ocean meets land.
The osprey’s departure was effortless and silent, save for one short sharp cry.
This morning, as I opened my eyes to take stock of my position, I was met by the sight of an osprey, barely 50 yards away, perched on a stark-white driftwood branch that had been trapped in a fissure in the granite ledge of David’s Island. I dipped the oars and rowed cautiously sternward to the shore. The bird stood, immobile, its head locked in my direction. I gave one final extended push to the oars and at that glide, the bird rose effortlessly from its perch, and with a single flap of its wings, soared away.
The lobsterman, busy about his work, wanted little to do with conversation.
Early in the summer, the harbor remains the province of the fishermen, but the lobster season has barely begun, and the larger boats still swing to their moorings. Some days, a small one-man boat joins me in the narrows, arcing from trap buoy to trap buoy, the gently purring outboard making little noise. The fisherman works in silence, my presence ignored. A week or so back, I endeavored to engage: “Is there much of a catch, yet?” I asked. “Not much,” he said, and steered his boat away. Of late, I have shared a wave with the elderly couple who have taken up their summer positions in the covered porch of their house overlooking the channel. Each morning, they sit and watch the comings and goings in a view that has remained constant for decades but which, no doubt, is never the same from one day to the next.
Year after year, the ospreys return to their nests on the day markers.
These, then, are my mornings, and will be my mornings for a while. Mornings when, blue skies or grey, nothing seems more worthwhile or necessary than spending a half hour doing almost nothing in a small well-worn boat.
I have built a number of boats over the years, including two designed by John Welsford and one by Arch Davis. My most recent build is the Heron 15, a design by Paul Fisher of Selway-Fisher in the U.K. Some time ago Paul designed the Heron 14, a compact cruiser, and the 15 is a more recent larger version that provides a bit more cabin space. At 15′ 4″, it is one of the smallest pocket cruisers I’ve seen, but it has a substantial cockpit, and enough interior space for two berths, a small galley, and a head. To my knowledge, mine is only the second Heron 15 to be built.
As well as building boats, I’ve owned several cruising boats, including a Flicka 20 that I sailed for many years. My wife and I cruised extensively up and down the Salish Sea in the Flicka, and I once sailed it on a solo circumnavigation of Vancouver Island. Moorage around northern Vancouver Island where we live has become very precious, so I was looking for a boat that was small enough to trailer and launch easily, yet comfortable enough for two people to stay out on for several days at a time. The Heron 15 appealed because it met these requirements and had a traditional look.
Building the Heron 15
Selway Fisher’s plans (supplied through Duckworks in the U.S.) were detailed. The Heron 15 hull is V-bottomed with a hard chine and straight sides—which makes construction relatively straightforward. The original design has a fixed keel with an external-pivot centerboard within it. The centerboard trunk stands a few inches above the cabin sole, and I worried that this would present a tripping hazard. Initially I thought about removing the centerboard completely and increasing the depth of the keel; the draft would still be under 2′ and the hull and keel construction would be simplified. To achieve the same weight, I would install some steel or lead plates in the keel. I discussed my ideas with Paul Fisher. He said my proposed modifications would work but suggested bilge keels as an alternative. I could keep the original keel profile, without the centerboard, but fit 3⁄8″ mild-steel-plate bilge keels welded to a 3⁄8″ × 4″ flange through-bolted to a 3⁄4″ × 8″ wooden backing board. Each keel would be 48″ long at its upper edge and would weigh 62 lbs, which would introduce ballast down low, and its lateral plane would help to reduce any rolling effect in a swell.
Photographs by the author
The hull was built in my basement, but space was tight, so I moved it out into the yard as soon as possible. Several months later, the exterior was complete. Framing the deck and cabin was time-consuming but once complete everything came together quickly. Note the starboard bilge keel visible behind the trailer fender; bilge keels were not featured in Paul Fisher’s original plan but are now offered as an alternative to the drop keel.
I liked the idea of having a boat with a very shallow draft and the ability to stand upright if beached. I do not plan to beach the boat often, but I did have an experience in my Flicka when I underestimated the drop in the tide and woke up in the middle of the night to find the boat lying on its side. Fortunately, the bottom was soft, and by morning she was floating again, no harm done.
The Heron 15’s build starts with a strongback frame and a set of six molds. Of these, three become permanent bulkheads, and three remain as simple ring frames. I used yellow cedar for most of the structural parts (buying it in 2×6 boards, which I could resaw and plane at home). The sides and bottom of the hull were of 9mm marine plywood (the plans call for 18 sheets) bent over the frames. The hardest part of the hull construction was getting the planks to bend in at the stem; indeed, this proved impossible working with the 9mm ply that was called for in the plans. After several attempts, I built this section with two layers of 4mm plywood, laminated in place. The resulting curve in the forefoot is appealing and cuts nicely through the water when underway. For adhesives, I used Titebond III above the waterline and WEST System epoxy below.
Despite the hull being only 15′ 4″ long, the Heron’s cabin is a decent size for two. The cabinets aft of the berths serve as the galley and storage, and there is further locker space beneath the berths. Thanks to the new bilge-keel configuration, the sole of the cabin is unobstructed.
Building the boat took me a little over a year, working on it for at least a few hours a day. I built the hull upside down in my basement workshop, and when it was complete, friends came over to help haul it out into the yard where I would build the decks and cabin.
Fitting out the interior was fun but time consuming. The basic structure is covered in the plans. The layout is conventional with twin settee berths coming together in the forepeak, a stove aft to port, and a head to starboard. For details, the builder is given a lot of latitude. I followed the designed layout but was particularly pleased with my design and installation of a folding table and shelving for dishes and other odds and ends. The shelf is mounted on the forward bulkhead and the hinges of the folding table are suspended on a wooden cleat below the shelf. When the table is lowered, two people can sit facing each other, one on each of the twin berths; when folded up it encloses the shelf and protects the chinaware behind it. When the table is raised, there is plenty of space beneath for the berths to be used for sleeping.
The forward end of the cabin extends past the aft end of the foredeck, creating a built-in shelf, which lends itself well to storing place settings.
There is ample storage in the cabin. Lockers run the full length of both berths, and aft there are lockers to either side of the companionway. The plans suggest the steps should be removable, but I was unsure where I would stow them, so instead built the bottom step as a storage box and the upper step as a removable step-stool that doubles as an extra seat at the table. To starboard I installed a stainless-steel sink with a 1-gallon water jug with spigot, and a locker beneath. This is where Paul Fisher suggests installing a head, but we use a portable version that we keep stowed forward between the berths. When the table is lowered the head is out of the way; when the table is raised the head can be used. To port at the foot of the companionway there is an unpressurized-alcohol two-burner stove with another locker beneath. There is 4′ 6″ headroom in the center of the cabin. (Fisher has designed an alternative raised coach roof that increases headroom to 4′ 10″, but I prefer the look of the lower profile.) There are no electronics or wired electrics on board; I installed two overhead cabin lights that are battery powered with a timer in case they are left on by mistake.
In the cockpit, I replaced the suggested washboards of the companionway with hinged doors; I like the convenient access, and it solves the problem of where to stow the washboards. I made the doors out of leftover 9mm plywood from the build. I also removed the designed bridge deck and instead built a simple box with hinged lid that does double duty as a companionway step and storage. Auxiliary power is from an ePropulsion Spirit Plus transom-mounted outboard for which the batteries are stowed beneath the cockpit benches.
Sail Plan and Performance
The Heron 15 has a high-peaked 85.7-sq-ft gaff main, with a 33.3-sq-ft jib. I installed a roller furler as I often singlehand and don’t want to go forward to raise or lower the jib; for this same reason, all the running rigging is led back into the cockpit. I also added some lazyjacks, and raising and lowering the mainsail from within the cockpit works well. After some trial sails in light airs (quite common in our area) I also added an asymmetric spinnaker. There is a short bowsprit (about 32″) to which I added a retractable aluminum pole to take the spinnaker’s tack about 1′ forward of the jib fitting.
I tested the rig in the yard before heading out. All the lines—halyards, roller-furling controls, and sheets—lead back to the cockpit for easy handling. The boom and the loose foot of the mainsail are high above the cockpit, providing ample headroom and good visibility beneath them.
I’m fortunate to live right next to a decent boat ramp. Having launched other boats here, I know the exact height required to clear any overhanging wires on the way to the ramp. So, when I built the Heron I made sure the mast could go under the wires. This allows me to keep the boat fully rigged through the sailing season, which saves time when launching and retrieving. For the most part, I hook up the trailer, drive over to the ramp, and launch as soon as I arrive. After parking the truck, I get aboard and, using the outboard, back away from the ramp, and I’m ready to start sailing.
The boat handles well on the water, combining small-boat feel with big-boat stability. In early trials there was a touch of lee helm, but after doubling the forward ballast (I had originally installed 54 lbs of movable sandbags under the foredeck, accessed from within the cabin) and introducing a slight aft rake to the mast, the lee helm was replaced by a more reassuring touch of weather helm. The rudder on the Heron 15 is quite large for such a small boat, so she tracks well while also responding quickly to the helm. I have yet to make use of the drop rudder blade that is part of the design, and doubt that it will ever need to be deployed, except perhaps in a heavy following sea when the stern is being lifted.
The first outing was in light airs—not unusual in my local waters—but the Heron 15 sailed well, slipping along in a mere breath of wind. It is easily handled by one person but there’s plenty of room for two.
Toward the end of 2024, I went out for a sail with a good friend who is an experienced sailor. The wind was light, probably 6–8 knots at best, but we got the sails up and headed off on a close reach. The boat moved along nicely in the light airs maintaining a consistent 3–4 knots. As the day wore on, the wind became even lighter, and we decided to try out the asymmetric spinnaker. After a little fumbling with the lines—I have since simplified the leads—we got it flying, and it looked beautiful. We were sailing on a broad reach, and the wind had dropped to less than 5 knots, but the boat was still moving along at 1 1⁄2 knots.
Light airs may not be the most exciting for sailing, but I do think they’re an opportunity to get a feel for a boat, and both my friend and I observed that the Heron 15 felt comfortable, moved easily through the water, and the cockpit was roomy. It is, surely, quite an accomplishment to design a boat of only 15′ 4″ length complete with a sizable cockpit and a cozy but very usable cabin that sleeps two, has plenty of storage, and some basic amenities, and which performs well, even in the lightest of airs. I am looking forward to getting out there this summer for some extended cruising.
Growing up in Annapolis, Maryland, Ram Sudama spent his summers as a kid racing and cruising in boats from 6’ to 60’ on Chesapeake Bay and later around the coast of New England with his family. He started building small boats after he moved to Vancouver Island, British Columbia, where he has cruised up and down the Salish Sea as well as completing a solo circumnavigation of the island.
Plans for the Heron 15 are available in the U.K. from Selway Fisher Design, price £195 for full printed plans, £25 for study plans, plus shipping; and £175/£25 for electronic files; and in the U.S. from Duckworks, price $203 for full plans, $34 for study plans.
Is there a boat you’d like to know more about? Have you built one that you think other Small Boats readers would enjoy? Please email us your suggestions.
While waiting to find space to build a 22′ motoryacht based on a Lake Union Dreamboat and custom-designed by Paul Gartside, I decided to build the tender that would ultimately be needed to accompany it. The larger boat would be of traditional design and construction, and it was important to me that the tender matched it in style. I was also looking for a boat that would tow well and was small enough to carry on deck.
Paul Gartside’s Design 206 for an 8′ clinker pram of traditional construction suited my requirements exactly, and the beaminess created by the two transom ends provides good space in a small package.
Cecil Rhodes
The pram is built upside down over a plug. Once the transoms and keel are set in place, the plank locations are lined off with battens. Even at this early stage the graceful arcs of the planks as they tuck up to the bow transom are evident.
As a devotee of wooden boats, I have built several designs from varied sources and appreciate detailed plans that include what is necessary for the builder, illustrated with clear drawings and notations. Paul Gartside’s work not only achieves this standard but is guided by many years of building and using boats as well as designing a wide range of craft of all sizes. For this particular design, his five sheets of hand-drawn plans are a joy to use or just to look at.
Design 206 is a pram dinghy of traditional lapstrake construction, which requires a high level of skill and considerable time to complete. The investment of time demands that the project be completed with the best possible materials.
Tyler Rhodes
An eyebolt, placed low on the bow transom, serves well for towing the pram. Inside, the 8mm sprung floorboards are removable, making it easy to clean the hull after mud and sand are tracked aboard when launching the boat from a beach.
I followed Gartside’s recommendation of white oak—quarter-sawn for the transoms and other fittings, green for the 13mm x 11mm steam-bent frames—and old-growth fine-grained western red cedar for the 8mm planks, nine per side. Here in the Pacific Northwest good cedar is available, but for builders in other parts of the world Gartside recommends alternative planking material such as spruce or pine. Scantlings are only as large as is necessary to create a strong but lightweight shell—just over 100 lbs. Fastenings are copper boat nails and roves with a few bronze screws. The advent of the internet has greatly improved the ability to source bronze and copper fastenings of good quality from suppliers now few and far between; I bought Davey & Co. copper boat nails and roves from Fisheries Supply in Seattle.
Building Gartside’s Pram
Assembly of the keel, transoms, and planking takes place upside down on a form comprising three molds. The lining-off of the plank locations is done with battens followed by spiling plank shapes. Shaping the individual planks and cutting the laps and gains needs to be done with patience, using planes dedicated to the job and kept sharp. The planks are nailed to each other at the laps—with bedding compound at the gains and transoms—until the boat is turned over when roves can be added, and the steam-bent frames can be installed and riveted to the planks. As the hull slowly comes together the structure is somewhat unstable until the gunwales and bilge stringers are installed, then the boat becomes stiffer and ready to receive seats, knees, and trim. A word of caution: most of the build can be done by one person working alone, but when it comes to riveting (the boat takes about 850) and installing the 19 steam-bent frames, a second pair of hands is needed. It is at such times that you’ll find out who your friends are.
Cecil Rhodes
Given its traditional construction, the pram is not especially light. Yet, it is small enough to be transported in the back of a pickup truck, from which it can be launched by one person if the truck is backed up close to the water.
The finished pram is light enough to be easily transported in a pickup truck, or lifted onto a deck or dock. The design calls for 9mm × 8mm oak reinforcing strips to be added to the lower edge of the lowest four planks to protect the boat during beaching or loading operations; they have already saved some scarring of the bottom paint and planks. It is possible for one person to load and unload the pram into the water from a truck bed if the vehicle is backed up close to the water, but to move it any distance on land requires either a dolly or two people.
The boat can be rowed from either of two locations—amidships or forward—depending on load or number of passengers. Rowing alone with light loads is effortless and maneuverability is immediate. With two people, not much changes except that the rower moves to the forward seat. The pram’s broad, deep shape can carry a considerable load if required. The tightly spaced 8mm sprung floorboards protect the bottom of the boat and spread the load while standing, boarding, or distributing cargo. The boards are held in place by wooden buttons and can easily be removed when necessary.
Tyler Rhodes
Even in a small pram it’s important to maintain the right fore-and-aft trim. For that reason, there are two rowing stations. When rowing alone, sitting on the center thwart is optimal, but when joined by a passenger or if carrying heavy cargo, the rower can move to the forward thwart.
I have used the pram for some time, and it has taken on no water. This suggests that the planking installation is well done and that the tightly spaced rivets are working to keep everything sealed—an important factor if the boat is to spend any time sitting on deck or otherwise out of the water.
For the oars and oarlock placements I followed Gartside’s directions, and they work well—oarlock location is extremely important to the long-term ergonomic satisfaction of using any rowboat. The 6′ 6″ oars are fine-grained old-growth Douglas fir as specified in the plans and are light and strong; the collars are leather, and the oars work quietly and smoothly.
Cecil Rhodes
The plans show a traditional rope fender installed in a cove beneath the oak gunwale and turning onto the transoms by 150mm. More than just decorative, the fender works well to protect the pram’s gunwales and upper planks.
Using this boat is a pleasure. Even children can easily row it in safety and comfort. The benefits of the classic design and traditional construction will appeal to those who appreciate fine workmanship, don’t mind refinishing from time to time, or have a traditional parent ship that requires a complementary tender. It may be small, but such a boat will always get more than its fair share of attention; perhaps because of its rarity in this day of the ubiquitous inflatable boat, or simply because we have an unconscious appreciation of a good design well built.
If you’re looking for a pretty tender of traditional appeal, you surely won’t go wrong with Gartside’s Design 206.
Cecil Rhodes is a retired architect living on Vancouver Island; he has built many small wooden boats over the years.
Is there a boat you’d like to know more about? Have you built one that you think other Small Boats readers would enjoy? Please email us your suggestions.
It was August 23, 2024, when I launched my 14′ 6″ Northstar composite solo canoe at midday in Cooperstown, New York, on the tree-lined banks of Lake Otsego, the source of the North Branch of the Susquehanna River. As I set out for Chesapeake Bay, 444 miles downriver, my progress was slow. The river was shallow and narrow enough to be spanned by fallen trees, which I had to crawl through or clamber over. Cornstalks littering the river’s edge had been cut by beavers from fields behind the riverbanks. One beaver, startled as I went by, raced down the bank, tripped, and rolled into the river with a great splash.
Photographs by the author
I set off from the dock at Lake Front Park in Cooperstown, New York. Before I left, my wife “reviewed” my packing job.
After five hours of paddling, I was 11 miles downstream and hunting for places to camp; another hour and I found a cobble bar overhung by a large willow tree where I could set up a tent. A half dozen mosquitoes whined around me as I got dinner down and settled in the tent. During the night I was roused several times by the slaps of beaver tails on water, but each time I quickly fell back asleep, gazing up at the willow-tree leaves silhouetted on the tent in the silver moonlight.
I had read several descriptions of paddling this river and anticipated it would take me close to three weeks to reach Chesapeake Bay, doing 20–25 miles a day. The river should be mostly slow-moving (with a maximum current of about 2 mph), but there were a number of low and high dams to get around, as well as a few Class II rapids to deal with. While fairly wide for much of its length, the river is generally shallow and rocky, so I would need to be attentive to my position in the current. There are few designated campsites along the river, so I would be finding suitable sites where I could.
August 24
In the murky light of early dawn, the opposite bank was a dark blur in the morning fog. I dressed in layers and dragged myself into the cold morning to start packing. When I got underway, the serpentine river was just deep enough to float the canoe, but I chafed at my slow progress in the gentle current and shallow water. Silver maple and willow trees towered over me. After three hours the river opened up into the mile-long Goodyear Lake. At the south end, a 220-yard trail led through open second-growth forest around the dam to the river below. The first 50 yards of portage were too steep and uneven to allow me to wheel the laden canoe. I unloaded everything and walked back and forth several times, first carrying the 30-lb canoe, then the gear. Safely down on the far side, I repacked and pushed off. Over the next couple of miles, the river shallowed half a dozen times, forcing me to get out and walk the canoe over the rocky riverbed in the pleasantly cool water.
I had to carry the canoe around the dam at the south end of Goodyear Lake and then follow a trail along a creek to the river to find water deep enough to paddle in.
By 2 p.m., I had paddled a total of 19 miles and reached a second portage at the Southside Dam near the town of Oneonta. The trail entrance was poorly marked and obscured by foliage, and while I knew it was there, it was only after I had paddled back upstream, away from the dam, that I realized I had paddled right by it, mistaking it for a small fishing spot. The portage was a narrow trail through bushes and small trees, but a fisherman kindly helped me carry the canoe and gear in a couple of trips.
Four miles past the dam, there was a short, rocky 12″ drop extending across the river. It was fairly obvious, but came up sooner than I expected—I had been making good time. It was straightforward to run without problems down the right side where the drop was spread over a distance of about a dozen feet.
Four miles beyond Southside Dam near Oneonta, I encountered a rocky ledge, which created a 12″ drop across the river (seen here as I looked back from downstream). I successfully ran it along the right side (at left in the picture). Rocky ledges spanning substantial breadths of the river were common, even as the river became much wider.
At 5:30 p.m. I pulled to the side of the river to camp on another cobble bar. By the time I had the tent pitched and dinner eaten, the bats were out, flitting back and forth overhead. I tried to stay awake long enough to see the stars come fully out but was lulled to sleep by the gentle murmur of the river.
August 25
In the pre-dawn dark a great blue heron, flying low over the tent, croaked loudly. It was only 3:50 but I was now thoroughly awake and got out of my sleeping bag. Though everything was damp, I broke camp, loaded the canoe, and was soon launched under clear skies.
By noon I was beyond the town of Unadilla. It had been a relaxing, smooth morning but as I took the inside corner of a bend in the river, the bow of the canoe caught on a barely submerged log sticking out of a wood pile by the water’s edge. The canoe flipped and I was dumped into the water, losing contact with the boat but not my paddle. I swam to shore in the deep, swift-moving water, clawed my way up the steep rocky bank and looked upstream. The upside-down canoe had hung up on another log. I crawled out on the log to the canoe, got it off, swam it to shore, pulled everything out, and bailed it dry. I had lost only my pride and my shoes, which I had kicked off to let my feet dry. I fashioned some sandals out of my foam sit-pad and some duct tape; they would have to do until I could find a shoe store. Everything else was in drybags so mostly stayed dry, and the clothes I was wearing would drip-dry as I paddled on. Another 15 miles down the river, I made camp on the cobblestone shoreline and spread out the maps to dry—my map case was not totally waterproof.
For the first three days, woody debris occasionally spanned the river, adding challenges to my downstream progress, and at times, causing me to struggle to stay both safe and dry.
August 26
When I set out the next morning, the river was noticeably wider, perhaps several hundred feet wide on occasion, where the water was so calm it felt more like a lake than a river. Between these quiet areas were small rapids and 30′-wide back-eddies wherever the current picked up.
Eighteen miles downstream I came to Windsor, the first town I had been through since leaving Cooperstown. At a store near the river, I bought flip-flops, water, duct tape, and some chocolate. By day’s end, I was good and tired—the physical and mental exertion of focusing on river conditions had taken a toll—and when I saw the primitive campsite with a picnic table atop a small bluff, 30′ above the water, I was only too happy to stop. The landing was mud and rocks with a steep trail up to the campsite. I carried some logs from the campsite down to the bank and dropped them in the mud to make the footing less treacherous while unloading the canoe. I tied the canoe to a bush along the bank, carried the gear up to the campsite, and settled in at the picnic table.
August 27
Mist insinuated itself everywhere as I arose the next morning, and the dampness slowed my packing up. The mosquitoes from the adjacent wetlands were relentless, and I decided to take a walk. A trail through the woods behind the campsite was perfectly straight and followed a retired turnaround for locomotives that had once moved trains through the nearby mountain pass. I walked the trail for 15 minutes before heading back to camp. By the time I had all my gear down the slope, across the rocks, and over the logs, the fog had burnt off.
Many houses along the Susquehanna are either built on stilts or hide behind substantial dikes. Flood waters may not have reached this house at the top of a bluff, but they had significantly eroded the bank underneath it.
Three miles downstream near Oakland was a 2′-high rocky weir with a narrow chute to the left. I saw no portage, took a close look at the chute, decided it appeared clean, and carefully paddled through, happy to find no hidden rocks. Downstream of the weir the river slowed and widened again, the slack current giving me little forward motion under sunny skies.
Another 10 miles and a gently sloping riverbank and mown field provided easy access to Great Bend, Pennsylvania. I pulled ashore, and walked into town for groceries and cheap shoes; a sandwich rounded out my shopping. Farther downriver, at a park in Kirkwood, I found drinking water and bathrooms.
That evening, less than a mile downstream of Kirkwood, I pulled ashore at a 5′-wide strip of cobbles between the water and a copse of young sycamore trees. I made camp in the company of a little green heron fishing and a killdeer darting around and piping.
August 28
I paddled through the outskirts of Binghamton, tied up just past the city’s first bridge, and walked into town, stopping first at a sporting-goods store to buy some real shoes—the cheap shoes had served their purpose, but they were giving me blisters. I had thought of exploring the town, but indications of people living under the bridges and in the bushes along the river made me nervous about leaving the boat for long. I bought what I needed and hurried back.
The 5-mile stretch of river that runs through Binghamton and adjacent Johnson City had been weighing on my mind since I left Cooperstown. Beyond the bridge where I’d stopped, I would encounter four low-head dams and had scant information about either the conditions I’d encounter or the portage details. The first dam was straightforward; the right bank had an easily-accessed wide dirt road—along which I could pull the fully loaded canoe on the set of portage wheels I had brought along—but on the downstream side, the riverbank was muddy; stepping aboard without getting everything dirty was tricky. At the second and third dams there wasn’t much of a drop in the water level, and I was able to line the loaded canoe through as I walked along the bank. The last dam required a portage along a couple hundred yards of trail too narrow and uneven to use the wheels. I unloaded, carried the canoe and gear in several trips, and, at the downstream side, spent several minutes negotiating a rock-and-mud foreshore to get back in the water.
All told, it took four hours to transit the four dams, and it felt good to be able to focus again on just moving down the river. The heat hung on as the day waned, and by the time I was ashore once more and making dinner, I had stripped down to my shorts but was still bathed in sweat. I decided to trust the no-rain forecast for the night and turned in without the fly on the tent, hoping to catch any breeze.
I wheeled my canoe and gear around the first dam below Binghamton. This was one of the two longest portages of the trip, and I was happy to have wheels.
August 29
The river was wide and still, with the occasional short reach of swift water. A gray sky and no wind made for contemplative padding, enlivened by an encounter with five otters that raced along the bank; two swam out to check me out. Even in the middle of the river, the mergansers, little green herons, kingfishers, great blue herons, cormorants, and bald eagles were readily visible and kept me company. At day’s end I found the established campsite but it was little more than a tree-root-laced mud hollow on the riverbank and I decided to set up camp on the adjacent cobblestone bar, grateful that the river was low and not likely to rise overnight unless there was a heavy rainfall. The clouds threatened rain, but it held off until I was in bed and asleep. There was, indeed, an overnight shower, but by morning it had passed through.
August 30
The day began calm and misty, but soon transitioned to a blowing mist with a headwind ruffling the Susquehanna, now at least several hundred yards wide. Close to lunchtime, I pulled in to walk up a short path and into Towanda, a quiet town of two- to four-story buildings offering social services, tourist souvenirs, restaurants, and shuttered shops. I scarfed down some faux-Mexican food and a bagel before heading back to the river.
Roger Siebert
.
I was now well into the northeast corner of Pennsylvania, a region called the Endless Mountains, although it might more aptly be named the Endless Meanders. The river wound its way through a steep landscape that often towered 500′ above me on one or both sides. The slopes were blanketed in dark-green pine trees that contrasted with the large sycamores and maples along the river’s floodplain. Below me, a massive fish, some 7″ across and more than 2′ in length, slipped away beneath the canoe.
The current was minimal, adding only about 1 mph to my speed, so I was grateful for the gray skies that kept the sun off as I worked the paddle. When I arrived at the marked campsite near 5 p.m. (more than eight hours after setting off that morning), it was to find another unappealing mud-hole, this time among the trees at the top of the riverbank. Disappointed, I scrambled back down to the boat and set up camp alongside the river.
August 31
Through the following morning, a thick layer of stratocumulus clouds and even a light rain kept the sun off. As I approached a shallow side channel that branched off to parallel the river, a black bear splashed across it some 200′ ahead of me. I cautiously approached to see where it had gone but, hearing it in the knotweed close by, decided that paddling in the main channel, well away from shore, would be safer.
The river now averaged 500′ in width and houses occupied the occasional low flat spots scattered among the steep tree-covered slopes. The slower sections had numerous gravel bars just below the surface, and I had to get out and walk the canoe through to the next deep spot more than a few times.
I set up camp on a gravel bar, choosing a spot beneath overhanging silver-maple branches, which I hoped would keep the worst of the morning dew off. A cicada chose the same tree, and around dusk, it started chirruping so loudly it drowned out the sounds of the river. It kept it up until around 4 a.m. Had I been less tired I would have moved the tent, but the rhythm of its song did at least allow some sleep, albeit not too deep.
September 1
It was Labor Day weekend and there was an increase in river traffic. For days I’d had the waters mostly to myself, but on that Sunday I passed 20 fishing boats and four kayaks.
I usually had the river to myself, encountering only a handful of boats each day. This fisherman was creative about dealing with sun exposure and had mounted a patio umbrella on his boat.
The hilltops were lower now, dropping to about 350′, but from my vantage point on the river they were still impressive, and some were shrouded in cumulus clouds. I stopped in Tunkhannock, a small town with a single main street. I climbed up an aluminum ladder on the riverbank’s steep slope to begin the walk into town. The afternoon was hot and, after shopping for lunch and supplies, I was happy to sit and linger beside the creek at the edge of town. Finally, I roused myself and paddled on for eight more lazy miles to another riverside cobblestone camp.
September 2
A toad wandered around the campsite as I packed up and launched; I followed my usual pattern of eating breakfast after I’d gotten some miles in. As I paddled downstream the hills grew ever lower and the landscape more expansive with the river less sheltered. By afternoon rolling clouds had appeared and winds shifted from behind to ahead and back again. From the east, the Susquehanna was joined by the Lackawanna River, laden with mine runoff that for days after stained the Susquehanna’s rocks a dusky orange.
Five minutes downstream of Nanticoke, I encountered the first continuous rapids of the trip. It was little more than faster water moving over a shallow riverbed, but it took work to keep my sluggish, fully loaded boat lined up where I wanted it.
September 3
Overnight the temperature plummeted into the low 40s, but clear skies and sunshine soon warmed the day. By midday, scattered boulders broke the water’s surface, and the river was no longer flanked by hills; instead, gentle tree-covered slopes or simply a line of riverside trees dominated the scenery. Upstream from Berwick, I avoided the worst of a couple of turbulent rocky drops and on both occasions had to work my way close to the right bank where the gradient was more gradual.
I camped in Berwick in a large, well-tended green space with a bathroom, running water, and trash cans. That evening, at the sound of a whistle, 20 boats sped away from the ramp in a timed fishing competition, all seeking favorite spots from which to try their luck. They returned before darkness fell. In my tent, I dropped off to sleep listening to the fishing awards ceremony in the parking lot.
September 4
Packing up the next morning was made easier thanks to the picnic table, and I was eager to get going, if only to fend off the morning chill by paddling. The landscape had changed again: low wooded hills threaded with powerlines came right to the water’s edge and as I left Berwick astern, I once again had the river to myself. The water was deep and for the first time in days I didn’t have to worry about scraping bottom.
I settled for the night on a cobble bar backed by a steep poison-ivy-covered bank that rose to a working railroad. I slept well and woke with no memory of hearing trains passing in the night.
September 5
The river was now wide and unsheltered, and I expected higher winds as the day went on, so started early. As I approached Lake Augusta, I maneuvered around long, jagged rock ridges angling across the river. The West Branch of the Susquehanna merged from the right at the top of Lake Augusta reservoir—formed by the Adam T. Bower Dam—a 2,100′-long inflatable dam, the longest of its type in the world. There was a 1⁄2-mile portage along a dike starting just upstream of the dam. I wheeled the canoe full of gear on the dike-top road and then cut down steeply through a grass field to a boat ramp to get back on the river. A second portage around a low-head dam a mile farther downstream involved just a 10-yard walk along the shore. The short but untrampled grass suggested few people ever came this way.
The Adam T. Bower inflatable dam was a mandatory portage. The take-out for it was no more than, perhaps, 20′ upstream from the lip, so I paddled tight to the shore as I neared the drop. Approaching dams like this was a tense part of the trip.
Beyond the dams, the river was abundant with eelgrass that swayed in the current. Spotted lanternflies, a large and colorful invasive plant-hopper, floated on the water and large patches of knotweed lined the bank.
McKees Half Falls is formed by two lines of boulders stretching diagonally across the river. The drops were less than 1′ and required just lining up in the water passing between the rocks (although I did have to maneuver a little to avoid one messy hole below the second drop). Farther on I set up camp below the railroad tracks. As I drifted off to sleep, a crescent moon shone through the silver maple behind me and the Big Dipper was bright in the sky.
September 6
I was now in the 50-mile middle-section of the Pennsylvania River Water Trail. The river was dotted with tree-covered islands with plentiful designated campsites and, after 8 1⁄2 hours of almost constant paddling, I chose a site that overlooked the water but was out of the mud and away from several standing dead trees. It looked like the rain would hold off, so I went without the tent fly and fell asleep to the sounds of busy insects.
September 7
The rapids by the town of Dauphin were the first challenge of the day. For the previous couple of days, decaying organic matter in the river had been churned by dams and rapids into finger- to hand-sized foam blobs on the water. It tracked the surface-water currents and helped me pick a course through the rapids and around rocks. Unfortunately, the day was windy, and wind-blown foam added some confusion, but I made my best guesses and hoped I would spot all the rocks before I hit them; I mostly succeeded.
The forecast rain held off until noon, by which point I was almost to the portage around the drop beneath an interstate bridge in Harrisburg. I pulled the canoe out of the water and waited out the worst of the rain under the bridge. At last, it eased up enough for a damp walk into New Market for groceries. By evening the rain was well gone, and after I made camp on the cobblestone beach below the train tracks, I sat on a boulder and watched the day’s last light yield to darkness.
September 8
Between the cicadas, the midnight trains, and the roar of jets at the Harrisburg airport across the river, my sleep had been spotty. I began the day by paddling toward the narrow mile-long channel that passed behind Hill Island. It was shallow and choked with boulders, but I took more epoxy off the paddle than the canoe. Beyond the island, I paddled through a maze of eelgrass that reached the surface and swept against the hull.
I threaded my way between the boulders that choked the channel between Hill Island and the right bank of the river. The visible boulders were of little consequence to my progress, but the barely visible submerged ones forced many last-minute course corrections.
The 30′-high White Cliffs of Conoy were bright and unmistakable on the left side of the river. I beached below this scar left by a 19th-century limestone and dolomite quarry, and followed an easy trail to the top so that I could survey the river and look for a channel through the upcoming river-wide ledge. Returning to the river, I was happy to find that the channel I had selected was, indeed, clean and I continued downstream unscathed.
I stopped on the left shore above the 120-year-old Shock’s Mill Bridge to examine the rapids just beyond. The arch nearest shore (the bridge has 28) was dry, the current in the second split around boulders, but the third and fourth arches led to a smooth wave train undisturbed by rocks. Back in the canoe, I wove around the rocks in the shallows at the top of the rapid and then had a straight shot at the third arch in the 4-mph current. Waves splashed in over the bow briefly, but there were no hidden rocks. Past the waves, I let the current carry me while I bailed. There was a long straight stretch beyond, and I ran downwind keeping an eye out for rocks masked by the wind-ruffled water.
A dozen miles beyond the bridge, I paddled through the backwaters behind the islands of the Conejohela Flats Birding Area to look for wildlife. The water shallowed. I didn’t want to go back and around so kept going, stopping regularly to wash bottom mud off the paddle and fuss about my slow progress through water 3″ to 12″ deep. As I cleared the islands, a good half mile of mudflats covered in gulls, terns, and ducks stretched off into the distance. I followed the deepest channel through the flats, hoping it wouldn’t broaden and shallow out. After a nail-biting half-hour I was clear of the worst and could relax.
Many of my campsites looked like this. After making landfall my priority was always to unload the canoe, pitch the tent, and get organized before making dinner. The low water levels during my trip meant that cobblestone bars were common along the river, and I much preferred to camp there than among the dense bushes (often knotweed) that grew on the riverbanks.
Beyond the flats, the railroad shoulder dropped straight into the water with no beaches for camping. After another hour of paddling, I at last found a narrow stretch of beach. By sunset a pale moon had risen, and the setting sun banded the clouds in the western sky purple and orange.
September 9
I broke camp only to discover half of the tent floor was wet. This stretch of the Susquehanna is a reservoir created by the Safe Harbor Dam downstream which must have reduced the flow through the dam and caused the water level to rise 3″ overnight.
I had called Safe Harbor the previous day to schedule a shuttle around the dam at 10 a.m., but when I arrived at the take-out, the concrete boat ramp was clogged with driftwood. I scrambled up onto the adjacent concrete dock and unloaded there; vultures watched me from the mobile crane used to pull debris out of the water above the dam. The portage crew showed up on time to drive me around to the put-in. At the next dam, Holtwood, 8 miles downstream, there was no cell reception, so I walked up the road to the dam’s call box to check in. The portage crew showed up shortly to collect me.
Below Holtwood, as I paddled along the west side of the Conowingo Reservoir, I became increasingly worried about finding a place to camp. The few level spots had houses on them and everywhere else was a steep rocky wooded slope that fell straight into the water. I spied a small level spot right at the water’s edge, but mindful of the previous night, I paddled on. Finding nothing better after 20 minutes, I turned around. As I paddled back along the shore, a black bear burst out of the water 50′ away and scrambled up the slope. I could hear it paralleling me as I kept paddling toward the place I’d intended to camp. It was no good. If I stayed there, I wouldn’t sleep. I headed downriver to Glen Cove marina, two hours away. After dusk at 8 p.m., the marina entrance light was a welcome sight. No one was around, so I bedded down in my sleeping bag on the dock. Through the night, carp gulped at the surface; it was worse than the regular song of cicadas, but better than hearing a bear in every noise.
September 10
Drowsy at 5:30 a.m. I watched what I thought was a meteor, but a post-trip search online pointed to a Falcon 9 rocket lift-off. Soon a fisherman motored out. Expecting a busy morning at the marina, I packed up and went paddling in search of ripe pawpaws for breakfast. These greenish-yellow fruits grow wild along the bank and usually range from boring to good, depending on the tree; hunger that day made them delicious. Back at the marina I saw no one until the Conowingo Dam portage crew showed up. They told me about a human-habituated bear in the area: my campsite selection was vindicated.
A different world: as I approached Concord Point Park and my takeout point on Chesapeake Bay in Havre de Grace, buildings and marinas lined the right bank.
Beyond the Conowingo Dam, I spent half an hour dodging mostly submerged boulders in 1⁄2–1 mph of current as the final four bridges spanning the mouth of the Susquehanna came into view. Clearing the bridges took two hours in the bright sun, and the light sparkled on the small wind-driven waves covering the wide open expanse of Chesapeake Bay. I turned south to finish at Concord Point Park in Havre de Grace, enjoying the feel of open water, but also wanting to be ashore before the afternoon winds picked up. I had made it. Thanks to mother nature and lady luck I had avoided the high waters left from Hurricane Debby in early August, and the September 22 sewer-line rupture that would close 20 miles of the river north of Harrisburg of Selinsgrove for recreational use. It had not always been an easy trip, but the weather had been kind, allowing me the privilege to experience the wildness that still survives along one of the major U.S. East Coast rivers, despite the impacts of our modern world.
Hugh Rand lives in Maryland where paddling gets him out into nature and provides some much-needed exercise. During his trip down the Susquehanna, he learned from the portage crews that as few as ten people a year paddle the entire length of the river in one go. For more of Hugh’s adventuring read “The Erie Canal by Canoe.”
If you have an interesting story to tell about your adventures with a small boat, please email us a brief outline and a few photos.
There is no perfect solution for mounting an outboard motor on a small boat; it must be tailored to the boat and the needs of the sailor. Modifications to any of my boats must be aesthetically pleasing as well as functional. Aesthetics and functionality need not be in conflict, and in my case, the motor is not used enough to warrant the weight and complications of having it permanently mounted on the transom. Recent advances in electric outboards have allowed for options not practical for heavier and bulkier gas-powered outboards.
My Torqeedo 1003 is about 10 years old and has been adapted for several boats. It was originally used on AUNT LOUISE, a William Gardner–designed Eel. For this double-ender, the motor was mounted on a bracket attached to the side of the hull; it could be quickly removed and stored once under sail. AUNT LOUISE sold without the motor and, not having a small skiff in my fleet, I decided to see if the Torqeedo could turn my sharpie into a serviceable power skiff.
Photographs by the author
MALU’s rudder is mounted on two pintles on the transom. To make use of those pintles, the motor mount has two drilled-out Delrin blocks, which are bolted to a teak board and serve as gudgeons. Below the upper gudgeon, I through-threaded a bolt that will prevent the board from rising up and off the pintles.
MALU, my 17′ sharpie, has a transom but it also has an afterdeck that prevents simply clamping the Torqeedo to the stern. To avoid modifying the boat, I made a motor mount that fixes on the rudder pintles. I fashioned it from a teak board onto which I bolted drilled-out blocks that serve as gudgeons to the boat’s pintles. The mount sits snugly against the transom, cannot pivot, and rises above the transom to achieve the correct height for the long-shaft motor. With a long tiller extension that allows me to keep my weight well forward, the boat becomes a handy utility skiff.
Using the existing pintles works perfectly for my use of the outboard on this boat. But if you wish to use it on a sailboat where the rudder is not easily shipped and unshipped, you could fit a second set of pintles or gudgeons mounted to one side of the existing rudder hardware on the transom, making sure to offset the motor enough that it does not interfere with the rudder.
Because bad things can happen and a motor can be dropped on its way on or off the mounting board, a safety line is attached to the motor and connected to the boat.
Making the Mounting Board
To make the gudgeon blocks, I used Delrin, a dimensionally stable high-strength plastic that is easily worked using woodworking tools. Other high-strength plastics, or a good hardwood block, would also work, provided you take proper precautions to prevent splitting. The fabrication is quite simple. All that is needed is a hole drilled to match the diameter of the pintle. The center of the hole should be the same distance from the edge of the block as the center of the pin is from the boat’s transom. It is important to have a snug fit, with no rocking movement when the board is in place. Another solution would be to use a manufactured gudgeon bolted to the board, with blocking down each side to keep it parallel and fit tightly against the transom. If installing a set of pintles and gudgeons to use the motor on a sailboat without having to remove the rudder, mount the gudgeons on the boat and the pintles on the board—this will avoid having the more obtrusive pintles on the transom when the outboard is not in use.
Once the motor is mounted to the board it’s important to keep it there. The simplest way to prevent a motor from working its way off the board is to create a recess for the screw pads. This recess can be two indents, made with a Forstner bit (as seen here), for a specific motor or a single larger area suitable for a range of motors.
It is always important to make sure both mount and engine stay attached to the boat. First, just like securing the rudder, you need to prevent the mount from lifting off the pintles. I threaded a bolt through the mounting board just below the gudgeon. If the mount begins to rise up, the bolt prevents the pintle from lifting out of the gudgeon and keeps it securely in place.
After making sure the mount will stay in place, we then need to ensure the motor stays connected to the mounting board. Perhaps the simplest solution is to create a recessed area for the screw pads to fit into; this will prevent the motor from “walking” off due to vibration or simply because the screws have not been sufficiently tightened. You can make either two recessed holes to fit a particular motor or a recessed area for more universal use. While I chose the former, a larger recess could be created by routing out a small area, or simply by adding a block or cleat above the screw pad area. Finally, it is always a good idea to attach a safety line to the motor, for retrieval if the unexpected happens.
The Torqeedo motor is free to turn for steering while the board mount, fit snug against the transom, remains stationary.
Francis Herreshoff is often quoted as saying, “Simplicity afloat is the surest guarantee of happiness.” It could also be said that simplicity afloat is the surest guarantee of safety. Having your gear and systems set up to be easily accessed and deployed makes for a successful, enjoyable day on the water.
A lifelong resident of Florida’s Gulf Coast, Michael Jones spent his career as a boat carpenter working on the full spectrum of yachts from traditional to high-end luxury cruisers to sportfishing boats. Past president of the Traditional Small Craft Association he is a collector of small craft and is, he says, “still (boat) crazy after all these years.”
Putting the Pintles on the Board and Not the Boat
Notes by Christopher Cunningham
Michael’s sharpie, MALU, has pintles on the transom, so his motor-mounting board required fixtures with holes—the equivalent of gudgeons. All my rudder-equipped boats have gudgeons on the transom, and so, instead, require some sort of pintles on the mounting board.
Michael’s homemade gudgeons could be converted into a pintle by driving a short length of brass, bronze, or stainless-steel rod into a hole drilled to give it a tight fit in the block. Delrin would work well, as would a dense hardwood that’s not prone to splitting. I used a piece of local honey locust, a wood that I often use for making cleats. The hole for the metal pin is located to match the distance between the face of the transom and the hole in the gudgeon. To keep the motor-mounting board from swinging as a rudder does, the block is sized to fill the space between the transom and the rudder fitting. To taper the pin, I chucked it in a drill and spun it against a grinding wheel, then a 1×30 belt sander with a fine grit, and finally a buffing wheel. Note the cross cleat at the top of the board. Like the circular depressions in Michael’s board, it serves to keep the motor from slipping off.
One of the gudgeons I have, a commercial model made in cast bronze, has its hole very close to the surface on which it’s mounted, and I wouldn’t have confidence in a motor-mount pintle installed so close to the edge of the block of wood. A metal pintle would be stronger and, while commercial transom pintles aren’t as common as rudder pintles, they are available. I opted instead to make a pintle out of bits of brass joined by brazing them with silver solder. (See “Fillet Brazing for Custom Boat Hardware.”) To increase the space between the pin and the strap, I added a short piece of brass stock between the two elements and brazed all three elements together at the same time. Using a metal pintle requires adding a block of wood above the pintle to keep the motor-mounting board from pivoting.
On three of the boats for which I made rudder hardware, I avoided the challenge of making pintles by fitting gudgeons on both the rudder and the transom. A single brass rod inserted through all four of them holds the rudder in place. This method can have the advantage of keeping the rudder from lifting off by having the gudgeons on the rudder side flanking those on the transom side and would also work for the motor-mount board.
Christopher Cunningham is Small Boats’ editor-at-large.
You can share your tips and tricks of the trade with other Small Boats readers by sending us an email.
Most boats produced as tenders today row so poorly that it is little wonder that their owners often turn to an outboard motor for help. But if you are willing to forgo the noise, expense, and pollution of a motor, you may find that a peapod is the ultimate yacht tender.
These are great little boats, seaworthy, stable, and easily rowed. Here is a pod that is a bit smaller than most, but she will still carry a big load and bring you through some lumpy water with confidence.
The Beach Pea design uses modern glued-lapstrake plywood construction, so she is lighter and easier to build than a traditionally built boat. In addition, you won’t have to worry about her seams opening if your pod has been out of the water for a while. The clean interior will be easier to maintain, and a coat of paint will last quite a bit longer on the stable plywood surface.
Two sailing rigs are shown-an easy-to-strike lugsail, and the more traditional sprit rig. Sailing your pod can be a lot of fun, especially if you are willing to go rudderless. Unlikely as this may sound, you can amaze your friends and steer your pod just by moving your weight forward or aft. A centerboard will help you get to windward, and for the less adventurous the plans include a rudder.
Doug Hylan drew his Beach Pea design plan with the beginning builder in mind. The plans are well detailed, and full-sized patterns eliminate the need for lofting. The six-sheet set of plans includes lines, construction, two sail plans, and full-sized patterns for molds and stems. A 22-page how-to-build booklet will help you along. WoodenBoat Plan No. 110, $75.00.
The Beach Pea excels as a pulling boat. A simple lug rig provides auxiliary power.
Check Out These Other Doug Hylan Designs
Need some inspiration before you build your own Beach Pea Peapod? Read our full profile of the Beach Pea, then take a look at a few other boats designed by Doug Hylan.
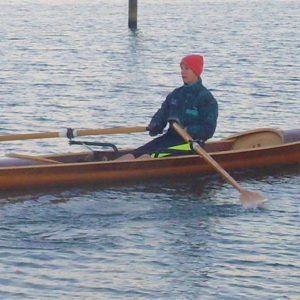
 photographs by the author
 The seat support rail is designed for the Piantedosi sliding seat rowing rig. Under each deck is a sealed compartment for dry storage and flotation. The manual includes instructions for making the hatches from plywood.