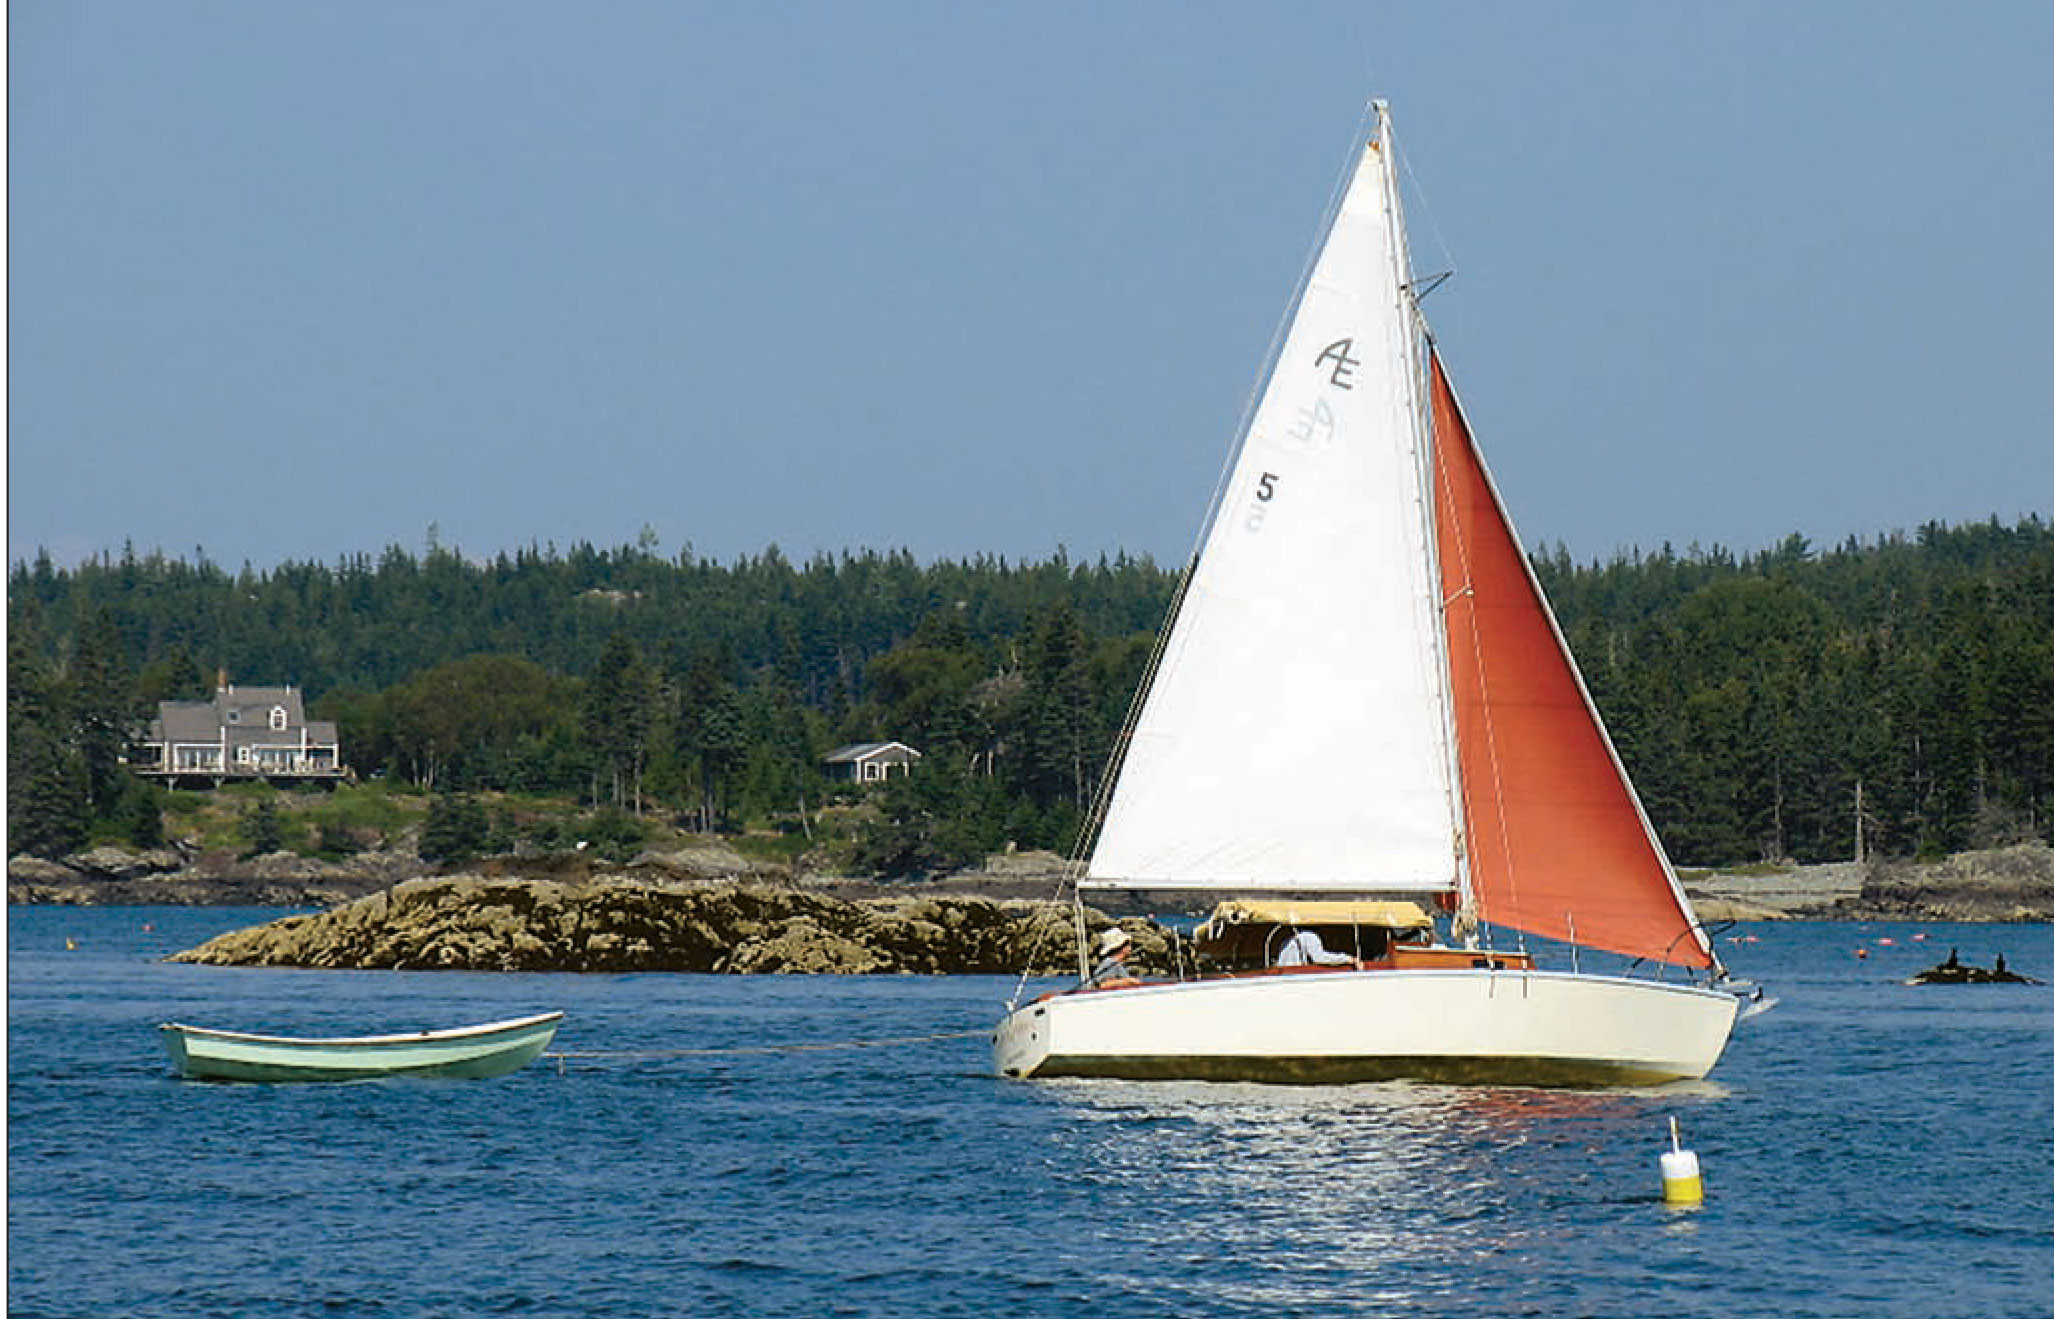
Some weeks ago, faced with a boring household chore, I went in search of a podcast that would keep me company and distract me from the mundanity of my task. I stumbled upon “A Short History of… Shackleton,” from the Noiser Network. I tuned in. While it didn’t help me with the task in hand—barely 10 minutes in I had, instead, settled into a comfortable chair with a cup of tea—it did remind me of the extraordinary challenges that Sir Ernest Shackleton and his crew had faced and survived more than 100 years ago. Once the podcast was over, I went to my bookshelf to find Shackleton’s Boat Journey, Frank Worsley’s account of how Shackleton and five of his crew—Captain Frank Worsley, Ship’s Carpenter H. McNeish, Second Officer Tom Crean, and Able-Bodied Seamen J. Vincent and Timothy Macarty—sailed one of the ship’s lifeboats across nearly 800 miles of Southern Ocean from Elephant Island to South Georgia.
The story of Shackleton’s Imperial Trans-Antarctic Expedition, of which the “boat journey” is just a part, is well known and, despite being one of arguable failure, is one of the most heroic maritime survival stories of the 20th century. Shackleton and crew had left England on the barkentine ENDURANCE in August 1914. The expedition’s goal was to cross the Antarctic continent from the Weddell Sea to the Ross Sea via the South Pole. But by January 1915, ENDURANCE had become trapped in the pack ice at the southern extreme of the Weddell Sea, and by late October, the crew of 28 men—seamen and scientists—had to abandon ship. Less than four weeks later, ENDURANCE succumbed to the crushing ice and sank.
Photographs by Frank Hurley, as published in Shackleton’s Boat Journey by F. A. Worsley
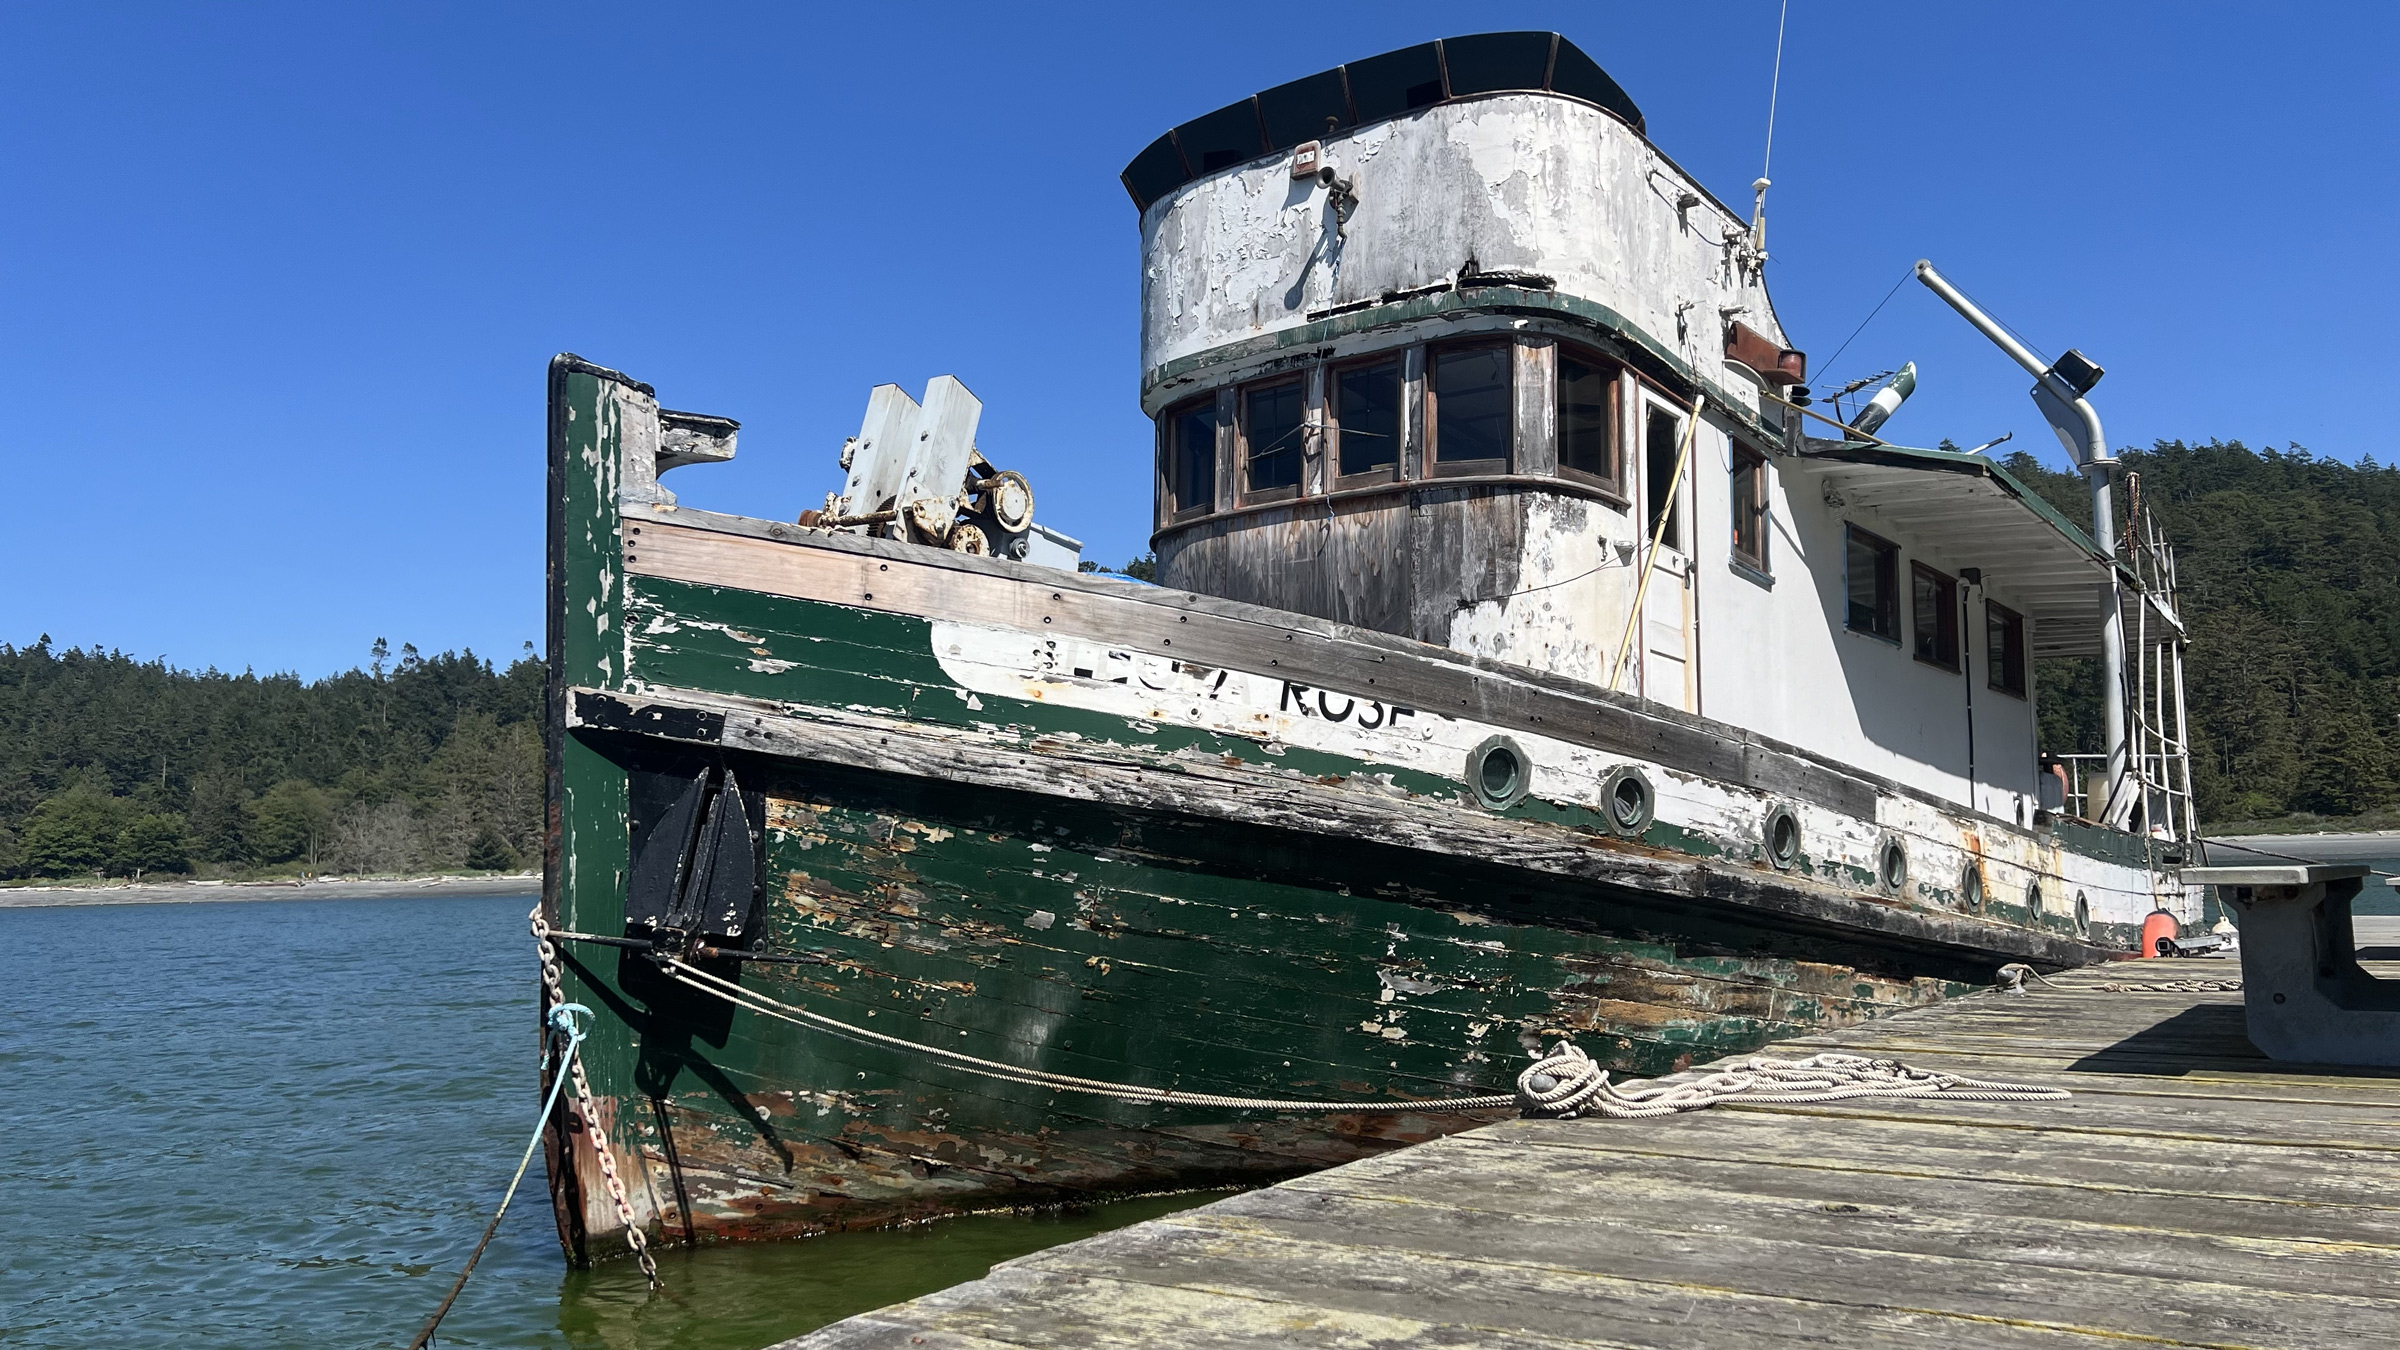
After dragging the three ship’s boats across the ice and then rowing and sailing them for 60 miles, the ENDURANCE crew made landfall on Elephant Island on April 15, 1916.
For a month, the men dragged their equipment, supplies, and three boats across the ice until they established Patience Camp in late December. There they would live for three and a half months until, in April 1916, with the floe breaking apart beneath their feet, they launched the three boats—the JAMES CAIRD and DUDLEY DOCKER, both 22′ 6″ long with a 6′ beam, and the STANCOMB WILLS, 20′ 8″ by 5′ 6″—and set sail for Elephant Island, 60 miles to the northwest. Six days later, having weathered massive seas, strong and often adverse winds, and ice that closed up and broke apart around them, they made landfall.
It was inevitable that Shackleton, as leader of the expedition, would be remembered through the century since ENDURANCE foundered and, while some have pointed out that it was his own recklessness that brought his crew to their life-threatening predicament, none has argued that his leadership qualities were anything but exemplary. But to remember only Shackleton is to do considerable disservice to the memories of some truly remarkable men; first among them the captain of ENDURANCE, Frank Worsley, author of Shackleton’s Boat Journey.
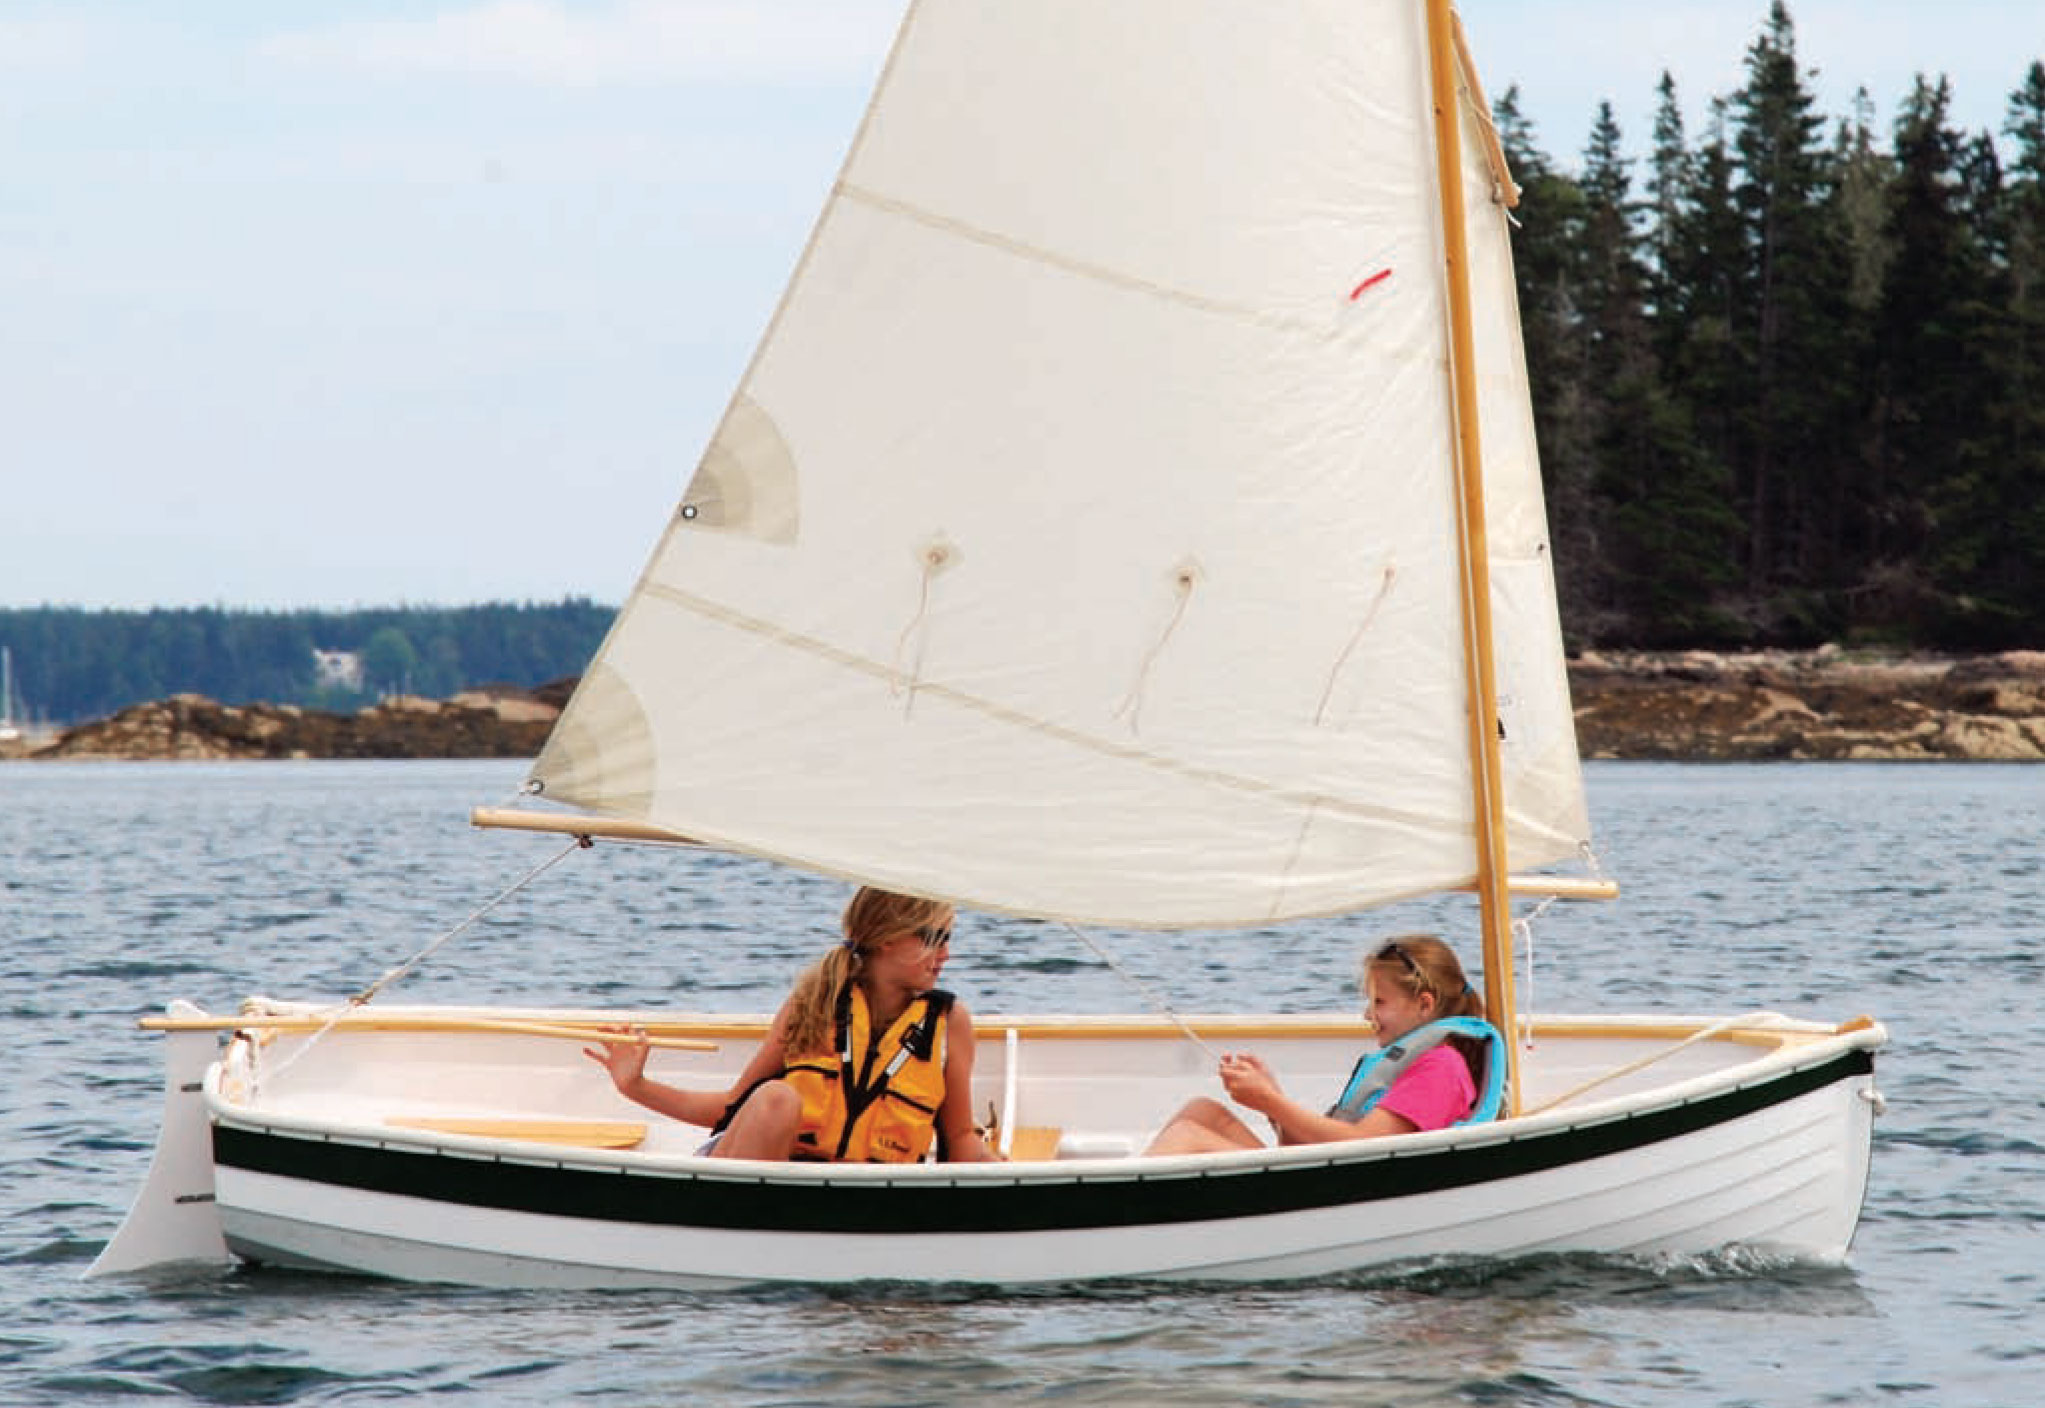
The JAMES CAIRD was made as seaworthy as possible for the 780-mile voyage from Elephant Island to South Georgia. Harry McNeish, the ship’s carpenter—who would be part of the JAMES CAIRD’s six-man crew—covered the space between the decks with sled runners, lids of boxes, and old canvas. A mast from one of the other boats was bolted along the keelson to prevent the CAIRD’s back being broken in heavy seas; and the mast and sail from the STANCOMB WILLS were cut down to make a mizzenmast and its lug sail. Frank Worsley, inset top right, was the captain of ENDURANCE and navigator of the JAMES CAIRD.
Worsley’s skills as a navigator were truly extraordinary. Shortly before ENDURANCE sank, he had worked out the courses and distances from and to the various nearest landfalls: South Georgia, the Falklands, Cape Horn, Elephant Island. It was a foresight that stood him and the other men in good stead, and as they reached the edge of the ice floe, Shackleton trusted Worsley to get them to Elephant Island. But courses and distances, when you can see the sun and stars and know the speed and directions of currents, are one thing; when you have none, or at best, only a few of those aids to hand, navigating a small boat across storm-tossed ocean waters to land on a 30-mile-long island 60 miles away is no small feat. On the relatively short voyage from the ice pack to Elephant Island, Worsley wrote, “I can never forget my acute anxiety for the next two days. If there was a mistake in my sights, which were taken under very difficult conditions, twenty-eight men would have sailed out to death. Fortunately the sights proved correct.” Thanks to Worsley, all the men made it to Elephant Island, and 10 days later, six of them set sail again on the JAMES CAIRD, this time bound for the island of South Georgia, 780 miles away.
Worsley’s firsthand account of that voyage from Elephant Island, written from memory and his own log records, is both humble and humbling. Most readers (myself among them) cannot possibly fathom the discomfort of being soaked to the bone for 15 days in sub-zero temperatures, while crammed into a storm-tossed boat with waves that frequently rise to more than 30′ and at least once to more than 50′. Worsley, while not making light of their predicament or discomfort, nevertheless has such a pared-down matter-of-fact style that you are left in no doubt that what you are reading is true; there is no hyperbole to make you doubt the author, no moments of self-congratulation that question his authenticity. Page after page, his power of description—always exact and occasionally poetic—puts you right there in the thick of it, even as you hunker down in your warm, dry, comfortable armchair.
While Elephant Island was, indeed, solid land, its beach was narrow and bleak, and landing or launching through the surf was not easy.
On the third day out from Elephant Island, Worsley writes that the wind “blew a hard west-southwest gale with snow squalls. Great torn cumulus and nimbus raced overhead. Heavy westerly seas rushing up on our port quarter swept constantly over the boat, pouring into the ‘cockpit’ and coming through the canvas in little torrents, soaking everything… I took observations of the sun for position, but the boat pitched, rolled, and jerked so heavily that I could take them only by kneeling on the after-thwart, with Macarty and Vincent clinging to me on either side, to prevent me pitching overboard, sextant and all… Stormy, snowy weather. Rolling, pitching, and tumbling we laboured before the roaring grey-green seas that towered over us, topped with hissing white combers that alas! Always caught us. Bruised and soaked, with never a long enough interval for our bodies to warm our streaming clothes, in zero weather we now fully gauged the misery and discomfort of our adventure.”
Five days later, conditions were even worse: “The boat leaped and kicked like a mad mule; she was covered fifteen inches deep in a casing of ice like a turtleback, with slush all over where the last sea was freezing. First you chopped a handhold, then a kneehold, and then chopped off ice hastily but carefully, with an occasional sea washing over you. After four or five minutes—‘fed up’ or frostbitten—you slid back into shelter and the next man took up the work… This fierce, cold gale had lasted at its height for forty-eight hours.”
Twenty of the twenty-two men left behind on Elephant Island after the JAMES CAIRD and its crew of six departed on April 24, 1916. Not pictured are the steward, A. Blackborrow, and Frank Hurley, the man responsible for the extraordinary photographic record of the ill-fated Imperial Trans-Antarctic Expedition. Behind the men can be seen the canvas-covered up-turned hulls of the DUDLEY DOCKER and STANCOMB WILLS. These would be bedroom, smoke room, dining room, operating theater, and hospital for the men for more than four months. All the men would be rescued on August 30, 1916.
Throughout, Worsley navigated. South Georgia, just 90 miles from end to end, was but a pin-prick; if they missed it, they would sail on into the Southern Atlantic where there would be no hope for them or for the 22 men left behind on Elephant Island. His books and log, Worsley writes, “were in a pitiable state—soaked through, stuck together, illegible, and almost impossible to write in. They were not paper pulp, but something like it, and it took me all my time to open them without completely destroying all chance of navigating to land.” But, against all odds, after 15 days at sea, having managed to get a sun sight just four times in the first 13 days, “two of these being mere snaps or guesses through slight rifts in the clouds,” Worsley brought the boat and its six-man crew to the west coast of South Georgia.
Still their trials were not over. As they lurched along the lee shore, desperately searching for a place to land, they were hit by the worst wind they had encountered thus far. “For nine hours,” writes Worsley, “we had fought at its height a hurricane so fierce that, as we heard later, a 500-ton steamer from Buenos Aires to South Georgia had foundered in it with all hands, while we, by the grace of God, had pulled through in a twenty-two-foot boat.” Despite the ferocity of the weather over the final 24 hours, Worsley’s account continues with his trademark precision and lack of sentimentality. Just once does he touch on what must have been utter fear and desperation when he writes: “The thoughts of the others I did not know—mine were regret for having brought my diary and annoyance that no one would ever know we had got so far.”
Worsley’s account is not long. My paperback edition, published by Birlinn Ltd, in 2007, runs to just 143 pages, and covers the story from ENDURANCE becoming trapped to the escape to Elephant Island, the “boat journey,” and the subsequent climb made by Shackleton, Worsley, and Crean across mountainous South Georgia to get help. It is a story that captivates from the first page to the last; knowing the author survives takes away none of the suspense.
Jenny Bennett is editor of Small Boats.
Shackleton’s Boat Journey by F.A. Worsley, published by W.W. Norton, is currently available through most book outlets, price $20.
Is there a product that might be useful for boatbuilding, cruising, or shore-side camping that you’d like us to review? Please email your suggestions.
Many of the stoves I use for camp-cruising are fueled by pressurized canisters of either butane, propane, or a propane/isobutane mix. Compared to the white-gas-fueled camp stoves that were popular when I started camping in the 1960s, canisters are much easier to use, but their convenience comes at a cost. The canisters themselves are expensive—about 80% of the purchase price is for the canister, not the fuel—and when the fuel is used up it is difficult to dispose of the canister responsibly.
When I prepare for a cruise, I usually pack a full canister and return home with it partially full. At my latest count I’ve accumulated nine 8-oz canisters of butane and fourteen 1-lb canisters of propane, most containing an unknown quantity of fuel. I can’t dispose of them until they’re empty, and even then, canisters must be taken to a hazardous-materials disposal site or a store that collects them for recycling. Unfortunately, in the U.S., many of the 40 to 60 million 1-lb propane canisters sold annually wind up in landfills.
Photographs by the author
I can use the Growler to fuel my nCamp multi-fuel stove, Gas One Mini, and Zodi Hot Shower.
It’s worth noting that although there are many online videos demonstrating how to refill common 1-lb propane canisters, they are not intended for that purpose. While federal law does not prohibit the practice, 1-lb canisters carry a warning: “Federal Law prohibits transportation if refilled. Penalty of up to $500,000 fine and 5-year imprisonment.” You can buy refillable versions of the 14.1-oz and 1-lb canisters, but to fill them you also need a large propane tank, a stand on which to hold it inverted, and an attachment to connect it to a canister.
The Growler works with the dual-fuel Gas One Mini because the Mini’s adapter hose (its end seen here) can be connected to the Growler’s hose. For stoves that accept only bayonet-type canisters, there is an adapter compatible with the Growler hose; I haven’t yet purchased or tested it.
To avoid the cost, disposal problems, and waste of the single-use canisters, I recently bought a refillable Gas Growler 3.8, the smallest of the propane tanks made by Ignik, a company headquartered in Washington State. The tank is 10 1⁄4″ tall, 8 1⁄4″ in diameter, and weighs 8.2 lbs empty and 11.4 lbs full. It holds 3.8 lbs (0.9 gallon) of propane, and like larger propane tanks, is refillable at many gas stations and hardware stores. When I first filled the Growler, the gas-station attendant stopped at 0.68 gallon—a judgment call, I believe, based on what the Growler valve was venting. I was charged the 1-gallon minimum of $4.99, but that was still a significant saving when compared to the purchase of a new 1-lb canister, which holds just 0.236 gallons and sells for $6 to $7.
The end of the Ignik hose (left) accepts fittings (right) that connect with typical propane cannisters, but the pins in the center of those fittings are not all the same. This one is chamfered and others may be unchamfered or rounded. All will fit the Ignik hose, but some, especially the unchamfered, require much more force to make the connection.
The Growler comes with a 4′ hose that connects to a valve on top of the tank. The tank-to-hose connector has an excess-flow protecting valve that stops the flow of gas if a device is disconnected while the tank valve is open. On the other end of the hose is a brass connector that is compatible with devices fueled by 1-lb canisters or the taller 14.1-oz canisters typically used with propane torches. The Growler’s hose can also be connected to other devices by means of an adapter. Both my dual-fuel Gas One Mini Stove and my Camp Multi-Fuel Stove have hoses with fittings that will connect to the Growler, allowing me to switch from butane to propane and from propane/isobutane to propane respectively. Many of the propane-fueled Coleman camp stoves also have fittings compatible with the Growler hose. If the connector that comes with the Growler is not compatible with a particular device, there are many adapters on the market. For example, I found an adapter that would allow my oldest butane-fueled portable gas ranges to be converted to propane. This type of stove uses butane canisters with bayonet or magnetic fittings, and the adapter is said to work with both, but I haven’t tried it because I will be retiring the stoves.
It is easy to connect the hose for the nCamp stove to the Ignik hose using the adapter—propane canister to Lindal EN417—seen here at right. It costs around $10.
While the Ignik hose does have the excess-flow protecting valve, it does not have a regulator. There are similar hoses from other sources that have them, but Ignik notes that regulators are not required for the Growlers. Like most camping propane canisters, the Growler 3.8 has an operating pressure of between 100 and 200 psi, the same as that of propane tanks. When fueled by the Growler and its hose, all of my torches—a simple brass one, and two BernzOmatic torches with built-in igniters—operated as they do when connected to a tall 14.1-oz torch canister or a 1-lb camping canister. With the valves on both tank and torch fully opened, there is no sign of the pressure exceeding that produced by canisters. The same was true of my stoves. Their flames were nearly identical whether fed by canisters or the Growler.
While the size of the Ignik Growler might be a deterrent where space and weight are of concern, with the right adapters it can be used in lieu of a variety of non-refillable fuel canisters including those for propane/isobutane, butane, and propane. I weighed the Ignik tank when empty and recorded the weight on the inside of the shield (3,708 g—Ignik lists 3,628 g). Now, by weighing the tank when filled and after use, I can determine how much propane is in it.
The Growler is bigger and heavier than the canisters it’s replacing, but the three boats I use for cruising have plenty of room to accommodate its use and storage. It will encourage me to indulge in both baking and preparing dishes that require longer cooking times. When fueling torches for metalwork, especially fillet brazing thick brass or bronze, the Growler can easily handle jobs that require long heating times, and having the torch connected to a flexible hose will make it easier to hold and angle to the work.
I will continue to work through my old fuel canisters and may occasionally buy a new one if I intend to prepare a hot meal on a day trip aboard one of my smaller boats, but when it comes to cooking aboard my cruising boats and metalwork in my shop, I will be relying more on Ignik’s Gas Growler 3.8.
Christopher Cunningham is editor at large of Small Boats.
Like many amateur builders, Steve Wenger came to boatbuilding gradually. But having arrived at his first project in 2014, he was well and truly caught by the bug. To date, he has built five boats ranging in size from 12′ to 15′. Steve’s love of boats stems from childhood when, in the 1960s, his father was working as a park ranger at Lake Mohave in Arizona and the family had access to a cabin cruiser with an inboard diesel engine. Decades later on a trip to Canada, Steve met a boatbuilder who had a plywood sailboat, and the concept of building his own boat was sparked in his mind. He had, he says, already designed and built two campers—one for a small pickup truck, the other a conversion of an early Toyota Four-Runner—and had been canoeing for several years; building a wooden boat seemed a natural progression. And yet, Steve still didn’t take the plunge. Six years later, he did buy plans for the Tracy O’Brien-designed Headwater 14, a Rogue River drift boat…but still he didn’t build.
Photographs courtesy of Steve Wenger
Steve’s first Tracy O’Brien build was the Headwater 14, a Rogue River drift boat. He chose it for its suitability on local Colorado rivers and because he “loved looking at that wild sheer.”
“Those plans sat around for a couple of years,” Steve says. “Partly because getting marine plywood to Colorado seemed insurmountable, but mostly because of the inertia of life in general.” Nevertheless, not only did the dream not go away, it became ever more persistent. “I became obsessed with the idea of building a boat I could sleep on, and purchased two more plan sets for larger boats from O’Brien.”
For Steve, Tracy O’Brien’s plans were the perfect antidote and fodder for his dream: “It was easy to build scale models from Tracy’s offsets,” he says. Using artist’s mat board and Scotch tape, Steve built hulls scaled to 1 1⁄2″ to the foot. “I’m sure I could have built a whole full-sized boat in the time I spent daydreaming about those designs and others.” Finally, however, Steve’s modelmaking and testing led him to decide that if he were to build a full-sized boat, it should be something smaller, a boat he could use on local Colorado rivers. His dreaming came full circle when his musings brought him back to the very first plans he’d bought: the Headwater 14 drift boat.
Space was tight in Steve’s garage workshop, but after his first two successful builds he moved on to a stretched version of O’Brien’s Transport 9.9.
In 2014, the time to build had come at last. As it turned out, Steve decided to build two boats: the Headwater and Harry Bryan’s Fiddlehead. He would build them simultaneously, side-by-side. He reasoned that if one construction had to pause—when glue was curing, for example, or if waiting for materials—he could work on the other. Furthermore, he could reduce the cost of shipping quality marine plywood to Colorado by ordering enough material for three builds at once. It was an ambitious move, but one he does not regret.
Neither of those two building projects caused Steve much angst. The Fiddlehead was finished in November 2015 without problems, and the larger Headwater was launched in September 2016. Of the latter, he says, he appreciated the “straightforward building sequence and O’Brien’s key to the plans with parts numbered and illustrated.” And there were details in O’Brien’s design that appealed. “I particularly liked his use of ‘riblets’—short ribs that help to stiffen the upper topsides and, on the Headwater, tuck in between the gunwales and inwales to give the appearance of a scuppered rail.” And then there was the sweeping sheer. “I loved looking at that wild sheer; there was so much shape in that boat.”
SWIFT, Steve’s stretched Transport 9.9, benefited from some personal touches including the rod-and-oar racks and pedestal seat. Steve also extended the spray-deflecting outwales around the bow to provide two carrying handles.
With two successful builds under his belt and that extra plywood on hand, Steve was soon moving on to a third construction boatbuilding project. He had long decided that a cabin cruiser would be impractical for western Colorado, and besides, his garage shop couldn’t accommodate anything big. “And,” he adds, “my wife is a landlubber at heart, so I looked for an outboard boat that could carry two adults, a dog, and our camping gear.” He considered O’Brien’s Transport 9.9, a cartopped pram dinghy, but worried that it was too small at just 9′ 10″. Nevertheless, he kept returning to the Transport, and after studying other designs and building yet more models, decided to stretch the design. “I feel bad that I didn’t run the changes by O’Brien. His 9.9′ V-bottomed Garvey became 13′ 7″ × 5′—I enlarged it overall by 25 percent and added 15″ to the straight run aft to even out the proportions. It’s a high-volume boat, but I find that volume comforting; it performs like a larger boat.” Steve powered the boat with a 25-hp Yamaha four-stroke outboard, which he says might be more than it would need at sea level, but it serves him well in western Colorado where elevations of 6,000–8,000′ starve engines of air.
The modified Transport 9.9 was a hit with the family: Steve’s wife, who is “essentially a landlubber,” enjoys camp-cruising in it, and the dog was always happy to be on board.
“Besides enlarging the design,” Steve says, “I added many custom features until I was almost embarrassed by my indulgence. I built a seat pedestal so I could use a tiller extension on the outboard; some oar and fishing-pole racks; a ‘chicken-post’ handhold that can be height adjusted; and I extended the spray rail around the bow transom to provide two handles.” Together with his wife and their dog, Steve has used the boat to beach-camp in Colorado, Arizona, and British Columbia. “The dog was always eager to hop in—and even more eager to hop ashore.”
Steve’s most recent O’Brien build is a sailboat. The Nemah, a 14′ flat-bottomed sharpie, equipped with a daggerboard and a maststep and partner, appealed to Steve because it can be rowed and motored as well as sailed.
For his most recent build—his fifth (he has also made a skin-on-frame canoe for his wife)—Steve turned to another O’Brien design. The Nemah is a sailboat, a 14′ flat-bottomed sharpie. Once more, Steve considered other designs but ultimately chose the Nemah because of his prior experience building O’Brien’s designs which, he says, combine ease of construction with more than a touch of elegance. He had originally bought the Nemah plans for their own sake, because he “liked the look. But then the idea grew on me. I had no sailing experience, so I liked that the boat could also be rowed or powered with a small motor; and I already had an electric trolling motor.”
RUBY—the 14′ sharpie seen here with a wishbone-spritsail rig—has the truncated frames (“riblets”) that O’Brien favors for giving strength and stiffness to the plywood topsides while maintaining an uncluttered cockpit.
Construction, he says, was typical “straightforward O’Brien stitch-and-glue. Laminating and shaping the mast was interesting, as was sanding the daggerboard and rudder blade to their foil shapes.” But despite the apparent simplicity of the build, the hull was not without its challenges. “The stitch-and-glue construction,” Steve says, “requires a lot of sanding and fairing, which tested my ability to let go of my perfectionism. I developed a mantra: ‘It’s a boat, not a work of art.’” But all that sanding also indulged one of Steve’s favorite aspects of wooden boat building. “I love the tactile experience. I faired by hand mostly, because of my poorly lit, off-grid shop. If I could feel a blemish, then there was more work to do. All that touching of the boat, milling and sanding all the parts, feeling for smoothness, running my hand along the rail as I walked away…it has all connected me to my boats in a way that few other creating projects have. I build myself into the boat.”
Steve’s love for his boats has caused something of a problem. “It’s hard to let go of a boat you’ve built. We still have all five. I’ve given up the idea of a ‘sleep-aboard,’ but I do think there might be another boat in me.” In part, however, any future projects will depend on Steve’s wife: “She’s given me an ultimatum: no more new builds until I sell one or two.”
Jenny Bennett is editor of Small Boats.
Do you have a boat with an interesting story? Please email us. We’d like to hear about it and share it with other Small Boats readers.
More reader-built boats for oar and power
YEAH BUOY, a plywood skiff built for drift-fishing and family boating LADY LOUISE, a Candlefish 13 GENERATIONS, a family-built Bevins skiff
Developed in the late-19th century for Maine lake fishing camps, the Rangeley type has long been admired as a capable small craft with excellent rowing characteristics.
In 1977, Bruce Malone began working on a Rangeley boat in his living room, moving the furniture out and bringing in a strongback, molds, and a planking bench. The engineer-turned-boatbuilder had been working at the Newbert & Wallace Shipyard in Thomaston, Maine, when he read about Rangeley boats in a reprint of a National Fisherman article by John Gardner, who also included the type in his book, Building Classic Small Craft. Gardner praised the boat’s “handsome shape and superior performance” and noted its “fairly simple” construction. Malone, who grew up rowing a beamy 14′ skiff on Lake Winnipesaukee in Wolfeboro, New Hampshire, was immediately drawn to the Rangeley’s graceful lines, lapstrake hull, and reputation as a dream for rowing and fishing.
“I had enjoyed rowing in boats that didn’t row well, so I thought, ‘What would it be like to row a real rowboat?’” Malone recently reflected. Except for a hydroplane he built in his youth, the 17′ Rangeley, planked with cedar over steam-bent white oak frames, was the first boat Malone had built for himself. He put over 500 hours into its construction, including driving 2,886 rivets. His girlfriend, Barbara, bucked the back of each rivet as he peened them over. “Despite that, she did eventually become my wife,” he chuckled.
Malone lofted the boat—which is 17′ LOA with a 4′ beam and a depth of 15″, measured from the bottom of the keel to the top of the lowest point of the sheerline—following the plans from Gardner’s article. The wineglass- shaped transom would allow the boat to carry a small outboard without compromising its fine rowing characteristics. Malone constructed the hull right-side up, installing the keel, inner stem, transom, and transom knee first, then setting up seven hull station molds. The stem and keel both had outer and inner pieces, which made the sometimes-complicated task of cutting keel and stem rabbets unnecessary.
Starting with the garboards, he installed 11 planks per side, each 5⁄16″ thick. Where necessary, strakes were made of shorter pieces scarf-jointed together and glued with epoxy, and Malone used polysulfide bedding compound in the plank laps. He riveted the laps as the planking was installed, leaving space for the frames to be bent into position and riveted after the boat was planked up. The frames, 3⁄4″ wide, 3⁄8″ thick, and spaced 2 11⁄16″ apart, were steam-bent.
Barbara A. Malone (left), Donnie Mullen (right)
Left—In the late 1970s, Bruce Malone visited Herb Ellis (at right), whose transom-sterned—“square-sterned” in lake parlance—boat was documented by small-craft historian John Gardner. Right—Malone’s first boat used bench thwarts. He followed the light, closely spaced framing of the original boats, though in his later hulls he favored wider frames more widely spaced.
Characteristically, Rangeley boats had round, stoollike seats mounted atop recessed thwarts, a style unique to these boats, which were originally used by fishing guides to take paying clients out on the Rangeley Lakes of western Maine (see WB No. 225). For his boat, Malone decided instead to use common bench-style thwarts.
Next came the gunwales, breasthook, and the outer stem, all of white oak. Rangeley boats had unique trunnion-mounted oarlocks, which are rare today, so Malone used bronze round-socket rowlocks as the closest approximation he could find.
Legacy of the Rangeley
When Malone launched his Rangeley, he found his dream realized. He had never rowed anything like it. He still has—and still uses—the boat. Over the years, the Rangeley has taken him on camping and fishing expeditions across interior and coastal Maine, easily carrying Malone and his wife, and eventually their daughter, with all their gear. Malone found that it rowed well with one or two people aboard, tracked well, and was fast. When fishing, standing up to cast was no trouble, and the boat handled rough water with ease.
Since founding Malone Boatbuilding in 1980, he has built some 20 Rangeleys for customers. With experience, he began making modifications and simplifications. By his second boat, he determined that rivets were too much work to install and were stronger than necessary, so he switched to using copper clench nails, similar to the iron clench nails used in the original boats. He increased the width of the frames to 1″ and spaced them farther apart, to 4″ on center. Before long, he had cut his original construction time in half. He developed a 1 3⁄4″-wide, single-piece keel and a 1 1⁄4″ wide, single-piece stem, learning to cut the rabbets by eye. He found that building the boat upside-down was easier. Instead of an oak breasthook, he started installing a short cedar foredeck, and he used cast bronze thwart braces instead of white-oak thwart knees.
“Building Rangeleys was really a labor of love,” Malone said. Most of his work these days involves larger boats, but he is still drawn to the graceful lines of a lapstrake Rangeley hull.
Rangeley Performance on the Water
On a recent summer day, I joined Malone for a row. The Rangeley’s 17′ length, which easily accommodates two, was the result of year of refinement on the lakes of western Maine, where a variety of innovative builders made their own contributions to the type. This evolution of design played out before my eyes as Malone slid his 35-year-old boat into the water. With his succinct oar strokes, the Rangeley smoothly picked up speed, tracking like an arrow in protected cove and choppy bay alike, a virtue of the boat’s long, straight keel. In fact, the Rangeley was designed to cut through large waves that were characteristic of some of Maine’s largest lakes while keeping the passenger comfortable and dry. On a brief stint ashore, I marveled at the boat’s arcing sheer against the backdrop of nearby Mount Megunticook.
Donnie Mullen
With a block-and-tackle rigged to a gallows frame and the keel sliding on an inclined beam, Malone can haul his 17’ Rangeley boat in the back of his pickup truck.
When I took a turn at the oars, I was immediately struck by the boat’s swiftness and remarkable stability. The hull required some patience to turn—a flip side to that long, straight keel’s advantage in tracking. But it was such a pleasure to row, I hardly felt inconvenienced. At one point, I stopped rowing long enough to dip my hand in the water. I was surprised to find the boat only grew more stable as my weight shifted toward the gunwale. While muscling back to shore against a headwind, I felt like I was working a lot harder than Malone had under similar conditions. I had to make regular corrections, as the bow was a tad proud. Malone later explained that shifting to the boat’s forward rowing station could help balance the hull in such wind. He added that shifting the weight of the passenger, a second rower, or gear can also keep the boat in proper trim fore-and-aft.
Malone loaded the Rangeley into his pickup unassisted, thanks to a shop-made carrying rack. He uses a trailer winch to haul the 200-lb boat along a keel-support beam rising diagonally from the tailgate toward the roof of the cab. As we parted ways, I thought about asking Malone if he would help me build a Rangeley, but then quickly decided I was getting ahead of myself. Instead, I savored the simple joy of a few hours spent on the water. As though on cue, Malone concurred.
“A morning like this reminds me of why I got into the boat business,” he said, before he started his truck and headed back to his shop.
Plans for the Rangeley boat shown here were published in John Gardner’s Building Classic Small Craft, Volume 1 (International Marine, first published in 1977), which is available from The WoodenBoat Store.
In the 1970s, John Gardner included the Herb Ellis transom-sterned Rangeley boat in his Building Classic Small Craft. Ellis built the boat in the 1930s, and Gardner took the lines in the late 1960s. Before the outboard-motor era, Rangeley boats were built double-ended.
Is there a boat you’d like to know more about? Have you built one that you think other Small Boats readers would enjoy? Please email us your suggestions.
More Designs from Building Classic Small Craft
Building Classic Small Craft by John Gardner combines two out-of-print books: Building Classic Small Craft and More Building Classic Small Craft. The current edition includes plans and instructions for building 47 small boats. Here are a few others from the book that Small Boats has profiled.
Down East Workboat, a Gardner-designed powerboat that blends seakeeping ability with speed Lawton Tender, a classic tender for strip-plank construction by Newfound Woodworks Herreshoff/Gardner 17, a lightweight, fixed-seat rowboat for one or two people
In seeking a tender for his cruising ketch, Maine-based author Bill Mayher sought a boat that would tow, sail, and row well, and carry a larger-than-average person in the stern sheets. A web search turned up the Drifter design from Harwood Watercraft in western Ontario.
Defining the Ideal Dinghy
ZANCUDO is a glued-lapstrake plywood sailing dinghy that I hoped would serve many purposes in my family for generations to come. Sometime in the middle of May she arrived at my house in Maine, upside down on a flatbed utility trailer, all the way from Canada.
The business of acquiring her had gotten underway in February of the previous year, when I started dreaming about a new tender. In the dead of winter, after all, with the snow knee high and trees rattling and cracking in the woods under the force of ferocious gales, thoughts of boats come through most clearly as dreams. But then as the miracle of gathering light spread ever stronger across the southern sky and sap flowed at last in both man and tree, those dreams morphed into thoughts and then thoughts into specific notions.
This dinghy would be shorter than 11′. It would be light enough for my wife and me to lug up the beach above the high-water mark, so that when we set off on island rambles we wouldn’t be worrying about it as the tide came in. Because we often cruise in the early spring and then again well into the fall, and regularly end up anchoring in deserted spots along the wild edges of the Maine coast, it is important to have a real boat under us as a tender. Especially when the wind blows through rolling anchorages. A low-freeboard dinghy, no matter how speedy under oar or sail, will not do.
On our cruises, we enjoy calling it quits early if only because this gives us a chance to set off on exploratory dinghy sails among the nooks and crannies of favorite destinations. Accordingly, the craft emerging in my imagination needed to be a proper sailing dinghy with rudder and daggerboard. As a sailing dinghy it must go to windward and tack smartly in a stiff breeze. It needed to be safe as a sail trainer for our grandchildren, and it needed to be sufficiently buoyant to comfortably float a person of larger-than-average size in the sternsheets. But this boat would have to row well, too— so well that my grandchildren would find the sweet groove of rowing a great little boat early on in their lives, and therefore enjoy that pleasure for a lifetime, just as I have.
Why Glued-Lapstrake Plywood
To fulfill these requirements, it seemed clear that I should be looking into something built with glued-lapstrake plywood planking, which is both light and strong. The maintenance of such a boat would be minimal, because high-grade marine plywood is stable and holds paint well, and thus doesn’t call for annual painting to achieve the good-enough level of finish that I find acceptable these days. Also, plywood laps don’t call for steam-bent frames, which become such a time-and effort nuisance when sanding and painting is called for. Another advantage is that a plywood boat will not suffer the stresses that drying-out puts a small boat through if she is not launched every season. Although a glued-lap boat is not quite as righteous-looking as a traditionally framed dinghy, these advantages I’ve just detailed were crucial in the equation that was working itself out in my mind: Light, strong, a smart sailer that would tow well in a seaway, easily sponged out, and tough enough to endure the naval warfare grandchildren often subject small boats to down in the cove. A glued-lap dinghy it would be.
Jenny Mayher
Mayher’s Drifter is named ZANCUDO. Her simple lug rig is ideal for a tender, as the spars all stow within the length of the boat when she’s being towed.
Discovering the Drifter
With mind made up and without further ado, I checked the Internet to see what was out there all built and available. It was on the web that I happened upon Mark and Karen Harwood of Harwood Watercraft, a vest-pocket enterprise deep in the backwoods hell-and-gone of western Ontario, somewhere east of Georgian Bay. Too far for me to go for a boat, for sure, but why not make the call anyway?
Talking to Mark on the phone was great. He is smart, funny, down home, and filled with the humility of a talented and original jack-of-all trades who had stumbled into boatbuilding and liked it and was good at it. On the web the boats he was building looked good to my eye, especially his Drifter model, a 10′ 6″ sailing dinghy that he described as an Iain Oughtred Acorn derivative whose design he had beefed up in the aft sections, perfect for a 6′ 2″-plus person of healthy proportions.
Studying the boat on the Harwood Watercraft website, I could picture myself in the sternsheets, or even scrunching in passable comfort, forward of the daggerboard trunk, with a grandchild at the tiller. I could picture kids rowing this boat out of the cove and could see them hoisting sail when the breeze served. Crucially, as far as the kids were concerned, the standing-lug rig with its relatively short spars seemed especially manageable on those occasions when the afternoon southwest breeze sprung up in earnest. These pictures bloomed and multiplied into a pleasant slide show of watery delights. I couldn’t get this boat out of my mind, and this was a problem.
As we all know, awakening the “I’ve-gotta-have-this boat” Princess from her winter-long slumber can be an expensive proposition. But when Mark mentioned he had a used Drifter that he would be able to let go at a discounted figure, the Princess and I sat down for a talk. After this discussion, the Princess seemed pleased, as she usually does when things go her way.
And so on to the plan: “How’d you like to drive the boat over to Maine for a trial?” I offered. “I’ll help with gas money and you can spend a week in our guest cabin. Maybe I could send you some pictures of the place? Comfy digs, Victorian parlor stove, boats to see, wooden-boat people to meet at the yards around town and at the magazine…. I’m betting the ice is barely out in Canada, anyway…. A pre-season vacation with a payoff at the end if everything goes according to plan. Whaddyathink?”
Jenny Mayher
In addition to its utility, the lug rig has proven to be a great training rig for grandchildren and friends. Here, ZANCUDO sails in company with a Nutshell pram.
From these tentative beginnings I could tell Mark was interested—and his wife, Karen, even more so. Among other things, she does fancy ropework. Floor mats, monkey-fist door stoppers, that sort of thing. Back in Canada in the summers they fill their pickup truck with her work and load a rowboat onto the little trailer and go around to farmers’ markets and the like peddling their wares. A trip over to Maine seemed like just one more adventure to them.
Needless to say, if things hadn’t worked out so splendidly, I wouldn’t be writing this piece. But splendid hardly describes the pleasures of last summer. As a tender she tows easily behind VITAL SPARK. She is just right for short sails around Center Harbor or out to the islands when there are interesting boats to see or the chance to picnic with friends. My wife and I had some memorable dinghy sails farther afield during summer cruises whenever we needed to get to a town or to a trailhead on an island or just for a change of scene. But the best thing is how my granddaughter Essie, aged 11, took to her.
Living with ZANCUDO
Everything I had hoped for in terms of ease of handling and seaworthiness was evident immediately, and soon enough I’d spy Essie and a friend taking the new dinghy out into Eggemoggin Reach, often to sail in company with her brother and his buddy in the family’s Nutshell pram. The Nutshell, built for the children’s mother 30 years earlier, was perfect for that moment in time so many years ago. Now the Drifter, named ZANCUDO (Spanish for mosquito) by Essie, is perfect for this later moment. She is easy to carry up the beach, simple to rig and get underway from alongside VITAL SPARK , she tows straight and true in the ocean, she rows beautifully, and can carry four people ashore. Her sailing performance exceeds even my rosiest hopes. And, finally, with varnished ash gunwales, breasthook, and quarter knees in combination with varnished pine thwarts and stern sheets, she is elegant enough for my purposes—yet at the same time easy to care for.
But the best thing is what she means to Essie. Last summer, ZANCUDO became Her Boat. At the threshold of seventh grade with its social terrors and fearsome cliques in the offing, Essie had a boat to focus her energy and her dreams upon. It centered her in a set of challenges and accomplishments throughout the summer, and when it came time to return to school in the fall, it was reported that she slung her backpack over one shoulder, smiled broadly, and marched into the maelstrom.
Jenny Mayher
The author’s granddaughter at the helm. “At the threshold of seventh grade…she had a boat to focus her energy and dreams upon.”
Mark Harwood
Designer-builder Mark Harwood developed his Drifter design as an able yacht tender.
Mark Harwood
She has wider after sections than a fine rowboat would: This feature favors buoyancy and stability over pure rowing—a worthy tradeoff in a tender.
Plans for the Drifter designed by Harwood Water Craft in Muskoka, Ontario are not currently for sale, but you can email them with questions at: [email protected]
Is there a boat you’d like to know more about? Have you built one that you think other Small Boats readers would enjoy? Please email us your suggestions.
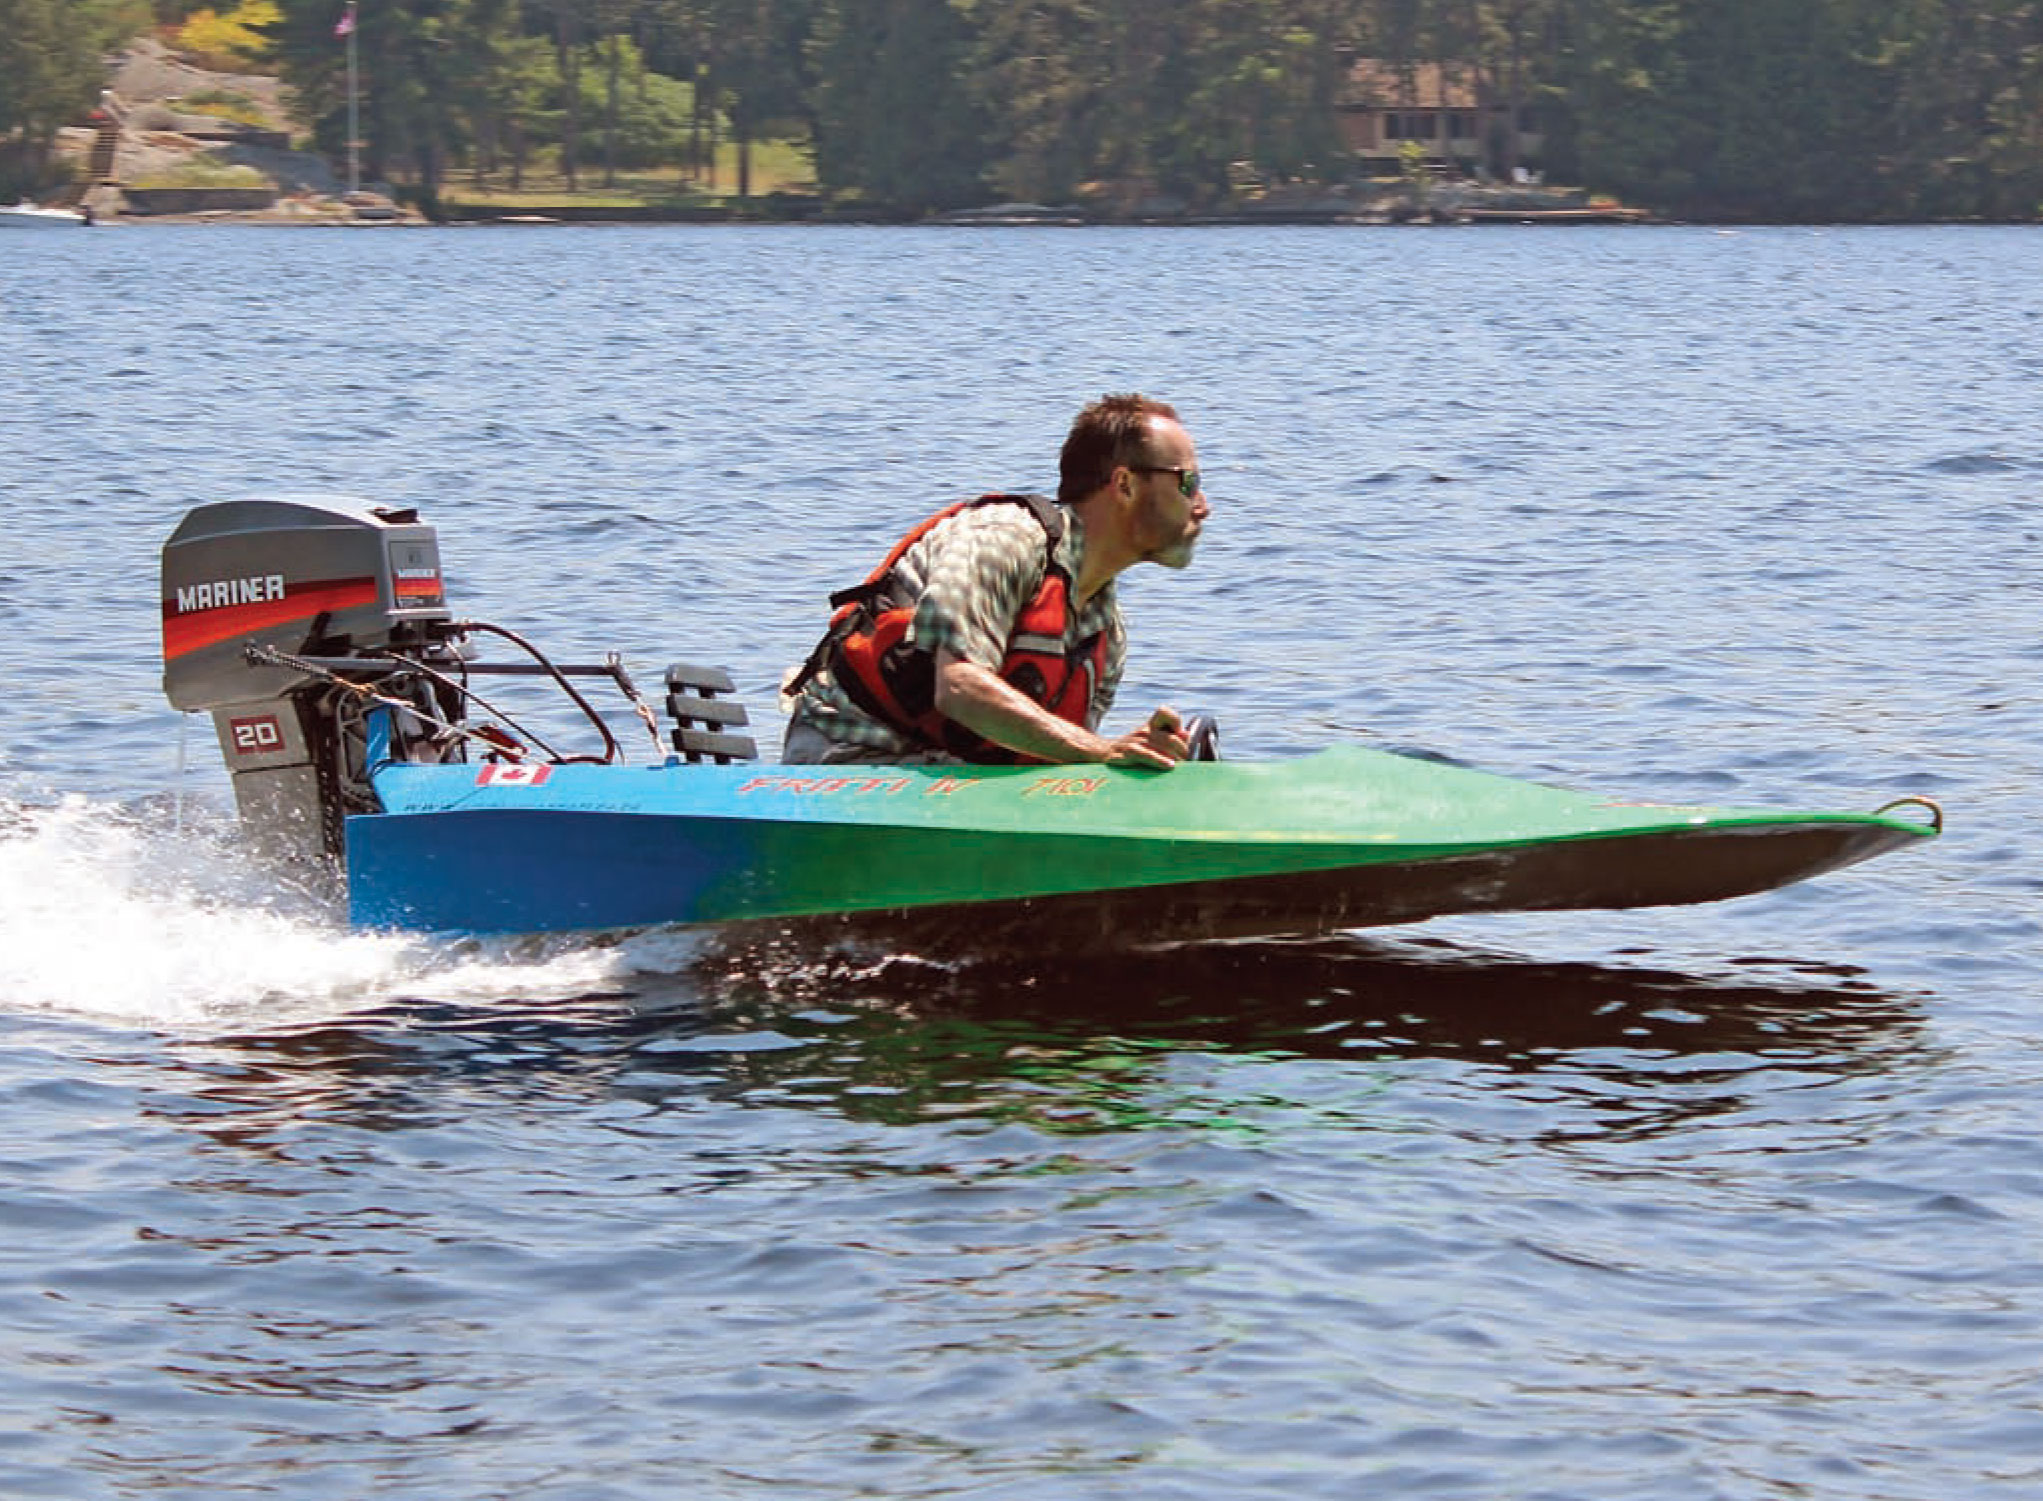
What it’s all about: a Minimax Sea Flea at speed with one hand on the wheel and the other on the throttle.
It couldn’t get much simpler, really: two sheets of plywood, a bit of lumber, some nails and screws, a little glue and paint, and an outboard motor. If you put these together in the right order, you end up with a Sea Flea–type outboard hydroplane, your ticket to a thrilling ride. Along with the Boston Whaler, the Laser, and the Sunfish, the Sea Flea is among the boats that have gotten the greatest number of people out on the water.
The urge to go fast on the water in an outboard-powered boat likely dates to shortly after the first practical outboard motors were built in the early years of the 20th century. It got a lot easier to satisfy that urge in the early 1960s when naval architect William D. Jackson drew the Minimax and Minimost, possibly the most frequently built of the Sea Flea–type designs. Originally published in Science and Mechanics in 1962, the plans for the Minimax and Minimost have been circulating from hand to hand via dog-eared and yellowed copies of the magazines, photocopies, and Internet downloads ever since. Magazines such as Popular Mechanics, Modern Mechanix and Inventions, The Mechanical Package Magazine, and the Sports Afield Boatbuilding Annual fed the boating dreams of thousands as they offered plans, instructions, and encouragement for building anything from a tiny dinghy to a substantial power cruiser or inboard sailboat, and often included designs for small, fast, outboard boats. There’s no telling how many of these little hydroplanes have been constructed, but their appeal is as fresh now as it was 50 years ago, and they continue to inspire builders.
There isn’t actually one particular design called a Sea Flea. That term was coined by Toronto athlete and sportsman Lou Marsh (1879–1936), who began racing small outboard hydroplanes in the 1920s in Toronto, Ontario, and it has come to be generally applied to this type of boat. Along with the Minimax and Minimost, some of the evocatively named designs considered Sea Fleas include the Hasty Hydro, Hydro Kart, Spitfire, Flying Saucer, Pewee, Dragonfly, Mini Hydro, Yellow Jacket, and Skeeter. The Sea Flea spirit is also alive and well in the Cocktail Class Skuas (see WB No. 213), which is also available in kits from Chesapeake Light Craft.
John Summers
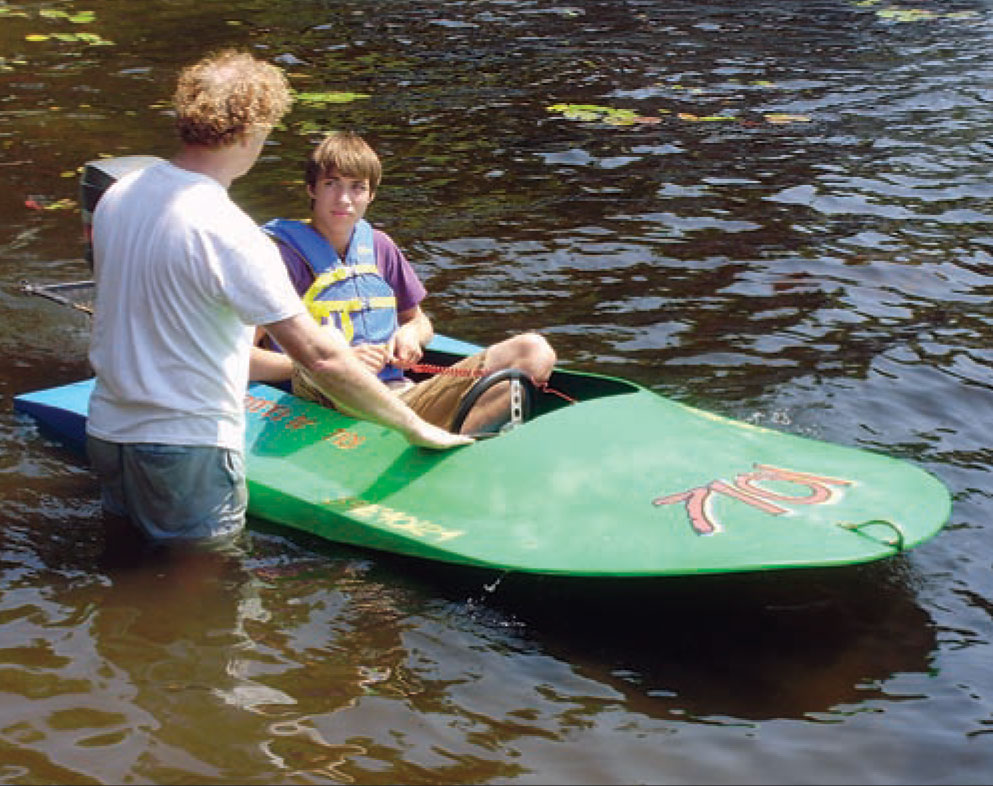
A young driver gets some tips before his first ride.
Building the Sea Flea
The Sea Fleas are all constructed in the same manner. According to the original article, “Most boat for the least money is this happy little hot rod racing dish. One weekend of work, or even one day if you’re experienced, will have you ready for the water for under $20. Clamp on a small outboard and go….” If my own boatbuilding projects are anything to go by, the promise of “one weekend of work” is probably a little optimistic, and I’d be very surprised if you could still build one for “under $20.” These details aside, however, a Sea Flea is still a simple, easy, and relatively inexpensive boat to build. The boats can be put together anywhere you can fit a sheet of plywood, and they have been built in basements, garages, living rooms, and carports. Their construction requires only the most basic tools and materials, and they would make an ideal first boatbuilding project. They are also a perennial favorite project for a parent and child to share, both to build and enjoy afterwards.
John Summers
A family gathering of Sea Flea designs. From front to rear, the designs are a Glen-L Tiny Titan and four Minimax hulls, the oldest of which, at the rear, was constructed in 1962 and is still in regular use.
The construction of the Minimax is typical of the Sea Flea type. The basis of the hull is two sheets of ¼″ plywood, reinforced with stringers cut from standard dimensional lumber such as 1×8 and 2×4 hemlock, pine, or spruce. Fastenings are flathead wood screws, ring nails, and epoxy, and the materials list is rounded out by fiberglass tape and cloth, filler, and paint. There’s no reason why boats can’t be built with A/C fir, or even underlayment, but better plywood will probably produce a longer-lasting boat for the same amount of effort, especially if a bright-finished deck is desired. One piece of plywood gets a half circle at one end with a gore in the middle that will later be used to introduce some deadrise at the bow. No extra lumber is required for a building form, as the framing is erected right on the bottom sheet. The deck is cut to the same semicircle at the bow as the hull, and the cockpit opening is also cut and marked. The gore in the bottom is closed up by a band clamp or Spanish windlass and secured with a metal strap. Clearcoating all surfaces with epoxy, especially those that will later be part of enclosed compartments, will greatly extend the boat’s life.
The main longitudinals are the hull sides and cockpit sides, the latter also extending to the transom to support the motor board. A web strut under the foredeck and a bulkhead at the front of the cockpit round out the framing members. These pieces are all built from scraps of plywood left over from the deck and hull with nailing strips added on top and bottom. Although the original plans show “lightening holes” of graduated size in the cockpit sides, many builders omit these and make the side deck spaces watertight for use as buoyancy. If they are enclosed, the plans promise that the resulting buoyancy will support 900 lbs if the boat is swamped. Similarly, the original plans call for fiberglass tape only on the hull seams, but a layer of cloth on the hull, and even on the deck, would increase abrasion resistance for boats that are often hauled up on the beach. Paint schemes are as individual as the builders and owners, but from my brief examination of Sea Flea pictures, hot rod flames do seem to be a recurring (and entirely appropriate) motif.
John Summers
Part of the fun is tinkering with the boats and motors, especially when running an antique power plant such as this 1951 7.5-hp Mercury KG4.
Finished boats weigh in the neighborhood of 65–85 lbs without a motor, and are easily cartopped or carried in the back of a pickup. Ideal crew weight is one average-sized adult or one adult and a small child, and motors from 3 to 20 hp can be used depending on the age, weight, and skill level of the driver.
Performance
To run a Sea Flea, you sit or kneel in the tiny cockpit. Once the motor is running, and assuming that you’re not using an antique clutchless “start-and-go” motor like the 1950s Mercury shown in the photo above, your right hand goes on the throttle and your left hand on the wheel, though there’s nothing to say you couldn’t rig the boat with the throttle on the left if you wished. Getting up on plane takes a bit of practice—as you throttle up, you also move toward the bow, leaning over the foredeck. As the hull begins to climb out of the water, you lean back and ease the throttle a little, and soon the boat pops up on plane and takes off.
For those of us accustomed to the feeling of security offered by strong sheerlines and seaworthy bows rising up in front of us, it is a little disconcerting to be driving a boat at what feels like high speed with a bow that seems to go down like a scoop just waiting to pick up water. And scoop it will, especially through chop and wakes; but if it does, all you will get is a little wet. This is definitely a boat for summertime and warm water. Slowing down also requires a bit of care lest you get pooped and swamped by your own stern wave.
Ben Summers
The Minimax is the essence of powerboating: Just enough hull to float you, a power plant, a gas tank, the wheel, and a throttle, all in 8′ of boat.
And how fast do they go? The Minimax I drove had a 20-hp motor on it, approaching the upper end of reasonable power for an 8′-long boat. Heading downwind, according to the speedometer on the dash I was running over 30 mph, and occasionally hit 33 or 34. That is almost immaterial, however, as it felt like I was going about 100, and that was a large part of the fun. The yammering of the outboard, the occasional jolts to the knees as I went through chop, and the haze of water droplets shimmering just ahead and to either side of that downward-pointing bow were mesmerizing, and even meditative in a kind of noisy, twostroke way.
Turning takes some planning, as there’s really nothing in the water other than the lower unit of the outboard. It’s really more of a controlled drift, but by leaning, easing the throttle into the turn, and throttling up going straight again, you soon figure it out. Essential safety equipment includes either a kill-switch lanyard and/or a deadman’s springloaded throttle and a PFD; and essential courtesy includes being mindful of local boating regulations about how fast you can go at what distance from shore.
Sea Flea hulls aren’t competitive in contemporary outboard racing, but building and driving one would be a good stepping stone into more formal American Power Boat Association competition if you were really bitten by the racing bug. This is really a summer vacation boat, perfect for high-speed excursions on sheltered water and perhaps the occasional brief fantasy that turns your 8′ plywood Sea Flea into a thundering unlimited hydro, at least until you have to head back to the beach and return the boat to the 12-year-old from whom you borrowed it.
Science and Mechanics magazine
The designs for the Minimax and Minimost were originally published in Science and Mechanics magazine in 1962.
Copies of the original building plans for a variety of Sea Flea–style designs, including the Minimax and Minimost, can be downloaded from www.muskokaseaflea.ca, where you will also find photos of other Sea Fleas, building sequences and instructions, videos of the boats underway, safety and operating tips, and a whole lot of enthusiasm for these little boats, as well as information about the annual FleaFest rendezvous in the Muskoka region north of Toronto, Ontario.
Sea Flea Particulars
LOA: 8′ to 10′
Beam: 48″ to 59″
Draft Propeller: depth
Power: 3–20 hp
Take a look at a few other tiny racer boat profiles
Midget Flyer, A smart little runabout from 1938 designed by Bruce N. Crandall
RETRO-ROCKET, Glen-L’s Super Spartan makes a splash
I am regularly impressed and often amazed by the ingenuity and dogged determination of Small Boats’ contributors and readers. Take two young men featured in this month’s issue. Both had boating dreams and self-devised ambitions, and against considerable odds, both achieved their goals. The obvious similarities end there, however, for their quests, though both challenging, were of very different natures.
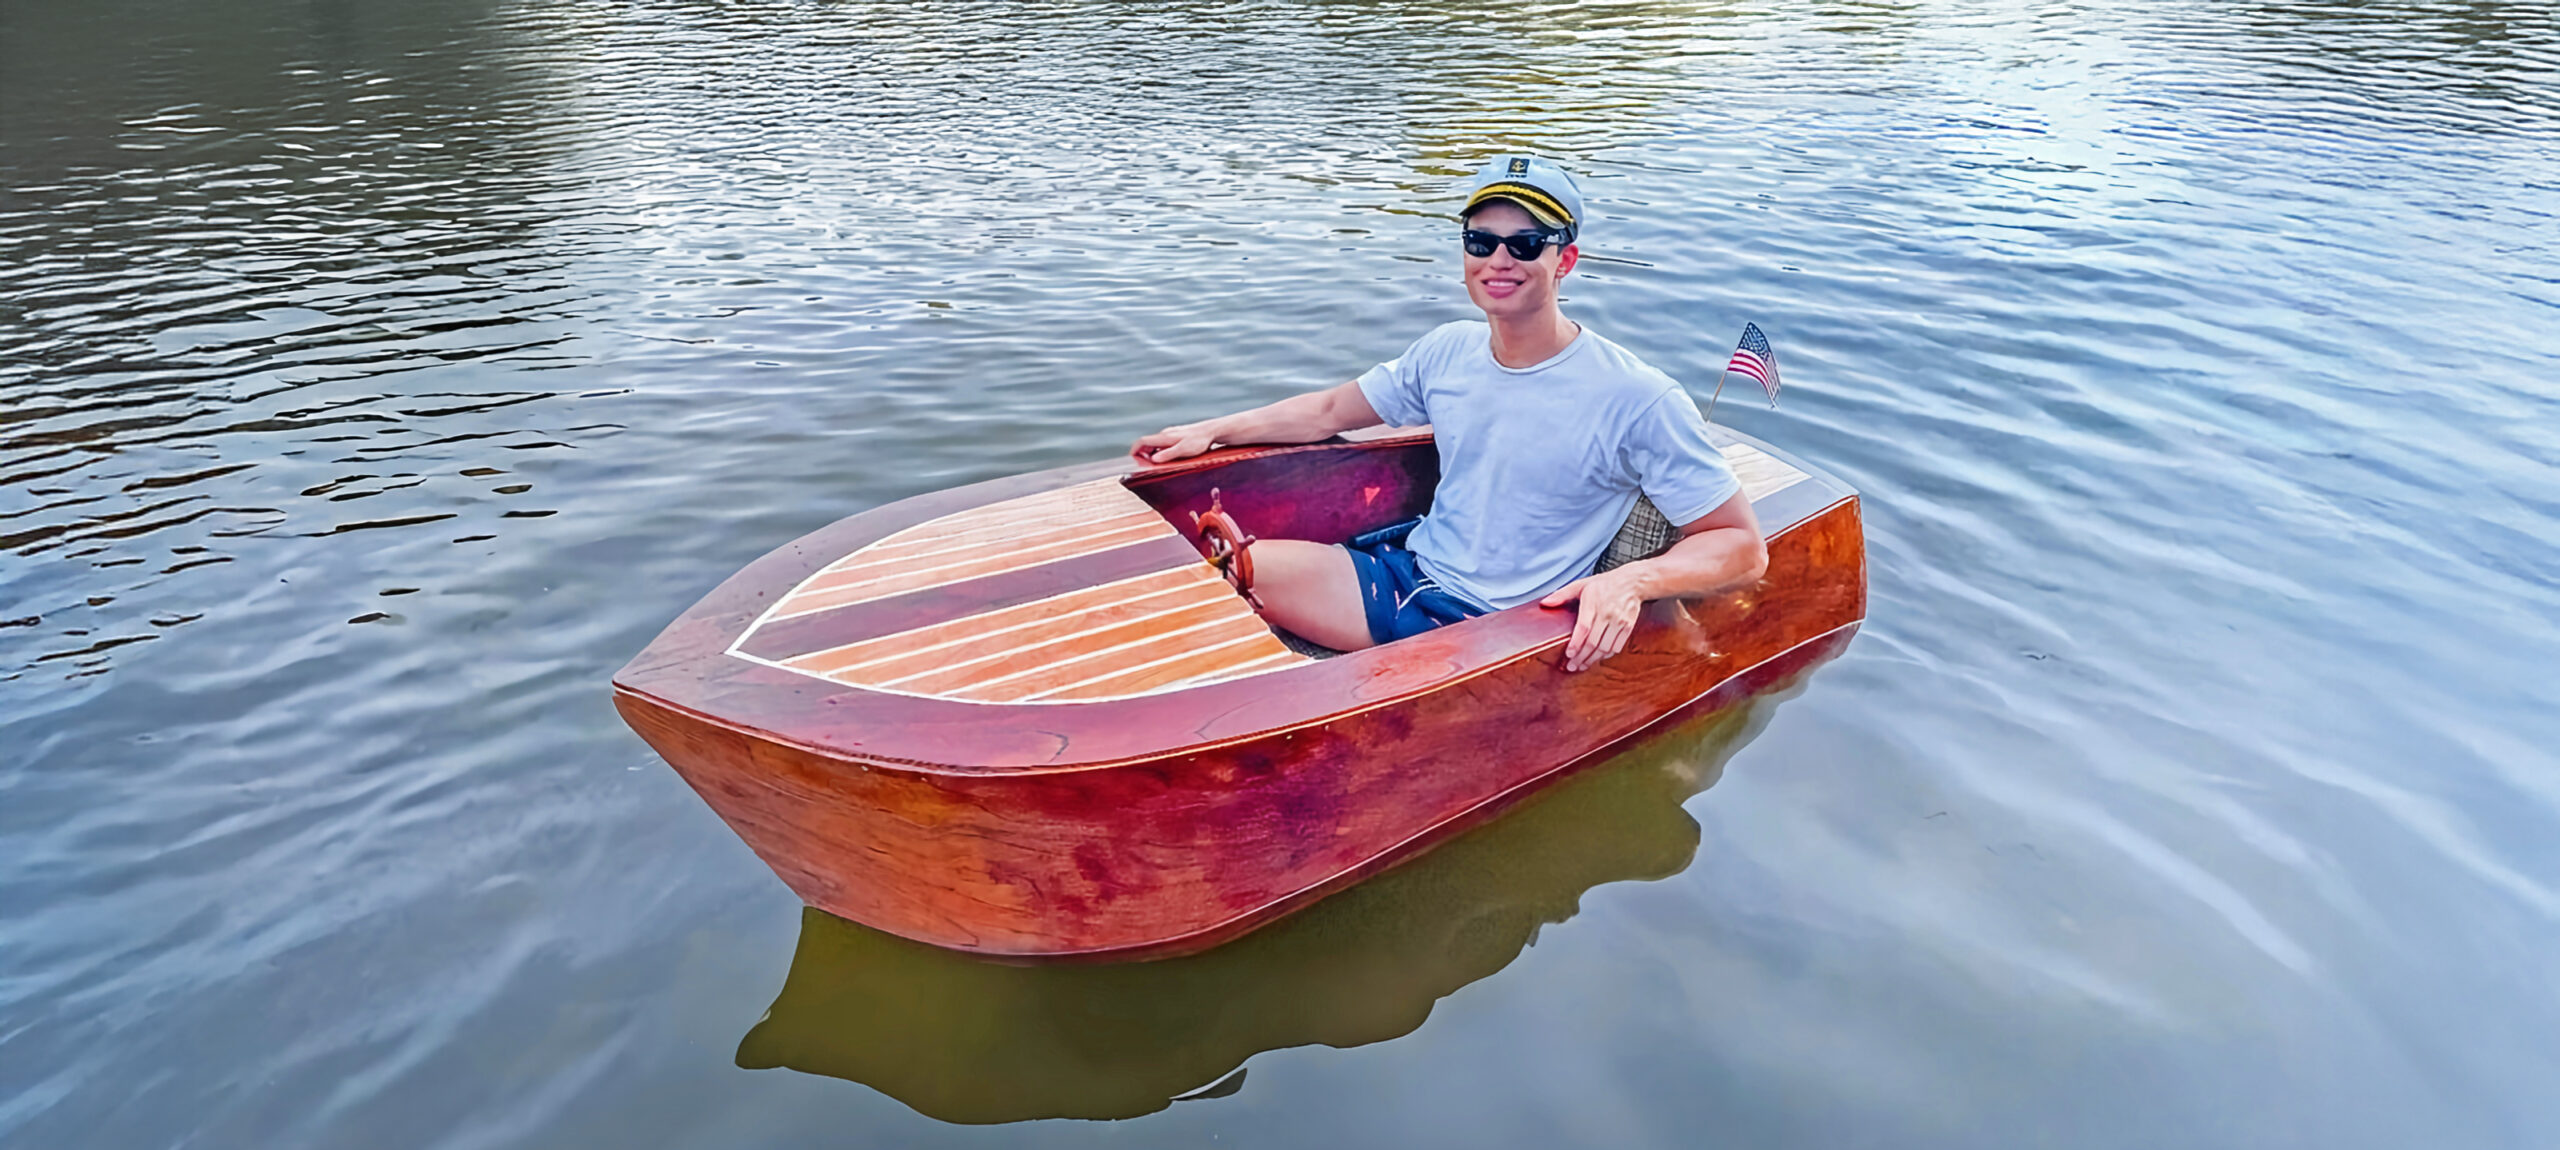
Tyler Ellis (featured in this month’s Reader Built Boats), a recent graduate with a degree in Ocean Engineering from Virginia Tech, was just starting out in pursuit of a career in naval architecture. He didn’t have the money to indulge in extras. But Tyler wanted a boat. And not just any boat; Tyler wanted a classic boat. He had nowhere to store such a boat, no ability to transport such a boat, and certainly not enough funds to buy such a boat. But Tyler wasn’t about to give in to all the negatives. Instead, he designed a new boat: a classic wooden runabout, complete with electric motor and lightweight dolly, that fits in the trunk of his car. He designed it, built it, and now, when the weather is calm, he uses it on the lakes around D.C.
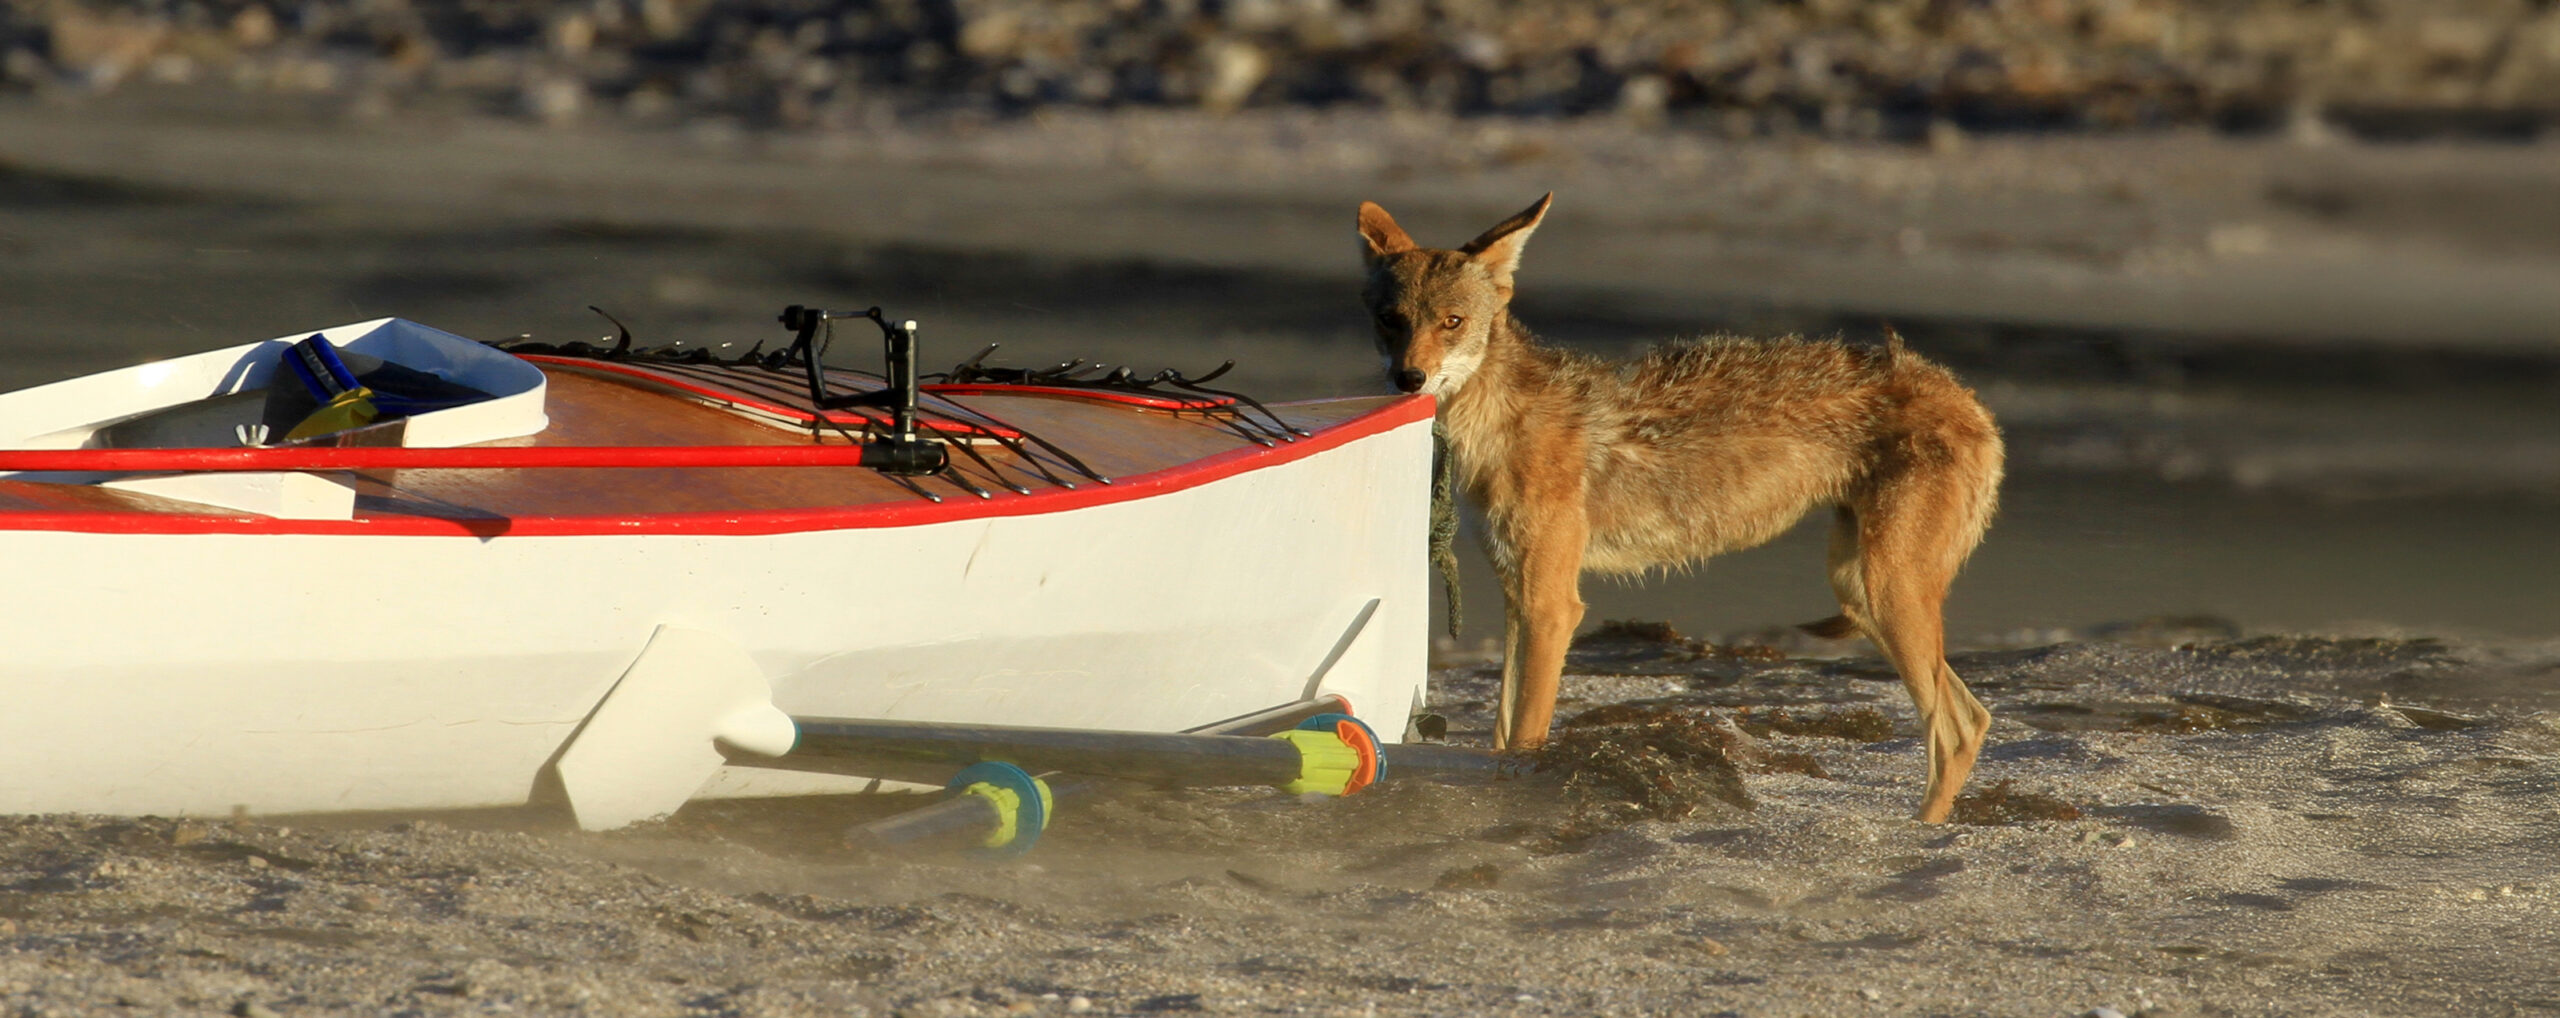
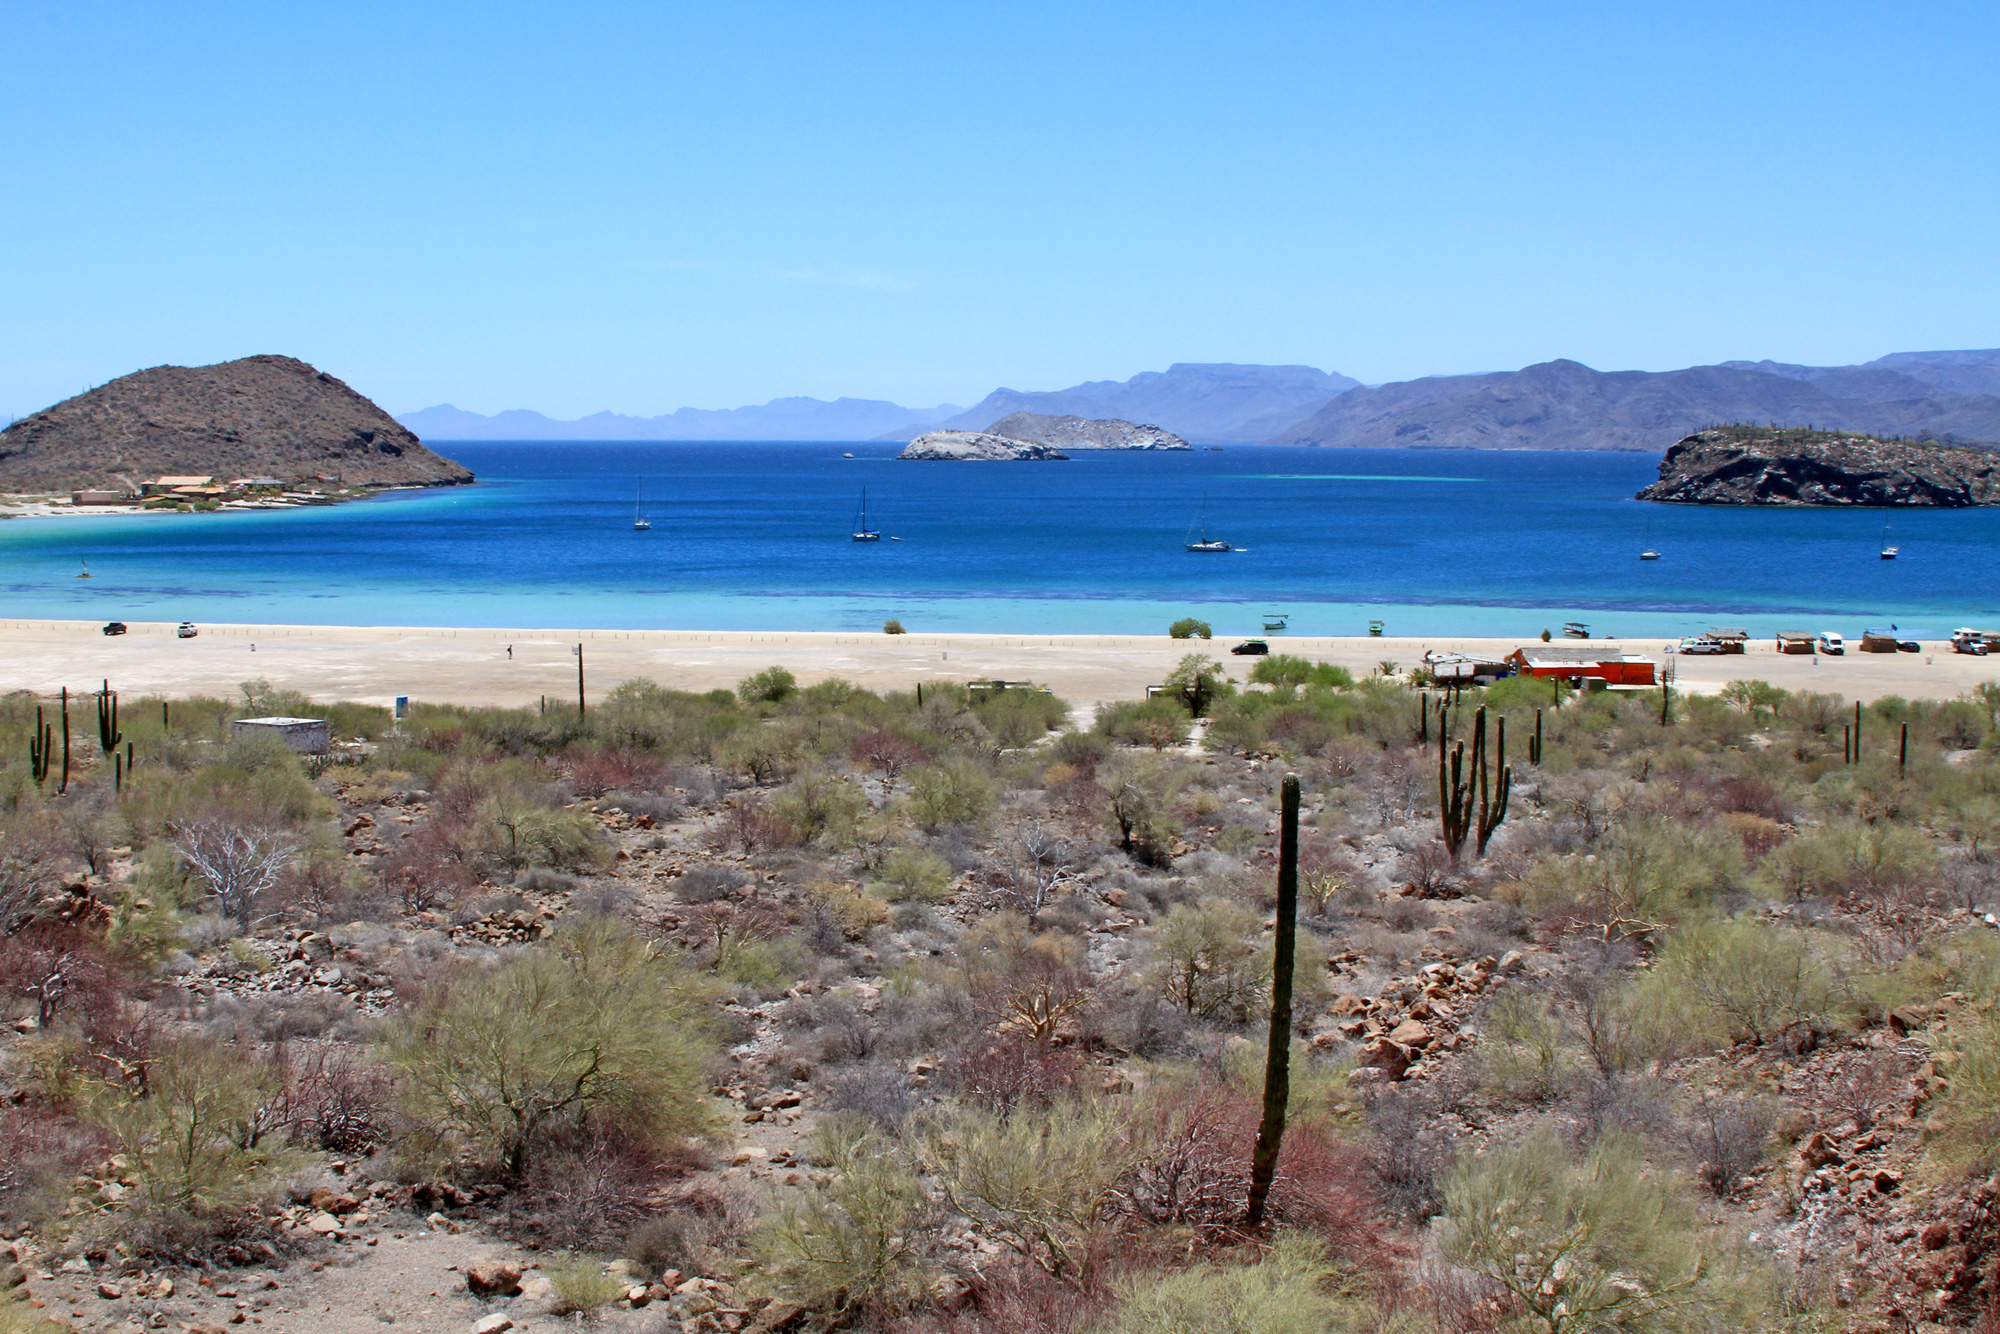
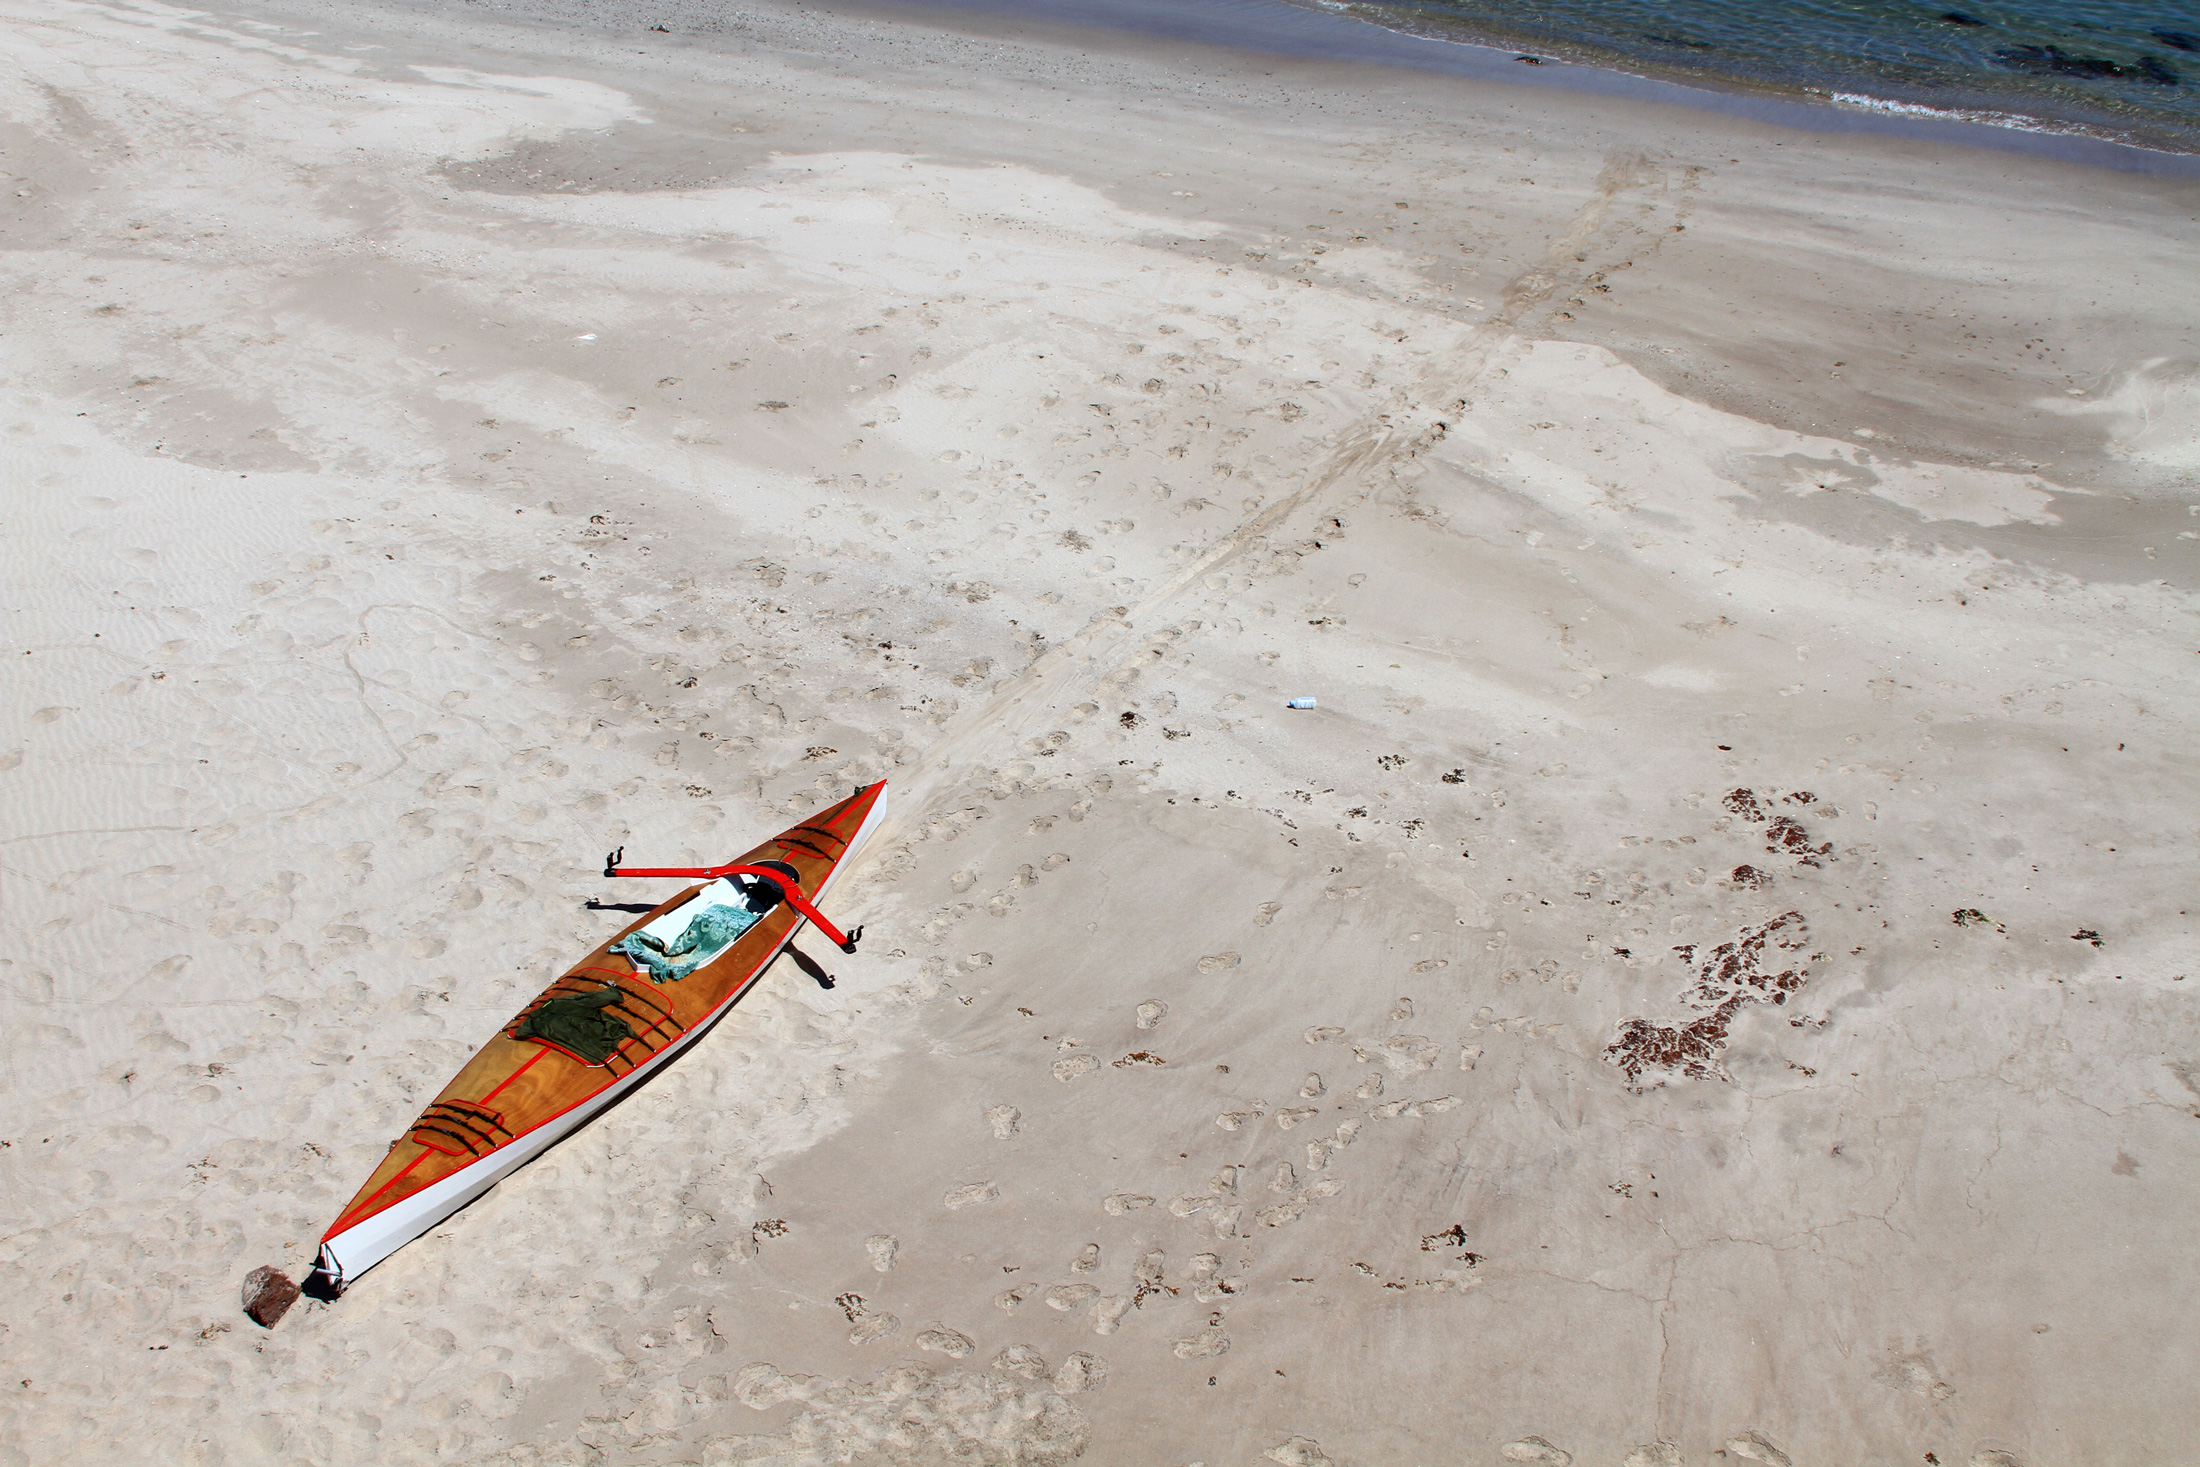
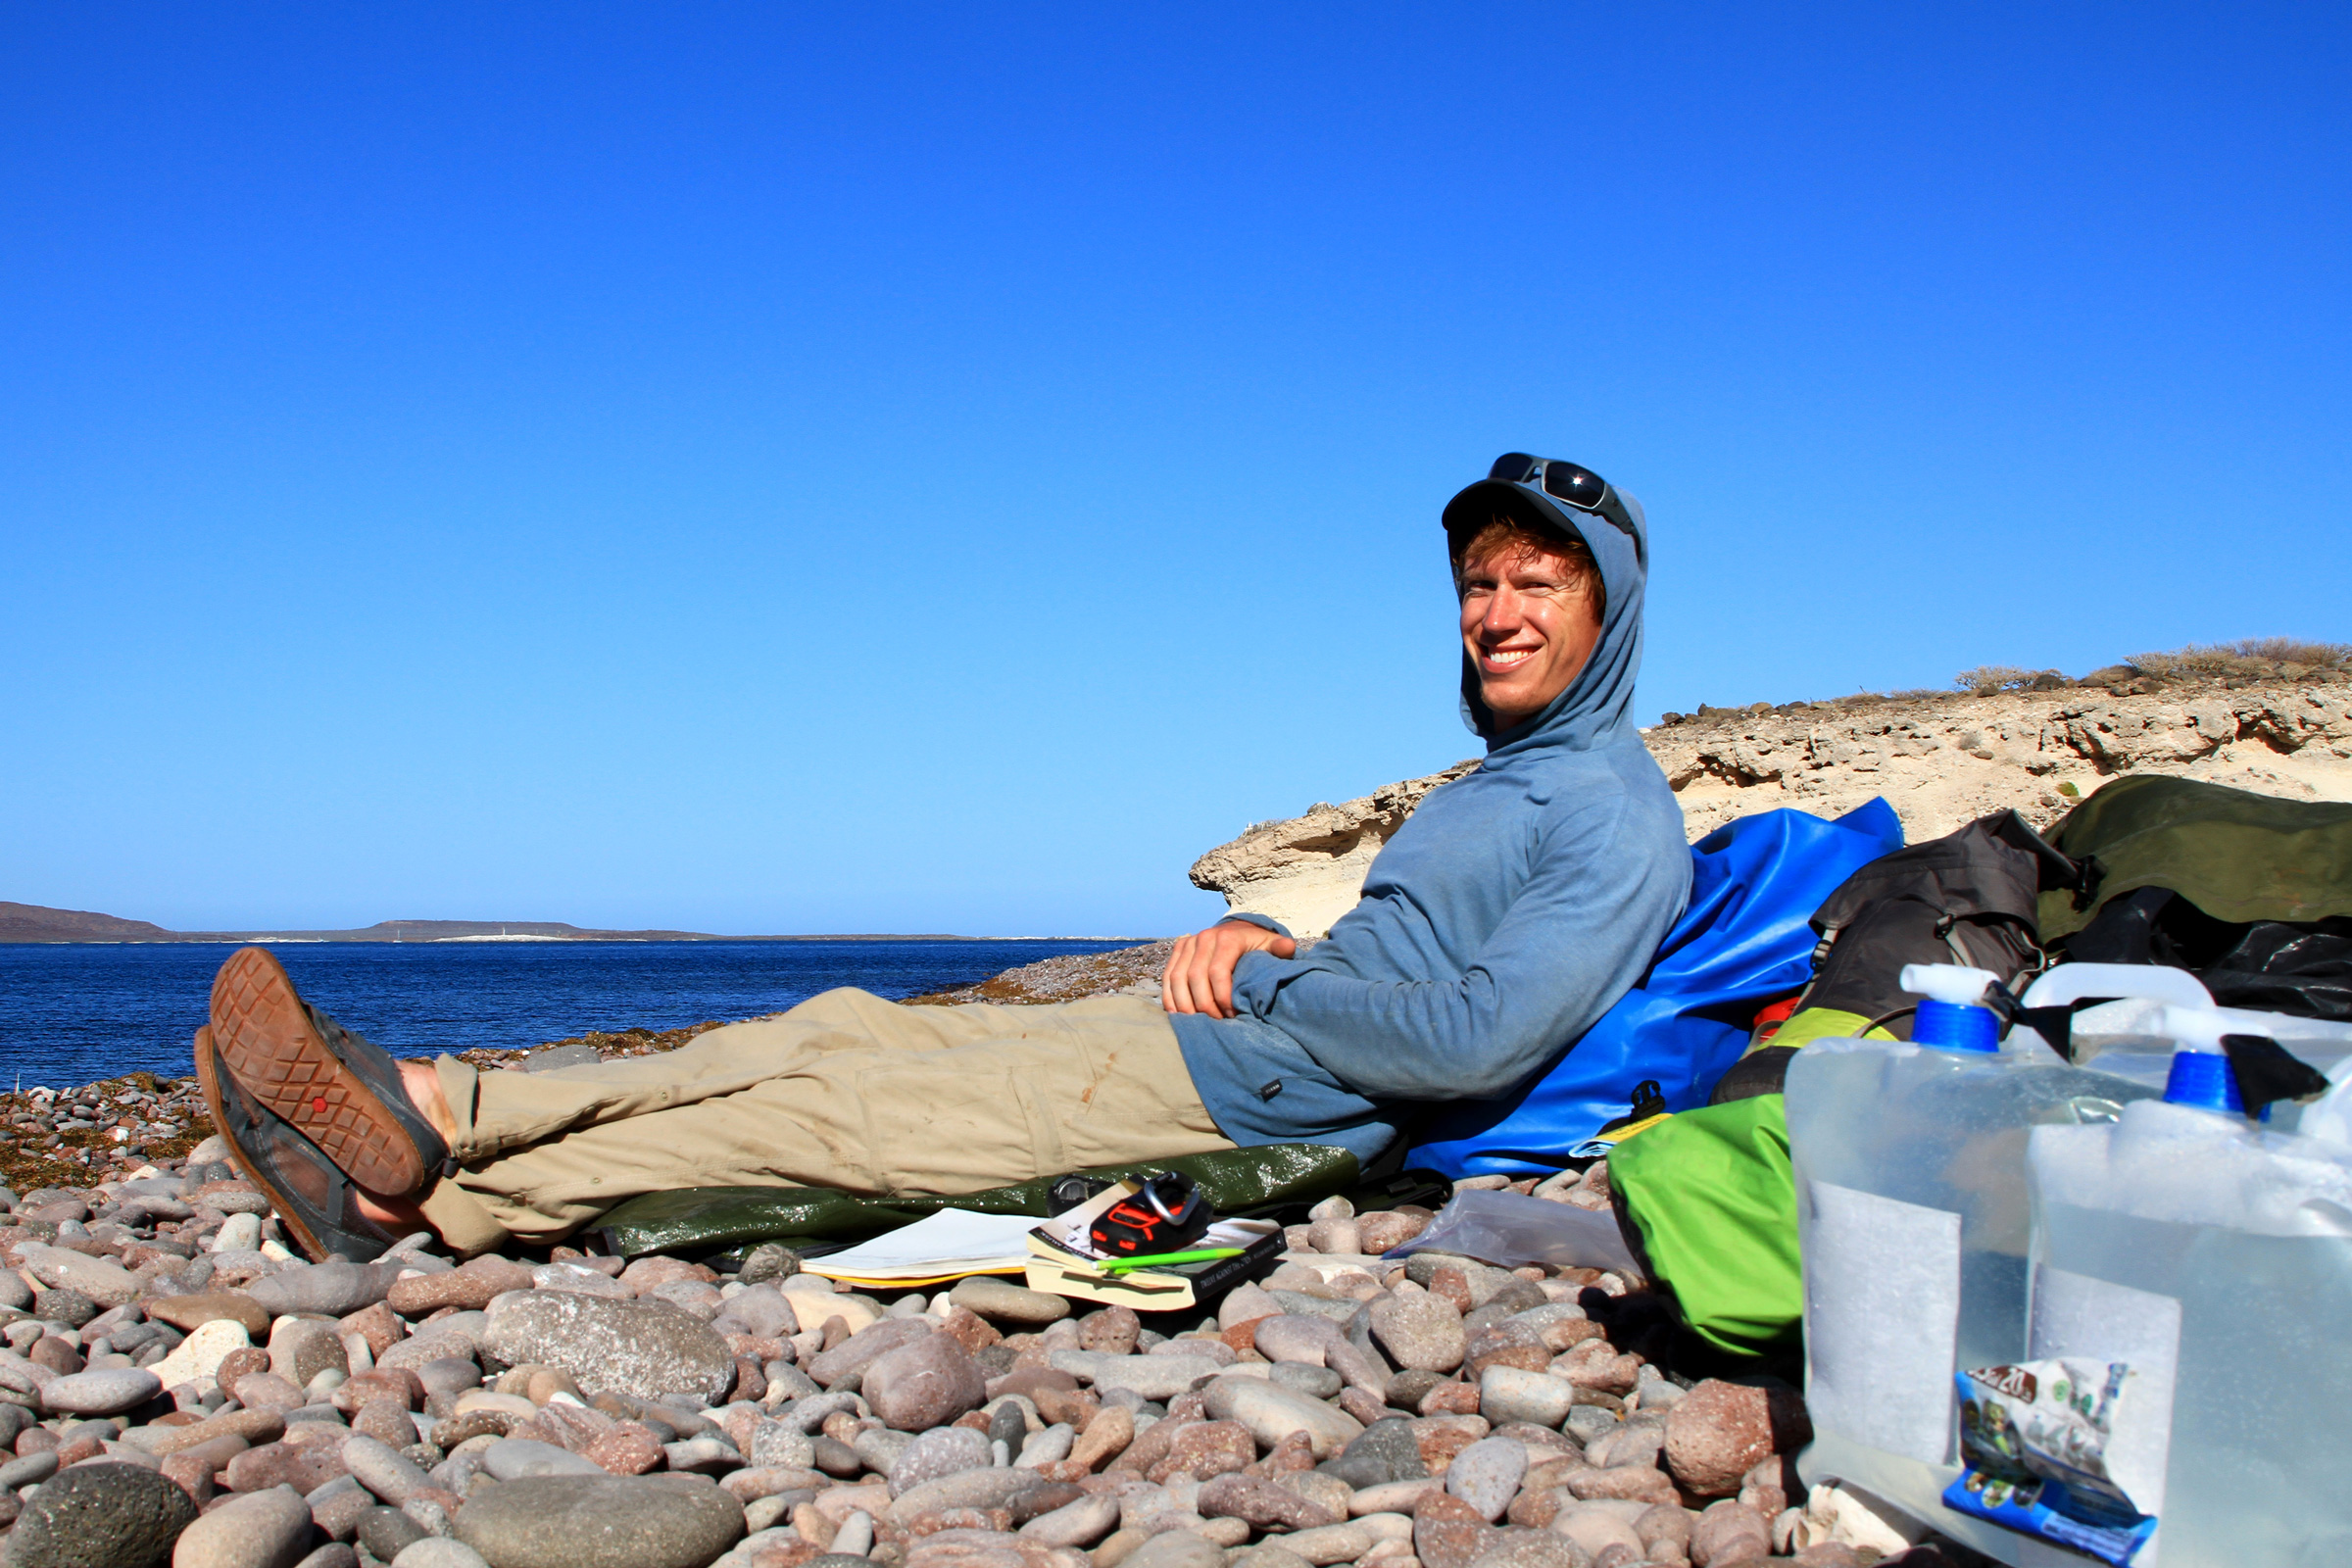
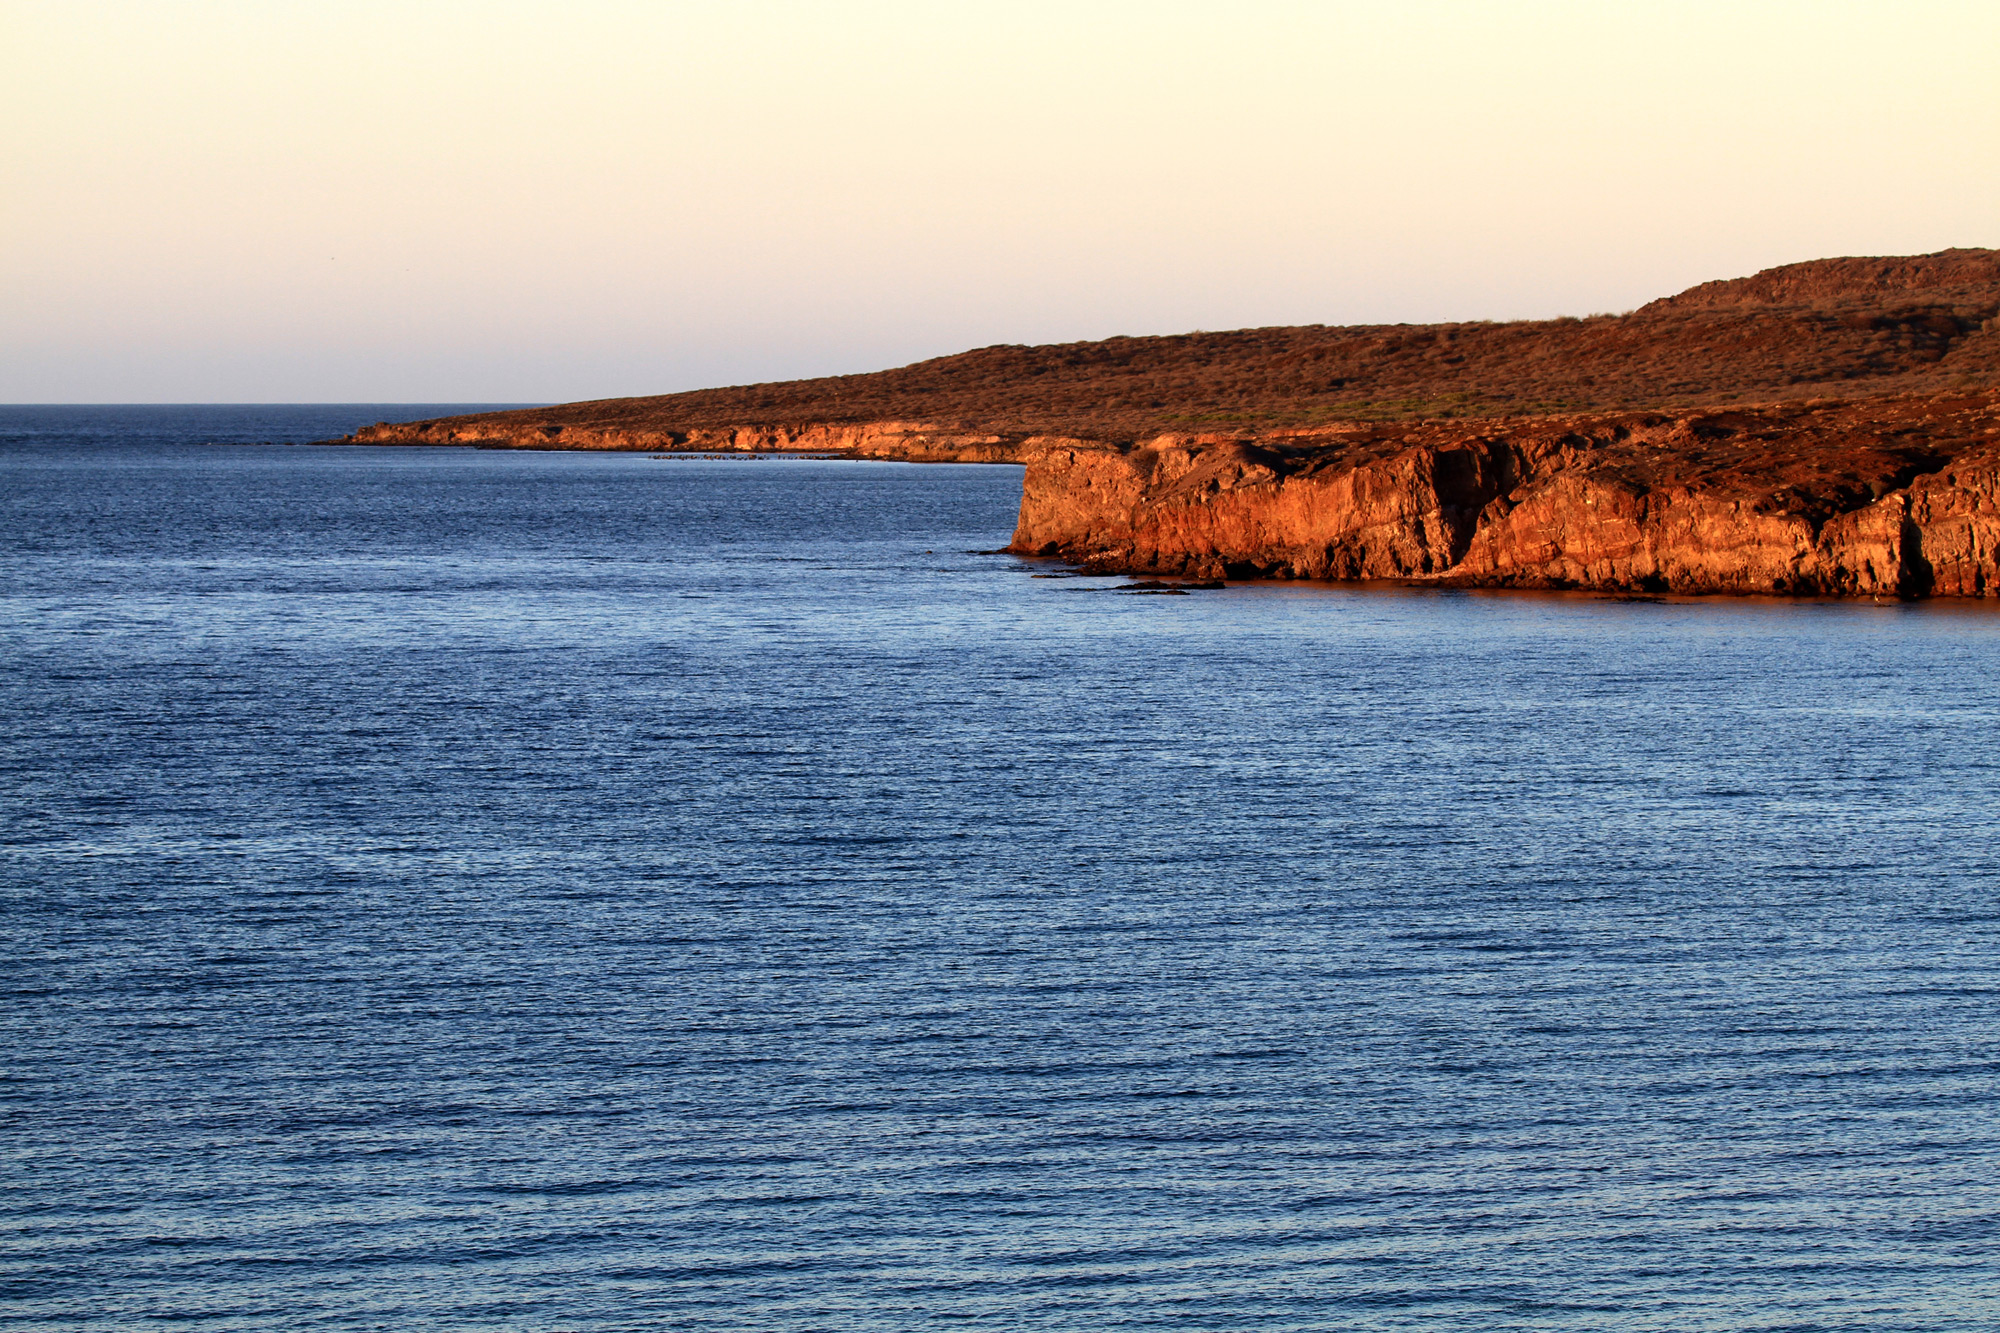
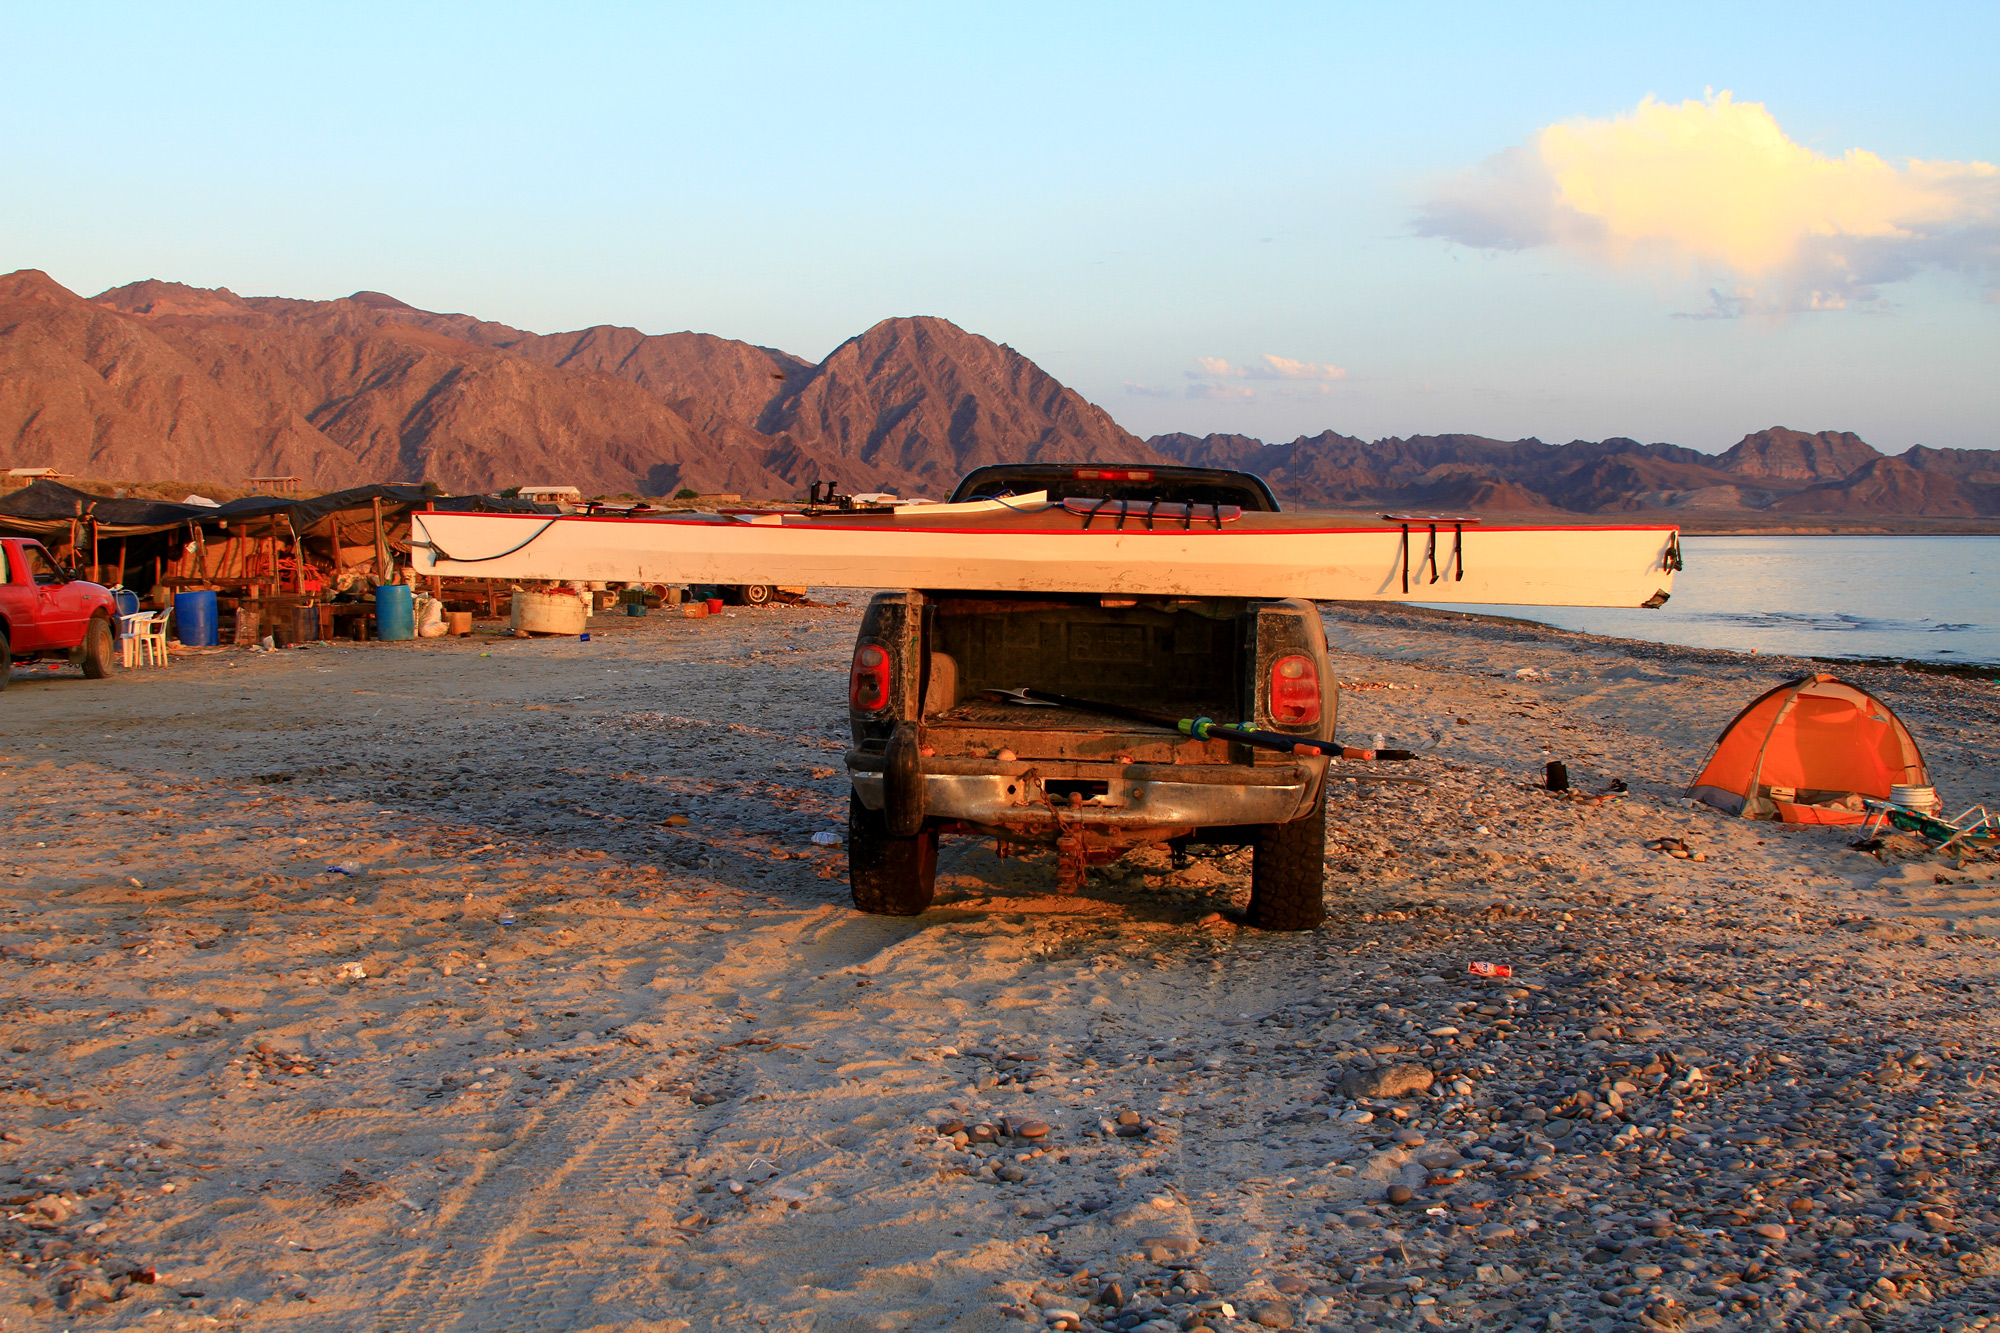
At almost exactly the same time as Tyler was planning and designing, Owen Alfonso (author of this month’s Adventures feature) was considering something entirely different: an adventure under oars. He knew how to row and had a suitable boat, but he had never before rowed on sea or ocean. Nevertheless, Owen imagined rowing the eastern shore of the Baja California Peninsula, and no lack of experience was going to stop him. In May 2022, he set off on a 33-day odyssey, rowing 650 miles alone, northward along the Sea of Cortez from La Paz to San Felipe. He faced dangers and experienced joys, marveled at the intricacies of nature, and lost himself in the grandeur of distant land- and seascapes. He took exquisite photographs (like the one above) and lived to tell some extraordinary tales.
Tyler’s and Owen’s big adventures could not have been more different and yet, for me, both are examples of how, if a person has the determination, passion, and belief in self, a small boat can transform lives and turn dreams into realities.
So long and thank you
Behind every production there are unsung heroes—the people who work hard to make things as near perfect as possible. Their efforts go largely unseen by the audience but for co-workers their contributions are immeasurable.
WoodenBoat Publications
For many years Pat Lown was WoodenBoat’s librarian. For the past five years she’s worked diligently for Small Boats, a valued team member and friend.
At WoodenBoat Publications, Pat Lown has been one of the unseen, unsung champions for more than three decades. Pat came to WoodenBoat in 1993, working in the store, on the editorial staff of Professional BoatBuilder, and in the circulation customer-service department. By 1997, she had been snapped up by the WoodenBoat Library where she worked alongside Anne Bray helping countless readers, writers, and editors with research requests. With a young family at home and a genuine love for what she was doing in the library there were, surely, too few hours in the day; nevertheless, Pat found time to contribute to myriad in-house projects and for many years helped out at the annual WoodenBoat Show. In the earliest days of social media, it was Pat who helped to establish WoodenBoat’s Facebook presence and online voice.
Pat has been an ever quiet, calm, essential cog in the WoodenBoat wheel; a valued colleague for whom no job has been too small, no request too big.
In March 2020, Pat joined Small Boats as the copyeditor. Her work continued behind the scenes with the same diligence as ever. While readers would never know of her contribution, writers and editors alike have been very aware of the typos she’s caught, the sentences she’s smoothed, the information she’s clarified, and the pertinent questions she’s posed.
Now, after more than 30 years with WoodenBoat, and five years with Small Boats specifically, Pat is hanging up her hat. She’s leaving behind a legacy of good writing, accurate information, and reassured editors. We will miss her for her work, her patience, and her friendship.
Several years ago, I was watching a TV show that featured a Riva Aquarama, and I remember thinking that the luxury runabout was perhaps the most beautiful boat I had ever seen and wondered if I could buy one. I soon realized that even if I could find one to buy, I certainly couldn’t afford it. But during my Riva research I stumbled upon the Glen-L Marine website and started thinking: maybe I could build something that resembled the Aquarama, but at considerably less cost.
Since 1953, Glen-L Marine has been producing designs for amateur builders, and their creations have been built all over the world; their website features hundreds of successful builds. After sifting through about 300 designs of extraordinary variety, I landed on the page for the Malahini, a classic 16′ runabout designed by Glen L. Witt in the 1950s. It spoke to my runabout imaginings, and I studied the online drawings closely: It was powered by an outboard, which appealed to me as I was somewhat intimidated by the idea of installing an inboard; and its V-bottomed hard-chined hull was developed for plywood construction, which sounded a lot simpler for a beginner than cold-molding or carvel planking. I am an IT guy by trade and have only a few carpentry skills, but I had built a simple johnboat a few years earlier so did have a few tools and a little experience. I ordered the plans.
Simon Foord
The build of the Malahini begins with the strongback onto which are mounted the stem, transom, and frames. Before fitting the bottom panel, the chine logs and the battens that stiffen and strengthen the bottom of the hull are also fitted. At this stage in the construction, it is easy to see the sharp V-entry and how it contrasts with the flat, beamy sections in the stern.
The delivered package included complete plans with full-sized patterns for the stem, breasthook, transom knee, and chine-blocking, as well as half-section patterns for the frames and transom. There was an eight-page instruction manual, broken down into very detailed sections that cover every aspect of the build including a comprehensive bill of materials and fastening schedule. In addition, there are five illustrated sheets with clear descriptions and dimensions. The build calls for hundreds of screws (I chose silicon-bronze), fiberglass cloth, epoxy (the company does offer both a fiberglass and a fastening kit), oak or mahogany for the boat’s backbone, framing, and transom, and marine plywood for the hull sides and bottom, stem, floorboards, seats, and decks. I was unable to find good marine plywood where I live in Tennessee and instead used good-quality exterior fir plywood. As per the plans, I used 3⁄8″ for the bottom planking and 1⁄4″ for the sides and sub-decks.
Building the Malahini
The build begins with the construction of the strongback onto which are mounted the transom, stem, breasthook, and frames. The plans and instruction manual thoroughly explain how to build each component and the order of operations. I used red oak for the frames, not realizing when I began the project that it is more susceptible to rot than the specified white oak. Rather than replace all the frames, I thoroughly encapsulated them in epoxy resin and later applied plenty of bilge paint below the waterline. Eight years later, the frames are still like new. However, having learned of the superior qualities of white oak, I switched to that for the rest of the build. After the frames were all in place, I installed the keel, bottom battens, sheer clamps, and chine logs.
Once all the structural pieces are complete, the hull’s bottom and topsides panel can be fitted. I scarfed the plywood sheets to get the required lengths, and then the installation of the panels was relatively straightforward using thickened epoxy and a ton of screws. The tighter bends in the bow area did need a little encouragement, but the shaping was achieved by dampening the plywood with towels soaked in boiling water. I stained all the plywood panels a mahogany color before sheathing the exterior with fiberglass cloth and epoxy resin.
Simon Foord
When the hull structure was complete, but before the deck was fitted, I painted the bilges throughout. The plans call for the cockpit sole to be made of plywood, but I installed 5 1⁄2″ pine floorboards, spaced to let water pass through to the bilge, instead. Limber holes in the floor timbers let water flow aft to be collected in the open area in the stern.
I recruited and bribed friends and neighbors to help flip the boat right-side up onto its trailer. It was an exciting, if nerve-racking, moment, but the operation was successful and went without incident.
Before proceeding with any of the fit-out, I painted the bilge while it was still exposed and accessible. Then I installed the sole boards so that it would be easier to move around within the boat. For the sole, the plans call for plywood sections, but I opted to use 5 1⁄2″ pine boards with 3⁄16″ spaces between them to allow for drainage to the bilge. I encapsulated the boards with epoxy and varnish, and applied strips of clear nonskid tape for safety.
The plans suggest several ways to finish the decks and covering boards. I chose to use 1⁄4″ fir plywood as sub-decks onto which I laid hardwood veneers—first, 1⁄4″-thick mahogany for the covering boards and kingplank, then book-matched strips of 2 1⁄2″-wide by 1⁄4″-thick mahogany alternating with 1⁄4″ × 1⁄4″ maple to simulate classic deck planking with caulked seams. I temporarily screw-fastened the strips while the epoxy cured. After removing the screws, I counterbored the holes and filled them with mahogany plugs for a traditional look. I had seen this method used by other builders, and thought it attractive.
The Malahini cockpit layout
Next, I worked on the cockpit. After selecting good-quality mahogany boards, I installed the coamings and dashboard. The plans leave the layout of the dashboard and the number of gauges and switches to suit the builder. I laid my gauges out in a straight row with the various switches (for lights and bilge pump) beneath. To add a little flare, I inlaid two strips of maple across the dashboard.
Lisa Foord
The layout of the cockpit is close to the design, but I wanted to get as much weight forward as possible, so while the fuel tank and battery would ordinarily be carried beneath the afterdeck, I moved them forward and installed them beneath the foredeck. In turn this gave me storage space beneath the afterdeck, where I made the bench seat easily removable and attached the backrests with strong magnets. The motorwell is self-draining and large enough to allow the motor to be fully tilted.
The plans offer several options for steering, the position of the remote controls, and how to run the cables. I mounted the throttle control on the starboard coaming and ran the wiring harness with the steering cable beneath the side deck to the transom.
To construct the benches, I followed the plan dimensions but with a few changes. I wanted to get as much weight forward as possible, so I moved the dashboard and steering bench forward 6″ and installed a 19-gallon fuel tank and battery beneath the foredeck (Glen-L positions these beneath the stern deck). This alteration provided me with storage space beneath the afterdeck, so I made the stern bench seat easily removable, and attached its backrests with powerful magnets so they can be folded down or removed for quick access. I also reduced the width of the walkthrough cutout in the forward bench backrest to give a middle passenger better back support. All the seat bases are hinged and have generous storage beneath them. Despite the fuel tank and battery under the foredeck, there is still plenty of foot room for passengers, with places to stow bags and life jackets.
The plans include a schematic of the transom and self-draining motorwell with a table of various dimensions to cover a variety of motors from a 5.5-hp short shaft to an 85-hp long shaft. I made the recommended modifications to suit a new Mercury 60-hp four-stroke long shaft. The well is sized so the motor can be fully tilted up. To satisfy the warranty conditions, the motor was installed by the dealer. It has been reliable, has ample power, and is relatively quiet.
Michael Maddox
For four adults, the Malahini’s cockpit is spacious. For extra comfort I mounted chrome grab handles in front of each seat. The bimini is not specified by Glen-L, but this production 8′-long, four-hooped version that I found online works well. While the boat is designed to accommodate an 85-hp outboard, the 60-hp motor here provides ample power, though the addition of trim tabs helps the boat to get on plane quicker when there is a full crew on board.
Little information is given regarding the electrical system. I ran all 12-volt wiring back to a convenient flip-down fuse panel beneath the dashboard. Finishing up the electrics, gauges, and controls took several months. The plans do give some brief details on the upholstery, and l considered doing it myself but instead found a professional shop to custom-make everything for me.
After a good deal of fairing and sanding I applied more than 10 coats of varnish to the topsides, interior and decks, and then installed chrome and stainless-steel fittings to complete the classic look. The windshield shown in the plans is a fixed Plexiglass type. I bought cast-aluminum frames from a foundry in Pennsylvania, and cut the windshields from 1⁄4″ clear Plexiglass sheets. Although a bimini is not specified, my wife and I were keen to have one. I found a production 8′ four-hoop bimini online that has worked well.
Working evenings and weekends, and with support from my wife, the build took me two and a half years.
Malahini on the water
At rest the Malahini is very stable, which makes it easy to get aboard and move around, especially with the walk-through forward bench. I added a bracket in each side deck for boarding poles, which some passengers find reassuring. There is comfortable seating for four adults. To achieve optimum trim, I always try to seat lighter passengers on the aft bench. The Malahini drives like a sports car and is exceptionally maneuverable, carves through turns without skidding, tracks straight, and is quick to get on plane. The boat’s top speed is a little over 33 mph, and it will cruise comfortably at 25 mph; with the full-length spray rails, long and slightly radiused foredeck, and windshield it is a fairly dry boat. After using the boat for a while, I added trim tabs to the transom, and these have significantly helped to get on plane when the boat is fully laden. The boat performs best in calm waters, but while it does have a tendency to pound a bit in a chop, I have full confidence in the strength of the hull.
Michael Maddox
Even at speed and crossing the wake of another boat, the Malahini is a dry boat. The spray rails at the chines direct water out and away from the hull.
Above all, the Malahini is an extremely good-looking boat and always attracts plenty of attention and compliments. The construction project is best suited to builders with some experience, but the support from Glen-L’s plans and instructions is excellent, and I also appreciated the wealth of information to be found online in the Glen-L forum and elsewhere. On the occasions that I called Glen-L Marine they happily answered all my questions.
Simon Foord is a retired IT systems engineer, born and raised in England. He moved to California almost 40 years ago and now lives in Tennessee. Simon has owned and built several boats over the years, and has a special passion for wooden boats. He enjoys running about in the Malahini and sailing his Glen-L 19 sloop on Percy Priest Lake near Nashville, Tennessee.
Plans and accessories for the Malahini are available from Glen-L Marine. Prices range from $149 to $690 depending on the options chosen.
Is there a boat you’d like to know more about? Have you built one that you think other Small Boats readers would enjoy? Please email us your suggestions.
More powerboats from Glen-L Marine
Glen-L Zip: A twin-cockpit runabout, reviewed by Ted Gauthier
Glen-L Sea Knight: A 1957-vintage outboard cabin cruiser, reviewed by Chuck Black
The Glen-L Utility: Classic 1950s style in a boat that’s simple to build and a joy to use, reviewed by Michael S. Maddox
Fifty-plus years ago, while living in California, I met some folks from Washington who told me about commercial fishing in Alaska. The idea took hold, and along with a buddy and my dog, I hitchhiked to Northwest Washington in search of jobs on the water. It took a while, with a few rabbit trails, but I settled into a 20-year stretch of commercial fishing for salmon, shrimp, herring, and Dungeness and king crab, as well as a stint working as a shipwright. I fell in love with boats of all sorts, mainly working craft, and dreamed of building one. I had my WoodenBoat magazine subscription and bought any book I could find on the subject of boatbuilding. But dreams often get hijacked by reality, and a family, a mortgage, and a construction business put that particular fantasy on hold.
Fast-forward 50 years and I’m retired, the kids are grown, and the mortgage is paid. Now, I have time. One day, with clarity, it hit me: I would build a boat. I started looking at plans and setting parameters to make sure I could pull it off. It had to be a design and a method of construction that I could be sure of starting and finishing in a predictable time frame—I didn’t want an incomplete project to be staring at me for years. It had to be built in the space I had available—one-half of my two-car garage. It needed to be challenging and to include lofting; there would be no templates or kits. I was drawn to the lines and construction of Nexus Marine Corporation’s 16’ San Juan Dory. Of all the designs I considered, I felt it had the fairest lines and its construction seemed more traditional than others. I also had much of the necessary material. All the framing and removable deck grates could be built from clear vertical-grain (CVG) Douglas fir that I had salvaged from a church remodel and stored for the past 40 years. I purchased one 16’ piece of CVG Douglas fir for the chine logs. The plans call for white oak for the guards, inwales, spray rails, and trim, but I substituted repurposed decking—a tropical hardwood marketed as tigerwood (Goncalo alves)—leftover from a previous job.
Nick Ivancovich
The ladder frame on which the San Juan Dory is built can be used in the early stages of the project to support a plywood lofting table (seen here at left leaning against the workshop shelves). The frames, chine logs, and stem are all Douglas fir.
Building the San Juan Dory
David Roberts, owner of Nexus Marine, designed the 16′ San Juan Dory for a client some 30 years ago; it was based on a 21′ cuddy-cabin dory he was then building. It has been one of his best-sellers both in finished boats and plans. Throughout my building of the boat, he was extremely helpful, filling in whatever details I asked for. The plans for the San Juan Dory include three 24″ × 36″ pages showing profile, body, and plan views as well as seven 8 1⁄2 × 11 pages of specifications, a table of offsets, a detailed list of lumber and fastenings (hardware choices such as hinges, latches, and oarlocks are left to the builder), offsets for spray rail and waterline, ladder frame measured drawings, frame section and bevel drawings, and a bibliography of suggested reading. While I didn’t choose them, Mylar templates are offered, which make lofting unnecessary.
The plans call for 1⁄4″ okoume plywood for the boat’s sides and 3⁄8″ for the bottom, scarfed for length and coated with epoxy resin—three coats per side—before cutting. I used approximately 4 gallons of WEST System 105 epoxy resin, mixed with 206 slow hardener, throughout the build for sealing all components and for gluing, using their 403 microfiber adhesive filler. To begin the build, I cut out the Douglas-fir frame parts, assembled them, then set them aside. I built the ladder frame and set it on sawhorses that supported a white-painted 1⁄8″ sheet of plywood to serve as a lofting table. With the Douglas-fir frame sections drawn full scale, cutting and assembling them was easy and accurate. The transom, bow, stem, and splash well were also constructed using the full-scale drawings on the lofting table. Once all the components were completed, the lofting plywood was removed, the ladder frame was lowered to the floor, and assembly could begin. First the frames, transom-splash-well assembly, and stem were set up, plumbed, leveled, braced, and quadruple checked, and then the chine logs could be installed.
Nick Ivancovich
The hull is heavy enough to require a few helping hands when it was time to turn it upright for finishing the exterior. The plans specified the locations for the spray rail and the waterline, so those features could be applied after the hull was painted and before it was rolled over.
Next came the plywood bottom and side panels. The instructions suggest having two people for installing the panels, but I found that by clamping a 2×4 across the breadth of the boat at the sheer near the stern, I could support the plywood panels as I screwed them in place starting at the stem and moving aft one frame at a time. Once cut to fit, the sides and bottom are glued to the frames, stem, and transom with epoxy and screwed with stainless-steel fastenings. I added another coat of epoxy to all exterior and interior surfaces including framing after installing the white-oak chine logs, runners, and skeg. I then coated the outside of the hull with two coats of epoxy primer and four coats of Interlux Toplac. Because my boat would be trailered, I did not use an antifouling bottom paint.
When it came time to turn the hull over, a few willing neighbors helped and the task was accomplished without a hitch. I modified the interior layout to fit my needs. The designer’s specifications state that no interior bulkheads are required, and the plans call for a cockpit configuration that leaves little open space. As I would be using the boat for sportfishing and crabbing, space for crab pots was important. In the stern quarters, where the plans show fixed side benches, I substituted hinged benches that fold down flush against the frames when they are not needed. There’s still plenty of seating for four or five people, which is all you’d ever want, and then only in calm weather. Next, I installed four interior bulkheads, creating a bow locker, storage under the ’midship thwart, and more storage either side of the splash well. Again, I deviated from the plans, which called for foam flotation in most of the enclosed spaces; I wanted lots of storage so significantly reduced the amount of foam. Discussing this with David I learned that the main reason for the flotation—other than the obvious safety factor—was to meet Coast Guard requirements if the boat were built commercially. My decision to reduce the flotation was personal and may not be for everyone, but the storage was important.
Nick Ivancovich
As designed, the San Juan Dory has fixed benches connected to a wide thwart near the stern. However, the layout can be adapted, and designer David Roberts is willing to discuss ideas and answer questions. My dory’s side benches are hinged so that they can be folded down when not needed, and I removed the thwart to provide more space aft.
Next, I painted the entire interior with a marine enamel, then I turned to the solid-wood parts of the build, all of which I would leave bright-finished to complement the painted hull. Tigerwood is a beautiful deep amber red with contrasting streaks of black; it’s also strong and resistant to rot. On the negative side it can be brittle and difficult to bend, but on the San Juan Dory there are no extreme bends. I used grown black locust crooks for the breasthook and quarter knees. Fitting these was probably the most demanding part of the construction, but it was also the moment when the boat really started to take on an identity. I’ve had years of carpentry and finishwork experience, which made the task possible, but I think without that I would have struggled with this aspect of the construction. Having the right tools is key: Essentials include a good tablesaw with plenty of room fore and aft, because some of the components are 16’ long; a handheld circular saw (I used it for cutting most of the plywood); a miter saw and bandsaw; block planes; a jack plane for scarfs and straight edges; a bevel square; and plenty of sharp pencils.
Once everything was built and fitted, I treated the hardwood components with six coats of varnish. There were still things to be done, but the hull was finished. From receiving plans to the last stroke of the brush had taken five months. It was a full-time job, but the challenge and satisfaction were worth every minute. I asked David for his evaluation of the build’s difficulty level. I estimated it as moderately difficult for a first-time builder. But I liked his evaluation better: “It’s instructional. You’ll learn a lot building this boat.”
Mark Ouellette
At speed, the San Juan Dory planes but does ride high in the bow. The weight of a passenger seated forward brings the bow down without noticeably affecting the speed.
The San Juan Dory on the water
I haven’t weighed the boat, but David estimates the finished boat to be between 450 and 500 lbs. The specs call for a 25-hp (maximum) outboard. I purchased a Tohatsu 20-hp, EFI, tiller-steered motor with electric start and power tilt. It weighs approximately 110 lbs. With two 3-gallon fuel tanks, the boat and all its equipment weigh approximately 650 lbs.
With myself and my first mate, Khodi, in the stern, I’ve had the San Juan Dory running at 23 mph. It gets up on plane but rides a little high at the bow. An additional passenger forward brings the bow down with no real change in maximum speed. The boat handles well in a 1′ chop at half-throttle and stays dry while setting and retrieving crab pots. While hand-hauling and lifting pots over the side with two additional people on board, it is stable and comfortable, provided that attention is given to weight distribution.
Mark Ouellette
The San Juan Dory handles well in a chop and stays dry, the rails being well placed to deflect most incoming spray.
I’ve set up my dory with manual outriggers for both freshwater lakes and saltwater trolling. I will also be designing a custom davit for hauling crab and shrimp pots. I have in mind doing day trips and overnight island camping in the San Juan Islands for which the design is named. I have called the boat ŽIVJELI, Croatian for “Live Life.” For me, building the San Juan Dory was exactly that.
Nick Ivancovich, 74, is a retired general contractor and former commercial fisherman. He lives in Northwest Washington with his wife Debra and their two dogs. His hobbies are hunting, fishing and woodworking, and he spends time working with a competitive youth clay-target shooting team.
Is there a boat you’d like to know more about? Have you built one that you think other Small Boats readers would enjoy? Please email us your suggestions.
I had never been to Mexico before. But there I was, on a lonely beach on the east coast of Baja California dressed only in my boxer shorts, wielding a 10″-long hatchet under a silvery moonlight, staring into the yellow headlights of a Ford F150. Facing me were two men, one brandishing a golf club. The other, a shirtless man with tattoos covering his torso and arms, pointed his finger at me and growled, “This him?”
“This is it,” I thought, and prepared to fight for my life.
North through the Sea of Cortez
Twenty-four days earlier and some 550 miles south, I had been bobbing up and down on the long glassy swells of the Sea of Cortez in my 18′-long wooden rowboat named GINGER. My friend AJ had just dropped me off at the Dunas del Mogote, a nature preserve a few miles north of La Paz in Baja California Sur. Together we had driven for two days in my Suburban from Phoenix, Arizona. Now, from the water, I watched as AJ drove away and disappeared over the top of a heaping sand dune. As the dust cloud settled, so did the realization that my only chance of abandoning the adventure of a lifetime had just departed.
Photographs by the author
After two days of driving from Phoenix, Arizona, to La Paz, Baja California Sur, I was happy to take a moment to pose for the camera. AJ and I spent the first night camped on a cliff overlooking the Pacific Ocean, and four hours of the following night digging the car out of the sand after we got stuck in a dune in the Dunas del Mogote nature preserve.
My plan was to row north along the coastline of the Baja California Peninsula from La Paz to San Felipe, a distance of roughly 650 miles. I hoped it would take me no more than 35 days since that was when my friend Isabel was supposed to pick me up in San Felipe. The east coast of the peninsula is a diverse array of soft sand beaches, smooth cobble rocks, extensive desert, vertical sea cliffs, and rugged mountains. For overnight accommodations I required only a plot of reasonably level land where I could lay my sleeping bag and camp above the high-tide mark. I did have a tent, but I planned to use it only if it rained; it never did.
It was May 14, 2022, and I was 29 years old, the age when physical capability combined with a keen sense of adventure permits a person to explore the world. I knew of a few kayakers who had traveled smaller sections of the peninsula but had found no information about any expeditions that had rowed or paddled the entire length. It seemed like the perfect challenge. Now, I was not so sure… I was alone, spoke no Spanish, and had never before rowed in the sea. Maybe this was a stupid idea, I thought, as I turned GINGER’s bow north toward San Felipe and plunged my oars into the clear turquoise waters of the Sea of Cortez.
Roger Siebert
.
GINGER is an 18′ Angus Expedition sliding-seat rowboat, built for seacoast adventure in most conditions. She is flat-bottomed with a 3′ beam, fine ends, and nearly plumb stems. She’s incredibly stable in rough water. Her hull is sheathed in Kevlar to withstand long drags over jagged rocks, and apart from the oval cockpit opening, she is completely enclosed, with three watertight compartments in which I had stowed more than 250 lbs of gear, food, and water.
Not 10 minutes into my journey and barely 200 yards from land, I noticed a large fin jutting above the water’s surface. It looked like the nose of a surfboard slicing upright through the water. I quickened my pace and rowed away, putting distance between me and the threat. I rowed for about an hour without incident before deciding to take a break. Rowing has many advantages—I can carry more gear than in a kayak, I get to admire the path I have traveled, and my whole body becomes stronger—but not seeing where you’re going is a distinct disadvantage. As I swung the oars out of the water, I glanced forward over my shoulder as GINGER glided on. There, barely 20’ ahead of me, was another giant surfboard-like fin.
I spun around, frantically dug my starboard oar into the water to turn the boat, and raised it again just in time for the fin to pass beneath the blade. I peered over GINGER’s side to see a huge shadowy mass, both wider and longer than my boat, slip by beneath the water’s surface. It was a whale shark. The anxiety drained from my body as I laughed with relief. A few minutes later I saw another fin gliding through the water, but this time I knew what it was, and I smiled.
On the way to La Paz, we stopped to admire the startling aquamarine blues of the Sea of Cortez that were in stark contrast to the muted desert colors that surrounded it. Despite the apparent harshness of the landscape, I was to discover a thriving ecosystem in and around the sea.
The company of wildlife
Two hundred and fifty miles farther on and several days later, my hands were layered with thick calluses, and the muscles along my spine were like rods of rebar, but no matter what type of steel I believed my butt had been forged from, sitting down and rowing for hours was still a real pain.
It was 3 p.m. and I was close to the state line that divides the Baja California Peninsula into the states of Baja California Sur and Baja California. The 20-mph headwinds I had been battling since the previous day were finally subsiding, and I decided to give my butt a break by bracing my legs and shoulders on opposite ends of the cockpit and lifting my midsection above the seat. A flicker of motion in the water to my right caught my attention. I glanced over and found myself looking into the black eyes of a slick-headed seal peeking at me from the water. A second head popped up. Then another, and another, and another… all staring at me.
A few seconds later, the seals retreated beneath the surface. The sun was still high in the sky and illuminated the depths of the sea so I could watch the seals swimming back and forth under the boat. Then one of them pierced the surface, its whole body leaping into the air and plunging back into the water. Soon, there were five sleek-bodied seals playfully breaching the surface all around me.
In one of my first encounters with the local wildlife, I met this horse near Punta Coyote, a small fishing settlement on the Sea of Cortez coast of Baja California Sur. Shortly after we caught sight of each other, the horse joined the rest of its herd that had been hidden by bushes at the top of the beach.
I started rowing, and they followed. After a few minutes, the sound of barking reached my ears. I turned in my seat; we were approaching a colony of seals near a rocky outcropping. As I neared, some 20 seals swam to join me and the original five. They swam and leaped, sometimes behind me, sometimes in front. The conditions were perfect for rowing, and I was flying across the smooth swells at full speed, but the seals could easily swim faster. For an hour we kept the pace, until at last, I stopped to give my butt another break and watched the seals as they slowly disappeared from sight.
Before setting out on this voyage of discovery I had thought I would be alone. But the Sea of Cortez was filled with an astonishing abundance of life. That same evening, after dragging GINGER over a 4′-high sand berm to get her out of the water, I sat on the soft sand and gazed out over the sea. In the shallows I could see dolphins and seals; above them a flock of pelicans swooped and dived, hunting for fish; on land, a lone coyote scoured the shoreline for the remains of marine creatures. As the sun sank below the sea, I laid out my sleeping bag and gazed into the night sky packed with layers of brilliant stars.
After an exhausting day, during which I was pushed backward by powerful headwinds and gusts of over 30-mph, I made camp early, about 15 miles south of the border between Baja California Sur and Baja California. The farther north I traveled, the more common and curious the coyotes became.
One night, while the wind was whipping through my sleeping bag and I was struggling to sleep, I felt a firm pressure against my left butt cheek. Startled, I scrambled from my sleeping bag, grabbed my headlamp, and flicked on the light. Barely an arm’s length away, a coyote was staring back at me. I yelled and it trotted away.
Another night found me hurling dozens of hermit crabs out of my camp, fighting them off as they burrowed into my gear and tore into my shoes. And on one morning, as I was breaking down camp, I discovered a foot-long rattlesnake cozily nestled under the food bag that I had been using as a pillow.
Not all my wildlife encounters were stressful. Three days after leaving La Paz, I landed on a beach near the small settlement of Punta Coyote late in the afternoon and lay down to take a nap. When I awoke, a chestnut-brown horse with a tiny white dot on its forehead was meandering along the wet sand toward me, the water lapping around its hooves. We made fleeting eye contact, both surprised to see each other, then it bolted up the beach and joined a herd of five other horses that had been hidden behind the tall bushes at the sand’s edge.
The day after leaving Loreto and just 7 miles farther on from my cobble beach, I spotted this peaceful-looking sandy beach. It was only 8:30 a.m. but I had been making good time and decided to stop and relax there for the day. During the night, I discovered that I was not alone in enjoying the beach—dozens of hermit crabs were burrowing into my gear.
The generosity of locals
In the mornings, as I followed the eastern edge of the peninsula, thin rays of light began to leak into the salty water at around 5 a.m. until, just 12 minutes later, the surface of the water had become a sun-drenched yellow canvas, and it was impossible to distinguish sea from sky. If I was lucky, the silhouette of a fisherman standing tall in his skiff would cross my field of vision to give context to the morning artwork.
After filling my water jugs in Loreto, the first of three re-supply stops, I stopped to camp on a small cobblestone beach 11 miles north of the town. I spent the rest of the day reading, dozing, and walking along the shoreline.
By 5:30 a.m. each day, the sun had climbed well above the horizon, its heat already palpable on my skin. Even at the beginning of my journey in mid-May, the mid-afternoon temperatures had been close to 100°F; by June, the normal was higher than 100°. On windless days, in an effort to stay cool, I removed my shirt several times an hour, dunked it in the sea, and put it back on.
I had decided not to carry a portable desalination kit due to cost, and one of my biggest concerns was having enough fresh water to stay hydrated through the long days of rowing. Planning to row about 20 miles a day, I had plotted my course to give myself sufficient supply stops—Loreto, Santa Rosalía, Bahía de los Ángeles—that 18 gallons of fresh water would see me through. There were few access roads in Baja California Sur, and I wanted to be sure that I had enough for hydration plus emergencies. I had expected to drink about 2 gallons a day but in the end I drank a little less. For food, I ate oatmeal, peanut butter, coconut oil, Clif bars, and Backpacker Pantry meals—it wasn’t an amazing cuisine, but it was good enough, and when I stopped to resupply, I supplemented my rations with fresh fruit and cookies.
In the fading light of the setting sun, I saw this small fishing boat nosing into the shoreline at the mouth of Concepción Bay. The next day I made the 6-mile crossing of the bay from the tiny village of Concepción to Mulegé.
My first inhabited stop after leaving La Paz was Loreto, a small colonial-style city founded by Jesuit priests in 1697—the first Spanish settlement on the peninsula. Today it is a thriving oasis nestling between the Sea of Cortez and the high Sierra de la Giganta, its streets lined by palm trees and vibrantly colored buildings of rarely more than two or three stories. I had been rowing for eight days and had covered roughly 180 miles; when I pulled into the Bay of Loreto, I had 5 gallons of water in reserve. As I approached the town, my attention was split between looking for a place to land and watching a school of frying-pan-sized stingrays perform front flips, back flips, and side flips before belly-flopping into the water with a plopping sound. Eventually, I focused on finding a landing. AJ and I had driven through Loreto on our way to La Paz, and I knew there was a store near the beach where I could fill my water containers.
At last, I found a suitable spot, nosed GINGER ashore, and unloaded the heaviest items so I could drag her up above the tidal line. As I began the laborious dragging process, a man walked down the beach, grabbed the bow handle, and together we hauled GINGER to safety. Besides some grand waving gestures to fishermen who had passed me by in their boats, this was the first genuine human contact I had had in a week, and it felt good.
The store selling purified water was only a quarter mile away. I filled my containers with 100 lbs of water and began my trudge back to the beach. A boy on a bike—too small to carry a 5-gallon container of water—offered to help, and later, as I was almost at the beach, two men in a truck also offered.
Many of the beaches where I camped overnight looked like this—long deserted stretches of sand. I always tried to bring GINGER above the most-recent looking high-tide mark. However, I never wanted to carry her too high up the beach because the following morning I’d have to haul her, and my gear, all the way back (and farther if there was a falling morning tide).
Kindness and curiosity were common among the people I met on the peninsula. When I resupplied in Santa Rosalía, I had to walk a mile to find drinking water. As I set out to return to the boat with my two 5-gallon jugs of water, a man saw me struggling, and drove me back instead. In Bahia de los Ángeles a team of fatigue-clad soldiers bearing assault rifles walked into my camp at dusk. I thought they were going to arrest me for breaking some unknown law, but instead, the captain only wanted to know what kind of fish I had caught.
Surviving extremes
I could feel my stomach in my chest. Then I could feel my stomach on top of my hips as I rode the massive seas on my way to Calamajué Bay. I had covered roughly 500 miles and had reached a 21-mile stretch of unforgiving coastline: 100’-high cliffs and jagged rocks rose straight up from the water; there was nowhere to land. The swells were monstrous, somewhere between the size of a one- and two-story building. I’m not sure what scared me more: looking up to the top of a powerful wave from the trough far below or watching the endless line swells traveling toward me as I balanced on a wave’s crest.
An hour earlier I had checked my GPS and knew that I was nearing the safety of Calamajué Bay, but the swells were driving me ever nearer to the cliffs and I didn’t dare let go of my oars to check again. I had to focus all my energy on angling GINGER away from the shoreline just enough to keep us from being crushed between water and rock, but not so much that I risked being flipped while crossing the swell.
Near Concepción Bay the coastline was marked by cliffs about 50′ to 60′ high. These were later dwarfed by the cliffs to the south of Calamajué Bay, where the sea state was the most challenging of the entire trip.
Another half-hour of white-knuckle rowing, and at last I rounded the high headland that kept the deadly walls of water from the placid surface of Calamajué Bay. In the sudden absence of waves crashing on rocks, I could hear the droplets falling from the blades of my oars into the water below. I stretched out in the cockpit, rested my head in interlaced fingers, and took my first break in several hours, grateful to find this tiny slice of calm amidst a big water wilderness.
From Calamajué to San Felipe
Two days later, I was in despair. The backpack containing my passport, driver’s license, credit cards, cash, cellphone, and spare car keys was gone. The night before, I had misjudged how far the tide would rise and had woken to waves crashing onto the beach only a few feet from my camp. I hurriedly hauled GINGER and my gear higher up the beach, and fell back asleep. But when I began packing up in the morning I discovered my backpack was missing. I believed that I had forgotten it on the beach below the tide line, and the sea had taken it.
I resupplied in Santa Rosalía but didn’t stay. Instead, I camped on a beach 18 miles north of the town and in the morning enjoyed watching this procession of pelicans silhouetted against the rising sun.
I spent the day searching. At around 4 p.m., I went snorkeling through the shallows in the desperate hope that the incoming tide would return my bag. I poked my head out of the water and saw a man walking down the beach toward my camp. I waded out of the sea and waited next to GINGER for him to arrive. His face was obscured by a dark brown balaclava, large circular sunglasses, and a black baseball cap. I waved as he approached, and he pulled the balaclava down around his neck. He smiled and introduced himself in broken English. His name was Adair, and he worked at a fishing camp a mile to the north.
I asked him if he had seen a black backpack. He smiled at me again; did the backpack contain my identification documents? I replied that, yes, it did. Again, he smiled; his friends knew where my backpack was and I should wait here until he returned. Then he spun around and started walking back in the direction from which he had come. Since I had nothing else to do, I waited.
By 10:30 p.m. I had lost hope that Adair would return and was dozing off when the low rumbling sound of an engine jarred me awake. I jumped up from my sleeping bag. A Ford F150 skidded to a halt 60′ in front of me. The truck’s headlights illuminated the foreground as all four doors burst open and four shouting men poured out. Two of them slowly walked in my direction, their bodies silhouetted by the headlights.
In the afternoon of the day before I lost my backpack, I watched two fishermen retrieve their nets near the beach. Pelicans were never far away when fishermen were working.
“This him?”
I grabbed my hatchet, the only weapon I had, and prepared for a fight. A fifth person was being dragged, shrieking from the truck. I tightened my grip on the hatchet. As one of the men wrangling the frightened passenger stepped out in front of the group, a voice rang out. “Owen, Owen…everything is fine!” It was Adair. Still afraid, I watched as the men pulled their squirming prisoner across the sand and flung him to the ground in front of me. He had clearly been beaten. His arms, neck, and face were covered in red, swollen welts. Both his eyes were puffy, and his left eyebrow was bleeding. Pointing at him, Adair said “Owen, this is Pancho. He stole your backpack last night while you were sleeping.”
Pancho immediately began yelling in protest, but was quickly silenced by a flurry of punches from one of his captors, a shirtless man whose torso and arms were covered in tattoos. “You shut up!” he yelled, before turning to me with a smile. He handed me a small purple bag containing my driver’s license and credit cards, but no passport.
Without warning, two of the men lifted GINGER up and loaded her horizontally across the truck bed. “It’s too dangerous here, you need to come with us tonight,” the tattooed man said, “there are too many thieves.” I needed my boat to get home, so I climbed into the rear cab of the truck, and allowed them to drive me to their fishing camp. The tattooed man and Adair stood in the back and held onto GINGER; Pancho was bundled into the front between the two other men.
After some of the contents of my backpack had been returned to me, GINGER and I were transported into the fishermen’s camp in the pickup—I sat in the cab, GINGER was balanced precariously across the truck bed. The boat remained on the truck overnight, while I slept on the sand nearby.
When I awoke the next morning—I had slept on the beach near the truck, reluctant to leave GINGER unattended—the tattooed man brought me to a pile of ashes near one of the camp’s ramshackle buildings. I stooped down and lifted my charred car keys from the fire’s remains. I never did get my passport back.
I left the fishermen’s camp the next day, well fed and restocked with water. The men had even taken me fishing on one of their boats. They had offered to drive me and GINGER the final 100 miles to San Felipe, but wanting to complete the trip by boat, I had turned them down. Three days later, I was regretting my decision. The sea floor and shoreline had flattened so that, at low tide, there was a vast expanse of land between the high-water mark and the sea. For the last five days of the trip my mornings began with a two-and-a-half-hour struggle to drag the boat and haul my gear over rock fields and wet sand from campsite to water’s edge.
Eventually, I landed GINGER on the shores of San Felipe. I sat down on the warm sand and waited for Isabel to appear in the red Suburban I had last seen disappearing over the sand dune 33 days earlier and 650 miles away. I felt the wind build and watched the growing waves as they crashed onto the beach, and breathed deep. One month earlier I couldn’t wait to escape from Phoenix; now I couldn’t wait to return. All adventures start by leaving home, but the really good ones end by running back toward it. I was ready to run home.
Owen Alfonso is new to freelance journalism and has degrees in law and philosophy. He is attracted to stories where politics and adventure meet because there is no better way to understand an issue than traveling through it. He fills his free time with martial arts, playing with his kettlebells, and planning the next adventure. He is currently learning Spanish in Mexico City.
If you have an interesting story to tell about your adventures with a small boat, please email us a brief outline and a few photos.
Last winter I needed to tighten the rivets on my Delaware ducker, JOSEF W. The job would require two people and some potentially awkward working angles.
JOSEF’s 1978 lapstrake build was completely traditional: cedar on oak (fits were wood to wood), fastened with rivets. When a lapstrake boat is placed in water, its wood swells against the rivets, compressing the wood and closing up the seams. Initially, and for a long time—if the boat is well built—this results in a tight hull. If the boat is left in water, the wood remains swelled, but if the boat is taken out for the winter season, the wood dries and shrinks, and the process of “taking up” must be repeated when next the boat goes in the water. After a while, as the wood is repeatedly pressed against the rivets, it will become crushed and take longer to swell. After many cycles, the wood will no longer swell enough to overcome the damage, and the seams will not close tight; the boat becomes leaky. This was the problem I needed to address.
Photographs by the author
Supported by the slings, a boat can be tipped to any angle. By taking some of a boat’s weight off the straps, a person working alone can turn it to the required position and then, as the full weight of the boat settles back into the slings, it is supported at the desired angle.
The traditional remedy is to tighten up the rivets—a two-person job in which one holds a bucking iron on the outside of the hull against the rivet head, while the other works inside the boat, using a hammer to tap the rivet tighter against the rove. This was what I planned to do on JOSEF W.
I brought JOSEF W inside, but as I set her up on my 20″-high benches, a problem was immediately evident. If the boat were upright, the person holding the iron would have to work over their head, sometimes lying on the floor. Conversely, if the boat were inverted, it would be the person with the hammer who would be working above their head. I needed to roll the ducker into a position that would provide easy access for both workers. I had no way of setting up an overhead lift.
When building kayaks, I had often used an H-shaped sling system to support the build. I could, surely, modify that setup to suit this situation. I had recently disassembled some interior window casings and had a good deal of long scrap wood left over. I decided to use it to make two large H-shaped stands with webbing slings.
The slings not only support the boat but also can be adjusted up or down so that any part of the boat can be easily reached. The ducker is double-ended so the two stands can be the same width; if the boat to be supported is beamier in the stern, then the after stand would need to be correspondingly wider. For any boat, the stands’ vertical posts need to have a height above the cross bars equivalent to at least half the beam of the boat at the location of the stand.
The stands’ verticals needed to be positioned apart just a bit more than the boat’s beam at the support points. They also needed to be connected well and braced horizontally, and to have long fore-and-aft feet to give them good stability. Together, the stands must support the weight of the boat—160 lbs, in the case of JOSEF W.
Using what I had, I was able to make a couple of H-shaped stands braced diagonally with 1×3s below the horizontal bar, which I placed at 21″, just an inch higher than my benches. Each stand was 4′ tall and 3′ wide, with 2′-long feet beneath each pillar (if my boat were more- or less-beamy, or weighed more or less, these dimensions would have been different). The stands had 2″-webbing slings—a soft layup that held knots well—that were fed through a hole in the top of each vertical. One end of the fabric was tied with a stopper knot; the other end had a loop through which I ran a line that could be tensioned and cleated off on the stand’s crossbrace. The slings were long enough so that, when slack, the boat could rest unimpeded on the stands’ crossbars.
I made my stands out of left-over bits of wood, but buying some inexpensive 2x4s, especially for the uprights, would have been more straightforward. The important element is that the stands are strong enough and stable enough to support the weight of the boat for which they are intended—in this case, my Delaware Ducker, which weighs 160 lbs.
Once the boat was on the stands, I could raise it by myself. Working incrementally, first at one end, then the other, I could tension the slings, tying off one end at a time, and thus raise the boat so that its bottom was clear of the crossbars and suspended in the slings. Once the boat was 1′ or so above the crossbars I could then rotate it by myself to any convenient angle up to 90° to make it easy for me as well as my iron-holding partner to get access to both rivet head and rove.
When we had dealt with the rivets, I wanted to turn the ducker over to paint the bottom. Inverting a boat is challenging when working alone. However, with the boat suspended in the slings, I was able to pull the rail to get the hull past 90°, at which point I could move around to the keel side and lift up on the lower rail to fully invert the boat. Once the boat was upside down, I could adjust the height of the slings for sanding and painting, and was surprised by how stable the boat was while I was working on it. Once I had finished with the bottom, I rotated the boat back to upright (realizing, too late, that I should have put some soft blanket material between the boat and the webbing as it marred the fresh paint a little). Now, I moved on to repainting the deck and interior, making full use of my ability to raise and tilt the boat as needed.
My H-stands are now out on loan to a friend who is building a complicated stitch-and-glue sailing kayak this winter. Once he is done, the stands will come back to me so I can tighten up on the ducker’s garboard rivets just a bit more. Being able to adjust the height and angle of a small boat when working on it greatly improves the experience for the worker. It is worth taking the time to figure out a simple system: your back, knees, and helper will thank you.
Ben Fuller, curator emeritus of the Penobscot Marine Museum in Searsport, Maine, has been messing about in small boats for a very long time. He is owned by a dozen or more boats: kayaks, canoes, a skiff, a ducker, and a sail-and-oar boat, and is a regular contributor to Small Boats.
You can share your tips and tricks of the trade with other Small Boats readers by sending us an email.
Building and maintaining boats is a messy business. Saws and sanders, planers and routers create a lot of dust, and while some tools are equipped with dust-collection systems, boats and workshops eventually need to be cleaned up. I have two shop vacs, a 6-gallon and a 4-gallon. The larger one is on wheels, while the more compact one has a handle for carrying. Both have flexible hoses and extension tubes to reach whatever needs to be cleaned up, but while they both do their jobs well, vacuums of that size can be cumbersome. The cordless handheld DustBuster I use for household chores is useful in small spaces but it’s not up to the rigors of workshop use. For picking up some of the dust kicked up by my tools, the 20V DeWalt Dry Hand Vacuum I bought recently is up to the job.
Photographs by the author
The dust bowl is easily emptied with a touch of its release button. The pleated filter is HEPA rated to be 99.97% effective at capturing airborne particles down to 0.3 microns in diameter.
The DeWalt, without a 20-volt battery attached, weighs 3 lbs 4.8 oz. It is equipped with a HEPA filter (for dry debris only) and an LED headlight. It comes with six attachments. The 20″ rigid extension facilitates cleaning the shop floor. The flexible hose can easily get through small hatches and into confined small spaces. It can stretch from 2′ to 6′ and the vacuum, thanks to its rubber feet, will stay in place for about 5′ but will then trail along, remaining upright. There are two brushes: one round, 2 1⁄4″ in diameter with 1″ bristles, and one rectangular, 6″ wide with 5⁄8″ bristles. The shorter bristles are stiffer and better suited to loosening sand or mud that has dried on floorboards or a cockpit sole. The crevice tool is useful in tight spaces and corners. Its angled opening has a slight curve to ensure there is always some airflow on flat surfaces, so the vacuum’s motor is not strained. The floor accessory has wheels, which also ensures airflow and keeps the device from sticking to a flat surface; on a carpeted surface this accessory is more efficient if pulled rather than pushed. The vacuum has a belt hook so the operator does not have to carry it by hand, and while the vacuum is a lot bulkier than a cordless drill in a holster, there are times, such as while working on a ladder, when that feature will be most welcome.
The vacuum has a belt hook by the handle’s battery compartment. With an Allen wrench or a screwdriver, it can be detached and relocated to the opposite side for using the vacuum left-handed. The vacuum weighs 3.3 lbs and is bulky, but carrying it on a belt works surprisingly well.
The DeWalt is rather noisy. Held at arm’s length from a sound-level meter, it measured around 78 dBA (A-weighted decibels, adjusted for the effects on human hearing). That’s just a bit higher than the average 75 dBA for household vacuum cleaners. Hearing protection isn’t required, but I like to wear my WorkTunes hearing protectors to block loud noises, and would definitely wear them if I were using the vacuum in an enclosed cabin or with my head near the vacuum.
Of all the accessory fittings, the floor attachment covers the widest area yet can pick up every bit of table-saw dust in a single pass.
Power comes from a DeWalt 20-volt battery, sold separately. The batteries range in size from a 2-amp-hour model up to a 10-amp-hour. I have the 2-amp-hour model with which the vacuum will run for 15 minutes of mostly uninterrupted use.
The vacuum has strong suction. It easily and quickly gathers up sawdust. With the 9″-wide floor accessory on the end of the extension, the vacuum will completely clean a swath of liberally sprinkled tablesaw dust in a single pass. DeWalt notes that it moves 46 cu ft of air per minute, but that doesn’t mean much to me. I thought steel hex nuts would be a better measure of the vacuum’s power and was happy to see 1⁄4″ and 1⁄2″ nuts easily snapped up into the dust bowl. Even a hefty 1.4-oz boat-trailer acorn lug nut rattled quickly up the extension and crashed into the bowl. I didn’t hit the limit of the vacuum’s power until I lifted a lidded water-filled jar weighing a full pound.
Between the dust bowl’s release button and the on/off thumb switch there is a built-in LED light. It goes on automatically when the vacuum is turned on and stays on for 21 seconds after the vacuum has been turned off.
In the short time I’ve had the DeWalt vacuum, it has proved itself useful not only in the shop and boats but also around the house. Dust bunnies under the bed and crumbs in the kitchen no longer accumulate during the long stretches between housecleaning sessions.
Christopher Cunningham is the editor-at-large of Small Boats.
The 20V Cordless Dry Hand Vacuum by DeWalt is available from many hardware outlets. Prices range from $123 to $129. Batteries and a charger are available separately.
Is there a product that might be useful for boatbuilding, cruising, or shore-side camping that you’d like us to review? Please email your suggestions.
The 24′ Amphibi-ette was among the first trailerable cruising sailboats. At only 2,300 lbs, she can be towed by a modest-sized vehicle to distant cruising grounds.
The Amphibi-ette (A/E) has been called the Volkswagen camper bus of sailboats. One of the first cruising sailboats to be specifically designed for trailering, she is still considered one of the best of the breed by those who know her. Conceived in the mid-1950s by designer Cyrus Hamlin and boatbuilder Farnham Butler, the A/E is the smallest of a line of sailboats called “Controversys” because, at the time of their debut, many of their features were radical departures from tradition. These features included light displacement, reverse sheer, glued strip-plank and plywood construction, and unusually open deck and interior layouts. The A/E and her cousins give us a good idea of where mainstream wooden boat building was headed just before the start of the fiberglass era.
The design’s name, which to our ear is endearingly 1950s retro, came about because in many ways she is a smaller version of the Amphibi-Con, which got its name from “Amphibious Controversy,” a reference to its trailerability.
The Amphibi-ette is aimed squarely at young families for whom absolute practicality is more important than traditional aesthetics, and she really hits the mark. At 2,300 lbs designed displacement she is light for a 24-footer even by today’s standards, meaning she can be trailered behind almost any vehicle with a V-6 motor. While it was a new idea in the ’50s, today everyone is aware of the advantages of trailerability, in the potential elimination of boatyard and transport bills and the convenience of performing maintenance in one’s own backyard. The trailer also enables the boat to be transported quickly and economically to distant cruising grounds, which might not be attainable by a non-trailerable boat and only reachable by an offshore-capable boat whose crew had the time to make a long voyage.
Greg Pugh
The Amphibi-ette’s cozy cabin will accommodate a small family for short cruises.
Amphibi-ette Features
Amphibi-ette’s shallow 2′ 4″ draft is one of the features owners like most, because it makes available the most sheltered anchorages in a given locality, and because of the security it provides—running aground in water that shallow is unlikely to be a surprise and is quite a lot less scary than doing it with deep draft. The draft she does have puts the ballast low enough to make her self-righting from a knockdown and, almost as important, it enabled the designers to position the centerboard entirely in the long, shallow fin keel. This greatly simplifies construction of the centerboard trunk and keeps it out of the cabin. The centerboard cable comes straight up through a tube to a point above the waterline, where it is adjusted with a small reel winch. The tube terminates in a small “coffee table,” which serves as a mount for a larger dining table and, often, as a convenient seat.
The designers understood that for comfort small boats need to be designed around the dimensions of the human body, the goal being enough space for comfort but no more. The whole Controversy series is a masterpiece of what we now call ergonomics, and the A/E, as the smallest of the line, benefits from this the most. Her interior is her biggest claim to fame. Depending on the layout she will sleep three or four full-sized people—I’ve cruised successfully with three adults and two kids aboard. The four-berth version will seat six people in the cabin (one on the seat in the galley, one on the end of the V-berth, and two on each quarter berth at the table) and the three-berth boat will seat five. She has standing headroom in the galley and main cabin, under the canvas top. The galley has a high countertop on the port side that is good for a two-burner stove, with lots of storage underneath. On the starboard side is a low countertop over the icebox, doubling as a seat, with a storage bin or hanging locker outboard. This galley seat is in many ways the best in the boat. When seated here one has the small windshield at the forward end of the galley at eye level, providing a 180° view forward—almost unknown in sailboats. The windshield is also helpful to forward visibility from the cockpit, when the canvas top is in place, and I often steer my boat under power from down below, when it is hot or rainy.
Dan MacNaughton
The design’s removable canvas shelter is one of its most popular attributes.
In the three-berth version the forward cabin has a berth on the starboard side and a toilet to port, creating an encloseable head. In my four-berth boat there is a V-berth in the forward cabin. A toilet could go under the head of the berth, but we are fans of the portable, low-tech bucket, which can be used in the cockpit under favorable conditions. A curtain can be rigged at the aft end of the galley when it is desirable.
All who have used the boat agree the canvas top is one of her best features. It is essentially a large dodger mounted on permanent hoops. The sides roll up and down and can be secured partway up. When the top is rolled all the way down, the cabin is snug, tent-like, and well protected from the weather. When the top is rolled partway up the interior is shaded and open to the breeze, with all-around visibility. When the top is removed (about a one-minute operation) the galley and main cabin are wide open and part of the cockpit. It’s like a sailing living room—about the ultimate in daysailing comfort.
Dan MacNaughton
With only a 10″ difference in height between the cabin and cockpit soles, the two spaces flow together easily.
There is no bridge deck, and there is only a 10″ height difference between the cabin sole and that of the self-bailing cockpit. Taken together with the canvas cabin enclosure, this blurs the distinction between cockpit and cabin, and the ease of movement from one to the other is one of the most pleasant things about the boat, especially when sailing singlehanded, when everything in the cabin is just two steps away from the helm. When seated in the cabin the effect is like sitting under the dodger of a 60-footer: one’s eye is well above deck level and one’s surroundings are in full view, over the aft end of the boat.
The remarkable interior is made possible partly by the boat’s unusual hull shape, which incorporates plywood topsides and a strip-planked bottom shaped like an inverted bell in cross section. The shape provides good width at berth level and remarkable width at the cabin sole, while the boat floats on what is basically a very shallow and narrow hull, under the chines. The A/E sails fast and well under all conditions except very light air when, like most light boats with long waterlines, she has a less-than-optimum sail area-to-wetted-surface ratio. She is particularly fast downwind, and she loves a breeze. Like any really light boat her motion in rough water is quick, but she doesn’t pound—this quick motion is a factor when on the anchor, so sheltered anchorages will be much preferred. Fortunately, her shoal draft allows her to find them most of the time.
Julie Noyes Johnson
The Amphibi-ette’s 2′ 4″ draft allows her into anchorages off-limits to most cruisers; rigged with a pair of beaching legs, she can easily take the ground on a falling tide.
Amphibi-ette Performance
The Amphibi-ette is remarkably fast under power. A 9.9-hp Johnson two-stroke pushes the boat well over 6 knots, a big beneft to the family cruiser who wants to get in before dark, or home in time for work. At 4.5 knots this outboard consumes about one-half gallon of gas per hour. A four-stroke motor might cut this consumption nearly in half. Smaller outboards will work fine. I’ve run the prototype of this design with a 2-hp Seagull and found it perfectly practical. A motor larger than 9.9 hp will be too large and heavy. The outboard is mounted in a well aft of the cockpit, behind a watertight bulkhead. There is no motor out on the transom looking ugly, snagging lines, and inviting theft; there is no leaning over the transom to work the motor. The motor is protected from collision or submersion, and the installation can be very, very quiet.
The Amphibi-ette’s construction was radical for its day, taking elements from aircraft structures and wartime plywood applications, as well as from traditional wooden boat building. It was one of the frst boats to utilize glue in virtually every joint. There are no large timbers in the boat, but the structure as a whole is tremendously rigid, which has contributed greatly to the longevity typical of this relatively economical construction. With today’s epoxies the A/E’s construction can be just that much better and easier, and she is well within the abilities of a dedicated amateur. While she is far from an “instant boat,” the structure is designed for economical materials and rapid construction. There may be other ways to speed, improve, or simplify the construction by modernizing it slightly, but the original structure, glued with epoxy and fastened with bronze, would seem to be good for a very long life span just as it was.
Plans for Amphibi-ette are available from The WoodenBoat Store, P.O. Box 78, Brooklin, ME 04616; 800–273–7447.
The Amphibi-ette’s construction was groundbreaking when introduced in the 1950s; it was one of the first glued-together plywood boats.
Here we see the three-berth layout; there is also a four-berth option.
More Trailerable Sailboats
With a trailerable sailboat like Amphibi-ette, if your car can drive there, your boat can sail there. For some other trailerable small cruising boats see:
In 2019, when I first moved back to Midcoast Maine, I quickly became aware that people around the boatyard docks where I was working were wearing short rubber deck boots in a variety of colors. In that commercial setting, the boots made sense: they were evidently comfortable, waterproof, and hardwearing. Then I noticed that many of the kids coming out of the middle and high schools at going-home time were wearing the same boots and proudly so, their pant legs rolled up just enough to display the contrasting gussets in the boots’ ankle sleeves. On those younger wearers, the boots looked stylish, and if someone can persuade a teen that a practical item of clothing also looks good, I’m all in. So when my daughter asked for a pair of Xtratuf Ankle Deck Boots, I investigated. They weren’t inexpensive, but I reasoned that, apart from being a teen fashion statement, they would be practical for summer dinghy-sailing and for shoulder-season boating. When Santa delivered a gray pair for Christmas, she was thrilled, and I was a little jealous.
Photographs by the author
After three or more years of use, this pair of Xtratuf Ankle Deck Boots is showing signs of wear, but they have held their shape both inside and out, and are still 100% waterproof. The heel spur is a thoughtful addition that makes it easy to get the boots off by pressing the toe of one foot down on the heel of the other. Since 2016, Salmon Sisters, an Alaskan apparel and seafood company, has been creating Alaska-fisheries-inspired designs for Xtratuf boots.
A couple of years later, in the height of mud season, I found a used pair of the Xtratuf deck boots in the local thrift store. I tried them on; they were my size, they were in decent shape, they were comfortable—really comfortable—and they were 80% cheaper than retail. I bought them.
That was almost three years ago, and those thrifted Xtratuf Ankle Deck Boots are still going strong. I wear them for boating, but I also wear them for walking, gardening, running to the store. They have become my go-to footwear on chilly mud-season days, warmer rain days, even on cold snowy days—so long as the snow isn’t too deep.
All Xtratuf Ankle Deck Boots have a non-marking, slip-resistant Chevron outsole in a color that complements the boots’ uppers.
The Xtratuf brand was created in the 1950s and for 60 years a range of boots was manufactured in Illinois. In 2011, production moved to China while design and development remained in the U.S. Supporters of the pre-China-made boots saw a decline in quality, but the U.S. parent company worked hard to reverse that trend and regain its reputation for producing quality long-lasting footwear. Since 2021, the Xtratuf brand has been owned by Rocky Brands, and while I can’t speak for every Xtratuf boot out there, from personal experience I can say my Xtratuf Ankle Deck Boots have been long-lasting and are living up to their brand name.
The Ankle Deck Boot comes in men’s, women’s, and kids’ variations and in myriad colors from solids to patterned as well as limited-edition designs. Flexible and lightweight (the women’s size 9 weighs a little over 1 lb per boot), from sole to top of the ankle sleeve the boots have a height of approximately 6″ (men’s and women’s). The boots’ uppers are made of waterproof Bioprene, a bio-based rubber, with a stretch neoprene elastic gusset of a complementing or contrasting color. The molded inner footbed is Biolite, a material described on the Xtratuf website as “a low-compression high-performance injection-molded EVA foam that is easy to clean, and delivers superior impact absorption and support.” The flexible sole is non-marking and has a slip-resistant chevron tread. The webbing pull-on tabs, front and back, have a reflective stripe along the centerline, and the uppers of the boot’s toe and heel both have an added layer of Bioprene to offer greater stiffness, protection, and durability in those typically vulnerable areas. Low down on the back of each boot, molded into the rubber, is a wedge-shaped heel spur. This humble addition is one of my favorite elements of the boot: by pushing down on it with the toe of the opposite foot, a wearer can easily and swiftly slide the boot off. The integrated lining of the boot is antimicrobial and moisture-wicking. For extra warmth, Xtratuf also sells felt insoles separately.
Whether they are part of the men’s, women’s, or kids’ ranges, and regardless of color, all the Ankle Deck Boots have the same essential features: non-marking soles, moisture-wicking inner linings, heel spurs, reflective pull-on tabs, and comfort. Pictured from left to right are a men’s pair in Chocolate Tan, a women’s pair in Salmon Sisters Blue with mermaid design, and a women’s pair in Grey.
Despite the hours and miles I’ve put into my boots, they show little sign of wear: the off-white trim around the bottom of the boots is certainly scuffed, but the treads are still good, the inside footbeds have held their original shape, and both boots are still waterproof. No doubt, one day they will wear out, and when that happens I will be quick to buy a new pair, full price.
Tyler Ellis was introduced to boating at a young age. He grew up in the Washington, D.C., area where the family owned a Bayliner runabout. During the long, hot summers, they would often take the boat out on the Potomac River and cruise into Alexandria, Virginia, to spend the afternoon and eat lunch out. As he grew older, Tyler helped take care of the boat, learned to fish—something he stills loves to do—and became involved for many years in competitive swimming. It all shaped his connection to the water, he says, and ultimately led him to study and earn a bachelor’s degree in Ocean Engineering at Virginia Tech, before pursuing a career in naval architecture.
All images courtesy of the Ellis family
Tyler made the most of various software programs to help him design his boat. This early diagram allowed him to establish the minimum hull length.
In 2022, a year after graduating from Virginia Tech, Tyler began yearning for a boat of his own; nothing too fancy, just something in which he could “get to enjoy time out on some of the local lakes.” But, he says, there was a problem: “I had neither the money to buy nor the space to store a ‘regular’ boat.” Nevertheless, the more he was confronted by the complications of boat ownership, the more determined Tyler became. “The problem inspired me to use my engineering background to create my own compact, fully functioning boat that I could transport in the trunk of the car. If it wasn’t a large boat, I wouldn’t need storage space or a trailer, and that would all save me money.”
Tyler spent time laying out and dry fitting the deck to ensure a pleasing classic-runabout look. Despite appearances, all the plywood was exterior-grade sumauma, but Tyler discovered that if soaked in water, the wood released tannins causing it to become darker, even after drying out.
Tyler has always liked the aesthetic of classic wooden runabouts and decided that would be his starting point. “I created a vision board of designs that I liked—Chris-Crafts, Glen-Ls, Rivas—and from there I sketched some two-dimensional concepts in a 3D modeling program called Fusion 360. Then I established some size parameters.” First he worked on the minimum dimensions. “I started with a ‘stack-up length’ calculation. It lays out the essential components—battery, motor, seating, etc.—in sequence, end to end, to determine the shortest length the boat could be.” At the same time, he calculated the displacement required to safely carry the equipment and himself—with some safety margin built in—which established the hull’s minimum volume requirement. Finally, he measured the interior dimensions of his 2009 Honda CRV’s trunk to determine the maximum size his boat could be.
Persuading the plywood to bend around the curve of the hull required an overnight soaking of the wood, patience, and help from Tyler’s brother.
With the “design envelope” finalized, Tyler set to work on the boat’s lines, still basing the look on the classic runabouts he so loves. When he came to the boat’s interior dimensions, in particular ensuring an ergonomic and comfortable cockpit, he climbed into his bathtub. It was, he says “a handy real-world reference. It gave me a quick, relatable sense of the minimum length and width—especially for leg room and armrests—that would feel natural for most people.”
With a rudimentary design in hand, he went back to the computer to create a refined 3D model. “I calculated the displacement, center of gravity, and center of flotation.” He even ran “static-stability analysis with a marine-stability software program to ensure the hull would feel stable and safe on the water.”
When Tyler glued down the outer deck layer he used any weights he could find to ensure uniform adherence.
At last Tyler was ready to build. He transferred the dimensions for the stem onto a piece of 2×4 pine, for the transom onto a 1⁄2″ plywood panel, and for the ring frames onto 1×5 pine (which he strip-cut into 1 1⁄2″-thick pieces). He assembled the ring frames from four pieces, joined and reinforced at the corners with plywood braces; the ’midships frame gives the side panel a flare of 100°, while the after frame is set at exactly 90°. Next he cut out the plywood panels for the sides, sub-deck, and bottom. In order to keep costs down while still working with a water-resistant material, Tyler used exterior-grade sumauma plywood throughout (1⁄2″ for the transom and bottom, 1⁄4″ for the sides and two deck layers).
After dry-fitting the bottom, deck, stem, transom, and frames, Tyler started assembling. First he glued and screwed the frames, stem, and transom to the bottom panel. Next he cut the hole for the cockpit opening in the sub-deck panel. To get the appearance of a classic laid deck, Tyler built the outer deck layer in strips, again of 1⁄4″ plywood. He cut the kingplank and covering boards from a darker panel to complement the narrower strips and filled the seams with white silicone deck caulking. He glued the deck strips and kingplank to the subdeck, and then glued and screwed the finished deck to the frames, transom, and stem.
STELLA ROSE and her dolly fit in the trunk of Tyler’s 2009 Honda CRV.
The trickiest part of the hull construction, Tyler says, was persuading the side panels to take the curves of the hull—both into the bow and around the tumblehome into the transom. “I soaked the plywood in water overnight and bent it to shape with the help of my brother, Hunter.” As they worked to bring the panels into the curves the brothers screw-fastened them to previously placed pine blocks along the chine and sheer.
STELLA ROSE’s dolly was built out of PVC pipe and a couple of bicycle wheels and allows Tyler to pull her by himself even over rough ground. The total cost for the dolly parts was $91.45.
When all was assembled, Tyler faired everything, fiberglass-taped all the exterior joints, applied a layer of fiberglass to the bottom panel, and then finished with several coats of epoxy both inside and out.
Before fitting out the cockpit, Tyler cut a hole in the bottom of the boat. “I wanted to have an ‘inboard engine,’ which would have been common in classic runabouts, so decided to install a repurposed Minkota 30-lb-thrust electric trolling motor in the cockpit, with its shaft going down through the bottom of the boat near the stern. Then, because I didn’t want to have to reach back and manually move the trolling motor head, I installed a steering wheel with a pulley-cable system from it to the motor—it’s similar to the steering systems you find on Soap Box Derby cars.”
All that was left to do was to mount a varnished dashboard for the steering wheel and dry-fit a simple plywood plank seat with a back. While not fastened to the boat, the seat is the same width as the hull so cannot shift side to side; it’s prevented from moving fore-and-aft by the after deck and the weight of the boat’s operator. As luck would have it, seat cushions from a chair given to Tyler by his grandparents fit the boat perfectly.
Tyler established the interior ergonomics by sitting in his bathtub and figuring out the measurements for maximum leg and arm comfort.
Tyler launched the boat, named STELLA ROSE, at Lake Audubon in Reston, Virginia, in 2022. The whole project, he says, including design and build, took two months and cost him just over $550, including the price of two bicycle wheels and some PVC tubing from which he fabricated a custom dolly to transport the boat from car to launching ramp and back. Whenever he takes her out, he says, STELLA ROSE is admired and photographed. And when it’s time to go home, he pulls her back onto the dolly, loads everything into the trunk of the car, and drives away.
Jenny Bennett is editor of Small Boats
Do you have a boat with an interesting story? Please email us. We’d like to hear about it and share it with other Small Boats readers.
Other reader-built boats that have redefined “small boat”
Until the 1960s, community rowing and sailing groups were popular in the United Kingdom, with regular rowing and sailing regattas using locally designed craft. With the advent of fiberglass production boats, this practice gradually ceased, as regattas came to be events between production boats, and the demand for local construction declined.
Over the past couple of decades, some parts of the United Kingdom are seeing a revival of competitive rowing in local wooden boats. In southwest England, pilot gig racing is popular, sometimes drawing dozens of boats and thousands of spectators. In Shetland and West Wales, interest in rowing is also increasing. In these areas, the boats are generally built by professional boatbuilders, creating a steep initial cost for anyone who wants to get into rowing.
Kathy Mansfield
Iain Oughtred designed the St. Ayles Skiff as a competition rowboat that could be built and then campaigned by Scottish communities under the umbrella of the Scottish Coastal Rowing Project.
The Scottish Fisheries Museum of Anstruther, Scotland, started the Scottish Coastal Rowing Project in an effort to provide a way for people to get involved in rowing through the use of inexpensive community-built and community-owned boats. They envisioned a one-design kit boat to be built by small groups of people who could race against other community groups.
The museum commissioned Iain Oughtred to develop a design that would be reasonably inexpensive (about £3,000, or US$3,900). The boat would be fast, safe, of simple construction, and able to be powered by a small crew. The St. Ayles Skiff is the result of that commission. Drawing on the Fair Isle Skiff as inspiration for his design, Oughtred chose the name St. Ayles, from the name of the chapel in which the Scottish Fisheries Museum is now located.
The Scottish Coastal Rowing Project was formed in 2010 to oversee the racing of these community boats. According to their website, the St. Ayles Skiff “provides a desired mix of tradition, seaworthiness, speed, and ease of build. These boats take a crew of five—four rowing, and a coxswain to steer and coach the crew during racing and training.” The group asked Alec Jordan of Jordan Boats in Fife, Scotland, to develop a reasonably priced plywood kit from Oughtred’s plans.
This new community rowing initiative has caught fire faster than a burning Christmas tree. As of summer 2011, when this article was written, 18 boats had been launched, with 20 more in mid-build, and more than a dozen other communities are getting started in the process, including groups from Ireland and The Netherlands. Construction also started on five of these boats at Maine high schools over the 2010–11 school year; they are part of a parallel U.S. program, founded by WoodenBoat Publications, called the Boatbuilding and Rowing Challenge, or BARC.
The SCRP website has extensive building instructions, measurement rules, tips on rowing, and fundraising ideas. It also offers links to many other community builds, with blogs and photographs of their experiences—an inspiring resource for any group interested in taking on a St. Ayles Skiff. In the United States, the BARC website provides a similar service. And a quick search of Scottish coastal rowing on YouTube will bring up dozens of launching videos of the St. Ayles Skiffs.
Designing the St. Ayles Skiff
With a length of 22′ and a beam under 6′, the St. Ayles Skiff is long, lean, and fast. Like nearly all of Iain Oughtred’s designs, the curve of the stem and sweep of the sheer draw and hold your eye. This double-ender is sleek, with a finer bow than stern, and both ends flowing to flatter floors as one moves toward amidships. The four fixed thwarts are spaced evenly along the hull, with stretchers for each rower’s feet lying under the next seat. A displacement of only 330 lbs makes it possible for a crew of five to carry the skiff from trailer to water and back again, though a couple of extra hands in this chore will be very welcome.
The coxswain sits high in the stern, as far aft as possible. The tiller would impale him were it aligned with the centerline, so Oughtred’s plans call for it to be offset to starboard, such that when the rudder is amidships, the tiller is parallel to and just above the starboard gunwale. He also suggests a yoke and lines as an alternative steering method. Some boats choose a push-pull tiller as a third option.
Kathy Mansfield
WoodenBoat Publications took inspiration from the Scottish Coastal Rowing Project, establishing a sister program, the Boatbuilding and Rowing Challenge, in the United States. Five boats have been built or are nearing completion at this writing. Eighteen have been launched in Europe, with 20 more in mid-build. Here, a boat competes at Portsoy, Scotland, in 2010.
Like all of his plans, Oughtred’s construction drawing for the skiff is clear, complete, and an artwork in itself. He captured all of the necessary information on a single sheet, providing dimensions in both inches and millimeters, and all inscribed in his beautiful calligraphy.
The kit pieces are cut from five sheets of plywood, one sheet of 3⁄48″ for the stems and frames, and four sheets of 3⁄8″ for the planking. The kit also contains five sheets of MDF cut into pieces for the strongback and molds. A perusal of the existing boats will show much variation in stemheads. While the design calls for them to be finished flat a few inches above the sheerline, many groups have left them longer to accentuate the profile curve of the bow and stern, and some have sculpted them.
Each of the four rowers holds one oar. The plans call for 12′ oars, made of fir or soft pine, with the loom to be squared off where the leather would go. A piece of 1⁄2″ larch is added to two sides of this squared-off area to provide additional protection. The oars rest on the gunwale between a tholepin and a wooden kabe—a hardwood peg that bears the thrust. Organizers felt that prohibiting the use of metal oarlocks would help keep the costs of the boats down. The SCRP website, under the “Oars” tab, mentions that oars can vary in length from 11′ to 15′. Several groups have had difficulty with oars hitting the backs of the rowers immediately astern. Varying the oar lengths, or staggering the rowers from side to side, helps rectify this situation.
While the kits are very popular and groups seem to be successful in finding both the funding and volunteers to build them, there are some who would like to build from the plans alone. As of this writing, I understand lines plans and a construction manual is in the works.
Rowing a student-built skiff
I had the opportunity to row a skiff built by students at Sumner High School in Sullivan, Maine. They had built this boat under the instruction of John Wells and Steve Belyea as part of the BARC program. We rowed the skiff, named TIGER PRIDE, in Rockland Harbor during last summer’s Maine Boats, Homes, and Harbors Show.
The skiff was very easy to launch, with a dozen people carrying it to the water. The boat offered plenty of room and stability for our crew to move about and get situated before setting out. It takes a bit of thought to maneuver the 12′ oars from their resting positions on the thwarts to their working positions in the tholepins without hitting any crew members.
Kathy Mansfield
The St. Ayles Skiff carries a standard crew of four rowers—each working a single oar—and a coxswain. The design name is from the former chapel that now forms the entrance to the Scottish Fisheries Museum, which is headquarters to the Scottish Coastal Rowing Project.
The building crew strayed from Oughtred’s plans both in their tiller and their oarlocks. They made a tiller that was bent to starboard rather than just a straight tiller with a starboard cant. Instead of wooden kabes, the builders made tholepins out of long carriage bolts, covering them with bushings and bolting them through the rails.
With four of us rowing, new to each other and some new to the boat, our coxswain got us into rowing cadence within a few dozen strokes. Once we worked in rhythm, the boat flew through the water, cutting barely a wake, covering ground quickly. We exerted very little effort to maintain speed. I was surprised at how easy it was to jump into this boat and just go.
The coxswain led us through stopping and turning the boat several times. The latter was difficult at first, but our performance improved with practice. If one side just stopped rowing for a stroke or two while the other side kept on, the boat turned in a smooth circle. With one side rowing back, and the other rowing forward, we could spin the boat nearly in its own length.
Unlike a rowing shell, which demands precision movements and hours of practice toward perfection, this boat welcomed the novice, with patience to shake off the mistakes of the learner. When we got it right, we were immediately rewarded with speed. Even when we were out of rhythm, the boat still responded well. It was easy to imagine how well this boat would go with a practiced crew.
In Scotland, dozens of community groups including people of all ages are building and racing these skiffs. WoodenBoat has inspired a few local high schools to start their own racing season here. I hope these boats catch on and spread; they are an easy and elegant way for just about anyone to get out on the water and row for fun.
A skiff is a small, lightweight boat that can be rowed, sailed, or powered with an outboard motor. They are great for fishing or recreational cruising along shallow waters. Small Boats has featured several skiffs designed by Iain Oughtred. Here are a few we think you will enjoy.
Conventional wisdom insists that every boat is a compromise, a balancing act between competing priorities, and that’s true enough. But Australian designer Ross Lillistone’s Phoenix III won’t feel like a compromise to anyone looking for a good solo or two-person sail-and-oar beach cruiser. That’s not to say Lillistone’s design wouldn’t make a fine small daysailer, or that it must remain a strictly sail-and-oar boat (the plans show an optional outboard well). But the Phoenix III is so well suited for engineless cruising that it would be a shame to build one without a few sail-and-oar adventures in mind: the Maine Island Trail, the Inside Passage, the Sea of Cortez, who knows where. Fortunately for me, my brother built a Phoenix III a couple of years ago, and since then I’ve logged almost as much time aboard as he has.
At 15′ 1 1⁄2″ long, with a beam of 4′ 9″ and a 6″ draft, the Phoenix III is sized to fit the designer’s idea (and mine) of the perfect solo beach cruiser. Extra length and displacement offer certain advantages, but these days anything much bigger has begun to feel like more boat than I need. The layout is simple: a large foredeck, a single mast at the forward bulkhead, a rowing thwart across the centerboard trunk, and a wide stern seat. Removable side benches can be arranged, and will slide together for a one-person sleeping platform. (A solo cruiser could sleep on the sole instead, although fitting under the thwart is a bit of a squeeze.)
Designing the Phoenix III
Inspired by a slightly larger, heavier boat created by his father, Lillistone pondered the Phoenix III design for years until a customer finally talked him into drawing the plans. The result is a boat that feels as though it was designed by someone who practices what he preaches.
Sherry Pamperin
Phoenix III is meant to be rowed, sailed, or powered by a small outboard. Ross Lillistone designed the boat as the ideal solo beach cruiser.
“Having spent most of my life sailing in a short, steep chop, I was determined to reduce pounding and spray to a minimum,” Lillistone says. “With that in mind, I made Phoenix III very fine in her forward sections, and her entrance half-angle is only 13 degrees. This fineness has a lot to do with her being an easily driven hull—the theorists will talk a lot about optimum prismatic coefficients and so forth, but in a very small, light boat, the simple process of cutting through a chop is a very important issue.”
In addition to a fine entry, the hull has ample rocker but a fairly flat run aft, which should help the boat plane or surf well beyond displacement speeds. A low wetted-surface-to-displacement ratio also helps performance, and the Phoenix III is narrow enough to make rowing a pleasure rather than an act of desperation; plans for 7′ 6″ oars are included. As for the rig, there are three options: a spritsail sloop of 104 sq ft, a balance lug of 76 sq ft (both of these rigs use an unstayed mast just over 12′ 6″ long), or an 89-sq-ft Bermuda sloop for those who insist on the added hassle of an 18′ stayed mast.
Designed for glued-lapstrake construction, the Phoenix III achieves a nice balance between aesthetics and practicality with five planks per side. The hull is built upside-down over four permanent bulkheads and several temporary molds, and interior framing is minimal; the plank laps, bulkheads, and rowing thwart provide strength and rigidity while keeping weight down—my brother’s boat weighs well under 200 lbs. The lack of framing also makes it easy to keep the interior clean and dry. Large buoyancy chambers fore and aft provide plenty of flotation and some dry stowage if needed.
Although glued lapstrake can be intimidating to new builders, the Phoenix III’s plans (available in either metric or Imperial) include a 42-page instruction manual with photos and simple explanations of creating and using plank patterns, cutting bevels and gains, and more. There’s no lofting or lining-off required, either—the faceted molds and bulkheads define the plank shapes, keeping things relatively foolproof. The plans themselves consist of 30 pages of detailed drawings. Unlike traditional plans, with multiple drawings on several large rolled-up sheets, the Phoenix III package is a comb-bound 11″ × 17″ booklet with one component per page. Even better, the booklet lies flat on a table or workbench with no need to hunt around the workbench to find something to hold the edges down while you puzzle out the next step.
Sailing rig options
I haven’t seen what a Phoenix III can do with the 104-sq-ft spritsail sloop rig, which spreads a lot of s ail and keeps it very low; the spritsail rig will also balance well without the jib. Looks fun, but I’d stick with the 76-sq-ft balance lug rig for its simplicity, ease of reefing, and docile behavior. If you’re overpowered or need a break, simply let the sheet fly and the sail weathercocks freely, bringing instant calm. The sail is essentially self-vanging, jibing is gentle and utterly predictable, and if you need to douse the rig in a hurry, uncleating the halyard will bring the sail down—now. You’ll need non-stretch line for the halyard and downhaul, but very few expensive fittings. One caveat: The boom is rather low. Specs for a slightly longer mast are available in a later plan amendment, which should help. It’s not a big problem when singlehanding, or when your crew knows what to expect, but the boomless spritsail would be friendlier to passengers unfamiliar with sailing.
Solid or hollow, the mast for the lug or spritsail can be stepped or unstepped with one hand; just set the heel in place and push the mast into the partner. Stowed in the cockpit for rowing, the mast overhangs the transom, but that’s no problem. For trailering, the spars (except for the Bermuda rig) lie flat inside the boat as long as the hatch in the forward bulkhead is opened.
Courtesy of Ross Lillistone
The very first Phoenix III, built by Australian Paul Hernes with a boomed sprit rig. This boat has since been repainted and rerigged with the balance lug option.
Although the Phoenix III won’t haul a boatload of passengers, it’s comfortable for two adults and a couple weeks’ worth of camping gear. With a passenger lounging on the thwart (or tucked alongside the centerboard trunk atop some cushions, a cozy spot for long passages), the helmsman can use the wide aft seat or side benches. But I often remove the side benches and sit directly on the sole, with a cushion beneath me and another propped against the side deck for a back rest, which keeps my weight low (and farther forward) and permits better visibility and boom clearance.
The steering is light and responsive, with just a touch of weather helm. Even in 15–20 knots of wind I can hold the tiller between my thumb and forefinger. Sheeting loads are minimal, too. I run a single-part sheet directly from the boom to my hand. Hooking the line under a horn cleat on the leeward quarter takes the strain off, and the lack of blocks makes for a much shorter sheet—less clutter underfoot, and no frantically reeling in line after each tack. A rope traveler over the tiller is another option. With the boom, the sheeting angle isn’t critical.
I’m a sail-and-oar cruiser with no racing background, and I spend most of my time sailing alone, with no other boats in sight for comparison. My usual method of gauging a boat’s speed is to dangle a few fingers in the water. When I do that, the Phoenix III feels awfully fast, especially considering its minimal wake and smooth motion. In light airs I often find myself bemoaning our slow progress. Then I dip a hand overboard and feel the water rushing past and have to smile. Sailing to windward, reaching, running, the heading doesn’t seem to matter; the Phoenix III slips easily through the water.
For such a narrow hull, though, the Phoenix III is surprisingly stable. To find out exactly how stable, my brother and I set out to capsize it. Sailing unreefed in a gusty 15–20 knots, it took a concerted effort (i.e., a couple of 200-pounders leaning on the leeward gunwale) to dip the rail and scoop up water. It took a sustained effort to complete the process and roll the boat over—the Phoenix III simply does not want to capsize, and gives the crew plenty of time to react. Sailed sensibly, this boat is unlikely to ever suffer an accidental capsize, a comforting thought for serious cruisers.
Courtesy of Ross Lillistone
Phoenix III is meant to be rowed, sailed, or powered by a small outboard—self righting after a capsize, and stable even when swamped, the boat is the ideal solo beach cruiser.
When the boat finally did go over, the wooden yard and mast kept it from turtling, and a simple pull on the centerboard turned the boat upright, sail and all. You can also remove the sail from the mast and wrap it around the yard while the boat is still down. When we tried that, the Phoenix III slowly rolled back upright without any help whatsoever. I was able to swim aboard and let the boat scoop me up as it went, handy indeed for an exhausted or injured sailor. Once righted, the swamped boat was stable, with the water level just below the rowing thwart, far beneath the top of the centerboard trunk (a benefit of the trunk’s unusual shape—the forward end of the board is quite a bit wider than the part that runs under the thwart). One hundred scoops with a three-gallon bucket and it was time to sponge out the rest and sail away.
So is the Phoenix III a perfect boat? That’s probably not even theoretically possible. But for singlehanded or two-up cruising, I can’t see much that would improve it. It’s light (one person can easily roll it up a beach with a couple of inflatable fenders under the keel), fast, handy, and capable. It’s good-looking, too. While it may not be perfect—what boat is?—you can’t go wrong with this design. It’s perfect enough.
Phoenix III’s lines show a fine entry, ample rocker, and flat after sections. She’ll plane and surf well above her displacement hull speed. Flotation chambers forward and aft add a margin of safety on expeditions and heavy-weather outings. The three rig options give plenty of opportunity to indulge personal preferences.
More boats from Ross Lillistone
Want to explore more small-boat designs by Ross Lillistone? We have you covered! Check out a few that we’ve reviewed, including a pair of cruisers.
First Mate: A Lillistone beach cruiser for sail, oars, and outboard
Periwinkle: A camp-cruiser for oar, sail, and outboard
When I wrote in this space last month about “The Joy of a Free Boat” I had not anticipated hearing from several readers with similar tales of good fortune. Some anecdotes, in particular, stood out:
Regular contributors Kent and Audrey Lewis of Smithfield, Virginia, emailed saying their “latest free boat is a 1930s Bahamas Dinghy, a little 10-footer.” I asked them about that word, “latest.”
Kent wrote back: “We currently have several ‘free’ boats. It started in 1994 when Audrey’s dad began slowly unloading three fiberglass Sunfishes, an O’Day Day Sailer II, a Grumman 17, and a Drascombe Lugger. Then, in 2013, we were offered another Sunfish—the 13th of the wooden versions—which was in New York. There was a condition—we had to pick it up. So, I drove from Navarre, Florida, to Grand Island, New York, to get it.
Kent Lewis
Audrey takes time out to sit in the Bahamas Dinghy that was given to her and Kent for restoration. In the 1950s the dinghy had been sheathed with fiberglass cloth. Far from damaging the hull, Kent believes it may have protected it while it was in storage for 40 years.
“Another Sunfish came our way, from Nashville, North Carolina. It was in an antiques shop, and the owners were trying to sell it for $50 as a bar. When they heard we could find all the rigging, a sail, rudder and daggerboard, and get the boat sailing again, they gave it to us. We fixed it up and passed it on to a friend in Port Townsend, Washington. That little boat is well traveled—from Connecticut to North Carolina to Florida to Washington.”
There have been other boats along the way, said Kent, of which the Bahamas Dinghy is, indeed, the latest. “When we were offered it, it had been in storage for more than 40 years. We’ve been slowly restoring it since November 2023. It was beautifully built of fine Caribbean woods with copper rivets. The planks were a little dry and needed caulking, but she should get her keel wet again this year, and then we’ll continue working on the rig.”
Kent Lewis
The newly-painted Bahamas Dinghy should be ready for relaunching before the end of the year.
Shortly after I heard from Kent and Audrey, Jim Black wrote from Mechanicsville, Virginia, to tell me about the Snipe that was given to him in the early 2000s by the father of a neighbor. “He was moving out of his house in northern Virginia,” Jim wrote, “and the boat was going to the dump if no one took it. My neighbor knew I was a sailor and a woodworker, so he asked if I wanted it. I’m always a sucker for a project, and for some reason the pictures didn’t scare me off.”
Built in 1939 in Long Beach, California, by a group of Douglas Aircraft employees in their office hours, the Snipe was owned and raced in Galveston, Texas, in the late 1940s. In the late 1960s until the early 1980s, it had one owner who took it with him when he relocated first from Texas to Chicago, then to Washington State, and finally to Washington, D.C.
C.F.E. Roper
When Jim Black saw this and other pictures of the Snipe, he could see that it was in poor condition, but he wasn’t put off. Instead, he borrowed a roadworthy trailer and brought the boat home.
Even before Jim got the boat home and was able to take a close look at it, he knew it needed a lot of work. “The deck was too far gone to save, although I did retain two original deckbeams. The hull had kept its shape, but all the 300-plus screws were rusted out to varying degrees and there was a lot of iron sickness around each one. I filled each hole with 1⁄4″ fiberglass rod, drilled out to 3⁄8″ to get to good wood; rebuilt and refastened each frame; reamed out the original caulking and filled the grooves with epoxy; ’glassed the exterior and sealed the interior with epoxy…” The restoration took Jim about four years of intermittent work. And the cost? He’s not sure, but he managed it, he said, “on a limited budget.”
Now, in 2025, with the boat just three years shy of its 90th anniversary, Jim has decided the time has come to pass it along. “This time, it’s going to a friend who’s a new sailor but who appreciates nice old boats. I’m hoping she and her kids will have a wonderful time with it, and I’ll be around for maintenance tips and maybe even an occasional sail.”
Jim Black
After years of hard work, the Snipe was as new. Subsequently, Jim sailed her for over 20 years, but this year passed her along to a new owner.
Two things struck me in these tales: first, free boats continue to be passed on, for free, from owner to owner. And second, it seems to me that recipients know what they’re getting into: they appreciate that they are getting something for free, but they also know that ultimately, there will be a cost—time, money, blood, sweat, and tears.
Which, indeed, is what appealed to me about the final anecdote that landed in my inbox this past month.
From the mountains of Western Virginia, Doug wrote, “I live in a secluded cabin in Western Viriginia, and my property is fairly steep. On a friend’s suggestion, I bought a used ride-on mower. All went well until I tried to ride the mower across the slope. It wanted to tip over, and the tires came off the rims. I dragged it back to the top of the hill and started repairing the flat tires. A neighbor drove by. He offered to buy the mower, and threw in a vintage 3-hp Johnson outboard. I accepted.
“I have several wooden canoes, but the motor wasn’t going to work on any of those. So, I bought a 1949 Penn Yan Trailboat on Facebook Marketplace. It was only 300 miles away. Now I had a boat for my motor. In time, though, I realized the motor wasn’t quite big enough, so I searched for and found a larger, vintage Johnson outboard. Then I needed to build a garage to store the boat and the trailer. And, of course, in the mountains of Western Virginia there’s no place nearby to launch the boat, so now… Now, I’m looking for an affordable cabin on a lake, where I can launch my vintage boat with its vintage motor.”
As another reader put it: “You wouldn’t get into it if you knew where it was going to lead.” But I believe we’d rather not know; that maybe the not-knowing is some of the appeal, and that certainly the journey that leads from a free boat (or outboard) to a beauty on the water is almost as important as the boat itself.
It was a long path to building my first boat. I was a sailor and hobby woodworker, but the two pastimes didn’t begin to merge until my wedding. Our wedding venue was at a small lake, and we thought it would be fun to row to and from the ceremony in a small boat. A friend offered his Shellback Dinghy, and I was hooked by the idea that perhaps I could build my own boat. I spent the next couple of years daydreaming and even took some classes at WoodenBoat School in Brooklin, Maine, until at last I decided it was time to build my first wooden boat. I realized that traditional plank-on-frame construction might be more than I wanted to tackle, and while I thought strip-built boats were graceful, I concluded that stitch-and-glue construction would provide both the challenge and the simplicity I wanted. Further research led me to Sam Devlin’s Guppy 9 as the perfect first boat for me.
The Guppy 9 design
Sam Devlin of Devlin Designing Boat Builders offers a variety of small and not-so-small boat designs, all stitch-and-glue, and all designed with the amateur builder in mind. The Guppy is a small boat that can be rowed, motored, or sailed. Its length overall is 9′ 1″, beam is 4′ 4″, and dry weight is 80 lbs, which makes it easy to transport in the bed of a truck, on a small trailer, or even on a car’s roof rack. Draft is 6″, allowing the boat to be rowed or motored in very shallow water. With the daggerboard down, draft increases to 32″. Under power or oar, it can comfortably carry two or three people, making it an ideal tender. Under sail, it can accommodate one or two people, and it’s a fun sailboat in protected waters. The plans offer a choice of either traditional sprit or modern windsurfer rig.
Photographs by the author
With the stitch-and-glue method of construction, the boat’s full-sized form is quickly revealed. Here, with only the bottom panels and one side panel stitched in place, the hull’s moderate V-bottom and gently curving topsides can already be appreciated. The crosspiece, attached to a stitch in the keel by a wire, keeps the bottom panels from folding up.
The Guppy is designed to be built by amateur woodworkers with limited experience and tools. Materials are typically available locally or through mail order, and include marine-grade plywood, easily sourced local hardwood, epoxy, and fiberglass. I especially enjoyed working with a local sawyer for the hardwood, and my build turned into quite the quilt work with white oak for the keel and stem; black walnut for the rail, breasthook, and quarter knees; sassafras and ash for the tiller; tulip poplar for the spars; and black locust for the home-made cleats. Minimal lofting or layout is required, and all the hull’s parts can be cut directly from three 4×8 plywood panels—the hull requires two sheets of 6mm (1⁄4″), while the transom and bulkheads require one sheet of 12mm (1⁄2″) plywood. I was able to order 4×10 sheets for the 6mm (1⁄4″) hull, which avoided the need for scarfing to get the required length. A good tape measure and batten are needed for layout. I also found a drywall square—a 48″ rule with a right-angle arm—very helpful. Using the plywood’s factory edge as the base, I could quickly lay out the stations, plot the heights, and bend a batten to create a fair curve. Stitch-and-glue construction does not require a great deal of advanced skills or traditional joinery, and a boat this size does not need a precise construction cradle. However, a simple strongback with some brackets is needed as construction progresses. Maintaining a work height that is comfortable for the builder is also important, so if possible, the project should be set up so the work height can be adjusted depending on the stage of construction. The build also involves the application of fiberglass and epoxy, but this is a skill that can be quickly learned, and the Guppy is a great place to start.
Building the Guppy 9
Devlin’s construction plans for the Guppy 9 include three pages of detailed drawings and materials list, as well as a construction manual on Devlin’s general stitch-and-glue method. I found the manual well written and easy to understand. It covered everything from scarfing plywood panels to detailed instructions on stitch-and-glue construction to recommendations for paint and varnish. I was able to lay out, cut, stitch, and glue the hull panels with few issues, and it was exciting when the hull’s shape first revealed itself. It should be remembered that the manual is written for a range of Devlin’s designs, including much larger boats, and builders do need to be careful about size and scale. For example, in larger boats, Devlin calls for 24-oz fiberglass tape for joints; this is much too heavy for a 9′ dinghy (I learned the hard way).
The transom cutout accommodates both a tiller and an outboard motor. The plywood transom has a doubler glued in place to reinforce the connection with the outboard’s mount.
The construction drawings include a good deal of detail. I had to study them closely to get my bearings but eventually found they contained all the dimensions I needed. All of the plywood pieces are presented as measured drawings. Probably the most challenging portion of the build was constructing the rudder and daggerboard—creating the foil shapes was a new skill for me, but very rewarding once I figured it out.
Two sheets of the drawings cover the optional sprit or windsurfer sailing rigs. I chose the sprit rig, and again, enjoyed the process of building the spars and learning about this traditional rig. The drawings do provide spar dimensions, but builders with no prior experience will need to find additional resources on how to build spars. The sawyer and I decided that tulip poplar would make fine spars for such a small boat. I researched and found its mechanical properties were more than adequate and comparable to other wood species typically used to make spars. Again, for me, this was an opportunity to learn new skills. I also considered making my own sail but decided it was a skill I could come back to. Instead, I ordered a sail kit from Sailrite and hired a sailmaker to complete it.
The finished boat
The interior layout of the Guppy includes a stern thwart and a central bench that stretches from the bow to the after edge of the offset daggerboard trunk. The bench is ideal for one person when rowing or controlling the tiller (with extension) of an outboard motor, while the thwart is perfect for one or two passengers. When sailing, the comfortable place to sit is in the bottom of the boat. When singlehanding, I sit astern of the daggerboard trunk either leaning on the bench or against the side of the hull, depending on the wind strength. With a second person on board, the helmsperson can sit farther aft, while the passenger sits across from them, also behind the bench. Under both seats are compartments that Devlin recommends filling with rigid-foam flotation.
The Guppy 9 can be rigged with either a windsurfer-style sail or a spritsail. I chose the latter, which can be rigged with or without the boom; here the sprit boom is behind the sail and crosses the mast just above the sprit that holds the sail’s peak
The plans call for limber holes to drain both compartments, but after a day of using the boat I realized that it would be challenging to keep the areas dry and clean. I also worried that the foam would trap moisture within the compartments and decided, instead, to add access hatches and install flotation bags in both. This arrangement allows for natural airflow and gives me greater access for cleaning. In the aft section of the bench, there is a storage compartment with hinged-top access, in which I store a small kayak anchor, my lunch, and a water bottle. To starboard, but still beneath the hinged-top, is the daggerboard trunk.
At roughly 80 lbs, the Guppy 9 is relatively light, and two people can load it into a truck bed. When I built my boat, I did not have a truck, but found an old jet-ski trailer and modified its bunk boards to fit the Guppy. However, because it was designed for the weight of a jet ski, the trailer was too stiff for my little boat even after I removed all but the longest leaf spring. I would recommend a lightweight trailer to simplify transportation and launching.
Georgia Richardson
The central seat is well positioned for rowing, and with only one person on board the trim is perfect, with the bottom of the transom just touching the water. Even with a passenger sitting on the after thwart the boat still rows well.
The Guppy 9 was designed to be an all-around boat, and it performs well in all its roles. It rows well and tracks extremely well. The plans call for 7′ 6″ oars, but even with my 6′ 4″ oars, it is nimble in tight spots. Under power or sail, the oars store nicely in the bottom of the boat tucked into either side of the bench. With a five-speed 30-lb-thrust electric trolling motor, it moves along smartly. I have never checked the speed with GPS, but at Speed 5 water will rush up and overflow the daggerboard trunk. The first time this happens it is disconcerting, but the problem is easily solved with a simple plug that fits the top of the trunk and is held down by the bench lid.
Under sail, the boat is a lot of fun. It’s not a Laser and won’t point high, but it is responsive in light wind. The sprit rig is simple to set and furl. When furled, a brail line keeps the sprit against the mast; to set the sail, you simply loose the brail line and if necessary adjust the snotter. The center of effort is relatively low, so stability is good and, if a puff of wind surprises you, it likely won’t cause excessive heel. The Guppy’s spritsail can be rigged either with a sprit boom or boomless and it performs well in either setup. Although I do have reef point sewn into the sail, the rig is not designed to be reefed, but it can be reduced in size by removing the sprit. This method, called scandalizing, drops the peak of the sail and effectively turns the four-sided sail into a three-sided sail—it is not the most efficient arrangement but will get you and your Guppy out of trouble. At only 9′ in length, the Guppy is intended for protected waters and moderate winds. If the wind builds to anything over 12 knots, I simply haul in the brail line, furl the sail, and get out the oars.
Arne Croell
Even in light airs, the Guppy makes headway. If the wind dies completely, sailing without the boom means the sail and sprit can be quickly furled into the mast with the brail line and then you can row home.
The Guppy 9 is an ideal first boat to build. The construction method should be approachable for just about any amateur builder, and for a complete beginner it provides plenty of opportunities to learn new skills. It may not win any high-performance dinghy races, but it is drier than, say, a Laser or Sunfish, is certainly more versatile, and can double as a useful tender. Building and then sailing my own wooden boat was a great experience, and the Guppy is a boat to make a first-time builder proud.
Cameron Handyside is a retired engineer. He lives with his wife, Georgia, on a saltwater creek near the Pamlico Sound in North Carolina where he enjoys sailing, paddling, and woodworking…as time and weather allow. Cameron financed the building of his Guppy 9 thanks to a modest inheritance from his grandmother, Georgia Macy. “She was,” he says, “deathly afraid of the water, but she financed the boat. I thought it was only fitting to name it, GEORGIA MACY, in her honor.”
Plans for the Devlin-designed Guppy are available from Devlin Designing Boat Builders, $65 for downloadable PDFs, $95 plus shipping for printed plans. All construction plans are in Imperial measurements.
Is there a boat you’d like to know more about? Have you built one that you think other Small Boats readers would enjoy? Please email us your suggestions.
Back in 1984, when I was curator of Mystic Seaport, John Gardner and his Small Craft program were part of my department. Each year we selected a winter project that could become the focus of the following June’s “Small Craft Workshop.” That year John wanted to focus on peapods, Maine’s signature small workboat. There were several examples in the Seaport collection, both working and recreational. Richard Rathburn, writing in the 1880 Fish Commission survey of American working watercraft, stated that the “double-ender or peapod” had been introduced only recently to Penobscot Bay when the demand for lobsters to supply Maine’s 23 canneries, as well as for live lobsters for local consumption, made inshore fishing profitable. The Fox Islands in Penobscot Bay are a complex of inlets, ledges, and small islands, an area well suited to lobstering by hand, and as a working type, the peapods grew quickly in popularity. After the introduction of powered boats and the discovery of Penobscot Bay by “rusticators,” builders modified the peapods for recreation. Typically smaller, at under 14′ in length, recreational peapods tended to have more seats, more rocker in the keel, and more curve in the sheer. They were of lighter construction and sometimes had a centerboard for sailing.
John Gardner had designed several peapods, writing about them as boats well suited for amateur construction, and now he proposed donating the one that he owned to the museum for measuring, creating plans, and building a reproduction. He had bought his peapod around 1966 for about $100 from Captain Allison Ames of Camden, Maine, who had, in turn, bought the ’pod from a local fisherman. She had been built in about 1929 by Alton Whitmore, originally of North Haven, the northernmost of the Fox Islands, after he’d moved his shop from there to Rockport, Maine. Ames told John that one of the peapod’s earlier owners had “claimed she didn’t blow around and held steadier in a wind than any boat he’d ever used.” But by the mid-1960s, the boat was in rough shape. John fixed her up and took her with him when he went to work for Mystic Seaport Museum in 1969.
Photographs by David Cockey
The Apprenticeshop peapod was built using Whitmore’s construction technique. First the backbone was set up, next the sheerstrakes were fitted and spread by cross spalls, and then the frames, which had already been bent to shape, were installed. At that point, the structure was ready for the inwales and thwarts to be fitted. The planking would come after.
In a National Fisherman article, subsequently republished in his 1993 book, Classic Small Craft You Can Build, John wrote of the carvel-planked 14′ 3″ boat that it had “a low flat sheer and a heavy, slightly rockered plank keel. Her wide, rather flat floors amidships give her marked initial stability, enough so that you can actually walk around in her without causing excessive heel. This feature was important for hauling pots over the side and makes for comfort in a rowboat used for fishing, transportation, and as a large tender. Capable of carrying a big load, this pod rows easily even when heavily weighed down. As an all-purpose rowboat for the open, windswept coast, a pod of this sort can hardly be excelled.”
John’s offer to donate his boat to the museum was typically generous, and there was no question that a reproduction would be an excellent addition to the Seaport’s on-water fleet. So, we went ahead with the project and, together with his assistant, Bill Mills, John built the reproduction.
Construction of the Whitmore peapod
John and Bill’s 1984 reproduction of the Whitmore peapod was built over molds as they endeavored to accurately reproduce the original’s shape. But in 2024, when David Cockey—a board member at The Apprenticeshop of Rockland, Maine—and I suggested that a Whitmore peapod would make an interesting construction project for the shop, students and staff researched and decided to follow the much simpler approach that Whitmore himself had used. In his article for National Fisherman John described Whitmore’s building process thus: Once the backbone is set up, sheerstrakes are fitted with cross spalls to hold them apart. Pre-bent ribs are then installed, followed by the interior structure: the inwales and thwarts. With the ribs and interior in place, the boat is stable enough to be turned upside down to be planked. When The Apprenticeshop builders constructed their peapod using this method, Wade Smith—John’s successor as director of the John Gardner Boat Shop at Mystic Seaport Museum—figured the finished boat to be 1⁄4″ off the lofted shape, a discrepancy that would be undetectable in use.
After the interior structure was complete, the peapod’s framework was carefully turned over and then planked up.
Scantlings of the Whitmore peapod are pretty standard, although as a 14-footer the boat is at the smaller end of the typical working-peapod range. The keel is a heavy oak plank steamed and sprung for some rocker. The planking is 1⁄2″ cedar. The oak frames are flat (5⁄8″ × 1 1⁄8″), butted at the keel, and spaced 9″. Between the full frames, 2 1⁄2″-wide half-timbers tie the boat together.
Rowing the peapod
Despite John Gardner’s Whitmore peapod reproduction being on the Mystic Seaport waterfront for some years, I never made the time to row it. So, I wanted to try out the new boat built at The Apprenticeshop. I had a brief chance to do so before it was delivered to its new owner’s summer house on Fox Islands Thorofare.
The most significant visual difference between traditional working peapods and later recreational versions is in the positioning of the thwarts. A recreational peapod will typically have its thwarts spaced for passengers or to be suitable for double rowing, but a working peapod had its thwarts spaced so that lobster traps could be carried between them, with the rowing thwart well forward of amidships and its associated oarlock pads set just ahead of amidships. This is how the Whitmore peapod is laid out. Thanks to this placement there is a good deal of open space aft, but when rowing light the boat trims bow down.
The traditional working peapod carried its rowing thwart forward of amidships to leave plenty of room to accommodate several lobster traps.
For the trial, I filled a 5-gallon water jug, which weighs more than 40 lbs, and set it in the stern to level-out the boat. A passenger or some soaked traps would have the same effect, as does standing abaft the thwart and rowing while facing forward.
Stepping into the Whitmore, I felt the support and inherent stability offered by the hard bilge. Kneeling on the rail left several inches of freeboard, and as John Gardner observed, I could walk around easily. Indeed, the working thwart spacing made moving around a pleasure. However, there are no floorboards, so rowing barefoot or in light sneakers could be uncomfortable.
Once I was settled on board, I tried rowing in the usual style—seated facing aft. I tried two different lengths of oars: 8- and 9-footers. The nines were too long, and while the eights worked fine, another 6″ in length would have been better. I began rowing with the ballast amidships. The boat was predictably high in the stern, and in a fairly light breeze, I had to work to keep her on a straight line unless the wind was dead ahead. I then moved the ballast. As soon as I weighted the stern she ran straight, while the rocker in the keel allowed me to spin with just a few strokes.
Built in the traditional manner, the replica Whitmore peapod has no floorboards. The half-timbers between the full frames go across the keel plank and tie the hull together.
I was favorably surprised when I stood up and tried facing forward to push-row. I used oarlocks lifted on 6″ extensions made of rod and pipe. The thwart spacing allowed me to stand abaft the main thwart but with one leg forward and one aft, and to then push on the oars using my full body weight. When I was seated, I could row at a sustained speed of around 3 1⁄2 knots; pushing I could easily do 3 knots. When I was pushing, the 8′ oars were workable, but shorter ones might have been better. Nevertheless, it was easy to see that I might comfortably cover lengthy distances when pushing, working through passages between rocks and ledges—ideal for a working lobsterman approaching his traps in shallowing water.
The new owner will use the Apprenticeshop’s Whitmore peapod for some recreational rowing and ferrying in Fox Islands Thorofare, between the islands of North Haven and Vinalhaven, waters that were once extensively lobstered by hand and under oar. As befits a boat of traditional construction, it will be kept in the water. If a prospective builder wanted to optimize the boat for seated rowing, the rowing thwart could be shifted to amidships; but if the extra space in the stern of the boat is appealing, utilizing shifting ballast, as I did, works well. With the plank keel, it would be easy to add a centerboard trunk and a sailing rig; one could also leave it without a centerboard and limit one’s sailing to reaches and runs while steering with an oar.
The combination of the peapod’s inherent stability and the positioning of the oarlock sockets makes the boat ideal for rowing while standing up and facing forward. Indeed, I’ve not been in any boat in the U.S. that has performed better when I’ve used that technique. The method, which utilizes oarlock extensions, would have been particularly useful when working traps in narrow rocky passages.
In comparison to the Whitmore peapod, there is no doubt that many modern peapod designs for cold-molding, strip-planking, or glued-plywood lapstrake are lighter, simpler to build, and easier to handle on and off trailers, but they are not significantly faster, nor do they offer the steadiness to accommodate forward-facing rowing, so useful when pushing up narrow creeks and between rocky ledges. Traditional carvel construction of the Whitmore peapod does require some previous experience, but it should be within the reach of a competent amateur boatbuilder, and its size is such that it could be built in a decent-sized garage or small barn. And, if you are looking for a peapod with charm, practicality, and history, then Whitmore’s would be the one to choose.
Ben Fuller, curator emeritus of the Penobscot Marine Museum in Searsport, Maine, has been messing about in small boats for a very long time. He is owned by a dozen or more boats: kayaks, canoes, a skiff, a ducker, and a sail-and-oar boat.
Whitmore Peapod Particulars
LOA: 14′ 3″
Beam: 4′ 2″
Plans for the Whitmore Peapod are available from Mystic Seaport Museum, price $75 plus shipping. They can also be found in John Gardner’s Classic Small Craft You Can Build, now out of print, but used copies are available from online vendorsand secondhand booksellers.
New Whitmore peapods can be commissioned from The Apprenticeshop, and there is a possibility of CNC molds for strip-planked, cold-molded, or glued-plywood lapstrake from Chase Small Craft; (207) 602-9587.
For a detailed record of the building process of the Whitmore peapod as followed by The Apprenticeshop, see “Boatbuilding Without Molds” by Wade Smith in WoodenBoat No. 293.
Is there a boat you’d like to know more about? Have you built one that you think other Small Boats readers would enjoy? Please email us your suggestions.
It was one of those rare and perfect July mornings on Port Townsend Bay, Washington, when the waters are so calm you can almost see them ripple when the clocktower strikes its bell. The sun was cresting over the Cascades and glinting golden on the inlet, which was just waking up to the distant sound of moaning outboards, a faint smell of gasoline on the breeze. I had stumbled down to the dock with tired eyes, having stayed up all night packing essentials into drybags, which I now stuffed into every available nook in SOLSTICE, my 17′ Swampscott Dory. She was low in the water when I topped it all off with the bundled sail and mast, and climbed aboard to sit on the thwart and slip the oarlocks into the sockets. The clack of brass on brass brought the gulls to attention; they eyed me sharply and gossiped as I passed them by.
The oars felt good in my hands as I rowed out of the mouth of Boat Haven Marina, the brick buildings of Port Townsend glowing warmly in the early light. I was momentarily mesmerized by the peace, but a glance over my shoulder reminded me of what lay ahead—the channel of the Admiralty Inlet with its busy shipping lanes. To the commercial freighters my little dory wouldn’t be so much as a flea—to the watchful eyes on the bridge decks she might appear like a grain of rice in a big pot of blue soup.
Photographs by the author
On the morning of my departure, SOLSTICE was all packed up for the month-long journey. By the time I had everything on board, there wasn’t much room left for me. It was the first time I had loaded the boat for a trip and the clutter was distressing.
This was the first fearsome hurdle in a month-long journey I had planned, to go as far north as I could through the San Juan Islands, onward to the Gulf Islands of British Columbia, and all the way back in a big loop.
Rowing off the eastern edge of town, beyond Point Hudson I spied a dark line of growing breeze approaching the red bell buoy. By the time I reached it there was enough wind to sail, so I shipped the oars and went about turning SOLSTICE into a sailboat. I hefted the unwieldy rudder aft and hung it from the stern. The sea state jostled it about as I struggled to line up the pintles and gudgeons with water up to my elbows, until at last, they slotted in with a satisfying thunk! Now it was time to raise the 12′ mast, with its sail and sprit, and slide it through the 3″ hole in the forward thwart. It was an awkward maneuver—holding the heavy mast above my head as the sea toyed with the boat. I swayed uneasily while trying to aim for the hole until finally the foot slid through and into the step, squeaking on the leather as it went. I moved quickly to cast off the brail line and tighten up on the snotter to peak the sprit. The sheet whipped from the clew of the unruly sail; I leaped back and grabbed it to run it through the block on the traveler and make it off to the belaying pin, then spun around to drop the centerboard and quickly take hold of the sheet and tiller. We came alive all at once as the bow pulsed a cadence through the waves.
Looking over my shoulder shortly after leaving Port Townsend, I was thrilled to see the 1907 schooner MARTHA motoring out from Point Hudson. For a while she was near enough for my friend Emma, then MARTHA’s skipper, and me to yell greetings to each other across the water, but it wasn’t long before they had passed me by and soon disappeared from sight.
I looked back toward town and saw the classic wooden schooner, MARTHA, emerging under power from the mouth of Point Hudson, my friend Emma at the helm. Soon, they were abeam of me, and we shouted greetings across the water, our words totally swallowed by the gusting wind. They passed me swiftly and hoisted the sails before vanishing from sight around Point Partridge.
I crossed the inlet in good time and felt that I could cruise forever in the gentle 7-knot westerly, but just as I was getting comfortable, the wind died to nothing and left me bobbing off the coast of Fort Ebey. It was time to lower the mast and take up the oars. I laid the rig over the thwarts from stem to stern, just beneath the sweep of my knuckles. Pulling along in the heat of the sun I could make out some disturbance on the water west of Point Partridge and rowed toward it, hopeful of finding a breeze and being able to sail again. I arrived at the patch of riffling water and raised sail, only to discover that despite appearances, there was not a breath of wind. I was confused for a moment until it hit me: this disturbance wasn’t caused by wind but by the current. Once more, I lowered the rig and picked up the oars. We were in the still heat of midday, a haze blanketing the languid waters. I was already tired, but I had to make way to Bowman Bay, at the mouth of Deception Pass, if I was to find shelter for the night. This stretch along the west coast of Whidbey Island from Point Partridge to Deception Pass is about 13 nautical miles of blanched-white sandy cliffs with a narrow band of beach and rock at their base. When the wind picks up in the Strait of Juan de Fuca there is nowhere to hide, and the sea state can turn ugly in an instant.
Emma Gunn
As MARTHA pulled away, Emma took a picture of me and SOLSTICE. In the distance to the northwest, the Point Wilson Lighthouse marks the entrance to Port Townsend Bay. My humble dory appears dwarfed by her surroundings, and it brings to mind the old Breton fisherman’s prayer that begins “Oh God, thy sea is so great, and my boat is so small…”
I rowed furiously, checking my progress against Mount Pilchuck in the distance and the clifftop houses in the foreground. There was no time for rest; for every inch I gained rowing, I lost two if I paused for even a moment. I was going nowhere and was baffled, I had planned to ride a narrow band of north-flowing current that cropped up after the transition from ebb to flood tide, but I was being pushed aggressively south; what was going on? I checked my chart and realized with terrifying clarity that I had totally missed the mark and was trapped south of Partridge Bank in a powerful back-eddy. The gathering strength of the flood tide would easily push me into the shipping lanes and back into the hungry mouth of the Admiralty Inlet.
By now, my rowing muscles were almost spent, my energy was failing, and I was in the thick of a situation that was fast turning dire. My only choice was to cut straight back to Point Partridge on Whidbey Island in a last-ditch effort to beach the boat and get some rest. The flood tide had gathered strength and was pulling me sideways toward the rips that were snarling up into breakers off the point. I mustered what dregs of energy I still had and rowed like a madman toward the beach. At last, in a daze, I heard the bow of the boat grind into gravel, and hopped out to drag the dory up out of the surf as much as I could. Fully loaded with all the gear and heavily built of solid wood, the boat weighed about 550 lbs, but I managed to get half the hull out of the water. I started pulling gear out, thinking that I could perhaps set up camp and stay for the night, but even as I did so, SOLSTICE turned beam-on to the waves and was pushed and rocked sideways, all the while being pummeled into the stones. Staying would not work. I threw my belongings back on board and shoved off, pulling hard to escape the breakers.
I was glad to have made it through the busy shipping lanes of the Admiralty Inlet but, before I knew it, I was stuck in a powerful current pushing me back toward the passage plied by commercial freighters.
About 20 yards from shore, I dropped the anchor and slumped down into the bottom of the boat to weigh my options. The sun was low; I had maybe an hour and a half before it would set behind Vancouver Island. I wanted to run home, but looking down the shore back toward Fort Casey, I saw that the ferry emerging from behind Admiralty Head was the size of a box of matches—it was much too far to row before nightfall. Instead, I pinned my hopes on the stretch of coast to the north: the Cascadia Marine Trail provides a few camps along the Whidbey shore, offering refuge to paddlers. But I was worried about making a landing in my relatively heavy boat—a kayak can be carried by one person, or even dragged across fist-sized stones, but not a Swampscott Dory. I had to try to find a decent landing, though, so I hauled in the anchor and took up the oars again, rowing northward.
As the sun sank low and touched the hills of Vancouver Island, it lit the pale cliffs to leeward with a fiery orange light. The large swells from the west rolled uncomfortably onto our beam, lifting us up and letting us down before crashing ashore, and still there was no landing in sight. I hoped for a miracle. I knew there was a marine camp just a little farther along. I rowed without pause, reaching the camp in the dusk, but my hopes of refuge were dashed; the shore was stony and awash with waves.
My plan for the month-long adventure was to cruise through the serene and beautiful coves of the San Juan and Canadian Gulf islands (here SOLSTICE is anchored at Saltspring Island). But to reach that cruising ground I had to cross the Strait of Juan de Fuca. Little did I realize just how challenging that crossing would be.
There was nothing for it but to pull on into the thickening night. To the north, just beyond a jutting promontory, I could see the lights of a town and prayed that the good citizens had built a sheltered boat ramp. I rowed for what seemed like hours toward the lights. At last I arrived, but with dismay found what I had dreaded: there was no way to go ashore. The “town” was simply a cluster of houses clinging to the hillside with boulders at its base. I had no choice but to spend the night aboard, fully exposed with no protection from the growing wind and swell from the west. I anchored 100 yards from shore, dumping my red 15-lb anchor and all 30 fathoms of line off the bow, and dropped the stern anchor as well to keep me from swinging any closer to the boulders that jutted out from town.
Night had fallen and all I could see were the running lights of distant ships, lonely beacons blinking on the headlands, and waves crashing on the rocks, white as teeth. My anchors seemed to be holding steady, so I put on all my clothes, pulled myself into the sleeping bag that was wet with spray, and allowed the voices scratching over the VHF to lull me into a few hours of fitful rest. I woke to the screeching sound of the VHF dying. I grabbed a pack of new AAA batteries, exchanged them for the radio’s dead ones, and lay awake in the pitch black of night as the wind gathered strength. The boat pitched up and down; spray burst over the bow and soaked me with saltwater.
SOLSTICE sails best when loaded with gear and heeled slightly in winds of 7 to 12 knots. However, during my scramble to reach Bowman Bay in the building winds, I wished I had added reef points to the sail.
The color of gladness is the faint light of dawn when you’ve had a troubled night, as the blackness behind the stars gathers shades of silvery blue. There were about 9 miles between me and Bowman Bay, at the mouth of Deception Pass, where I knew for sure I could find shelter. I had no time to waste. For now, the currents would be in my favor, but in a few hours the tide would turn, and if I hadn’t reached Bowman before that, the ebb would run against the wind and whip up steep and deadly breakers.
I was frightened by the strength of the wind and considered rowing—I hadn’t yet tested my homemade rig in winds this strong. But as I mulled over the chart, and calculated the distances, I realized that if I rowed in those waves, my progress would be too slow, and I’d never make it in time. Sailing would be perilous, but unless I braved it, I would be at the mercy of the currents and the building snarl of weather.
Colin Schehl
.
In the dim light of dawn, I stepped the mast and hauled in the stern anchor. As she came free SOLSTICE swung madly in the confused seas. I was distressingly close to shore, some 30 yards off, with an onshore wind. I knew that I had only minutes to run the lines, lower the centerboard, raise the anchor, and grab the tiller before SOLSTICE was dashed against the rocks. I staggered forward, fell, broke the fishing pole, regained my footing, grabbed the rode, and started hauling. I felt for the markings as they passed through my hands—30 fathoms, 15, 10—and as I hauled, I piled the line into a bucket. Fathom by fathom I heaved us forward, SOLSTICE leaping and falling in the building swells, her bow, like a gaping pelican’s beak, taking great gulps of seawater. At last, I felt the anchor break free and hauled as fast as I could, bringing it in over the bow. As I moved back aft, I struck the brail line, and ducked as the sail billowed open and flogged violently. I fell again; this time my knee broke through the large plastic drinking-water jug. I hurried on to grab the sheet, ran it through the block, and belayed it to the pin. We were rolling ever closer to the shore, the menacing roar of breaking waves mere feet away. I had no time to feel afraid, I just had to grab the tiller. SOLSTICE bore away, held fast, and leaped on a cresting swell. In an instant we had left behind the desperate scramblings of an unhinged creature and become a great seabird surfing the swells. Like a crazed cowboy, I howled into the wind, “Yeehaw!” I didn’t know SOLSTICE could go so fast.
We were heading downwind with following seas, and surfing the steep faces of the rolling swells making one terrifying jibe after the next. It took all the strength I had to keep us from broaching and capsizing into the gurgling troughs. One hand on the tiller—I hope it holds!—the other on the sheet, my muscles shaking, I kept watch behind me to time the swells. A dark 5-footer loomed high overhead, its white top bearing down before it lifted us up toward the sky and broke with a resounding crash over the stern. The cockpit was flooded above the gratings, I was soaked from head to toe. I kept to my post, holding on for dear life, fighting the impending broach, turning the stern into the white-capped crests and then swerving, serpent-like, to surf down the face of the swell at an angle.
Much of the coastline in the archipelagos of the Salish Sea is rocky. In sheltered areas (such as this marine-trail camp at Point Doughty, Orcas Island) this poses little threat, but in strong winds on the exposed coast of Whidbey Island, a dory could be dashed to pieces.
We kept up this perilous dance in the moody predawn until, at last, a dazzling light broke over the ridgeline to the east. Brilliant in the morning haze, the sun was like a guardian angel with a crown of rays coming through the treetops, glinting off the metal hangers of the Whidbey Island Naval Air Station, turning the swells into piles of sparkling treasure that lit my eyes as a smile stretched across my lips.
I took a moment to study the soaked waterproof chart book and realized I was entering a restricted area just off the naval base where they frequently fire live ammunition, but with the weather worsening I didn’t dare head farther out into the strait. I carried on. The sun had now fully risen, illuminating the haze of a building fog and the spray of whitecapped swells with a luminous luster.
And still the wind was strengthening, as though the sun was inhaling a great morning breath. Then, off my port bow, I saw a vessel approaching. Rising out of the mist, it was headed right for me. I could make out an orange, semi-rigid, inflatable hull with an aluminum pilothouse: Marine 5 Whidbey Fire and Rescue. Right on cue my VHF once more squealed its low-battery warning and died. With two large outboards, the rescue boat came up to me in no time. They slowed some 10 yards off in my lee. There were three crew: the captain and two others. One of the crew came out of the pilothouse to yell across to me.
As the wind gathered strength, sailing SOLSTICE became very exciting. I was surprised by how well my makeshift creations held up to some of the more extreme weather of the voyage. The push-pull tiller is a piece of bamboo salvaged from the side of the road. It is attached to the rudder with seine twine. The old canvas sail was found at a marine thrift store, and the spars were made from planking offcuts destined for the burn pile.
“Are you OK? Do you need help?”
I yelled in response, “I’m fine!”
He turned back to the captain, exchanging a glance, and then back to me, “Are you sure?”
“Yeah, I think I’m good!”
It was a real challenge to hear each other over the wind and the roaring sea.
“OK, well, we are going to tag along for a little bit anyway.” I gave them a thumbs-up and went to work to change the batteries in my VHF. Rifling through my dry bag to retrieve the batteries while using my teeth to unlock the battery cover on the Standard Horizon, the radio’s battery pack sprang loose, and fell into the bilgewater where it sloshed around at my feet, “Damn it, man!”
The rescue boat was matching my speed, motoring just astern of me to starboard, witnessing my indelicate ballet; somehow I kept the boat under control.
Once more they pulled up alongside.
“One more question: the Coast Guard wants to know what your intentions are!”
It was a good question.
“I’m heading to Deception Pass to get some shelter!” I yelled back.
Nodding the affirmative, they dropped back again.
I blew the seawater out of the battery pack, crammed it into the crook of my hip, and fed in the batteries. The rescue boat came alongside again.
“Sorry to keep bothering you!” This time it was the captain, leaning out of the cabin window.
“What’s your name and phone number?”
“Colin Sch…”
“Tom?”
“No! Colin Schehl! Like seashell!”
He nodded.
“My number is: Eight-Zero…”
“OK!” he yelled back, and jamming the throttle forward he turned the boat toward Deception Pass.
The relief I felt when I tied up at the dock in Bowman Bay was immense. I was enveloped by calm and yet, just minutes before, I had thought that SOLSTICE and I would both be swallowed up by the sea.
Deception Island, a tree-covered hump of stone the size of a modest hilltop, was half a mile dead ahead, and beyond it was the mouth of Bowman Bay where I hoped to find some protection. I wanted to take the more direct route between Deception Island and West Point, which shouldered out toward the island, making a narrow passage, but the shallows kicked up the swells into breakers; I would have to go around the long way, to the windward side of the island. I clawed my way past, holding my breath; the tide was shifting from flood to ebb, and things were about to get very ugly in Deception Pass. The swells were already steep, and I could feel them getting steeper. The VHF crackled to life; it was the captain of the rescue vessel radioing my information to the Coast Guard.
“We’ve got a Colin Schehl heading east through Deception Pass in a small, open boat.”
The decrepit wooden trawler with which SOLSTICE shared the dock had been a liveaboard for many years before being abandoned in Bowman Bay.
The static took over, and I laid the radio down. I was nearly around the island now and could see the mouth of Bowman Bay opening up before me like the gates of heaven. There would be one more perilous jibe to bring SOLSTICE dead downwind toward the mouth of the bay, careening down the steep faces of the whipped-up swells. The tide was on the turn, and the sea was growing mean. I was so close, but this was perhaps the most precarious moment of all. I held onto the tiller for dear life and prayed that nothing would break as we flew into the bay and, at last, calm.
In the lee of the bay’s southern headland was a floating dock with a decrepit fishing vessel tied to it, its lines thick with moss, looking thoroughly abandoned. Leaving the mast stepped I brailed in the sail, took up the oars, and rowed up to the dock, tying off on the other side from the ghost ship. Out in Deception Pass a heavy fog bank was rolling in. Had I been out there for half an hour more, I would have been swallowed up in the thick gray cloak. I began laying out my sodden possessions, dripping and briny in the bright morning sun. Then, with everything spread out to dry, the exhaustion came over me like a lead blanket. I reached into my first-aid kit, found a tiny bottle of whiskey, raised it in salute toward the mouth of the bay, and brought it to my lips. Tipping it up, I took a fiery gulp, felt the fuzz spread over me, and laid down to rest in the warmth of the sun. Immediately, I fell into a dreamless slumber.
While battling the elements and fighting for survival, I had sworn that I would sell SOLSTICE as soon as I reached shelter. But the resolution quickly faded once we were safe in Bowman Bay, and together we went on to cruise the San Juan and southern Gulf islands in British Columbia for a good month. The dory is well-suited to inshore cruising: with its shallow draft it can navigate very shoal waters—as here, moored at Wallace Island—and the boomless sprit rig can be swiftly doused thanks to the brail line.
I woke an hour or so later. A group of kayak tourists were floating a few feet off, gawking. They must have been wondering if I were dead or alive. As I lifted my head they quickly shifted their gaze, the guide resumed his spiel, and they paddled away. I sat up and took stock: my gear was strewn about me, caked in salt, and my trusty dory was quietly moored beside me. A few hours earlier, when I’d been out in the thick of it all, blown around by the winds and tossed over dark swells, full of exhilaration and dread, I had sworn that the minute I got to safety I would end the trip and sell the boat. But, somehow, a nip of whiskey and an hour of sleep had changed everything, or maybe it was the beauty of the bay around me, its teal water glistening brilliantly below the mossy conifers on the cliffs. Or was it the rig, which I had built from scrap lumber and thrift-store canvas, and which had weathered the winds so well? Or perhaps the trusty dory herself, that had surfed the swells and carried me to safety? Whatever it was, I now felt purged of fear and misgiving, I was ready to go farther into the maze of channels and feel the pulse of the ever-changing wind and tides.
Colin Schehl is an artist and craftsman who lives on the Olympic Peninsula in Washington State. He and his partner can often be found plying the waters of the Strait of Juan de Fuca in a small wooden dory, fishing and sailing, when they aren’t growing flowers and food or chasing swarms of honeybees through the forest.
When I built my 17′ 6″ Antonio Dias–designed Harrier, FALCONE DE PALÙ, the plans included the option to build it with a centerboard or a daggerboard. The Harrier has a plank keel and 6” draft with board and rudder raised, which is perfect for my boating in the “thin water” of Italy’s Venice Lagoon with all its sandbanks and mussel-covered shoals. At first glance, a pivoting centerboard seemed to be the best choice for the area, but I wanted to use the boat for camp-cruising and thought the designed centerboard trunk would take up too much room in the cockpit. The floorboards, resting 8″ above the plank keel, make a suitable sleeping platform and the cockpit is spacious, with only side benches and a removable rowing thwart. But that space would be compromised by a long centerboard trunk in the middle of the boat. A centerboard trunk can also become blocked up by sand and grit when beached, sometimes rendering the board immobile. Perhaps a daggerboard would be a better answer—it would take up less space and wouldn’t jam so easily. But in areas where you all too often hit bottom, a daggerboard that can only go straight up and down is unforgiving and liable to break. I was not keen on that option either.
Photographs by the author
When all the way down, the board is vertical in the trunk and held in position by the bungees. Preventer buttons on either side, below the handle cutout, keep the board from being pushed too far down into the slot. To avoid scuffing the varnish on top of the trunk, the buttons were later covered with short offcuts of garden hose.
Coming up with a solution was a lengthy undertaking, but I was inspired by two articles in WoodenBoat No. 164. One was by Robb White, the other by Lang Warren, and both described pivoting daggerboards. Dias, in his drawings for the Harrier, did show an angled daggerboard case that would allow the board, like White’s, to be pivoted back for broad-reaching. I wanted a daggerboard that could not only swing back if it hit a submerged obstacle, like Warren’s, but also would pop up when struck. Many centerboards and daggerboards are weighted so that they go down through the trunk by themselves. Others are somewhat buoyant and are held down by a bungee stretched across the top of the board. I set out to design a daggerboard that, upon striking bottom, would free itself from the restraining bungee and have enough buoyancy to then raise itself high in its trunk and clear the obstruction. It would call for using a very light wood and a good amount of volume.
Designing the pivoting daggerboard and its trunk
From a drawing by the author
.
To construct the board, I used two pieces of 3⁄4″ paulownia, a lightweight, easily worked, straight-grained wood. After laminating the two pieces to give an overall thickness of 1 1⁄2″, I planed and sanded it to an airfoil profile. I applied epoxy to seal the board’s surface and, to reduce friction, applied several coats of an epoxy-graphite composite to the edges of the board.
Next, I built the daggerboard trunk, shaping it to allow the board to pivot. The after edge of the trunk is vertical and perpendicular to the keel plank; its bottom corner is rounded to avoid damaging the trailing edge of the daggerboard when it swings back. The opening at the base of the trunk is 13 1⁄4″ long—14″ with the rounded aft corner. The forward post is sloped at an angle of 45°. The top opening is 19 1⁄2″ long—the maximum width of the daggerboard is 11 7⁄8″. The interior width of the trunk is 3⁄16″ greater than the thickness of the board and all interior surfaces are coated in the friction-reducing epoxy-graphite mix.
The lightweight construction and high volume of the daggerboard give it positive buoyancy so that it will float high in the trunk. To deploy the board for sailing it must be manually pushed down and held by bungees, seen here crossing the slot behind it. Both the leading and trailing edges of the board are protected by a layer of a low-friction mix of epoxy and graphite.
The lightweight, buoyant daggerboard is prevented from being pushed through the trunk by a wooden button on both sides at the top of the board near its leading edge. The board is held down in the vertical position by bungee cords stretched taut across its top from side to side at the after end of the trunk. If the daggerboard hits a submerged object, its leading edge is forced back. As the board pivots, its top is forced out from under the bungee cords and the board continues to pivot forward and up approximately 18″ along the sloped forward post of the trunk. From there it can be manually raised as much as necessary. The automatically pivoted 45°/18″ position is also ideal for sailing on a broad reach or run, and the desired draft can be further adjusted and held by a second pair of bungee cords, attached to the side of the trunk. When the board is raised and forward these cords are stretched behind the trailing edge and provide enough friction to keep the board in place.
The pivoting self-raising daggerboard has proven to be an efficient and elegant solution, and I am more than content with the results.
Detlef Arthur Dücker grew up on a small lake in Carinthia, Austria, surrounded by boats. He built his first sailboat when he was 20. A former American Canoe Association Open Canoe Instructor for solo and tandem canoes, he took several canoe trips on the Allagash Wilderness Waterway in northern Maine and paddled with the Cree and a Maine Guide on the Temiscamie river in Northern Québec. After three years of building, he launched his Harrier—the 17’ Dias-designed Expedition Wherry—in 2017. He has sailed it in many regattas for traditional wooden boats in the northern Adriatic Sea. This summer he acquired a well-maintained 50-year-old catboat.
You can share your tips and tricks of the trade with other Small Boats readers by sending us an email.
Thanks to the advice of Audrey’s father, Cap’n Jack, we always have a sponge at hand in our boats. Lately we have been impressed by the Deluxe Boat Sponge from Northwest River Supply (NRS) that we began using during the summer of 2025.
We came across NRS when we were shopping for PFDs. The company sells high-performance equipment for human-powered watersports, and it was while scrolling through their website that we spotted the Deluxe Boat Sponge, made to NRS’s own design. The description on the site claims that the sponge can absorb up to 24 oz of water at a time—even though it is only 8″ long × 4 1⁄2″ wide × 2″ thick—that it can lift out moisture and sand, and that its covering of terrycloth increases its water absorption. It seemed like a lot for a small sponge, and we bought one to test.
Photographs by the authors
The terry-cloth covering of the NRS Deluxe Boat Sponge makes it the perfect tool for wiping down wet and dirty decks. It is soft enough to be used on most materials and is effective at picking up dirt.
For years we have had general-purpose cellulose sponges bumping around in our boat bilges, as well as old hand towels stowed in various lockers. It seemed possible that the NRS Deluxe Boat Sponge might combine the properties of a good sponge with those of a decent hand towel.
First we proved that indeed, the sponge can soak up to 24 oz of water. When fully charged, it doesn’t leak water, and will also float. While testing its absorption, we also found that it’s pleasant to use. The sponge is very pliable and its tapered shape and smaller size, together with the soft terrycloth covering, fits comfortably in our hands. It is small enough to get into tight spaces, but large enough to make sponging-out a quick process. When there’s a lot of water in the bilge, we use a pump—our Paddle Pump—for most of it, and finish off with the NRS sponge.
The sponge soaks up the last of the bilge water after pumping (left), and the terry-cloth cover picks up sand and grit (right).
The cloth cover adds significant benefits to the sponge: first, it greatly enhances the sponge’s ability to pick up the last bit of grit, sand, twigs, and other small stuff; second, after being rinsed of any debris and squeezed out, it can be used to swab down the decks and thwarts so that they dry faster. The terrycloth is gentle enough to be used on varnish, paint, metal, and gelcoat, and is more effective than a normal sponge at removing those last few drops from a flat surface. The sponge is easily wrung out and dries in a surprisingly short period of time.
On one end of the sponge, a small loop sewn into the cloth cover allows it to be secured to the boat with a lanyard or clip, so that it is always to hand, and stays with the boat in the event of a capsize.
The sponge’s hourglass shape and soft terry-cloth cover are comfortable in the hand; the sewn-in loop at left simplifies tying the sponge to the boat.
The combination of these thoughtful design features creates a product that helps keep our boats in fighting trim, minimizing moisture and debris that can damage a finish or cause mildew and mold if left in a confined space.
Audrey and KentLewis sponge out their armada of 16 small boats in the Tidewater Region of Virginia. Their adventures are logged at smallboatrestoration.blogspot.com.
Priced between $13.95 and $14.95, the NRS Deluxe Boat Sponge is available at major retailers. As of October 2025, it is on backorder on NRS’s own website.
A lot of work goes into making a good pair of oars, and whether you’ve shaped them yourself or paid a pretty penny for them, they deserve to be cared for. A few scuffs are to be expected when they’re in use, but dings and scrapes while they’re being transported and stored can be prevented by carrying and keeping them in an oar bag. To keep oars in good shape, Chesapeake Light Craft offers the Canvas Oar Bag, made in three sizes by The Nautical Tailor in Annapolis, Maryland.
Photographs by the author
The bag rolls into a compact package that’s easily stowed when not in use.
The bag for 7′ to 7′ 6″ oars is 7′ 7 1⁄2″ long by 8 3⁄4″ wide, and has an exterior of tough 9-oz marine-grade UV-resistant polyester fabric with a durable water-repellent finish. The interior of the bag has, at its ends, a soft layer of breathable non-woven polypropylene-polyethylene-polyester material commonly used for car covers. The middle of the bag is unlined. One-inch webbing is used for the buckled closure at the opening of the bag, the adjustable shoulder strap, and the gusset-reinforced handy-carry strap. The bag is more than wide enough for my straight-bladed dory oars that have 4″-wide blades, and there’s plenty of room for my 6 1⁄2″-wide spoon-blade oars. Inserting the oars is easy, and can be done with one hand on the bag and one hand on the oar without it coming into contact with the ground.
To keep the oars from rubbing against each other and scuffing their varnish, the bag has a full-length divider—polyester on one side, soft non-woven material on the other. A 10″-long flap over the bag’s opening is equipped with a strap and buckle to keep the oars from slipping out.
A soft non-woven fabric lines the ends of the bag and protects the oar blades where the varnish is the most vulnerable.
Without a bag, I can carry a pair of oars in one hand, but they inevitably shift from parallel to each other to an awkward, unbalanced X. In contrast, the bag keeps them together, which makes one-handed carrying straightforward. And, with the oars protected by the bag, I don’t have to be as careful about where I lay them down. At a launching ramp, for example, I can set the bag down on pavement or on an unpaved parking lot, without worrying about the effect on the varnish.
The flap over the bag opening is secured with 1″ webbing straps and a buckle.
Oars can be inserted blade or handle first, and while they can both be stowed the same way, I find it best to put one in blade first and the other handle first; getting the second oar in is just as easy. Oars are not equally weighted either side of their midpoints, but are heavier toward the handle ends; stowing them in opposition within the bag balances them when lifted by either of the centered straps. With the longer strap pulled over my head and resting on my far-side shoulder, I can easily carry the bagged oars hands-free.
While neither of the fabrics used in the bag’s construction is fully waterproof, they are both highly water resistant. I made a depression in a portion of the bag, pooled water in it, and let it sit for 90 minutes. The outer surface of the bag darkened and felt cool to the touch, indicating water had been absorbed by the fabric’s fibers, but the inner fabric remained dry and warm. If oars are put away wet, the breathability of the two fabrics will allow the bag to dry.
The oars are best arranged in the bag blade-to-handle to evenly distribute the weight and ensure that the bag remains parallel to the ground when it is lifted by either the handle or the shoulder strap.
The Canvas Oar Bag has me thinking of refinishing some of the spoon-bladed oars I worked so hard on decades ago, but which are now much the worse for wear. A bit of sanding, some scars filled, and a few coats of varnish will have them looking like new, and the bag will help keep them that way.
Christopher Cuningham is editor at large for Small Boats.
The Canvas Oar Bag, made by The Nautical Tailor, is available from Chesapeake Light Craft for $160. It comes in Small for oars 6′ to 6′ 6”; Medium for oars 7′ 6″; and Large for oars 8′ to 8′ 6″.
When he was 13, Stanislaw Klupś, from Poznań, a city in west central Poland, received an unexpected Christmas present from his parents: plans for the Piranha V, a 10′-long sail-and-oar boat designed for amateur builders. At first Stan thought the plans were for a toy model, but when his parents led him outside to the garage and showed him some sheets of plywood stacked up against the wall, he realized he was looking at “the beginning of a great adventure.”
Photographs courtesy of the Klupś family
Stan built his boat in the family garage, which is also used for storing garden tools, bicycles, a lawnmower, and more. Space was tight and the lighting was poor, so Stan did as much work as he could outside.
Stan has always enjoyed working with wood. Before the boat, he’d made toys, like building blocks, figurines, and cars; a real boat was something new, something that gave him the possibility of fulfilling a dream. In 2017, when Stan was 10, his parents had bought a small cabin boat in which they, Stan, and Stan’s baby sister sailed on a lake near the village of Boszkowo, an hour’s drive from their home. Stan loved his time on the water and while the boat was “perfect for family sailing and the occasional overnight on the lake,” he dreamed of having his own boat. It turned out Stan’s parents had been paying attention.
The plans for the Piranha V were drawn by Polish yacht designer Janusz Maderski. One of a range of his small stitch-and-glue boats, the Piranha is 10′ long with a beam of 4′ 10″, and to Stan seemed ideal for a first-time build.
The pine keel strip—made up of two pieces butted together just forward of amidships—took the curve of the Piranha’s bottom without steaming.
The family decided Stan would work in a metal garage behind the house. Normally it was used to store the lawn mower and other garden tools. “There was enough room,” says Stan, “and it was good to be inside when the weather was bad, but the lighting wasn’t great, and it could be a bit damp.” He would start the following summer, when his work wouldn’t interrupt his school commitments and the weather would be warmer. His father helped to get him set up, and together they cleared some space.
To measure out the plywood panels Stan worked on the floor, but for the most part he built the boat on temporary tables and stands, moving the project out of the way whenever the garage was needed for something else. The project, says Stan, was “quite challenging because of my lack of experience. There were some pages of instruction, but mostly the plans consisted of drawings, with dimensions, for every part of the boat—it was a lot to digest.”
After completing the bottom and side panels Stan was excited to turn the hull over and see that it already looked like a boat. But, like so many builders before him, he quickly learned there was a long way to go.
The early stages were the hardest; Stan was unfamiliar with the work, and the large plywood panels were awkward. “It was difficult handling those big pieces; my dad’s help was crucial.” He was able to get the bottom panel out of a single piece of 8mm plywood, but the longer side panels had to be cut from two pieces to get to the required length. “Figuring out the best way to do that slowed me down, but it worked in the end. I butted the two pieces together and glued them with fiberglass and epoxy.” After he stitched together the bottom, sides, and transom, he could see the boat’s shape emerge. “It was one of the really big highs of the project.”
Along the way, Stan gained experience in reading plans, using power tools, and taking his time. “I think my worst mistake was when I cut out one of the side benches. I didn’t realize I’d done it wrong until I came to install it. I took it to the boat only to discover it was about 18″ too short! It was a bit of a shock. Fortunately, I had enough spare wood to make another one and, once my initial embarrassment had worn off, it was pretty funny. Mostly, though, everything went very smoothly. It just took longer than I’d expected. But I loved working with the wood, listening to music as I worked, seeing it all slowly come together.”
Following Maderski’s design, the rudder is set up without expensive hardware. The two lines hold the rudder snug in the transom-mounted chocks, but for launching and landing in shallow water, the lower line can be released to allow the rudder to float up. Drawing that line tight prepares the rudder for steering.
For the most part Stan’s boat is all plywood; only the deckbeams, rubrails, keel band, spars, oars, and tiller are of solid pine. He bought all the materials locally. Indeed, the construction calls for nothing fancy, and even though Stan lives in an area where the nearest water for boating is about an hour away, he had no difficulty finding what he needed. But, he says, he raised a few eyebrows when he went into the local hardware store to buy 50 clamps.
With the exception of the standing lugsail, he made everything himself, but kept things affordable and simple: the spars have square cross-sections, the oars are lashed to single tholepins. There is little hardware on the boat—even the rudder is attached without pintles and gudgeons. Instead, as designed by Maderski, it is located on the transom by two centered blocks, and held snug against them with two lanyards—one is attached to the rudder just above the bottom of the transom from where it is led up and through the top of the transom to be cleated off in the cockpit; the other is attached to the top of the rudder and, again, cleated inside the boat. When the rudder needs to be raised in shoal water, the lower lanyard is released, and the blade floats up.
Much of the time, Stan sails ZJAWA on his own, but he is often joined at the lake by his sister Lucy, whom he has taught to sail.
After two summers of building, Stan launched ZJAWA (Polish for “Phantom”) in 2023 on the lake at Boszkowo. He sailed her for the first time. “She’s very maneuverable and sails in the lightest of breezes. She’s big enough for two people, plus my guitar, and I’ve taught my sister, Lucy, who’s now 10, to sail her. But I love sailing alone and listening to music. When I’m alone in the middle of the lake, just me and my thoughts, nothing else matters.”
Stan had ZJAWA’s sail professionally made, but otherwise, the build and finish are all his own work.
As for what’s next, Stan, now 18, dreams of building a small boat with a cabin. “Nothing big, just enough to sleep on board but inside. Even in summer the nights in Poland can be quite cold. But for now, I’m concentrating on smaller things: I’m currently studying violin-making and have just started building my first stringed instruments. But ZJAWA… the whole project was really great. And to sail a boat you built yourself? You can’t beat that.”
Jenny Bennett is editor of Small Boats.
Do you have a boat with an interesting story? Please email us. We’d like to hear about it and share it with other Small Boats readers.
Continue Reading - Enter your email to log in or subscribe
New to Small Boats? Create a free account to get our weekly emails and two free articles each month.
Time to upgrade!
You've read all of your free content for the month. Upgrade to a paid subscription for unlimited access.

 Photographs by Frank Hurley, as published in Shackleton’s Boat Journey by F. A. Worsley