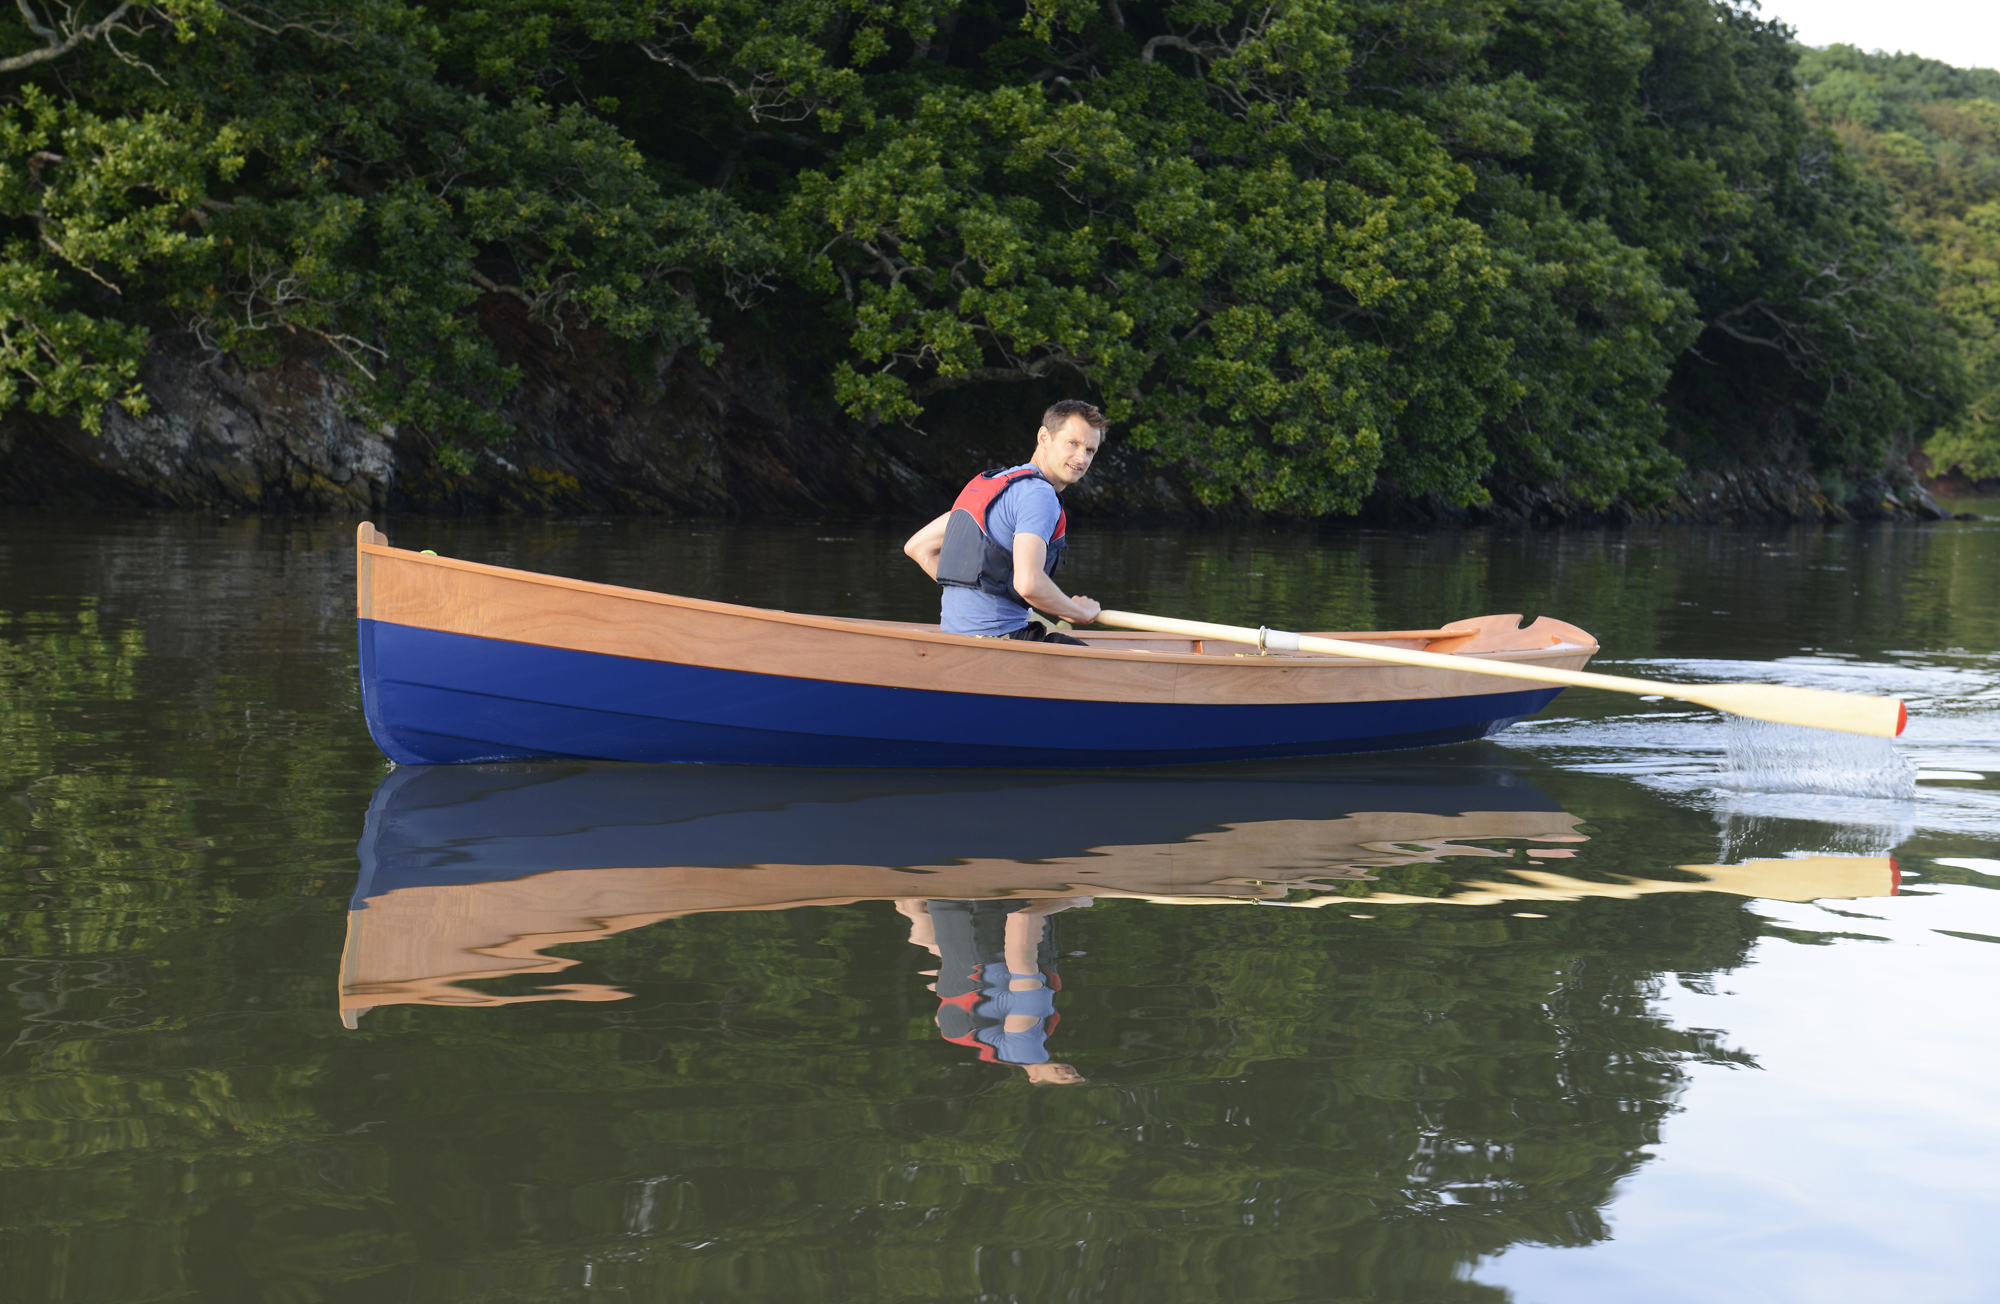
Summer comes slowly to Midcoast Maine. As someone not raised in this part of the world, I doubt I will ever be fully comfortable with the fits and starts that herald the change from winter to summer, nor cease to bemoan the lack of spring.
This year has been typical.
In mid-April I went south on a trip and imagined that on my return, just nine days later, spring would have arrived. It had not, of course. Yes, the daytime temperatures had risen, slightly, but the evenings and nights were still cold and I lost track of how often I turned the central heating off, then on, then off, then on. Beyond the windows, the world was still sadly monotone: emergent leaves remained curled up in their brown sheaths, grass was a dull yellow, burned by all the winter’s snow, and stark gray branches reached high to a blanket of equally stark gray sky. Even the dark green of the native pine trees seemed dull and lackluster.
Jenny Bennett
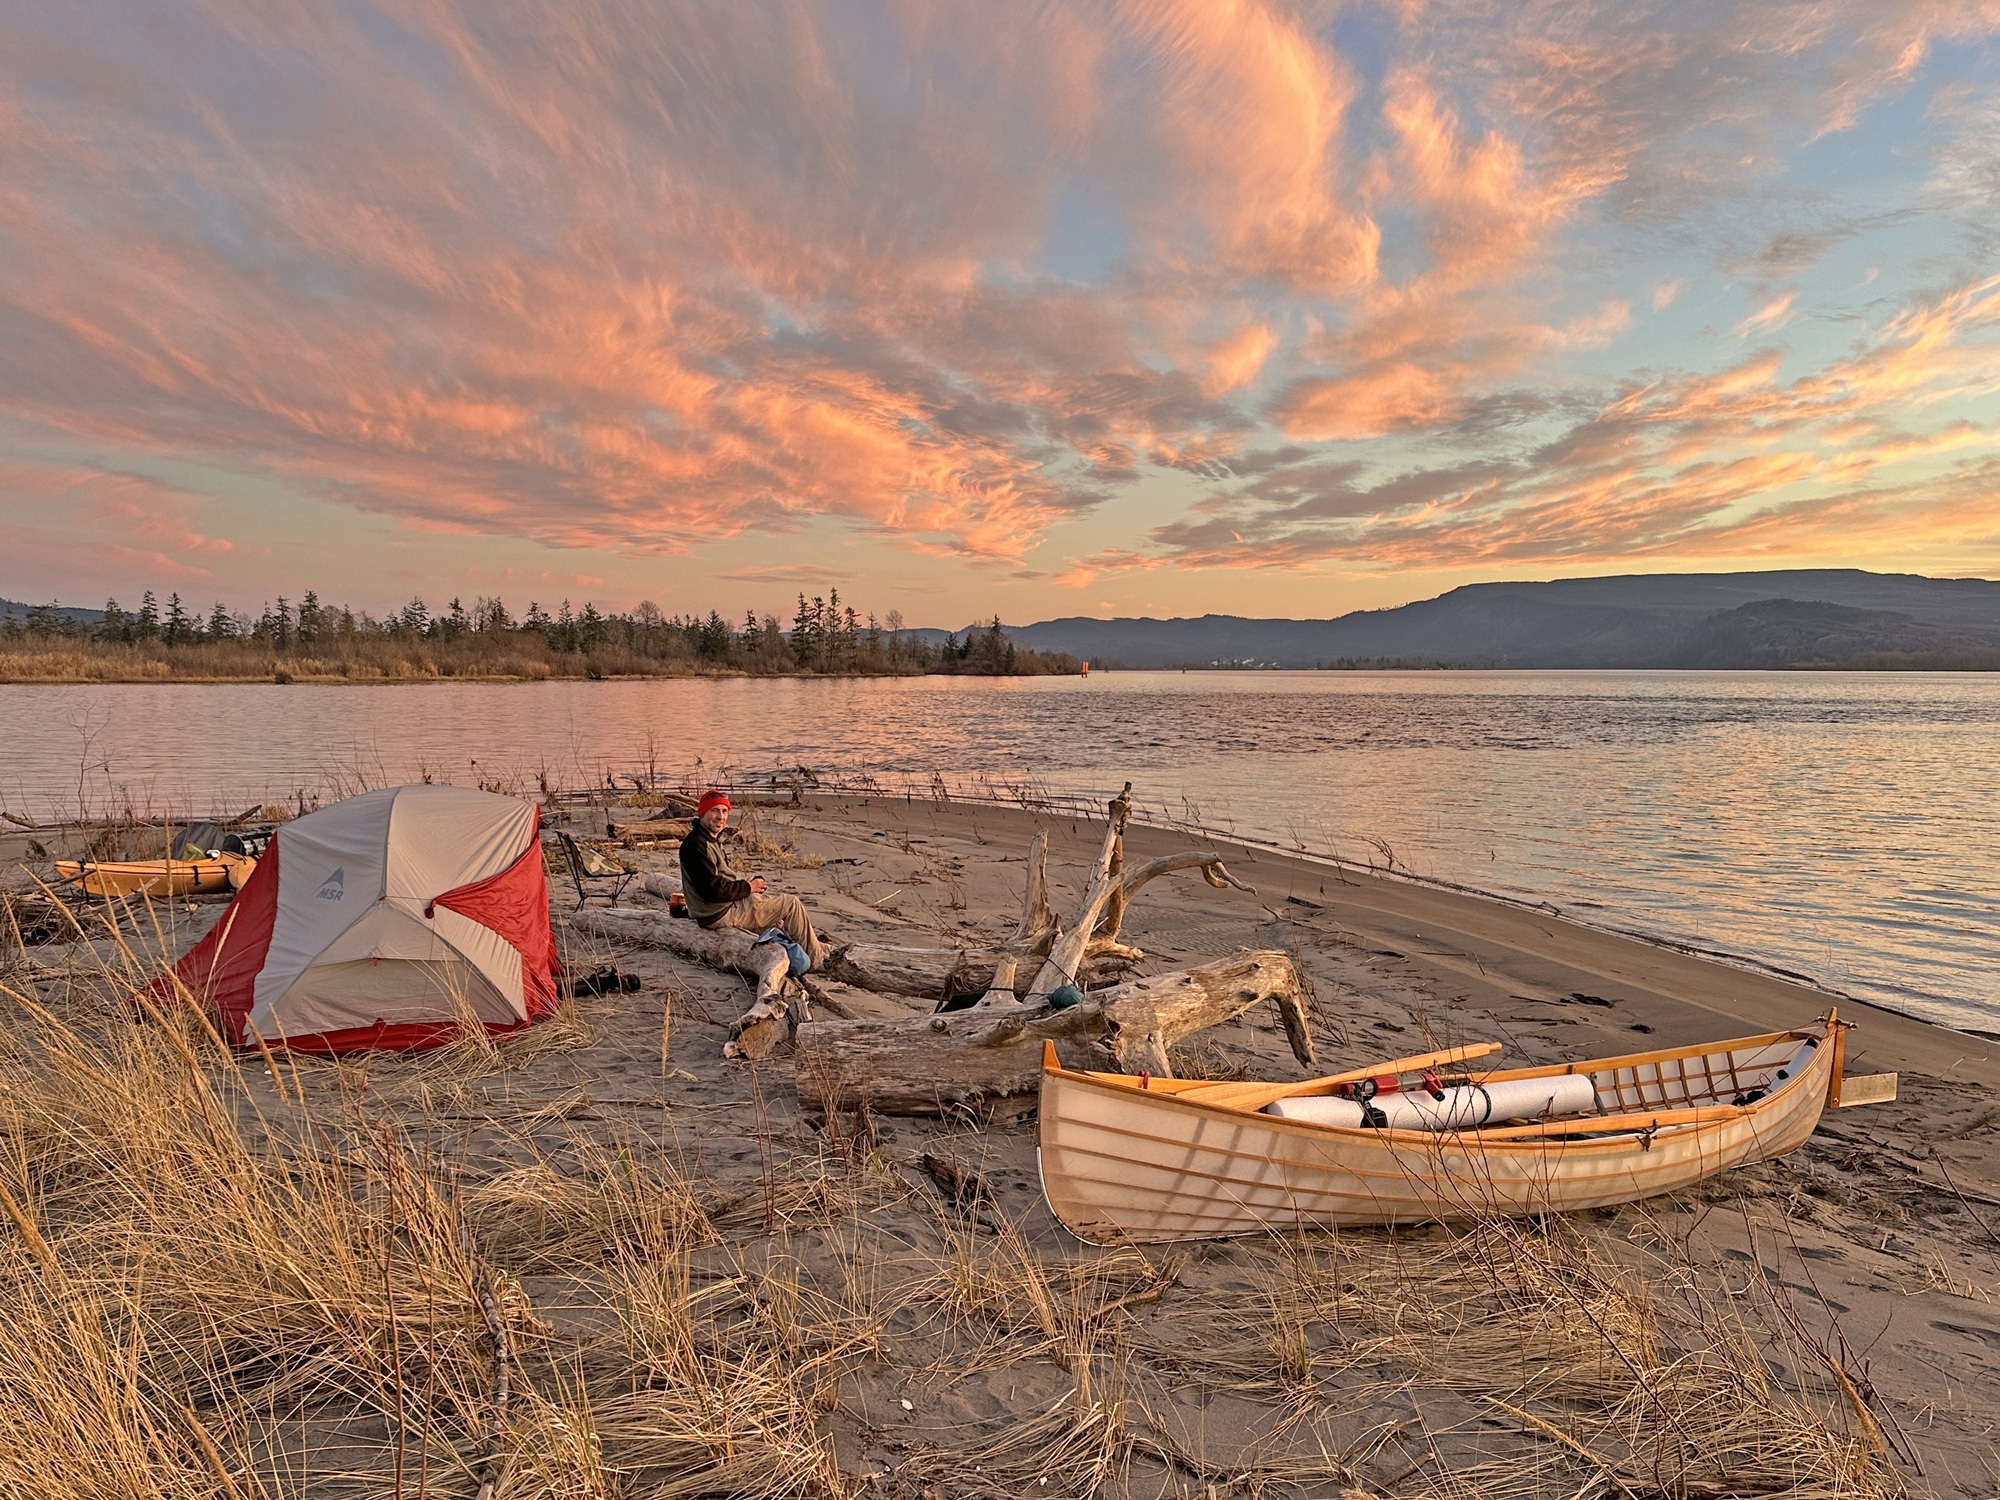
In the last week of May, when summer seems a long way off, many of Maine’s harbors still have unoccupied moorings and docks that lead to nowhere.
In the harbor, the dock floats were yet to be put in, the mooring balls were still empty, the fishing boats were largely still on land. And for those of us with boats in the driveway, summer seemed a long way off.
Then, in mid-May, everything changed…in the space of one week we went from a maximum daytime temperature of 52°F all the way up to 90°F. Each day the temperature rose another 5 to 10 degrees, and each day I tapped the thermometer, watched the forecast, and chatted with friends about the strangeness of it all. We discussed, at length, whether we should risk uncovering boats and getting out the varnish cans, but shook our collective heads, decided it was a flash in the pan that would surely not last, and let the sleeping boats lie. On day seven, I bucked the trend. Under the knowing gaze of a neighbor, I pulled the tarp off the sailboat, and got organized for prepping the wood for varnish. On day eight it rained.
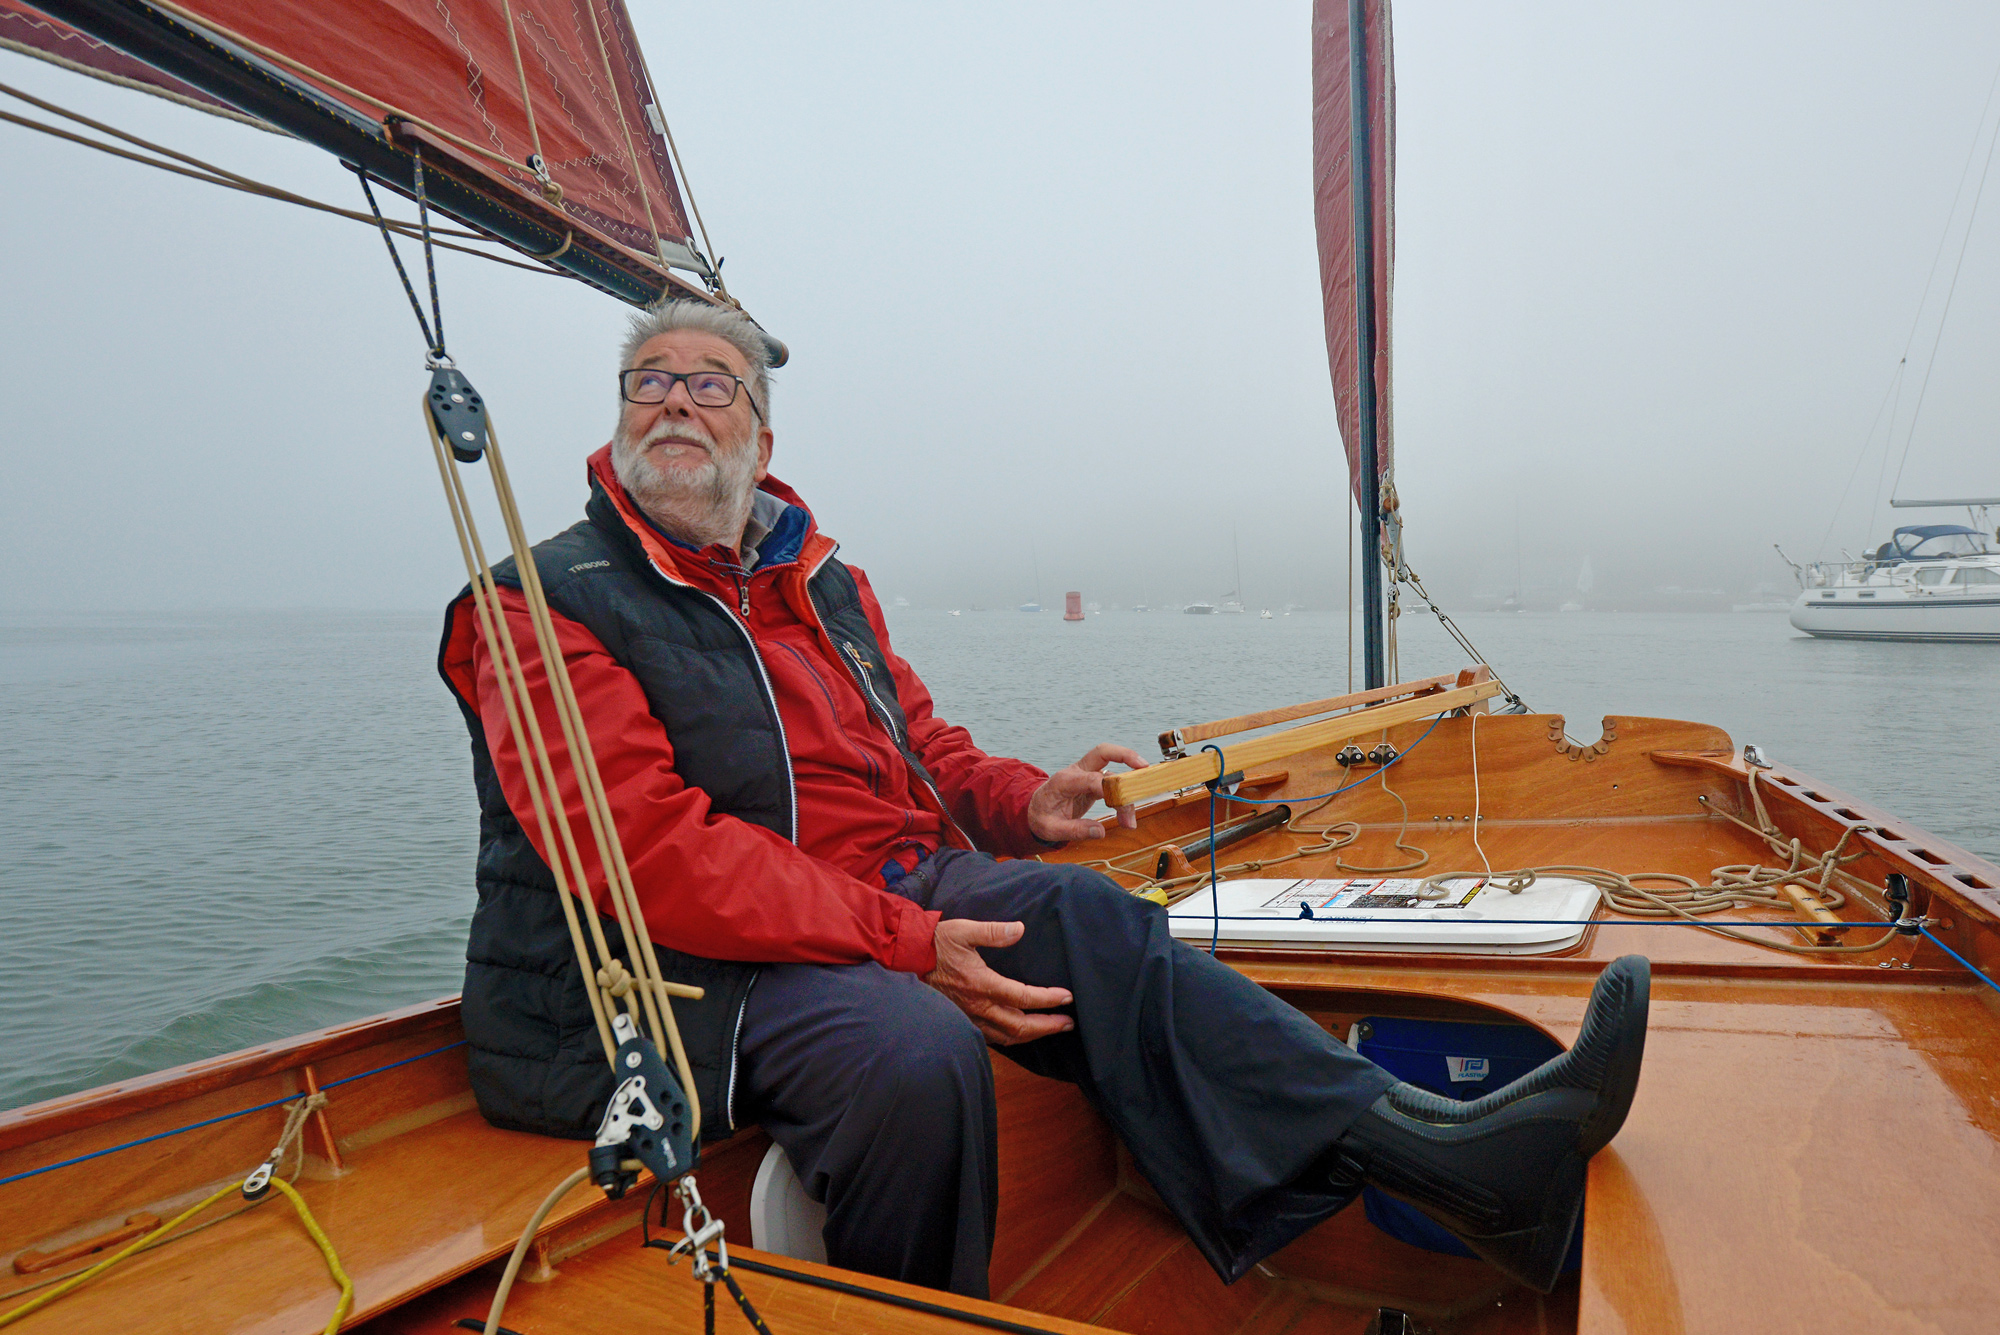
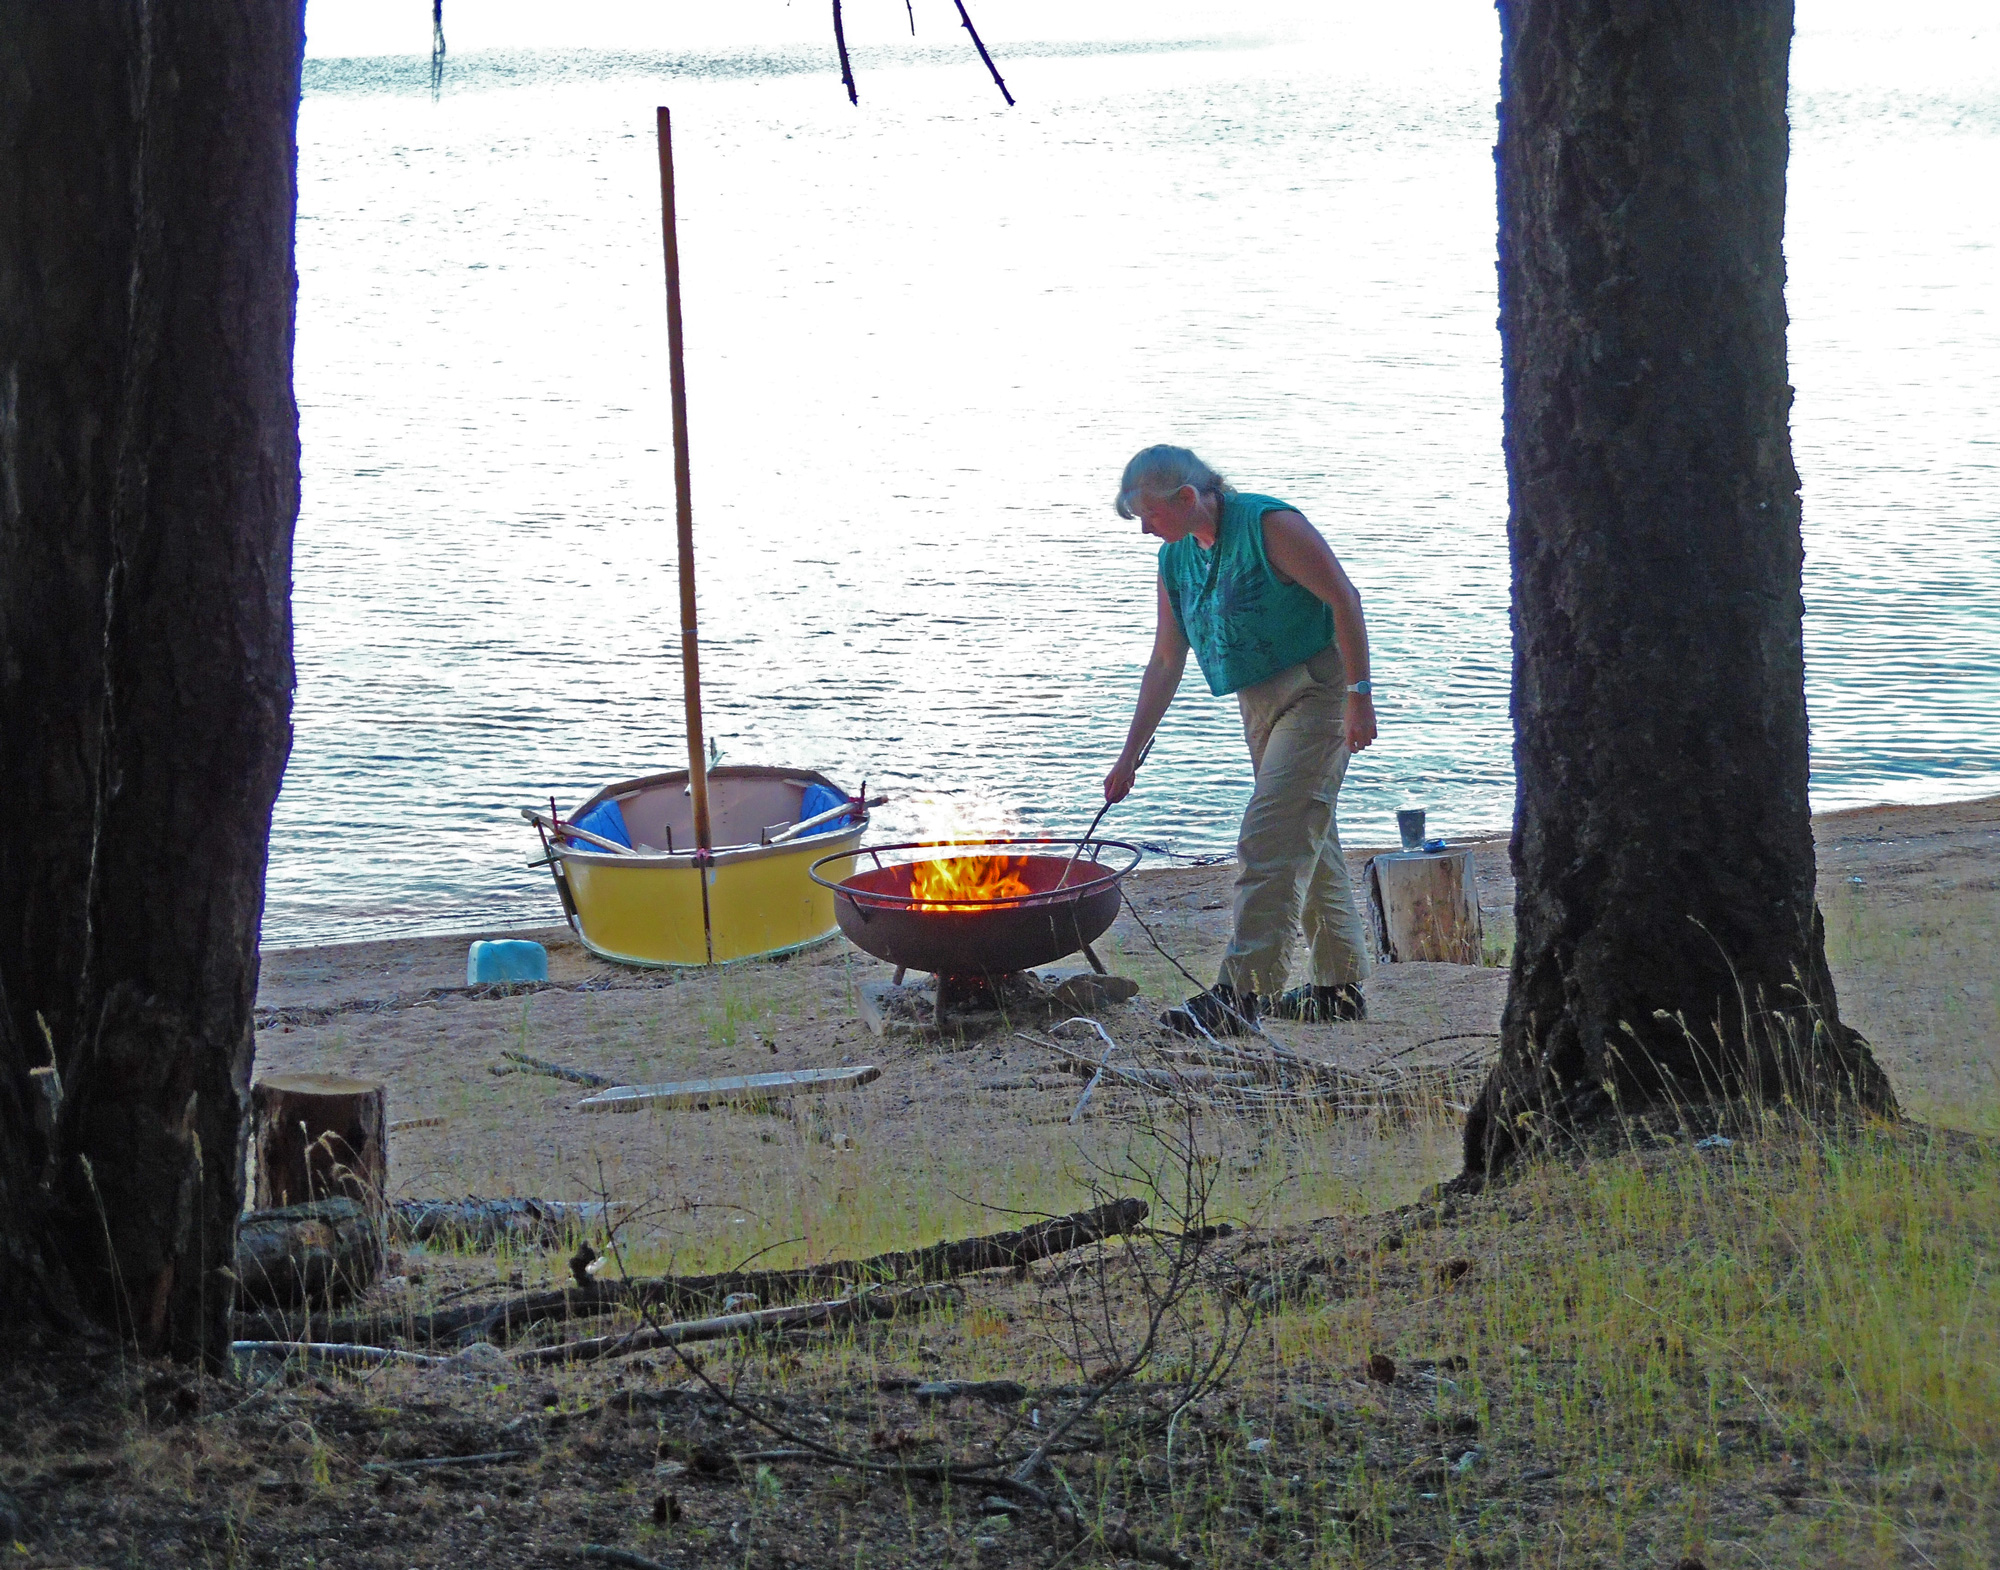
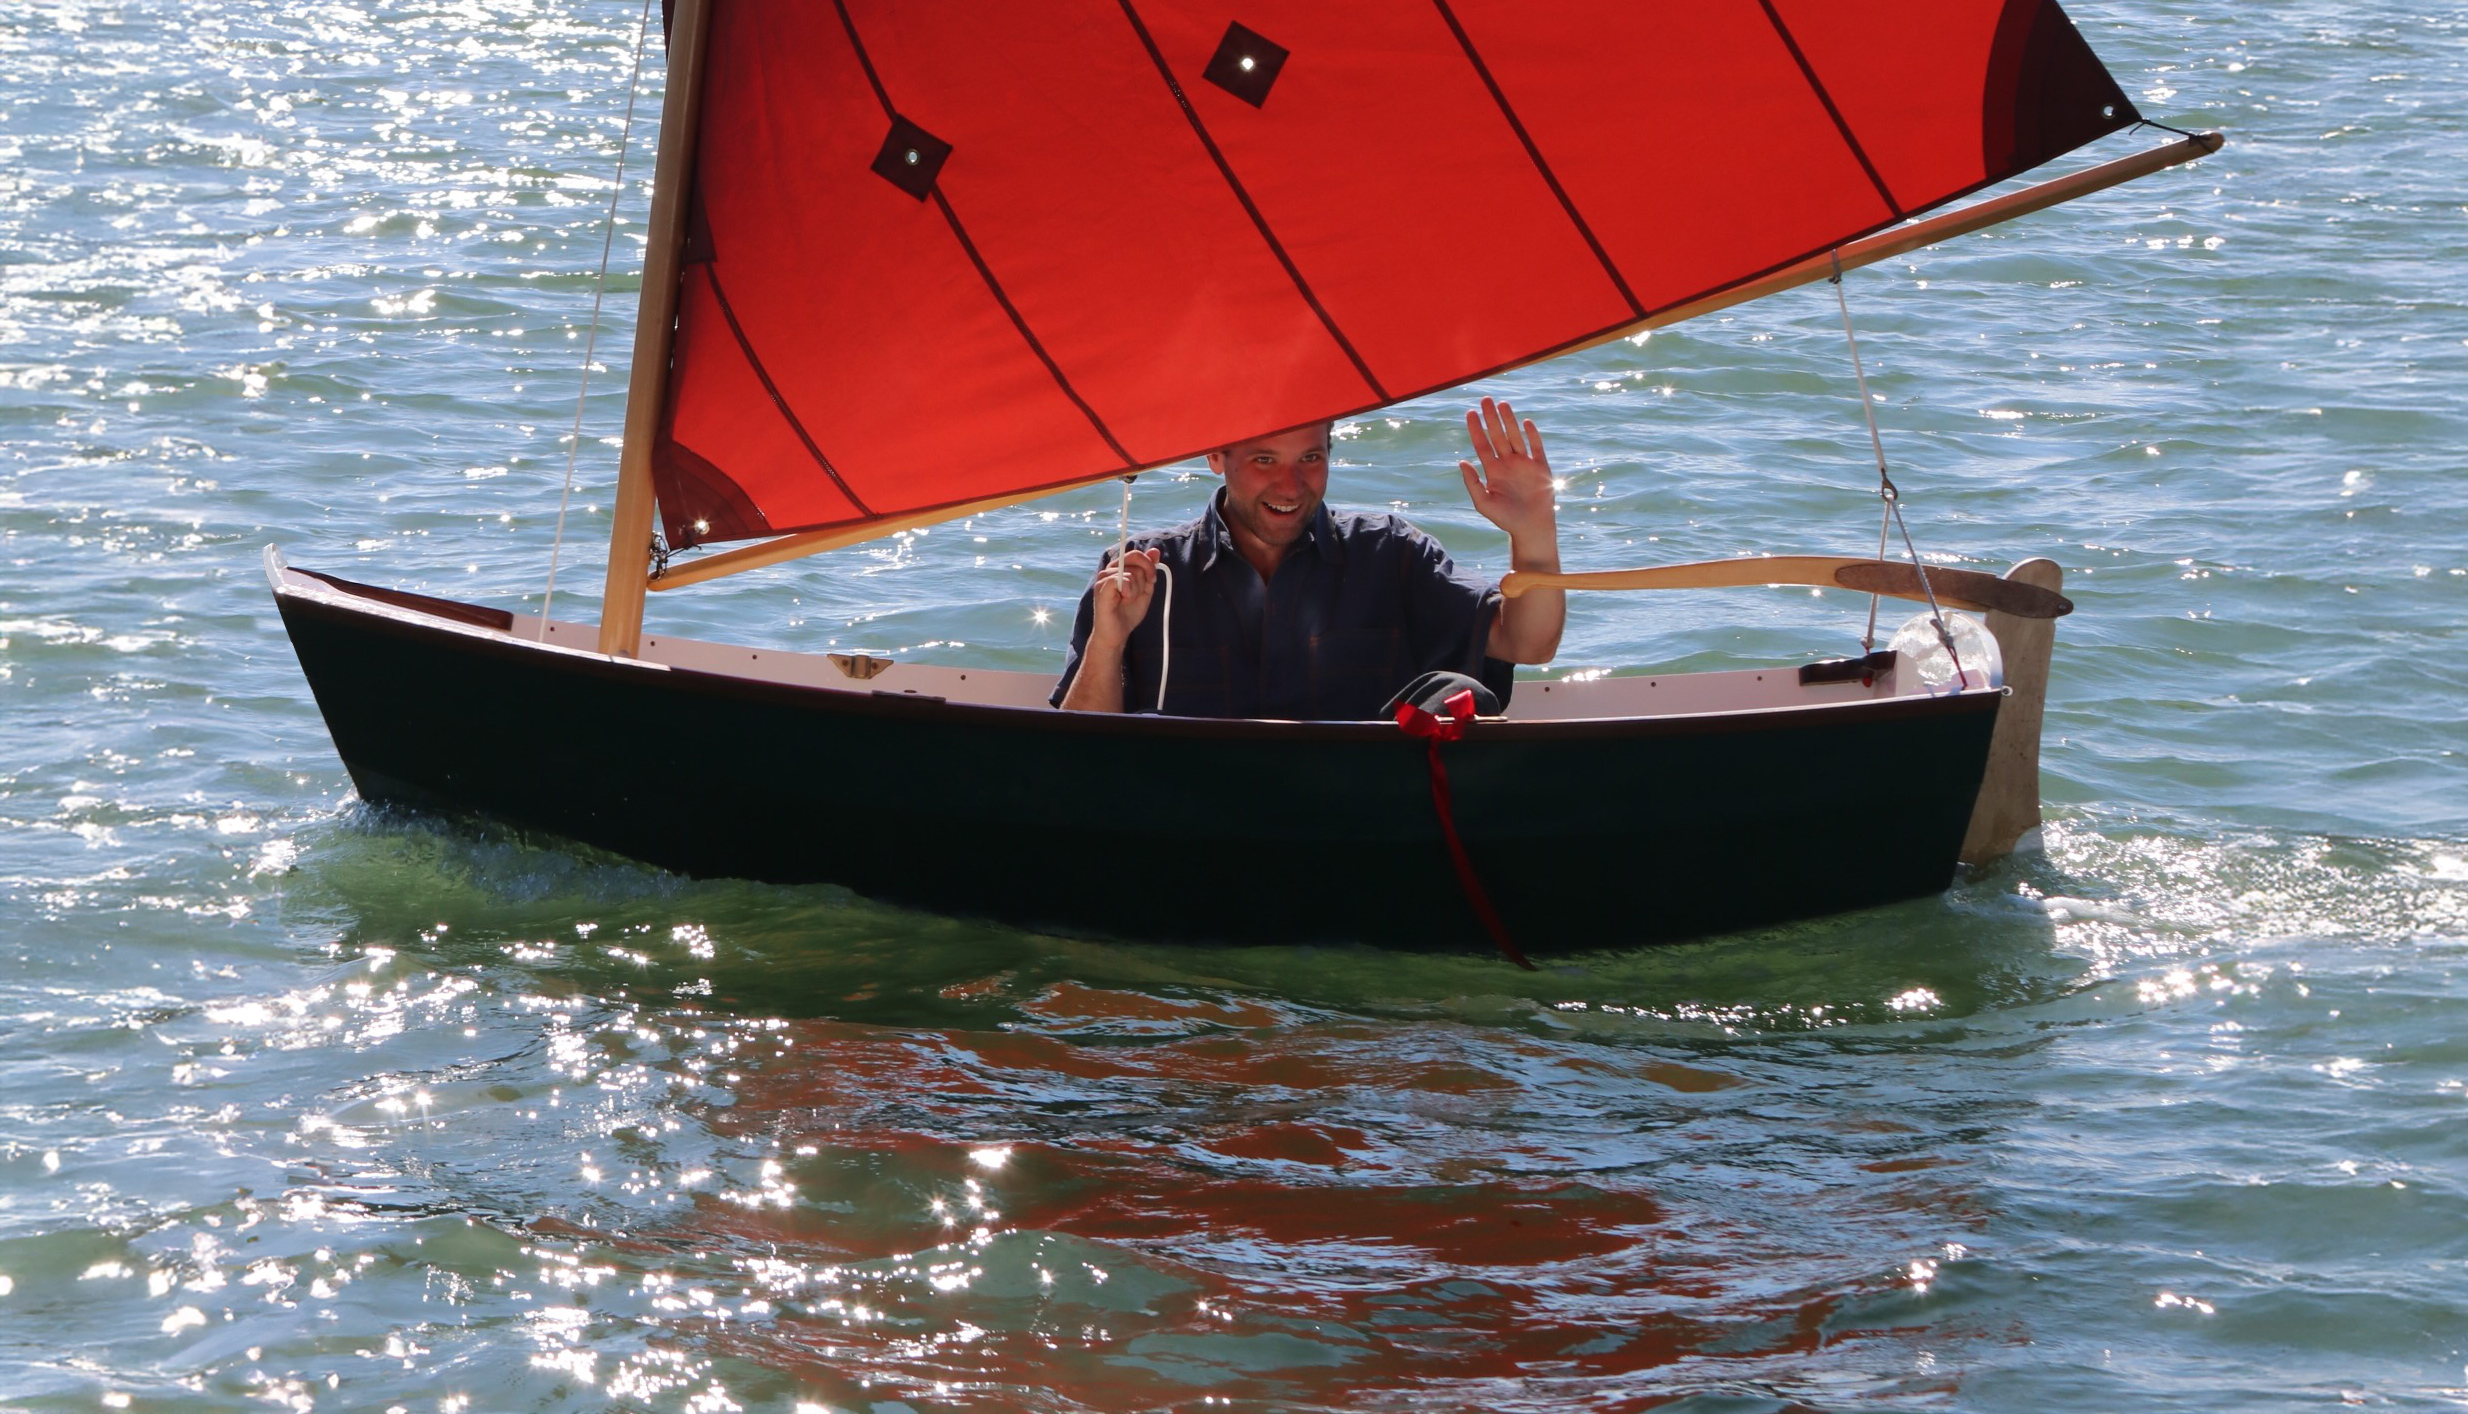
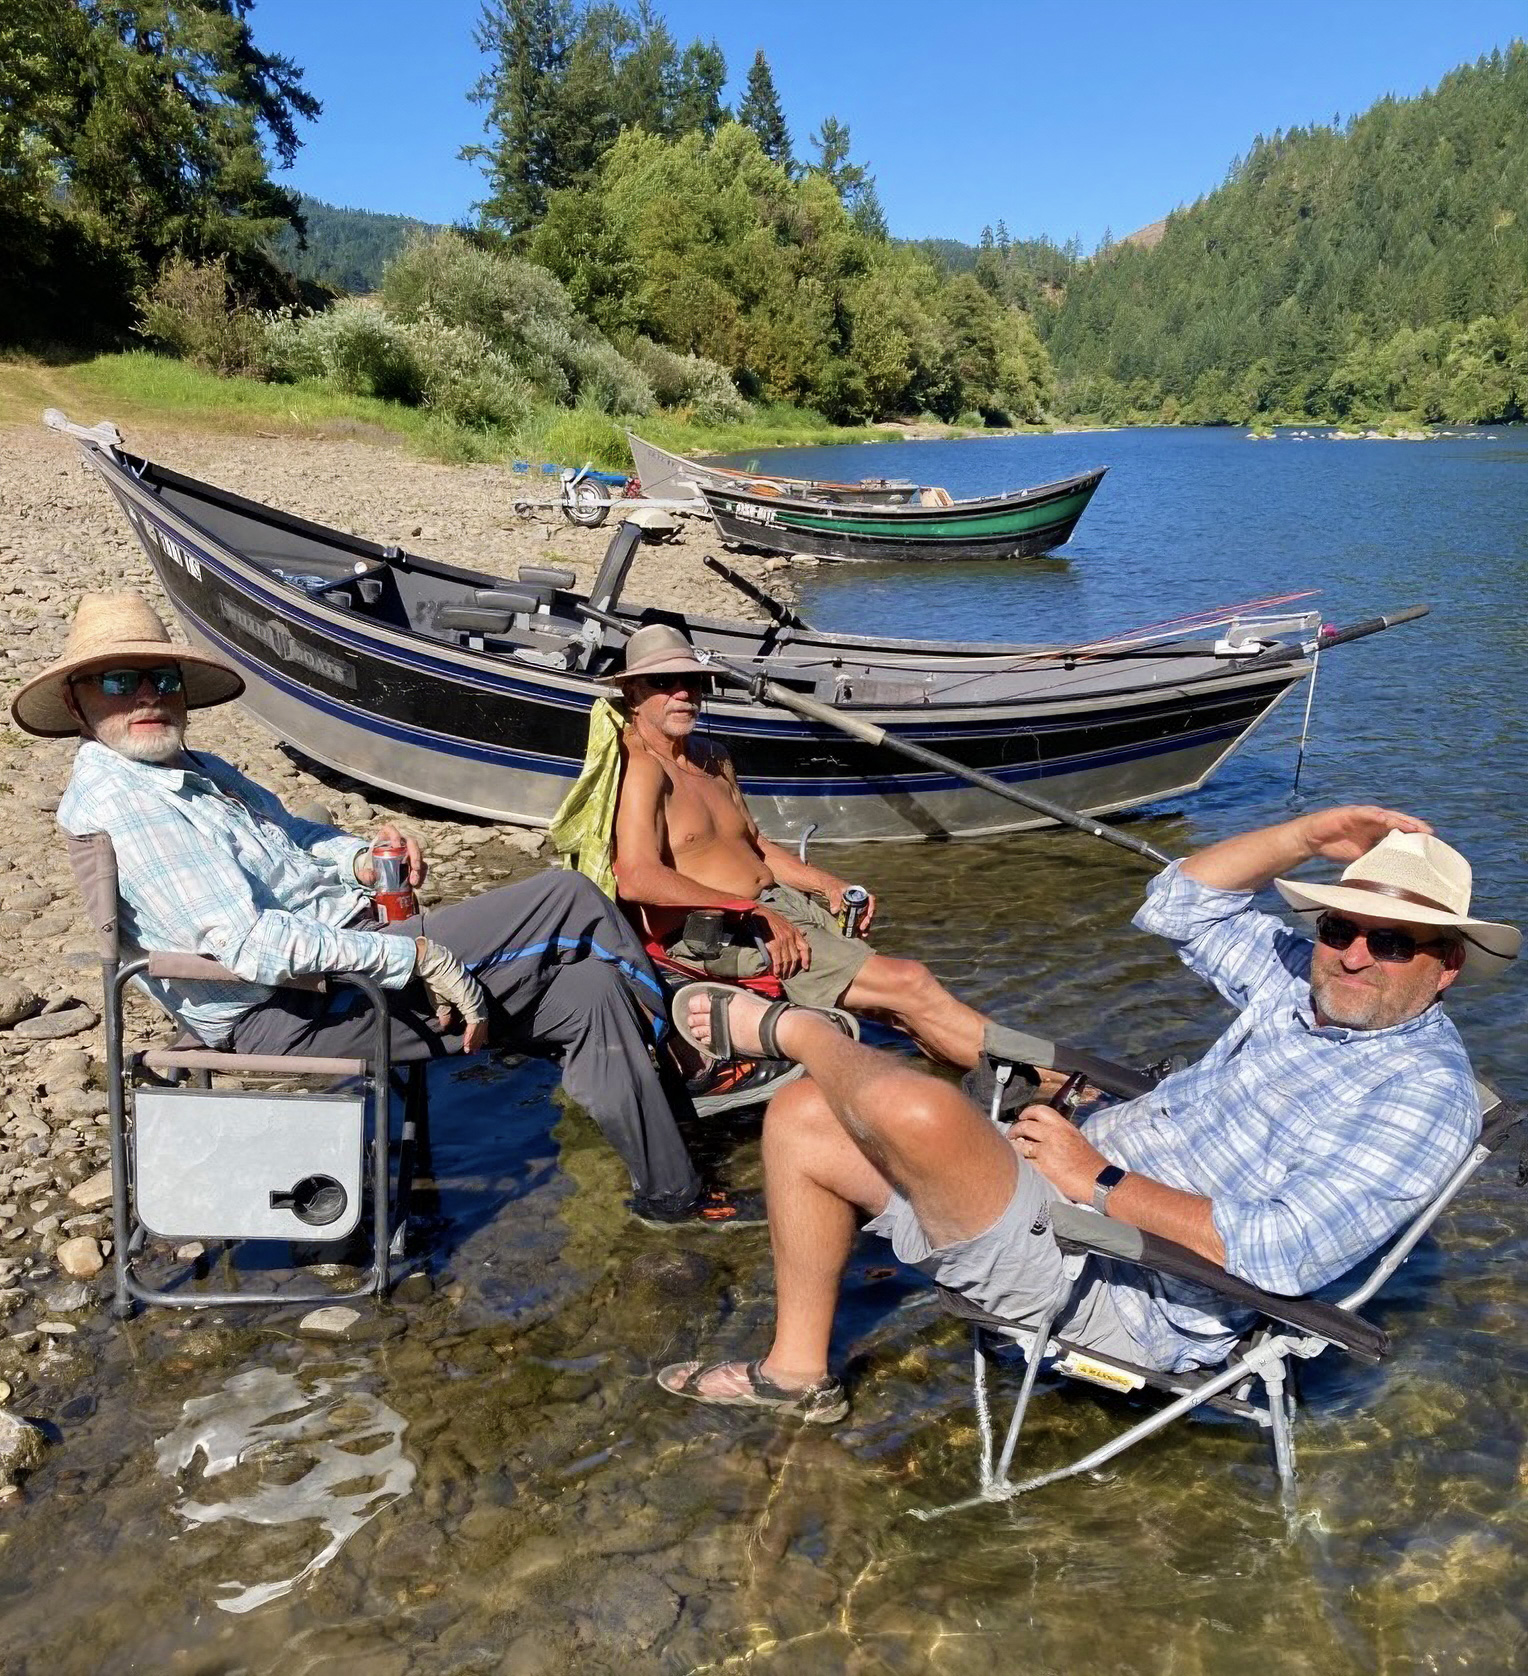
Since those heady days of a couple of weeks back the weather has settled into a normal routine for this time of year—one day mild and sunny, the next gray and chill, the next heavy rain. There is hope: the monotones of late April have been replaced by vibrant greens, gardens are bursting at the seams, and every day welcomes another flower, another leaf, another migrant bird last seen in the fall. But still summer evades us. The boat remains buttoned up in the driveway, and instead of enjoying my own lazy days on the water, I am making do with reading about other people’s adventures, and smiling at the picture of Bob Van Putten on the contents page of this issue, where he dozes in the stern of his flatiron skiff as if to assure me that summer really is just around the corner.
And in the meantime…
Courtesy of Alex Walker
Jasmine Thomas coxing a 15′ Banks Dory in the 2024 Mighty Merrimack Rowing Race hosted annually since 1983 by Lowell’s Boat Shop in Amesbury, Massachusetts.
Fair winds and thank you
In any business, staff members come and go; some remain for many years, others come for a season and move on. Some, like WoodenBoat Editorial Assistant, Jasmine Thomas, come for a short while but make such an impact that it’s tough to remember they haven’t been there forever.
For Small Boats, Jasmine has been the voice on the phone with subscribers since January 2024, and for our editorial staff, she has been the person behind the scenes making sure everything is running smoothly, that contributors are getting what they need, and that readers are able to access their subscriptions and can reach a friendly human being if things go wrong. Even farther behind the scenes, Jasmine has worked diligently on the backend of our website, fixing errors and improving the user experience. She may only have been here for two-and-a-half years but her positive impact has been mighty.
Courtesy of Richard Thomas
Jasmine on the foredeck of ADVENTURESS, the Sparkman & Stephens–designed Gulf Stream 30 she recently restored.
Sadly, this issue of Small Boats will be Jasmine’s last. She is staying in the marine industry but stepping out from behind her desk. Her new job as a sales rep for Modern Recreational Technologies (MRT), makers of Pettit Marine Paint, will see her visiting boatyards large and small across northeast U.S. and into Canada. When she’s home, she’ll be sailing ADVENTURESS, the Sparkman & Stephens–designed Gulf Stream 30 she restored, and sharing her seamanship skills with others in the Rockport, Maine, area. And, we hope, she’ll be writing articles for future issues of Small Boats. She will be missed by staff and readers alike and we wish her well in her new endeavors.
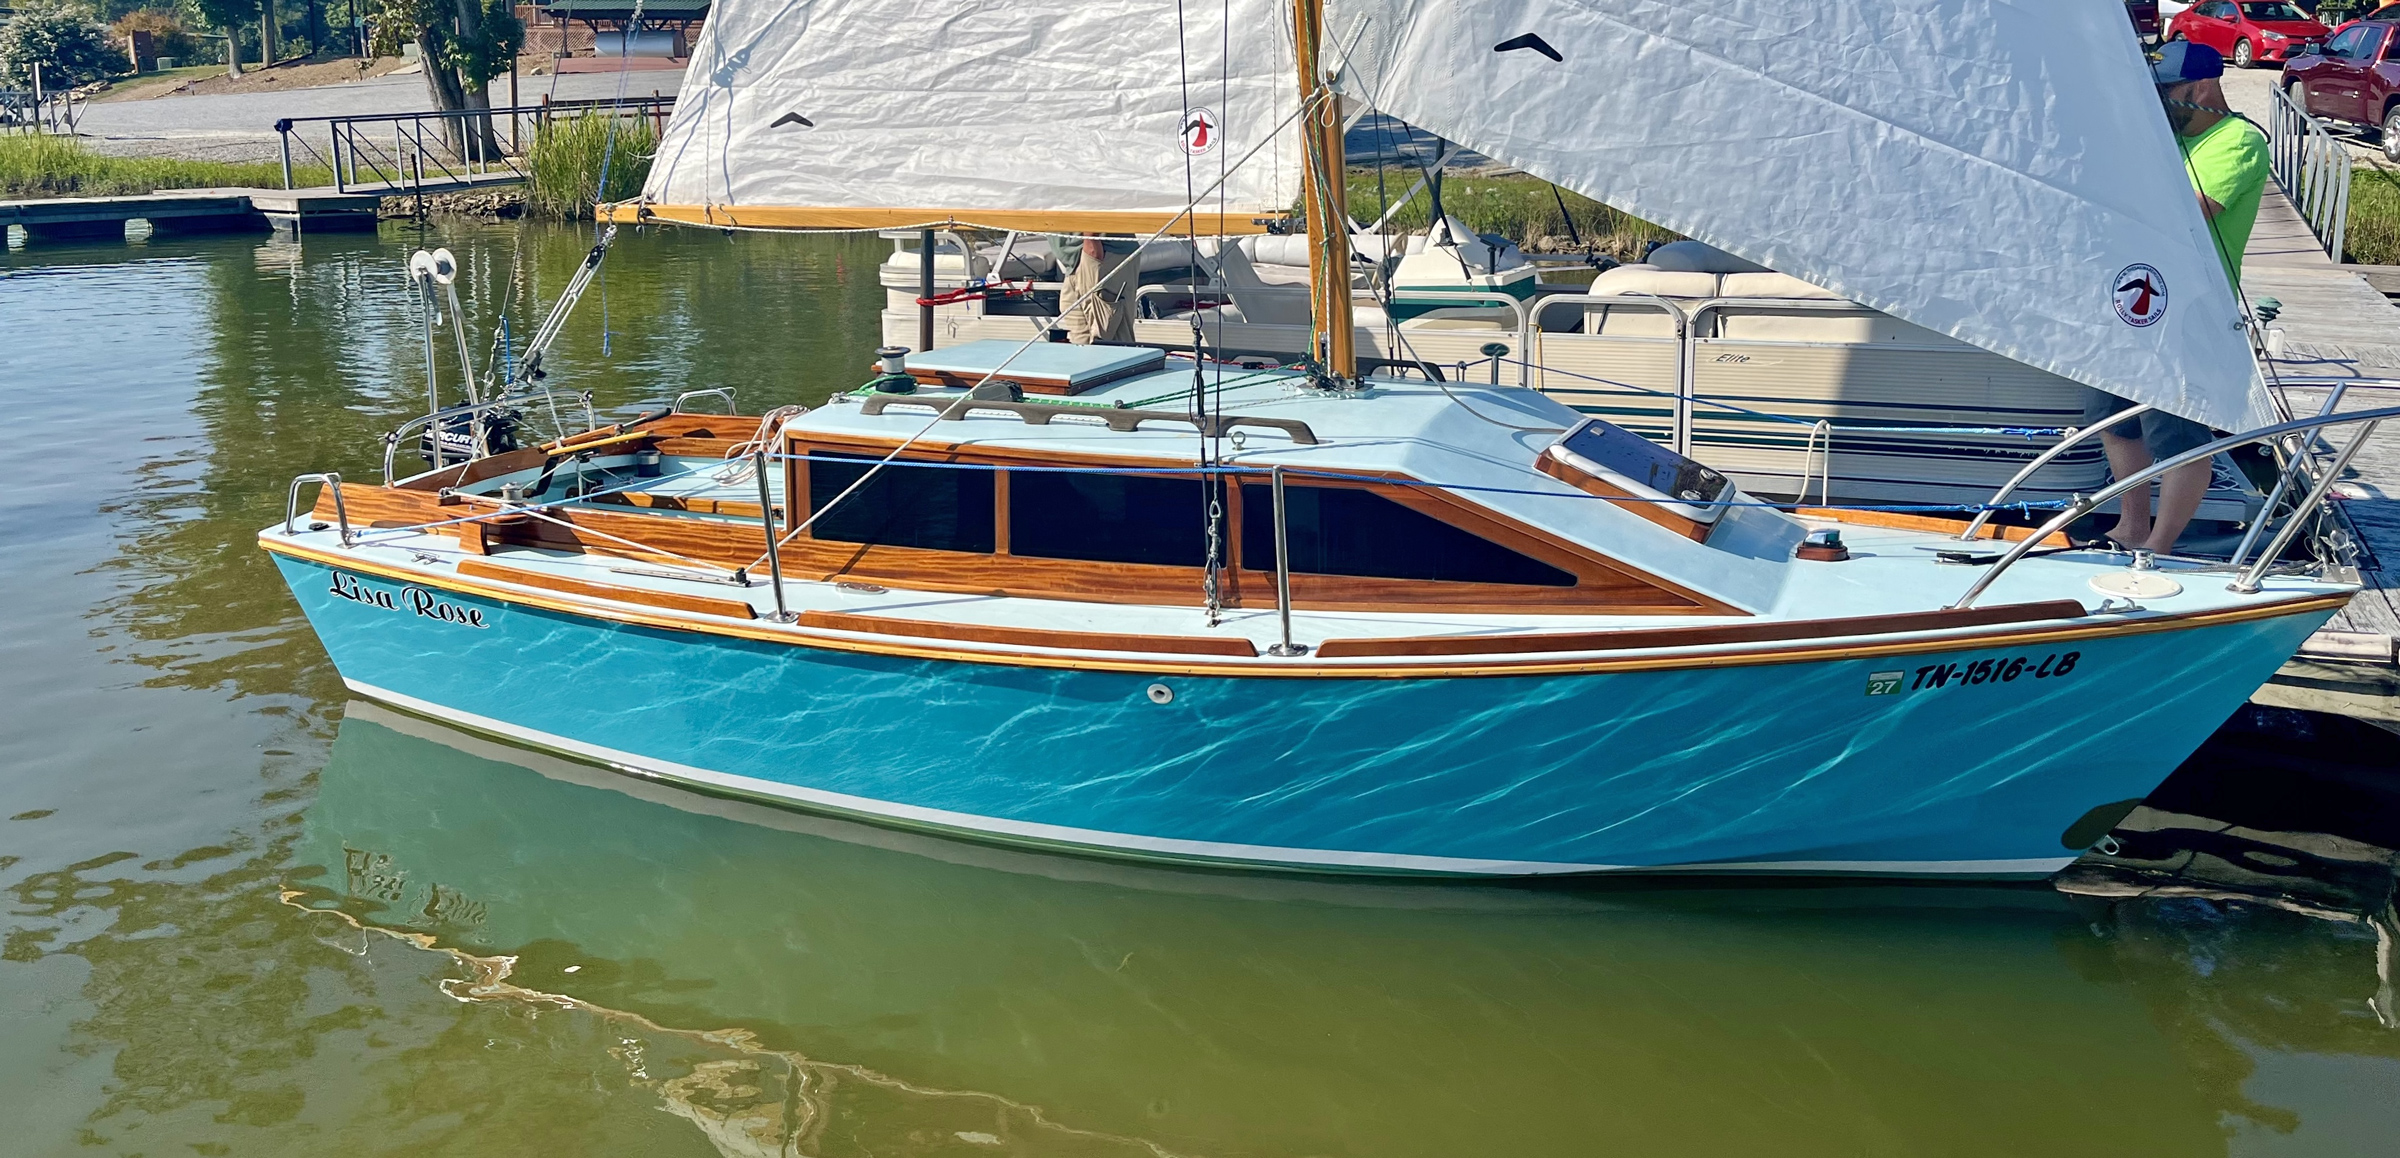
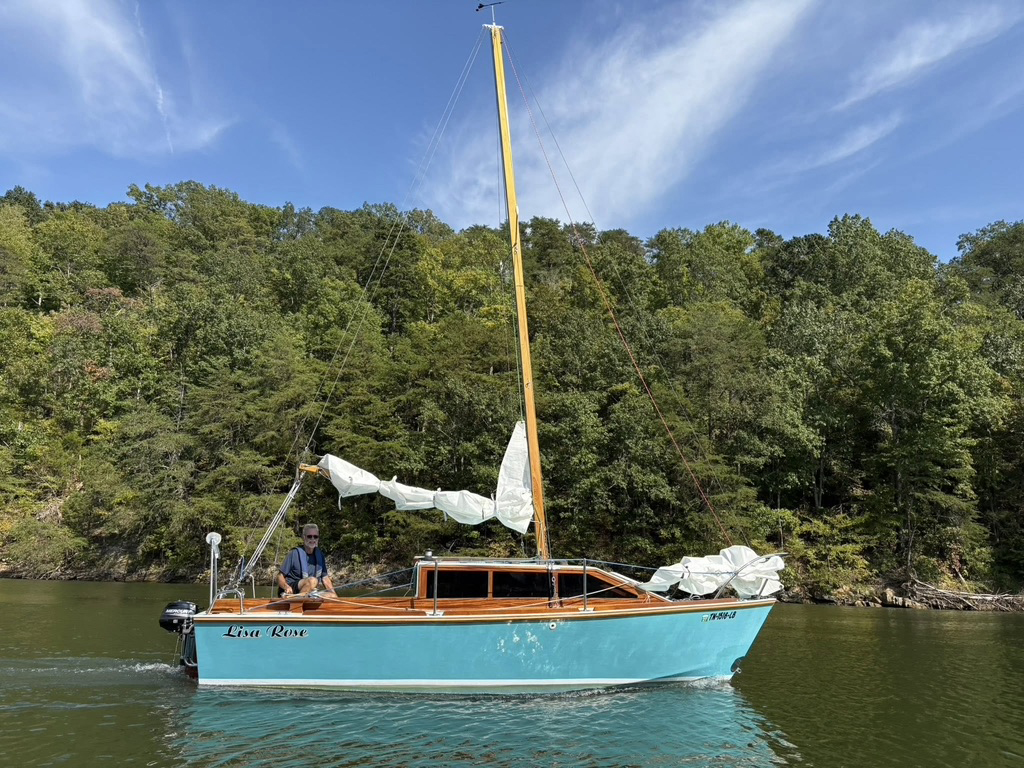
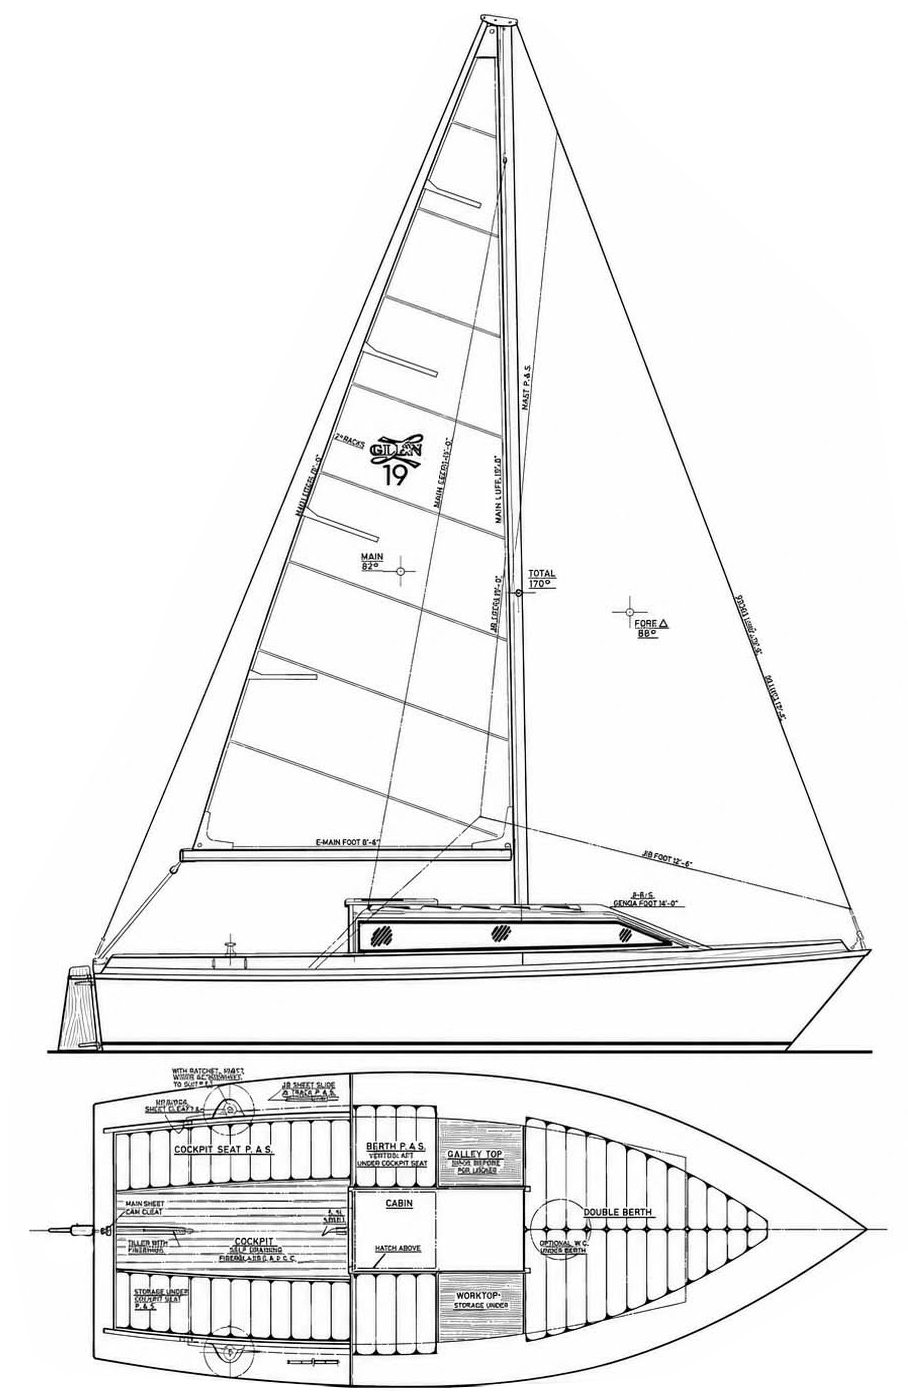
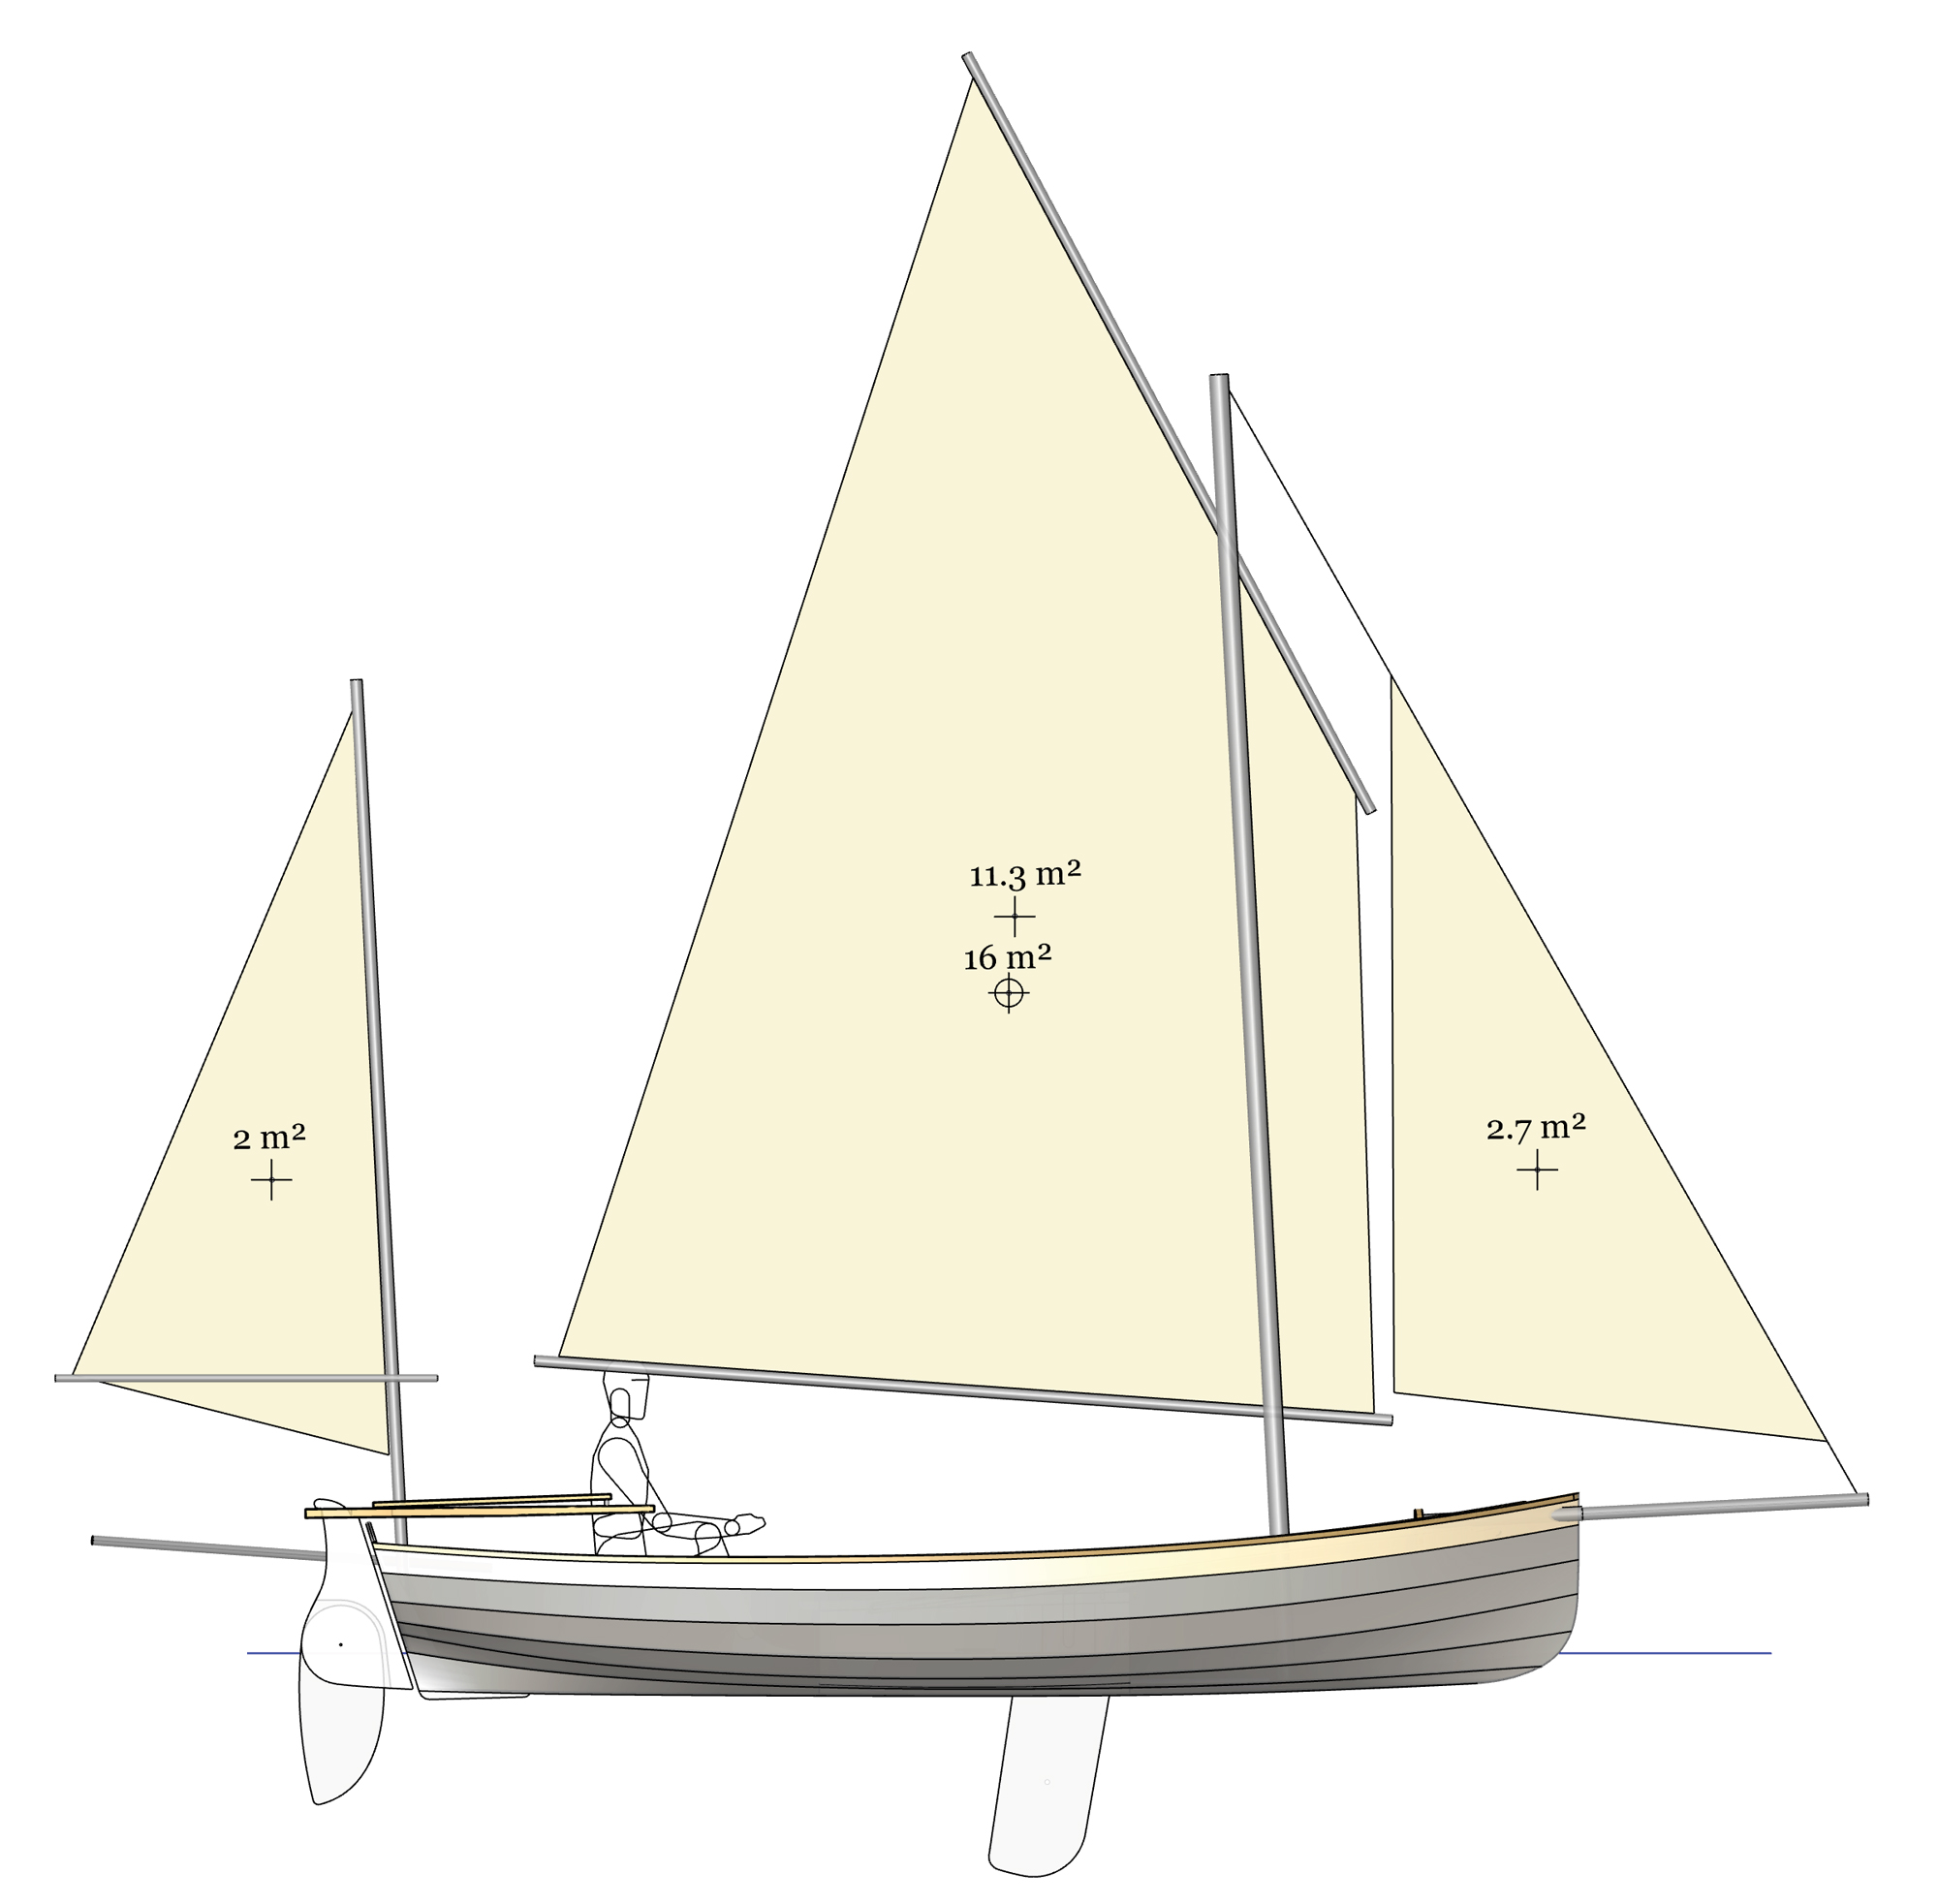
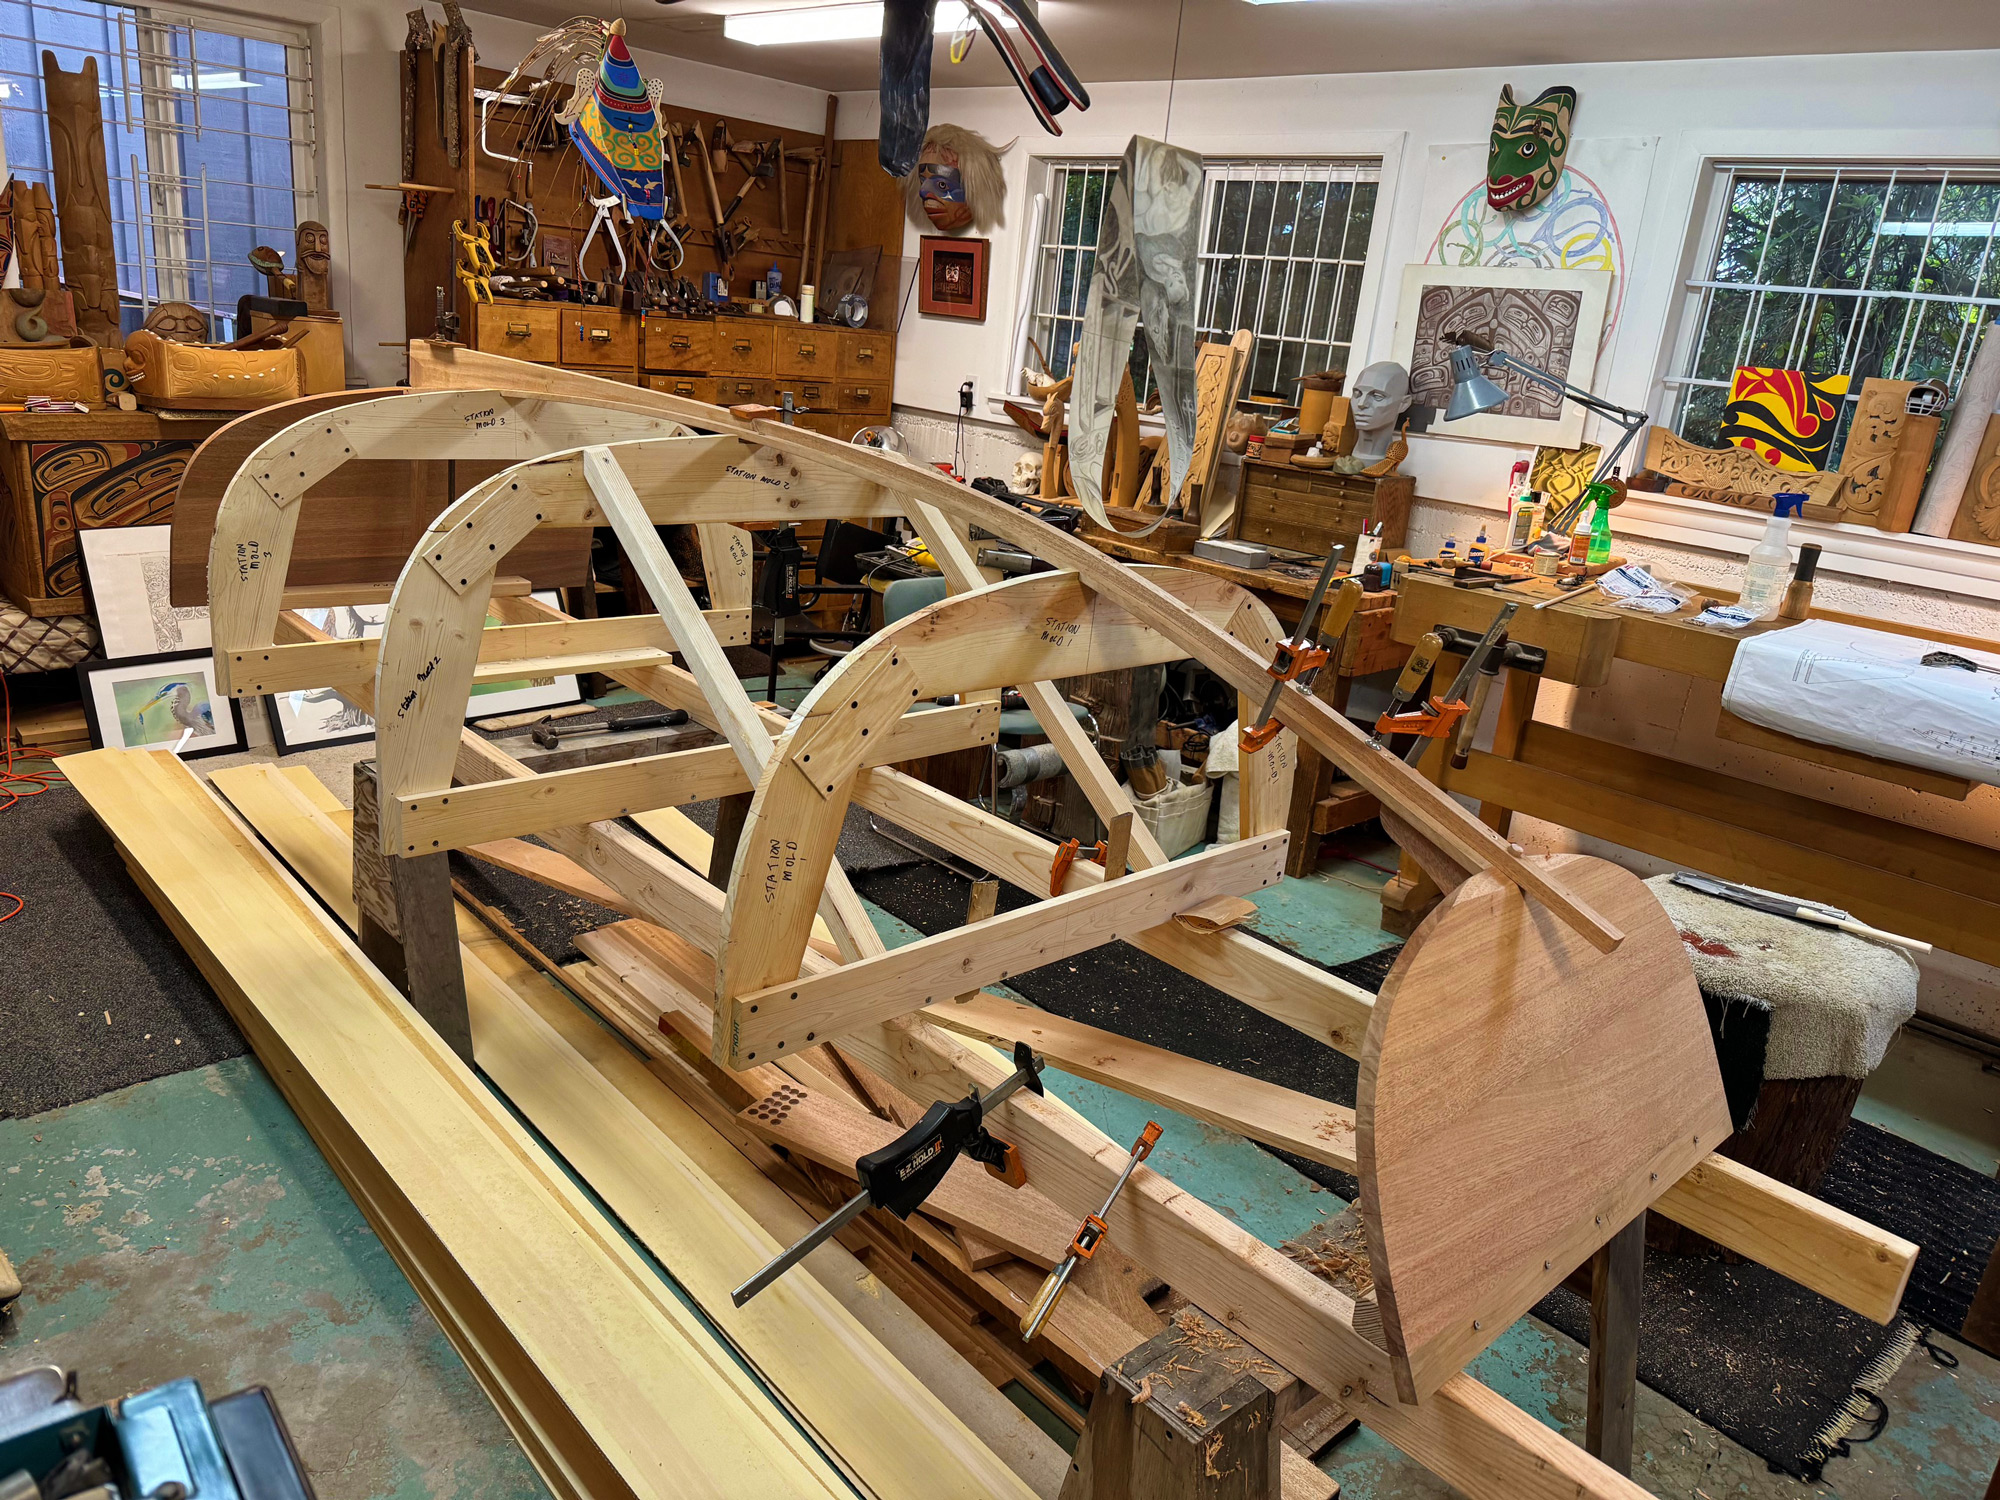
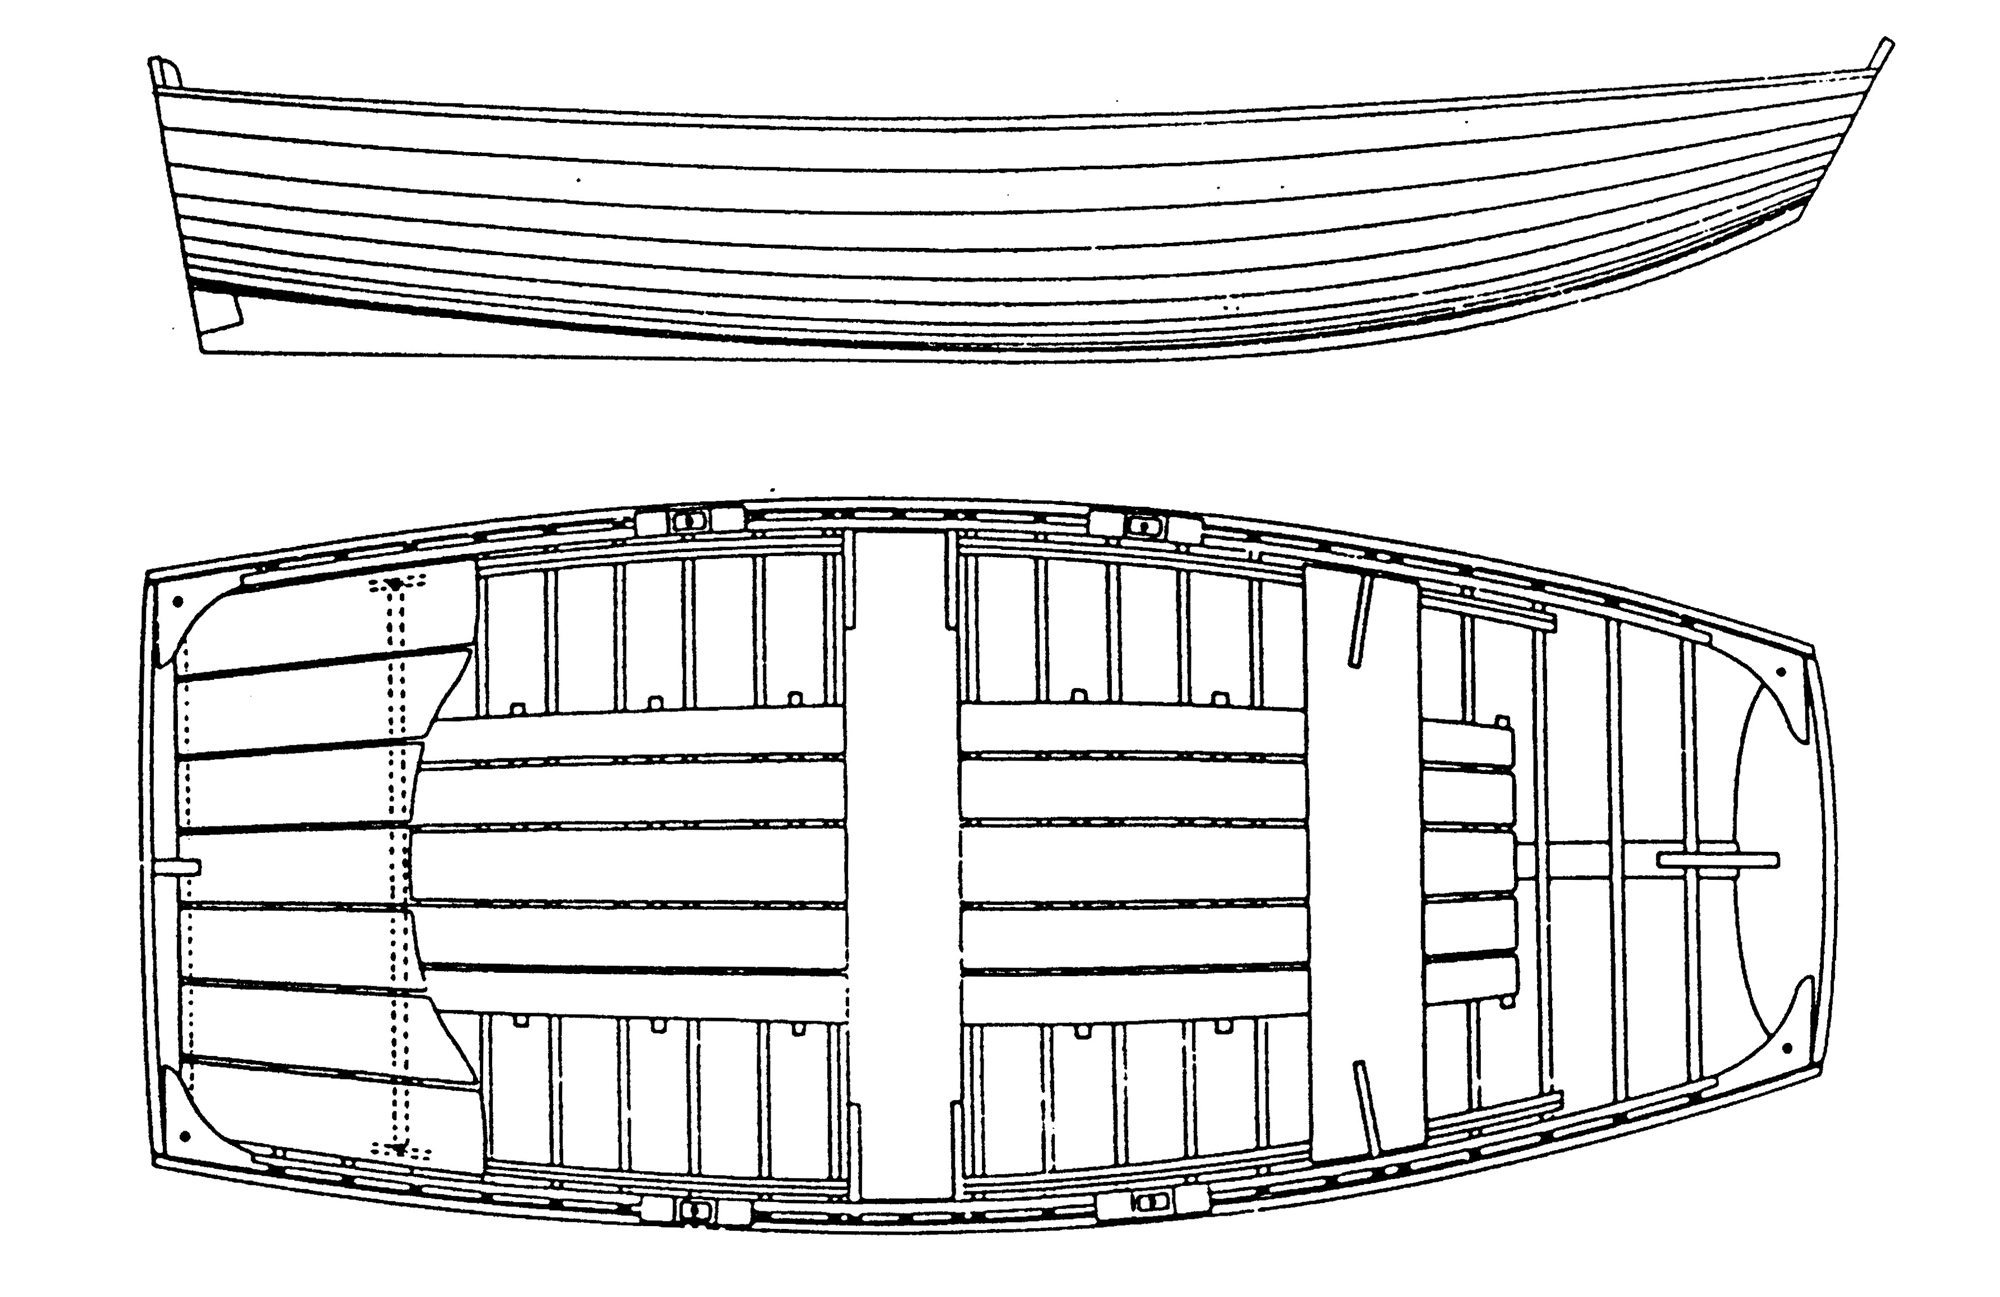
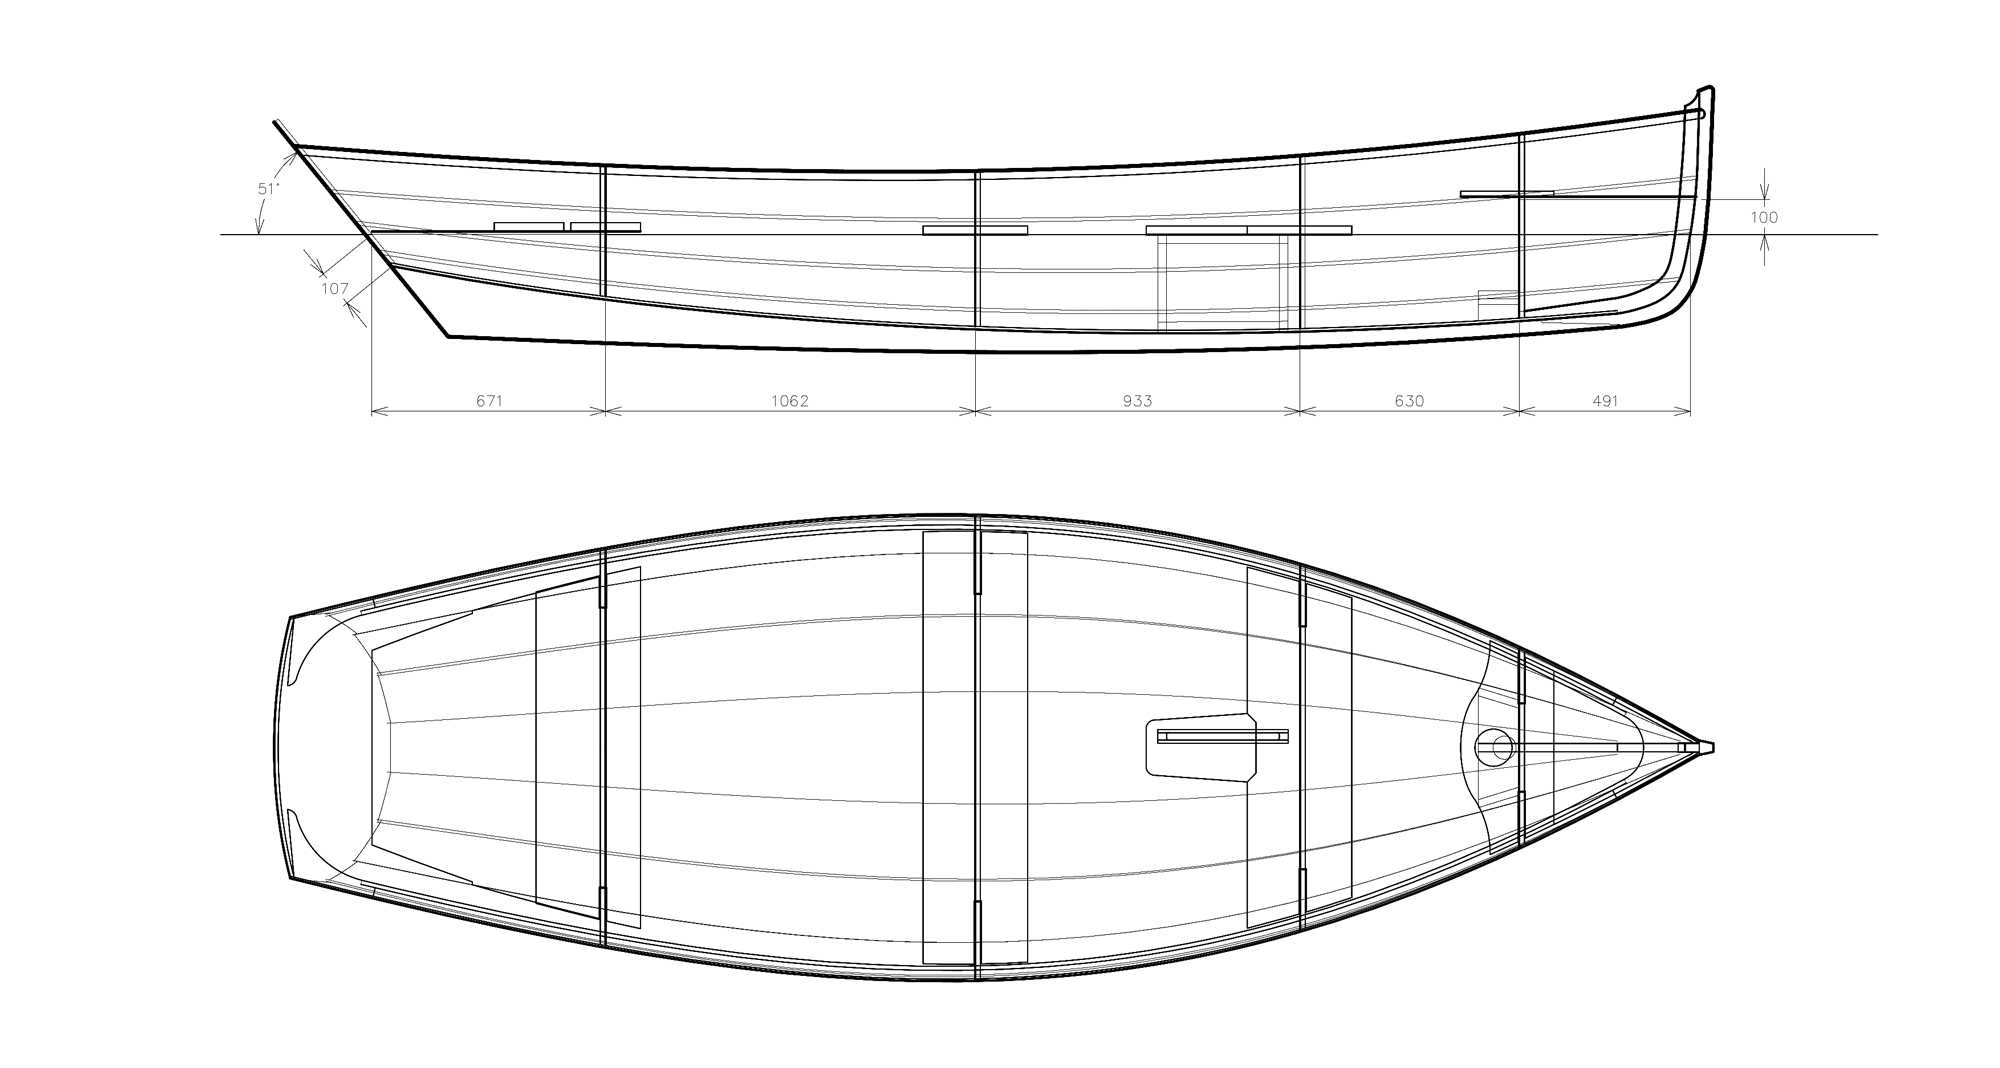
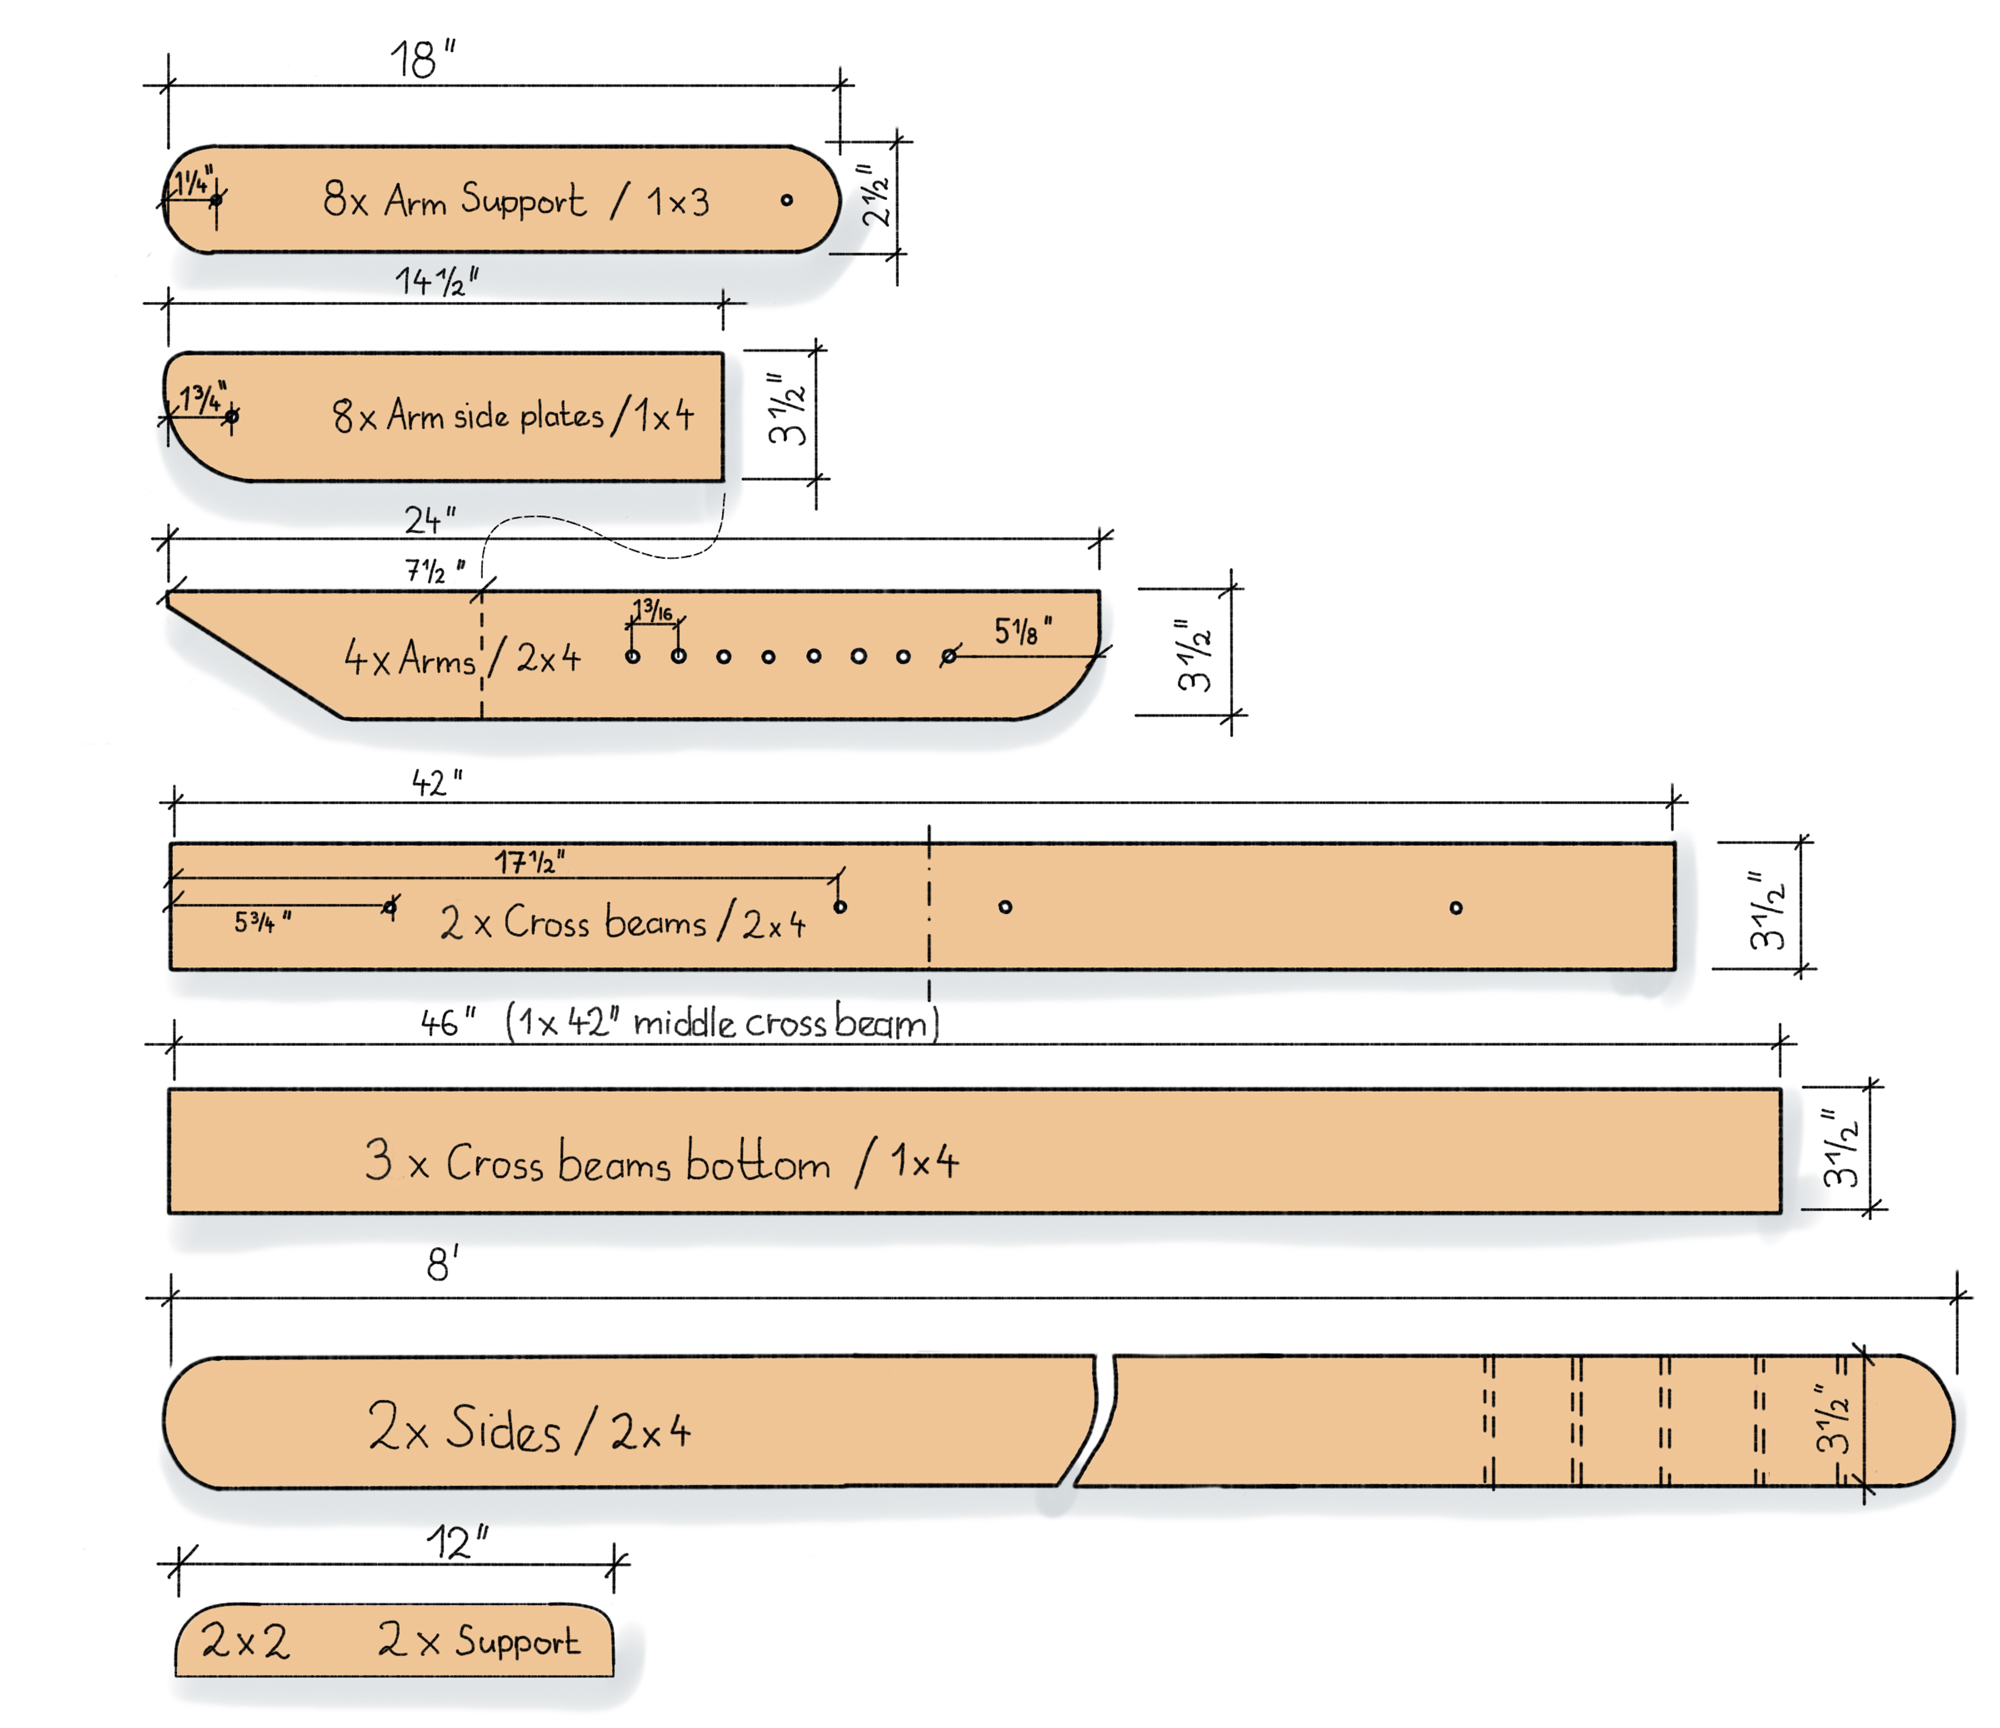
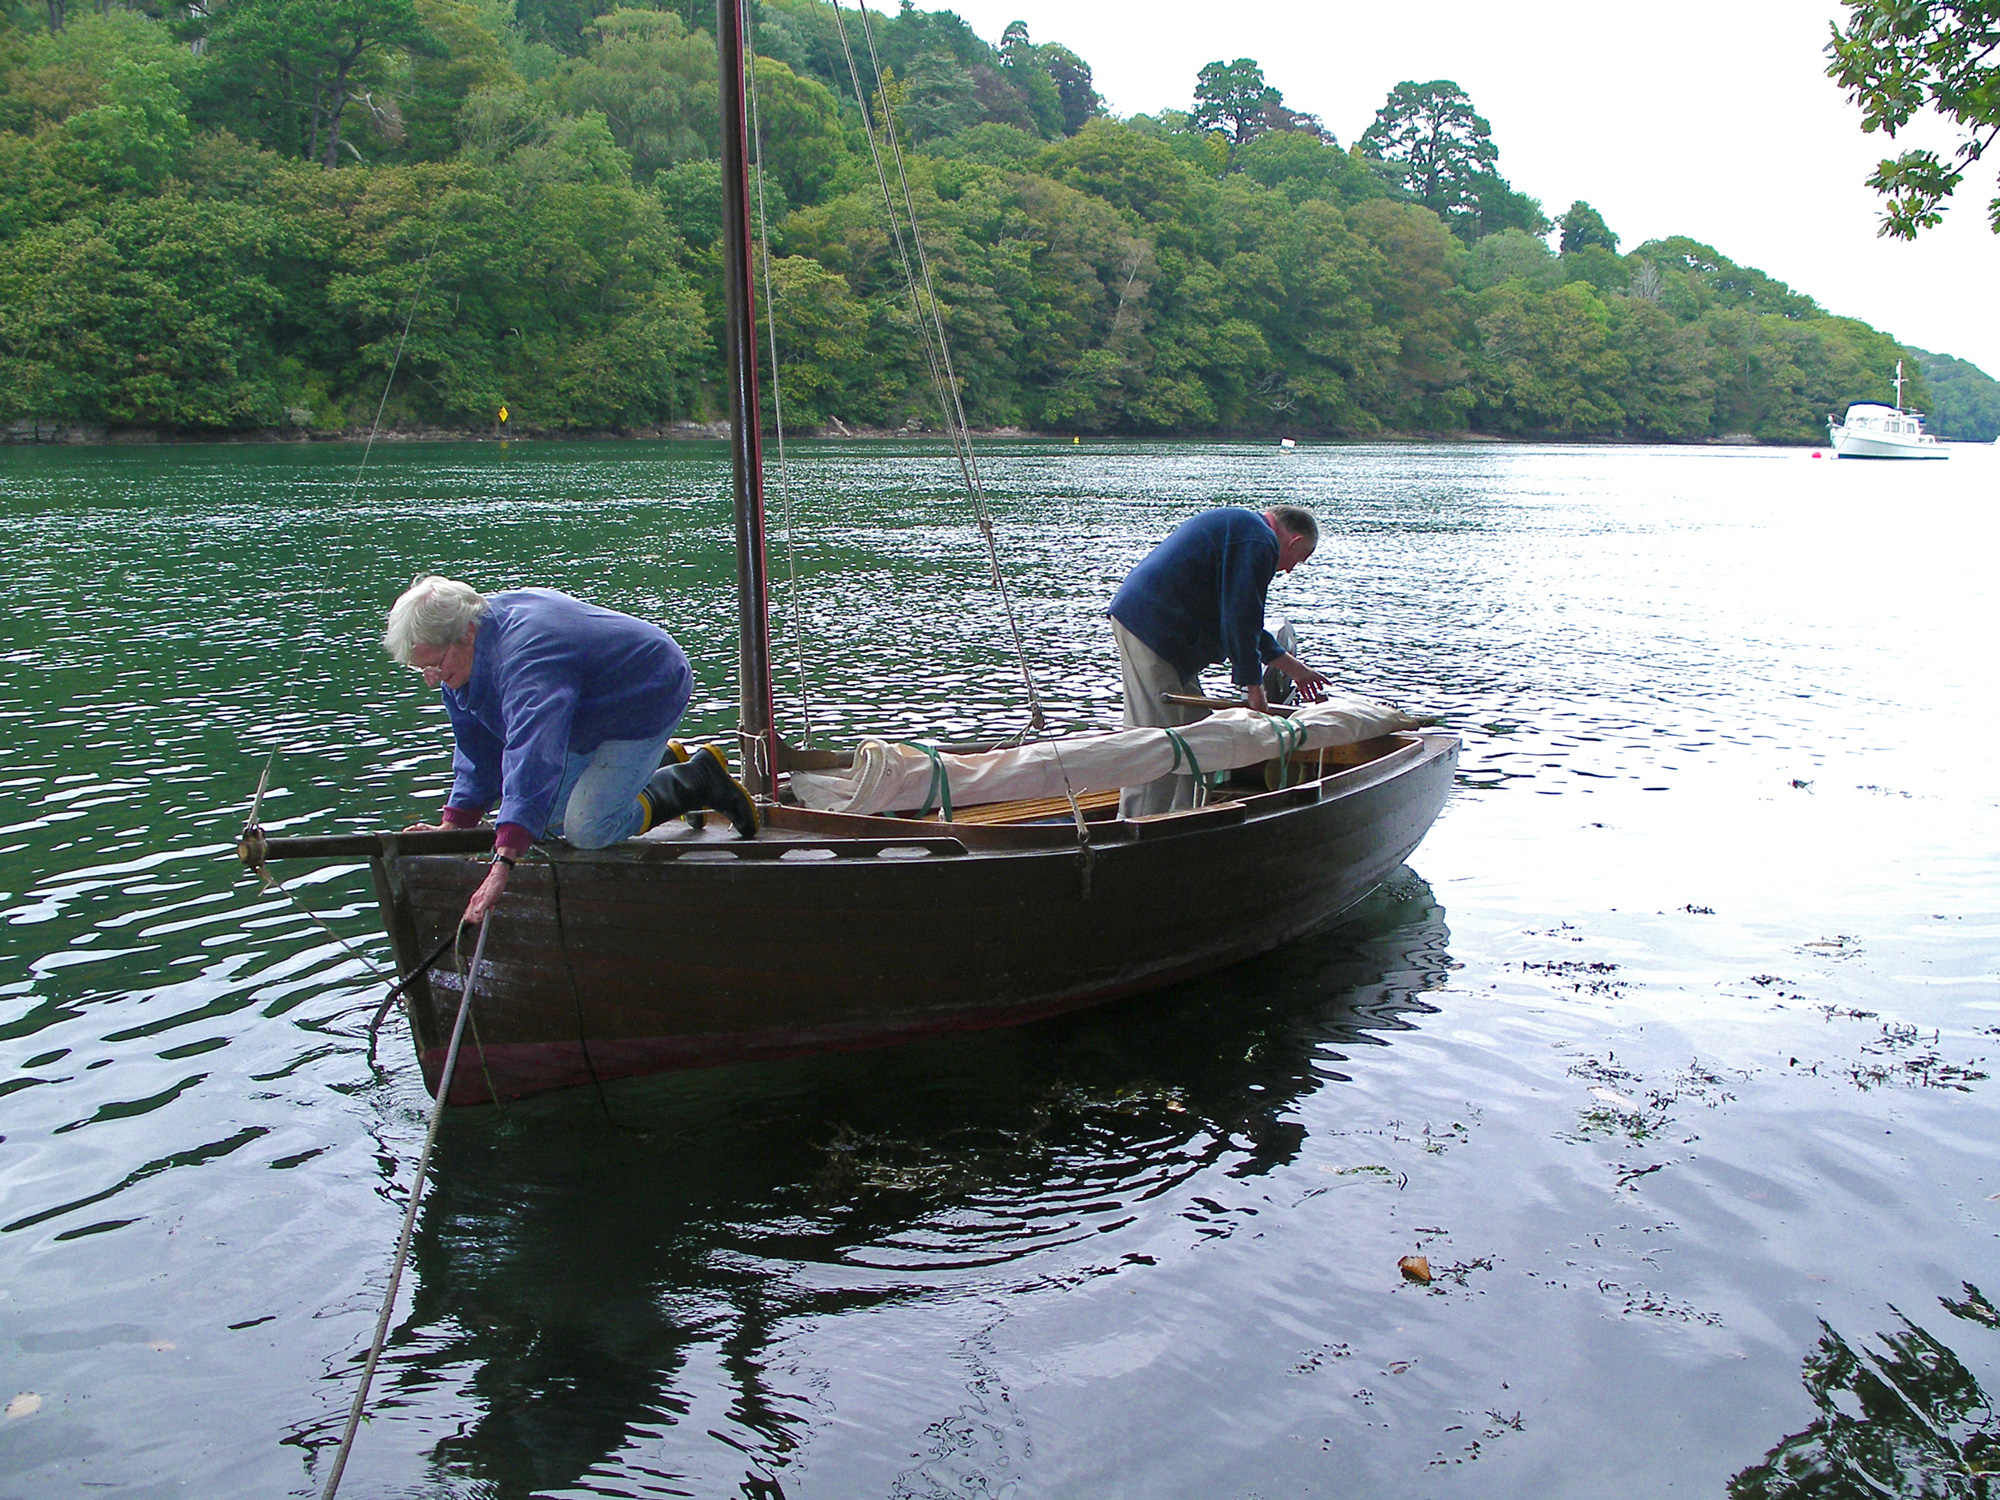
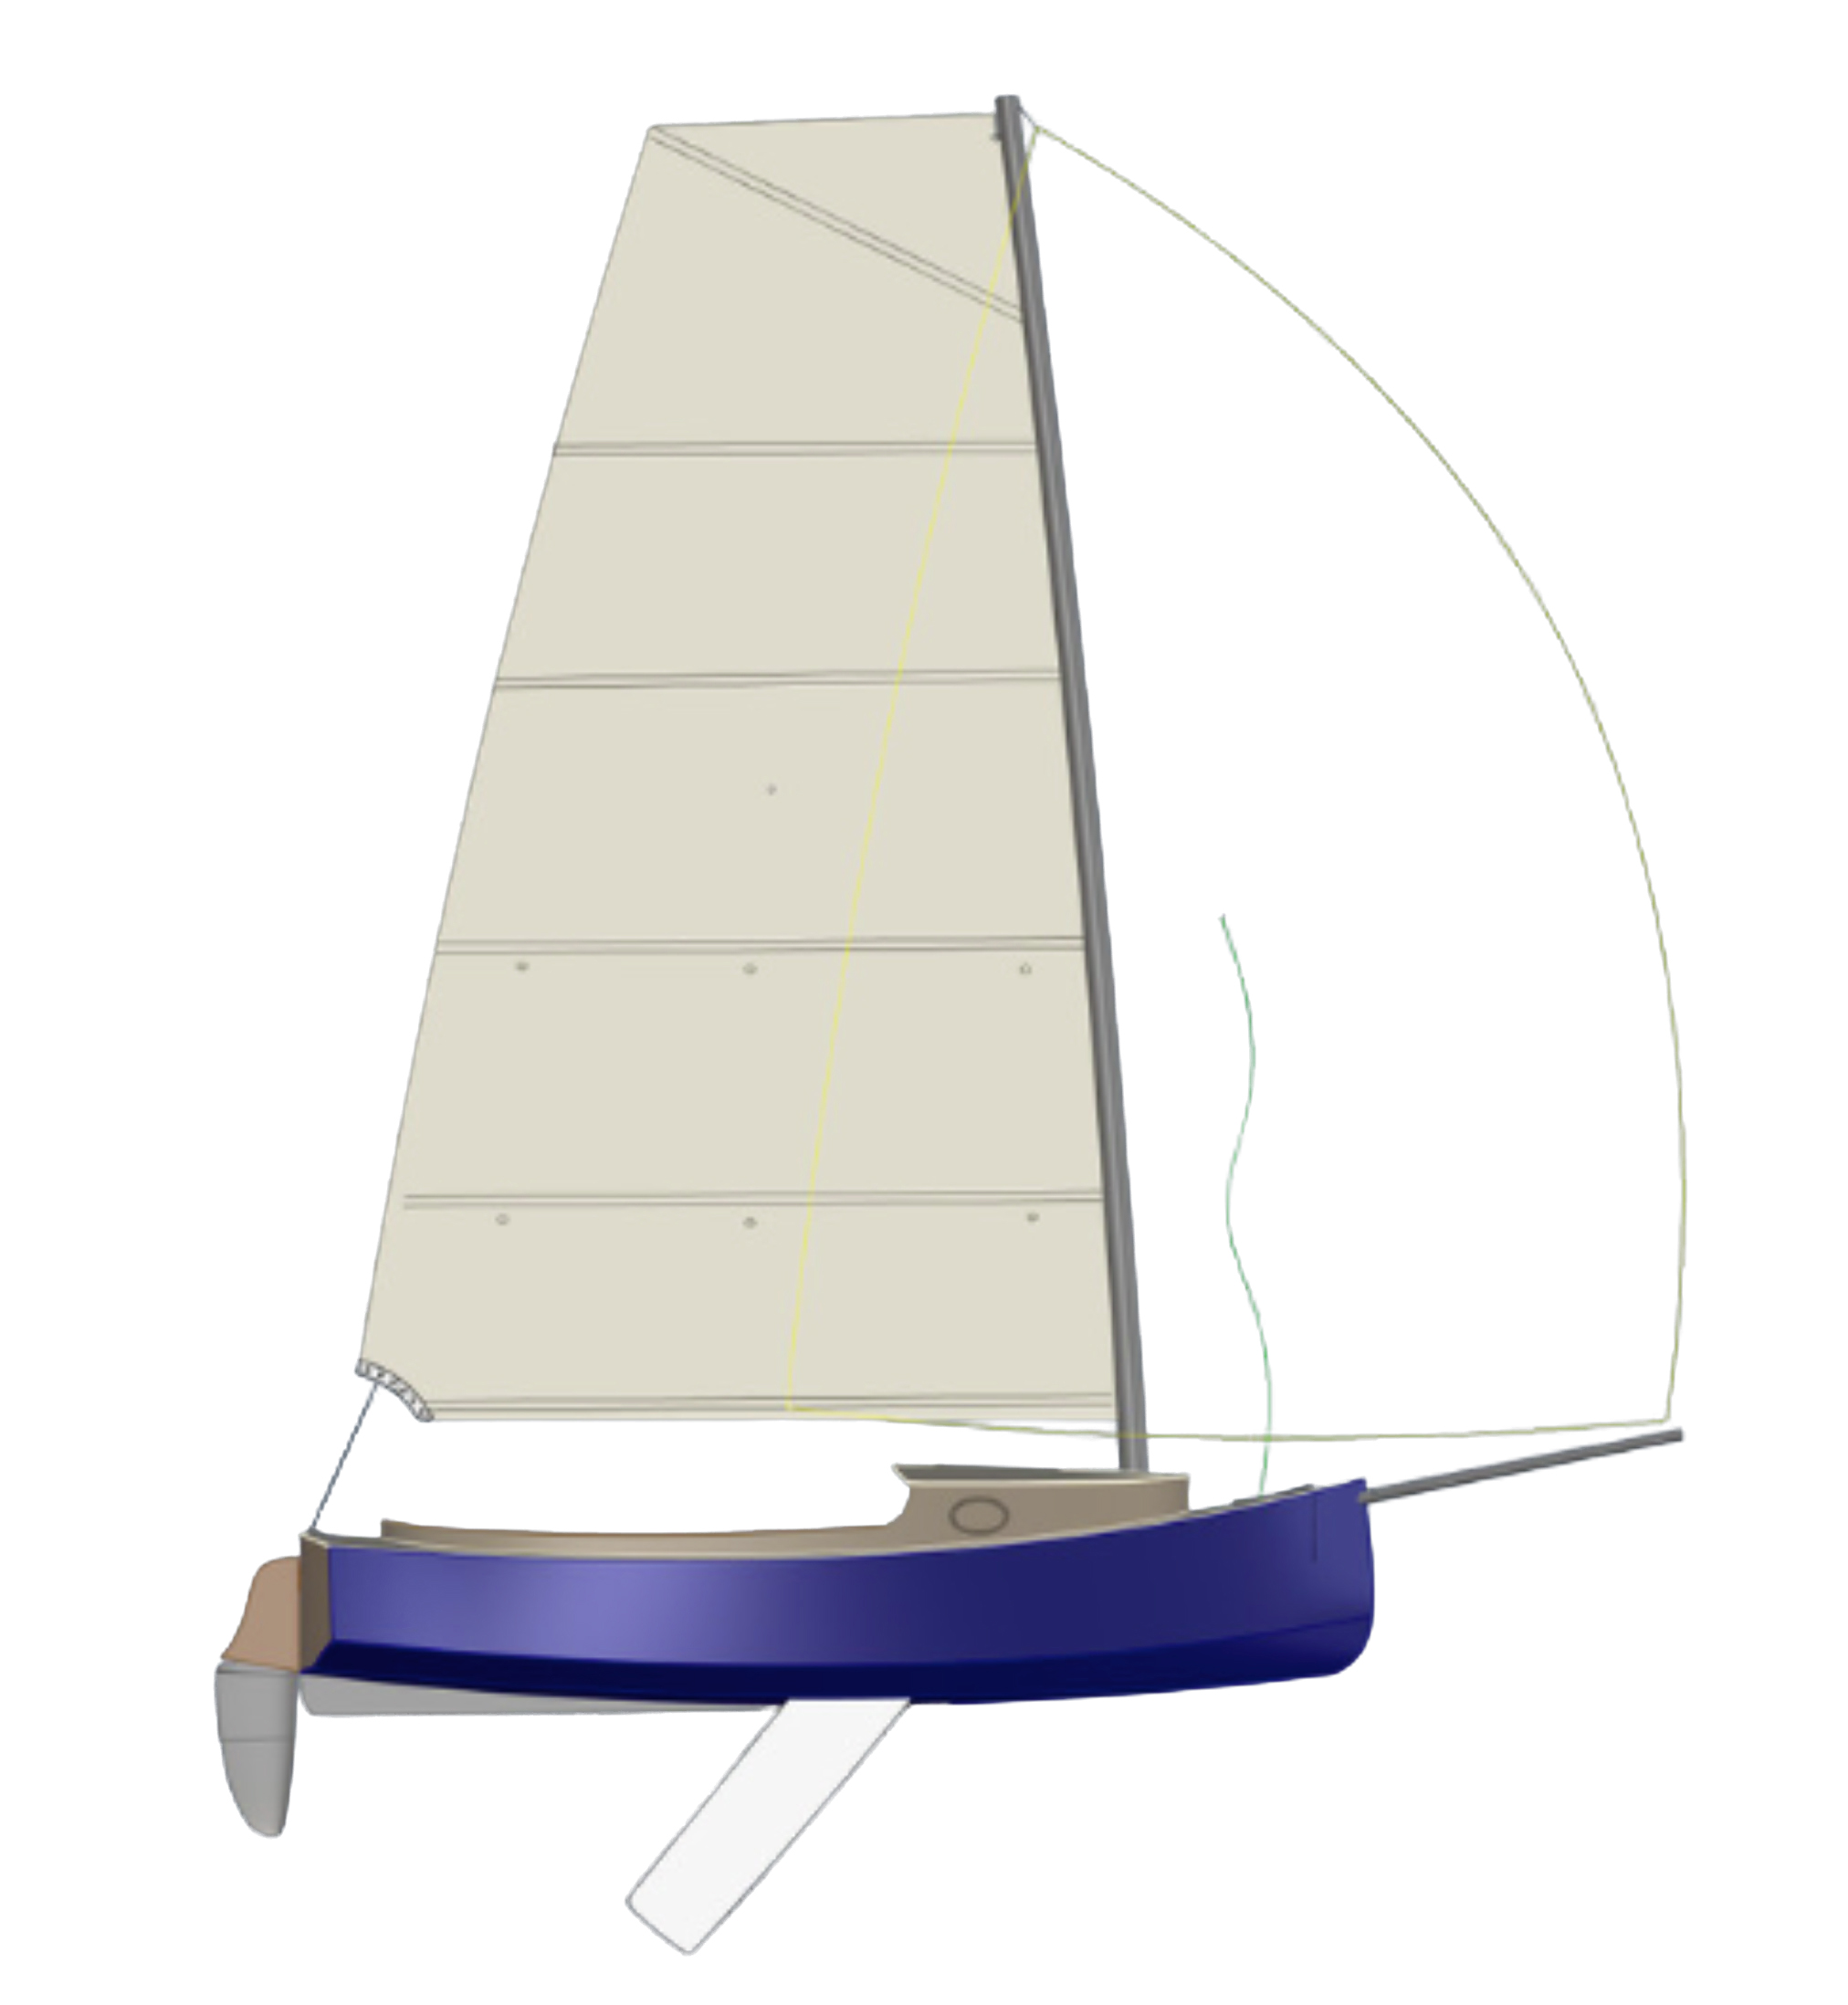
In 2018, after a visit to The Wooden Boat Show at Mystic Seaport, Connecticut, I was inspired to build a sailboat. I had built a Malahini runabout by Glen-L and had enjoyed the experience, so naturally reached for the Glen-L catalog. There I found a listing for the Glen-L 19: a 19′ sloop with a spacious cockpit and good-sized cabin, complete with a generous V-berth. It would, I thought, lend itself to some fun weekend boating.
The finished boat would be trailerable, quickly rigged, and simple to launch, with a pivoting centerboard and an easily stepped mast. It was also a project that would fit in my workshop. I ordered the plans, which included a 13-page instruction manual with complete fastening schedule and materials list, and a 12-page booklet covering the general building method. The plans came as six sheets of 12:1 scaled drawings, and two sheets of full-sized patterns for the transom, frames, stem, breasthook, centerboard trunk, and centerboard. I had previously found Glen-L plans to be complete, informative, and easy to follow, and was not to be disappointed by the Glen-L 19 plans.
Building the Glen-L 19
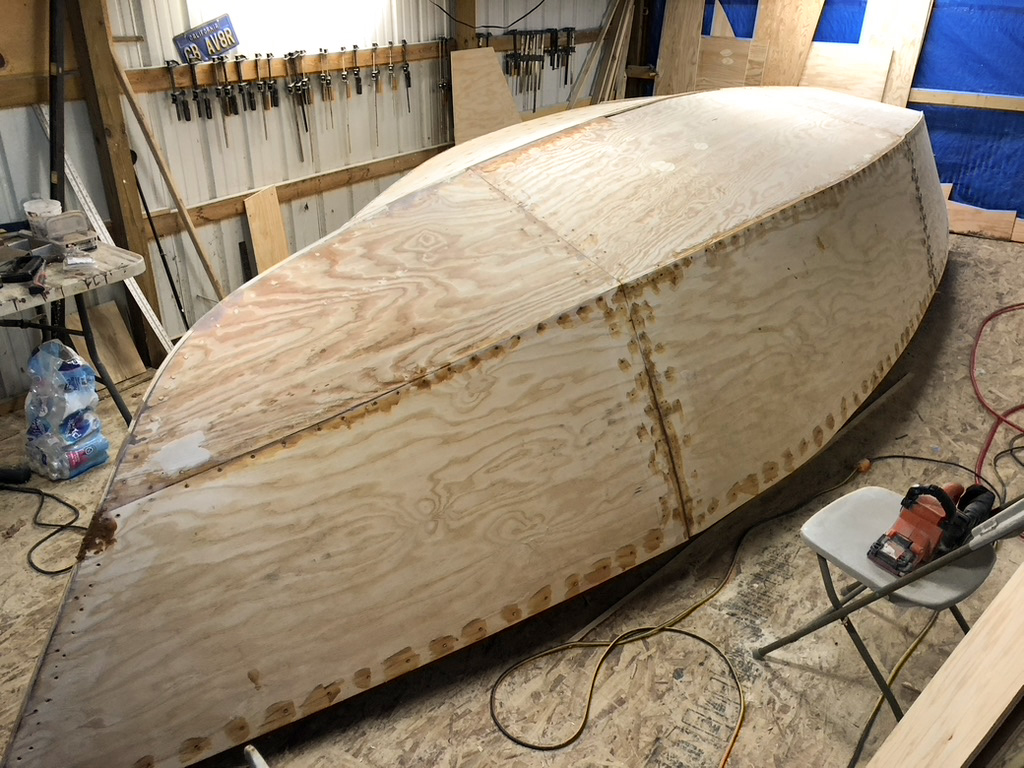
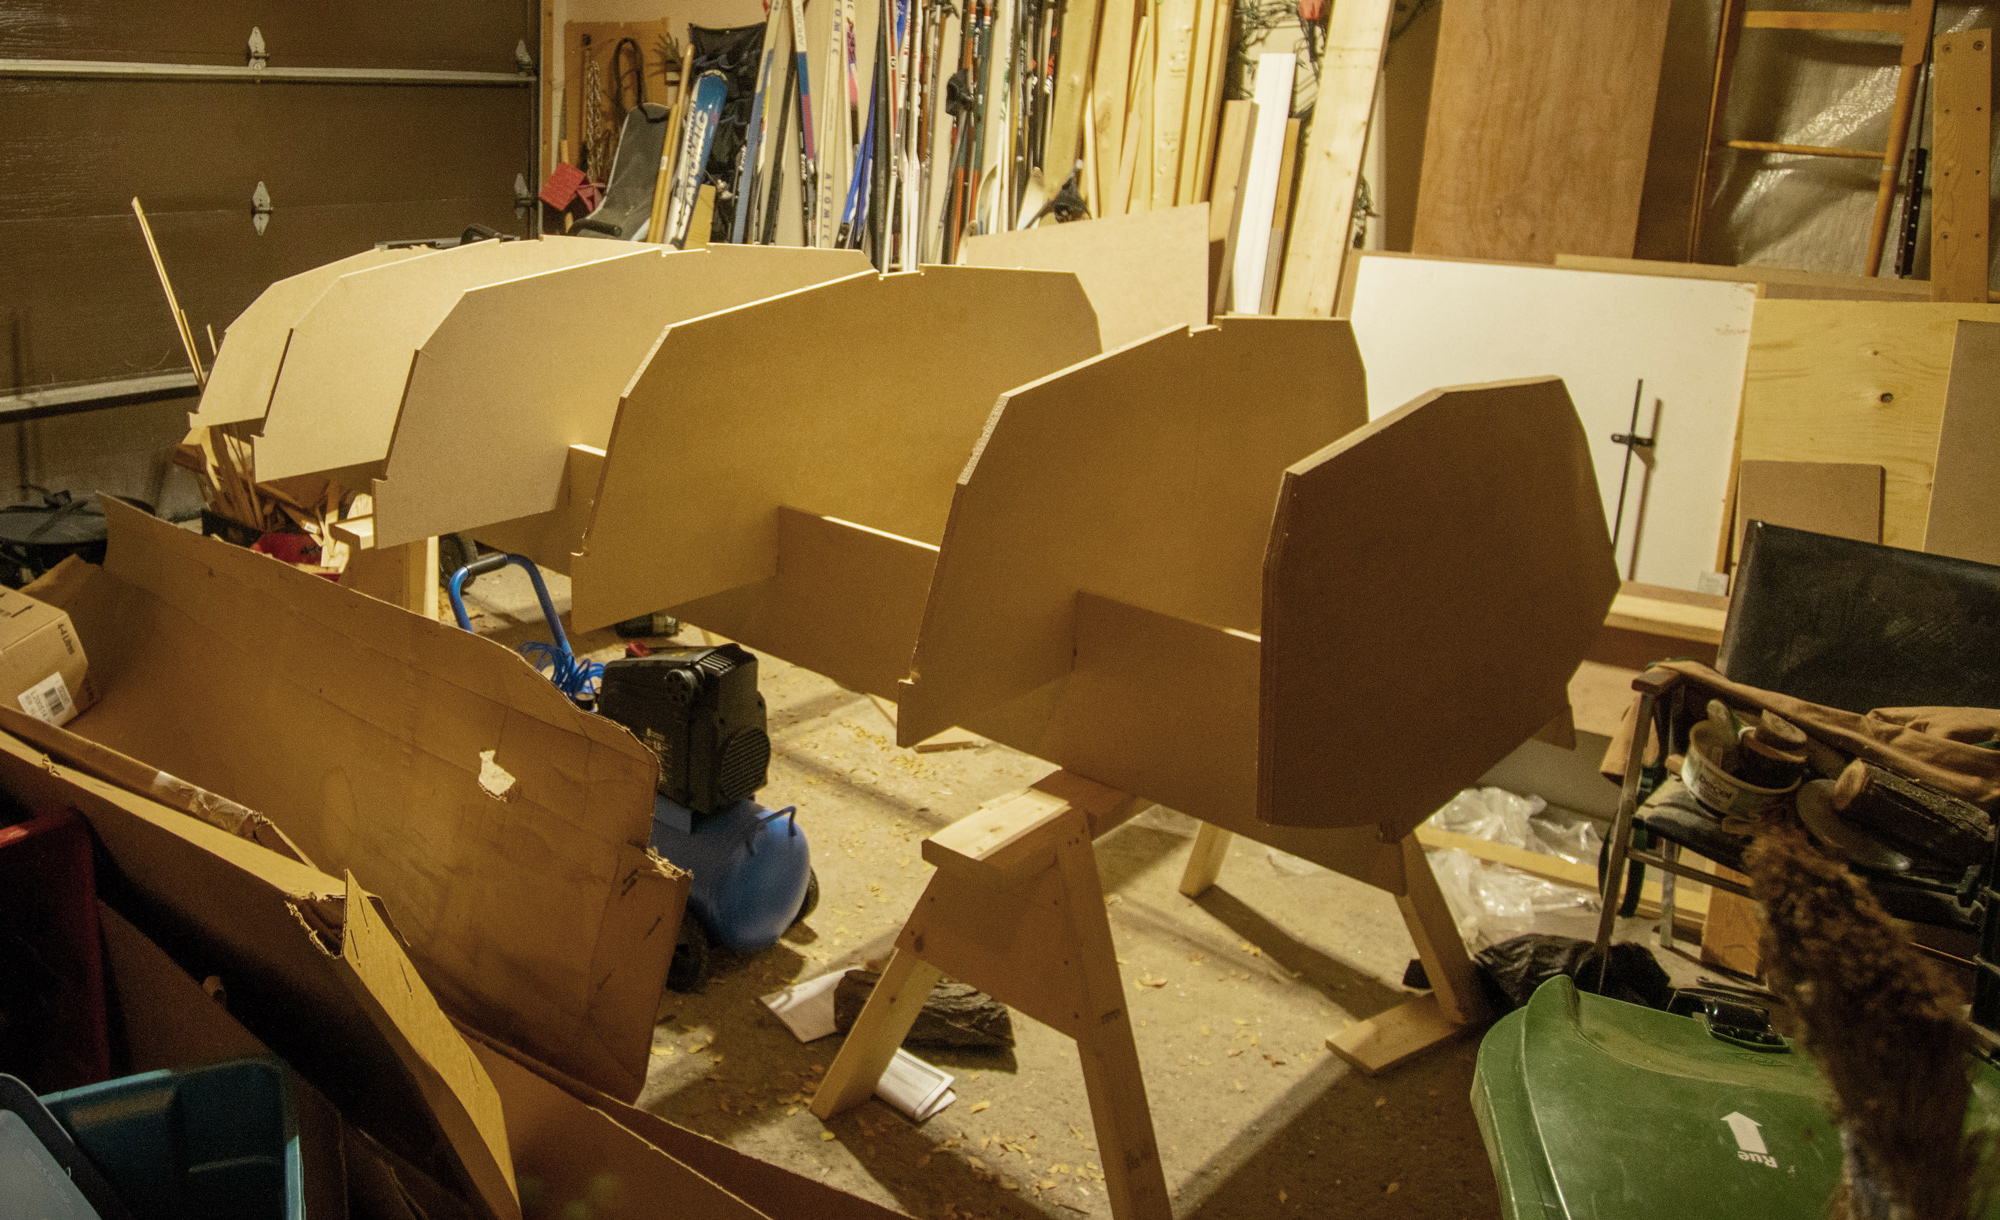
The project began with cutting out the pieces for the hull’s framework: 4/4 mahogany frames, notched to accept the oak keel, chines, sheer clamps, and bottom battens; 3⁄8″ plywood gussets and bulkheads; and a stem and breasthook comprising two layers of 3⁄4″ marine plywood. Each of these components was represented in the full-sized patterns. Once these parts were created, I mounted them, upside down, on a level building form as detailed in the plans.
Next came the centerboard trunk, which had to be built and installed before the keel could be fitted. This was a fairly involved task, requiring care and accuracy. Following the directions, I cut out a plywood template of the centerboard, which is used to check its dimensions and ultimate operation within the trunk (after some fine-tuning the template is used again, when making the steel centerboard).
The 2″-thick side panels of the centerboard trunk are built of two layers of white oak with a 3⁄8″ plywood and fiberglass lining. The holes for the pivot pin are drilled into the panels before they are fastened to the trunk’s frames.
Photographs by the author
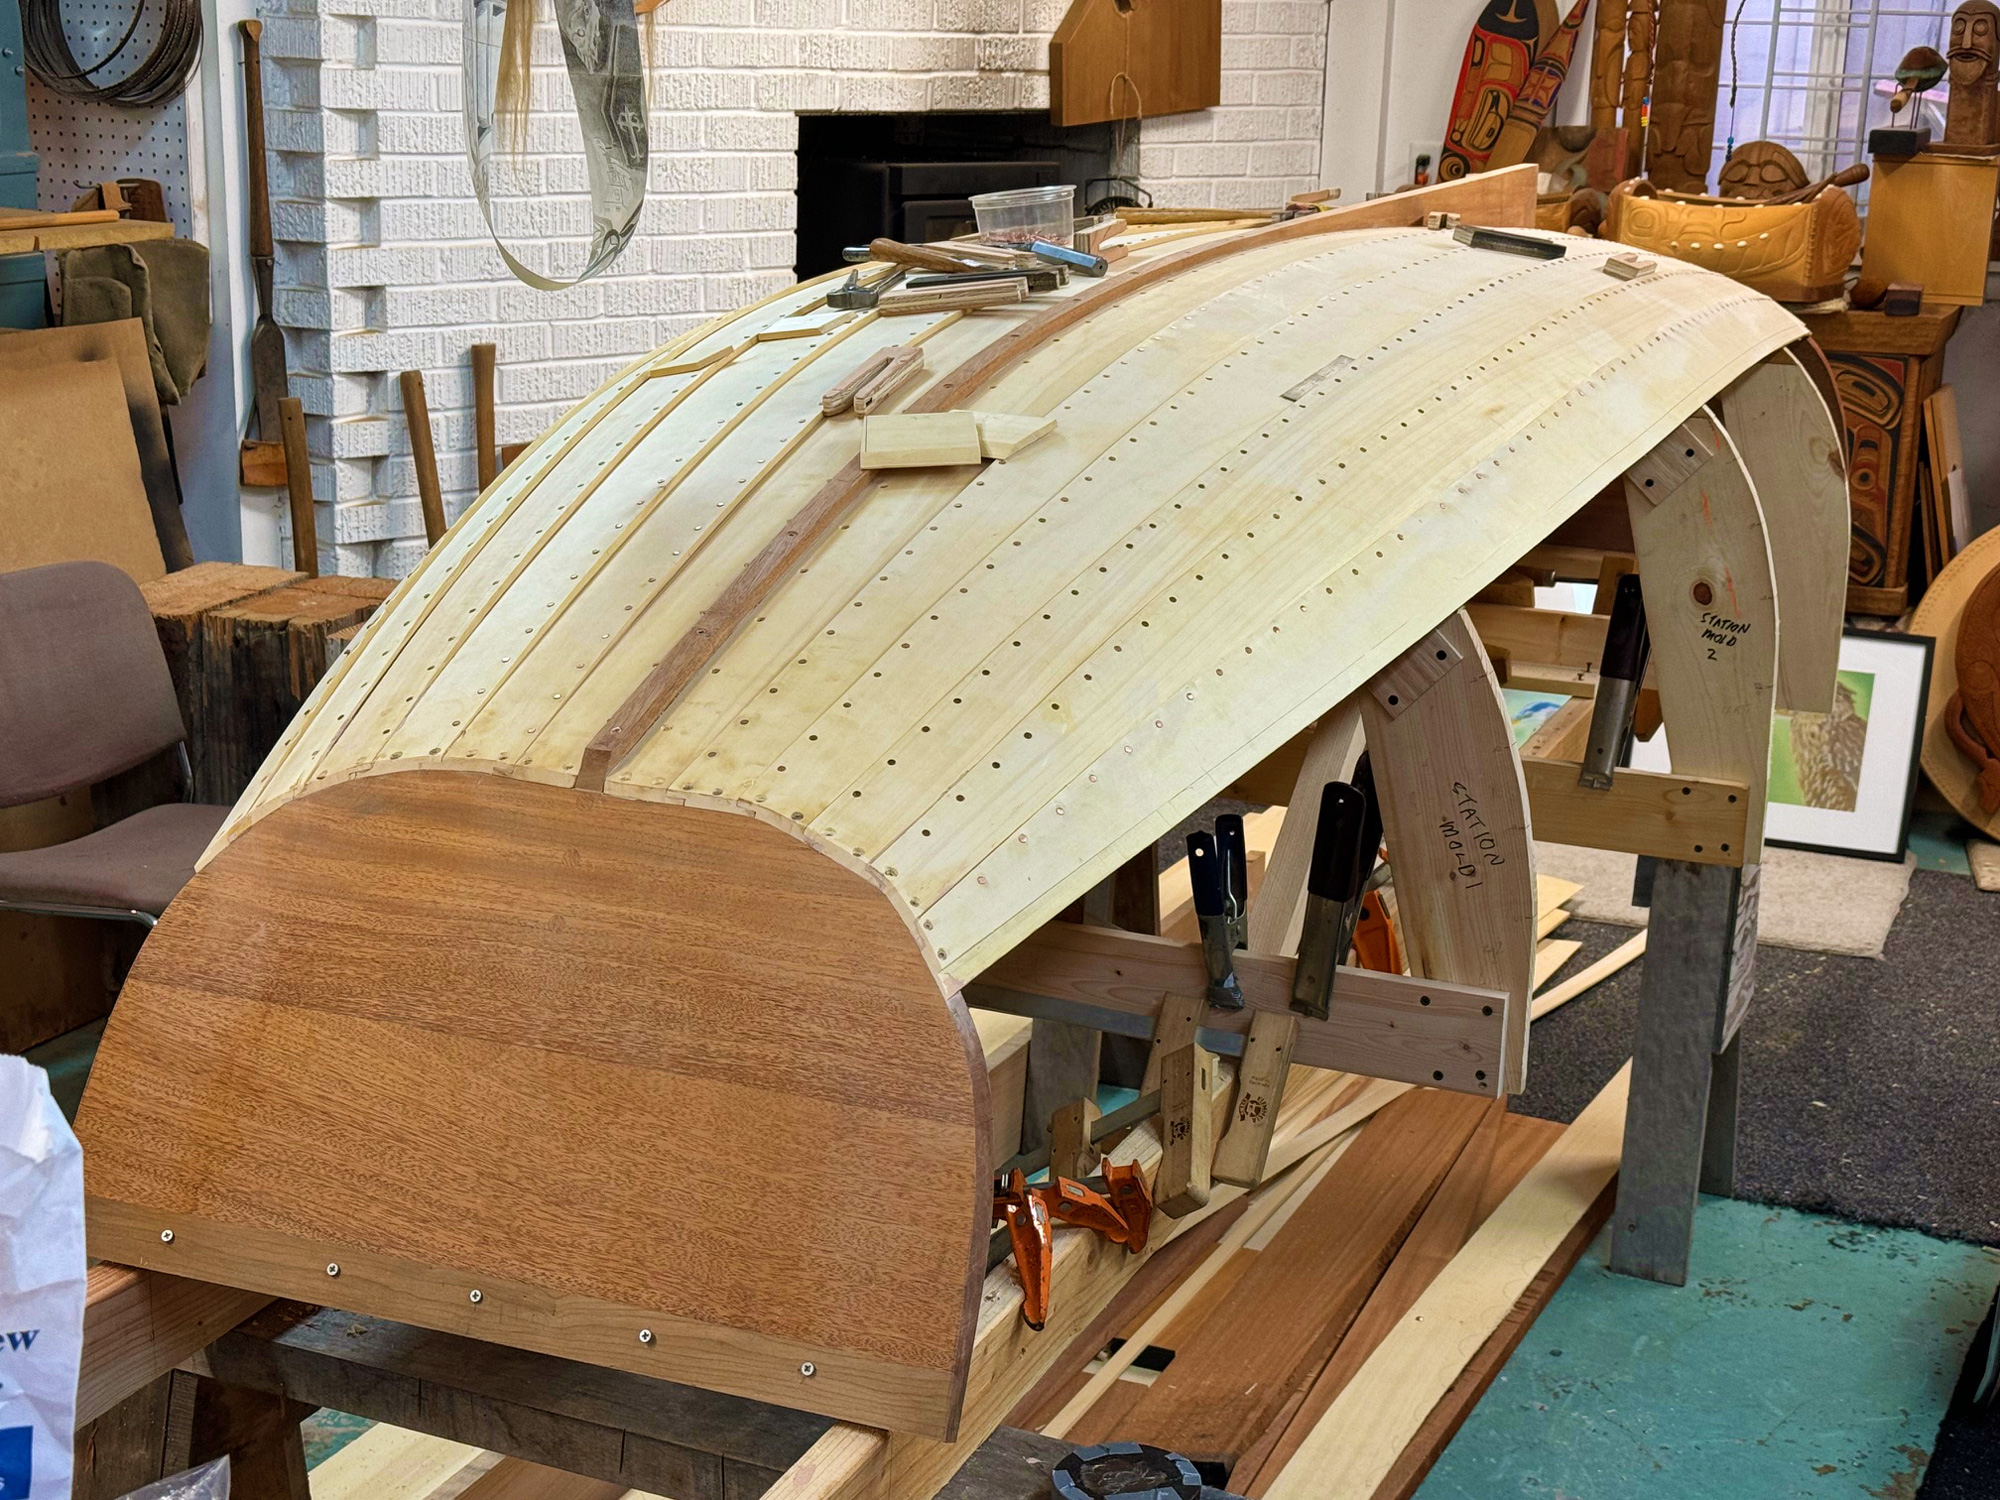
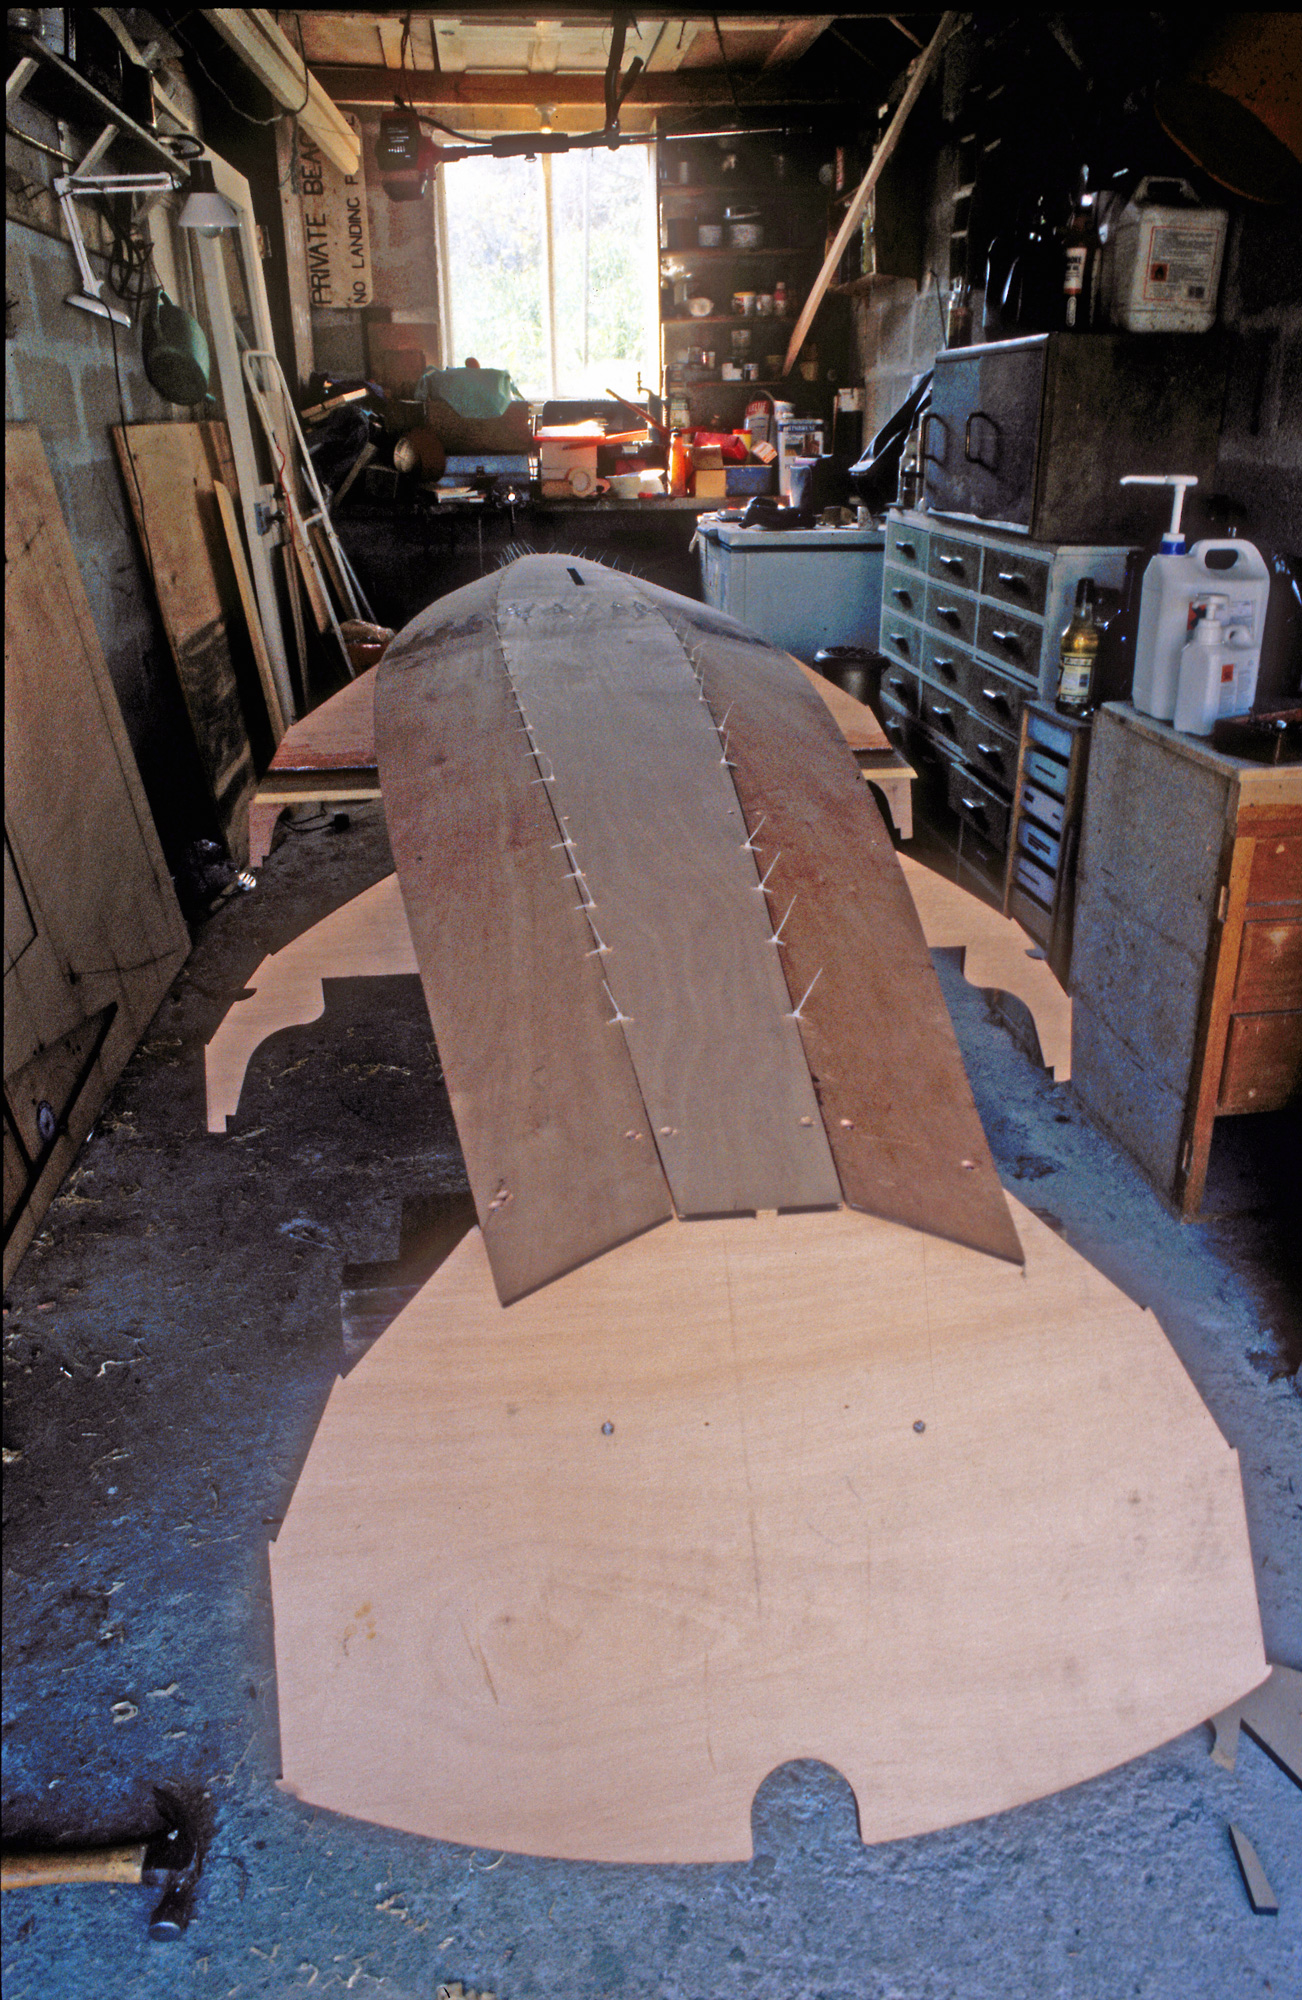
The 19′-long hull is built using three plywood panels per side and a further three for each side of the bottom. Glen-L suggests two different techniques to get each trio joined to achieve the required overall length: the butt joint and the scarf joint. I chose the former as the simpler of the two, knowing that the backing blocks would be hidden once I had fitted out the interior and the cockpit.
With the hull’s framework glued and fastened in place, I faired everything in preparation for receiving the 3⁄8″ marine-plywood side and bottom panels. All the hull panels need to be scarfed to provide the necessary lengths for the construction. The Glen-L instruction manual offers two methods for this—a scarf joint and a simple butt joint—and I chose the latter, reinforced with 8″-wide plywood butt blocks.
The instructions suggest installing the sides before the bottom, but I began with the bottom panels as I found it easier to seat the bottom battens and to manage their tight bends in the bow before fitting the sides. Attaching the side panels later caused no problems.
The basic hull now complete, there was much sanding and fairing required before I could apply the sheathing of 6-oz fiberglass cloth and epoxy, followed by primer, more filling and fairing, and then paint. To strike the waterline, I used a laser level.
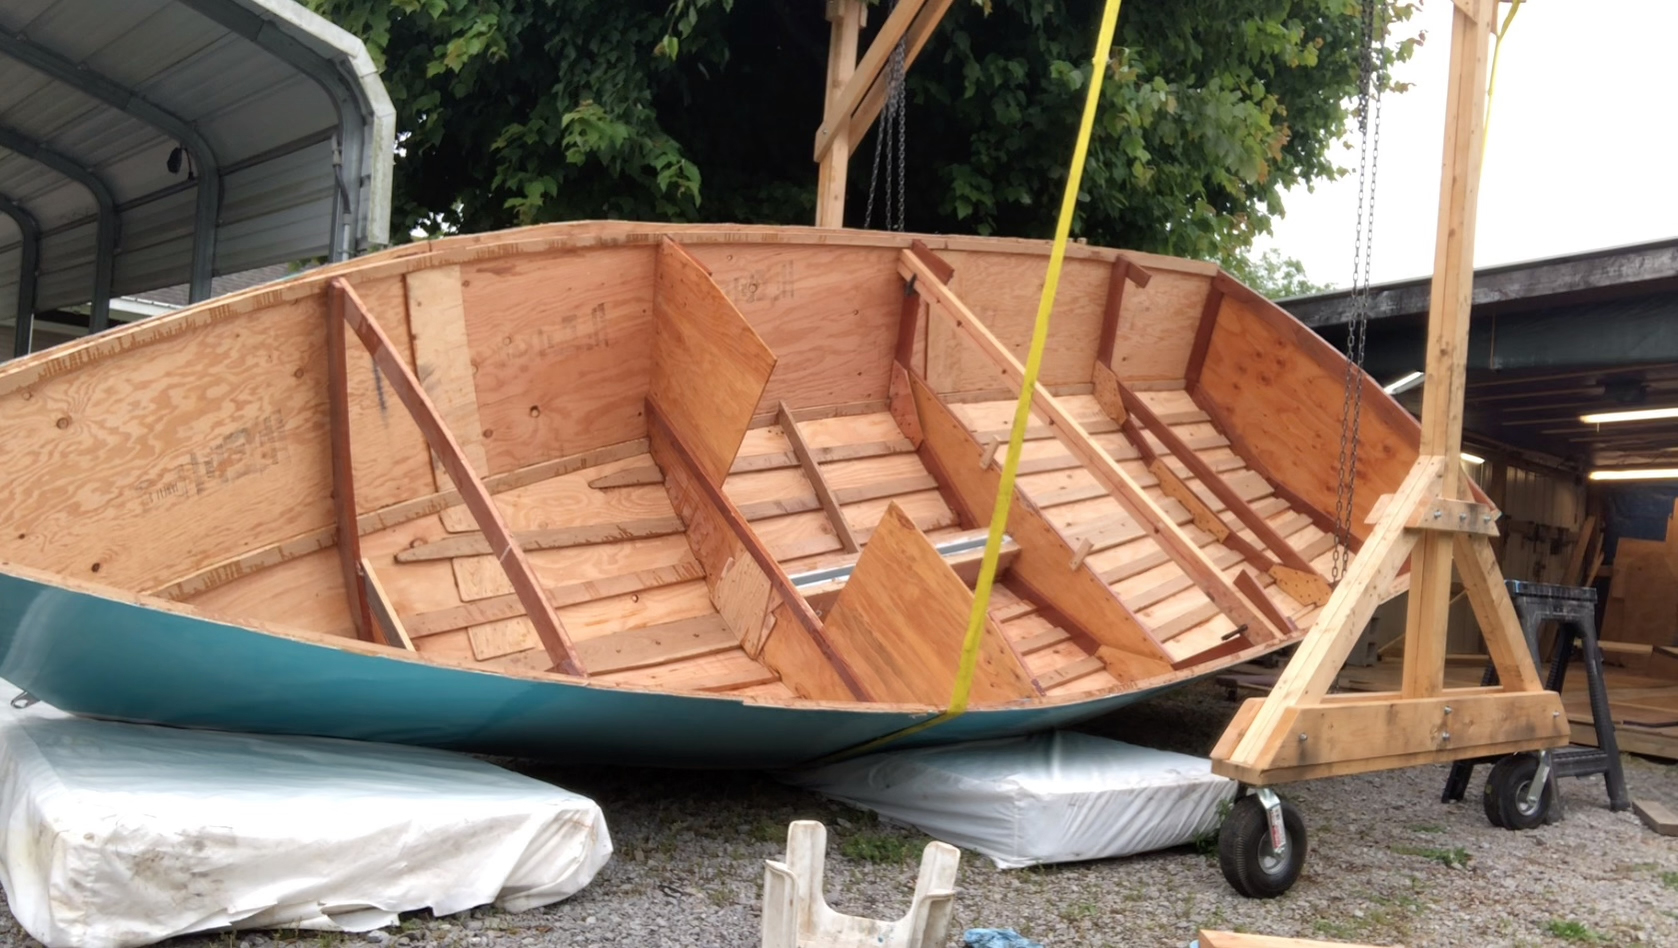
Once the exterior of the hull was complete, I turned it over—using the gantry I had made—so that I could move onto the decks and interior. Before I continued the build, however, I made the centerboard. The plans call for a 200-lb board cut from 1″-thick steel plate. I found a piece at a scrapyard that was about twice the size I needed (I would later use the offcuts as ballast).
Using the template, I traced the shape of the centerboard onto the steel and then cut it out with an angle grinder and many discs. After rounding the edges and carefully boring through the holes for the pivot hinge pin and lifting mechanism attachment, I coated the steel with a protective layer of cold-galvanizing paint. I installed the centerboard later by lowering it through the companionway hatch and into the trunk (I again used the gantry to turn over the hull). Once the centerboard is installed—with the stainless-steel cable led to a winch that is operated from the cockpit—the trunk is sealed with a top plate of 1″ white oak.
I constructed a simple but sturdy wooden gantry so that I could lift and rotate the hull on my own. While it worked, in hindsight I would have had more control if I had built two gantries. Thanks to the frames, bulkhead, transom, and temporary cross braces, the hull was remarkably stiff even at this early stage.
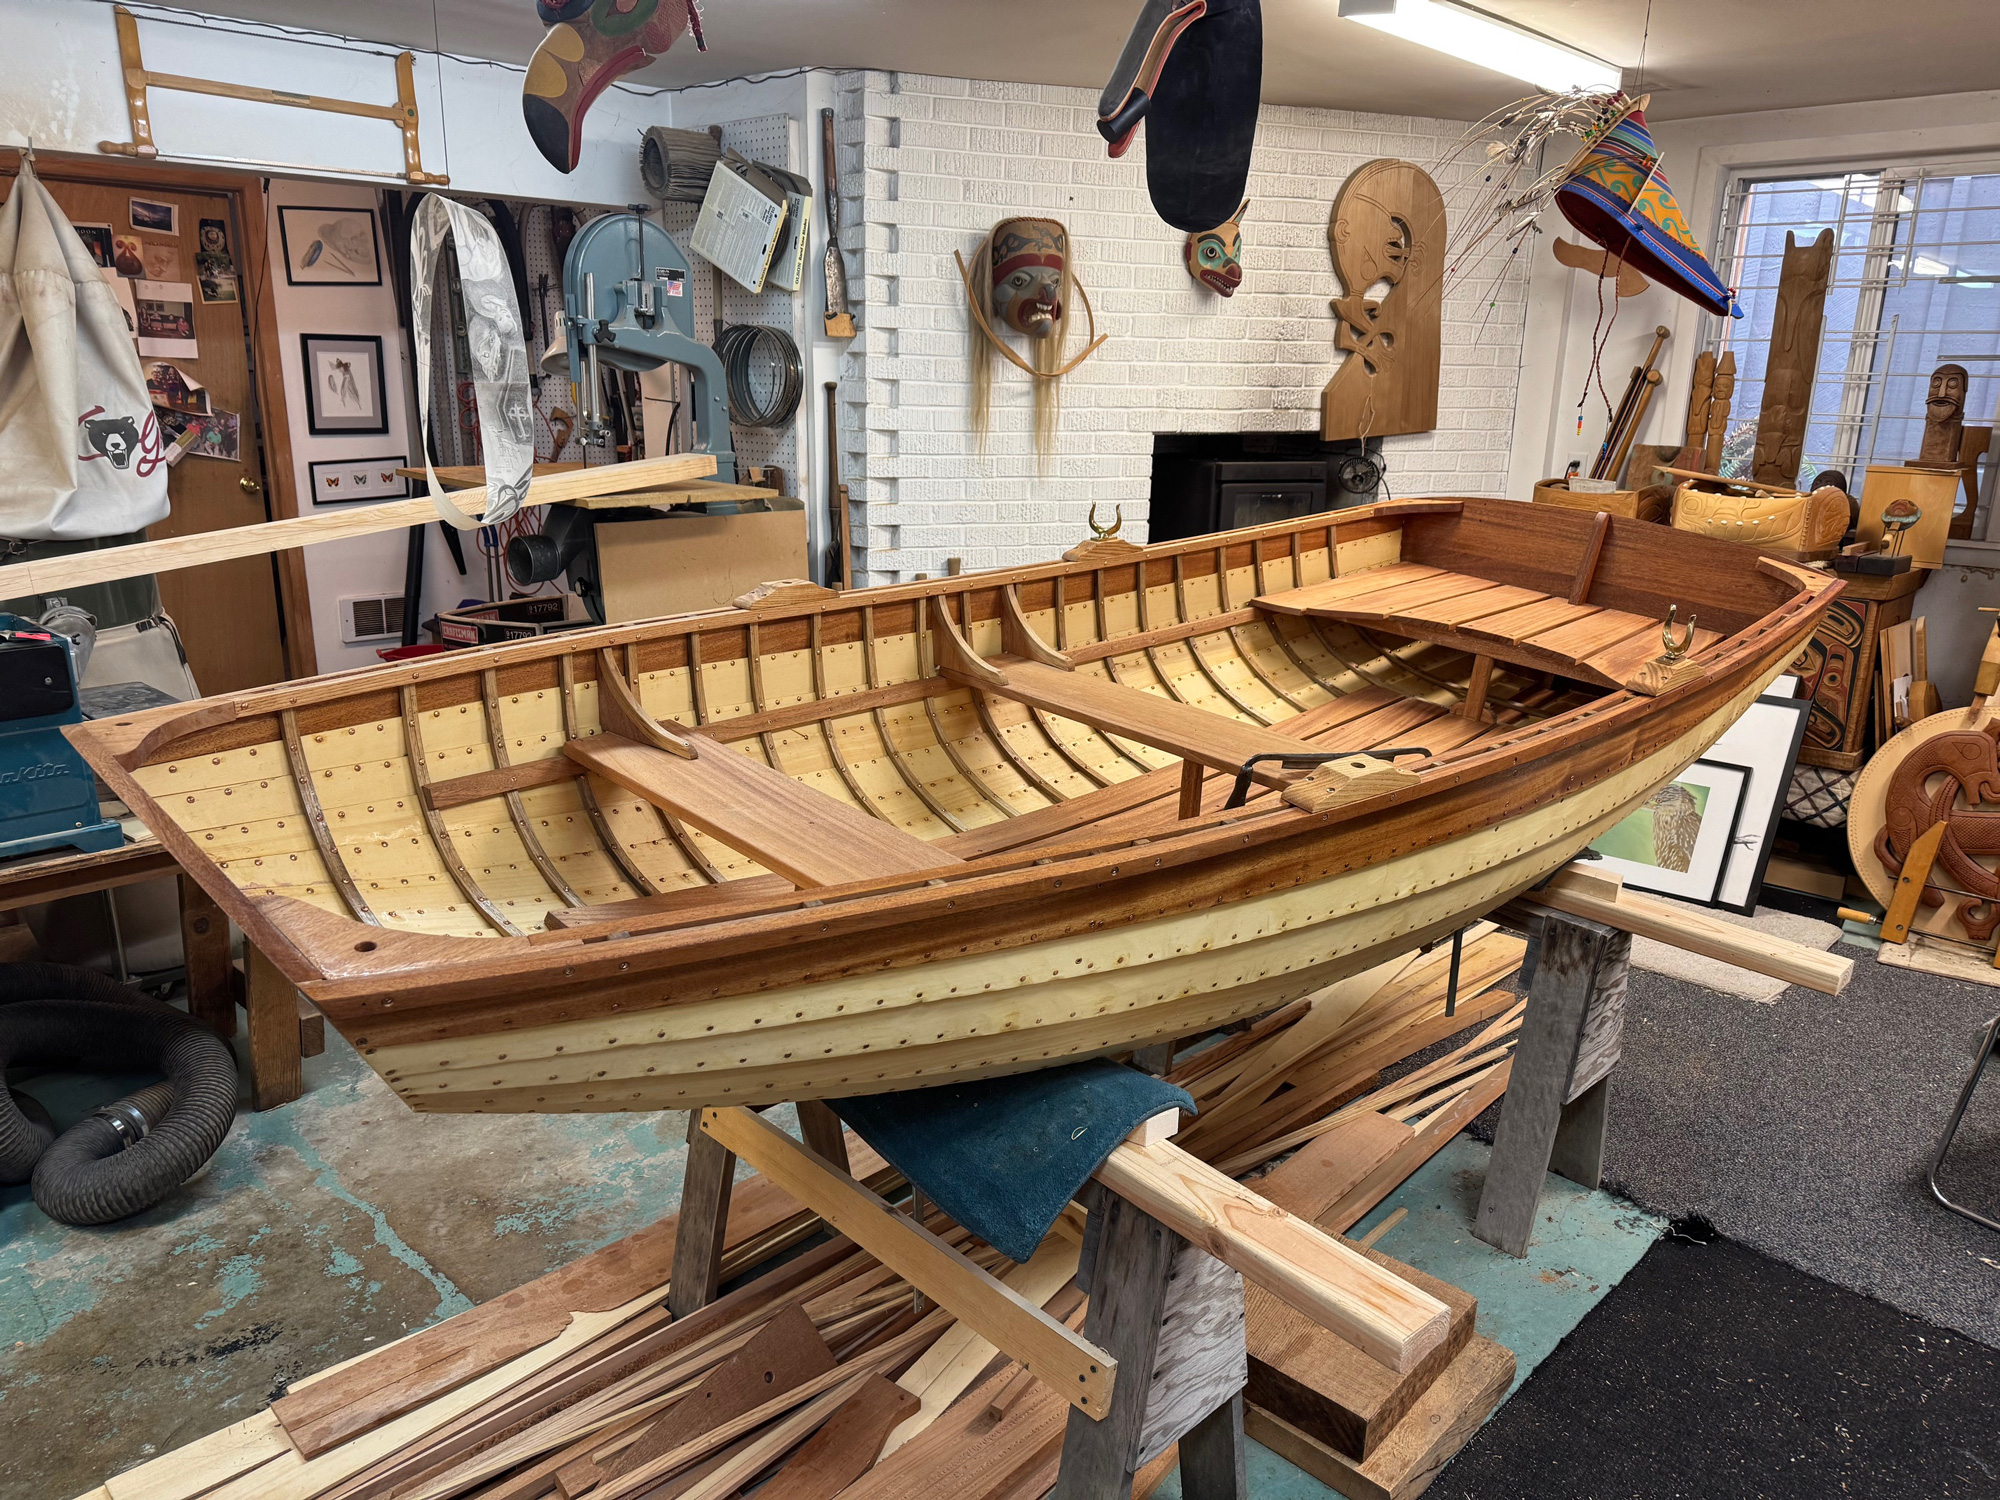
Building the Glen-L 19’s decks and interior
My next task was to seal and prime the inside of the hull. Then, after framing and installing the plywood decks as described in the plans, I installed the sole boards and built out the cockpit benches. Perhaps the hardest part of the build is installing the cockpit and cabin superstructure. Both the coaming and the coach-roof beams are in 5/4 mahogany and require copious bending to achieve the desired shape and dimensions. With hindsight, I would recommend a steambox, but I was ultimately able to accomplish all the bends with some creative bracing, clamping, and leverage.
All the exposed plywood surfaces were sheathed with fiberglass and epoxy prior to being finished. The plans show one long portlight on each cabin side. I chose to install three smaller acrylic portlights set in rabbets routed into the coach roof’s wooden frames. Glen-L suggests bedding and sealing with mastic and aluminum strips, but instead I used 3M VHB foam tape and then sealed them with the recommended silicone caulk.
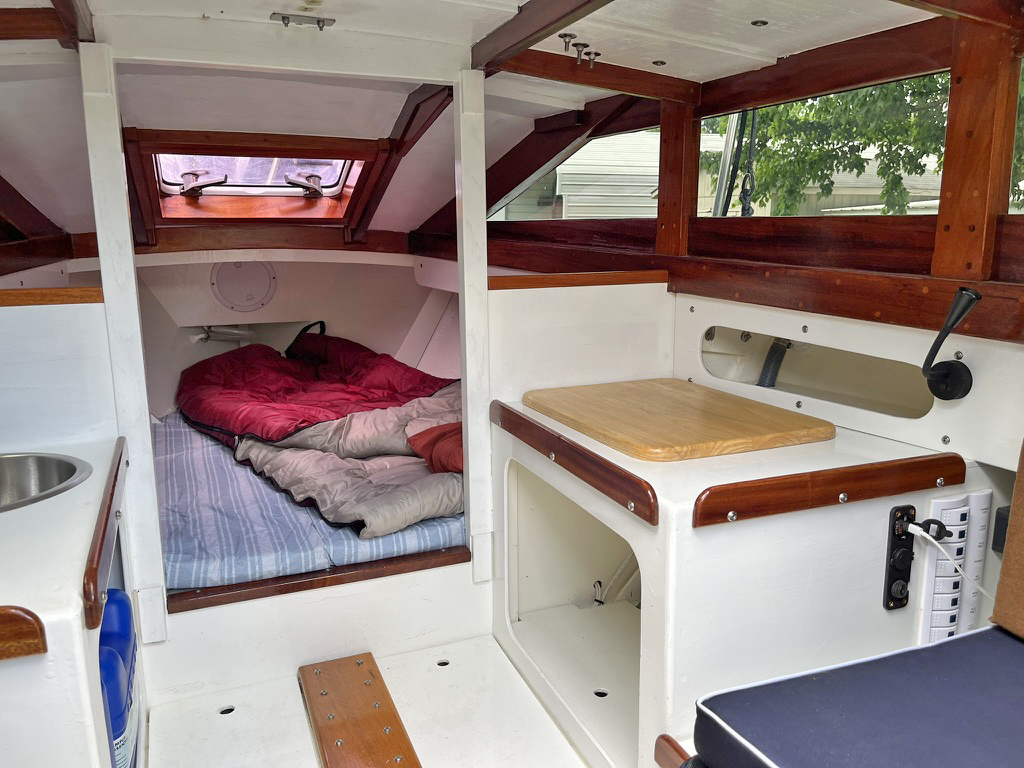
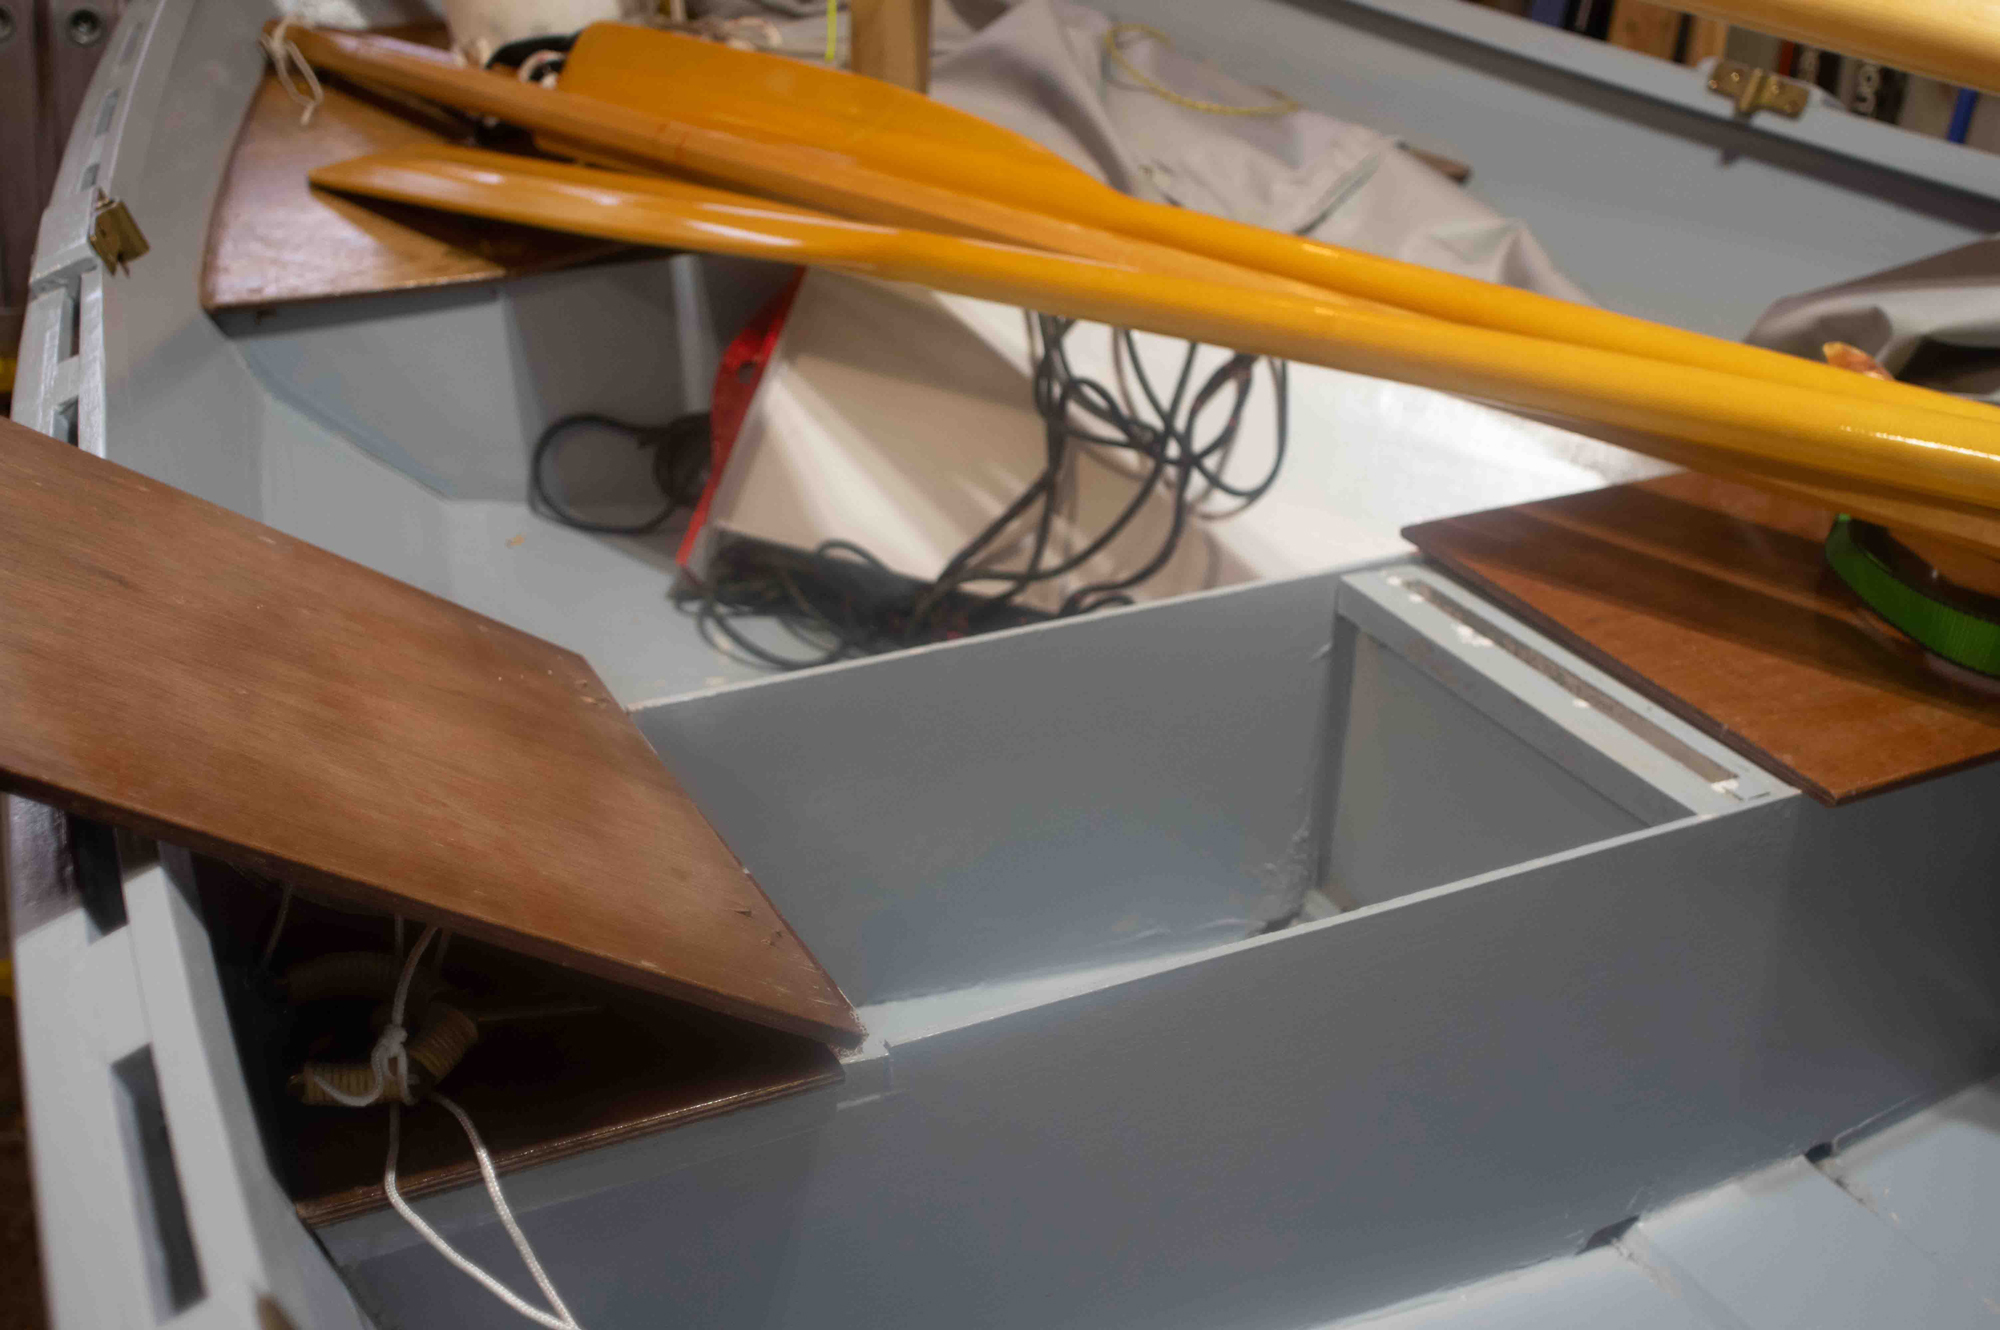
For the interior layout, I followed the Glen-L plans: a forward V-berth, aft of which are open cabinets to port and starboard with worktops above, two seats either side of the companionway, and two 6′-long but narrow quarter berths beneath the cockpit side benches. The quarter berths would be suitable for a child or pet, but I use them for extra storage and a place to keep a Porta Potti.
Beneath all the berths are sizable lockers accessed by simple lifting hatches, and similar hatches in the cabin sole provide easy access to the bilge. In the open cabinet to port I installed a sink with hand-pump faucet. There is good headroom when seated in the cabin, and the deck-stepped mast is supported by a reinforced frame built into the coach roof so there is no need for a mast post below; this greatly improves the available cabin space. Thanks to the large portlights, the cabin has plenty of natural light.
The cabin is light and airy and, with no mast post, remarkably spacious. To port, I added a sink with hand-pump faucet, but as I cook on a portable camping propane stove out in the cockpit, the starboard countertop is free for meal prep and other work.
The self-draining cockpit is 5′ 6″ wide by 6′ long. The benches slope down to the cockpit sides, making seating comfortable, and there is room for four adults at a pinch, or two with ample space. There is more storage beneath the cockpit seats—accessed through sealed hatches in the seat tops—and the mechanism for the centerboard is mounted through the cabin bulkhead, so that it can be reached by the person on the helm without releasing the tiller.
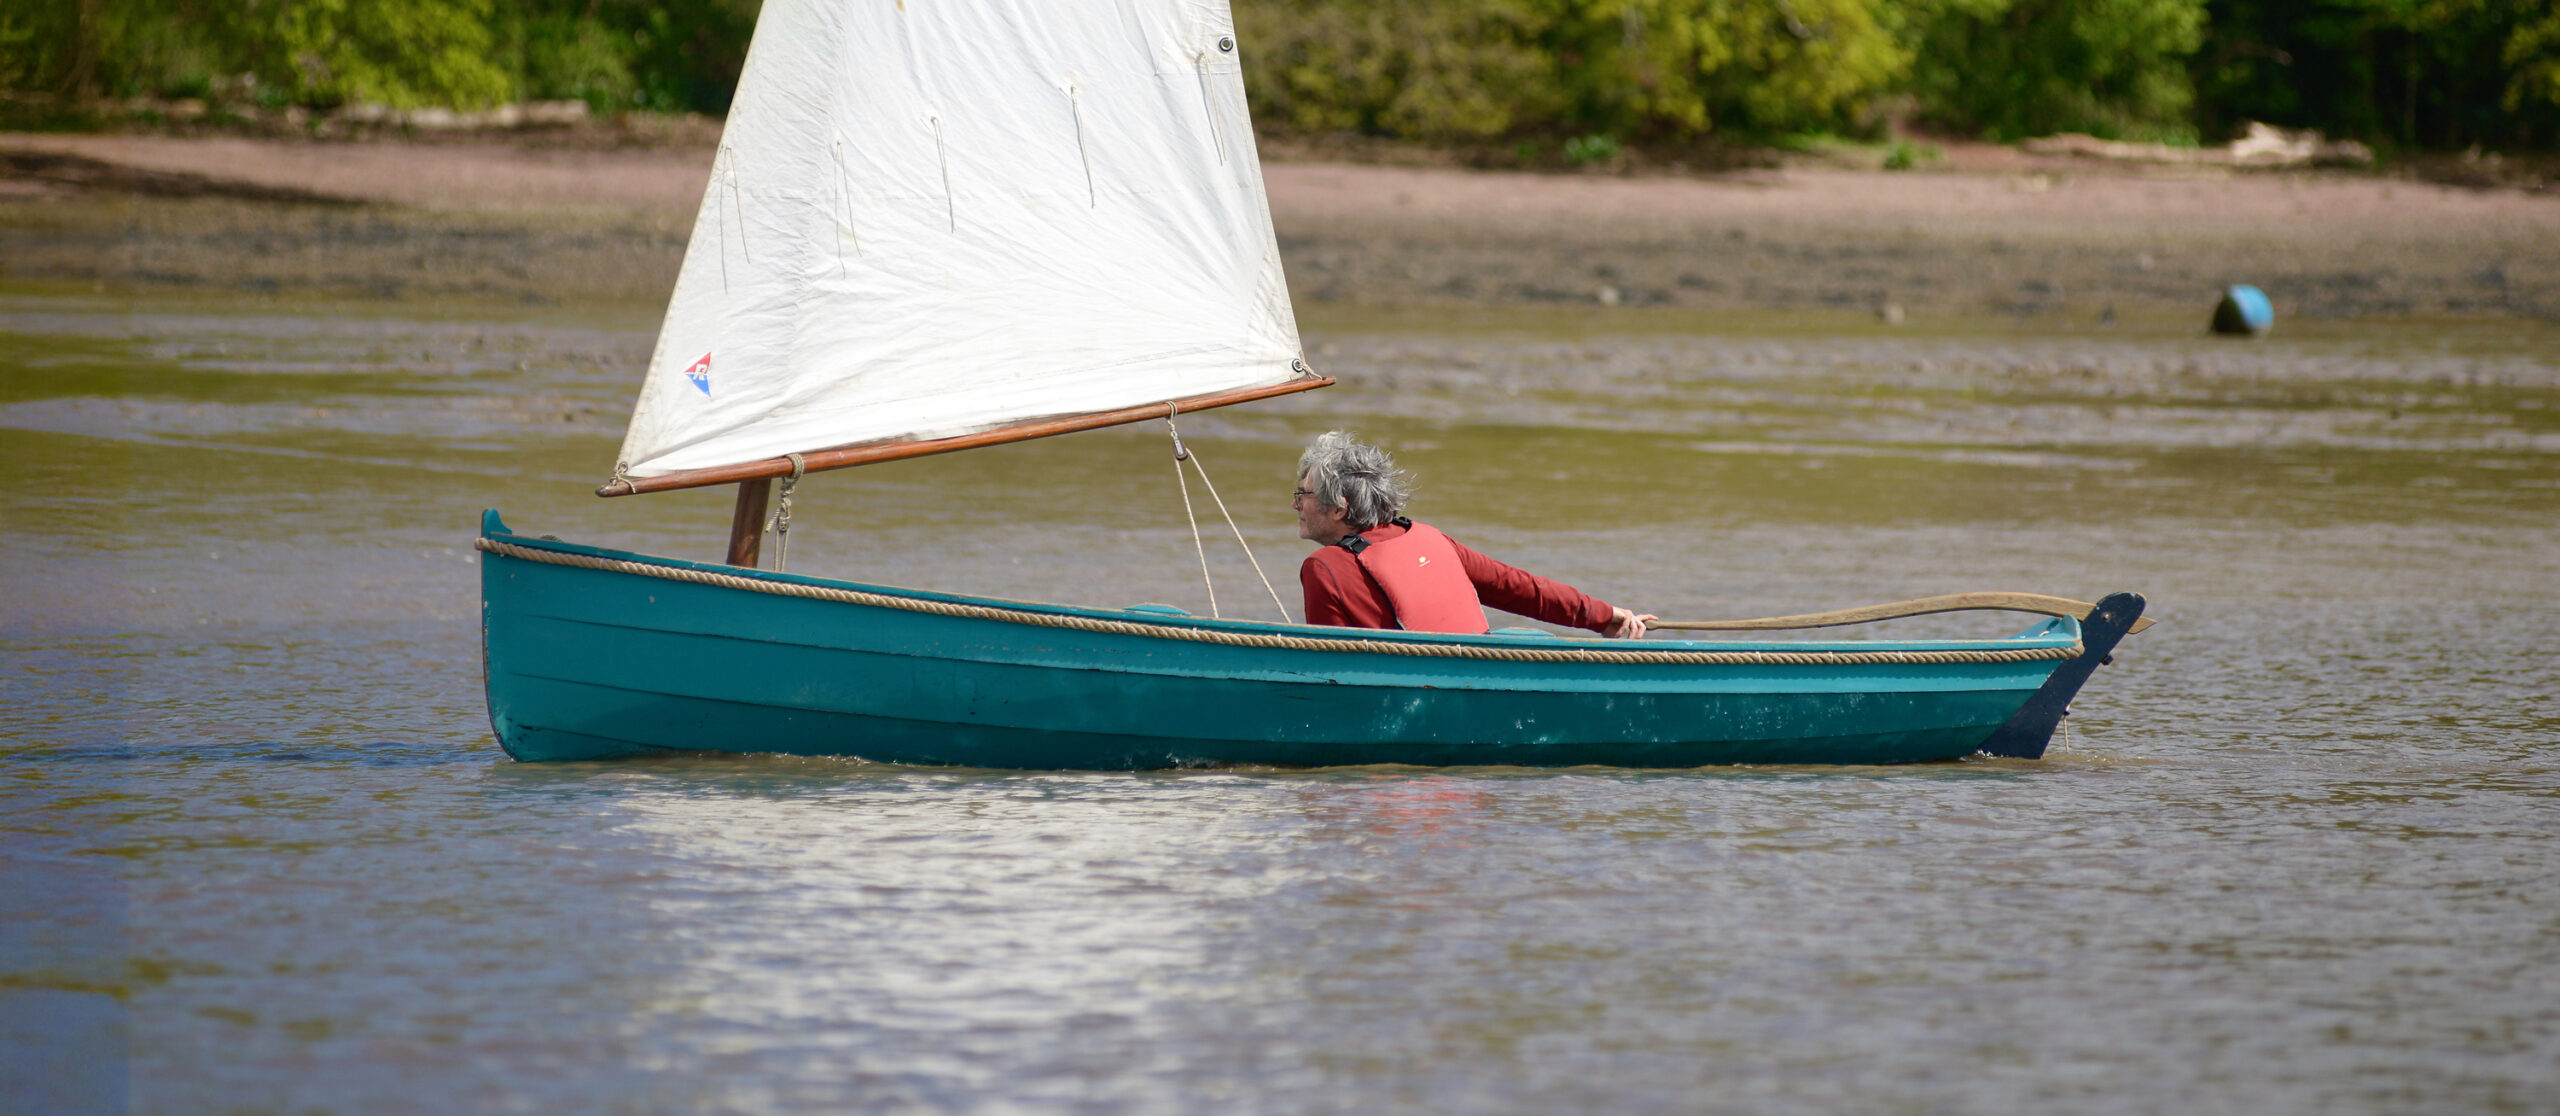
The Glen-L 19 on the water
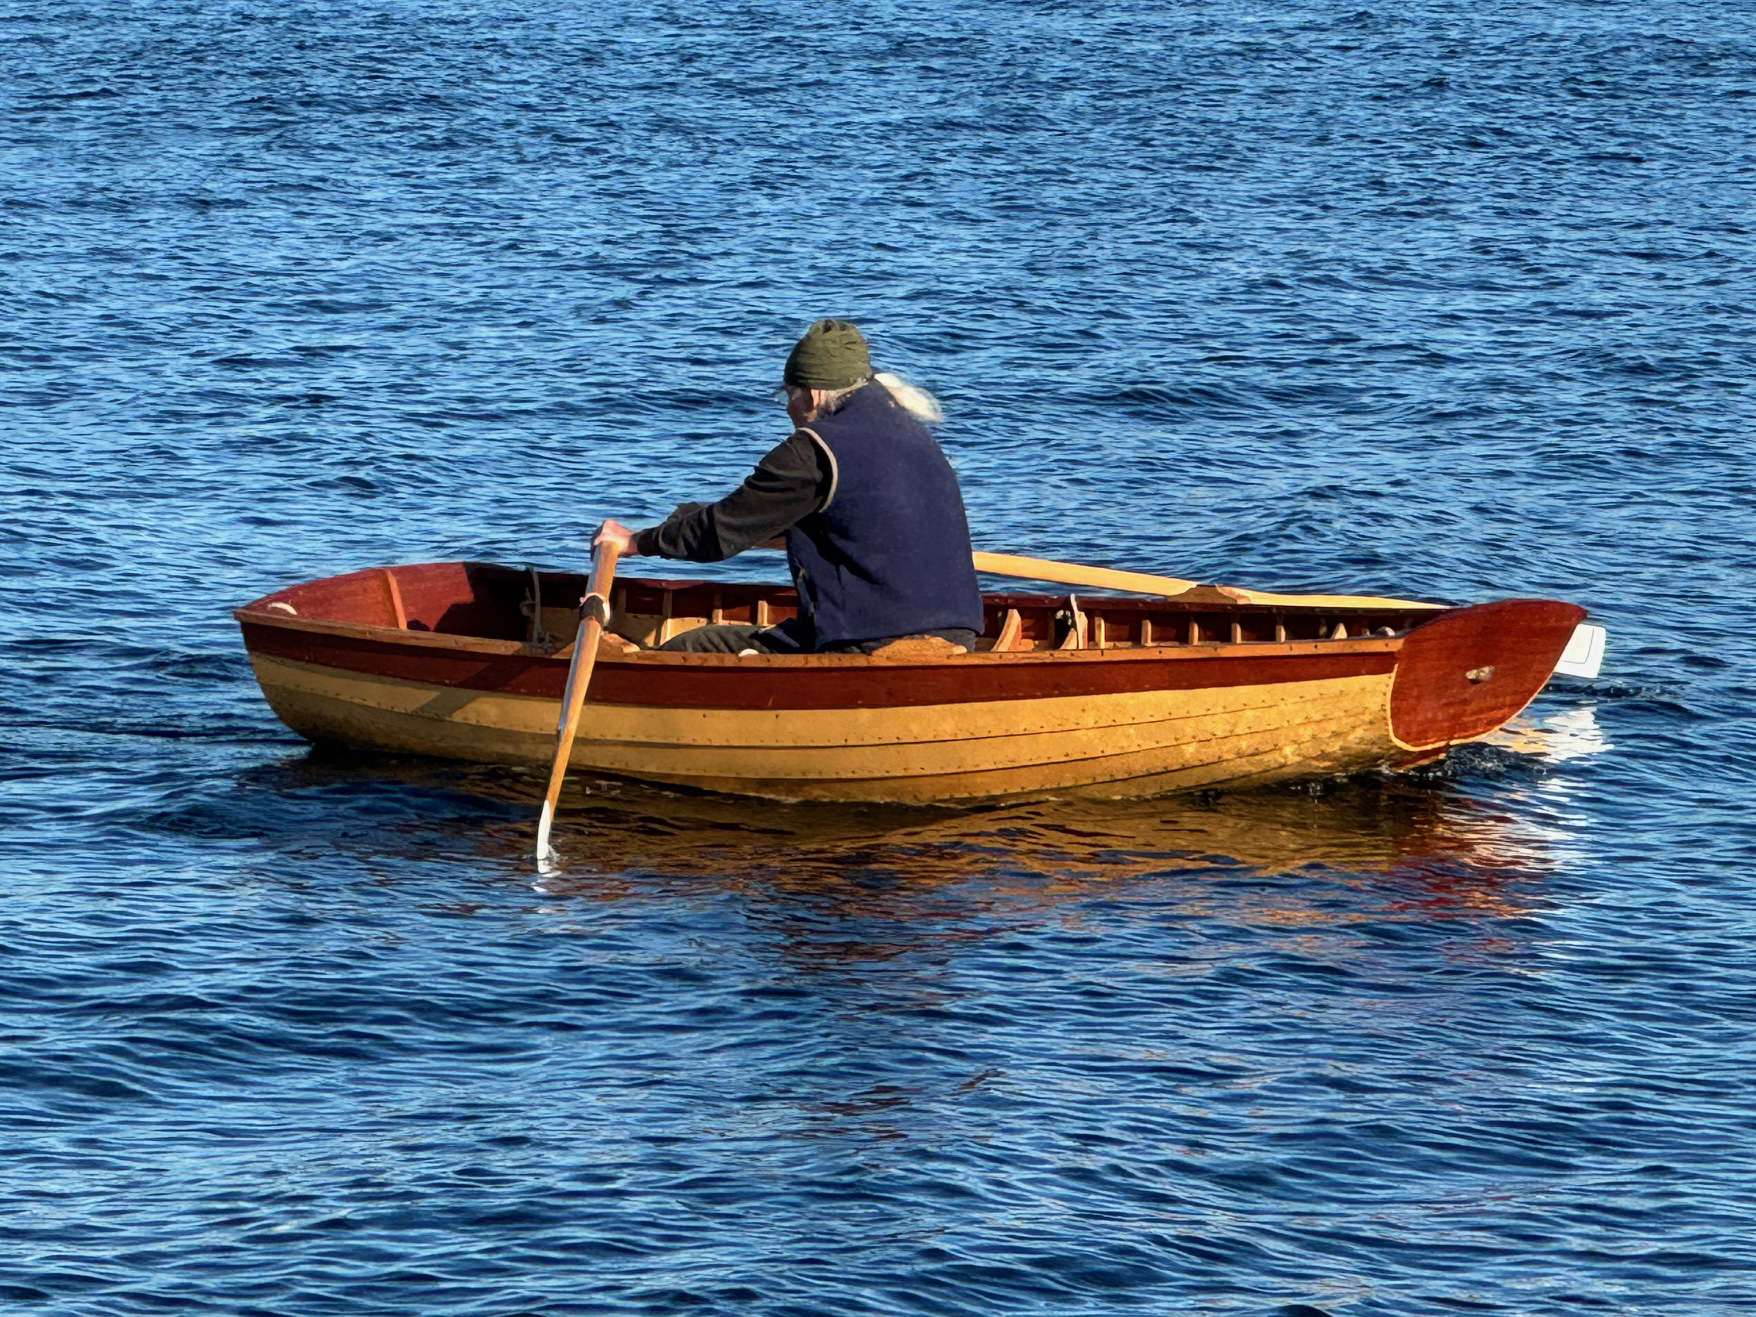
Initially I “splashed” the boat with no rigging or mast. I wanted to see how it maneuvered and if my 3.5-hp four-stroke Mercury outboard would have sufficient power. I was pleasantly pleased on both counts. At half throttle we cruised at 2.5 knots and at full throttle achieved 5 knots. The boat was very responsive to the rudder.
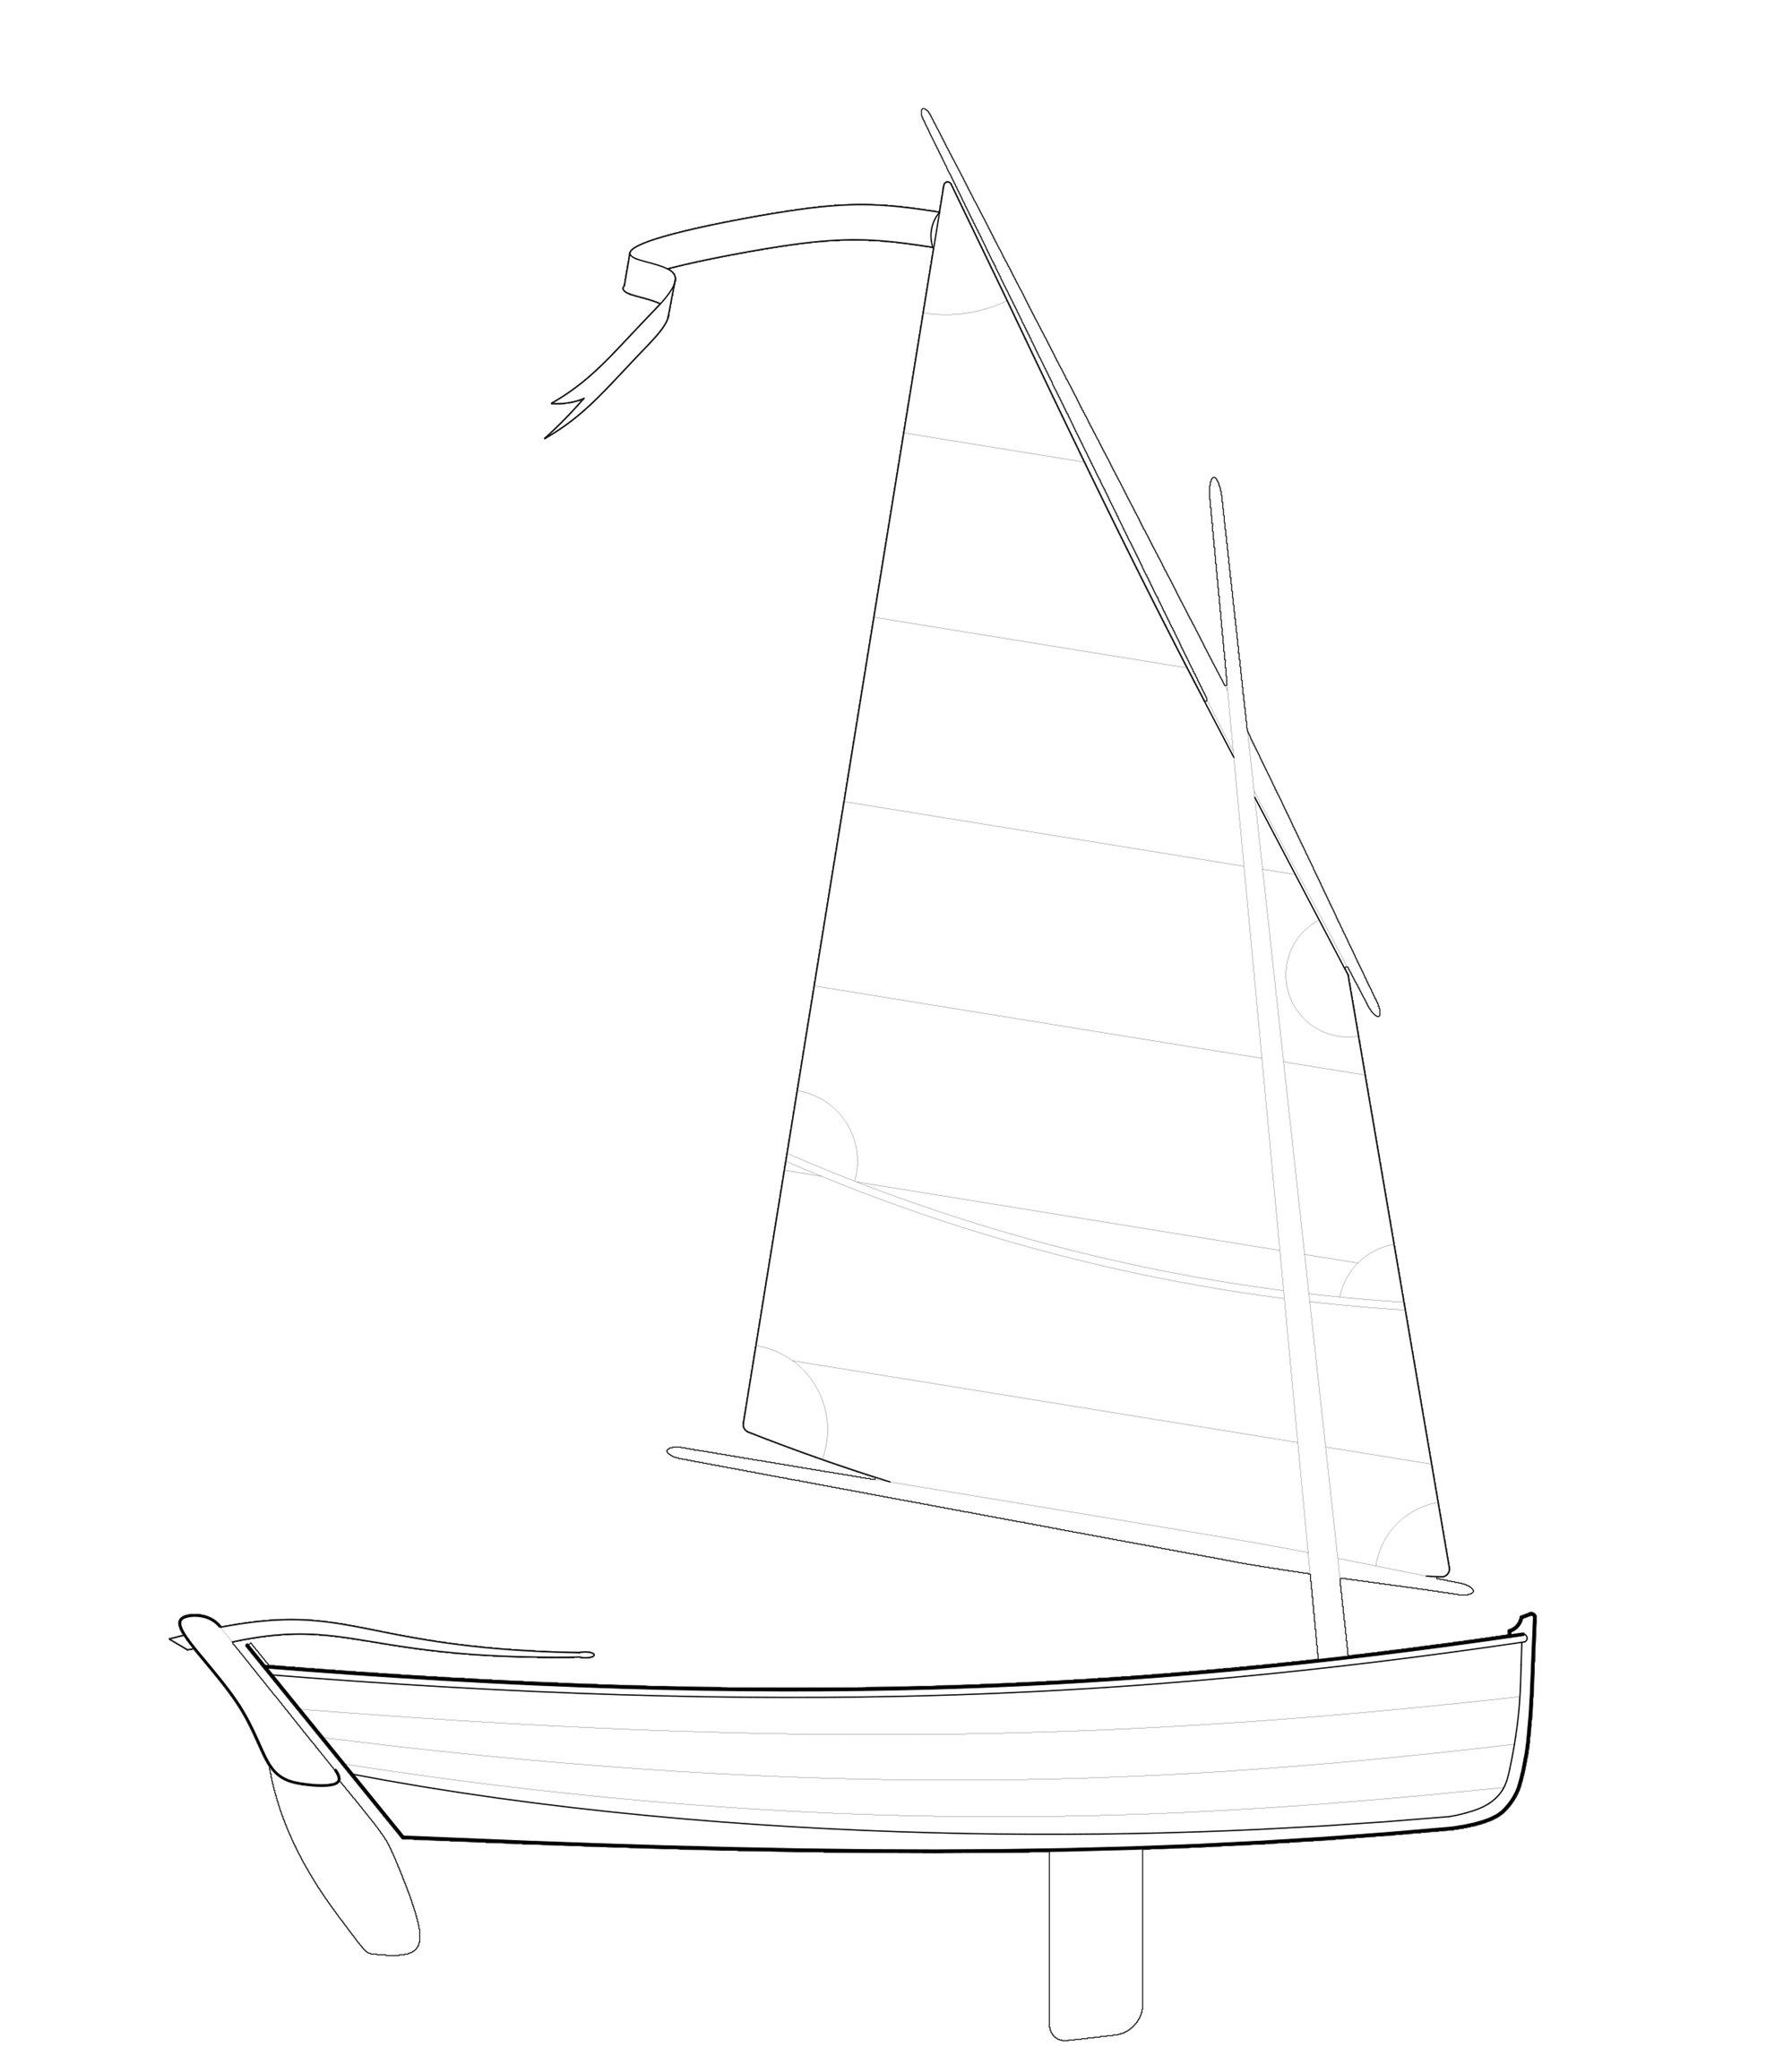
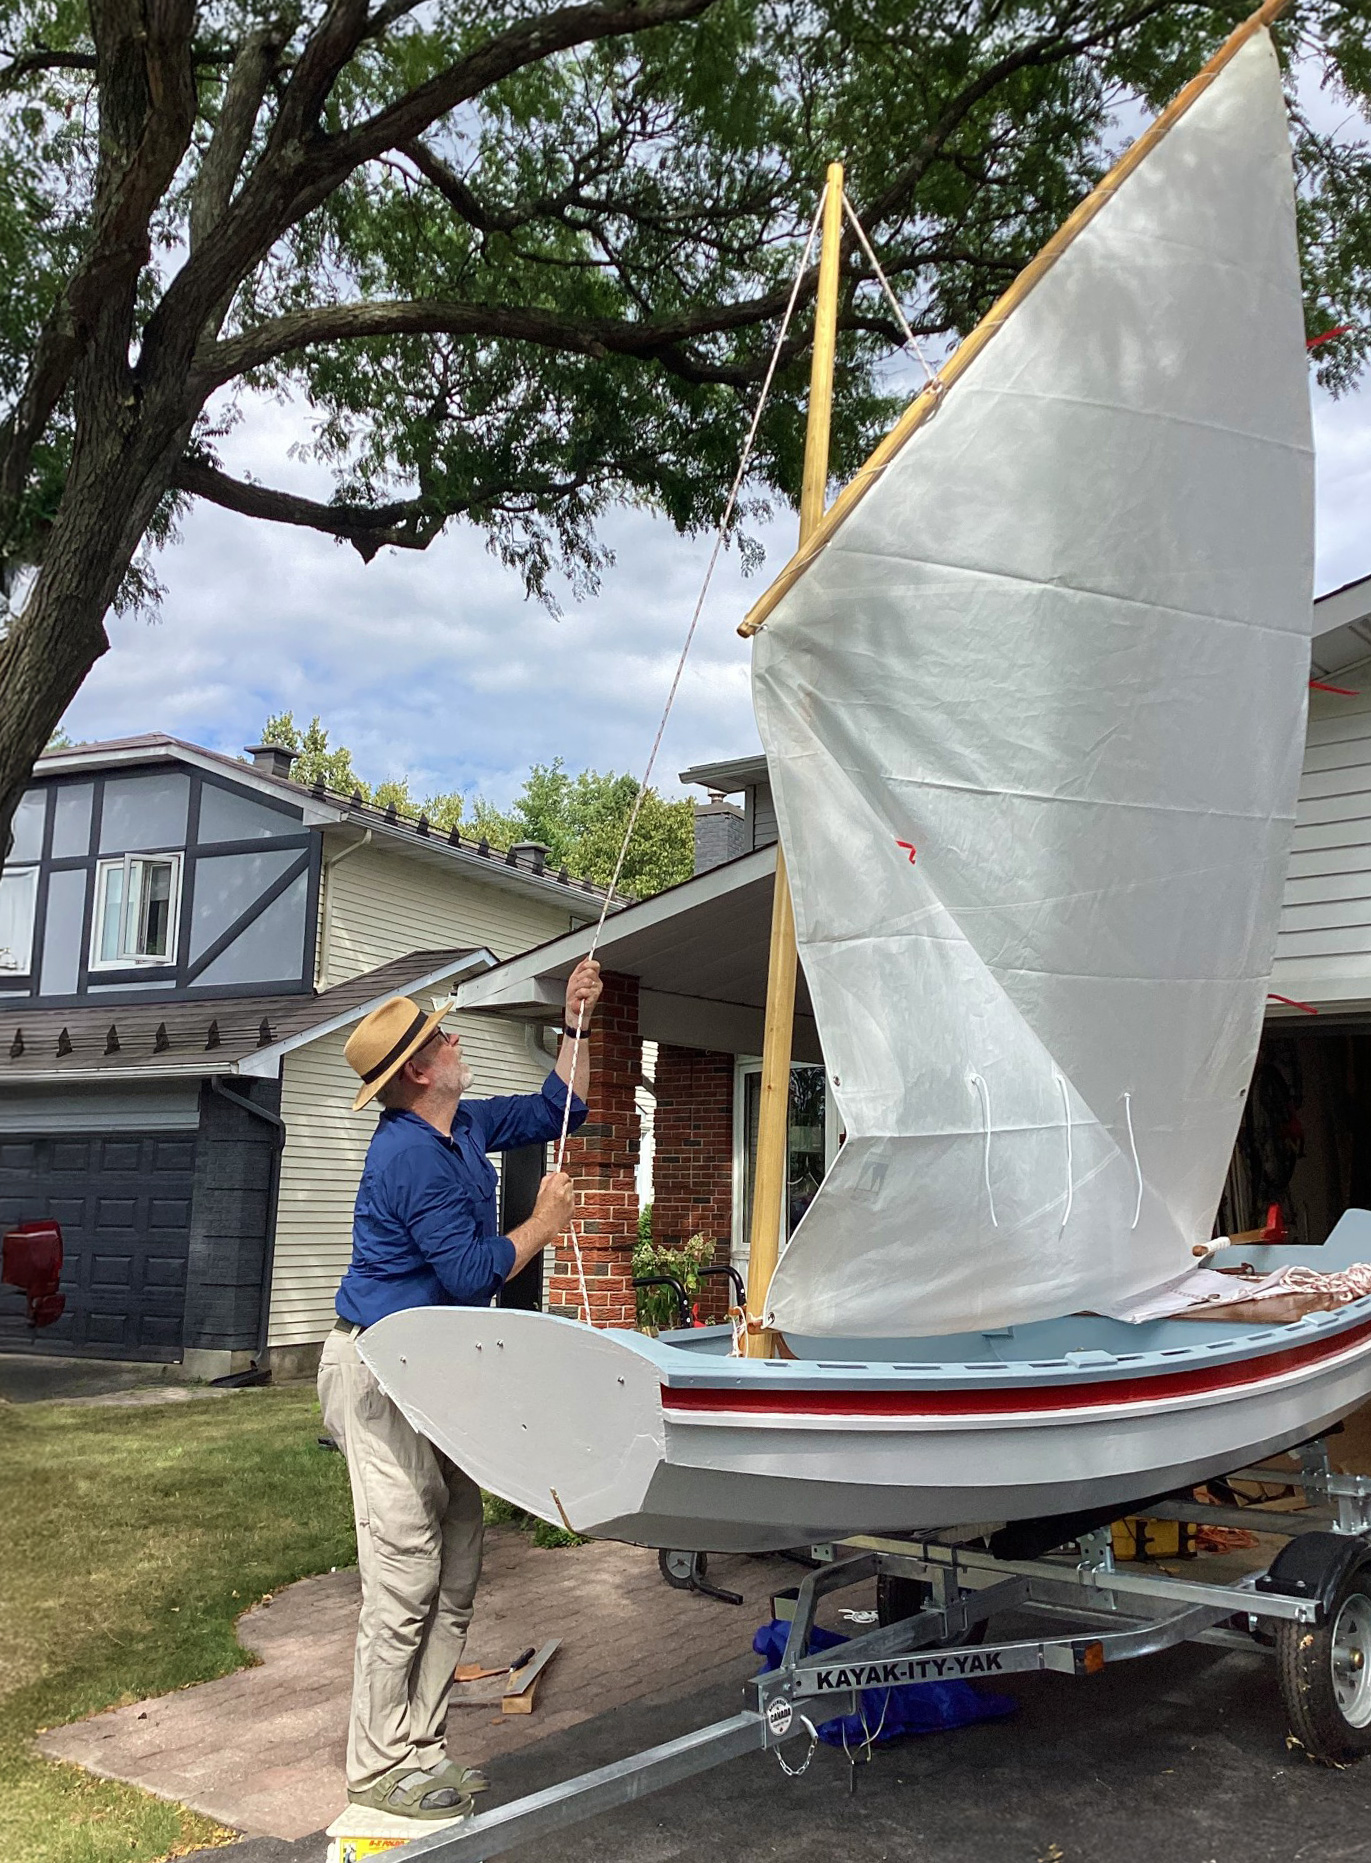
But I was eager to go sailing, and so continued with the construction of the wooden spars according to the Glen-L plans. For reasons of cost, I used cypress rather than the recommended Sitka spruce or Douglas fir. The 22′-long mast (which I extended to 22′ 8″ to give greater headroom beneath the boom) is box-sectioned, while the 8′ boom is solid.
I dry-sail the Glen-L 19, often launching singlehandedly from a trailer. My original standing rigging was steel cable—as suggested in the plans—but with the frequent stepping and unstepping of the mast, I found this material hard on the boat’s and spars’ finishes, as well as being difficult to stow. After one season, I switched to Dyneema for all the standing rigging and have been delighted with the change. It is easy to splice—with no special tools needed—and extremely manageable. When the mast is lowered, I simply wrap the shrouds around it. I bought stock sails from Rolly Tasker Sails, available in the U.S. through The Sail Warehouse.
Chris Atwood
The Glen-L will cruise at 2.5 knots with the transom-mounted 3.5-hp four-stroke outboard at half throttle; at full throttle the speed rises to 5 knots.
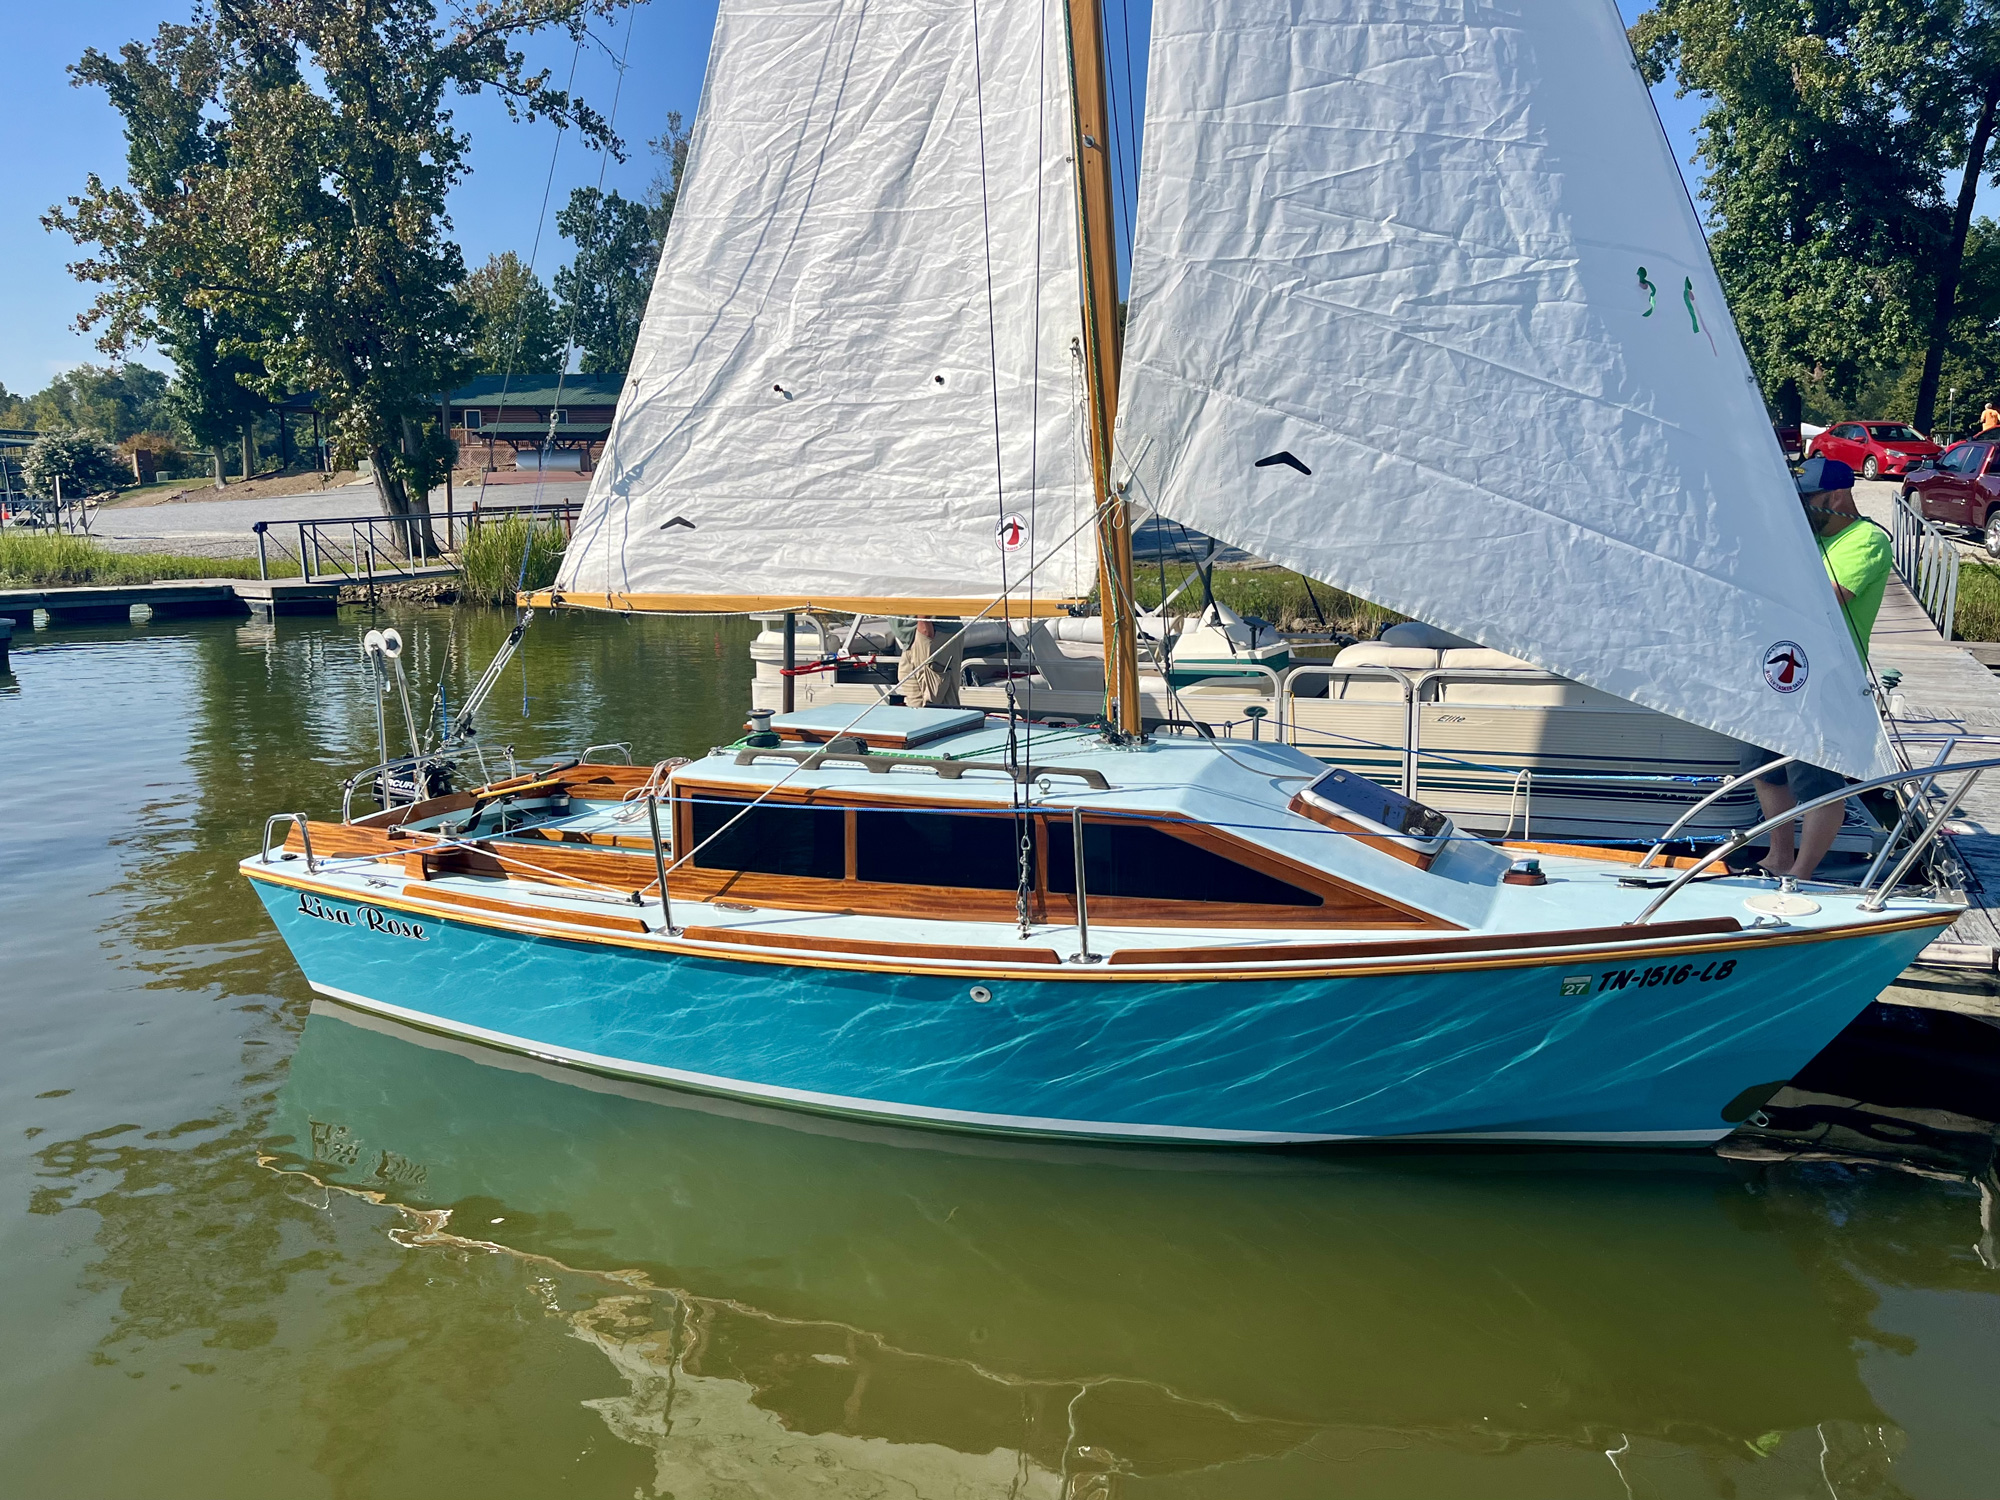
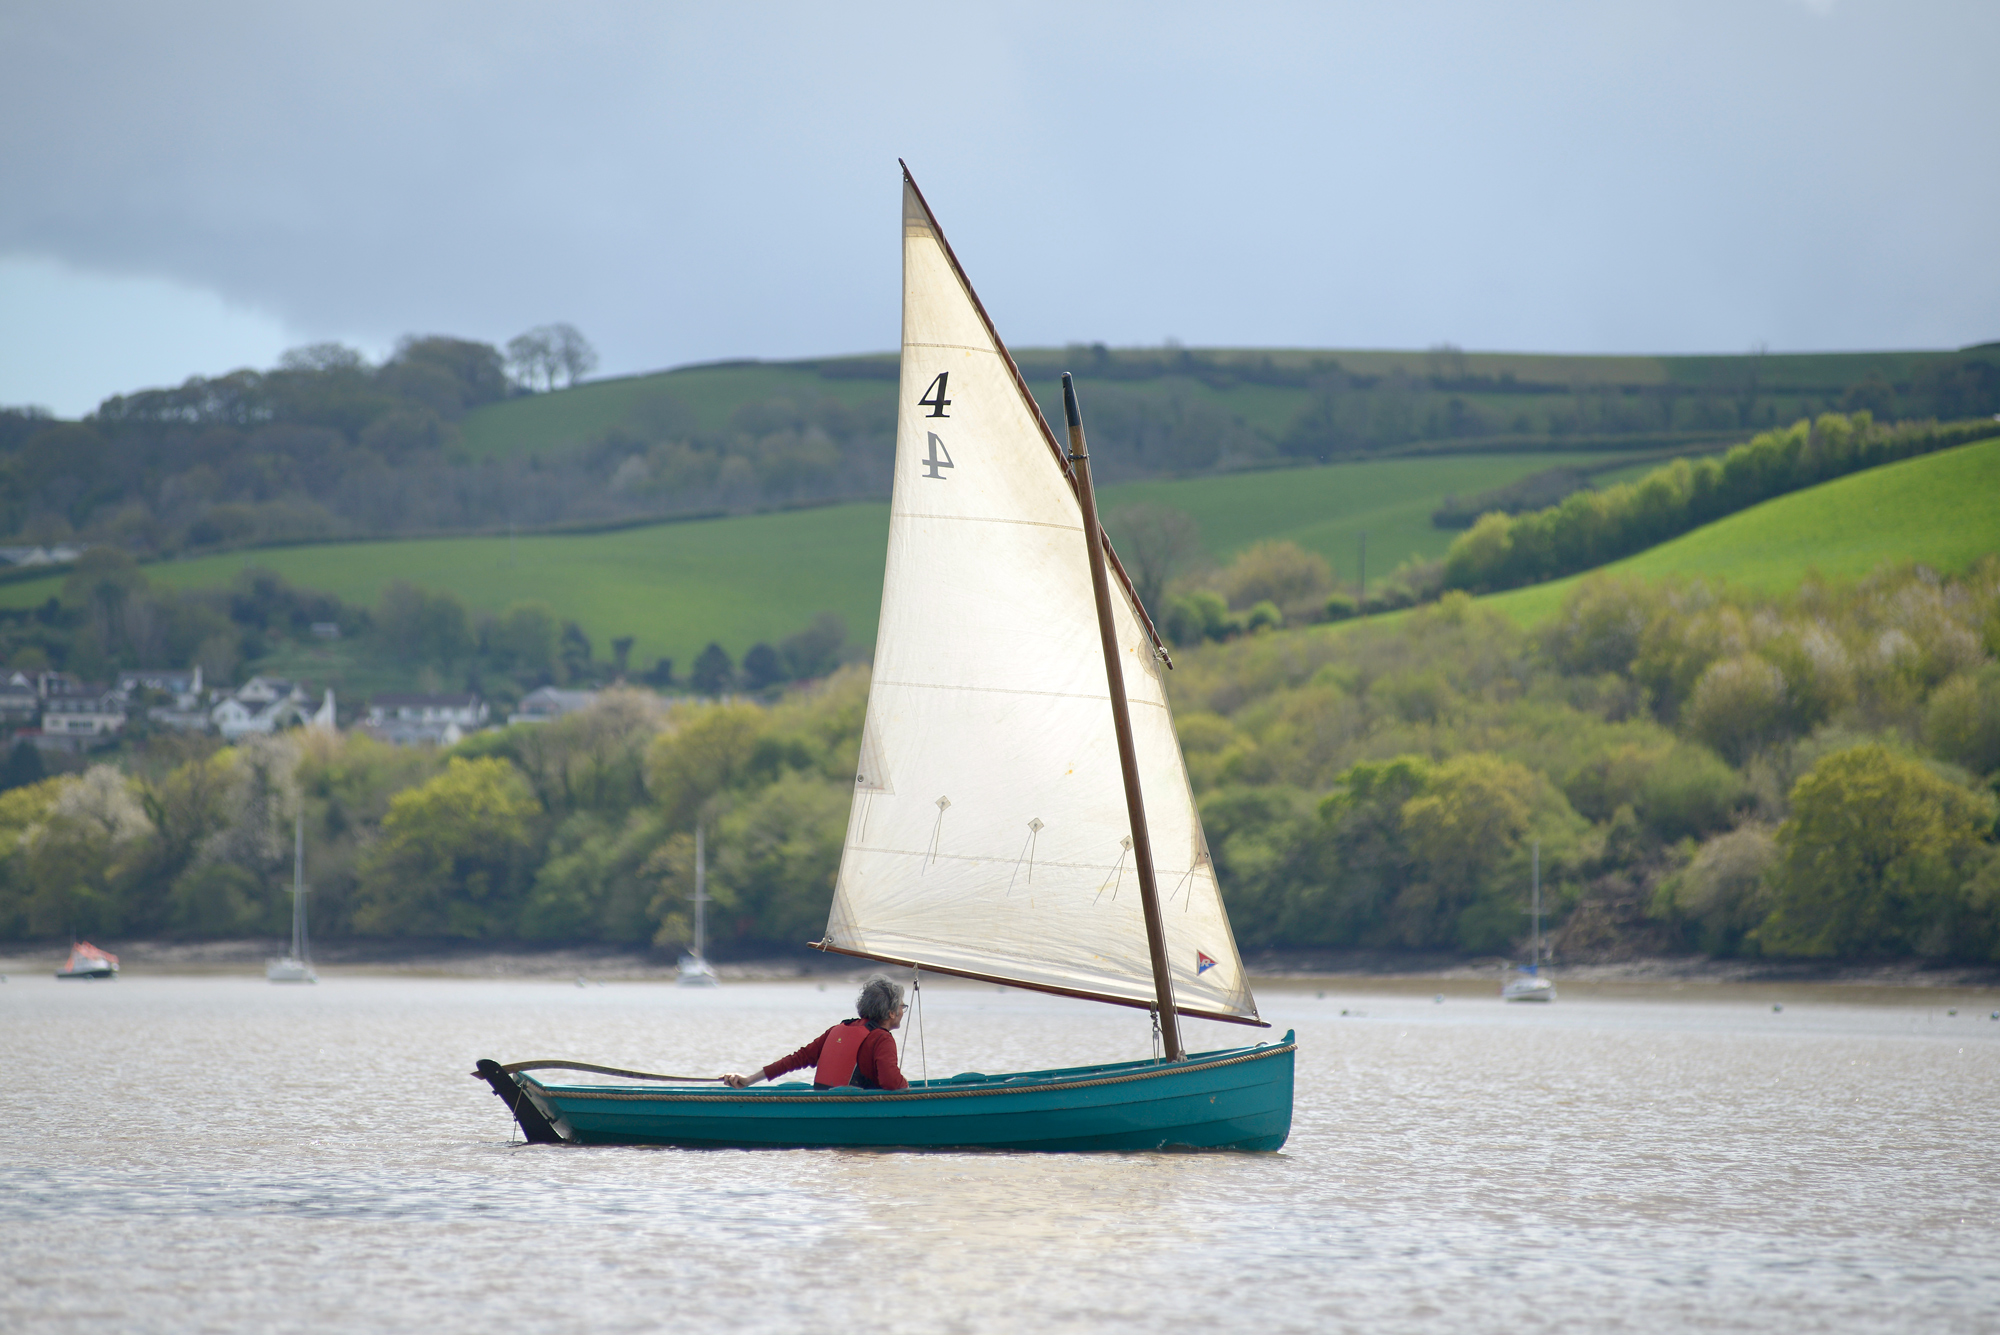
When stepping aboard the Glen-L 19, the boat heels to the weight but does not feel tippy, and once on board—whether at anchor or underway—it feels stable. The maximum wind strength I’ve been out in is 15 knots with strong gusts, and on that occasion my wife and I sailed under full main with no jib. The boat handled the conditions well with no excessive heeling, and maneuvered without difficulty on all points of sail. In lighter airs, under main and jib, it is very responsive, coming about easily and smoothly, and carrying its way through head-to-wind. There is a reassuring amount of weather helm, and in a slight chop there is little spray. I added a topping lift to support the boom when the mainsail is lowered. As a boat for singlehanded sailing, the Glen-L 19 is excellent.
When seated in the cockpit the boom is several inches above my head. Because of the height of the coach roof, visibility is somewhat restricted—not unsafe, but a little awkward. I replaced the designed hinged companionway hatch with a sliding one so that I can sail (and see) with the hatch open, and I am experimenting with raising the jib tack so I can see beneath it.
The jib is hanked to the forestay but its halyard and downhaul are led aft to the cockpit, so once the sail is bent on there is rarely a need to go forward. However, if I do need to go up to the foredeck, there are a number of handholds—I added stanchions and lifelines for additional safety—and the boat is reassuringly stable, even when I’m up in the bow.
I raised the boom some 5″ to give more headroom and better visibility from the cockpit. The pulpit and guardrails are not standard, but I added them for safety.
There is no anchor locker specified in the plans. I added a chain/rope locker forward of and above the V-berth. It is accessed through a circular hatch in the foredeck and via another hatch in the forepeak bulkhead. The locker has through-hull drainage. I stow the anchor either in a bilge locker or a bracket mounted on the pulpit.
Whenever I launch the boat and, indeed, when out on the water, it always gets plenty of attention, often coupled with questions and compliments. Overall, I am very happy with my Glen-L 19, and I’m looking forward to many sailing adventures.
SimonFoord is a retired IT systems engineer, born and raised in England. He moved to California almost 40 years ago and now lives in Tennessee. Simon has owned and built several boats over the years and has a special passion for wooden boats; he is currently building a Glen-L Console Skiff. He enjoys sailing the Glen-L 19 sloop and running about in his Glen-L Malahini on Percy Priest Lake near Nashville, Tennessee.
Plans for the Glen-L 19 are available from Glen-L Marine, $206 plus shipping for plans and patterns.
Is there a boat you’d like to know more about? Have you built one that you think other Small Boats readers would enjoy? Pleaseemailus your suggestions.
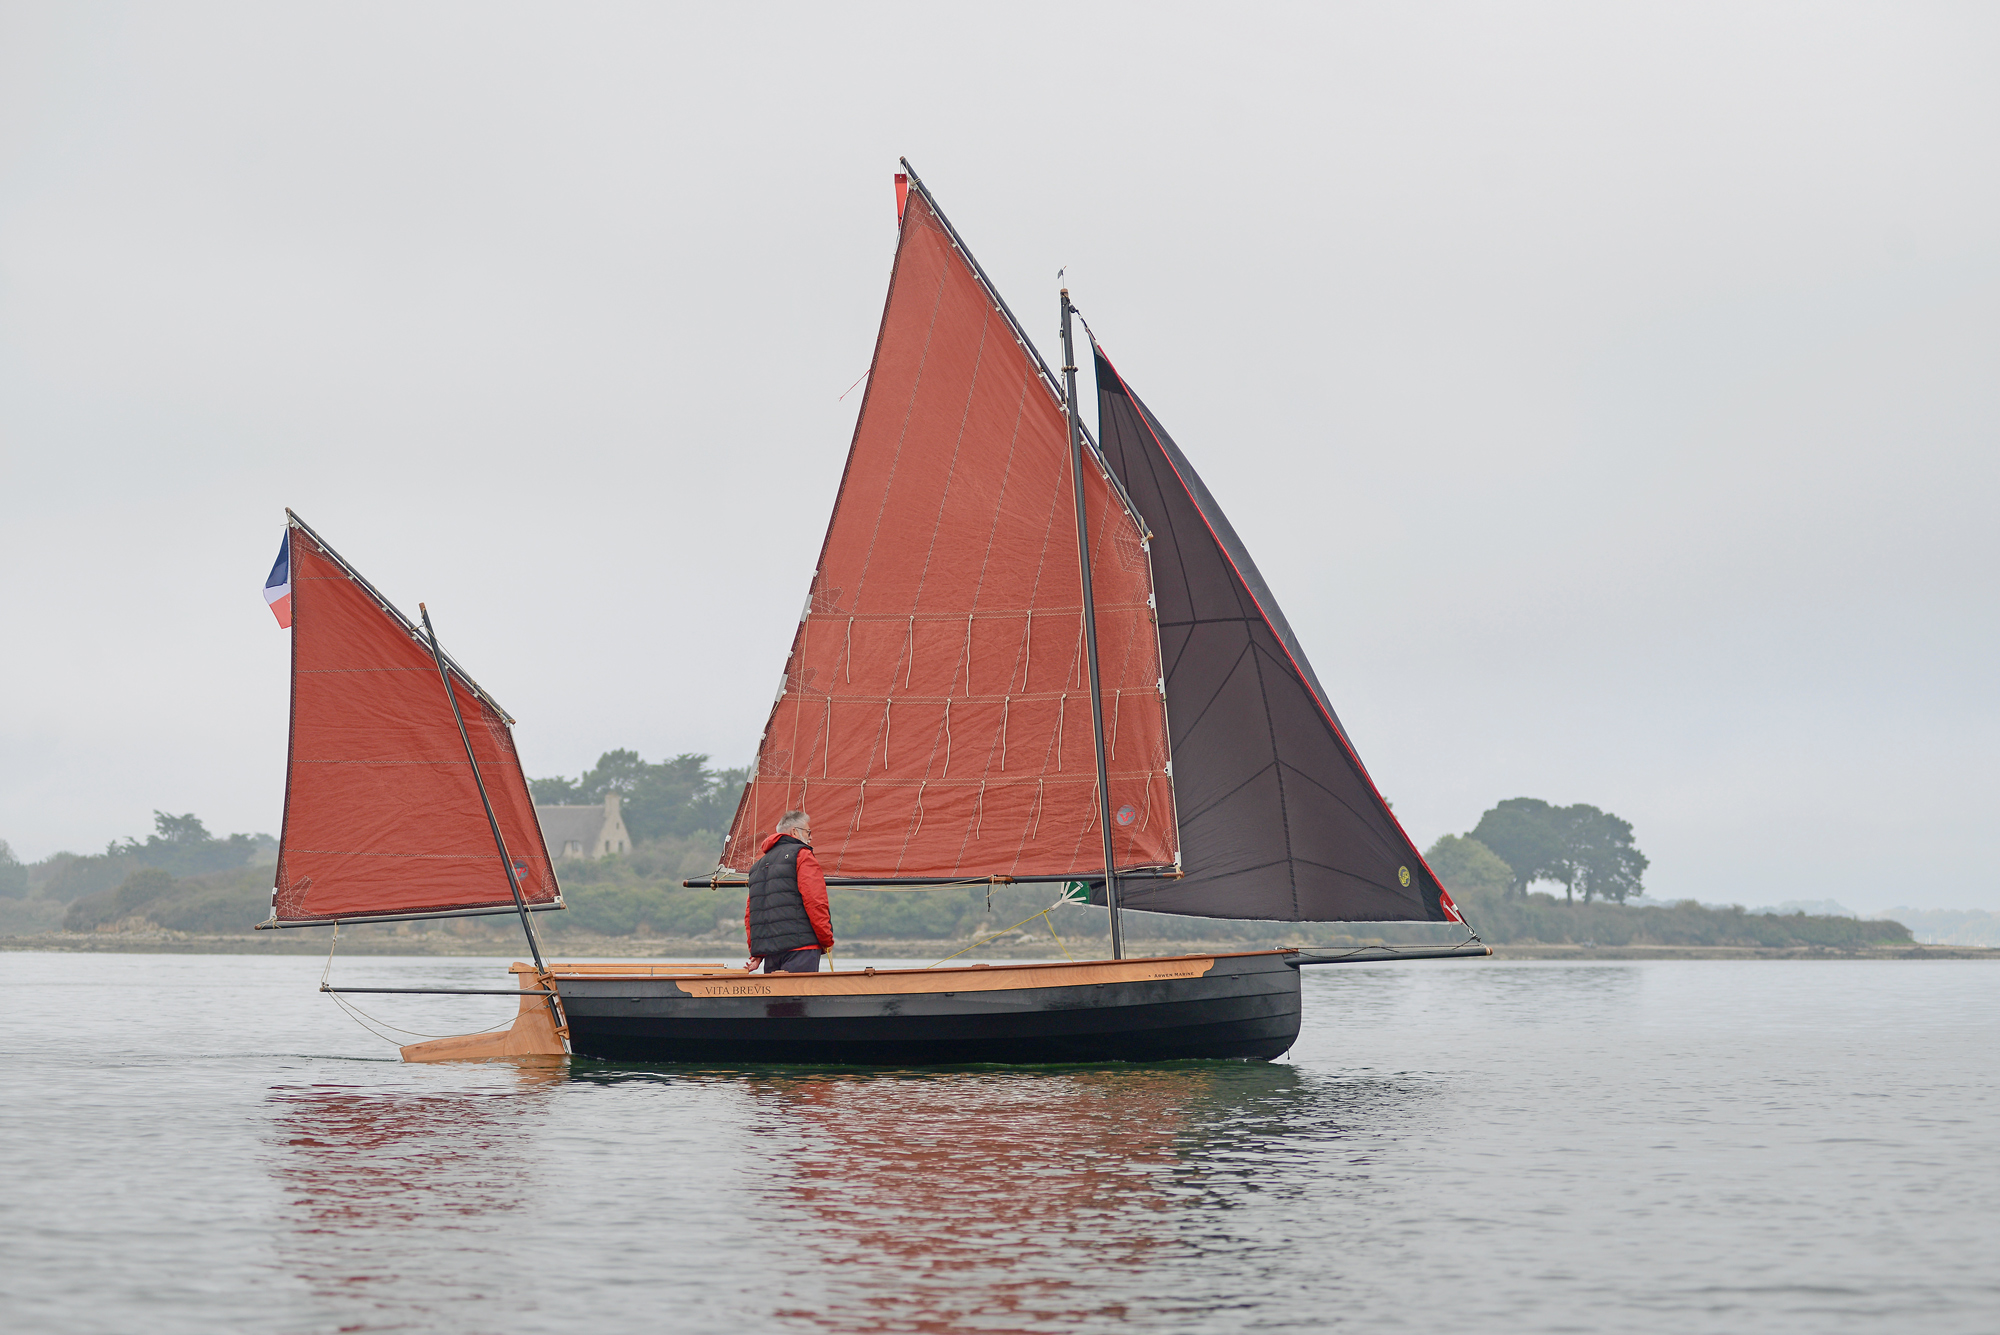
One of the most memorable moments of the 2025 Challenge Naviguer Léger (CNL) on the north coast of France came at the very beginning of the event. It was a gray morning without much wind as the fleet of 14 boats headed out of the L’Aberwrac’h estuary and negotiated the rocky coastline leading to the dramatic lighthouse on the Île Vierge. It was a slow start and none of the boats was going particularly well when suddenly, out of nowhere, Emmanuel Conrath appeared in his prototype Grand Silmaril. For several minutes it seemed as if he had magicked his own personal breeze, as he sailed up and down the fleet, passing us first one way and then the other.
It was a remarkable performance, which left me scratching my head. I assumed that Emmanuel was managing it because he was singlehanding a big two-person boat with empty water ballast tanks and maximum sail set. Or perhaps, I considered, the Grand Silmaril is a deceptively fast boat.
Photographs by the author
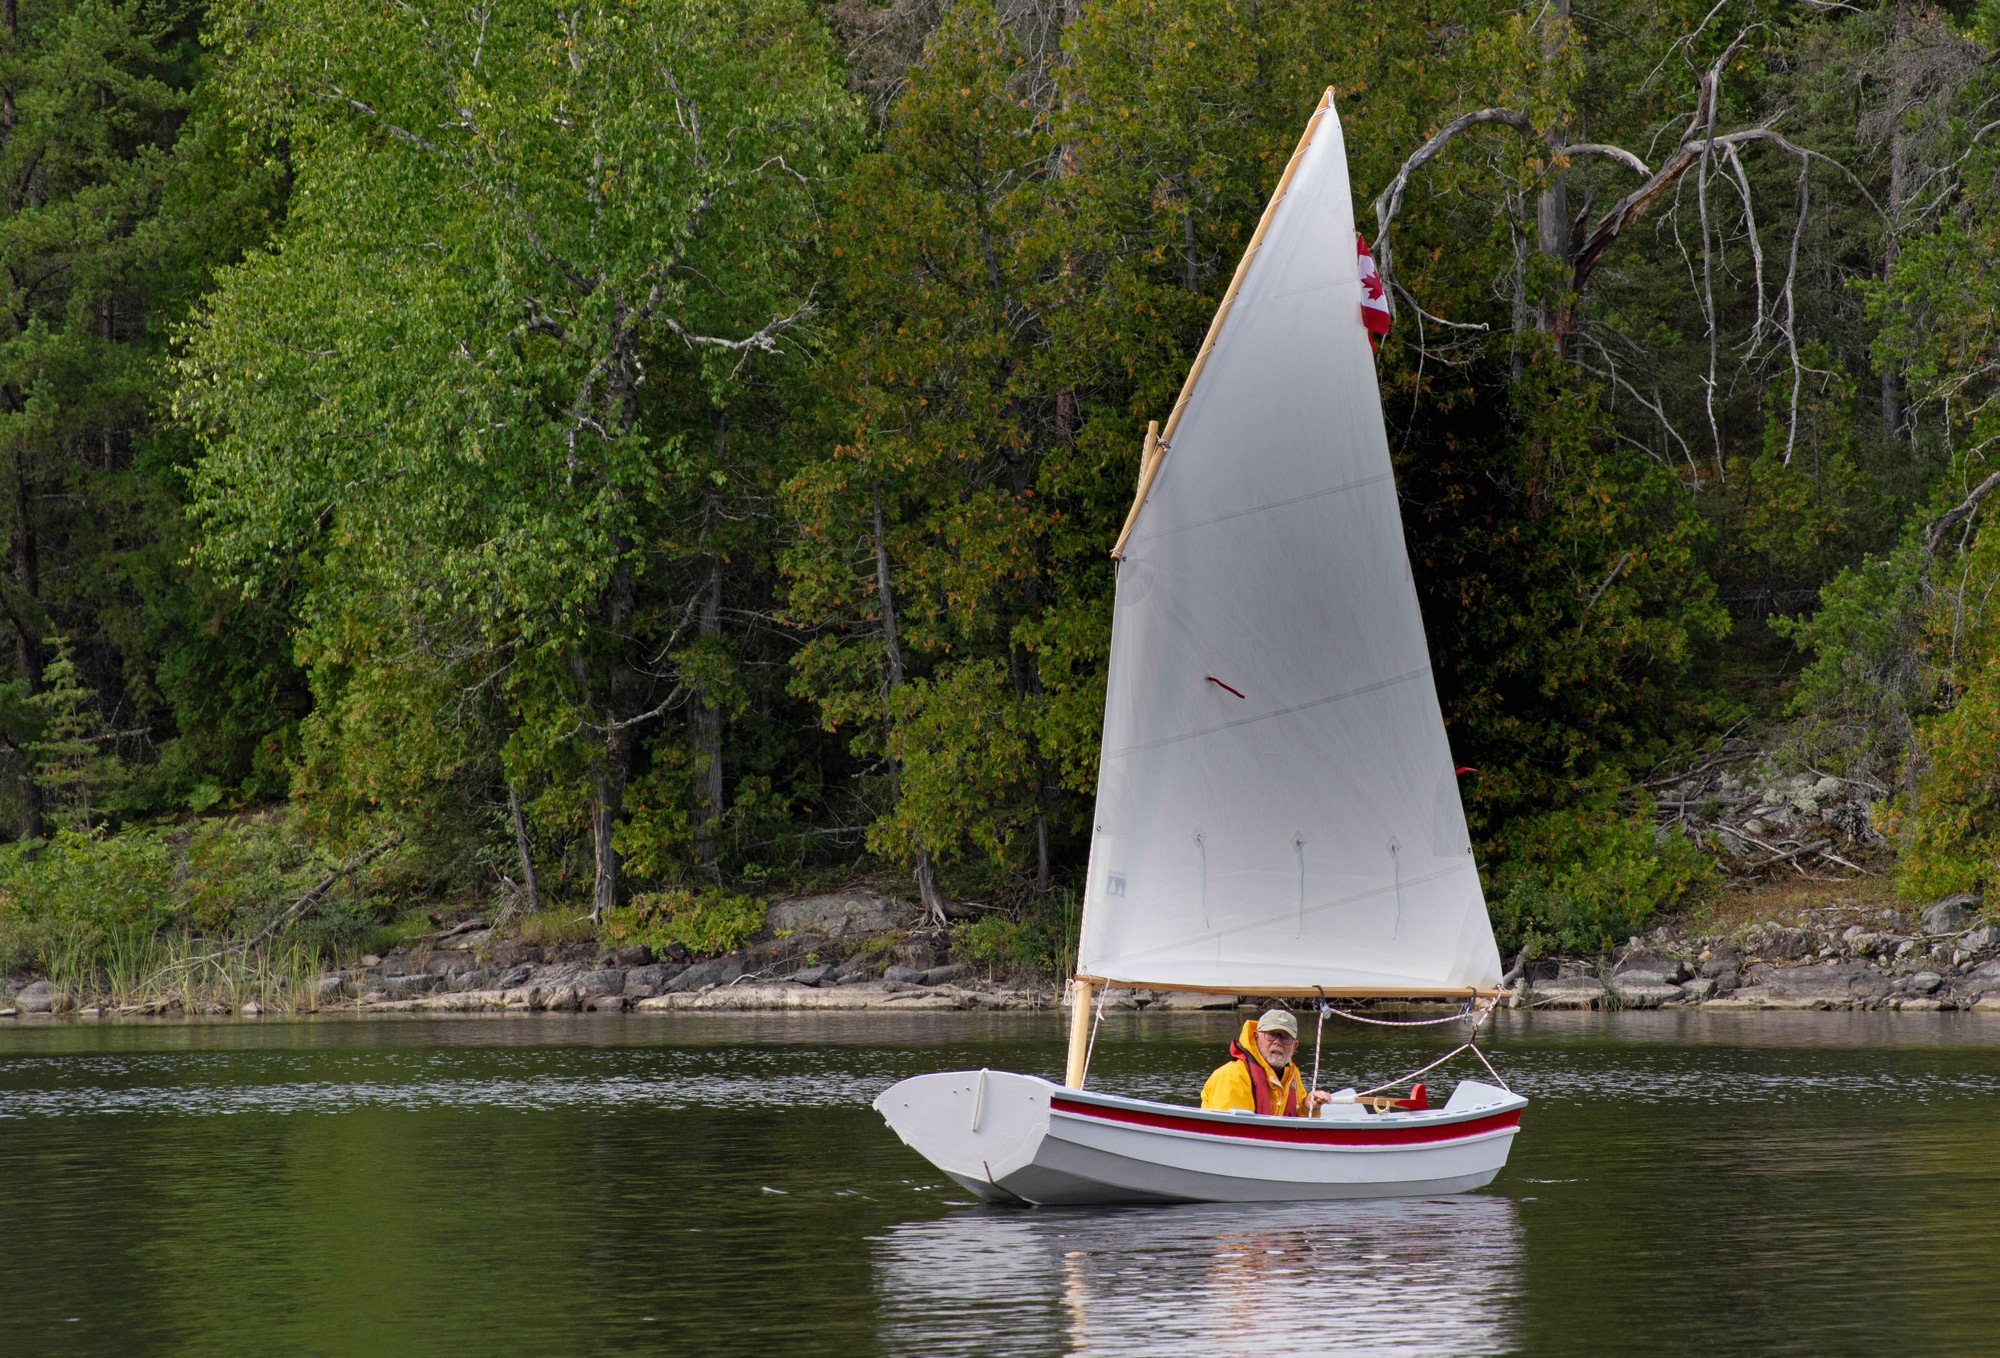
The Grand Silmaril needs only a light touch on the helm with, or without, the optional mizzen as seen here. The after deck has a large hatch giving access to the dry storage beneath.
I had sailed the boat the previous year in the Golfe du Morbihan, and even then its light-air performance had surprised me. Emmanuel’s prototype Grand Silmaril is finished in traditional colors, with a black hull, varnished sheerstrake, and mostly tan sails. At first glance, it looks like a pirate’s boat straight out of the 17th century. Only the black spars—unmistakably carbon fiber—give the game away. Yet, despite these traditional looks, the design is a thoroughly modern concept and possibly one of the best raid boats ever devised.
The evolution of the Grand Silmaril
For Emmanuel, the Grand Silmaril is the culmination of 15 years of building and sailing small wooden boats. In 2007, after half a lifetime working in IT, he chucked it all in and set up a boatbuilding business near Paris, France. Under the banner of Arwen Marine, he soon teamed up with John Harris of Chesapeake Light Craft (CLC) in Maryland, U.S., and started building Harris’s boats under license for the French market. The voile-aviron (sail-oar) scene has taken off in France in recent years, and Emmanuel is an enthusiastic promoter of the cause. When I first met him in 2024, he was already on his 10th CNL raid and had taken part in many others in France and The Netherlands.
To date, Emmanuel’s most successful build is Harris’s 15′ Skerry, of which he sold 40 in seven years, and which he scaled up by 20% to create the 18′ Gandalf design, launched in 2012. Much as he loved those boats, however, he knew they weren’t quite rugged enough for coastal cruising, particularly when the coast borders the eastern fringes of the North Atlantic. Influenced by designs from the U.S.—in particular the Whitehall type, and the Penobscot 17 designed by Arch Davis—he approached French small-craft designer François Vivier and commissioned him to design a lightweight, modern sailboat that could be easily trailered and yet would be steady enough to cruise in safety.
Courtesy of Emmanuel Conrath
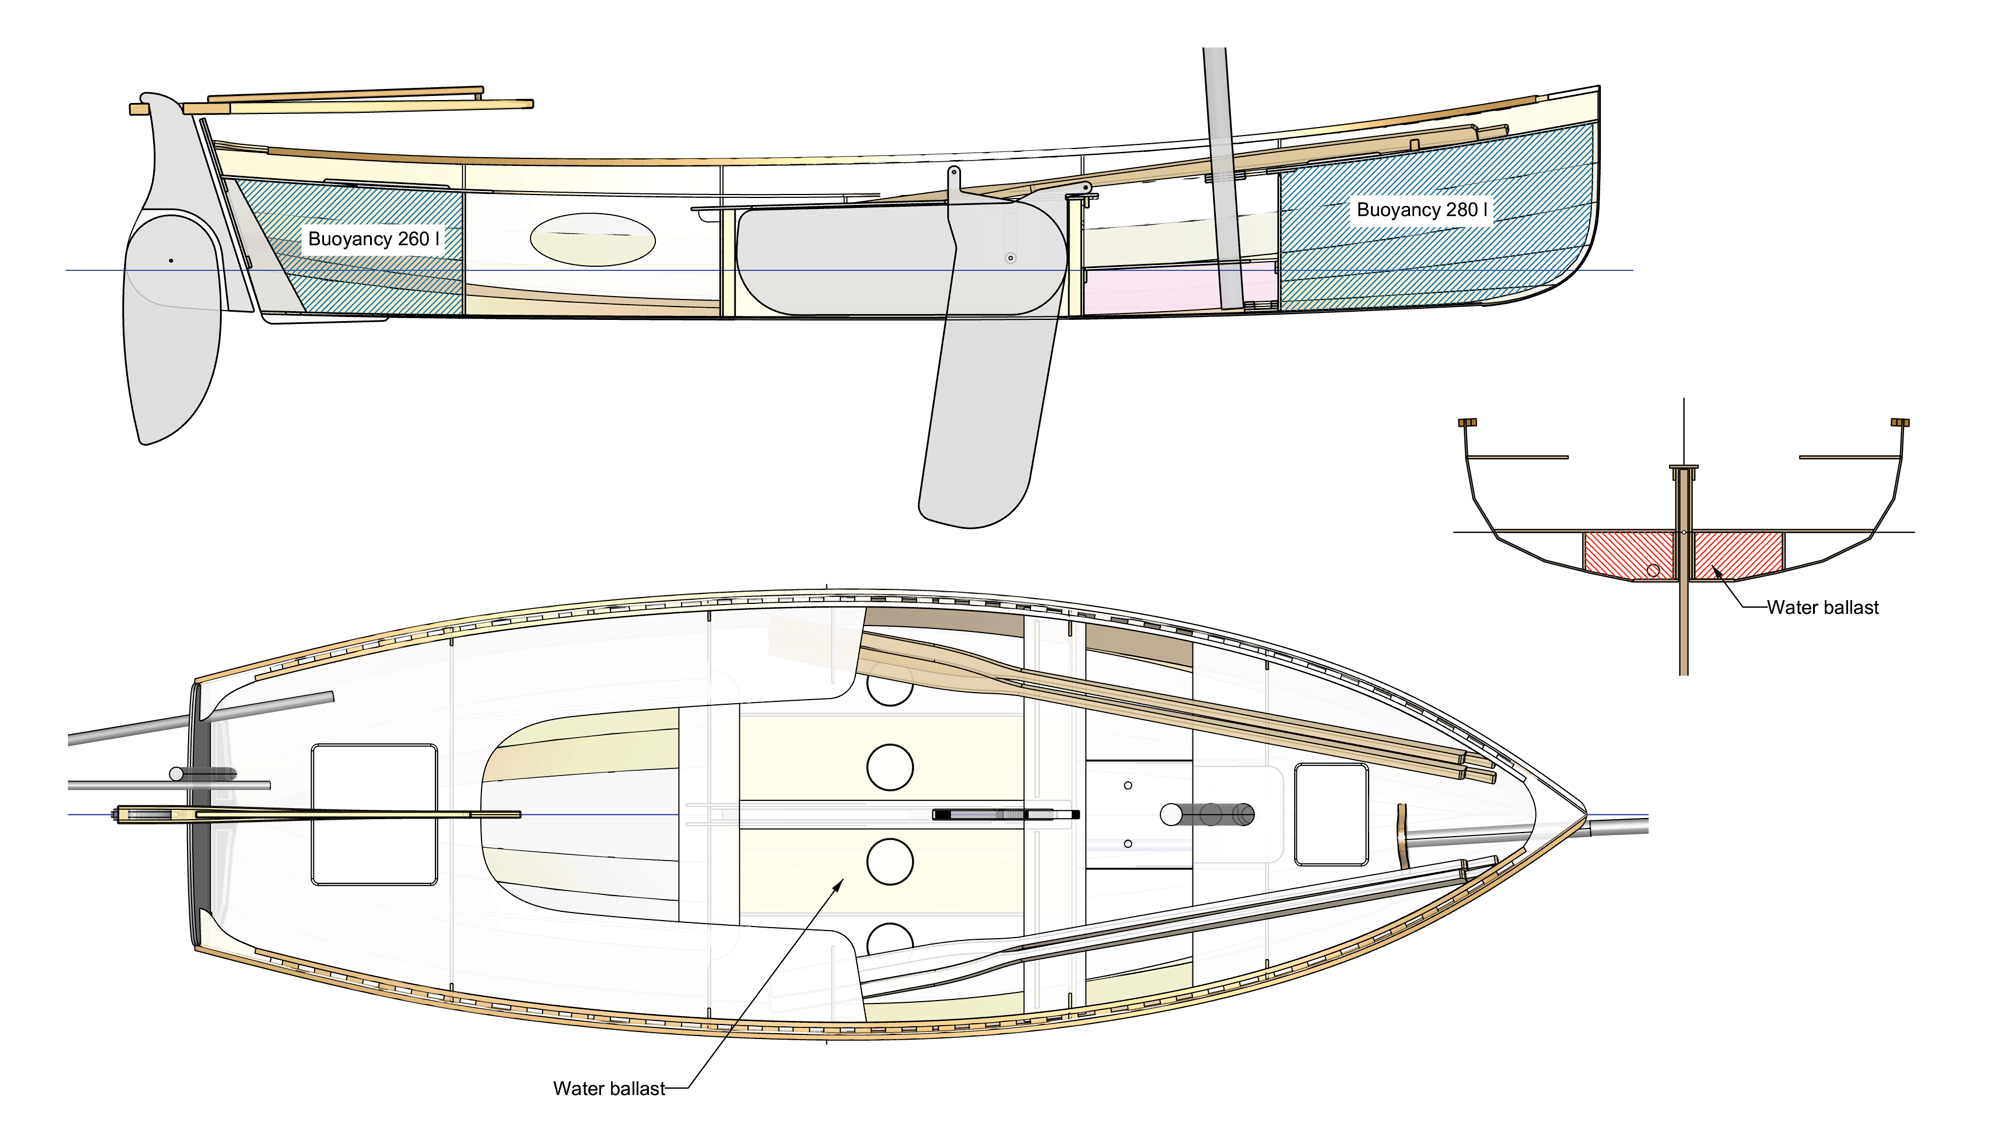
The underside of the Grand Silmaril reveals how the boat can sit upright, unsupported, on land. In place of a conventional keel, there is a flat, single-plank bottom on which the boat sits when beached. The centerboard can be lifted out, like a daggerboard, so that stones are unlikely to get stuck in the trunk, and with the boxed garboards tapering into a sharp skeg aft the boat tracks well when being rowed.
“I wanted six strakes per side, a narrow flat bottom, all plywood to save weight, water ballast, and 15′ maximum length,” he says. “I wanted the boat to be as narrow as possible, so that it would row well, but sufficiently beamy to sail well, too. Dinghy cruising is the thing to do with these boats. You sail to a nice beach, you pull the boat out of the water, and you sit there a while. You can travel rather far; you just have to find a reasonably sheltered beach every few miles.”
The resulting boat was the 15′ × 4′ 9″ Silmaril, and after five years of sailing the prototype (and building 12 more for clients), Emmanuel was keen to enlarge the design by 20%, as he had done before with the CLC Skerry. But this would have effectively increased the boat’s volume by 73%, which Vivier thought excessive. They settled on 10%, giving a 33% increase in volume, and the prototype 16′ 7″ Grand Silmaril was launched in September 2022.
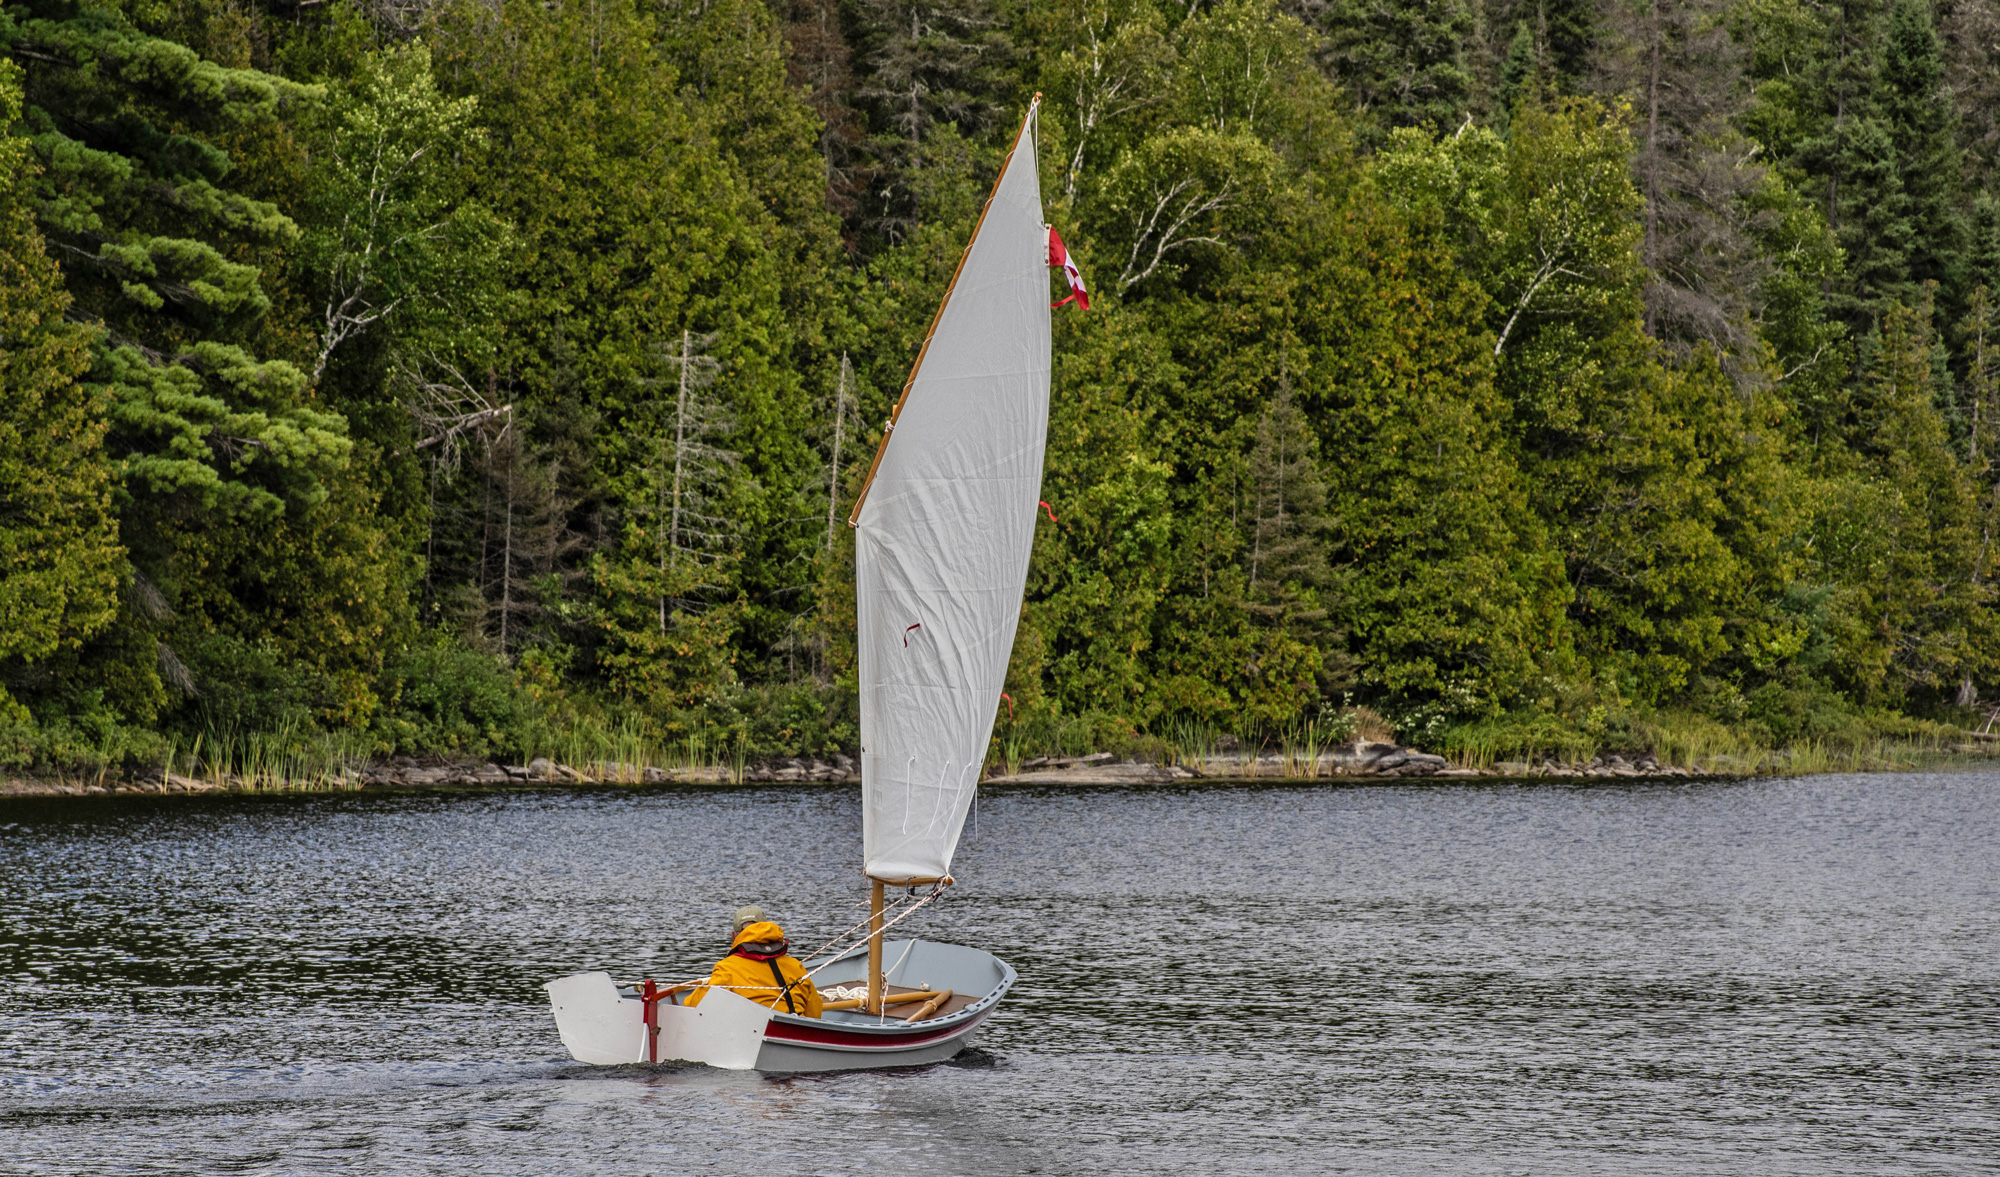
With its scuppered gunwales, the Grand Silmaril has plenty of places where lines and fenders can be tied off. Forward there is some open space beneath the mast thwart and more closed storage beneath the foredeck. Here, ghosting along in light airs, the Grand Silmaril chases the smaller Silmaril, under oars, off her port bow.
My first encounter with the boat was two years later, when I joined Emmanuel and friends for a mini-expedition in the Golfe du Morbihan. The Grand Silmaril is comfortable and fast. Part of the design’s secret is its light plywood construction. The boat’s total weight, including sails, carbon-fiber spars, and oars, comes to just 350 lbs. Not only that, but because of its buoyant shape, it sits high in the water, so that at times it appears to be barely touching the surface. Like its smaller predecessor, the Grand Silmaril has water-filled ballast tanks, one on either side of the centerboard trunk below the waterline. These can be filled while underway and add 308 lbs of weight, greatly increasing the boat’s stability. However, if the boat does capsize—even with filled tanks—it is easy to right, thanks to the considerable internal buoyancy above the water. Emmanuel told me that during capsize trials he has found that if he releases the main halyard before righting the boat, not only does the sail not work against the righting motion, but also it stays in the water after the boat is righted, to act as a sea anchor. After a capsize, the Grand Silmaril comes up with a maximum of about 50 gallons of water in the cockpit, but with so much enclosed space that the boat still floats high with the crew safely on board.
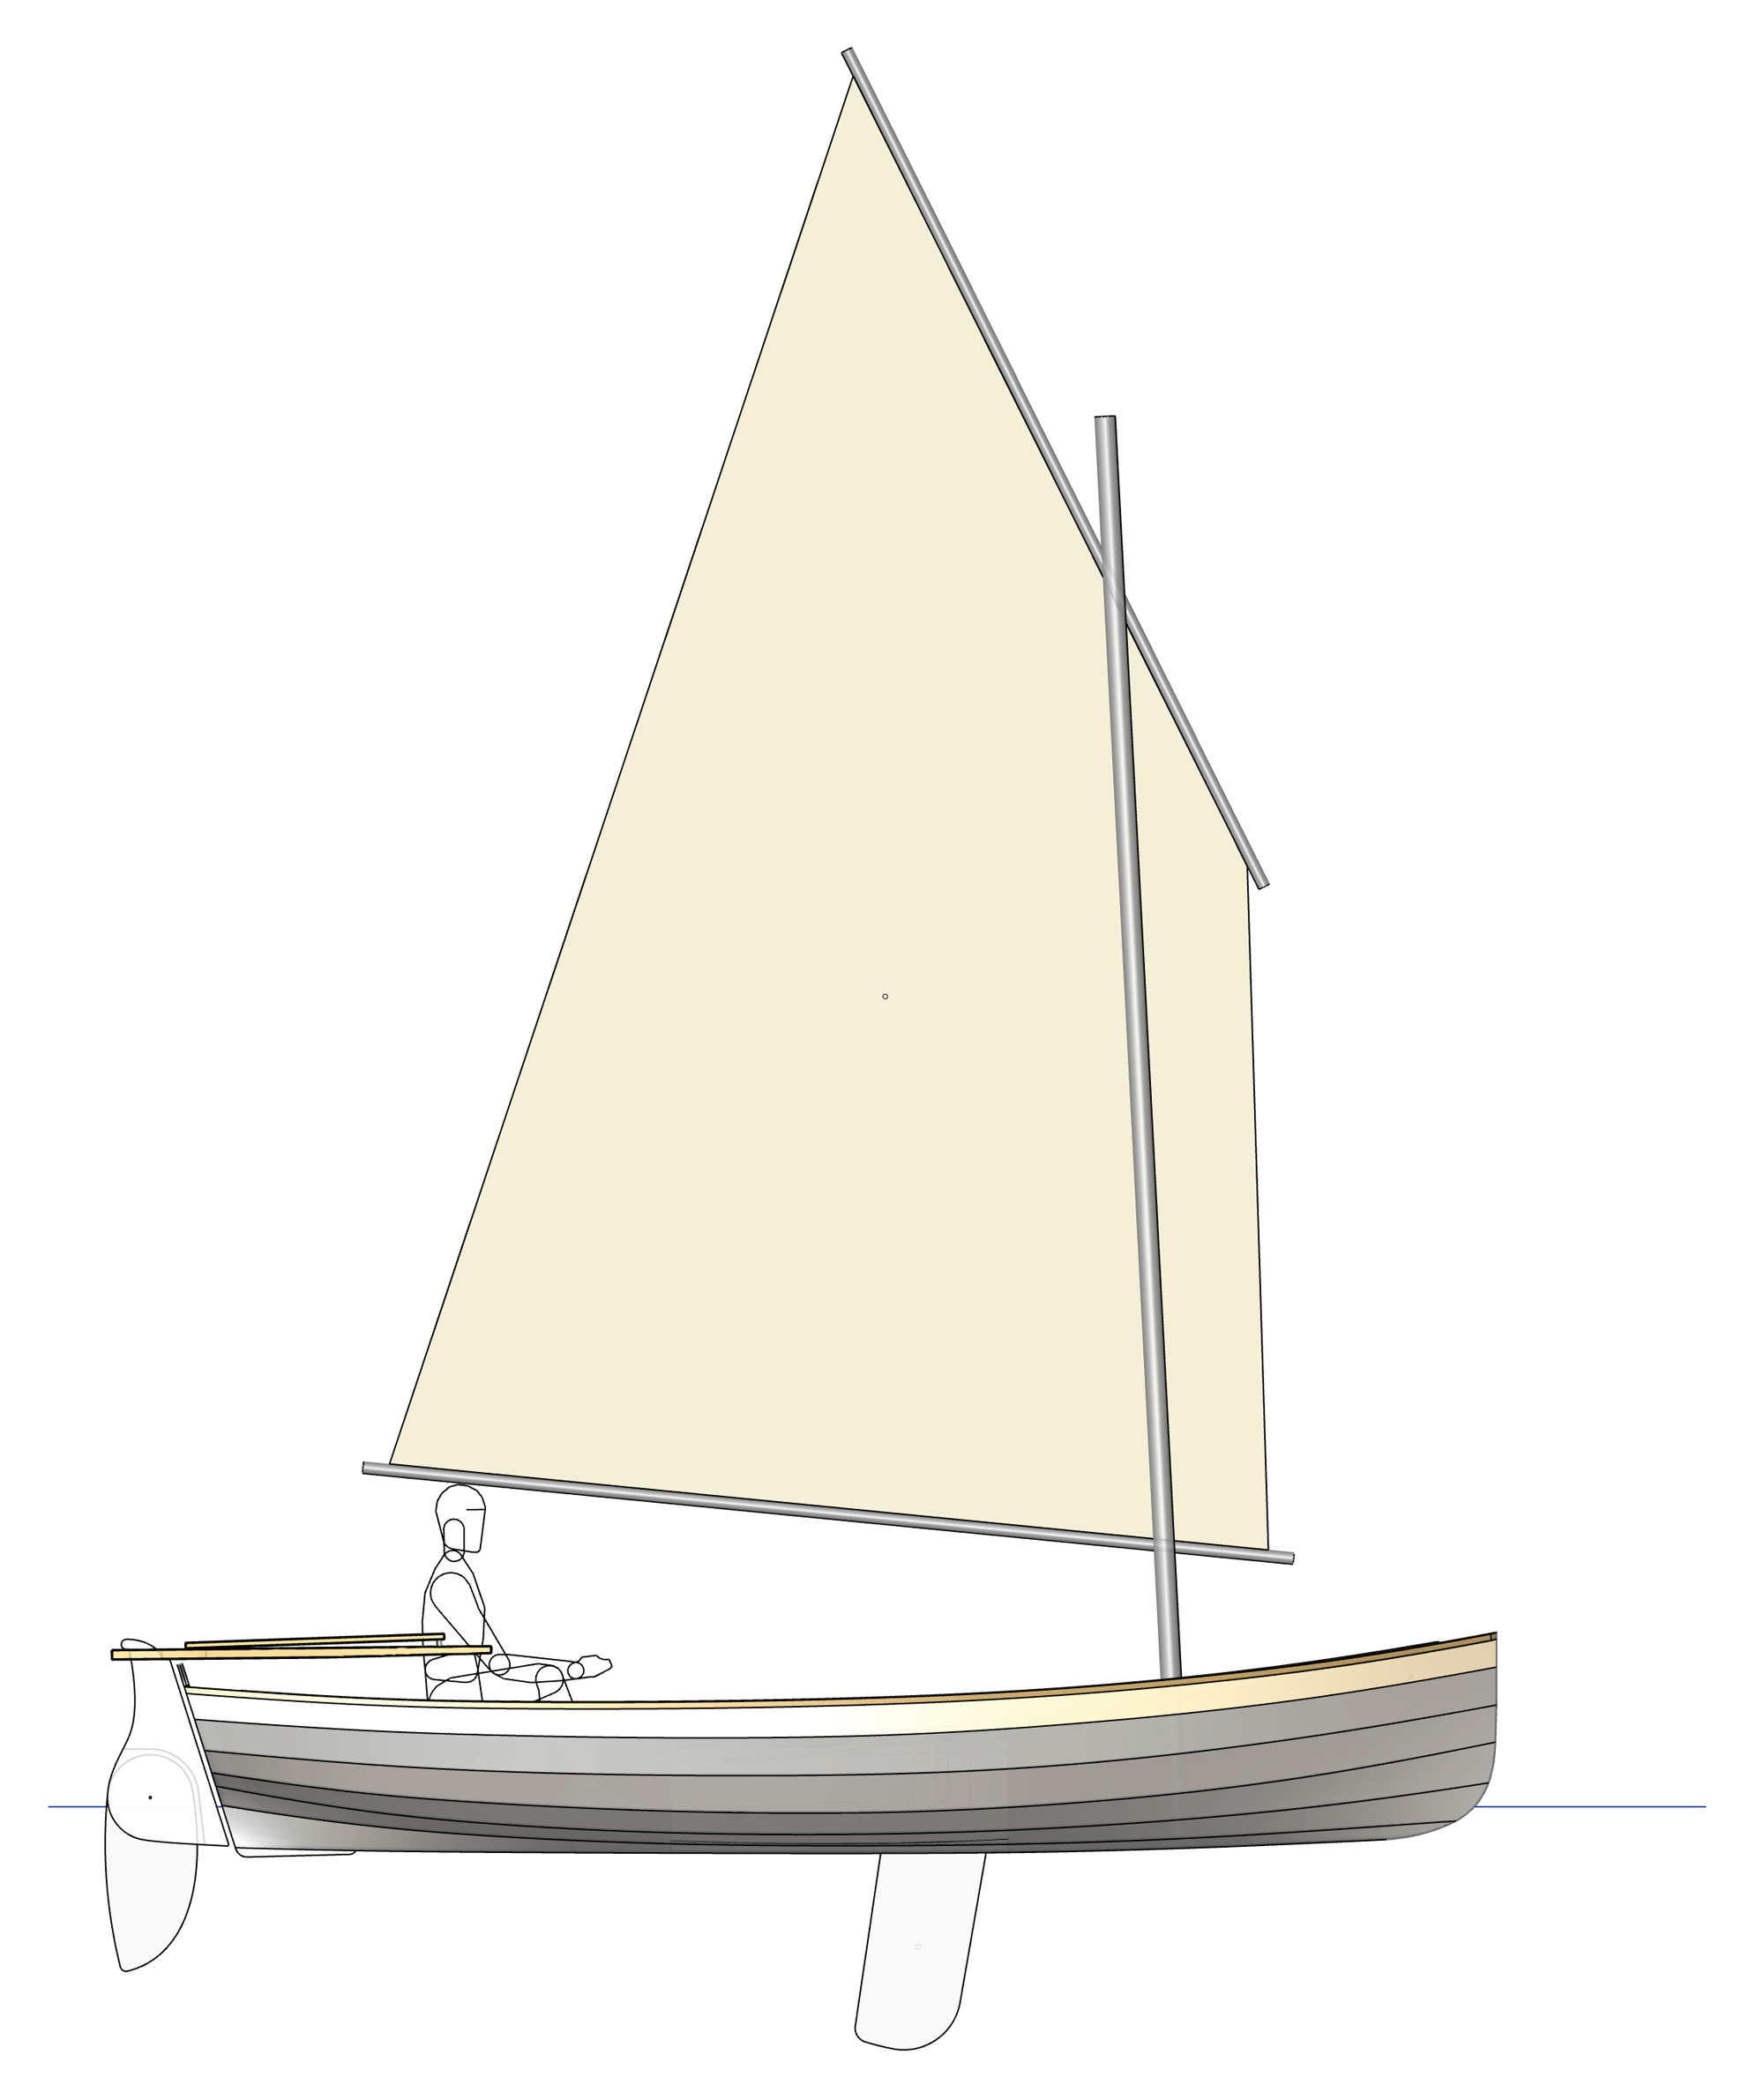
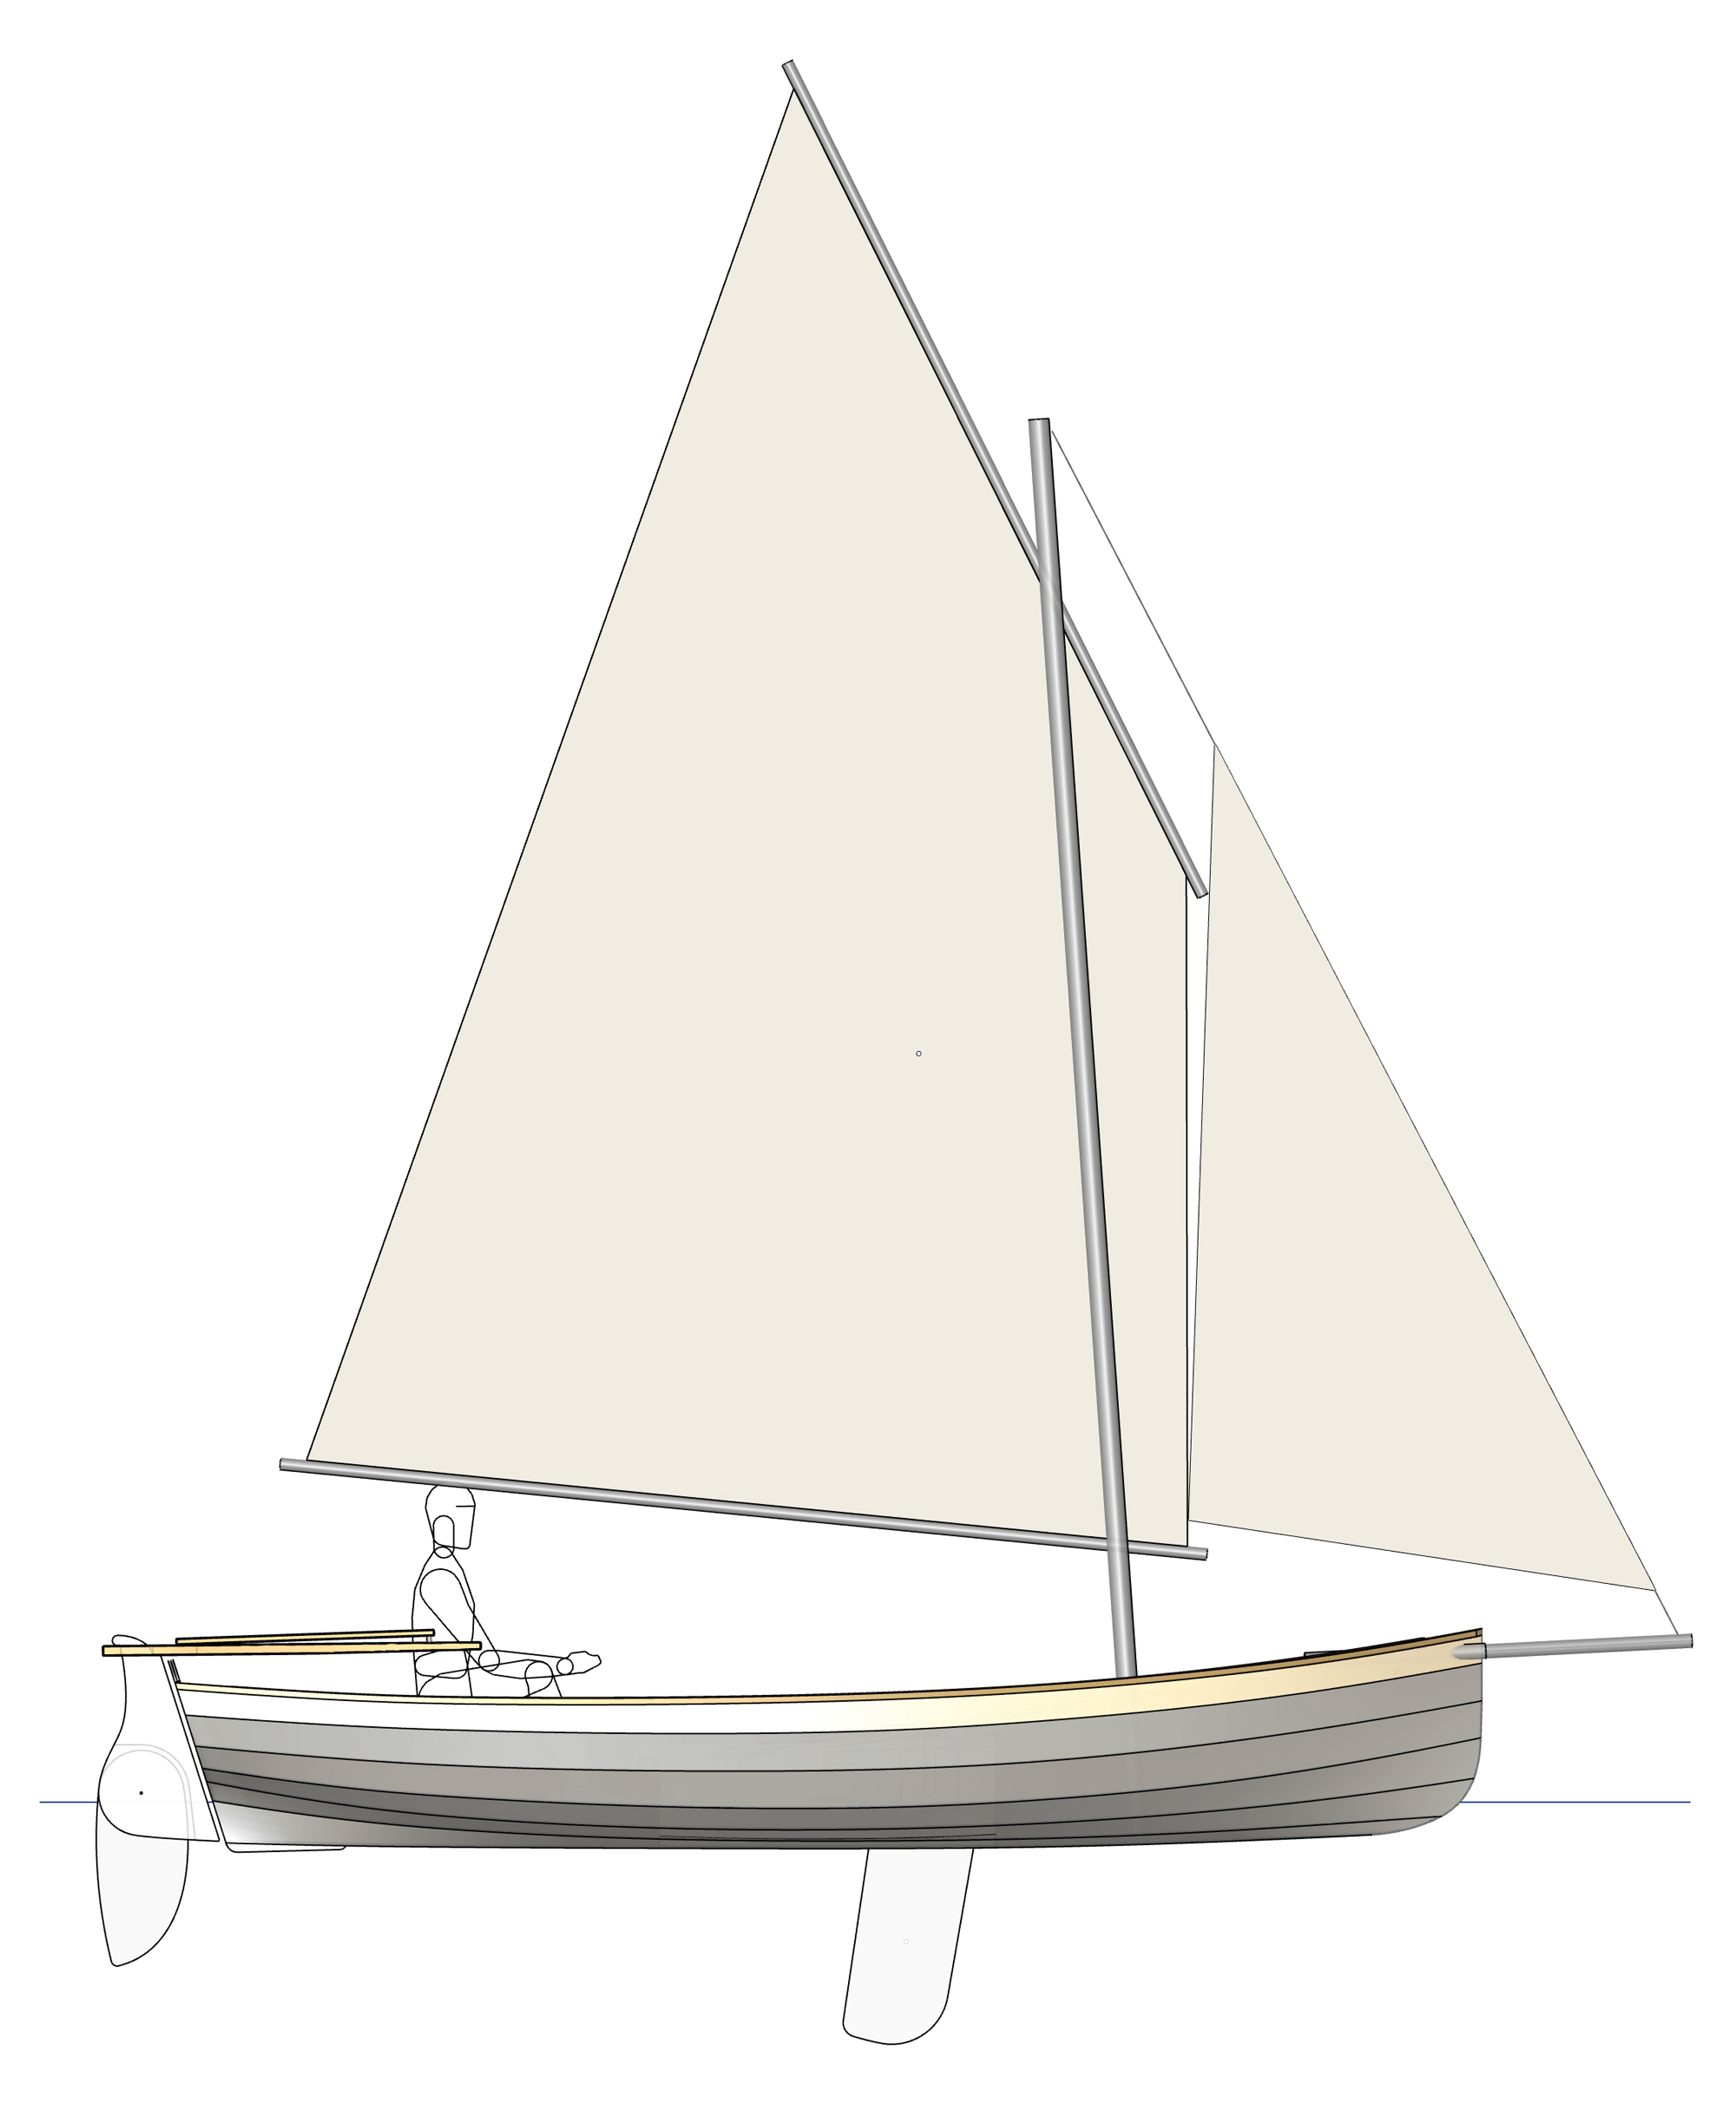
The Grand Silmaril’s rig has been through several incarnations that have included a mizzen, two foresails, and even a jackyard topsail. Emmanuel has continued to sail with a mizzen on the prototype, and Vivier has drawn three optional sail plans ranging from a single-sail balance lugsail, to a jib-mainsail-and-mizzen configuration. The middle-range main-and-jib plan works efficiently in most conditions. The mainsail is sheeted through a block mounted on the centerboard trunk, which means you don’t have that awkward tiller/sheet dance every time you go about. It also means the sheet stays clear of the helmsman when jibing. Unusually in a boat of this size, the sail has three rows of reef points, and Emmanuel says the Grand Silmaril can handle up to 25 knots of wind—which was proven during the 2025 CNL when the fleet was hit by a sudden squall of at least that strength.
The hiking seats are an option but make sitting on the rail more comfortable in heavy winds. Using a simple block that fits snugly into the gunwale scuppers, the seats can be swiftly placed or relocated according to need.
Emmanuel and François’s combined knowledge is phenomenal, and there are countless nice details on the Grand Silmaril. Take the centerboard (or is it a daggerboard?), which has been designed so it pivots like a centerboard, but once raised high enough, can slide out like a daggerboard so that it’s almost impossible for stones to get jammed in the centerboard case when beaching the boat.
The boat’s construction is stitch-and-glue lapstrake plywood with fiberglass sheathing inside and out. Traditional in appearance, the hull has six strakes per side, including the “rolled-box” garboards, which are almost vertical at the stern, like a skeg. A single-plank flat bottom allows the boat to sit upright, unsupported, on land.
The Grand Silmaril features eight watertight compartments, all of which can be used for storage. The compartments are spaced throughout the boat: beneath the foredeck (where Emmanuel stores his boat tent and bedding when cruising); one either side of the anchor locker—between the maststep and the centerboard trunk—and two more beneath the floor outboard of the ballast tanks; a generous locker beneath each of the side benches aft of the ’midship thwart, and a large lazarette beneath the aft deck. All are accessed through large locking hatches. Emmanuel told me that some clients prefer not to seal the bench lockers and, he says, there’s still plenty of buoyancy if these are left open. It’s an impressive amount of storage in a 16′ 7″-long boat, and I commented as much to Emmanuel. “There’s easily enough storage for two people to cruise for a week,” he responded. “My problem is that I regularly forget where I’ve put things and only find them after I get home.”
The standard sail plan for the Grand Silmaril is a balance lug and jib, with an optional mizzen. Here, the boat is seen under an earlier sail plan that included a balance lugsail, genoa, and mizzen. The rudder blade is here fully raised as the boat prepares to come in for a beach landing.
At first glance the internal layout of the Grand Silmaril seems to favor singlehanded sailing with generous seating aft, but only short side benches that barely extend forward of amidships. Nevertheless, as I was to find out, there are good options for a crew: the forward end of those side benches gives ample seating for an adult crew to sit up but still within the confines of the cockpit, and in calmer conditions I settled comfortably on the floor leaning on the side of the boat with my legs stretched out in front of the centerboard trunk. When the wind picked up, we made full use of Emmanuel’s hiking seats—simple wood seats that slot into the gunwale scuppers and prevent the pain of a narrow rail digging into the backs of your legs.
As the day wore on in the Golfe du Morbihan, we found a sheltered beach and went ashore to enjoy an impromptu lunch of bread, cheese, and wine (we were in France after all) before heading back to Arradon. The wind died about a mile from the slip, and I volunteered to row us to shore—the Grand Silmaril is designed for two people to row with two oars each, but we only had a single pair of oars on board that day. There is a removable thwart for the forward rowing position, but Emmanuel told me he tends to leave it and the second pair of oars behind as he is typically singlehanded and prefers to have the space. I rowed from the ’midship thwart and Emmanuel moved forward to trim the boat, sitting on the centerboard trunk. Having made the offer to row, I was secretly concerned that I might run out of puff, but the boat proved an absolute pleasure under oar, and thanks to the narrow waterline aft and the deep skeg, it tracked well and moved along with ease.
With three reefs in the main, the Grand Silmaril’s sail plan can be greatly reduced to cope with increasing winds. Here, in gusts of 25 knots, the boat is being easily controlled under just the main with two reefs.
I left the boat feeling that Emmanuel had found the perfect combination of size and performance: big enough for two, light enough to trail, steady enough for coastal sailing. But I should have known it wouldn’t be enough for the constantly curious Frenchman. Soon after I got home, I heard he had started building his next boat: a Mega Silmaril, 20% bigger than the original. What’s more, he’s asked me to try it out once it’s been launched… it would be rude to say non.
Nic Compton is a regular contributor to Small Boats.
Is there a boat you’d like to know more about? Have you built one that you think other Small Boats readers would enjoy? Please email us your suggestions.
For more sailboat designs from François Vivier, see:
Pen-Hir, a modern classic pocket cruiser, reviewed by Kathy Mansfield
Stir-Ven 19, a water-ballasted daysailer, reviewed by Mark Gallo
Ilur, one of the most popular voile-aviron boats, reviewed by John Hartmann
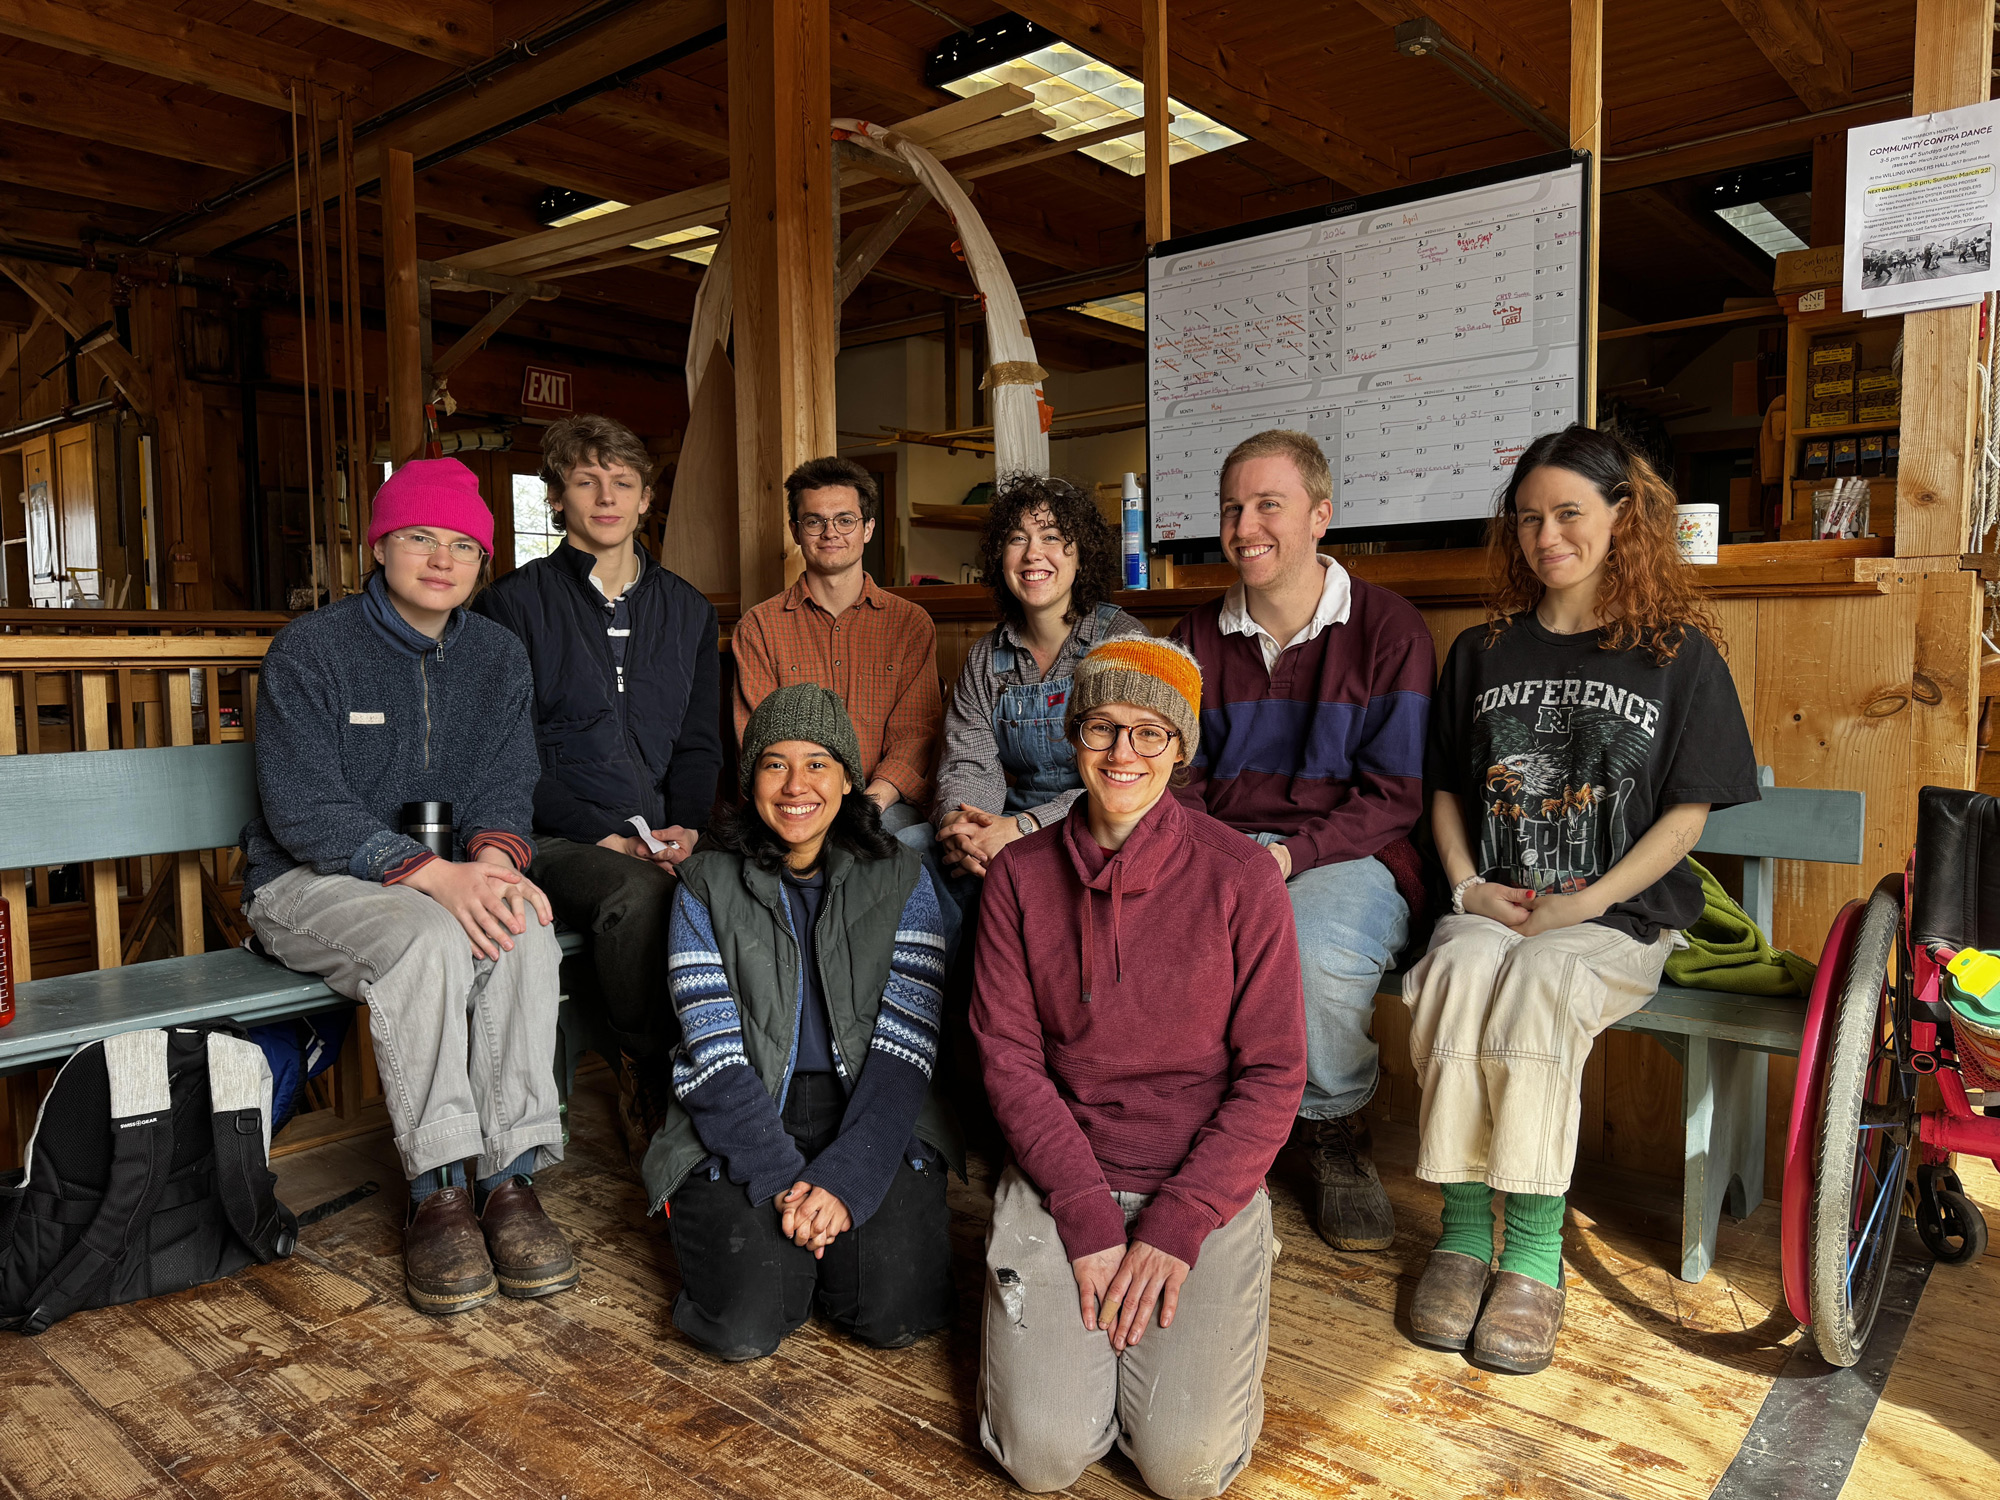
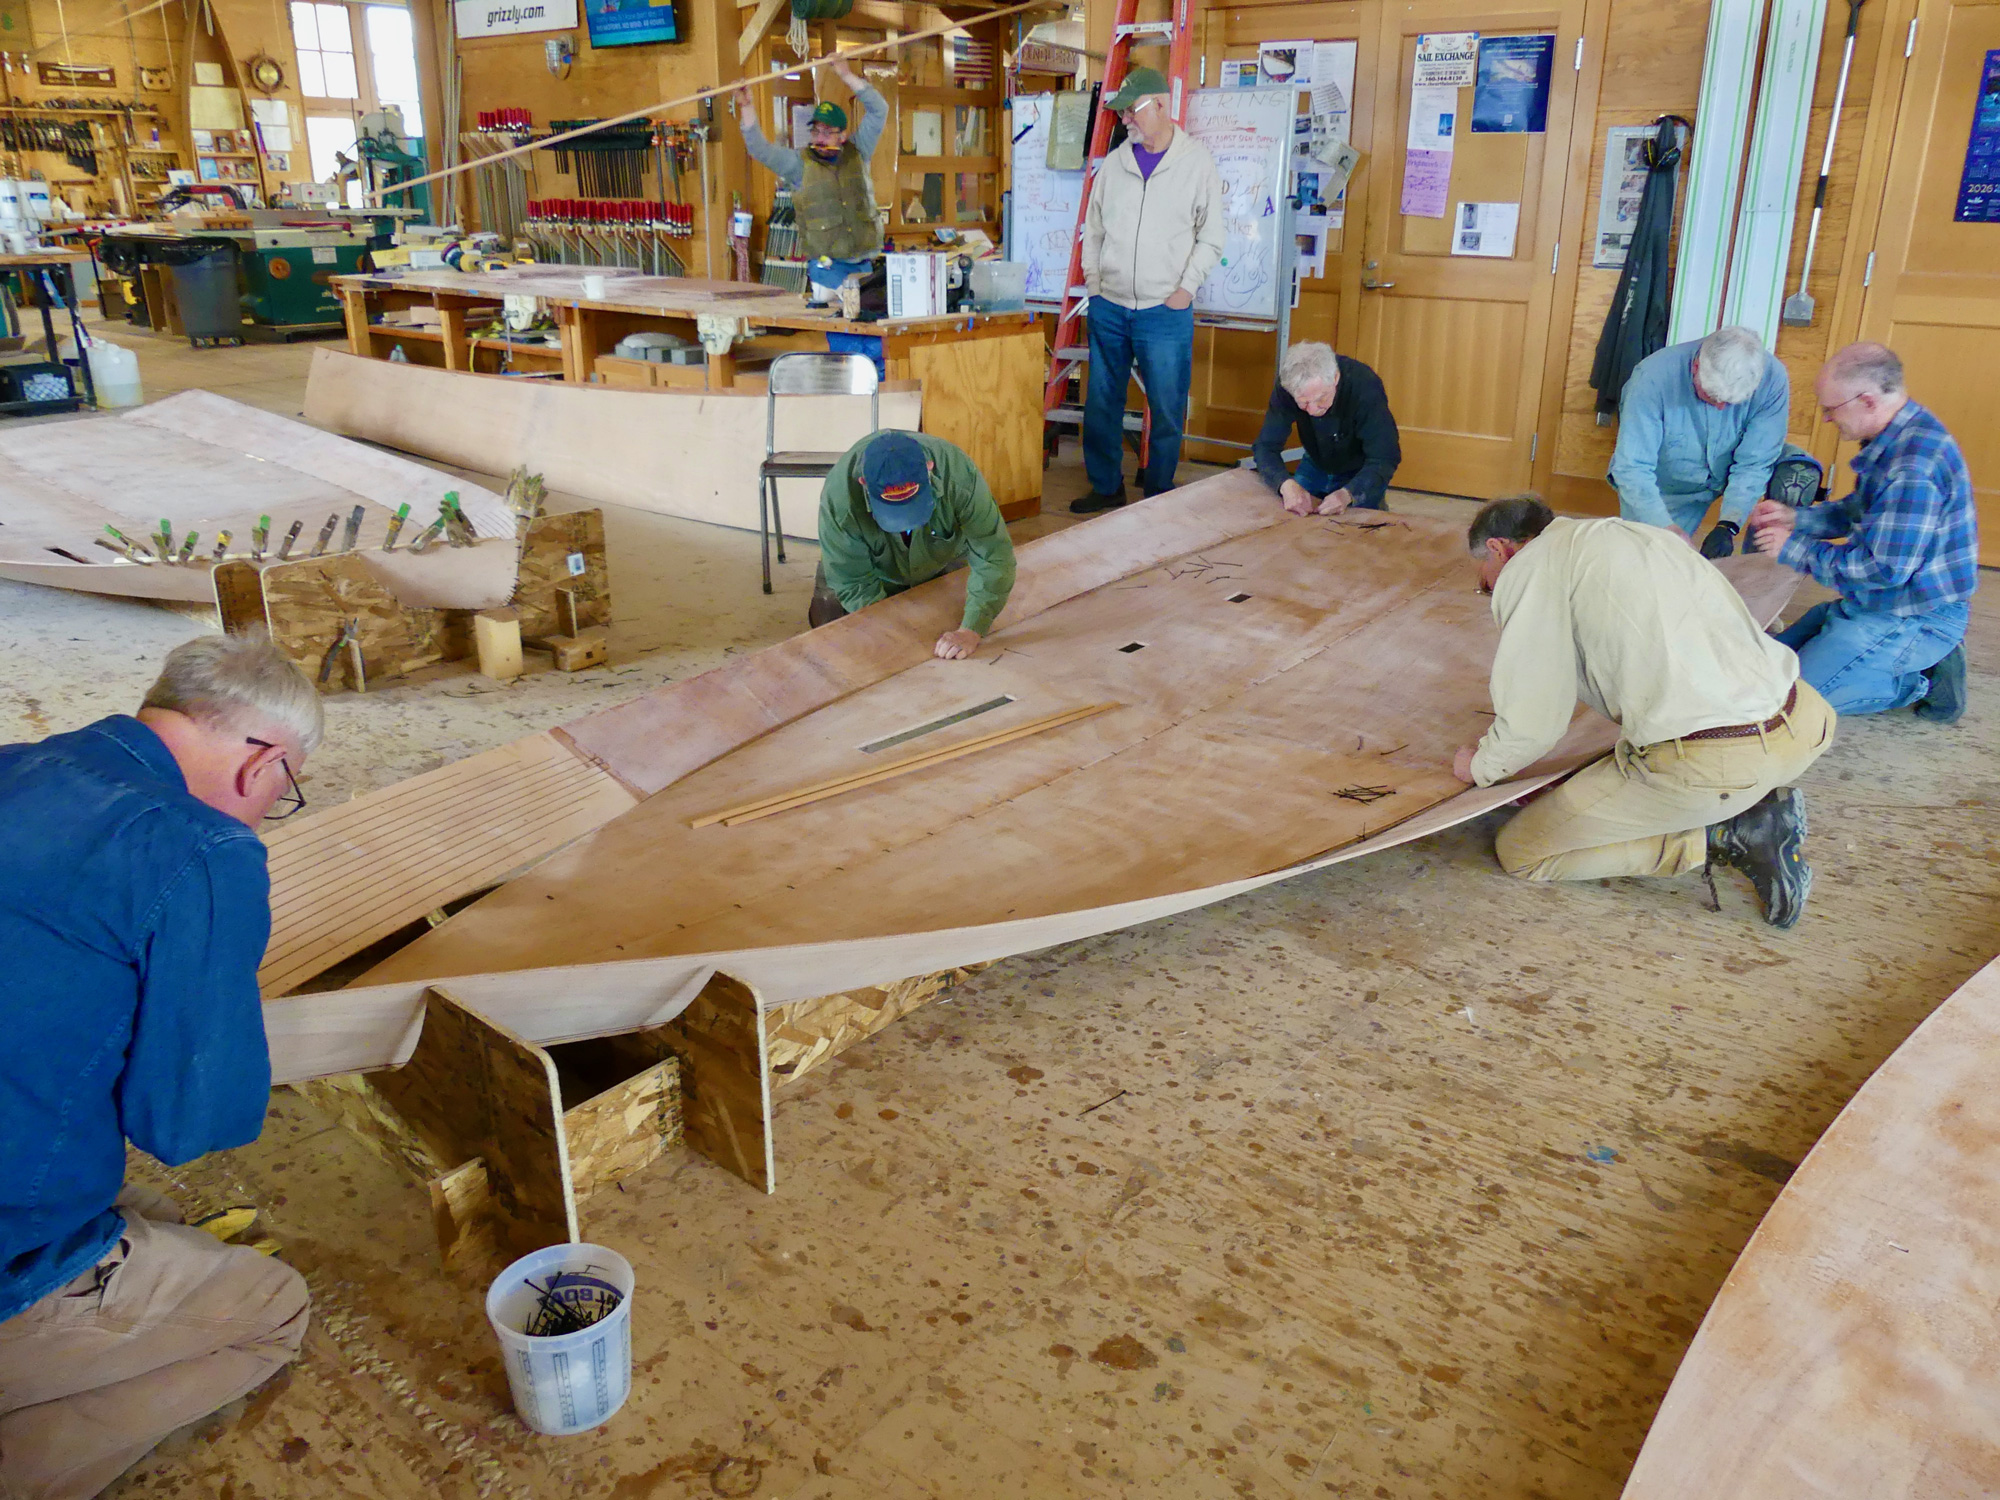
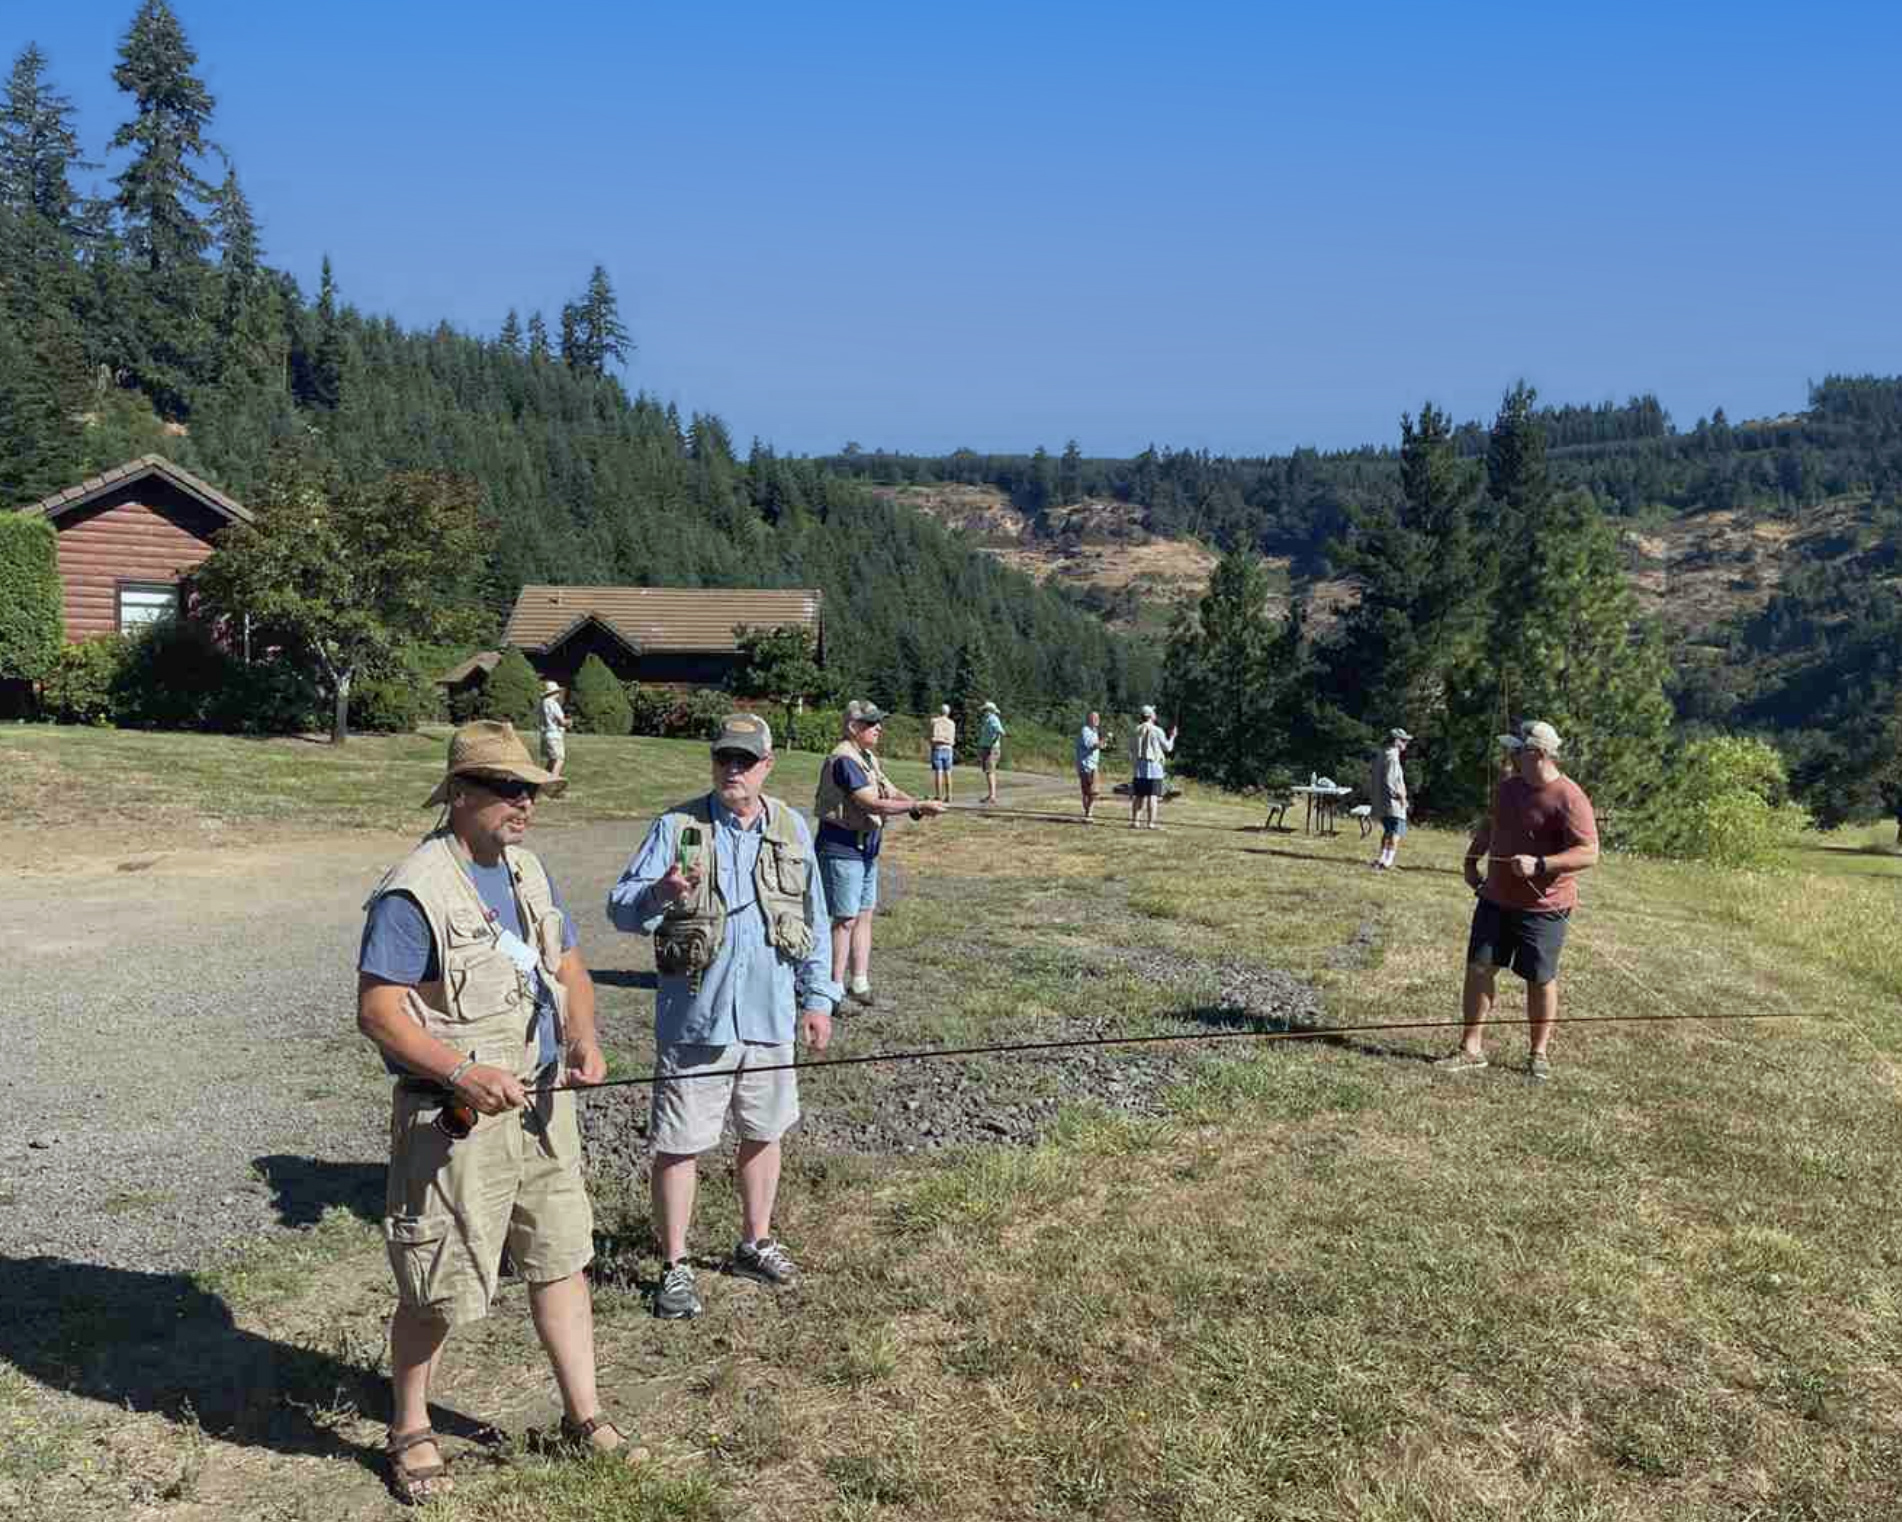
Ten or more men and women dressed in well-worn work clothes sit on wooden benches forming three sides of a square. They chat while sipping on cups of tea and coffee. There is a broad spectrum of ages, but they are clearly at ease with each other. There are several conversations going on, and from time to time laughter breaks out and the chatting stops while everyone turns to share the joke. It’s a typical group of people enjoying a mid-morning tea break. But in today’s fast-paced, high-tech world this is not a typical group: these are the 2026 apprentices and their instructors at The Carpenter’s Boat Shop in Pemaquid, Maine. They have paused, as they do every day at 10 a.m., to enjoy a hot drink, a cookie, and a half hour of relaxation.
Courtesy of The Carpenter’s Boat Shop
The class of 2026. Back row from left to right: Laurel McLaughlin, Rocco Pumphrey, Chase Weeks-Purdy, Maple Perchlik, Harry Levine, Ruby Joy Baron; front row from left to right: Marisa Rain Rodriguez, Colleen O’Laughlin.
It is late April and I have driven down the peninsula through a light mist to visit for a couple of hours. The apprentices met for the first time when they arrived on campus in March; they will stay together, living and working as a community, through November. In those nine months they will become boatbuilders, learn to sail, help out around the local community, and support one another through a unique journey. Their stay at The Carpenter’s Boat Shop is free—they pay nothing for their board, lodging, and education. But they come armed with curiosity, a willingness to work hard, and an enthusiasm for woodworking and boatbuilding.
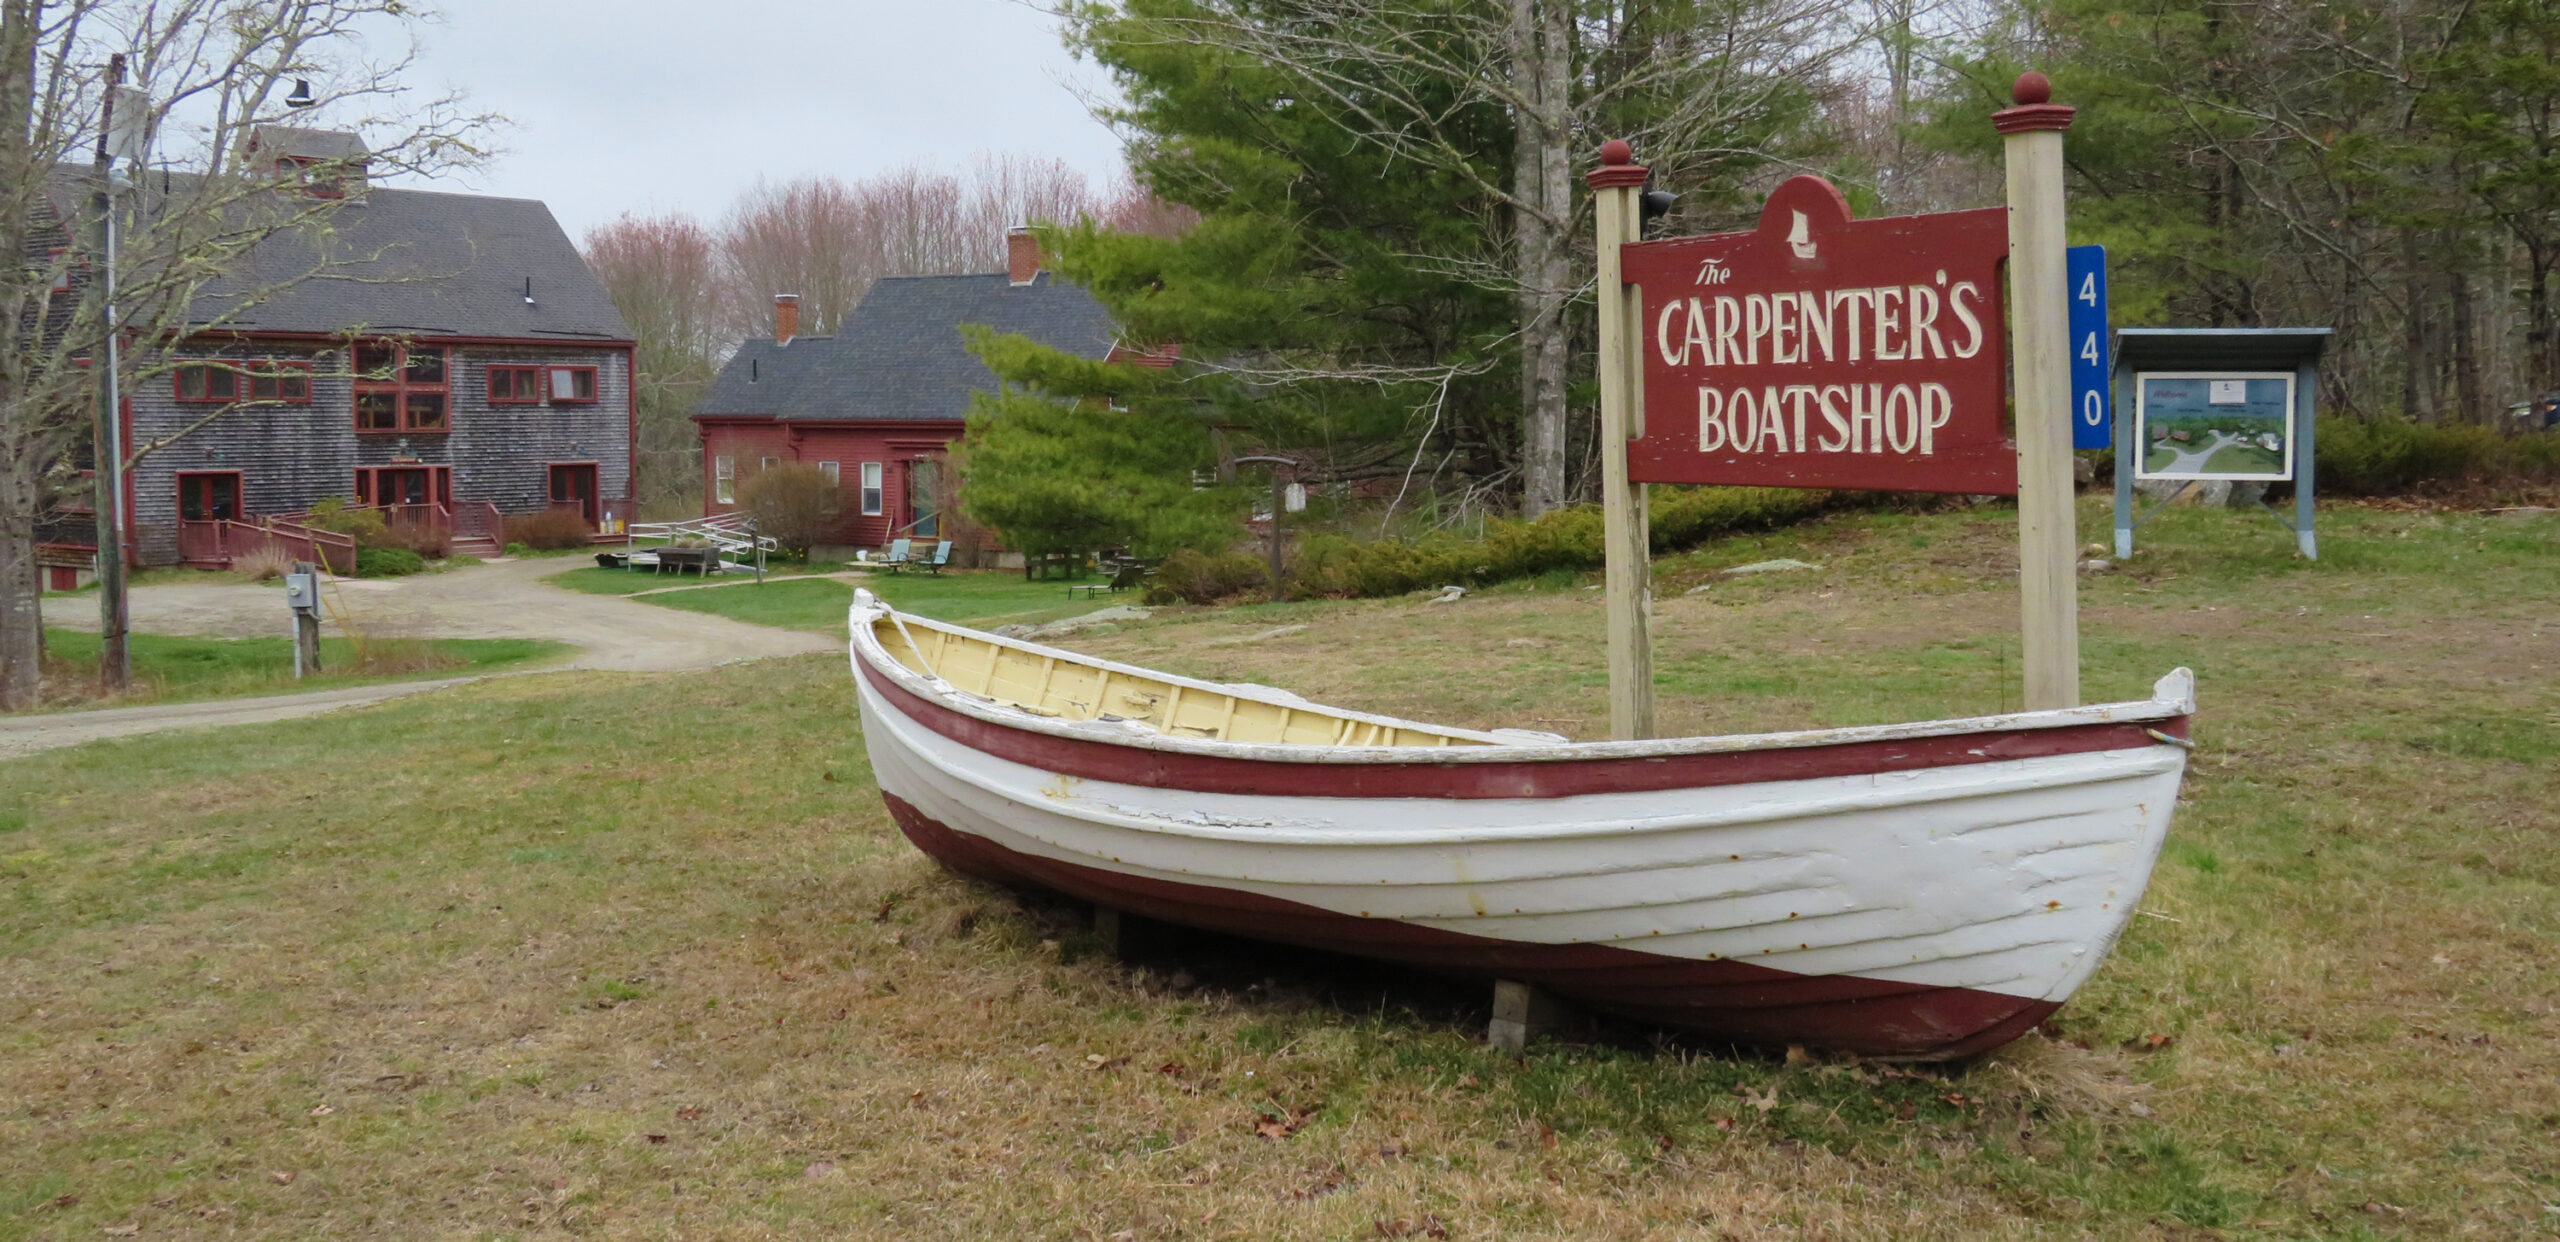
The Carpenter’s Boat Shop is one of Midcoast Maine’s best-kept open secrets. Situated down a long side road off a miles-long state road that winds through a rural landscape from Damariscotta to Pemaquid Point on Muscongus Bay, it was founded almost 50 years ago by Robert “Bobby” Ives and his wife, Ruth. For some years, Bobby and Ruth had been living and working as ministers and teachers on Maine islands, first Monhegan Island, then Louds Island in Muscongus Bay. It was on Monhegan that Bobby first came upon the Monhegan Skiff, a small boat that would alter the course of his life. “The island’s fishermen used them to row from the rocky shore to their lobsterboats,” he says. “They were their ‘donkeys of the sea,’ and they were vital to their working lives. I thought they were beautiful, but I had no idea they would become so entwined with my life.”
Jenny Bennett
The main workshop is on the second floor of a timber-frame building raised in four days by Amish builders in 2018. After introductory projects—building a toolbox and a footstool—the apprentices work together with Bobby Ives to build a new Monhegan Skiff and then work in groups of twos or threes to build their own skiffs. The skiffs vary in construction: some are all cedar, with planked sides and bottoms; some are all marine plywood; and some, like the skiff in the foreground of this picture, have cedar bottoms and marine plywood sides.
In 1979, Bobby and Ruth and their three children moved back to the mainland, a few miles inland from Muscongus Bay. They had decided to set up an apprenticeship program “dedicated to the enterprise of building boats, nurturing lives, and helping others.” They bought an old farmhouse in Pemaquid and invited a group of apprentices to come live with them and learn how to build boats. Their first was a peapod, their second a Monhegan Skiff.
The Stanley family had been building Monhegan Skiffs on Monhegan since Will Stanley Jr. designed and built the first one in the early 1900s. When Bobby and Ruth were establishing The Carpenter’s Boat Shop in 1979, Will Stanley’s grandson, Ronnie, asked if they’d take on the role of building skiffs for the fishermen when they needed them. Bobby was honored and Ronnie passed on his plans and a bevel board containing all the angles, bevels, and dimensions for the 9′ 6″ and 11′ 6″ skiffs. The Carpenter’s Boat Shop had its keystone.
Jenny Bennett
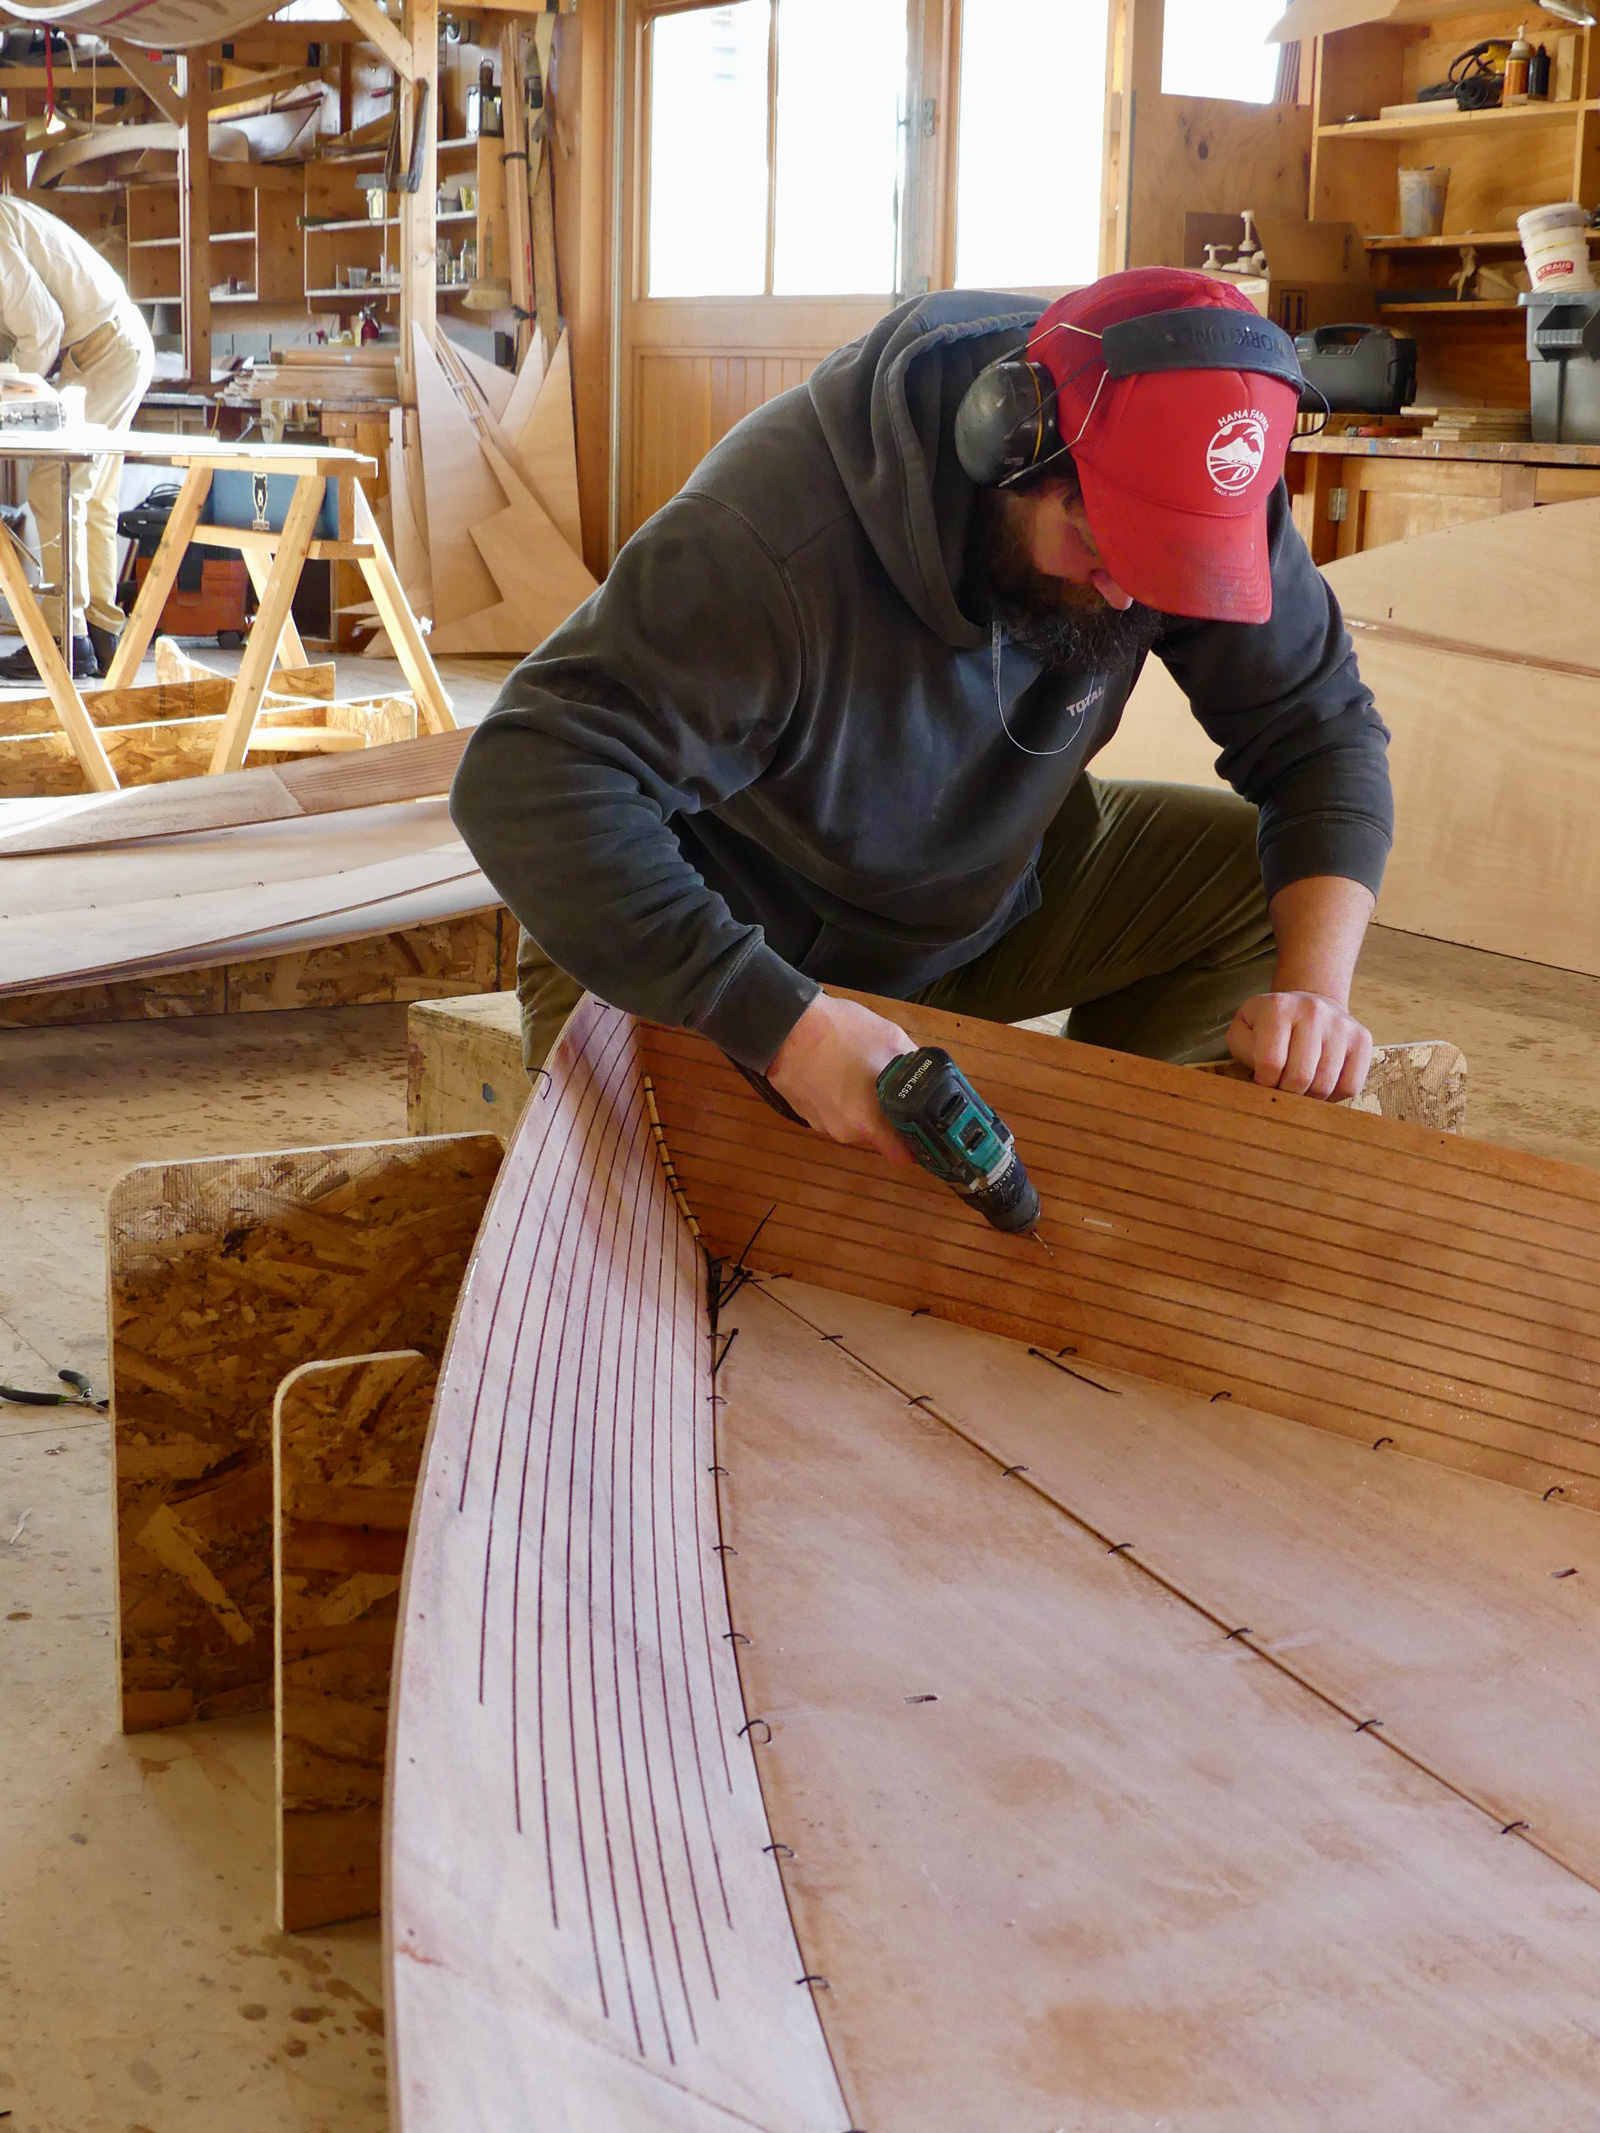
In the paint shop below the main workshop, apprentices and instructor Sozo Pumphrey (at the stern) work on restoring a customer-owned Catspaw Dinghy, readying it for the coming season.
In the early days, apprentices came for two years at a time. They lived with the Ives family, and learned boatbuilding from Bobby and his mentor, retired Norwegian boatbuilder Edvard Salor, with Bobby bringing an element of religious practice to the day-to-day. Over the next 47 years the program and offerings have evolved. Today’s apprentices come for nine months instead of two years, they no longer live with the family—although they do still live on the campus—and, says Interim Executive Director, Luke O’Neill, “the structured religious element has gone but there is still a strong spirituality, a sense of service, community, and mission. Bobby retired from running the shop a few years back, but he still teaches the Monhegan Skiff, and his ethos is still woven into the fabric of the organization. He wanted to create a community of people who came together through working with their hands.”
While the main hands-on focus of The Carpenter’s Boat Shop remains boat building and restoration, the organization has branched out to host artists in residence, and to offer furniture-building classes, open-enrollment woodworking classes, kids’ carpentry classes, and a virtual speaker series, and the doors are open to an ever-evolving group of volunteers who come in twice a week to build Adirondack chairs, kids’ wooden toys, and the occasional boat. There is also the work in the wider community. “There are a lot of folks who don’t always have the opportunity or the means to take care of things,” says Luke. “So we help out. We split, deliver, and stack firewood, we helped a neighbor to paint their barn, we fix things that need fixing. Everyone gets involved—apprentices and staff alike.” And it is that philosophy of giving back and caring for others that has fueled The Carpenter’s Boat Shop for its half century: 90% of the organization’s funding comes through donations.
Jenny Bennett
The Carpenter’s Boat Shop stores and maintains a few privately owned local boats over the winter, and accepts donated boats—some to be restored by apprentices, some to be sold as is.
The 2026 apprentices have come from near and far: from New York, Pennsylvania, Virginia, Vermont, Indiana, Maine, and Florida by way of Oregon. Their ages range from 18 to somewhere in their 40s. One apprentice is fresh out of high school; others have been working for many years. All have come to learn. Colleen, a professor of chemistry and biochemistry from Gardner, Maine, looking for a change in direction, came to volunteer, and fell in love with the place. Marisa, from Pleasantville, New York, heard you could “do carpentry and sailing as a duo, and I loved that and the idea of community and working in a shop every day.” Harry, from Brooklyn, New York, “read a book in which Bobby had written a foreword describing The Carpenter’s Boat Shop. I loved how he wrote about the place, it sounded amazing. I was at a crossroads, so I applied.”
The group’s skill level, too, is varied. Some have a modicum of woodworking experience; others, like Harry, have none. “I didn’t even know how to hold a drill or a screwdriver,” he says. “Some of the tools are still a mystery. But I know what cherry looks like now.” He turns to the group for confirmation. “The slightly red one, right?” he says. “Right!” they chorus back. Harry grins. They have been together for only a few weeks, but already they are becoming a family.
Jenny Bennett
In the restoration shop, apprentices Rocco Pumphrey and Ruby Joy Baron work on an early-1900s Rangeley Lake Boat.
Before Luke took on the role of Interim Executive Director, he asked Bobby to describe what was important about The Carpenter’s Boat Shop. “Apart from the message of community and service, he told me, ‘I want it to feel like home.’ And it does. This place is a home. People return. Past apprentices and volunteers stop by to visit, to share a meal. There’s always a place at the table. Our staff have nearly all been here as apprentices. People come back to reconnect and re-energize. But Bobby’s philosophy is that you can create that for yourself anywhere, you don’t have to come here to get it. You start small, focus on loving, work hard, do something, learn something, work together, and make something beautiful. Beautiful, not perfect. We work hard to build really good boats, not perfect boats.”
Since 1979, The Carpenter’s Boat Shop has built well over 200 Monhegan Skiffs, as well as other small boats of varying types, and many hundreds of toolboxes and step stools—the initial projects for every apprentice. But more than that, it has touched and changed countless lives, and continues to do so.
Courtesy of The Carpenter’s Boat shop
Robert “Bobby” Ives, founder of The Carpenter’s Boat Shop, still teaches and joins the crew most days for morning tea.
Ruth Ives died in 2006, at the age of 59, but Bobby, now nearing 80, still teaches at The Carpenter’s Boat Shop, still nurtures the people who come to share his vision and love of boats, and still smiles broadly as he walks with apparently boundless energy through the buildings and grounds of a place that undoubtedly feels like home.
With thanks to the staff and apprentices of The Carpenter’s Boat Shop for sparing valuable time in their busy day.
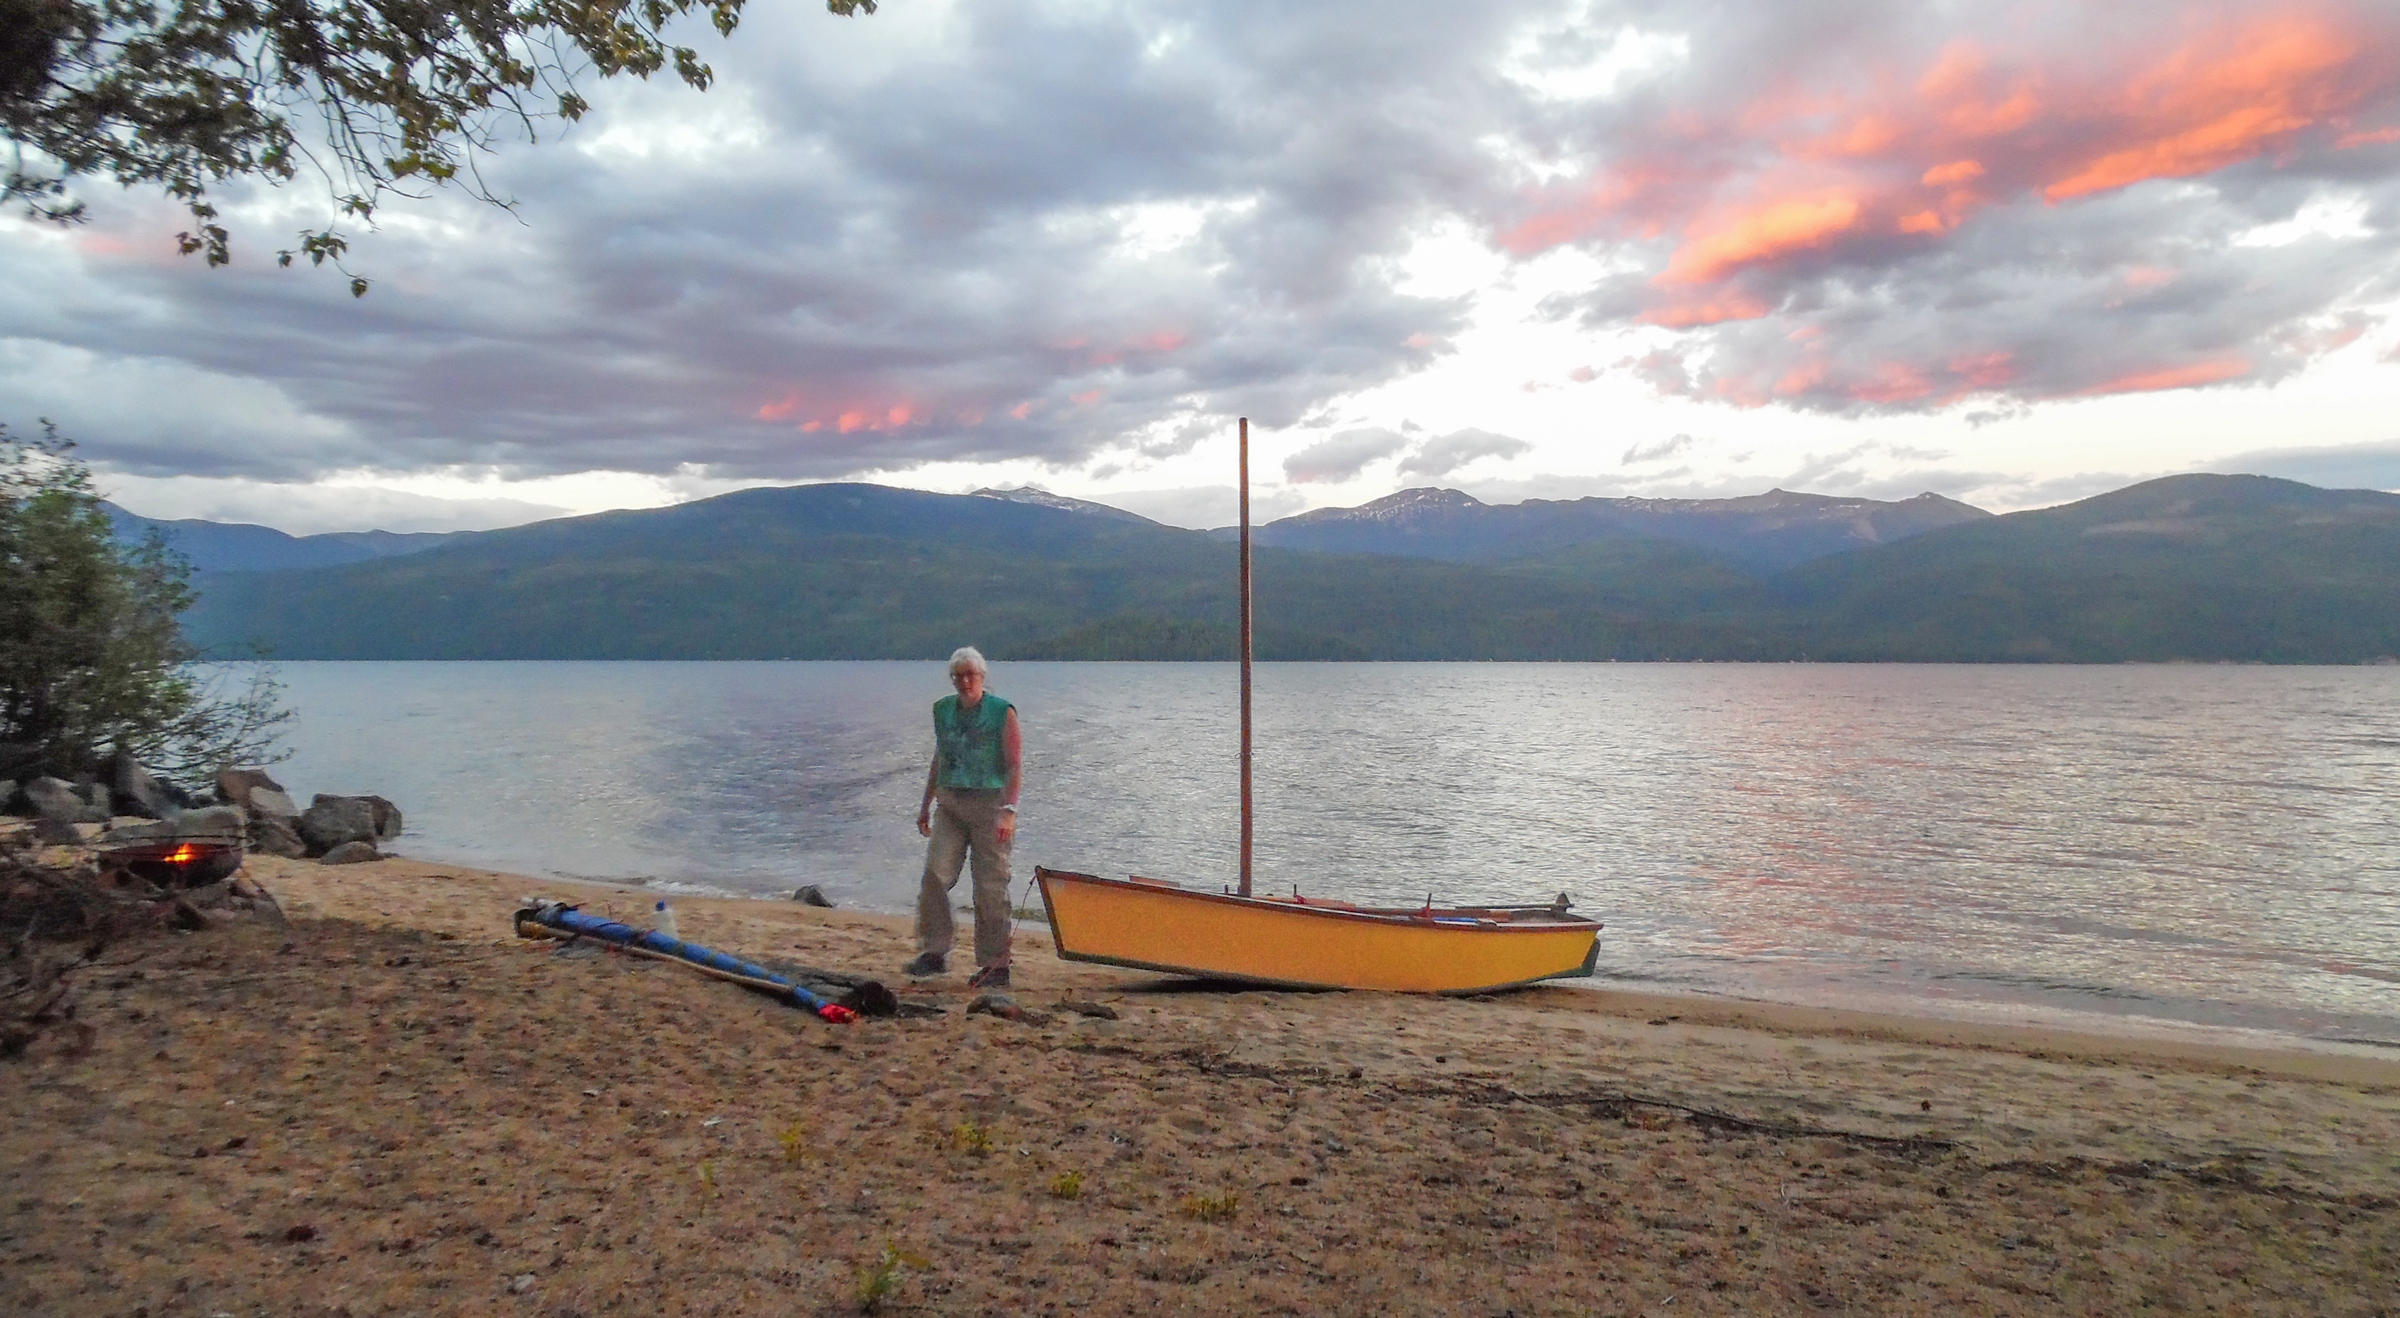
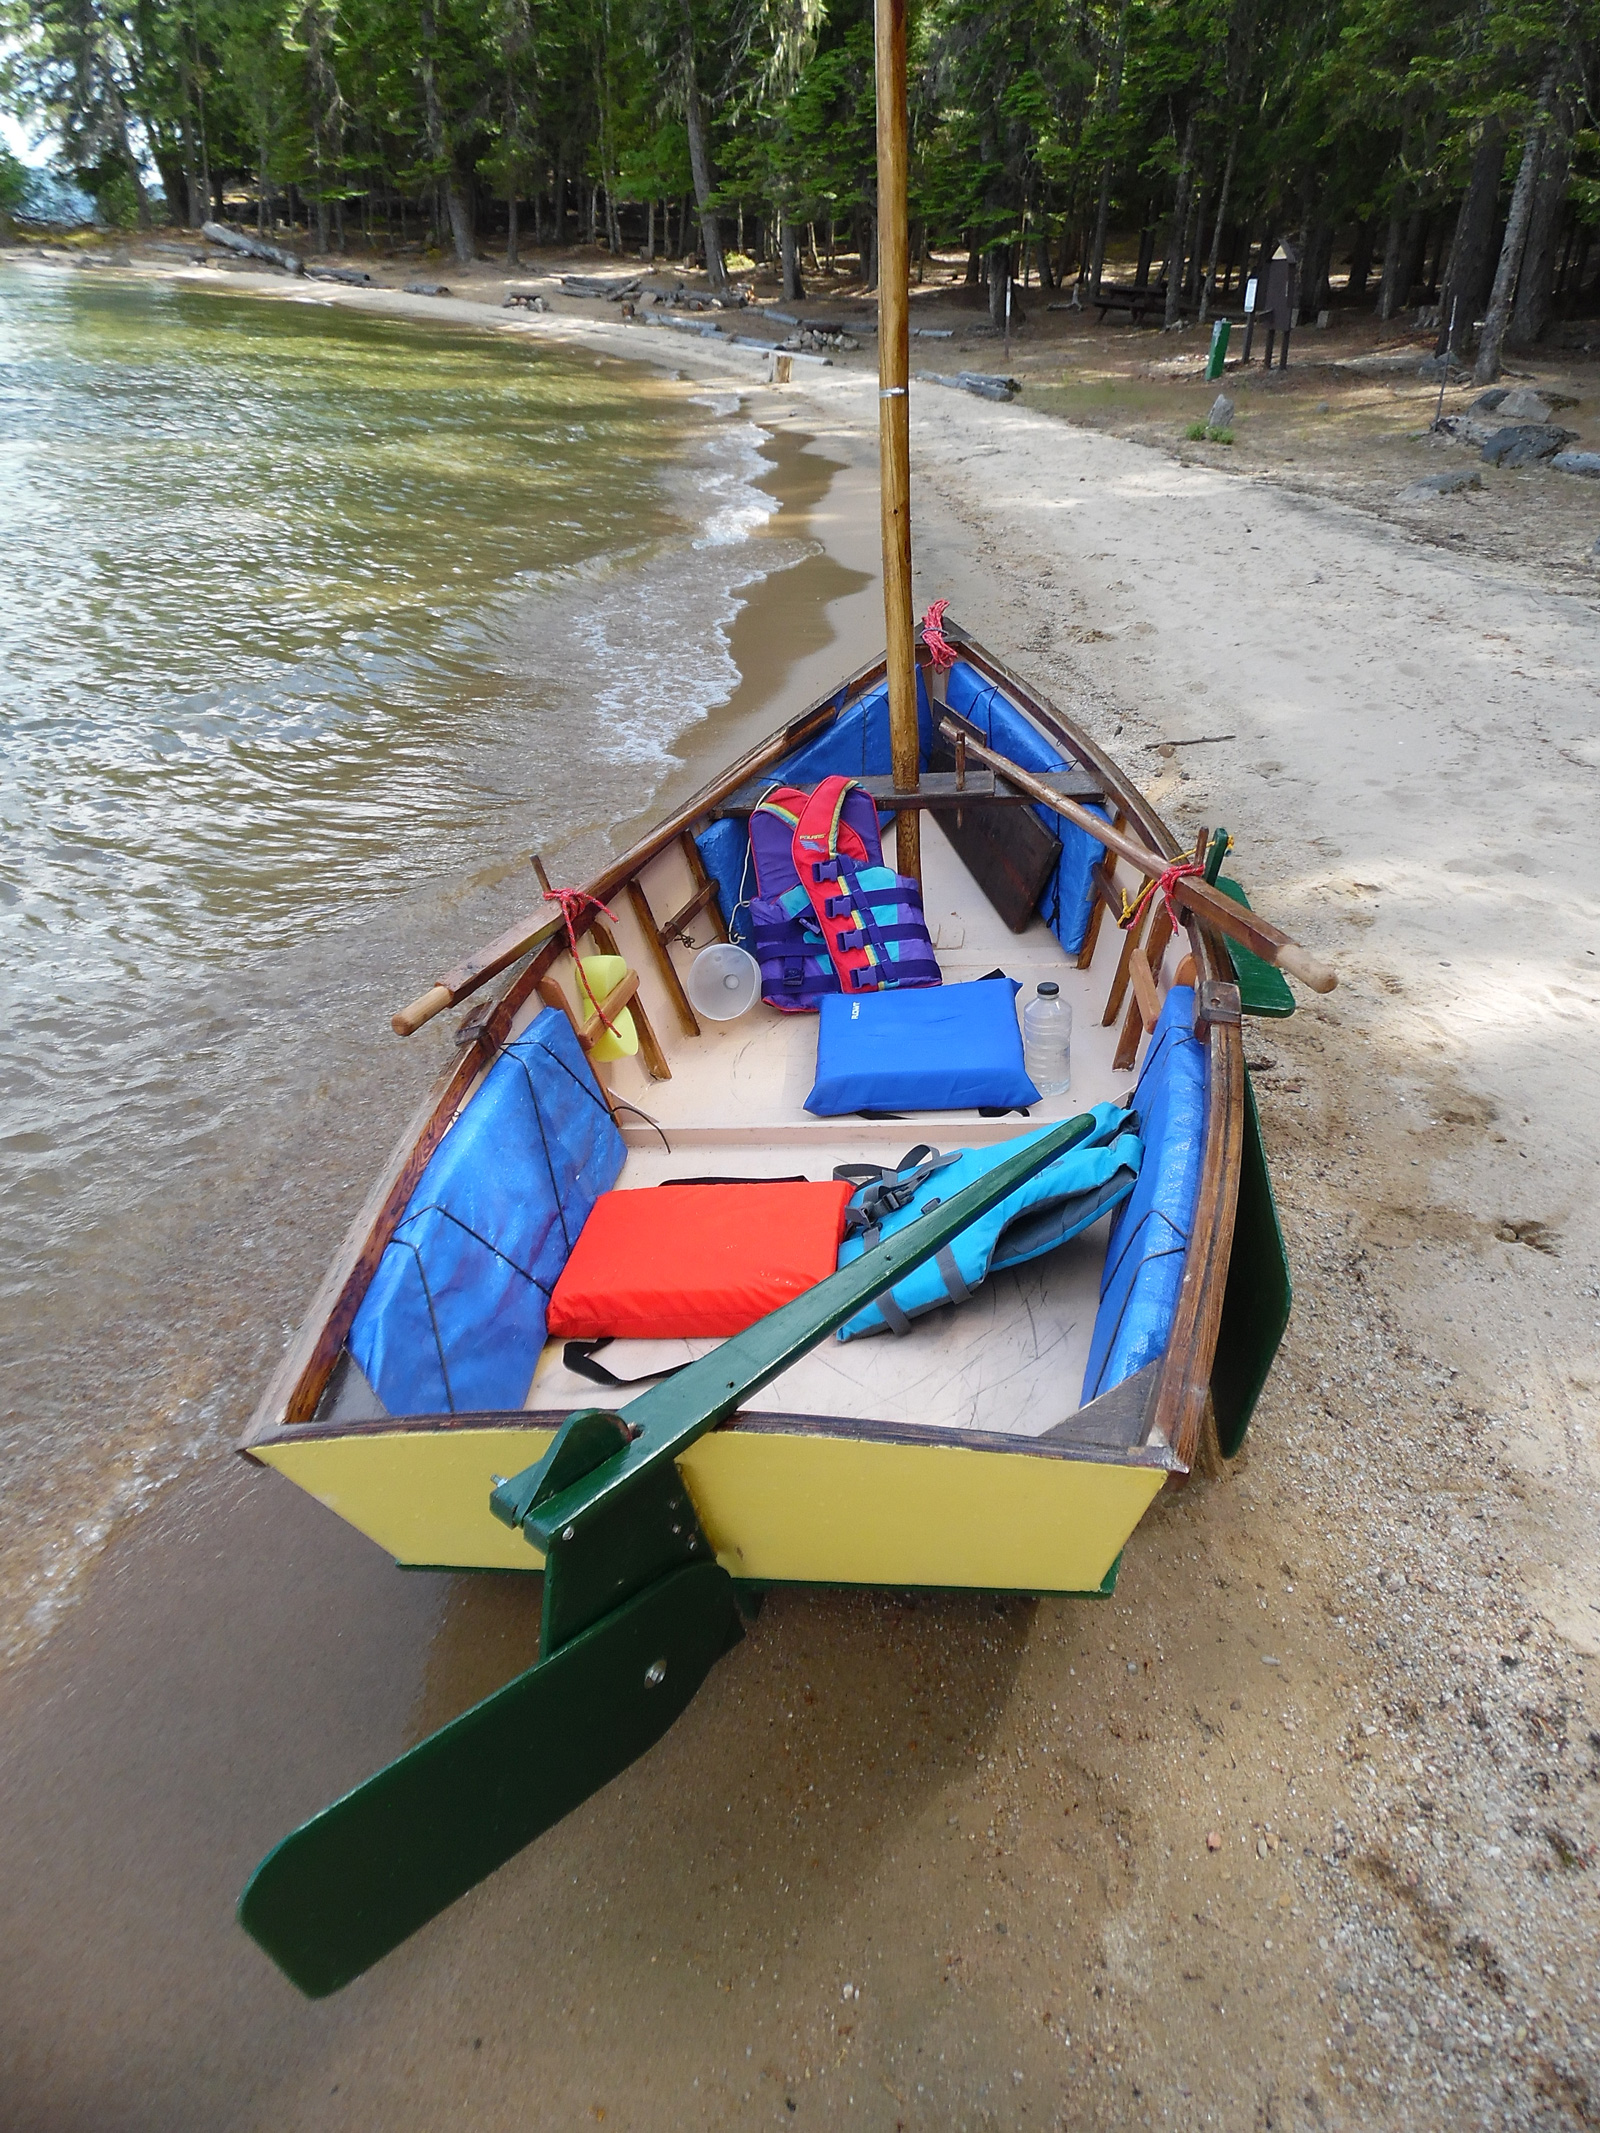
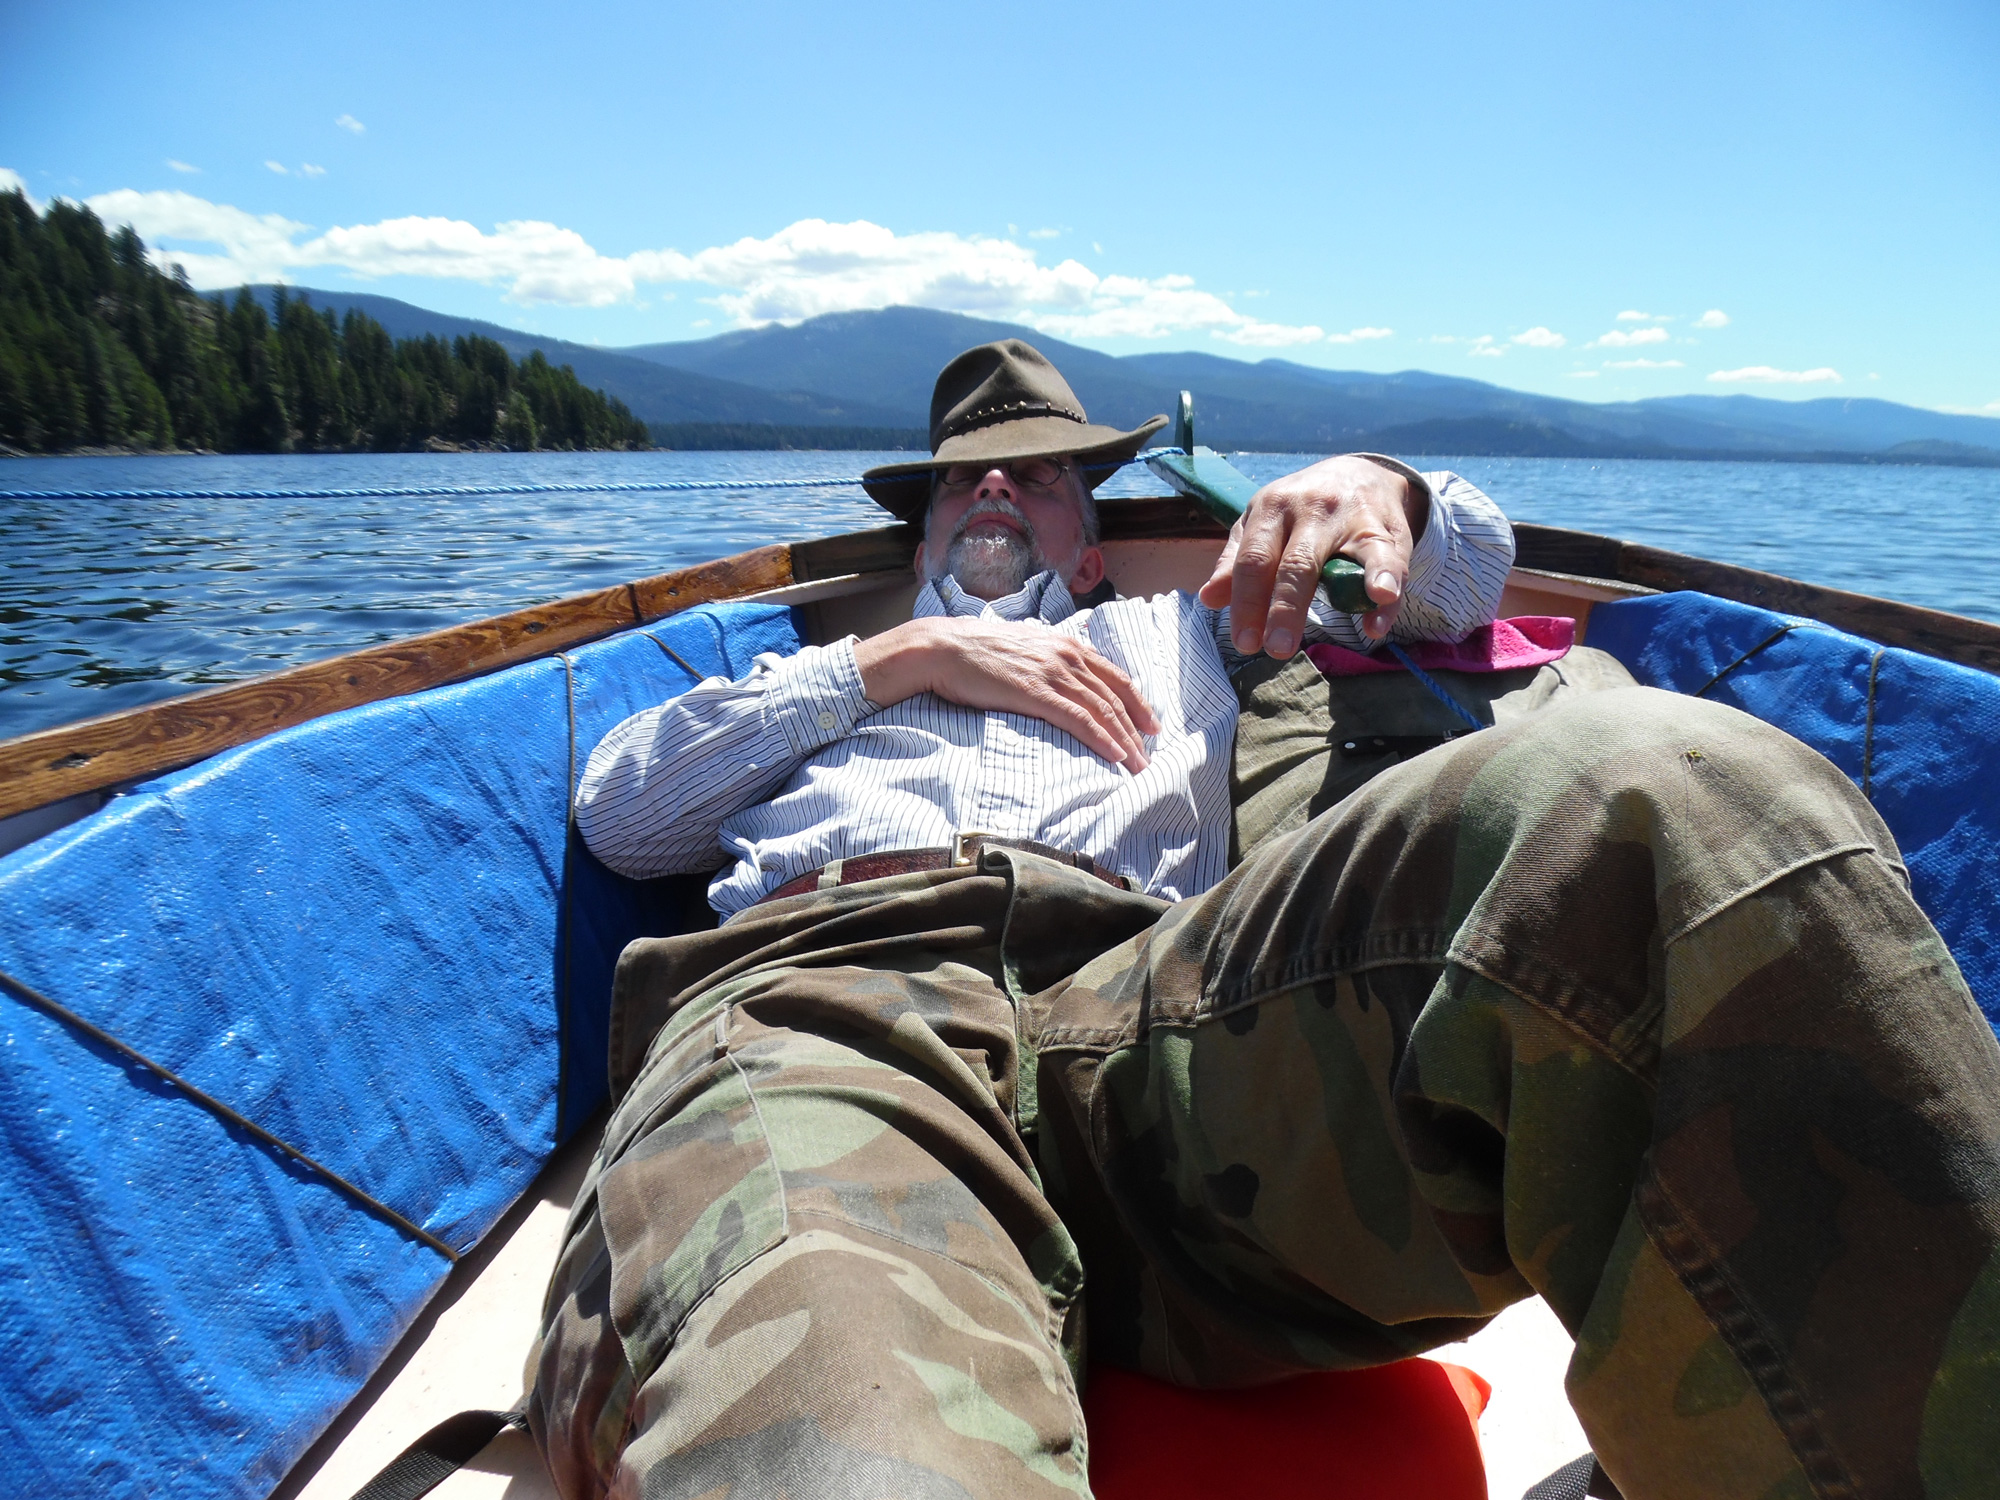
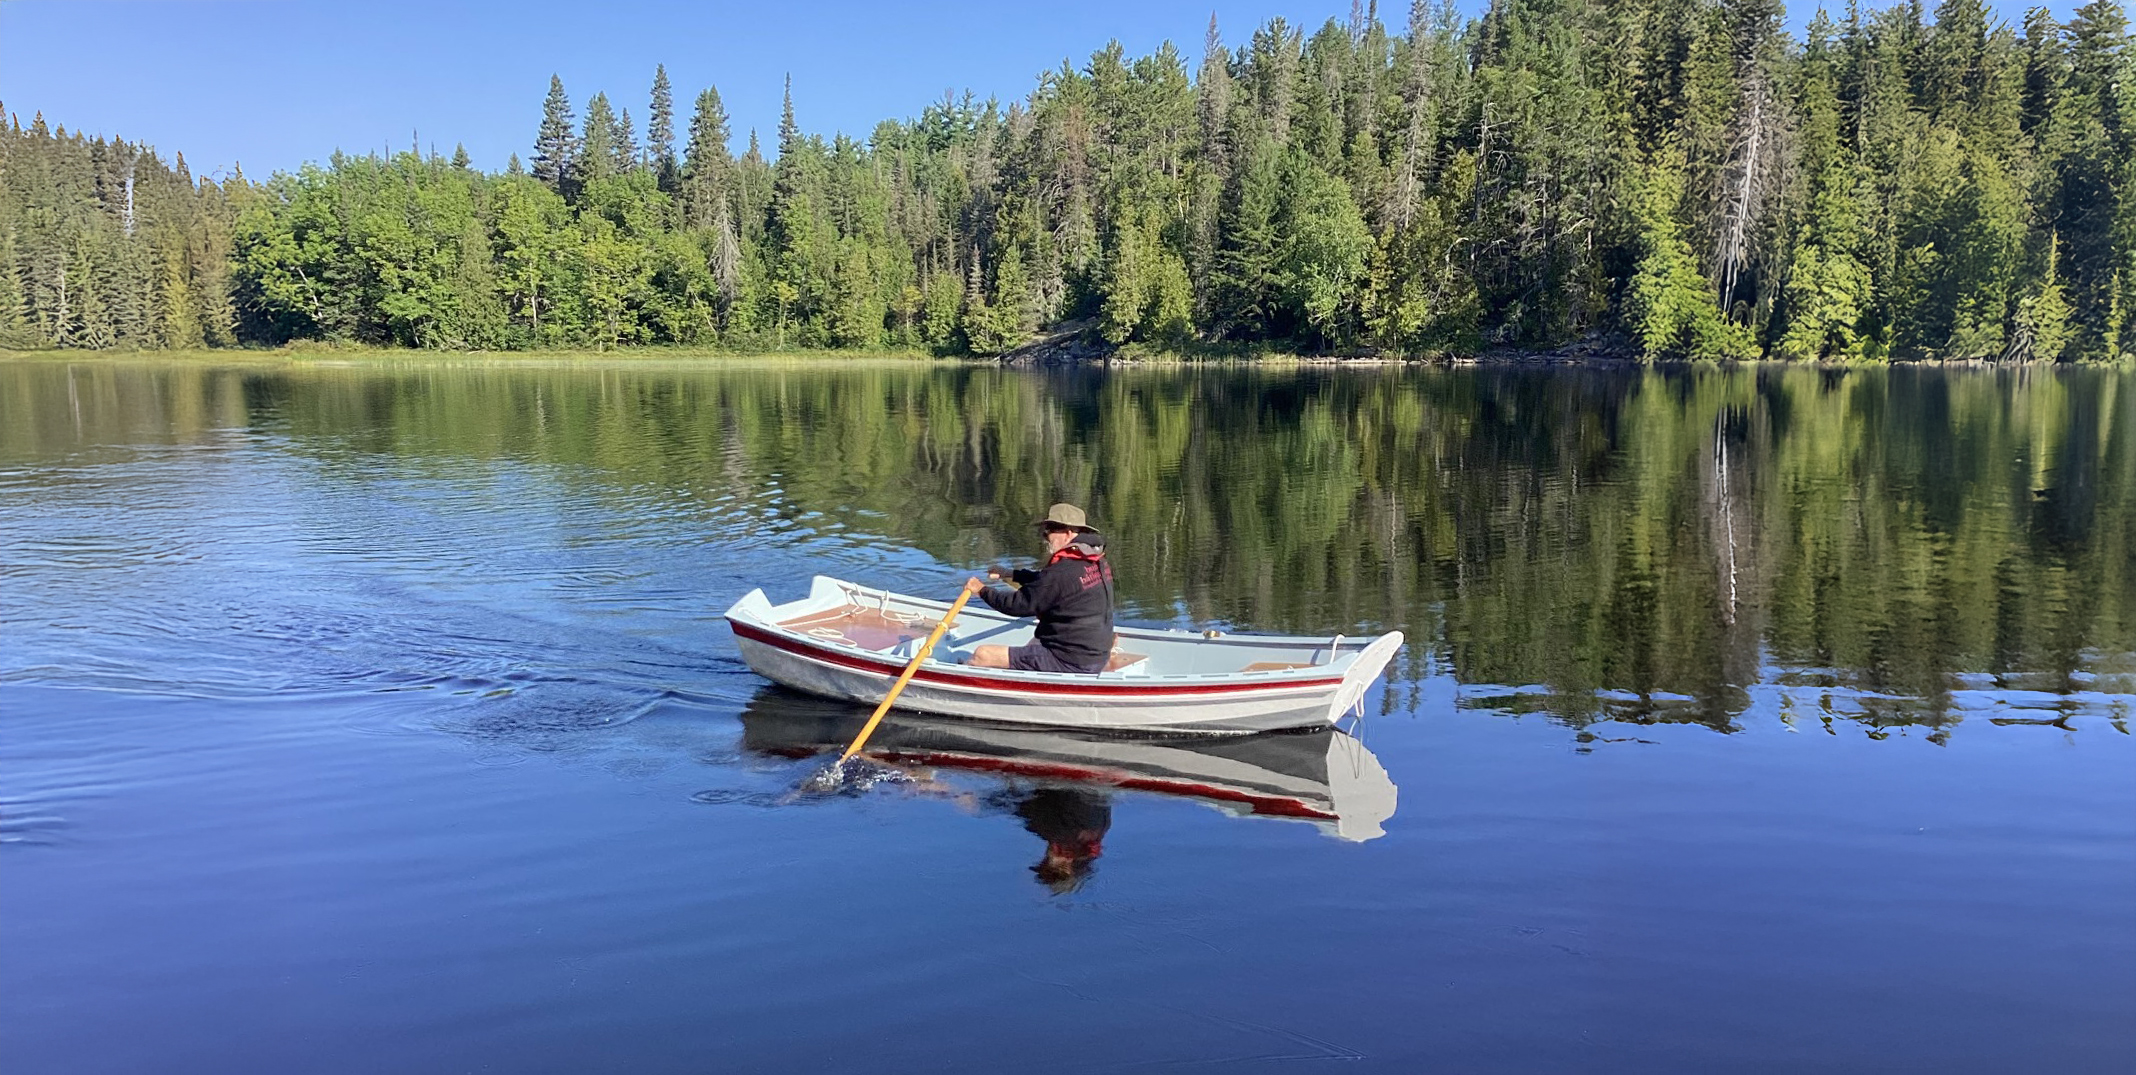
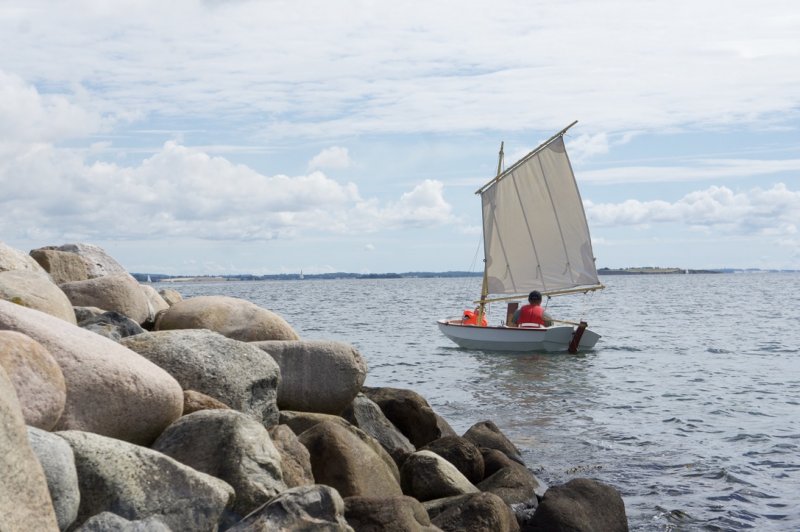
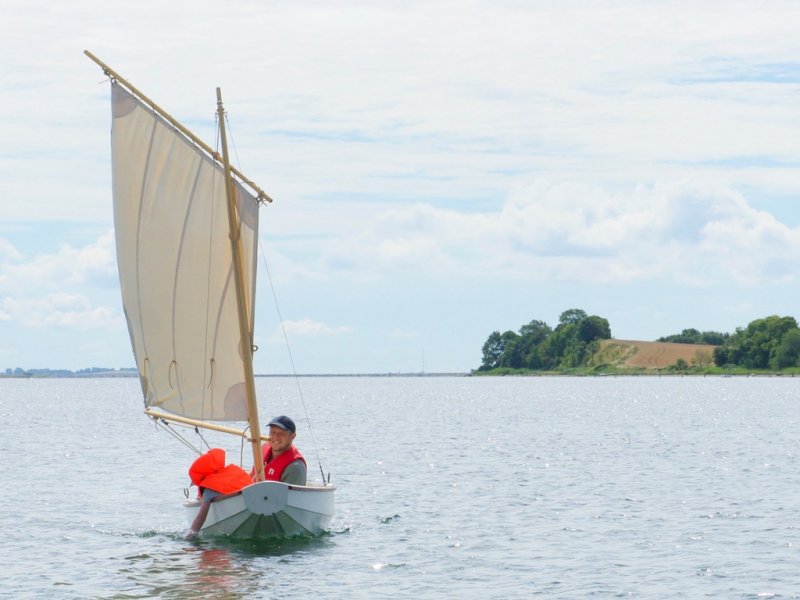
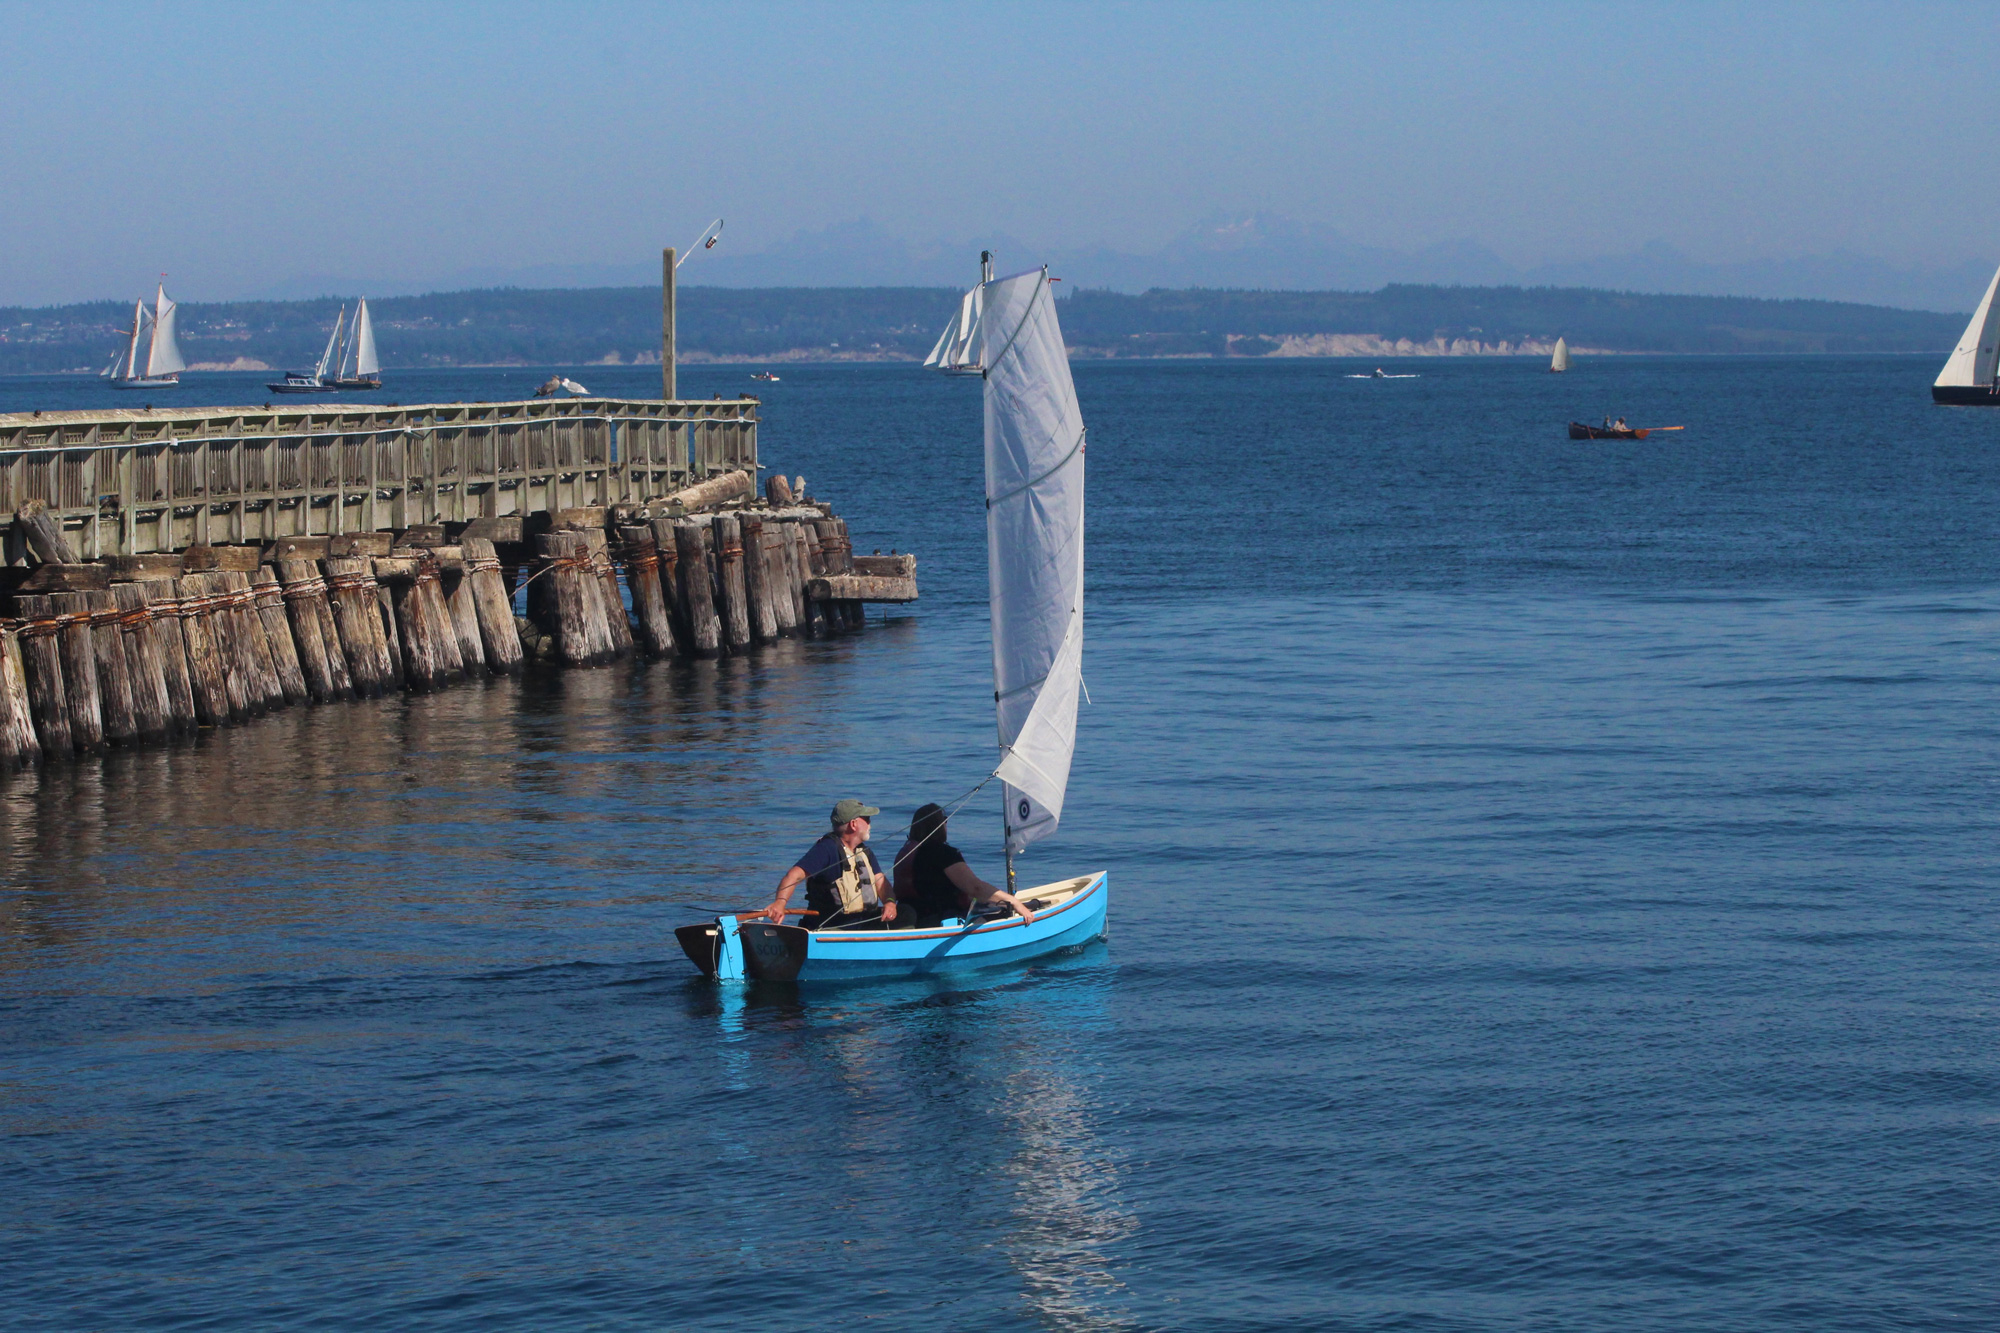
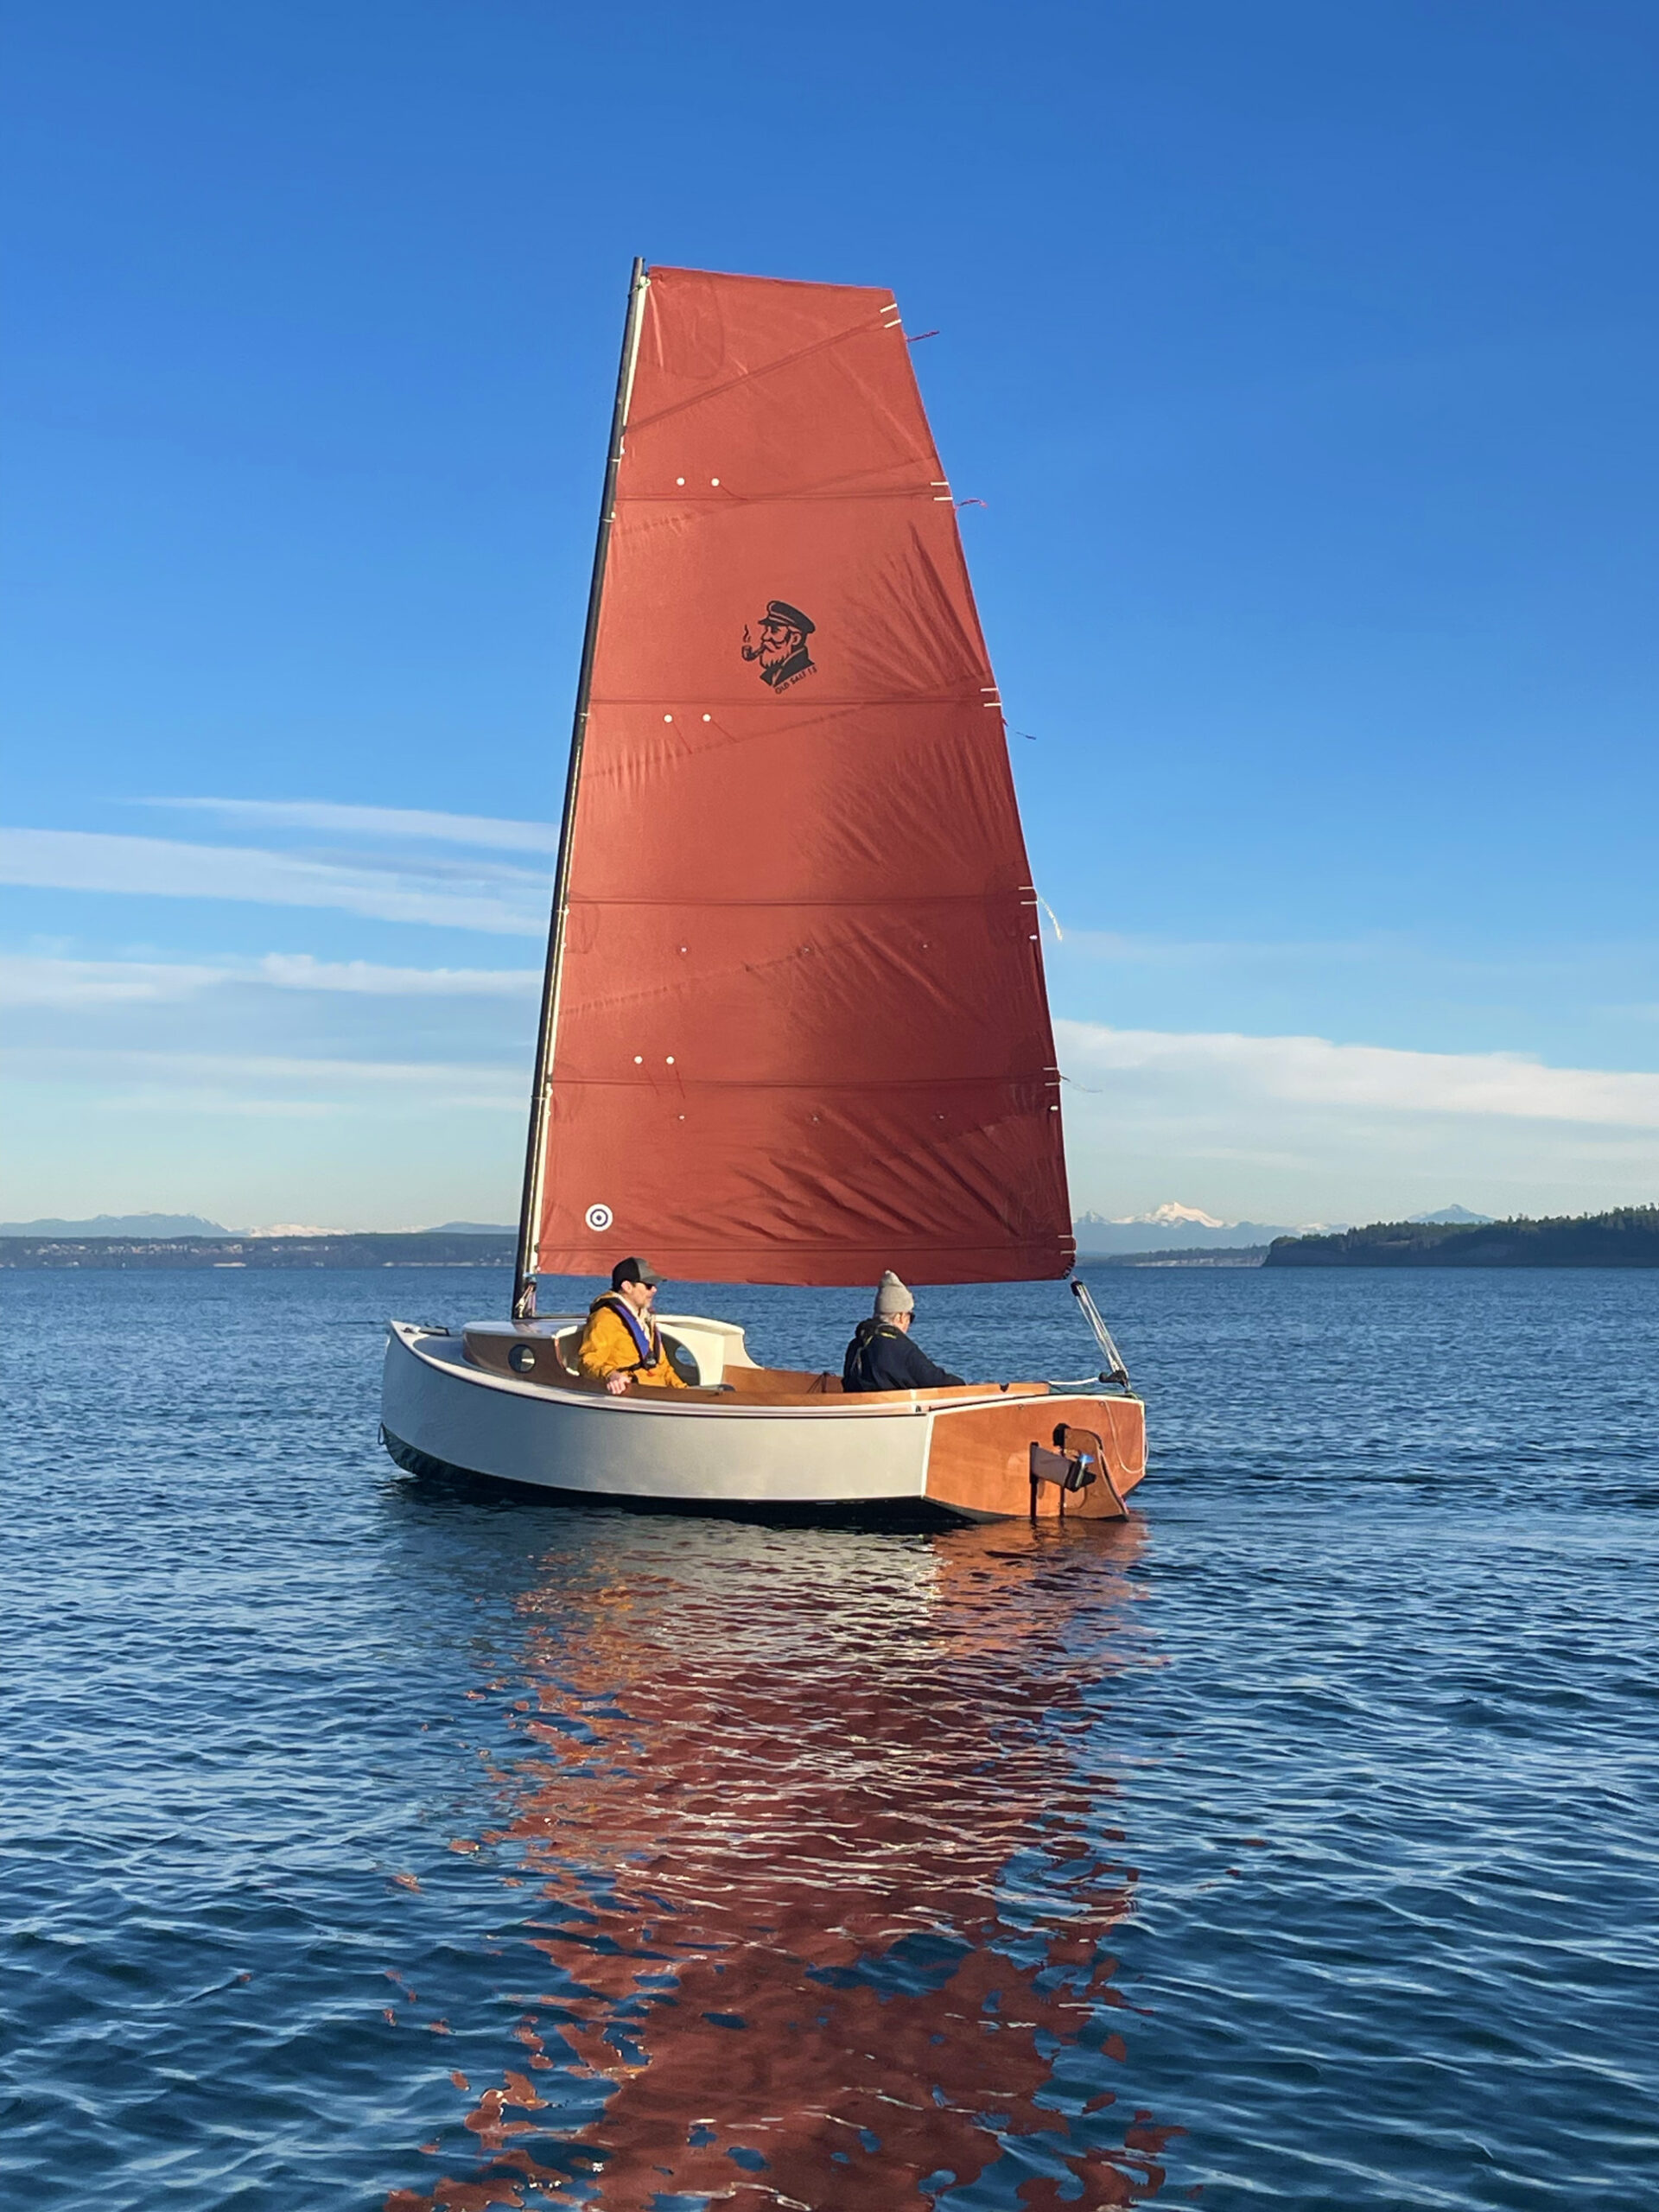
A wave slapped the windward gunwale and splashed the back of my neck—a new experience for me. I sat scrunched up in the stern of our little skiff, LA MADALINA, one white-knuckled hand gripping the tiller, the other clinging to the sheet. My wife, Heidi, sat facing me, cross-legged behind the mast, laughing every time water came over the bow and hit her. She was laughing a lot. Armed with a scoop and a sponge, her job was to keep the water in the boat to a minimum. Mine was to get us to the island without going swimming. The 11′ 8″ flat-bottomed skiff was swashing gamely along to windward and seemed to be moving at a good clip. We were dealing with more wind and waves than we ever had before, and I didn’t really know just how much we—or the boat—could handle. I had launched the skiff only a month ago, and already I was thinking we might need something bigger. But she was heavily laden with two adults and camping gear for three days, and she hadn’t capsized yet. It was a glorious afternoon, with a pale blue sky studded with puffy white clouds, sunlight sparkling off the dark blue waters of Priest Lake, and we were having a blast.
Back in my school days I’d messed around on the bays and estuaries of Long Island Sound in a friend’s lateen-rigged Super Snark, but I hadn’t set foot in a sailboat since. Now, some 37 years later, I had decided to try sailing again and so had built this little boat, a Summer Breeze flat-iron skiff designed by David Beede. For the sail, I’d pulled a discarded tarp from a dumpster, cut it out on my lawn, stuck it together with double-sided carpet tape, and (without quite knowing how) had wound up with a decent enough shape. I launched the skiff on our local lake and was surprised by how well it had performed. Mind you, I had little to compare it to, which may have had a lot to do with my appreciation of the “sparkling” performance. But the boat moved along faster than we could paddle a canoe, and could actually sail to windward. What more could I ask for?
Roger Siebert
.
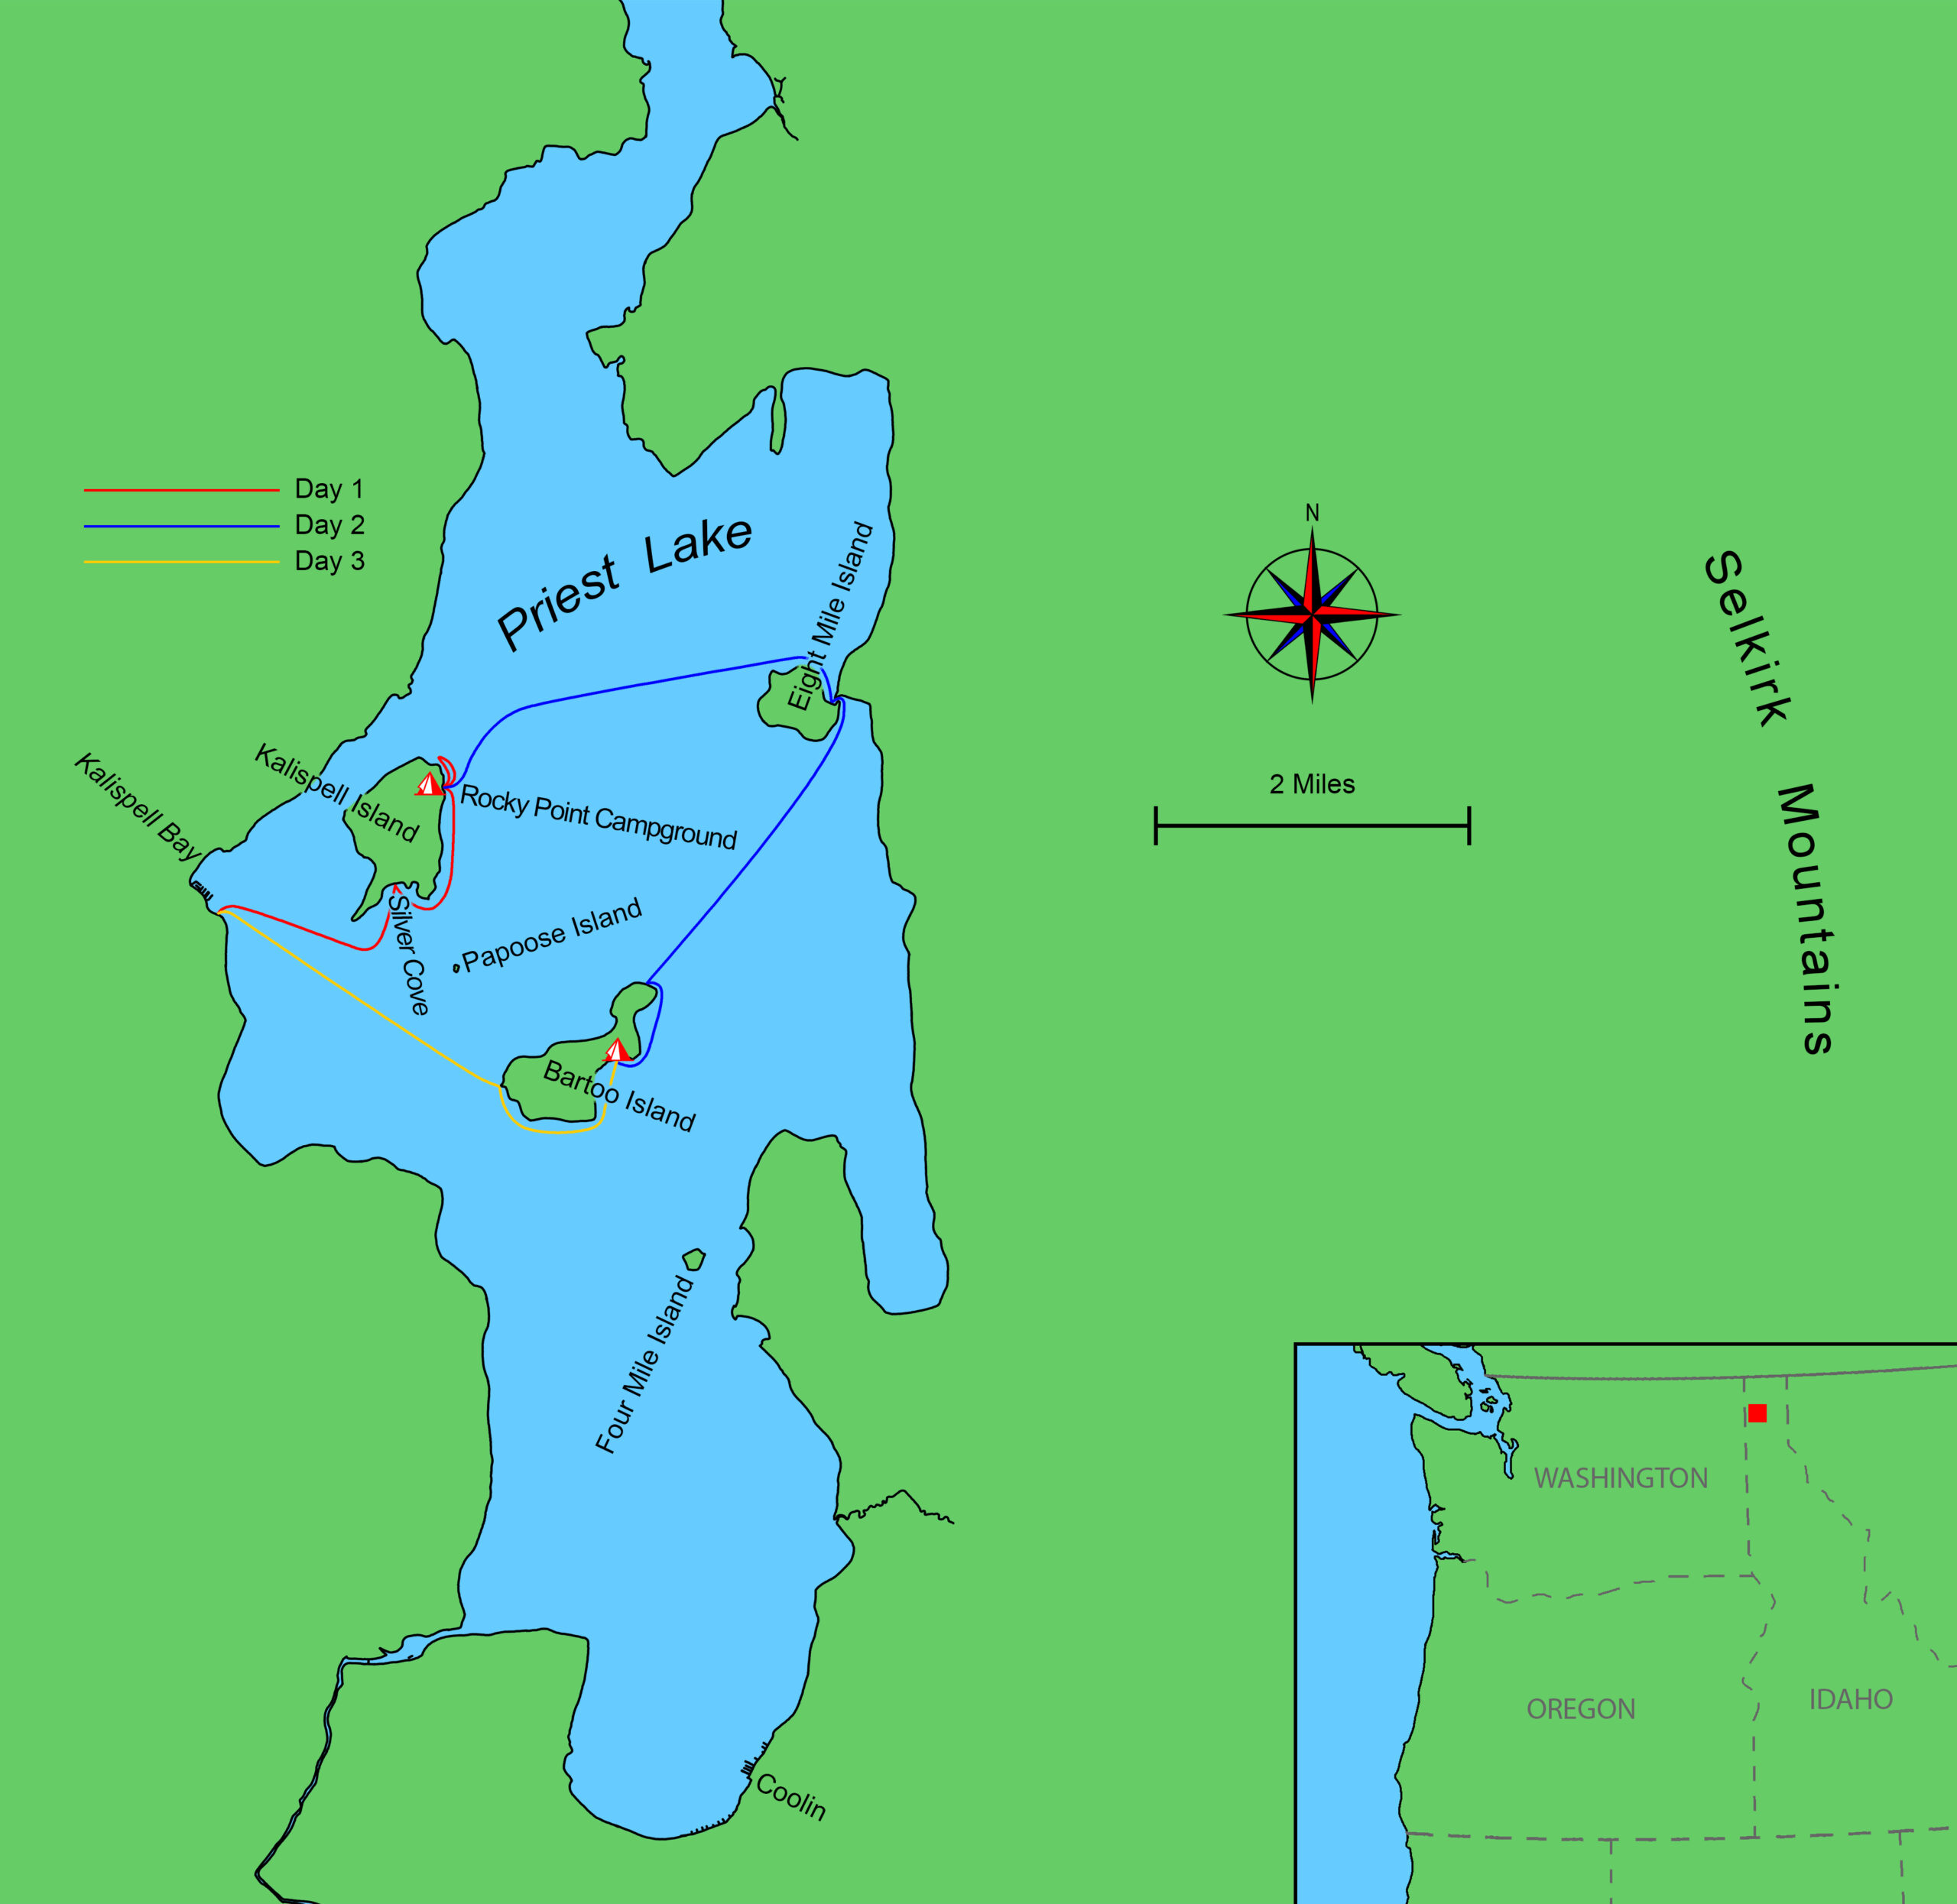
Flushed with early success, I immediately began planning a boat-camping trip to the most beautiful place we knew, Priest Lake, in the Idaho panhandle. And so, a month later, in mid-July 2017, on a warm, sunny afternoon, Heidi and I set off on our first ever beach cruise, headed for Kalispell Island.
Kalispell Bay to Kalispell Island
Priest Lake is 19 miles long and 4 1⁄2 miles wide at its widest point, with several small islands in its southern half. Often calm in the morning, it is surrounded by mountains, which funnel the afternoon’s southerly winds up the lake and at times can create a steep chop. Heidi and I had launched in the late morning at the Forest Service boat ramp in Kalispell Bay, on the western shore of the lake about a mile from the southernmost tip of Kalispell Island. The bay is sheltered from the southerly winds, but the farther out we ventured, the more the wind built.
The cedar-sapling mast supporting the 63-sq-ft standing lugsail creaked in the stiffening wind. There were not yet any worrisome whitecaps, thanks to the partial shelter provided by Bartoo Island 2 miles to our southeast, but the wind was a growing concern; and the waves were being confused by the wakes of motorboats that came and went across our bows. Still unsure of the boat and my mastery of her, I instinctively handled her as I would a canoe.
Heidi and I were old hands at canoeing, and had paddled out to Kalispell Island before. Once, we had even paddled out in a canoe laden with three people and a whole load of camping gear in a brisk November snow squall. On that occasion, we had quartered the wind and waves on the starboard bow, not daring to set a course directly to the island, which would have put the canoe broadside to the big waves rolling up from the south.
Halfway to Papoose Island—a heavily wooded island, barely 90 yards long, which lies off the southern tip of Kalispell Island—we had waited for a break in the waves, and then turned the canoe to surf downwind to Kalispell with the wind on our port quarter. I used the same tactic now—there might be neither snowstorm nor paddles but, I reasoned, the maneuver would work just as sweetly under sail.
As we neared Papoose, I pulled the tiller to windward and turned the boat to scud away on a broad reach to the southeast end of Kalispell. The wind felt overwhelming as I awkwardly tried to manage both helm and sheet, keep my weight low, and drive the boat in mostly the right direction; she was affected by a fierce weather helm and was constantly trying to round up, fighting me all the way. As we neared the island, the leeboard hit rocks and pivoted back several times, reminding me that in a sailboat depth of water is of more concern than in a canoe. But, at last, we ducked into Silver Cove, a narrow inlet, barely 100 yards wide, full of sunlight and clear water, edged by granite boulders and with a white sandy beach at the end.
Photographs by Bob and Heidi van Putten
When we left the Kalispell boat ramp, we had thought to camp at Silver Cove at the southernmost point of Kalispell Island. But finding it crowded with motorboats and beach campers, we headed north to Rocky Point where we had this beach to ourselves.
The calm was immediate. We looked around. Silver Cove is a beautiful, sheltered spot in which to camp in the off season, but in July, even mid-week, it was a different story. The cove was filled with motorboats drawn up on the shore or anchored off, and the beach was busy with tents and people. There was no way we were going to land there.
Under the gawking gaze of countless campers we struggled to turn around and head back out. As we made our retreat, I clearly heard someone on the beach say, “Is that a blue tarp for a sail?” And then, moments later, our rudder snagged an anchorline and we stopped dead in the water. The skiff sagged to leeward and rocked as Heidi struggled to free an oar lashed to a tholepin, and I plunged an arm over the transom to grab the rudder blade and swing it up.
The kick-up blade had no lanyard and the single pivot bolt held the blade tight. Somehow I managed to pull it up and we were released, getting away without hitting another boat or snagging anything else. Our pride somewhat bruised, we tacked silently out of the narrow cove, rounded the southeast point of the island, and ran downwind half a mile to the Rocky Point campground, where a narrow crescent of fine sand is backed by a jumble of granite boulders and a thick forest of cedar and fir.
Completely exposed to the east, this shore is less popular with motorboats, but for a small boat that can be drawn up on the beach, it is perfect. Both beach and campground were deserted. We pulled in to the shore, pitched the tent in a shady spot, prepared a meal and a pot of tea, and retired to the tent for an afternoon nap. We’d sailed just a handful of miles, but the effort had been exhausting.
High winds of Kalispell Island
Later that afternoon, feeling well rested, we thought it would be fun to circumnavigate the island—a voyage of about 3 miles. Heedless of the wind that was now blowing a good Force 6, we flew off downwind and reached the north end of the island in a jiffy. Belatedly, we decided that perhaps discretion was the better part of valor, and turned to head back to camp.
Clawing our way back was almost impossible. In the high winds, the weather helm was as strong as ever, and again and again the boat stalled in irons. We could go down or across the wind, but getting upwind was a real struggle. Without the ballasting weight of our camping gear the boat seemed less stable, and time and again I let the sheet fly to keep from driving the rail under. Then the little skiff would round up and stall, and I would fight to get her underway again. At the time I was convinced the sail needed a reef, but the real lesson here was simply to stay off the water when it’s blowing that hard! We managed in the end, but what had taken us only minutes to run downwind took us half an hour to work back upwind. These days I’d drop the rig and row, or just walk along the beach and tow the boat along by the painter.
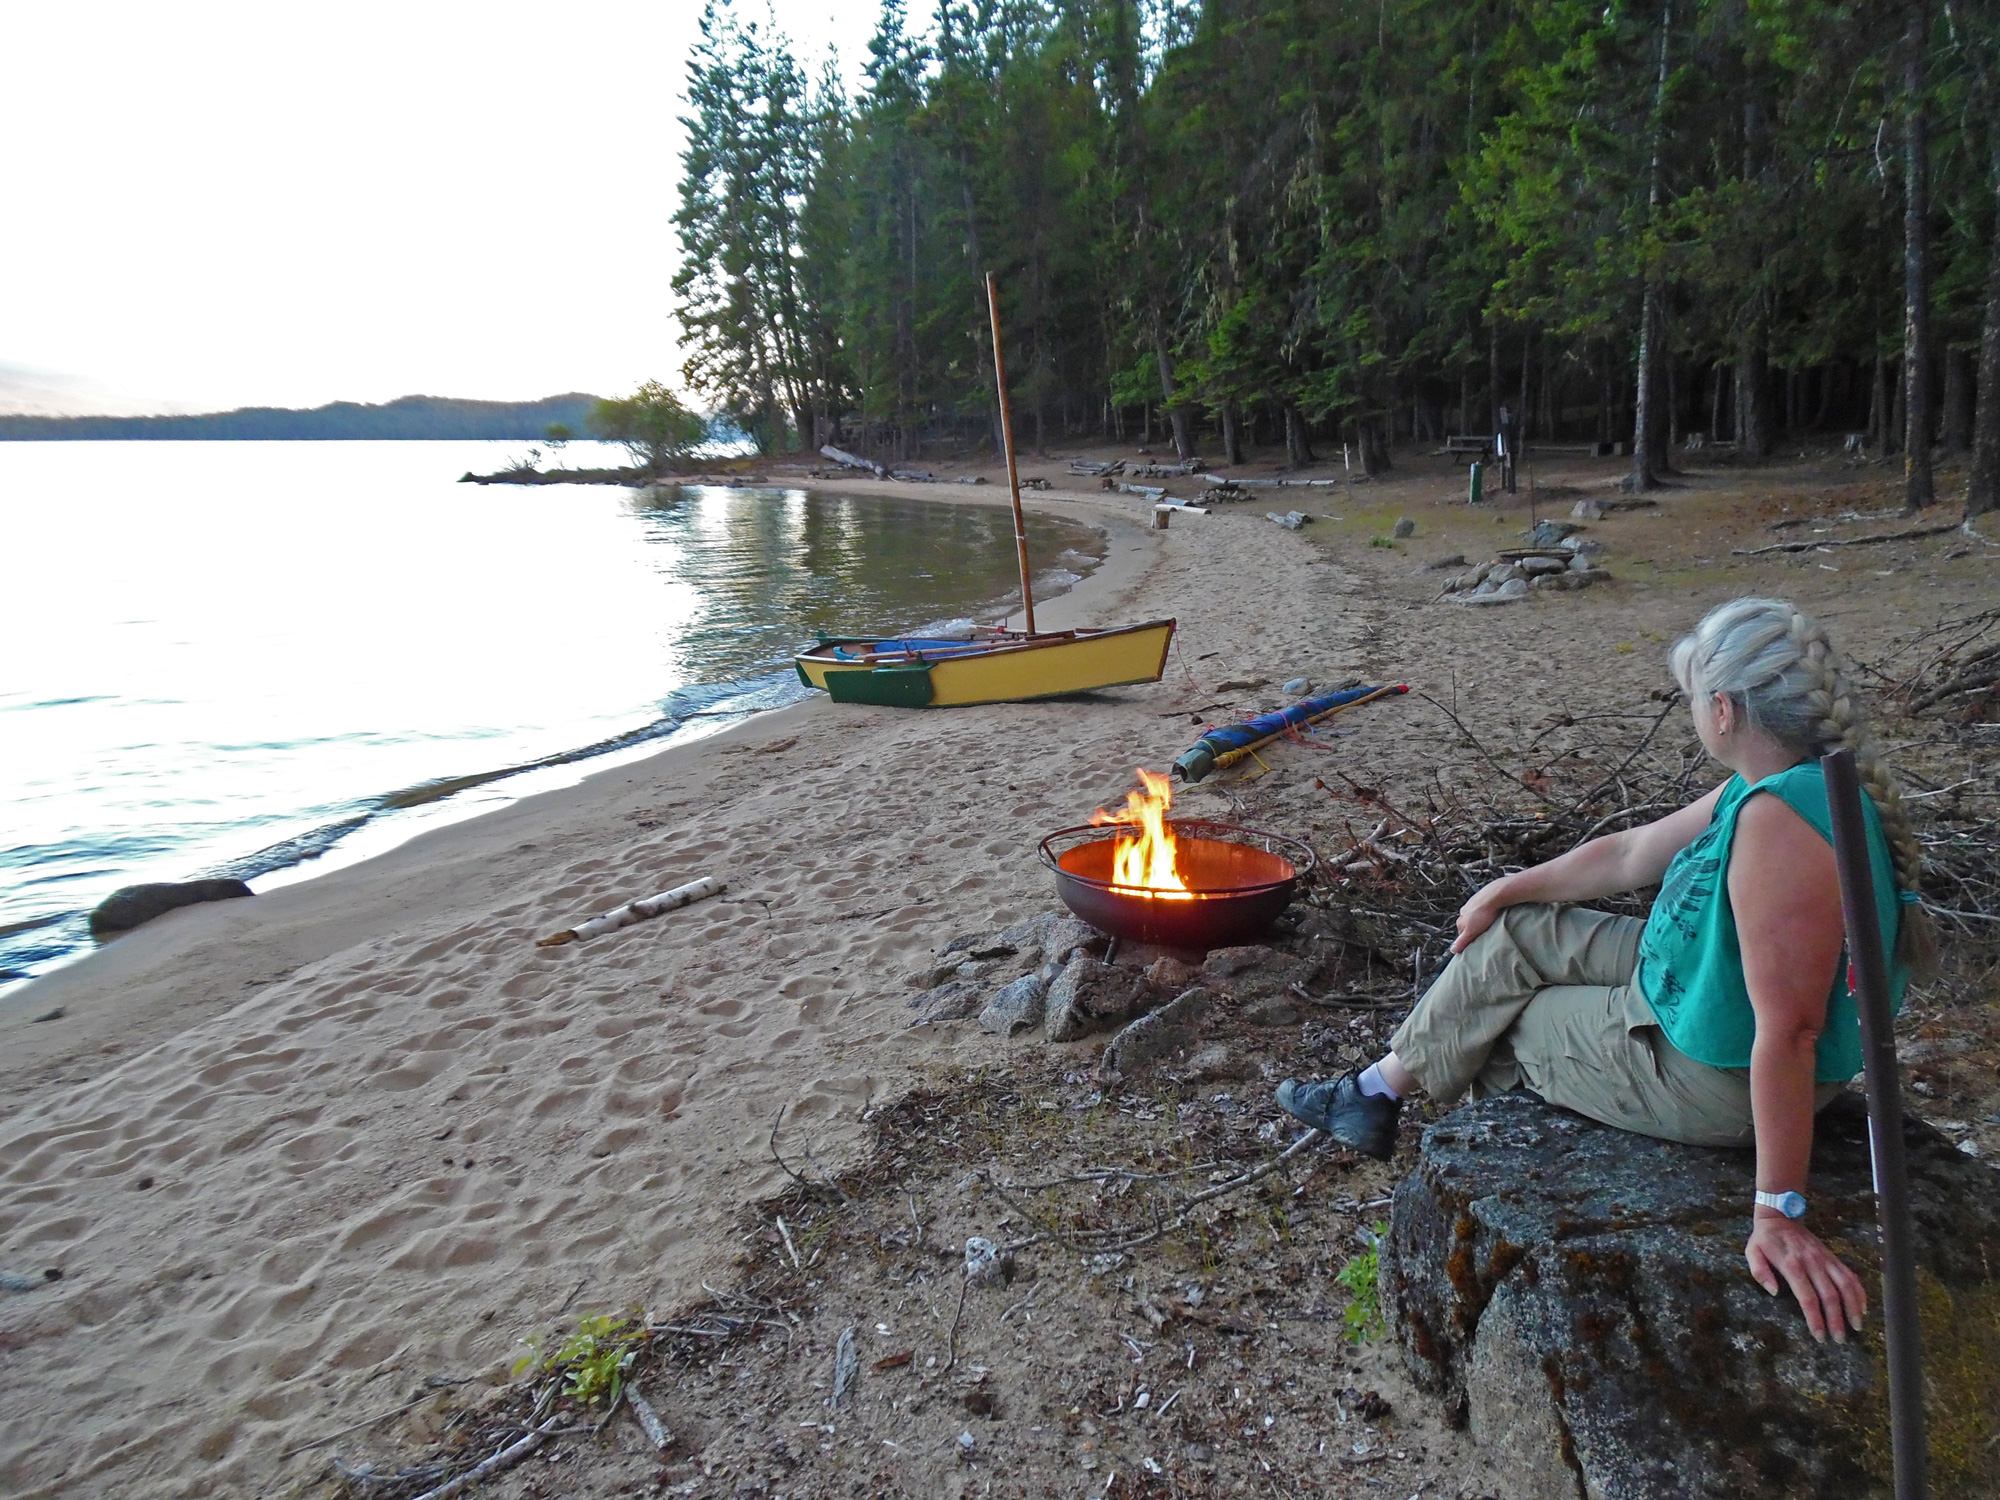
After the adventures of the day, the peace and solitude of Rocky Point were welcome.
Back at camp we looked out across the water between Kalispell and Bartoo islands. It was a froth of whitecaps. Somehow, even in those wild conditions, two sea kayaks were working along, and I watched them until they passed from sight behind the southern end of Kalispell. I marveled at their ability to survive, but worried that if they went over they might not be able to right their kayaks again.
The sunset lit up the clouds in the eastern sky, and on the ridgeline of the distant Selkirk Mountains we could make out the last of the snow still clinging to the high slopes.
Around nine o’clock, as the sun went down, so did the wind, and the lake grew calm. The lowest clouds turned peach and suddenly all was still. The ragged peaks of the Selkirk Mountains across the lake to the east were still crested with snow that gleamed in the last of the light. On the beach our little yellow skiff sat jauntily on the sand, ready to carry us off on whatever adventure we fancied. The contrast between boisterous day and tranquil evening was striking, and we lingered long on the beach as darkness gradually overwhelmed the lake. Sitting by our fire I noted in my journal that the sail needed reefpoints, and that the boat had terrible weather helm—in hindsight we were lucky she had been rounding up rather than falling off in that strong wind.
Across the lake to Eight Mile Island
The day dawned bright and cloudless and calm; the smooth blue lake ruffled here and there by soft, warm breezes. We had no itinerary—we never do—preferring instead to make things up as we go. It looked to be a perfect day for crossing the lake to Eight Mile Island, a distance of a little more than 2 miles to the east–northeast. But I was worried: if the afternoon wind returned as strong as the previous day, we could be stranded there. We pushed worry aside, figuring we’d deal with it later. If need be we could always stealth-camp on some flat spot that we’d be sure to find along the shore of Eight Mile Island. “Why not?” I wrote in my journal that morning. But I did note that in future it might be smart to carry a flare gun or smoke signal in case we ever got into trouble far from land.
The Vinther-Nelson cabin on Eight Mile Island was built by brothers L. and Curtis Crenshaw in 1897 and purchased that same year by Samuel Vinther and Nels Nelson. In 1909, the Vinther and Nelson families were granted a special-use permit by the Forest Service to use the cabin as a summer residence, which they did until 1981. Today, the cabin is on the National Register of Historic Places and is restored and maintained by the Vinther and Nelson families and the USDA–Forest Service for public use.
We worked the morning zephyrs away from the island and northward, then set course straight across the 2 miles of open water to Eight Mile Island. Away from shore we caught a gentle wind from the north and slid across the smooth lake on a reach. We were exhilarated. Never had we dared to cross so much open water in our canoe; and the previous day’s sail had been exciting, if a little dangerous. This morning our small boat, modest as she is, was like a magic carpet carrying us swiftly and effortlessly across this big lake. We were officially hooked on sailing.
We landed on the north side of Eight Mile and discovered a cabin built in the 1890s and which, by special arrangement with the Forest Service, is still maintained and used by descendants of the original owners. Part of the cabin is a museum and the entire island is open as a day-use area. We whiled away the heat of the day in the cabin grounds, exploring, eating a big lunch, sitting in the shade, and talking to an elderly gentleman who introduced himself as one of the descendants.
Near the cabin on Eight Mile Lake, a rowboat—built generations ago, according to the owner—lay upturned on the ground. The boat’s frames were wood but the hull was sheet-iron. It had been the family’s main means of transport between the island and the town of Coolin some 8 miles away.
Overturned nearby was an ancient rowboat with wooden ribs and sheet-iron hull which, according to the gentleman, had been built in Spokane, Washington, generations ago. Once, the only way to get to and from the cabin and Coolin, 8 miles away to the south—and the only sizable town on the lake—was to row that heavy boat, fully laden with supplies and people. The gentleman empathized with our small-boat voyage, and told us how, as a young man, he’d once rowed the 12 miles from the island clear to the top of the lake in one day; he’d been lucky enough to catch a tow home in the evening.
At an abandoned homestead on Bartoo Island we found an old root cellar, built with remarkable ingenuity into a rocky hillside.
Other people came and went in motorboats throughout the day. Some stopped to chat with us, and several wondered how two people could travel in such a small craft, and without an engine. In truth, our pocket-sized skiff was pretty much maxed out on this voyage, and we had only managed by traveling light. A canvas packsack holding our food and cookstove was stashed in the stern beneath the tiller. A drybag holding our clothing, two sleeping pads, and one sleeping bag, which we spread over the two of us as a blanket, was stowed forward of the mast, and our pup tent, in its own stuff sack, was wedged in the bow. Unlike many of the motorboaters, we didn’t feel the need for cabin tents, folding chairs, barbecue grills, huge coolers of ice and beer, and portable stereos.
Looking south from Bartoo Island we could see the densely wooded Four Mile Island, seen here in the center of the picture. If we had had more time, we might well have stopped there to spend a night at a secluded campsite accessible to only the smallest of boats.
In the afternoon we set sail, rounding the northeast corner of Eight Mile Island and setting a course for Bartoo Island, 2 miles to the south. The old south wind was back, as reliable as ever, but it wasn’t as strong as the day before. Plenty of waves were rolling up the lake, but no whitecaps. The skiff reared and stamped over the waves, sending a good deal of spray flying, but she never stopped or buried her bow. The wind was angled just right for us to hold a port tack all the way to the eastern shore of Bartoo, and it moderated as we entered the lee of the island. My journal records that Heidi reported the crossing as “uneventful.”
South of the Bartoo homestead site we found an alternative campsite, which again we had to ourselves. Heidi cooked up some Jiffy Pop, which we enjoyed with some cold Rolling Rock beer that a previous visitor had left behind.
We landed and explored the island, finding the remains of an old homestead with a stout root cellar built into a rocky hillside, and an old riveted-iron tank almost as large as our boat—it looked like the boiler for a steam engine. We had considered staying at the homestead, but previous campers had seemingly used the entire area as an outhouse, scattering toilet paper (and more) everywhere. Disgusted, we bushwhacked inland, pushing through a tangled forest of cedars and ferns to the rocky northeast–southwest spine of the island about 150′ above the lake where, to our surprise, we found a small pond. From this high vantage point we could see whitecaps marching up the lake to the west—as expected, the south wind was building and blowing unimpeded up the lake.
As the sun sank low toward the horizon, we pushed off the beach and sailed southward along the shore in search of a place to spend the night. Rounding a point about a mile south of the homestead we discovered a large empty campground with pit latrines, picnic tables, and tent sites. We landed alongside a six-pack of Rolling Rock beer that someone had left cooling in the shallows. We built a fire and, not for the first time, Heidi proved herself master of the campfire Jiffy Pop pocorn. We settled down to enjoy the quiet evening as we chewed popcorn and sipped beer, but it had been a long day and by full dark we were fast asleep in the tent.
In the light morning breeze, we ghosted around the southern tip of Bartoo and inched northward waiting for the southerly to pick up and carry us back to Kalispell. I lay sprawled in the stern, resting a hand on the tiller, and taking an occasional peek from under my hat to see where we were going.
Return to Kalispell
The last day of the cruise dawned as flawless as the day before. Puffy white clouds chased each other across the pale blue sky, dragging dark shadows up and down the thickly forested mountains that surround the lake. From our camp we could clearly see the hump of Four Mile Island to the south, maybe 1 1⁄2 miles away. We knew that this tiny rocky and heavily forested island, only some 300 yards across, concealed a primitive north-facing campsite that is accessible only by the smallest of boats. It would have been the perfect spot to spend another night, but regrettably we had to be home this day—Four Mile would have to wait for another trip.
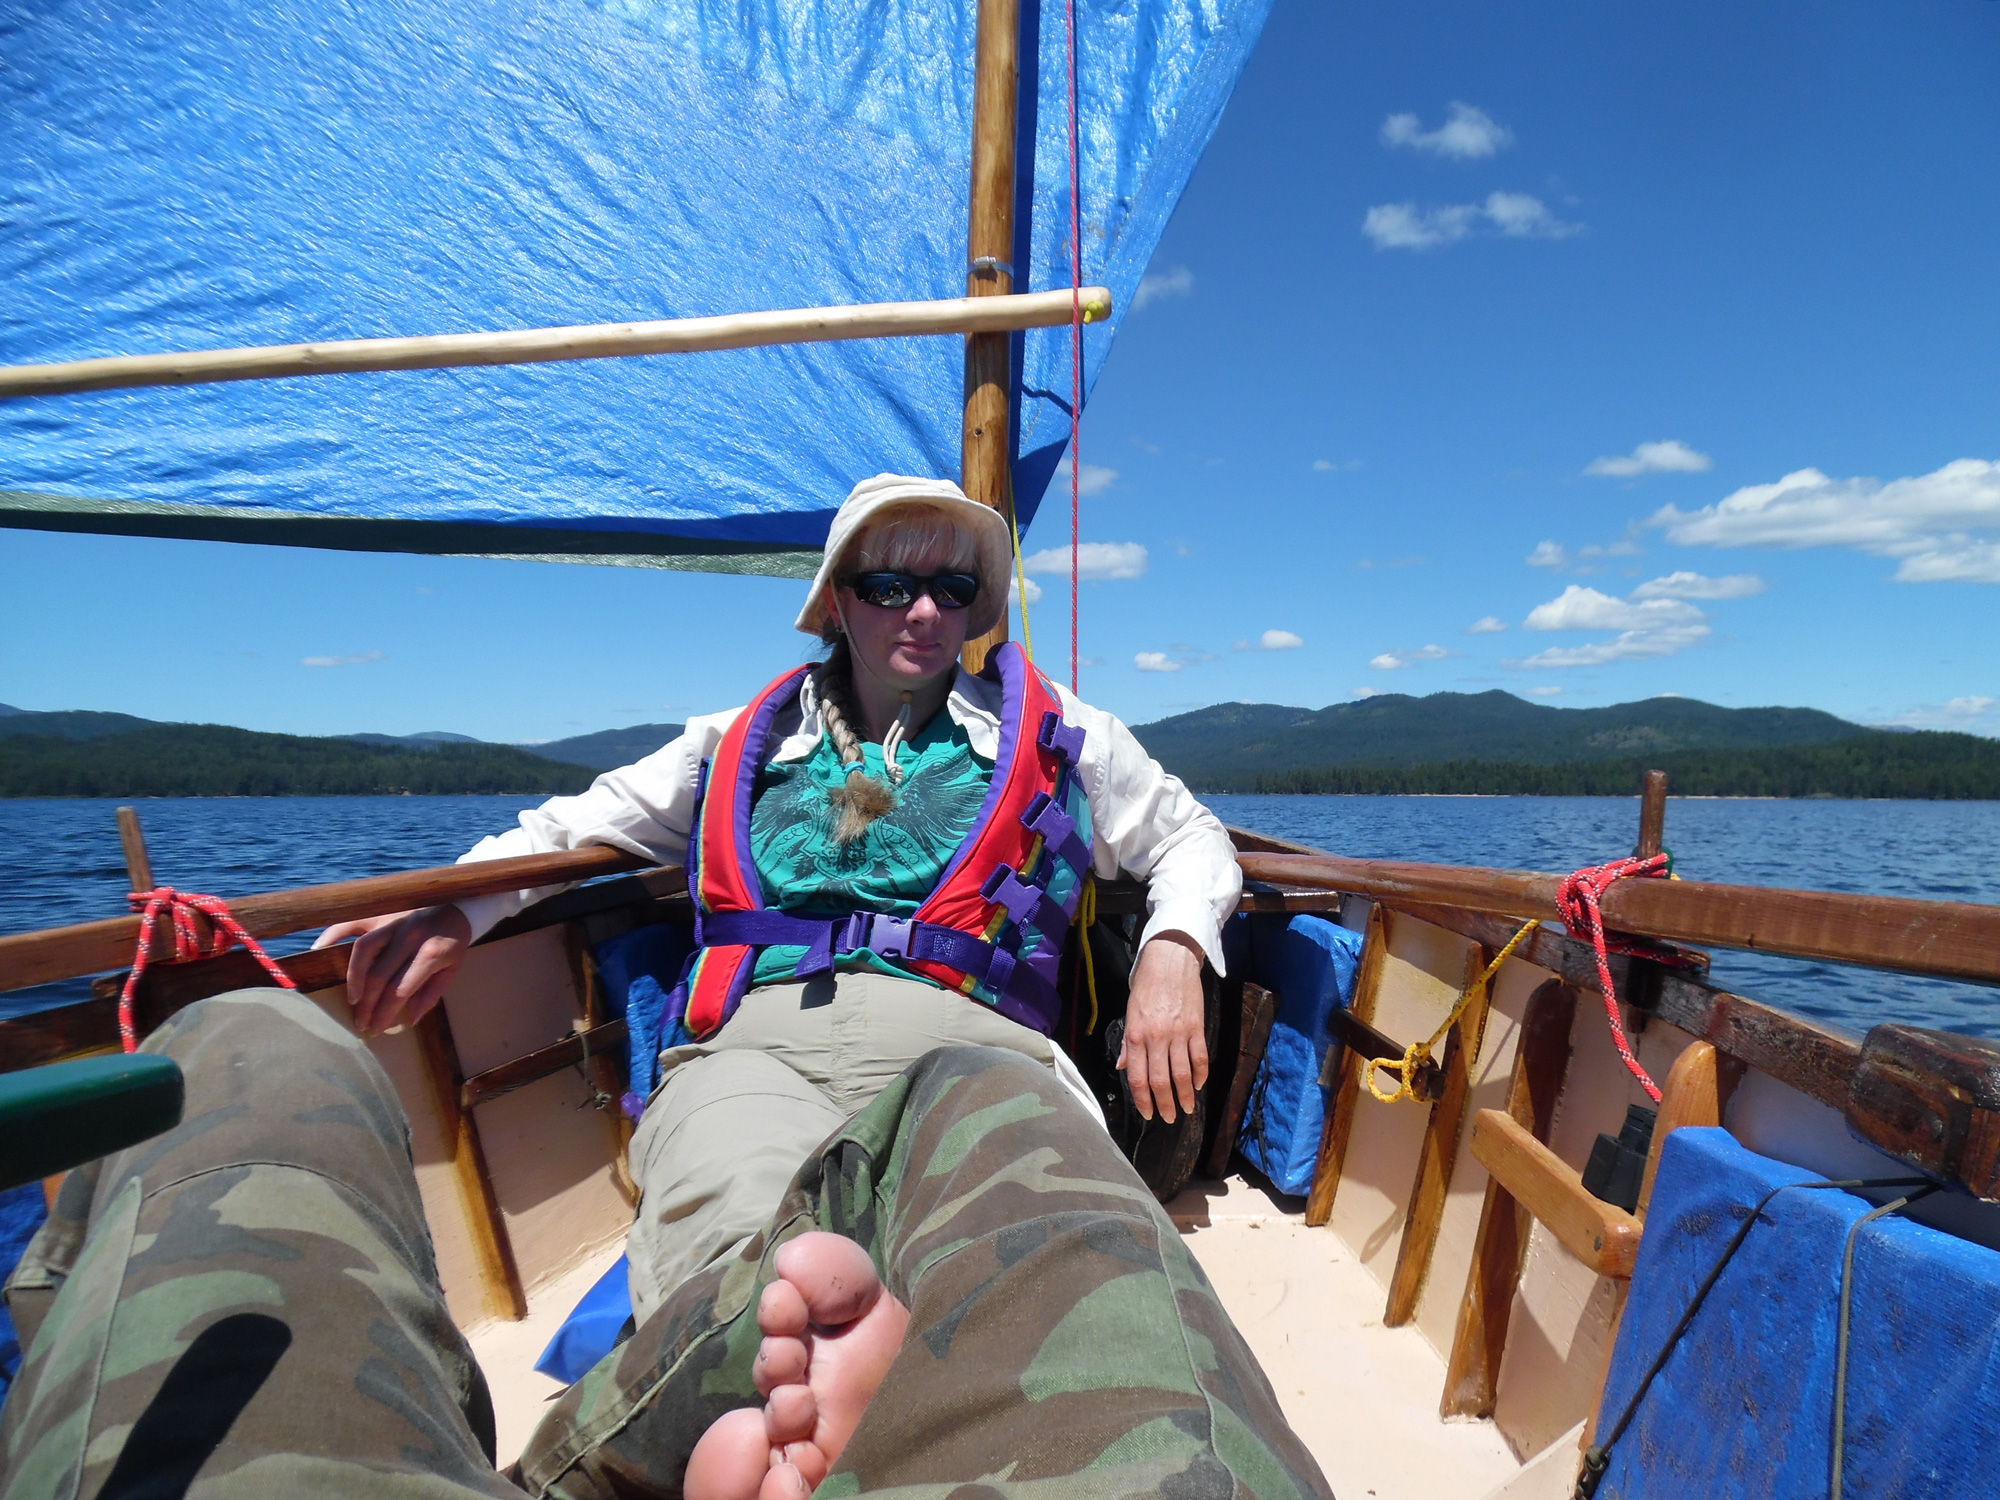
Making the most of the space, Heidi leaned back against the mast. The foot of the sail occasionally threatened to tip off her hat, but the boom angles up to the mast, easily clearing her head.
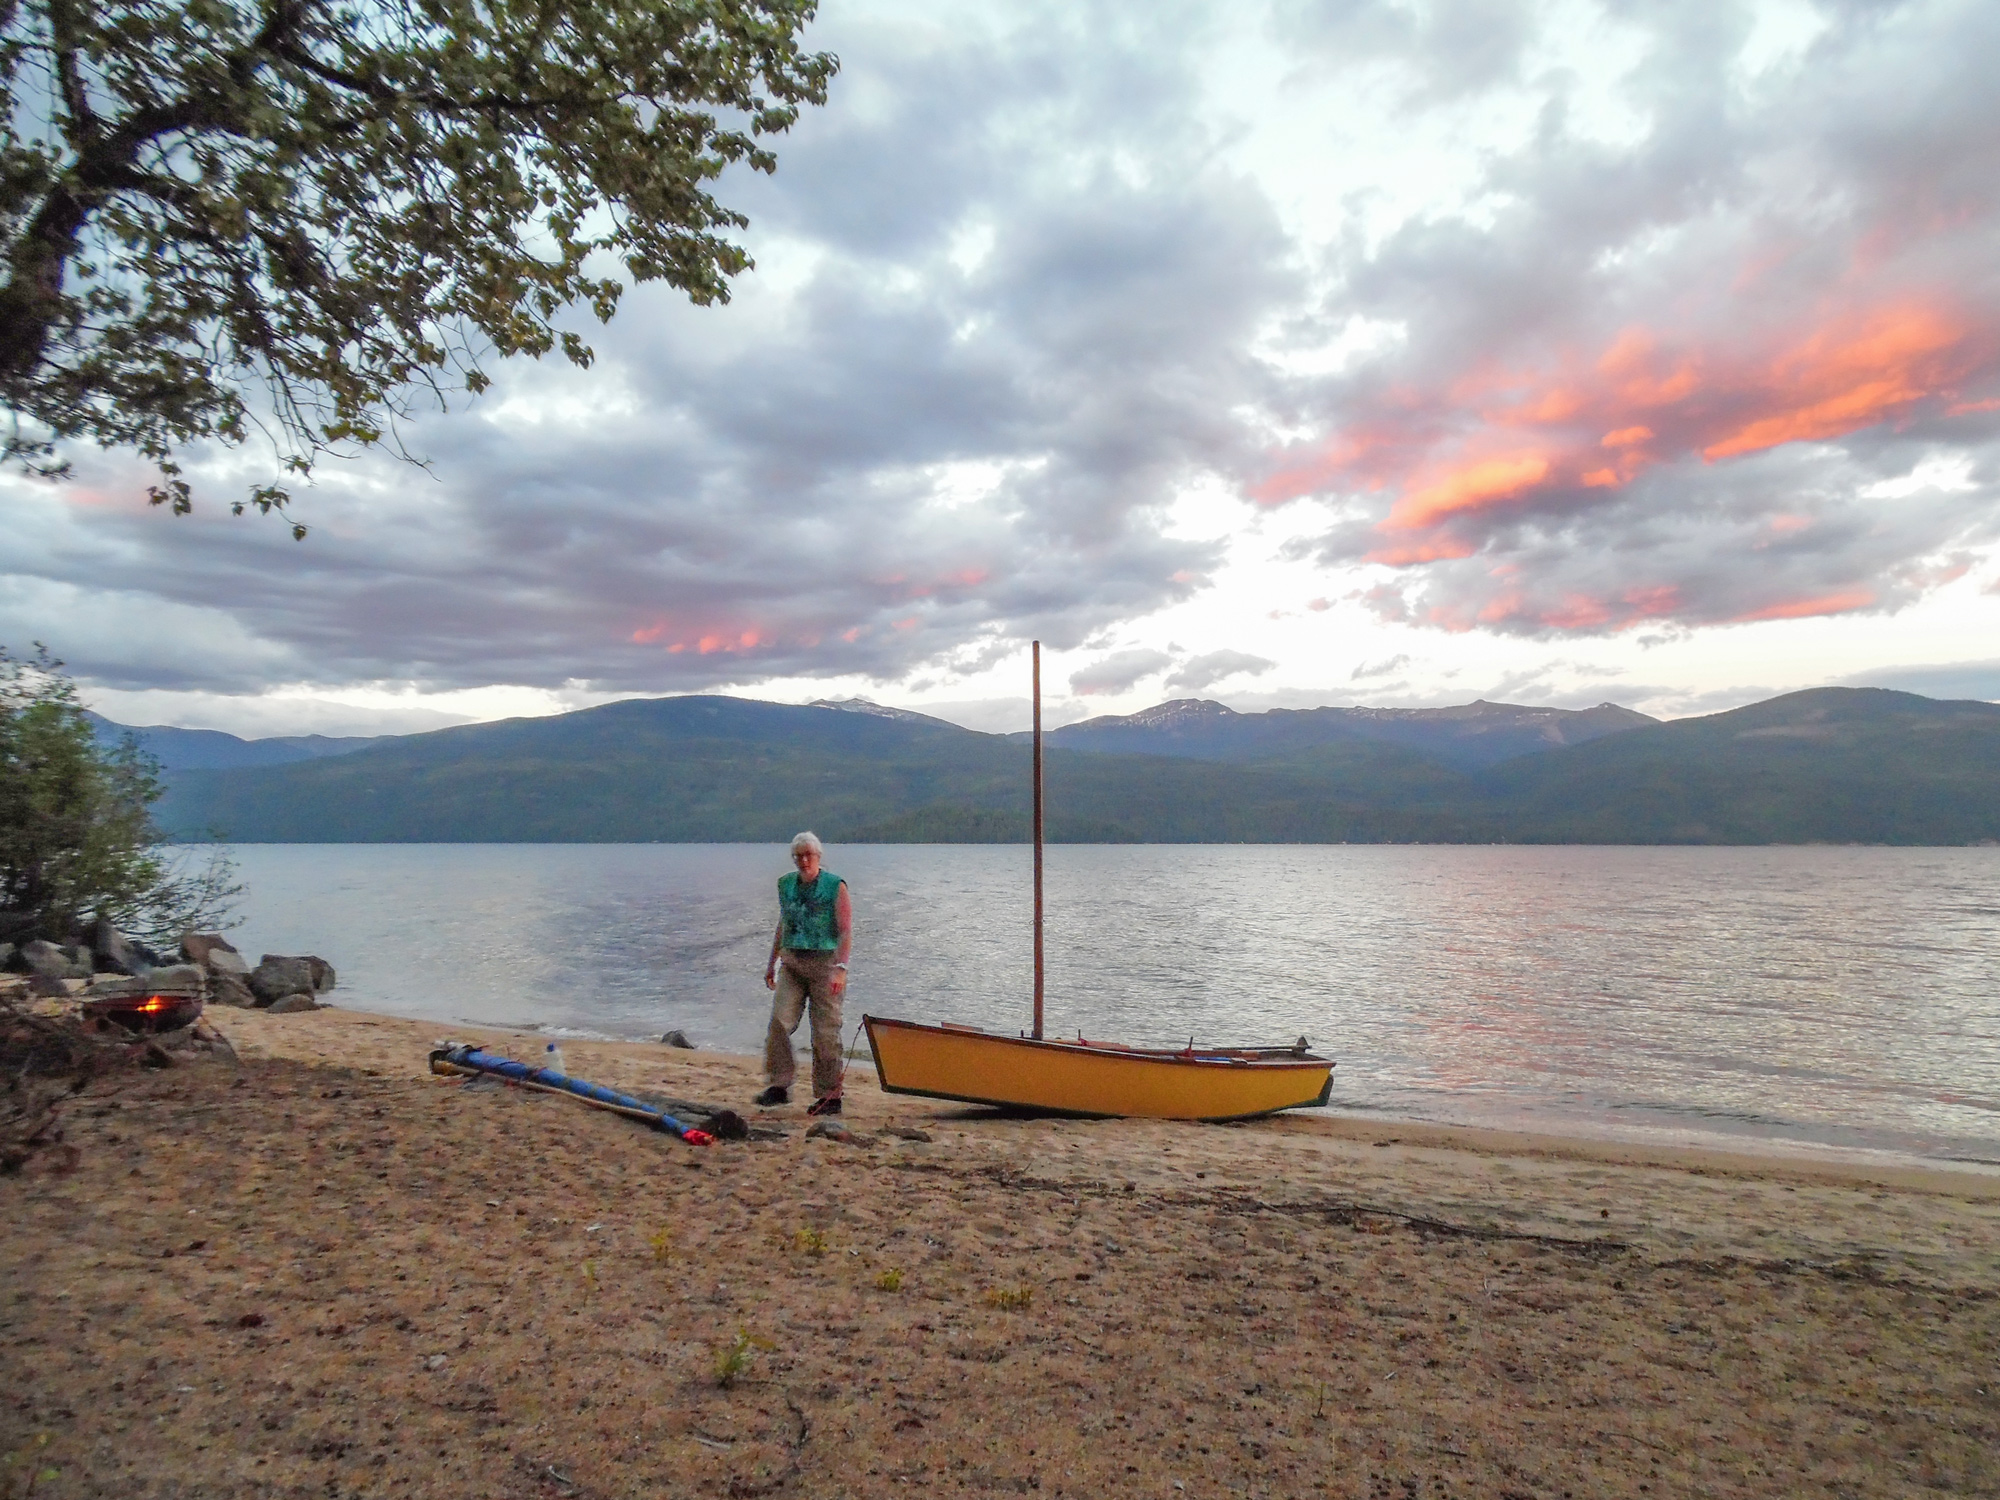
Through the morning we explored the thick forest and swam in the cool water off the sandy beach, and just before midday we set sail once again for Kalispell Bay and the end of our midsummer cruise. Stretched out lazily in the bottom of the boat, my head resting on the transom, tiller balanced on my shoulder, hat over my eyes, I could barely keep awake as we ghosted around the southern end of Bartoo under the high sun.
Heidi reclined comfortably against the mast, her legs stretched out before her. The “passenger space” in the skiff, between the ’midship frame and the mast, is roomy, and the sail’s sprit boom angles up from clew to mast, leaving plenty of headroom below; sitting up against the mast, Heidi’s hat might get knocked off by the foot of the sail, but she’d never be hit by the boom. We lazed along for another mile or two before landing on the westernmost tip of Bartoo to stretch our legs. As the afternoon’s south wind looked like it was picking up, we set sail one last time and began the 2-mile downwind glide back to Kalispell Bay and the boat ramp.
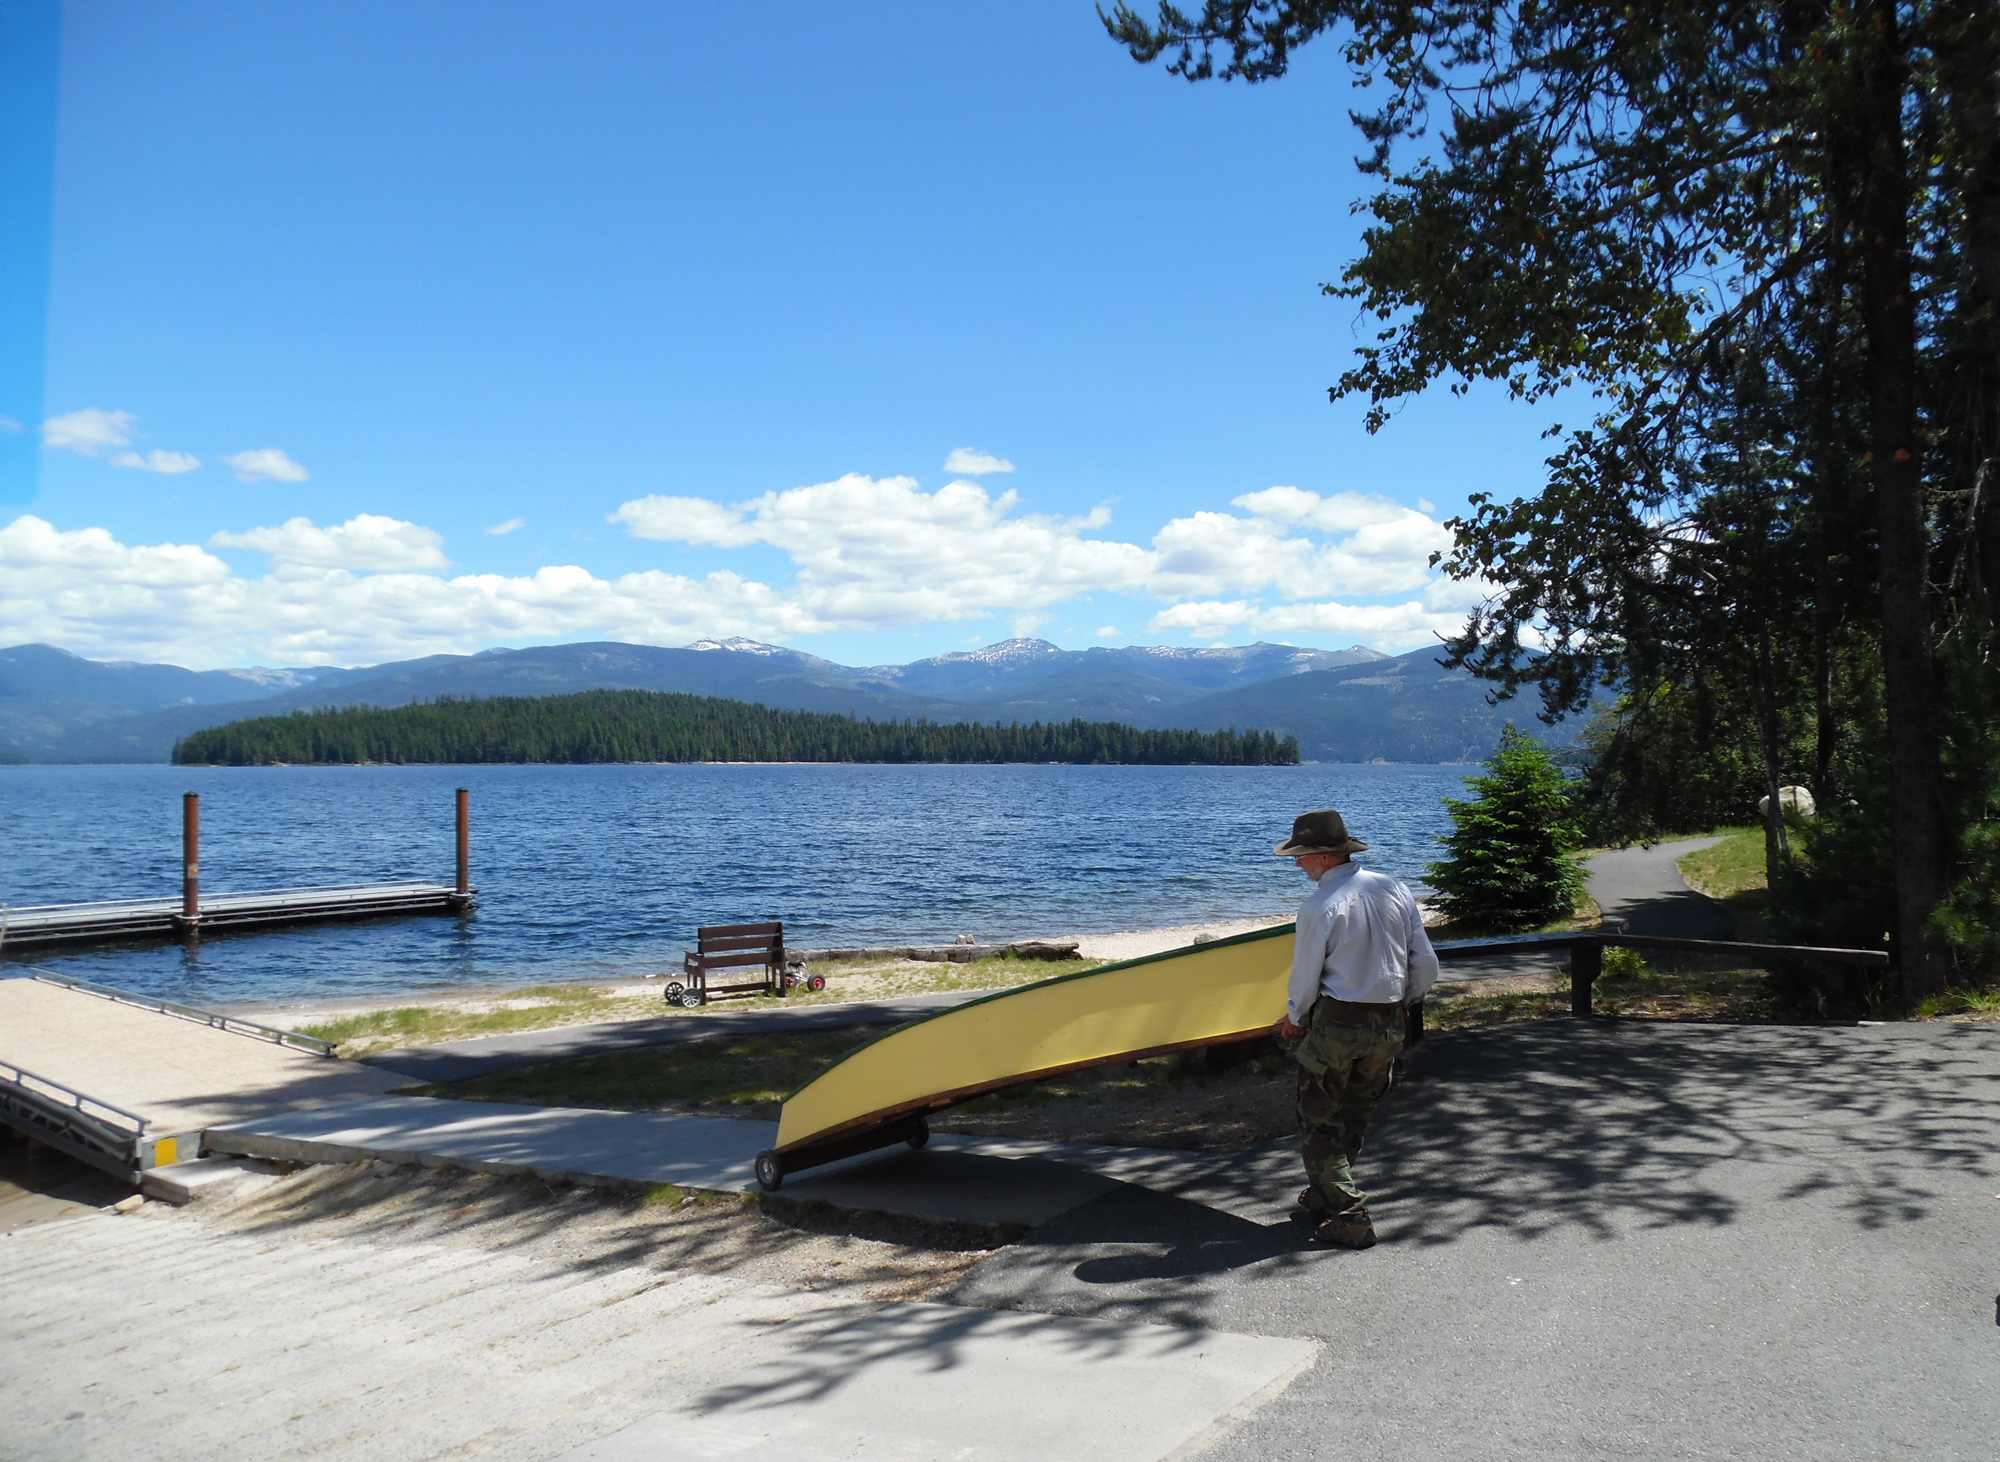
Back at the Kalispell ramp with all our gear from the previous days offloaded and stowed in the truck, we flipped the boat and hauled her up on her simple two-wheel dolly.
The skiff quietly gurgled off the miles as the southerly gradually grew from a gentle breeze to a modest wind. As we made the crossing, we could see Kalispell Island, which we had struggled to reach the first day, and there was little Papoose Island half a mile to its south. Behind us was Bartoo, and off in the distance we could just distinguish Eight Mile Island from its backdrop of the wooded eastern shore. What an ideal place to explore in a small boat! Our first beach cruise had been a delight. We’d run into some strong winds and chop, but not once had we needed to down sail and row. I might have toyed with the idea of a bigger boat as we’d first set out, but by journey’s end I was remembering the old saying, “The smaller the boat, the bigger the adventure.”
Bob and Heidi Van Putten live off-grid deep in the Washington mountains in a straw-bale cottage they built for themselves more than 20 years ago. After canoeing happily for decades, one day on Ross Lake they were trying to round a point in a canoe in high wind and waves, when it occurred to Bob that it might be nice to have a boat that could harness the wind.
If you have an interesting story to tell about your adventures with a small boat, please email us a brief outline and a few photos.
For more low-cost adventures with Bob Van Putten see:
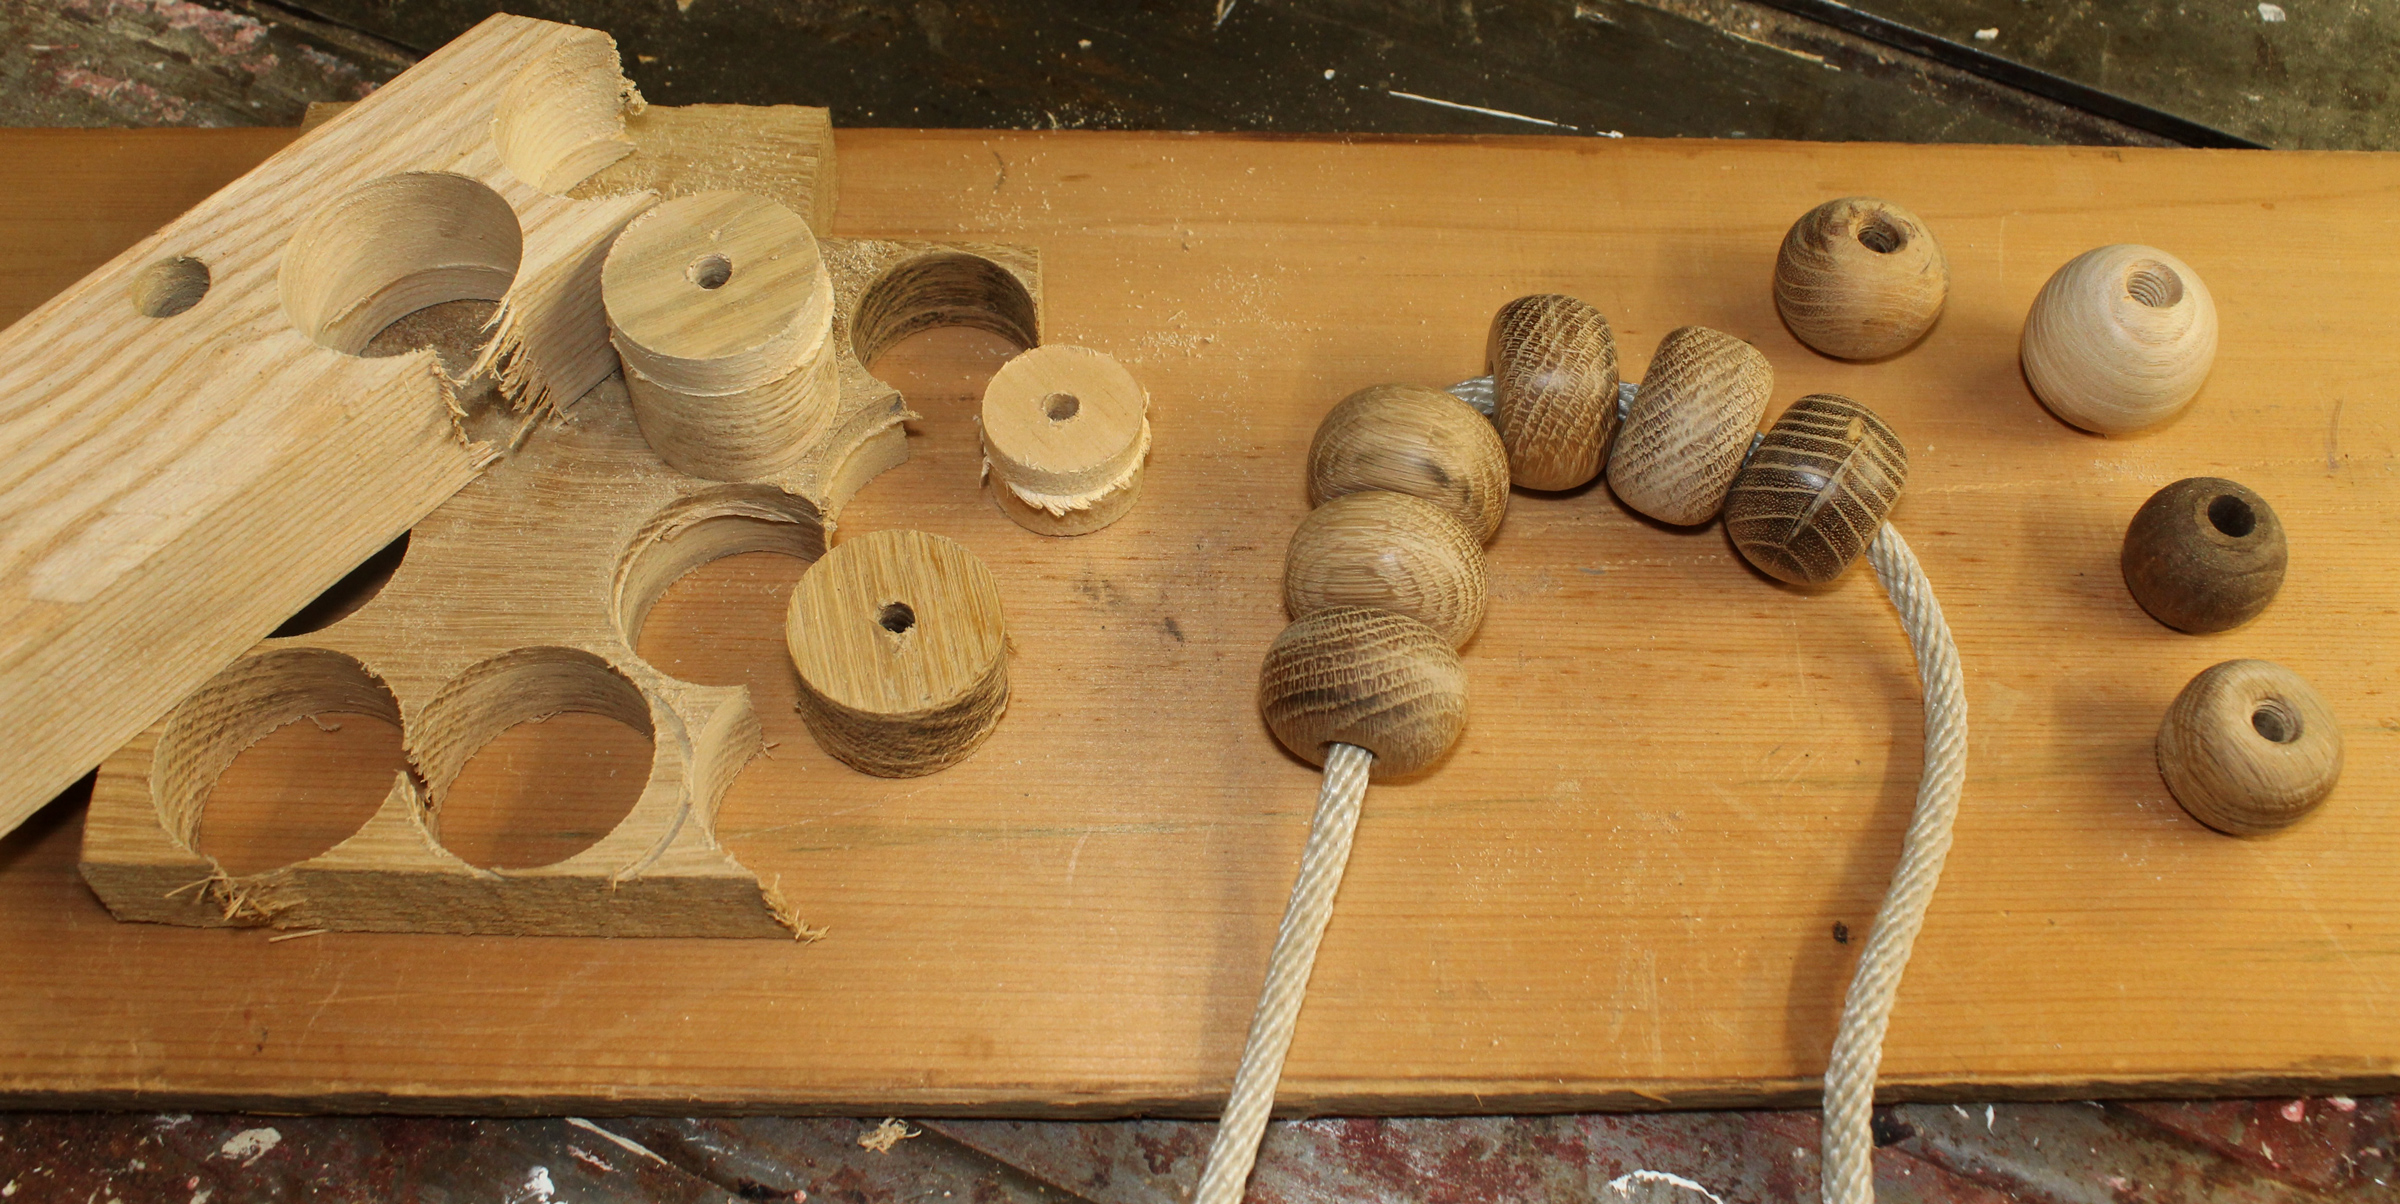
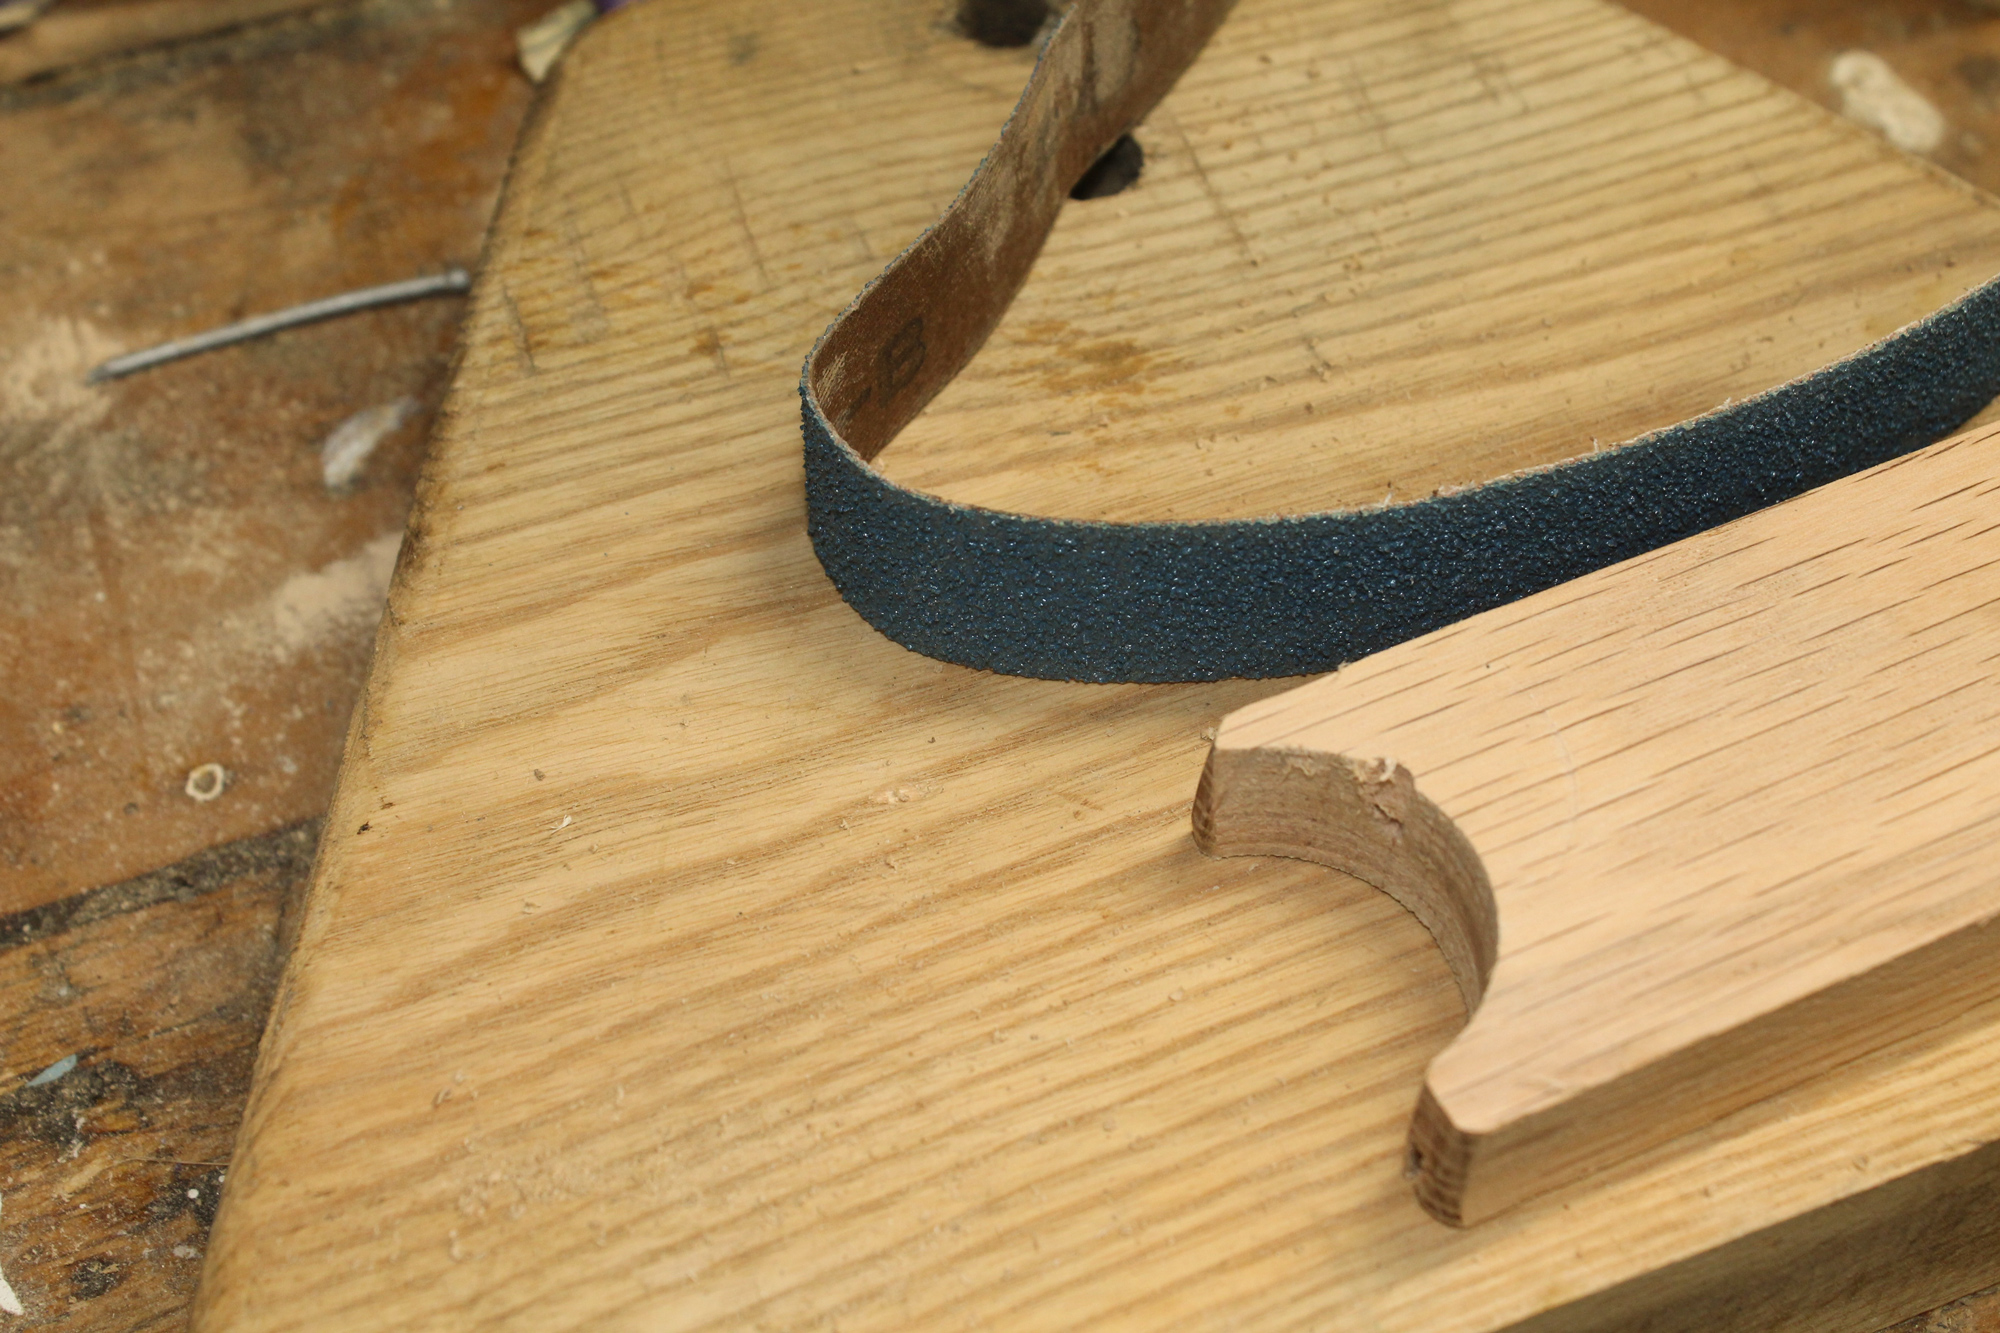
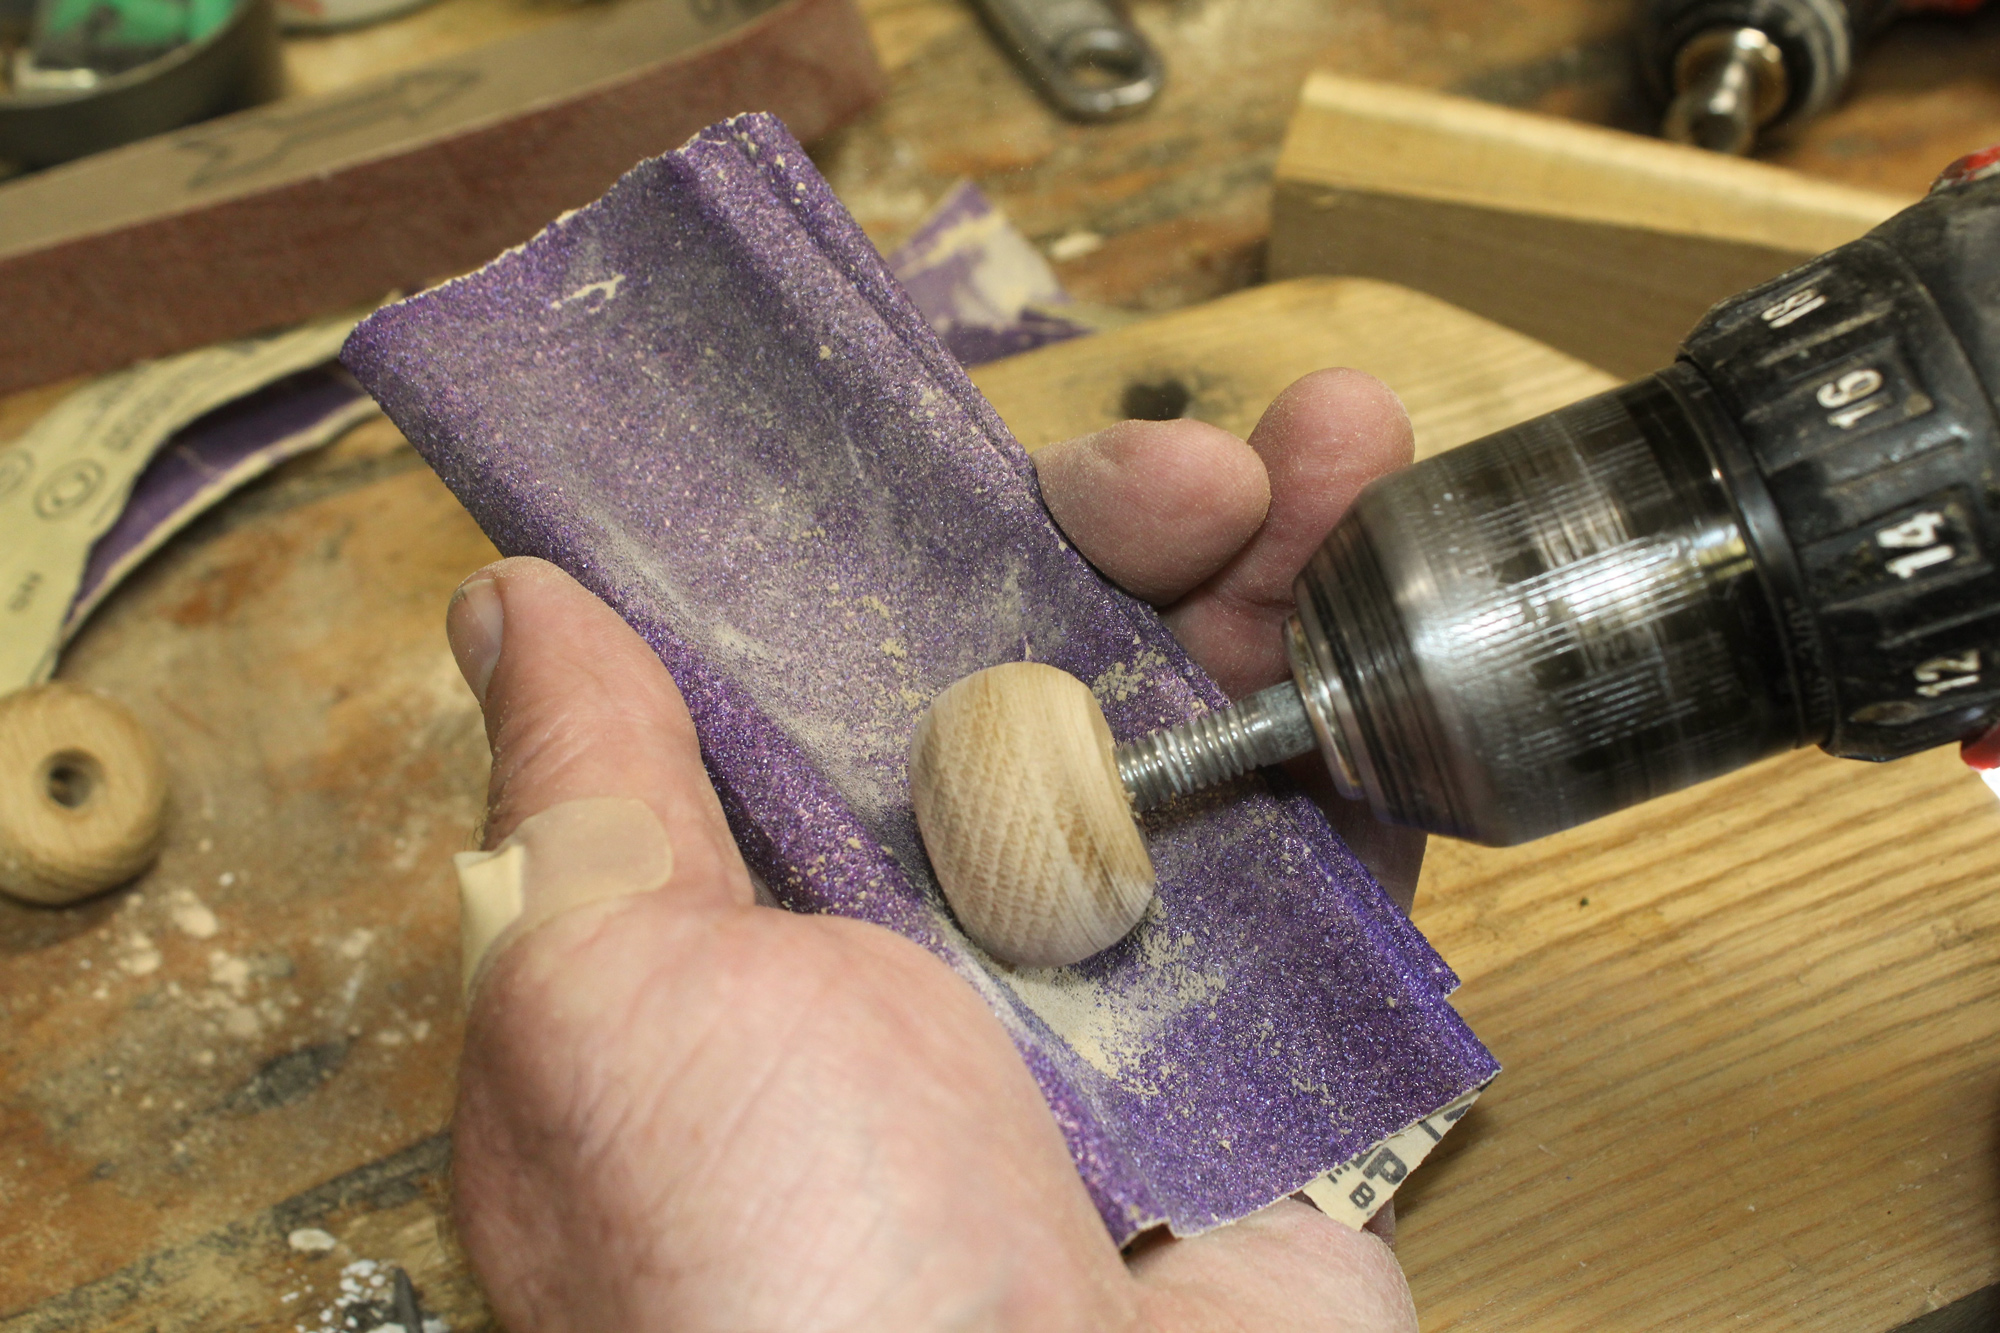
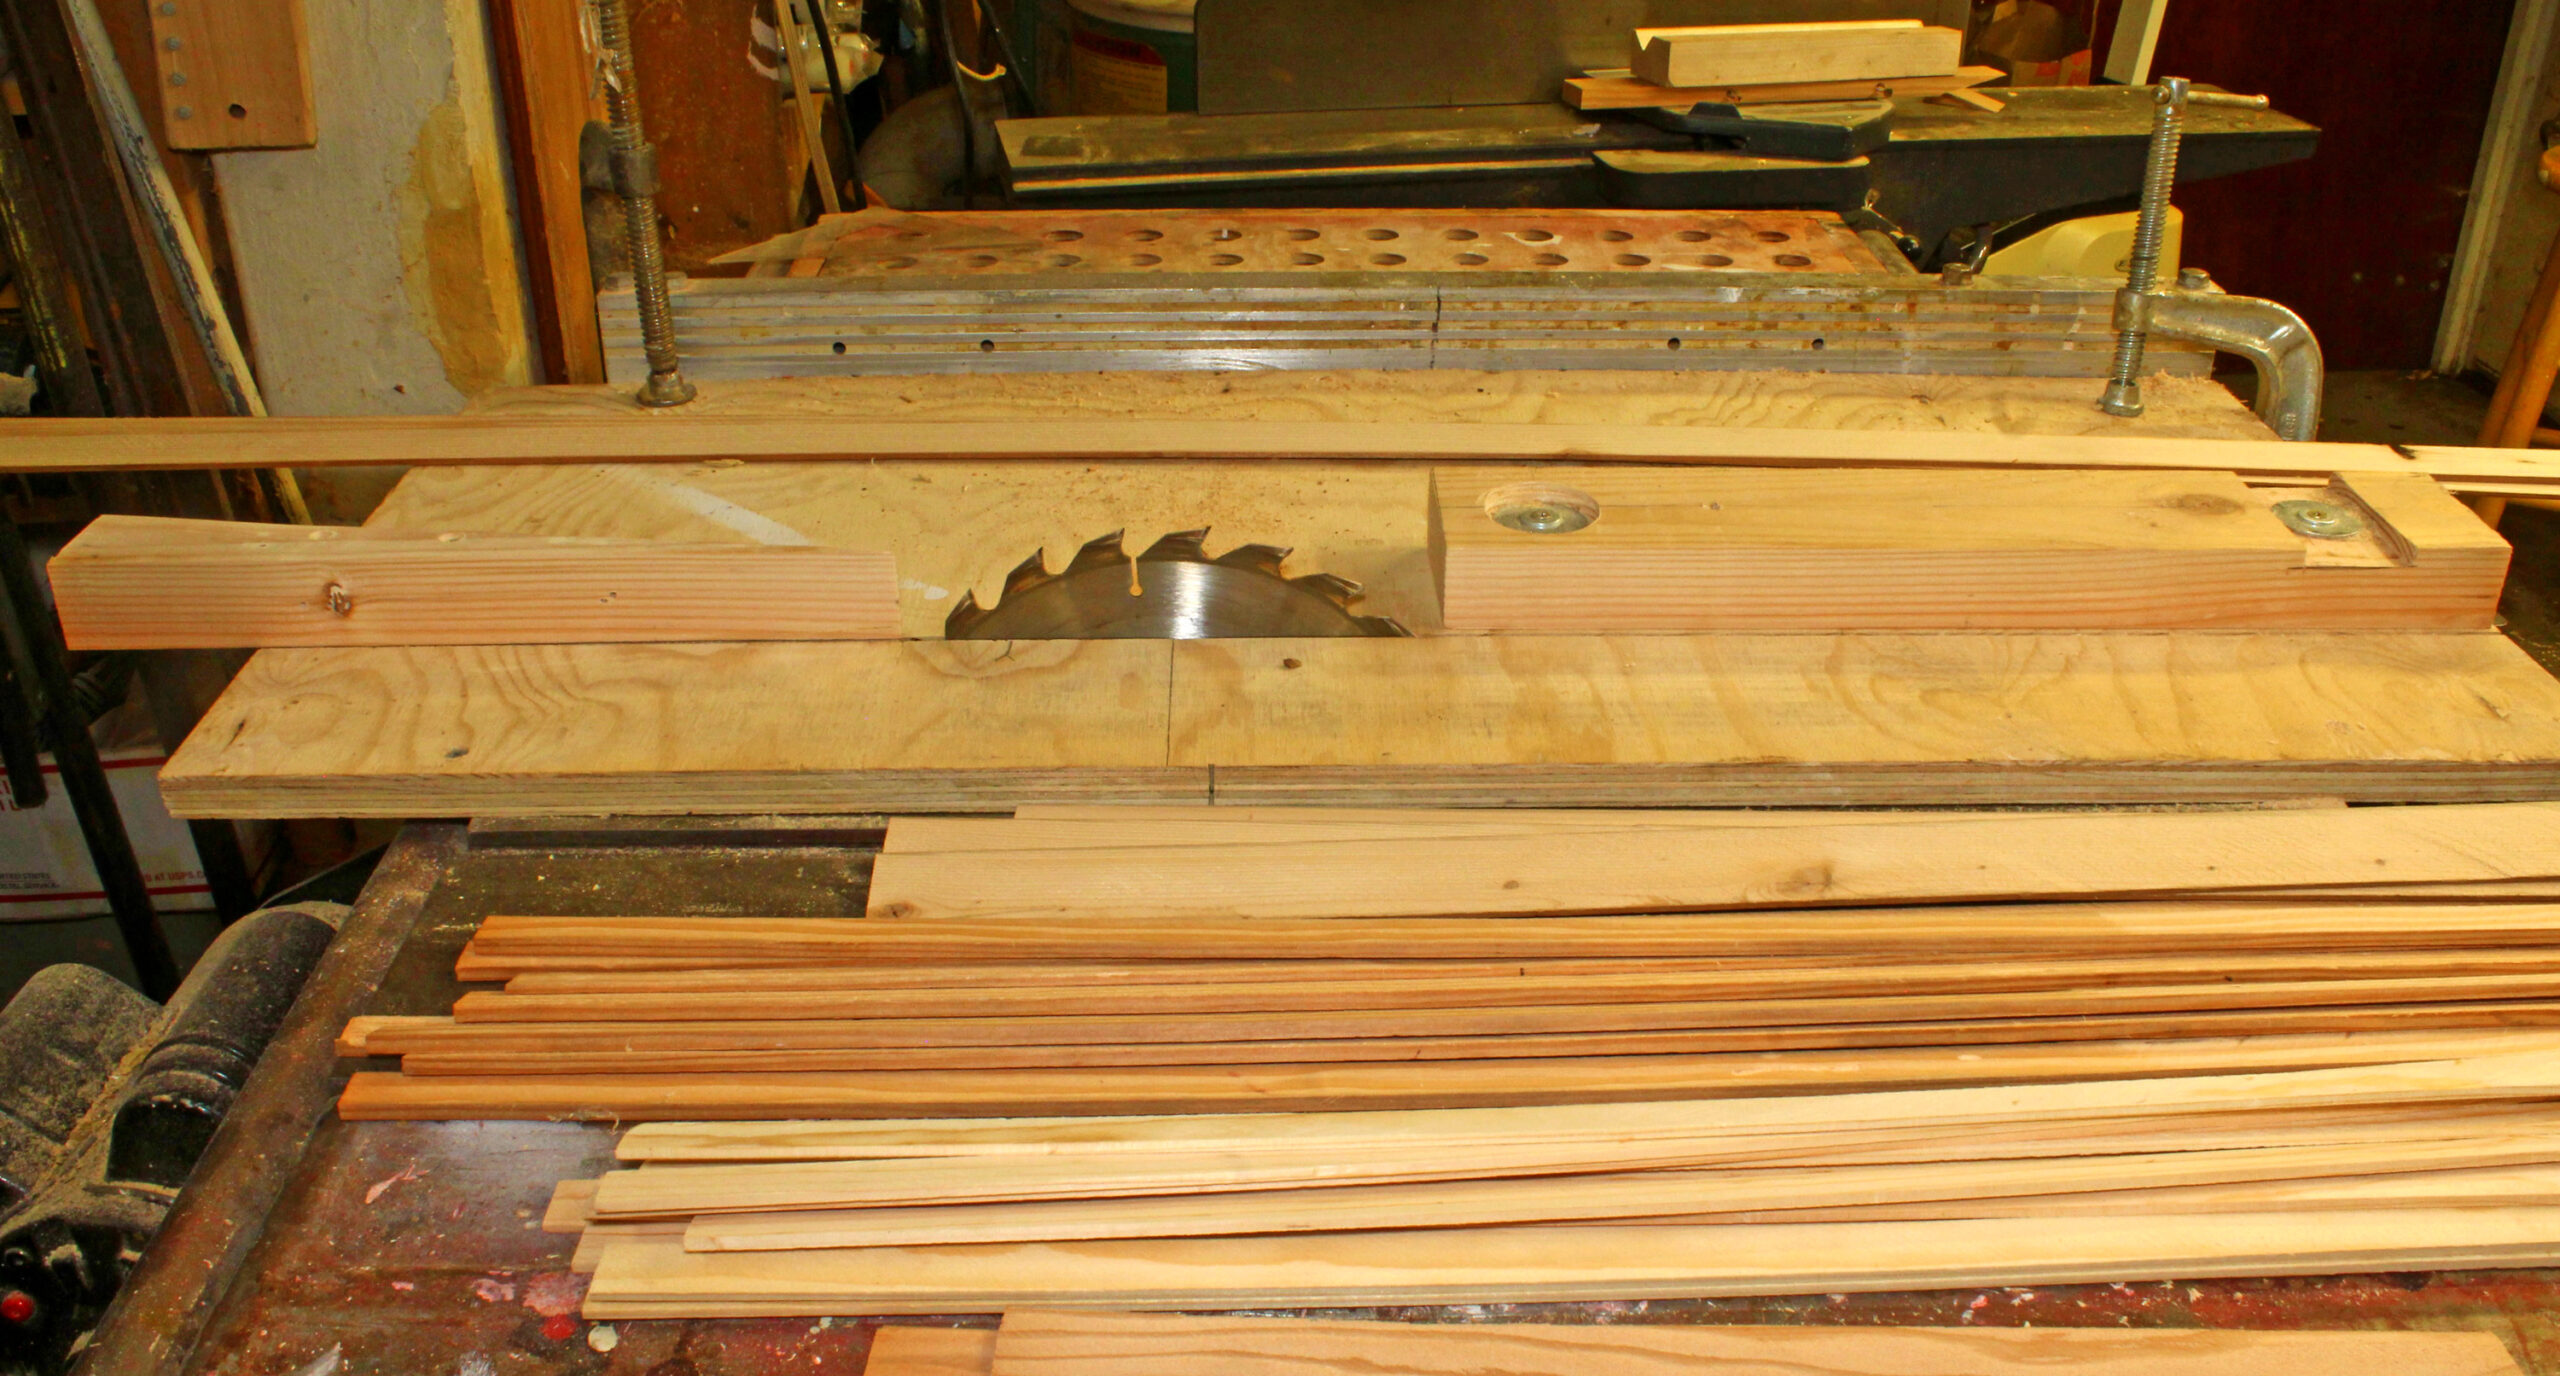
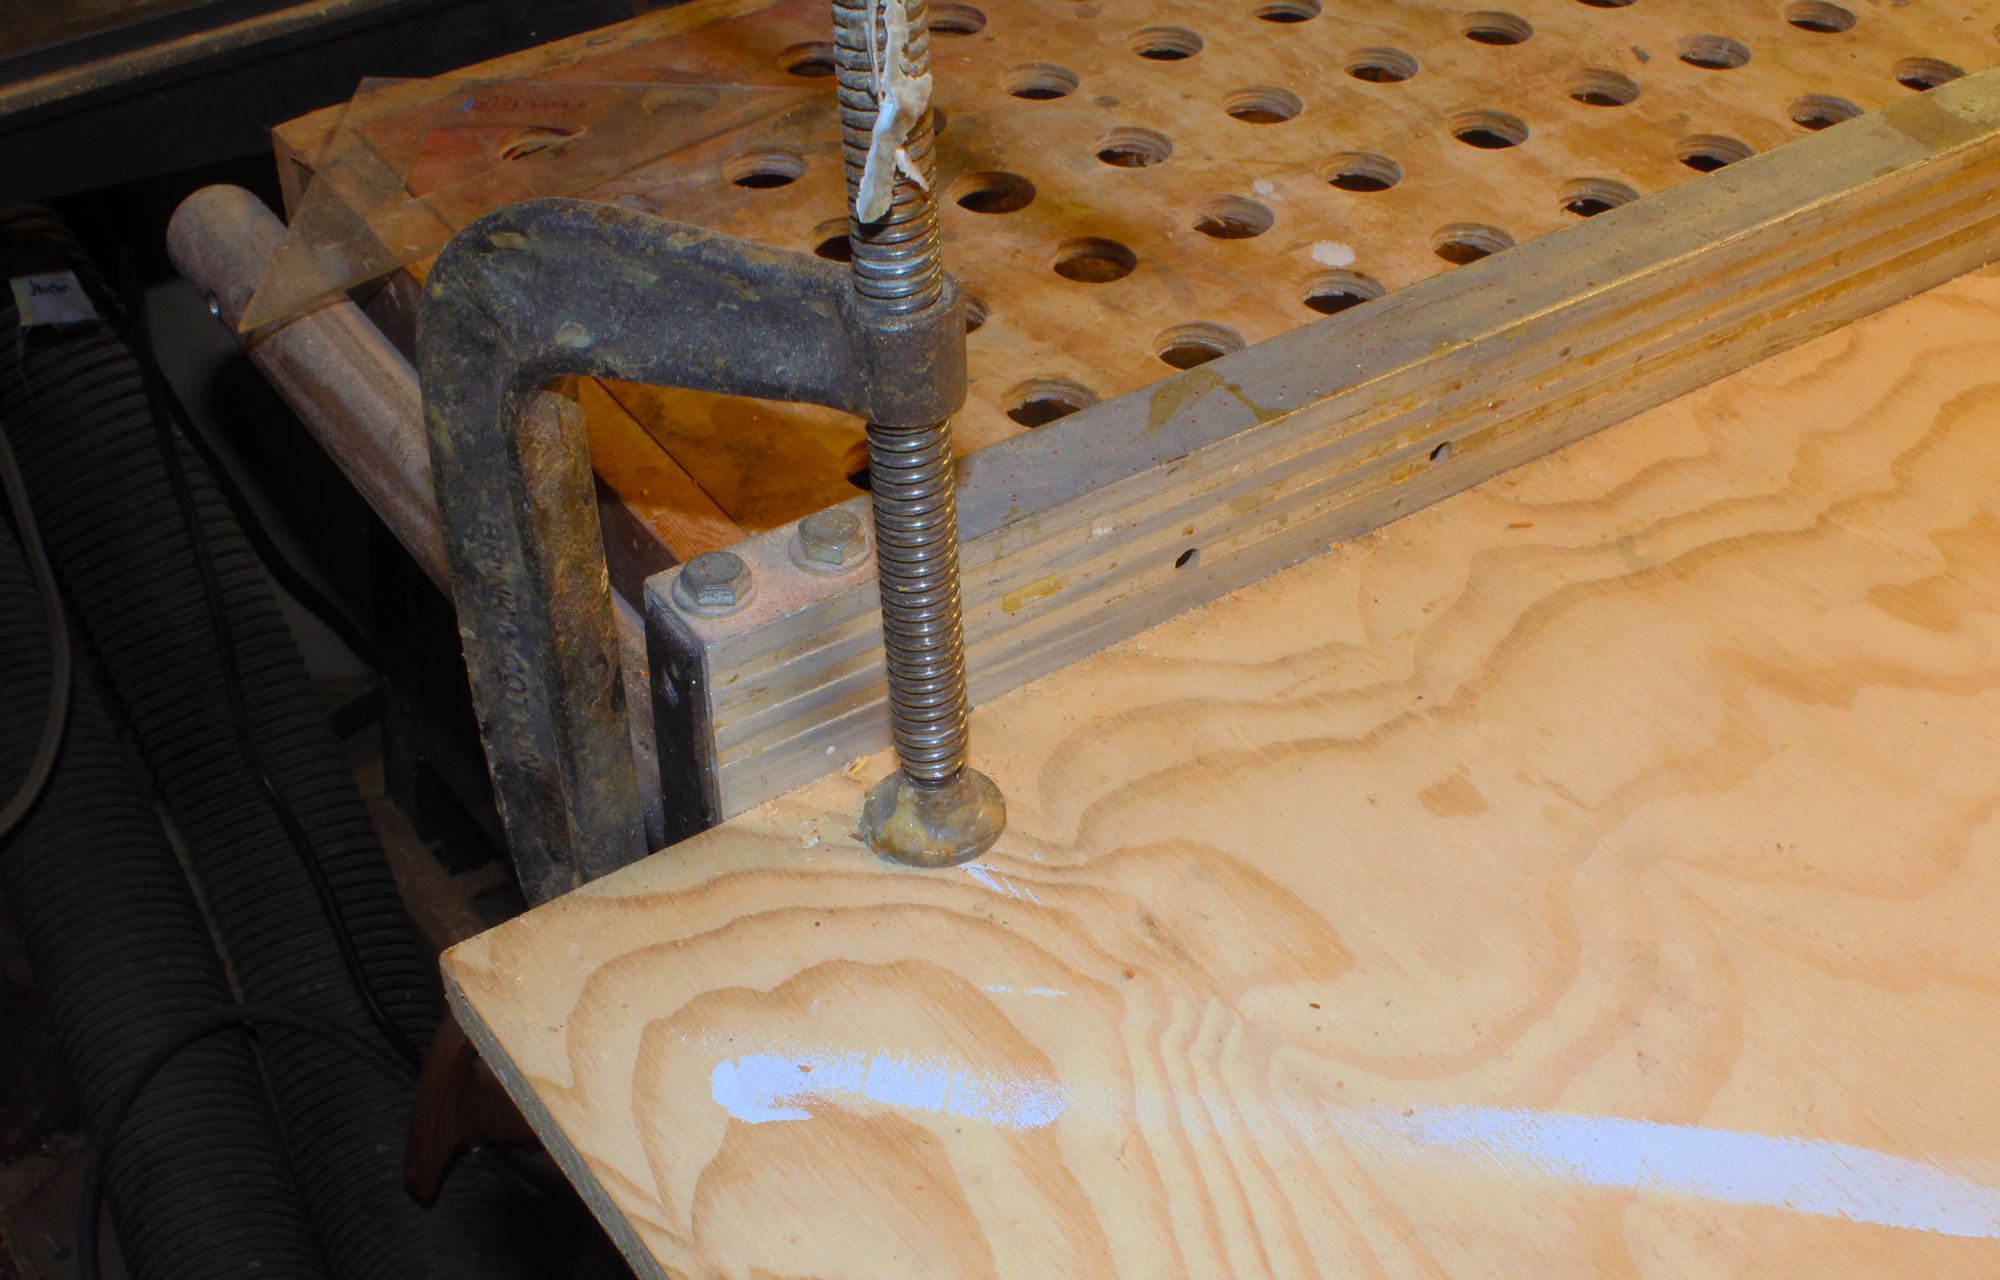
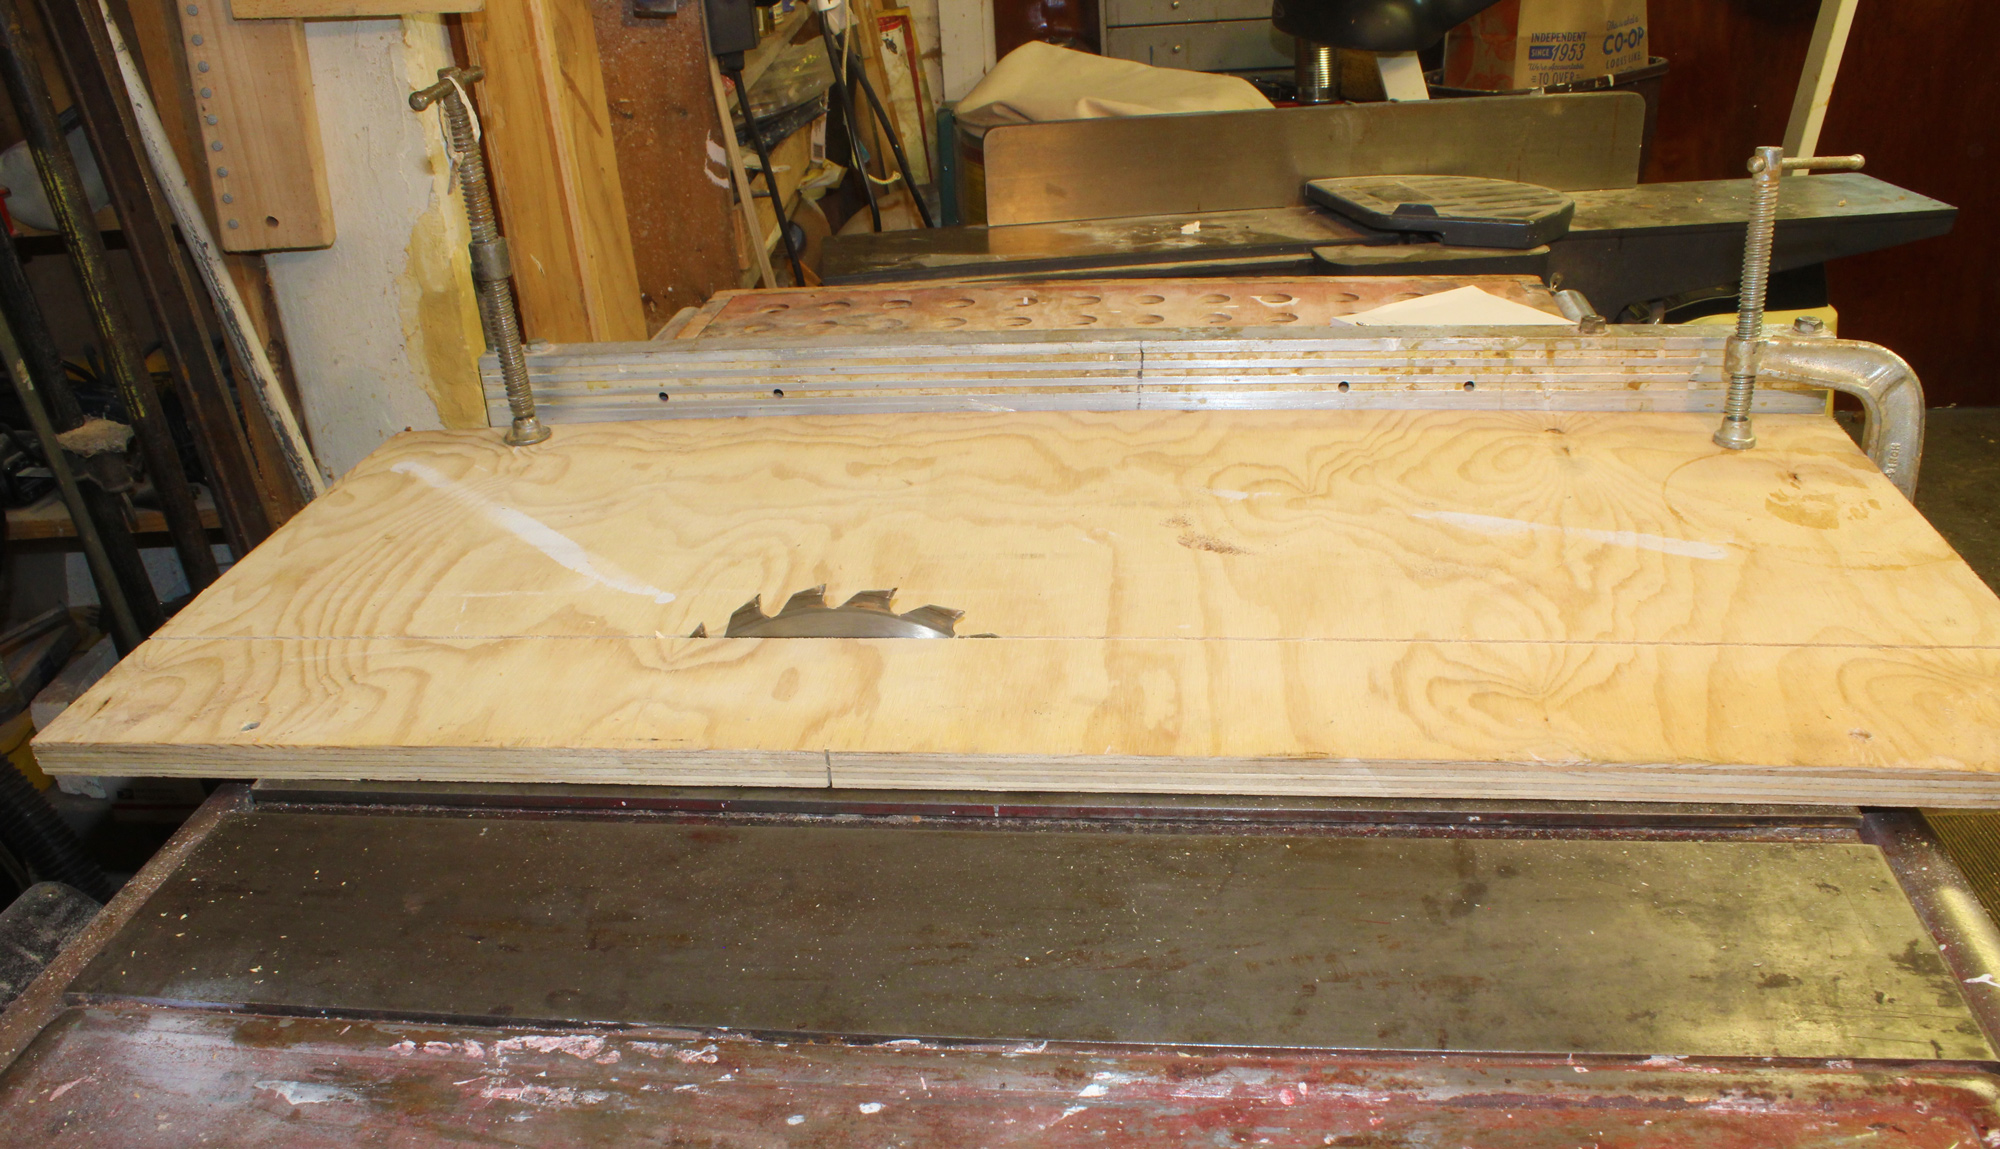
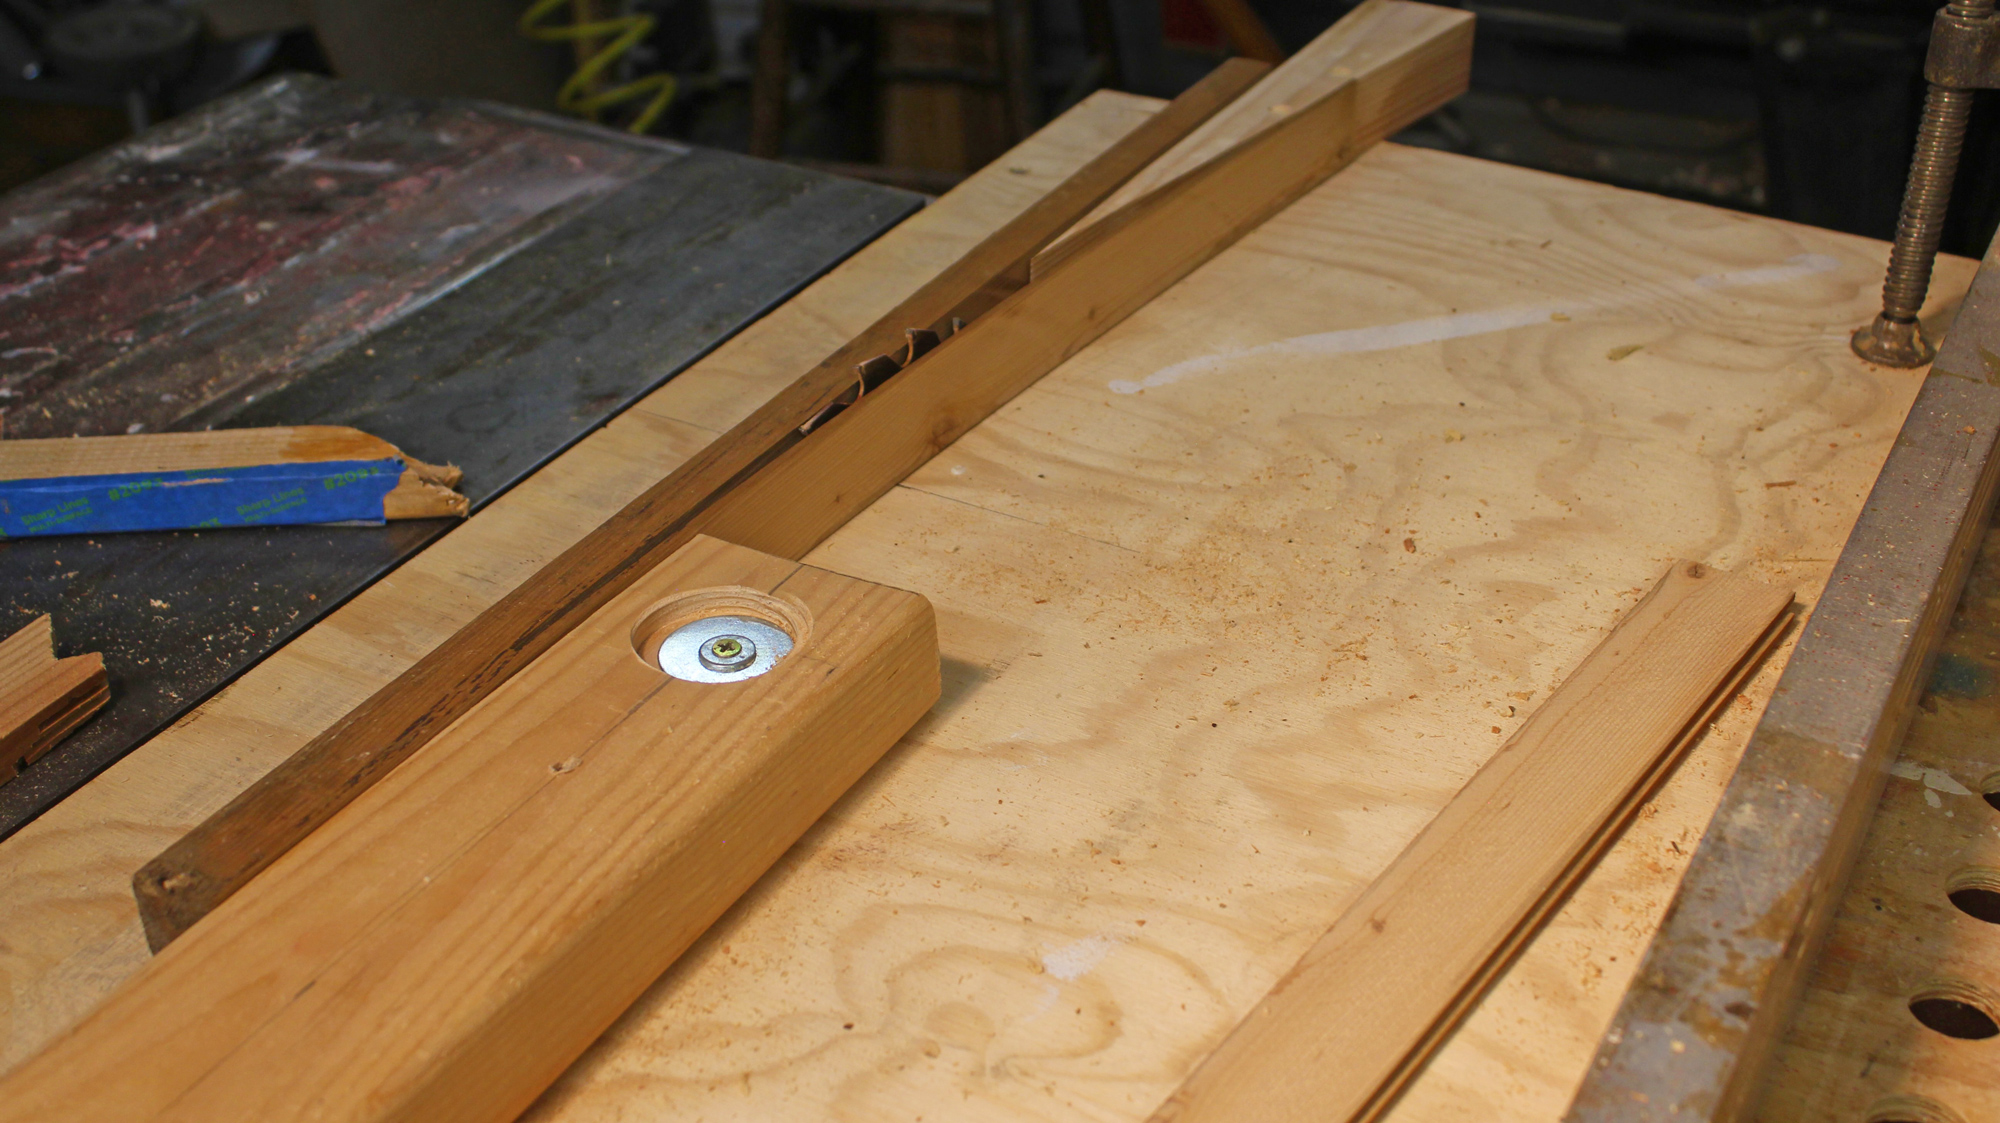
The yard and boom of the balance-lug mainsail in my Caledonia Yawl have parrels to keep them close to the mast, and parrel beads, which roll easily when raising or lowering the sail. A few years ago I made a square sail with an upper and lower yard but equipped neither with parrels. I could get away with setting and striking the sail in a very light wind, but in anything stronger both yards became rather unruly. It was time to make some parrels.
The traditional method for making wooden parrel beads is to turn them on a lathe, shaping several at once from a single length of hardwood. I have a lathe, but I know from experience that shaping a series of spheres is no easy task. My square-sail parrels would require about 18 to 20 beads, so I set out to find an easier way to make them.
Photographs by the author
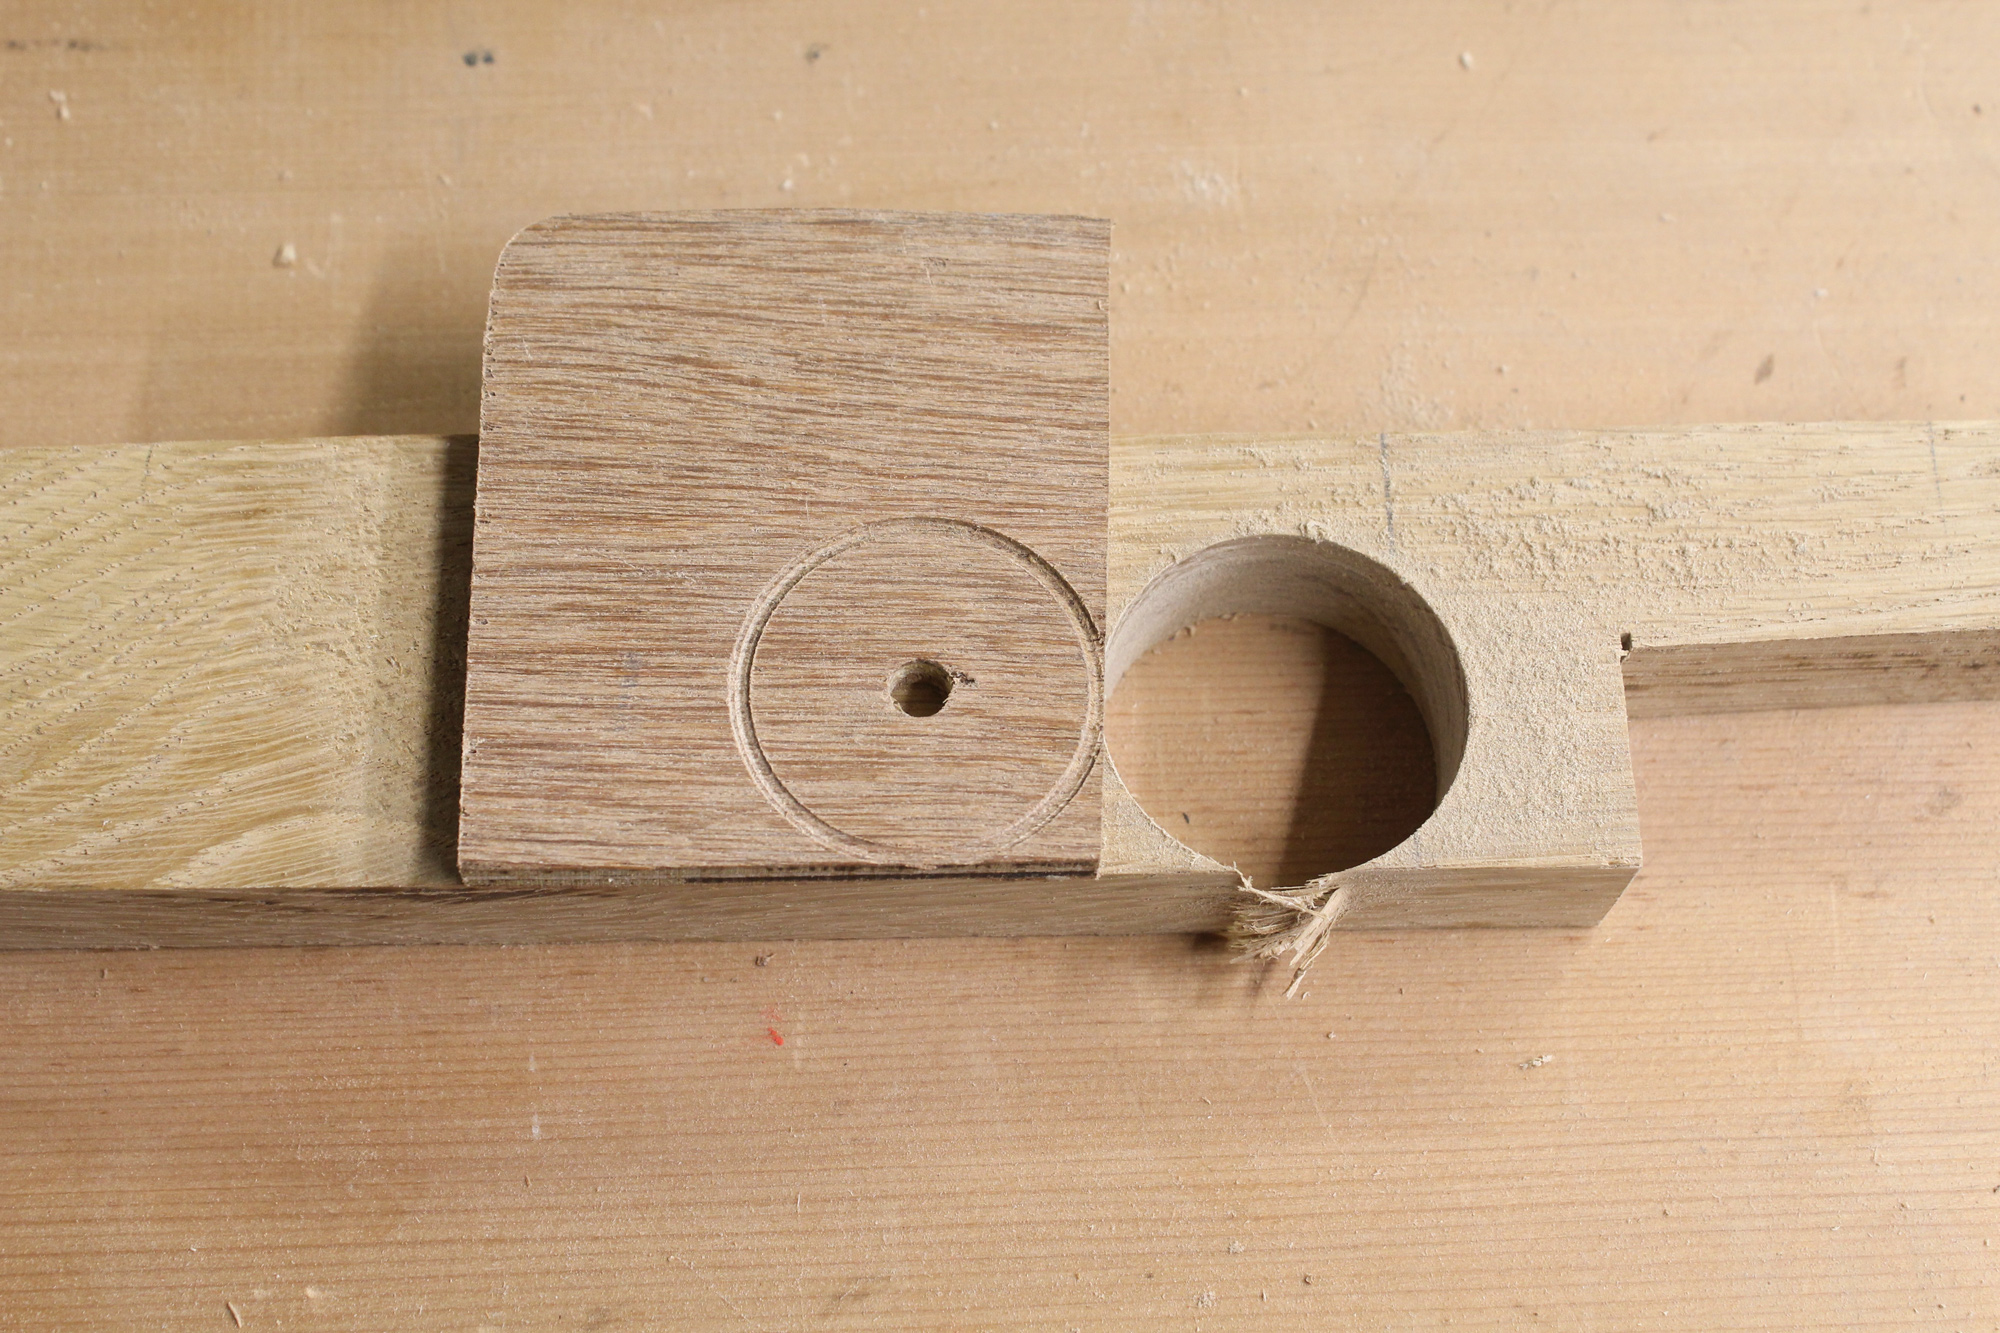
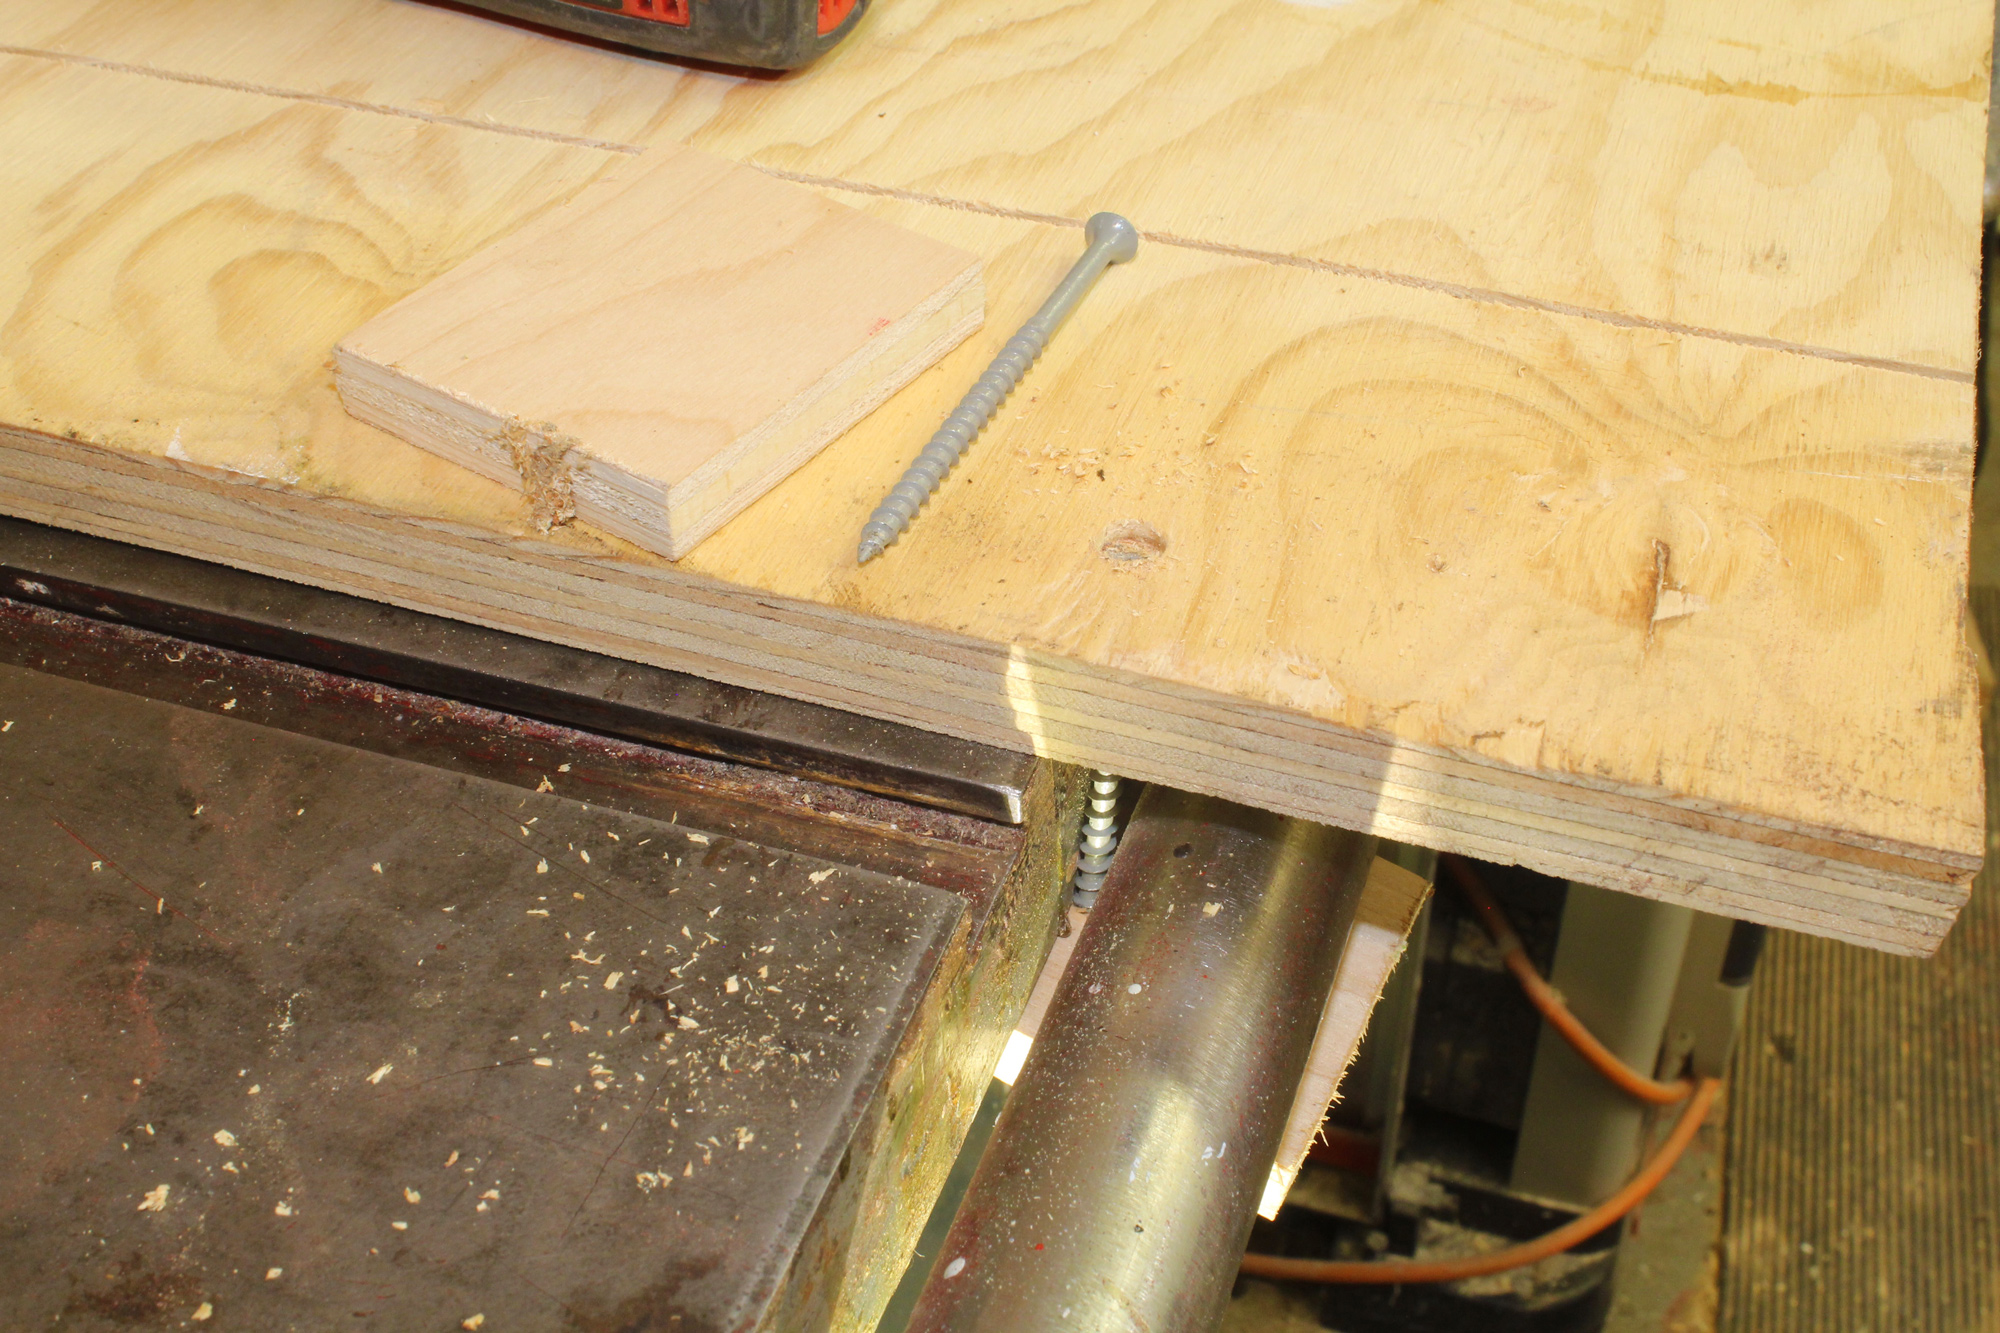
A plug cut with a holesaw is usually just waste wood, but it’s a good basis from which to make a parrel bead. If a plug is cut by a 1 1⁄4″ holesaw from a scrap of 3⁄4″ white oak, it cannot be shaped into a perfect sphere but can be made into a perfectly functioning parrel bead.
Plugs made by holesaws seemed like a good place to start. They’re already round and have a hole though the center. All that is required is to round the plugs from cylindrical to spherical. The holes through the plugs are drilled across the grain rather than parallel to it as in lathe-turned beads, but given the light loads put on parrels, that doesn’t matter.
My 1 1⁄2″ holesaw makes a plug that is 1 5⁄16″ in diameter, a good size for parrel beads on boats as big as the 19′ Caledonia Yawl. A 1 1⁄4″ holesaw’s plug, with a diameter of 1 1⁄16″, would be appropriate for smaller boats.
If the thickness of the plug stock is equal to the diameter of the plug, that plug can be shaped into a fully spherical parrel bead; it just takes a little longer to shape it.
To make spherical beads, the stock used should have a thickness equal to the diameter of the plug. Beads cut from thinner stock have a slightly oval cross section but will work just as well and are more quickly made, so for the new parrels I used 3⁄4″ hardwood, which I have in abundance in scrap pieces.
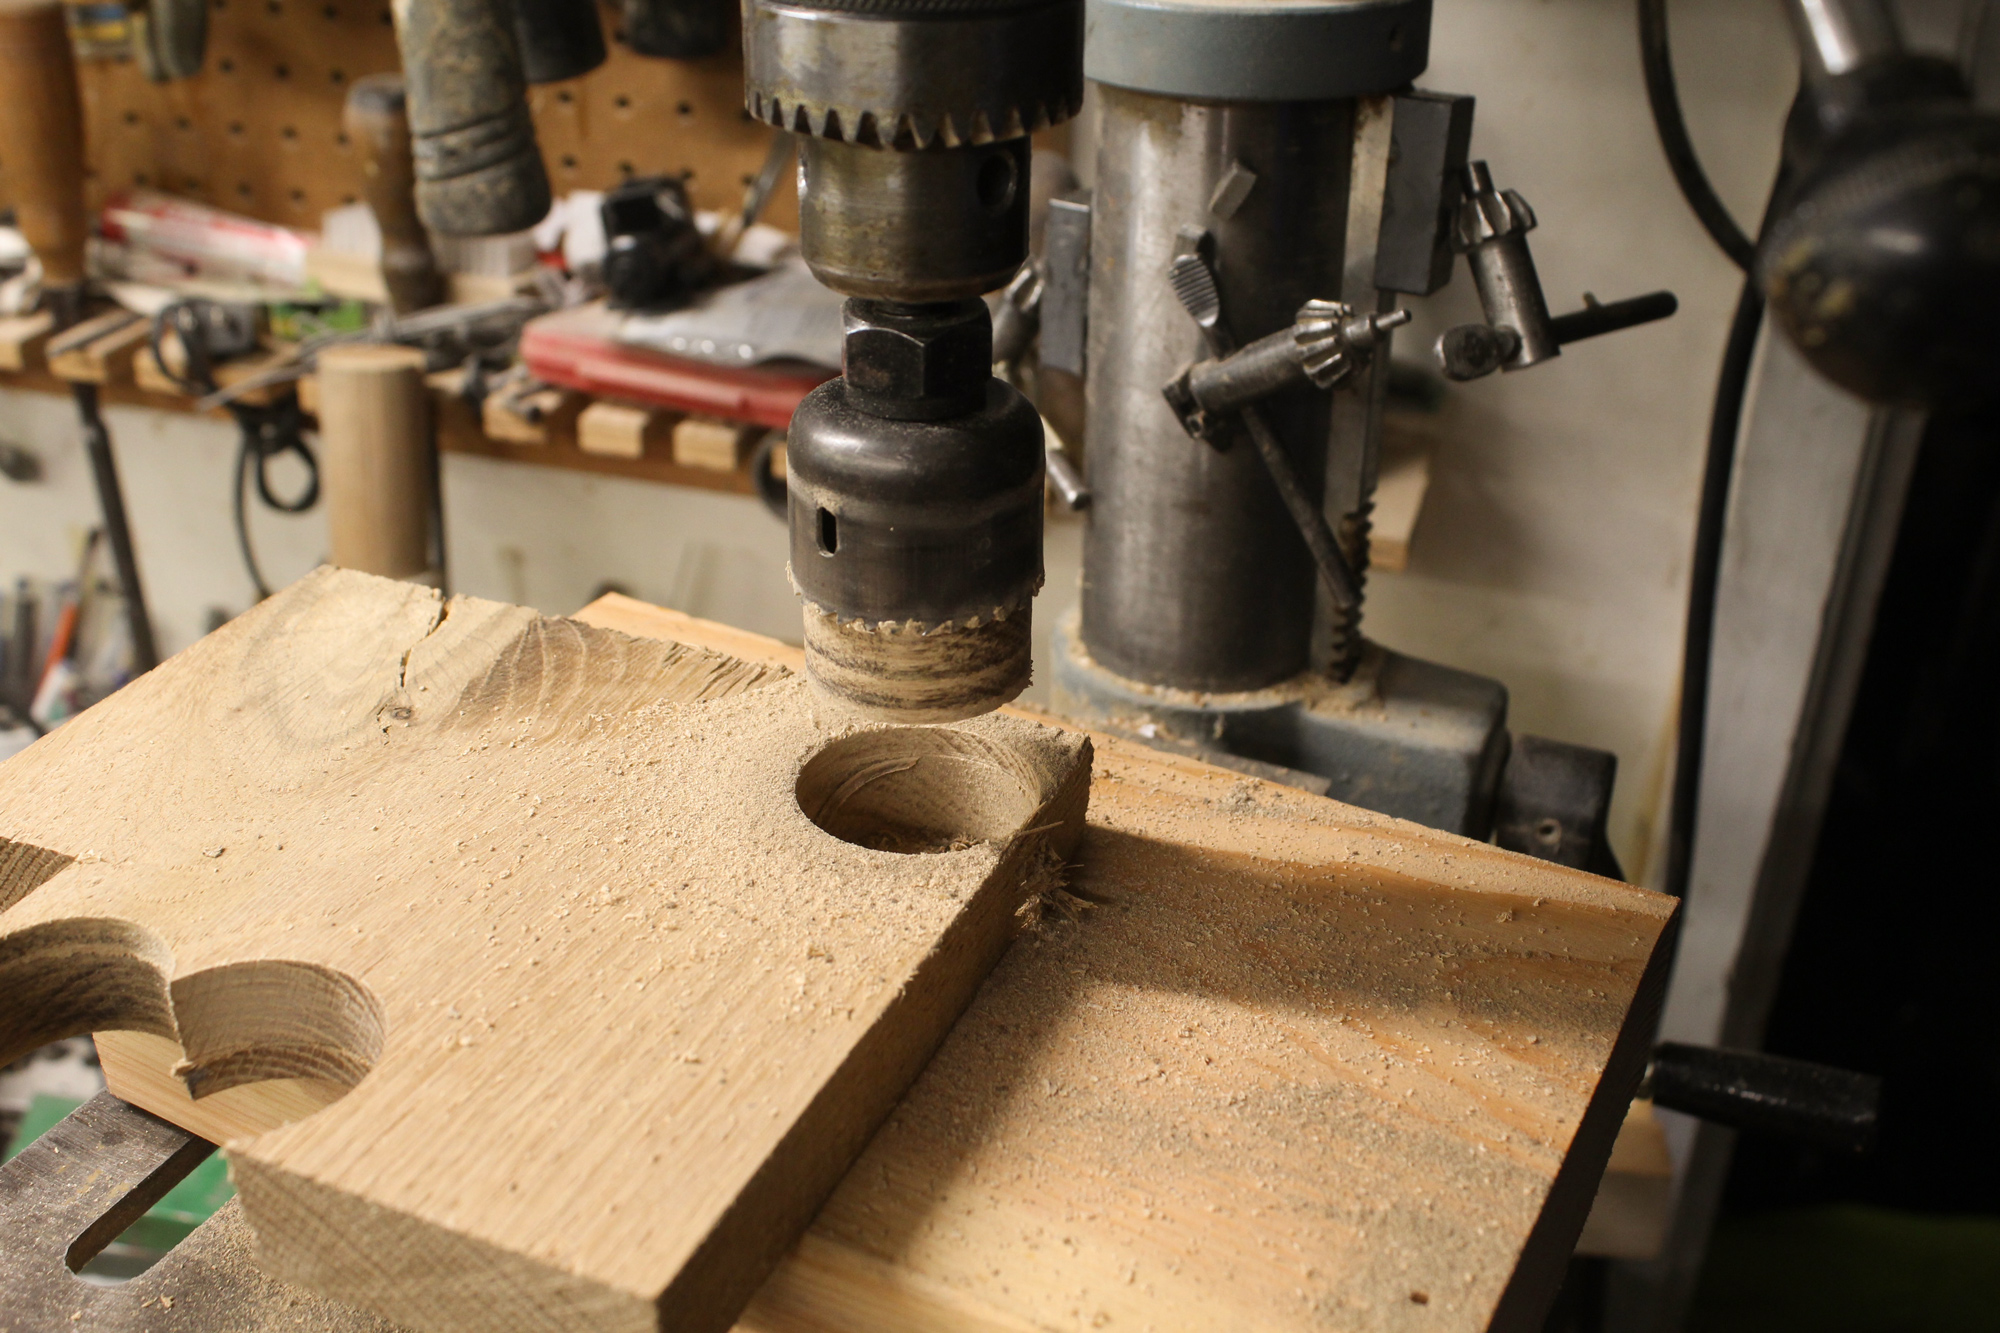
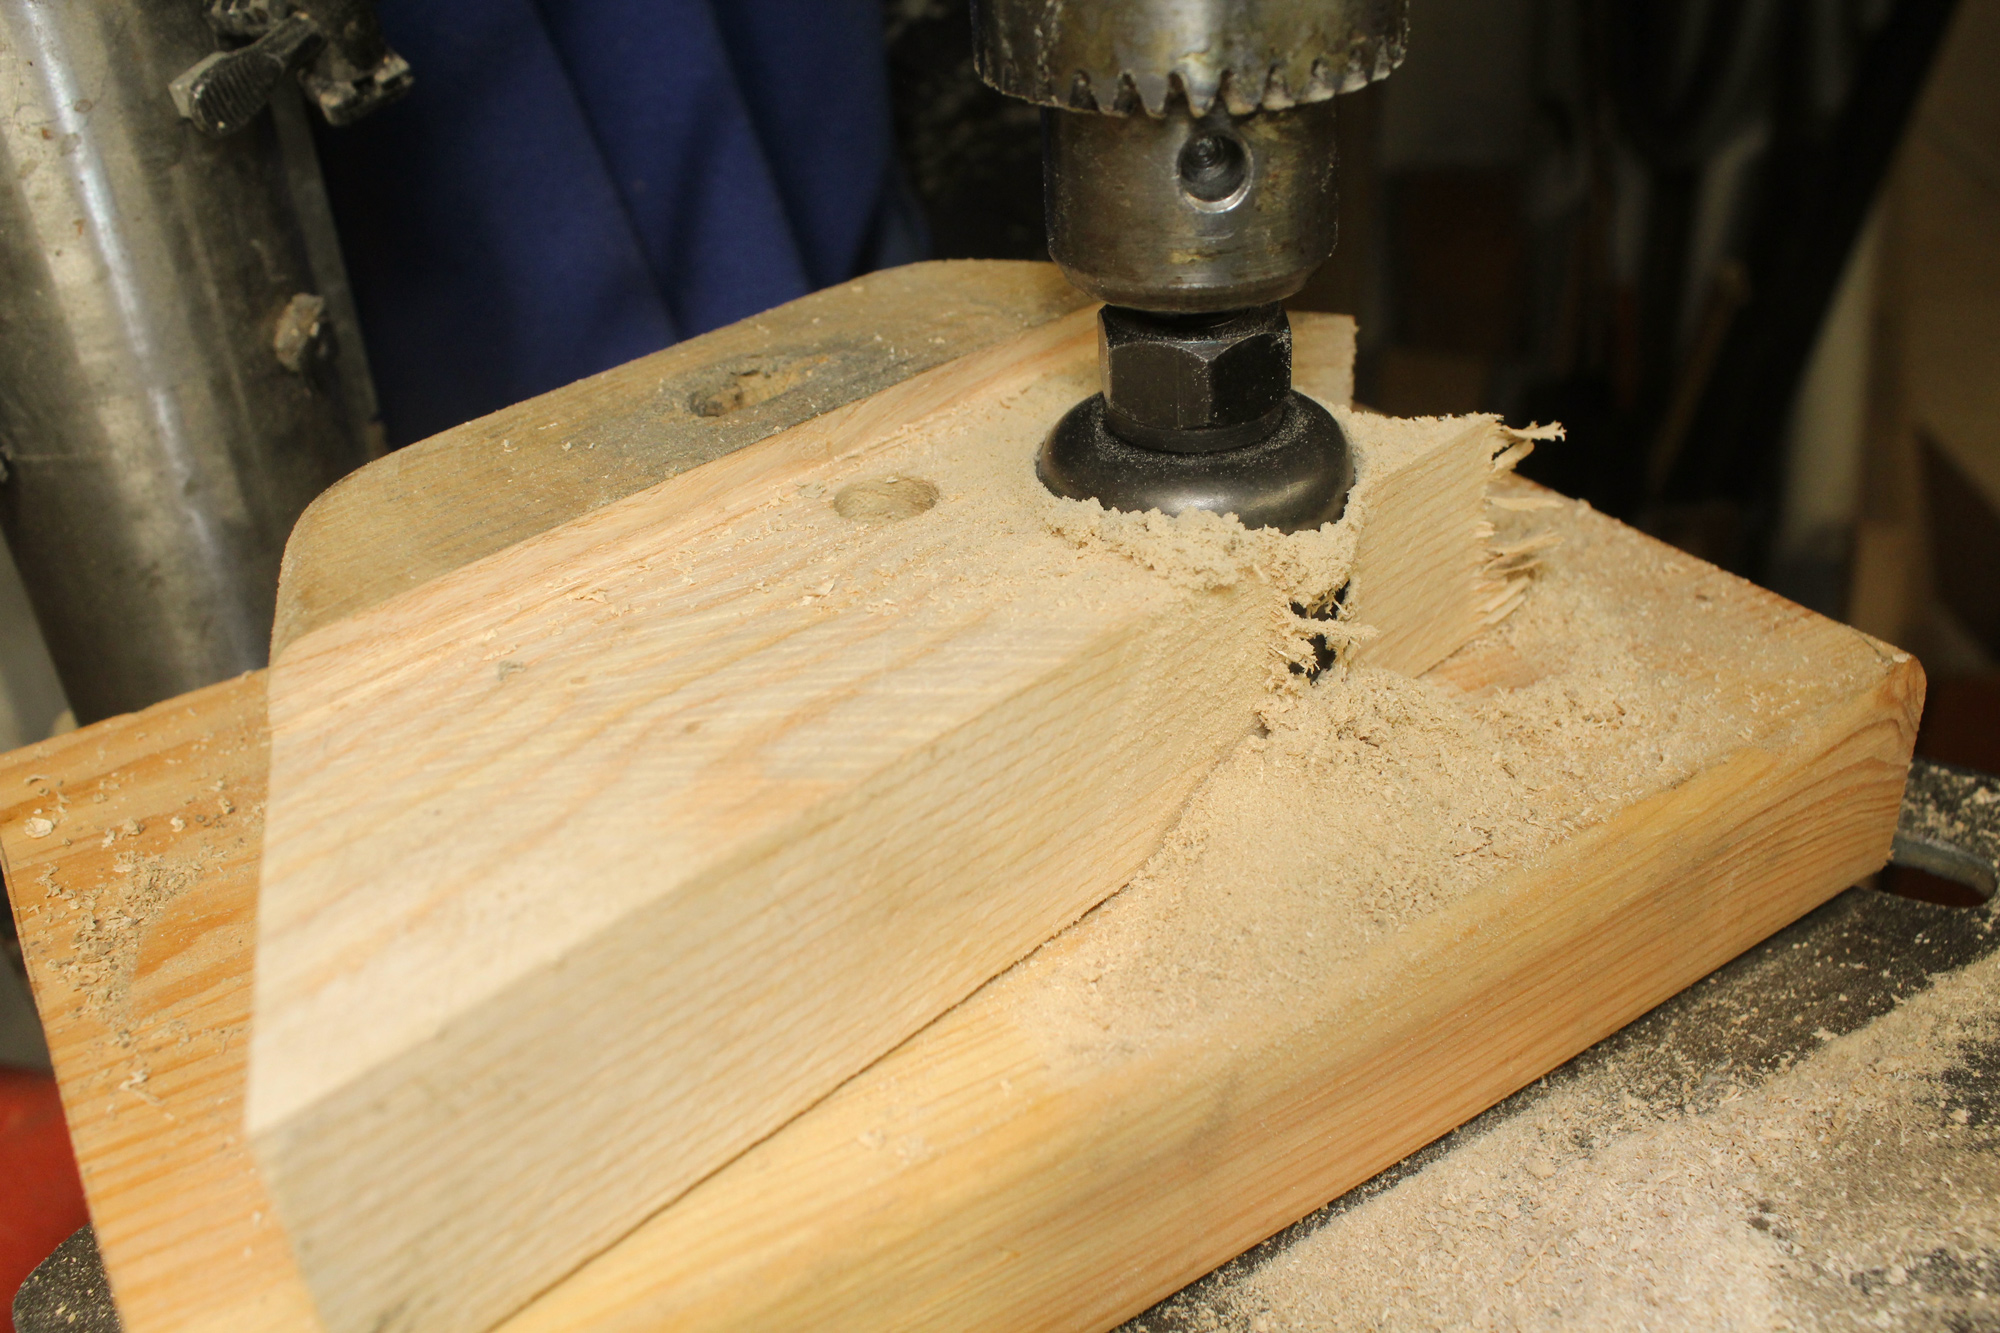
A drill press is the best tool to use with the holesaw. I set the depth of cut to let the pilot drill go into the sacrificial 2×6 on the drill press table and then held the saw teeth just shy of cutting into it. Going all the way through the stock would leave the plug fully captured by the holesaw. Making two cuts—one almost all the way through, and one from the other side to separate the plug from the stock—leaves plenty of exposed plug to pull on and very little to extract from the saw.
If you don’t have a drill press, you can use the holesaw chucked in a corded or cordless drill. While it may not cut perfectly square to the stock, the sides of the plug will still be parallel to the hole and fine for the shaping steps to follow.
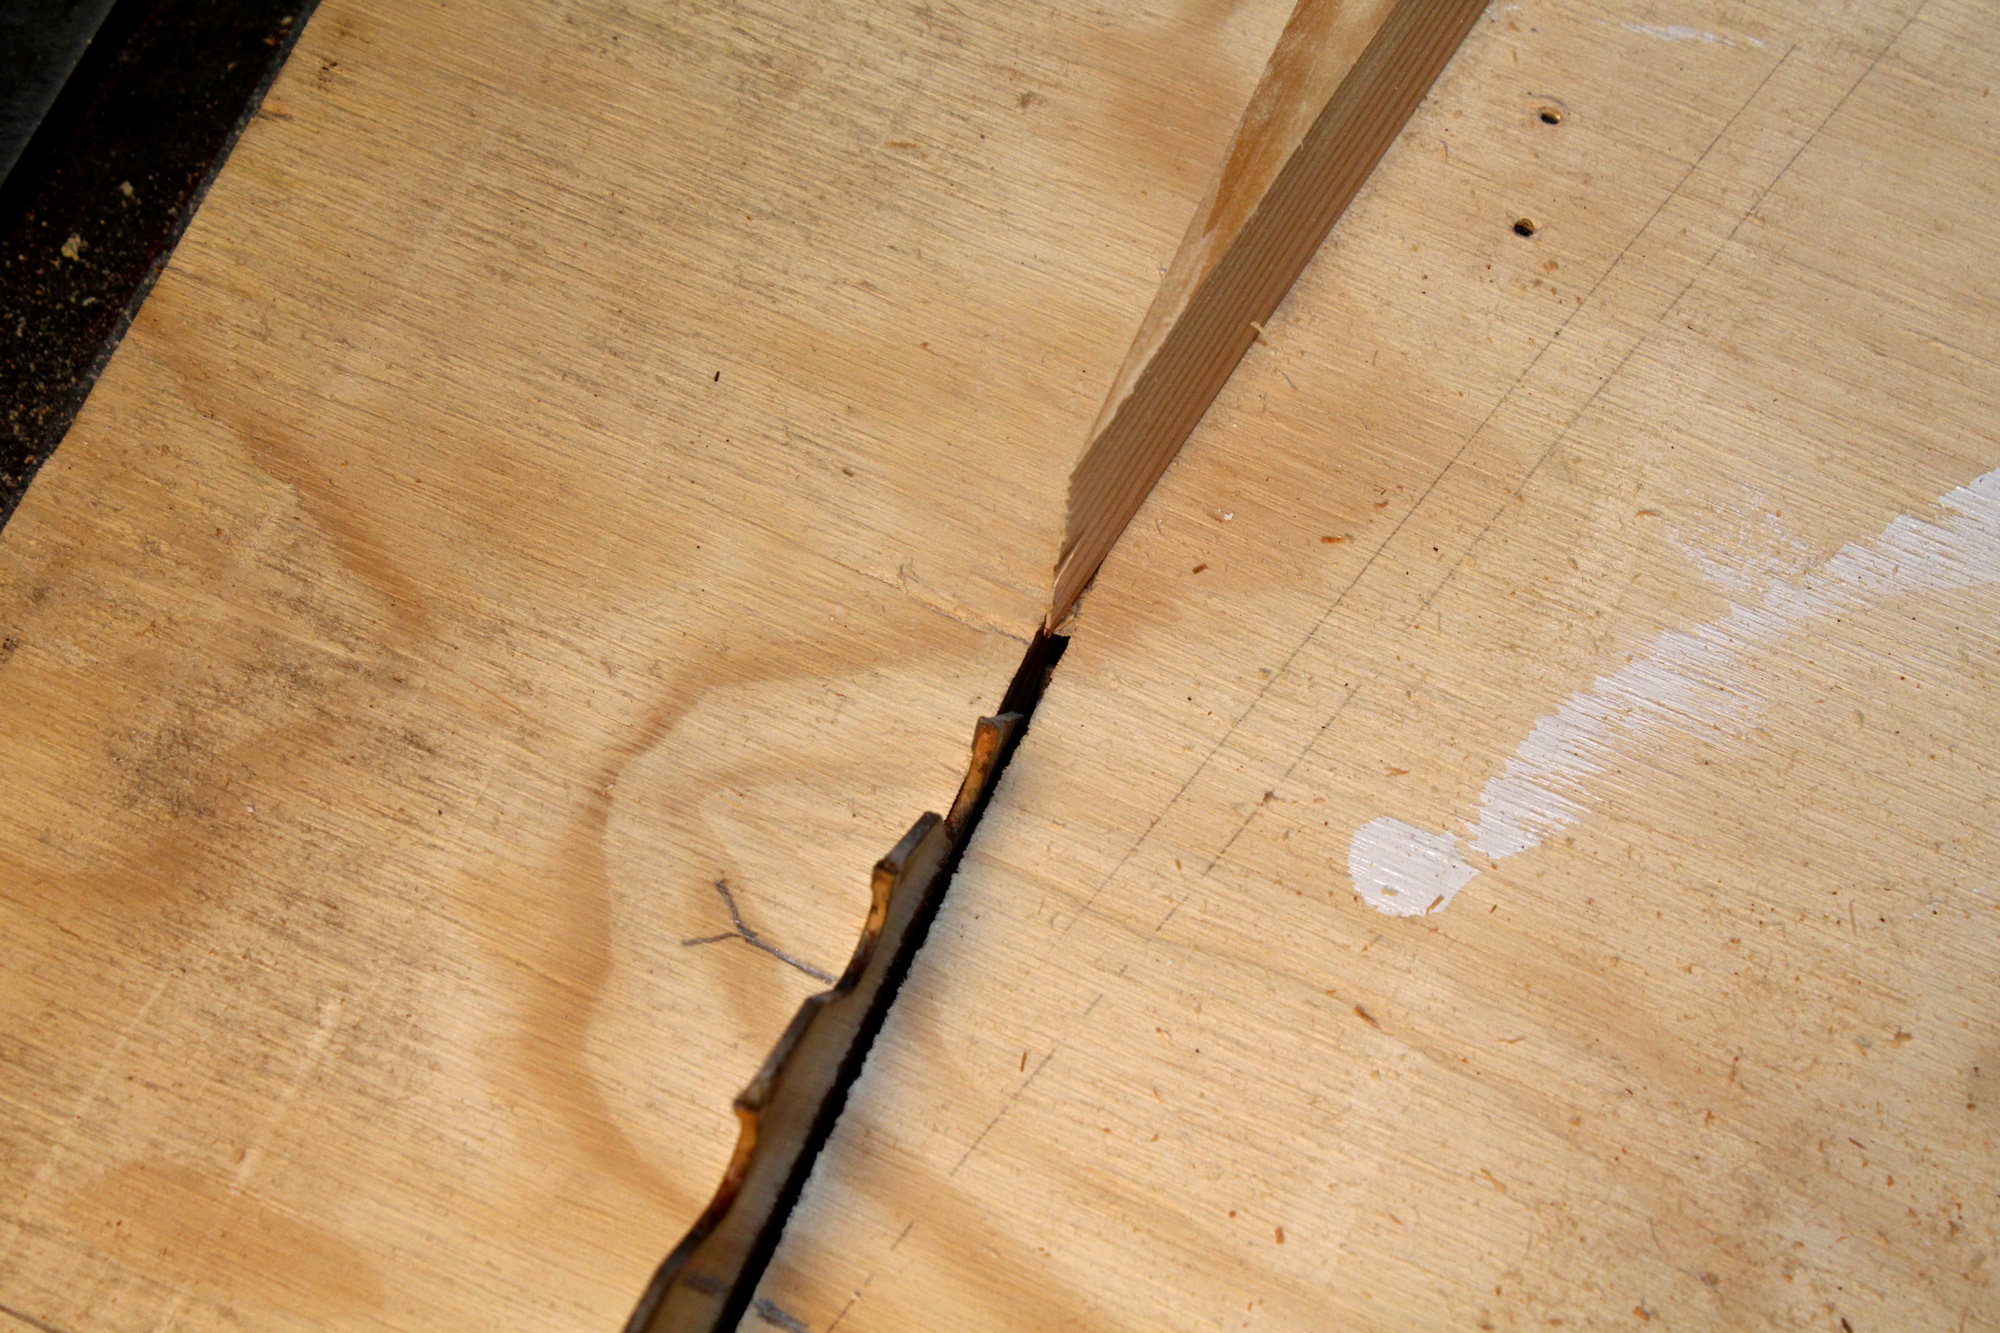
Setting the holesaw with its kerf on a tangent with the stock allows the sawdust to escape rather than get trapped. This makes it possible to make a continuous cut without having to retract the holesaw to clear the saw teeth.
Holesaws can choke on the sawdust that builds up in the kerf. This creates both heat—which isn’t good for the cutting teeth—and smoke, which isn’t good for lungs. If the kerf slightly overlaps and cuts through the edge of the stock, the opening provides an outlet for the sawdust; not only will this eliminate smoke and excess heat but also it allows the teeth to cut much faster. There’s no need to back the holesaw out repeatedly to clear its teeth.
Because the holesaw’s pilot bit touches the wood well before its teeth engage, it is very difficult to get the 1⁄16″-wide kerf to intersect the edge of the wood by eye. This jig, made from thin plywood, has two of its edges sanded so that they land in the middle of the kerf. Marking the stock through the hole made by the pilot bit assures easy going for the next plug.
It’s not easy to get the pilot bit in the right place by eye, so a jig is helpful. This is made of a small piece of plywood with a pilot hole and a shallow kerf cut on both sides. Two edges of the jig are then trimmed—I use a disc sander—to intersect the kerf. Those edges are aligned to the edge of the stock and to any previously cut hole, both to make the vent through which to expel dust, and to minimize waste by keeping the holes as close together as possible.
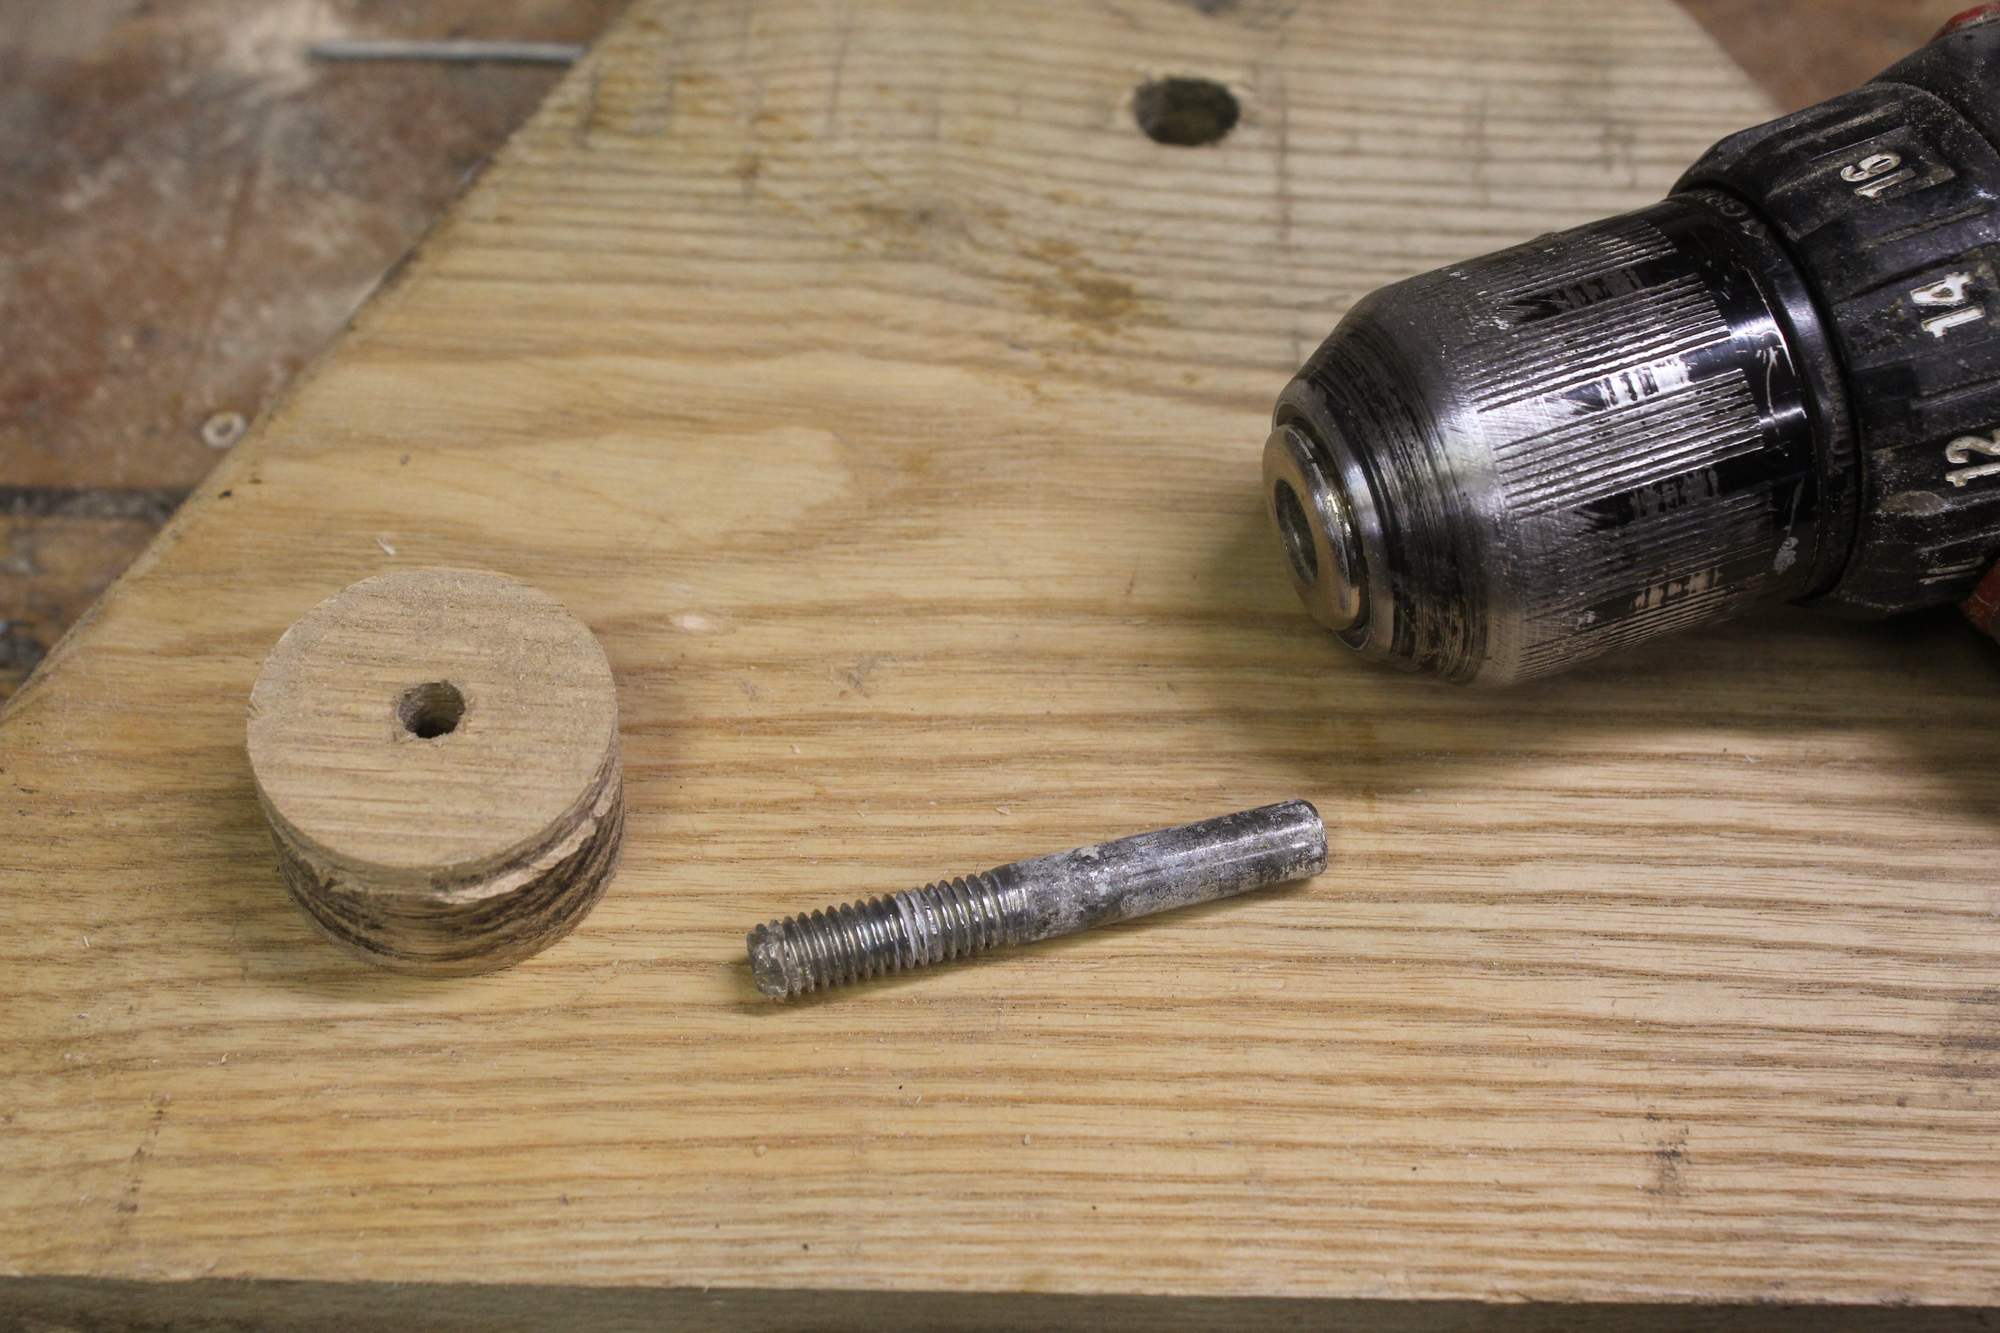
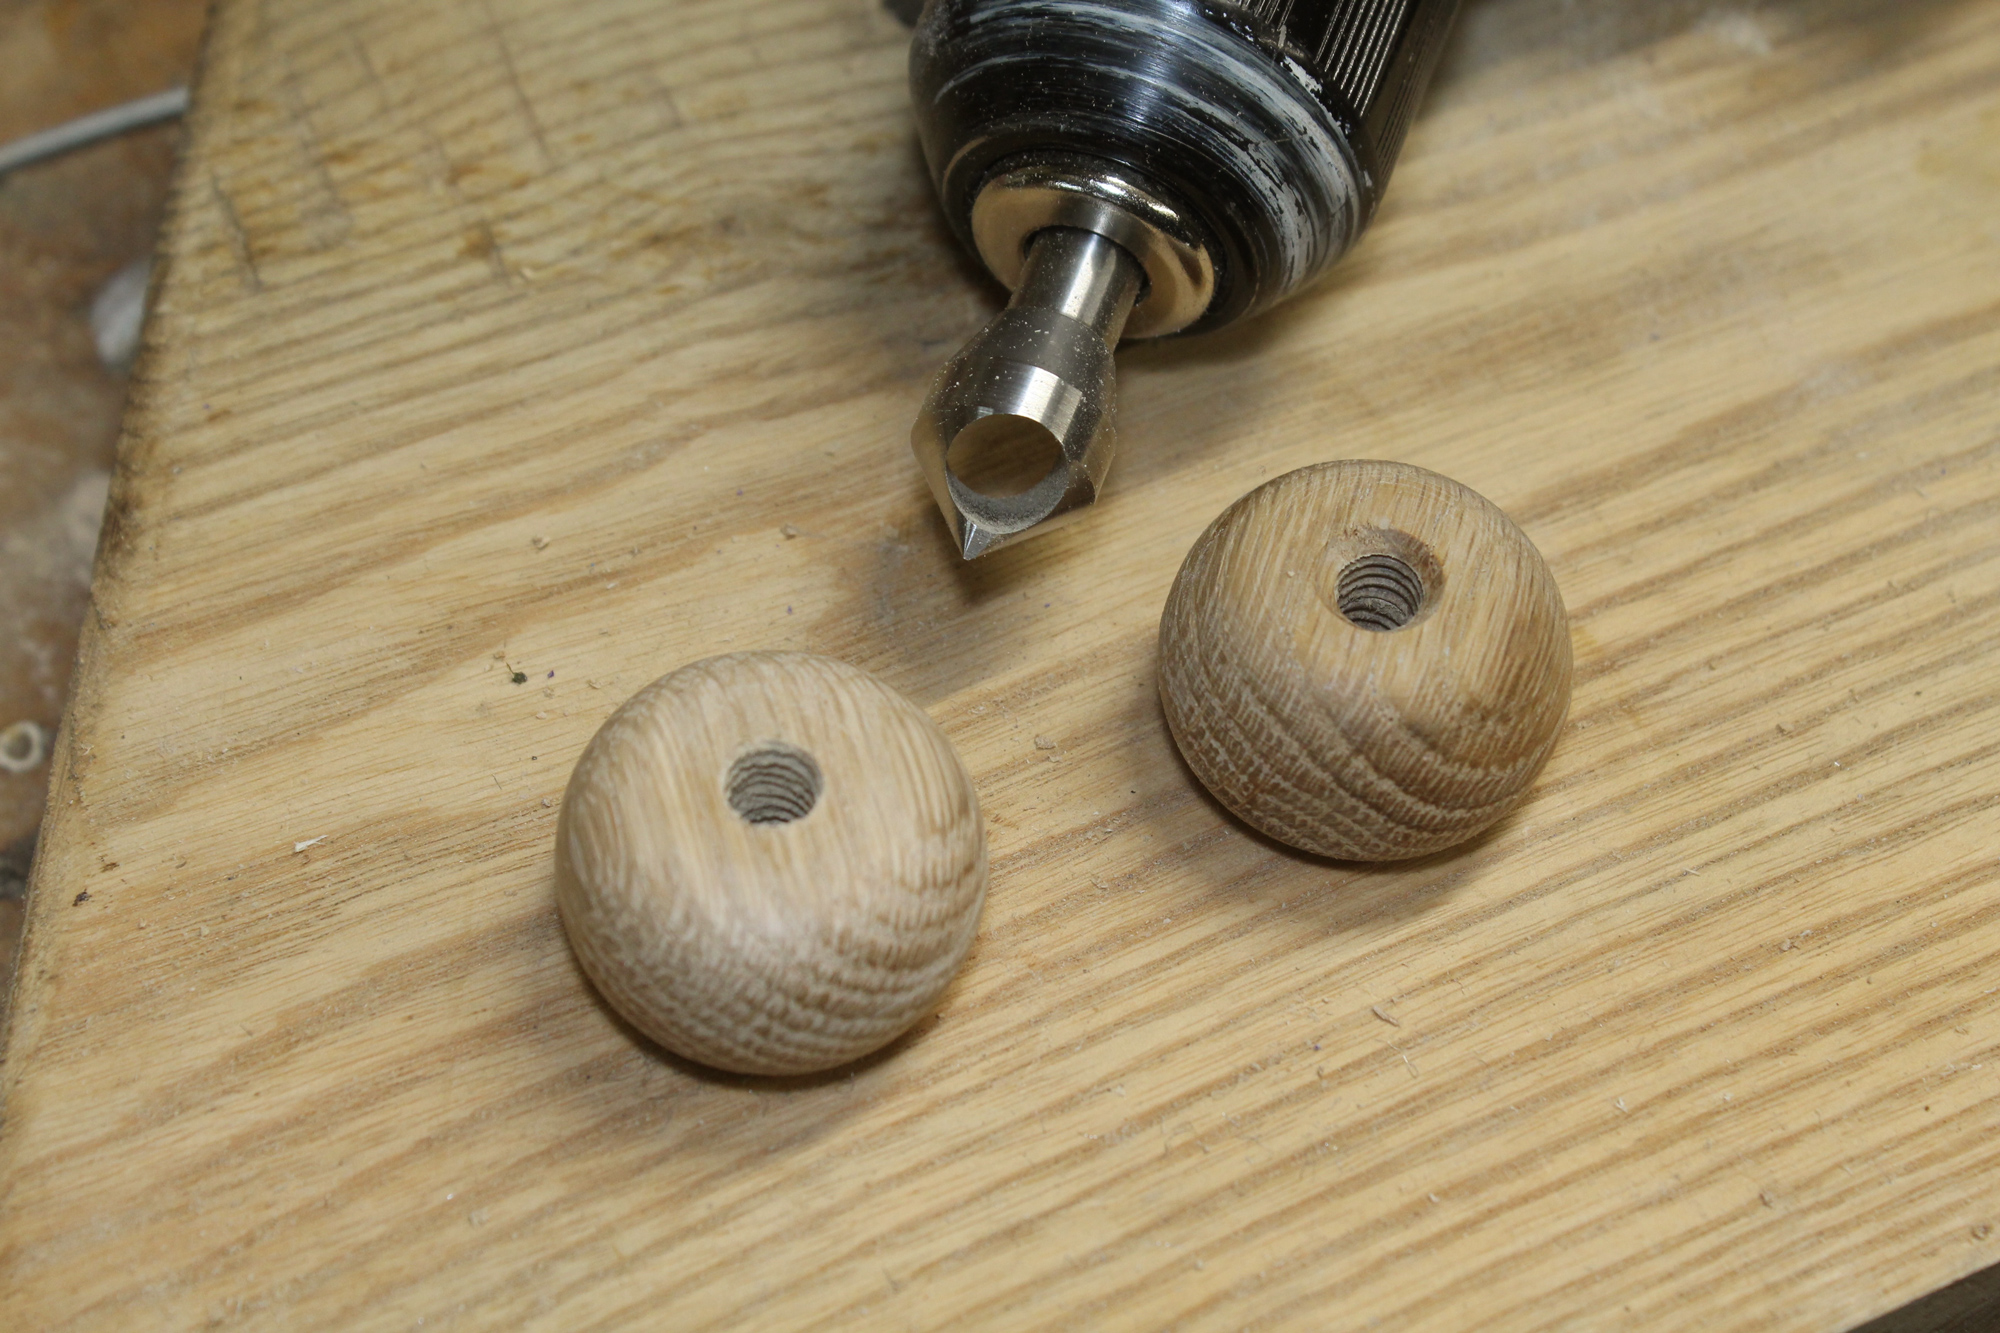
Plugs made by holesaws have a 1⁄4″ hole left by the pilot bit. A 5⁄16″ bolt, with its head removed and its threaded end filed to a slight taper, can be driven into the hole. The plug can then be spun for shaping.
To shape the plug, I spin it with a cordless drill. I use a 5⁄16″ bolt with the head sawn off and the threaded end tapered slightly with a file. Chucked in the drill and spun slowly, it can work its way into the plug’s hole in some woods.
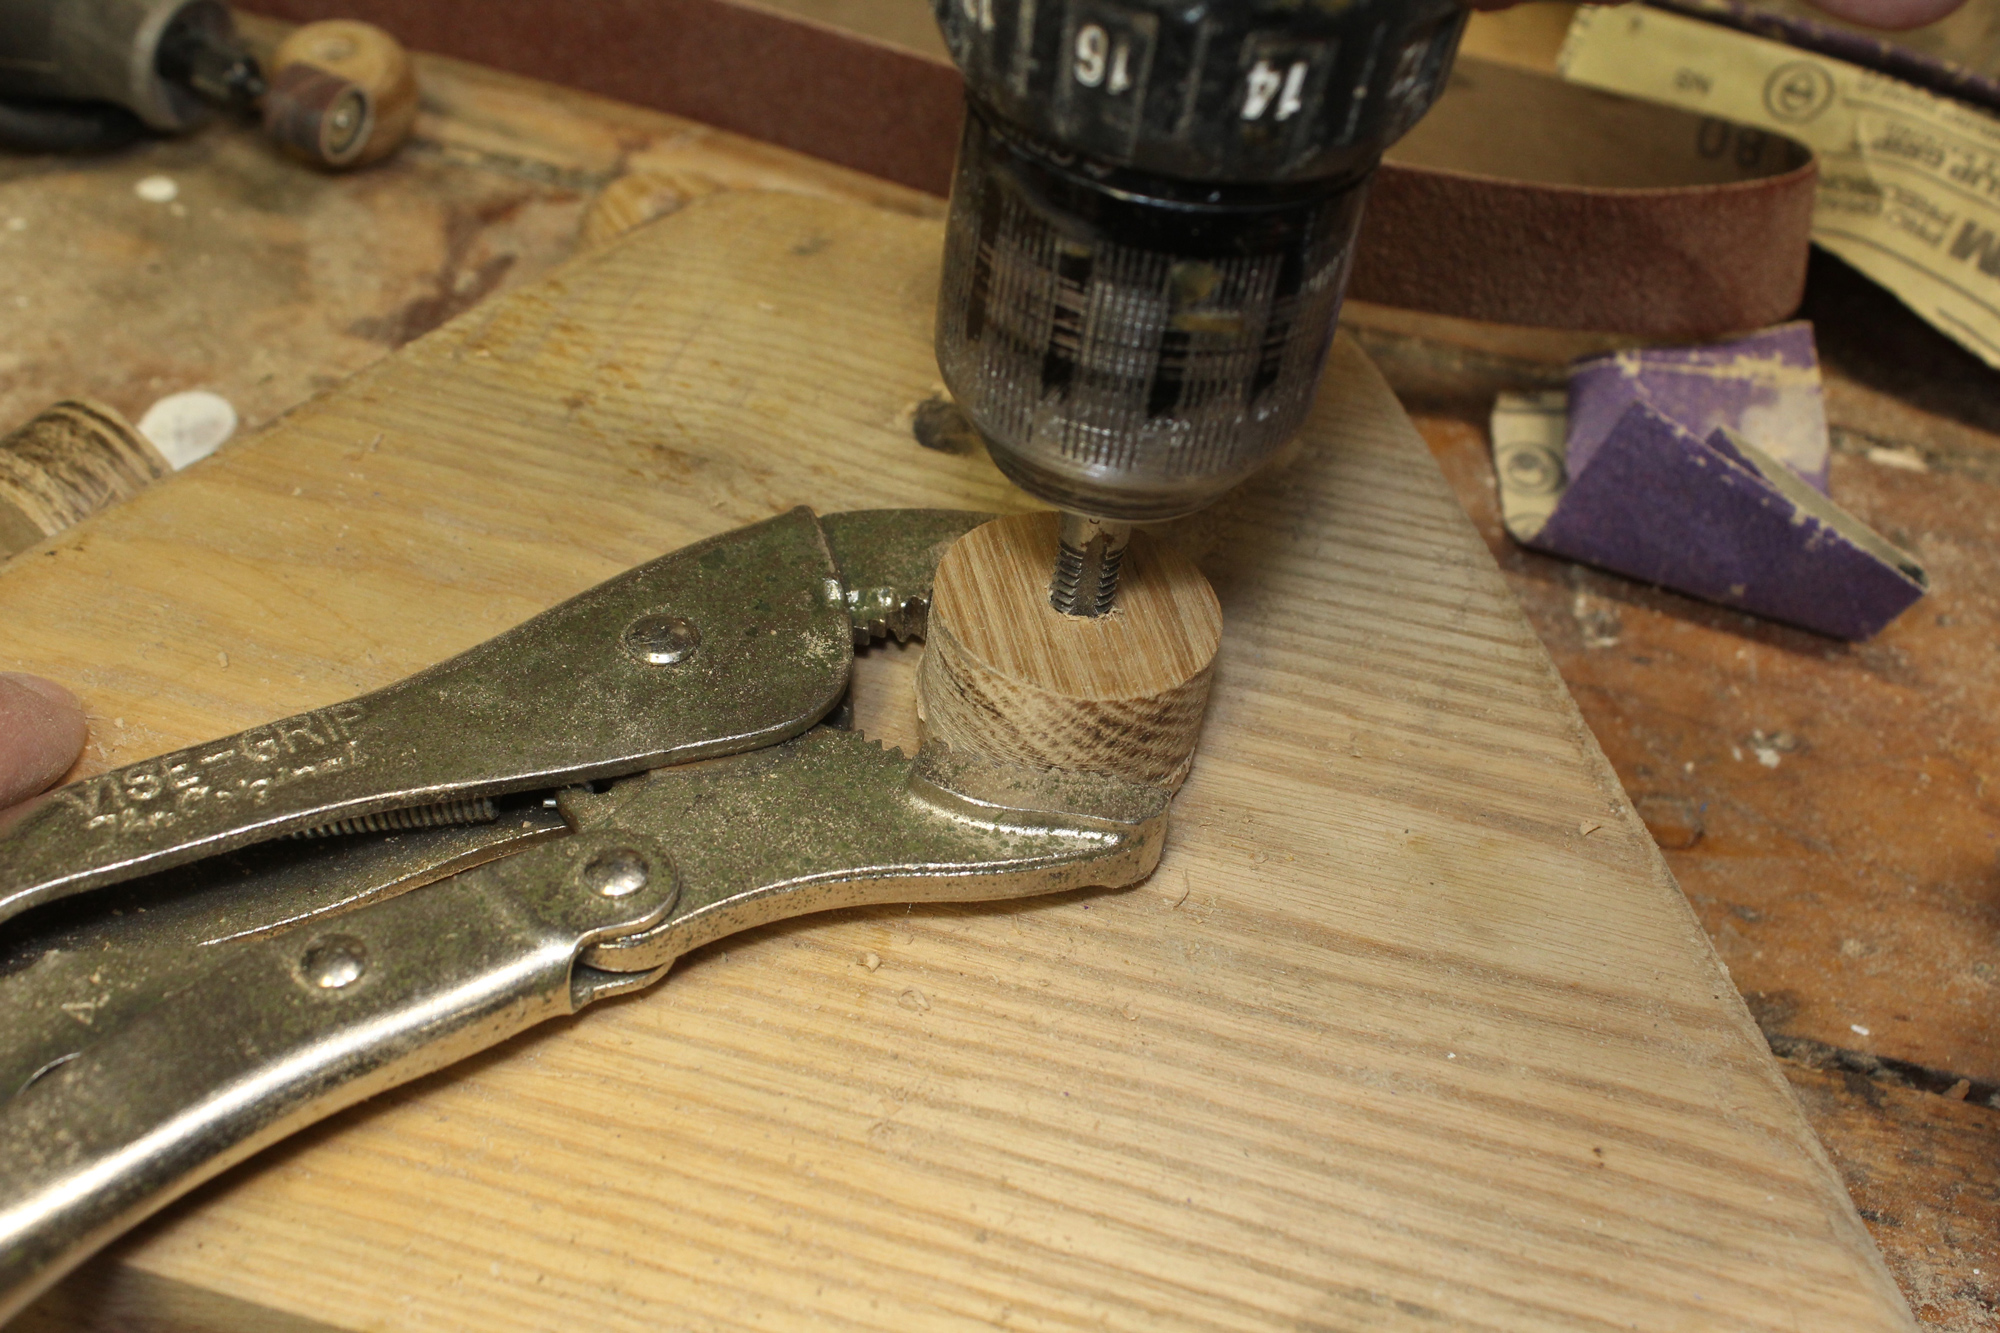
Installing the bolt in the plug can be made easier by first threading the hole with a 5⁄16″ × 18tpi tap chucked in a cordless drill.
If the bolt won’t easily thread its way into the plug, cut threads into the hole with a 5⁄16″ × 18tpi tap. Cut partway, not all the way, through; leave some wood untapped so the bolt will grip the plug without going through it. Holding the plug with pliers or Vise-Grips and resting it on the work surface will make the job easier.
With the bolt twisted into the plug and chucked in the drill, the plug is ready for shaping.
The tapered end of the bolt can stray offline, so set the plug on the work surface, as shown with using the tap, and keep the drill upright. The bolt will align itself as it gets deeper into the plug.
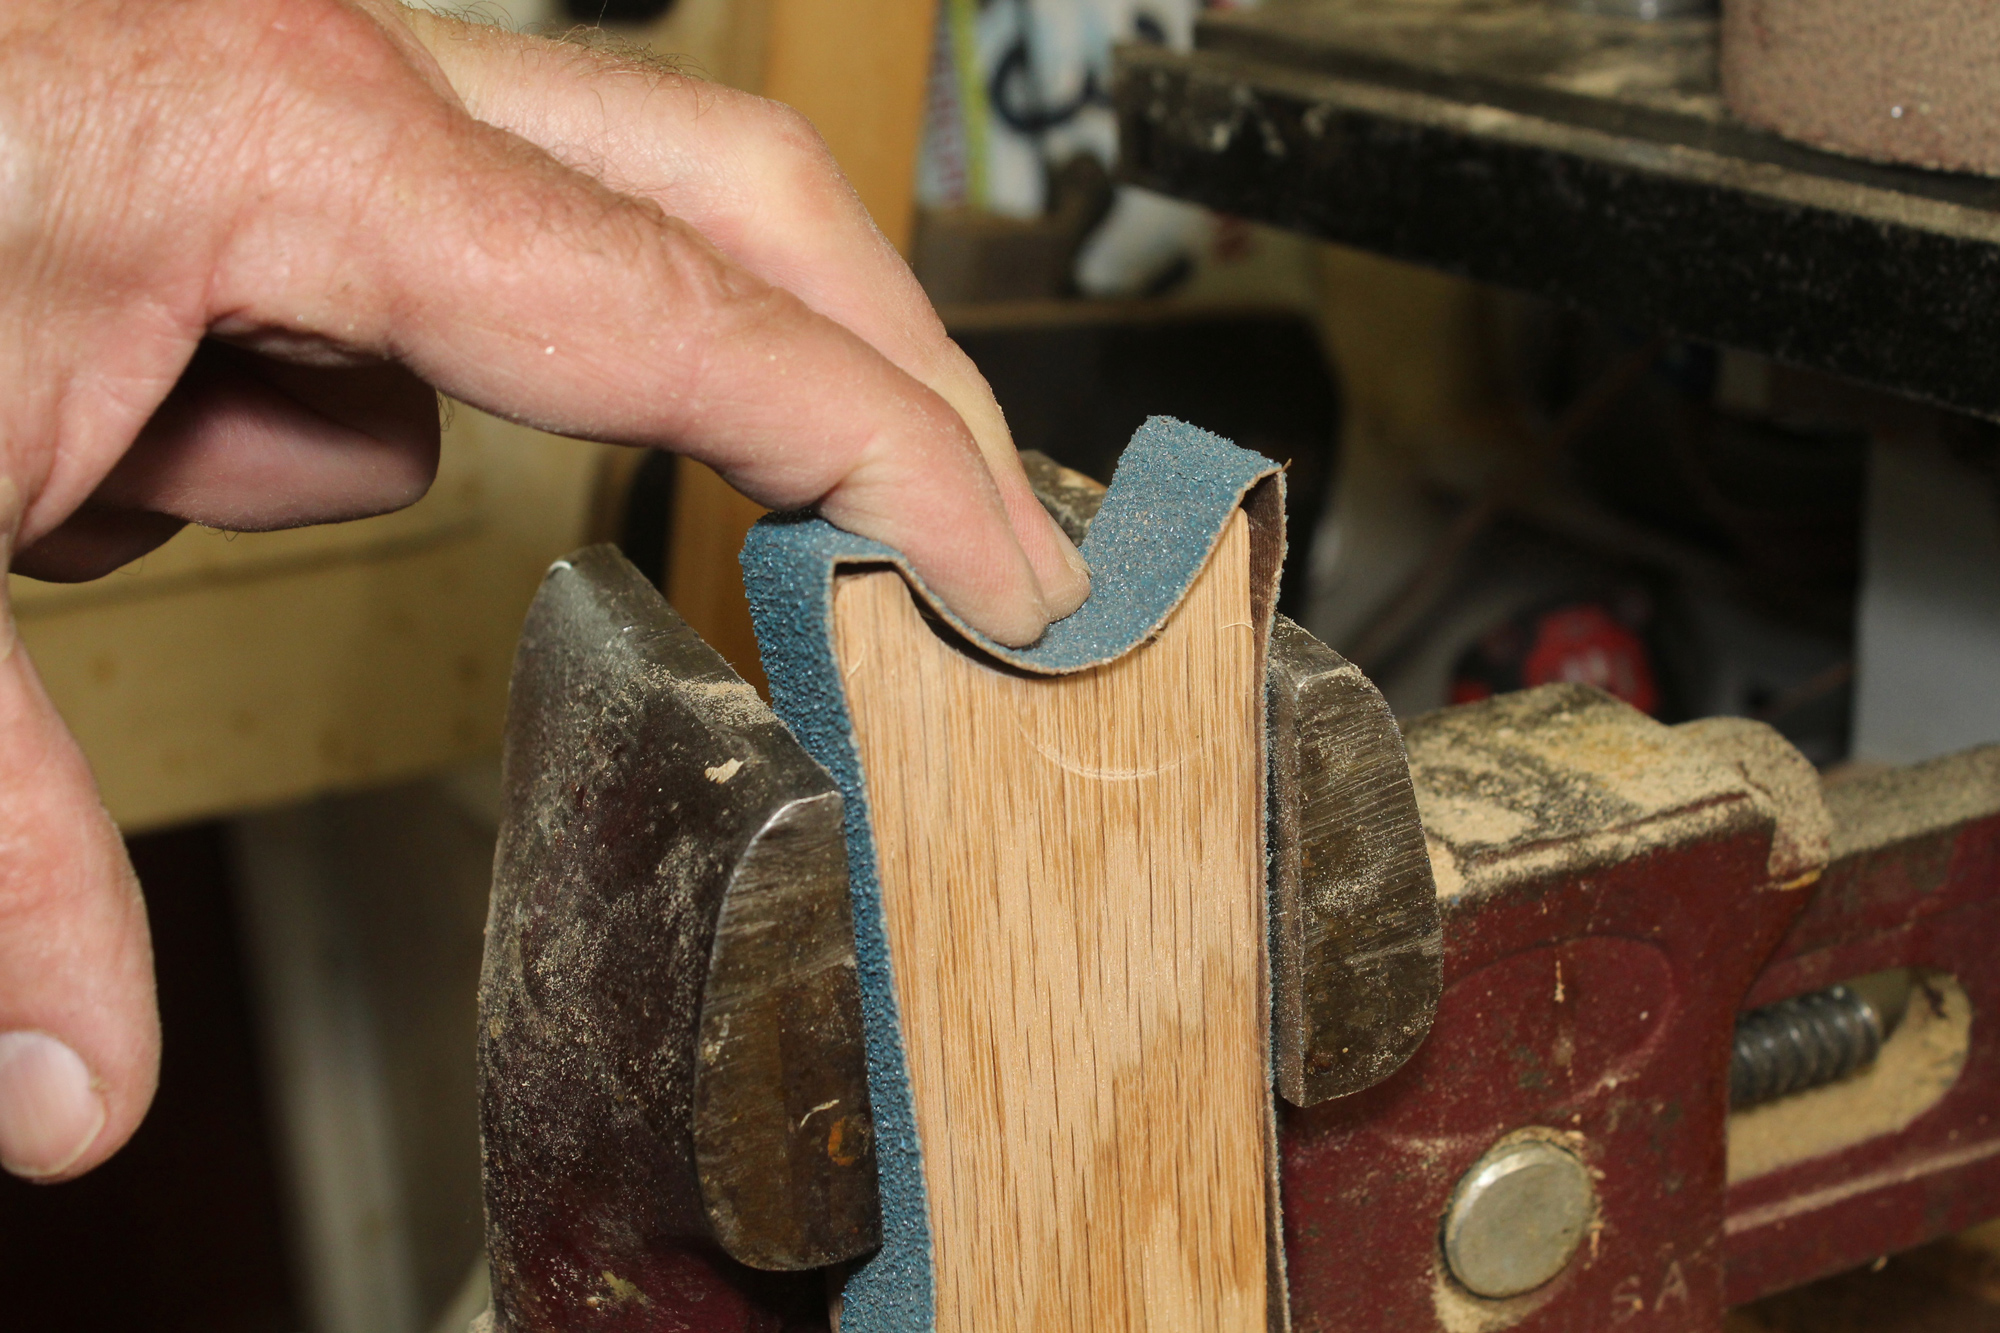
The arrangement for shaping the bead includes a sanding belt and a block of wood with a half-circle cut in one end with the holesaw.
To shape the beads, use a coarse sanding belt: 40-grit cuts quickly; a 1 × 30 belt works well, as do strips torn from a 3 x 21 belt. To make a holder for the belt, use the holesaw to cut a hole in a block of wood and saw off half of it, leaving a concave half-circle.
The sanding belt and block are held in a vise. The belt is left with enough slack to settle into the half circle. The 40-grit belts are stiff, but they will conform to the curve during the sanding process.
Press the sanding belt into the half-circle and fold the ends over the edges. Clamp the belt and block in a vise.
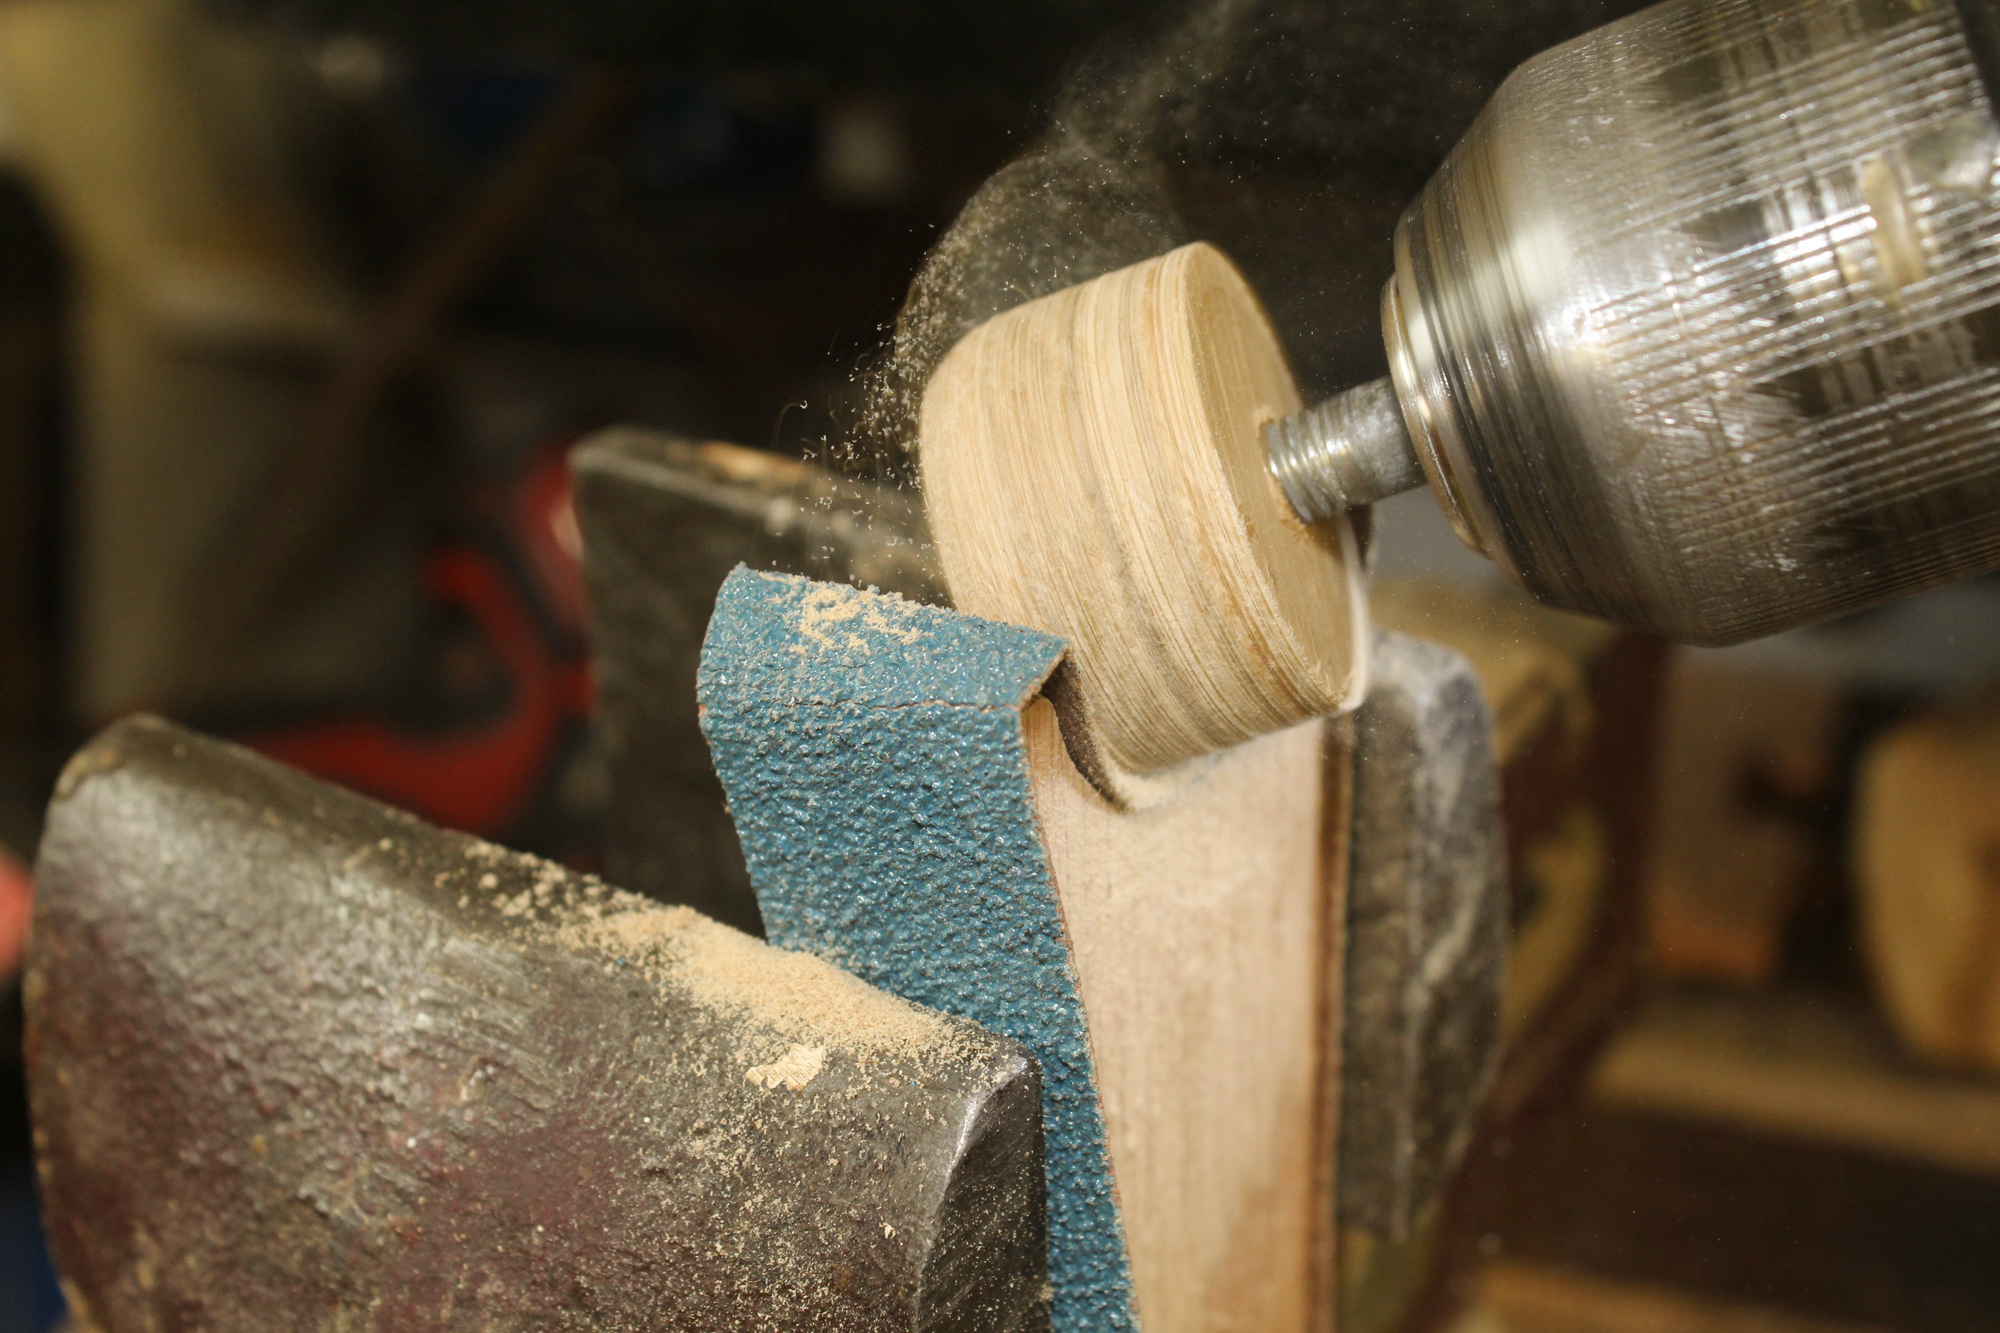
With the drill running at high speed, the sanding belt rounds the end of the plugs.
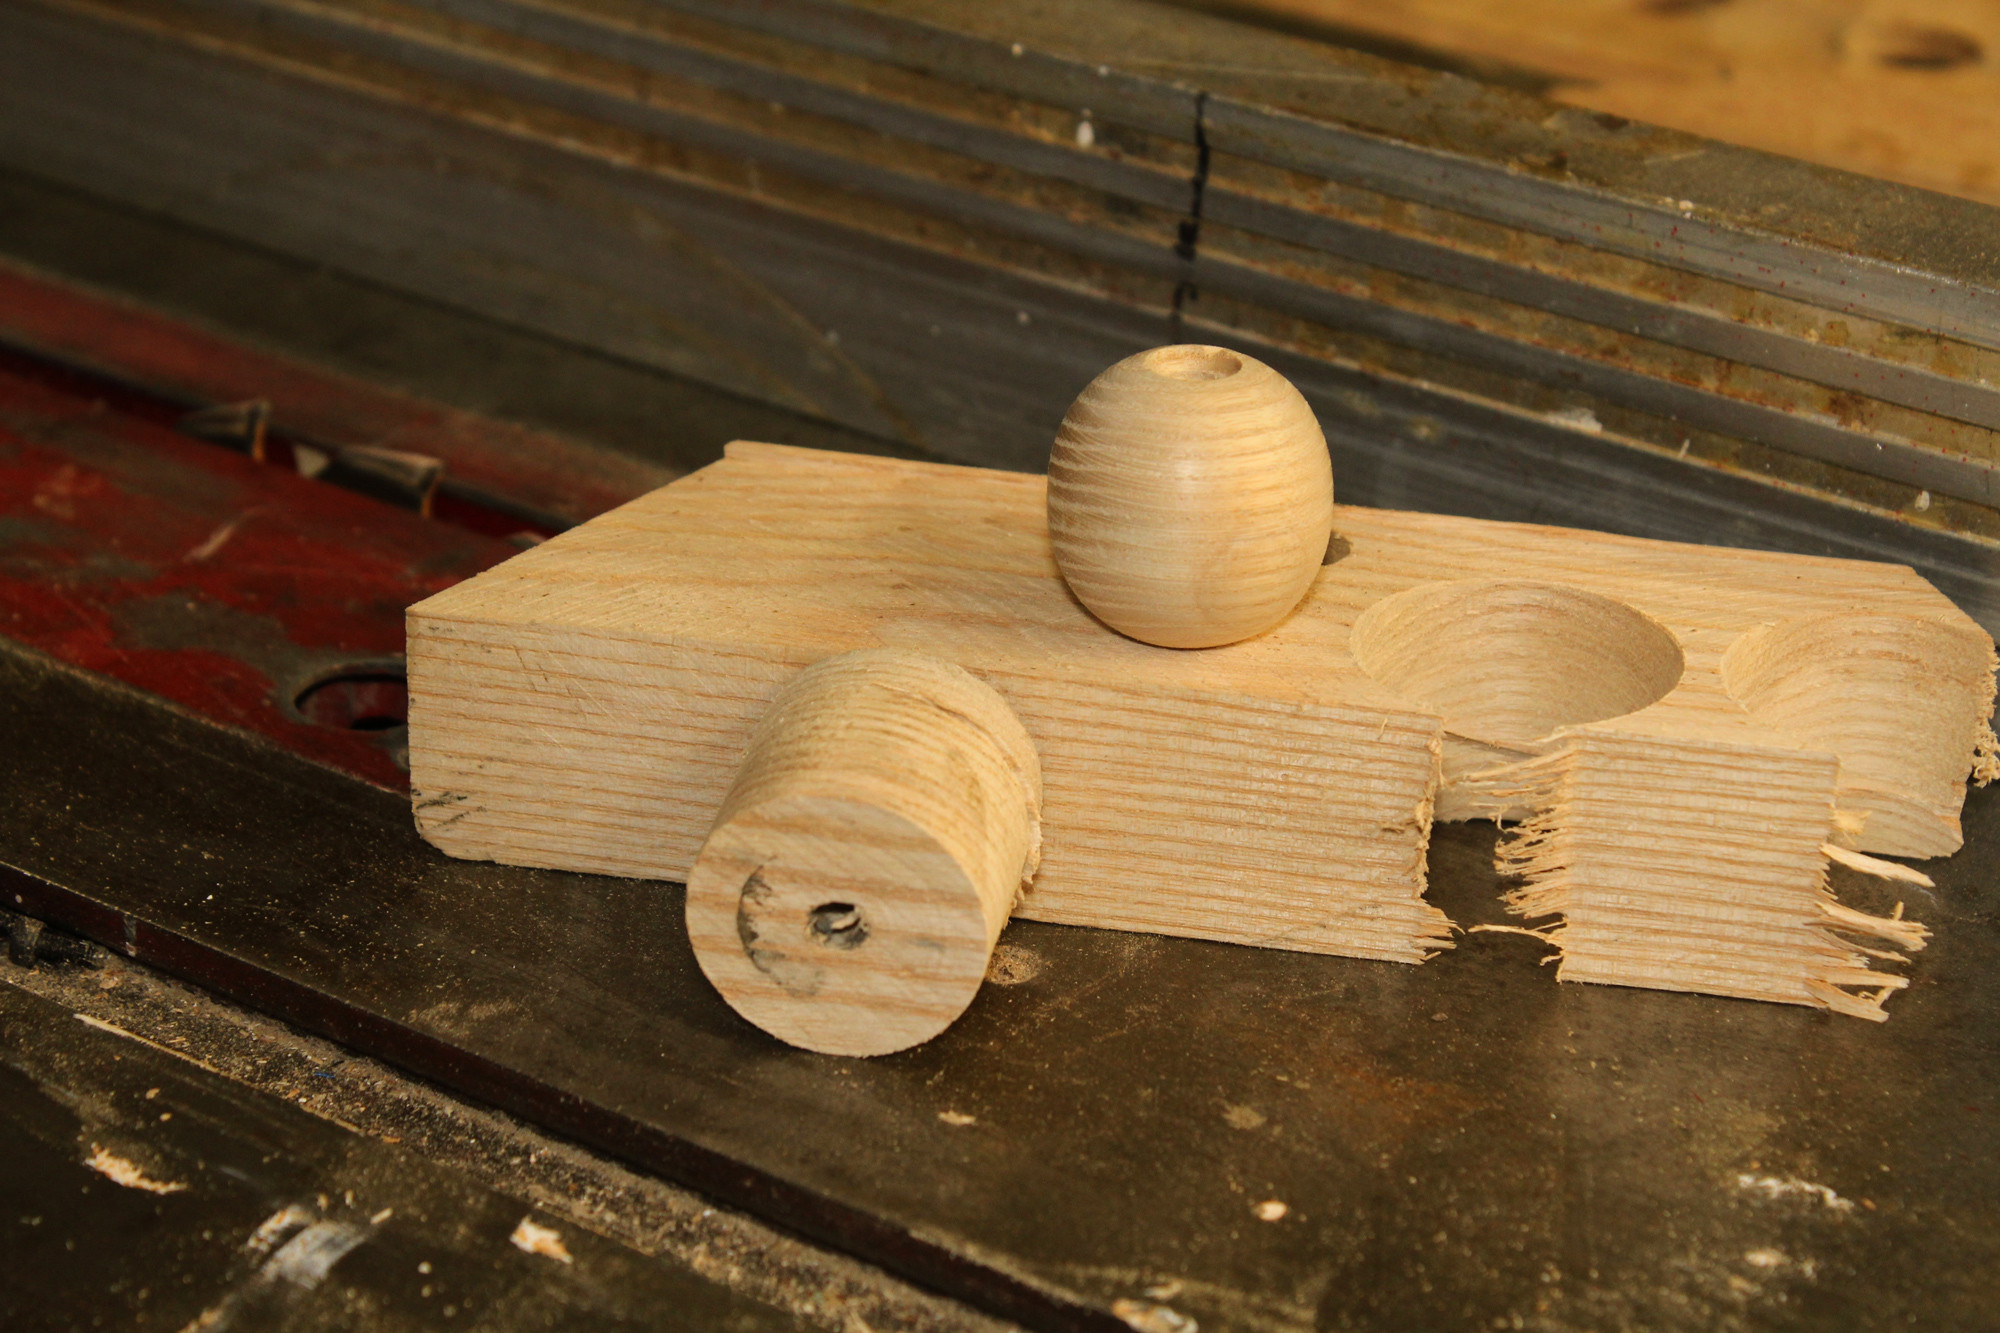
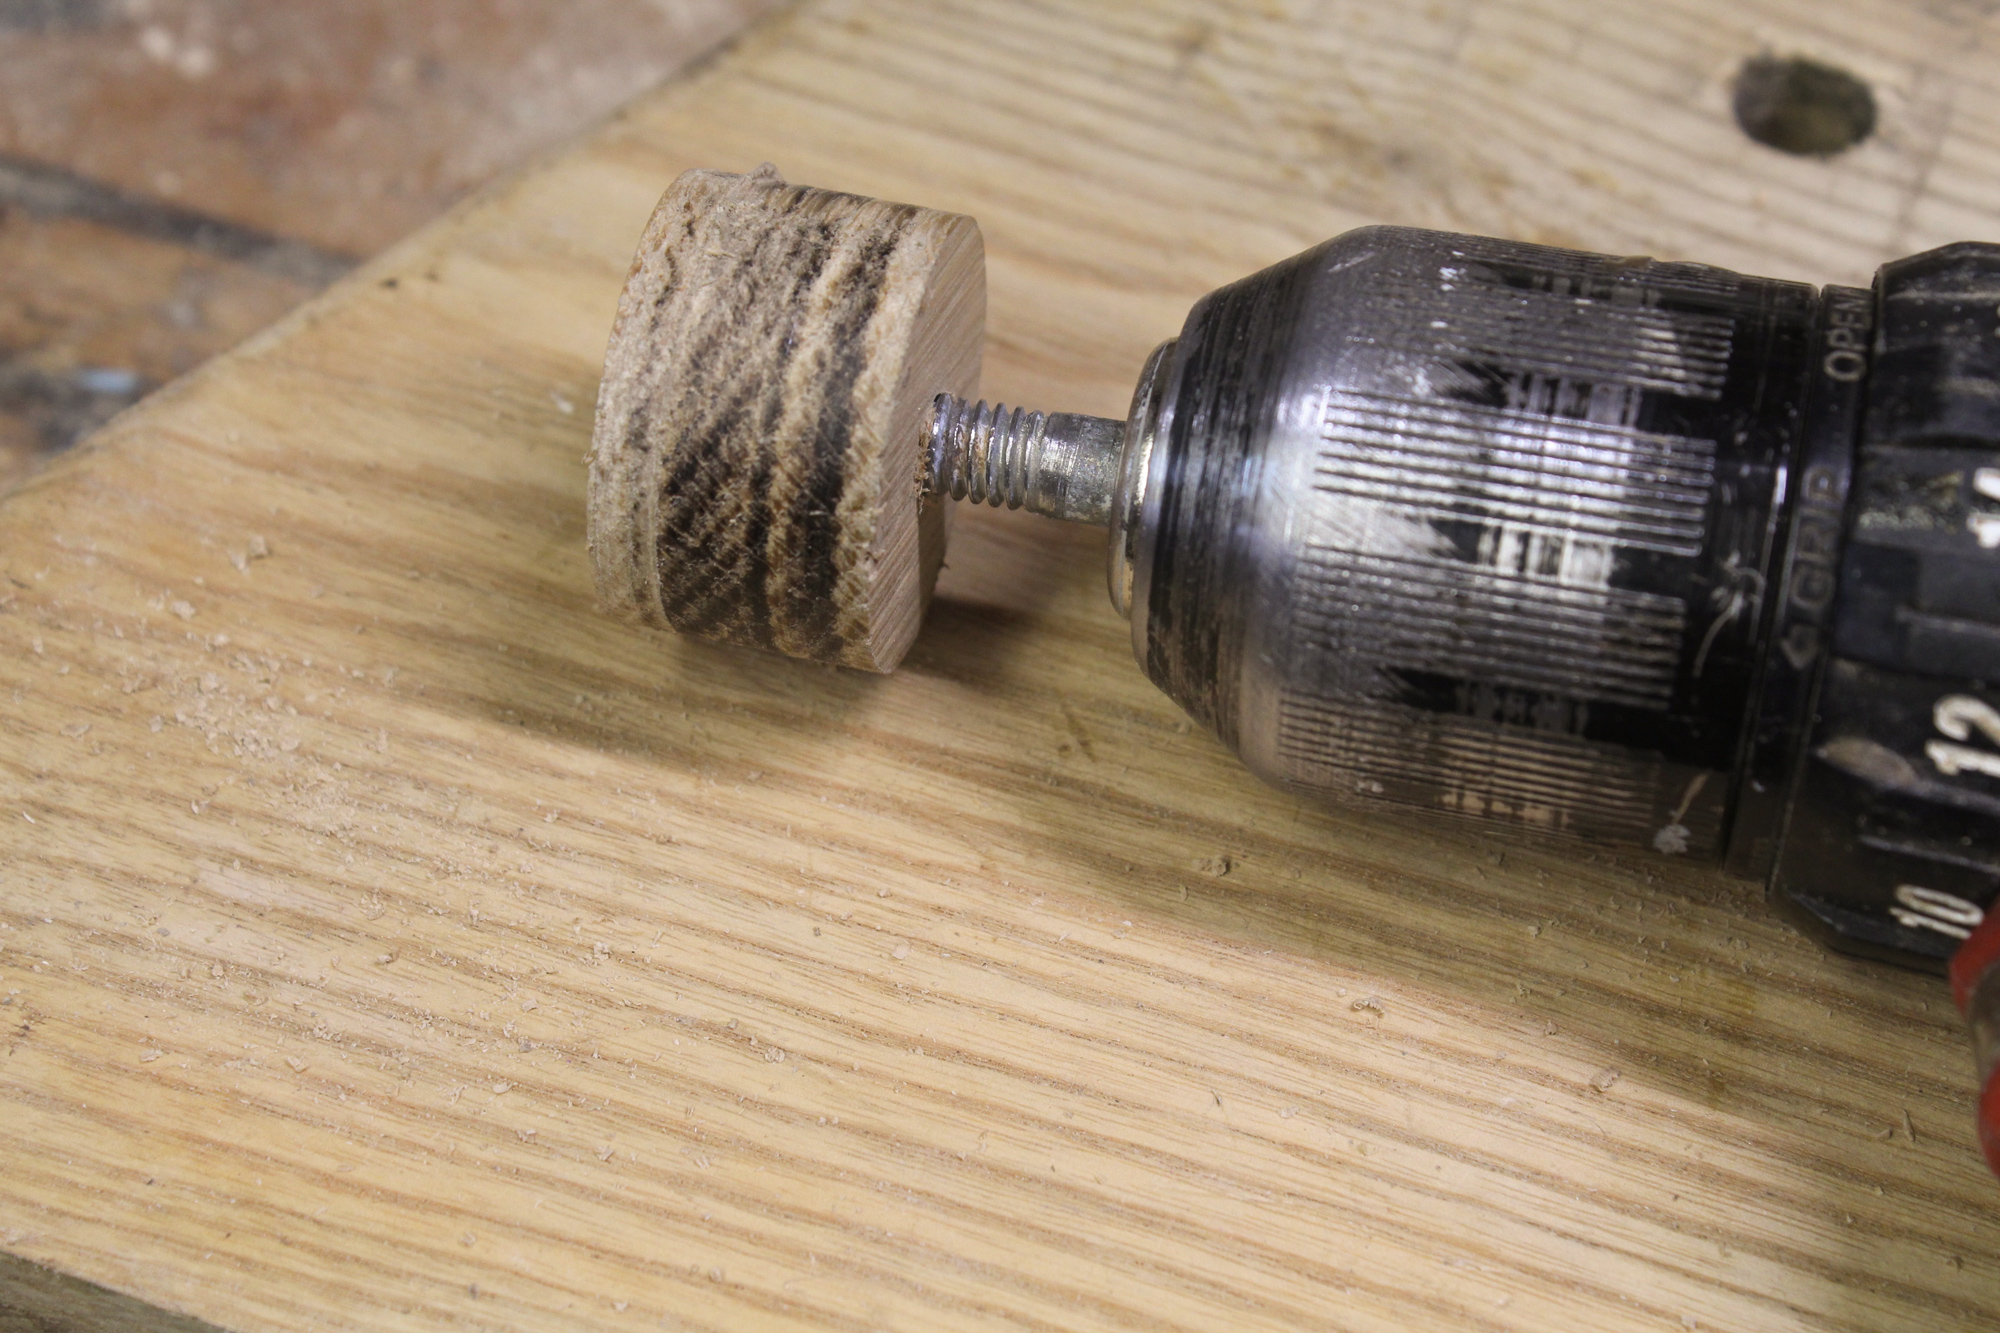
Activate the drill to spin the plug at high speed and press the plug against the sanding belt to settle it into the recess in the block. Pivot the drill up and down, even up to vertical, and from side to side to round the edges of the plug. To maintain a consistent diameter for a set of beads, do no more than a light smoothing of the center and focus your effort on rounding the ends. A plug cut from 3⁄4″ stock will have a length of less than its 1 5⁄16″ diameter, and sanding will not get all the way to the center of the ends. The finished bead will be somewhat oval in cross section rather than circular.
After one end is shaped, the drill is reversed to back the bolt out of the plug; the bolt is then driven into the other side of the plug. Because this plug was cut from 3⁄4″-thick stock using a 1 1⁄4″ holesaw, the end of the plug shows unsanded wood, which will be shaped by hand. The resulting bead will be somewhat oval in shape.
After shaping one end, remove the plug from the threaded bolt and turn it around to sand the other end. To get the most use from the sanding belt, work the bead from both sides to reverse the direction in which the plug spins against the grit. Shaping hardwood can wear a section of the belt quickly, so for each new plug you may need to shift to a new part of the belt.
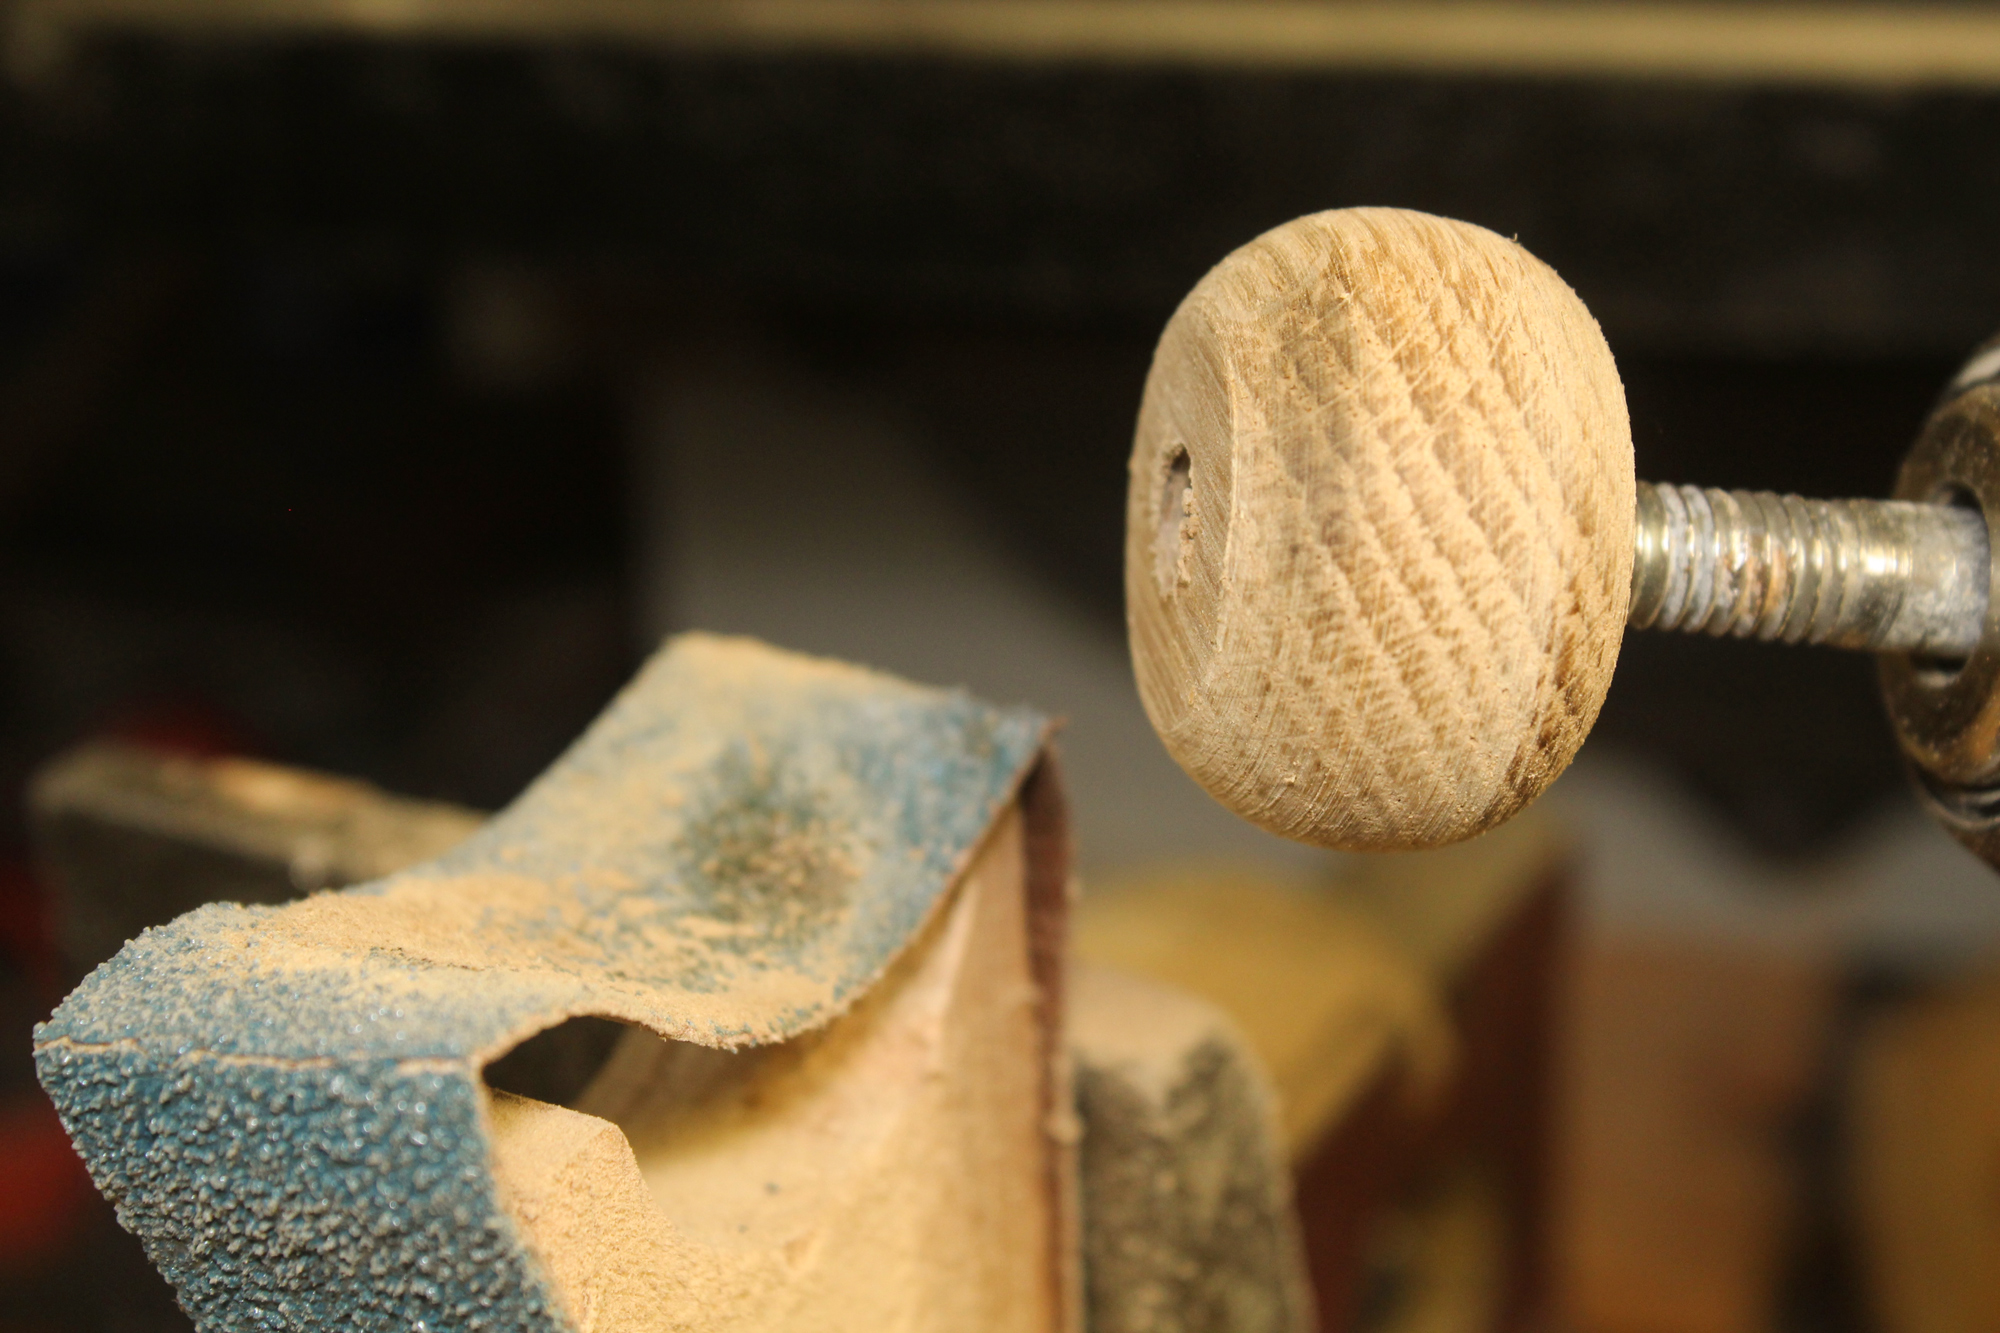
The final sanding starts with 80-grit and ends with 120. Curving the sandpaper and pivoting the drill smooths the shape at the end. Steel wool brings a shine to the wood.
Next, hand-sand the bead with half a sheet of 80-grit sandpaper, folded in thirds and held in a U shape. The final sanding is done with 120-grit, and then the bead can be polished with steel wool.
A zero-flute countersink cleans chamfers quickly and without the chatter other countersinks are prone to make. The threads, visible here inside the holes, will be smoothed by drilling through with a 5⁄16″ drill bit, which can require holding the bead with pliers or Vise-Grips with leather to pad the jaws.
The final woodworking steps are to drill out the holes using a 5⁄16″ bit. This will remove the tapped threads inside the bead and accommodate a 1⁄4″ parrel line. Finally, countersink the holes (zero-flute countersinks do the smoothest job). Once finished, soak the beads in linseed oil.
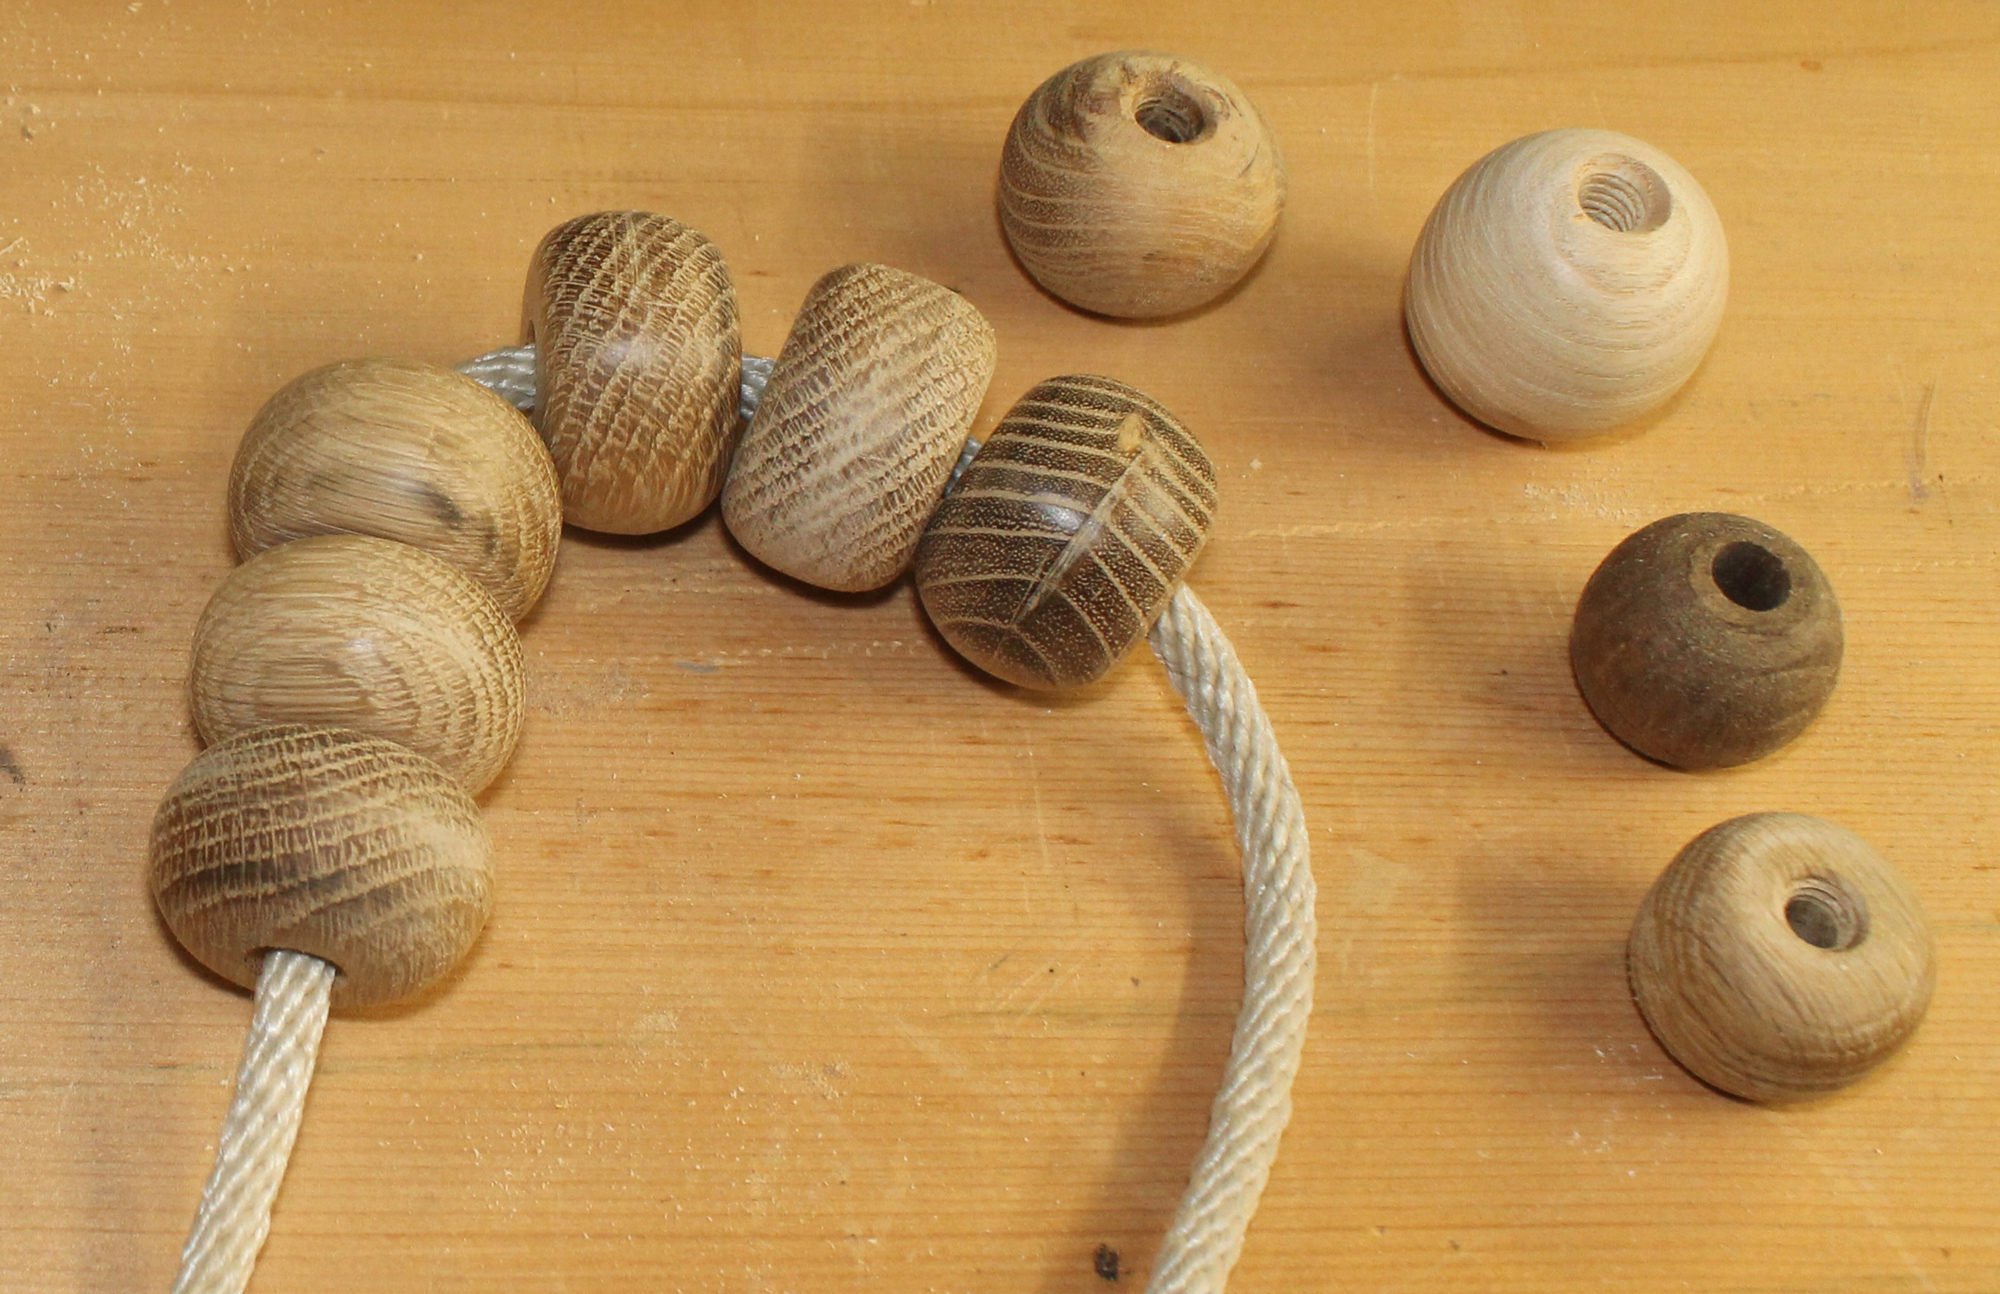
The finished parrel beads are threaded onto 1⁄4″ line.
In the middle of a run of beads, with everything set up for the job, I can get from turning on the drill press to having a bead ready for oiling in six minutes. While creating uniform beads can be a time-consuming challenge on a lathe, this sanding method is quick and easy.
Christopher Cunningham is editor-at-large for Small Boats. He has been building, restoring, and rigging small boats as either a vocation or an avocation since 1977.
You can share your tips and tricks of the trade with other Small Boats readers by sending us an email.
For more time-saving shop ideas, see:
Sawing Laminates, setting up for a thin-strip jig on a tablesaw, by Christopher Cunningham
Sanding in Tight Spots, making and using simple tools to reach the unreachable, by Ben Fuller
When I’m boating, I don’t leave home without a multi-tool. I first adopted the habit of carrying one when I was the curator of a museum that occupied many buildings. I often needed a tool for small jobs—too small to warrant a trip to the maintenance building where the “real” tools lived—and having a multi-tool on hand was a must. On a boat—especially a small one—a toolbox is inevitably limited, but the need to fix something is often immediate. Once again, the multi-tool comes into its own.
Most multi-tools have pliers. Beyond that, my minimum requirements are to have at least one decent knife blade, and both a flat-head and cross-head screwdriver; all the tools must lock. Beyond these basics, most multi-tools come with a can and bottle opener, a file, often a serrated blade, and typically a way to attach a lanyard—beyond these, the range of offerings is wide.
Photographs by the author
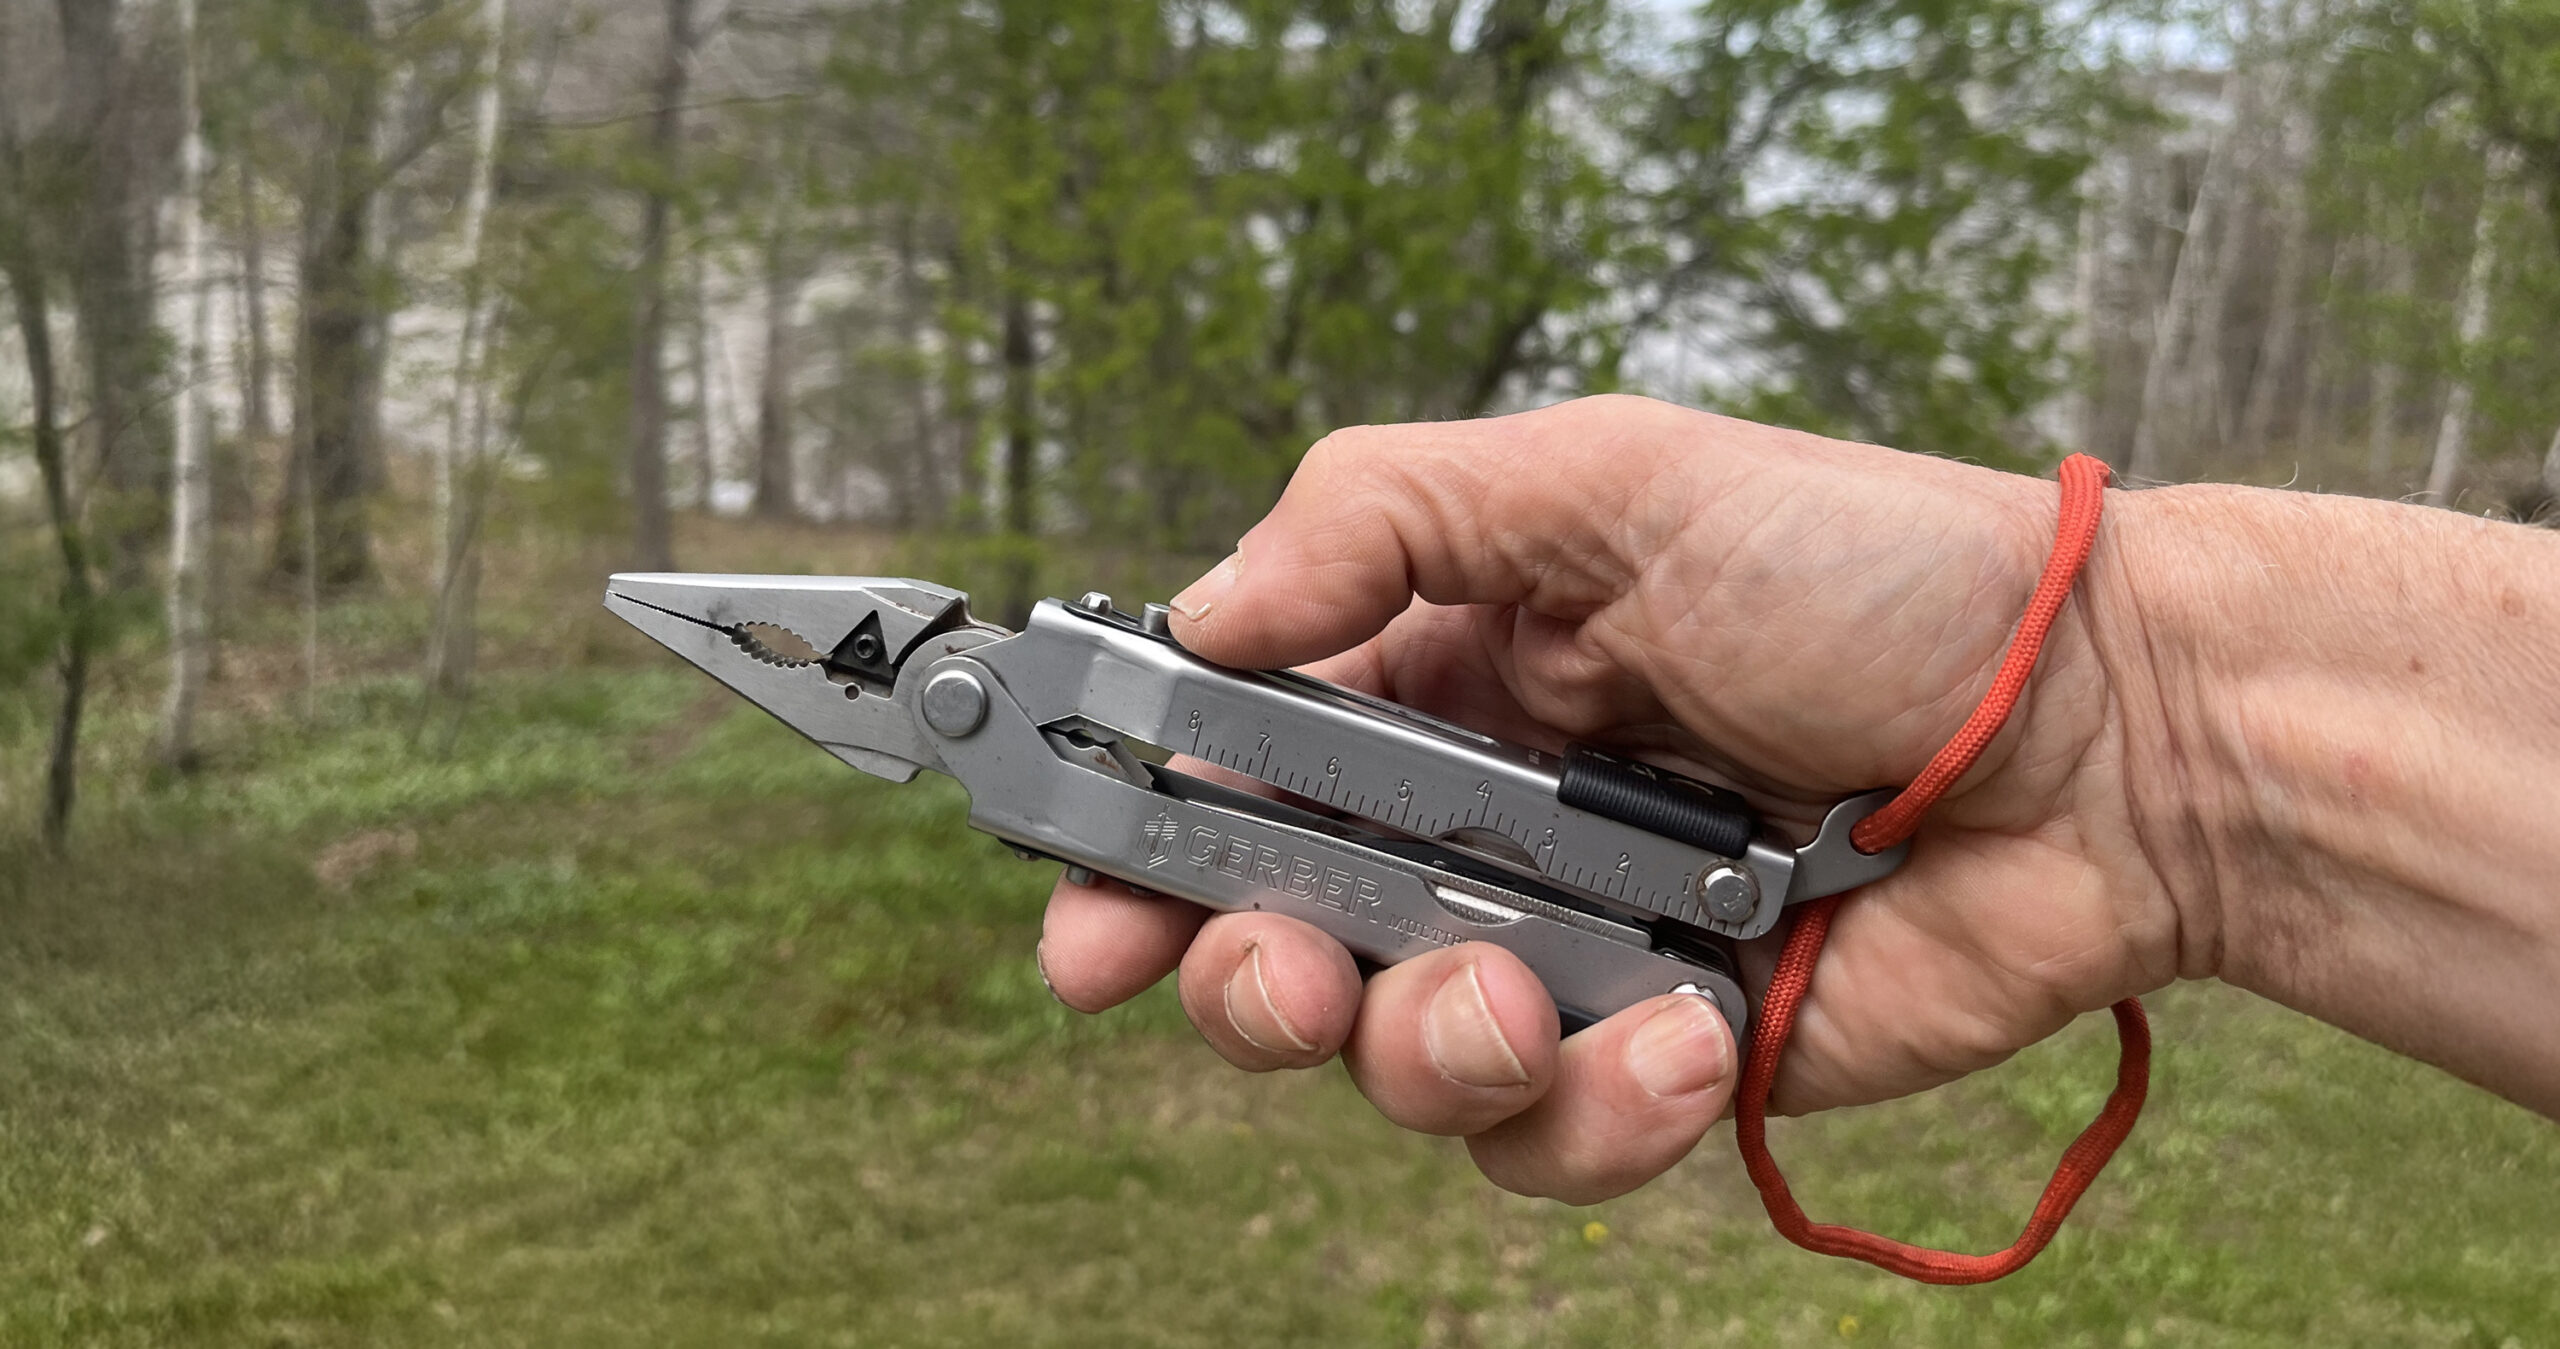
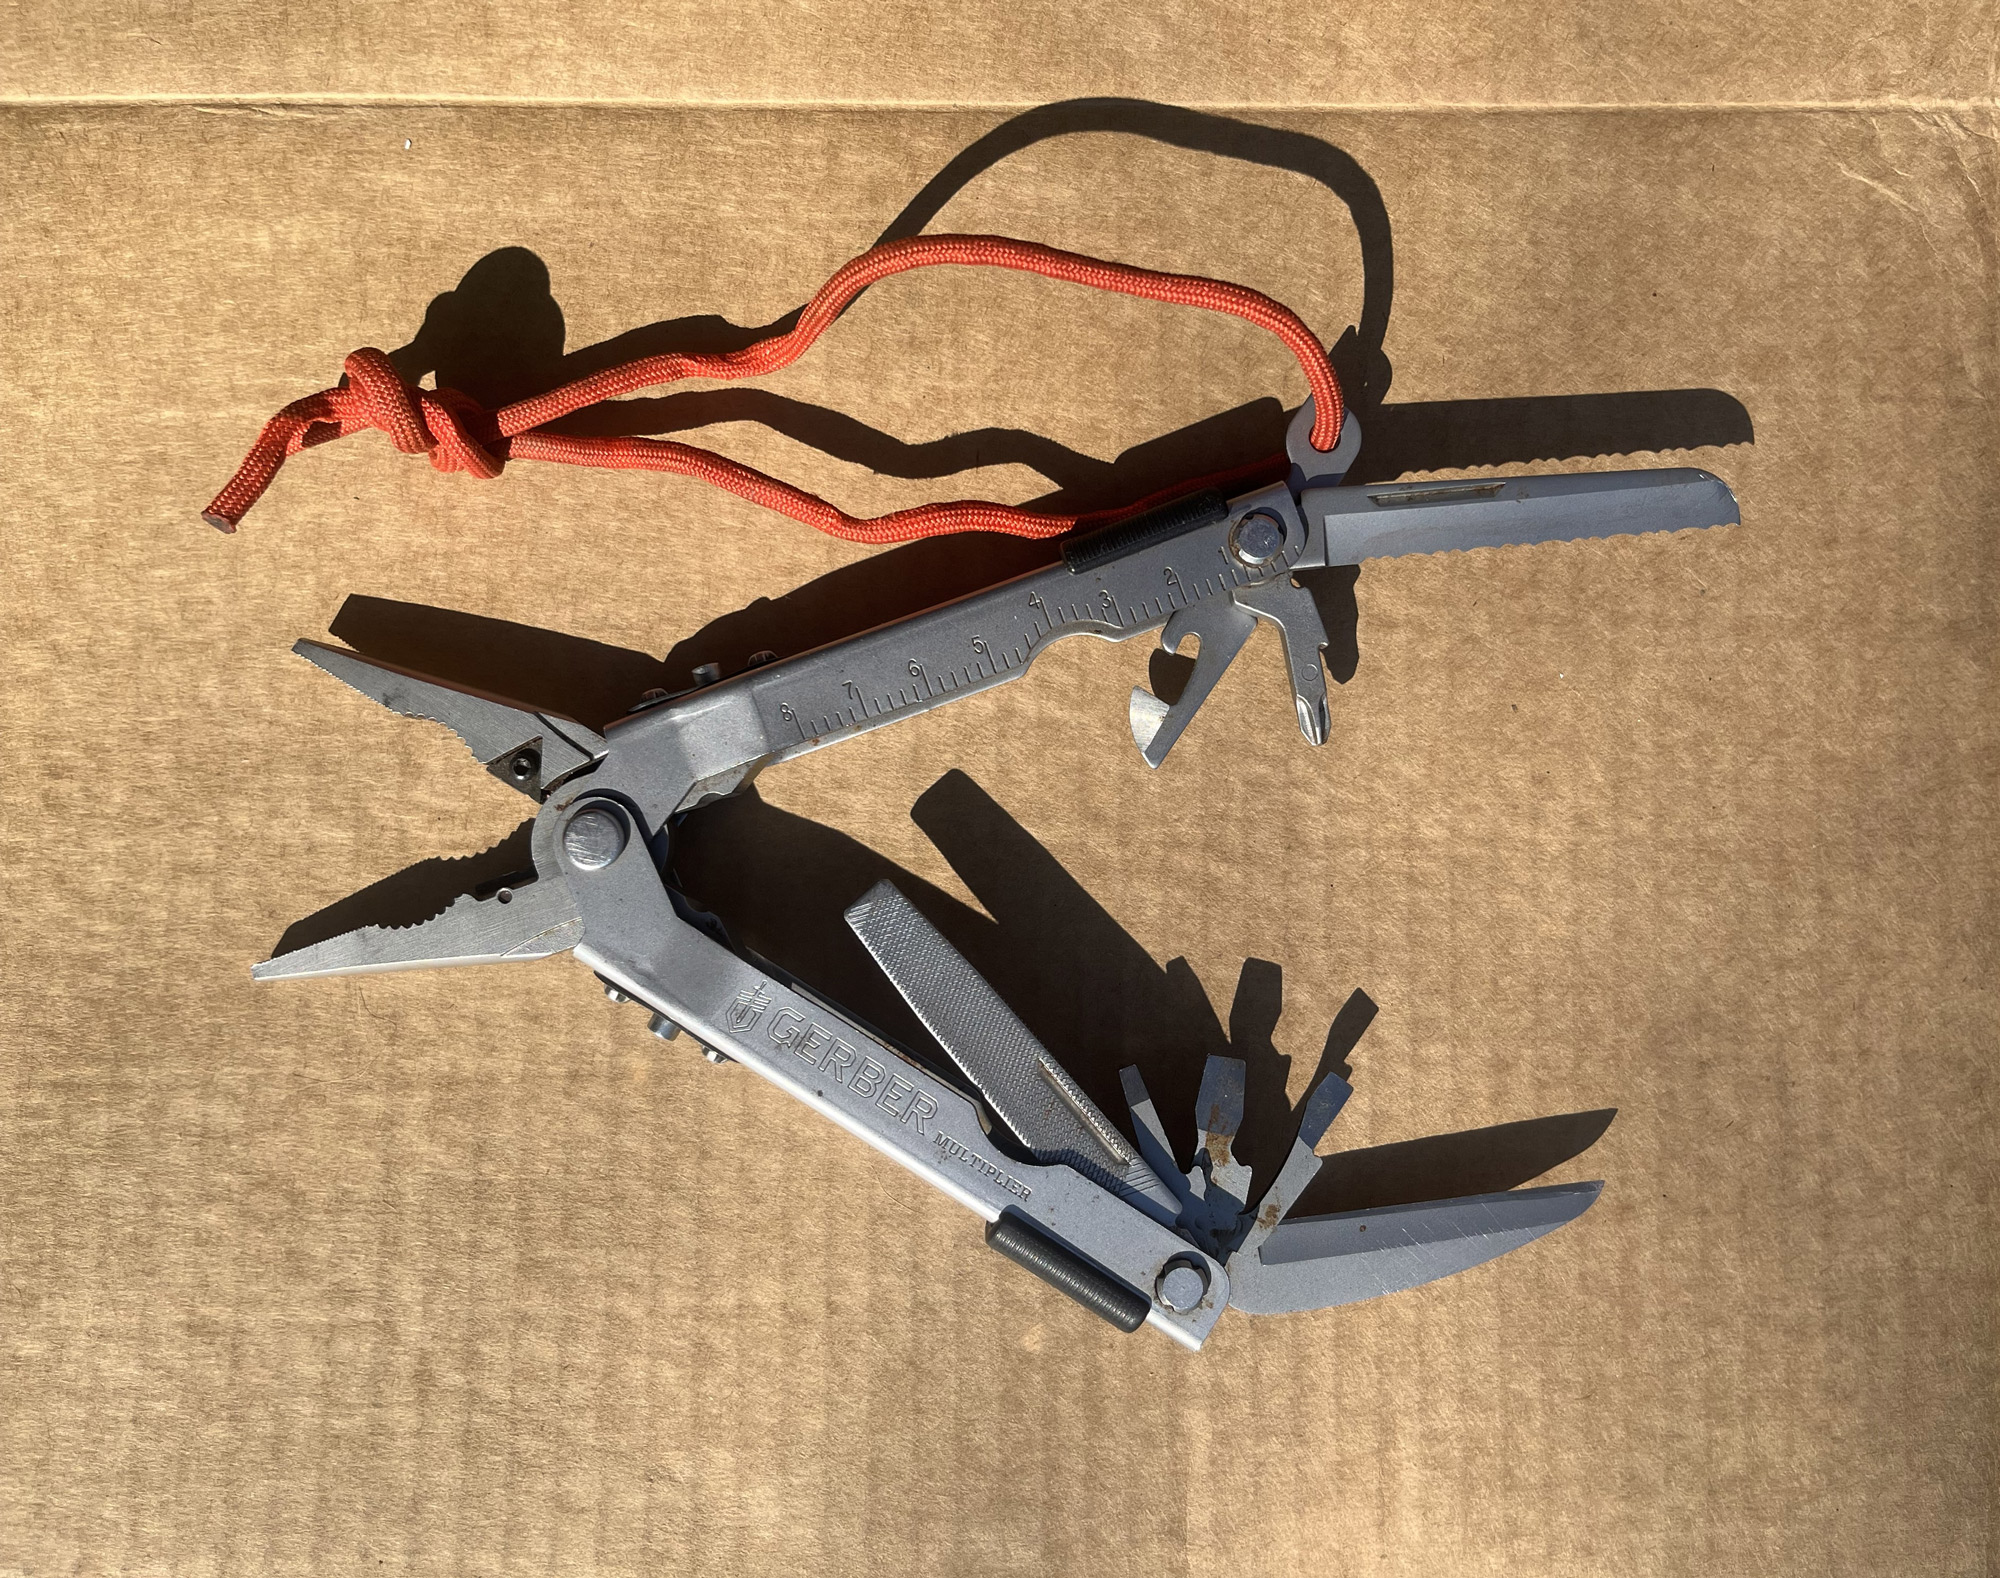
The Gerber Multi-Plier 600 has 14 tools, most of which fold away within the handles and require two hands to access. Unlike most multi-tools, however, the Gerber pliers can be opened—and closed—one-handed, as demonstrated in the video below. The multi-plier seen here is at least 10 years old and is in daily use. It has suffered more than one salt-water immersion and yet continues to function well.
When it comes to operation, however, there are fundamentally two types of multi-tools that have pliers. Both stow multiple tools in the handles. But to access the pliers, one opens butterfly style, needing two hands. The other—with a flick of a wrist—slips the plier jaws out from the handles into their working position.
I was introduced to the concept of a one-handed multi-tool many years ago by a foredeck hand on a high-end racing sailboat. When you’re hanging on to the boat, they told me, the spray coming at you cold and hard, you need pliers that you can access with one hand. They had a point, and I was sold.
My current go-to one-handed multi-tool is the Gerber Multi-Plier 600, which comes in various models.
Favored by the U.S. military, the Gerber Multi-Plier 600 has 14 tools: one plain and one serrated knife, a crosshead screwdriver, three sizes of flathead screwdriver from 1⁄8″ to 1⁄4″, a file blade with two grits, a tungsten-carbide wire stripper/crimper, pinch-cut wire cutters (fixed stainless-steel on the basic model, replaceable carbide on the upgrades), measuring scales to 3″ and 8cm, a can opener, a bottle opener, a lanyard holder, and of course, pliers—needle-nosed with a toothed cutout that allows you to grip objects such as nuts up to about 1″ in diameter. I’ve had fancier multi-tools with more features, but this one does all I need. The pliers open with a flick of the wrist and, indeed, must be opened before the other tools can be accessed. Once a required tool has been opened, the plier handles can be closed and the plier noses retracted.
All the tools have fingernail hooks for opening, and all lock into position; unlocking them to close the tool requires light pressure on a side-mounted slide. I do lubricate my Multi-Plier from time to time; it has been dunked in salt water more than once and I have weak fingernails, but I still have no trouble opening the various tools.
The Multi-Plier 600 is American-made of stainless steel and weighs 9 oz; when closed it measures 5 1⁄8″ end to end, 1 1⁄2″ wide, and 3⁄4″ thick. All Gerber tools come with a limited lifetime warranty, and in my experience the customer service is excellent. When the tool lock on my last MP 600 failed, I took a picture and sent it to Gerber; within days they had sent me a new tool. Of course, they won’t replace a Multi-Plier that has been lost or dropped overboard, so I attach a paracord lanyard when going afloat.
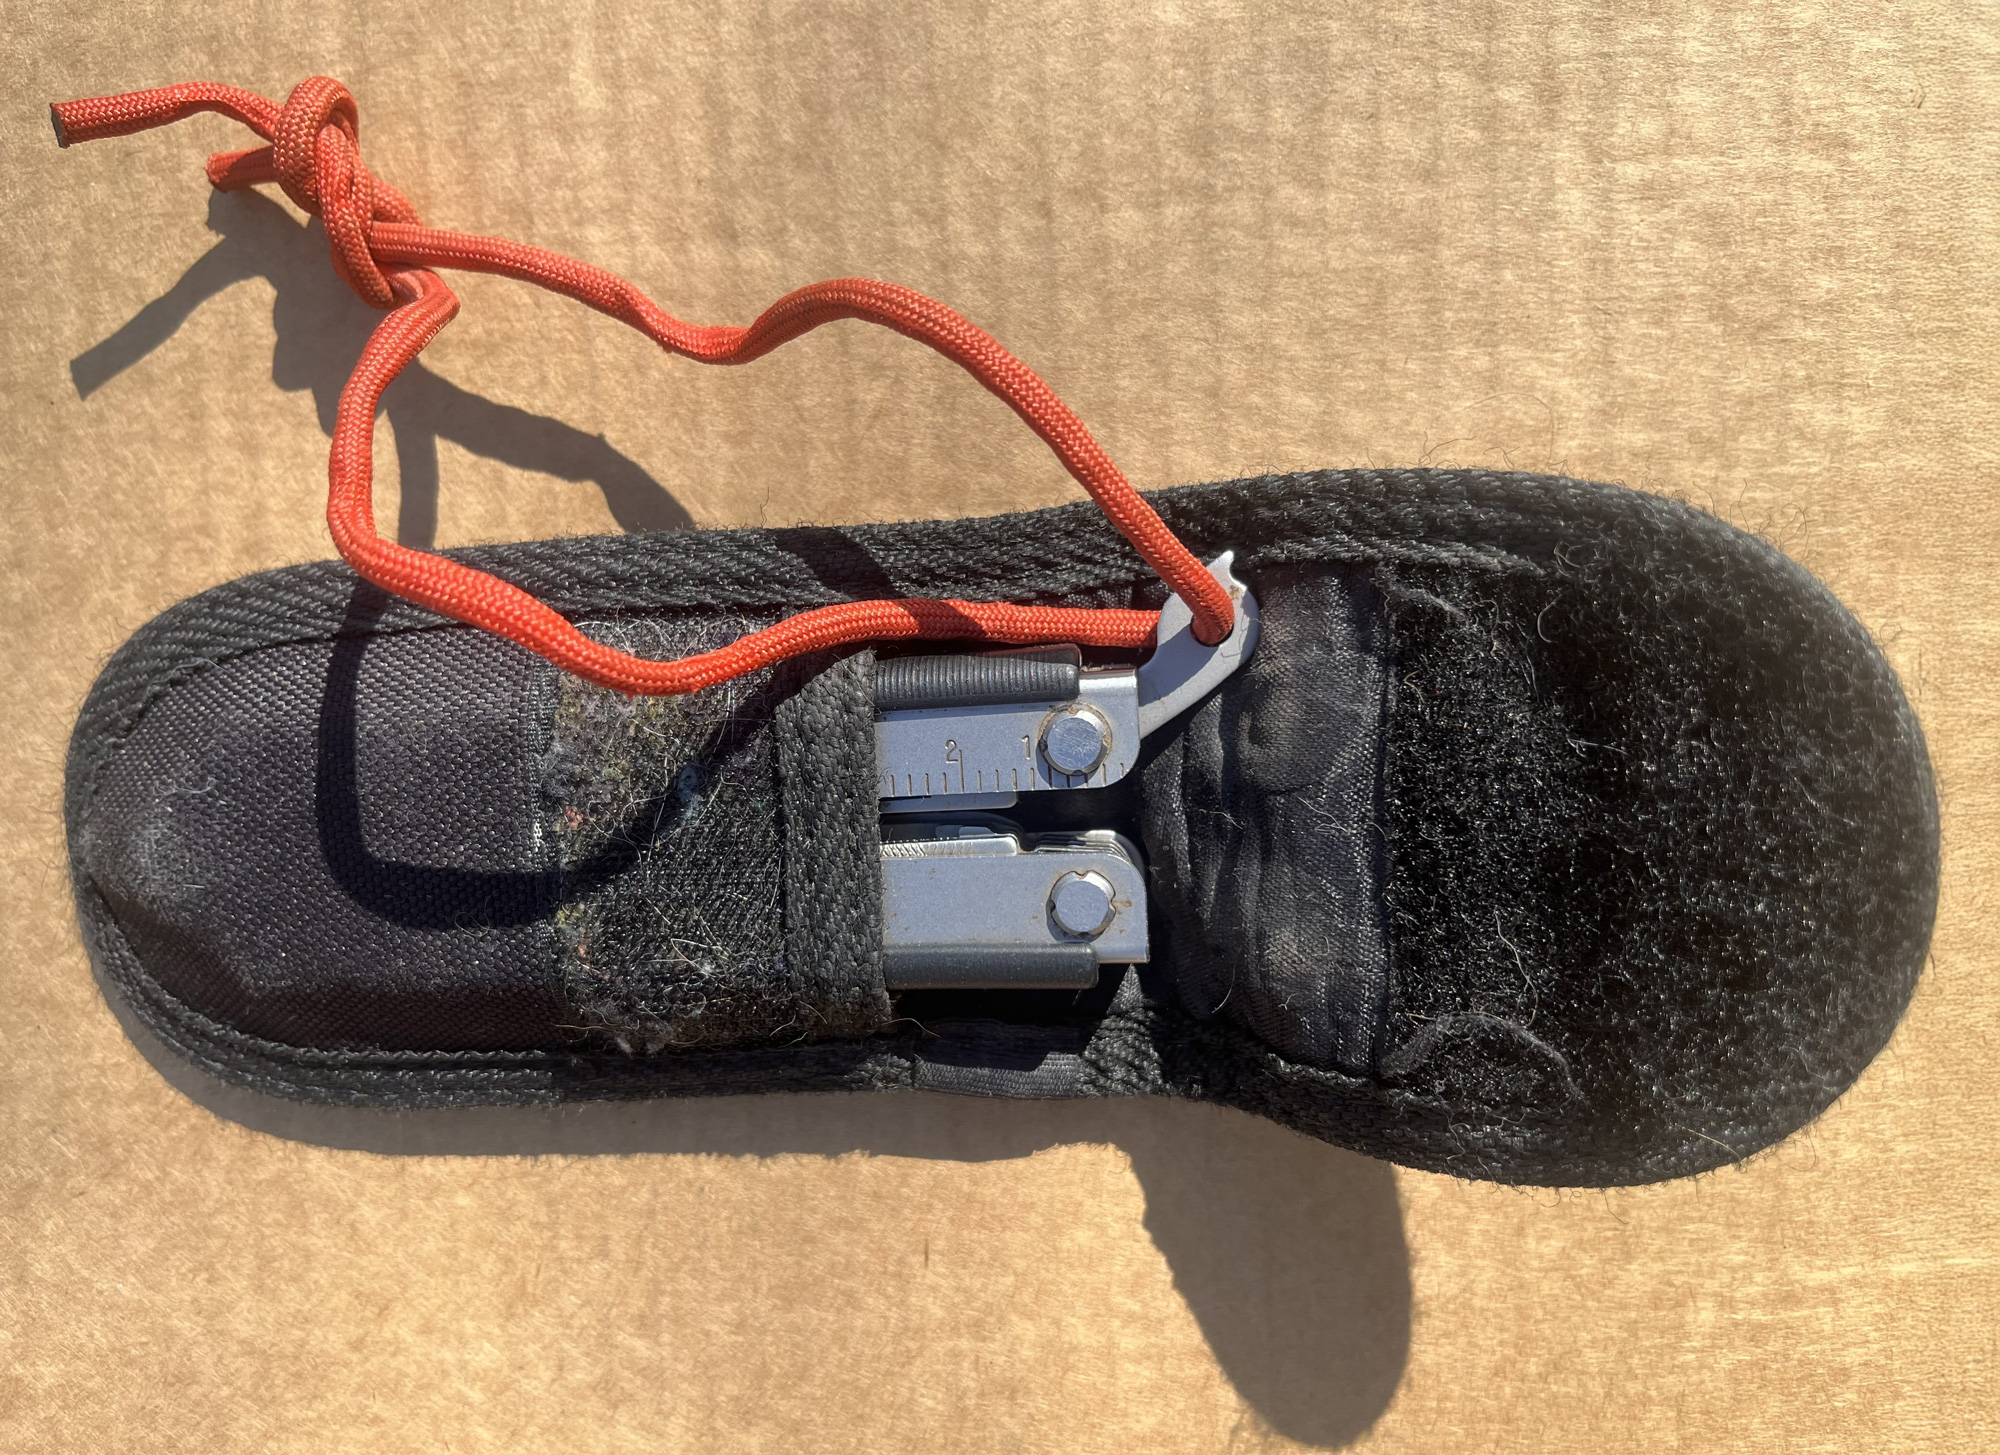
The nylon sheath has stood up well to being always on my belt ready for use. The generous amount of hook-and-loop fastening on the flap accommodates the extra length of the multi-plier when its lanyard holder is extended, as seen here.
The Multi-Plier lives in its nylon sheath on my hip pretty much all the time—indeed, it’s only not there if I need to go someplace fancy or through a security checkpoint. On the boat, I do have a separate sheath-knife with a bigger blade and one-handed access, but I will often just use the Gerber blades, and the pliers never let me down. I am now on my third Gerber Multi-Plier in 30 or so years—the first was lost overboard and the second had that faulty lock. I wouldn’t be without one.
Ben Fuller, a regular contributor to Small Boats, and curator emeritus of the Penobscot Marine Museum in Searsport, Maine, has been messing about in small boats for a very long time. He is owned by a dozen or more boats: kayaks, canoes, a skiff, a ducker, and a sail-and-oar boat.
The Gerber Multi-Plier 600 is available in stainless steel or stainless steel with black anodized finish through various outlets. It is also available direct from Gerber where the price ranges from $99.99 for the standard model to $124.99 for models with replaceable carbide wire cutters. Please note that the Gerber website can be confusing. The links above are for the multi-plier without anodized finish (as reviewed); for the anodized finish visit: Multi-Plier 600 Basic. Customer service is no longer offered by telephone but only through the website.
Is there a product that might be useful for boatbuilding, cruising, or shore-side camping that you’d like us to review? Please email your suggestions.
For more knives with extras see:
Sailor’s Tool, Myerchin’s rigger’s knife with pliers, reviewed by Kent and Audrey Lewis
Colonial’s Marlinspike Knife, a traditional tool favored by the United States Navy, reviewed by Kent and Audrey Lewis
The sou’wester has been around for close to 200 years. It was first worn by Gloucester fishermen in the mid-19th century, and while the materials it is made of may have changed, the essential design has not, a testimony to its effectiveness as foulweather gear.
Grundéns, established in Sweden in 1926 as Grundéns Regnklader (Grundéns Raincoats), made waterproof oilskins for North Sea fishermen. In early days, the company used a rubberized material for its rainwear, but in 1950 production switched to polyvinylchloride (PVC)-coated fabrics, which are still used today.
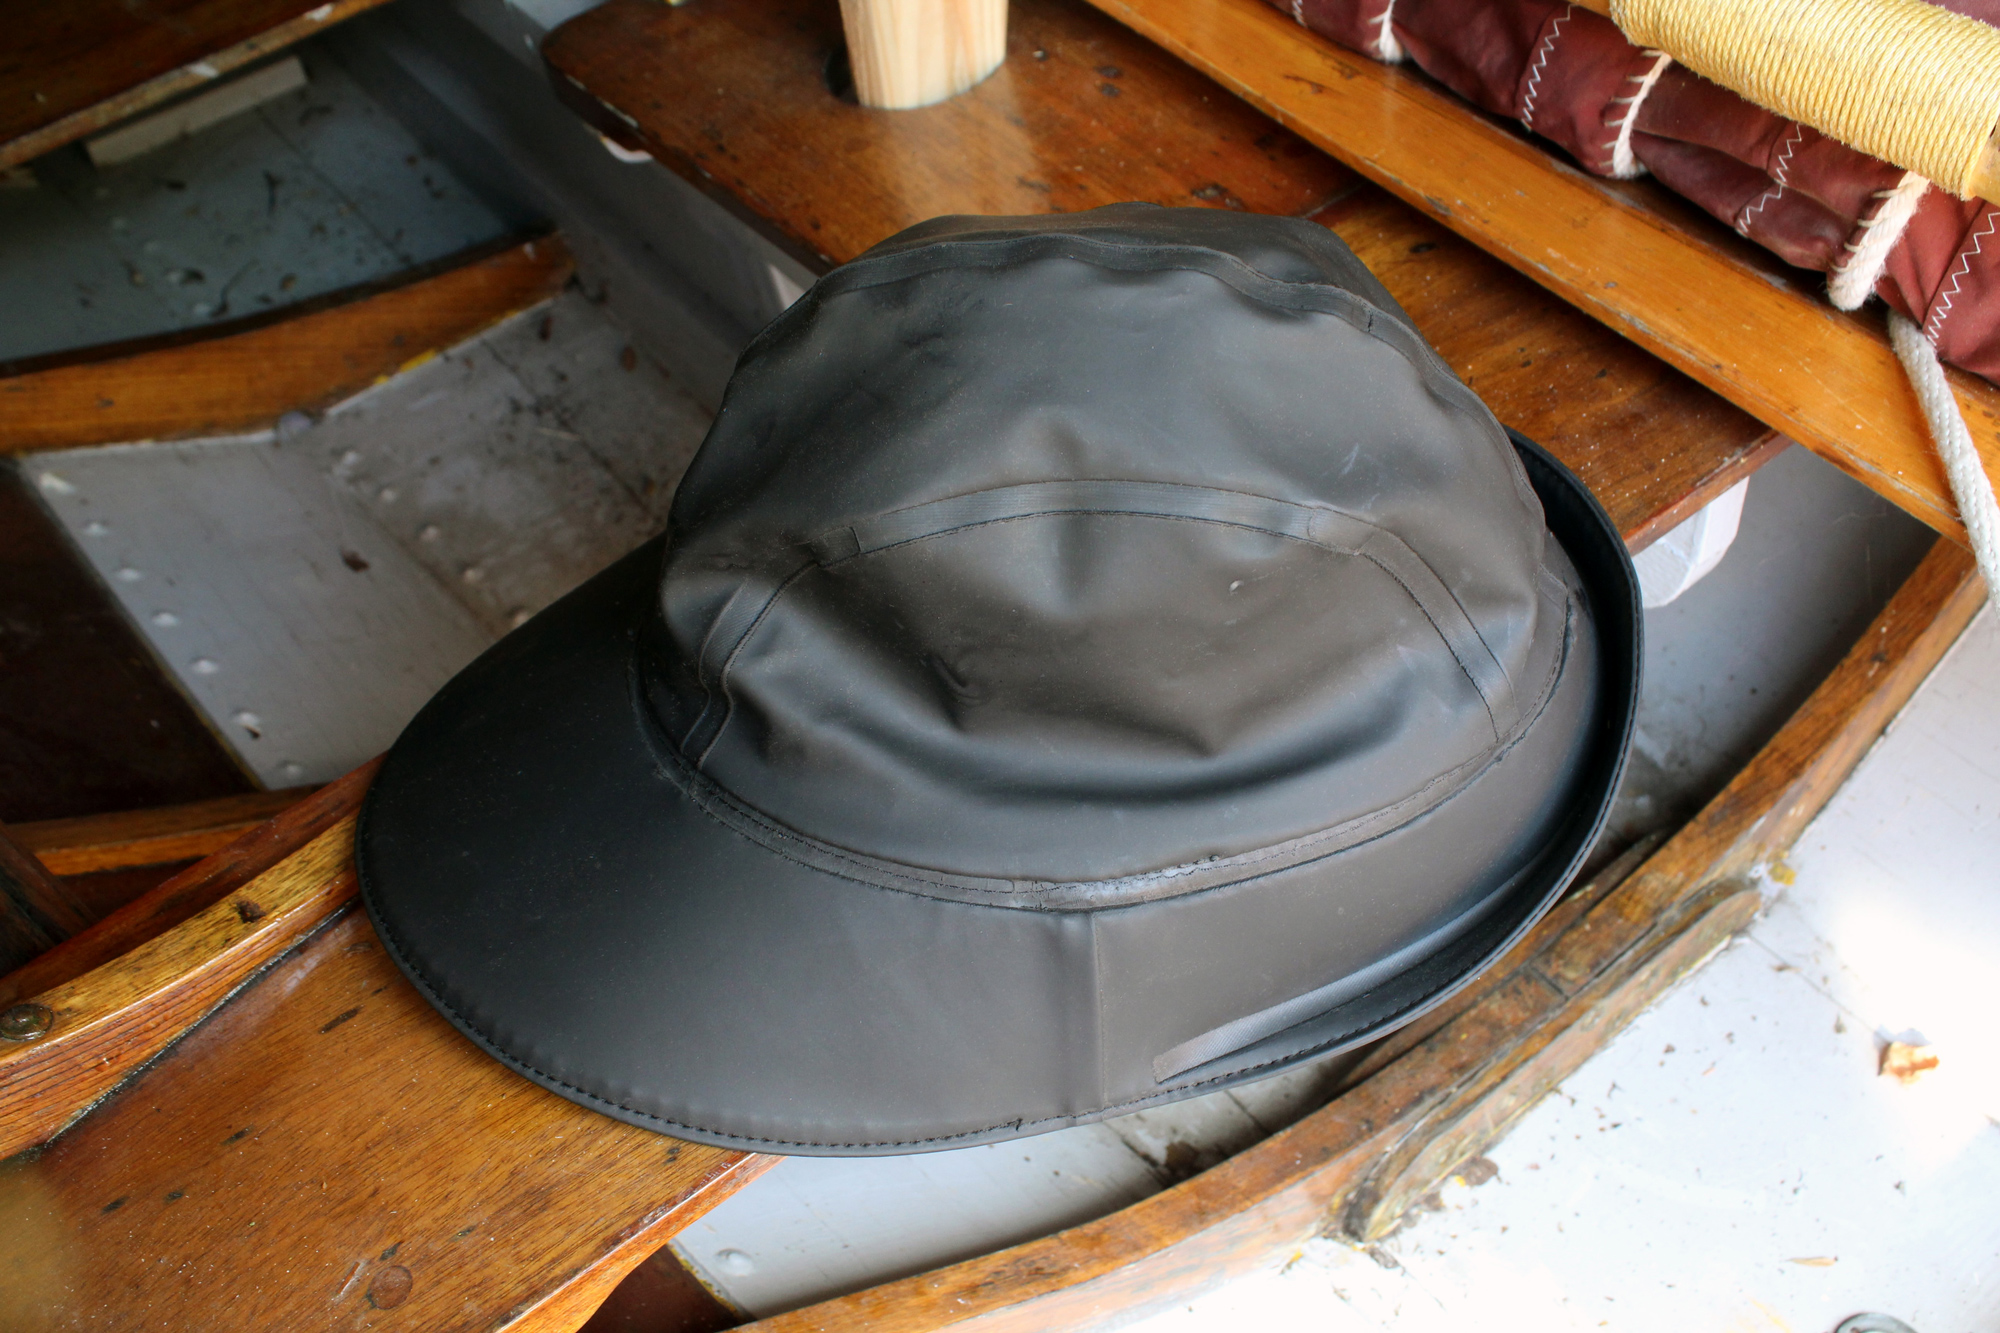
The Sandhamn 21 Fishing Hat, Grundéns’ version of the timeless sou’wester, is made of PVC-coated polyester with a polyester-flannel lining. It is available in dark green, orange, yellow, black, and a bright neon “Seattle green.” While the orange, yellow, and Seattle green have the best visibility, I opted for the black for its traditional appearance—the earliest sou’westers were waterproofed with linseed oil and lampblack.
Photographs by the author
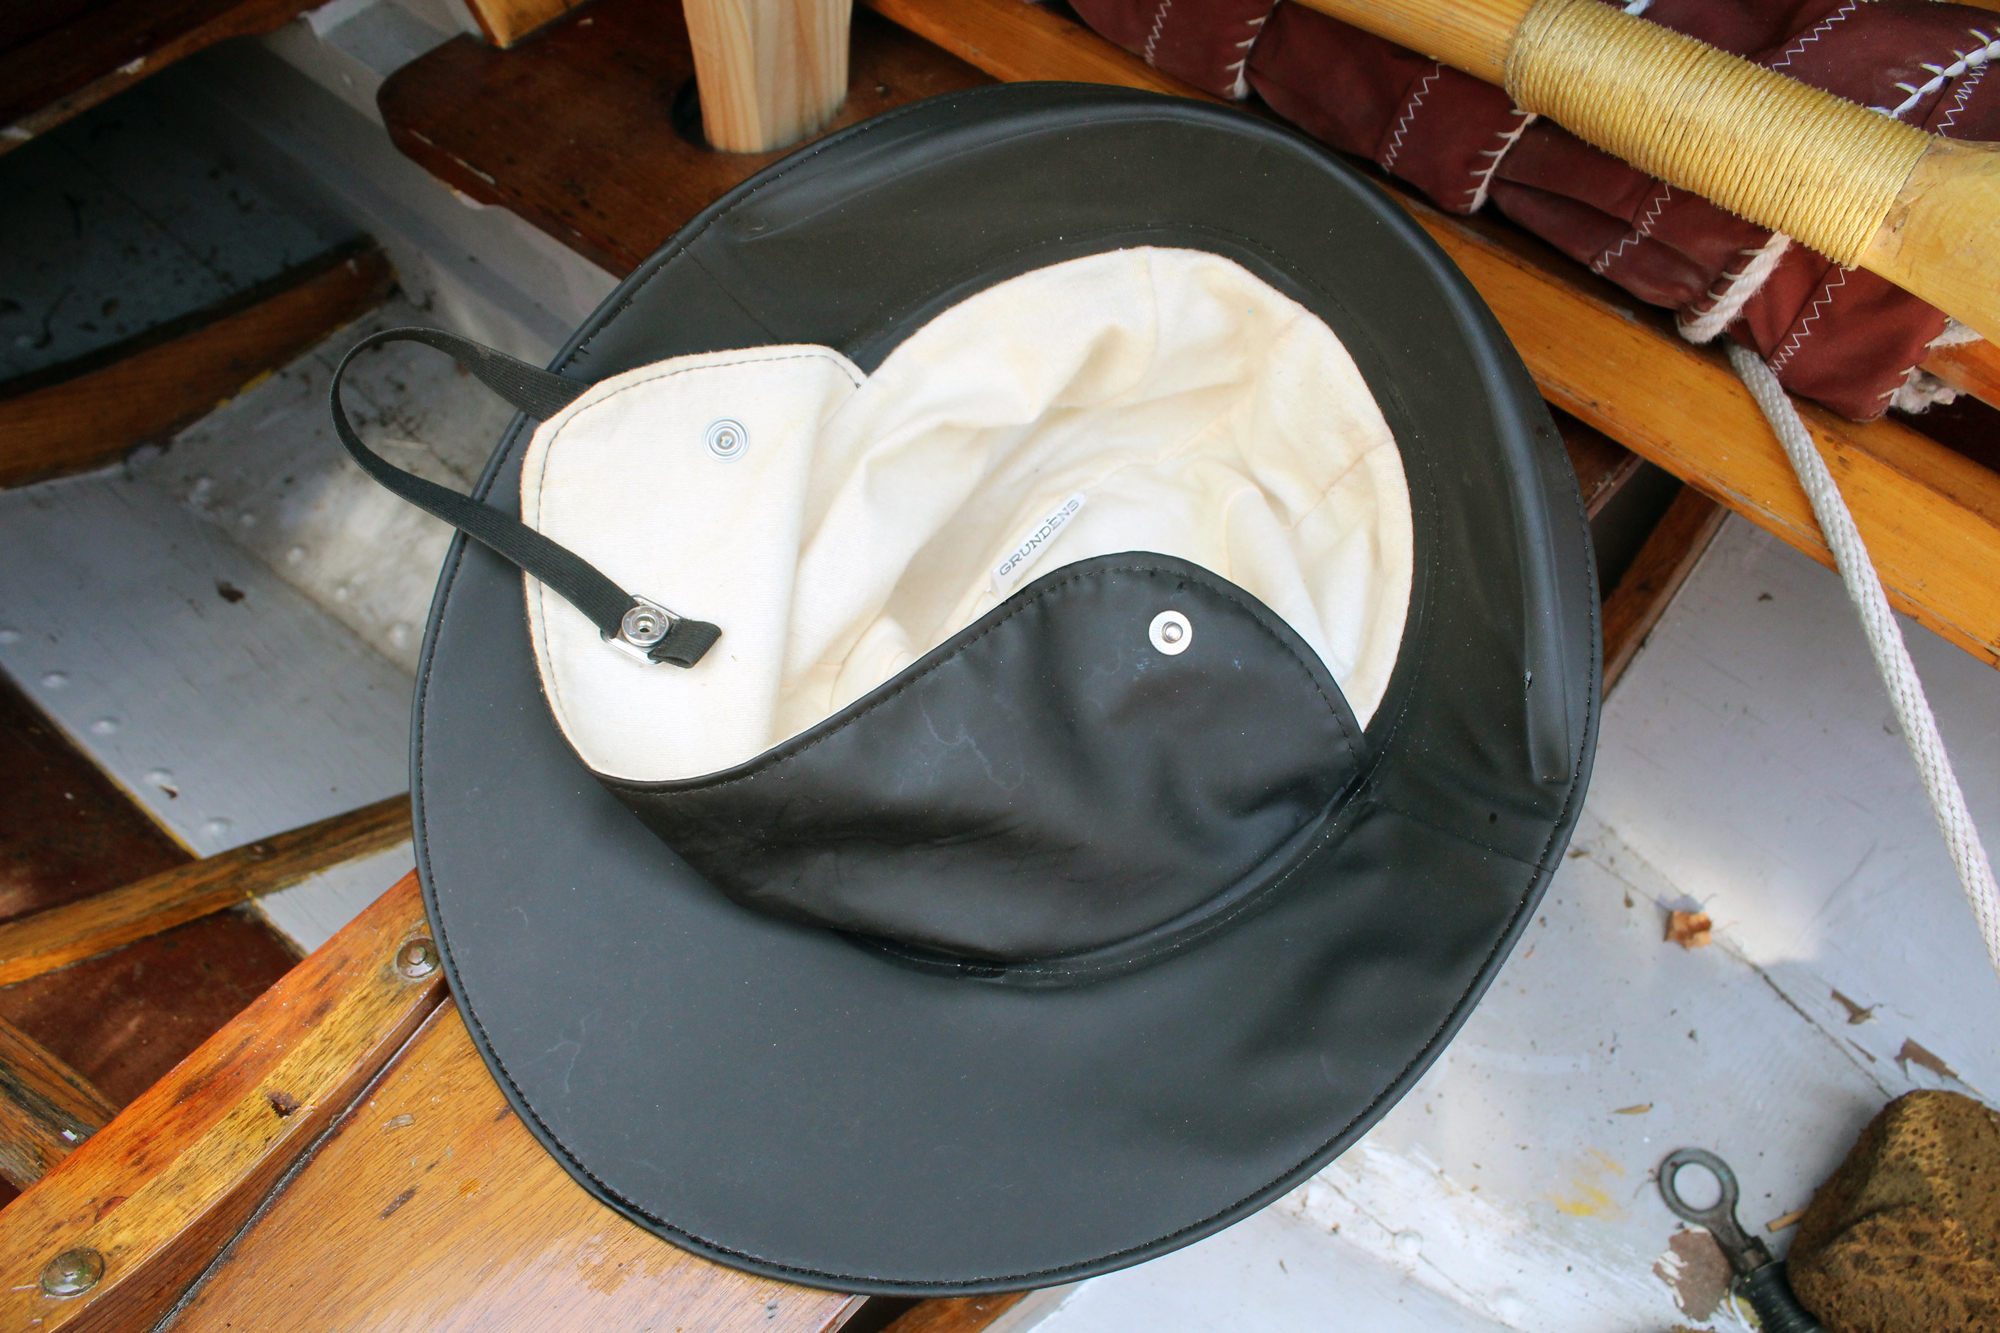
The seams on the Sandhamn are a combination of sewn and welded; none showed any signs of leakage. The light-colored stripe inside the folded-up brim is a weld that locates and facilitates the fold when making what Grundéns calls the “water ditch.”
The hat’s brim is made of two layers of coated polyester sandwiching a stiffener that maintains the brim’s shape. The brim isn’t distorted by being crushed into tight folds, and comes back to shape after it is unfolded. Around the front of the brim a weld divides the stiffener so that the brim can be easily folded to make a “water ditch,” channeling water from the front of the hat to drain off to the sides, away from the wearer’s face. The form-fitting crown has two side panels—near semicircles—and two parallel top panels arching from front to back; all the seams are sewn and welded. Below the brim, an integral flap lined with polyester flannel provides ear and neck protection. An elastic chin strap, sewn into the right side of the flap, has an adjustable snap; when not in use the strap is snapped up to the right, out of the way, but when needed, it wraps under the chin to snap on the left.
My Sandhamn is an XL, the largest of the four sizes offered, and is a perfect fit. It is comfortably snug around the circumference of my head at its largest point just above my brow and ears. The top of the crown isn’t in contact with my head but leaves an air space for both comfort and warmth. The flannel-lined ear flap is warm and comfortable and can be tucked into the crown so that the Sandhamn can be worn in comfort without covering the ears.
The lining of both the crown and ear flap is a brushed polyester flannel that is warm and soft to the touch. The chin strap is 9 1⁄2″ long, has an adjustable snap, and is highly elastic so that it never feels constraining. I don’t often use the elastic chin strap, but it is useful on windy days and wide enough to be comfortable. In a headwind of 25 mph (experienced while standing with my upper body through the sunroof of an SUV driven along a quiet backroad), the Sandhamn stayed firmly planted on my head—but I was glad of the strap when the hat started to lift at 30 mph.
The Sandhamn is completely waterproof—I have never detected any leaks when wearing it in the rain, nor in a preternatural garden-hose downpour. In a test, I inverted the hat, clamped its brim to the perimeter of a 5-gallon bucket, and poured water into the crown up past the seam with the brim. After an hour there was no sign of any water getting through.
For the past 100 years, Grundéns has been making foulweather gear favored by commercial fishermen. Their Sandham 21 is a well-made, reliable sou’wester.
Christopher Cunningham is editor-at-large for Small Boats. His first sou’westers were two that he made in the late ’70s from canvas coated with GacoFlex rubberized paint.
The Sandhamn 21 Fishing Hat is available from Grundéns for $59.99. It is also carried by many online sources and marine hardware stores.
Is there a product that might be useful for boatbuilding, cruising, or shore-side camping that you’d like us to review? Please email your suggestions.
Looking for more foul-weather protection? See:
Taku Essential Jacket, a waterproof and breathable jacket kept simple reviewed by Christopher Cunningham
Third Reef Foulies, a waterproof jacket and bibs from West Marine reviewed by Kent and Audrey Lewis
In September 2024, an intriguing email landed in the mailboxes of a select group of people in and around the Berkeley Marina in Berkeley, California. “If you pay for materials, I will build you a boat. If you’re interested, send me a story, poem, or anything written by hand on paper that will convince me to go forward with the idea.”
The sender was Iñaki Garat. Four years earlier, Iñaki, a graduate of the California College of the Arts, had bought a 1975 Dufour 24′ sloop, hoping to learn how to sail. The boat was something of a fixer-upper so, while he did learn to sail, Iñaki also learned a good deal about boatbuilding.
Photographs courtesy of Iñaki Garat
While Iñaki had most of the power and hand tools that he needed to build the Nutshell Pram for Jenny, he did invest in new clamps. He put some of the bar clamps to good use early on in the construction when he laminated the ’midship frame.
To this day, Iñaki isn’t sure when or why he started dreaming of building a boat from scratch. All he knows for sure is that it was a challenge he’d wanted to take on for years. But there were a couple of obstacles standing in his way: he had nowhere to build a boat, and he didn’t have the money to pay for materials.
In 2024, Iñaki was living aboard a 36′ sloop when he was offered space in a shared workshop in Oakland. He jumped at the chance; with shop space he was one step closer to fulfilling his dream. But, with the “where” resolved, Iñaki had to confront the “how.” He had most of the tools he’d need, but no disposable income for the materials. Nevertheless, he didn’t want to give up on the dream. And that’s when it came to him: if someone else paid for the materials, he could build a boat for them.
Once the transoms, ’midship frame, and two temporary molds were set up on the strongback, Iñaki laid down the bottom panel. The Nutshell is just 7′ 7″ overall, so its bottom and planks can be cut in their full lengths from 8′ plywood sheets; they do not need to be scarfed for length.
Most of his friends thought the idea was crazy, but Iñaki was determined. He sent his email and waited. “Truthfully,” he confides 18 months later, “I only received one ‘application,’ but it was clear to me that Jenny, who sent a poem, was the perfect partner for the endeavor. It was critical to me that the boat go to a good home, and I had no doubt that Jenny would be that.”
The two had originally met through a mutual friend, but knew little of each other. Nevertheless, they embarked on their joint project with enthusiasm. Jenny was in search of a small boat in which she could learn to sail—her ultimate dream is to fix up an old boat and sail around the world. Other than that, all Iñaki knew was that she was a “nurse who dedicates herself to the homeless community in Oakland, and she’s an amazing baker.” But they decided to go ahead, and within a week had discovered they share the same birthday—it was a good omen.
With just the starboard sheerstrake still to be installed, the pram takes shape.
Iñaki had drawn up a shortlist of small boats he was interested in building, and together he and Jenny settled on the Joel White–designed 7′ 7″ Nutshell Pram.
Iñaki built the pram according to the plans, which he had bought from The WoodenBoat Store. He laminated the stem and ’midship frame from Douglas fir, cut the transoms and planking from marine plywood, the gunwales and thwarts from mahogany, and the spars from Douglas fir. With his background in arts and a professional career that has spanned furniture making, composites, and sailboat rigging, the project—as a whole—was a new experience, but the individual component parts were familiar.
Once all the strakes were fitted, Iñaki could remove the hull from the strongback and turn it right-side up. Before progressing with any of the interior structure, he would clean up any epoxy that had flowed in from the laps.
The hardest aspect, he says, was finding time to actually work on the boat. No sooner had he agreed to build the boat for Jenny than he landed himself a job as a full-time rigger. The Nutshell became a weekend project. Nevertheless, as the months passed the project went on. “Every time I walked into the shop,” says Iñaki, “I’d see the progress being made, but it didn’t feel like I was the one doing it. But one day, after gluing in the maststep, I put the rig up, and it hit me all at once. I remember thinking, ‘Wow! I have built this thing!’”
As the build neared completion, Iñaki turned his attention to the sail. He had a sewing machine and ordered a kit from SailRite, but he had nowhere suitable to make it. In the end, he turned a friend’s apartment into a sail loft for two days. It was, he says, “a fun experience. I’ve sewn clothes and bags, so the assembly was straightforward once I’d found the space to do it in.”
The day Iñaki raised the mast and sail for the first time was the day he fully appreciated that he had actually built a boat.
From that very first email sent to a select few, Iñaki’s boatbuilding endeavors have involved friends and neighbors, so it was perhaps inevitable that the launching would be a community affair. Building his first boat, he says, was a big achievement, worthy of celebration. Together with Jenny, he hosted a launching party. His girlfriend, Natalie, painted a poster to advertise the event, and a band came to play live music. “The band was spread out over two boats in the marina, but even so, in the end so many people showed up that we nearly sank the dock. None of us had ever been to a launch party before, so it was unique experience.” Jenny named the boat THEIA—for the Greek goddess of light, the sun, the moon, and wisdom—and allowed Iñaki to take the inaugural sail. “It was probably one of the best days of my life,” he says.
Photograph courtesy of Lucero Garat
On launching day, Jenny was happy to allow Iñaki the first sail in THEIA—his smile said it all.
Since that day, Jenny and THEIA have often been seen sailing and rowing around the Berkeley Marina, while Iñaki has gone back to dreaming. “Building THEIA served as inspiration to continue to build small boats that strengthen the community,” he says. “I just need to figure out how to do that.”
Jenny Bennett is editor of Small Boats.
Love Letter to a Small Boat
by Jenny Martin
Lilliputian wonder with sail full of holy potential
Joyful companion—we have a vocation—there are friends to visit, sandbars and coves to explore, meteor showers and constellations to fathom, seagulls and seals to chase. There are horizons to navigate, circumscribed only by the limits of imagination.
I want to rock in your wooden cradle, waiting for the sun to rise and the morning breeze to pick up, I want to skip across the spilled paint of sunset, I want to silently sail past sleeping souls under the cover of night, playing at pirate Peter Pan.
And when the weight and woes of the world weigh heavily, we will set out and let the wind and water waste away our cares.
Forget hope, or even courage.
Believe only in joy and vision.
Do you have a boat with an interesting story? Please email us. We’d like to hear about it and share it with other Small Boats readers.
For more designs by Joel White, see:
The Flatfish, an inspired daysailer, reviewed by Joe Youcha
Martha, a soulful little pocket cruiser, reviewed by Rich Hilsinger
Shellback, an easily built all-around skiff, reviewed by Ben Laster
At 81 years of age, I decided to build a small boat in my studio workshop. As a full-time professional woodworker, I had the space, the power tools, and the hand tools to undertake such a task. But I had never before built a boat.
Having worked in Norway for a number of years as a woodcarver, I was familiar with lapstrake construction. In 2010–12 I had worked as the lead carver on the construction of the Oseberg Viking Ship replica. As I carried out my carving work on SAGA OSEBERG I was able to watch closely the process of building a lapstrake hull, from hand-splitting the planks, to laying the keel and stems, fastening the overlapping planks, and fitting the frames—everything about the process was an amazing revelation.
Photographs by the author
After the strongback was made level and stable, the two transoms and the keel were fitted. The addition of the keel previewed the sweet curve of the hull’s bottom shape from its lowest point at the skeg to its highest at the bow, where the bow transom sits well above the waterline.
When I decided to build a boat, there was no question that I was going to use some type of lapstrake construction. I also knew that I wanted a simple rowboat that I could use around the waters and lakes of the Seattle area, and that it needed to be small enough to build inside, and come out of, my basement workshop. I searched the internet for designs and plans. The process of lofting seemed too overwhelming, but I knew I didn’t want to build from a kit, or use epoxy, but that was where my search kept leading me… Until, that is, I came upon the website for Jordan Wood Boats.
And there it was… the design for a Norwegian lapstrake pram, Dulcibella. The site described the Dulcibella as “a classic lapstrake pulling boat in the tradition of the renowned Norwegian pram. She is elegant but practical, offering both excellent stability and load carrying capacity in a relatively short length, making her an ideal tender. Two rowing positions provide good balance under various loading conditions and she is very responsive and easily propelled. Dulcibella is designed to be built using traditional lapstrake construction methods. The pram bow provides an easy shape to build; the thin planks bending easily into place with very little twist in the ends.”
The Alaska yellow cedar planks—nine strakes per side plus one mahogany sheerstrake—were screwed to the transoms and riveted at the laps. The garboards were also screwed to the keelson.
It was perfect, and at 10′ LOA, 4′ 2″ in the beam, and with a midship depth of 1′ 2″, it would fit in my workspace, and could even be moved around. I ordered the plans and awaited their arrival with eager anticipation. When it arrived, the package included all the necessary information: detailed large-scale construction drawings for all the parts; full-sized patterns for the molds and transoms (stern and bow); a diagram with instructions on how to build the ladder-frame jig and backbone setup; plans for 7′ 6″ oars. The website assured me that no lofting would be required and that, to “clarify the building process, comprehensive construction notes are number-keyed to the corresponding assemblies in all the drawings.” Being new to boatbuilding, I also ordered a book offered on the Jordan website: Boatbuilding My Way, by Warren Jordan, which introduced me to such things as spiling, beveling the plank laps, cutting the gains, and peening rivets.
Building the Dulcibella
With book and plans to hand, I immersed myself in the language and construction of small wooden boat building—everything was new to me. Nevertheless, as I proceeded through the build, I discovered that the materials from Jordan Wood Boats gave me everything I needed to succeed. Whenever I made a mistake—and I made plenty—I reread the instructions and plans and, sure enough, the error would be down to me; with careful study I could figure things out.
Warren Jordan’s book listed those tools that he considered essential: bandsaw, tablesaw, drill press, belt sander, 3⁄8″ drill, orbital sander, various hammers, nail sets and center punch, various saws, and low-angle, rabbet, and jack planes. He further listed detailed items under the heading of “chisels, files, drill bits, clamps, measuring and marking tools, wrench and pliers, and miscellaneous.” Fortunately, I already had all the necessary tools.
The Dulcibella is built using traditional construction methods—no epoxy, no fiberglass. The interior fit-out included the installation of 20 steam-bent white-oak frames and nine sawn floor timbers. Each transom knee is cut from a single piece of wood; the thwart knees have laminated curved elements combined with backing blocks.
For the keel, transoms, thwarts, knees, and sheerstrake I used mahogany. The planking was clear Alaska yellow cedar milled to 3⁄8″ and planed to 1⁄4″ (the plans recommended yellow cedar, Port Orford cedar, white cedar, or Honduras mahogany). For the floor timbers and steam-bent frames I used bending white oak (flat, straight-grained wood that has been kept green to retain its moisture content for easier bending), which was recommended. For the fastenings I used silicon-bronze, square-drive, flat-head screws, and copper rivets and roves.
The Dulcibella is built upside down. After constructing the strongback of 2×4s, I attached the pine molds, and then assembled the backbone (keel, skeg, sternpost, and transoms). Then came the planking. There are 10 planks per side, all 1⁄4″ Alaska yellow cedar. For an aesthetic contrast, I used 1⁄4″ mahogany for the sheerstrake. Each strake was screwed to the transom at each end and copper-riveted to the plank adjacent to it. The garboards were screwed to the keelson.
Once the planking was complete, I turned the hull over and installed the frames—20 in all—which I steamed in a 4″-diameter PVC pipe, with the steam coming from an old water-filled propane tank heated by a propane-fired crab cooker. I then fitted the nine sawn floor timbers, before moving on to the interior fit-out, all of which was fairly straightforward.
For a small pram there is good legroom for even a tall rower. The choice of rowing stations ensures that the boat remains well trimmed with from one to four people on board. The 7′ 6″ oars were made according to Warren Jordan’s plans. CORA was named for my grandmother.
While the plans implied that the Dulcibella can be built with little prior woodworking experience, I do believe that some previously acquired boatbuilding skills would be beneficial, perhaps necessary. There were many parts of the overall build that I think would have been difficult for a novice builder.
I finished the pram, both inside and out, with three coats of a clear marine oil.
The Dulcibella’s performance
The Dulcibella weighs 120 lbs and I transport mine on a small trailer, but someone younger and stronger than me could, perhaps, load it onto a car roof rack or into the back of a pickup truck.
Rowing the Dulcibella is a delight. It is set up for two rowing positions. Which station you use depends on how many people are on board. When rowing solo, the best position is to sit on the center thwart and use the aft oarlocks; but with one or even two passengers, the best trim is for the passengers to sit in the stern, while the rower moves forward to the bow thwart. I made the 7′ 6” oars according to the plans, using Sitka spruce. Each oar has a 5″ rounded grip, an 18″-long octagonal cross section from the grip to the leather, and a round cross section from the leather to the throat of the blade. I coated the tips of the oars with a white epoxy paint.
Ron Berry
I was very happy with the Dulcibella’s performance. It has good stability, tracks well, and yet turns on a dime.
The boat tracks well, feels very stable, and handles mildly rough water well. It turns on a dime. From time to time I do have to make course corrections, but that may be down to my lack of rowing skills rather than any fault in the boat’s design. I have some mobility issues but am happy to report that I’m able to board from a dock without difficulty, and friends who have used the boat report no issues with stability.
Overall it was a pleasure to build the Dulcibella, in spite of my inexperience in small-boat building. It was worth the effort: the Dulcibella is a joy to row and draws appreciative glances and comments wherever it goes. I would recommend it to anyone looking for a sweet small boat that could serve either as a beautiful tender for a larger boat or be enjoyed in its own right.
Obert Jay Haavik is a former Lutheran minister and urban planner who discovered, in his early 30s, that making things out of wood was his calling. He began with Northwest Coast Native art, moved on to fine furniture, and then to Viking-era art. He is currently building his second boat, and thinking about his third. Some of his work can be seen at www.jayhaavik.com.
Dulcibella Particulars
LOA: 10′
Beam: 4′ 2″
Midship depth: 1′ 2″
Plans for Dulcibella are available from Jordan Wood Boats, $74 for PDF copies, $89 for printed. Boatbuilding My Way by Warren Jordan is also available, $19.59 for PDF copy, $29.95 for printed.
Is there a boat you’d like to know more about? Have you built one that you think other Small Boats readers would enjoy? Please email us your suggestions.
For further reading on traditional lapstrake construction, see:
I didn’t choose my boat; it chose me. That might sound like a cliché, but it’s true. In 1997, while I was editor of Classic Boat magazine, I heard that the legendary multihull designer Nigel Irens (responsible for Ellen MacArthur’s solo around-the-world record-breaking trimaran B&Q/CASTORAMA, among many others) had designed a 13′ 7″ dinghy, which was to be produced as a kit for amateur construction. It was too good a story to miss, and in no time at all we’d agreed to write up the project and sell the kit through the magazine. It was in the early days of CAD and CNC and Nigel, being the visionary designer that he is, had seen the future.
“There’s more than a whiff in the air that kit building is in for a revival,” he wrote. “Partly because, as in the post-war years, people are again looking for a way to get afloat without mortgaging their soul, and partly because there’s some new technology about that makes the whole idea more accessible to those who cannot claim to be master builders.”
The design Nigel and his protégé Ed Burnett produced was a long, slender boat with a bold upright stem and an elegant counter stern—angled to discourage the use of an outboard. The boat was primarily intended for rowing but also had a small lug rig, along with the associated daggerboard and rudder. They named it the Western Skiff.
Nic Compton
The Western Skiff’s kit includes an MDF strongback but no molds. Instead, the boat’s shape is determined by the bulkheads, central frames, transom, and stem.
The prototype had been built and tested, and Nigel and Ed were looking for four “guinea pigs” to test the kits and the instructions Ed had written. I jumped at the opportunity—not least because they were offering the kit at half price.
Building the original Western Skiff kit
The kit was ingeniously simple: seven sheets of plywood, and two sheets of MDF for the strongback. Solid wood was supplied for the thwarts, keel, and gunwales, while the hollow wooden mast and solid spars arrived eight-sided, ready to be planed and sanded into shape. There were no molds. Instead, the two bulkheads, two central frames, transom, and stem were set up on the strongback to determine the boat’s shape. Each strake was assembled from two pieces, joined together with precut triangular finger joints, which were set in epoxy, and the full-length planks were then wrapped around the skeleton, where they were temporarily stitched together with cable ties. The lands were left square and the resulting gaps in the overlap between the planks were filled with epoxy, not only creating a strong bond but also effectively producing stringers to stiffen the boat longitudinally.
It was boatbuilding for amateurs, using the benefits of a laser-cut kit combined with the forgiving nature and strength of epoxy. Even the quarter knees were made by gluing together two layers of plywood, staggered to give the required angle, with the resulting gaps filled with thickened epoxy. The solid-wood forward and after thwarts were bedded onto the plywood buoyancy tanks with a layer of thickened epoxy. The two middle thwarts were notched into the tops of the frames, which did duty as knees, and were secured with a heavy fillet of epoxy at each end.
Sol Compton
The balance lug rig is ideal for a boat of this type and size; it’s simple to handle, needs no standing rigging, and the spars all fit within the length of the boat. However, for optimal upwind sailing performance, I should have moved the downhaul farther forward along the boom.
It sounds crude, but it has stood the test of time. The only area of weakness after 30 years of use has been in the finger joints, which in retrospect I should have strengthened with a layer of fiberglass, something that is recommended in the most recent version of the kit. Indeed, today’s kits have replaced the original finger joints with a choice of either short finger joints backed by fiberglass on the inside, or with conventional beveled scarf joints.
The Western Skiff on the water
I launched my skiff in the summer of 1997 and have used her ever since. At just 70 kg (154 lbs), she’s easy to launch and recover from a trailer or dolly. She’s also a pleasure to row solo, although I think she carries her way better with a little weight in the bow—either a jerrycan filled with water or, in my case, more typically a 55-lb dog. She can be rowed by two people, either with each rower handling one oar or, for maximum speed, a pair of oars apiece. The space between the rowing thwarts is tight, however, and if you get the timing wrong, the stroke rower is likely to get an oar handle in their back.
Nic Compton
Nigel favored the raked transom both for its good looks and because it made mounting an outboard motor almost impossible. He wanted to encourage the use of sail and oar, and the Western Skiff does, indeed, row well, either solo or with two at the oars.
Under sail, following Nigel’s lead, I usually sit in the bottom of the boat. The idea is to keep the weight as low as possible, but despite this, the Western Skiff is decidedly tippy (both the designer and I have capsized our respective boats). In a stiff or gusty breeze, you have to be prepared to release the sheet or head into the wind at a moment’s notice, which can make it hard to get any consistent speed to windward. Off the wind, she flies along quite happily.
The balance lug is a forgiving rig for the dinghy—it is simple, the spars can all fit inside the boat, and the sail can be raised and lowered quickly in the event of changing conditions. The halyard, downhaul, and sheet blocks on my boat are all attached with lashings, as I originally thought I’d try out different positions before permanently fixing them in place. In the event, I never got around to that, so they tend to move around a little. The most critical item is the position of the downhaul on the boom. For best performance, it should be closer to the tack for upwind sailing and eased off for downwind. However, for the kind of sailing I do (pottering around an estuary), it makes little difference—although I have to admit that my lackadaisical attitude may well account for my boat’s slightly disappointing windward performance.
For flotation, there are built-in buoyancy tanks in the bow and stern, as well as designed side tanks forward of the daggerboard thwart. I never fitted the latter, preferring to leave the interior free and uncluttered. I did plan to hang inflatable buoyancy bags beneath the two ’midship thwarts, but again, have never gotten around to it. Without the built-in side flotation compartments, my boat does float when capsized, but emptying her while afloat is impossible as the water floods back in through the daggerboard case. If I were to build anew I would likely still leave out the fitted side tanks but would definitely install bags.
Over the past 30 years, the skiff has lived on a trailer and been used in a variety of situations, first as a family dinghy in a sheltered river, then as a bachelor boat off a sloped pebble beach, then as a family boat again on the very tidal River Dart in Devon, southwest England. During those same three decades, I’ve owned five big boats—ranging from 22′ to 36′ LOA— but, while those have come and gone, I’ve never felt tempted to sell my Western Skiff.
Nic Compton
Two generations of Western Skiffs rafted up: in the foreground is one of the newer skiffs built in 2018, and beyond is my original boat, built some 30 years ago. The layout has remained the same as has the general build, although the long finger joints have been replaced by either short fingers or beveled scarf joints. In the starboard quarter of my boat can be seen the outboard well box, which I fitted retrospectively with Nigel’s blessing. It takes a 3.5-hp motor and has greatly expanded my family’s use of the boat.
Ten years ago, I did the unthinkable and, with the designer’s blessing, fitted an outboard well, which greatly expanded the boat’s range. Suddenly, from just rowing a mile or two from our home, we could head down to the mouth of the River Dart and out to sea.
I wrote an article about that metamorphosis for Small Boats, and the positive response to the story helped relaunch the Western Skiff design. Nigel was enthusiastic, naval architect Jack Gifford kindly agreed to convert the CNC cutting files into a set of full-sized templates, and Practical Boat Owner magazine offered to host the project on its website, where downloadable cutting files are now offered, free of charge. Simultaneously, Alec Jordan of Jordan Boats made the boat available as a kit, through his own website in the U.K. and later through Hewes & Company in the U.S.
Sol Compton
The sleek lines of the Western Skiff, with her sharp entry, sloped transom, and curved sheer that rises gently to the bow, reflect a marriage of traditional looks and good performance—a trademark of Nigel Irens’s design work.
Thus, in June 2018, the first official Western Skiff to be built in almost 20 years was launched on the River Dart, coincidentally just a stone’s throw from where Nigel had tested the original design. The new boat was built by former professional boatbuilder Jeremy Butler from a kit supplied by Jordan Boats and featured several innovations: all four thwarts are removable so that the boat is now light enough to be lifted on to a car roof rack; and two wheels on a detachable bracket can be fitted to the forward end of the keel so that the boat can be wheeled to the slipway (Jeremy worked for a time for the Barrow Boat Company in the U.K.).
Since 2018, there has been a steady trickle of new builds on both sides of the Atlantic, and their progress is often shared on the Western Skiff Forum on Facebook. At least one boat has been built with removable thwarts and a tent for sleeping on board, following the current trend for dinghy cruising. If a measure of a design’s success is how well it can adapt to the changing times, the Western Skiff has more than proven its worth over the past 30 years.
A regular contributor to Small Boats, Nic Compton is a freelance writer and photographer based in Devon, England. He currently sails, rows, and motors his Western Skiff—30 years after he built it—and a 33′ Freedom cat-ketch.
Downloadable cutting files for the Western Skiff are available from Practical Boat Owner, free of charge.
Kits are available in the U.K. from Jordan Boats, from £1,749 and in the U.S. from Hewes & Company, from $3,165. Note that the current kit only includes the plywood building parts and a plywood strongback. Patterns for the solid timber parts are included.
Is there a boat you’d like to know more about? Have you built one that you think other Small Boats readers would enjoy? Please email us your suggestions.
For more articles by Nick Compton, see:
The BETTY Effect, a retired couple discover the joys of river cruising under oar.
Within five minutes of setting out, a thick fog had rolled in, cutting off the sunshine and hiding the far bank. I hugged the near shore, looking and listening for tugs and freighters plying the industrial confluence of the Willamette and Columbia rivers. Early on a Tuesday, their crews had little reason to be on the lookout for a small skin-on-frame skiff edging its way along the docks.
It was early February. I had a month off from work and had decided to explore the Columbia River from Portland, Oregon, to Astoria, Oregon. Winter temperatures in Western Oregon are typically in the low 40s Fahrenheit and the weather is relentlessly rainy, but the next four days were forecast to be unseasonably warm, dry, and almost windless.
I had reached out to Brian Schulz of Cape Falcon Kayak, knowing he’d just completed two prototype skin-on-frame St. Lawrence River Skiffs and was looking for a test driver. Both boats were set up for rowing, but they had also been modified to use pedal drive. At 17′ long and 42″ wide, the larger of the two was too much for a solo mission, but the smaller one—15′ × 38″— seemed just about perfect for a multi-day camping trip. Astoria is about 90 river miles from Portland. With favorable winds and current, 20-plus-mile days would be long but not unreasonable.
Photographs by the author
I set off from Cathedral Park in the morning fog grateful for the Hobie pedal drive that allowed me to look forward as I carefully navigated past Portland’s commercial docks. It was a Tuesday morning and I was aware that the crews of working tugboats and freighters would not be on the lookout for a small skin-on-frame skiff.
After three days of preparation, I began my trip in Portland’s Cathedral Park beneath the green-steel Gothic-arch towers of the St. Johns suspension bridge that spans the Willamette River. Apart from a few runners and dog walkers enjoying the early-morning sunshine, the park was largely empty. During fishing season, the acres set aside for boater parking would be thronged with trucks and trailers, but we had the sleepy boat ramp to ourselves as my wife helped me get the boat off the car roof rack and pulled the pile of dry bags from the trunk. Brian, too, had shown up to take photos. He was happy to see the boat on the water, but horrified by the stack of red, blue, orange, and yellow bags stuffed into the bow, making it look like a floating garage sale. “I can run home and get one 65-liter dry bag,” he offered. “Everything will fit, and it’ll look tidy. I can be back in like 20 minutes!” I apologized, but explained there was a method to my messiness and I wanted to have easy but compartmentalized access to clothes, snacks, lunch food, and my Columbia River chart book. He was skeptical, and I felt bad to be turning his elegant boat into a garbage scow, but my system works.
At heart, I’m a rower. I’ve probably traveled 2,000 miles facing backward, but I decided to bring Brian’s Hobie pedal drive for the novelty of seeing where I was going. Brian suggested I might like it well enough to become a convert. I had my pride, my doubts, and a moderate reluctance to embrace new technology, but if ever there was a trip on which I could learn new tricks, it was this one. The Hobie pedal-drive system uses two submerged fins that move from side to side, flexing like the tail of a fish. The hydrodynamics aren’t exactly intuitive, but the result is utterly convincing. With a wherry-shaped hull and narrow beam, I already knew the St. Lawrence River Skiff would move fast under oars, but I was surprised to find that it went as fast, if not faster, when pedaled, and with less effort. I was also excited to be looking forward without craning my neck over one shoulder.
Roger Siebert
.
After some quick goodbyes, I started pedaling downriver. At first my upper body felt awkwardly inert, but seeing how quickly I was cruising past moored tugs and freighters, I knew that being able to switch between using my arms and my legs for locomotion would make the trip far more enjoyable than if I were just pulling oars.
The fog surrendered slowly to sunshine as I reached the confluence with the Columbia River 5 miles from my put-in. To the west, Sauvie Island would be my companion for the next 15 miles. Between Portland and Astoria, the Columbia averages more than a half-mile in width, and for the next 20 miles both shorelines were generally low-lying and sandy, with any hills and heights miles inland. Cottonwood and ash grew thick along both banks, and even though the trees were bare they still limited the views to the east and west.
At Sauvie Island, a dozen miles downstream of Portland, I went ashore to take a look at the UFO (Unmoored Floating Object) that has long attracted local graffiti artists. This extraordinary object is what remains of a ferrocement trimaran built in the 1970s and stranded on the island in 1996.
After a solid four hours and a dozen miles of pedaling I saw the Sauvie Island UFO and decided it was time to stretch my legs. The UFO acronym stands for Unmoored Floating Object. Built in the 1970s out of ferro-cement as an experimental trimaran, the thin-shell concrete vessel was carried downstream during the 1996 flood to become stranded on Sauvie Island, where it has been accumulating graffiti and watching over a clothing-optional beach ever since. From the river, the boat was just visible at the edge of the forest where it sat in a grove of cottonwoods. I walked around the hull, admiring how much time and effort had gone into its unconventional construction. Breaks in the cement coating revealed inner substrates of welded wire, rebar, and foam, which someone had sculpted into an alien crab-shell shape. The upper decks sported thick rinds of moss, while the trimaran hulls had become canvases for graffiti artists venturing out from Portland. The UFO is just one of many ghosts of dreams scattered along the river: several abandoned algae-covered sailboats sit at anchor in lonely side channels, and there is even a nearly 400′-long ex-military landing ship slowly exfoliating its paint and surrendering to the elements, having been abandoned by its owners years ago.
Back on the water, I switched from pedals to oars, and after an hour or so of rowing, my mind went blank. I still navigated, looked for hazards and wildlife, but my thoughts simplified and eventually disappeared. Time passed, miles passed, and the shadows of trees lengthened; the water shifted through various degrees of glassiness.
The sun had already dropped below the low, rolling Oregon Coast Range foothills when I reached Sand Island off the town of St. Helens. Overall, my body felt the effort of a long day, but happily nothing hurt. The landing is home to a popular campground that offers ferry service between the town and the island during the warmer months, but I had the entire place to myself and set up my tent on a sandy beach facing away from the lights of downtown. Sleep came easily; then at midnight a freighter passed by in the moonlight, trailing a large wake that swept ashore. The accompanying noise was the beginning of a sporadic cacophony of sound: tugboats plied the waters all night long; the din of the I-5 freeway and horns of freight trains carried easily over the 3 miles of flat land between us; coyotes yipped on the Washington side of the river. And, judging by the squawking, chittering, and quacking deep into the night, the herons, bald eagles, and ducks were also awake.
The Lewis and Clark Bridge soared 185′ above me. Built in 1930, its arch—with a maximum clearance of 210′—accommodated the last of the commercial sailing ships that still plied the Columbia River at that time. Designed by Joseph Strauss, who also chief engineer of the Golden Gate Bridge in San Francisco, it is 2,722′ long and the only bridge to cross the Columbia between Portland and Astoria.
An early start
I was a little sleep-deprived as I pushed the boat into the flat, black water well before the sunrise. The distant silhouette of Mount Hood stood in contrast to wispy clouds in the lightening sky. Even 80 miles from the sea, the Columbia is tidal and the ebb is a powerful force. An early start maximized the free ride, but after a few hours in the main channel, I started to seek out the slower, more intimate side channels. Sheltered from the battering of heavy wakes, shrubs and trees on the less trafficked waterways grew thick to the water’s edge, with some grasses thriving below the high-tide line. Kingfishers, herons, and ducks abounded, finding perches and shelter amidst the tangled vegetation.
Basalt outcroppings skinned with moss and capped by scraggly white oaks appeared on both shores as the river valley narrowed and started to bend from north to west. Glad to have a change of scenery from the sand and winter-bare cottonwoods that had lined the preceding 30 miles, I turned toward the now-defunct Trojan Nuclear Power Plant site, built on one of the few areas of exposed bedrock near the river. I approached a house-sized stone island that should have been green with moss but was, instead, capped with brown. I was close by before I realized it was a sea-lion rookery; I altered course abruptly, a chorus of grunts and barks helping to speed my departure. A few of the larger animals swam out for a closer look at the intruder.
Near the Lewis and Clark Bridge, the Oregon shore became steep. The only way to access the river here is by boat or the still-used railway that was constructed in the 1890s.
Nearing my journey’s halfway point, I crossed under the Lewis and Clark Bridge, which soared 185′ overhead. When the two-lane steel bridge was completed 95 years ago, it was the longest cantilever span in the United States, and had ample clearance for the few commercial sailing ships that still made their way to Portland in the 1930s.
I was now happily downriver from the last of the Columbia’s major industrial and shipping ports. The Oregon shore turned steep, with occasional basalt cliff faces showing through the tall Douglas firs that covered the slopes. Only boats and the seldom-used 1890s railway provide access to the shoreline. Every hillside on both sides of the river bore scars from clearcuts. Clusters of pilings along the shores hinted at a vanished history of sawmills and salmon canneries.
Daylight was fading as I found a sandy island beach with a flat and open meadow where I could drag the boat ashore and set up camp. The last 5 miles of my 30-mile day had offered only brushy or rocky, steep shorelines, and I was elated to have found, at last, such a comfortable spot. The deserted beach offered a view of snow-capped Mount St. Helens looming high over the distant eastern hills. As I settled in, a freighter pushed upriver, its red hull riding high above the water ready to be filled with wheat before heading back to sea. I stayed up late enough to see the Milky Way emerge in the dark sky, but was fast asleep about two hours after the sun set.
Moonlight illuminated a thick fog that had filled the valley overnight, creating a false dawn. A crowing rooster on the Washington shore also seemed to believe it was morning. I looked at my clock and groaned: 4:00 a.m. After an hour of lazing, I managed to cook and eat breakfast without leaving the warmth of my sleeping bag. Trees strained the moisture from the air and I could hear the drops as they plopped from the branches. My rainfly was soaked inside and out with the humidity, and I knew I would be, too, once I was outside. The forecast had said there’d be no rain; it never said I wouldn’t get wet. Wearing full raingear and with chilled fingers and toes, I was underway before sunrise and happy to be facing forward as I picked my way through the murk. Both mainland shores were obscured by the fog, so I referenced the few bits of islands that I could see and followed the flow of the water.
Some distance downriver from the Lewis and Clark Bridge I found a sandy beach where I could pull ashore and set up camp for the night. I had covered 30 miles and was happy to have found a good spot to rest. As I relaxed on the beach, this freighter passed by on its way upriver, its red hull riding high. In Portland, it would load up with wheat and return downriver to head out to sea with its cargo.
The fog felt interminable in the early-morning gloom, but, as the day lightened, the sun began to burn through the top layers and shafts of sunshine made their way through to the nearby hilltops. A few miles upriver of Puget Island, the light tailwind grew strong enough to send the water into a light chop with occasional whitecaps, and I decided to switch to oars, believing I’d feel more at ease with their familiarity in the rough water. With the pedal adaptation requiring a center trunk, my rowing seat was toward the stern and the boat needed a counterweight forward. Initially the weight of my gear and water bags had been sufficient to produce the best rowing trim, but now I realized I had consumed too much of my drinking water for it to provide effective ballast and the boat was no longer tracking well. I decided to forgo the familiar and went back to pedaling. The setup had performed well in tug and freighter wake; perhaps it would do equally well in the moderate chop.
Transitioning took about a minute, but I was soon comfortably pedaling again and feeling perfectly stable. According to the hiking-map app on my phone, I was traveling at approximately 6 to 7 miles per hour, with much credit owed to the stiff following breeze and strong ebbing river current, now constricted in a shipping channel narrowed by pole dikes. The Army Corps of Engineers, responsible for maintaining the river’s navigability, has pounded whole forests of trees-made-poles into the riverbed in order to adjust the flow, control erosion, and channelize the river. The two largest ports on the Columbia—Portland, Oregon, and Vancouver, Washington—lie more than 100 miles upriver from the ocean, and especially after the construction, starting in the 1930s, of several dams and locks even farther upriver, which allowed maritime traffic to reach as far as Lewiston, Idaho, the river has served as a major regional transportation artery. The Corps also dredges the navigation channel of an estimated 6 to 8 million cubic yards of material annually, creating gray sand dunes and artificial islands at intervals along the river.
Aaron Smith
Throughout the voyage, the weather was kind. Leaving the Westport Slough the winds dropped and the day grew warm. Ahead was the small town of Cathlamet. From there, downriver, Aaron and I would enter the Elochoman Slough.
Two’s company
My friend Aaron had planned to meet me at Westport to kayak the rest of the river to Astoria with me. I pedaled south into the narrow Westport Slough as the final wisps of fog vanished. Three-quarters of a mile up the side channel, there was a recently constructed dock with a spacious side float for kayaks and canoes, undoubtedly popular during warmer weather. On this February day I was alone and able to monopolize the empty float and its benches as drying racks in the late-morning sunshine. Aaron arrived as I finished my lunch, and I helped him bring his kayak and gear down from his truck.
As we left the shelter of the Westport Slough together, and turned to paddle down the shore of Puget Island, I was pleased that the winds had moderated and the air was warm enough for us to stow our jackets and paddle in shirtsleeves. Puget is one of the few inhabited islands on the river and is accessed by bridge from Cathlamet, Washington, and a ferry from Westport. Much of its land is dedicated to farming, but the south shore is packed with vacation homes that sit just a few feet above the high-tide line. On the Oregon shore, the Wauna Paper Mill sent up plumes of steam against the evergreen hillsides and sounded an incessant thrum across the water. Rounding the northwest end of Puget, the small hillside town of Cathlamet came into sight. Most of its homes and buildings were built during its logging and fishing boom years, which ended more than half a century ago, and it has retained much of its historic charm with downtown storefronts and wooden houses clustered together against a green backdrop.
Aaron and I followed the Elochoman Slough downriver between the Hunting Islands and the Washington shore. The slough twisted and turned and had a primordial otherworldly atmosphere.
At the downriver end of Cathlamet, Elochoman Slough separates the low-lying, swampy Hunting Islands from the Washington shore. The slough once gave river access to a now-demolished sawmill, but just beyond the vacant site, surrounded by the Julia Butler Hansen Refuge for the Columbian white-tailed deer, the slough took on a primordial wildness. It twisted and narrowed and grew shallow, its low shores covered in moss-draped maples, alders, and scaly-barked Sitka spruce. The previous year’s dried reedy marsh grasses rose from the water and were intertwined with the bare red-willow branches to make an impenetrable understory. The sinking sun set everything aglow.
We meandered at a leisurely pace through the slough, putting high hopes on a potential camp near where the slough returned to the main stem of the Columbia. We did, indeed, find a small spot on a sand spit with just enough bare ground to pitch two tents. Driftwood had been pushed far into the nearby bushes by recent storms and high water, but it was a perfect fair-weather camp. The thin, high clouds took on brilliant hues of pink and gold, creating a panoramic sunset that surrounded us. The day’s warmth slowly faded into the clear air, reminding us that, despite all the sunshine, it was still midwinter. Stars began to show shortly after the colors faded from the sky, and we managed to stay awake past 8 p.m. to watch for satellites and shooting stars in the still silent air before retreating to our sleeping bags. I would have slept well and deeply, but long before the sun rose, hundreds of ducks, geese, and trumpeter swans in the neighboring wildlife refuge started an hours-long chorus of quacking, honking, and trumpeting.
Aaron Smith
At the mouth of the Elochoman Slough, where it rejoined the main Columbia River, we found a sandy spit just large enough to accommodate both boats and two tents. Driftwood washed high up into the grasses suggested that the spit would be awash in a storm, but on this calm February evening it provided the perfect campsite.
A visit to Pillar Rock Cannery
Dawn came at last, bringing clear skies and crisp air. Frost whitened the tips of the nearby grass. This would be our big-water day, with minimal shelter and 8 miles of largely open water to traverse between the Washington and Oregon shores in the afternoon. About a mile downriver from our camp we entered Steamboat Slough, our last opportunity to enjoy a narrow, sheltered passage before following the exposed Washington shoreline. At the west end of the slough we passed the small town of Skamokawa, where the highway that parallels the right bank of the river heads inland for 15 miles. Beyond the town, numerous canneries, dating back to the 1870s or earlier, once lined this remote and largely roadless shore. Four miles downriver from Skamokawa we reached the site of Brookfield, once a major cannery with a population nearing 500 according to the 1900 census. It had burned down almost 100 years ago and now only a few acres of telephone-pole sized pilings indicated where the docks and buildings once stood above them.
We rounded Brookfield Point to see what was left of both Pillar Rock Cannery, and its namesake monolith, described by William Clark in 1805 as “situated half a mile from Shore, about 50 feet high and 20 feet Diameter.” Later accounts describe it as being “75–100 feet” tall before it was decapitated with dynamite so that a navigation beacon could more easily be placed on top. It was from a nearby camp that the Lewis and Clark expedition first saw and heard the ocean, still some 20 miles distant.
A few miles downriver from our overnight spot, beyond the town of Skamokawa, we passed numerous sites of once-thriving canneries. In many places, like this one, all that was left were the decaying pilings that once would have supported large buildings.
The cannery looked weatherbeaten but otherwise in surprisingly good shape. Most of the roof and walls had been clad in corrugated metal sheets, but any exterior wood surface showed the scouring effects of wind, rain, and time. Aaron and I beached our boats and ventured ashore for a closer look. The foundations of the buildings were anchored to land on the north side, but the majority of the structures were supported atop pilings in various states of repair with some of the rotted wooden posts resembling stalactites and stalagmites, their middles thinned by decay. There were even a few places where the supporting timbers were now conspicuously absent, perhaps having rotted all the way through. Recently added concrete footings suggested there had been efforts to stabilize the buildings. Through open doorways we could see a large entry hall lined with museum-like displays of artifacts from logging and fishing; beneath them a modern backhoe and tractor stood on the floor. A fine example of a wooden Columbia River bowpicker—a local boat once used in the salmon gillnetting fishery—sat on a large wooden cradle, ripe for restoration.
After a too-brief stop, but mindful of the long crossing we still needed to make to Oregon, we returned to the boats and set off. We had made it all of 500′ downriver before we saw a solidly built older man on shore waving for us to come back. We paddled to shore and nosed our boats onto the sand so we could talk. Leon and his wife had purchased both the cannery and the entire townsite, in 1978, just as it was slipping into economic irrelevancy with a slowing and consolidating fishing industry. He and his family had dedicated nearly 50 years of their lives as caretakers, restorers, and historians, preserving what they could of a rare treasure. Although Aaron and I were faced with the growing likelihood of rowing in darkness, we were not going to refuse Leon’s offer of a tour.
Four miles on from Skamokawa we came to Brookfield. This had been the site of a major cannery and in the census of 1900 the town had a recorded population of 500. Today, all that remains are a few acres of pilings where once would have been buildings and docks.
Most of the building’s galleries were empty of machinery, but we could see the ramps from the docks where the fish had been hauled in and processed in their millions. Long before a road was cut along the shoreline, the residents of Pillar Rock were solely dependent on the river for their livelihoods, food, communication, and transportation. The cannery contained the general store and post office in a corner over the water, so that residents had to walk through the length of the building past fish and nets and canning lines to get their necessities. As we walked through the whitewashed corridors, Aaron and I were surprised by how much of the interior seemed untouched by time, with the office and store looking much as they must have done in the last few years of operation. We would have happily stayed for hours hearing about the history of the cannery and the region, but the tide was already lapping at our boats and there were only a few hours of daylight ahead of us. Reluctantly, we said our goodbyes, and pushed off into the rising tide.
Crossing the Columbia
Downstream from Pillar Rock, the river widens to about 5 miles between the Washington and Oregon shores. Charts show a maze of marshy grass islands and mudflats that comprise the Lewis and Clark Wildlife Refuge between the two shores. Our plan was to cross diagonally to avoid the worst obstacles. But before we did, we paused at the eastern tip of Miller Sands for lunch, enjoying the last reliably dry ground before Lois Island, 6 miles away on the Oregon side.
Pillar Rock Cannery is one of the few canneries that still has its original buildings. While no longer operating, the site has been privately owned and preserved for some 50 years. The machinery is long gone but the buildings are largely intact.
Rounding south of Miller Sands, we had a wide view towards the south and west, and could see the high steel-lattice towers and arched roadway of the Astoria–Megler Bridge that connects Washington State to Oregon. To our southwest, along the shipping channel off Astoria, 11 freighters sat at anchor as they awaited river pilots to guide them to ports further inland. Our plan was to skirt the marshy southern end of Lois Island and to head up the John Day River to meet my brother at the Depression-era floating home he and his wife were slowly restoring. Aaron and I were both prepared to spend another night out, but the promise of a solid meal and the prediction of 2″ of rain forecast to start falling in the early hours of the morning were incentive enough to keep going.
I was familiar with this body of water where, with the Pacific Ocean just beyond the low-lying hills to the west, strong summer sea breezes frequently build in the afternoon, and whip up waves and whitecaps that can be terrifying in a small open boat. But, on that day in February, the water could have hardly been more placid—nevertheless, I felt like we were tiptoeing around a sleeping giant. The tide was nearing the high-water mark, allowing us to pass clearly over all the mudflats and sandbars. Although high clouds began to cover the lowering sun, it would have been hard to imagine better conditions. We were happy that we could continue to make progress. Had we needed to stop, we would have been hard-pressed to find a landing: the few islets we passed were either inundated patches of grass or willow clusters sticking out of the water like temperate mangroves. None would have been suitable for getting out and stretching our legs.
After rounding Miller Sands we had a wide-open view to the south and west. In the far distance we could make out the Astoria–Megler bridge (seen here in the haze, just above the tip of the oar blade) while nearer to us we counted 11 freighters anchored along the Astoria shipping channel awaiting pilots to take them upriver.
We reached John Day Point, with its distinctive crown of spruce, hemlock, and fir, just as the sun was setting. The railroad swing bridge at the small tributary’s mouth sat open as it has for decades since landslides and washouts a few miles to the east caused the Wauna–Astoria stretch to be abandoned. Pedaling 1 1⁄2 miles up the John Day River in the growing darkness, I was grateful for how well the boat had performed, how well the weather had behaved, and how my mind and body both felt stronger at the end of the trip than they had at the beginning. Aaron and I were tired from our few hard days of pedaling, rowing, and paddling, but we were elated as we pulled up to the floating home and were welcomed by my brother.
After a filling meal, we slept soundly in real beds, awakening the next morning to gray skies and drumming rain. The Oregon winter had reverted to its usual self, but for a few brief days, February had delivered, proving itself a perfect time to be on the water.
Don Golden is a carpenter living in Portland, Oregon. He loves exploring the Pacific Northwest by boat, bicycle, and on foot. His brother, Harvey Golden, wrote “Two Nights on ZEPHYR,” which appeared in the March 2015 edition of Small Boats.
If you have an interesting story to tell about your adventures with a small boat, please email us a brief outline and a few photos.
For more Columbia River adventures, see:
Quiet Time in a Big Estuary, friends in two boats explore the Columbia River below Puget Island; by Bruce Bateau.
Taking Refuge, rowing among the islands of the Columbia River estuary; by Dale McKinnon.
Roll on Columbia, a 100-mile cruise under sail and oar in a 12′ skiff; by Torin Lee.
I share a small workshop with a picture-frame maker and, as our space has to function as workshop, small gathering space, and even classroom, our work areas must remain flexible. Power tools, worktables, and large projects—such as boats—must be movable.
Even if I were not sharing my space, being able to move a boat once the hull has been detached from its building frame has advantages. When I need to make space for other projects, maneuver long stock through table or bandsaws, or get the boat out of the shop entirely, the more easily I can move the boat, the smoother the work goes.
To meet this need, I designed and built my own mobile boat stand, one that keeps the boat steady, even during aggressive tasks like sawing, drilling, or sanding, and can support the boat whether it is upright or upside down.
Designing a mobile boat stand
Four pivoting cradle arms support the boat and can be adjusted to fit the shape of the hull. Even if one arm is folded down to permit access to a particular area, the hull will remain stable, supported by the three remaining arms. When folded down, the arms must span the maximum beam of the hull in order to support it, upside down, on its gunwales.
Drawings and photographs by the author
The arm side plates and cross-beam bottoms are glued to their respective arms and cross beams. All the other connections are made with threaded rod or bolts, making the boat stand adjustable to fit a variety of hull sizes and shapes.
As designed, my stand can be adjusted in length to fit boats from 2500mm (8′) to 6400mm (21′) long, and weighing up to 270 kg (600 lbs). With the dimensions given here, the arms have a span of 1600mm (63″). Because the arms are set apart from each other, they can support a hull, upside down, with a slightly greater beam. The arms could be made a bit longer if necessary.
Locking swivel casters on all four corners of the bottom of the stand provide mobility when free, and steady the stand when locked. I chose 200mm- (8″-) diameter casters that can roll over the 40mm (1 3⁄4″) threshold between my shop and the yard. Smaller casters would be an option if you have no obstacles to moving the stand.
How to make the boat stand
Tools needed
Jigsaw
Drill press (optional)
Sander or sheet sandpaper
Router (optional)
Wrench for tightening nuts
Electric drill
6mm or 8mm drill bit
Hacksaw or angle grinder
File
Metric parts and dimensions. The boat stand can be made from common lumber, indicated here by metric dimensions. North American nominal sizes and imperial dimensions are given below.
Materials needed
Lumber (metric here, imperial in Notes below)
120 x 28mm pine
Purchase 5 @ 2500mm
Cut:
2 @ 2500mm sides
2 @ 1070mm crossbeam bottom flanges
1 @ 1000mm middle crossbeam
8 @ 370 x 90mm arm side plates
90 x 40mm pine
Purchase 5 @ 2500mm
Cut:
2 @ 1000 crossbeams, web
4 @ 620 arms
2 @ 300 x 40 supports for middle crossbeams
70 x 20mm pine
Purchase 2 @ 2500mm
Cut:
8 @ 450 arm supports
Wood glue
The length of the cradle can be adjusted by means of the series of holes at the narrowed ends of the sides. At each corner, the caster, cross-beam bottom, and side are all connected by threaded rod cut to length or bolts of the required size.
While you can buy bolts for the fastenings, I cut threaded rod to length and screwed a self-locking nut with a washer onto each end. The M8 threaded rods should be measured to fit the various locations on the boat stand and cut to length during installation.
With padding on the arms, the finished mobile boat stand is ready for use.
The wood
Cut all the wood pieces to the required lengths. A chopsaw is particularly well-suited for this task, though an electric jigsaw or hand crosscut saw can also be used. Both the jigsaw and the handsaw, as well as a bandsaw, can also be used for narrowing the ends of the side pieces.
Mark the holes to be drilled before rounding the edges. The mounting plates for the casters can be offset 28mm in from the ends of the crossbeam bottoms if you are not equipped to drill the edge-to-edge holes through the ends of the side pieces.
The arms have angled inboard ends to allow them to pivot closer to horizontal. For any rounded ends, a compass, jar lids, and other round objects are suitable for marking the semicircles, which can then be cut using a jigsaw or bandsaw. The newly shaped edges can be sanded smooth.
With the arms set at their lowest angle, the stand can support an inverted boat resting on its gunwales.
Drilling
Drill 7mm holes for threaded rods that connect the frame pieces and 8mm holes for the rods that attach the casters. Be sure to drill the holes as square to the wood as possible. This is most easily achieved using a drill press or a guide for use with a handheld electric drill. A long drill bit is required for the holes through the 120mm width of the side-piece ends. The spacing of the holes will be determined by the caster mounting plates. The threaded rod should slip easily through the 6mm holes; if the fit is too snug, re-drill the holes with an 8mm bit.
Rounding the edges
With the exception of the bottom edges of the crossbeam and the edges of the arms—which will be covered by the crossbeam flange and arm plates—I used a round-over router bit to make the edges easier on the hands when I’m moving the boat stand around the shop.
Gluing
Each crossbeam is assembled from a vertical web and a horizontal flange. The web is centered so that the flange extends beyond the ends of the web equally on both sides. The flanges can be temporarily secured to the web with screws after the glue has been applied.
Next, glue two arm plates to each arm. A 6mm threaded rod inserted through the holes in both arm plates will prevent them from shifting while the glue is setting. After the glue has cured, check whether the assembled arm fits over the web of the crossbeam. If it doesn’t, the thickness of the web can be reduced a little by sanding. If the holes do not align exactly during assembly, re-drill them.
Casters with large wheels can roll over rough ground. Thus, the mobile stand—with boat—can be moved in and out of a shop in order to raise a rig or profit from natural light.
The two support blocks are glued and screwed in the middle—length and width—of the side rails. Space the screws toward the ends of the blocks so they won’t interfere with the crossbar’s fastenings.
Assembly
To assemble the structure, first connect the assembled arms to both crossbars. Then bolt in the supports. The threaded rod at the top of each support will get a wing nut so the angle of the arms can be adjusted by moving the supports’ rod along the row of holes without the need for any tools.
Next, the casters are installed to the ends of the crossbeams, each with the two inboard bolts. The two outboard bolts are then used to attach the side pieces along the row of holes to best accommodate the length of the boat. Finally, the center crossbar is placed on the two support blocks and securely bolted into place.
A bit of padding on the arms will help prevent marring the paint or varnish of a newly finished hull.
Sebastian Schröder lives near Leipzig in southeast Germany and sails in the nearby lakes of Neuseenland as well as farther away in the Baltic Sea. The boat seen in the above photographs is his Blekingsega, which he reviewed for Small Boats in September 2024.
Measurements for creating a mobile boat stand in the U.S.
Notes by Christopher Cunningham
Imperial parts, nominal lumber sizes, and measured dimensions
2×2
Center crossbeam supports: 2 @ 12″ (can be rip-sawn from a 12″ length of 2×4)
1×4
Crossbeam bottom flanges: 2 @ 46″
Center crossbeam: 1 @ 42″
Arm plates: 8 @ 14 1⁄2″
1×3
Arm supports: 8 @ 18″
Hardware (fastenings zinc-plated steel)
For casters
Hex bolts 5⁄16″ × 18 threads per inch (tpi). (Some mounting brackets for smaller casters may have round holes for 1⁄4″ bolts. If the holes for the bolts of either size are elongated, they will accept carriage bolts for easier mounting.)
8 @ 1 1⁄2″
8 @ 5″ (if the casters are not installed under the side pieces and fastened through it, these bolts would also be 1 1⁄2″)
Nyloc (nylon locking) nuts
16 @ 5⁄16″ × 18 tpi
Washers
16 @ 5⁄16″
When we’re building or restoring boats, the difference between a pleasant or a miserable day in the shop often comes down to the effectiveness and quality of a hand tool. Whether we are stripping out an old interior or scraping freshly cured glue during new construction, the Titan 17007 Pry Bar and Scraper Set is a favorite in our small-boat shop. Titan, based in Kent, Washington, has been around since 2001 and specializes in hand tools and tools for the automotive trade. While designed for automotive work, the 17007 set is equally useful for small-boat building, finishing, and restoration. It includes three stainless-steel bars of different lengths: 5 1⁄2″, 7 1⁄4″, and 9 1⁄4″. Each bar is the same shape: the straight end has a beveled chisel edge that can be wedged into tight spaces; the curved end has a sharp scraper edge. The varying sizes of the bars add to their versatility.
Photographs by the authors
Whether prying or scraping (as here), the smallest of the three bars is useful for reaching into tight spots.
For prying, the 9 1⁄4″ Titan is ideal when working on larger pieces such as removing a rubrail or releasing a plank, while the smaller bars are useful in tight spots when, for example, removing frames or thwart supports. All three bars are rigid enough to provide substantial leverage without flex and have smooth, wide, bent necks that distribute pressure while not marring the surrounding wood. Thanks to the thin profile we can slide the bars under tight trim pieces, and pressure is distributed evenly without leaving large divots in the surface beneath.
Each bar also features a nail-puller hole, the perfect size for easing out stubborn nails or rivets in larger planks. We have used them with success on old square nails and stripped-out screws, when we will pry the fastening just a little, pull it straight out the rest of the way, and then repair the hole with a bung.
The scrapers’ sharp edges have stood up well to many hours of use and have not yet needed resharpening.
The scraper ends of the bars are perfect for removing paint and varnish from old boats, and for scraping off drips of cured epoxy and other adhesives during new builds. The 5 1⁄2″ bar is ideal for reaching into tight corners, around frames, and under seat risers. It is also useful when working on the interior concave face of planks, where the corners of a wider bar would tend to dig in. The larger bars are effective when scraping off old coatings on large flat surfaces and their straight ends are ideal for “creeping” under a layer of fiberglass to remove it without digging in and gouging the wood substrate, or to separate strakes, when the tool’s larger surface area spreads the force and reduces breakage.
The Titan 17007 tools are razor-sharp with a mirror finish right out of the package. We recently used all three bars when removing decades of old coatings from our Bahama Dinghy. After hours of work, the bars’ edges were as sharp as when we started.
The Titan 17007 set includes three bars of different lengths and widths. Fabricated in stainless steel, each had a razor-sharp edge and mirror finish right out of the package. They are rigid enough to provide considerable leverage when used as pry bars.
There are similar bars on the market, but often they are made of carbon steel which, in an environment where salt air and humidity are constant threats, can succumb to surface rust overnight. Being of stainless steel, the Titan bars remain corrosion-resistant, ensuring that you won’t accidentally transfer rust stains onto unfinished wood or light-colored coatings, and their long-lasting mirror-smooth finish makes them easy to clean.
Reasonably priced, the Titan 17007 set has become one of our workshop essentials, and having already used the bars extensively, we believe they will survive years of prying and scraping. Whether we are stripping out an old interior or carefully aligning planks during a new build, these bars provide the control required. This stainless-steel trio has earned its place in our tool chest.
Audrey and Kent Lewis mess about in the Tidewater region of Virginia. Their adventures are logged at smallboatrestoration.blogspot.com.
The 17007 3-Piece Stainless Steel Pry Bar and Scraper Set from Titan is available from many hardware stores and online, with prices ranging from $18 to $25. Titan scrapers are also available individually.
Is there a product that might be useful for boatbuilding, cruising, or shore-side camping that you’d like us to review? Please email your suggestions.
For more welcome additions to your boat or workshop, reviewed by Audrey and Kent Lewis, see:
Boatbuilders are occasionally faced with tasks that require shaping wood into complex, often decorative, shapes that require taking up the skills and tools of sculptors. Rasps are essential for shaping things like stemheads, tillers, oars, paddles, rudder blades, and centerboards. These simple tools haven’t changed much over the centuries—Michelangelo would have used something similar—but recently there have been a few interesting departures from the norm, such as the American-made Wood Shaping Rasps from Kutzall.
Available in two sizes—8″ and 6″—the Kutzall wood rasps are available in coarse and fine finishes. They are half rounds. The 6″ rasps, seen here, are 11″ long overall, 5⁄8″ wide, and 1⁄4″ thick. Each has a soft plastic grip 5″ long, and a cutting surface that is 5 7⁄8″ long. The coarse Kutzall weighs 6.8 ounces, the fine 6.3 ounces. I could find no information about the material used in the core of the rasps, but a magnet indicates some kind of steel.
Photographs by the author
Both 6″ Kutzall rasps—coarse above and fine below—have teeth made of tungsten carbide, a compound that may not be as hard as a diamond but is much tougher.
The Kutzall rasps’ teeth are tungsten carbide applied in a random pattern. Each tooth is shaped like an onion, with a spherical base and a jagged point for an apex. The coarse rasp has, by my count, about 24 teeth per inch (tpi), while the fine has about 36. By comparison, my conventional 12″ half-round rasp has 6 tpi, an 8″ version has 8 tpi, and the ends of my 10″ four-in-one hand rasp have 13. Unlike the teeth on those rasps, the Kutzalls’ teeth aren’t angled in one direction, and can cut forward, backward, and even laterally.
I put the rasps to work on several wood samples—spruce, pine, Port Orford cedar, western red cedar, ash, oak, locust, and ipe (a Brazilian hardwood)—and test projects, two oars and a horn cleat. The soft handles provided a comfortable grip, and the teeth cut both soft and hard wood effectively without excessive clogging. When using a rasp I often put my left hand on the business end and apply a few wraps of tape around the teeth to protect my fingertips. Tape is not necessary with either Kutzall rasp, which both offer a comfortable non-slip grip for my left hand.
On the coarse Kutzall rasp, the random placement of the teeth leaves some gaps, but these do not affect performance. On the top row, the jagged points on top of the spheres are visible. The lines in the background are 5mm apart.
Compared to my conventional rasps, the Kutzall coarse rasp would be considered a medium. It didn’t cut as fast as my 8″ or 12″ rasp, but neither did it fray the wood as rasps tend to do. The Kutzall has a few slightly taller teeth that make a slightly deeper cut than those adjacent, but following up with the fine rasp leaves a uniform cut with no noticeable grooves.
I had to remind myself that the teeth cut in all directions, and that I could maintain firm pressure on both push and pull strokes. I counted strokes and examined depths of cut, and—maintaining constant pressure—cut twice as fast as when I worked in just one direction.
The fine Kutzall rasp has closely spaced teeth with points at slightly inconsistent heights, but despite this, the tool cuts a fairly smooth surface. The lines in the background are 5mm apart.
Kutzall says that the two rasps are “Made of tungsten-carbide for incredible durability,” and that “they will outlast 100× conventional abrasives.” That seems reasonable. My tablesaw blades with tungsten-carbide teeth seem to last forever. With either Kutzall rasp, I was able to press as hard as I could while working ipe—near the top of the Janka wood hardness scale, and the hardest wood I have in the shop—with no ill effect on the teeth.
Like any tool, the Kutzall rasps will have their best chance at a long and productive life if treated well. In my shop, unfortunately, tools do get dropped on occasion, sometimes onto the concrete floor. To see how well the new rasps would hold up to such a fumble, I dropped the coarse one, twice, from chest height. I let it fall at an angle so that it hit tip-first, where the teeth are most vulnerable. Each impact detached a single carbide tooth. Because of the random distribution of the teeth there were already a few gaps in the rasp’s surface, so a single missing tooth isn’t an issue. For best performance, rasps and files should never be stored loose and in contact with each other or other tools.
My conventional half-round rasps are decades old and showing some wear on the teeth. I often wrap tape around the working end to protect my fingers while using one with both hands.
Kutzall lists three methods for cleaning the rasps. For the work I’ve been doing with them, using a wire brush—brass is okay, steel is better—was the most effective and quickest method. A file card, with its very stiff bristles, worked well too. Kutzall also recommends soaking overnight in “solvent capable of breaking down your clogged material (mineral spirits, turpentine, or acetone work well).” I’ve been working with wood alone (except for some epoxy-glue lines and squeeze-out) so have had no need for soaking and prefer the immediacy of a wire brush. I was intrigued by the third recommendation—using a propane torch to burn away clogged material—but it wasn’t an effective method for me. While the myriad spiky carbide teeth can tolerate the heat, they make the rasp a very effective heat sink. I played the torch flame over some blonde spruce fibers and they didn’t even scorch to brunette, let alone char to a raven black. Yet the rasp’s business end was made too hot to touch and had to be dipped in water to cool down before I could use the tool again. I’m happy to continue using a wire brush.
I’ve been impressed by the Kutzall rasps. The durability of the tungsten-carbide and omni-directional cutting action are a significant development for these age-old shaping tools.
Christopher Cunningham is the Small Boats editor-at-large.
The fine and coarse 6″ (11″ overall) Wood Shaping Rasps by Kutzall are available from the manufacturer as well as The WoodenBoat Store for $46.95; 8″ versions are available for $57.95.
Is there a product that might be useful for boatbuilding, cruising, or shore-side camping that you’d like us to review? Please email your suggestions.
Further reading
For a different type of rasp, see Christopher Cunningham’s review of Shinto Rasps.
and for tips on how to sharpen rasps and files see how Christopher Cunningham uses acid with success in Sharpening Files.
After 33 years in the Canadian Army, Jim Peverley was ready for a challenging retirement project. He had grown up with boats. His father bought the family’s first boat—a 12′ cedar-strip, fiberglassed skiff with oars and a 2-hp Johnson outboard—when Jim was just six, and from a young age Jim was allowed to take the boat out on his own to explore Lake Wendigo, a small body of water in the Timiskaming District of Ontario northwest of Ottawa, where the family had a cottage. The experience introduced a sense of freedom that can only be found by a boy in a boat. Family boats grew in size—first there was a bigger cedar-strip boat, then an aluminum skiff, and somewhere along the line, a houseboat—but the original skiff never left, and, indeed, Jim still has it, albeit stripped of its hardware and definitely no longer seaworthy. But, despite his early experiences, the nomadic life of a career soldier was not compatible with boat ownership until—finally—Jim and his family landed in Ottawa and he realized he was going to be staying for good. That was when he bought his “forever boat”—an 18′ cedar-strip runabout. But before long his thoughts had turned from simply owning a boat to building one.
Photographs courtesy of Jim Peverley
Jim built his Oonagh in the garage. Space was tight but he made it work. The makeshift shop wasn’t heated, so most of the work was done during fall and spring when the temperatures were warmer.
Jim’s first boatbuilding project was a Warren Jordan–designed Newt. An 11′ 3″ double-paddle canoe with a 30″ beam and 40-lb weight, the Newt was an ideal first-time build. But, wanting also to learn to sail, Jim soon added a ketch rig, and created what he describes as a “tiny sailing canoe.” Looking back, he says, “It wasn’t a very good sailboat, but I just wanted to see if I liked sailing. Turns out I did!” Several years later, even as he continued to enjoy the Newt and its somewhat challenging sailing qualities, Jim also built a Dave Gentry–designed skin-on-frame Wee Lassie canoe, stretched from the original 10′ 6″ to 11′ 6″.
Then, in 2020, at the height of the Covid pandemic, Jim began considering a more ambitious build. He was, he says, looking for something more substantial, a boat that wasn’t just for singlehanding but which he could use for family sailing with the grandchildren, maybe even for some camp-cruising on the waters around Ottawa or on Lake Wendigo (where the family still has a cottage). His wish list was neither long nor complicated. The boat must sail, be relatively stable, large enough to accommodate two adults or one adult and two children, but small enough to be built in Jim’s garage. He settled on the Oonagh, an 11′ 8″ lugsail pram designed by Doug Hylan and described on the Hylan & Brown Boatbuilders website as “a fine boat for family sailing, fishing trips, or just an evening row with the kids.” It could have been designed just for Jim.
All the seats—foredeck, ’midship thwart, and after deck—double as built-in lockers, giving the boat a good deal of storage space and minimizing clutter. The bow and stern lockers also provide buoyancy. In his first season Jim hadn’t decided how to latch and seal the ’midship seat lids in order to keep everything contained and dry if he should ever capsize.
Oonagh is available for home building from plans or a CNC kit from Off Center Harbor, and there’s a series of how-to videos also presented by OffCenterHarbor.com. Jim decided to go ahead and order the kit, which is when the first complication arose. Because of the pandemic and the associated cross-border travel limitations, Jim discovered he couldn’t get a kit from Maine. He reached out to Off Center Harbor which, in turn, helped him source a Canadian company that could CNC-cut the kit’s plywood parts. Jim placed the order. “The only difference in my kit compared to the Off Center Harbor kit,” he says, “was that I had to cut the bevels for the scarf joints.” Then he discovered that the registration holes that would have been cut in the Off Center Harbor kit, to ensure alignment of the planks, were also missing. The Maine-based company helped out again, and shipped some Mylar patterns that Jim could use instead.
With every build there are milestones: finishing the hull, turning it over, completing the fit-out, applying the paint and varnish, and then the day when a boat first emerges into the driveway. Raising the sail for the first time, Jim keeps an eye on the halyard lead. The standing lug rig has a single halyard, sheet, and downhaul.
A standard Oonagh kit comprises only the plywood elements of the hull; everything else, says Jim, was built from scratch following the plans and using materials he sourced himself. It was, he says, a good hybrid process, but he was grateful for the video series: “I’m not sure my boatbuilding skills would have been adequate without that additional instruction,” he says. And, indeed, he enjoyed the challenge of finding the materials. “It was a pleasant search through many suppliers—Fairwinds Fasteners in Rhode Island for all the fastenings, Douglas Fowler in upstate New York for the sail, rudder-mounting hardware and keel half round from The WoodenBoat Store in Maine, oars and oarlocks from Barkley Sound Oar and Paddle in British Columbia, and the epoxy, paint, and rope from a local marine chandlery. It says something about the boatbuilding community,” he says, “that every supplier was a pleasure to deal with and very responsive to my needs.”
The Oonagh has two rowing positions, making it a versatile boat for multiple passengers. On the day of launching, Jim put THISTLE through all the paces: sailing, rowing, and even doing some rudder-sculling to get her from the public launching ramp to the family dock.
And then there was the wood. For the hardwoods Jim used in the keel, skeg, and rails, he found what he needed at a local specialty lumber store, but for the spars he had to look elsewhere. “Early in the build I started haunting the ‘two-by’ section of the local lumber store in search of pieces long and clear enough to make the spars. One evening I found a piece of spruce 2×10, 12′ long, and almost knot-free. Grabbing that and running for the cash register with my future mast in hand felt like a big win.” On a subsequent visit to the same store he found a 2×12 piece, similarly clear and straight-grained. But, he says, it had “an orange hue, which led me to believe a piece of Douglas fir had found its way into the shipment of spruce.” It would serve for the yard and boom.
Sailing singlehanded Jim sits in the bottom of the boat aft of the thwart. But, he says, there’s plenty of room for passengers, and he looks forward to going out with his grandchildren this summer.
Jim built the boat in the garage alongside his home in Ottawa. Progress was slow but steady. The project was protracted, he says, partly because having no heat in the workshop during the long, cold Ontario winters meant he could do little between fall and spring. Then came the post-retirement contract work and other distractions that kept him away. And, each summer, he and his wife left Ottawa and headed to the lake cottage to use the boats they already owned. If he’d had heat over the winter months, and no other commitments, Jim believes he could have built the boat in a year. As it was, it would be four years to the day between receiving the kit and launching.
Jim has sailed THISTLE in wind strengths up to 25 knots, and she has handled them all. In light airs she glides along, and if the wind drops too much Jim moves from the bottom of the boat to the ’midship thwart and rows home.
September 1, 2025, THISTLE slipped into the waters of Lake Wendigo. “The weather was glorious, although the winds were a bit on the light side,” recalls Jim. “The trip from the launching ramp to the family dock was in flukey, light airs that required a bit of rowing as well as some sculling with the rudder to get there. But she didn’t leak.” Since that quiet day, Jim has used THISTLE in all kinds of weather. She has sailed, rowed, been out on a day “when the wind was gusting 25 and THISTLE flew along at over 5 knots, according to the GPS on my watch.” He is, he says, thrilled with the results of his labor. “Building a boat is all about correcting the various mistakes you make along the way. I didn’t build THISTLE to yacht-like standards, but she’s sturdy and pretty and will see much use in coming years both for myself and for my granddaughters. I discovered that building the boat was itself a fun and challenging journey that, in retrospect, was as rewarding as I anticipate sailing her will be.”
Jim’s glad he didn’t build from a more complete kit, as it allowed for some individual additions—somewhere in THISTLE is a bronze screw taken from the boat his father bought when Jim was six—but he’s already talking about building a second boat and isn’t averse to the idea of a kit. “I have the plans for a Footloose sailboat from Jordan Wood Boats, but there are also a couple of kit boats that I like the look of, like Bill Thomas’s Fox Canoe. So, who knows? There are so many boats!”
Jenny Bennett is editor of Small Boats.
Do you have a boat with an interesting story? Please email us. We’d like to hear about it and share it with other Small Boats readers.
For more designs from Hylan & Brown, see:
Beach Pea, a double-ender based on the Maine peapod type, by Matthew P. Murphy.
The Point Comfort 18, a marine-plywood outboard skiff with the lineage of a Chesapeake deadrise skiff, by Robert W. Stephens.
The Ben Garveys, a range of stable, marine-plywood boats for work and play, by Mike O’Brien.
The microBootlegger is an elegant, cedar-strip boat that is a joy to paddle and draws compliments every time I take it out. Designed by Nick Schade of Guillemot Kayaks for use on small lakes or sheltered bays, it was inspired by a 1924 mahogany speedboat named BABY BOOTLEGGER as well as by Henry Rushton’s double-paddle canoes. Nick calls it a “roomy, efficient tandem kayak,” but I usually propel it with a single-bladed canoe paddle. Most people who ask me about the boat are equally confused as to whether it’s a kayak or canoe, and I use both terms for it.
Building the microBootlegger was my initial foray into boatbuilding, and the choice of this design was as much due to its stunning classic styling and aesthetics as to the fact that it can accommodate a second paddler and/or a small child or two to share the paddling experience.
The slightly raked forward bow and stern stems accented in quilted maple against the dark cedar, along with the contrasting maple waterline strip, give this canoe hints of the early 1920s mahogany speedboats. People have asked if the canoe is old and have remarked that it looks like a Chris-Craft or “the Rolls-Royce of canoes”—nice reinforcement for a first-time builder, and a compliment to the creativity and style of Nick’s design.
Adam Eckhardt
The rounded transition between the hull and deck, known as a rolled sheer, is a feature created in 1924 by George Crouch when he developed the Baby Bootlegger, a speedboat powered by a 220-hp aircraft engine.
The canoe is built using standard cedar-strip construction, a process which is covered well in numerous books and other resources. I purchased Nick Schade’s book, The Strip-Built Sea Kayak, which walks a builder through every step of the cedar-strip process from building the strongback to finishing touches. He also includes a great chapter on hull design and performance, and how to choose the right boat for your needs.
There are several ways to begin building your microBootlegger. You can purchase plans directly from Guillemot Kayaks or contact Chesapeake Light Craft to choose from numerous options, from plans only to complete kits with everything you need including materials for seats, foot braces, and hardware. I chose one step up from plans only and opted to get the CNC-cut forms, which saved me quite a bit of time and ensured accurate shaping.
I recalled seeing pictures of a version Nick Schade built himself out of mahogany strips and wanted a similar look for my boat. To get as close to that mahogany runabout look as possible, I decided to select my own lumber locally rather than order pre-milled strips. I already owned a tablesaw and router, so milling the strips involved only a minor incremental investment in bead-and-cove router bits. While CLC offers pre-milled bead-and-cove strips in light, medium, and dark shades (and you can specify your color preference), I also wanted to use sequential strips—especially on the deck for the most uniform color and grain.
The microBootlegger is a simple build as it does not have any particularly tight curves more common on performance kayaks. That said, as an absolute beginner in the strip-built process, there was one feature that I struggled with—the rear deck-to-side section, which is supposed to have a somewhat sharp transition similar to a hard chine.
As I laid the strips in this area, I was confused about how to manage that sharp transition, and ended up rounding-over the corners of the forms a bit so the strips could actually twist around from deck to side. If I had bothered to think just a bit more about this, contact Nick, or even post a question or two on a forum, I could certainly have accomplished this feature according to the original design.
In the end, my boat is more rounded in this area which looks just fine to my eye. Since I built my boat, Nick has posted a series of videos of an entire microBootlegger build on YouTube, detailing every step.
Builders of cedar-strip boats have many opportunities for customizing them, from artful selection of alternating color strips or grain patterns to actual art in the form of inlay or marquetry. What drew me to this design was its classic form and uniform mahogany color, and I didn’t want to deviate too much from that, but I did want to include some accent on the fore and aft decks. I settled on contrasting maple strips on the decks—understated, but something to give the otherwise blank bow and stern decks some visual structure.
This being my first build and my first time using fiberglass and epoxy, my boat, at 49 lbs, ended up probably heavier than what more experienced builders could achieve. I had turned on a space heater in my basement before applying fiberglass and epoxy to the inside hull. Rising temperature results in expanding air, causing bubbles to form between the wood and the fiberglass skin as the epoxy hardens. While not a structural concern, it was unsightly, and I had to spend extra time sanding and filling.
The bow and stern have quilted maple stems, which are a large part of the visual appeal. I used maple edge banding in the coaming buildup for some accent stripes. I also made two other modifications. First was to add some holes in the bow and stern that I could use for carry loops and as tie-down points while transporting on a roof rack. I did this by epoxying a maple dowel into an oversize hole, then drilling out a smaller hole leaving a cylinder of maple for reinforcement and wear protection. Second, I thought a flag seemed perfectly appropriate, so I epoxied a block of maple on the underside of the stern deck, drilled a hole, and reinforced it with an oval brass plate. I finished my microBootlegger after logging 177 hours over seven months.
Adam Eckhardt
The nearly plumb bow and stern keep the waterline long, just 2.4″ short of the overall length, to keep the potential top speed high.
The cockpit is quite roomy and can be organized in a variety of ways. Nick Schade’s carved wooden seats are stunning. At the time, I did not have the confidence to attempt something so complex. I’ve made a couple of variations of seating since launching but have settled on a carved minicell foam seat in the rear, with foam insulation on the back coaming to provide back support, and a caned seat with collapsible backrest for the front paddler or when paddling solo. It rests directly on the bottom of the boat with leather patches at the four corners to eliminate scratching and noise. This seat can be easily installed and slid forward or aft as needed to distribute weight for various conditions.
I have not yet installed foot braces. I was apprehensive about drilling holes or gluing mounts inside of the hull without knowing where I would want them, and I’ve just grown accustomed to paddling without them. The cockpit is so roomy, I can raise one or both knees and sit almost cross-legged. The ability to adjust position like this makes longer paddles more comfortable.
Adam Eckhardt
While the cockpit is designed for two, a solo paddler can move a seat and backrest just aft of center to achieve proper trim.
Flotation is provided by removable, press-fit, 3″ minicell foam bulkheads reinforced with plywood on both sides. They are not glued in, as suggested in The Strip-Built Sea Kayak. I put them in place, then pound them in with my fist. The fit is airtight, so much so that I had to add tiny air relief holes near the top to allow me to seat them. Without these, the increased air pressure would push them out like a piston. I’ve tested the bulkheads by intentionally flooding the kayak, and they remained in place and kept both the bow and stern nearly dry except for a few teaspoons of water. Making the bulkheads removable allows for greater gear storage options. If I spent more time paddling offshore in open water, I might consider gluing them in with sealant.
Adam Eckhardt
The aft bulkhead is made of minicell foam shaped to seal the stern compartment with a press fit. The wood face provides extra rigidity and the two handles easy removal of the bulkhead for access.
After having paddled this boat for 12 years, I can honestly say that its performance is wonderful and exactly meets Nick’s goal of “a roomy, efficient tandem kayak for cruising a lake or exploring a bay.” At first, I struggled a bit with tracking, and thought that I would want to add a rudder or skeg. However, after having built and paddled some more traditionally shaped canoes, I see that the microBootlegger’s tracking/maneuverability is right in the sweet spot.
Being just over 17′ long and having a nearly full-length waterline, it tracks strongly compared to my more traditional canoes, yet not so much that it is overly difficult to turn. Most of the time I paddle solo and have become quite adept at maneuvering. The only time I struggle is when there are stronger winds. At 17′, and with that large vertical bow, it can be a challenge to keep microBootlegger going straight when the wind picks up. However, it does indeed handle waves very well. I’ve had it on four of the Great Lakes, in the Detroit River as well as the Gulf of Mexico where waves have come completely over the bow and very little water made it into the cockpit.
While it doesn’t have the initial stability of a recreational canoe, it balances initial and secondary stability well. When inexperienced paddlers use this canoe, I generally help them with entry and exit, but once they’re under way they feel stable and safe. My caned seat supports the paddler right about at the surface of the water.
I usually paddle with a group of friends who use recreational kayaks 10′ to 14′ long. My boat has a significant advantage in efficiency, but they struggle much less than I do in keeping on course in wind. Another factor may be that, although my boat is a tandem with a design displacement of 459 lbs, I always paddle it lightly loaded, with only about 190 lbs onboard.
If I were to take the microBootlegger on extended cruises, I would want to add a rudder or retractable skeg. However, for the paddling I do I am entirely happy with the tracking built into the microBootlegger design without adding the extra weight and complexity of a skeg or rudder.
Another unexpected benefit of the microBootlegger design, specifically its voluminous bow and stern compartments and the large open cockpit, is that it serves marvelously as a cartop cargo carrier for camping gear. I carry it right-side up on the roof rack and made a cover for it to protect cargo from rain, wind, and sun. I carry lighter-weight items in it—sleeping bags and pads—as well as the usual paddling gear, a huge benefit since I have a small car.
Jason Eckhardt
The cockpit provides enough room between paddlers to keep them out of each other’s way.
Lifting the microBootlegger to the roof rack is not too difficult with my shorter vehicle’s roof height, and I regularly load and unload it myself. It would likely require two people to put it on a larger SUV.
The microBootlegger is a fantastic boat for a first-time builder, as well as a superb performer appropriate for novice as well as more experienced paddlers looking for a comfortable cruising canoe with loads of capacity. If you will likely paddle solo and/or lightly loaded most of the time, and don’t want the tandem capability, the Solo or Sport versions might be better options for you to consider. Regardless of which microBootlegger you choose, you’ll enjoy the roomy comfort, easy paddling, and the compliments on its beauty and style every time you take it out.
Adam Eckhardt of Flatrock, Michigan, has been a maker of things all his life. He has built a Yostwerks Sea Pup and three Cape Falcon 66 canoes, which he reviewed in the December 2021 issue.
The layout drawn by Roberts seems about right for general use.
The rugged and able 16′ San Juan outboard-powered dory combines beauty with practicality—and it is easy to build. David Roberts designed the handsome hull and built it as the Nexus 16′ Dory. Now, for the first time, this highly regarded builder has been persuaded to offer the original plans for sale.
The high bow and deep sides of this dory will shed rough water and give you a feeling of confidence out of proportion to the hull’s length. Go birding in the sloughs, camping on the islands, or salmon fishing in the straits. This boat is up to the job.
Simple, traditional plywood construction
The straightforward, traditionally framed, sheet plywood construction is both educational and simple. And, unlike stitch-and-glue boats, this dory allows you a choice of glues, compounds, and fastenings. Epoxy is great goop, but not every builder can, or wants to, work with it.
You’ll make the dory’s sides from 6mm plywood and its bottom from 9mm or 10mm plywood. The solid timber for stem, frames, rails, etc., can be oak or mahogany or any acceptable local woods. All of the wood in this boat can be bent into place cold; no steaming or soaking is necessary.
If you wish, the San Juan Dory’s bulkheads can be eliminated, resulting in a clear, unobstructed interior. Simply make frames Number 2 through 8 according to the chine-gusset system shown for frame Number 3.
San Juan Dory profile.
Despite its great strength, this San Juan dory weighs only 300 lbs. Motors of 10 hp to 20 hp will move it along at speeds ranging from 12 knots to 18 knots. Although a 20-hp engine is most appropriate, you’ll find that a 15-hp engine will provide satisfactory performance; however, a motor of 10 hp will prove marginal at best. Because it is so easily driven, there’s no sense in hanging engines of more than 20 hp on this hull.
Styles come and go, but there’s always room along the waterfront for rugged, practical boats like this dory. This is a boat you’ll keep, not a boat that you’ll sell.
San Juan Dory design plans include: outboard profile, lines plan, offsets, construction and arrangement plans, and seven pages of specifications. WB Plan No. 123, $75.00.
At speed, the San Juan Dory planes but does ride high in the bow. The weight of a passenger seated forward brings the bow down without noticeably affecting the speed.
Nick Ivancovich
As designed, the San Juan Dory has fixed benches connected to a wide thwart near the stern. However, the layout can be adapted.
The Norwegian Pram comes to us from long ago. While the lines of this example were taken off a modern descendant, the method of construction and the hull shape are directly linked to Norse small craft of the first millennium.
Simon Watts has made a career of teaching people to build lapstrake small craft, to help them learn ancient skills and to keep those skills alive. From his many years of experience he’s created a thorough step-by-step guide to building this pram nearly as it would have been done a thousand years ago, and peppered the manual with entertaining stories, fascinating history, and invaluable tips for working with wood in traditional ways. Many of these tips apply more generally (than to only this pram), and they make a great education for any builder.
Bill Nielsen
General arrangement for the Norwegian Sailing Pram
This pram features a distinctive Scandinavian shape—a long narrow bow that makes for a great rowing boat, a sweet-towing tender, and an able craft in a sea or a beach-surf. She’ll have greater carrying capacity than a pointy-nosed boat of the same length, and she’ll be more maneuverable under oars or the optional lug rig.
She is built right-side-up on a strongback. Her central “keel” plank is bent to the appropriate rocker and then lapstrake planks are added to each side until the sheer is reached. In traditional Norwegian building the planking would be completed “by eye” before any transoms or frames are installed; Watts has given us the shapes of the transoms and of two temporary molds to help us along when our skills aren’t up to the level of ancient Norse builders. However, the planking is still completed before sawn frames (a technique that predates Scandinavian knowledge of steam-bending) are installed against the inner planking.
This Norwegian Pram plans and design book set is a wonderfully accessible way to explore the world of truly traditional boatbuilding. All the support you could want is included in the booklet, and there’s even a section on boatbuilding with kids with invaluable guidance for helping to pass this knowledge on to yet another generation. Plans and instruction booklet are digital (PDF) format.
When my father was in his mid-80s and my mother was approaching 80, they made a decision that had been a long time coming: They would give up on the small sailboats that had been a constant joy throughout their married life. It was not an easy choice—for almost 50 years they had never been without some daysailer or other swinging to the outhaul that was tied off to the riverbank below the house. In the winter months, the boat would be hauled out and stored on its trailer in the garage. My father was always busy with multiple projects around the house and yard, so it was Mum who took on the boat’s winter maintenance. But summer sailing was a shared love, and one that was hard for them to give up. Nevertheless, the time had come.
Jenny Bennett
By the time my mother was nearing her 80s and my father was well into his, their traditional gaff-rigged sailboat, somewhat tippy and with a complicated rig, had become more work than they wanted to handle. Had there been a simpler, affordable alternative on the market, they would have continued sailing for several more years.
There were many aspects to their boating that had, slowly but surely, become too difficult. They had never owned a boat longer than 16′, but all had been traditional, gaff-rigged, wooden boats with heavy hulls and complicated rigs for their size. Each spring, the process of launching at the public ramp, stepping the mast, untangling the rigging, bending on the sail, and getting the two-stroke outboard onto the transom bracket and ensuring that it worked, was anticipated with increasing dread. And even when the boat was finally launched and settled on its mooring, the summer outings became fewer and farther between: pulling the boat in and out and raising the sails had become hard work, and the effort took away much of the pleasure of a gentle afternoon’s sail. When they at last announced to the family that they were selling the current sailboat and buying a fiberglass rowboat with an outboard—so the grandchildren could still get down the river to the bay and the local beach—they did so with heavy hearts.
Remembering my parents and their difficult choice, I was particularly interested when I heard about the Old Salt, which Larry Cheek has reviewed for us in this issue. Some years ago, Josh Colvin and Brandon Davis got together to design a new boat. They had recognized that for many older people stepping a heavy mast or maintaining balance in a tippy boat can be major challenges and can cut short a long and happy relationship with sailing. But they also believed that older age shouldn’t mean having to give up or even settle for second-best or poor performance. Furthermore, they wanted to create a boat that would appeal to more than just the old folk. As they say on their website for Kit Boats Co.: “the best boat is the one you actually use. As we progressed, we realized: everything that makes this boat perfect for older sailors also makes it ideal for kids or new sailors. Who wouldn’t want a boat that’s simple, safe, and ultra-stable? … Simplicity, comfort, and capability appeal across all age groups.”
Christopher Cunningham
Small sailboats can keep us sailing into older age, especially if the rig is simple and the process of launching and recovering is straightforward. While Brandon Davis’s Scout 10 (seen here) answers the need for simplicity and a light-weight rig, his Old Salt design, conceived in collaboration with Josh Colvin specifically for older sailors, offersthe same advantages but in a boat with greater size and stability.
The boat they have come up with is a stable 15′-long catboat with an unstayed rig, lightweight mast, and good performance. And, with an optional asymmetrical spinnaker set to a bowsprit that still doesn’t require any standing rigging, the Old Salt should appeal to a younger crowd, making it the boat that ages with the sailor. Sadly, the Old Salt came along too late for my parents, but I feel sure it would have suited them to a T.
Brandon and Josh are not the only ones looking for ways to help people stay active and doing what they love. Also in this issue we are introduced to an extraordinary organization offering hope through fishing. Also in this issue we are introduced to an extraordinary organization running retreats for men living with cancer. Since 2003, Reel Recovery has been offering hope through fishing. It was founded by Stewart Brown, a fly-fisherman who was, himself, suffering from cancer. He wanted to share with others the “healing serenity that fly-fishing had offered him.” While most of the retreats offer fly-fishing in the shallows (sometimes wearing waders), the retreat described in this issue by Greg Hatten involved getting afloat and fishing from boats. In late August 2025, Greg joined four other volunteer river guides to introduce 11 men affected by cancer of various types and stages to the joy of fly-fishing from a small drift boat. Greg has written for Small Boats before and has shared with our readers his wooden drift boat, PORTOLA, built in 2011–12, a replica of a 1962 Mckenzie River drift boat. For the past 12 years Greg and PORTOLA have run many a river together, starting with the Colorado, but his new article suggests no outing has been more fulfilling than his gentle weekend on the Umpqua River with fishermen Pete and Mike.
A few years ago, I discovered Building a Strip Canoe by Gil Gilpatrick. Of the eight canoes described within the book, one design immediately stole my heart: the 14′ Puddle Duck. Gilpatrick describes it perfectly: “A canoe you can leave hidden at a favorite small stream or pond that will be there for you to use without any preparation. The Puddle Duck is small and light enough for an average person to handle solo both in and out of the water. It has the capacity to carry two people, if necessary, though it’s better suited to one handler with the tools and gear for the day’s work or play.” It was exactly what I needed. Too many times have I stood at the water’s edge, wishing I had something light and simple that would let me get out there without fuss—and here it was, the Puddle Duck. I decided to build two, one for me and one for my partner, so we could glide side-by-side on quiet outings.
Building the Puddle Duck
Gilpatrick’s book takes a builder through every step of construction, and beyond. The first three chapters cover safety; the difference between the eight models (for which there are plans); and the preliminary setup, including building the strongback, setting up the stations, and cutting the strips. As Gilpatrick says, while the strips may not come into play until later, “sawing and machining them is a dusty job that is necessary to have behind you before the fun stuff—the building—begins.” The middle four chapters cover the build of the canoe, including planking and fiberglassing the hull, installing the gunwales, decks, and yoke, and making and installing the seats. Finally, there is a chapter on how to repair your canoe in the event of it being damaged later in life, and another on how to make paddles. The whole book is written in a friendly, informative, and easy-to-follow style with many photographs and step-by-step instructions that offer encouragement to the novice but won’t irritate a more experienced builder. Full-sized plans for eight canoes and a paddle are folded and tucked into the back of the book.
Photographs by the author
The Puddle Duck canoe is strip-planked over seven station molds and two stem forms. For the most part, I needed only tape to hold the strips in place as the glue cured. Occasionally, however, I did use drywall screws, especially at the stems, to temporarily fasten the strips to the station molds. Such screws can sometimes become set in the glue and break when being backed out. To avoid this, I hold a soldering iron to the screw to warm it as I work it out. Using this method, I have never had a fastening break as I remove it.
My first task was to take the full-sized plans for the Puddle Duck to a print shop in order to get them scanned. From there I digitized everything into AutoCAD—partly to understand the lines better, and partly so I could CNC-cut the station and paddle molds. The plans can, of course, be used as patterns for cutting pieces in the home workshop in the traditional manner. Whatever the construction technique, having precisely cut molds makes the building process easier and much more enjoyable.
I made my strongback from peroba rosa, a Brazilian wood known for its resistance and low warping— the book recommends either 2×6s or plywood—and made the seven station molds and two stem forms from inexpensive plywood. For the strips I used milled Brazilian marine cedar, a local substitute for the western red cedar Gilpatrick recommends. It’s a beautiful wood, rich in color, but denser and about 53% heavier than its North American equivalent.
Stripping the hull was pure meditation—each strip, carefully milled to a bead-and-cove profile, clicked into place like a puzzle piece. The book states that common carpenter’s glue can be used to glue the strips to each other—as the hull will be fiberglass sheathed—but I used waterproof Titebond III. Most of the strips fell beautifully into place and didn’t need to be stapled. I occasionally taped some strips in place, and others were temporarily fastened to the molds with drywall screws. At the stems I alternated port and starboard overlaps for extra strength. On the bottom of the hull, where the two sides come together, I switched from bead-and-cove strips to square-edged, which made it easier to bring the strips together.
After the strip planking is complete the hull is sheathed. Gil Gilpatrick recommends using 6-oz fiberglass cloth. I chose to use Kevlar, which has greater tensile strength but is nearly opaque, so I chose to paint the hull rather than give it a clear finish.
Once the hull was fully planked and the outside was faired and smooth, it was time for the sheathing. Instead of Gilpatrick’s recommended 6-oz fiberglass cloth, I used 6-oz Kevlar fabric. Kevlar is lighter than fiberglass with an equivalent tensile strength and is far tougher against rocks and scrapes, which will give peace of mind for years of adventures. I also find that it folds more easily to the contours of a hull. But there are some trade-offs: Kevlar is opaque—which meant I had to paint the outside of the hull instead of varnishing it to show the wood—and it is difficult to cut. In order to achieve the clean cuts required, I bought a pair of serrated scissors specifically designed for Kevlar and other aramid fabrics. Finally, Kevlar doesn’t wet out as readily as fiberglass, and when sanded it produces stubborn fuzz that is almost impossible to fully eliminate and finish smoothly. I dealt with the fuzzy spots by applying a fairing putty made from epoxy mixed with microballoons, spreading it widely to avoid creating high spots, and then sanding it back carefully.
On the inside of the canoe I followed Gilpatrick’s directions and used a 6-oz fiberglass cloth, which offers good protection and allowed me to finish the interior with a clear polyurethane varnish, to protect the epoxy from the sun and to expose the beauty of the wood.
In another departure from the original design, I added a surfboard fin box near the stern. When preparing to paddle on long flatwater stretches I install the fin prior to launching; it provides laser-straight tracking. But for quick, nimble turns in tight streams, I leave it off. It has given us the best of both worlds and only required a small internal reinforcement—a 15mm-thick piece of hardwood epoxied to the inside of the hull directly above the fin’s external bracket.
Gilpatrick gives detailed instructions on how to build and cane the seat. I was so happy with the result that I made a second seat so two people can paddle the canoe in comfort. The small block seen here beneath the seat is a backing reinforcement for the surfboard fin box that I fastened to the underside of the hull.
Although Gilpatrick recommends a hardwood for the gunwales, I used Brazilian cedar, which was readily available and, while not a hardwood, is much stronger than North American red cedar. I cut slots into the inwale to reduce weight, to allow water to drain when the canoe is stored upside down, and because I like the look of scuppered inwales. The decks, also of Brazilian cedar, have a gentle camber that blends into the gunwales. Shaping the compound curves here was tricky, but the result is genuinely elegant. A single, centered yoke, as described in the book, balances the canoe well for comfortable carrying solo and gives the hull athwartship stiffness.
I decided to make my own caned seat and was dreading the challenge: the cane looks classic and beautiful, but the weaving was new to me. But, thanks to Gilpatrick’s excellent instructions, it was surprisingly straightforward, and the finished look is stunning. So stunning, in fact, that I added a second seat for two-person comfort.
The inside of the canoe is sheathed in fiberglass, allowing for a clear finish to display the beauty of the cedar-strip planking. I made paddles following the detailed instructions and plans published in Gilpatrick’s book.
Finally, as the book includes an entire chapter on making paddles—including plans—I couldn’t resist making two of those as well. Gilpatrick recommends cedar for the paddle blades with hardwood strips to strengthen the shaft. I used marine cedar for the blades and freijó (Brazilian walnut) strips for the shaft—strong yet flexible, freijó is a perfect local stand-in for cherry. I made one paddle with the thicker (1 5⁄16″) shaft shown (but not described) in the plans and a second thinner one (1 1⁄8″) as described in the book. The first offers rugged toughness, the second graceful lightness. I followed Gilpatrick’s advice and reinforced the blade tips with epoxy-impregnated nylon cord, an important step that should not be skipped.
Puddle Duck on the water
Because of my use of Brazilian marine cedar, this first Puddle Duck is heavier, at 29kg (almost 63 lbs), than the book’s 20kg (45 lbs) estimate, but still light enough to hoist onto a shoulder and carry to the water.
When stepping into the canoe, there is good initial stability and the hull has little or no tendency to tip. Once I’m settled, the caned seats are extremely comfortable, and at just the right height to maintain the canoe’s stability. Even though the Puddle Duck is designed for solo use, two adults plus a picnic cooler fit with room to spare, and the canoe becomes extremely stable. On our maiden voyage we paddled for six hours, stopping only for a short picnic—there were no numb legs, and no discomfort. With both of us paddling in rhythm we cruised at a relaxed, all-day pace of 3.8 knots, hitting 4.2 knots in some more spirited bursts. With the skeg installed, the canoe tracks well and needs few corrective strokes—without the skeg, she spins on a dime.
The Puddle Duck is everything Gilpatrick promised: light, nimble, stable, and utterly delightful on quiet waters. Building it was a rewarding project, suitable for novice builders as well as experienced ones, and now we have our own canoe ready and waiting for the next adventure—big or small, whenever the mood strikes.
Oliver Ilg is a German-born Brazilian entrepreneur, former automotive executive, and passionate wooden-boat builder. He launched his first boat in 1987, a 53′ steel sailboat. In 2003, he founded Sterling Yachts in Brazil, producing modern-classic fast trawler cruisers, and in 2008 began building small wooden boats after hours. He continues to build boats in his backyard and, while he has plenty of high-end power tools, he is especially proud of his meticulously maintained hand planes.
Puddle Duck Canoe Particulars
LOA: 14′ (4.27m)
Beam: 34 1⁄2″ (0.88 m)
Depth: 12″ (0.30 m)
Stem height: 20″ (0.51 m)
Designed weight: 45 lbs (20 kg)
Is there a boat you’d like to know more about? Have you built one that you think other Small Boats readers would enjoy? Please email us your suggestions.
To read more about Oliver and his boats, see:
Home-Built Elegance, how Oliver reimagined and built his own Duck Trap Launch
Duck Trap Wherry, an elegant rowboat designed by Walter J. Simmons
and for another canoe from Gil Gilpatratick’s book:
Lunch break for the Old Salt build class is ending, and James Thomas, 78, offers a suggestion: “They ought to supply this class with little roll-out pads so we can all take our naps on the shop floor.”
It’s a joke, of course. The six guys in this two-week class, hosted by the Northwest Maritime Center in Port Townsend, Washington, have been working like demons, rarely taking breaks except for bathroom and lunch; if it weren’t for the blizzard of white hair and silver whiskers, you’d never guess that their average age is 71. If progress on the five boats under construction has fallen a little behind instructor Joel Arrington’s hopes, it’s not because the builders are slacking. As anyone who’s ever built a boat knows, it always takes longer than it’s supposed to. The builder’s vintage doesn’t matter.
Apart from the prototype, completed in December 2025, these are the first Old Salts to be constructed. The design is a product of several years of collaboration between Joshua Colvin, editor of the online magazine Small Craft Advisor; and Brandon Davis, owner of Turn Point Design, a CNC fabricating firm in Port Townsend, Washington. This class is both an opportunity for a few amateur builders to get first crack at building and owning one of the boats, and a proving ground for Brandon to work out any kinks in the kit. I’ve dropped in just to evaluate and report. I’ve built three sailboats from kits by three different designers, so have a solid baseline for comparison.
The idea powering the design was to create a small sailboat that would address every issue older sailors are likely to worry about; issues that might make us give up sailing or boating altogether. Prime among these worries is safety: Few of us seniors look forward to an unplanned cold-water swim, so the Old Salt’s catboat proportions—15′ 3″ length with very generous 7′ 6″ beam—provide a platform with tremendous form stability. The cockpit is very deep, very long, very wide, and unencumbered by a centerboard trunk, which is offset and integrated into the starboard seat. Rarely, if ever, should anyone have to leave the cockpit. There’s even a concave belly-fitting cutout in the after edge of the cuddy-cabin roof in which to stabilize a body when standing at the mast, fiddling with the rigging.
Lawrence W. Cheek
The Old Salt’s hull is made up of seven marine-plywood hull panels stitched together with zip ties. The panels are predrilled with holes for the ties, ensuring neat alignment. The three holes in the starboard bottom panel, as seen here, are for the offset centerboard slot. Rather than a full-length hole, which could weaken the panel before assembly, there is one long and two short guide holes to facilitate the accurate cutting of the slot after the hull is fully assembled.
Another issue that often overwhelms older sailors—and many younger ones—is everything that falls under the heading “fuss.” James Thomas tells me that he owns a popular sloop about the same size as the Old Salt, and is frankly tired of the rigging rigamarole. “It’s getting fairly physically challenging to get the rig set up for sailing,” he says. “It takes at least an hour. I expect to be able to rig this boat in 10 minutes.”
This is, however, a kit boat, so there’s necessarily a mountain of fuss to be summited before one ever sees the water. This class is just base camp. Joel has structured it as mass production, with all hands working on a single process such as ’glassing interior hull panels for all five boats at once. Nevertheless, months of solo work await the participants after they trundle the hulls home, and Joel and Brandon will take a few weeks to write the instruction book, incorporating what they’ve learned from the class.
Building the Old Salt
The Old Salt is a stitch-and-glue design, with seven marine-plywood hull panels to stitch together with zip ties over a building jig. One smart innovation is Brandon’s strategy to help the builder accurately shape the boat at the bow, a chronic problem with plywood boats. Designers like compound curves, and plywood fiercely resists them. Brandon programmed the CNC cutter to furrow a field of parallel kerfs halfway through the panels so they can be coaxed into the designed curves, and the building jig includes an unusual female mold outside the hull to accurately establish its shape. The curves are then permanently locked into the plywood by filling the kerfs with epoxy.
Another welcome innovation is the use of tabs or outlines scribed into the plywood panels for the placement of bulkheads and other panels—something easy enough for a CNC cutter to do, and not intended as an insult to the kit builder’s intelligence. “If you have to measure something to figure out its placement, you’re going to get something wrong once in a while,” Brandon says. “I feel like the more we can do to design the kit so no one can put anything together wrong, the better it is.” He adds: “Fewer phone calls to us, too.”
Lawrence W. Cheek
The forward ends of the garboards have pre-cut shallow kerfs along their inside faces to facilitate a compound curve. Once the bottom and garboard panels are stitched together, each garboard is screw-fastened to the concave side of a female mold to force a transverse curve into the kerfed area. The kerfs will later be filled with epoxy to make the compound curves permanent.
Experienced builders who enjoy the challenge of fabricating some parts themselves—spars, cabin parts, trim bits—might feel bereft when unpacking an Old Salt kit, because it will include nearly everything except the hardware, fiberglass, and epoxy needed to build the complete boat. The mast is a two-piece, tapered carbon-fiber tube. There is no boom, gaff, or yard. The cabin sides and coaming are puzzle-jointed to each other into an extravagantly curvaceous wraparound ellipse, fabricated as a 4mm plywood-and-foam sandwich. The ellipse would be a virtuoso feat for an amateur to fabricate from scratch, likely resulting in a bonfire pile of three failed attempts before getting it right, but the kit should make it relatively easy. And it crowns the boat with a brilliant character piece.
There are moments in the build where there is room for creativity: at the sheer builders are left to devise their own rub strip or ornamental sheerstrake. The cockpit sole can be customized to provide character; Brandon built the prototype with strips of cork carpet underlay separated by black caulking. And if I were building my own Old Salt, I would be tempted to add some form of handrails on the cabintop. While I wouldn’t plan any excursions to the foredeck, I found the rain-slicked seat tops hazardously slippery when boarding and disembarking.
Most Old Salt builders will come up with their own amendments. Few forces in the universe are stronger than a boatbuilder’s impulse to alter a designer’s plans. Indeed, on the final day of the building class, Brandon and Josh have been brainstorming the design of an optional camp-cruising tent over the cockpit, and before two minutes of talking have passed it is morphing into a convertible tent/bimini. The Old Salt design, fortunately, seems secure and solid enough to absorb a good deal of customization, even overcomplication (albeit this would go against one of the principal goals of the design).
Lawrence W. Cheek
Brandon Davis and Joshua Colvin designed the Old Salt for older sailors, hoping to keep them active on the water for as long as possible. With this demographic in mind, all the running rigging is led into the cockpit so there should never be a need for a skipper or crew to go up on the foredeck to tend to the sail. The mast, a two-piece carbon-fiber tube, is light enough for one person to raise or lower singlehandedly. It is guided through the gate in the top of the cuddy cabin and lowered down to the mast step on the cabin sole. Once raised, the mast requires no standing rigging, and if a crew member needs to go forward to reach it, there is a rounded cutout in the overhanging aft edge of the cabin roof into which they can lean for stability.
The Old Salt on the water
Early this year, during one of the Old Salt sea trials, Brandon committed a geezer-type error that inadvertently affirmed the boat’s suitability for its intended market. After motoring from the boat launch ramp onto Port Townsend Bay, he prepared to bend on the sail and discovered that the halyard’s working end was marooned at the masthead, 20′ up. No matter: the mast weighs all of 15 lbs, so he plucked it out of its step, lowered it, retrieved the halyard, and re-stepped the mast. And so a blooper that in other boats would have provoked a gale of curses and an unhappy trip back to the dock was fixed in half a minute on the water.
On the final scheduled day of the building class we’re conducting another sea trial. Class members have been eager to try out the prototype boat, but the weather, typical for March in Puget Sound, Washington, hasn’t cooperated. Every day has delivered rain, no wind, too much wind, or some combination of them all. Today it’s still raining, and there’s less than 5 knots of wind, but given what we’ve been seeing, it’s a go.
The prototype previews its beamy form stability when we board at the dock. Even though we’re not filling the water ballast tank today, it bobs no more than you’d expect with a 20’ ballasted keelboat. Brandon says he hasn’t even used the water ballast in trials yet; he predicts he’d wait for wind at 11 or 12 knots before filling the baffled bilge tank. If needed, the 50-gallon tank can be filled underway after slowing the boat, but emptying the ballast at sea would require hand pumping.
Though it’s more than a foot beamier than a standard king-sized bed, the Old Salt motors easily out of the marina with the ePropulsion eLite electric outboard drawing only 300 watts of its dainty 500-watt rating. It’s another preview, hinting that the hull is plenty slippery, and that even with only 3 or 4 knots of wind, we might enjoy some actual sailing today.
Brandon Davis
The Old Salt’s single sail has one halyard and one sheet—keeping fuss to a minimum. With no boom—cutting out the possibility of being whacked over the head when raising or lower the sail or during a less-than-controlled jibe—the sail gains its shape from six full-length battens.
And we do. The first thing that’s apparent is that Brandon and Josh have hit their objective of delivering fuss-free simplicity. There are only four lines to tend: halyard, downhaul, mainsheet, traveler. The helm is feather-light and neutral at these low wind speeds; earlier tests report just a touch of weather helm when the wind picks up. With three aboard in this light air, the boat doesn’t care how we configure the human ballast. Shuffling crew between sides when tacking would be wise and useful in 10 or 15 knots, but an imprecisely choreographed boogie would not result in disaster. And there’s no boom to whack anyone’s skull. When Josh takes the helm, in fact, he executes a jibe without bothering to haul in the mainsheet or alert the crew. Brandon, a little surprised, observes, “This boat is going to help people develop bad habits.”
My gaff-rigged cutter also sails very well in light air, but it takes a fandango of tweaking and tending seven sail-control lines to tune it to the conditions. The Old Salt, with its extremely generous 152 sq ft of sail, does at least as well with simple management of mainsheet and traveler. While it looks to me like the sail doesn’t set with enough camber to be an efficient low-speed wing, it’s hard to argue with results: we’re seeing 3–4 knots of boat speed in 3–5 knots of wind. In stronger wind, one could juggle the mainsheet and traveler and coax the battened sail into the ideal shape for the conditions.
Because we have a lot of 3–5-knot days in Puget Sound, I would make one change: with its internal battery, the recommended eLite will run for a maximum of 90 minutes at half power. With a larger, though still modest, 1-kW electric outboard and a higher-capacity battery, the motor could be employed for extended light-air motorsailing, running quietly enough that it would be easy to forget it’s on duty. This would also make Old Salt more useful for camp-cruising, which its expansive cockpit and cuddy certainly encourage.
A worthy sailboat for old salts
The two-week build class ends with boats a long way from completion. Hulls are stitched together with bulkheads in place, with some fiberglass tape reinforcements on the joints but many more to go. At home, the builders can look forward to: exterior fiberglass sheathing, sanding, cockpit sole, deck, cuddy cabin, coaming, cockpit seats, more sanding, paint, trim, hardware, and rigging. Simple though the Old Salt may be, and with a kit refined well beyond the usual, building a boat is still a long, twisty, arduous trail.
Brandon Davis
With an aft-led mainsheet and offset centerboard, the generously-sized cockpit is uncluttered. The tiller, along with the rudder blade’s lifting lines, is led through a cutout in the transom, as is the ePropulsion eLite electric outboard, so that everything can be controlled from within the safety of the cockpit.
I urge Brandon to give me a brutally honest time estimate, and he tells me he figures an amateur would need 500 to 700 hours. He and Josh believe the market will bring out a lot of customers who just want to go sailing and are in a hurry to start doing it, so eventually there will be a production boat to sell, possibly all fiberglass.
It would be fine to offer that alternative—not everyone has the time and space to build a boat. But anyone with the resources and the barest acquaintance with a drill and sander should undertake the build. It will literally make you a better person—more capable, more confident, more able to manage the emotional tidal cycles of discouragement and elation that life deals us in every arena of endeavor. It’s never too late for old salts to build character.
Lawrence W. Cheek is a journalist, frequent contributor to Small Boats, and serial boatbuilder. He lives on Whidbey Island, Washington, and since 2002 has built two kayaks and five sailboats.
The Old Salt kit will be available from May 2026. Basic kit: $4,200; carbon-fiber mast: $1,500; sail, tanbark or white: $1,500. For more information and details, visit Kit Boats Co.
Is there a boat you’d like to know more about? Have you built one that you think other Small Boats readers would enjoy? Please email us your suggestions.
Shrimper 19, a trailer sailer from Cornish Crabbers
For more inspirational “retirement” boating stories, see:
The BETTY Effect, a retired couple downsize from a sloop to a row boat and discover the joys of exploring the Thames River under oar.
Building a Goat Island Skiff, in the Upper Rhine valley, Gerald Trumpp learns to build a boat so he can learn to sail a boat.
The Tuesday Group Builds a Boat, a group of volunteers, all retirees, follow a retiring museum restoration manager, and get together once a week to build a Crandall Flyer.
Two men sat side by side on the forward seat of my drift boat, not knowing if this might be their last fly-fishing trip on Earth. We were in the heart of southwestern Oregon, where a river of crystal water tumbles out of the Cascade Mountains, cuts through the greenery of Douglas fir, cedar, and hemlock, and takes on a lake-like quality as it nears the Pacific.
At the Big K Guest Ranch in the Elkton Valley, about 35 miles inland from where the Umpqua River flows into the Pacific Ocean, these men, along with nine others—all with various forms of cancer—had come together from across the Pacific Northwest to fish the river and confront their own mortality. They were taking part in a retreat created by Reel Recovery, a nonprofit organization that supports men battling cancer. Such gatherings have been held across the United States since 2003 and for more than 20 years have helped “men cope with the impact of cancer by introducing them to the healing powers of the sport of fly-fishing.” Like so many before them, these men had come together to bond in a brotherhood that would form around the campfire and on the river as they pursued fish on a fly and escaped, at least for a while, the demons in their bodies and their minds. Along with five other volunteers, I was there to row a boat, help them catch fish, and listen to their stories.
I have rowed thousands of river miles, and can attest to the healing power of moving water. The mind is soothed as the current courses and rolls over the basalt riverbed in a tango of waves and ripples headed out to sea. It’s mesmerizing, and when you’re on the water in a boat that rides the highs and lows of rapids, you can feel the rhythm of the river that’s been flowing for thousands of years—and will continue to do so for thousands more. The realization that the mountains, the rocks, the river, and nature are eternal—and that we are not—is humbling in a most comforting way.
Greg Hatten
Downstream from the confluence of the upper North and South branches of the Umpqua River, some 35 miles from the Pacific Ocean, the waterway slows and widens and, at times, resembles a calm lake.
The Umpqua River is one of the Pacific Northwest’s most treasured waterways. It’s a river with personality. Here, rugged wilderness, haunting cultural history, and remarkable natural beauty intertwine. Stretching from the high reaches of the Cascade Range to the breakers of the Pacific, the river’s journey creates an ever-changing landscape that feels both timeless and alive. For generations, its forests, canyons, waterfalls, and wildlife have drawn travelers, hikers, anglers, and anyone with a passion for the outdoors, each to discover something personal in the river’s tranquil flow and power. Two separate branches—the North and South Umpqua—carve their own paths through the Cascades of Oregon before coming together to form the main Umpqua.
High in the dramatic upper reaches, cold crystal water rushes over boulders, and mist rises between narrow canyon walls. The scents of wet earth and conifer mingle together as the astonishingly clear water reveals salmon and steelhead on their annual pilgrimage up the river to spawn. The shimmering surface of the river glows with shifting hues of emerald and sapphire, reflecting the dense green canopy above, and in the summer sunsets, the waters turn crimson and burnt orange. At first light of early morning, shafts of sunlight pierce through the trees and illuminate the river in bright streaks, creating an atmosphere both surreal and sacred.
Downstream from the confluence of the north and south “Uppers,” the river widens and slows, revealing a kinder, gentler personality. Winding through rolling foothills, oak-covered plateaus, and fertile valleys, the landscape is dotted with ranches and vineyards. Here there is a mosaic of landscapes where deer, heron, and river otters explore the riverbanks, and ducks dart at breakneck speed above the surface of the water, their momentary presence contributing to the sense of peaceful coexistence that defines the river valley.
Of vests and hope
On the morning of the retreat’s first day, as we drifted downstream aboard PORTOLA, my replica 1962 river dory, my two passengers, Mike and Pete, began to open up. Mike admitted he was so apprehensive about sharing his cancer story with strangers that in the days leading up to the retreat, he had searched for reasons not to come. I asked him if he had run out of reasons or did someone give him a nudge? It was, he said, a combination of both: his wife had supplied just the right encouragement when she suggested “it would be good for me to be with other men suffering from cancer, to hear their stories, listen to their trials and know their fears.” Then there was the chance to fly-fish the Umpqua (Mike had never fly-fished before), which provided just a little more horsepower to the nudge.
Mike surrendered to the call, pulled out of his driveway, and headed south. Now, he was one of the most eager of all the campers. He had even brought along a vintage fly rod, which he described in detail to Pete and me. But, he admitted, he had left it in his cabin, opting instead on this first day to use the “high-end” rod provided by the retreat sponsor, Orvis, a Vermont-based maker of fishing and hunting equipment.
Greg Hatten
Reel Recovery fosters an atmosphere of sharing, both within the immediate group and with participants past and future. Each of the fishermen wears a vest that has been signed by previous participants, and will be worn by others in the future. Once the men have added their own signatures to the vests, they each sign the Reel Recovery weekend banner.
Pete, on the other hand, was an experienced fly fisherman and this river had been on his bucket list for years. He had just never quite got around to it.
The two had met for the first time that morning, at the pairings party, when they drew my boat.
All the men taking part that weekend wore faded Orvis fly-fishing vests, which they neither owned nor would get to keep. Upon their arrival at the lodge they had each picked out a vest from a stack on a table next to the fishing gear they would also borrow. The price for using this loaned gear was to write their name, date, and the location of the retreat on the vest with a black permanent-ink Sharpie. Their inscriptions would join those of all the other cancer patients who had participated in similar retreats over the years and had worn the vests before them. They are known as “legacy vests” and each tells a story of cancer, brotherhood, courage, vulnerability, and mortality—a sobering visual reminder of how many lives cancer continues to affect.
Greg Hatten
Before heading to the river for their first day of fishing, the men tested their fly-fishing gear and got a few casting tips from the guides.
Hope is one of the primary elements in any fly-fishing experience. There is hope that the river level will be right; hope that a hatch will be in full swing; hope that the man-made flies in the box match the living flies on the surface of the water. With every cast, a fisherman pins his hope on a delicate fly and knows that with the right presentation he might entice a fish to strike so he can actually feel the take, experience the tug, and participate in the struggle of a fish with its life on the line. When things go right, he will bring a wild fish to hand and admire its beauty before releasing it back to the clear, cool water of the river.
The hope Mike and Pete had of catching a fish mirrored their hope of surviving cancer, but on that day, the fishing triumphed. Instead of obsessing over treatments and medications, they were obsessing about flies, casts, mends, and fish. Fishing takes the mind to a peaceful place in a beautiful setting—it’s hard to think of anything else.
Greg Hatten
They had never met before that morning, but Pete (left) and Mike (right) quickly settled in, familiarized themselves with PORTOLA, and quietly enjoyed the scenery, the fishing, and the companionship.
I had become involved in this weekend’s retreat when a fellow river rat (a good friend of mine) asked me and a few of our mutual river buddies who owned drift boats to volunteer for what he described as a sort of Make-A-Wish event for men with cancer. Most of them had little to no experience in fly-fishing, so we would be called upon to be both patient and knowledgeable and, in a very short window, teach enough of the basics of fly-casting to fool a fish or two. As a long-time licensed Oregon Guide and member of the McKenzie Guide Association—one of the oldest such associations in the Pacific Northwest—I know the drill and gladly volunteered.
What has cancer taken?
Most of the men at this retreat had prostate cancer. Not Mike: he had a rare and aggressive form of skin cancer called Merkel cell carcinoma (there are only about 3,000 cases diagnosed annually in the United States). But, while he may not have shared the same form of cancer as his “retreat brothers,” the experience of diagnosis, needle poking, instrument prodding, multiple surgeries, and countless radiation treatments (in one two-month stretch, Mike had had 25 radiation treatments) was familiar to everyone in the group.
Also familiar to cancer sufferers is the mental aspect of the disease and the things men, in particular, are reluctant to discuss with anyone other than their personal medical teams. Shielding family and friends from some of the harsh side-effects of treatments and mental anxiety is a by-product of the process and the primary focus of “Reel Recovery.”
“What has cancer taken from you?”
Greg Hatten
While participants experience tough emotional moments through the course of a Reel Recovery weekend, there are also many moments of sheer joy, like this one, when Pete caught his first fish of the trip. He would go on to catch many more.
This was the ice-breaker question posed by the retreat leader and Director of Reel Recovery Terry Hildebrandt on the morning of the first day. The men were asked to wrestle with the question and be prepared to discuss it that evening. And, after a good first day of fishing when the smallmouth bass were aggressive to the fly, Mike and Pete joined the other men in the lodge.
Pete shared that cancer had taken away his “cockiness” and stripped him of his feeling of invincibility. Others said that cancer and chemotherapy and radiation took away their sense of taste, of smell, and brought about pain, nausea, and congestive issues. Answering the morning’s question caused the men to reveal things they didn’t like to talk about—maybe couldn’t talk about—with family or friends or, in some cases, even spouses.
Speaking up in this small-group setting of men who did not know each other required courage and exposed levels of vulnerability that is rare for men, regardless of whether they know each other or not. There was compassion in the room, and it was powerful. Many were tearful, emotionally moved by their own answers as well as those from others around the circle.
Greg Hatten
After dinner and the group discussion in the lodge, the participants headed off to sleep in their cabins, while we “river pal” guides gathered around a campfire to catch up on old times.
It had been a long first day—physically and mentally. After a quiet walk from the Big K lodge to their rustic pine-log cabins, the men crawled into their cozy bunks and slid beneath their Pendleton wool blankets. They were headed to a good night’s sleep, to dream of big fish, and to look forward to a hearty logger’s breakfast, a new question to ponder, and another day pursuing fish in the waters of the Umpqua. My fellow volunteer guides and I headed back down to the river where we had set up our cots and bedrolls right next to our boats on the sandy-rocky shore. For us, unwinding from a full day of rowing meant comfortable camp chairs around a small campfire, catching up with old friends, and sharing a little bourbon from a bottle passed around from hand to hand, before crawling into our bedrolls under the stars.
What has cancer given?
The morning of the second day was bright and cloudless. I stood in the water beside my boat and bent at the waist so that first Mike, and then Pete, could put a hand on my shoulder to steady himself as he swung his leg over the side of the boat and settled onto the bench seat in the bow, facing downriver. The six boats in the party, all brought along by the guest guides, were drift boats, five with aluminum hulls, mine the only wooden one. Drift boats are the preferred craft of almost all river fishermen in the Pacific Northwest. I had brought my Grand Canyon Dory (a decked drift boat I built in 2011), figuring that a boat that had survived two trips down the Colorado River might be appropriate for the occasion.
On a drift boat, both rower and passengers face downriver as the oarsman pulls hard (back-rows) against the current to maintain a downstream pace slower than that of the river. The technique is called facing danger and is the exact opposite of rowing a boat on a still-water lake where you can only see oncoming obstacles by looking over your shoulder. It’s a style that matched perfectly the challenges the men were here to face. Here they would meet their cancer obstacles head-on and would need courageous hearts, stout constitutions, and iron nerves. In a very real sense, all of them were rowing their own personal cancer drift boats facing forward, tackling whatever obstacle cancer threw at them, one challenge at a time.
Greg Hatten
My fellow volunteer guides and I bedded down by the river, near our boats. Sleeping under the stars with a cot, a bedroll, and a wool blanket is one of the perks of the job—as is waking up on a clear morning beside a slow-moving body of water.
The stretch of river we were fishing resembled a lake. The current was slow and there were no real obstacles to avoid. We floated slowly downriver, casting toward the shore, and then rowed back upriver in a series of slow, lazy ovals the size of a football field. Each lap took about an hour unless we found a pocket that was particularly productive; then we would pitch the anchor and post up to take several casts in pursuit of Umpqua fish.
Even though the current was slow, it was relentless; and with three men in the boat plus some gear and a couple of coolers, I was pulling about 1,000 lbs. We took a break for lunch and then fished all afternoon with occasional stops ashore so we could stretch our legs and rest our arms. Without even realizing it, we stopped counting fish brought to hand. We were working to a different scorecard… one that measured time relaxing, time spent connecting with nature, and with each other.
“What has cancer given to you?”
That day’s question was another challenge for the men and required deep reflection to look for any kind of silver lining in the cancer that threatened to kill them. The question had been posed at breakfast but the discussion would, again, take place after dinner, giving the men all day to explore its depths and possibly kick it around the boat with their partner or guide.
Greg Hatten
“Downstream Dave” Weiss, one of the guides, readies his drift boat for another day of fishing.
When Mike climbed into my boat on that second day, he wore his signature vest but had left behind the loaned fishing gear in favor of the vintage rod and reel he had brought from home. He said he’d bought it at an estate sale more than 35 years ago with the intention of taking up fly-fishing as a hobby, but he’d never made the time. Following the success of the first day’s fishing, his singular goal for the second day was to catch a fish with that rod and reel. It had been stored away in his attic gathering dust and now seemed to represent the start of a new beginning: to make time for the small things that give us pleasure and make life just a little more fulfilling. I was so glad he’d brought it.
We pushed off from shore and the boat eased forward as it caught the main current of the Umpqua. As I plied the oars and guided the boat across the river to our honey-hole from the day before, both men let out line and dropped their flies into the current in pursuit of a feisty smallmouth. The boat was filled with hope.
As the flies swung in lazy arcs, Mike felt the tug even before we got to our favorite spot. An aggressive take is always such a startling jolt, comparable to touching an electric fence with just enough shock to instantly get your attention. The fish was hooked tight and the current added a little extra force to the pull. Mike’s antique rod doubled over as he announced, “Fish on!” The smallmouth zigzagged in and out of the current and did its best to find freedom from the hook. At the end of the life-and-death struggle, we slid the net gently under the fish and brought it over the side of the boat. It was healthy and colorful with as many shades of green as the surrounding hills, and after a quick photograph, we slipped it back into the water and watched it swim away.
Greg Hatten
On the second day, Mike caught several fish—like this Umpqua smallmouth bass—using the vintage gear he had bought many years ago in an estate sale.
Over the years, I have guided fishing trips for all types of folks—men, women, children, fathers, sons, brothers, friends, and even folks who started the trip not knowing each other very well. Sometimes (usually with brothers) there is an element of competition in the boat, sometimes an air of exaggerated expertise, often good-natured banter about first fish, biggest fish, smallest fish. Not on this trip: not in my boat. These men were genuinely rooting for each other; there was no competition, no envy, no attitude, just genuine joy in each other’s fishing success, and it was refreshing.
Both Mike and Pete talked a lot that day about the second question that had been posed to them—almost rehearsing what they would say in the after-dinner circle. I listened in silence, honored to row a boat that provided a safe place in which they could wrestle with their thoughts.
Around the circle that night, almost everyone in the group talked about their own mortality and how cancer had caused them to reflect on their life and evaluate their priorities for what time they might have left.
Mike said, “When my cancer progressed to Stage 4 metastatic, I suddenly faced the fact that I might not be around much longer, and it brought me back to being in the moment…every moment I have left.”
Scott Vollstedt
The five drift boats spread out but were never far from each other. Here, one of the participants is landing a tiny smallmouth bass on Scott Vollestedt’s boat, while PORTOLA can be seen farther downriver.
Both Mike and Pete echoed feelings of facing mortality and making the most of the time they had left. Mike said it had given him a better appreciation of and a closer relationship with his wife. He was also amazed by the people who seemed to have entered his life at just the right time, when he’d needed them the most.
Eric, from Washington state, told us his spiritual life and faith had grown stronger. It was a common theme, and many of the men spoke of a peace they hadn’t experienced in a very long time. Their renewed faith, and engagement with prayer, calmed the chaos they felt in their personal battle with cancer. It was another meaningful day, and everyone went to his bunk drained but encouraged by the confessions and conversation.
What will you take with you?
The last day’s breakfast started, as before, with a question, but on this occasion it was for immediate discussion.
“What will you take from this weekend together?”
One of the men spoke up. Dealing with cancer, he said, was like “carrying an invisible backpack that no one else sees. It’s heavy and filled with a lot of stuff that just weighs you down every minute of every day. The Reel Recovery fishing experience has allowed me to take the pack off, set it down in a corner, and take a break from carrying such a heavy load. It’s been a two-day vacation from my problems and has allowed me to enjoy the moment, savor the experience, and appreciate guys who really understand what carrying the cancer pack means.”
Another man summed it up with Tim McGraw’s song—“Live Like You Were Dying”—and many agreed that that was exactly what the experience had encouraged.
Scott Vollstedt
The Umpqua runs slow in this section in late summer, but rowing 1,000 lbs of men and boat for several hours to keep from drifting downstream too fast is tiring. Over a leisurely lunch break, I was happy to relax and cool off in the shallows with fellow guides Jim Whitney (left) and Dave Weiss (center).
In a reflective moment in my boat the day before, Mike had said, “The ability to share my fears and sadness with other survivors who are going through the same or similar thing is priceless. It’s made me a believer in people again.”
All the men spoke of a new band of brothers and close friendships that had developed quickly in the two days of bonding over boating, fly-fishing, and the disease they all shared. Most confided that they had been personally touched by cancer before it attacked them, and they spoke of family members, spouses, friends, and co-workers who had also fought the fight.
For two days, I listened to the men in my boat and around the circle as they shared with each other, and I reflected on my own experience with cancer. In the silent seat of the oarsman, I found myself struggling with the very same questions the guys were answering for themselves. Cancer took my father when I was 15 years old. He was 38 and the father of four. It left a hole in my heart and a void in my life that has never completely healed. He was my coach, my superhero, my example of how to be a man, a husband, and a father, and cancer took him.
In his place, the image of him became larger than life, locked in time and memory. It was a lot to lose at such an early age. While I’ve never wanted to give cancer credit for contributing anything positive to my life, sometimes, when I’m rowing the river alone in my boat, I acknowledge that the disease gave me a desire to live a passionate life, knowing that every day is a gift and every person a blessing. It gave me a perspective on life and death and family that only comes from a personal encounter with mortality in someone you love. Cancer gave me maturity beyond my years and a determination to live life as a grand adventure.
Courtesy of Reel Recovery
Reel Recovery offers weekends filled with hope and joy and purpose, creating brotherhoods among participants who arrive as strangers and leave as friends.
Spending a couple of days on the river with a group of men who knew their time on Earth might be coming to an end soon was something deeply personal. As the rower of the boat, I took away far more than I gave on that weekend of Reel Recovery. Being able to offer a space in my hand-crafted wooden river dory where, for at least a couple of days, these men could pin their hopes on a fishing fly, instead of focusing solely on their cancer and the treatments that may or may not save them, is something I will never forget.
Greg Hatten is an outdoor writer, a consultant for active-consumer products, and a former Oregon Outfitter and Guide who hosts outdoor river adventures in a hand-crafted wooden drift boat pursuing steelhead on the fly. He is a member of one of the oldest guides associations west of the Mississippi—the McKenzie River Guides Association—and has run more than 100 Wild and Scenic Rivers in the Pacific Northwest.
To learn more about Reel Recovery (sponsored by Orvis) and upcoming fly-fishing retreats, contact the organization through its website.
If you have an interesting story to tell about your adventures with a small boat, please email us a brief outline and a few photos.
For more river-boat adventures with Greg Hatten see:
OBSESSION, building, using and repairing a traditional wooden drift boat.
Rogue River, running one of Oregon’s most challenging waterways.
Dories in the Canyon, honoring the boats and the men who saved the Grand Canyon.
A good way to get straight lumber to take curved shapes is to laminate it, gluing several thin flexible strips into a solid curved piece that has great strength without excess weight. Among the many laminated parts I’ve made are roof beams for cruiser cabins, thwart knees for a sailing dory, gunwale-to-gunwale frames for a faering, pivoting frames for a folding coracle, lapstrake canoe stems, and deckbeams for a sneakbox.
The first step in the lamination process is to resaw strips thin enough to bend around the required curves. While a table saw is the best tool for making straight cuts, setting the rip fence a small fraction of an inch from the blade can be dangerous. There are various tools on the market that minimize the risk. For example, a zero-clearance insert—a throat plate that fits around the blade and minimizes the gap between it and the table—is a good start. It will keep thin strips from being pulled down by the blade. There are also shop-made devices that slide into the miter-guide slots so that thin strips can be cut in relative safety without engaging the rip fence, but there’s a limit to how long the strips can be. Long strips can be cut by using a thin-rip table saw jig that sets the width to be cut on the left side of the blade, but this requires resetting the fence for each cut.
Photographs by the author
With the rip fence locked and the blade set to cut a depth of 1⁄8″, a shallow kerf is cut into one side of a 3⁄4″-plywood base, which is then flipped over, end for end, to bring the kerf to the top.
Searching for an alternative method, I found nothing that worked just how I would like, so decided to make a setup based on an online video, altered for more reliable and safer results.
The plywood base is set against the rip fence and clamped in place.
Making the infeed fence is the first step. Take a short piece of 2×4, about 12″ long, and with the table saw trim about 1⁄4″ off one edge to create an accurate right angle and two sharp corners, one of which will make aligning the fence on the base much easier.
When I cut the kerf, I didn’t leave enough room for clamps on the left side of the plywood base, so I anchored its edge with long screws, countersunk to keep from interfering with the stock to be sawn and driven through a scrap of plywood beneath the gap between the saw table and the fence rails.
I had a piece of 3⁄4″ plywood that was a good size for the base: 36″ × 16″. I set my table saw’s fence at 12″ and the blade height at about 1⁄8″ to cut a kerf in the plywood’s best side. Flipped end-for-end and set back against the fence, the kerf established the line along which the blade would cut. With the saw blade retracted, I set the base against the fence and clamped it to the table. Only 4″ of the base extended to the left of the kerf, which I thought would be enough for the lumber I’d be sawing, but that side of the base didn’t lie flat on the saw table, nor did it provide room for another two clamps. To pull the plywood down, I used long screws, set in countersunk holes and driven into scraps of 1⁄2″ plywood spanning the underside of the table and the fence rail.
The saw blade, first completely lowered, is raised while running and emerges from the previously cut shallow kerf. This creates a zero-clearance slot well suited to cutting thin strips.
With the base securely anchored, I turned on the saw and cranked the blade up through the base. It emerged from the kerf right on target. I kept raising the blade until it was high enough to cut through 1 1⁄2″ lumber, the thickest I’ve used for laminating.
Returning to the infeed fence, I drilled 1⁄2″ holes in each end to accommodate 2″ screws to anchor the fence when tightened and to allow a range of adjustment when loosened. Each screw had a washer to capture the screw head and a fender washer to span the 1⁄2″ hole. I screwed the fence to the base and set it parallel to the kerf at a distance of 3⁄16″, roughly the middle of the range of strips I’ve cut in the past. I used a 3⁄16″-thick file as a spacer, and marked the location of the fence on the base by circling a pencil in each hole. I then removed the fence, marked the center of each penciled hole with a punch, and drilled a shallow pilot hole for the screws.
The infeed fence, cut from a 2×4, is secured with screws set in 1⁄2″ holes to allow for a range of adjustment. For a set of 3⁄16″ strips , I placed a 3⁄16″-thick file alongside the fence and positioned its face directly over the right side of the kerf using a small piece of metal plate temporarily positioned in the kerf. The fence was then locked in place with the two screws, each with a washer and fender washer.
The wedge on my jig is cut at an 8° angle. You can use a protractor to establish that angle, but it’s easier to mark one edge of a 2×4 close to its end. Then, 12″ along from that mark, make a second mark 1 3⁄4″ in from the edge. A line drawn between the two marks will create an 8° angle for the wedge.
To serve as an outfeed fence, the wedge that guides strips away from the saw blade is screwed to the plywood base so that it covers the shallow kerf with its face aligned with the kerf’s left edge.
Because the outfeed wedge has a narrow angle and its point is set back from the blade, the strips are kept from bending too much, which would spoil the end of the cut.
I set the wedge on the plywood base with its point just behind the blade and an edge aligned with the left edge of the base’s kerf. This will serve as an outfeed fence. The wedge point does not need to be touching the side of the saw blade, as I have seen in some versions of this jig. By placing the point farther back, the strip will bend less and be under less strain as it moves out and away from the saw.
The point of the wedge stops just clear of the saw’s blade.
The infeed fence (right) and the outfeed wedge (left) ensure that the stock from which the strips will be cut stays straight and aligned as it is guided past the blade.
Using the thin-strip jig is straightforward. The wood is pressed against the infeed fence at the start of the cut and against the wedge’s outfeed fence at the end, providing an unwavering cut from start to finish. As the stock being cut grows narrower and closer to the saw blade, use a push-stick or two for safety.
Even with the slender wedge and its placement back from the blade, the bend in the strip will cause the strip to break away a small fraction of an inch before the end of the cut, often leaving a small tab on the upper corner of the back end. This can be quicky removed later with a stroke of a knife. The stock from which the strips are being cut is always trimmed completely at the end and is ready for the next strip to be cut.
The thin-rip jig cuts strips of practically any length without having to make any adjustments to the fence.
This thin-strip cutting system is easy to make and does its job quickly and effectively. As with any task involving a table saw, take every precaution to use it safely.
Christopher Cunningham is Small Boat’s editor-at-large.
You can share your tips and tricks of the trade with other Small Boats readers by sending us an email.
For more of Christopher Cunningham’s woodshop ideas, see:
Here in Maine, where cold weather lasts five to six months, wearing thermal base layers helps a body stay warm, indoors and out. The key is to find breathable layering garments that fit well and feel good, are easy to wash and a pleasure to wear. Two winters ago, having previously tried, but not loved various lower-priced options—cotton waffle-weave (bulky and baggy), silk pointelle (fragile and lingerie-see-through), cotton-polyester (pill-prone and stinky), and cotton-spandex leggings (clingy with holey knees and rotting elastic)—I was ready to try something different. Preferably a blend of natural fibers, in a subtle color that, if peeking out from under a shirt or pant leg, would not shriek “long underwear!”
Looking online, I found Engel’s line of merino-silk thermal long johns. I ordered their Women’s Thermal Base Leggings in a heather grey, and have enjoyed wearing them so much that I recently ordered their Women’s Thermal Undershirt, a long-sleeved scoop-neck top in a soft slate blue. Made in Germany and sold by U.S. online retailer EcoAble, Engel’s base-layer garments are, from what I’ve seen, beautifully designed and made to fit, flatter, and wear well. They may be a little pricier than other options but are well worth the investment. They offer warmth without bulk, even when wet—a definite plus when your adventures take you near or on the water.
Photographs by the author
Engel’s line of thermal base layers features natural fabrics and classic soft colors. I have the long-sleeved scoop-neck top in Mountain Blue and the leggings in Light Grey Mélange. The leggings have a sleek, snug fit and are long enough to comfortably tuck into a pair of crew socks.
Unlike other leggings I’ve owned and worn, these are sleek and itch-free, warm yet light, and fit like a glove—no sagging or bagging, no riding up or down, no tightness in the seat, calf, or crotch. The snugly warm yet breathable fabric is a lightweight (190 gsm) blend of 70% organic merino wool spun with 30% mulberry silk in a fine-rib knit that stretches and moves with your body and next layer of clothing, or as a stand-alone layer. I may be lucky in being a good fit with their women’s size chart (EU 38–40, S/M; I’m 5′ 6″, 115 lbs, usually a size 6, S, or 36) but can confirm that their garments fit me well and run true to size. Although the leggings gently hug my calves, I routinely tuck the hems into my socks to keep them from riding up under my jeans.
Engel states that the merino-silk fabric’s moisture-wicking properties make its thermal wear ideal for year-round use, and its line of women’s base layers does, indeed, include a tank top, shorter long johns, and a lace-trimmed camisole. The tank ($55.99) and long-sleeved undershirt ($78.99) come in Natural, Black, Dusty Rose, Light Grey Mélange (heather grey), Walnut, Red Mallow, Navy, Copper, Olive, and Mountain Blue; the leggings ($85.99) have a more limited range of colors. The men’s styles include thermal leggings, long-sleeved tops, and shorter versions in Black, Light Grey Mélange, Navy, Copper, and Walnut. The company also makes kids’ and babies’ sizes, so you can outfit the whole family.
The merino-silk thermal base-layer garments are both breathable and odor resistant, and I often simply air them out between wearings. When they need laundering I hand-wash them in lukewarm water, and lay them flat to air-dry. After two winters of regular wear, the leggings have held their shape without any sign of shrinkage, and the fabric is colorfast. The top shows every sign of delivering the same performance.
The merino-silk fabric is breathable, amazingly durable, odor-resistant, and easy to care for: simply air out between wearings, and hand-wash or spot-clean as needed. (After inadvertently getting a few drips of coffee on my new top, I was relieved to find the Mountain Blue fabric is colorfast, so that the spots completely disappeared after soaking in cool water, spot-treating with an enzyme stain remover, and hand-washing in cool water.) The Grey Mélange leggings I purchased two winters ago and wear daily in cold weather are still like new, with no signs of wear. I hand-wash them every week or so in cool/lukewarm water using a mild liquid detergent, roll them in a towel to squeeze out excess water, lay them flat on a drying rack, and they air-dry quickly.
When ordering my long-sleeved top in February, I found EcoAble’s stock low in some colors, and emailed their customer care manager, concerned about availability in this age of tariffs and supply-chain issues. She assured me the lower stock was simply due to it being the end of the season, and that they would be replenishing their inventory. “We’ve proudly carried Engel for many years and absolutely plan to continue offering their products for the foreseeable future.”
Jane Crosen is Small Boats’ proofreader, as well as a mapmaker, editor, and publisher of two cookbooks and historic atlases. When not reading or writing she enjoys paddling, camping, and exploring lakes and ponds in Downeast Maine.
Engel’s full line of merino-silk thermal base-layer garments is available in the U.S. from EcoAble, and in Europe from Engel; prices vary.
Is there a product that might be useful for boatbuilding, cruising, or shore-side camping that you’d like us to review? Please email your suggestions.
For more reviews of cold- (and not so cold-) weather clothing, see:
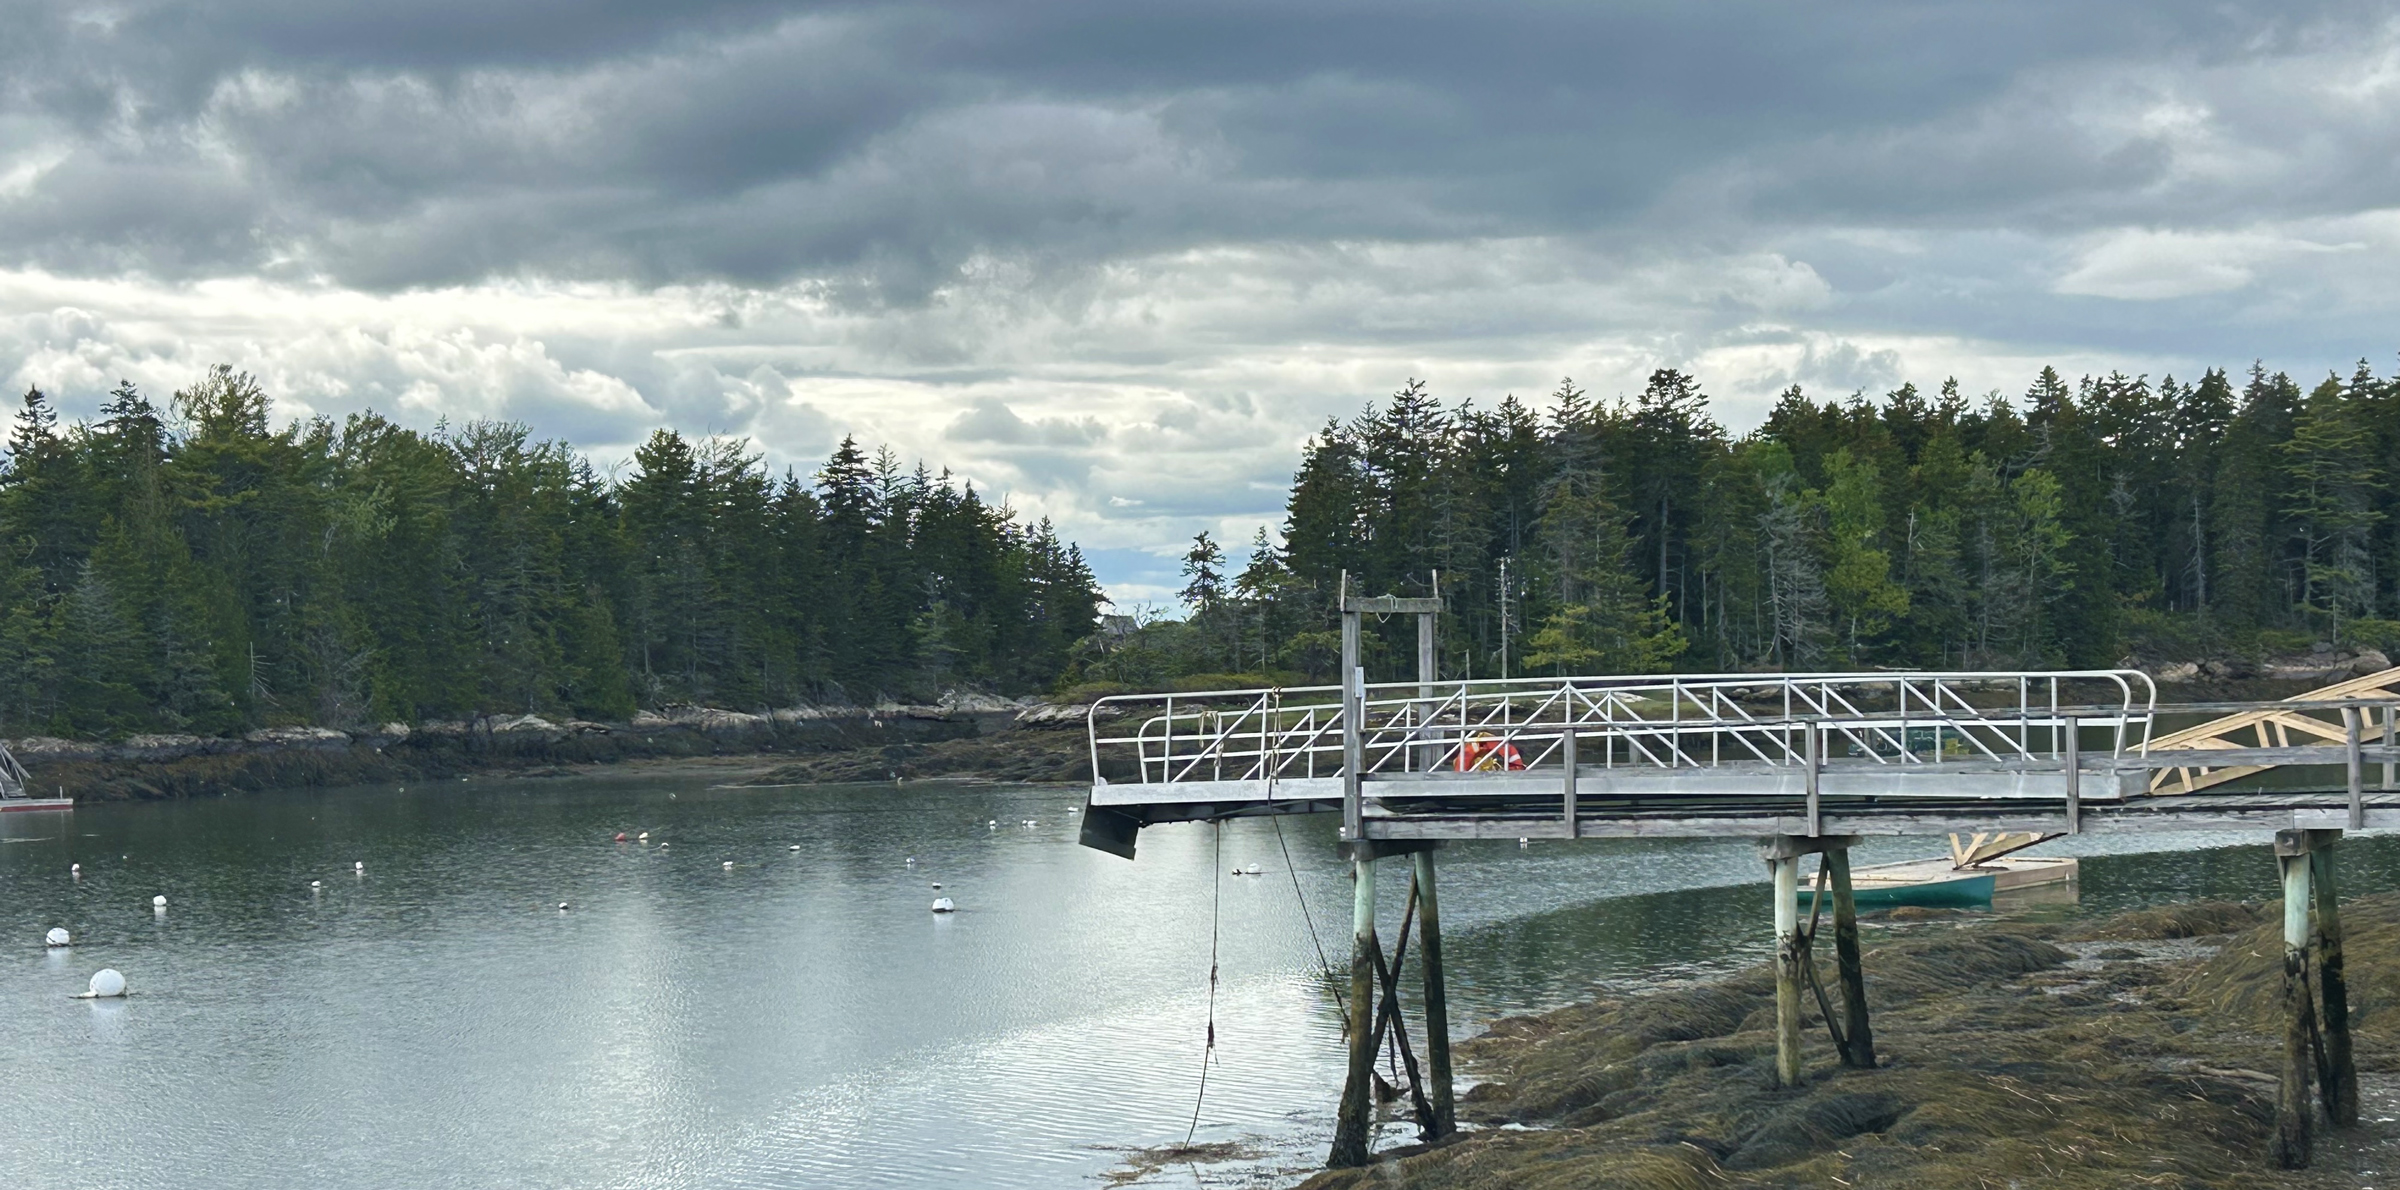
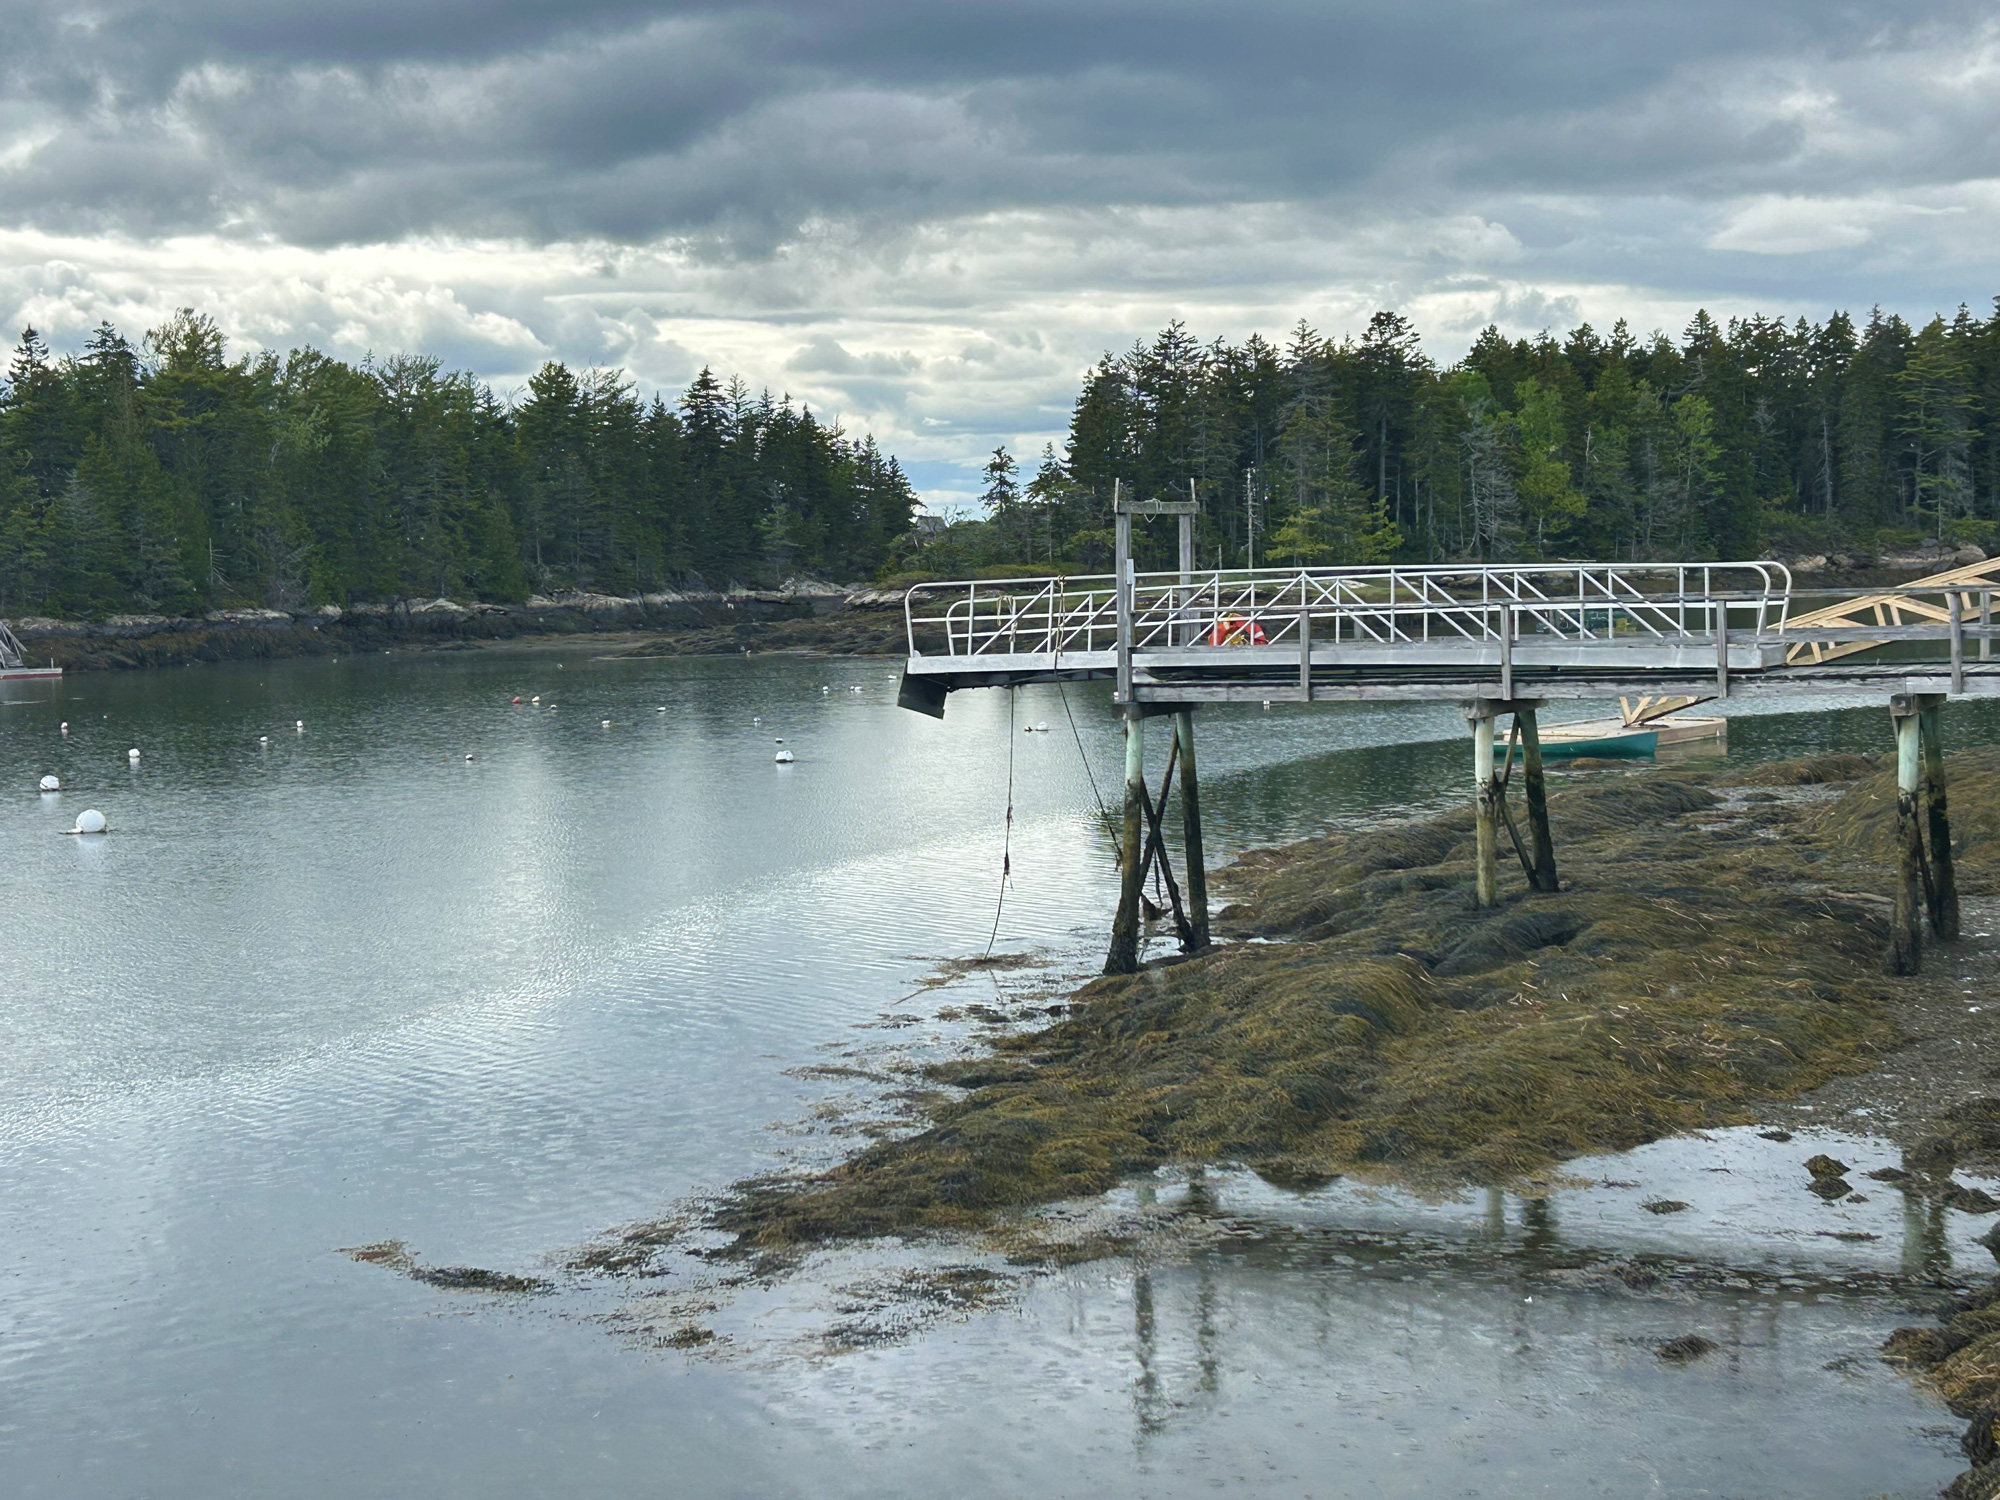 Jenny Bennett
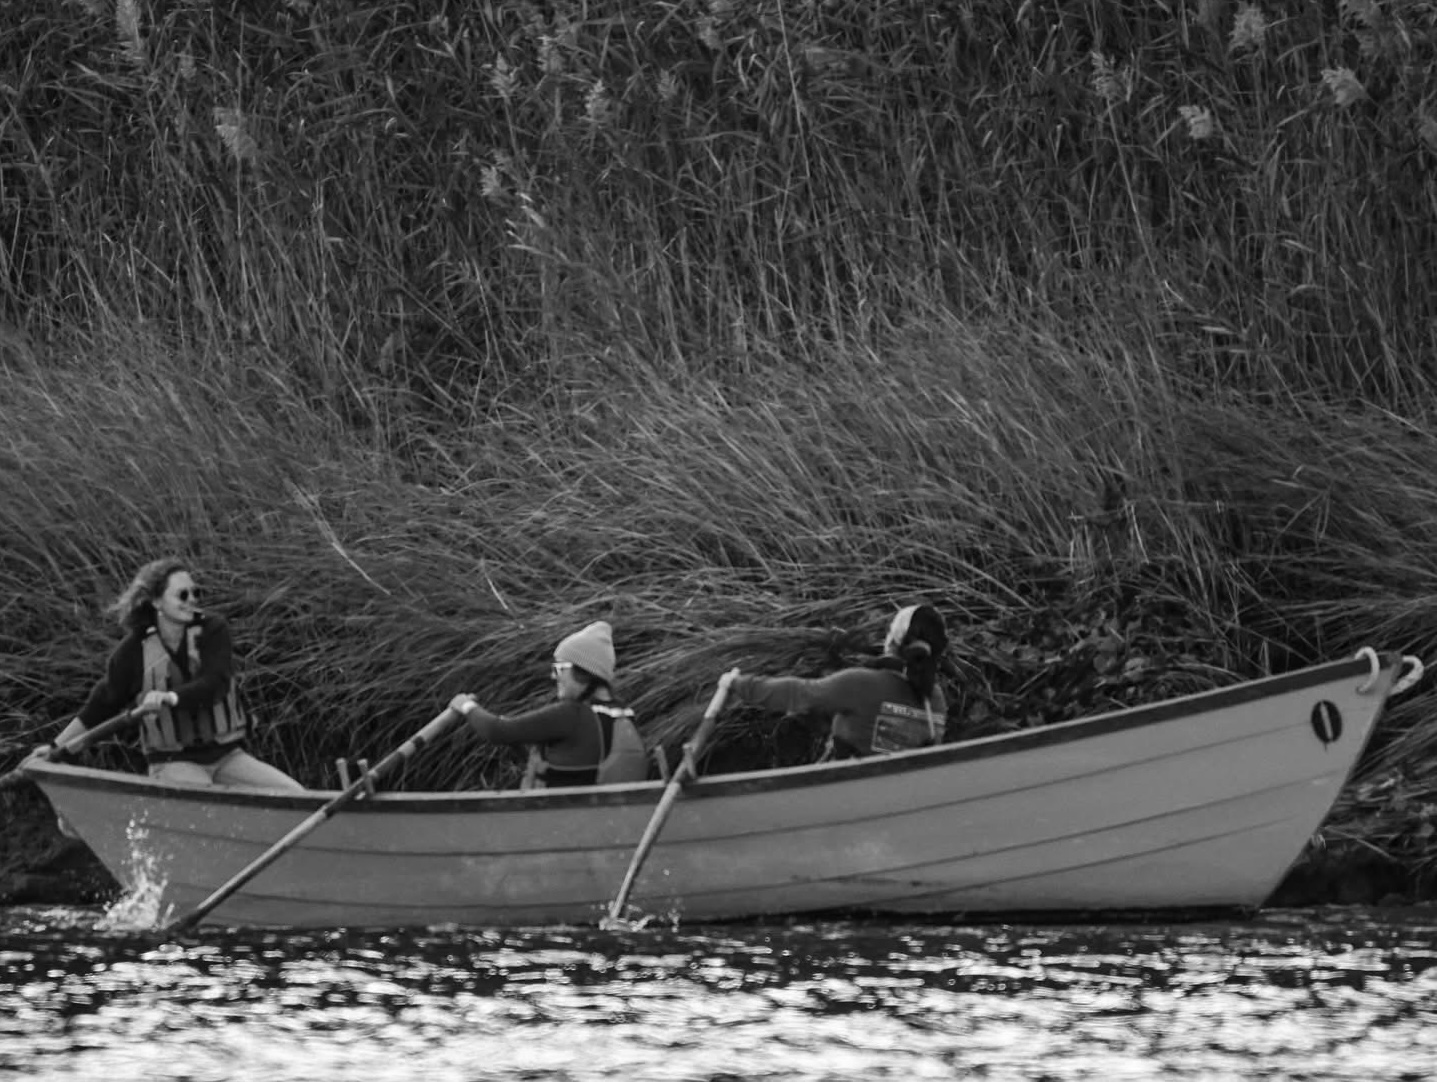 Courtesy of Alex Walker
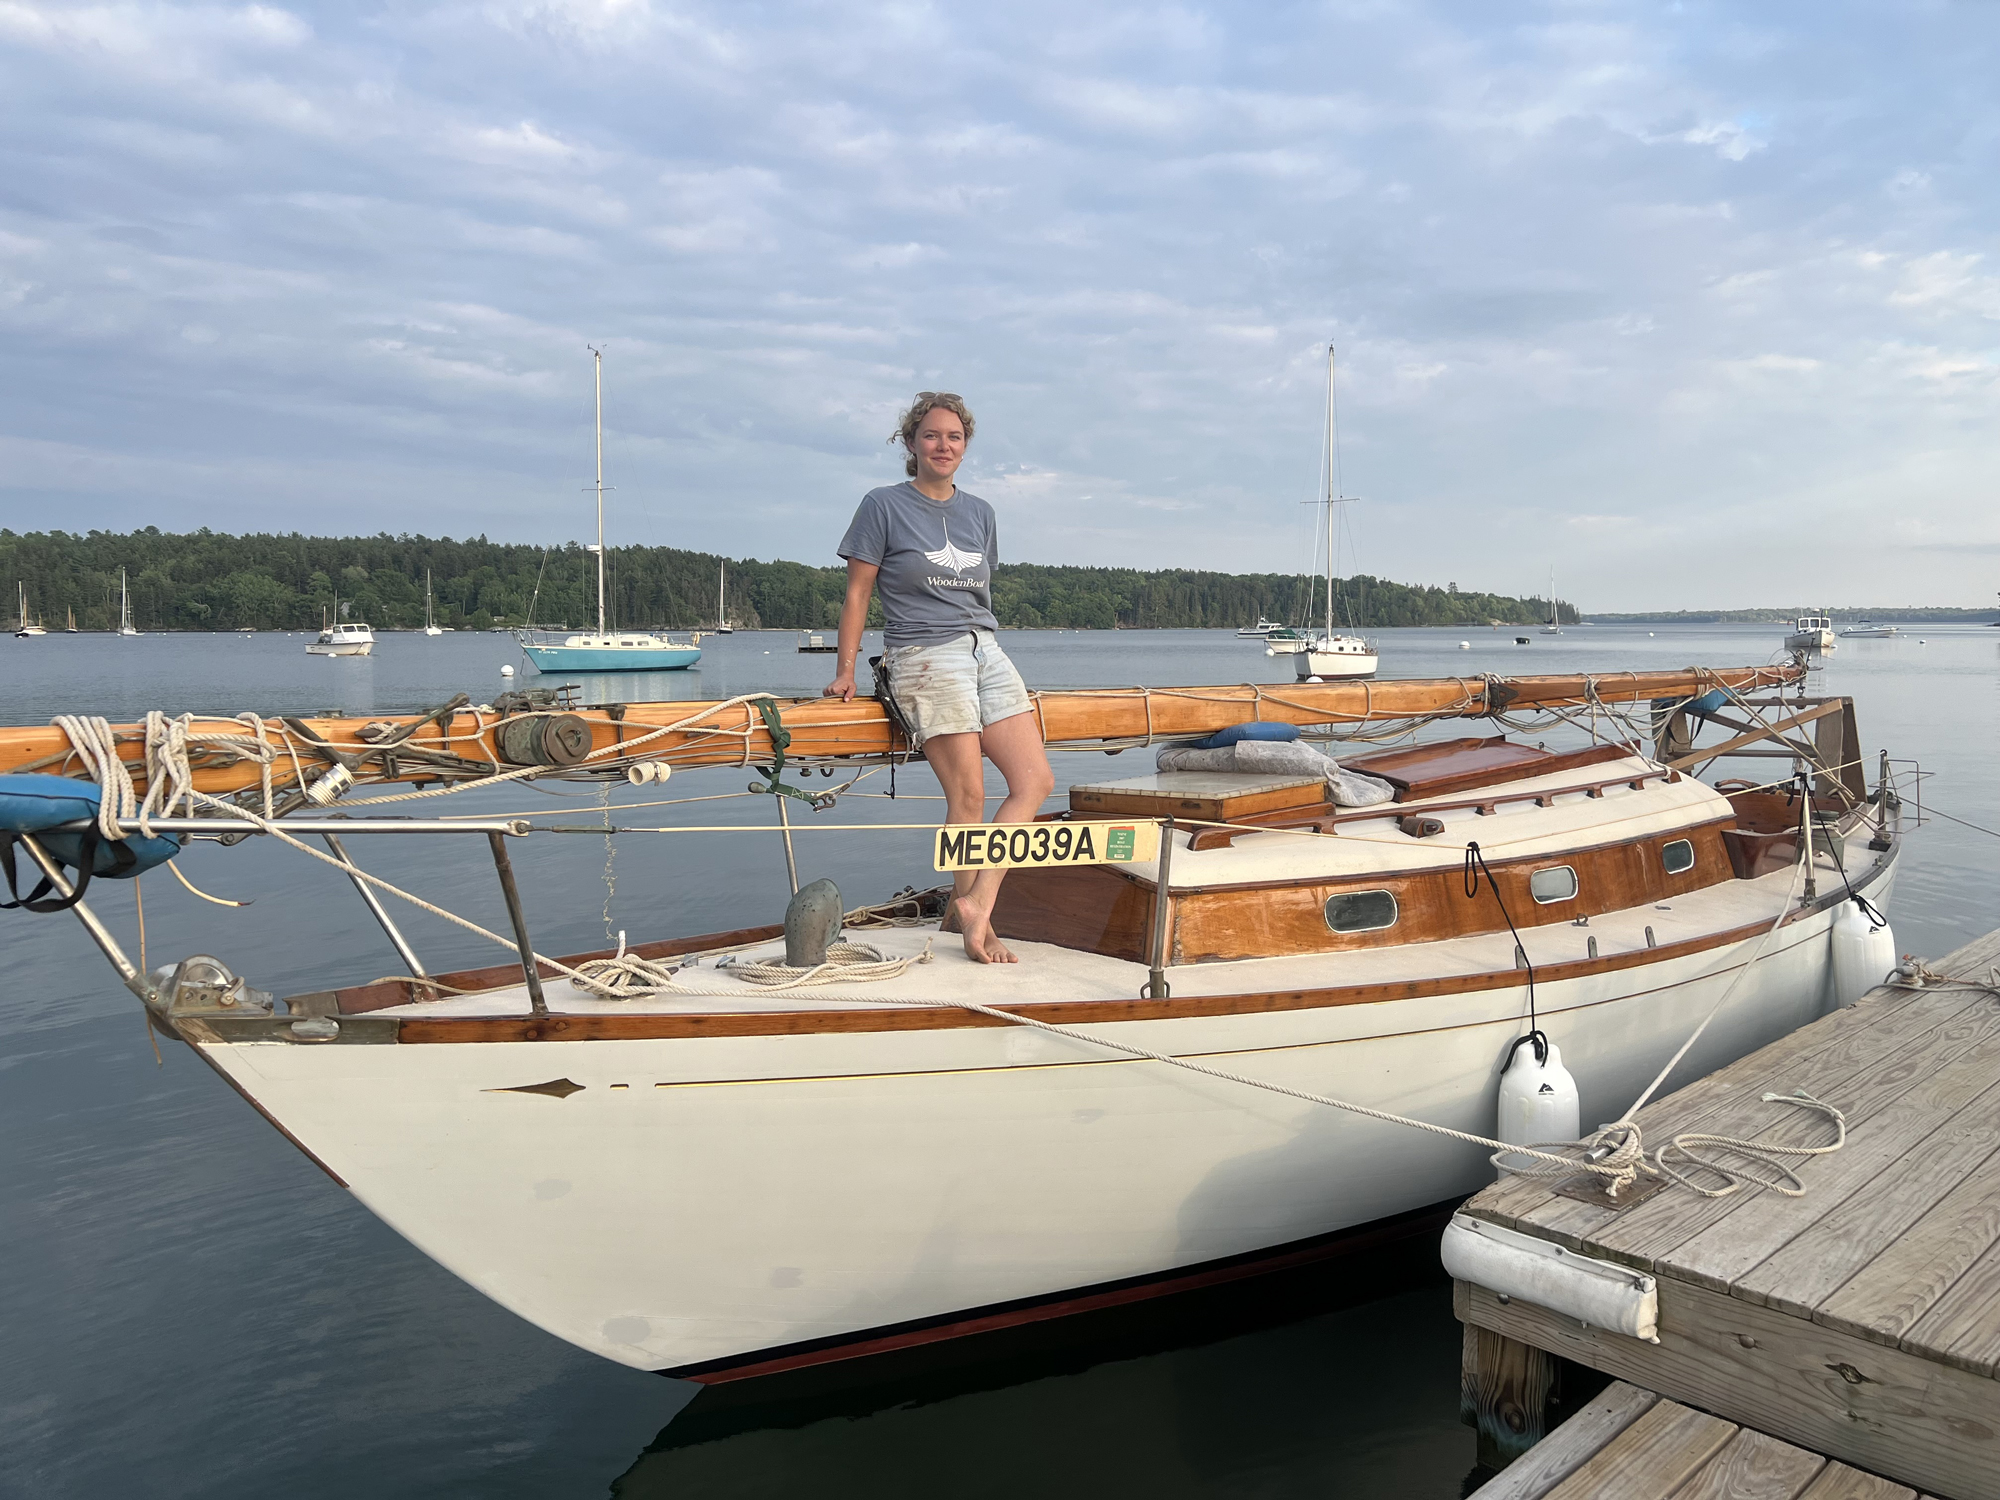 Courtesy of Richard Thomas