Last fall, my wife and I were paddling in solo kayaks on one of our favorite New Hampshire mountain lakes. We were about to cross a narrow channel when a powerboat came into view. We held back and waited, giving the boat a wide berth, but instead of moving through the channel, it slowed, altered course, and motored right up to us. The folks on board called out. We should have had lights, they said, “We could not see you.” They were clearly upset so we thanked them for their concern and kind advice. It was about an hour before sunset and, while we did have lamps with us, we had not yet turned them on. In most areas in the U.S. small non-motorized paddle- and rowboats are required to show an all-around white light when underway between 1⁄2 hour before dusk and 1⁄2 hour after dawn. (Specific requirements vary from state to state and on different bodies of water, so always check the rules before you paddle.)
One all-around light that I particularly like is Kayalu’s Kayalite Kayak Light.
Bill Thomas
The Kayalite Kayak Light can be clipped to a dedicated pad-eye or mounted using a boat’s existing fittings. Here the 4″-diameter base is held securely in place under a kayak’s deck bungee cords. However it is mounted, the light is easily removable so that it can be stowed when not needed.
Kayalu is a Boston, Massachusetts, company. It has several options for small-boat lights and mounts, of which the Kayalite Kayak Light is the basic model. It’s a clever design that I have been able to fit easily to six different boats.
The light is waterproof (with an IPX8 rating to a depth of 1,000′). It has two LED bulbs powered by three AA batteries. Kayalu records the lamp life at 10,000 hours and the run time at 100 hours. The light is bright and well diffused through a white titanium-infused Lexan lens that gives all-around illumination—you do have to mount the light behind you, so it does not disrupt your night vision. There is no on-off switch; instead, the light is operated by twisting the housing.
The lens stands atop a mast of 1 1⁄4″-diameter black ABS plastic tube above a 4″-diameter base. The base has EVA foam-rubber padding on its underside to protect the deck and to keep the light from slipping.
The Kayalite Kayak Light weighs just 13 oz, and it floats—reassuring if you accidentally drop it overboard before it’s clipped on.
Mounting the Kayalite Kayak Light
Mounting the light is straightforward. Decide where you want it to be positioned, and if there isn’t a suitable fitting there already, install a 1″ pad-eye or eyebolt with backing plate (Kayalu supplies a marine-grade eyebolt kit, but any standard stainless-steel pad-eye will do). A length of 1⁄4″ bungee cord leads through the bottom of the mast tube to emerge through a hole some 10″ up. At its upper end the cord has a stopper knot; at its lower end there is a plated-steel snap clip. This clip is attached to the pad-eye. Once clipped on, a cutout on the underside of the mast’s base is lined up over the deck fitting as the mast is brought to vertical. Now the slack of the bungee is pulled through the mast-tube hole and tensioned on a locking cleat a couple of inches below the hole. The tension in the cord holds the mast stable and upright, while its elasticity allows the mast to flex so that it won’t break in a capsize roll or if hit by, say, a paddle.
Jane Ahlfeld
In most U.S. waters non-motorized boats are required to carry an all-around white light from 1⁄2 hour before dusk to 1⁄2 hour after dawn. The Kayalite Kayak Light is waterproof, strong enough to withstand being hit by a paddle, flexible enough to survive a kayak roll, and easily mounted.
If you don’t want to add any hardware to your boat, you can use existing hardware such as a cleat or pad-eye, or the mount can be wedged between two items—in our canoe, for example, it is wedged between the top of the flotation tank and a grab handle.
I take the Kayalite Kayak Light on all my after-dark adventures. Not only does it keep me visible to other boats, but it’s also easily removed from the boat, making it a handy little light to have around camp.
Bill Thomas is a Maine Guide and has taught sea kayaking in Maine and other locations. He has been a custom woodworker, designer, boatbuilder, and teacher for more than 40 years.
The Kayalite Kayak Light is available from Kayalu, $59 plus shipping. The Kayalite Extension Kit, $19.95, enables the user to extend the height of the light to 21″ or 28″.
Is there a product that might be useful for boatbuilding, cruising, or shore-side camping that you’d like us to review? Please email your suggestions.
I have owned a Shellback dinghy since it was new, having bought it from a gentleman in New Hampshire who had built it for the love of building and with no intention of holding on to it. It’s a beautiful little plywood boat and the quality of build is excellent, but I have no idea what paint he used. On the day I went to look at the boat I asked about the finishes, and he was vague in his answers; he had used a bit of this, a bit of that…all “exterior paints.” Despite the lack of provenance, it has held up well.
The boat is now 10 years old and has spent every summer alongside a busy sailing-club dock in salt water. Most years, I’ve sanded down the topcoat and refinished above the waterline with a layer of Epifanes Yacht Enamel, and below the waterline with antifouling paint. This year, when I went to give it the customary sanding, I noticed the paint had some small linear cracks running parallel to the wood grain. As I scraped at them, most remained as small cracks, but some flaked away to uncover more substantial spots. I realized I had two choices: either take everything down to bare wood—which I was reluctant to do because it was a big job for a small problem and apart from those few cracks the rest of the paint was in good shape—or diligently scrape and sand the problem areas until they were stable and then fair them with a light filler.
Photographs by the author
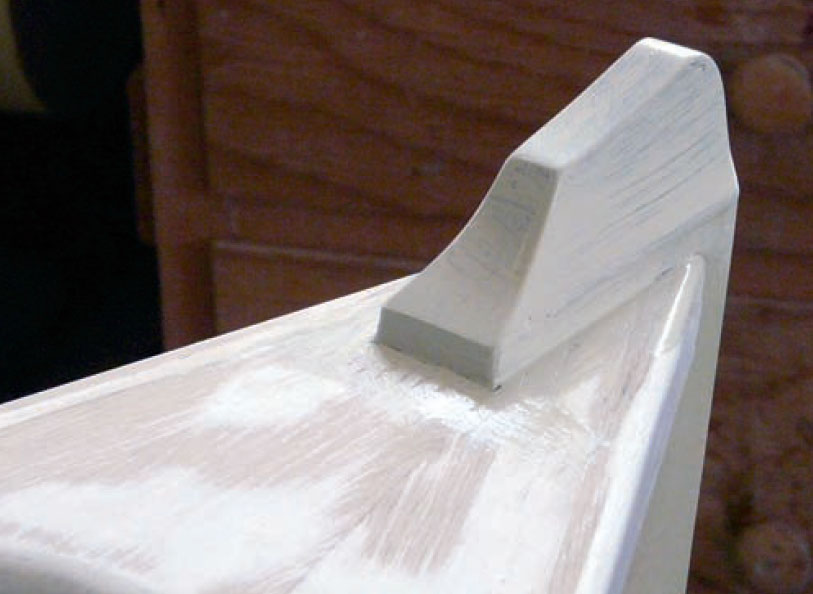
When I started work on the hull it became obvious that the small linear cracks in the lower topsides plywood panel were not going to be sanded out.
I decided on the latter option, but was unsure what to use for a filler. I had recently finished some work on an interior wall in my house where I had extensively used spackle, a defect-filling putty that dries quickly and is very easy to sand. That was what I needed for the boat: the marine equivalent of spackle.
The QuikFair spread easily—filling cracks and adhering well—even though I had not removed all of the old finish.
At my local marine hardware store, I described the project in hand and was recommended QuikFair, a two-part epoxy-based fairing compound from System Three Resins. The manufacturer describes it as “a lightweight, microballoon-filled, fast-curing two-part epoxy fairing putty with excellent moisture resistance.” It can be used above or below the waterline, and can be applied to bare wood, epoxy-coated wood, polyester resin, and steel. I bought the 1.5-pint pack.
Applying QuikFair
The kit contains a 16-fl-oz tub of resin—light purple in color—and an 8-fl-oz tub of white hardener; both are low-odor and solvent free. The instructions on the box are minimal but, as it turns out, are all that is needed. The two parts can be mixed by volume—2:1—or by weight—100:44. Having no way to measure accurately by volume, I decided to measure by weight and, needing only a little, weighed out 12.5g of resin to 5.5g of hardener. When thoroughly mixed together, the compound turned a pale-pink and to a consistency described by System Three as “butter-like,” but which I think seemed more like spreadable cream cheese.
It was easy to work. Because I was applying it to such a small area, I used a 1″ putty knife, but over a larger area would have used a wider 2″ flexible plastic spreader. The putty spread easily and filled even the smallest of indents and cracks. The instructions say that QuikFair allows for 10–15 minutes of working time; I was only working for about 7 minutes and in that time, the mixture showed no sign of curing; the last application spread as smoothly as the first.
After sanding the QuikFair and then applying two coats of yacht enamel the cracks had disappeared.
The manufacturer states that at 70°F QuikFair is sufficiently cured to be hand-sanded in three hours or machine-sanded in four hours. The temperature in the garage where I was working was, at best, around 60°F, but after three hours the putty was dry to the touch. I waited until the next day before sanding to a smooth finish using 240-grit paper. The cured compound sanded to powder and didn’t clog the sandpaper. I primed after three days (I later read the note that said full cure time at 70°F is four days). The primer dried and covered equally on the faired areas as elsewhere, but when I applied topcoat—several days later—I noticed that in those areas treated with QuikFair, the enamel needed more time to cure until no longer tacky and required an extra coat to get an even gloss.
The QuikFair two-part system: 8 oz of hardener to 16 oz resin. With no way to measure accurately by volume, I used a small scale and weighed out in grams—a little went a very long way.
I was pleased with the product. For an inexperienced user it was forgiving and easy to work and did exactly what I wanted, making the topsides of my dinghy look almost as good as new.
Jenny Bennett is editor of Small Boats.QuikFair is available from marine hardware stores and direct from System Three Resins, in several sizes. The smallest, 1.5 pints, is listed at $42.95.
Is there a product that might be useful for boatbuilding, cruising, or shore-side camping that you’d like us to review? Please email your suggestions.
When Kippen Briggs was 10, he took sailing lessons on Schwatka Lake near his home north of Whitehorse, Yukon. Once a week through the summer, he and his friends would go out in Optimists (and later Lasers) to learn the basics of sailing. By the end of the season, he had decided he wanted his own boat—something large enough to hold a couple of people comfortably and with some space for storage. It should be a sailboat but a sailboat that could be rowed and take a small outboard motor. He had been reading Jim Michalak’s book, Boatbuilding for Beginners (and Beyond), and thought the Mayfly 14 would suit his needs. It’s a simple hard-chined flat-bottomed boat designed to be built out of five 4 × 8 sheets of plywood on a temporary form with two plywood bulkheads, solid-wood stem, chine logs, and gunwales. He brought the idea to his grandfather, Ken.
Photographs courtesy of the Briggs family
The two side panels were temporarily screw-fastened to the central form, and then glued and screwed to the forward and after bulkheads. To bring the panel ends into the stem and transom, Ken and Kippen used a ratchet strap.
Ken has always enjoyed building—he and his wife have built multiple log houses and have lived in one of them since 1975. He has passed his love of woodwork on, first to his son Bernard (Kippen’s father), for whom Ken built a lathe, and then to Kippen who was about nine when he started using the lathe with Ken. “He makes small wooden gifts for the family,” says Ken.
“We discussed the boat over the winter of 2023,” Ken continues. “It would be a weekend project. It was Kippen’s boat—he was then 11 years old—and I made a point of not doing any part of the build completely on my own.”
The bottom was fashioned out of two plywood sheets butted together. It was finished with a layer of epoxy-saturated 12-oz fiberglass cloth.
Ken and Kippen worked together through the setup. “We started by purchasing a new 10″ cordless miter saw. I figured that if Kippen was going to use it, he might as well take it out of the boxes and put it together. I planed some rough lumber while he figured it out and got it operational, and then he cut some lengths of 1 × 8 boards that he would mark out for the forms.”
Cutting the wood and plywood, says Ken, was fun; checking and rechecking the plans less so. Ken stressed the importance of accuracy but allowed Kippen the experience of working through trial and error. He laid out the five forms—two temporary, two permanent bulkheads, and the transom. It took four attempts to get it right. “He wasn’t too discouraged when we sanded off all his pencil marks and started again,” says Ken. “And in the end, he laid out near-perfect lines for the wood forms.” To cut out the parts they used a bandsaw. It was another teaching opportunity for Ken: “Kippen learned to cut close to the outside of the line and then to take the wood down to the line with a disc sander.”
Once the bottom had been finished, the gunwales and chine logs fitted, the boat was returned to upright. Ken and Kippen took a moment to admire their work before moving on to constructing the decks. In hindsight, says Ken, they should have painted the boat’s interior at this stage, when it was all still open and easily accessed.
The simple boat demanded simple materials. For the hull panels Ken and Kippen agreed on construction-grade plywood. They would sheathe the bottom panel with fiberglass cloth and epoxy, but the rest of the boat would be simply primed and painted. For the bottom, transom, and deck panels they used 1⁄2″ plywood, while the sides were 3⁄8″. For the dimensional lumber they used locally grown spruce cut into 12′-long 1 × 8 boards on Bernard’s sawmill and then run through the thickness planer in Ken’s shop. The lumber came from the family firewood pile. “Some years ago,” Ken explains, “the Yukon Territory was infested by spruce-bark beetle and many square miles of spruce trees died. I purchased a B-train logging trailer’s worth of 50′ logs, which I cut as we need them to heat our home and fire the cookstove. We’ve also used them to build things: log cabins, furniture, even a strip-planked canoe. Now Kippen was using the wood for his boat, spars, and oars.”
Construction started right-side up so that Ken and Kippen could see the true shape of the hull as it came together. They had cut all the parts, marking the centerline on the forms and bulkheads, and the form locations on the side panels. Now, they clamped one of the side panels to the ’midships form, then temporarily screwed it top and bottom before repeating the operation with the opposite side panel. They then lifted the three joined pieces onto two sawhorses. Next, Ken and Kippen took a ratchet strap and, looping it around the two facing side panels, pulled the ends into each other—first at the stern, then at the bow. As the ends came in, they glued and screwed the sides to the bulkheads. Finally, the transom and stem were glued and screwed in place. “It went pretty quickly,” says Ken. “We managed to get it done in a weekend; it was exciting.”
Kippen and Ken made the sail out of poly tarp; they reinforced the edges with 1″ ratchet-strap webbing.
With the side panels in place and permanently fastened, Ken and Kippen carefully turned the boat over to install the gunwales, the chine logs, and the bottom—preassembled and cut from two sheets of plywood butted together. While the boat was still upside down, they coated the bottom with 12-oz fiberglass cloth and epoxy resin.
When they returned the boat to upright, Ken says, “it looked like it was almost finished! Little did we know that there was still a lot of work to do.” They mixed epoxy and sawdust for filleting the chine logs and all the interior side-to-bottom and -bulkhead joints; filled all the screw holes, and sanded for hours. They cut the decks to shape and glued and screwed them in place. Kippen cut and installed the raised hatch frames and the covers. “Then there was the leeboard and its framework, the rudder…even the tiller was a good little project. Kippen and I painted the boat together, including the inside of the lockers in the bow and stern. Unfortunately, we didn’t think of painting those until after the decks had gone on. We won’t make that mistake next time!” Kippen decided to varnish the hatch covers and stem and, adding a touch of flare, burned the image of a spruce branch and cone into the forward face of the stem. Over the course of two weekends, they fashioned the mast and spars from laminated 1 × 8 spruce—“a lot of sawing, planing, and sanding.”
The moment of truth: Ken and Kippen launched EMMA on a local pond on a day of light winds, but she performed well under motor, oar, and (ultimately) sail.
Finally, they made the sail. “We used a poly tarp and reinforced the edges with 1″ ratchet-strap webbing. Kippen set grommets where needed. We reinforced the corners and reefpoints—there are eight layers of material. We used Kippen’s mother’s sewing machine and were surprised that it was all we needed. All the seams are zigzag stitched.”
As the project neared the end the family discussed names for the boat. It was Kippen who suggested EMMA. “We had an unstoppable little German Shepherd, Emma. She and Kippen had grown up together and only he could keep up with her. The year we built the boat, she was killed on the highway. We all instantly agreed with his choice.”
When Kippen saw the Mayfly 14 design in Jim Michalak’s book, he decided it would be the boat for him. The summer after he and his grandfather built EMMA, Kippen and his friends took to the waters of the Yukon and used her just as he had imagined.
EMMA was launched on Father’s Day, 2024, on Shadow Lake. “It’s not much more than a small northern pothole lake, but it served us well for a shakedown cruise. We motored first—Kippen has a 2-hp outboard that he mounts on a board locked into the rudder fittings; he sits on the afterdeck to operate it. Then we rowed—not quite as fast as with the outboard, but it’s good to have oars. And then we sailed.” They reached, came onto the wind, tacked a few times—EMMA coming about nicely—and then ran for home with the sail all the way out to starboard. “We came back with great big smiles,” says Ken. “We’d set out, two boatbuilders; we returned, two sailors.”
Jenny Bennett is editor of Small Boats.
Do you have a boat with an interesting story? Please email us. We’d like to hear about it and share it with other Small Boats readers.
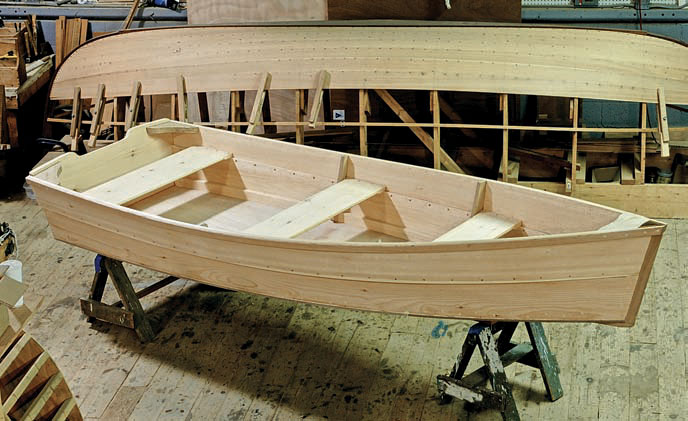
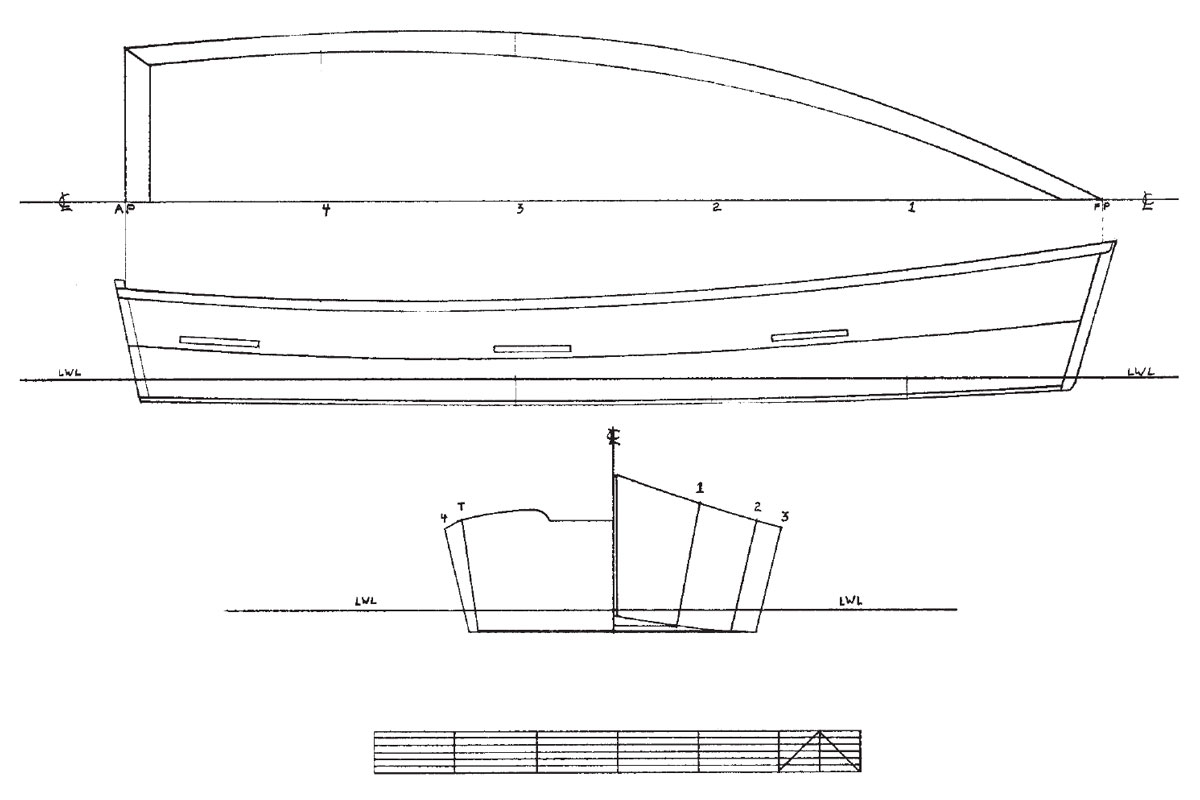
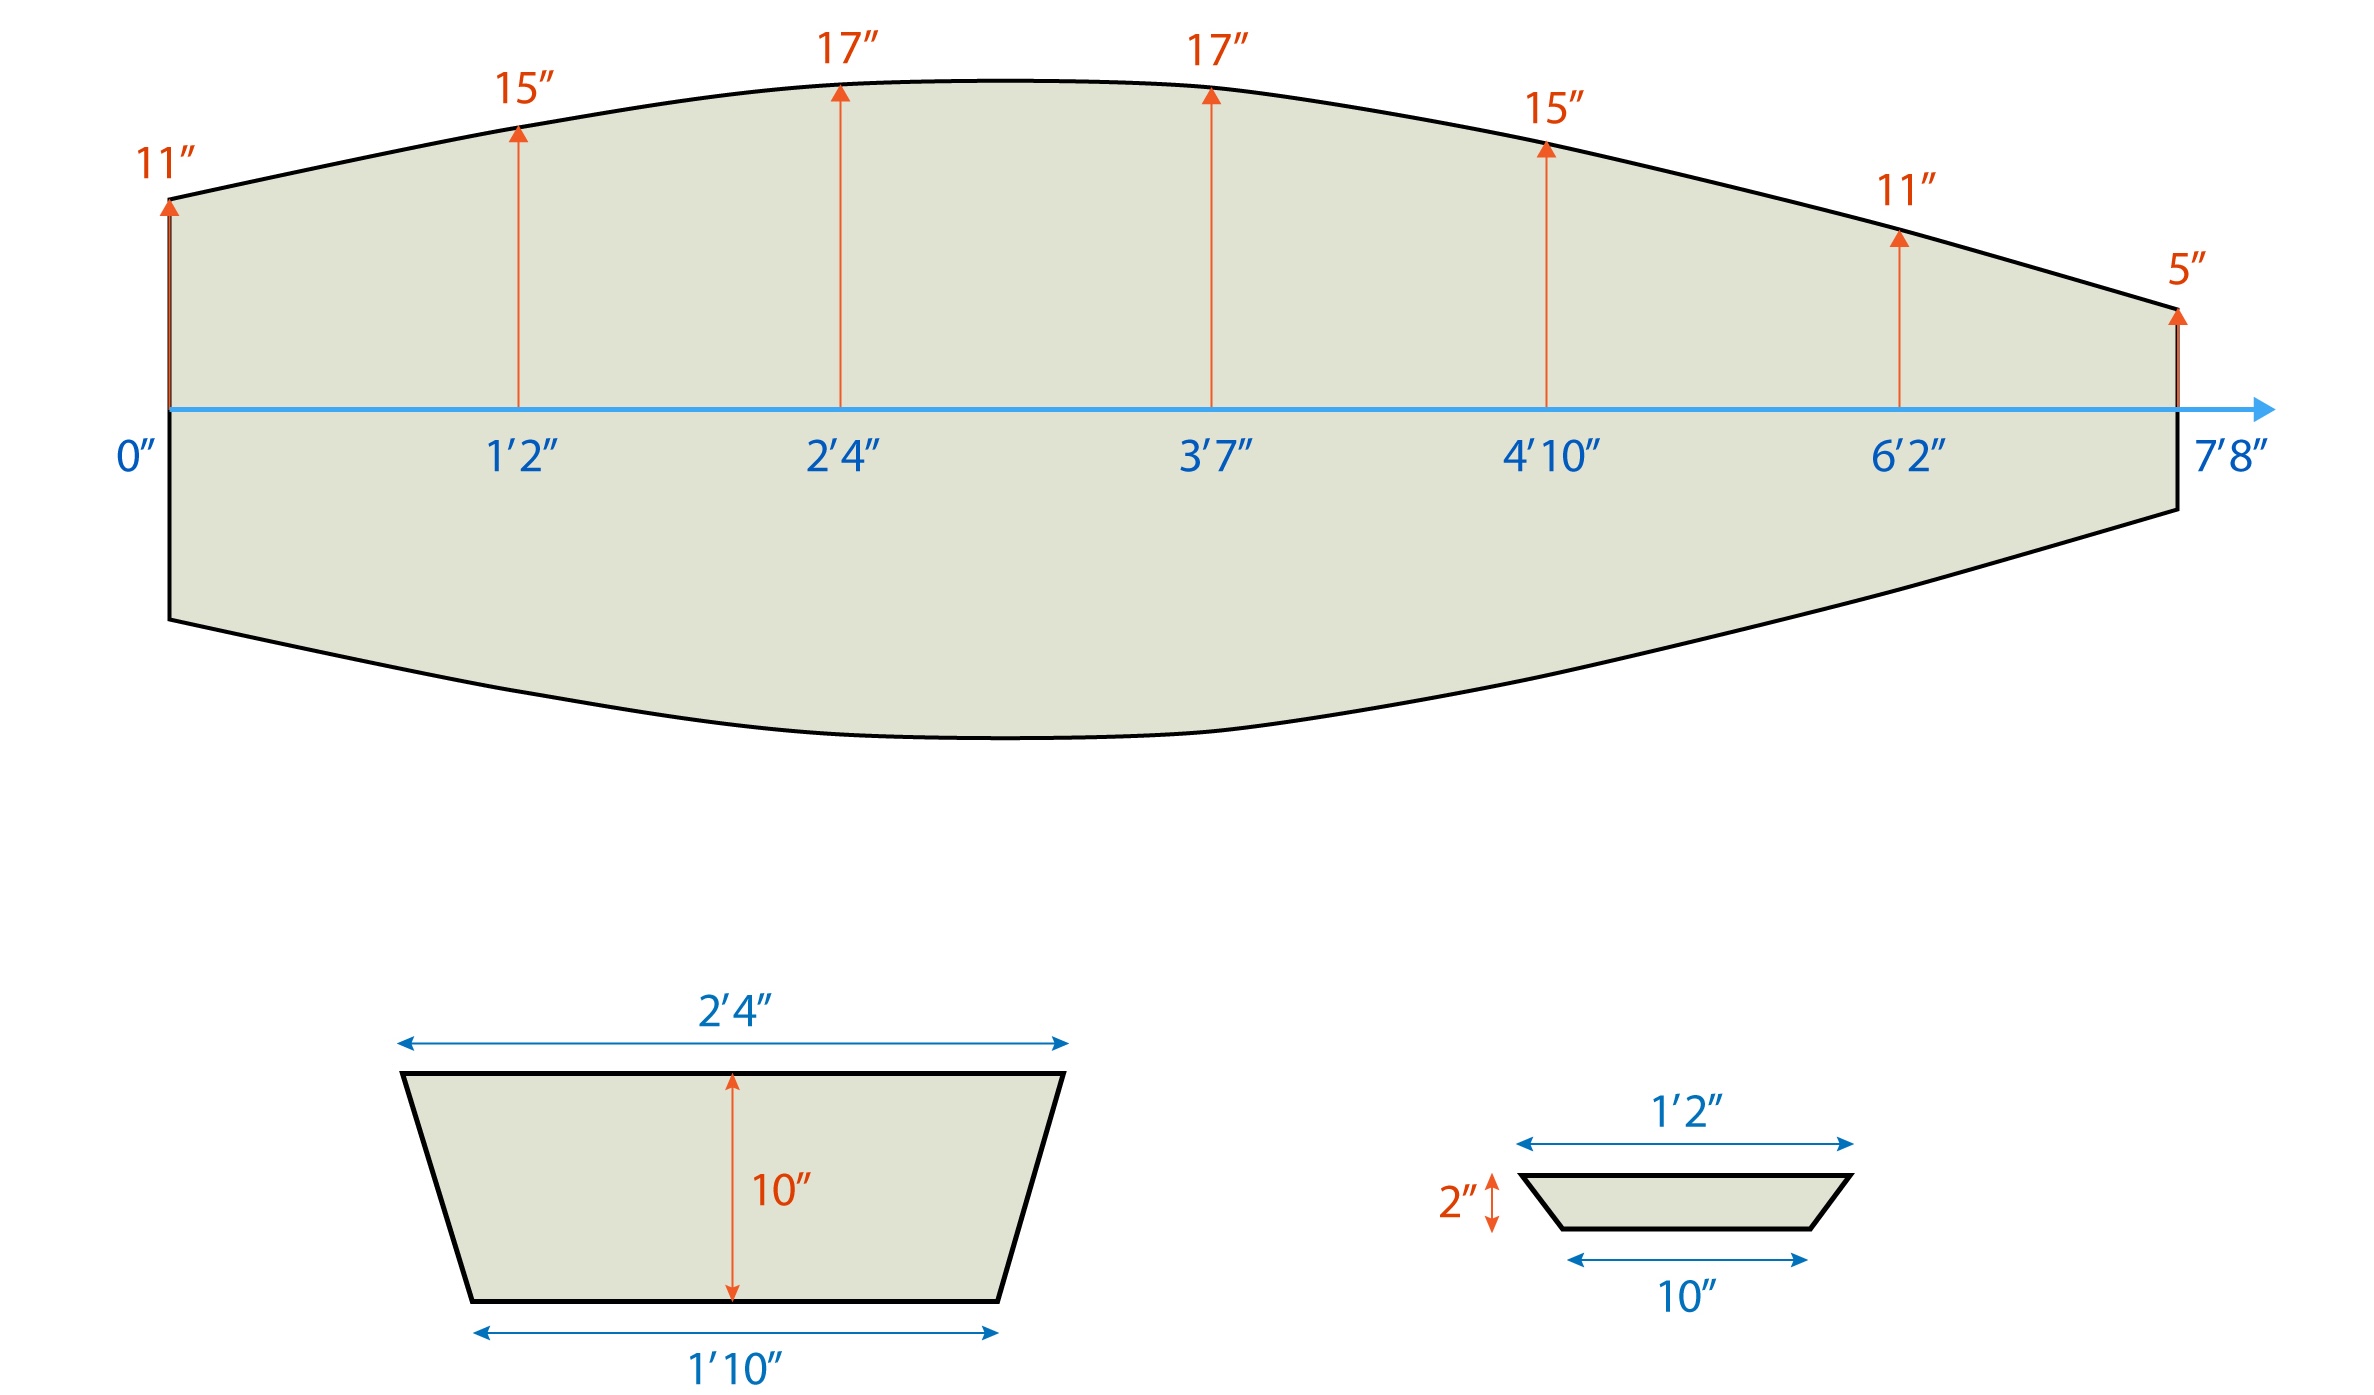
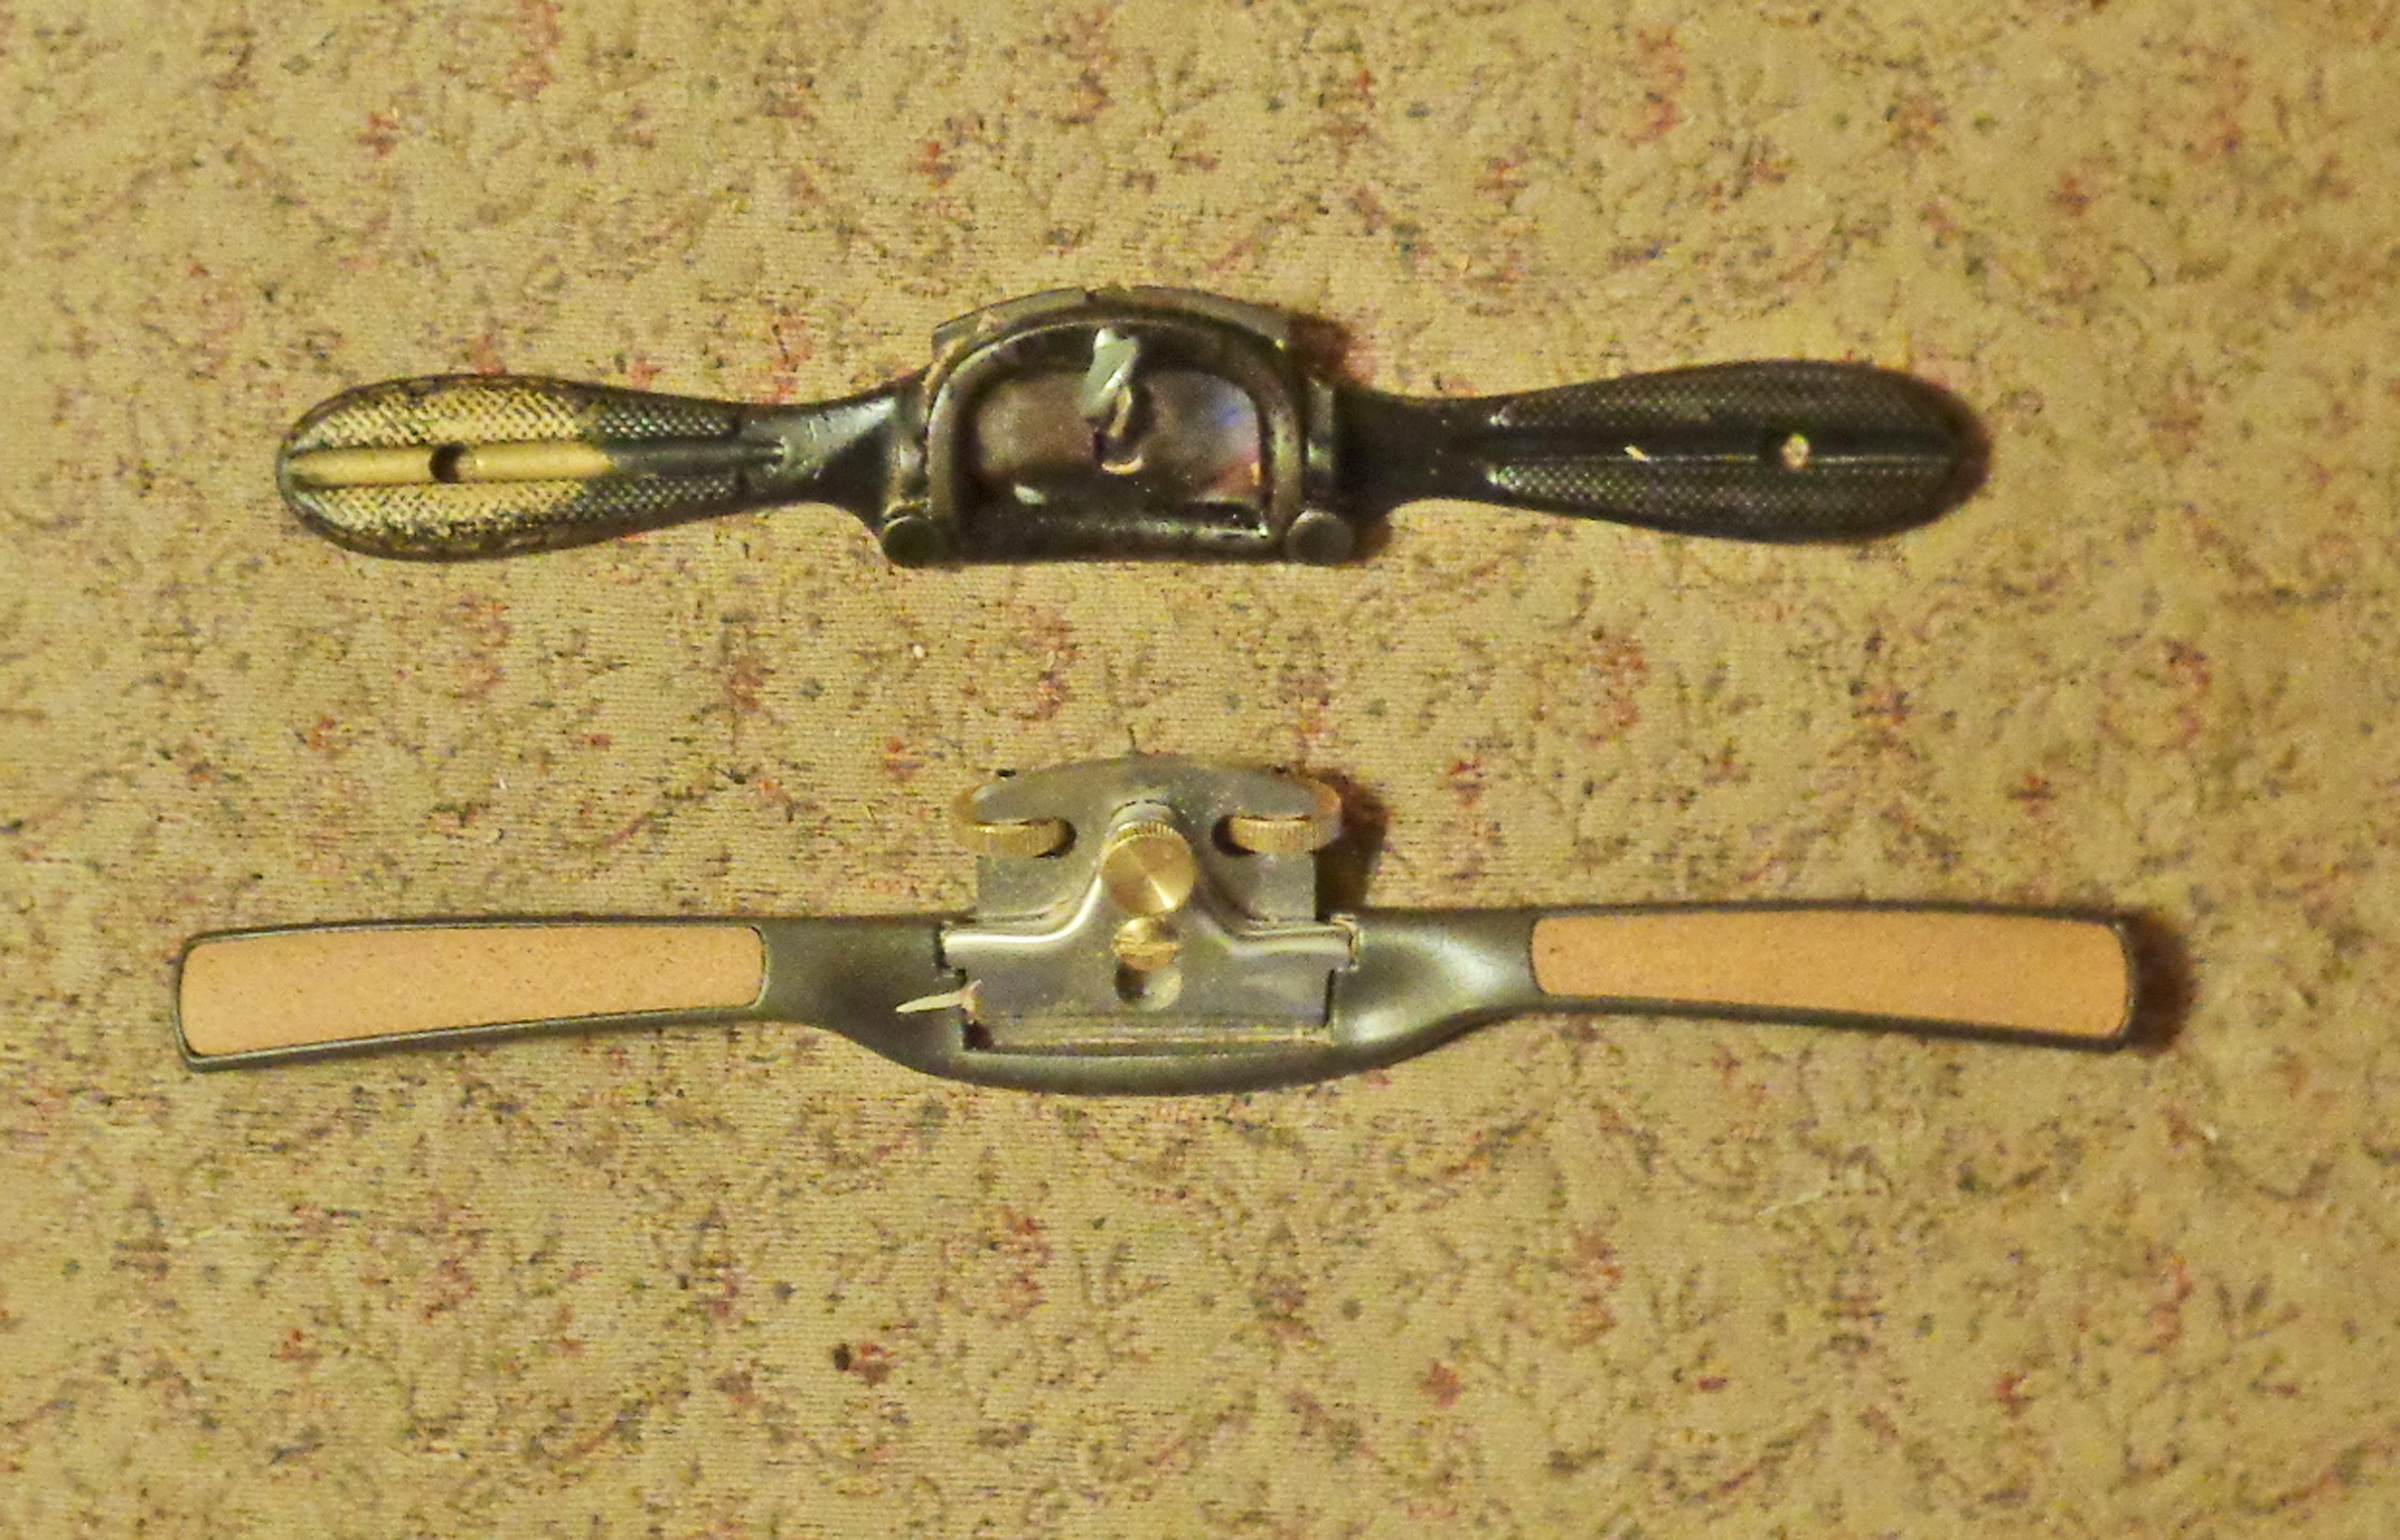
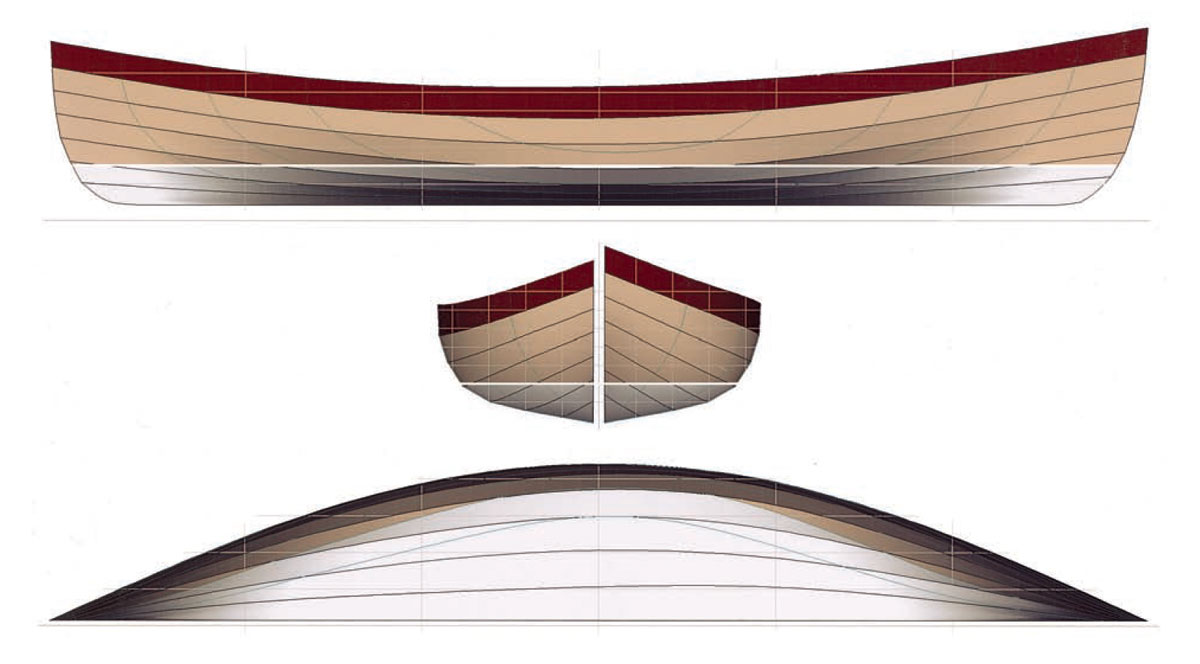
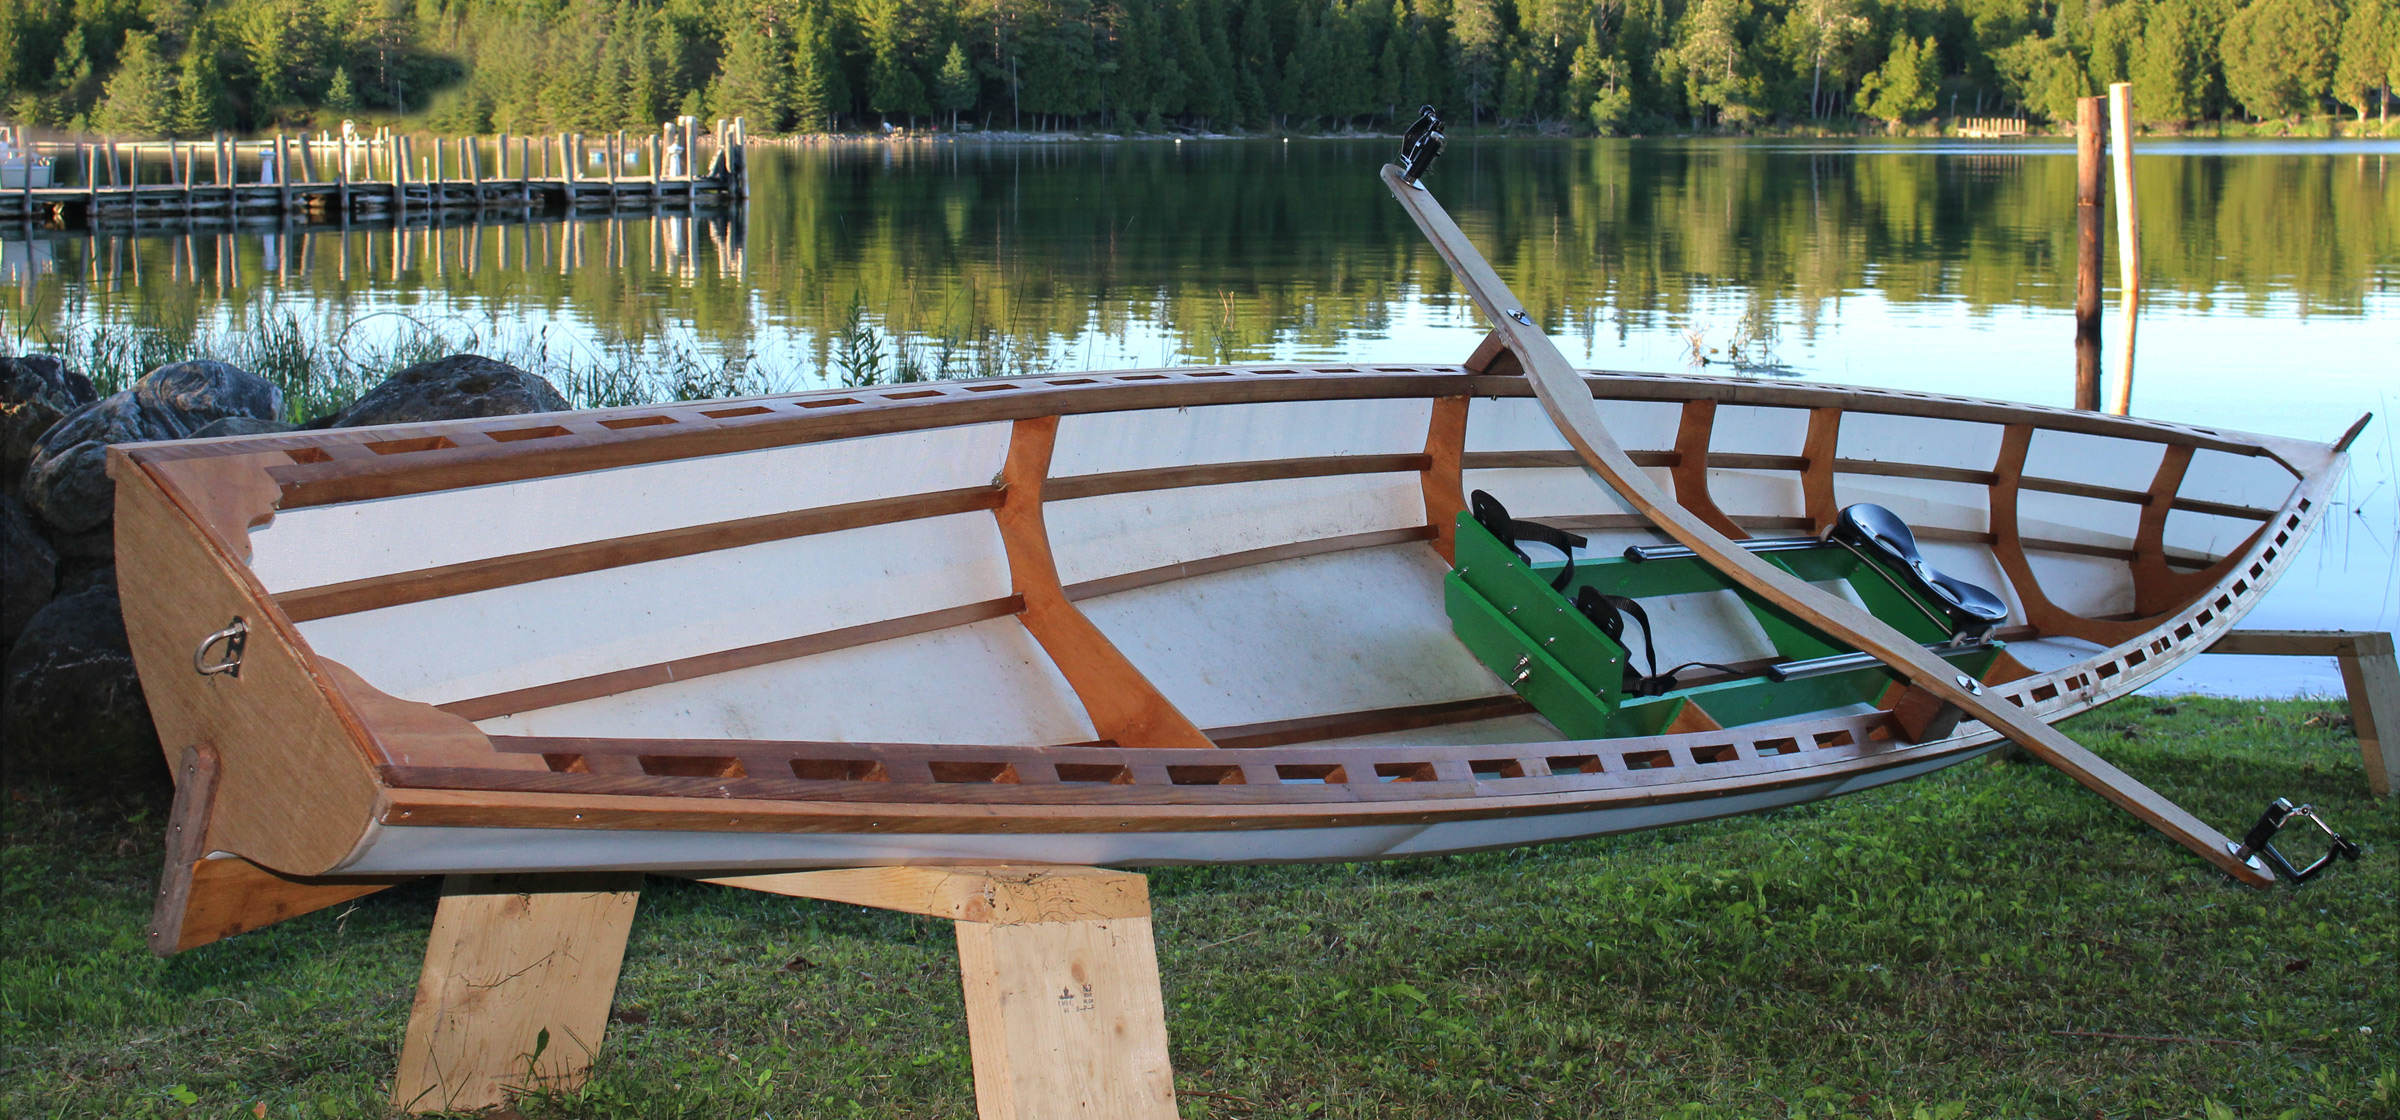
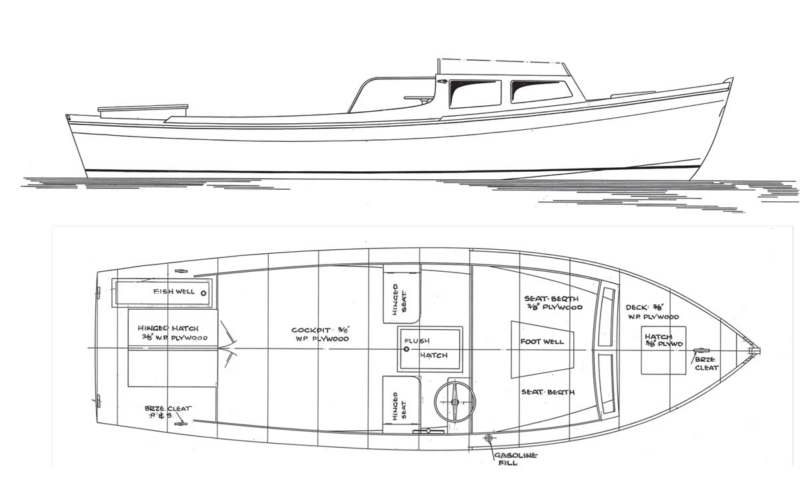
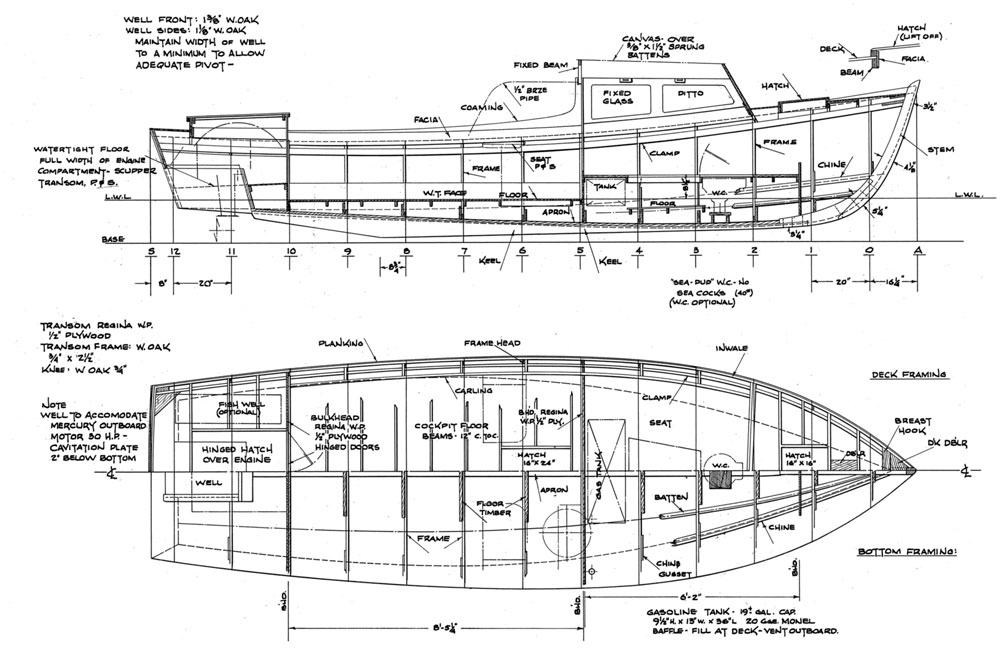
Feeling that some improvements could be made on the original Asa Thomson Flat-Bottomed Skiff,WoodenBoat (Maynard Bray, Spencer Lincoln, Joel White, and Jon Wilson) drew up some modified plans, which became the design for the Yankee Tender.
Mr. Thomson, a New Bedford boatbuilder legendary for his exacting standards and fine workmanship, built a number of skiff-tenders. Designed for a specific purpose in a specific area, they were light with a flat bottom for easy beaching. A good freeboard provided protection against a Buzzards Bay chop, and the strong sheer keeps the ends buoyant.
Spencer Lincoln
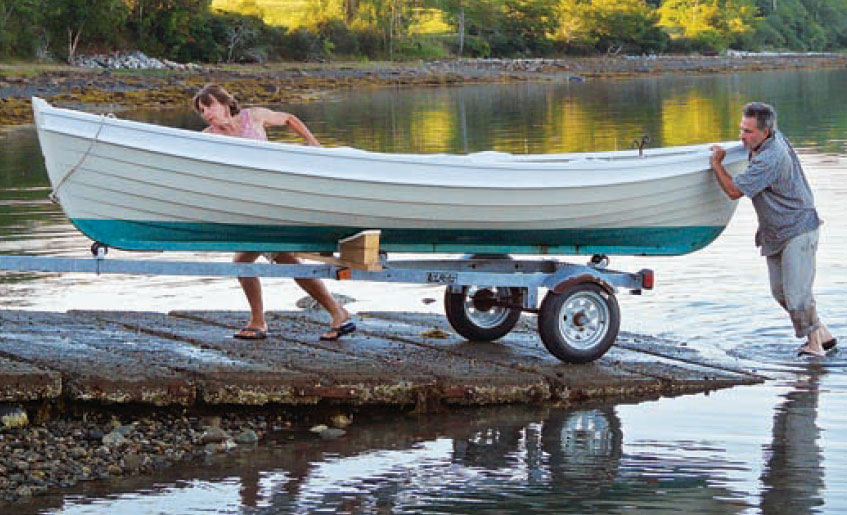
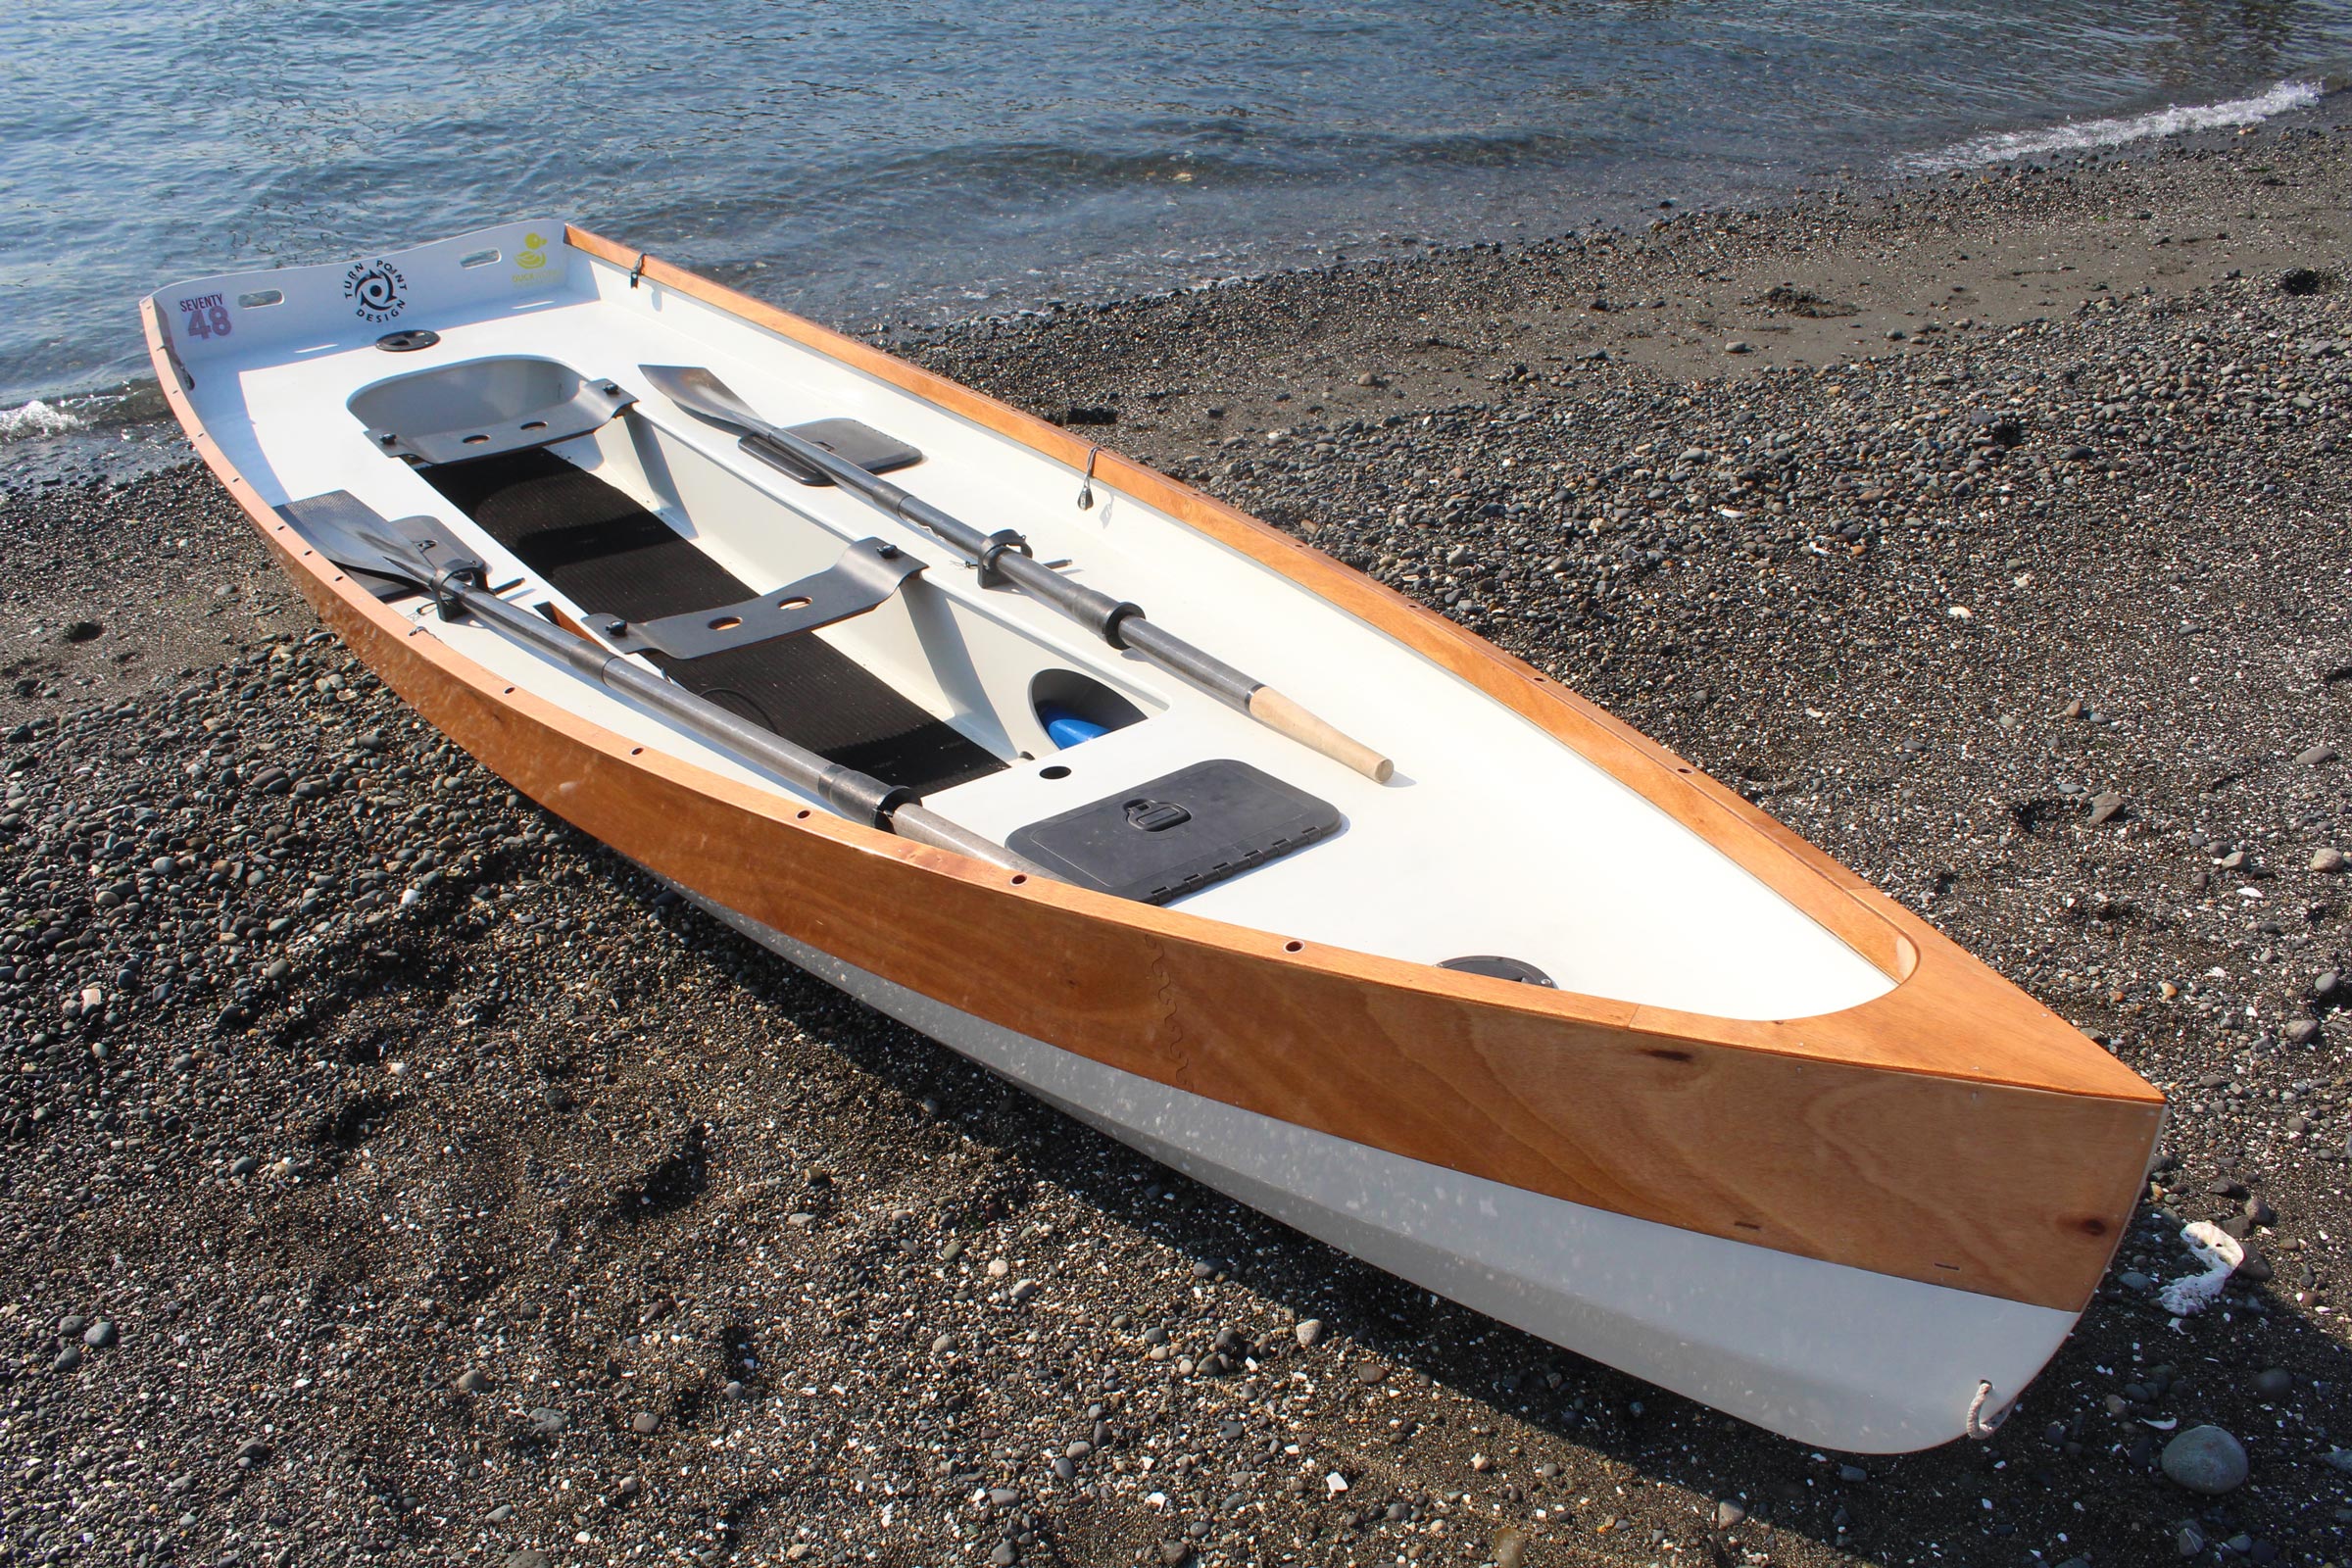
Yankee Tender is a capacious, seaworthy, flat-bottomed skiff weighing less than 150 lbs.
Feeling that Mr. Thomson’s design was just a bit stubby (probably because he was obliged to keep the overall length down to a minimum for easy stowage), WoodenBoat raked both the stem and stern, keeping the same bottom length, and raised her out of the water a bit forward so that she’d tow better and run farther up the beach.
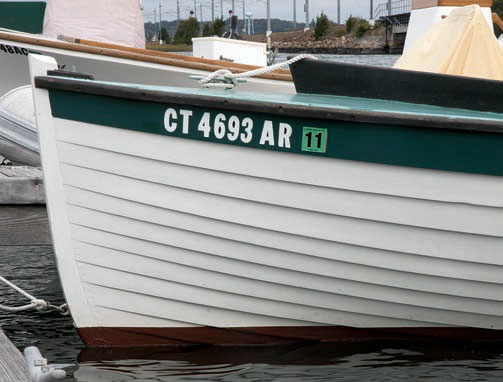
The original skiff by Mr. Thomson had three planks up each side. While it was easy for Asa Thomson to find wide planking in the 1920s, it’s a different story today; WoodenBoat felt obliged to use four planks on each side, and chose Maine cedar over the original white pine.
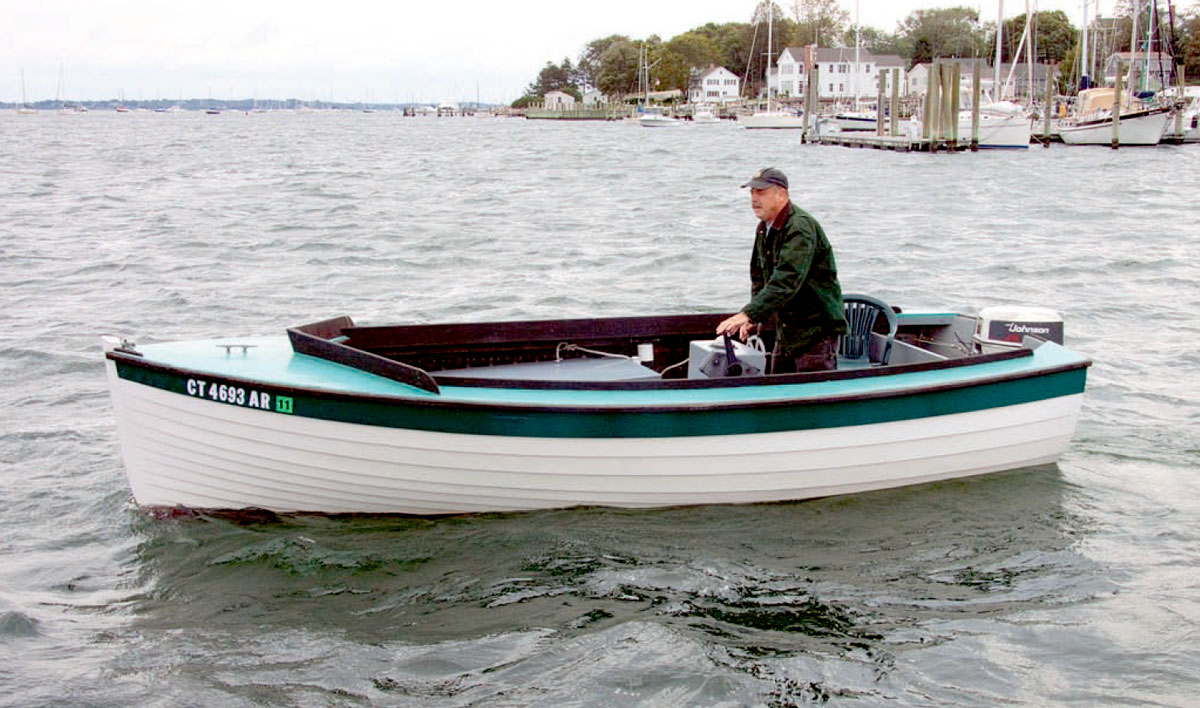
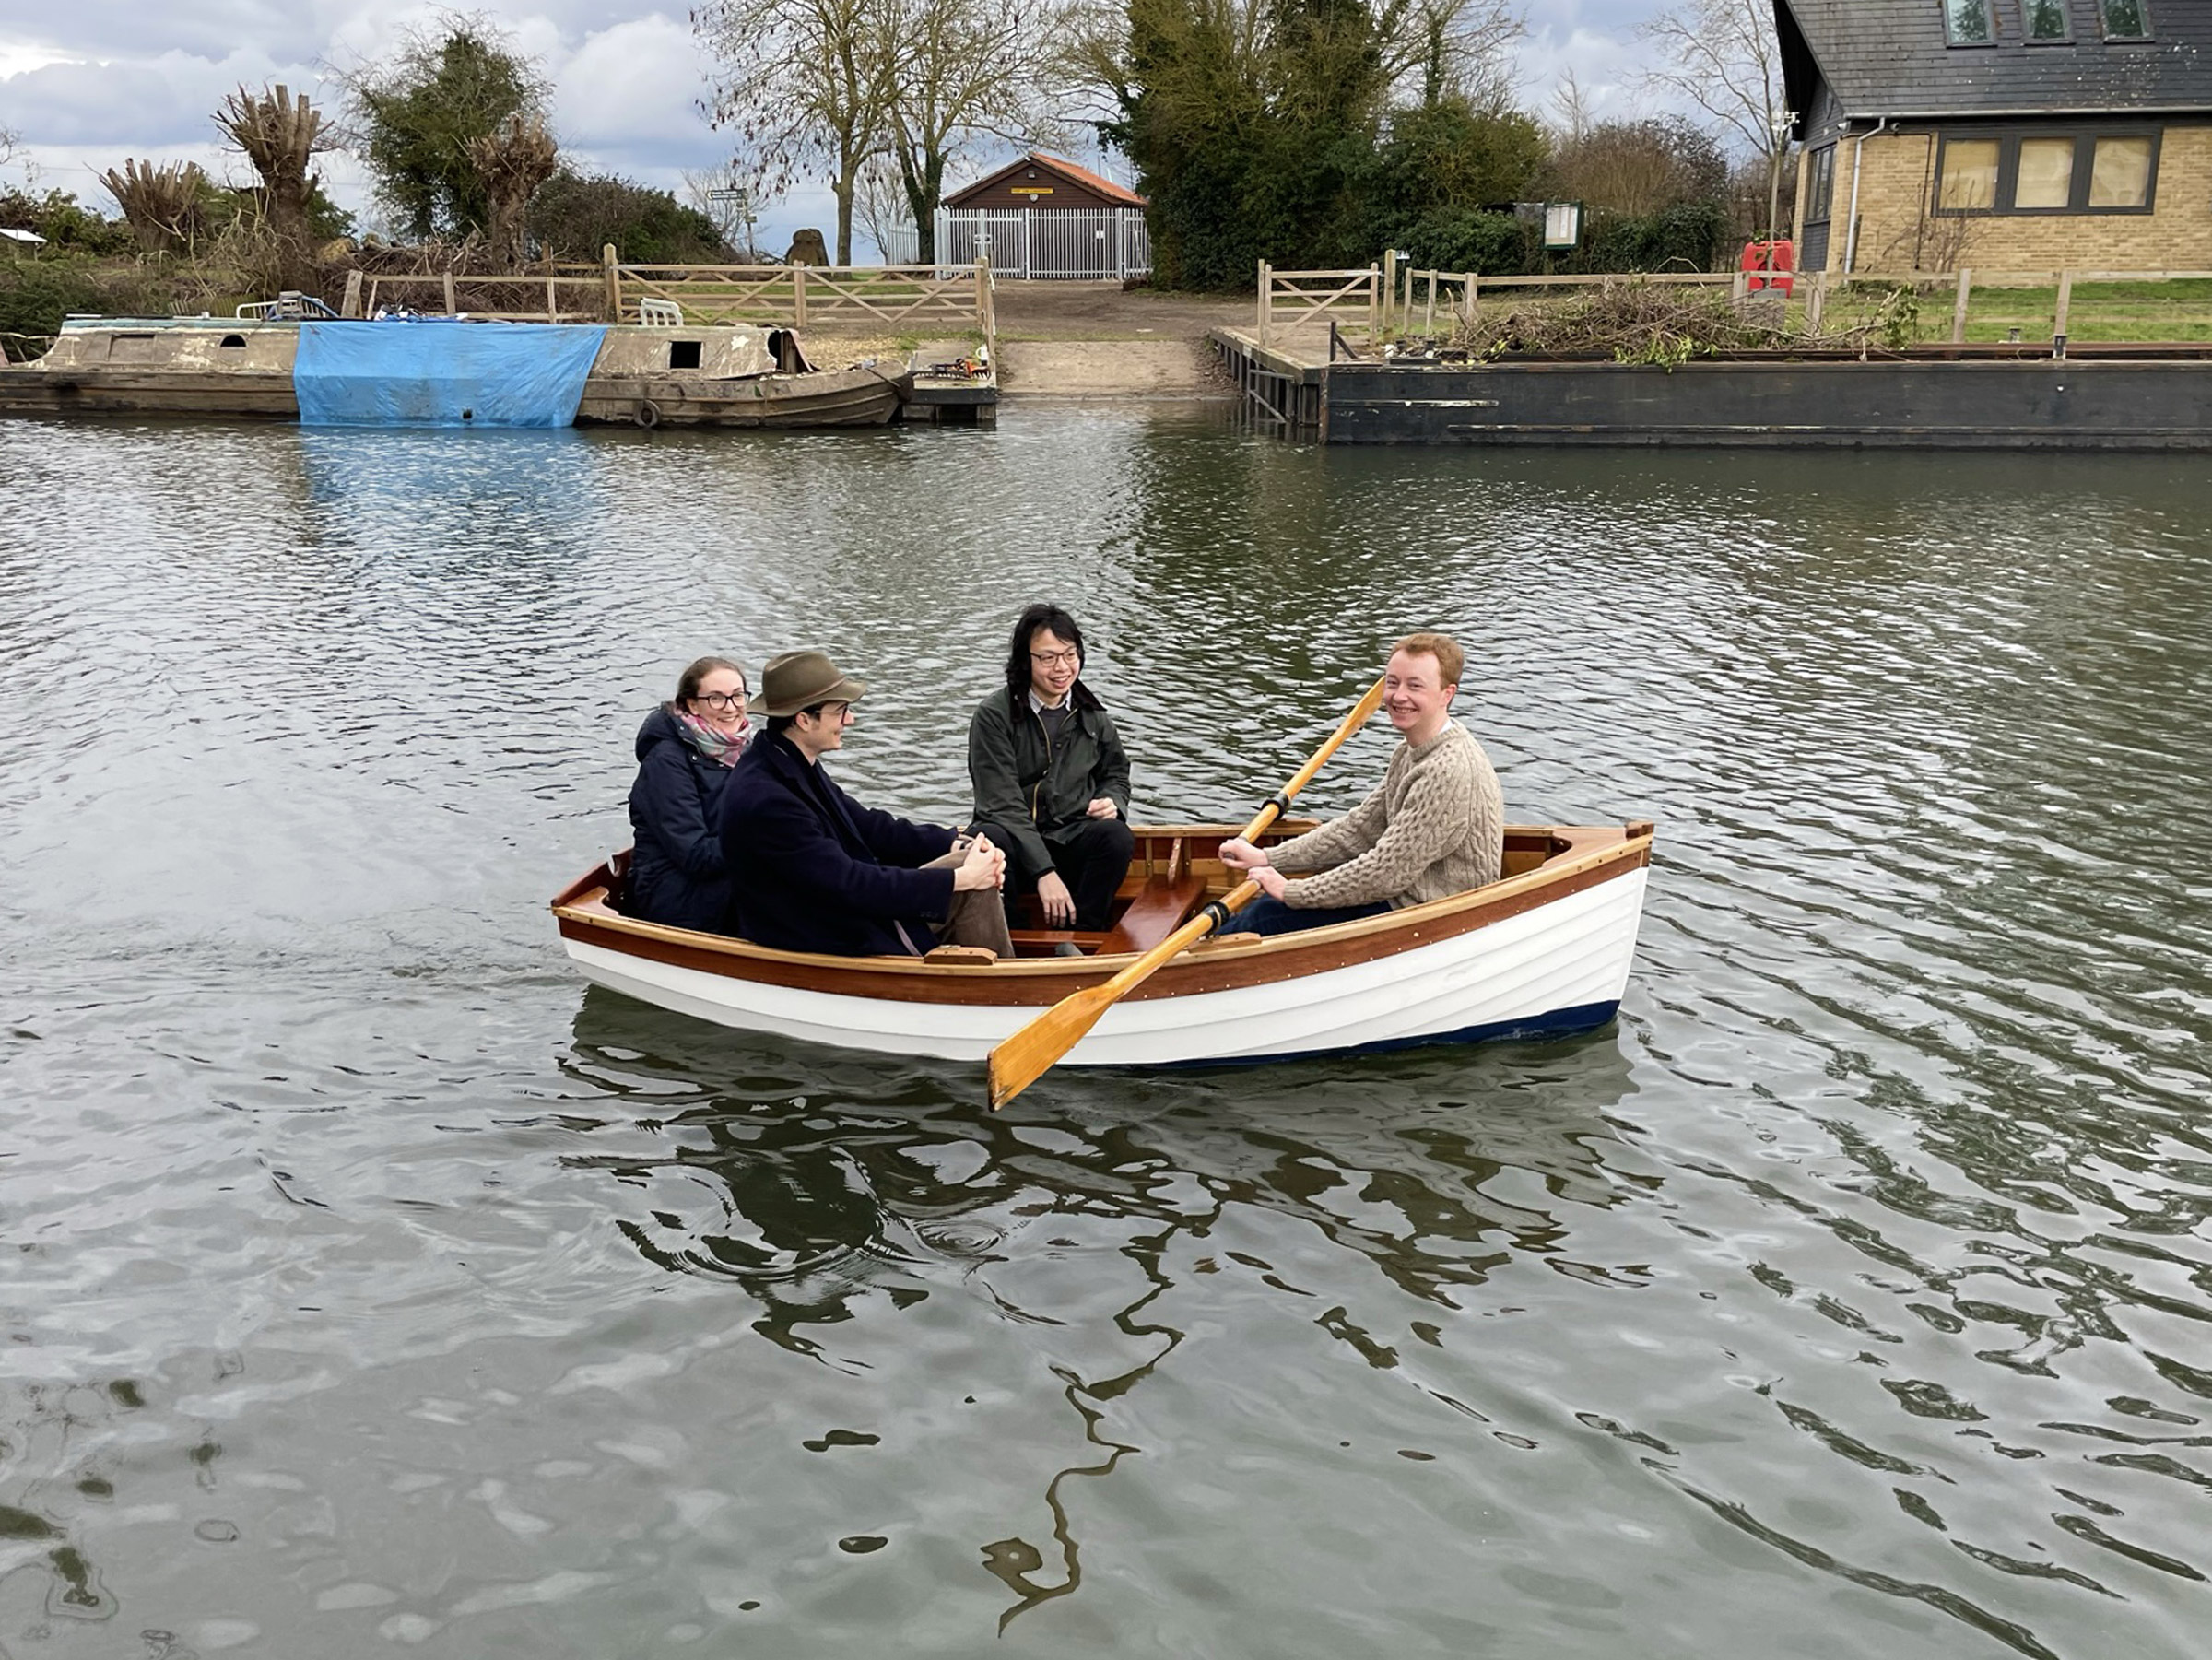
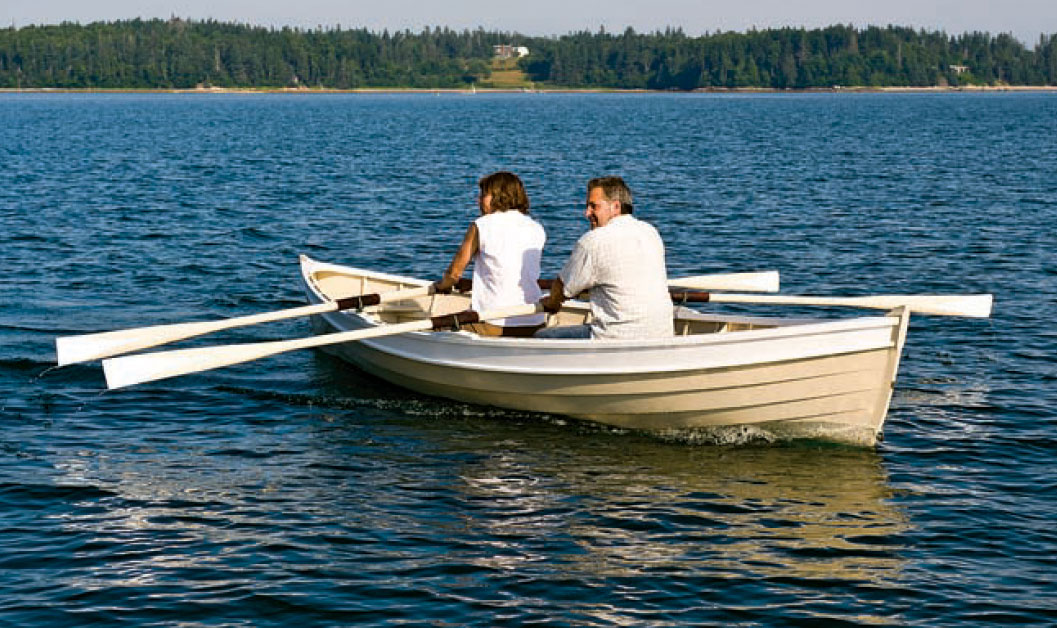
Like Mr. Thomson’s, the Yankee Tender is light and responsive. She will carry three adults with ease and promises to be a good tender and fun for “poking about.” LOA is 12′ 4″, and her beam is 4′ 4″. Her weight of less than 150 pounds makes her easy for two adults to carry, and she can be loaded on a trailer or truck.
WoodenBoat Nos. 30 and 31 feature “Building a Flat-Bottomed Skiff” from the Yankee Tender design plans, using step-by-step details. The plans themselves are exceptionally detailed. WoodenBoat Plan No. 11. $50.00.
Seguin, a sports car of a kayak, will reward experienced paddlers with spirited performance.
Designer Rob Bryan has added a retractable skeg to this kayak to assure positive control without the complication of a rudder system. Spectators watching sea kayaks working into big waves often comment on the daring of the paddlers. In fact, blasting to windward is the easiest part of rough-water kayaking in terms of the skills required. Sea kayaks, with their low profiles and pointed noses, love that game.
Rob Bryan’s Seguin kayak design will reward experienced paddlers with spirited performance
The real test of operator ability occurs when paddling across, or off, the wind. Some kayaks tend to dig in and root when traveling with wind and wave. Many kayaks want to round up and face into the wind, no matter where the paddler might want to go. By raising or lowering Seguin’s skeg, you can head where you wish at will.
With Seguin’s cockpit tailored to your own dimensions (using specially shaped foam pads), this kayak becomes an extension of your body. You’ll be able to lean, brace, and Eskimo roll with great ease and style.
Seguin’s cockpit details show the custom-fitted padding helpful for bracing and rolling.
Despite all its sophistication, Seguin is easy to build. Simply cut the hull panels to shape, stitch them together, and finish the seams with epoxy and fiberglass tape. At 42 lbs, this is a clean, light, and strong boat. And it is extraordinarily handsome on the water.
Plans for the Seguin Kayak include profile, deck plan, and panel layout; three sheets of construction details; full-sized patterns for skeg and cockpit; and a 40-page construction manual. WoodenBoat Plan No. lll, $60.00.
Seguin Kayak Design Plan Details
DESCRIPTION
Hull type: V-bottomed sea kayak
Construction: Stitch-and-glue plywood
Featured in WoodenBoat No. 115
BUILDING DATA
Skill needed: Basic to intermediate
Lofting required: No
Alternative construction: None
PLANS DATA
No. of sheets: 5 plus instruction booklet
Level of detail: Above average
Cost per set: $60.00
WoodenBoat Plan No. lll
Particulars
LOA: 17′ 10″
Beam: 21 1/2″
Weight: 42 lbs
Launching Your New Sea Kayak
So, you’ve built your Seguin Kayak and are ready to launch. But how and where to? Check out these other articles for a handy DIY boat cart you can use to transport your new kayak to the water, and a couple adventure stories for some inspiration.
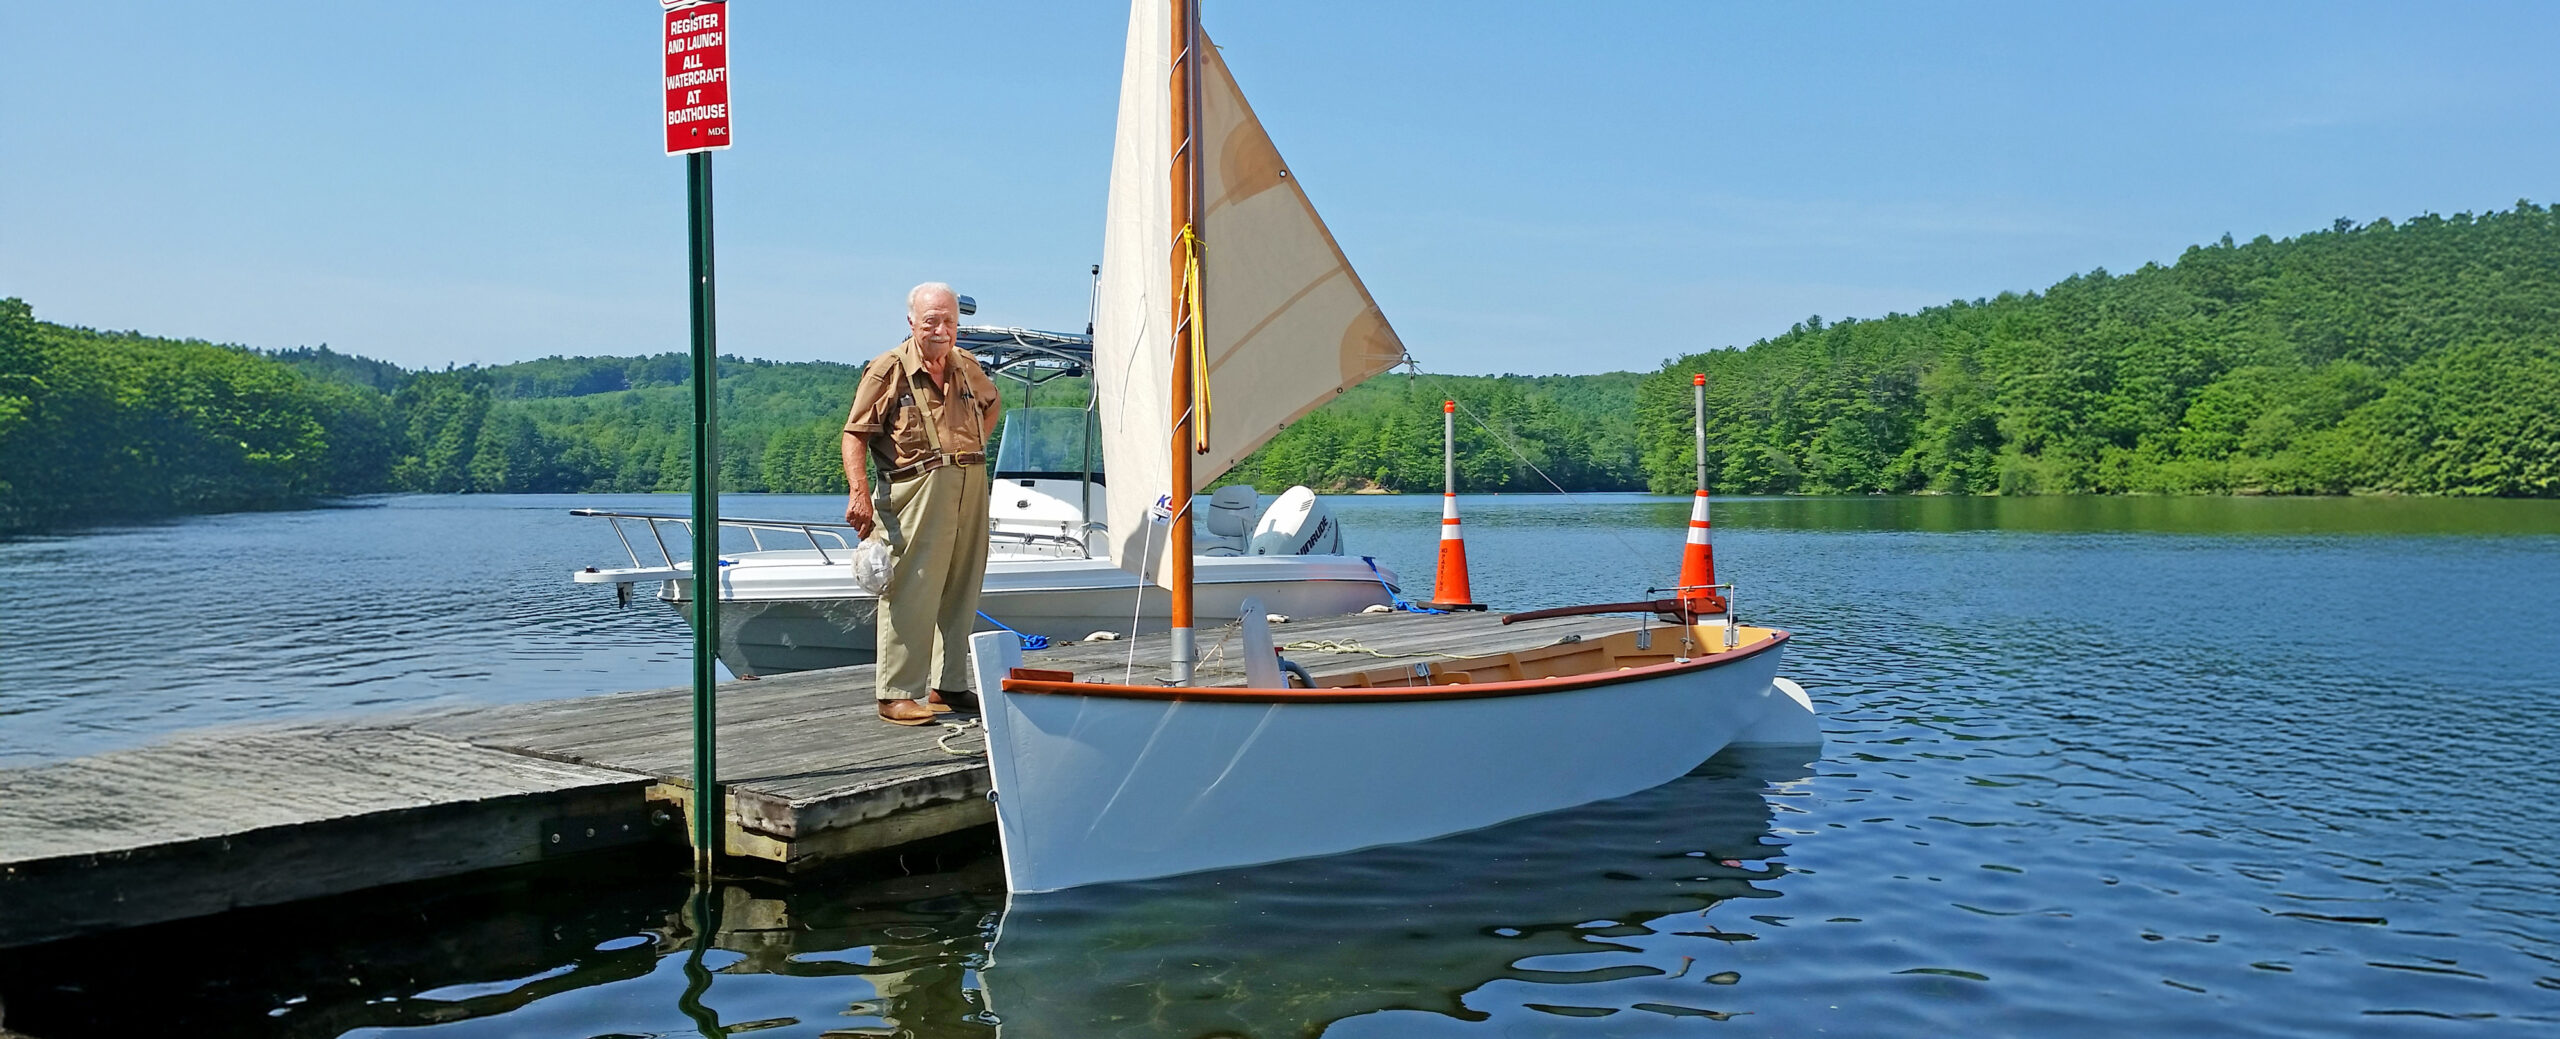
These plans are taken from what is thought to be the last remaining Asa Thomson flat-bottomed skiff, now owned by Mystic Seaport Museum. The Asa Thomson Skiff rows surprisingly well, and her rockered bottom makes her responsive, as well as allowing her to carry three adults and still row well.
Mr. Thomson apparently built Mystic’s skiff for a fisherman; there’s a watertight bait well under the middle thwart, open to the sea through holes bored in the boat’s bottom. Access is through two hinged lids that form the central part of the thwart when closed. It’s a unique feature, adding enough strength through its bulkheads so the usual seat knees aren’t required. Even if you’re not a fisherman, you might still find the space useful as a dry compartment for secure and weatherproof storage of life jackets, oarlocks, and other boat gear.
Spencer Lincoln
.
With an 11′ 3″ LOA and a beam of 4′ 5″, she weighs only about 150 pounds. The skiff at Mystic is framed in oak, double-planked with 3/8″ white pine on her bottom and 3/8″ white pine in three stakes on each side. She’s fastened with copper clout nails. Her transom is 5/8″ oak, and oak is also used for her stem, chines, sternpost, and seats. The keel piece, skeg, inwales, and guardrail arc made of yellow birch, and natural apple crooks form the breasthook and quarter knees.
Additional information on the skiff is available in an article entitled “Asa Thomson’s Elegant Skiffs,” WoodenBoat No. 29. WoodenBoat Plan No. 9. $20.00.
Asa Thomson Skiff Plan Details
DESCRIPTION
Hull type: Flat-bottomed, straight flaring sides
Rig: None
Construction: Cross-planked bottom, lapstrake sides
Featured in WoodenBoat No. 29
PERFORMANCE
* Suitable for: Protected waters
* Intended capacity: 3
* See page 112 for further information.
Trailerable: Yes
Propulsion: Oars
Speed (knots): 1-3
BUILDING DATA
Skill needed: Intermediate
Lofting required: No
*Alternative construction: Plywood
PLANS DATA
No. of sheets:
Level of detail: Below average
Cost per set: $20.00
WB Plan No. 9
Particulars
LOA: 11′ 3″
Beam: 4′ 5″
Weight: 125-150 lbs
Completed Asa Thomson Skiff Images
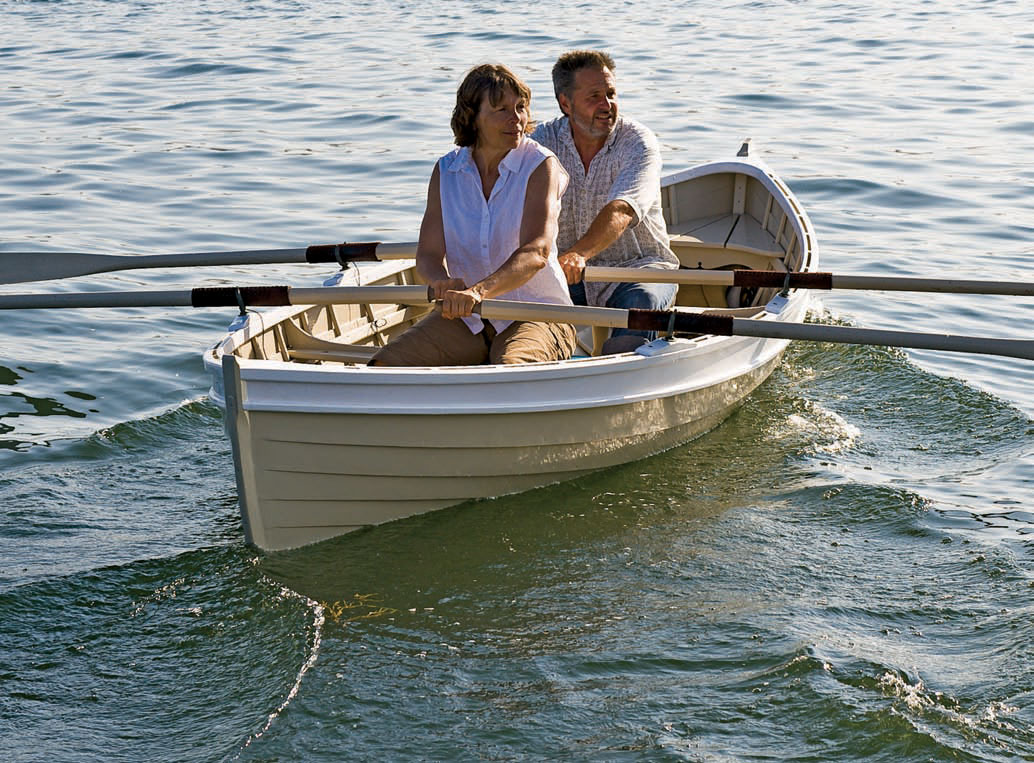
Karen Wales
Traditionally built, the Asa Thomson skiff weighs 125–150 lbs. Plywood construction makes COOKIE, a lot lighter and renders her immediately usable upon launching since there’s no waiting for wood to swell. She is trailerable and is easily lifted and launched by two people.
Karen Wales
In the normal rowing position, the skiff’s even loading and short turning radius are shown off.
In a clearing rain and soft mist LITTLE JOY slid through calm water to the middle of the Mississippi River, about 2 miles below Lock and Dam #1 in Minneapolis, the highest navigable on the Mississippi River. The river, here at Hidden Falls, is only 100 yards wide, clear and cold, with a gentle but steady flow. With a smile for my wife Xiaole, who was seated comfortably in the stern, I put my back into it, rowed out to mid-river, and caught the current that flows south to the Gulf of Mexico.
Photographs by Xiaole and David Hudson
After a 1,100 mile road trip from Philadelphia, we put in a Hidden Falls Park on the southern fringe of Minneapolis. The river was hardly looking like the Mighty Mississippi I’d imagined.
Our plan, well my plan, was to row/sail down the entire 1,800 miles of the Mississippi River in a 17′ dory I built in my backyard. Xiaole (pronounced Shihow-luh) wore a bulky, bright orange PFD. She is not the strongest swimmer, and we debated whether she should even come along. We eventually settled on having her come along for just the first week.
After just 3 miles of rowing, the tall office buildings of St. Paul appeared around a bend in the river, rising right along the eastern bank. Steel barges, 35′ wide and 200′ long, were tied on both sides of the river. A towboat just as big, with twin exhaust stacks and a square bow, idled next to them.
As we approached the first of the four bridges in downtown St. Paul, the river was quiet and we were at ease. Beyond the fourth bridge, the traffic of tows and barges would demand our close attention.
We moved with caution and worked our way past the barges and towboat. Two narrow channels ran underneath two successive bridges. A towboat underway now and pushing two barges passed us in the left channel. More barges and towboats slipped by as we put downtown St. Paul behind us.
Downstream from the city, the banks became heavily tree lined, and we made our way between small wooded islands and past the mouths of numerous back channels. A pair of bald eagles, perched high on a leafless tree, peered down on us. This was more like it, but what wasn’t more like it were the pleasure boats. It was Labor Day Sunday and they were out in force, enjoying the last weekend of summer. There were cruisers and houseboats, pontoon boats and jet skis, and even some I would call yachts. The one thing they had in common were motors and speed. Pulling with our oars at 3 mph, we felt we did not belong.
We took a break on a muddy beach just below St. Paul. This section of the river is quite narrow and crowded with tows.
Camping spots were plentiful among the islands and wooded shores, but unfortunately, the good ones were occupied with the pleasure boaters spending the night on the river. We finally managed to find a small grassy spot on a point of land, set up the tent, and eat some noodles with the last of the evening’s light. We had gone less than 22 miles on our first day, far less than I’d planned, but I was satisfied. We were off. Soon after we zipped the tent door shut, I fell asleep, exhausted.
We pushed off by 7 a.m. the next morning and rowed into a side channel warmed by the newly risen sun. The pleasure boaters were all still asleep and we had the river to ourselves. Several flocks of white pelicans flew low overhead, their white bodies bright against the blue sky. A turtle, balanced on a log, basked in the morning sun, then slid into the river as we drew near. An immature bald eagle, big but lacking the white head, flew past as another sat high in trees and surveyed the river.
Roger Siebert
.
We rejoined the main channel after passing through Baldwin Lake as the pleasure boaters began to wake up and head home. Roaring engines followed by 2′-high wakes would make me break my rowing rhythm. I would turn LITTLE JOY square to the waves and ride them out. Eventually, at the sound of the engines, my chest would tighten.
It rained on and off throughout the afternoon, but we made 35 miles and called it a day at Prescott, Wisconsin. Heavy rains were expected that night and through the next day so we left LITTLE JOY at a small marina, free of charge, and walked to the only motel in town. I was happy with the mileage, but I was exhausted and the motorboats added a new level of anxiety. “Are we too old for this?” I asked my wife. “We are not too old,” she said with a reassuring smile.
Not far from Prescott, Xiaole sought a little cover on a mid-river island during a violent summer storm. After the first three days, we encountered little rain.
The clouds were dark and heavy the next morning, and we set out in a light rain. We decided to make a run for a casino resort about 11 miles away. We could hole up there for the night when the storm came through. Right away the rains increased and got so heavy we pulled ashore and stood under the trees. A′’-long northern water snake slowly emerged from the trees, slinked onto the sand, and lay there near our feet.
We rowed off the river into Sturgeon Lake, tied up at the Casino marina, and spent the afternoon and night warm and dry in a hotel room as we watched the rain come down in torrents. It rained over 5” overnight and in the morning, the gear we left in LITTLE JOY floated in 8” of bilgewater. I started to bail.
The sky, now a brilliant blue, shimmered off the clear surface of the river. Still at the oars, my wife not yet ready to take a turn, I rowed easily down the middle of the river. There were no pleasure boats, no whining outboard motors. The Tuesday after Labor Day brought peace and quiet.
I enjoyed the warmth of the summer sun on my back and the company of my wife as we wound our way mile after mile downriver to Lake Pepin. At 20 miles long and 2 miles wide, it’s the largest lake on the river. The north wind that had brought clear skies was hard from the north, straight down the lake.
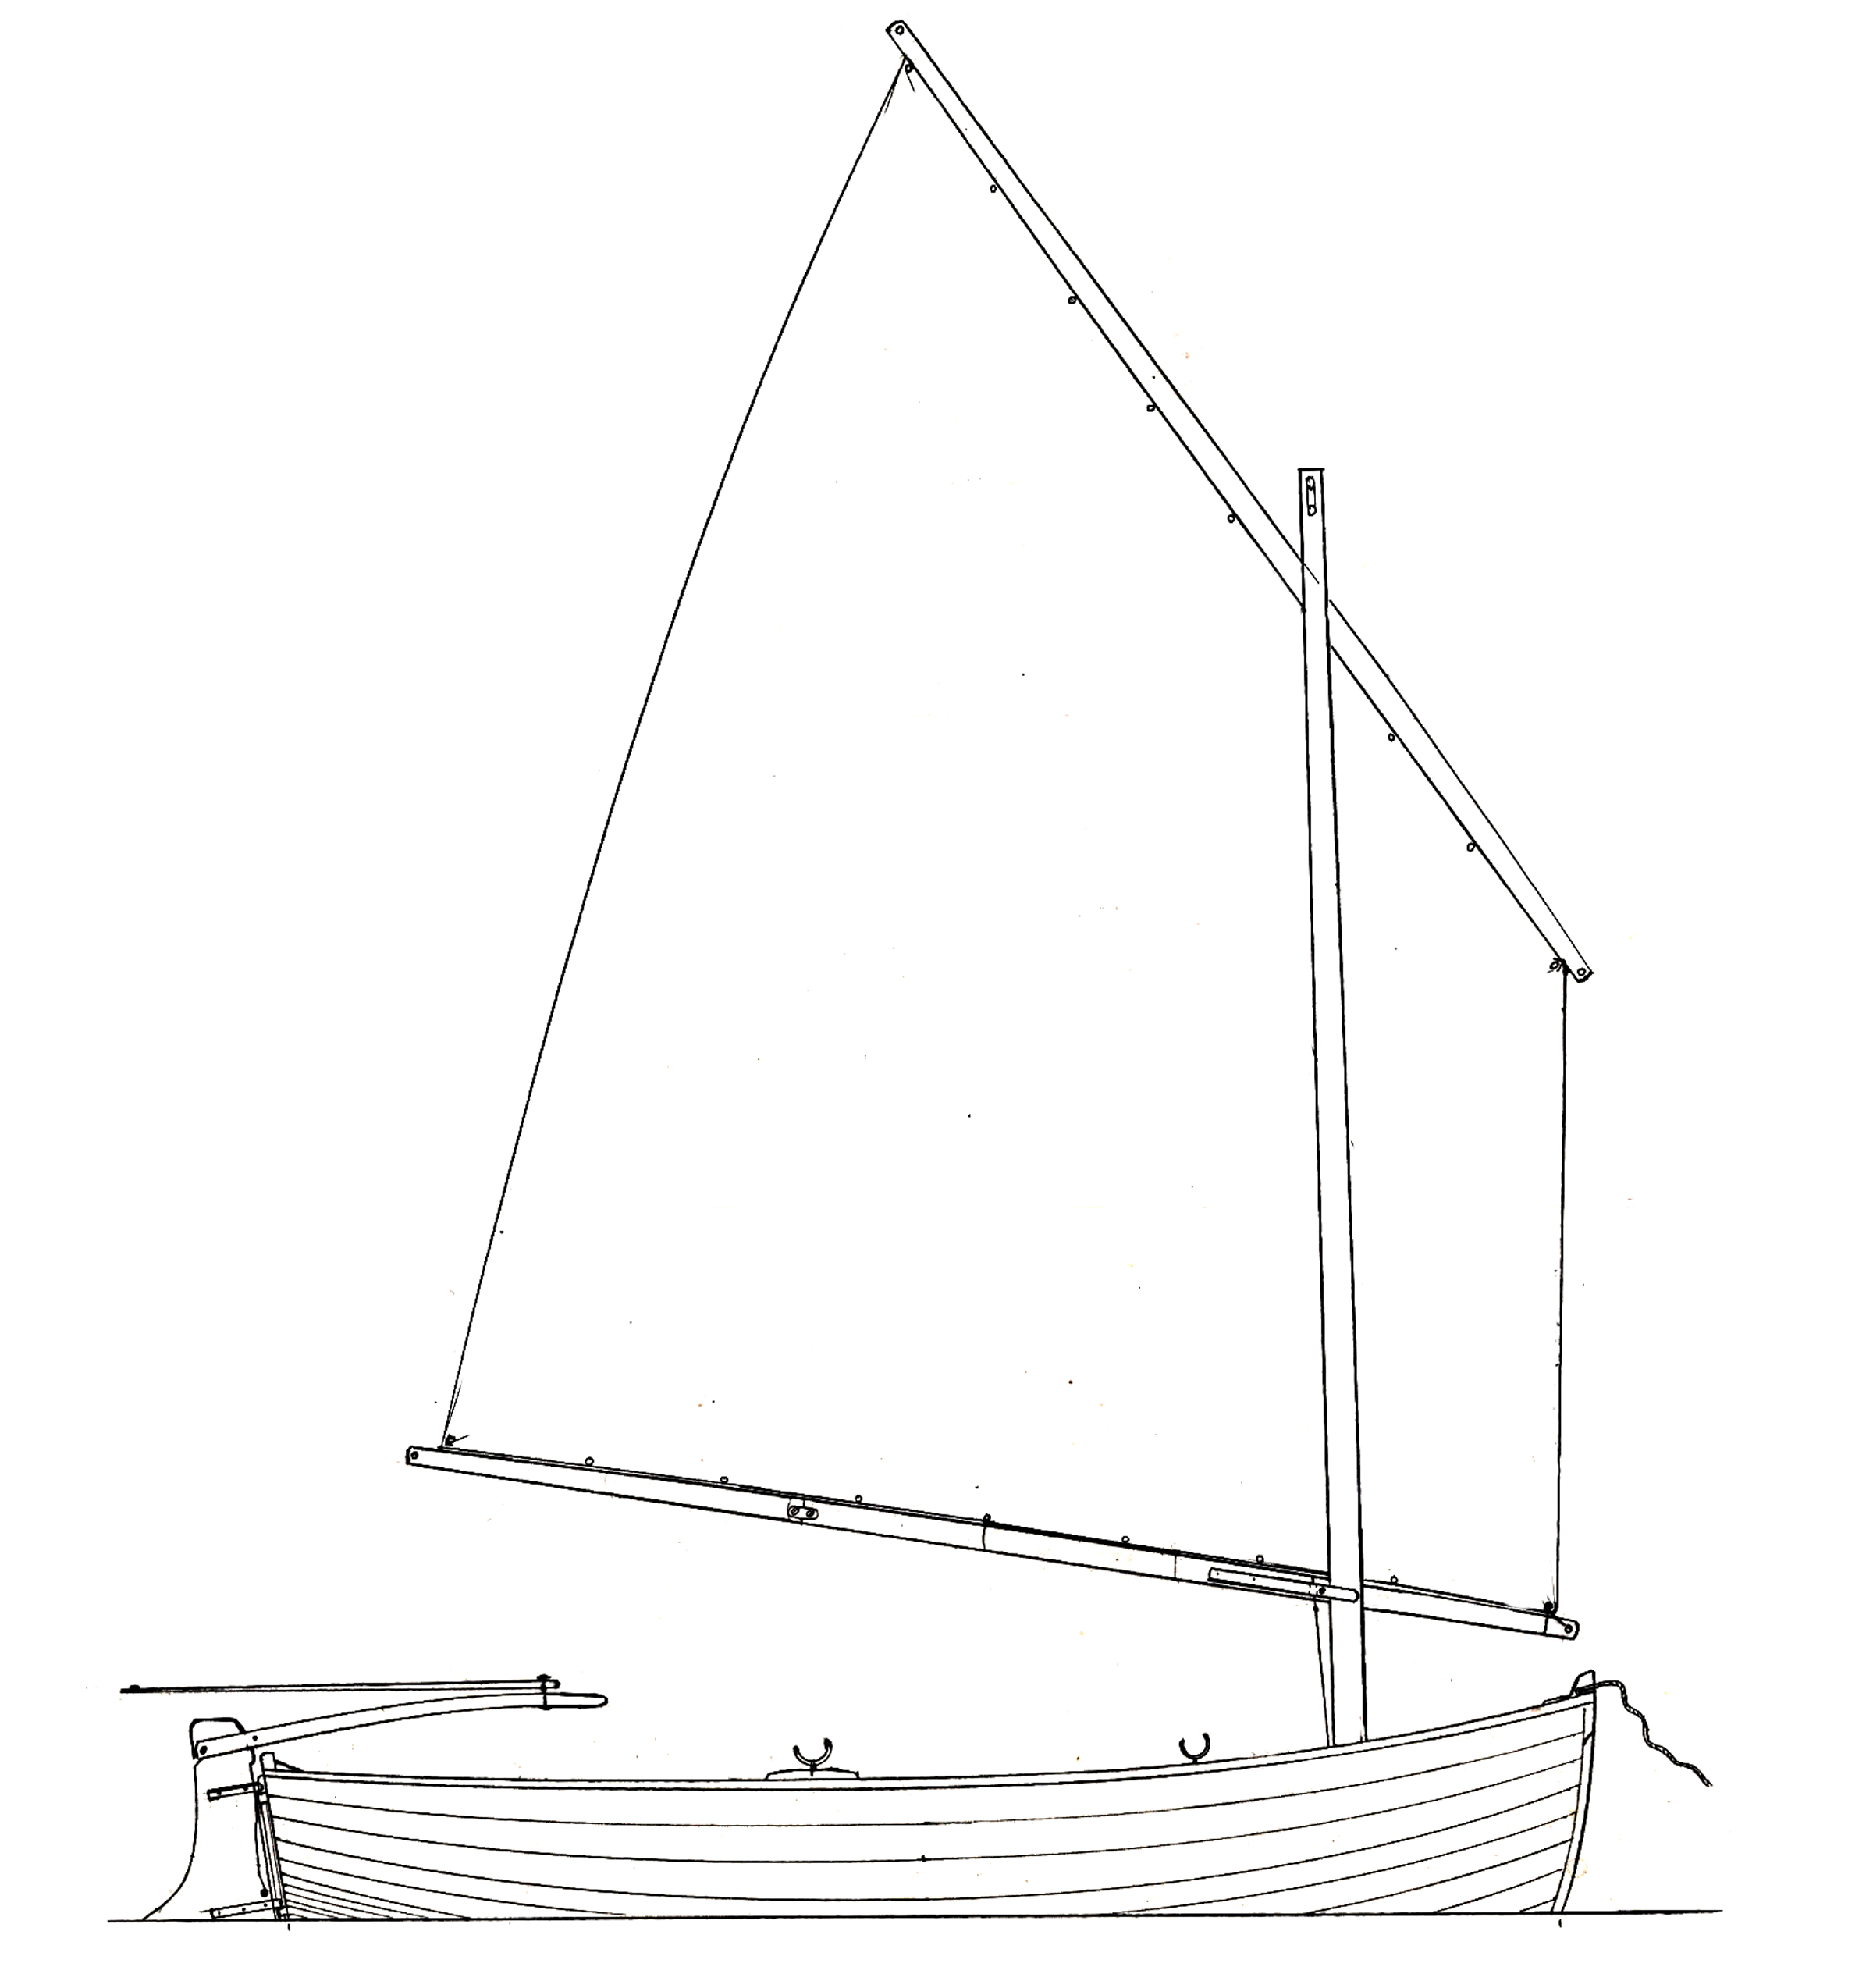
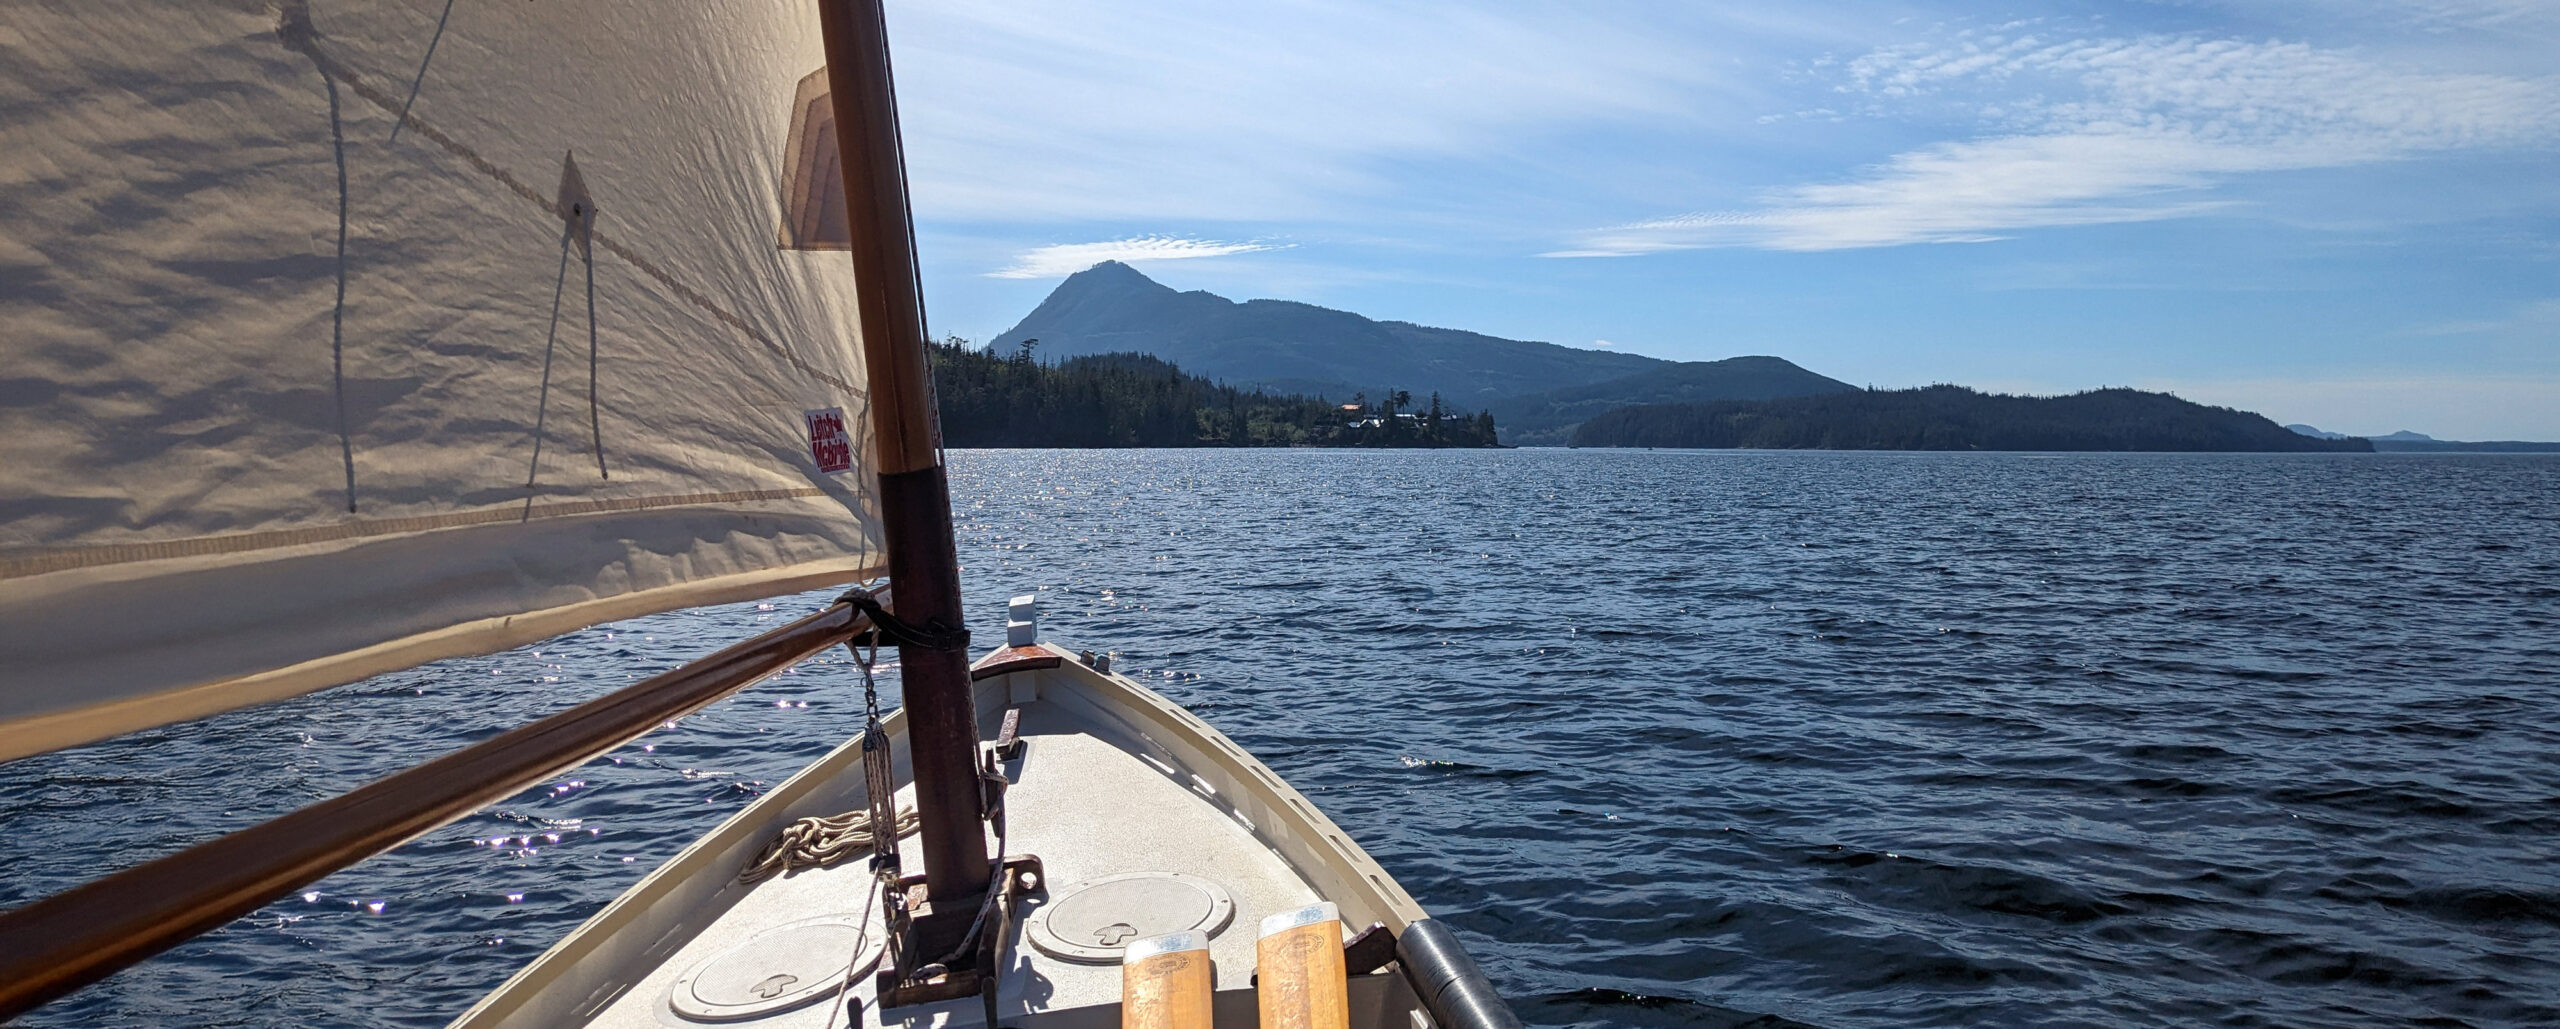
LITTLE JOY has a simple lug sail. I had sailed before: exactly three times, in light wind, and not competently.
Lake Pepin was big enough to try a little sailing. It was fun, fast, and exciting. Unfortunately, I was new to sailing and my sailing skills weren’t up to the task. This was the first and only time I tried sailing on the river. The bluffs all around were a common sight from Minnesota down to Iowa.
I hoisted the sail and pulled in the mainsheet. Off we went straight down wind. I squatted low on the middle thwart and Xiaole hung on tight in the stern as we flew over choppy waves down the middle of the lake. With growing confidence but ample anxiety, I guided LITTLE JOY 10 miles and aimed for a small point of land jutting out just north of Lake City. I hit it perfectly…by which I mean I hit it. The rocky beach was being pounded by small waves and, combined with the strong wind, bashed my boat against the rocks. I got Xiaole out of the boat and safe on land.
The campground was actually a half mile upwind. I took the sail down and worked my way back by pulling the boat along the shore and by rowing. Hok-Si-La Campground was empty, and we set up camp protected from the wind by the trees lining the edge of the beach. The exposed sandstone of the 400’ bluffs on the far side of the lake glowed in the warm light of the setting sun. As the wind died down, Xiaole and I ate noodles and eggs and watched the stars come out over the lake.
Xiaole used the paddle to contribute to our downriver progress. It wasn’t very effective so she didn’t use it often but enjoyed paddling when she did.
The next day we reached the south end of the lake, rowed along the 1/4-mile-wide river to Wabasha, and spent the night on a sandy beach 6 miles downstream from town.
The next day was leisurely, spent entirely on the river, covering 26 miles and ending camped on the tip of an island shaped like a crooked finger pointing upstream. We were on the river early the next day. Winona was just 3 miles away, and we left without breakfast.
Five miles upriver from Winona, Fountain City is typical of many river towns, nestled under the bluffs and stretched out along the river.
The current was moving 3 mph as we approached Winona, so I rowed LITTLE JOY to the shore just upstream from the dock. Xiaole was ready with a line. Approaching the cement dock, I spun around and pointed the bow upstream as we got close. The current carried us past as Xiaole threw the line around an oversize steel cleat and tied us off.
As we set out for town, I had my heart set on pancakes. After a search of the main street, we came up empty. We settled for an artsy coffee house, and I had to content myself with an enormous cinnamon bun and a cup of coffee. After days of noodles and fried eggs gritty with sand, this would have to do.
Great white cliffs begin at the confluence of the Illinois River and the Mississippi at Grafton, Illinois, and run 10 miles down toward Alton, Illinois. The Great River Road, a National Scenic Highway, was my companion on and off and runs right below the cliffs here.
Xiaole’s leg of the trip was over and she caught a bus to head back home. I walked back to the river alone. Fifteen miles downriver, I pulled ashore and made camp on an island directly across from Great River Bluffs State Park. Sitting alone on the sandy beach, I dined on fried chicken and cold iced tea from the resupply I did in Winona. Steep tree-covered bluffs rose before me topped by two 500’ peaks, the highest 200′ of each were sheer, exposed rock faces of dolomite. The cliffs run on both sides of the river, north and south, for dozens of miles; they closed in on the river as night fell.
Rising with the sun I stretched and let out a moan. My back was stiff. I’m 55 years old and a stiff lower back is nothing new. To add to that, four months ago, I separated a rib swinging a golf club and I wasn’t sure it was completely healed.
I took a break in a spot of shade to give my back a much-needed stretch. This beach was exceptional though not uncommon for a camping spot. Minnesota and Wisconsin both provide, free of charge, sandy open beaches for camping and day use. This would change as I got to the states farther south.
The two-man backpacking tent I set up on the beach is barely big enough for one person and a few overnight items, so I left most gear outside or on the boat. Packing up was easy except for the stooping to set up and tear down the tent—my back made it slow work.
I rowed in silence. With Xiaole gone, the aft seat was now empty, and beyond it is an expansive view of where I had just been.
I had rearranged the gear to trim the boat and stowed the sail away for good—the river was too dangerous for my sailing skills. I frequently looked over my shoulders, left then right, looking for obstacles. There were plenty. Fallen leaf-bare branches, uprooted stumps, and even entire trees floated past. Channel buoys, concrete channel markers, wing dams, river-wide dams, and bridges all stood immovable and the river wrapped around them.
It was a dangerous game to play, but I passed through this spillway and underneath the massive pivoting gate. Looking upstream, as here, it is easy to see the drop to the downstream side of the dam, but when I approached a spillway from the upstream side it was hard to determine the water level on the far side. It could have been a dangerous 6’ drop. The water level was very high because of the heavy rains in the upper Midwest, so many dams had the gates raised to let the river flow through unimpeded.
I was lost in the routine, daydreaming, when Bang! I was thrown forward then back, whiplashed and jolted. A shamrock-green steel buoy, as round as an oil drum and rising higher than my head went by in slow motion, scraping along the gunwale. I quickly headed to shore to inspect the damage.
Other than a small dent on the bow and a long green paint smear on the port gunwale, LITTLE JOY was fine. I, however, grumbled to myself for allowing such a potentially dangerous thing to happen. The Mississippi River, starting at the Gulf of Mexico all the way up to Minneapolis, is dotted with hundreds of red and green channel markers. Looking over the stern I’d see the wake left by LITTLE JOY’s passage through the water, and it was easy to forget the water itself is moving. Buoys, while they’re fixed to the bottom, appear to be charging upriver like submarines with only their sails showing. I had hit one head on, but it felt like it had run into me.
I passed the Effigy Mounds National Monument, where hidden in the woods are earthen mounds in various animal forms built by native people in the first millennium.
After nine days on the river I’d traveled 172 river miles and crossed the border from Minnesota into Iowa. That was only on the right bank—I still had Wisconsin on the left bank—but still, it was reassurance that I was getting somewhere.
Marquette, Iowa, is a village of only a few hundred people that lies in the shadow of one of the 130 bridges that span the Mississippi. After rowing under the bridge, I pulled up to a floating wooden dock where I met a man with a bushy blond mustache, cargo shorts, and high-top work boots. He gave me dock space, a giant cup of coffee, and pointed me to a place I could finally get a pancake breakfast.
Back on the river, I had a view of the bridge that carries US-18 across the river. Its single powder-blue steel arch stretching high above the deck for the roadway blended in with the cloudless sky behind it. Beneath the bridge I got a glimpse of a tow heading downriver toward me.
The bridges spanning the river come in many shapes and sizes and include many old, low railroad bridges that have a lift or a swing section that has to be moved to allow bigger boats to pass. This more modern highway bridge at Marquette is prettier than most. The tow seen here under the bridge would soon pass close by.
On the Upper Mississippi a “tow,” as it’s called, usually consists of a towboat and a set of barges, three abreast and five end-to-end that are cabled together into a rectangular raft. Each barge is 200′ by 35′, so a 15-barge tow with a 200′ towboat is 1,200′ long. I learned that the thousands of tons of cargo a tow carries is equivalent to a railroad train 3 miles long or a convoy of trucks 35 miles long.
The towboat, its two diesel engines whining, steered under the bridge close to the Iowa side following the marked channel. When it was a mile away, I moved tight to the Iowa shore knowing the tow would be back in the middle of the river when it passed. Ten yards from shore I sat and waited. The water along the shore was emerald green, covered by duckweed; round leaves no larger than 1/4″ floated on the surface in large mats, extending unbroken for hundreds of feet.
The bank at the river’s edge rose sharply about 10′ above me to a railroad. I heard a distant rumble and within minutes a freight train roared toward me. The engineer leaned out of the cab window of the red Canadian Pacific locomotive. Our eyes met and I waved. He gave me two short blasts of the horn as the train thundered by.
Just then the tow reached me, and its 100′-wide three-barge bow pushed the river out of its way with blunt brute force. I waved to the pilothouse high above the deck. No one waved back. I turned LITTLE JOY, moved away from the shore, and headed straight into the churning wake. LITTLE JOY rode over the waves with ease.
Tows passed me up to three times a day. They were going both upstream and down, and I kept an eye on the ones coming upstream, behind my back, even though once spotted there was plenty of time to get out of the way.
The next day I rowed 27 miles and stopped at a charmless county park at Mud Lake on the Iowa side of the river. I tied LITTLE JOY next to a concrete boat ramp. I stood, stretched my back and walked to a campsite under some large shade trees in easy view of the ramp. Still stiff from the day’s row, I hobbled around the end of an 8′ white panel fence separating the marina from the campground to see about keeping LITTLE JOY there for the night and maybe getting a hot meal.
This was the best camping spot in Illinois. I normally didn’t pull LITTLE JOY completely out of the water but the earlier waves forced me too here. My high-class bumpers are made from blue pool noodles.
I hadn’t shaved or washed my clothes for two weeks and could hardly stand up straight as I crossed the paved parking lot to the marina. I must have looked more indigent than adventurous, and I wasn’t surprised when a pickup truck came through a tall chain-link gate and stopped. “Can I help you find something?” said a fit man wearing a golf shirt and neatly groomed hair. “The restaurant?” I said. “Yeah that’s closed. I thought I would save you the trouble,” he told me as he waited for me to leave. I could see that everything was closed up but I stood there for an extra-long moment before turning around and hobbling back.
High water sometime made finding a suitable campsite difficult. This narrow beach by the water’s edge ended up being one of my favorites. The beer can and others were left by a previous occupant. Some people just don’t get it. Overall the places where I camped were clean and free of litter.
In the morning, I crawled out of my tent, relieved myself on the marina’s white fence, and as I zipped up I heard over my shoulder, “Hey is that your boat?” I nodded. “You can’t leave it there,” said a man in jeans and a forest-green ranger shirt. I explained that the man from the marina hadn’t been very friendly, and soon the ranger and I were having a friendly conversation about my trip. “That’s a really beautiful boat,” he said, then told me that kayaks and canoes stop here once in a while making the trip but he’s never seen a rowboat here.
He mentioned, more than once, that he thinks about doing a trip like mine, but work and family and…you know. I’d had that longing look before and it always made me grateful I’d had the opportunity. I wondered if the ranger would ever pursue his own adventures.
The first night I spent on a sandbar, I was camped barely 2’ above the water line and hoped the river wouldn’t rise while I slept. Lock and Dam #20 is downstream in the distance.
Four days out of Winona, I reached Guttenberg, named by the German immigrants who settled there in the 19th century. I opted for a night off the river at a cozy riverfront inn. I had not had a day’s rest since I started two weeks ago, so I stopped in Dubuque and got a hotel room. Two nights on a hotel bed helped my back some, and I was ready to get back on the river. I made my way another 17 miles the next day and spent the night on an Illinois island near Wise Lake. The following day I rowed towards Sabula, Iowa, the only Mississippi River town situated on a mid-river island.
“Where you headed?” asked a shirtless man with a ginger mustache and straw hat. He was at the helm of a well-maintained, well-appointed pontoon boat. Three other people were sitting comfortably under a huge bimini top. I was envious. It had reached 90 degrees Fahrenheit the past three days and the heat was sapping my strength. “Need a place to stay? Maybe a shower?” he asked. Within minutes LITTLE JOY was tied to his boat and I climbed aboard. We made the 5-mile trip downriver past Savanna on the left bank and Sabula on the right to their home.
“Is being towed going to bother you?” The skipper’s wife, Dee, asked as she offered me an ice-cold beer and a soft seat under the shade. “Yes, it will. Very much,” I replied downing the beer. Dave, behind the wheel, said, “It’s all part of the adventure.” He told me that he and his brother canoed the Mississippi a few years back starting in Lake Itasca and ending 800-plus miles later, right back at his home on the river.
The shower, laundry, air conditioning, pizza, beer, and a comfortable bed were small pleasures that I enjoyed all the more for having gone so long without them. While the only offer I took to stay overnight was made by Dave and Dee, there were others who extended invitations. Five third-shift workers from a local Nestle plant arrived at my island beach, their beach, actually, at 7:30 on a Friday morning to throw a Frisbee and have a beer after work. One offered his home to me if I stopped on my way by the next day. Pleasure boaters, townspeople, fellow river travelers offered me water, beer, food, a car ride or even a tow. Many just asked about my general well-being…almost always prefaced by “You’re doing this alone?”
Industrial complexes like this one were a common sight whether for agriculture, coal, stone, etc. Barges are pulled alongside, filled, and then sent down river. I was fascinated by the undulating white clouds being pushed by the coming storm, but not so fascinated by the violent but brief storm they brought. I took shelter on the leeward side of a tiny island.
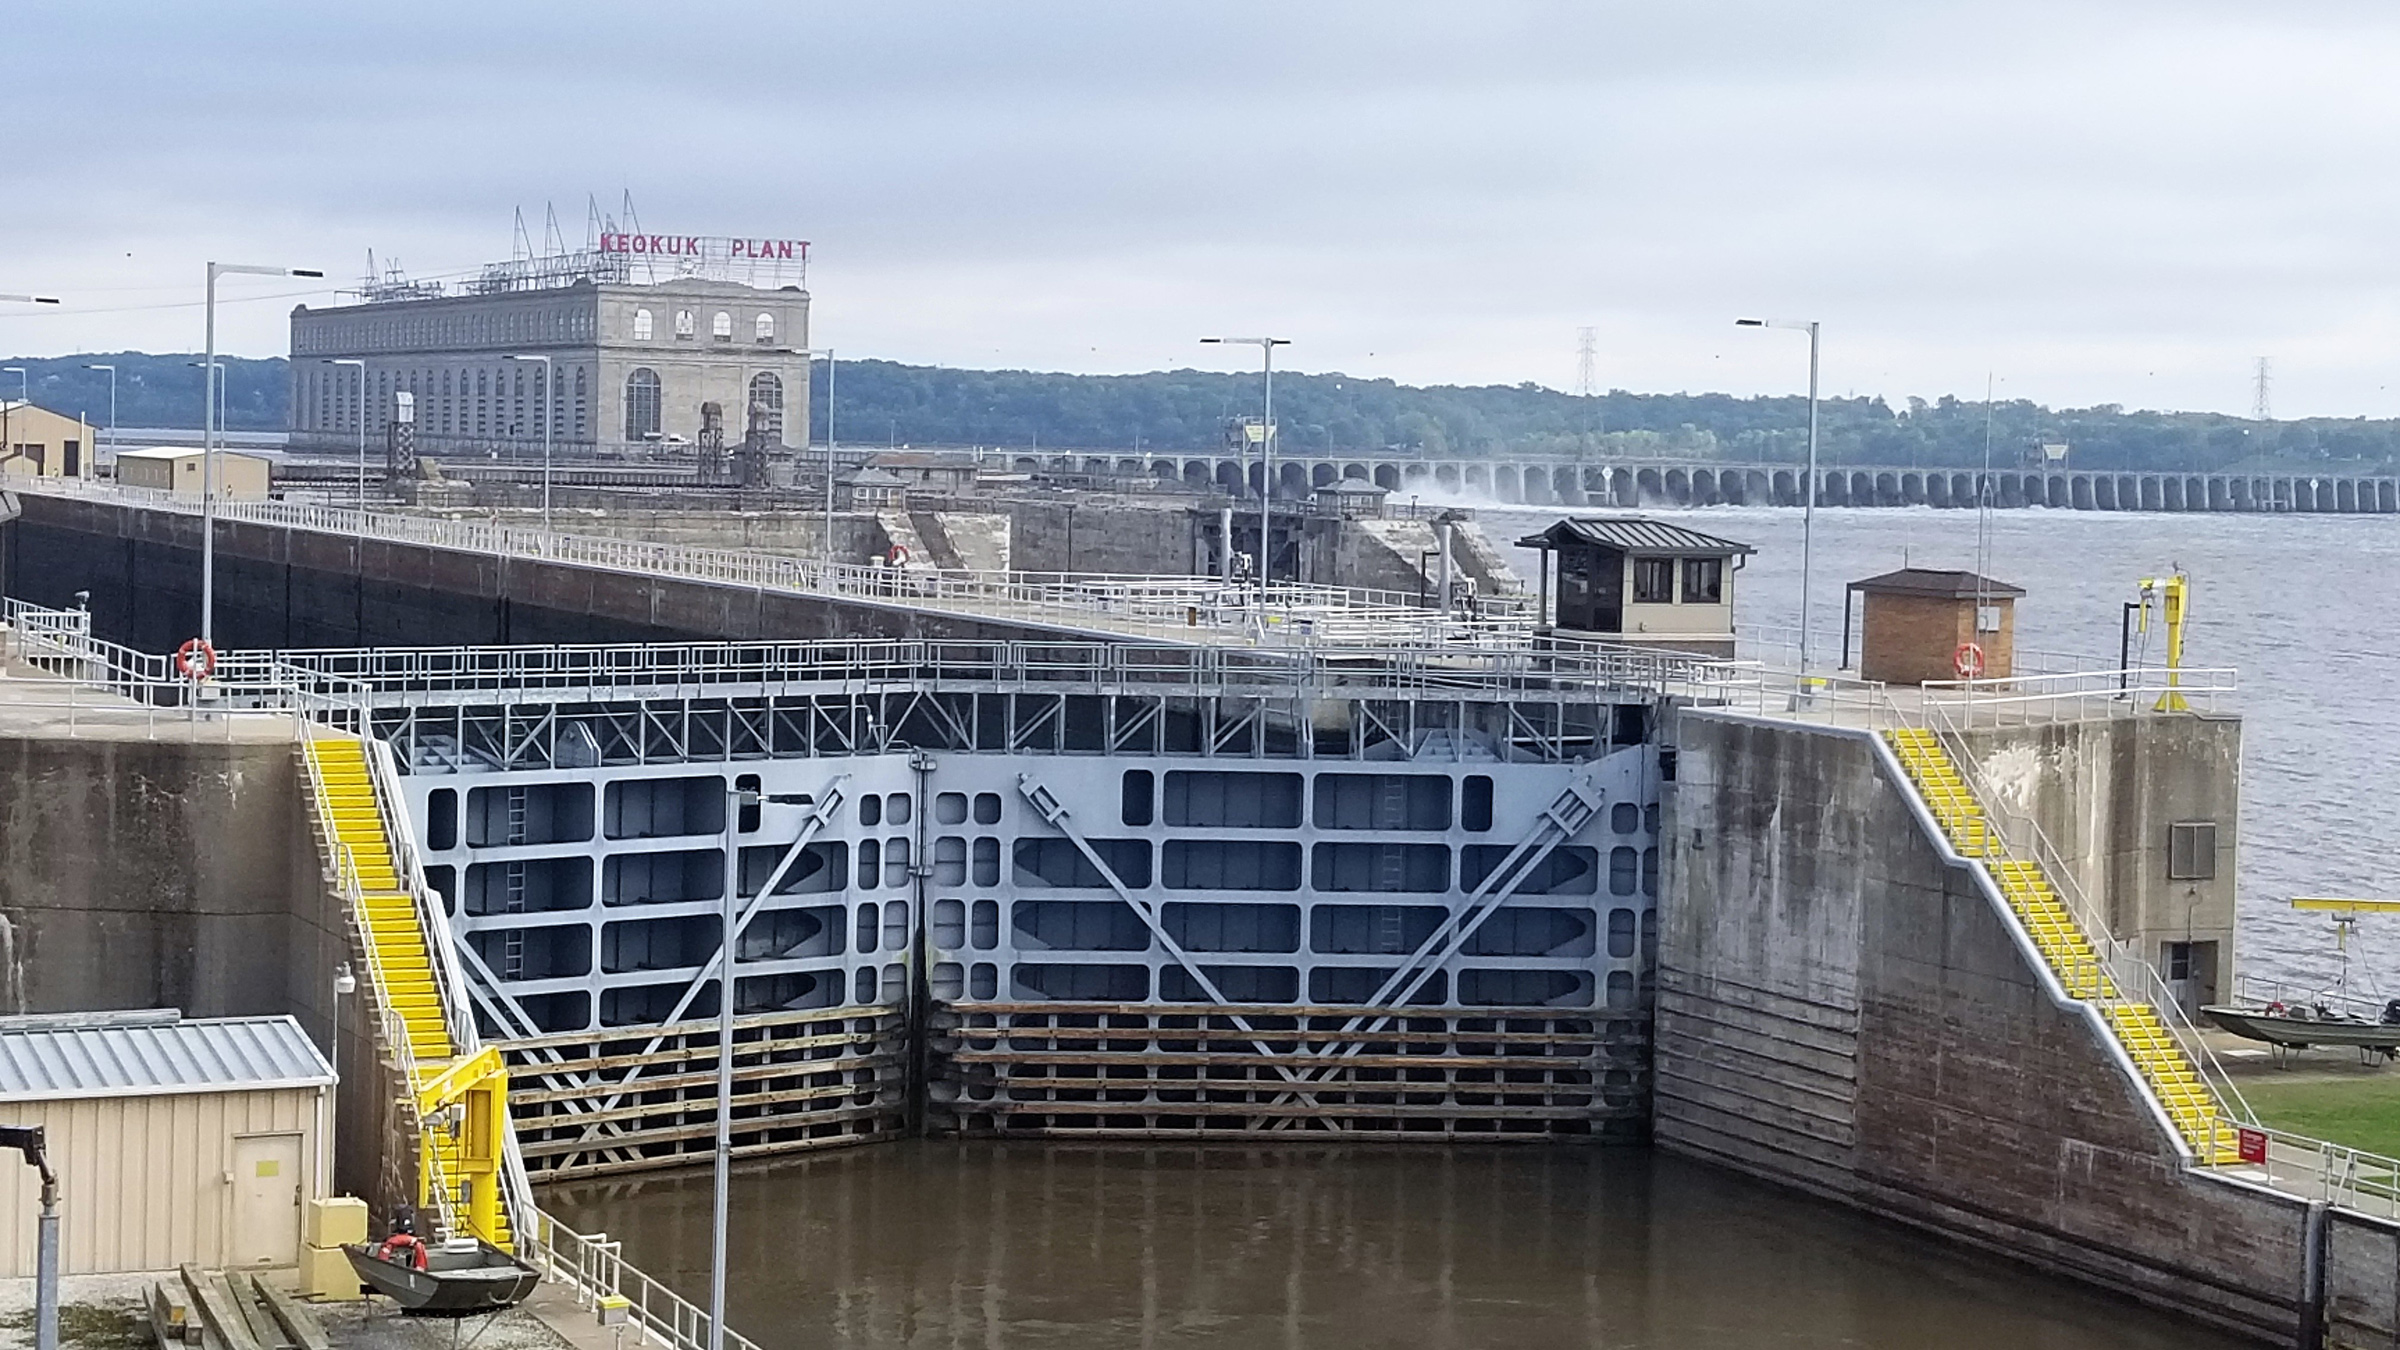
The days passed and I rowed 25 to 30 miles a day. I passed Davenport without stopping. I passed Muscatine, once the pearl button capital of the world, past Oquawka, Nauvoo, and Keokuk, but stopped for the night in Hannibal, Missouri, to enjoy the hometown of Mark Twain. I had passed through 20 of the 27 locks and accompanying dams of the upper Mississippi. They are part of the 9’ channel project to allow commercial navigation all the way to St. Paul.
The Lock and Dam #19 at Keokuk is one of three dams that produce electricity. At the time it was built in 1913, its powerhouse was the largest in the world. I stayed well clear of spillway and took the lock; it lowered me 28’, the biggest drop of the trip.
In the morning, I rowed to a mid-river island a few miles downstream from Hannibal. My back was killing me and I couldn’t sit comfortably in the boat. I pulled LITTLE JOY ashore and stretched out on a small sandy beach, warming myself in the sun. My back had been bothering me again for several days, and the miles I had been making were less than I’d hoped for. I began to rethink my plan to reach the Gulf of Mexico.
A towboat chugged by the island pushing a 1,000′ tow. It was only a couple miles to Lock and Dam 22. I knew by the time I got there, the lock would be tied up for a couple of hours as the raft was separated divided into halves and passed through the 600′ lock in two operations. It would be a long wait for my turn.
When I approached the lock, the tow that had passed me was waiting at the entrance; I studied the 3,000′-wide dam, a long, dark line that stretched from the Illinois side out well past the middle of the river. Tight against the Missouri side were the concrete structures of the lock, and between them and the dam was a spillway with 13 bays, each spanned by steel-plate arches above gates that control the flow of the river.
This tow, bound upriver, is pushing a load of rock, probably for a riverside town’s levee.
I lingered above the lock for 20 minutes, but grew tired of waiting. I cinched my PFD and crossed the river upstream from the lock side over to the dam. The water level was high, and I thought I could maybe haul the boat over the dam.
The dam at its lowest point was still showing 2′ above the water, and about 7′ down to the water on the other side. I could not drag the boat over it. I surveyed the spillway. I had rowed LITTLE JOY through two spillways back upstream on the Mississippi, each time knowing it was a stupid idea. The river, a half mile wide above the dam, squeezes through a spillway less than a quarter mile wide, and waves and swirling eddies roar furiously through the gaps. An abandoned barge was wedged cockeyed in one bay, and branches and snags were piled up in others. I took it as a warning and decided to cross back over and just wait my turn at the lock.
I cinched my PFD even tighter and rowed upriver. I managed to travel a few hundred yards, then aimed at a spot just above the lock entrance. The river rushed past and picked up speed as it funneled toward the spillway. I pulled hard, angling the bow upstream. I passed by the openings of the spillway, and when I reached the protection of the lock wall I paused, caught my breath, and called the lockmaster on my VHF radio.
“Lock and Dam No. 22, this is southbound rowboat. I’d like to lock through.”
“Okay skipper, we’ll try to get you through after the southbound tow,” he replied.
When the upstream gates opened for me, I went in. LITTLE JOY floated alone in the middle of the enormous 600′-long, 110′-wide chamber like a toy in a bathtub. Rough, age-worn concrete walls 20′ high and two sets of matching battleship-gray steel gates sealed me in. The water began to drain.
“Hey!” came a voice from atop the wall. “You better have a plan when you leave. There is a 3-by-5 tow waiting to come through.” I had seen the 15-barge raft out in the channel on the downstream side of the dam when I rowed past the spillway crossing to the lock; I wasn’t concerned.
The downstream gates opened, revealing a 15′-high wall of steel blocking my exit—the blunt overhanging bows of the three lead barges. The deckhands on the tow yelled something and laughed. Unsure if the tow was moving, I pulled hard for a small opening between the concrete wall and the steel side of a barge. It was just wide enough for me to pass through.
I shot out into the churning water below the spillway. The towboat fired up its engines and began to move into the lock. I caught my breath, laughed with relief, and let the current carry me. The river, again half a mile wide, swirled lazily. Low, green, tree-covered bluffs ran along both shores. A bald eagle soared low along the treetops. There was not another boat in sight; astern, the dam slowly disappeared behind a bend in the river.
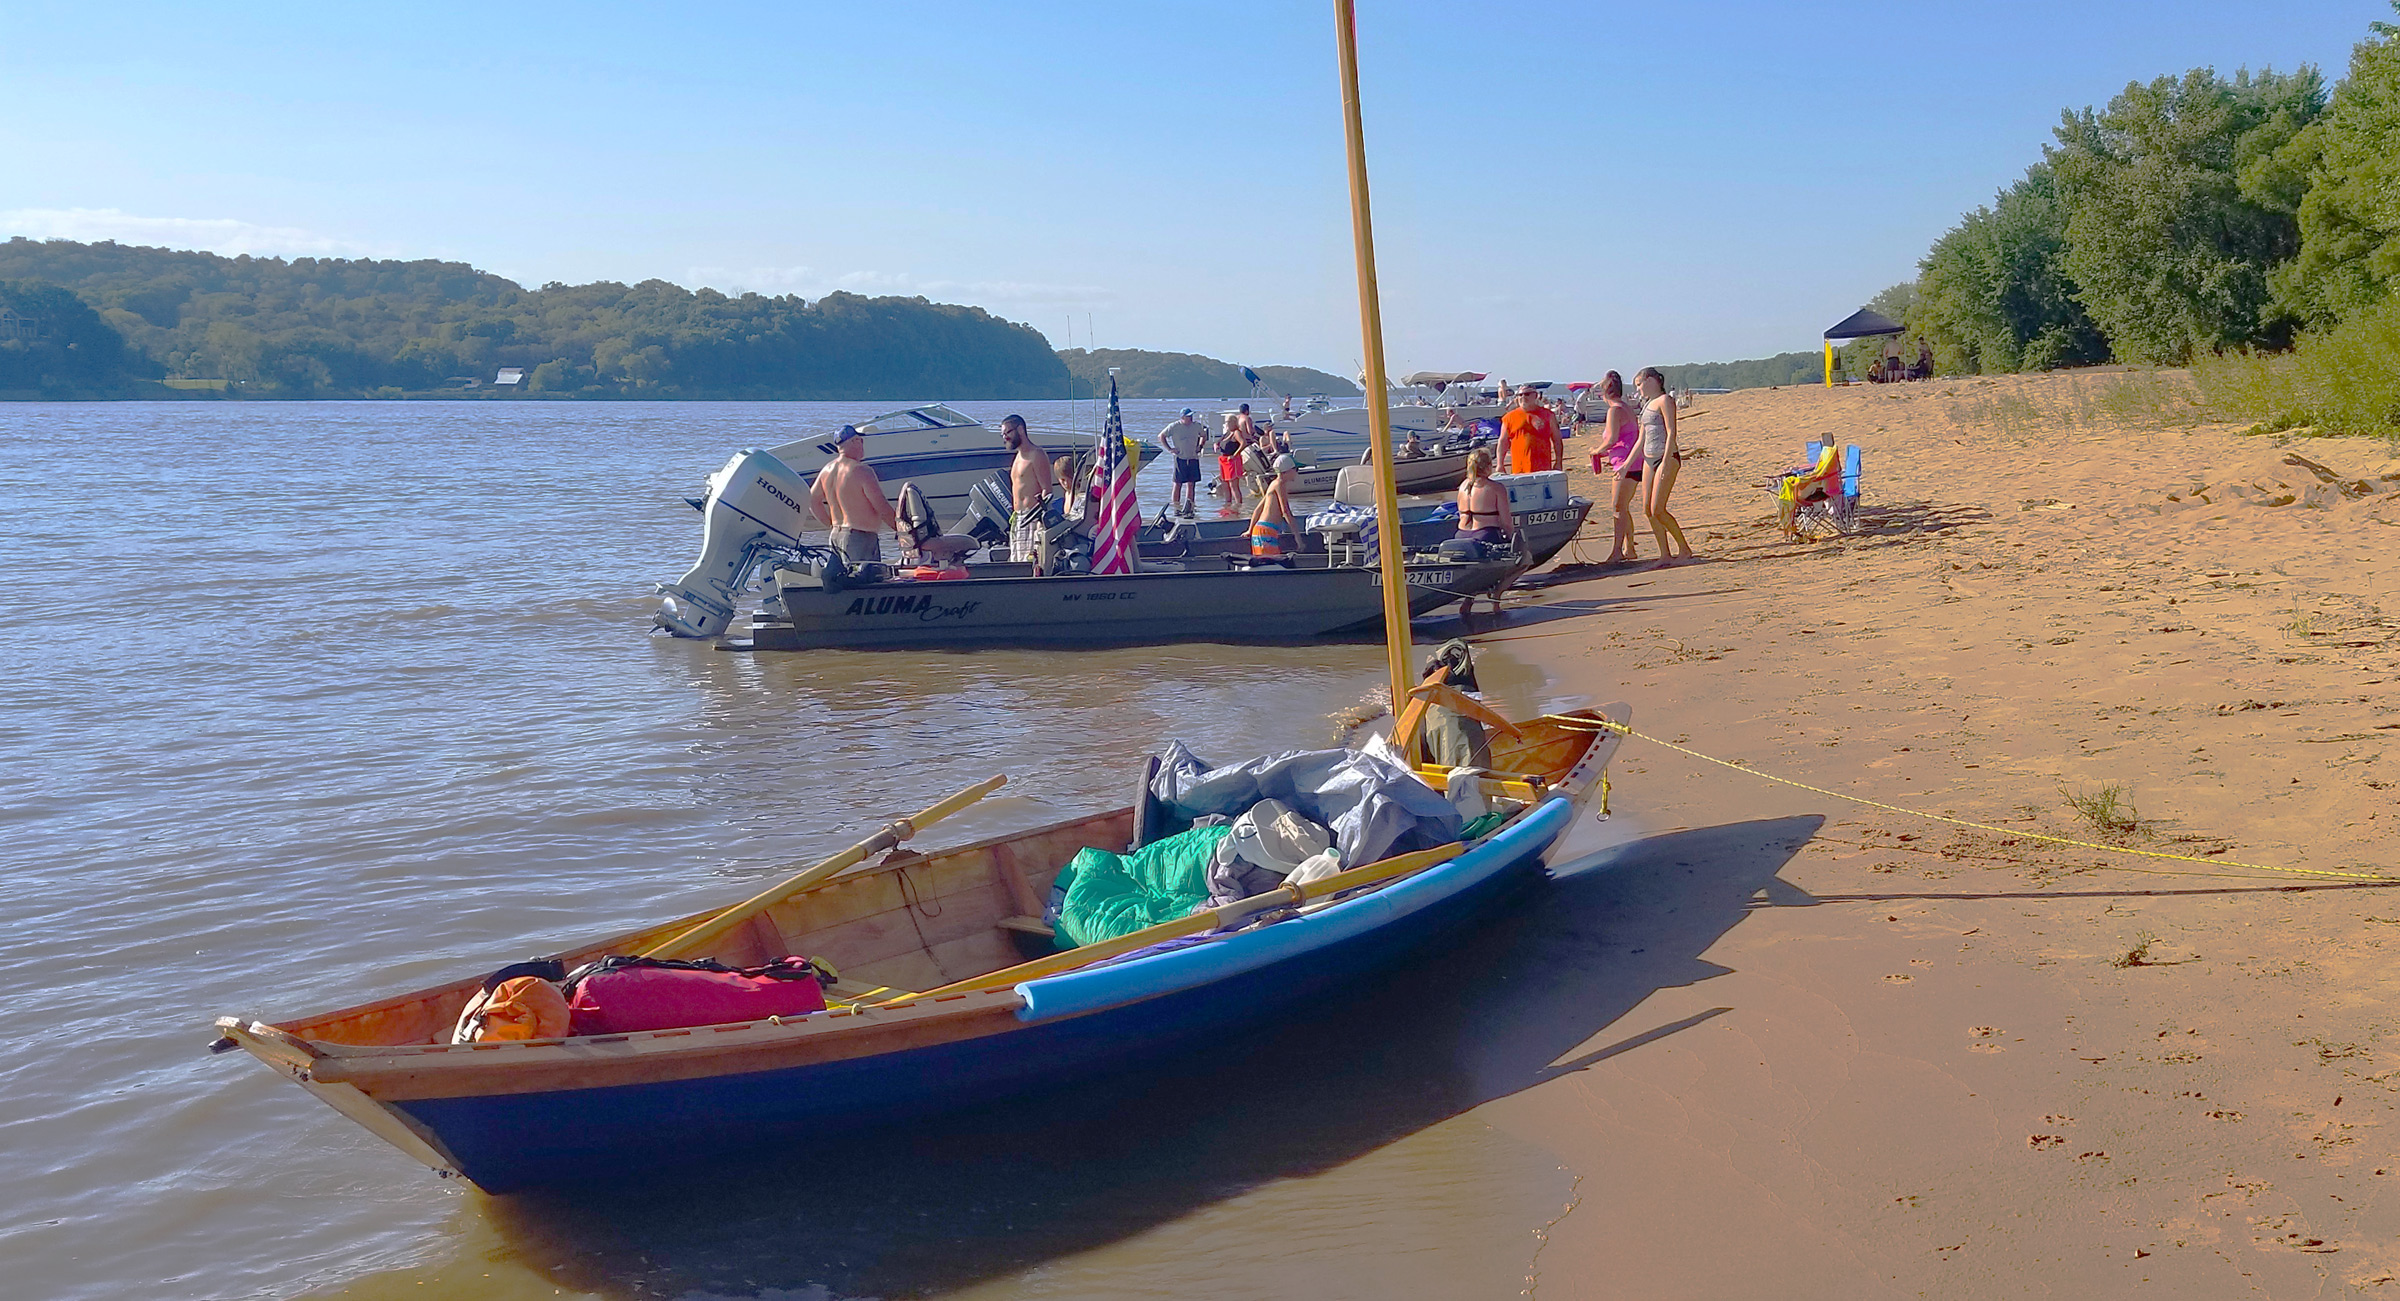
One of the largest beaches I saw in Illinois stretched several hundred yards with almost every foot of shoreline occupied on a beautiful Sunday afternoon. The question most often asked here was: “Hey, doesn’t that have a motor?”
A few miles more downriver I heard the growl of outboard engines. It was a sunny, hot Sunday in late September and weekenders were back out. I had reached St. Louis’s sphere of affluence. I had also reached a decision. I would stop in St. Louis and the end of the trip. My back pain was unbearable and I feared the lower Mississippi would prove to be even harder going.
I stopped in the late afternoon at large sand bar where other boaters were set up for a day on the beach. As the sun neared the western riverbank, they began to leave to make their way back to their marinas. As I set up camp, one of the last of the boaters, a woman in a one-piece bathing suit, came over. She was followed by three men with round bellies and a touch of sunburn. We had the usual conversation, they admired my boat, which made me stand a little straighter, then offered me a big bag of ice, a luxury I gratefully accepted.
“Do you have an anchor?” one guy asked.
“Nope. I’ll just pull it up.”
“Better anchor it. A barge will come by and wash it away.”
“Hope the critters won’t get you.”
“You know, if you set up over there, nobody will mess with you.”
I smiled. “Nah. Nobody will mess with me.” I was hairy and shaggy, dirty and smelly, hungry and lean. Nah, nobody would mess with me.
The marina at Alton, Illinois, is just upriver from St. Louis. The last lock and dam on the river, 1.5 miles downstream, was in view and another 5 miles from the lock, around the next bend was the confluence with the great Missouri River. The marina was full of fancy sail and power boats. The harbormaster gave me a small space for a large fee so I could leave LITTLE JOY for three days and a well-deserved rest, while I retrieved my truck and trailer from Minneapolis. Before heading to the airport, I walked along the St. Louis riverfront where the Gateway Arch, the symbol of St. Louis, stood glistening in the light of the setting sun. I climbed up to the walkway of the Eads Bridge, the same bridge that I crossed two summers ago on a cross-country bicycle ride. The same place where I saw the Mississippi for the first time. I walked out to the middle of the bridge. The river stretched south in a long, wide ribbon and glistened in the setting sun. I looked down. The river was no longer green, but brown with Missouri River mud and swirling around the gray stone pier below. Now doubled in volume, the Mississippi River from there flows unimpeded by dams for 1,200 miles to the Gulf of Mexico.
As cars flashed by on the other side of a low cement barrier just a few feet away from me, I raised my arms and let out a yell, “Yeahhh!” I did not complete what I set out to do, but I covered 650 river miles in 30 days. It was more than enough; I could go home.
David Hudson is a happy corporate refugee. As a teenager, he spent countless summer days rowing a 10′ aluminum pram around a small New Jersey lake. Later he cruised the Atlantic and Mediterranean atop the deck of a U.S. Naval helicopter carrier. Downsizing since the Navy, he has spent time exploring the rivers and lakes of New Jersey, New York and Ontario in a canoe. Putting his woodworking skills to a test, he built his 17′ dory, LITTLE JOY, and can be found, along with his wife Xiaole, rowing it up and down the Schuylkill River outside of Philadelphia.
If you have an interesting story to tell about your adventures with a small boat, please email us a brief outline and a few photos.
It’s another July day of 90-degree heat and humidity-sodden air, but we’re all standing contentedly in shallow water, wriggling our toes on the sandy bottom and admiring a key advantage of lapstrake hulls. The southwest breeze is blowing 12 to 15, we figure, and out on Buzzards Bay, things must be starting to rock and roll. Here in protected Onset Bay, pleasant little waves are charging onto the shore and against the side of the skiff, which we’ve grounded out for a bit of photography. Each wave slaps hard against the boat’s lower plank and splashes upwards only to be promptly quashed by the overlap of the hull’s upper strake. Not a drop of water makes it past that overhanging lap.
Beetle Inc.
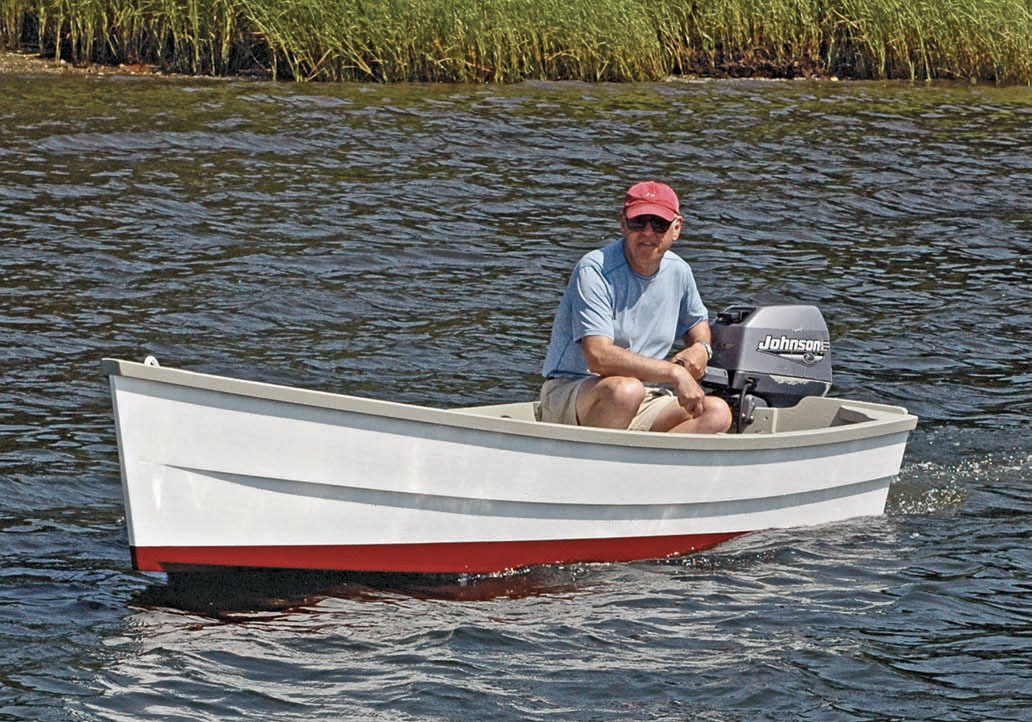
Beetle Inc.’s Onset Island Skiff is a recent interpretation of an old idea: the traditional New England flat-bottomed skiff. Here, author Stan Grayson demonstrates the handsome boat.
After awhile, we decide to see how the boat will do running right into the chop and wind. I take a seat on the forward thwart while boatbuilder Jonathan Richards pushes us out, hops in, and fires up the 6-hp Johnson two-stroke. Bill Sauerbrey, the skiff’s designer, takes up position on the float at Onset’s little pier to watch his baby go. Just like that, we’re heading into it.
Jonathan says the boat doesn’t get up on plane as quickly as it might with 8 hp, but we’re soon thumping our way over the chop at a good clip and the ride up front is remarkably dry. The thwarts are mounted high enough to permit convenient use of the space beneath them, something that can’t be said for all such boats. I note that Jonathan has a good-sized container of life preservers under the forward seat. When I get to try the skiff out, the boat tracks right along without much attention, but she’s easy to maneuver in close quarters, has a very solid feel, and is as stable as one might expect of a 12′ 4″ flat-bottomed boat with a 4′ 6″ beam. By that I mean, this is a seriously stable skiff.
Beetle Inc.
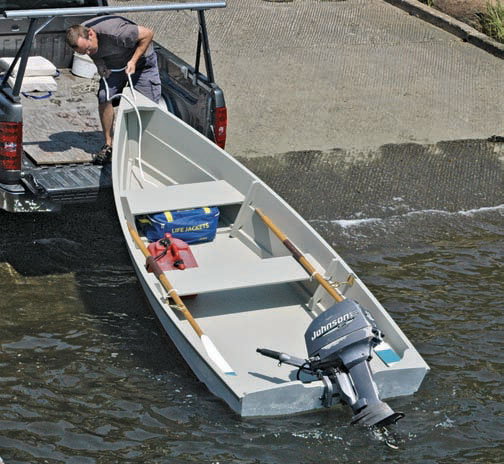
The plywood bottom allows the Onset Island Skiff to be run from a trailer without the usual worries of drying out and leaking between outings. For those with strong backs, the trailer may be eliminated; skids on the bottom allow easy sliding in and out of a truck bed.
When we’ve had our fill, Jonathan decides we’ll haul out just as we launched when he backed his pickup down the ramp and simply tilted the boat off into the water. By the time we motor in, Bill has backed down the Chevy Silverado and lowered the tailgate.
It’s an easy job for one man to haul on the skiff’s painter and tug the boat up onto the pickup bed. (The bottom features a small keel and protective runners on either side.) A final assist comes from Bill pushing on the transom. Then Jonathan rigs a tie-down over the raised bronze oarlocks, and we’re ready to roll—no muss, no fuss, no roof rack, no trailer. Pretty neat stuff.
On the drive back to the Beetle Boat Shop, Jonathan takes a little detour through the village of Onset to show me how this new boat got its name. He pulls up to a pier with a sign that labels it the property of the Onset Island Association. The 12-acre island, home to some 50 cottages, sits just offshore. For many years, folks got to the island in plywood skiffs; however, as those iron-fastened boats aged beyond the point of no return, most were replaced by aluminum models. Beetle Boat Shop owner Bill Womack has a place on Onset, and he decided it was time to reverse the trend.
“The non-availability of a good, affordable wood boat led to aluminum once the old wooden boats wore out,” is how Womack put it. That is how the new Onset Island Skiff came to be.
Beetle Inc.
The Onset Island Skiff’s construction is pure simplicity. Two planks per side are copper riveted at their lap joints. Save for the plywood bottom, all of the boat’s pieces are are of solid wood and are recorded in patterns, which allows Beetle to build the boat efficiently and offer it at the appealing price of about $2,500.
How Is the Onset Island Skiff Built?
In case you’re wondering if there could be anything new under the sun when it comes to boats like this, the answer is “yes and no.” Today, there’s an apparently endless variety of skiffs available. There are plans for traditionally built models with cross-planked bottoms as well as skiff plans and kits intended for various methods of plywood construction. The new Beetle offering arrives on the scene as a boat that combines traditional solid-lumber construction with a plywood bottom, and traditional-looking topsides with a hull shape drawn to optimize performance not under oars but with outboard power.
“The difference for outboard power compared to rowing is the boat needs to be flat and wide back aft, which can allow the hull to plane,” is how Bill Sauerbrey put it. “For a rowing skiff” (Beetle also offers the rowing-oriented Willy Potts), “you’re always in a displacement mode, so you want rocker (upsweep) to the hull back aft and a narrower transom. That allows the stern wave to fill back in as the boat moves forward. On the Onset Island Skiff, the water just skims off beneath the transom. It won’t glide when you row it, of course, but that is not its intended purpose.”
Like Beetle’s other production boats, the Onset Island Skiff is designed for series production over a permanent mold. Patterns exist for all the boat’s parts—the two planks per side, stem, transom, frames, chines with their bevels, stern knees, keel, and thwarts—and that makes it efficient to build the skiff singly or in a series. I was impressed with the materials used in this boat. The white pine used for the 3⁄4″ hull planks and transom is cut by a local sawyer from selected logs and then carefully stacked and allowed to dry in one of Beetle’s storage sheds. The stem, frames, and chines are white oak.
The bottom is 5⁄8″ meranti marine plywood, the same durable material that the shop uses for the centerboard and rudder of its catboats. The planks are fastened in the traditional manner with silicon-bronze rivets, the remainder of the fastenings being bronze screws.
Given that the plywood bottom is the only “non-traditional” aspect of a boat built by a shop dedicated to plank-on-frame construction, I asked Bill Sauerbrey about the availability and functionality of a cross-planked bottom. He indicated that such a change would be doable but would add both weight and cost to the boat. (The Onset Skiff weighs about 180 lbs and currently sells for $2,500.) “The best way to do a cross-planked bottom would be to use quarter-sawn cedar no more than 4″ wide,” Bill said. He noted that he’s owned a boat with such a bottom for 25 years and although it is dry-sailed, it suffers little in the way of leaks upon launching.
At the bow, the skiff has a sturdy breasthook and there are two small triangular openings where the breasthook butts up against the stem. These allow water to drain out should the boat be stored upside down. The stock paint scheme is white topsides, red bottom paint, and a gray interior. Customers who might desire different colors, however, can request a change. As delivered, the boat comes with a bow painter. Those who might need to regularly tie up at a dock or in a finger slip can discuss additional attachment points with Beetle.
Beetle Inc.
The flat bottom and resulting shallow draft allow the boat to be nosed into a beach, while lapstrake construction knocks down spray and thus contributes to a dry ride.
The Onset Island Skiff is easily able to handle a 6-hp, two-stroke or an 8-hp, four-stroke outboard. Officially, however, the boat is rated for a 4-hp motor. In all cases, a short-shaft model is what’s needed. Given access to a good two-stroke, one might want to consider such a motor since it echoes the skiff’s simple nature and will weigh about 10 lbs less than a comparable four-stroke, while possibly offering more oomph and requiring no special handling during transport or storage. Whatever type motor is selected, I’d guess that most folks using these boats for the intended utilitarian purposes will find 4 to 6 hp entirely adequate.
It’s no secret among designers that there are quite a few subtleties involved in creating a good skiff. Many years ago, naval architect John Atkin—that gentle and generous man—cataloged for me what he looked for in a good skiff, and all those design subtleties came spilling right out. John admired a skiff with a stem and transom raked to permit enough flare to the top-sides to provide “lift,” the benefits of which he noted were dryness and seaworthiness. He was a stickler for a graceful sheer that both looked good and provided adequate freeboard. And he always emphasized that a hull’s rocker be appropriate to its task, tucked up aft for a rowing or sailing skiff so the stern didn’t drag but mainly flat for a model intended primarily for out- board power. He had a name for the many skiffs that failed to meet the criteria, were slab sided, too pointy in the bow, and unattractive. These boats he labeled “clamdiggers’ skiffs.”
Beetle Inc.
The Onset Island Skiff’s simplicity and basic appearance are somewhat deceiving, for there’s more to creating a stable and dry skiff than meets the eye. The subtleties of design include a slight rocker to the bottom profile forward, and ample volume and a flat run aft for good trim while motoring; a good sweep to the sheer and flared sections for a dry ride; and a wide bottom for stability. The author reports he stood in the bow, “and felt pretty secure about it”; others wishing to do so are advised to proceed with caution.
The Onset Island Skiff is, I think, a boat of which John Atkin would have approved. It’s an honest, hard-working little skiff that should last a long time and fulfill a variety of purposes: utility boat, yacht or workboat tender, fishing, even hauling an occasional in-harbor lobster trap. Most surprising, perhaps, is that one can obtain this professionally built and finished wooden boat for a very attractive price.
Stan Grayson is a regular contributor to WoodenBoat. For more information about the Onset Island Skiff, contact Beetle, Inc., 3 Thatcher Lane, Wareham, MA 02571; 508-295-8585.
The Beetle Cat and the Boats It Inspired
Since 2004, Beetle Inc. has operated the Beetle Cat shop in Wareham, Massachusetts. In that time, the shop has built and maintained hundreds of classic boats, including more than 220 of the Beetle Cat sailboat—one of the oldest wooden sailboat designs to be continuously produced and competitively raced for over a century. Take a look at Small Boats profile of the Beetle 14, and another boat inspired by this legendary design.
Bobcat: Bolger’s adaptation of the Beetle Cat for tack-and-tape construction
Is there a boat you’d like to know more about? Have you built one that you think other Small Boats readers would enjoy? Please email us your suggestions.
Fifteen years ago, I found myself boatless. I was deeply involved at work in the restoration of a 46′ Nevins yawl, and evenings were fairly taken up by two great kids, five and seven years old. But reading boat books and fishing magazines at bedtime just didn’t satisfy my longing to be out on the water. It was time to build a boat for myself and my family.
I was looking for a cheap-to-build, seakindly skiff or outboard boat about 18′ long. I admired the Royal Lowell Eastern 18s that were sold from Beebe Cove in Noank, Connecticut. I saw them used for all sorts of near-shore activities: clamming, lobstering, going to the beach, fishing, and just general running around. Their owners always seemed to be very content when aboard them—but for me, they were built of the wrong stuff and rather expensive.
Carol Ansel
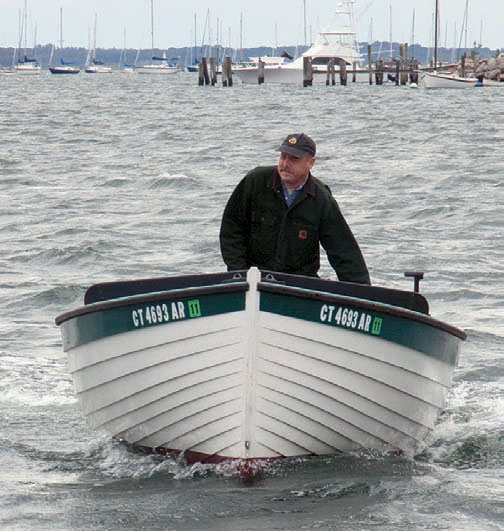
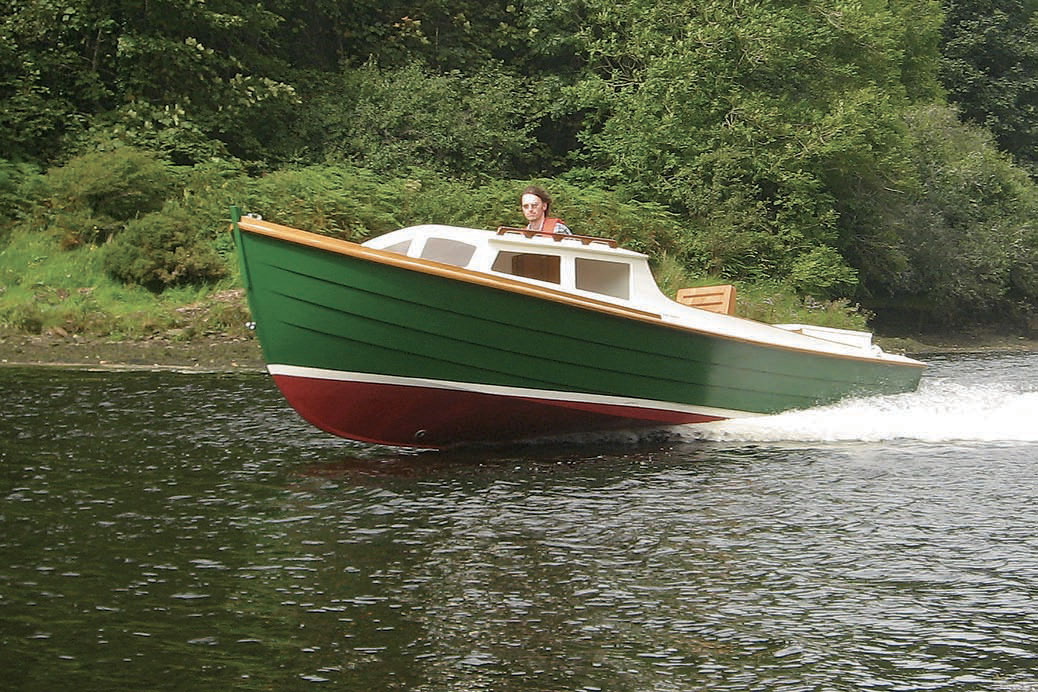
Walter Ansel (at the helm) built BLACK GHOST (17′ LOA, 6′ 6″ beam) to the Weston Farmer Kingfisher plans. Traditional construction and a seaworthy result make her an enticing project for any experienced builder.
At this same time, Weston Farmer’s book From My Old Boat Shop had been sitting at the top of the pile on my nightstand. I got a real charge out of Farmer’s feisty and humorous prose. He hooked me with his boat designs that he presented toward the end of book. After much study and thought, it seemed Farmer’s 17′ utility skiff, the Kingfisher, would fill the bill. Farmer promoted her as a “picnic boat, a deep-water runabout, a sea skiff, or just plain family putz-about.” Her close resemblance to the superb Lyman Islander further convinced me that this was the boat I was looking for.
Several important construction details of this design made her particularly attractive to me. I could buy decent cedar and great oak cheaply. The boat fit easily in the cellar. Construction would be relatively clean with not much glue. She calls for traditional lapstrake shell construction, so the hull could be built upright around molds and then framed all at once (no plank backing out or edge bevels!) She could be built with minimum setup. Also, I just wanted to build a clinker (lapstrake) boat.
I ordered plans. The beautiful drawings promptly showed an alternative profile for an outboard version, leading to more contemplation. Simplicity of installation, reliability, and price clinched my decision to build the outboard version.
Building the Powerboat BLACK GHOST
The boat proved quick to loft on painted plywood. I built six molds out of old, rejected cedar boat plank stock and sawed out the backbone parts. A cast-off piece of live oak made a sweet forefoot crook.
Space was tight in the basement. When I got the molds up, screwed to 2×4s attached to the floor joists, and stepped on the keel, I only had 24″ to the wall on the port side! There was little room to sight plank lines; nevertheless, the house floor frame overhead provided plenty of spots to nail bracing.
Carol Ansel
A lovely near-plumb bow and neatly lined off lapstrake planking give BLACK GHOST rugged good looks that hint at her quiet strength.
Planking proceeded at its own pleasant pace until I turned the bilge. I happened to measure the room left on the transom corners for the remaining planks one night and found to my horror that the port side, close against the wall, had grown considerably. The plank lines were higher on the port side than to starboard; the wide transom had hidden this fact. I stripped off two planks from the port side and planed down the third one to be narrower. This corrected the situation, and I was much more careful as I approached the sheer (the topmost plank).
My brother and I framed the boat in a weekend. I had prepared all the stock beforehand, ripping the white oak to dimension and rounding the corners.
Here, I departed from Farmer’s construction plans and ran the frames across the keel continuously from gunwale to gunwale. This made for fast work and stronger construction than two-part frames, and I had enough long stock to do it this way.
Carol Ansel
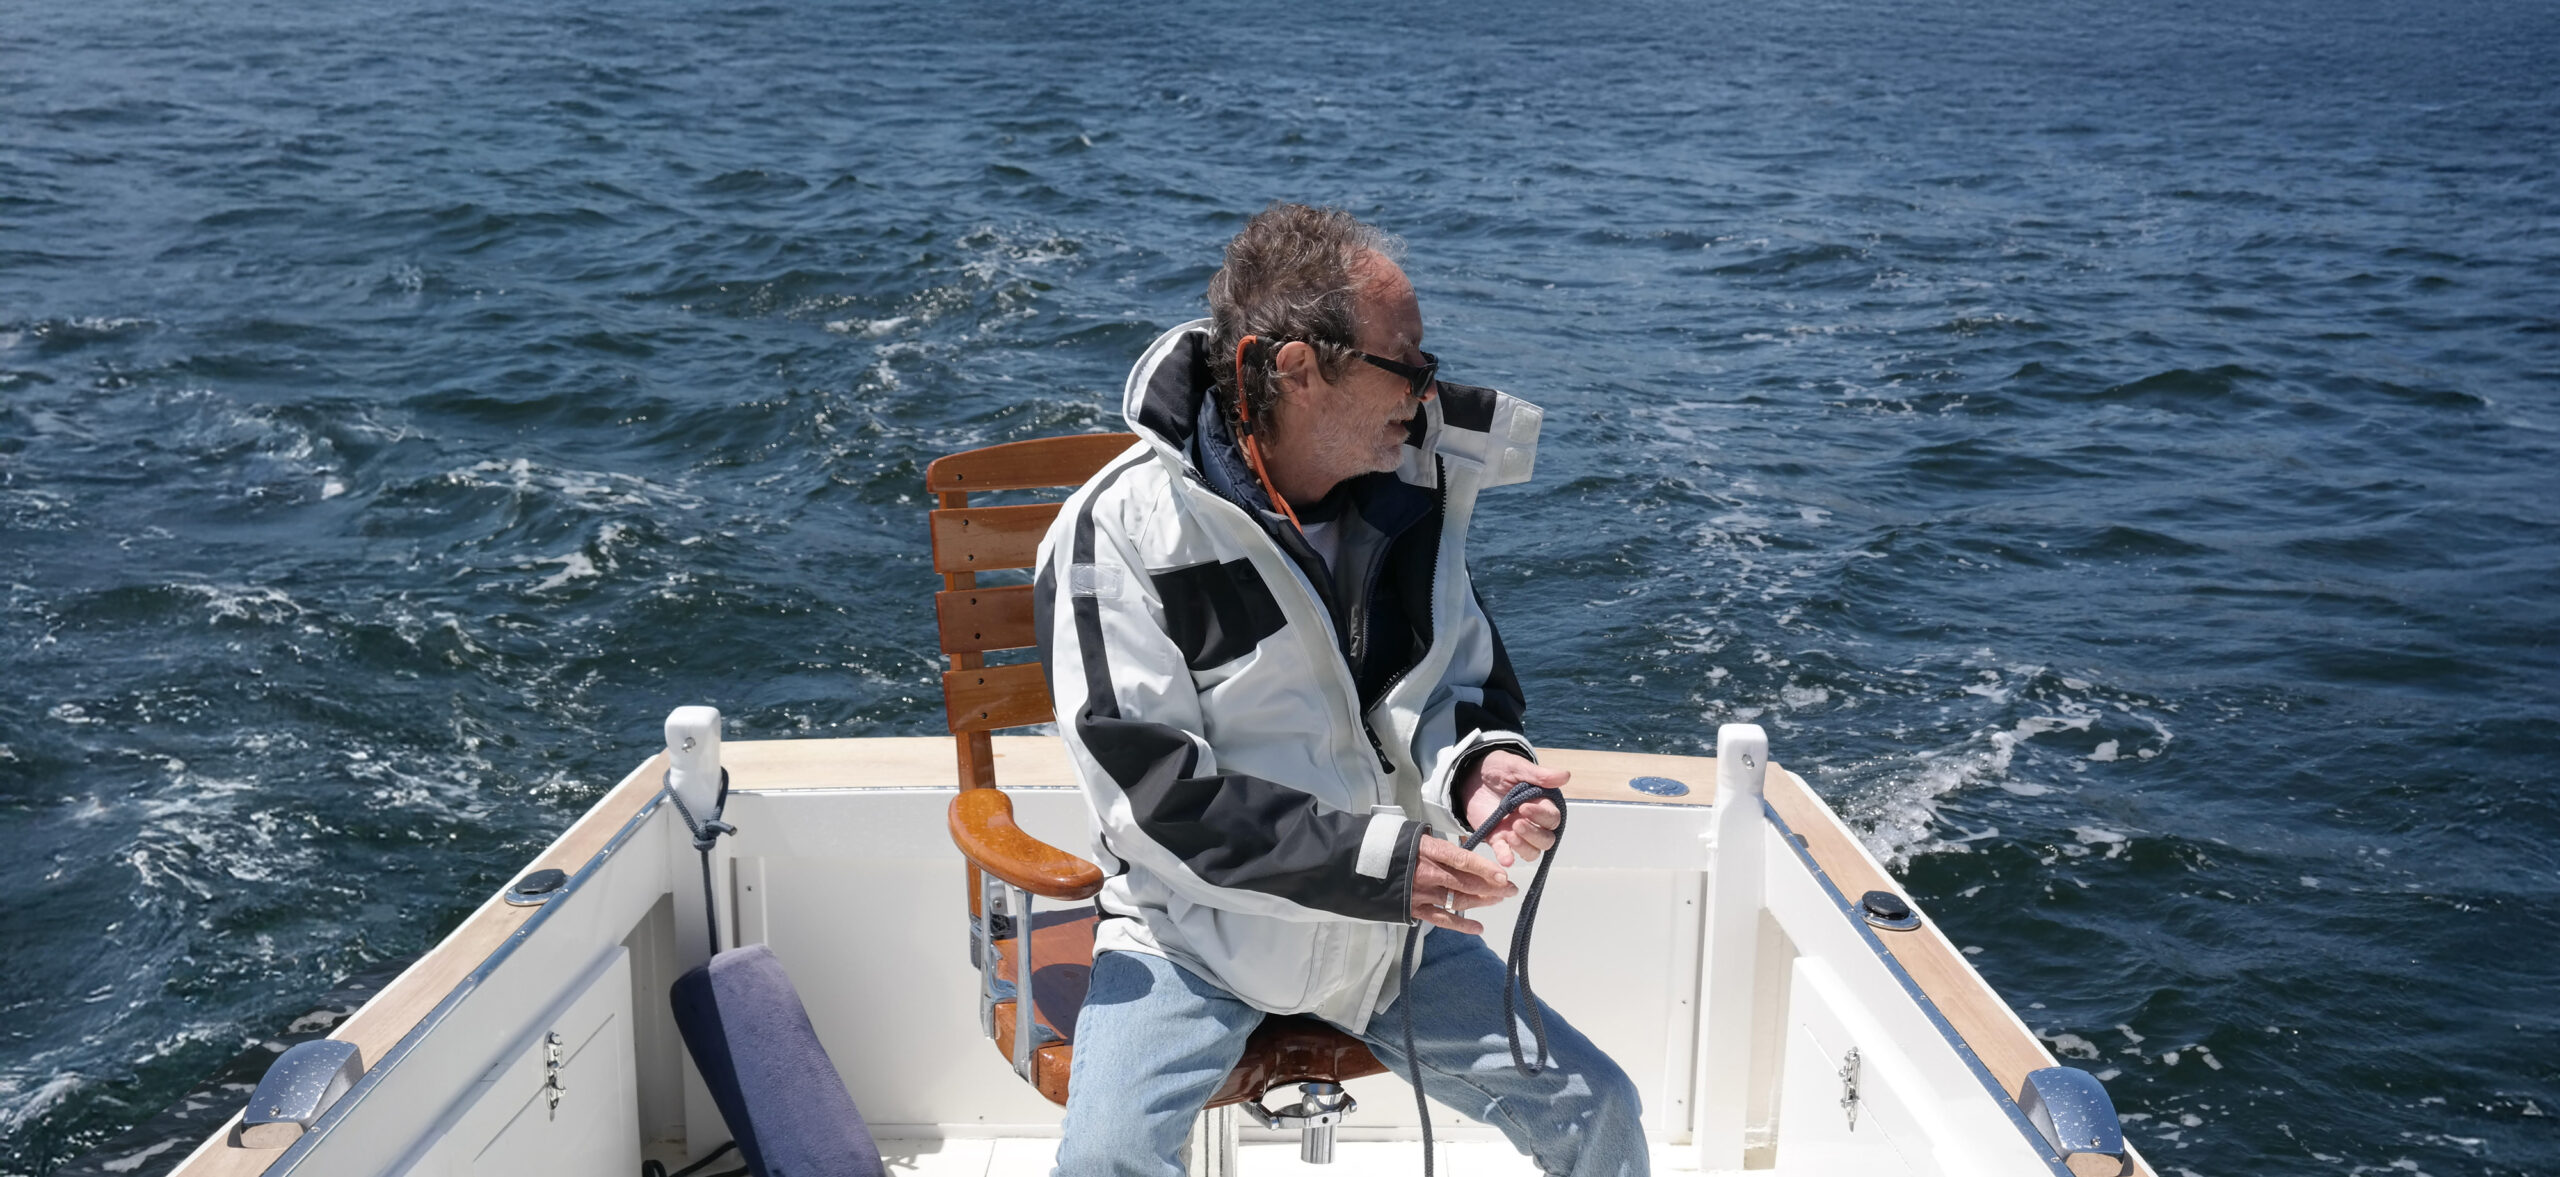
This hearty powerboat can take good care of her crew even when the weather turns foul.
My wife and I riveted the frames. She decided that bucking under the hull was a much better job for me, so I lay on my back with the dolly on the floor while she headed up the nails. One of the neighbors informed us that riveting must stop at 10 p.m. We complied to keep peace in the neighborhood.
I installed 5⁄4 Douglas-fir floor timbers to stiffen the bottom. These were jogged to fit the laps and were of sufficient height to hold the floorboards. I rolled the hull outside the cellar to see what she looked like at this point. The hull looked good, if a bit high-sided. She had a nice, hollow bow and slight tumblehome aft. I knew that later the paint scheme would diminish the freeboard. High sides provide safety in rough waters; you can’t fall overboard as easily.
Finishing the inside of the hull proceeded in a straightforward fashion. For the floorboards, I used 3⁄4″-thick stock that had been rejected for planking. A V-shaped seat was built in the forward half of the boat with a console placed on the port side to hold the wheel and throttle. I built a slop-well ahead of the motor that drained overboard through the transom. In consideration of all the construction modifications I made to Farmer’s plans, I always tried to keep the materials as light and strong as possible. Not adding any significant weight to the original design delivered the performance that Farmer predicted.
Carol Ansel
Walter chose the outboard powering option shown in the complete set of plans, rather than the inboard version shown on the opposite page. With the inboard engine gone, he had many more options to customize the arrangement of the cockpit.
Launching the BLACK GHOST
I named the boat after my favorite fishing fly, the BLACK GHOST. I painted her outside with Kirby workboat paint and used soaking oil inside. Rails and coamings were oiled white oak. My aim was to have a paint scheme that could be maintained and completed in two weekends a year, and this proved out over the seven years that I owned the GHOST.
Launch day was a great family affair. It included many kids, friends, beer for the grownups, and cheese balls for kids. Escaped cheese balls were later found in the bilge swollen to bizarre size; for a moment I thought bits of bedding compound had evolved into a new life form. The GHOST floated at perfect trim and planed out nicely with the new 28 Special Johnson outboard I had purchased. The steering wheel was an antique, galvanized, drum-style, fisherman steerer found at a marine consignment store.
I fished the boat twice a week from June through October, primarily on the reefs that extend from Fishers Island, New York, to Watch Hill, Rhode Island. This area of half-exposed rocks is swept by strong tides. The striped bass, bluefish, and false albacore love to forage here, and the fishing is great. The GHOST proved to be a safe, extremely able, and nimble boat on the reefs. On the second trip out, my brother and I hooked lively stripers and had to leave the GHOST to fend for herself. We drifted back through the tide rip stern-first into a break that looked like a swamper. The GHOST plunged through, filled her slop well, shook herself off like a retriever, and kept us fishing. We grinned at each other upon finding out that we had a great little boat under us. We stood out in our time-warp 1950s utility skiff among the all-white center-console, tub-shower units, their fishermen staring at us in astonishment.
The favorite family beach spot was a guzzle that drained a few salt ponds across a barrier beach. We had this to ourselves, as it was inaccessible by car. We would load the GHOST with food and beach gear and try to hit the place at high tide with the ebb just starting. We’d motor in to waist-deep water, haul the gear ashore, and then anchor off. We spent many happy hours swimming the guzzle, observing all sorts of marine life with glass-bottomed boxes, or just lying on the beach looking out at our BLACK GHOST moored just off shore—waiting to take a tired, sunburned, and happy crew home.
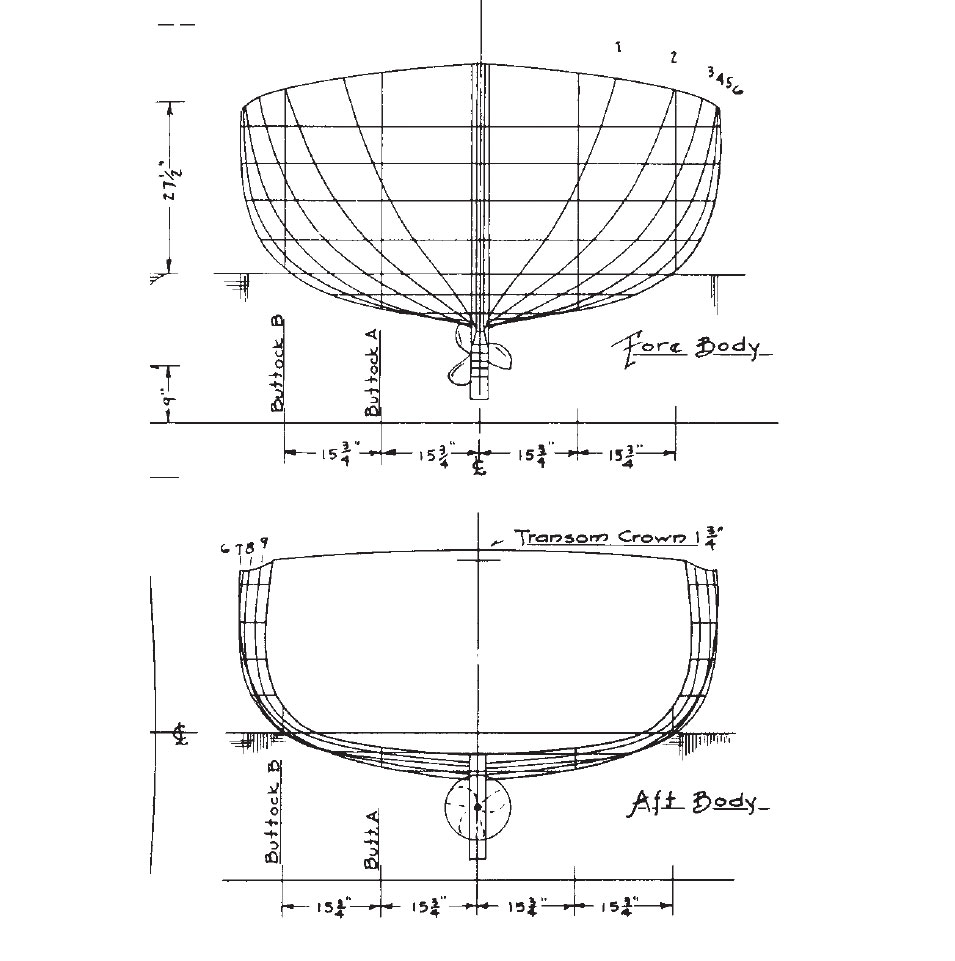
The Kingfisher’s lines plan is unusually well detailed for a small boat of this vintage.
Weston Farmer Associates
It gives not only the complete shape of the boat but also provides many useful construction and lofting details, such as the half-siding of the stem, keel, and apron, the location of the building floor and frames, and the centerline of the propeller shaft, to name a few. Clearly, Weston Farmer was a man who not only designed good boats but could build them as well.
Plans for the Kingfisher design are available from Weston Farmer Associates, 7034-D Hwy. 291, TumTum, WA 99034, or from Duckworks.
Ready for More Lapstrake Powerboats?
Lapstrake construction results in boats that stand the test of time in both performance and aesthetic appeal. Now that the Weston Farmer Kingfisher BLACK GHOST has your attention, check out these other designs.
Is there a boat you’d like to know more about? Have you built one that you think other Small Boats readers would enjoy? Please email us your suggestions.
One evening in late May 1994, my phone rang. Standing by the kitchen door, receiver in hand, I heard an unfamiliar voice with an American accent.
“Jenny Bennett? This is Carl Cramer. Will you be at the Wooden Boat Show in Greenwich next weekend?”
When I didn’t immediately respond, the voice repeated, “Carl Cramer…WoodenBoat magazine…hello?”
For some years before that phone call, I had been working first at Classic Boat magazine and then at The Boatman in Cornwall, England. Now, I was back in my home county of Devon, working for a large book-publishing house. Like most people in marine publishing at that time, I was familiar with WoodenBoat, but the name of its publisher, Carl Cramer, had passed me by.
“I’ll be there,” said the voice. “It’d be good to meet you.”
Why, I wondered, would the publisher of WoodenBoat magazine want to meet me?
“I think I’ll be there,” I said.
“Great, I’ll see you on the Saturday.”
And with that the call ended.
A week later, I was in the grounds of the National Maritime Museum in Greenwich, England, chatting with old friends, admiring new boats, and hearing about forthcoming projects. As I made my way around the annual show, I asked if anyone had seen Carl Cramer from WoodenBoat. The oft-repeated answer was: “Yes, you’ve just missed him.”
As the day wore on, I came to think that our paths would never converge, and that our meeting would become one of my life’s “might-have-beens.” But then, in the gloom of the small-exhibits tent, there he was: a slight man with wild dark hair, a short but unkempt beard, a crumpled suit coat above a pair of jeans and, on his feet, well-worn boat shoes without socks.
“Aha,” he said, “there you are. There’s no time now, but I’m having dinner with friends, come join us.”
I did. We sat together and talked magazines, and boats, and books that we had read, and books that I had not read (Carl seemed to have read every book ever published), and Maine, and why I had never been to America. We closed the restaurant, shared a taxi, shook hands as I got out at my stop, and went our separate ways. It had been an amusing and frenetic encounter, and I stored it up for later anecdotes, unaware that there would be a postscript.
Photographs courtesy of Aaron Porter
Carl taking a break during set-up at the International Boatbuilder’s Exhibition and Conference (IBEX), which he established after he launched Professional BoatBuilder in 1989.
He called the following Tuesday.
“Hi, it’s Carl Cramer. Do you remember the name of the restaurant? I left my glasses there.”
I didn’t, but I would find out.
And then he asked the question that would change everything. “Do you want the job?”
Job? What job?
It was only weeks later, after I had visited the WoodenBoat offices in Maine, been toured around the area by Carl for three days, gone for a sail in a Herreshoff 12 1⁄2, eaten countless American pancakes, and been treated to a front-row “seat” at a small-town Fourth of July parade, that I understood: the London encounter had been an hours-long interview for the position of managing editor, and the unorthodox approach had been typical of the man.
In the three years that I worked alongside Carl in Brooklin, Maine, and later when I returned to England but continued to work with WoodenBoat remotely, I was never aware of him taking time off—unless it was to go for a sail, or to step outside for a smoke. His energy seemed boundless as he kept tabs on all the comings and goings in the magazine’s offices. He’d move from art department to editorial department to advertising department without pause. He seemed to have the pulse of every aspect of WoodenBoat and Professional BoatBuilder, somehow managing to be in control while giving his staff free rein. He could talk boats with passion, loved them all, but never preached or forced his opinion on others. Endlessly curious, he could strike up a conversation with anyone. And his laugh—a loud infectious bark made raspy from his lifelong cigarette habit—was ever accompanied by a twinkling eye, owl-like behind his glasses.
Carl Cramer, 1946–2025
I had worked in magazines for five years before joining WoodenBoat, and yet it was from Carl that I learned the importance of the finer details of producing a magazine…how to choose between one front-cover image and another; how to say more with fewer words; and above all, how to love the job.
Carl passed away on April 10, 2025. He had been publisher at WoodenBoat Publications from 1989 to 2014, stepping down just as Small Boats was beginning. He had changed the trajectory of my life, championed my position at the magazine and, ever in the background, had offered advice, good humor, and kindness to me and all who worked with him. Like everyone connected with Small Boats and WoodenBoat, I have much to thank him for.
Lightweight but sturdy, sure. Sweet to row but able to carry a heavy load safely, of course. Well-behaved while being towed, yes. Will take a sail rig or a motor. Stable under foot or butt. Looks good—the list goes on and on.
In 1912, the English yachtsman Claud Worth saw fishermen from the Breton port of Auray using pram dinghies that checked a lot of those boxes. “For steadiness, carrying capacity, landing on a beach, or dragging over mud they would be difficult to improve on,” he wrote in his book, Yacht Cruising. “Any amateur carpenter could build one.”
Courtesy of Andrew Fetherston
Claud Worth’s plans and description for the 9′ 9“ workboat, Auray Fisherman’s Dinghy, was published in his book, Yacht Cruising.
The Auray prams were either carried on the decks of luggers or towed. “The next day we saw one of these punts being towed in a fresh breeze,” Worth wrote. “It seemed to be skimming along the top of the water like a hydroplane.” Worth measured and drew plans of an Auray dinghy that was 9′ 9″ long, 4′ 2″ beam. In profile, it was quite like a Norwegian pram, but was a simpler build with a flat bottom and flat planked sides. The long bow, as Worth said, kept the pram dry while under tow, and would allow a rower to step ashore dry-shod.
Several designers since—Phil Bolger among them—have drawn their own versions of Worth’s Auray plans. Even though Worth noted that knocking 9″ off the length would do no harm, most subsequent versions stayed near 10′ long—big and quite heavy for a tender. Eventually, plans for smaller versions appeared; Gavin Atkin features one—along with a more Worth-sized version—in his book Ultrasimple Boatbuilding.
Gavin Atkin
Auray punts are still in use as dependable workaday boats in their home region. This one was spotted in France in the Gulf of Morbihan, Brittany.
Another smaller Auray comes from Hannu Vartiala, the Finnish proprietor of the website Hannu’s Boatyard, a labor of love through which he offers free plans of his small—sometimes very small—plywood boats. Visit his site and you will see two designs that are smaller, lighter versions of an Auray pram: the Micro Auray, which can be built from one sheet of plywood, is too small to make a good tender, but the Mini Auray, built from one and a half sheets, I would say, sits right in the Goldilocks spot.
“As it happens, the boat scales down very nicely,” Vartiala notes. “The overall shape is conserved beautifully. The Mini Auray measures 7′ 6″ × 4′…she displaces about 1,200 lbs just before flooding. At 250 lbs displacement—that is, one person—her freeboard is 10″. The freeboard is 6″ at 570 lbs displacement.”
Building the Mini Auray
A few years ago, when I was living part-time in France, I decided to build a Cape Henry 21. I ordered a kit from Alec Jordan of Jordan Boats in the U.K., and also asked him to cut me a kit for Vartiala’s Mini Auray out of 1⁄4″ okoume plywood. It would, I thought, give me something to work on while epoxy cured on the main project, and later would serve as my tender. This was, I confess, a lazy man’s shortcut. Vartiala’s plans, given in both imperial and metric units, are models of simplicity and clarity, and I could have laid out and cut the parts in a few hours. But Vartiala’s plans include CNC cutting files, so opting for the kit—even adding a nice crown to the transoms, just for style—was an easy choice. I needed to drill holes for the wire stitches, but then it was straightforward pulling the hull into shape and filleting with epoxy and fiberglass tape.
Amanda Harris
Alec Jordan cut and delivered the parts for the Mini Auray’s hull; all the author had to do was drill the holes for the stitches and put everything together.
The kit did leave much to the builder’s imagination. Vartiala’s plans yield five pieces of plywood that, assembled, give you a hull and one small but crucial piece of information: the location of the aft edge of the main rowing seat. The rest—rubrails, frames, seat arrangement and supports, bow eye location and backing plate—are up to the builder. Like many boatbuilders, I prefer this. Want quarter knees? Sheer clamp? Floorboards? Skeg? Have at it, if you’ve got the wood and don’t mind the extra weight.
Vartiala’s site has photos of a Mini Auray with floorboards, a rowing seat, a stern seat, a small foredeck and a rubrail. Sealed with three coats of epoxy, it weighs 43 lbs, according to the builder. My experience suggests that this is close to the minimum possible for a solid, useful, good-looking copy of the boat.
I wasn’t too concerned about weight, so introduced some structural elements to make the hull stiffer and stronger. At my request, Jordan created and cut three okoume frames, to be set 20″, 50″, and 75″ aft of the forward perpendicular to be part of the seat structures. (The Auray’s sides splay at a constant 68°, so you can easily put frames wherever you wish.) I put in an iroko sheer clamp and rubrail, to create a solid base for oarlocks, and added iroko quarter knees and doubled the transoms to 1⁄2″ thickness.
Other features blended the practical with the aesthetic. The center rowing thwart is a simple pine plank, slotted to fit over the second frame, resting on short riser cleats screwed and epoxied to each side panel, and a single ’midship post. The forward seat and sternsheets are my creations, pieced together from okoume offcuts, carried on black-locust riser cleats, and braced against the forward and after frames. There’s room for flotation underneath them.
Amanda Harris
When rowing solo, the author sits at the ’midship rowing station. He moves forward when carrying a passenger in the sternsheets. In either configuration the boat’s fore-and-aft trim is excellent.
There is a 2″ space between the transom and the sternsheets: I realized that my feet would reach the Auray’s transom when I rowed, so I created this gap to give my toes wiggle room. If you build this boat, I strongly recommend this; it is the difference between pain and comfort.
Because the boat would be dragged off and onto beaches, I added a small skeg and two rubbing strips—all of black locust—on the bottom. The rubbing strips allowed me to epoxy and through-fasten floor strips inside to enhance the bottom’s rigidity. I could install floorboards over the floors, but haven’t yet felt any need.
The finished boat, including two sets of oarlocks, weighs 52 lbs. I could and often did carry the boat comfortably on one padded shoulder, with a pair of 6′ 6″ oars in the other hand—at least until I began looking back to my early 80s with nostalgic longing.
The Mini Auray’s Performance
The Mini Auray was quick to show its merits. I was meeting some friends at Lacanau, a lake west of Bordeaux, for the champagne launch, and found I needed wider roof racks to carry the boat. I sawed out some wood extensions and headed for the coast. Got stuck behind a slow driver on a back road. Passed him doing 60+ miles per hour. One of the wood rack extensions snapped. I watched in the rear-view mirror as the boat hit the pavement and started to tumble. Not a pretty sight. It ended up in the roadside weeds.
Amanda Harris
The Mini Auray has the distinctive sweeping lines of the original working pram as drawn by Claud Worth. The high bow keeps the boat dry when rowing in a chop or being towed. The skeg (just visible here below the transom) assists in maintaining directional stability under oar or tow.
I pulled over and walked back. The boat was undamaged. Yes, you read that right. A couple of scuffs. I jury-rigged the rack and drove—carefully—the rest of the way. Launched the next day. No leaks. So, without question, sturdy and durable. And, as a few moments at the oars would reveal, a dancer. Tourner, glisser, elancer—it had all the moves. And it was quick. Two of my boat-wise friends, paddling hard in an inflatable kayak, could not keep up. The pram carried well, ran straight, turned when asked, pirouetted on demand. I put a passenger in the sternsheets and rowed from the forward seat; the resulting fore-and-aft trim was perfect.
In a later outing, to test her ability to carry weight, I enlisted two sturdy friends as cargo; together we weighed about 550 lbs. As Vartiala had promised, we had a bit more than 6″ of freeboard. I rowed from the center thwart, 100 yards across the Lot River at Caix and back, without incident, although I would hesitate to try it in a choppy anchorage. Also, the oarlocks were too close to the water for comfortable rowing. I think rowing from the bow seat might be easier.
Kristin Fetherston
The diminutive size of the Mini Auray is deceptive. It can carry as much as 550 lbs and still have 6” of freeboard. With an adult and two children the freeboard is more generous and motion through the water is smooth.
So, I had my tender. One of the sweet details of a Mini Auray is that the towing eye is mounted under the bow transom, where it won’t damage your big boat’s topsides paint job.
And there, alas, the project ended. I wasn’t spending enough time in France to finish the Cape Henry quickly, and had not been able to find a mooring or dock space in the region. So, I sold the Cape Henry hull.
Which left me with my little Auray. No regrets. She’s great company.
Andrew Fetherston, born in New York City, has owned boats since he was 11, including eight that he built himself since retiring from a career in journalism. He is an artist and the author of two books. He worked on tugboats, freighters, and railroads in his youth. He has three grown children and eight grandchildren. He and his wife, the writer Amanda Barton Harris, live in Manhattan, Shelter Island, and Pestillac, France. In the April 2024 issue of Small Boats, he wrote “Crow’s Last Sail.”
Mini Auray Particulars
LOA: 7′ 6″
Beam: 4′
Weight: 52 lbs
Information and cutting plans for the Mini Auray can be found on Hannu Vartiala’s website, Hannu’s Boatyard.
Is there a boat you’d like to know more about? Have you built one that you think other Small Boats readers would enjoy? Please email us your suggestions.
My first experience of boatbuilding was with my father, constructing a strip-planked canoe and a stitch-and-glue kayak while I was at school. Later, while doing research in a fairly theoretical field, I felt a strong urge to do something practical. I had long been fascinated by traditional boatbuilding methods, particularly those I’d seen when visiting the Viking Ship Museum in Roskilde, Denmark, and wanted to see if I could learn some of those skills.
The engineering department where I was doing my research has a large workshop, equipped with many tools from lathes to 3D printers. The space is mostly for professional use but is also available for personal projects. I had known and worked with the workshop supervisor for several years, and he kindly allowed me to build a boat there, with the condition that it had to be small enough to carry down the (fairly wide) stairway.
I had read about the Nottage Dinghy in How to Build a Boat by Jonathan Gornall. It is a 3m (9′ 10″) lug-sailed lapstrake dinghy designed by Fabian Bush. When I bought the plans direct from Fabian, he invited me to visit the Nottage Maritime Institute in Wivenhoe, Essex, England, where students can enroll in a class to build dinghies for themselves. On a dark and cold Saturday, I went to the workshop where they gave me tea and biscuits, and in a happy daze I wandered around boats being built, and chatted with the students. By the time I went home late in the evening I was committed.
Alastair Gregory
The Nottage Dinghy can be built upside down or rightside up. I chose to build upside down and made four molds. After constructing the backbone with iroko and sapele, I used some strip planking—left over from another project—to line out the 10 strakes.
The Build
The Nottage Dinghy is heavily built for its size, with spruce planking over steamed oak frames on an iroko-and-sapele centerline structure. It has internal floors supporting floorboards. Fabian helped me source the timber and was always happy to answer my questions throughout.
I had chosen the Nottage Dinghy specifically to learn traditional boatbuilding skills, and it is excellent for that. Gone were the days of playing with large quantities of epoxy, accidentally leaving it in a pot until it starts to smoke; in were the days of steaming inch-thick timbers into shape, only to find they had split the next day. (I did this with the gunwales…twice.)
The build begins with constructing the backbone, for which I used iroko and sapele. The drawings specify the dimensions, with several full-scale patterns included. The hog is a fairly heavy piece of wood and needs to be steamed into shape at the stern—which gave me my first experience of steaming. I used a wallpaper stripper to generate the steam and bagged up the parts.
The rabbet position is marked in the drawings, but you need to work out the bevels yourself. This can be done by lofting the boat, but I did it by constructing the backbone, setting the molds, and cutting the rabbet in place using battens and some educated guesswork. The boat can be built upright or inverted; I planked it upside down and later turned it over to work on the interior.
The plans include patterns for seven molds. I made four—three evenly spaced between the stem and transom, and a fourth at the bow to help get the right twist at the forefoot. This worked well with the 10mm—as specified in the plans—spruce planking, which was able to self-fair over the four molds. If using thinner stock, additional molds might be needed.
Alastair Gregory
I planked the boat in the recommended 10mm spruce and finished with a sapele sheerstrake, which I would leave bright finished.
I lined out the 10 strakes using leftover strip planking as battens, marking plank lands on the transom, molds, and stem, and got down to planking. My lining-out looked nice to me, though a more experienced boatbuilder might have been able to achieve fairer planks. I found plank spiling particularly rewarding. It always seemed a bit like magic to take the strange sinuous shape I had cut out and have it wrap onto the hull and assume the shape I needed. At least, it was magical when it worked.
For all but the garboard and a couple of nearly straight strakes around the bilge, I scarfed together stock to ensure that the wood grain was running as straight as possible along the planks. This is important around the forefoot where the planks have significant twist and grain runout could cause a split.
The garboards had the most extreme twist and needed steaming and careful clamping along their full length and especially at the bow. Indeed, most of the planks needed steaming at the bow, and some required steaming at the stern also. If the hull were planked in hardwood, the stock could likely be thinner—perhaps around 8mm—which could considerably reduce the amount of steaming required.
For the 12mm × 20mm oak frames I bought the wood early and for a couple of months submerged it in a tank filled with tapwater to which I added a bit of salt to minimize rot—a method used at the Nottage Institute. I checked periodically for signs of rot, but encountered no issues. My steambox for the frames was a 10’ length of schedule 40 PVC pipe, which handled the heat well (most plastic pipes melt like a Dali painting…ask me how I know). With friends helping, we bent the frames quickly, breaking only about three. The much longer process of hammering in all the copper rivets and roves took several weeks.
Alastair Gregory
I originally planned to fit a sapele gunwale, but it split when I tried to bend it into the stem. In the end, I followed the suggestions in the plans and steamed and laminated two pieces of oak—the lighter wood contrasted nicely with the darker sapele of the sheerstrake and the seats.
The interior fitout was mostly sapele and iroko left over from the backbone build. The only false start was my attempt to use leftover sapele plank stock for the gunwales instead of the oak, iroko, or teak indicated in the plans. The sapele split when I tried to steam it to shape. In the end, I steamed two laminated pieces of oak for the gunwales, and this worked fine. I made the sheerstrake with sapele rather than the spruce I used for the other planks. It made the thwart-knee connections feel sturdier and allowed me to varnish the sheerstrake as a nice accent. One of the longest jobs, second only to riveting, was shaping and fitting the floor timbers. Each had to be patterned, cut, and beveled. It was time-consuming, but I particularly enjoyed it, as it felt like the purest form of “traditional” boatbuilding I got to try.
I made the sail from a Sailrite kit—Sailrite cuts the panels (they worked from Fabian’s sail plan) and the customer sews them together.
Sailing the Nottage Dinghy
I launched the dinghy in January 2023. Over the course of four years, I had probably spent about 1,000 hours on the build. Since completion, I have kept it at a local sailing club on a non-tidal river and have trailed it to various estuaries on England’s East Coast; this year, I plan to take it to the Norfolk Broads.
Joanna Wolstenholme
Thanks to the second rowing station forward, there’s room for four adults. Despite being less than 10′ long, the Nottage Dinghy carries the weight well, maintaining decent trim and plenty of freeboard.
Rigging the Nottage Dinghy is straightforward, and I can go from trailering to sailing in about 45 minutes. The dinghy is small but feels sturdy. Its weight makes it seem larger, and stability is good, even when moving about in the boat. In light airs I sit on the center thwart, moving aft as the wind picks up. When sitting on the seats, my head is quite close to the boom while closehauled and coming about or jibing, and it can feel a bit cramped. I am considering removing a section of the side benches so that I can more easily sit on the floorboards, which I think would make light-airs sailing more comfortable and would aid visibility. In stronger winds, moving aft on the side bench improves both trim and visibility. In a short chop some spray comes over the bow, but when I’m sitting aft of the center thwart it doesn’t reach me.
Maneuvering the boat is straightforward, and it’s pretty responsive. In light airs it slips along fine as long as you are careful to keep it well-balanced, the sail filled, and not to stall when going through a tack, but it is definitely not a racing boat. In stronger winds it comes alive with the crinkling sound of the bow wave on the plank laps. I’ve sailed in winds up to about 18 knots, and with the sail reefed I think it would handle more, so long as the sea state allows. It’s a comfortable boat, feels very safe, and while it does respond to gusts the motion is neither violent nor unwieldy and is accompanied by the characteristic creaking of a traditional wooden boat.
Joanna Wolstenholme
As the dinghy picks up speed, the chuckle of the bow wave against its narrow lapstrake planks is a comforting sound. In stronger winds it’s best to move aft to maintain good trim. In a short chop, if spray does come over the bow, it doesn’t reach farther aft than the center thwart.
The yard and boom fit comfortably in the length of the boat (the mast is too long, but for trailering can be strapped in place with its heel in the sculling notch), and I can row with the rig lying alongside me on one of the side benches. The center and forward thwarts are both rowing stations and I’ve rowed with four adults aboard without difficulty. When estuary sailing, I often launch and row into clear water before raising sail. The boat lies comfortably beam-on to the wind when hoisting the sail; I have also made use of this trait when putting in a reef.
Overall, the Nottage Dinghy has been a fantastic choice for learning traditional boatbuilding, and while I’m still getting to know it as a sailing boat, it’s the ideal messing-about Swallows-and-Amazons-type dinghy that I look forward to making the most of.
Alastair Gregory is an engineer working in medical device development near Cambridge in the U.K. When he started building his Nottage Dinghy MABEL he was a researcher at the University there. He’s a keen sailor and amateur boatbuilder, and has a particular ambition to build a Folkboat one day. He says that throughout MABEL’s build, he learned from YouTube channels such as Tips From a Shipwright by Louis Sauzedde, and also from many books, including Clinker Boat Building by Martin Seymour, Clinker Boatbuilding by John Leather, Boatbuilding by Howard Chapelle, Planking and Fastening by Peter Spectre, and From Tree to Sea by Ted Frost. All are available from multiple outlets both online and on the high street.
Plansfor the Nottage Dinghy are available for £55 (plus shipping) from Fabian Bush, The Old Yacht Store, 49 High Street, Rowhedge, CO5 7ET, U.K.; tel: +44 (0)1206 728577.
Is there a boat you’d like to know more about? Have you built one that you think other Small Boats readers would enjoy? Please email us your suggestions.
I’d been driving around Vancouver Island for two and a half weeks, boat in tow, looking for chances to sail and take myself out of my comfort zone. I had come hoping to explore the Broken Islands group on the west side of the island, but heavy and prolonged rain had curtailed the trip. I had driven, instead, to Sproat Lake in the middle of the island where I’d camped overnight and had a whole day’s sailing on the mountain lake before the rain returned. Finally, I had bent to the inevitable and driven to a friend’s house to dry out and make a plan for my last week on the island.
I’d owned FIRE-DRAKE—an 18′ lapstrake open boat with lug yawl rig—for almost a year. Alex Zimmerman, her original owner—also her builder and designer—had sailed and rowed her the entire length of the inside coast of Vancouver Island. His story was inspiring, and while I didn’t have such high aspirations, I did, and still do, have hopes of adventure, exploration, and a sense of accomplishment.
Photographs by the author
By the time I had stepped the masts, stowed all the gear, and set up the cockpit tent, the rain was coming down hard again. I decided to cut my losses and find a room ashore for the night.
The boat is well suited for camp-cruising and I had already had some experience in her. From Bellingham, Washington, I had made several trips out to Sucia, an island on the north side of the San Juan archipelago. I had also sailed around Lummi Island to the west of Bellingham Bay. But this trip up to Vancouver was my most ambitious yet.
Now, drying out at my friend’s house in Courtenay I was feeling a little discouraged. Getting soaked by rain is a common theme of stories about Vancouver Island, but that didn’t provide me much solace. After all, it was only the end of August; it hardly seemed fair. I spent a day and a night in comfort, and awoke the second morning revitalized. I headed off to Telegraph Cove, farther up the island’s east coast, and arrived in the small town before dark. I packed the gear into the boat, slipped the boat into the water, and parked the truck. My plan was to sleep on board at one of the marina slips and then head out in the morning. But soon after I got everything set up, the clouds opened once again, and the rain came down in sheets. I sat nursing a beer at the little tourist bar, looking out over the harbor as the rain filled the air and made it hard to see across the bay. I imagined sleeping on the boat, waking up damp and cold and stiff, and decided to get a room for the night.
Through the narrow opening leading out of Telegraph Cove, I could see the islands of Broughton Archipelago on the far side of Johnstone Strait—where I would be headed the following day.
Telegraph Cove to Flower Island
By early morning, the rain had eased, and I rose to sort the boat and get underway. I could feel, as much as see, the tall trees looming out of the haze—other than a few quiet gulls that watched me as I passed them by, the trees were my only company. I rowed out of the cove in a light drizzle, but the moisture didn’t dampen my spirits. In the distance, the islands were veiled by a thick mist—in my mind I was venturing into a true wilderness. Out in Johnstone Strait, the 2-mile-wide channel that separates Vancouver Island from the Broughton archipelago, I raised my sails. There was a perfect breeze for a beam reach across to the northwest end of Hanson Island. Visibility still wasn’t the best, so I wanted to cross perpendicular to the channel to make the shortest route possible to the Plumper Islands, a small archipelago at the northwest end of Hanson Island.
I flew across Johnstone Strait. It was thrilling. The wind blew a steady 10 knots just abaft the beam, and the sea was smooth. The boat settled into a groove and almost sailed herself. A little tinkering with the lines and stowing the gear, and then I sat back. What a great way to start the trip; I couldn’t have been in a better frame of mind.
Roger Siebert
.
When I reached the far side of the channel, approaching Weynton Passage between Hanson Island and Pearse Islands, I saw what looked like breakers ahead. “That can’t be right,” I thought. I fished out the iPad I was using for navigation from a drybag that wasn’t as accessible as I had imagined. Yes, indeed, there actually was a bunch of shallow rocks just in front of me. I fell off and jibed to run parallel to them, feeling lucky and slightly stupid for not having had my chart in front of me as I sailed. It planted a seed of nervousness in the pit of my stomach that would return off and on through the rest of the trip.
When I passed the last of the rocks, I turned toward the Plumper Islands, a group of wooded islands, which I would sail around en route to Blackfish Sound. As I neared the intersection where Weyton Passage meets Cormorant Channel at the entrance to Blackfish Sound, water that a moment ago had appeared just slightly confused, was suddenly very steep and very confused. FIRE-DRAKE was tossed from side to side and up and down. “Okay,” I thought, “a little exciting, but I have wind and I’m in no danger of jibing or getting caught in irons.” I was still on a reach as I struggled to control the boat, but then the waves pushed the stern up and off the wind and suddenly I was at risk of broaching. Cursing, I tugged on the push-pull tiller and got back on course. It was probably only moments, but time stretched until I was at last out of the confusion and in one piece, though my confidence was shaken.
As I rowed out of Telegraph Cove the next morning, the air was still damp, the clouds still low. Mist hung in the trees and along the foreshore, and I felt like an explorer venturing out into the wilderness.
As I caught my breath, I heard the staccato burst of a whale’s breath. Barely 50′ away and coming straight at me was a humpback whale. Normally, I try to keep my distance and stay out of the path of whales, but I had been unaware of this individual until it was too late. I clenched my jaw and held my breath as the whale slid away beneath me. I was thrilled, but once more my heart was pounding—the whale was many times larger than me and my boat, and even slight contact could have been disastrous.
To the north of Hanson Island, the wind dropped, but there was still enough for me to sail along slowly. Off to starboard were two more humpbacks surfacing near the shore. I glided by. This was why I was here!
When heard close by, the loud staccato puff of an exhaling humpback is exhilarating. Seabirds gather around the whales, looking to catch some of the fish forced up to the surface by the feeding pods.
I could have lingered and stayed to watch the spectacle, but I had places to be. I wanted to get to Flower Island in the early afternoon to avoid having to fight a current and to give me plenty of time to set up camp. I find it difficult to estimate just how far I can get in a day. Some days seem to go smoothly, and I can go 20 miles with little effort; other days I have to struggle for every inch. On this day, I hoped to make it 10 or 15 miles, depending on the wind and current.
I continued out into Blackfish Sound and turned closehauled, ready to sail across to Flower Island, an islet just 150 yards wide, off the southern tip of the much larger Swanson Island. It had been described on the BC Marine Trails website as a campsite with an easy landing and a view of Blackfish Sound; it seemed ideal for my first night. For a while I stayed close to shore, but the wind began to die so I started to row. I was being followed by a couple of well-fed-looking sea lions. I kept telling myself, “There is no danger, nothing to worry about. Who’s ever heard of a sea lion sinking a boat?” But I couldn’t shake a nagging fear, and while I’m sure their interest was simple curiosity, their presence raised the hairs on the back of my neck. They would surface in random places, sometimes next to me, sometimes behind, but always they would stare at me with giant inky black eyes. They’d quietly watch me pass and then submerge. They seemed to have no trouble in keeping pace with me. I rowed farther out into the sound and left them to their own business.
Mist and drizzle soon enveloped me, but as the wind picked up to a slight yet steady breeze, I put away the oars and started sailing again upwind with no reefs. The visibility dropped to less than 50′, forcing me to steer by compass. It was otherworldly. Except for the occasional sound of humpbacks breathing in the distance, it was eerily quiet, and I could see nothing but the boat and a circle of gray water around me. I was sailing in a bubble, and time stopped.
As I sailed past Hanson Island, two humpbacks surfaced and dove close inshore. I tried to stay away from the whales but shortly before this sighting, had found myself sailing on a head-on-course with a large humpback barely 50′ away. Fortunately, it dove and swam beneath me without incident.
After what seemed like an entire afternoon but was in fact just a short hour spent in a near-trance, I heard sounds of birds and waves, and the forested shore emerged as the mist lifted.
The breeze shifted and I was close to the southern shore of Swanson Island, downwind of Flower Island. I had tried to make it across before the tide turned but now, as I measured my progress against the trees that stood proud above a low bluff on shore, I realized I was punching into not only the wind, but also the ebb current. At least I was moving and didn’t have to row, but I was shivering with cold, even though I was already wearing all my warm layers: a thick wool sweater over wool long johns, my foulweather pants, and a wool knit cap. Yet, I was chilled still more as even the light breeze knifed through my clothes. I was making good time though, and I was right where I had hoped and planned to be by early afternoon. It was validating and filled me with a certain pleasure that despite my inexperience dealing with the region’s currents, my calculations and predictions had worked out.
I drew level with Flower Island. The current had grown stronger and started to overcome my ability to sail upwind. Several times I tacked into and away from the island, but I made little progress. I tried to head away on a long tack that would take me upwind of the island so that I could come back down on it, but even that didn’t work. I was becoming frustrated. Then, I saw kayakers paddle by close inshore, following the route I should take. They were paddling through a narrow passage between Flower Island and Swanson Island. I had avoided that route because I was nervous about short-tacking in a narrow channel, even though FIRE-DRAKE’s draft is minimal. But I sailed in, tucked behind Flower Island, dropped my sail, and followed them up the channel. It was the correct move and the origins of a mantra I held in my mind through the rest of the trip: “When in doubt, follow the kayakers.” At last, I came around the point to the beach on Flower Island where there were several marine-trail spots for camping, and rowed right up to the beach.
Within minutes of setting up camp on Flower Island the rain started again, coming down in sheets. It was the heaviest rain I experienced on the trip but fortunately was short-lived and soon after I took this photo the sun came out. As the tide fell, FIRE-DRAKE settled on the gently sloping gravel beach.
There wasn’t much of a bay in which to anchor, so I decided to beach the boat for the night and sleep on shore. For a few hours, I tended the boat: pushing it out with the falling tide, until it reached the point that, by my calculations, would put it at the edge of the water on the rising tide the next morning when I would want to depart. I found a place to camp for the night: a perfect little spot that had been terraced and made flat, surrounded by trees from which I could string my hammock and tarp. Low down, the branches were sparse and I had a clear view to the east toward islands that seemed to pile up over each other into the distance. FIRE-DRAKE was resting on the gravel beach just in front of my slightly elevated pitch. I set up the hammock and tarp, and tucked all my gear away beneath the shelter. I was just in time. I thought I had seen rain before, but now it truly opened up and dumped everything it had. It was the kind of rain in which you have to keep your face down for fear of drowning. It thundered against the top of the tarp, where it quickly made little puddles that built and flowed to the edge of the tarp to spill over all at once. But the tarp stood up to the torrent. I sat beneath it, dry, and watched as several paddlers emerged from the downpour and came ashore through the murky gray wall of water.
After the rain, the sun came out. Glorious! The transition was immediate, and though there wasn’t much heat in it, the touch of sun quickly warmed me. More kayakers came dribbling in, soaked but grateful to have made it, and in a while we had a full beach—there were only a dozen of us, but the beach is just about 10 yards wide with six campsites. I felt a little guilty that FIRE-DRAKE was taking up so much of the beach where the kayaks were landing.
In the middle of the night, I got up to check on the boat. It was high and dry. I was amazed by how far the tide had gone out. The range was only about 4–5′, but on the gently sloping beach it was significant. The moonlight reflected off the water and the stars hung low and bright. The water itself seemed to glow and shimmer, and in the dark FIRE-DRAKE looked like a spaceship surrounded by a galaxy of stars.
Beyond the landing beach, the geology of Flower Island was less welcoming, with a steep slope and sharp rocks that would make beaching out on a falling tide impossible.
Flower Island to Boat Bay
The next morning was bright and crisp, with vibrant greens and blues everywhere I looked. Every tree had a different hue. I occasionally dabble in watercolors, but the variations that morning would have stumped any attempt of mine to express what I saw in paint. The sky bled from a deep blue near the horizon to a lighter blue above. The air was cold in my lungs, but I could feel the warmth of the sun on my skin. There was a strong westerly breeze. My goal was to make it down to a small bay at the southwest tip of West Cracroft Island, a distance of some 8 miles—where I thought there would be some shelter from the west—or perhaps all the way to Boat Bay, also on West Cracroft, which would be sheltered for sure but was an additional 4 or 5 miles away.
I started out from Flower Island with a single reef, and quickly took in a second one. I was still a little gun-shy after the near-broach in the tide rip the day before. All morning the tidal current would be with me as I headed southeast. I flew down and out through Blackney Pass between Hanson and Harbledown islands. As I neared the main channel, I saw a tanker heading northwest toward me, so hung tight to the side. When it had passed, I turned onto a run and sat back; it was the kind of run that goes on and on until you have had all the fun and are ready to be done.
The wind was blowing straight down Johnstone Strait between Vancouver Island and West Cracroft, but I was reluctant to go too far—miles run downwind today would have to be reclaimed upwind tomorrow.
The end of the second day could not have been less like the first. As I arrived in Boat Bay, I had a following wind and the sky above was almost cloudless.
I reached my little bay protected by the Sophia Islands off the western end of West Cracroft, and it looked perfect. There was plenty of kelp to keep any surf down and a narrow entrance between two rocky points, but it was kind of windy. As I approached, becoming dubious of the landing’s suitability, I saw that the beach was covered in large sharp cobbles. I changed my mind and decided to press on to Boat Bay. But first I had to row hard to get out against the wind.
To reach Boat Bay I had to sail along an exposed bluff for at least 3 miles, then turn to duck into the bay. I was glad to be sailing downwind: there were large rolling waves running and the wind was blowing about 15 knots, more than I usually like. Going upwind would have been hard work and most likely cold and wet. I pulled into Boat Bay and found a protected bay with a sandy spot on the beach.
I rowed into Boat Bay, a protected bay with a sandy beach, looking south toward Vancouver Island.
A crowd of people watched me as I pulled up to the beach at the same time as a water taxi. As I reached the shore, the taxi captain started berating me: I needed permission to come here; I should go somewhere else. I was confused; the spot is listed on the BC Marine Trails website as having 12 campsites and is crown land. I replied that I wasn’t going anywhere but that I would stay anchored out in the bay if it was an issue. This seemed to mollify him a bit, and he pulled away with a load of kayaks.
After he’d gone, one of the other people told me I was allowed to be there but to avoid the orca watchers’ camp at the edge of the bay where a group of people were living and working. They were monitoring Robson Bight, an ecological reserve across the strait that is critical habitat for orcas. My informers, another crowd of kayakers, had been dropped off to go on a hike that would end by my first bay at the northwest end of the island. I was grateful for the explanation, and far more sympathetic to the taxi captain’s confrontational approach. I stretched my legs a little and then, having no desire to upset the locals, rowed out to anchor in the bay.
In Boat Bay, after an encounter with a less-than-friendly water-taxi operator, I decided to sleep on board. After a peaceful night, the day dawned bright, sunny, and calm.
The night was dry, but the breeze cut right through my little boat tent. Even in my 20°-rated down sleeping bag I was cold. I built a little wind block with my toilet bucket and drybag, and once more put on all my clothes. Finally, I fell asleep.
Boat Bay to Telegraph Cove
I awoke mid-morning. It was another crisp and sunny day. The wind had dropped, but later it would be perfect to sail back without a reef. I did my morning stretch routine—or as much as I could in my small and rather messy boat. I had plenty of time; the current wouldn’t be going my way until the afternoon, so I stayed at anchor in the warming sun, and spread everything out: my tent, my clothes, my sleeping bag, my gear. I let the sun into all the nooks and crannies so that everything could dry out while I relaxed and drank coffee and wrote in my journal. Then I heard voices. A crowd of kayakers paddled by; they were going my way!
“When in doubt, follow the kayaks,” I remembered. “If they can go, I can as well.” I had originally planned to stay out another night, but between my coldness and dampness, as well as a need to get back to prepare for a new job, I decided to see if I could get back that day.
Waking in Boat Bay to a sunny day with little wind and time to wait for a favorable current, I decided to spread out all my gear to dry. Later I would take down the cockpit tent so the sun could get into all the nooks and crannies of the boat.
I had been worried about having to beat all the way back, but the wind veered just enough that I could make it three-quarters of the way to Telegraph Cove on one tack. I was able to lock the tiller down and sit and watch the boat sail itself for hours. After that I just needed a few short tacks to get into the marina.
About a mile from Telegraph Cove a medium-sized cruise ship with a French flag came down the channel. As they passed me by, I saw the bridge crew come out and look at me through their binoculars. I waved and watched them go.
I had some moments around a point where I was in a wind shadow and had to row between wind spots. I tried rowing with the sail up—in my mind it was akin to motorsailing—but the boom whacked my head right on my ear.
The wind on my last day could not have been kinder. With no reefs in the sail, a single tack took me three-quarters of the way up Johnstone Strait from Boat Bay to Telegraph Cove. I was able to tie-down the helm and watch FIRE-DRAKE sail herself.
At last, I pulled into Telegraph Cove, sailed right up to the entrance, and then smoothly dropped the sails to row into the boat ramp. As I stepped ashore, I thought about the days behind me: I had struggled with the weather issues, the currents being sometimes with me, sometimes against, and my own lack of rowing stamina. I had felt ridiculous at times, working so hard yet making no progress. But on the other hand, using wind, tide, and muscle, I had traveled independently around the edge of the Broughton archipelago. With no engine available, I had been forced to think ahead and use my skills to their utmost. I had also learned where my skills were lacking.
I had come back a day early, but I was satisfied. It was late afternoon as I threw all the boat gear into the truck, tied the boat down, and hit the road. Four hours later I was pulling into Campbell River where I planned to spend the night. I looked out over the water and saw the French cruise ship that had passed me earlier in the day. A warm sense of satisfaction came over me as I found my place for the night and felt my exhausted bones and muscles relax.
Merlin Clark-Mahoney grew up sailing on dinghies with his dad. He’s been a sea scout, a merchant mariner, a tall-ship sailor, and now is exploring Washington and British Columbia by small boat.
If you have an interesting story to tell about your adventures with a small boat, please email us a brief outline and a few photos.
RANTAN, my Tony Dias–designed Harrier, was launched in 2008. She’s a glued-lap boat planked in plywood; her hull is round sided but with a flat bottom to easily take the ground and live on a trailer. Since her launching, she’s not had much maintenance thanks to a well-fitting cover and a secondary top winter cover. I’ve refinished the brightwork on her cherry seats, refinished the removable floorboards, and redone the orange paint on the rails once. This winter, while she didn’t need any wooding—none of the finish needed to be taken back to bare wood—she did need to be painted inside and out.
Photographs by the author
RANTAN (seen here at The Apprenticeshop in Rockland, Maine, where she was built) has lengthy decks in both ends that prevented me from reaching the stems. However, when I used the homemade extender, I could access every inch of the boat’s interior.
I set her up on benches 18″ high, which are 48″ long and 15″ wide. The height is great both for reaching the interior structure and working on the topsides of a small boat, and with RANTAN’s flat bottom I needed nothing in the way of props to keep her upright. The biggest problem was figuring out how to get to all the places that were easily reached during the boat’s build but are now tucked away. There are decks and benches that restrict access to the ends and sides, and the open gunwale structure has lots of small spaces between the tops of the ribs, the inwale, and the sheerstrake, all of which need to be sanded and painted but are difficult to access.
Possibly the best Christmas present ever: a portable tray that holds four rolls of sandpaper and four sanding blocks.
For sanding, my favorite tools are rolls of sticky-backed sandpaper coupled with soft hand blocks. Years ago, a friend gave me a portable tray with a bar that holds four rolls of sandpaper. Below the bar, the tray carries my sanding blocks and the scissors I need to cut the paper. The paper can be pulled off the roll straight onto a block; it can also be stuck to other tools suitable for tight spaces, and doubled back and stuck to itself for sanding small spots. Sandpaper rolls are expensive, but for an amateur like me, a roll could last an entire career of boat maintenance—after a decade or so of building and maintaining half a dozen small wooden boats, I’ve only had to replace the 80-grit roll (my boats are mostly painted workboats—80-grit is fine enough). I do use power sanders, but there are so many intricate spaces in RANTAN that most of the interior work is done by hand.
My overall plan for RANTAN’s repainting was to tackle the hardest parts first. I began with the challenge of sanding the inside of the sheerstrake. The spaces between the inwale and the sheerstrake are too narrow for sanding blocks to access, and I couldn’t get the pressure I needed with folded paper; there also seemed to be no way I could sand the small areas of planks beneath the ribs. I solved these problems by wrapping sticky-backed paper around a wooden paint stick and around a narrow 6″ length of 3⁄4″ × 6″ aluminum bar stock that I had in my scrap bin. With these I could access all the smallest nooks and crannies.
Narrow gaps, such as between RANTAN’s inwales and sheerstrakes, can be extremely difficult to get to for sanding, but with the help of some homemade tools, even the tightest of spaces become accessible.
Next, I moved my focus to the ends of the boat.
I lowered RANTAN from the benches and set her on the floor so that I could step aboard. Now, however, even when I lay on my chest or side in the boat, I couldn’t reach all the way under the foredeck or the sternsheets to sand, so I had to come up with a way to extend my reach. I had some 1 3⁄4″-wide hardwood battens with which I could make an oversized pincer tool that could hold a sanding block and (later) a paintbrush. I thought about cutting one of my sanding blocks down to a width of 1″ but then discovered some mini foam sanding blocks at the hardware store that were ideal for the job.
The tools for sanding in hard-to-reach places: the extender is homemade using a couple of battens, three bolts (two with wing nuts) and a mini foam sanding block; for accessing tight nooks and crannies, sticky-backed sandpaper can be wrapped around a paint stick or anything else thin, such as the short piece of aluminum stock seen here.
I rounded the ends of two battens, and drilled 1⁄4″ holes into them, equally spaced along their lengths—unsure of exactly where I would need them to produce the desired tensions, I drilled five holes. I then drilled same-diameter holes through the mini foam block—two, so that I would be able to adjust the angle of the block. In the squared end of the battens, I inserted a 1⁄4 × 20 bolt tightened down with a simple hex nut. In the middle hole I threaded a bolt with a wing nut (this would be used to adjust the tension of the pincers). Finally, I placed the sanding block between the two rounded ends of the battens, threaded a third bolt through both battens and the block, and tightened it down with a wing nut. And there it was, a 16″-long sanding-block extender that allowed me to reach into the very ends of the boat. I later used the same tool for painting by replacing the sanding block with a 1″ paintbrush into which I drilled a hole through the handle just above the metal ferrule (I also use this hole to hang my brush after use).
The job of prepping RANTAN for painting was time-consuming and not always comfortable, but with my simple and affordable tools I was able to reach into every spot on the boat.
Tools used for sanding RANTAN’s tight spots
Foam sanding blocks—standard and mini sized (I used a Gator Zip Micro Tool—1″ × 3 1⁄2″—which came with 80-, 120-, and 220-grit paper. I bought an extra pack of 120-grit paper)
Sticky-backed sandpaper in grits from 80 to 220
Paint sticks and aluminum stock bar
Bright rechargeable headlamp—essential when working in the ends of the boat
Battery-powered portable vacuum with crevice and dust-brush attachments (handier than a regular vacuum because it stayed with me in the boat and didn’t get in the way)
N95 face mask
Thin leather gloves (I use disposable nitrile gloves for painting)
Knee pads
Ben Fuller, curator emeritus of the Penobscot Marine Museum in Searsport, Maine, has been messing about in small boats for a very long time. He is owned by a dozen or more boats: kayaks, canoes, a skiff, a ducker, and a sail-and-oar boat.
You can share your tips and tricks of the trade with other Small Boats readers by sending us an email.
Even though I’d dabbled in camp-stove baking, I was never inspired to do much beyond cooking frozen pizzas. When I happened across the Omnia oven I was intrigued by how simple and compact it is compared to the other systems I’ve used.
Photographs by the author
The basic oven kit includes (back row, left to right) the stainless-steel base, the aluminum mold, and the enameled lid. The options I added (front row, left to right) are the stainless-steel oven rack and silicone mold.
It has a stainless-steel base with a hole in the middle to allow the heat of a camp stove to pass through it. The center element, made of aluminum and called the mold, is nearly identical to a bundt pan. The open cylinder in the middle brings the heat to the top of the mold and reduces the risk of overbaking the outside of food while waiting for the middle to be cooked. The enameled lid has a knob handle on the top and six small ventilation holes in the side, sized to accommodate Omnia’s optional dial thermometer.
Most Omnia baking projects require a low heat, so a camp stove that can maintain a low to medium flame is all that’s required. The folding digital thermometer at left was a good tool for monitoring the temperature in the oven. The pot pliers at right came in handy for moving the hot mold.
For baking with the Omnia, I use my compact Gas One Mini dual-fuel camp stove with a butane canister for fuel. One of the repeated complaints I had found in the oven’s reviews is that food touching the base of the oven and the inner ring of the mold can easily get scorched, so it’s important to use a low flame. The best way to regulate the temperature is to use a thermometer. Omnia’s optional dial thermometer, fixed in one of the holes in the lid, measures the temperature in the upper part of the oven. Removed from the lid, it can be used as a probe to read the internal temperature in the food being baked. Rather than buying Omnia’s dial thermometer, I used a digital meat thermometer that I already owned which has a probe sized to fit the holes. With its probe inserted through a hole in the lid, I could read temperature fluctuations in temperature quickly and accurately on its digital readout and make fine adjustments to keep the oven very close to the target setting.
I did, however, buy two of the many other options offered by Omnia: a stainless-steel oven rack and a BPA-free silicone mold. Both reduce the risk of food being scorched at the bottom of the oven, and the mold is nonstick and easily cleaned.
My wrapping of the pizza dough around the fillings wasn’t pretty, but the calzone I made was tasty. The silicone mold helped to avoid scorching the dough and simplified clean-up.
My early trials with the Omnia went very well. Pizza, one of my favorite indulgences at anchor, isn’t well suited to the shape of the Omnia mold, but calzone, a pizza folded around the toppings, is. Using store-bought frozen dough with grated cheese and tomato sauce, I made a ring-shaped calzone. Omnia’s recipe called for cooking on medium heat for 30 to 40 minutes but didn’t specify a target temperature for the thermometer; I used 350°. The calzone came out very well despite my clumsy work with the dough; it was cooked through and there were only two small scorched spots where the dough had been in contact with the mold’s chimney.
Once I had popped the calzone out of the mold, I could see that its bottom was a nice golden brown.
I was concerned about fuel consumption for the long cooking times required by baking recipes, so I weighed the butane canister before and after baking two batches of cookies. For the first batch I placed seven well-spaced 1″ balls of dough on parchment paper resting on the oven rack; the second batch was a closely spaced dozen. The first batch consumed 21g of butane over the 13 minutes it took to bake the cookies, the second used 26g for 20 minutes of baking time. At that rate, the 8-oz/227g canister would provide a reassuring 2 hours and 39 minutes of baking time; in terms of cookies, that would make 10 average batches.
The oven rack, with a cut-out of parchment paper on top of it, worked well for baking chocolate-chip cookies. I’ve already eaten one from this batch and two have been flipped over to show the evenly cooked bottoms.
I’d never baked a yeasted bread either at home or in camp, but I was eager to try the Omnia manual’s simple recipe for thyme bread. Set in the silicone mold, buttered and lined with sesame seeds, the bread baked thoroughly, without scorching, and turned out even better than I’d hoped, with an artisan bread’s crispy crust and fluffy interior.
The yeasted thyme bread, with sesame seeds baked on the crust, was surprisingly good, especially while it was still warm.
The Omnia oven’s three components, plus the silicone mold and the oven rack, all nest together in a stack 3 1⁄2″ high and 10″ in diameter and fit in the nylon stuff sack included with the oven. The compact 1 lb 12 oz package is well suited to small boats. The prospect of adding freshly baked goods to camp-cruising cuisine makes the Omnia system a welcome addition onboard.
Christopher Cunningham is editor at large of Small Boats.
The Omnia oven and accessories are available direct from Omina or from a worldwide network of retailers. I paid $59.99 for the oven, $26.99 for the silicone mold, and $17.99 for the oven rack.
Is there a product that might be useful for boatbuilding, cruising, or shore-side camping that you’d like us to review? Please email your suggestions.
Before the advent of electric-powered hand tools, the humble spokeshave could be found in every woodworker’s tool kit. It was an essential shaping and smoothing tool that excelled in chamfering, beveling, and rounding, and was just the ticket for beveling that dory stem or working in the compound bevel on lapstrake planking.
Consult the pages of the Antique & Collectible Stanley Tools: Guide to Identity & Value and you’ll find a plethora of spokeshaves…something for every purpose. Round or flat bottoms; cutters that are straight, concave, or convex; angled guides for chamfering; handles that are straight, others that arch upward like gull-wings to provide clearance for the user’s hands above the work. There were double-cutter marvels that had side-by-side concave and straight cutters; the curious Stanley #67 with handles set at 90° for working into corners; a jumbo version for coopers and diminutive versions for modelmaking. There was even the delightful Stanley #54 with its spring-loaded adjustable throat that effectively changed the iron’s depth of cut.
Photographs by the author
When seen alongside a classic Stanley #54 spokeshave of the 1940s there is an obvious difference in shape. Also, where the traditional tool has but one central screw and slot for adjusting the cutting iron, the Melbourne spokeshave has a pair of adjustment knobs as well as the cap-iron screw.
Alas, by the 1960s, much of the wide variety of spokeshaves had disappeared outside of antique and curio shops. If you could find a new one in your hardware emporium, it would likely be the most basic version: straight bladed, flat bottomed, in Japanned black iron with lackluster casting. It would probably require extensive tuning to operate as intended. The performance of such a spokeshave can be off-putting and make one question not only its purchase but also its practicality.
That said, there are still some new versions produced by smaller manufacturers who are sticklers for quality. Some of these tools are extraordinarily elegant, finely tooled, and cast in bronze. Others are accurate reproductions that have the Victorian elegance of early-20th-century tools. Yet others are 21st-century reimaginings of the classic tool, but with the same attention to detail of their predecessors. Such tools are made by people who actually use tools.
One new entry into the pantheon of modern devices is the Melbourne Tool Company (MTC) Flat Sole Spokeshave; our Small Boats editor sent me a sample to review.
On this white-oak stem with a confused grain, the spokeshave performed well, producing clean shavings and a very smooth surface.
The body of the MTC spokeshave is modern in its appearance. Clean and sleek, it is crafted from a single piece of investment-cast steel, which renders a very clean reproduction with none of the sharp edges occasionally found on cast-iron tools. Cork is inlaid into the upper face of the hand grips, which span roughly 11 1⁄2″. The handles are narrower than those of my 1940s Stanley #54 spokeshave and I did wonder if it would be less comfortable or ergonomic in my hand. But the shape and cork work well, and there are dimples on both sides of the cutting iron into which a user’s thumbs naturally nest, affording better control of the tool.
The width of the cutting iron (or blade) is 2″ and the thickness is 1⁄8″ (twice that of the Stanley, which should make the blade relatively chatter- or vibration-free in use); it is made of M2 High Speed Steel (HSS), which should stay sharp longer. Straight out of the box, the spokeshave’s sole and the back of its cutting iron required no extra lapping to ready them for work. I did add a slight micro bevel to the iron’s primary bevel.
One feature that I especially appreciated was the cutting iron’s adjustment mechanism: a pair of ample knurled brass adjustment knobs. Old-time spokeshave irons typically have a central slot cut into them, which slides under a screw. To get the blade set to the proper depth and without skew usually takes a lot of persnickety trial and error, followed by a lot of hope that the single cap-iron screw holds it in exactly the position you want. With the twin screws, it’s easy to “sneak up” on the desired adjustment and then simply hand-tighten the cap-iron screw.
Even though the handles are narrower than might be found on a traditional spokeshave, their shape, coupled with the soft cork covering, is ergonomic, feels comfortable in the hand, and offers good control of the tool.
Finally, the fixed mouth of the tool is wide enough to allow shavings to pass through, and the leading edge of the cap-iron is sharp enough and set tight against the cutting iron to keep the shavings from jamming or plugging up.
So how did it work? I liked it. I tested it to bevel the pine bottom board of a dory, and a dried and convoluted-grain white-oak stem. On both woods, it performed well, producing clean shavings and a very smooth surface. I then tried it on pressure-treated yellow pine, hackmatack knee stock, and both mahogany and sapele plywood. Again, smooth surfaces were easily produced on all.
The verdict? The MTC spokeshave is a quality tool at an affordable price that simply functions as advertised. These days you can’t ask for much more than that.
Greg Rössel is a builder of small boats and a longtime instructor at WoodenBoat School. He is the author of Building Small Boats, The Boatbuilder’s Apprentice, and Half Hull Modeling, and a regular contributor to WoodenBoat magazine. He is also a member of WoodenBoat’s Mastering Skills video crew, and the presenter of A World of Music on WERU-FM.
In 1975–76, Felix Garlasco and his two sons, Mark and John, built a 16′ boat from plans published in the Sports Afield Boatbuilding Annual of 1965. The design was called “Scaup” and was said to have been based on a Maine Lobsterman type but modified for duck hunting. The Sports Afield editors described it as “A wildfowler’s dream come true.” At the time of the build, Mark was studying at the University of Connecticut and boatbuilding was restricted to the long summer vacations. Felix had built his first boat in the early 1950s, and now, as he introduced his two sons to the art of woodworking, they used many of the classic hand tools he had used on that earlier project.
Photographs courtesy of the Garlasco family
In the 1950s, Felix Garlasco built his first boat, the 19’ sloop seen here with Felix standing on the cabin top.
Almost 35 years later, in 2009, Mark chatted with his father one evening, fondly recalling the project of his youth and musing about building another wooden boat. He was now also a father, and his children were much the same age that he and John had been when they built the Scaup. But he also had a management role in a growing company that required long hours and a good deal of travel. Felix reminded him just how much work was involved in building a boat. Even so, Mark was enthusiastic and suggested that, while his availability would clearly dictate the pace of the build, if they built the boat in his garage, the inconvenience of its presence would provide the motivation he needed to complete it. He wanted, he said, to share with his own children the satisfaction and skills he had gained at their age.
Over the winter of 2009, Felix, a retired manufacturing and design engineer, designed the Garsharp-14 and produced a 100-page binder of lines and detailed construction drawings.
The Design
As soon as Mark had committed to the project, Felix went to work. A retired manufacturing and design engineer for Grumman—now Northrop Grumman—he looked around for a suitable boat design. He settled on a sharpie, deciding that it would be relatively straightforward to build and would perform well with just a simple spritsail. The fact that the type was also native to the Garlascos’ home state of Connecticut didn’t hurt. After studying the plans of many possible sharpies, Felix eventually developed his own modified version that would be slightly wider than a traditional sharpie to provide more comfortable seating and more stability.
After struggling to dry-fit mahogany chine logs and sheer clamps, the Garlascos switched to steamed white oak. They built an 8’-long steambox with a hinged lid for easy loading and a plugged end through which the steamed wood could be quickly extricated without lowering the internal temperature of the steambox.
He worked on the design over the winter of 2009 and in the spring presented Mark with a complete set of hand-drawn plans—100 pages that included detailed drawings of all the parts, frames, joint details, wood types and dimensional requirements, and a comprehensive materials list including wood and hardware. The level of detail, said Mark, was much more than is “typically found in commercially available boatbuilding plans, but it was nothing short of necessary in the mind of an aerospace manufacturing engineer used to government and military programs.” Felix called his design the Garsharp-14. It was 14′ overall—long enough to suit the family’s needs, but short enough to be built in the garage—with a beam of 4′ 4 3⁄4″ and a draft of 9″. The mast was 13′ long so that, together with the sprit and loose-footed sail, it could be laid down in the boat for trailering.
The plywood sides were cut and clamped into place with adhesive caulking applied, then screwed to the oak chine logs. More than 30 years after building the Scaup, the Garlasco brothers—John (in the foreground) and Mark—were back together building another boat.
Mark, Felix, and Mark’s then-20-year-old son John Paul started work that year. It was, says Mark, slow going, but “we tried to get together most Sunday afternoons and on any other spare days.”
Building the Garsharp-14
They built the hull upside down, using marine-grade okoume plywood—3⁄8″ for the sides and 1⁄2″ for the bottom—on an oak centerline structure and mahogany frames. They eschewed the use of epoxies but instead fastened everything with stainless-steel screws and bolts (except for galvanized rod to fasten the skeg), and used Sikaflex adhesive between the plywood panels and the frames, sheer clamps, and chine logs. The stem was two pieces of white oak laminated with resorcinol, and the centerboard trunk was bedded to the keel with canvas smeared with compound on both sides, which, said Mark, “helped to fill in the slight voids between the hand-shaped curved surfaces of the centerboard-trunk logs and the keel.”
Felix Garlasco looks on as his grandson John Paul uses a ratchet brace to drive a screw through the plywood side and into the frame.
For the most part, the build went smoothly. But when it came to fitting the chine logs and sheer clamps the Garlascos ran into an unforeseen issue. They had opted to use 2″ × 1″ mahogany for all four parts. But as they tried to bend the pieces into the bow the mahogany cracked. “Even after we soaked the parts in the swimming pool for multiple days,” said Mark, “they still cracked.” They revised the jig and added 3″ to the boat’s length to ease the tight bend. Still the mahogany split. “We couldn’t add any more length,” explained Mark, “because of the limited shop space.” Instead, they researched the process of steaming wood. “We determined that white oak was one of the more pliable woods if steamed, and it’s more water-resistant than red oak.” They went back to the lumber yard and bought some suitable 2″ × 1″ white oak.
“Then we built a steambox, 8″ × 8″ and 8′ long,” said Mark. “The top hinged open so we could easily place the oak inside two at a time. The door closed with spring-loaded latches to keep it well sealed. Inside the box, we set a ‘piccolo tube’—a length of copper pipe drilled with holes to equally distribute the steam—which we connected to a hose. The other end of the hose was connected to a repurposed 5-gallon oil can filled with water and heated on a propane burner. We steamed the parts for an hour and then a team of four gloved friends pulled them out through one end of the box, which we’d left open save for a wood plug and rag seal, and ran them over to the boat where we clamped them in place until they cooled off. Problem solved.”
Felix’s great-grandson Nicolas, the youngest member of the building team, was given the honor of fastening the breasthook, the last part of the construction.
Mark estimates that they put about 2,000 man-hours into the build. The main building team were Mark, Felix, and John Paul, but they were joined on occasion by Mark’s wife, Kathy, their daughter Gina, and Mark’s brother John when he was in town. Toward the end of the project another family member pitched in: “We had started building in 2009, but we didn’t finish until 2020,” Mark said. “By then John Paul had become a father himself, and my grandson, Nicolas, then aged seven, was also helping out. We gave him the honor of fastening the very last piece of construction—the breasthook.”
Painted, varnished, and ready to go. The two maststeps were designed to provide a choice of mast position depending on wind conditions and load. The centerboard trunk is bolted through the 1 1⁄8″ × 4 1⁄2″ white-oak logs, the keelson, and keel with 1⁄4″ × 7″ galvanized bolts. The trunk and logs were shaped to follow the slight curve of the boat’s bottom, and the logs were sealed with canvas gaskets and bedding compound to keep everything watertight.
Launching the Garsharp-14
Construction complete, the boat was finished with Interlux polyurethane primer and paint, the spars and sail were built, and she was launched in July 2020. “We christened her TRADITION, which seemed an appropriate name,” said Mark. “From the day we put her in the water, she’s never taken on a drop of water, even when moored overnight—we’re quite proud of that.”
Nicolas prepares TRADITION for her first sail. From the day of her launching, the boat has never leaked, an achievement that the Garlasco family builders are justifiably proud of.
The Garlasco family have now sailed the sharpie for three summers and, said Mark, “we continue to learn how to sail her, going out on increasingly gusty days. The spritsail arrangement is extremely easy to set up and take down, and has the minimum of lines to manage. It’s great for a novice like me.”
Some 70 years after launching his first boat, Felix Garlasco stands on the dock with TRADITION, the boat he designed for and built with the next three generations of his family.
One day, late in 2024, Mark was with John Paul. “Out of the blue, he asked me, ‘What do you think about building another boat?’ I was surprised,” said Mark, “But I’m seriously considering it.” And why not? After all, boatbuilding is now a Garlasco family tradition.
Jenny Bennett is editor of Small Boats.
Do you have a boat with an interesting story? Please email us. We’d like to hear about it and share it with other Small Boats readers.
Sandy Buxton and Todd Skoog enjoy an early evening row in TINKER, their Matinicus double-ender built by Walter Simmons of Lincolnville Beach, Maine.
Like water finding its own level, those who are familiar with wooden boats seem to be drawn to the Matinicus double-ender, built by Walter Simmons. Designed over a century ago for fishing, she represents the finest kind of Maine workboats. The boat has a length overall (LOA) of 15′ 6″ and a 4′ 5 3⁄4″ beam. She moves easily and rises to meet seas without pounding. It’s no wonder that she was chosen to grace the cover of the book, Boats, Oars, and Rowing, written by R.D. “Pete” Culler, an icon of the boatbuilding trade.
In an age when many designers and builders are out to “push the envelope” and “revolutionize the industry,” designer and builder Walter Simmons carries on, honoring many of the old ways of doing things. He has been building the Matinicus double-ender for years, using molds passed on to him from the family of Merrill Young, one of a long line of boatbuilders and fishermen who lived on Matinicus Island, off midcoast Maine.
In boatbuilding circles, Simmons is known for writing several books, including works on lapstrake boat-building, a traditional type of construction in which planks (strakes) overlap, appearing somewhat like the laps of a clapboard house. Lapstrake construction makes a strong hull, since the laps themselves—about 3⁄4″ wide in this case—add strength to the hull.
The term double-ender is applied to a variety of boat types. Simmons refers to his model as a double-ender (rather than a peapod, or anything else, for that matter) because the Youngs referred to her that way, so whether technically correct, a bow to her heritage, or both, she is a double-ender.
Karen Wales
Boatbuilder Todd Skoog added stemhead details to each of TINKER’s stems.
There are two keel versions of the boat: one with a T-shaped keel that Simmons builds exclusively and one with a two-part plank keel that he both builds and offers in plan form to other builders. I was invited to row and to ride in a Simmons-built double-ender (T-shaped keel model) owned by Todd Skoog and Sandy Buxton.
Todd is a professional boatbuilder and Sandy has lifelong experience on the water; she has even co- owned and worked on a couple of sardine carriers. With the vast boatbuilding and boating knowledge that exists between these two, it is high praise that they would choose to buy a boat rather than build one themselves—but no surprise that they would settle on this one. They’ve named her TINKER.
Karen Wales
The Matinicus double-ender weighs about 130-145 lbs. Though this is not a lightweight boat, two people can load and unload it from a trailer.
She tracks beautifully. After a few pulls on the oars, momentum begins to carry her in calm water like a large and happy fish awakening from slumber, propelling into the morning’s hunt. She never feels tippy or corky. Imagining what it might be like to have a child aboard (or to be one), I stood up, sat down, turned around, rowed, sat back, and sometimes shifted my weight without warning. TINKER never wavered or gave fright.
As mentioned, TINKER is the model with the T-shaped keel. This type of keel receives its garboard planks (the lowermost planks in the boat and the first ones to be installed during the building process) by way of a rabbet that is cut along the keel’s length.
Benjamin Mendlowitz
Descended from a long line of workboats, these striking lapstrake double-enders are often very long-lived, partly because of the pride they instill in their owners.
The plank keel, as it sounds, is flat—like a plank. In cross-section, it is wider than it is deep. In construction, garboard planks are fitted to bevels that are cut along the length of the plank keel’s bottom. The edges of the garboard and the bottom of the plank keel are then protected by a second, outer keel-type piece (called a shoe in the plans), which covers the bottom of the plank keel and butts against the garboards. The plank keel allows for the easy installation of a centerboard trunk if the builder wants to rig the boat for sailing. It also gives nice footroom in the bottom of the boat. I envision how helpful this flat sole might have been to fishermen of old as they hauled their lobster pots or otherwise stood while handlining for fish. Simmons has drawn remarkably well-detailed plans for the Matinicus double-ender—plans that carry the mark of experience.
There are other boats in this family. One notable design is John Gardner’s Matinicus Peapod, which, due in part to the name, is sometimes confused with Simmons’s Matinicus double-ender. A comparison of the plans of both boats shows some significant differences. Simmons’s boat is a full 6″ longer (15′ 6″ to Gardner’s 15′ LOA), yet has a smaller beam (4′ 5 3⁄4″ compared to Gardner’s 4′ 6 3⁄4″). The biggest difference is that while the Gardner boat is symmetrical about the ’midship section (she is the same fore and aft), Simmons’s boat is not. The aft sections of the Matinicus double-ender are finer than those forward, and the stern profile is not the same as the bow.
Walter Simmons
Unlike many other double-ended rowboats of this size, the Matinicus double-ender’s hull is not symmetrical fore and aft. This, combined with her different bow and stern profiles, makes a very pleasing and interesting hull that will always be a joy to use.
Although Gardner mentions a plank keel in his write-up, his plans show a rectangular keel topped by a narrow keel batten, while Simmons’s show details for the wider plank keel described earlier. Finally, the Gardner Peapod was designed for rowing and her plans show none of the sailing rig details such as the mast, sprit, sail, rudder, centerboard and aforementioned centerboard trunk. These details are all completely spelled out in Simmons’s plans.
This would be a fine boat for any serious builder to take on. Lapstrake planking makes this a particularly good choice because it does not require as much time to swell as carvel planking. It is a workboat in the true sense of the word. No flash, no varnish needed. Her charm is all in her lines and in her performance.
While it may seem that boaters and boatbuilders with a more experienced eye are drawn to this design, they are not an exclusive club. Almost anyone can own this boat. Plans are builder-friendly and the finished product is a down-to-earth pleasure with enduring quality. Like Walt Simmons himself, she’s the real deal.
Matinicus Double-Ender Particulars
LOA: 15′ 6″
Beam: 4′ 5 3⁄4″
Weight: 140 lbs
Plans and finished boats are available from Duck Trap Woodworking, P.O. Box 88, Lincolnville Beach, Maine 04849, 207-789-5363.
Check Out These Other Duck Trap Offerings
Ready for more boats from the mind of Walter Simmons? We’ve profiled a few you might enjoy.
Is there a boat you’d like to know more about? Have you built one that you think other Small Boats readers would enjoy? Please email us your suggestions.
Sliding-seat rowing is a great exercise; it is good for building strength in the muscles and flexibility in the joints. Racing shells are fast, but they require a refined technique and smooth water, so for recreation we’d enjoy rowing more in a boat that offers a bit of stability and seakeeping ability without giving up a lot of speed. Ruth, Dave Gentry’s rowing wherry, is 18′ long and while it has a maximum beam of 33″, it’s appreciably narrower at the waterline. Those dimensions add up to a good turn of speed. Its light weight, 45 lbs, will be quick to accelerate and reward good rowing technique.
Skin-on-frame construction keeps the weight low. The keel, chines, and gunwales that support the fabric skin take their shape from the six plywood frames. The keel and the lower chines give the hull a shallow-V cross section, and combined with the skeg they give Ruth good tracking abilities. The transom sits well above the waterline so the underwater shape of the hull is fine at both ends. There’s a thwart for a passenger in the stern and it’s set at the aft frame, not at the transom, to keep the additional weight close to the center of the boat. The aft ends of the chines, spread apart by the transom, contribute some reserve buoyancy to keep the boat in proper trim if you choose to take a friend along. Floorboards slipped through slots in the frames provide a place to step aboard.
Dave Gentry
Ruth, the Dave Gentry rowing wherry, is 18′ long and while it has a maximum beam of 33″, it’s appreciably narrower at the waterline. Those dimensions add up to a good turn of speed.
The wherry will take a drop-in sliding-seat rowing rig with outriggers. The plans show a Piantedosi rig bolted in place for rowing, and make the attachment easy to take apart. It’ll be a lot easier to car-top the boat and carry it to the water’s edge without the extra weight and width of the rowing rig. The plans provide the option for fixed-thwart rowing with simple plywood outriggers. They only need to be about 11″ long to provide a good span between a set of standard oarlocks to suit 7′ oars.
Skin-on-frame construction is very economical and with the money you can save building a Ruth, paying for a sliding-seat rowing rig and a pair of sculls is not going to make a big dent in your checking account.
The author’s Ruth is rigged with a homebuilt rowing rig for solo rowing and is without floorboards and a seat for a passenger. A False transom covers the edges of the fabric skin for a tidier appearance.
Kyla Dumser
While this Ruth isn’t equipped with a seat for a passenger, the reserve buoyancy created by the transom will support the additional weight without putting the hull well out of trim.
Originally designed for racing in Marblehead, Massachusetts, the Baybird Sloop by W. Starling Burgess found a true home in the summer sailing camps on Cape Cod’s Pleasant Bay beginning in the 1920s.
Originally designed for junior racing at the Corinthian Yacht Club in Marblehead, Massachusetts, the Baybird Sloop was a product of the restlessly creative naval architect W. Starling Burgess (see WoodenBoat Nos. 71–74). The Marblehead sailors, however, soon found that the very flat sheer Burgess drew for the gaff-headed sloop made the boat a wet ride in their blustery home waters. The type was, fair to say, less than successful—until sailors in the thin waters of Pleasant Bay on Cape Cod bought 20 or 30 of the boats (the story varies) and brought them down from Marblehead. This group fanned the embers, and soon the Baybird’s popularity was ablaze, especially in summer sailing camps in the shallow bays centered on the elbow of the Cape.
The flame never fully extinguished in the ensuing decades, and the Baybird’s modern supporters fervently hope it will soon undergo a second rekindling with a return to wooden construction. The pretty towns of Chatham, Harwich, and Orleans are surrounded by a tangle of bays, and people here take a keen interest in preserving the lifestyle of Cape Cod. Their love for this area is evident, and by some alchemy the Baybird tradition has become bound together with it.
The shallow and sandy waters are ringed with salt marshes and sinewy channels leading to hidden ponds. It can blow here, but winds can be temperamental and fluky. The bottom is rarely out of sight: it isn’t uncommon to see sailors jump overboard so they can push a boat grounded on a bar off to deeper water. The waters are protected, however, so the Baybird’s flat sheer seems to be no issue. A centerboard and kick-up rudder give the boat 6″ of draft, making the type an excellent choice for daysailing and racing here.
Katherine Mehls
Suzanne Leahy of Pleasant Bay Boat and Spar Company in South Orleans, Massachusetts, built a new cold-molded Baybird in 2010, hoping to rekindle an interest in wooden-hulled boats of the class.
Boatbuilder Suzanne Leahy, who grew up in Marblehead, discovered Baybirds after moving to Orleans from Philadelphia, Pennsylvania, in 1993. Possessed of the wiry energy of a coiled spring, the former sculptor (she holds a master of fine arts degree from the University of Pennsylvania) found boatbuilding—sculpture come to life—by working as a volunteer with John Brady at the Independence Seaport Museum in Philadelphia. She fell for it hard. Then, after a vacation to Cape Cod, she planned a way to forge her boatbuilding experience and the Cape into a new lifestyle for herself. Then she “met someone,” moved to Orleans, tried finding work in boatyards, and ended up working five years in a hardware store—a great way to get to know the locals. She later started a business, now called Pleasant Bay Boat and Spar Company, focusing primarily on wooden boat building and restoration but also on hollow spar and flagpole construction. Along the way, she became active in the Friends of Pleasant Bay and later was instrumental in restoring a historic Coast Guard 36′ motor lifeboat (see WoodenBoat No. 212). Boats, the Baybird among them, became as important to her as the Cape itself.
“I was meeting people who talked to me about the Baybird, but I hadn’t noticed it at all,” she said. “This is the story of my life—I just stumble into these things.”
In 2010, she built STARLING, the first new wooden Baybird sloop in more decades than anybody can remember, maybe even since the original boats were built at Marblehead.
Katherine Mehls
The Baybird STARLING, named after her designer, is a comfortable racing daysailer for a skipper and crew. The teamwork involved in sailing it is what made the type so great for use in Pleasant Bay’s numerous sailing camps—and her builder hopes to revive that use.
She took the lines off the Cape’s only surviving wooden example, PURA VIDA. (The only other known wooden survivor is in Maine.) She faired them to what she and other Baybird aficionados believe to be as accurate a reflection of Burgess’s original design as can be attained, since the original plans are lost. At the same time, she joined others in launching a new Baybird Class Association to nurture the type and control its specifications.
Leahy hopes her cold-molded version will help to revive one part of Cape Cod’s history by steering more sailors toward wooden-hull heritage. Because this is a one-design class, requiring tight control over specifications, the association has granted Leahy the exclusive right to build the type; plans aren’t available for purchase.
Tom Jackson
With two halyards for the gaff-rigged main and one halyard for the jib, the Baybird’s rig is uncomplicated.
It was probably wise of Leahy and the nascent association to permit modern methods and materials, as they have done, to bring the boat into a new century. STARLING is cold-molded, using an inner 3 ⁄8″ layer of white cedar strip planking followed by two 1⁄8″ veneer layers of Spanish cedar on opposing diagonals for a
total thickness of 5⁄8″. The hull, very fair and stiff, is sheathed inside and out with Dynel set in epoxy. The deck is 1⁄2″ okoume plywood, also sheathed in Dynel in
epoxy. The white cedar side seats are comfortable, with a low coaming of laminated mahogany making hiking out easy and comfortable when necessary. The cedar floorboards make an unobstructed cockpit, easy to move around in and providing many ways to shift crew weight to find the right balance.
The centerboard trunk is neatly trimmed with mahogany, and a wooden mainsheet jam cleat is mounted on its aft end. Inside, however, the centerboard is made of 1″ ultrahigh molecular-weight plastic faired to a foil in cross-section.
Tom Jackson
A bronze gooseneck fitting clamps around the hollow Douglas-fir mast, avoiding holes for fastenings.
The rig, too, is modernized, with the mast built hollow using the bird’s-mouth method of fitting together staves for glue-up (see WoodenBoat No. 149). The standing rigging is high-tech, low-stretch synthetic line. The boom is intentionally left solid, adding a bit of weight to the foot of the sail. The gaff, however, is hollow, and instead of wooden jaws it has a saddle, a carbon-fiber lamination that allows the gaff to slide up and down the mast. The boom’s gooseneck fitting is cast bronze using straps that encircle the mast and therefore don’t require fastening holes bored into the spar’s lovely bright-finished Douglas-fir.
I sailed with Leahy in August on the first day of the annual Arey’s Pond Catboat Gathering, in waters she has come to know well. I had sailed with her first at The WoodenBoat Show at Mystic Seaport with not enough time, not enough wind, and too many boats, after which I formed an idea to join her again in the sloop’s home waters, which I’d never seen. Here, the Baybird shone. In the shifting winds of Pleasant Bay, we tacked easily, dodging the shoals—most of the time.
Tom Jackson
A purpose-made mainsheet jam cleat on the after edge of the centerboard trunk is handsome and works well.
Leahy has a fine eye and has built a fine boat. The boat has all the hallmarks of a classic daysailer—comfortable to handle, fast, nimble, and placing a premium on the teamwork of a skipper and crew who know each other and their boat well and sail often. It tacks easily, is responsive, and has a very well-balanced helm. It’s unusual these days to see gaff rig on a boat of this size, but it is powerful and close-winded enough to surprise many a dinghy racer. The boat is a joy to sail. Such boats tell what they need, and an attentive crew quickly learns to listen.
Old-time sailors tell Leahy that they sail the boats very flat, not even inducing heel in light airs, as is commonly done on light racing dinghies. They keep crew weight far forward, and they don’t strap the mainsail in too tight. In the camps, “they were never allowed to bring the boom in over the stern quarter—that was a rule, and even farther outboard was better,” Leahy said. They also used about 80 lbs of lead ballast in the boat, and told her that they remembered adding more ballast in the camps to account for the fact that their sailors were young and light. Racing against one boat in the hands of an old-time skipper, “we were watching them fly. That’s the only way to sail them. It’s completely not rational. It defied reason. The sail was old, full of holes, but the guy was flying. I was trying everything to catch him.”
Suzanne Leahy
Suzanne Leahy took the lines off one of the last two surviving wooden Baybird boats to reconstruct W. Starling Burgess’s original design, plans for which do not survive. She and others also formed the Baybird Class Association, with the intent of reviving the type and keeping control over its specifications. Plans for the type are not for sale; Leahy is the sole builder authorized by the association.
The beauty of racing, and the reason why it is such a great teaching tool, is its instant feedback on experimentation, not to mention the way it teaches people the mental habit of paying constant attention with ease. The Baybird is an excellent platform for that kind of sailing and that kind of learning, which is why the type took off so well in the sailing camps of the Cape.
“Because so many people learned sailing there, they have memories of what the bay used to be like,” Leahy said. “It was in them to try to keep the bay like this forever. The memories they’ve described to me were just magical.” Some families have summered here for four generations, and sailing catboats and gaff-rigged sloops has always been part of their lives. May it always be so.
Pleasant Bay Boat and Spar Company, P.O. Box 1174, 80 Rayber Rd., Orleans, MA 02653; 508–240–0058. The website also has information about the Baybird Class Association. Note: Google lists the company as Permanently Closed
Katherine Mehls
During the annual Arey’s Pond Catboat Gathering, held each August on Pleasant Bay, Baybirds—most of them ‘glass—are active participants. Supporters hope more gaff-rigged wooden boats of the type will help Cape Cod hold on to what they see as an important part of the area’s historical legacy.
Is there a boat you’d like to know more about? Have you built one that you think other Small Boats readers would enjoy? Please email us your suggestions.
Charles Wittholz recommends rigging this catboat with the gaff sail.
Here is an easily built small boat with a big heart. A seaworthy daysailer or vest-pocket cruiser, Corvus (named for the constellation known to mariners as the
“gaff-rigged mainsail”) has the look of a traditional Cape Cod catboat with tumblehome stem, a beam of almost half her length, and a “barn-door” rudder on her stern. She has room for six adults in her 7′ -long cockpit, and there’s a “head” in her small cabin. Some builders have extended the trunk cabin a bit in order to fit in two berths for cruising. A few other boats have been built without any cabins at all for use as open daysailers. For auxiliary power, a small out board can be mounted on the stern, or an inboard engine can be installed. (There’s information on one of the drawings for this latter option.)
The head and stores occupy the cuddy.
Corvus is designed for planking with 3/8″ plywood over eight sawn frames. She’s well thought out for amateur construction; the plans contain better-than-average detail and even show how to fit Corvus with an outside ballast keel, if you’d prefer that over a centerboard. While her designer recommends the conventional gaff mainsail, there is an alternate lug rig shown having a considerably shorter mast-a special requirement for one boat that had to pass underneath a bridge on her way to open water.
Wittholz 15 sheer plan. Lots of shape for sheet plywood.
These boats make delightful daysailers because they sail at a small angle of heel, and the centerboard version can be used where the water is but knee-deep.
Plans for the Wittholz Catboat design come in seven sheets, including sail plans, spar and rigging details, lines and offsets, construction plan, keel construction details, inboard profile and arrangement. WB Plan No. 47. $75.00.
BUILDING DATA
Skill needed: Intermediate
Lofting required: Yes
Alternative construction: None
PLANS DATA
No. of sheets: 7
Level of detail: Above average
Cost per set: $75.00
WB Plan No. 47
Completed 14′ 11″ Wittholz Catboat Images
Asli Iskeceli
We christened the boat GAVIIDAE (from the Latin genus, Gavia, and family, Gaviidae, for members of the loon species) and sail her on both lake and Gulf Coast waters. Her large sail moves her in all but the slightest of breezes, and the 3-hp Torqueedo 1103 gives us good auxiliary power when the wind fails completely, or we’re maneuvering alongside a dock or into a ramp.
Asli Iskeceli
The plans offer lug or gaff sail plans. We chose the latter and have found the boat to be responsive, stable, and remarkably close winded.
Rumor has it, spring is on the way. I say “rumor has it” because here in Maine—tucked up in the far northeast corner of the United States—this last weekend of March has brought snow. A week ago, we were in shirtsleeves being tricked into such conversations as “Shall we pull the boat out of the garage and do some work on it?” Even yesterday, despite the wind and a forecast of snow, the sky was cloudless, the temperature hovered somewhere in the 50s, and the central heat barely kicked in. But here we are, the last Saturday in March, and we have woken to two inches of snow on the ground and more still falling from a leaden sky.
As a recent import to these shores—I moved here nearly 20 years ago from southwest England where the thermometer rarely dipped below freezing—I have always been fascinated by winter, and snow in particular. I enjoy those harsh days when the air is so dry and cold that it literally takes my breath away. I take satisfaction in shoveling paths. I’m intrigued by the icicles that grow down from the roof outside the kitchen window. But by the end of March, even I have had enough. Now, I am ready for spring and warmth and getting out on the water. It seems I’ll have to wait awhile.
But, while I wait, I can do two things: I can make ready, and I can dream.
Each year, around this time, I start to think about getting boats ready for launching. The Shellback Dinghy in the garage is due for its five-year paint job and now that the ambient temperatures are mostly above freezing, my weekends will be taken up with scraping and sanding and painting. The 16’ daysailer needs less work and will stay snug and dry under its tarp until the forecasters stop talking about rain for three days straight, but I’m still itching to get at its topsides and bottom paint.
And then there are the trailers, which are called upon to make a half-mile round trip delivering the boats down to the harbor each spring, and back again in late fall. Despite their essential role, year after year those trailers are forgotten until the last possible moment. Only then, with the boats loaded and ready to go, and one trailer after another is hitched up to the car, do I think to check that everything is in working order.
This year, I have no excuse. Thanks to Kent and Audrey Lewis’s thoughtful, easily referenced Road-Ready Trailer Checklist in this issue, I have all the guidance I need to inspect both trailers in plenty of time to get replacement bulbs, inflate tires (buy new ones if necessary), and check on all the car-to-trailer connections. Of course, if I follow my usual MO, I’ll still wait far too long and it’ll still be a last-minute scramble, but we can always hope.
And in the meantime, my dreams of summer boating are well underway, inspired, in no small part, by Davis Taylor who in this issue shares his story of a short-but-sweet voyage on the Bagaduce River last September. He saw no other boats, camped on uninhabited islands, dealt with tidal currents for the first time, and relaxed through long leisurely mornings waiting for the water to float his boat each day. It wasn’t an overly ambitious trip, nor was it one of high drama and excitement, yet such stories never fail to inspire me to pull out the charts and plot some island-hopping adventure of my own.
Rumor has it spring is on the way. Here in Maine those rumors may be exaggerated, but when spring does eventually find us summer will be hard on its heels, and my boats and trailers had better be ready.
To those of you already enjoying fine and fair boating weather…see you on the water soon.
In December 2020, Australian boatbuilders Paroz & Co.—based in the outskirts of Brisbane, Queensland, on the banks of Breakfast Creek, a tributary of the Brisbane River—launched FINCH, an 8′ plywood hard-chined stem dinghy. A few years later, proprietor Simon Paroz, who had designed the boat, decided he would like a sistership for his own use. But before the build was complete, a new client saw it and made Simon an offer he couldn’t refuse. That boat was launched as TENDER TO MALVEENA.
Before embarking on a third build, Simon gave some more thought to the design and what modifications he should make for his own needs, and came up with a list of criteria. Essentially, the boat would be used as a tender to PERCY, Simon’s 37′ retired prawn trawler, built in the 1950s. It would need to have enough volume to carry himself, his wife, their two teenage daughters, and small dog. With just one person on board, it must plane easily with a 3-hp outboard motor (he didn’t want to deal with the weight of a larger outboard). And the dinghy should be easy to hoist aboard PERCY with a pair of simple davits each having a 2:1 purchase.
In order to fulfill this wish list, Simon determined that the new boat would need to be 18″ longer than FINCH and TENDER TO MALVEENA, but that weight must be a major consideration. To improve the aesthetics of his design, he also redrew the transom to give it more tumblehome, and raised the sheer and chine line forward slightly. “With a bit more length you can sweeten the lines,” Paroz said. “I was really happy with the way it looked.”
Photographs by the author
The floorboards are fabricated to lay flat, even in the deep V of the bow section. They are screwed to the keelson and the slats are of Queensland beech, an oily timber that needs no sealing. With an eye to low maintenance, Simon used a two-part high-gloss polyurethane paint known for its durability in hot climates and abrasion resistance. Four pad-eyes were installed to which lines can be attached when lifting the dinghy onto another boat or dock.
Building the Paroz Tender
The build process began by setting up the 1⁄4″ plywood transom (with its 2″ × 5⁄8″ internal framework already attached) and three temporary molds. The inner stem, laminated from six layers of 1⁄8″ Douglas fir, was then scarfed to the 1 1⁄2″ × 3⁄4″ Douglas-fir keelson, which was let into the transom and molds. The 1 1⁄2″ × 3⁄4″ internal chines and inwales and 5⁄8″ × 5⁄8″ stringers, all in western red cedar, were then also let into the transom and molds and fixed to the stem—none needed steaming.
Next the plywood sides and bottom panels were fitted. On all three of the dinghies, Simon drew distinctive V-shaped entries to minimize slamming in a chop. On his earlier builds this shape was achieved by cold-molding the forward sections of the bottom panels, but to save time on this later boat he used 3⁄16″ plywood, which could be “tortured” into shape in the forward 3′ of the bottom and scarfed it into the 1⁄4″ plywood that was used for the rest of the bottom. Simon designed the boat to ensure the most economical use of 8′ × 4′ sheets of marine plywood: the maximum width of each of the bottom panels—one on either side of the centerline—is just over 21″ so that both can be cut from a single sheet of plywood. The topside panels are 3⁄16″ plywood with a scarf joint near the stern to accommodate the length; their maximum width is only 15″ so, again, Simon was able to cut both sides from one sheet.
The dinghy is easily driven with 6′ 4″ oars. It is quick to accelerate and, thanks to the skeg-like keel aft, tracks well.
Once the plywood shell of the boat was assembled, it was time to fit the solid wood pieces to the outside of the hull. The centerline components were made from Douglas fir: the outer stem is 10 laminations of 1⁄8″ fir, while the keel is 3⁄4″ × 3″ and runs almost the length of the hull, providing an ample skeg but ending 3″ short of the transom “to allow the water to come through to the propeller,” Simon explains. The gunwales (1 1⁄2″ × 3⁄4″), external chines (1 3⁄8″ × 5⁄8″), and transom frame (1 3⁄8″ × 1⁄2″) are all in western red cedar.
The 9 1⁄2″-wide thwarts are of 3⁄4″ western red cedar, as are the 9⁄16″ stiffeners attached to their underside, and the stem and stern knees are all of 3⁄4″ western red cedar laminated between two layers of 3⁄16″ plywood. Simon appreciates western red cedar for its light weight, strength, and stability, especially, he says, when it’s glued to other materials. He used epoxy as an adhesive throughout the build.
Floorboards were next on Simon’s wish list: water inevitably collects in the bilge of a small boat, and Simon wanted to keep passengers’ feet dry. He was also keen that the boards should follow the internal shape of the hull and not stand up too high. To achieve this, each of the two floorboard panels has three 1 1⁄4″ × 1″ athwartships beams laminated in four layers, with 2 3⁄8″ × 1⁄2″ fore-and-aft slats glued to them. On the forward panel, all but the center two slats are laminated in two layers to achieve the necessary curve of the boat’s V-section. The slats are of Queensland beech, a naturally oily timber that needs no sealing, and each panel is screwed to the keelson.
With only one person on board, it’s hard to bring the boat onto a level plane without a tiller extension. However, it can still achieve 9 knots with just a 3-hp motor.
Simon finished the boat with International Perfection Pro two-part paint, chosen both for its durability in the hot Queensland climate and for its abrasion resistance (Perfection Pro is no longer available in the U.S. but has been replaced by Interlux Toplac Plus, a one-part silicone alkyd yacht enamel). To minimize damage when coming alongside PERCY, the dinghy has a 3⁄4″-diameter Hempex polypropylene fender rope around the sheer—it sits in a cove routed in the gunwales and is fixed in place with adhesive sealant and boat nails at 14″ centers.
The Paroz Dingy Performance
The new boat was finished and launched in December 2024, and named SUNNY SIDE UP (a name chosen by Simon’s 13-year-old daughter). The final all-up weight (including the floorboards) is 105 lbs—rather more than the 77 lbs of the smaller FINCH, which Simon says he can carry by himself on his shoulder, but still light enough that he and I could carry it through his workshop to the water’s edge with little difficulty.
With a tiller extension a single operator can move their weight forward and help the boat to level-out on plane. Thus balanced, the boat can be driven at 12 knots. The bow line fitting is mounted low on the stem for optimum pull when being towed.
On the day we tested SUNNY SIDE UP, conditions were calm in the sheltered river. Thanks to her hard chine sections, the boat felt very stable at all times, including when getting in and out.
Rowing SUNNY SIDE UP with Simon’s 6′ 4″-long spoon-bladed oars was a delight. The boat’s light weight gives quick acceleration and a lively feel, and the skeg is deep enough to provide good directional stability. The aft thwart can be used effectively as a foot brace.
While Simon reports that the boat is well balanced rowing from the central thwart with just one passenger in the stern, there is no reason why oarlock sockets shouldn’t be fitted to allow the use of the forward thwart as a second rowing position. He also reports that with all the family on board (typically with him rowing, his daughters in the stern, his wife in the bow, and the dog on either of the sole boards) the boat is “very comfortable” and has “room for more.”
Despite being only 9′ 9″ long, the dinghy has plenty of volume and can carry Simon’s family of four plus dog. When he lengthened the hull from the original design on which it was based, Simon also raised the sheer and introduced some tumblehome in the stern.
Under power with the two of us on board, the 3-hp outboard gave us a maximum speed of 5 1⁄2 knots. We then each tried the boat singlehanded with no tiller extension and were able to reach up to 9 knots, planing, but because it was only possible to perch on the aft part of the central thwart, the bow was raised a little too much. It was clear that it would be advantageous to sit farther forward. Sure enough, after Simon managed to find a tiller extension he could shift his weight farther forward, which leveled the boat nicely and the speed ticked up to 12 knots. Simon has found that SUNNY SIDE UP “tows easily and is well behaved” behind PERCY.
SUNNY SIDE UP is a delightful, good-looking stem dinghy that clearly satisfies all of the requirements that Simon identified at the design stage. It should be within the capabilities of most amateur builders, although Simon thinks that “moderate skill levels” will be needed to cope with the scarf joints in the plywood, and the laminated stem.
Nigel Sharp is a lifelong sailor and a freelance marine writer and photographer. He spent 35 years in managerial roles in the boatbuilding and repair industry, and has logged thousands of miles in boats big and small, from schooners to dinghies.
Paroz Tender Particulars
LOA: 9′ 9″
Beam: 4′
Depth of hull: 1′ 6″
Plans and custom builds are available from Paroz & Co., Tripcony Slipway, 32 Argyle St., Breakfast Creek, Queensland 4010, Australia; [email protected].
Is there a boat you’d like to know more about? Have you built one that you think other Small Boats readers would enjoy? Please email us your suggestions.
Ninigret is easily driven by a modest outboard motor (25-60 hp) and runs flat, smooth, and dry.
This 22′ skiff seems about perfect for most of our needs. She’s easily driven by a modest outboard motor (25–60-hp) and runs flat, smooth, and dry. We’ll spend most of our time in the huge cockpit, and not in the cabin. Yet when we do go below, we’ll find a head and sleeping room for a couple. If we should fall victim to claustrophobia, we’ll simply roll back the cloth housetop and stow its ash battens. The large fixed windows will block the breeze, and we can hunker down on the berths and look up at the sky. What a fine place to enjoy the last light of day.
John Atkin designed this outboard skiff-cruiser for a client who wanted a practical boat for use on Ninigret Pond (really a coastal lagoon) in Rhode Island, but this good boat will be at home along almost any coast.
An efficient hull with steep deadrise forward for a smooth ride in a chop, and a flat run for stability and easy speed with moderate power.
The hull shows healthy deadrise (V-shape) up forward, which warps down to about 15% amidships and disappears in a flat bottom at the transom. All this shape gives us a boat that planes easily across smooth water, and yet cuts smoothly through a harbor chop. In truly rough conditions, Ninigret’s ample volume above the waterline ensures that she’ll climb over large waves.
The designer tells us to sheathe Ninigret’s bottom with high-quality 3/8″ plywood. We’ll plank the sides lapstrake fashion with four strakes sawn from the same plywood sheets. This is simple work, but let’s take care with the lining off. Shadow lines cast at the plank laps will define the sweet shape of this hull, and we’ll want to get it just right.
Deck and bottom framing.
Atkin never liked the look of a big outboard motor clamped to the transom of a handsome boat, so he hid Ninigret’s engine in a well. Then he enclosed that well in its own compartment. We won’t see the engine, and we’ll barely hear it. How large an engine should we fit to Ninigret? Early on, the designer suggested 25–30- hp. Experience proved that this skiff could be happy with more horses. A revised motorwell drawing allows up to 60-hp.
John Atkin eventually built a Ninigret for himself, which is a designer’s ultimate compliment to a particular boat. For several years he and his wife, Pat, cruised and picnicked their way around the western end of Long Island Sound. That’s a fine use for a good boat. Ninigret design plans are available for sale at The WoodenBoat Store.
Timm Schleiff’s motor sits handsomely in an exposed well.
Roeboats
John Atkin recommended a 30–45-hp outboard for Ninigret; the corresponding top speed with this power reportedly ranges from 18 to 25 knots. Tiernan Roe’s Ninigret is powered by a 30-hp Honda.
While John Atkin designed Ninigret for fishing the choppy waters of Block Island Sound, the boat also makes a superb camp-cruiser. Irish boatbuilder Tiernan Roe built the fine example in the photograph above.
In 2023 I spent some time rowing and sailing the Scout 10, a sailing dinghy that is the result of a collaboration between Brandon Davis of Turn Point Design and Scott Jones of Duckworks, both based in Port Townsend, Washington. Their goal was to create the “ultimate mini cruiser,” small and light enough to be cartopped yet able to accommodate a solo sailor sleeping aboard. On land the diminutive Scout 10 certainly has some noteworthy advantages, but a longer boat will be faster on the water. While Scott and Brandon were pleased with the performance of the Scout 10, they wanted to shift the design toward better speed under sail and oars and greater carrying capacity. The answer was the Scout 14.
Scout 14 Construction and Layout
The Scout 14 is available as a kit, which includes CNC-cut pieces of marine plywood and closed-cell sheet foam. The planks, transom, and bulkheads are of 4mm BS 1088 plywood, and the bottom and laminated skeg are of 6mm plywood. The recessed deck, which serves as seating, is of weight-saving 1⁄4″ marine-grade foam. The gunwale has a 1″ foam core boxed in with plywood. Where the full length of a component—plywood or foam—demands the use of more than one piece, the sections are connected with puzzle joints and epoxy. After assembling the full-length pieces, both foam and plywood are fiberglass-and-epoxy coated on one or both sides.
Photographs by the author
The recessed deck, made of foam reinforced with fiberglass and epoxy, encloses the storage areas and provides generous seating and flotation. The holes in the gunwale caps are lined with phenolic tubes and serve as oarlock sockets and attachment points for sheet blocks, fenders, and other items.
The hull is built without molds or strongback. Mating tabs and slots assure that adjoining pieces are properly aligned. Support jigs holding the hull right-side up and a spreader spanning the sheer amidships help to keep the hull straight and without twist. The seams between the bottom, the garboard strake, and the lone broadstrake are butted edge-to-edge, which aids in ’glassing the bottom of the hull and reduces abrasion. The sheerstrake overlaps the broadstrake, and in the finished hull casts a shadow to accentuate the hull’s curves. A foam daggerboard and rudder blade are included in the kit and are both CNC-shaped as NACA 0012 foils; all they require is sanding, ’glassing, and finishing.
At around 100 lbs, the Scout 14 is about at the limit for cartopping, lifting one end at a time, and I would use a cart to get the boat to and from the water. During my time with the boat, Brandon helped me to carry the boat across the beach. The transom has two oval handholds, and the breasthook provides a good hold at the bow.
In the cockpit, the side benches and bow and stern seating areas surround a footwell that is 8′ 3″ long by 21 1⁄4″ wide by approximately 9″ deep. Sealed compartments beneath the benches provide storage and flotation and are accessed from above via three 10″ × 14″ Sealect Triple-Latch hinged hatches as well as three optional 6″ deck plates. For gear that needs to be accessed quickly, there are two open-sided compartments at the forward end of the footwell.
The thwarts, made of carbon-fiber and plywood, can be located anywhere along the parallel-sided decks. The two holes relieve the pressure on the rower’s sit bones. The daggerboard slot can be seen in the starboard sidedeck.
The inside edges of the side benches are straight and parallel so that two removable rowing thwarts—made of plywood and carbon fiber—can be located anywhere over the footwell and locked in place with thumbnuts that clamp to a flange that extends from the side bench edges. The thwarts hang about 2″ at center below the level of the side benches, providing more clearance between the oar handles and tops of the thighs while rowing. Each thwart has two holes in its surface, a feature common in racing-shell sliding seats for relieving backside pressure points. I’ve used seat pads with such holes, but they result in a higher sitting position.
I lay down in the footwell to try it for size for sleeping aboard the Scout 14. It has more than enough length and is wide enough for me to rest on my side with my knees drawn up and my elbows out. Lying on my back was more cramped: my shoulders filled the width of the footwell, and I could set only one arm alongside my torso; the other had to rest on a side bench or across my chest. Because the tops of the side benches have flanges extending over the footwell, a pair of floorboard panels with transverse slats could be built to serve as a sleeping platform at night. Alternatively, a long single panel with slats parallel to the centerline could rest on the thwarts. Either way, the Scout 14 has more than enough stability to support a good-sized sleeping platform at bench level.
The top of each gunwale has 14 holes lined with phenolic tubes that can be used for oarlock placement, attachment points for sheet blocks, and even hoops to support a camping canopy. The holes are spaced about 12″ apart with an extra one amidships to allow for a finer adjustment of the boat trim for a solo rower.
A solo rower can use the unoccupied thwart as a foot brace. The ready adjustability of the seat and oarlock positions makes it easy to trim the boat to accommodate load carried and conditions encountered. Here rowing the Scout 14 is its designer, Brandon Davis.
Rowing Performance
The Scout has good stability and is easy to get aboard. To test the secondary stability, I sat amidships with my seat planted on a side bench and both legs hanging well over the side. With my mid-thighs resting on the gunwale, the outwale was still an inch or more above water level.
Rowing solo, I found the Scout 14 tracked well and was easily maneuvered. From a standing start I could spin the boat through 360° with eight strokes—two and a half more than the Scout 10 but still a quick spin and a good indication of easy maneuverability.
While I didn’t have a second pair of oars to try tandem rowing, the cockpit is long enough to accommodate a rower in each end. While there are no dedicated foot braces, the aft rower can use the aft bench as a brace; there is no such brace point for the forward rower.
The daggerboard trunk is offset to starboard to leave the cockpit unobstructed. A bungee cord, anchored forward of the trunk, holds the board in any position; here it is raised high while the boat is on the beach. At the forward end of the cockpit are open storage compartments with easy access.
During GPS-measured speed trials, with the boat empty and one rower, the Scout 14 averaged 3.7 knots at a relaxed pace, maintained 4.3 knots with an aerobic exercise pace, and averaged 5 knots in short sprints. The speeds are an average of 17 percent faster than those of the Scout 10.
To row with a passenger seated in the stern, I moved the thwart to the forward end of the footwell and placed the oarlocks in one of the many holes built into the gunwale. Then the speeds, respectively, were 3.6, 3.9, and 4.4 knots, averaging 35 percent faster than the Scout 10.
Sailing Performance
The daggerboard trunk is housed within the starboard storage compartment, leaving the footwell unobstructed. Its opening is in the side bench where a loop of bungee cord, anchored in the side bench forward of the trunk and stretched around the back of the board, keeps the board at any depth. The rudder also has bungee looped around its blade that will hold it down but still lets it kick up if it hits an obstruction. For beaching, a lifting line runs from the blade’s trailing edge, through the rudderhead, and is secured by a jam cleat on the underside of the tiller.
The arrangement of the sheet brings it readily to hand without obstructing the tiller or interfering with the sailor.
The 70-sq-ft square-top boomless sail has four full battens. A single row of reefpoints will gather up the sail and the bottom batten beneath the second batten. The two-part mast is made of carbon fiber and fiberglass and can be easily pulled apart to stow aboard. The sheet has an unusual arrangement: It runs through a block tethered to one of the holes in the gunwale, then aft to a block mounted close to the transom, up to a block at the sail’s clew, down to the transom on the other side of the boat, and forward to a final gunwale-mounted block. There is a stopper knot at each end of the sheet so that the line can be managed from either side of the boat. For handling the sail, the windward end of the sheet is pulled through until the leeward end is prevented from running through its forward block by the stopper knot. Now the sail can be trimmed from the windward end. With the sheet running around the perimeter of the stern, it was never in the way when coming about, and with its ends led forward, they were within view and accessible while I was keeping watch over the bow.
Thanks to its full-length battens, the Scout 14’s 70-sq-ft square-topped sail holds its shape and provides good power even in light air.
Under sail, the Scout 14’s well-balanced rig required only a light touch on the tiller. The boat pointed well and was exceptionally quick to tack. I suspect the NACA-foil rudder and daggerboard get the credit for the Scout 14 carrying so much speed through tacks. The bow would swing through the eye of the wind so quickly that I had to change sides swiftly before the sail filled on the new tack. In the light winds I had for the sailing trials, the full battens usually popped on their own to push the belly of the sail out to leeward. If they didn’t take care of themselves, a tug on the sheet did the job. When jibing, the battens absorbed much of the impact when the sail snapped the slack out of the sheet.
The Scout 10 was designed as the smallest camp-cruising sailboat, and the Scout 14 incorporates all the features of the 10 with the benefits of greater speed, stability, and capacity that come with the additional length. It was a pleasure to row and sail. In 1980, I did my first Inside Passage cruise in a traditionally built dory skiff very similar in size to the Scout 14—if I’d had the Scout, I could have traveled not only faster but also in greater comfort and safety.
Christopher Cunningham is Small Boat’s editor-at-large.
Kits for the Scout 14 range from CNC-cut parts for the boat alone priced at $3,399, to a complete package including sailing rig priced at $4,999; all are available from Duckworks Boat Builders Supply.
Matt Steverson built a Scout 14 as a tender for the DURACELL racing yacht he has been converting and shows the process on his YouTube channel, The Duracell Project, episodes 123 through 126.
Is there a boat you’d like to know more about? Have you built one that you think other Small Boats readers would enjoy? Please email us your suggestions.
Continue Reading - Enter your email to log in or subscribe
New to Small Boats? Create a free account to get our weekly emails and two free articles each month.
Time to upgrade!
You've read all of your free content for the month. Upgrade to a paid subscription for unlimited access.
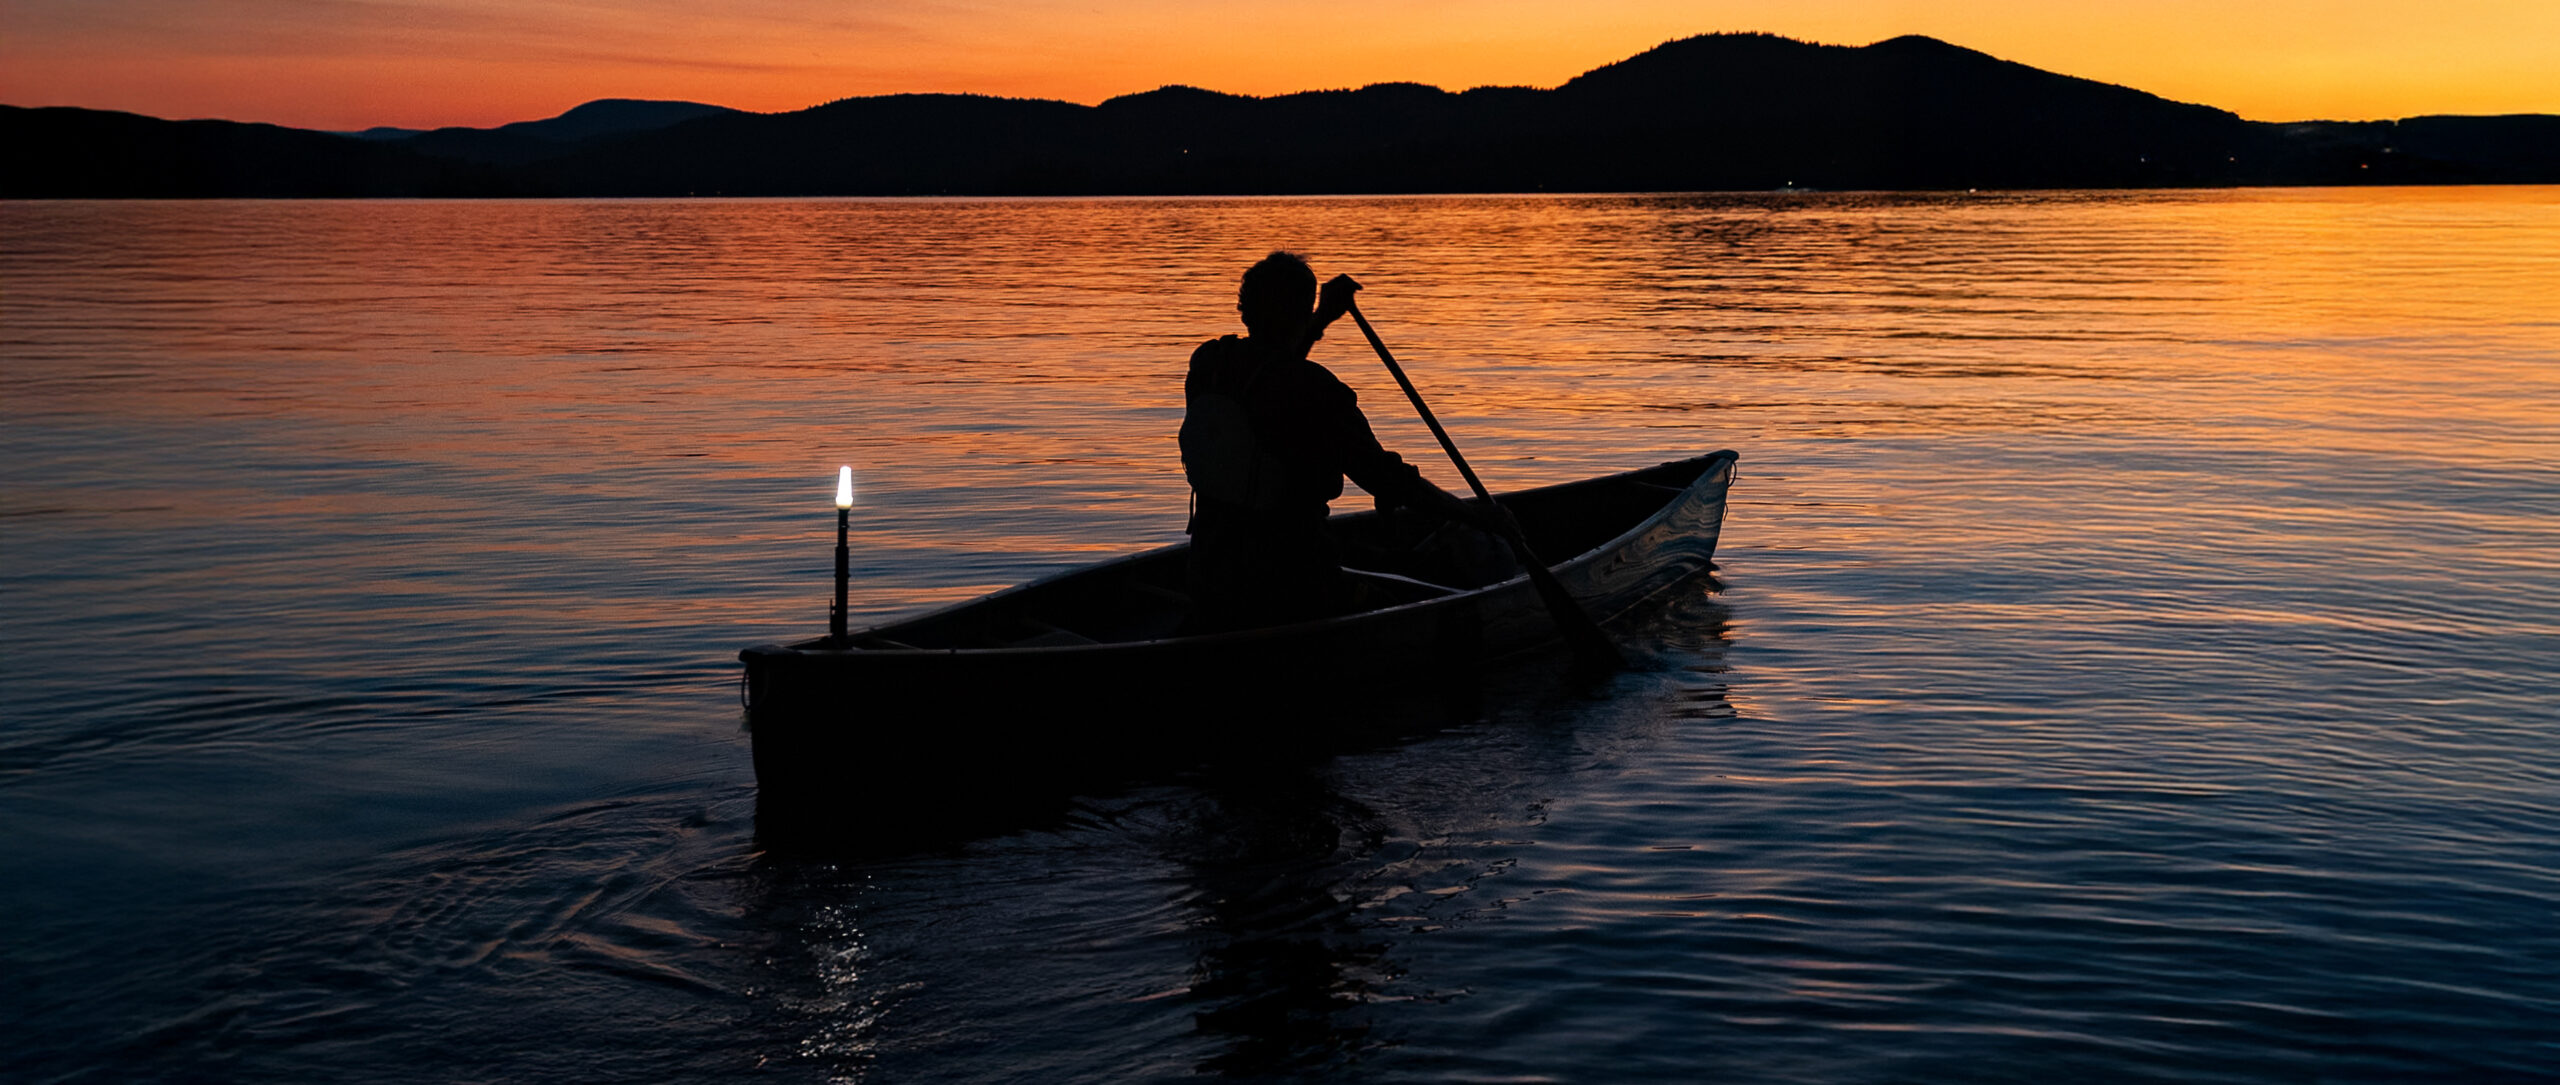
 Bill Thomas
 Jane Ahlfeld
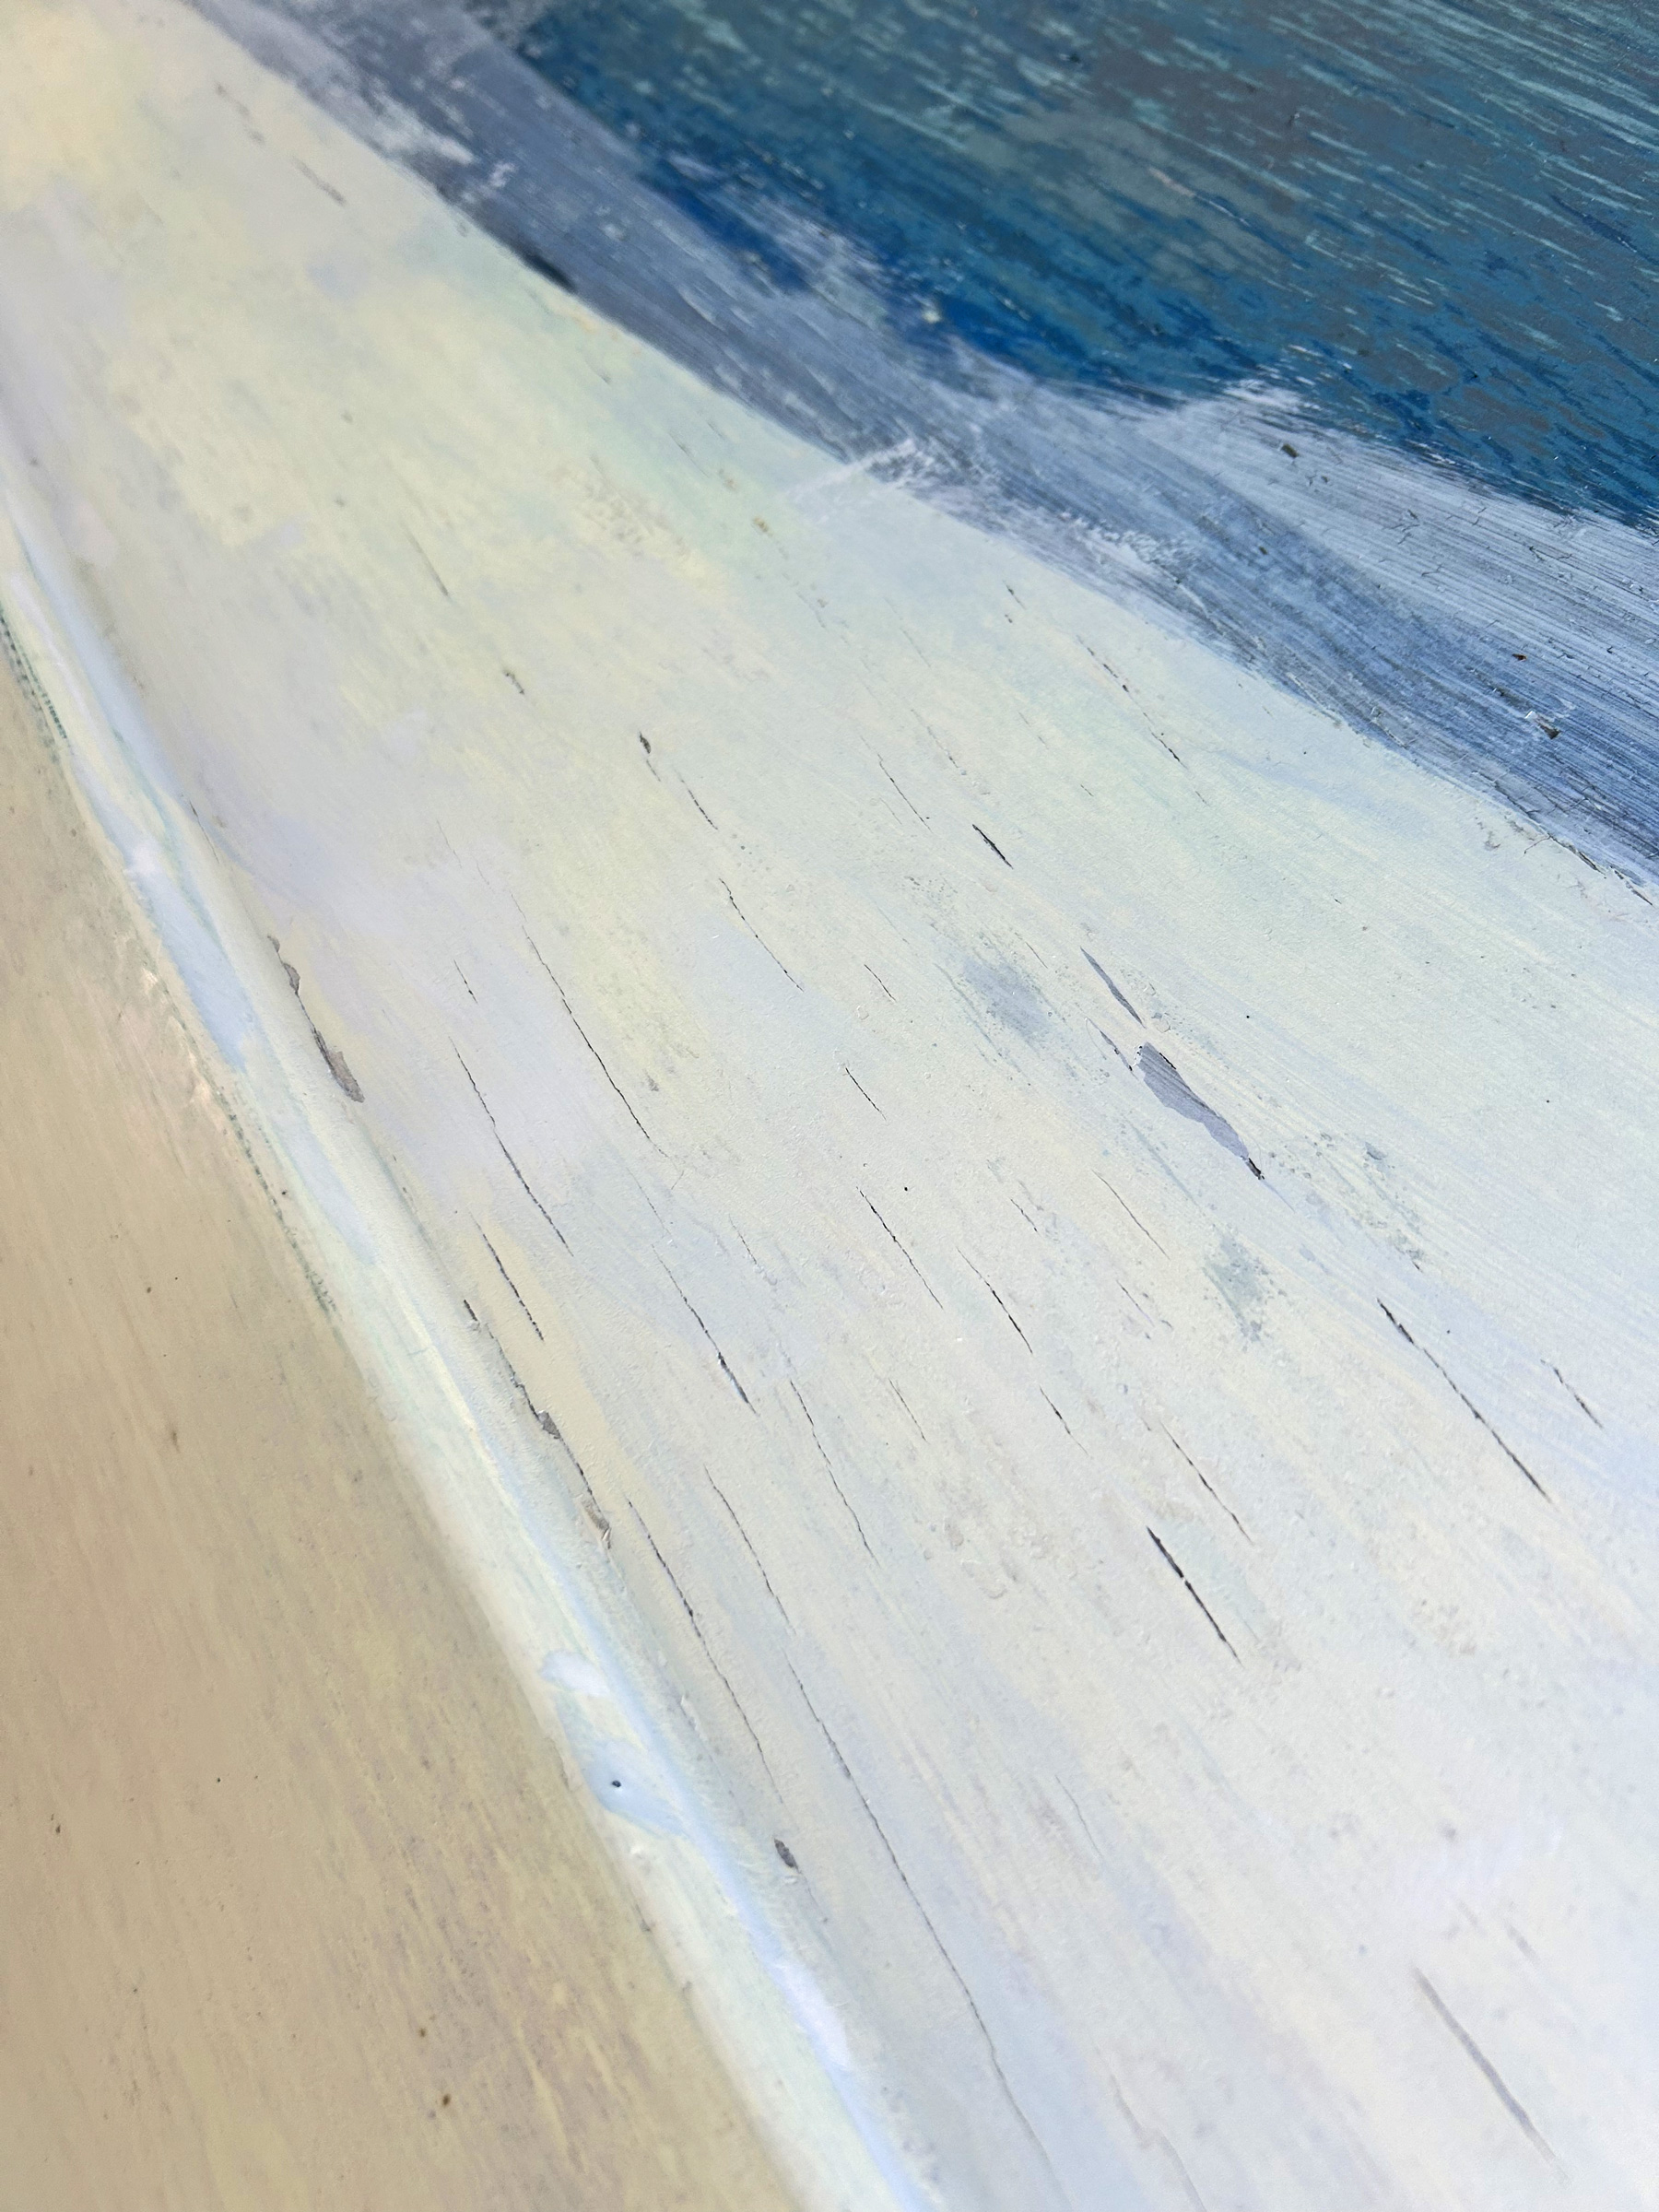

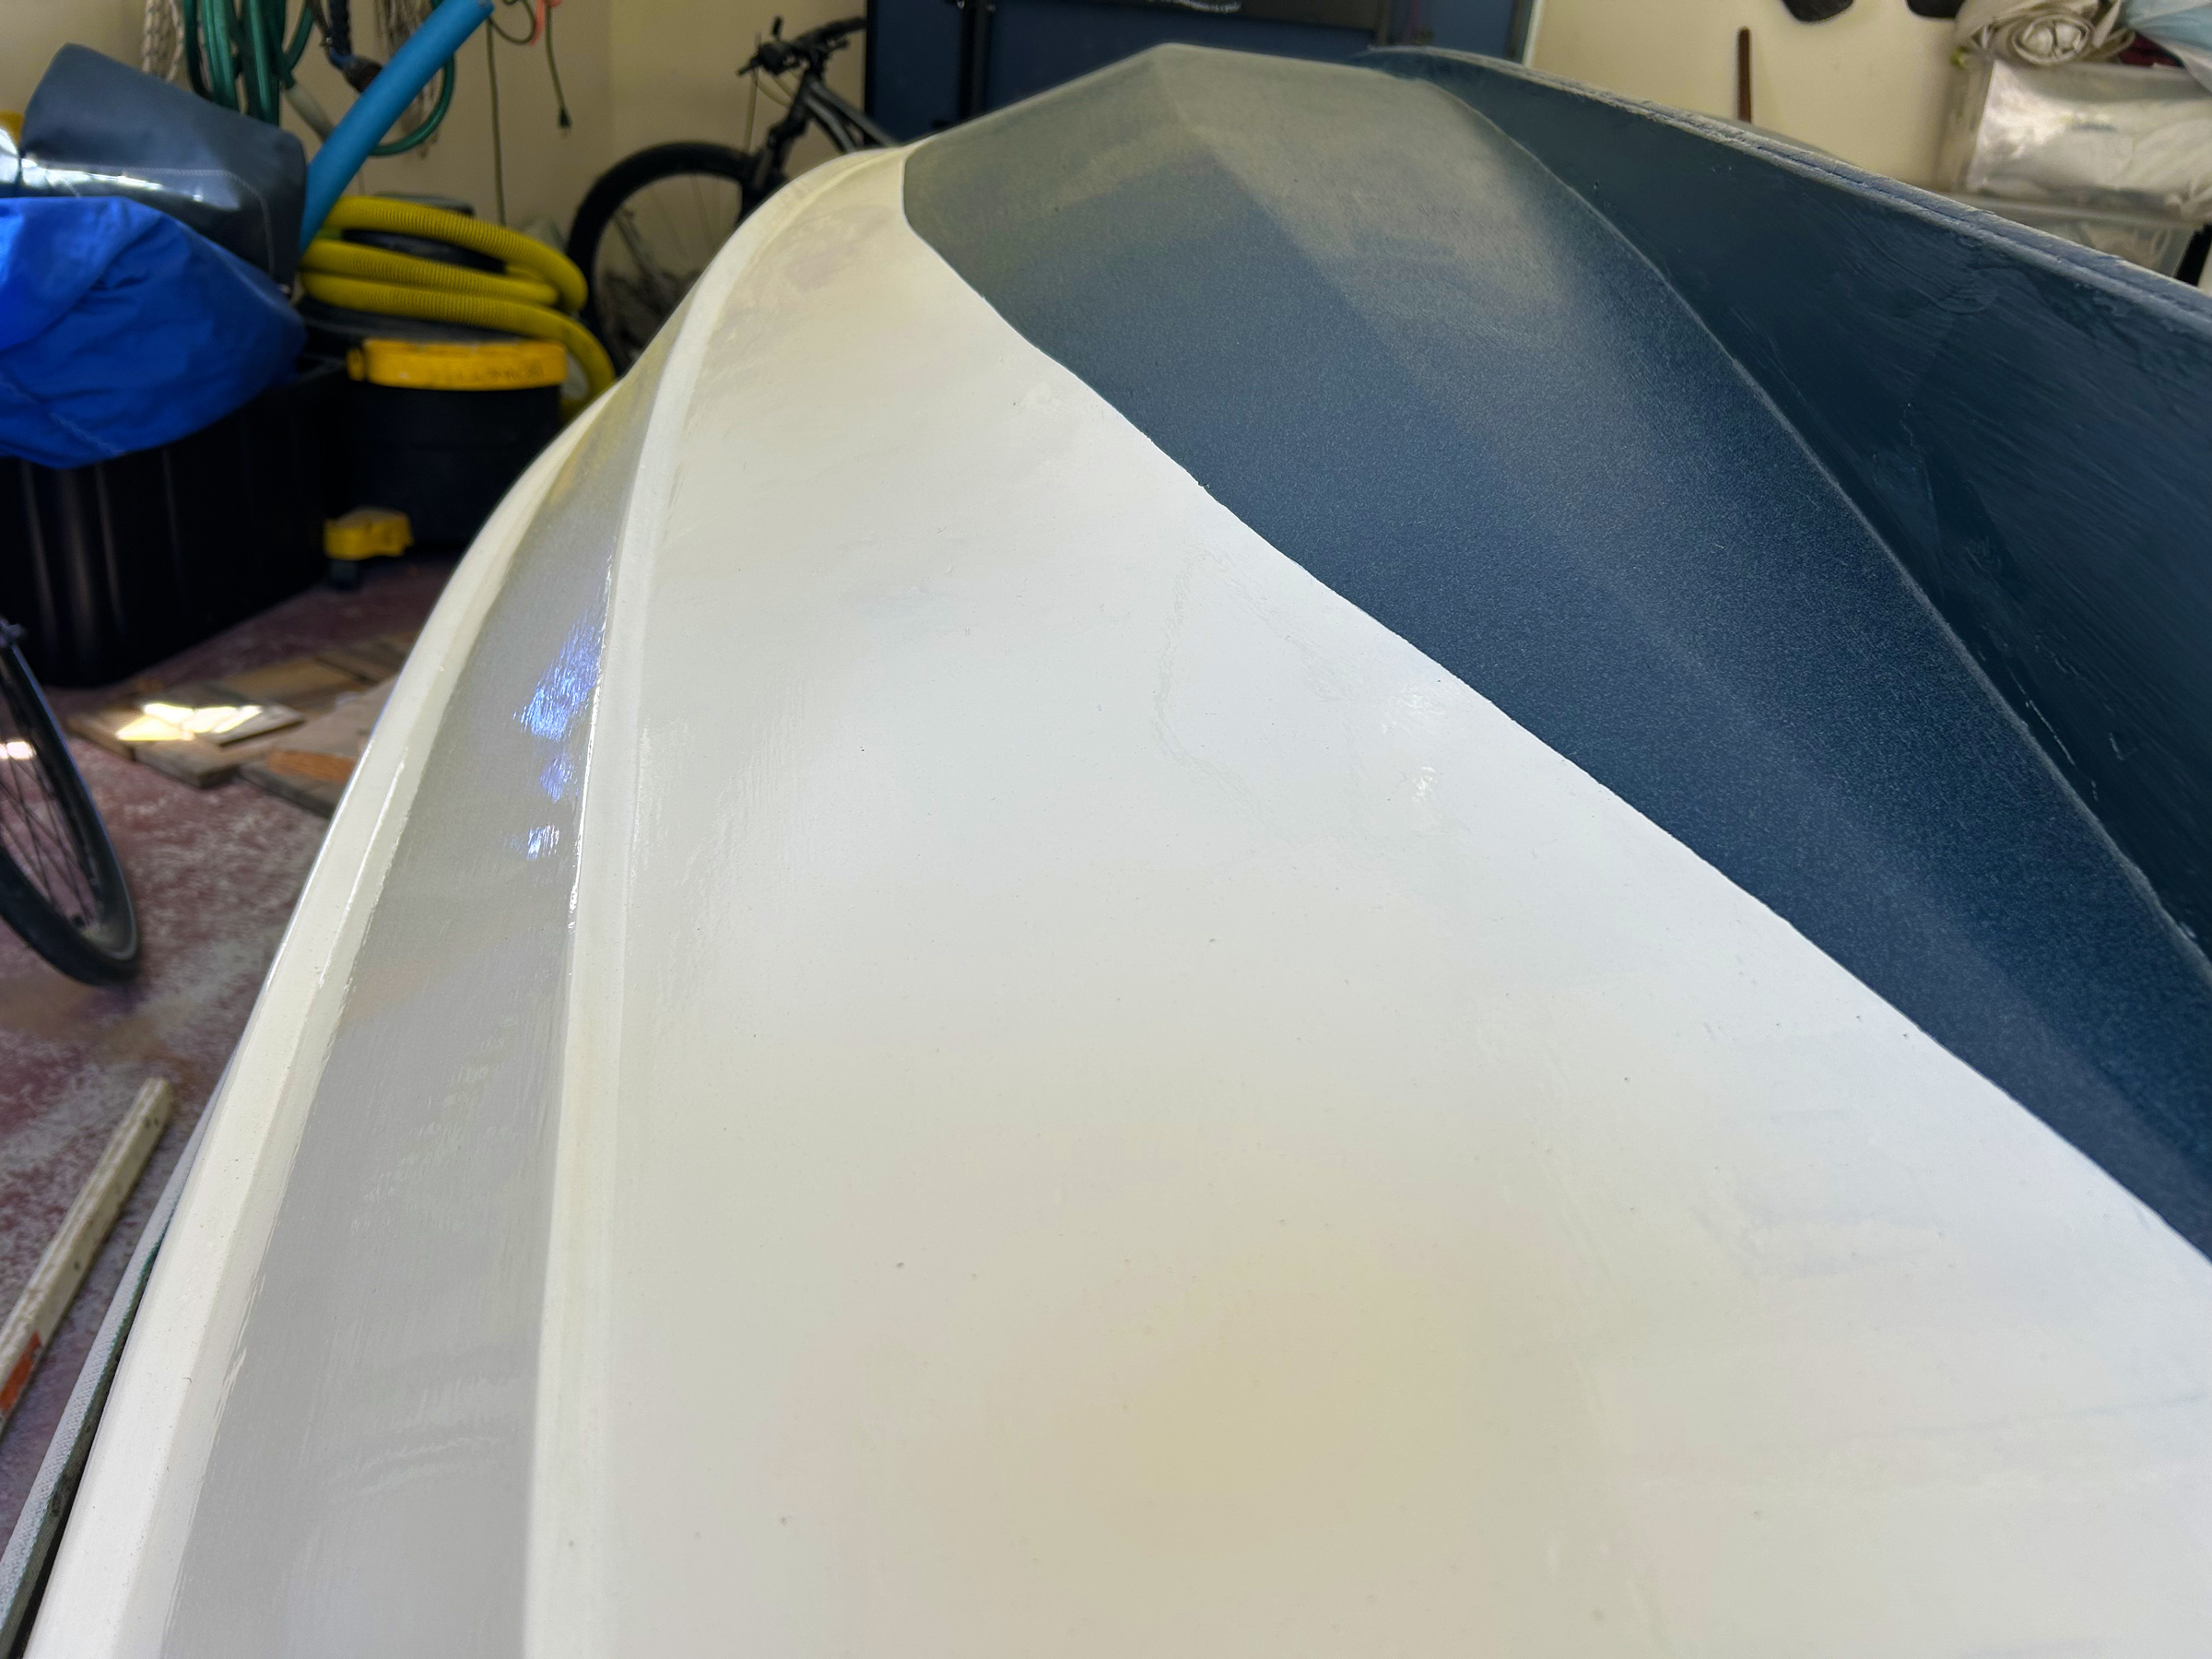
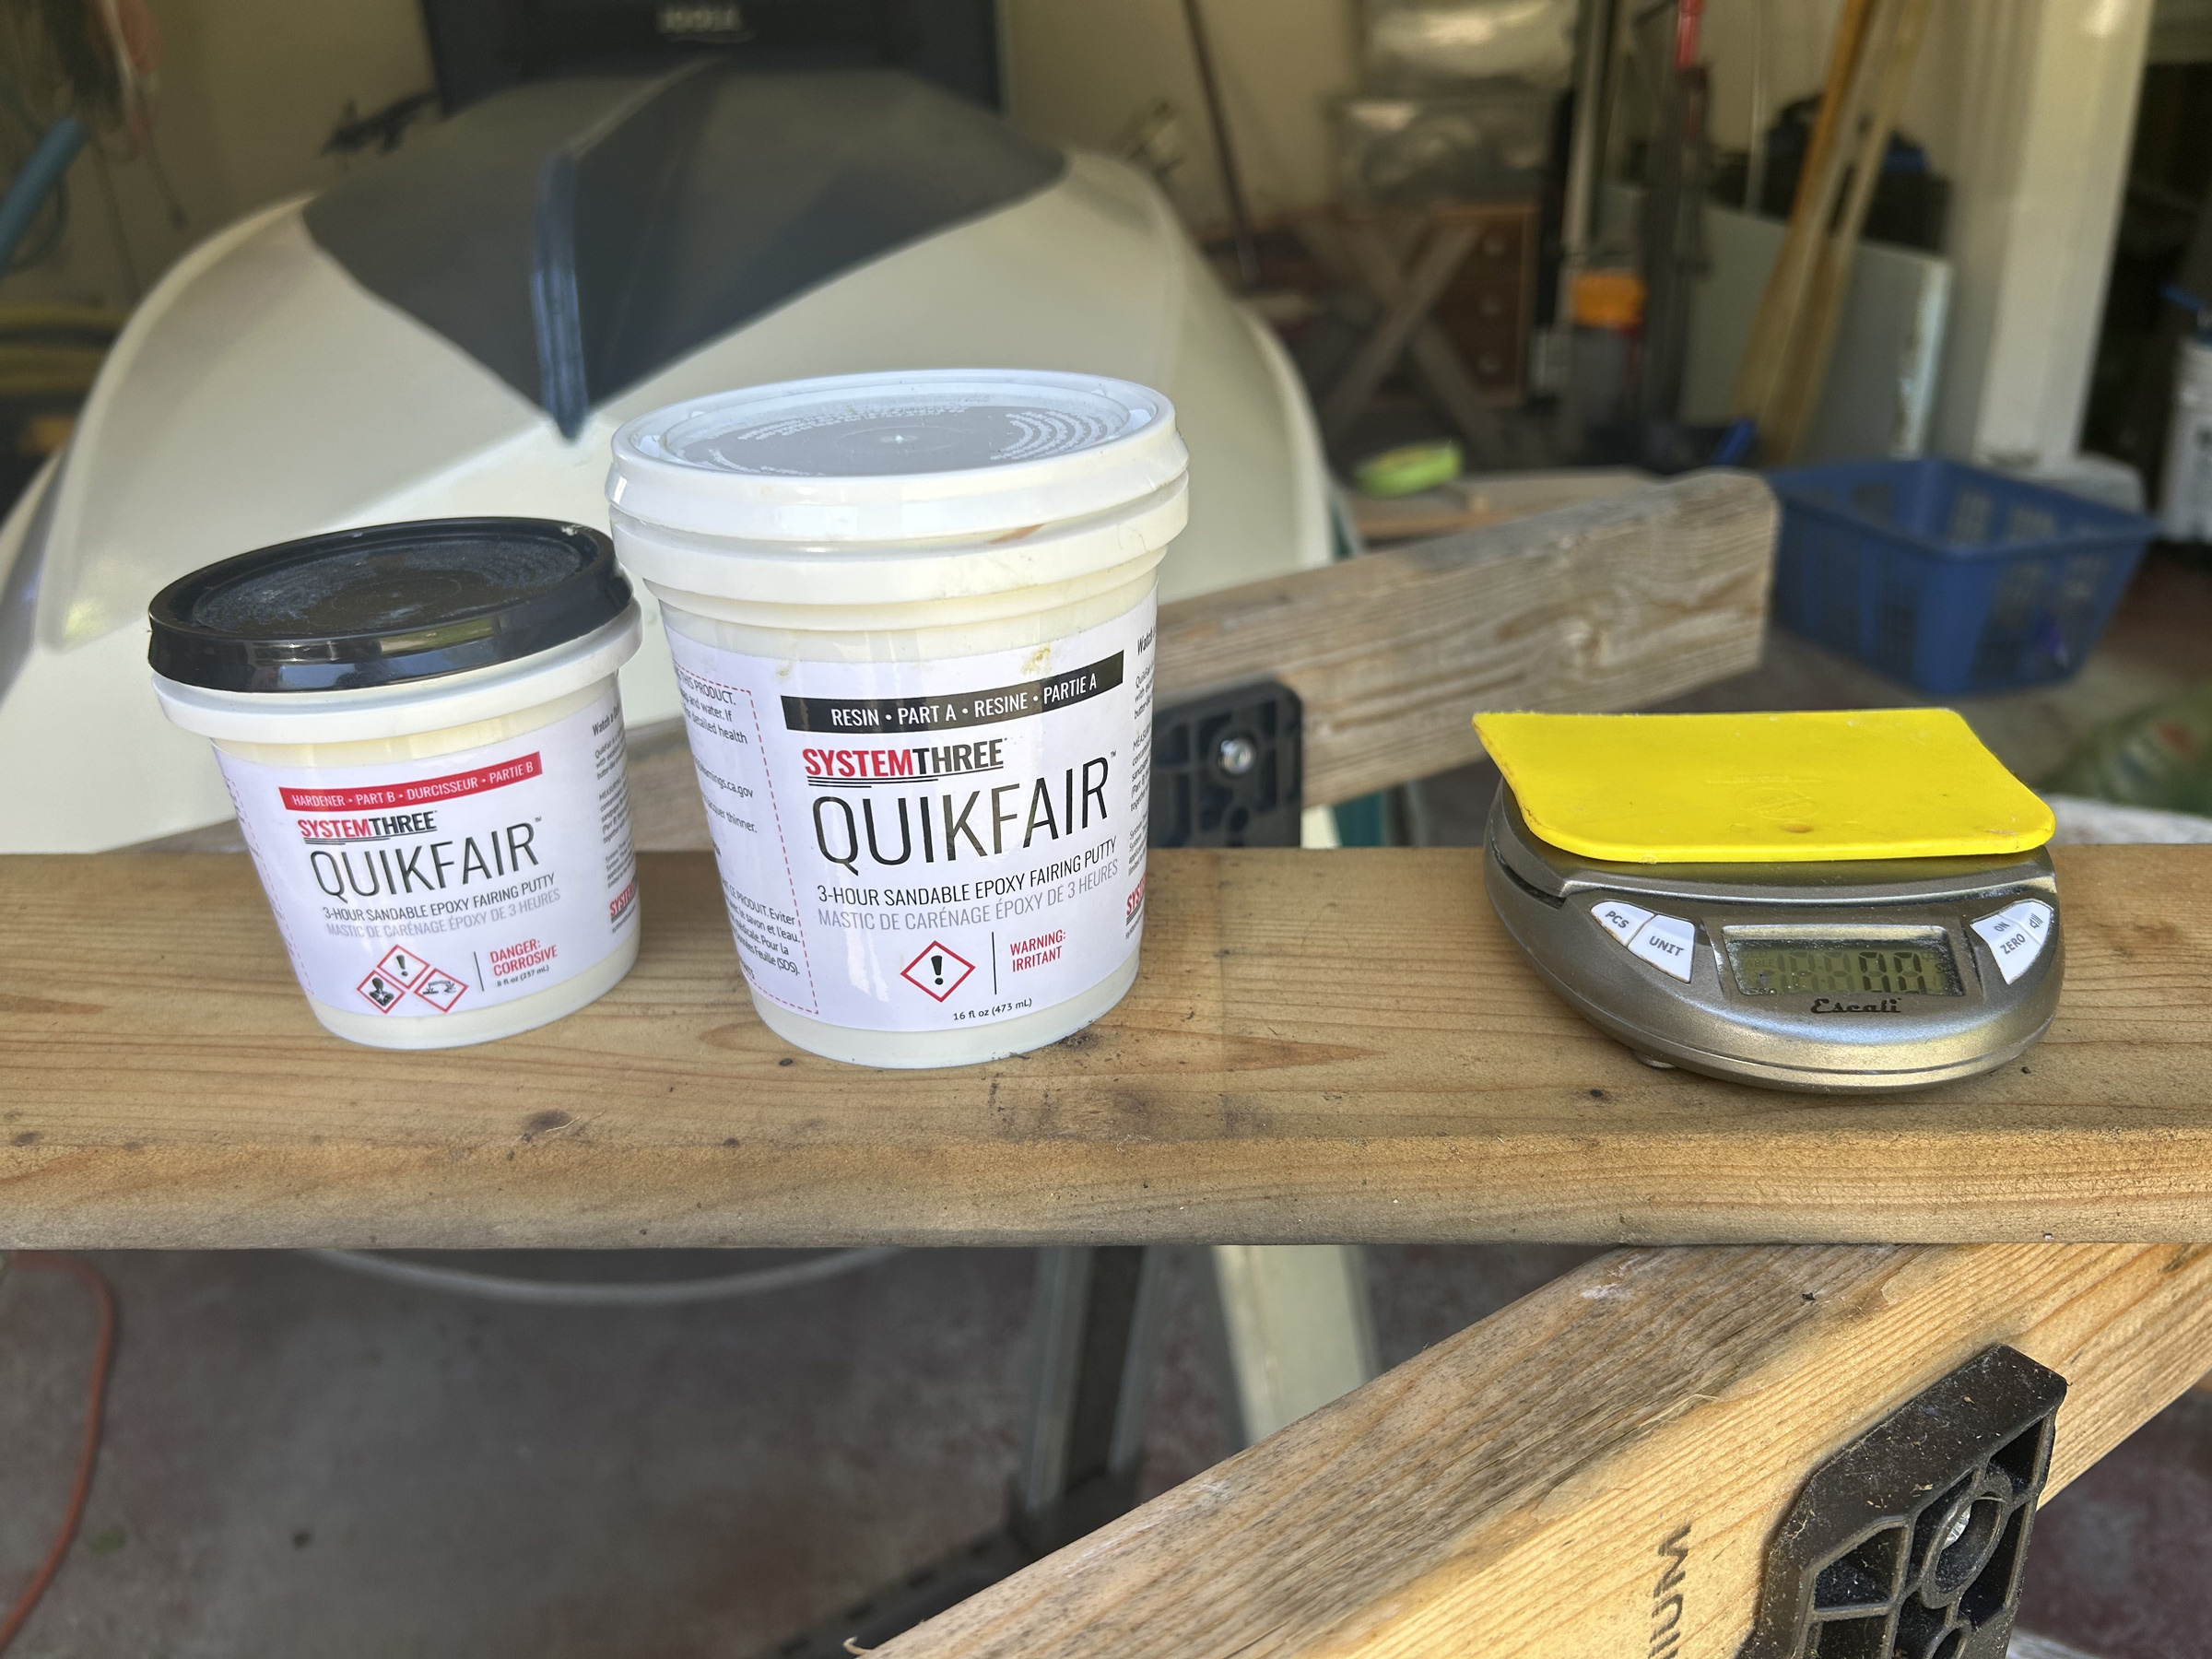
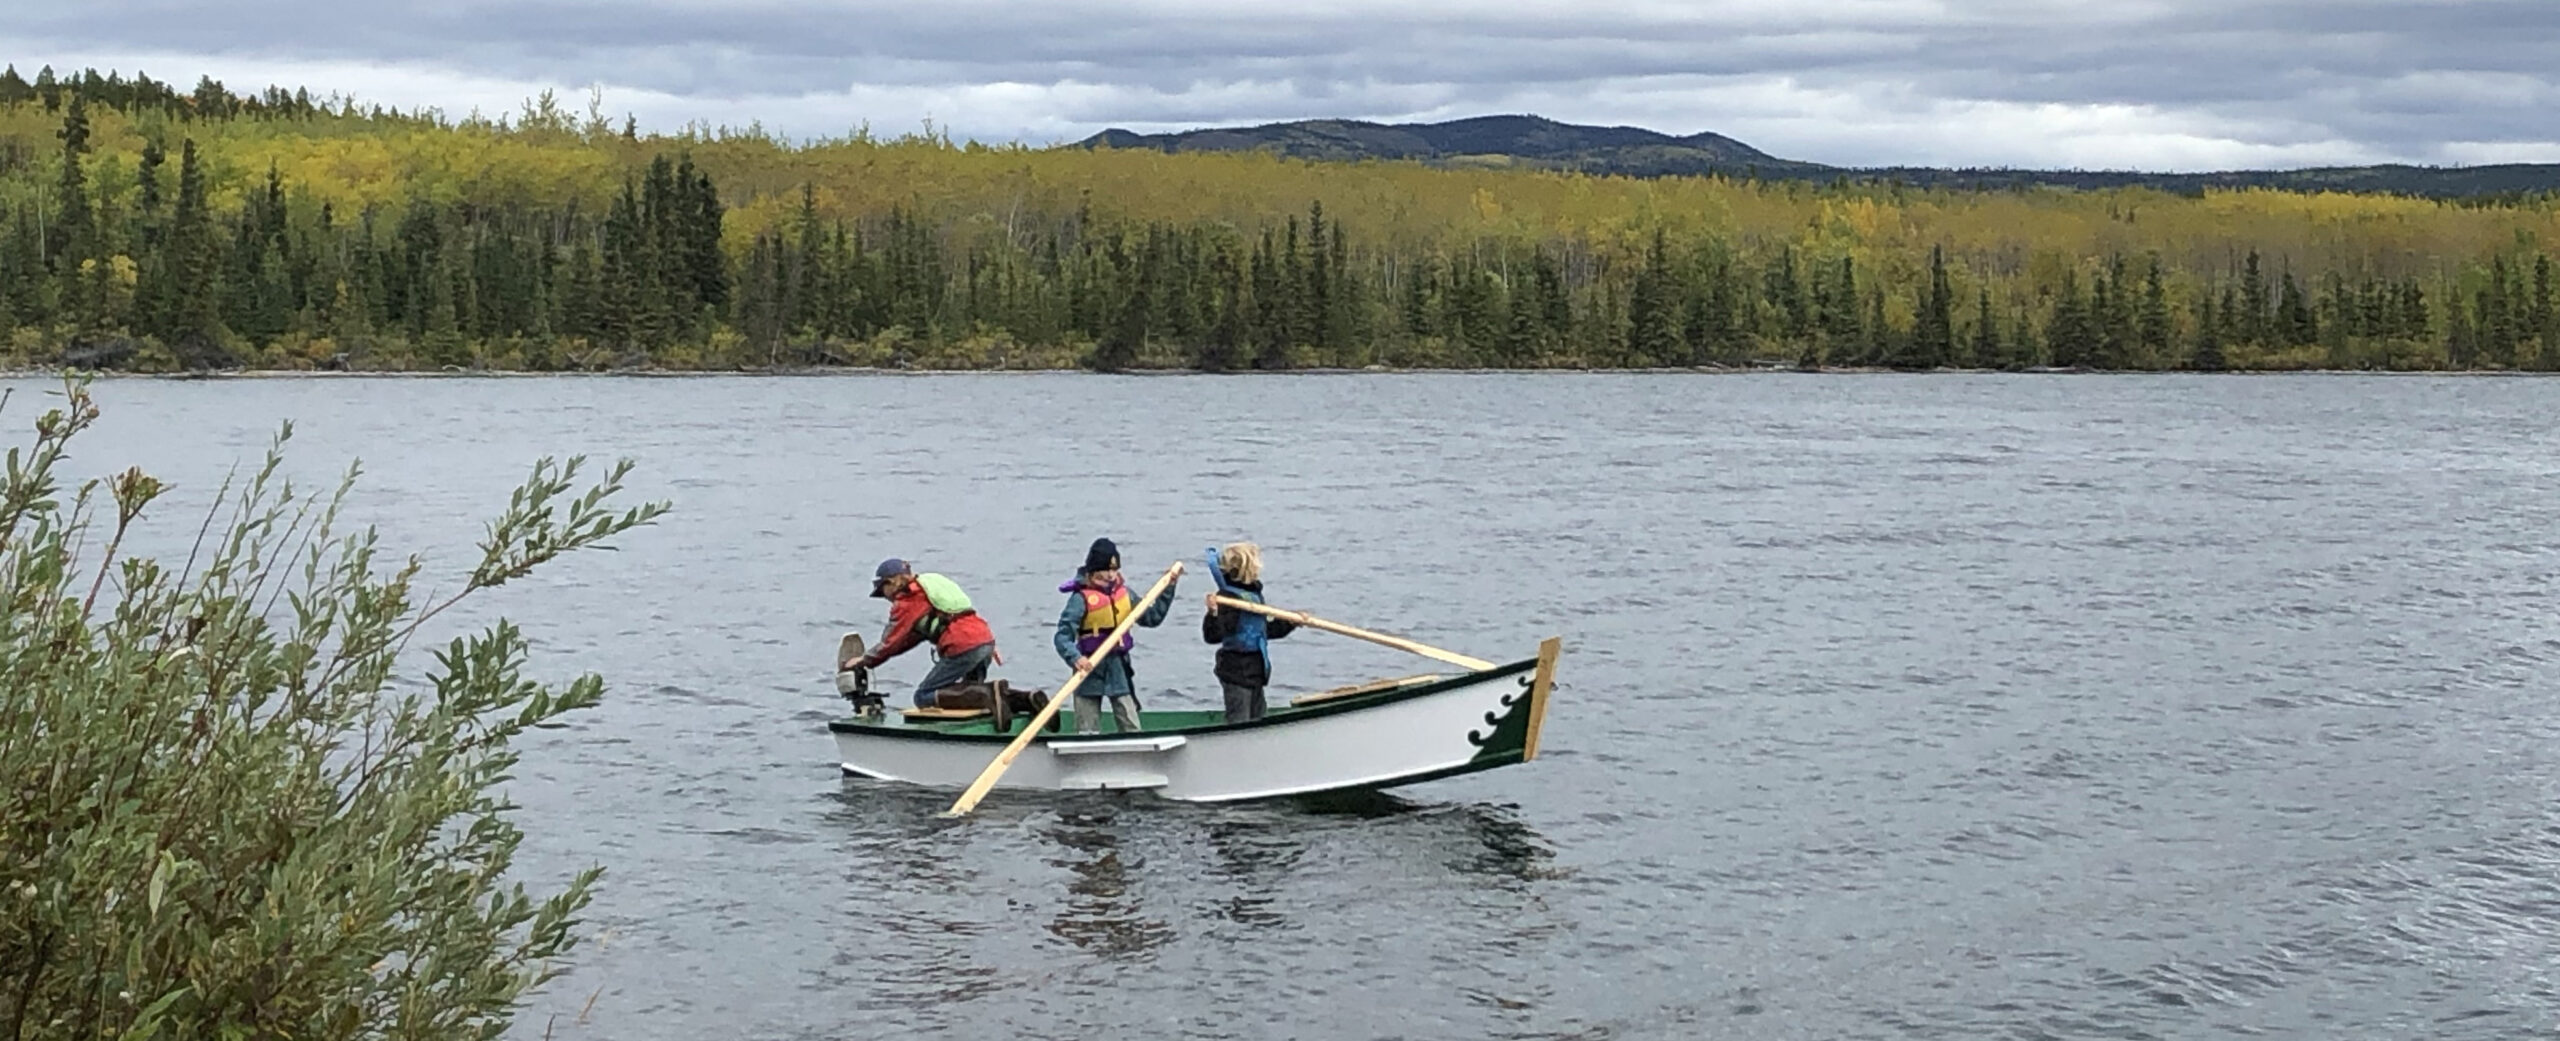
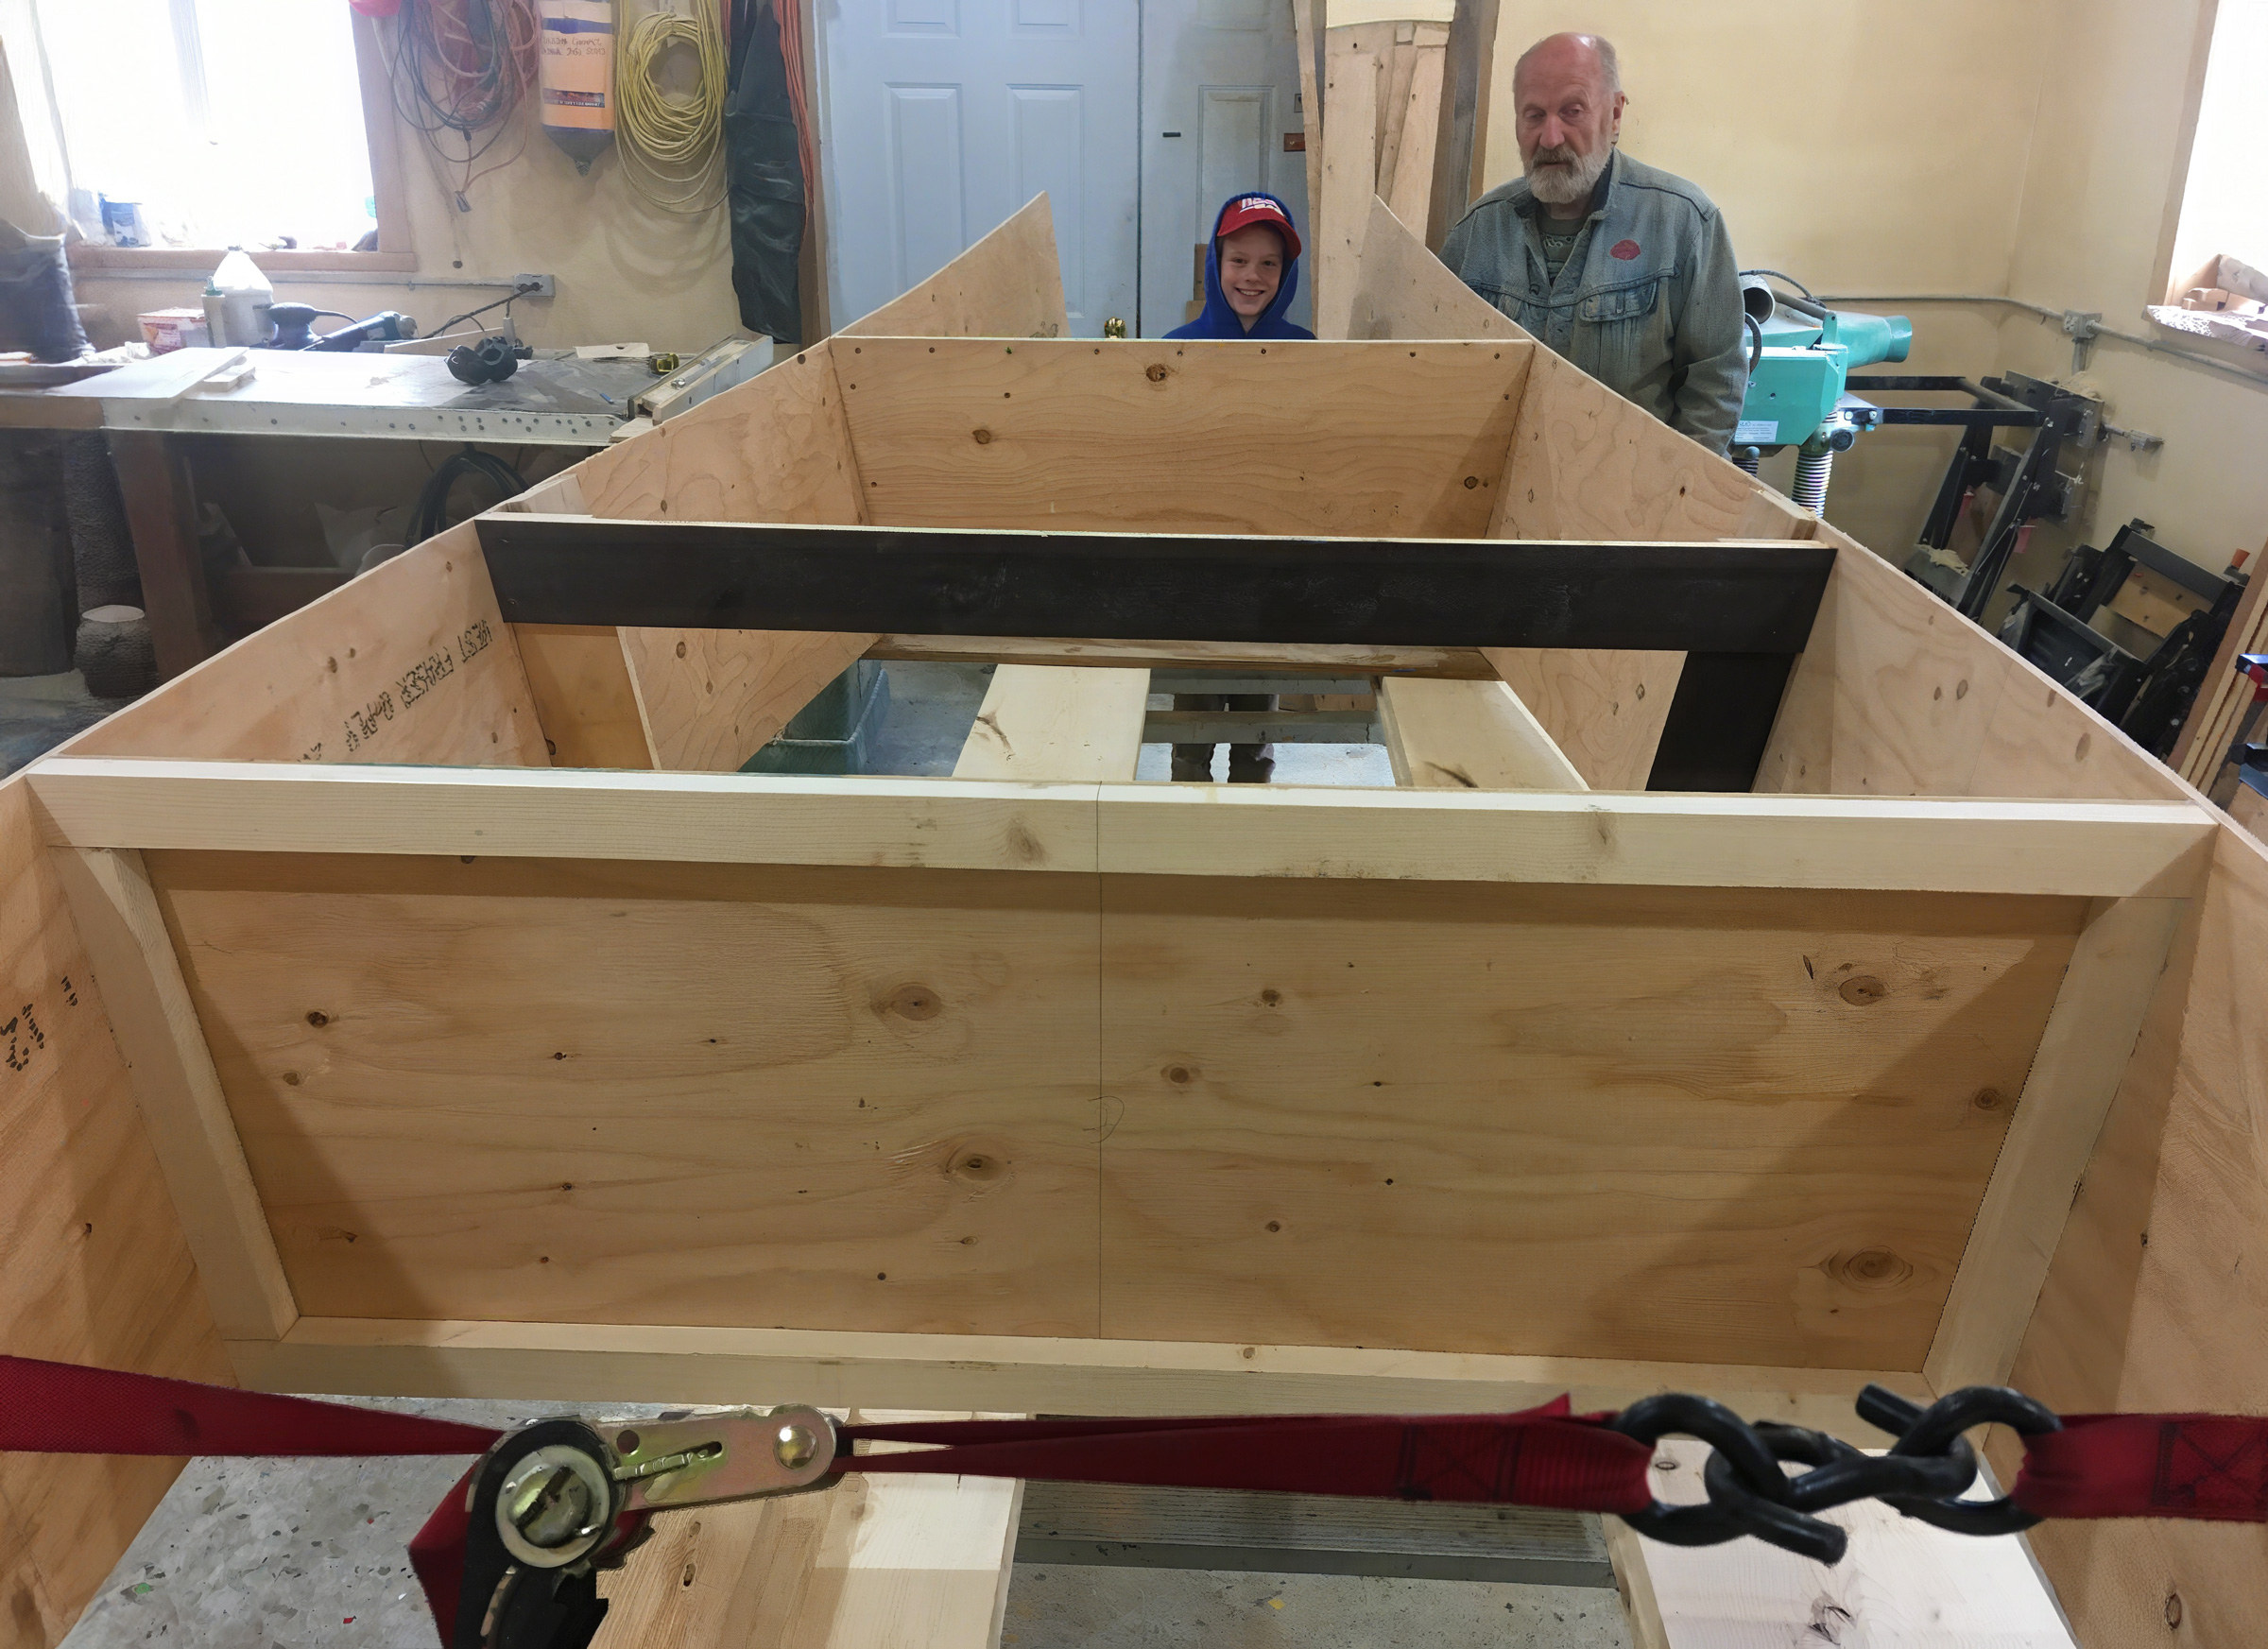
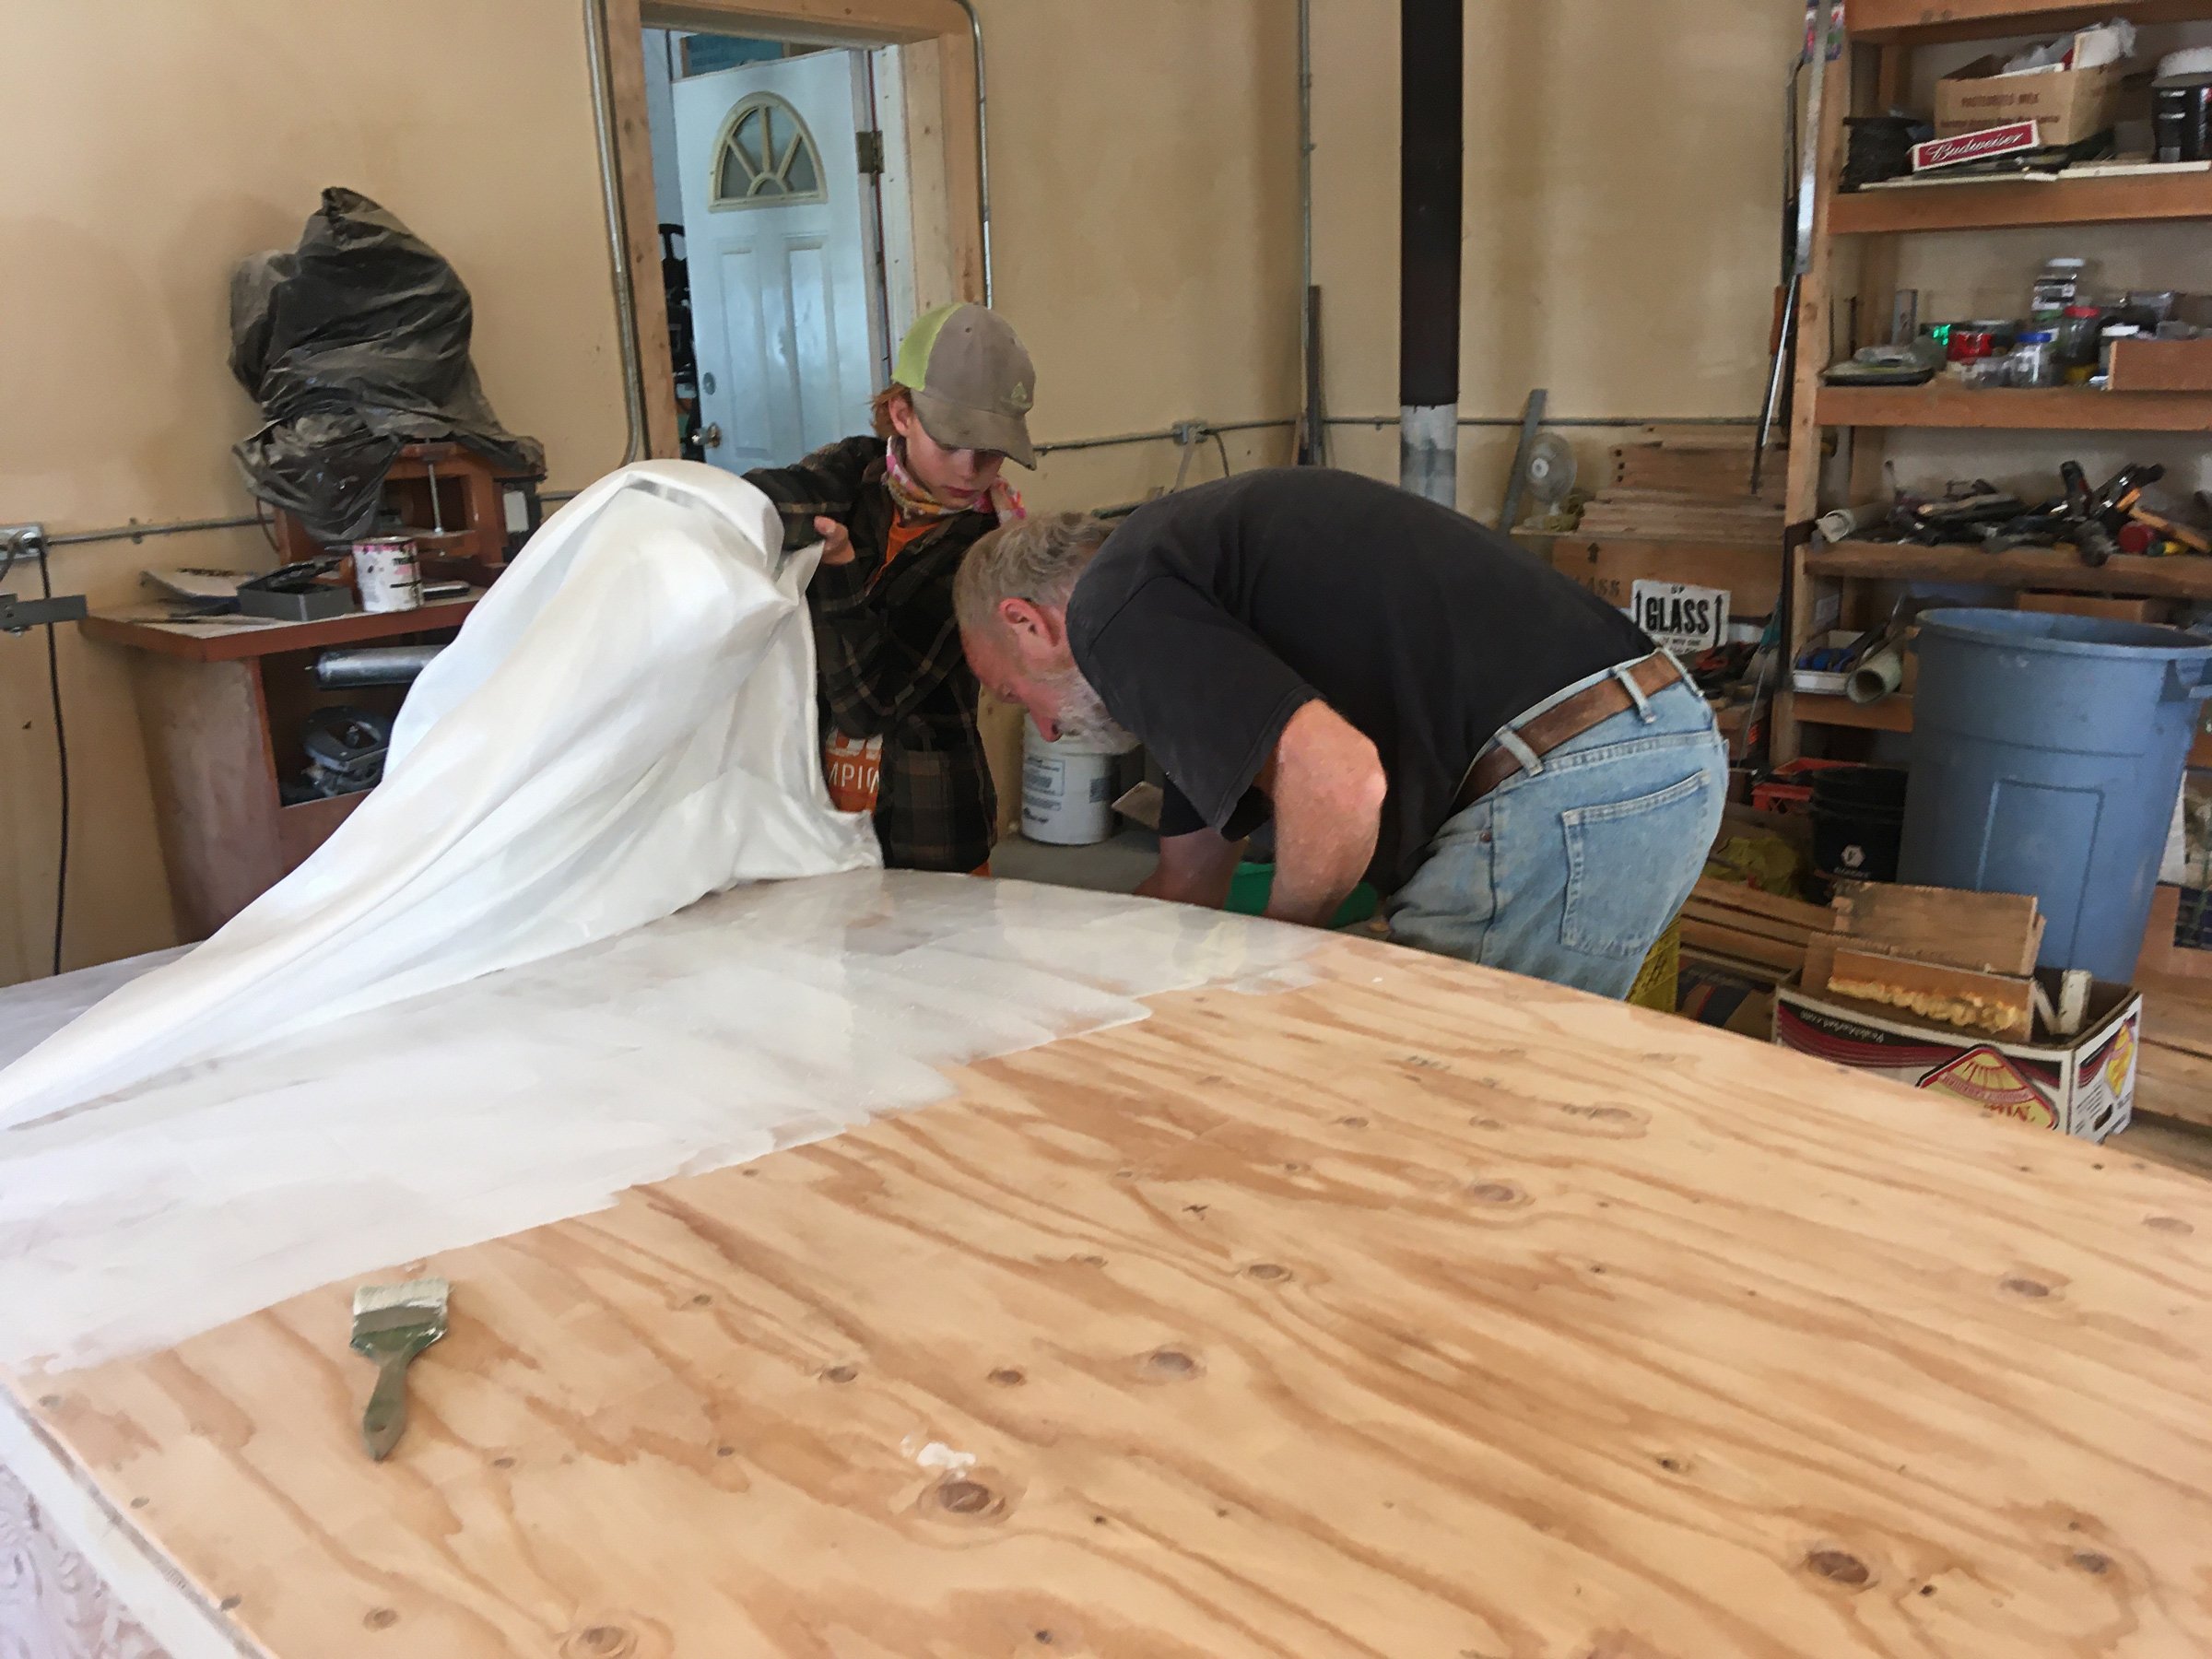


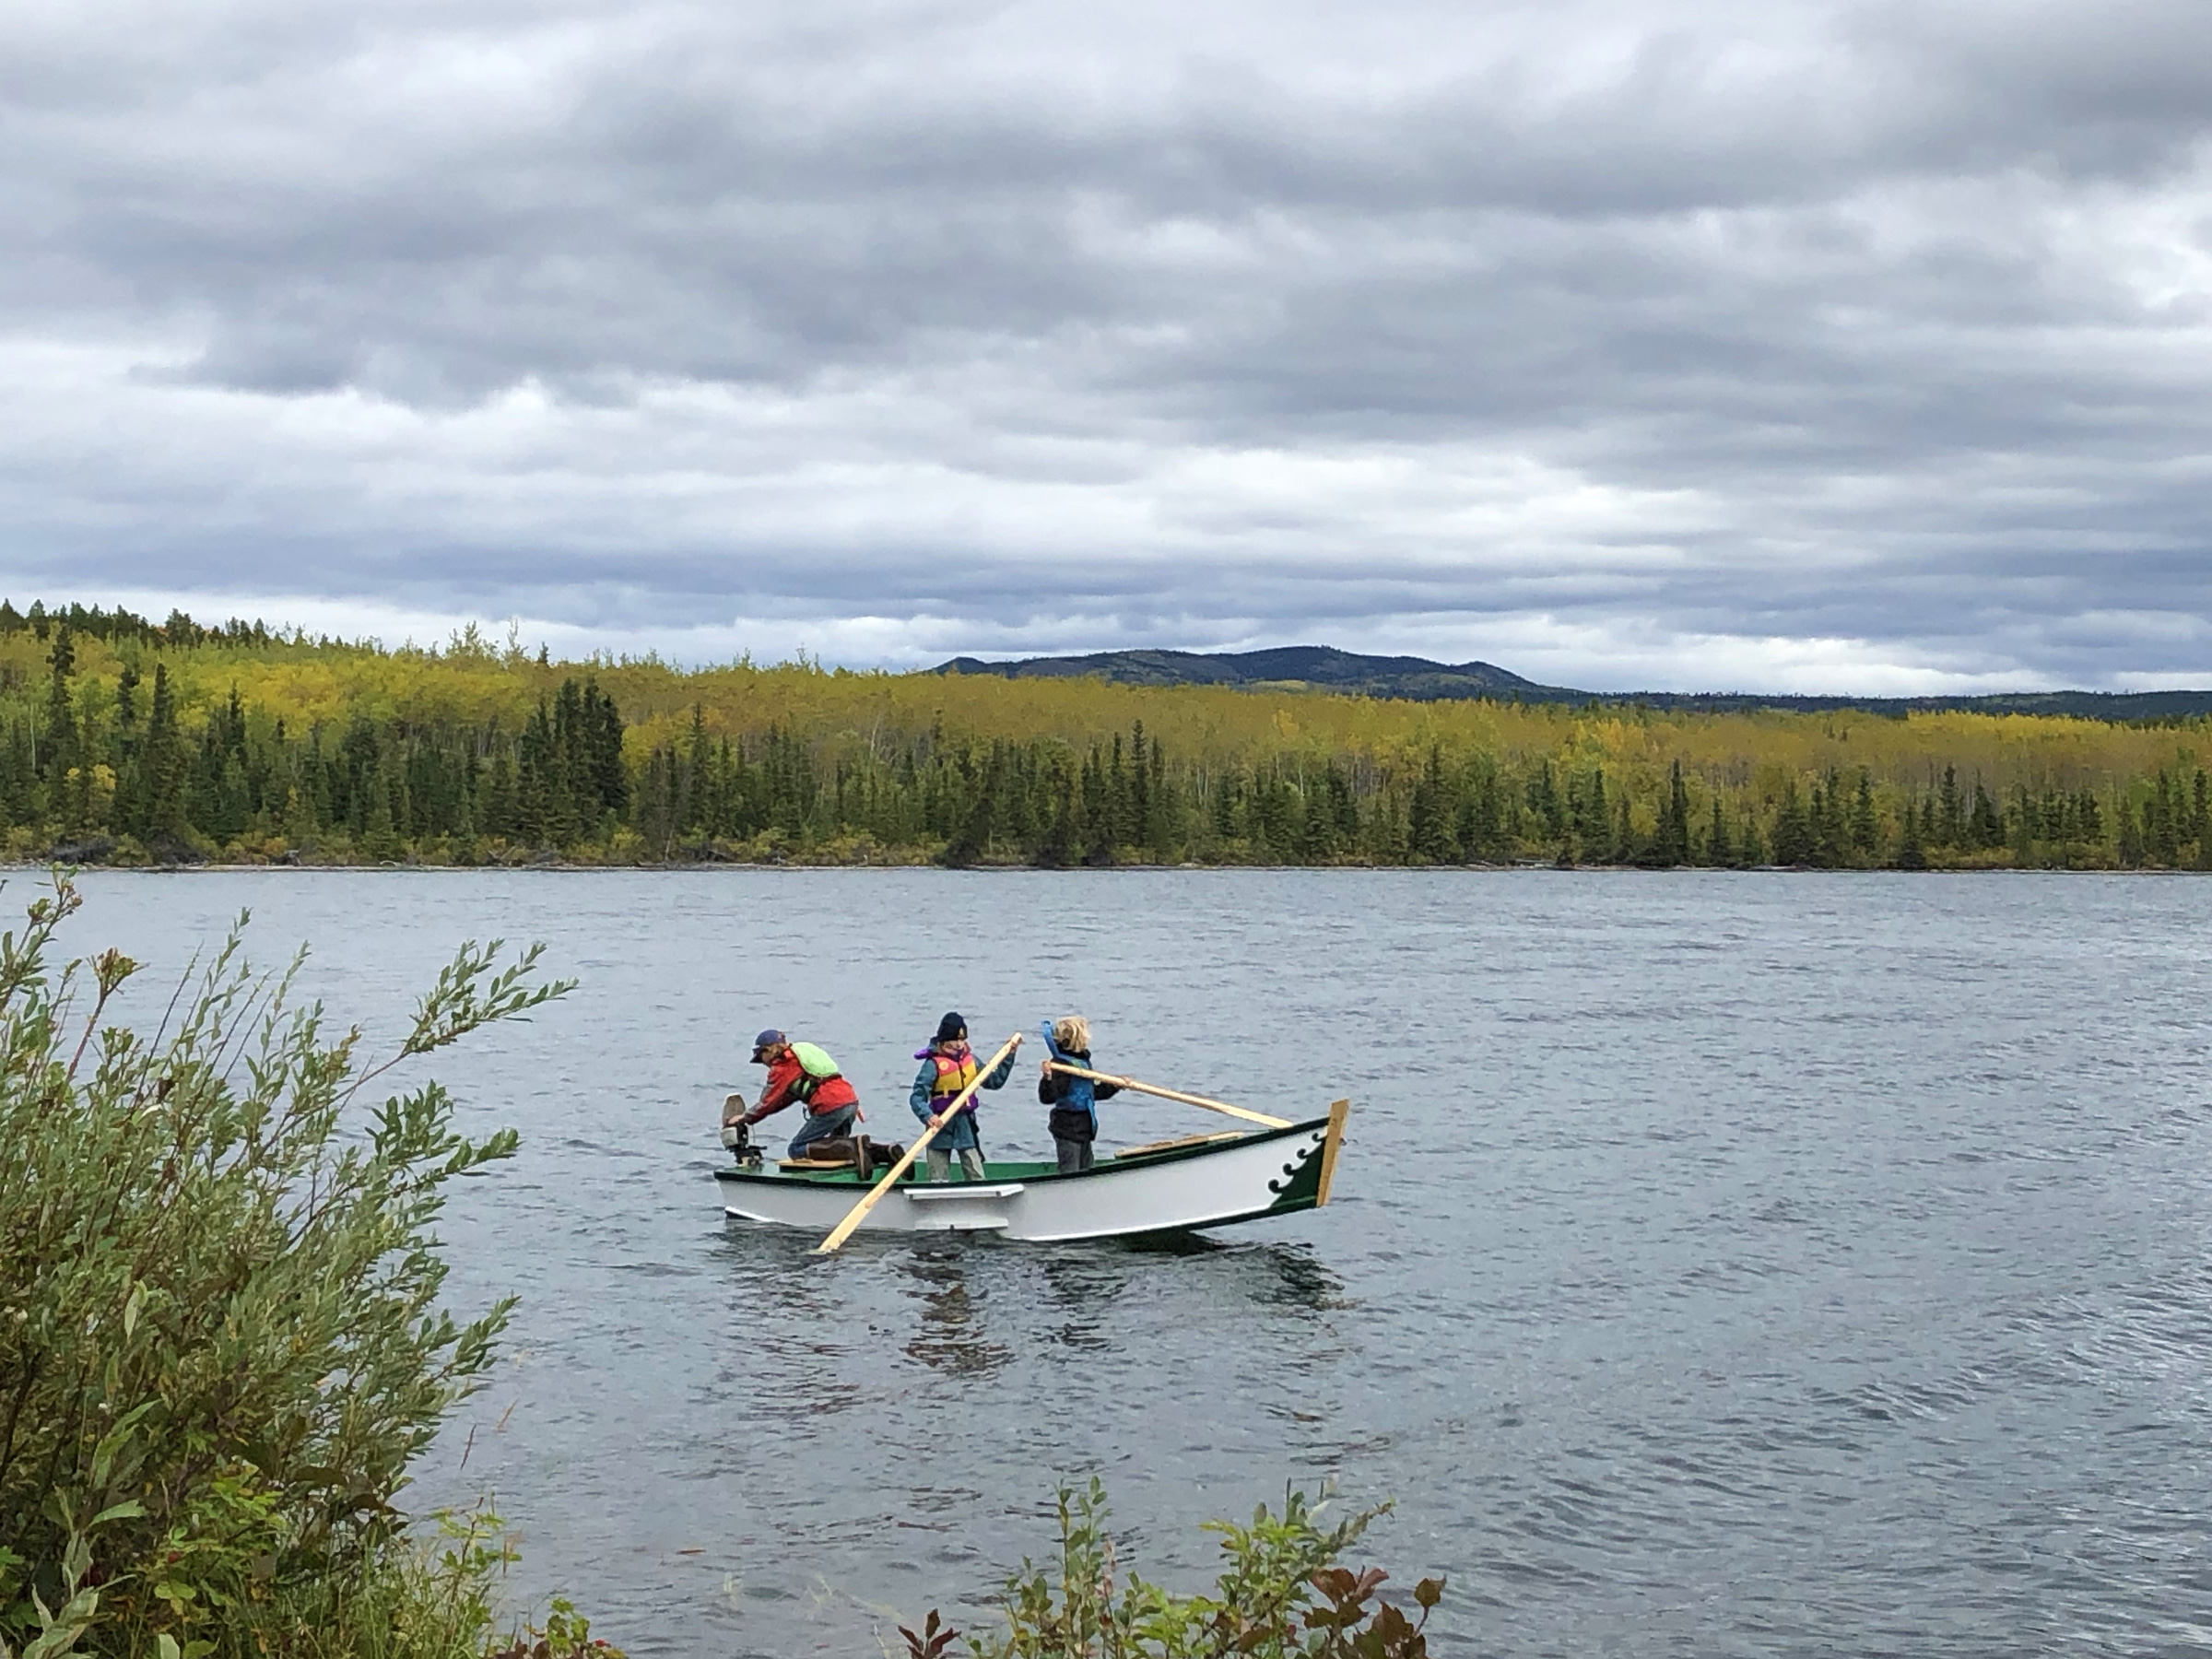
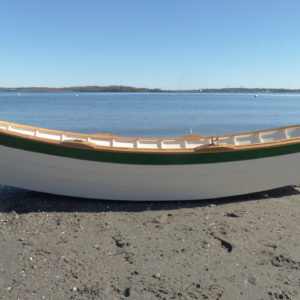
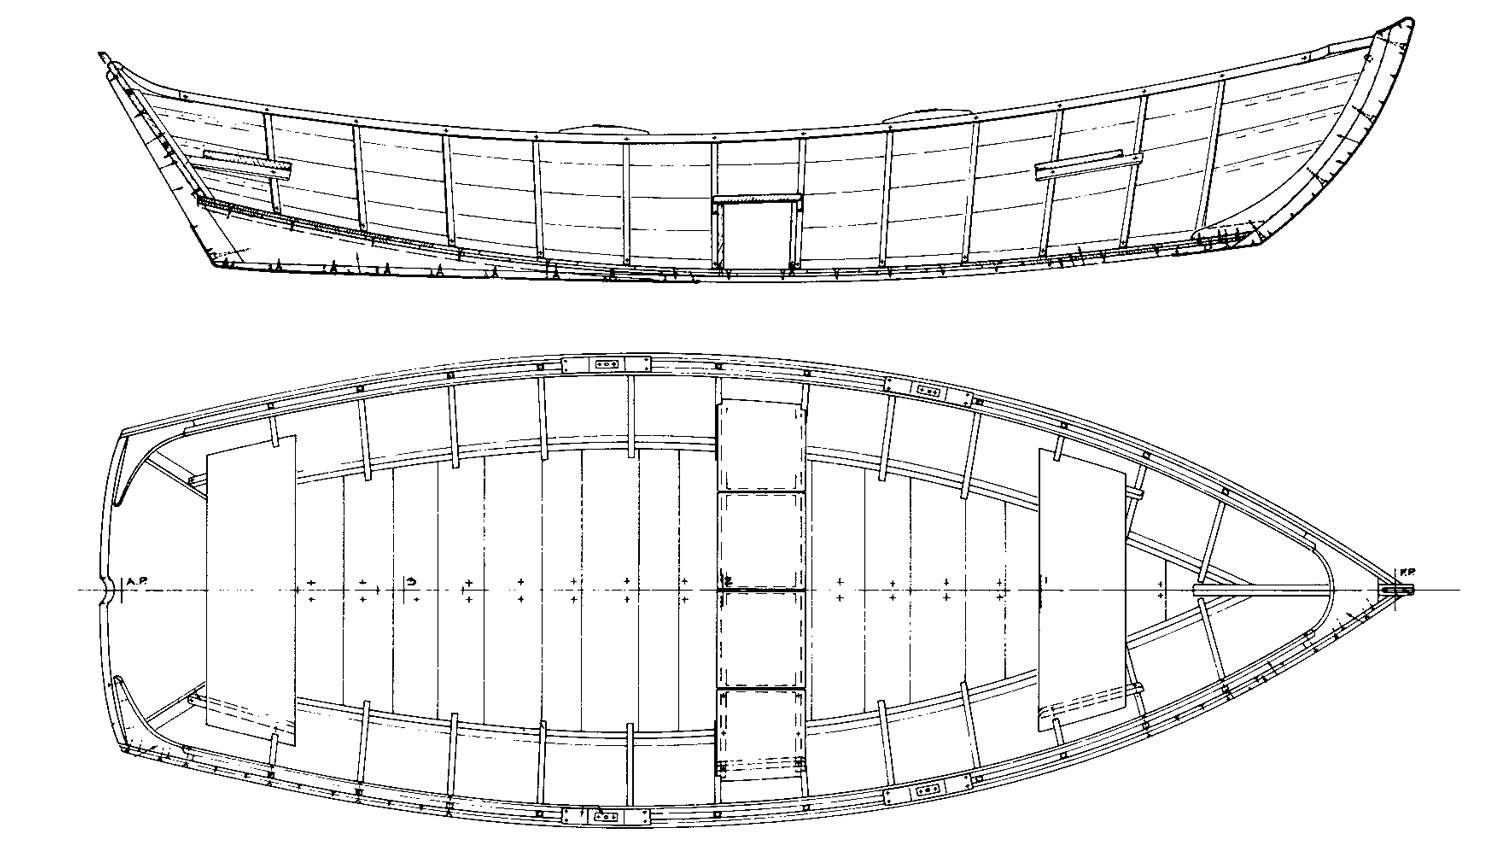
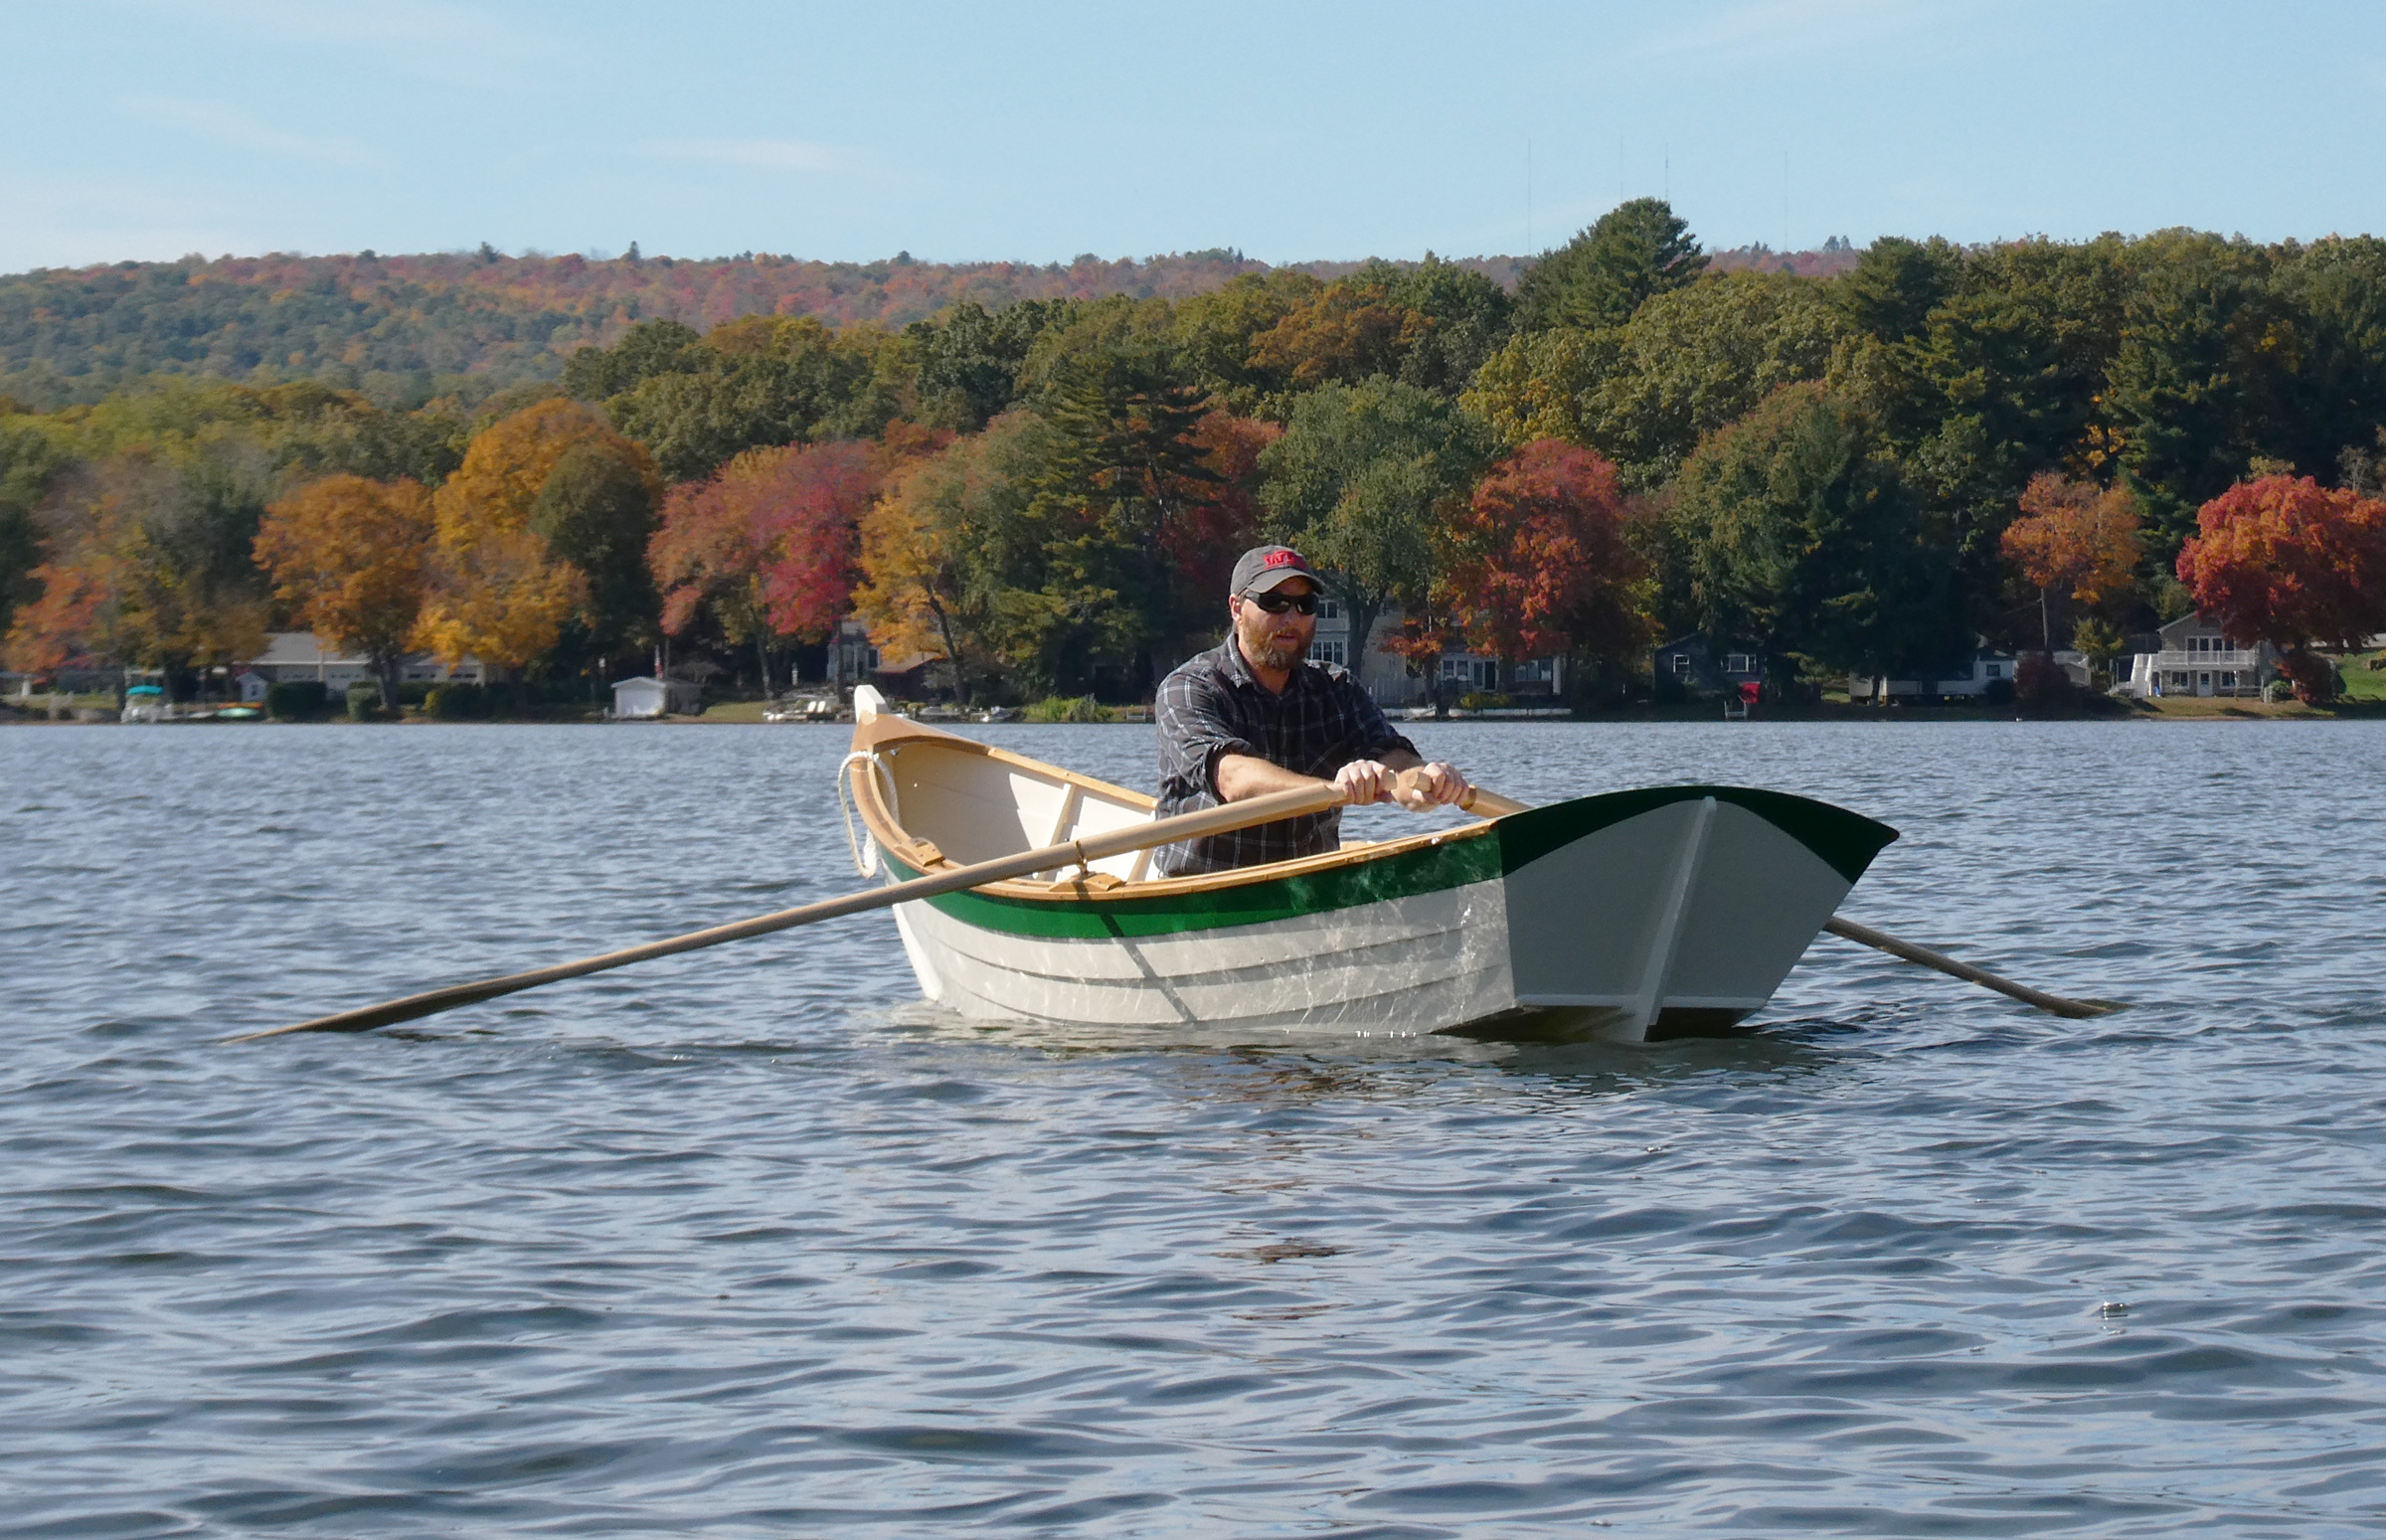
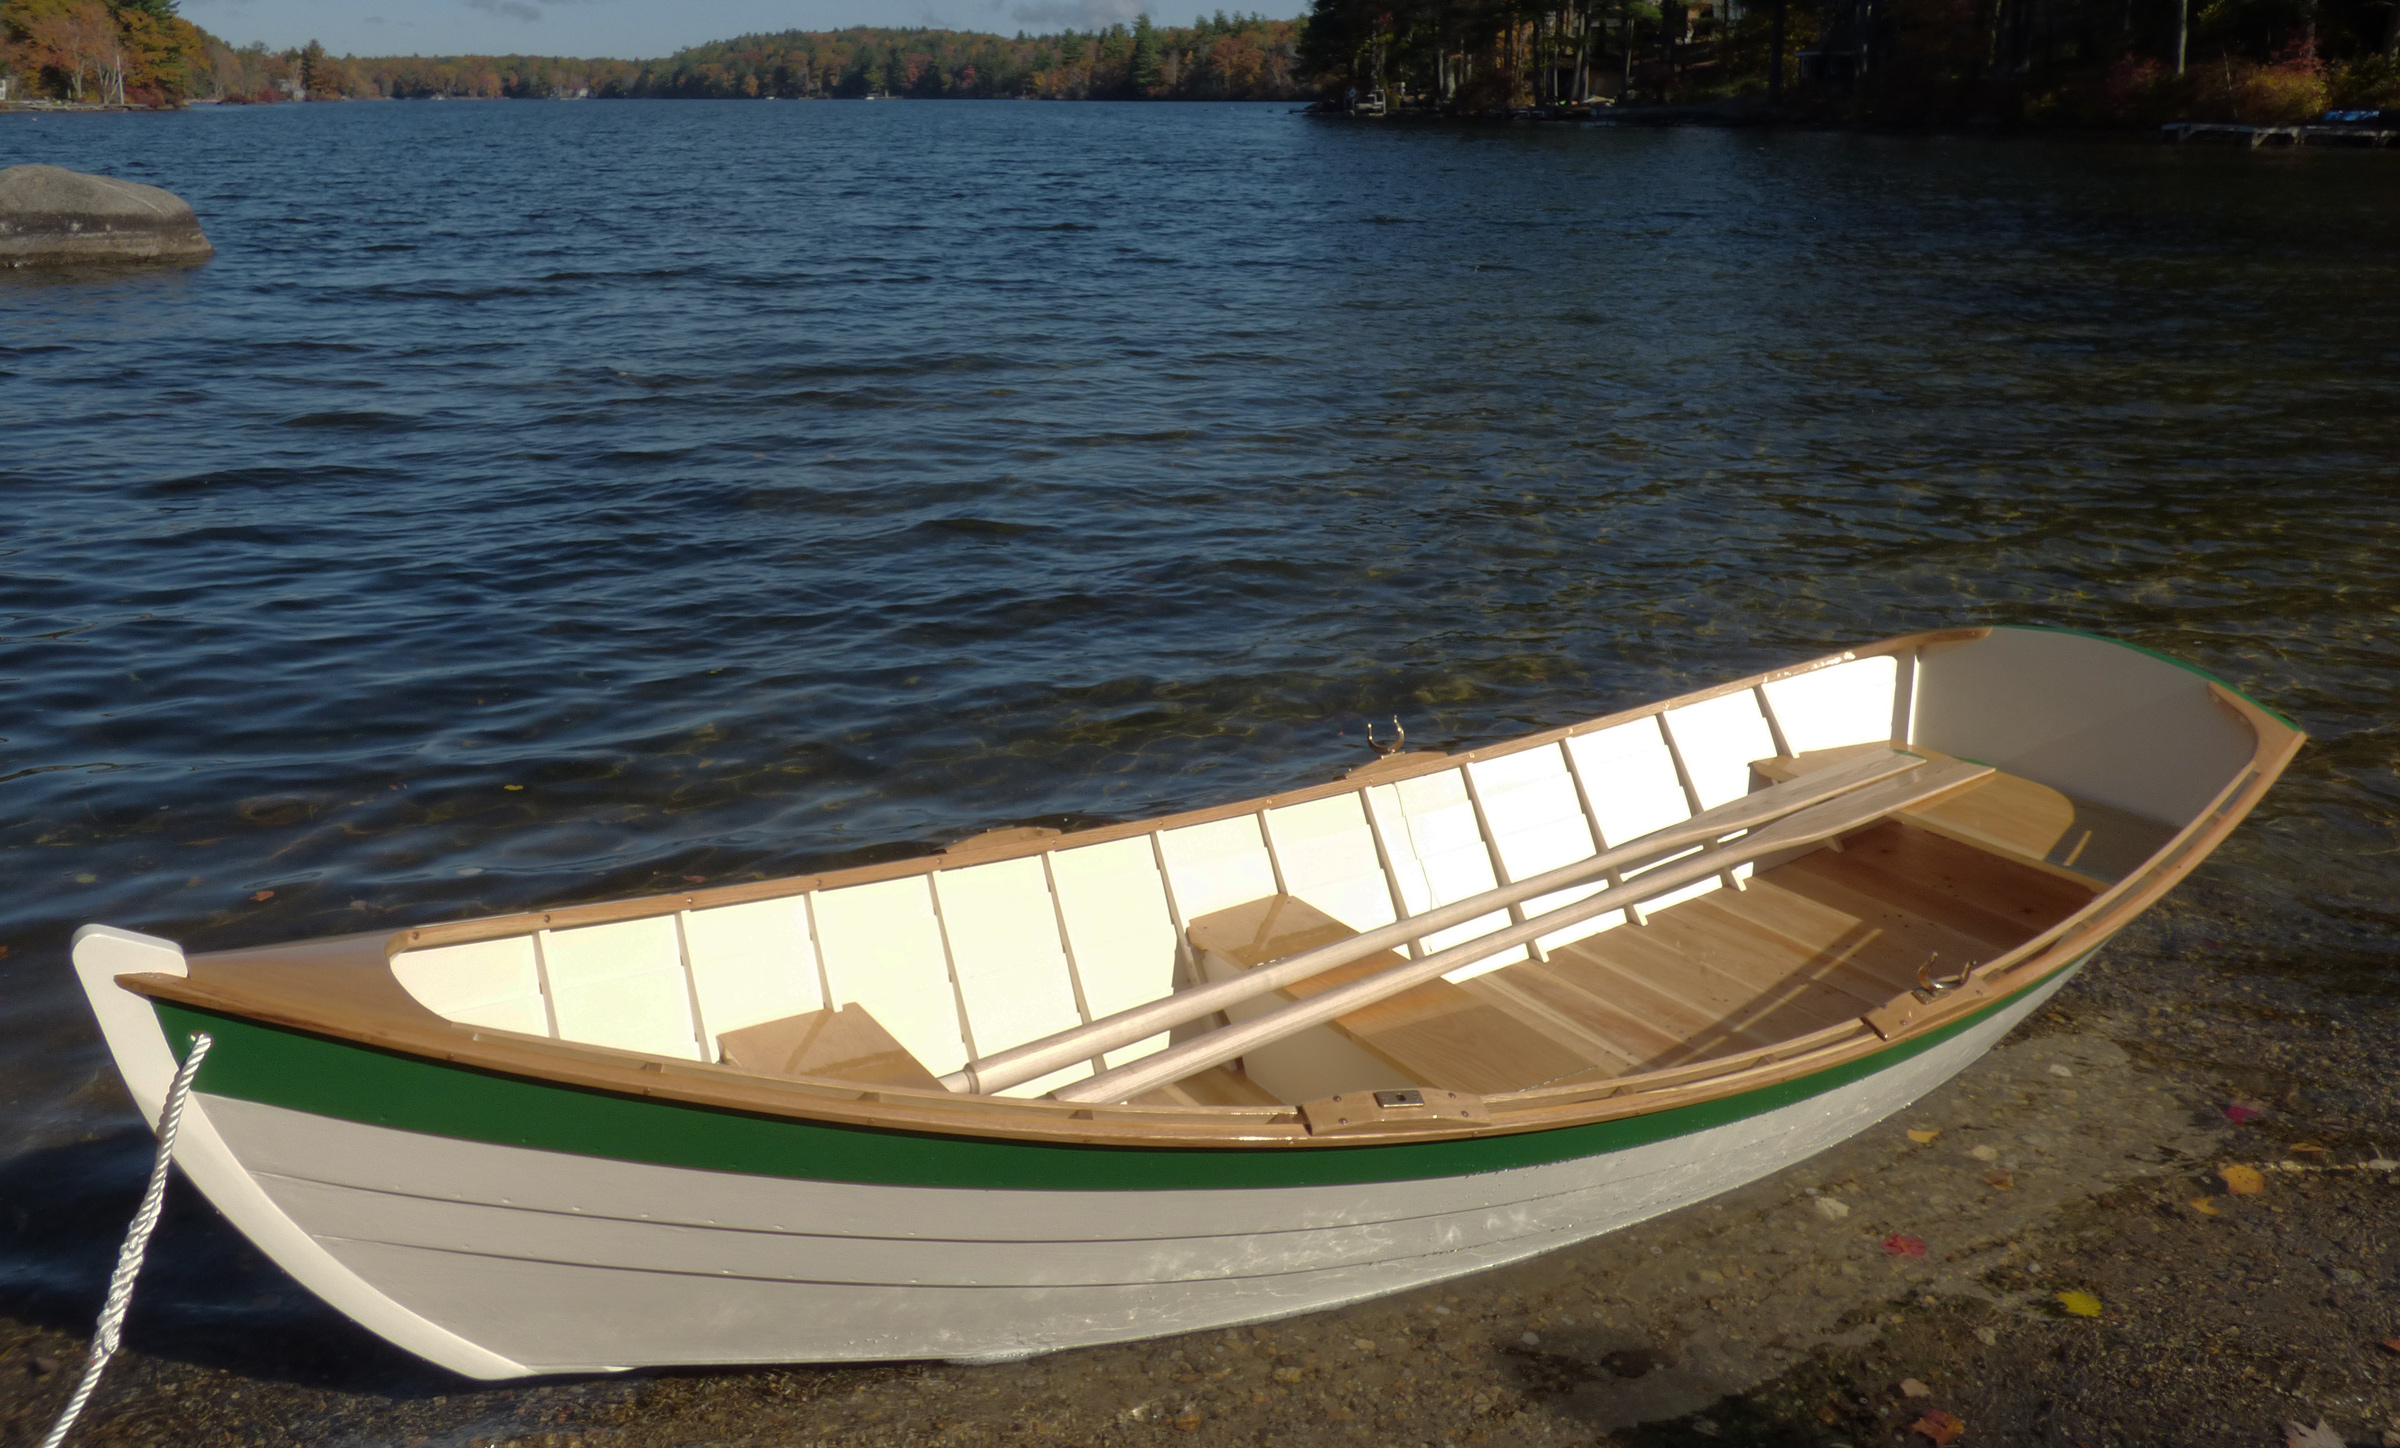
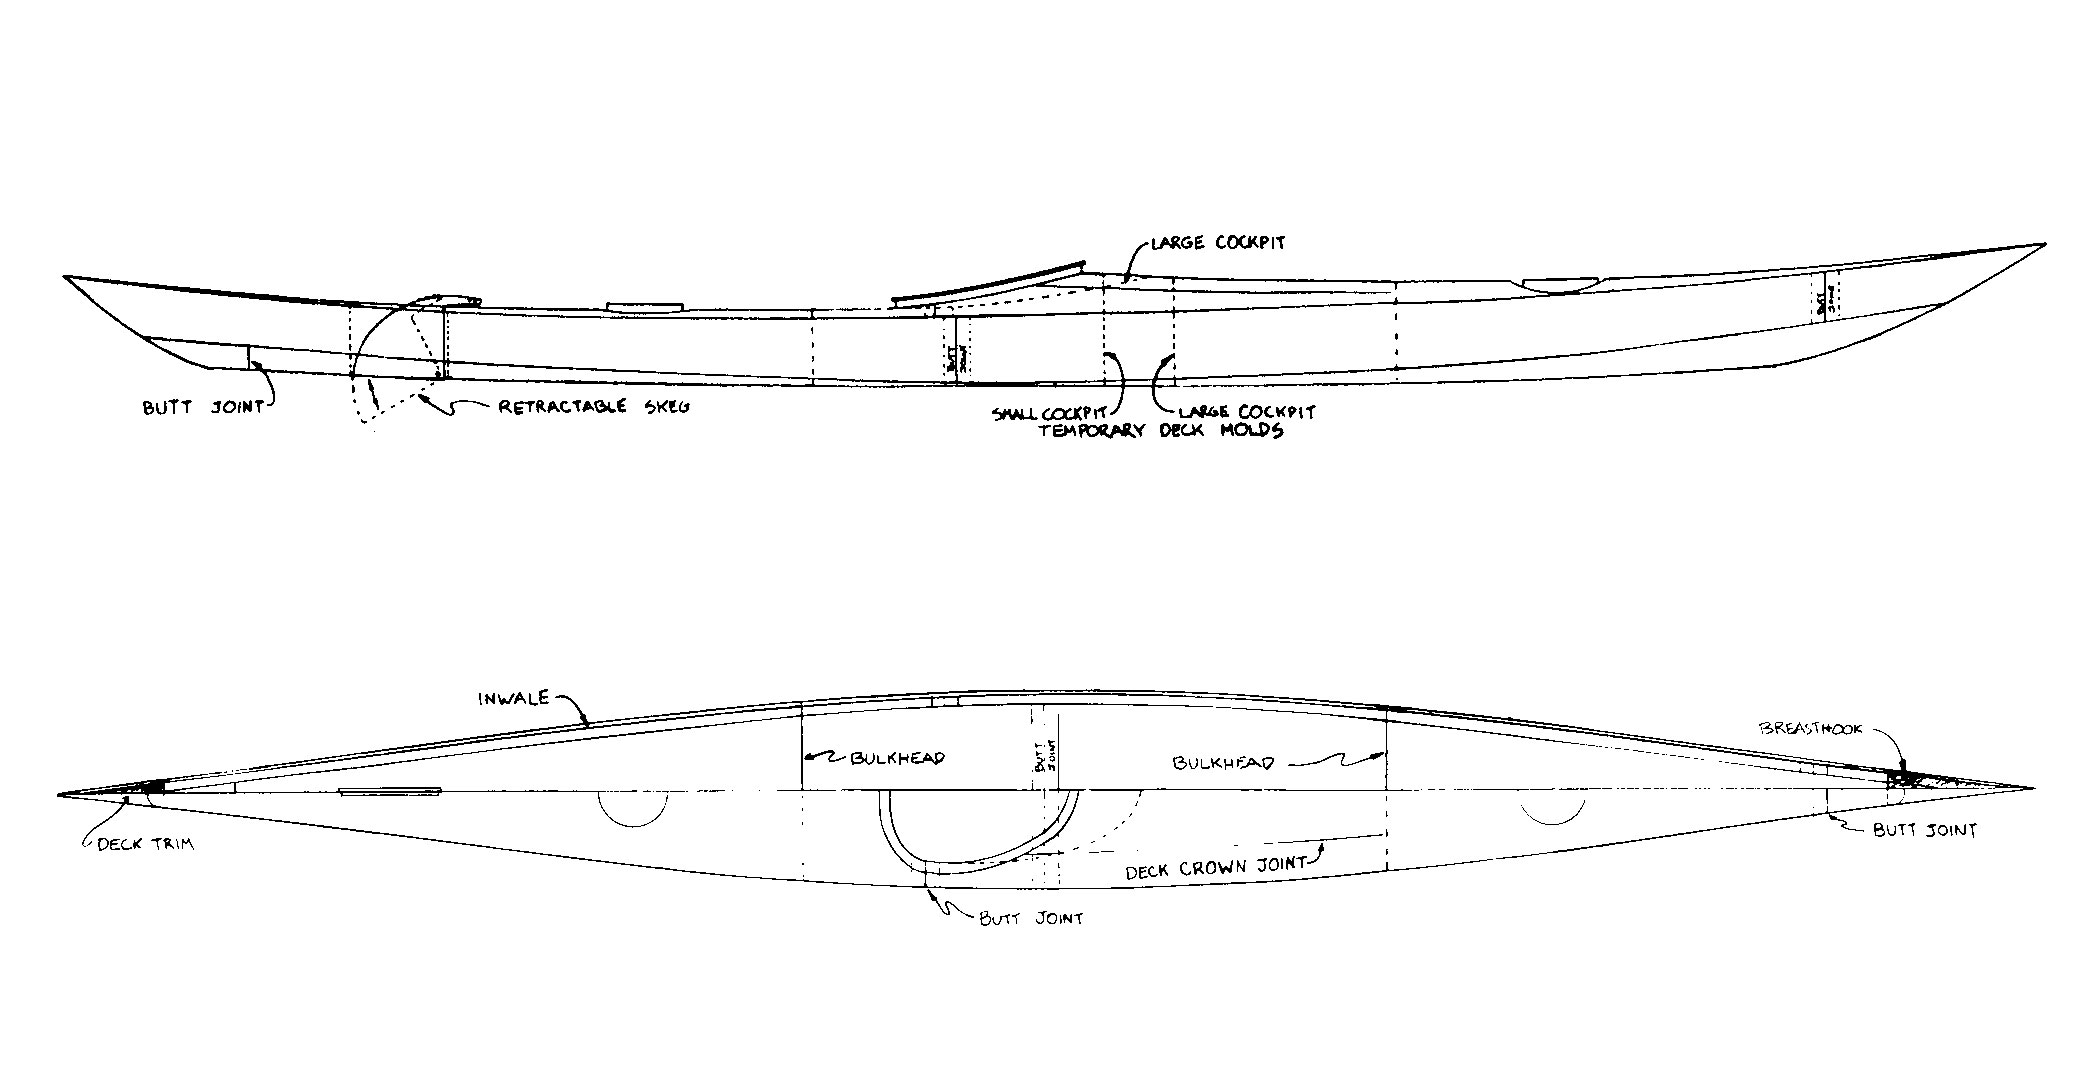

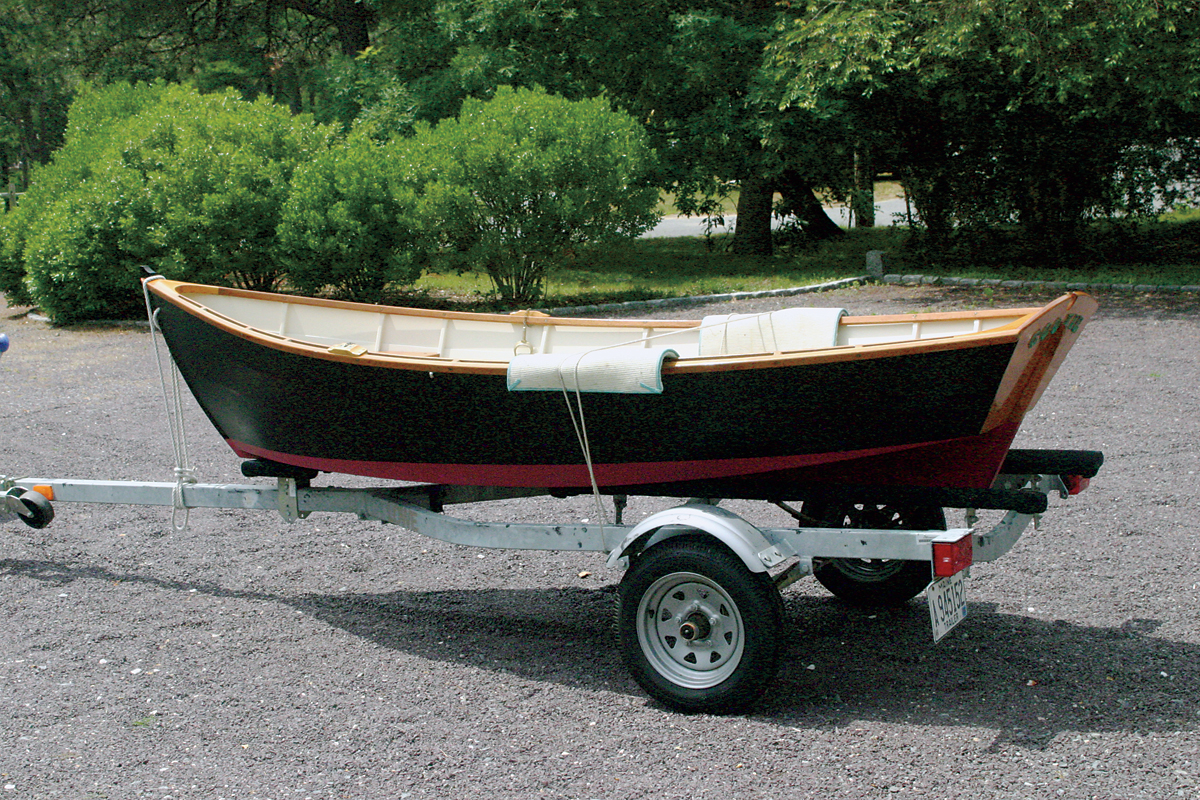

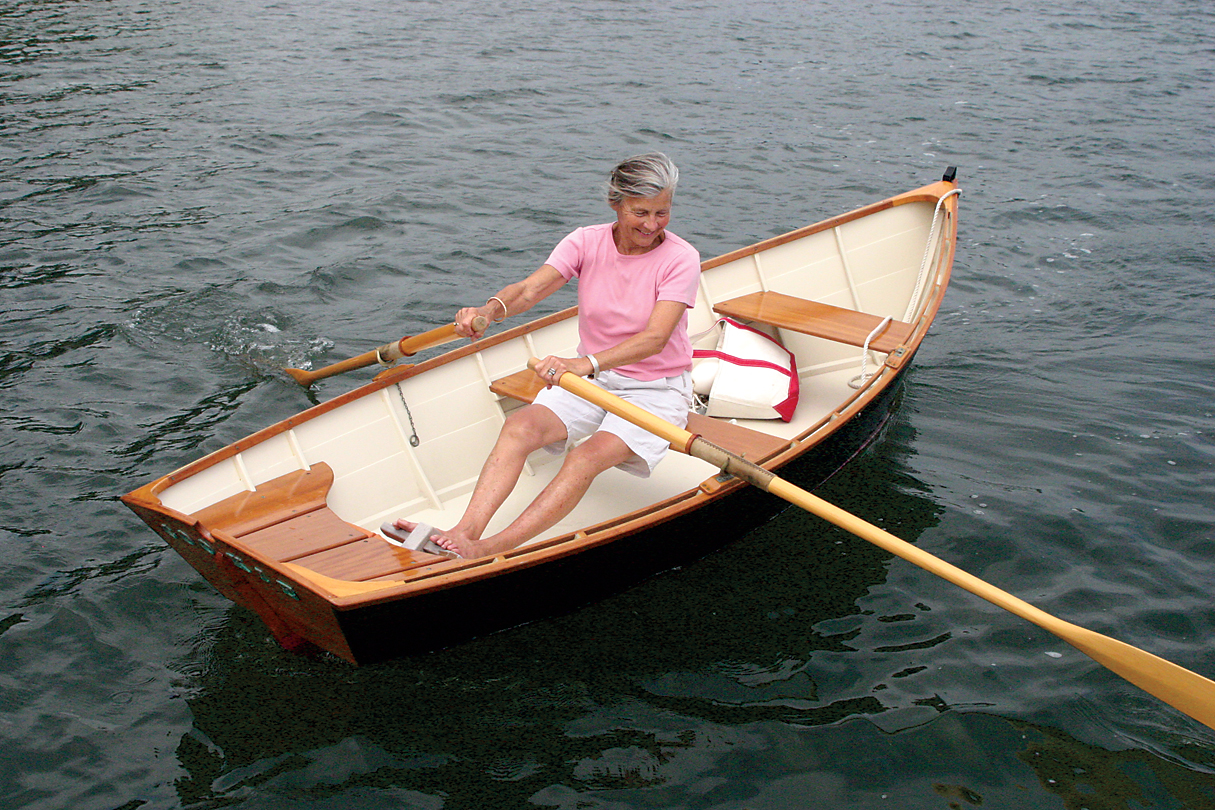
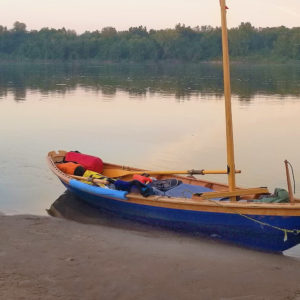


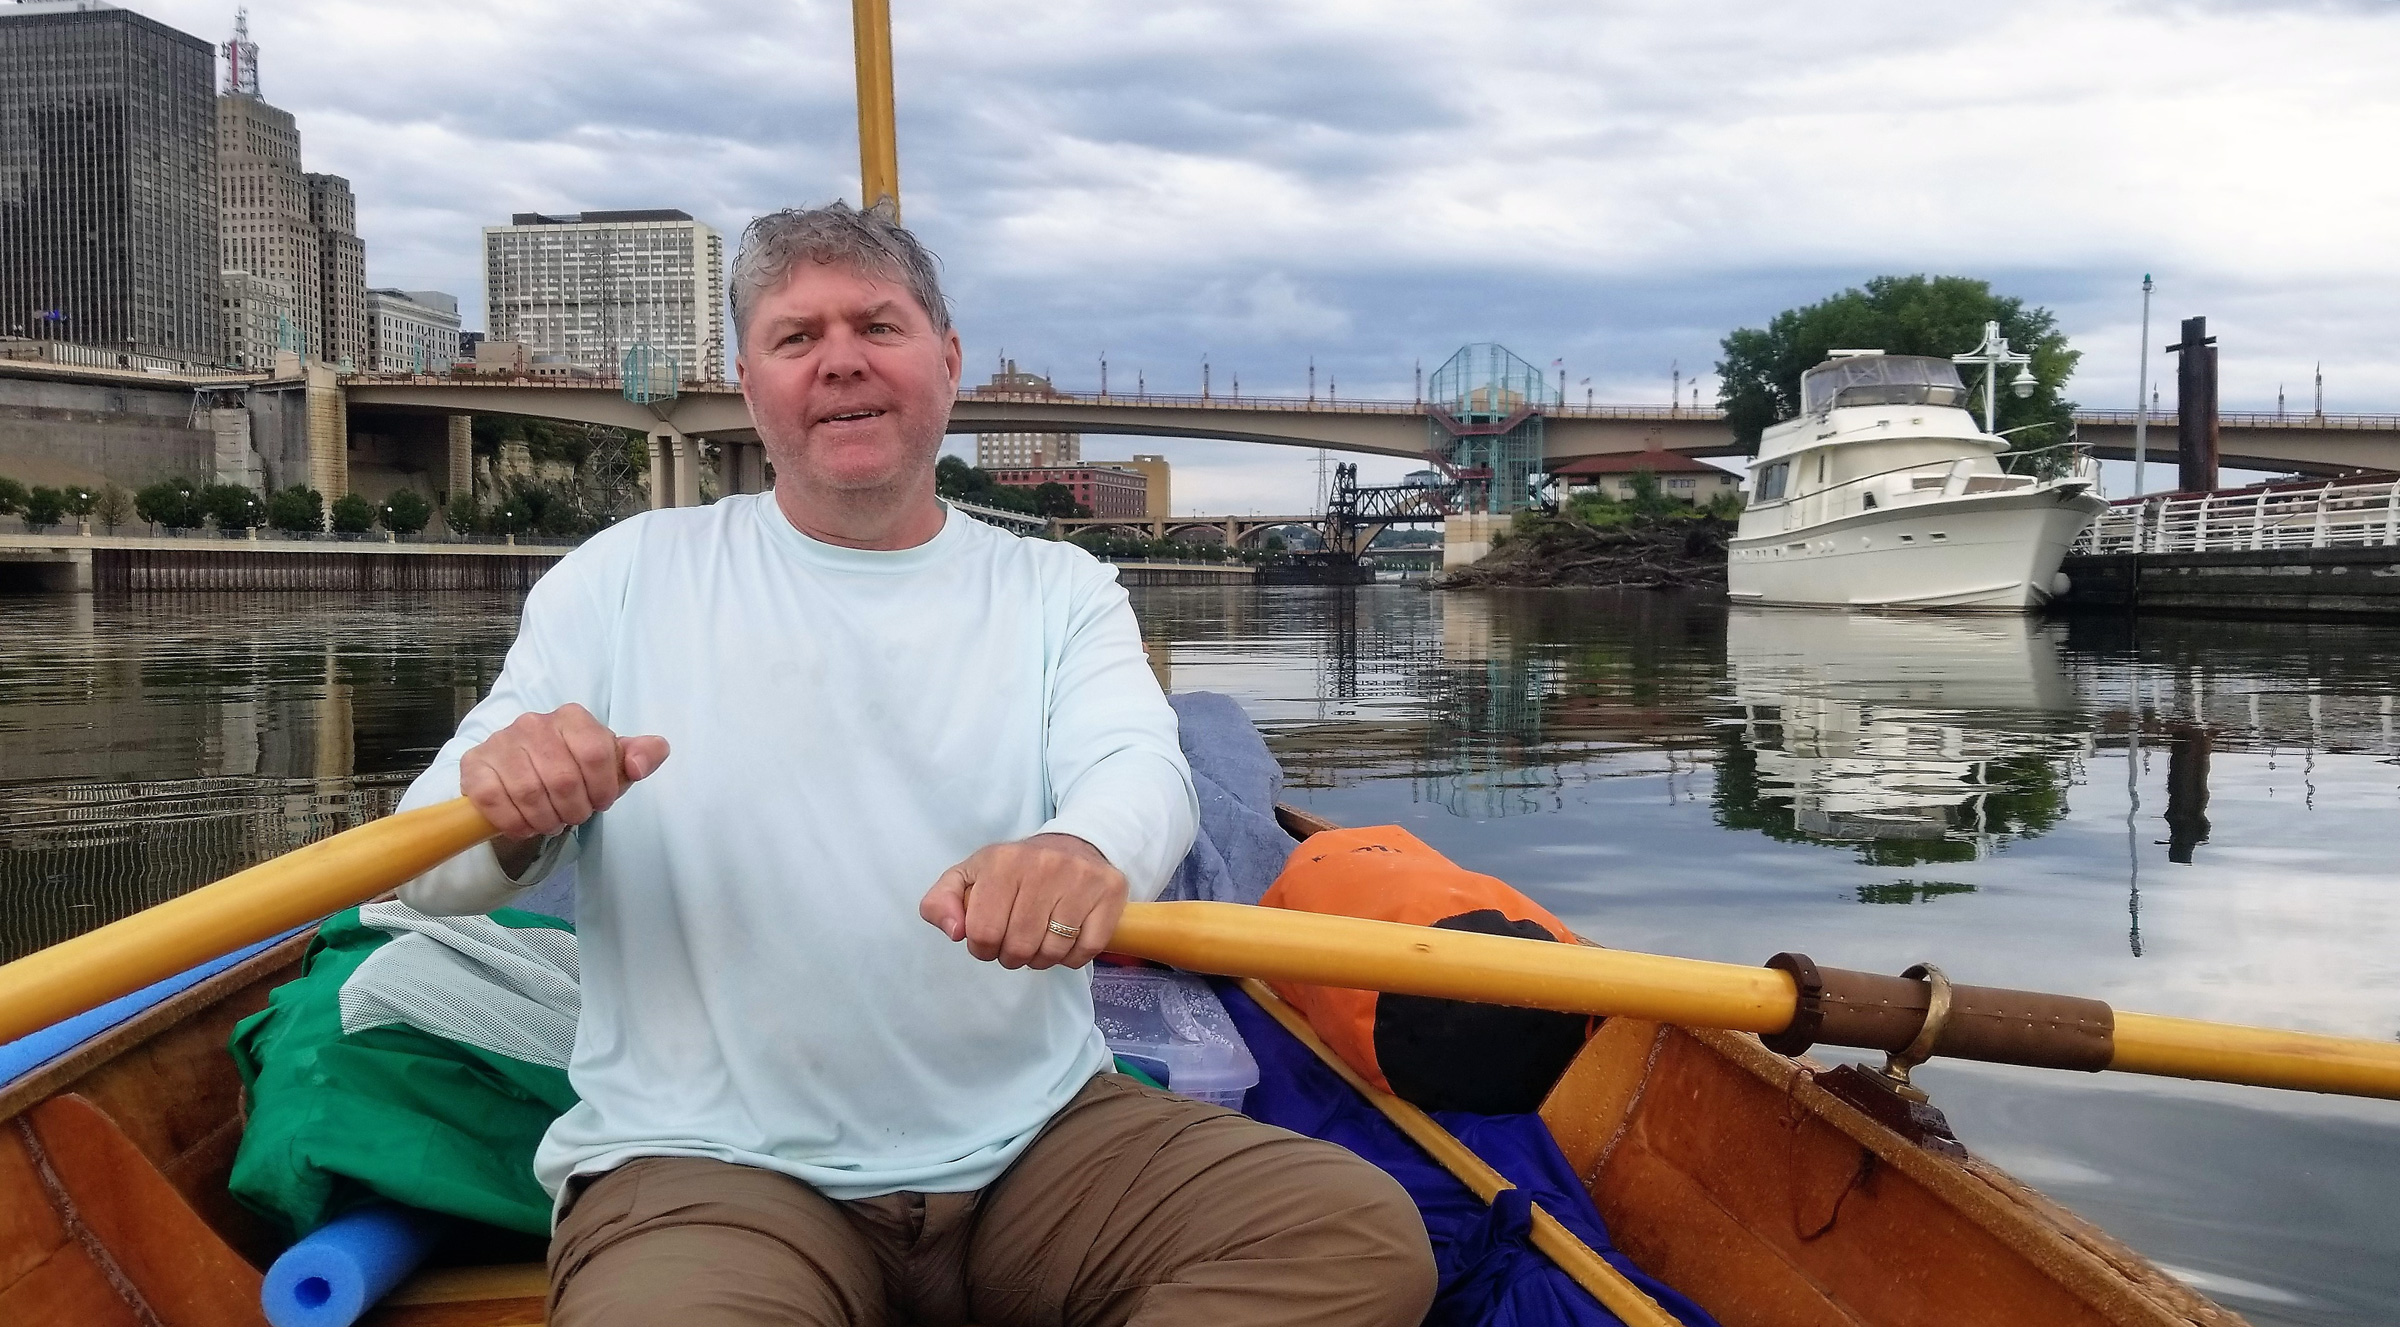


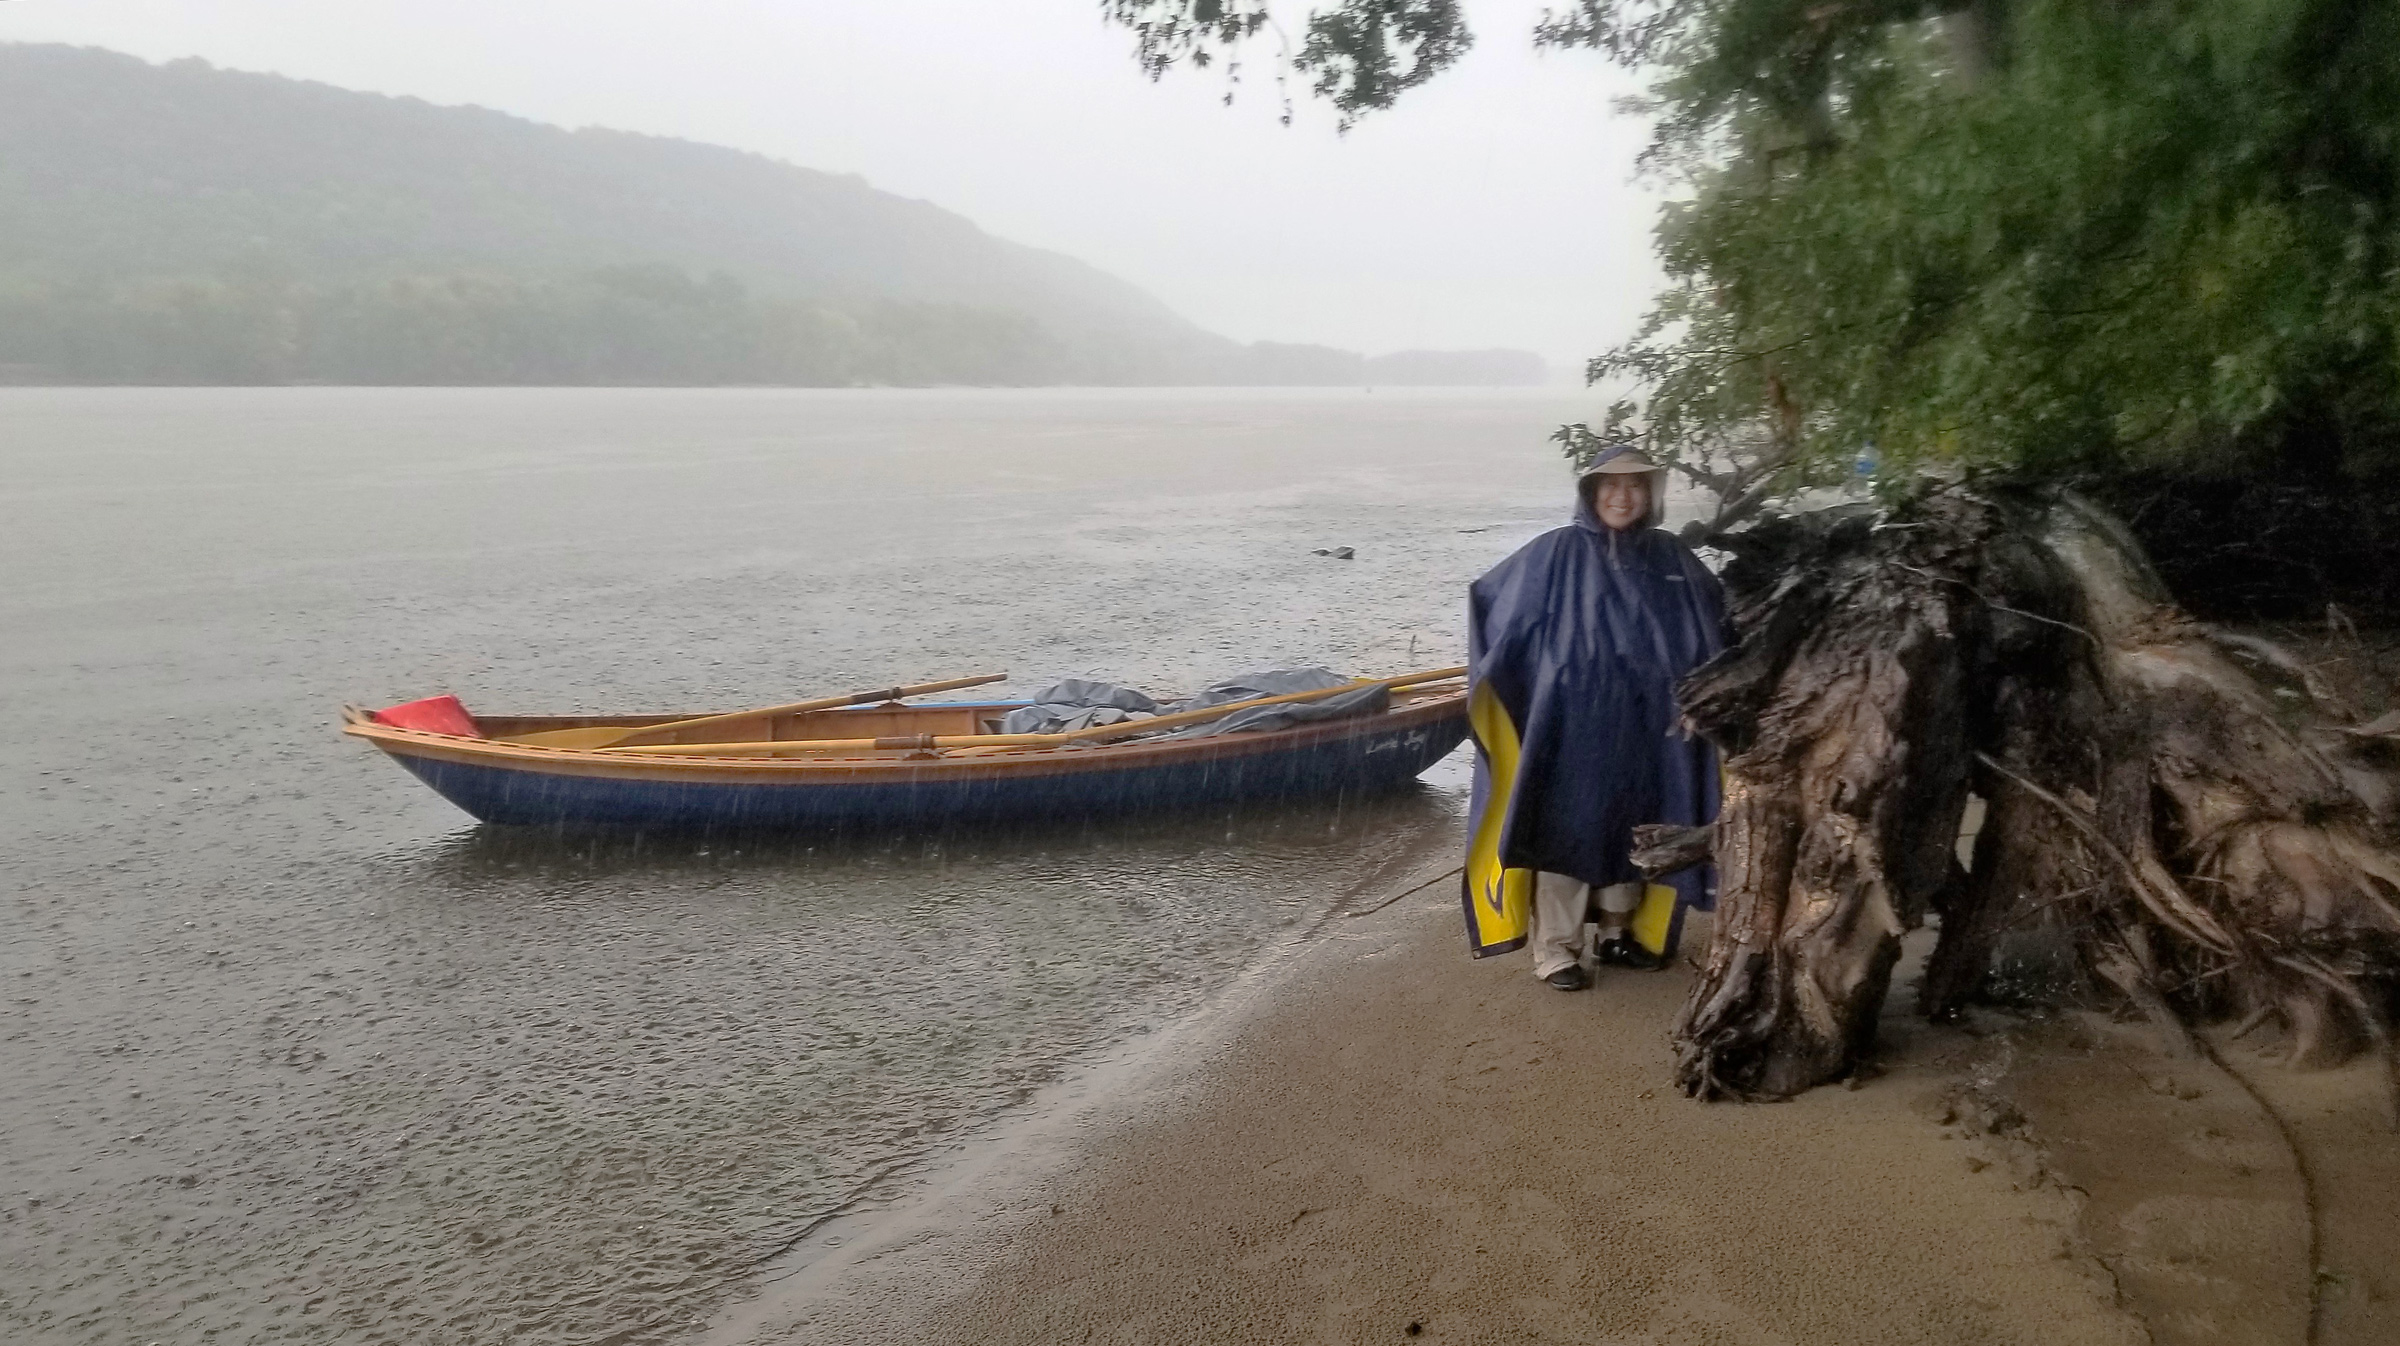
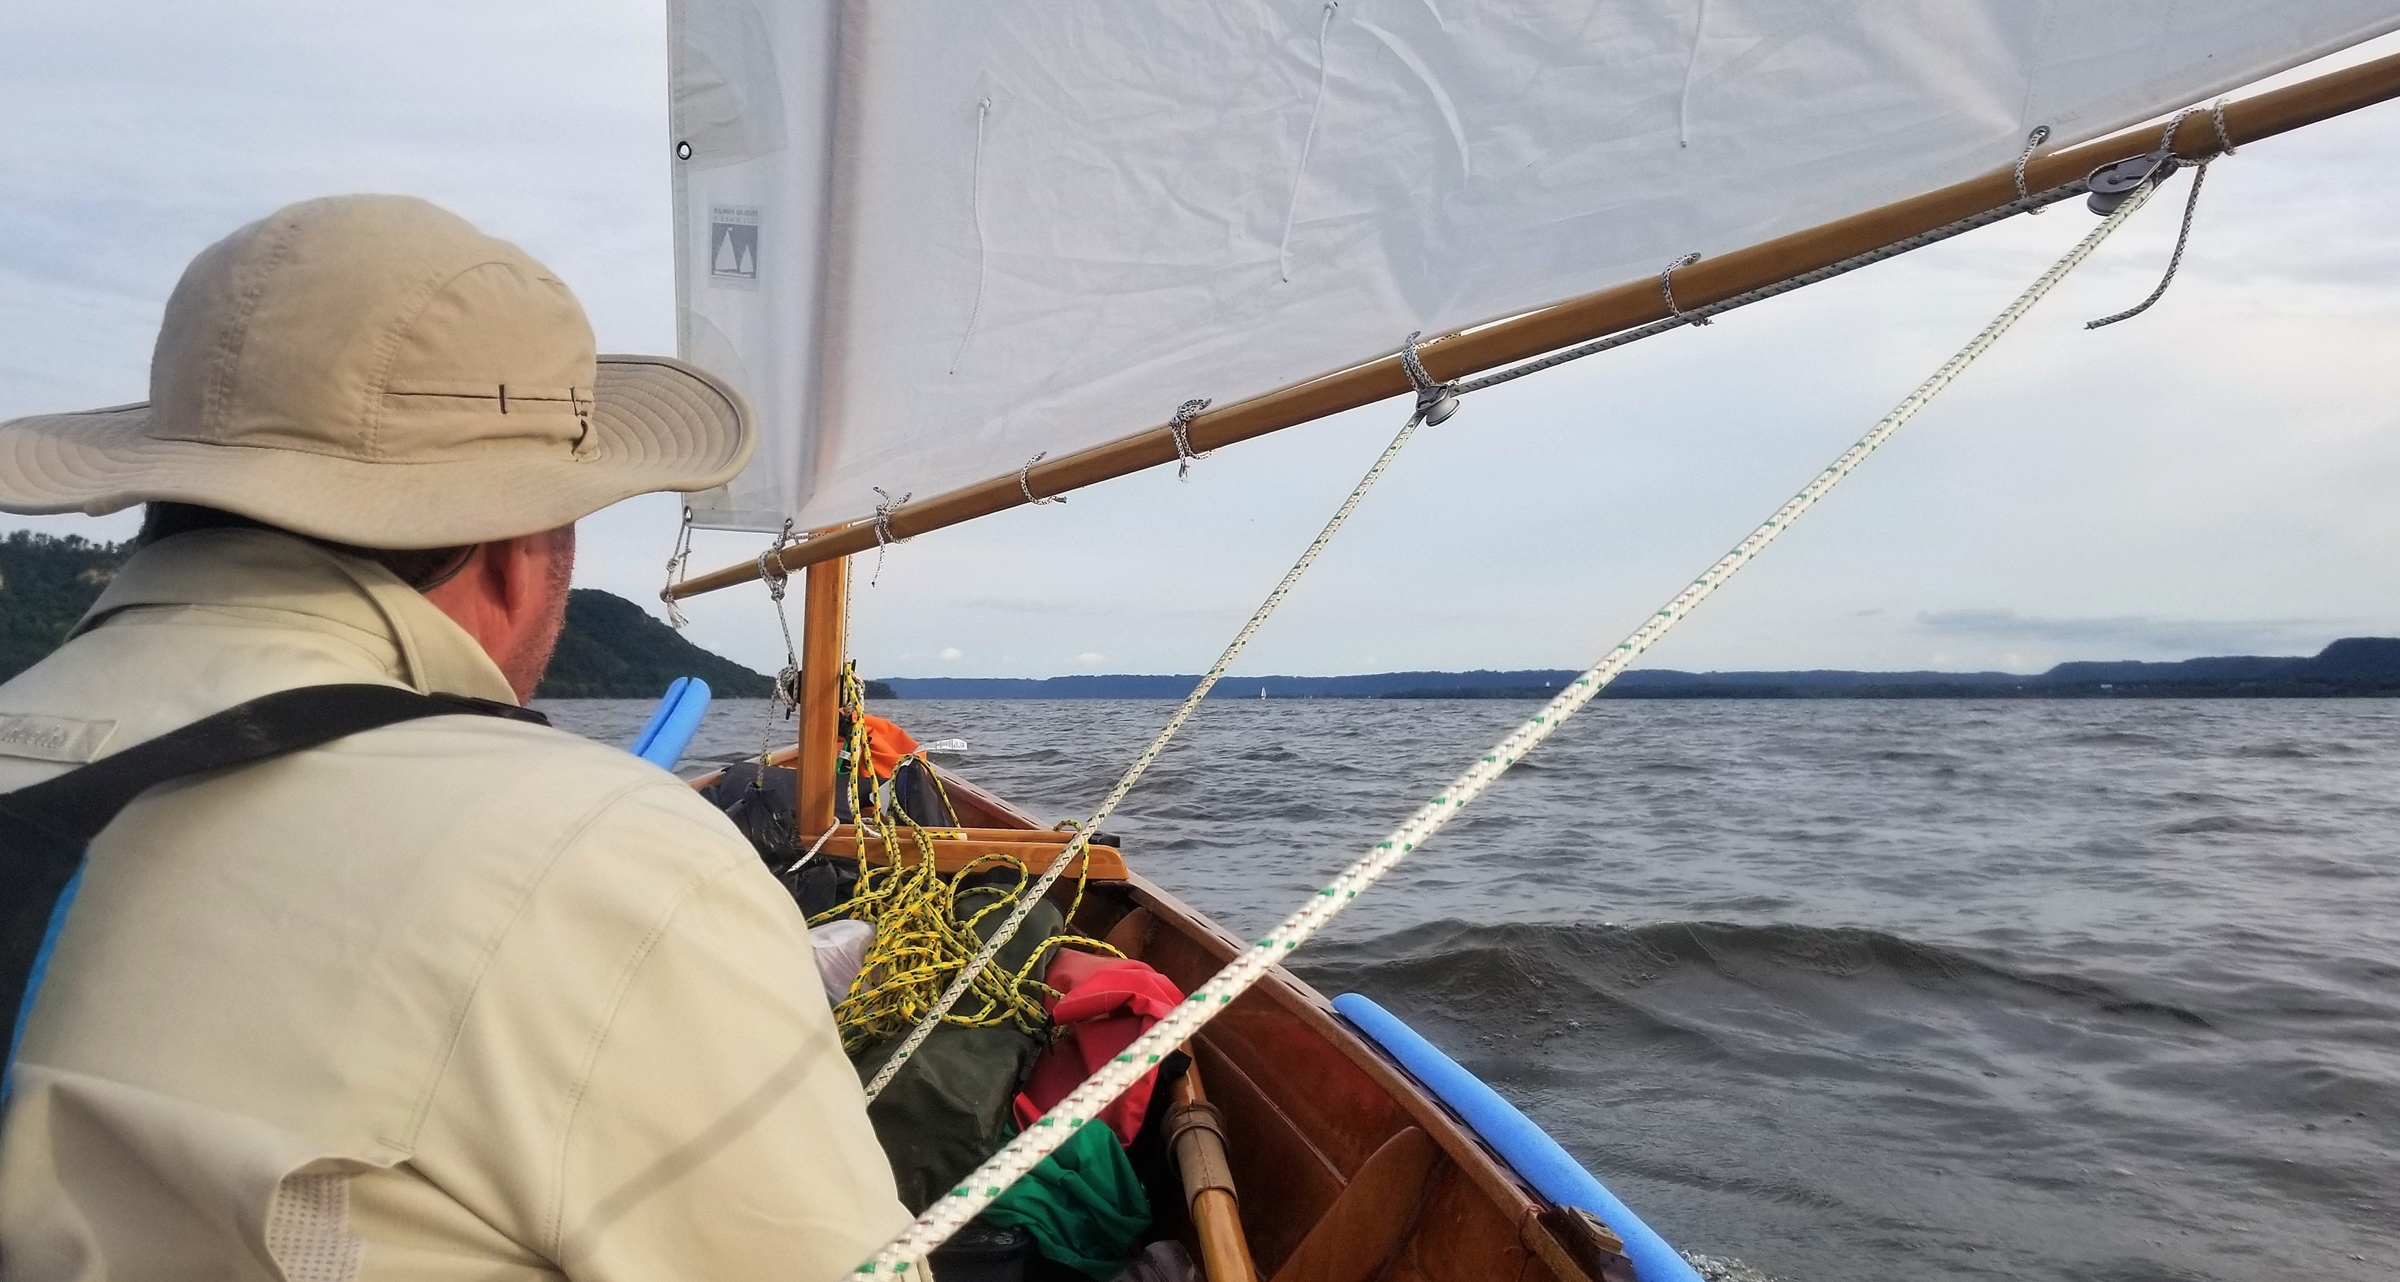
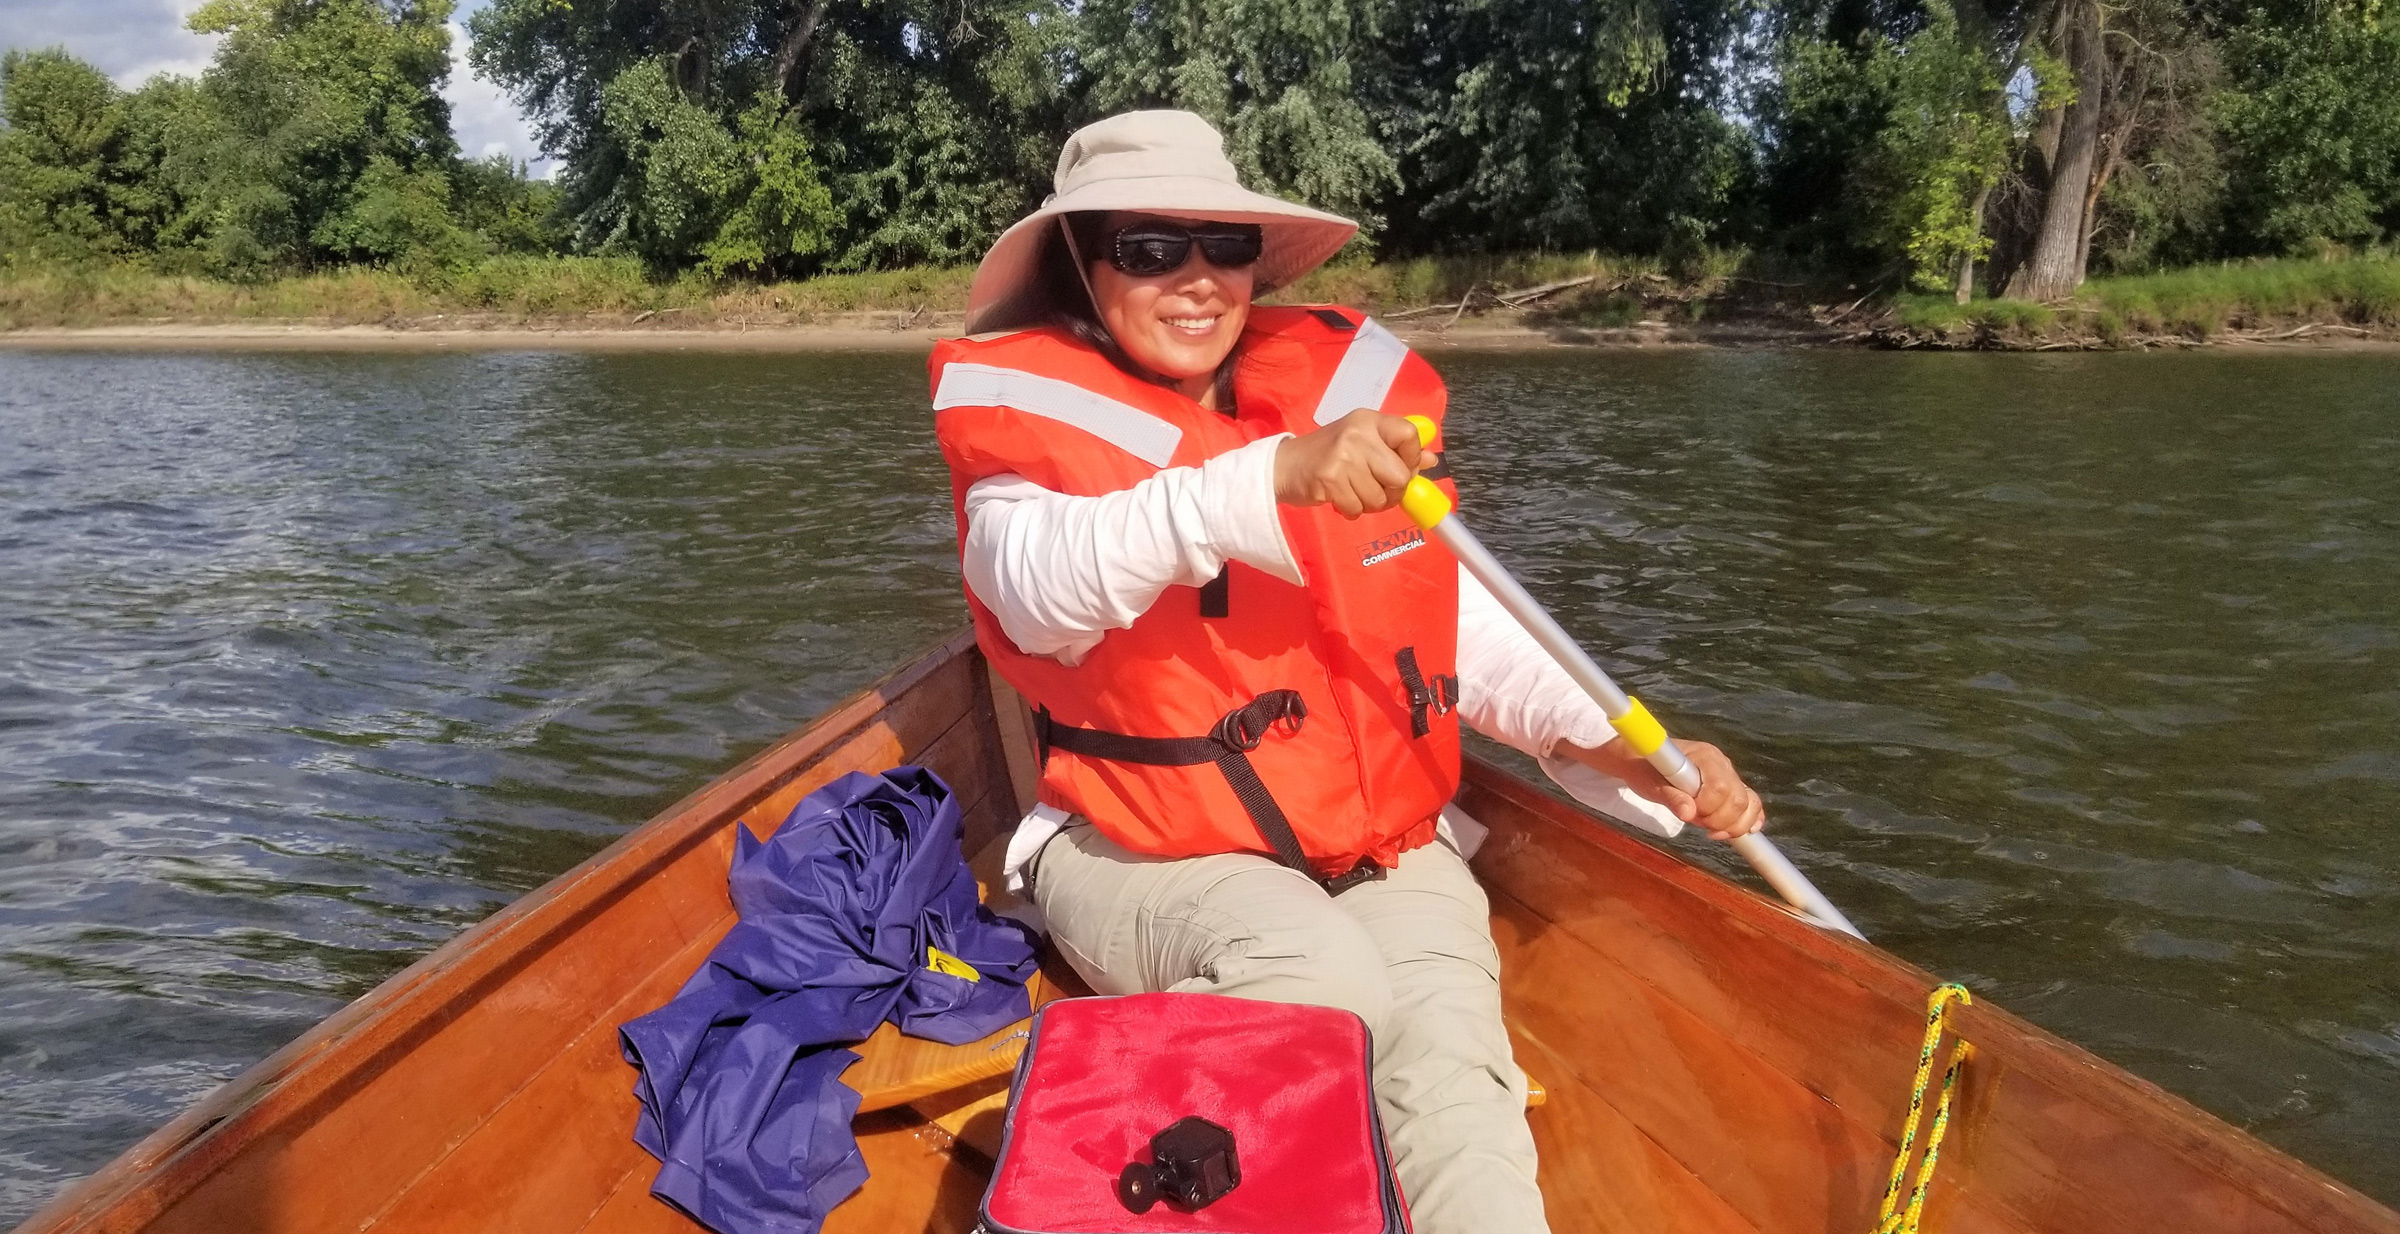
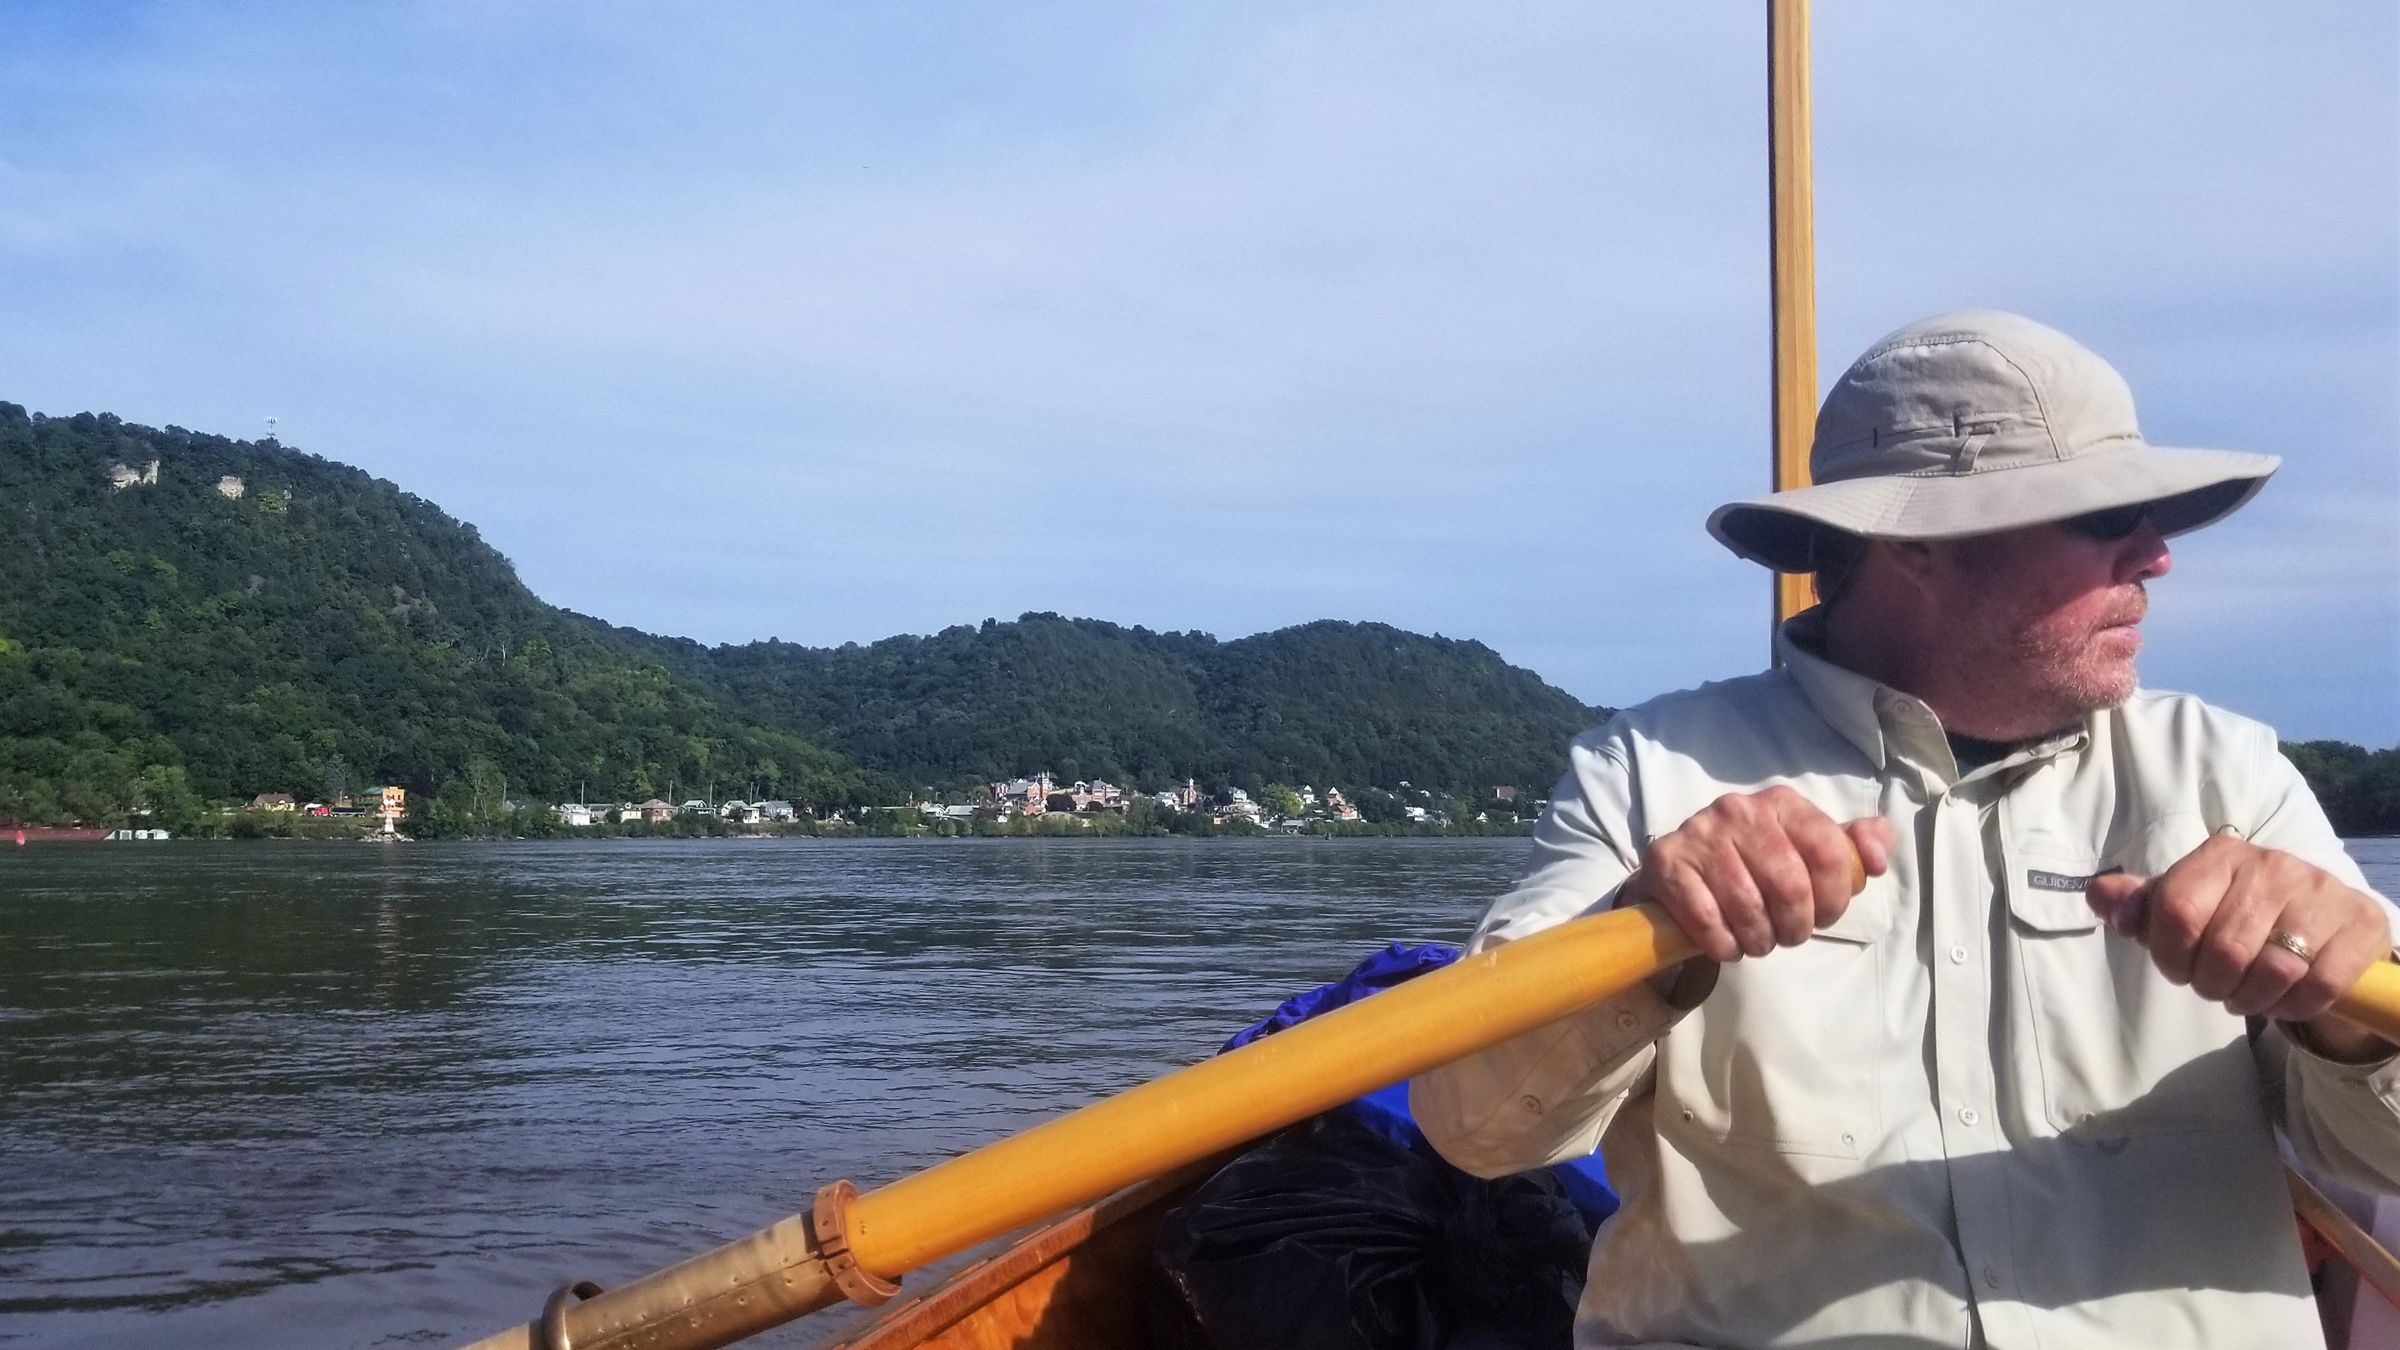

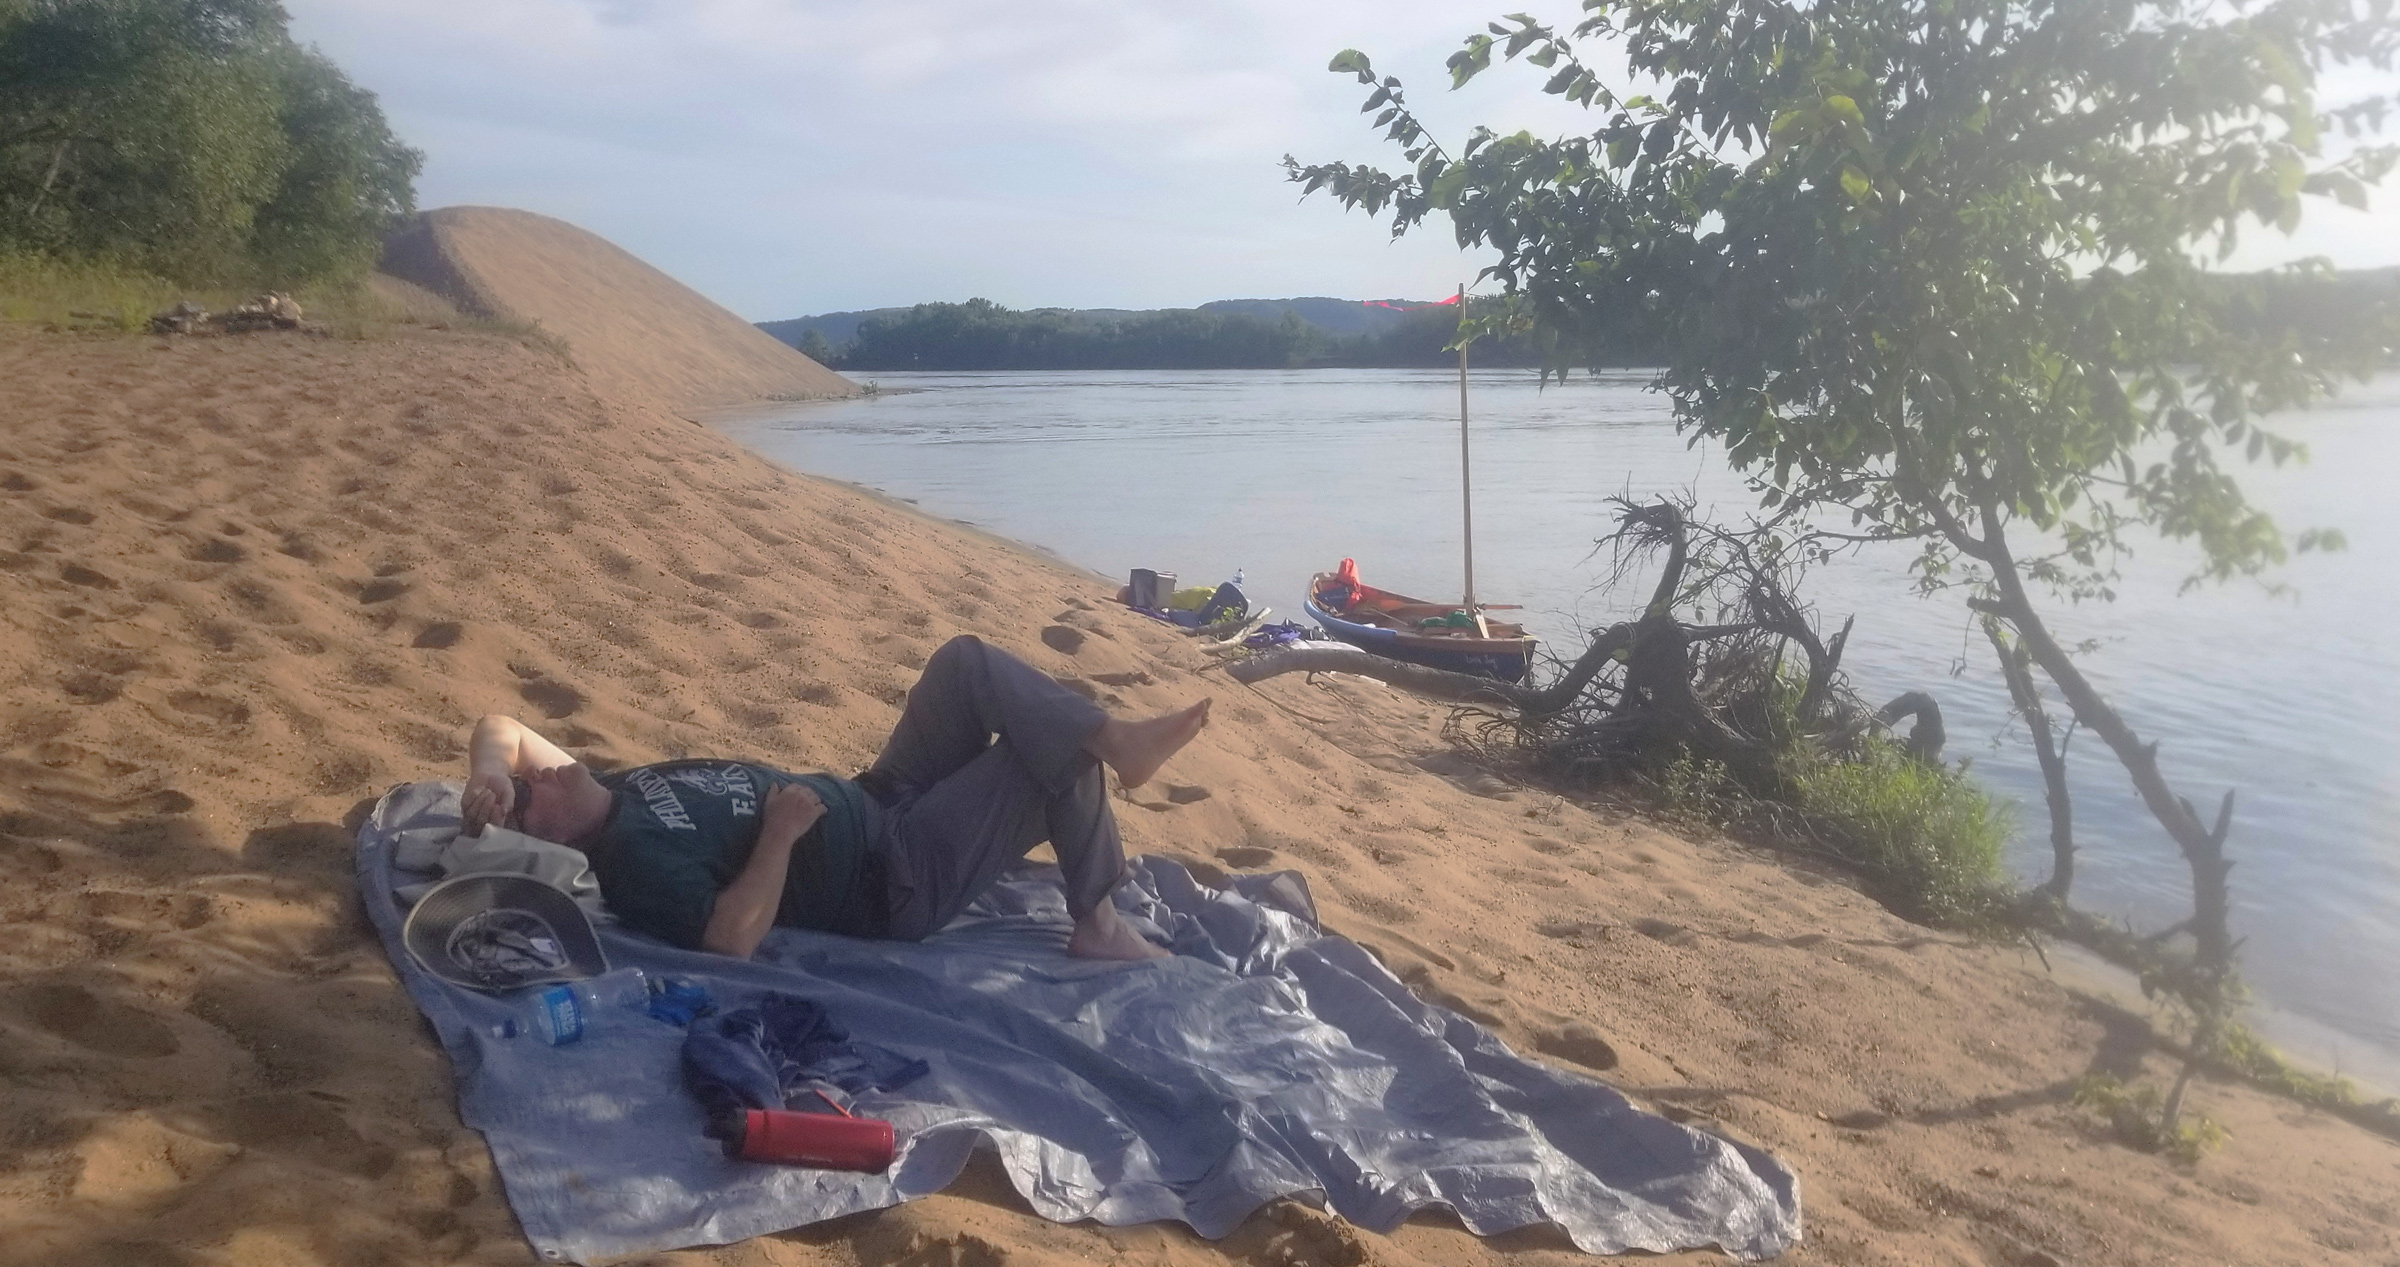
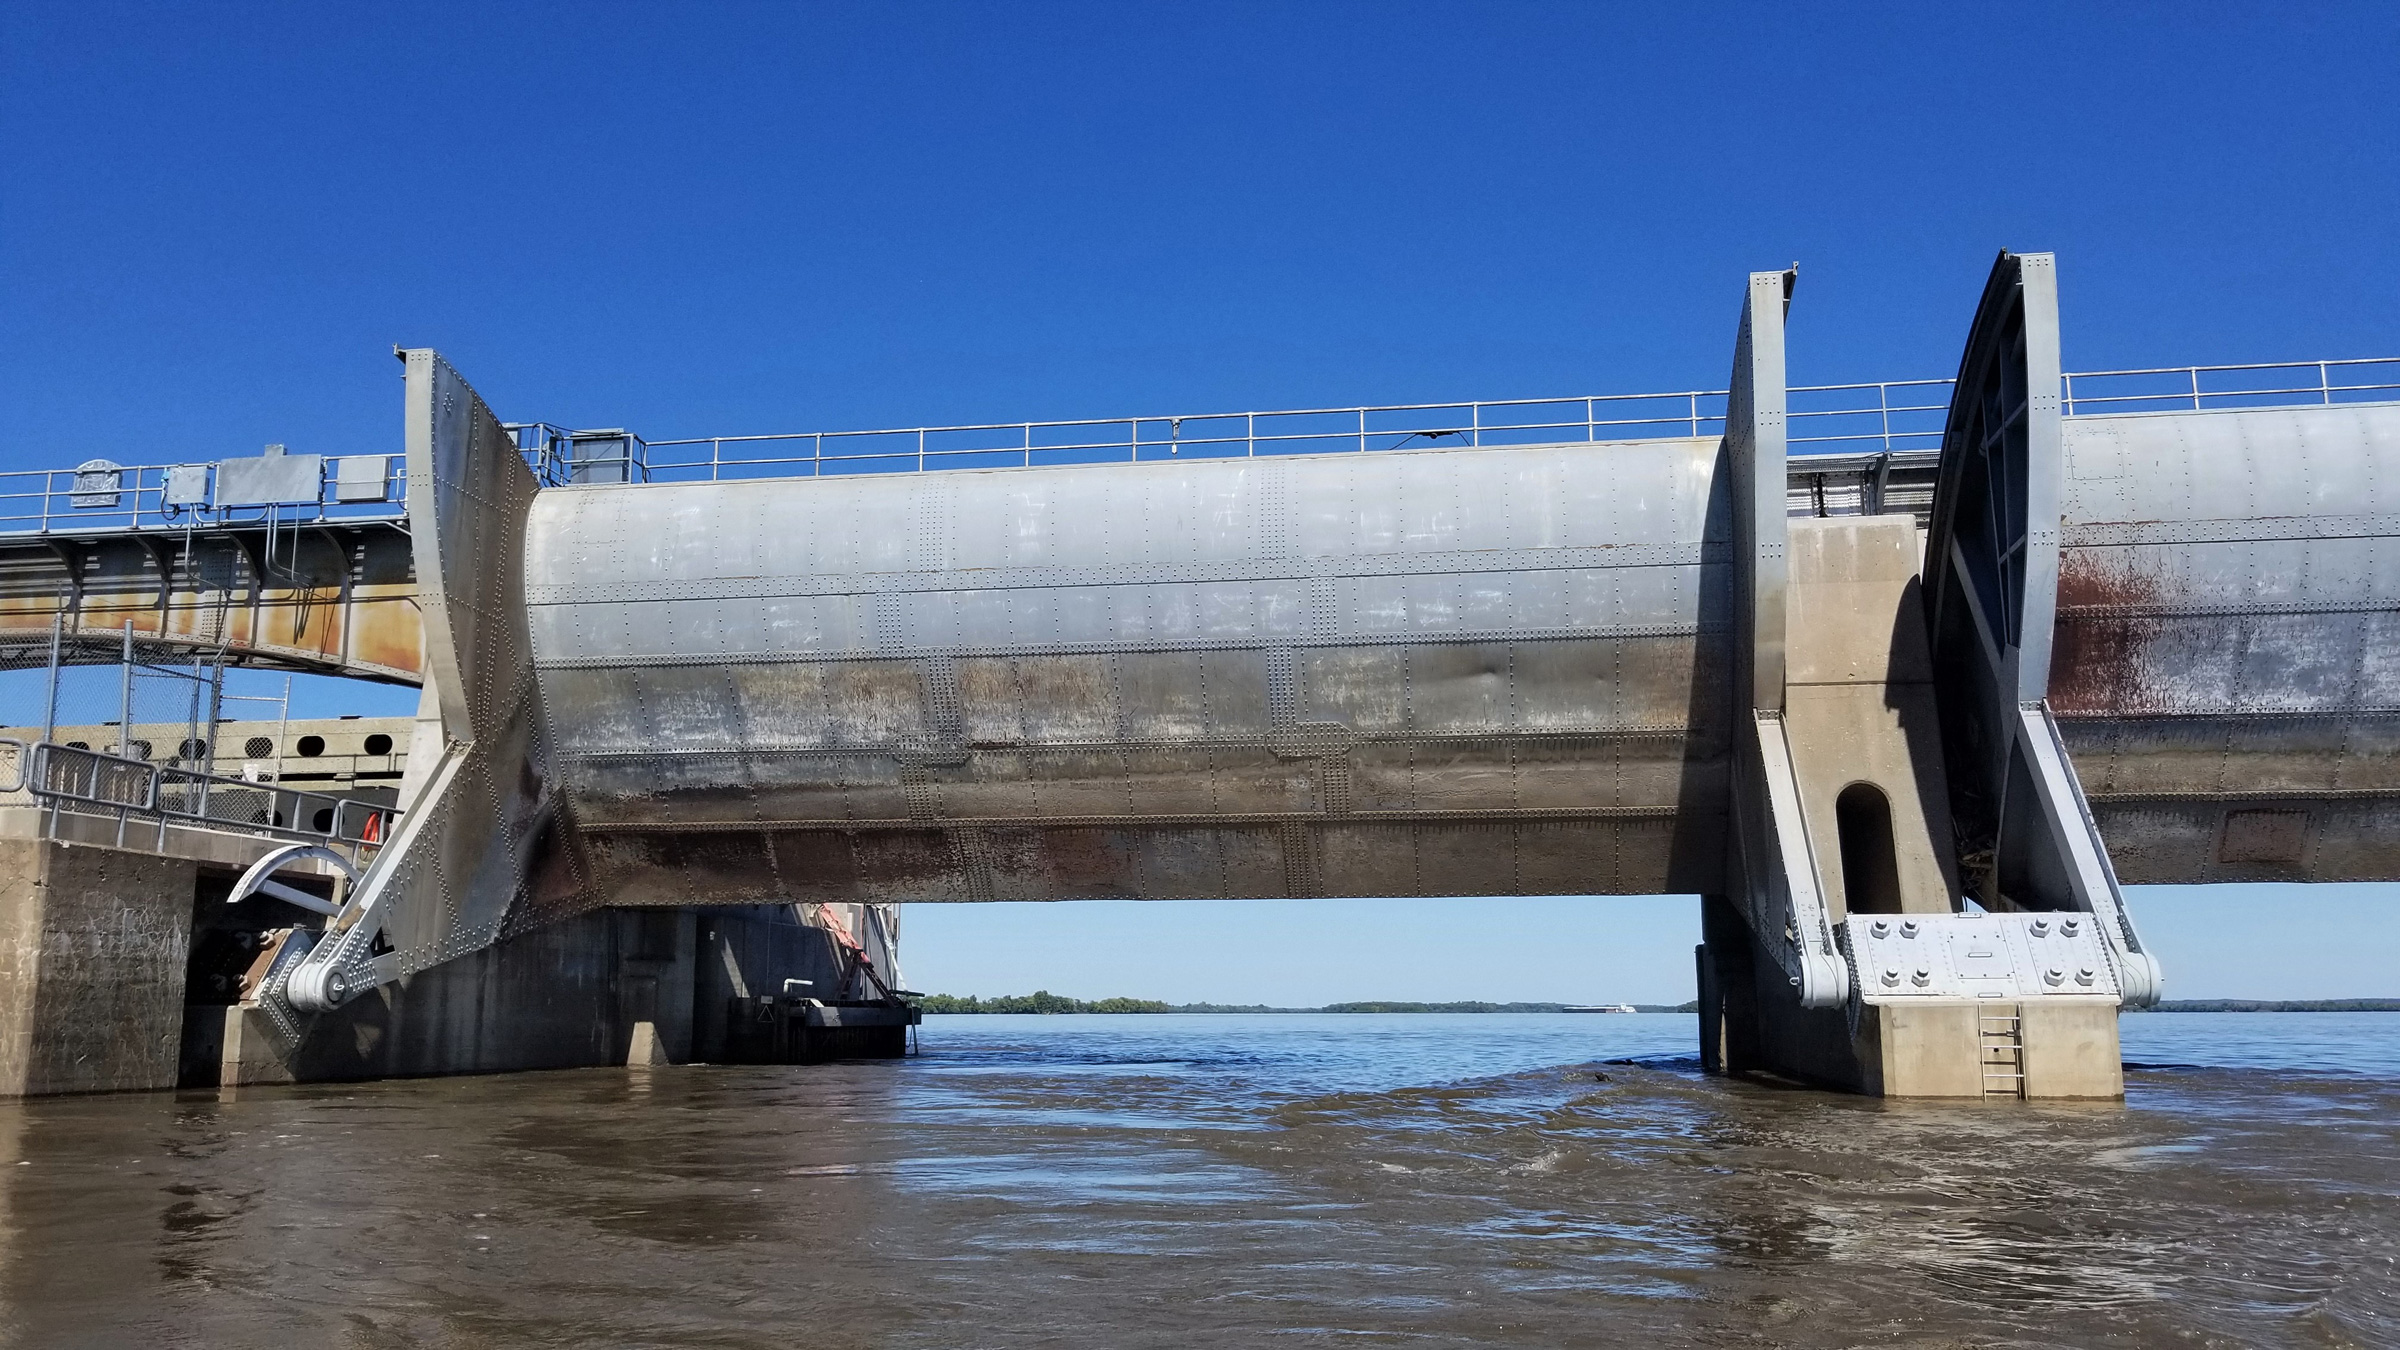
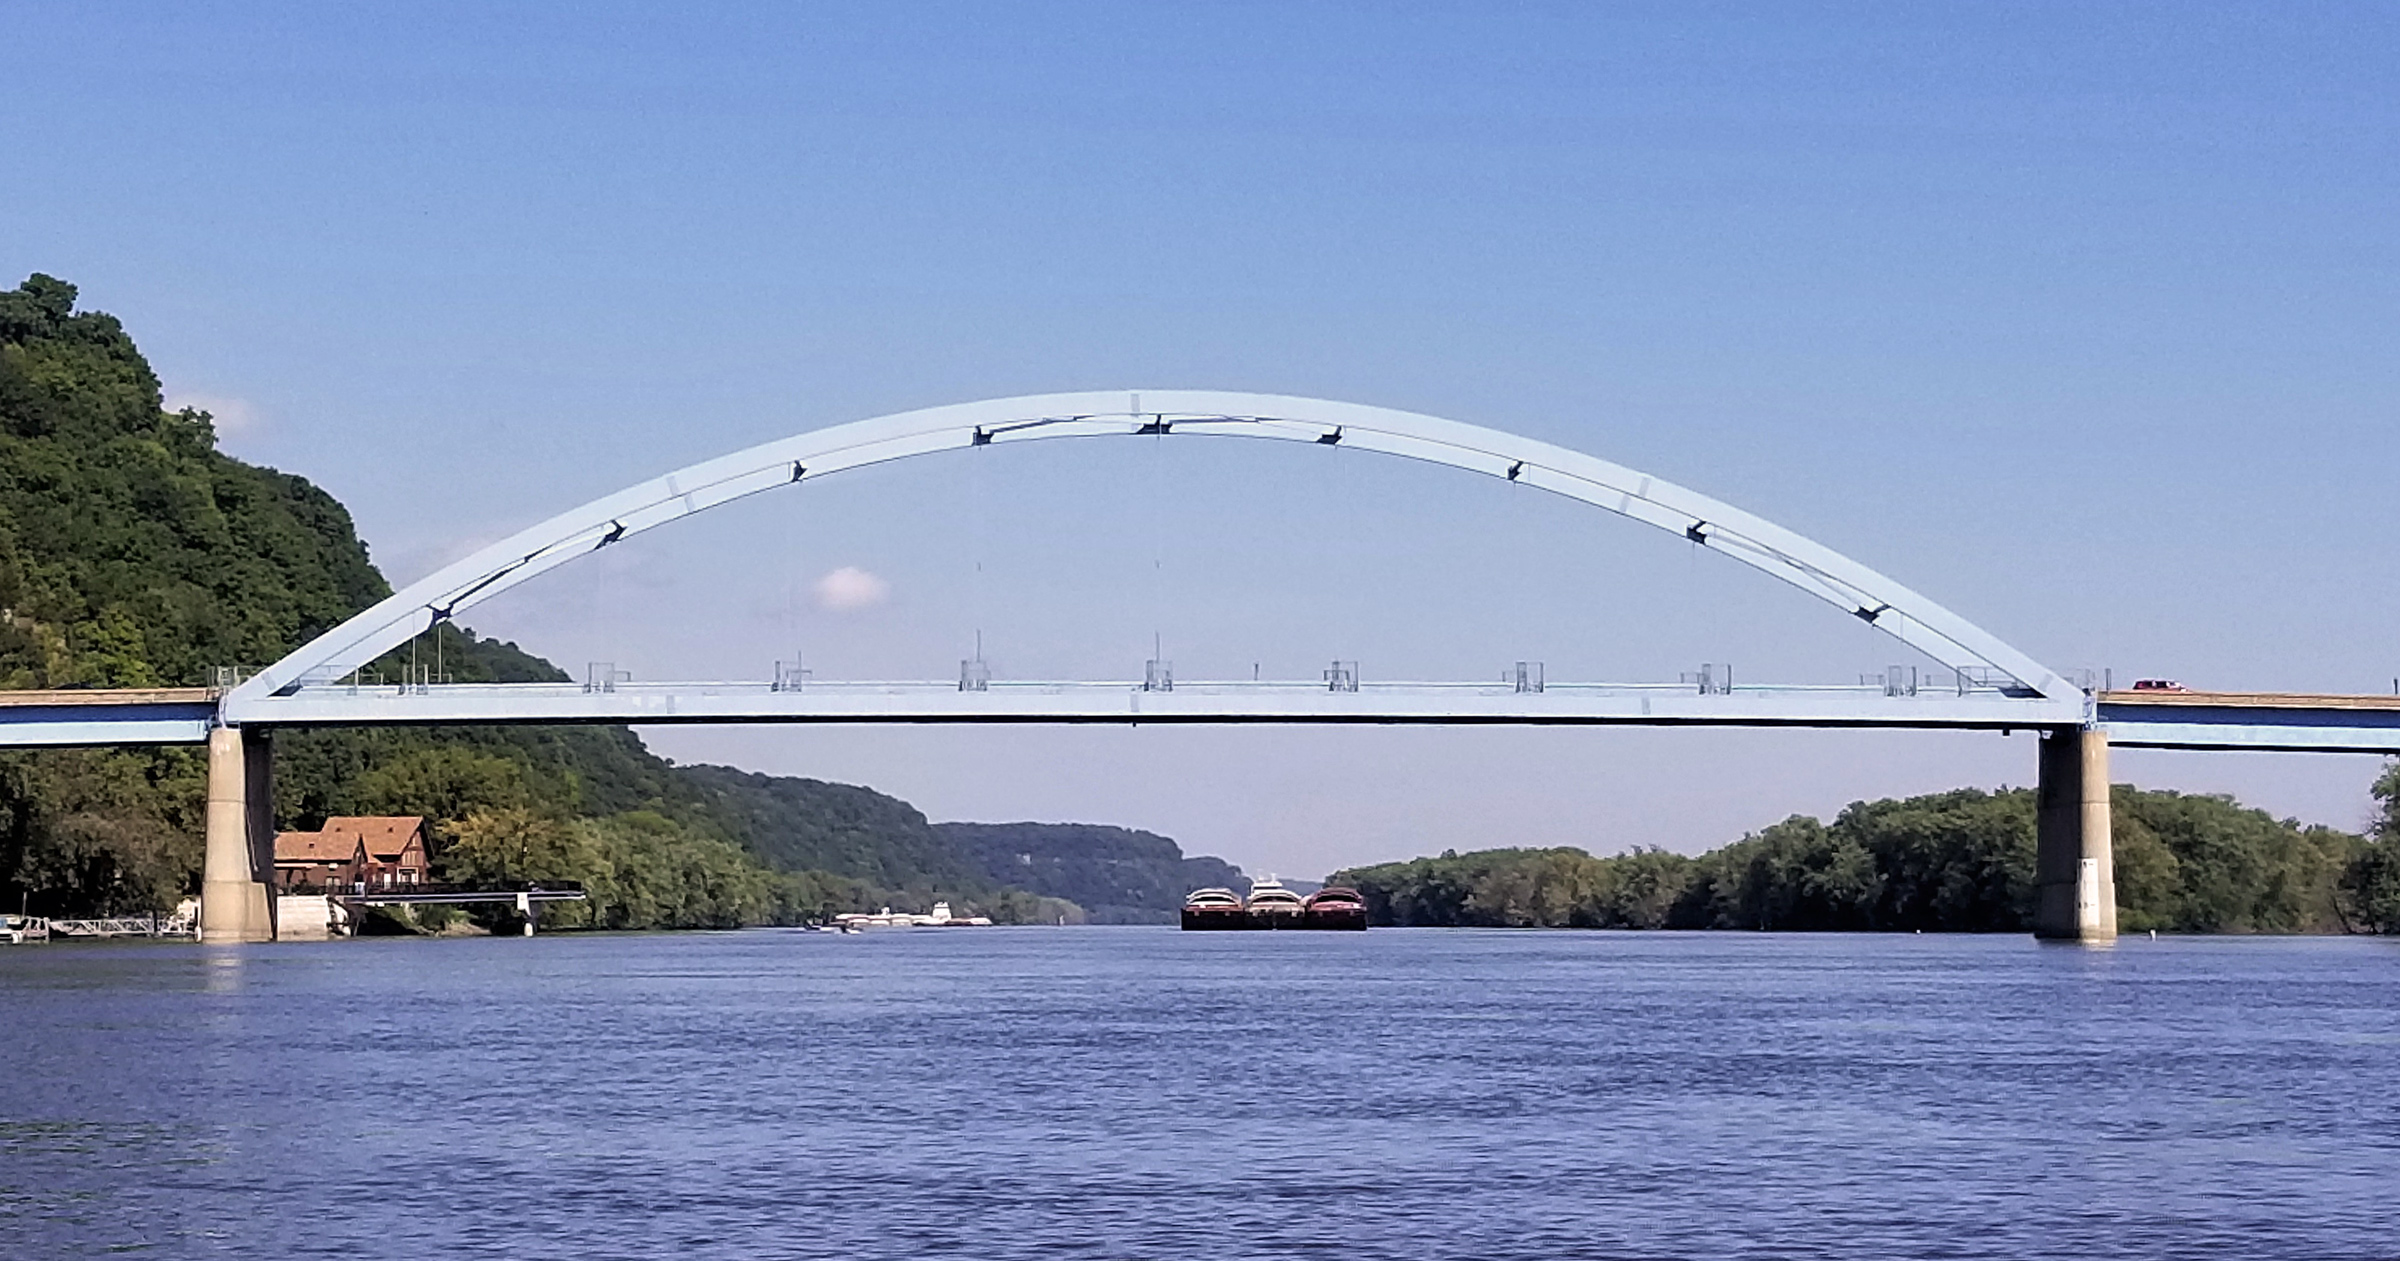
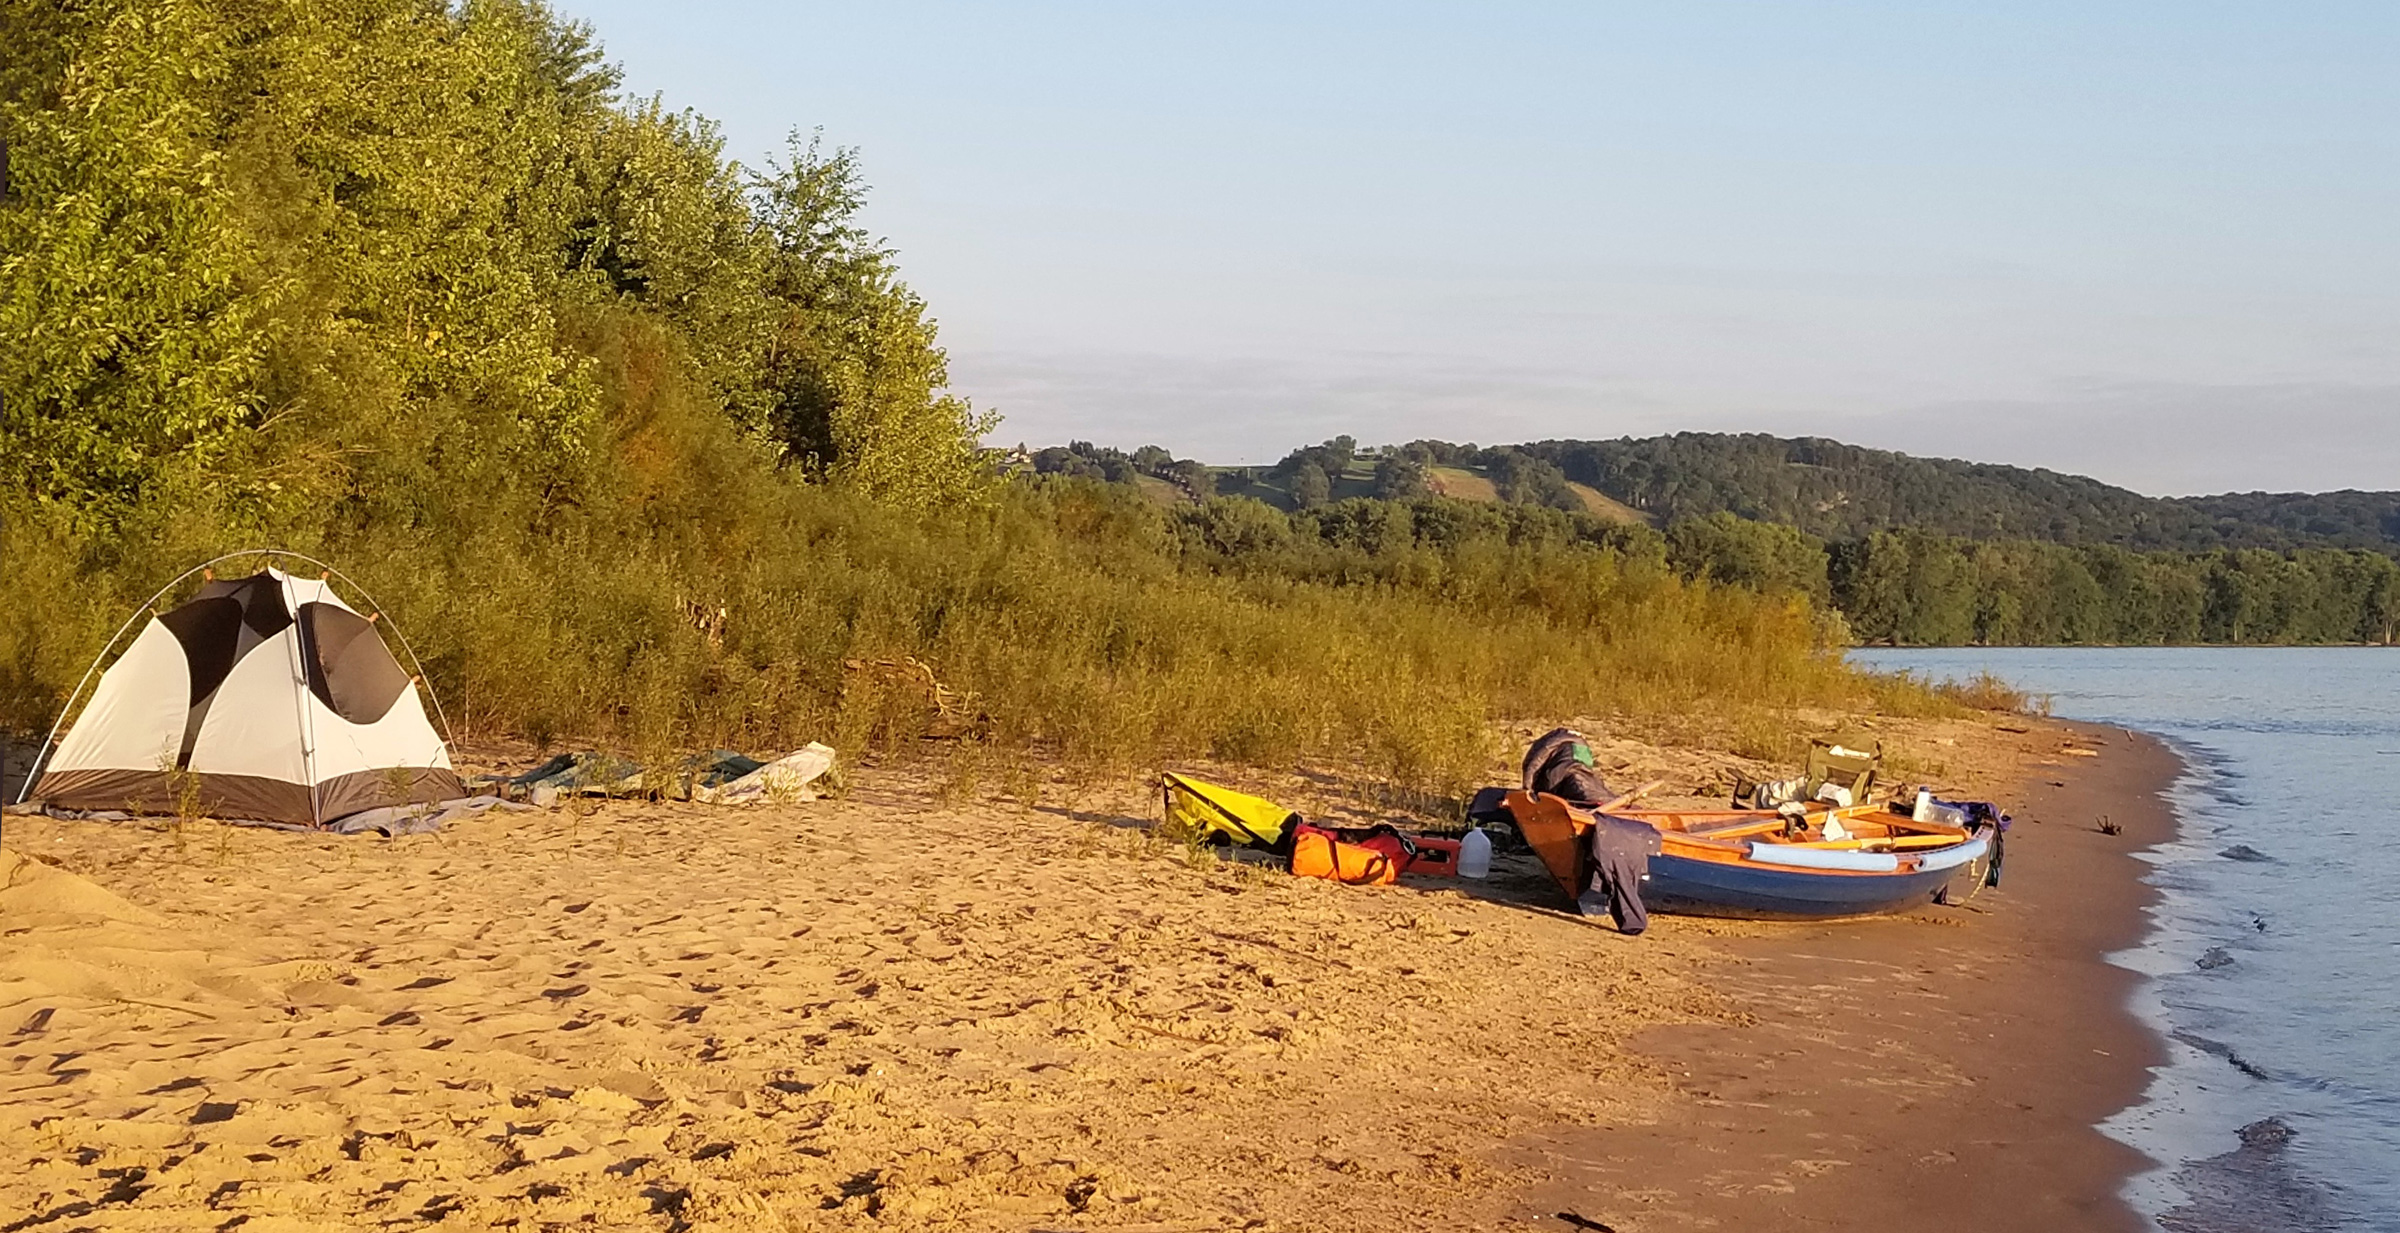
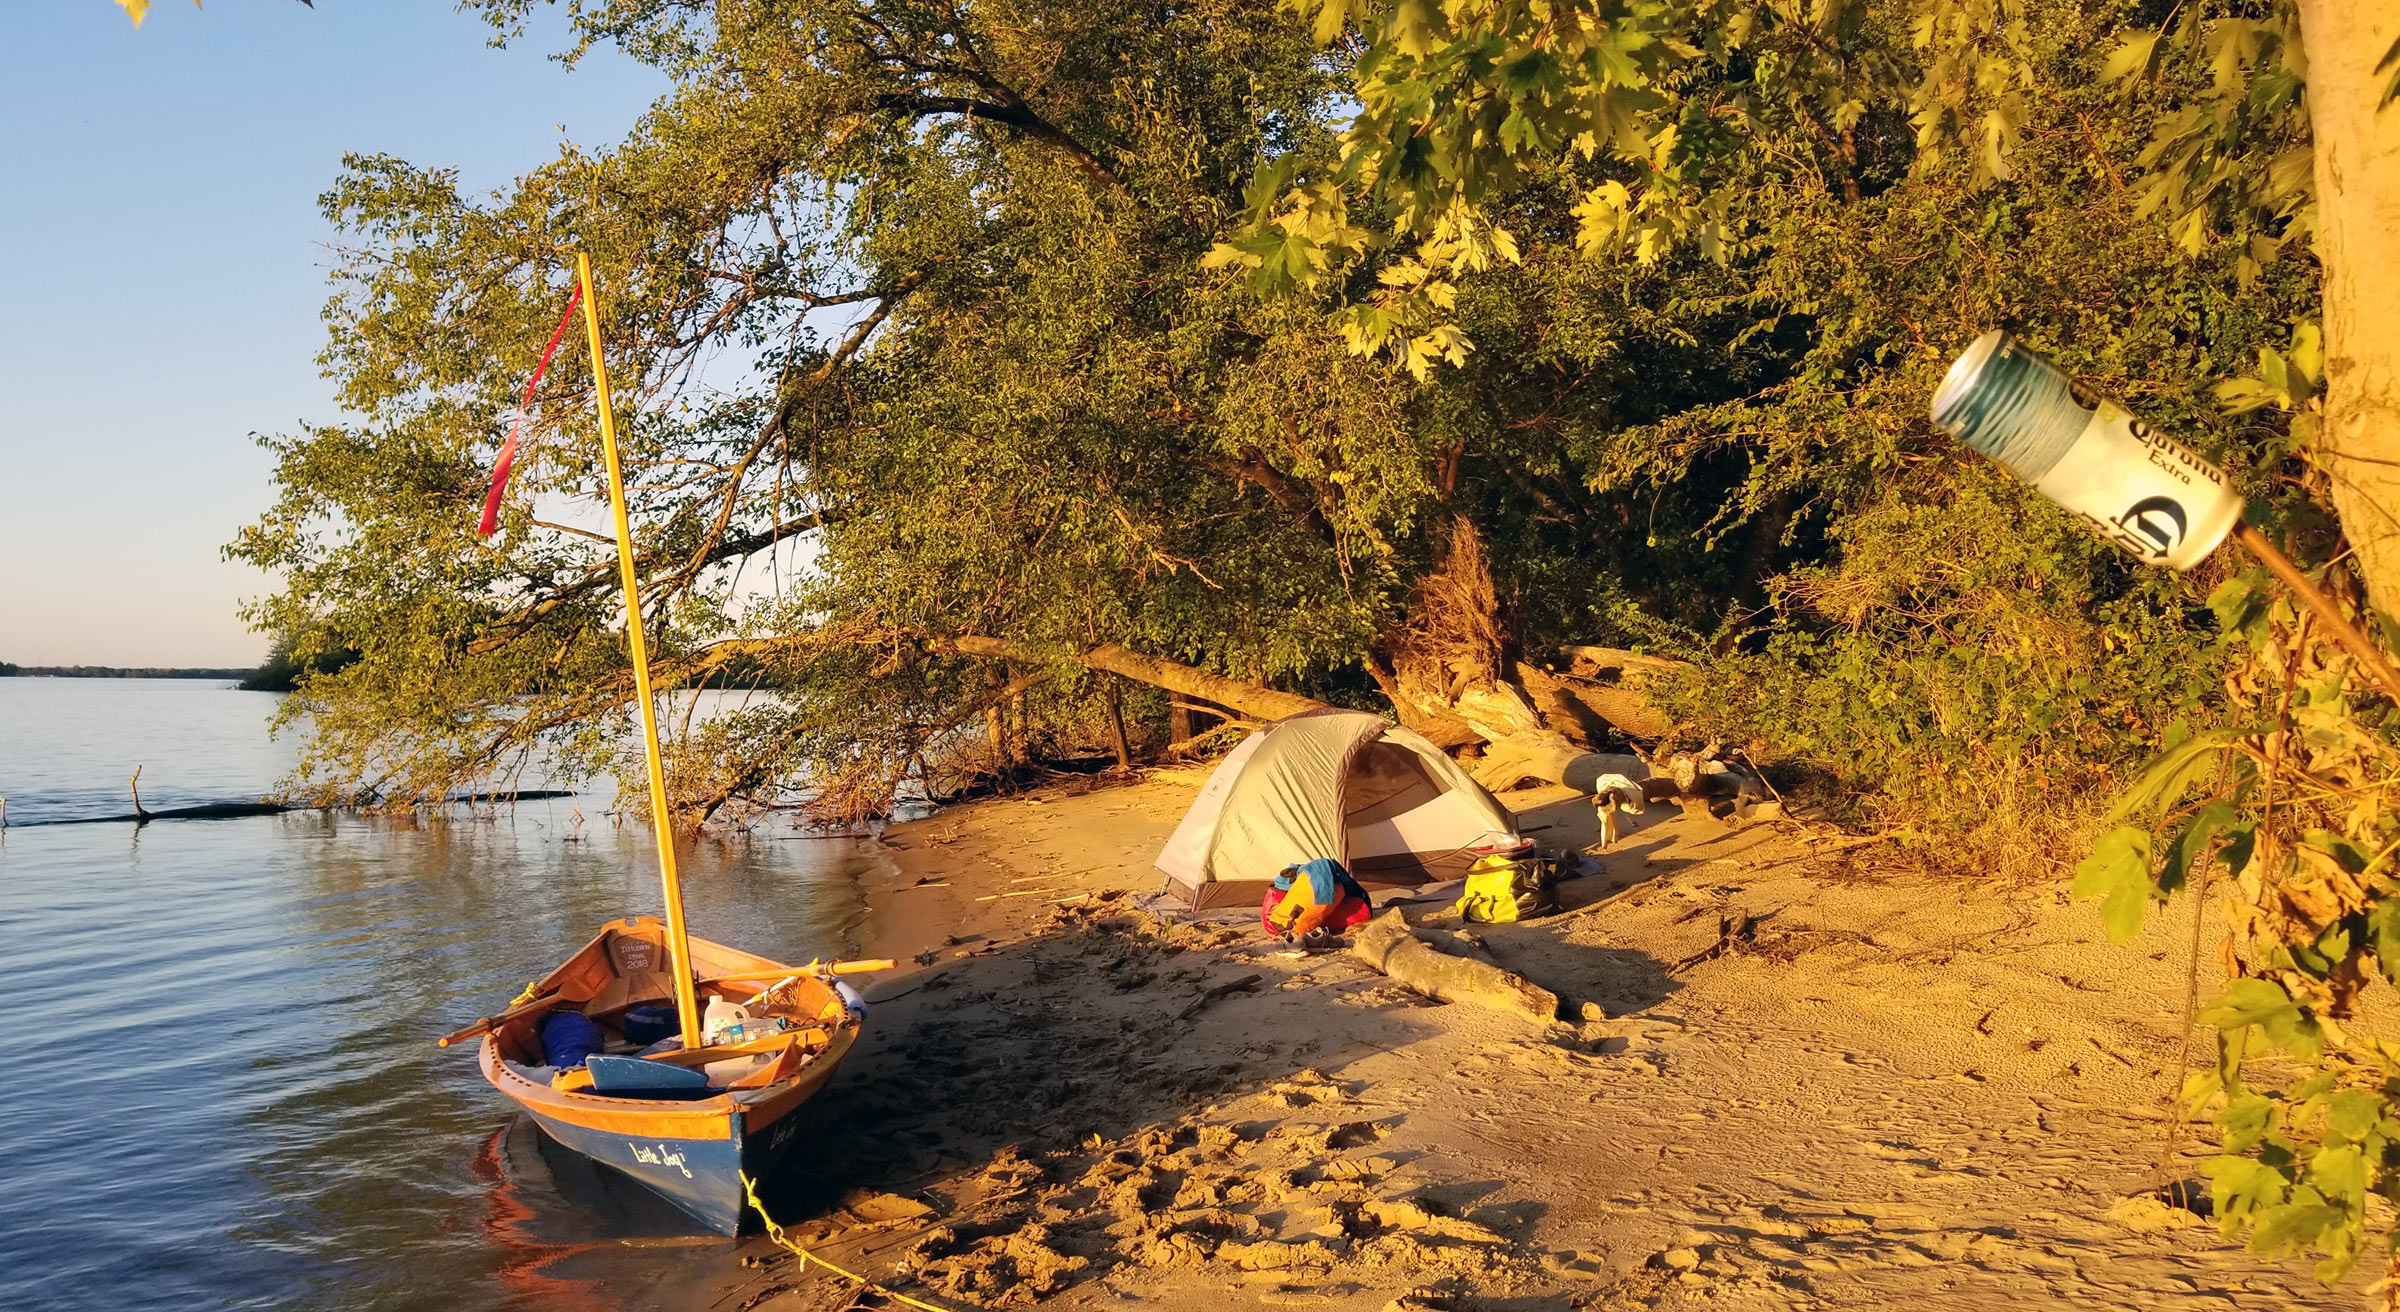
![The first night I spent on a sandbar, I was barely 2’ above the water line and hoped the river wouldn’t rise while I slept. Lock and Dam #20 is downstream in the distance. [between Keokuk and Hannibal]](https://smallboatsmonthly.com/wp-content/uploads/2019/02/MissRiver5957web.jpg)