It was a long path to building my first boat. I was a sailor and hobby woodworker, but the two pastimes didn’t begin to merge until my wedding. Our wedding venue was at a small lake, and we thought it would be fun to row to and from the ceremony in a small boat. A friend offered his Shellback Dinghy, and I was hooked by the idea that perhaps I could build my own boat. I spent the next couple of years daydreaming and even took some classes at WoodenBoat School in Brooklin, Maine, until at last I decided it was time to build my first wooden boat. I realized that traditional plank-on-frame construction might be more than I wanted to tackle, and while I thought strip-built boats were graceful, I concluded that stitch-and-glue construction would provide both the challenge and the simplicity I wanted. Further research led me to Sam Devlin’s Guppy 9 as the perfect first boat for me.
The Guppy 9 design
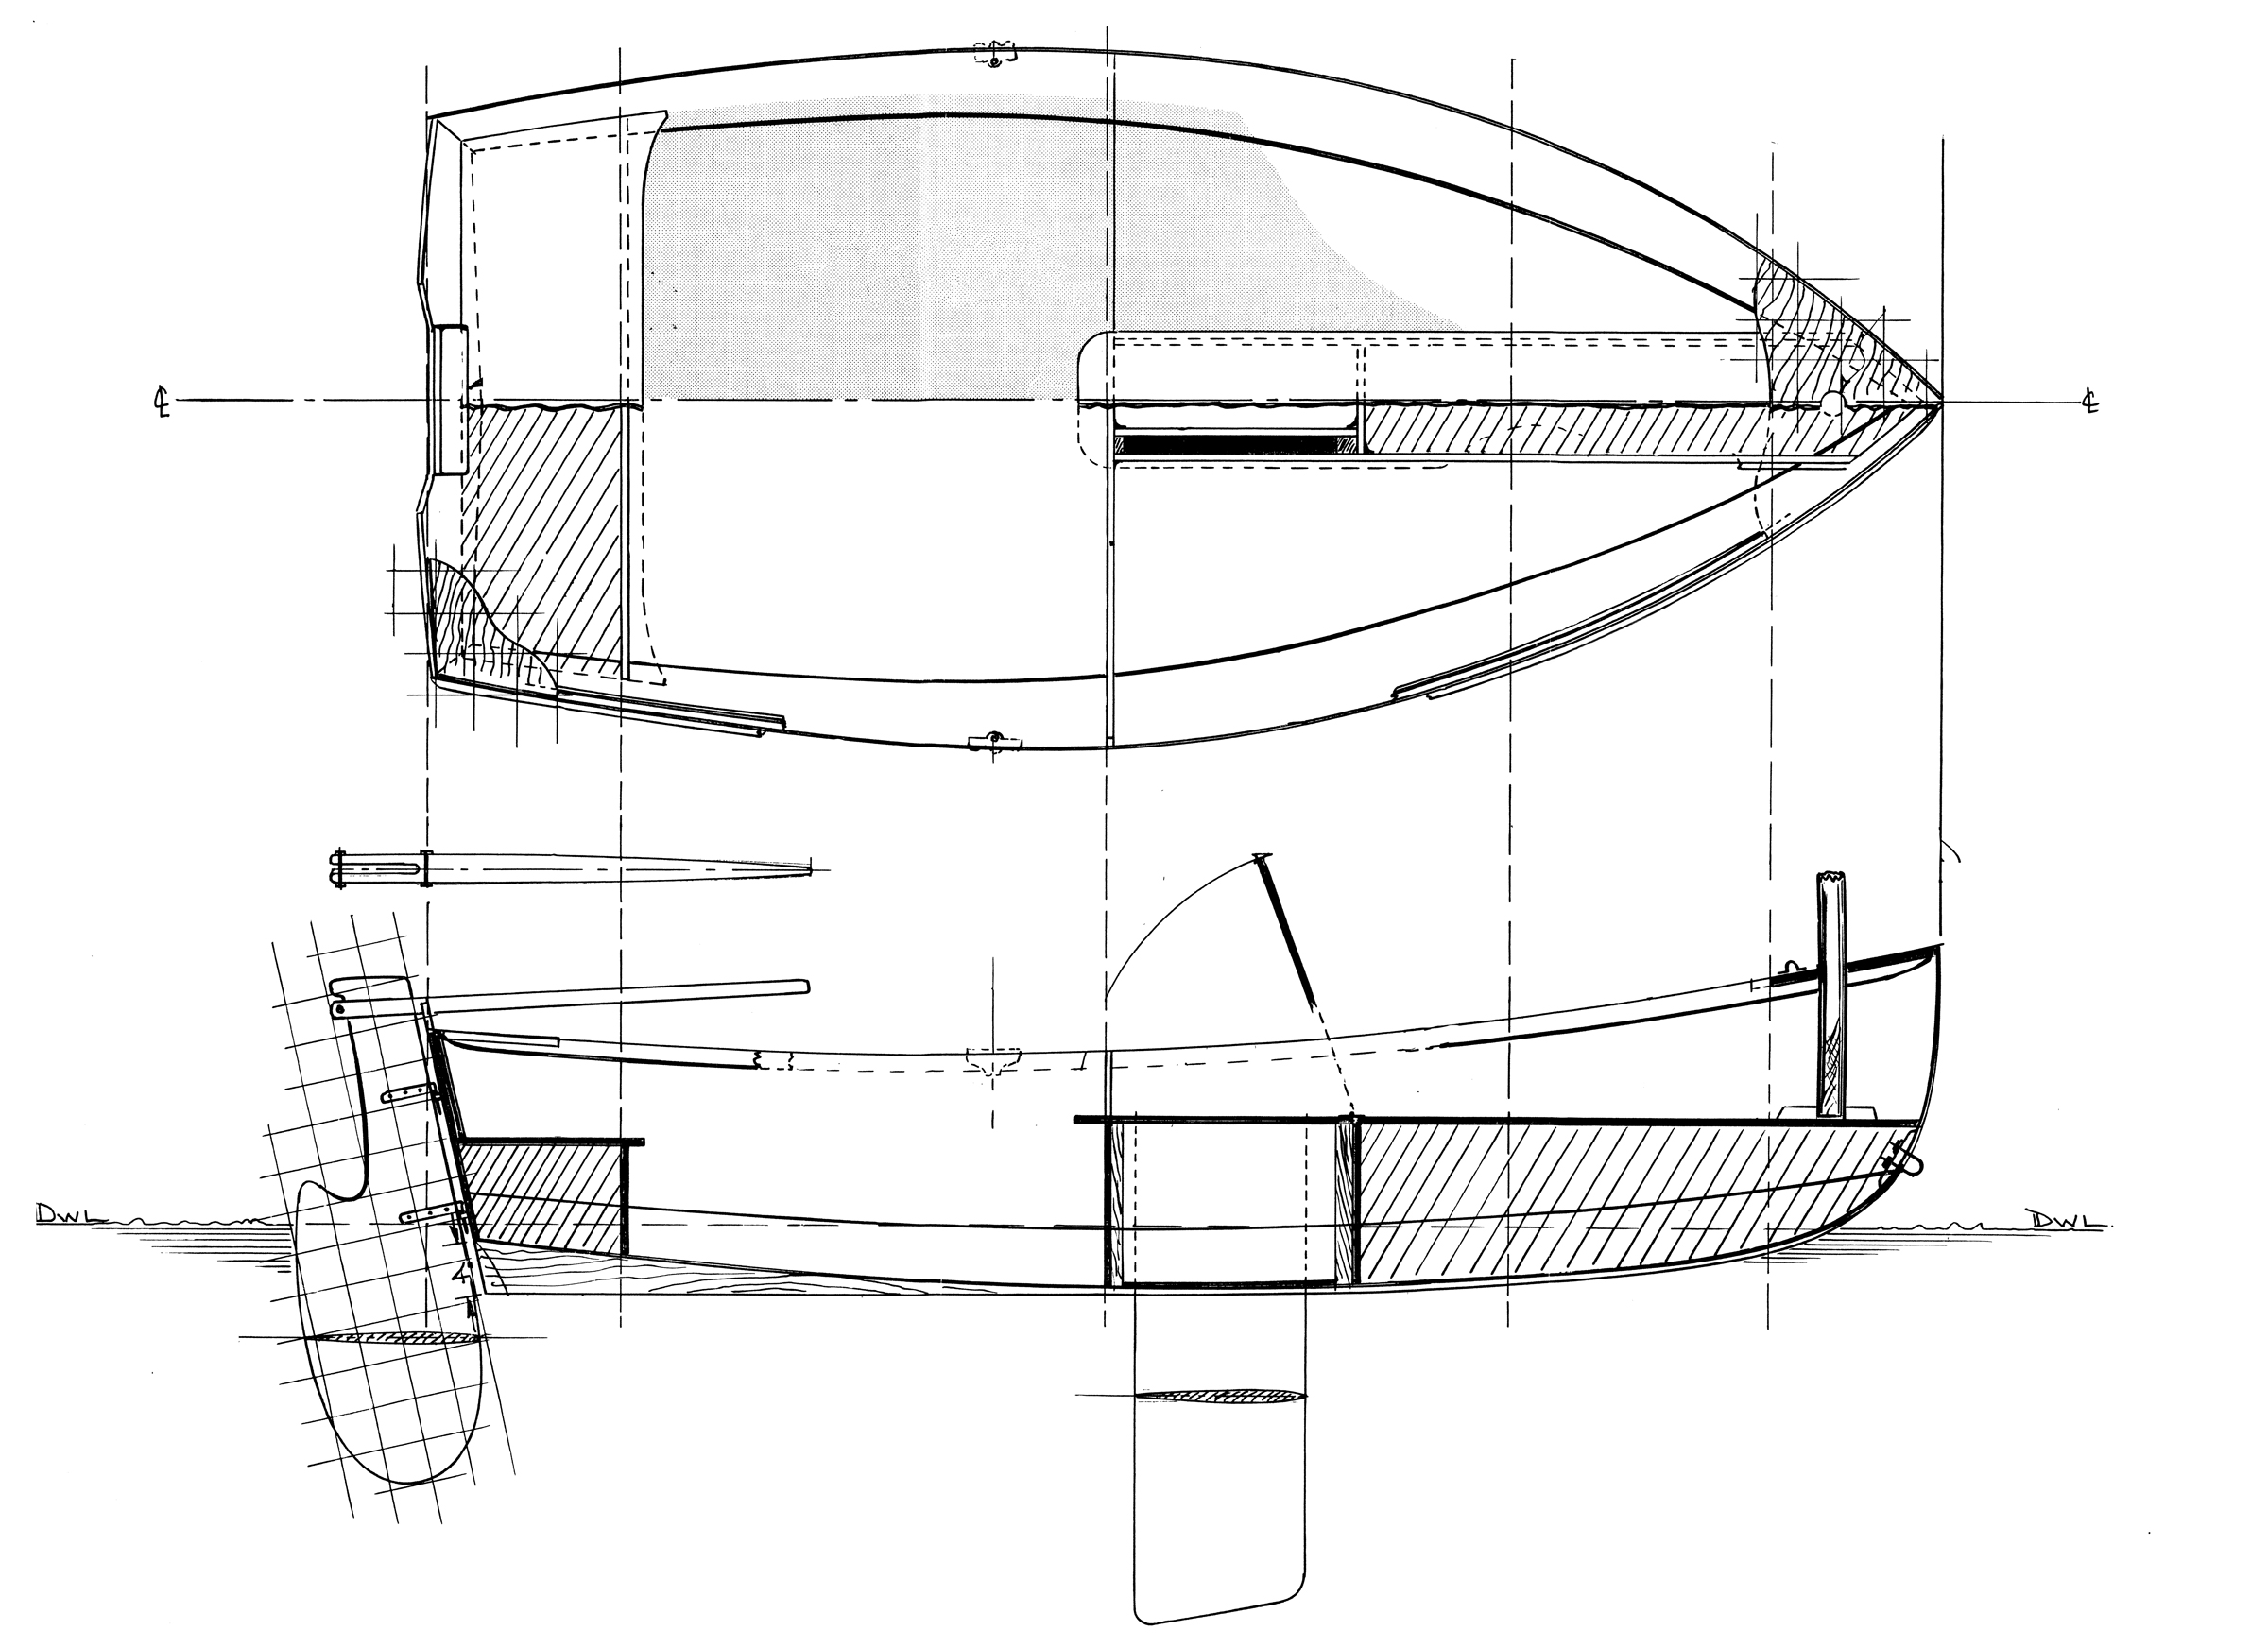
Sam Devlin of Devlin Designing Boat Builders offers a variety of small and not-so-small boat designs, all stitch-and-glue, and all designed with the amateur builder in mind. The Guppy is a small boat that can be rowed, motored, or sailed. Its length overall is 9′ 1″, beam is 4′ 4″, and dry weight is 80 lbs, which makes it easy to transport in the bed of a truck, on a small trailer, or even on a car’s roof rack. Draft is 6″, allowing the boat to be rowed or motored in very shallow water. With the daggerboard down, draft increases to 32″. Under power or oar, it can comfortably carry two or three people, making it an ideal tender. Under sail, it can accommodate one or two people, and it’s a fun sailboat in protected waters. The plans offer a choice of either traditional sprit or modern windsurfer rig.
 Photographs by the author
With the stitch-and-glue method of construction, the boat’s full-sized form is quickly revealed. Here, with only the bottom panels and one side panel stitched in place, the hull’s moderate V-bottom and gently curving topsides can already be appreciated. The crosspiece, attached to a stitch in the keel by a wire, keeps the bottom panels from folding up.
The Guppy is designed to be built by amateur woodworkers with limited experience and tools. Materials are typically available locally or through mail order, and include marine-grade plywood, easily sourced local hardwood, epoxy, and fiberglass. I especially enjoyed working with a local sawyer for the hardwood, and my build turned into quite the quilt work with white oak for the keel and stem; black walnut for the rail, breasthook, and quarter knees; sassafras and ash for the tiller; tulip poplar for the spars; and black locust for the home-made cleats. Minimal lofting or layout is required, and all the hull’s parts can be cut directly from three 4×8 plywood panels—the hull requires two sheets of 6mm (1⁄4″), while the transom and bulkheads require one sheet of 12mm (1⁄2″) plywood. I was able to order 4×10 sheets for the 6mm (1⁄4″) hull, which avoided the need for scarfing to get the required length. A good tape measure and batten are needed for layout. I also found a drywall square—a 48″ rule with a right-angle arm—very helpful. Using the plywood’s factory edge as the base, I could quickly lay out the stations, plot the heights, and bend a batten to create a fair curve. Stitch-and-glue construction does not require a great deal of advanced skills or traditional joinery, and a boat this size does not need a precise construction cradle. However, a simple strongback with some brackets is needed as construction progresses. Maintaining a work height that is comfortable for the builder is also important, so if possible, the project should be set up so the work height can be adjusted depending on the stage of construction. The build also involves the application of fiberglass and epoxy, but this is a skill that can be quickly learned, and the Guppy is a great place to start.
Building the Guppy 9
Devlin’s construction plans for the Guppy 9 include three pages of detailed drawings and materials list, as well as a construction manual on Devlin’s general stitch-and-glue method. I found the manual well written and easy to understand. It covered everything from scarfing plywood panels to detailed instructions on stitch-and-glue construction to recommendations for paint and varnish. I was able to lay out, cut, stitch, and glue the hull panels with few issues, and it was exciting when the hull’s shape first revealed itself. It should be remembered that the manual is written for a range of Devlin’s designs, including much larger boats, and builders do need to be careful about size and scale. For example, in larger boats, Devlin calls for 24-oz fiberglass tape for joints; this is much too heavy for a 9′ dinghy (I learned the hard way).

The transom cutout accommodates both a tiller and an outboard motor. The plywood transom has a doubler glued in place to reinforce the connection with the outboard’s mount.
The construction drawings include a good deal of detail. I had to study them closely to get my bearings but eventually found they contained all the dimensions I needed. All of the plywood pieces are presented as measured drawings. Probably the most challenging portion of the build was constructing the rudder and daggerboard—creating the foil shapes was a new skill for me, but very rewarding once I figured it out.
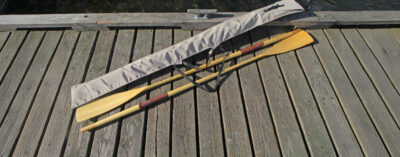
Two sheets of the drawings cover the optional sprit or windsurfer sailing rigs. I chose the sprit rig, and again, enjoyed the process of building the spars and learning about this traditional rig. The drawings do provide spar dimensions, but builders with no prior experience will need to find additional resources on how to build spars. The sawyer and I decided that tulip poplar would make fine spars for such a small boat. I researched and found its mechanical properties were more than adequate and comparable to other wood species typically used to make spars. Again, for me, this was an opportunity to learn new skills. I also considered making my own sail but decided it was a skill I could come back to. Instead, I ordered a sail kit from Sailrite and hired a sailmaker to complete it.
The finished boat
The interior layout of the Guppy includes a stern thwart and a central bench that stretches from the bow to the after edge of the offset daggerboard trunk. The bench is ideal for one person when rowing or controlling the tiller (with extension) of an outboard motor, while the thwart is perfect for one or two passengers. When sailing, the comfortable place to sit is in the bottom of the boat. When singlehanding, I sit astern of the daggerboard trunk either leaning on the bench or against the side of the hull, depending on the wind strength. With a second person on board, the helmsperson can sit farther aft, while the passenger sits across from them, also behind the bench. Under both seats are compartments that Devlin recommends filling with rigid-foam flotation.

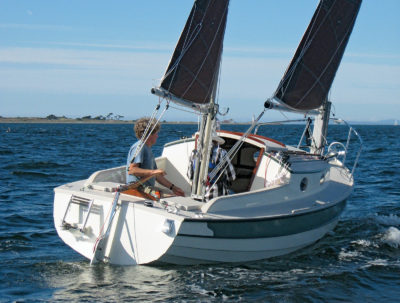
The Guppy 9 can be rigged with either a windsurfer-style sail or a spritsail. I chose the latter, which can be rigged with or without the boom; here the sprit boom is behind the sail and crosses the mast just above the sprit that holds the sail’s peak
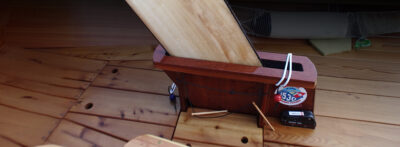
The plans call for limber holes to drain both compartments, but after a day of using the boat I realized that it would be challenging to keep the areas dry and clean. I also worried that the foam would trap moisture within the compartments and decided, instead, to add access hatches and install flotation bags in both. This arrangement allows for natural airflow and gives me greater access for cleaning. In the aft section of the bench, there is a storage compartment with hinged-top access, in which I store a small kayak anchor, my lunch, and a water bottle. To starboard, but still beneath the hinged-top, is the daggerboard trunk.
At roughly 80 lbs, the Guppy 9 is relatively light, and two people can load it into a truck bed. When I built my boat, I did not have a truck, but found an old jet-ski trailer and modified its bunk boards to fit the Guppy. However, because it was designed for the weight of a jet ski, the trailer was too stiff for my little boat even after I removed all but the longest leaf spring. I would recommend a lightweight trailer to simplify transportation and launching.
 Georgia Richardson
The central seat is well positioned for rowing, and with only one person on board the trim is perfect, with the bottom of the transom just touching the water. Even with a passenger sitting on the after thwart the boat still rows well.
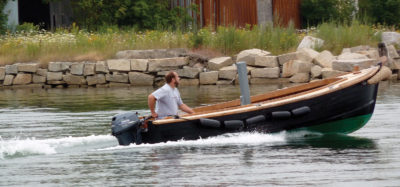
The Guppy 9 was designed to be an all-around boat, and it performs well in all its roles. It rows well and tracks extremely well. The plans call for 7′ 6″ oars, but even with my 6′ 4″ oars, it is nimble in tight spots. Under power or sail, the oars store nicely in the bottom of the boat tucked into either side of the bench. With a five-speed 30-lb-thrust electric trolling motor, it moves along smartly. I have never checked the speed with GPS, but at Speed 5 water will rush up and overflow the daggerboard trunk. The first time this happens it is disconcerting, but the problem is easily solved with a simple plug that fits the top of the trunk and is held down by the bench lid.
Under sail, the boat is a lot of fun. It’s not a Laser and won’t point high, but it is responsive in light wind. The sprit rig is simple to set and furl. When furled, a brail line keeps the sprit against the mast; to set the sail, you simply loose the brail line and if necessary adjust the snotter. The center of effort is relatively low, so stability is good and, if a puff of wind surprises you, it likely won’t cause excessive heel. The Guppy’s spritsail can be rigged either with a sprit boom or boomless and it performs well in either setup. Although I do have reef point sewn into the sail, the rig is not designed to be reefed, but it can be reduced in size by removing the sprit. This method, called scandalizing, drops the peak of the sail and effectively turns the four-sided sail into a three-sided sail—it is not the most efficient arrangement but will get you and your Guppy out of trouble. At only 9′ in length, the Guppy is intended for protected waters and moderate winds. If the wind builds to anything over 12 knots, I simply haul in the brail line, furl the sail, and get out the oars.
 Arne Croell
Even in light airs, the Guppy makes headway. If the wind dies completely, sailing without the boom means the sail and sprit can be quickly furled into the mast with the brail line and then you can row home.
The Guppy 9 is an ideal first boat to build. The construction method should be approachable for just about any amateur builder, and for a complete beginner it provides plenty of opportunities to learn new skills. It may not win any high-performance dinghy races, but it is drier than, say, a Laser or Sunfish, is certainly more versatile, and can double as a useful tender. Building and then sailing my own wooden boat was a great experience, and the Guppy is a boat to make a first-time builder proud.![]()
Cameron Handyside is a retired engineer. He lives with his wife, Georgia, on a saltwater creek near the Pamlico Sound in North Carolina where he enjoys sailing, paddling, and woodworking…as time and weather allow. Cameron financed the building of his Guppy 9 thanks to a modest inheritance from his grandmother, Georgia Macy. “She was,” he says, “deathly afraid of the water, but she financed the boat. I thought it was only fitting to name it, GEORGIA MACY, in her honor.”
Guppy 9 Particulars
LOA: 9′ 1″
Beam: 4′ 4″
Draft, board up/down: 6″/32″
Dry weight: 80 lbs
Sail area: 54 sq.ft


Plans for the Devlin-designed Guppy are available from Devlin Designing Boat Builders, $65 for downloadable PDFs, $95 plus shipping for printed plans. All construction plans are in Imperial measurements.
For more Devlin designs, see “Lit’l Petrel,” “The Cackler,” and “Pelicano 20.”
Is there a boat you’d like to know more about? Have you built one that you think other Small Boats readers would enjoy? Please email us your suggestions.


The account of using a small boat in a wedding in the opening paragraph reminds me of the wedding of some old friends at a venue on a little lake somewhere in NE Ohio a couple of decades back. Guests were invited to bring small boats, and we brought our Stowaway 18 (1.8 meters) folding dinghy which was the tender for our Menger 19 catboat. We used the boat to put the bride and groom to a “marriage compatibility test” to see if they could maintain a steady course rowing side by side, each with an oar. They passed with flying colors, and are still having all manner of adventures “messing about in boats” and other no octane vehicles.
Cameron, I enjoyed reading your article on the Guppy and it has me inspired to try my hand at one. It turns out that i already have most of the wood materials except for the 1/2 inch plywood for transom and seats so was wondering if solid mahogany wood stock would work? Also, I have an old sprit sale rig about the right size and as an alternative several windsurfing rigs from earlier more athletic days. Thanks for writing the article!