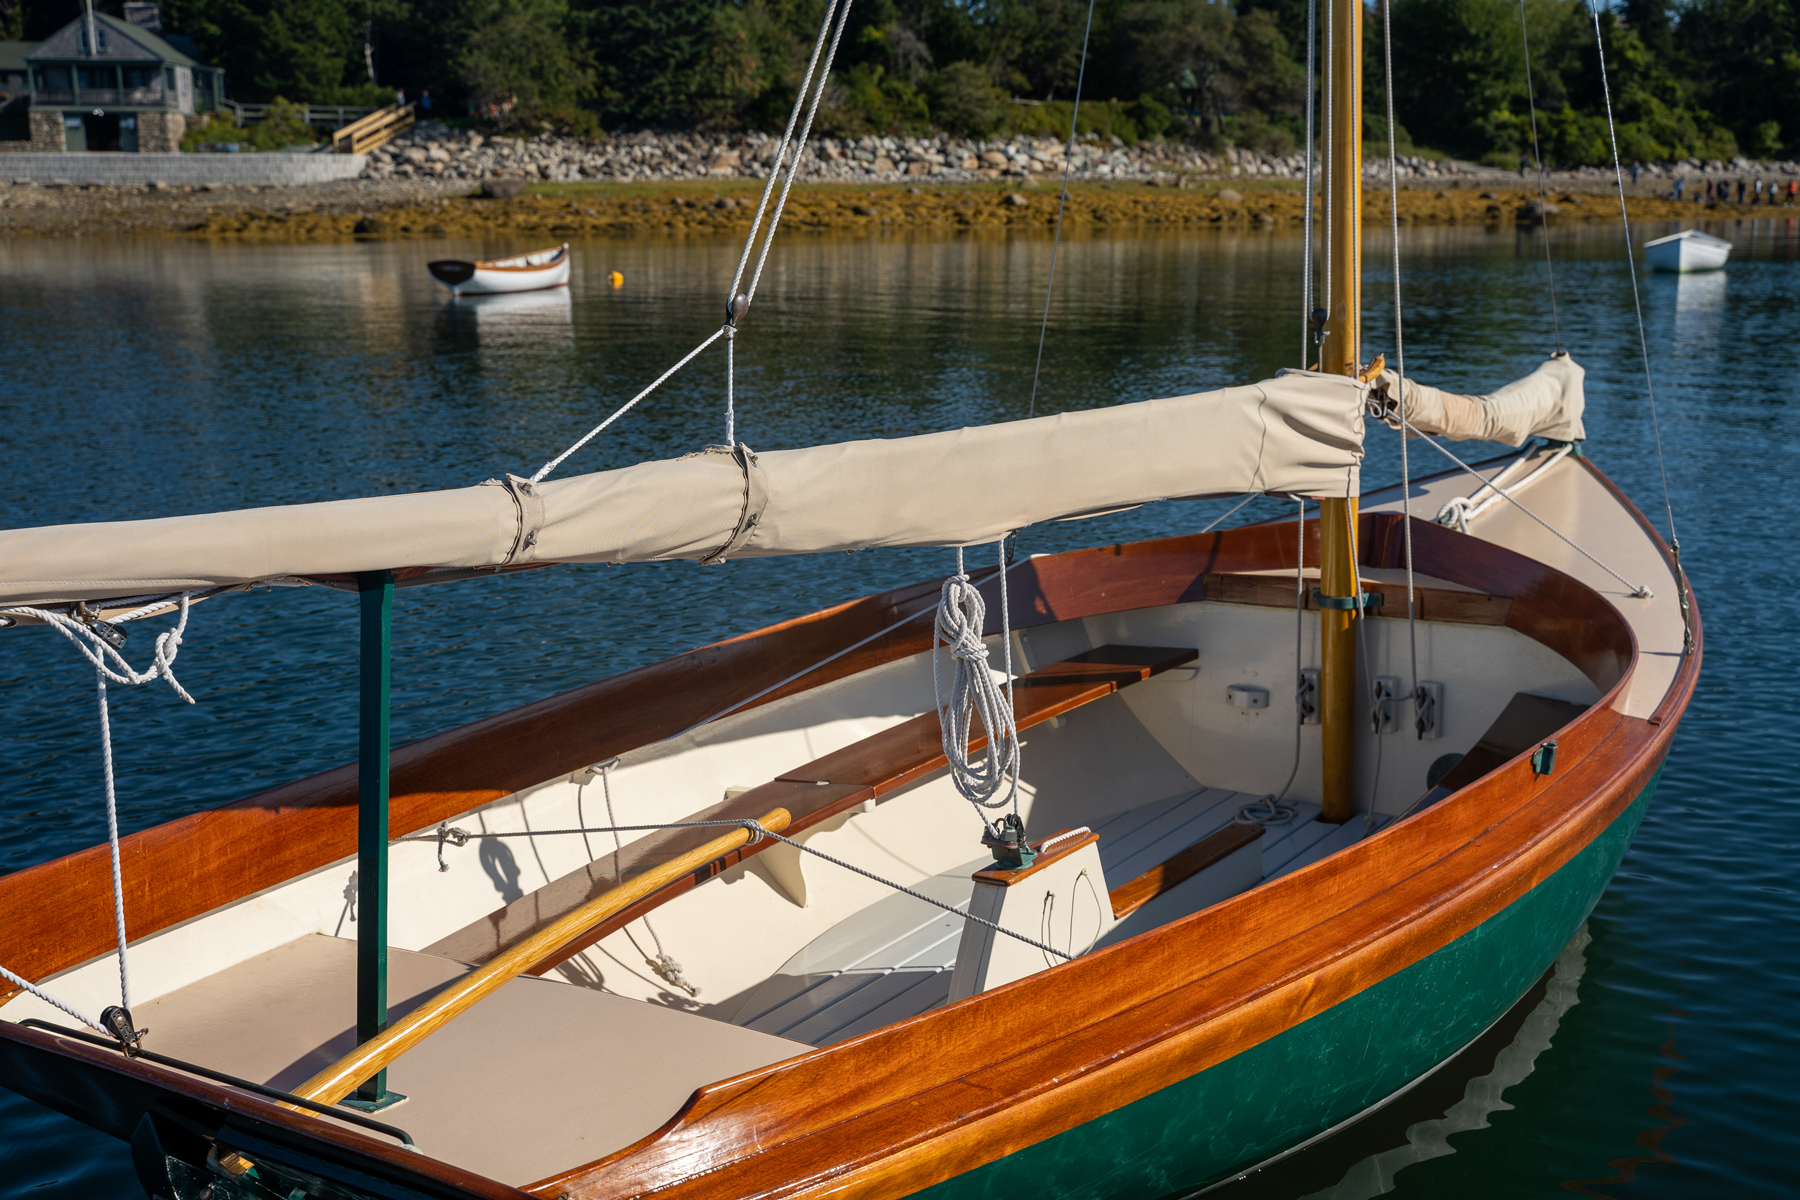
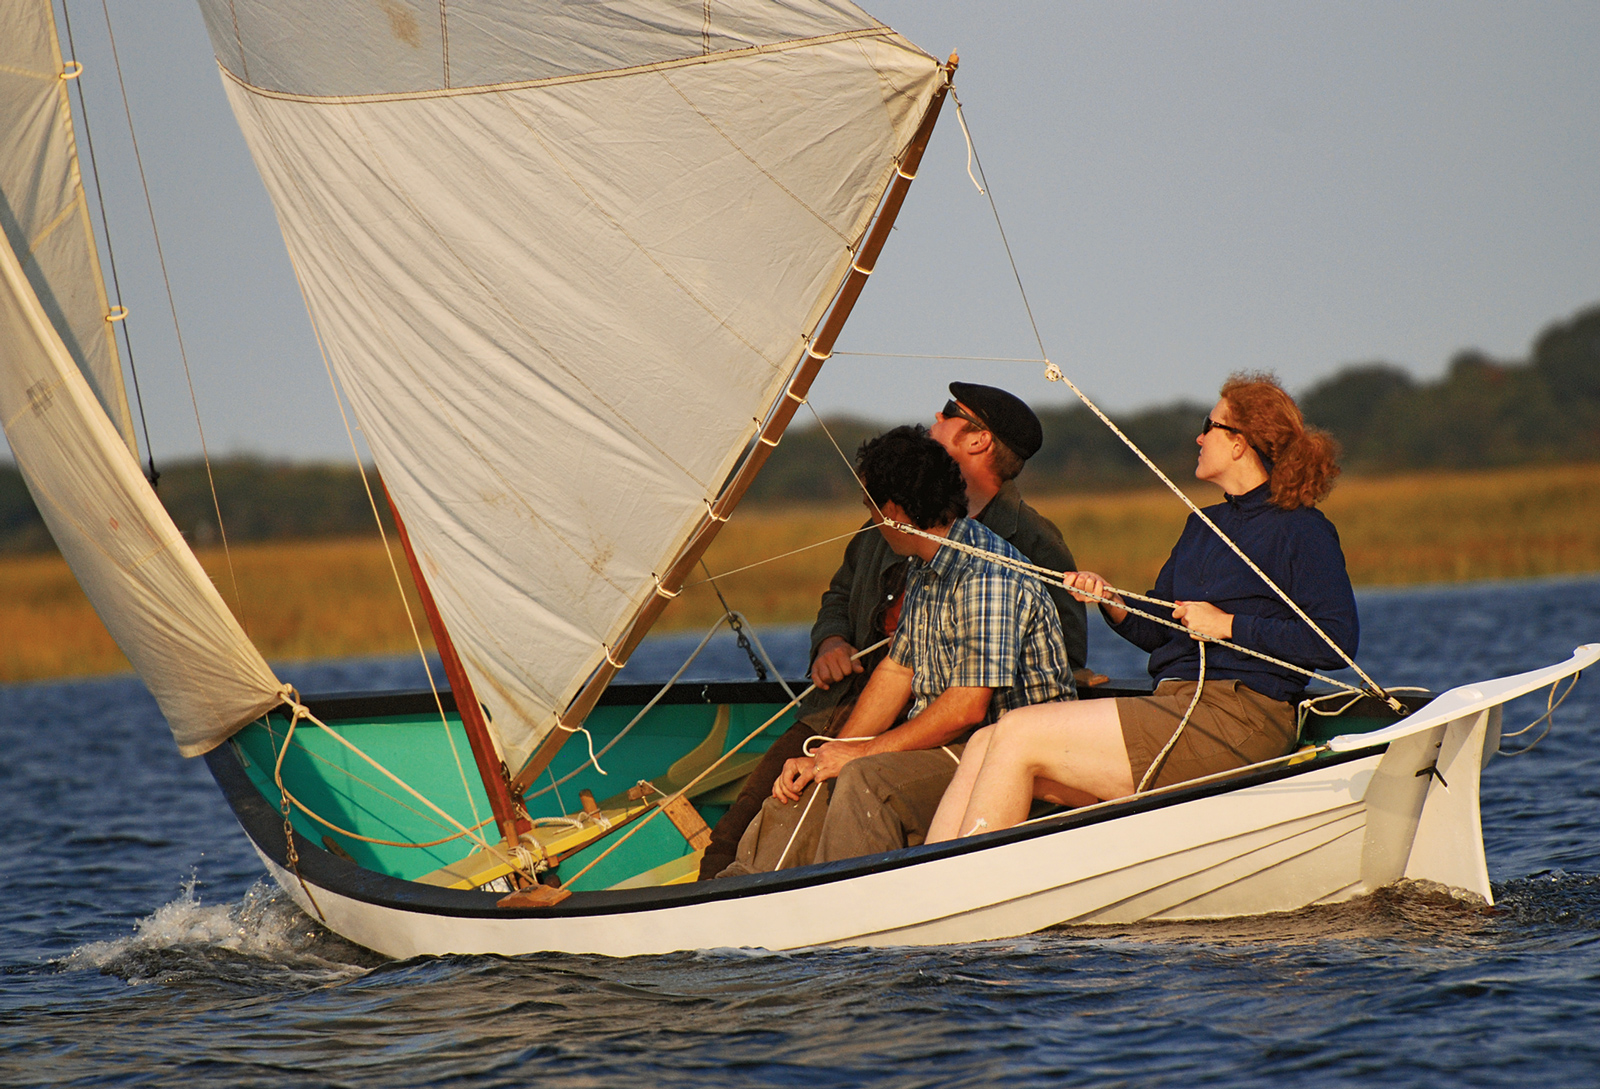
The Sperry 7-Seas 3-Eye Sneakers are boat shoes that perform almost every job you can ask of them. They’re lightweight, flexible, and easily adjustable sneakers that grip well on most surfaces you can imagine encountering in, or around, small boats.
This lightweight water shoe is designed to perform through the rigors of a day on the water. The ovals in the rubber sole’s honeycomb pattern have sipes—fine cuts that improve traction on slippery decks—while the wave-like tread near the toe and heel provide grip on a variety of surfaces. The injection-molded EVA (ethylene-vinyl acetate) midsole provides cushioning and is equipped with built-in drainage holes that ensure that your feet won’t be sloshing for long after you’ve stepped out of the water. The breathable hydrophobic mesh uppers are quick to dry out. I wear the shoes without socks, which works fine for the sailing season’s mild weather. Waterproof socks would be in order if you need to stay dry and warm.
Delaney Brown
The siped mid-section of the sole is covered in a honeycomb pattern while the toe and heel portions have a wave-like pattern.
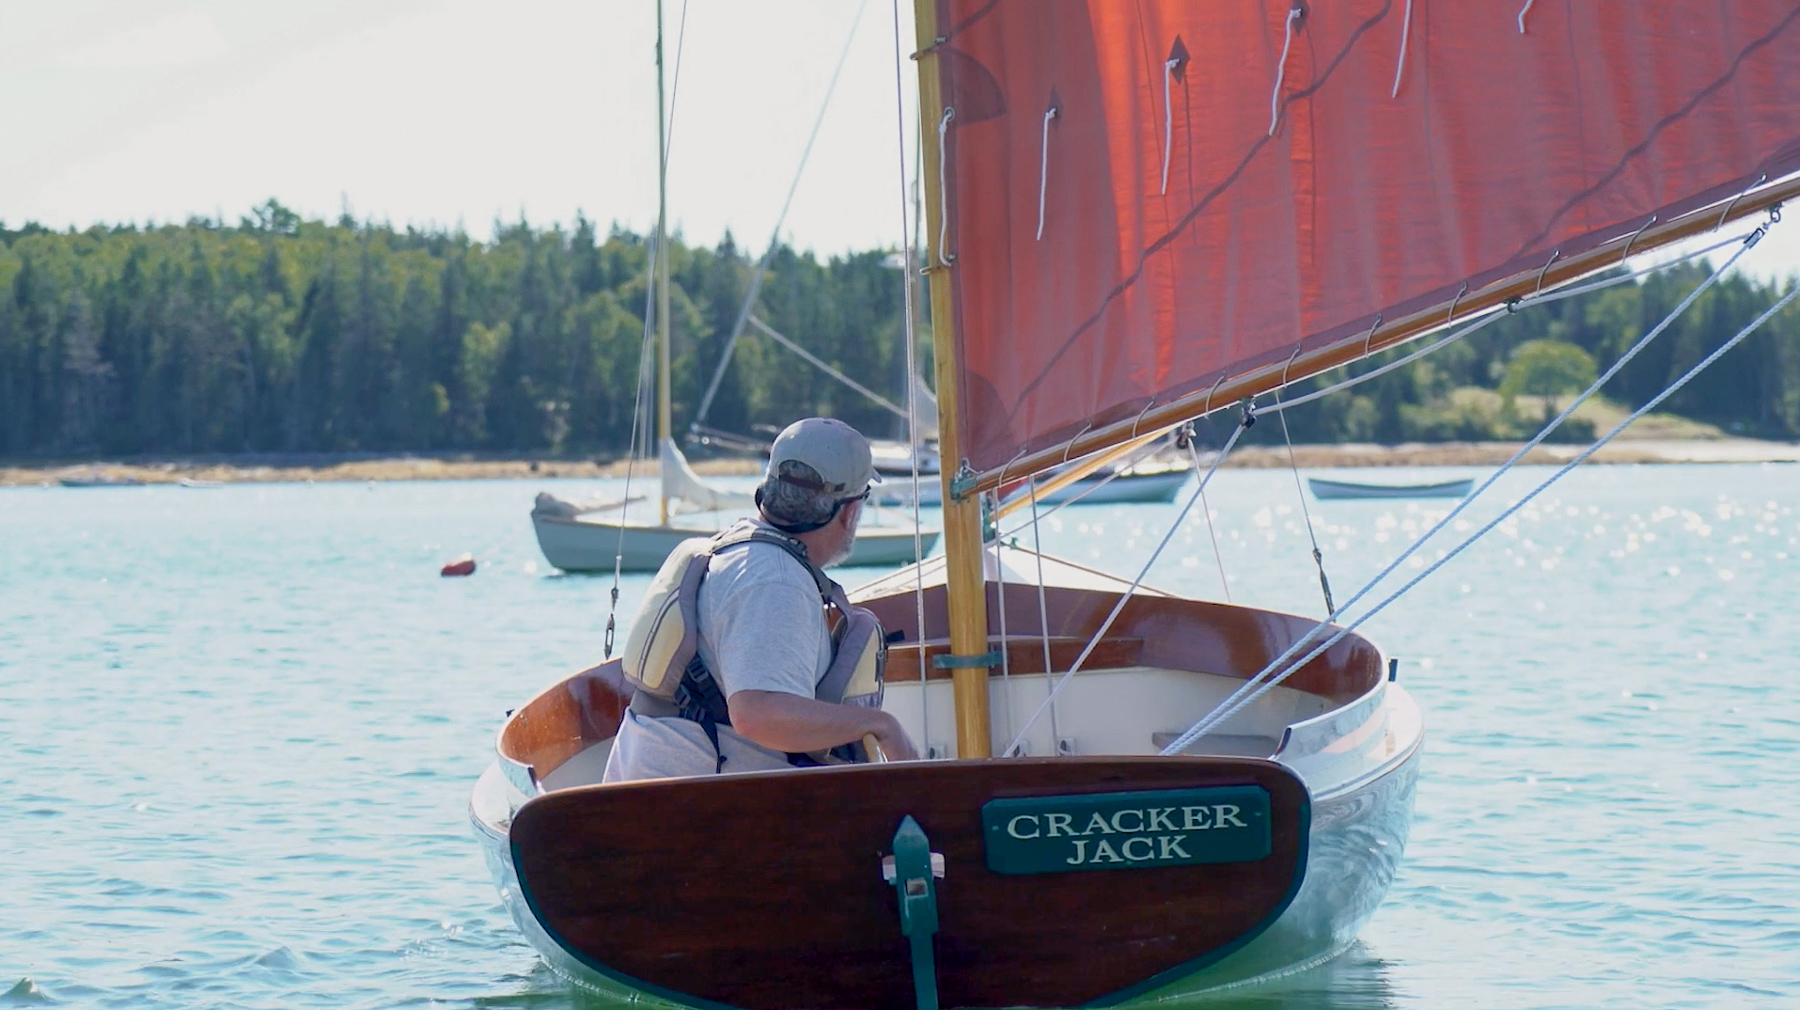
When sailing off a beach of sand and pebbles, no sand gets into the shoes through the drainage holes or past the seal between the uppers and my feet. After I step aboard the soles stay put on the slick, painted bottom of the dinghy and my feet don’t slide around in the shoes. I didn’t feel any water sloshing around my sole; the mesh uppers dry in about 5 minutes. On shore, the hiking sandals I frequently wear slip on smooth granite and rocks recently soaked by a high tide, but the Sperry 7-Seas had a secure grip and enough traction for leaping from boulder to boulder, even when landing on a rock face sloped about 40 degrees.
I use my shoes hard, and many others I’ve tried have lasted only a single season of boating. I wore the previous iteration of this shoe through three years of vigorous college sailing. Hiking straps on boats chafe away at shoe’s uppers, and constant alternation between long dinghy-dolly pulls over asphalt, beach launches, and hanging on to the grip tape placed on the floors of dinghies and decks of keelboats can quickly wear down the soles of many rubber dinghy boots. I can’t yet speak to the longevity of the new 7-Seas sneakers, but they appear to be made with the same materials and care, and I expect they’ll last at least as long as their predecessors.
Delaney Brown
The laces on the uppers not only tighten the shoes over the instep but also tension the laces on the sides for a snug fit at the heel.
I have a wide foot and usually wear a women’s size 8.5; in the new Sperry 7-Seas 3-Eye Sneakers, size 8.5, my foot didn’t overlap the sides of the shoe’s sole, and I had about 1/2″ of space between my big toe and the shoe’s end, the minimum amount recommended for the best fit in most shoes. By adjusting the two heel cords that wrap around the heel on the outside of the shoe and then cinching the laces tightly to tension those cords tight, I was able to lock my heel into the back of the shoe.
The Sperry 7-Seas 3-Eye Sneakers do just what I need them to do—keep my feet comfortable and firmly planted under me, even on slippery decks and seaweed-covered rocks.
Delaney Brown is associate editor of WoodenBoat magazine and recent University of South Florida alumna, currently living in Maine to restore a 31′ liveaboard sailboat.
The Sperry 7-Seas 3-Eye Sneakers are available from Sperry for $89.95. Men’s sizes come in black, gray, and navy. Women’s sizes come in navy, gray, and peach.
Editor’s Notes:
I have a high instep and a long heel, and that combination makes for a tight squeeze getting into slip-on neoprene booties and knee-high rubber boots. The Sperry 7-Seas Men’s 3-Eye Sneaker is not a slip-on but a laced shoe, with the laces connected to two cords that wrap around high on the outside of the heel. Tightened, the cords help prevent the shoe from slipping off the heel, a valuable feature, but they prevented me from getting the shoes on if I loosened the laces only at the top. After loosening the laces all the way to the bottom to put slack in the heel-retention cords, I could pull the shoe on.
I have wide, size 13 feet. The sneakers’ stretch-mesh uppers comfortably accommodate them by allowing the outside of my big and little toes to overhang the sides of the soles a little bit, while the soles are just wide enough to support the weight-bearing parts of my feet. Sperry’s sizing worked for me, and the stretch in the uppers allows me to wear Sealskinz or Kokatat knee-high waterproof socks to keep my feet dry and warm.
Christopher Cunningham
The sipes, razor-like cuts into the ovals of the honeycomb pattern, appear as faint wavy lines. They provide grip on slippery painted or varnished surfaces. A men’s size 13 model is shown here.
The 7-Seas sneakers are very comfortable and light—a size 13 men’s shoe weighs just 10.6 oz. I had surgery on my left knee about 35 years ago, and that knee can get sore after 10 minutes of walking on pavement. These sneakers have a well-cushioned sole that is shaped to roll my foot down, eliminating the impact and thus the soreness of that knee.
The grip of the textured and siped sole is excellent on oiled teak floorboards and varnished ash seats, whether they are dry or have standing water on them. The sole would only slip an inch or two on the slipperiest surface—a wet varnished seat—if I lunged onto it, but when my full weight was planted, the shoe’s sole held fast.
Is there a product that might be useful for boatbuilding, cruising, or shore-side camping that you’d like us to review? Please email your suggestions.
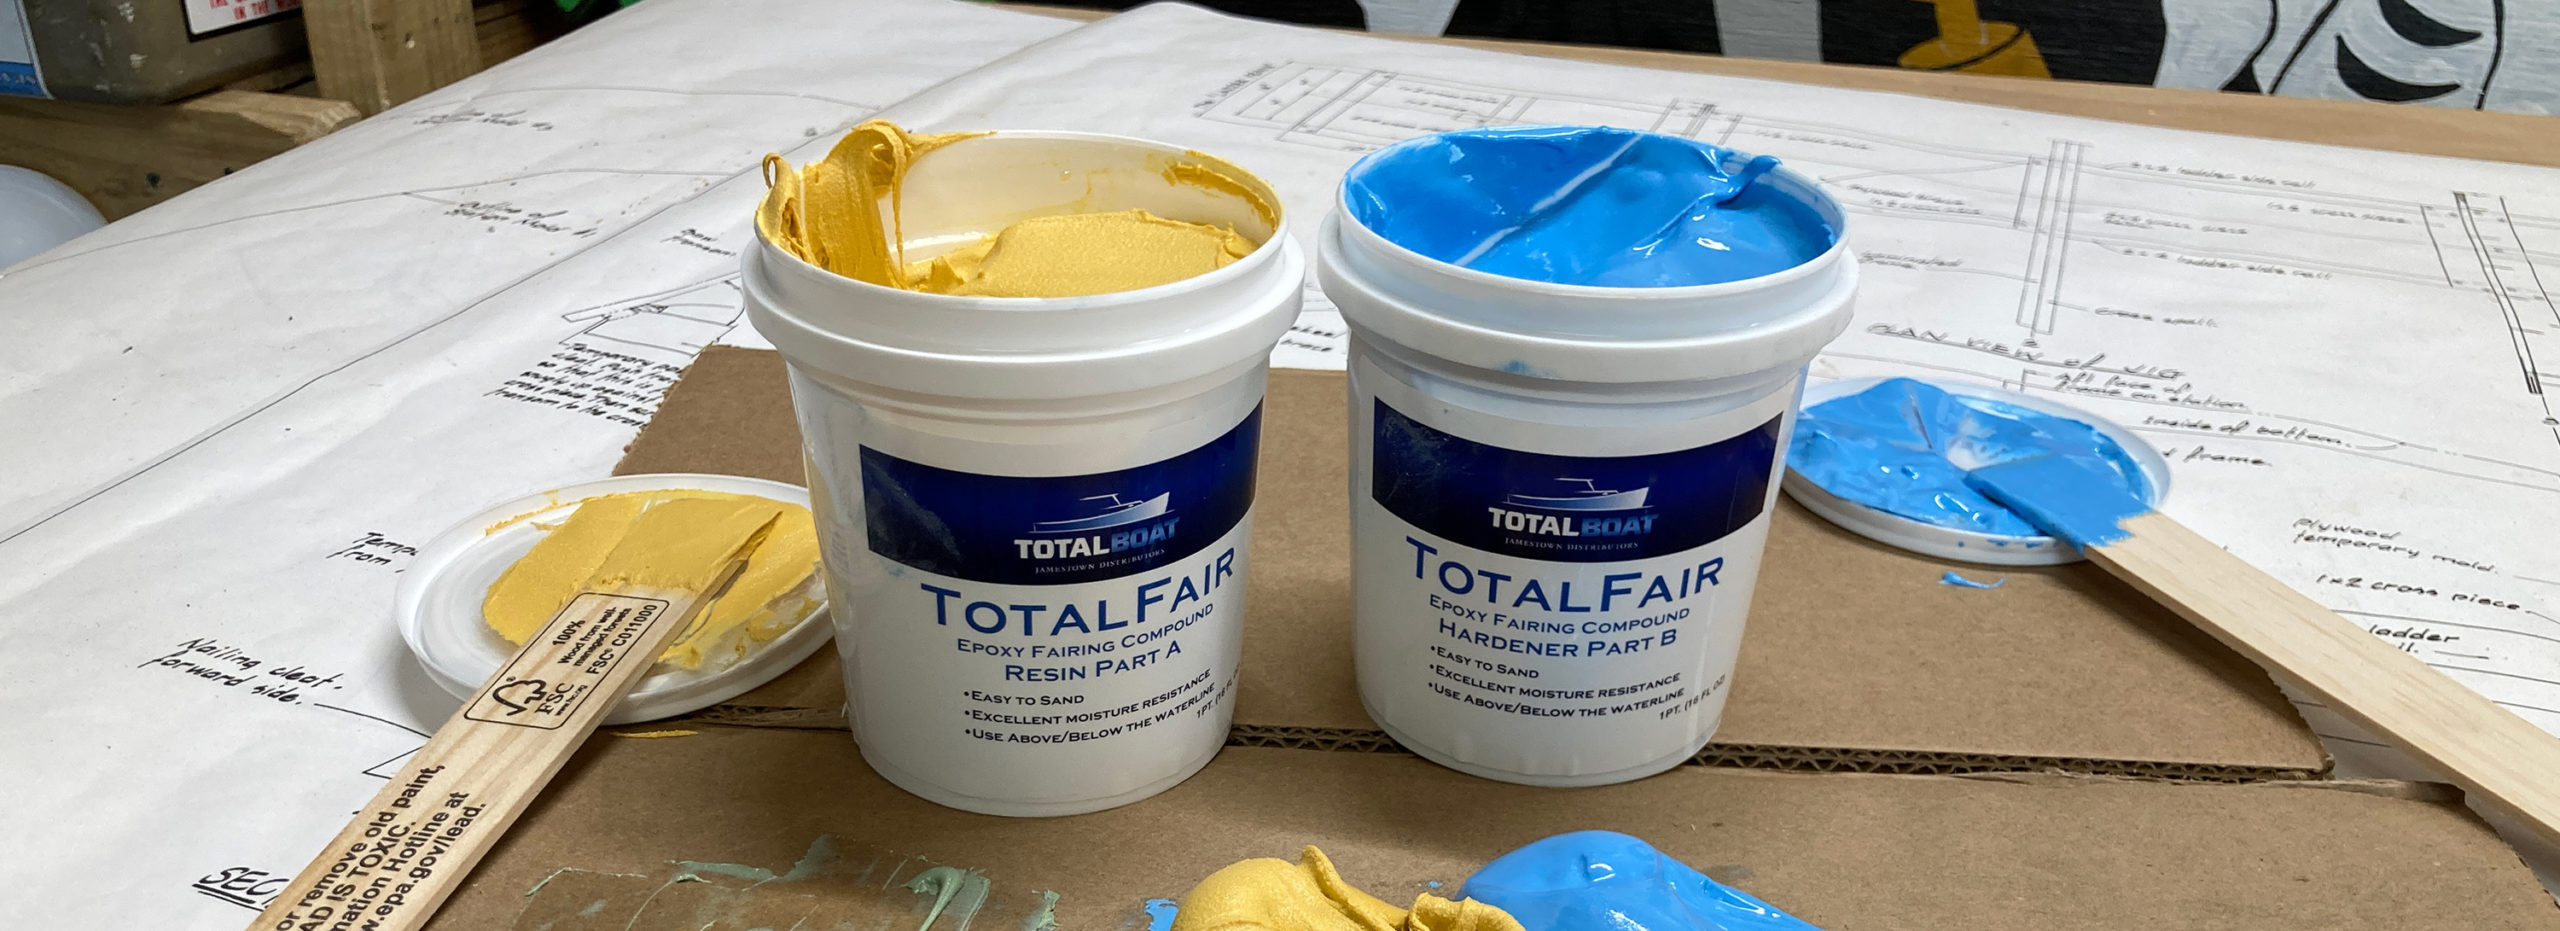
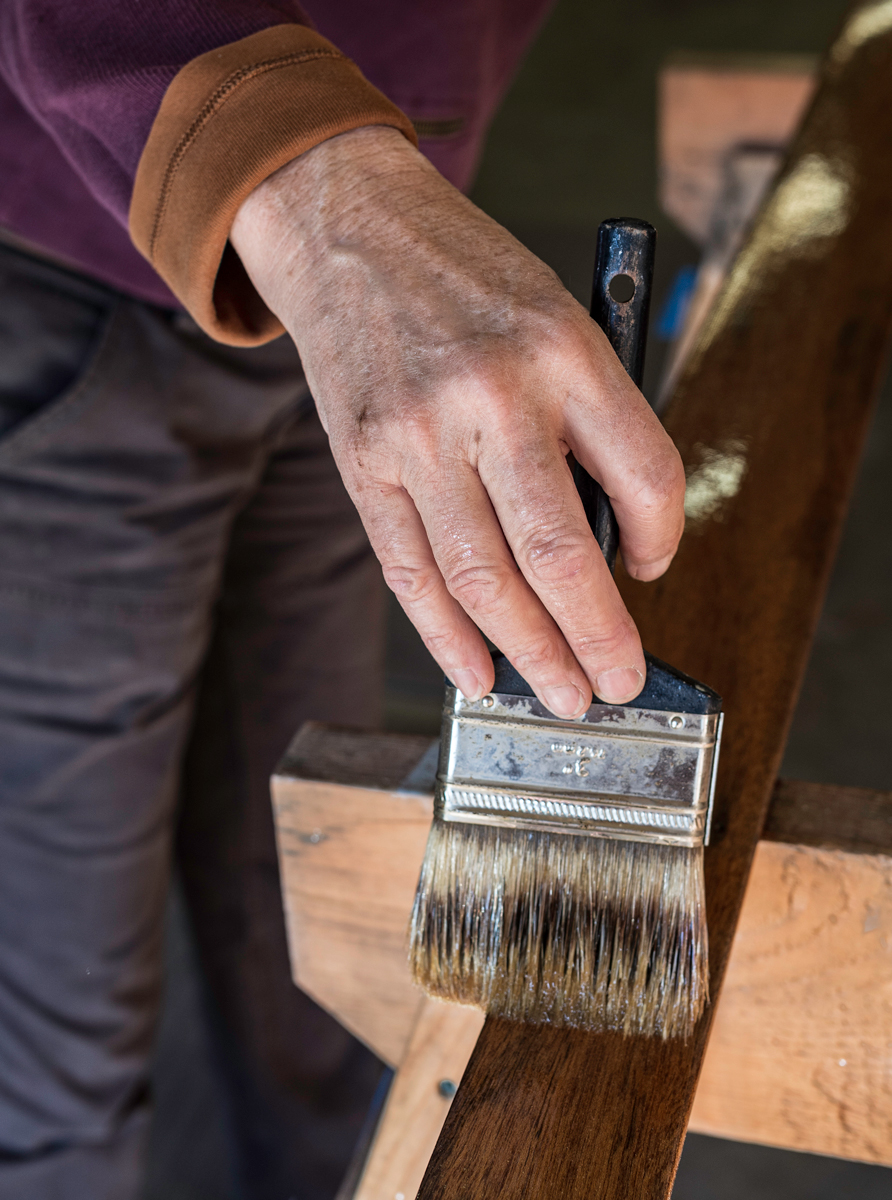
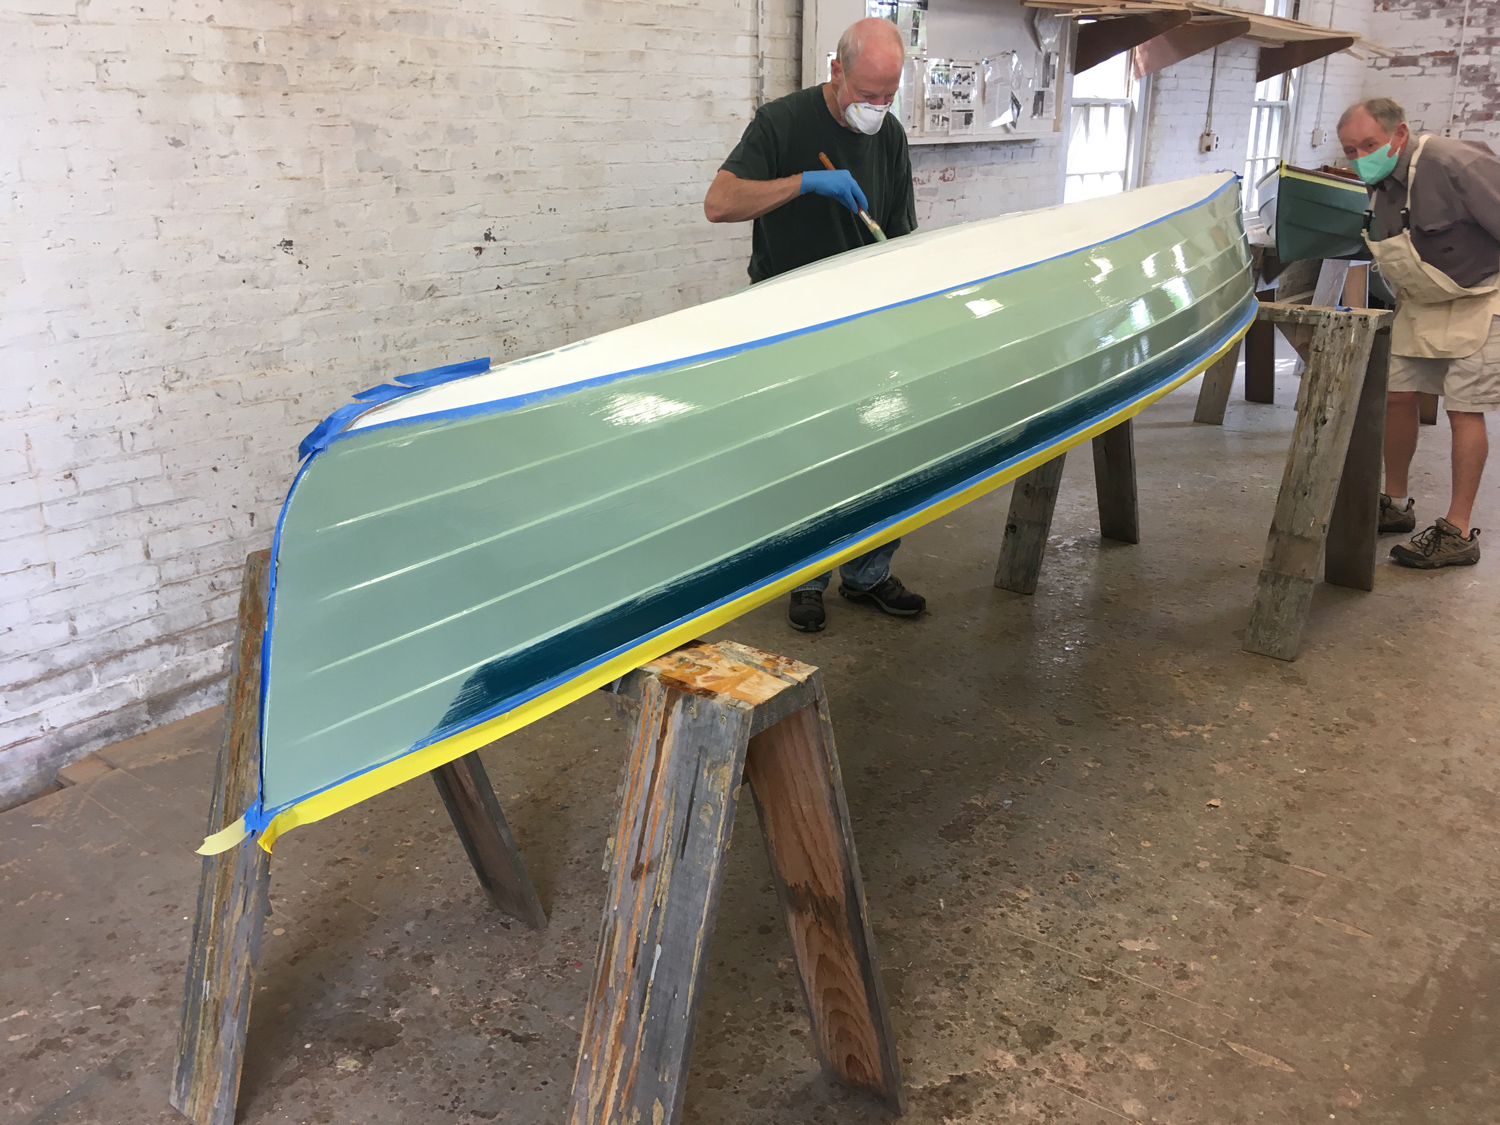
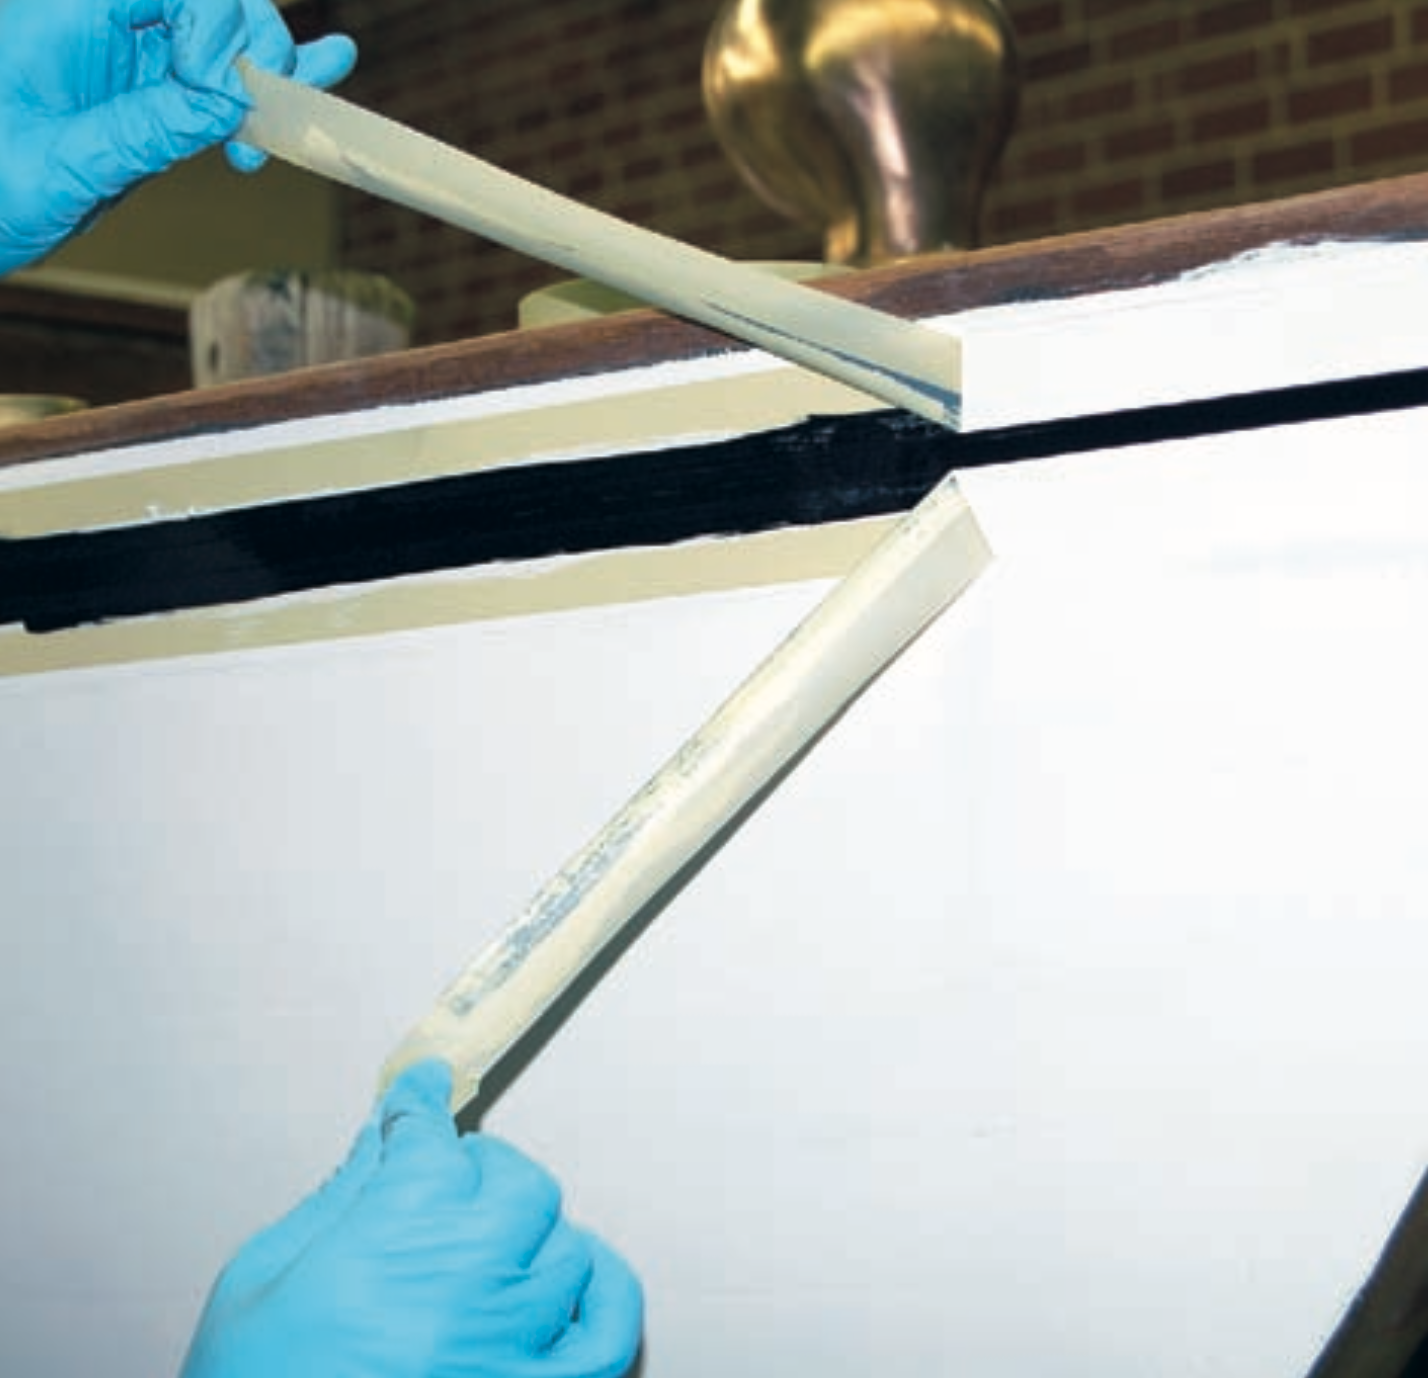
Skipper and I like to usher small boats to their natural habitat, and after 29 years at this work we are creeping up on 80 restorations or new builds. Many of these projects involved smoothing a wood or fiberglass surface prior to application of primer and paint. With our first few projects we used an epoxy-based system that required a guessing game of resin, hardener, and various types and amounts of thickening powders. Four years ago we tried TotalBoat’s TotalFair epoxy-based fairing compound and have stuck with it ever since.
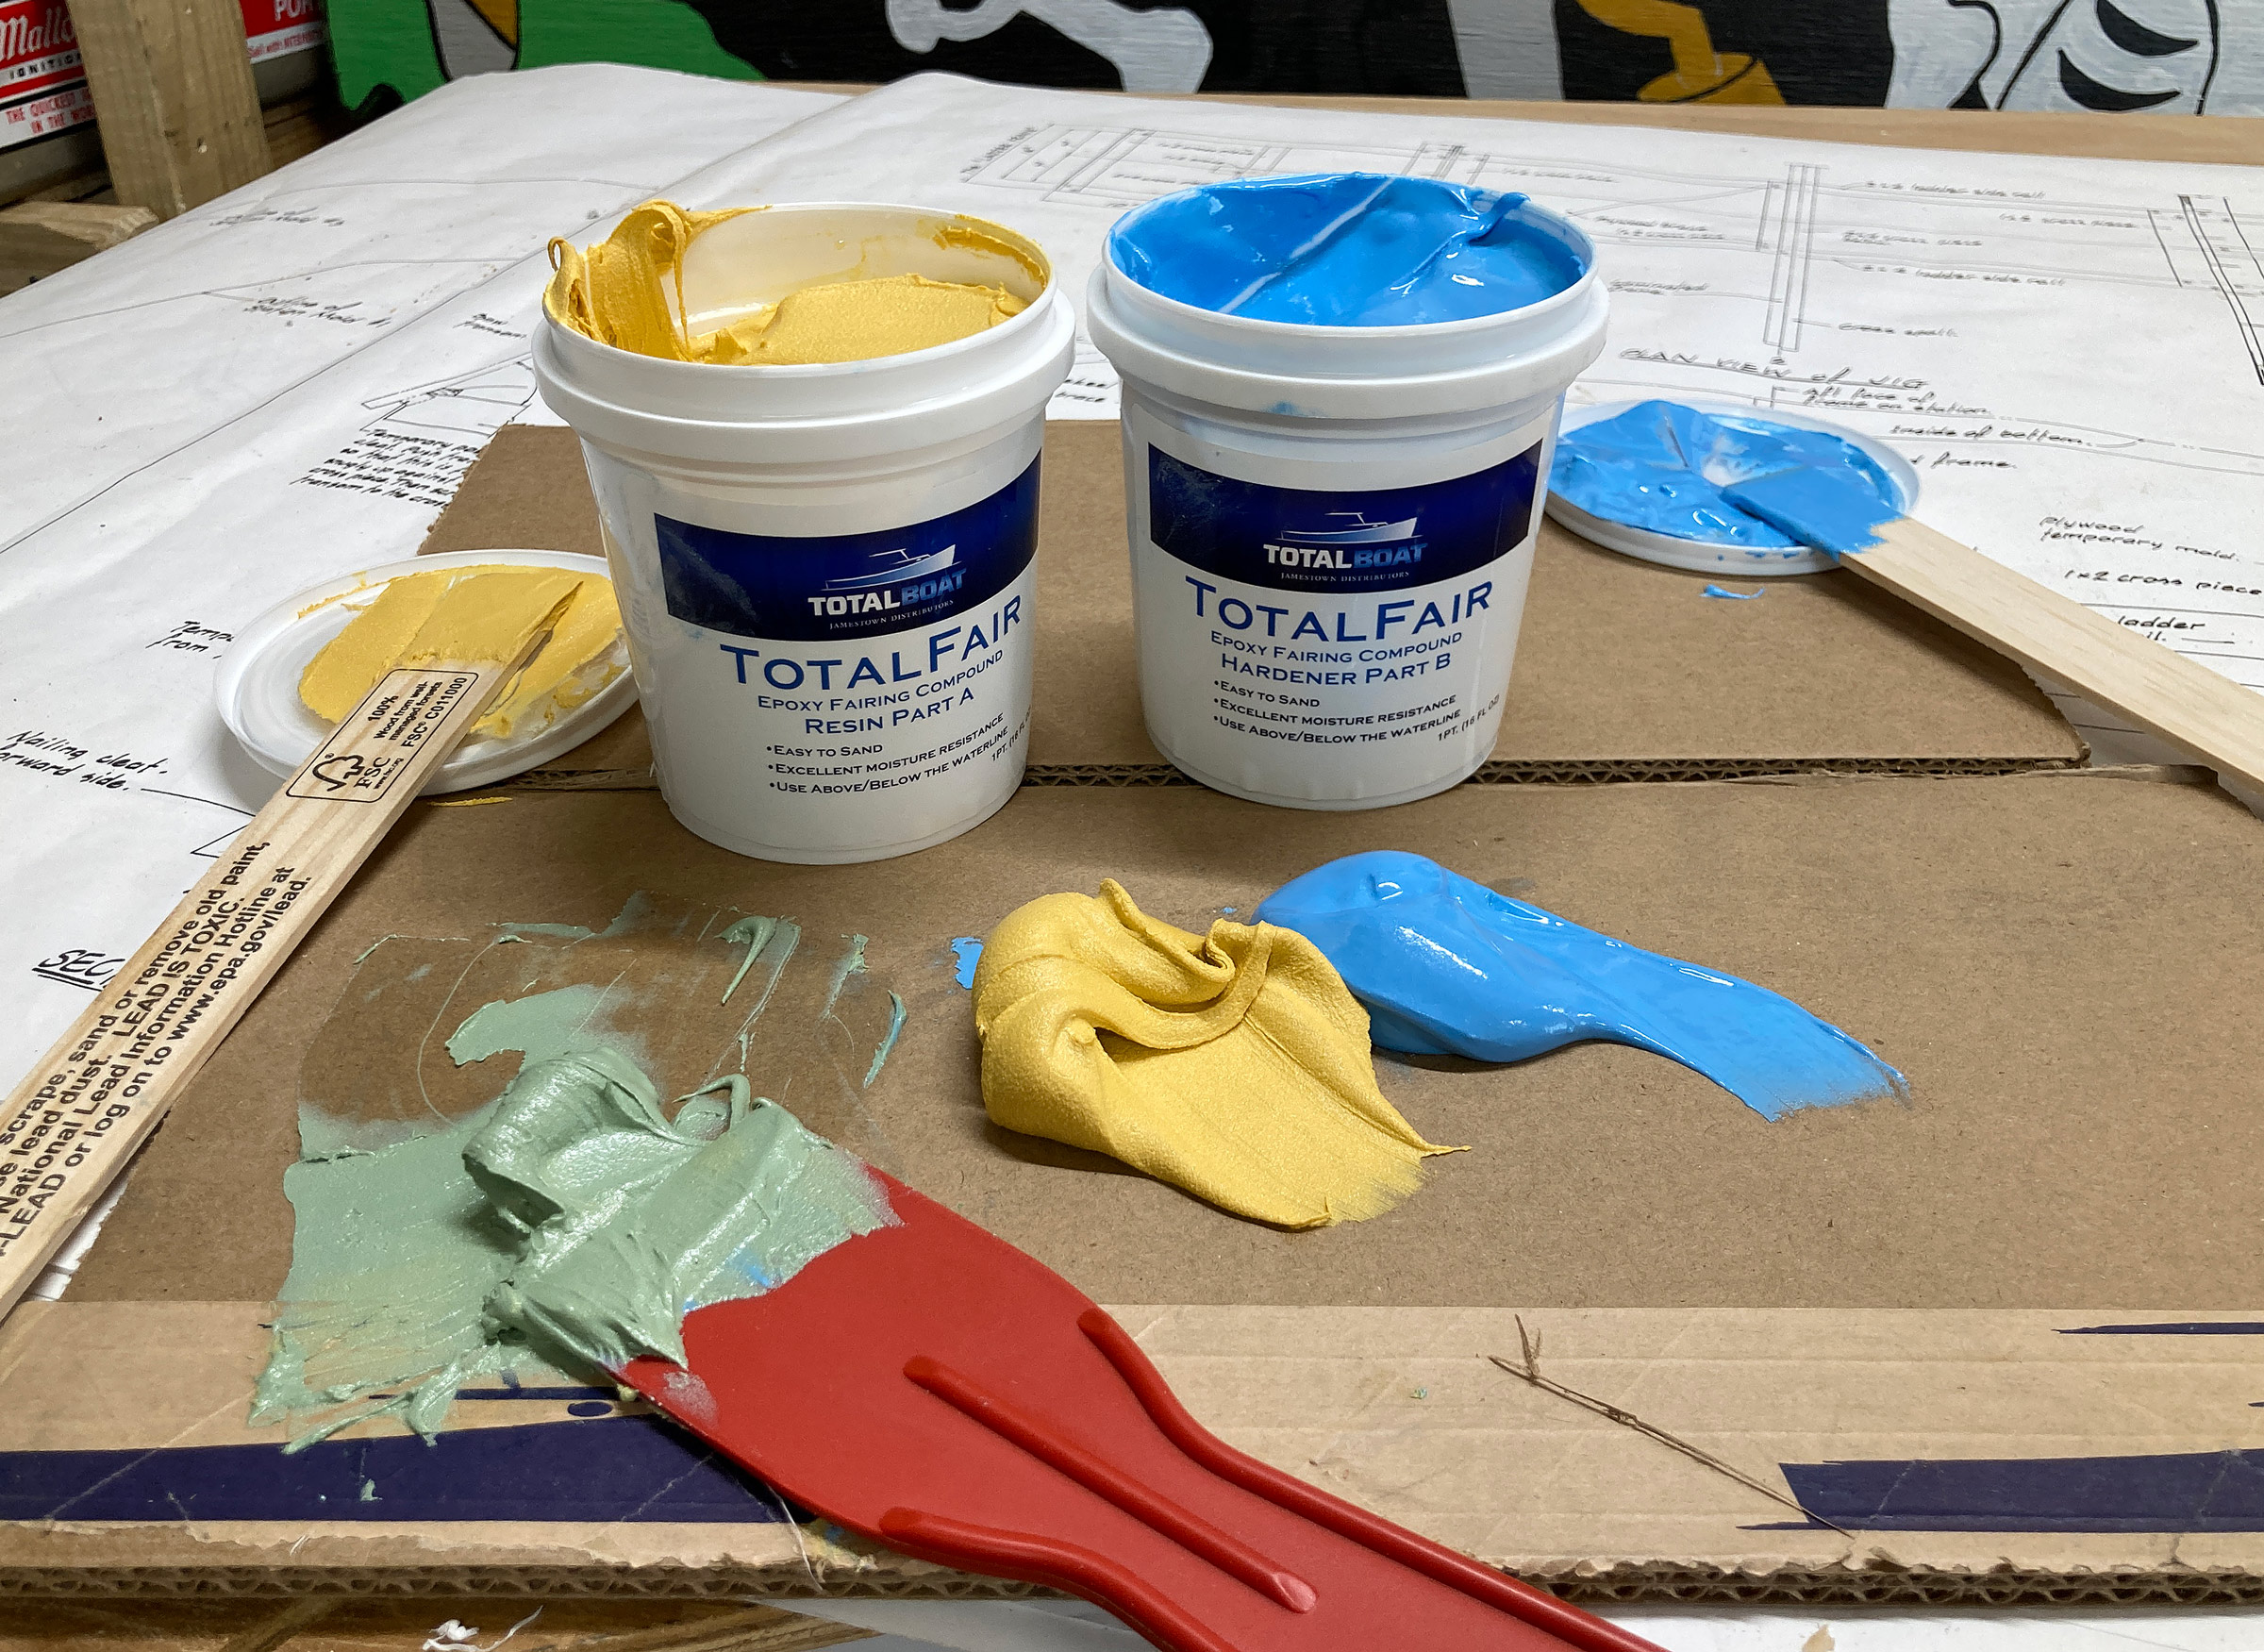
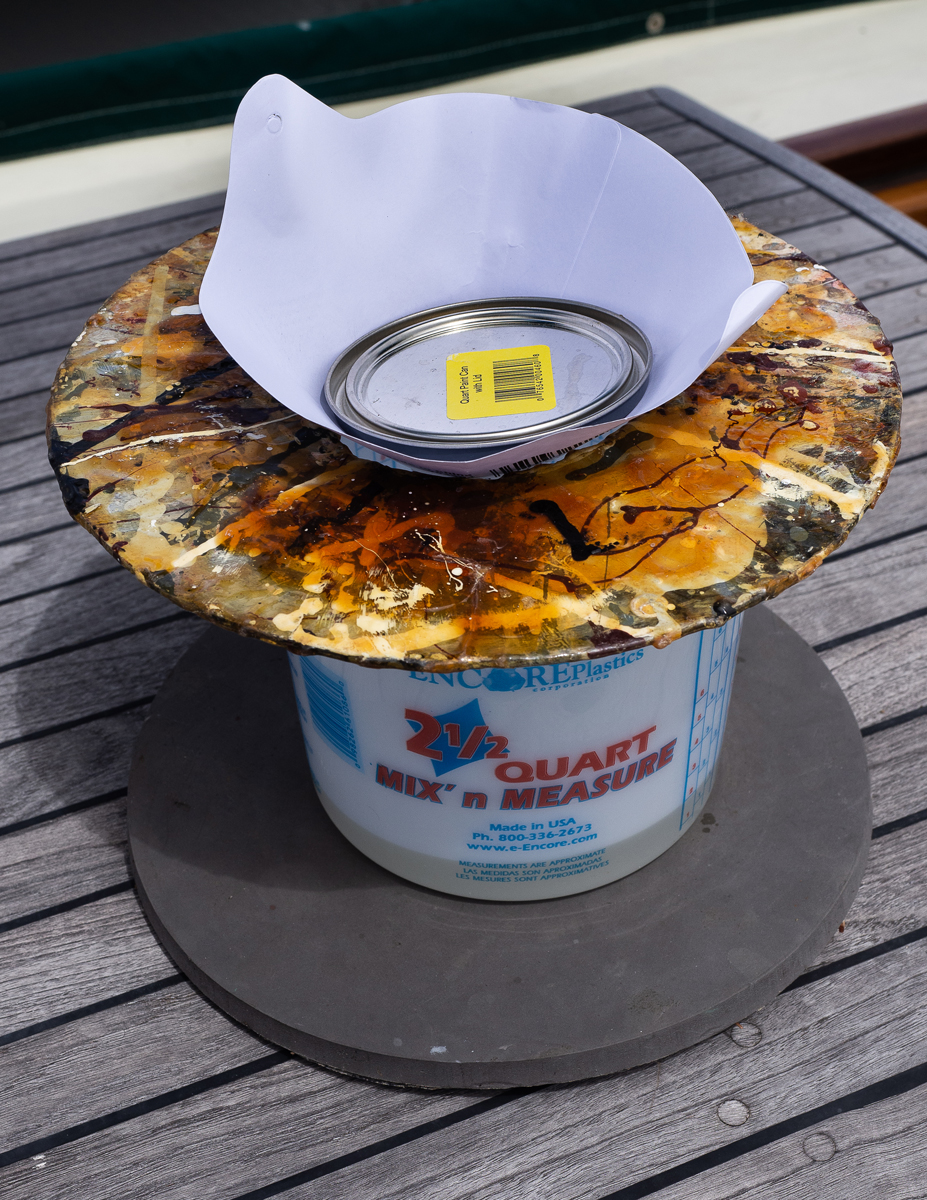
TotalFair is a two-part epoxy-based compound, packaged in separate containers of resin and hardener. The fairing filler is mixed into both parts, so there is no guessing how much filler needs to be added and nothing runny to make a mess. The resin is yellow, the hardener is blue, and each part is scooped out onto a mixing board. We measure the parts by eyeball; ratio has not proven to be super-critical. Cardboard makes a handy palette for mixing the yellow and blue until the compound is a uniform green. The opaque materials and the color combination make it much easier to see when the two parts have been completely mixed than with clear resin and hardener.
Photographs by the authors
The mixing ratio is not critical. Just eyeball equal amounts of the resin and hardener then mix until you have a uniform green without streaks of yellow or blue.
We apply TotalFair with a rubber spreader or plastic putty knife, using different tools appropriately sized to the area we are covering—some boats require only the filling of small holes while others need fairing compound for the entire hull or deck to fill in irregularities from surface grain or to hide the vagaries of our fiberglass repairs.
The compound dries quickly. On a summer day, when temperatures are about 80°F, we can fair a surface in the morning, sand three hours later, and move on to priming the same day. Cooler temperatures will mean longer drying times, up to 12 hours at 50°F. The product is simple to apply and easy to sand—so easy that the main risk is sanding away all of the compound. There is little risk of sanding away the adjacent fiberglass or wood. When fully cured the compound sands away as dry powder that doesn’t clog sandpaper. The TotalBoat website cautions, “If it sits for more than two days, it can become harder to sand,” but we usually sand the same day or the next and have not experienced the compound becoming any less easy to work. TotalFair isn’t prone to trap air bubbles while mixing, so sanding doesn’t result in pinholes to fill; most of the time this eliminates the need for a second application.
TotalFair is formulated for the marine environment, unlike other often-used fillers from the automotive market, and we have used it successfully on our trailered fleet on wood and fiberglass, under and over compatible primers, and above and below the waterline. While Jamestown Distributors states that “TotalFair will not stick to one-component paints or primers,” we haven’t had adhesion problems with these simple coatings. Jamestown recommends using TotalFair under “epoxy, polyester, or a two-component urethane in good condition, with good adhesion.” When repairing fiberglass boats, use a primer over TotalFair if a gelcoat finish is to be applied or the gelcoat may not cure properly.
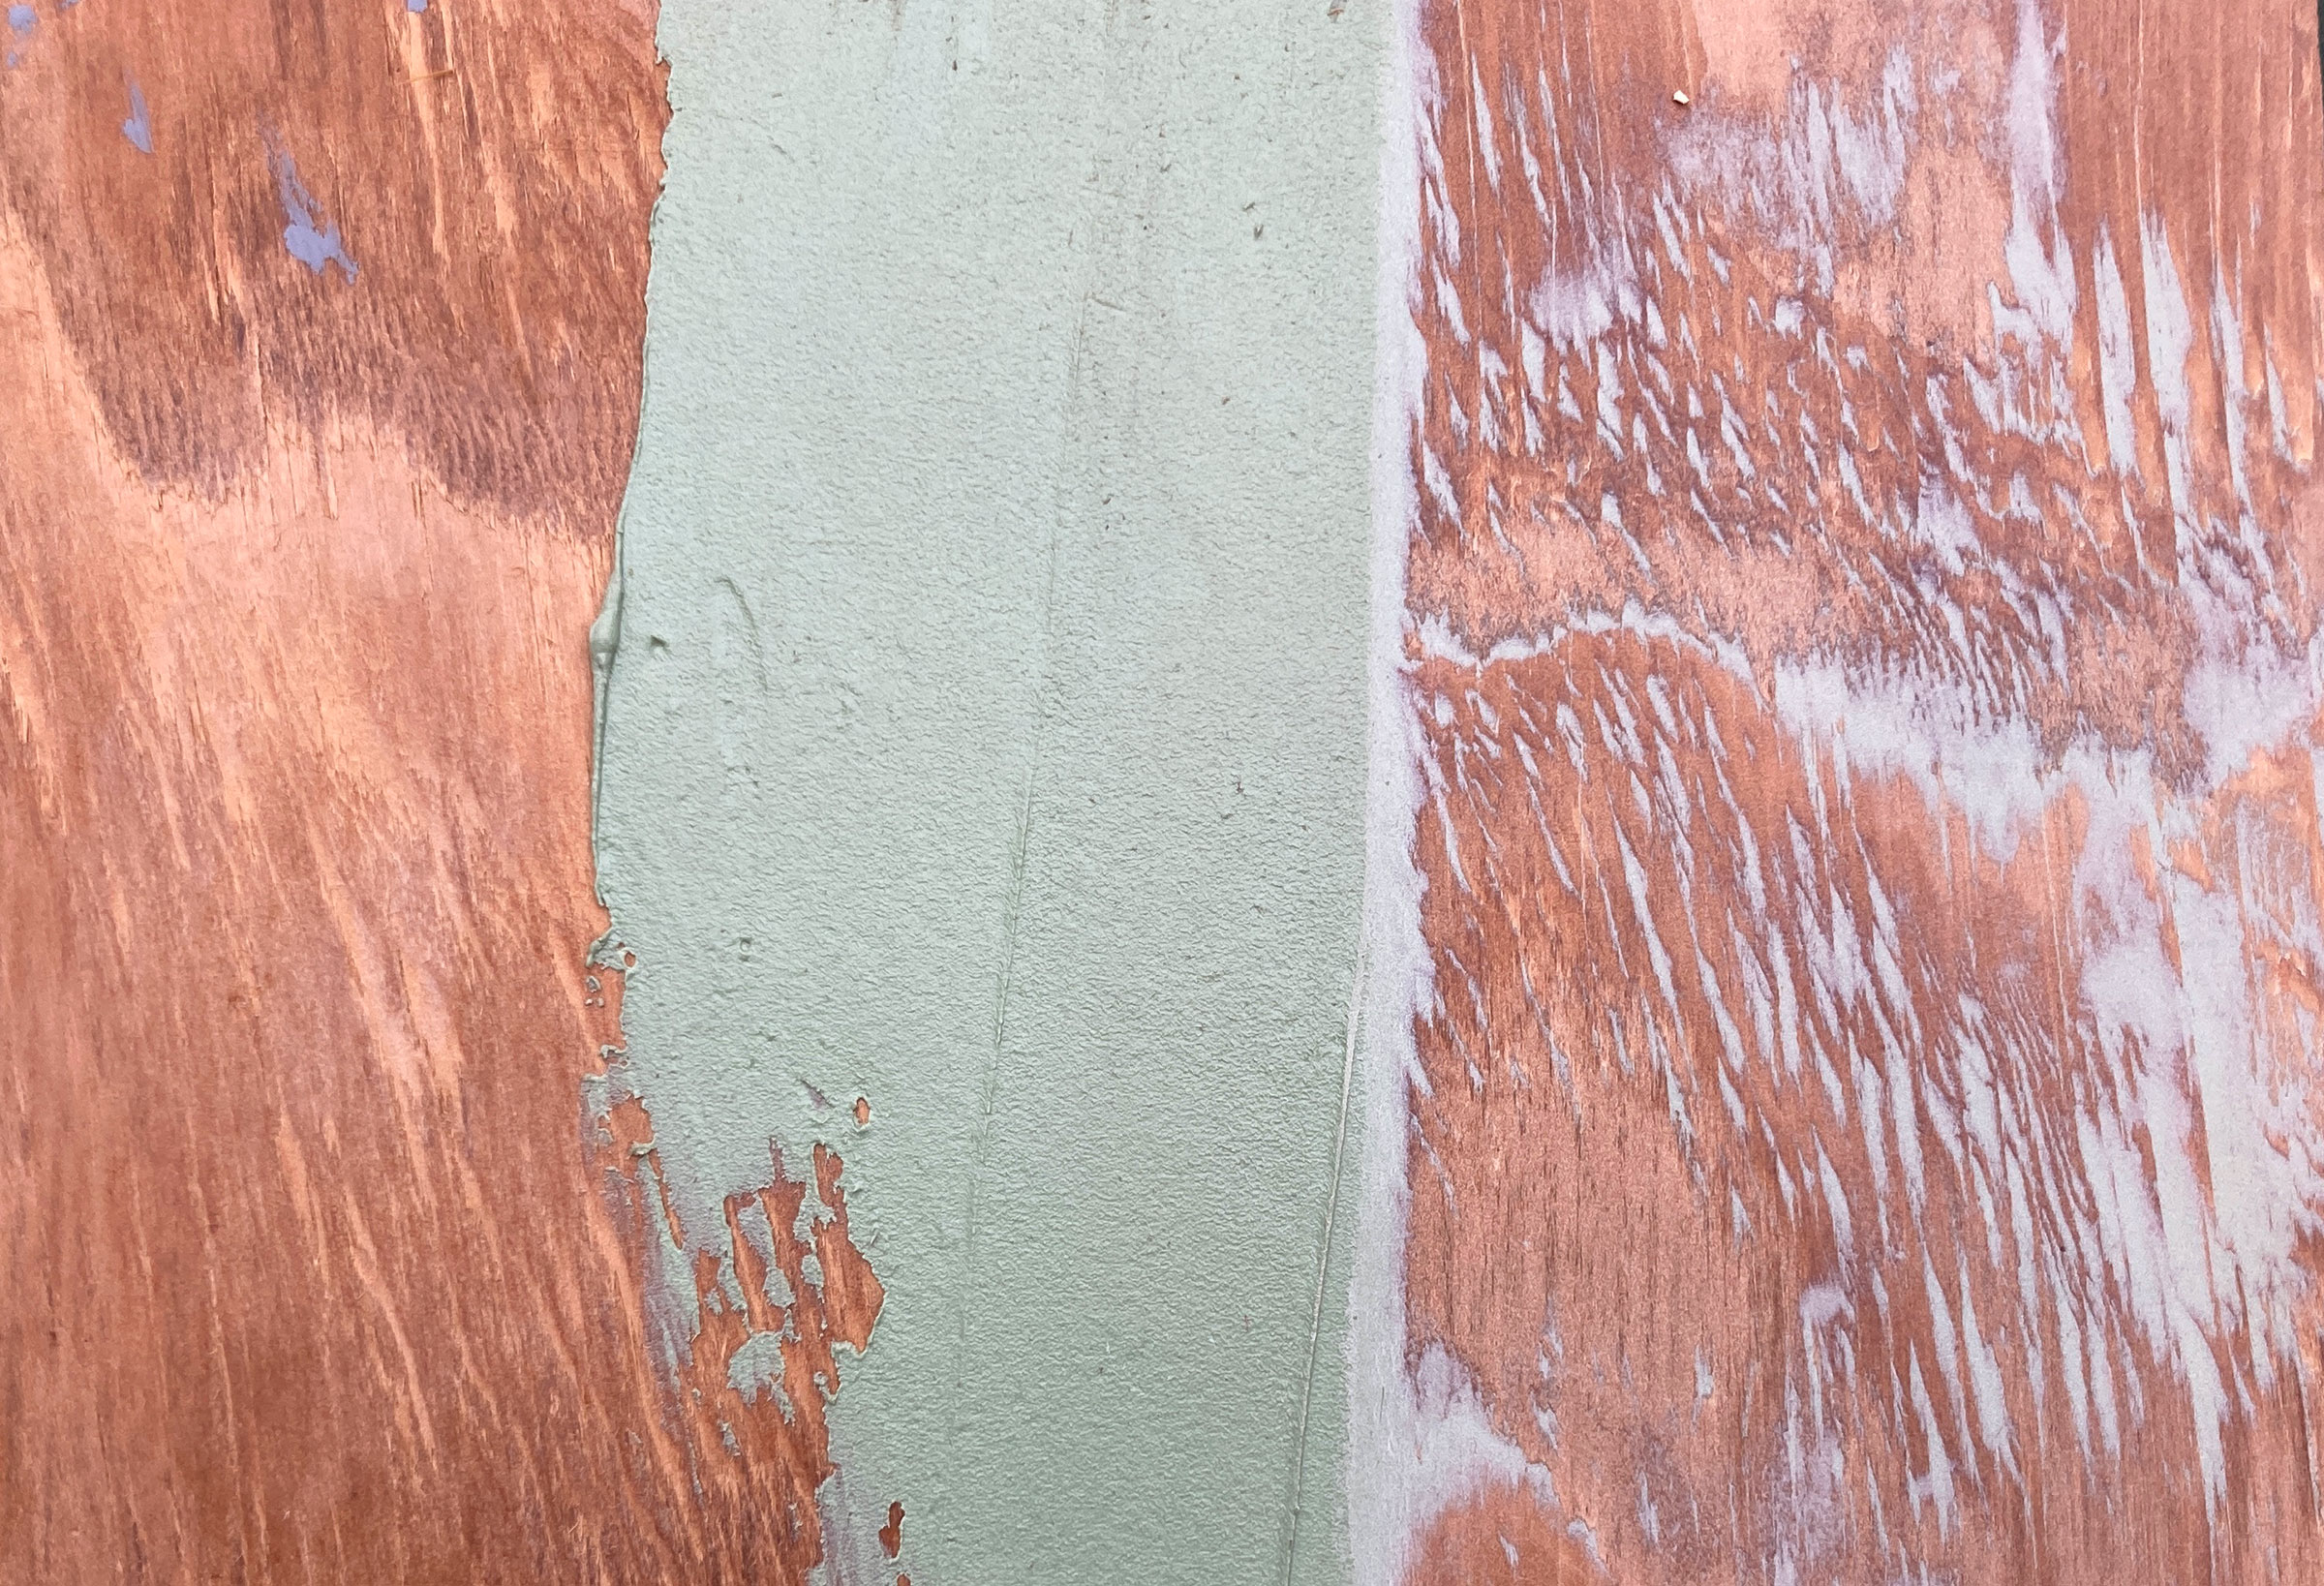
Untreated fir plywood (left) can take an overall application of TotalFair (center), and be sanded to a smooth surface (right), ready for primer and paint.
The compound can fill divots up to 3/4″ deep, though for a fill that deep it is best to use two, layered applications. It can be applied to vertical or overhead surfaces without sagging or running. It is easy and fast to mix small or large batches of the compound; we have had working times out to 30 minutes at 70° F. Being able to mix the two pre-thickened components eliminates guesswork and minimizes waste. Once finished with fairing, we have stored the remaining TotalFair resin and hardener for several months before popping the containers open again for use the following season. (A plastic sheet inside each container reduces air intrusion and ensures fresh TotalFair when the next fun fairing times arrive.)
Skipper (Audrey) and Clark (Kent) Lewis mess about in a small armada of sail, oar, paddle, and motorboats in the Tidewater Region of Virginia, when not fairing and sanding. Their adventures are logged at Small Boat Restoration.
TotalFair is sold by Jamestown Distributors from their in-house brand of TotalBoat products in 2-pint, 2-quart, and 1-gallon kits for $41.99, $69.99, and $124.99, respectively.
Is there a product that might be useful for boatbuilding, cruising, or shore-side camping that you’d like us to review? Please email your suggestions.
That’s according to a poem Alexander Pope wrote more than 300 years before Dennis Ward of Riviera Beach, Florida, figured it out for himself. Reading a book on stitch-and-glue boatbuilding inspired him to design and build a boat in 2004 even though he had no experience with either skill.
Fired at first sight with what the Muse imparts, In fearless youth we tempt the heights of Arts
Dennis’s muse was Sam Devlin and his temptation was the boatbuilding method detailed in Sam’s book, Devlin’s Boat Building. After reading the book, Dennis went straight to work to create a boat of his own: “I sketched a dinghy on paper, then glued some pieces of wood together with epoxy, and was amazed I had made a boat that didn’t sink.” Cutting out pieces of plywood, drilling a bunch of holes, and wiring and gluing the pieces together just happens to be the easy part, but the goal is more than just keeping the water out. Dennis quickly discovered that the dinghy was unsafe on the water. Pope expressed that awakening of a novice to what has yet to be learned:
But, more advanced, behold with strange surprise New distant scenes of endless science rise!
The subtitle of Devlin’s Boat Building is “How to build any boat the stitch-and-glue way”. Sam likely intended “any boat” to encompass the sizes and types the system works for—he has designed and built boats ranging from a 6′3″ dinghy to a 45′ motor cruiser—but “any boat” could also be taken to mean good boats as well as bad boats. Sam’s boats, the result of a wealth of education and experience in boat design and construction, belong in the former category. Dennis admitted that his boat had fallen into the latter: “That dinghy has since become yard art.” The lesson he learned was “Let the professionals design the boat!”
Photographs by and courtesy of Dennis Ward
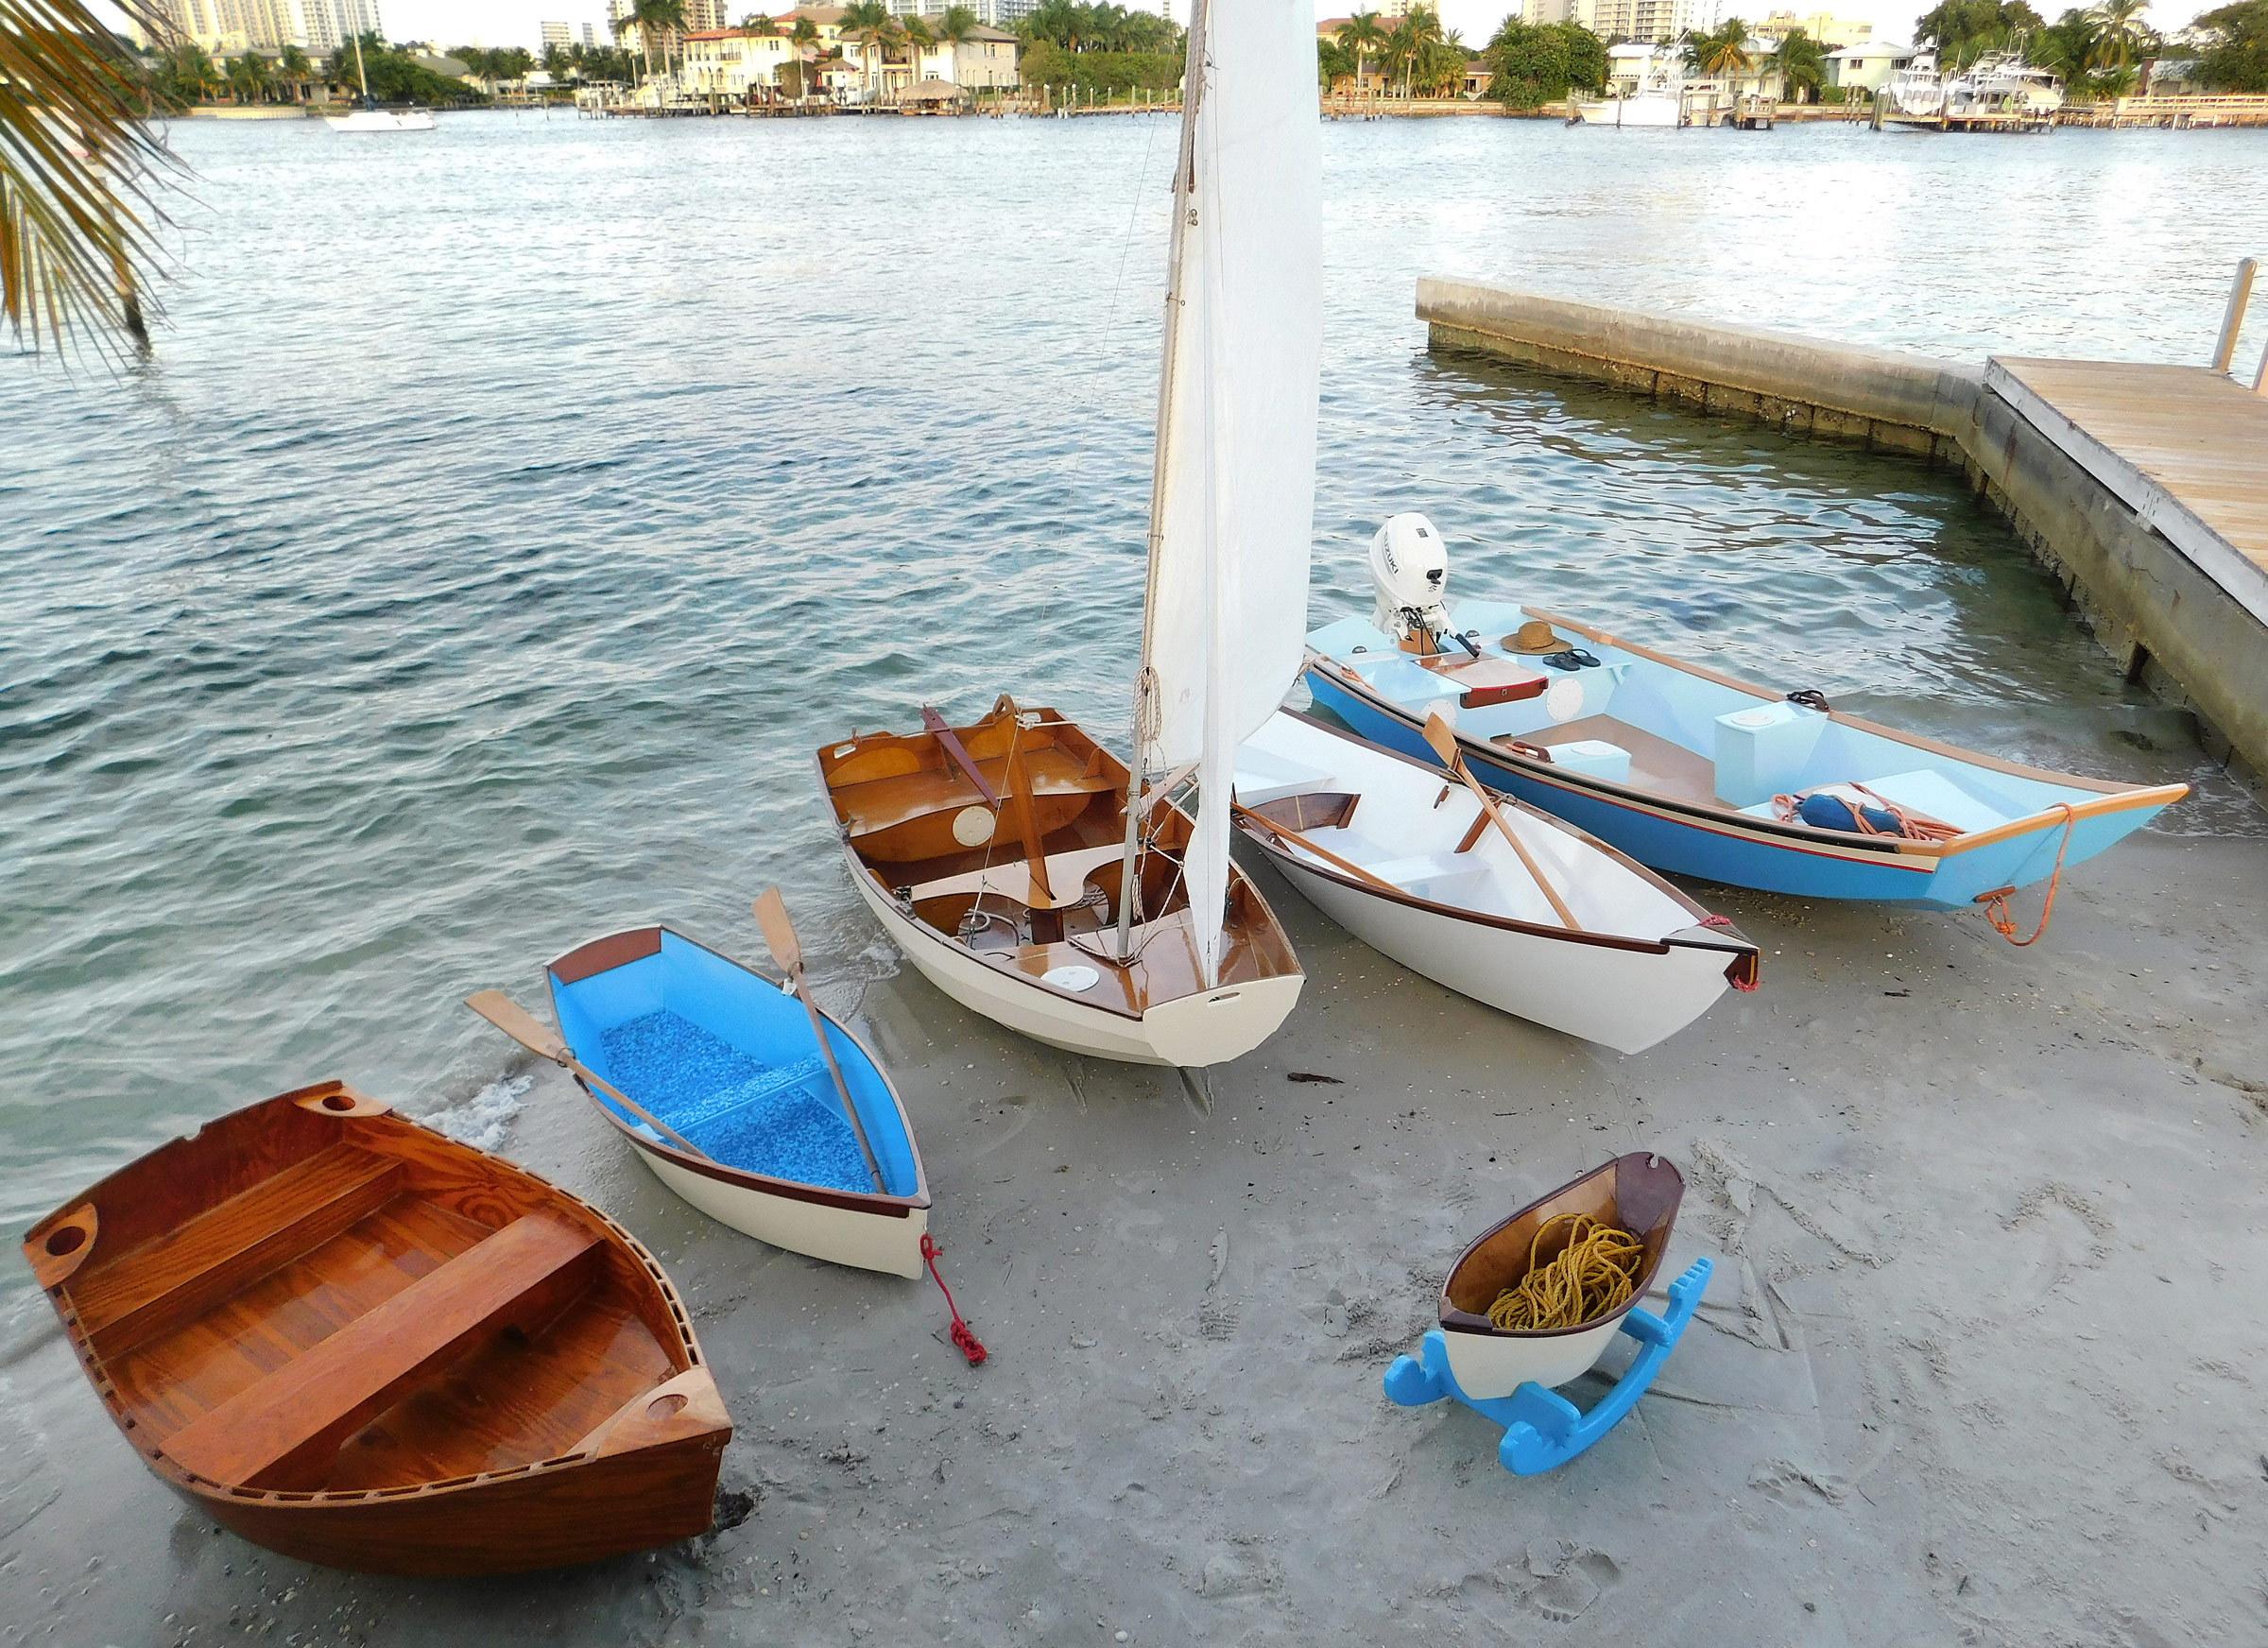
In October of 2021, Dennis retired after a 35-year career as a Palm Beach County ocean lifeguard, rower, rescue-boat driver at Jupiter Inlet, Boynton Inlet, and Boca Raton Inlet. A couple weeks later, he got all six of his boats in the water for some photos. At the water’s edge, from left: Dennis’s self-designed dinghy, kid’s rowboat from a thrift store, Passagemaker Dinghy, Gloucester Gull, and Ben Garvey. The Gloucester Rocker is safely away from the water. His Chester Yawl isn’t shown.
Despite the disappointing results of his first efforts, Dennis thoroughly enjoyed the time he spent building the dinghy. For his second boat, he skipped the designing and bought a kit for Chesapeake Light Craft’s 11′ 7″ take-apart Passagemaker Dinghy. He finished it in 2007 and, although it had all the characteristics that would put it in the “good boat” category, the Passagemaker was only afloat a few times before Dennis was back in his back yard under a 10′ by 20′ canopy, “making more sawdust.” His series continued with a Gloucester Gull and a partially built child’s rowboat he bought in a thrift store for $30. The Gull was afloat only a few times, and the little rowboat has yet to be launched and is waiting for an interested kid he can give it to.
The mild weather in Florida made it practical for Dennis to build the garvey outdoors under a canopy.
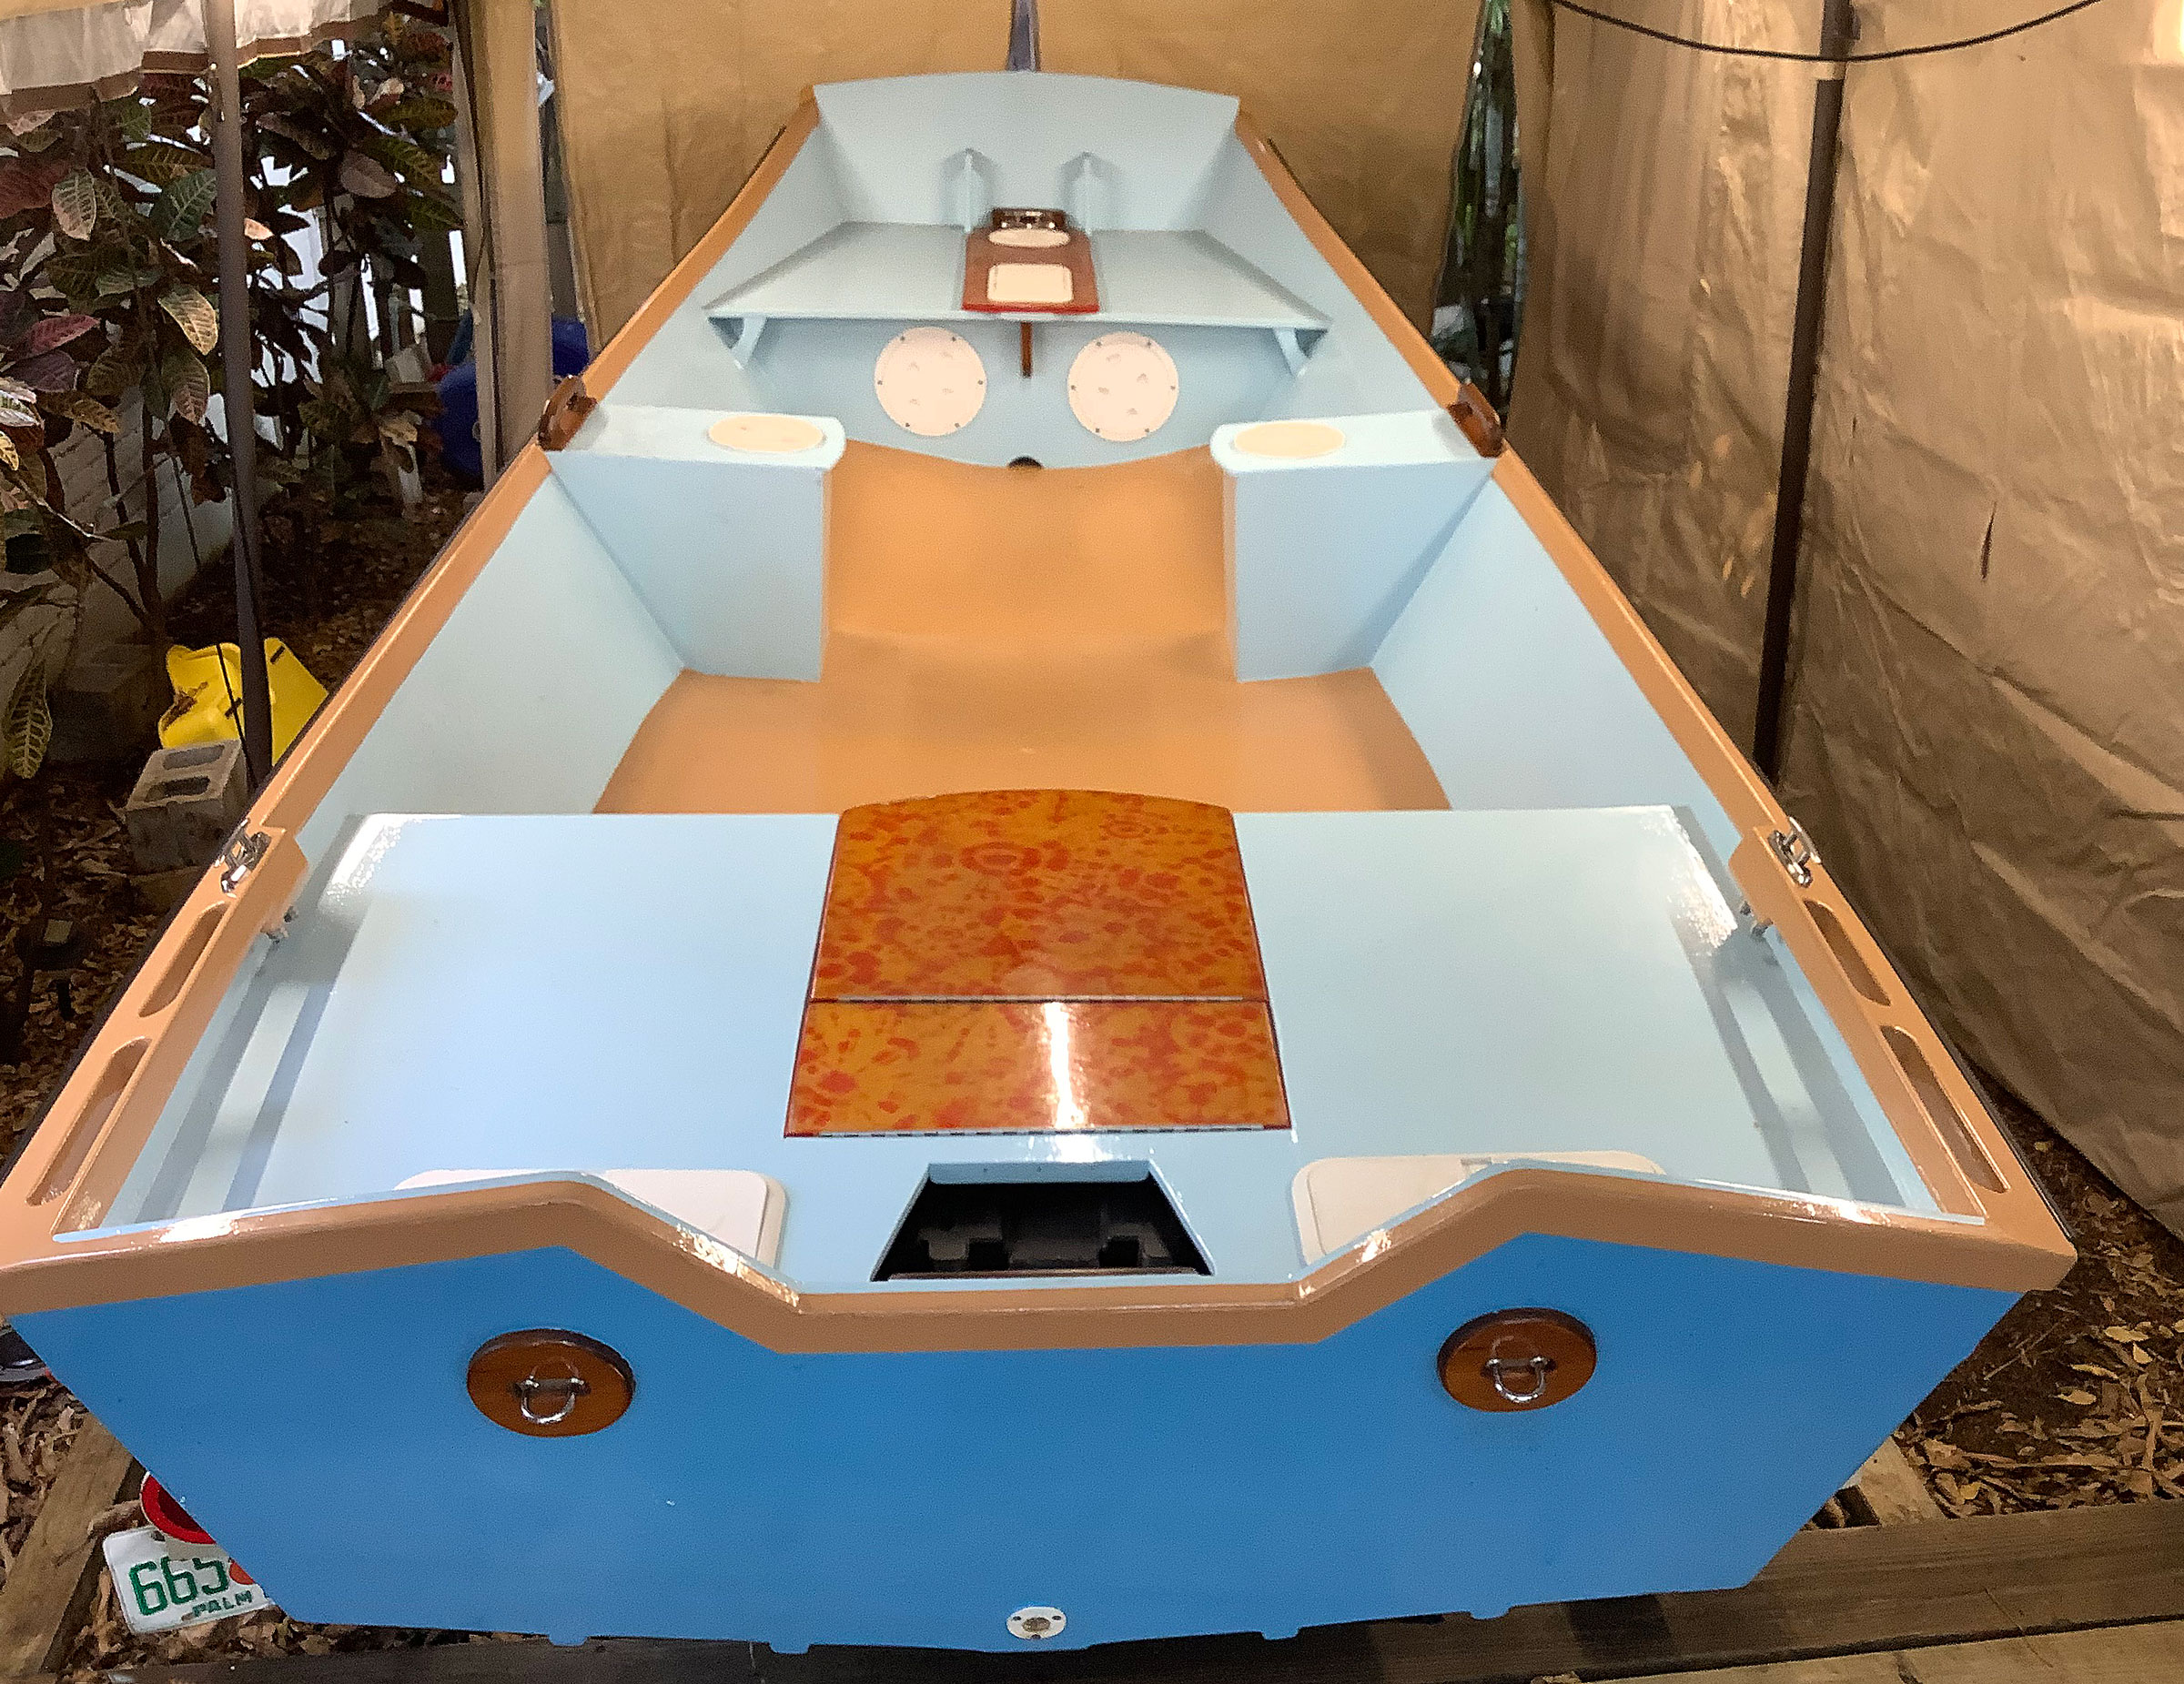
One of Dennis’s friends bought plans for Doug Hylan’s Ben Garvey, decided the project was more than he could manage, and gave the plans to Dennis, who started building it in 2011. After he had finished the hull and flipped it right-side up to begin work on the accommodations, he decided to do away with the center thwart. “That way I wouldn’t be stepping over it, and there’d be 8′ of space on the bottom for horizontal activities, like napping.”
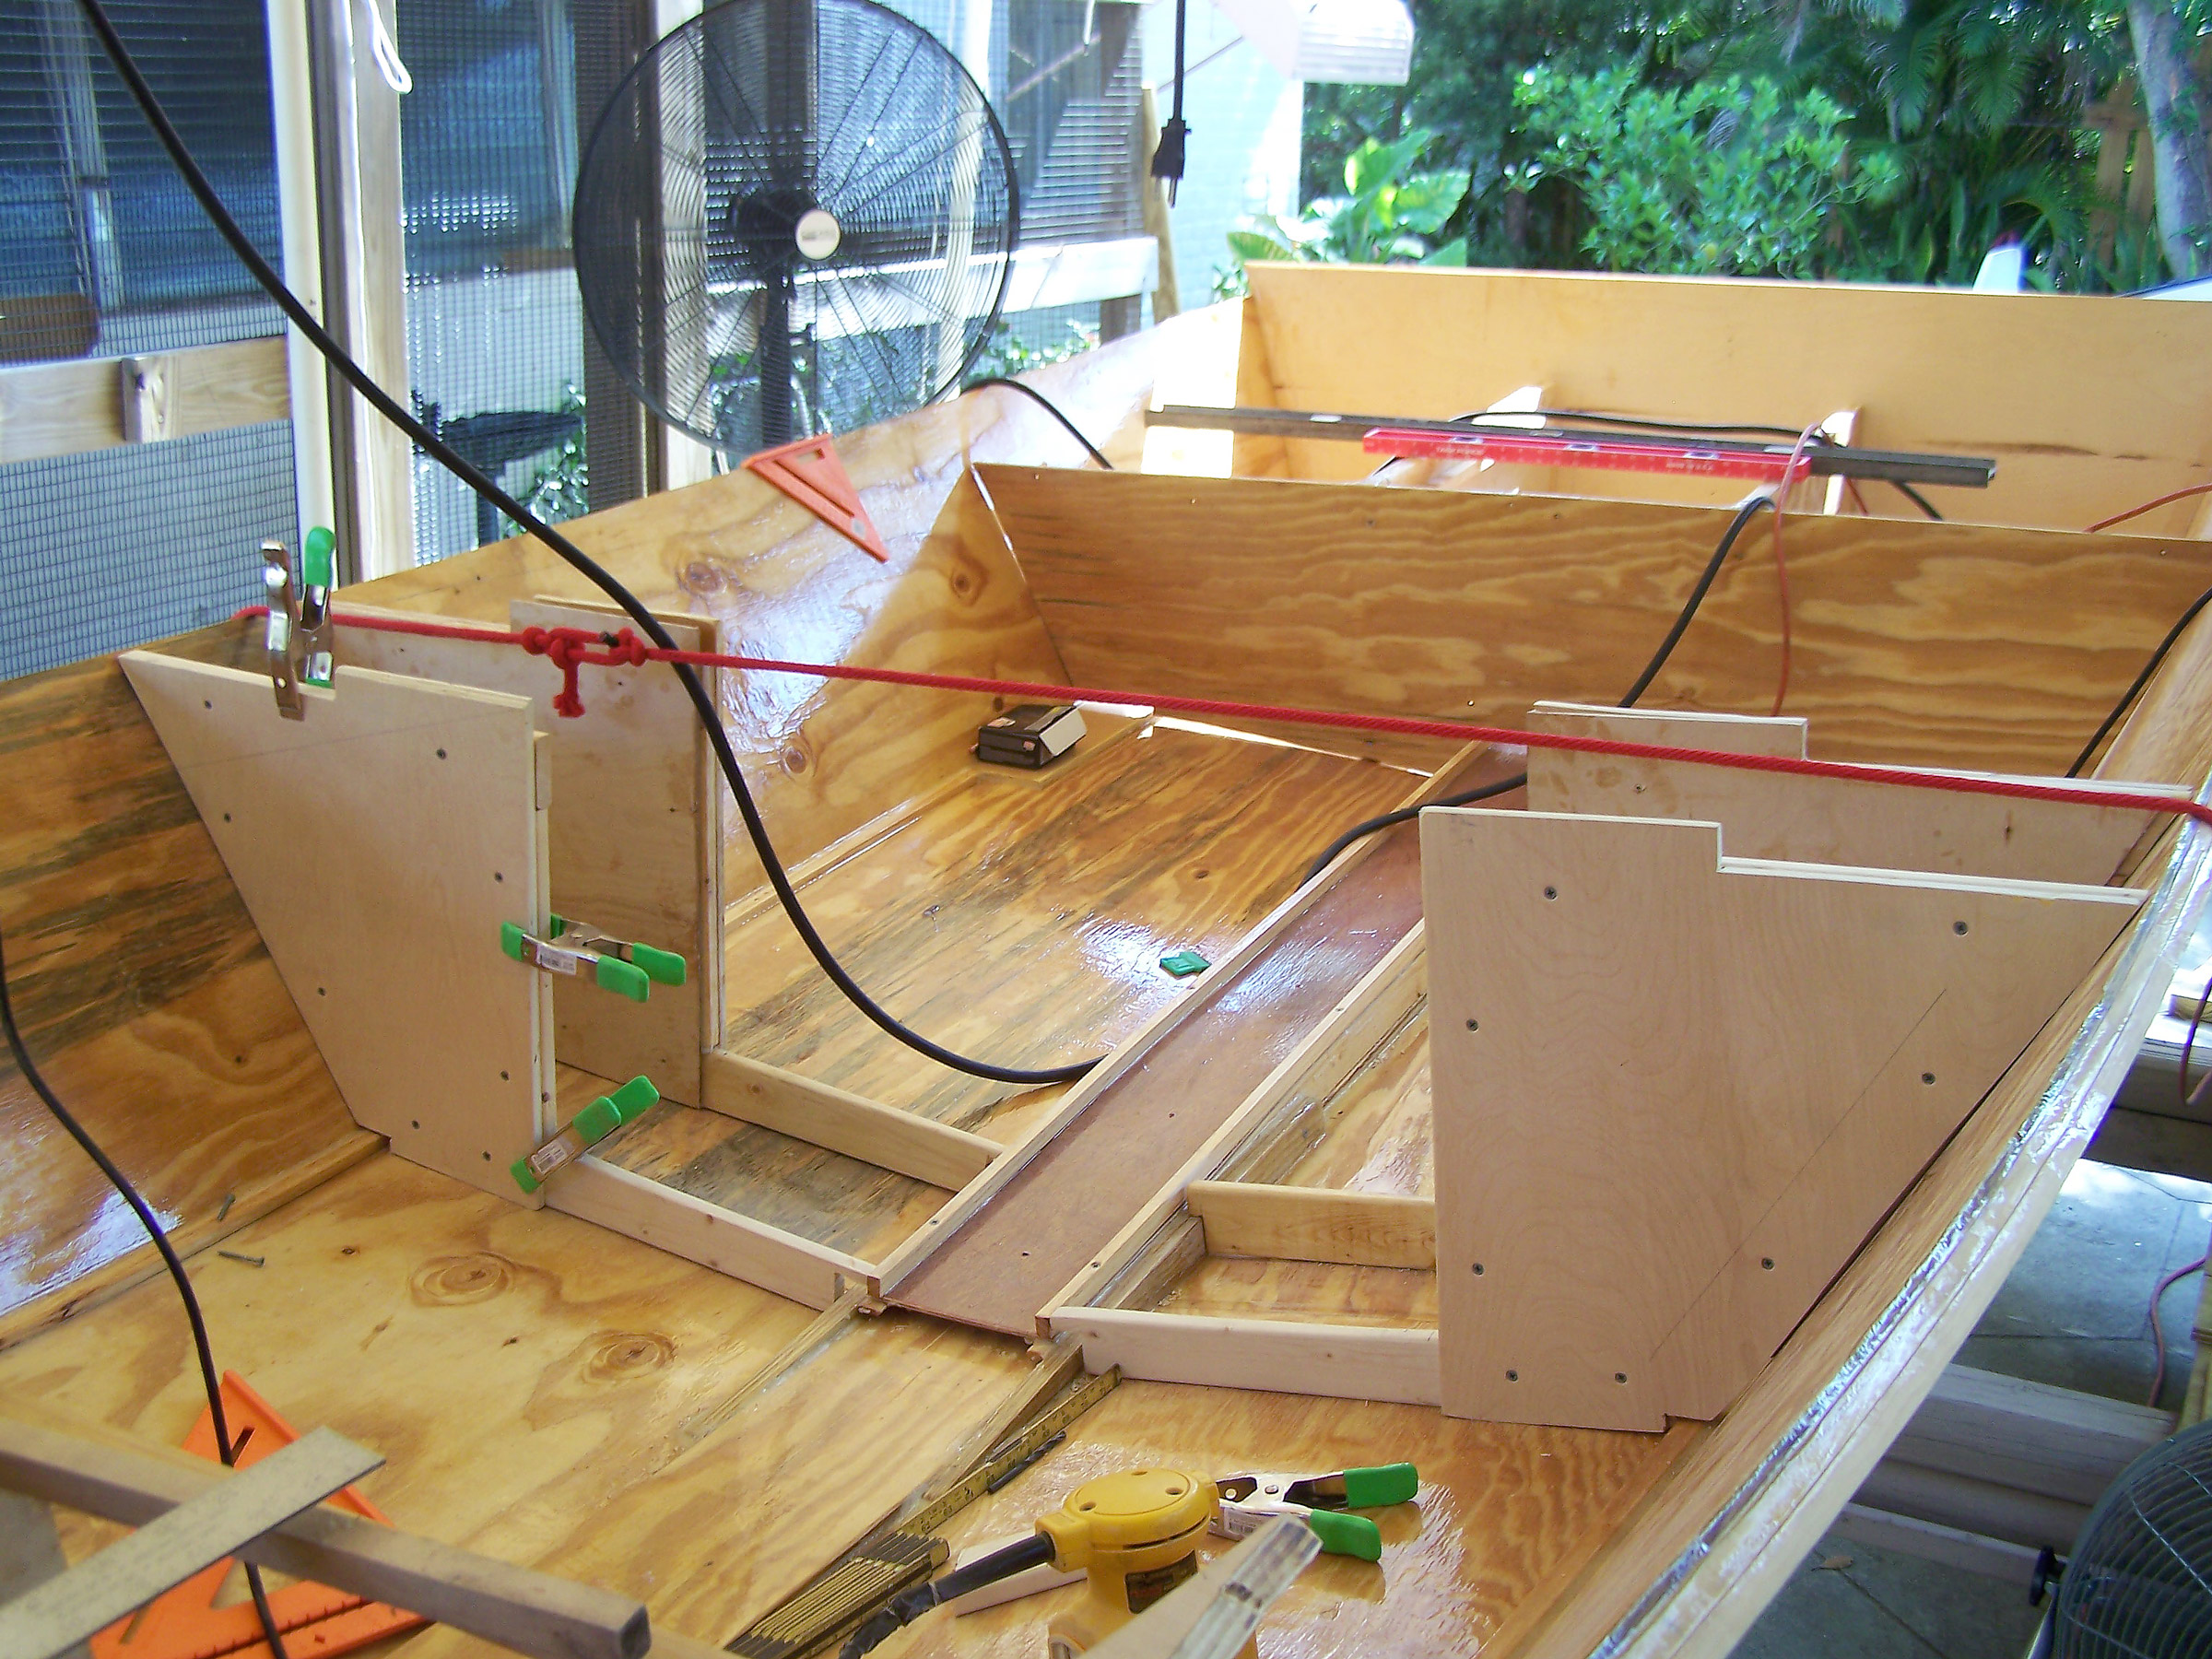
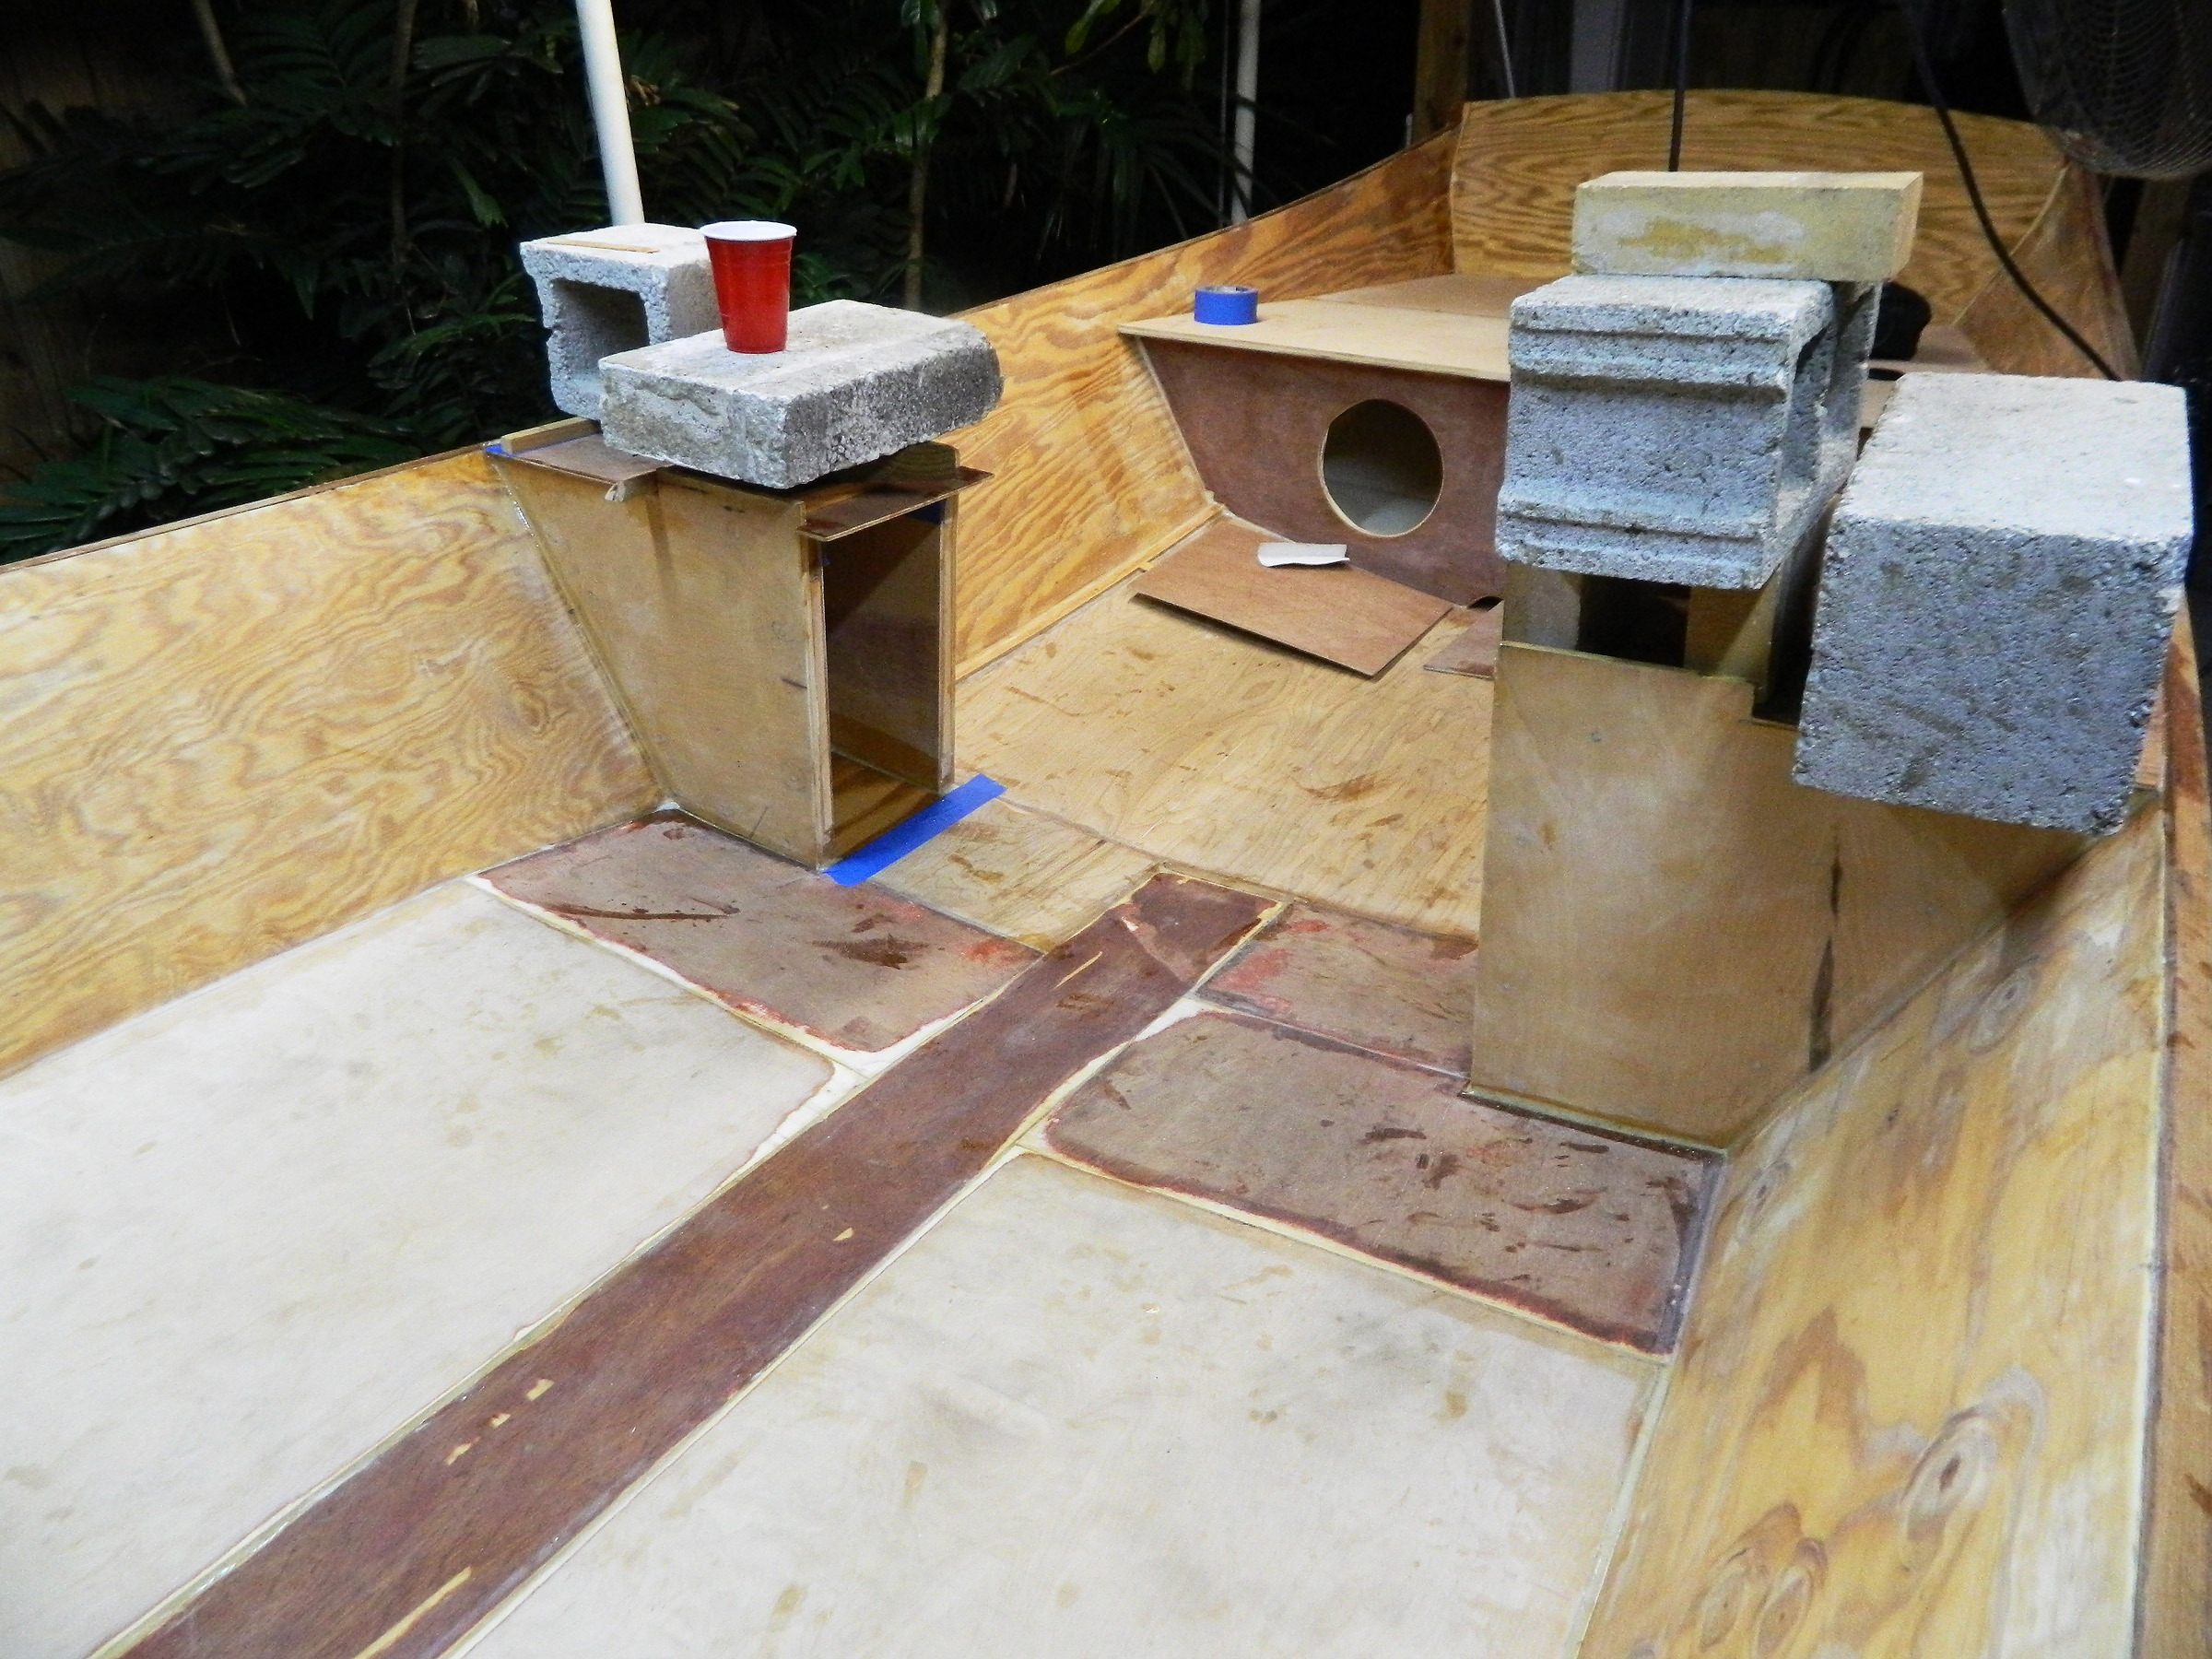
Having decided to omit the center thwart to open up the center, Dennis devised a structure that provided a walk-through passage between partial side benches and framing across the bottom.
A cockpit sole over the added interior framing provides a smooth surface for napping and enclosed spaces for flotation.
Concerned about losing the strength the thwart would have provided to the hull, he replaced it with two enclosed storage-compartment seats on either side. “I also intended to add several more frames on the bottom to add more strength to the chines and sides. The extra frames would be a tripping hazard and make napping uncomfortable; adding a cockpit sole on top of the frames seemed to be the ideal solution. I ended up with a double-hulled boat with flotation in between.”
The gunwales are teak and were initially varnished but Dennis decided “it’s like lipstick on a pig. This is basically a workboat, not a fancy piece of furniture.” He also embedded tie-dyed fabric on a pane forward and a hatch aft “because I wanted to learn how to do that. What I didn’t know at the time is that I coulda bought clear epoxy, instead of regular yellowish epoxy. So the tie-dyed bright whites turned yellow.”
Dennis finished building the garvey in 2012 but then left it on sawhorses under a canopy for several years until he could afford a trailer. A few more years drifted by as he saved enough for a 25-hp outboard for it.
Dennis worried that his weight in the stern along with that of the motor and fuel tank would cause the bow to rise too high, but It sat in the water perfectly.
While the garvey waited, Dennis’s mother gave him the plans for the Gloucester Rocker as a Christmas present. That was in 2017, and all through the following year he worked on it without telling her. The hull and rockers were straightforward work but the seat and grab bar—fashioned from walnut and holly that he had harvested on his mother’s lot—were not. The curved and beveled joints were not easy to get right and by the time he got perfect fits, the two pieces had taken more time than the rest of the boat. The next Christmas he surprised his mother with the rocker; she was delighted with it and she uses it to hold her dog’s toys.
Rob Rogerson
On the boat’s first sea trial, Dennis was “somewhat surprised how powerful the 25hp motor was. The garvey is a heavy boat but it got up on plane right away and I wasn’t comfortable going any faster than half throttle. An hour later, the garvey was back under the canopy.”
The garvey was finally ready to launch in 2020, but it wasn’t launched until this year for what Dennis says are “various lame reasons. Mostly, I’d rather build boats than go boating.”
Dennis’s 15′ Chester Yawl kit boat is being built with the help of his 86-year-old mother. She offered her basement for the project.
And he has been building boats. A Chester Yawl is in the works in his mother’s basement in North Carolina. Earlier this year, Dennis built the molds and a ladder frame for the L. Francis Herreshoff pram featured in John Gardner’s Building Classic Small Craft. The hull of the 10-footer is usually built in lapstrake cedar on steam-bent white-oak frames, but Dennis had been given a generous assortment of sapele strips and was eager to turn them into a boat.
In fearless youth we tempt the heights of Arts
Strip-building would be uncharted waters for him and, more cautious now after the experience of his first dinghy, he floated the idea of strip-planking the pram on the WoodenBoat Forum. He was dissuaded from making an attempt that could waste time, money, and valuable wood.
New distant scenes of endless science rise!
Rather than forge ahead, he bought Nick Schade’s book, Building Strip-Planked Boats. “I’ll read up some more before I decide what to do.”
Dennis is happier building boats than using them: “The prominent pleasure of wooden boats is in all the different things I learn in the building process.”
Do you have a boat with an interesting story? Please email us. We’d like to hear about it and share it with other Small Boats Magazine readers.
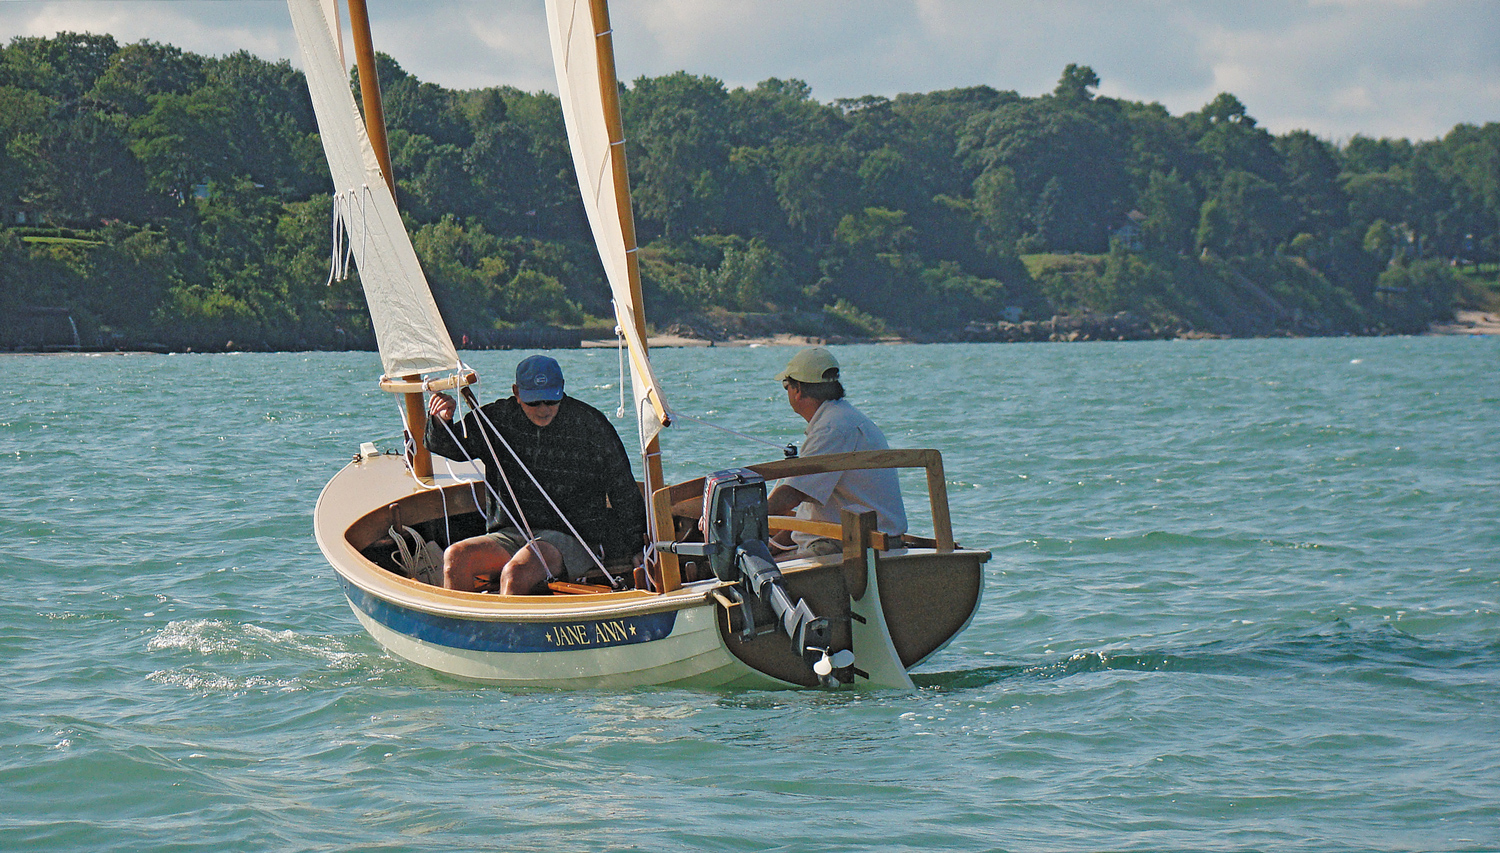
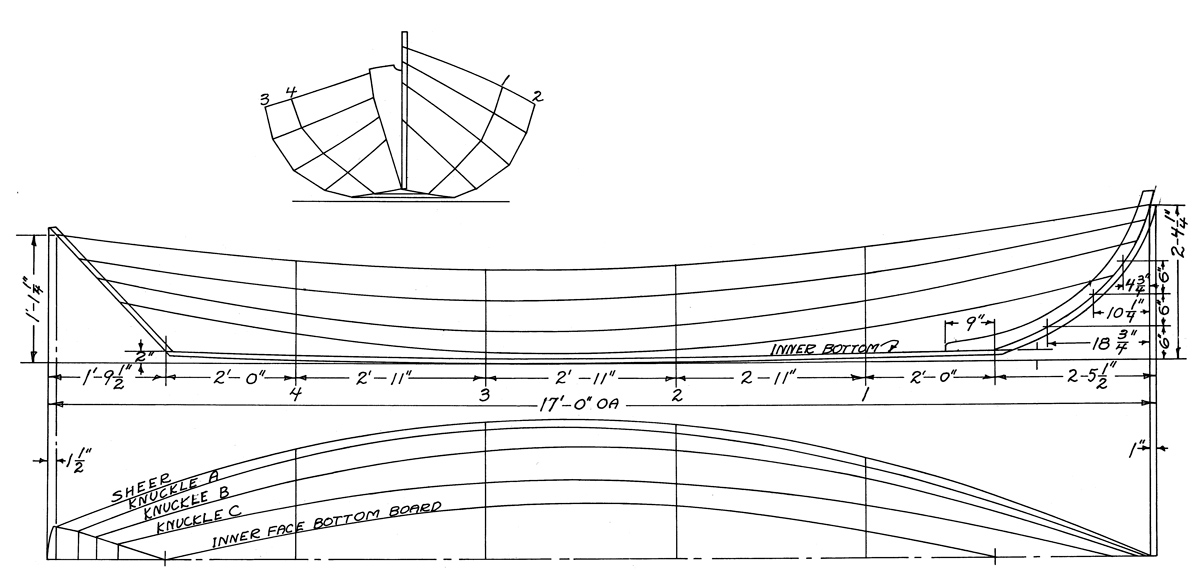
The cat-ketch JANE ANN—18′ LOA, with a beam of 5′ 6″—is builder Mike Kiefer’s interpretation of the lapstrake daysailer Robin, designed by naval architect Rob Pittaway, formerly of Mystic Seaport. Robin was originally conceived as a trailerable open boat that could be sailed or rowed for short distances in New England’s coastal waters. Pittaway said his design was inspired in part by Nathanael Herreshoff’s Columbia Lifeboat Tender, which has a striking resemblance to JANE ANN.
Kiefer, a South Haven, Michigan-based boatbuilder, modified Pittaway’s design by adding a short foredeck, 3″ side decks, an aft deck with a lazarette underneath, and a steam-bent white-oak coaming, which combine to scatter spray in open waters. A motor mount bolted to the aft deck accommodates a 3-hp long-shaft outboard for auxiliary power to get in and out of channels on the Great Lakes, where few natural harbors exist. Two rowing stations provide alternative propulsion, but maneuvering under oars in relatively long and narrow Great Lakes channels, with surging waters and heavy traffic, can be a tricky proposition.
Robin’s original rig called for a mainsail with a diagonal sprit and a mizzen with a horizontal sprit. There were no headsails. Under Kiefer’s interpretation, JANE ANN is rigged with a balance lug mainsail, which has a boom, while the mizzen setup remains unchanged. Collectively, the Robin’s sails carry 103 sq ft of Dacron (70 on the main, 33 on the mizzen).
George D. Jepson
This 18’ cat-ketch, designed by Connecticut-based naval architect Rob Pittaway for New England’s coastal waters, is equally at home on the Great Lakes or inland waters, under sail, auxiliary outboard power, or oars.
JANE ANN’s rigging is simple, with minimal hardware. A hole pierces the top of each mast, taking the place of a sheave, to accommodate the halyards. Sheets are neatly tied to the main boom and mizzen sprit, and run through jam cleats. The mainsheet also runs through one wooden block attached to the boom, which Kiefer crafted to assist the helmsman in gaining purchase in a stiff breeze.
On a bleak winter’s day over a decade ago, my wife Amy and I stopped by Great Lakes Boat Building Company—Kiefer’s rural shop out-side South Haven, Michigan—to “talk boats.” I mentioned that we were interested in a trailerable daysailer for the Great Lakes. Moments later, Mike pulled several designs from his files, including a lines drawing and a description of Pittaway’s Robin.
The following autumn, Mike laid the keel for our new Robin. By the time of my next visit, the backbone, made of Michigan sassafras, was in place on the jig, ready to accept her planking. Over pancakes and eggs at a nearby diner, he described the modifications he planned for the boat.
Winter settled in and the wood-burning stove in Mike’s shop glowed red as he hung the boat’s 9mm okoume plywood planks—eight to a side—gluing their laps with epoxy. Frames (steam-bent), thwarts, centerboard and trunk, and trim were all fashioned from sassafras. “For my money, ‘sassy’ is the best [native Michigan] wood for small-craft construction that we have,” explained Kiefer. “It glues, accepts fastenings, and steams well. It has a medium density and weight, and it’s durable.”
Warm spring breezes signaled the end of winter, as the boat neared completion. The masts, which are identical and fit either the main or mizzen stops, were shaped from Sitka spruce. Varnishing and painting the boat were the only tasks remaining before she would be launched in the Black River.
George D. Jepson
Boatbuilder Mike Kiefer modified Pittaway’s design, adding flat floorboards to the bilge and belaying pins for stowing lines.
On a lovely May morning, the boat sat on the stocks as I stepped into Kiefer’s shop. Dust floated in the sun’s rays slanting through the doorway, illuminating the boat’s lovely lines. The aroma of freshly sawn wood, shavings, paint, and canvas permeated the air.
As we stood gazing at her fair sheer, Mike looked like a young boy at the county fair, anxiously waiting for someone to bid on his prize calf. We christened her JANE ANN, for our daughter.
JANE ANN’s maiden sail was down the Black River, bound for the open waters of Lake Michigan. Sails were set in the lee of the channel. As we passed the pier heads and barn-red South Haven Light, we switched off the engine and trimmed the sails. She heeled slightly, slicing through the light chop. It was an exhilarating sail for builder and owner alike.
She is beautiful to behold, whether viewed from the cockpit, standing on the dock, or from another boat. Her bright interior finish accentuates the wood grain and her graceful lines are eye-pleasing from virtually every vantage point. Under sail or oars, she draws waterfront admirers.
With a spacious cockpit and deep, sumptuous seating, JANE ANN is a comfortable daysailer with four adults aboard, and could be a camp-cruiser for two, with the addition of a cover for inclement weather. Over the years, she has proven to be fast in gentle breezes, and with an experienced helmsman she has sailed in winds up to 30 knots in heavy seas. She sails well close-hauled, is a delight on a reach, and jibes deftly. A particular joy is sailing downwind wing-on-wing. JANE ANN rows easily, even with three or four adults aboard.
She also tows effortlessly behind a vehicle. Weighing less than 400 lbs, she is light enough to be maneuvered onto her trailer by one person. At boat ramps, she can be rigged and ready to sail within 15 minutes. Hauling out and dropping the rig afterward take about the same amount of time.
George D. Jepson
JANE ANN performs well in light air and is heart-pounding fun in a stiff breeze. With the addition of fore, aft and side decks by Kiefer, she has proven to be snug and dry.
After several summers sailing JANE ANN, I discussed possible alterations with the builder. The original floorboards followed the shape of the hull, and were not comfortable while moving about or sitting. So he designed, built, and installed a new flat platform, which is much more agreeable. He added belaying pin stations—two on the forward coaming and two at the mizzen mast hole. Finally, Kiefer built a wooden traveler at the aft end of the cockpit, which has a jam cleat at its center through which the mizzen sheet runs. Previously, with the cleat fixed atop the rudder, the sheet tended to become tangled with the outboard motor. The traveler also serves as a crutch for the mizzen sprit.
A fresh coat of paint on the hull—Hatteras off-white, which has a tinge of the color of the sun—and a new slightly darker blue sheer stripe, a coat of varnish on all of the brightwork, and a new layer of tan paint on the deck completed the boat’s fetching new livery (paint scheme). Freshly varnished masts were re-rigged with new lines, and she was ready to sail yet again.
Under a dazzling blue, late-summer sky dotted with white cumulus clouds, JANE ANN rounds South Haven Light on a starboard tack, her cream-colored sails— reminiscent of Egyptian cotton—filled to the south-westerly breeze. Heads turn along the breakwater, while this lovely wooden boat begins life anew on the Great Lakes.
Rob Pittaway
In all views she resembles Nathanael Herreshoff’s Columbia Lifeboat Tender, which was her inspiration. Like her forebear, each of the fetching JANE ANN’s lines is placed with purpose. Her full midsection and moderate deadrise indicate a comfortable and accommodating boat.
This Boat Profile was published in Small Boats 2011 and appears here as archival material. If you have more information about this boat, plan, or design – please let us know in the comment section.
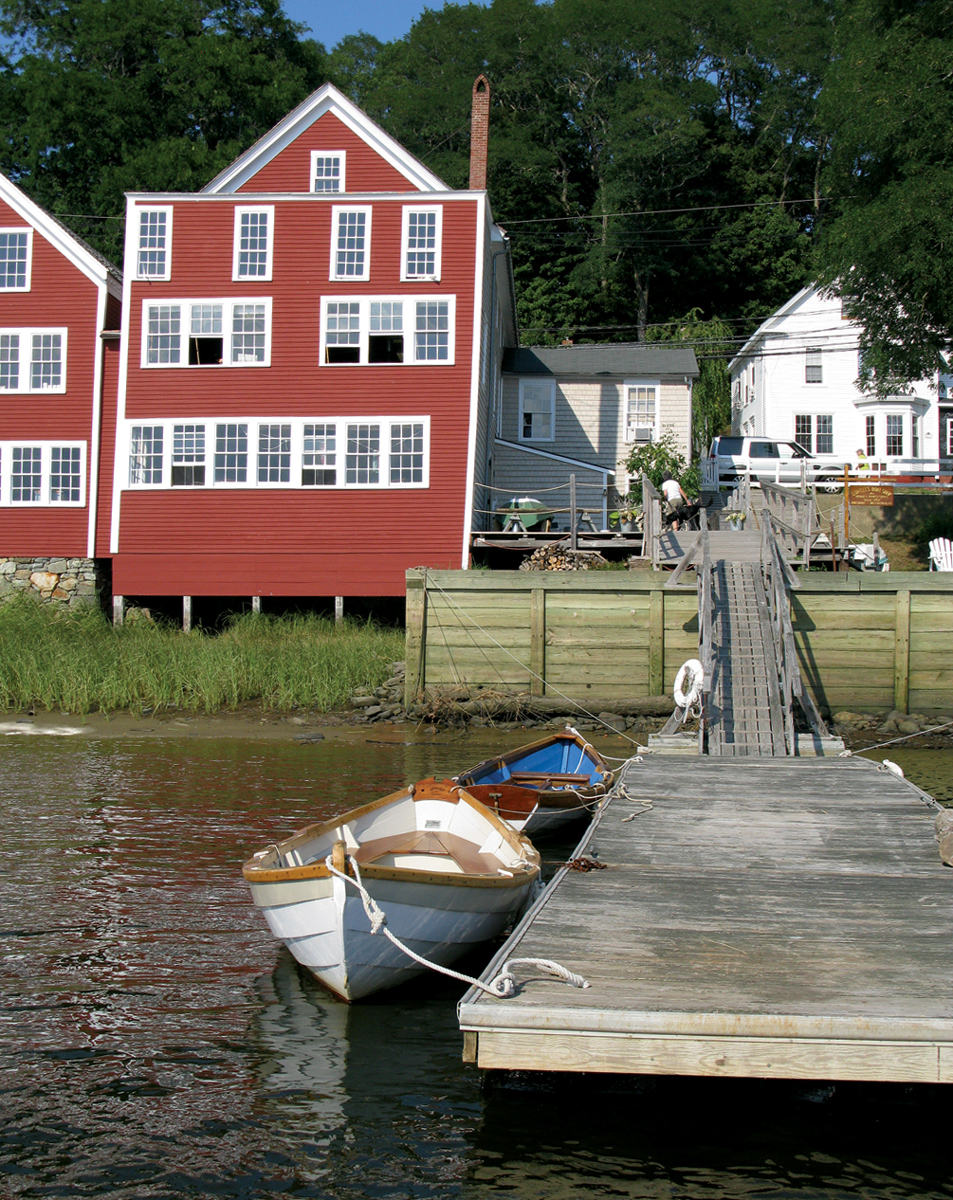
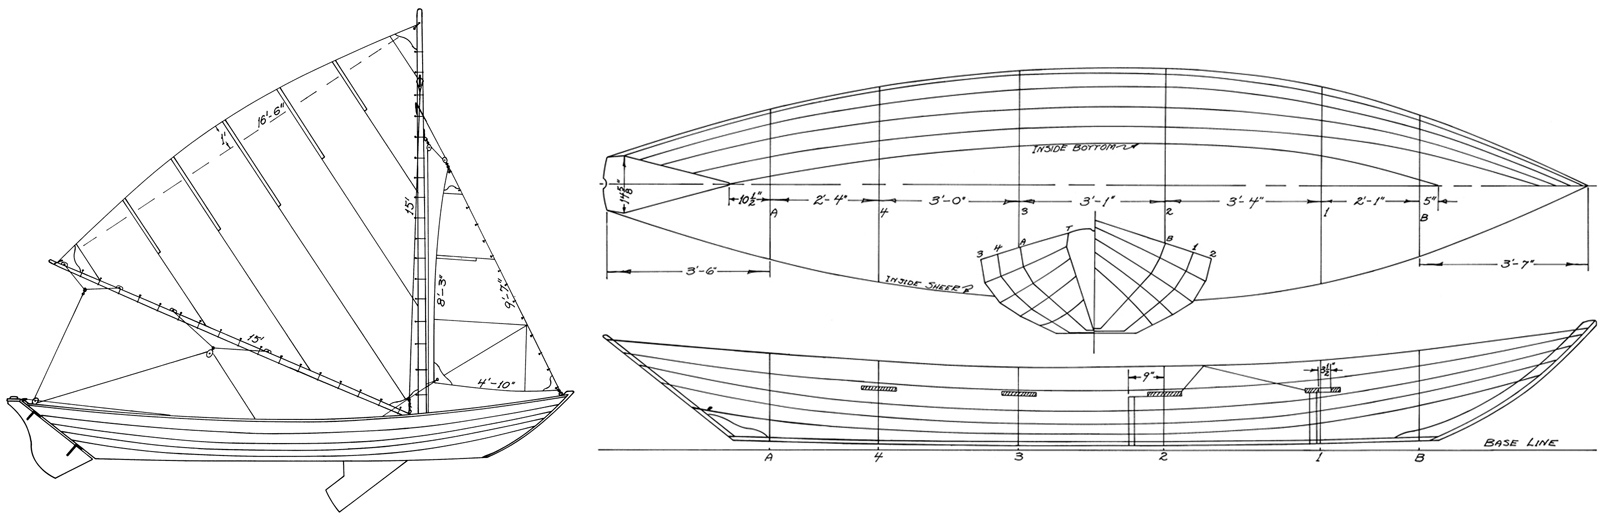
Going to Lowell’s Boat Shop in Amesbury, Massachusetts, is like going to a dory candy store. Do you pick a straightforward rowing dory like the Salisbury Point Skiff, developed in the 1860s? How about the outboard-motor-powered version of the Amesbury Skiff, an adaptation from the 1920s? What about a high-sided Banks Dory, set up for traditional tholepin rowing? Having but one choice to make, I selected what I thought for me, and I suspect for many others, would be a fine compromise: a Sailing Surf Dory.
Corinne Ricciardi
A comparatively round-sided dory, the Sailing Surf Dory handles well under sail or oars. This boat is a 14-footer, and Lowell’s Boat Shop in Amesbury, Massachusetts, also builds 16’, 18’, and 20’ versions.
For many dories, the words “sailing” and “rowing” don’t comfortably sit side by side. If performance sailing is of paramount importance and you break out the oars only grudgingly, look elsewhere. If keeping up with the collegiate rowing teams along the Charles River in Boston is your ambition, don’t even think about a boat that has anything like the word “sail” in its vocabulary. All boats are compromises, and the only question is whether the compromise works well or works poorly for its intended function in the hands of its owner.
Lowell’s Boat Shop made thousands of dories in the schooner-fishing era and has a tradition dating back to 1793 in Amesbury. The combined boatshop and museum, now a nonprofit organization, is worth a visit in its own right. Dories built here using jigs and patterns polished by use and time have been shipped far and wide. “All that we build we build from patterns that are here at the shop and notes from the original builder,” lead boatbuilder Graham McKay said. “John Gardner has a few plans for boats like this, such as the Nahant Dory and the 19′ surf dory in The Dory Book, but our design is indigenous to the shop and based on 19th-century patterns. Likely some of the boats Gardner recorded were similar surf dories built here…or they were closely based upon them.”
Tom Jackson
The nonprofit Lowell’s Boat Shop fulfills roles as a working boatshop and also as a museum. Dories are built here using strongbacks and templates that date back many decades.
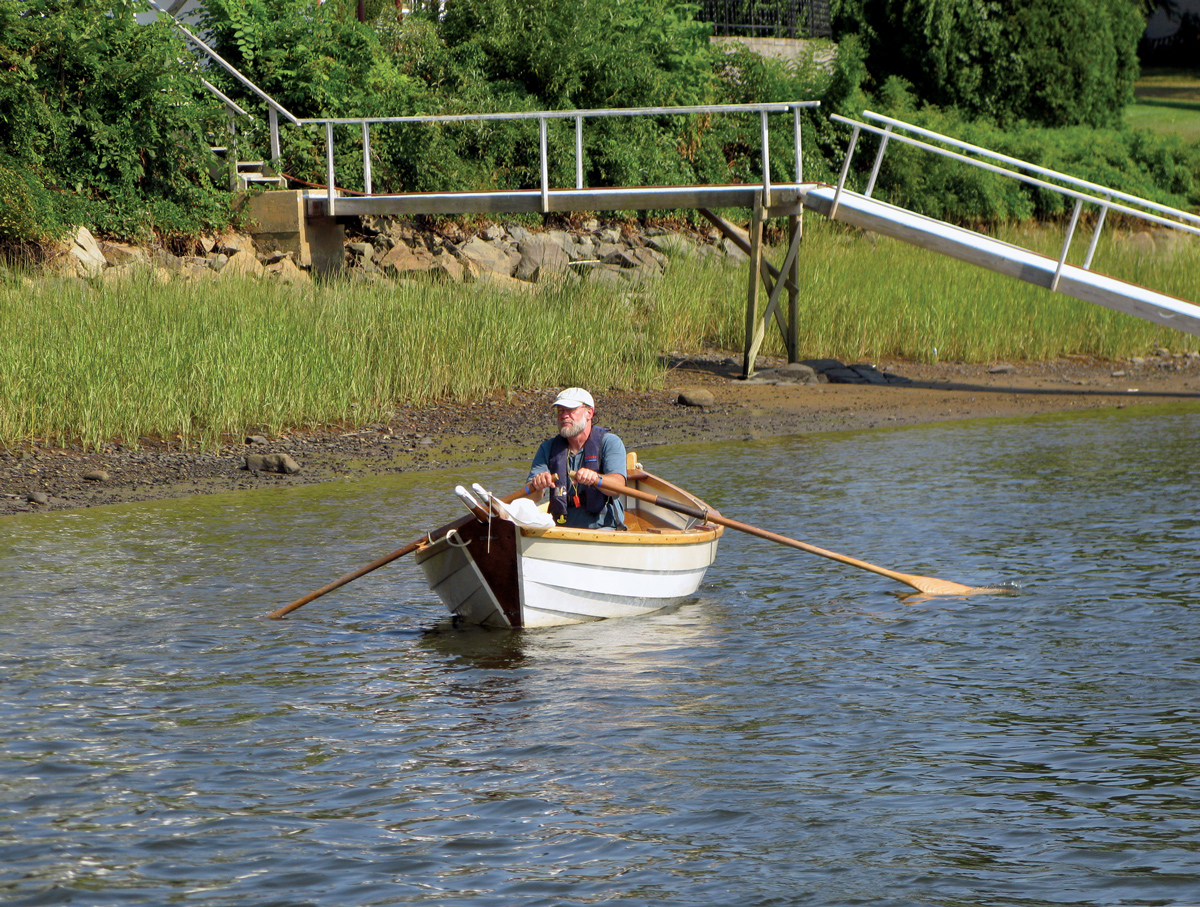
Lowell’s makes the Sailing Surf Dory in four sizes, 14′, 16′, 18′, and 20′. On a fine day with a fair breeze, I took a 14-footer for an afternoon sail on the Merrimack River during the high slack tide. The boat was 33 years old, built by longtime Lowell’s builder Fred Tarbox. She had been donated back to Lowell’s by her owner after long service. The boat was in excellent condition, a testament to her builder and the care she has received during her lifetime.
Tom Jackson
The Sailing Surf Dory, at front, is one of many dory types built at Lowell’s on a site that has a boatbuilding tradition extending back to 1793.
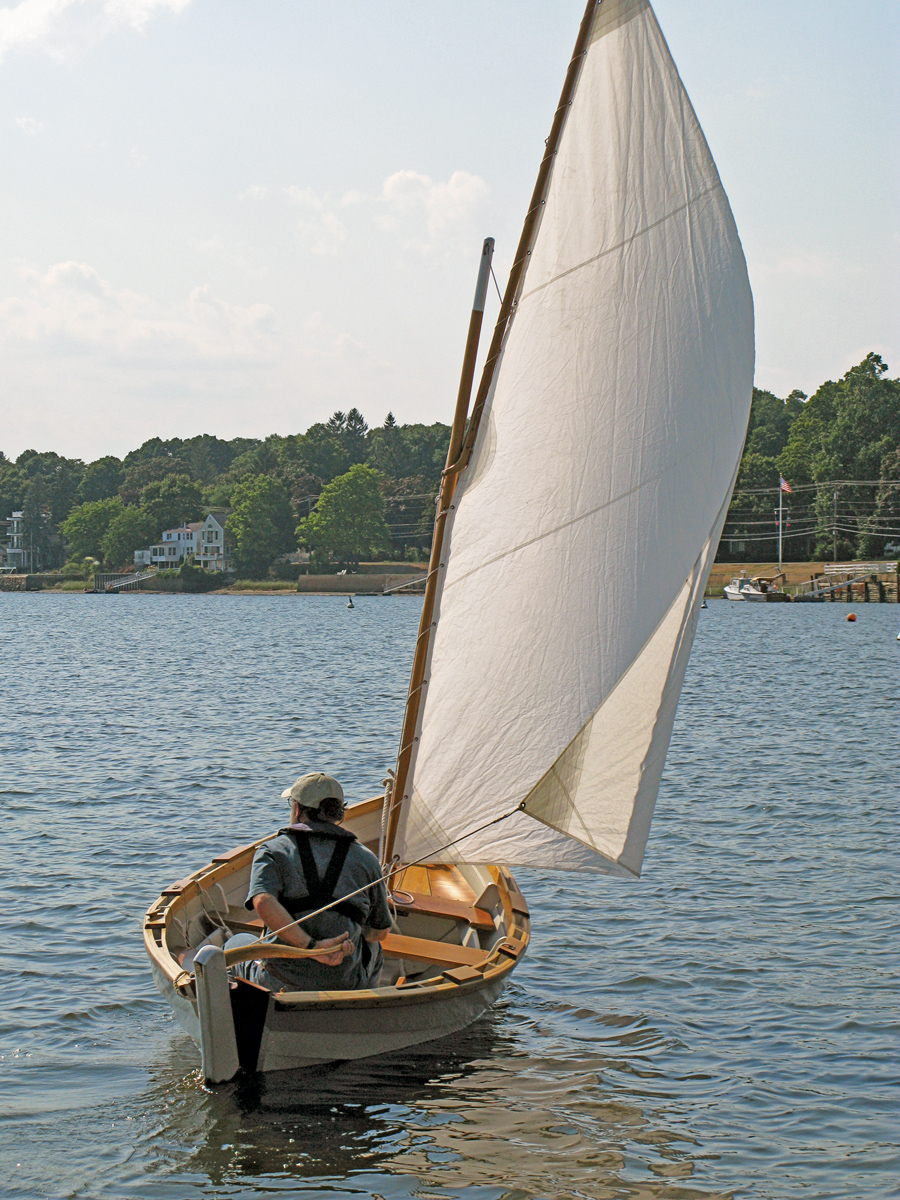
This particular boat was rigged with a single sliding gunter sail. Other rig variations are possible, among them the traditional dory combination of a long-footed triangular mainsail with a small jib. For solo sailing, I found the sliding gunter to be a fine choice. It has ample sail area, and it’s easy to handle. The rig is something like a very high-peaked gaff rig, with the gaff nearly parallel to the mast. Its particular advantage is that the mast can be quite short, making the entire rig easy to stow inside the boat when rowing.
The boat is handy, responding well to her helm and easily making stays, or turning from one tack to another, leaving no doubt of her ability to cross the eye of the wind. The sheeting system is the only thing that might offer a novice some consternation, but with a bit of practice it becomes clear. The system is a common one for dories and a few other small-boat types in which a single-part sheet passes around one of a pair of very simple thumb cleats mounted on the inwales well aft, one on each side. When you tack, you free the sheet from one thumb cleat and pass it around the other one, which will be on the leeward side on the new tack. There is no provision for cleating it off, nor should there be: Get used to keeping it in your hand, where you can instantly let it go in a gust. This sheet-shifting can seem awkward at first, but very soon the sailor develops a strategy to guard against having the sheet run afoul of the long tiller.
Corinne Ricciardi
With no standing rigging, the rig is easily struck completely when it’s time to row. Here, the mast heel is run under the rowing thwart and the masthead and spar extend just a bit past the transom.
The sheet really must be shifted when sailing close-hauled, not just because doing so assures the best sheeting angle for the sail but also because it’s the best way to keep the sheet clear of the tiller. When jibing, however, I found that it is much simpler to leave the sheet on one or the other thumb cleat and forgo shifting it. On downwind points of sail, this has a negligible effect on sheeting angle, and leaving the sheet on one cleat means that jibes can be done one after the other in quick succession with very little effort or disruption. I simply held the tiller and sheet together in one hand and grabbed the clew with the other to pass the sail across the boat for the new tack.
The boat is fitted with a daggerboard, which is sensible for a dory. The board can be raised fully for downwind sailing, and it allows a continuous adjustment for any given point of sail. It requires no complicated gear, and its top is well supported by the rowing thwart. The trunk’s short length minimizes intrusion into the interior. Forgetting to raise the board when nosing into a beach, however, would bring a memorable reminder, and venturing too close to rocks risks not only harming the board but also wrenching and possibly damaging the trunk. Having simple and uncomplicated rigging perhaps leaves the mind free to pay close attention to that board.
Tom Jackson
A daggerboard helps the dory track while sailing, and the fitted cap (below) keeps the water at bay while rowing.
When it comes time to row, the dory’s sail bundles easily around the mast, spar and all, where it can be made off with a short length of line or the end of the sheet. There is no standing rigging. The halyards— there are two, throat and peak—are made off to cleats mounted on the mast above the partners. This means that the whole bundle can be very easily lifted free and stowed in the boat. When I row a boat like this one, I like to pass the heel of the mast under the rowing thwart and let the top end of the mast trail over the transom. This keeps the rowing thwart clear.
Tom Jackson
Thumb cleats on the insides of the rails, far aft near the distinctive transom, provide a good sheeting angle.
Dories can be remarkably agile under oars, and they can also be very comfortable to row. The surf dory steps up nicely to its pace, and with its well-rockered bottom it comes around sharply. No dory will track as well as a long-keeled, round-bottomed boat, but steady rowing rewards the oarsman with a reasonably straight course. One benefit of a dory is that when you come to shoal water, you can adroitly turn it around and row effectively backwards, allowing you to see any rocks and maneuver around them. When beached, this boat will also remain upright on her flat bottom.
Corinne Ricciardi
Downwind, it is possible to leave the sheet on one thumb cleat to simplify quick jibes.
I sailed in a fairly light breeze in protected waters, but I wouldn’t hesitate to do some adventuring in this boat, especially the larger versions of it. Dories are famously capacious, and with dry bags for gear, camp-cruising for a solo sailor or a couple would be a tempting possibility, especially if tenting ashore. The boat has no floorboards, so it would be difficult—but not impossible—to set her up for sleeping aboard. The 18′ and 20′ versions, especially, would be robust trekking boats for cruising to islands in at least somewhat protected waters. Like many boats, this one will probably take more weather than the skipper will—and it’s worth remembering that for a century the old U.S. Life Saving Service, before the days of the Coast Guard, relied on surf dories like these.
With effective reefing systems, wise choices of ground tackle, and a willing oarsman, this boat will go places. At 230 lbs for the shortest boat and 400 lbs for the longest, any of these dories would do well on a trailer for expeditions to new territory. And once set up to the owner’s taste, new territories will always beckon.
Because Lowell’s Boat Shop uses templates and patterns, no plans exist for the boats built there—and Lowell’s built them by the thousands back near the turn of the 20th century, especially for the Gloucester fishing schooners. Mystic Seaport’s John Gardner reproduced lines for some boats, and one that comes close to the Sailing Surf Dory shape is the Nahant Dory shown here and published in The Dory Book. Note, however, that it was not set up for sail and that with 4’2” of beam for its 17’ length, the Nahant Dory is much narrower than the 14’ Sailing Surf Dory with a beam of 4’11”.
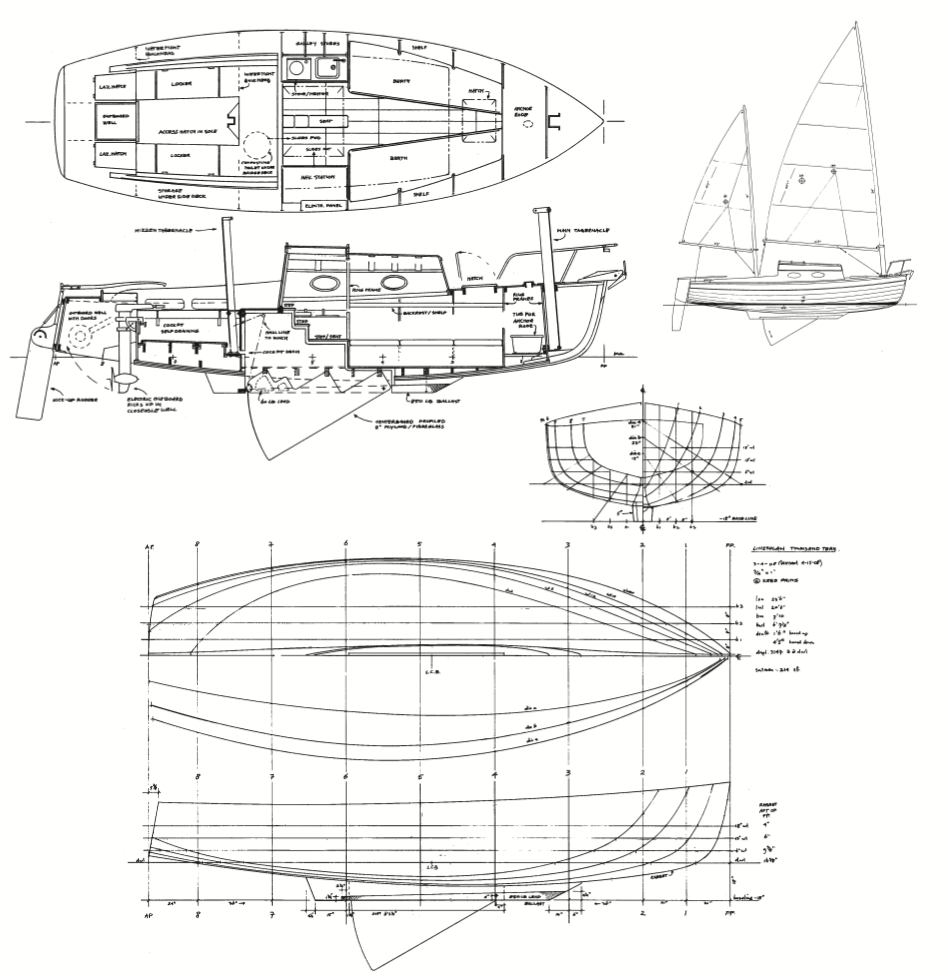
The Townsend Tern adroitly answers the question of whether good-looking small boats permit anything but cavelike accommodations. In the Tern, the paradox is literally one you can live with. Her attractive hull, accentuated by the lines of her plywood-lapstrake planking, still has a welcoming interior.
Kees Prins, a Port Townsend, Washington, builder and designer, designed the boat for Chelcie and Kathy Liu, small-boat enthusiasts who retired to the area. They knew what they wanted, and equally well they knew what they didn’t want. They were willing to put time into a lengthy—and therefore expensive—collaboration on design details. The boat was launched for the first time just a week before the 2010 Port Townsend Wooden Boat Festival, and based on the pleased expressions of the couple, the result is on the mark.
Laingdon Schmitt
For a 23’6” boat, the Townsend Tern packs in plenty of the necessities of life for a cruising couple. She is designed to be simple to sail singlehanded, with unstayed carbon-fiber masts that are hinged at the tabernacles to make them easy to lower for trailering. Port Townsend, Washington, boatbuilder Kees Prins, at the helm, designed her in close consultation with the owners, Chelcie and Kathy Liu.
“Part of the reason or the impetus for this was a particularly grungy winter up here, when I thought, ‘Gee, wouldn’t it be nice to trailer a boat to a place that’s nice and warm, and sunny, and has longer days?’” Chelcie said. San Diego, maybe—but the freedom is there to venture farther afield.
They were specific with their other criteria, too. Both are, as they say, not getting any younger, so it was important that either of them, and most especially the slight-of-stature Kathy, could handle the boat alone if need be. Endurance cruising holds no appeal—“How long does it take to go from one B&B to another?” Kathy asked rhetorically—and they’re more likely to find a favorite restaurant than to cook aboard. But they wanted a workable galley. They definitely wanted a cabin heater for Northwest cruising, which can be clammy or outright sopping wet. They favored wooden construction, but wanted contemporary techniques so maintenance would be minimal. They insisted on electric auxiliary power—“that was non-negotiable,” they said, partly because they don’t care for pull-starting gasoline engines. But for safety, they didn’t want to have to lean out over the transom to deal with the motor in any way. They also wanted all sail controls led to the cockpit. One more thing: no through-hull fittings.
To simplify the sail plan, Prins incorporated a cat-ketch rig from a Bruce Kirby–designed Norwalk Islands Sharpie, which has free-standing carbon-fiber masts hinged in aluminum tabernacles for light weight, ease of setting up and folding down for trailering, and simplicity of rig. Its 214 sq ft of sail area also was the right size for their targeted hull length. Prins laid out a glued-lapstrake hull of 23′ 6″ LOA with a beam of 7′ 10″, comfortably within legal trailering limits. He specified using a laminated keel and 1⁄2″ okoume plywood for the bottom planking. To save weight, only the garboards are fiberglass-sheathed; the first two broadstrakes are coated with a mixture of epoxy and graphite, the rest are simply epoxy-coated, as is the interior. The bulkheads, which are set up for egg-crate-style structural support, are also made of 1⁄2″ okoume plywood, as is the deck. The well-rounded cabintop is made of two layers of 1⁄4″ plywood. No fastenings were used in the hull.
Tom Jackson
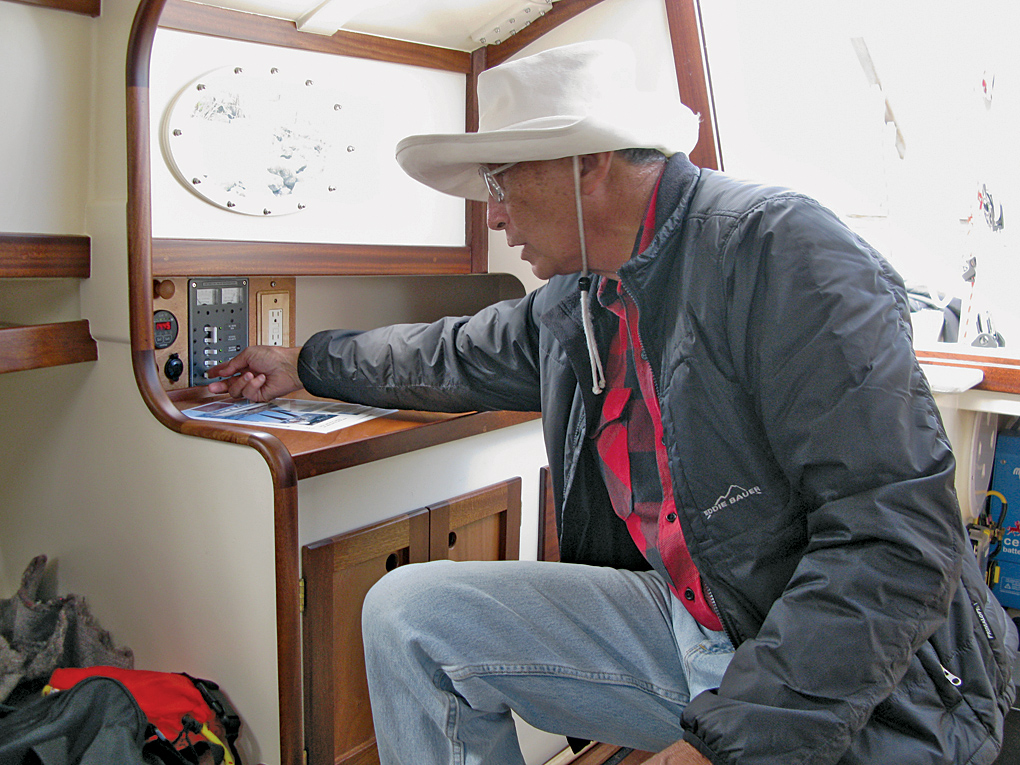
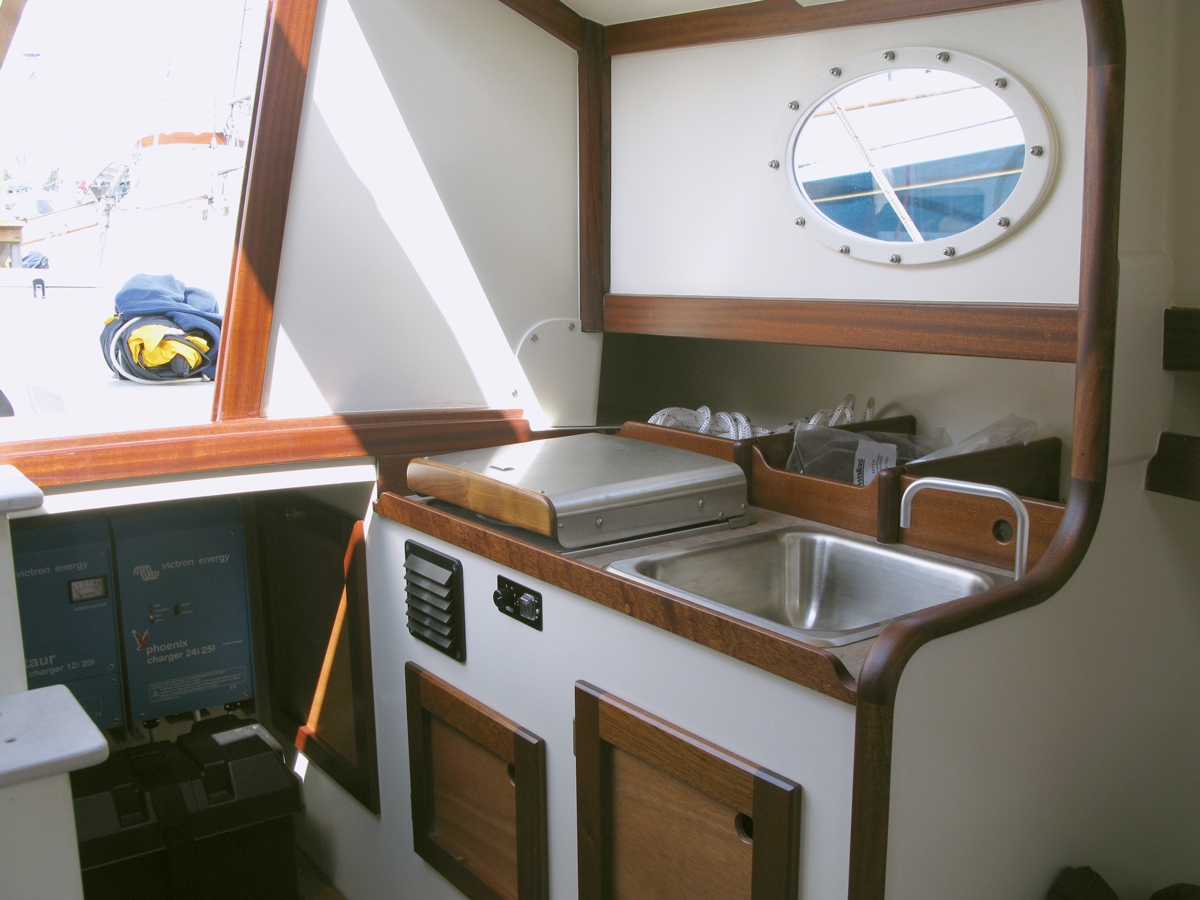
Sitting on the lowest of the centerboard steps, Chelcie Liu shows the convenience of the navigation station. The main saloon has ample sitting headroom throughout. The electronics are simple: The couple chose portable GPS and VHF units, thinking that they would be easiest to upgrade later. A house battery powers everything except the electric outboard.
In any centerboard boat, the placement and profile of the centerboard trunk has a controlling influence over the cabin layout. Prins made this centerboard’s top edge stepped in a zigzag pattern, allowing the centerboard trunk to cleverly double as companionway steps. The lowest of these is longer than the others and serves as a seat while working at the stove to port or the navigation table to starboard. The trunk also has a screw-in hatch cover mounted high on its port side, giving easy access to the lifting line and its fitting.
The plywood centerboard itself is 2″ thick to provide good strength and bearing surface in the area where it fits into the slot. When the board is fully lowered, the apex of each step corresponds to a floor timber, distributing heeling loads to the hull. The board’s below-the-keel profile, however, is sculpted to airfoil cross-sections that are parallel to the waterline when the board is fully lowered—something that Chelcie, a retired physics professor, appreciated.
Tom Jackson
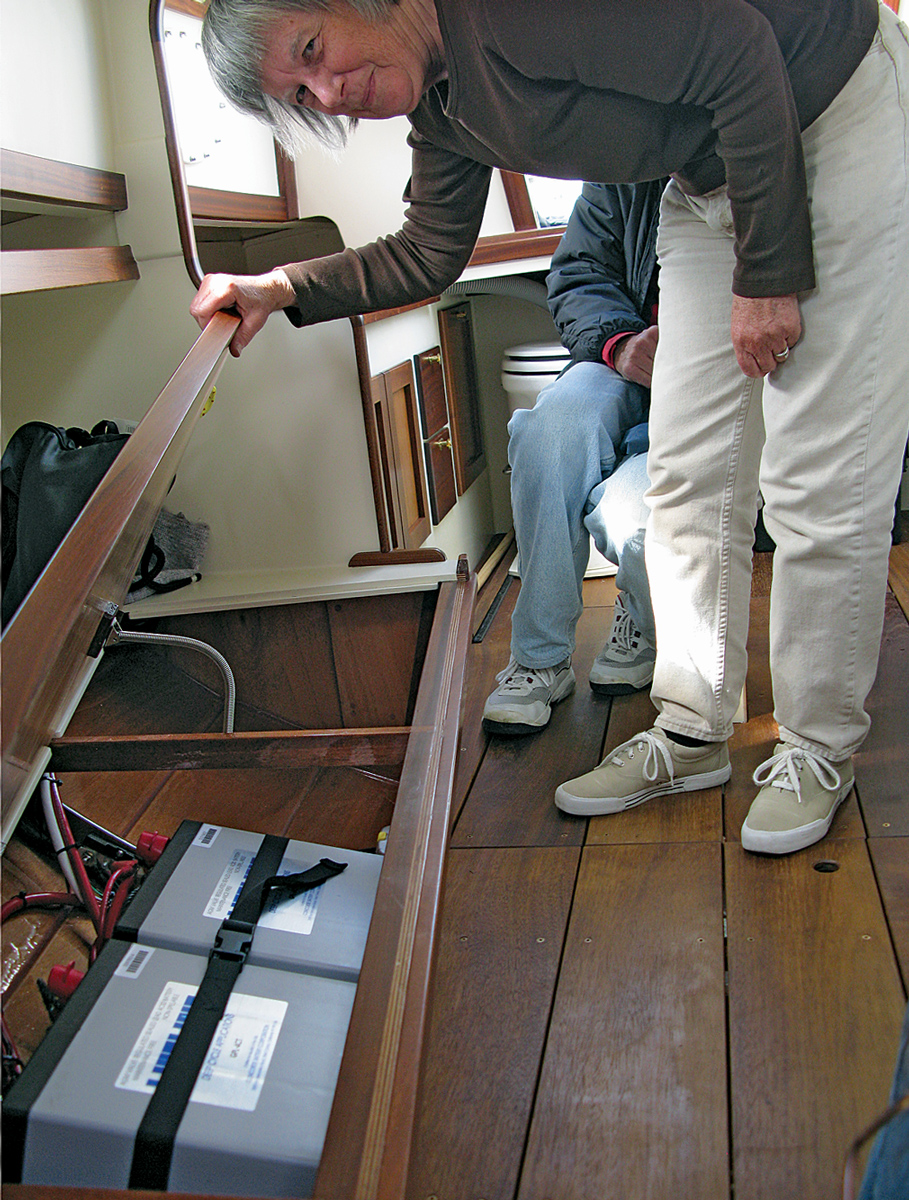
Four AGM (absorbed glass mat) batteries—two stored on each side under the settees—power the Torqueedo Cruise 2.0 electric outboard, which is housed in a well.
The space under the bridge deck to each side of the highest part of the centerboard trunk is used to good advantage. To starboard, a composting Airhead toilet—a logical choice given the Lius’ proscription on through-hulls—is mounted on cabin-sole sliders allowing it to be pulled out for use. To port, two battery chargers and the easily accessible house battery, which powers everything not related to the electric outboard, are tucked neatly out of the living space.
The cabin has excellent sitting headroom that is little impeded by the centerboard trunk. The after ends of the bunks provide comfortable vis-à-vis seating. When it’s time to hit the sack, the floorboards lift in sections that fit between the V of the berths to provide a large sleeping platform. The interior doesn’t feel cramped, has lots of stowage, and gets lots of light from six portlights and a polycarbonate foredeck hatch.
Tom Jackson
To port is a simple galley, with a stove that converts easily from a one-burner cookstove to a fan-powered cabin heater—a comfort on a rainy Pacific Northwest day. Visible under the bridge deck are battery chargers and the house battery; in a similar space on the starboard side of the centerboard trunk, a composting toilet is stored, ready to slide out on tracks built into the cabin sole when needed.
Some interior choices were easy to make. The galley stove is a Wallas, a dual-purpose Finnish unit that runs on kerosene and has a plastic fuel container that can easily be refilled off the boat. The stovetop has a hinged cover that swings up to expose a single burner suitable for one-pot cooking. When the top is closed, a fan kicks in to blow heat into the cabin. Electronic systems are minimal, and the GPS, VHS, and anemometer are all handheld, avoiding cabin and masthead wiring. Electronics have a habit of going obsolete rather quickly these days, and handhelds don’t pose the same problem of reinstallation posed by built-in devices. Cabin lights are battery-powered LEDs that can be placed anywhere, avoiding fixed wiring. The running lights, too, are Danish-made Lopolight LEDs, battery-powered to avoid wiring.
Other judgments, however, became a true collaboration between designer and client. For example, the Lius printed off ellipses they could tape to the cabin sides to help decide portlight sizes and shapes, ultimately choosing to diminish the forwardmost one on each side to accentuate the slope of the cabin sides. During a trunk cabin mockup, they agreed to reduce its height to better suit the hull without losing interior comfort.
To power the Torqueedo Cruise 2.0 electric outboard, four Lifeline GPL-6CT deep-cycle marine batteries in series are placed under the berths, two on each side, for a total weight of 280 lbs, rechargeable via shore-power connection. The 24-volt outboard’s thrust is equivalent to a 6-hp gasoline-powered outboard, with perhaps 30 miles of range running at slow speed. Prins feels that a gasoline-powered outboard would work as well in the boat and may provide greater thrust when needed.
The motor is placed in a conventional after out- board well. The well closes off in a manner anything but conventional, however, to reduce drag, the bane of outboard wells in sailing boats. The keyhole-shaped opening in the bottom planking, straight-sided forward for shaft clearance and rounded aft for propeller passage, can be closed off entirely. Two box-shaped plugs can be snapped into place in the shaft alley, and the oval propeller aperture is closed off by clamshell doors operated by lines from the cockpit. When everything’s closed up, the well isn’t waterproof (and doesn’t need to be), but the fair shape of the hull is restored to assure the best possible sailing performance.
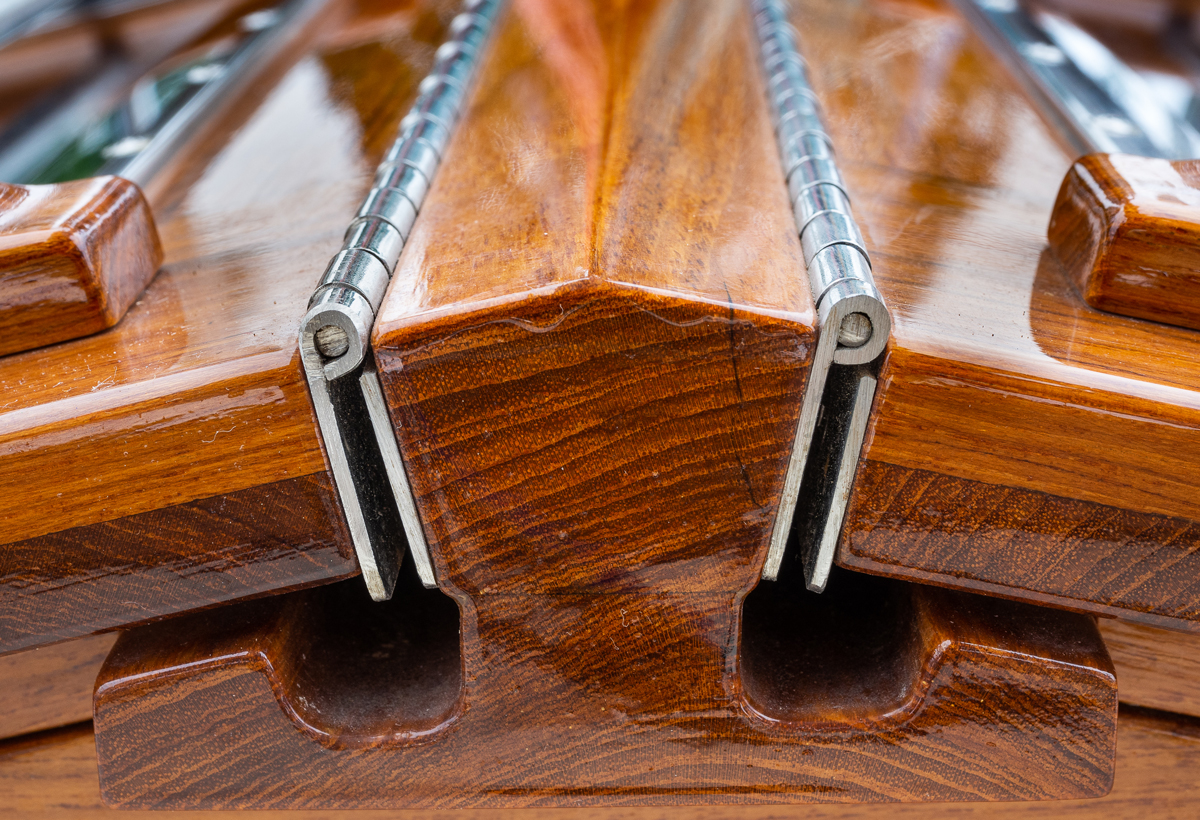
The rig is simple to set up and use. Even reefing lines are led to locking cleats on the after edge of the cabintop. The mainsheet doesn’t have a traveler; instead it passes through a block and then through a hole in the mizzenmast tabernacle, then to a cam cleat. A winch mounted on the mizzenmast can be used for either the centerboard pennant or the mizzen halyard, which can be cleated off after being snubbed up. The boat has no standing rigging, and all of the running rigging is within easy reach of the helmsman when singlehanding.
Sailing couldn’t be easier. The mizzen halyard runs alongside the mast and cleats at the tabernacle. The main halyard is led to a locking cleat on the aft edge of the cabintop. When tacking, really nothing needs to be done except to haul or ease the sheets to trim the sails as needed for the new course. Jibing is equally simple, except of course that the sheets have to be hauled quickly and then eased steadily to bring the sails to the other side for the new tack—but because there’s no jib to haul around the mainmast, jibing couldn’t be easier. Visibility is excellent. The boat is well-balanced and responds quickly to the tiller. She tracks well, even in the swirling ebb current off Port Townsend.
In a light breeze off Port Townsend during the annual festival, the Tern stayed even with one racing Thunderbird sloop and bested another through a long tack to windward, which is no mean feat and bodes well for her performance. The boat isn’t meant to be a racer, but she won’t make you late for that restaurant dinner, either.
More than anything else, it’s easy to imagine set- ting out for a long cruise in interesting territory in the Townsend Tern. The ability to handle a simple rig and reduce sail jointly brings the promise of safety and security when, as is inevitable, the sailors are caught out in a blow. Fair weather or foul, approaching an anchorage with the prospect of a roomy cockpit, a commodious and warm cabin, a comfortable berth, a good book, and a hot meal—well, what else in the world does a person need?
Comfortable accommodations, ample storage, a practical rig adapted wholesale from the Norwalk Islands Sharpie, and numerous clever solutions make the Townsend Tern an excellent cruising boat for a couple. The stepped centerboard allows the trunk to double as companionway steps, the lowest and longest of which allows the comfort of sitting to work in the galley or at the navigation station. The forward hatch admits light and also allows a crewman to handle most of the foredeck work, even setting and retreiving the anchor, from inside. The electric outboard motor kicks up in a well, which has doors that close to leave the hull fair for sailing. She also has a stowable composting toilet. Even with all this, the hull is well proportioned and attractive.
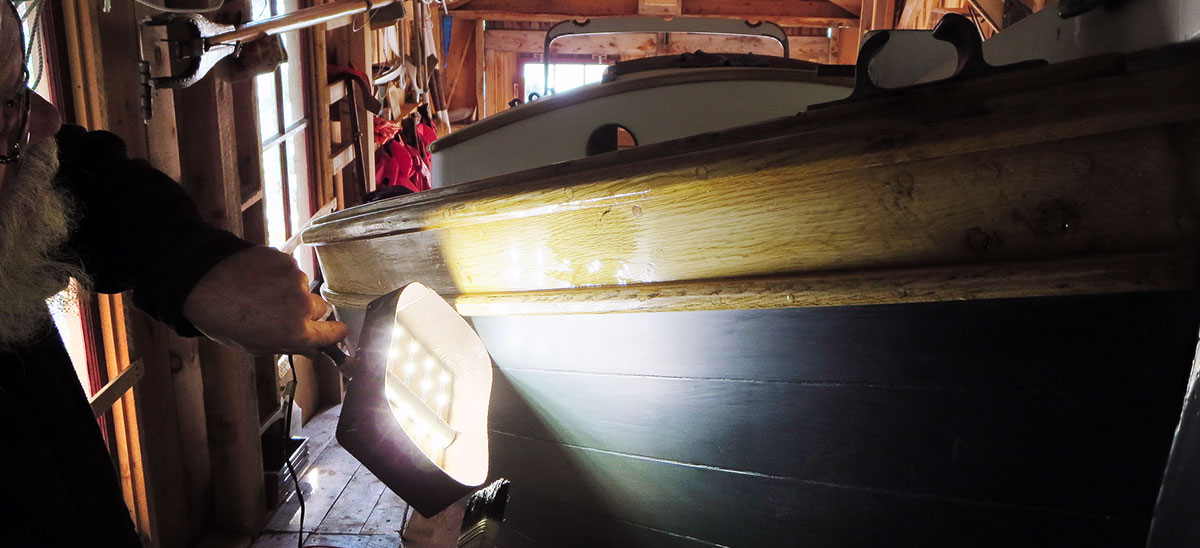
This is a general outline of the process for a basic annual-maintenance varnish job. Healthy, well-maintained exterior varnished surfaces will require one maintenance coat per year, unless the boat is in a boathouse or under cover. Additional coats might be needed on surfaces subjected to high traffic, abrasion, or ultraviolet exposure, and more frequent recoating might be needed in the tropics.
In areas where damage requires touch-up varnishing of bare wood, or if starting a varnish project from bare wood, I apply nine coats of varnish minimum (seven coats on interior surfaces). On transoms, masts, or deep-grained oak, I recommend a minimum of 12 coats.
Note that with any exterior varnish, you may need additives to keep your varnish flowing in hot sun, windy weather, or on particularly large expanses of wood. Conversely, when varnishing off-season in cold shop or storage spaces, you may require additives to help your varnish dry.
Power sander with a hole-punch pad and adaptor to fit a standard vacuum hose.
Vacuum with brush and floor attachments
Extension cord with two-way splitter
Heat gun fitted with nozzle ends
Scrapers (I use carbide ¼”, ¾” triangle blade, 1½” blade.)
Hard and soft sanding blocks plus small wood blocks for fairing touch-ups
Rubber mallet
Screwdrivers (square, slot, and Phillips-head)
Long awl (to unseal thinner and additive containers, clean caulk nozzles, and poke drain holes in varnish cans)
Paint-can opener key
Five-gallon bucket
Varnish brushes (I use Redtree badger-hair brushes, and 1” (25mm foam brushes for a few limited instances.)
Varnish roller trays (I use white plastic trays with a bubbled surface; they can be reused if cleaned well.)
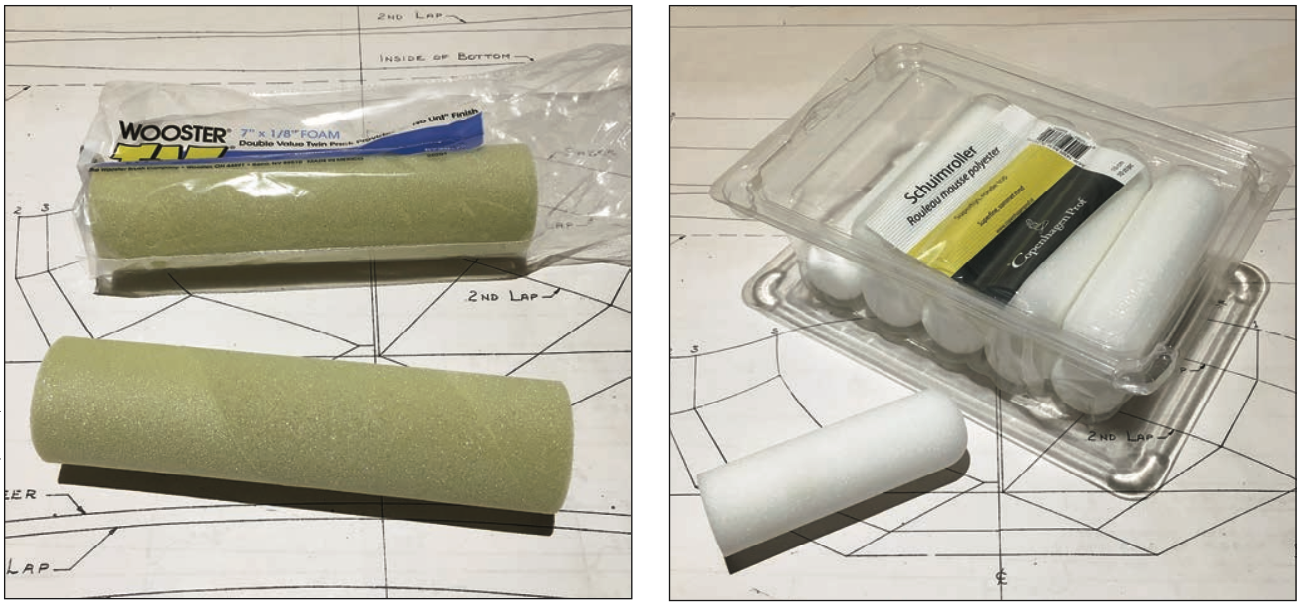
Roller frames and foam rollers (I use yellow foam rollers: 3” (76mm) for small jobs, 7” (178mm) for large surfaces.)
Sharpie pen for labeling
Tack rags and rags (and scissors to cut them)
Rubber gloves, eye protection, dust masks, respirator, ear protection, knee pads, and protective tape for fingers
Cone paint filters and a filter “donut” (a plywood or cardboard cutout with a 4” [102mm] hole to hold the filter over a bucket)
Stir sticks
Brush spinner and combs
Two plastic buckets with lids (2 qt [2 liter]) for cleaning brushes, and a 1 qt [one liter] to hold brushes)
Jug labeled “Used Thinner”
Umbrellas (to shade my varnish tray as I work)
MATERIALS:
Sandpaper—80 grit, 120 grit, 240 grit, and sticky-back 240-grit sheets (Use quality sandpaper such as Norton. It’s worth it.)
Red Scotch-Brite scouring pads. Half a pad fits on a ¼-sheet sander (for deglossing only).
Tape (I use 3M Scotch green masking tape #256—for exterior use up to five days— and 3M blue 2090 tape for bare wood and double-taping around touch-ups for heat-gunning.)
Denatured alcohol in a spray bottle
Turpentine
Varnish and additives
Scrap cardboard and boxes (for under buckets and for workstation)
PREPARATION:
Wash the boat. This removes grime and saves sandpaper.
When removing hardware that would interfere with your varnishing, label each piece for re-installing afterward. For any hardware you leave in place, be sure to tape it thoroughly to prevent contamination with splatter or stray varnish.
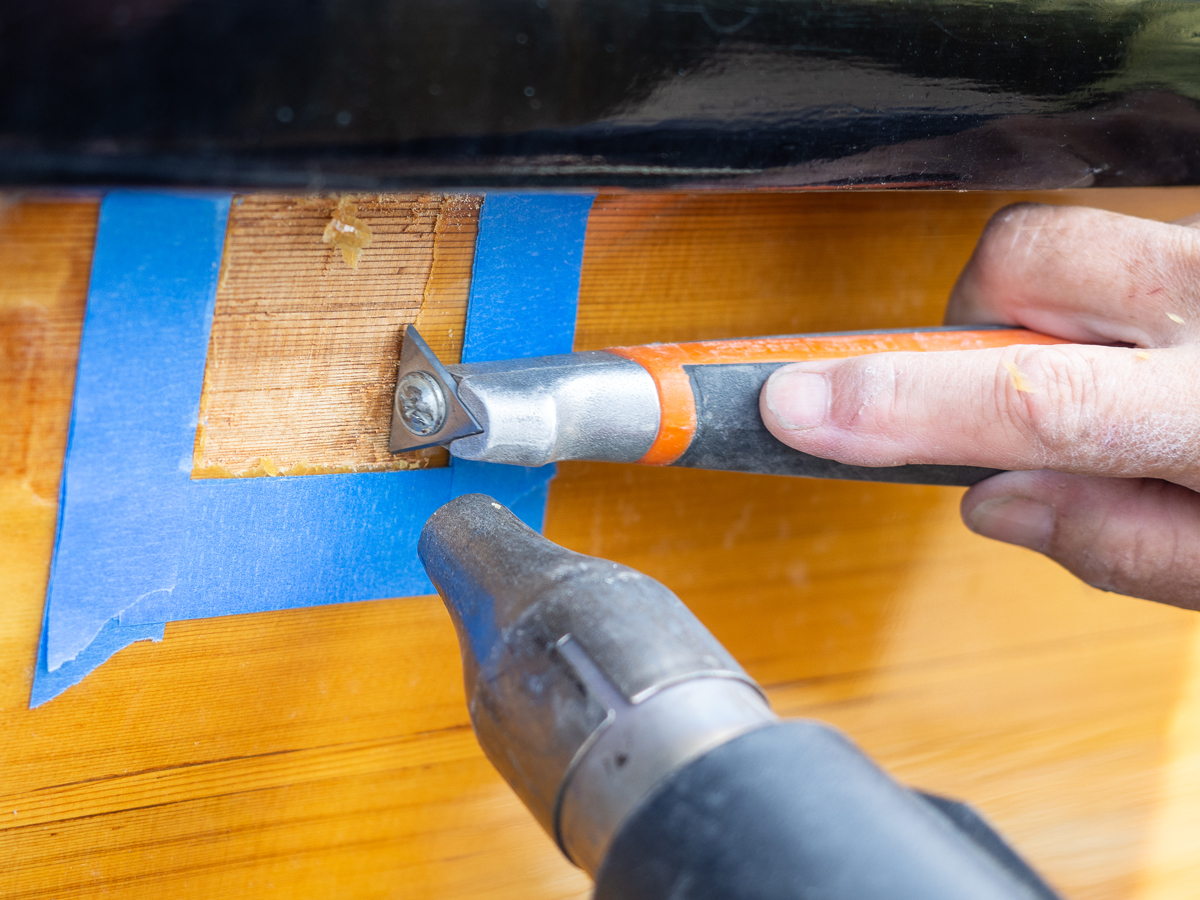
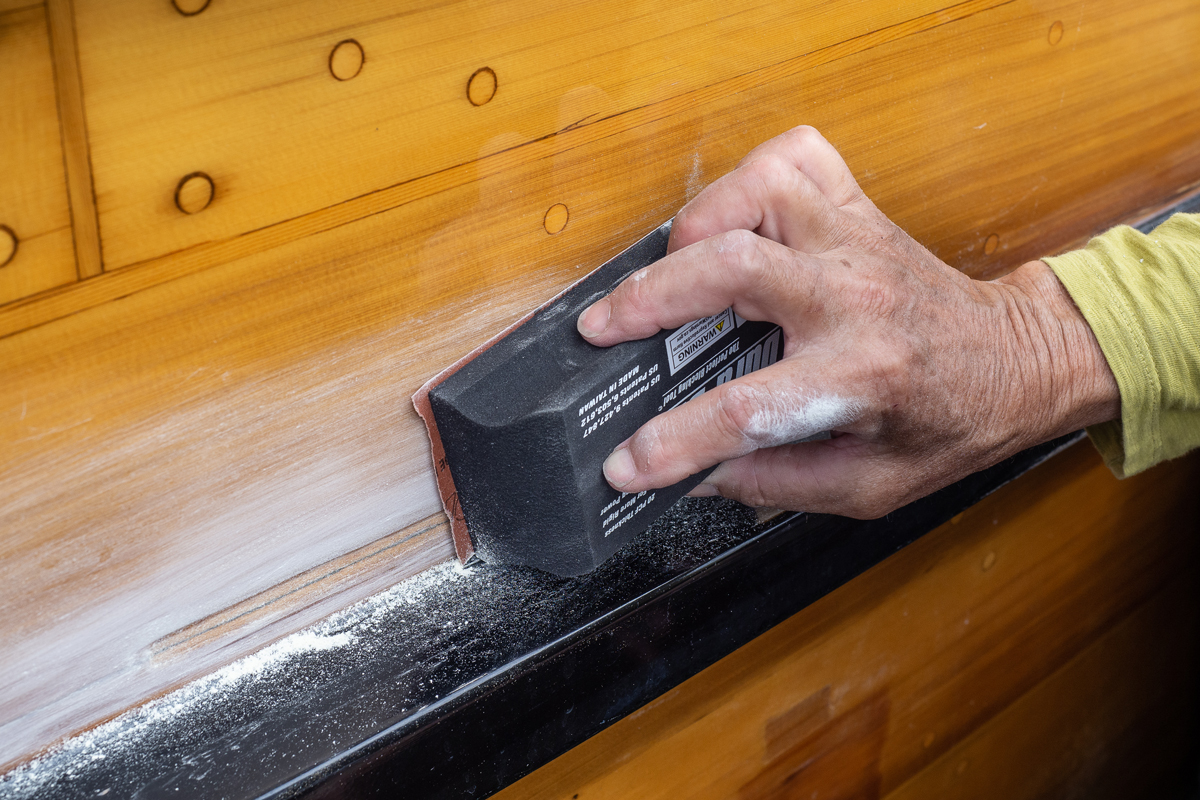
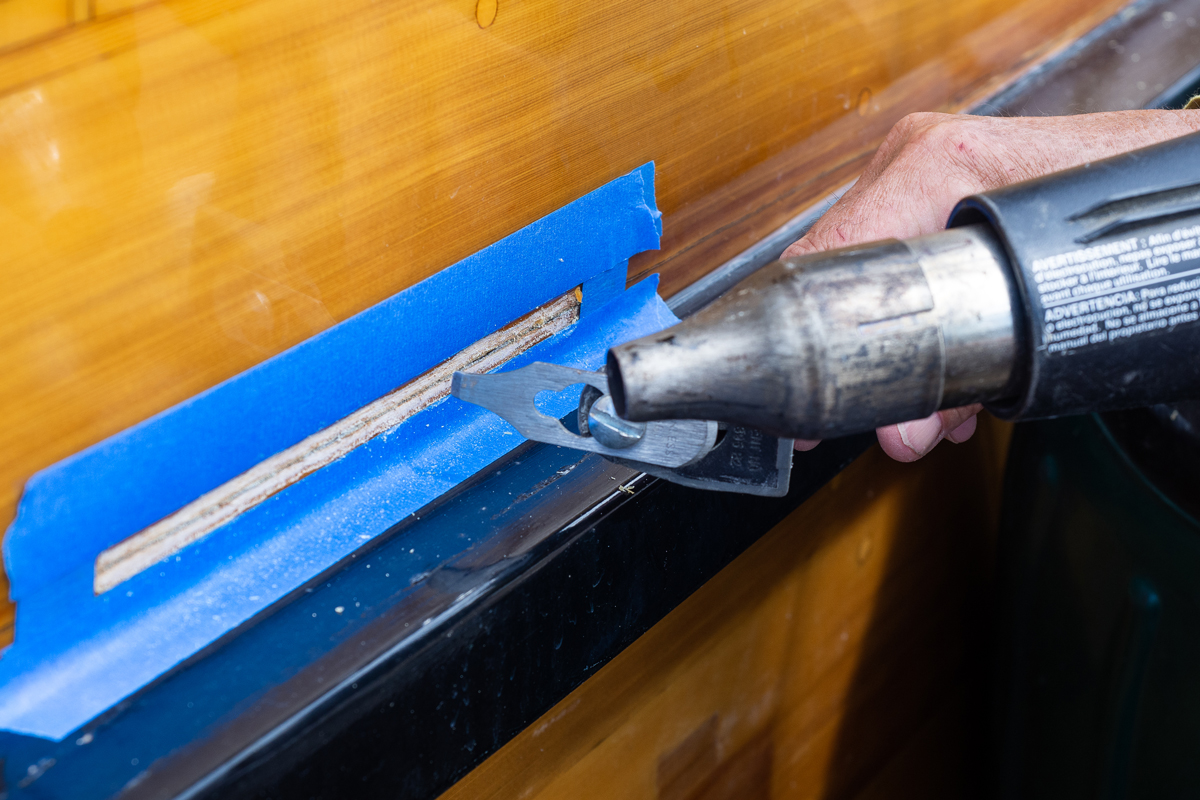
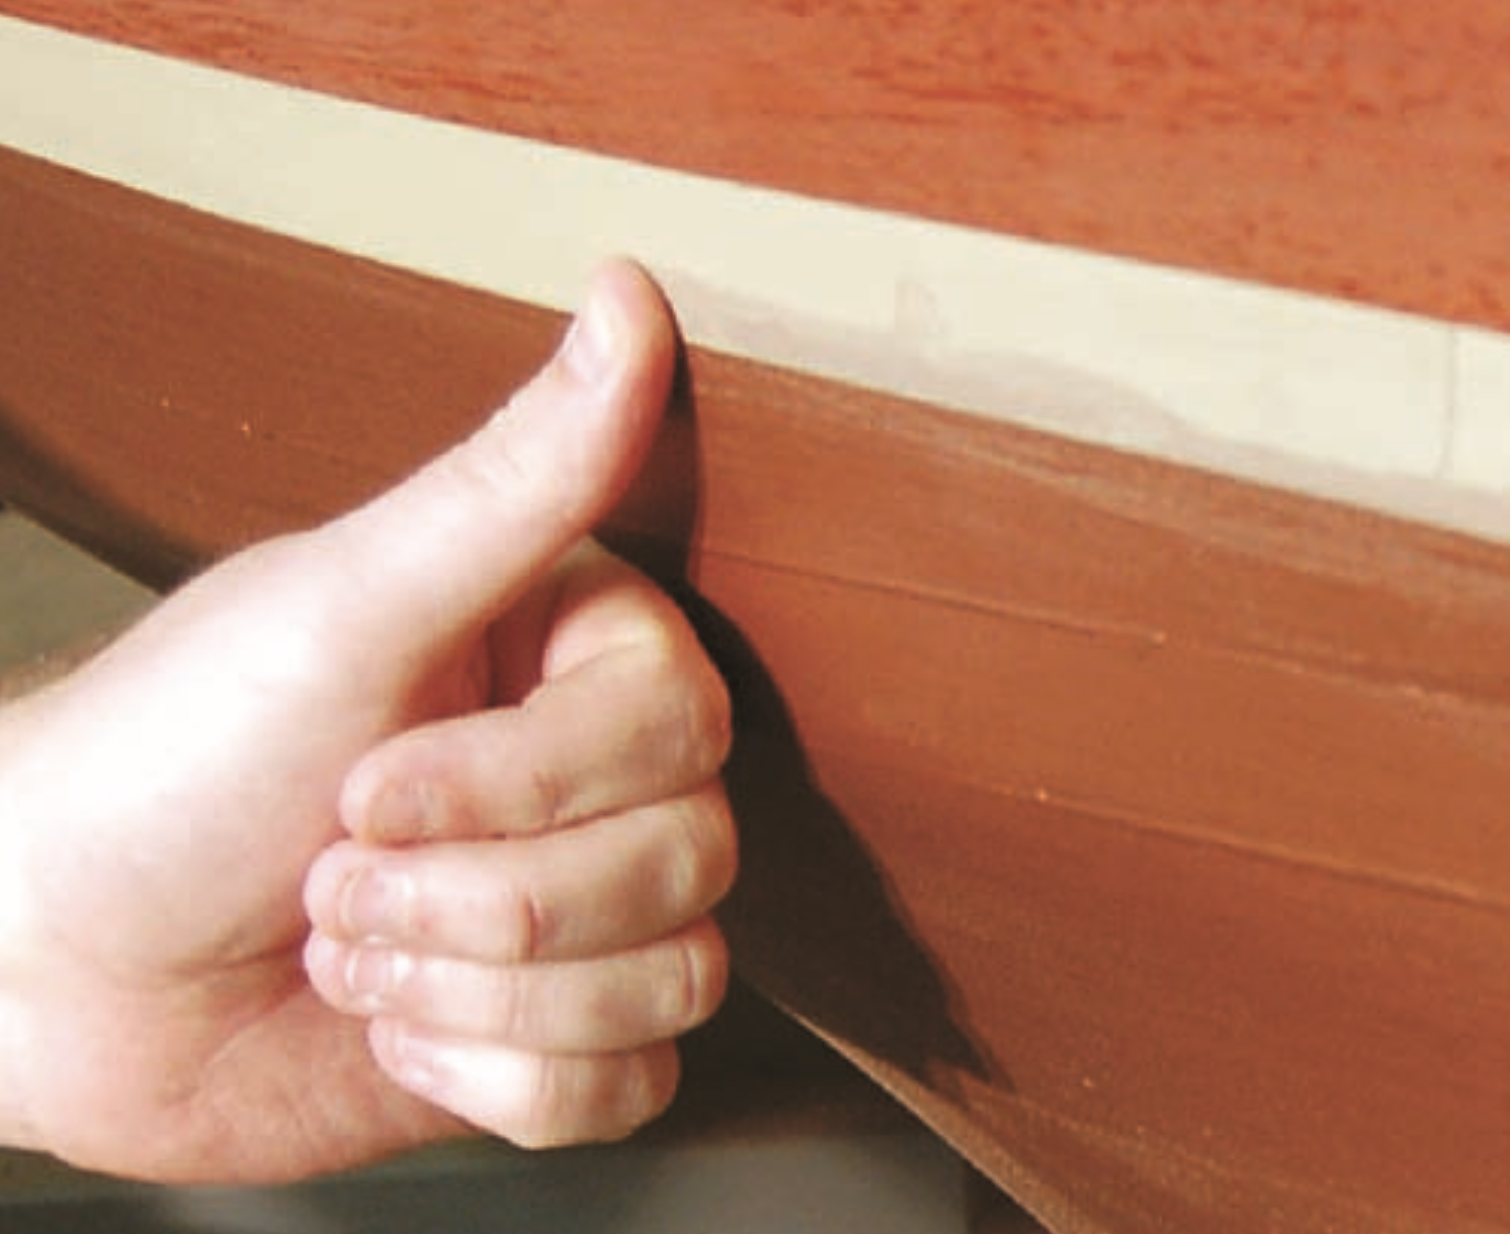
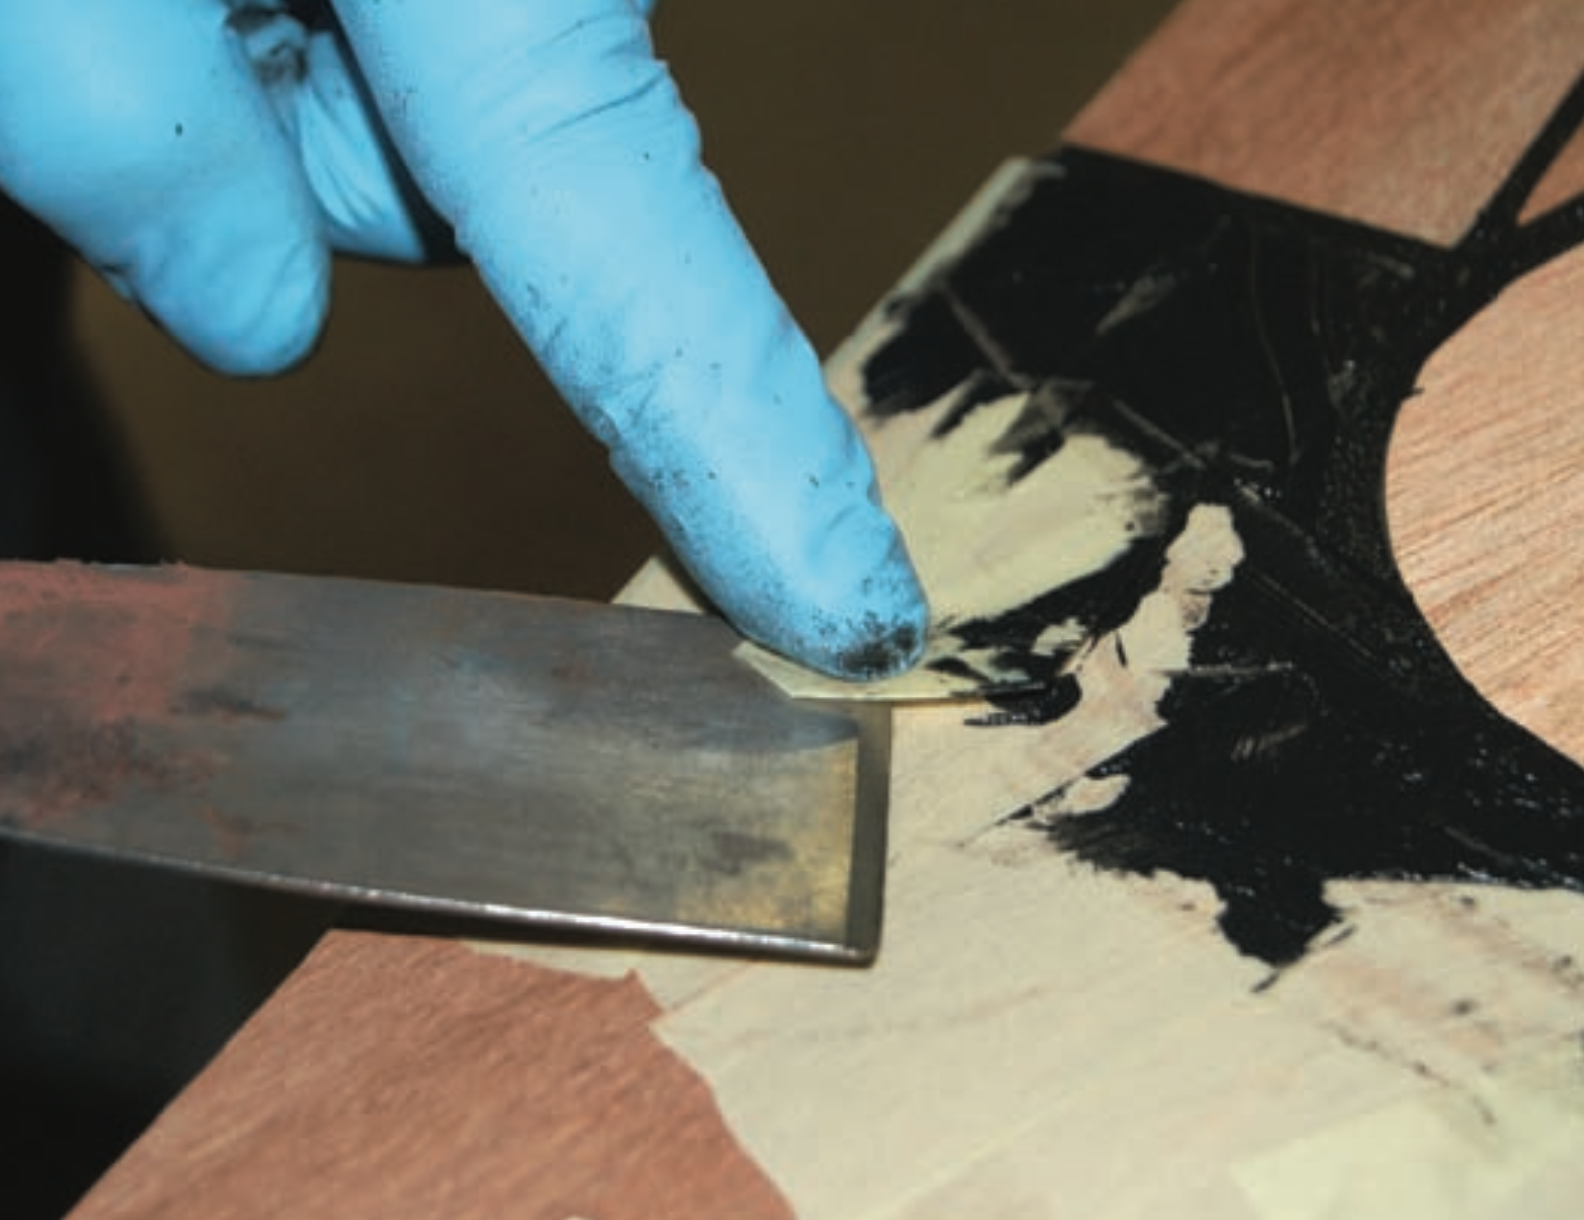
Identify and mark with tape any damaged or blistered areas that require touch-ups. (When you find “blown” varnish, that is, varnish that has turned yellow and milky, and no longer adheres to the wood, think about why it’s blown—sun, moisture—and fix the source of the problem if you can.) Deal with these areas first, because they will need nine coats to match the surrounding varnish. Remove blown varnish with a heat gun and scraper, scraping into the damaged or bare spot (see more in TIPS AND DETAILS, below). Fair the edge of intact varnish into the bare spot with 120-grit paper on a small hard block until smooth. Sand the entire touch-up area with 240-grit paper. Wipe with alcohol and seal with a 50/50 varnish-and-turpentine mix. Do this with each touch-up.
Dieter Loibner
Tape off with a double layer of blue 3M tape and carefully remove blown varnish with a heat gun and scraper.
Tape will not stick to sanding dust, so before sanding it’s best to tape off the surface to be varnished, and be very careful not to disturb the tape while you sand. If sanding up against glass in portlights, hatches, or windshields, it’s best to tape first just for insurance; scratches in glass often cannot be undone.
When touch-ups are sealed and you’re building coats on them, you can begin to sand areas with intact varnish. On sunny days, you can get two or three coats of varnish on touch-ups if they dry enough to the touch in between; on cold days, you may get only one on.
Dieter Loibner
Fair the edge of intact varnish with 120-grit paper, and then switch to 240-grit to sand the entire touch-up area.
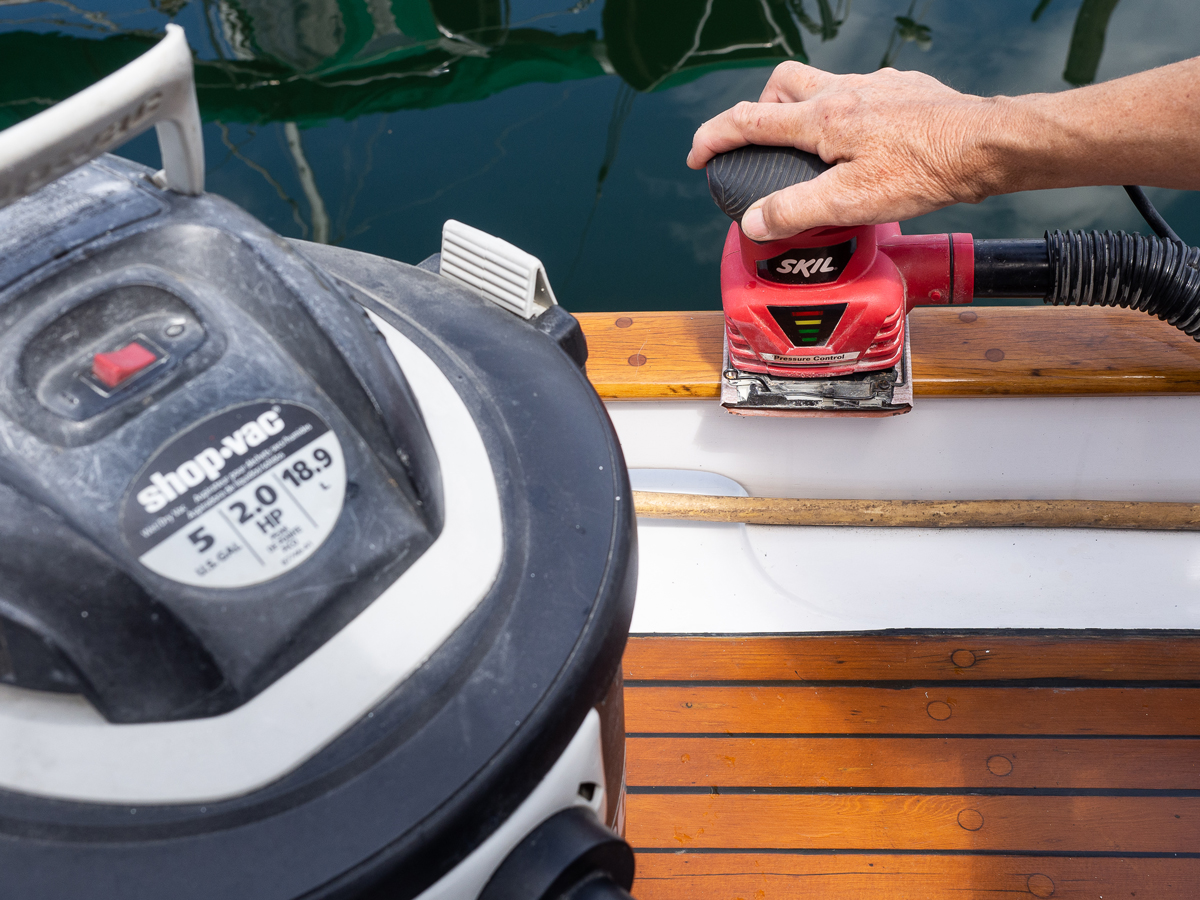
For surface preparation of healthy varnish, it’s important to degloss everything. I start with 240-grit paper on a ¼-sheet palm sander to do a quick deglossing and overall sanding. It does the bulk of the work quickly and easily. Then I hand-sand using a soft block with sticky-back 240 grit to remove swirls from the mechanical sander and hit any missed spots such as seams and corners. For surfaces with prominent brush strokes or uneven varnish, it’s best to hand-sand with a hard block to fair them. For deglossing line holes, detailed scroll pieces, or hard-to-reach undersides of cleats, Scotch-Brite scouring pads work well, but they will not remove sags, drips, or hairs.
Dieter Loibner
Degloss with 240-grit paper on a 1⁄4-sheet palm sander connected to a shop vacuum, and then handsand with a soft block to remove swirls.
Work around your wet touch-ups. If you need to, skip the midday touch-up coating so you can sand parts near touch-ups without the dust embedding in very wet varnish. Usually after a couple of hours, touch-ups are dry enough to sand nearby them without them becoming embedded with dust.
If you’re doing more than one overall coat, sand everything out, and apply your first full coat as soon as you can, rather than wait until all your touch-ups are done. This allows your first overall coat a few days to dry before sanding for the topcoat once your touch-ups are ready. (If only doing one overall coat, you’ll need to wait until your touch-ups have eight coats on them before doing your finish coat on everything.)
Dieter Loibner
Wet-sand in dust-sensitive areas, e.g., to wet varnish. The specially formulated paper cuts faster than dry sandpaper.
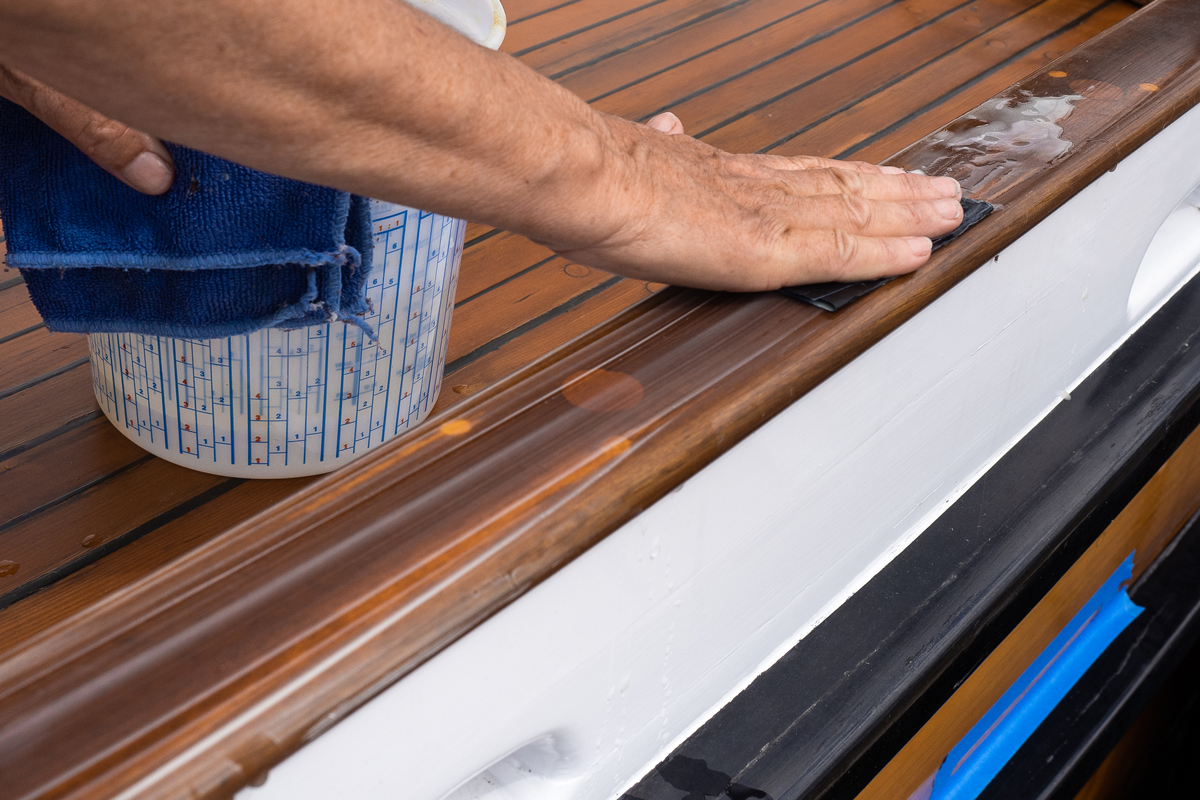
Wet-sanding, which produces no dust, is useful when you need to sand a surface next to wet varnish or touch-ups. It’s also useful when prepping any exposed exterior varnish when you shouldn’t produce dust or you don’t have power for vacuuming. Specially formulated paper for wet sanding cuts much faster than conventional dry sandpaper. I use it with a 2-qt bucket of water and a microfiber cloth, sprinkling water on my sanding area with my fingers or dipping the paper in water before sanding a section. Then I wipe the wet dust slush off with my wrung-out cloth. Leave the bucket of sludge water in the sun to evaporate. Do not dump it at the shop or marina. Dry wiping and vacuuming aren’t necessary. Just wipe the surface with alcohol, tack, and varnish.
Dieter Loibner
Dip your fingers in a small bucket of water to dampen the area, or dip the wet-sand paper. Afterward, clean up the area with a microfiber cloth.
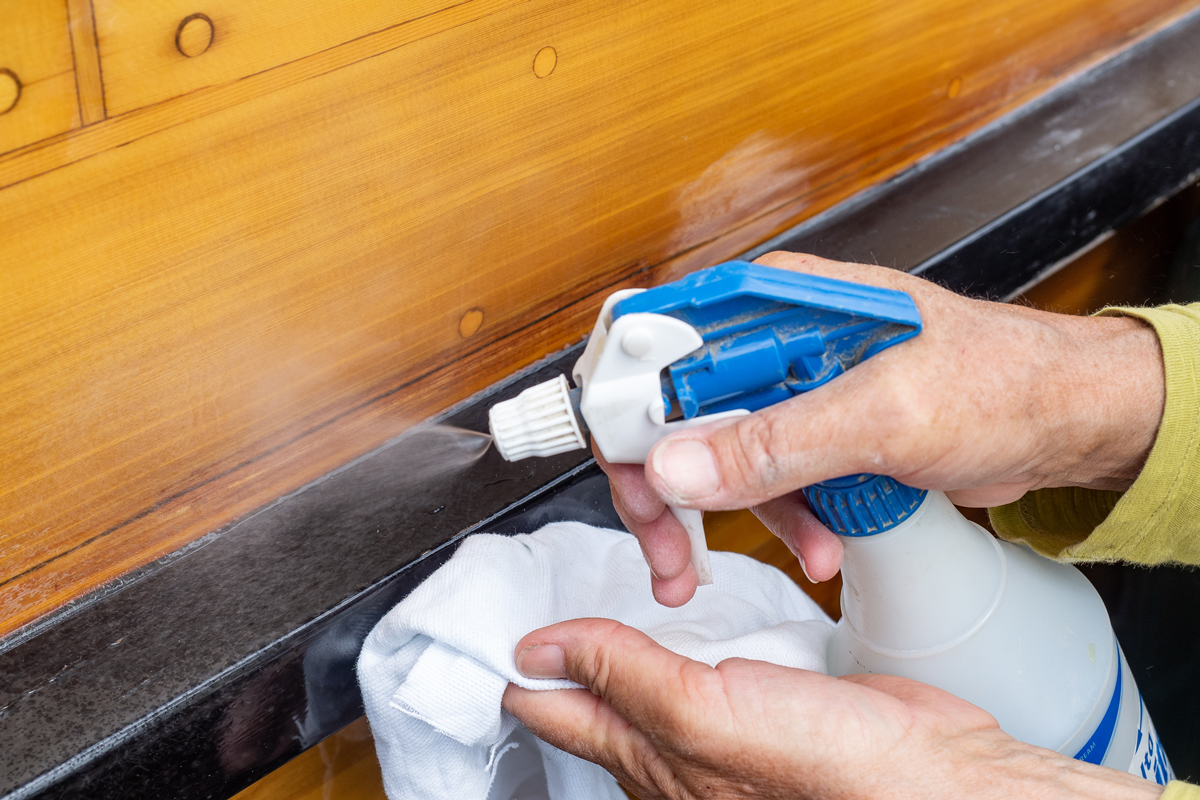
After dry-sanding, wipe down with a dry rag. When the rag gets too full of dust, I clean it by letting the vacuum hose suck it in while I hold the end. Next, vacuum to clean any leftover dust off the surface and surrounding areas, and then wipe down the surface with a clean rag and denatured alcohol. I put alcohol in a spray bottle for economy and convenience.
Dieter Loibner
After dry-sanding, wipe down and vacuum the surface and surrounding areas. Then spray with denatured alcohol and wipe again with a clean rag.
If you didn’t tape off the perimeters of the surface to be varnished before sanding, do it now.
APPLICATION:
Just before varnishing, wipe the surface with alcohol again, and then tack with an unfolded gauzy tack cloth to pick up any last bit of dust. Wear gloves to keep the tack cloth wax off your hands, and never press a tack cloth hard against the surface (it will leave wax, and your varnish will fish-eye and not adhere). If varnishing interior surfaces the same day you sanded, it’s best to spray the air above with a mist of alcohol to drop any airborne dust and then wipe surfaces with alcohol. Also wipe any work lamps you may have positioned over your varnish. Pull your hair back and mind your clothes. A wool sweater or any cloth that sheds fibers isn’t good varnishing attire. I roll and tip my varnish.
Dieter Loibner
For final prep, gently wipe with an unfolded gauzy tack cloth. Wear gloves and never press a tack cloth hard against the surface, as it will leave wax.
For most surfaces I use a 3” yellow foam roller with a white plastic bubbled tray. The roller should be flaked to remove lint from it, and its cardboard ends should be rubbed—even if the packaging declares “NO LINT” in big bold letters. The roller puts the varnish on quickly and evenly. First, I roll the varnish on in short sections—roughly 1.5’ x 2’ (0.45m x 0.61m). Next, using a high-quality badger-hair brush, I brush the rolled varnish gently forward, then brush it back into the finished section and move on. This sequence helps reduce the stop-and-go buildup lines and keeps the varnish flowing into itself.
Dieter Loibner
Brush rolled varnish forward, and then back into the finished section. This helps reduce buildup lines and keeps the varnish flowing.
If I have a large expanse to varnish or if it’s breezy, it’s helpful to add a little flowing agent, such as Epifanes Easy-Flow or Penetrol. But if it’s not breezy and the expanse is not large, I use the varnish straight out of can, without any I hardly ever use thinner in varnish. The exception is when I’m coating a large expanse, such as a hull, on a windy day.
When varnishing caprails or cabin trim, I first roll the underside edges just up to the visible round, and tip with a foam brush, which leaves a nice beveled edge to meet up with when I come back and tip the adjacent visible surfaces with my varnish brush. This sequence keeps me from having to slow down to get those unseen spots and break my flow on the visible surface. With the undersides done, I’ll quickly coat the sides first, then the top for a short length—roughly 1.5’ x 2’—then move on to next section.
As I varnish, I keep my varnish tray in a cardboard produce box with a magnetic clip on the side to hold my brush. I also keep a rag and my tack cloth in the box in case I need them as I’m going along.
It’s important to block the sun from shining on the tray of varnish. The box flaps can help with that, but I also use my own shadow, shadows from the boat, or umbrellas I set up strategically.
Dieter Loibner
Protect varnish from the sun by putting the container into a high-sided box. If necessary, you can make your own shade with a small umbrella.
When you’re finished applying varnish, go back around, and, while it’s still wet, clean up any varnish you may have gotten where you don’t want it.
CLEANUP:
Pour leftover varnish into a separate can from your fresh varnish.
Dieter Loibner
Use paint filters and a filter “donut”—a plywood or cardboard cutout with a 4″ (102mm) hole to hold the filter over a bucket.
If you clean your bubbled tray well with your brush, you can let the tray dry and reuse it.
Pour a couple of inches (about 50 mm) of turpentine into a 2-qt plastic bucket, and then discard the used yellow roller, but put the roller frame in the bucket and clean it well using your brush. Wipe the frame with a rag, and put it away. (If you don’t clean your frame, it won’t roll next time you need it.)
Dieter Loibner
To reduce expenses, maintain all your brushes well. Cleaning them with a brush comb and turpentine is only the first step.
Clean your brush well with a brush comb and turpentine, and spin any solvent lingering in the bristles into a 5-gal pail with a brush spinner. If you use your brush frequently, after cleaning it you can store it in a quart plastic bucket with 1” or 2” of turpentine. Cut a slit in a plastic lid to push the handle through. Then each time you need to use it, you just comb it out and spin it, and you’re ready to go.
Dieter Loibner
Next, mount the handle to a brush spinner and spin hard into a 5-gal pail to remove all the remaining solvent from the bristles.
I keep a lid on the 2-qt cleaning turpentine bucket and reuse it for quick cleaning of my brush through the day, or for setting my brush in while going for lunch. (Leave your brush in turpentine only. In paint thinner or mineral spirits, varnish in the brush will turn to goo in just an hour.) When the cleaning turpentine gets too murky, pour it into a labeled “Used Turpentine” container, and take it to a hazardous waste disposal facility when it is full.
When spot-stripping varnish, use a heat gun set on medium and fitted with a narrow nozzle to help keep varnish from bubbling up adjacent to the intended touch-up. Double-taping with 3M blue 2090 tape right around your touch-up will also help limit the area you strip. And remember, you need only a bit of heat on the varnish. It doesn’t need to be a gooey mess before scraping.
Dieter Loibner
To spot-strip varnish, use a heat gun set on medium with a narrow nozzle to direct the heat and keep adjacent varnish from bubbling up.
When applying touch-up varnish, always brush in toward the patched area to reduce buildup on the edges surrounding it. This makes for easier sanding when your many repair coats are done.
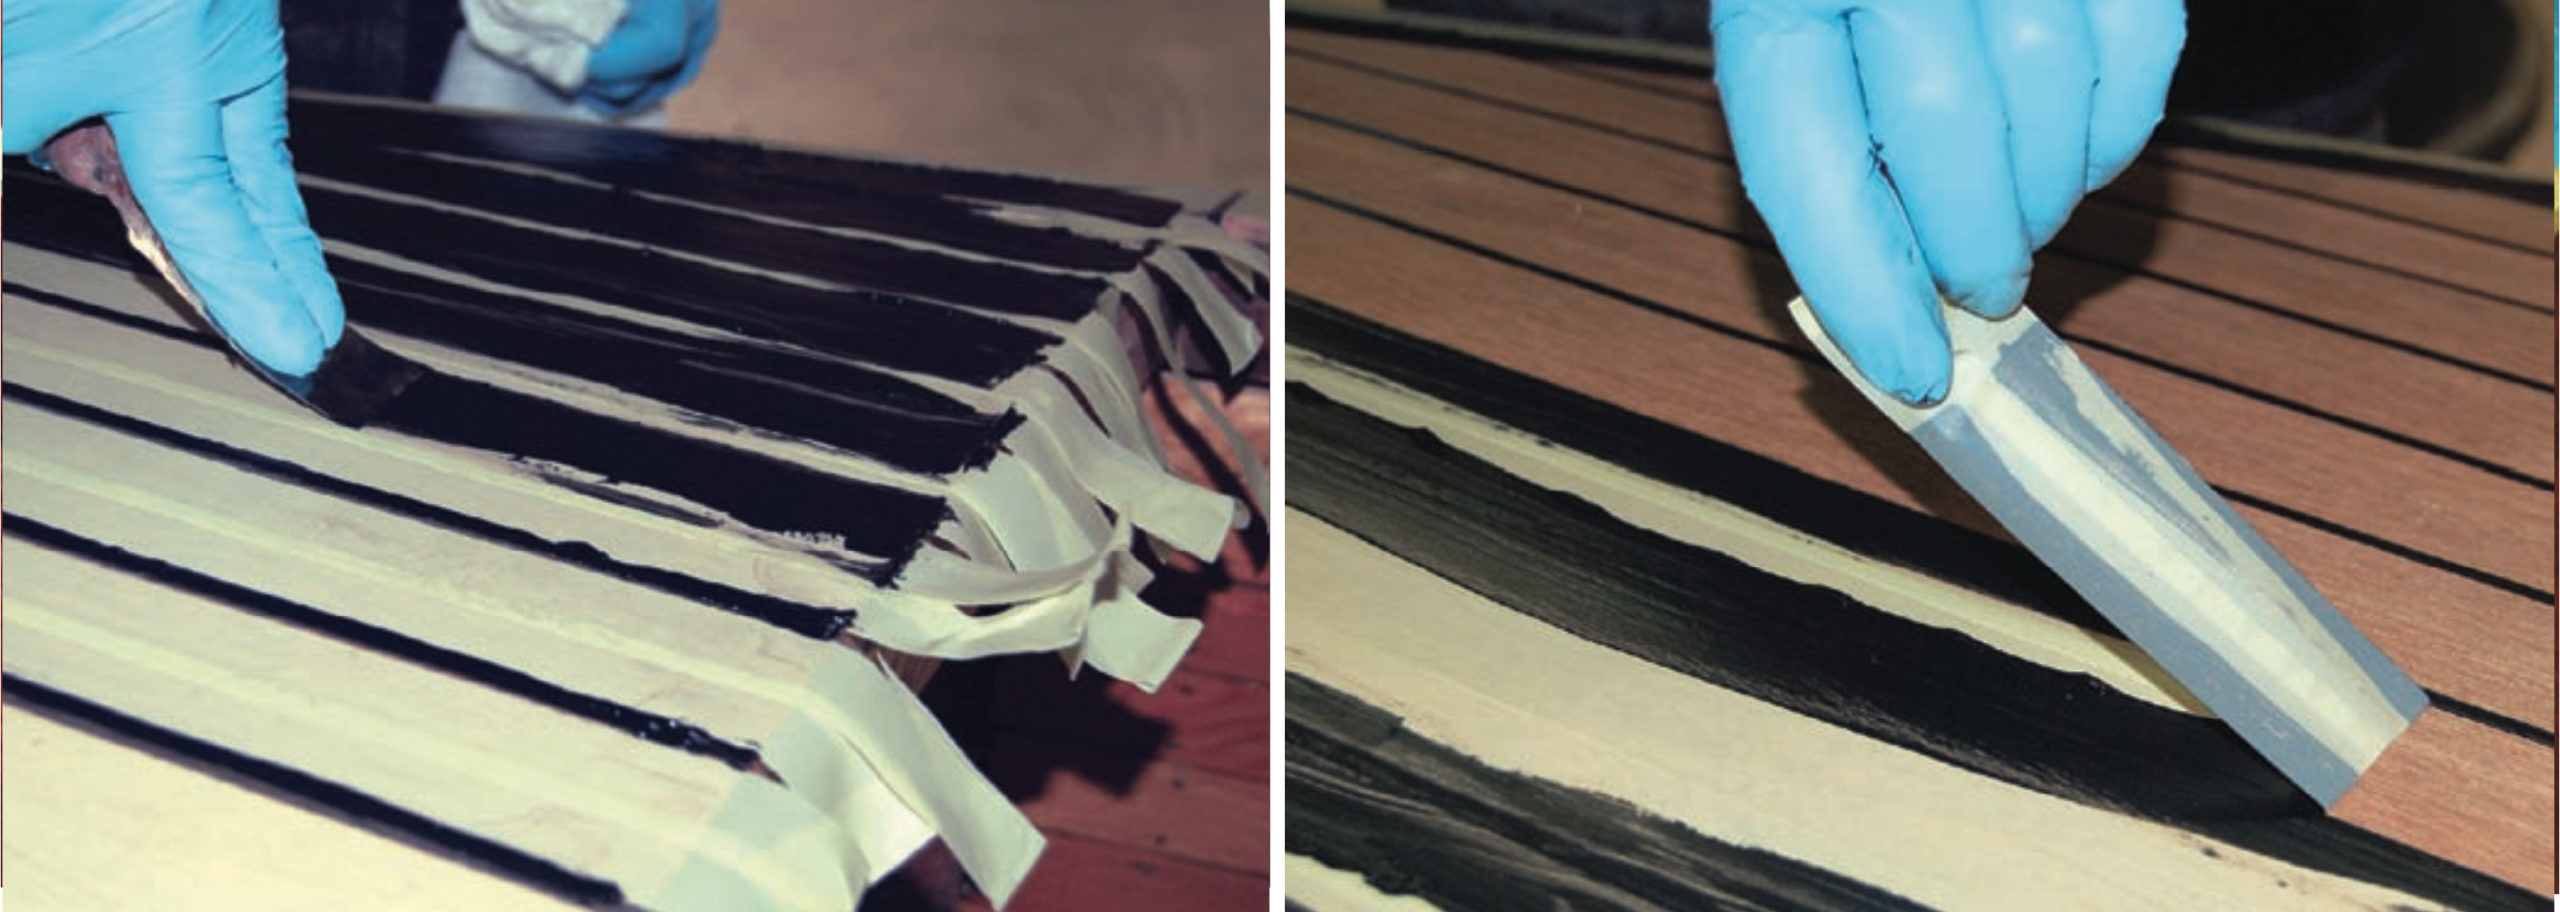
Never let more than three coats of varnish dry before pulling your tape. When doing nine coats, I’ll pull my tape after the fourth coat before it’s dry, then again after the eighth coat before it’s dry. I always retape just before the topcoat.
Dieter Loibner
A double layer of 3M blue 2090 tape limits the strip area. Never let more than three coats of varnish dry before pulling the tape.
For sanding and varnishing bare wood, I will sand up to only 120 grit and then seal with 50/50 varnish and turpentine.
“Hot-coating” is recoating within 24 hours of the prior application, before that coat has completely cured but is dry enough to rub your hand over. When hot-coating or recoating without sanding, tack between each coat. To keep the surface fair, it’s best to let the varnish thoroughly cure after three hot coats, and then sand it, especially on open-grain teak or whenever the finish shows too many brush strokes or any unevenness.
Don’t pile more varnish on top of flaws. Spot-sand out any sags, drips, hairs, or bugs before applying the next coat. If you have a thick drip or sag, get rid of it before the next coat—scrape it down with your scraper, let it dry, then sand it out. In the meantime, just varnish around it.
When taping around curves, use a series of small pieces.
Dieter Loibner
Taping around curves is tricky, but a series of small pieces going in the same direction will make it easy to pull the tape after the job.
Be aware that sanded surfaces—whether they are to be painted or varnished—will usually pull adhesive from your tape and leave it on the surface. It’s hard to see this residue, so always double check for it and clean it away before varnishing or painting that area. It will otherwise show up in your finish.
Never pool varnish in corners or on low horizontal seams. It tends to blow within a year.
Dip only your brush tip into varnish, and never hold your brush upside down long enough to let varnish get in under the ferrule.
When you set your brush in turpentine, you need the solvent to come only an inch or so up the bristles. Don’t immerse your brush up to the ferrule in turpentine.
Be mindful of sharp tools in your pockets as you move about the boat; also beware of any metal snaps, rivets, and buckles on your clothing that could scratch the finish.
Wear a dust mask for dust, a respirator for chemicals (keep respirators in sealed bags for longer life), gloves for wipe-down and cleanup, and kneepads.
Dieter Loibner
Dust mask, respirator (with replacement filters), gloves, kneepads, and tape (to protect fingertips) are the basic necessities for personal protection.
While gloves are important when handling solvents, I never wear them while varnishing. It’s too easy to get varnish on the tips of the gloves’ fingers without realizing it, and then to go around the boat leaving little varnish prints everywhere.
Always put lids back on tight each time you use anything.
Be especially careful with your rags. Always hang them to dry or put them in a fireproof bucket with water in it. Never leave a chemical rag balled up or resting on varnish.
Unplug your heat gun whenever you turn your back on it, and be mindful of how and where you set it down when it’s hot.
Check for residual adhesive after pulling your tape when the job is done. Rubbing a dirty hand or rag over where it was will make the adhesive show. Clean away the adhesive with an orange citrus cleaner if you need to. Do notuse an acetone-based cleaner.
In a cold shop in the winter, I sometimes add accelerator to speed up the drying time so that I can coat the next day. (It’s also good to slightly hasten drying time if rain is on the way.)
Random-orbital sanders can be problematic with varnish. For the most part, they are overkill. You must be very careful not to create circular ditches and ruin the fairness of the finished surface. It won’t show up until you put the glossy finish on. Also, the friction created by sanding at high speeds with paper as fine as 320 can heat up and lift the varnish.
To make unfolding cold tack cloths easier, just set them in the sun or on a lamp for a minute.
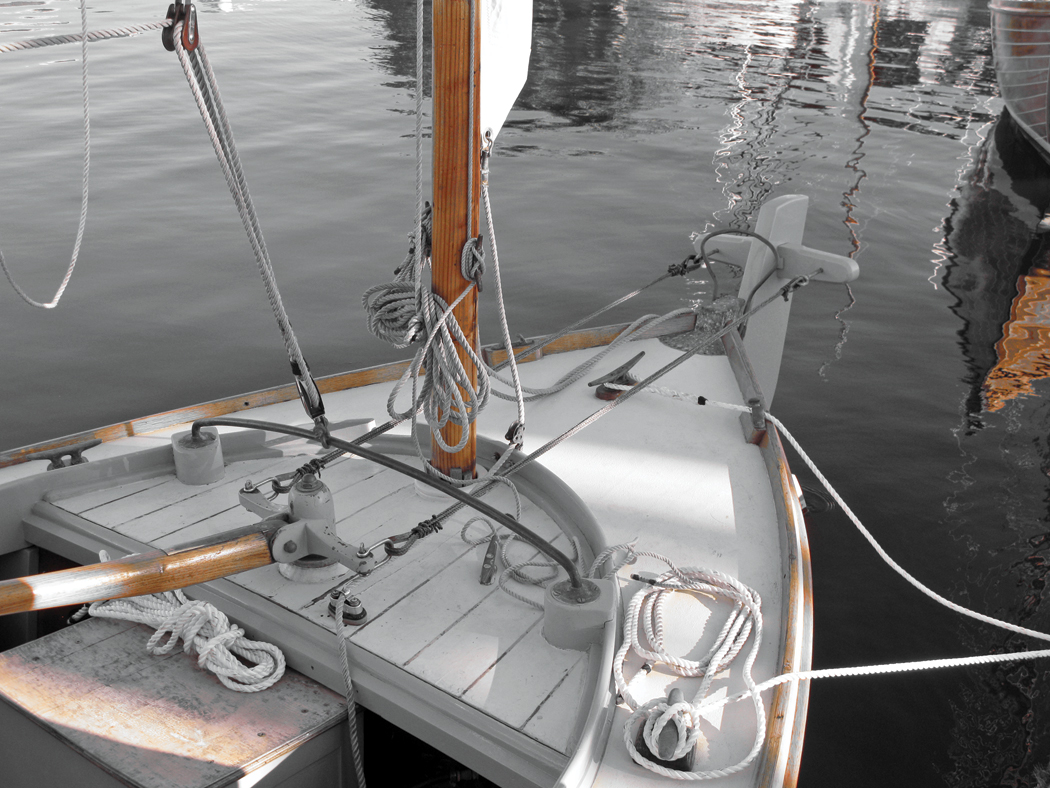
Small boats provide endless opportunity for innovative thinking. We prowled the waterfront seeking clever and aesthetically pleasing solutions to some of the common problems posed by small boats: how to rig them, how to move them, how to stow gear aboard them, how to steer them, and how to live comfortably aboard them.
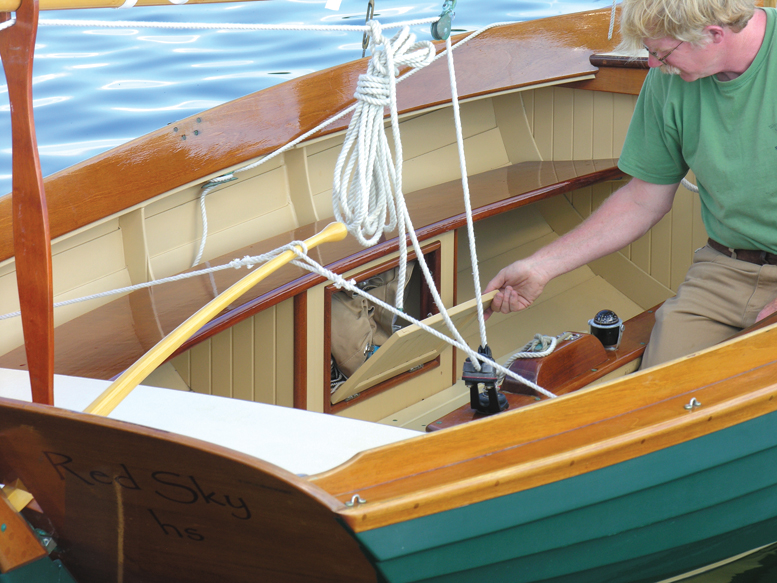
On the following pages, we present a selection of those details, beginning with an ingeniously outfitted Caledonia Yawl in which Small Boats Magazine editor Chris Cunningham cruises in style with his two children. We hope the ideas presented here will inspire you when it comes time to outfit your own small boat.
Christopher Cunningham
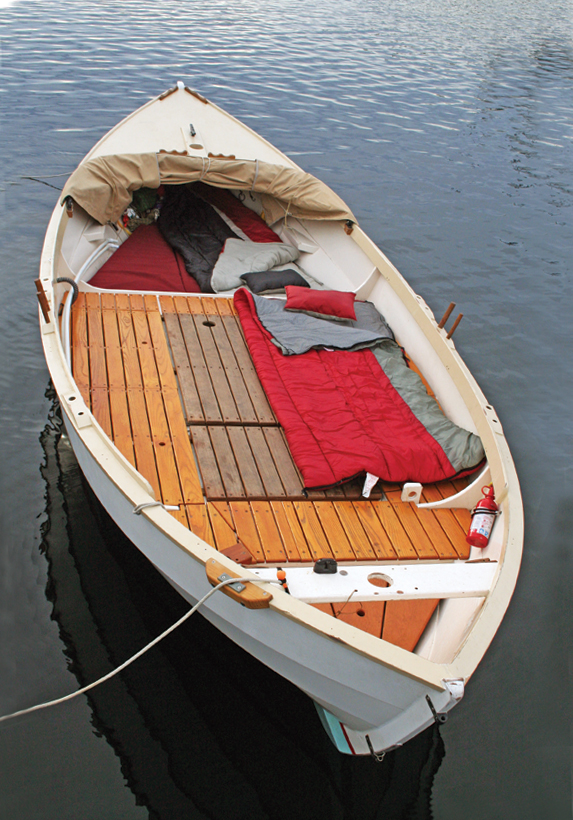
Chris Cunningham’s crew enjoys dinner aboard Chris’s 19’ Caledonia Yawl. (Chris is behind the camera, and will join them shortly.) Carefully designed and built details allow this small boat to be comfortable for daysailing, sleeping, and eating.
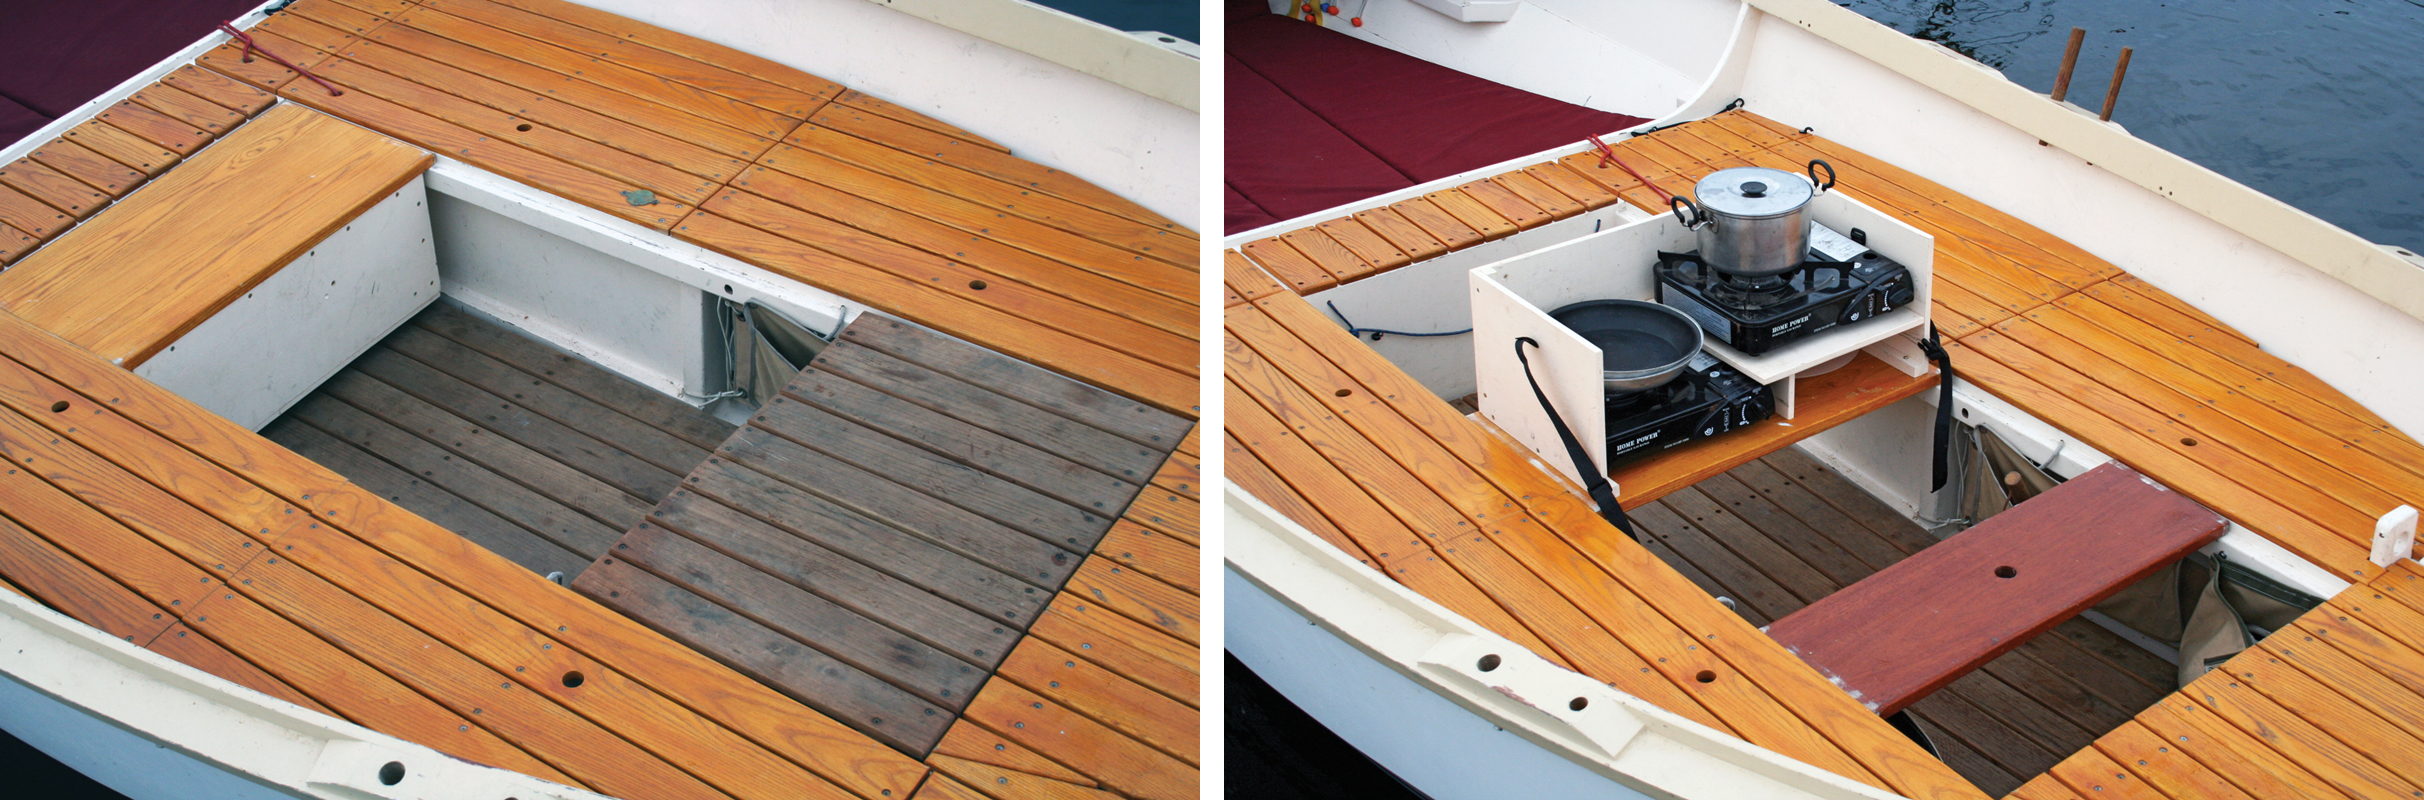
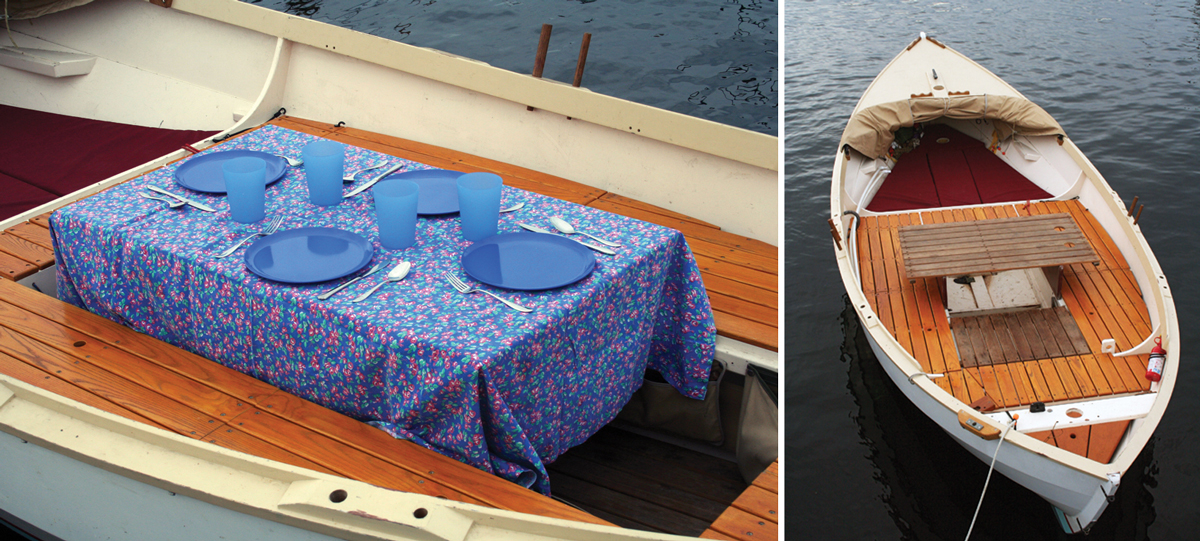
A Galley in a Box
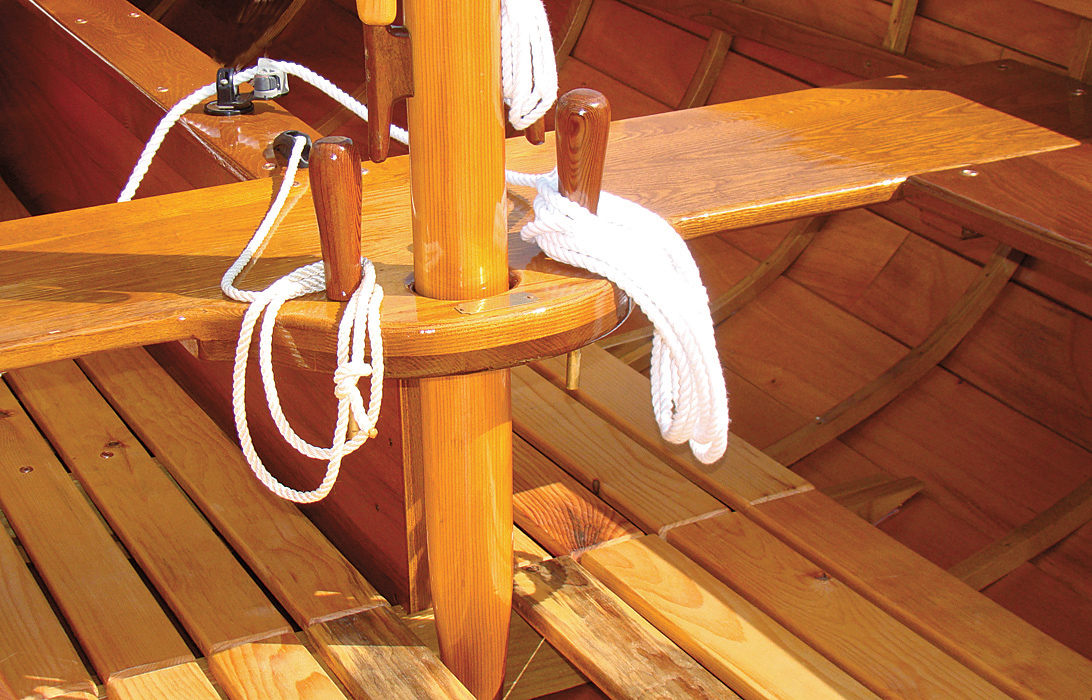
Here’s a galley in a box that stows neatly aboard Chris Cunningham’s Caledonia Yawl. “I used a wide slip thwart as a base for the galley box,” says Cunningham. A slip thwart is a removable crosswise seating platform that sits on ledges built into the edges of parallel side benches. “When not in use,” says Chris, “the galley hangs beneath the thwart and serves as a seat for rowing or as part of the sleeping platform. At mealtimes the box is flipped upright and set anywhere along the side- bench ledge. With two stoves, tableware, and cookware, the box is quite full and the contents shift little when flipped. I always pack a tablecloth as much to cushion plates and pans as to cover the footprints on the dinner table.” The dinner table, you see, is a repurposed floorboard.
A Floorboard as Dining Table
“A pair of slip thwarts 9″ to 10″ wide and set vertically,” says Chris, “will support a floorboard panel at table height. Holes drilled in the center of each slip thwart accept the ends of a dowel to hold them on edge.” Imagine a trestle table, and you’ll get the idea. “The slip thwarts then can rest on the bench ledges. In my yawl the dowel allows the slip thwarts to be set across the ledges and support the table in its normal athwartship orientation to seat four or more, or with the slip thwarts parallel with the ledges and the floorboards rotated 90° to provide an alternate seating arrangement for two. The latter arrangement allows the diner aft to tend to the helm when the boat’s underway. (Meals I serve while underway are usually limited to downwind runs in light air.)”
An Elevated Sleeping Platform
The same ledges that support Chris’s slip thwarts also support his floorboards, which are raised up to become the sleeping platform. “The space between the side benches will dictate the dimensions of the floorboards,” says Chris. The thickness of the floorboards and the placement of their cleats is carefully planned so the surface of the floor-board–sleeping platform rests flush with the tops of the side benches. The floorboards in the bow of Chris’s yawl are at a fixed height, which is 9″ above the designed height. This extra elevation, due to the flare of the hull, allows enough width for a V-berth; the space beneath them allows some storage. “As high as these floorboards are,” says Chris, “there is little effect on stability when I stand on them, and their broad expanse makes for excellent footing for handling the sailing rig.”
Locker Ventilation
This pleasing silhouette depicting seagulls against the setting sun adorns a locker door on a First Light launch built by Pease Boatworks of Chatham, Massachusetts. The hand-cut detail is not only decorative; it also provides needed ventilation to the locker.
An Oar Cradle
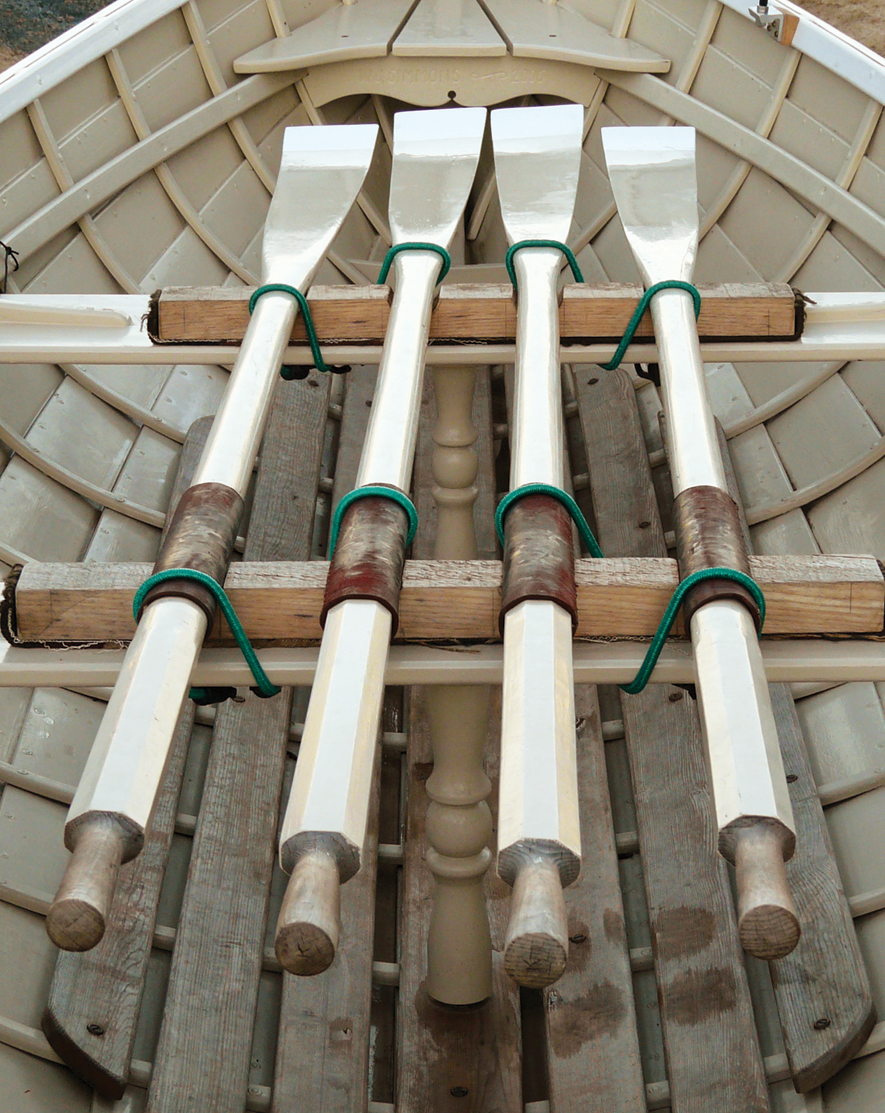
Walt Simmons made this clever oar transport cradle for his Matinicus double-ender (page 96). Two, 2×2s are bored with 2-1⁄4″-diameter holes and then ripped to form half-round cradles. The outside of each cradle is carpeted to keep it from scratching the thwart it rests upon. The two cradles are set on the thwarts, the oar looms are laid into their respective cradles, and then the whole thing is bungeed in place to prevent sliding or shifting during transport.
A Shop-Built Inspection Port Tool
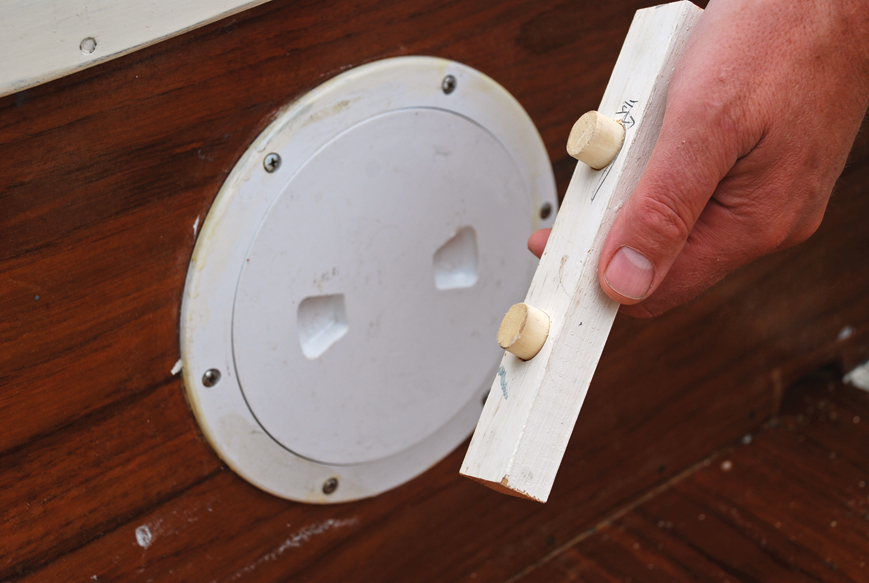
Trevor Peterson devised this handy inspection-port wrench for his 16′ Bolger-designed Surf double-ended sloop, BLUE BIRD. His oarlocks were stowed under the afterdeck one day, accessible only by the port, and the breeze was dying. That’s when Trevor discovered that loosening the port’s threaded plate was far harder than tightening it. Some determined effort freed the oarlocks that day, but it also sent Trevor’s mind to thinking about a tool to aid the job. The result couldn’t be simpler—and more effective: Two 3 ⁄4″-diameter dowels are set and glued into holes bored through a piece of 3⁄4″×1-1⁄2″ pine. The dowels protrude from the face of the pine by about 1 ⁄2″, and they do the work that would otherwise be done awkwardly by fingers. The tool also allows for ports to be mounted in tight places where hand function might be restricted.
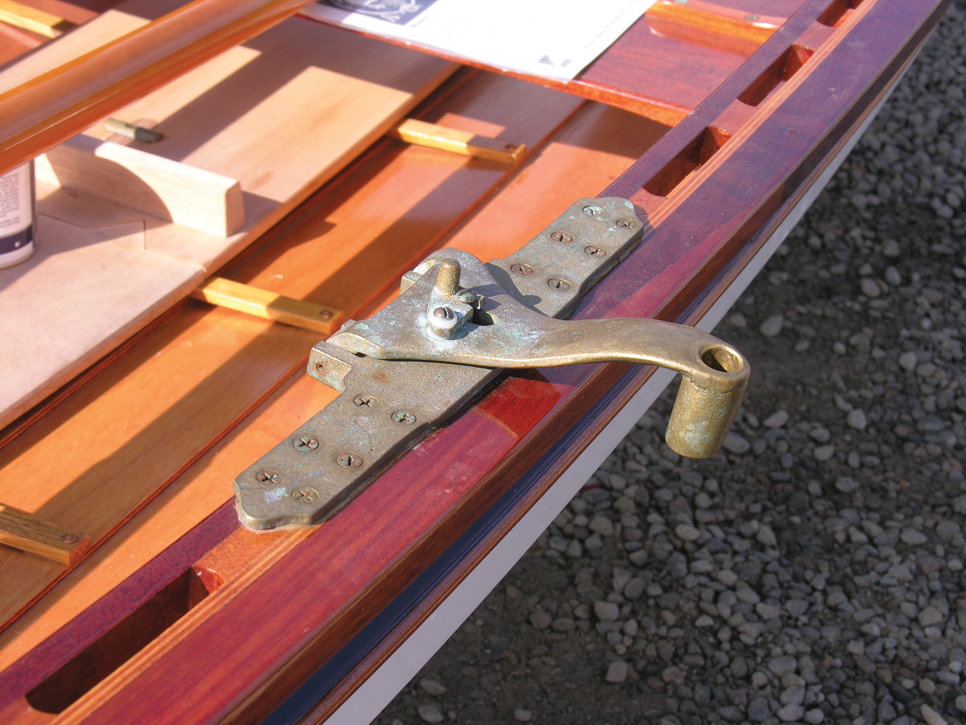
Steering Linkage for a Yawl
Small yawls with outboard rudders always pose steering problems: how do you work around the mizzenmast? Some use a traditional Scandinavian method of a long push-pull tiller connected to a one-armed yoke on the rudderhead; others use a wildly looping tiller laminated to a great bend to allow it to swing and yet clear the mizzen. This solution uses a cast-bronze tiller yoke connected via low-stretch line to a similarly proportioned rudderhead yoke. Stephen Canright of the San Francisco National Maritime Historical Park developed this system for his own double-ended Nomans Land boat.
Wooden Bailers
These handcrafted bail scoops are nicer-looking than the often-used cut-away bleach bottles for bailing water that collect in the bilges of small wooden boats. The smaller, solid bail scoop is simple to make and fits smartly between a boat’s seat riser and planking when not in use.
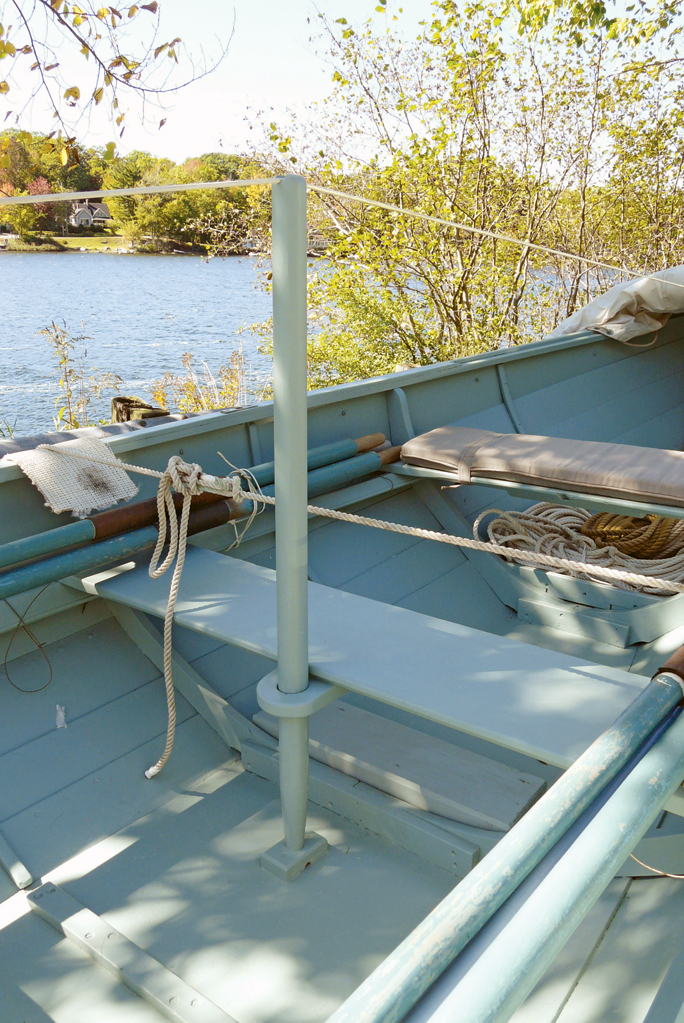
A Ridge for the Boat Cover
Standing water on a boat cover can leak and damage a wooden boat in storage. This pole supports a fore-and-aft wire, which keep the boat’s canvas cover elevated, ensuring that water will be shed from it. The pole’s step and partner hold it fast, even in strong winds.
Bow Grating
Near the bow of a boat—in this case, the dory REPUBLICAN built by Capt. Gerald Smith—where the painter and anchor rode are stowed, this removable “bow grating” will help keep the bilge well ventilated while giving wet line a broad drying surface.
Dory Oarlock Keeper
This simple oarlock keeper on a Bolger-designed Gloucester Light Dory is made by cutting a slot in a side-mounting oar-lock socket. Filed and
sanded smooth, the slot allows the twine to pass when the oarlock is slipped into the keeper. Mounting the keeper on a spacer block gives a bit more clearance for the oarlock’s horns, making it easier to set or retrieve the oarlock. When the boat is set upside down over sawhorses for the winter, the keeper works another way: Sliding the oarlocks into the keeper the opposite direction makes them stay tucked up out of the weather.
Oar Keepers
Jonathan Minot, a boatbuilder from central Maine, borrowed from an elegant Adirondack guideboat tradition when building this lovely pulling boat to his own design. Like those famous lake boats, this boat’s seat back for the after thwart doubles as a keeper for the oars, which slip into purpose-made notches. Note that the seat’s top edge is fitted with a brass rub strip to guard against the inevitable times when the blades don’t make it into the notch on the first shot.
Centerboard Rod Pennant
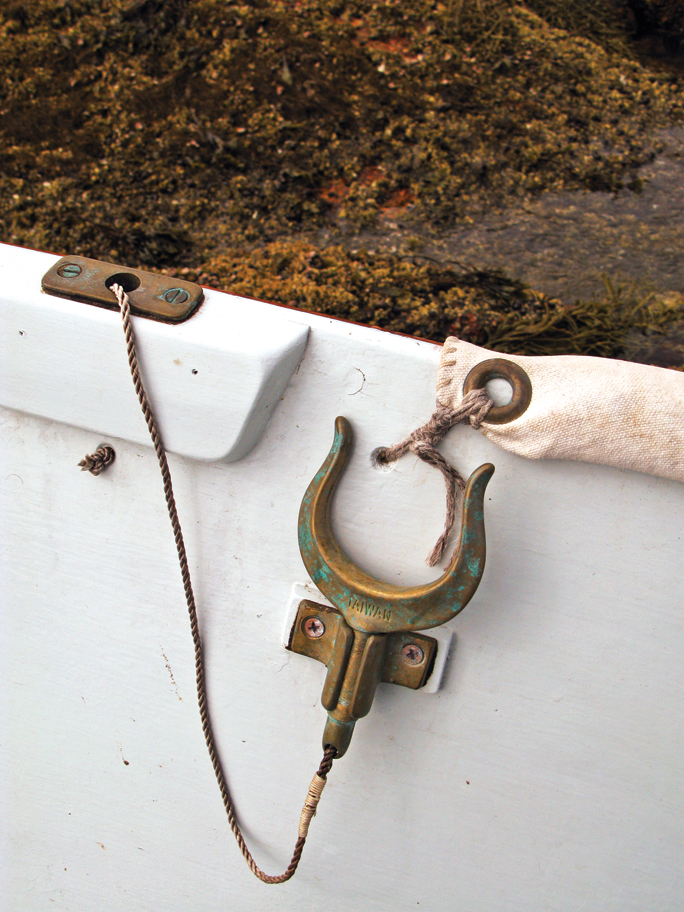
A sailing Beach Pea peapod designed by Doug Hylan of Brooklin, Maine, and built by The Landing School in Kennebunkport, uses centerboard hoisting gear made of bronze rod. The great advantage of the rod is that if a stone jams the centerboard in the trunk, the rod instantly provides something rigid to use to push down on the board to clear the blockage. This arrangement doesn’t allow for fine-tuning the centerboard—it’s either all the way up or all the way down—but racing tactics like slight board adjustments aren’t really the objective for a boat like this one, anyway. When the board is raised, the rod is housed by pressing between two simple bent-bronze keepers; when lowered, a similar keeper stops it from drifting up. A setup like this also saves overall boat weight because the board doesn’t need lead ballast to hold it down when under way.
An Organized Center Console
Boatbuilder Mark Ober of Sorrento, Maine, put a lot of thought and care into the construction of a well-appointed center console for his 22′ Pulsifer Hampton boat. The box-shaped, low-profile addition to the console is held in place by only two screws, and by backing them out—and disconnecting several multiplugs—the entire box can be removed for access. On the underside of the hinged lid, Mark has his VHF microphone, a stopwatch, a digital clock, a pencil, and a flashlight neatly organized. Inside the self-draining box are engine instruments and warning lights, bilge pump switch, the VHF’s main unit, a GPS display, and a depthsounder readout. In case of rain, the console’s lid can be closed to cover the gear. As backup in case of GPS failure, Ober uses a compass with a purpose-made mount that slips under the lid’s handle aligned with the boat’s centerline. By placing the main battery under the afterdeck instead of at the base of the console, he opened up in-console locker storage, with quick access to his fire extinguisher, flare kit, horn, and binoculars. It’s a tight package, neatly organized, and highly functional.
A Well-faired Motorwell
Aboard the Townsend Tern, a small cruiser designed and built by Kees Prins of Port Townsend, Washington (see page 88), this well for an outboard motor—an electric one, in this case—has a clever method for closing off the bottom when sailing. Two doors, operated by lines from the cockpit, close when the motor is kicked up but allow easy opening when resorting to motor power when the wind fails. Being able to close these doors keeps the hull stream-lined when sailing. The system relies on simple technology—bronze angle and commonly available rigging fittings. A car sliding on a piece of sail track mounted on the well side works through a hinged bronze angle to open or close the door. Two lines per door—one hauling the car down, the other up—lead to cam cleats in the cockpit, locking the door either in the closed or open position. The three bronze angles that form the door hinges lie flush with the inside of the plywood bottom planking, assuring that the door will stay flush, as well.
A Box for the Anchor Rode
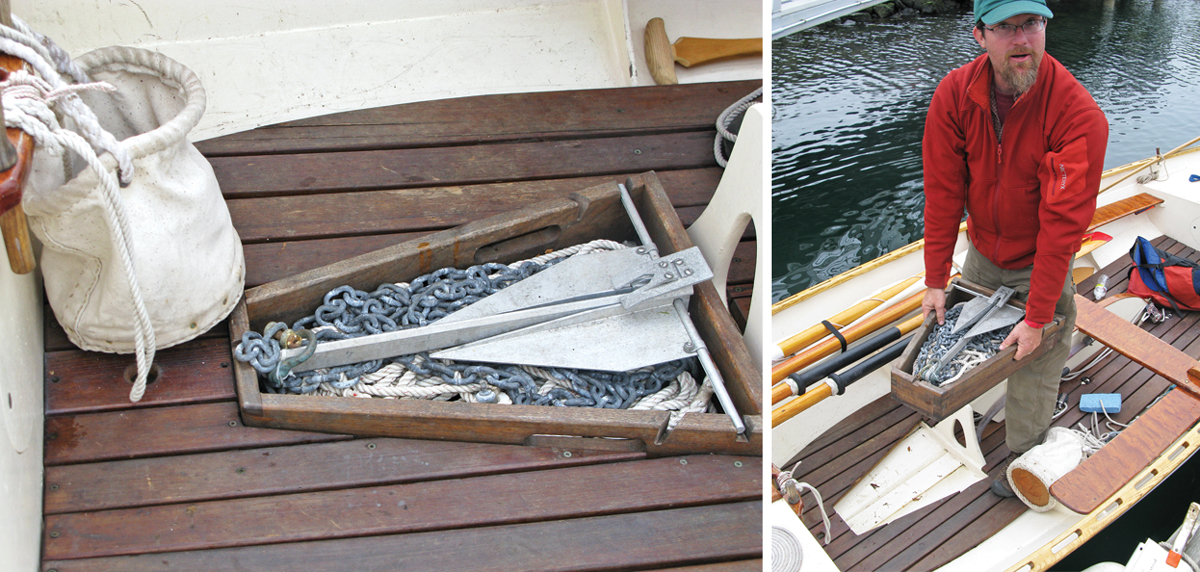
James McMullen of Emerald Marine in Anacortes, Washington, developed an effective box for keeping the anchor under control on ROWAN, his Iain Oughtred–designed, double-ended Sooty Tern. The box keeps the anchor, chain, and rode contained, and a purpose-built cutout in the floorboards prevents the box itself from sliding around the boat during tacks. Keeping an anchor under control not only keeps it from damaging floorboards and planking, but also can increase safety by keeping the anchor’s weight low and on the centerline instead of off to leeward. The box also keeps the anchor within easy reach when it needs to be set In a hurry. An additional benefit is that the box lifts out for trailering, so the chain doesn’t get dragged across the boat’s nice woodwork.
A Folding Trailer Bunk
For his Washington County peapod, Charlie Chamberlain of Brunswick, Maine, made up an unusual trailering bunk. The hinged bunk folds down so the boat can clear it when being drawn up onto the trailer. The boat settles into a fixed forward bunk and, once the hull is in the right position fore-and-aft, the after bunk swings up and locks into place.
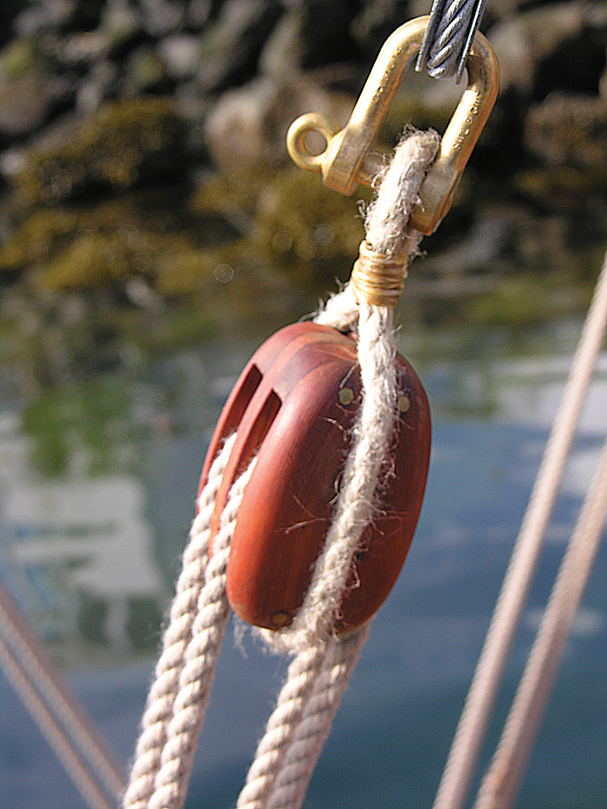
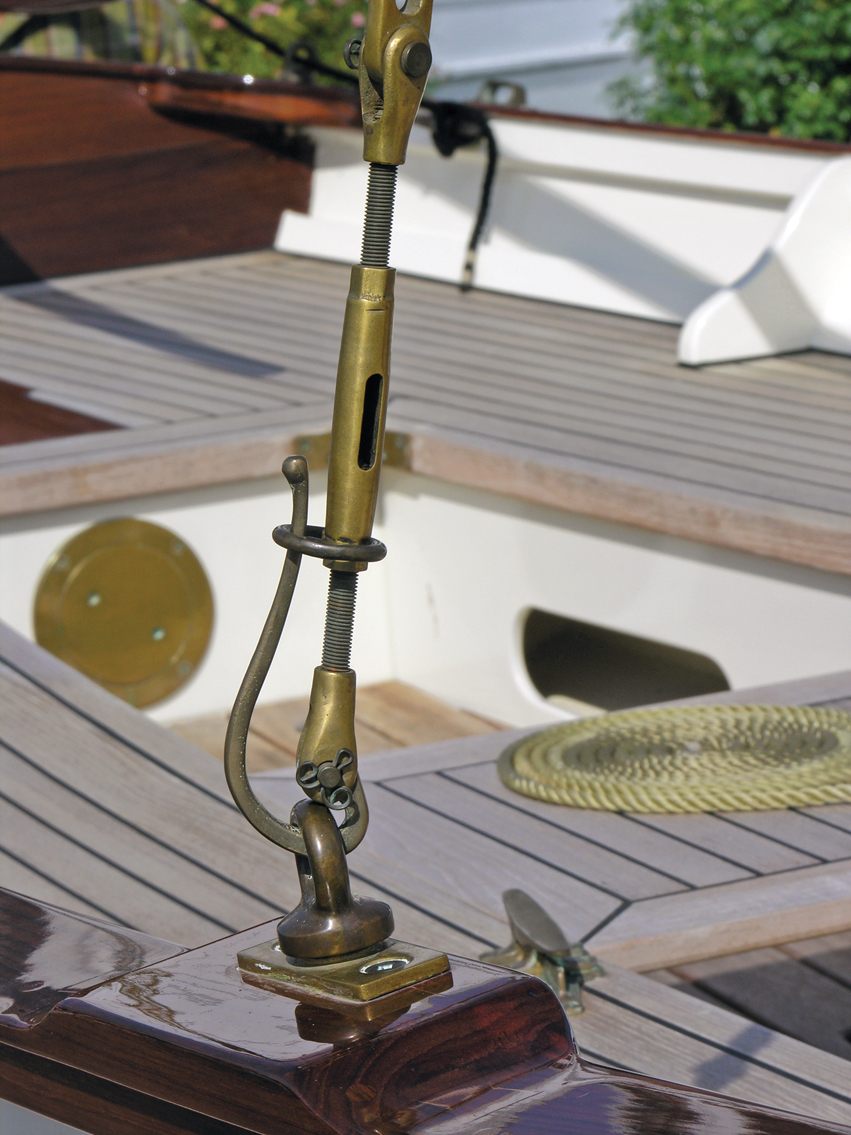
A Rope-Stropped Block
This rope-stropped block made by Trevor Henderson is used to tension the starboard running backstay of FRANCES DE LA ROSA, a sloop designed by J.R. Purdon in the late 19th century, and built by Alex Low and Jon Brown in 2010. Rope-stropped blocks are straightforward to build and to modify, and the rope strop both conceals and secures the sheave axle.
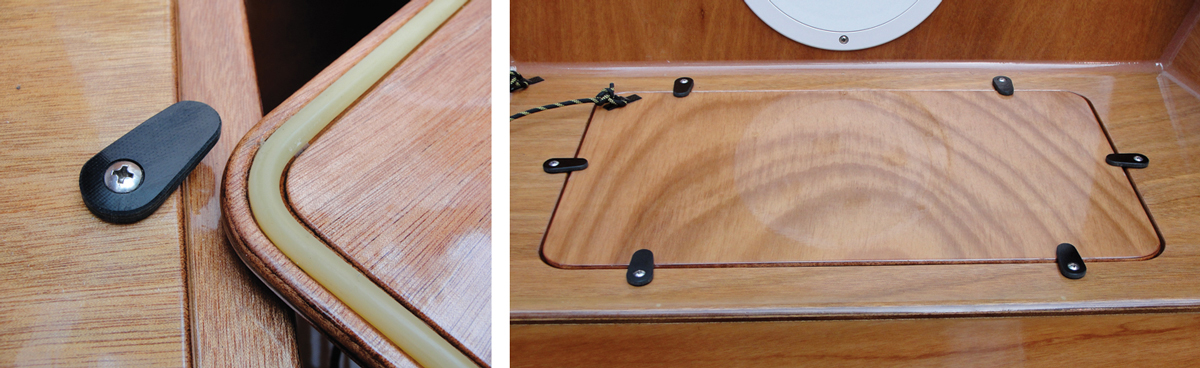
A Watertight Hatch Seal
The words “simple” and “watertight” don’t usually go together, but these hatches in the seats of the PT Skiff are both. Surgical tubing glued into a notch in the hatch lid provides a gasket. The dogs are machined from fiberglass plate and have a thin plastic washer underneath. The fastenings are bonded into epoxy-filled holes in the wooden hatch coamings.
An Under-Seat Locker
Designer-builder John Brooks built an eye-catching glued-lapstrake plywood interpretation of the legendary Herreshoff 12 1⁄2 daysailer (see WoodenBoat No. 217), and in the process devised this clever under-seat locker. The spaces under the forward and after decks of both the orignal Herreshoff boat and the Somes Sound 12 1⁄2 are relegated to buoyancy chambers, and aren’t meant for storage. But a small boat such as this one is kept much more tidy if its gear—unused sail stops, foghorn, flares, hand-bearing compass, docklines, and such—have a home. The space under the seats of the Somes Sound 121⁄2 proved to be a perfect place to tuck all of this stuff, and a locker there keeps it safe and organized.
Flip-out Oarlock
This flip-out oarlock socket increases the effective beam, and thus the oar power, on a 16′ Rangeley Lakes boat built by Tom Regan of Grapeview Point Boat Works. The boat is based on a C.W. Barrett design of 1915, and the hardware is from Shaw & Tenney (www.shawandtenney.com) of Orono, Maine. The otherwise vulnerable socket locks in its rowing position, and is easily unlocked and flipped into the boat for storage and transport.
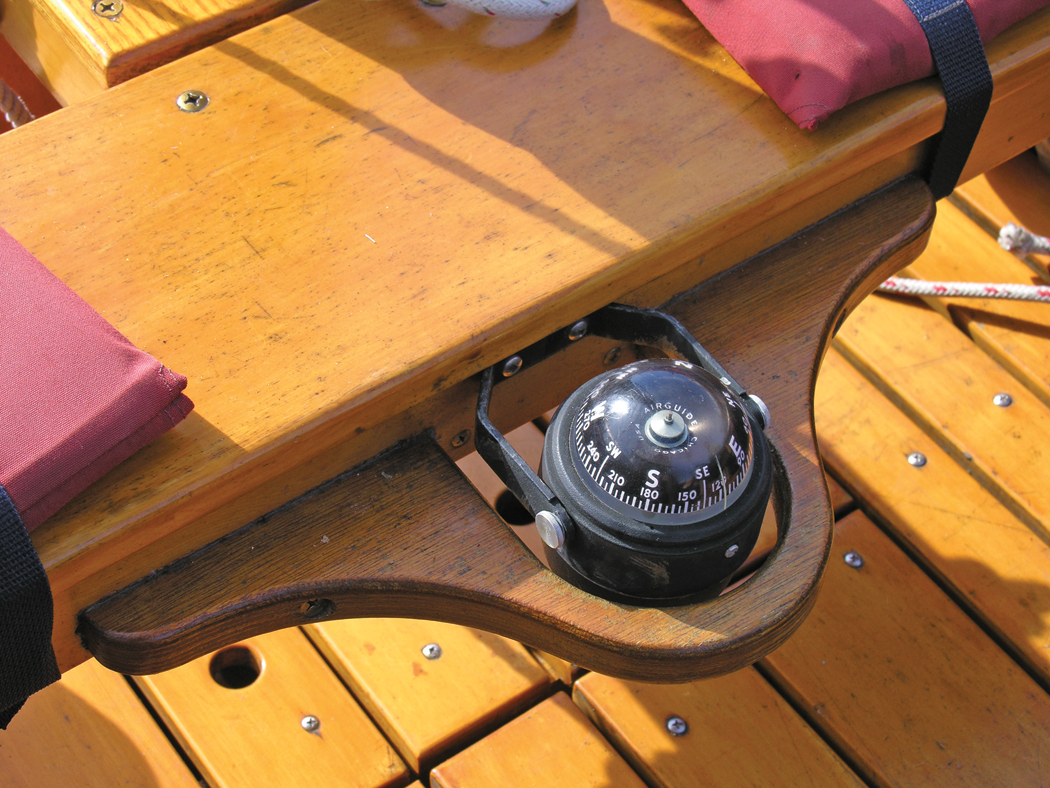
A Compass Guard
A thwart-mounted compass in an open boat is vulnerable to all sorts of knocks from oars, errant steps, and fouled lines. This simple guard, resembling a mast partner, is part of the outfit of TERN, a 23′ open ketch designed by Tad Roberts and built by a group of recently graduated college friends who made a 10-month expedition in the boat from Lopez Island, Washington, to Ketchikan, Alaska—with no damage to the compass. (See WoodenBoat No. 195 for an account of the expedition.)
Shop-Built Kayak Cart
Brian Bean of Lake Tahoe, California, designed and built both this 19′ kayak and the cart upon which it rides. The cart has a form-fitting carbon-fiber saddle, a wooden axle to which the spoked wheels are lagged. The buckle and strap came from the local hardware store.
Quick-Release Turnbuckle
Here we have a quick-release turnbuckle from Port Townsend Foundry of Port Townsend, Washington (www.porttownsendfoundry.com). This hardware allows for fast setup and down-rigging of an Aurai 17, an Arch Davis–designed sloop (based on his Penobscot 17 design) sold by Callisto Sailcraft of Wenatchee, Washington. Note the deadeye to which the turn-buckle is fixed: It’s attached to a piece of threaded rod that’s nutted on the other end. Remove the nut, pull out the deadeye, and you’re left with an oarlock socket. Very resourceful.
Paul Gartside’s 14′ daysailer is a classic example of a “big” little boat. SKYLARK was built at WoodenBoat School by students in the Fundamentals of Boatbuilding program.
This handsome dinghy is an ideal family daysailer and can comfortably carry up to 4 people.
Skylark has great stability under both sail and oar.
Skylark is very fast, sails well with a good turn of speed even in light air and tacks well without hesitation.
Paul Gartside’s 14′ daysailer is offered with either a standing lug rig or a gunter jib and main.
Dawn came early, as it so often does when one is anxious, and I was anxious. The forecast was for a hot and sunny day, a rare treat in our corner of the Pacific Northwest. Normally I would be elated at such a prediction, a chance to slow down, go for a lazy sail, or putter about the boat. But this was painting day, and, next to snow, intense heat was about the worst weather we could be dealt; it would cause the paint to dry too fast, thus leaving brush marks, sags, and lap lines where the so-called “wet edge”—the advancing front of fresh paint—was lost. We had spent days painstakingly sanding the hull with a longboard. Our arms hurt. Our backs hurt. Our heads hurt—probably from self-medicating our arms and back with contents from the cooler. It would take another day of cleaning and taping, but it would all be worth it if we could apply a perfect coat of paint.
Staging surrounded the boat, laid out so we could walk continuously down the length of each side without stopping or tripping. In a shady spot, we had laid out our paint, thinners, rags, extra brushes and rollers, and anything we might need in a hurry. The plan was for an early start. We wanted to dry off the dew, get the hull wiped down, and be painting as soon as possible so as to take advantage of the cool morning air. Three of us mixed up our paint, grabbed our tools of choice, and went for it—one person rolling, another “tipping” the rolled-on paint with a brush, and the third standing by to pour more paint when we ran out and look for holidays, runs, and sags. And, most important, this third person also adjusted the viscosity of the paint as we went along; we would call out to have brushing thinner added as the sun evaporated it out of the paint pot, or to further thin the paint as the day heated up, to assure that the paint would flow out and level off. Although we didn’t get a ticker-tape parade when we were done, we were pretty proud of the finished product.
By noon that day it was hot, and the wind had picked up. As we were cleaning up, we heard shouts of anger from somewhere in the boatyard. A bit of investigation revealed a jet-black boat practically spontaneously combusting in the heat of the day and her crew doing everything they could to hopelessly trowel on a decent paint job. It was a losing battle, but they were not giving up. They should have. I’m pretty sure at one point I saw a paintbrush stick to the side like a kindergartener’s macaroni-art project, and the conditions did not improve with time.
This article is about how to get your paint to flow and level. And the first thing you can do to assure success— before adding stuff to your paint, and before refining your application technique—is to pick the proper weather.
Have you ever read this on the label of a paint can: “Do not apply in direct sunlight,” and wondered, “why not?” In direct sunlight on a warm day, say over 75°F, a white finish can reach temperatures of 180°F degrees and black can reach 250°F. With those temperatures, not only are the solvents quickly leaving the paint, but the outer layer of paint is oxidizing (drying) too quickly, and locking the brush marks in place. There simply is no way for the paint to level—to smooth out once it is applied to the surface—let alone maintain a wet edge.
Perhaps you’ve heard the suggestion of putting your can of paint in the refrigerator until you are ready to paint. Don’t forget that the temperature of the surface to be painted is just as important as the air temperature and the temperature of the paint. So, if you are spread- ing your refrigerated paint in hot air on a boat that has been sitting in the sun, your problems will persist: as soon as the paint is exposed to the hot air and applied to the hot surface of the boat, the solvents are going to flash off, the outer layer is going to heat up and start to dry, and you’ll be left with paint that won’t flow out. The solution is simple, and right there on the label of the can: Do not apply in direct sunlight.
So, check the weather forecast. If it looks as if it is going to be hot on the day you plan to paint, prep the boat the day before so that all it needs the next morning is a quick wipe-down before painting. I often see people spend the morning preparing a boat and then painting in the hot afternoon sun and getting a poor paint job that has to be redone. Save yourself the trouble: prep one day and paint the next.
Cold Weather
“That’s all fine and dandy” you say, “but what about when it’s cold and wet?” Well, when I am cold and wet, I have a tendency to huddle up and hold myself for warmth. Paint has the same tendency: it thickens up, it doesn’t like to flow out, and it can feel as if you are trying to spread glue with a cat’s tail. Again, just as important as the outside temperature and the temperature of the paint is the temperature of the thing you are painting—the substrate temperature. Often, the substrate is much colder than the air in the morning, and it might warm up if direct sunlight beats down on it. But if you are working in a part of the world where mornings are cold and afternoons warm, you won’t find much time where the substrate is the same temperature as the paint. In this case, you must first warm things to a workable and even temperature, preferably around 55°F.
If you are lucky, your boat is in a shed or building with a woodstove or some other heating device. If not, grab some tarps and build a quick temporary shelter, then find a way to get some heat going, such as a blast furnace or safety heater. Sometimes a 500-watt halogen work light does the trick (if you decide to use a propane blast furnace, remember: they put out a lot of moisture). If your paint is still sitting in the refrigerator, take it out the night before and put it someplace warm. Do the same for the thinners and conditioners you plan to use, as well, warming them to just above room temperature but being careful to not bring them to the point at which they will ignite. Some of us have a long drive to the boatyard; for me, it’s an hour and a half. I like to put the paint on the floor of the car under the heater and keep the heat going. You will likely have to warm it up again before you start mixing and painting, but at least you won’t be starting with really cold paint.
Painting your boat without a shelter in cold and wet weather, such as spring or fall, can be challenging, but rest assured it’s possible. You likely won’t get as much done every day, so plan to be hauled out longer than you might expect if you are in an area where your boat lives in the water year-round and you haul it just for painting and bottom maintenance. Break up your painting projects so you are not trying to paint everything in one or two days. Start painting late in the day to take advantage of sunlight. And be careful: even in a cold region, direct sun can still heat up the substrate quickly.
WoodenBoat School
Painting a boat in warm or cold weather requires careful use of modifiers that allow the paint to flow and level. Shelter can make a big difference, too, in blocking sunlight, retaining heat, and protecting from wind and dew. The first step to assuring a good paint job is to choose your weather.
Thinning and Conditioning the Paint
Have you ever thrown up your arms in disgust and screamed at the heavens, “Why can’t the manufacturer just make a paint that I can use straight out of the can!”? There are too many factors at play for such a one-size-fits-all approach. In order to evaluate coatings, tests in the lab must be consistent, so paints are formulated to standards. For example, an oil-based alkyd is said to be dry after cooking at 70°F for seven days. But in the real world, where you might have daytime temperatures in the 80s and nighttime temperatures in the 50s—or 55°F consistently, all the time—the paint might take a month to fully dry.
Flow and level are also both calculated in the lab, and the recipe is adjusted for optimum performance. The application method is a factor because different qualities are preferred if you are spraying as opposed to brushing. To evaluate flow and level, a lab will take measurements using a sag meter and a leveling bar. These are metal tools with precise grooves cut in them, and when they are dragged across a paint film they’ll show what thickness of paint will flow out and level. Various modifiers or additives are mixed into the paint until the chemist is satisfied with the results. Sometimes they want to make the paint thicker, reducing flow so you can get a thicker coat applied before sags appear; sometimes they might put in a surface modifier that alters the sur- face tension so the paint levels off better than it would otherwise. Regardless of what’s done in the lab, however, you most likely will have to adjust the paint on the day you use it, to get it to flow out and level off according to the ambient conditions.
To combat the effects of excessive ambient heat, you can thin the paint with a suitable solvent. The instructions on the labels of quality paints include suggestions for suitable solvents; some blends, such as Interlux 333, are formulated specifically for brushing. If you can, thin with a solvent that has a slow evaporation point or use a paint conditioner designed for thinning a paint in hot conditions. Typical paint conditioners are a blend of oils and sometimes resins and other additives. Penetrol is a popular one. They can drastically increase the paint’s dry time and wet edge, but because they are usually mostly oil, they can soften the dried paint film; sometimes dull the gloss; and, if not mixed in well with your semigloss, satin, or flat-sheen paint, can yield a mottled look. With as little as one percent by weight of raw linseed oil added into the paint, you will notice a big difference in the paint’s softness, dry time, and durability.
Be careful when adding thinner, too. Too much of it will dilute the paint’s resin, and you will be painting on mostly solvent and pigment, resulting in poor film build and a loss of gloss. This starts to happen when the additional solvent reaches 20–30 percent of the paint volume. In most single-part paints, the solids content is around 50 percent, meaning that half of the paint is resin and pigments while the other half is solvent. An additional 30 percent solvent diminishes the solids content; you would thus have to apply additional coats to get the film thickness you would get with one unadulterated coat. However, if that is what it takes to get the paint to flow out in the conditions you are stuck with, it might be the better option.
When mixing thinners and conditioners for warm weather, the goal is to keep the paint from drying too quickly. With cold weather, the goal is to speed up the paint’s drying so it doesn’t thicken due to the cold and cause sags, runs, and brush marks. If there is a lot of wind, don’t paint! If you disregard this advice, treat the paint as you would for warm weather.
Use the same additives for cold weather that you use for warm weather, except that instead of a slow-evaporating thinner you might try a quick one. Some- times, if I am afraid the substrate might be a little cold and not want to hold onto the new paint, I’ll even add a little bit of a “hot” solvent to help melt the old layer of paint and thus help the new one adhere. When the weather is cold, roll or brush the paint on thin; on such days, it takes a long time for paint to “through- dry”; if you have applied a heavy coat, you might notice weeks later that even though the outside is hard and sandable, you can easily press hard and leave a mark. Resist the urge, in cold weather, to apply multiple coats of paint before the previous coat has thoroughly dried, or you will end up with a soft mess.
Photos by Peter Marshall
Topside enamel is seldom applied without the use of additives, and the choice of additives depends upon the weather and the viscosity of the paint in the can. Left—Penetrol improves flow, reduces brush marks, and extends the working time of the paint; too much of it will soften the cured finish. Middle—Some solvents, such as Interlux 333, dry slowly and are meant for hot weather. Right—Xylene is a “hot,” or fast-evaporating solvent, and is ideal for cold-weather painting. It should be used sparingly, and the mixture checked on a test board, because it can melt paint.
TOOLS AND TECHNIQUES
Conditioning the paint is only one of the variables of a good paint job; tools and techniques are also critical to ensuring good flow and leveling when applying paint.
Before you begin painting, make a test board. This could be a simple piece of plywood, 2′ × 2′ or larger. It need not be fancy. Every phase of your painting project should be tested on this board. Use it to test how your paint is flowing out before you apply it to your boat; this way, you can see if you need to add more conditioner or less, or not paint at all. It’s much cheaper and easier to not paint than to do a bad job painting and have to sand it all off.
Starting with the primer coat, a foam roller tends to work the best for applying paint. Primers do not flow out or level because they are packed full of pigments that do things like hide the previous layer, block tannins, and fill grain. Don’t attempt to tip out the primer; the stipple from the foam roller leaves a very nice and even surface that is easy to sand out. If you try to use a brush to tip off the primer, you will get brush marks that are uneven, making it harder to sand out and giving a greater loss of the primer layer. This translates into more work.
There are two basic types of foam roller: the yellow ones that fit a standard roller frame, and the little white ones with domed ends that take a special frame. I had never seen the little white ones until I was working on a 175-million-dollar-yacht and the varnish crew used them exclusively. After I promised to never reveal their secret (sorry, guys), they informed me that the little white rollers left a finer stipple, giving a smoother finish. I tried them. The varnish guys were right, but the downside is these rollers come only in short lengths, inadequate for a large surface. The yellow foam rollers come in three sizes and fit standard roller frames. After doing an amazing job of priming, make sure you sand out all of the stipple. To do this, employ a friend and a raking light—that is, a light held at an angle to the surface—to make sure it’s all smooth. Any leftover stipple will telegraph through the top coat. The primer coat is the spongy, cozy layer of forgiveness that helps you even out the surface of the boat; its surface should be oh-so-smooth.
Photos by Peter Marshall
Rolling and tipping of topside paint has become standard practice, and the choice of roller cover is critical to a good job. Left—Standard-sized foam rollers are an ideal choice for large surfaces. Right—Small, white, dome-tipped foam rollers are reportedly superior.
The topcoat allows you to really get to show off your talents as a painter. If you must thin the paint, it may take a couple of final coats to completely hide the primer; “hide” is not only a function of pigment load, but also of coat thickness. I like to roll-and-tip my top coats. It’s fast; an experienced and prepared painter, working with a friend, can paint a properly prepared 30′ sailboat in 30 minutes.
We have talked about roller choices, but what should we tip off with? Don’t even think about using a cheap brush if you want a great job. Here are the basics of brush design: The bristles of a great brush will have “split ends,” which means one bristle is broken at the end to form many smaller bristles. The smaller the bristle, the shallower the groove it leaves in the paint and the less the paint has to level out to eliminate the brush marks. Put the brush in your hands and run your fingers through it to make sure the bristles are fairly even in thickness, which translates to even grooves in the paint film, and thus consistent leveling.
Another trait of a great brush is the shape of the tip of the brush. An inexpensive brush’s tip will be fairly flat, having only spilt ends at its very tip; a great brush will have a tapered crown and the split ends are distributed along the portion of the brush you actually use.
The brush should be packed with enough bristles to hold paint, and it should be stiff enough to move paint around—but not so stiff that it is not flexible. For small jobs you can buy, for a couple of bucks each, some decent artist’s brushes in the range of 1⁄2″ to 1″, but they are pretty flexible. Try one out; if it is too flexible, shorten the bristle length by wrapping some masking tape around the bristles until it firms up. My shop has a painting corner in it, which is a fancy way of saying my shop has a place where I lazily heap my painting supplies, and in that corner I try to keep a supply of inexpensive foam brushes. In numerous books, I have read about glorious jobs produced with foam brushes, but I have never been able to get a great paint job with one. If you look closely at the tip of a foam brush, you will see just how ragged they are. This hinders leveling. When I use them, foam brushes tend to act like squeegees, pushing the paint clean out of the way. So, why do I keep them? They are great for touch-ups.
Photos by Peter Marshall
The rolled-on paint must be brushed, or “tipped,” to spread it evenly and to begin its leveling, and a good brush must be employed for this purpose. Left—Great brushes have bristles with split ends, and the tips of the brushes are beveled to ensure maximum contact of bristle tips with the paint. Right—Poor brushes have squared-off tips and cheap bristles that shed during use.
You can successfully roll-and-tip on your own, but if you have a team of two to four people, you will get a better job. Use one person to roll, one to tip, one to mix paint and pour it in the tray (this way you don’t have to stop painting and risk losing your wet edge), and one to look for holidays, sags, and runs. Remember to constantly communicate with each other by saying things such as “more paint here,” or “less paint, roll it out thinner,” or “needs more conditioning so add three capfuls of thinner,” and so on. Yes, this is why shiny boats tend to cost more. It takes more people to keep them that way.
If you are more old-school and decide to forgo the roller and use only a brush, you can get good, even results by painting first in alternating diagonal lines (like painting an X) and then tipping out. It’s important when you tip out to follow the sheer when painting plywood or the plank lines when painting a planked boat. No matter how good you are, there will be brush marks, but if they follow the sheer or the plank lines (as opposed to random zigzags like the ones on Charlie Brown’s shirt) they tend to disappear.
Recently a friend asked if I would help him paint a new boat he was building. He was using a two-part top-coat paint that I had never used. Two-part paints can be tricky. They are used mainly on big, expensive yachts and airplanes, and generally are formulated for spraying rather than brushing. That means the paint is sticky, goes on very thin, and dries fast, not leaving much time for leveling out. Some manufacturers make brushing thinners for these paints, but that does not always help to the extent you would like it to. This is where that sample board can really come in handy: make sure you practice on it before touching a brush to the actual project.
We mixed our paint according to the directions, but as soon as I touched the sample board with the brush I realized we were going to have problems because the brush seemed to drag, sticking to the surface even though the paint was fairly thin. We added more brushing thinner and continued to add it as we went along the boat and the thinners flashed out of the paint pan. We ended up with a decent job. Some two-part paints claim you can buff them out with an electric polisher, and some claim you can’t; buffing allows your sins to be erased by a machine later on.
If you are a novice, afraid of making a mistake and worried your paint job won’t look like a calendar photo, or if you are the experienced veteran who rushed the job to satisfy a schedule, I have some final words of advice for you: Don’t worry about it. It’s just paint. You will be doing it again next year anyway.
Nonskid Deck
My first experience painting a nonskid deck came when I was just a little kid. At 36′, my parents’ old converted fishing troller was not a large boat, but its after portion was a giant party deck above the old fish hold. It was covered in nonskid.
One day, my dad decided to repaint the deck, so he got out the TSP (trisodium phosphate) and mixed it in a bucket of water, explaining to me that TSP didn’t leave a residue so it was good for cleaning paint work before painting. On that deck, the nonskid was silica sand scattered (broadcast) over wet paint and let to dry. Then the excess nonskid was vacuumed up and a top coat was applied. As I watched him scrub, he explained to me that with this method you can’t sand to any effect when you go to prep for a fresh coat of paint, so you must clean well!
Today, several different kinds of nonskid are available, including ready-made and mixed varieties, thick paints that dry rough, and various different sands that you can either stir into the paint before application or apply using the broadcast method while the painted coat is still wet. When using the broadcast method, or if you are adding nonskid particles to the paint pot yourself, you have a few options not only for the particle material but also its size.
The pre-mixed, ready-made, nonskid paints are often available in professional industrial-grade, two-part systems consisting of resin that you mix with a catalyst when you are ready to paint. There are also easier-to-handle single-part systems. The benefits of these premixed products are twofold: first, they create less mess, and, second, you don’t have to apply a top coat after application. If there is a downside, I would say the industrial stuff is expensive and the single-part versions tend to be light on concentration of nonskid particles.
Photos by Peter Marshall
Major paint manufacturers offer fine, uniform-grain sand additives to create nonskid paint of virtually any color.
A fairly new development in the world of nonskid is paint formulated to be thick. This type tends to be a water-based acrylic that goes down thick and is then hit with a textured roller to create an aggressive nonskid surface. Although simple to use, they dry very fast; one should plan accordingly. I found out the hard way to be very careful not to use, or spill, harsh chemicals such as gasoline or acetone on these surfaces; these chemicals will “melt” or dissolve the acrylic coating. Acrylics don’t cure like alkyds or epoxies; they get hard once the solvent is gone, but reintroducing the solvent makes them liquid again, the way shellac handles. If you want a version of this but need it to be more robust, try a two-part epoxy or epoxy paint, then add silica adhesive thickener to it until it is really thick—almost like cookie dough. Then spread it on and use a textured roller to achieve the desired surface. Years ago, I worked in the movie industry, and this was a method the painters used for giving texture to movie-set pieces.
Proven by decades of trial and error, the old method of broadcasting grit into wet paint is a workhorse of nonskid applications. You get a lot of flexibility using this method because you can choose not only the type of nonskid particles but also their size and concentration. Some examples of materials are walnut shells, aluminum oxide sand, silica sand, and rubber sand. This flexibility allows you to have more aggressive nonskid in areas such as the foredeck around the anchor windlass or the cockpit sole, and less aggressive texture in areas such as the cabintop or a place you might sit.
Photo by Peter Marshall
Rubber particles offer a softer surface than sand does.
Start by laying a coat of your deck color in the area you want the nonskid to be, then either put your particles in a shaker and shake them over the wet paint or simply toss or cast them onto the wet paint. Start light. You can always add more if you don’t think it looks even or aggressive enough. Let the paint dry. Then get a broom or vacuum and clean up any loose particles. After that, put down another coat of deck color. When you need to refresh the paint, scrub and clean it well with a soap that does not leave a residue (such as TSP), and recoat. When the nonskid starts to fill in with paint, grind it off and do it again.
All nonskid is difficult to clean and keep clean, so my philosophy is to use it only where you need it. Keep the nonskid out from under cleat horns, for example, because it can chafe lines. A nice way of laying out the different zones of nonskid on your boat is to use masking tape and create waterways (smooth areas of paint without nonskid) around deck fittings, cabin sides, coamings, and toerails. If you are having trouble visualizing this, go check out any fiberglass boat and you will see areas where the molded nonskid is and is not. Deciding on the width of the waterways is artist’s choice, and it depends on the size of the boat and size of the area to be painted. A 2″-wide waterway on a small daysailer might look silly and wide, but on a 75′ yacht it might be just right. Use your eye as your guide, but don’t sacrifice safety for beauty.
Photos by Peter marshall
Step 1: Nonskid application begins with a cleaning or sanding of the surface to be painted, and then careful masking around hardware and deck furniture. Step 2: Detailing the masking tape with radiused corners, marked with the gauge shown in Step 1, is important for a refined appearance. Step 3: The paint is applied to the masked-off area. Step 4a: The nonskid medium is then broadcast by one of several means. Here, a modified Ball jar does the job.
Waterways look best to me when they terminate in a radius. This is more forgiving to the eye and allows your dimensions to require less precision. To get those radii consistent, I like to make a radius gauge block out of 1⁄4″ doorskin. Generally, I make two blocks, each about 2″ square, one with different outside radii on each corner and one with different inside radii on each corner. You make whatever fits your project. A nickel or a quarter works well for drawing the radii. Using a Forstner bit or a paddle bit in a drill press can help you make the inside radii on your gauge block perfect. To do this, draw your gauge on an oversized piece of pattern stock, then at each corner drill an appropriate-sized hole. With the holes drilled, cut the block to the finished size. This is a lot easier than trying to get a drill bit to drill half on the plywood and half off.
Photos by Peter Marshall
Step 4b: Particles may also simply be broadcast by hand. Step 5: Excess nonskid is vacuumed from the surface after the paint has dried. Step 6: A second coat of paint covers the particles and completes the job. The nonskid surface, with masking removed. Maintenance coats should be applied sparingly, in order to retain the effectiveness of the nonskid. Surface preparation should be an aggressive scrub with trisodium phosphate—unless one wishes to sand it all off and start over.
With a fresh coat of varnish, the chart holder hangs from the overhead. To get it to this point, I had to gather things from everywhere in the shop. I used a measuring tape, a combination square, the table saw, a table-saw sled, a stop block, a clamp, the dust collector, the bandsaw, the drill press and its hold-down, a plug cutter, the belt sander, a random-orbit sander, the compressor and nail gun, a cordless drill, a 1/4″ bit, Titebond III, a flock of drafting ducks, superglue and accelerator, a disposable bristle brush, nitrile gloves, my painting apron, a foam brush, lacquer thinner, a piece of a T-shirt for a rag, scissors, a paper cup, sandpaper, a foam pad over the table saw, a sanding block, a scraper, a chisel, a hot knife, the shop vac, a length of wire, and wire cutters.
When I read David Cockey’s article about chart holders, I knew I needed to make one for myself because I use paper charts exclusively—they can indeed be awkward to handle—and I also enjoy woodworking projects. Unfortunately, spending time in my shop can be a mixed blessing. The tools and supplies I’ve accumulated since I began building boats in 1978 have overwhelmed the one-car-garage workshop they now occupy.
While there is a place for everything in my shop, there just isn’t enough space. The stocks of wood and metal I have leaning up against the walls and the tools piled on shelves are as unstable as mountain talus slopes. “Debris piles up to a characteristic angle of repose,” notes Encyclopedia Britannica, and “when new debris is added to the slope, thereby locally increasing the angle, the slope adjusts by movement of the debris to reestablish the angle.” It’s not uncommon while I’m working at the bench to hear something fall on the opposite side of the shop: an angle grinder, for example, sitting on a shelf 10′ away from me, spontaneously rolled off, dropped onto a box of soldering equipment sticking out from the shelf below it, and took it to the floor with itself, breaking one of the firebricks that was in the box.
When my house was built in 1926 the car parked in this garage probably had wheels with wooden spokes. When I built my Caledonia yawl here, there was only room for the boat. All of the tools occupied the adjoining basement. Other boats occupied either the basement or the back yard.
More often, when I drop things I can’t find them (especially if they’re smaller than a half-dollar). The floor is speckled with drips and trails of paint, amber-like globules of epoxy, and wayward screws, nails, and staples. The Jackson Pollock–like pattern is as good at hiding dropped hardware and drill bits as Mossy Oak camo clothing is at concealing hunters. The back third of my workbench is devoted to storage for knives, tape, pencils, drill bits—and the rest of it (along with the table saw and jointer) can get so cluttered during a project that when I put a hammer down and turn my back it’s as good as gone.
The garage was built with an extension on one side. It’s now occupied by a mix of woodworking and metalworking equipment.
Working in my shop is a bit like delving into the I Spy books I enjoyed with my kids when they were very young. On each page of the books is a photograph of dozens of miscellaneous scattered objects with a rhyme that names items to find: “I spy a lion and eight other cats, a shell from the ocean, a fish who wears hats.” In my shop it’s: “I’ve misplaced my chuck key, a stainless-steel screw, two ball-peen hammers, and the cap for the glue.” There’s a satisfaction in finding things, but nothing in an I Spy book is burdened with the annoyance of having lost the hidden objects in the first place.
I’ve worked in tidy woodworking shops, so I know such places exist. I’ve had woodworking jobs in two Smithsonian Institution museums making displays and at Seattle’s Dusty Strings building hammered dulcimers. The floors in those shops were always swept clean, and every tool and every unused clamp was put back where it belonged after use so others would be able to lay hands on them. I don’t know why it has to be so different in my own shop. I like to think that more space would make a difference, but the shop once occupied most of my home’s basement and it was every bit as cluttered.
Now that my kids are on their own, I plan to move to a smaller home that has a big, detached garage where I can spread out. I can imagine having all my tools and supplies as neatly arranged as they would be in a Smithsonian workshop. I might set it up that way, but I worry that Shakespeare is right that “what’s past is prologue.” A character flaw would seem to be at the root of my disarray, but I finished the chart holder losing only a cabinet scraper (and not my temper) and I think it came out okay.
For fans of the I Spy books, here are lists (with my apologies, not set to rhyme) of items in the photographs here (click on the photos for a larger, sharper view). All of the objects included appeared in articles in Small Boats Magazine and are linked to them.
Envision a frustrated prehistoric man gazing beyond the crashing surf to schools of fish erupting on the surface, well out of reach: “If only I could get to them.” Every surf-casting fisherman can relate. Skiffs provide the shore-bound fisherman a new universe of opportunity, but those who launch directly from the beach when favorable conditions allow, must hope surf conditions don’t worsen before it’s time to return to land. Every continent has a stretch of turbulent coastline on the receiving end of an ocean reach spanning thousands of miles. Much of North America’s Pacific coastline fits this bill with exposed shorelines and frequent big swells.
For the early Euro-American pioneers of Oregon’s north coast, the Pacific swell was certainly a few notches more dangerous than the inshore waters of New England, where many dory designs evolved. Unlike the countless bays, estuaries, and sheltered harbors of New England, this stretch of the coastline offered no safe passages to the ocean. Pacific City, a hamlet on this stretch of the Oregon coast, was built near the mouth of the Nestucca—a coastal river with a nightmarish bar. As a result, fishermen had to choose the beach as the port of entry for their modest fleet.
Local builders started with the classic double-ender surf-dory designs of New England, but soon made longer and beamier versions for more stability among the larger swells. By the 1950s, motorwells were common in double-enders, and by the ’70s square-sterned powered semi-dories took over. Abundant old-growth Douglas-fir provided premium framing lumber, and the golden age of AA marine-grade fir plywood offered outstanding planking. Builders abounded in western Oregon, where the Pacific City Dory probably held the title as the most abundant plywood-on-frame working skiff in America. These boats were simple to build and had a length of 20′ to 22′, a beam of 7.5′ to 8′ carried well forward, a 5′- to 6′-wide flat bottom, a transom raked at 12 degrees, and sides angled of at least 25 degrees.
Sandy Weedman, (pcphotolady.webs.com)
With a flat bottom that’s 5′ wide for much of its length, the Hunky Dory is quick to get on plane even at low speeds. For the author’s boat, equipped with a 90-hp outboard, the top speed is 34 knots.
A beach-launched skiff should have a flat bottom and a wide, proud bow, with rocker to rise over waves, not bury into them. The framing must be strong enough to withstand the head-on wave impacts and the stinging slams as the boat falls into the troughs at the back of a wave. Returning to shore, a high transom and splash well fend off following waves while the upturned bottom at the bow resists the bow steering that can lead to a broach. Landing can be more technical than launching. The skipper needs to feather the throttle to stay in the trough between wave crests and then, at just the right moment, accelerate over the collapsing wave and onto the sand, far enough to avoid being sucked back into the break.
Sandy Weedman (pcphotolady.webs.com)
With careful attention to the throttle, the Hunky Dory can match speed with the waves and approach the beach on the back of a collapsing wave.
The Glen-L 22′10″ Hunky Dory (and 18′3″ Little Hunk) are the only readily available sets of plans with true Pacific City Dory DNA—not only in their proportions, but in the finer details of framing. While many Glen-L designs may well be original, many are riffs on older, established designs, as Glen L. Witt often converted known hull shapes to a more approachable plywood-on-frame construction for the home builder. We do not know what specific Oregon dory or builder he pulled lines from, but his Hunky Dory and Little Hunk carry the likeness of many 50-plus-year-old, locally designed and built dories that still launch and land on the Pacific City beach. His Glen-L semi-dories include very strong framing with heavily gusseted frame joints with numerous 1×3 inner bottom battens. The battens are not let into the frames so bilgewater can flow freely through the gaps.
The broad appeal of this design is likely its versatility and simplicity of build, not its surf origins. Its beam-forward design and wide, flat bottom make it a very stable platform as a fishing or dive boat. While the semi-dory is a proven seaworthy craft with a large load capacity, its flat bottom and reserve buoyancy make it a capable shallow-water vessel.
Sandy Weedman (pcphotolady.webs.com)
With its broad flat bottom, the Hunky Dory can slide over thin water—even as the outboard is kicking up—before coming to a stop on the sand. Note how well the spray rail turns the water away.
In 2019, I purchased plans for the Hunky Dory and salvaged some old Douglas-fir lumber, including four sheets of 1970s-era AA Douglas-fir factory-scarfed 20′ plywood. The package from Glen-L came with a set of study plans, a build guide, and full-sized patterns for the frames, transom, stem, and breasthook. The patterns have copious annotations and identify the cuts in the frames for the sheer clamps and chines on each frame station. The patterns also clearly show the elevation of each frame on the jig needed to produce the straight bottom aft and the upward curved bottom forward. The build jig, typical of Glen-L designs, is a double beam that works well to stabilize the awkward heft of the transom and 12 frames, making subsequent adjustments and alignments much easier. The spacing between these elements can be adjusted proportionately to lengthen or shorten the dory up to 3′. Once the frames, transom, and stem are fabricated and mounted on the jig, the rest of the build is an intuitive process of marking, cutting, and fastening longitudinals. While I had some 20’ sheets of plywood to work with, the drawings detail butt joints with 8″-wide butt blocks or scarfed joints.
The plans offer alternatives for a motorwell or transom-mounted outboard, although they don’t provide details on a splash well for the transom version. Spray rails are shown in the drawings, but their shape and placement are left up to the builder. I set mine at a roughly 8-degree angle from horizontal down from the bow to the stern and applied curved fillets on the undersides to turn the water away from the hull. The interior is similarly left to the imagination of the builder, which is typical of many similar open boats. I opted for a plywood stand-up center console with a raised cooler as a leaning post. An optional set of plans detail five different cabins that can be added during construction or retrofitted later.
While some may gravitate to the motorwell option, the transom option is a more efficient planing surface, is just as safe with a good splash well, and provides more cockpit space for fishing. All contemporary Pacific City Dory builders have opted not to build the motorwell.
In a departure from the Pacific City style, Glen-L added four 1×3 battens to the outside of the bottom. They are an absolute no-go for beach landing because they violently grab the sand, so I installed them on the inside of the bottom to keep the strength they provide, while leaving the bottom smooth. Instead of the single layer of 1/2″ plywood specified for the bottom, I used two layers of 3/8″.
Rachel Bruce
The plans call for battens on the outside of the bottom, but for landings on a smooth sandy beach, they would only dig in and stop the boat before it could slide well up the flats. With the boat safe from the waves, it can be picked up by a trailer with a tilting bed and a strong winch.
To resist cracking from hard bottom hits, I reinforced the bottom piece of each frame with plywood cheeks or gussets, epoxied and nailed on either side. Due to the forces involved in surf launching and landing, I wanted to increase the strength of the transom and added two large transom knees on the bottom and quarter knees on the sides.
Although most Pacific City dories have an arrow-straight sheer aft of the upswept bow, I grew up in New England, and my idea of a sheerline is a sweeping curve. Whether a lobsterboat, dory, sloop, or a simple skiff, a nice curve from bow to stern was essential, so I gave my Hunky Dory just enough sheer to please my eye. Because the sides in that area are straight and set at a 30-degree angle, lowering the middle of the straight sheer to achieve the curve I liked also decreased the beam slightly, giving the boat a very subtle hourglass shape when sighted along the sheerline.
I started this build in December 2019, worked at a fairly fast clip, and finished by June of 2020 having logged about 375 hours. When the hull was complete, I turned my attention to the motor and trailer. Despite Evinrude closing its doors that year, the company’s E-tec 90-hp was a perfect choice with responsive two-stroke power for the surf zone and excellent fuel efficiency. I had an E-tec dealer install the motor. I salvaged a tilt-trailer from a junked dory and after some modifications to fit the dory, I was ready for a late-summer launch.
To say that launching and landing the Hunky Dory in the surf requires a steep learning curve would be an understatement. Over the course of the first couple of seasons, I gained experience and appreciation for the Hunky Dory’s seaworthiness. I was amazed how the boat ate 6′ curling waves on launch, often without even a splash of water over the bow, and thrived out in the open ocean in big rolling swells.
The boat jumps to a plane almost instantly and stays on plane even running as slow as 5 to 8 knots (some might say this relatively light hull with a large flat bottom is always on plane). It did require some trimming by moving the batteries from the stern to the center console; keeping crab traps and extra gas tanks forward also helps. The dory surprised me by how it carved turns and resisted skidding, an effect, perhaps, of the crisp, straight chines.
The dory’s wide, flat bottom helped make the E-tec exceptionally fuel efficient. On a 90-plus-mile round trip to albacore fishing grounds, the engine only drank about 17.5 gallons. All flat-bottomed boats pound in certain conditions, so for folks who want to spend lots of time running above 20 knots in rough, choppy seas, the Hunky Dory is probably not the right boat for them. But at around 15 to 17 knots this skiff moves comfortably in moderate seas, and in flat seas it can easily reach 34 knots at wide-open throttle.
Although launching often appears more dramatic, landing amidst larger swells is what gives most dory skippers the cold sweats. While running this dory downwind in a larger swell out at sea, I find its wide, flat bottom acts a bit like a surfboard, easily slipping down waves ahead of the danger zone at the wave crest. In the surf zone, I stay well away from following waves. What the Hunky Dory does so well, with enough power applied, is accelerate swiftly on command when the leading wave crumbles. Ideally, it glides in on a carpet of bubbling foam to a casual slide on the sand. I sometimes time it wrong, and land with a stinging slam on the leading edge of the wave, but the boat handles it with ease.
Two design features I have learned to appreciate are the 30-degree angle of the sides and the spray rails. Compared to other dories with sides several degrees closer to vertical, the Hunky Dory has ample flare at the bow to provide an extraordinarily dry ride in nasty conditions. The sides also have much finer, more pleasing lines than the bathtub-like 20-degree hulls. The spray rails keep the spray low and less likely to be picked up by wind; they also added significant rigidity to the plywood sides’ spans between frames.
The Hunky Dory is a versatile design, although it is in some ways too much boat for many inland waters and has too much flat bottom surface area to be practical for moving at speed in waters known for chop. However, this tough, stable boat delivers you through the surf to productive fishing resources in a big ocean. For that alone, it’s a magical thing.
John Goodell is a wildlife biologist and museum professional, currently serving as the Executive Director of The Archives of Falconry, in Boise, Idaho. He grew up in New England, and during stints in the carpentry trades he developed an interest in traditional dory and skiff designs in regional settings. He somewhat regrets choosing terrestrial professions in place of a life on the water. Before this project, he built a Chestnut Prospector strip canoe, and assisted in a Lumberyard Skiff build.
We were looking for a stable platform for fishing our local southern California waters with ample range to motor across the border to try our luck in Mexican waters. We also wanted to share our father-and-son adventures with others, so we needed a boat with the capacity to accommodate up to four fishermen.
Our web search of designs led us to the Glen-L La Paz 22. We were drawn to its spacious self-bailing open cockpit, seaworthy deep-V hull, and the range its 100-gallon fuel capacity would provide. The La Paz was designed as a trailerable center-console sportfisherman by Ken Hankinson—Glen L. Witt’s friend and partner at Glen-L.
The plans give options for building in either aluminum or plywood as well as changing the station spacing to build a 20′ or a 24′ version. We chose plywood, as we both (dad Mark, son Ryan) have a background in woodworking, epoxy, and fiberglass. And some 30 years ago Mark had built a Glen-L Hunky Dory.
We purchased study plans, decided to go forward with the project, and then purchased the plans and full-sized patterns for plywood construction along with Witt’s book Boatbuilding with Plywood. The plans give a wealth of information about the construction schedule, frame layout, and all the key elements of the build. Paying close attention to the detailed plans and patterns, especially before we cut any materials, saved us time and money.
Photographs by Dennis Eaton
The chine flats and lifting strakes are applied to the outside of the ‘glassed plywood hull and are meant to provide lift and reduce friction.
No lofting is required, so the La Paz construction—in any of the three lengths described in the plans—starts with building the seven frames, the transom, stem, and breasthook. The full-sized, half patterns for the frames and transom are transferred with carbon paper to a 4′x8′ sheet of cheap plywood that will serve as a table for assembling the frame and transom parts. Each frame consists of four individual pieces of solid wood gusseted together with 3/8″ marine-grade plywood and epoxy. The plans recommend vertical-grain Douglas-fir, Alaskan cedar, Southern pine, and Philippine, Honduras, and African mahogany. We made the frames with sapele; the plans give options for either 4/4 or 5/4 stock, and we chose 4/4 due to its availability.
The transom is drawn with options for configurations to suit a single outboard, twin outboards, or an inboard/outboard. It is made of two laminations of 3/4″ plywood with mahogany frame members. We added an additional lamination of 3/8″ plywood for extra strength and rigidity.
There are full-sized patterns for the stem and breasthook. The stem is made of three layers of 3/4″ marine-grade plywood; the breasthook has two layers.
The frames, transom, stem, and breasthook are all secured on a building jig made of 2×6 timbers anchored firmly, square, and level to the shop floor or ground. The frames are set square across the jig’s centerline and anchored to it with cross spalls secured to the frames at the design waterline (DWL). The keel, bottom battens, chine logs, and sheer clamps are bent in place without steaming, then secured with epoxy and bronze screws. The longitudinals are fastened with silicon-bronze screws and epoxied in place. The chine log, sheer clamp, and bottom battens are all beveled to provide a fair, flat mating surface for plywood planking. We used a grinder with coarse 80-grit paper to remove the bulk of the material, then finished with a block plane.
The plans include options for powering the La Paz with an inboard/outboard, twin outboards, or, as shown here, a single outboard. The actuators of the trim tabs that were added are visible here.
The plans do not include templates for planking, and Boatbuilding with Plywood recommends bending oversized plywood panels around the frame and tracing their outlines. We chose to first make cardboard templates to minimize waste. The 3/8″ side planking goes on first. Plans note the options for scarfing 8′ sheets to make full-length panels to apply in one operation or using butt joints to fasten the 8′ lengths of plywood one after another one the building form, joining them with butt joints. The butt joints are backed with 3/8″ plywood plates that span between chine log and sheer clamp and get epoxied and screwed in place. We opted for the latter for ease of installation.
Once the side planks are in place and their edges beveled flush with the chine logs, the bottom planking is installed, with sections butt joined. The aft section can be planked with 1/2″ plywood; the forward section is laminated with two 1/4″ sheets of plywood in order to accommodate the bend and twist in the bow area. Wet towels applied and left overnight made the plywood easier to bend.
While the plans call for sheathing the hull with one layer of 7.5-oz fiberglass cloth, we chose to use two layers for added durability. All corners and joints have doubled layers of fiberglass cloth. After the ’glassing process and final sanding, chine flats and lift strakes are installed and ’glassed in place. Once faired, the boat is ready for paint.The plans give dimensions for cockpit layout with center console, hatches, and an elevated casting deck forward, but this was one area where we deviated from the plans. We extended the fore anchor locker, and built an insulated fishhold under the raised casting platform. We also chose to foam-fill the entire hull under the sole for noise dampening? and safety, built a taller center console than plans detail with a centered helm, and purchased a leaning-post that provides a higher vantage point and, unlike a seat, lets the skipper’s legs absorb some of the shock when powering through chop. Like the designed console, ours has a seat built into its forward end, hinged to provide access to storage space. Our dual batteries and wiring panel are housed inside the console.
We purchased a T-top for some relief from the Southern California sun. It’s equipped with rod holders to supplement those attached to the seat and recessed in the side decks.
The La Paz was designed with a center console that could accommodate two on the helm side and two forward. The T-top was installed by the builder over his modified console to provide relief from southern California sunshine.
The cockpit sole is elevated above the waterline and self-drains aft through fittings in the transom. The 100-gallon fuel tank, made of aluminum by a metal fabricator, sits between frames under the sole and console. It keeps the weight amidships so the hull is nimble in rough water and trims properly whether the tank is full or empty.
The La Paz’s 8′6″ beam, lift strakes, and chine flats ensure a stable ride with superb handling. In moderate conditions the ride is dry if the wind isn’t picking up the spray and sending it on board. We installed electric trim tabs to keep the bow down in adverse conditions. The boat handles 3′ to 4′ seas well; the full-length deep-V hull softens pounding, but add wind and you’ll be slowing down to stay dry.
With a 135-hp outboard at wide-open throttle, the La Paz can hit 35 mph. It can accommodate an even more powerful motor. The 100-gallon fuel tank built into the hull under the console provides a respectable cruising range.
We powered the boat with a Honda BF135, which quickly gets it on plane and to a top speed of 35 miles per hour. If we were to do it again, power would be upgraded to 150 horsepower. Glen-L notes estimated speeds for motors ranging from 80 to 225 BHP (brake horsepower, measured at the motor without the losses created by a drive train), noting “the higher figure should not necessarily be considered the maximum rating.” The fuel consumption is economical, averaging around 3 to 4 miles per gallon. Given the 100-gallon fuel capacity, we have more than ample range for southern California fishing.
Our 24′ La Paz sits on a trailer we had custom-made. It weighs roughly 4,000 lbs fully loaded and trailers like a dream. At the launch ramp it can be handled by one person, but usually needs to be walked off and on with the trailer close to the dock. Two pairs of hands are best for a quick launch.
The La Paz has been a wonderful boat, and we are looking forward to many years of good times on it. It has fulfilled our expectations for a safe, stable, and economical center-console sportfisherman. We would highly recommend this design to anyone who has the time, space, and motivation to embark on such a boatbuilding project. Building it took us the better part of 18 months and was no easy feat to complete; there were times during the build that both of us doubted our ability to finish this project, but with a little fortitude and persistence, things fell into place. All in all, it has been the most rewarding project that either of us has worked on to date. The boat, with its classic lines, draws attention from most all who see it since it is definitely not your typical production center-console. While offshore fishing is our main objective for this boat, it will be just as at home on any smaller body of water.
Mark McDaniel is a recently retired airline pilot, and his son Ryan is a first-year middle-school teacher. They both have an affinity for all things saltwater and have long enjoyed woodworking.
La Paz 22 Particulars
[table]
Length/22′1” with options for 20′ and 24′
Waterline length/18′8″
Beam/8′6″
Hull draft/1′3”
Hull depth, maximum/4′7″
Displacement/3,800 lbs
Fuel capacity/100 gallons
[/table]
Plans for the plywood La Paz 22 are available from Glen-L for $284. Study plans cost $15.
Is there a boat you’d like to know more about? Have you built one that you think other Small Boats Magazine readers would enjoy? Please email us!
Our 19′ wood-and-canvas freight canoe, a derelict whale of a boat I’d restored, is a bit of a pig for long-distance paddling, but Tina and I stay mindful of the weather, eat well, work a little, and take the time to enjoy the beauty and quiet around us. And happily tuckered out after a full day outdoors, we sleep well, too. Early in September of 2021, our longtime friends Richard and Jessica Johnson, with their nimble kayaks, joined us for five days of paddling on Umbagog Lake, which straddles the border between Maine and New Hampshire and is the southernmost lake in Rangeley Lakes chain.
We left the low, muddy launch site at the south end of the lake at about 2 p.m. and paddled northwest toward the north end of Big Island and one of the three dozen campsites maintained by Umbagog Lake State Park. Our 19′ canoe has a transom to take an outboard motor, but the gently rockered stern makes it possible to move right along when paddling if we put some muscle into it. There was an easy southwest breeze at the outset, but after the half-mile crossing of Sargent Cove and leaving the lee, whitecaps surged around us. We still had 2 miles to paddle into Thurston Cove, now into a headwind.
Roger Siebert
.
Richard, in his yellow kayak, was out ahead scouting the shoreline for our campsite while Jessica kept us in view; we were trailing nearly 1/4 mile behind. The forecast was for a cold front to pass through in the afternoon and, right on cue, the sky turned as gray as a hornet’s nest, the temperature dropped, and the wind freshened. In the bow, Tina quickened her strokes to maintain headway and I switched to working my draw stroke hard on the starboard side to counteract the rollers and keep the big boat on course while quartering into the waves. When I paused to throw on my raincoat, the canoe spun quickly, the high freeboard acting as a sail. Putting our backs into it, we drew even with the northwest point of Big Island, where tall pines and spruce swayed in the gloom as the wind intensified, driving the slanting rain. To the east, Jessica, with Richard’s help, hauled her boat up the wet, black-rock shore of the campsite. Tina and I paddled farther windward before swinging downwind to ride the waves to the landing where Richard and Jess were waiting to catch our bow.
Tina and I slid over the gunwales into knee-high water and held the boat off the gravelly beach as the waves splashed against our legs, soaking our shorts. Tina pulled the Johnsons’ tent from under the canoe deck and chucked it up to them. We covered the canoe’s remaining cargo with a tarp as the rain angled across the wind and streamed across the tarp.
The canoe was side-to the rock-bound shore but was too heavy to lift. I hurled the 10-lb mushroom anchor offshore and secured the stern to its rode while Tina kept the bow off the rocks and held down the tarp. Richard and Jess got their four-man tent secured to its poles while the loose rainfly snapped like a whip. The gusting wind kept Tina and me focused on the canoe—our little anchor doesn’t hold well in a blow.
Tina DeVries
After landing at the campsite on Big Island, I tended to the canoe in the wind, trying to hold down the tarp to keep the firewood dry. It would take all four of us to carry the canoe to shore. This rock-strewn shore was no place to drag a heavy canvas-covered canoe.
With one tent up and the squall slackening, we offloaded the canoe, stashing open crates and totes in the tent and stacking dry bags and firewood nearby. Then, the four of us carried the freighter out of the water and set its canvas-covered hull on life jackets and seat cushions safely above the exposed rocks on shore.
Tina and I set up our two-man tent while Richard and Jess carried the gear stowed in their boats to their tent. The rain let up. They found the food bags and set out cheese and crackers. We heard the tinkling of ice in our camp mugs as they mixed drinks for happy hour. Soon, I had steak tips searing on the folding charcoal grill while the peppers and onions caramelized on the propane-fired griddle and quinoa and mushrooms simmered on the stove.
By early twilight the sky had cleared, and the evening cooled into a starlit night. I bundled up in warm pants and wool hat before we lazed in camp chairs, staring at the blue flames and orange coals of the dying fire. A loon’s song echoed around the lake.
Richard Johnson
After our first night at camp, we woke to a bright sun and a radiant blue sky. The exposed gray bedrock on the north end of Big Island is a common sight all around the lake.
In the morning, we fired up the camp stoves for French press coffee and oatmeal. After breakfast, Richard and Jessica tended to some leaky seams on their tent fly. Richard fashioned temporary drip rings for their paddles from twine and electrical tape to stand in for the originals, which he had forgotten to replace after varnishing the paddles. Jess sketched with colored pencils in her notebook while Tina rambled around the north end of Big Island and came back with news of dessert-plate-sized moose prints in the soft mud just 30 yards from our tent site.
We broke camp, then used the hand pump to empty the canoe of rainwater before the four of us lifted it back into the water and loaded it with firewood, coolers, backpacks, tents, kitchen supplies, fishing gear, spare paddles, water jug, and food bags.
Tina DeVries
Richard and Tom held the canoe off the rocks while waiting to load up for our excursion to Sunday Cove. The water was sweet-smelling and bracingly cold.
Tina and I got aboard and pulled away from Big Island, heading off for our day’s paddle to a campsite about 7 miles away at the northeastern end of the lake. Since our canoe was the slow boat, we got a head start while Richard and Jess finished stowing their gear and launched. They quickly caught up to us and paddled off along the shore, Jess with binoculars around her neck and Richard with a map under the bungees on his foredeck. We would meet for lunch at Molls Rock on the western shore. A west-southwest breeze gave us easy downwind paddling. The map showed a northeast heading to Metallak Island and then a jag north to make Molls Rock.
Richard Johnson
After an 11 a.m. start, Tina and I headed northeast from Big Island, paddling toward Metallak Island. The lake has a “bathtub ring” all around its perimeter because the water level was 4′ below normal.
By noon Tina and I were short-sleeved in the sunshine, and we found the paddling rhythmic and easy. Five loons floating nearby made mournful wavering calls, then dove out of sight. The wide-open lake basin stretched out along the evergreen hills dappled yellow and red with early touches of fall. The northern White Mountains rose to the south behind us, gray silhouettes beneath a bright sky. A blue heron stalked the shallows, fishing. I was fishing, too, trolling a small silver minnow lure. The pole bent and I quit paddling to set the hook and reel the line in. Tina netted the yellow perch as it rose to the surface by the canoe. Jessica was planning a chowder for our last night’s dinner, and we would add the fish to the pot.
We poked into Black Island Cove and made an easy landing on a soft, sandy beach on the north side. Wading in the ankle-deep water we saw hundreds of silver-dollar-sized freshwater clams and the curlicue grooves they trailed. After a stretch and a stroll, we boarded the boats again and continued, paddling around and between jutting boulders and exposed rock piles along the lake’s west side. We passed a few fishermen, their powerboats drifting with the wind in the shallows alongshore. Then, up ahead, we made out the prominent point of Molls Rock. Richard and Jess were already there and directed us to an easy landing on the bare-rock shelf at the water’s edge. To reach the top of Molls Rock, we walked up a worn granite incline. Clumps of green grass and a stunted spruce clung to the cracks and duff fringing the bare gray dome where names and initials had been carved into its knobbly top. The vista from 15′-high prominence swept from Tyler Point on our right up to Pine Point to the northeast. Beyond Pine Point and across the lake rose Johnson and Moose mountains.
To the northwest, the Magalloway River empties into Umbagog at the lake’s outlet and meets the Androscoggin River. The Floating Islands Bog lies between the rivers but as we left Molls Rock and headed north, we found the lake level too low to permit even the kayaks from progressing very far westward. Tina and I held back in the big canoe and skimmed over the clear shallows through lilies that twined around our paddle shafts. The muddy lakebed was close beneath us, but only rarely did we touch bottom with our paddles.
After traveling more than a mile north we turned east for the 2-mile run to our next campsite at the entrance of Sunday Cove. As we passed Pine Point, the afternoon wind picked up out of the west. In weed-free water now, I set to trolling again. The sky was nearly clear and bright blue as we rode downwind on the rising waves toward the 1/3-mile-wide mouth of the Rapid River. Richard and Jess paddled ahead along the shore to scout for the campsite. Tina and I saw only uninviting gravel and boulder landings and stayed a 1/4 mile offshore. Umbagog spans 8 miles from north to south and has an average depth of just 10′; it is deepest at the north end where it reaches down 50′ in spots. The west wind was blowing briskly across the 2 miles of open water behind us, and whitecapped waves swelled as the breeze freshened. As we waited for a sign from Richard, Tina and I labored to keep the bulky canoe on course and away from the lee shore.
In the distance we saw Richard land on the south side of the point at the entrance to Sunday Cove and manhandle his loaded kayak out of the water and up the rock-bound landing. He walked the shore of the peninsula looking for a better landing spot for the rest of us. Finding none, Richard waved Jess in and waded out to steady her kayak as she disembarked while it was still afloat. We then followed to the landing—a cove behind a wave-rounded natural breakwater, no larger than a compact-car-sized parking space. Paddling hard, broadside to the wind, we poked the bow of the canoe into the calm water just behind the rocks, letting the canoe swing slowly into shore where Jessica and Richard caught us. We managed our exit in thigh-deep water with wobbly rocks underfoot. Jess held the bow and Tina the stern as Richard and I offloaded the boat, tossing the firewood we carried high up the granite slope.
Tina DeVries
The canoe was cushioned atop the rocks at the head of Sunday Cove. This view is due west toward the middle of Umbagog Lake.
The wind was lively, and the canoe bobbed in its tiny harbor. Jessica strained to keep the canoe off the rocks and was a little dumbfounded when she saw Tina reeling in the trolling rod. I had forgotten about the rod while controlling the boat and hadn’t brought in the lure before approaching the landing. At the end of the line was a fist-sized, mossy-green bass on the hook: more fish for the chowder! After steadying the rocking canoe, the four of us humped the canvas-skinned canoe up the rocky slope and onto the life jackets and seat cushions. There was a little yellow paint from Richard’s kayak streaked on the rock along the path he had taken.
The campsite was crowded with crooked white cedar and arrow-straight spruce, white pines with trunks as thick as whisky barrels, balsam firs as symmetrical as Christmas trees, and a hemlock with branches like inverted umbrella ribs. Red maples blocked the sky with their thick crowns of leaves, and white birch were charcoal black where horizontal strips of paper-white bark had curled back. The air had a spicy smell of cedar with a pungent turpentine whiff of pine. At the head of the cove to our south, the mixed forest and shrubs gave way to a small, open beach and shallow water.
In the morning the woods were suffused with a thick fog. Tina had gotten up early and was perched on the rocks peering through the murk toward the lake. As the sun rose, the fog burned off and, under an azure sky, all four of us boarded the canoe to paddle into Sunday Cove and search for the Carry Road. If we could find it, a 3-mile walk would take us to Forest Lodge where author Louise Dickinson Rich and her family lived in the 1930s, chronicled in We Took to the Woods. Paddling into the shallow head of the cove, we wallowed in sandal-sucking muck and carried the canoe, carefully hop-scotching rocks, to a berth on the boat cushions. A stream we could have crossed in a single stride trickled through the loose rocks and under a derelict timber-and-steel bridge overgrown with brush. We wove through tangled woods, around blowdowns and through tight stands of saplings. We found rusted remnants of metal buckets and heavy wire, but nothing that looked like a road much less a footpath. Before getting in too deep, we headed back to the lake and searched along the shoreline. With no sign of a trail there either, we returned to the canoe. I paddled while Tina and Jess settled between the thwarts and Richard stood in the bow, pointing the way through the maze of rocks in the shallows. As we paddled out of Sunday Cove, we considered turning south into the mouth of the Rapid River to look for the path, but the low water discouraged us from that, and we headed back to camp.
Tina trolled on the way out of the cove. The lake holds large brook trout and landlocked salmon, and I daydreamed about splitting a cedar log and grilling planked salmon for dinner. Tina got a strike and we stopped paddling while she played the fish. In a minute or two, she had it alongside the canoe and its silvery sides flashed just beneath the surface of the olive-green lake water. I hadn’t put the landing net aboard—this was to be a hiking trip—and when the not-too-tired fish came alongside the canoe, I tried to hoist it aboard by grabbing the line, but it shook itself free and swam away.
We spent the rest of the day relaxing in camp amidst the trees. Jessica and Tina strolled on the beach while Richard and I played cribbage. Tina lazed in her hammock; Jessica sketched; we swam. Later that afternoon, three otters came bobbing into our little bay. Loons warbled across the water to the south. A shrike, easily identified by its Zorro-like black mask, flitted through the tree limbs. Red squirrels nibbling on mushrooms chattered with rapid raspy barks.
That night, as the campfire faded and darkness surrounded our campsite, the Milky Way’s dusty glow appeared overhead. I spotted the Big Dipper just as a shooting star streaked across it. Far off to the west, beyond the lake, a jagged bolt of lightning flashed. As we zipped into our tents, rain fell with a whisper. Thunder rumbled through the night and rain pattered on and off.
By morning, water was trickling from the trees and the rain flies were soaked but the storm had passed. Cotton-white clouds draped the western hills and there was a faint southwest breeze. Tina and Richard were up early, standing at the edge of the lake watching the otter family swimming and diving a mere 10′ away. A doe and two fawns with white-speckled backs sauntered across the beach. We stood in our raincoats under the dripping evergreens during our breakfast of coffee and granola. After breaking camp and loading up, we paddled away on mirror-like water.
Tom DeVries
Jessica and Tina enjoyed breakfast while lounging in rain pants on the damp granite. Looking through binoculars to the far-off hills in the west, we could see dozens of wind turbines harnessing the wind that blows across the hills by the lake.
Tina and I floated westward back toward Pine Point in the flat calm. The still morning air, thick with humidity, hung in a thin chalky haze over the lake. Fish, sipping flies, left dimples on the water. I could occasionally get one to follow a lure in toward the canoe, but then it would drift off when it got close to us.
Tina DeVries
Jessica and Richard drifted past Pine Point. An old-time summer camp sits back in the woods.
After we rounded the northernmost prominence of Pine Point, we had 4 more miles of paddling south to round Tyler Point and reach a campsite inside Tyler Cove. The weather was quiet, with no appreciable wind, either with or against us. Loons laughed and swam nearby. A bald eagle looked down on us from its tree-branch perch. We paddled languidly and it seemed a long, sleepy haul.
Tom DeVries
Tina provided forward momentum as we made our way northeast toward Tyler Point. In our cargo canoe we don’t need to travel light.
At length we reached the landing at Tyler Cove. We slowly drifted over the shallows and nosed the canoe gently onto the sandy beach. Rain was likely to fall in the afternoon, so we set up the tents and hung the flies, still damp from last night’s rain, to dry before putting them on the tents. Using the kayak paddles as poles, we set up our tarp over the campsite picnic table.
Tom DeVries
Jessica and Richard carried his loaded kayak to a soft landing at the campsite on Tyler Cove.
Jessica made fish chowder with the fillets of the fish we had caught and, although there may have been more canned corn in the chowder than fish, it made a delicious dinner. Rain spattered lightly as we drifted into our tents.
Richard Johnson
Low water in Tyler Cove left a wide, sandy beach. The view here looks southeast, with Metallak Island peeking out on the right.
On the last morning, we woke early to a gray dawn with drizzle speckling the lake. Tina, Jess, and I, still a little foggy-eyed, strolled southeast to a bog surrounded by blueberry bushes, balsam fir, and white birch. After a breakfast of oatmeal, grilled bread, and coffee we watched a family of three loons swimming 10 yards offshore. The elders were diving and bringing up food (freshwater clams, perhaps) to feed their youngster. The young one stuck its head under water but never dove and the parents whistled softly to each other as they fed the little one.
Jessica Johnson
At the trip’s end, Tina and I returned to the Umbagog Lake Campground boat launch. We powered the canoe with classic cedar beavertail paddles.
We loaded up and, although it was easy to shove the canoe off the sandy beach, once out on the lake, Tina and I were blown backward by the stiff northwest breeze. We settled in and bulled our way through the whitecapped waters to the lee of 150-yard-long Metallak Island. After a breather we ran southwest, back toward Big Island, with the wind aft on our starboard quarter. Rounding Tidswell Point, Richard and Jess rejoined us, and we drifted awhile downwind, lolling in the surf with the whole of Umbagog Lake behind us.
Tom DeVries and his wife Tina live in New Braintree, Massachusetts. He enjoys fruitful days spent in Beyond Yukon Boat and Oar, his snug woodworking shop. In years gone by, Tom has also canoed on the Yukon, fished commercially in Alaska, and sailed his skipjack on the Chesapeake. He wrote about his 1986 river travels in Zaire in the May 2019 issue. He wishes to thank Bob Lavertue of Springfield Fan Centerboard Company for the gift of the freight canoe four years ago.
If you have an interesting story to tell about your adventures with a small boat, please email us a brief outline and a few photos.
While a GPS chart plotter is our primary source of navigation information, printed charts and chart books still have a place on our boats. The challenge, particularly on outboard skiffs, is keeping the charts in place. Lay a chart or chart book down, and it may blow away. Try holding it for a look while underway, and it will bend and flap in the breeze.
Photographs by the author
The toggles have been pulled across a waterproof chart book and tucked under the holder, with the shock cords nestled in slots on the right side. A campsite guide protected by a plastic bag also fits under the cords. The compass is not attached to the holder.
I designed and built a couple of portable chart holders three years ago. They’re simple—a piece of plywood with shock cords to hold the chart in place and strips around the perimeter to provide a little lee for the edges of the chart. Ben Fuller has seen and used our holders, and this winter decided to build a couple. He modified the design, and we’ll see how his work this summer.
Plywood 3⁄16″ to 1⁄4″ (4mm to 6mm) thick works well for the panel. I used marine plywood, but any plywood with exterior glue and a smooth surface should be satisfactory. A bit of weight is desirable to help keep the unit from being blown about, but 3⁄8″ thick might be a bit heavy. Plywood also has the advantage that it floats. While we haven’t dropped a holder overboard yet, it is certainly a possibility, and it’s reassuring to know we’ll be able to recover the errant charts.
The wood strips around the edges can be rectangular or quarter oval in section (or a fancier profile, if desired). Rectangular strips are simple to rip from a board if a tablesaw is available. Wood molding strips from a good lumberyard are an alternative. The rectangular strips on the original holders are 1⁄2″ high. Ben used 11⁄16″ quarter-round molding, which I will use when I build additional holders. The original holders initially had strips only along the top and bottom. We found that strips on the sides are also needed to shelter the edges of the chart when the holder is turned sideways to the wind. It isn’t necessary for the strips to be continuous around the sides. Ben established that installing the strips in sections around the hole notches is more efficient than installing the strips and then drilling the holes and cutting the notches.
The shock cords at the top and bottom should be within a couple of inches of the edges of the chart to keep the chart corners from lifting in the wind, but not so close that the chart can slip out. The strips along the holder should extend close to the corners for the same reason.
The author’s chart holders have three separate shock cords with toggles. The borders keep the wind from lifting the edges of the chart.
The shock cords are held in place by holes on one side and notches on the other side. The originals have three shock cords with a wood dowel toggle on the free end. The ends through the holes have simple overhand knots which keep the shock cord from pulling through. Each cord slips into a notch and is held in place by the toggle. To fasten the shock cords in place, stretch them so that the toggle will fit around the edge of the panel with the cord in the notch. Releasing the cords just requires pulling the toggles around the edge of the panel. Be sure to hold onto the toggles so they don’t whip around and hit someone.
Ben Fuller’s chart holder has a perimeter of quarter round with the corners open to drain rain and spray.
Ben’s holders have a single length of shock cord with the ends of the cord through holes on one side of the panel. The shock cord goes through a wood strip with holes drilled in the ends. The strip takes the place of individual toggles.
A single length of shock cord has its ends knotted under the left side of the holder. The middle of the cord is passed through holes in the ends of a length of quarter round that serves as a single toggle for both slots in the side of the holder. Short lengths of quarter round on the bottom of the holder, each set directly under the short lengths visible here, engage the toggle as well as trap the thwart to keep the holder from sliding off.
I use 3⁄16″ shock cord, and it is strong enough; 1⁄8″ should also work well, particularly if three cords are used. A 1⁄4” shock cord would probably be satisfactory, but I wouldn’t use a larger diameter.
The holes for the fixed ends of the shock cords are the same diameter as the shock cord, and the notches are wider. With the 3⁄16″ -diameter shock cord we used 1⁄4″ -wide notches, though wider also works. To create a notch, start by drilling a hole with a diameter the desired width of the notch, then saw from the edge to the hole.
The shock cord only needs to be snug enough to hold the chart in place when stretched over it. Any tighter makes it more difficult to secure the cord in place and to push it out of the way when the buoy you are looking for is under the shock cord. The original holders span 13 1⁄2″ from the holes to the notches, and the shock cords are stretched about 2 1⁄2″ inches when in place.
Use a water-resistant glue to fasten the strips to the plywood. No need for epoxy or other high-strength glue; Titebond III is satisfactory. If you also use nails or staples to hold fasten the strips with or without glue, make sure they are galvanized or stainless.
The space between the strips needs to be large enough for the chart or chart book to fit; if it is much larger than that, the edges of the chart may be blown by the wind.
We carry two chart books and holders when underway in an outboard skiff. One stays by the helm while the other is used by a passenger/navigator—we’ve found it’s nice to be able to hand passengers a chart to look at. The holders are also useful when a portable flat surface is needed, such as a place to write notes. Ben has painted his holders white so he can write directly on them. His holders also have molding strips on both sides of the back so they can be placed over a thwart without risk of sliding off.
The chart holder can be built to accommodate a chart case if the charts are not printed on waterproof paper.
My original chart holders were put to use immediately after construction three years ago and never received any coats of finish. They do stay inside when not in use, and so far, they’ve held up with only some darkening of the wood from sun exposure.
David Cockey’s interest in traditional boats and boatbuilding began while he was a teenager in Maryland. His influences include Howard Chapelle’s books and John Gardner’s columns in National Fisherman. Several years ago, following a career in automotive research and engineering, David and his wife moved to Maine. His current activities focus around boat design and documenting historic boats, and his boating includes monitoring Maine Island Trail Association islands in Penobscot Bay.
You can share your tips and tricks of the trade with other Small Boats Magazine readers by sending us an email.
Minor injuries at home, at work, or in the shop may be painful and inconvenient, but most do not have severe consequences. But take that minor injury into the backcountry, or on a coastal cruise many hours from definitive care, and the stakes can quickly get much higher, particularly if an injury impairs mobility which delays travel to safer environs or renders an individual unable to operate a vessel safely, or at all. A well-stocked first-aid kit is an important piece of gear and can go a long way to keeping treatable injuries from turning an outdoor adventure into an epic, or even disastrous, affair.
The Boat Medic first-aid kit from My Medic is well-thought-out and very well stocked and packaged. It should allow responders to render care for a wide range of injuries and illness running the gamut from minor to life-threatening trauma. The supplies are packed in a waterproof and robust 10″×12″×6″ plastic case. Secure closure is provided by two rugged dual-action latches that prevent accidental opening, while an automatic pressure-valve equalizes the air pressure to assure that the case can always be easily opened. The case kept water out during my 10-minute spray test and 30-minute immersion, confirming its IPX7 rating for waterproofness.
All photographs by SBM
The case is manufactured by Nanuk and has an IPX7 waterproof rating (submersible at 1 meter for 30 minutes) and has double-action latches to prevent accidental opening. Loaded with the first-aid supplies, it weighs 5 lbs 10 oz.
I was impressed with the range of problems the kit was prepared for. There are ample supplies for minor wounds, burns, and orthopedic injuries, which I would expect (and hope) will be the most common uses for a first-aid kit in a field setting. The kit’s supplies for major trauma care could certainly stabilize potentially life-threatening injuries when used by a trained responder. There is no included checklist of gear (helpful when searching for a needed supply in an emergency, as well as when the kit is restocked), though one could be made from the list of contents on the kit’s web page. And while there is no instructional material beyond what is printed on each item’s packaging, users of a pre-stocked first-aid kit should familiarize themselves with its contents and read a good wilderness first-aid manual like NOLS Wilderness Medicine.
The supplies fill the case and need careful packing to get everything to fit. A square of sheet plastic or thin coated cloth added on top, ready to spread out on the ground, would provide a place to empty the case so the needed supplies can be located quickly without getting them dirty or wet.
Knowing how to use the items in the kit is every bit as important as having them handy. The tourniquet included in the kit, for example, can stem the flow of life-threatening bleeding, but should only be applied after direct pressure, wound packing, and pressure dressings have failed to control blood loss. A tourniquet in place for longer than a few hours can lead to permanent neuro-vascular injury or even limb loss, so a provider should be absolutely certain it is required before placing one, and once placed, the patient should be marked (on the forehead, usually) in pen to alert subsequent caregivers that a tourniquet is in use, and the time it was applied. Similarly, the kit’s nasopharyngeal airway can assist in maintaining an open airway in a patient with a depressed level of consciousness, but it can cause harm if used in the setting of unsuspected cranio-facial injuries.
Many of the items come in wrappers that provide brief instructions on their use. Training in first-aid would help the user to deploy them quickly and effectively.
Almost all first-aid kits will require some additions to meet local or personal requirements. For my New England cruising, I carry a tick remover along with doxycycline and dosing instructions for Lyme disease prophylaxis. I also carry Benadryl for insect bites, poison plant exposures, and mild allergic reactions, and an Epi-pen to treat severe allergic reactions to food or bee stings.
The Boat Medic first-aid kit might be more than you need for day trips where emergency resources aren’t far away, but for an extended cruise, a shop, instructional program, or to supply peace of mind, it is a well-stocked and securely packaged kit.
John Hartmann built his Ilur dinghy WAXWING, and his Jewell-class pocket cruiser UMAMI to sail in the Thousand Islands, Lake Champlain, and the coast of Maine. He is a board-certified emergency physician cruising into semi-retirement after 29 years on the front lines.
The Boat Medic waterproof first-aid kit is available from My Medic for $197.95. Some outdoor equipment suppliers also carry the Boat Medic.
Is there a product that might be useful for boatbuilding, cruising, or shore-side camping that you’d like us to review? Please email your suggestions.
If you wandered by our home’s little boatworks and asked what our most used tool was, I’d probably have it in my hand. It’s a DeWalt 5″ random-orbit sander and because it is cordless, I may not even be in the shop when you find me using it.
We started sanding decades ago and have never stopped, first by hand with bits of folded sandpaper and then with a square-sheet orbital sander. Along the way, we discovered that random-orbit sanders leave fewer visible scratches on our wood and fiberglass projects. For many years afterward, we used a single-speed Sears Craftsman random-orbit sander with a cord, knowing that it would wear out within the one-year warranty, and we’d return it for an exchange. We started switching to cordless tools as they became available, and five years ago we added the DeWalt 20V XR Max brushless random-orbit sander to our arsenal.
The DeWalt has been a good fit, literally. When I first started using the sander, I felt it was a bit big in my medium-sized palm, but I don’t even notice the size now. I can use the sander with either hand, and switch frequently to avoid fatigue. The sander weighs 1.9 lbs—a good weight for applying the pressure to a horizontal work surface and yet light enough for working overhead. The battery or the dust port can be used as an alternate handhold, especially nice when just the right touch is needed on small or delicate workpieces. The sander stands 5.1″ tall, 7.1″ wide, and the kit came with a 3-amp-hour (Ah) battery. Sanding discs are the 5″-diameter hook-and-loop style.
Photographs by the author
For completely untethered use, the sander has a dust collection bag. The 3Ah battery is compact for working in tight spaces and its light weight keeps the sander balanced over the sanding disc.
With the 3Ah battery the DeWalt can sand for well over 20 minutes, which is plenty for my taste, and the larger 4Ah and 5Ah batteries offer extended sanding time beyond that. The 5Ah battery is a bit bulky, can tip the sander on edge, and limits access to some smaller spaces. The 20V XR Max brushless technology extends run time and provides excellent power. The sander speed can be adjusted from 8,000 rpm, for softwood or faring compounds, up to 12,000 rpm, for aggressive sanding on harder surfaces such as hardwoods or fiberglass. At the high rpm setting I can remove a lot of material in a short period of time. The sander does an excellent job of pulling dust into its dust bag through eight dust ports on the disc, or a shop vac can be connected with a DeWalt adapter.
With the duct-collection bag removed, the sander can be attached to a vacuum system. The 5Ah battery has a longer life for each charge than the 3Ah battery, though it adds weight and puts more pressure on the edge of the disc directly below it.
Cordless tools are an excellent fit in the boatyard, eliminating the electrical shock hazard, and the portability of the tool allows me to work in a variety of locations. I prefer sanding long workpieces and tight spots without having to manage a cord and have not found myself in want of a corded sander for the past five years. The textured rubber grip on top of the DeWalt provides a secure grip which minimizes vibration.
The DeWalt sander comes with a three-year limited warranty; we are more than two years past that, and it’s still sanding.
Kent Lewis and his wife Audrey have messed about in over 50 different vessels over the past 28 years, and most of them needed some kind of sanding. Their boating and sanding adventures may be found at their blog, Small Boat Restoration.
Dave Feder built a kayak and burned it. He also made countless tables, stools, benches, wine-bottle racks, cigar boxes, bowls, and plates and burned them all. And yet he has much more to show for his efforts than a heap of wood ash. He burns his woodworking by wetting it with an electrolytic solution—baking soda and water—and clamping a pair of electrodes to it. With a flip of a switch, electricity flows through the solution-soaked fibers and the heat it generates slowly burns out across the wood. If it sounds dangerous, it is. Dave notes, “I am playing around with 2,000 volts, so inherently the whole process is potentially lethal. It is fun, though.” The burnt wood takes on the same fractal patterns that lightning makes between clouds and earth, but while nature’s lightning is a fleeting bright white flash, Dave’s lightning leaves charcoal-black scars of equal beauty.
The tree-like patterns of electrical discharge were first created in 1777 by Georg Christoph Lichtenberg, a German physicist. He generated static electricity to create a discharge across a glass plate where a fine powder of sulfur and red lead was attracted to the paths of the electrical current. The tree-like patterns are known as Lichtenberg figures.
Dave Feder
Dave burned patterns on pieces of Spanish cedar before installing them as inlays on the deck and protecting them with the kayak’s fiberglass sheathing.
Dave does Lichtenberg wood-burning as a hobby and side business—My Twisted Nature. Most of his pieces are live-edge wood slabs for tables and bar countertops, so he does very little joinery and considers himself “a completely novice woodworker. I have not glued two pieces of wood together since middle-school woodshop class in the early ’70s.” But Dave knows electricity. He spent four years in the Navy as an electrician’s mate on a destroyer, and in civilian life he has made a living as an electrical engineer.
Growing up, Dave spent his summers on the Jersey shore and swimming there fostered a love of water. As an adult, he took up recreational kayaking and enjoyed it as a means of getting on the water, but he hadn’t considered building a kayak for himself until he saw a strip-built kayak being paddled on a lake not far from his home. He had no experience building a boat of any kind and doubted that his woodworking skills were equal to the task. A dozen years slipped by since that moment of inspiration, and then the pandemic forced everyone to make changes. For Dave, not all of the changes were for the worse: “After years of daydreaming and never doing anything about it, I found myself with time on my hands during the Covid winter and decided to try and build a boat.”
His first venture into boatbuilding was on a small scale. He bought a kit for a 4′-long model kayak, a hybrid with a stitch-and-glue hull and a stripped deck. That gave Dave a feel for two methods of construction, and he was drawn to the aesthetic possibilities of the strips.
He bought a full-sized kit for the 12′ 8″ Excursion kayak from Newfound Woodworks with full-length strips of red cedar and northern white cedar. For color accents, Dave used brown ash, red oak, mahogany, maple, Spanish cedar, and teak. An attractive arrangement of strips in contrasting colors would have been enough for many builders aiming to personalize a strip-built boat, but the kayak wouldn’t truly be Dave’s unless he burned it.
Dave Feder
LAZY LIGHTNING is a 12′ 8″ Excursion kayak that Dave Feder built from a Newfound Woodworks kit. Aside from a model strip-built kayak, LAZY LIGHTNING is his first boat.
He wasn’t sure how the Lichtenberg figures might be affected by the glue lines between strips, so he didn’t attempt to make burns on the deck itself—once the juice was applied to the electrodes, there would be no do-overs, so he prepared separate pieces of Spanish cedar for the burns. They had to be oversize because the electricity works outward from both electrodes, creating two figures. When Dave got the patterns he wanted, he cut each out in a smaller piece to inlay in the kayak’s deck. To burn single figures on the kayak’s hatch cover and his Greenland-style paddle he flooded the wood around one electrode with a continuous spray of electrolytic solution to douse its arc and let the other electrode do the work.
Dave Feder
Burning the Lichtenberg pattern on the aft hatch took a special technique to allow only one electrode to create the electrical arc.
Dave built the kayak on his own and worked about 200 hours over nine months before launching it in June 2021. In a nod to his relaxed approach to kayaking, a favorite song by the same name from the ’70s, and the electrical origins of its decorations, he christened the kayak LAZY LIGHTNING. It’s an especially apt name, as electricity is indeed inherently lazy. It doesn’t take the shortest, most direct route between two points, whether as lightning or Lichtenberg figures, but instead finds and follows the far more complex and beautiful path of least resistance.
Jenna Bohling
The Greenland-style paddle Dave made has a Lichtenberg pattern on one blade (left) and LAZY LIGHTNING on the other.
Do you have a boat with an interesting story? Please email us. We’d like to hear about it and share it with other Small Boats Magazine readers.
Preparation is the key to any good paint or varnish job. Many boats come to my refinishing shop with a good-quality finish but with ragged edges that indicate a poor masking job. Some other boats I have seen still have leftover residue from masking tape. This makes the paint job look much worse than it really is. Here are some tips to make masking easier and give you a better-looking finish.
There are many types and brands of masking tape: green, blue, gray, silver, fine-detailing, long-mask, easy-release, masking paper, and the old standard natural-color masking tape. There are general-purpose tapes and specialized tapes; some are good, some not so good. To get the best results you’ll need the appropriate tape for the job at hand.
I primarily use 3M products, not because they are better, but because they are widely available and the company offers such great variety. The tapes I use the most are the blue long-mask (No. 2090) and the greenish plastic-like Fine Line tape (No. 218). Other favorites are the green and silver extended-use and easy-release tapes. I use these latter two only when working outdoors, in extreme conditions.
Gary Lowell
Store individual rolls in plastic bags. The tape’s edge does most of the work; bagging is the best way to ensure that the edges will stay clean between uses.
Despite its availability and low cost, I do not recommend the standard natural-colored masking tape for use with marine coatings. The adhesive is too strong to peel away easily, it may leave a residue, and I have found that it doesn’t leave a clean edge.
Proper storage is important and often overlooked. Remember, it is just the very outside edge of the tape that does the work. If the edges of the roll are exposed to dust and dirt, particles will stick to the adhesive, making it difficult to get that clean, sharp edge. If you set the roll down on a dusty surface, that roll becomes useless as a fine-detailing tape. Be careful when buying rolls of tape through mail-order companies, too. Individual rolls are often dropped into the shipping box with packing peanuts, covering the adhesive edges with dust and dirt particles. Although some rolls are individually shrink-wrapped, the plastic usually does not fully cover their sides, and it is perforated in places, leaving some areas exposed and vulnerable to damage. To avoid these problems, I buy all of my tape in bulk packages of nine rolls that come double-wrapped in plastic. Keep individual rolls in sealed plastic bags and take care to keep them clean while in use.
Gary Lowell
Once the tape is lying fair on the boat, burnish it with your thumb, noting how the tape changes color when it is pressed down.
Masking 101
The main reason we use masking tape is to get a crisp line between two different colors. Let’s say you want to mask off an area to paint a waterline stripe, as I recently did at my shop (see photos at left). It is important to make sure that your line is clean and fair.
Here, the topside varnish and bottom paint have already been applied, meeting at the scribed boottop lines. Before applying tape to the boat, unroll and fold over the first little bit of it to make a tab. This will help immensely when it’s time to remove it, especially if you have gloves on. There will be situations that require a tab-less piece of tape, but make tabs whenever possible. Begin at a corner of the stem or transom and roll out about an arm’s length of tape. Press the tape lightly against the hull as you work your way along it. It is better to use a few long lengths rather than several short pieces. Longer lengths better enable you to make fairer lines.
Gary Lowell
Left—For a tight radius, use a 1⁄4″ fine-detailing tape. This will wrap much more easily than a wider type. Right—Once the fine- detailing tape has defined the edge, use a wider tape to mask the brush-line area.
Once you have applied the tape lightly to one side, sight along its edge from bow to stern, then go to the other end of the boat and sight the opposite way. If it looks fair in both directions, press it down firmly. If not, lift an end and retape the unfair section. Then, press firmly to burnish the tape against the surface, making sure to get good contact throughout its length. You don’t need to press down on the whole width of the tape, just the edge that is doing the masking.
There are very few places on a boat where you’ll have a straight line. Most masking lines will be curved; some, very tightly. While paper tapes allow for slight curves, plastic tapes will bend much better. If you need to follow a tight curve, I suggest using a thin (1⁄4″ ) plastic fine-detailing tape or other conformable tape. Its narrow width will let you wrap it around the smallest of radii, such as a small cleat or other deck hardware. You may then add wider tape outside for more protection.
There will be situations where you’ll need to mask a wide area to protect surfaces from drips or over-spray. Taping paper or plastic sheeting over the area is the best method. However, don’t rely on a simple run of masking tape for both tasks. Use one run to get a nice, clean masked edge, and then tape the masking paper to that with another line of tape. The second line of tape does not have to be the expensive plastic type; it can be of the natural-colored, crepe-paper variety.
Post-Paint Procedures
Although many people think they must wait for their paint to dry before removing masking tape, this is not true in the vast majority of cases. In fact, most often, prompt removal of the tape is critical to success. After you apply paint or varnish, leave the tape on for only the few minutes it takes to clean your brushes. Keep your gloves on. Then remove the tape by grabbing the little folded tab and gently pulling it back beyond 90 degrees (see opening photo). I keep a putty knife handy to help grab those little pieces of tape that had to be applied without tabs. If the coating was properly applied, it should not run when the tape is removed. If it does, you have applied your paint too thickly. If you leave the tape on too long the adhesive may stick to the surface, leaving a mess; it may even pull off the paint.
Gary Lowell
Use a putty knife to remove small pieces of tape. The job will go much more easily and be neater than if you attempt this using your fingertips.
Sometimes you may find little “flags” of paint that have leaked under the tape. This means that there was a small length of tape that was not pressed down securely. It usually happens at tape joints, another reason to use as few pieces of tape as possible. Now is the time to get rid of these flags, before the paint dries. Fold a paper towel over the end of a putty knife or flat-blade screwdriver. Dip it in solvent, and then use the tool like a pencil eraser to carefully “erase” the paint flags.
Gary Lowell
Wrapped in a paper towel and dipped in solvent, the corner of a putty knife becomes an effective eraser of paint “flags.”
Masking tape is not just for paint. Use it any place you need a clean edge for a coating or want to protect an edge while sanding. If you have to add some caulk around a fitting or along a seam, don’t just squirt it all over the place. Take a few minutes to mask along the seam’s edges, apply the caulk, level it with your finger or a putty knife, and then remove the tape. You’ll have a nice, clean line that looks like it is supposed to be there rather than looking like a quick and messy fix.
Gary Lowell
Masking tape is not just for paint; here it’s used to mask a messy deck-caulking job. Notice the tab at the end of each piece of tape. Make tape tabs wherever possible for easier removal, especially while wearing gloves.
Remember to use the proper tape for the job, keep your tape clean, and, in most cases, remove it as soon as you’re done with your application. Follow these simple steps, and you’ll find masking to be a helpful process rather than a difficult task.
Exceptions to the Rule: When to Leave Tape in Place
As mentioned, in the majority of cases you should pull off the tape early. There are exceptions, though, such as when using epoxy or when there is a highly detailed masking job that requires several coats of paint. A good example follows as I describe a sign painter’s technique that I now apply to boat painting.
Gary Lowell
To prevent a contrasting color from bleeding under the tape, begin by applying a coat of the base color (in this case, white topsides paint), which acts as a sort of filler. Once the base- colored paint is dry, apply the topcoat as shown. Don’t wait longer than a day between applications. When the second coat has dried, carefully remove the tape.
This technique will produce a very crisp line on a smooth surface or a decent line on a rough surface. Let’s say we are painting a black covestripe on a white boat where there’s significant wood grain to contend with. The paint could seep under the tape through pores of the wood. Apply the fine-detailing tape as you normally would, making sure to press it firmly against the hull. Then before you paint the black line, apply a coat of white paint. This will fill in the tiny holes and seal the area between the tape and the wood. Leave the tape in place. When the white paint is dry, apply your topcoat of black. When you remove the tape, you’ll see that you have a razor-sharp line.
Gary Lowell, a Society of Accredited Marine Surveyors Surveyor Associate, owns Lowell Boats Inc. in Greensboro, North Carolina, and teaches Marine Painting and Varnishing at WoodenBoat School.
A good finish depends on many factors, including the quality of the paint or varnish, the preparation of the surface, and the expertise of the painter. However, even with the best possible paint quality, preparation, and skill, success will be elusive without good lighting.
Light intensity alone is not enough. It’s the reflection of light from the surface that allows us to judge the quality of a coating: at the right angle of reflection we can gauge whether we have applied the paint too thick, too thin, or whether there are places missed altogether—so-called holidays. We can see the work better if we lower the angle of the light source relative to the surface.
My shop does not have the best lighting; one side of the boat gets far more light than the other. The lighting isn’t much better in the boathouse, where our 20′ sloop gets an annual paint upgrade. When varnishing round-sectioned spars in either of these spaces, it is particularly challenging to get enough light to reflect at a favorable angle.
Harry Bryan
Photo 1 — In the subdued natural lighting of a boathouse, the handheld LED lamp accentuates the difference between sanded surfaces and new finish, in this case varnish on the sheerstrake.
I think the natural light coming from a window gives a better reflection for painting than artificial lighting does. But of the artificial lights I’ve used, I have come to favor the LED type. LED lighting has an intensity of reflection that is lacking in incandescent or fluorescent technology, especially if the LED bulbs are of the “daylight” instead of “soft white” variety. It seemed worthwhile, therefore, to explore the possibility of making a lamp for painting that would use daylight LED technology. If this light were handheld, then it would be possible to position it easily so that the light would bounce off the surface at a favorable angle without having to contort my body to get that perfect low-angle reflection from a distant window.
A single household LED bulb proved unsatisfactory, because the area of reflected light was too small to assure even paint coverage. Also, this type of bulb is designed to diffuse light in all directions and therefore doesn’t reflect as intensely as I had hoped. I then bought a battery-powered LED flashlight of the type that has a cluster of small bulbs; I found that they were concentrated to give a spot of light, which worked better than a single bulb but still didn’t cover enough area for my needs.
Harry Bryan
Photo 2 — Shining light at the correct angle and exactly where it is needed can help achieve an even coat of varnish or paint without holidays or sags.
Success has come with a shop-made lamp, shown in use in photo 1, that adapts LED strip lights intended to be mounted under kitchen cabinets so that they shine down on a countertop. The strips are 3/8″ wide, with an LED bulb every 11/4″. The strips can be cut to length and fastened to a surface with their peel-and-stick backing. Several strips can be wired together and then connected through an included 12-volt power supply that plugs into a 120-volt outlet.
I mounted the LED strips on a 3/8″-thick cedar board, to which I attached a handle and then a cowling made from a sanding belt ripped to a width of 21/2″ and tacked around the board’s perimeter. In use, I hold the lamp so that its light reflects off the surface being painted while the cowling prevents the lights from shining directly into my eyes.
This lamp has significantly improved my ability to turn out good paint and varnish work. I now have almost no holidays, and the few that do appear are easily found with a sweep of the light before the paint begins to set. Sags and “curtains” are also easy to catch and correct in time. The constantly adjustable angle of reflection required in finishing spars is far easier to achieve with this lamp, and poor ambient lighting is less of a problem, as shown in photo 2. I have even found the lamp useful outdoors on a sunny day, during which the intense backlighting while working on the shady side of the boat can impair vision.
Harry Bryan
Photo 3 — Attach the handle to the back of the lamp’s wooden back piece, making sure to leave room to mount the power supply, as shown, and also leaving room at the top edge for a 1/4″ hole for wiring. Vinyl electrical tape secures the cord to the handle and makes a comfortable grip.
To make the lamp, first cut out the back from a piece of cedar or other lightweight softwood, as shown in photo 3. The dimensions are 3/8″ thick, 5″ wide, and 8″ long. Round the corners to a radius of about 1/2″. The back can be coated with shellac or varnish if desired.
Make the handle 5/8″ thick, 11/2″ wide, and 7″ long, shaped below the back to fit the hand. Fasten the back to the handle with two No. 6 × 3/4″ screws. Also fasten the power supply above the handle on the back, as shown in photo 3.
The LED lighting strips are cut into five 8″ lengths, with the cuts made through the middle of the copper pads that show through the white strips every 4″. The positive and negative polarity of the strip is indicated in print adjacent to the copper pads on the strips themselves. Cut a notch at both ends of each strip, removing the negative (lower) half-pad at the right-hand end and the positive (upper) half-pad at the left, as visible in photo 4. Peel the backing from the adhesive strips and stick them to the back in five evenly spaced rows, as shown in the photo, leaving 3/8″ of wood above the top strip where a 1/4″ hole will be centered to lead the wires to the power supply. It is important to keep the writing on all strips right-side up, as the polarity of the top of each strip is positive while the bottom is negative.
Harry Bryan
Photo 4 (left) & 5 (right) — Left—Cut the LED strips into 8″ lengths, with the cut made through the middle of the copper pads, which are printed to show polarity. Then cut the lower (negative) pad away from the right-hand edge of each strip and the upper (positive) pad from the left end. Right—Solder a bare copper wire, shown at left, to the remaining pads at the left-hand end of each strip, which are labeled as negative. The black insulated wire soldered to its top end reeves through the hole at center and then connects to the negative pole of the power supply. Similarly, the bare copper wire at right should be soldered to the positive pad at the right-hand end of each strip and is, in turn soldered to the red insulated wire, which reeves through the hole and connects to the positive pole of the power supply.
Next, solder a piece of bare copper wire at each end of the LED strips, as shown in photo 5, connecting all the positive pads on the right side and all negative copper pads on the left. I used 14-gauge wire (1.84mm) taken from scrap left over from a household wiring project, although wire as small as 18-gauge (1.16mm) will carry the small current required.
Solder insulated wires to the upper ends of the bare wires, as shown in photo 5, and lead them through the 1/4″ hole at the top center of the back. Cut these wires to length, strip their ends, and fasten them to the appropriate positive and negative terminals of the power supply on the back of the lamp.
The cowl, visible in photo 1, is made from a coarse-grit sanding belt 30″ long. A used one will work fine. The perimeter of the lamp’s back is 26″, so cut the belt to a length of 27″ to allow a 1″ overlap. Then cut the belt lengthwise to make it 21/2″ wide. Attach the belt grit-side out; otherwise, it will not bend around the corners of the back. Tack it to the back with 3/8″ or 1/2″ tacks, and use contact cement to bond the overlapping ends.
Materials
LED lights and power supply. The strip lighting and 6-watt power supply used for the lamp shown in this article are made by Armacost Lighting, www.armacostlighting.com, and are available from Lee Valley Tools, www.leevalley.com, specify indoor natural white LED tape lights, with 30 LEDs per meter. The strips are sold by the foot; a 4′ piece is needed for this lamp.
Sanding belt. The sanding belt for the cowl can be readily found at hardware stores, but a used one would work fine. (Another dark, dense, flexible material could be substituted.)
Wire. The necessary lengths of bare and insulated electrical wire (16- or 18-gauge), are readily available at hardware stores. The red-and-black wire visible in the photos was left over from another project and came from an auto parts store.
Wood. The back and handle can be made from cedar or any scrap wood that can be shaped to 5″ × 8″. A thickness of 3/8″ works well.
Trailing the power cord is a minor inconvenience that could be eliminated by using a rechargeable 12-volt battery pack, but only at the disadvantage of its cost and ungainly weight. Another small inconvenience is that holding the lamp prevents holding a paint container. For me, these problems are a small price to pay for achieving a consistently better finish on my boats.
Contributing WoodenBoat editor Harry Bryan lives and works off the grid in Letete, New Brunswick. For more information, visit www.harrybryan.com.
The David Stimson–designed Ocean Pointer, a 19 1⁄2′ center-console outboard skiff, stands on the broad shoulders of a long Maine tradition. Alton Wallace began designing this boat’s ancestors in the 1940s, settling on the legendary West Pointer hull form in the mid-1950s. The West Pointer was meant as a stable fishing boat with good seakeeping abilities. He arrived at the hull shape the old-fashioned way, which is to say that he carved its shape in wood rather than drawing it on paper. Wallace built hundreds of these skiffs himself, and had a reputation for unusual generosity with the design: hundreds more—perhaps thousands—were built by fishermen and by other shops in both wood and fiberglass. Some of these were direct copies of Wallace’s original lines; others were derivative designs.
Although so many boats were built over several decades, the boat’s lines were not formally committed to paper until 1996, when the Rockport (Maine) Apprenticeshop measured one of Wallace’s boats, drew the lines, and built a copy. Bob Miller, writing for WoodenBoat No. 130, recalled the days in which he got to know Alton Wallace during that measuring project. “One might ask,” wrote Miller, “how someone with just a block of pine and a jackknife could design a boat that has been so widely copied and imitated. The answer is simple. Before Alton started whittling out the shape of what was to become the West Pointer some 50 years ago, he had spent a good part of the previous 30 years in and around boats that he and his father built and then used for trawling, dragging, shrimping, lobstering, and tuna fishing the often unpredictable waters at the mouth of the New Meadows River. Alton knew what made a boat work and what didn’t.”
Matthew P. Murphy
Owner-builder John Blatchford with his Ocean Pointer skiff near Bucksport, Maine. Using detailed instructions from designer David Stimson, Blatchford built the boat over the course of two years.
“It’s a flat-bottomed, round-bilged boat,” Paul Lazarus told me. Lazarus, who edited Professional BoatBuilder magazine for nearly two decades, owned a 16′ Alton Wallace skiff. The 16-footer was Wallace’s original design. He then built an 18-footer and, later, a 20-footer by simply spreading the molds apart and padding them out—all by eye. The larger boats eclipsed the 16-footer in utility, but the 20-footer was too big for Wallace’s shop—a converted schoolhouse. The 16′ edition of the West Pointer—a tiller-steered open boat— was powered by a 25-hp outboard. The 18-footer, with its greater length, side decks, a bulkhead, foredeck, and center console, was heavier and required twice that power. This boat—the 18-footer powered by a 50-hp motor—was the oft-copied sweet spot.
The hull form became famous for its good attributes, and especially for its great stability at rest. “That’s why it was such a good work platform,” Lazarus said. “They could drape a giant tuna [a 300-plus-lb fish] across the gunwales without rolling the skiff.” The boats were also low-sided for easy working and, with their flat bottoms, quick to plane. Pronounced sheer and flare forward obviated the need for a spray rail forward, and this shapely bow was balanced by proportionally pronounced tumblehome aft.
“If Wallace were to be faulted,” Lazarus said, “it would be because he didn’t prime the faying surfaces.” His boats were dry-strip-planked, which means that the planks were mechanically fastened without any compound or adhesive between them. “The only compound he used in the boat was where the keel met the stem—some black goo,” said Lazarus. His own 16-footer lacked floor timbers and had a shallow keel, and thus had a fairly limber bottom. “It was underbuilt,” he said. He is quick to point out, though, that the quickness of Wallace’s builds was in keeping with the design’s purpose: “He didn’t build these boats to be rebuilt; he built them to be used up. They were workboats.”
As workboats, dry-strip-planked West Pointers were meant to be used often, and were certainly not meant to spend long stretches out of the water, living on a trailer. The strip planking would dry and shrink in these conditions, creating numerous leaks that would seal only in the days following relaunching. And these boats were fastened with galvanized nails, which tended to rust out.
So, here we had a beautifully evolved hull form of serviceable but limited-life workboat construction. The West Pointer would make a fine form for a recreational boat, but this would require a construction upgrade.
Enter, David Stimson and the Ocean Pointer.
In the Ocean Pointer, Stimson channels Alton Wallace’s intent for the West Pointer, but he updates the construction to take advantage of epoxy. In his book, How to Build the Ocean Pointer (WoodenBoat Books, 2002), Stimson writes, “There is nothing new about the elements of Ocean Pointer’s design or construction. The general hull form has been around for at least fifty years. Plywood bulkhead frames, strip planking, sheathing fabrics, and epoxy have been in use for decades. The combination of these elements is what makes Ocean Pointer unique. Someone may prove me wrong, but as of this writing, I think that this is the only design that incorporates epoxy-glued strip planking on bulkhead frames in a pointer-style hull.”
Matthew P. Murphy
Ocean Pointer uses a classic center-cockpit layout, with ample storage under the foredeck, in the console, and under the helm seat
To get a feel for the Ocean Pointer, I went on an outing with John Blatchford, who built a fine example of this boat. Blatchford’s boat is built of strip-planked juniper formed around plywood bulkheads. The backbone is of mahogany; the stem assembly is laminated. That assembly includes an inner stem that does the structural work of holding the boat together forward; an outer stem, or stem cap, creates the illusion of a rabbet without the labor of cutting one. This is a common technique in strip-planked canoe and kayak construction; it makes good use of materials and is accessible to the inexperienced boatbuilder.
A plywood sole sheathed in Dynel caps a water-tight bilge, making the boat self-bailing and contributing a vast, foam-filled reservoir of buoyancy. The ample foredeck and small afterdeck are also of Dynel-sheathed plywood. In a departure from the instructions, Blatchford fiberglassed his boat both on the inside and outside. “I wanted a bulletproof boat,” he says. He also ran the sheer about an inch and a half higher forward than the design specifies, thinking it might knock down more spray. After some experience with the boat, he concedes that he wouldn’t advise either change. “It would have been a bulletproof boat regardless,” he says.
Working with the assistance of Jim Kingan of Penobscot, Maine–based Rosebud Boat Works, Blatchford built his boat over the course of two years. He has high praise for Stimson’s instructions, which he used before they were published as a book. “It’s a great book,” Blatchford says. “Great instructions.”
Blatchford powered his Ocean Pointer, OLD TIDES, with a 50-hp Yamaha four-stroke. He’s kept copious notes on the boat’s performance, and shared these highlights: At 5,300 rpm with only the operator on board, the boat will make 28 knots. Drop to 4,000 rpm, and the boat slows to 16 1⁄2 knots. With three people on board and the motor running at 4,100 rpm, the boat makes 15 knots.
OLD TIDES handles well at low speed, with little tendency to blow off sideways despite her flat bottom sections. She transitions gently onto plane and makes a nice, easy bank in hard turns. There’s none of the suspicion of tripping we’d feel in a chine hull pressed into a too-hard turn. Accelerating to full throttle, she gradually presses her bow further and further down, finally running level at 28 knots.
Blatchford showed me his boat in the sheltered waters near her home port of Bucksport, Maine, near the mouth of the Penobscot River. We didn’t have a chance to test the efficacy of the boat’s shapely forward sections in keeping the occupants dry, but that’s of little consequence to Blatchford: “If it’s a windy day,” he says, “I’m not going out on [Penobscot] Bay.” Lazarus, however, told me that the boat was well mannered in a chop and didn’t root in a following sea.
Blatchford uses his boat mostly as a river cruiser, exploring the marshy narrows of nearby Frankfort Flats, or making the scenic run to Bangor, about 15 miles to the north. It seems a perfect fit for him. I asked whether he’d considered other boats when selecting a design to build, and he said that he did not. The West Pointer’s reputation cinched the decision for him early. “I took two years to build the boat,” Blatchford says, “and I enjoyed every minute of it. It was a great joy. Great joy.”
Ocean Pointer’s hull shape derives its distinctive features from the skiffs built by Alton Wallace since the 1950s. The distinctive features are these: ample flare in the bow sections, pronounced tumblehome aft, and flat floor sections running along a dead-flat keel profile.
Plans for the Ocean Pointer are available from Stimson Marine. The instructional book, How to Build the Ocean Pointer, is available from The WoodenBoat Store.
The Port Townsend Skiff is a boat with a mission: Deliver stellar fuel economy in a good-looking, well-performing package. Russell Brown, the energy behind this boat, observes that our society has “gone to a totally absurd place” in powerboat design. “We came from having incredibly good-looking, sea-kindly motoryachts,” he says, and we’ve drifted into a place of having overweight, overpowered behemoths. The Port Townsend Skiff, in part, is a “relearning of what’s already been learned.”
The design was conceived in answer to a challenge sponsored by this magazine’s mother publication, WoodenBoat, and its sister, Professional BoatBuilder. In that challenge, we sought a boat of trailerable size and weight that would burn no more than two gallons of fuel per hour while maintaining a 10-knot cruising speed and carrying a family of four—or about 800 lbs. With the design parameters in mind, Russell Brown engaged the talented Seattle, Washington–based design firm of Bieker Boats to develop a boat that could be sold in kit form for amateur construction. And thus the Port Townsend Skiff—and the company that sells it, Port Townsend Watercraft—was born.
Matthew P. Murphy
The fuel-efficient PT Skiff handles well under a range of conditions and speeds, can carry a load, and moves well with just a 20-hp outboard.
In describing the concept for the new design, Brown recalls an encounter he had with a native Guatemalan dugout canoe many years ago. That boat was 40′ long, piled high with gravel, and moving effortlessly while powered by a 6-hp outboard motor. The boat’s efficiency was a product of its narrow beam. To move such a load in the U.S., says Brown, “you’d add horsepower—the exact opposite of a canoe.”
The Port Townsend Skiff has a narrow waterline, and to this she owes her efficiency and good ride. The boat is initially tender, meaning that she rolls easily to one side when a passenger steps aboard. “What you get for that tenderness,” says Brown, “is efficiency and ability to travel in rough water.” A water-ballast tank in the boat’s bilge firms things up a bit when the boat is at rest, and it provides momentum through a chop when the boat is lightly loaded. It holds 32 gallons of water, and is self-bailing when the boat is moving: simply open a valve, and the tank runs dry. This boat is designed to move—a commuter, at heart.
Matthew P. Murphy
Russell Brown (at helm) conceived the parameters for the PT Skiff design, and engaged the Seattle-based design firm Bieker Boats to develop the plans and kit. The windshield’s height is adjustable by means of a light line and jam cleat.
While the PT Skiff’s top-end speed is about 25 knots, speed was not the objective. “You could get better top-end speed in a purely planing boat,” Brown says. But for that, you would sacrifice efficiency and handling in the low and mid-speed ranges, and you’d give up some comfort. The Port Townsend Skiff is one comfortable boat in a chop. “The skinny hull is a pain getting in and out of,” says Brown, “but drive over a lumpy sea, and it really pays off.”
Brown and his wife, Ashlyn, trucked the prototype PT Skiff across country last summer to display it at The WoodenBoat Show. After that, they visited WoodenBoat’s Brooklin, Maine, headquarters, where we were able to test the boat—and compare and contrast it with the Design Challenge winner, Marissa (see page 64). It is, indeed, initially tender, but not alarmingly so. It steers nimbly at low speed and in tight quarters and accelerates smoothly, without the planing bump or ill low-speed manners of a pure planing boat. At cruising speed, it takes a 2′ chop with aplomb, and in tight turns it develops a notable bank. The Port Townsend Skiff’s rated horsepower is 25, and that power will yield the aforementioned 25 knots. The boat we tested was equipped with a 20-hp motor—Brown’s preference— and it topped out at 21 1⁄2 knots.
Matthew P. Murphy
A sophisticated hull form and light weight are the keys to the PT Skiff’s success. Light weight is achieved through careful choice of materials and good engineering.
It’s not the simplest boat to build,” says Russell Brown of the Port Townsend Skiff’s construction. There is, however, a detailed building
manual that walks through each step of the process. The boat is available in only kit form, and that kit includes hull panels that are joined to full-length sheets by means of a CNC-cut puzzle joint—which is just what it sounds like, and allows for flawless alignment. These panels and other parts are pre-finished before installation.
The hull begins to take shape with the wiring- together of the bottom panels, and to these are joined the next planks. This yields the basic shape of the bottom, which is nestled into a plywood cradle—a part of the kit. There are 10 frames and the transom, and these reinforce the wired-together bottom. The frames have tabs on their edges, and these are indexed to corresponding slots in the skin panels—again making for flawless alignment. Wires are placed at each of these notches to hold things together until gluing. The bottom receives longitudinal members that form an egg-crate structure in concert with the transverse frames, to take the considerable pounding expected on the flatter aft part of the boat. Topside panels are wired to the bottom planks, and this seam is later reinforced by short, tapered frames. In an effort to keep things lightweight, the structure is beefed up where required, and lightened where possible: The bottom panels are 9mm; topsides are 6mm. With everything wired together, the resulting seams are carefully ’glassed.
PT Watercraft
PT Watercraft estimates that a PT Skiff can be completed, with motor, for $10,000 to $12,000.
I’ve tried here to condense a detailed process into two paragraphs, to give you a sense of how this boat goes together. I’ll end this condensation by simply say- ing that, excluding appendices, the building manual is 258 pages long and includes 630 images. Any attempt by me to explain the nuances of the Port Townsend Skiff’s construction will simply not equal this effort. What you should know, however, is this: The Port Townsend Skiff uses a basic boatbuilding technique—stitch-and-glue— but it uses it in a very refined manner. Careful alignment and gluing will yield a boat vastly more refined than an average stitch-and-glue boat. Craftsmanship is paramount in the construction of a good PT Skiff, but a clever amateur builder should not be daunted by this, because your guide through the process, Russell Brown, is a master of wood-composite construction.
In fact, Russell Brown has been called the epoxy cop. “He’s a clinician with epoxy,” says one friend of Brown’s reputation for clean and precise work with glue. “There’s a lot of epoxy technology in the Port Townsend Skiff,” says Brown—for example, techniques for secondary bonding, whereby bulkheads and other assemblies are fitted and glued to pre-finished hull sides. “There’s a lot more to it than meets the amateur eye. There’s gluing, ’glassing, filleting, and coating, and each requires careful attention if you’re going to get the most out of it.” Brown’s attention to detail is exemplified in the contents of his kit: There are eight different sizes of machined fillet sticks included in the box. “Working cleanly with epoxy makes a high difference in weight,” Brown says. But the results are worthwhile: Brown believes that the boat cannot be built lighter out of another material while still maintaining the same longevity, ease of construction, and low cost.
Matthew P. Murphy
The PT Skiff takes some if its design inspiration from the world of performance sailing craft.
So here we have a refined boat and a detailed guide. Although he’d gone to great lengths to make this boat accessible to the dedicated amateur, Russell Brown was initially a bit apprehensive that the details would overwhelm an amateur—that the construction would take an unreasonable amount of time. Testimonial to the contrary arrived at the time of this writing, in early August 2010. Port Townsend Watercraft e-mailed an announcement saying they’d had a rendezvous with their first kit builder and his finished boat. That builder, Jan Brandt, had previously built smaller boats and kayaks. He spent five part-time months, balancing a full-time job and family obligations, building his Port Townsend Skiff.
Matthew P. Murphy
The boat’s construction employs proven kit-boat methods, such as the puzzle joint, seen here, that joins the console to the bottom framework.
Curious about the builder’s perspective, I clicked through to PT Watercraft’s online forum, where Brandt had posted the following:
“Hey, I enjoyed it, and now I enjoy being on the water. PIKA has exceeded our expectation in her utility as a runabout and camping boat for the Puget Sound area. We have powered her with a new 25hp E-Tec, which proved plenty powerful. On a recent trip to Deception Pass, fully loaded with 3 adults, 1 child, 8 gal of fuel, and food/gear for the day we averaged 1.25–1.5 gal/h running between 15–18 kn. I am still learning when it’s best to use the water ballast since so far we have been running loaded for every outing.
“One thing is certain, she turns heads wherever she is. Paul and Eric drew a beautiful and functional hull, and Russell provided the insights and experience to build her strong and light. Thanks guys. We are having a blast.”
PT Watercraft offers a range of kit- boat options for the PT Skiff. The base kit is currently (September ’10) priced at $3,950; the full kit costs $5,680.
For more information about the PT Skiff, visit PT Watercraft.
According to WoodenBoat’s founder, Jon Wilson, “The Shellback provides an education in the fine points of sailing, rowing, and sculling for sailors of all ages, her standing lug rig easily dropped altogether if the winds come on too strong. She is not easily adaptable to outboard power, primarily because the weight of the motor throws her fine hull out of trim, but she rows well enough to provide plenty of efficiency and speed, even with a load.”
A stable and responsive dinghy, the Shellback makes an excellent yacht tender.
The Shellback Dinghy is 11′ 2″ in length and weighs around 100 lbs., making it easy to cartop or trailer.
Plans for Joel White’s Shellback Dinghy are available from The WoodenBoat Store.
Small-boat designer and builder Daniel Noyes launched his Beachcomber-Alpha dory—with some alterations—in 2008 as a kind of tribute to maritime historian John Gardner. Living as he does in Newbury, Massachusetts, he was well aware of the type, which originated in the late 1800s in nearby Marblehead. These towns are near Gloucester, north of Boston, where dories thrived in the schooner fisheries and were soon enough adapted as racing sailboats when the sport took hold in the late 1800s.
In the 1970s, Gardner documented the Beachcomber-Alpha dories not once but twice, first in his Building Classic Small Craft (International Marine, Camden Maine, 1977) and again in The Dory Book (International Marine, 1978). Gardner was a vocal advocate of traditional designs for small craft and also of traditional and practical construction. Dan’s dory touched water for the first time at WoodenBoat’s waterfront in Brooklin, Maine, hours before the Small Reach Regatta (SRR) in 2008. He brought it back again in 2009.
Lauren Noyes
Originally intended for spirited racing, the Beachcomber-Alpha dory can be an exciting handful to manage. With three crew, one handles the jibsheet, another the mainsheet, and the third steers by means of a continuous loop of line made off to a yoke over the rudderhead.
For boats like these dories, what has changed since Gardner’s day? Construction, primarily. Like many boatbuilders these days seeking materials that are readily available and also light in weight for their lapstrake hulls, Dan used marine plywood—1⁄4″ on the sides and 3⁄8″ on the bottom. But Dan elected to clench-nail the laps in the traditional way in addition to gluing them. A traditional builder who had worked at the Pert Lowell Company earlier, he was setting out on his first glued-lapstrake project, so “it felt a little bit safer with clench nails as well.” He sealed the inside with epoxy and paint and sheathed the outside in 6-oz fiberglass cloth set in epoxy.
Dan followed Gardner’s hull shape and construction plan closely but not exactly. After looking at one of the original boats in the Marblehead Historical Society collections, he decided to flatten the sheer by reducing its height by 1⁄2″ at each end and adding about 3⁄4″ amidships. Gardner himself wrote that he had actually added spring to the sheer in his rendition—and many might like it better that way, or at least to not stray from the plans—but Dan preferred to pay a little homage to the original boat he had seen. He used four sawn frames as Gardner called for.
“We kept the bottom rocker, although the bottom was flat in the original boat,” Dan said. “I really love the shape of the stern there—the ‘mackerel tail.’” In the old “cod’s head and mackerel tail” way of shaping a hull, the widest part of the boat is a little forward of amidships, with a long taper aft to the transom. “The widest point is up by the centerboard case, almost,” Dan says. “It’s definitely an old way of thinking about how to get a boat to go fast. I have a feeling it shapes the boat aft, reducing the suction around the transom area.”
Dan took considerable liberties with the sail plan, adding 3′ to the sail’s luff and 3′ to the foot to substantially increase the area. He wanted the boat to move well in the comparatively light airs of his home waters around Newbury. Some of his decisions would have probably tickled John Gardner, not to mention the old Marbleheaders. For his clench nails, for example, he used commonly available aluminum siding nails instead of harder-to-find and more expensive copper ones. His mainsail is cut from a cast-off old jib—a touch I have to believe that Gardner would have thought well of, and one that fits right in with the go-to-it tradition of the dory racers.
The Beachcomber-Alpha dories were always meant for racing, so it should come as no surprise that they are fast, by any measure. The name of the design itself comes from the two rival sail racing clubs, Beachcomber in Marblehead and Alpha in nearby Salem, that once used them for spirited competition. Like other dories of the era (among them the similar Swampscott, Nahant, and Chamberlain gunning dories), Beachcomber- Alphas were adapted and tweaked by experienced sailors who were always looking for ways to take the dory to new heights. Competition was their driving force, and sometimes they stretched the definition of what a dory is.
Lauren Noyes
These dories make excellent daysailers that not only can be launched from a trailer, but with the rudder stowed inside, can be beached and easily refloated.
With my own boat to manage and a lot of obligations at the SRR, I could join Dan and Joel Peck, his friend, co-builder, and co-sailor, only briefly in light air one midday. My first impression was that at 21′ LOA and 5′ beam, this is a big dory, and I found her to be quite stable. But in the bit of a zephyr we found that day, the boat still moved with remarkable ease. And, in watching her sail during the SRR weekend as we experienced breezes touching 20 knots, she seemed very stable in the blow, as well, with skipper and crew providing intelligent ballast on the weather rail. Dan and Joel sailed her off the beach after lunch one gusty day, and she shot out of there at a truly amazing pace. The sail doesn’t have reefpoints, relying instead on the change in sail shape when easing the mainsheet to reduce power. “It’s a bit overcanvased,” Dan admits, but he sails most often on Plum Island Sound in winds of “maybe 8 to 10 knots, where it would be 15 to 20 plus in Marblehead,” where the earlier racers used a smaller sail. If he were to build a boat for a client, he’d use something more like the original. “In the Gardner plans, the sail has a 15′ hoist and a 15′ boom. I used to sail a Sunfish that was 14′ × 14′, so I thought, what, this is a 21′ boat? But I can see where it [the Gardner sail plan] would be perfect in Marblehead. And then, I’ve been sailing dories since my Dad gave me a Chamberlain dory skiff when I was 14, so I have an idea about keeping right-side up.”
Steering a sailing dory—or any fine-ended double-ender—presents some challenges. A tiller for such a boat would be a ridiculously long thing, and it very likely would force one crewman to take his weight to leeward to steer—not a place where you want to have to go when it’s blowing 20 knots. I suppose that a page could be borrowed from racing dinghies by using a tiller with an athwartships extension, which would allow steering while keeping your weight on the weather rail, but even then such a long tiller would sweep a large and sometimes inconvenient arc. One time-honored solution on boats of this form is a push-pull tiller working fore-and-aft through a single-arm yoke fitted to the rudderhead. This can be very effective, though it takes a little getting used to. The longstanding solution in the Beachcomber-Alpha dories, however, has been to use a continuous loop of line made off to both ends of a two-armed steering yoke at the rudderhead. This works even better, because the crew can distribute their weight not only athwartships but also fore and aft and still be in reach of the steering. Unlike the push-pull system, there’s no long tiller to contend with during tacks or to flop overboard when launching or beaching. This loop system has been used in a lot of boats to very good effect—the lately very popular N.G. Herreshoff design Coquina uses the same idea—and it is truly amazing how easy it is to get used to it. Dan runs his steering loop only as far forward as the ’mid-ship thwart, which puts the line within easy reach, just as in Gardner’s drawings.
Even in the original boats, the mast had to be stayed, using one shroud per side and a forestay upon which the jib was hanked, so Dan followed suit for his larger sail area. The mainsheet is set up to distribute the load along the boom, which can therefore be rather light for its length. The rigging is more complicated than the stark simplicity found in many sailing dories, yet it takes only 10 or 15 minutes to get the boat set up and ready to sail after launching.
I didn’t have time to join in for a row, but Dan tells of how easy it is to get the boat moving with her two pairs of 9′ oars and how well she keeps up her pace. In a 5.5- mile rowing race on the Essex River last year, she came in only 20 minutes behind the first-place finisher—but Dan notes that his was the only boat in the class set up for sailing. All the others were designed to win rowing races, and the winner was a high-tech, fabric-covered hull pulled by a couple of athletic types. Not a bad showing for a design over a century old.
Lauren Noyes
Competitive sailing was in the genes from the beginning for the Beachcomber-Alpha dories, but builder Dan Noyes has also found that his boat can hold its own in rowing races against more modern competitors.
At the time that Gardner documented and celebrated dories and other historical small craft for the books he published in the 1970s, no one could have predicted how the small-boat resurgence he so longed for would play out in the coming decades. With mooring and dock space at a premium and seem- ing to cater to exceptionally large boats that are more often the rule than the exception these days, there seems to be a small-is-beautiful counterpoint going on. Comparatively small and light boats that can easily be kept at home and launched from a trailer are finding eager audiences of camp-cruisers, gunkholers, explorers, daysailers—and boatbuilders working predominantly in wood.
None of which is to say that the kinds of traditional boats Gardner held up to the world as worthy of attention and in need of respect have been superseded in any way. Far from it. In fact, what made traditional boats great in the first place still makes them worthy today. Plus, nine times out of ten, boats designed these days with the small-boat sailor in mind derive from one kind or another of traditional craft: Scandinavian faerings and Greenland kayaks above all, but sharpies, dories, Whitehalls, you name it. Time and use seem to prove the merit of adapting these traditional types anew again and again, rather than confining them to the history books.
“Last year,” meaning 2008, “they didn’t run the John Gardner workshop down at Mystic,” Dan said, meaning the John Gardner Small Craft Workshop at Mystic Seaport in Connecticut, a weekend gathering of traditional craft that Gardner, then a Mystic employee, started in the early 1970s. The event was canceled in 2008 but returned in 2009, albeit at a reduced scale. “So I thought it would be cool if I could build a John Gardner—one of his designs. I thought about a Merrimack wherry.” But that was only 12′ long, and he wanted something for camp-cruising. Gardner produced books full of plans showing every detail you needed to build the boats, a tactic he hoped would lead to a liberal proliferation of traditional types. “So I looked at the Beachcomber- Alpha, looked at the budget, and went for it. We had the SRR as a deadline, and banged it out in about a month and a half.” I never met John Gardner, but I can’t imagine a better kind of tribute.
John Gardner drew his lines for the Beachcomber-Alpha dory in the early 1970s. He made the sheer a bit flatter than usual for the type, which was used extensively for racing in Marblehead and Salem, Massachusetts.
John Gardner’s plans for the Beachcomber-Alpha dory suitable for construction, with extensive descriptions and including the table of offsets, are found in Building Classic Small Craft (International Marine, 1977), which is available from The WoodenBoat Store.
Subscribe For Full Access
Flipbooks are available to paid subscribers only. Subscribe now or log in for access.
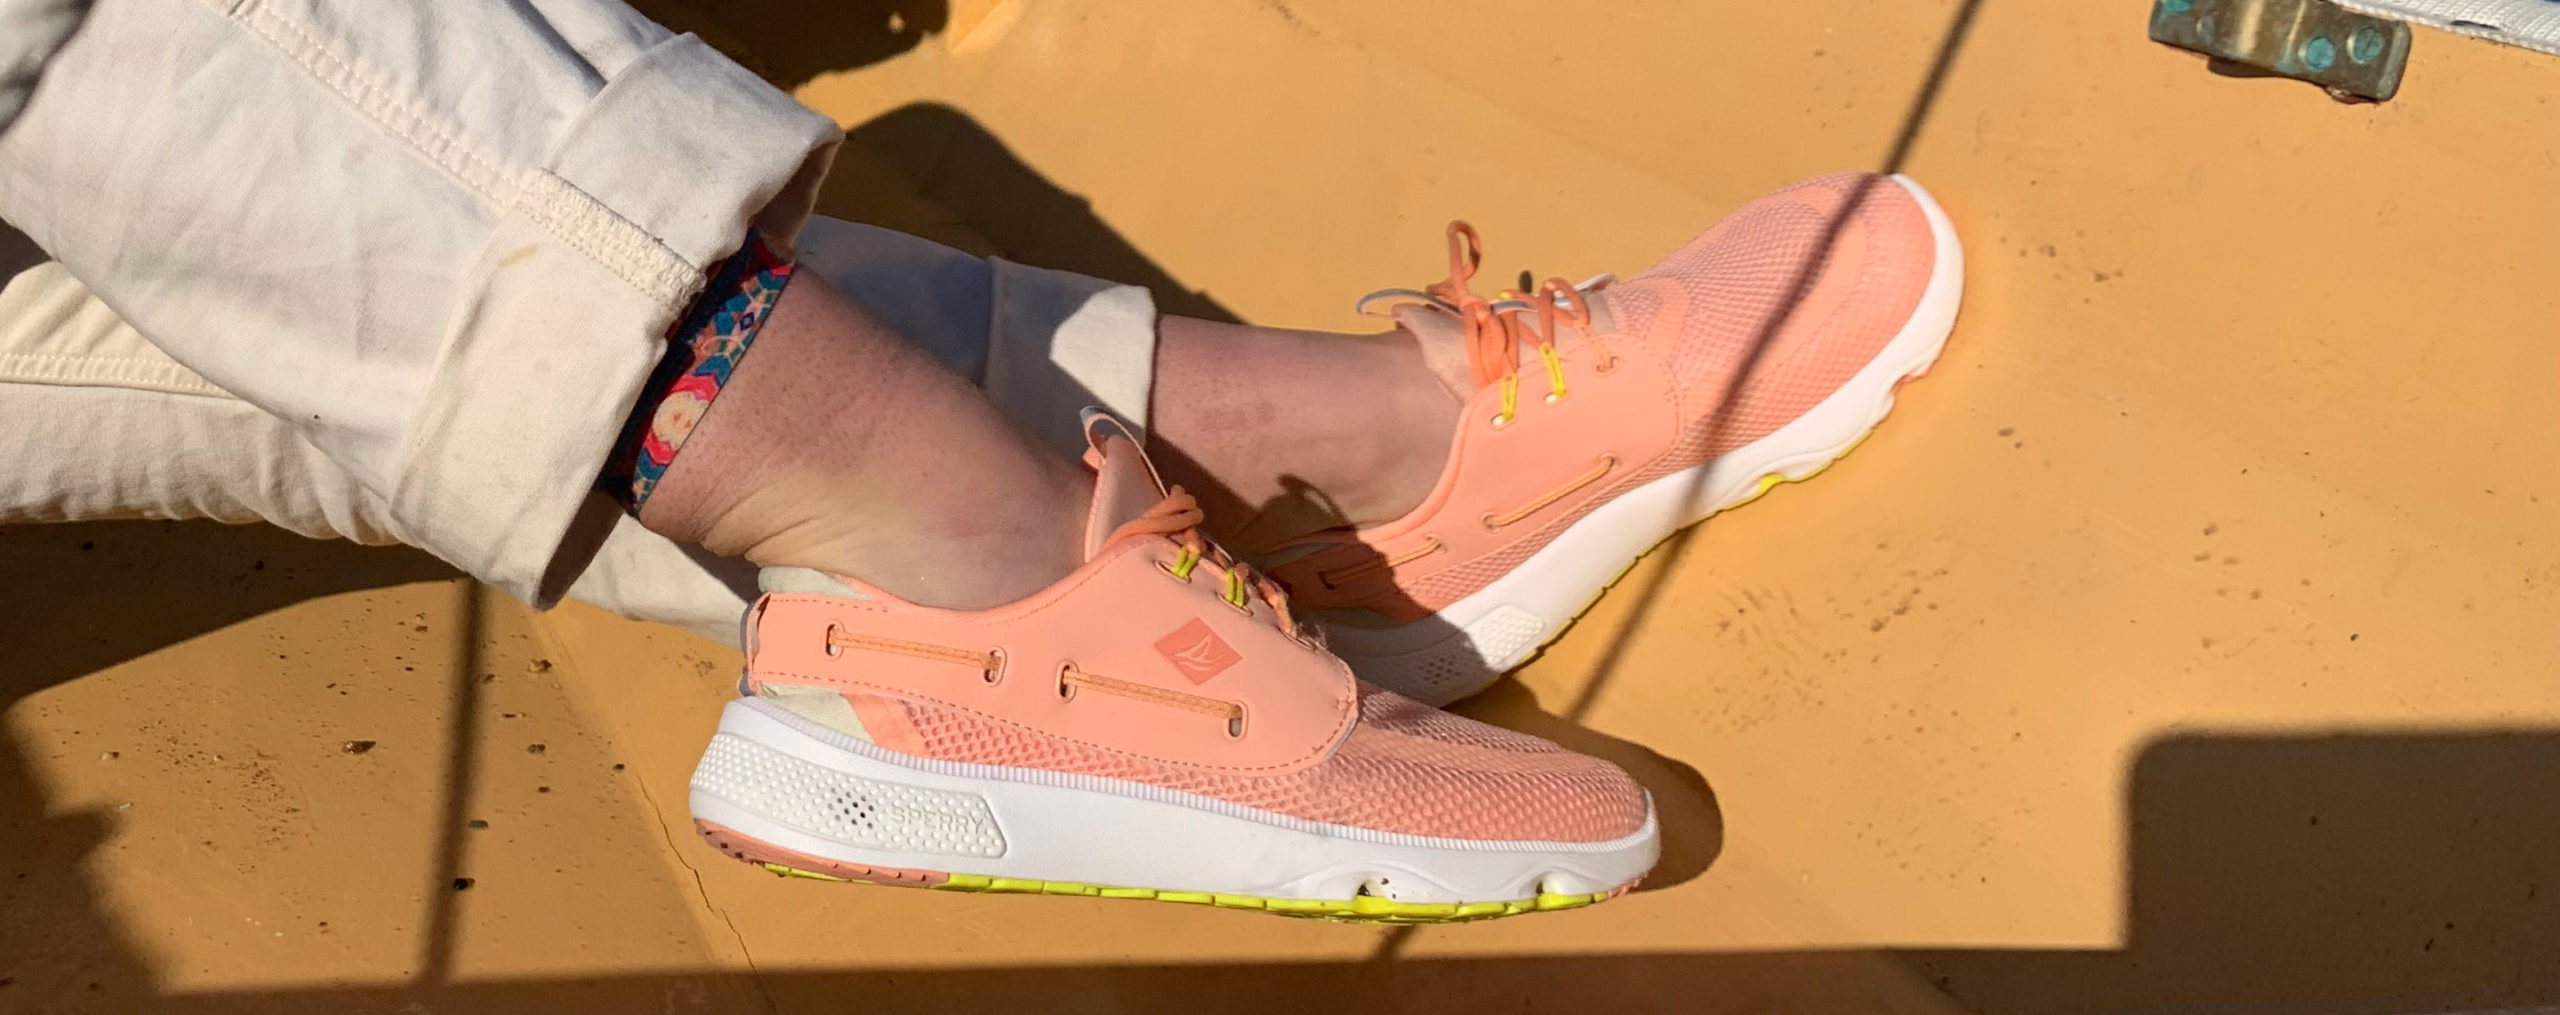
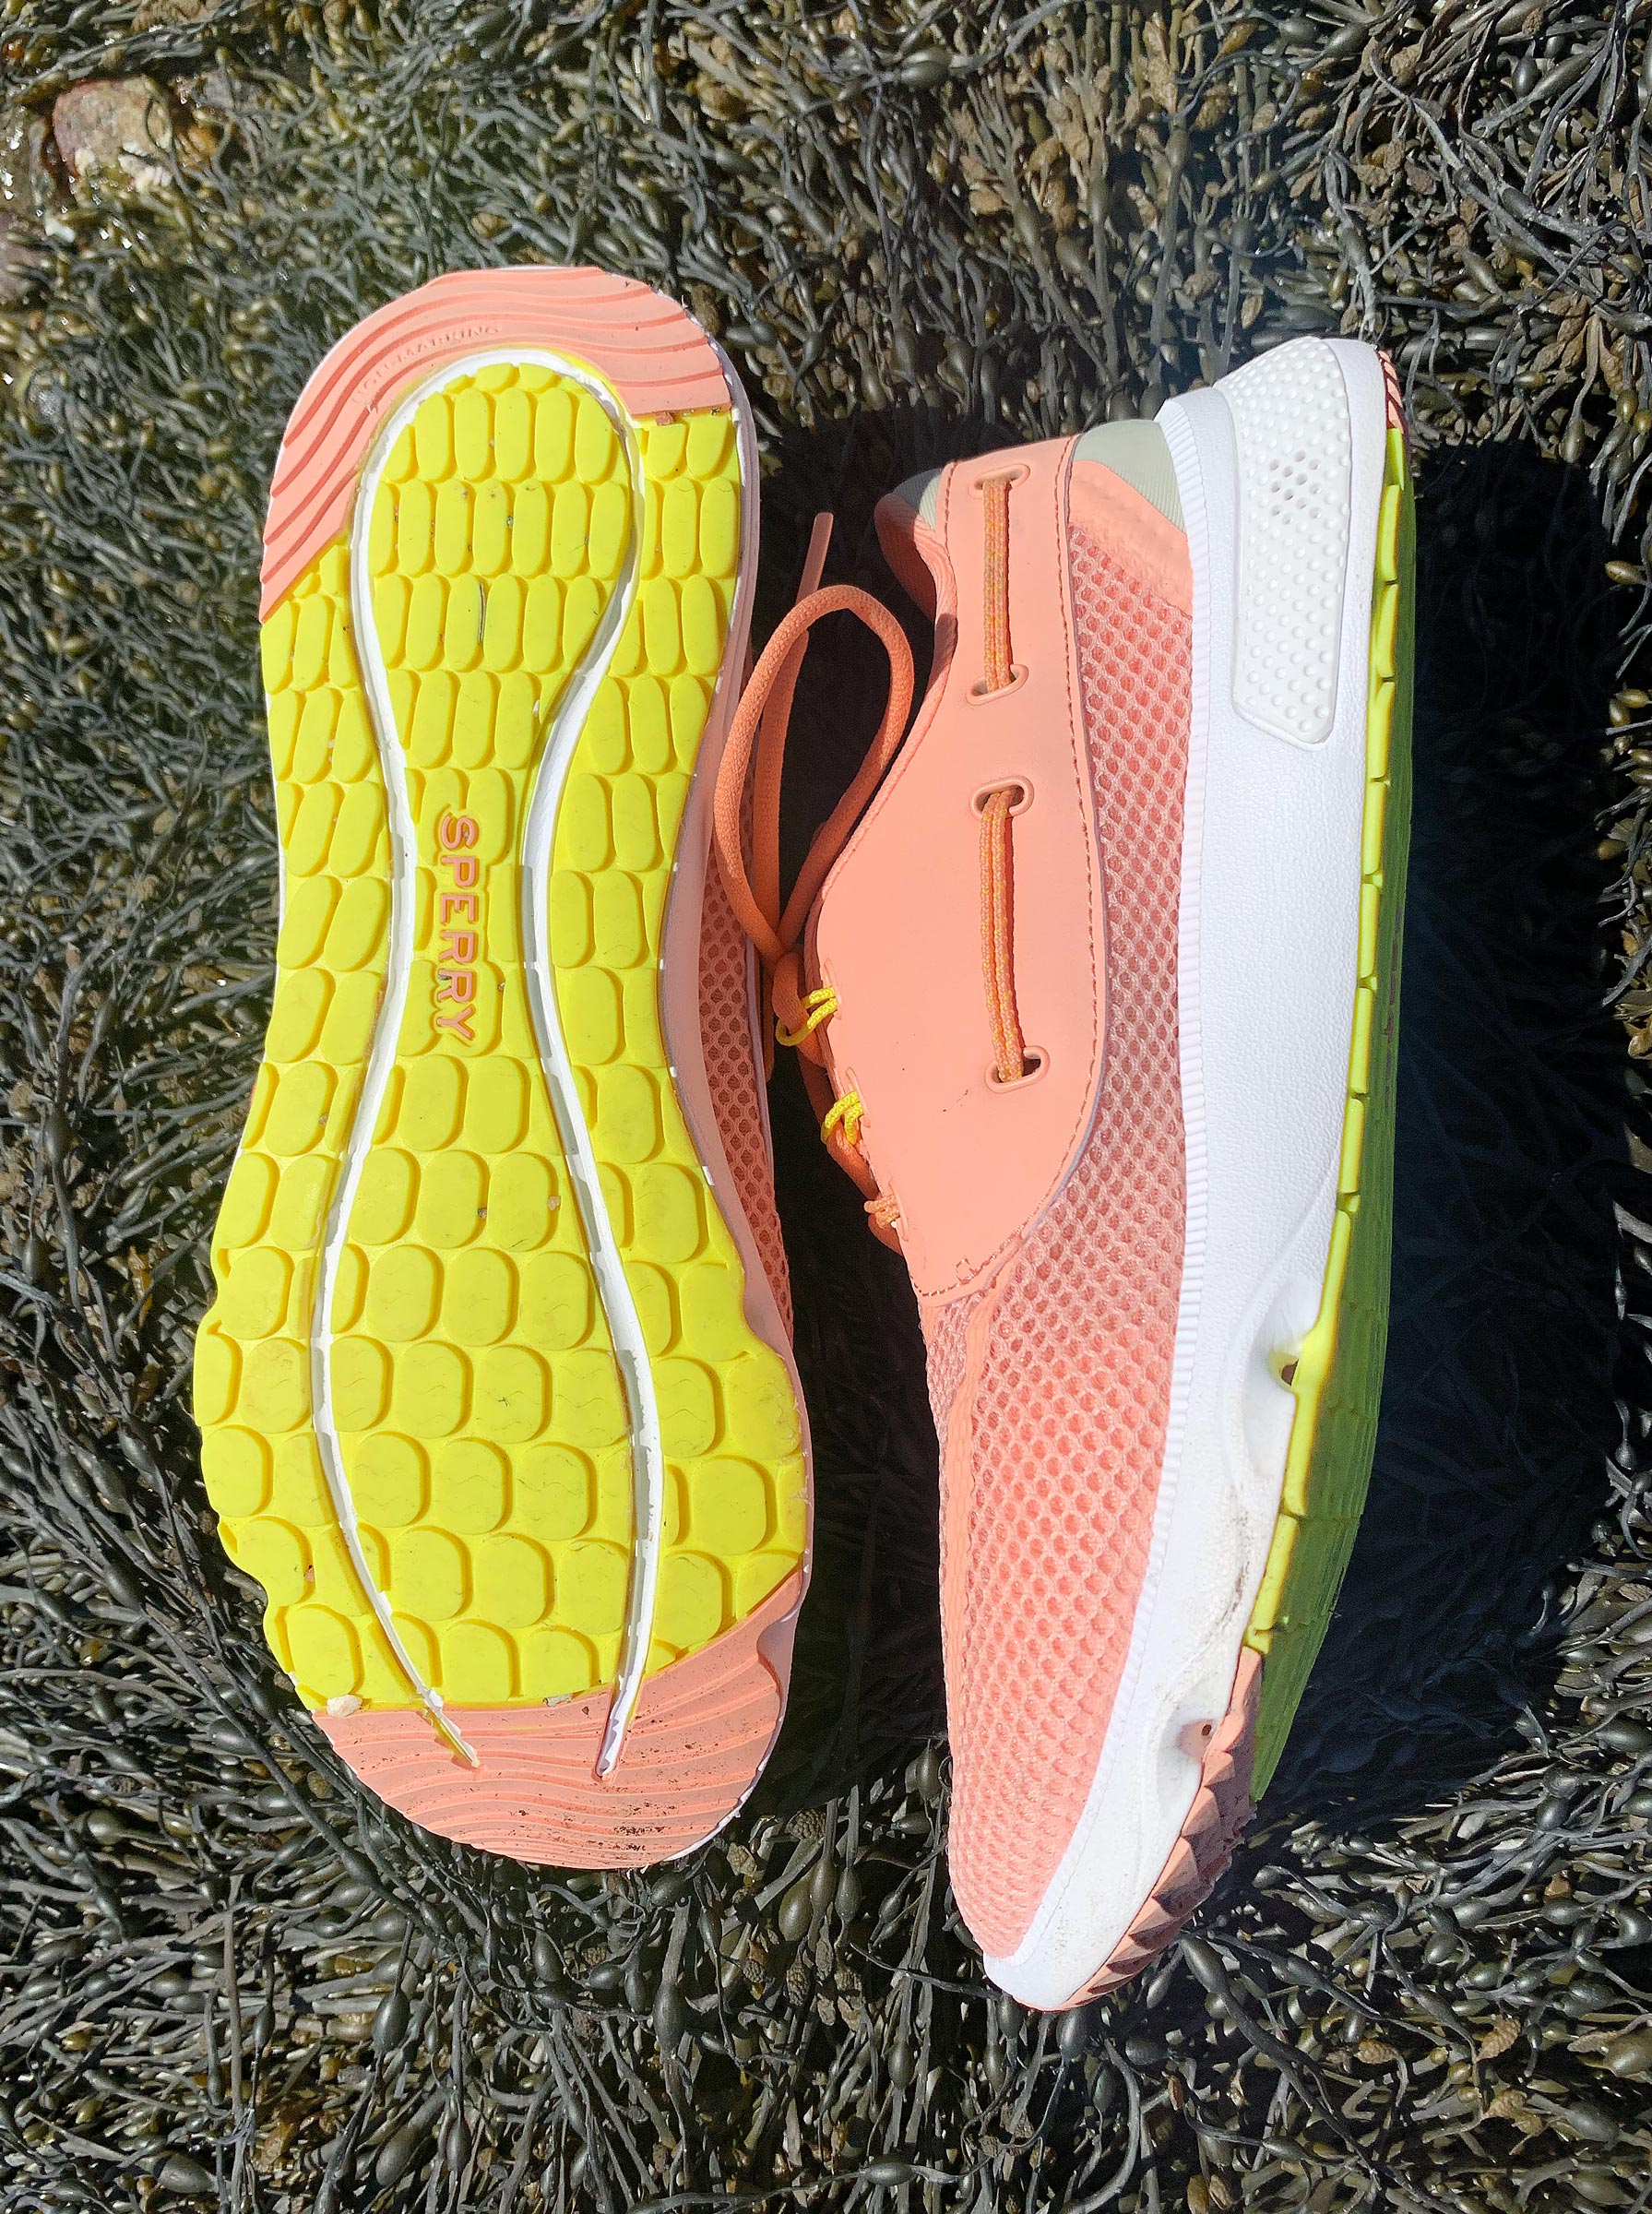 Delaney Brown
  Delaney Brown
  Christopher Cunningham