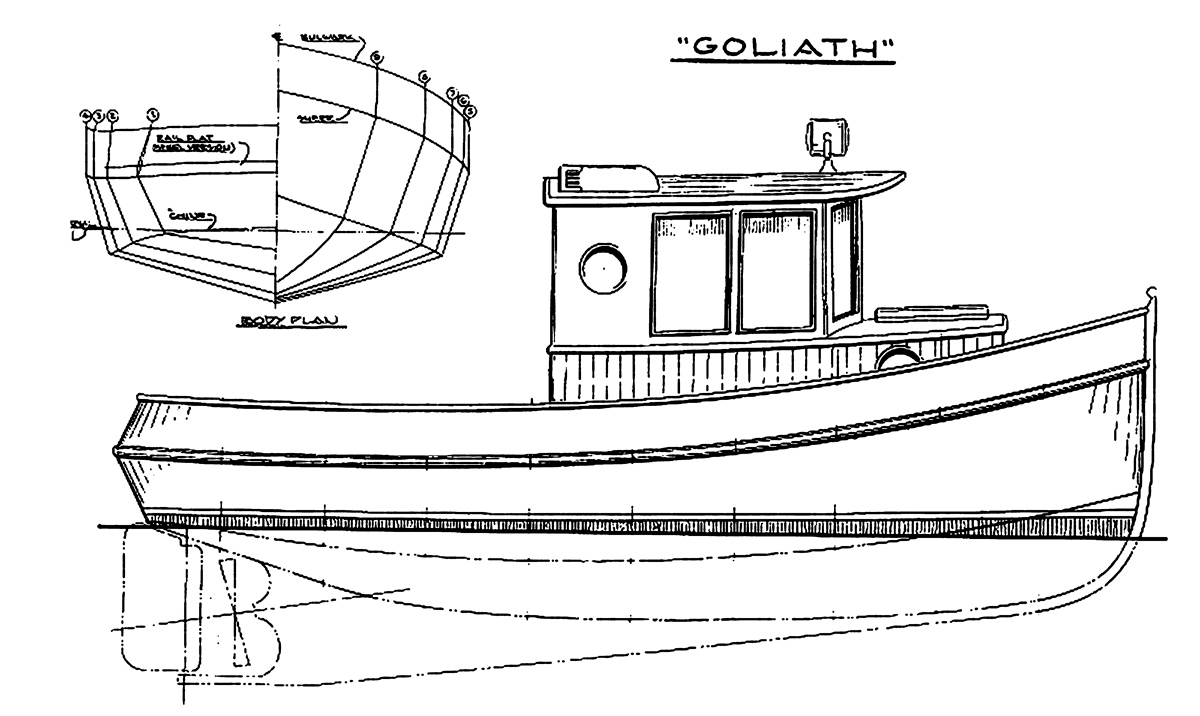
The Norwalk Islands Sharpies are the product of more than a century of evolution. Their pre-cursors are believed to have originated in New Haven, Connecticut, where there was a need for light, shallow-draft boats that could carry loads of oysters safely across bars to market. I say “believed” because there is some evidence that similar types were used in Ireland even earlier.
Working sharpies were flat-bottomed, slab-sided center-boarders rigged as cat-ketches with unstayed masts. They were perfectly suited to their environment, so when Bruce Kirby was thinking about a boat to use in his own slowly silting-in waterway at Rowayton, Connecticut, he turned to the local sharpies for inspiration.
The sharpie he drew for himself was a 26-footer (see Small Boats 2007). He was so pleased with her performance that he began designing a range of similar boats in varying sizes. He called them the Norwalk Islands Sharpies, and they’ve been around now for more than 20 years. In 1987 an Australian boatbuilder, Robert Ayliffe, came for a visit. The two hit it off, and when Robert returned home he set up NIS Boats to market the sharpies worldwide. About 250 Norwalk Islands Sharpies have been built from plans, over 60 of them in Australia. Their well-proven success is perhaps not surprising when you consider that they are designed by Kirby, whose credits include such diverse craft as the Laser, the Olympic Sonar class, and various Canadian challengers for the AMERICA’s Cup.
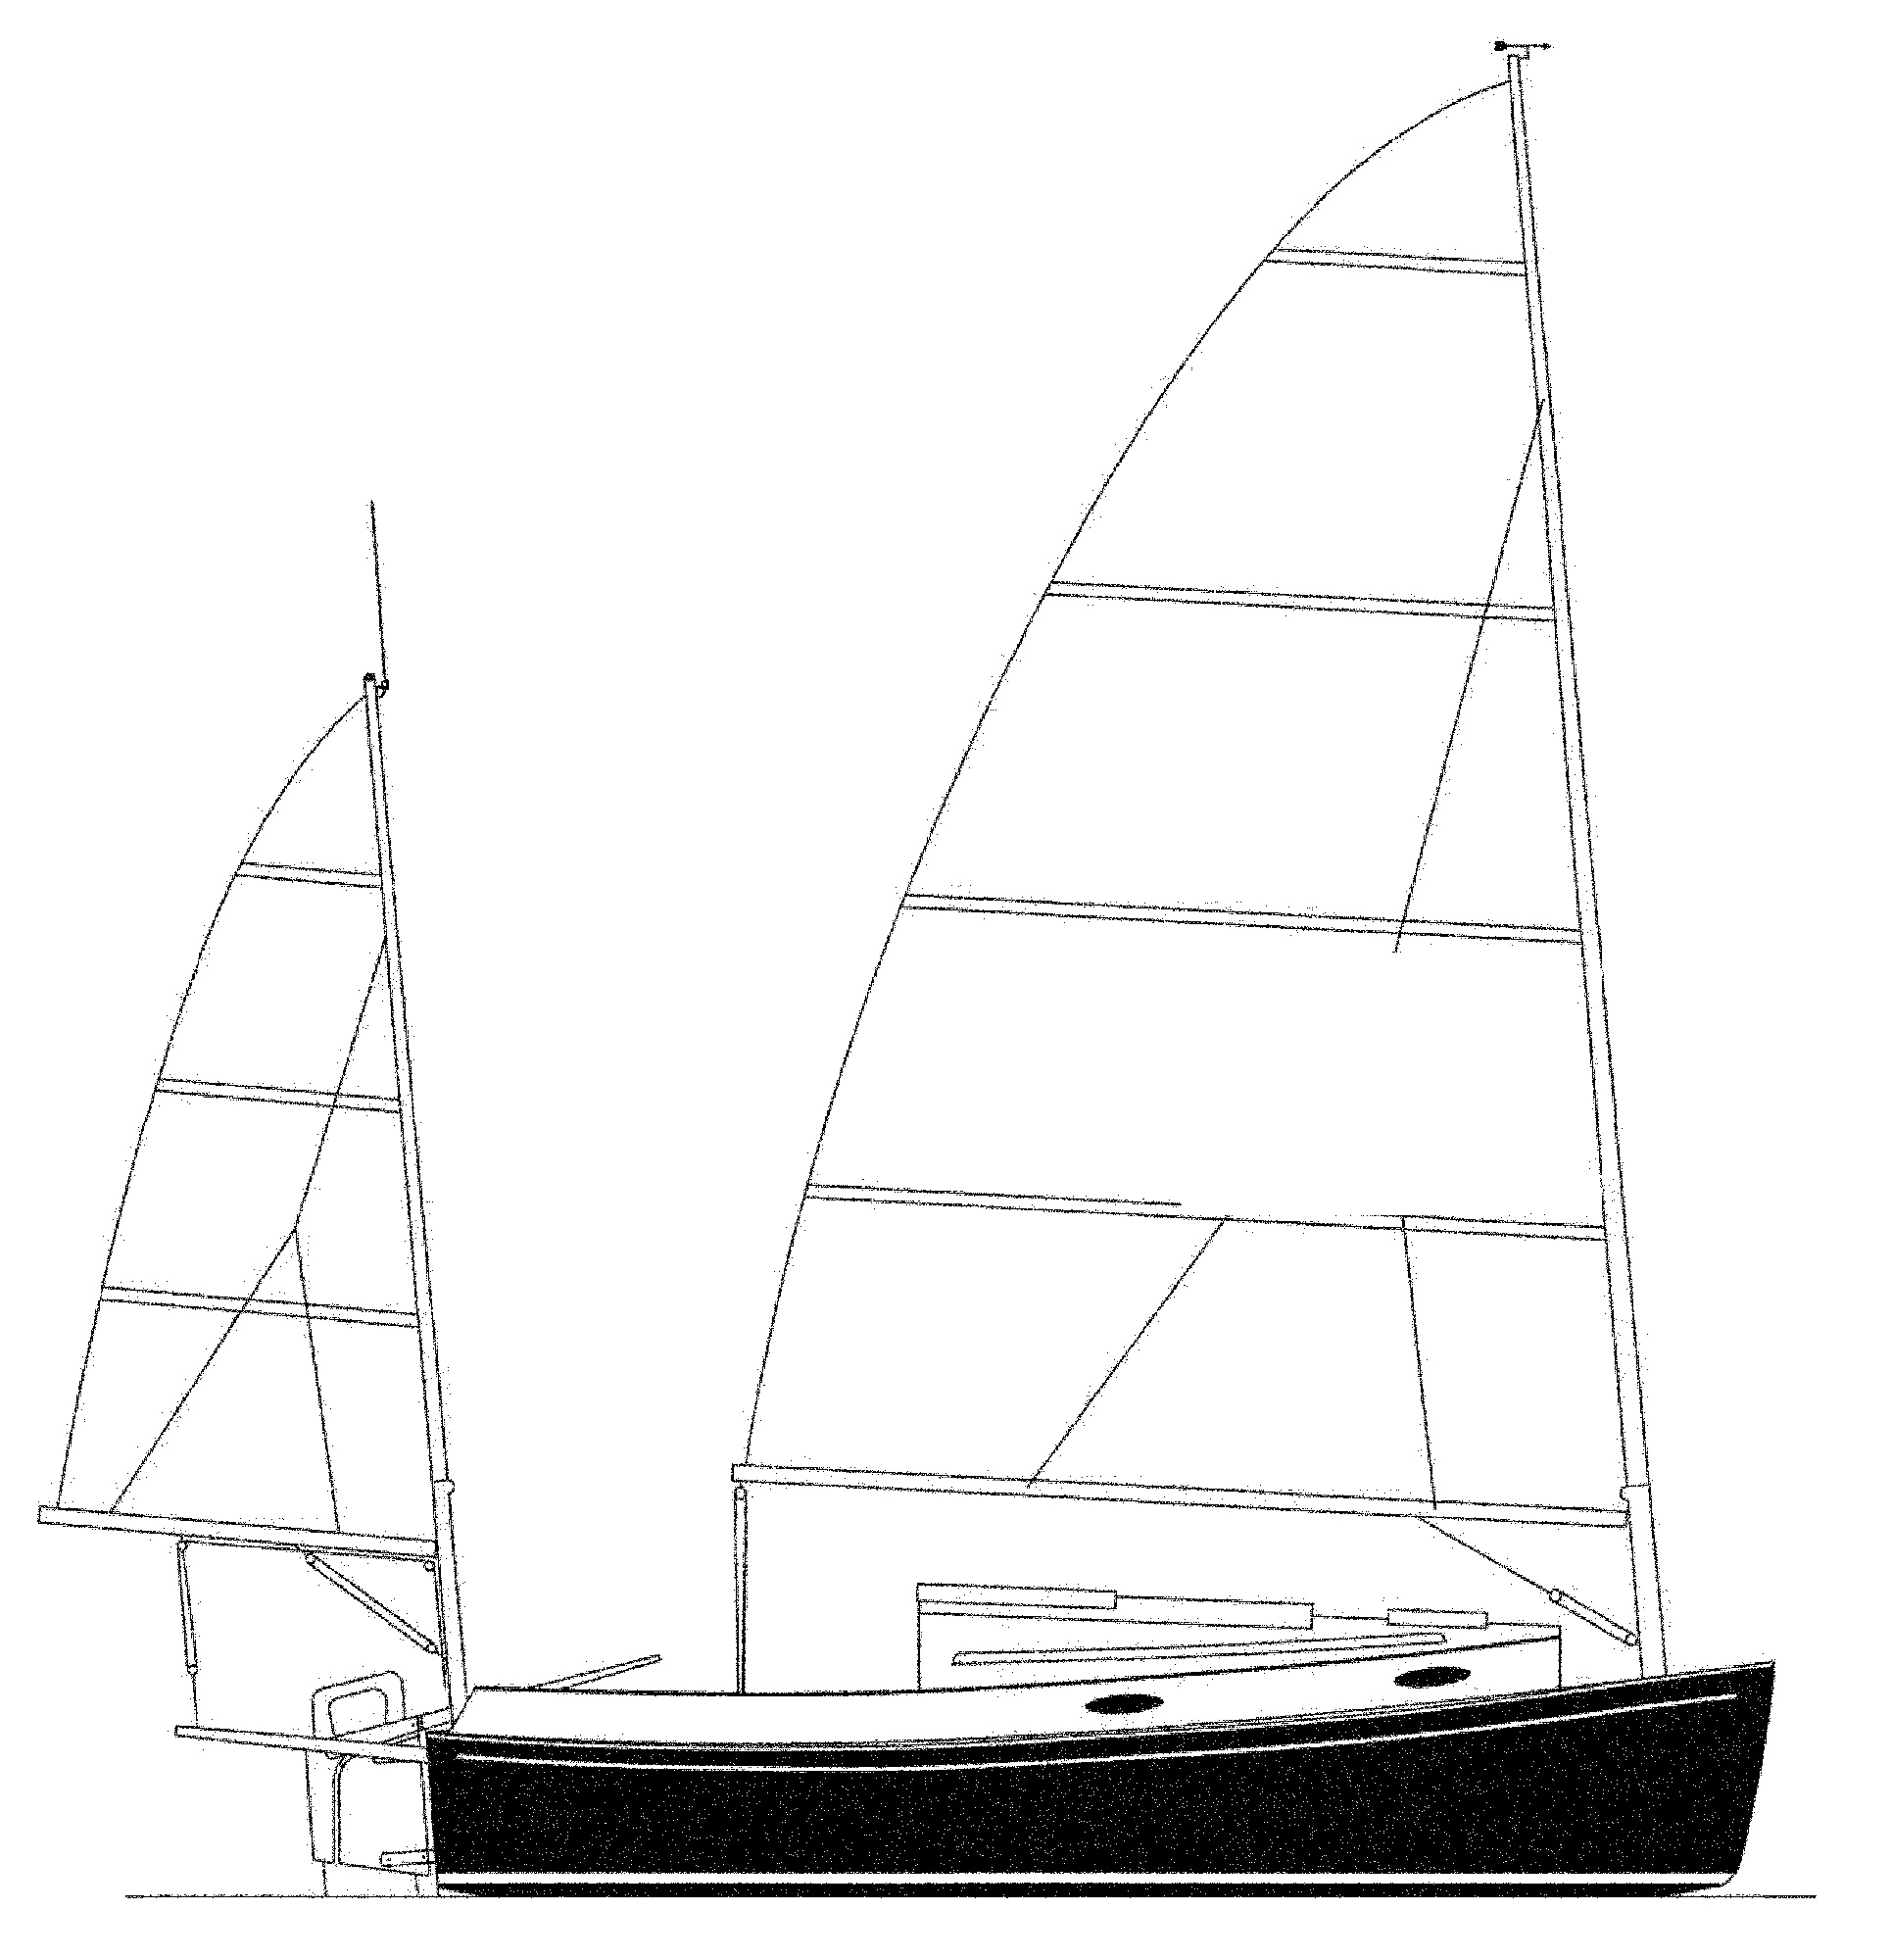
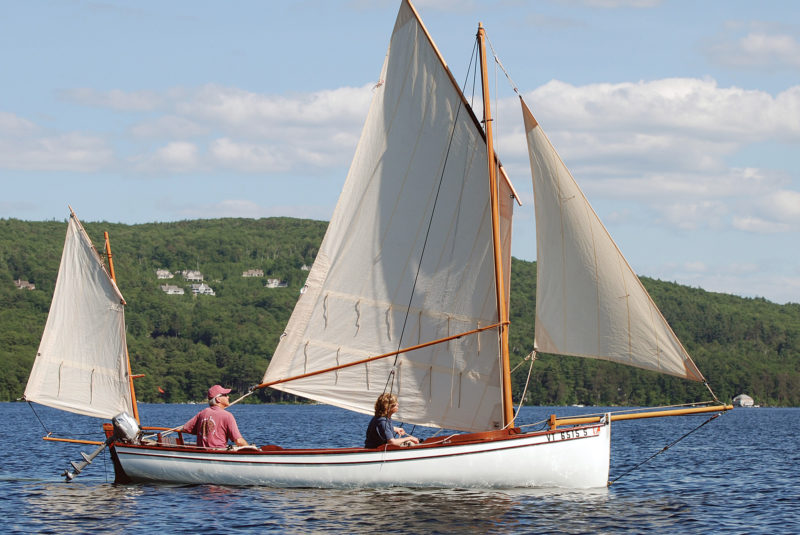
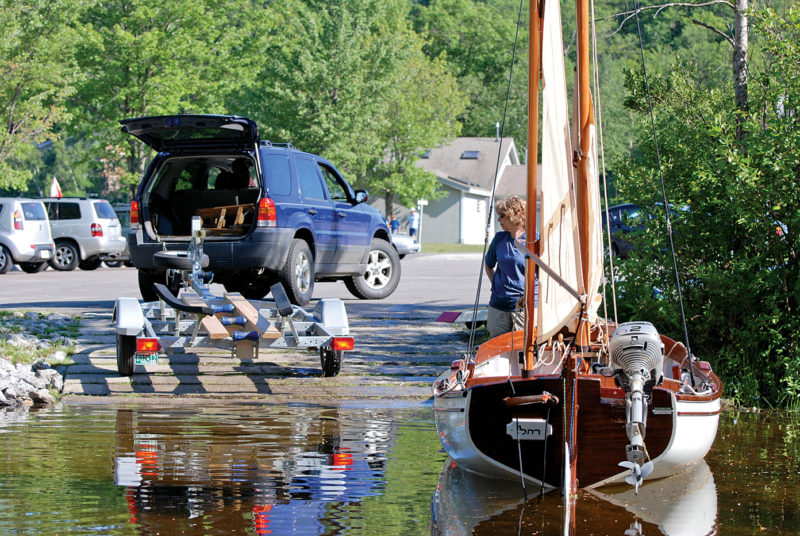
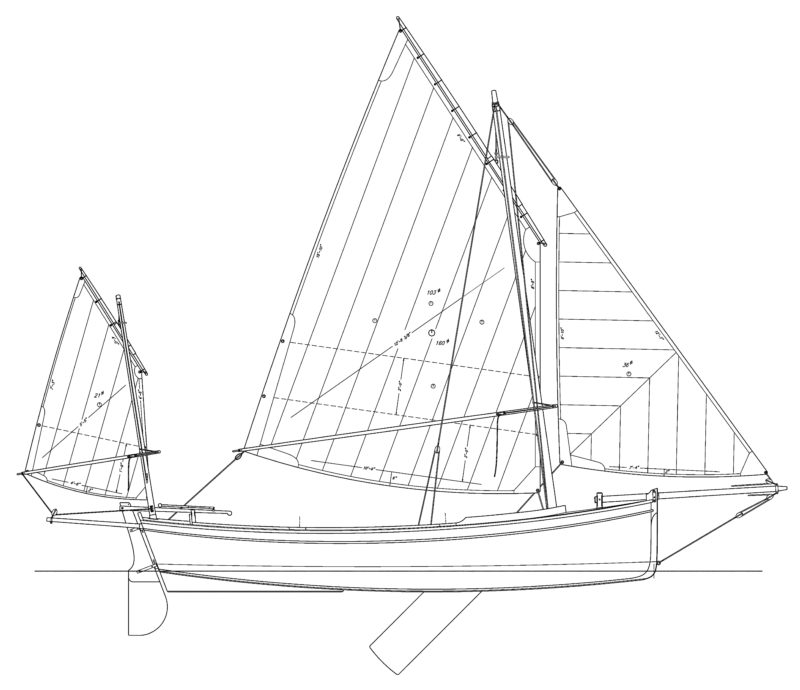
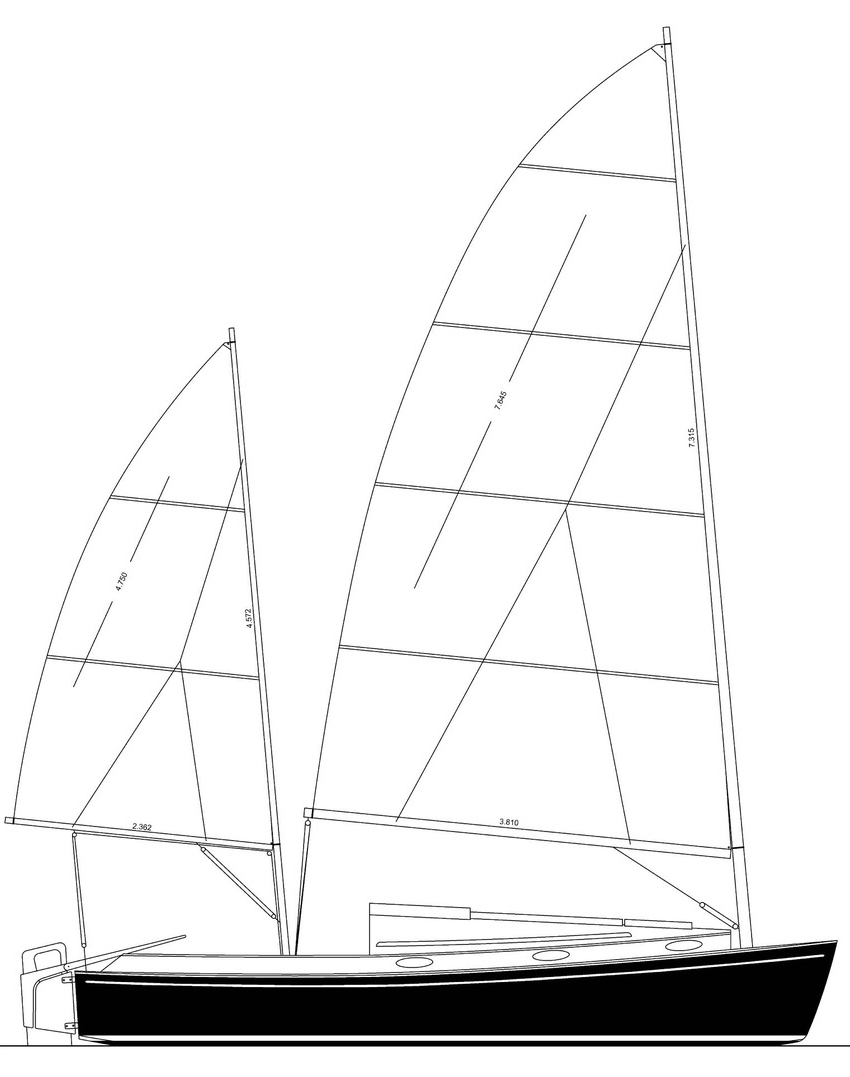
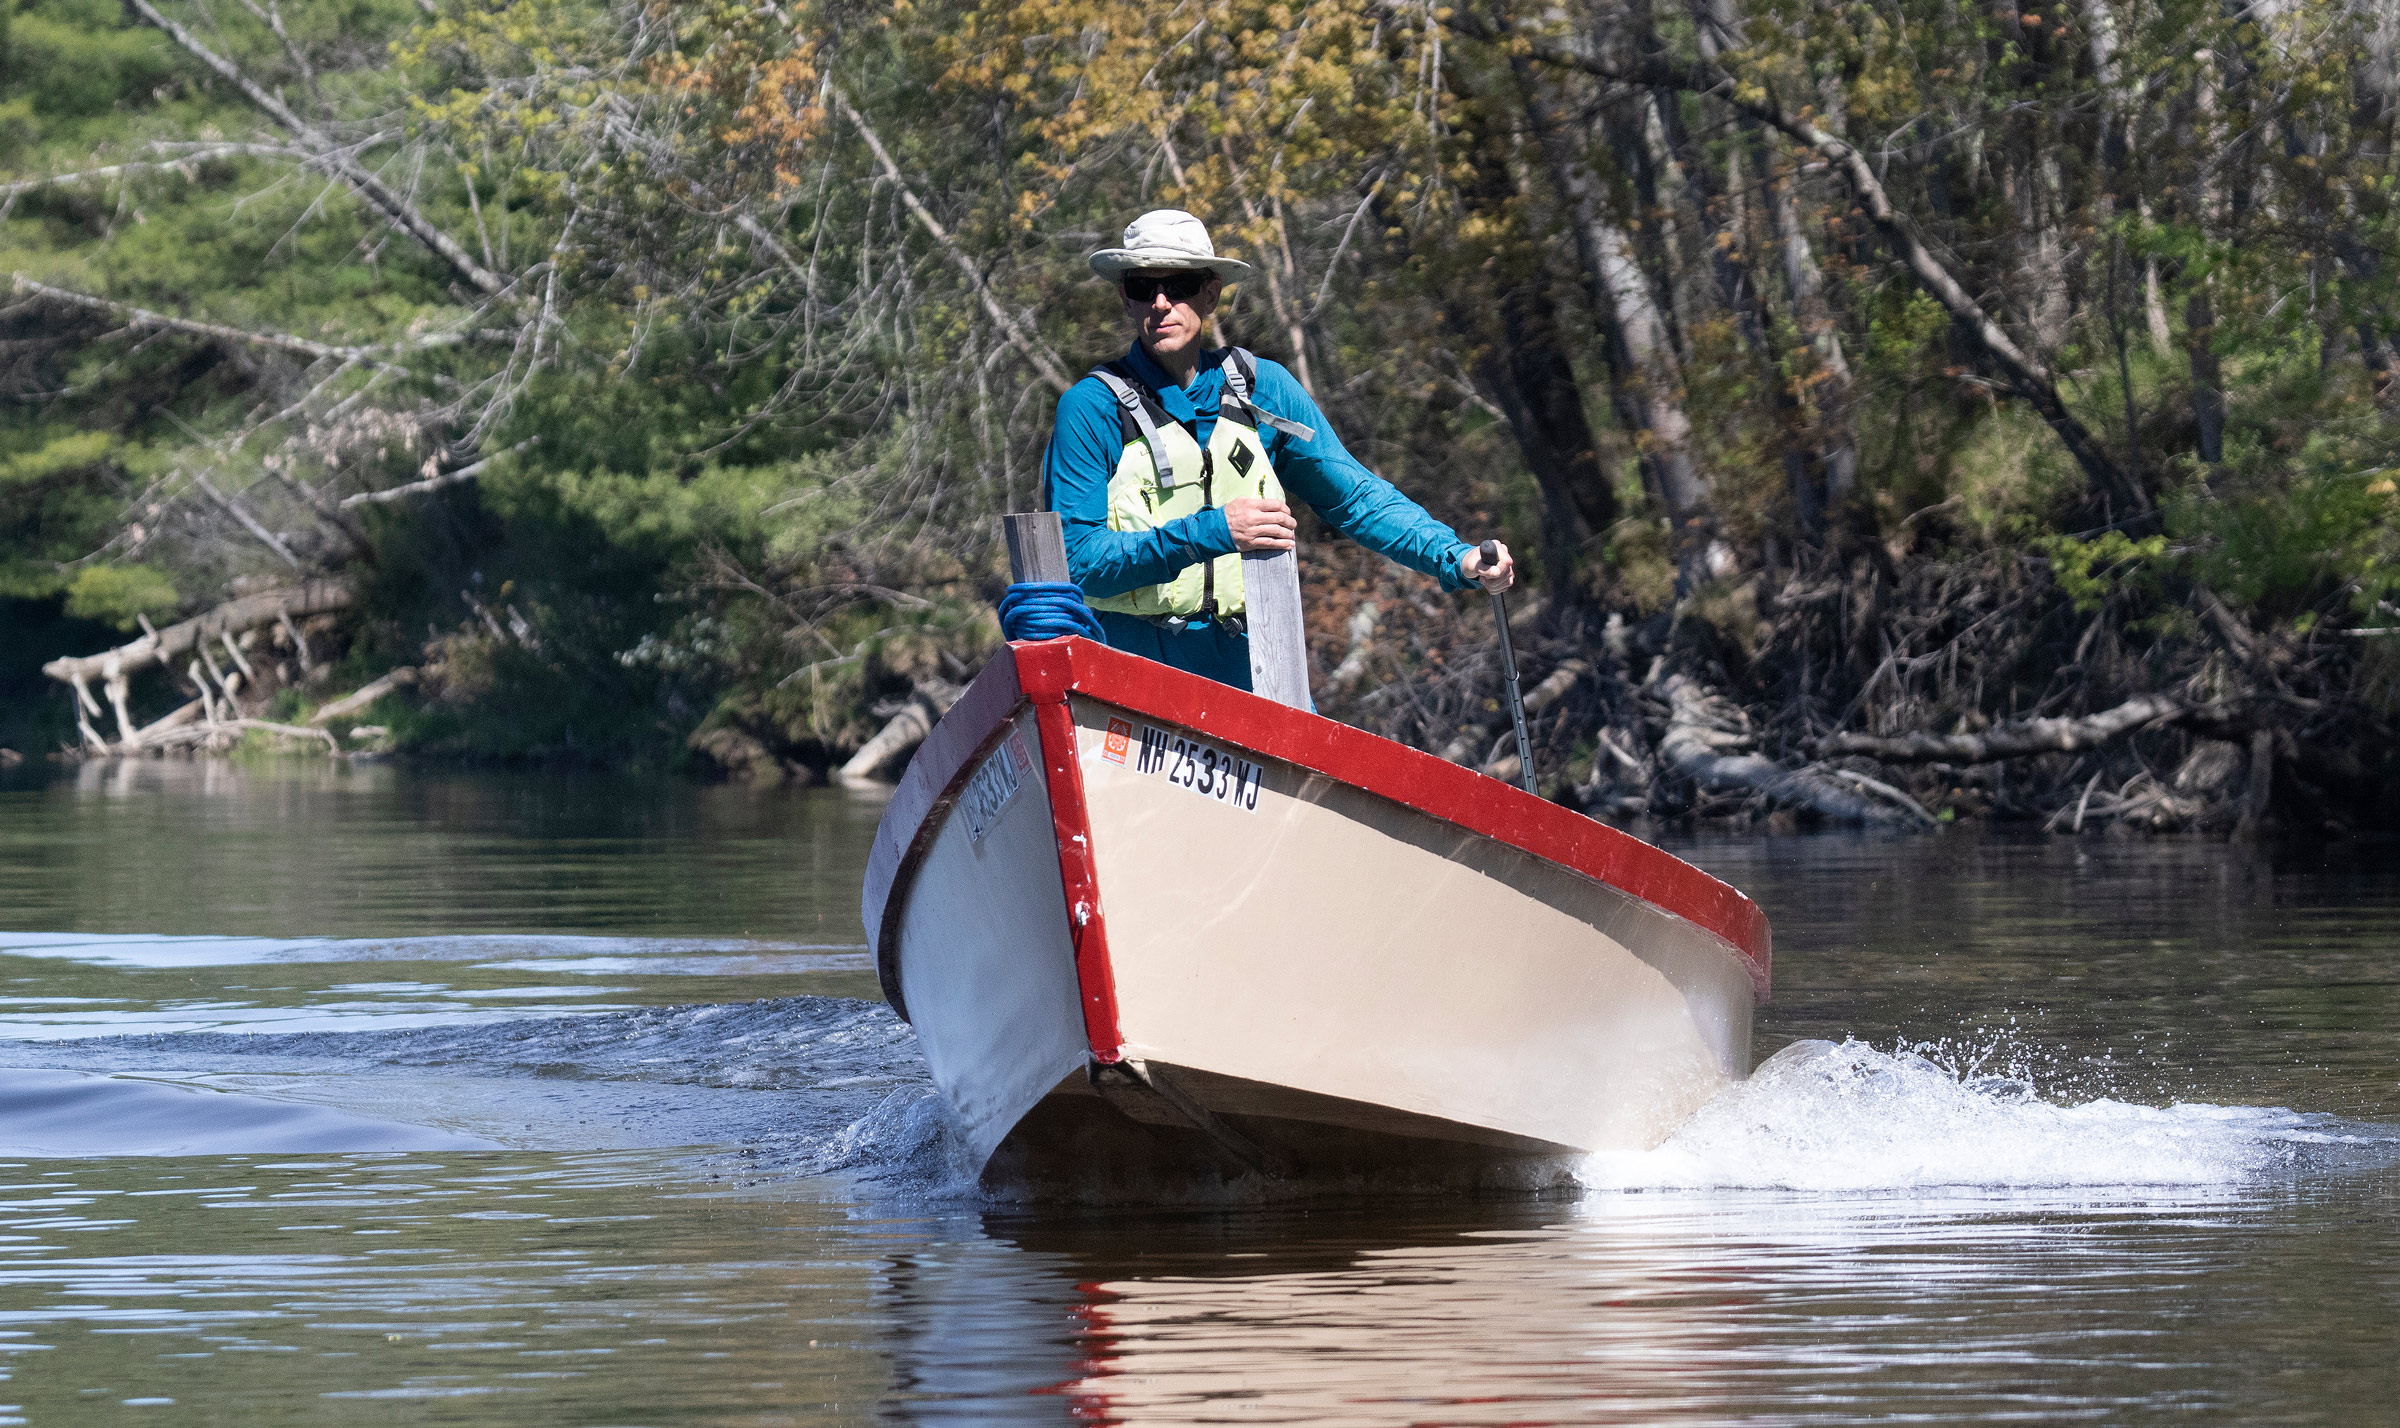
There are six designs in the NIS fleet, ranging from the 18-footer, which I sailed for this article, through 23′, 26′, 29′, 31′, and 43′. All except the two largest can be trailered, although the 29-footer is a ponderous beast on the road.
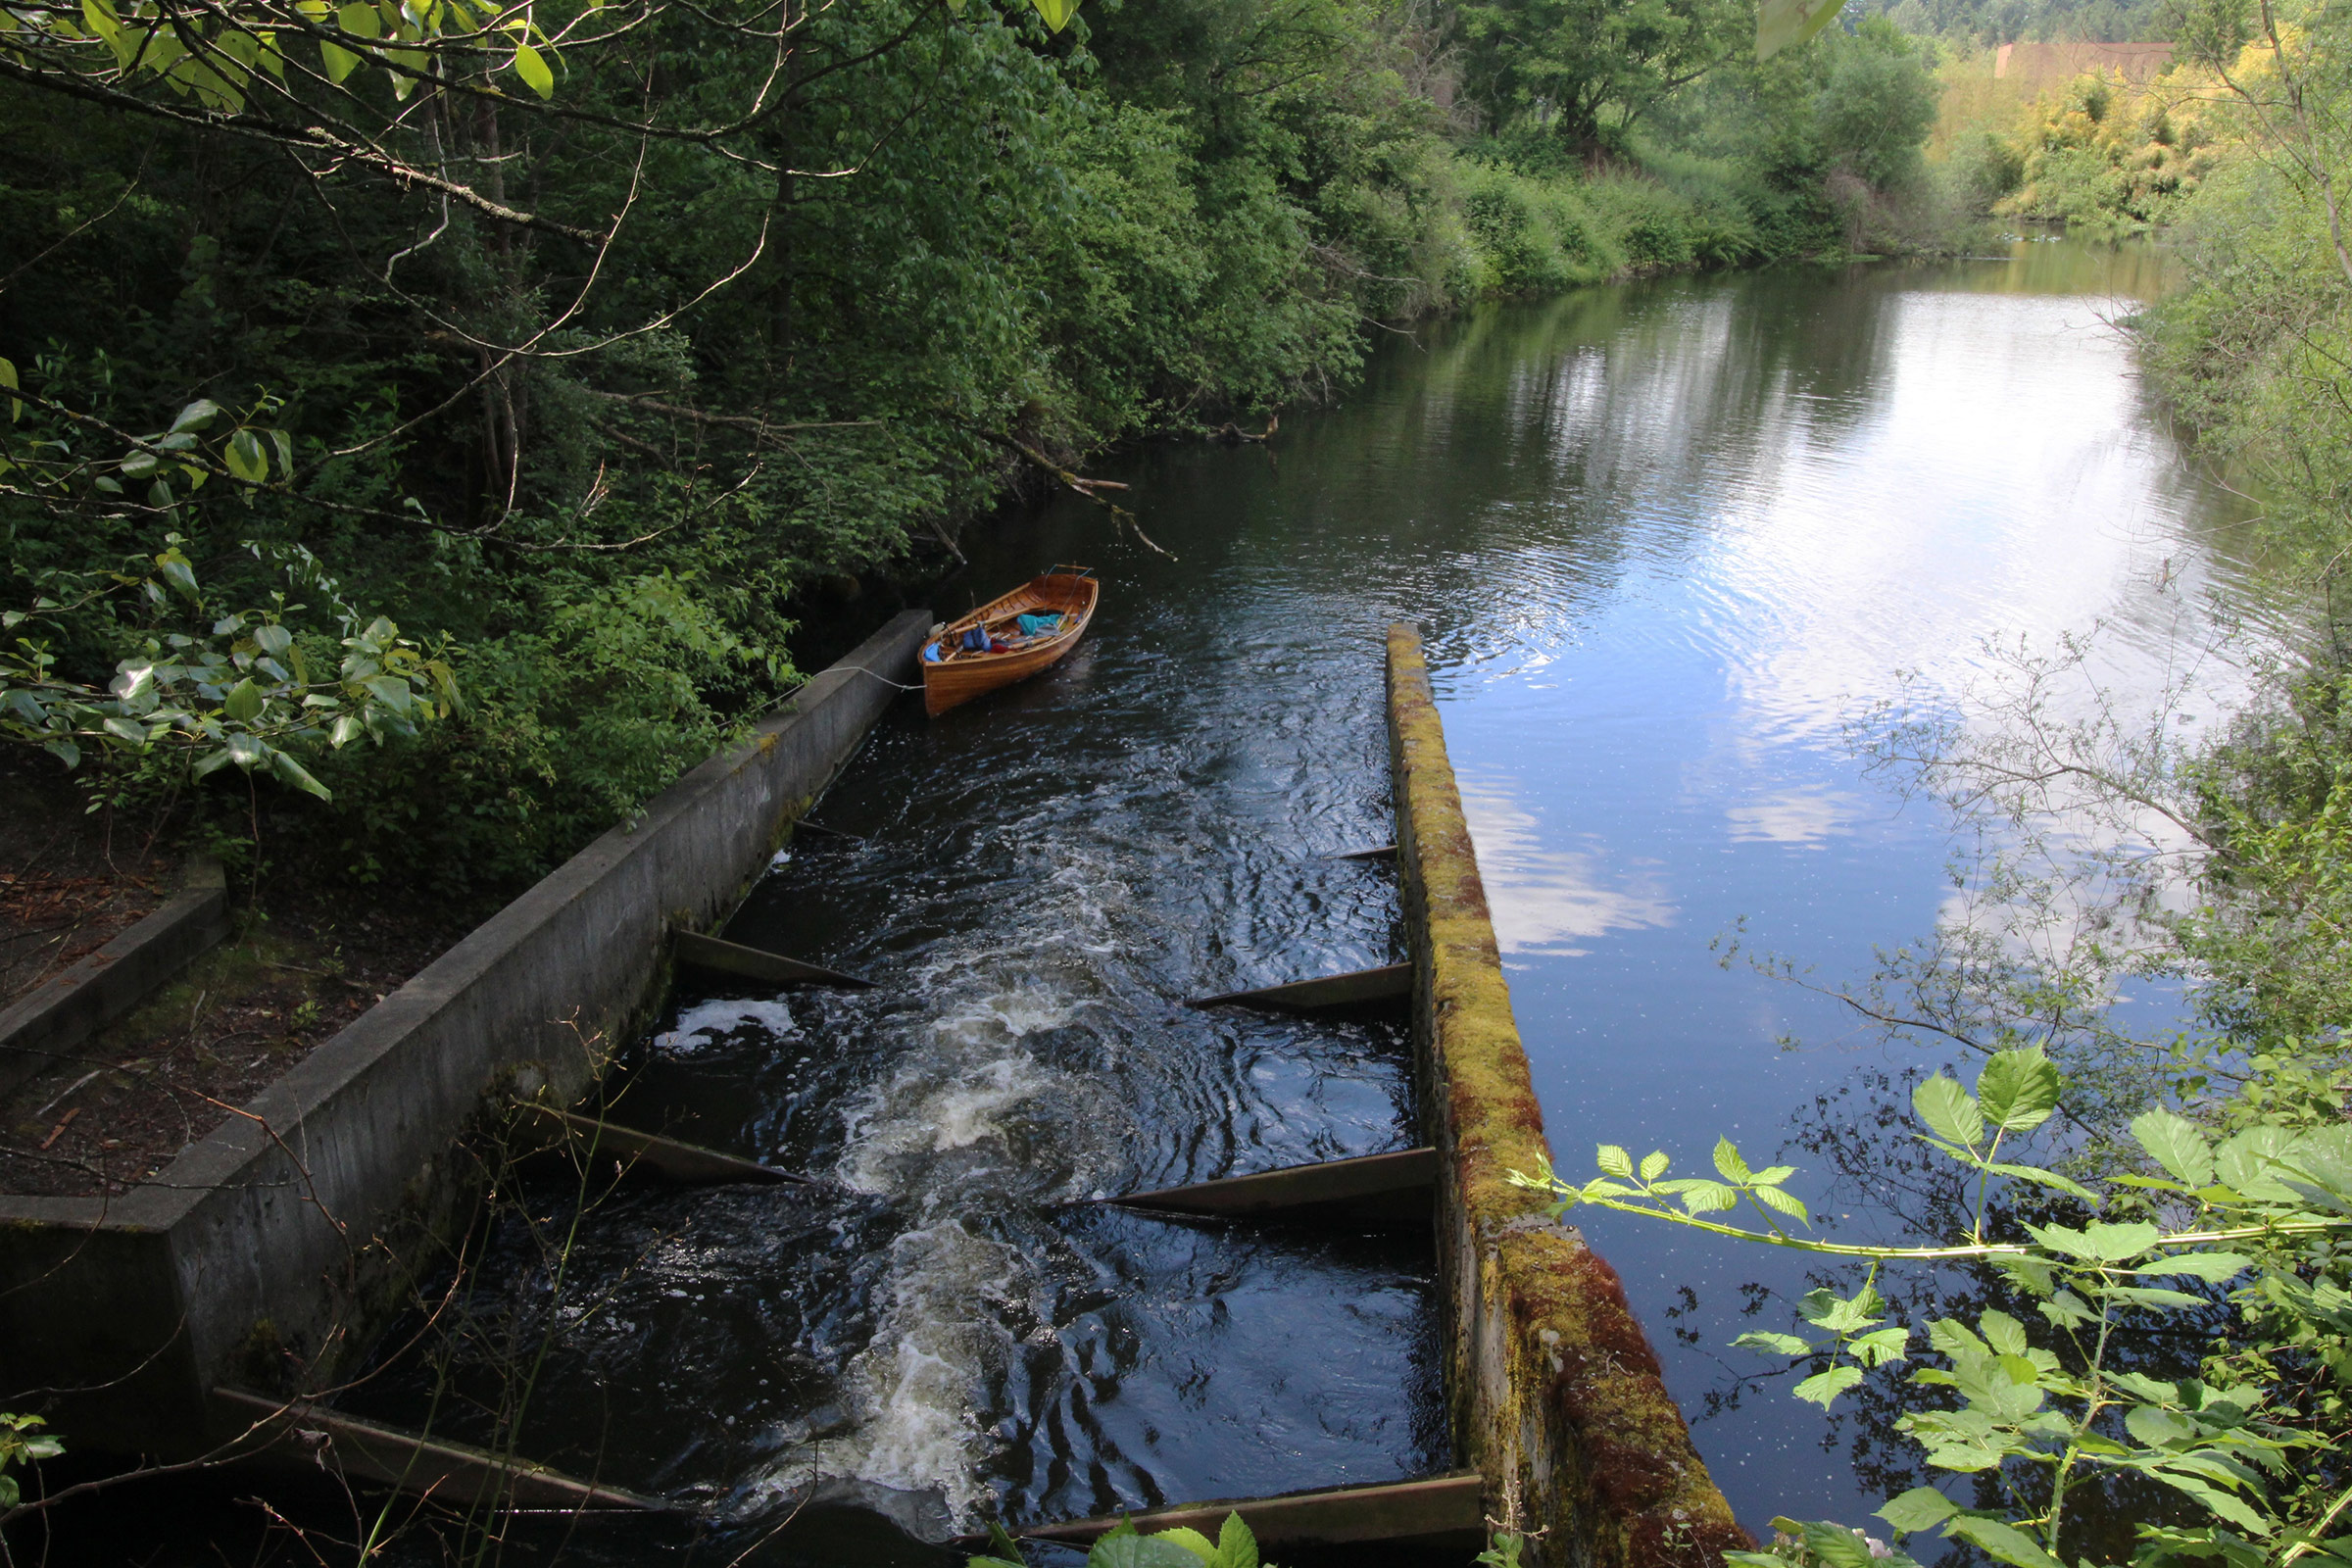
Traditional sharpies had their drawbacks. Their shallow, radically balanced rudders mounted under the rockered aft end sometimes made them tricky to steer. The NIS boats have retractable blade rudders mounted on the transom. The foil-shaped blades are designed to kick back against a bungee shock absorber if they hit something. You might think that the flat bottom would make the boats pound sailing to windward, but this is not so. They are initially quite tender before the hull shape firms them up, so even in light airs they sail slightly heeled. Owners report that once sailing, the boats present a chine to the waves, and the ride is remarkably soft and quiet.
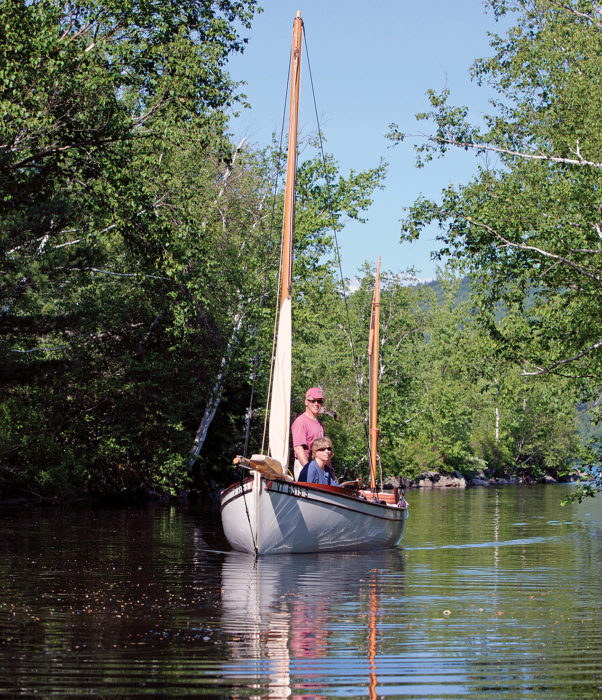
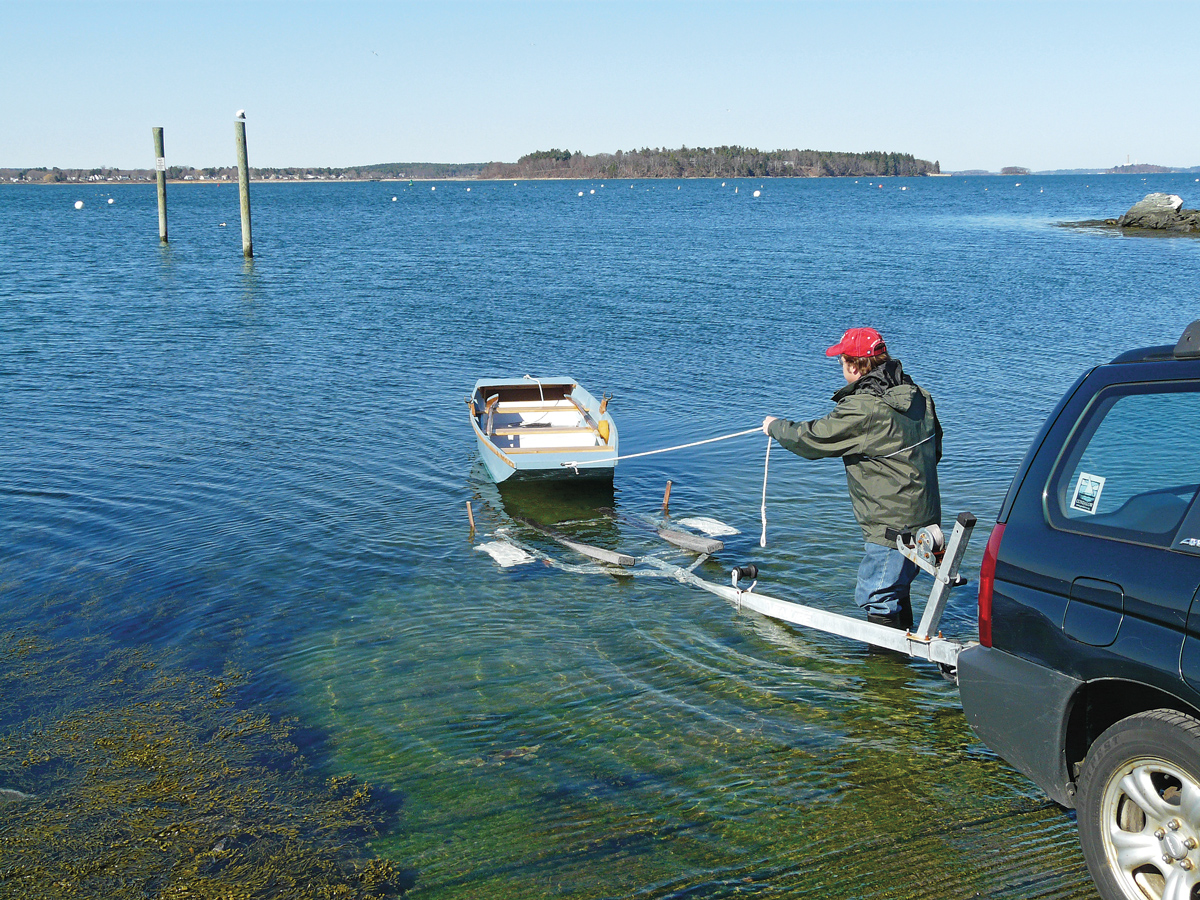
The shallow draft means that you can take these boats into places that are off-limits to normal yachts. The NIS 18 draws 10″ with the board up. The 31 draws only 12″. In calm, sheltered conditions you can literally run the bow onto the beach and step ashore.
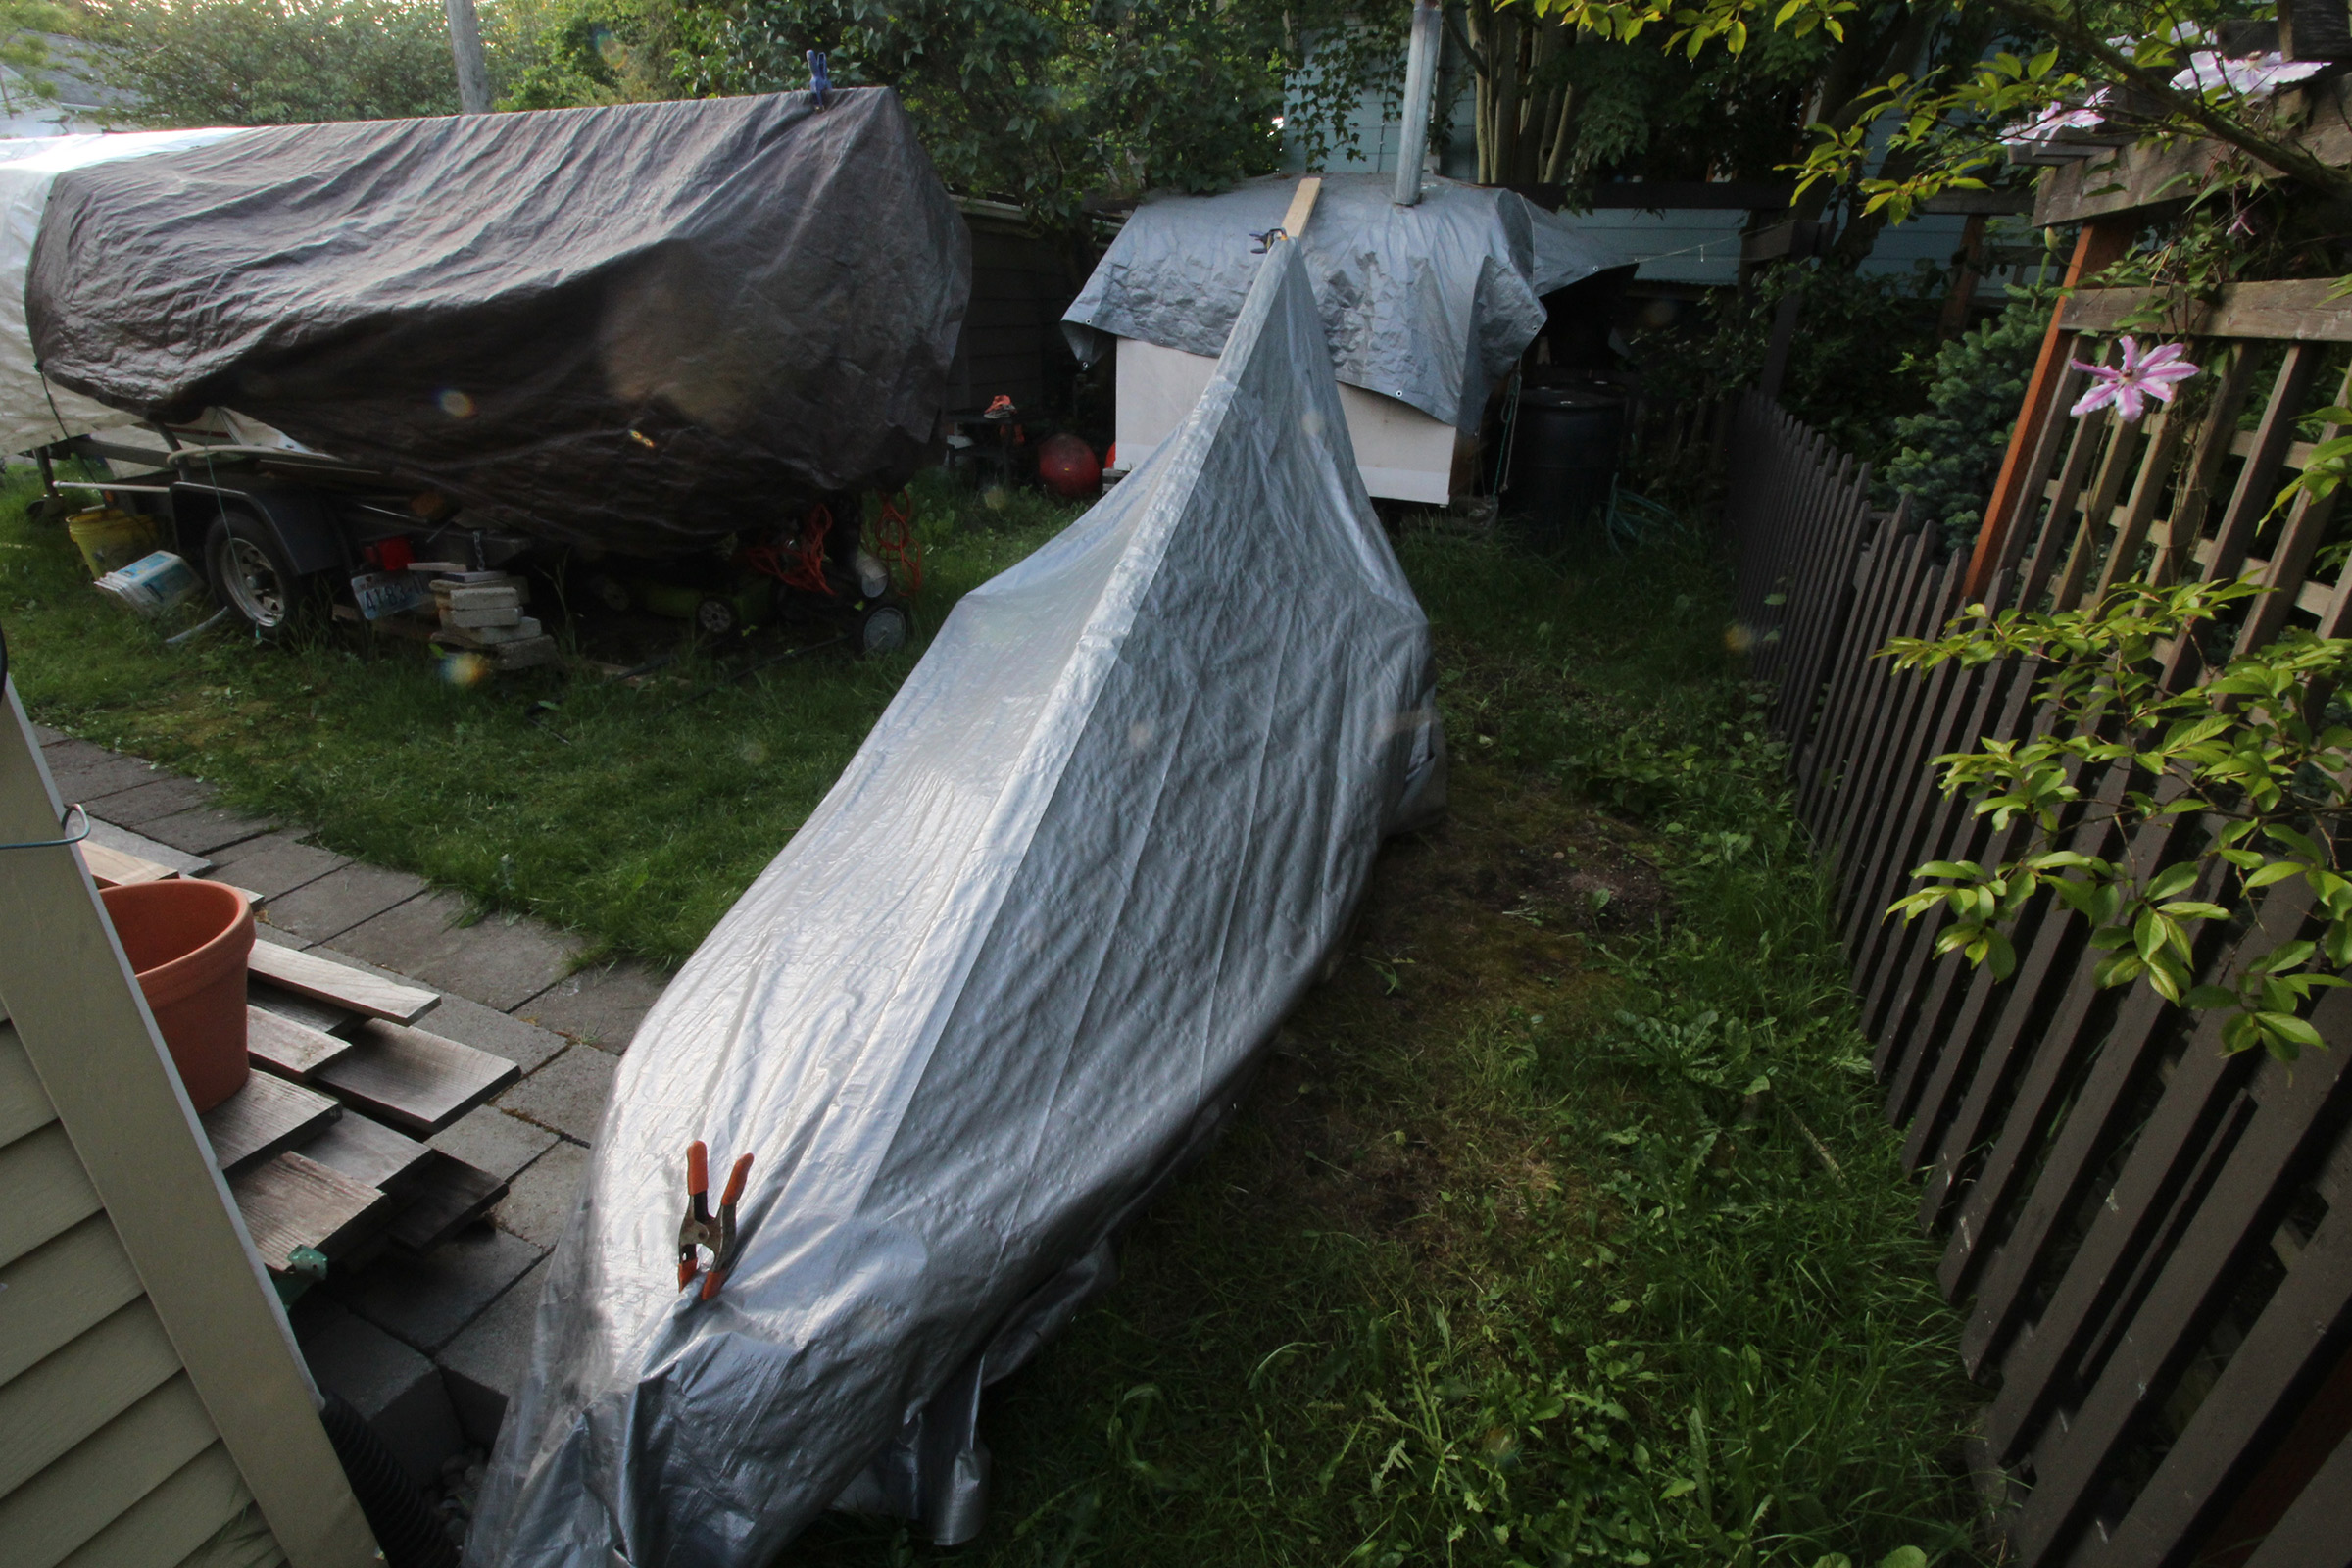
Courtesy of Stray Dog Boatworks
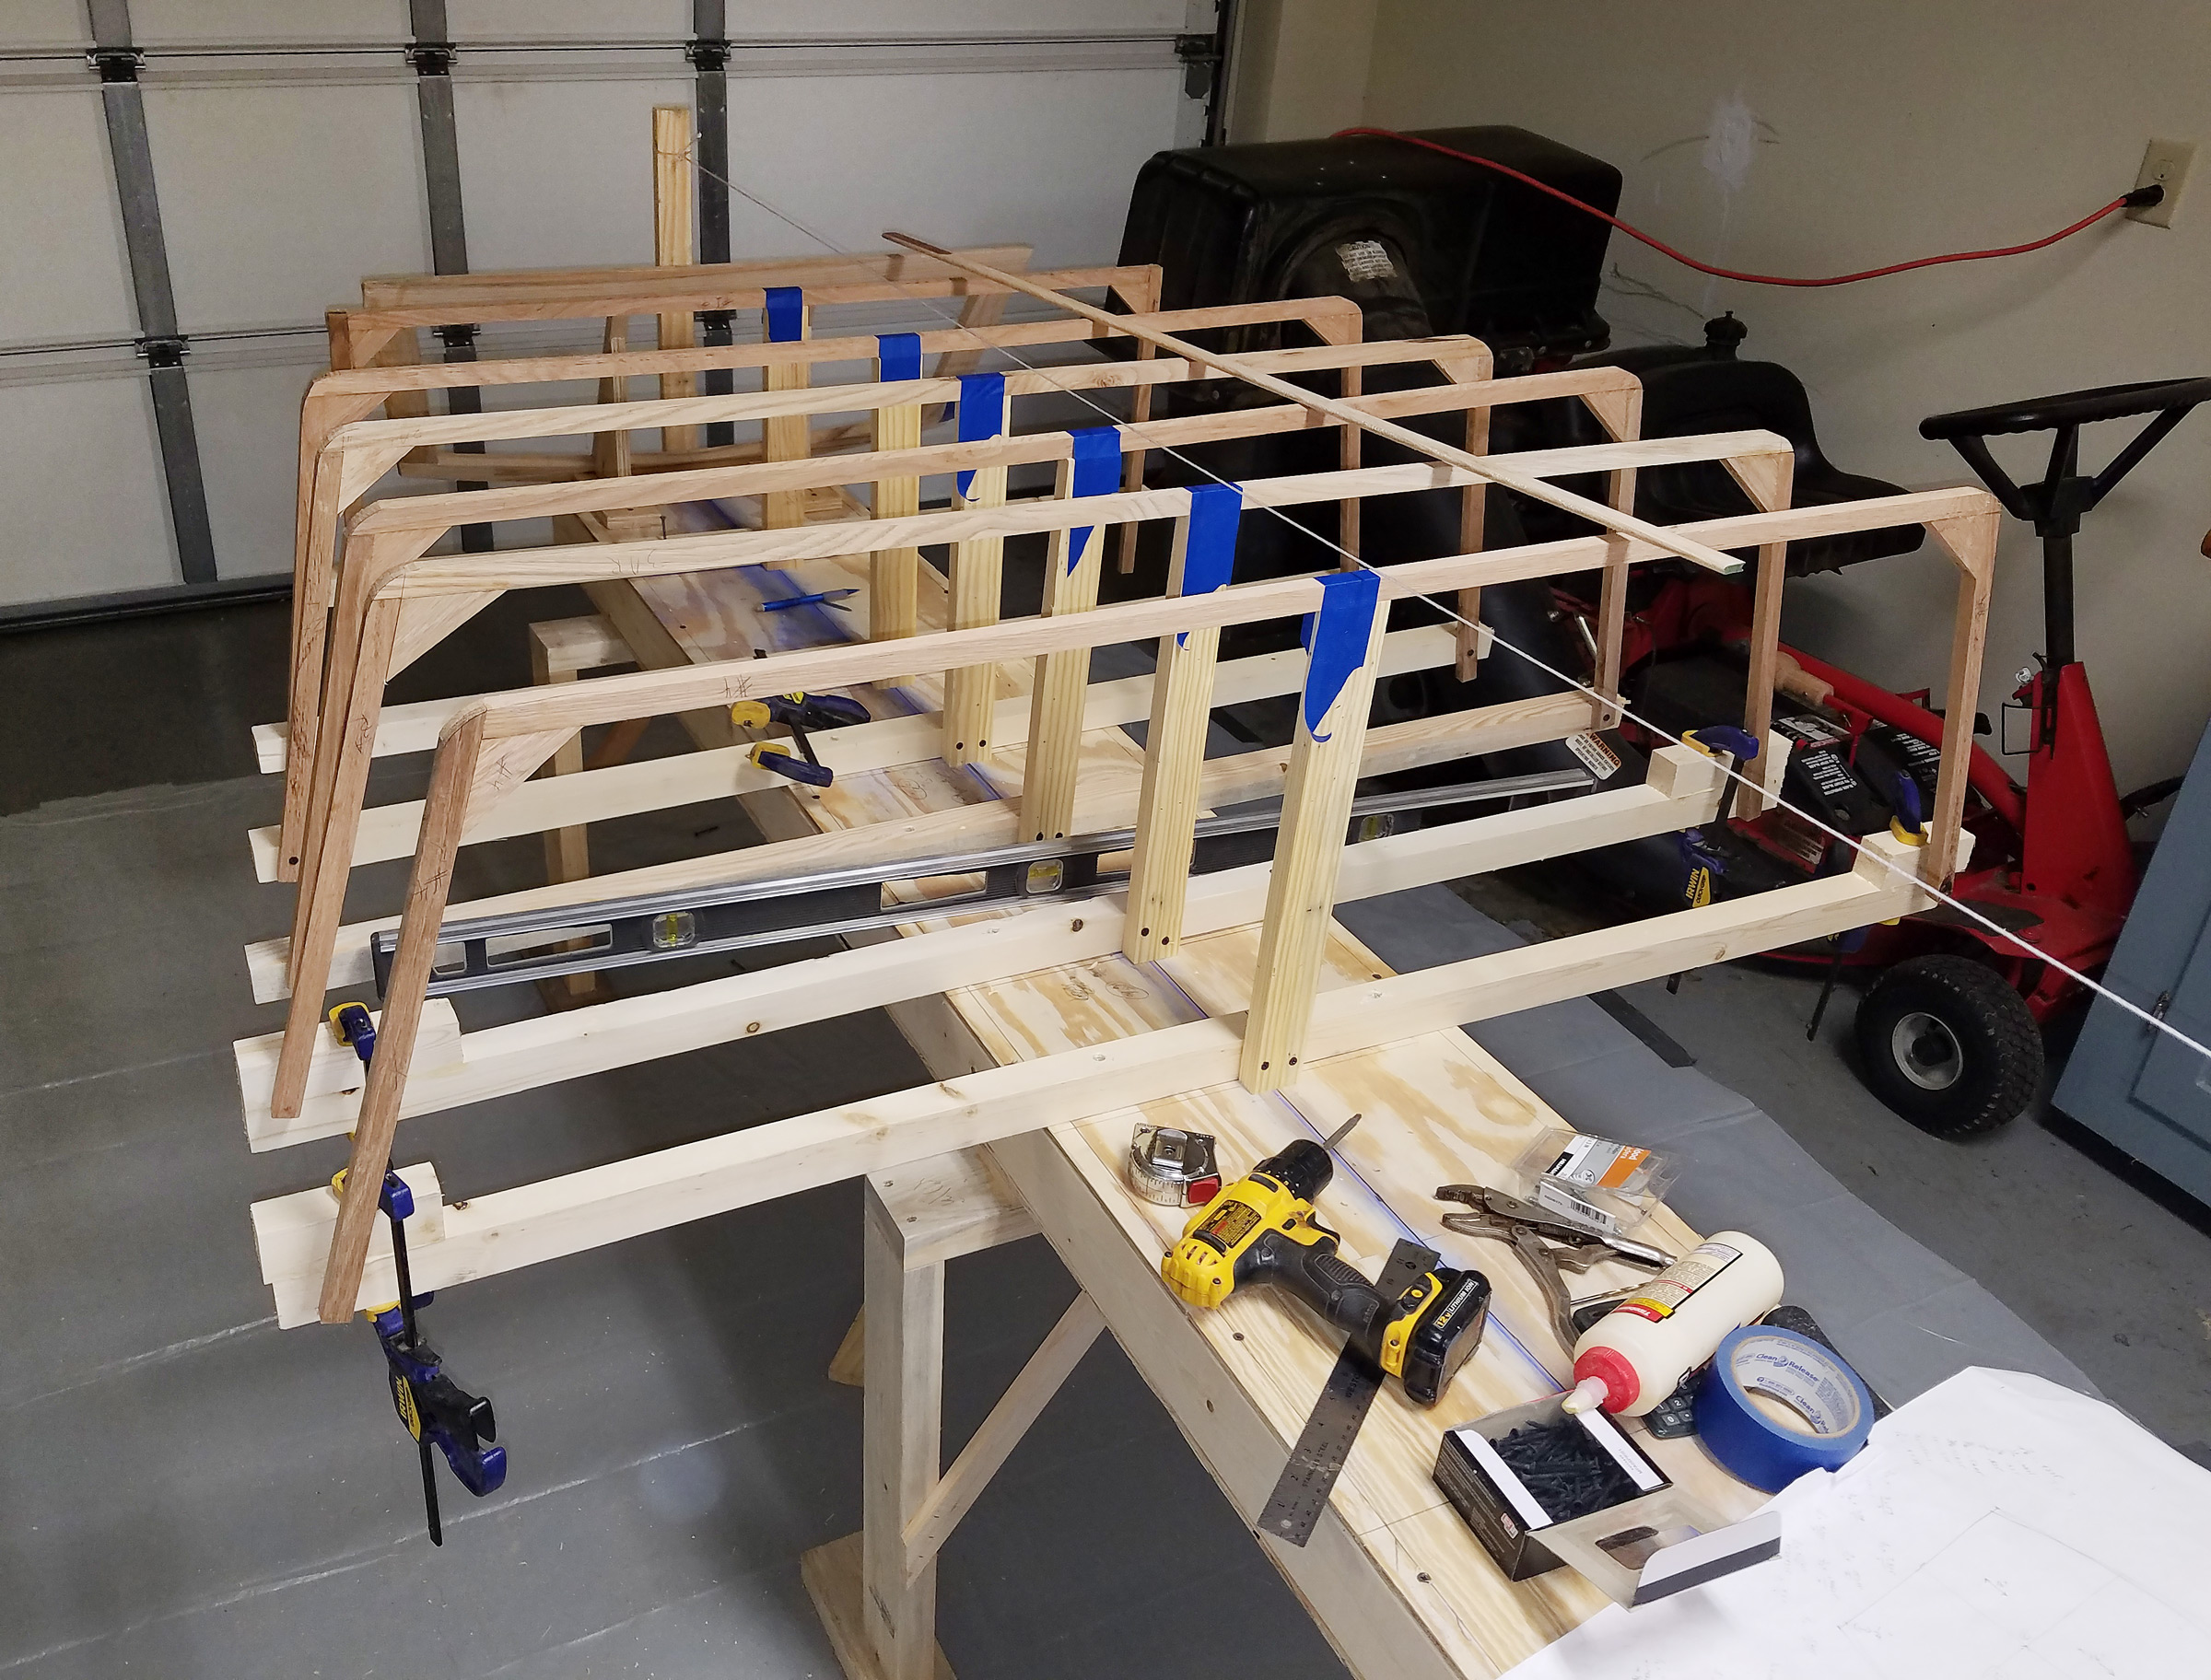
The Norwalk Islands Sharpies are built of readily available marine plywood, and a dedicated amateur should find the project both accessible and rewarding.
It’s probably fair to say that most people do not think of sharpies as seagoing boats. When Robert Ayliffe built his own 23-footer 23 years ago, he had no doubts about their capabilities. He had read the works of Commodore Ralph Munroe, who designed the sharpie yacht EGRET in the 1880s. The Commodore was one of the pioneer settlers of Miami, and his EGRET earned an enduring worldwide reputation while sailing on Biscayne Bay. Ayliffe was particularly impressed by an account of Munroe riding out a hurricane in EGRET without mishap.
Ayliffe’s first offshore passage in his 23-footer, CHARLIE FISHER, was from the South Australian mainland to Kangaroo Island, across the notoriously rough Investigator Strait. He and a companion beat to windward for eight hours in a gale that was recorded locally at 60-plus knots. “It was frightening,” he recalls, “but the boat sailed very well.” When they reached their destination, in true sharpie style they nosed up to the beach to rest and dry out. Other yachtsmen couldn’t believe that the little boat had been out in such weather. That was in 1988. Since then Ayliffe has weathered other Southern Ocean gales, including a protracted 45-knot howler in Bass Strait.
Courtesy of Stray Dog Boatworks
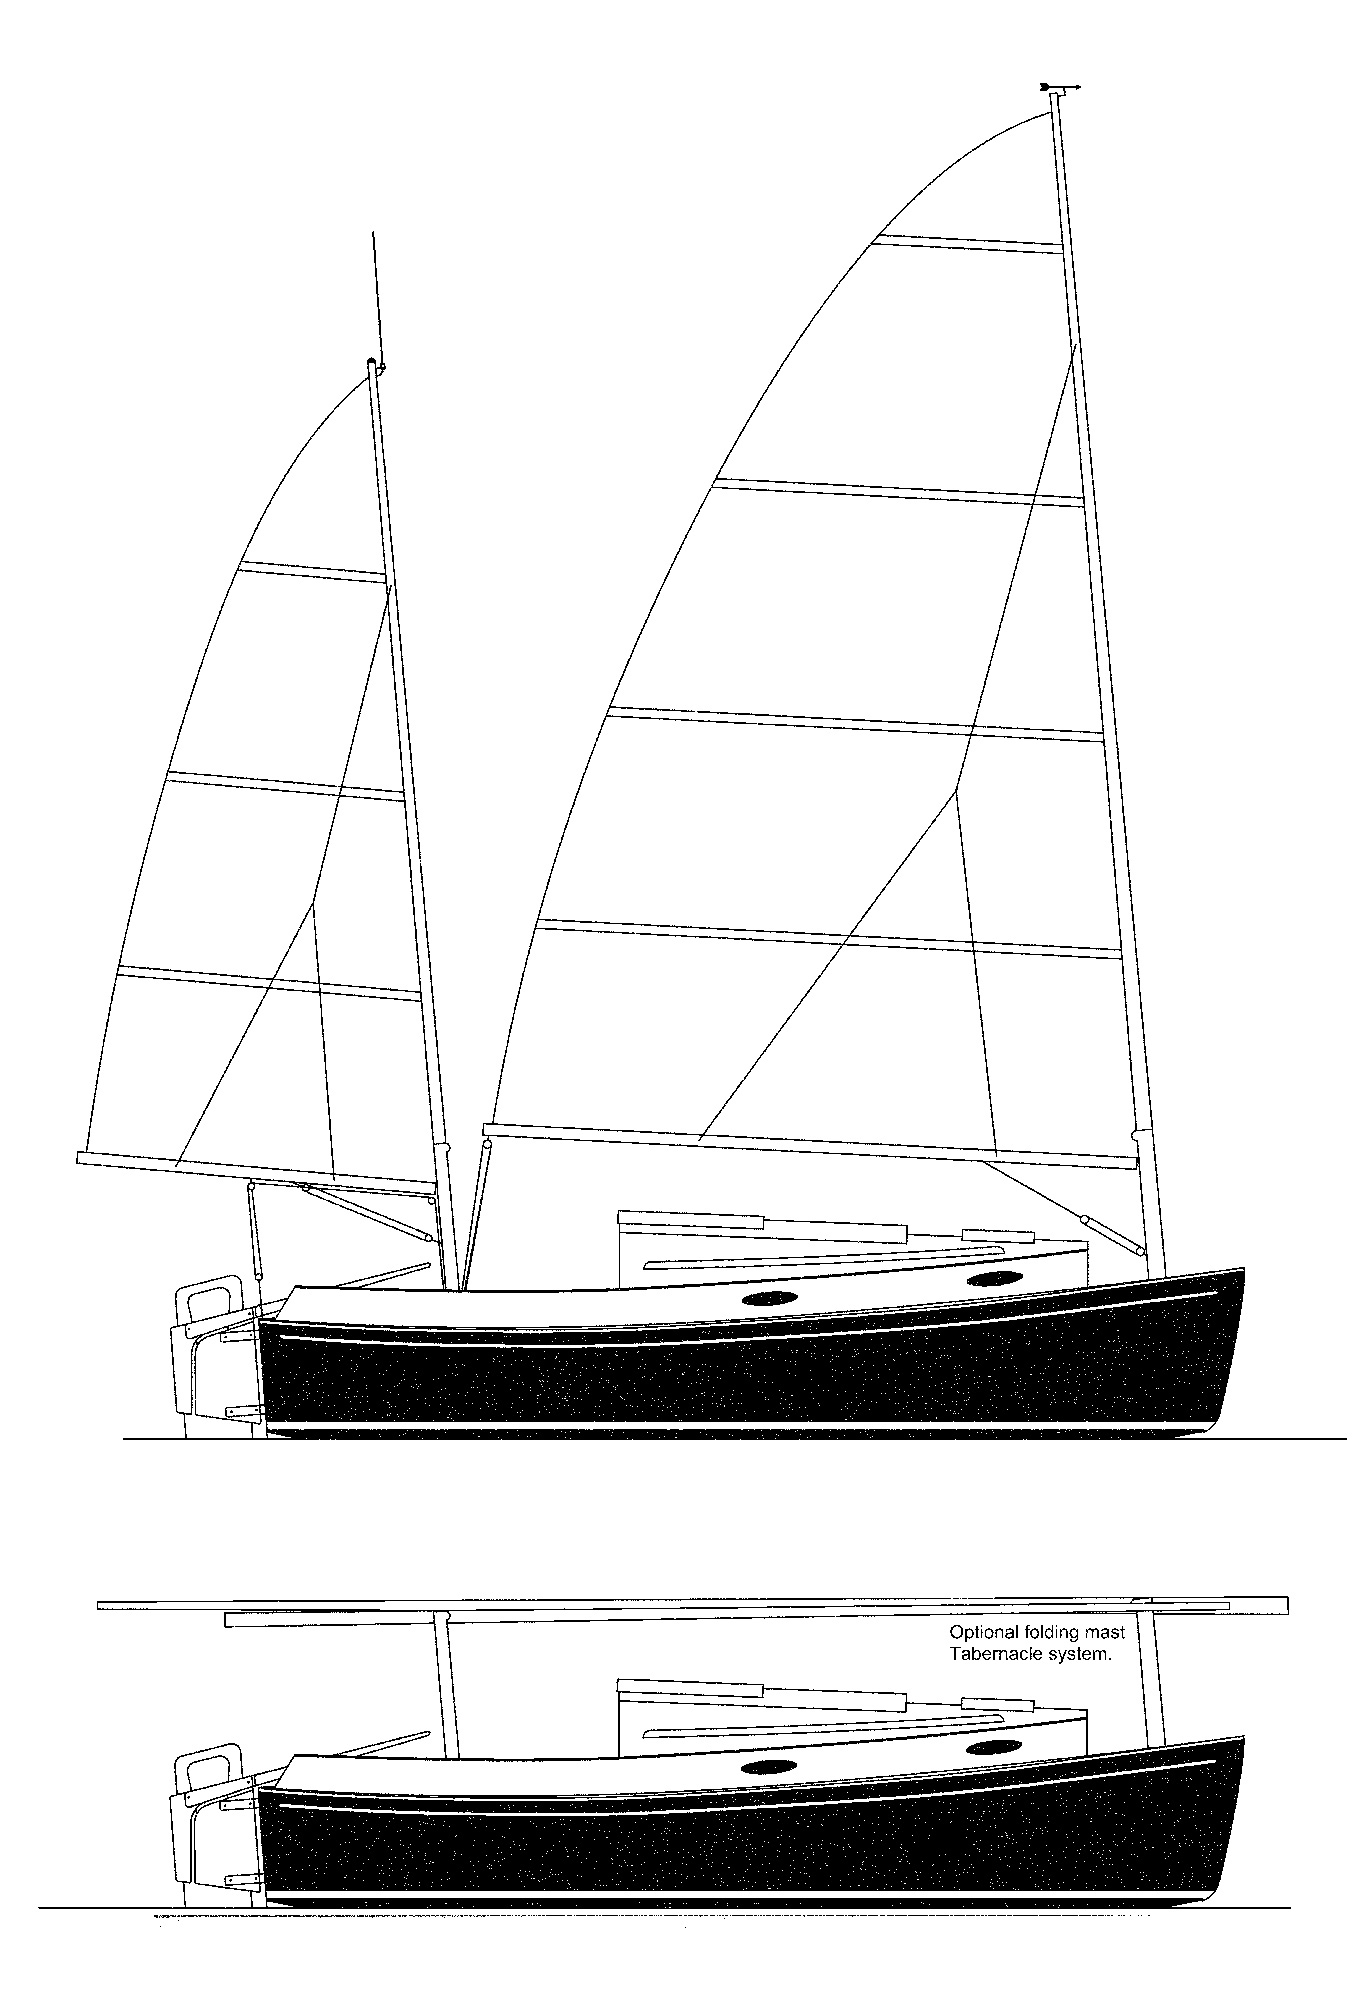
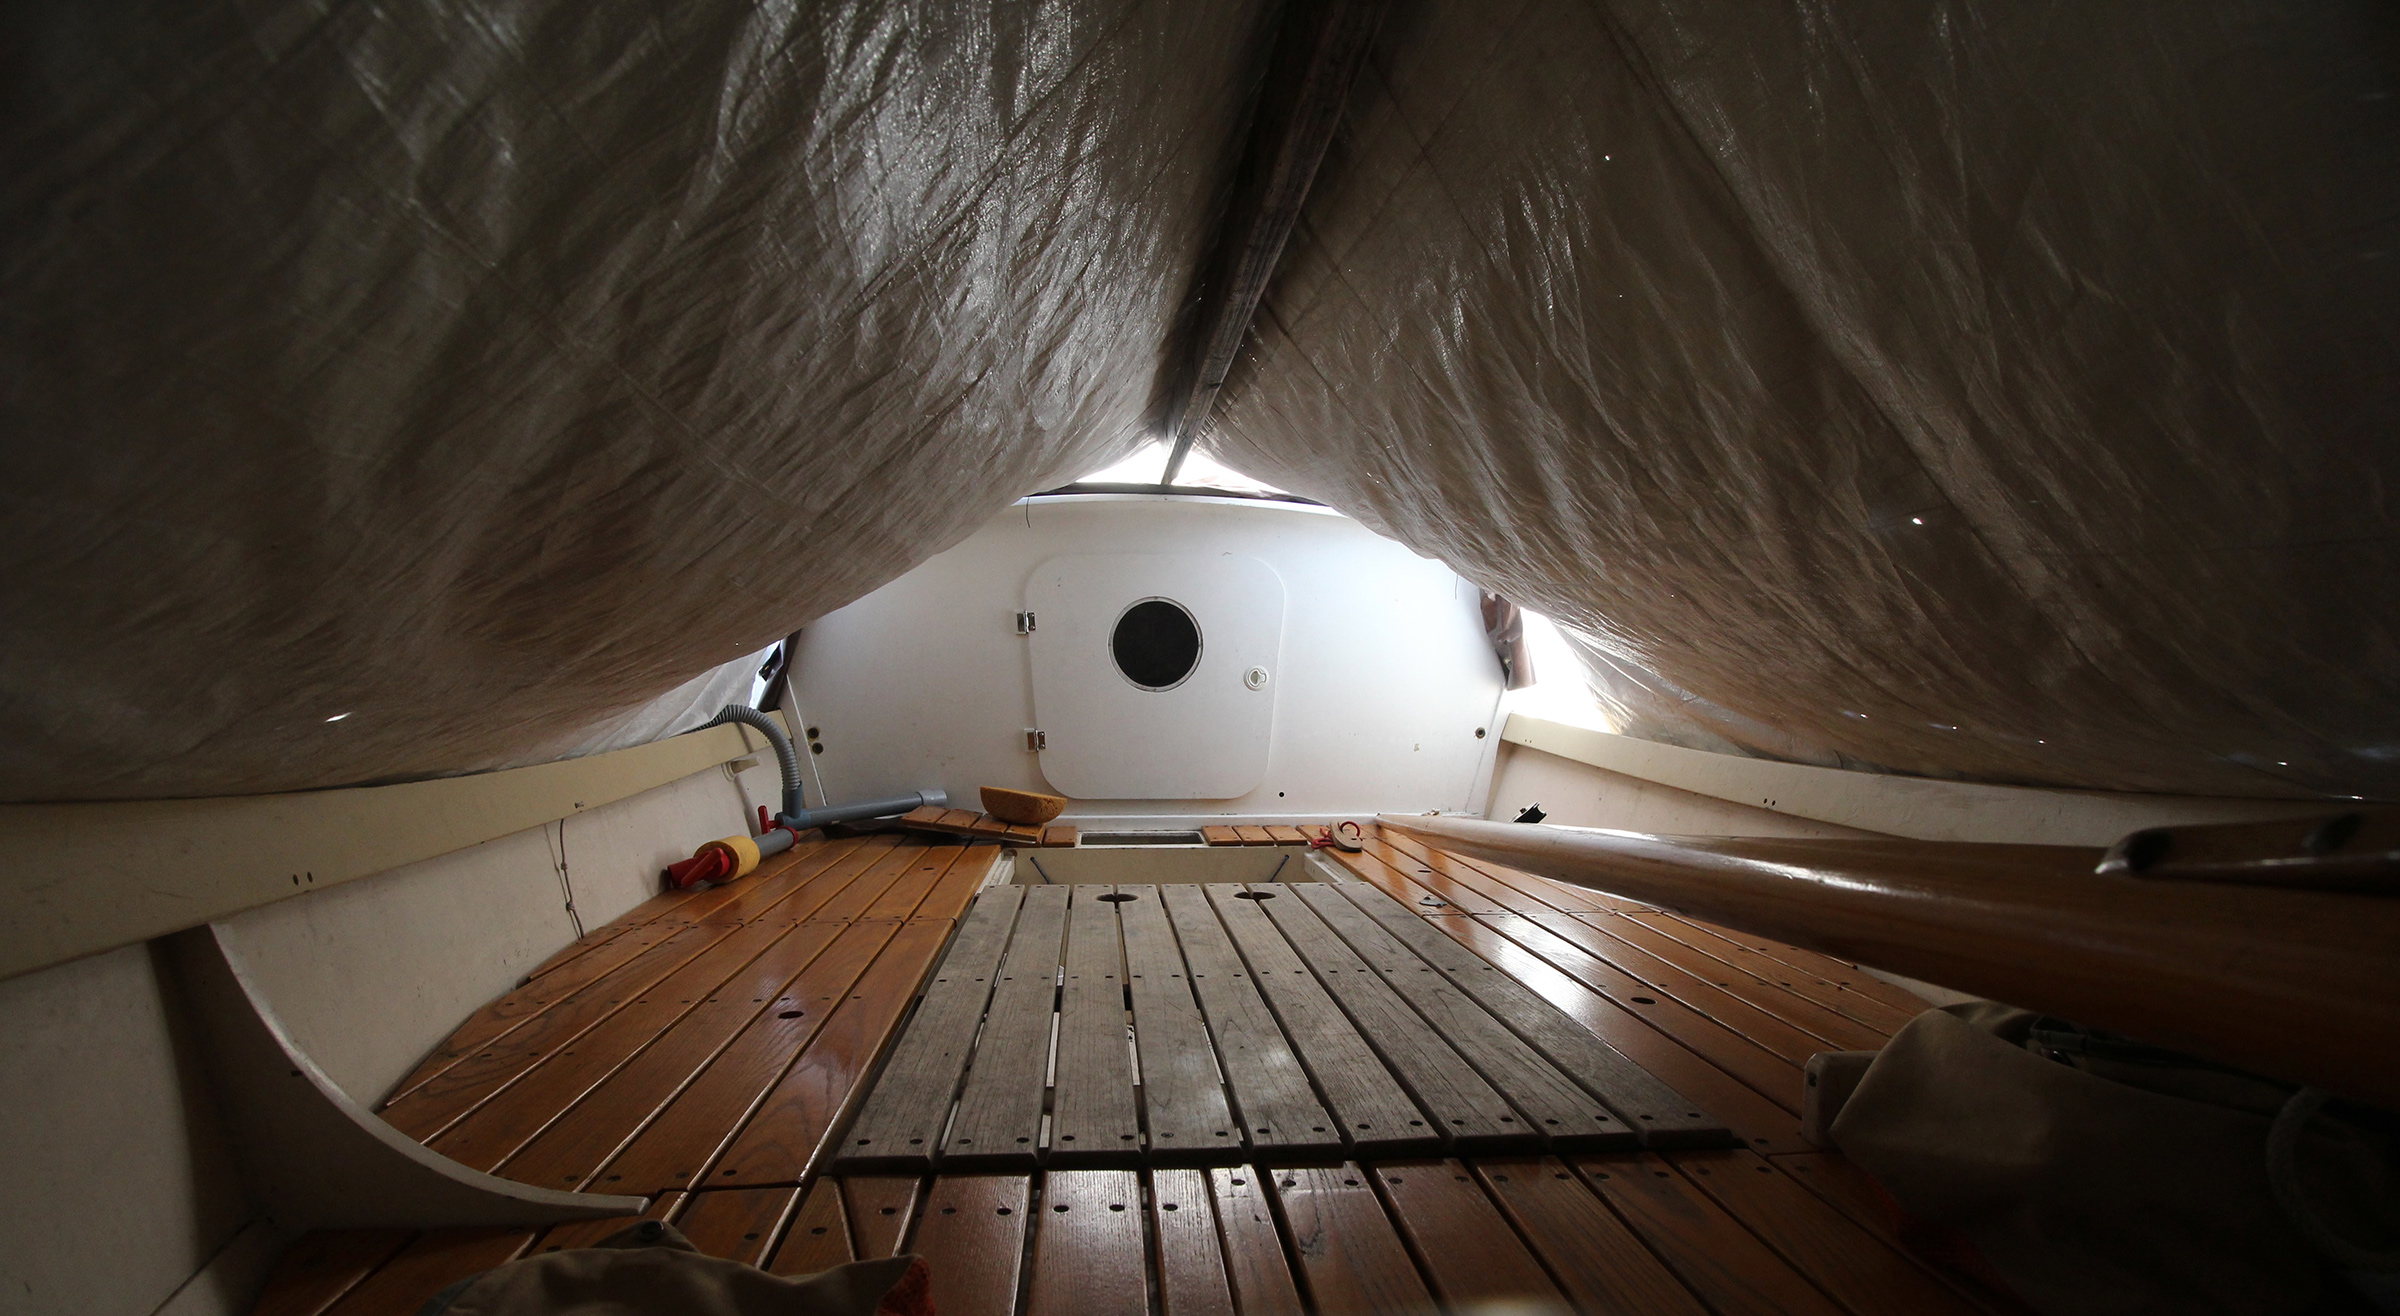
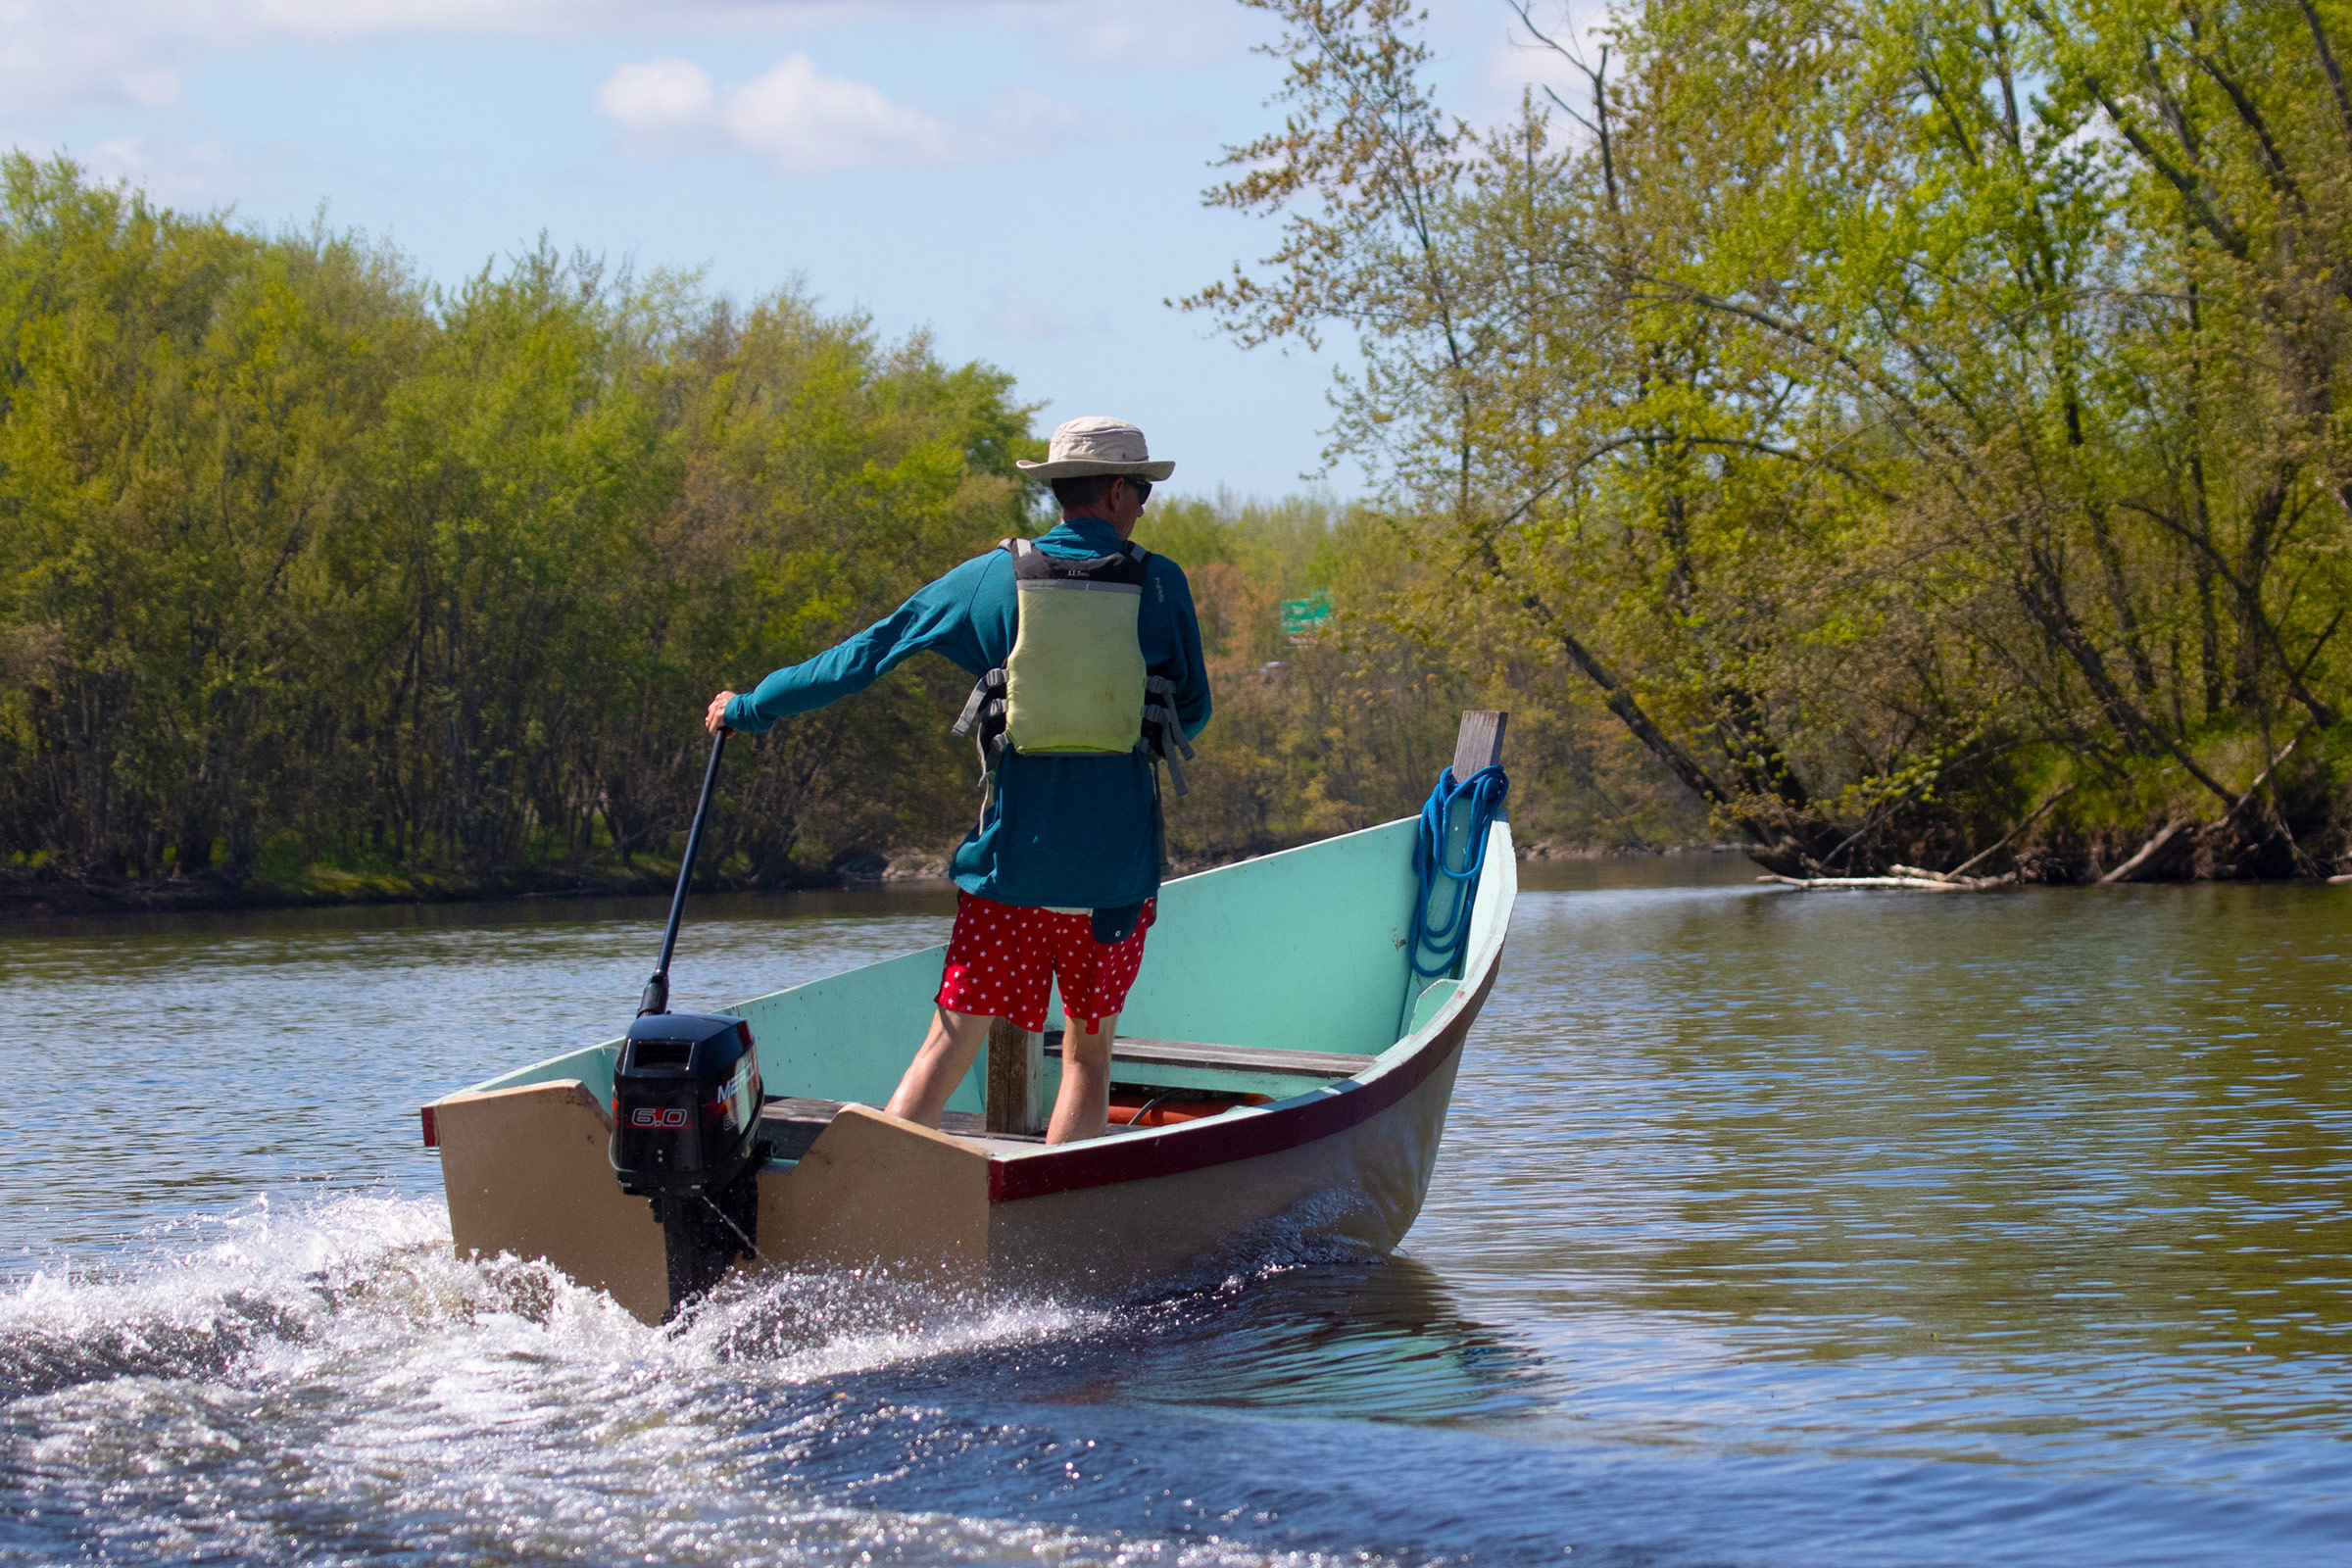
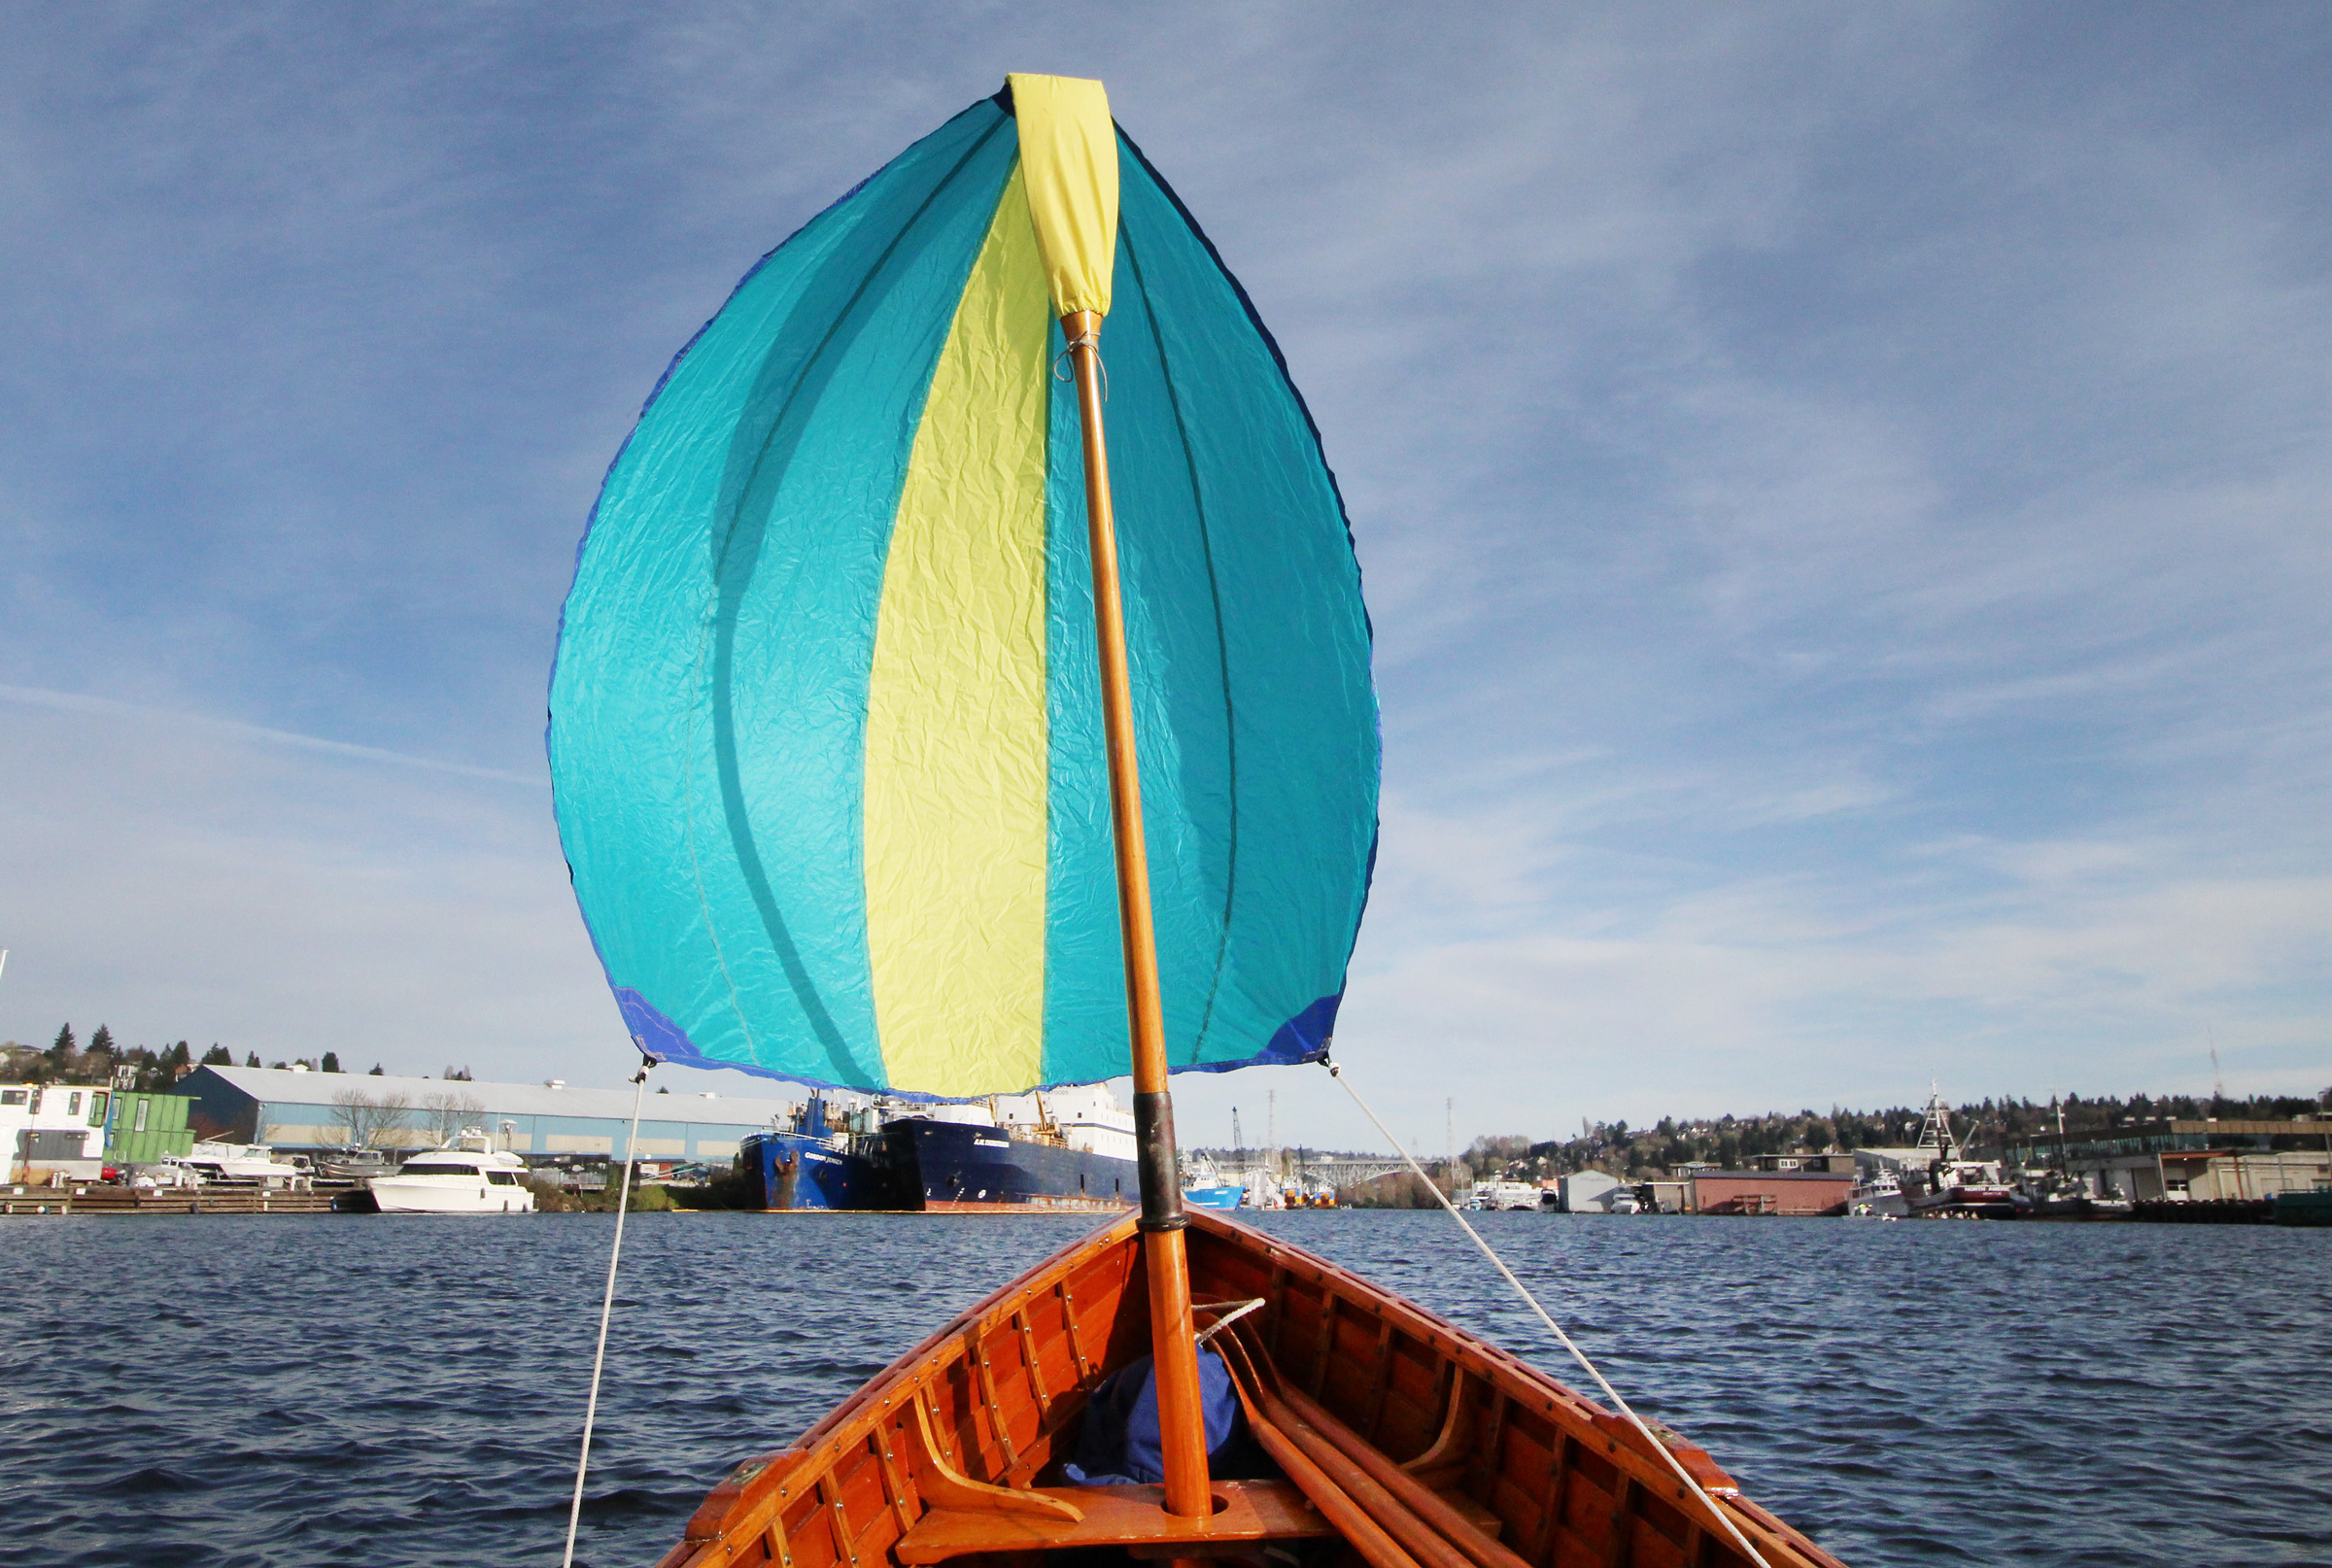
The deceptively sophisticated NIS 18 is easy to build and exciting and seaworthy under sail. The design includes the choice of two rigs: an unstayed gaff and an unstayed, fully battened marconi.
Bruce Kirby commissioned an independent marine consulting firm, Aerohydro Inc., of Southwest Harbor, Maine, to do an analysis of the righting moment of the 31-footer. He asked for righting moments for every 10 degrees up to 180 degrees (upside down). He was pleased and just a bit surprised when the results indicated that the 31 could roll to 143 degrees and expect to come back upright. A point of no return of 110 degrees is considered good for a small cruising boat; 143 degrees is remarkable.
The sharpies have fairly wide side decks combined with a high, crowned cabintop, so if the boat is knocked down the house supplies considerable flotation. The cockpit seats and the enclosed coaming seat backs also add buoyancy. Kirby notes that the self-righting chaacteristic applies to all sizes, but the smaller boats are more affected by crew distribution.
The Aerohydro study assumed that the hatches were closed. Ross Henderson, the Tasmanian owner of a 23-footer, was racing in Bass Strait recently when, through an odd combination of wind and wave, the boat was knocked flat. The masts were lying in the water; Henderson estimates that the boat was lying at about 100 degrees. The cockpit filled with water and, although the main hatch was open, not a drop went below.
While Robert Ayliffe hesitates to urge offshore adventures upon his customers, he says that with proper preparation and a skilled crew he has absolute confidence that these boats are up to the task.
Courtesy of Stray Dog Boatworks
The smaller Norwalk Islands Sharpies are uncluttered by sailbags and poles, since the two sails live on the booms and there are no bagged headsails needing stowage.
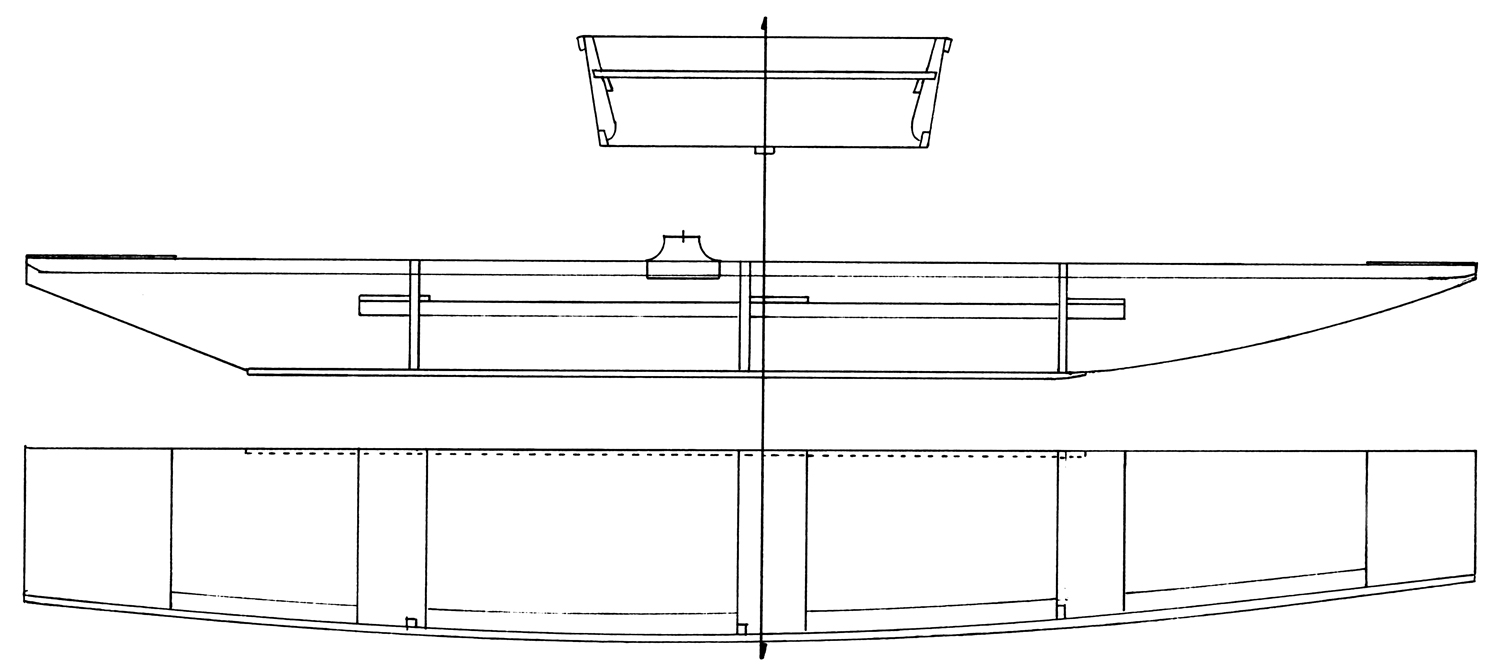
The NIS boats are built of marine plywood, sheathed with fiberglass and sealed inside and out with epoxy. Their simple, hard-chined hull shape places them within the abilities of amateur builders.
While the accommodations in the smaller boats is necessarily spartan, it is worth noting that the sails always live on the booms and, since the unstayed rig means that the boom can swing past 90 degrees, there is no need for spinnakers or spare headsails. Therefore, there are no sailbags down below. Some may find the presence of a centerboard trunk obtrusive, but on the 18-footer the accommodations have been left clear by cleverly placing the trunk slightly off-center and hiding it in the furniture. It seems to make no difference to the performance on either tack.
The cat-ketch is about as simple a rig as you can get. With the optional tabernacles, one person can step the unstayed masts easily. While the boat is being trailered, the sails can be left furled on the booms with the lazy-jacks and halyards in place, as the booms are attached to the tabernacles, not the masts. Upon arrival at the launching site, you simply winch the masts upright, slide the boat into the water, and go sailing. The masts on the original Norwalk Islands Sharpies were spun aluminum; there is now a carbon-fiber option, which is 35 percent of the weight of aluminum.
Having no jib, changing tacks on a sharpie is a matter of simply pushing the tiller over. The two sails look after themselves. You can sail these boats around in circles without touching a sheet, though there are control lines—vang, outhaul, and cunningham—for fine-tuning the sails’ shapes.
Courtesy of Stray Dog Boatworks
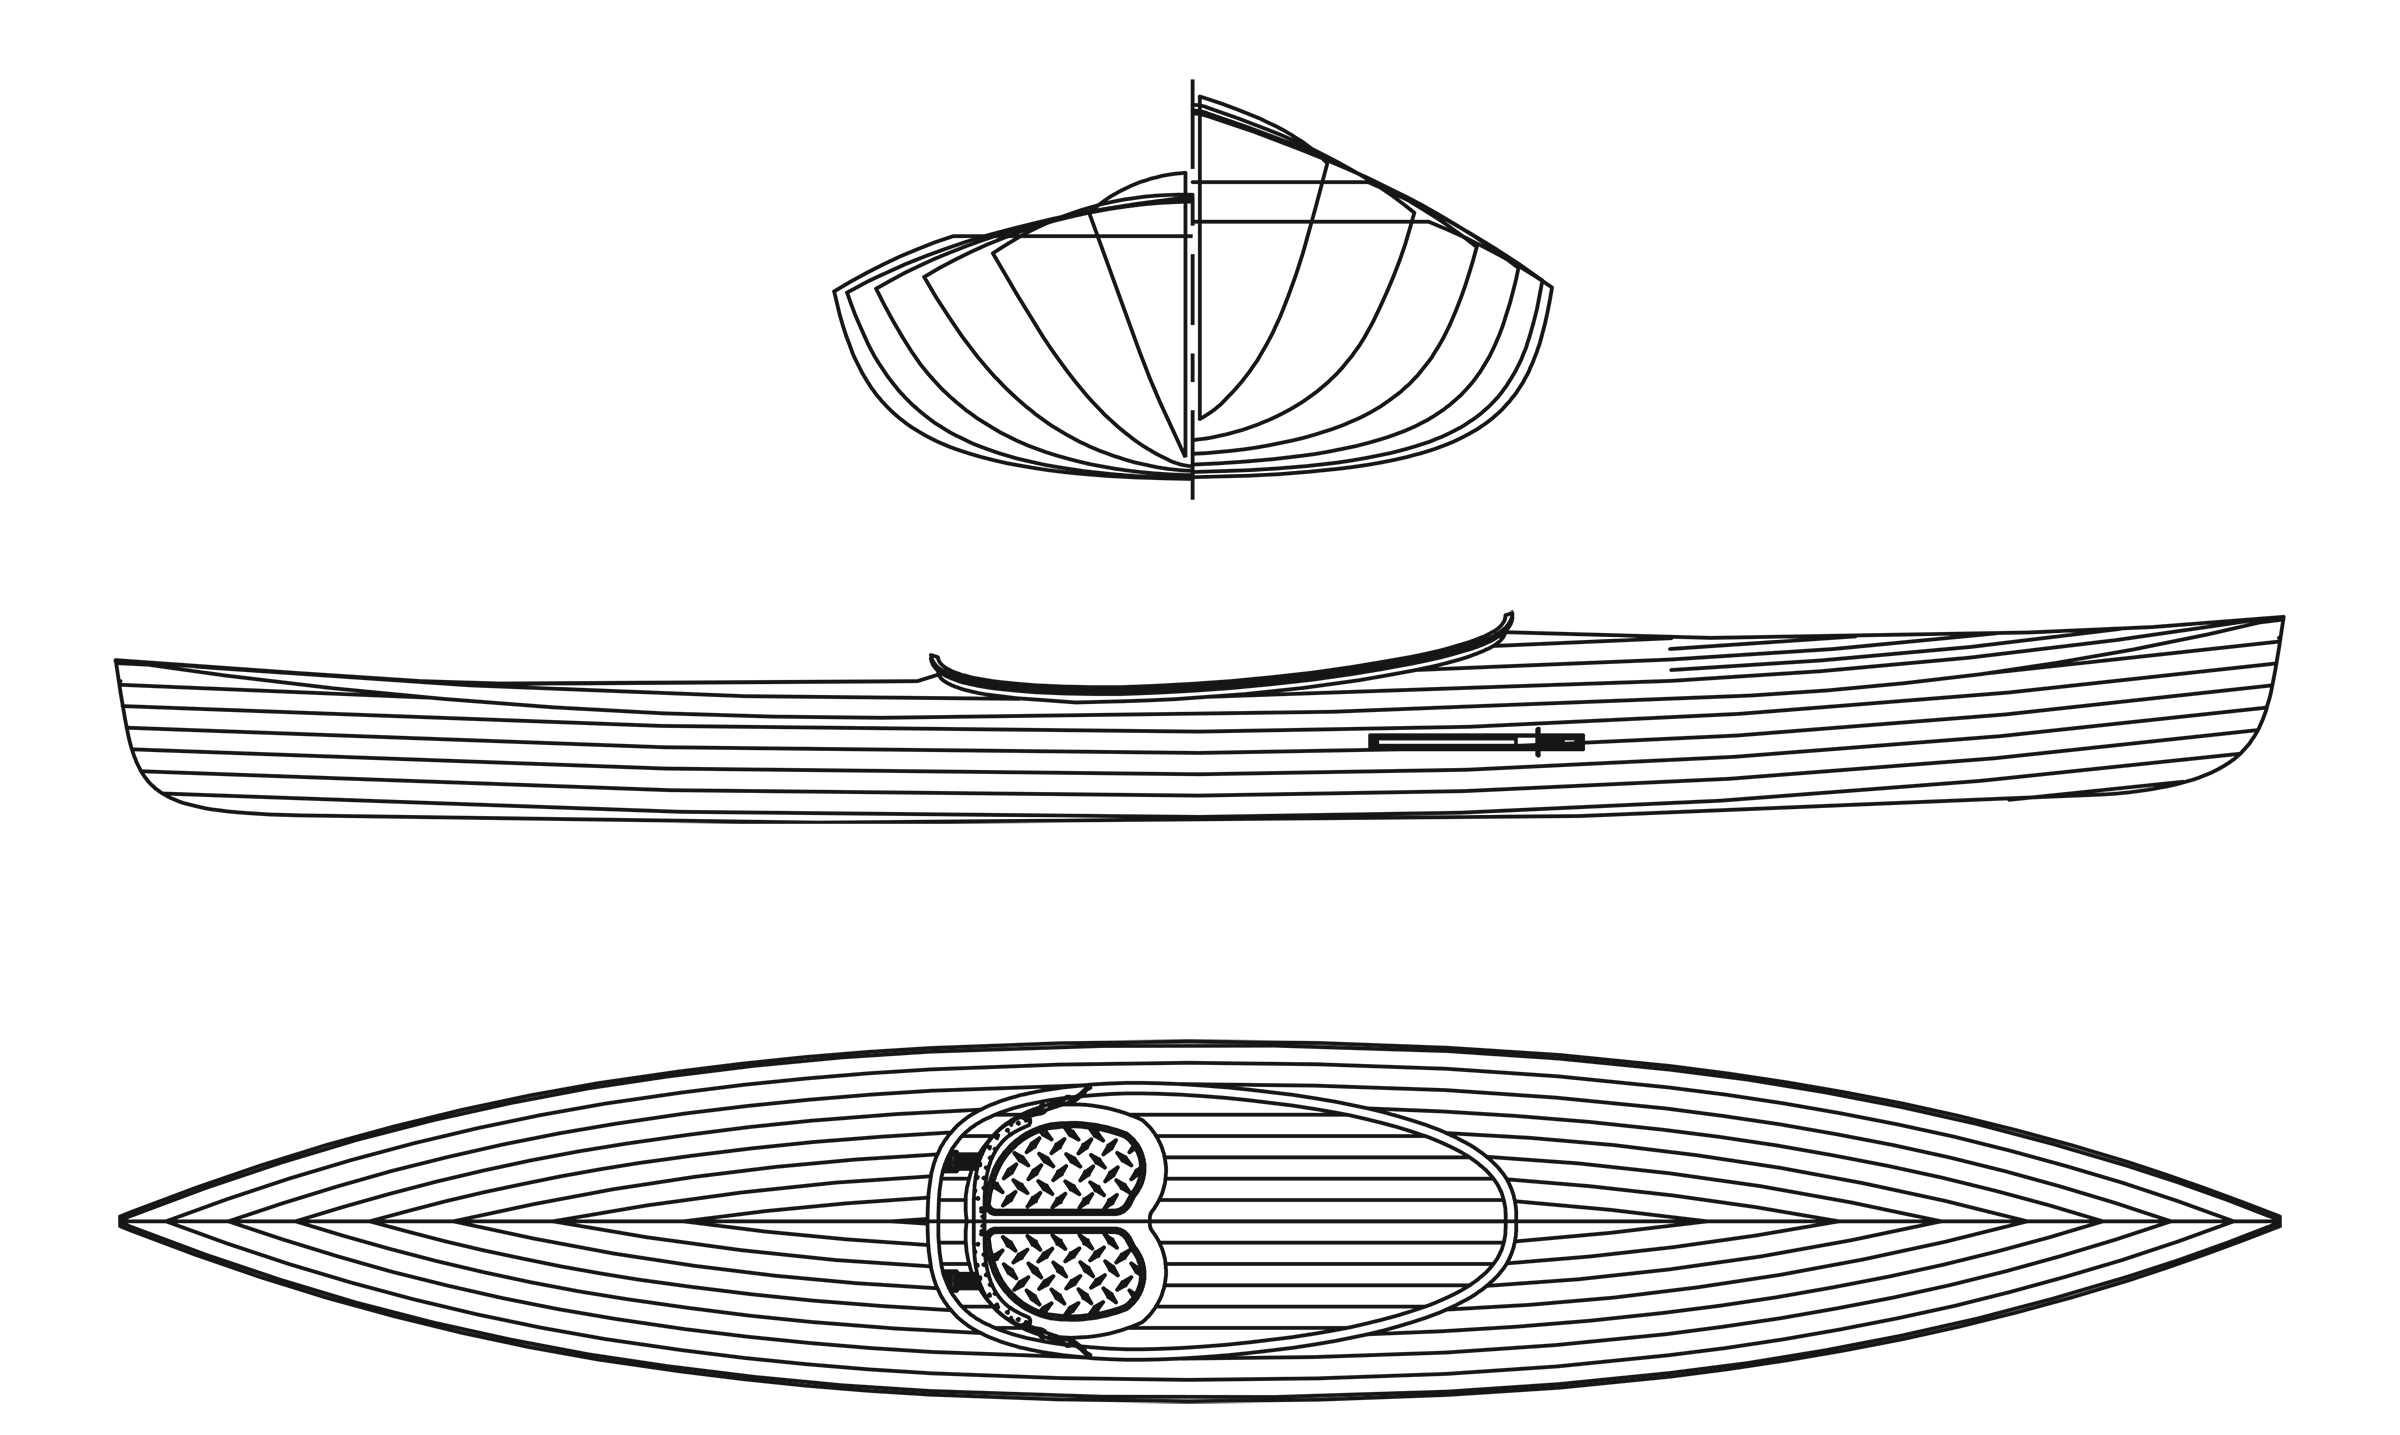
The Bruce Kirby–designed 18’ Norwalk Islands Sharpie is the latest and smallest in a family of boats ranging all the way to 43’.
The baby of the fleet, the NIS 18, originally had a single mast. The rig was recently reworked so that there is now either a ketch or yawl available. During a recent sail on board the first 18-footer with a ketch rig, I discovered that there were certain idiosyncrasies to get used to. Going to windward, you do not harden the mainsheet right in as you would expect to; instead, you ease it slightly so that the draft from the mainsail does not interfere with the mizzen. I found that the mizzen, sitting right in the middle of the cockpit, gets in the way a bit. The yawl, with the mizzen stepped on the transom, would free up the space nicely. There would be a slight loss of sail area and the sail would have to be sheeted off a boomkin, which could be prone to damage when maneuvering in marinas. At the time of writing, the first two yawls are being built, but none have hit the water yet.
When running wing-and-wing, one might instinctively choose to have the main setting normally and the mizzen slightly by the lee. Experienced NIS sailors do the opposite, running the mainsail by the lee and allowing the main boom to swing about 10 degrees forward of the mast. Wind hitting the mizzen is deflected into the main so that both sails keep filling beautifully.
There’s a lot to be said for a split rig in small cruising yachts. The center of effort is kept low, thereby reducing heeling. There are endless combinations available to balance the boat. One great advantage is that with the mizzen sheeted in hard, the boat will lie docilely head-to-wind while you take in a reef or go below to check the chart. The full-length battens ensure that the sails sit quietly.
These boats move in the slightest breeze. There’s no need for heavy, complicated, space-consuming inboard engines. Auxiliary power comes from an outboard motor mounted on the transom on the 18- and 23-footer, and operating through a well in the larger boats. But these motors don’t log many hours, for the Norwalk Islands Sharpie is truly a boat that is meant to be sailed.
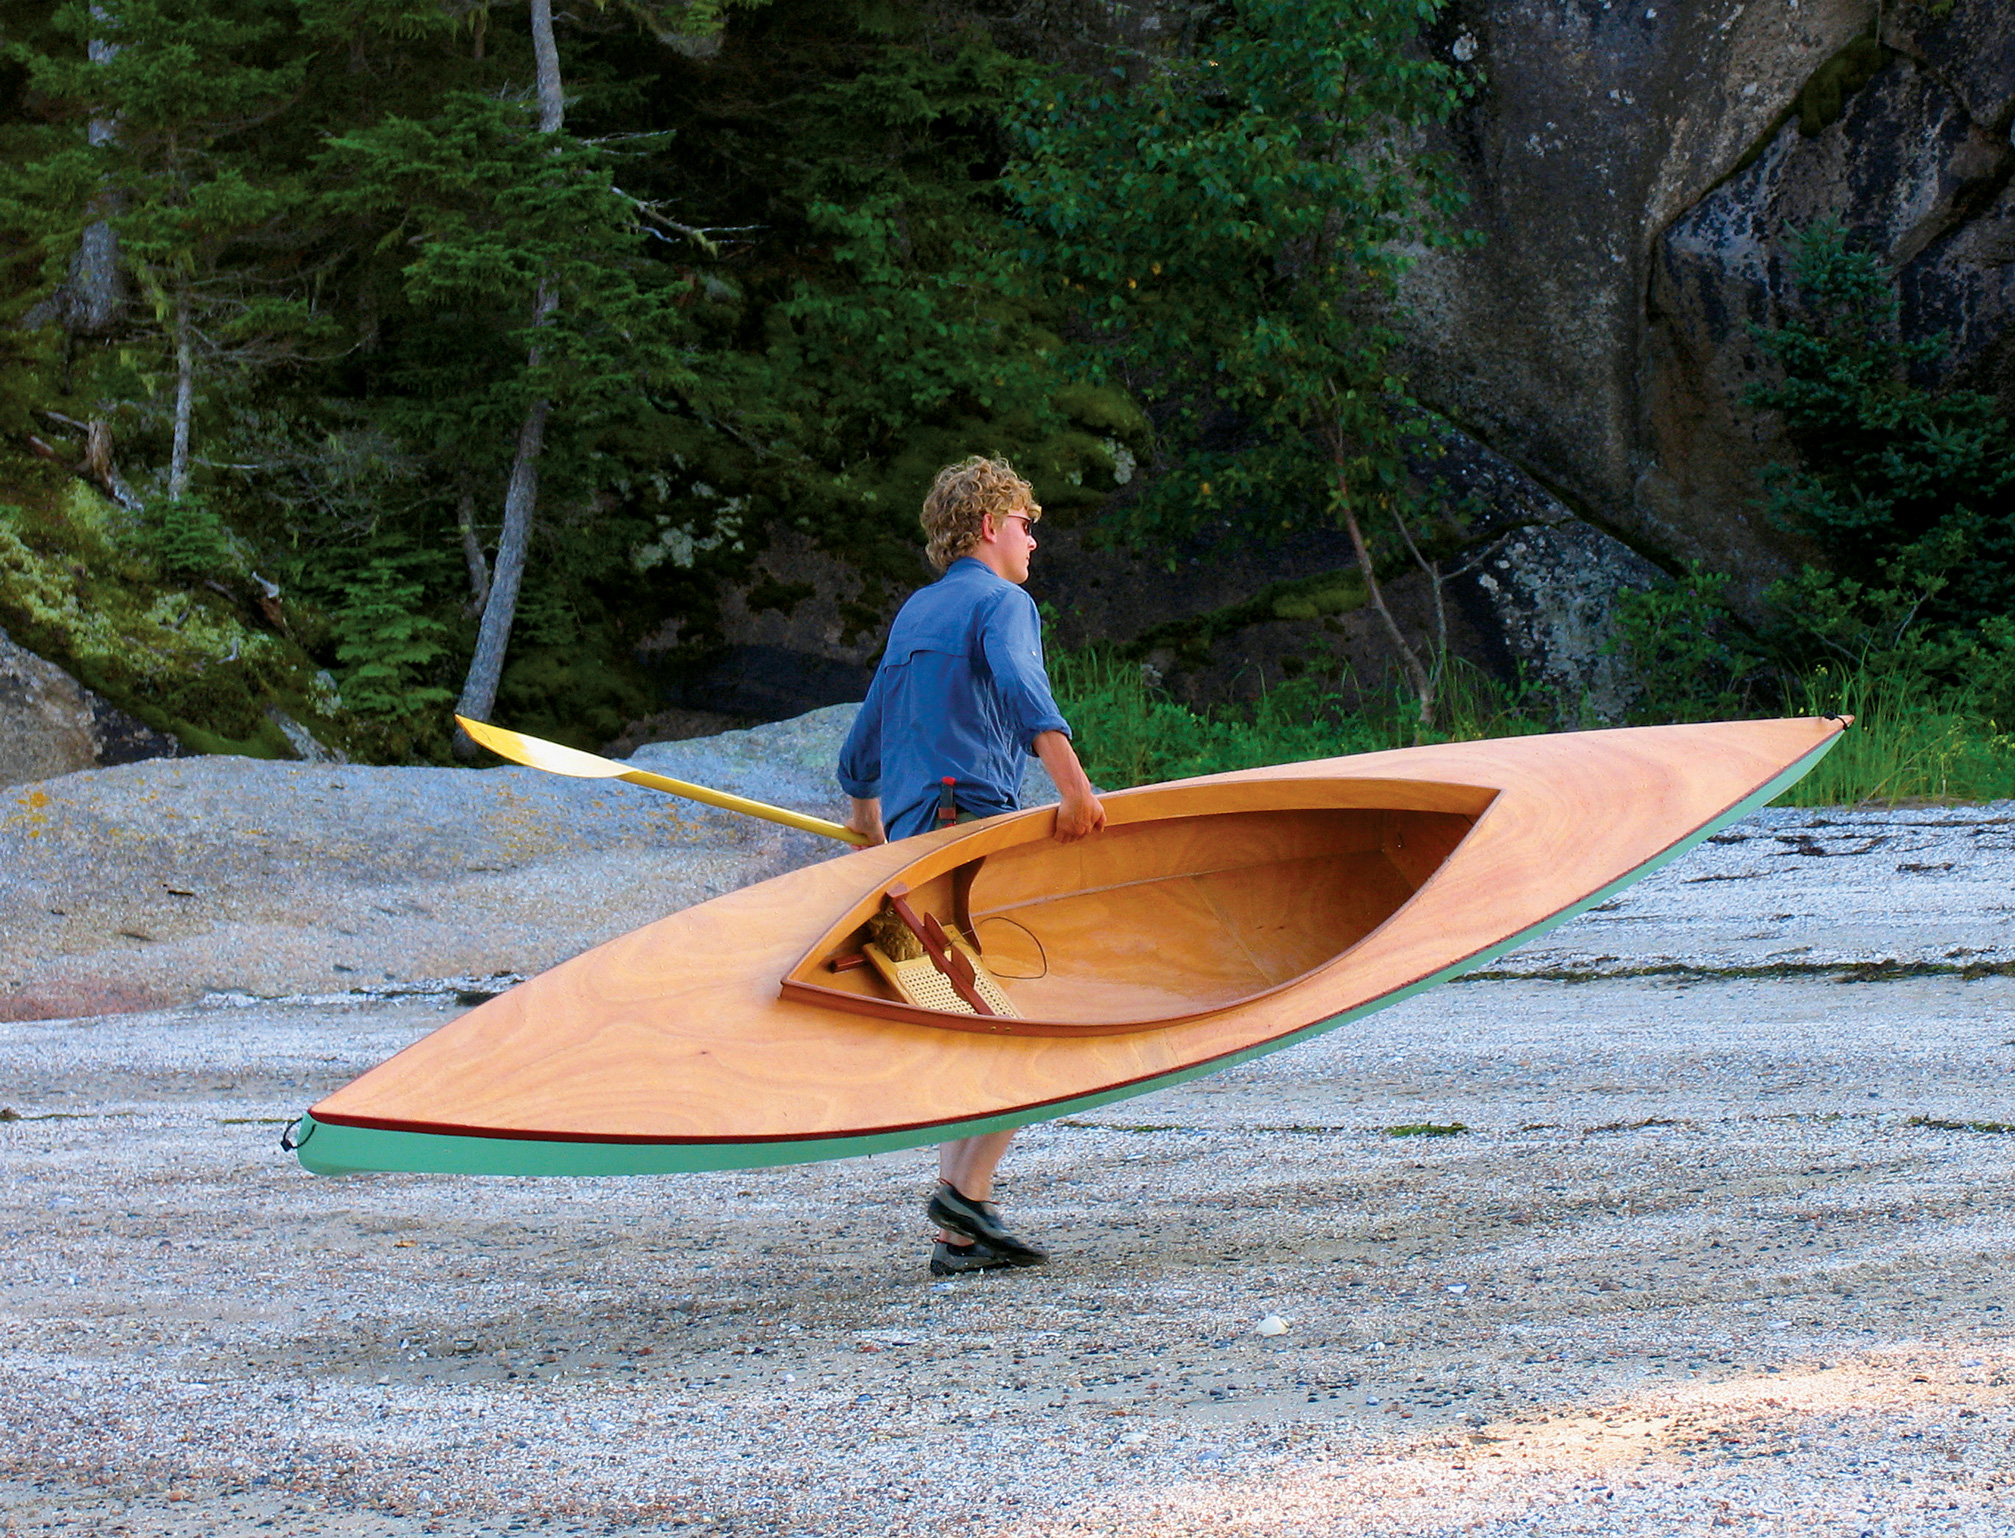
Nothing, absolutely nothing, conveys the joy of being afloat quite so purely as a light paddling boat. We can build the Fox canoe in our garage, carry it atop our car, and paddle it across open water. At the far side of the bay, the little double-ender might take us to the head of a forgotten creek that nature has reclaimed from industrial intrusion.
Bill Thomas
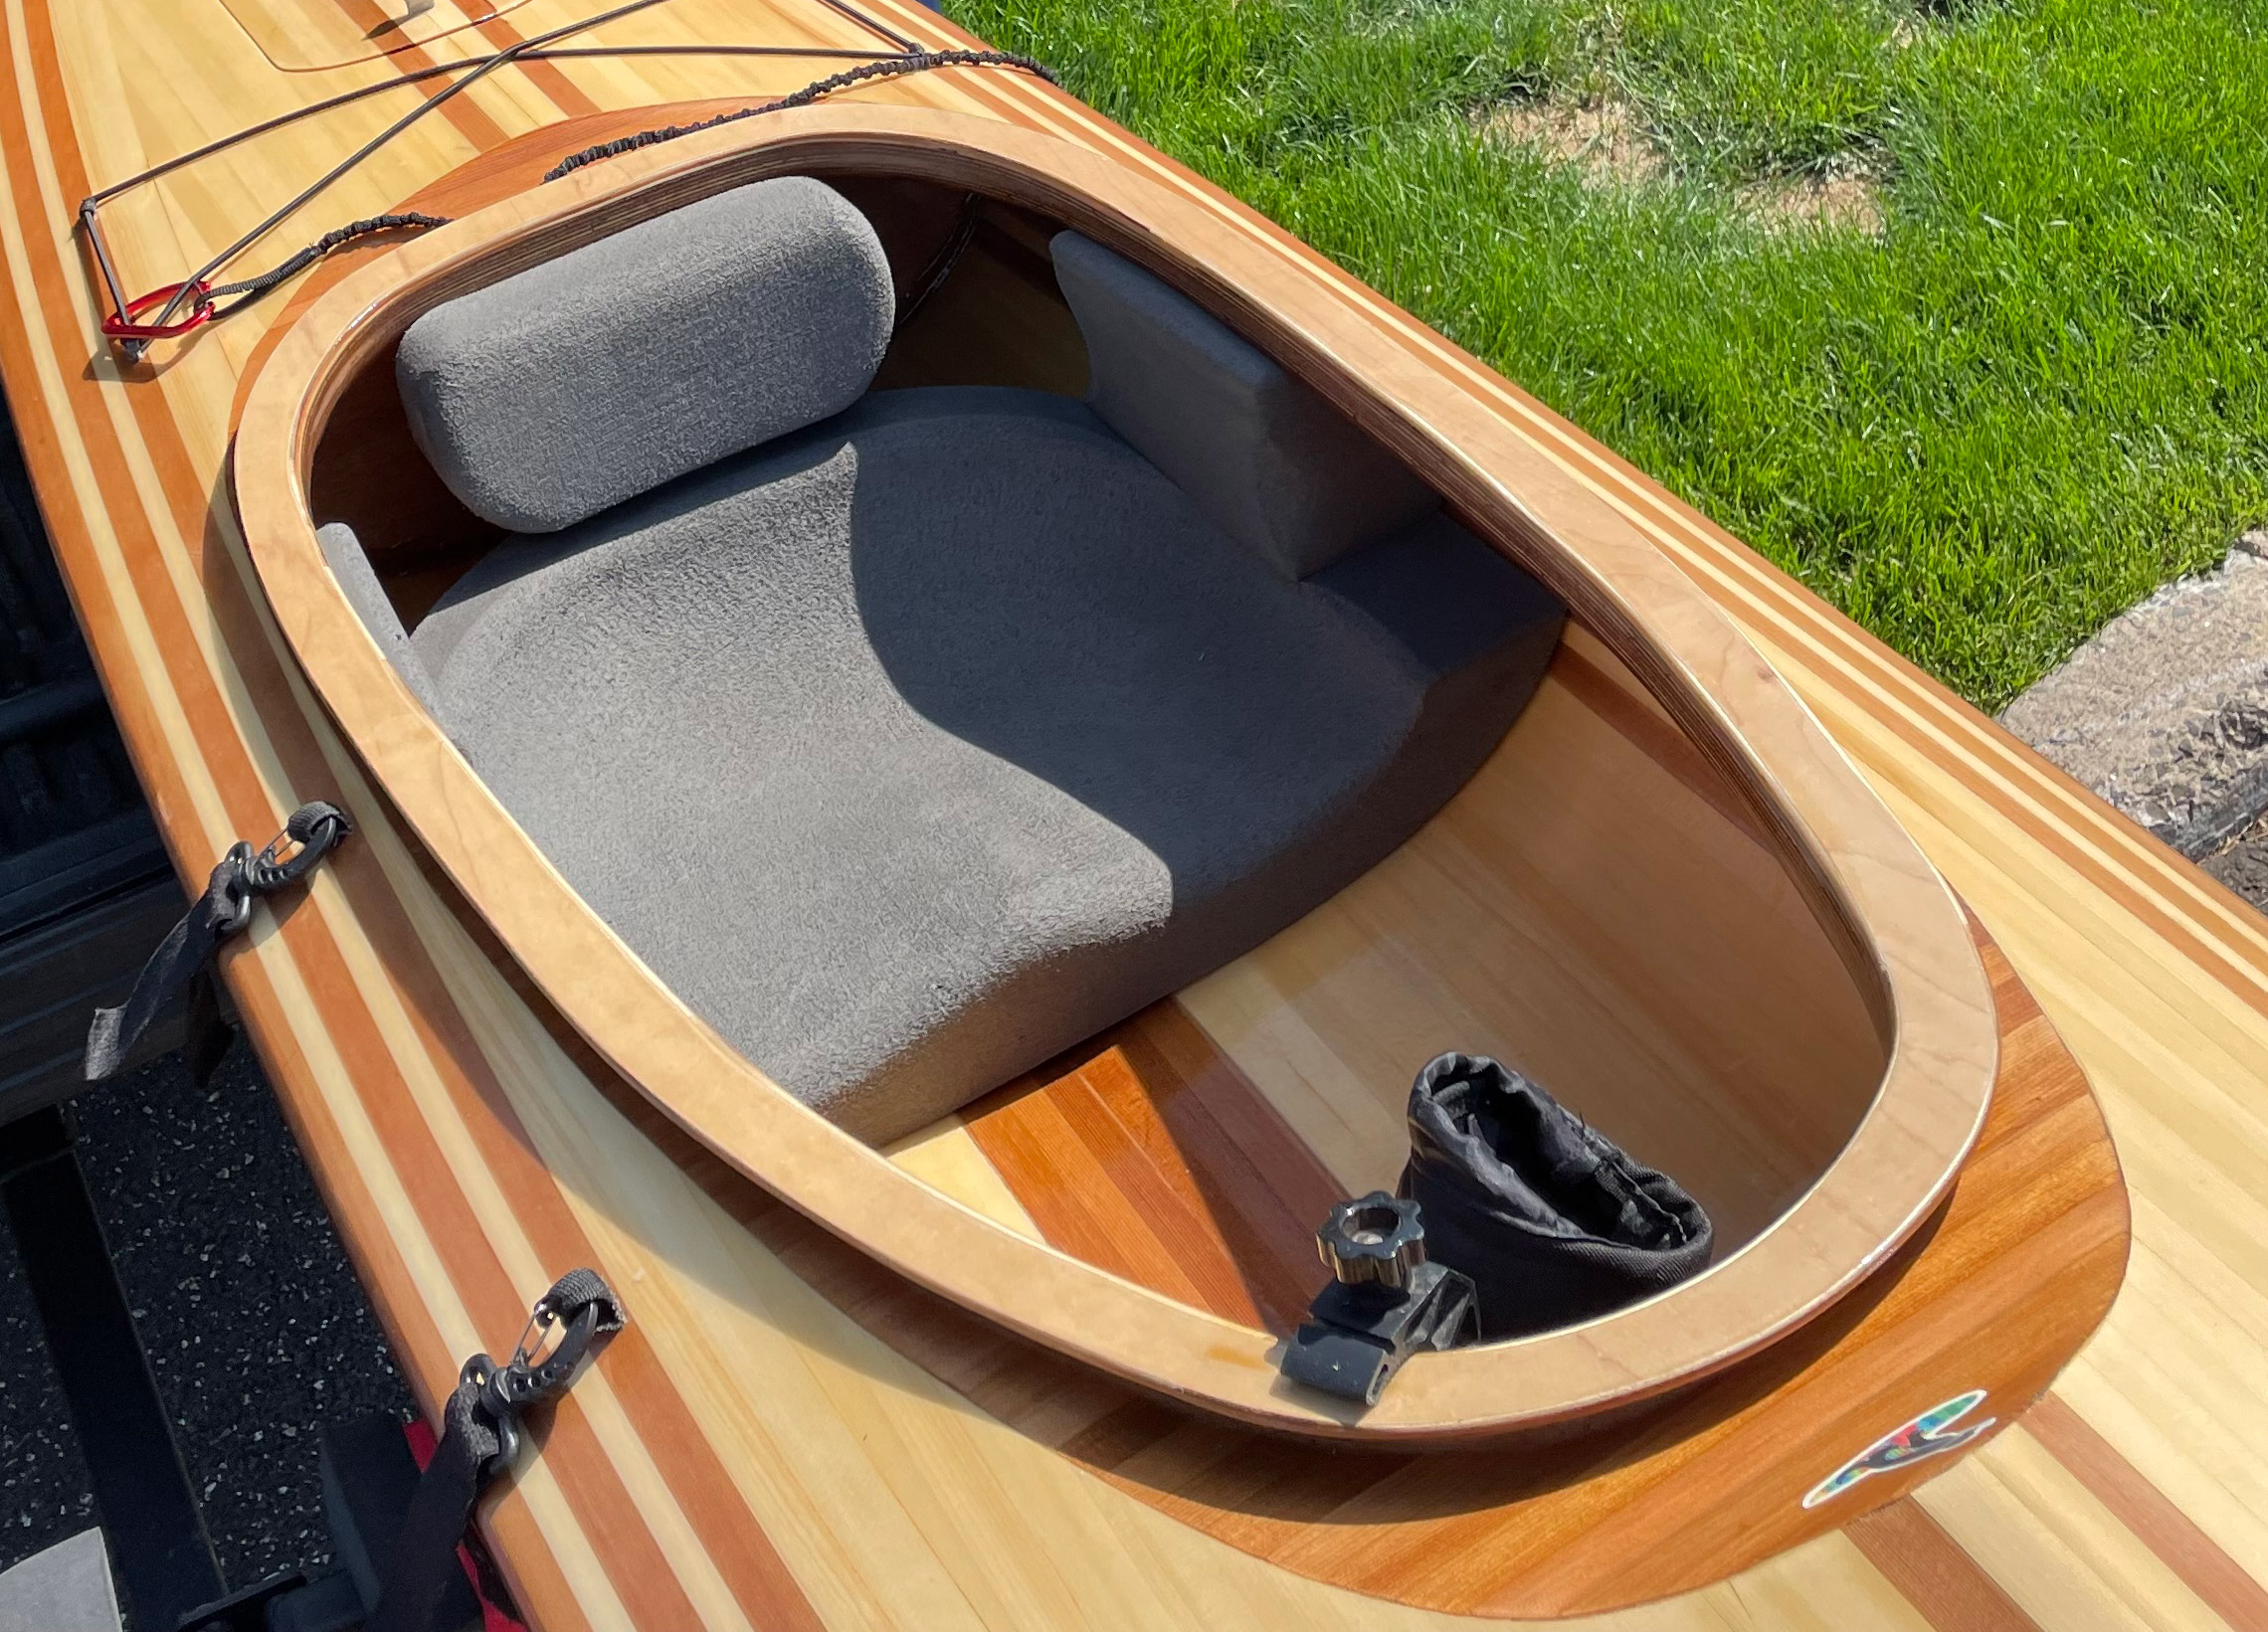
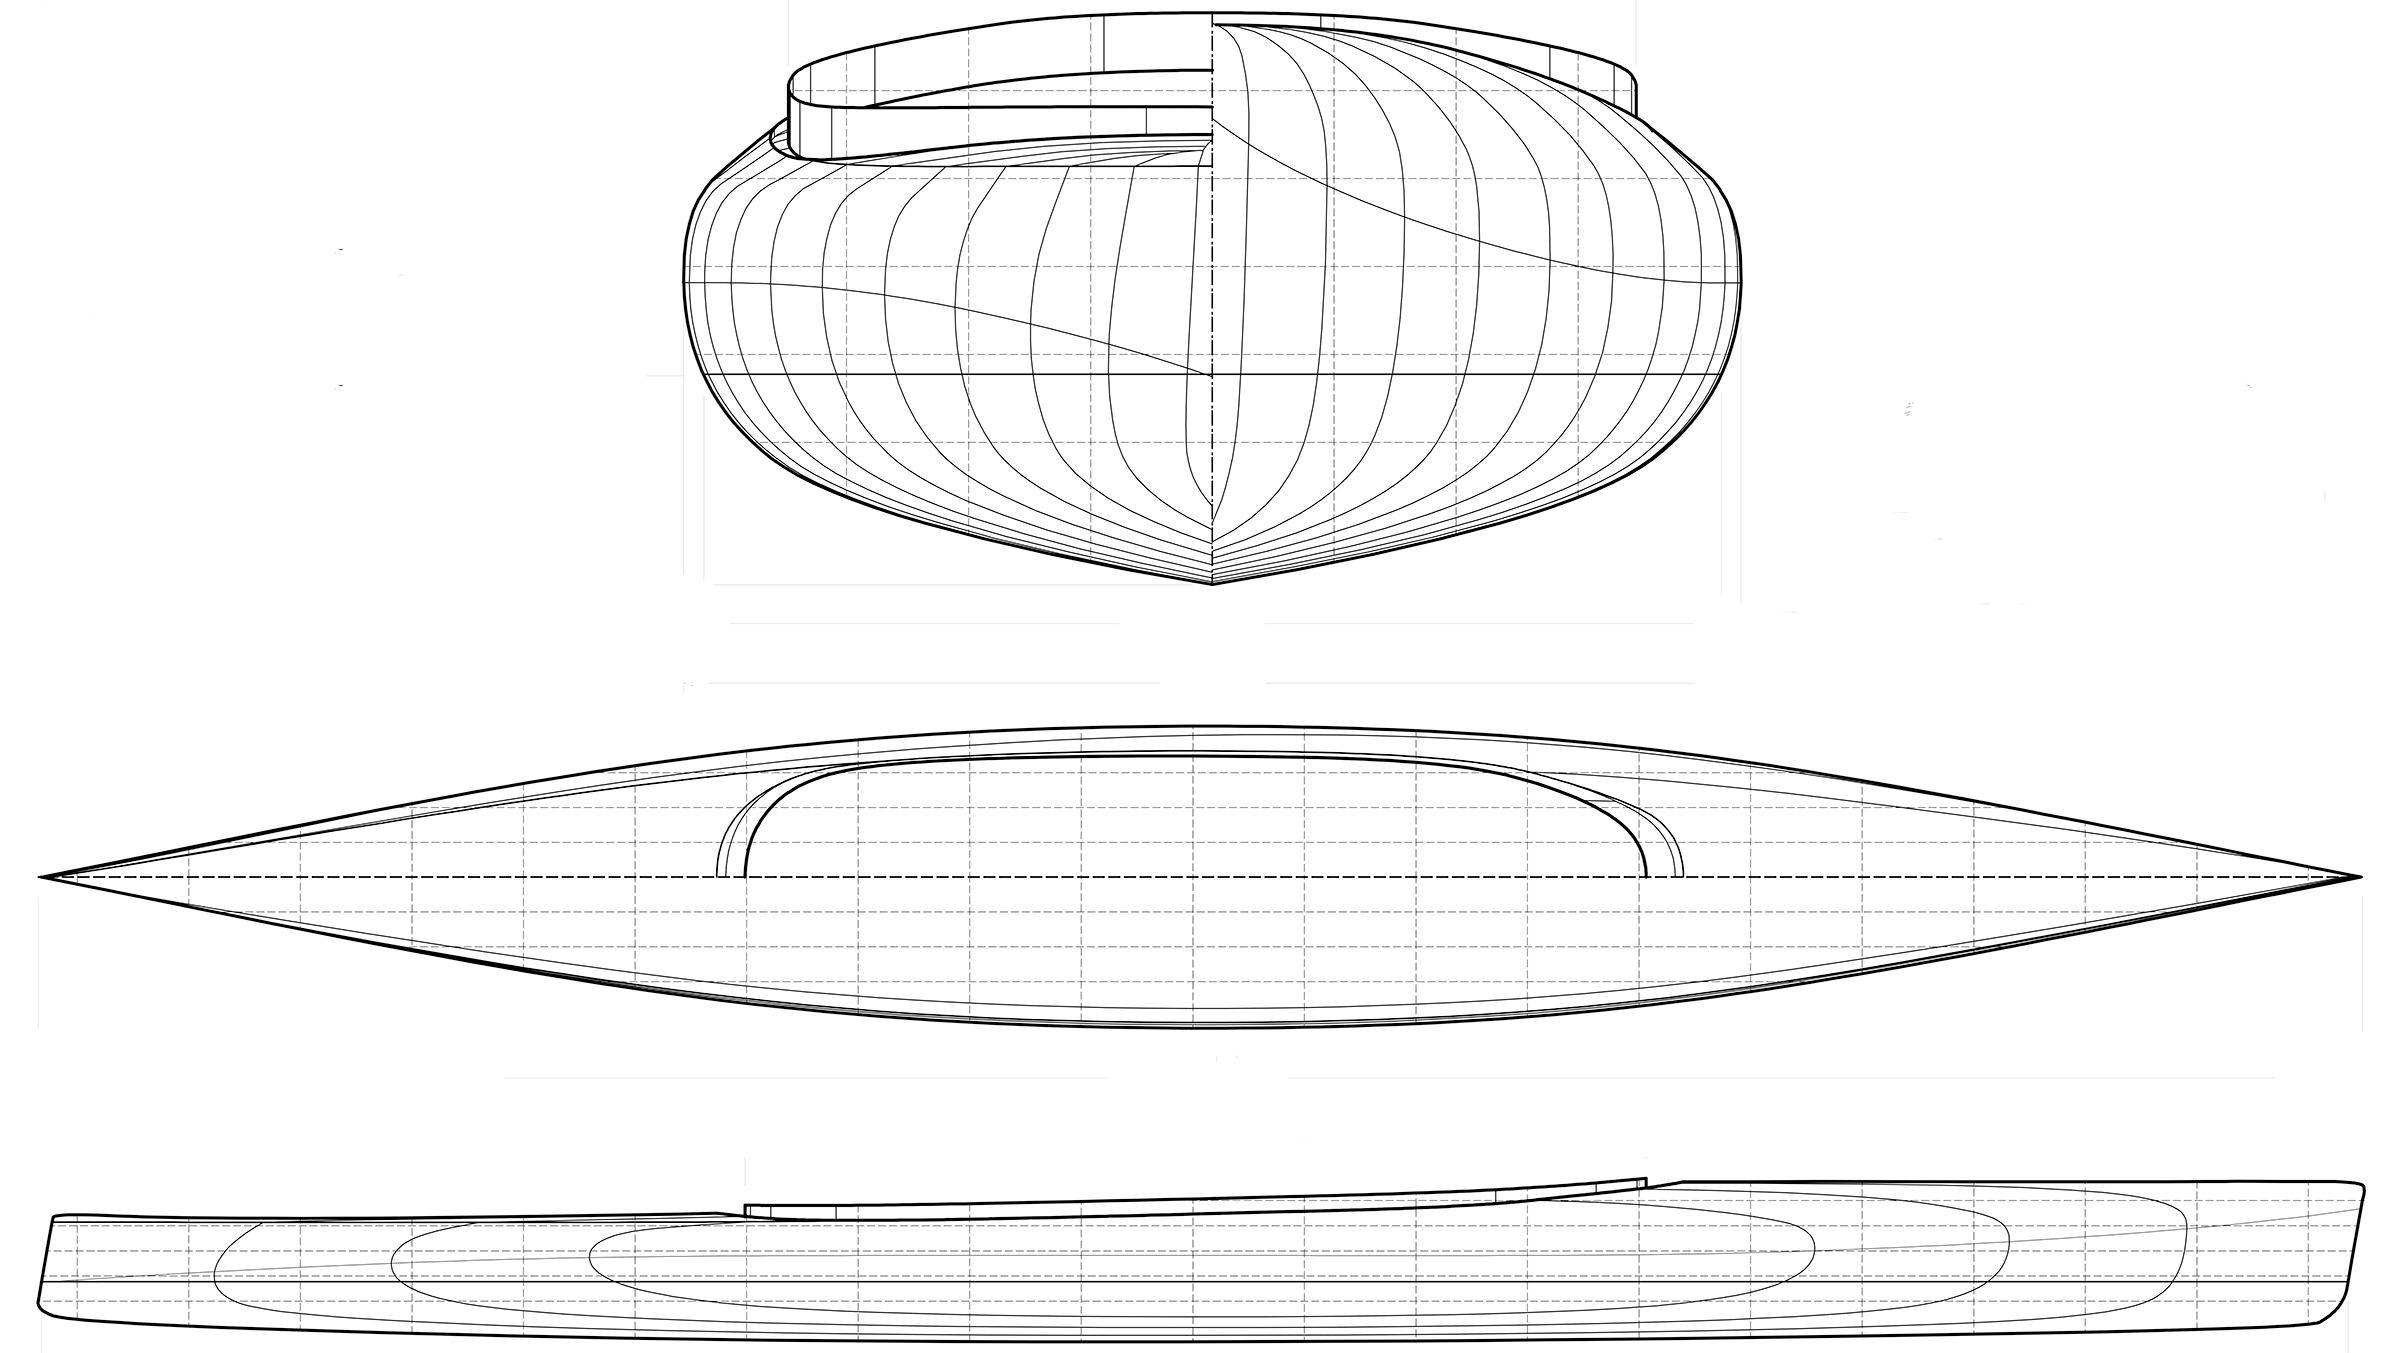
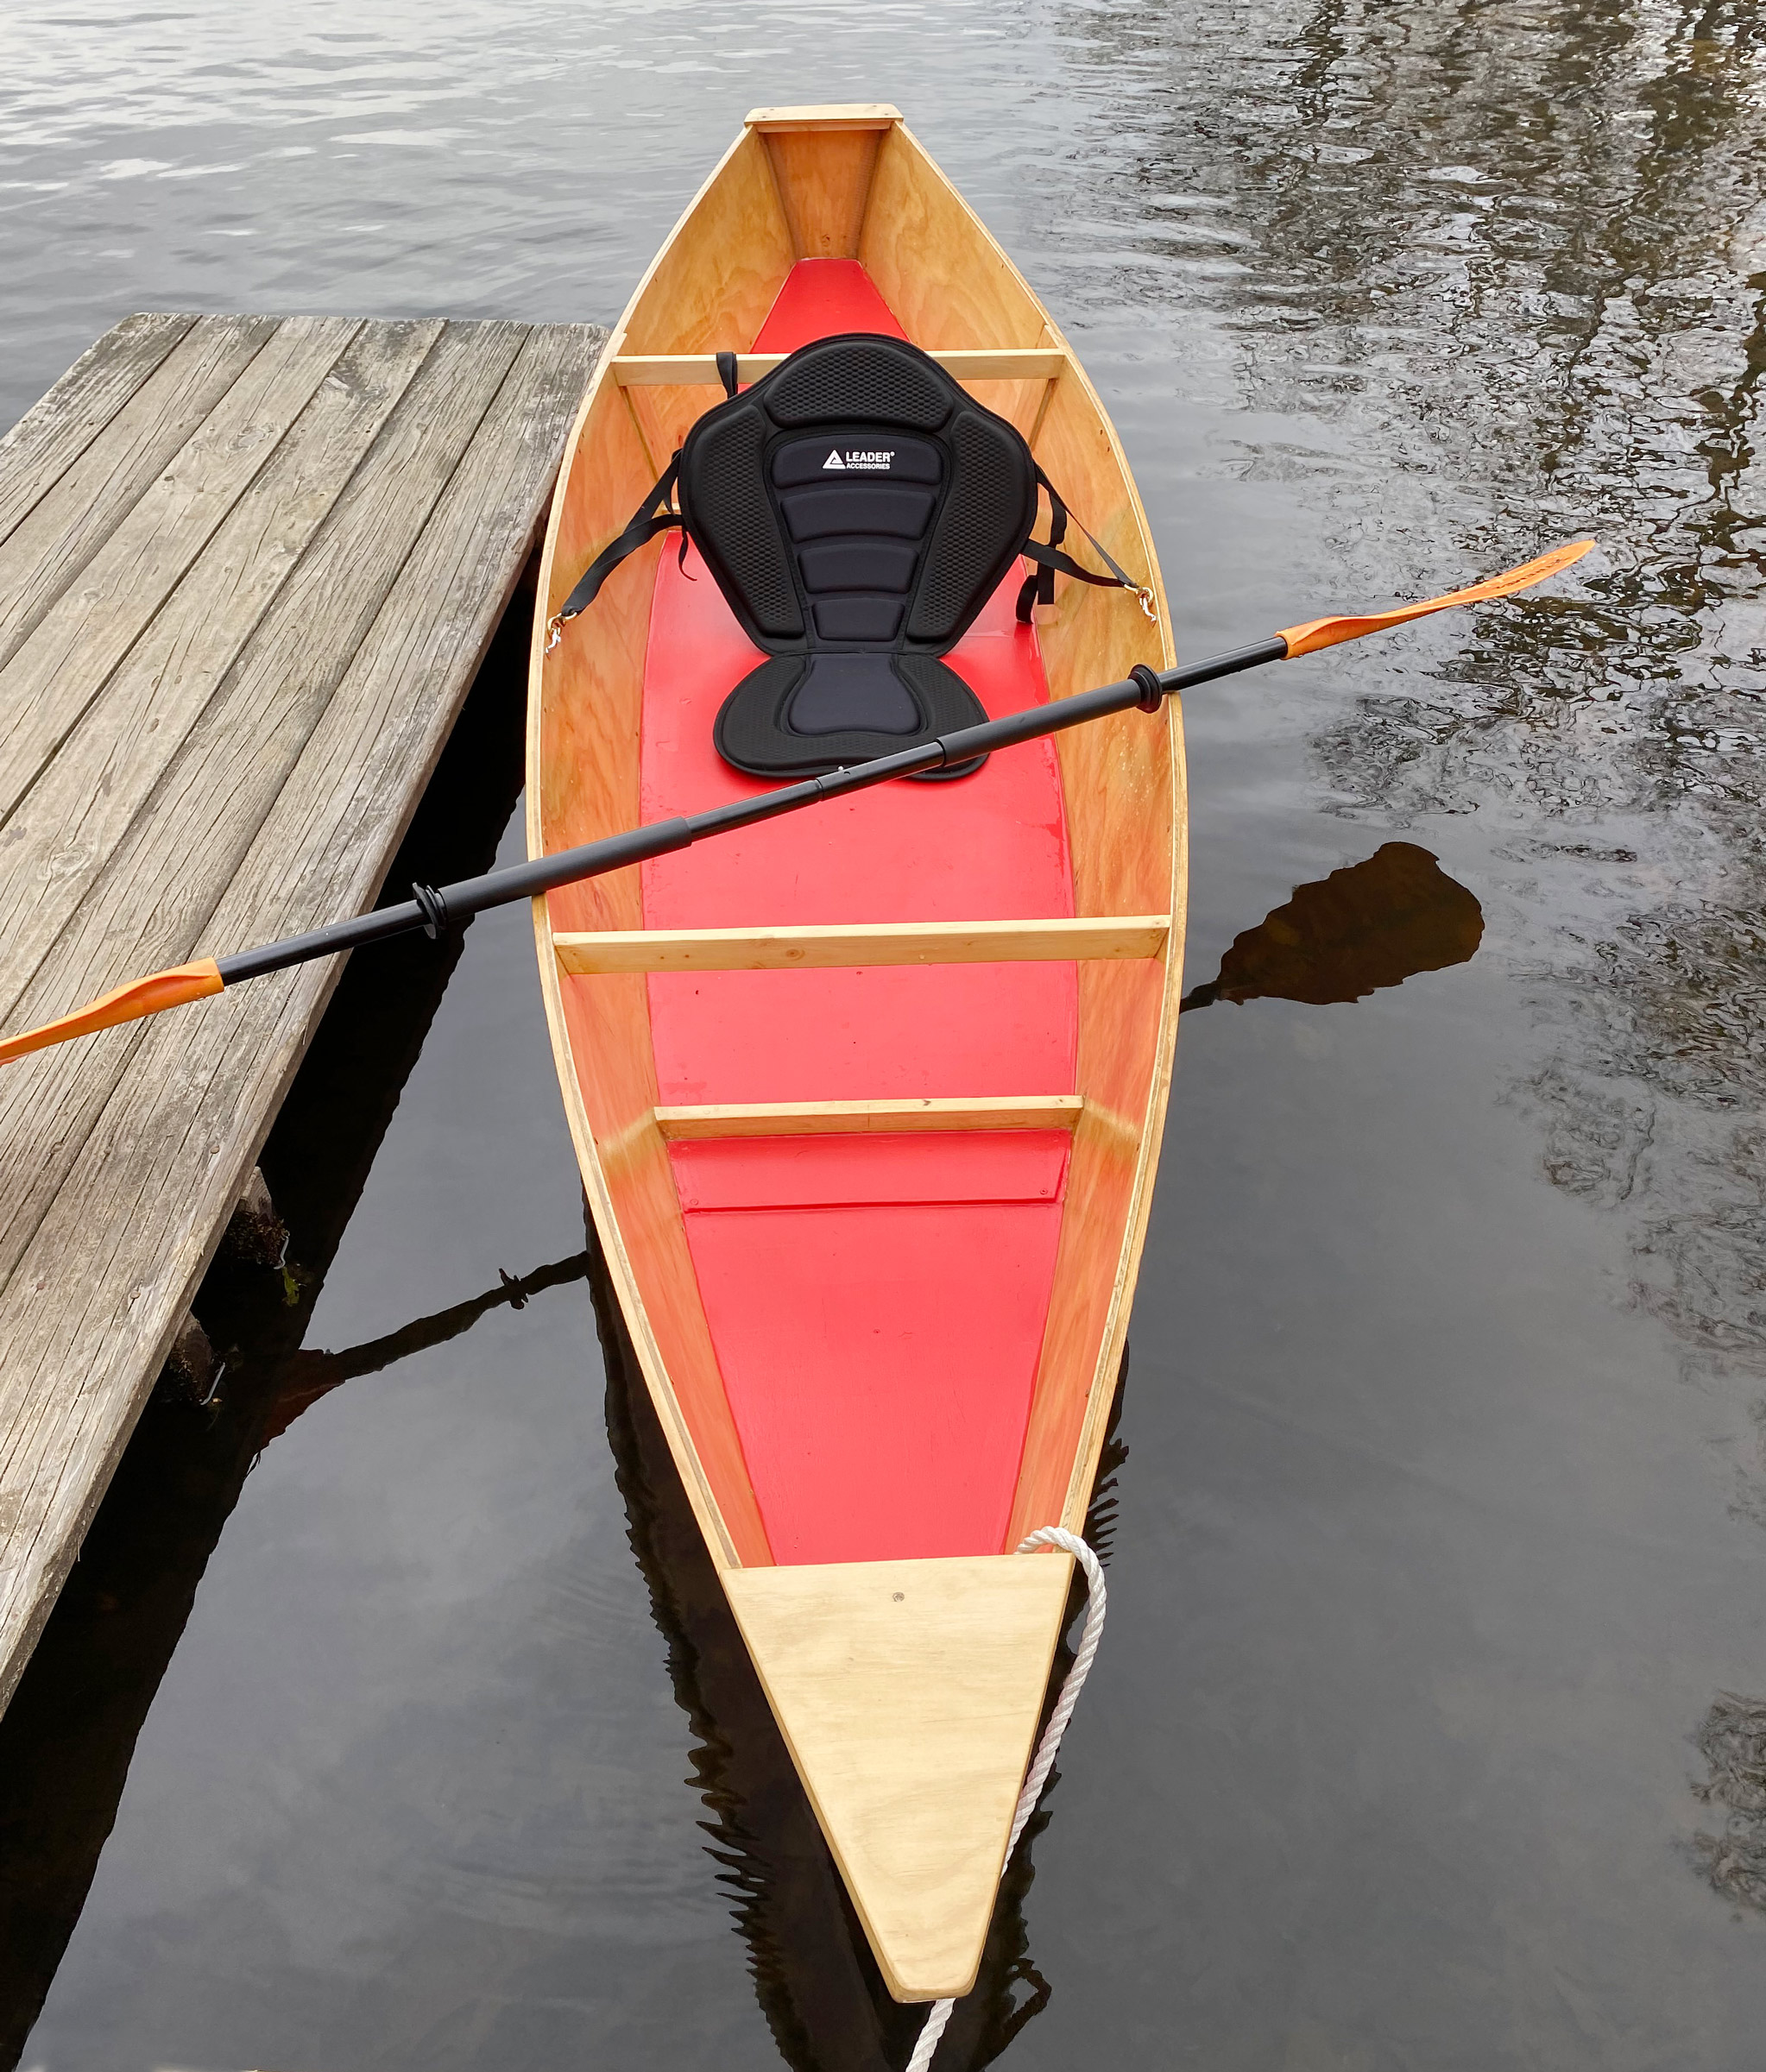
The 14’7” Fox double-paddle canoe, which weighs only 44 lbs, is casually portable. Its 6’8”-long cockpit offers considerable room, yet can be securely sealed with a spray skirt.
Readers of these pages will know that the past three decades have seen kayaks take to the water in great numbers. Indeed, some manufacturers might be tempted to market Fox as a “recreational kayak” in order to boost sales. To his credit, Bill Thomas, designer and builder, describes this nifty little boat as what it really is: a decked double-paddle canoe. At 14′ 7″ in length and measuring more than 30″ ″across the rails (to say nothing of its commodious 6’8″-long cockpit), this is no kayak. It will do things that no true kayak can…or at least it will do them more comfortably.
If you paddle kayaks, the first thing you might notice upon stepping aboard Fox is that you can, in fact, step right aboard. You will find no need to jackknife into a dark wormhole of a cockpit while leaning on a paddle for stability. If any unfriendly creatures have taken up residence in the boat since your last visit, they will be right out in the open. You’ll see the snake before it begins to climb up your right leg.
The caned canoe seat in Fox rests about 1″ above the hull’s narrow, flat bottom. This seat, combined with the flexible slatted backrest, offers hours of good comfort. Although no footrests are provided, we can brace our knees against the cockpit coaming. As an old kayaker, I’d be inclined to install adjustable and removable foot braces in this boat. They would add power to our paddling stroke and enhance feelings of security in rough water.
Bill Thomas
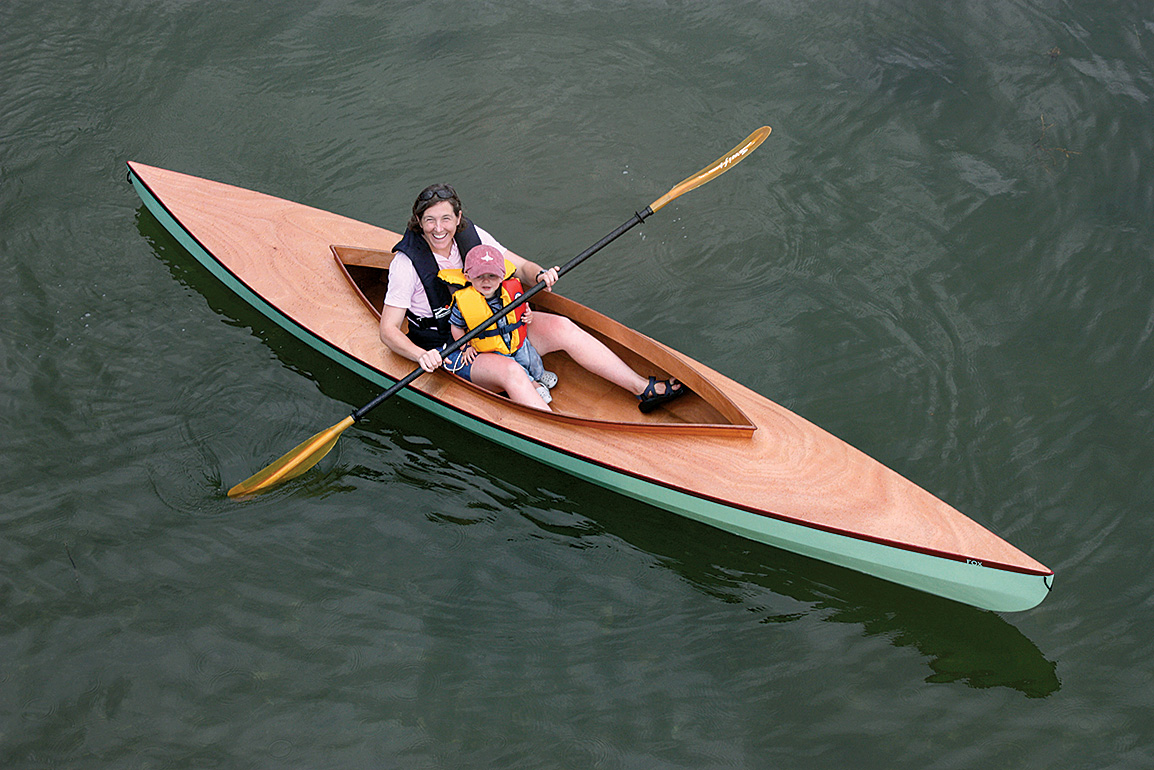
This stable canoe comfortably accommodates a mother and child.
Part of the comfort and ability of this boat results from its relatively generous freeboard. The point where our paddle shaft crosses the coaming measures about 13″ above the floor. We’ll likely hit it with our knuckles if we employ our favorite short kayak paddle. Let’s buy, or make, a wooden paddle with a long shaft and small blades.
How long should the paddle be? A few rules of thumb exist for determining paddle length, but experience has shown that they’re not worth repeating here. If we’re making our own paddle, we can put together a rough preliminary version that will let us experiment with shaft length, blade shape, and angle of feather. If we’re purchasing a paddle, we can test-drive several models at the local outfitter’s pond. For this boat, I’ll wager that we’ll favor a paddle that measures 8′ to 8 ½’ in length.
Designer Thomas has given Fox a multi-chined hull with a flat bottom that shows just a little rocker (longitudinal curvature). The resulting stability curve seems friendly. As we lean to the side, this canoe heels easily at first. Then it stiffens up nicely. A relatively long waterline and fine entry allow the boat to move right along. Can we keep pace with the local kayak fleet? Well, that depends. Yes, we can cruise easily alongside most sea kayaks, and carry a bigger lunch as well. But we cannot change the laws of hydrodynamics, so let’s not get drawn into racing against one of those 20′ × 18″ torpedoes.
Fox appears to have just the right amount of directional stability. It likes to keep going where we point it, yet it turns easily and predictably. This canoe needs neither a skeg nor a rudder, and our paddling technique will improve if we travel without these complications. The good maneuverability lets us play in river currents and on the faces of standing waves. Most of the time, we’ll feel no need for a sprayskirt, yet the tall cockpit coaming will easily accept one—inexpensive insurance against a wet lap, or a cockpit full of water. Should the worst happen, large watertight compartments forward and aft will keep the flooded boat afloat. They will hold plenty of food and gear as well.
At the end of the day, we can bed down in the huge cockpit. I’ve spent many nights sleeping in the bilge of my 17′ sea kayak, and the accommodations aboard Fox seem plush by comparison.
Bill Thomas
This canoe also comfortably accommodates designer-builder Bill Thomas and all his camping gear.
We’ll build this canoe in stitch-and-glue fashion. The plans set includes full-sized patterns for almost all the pieces, and a particularly well-illustrated 36-page Builders Guide comes along as well. No true lofting will be required. After transferring the paper patterns to sheets of okoume plywood (4mm for hull sides, deck, and bulkheads; 6mm for bottom and deckbeams), we’ll cut out the parts. Then we’ll drill holes along the edges of the sides and bottom, and pull the pieces together by twisting 3″ lengths of 18-gauge copper wire that’s been poked through the holes. This is quick work. After cutting out the parts, we can assemble the hull in less than a day. The cockpit coaming and deck will follow.
Then comes a lot of filleting (with filled epoxy), sanding, fiberglassing, sanding, priming, painting, and yet more sanding. This little canoe has a nice shape, and time spent obtaining a yacht finish would seem well spent. The process should move along at a satisfying pace.
Thomas teaches a class in how to build the Fox canoe at WoodenBoat School here in Brooklin, Maine. Starting with kits, the students put together their own boats. At the end of the six-day course, the boats are essentially complete and require only final finishing before hitting the water.
Decked double-paddle canoes are nothing new. John MacGregor, a Scotsman, usually received credit for the introduction and early development of these light double-ended boats. He might have taken inspiration for his well-known Rob Roy canoes from kayaks he had studied while traveling near the Bering Sea in 1859. During the late 1800s and early 1900s, the type enjoyed great popularity. Later in the 20th century, L. Francis Herreshoff, from whose drawing table floated the 72′ TICONDEROGA (all 108,300 elegant pounds of her), took much of his waterborne pleasure in double-paddle canoes of his own design.
Compared to sea kayaks, these canoes offer greater stability and comfort. For inexperienced paddlers, they can prove safer. Folks who have no intention of learning more than the first 180 degrees of the Eskimo roll, might be better served by double-paddle canoes. Compared to the common open “Indian” or “Canadian” canoes (usually driven by single-bladed paddles), Fox and its relatives offer better rough-water capability. In addition, double-bladed paddles tend to be inherently efficient, as our power strokes are virtually continuous. Nothing is lost to recovery.
In drawing Fox, Bill Thomas has created a capable and forgiving boat that will take us on grand adventures. Perpetually watertight and coated with epoxy, it will prove easy and inexpensive to keep. At 44 lbs finished weight, it is casually portable. If we build Fox, we certainly will paddle it—and more often than we might think.
Plans, kits, classes, and completed boats are available from Bill Thomas Maker. This Boat Profile was published in Small Boats 2012 and appears here as archival material.
It is hard to know why a particular style of boat appeals to a sailor. A hardcore racer looks at Paper-Jet and can’t wait to strap it on, a khaki-clad prepster can’t see beyond white hulls and varnished mahogany, and a dreadlocked steampunk needs linseed-oiled interiors and a three-day grunge to feel authentic. But the nascent 19th-century romantic responds to lots of rope, multiple sails, and belaying pins, and those of us so wired are the audience for Don Kurylko’s D-18 Myst design (18′ 3″ LOA, 5′ 7″ beam). I think I can see why. The designer has worked up a robust, capable camp-cruiser or adventure expedition boat with the aesthetic appeal and features of a British working boat of a certain age.
Geoff Kerr
The D-18 Myst has a striking profile and sail plan, and her general appearance prompts thoughts of British fishing boats of the late 19th and early 20th centuries.
She grabs you with her distinctive profile, offering the nicely scaled features of a much larger boat. The plumb stem and the bowsprit mimic those of the late 19th and early 20th centuries, but rather than twee whimsy they are the most obvious features of a very deliberately functional boat whose dominant impression is its low yawl rig. This setup drives her character and her purpose, giving a skipper many, many options for matching sail area and configuration to the wide variety of conditions one will encounter when cruising. That the design hearkens to the 19th century is less a romantic appeal than it is recourse to the days when sail was at the height of its commercial development.
Geoff Kerr
D-18 Myst is meant for adventure and exploration. Her owners, Ted and Ruth Cody, are seen here moving up a waist-deep, winding creek seeking shelter and a perfect campsite.
The D-18 Myst’s 160-sq-ft sail area is generous for a boat of this size. Ballast and her low rig keep her on her feet, and at 100′ her mainsail is man ageable singlehanded and without winches. Her relative narrowness and shallow draft (a mere 9″ with her centerboard up) make her versatile; easy trailering, storage, and rowability are desirable elements in a camp-cruiser. The tiny mizzen might appear silly until one discovers the myriad advantages of that 20′ sail when heaving to, balancing the helm, using it as a riding sail, and in helping to tack the boat in a hard chance.
An important test for the practicality of a camp-cruiser is the complexity of launch and recovery. The D-18 scores well here, with simple deck cradles for the mainmast, and all the rest of the gear simply stowed in the cockpit. Her height on the trailer makes setup possible without a ladder, with much of it, other than stepping the main, being accomplished from the ground. Only a wrench for a couple of nuts and a pair of pliers for a stubborn shackle were needed. The trailer package is clean and neat, and aerodynamic, so no cover is needed to keep gear in the boat. The rig is compact and light enough to be drawn by a sensible vehicle. The logistics on my visit were at a minimalist ramp with about 30″ of water; shallow draft and a long bowsprit for a handle make such launches a breeze. And a practical note for boat owners: a pair of 2 × 6s mounted on the trailer make great walkways. You still get your feet wet, but not much more, and you won’t stumble over axles and sea monsters.
In preparation for a daysail, the owner can do his bowsprit work in the parking lot while the boat is still on the trailer. Once rigged, the jib is set and struck, flying from the cockpit. Frankly, the rig looks (and is) busy. Sheets, halyards, running backstays, outhauls and downhauls, and cleats and belaying pins—all those components that make her a marlinespike codependent’s dream—probably make her a bit fiddly for those who are out for a mellow, social sail. The fact is, this is a real working rig, and that web of sails and control lines render Myst capable of some serious sailing. She will be upright and making progress when most boats her size have called it a day.
Auxiliary power comes in the form of oars or a small outboard. The boat’s weight and the owner’s experience call for rowing her double if an actual passage is to be made. As such the boat’s owners make regular use of a 2-hp outboard mounted on the transom. This setup moves the boat admirably, and the motor remains well out of the way perched back there. In the limited space available on this narrow transom, one must give up any thoughts of a larger engine or indeed steering with the engine rather than the rudder, so don’t plan on reverse or a sharp turn.
The designer put a lot of thought into the boat’s interior layout. There seems to be not a single square foot of space without some sort of furniture-type accommodation built into it. Thwarts double as storage lockers and the forward side benches hide bays for flotation bags or duffels, then hinge over to complete a full-beam berth flat or lounge deck. The short decks forward and aft have bulkheads forming flotation chambers large enough to compensate for the ballast. These individual features are sensible and practical for hardcore camp-cruising, albeit a bit overwhelming in the aggregate. The interior, like the rig, is busy—perhaps too busy for a sunset cruise. The owners and I sailed the boat in variable light air on a New Hampshire lake, with the furniture in the sprawling mode. I never quite found my joy, as the coaming and rail are too low to be much of a backrest, but surrendering to the supine in the sunshine was pretty sweet. Skippering aft was much more conventional and comfortable, with an ample well for feet and legs.
The nicely modeled hull is intended to be strip built, which is a practical construction choice for both hard use and the home builder. That home builder will find a complete and very detailed set of plans; Kurylko includes full-sized Mylar patterns for key components such as the molds. His drawings are logically organized and presented, with instructions that outline logical sequences and provide helpful hints. He gives manufacturers’ stock numbers and scaled details for the fabricator for such arcane bits as the cranse iron. Ted Cody, the builder of the boat I sampled, chose to mill his own square-section strips and edge-nail them, and then opted to sheathe the hull in fiberglass—a wise choice for an adventure-bound boat. This four-year undertaking by a minimally experienced boatbuilder is a testimony to the design, not to mention Ted’s patience and chutzpah.
Geoff Kerr
A centerboard, a kick-up rudder, and an easily unshipped bowsprit make launching and recovery simple. Note the modest-sized tow vehicle and stock trailer customized with 2×6 walkways.
As built, the boat carries a heavily ballasted centerboard (75 lbs), requiring a multi-part pendant, and movable lead “muffins” in vinyl bags under the floorboards, totaling about 120 lbs. Their combined effect is a stable, comfortable boat—still subject to crew trim—but deliberate rather than flighty underway.
The D-18 Myst cannot be to everyone’s tastes. But she merits high credit and consideration for aspiring camp-cruisers and adventurers. She is dramatically more functional than a “character” boat, much more complex and capable than a daysailer, and she offers plenty of strings, jewelry, and challenge to satisfy the inner shipwright and master mariner in all of us.
Plans for the D-18 Myst are available from Duckworks. This Boat Profile was published in Small Boats 2012 and appears here as archival material.
The Whitehall I built in 1983 is the finest bit of boatbuilding I’ve ever done. It began with a commission, so I wasn’t driven by daydreams of cruising as I had been with other boats I had built. For the Whitehall, I focussed on craftsmanship. Halfway through the project, my customer backed out on the deal, but at that point it didn’t change the nature of the work—I was building the boat for boatbuilding’s sake. I was deeply committed to traditional construction and put my best work into the best materials I could find: Port Orford cedar for the planks with mahogany for the sheerstrake, white-oak for the frames, and copper and bronze fastenings. I fashioned the breasthook, quarter knees, and boom jaws from crooks that I gathered and cured. The fruitwood crook that provided the book-matched pair of quarter knees was a once-in-a-lifetime find, perfectly suited to the angle and the curves.
I finished the Whitehall bright. The wood was too pretty and noteworthy in its rarity to hide under paint and I didn’t want to conceal the work I had taken such pride in. I launched the boat without christening it, leaving the naming to a buyer I hoped to find. A young couple living in one of the tonier parts of the Seattle metropolitan area purchased it and over the years I lost track of them and the Whitehall.
Thirty years later it resurfaced when its second owner sought me out. He’d had the boat for several years and loved it but was no longer able to use it. Feeling very strongly that it belonged back with me and my family, he let me buy it at a fraction of its value. Its transom had remained just as I’d made it, unadorned; the Whitehall was still without a name.
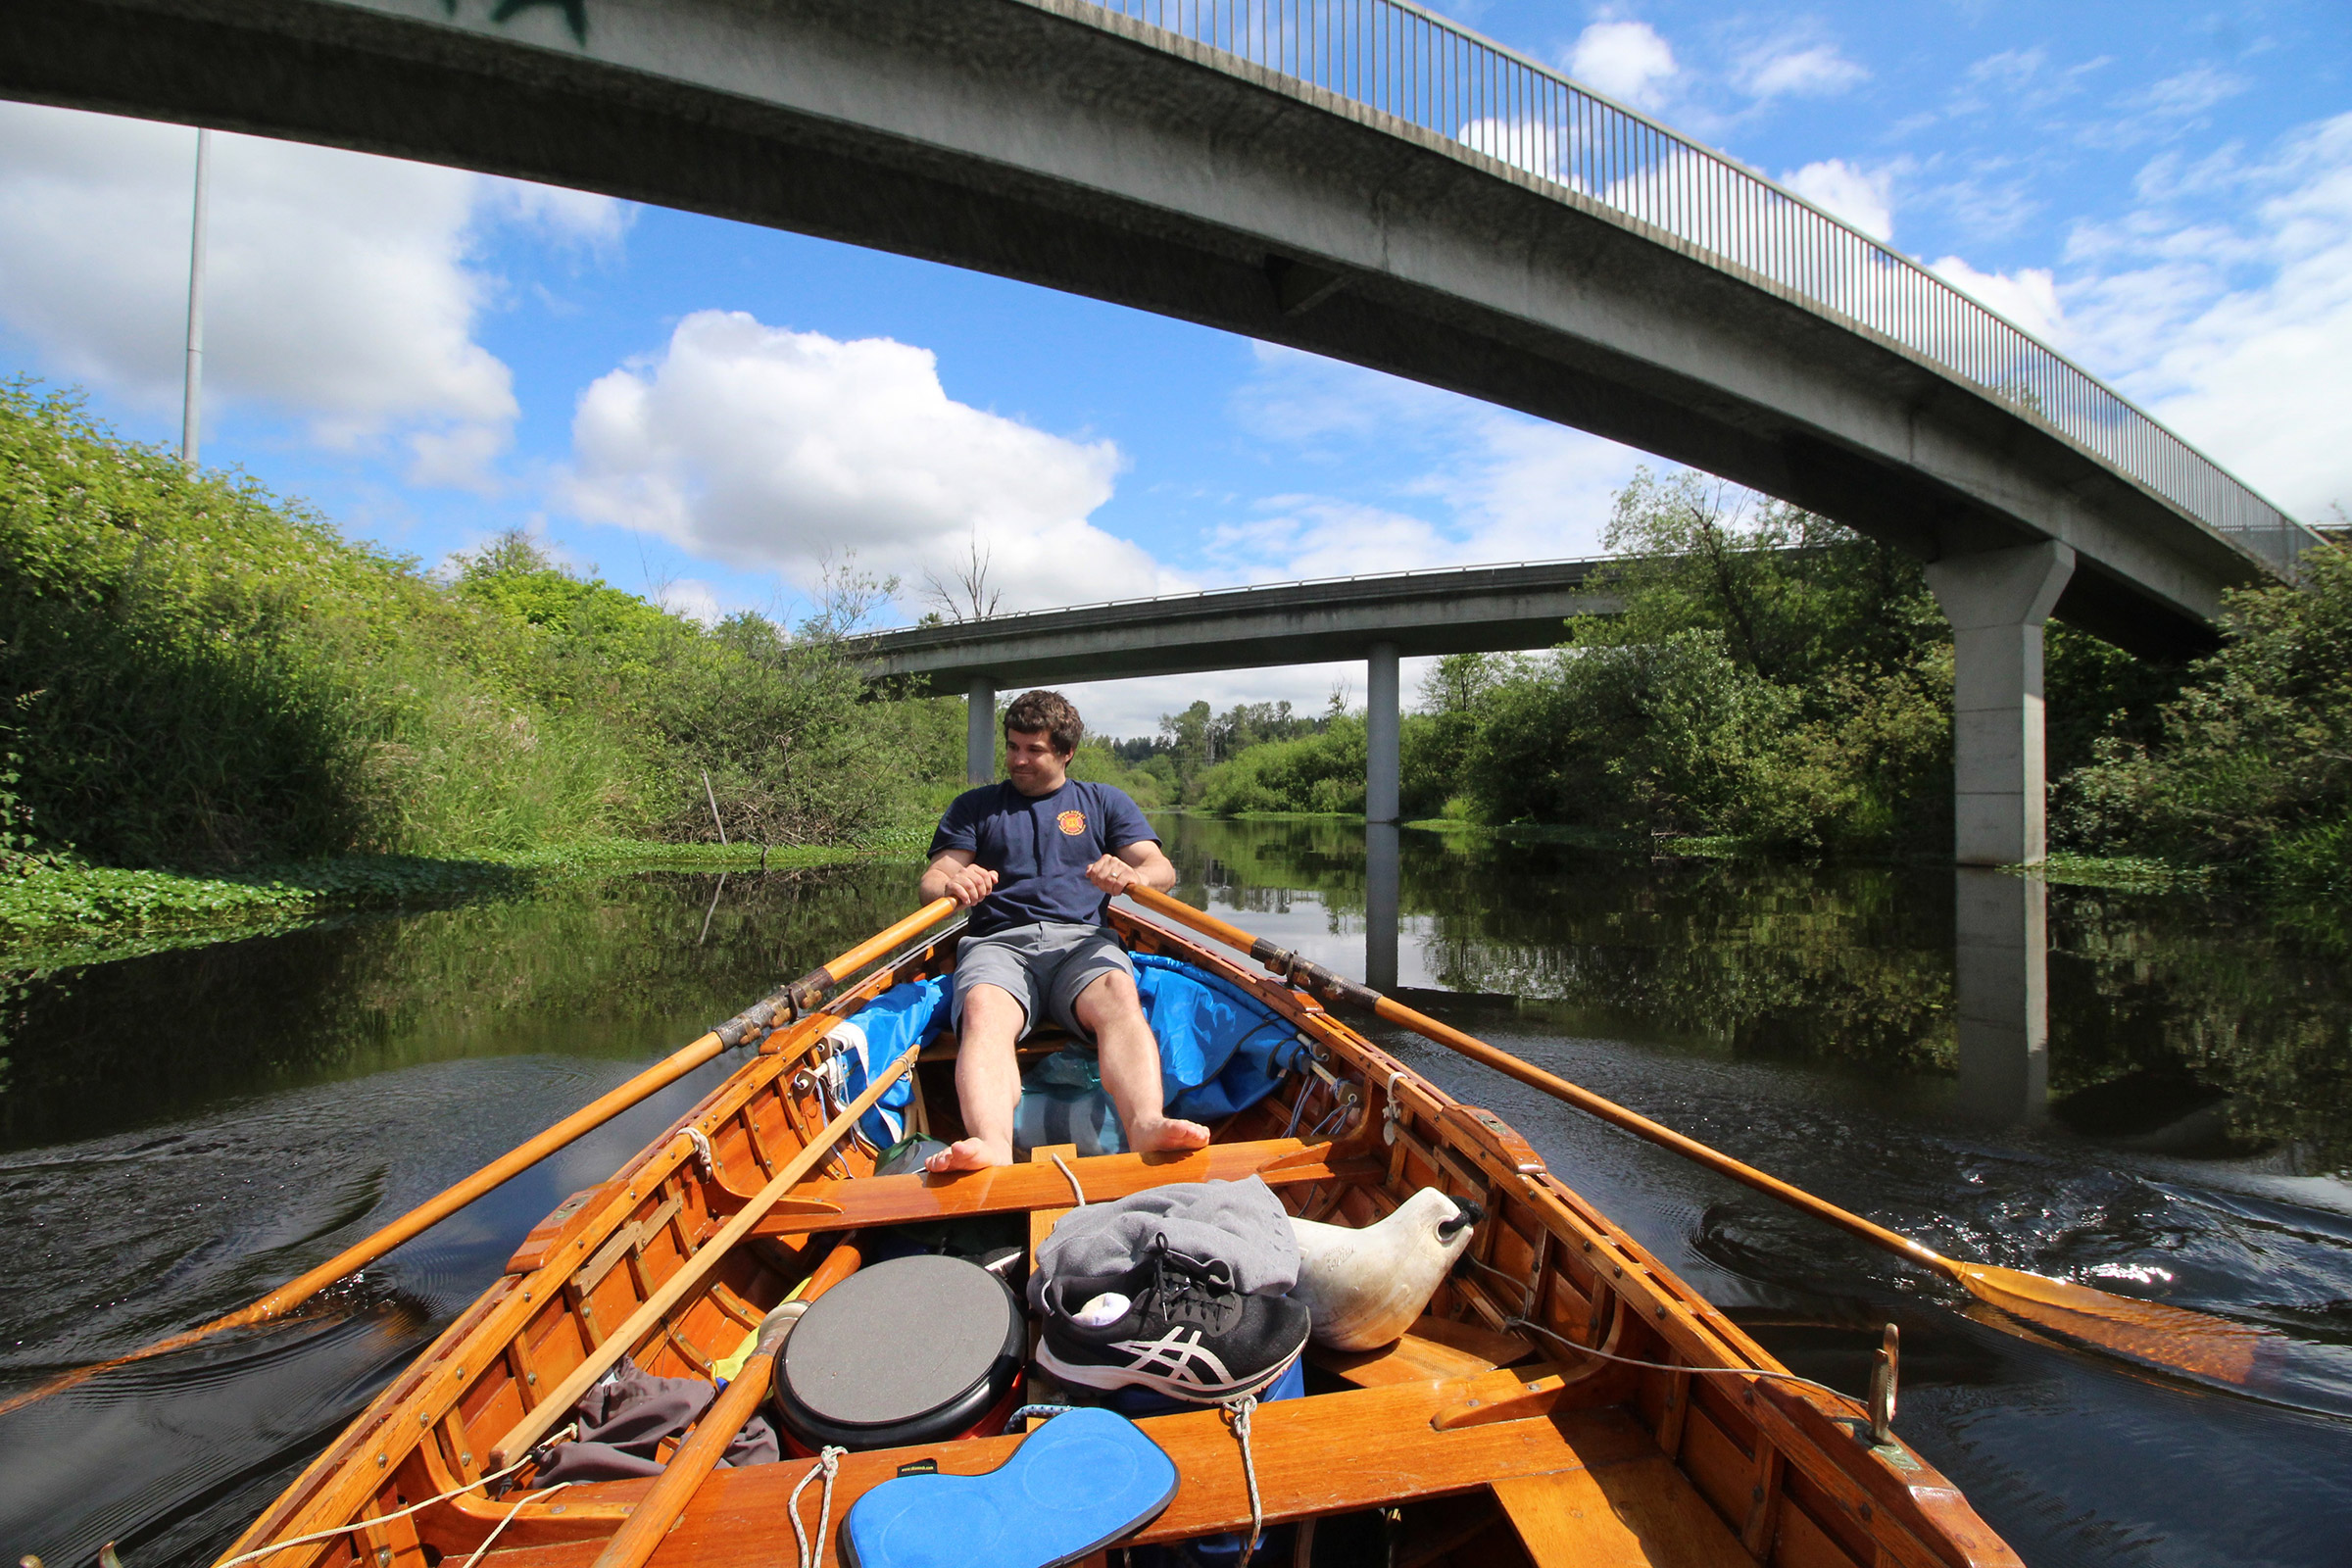
Between 1980 to 1987, four other boats I had built for months-long cruises got me through all the adventures that had captured my imagination and ambitions, and I was ready to settle into a career and raising a family. When I brought the Whitehall home in 2014, my kids were on their own and I had just been hired by WoodenBoat. Later that year, the Whitehall became a valuable asset for my work as the editor of Small Boats. It made its first appearance in the November 2014 issue in an article on Beaching Legs and has since appeared in one way or another in at least 54 more articles.
I enjoyed the attention the boat attracted at the launch and in my driveway, but all too often I treated the Whitehall very much like a trophy, brought out only for show and for polishing. That was until Nate and I spent this year’s Father’s Day together aboard it exploring Mercer Slough, a backwater surrounded by a park just south of downtown Bellevue, Washington.
The entrance to Mercer Slough lies under the spilled-spaghetti tangle of elevated off-ramps, on-ramps, and through lanes of Bellevue Way and Interstates 90 and 405. Beneath the widest expanse of concrete, the air is still but the traffic sounds like a gale blowing.
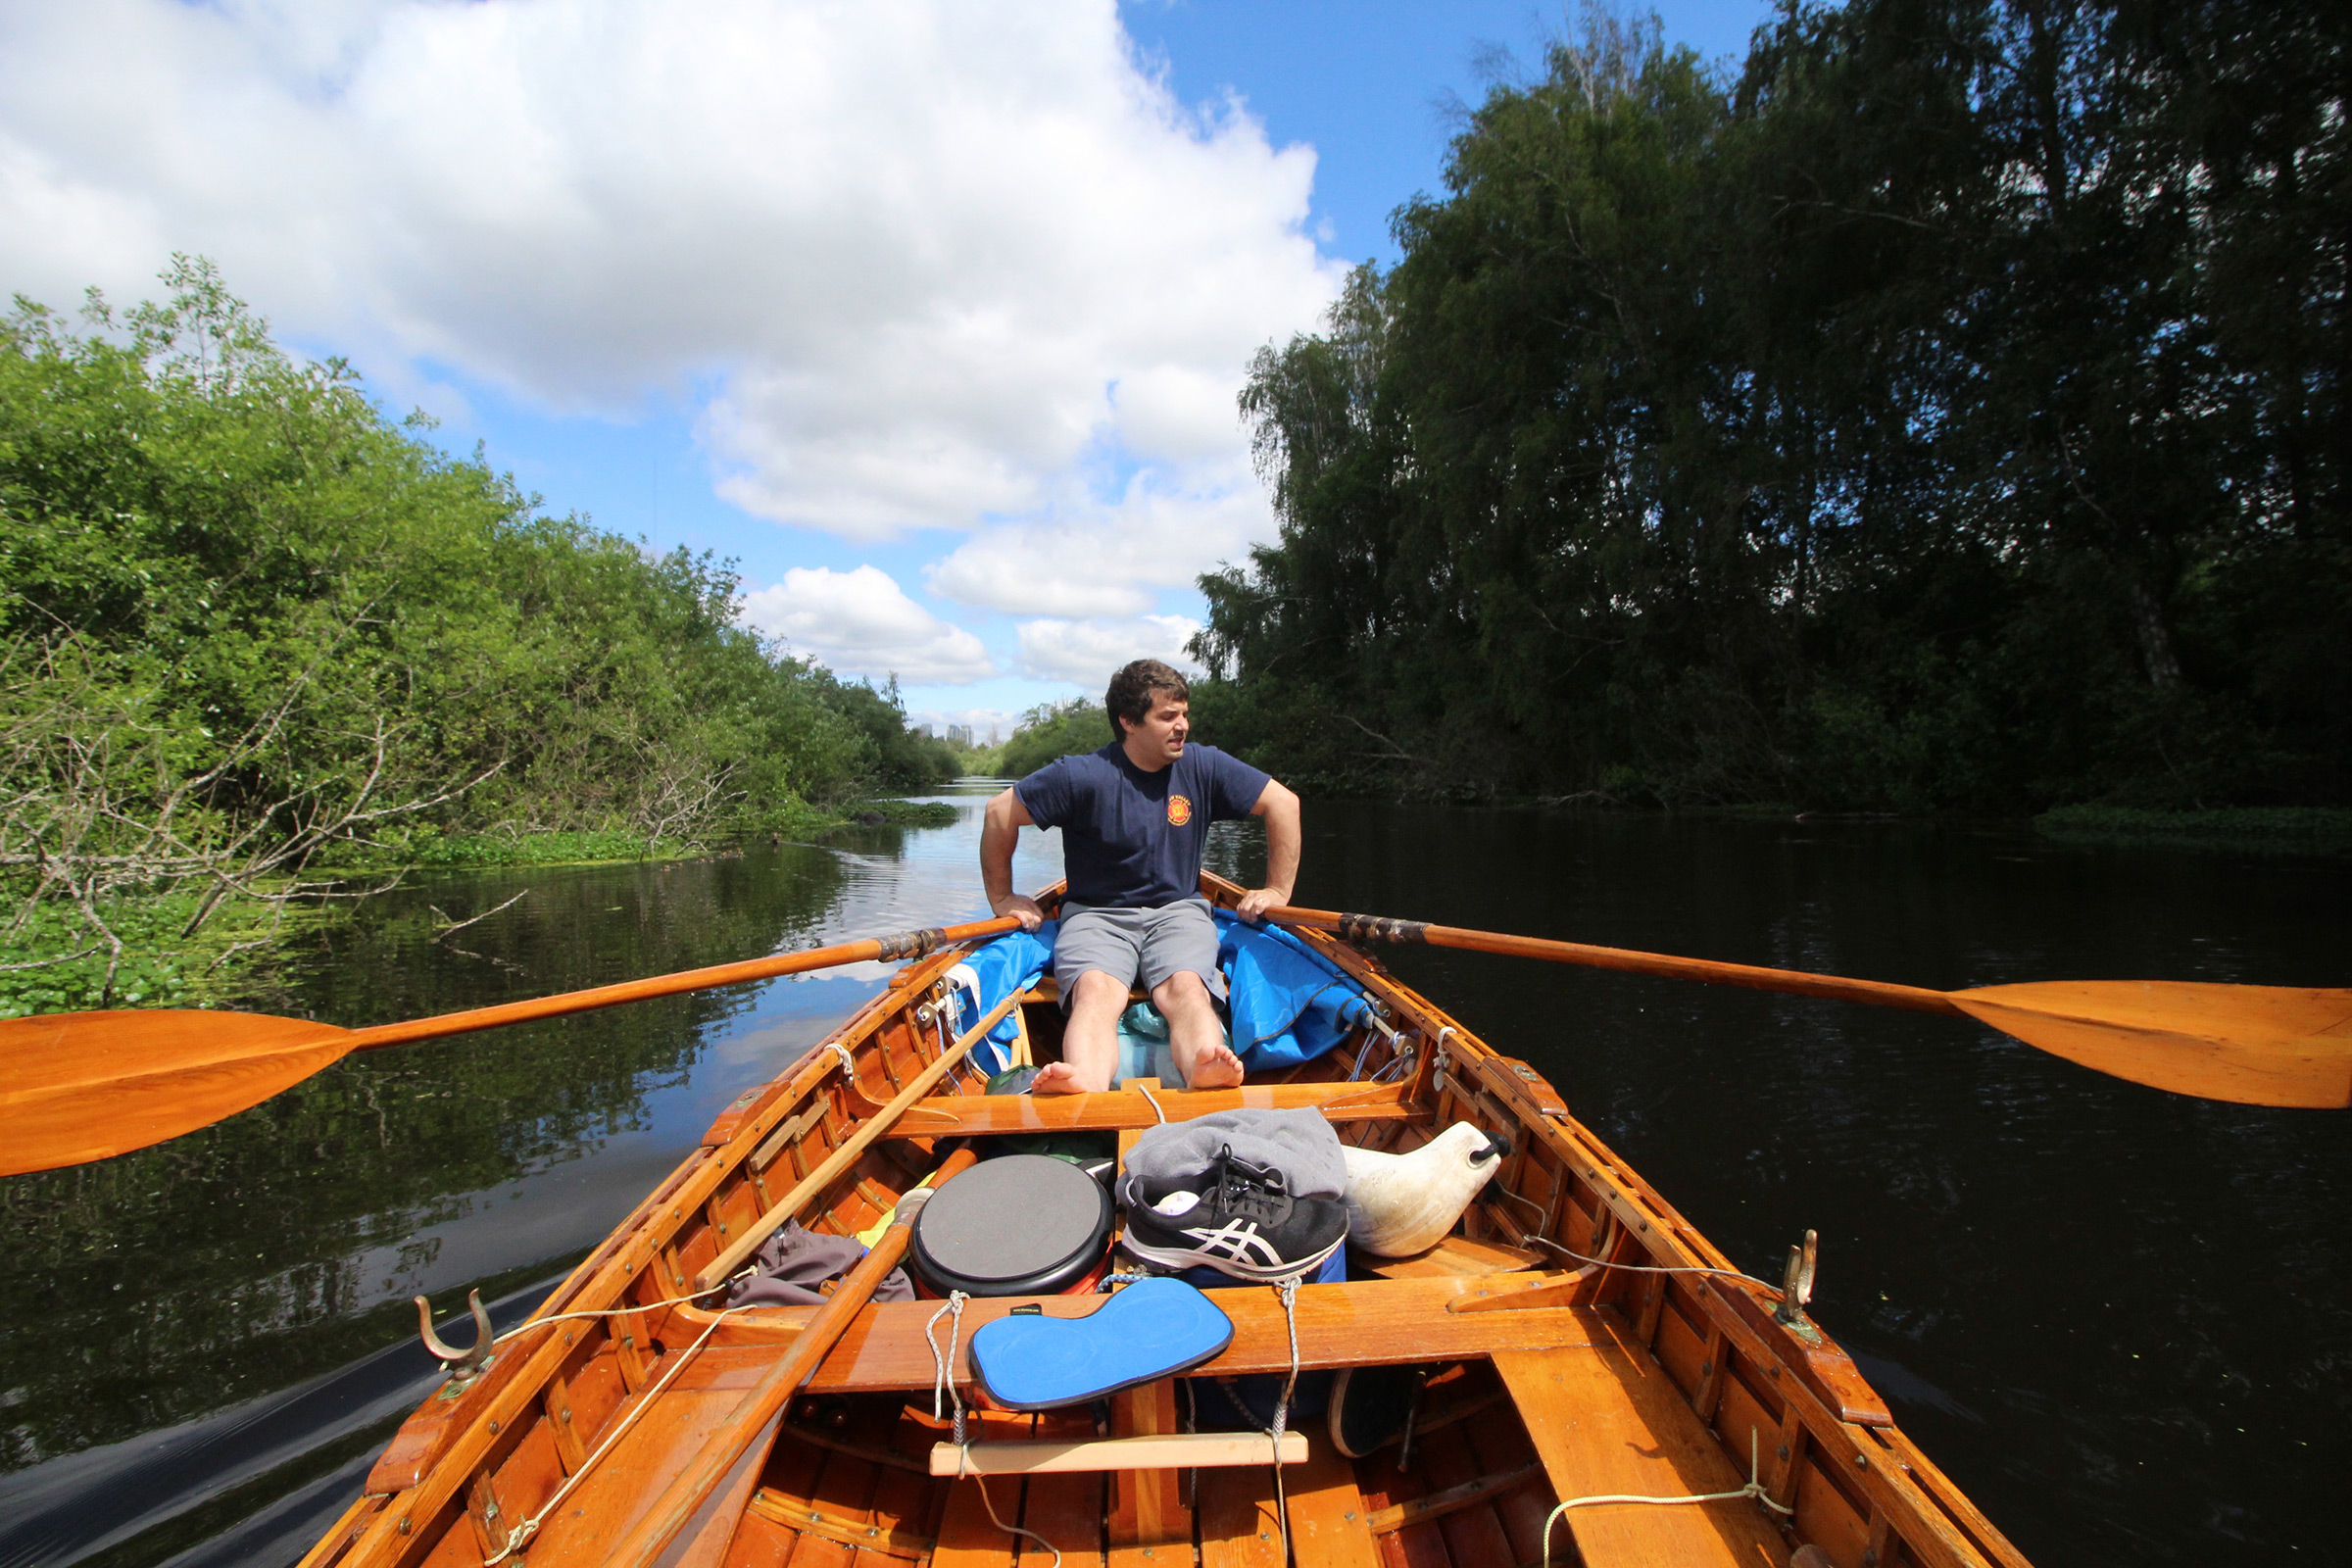
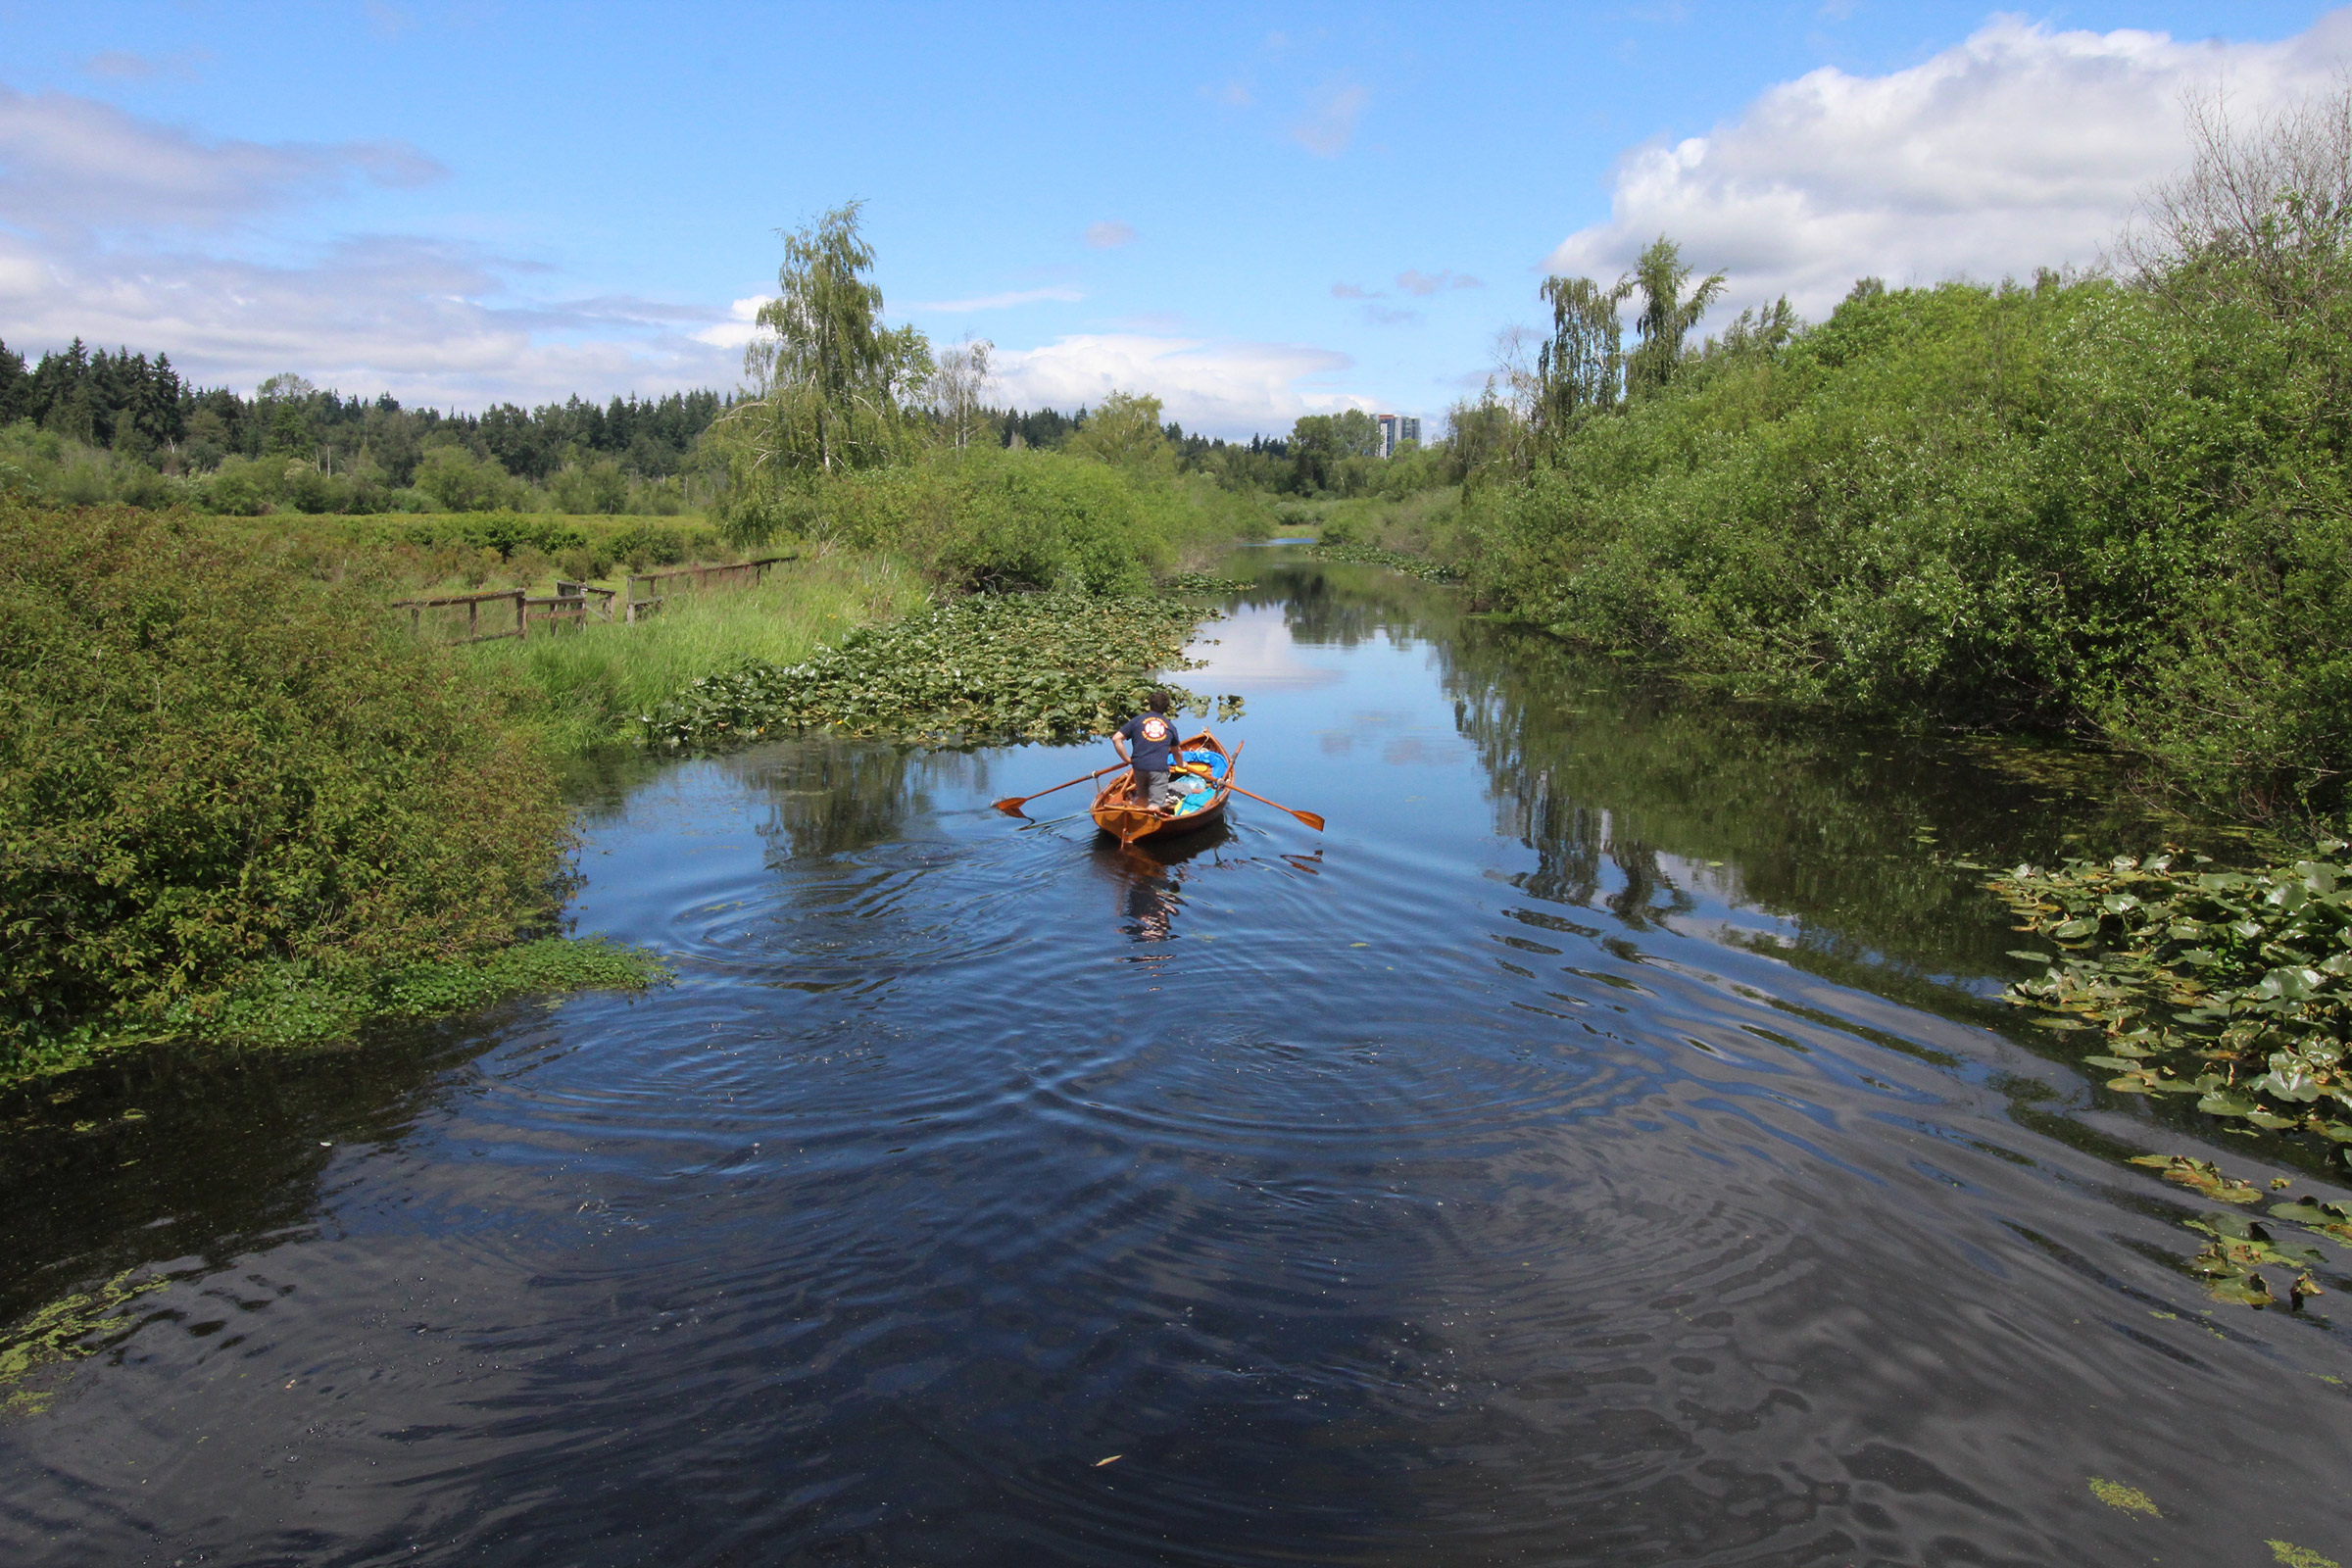
We started out from the launch ramp rowing tandem, but once we reached the slough it was best to take it in with a slower pace. We took turns rowing from the forward station and steering from the sternsheets. The nearest bridge here is part of a bike path that I’ve crossed often, looking down at the slough and wishing I were rowing or paddling rather than pedaling.
The center section of the slough runs straight for 1/2 mile and offers a glimpse of high-rises 2 miles away in downtown Bellevue, visible here just above Nate’s right elbow. At the next bend the city disappears from view.
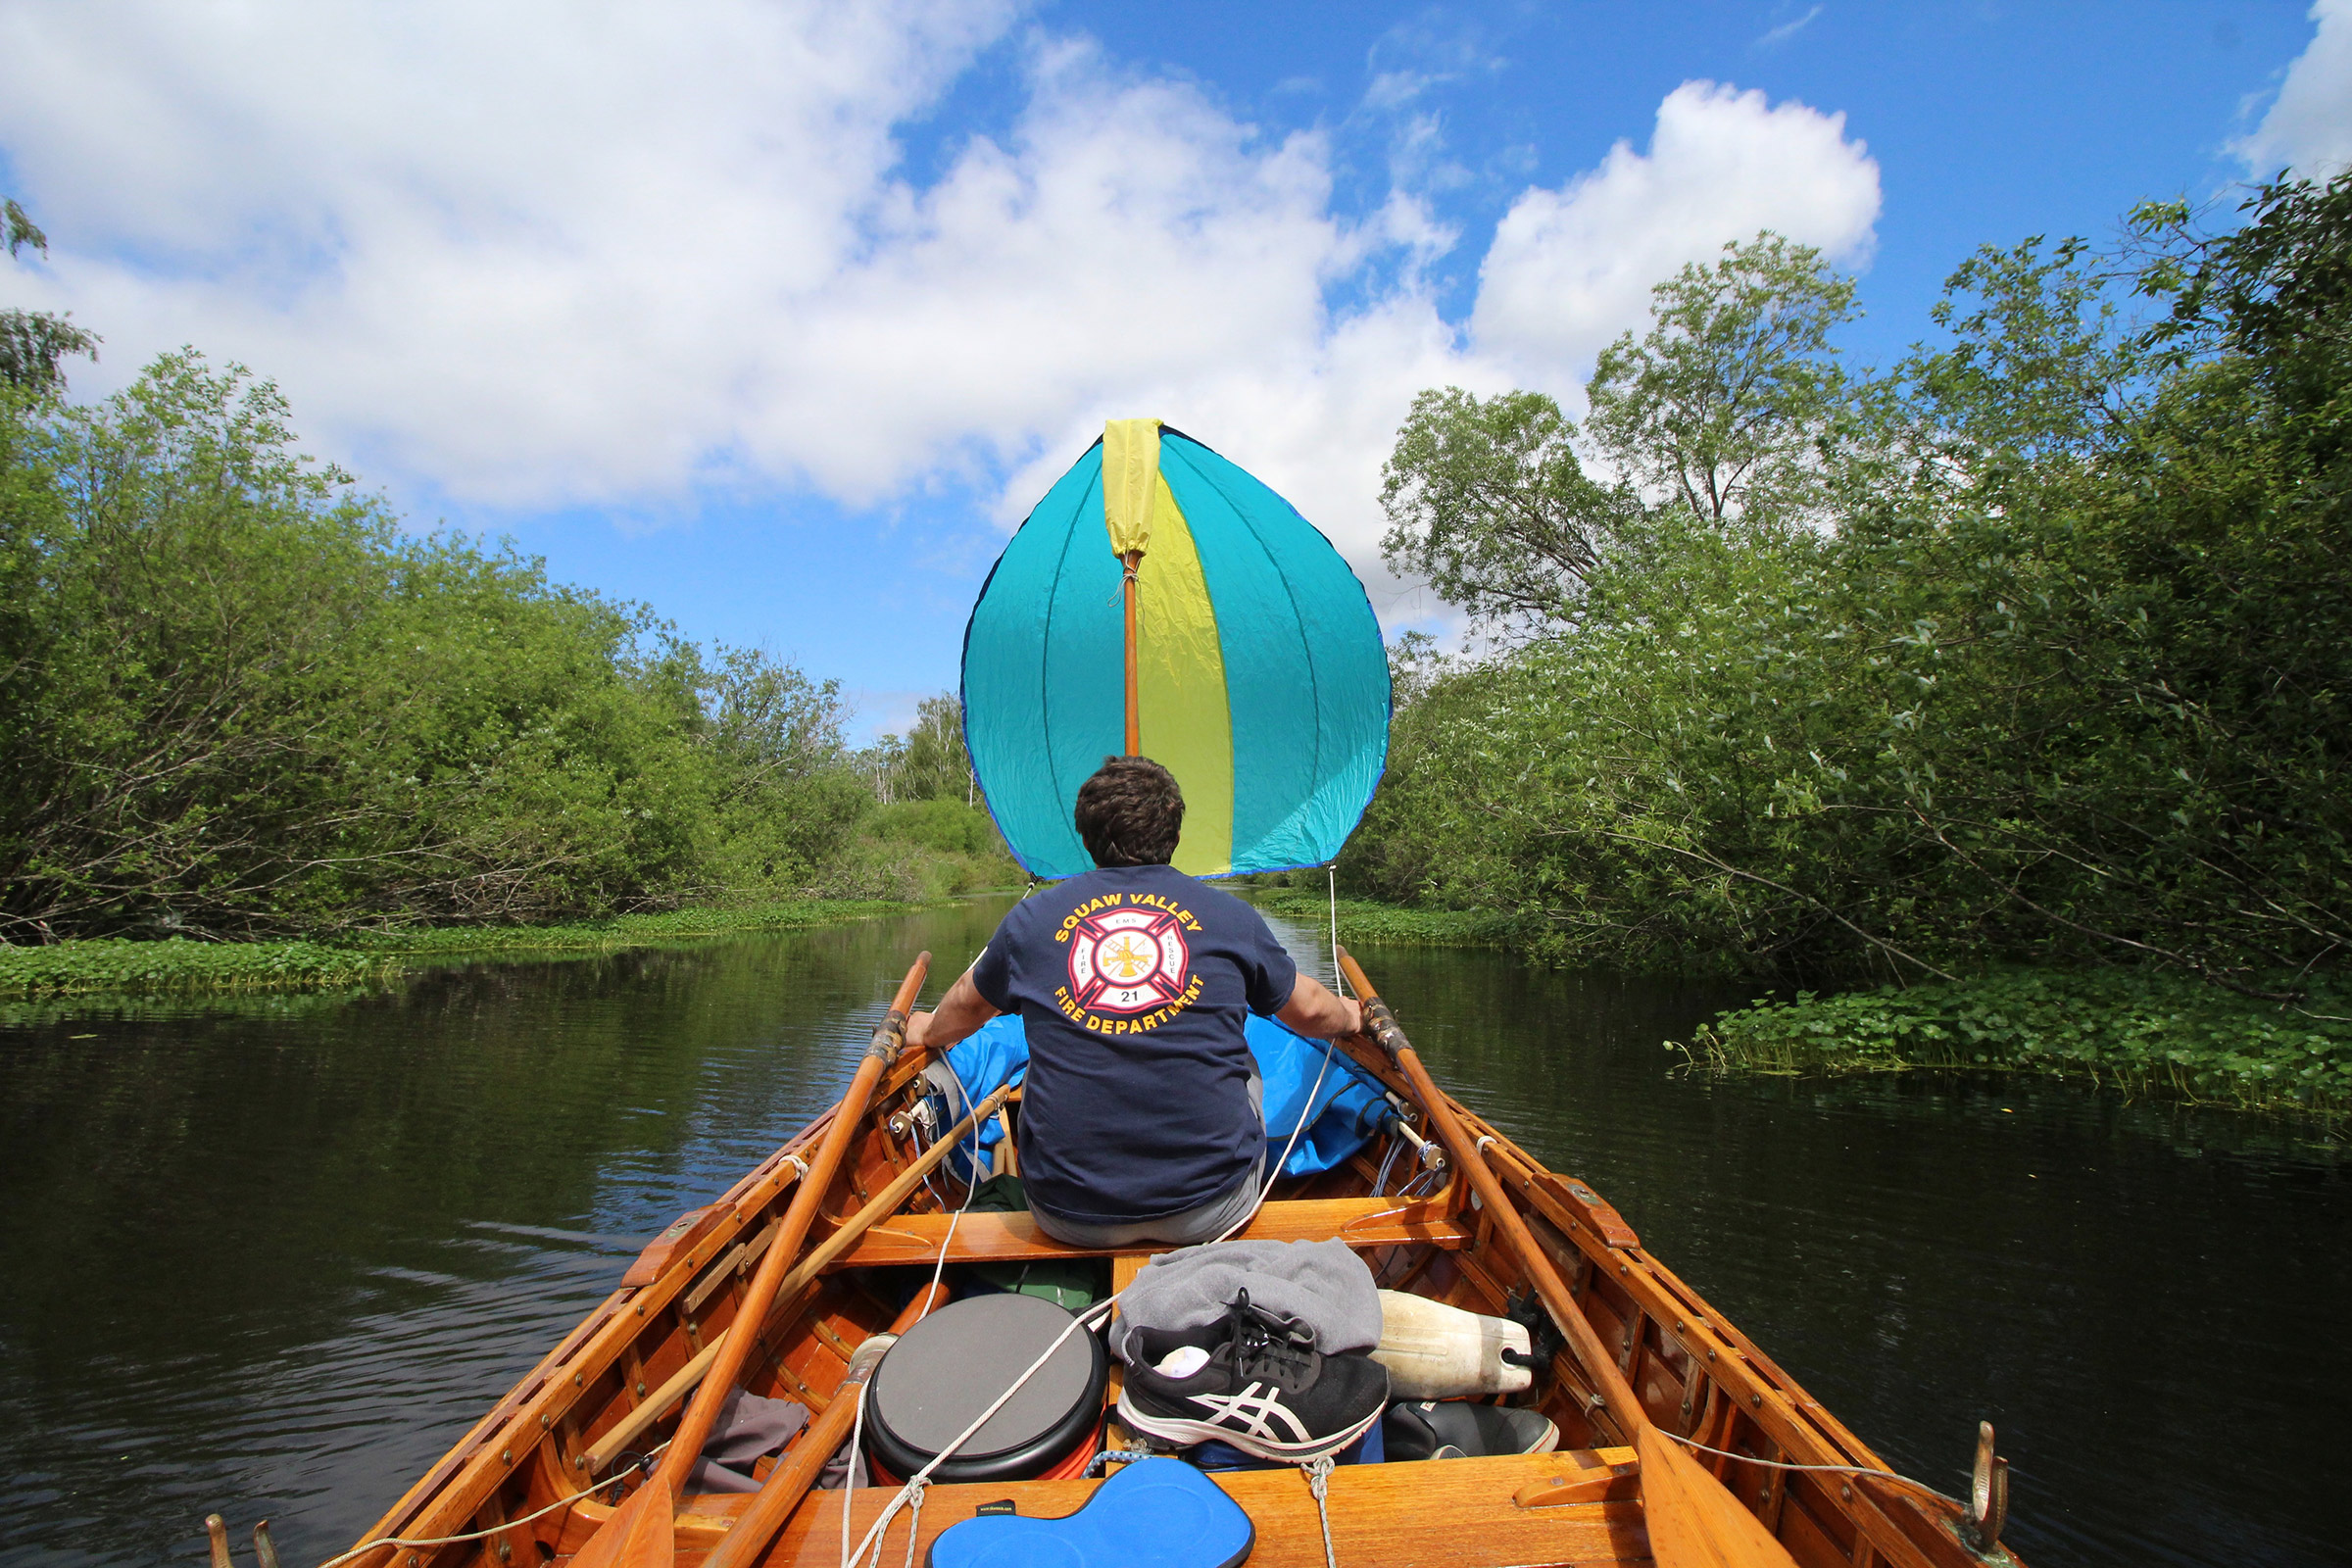
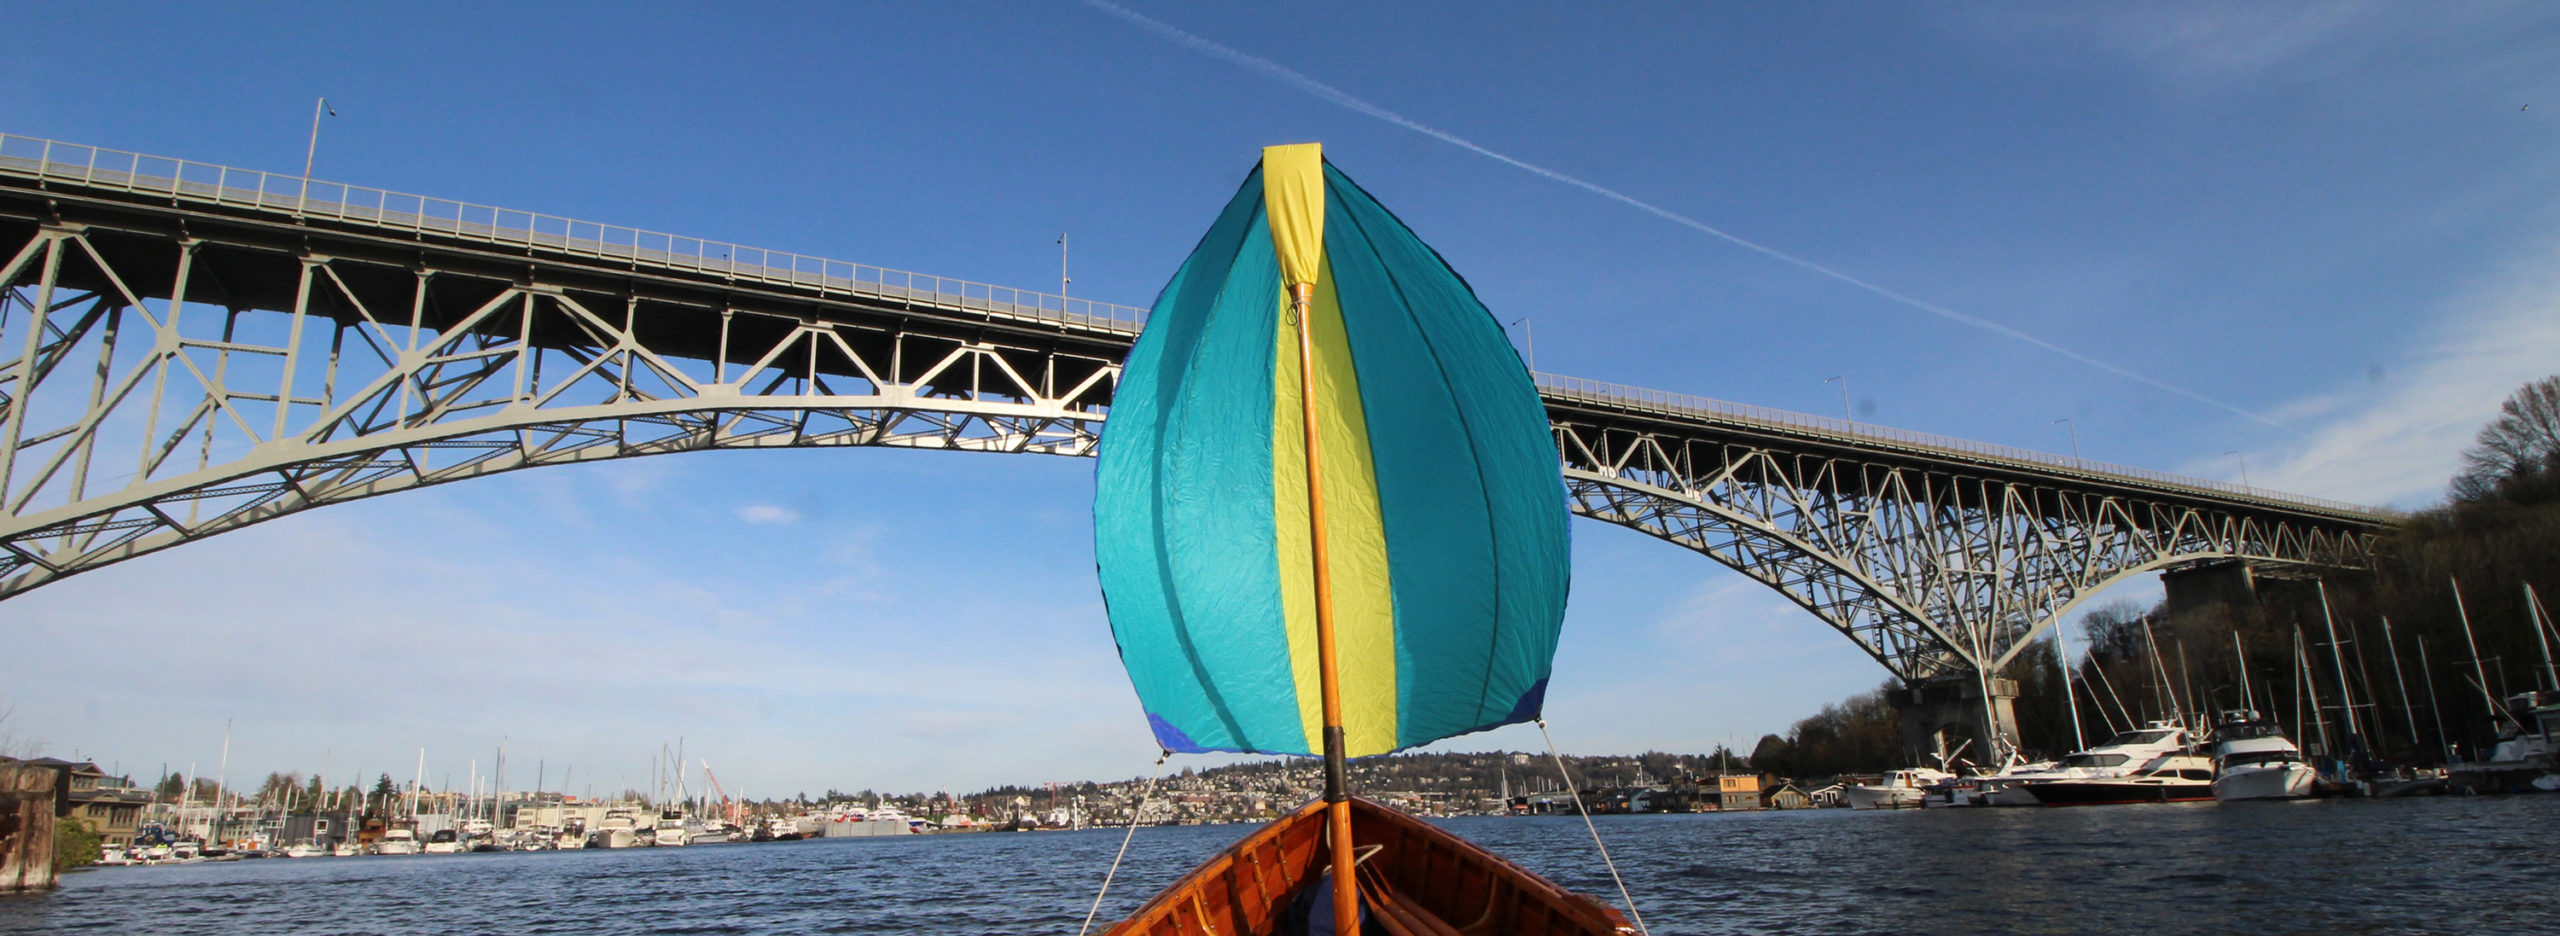
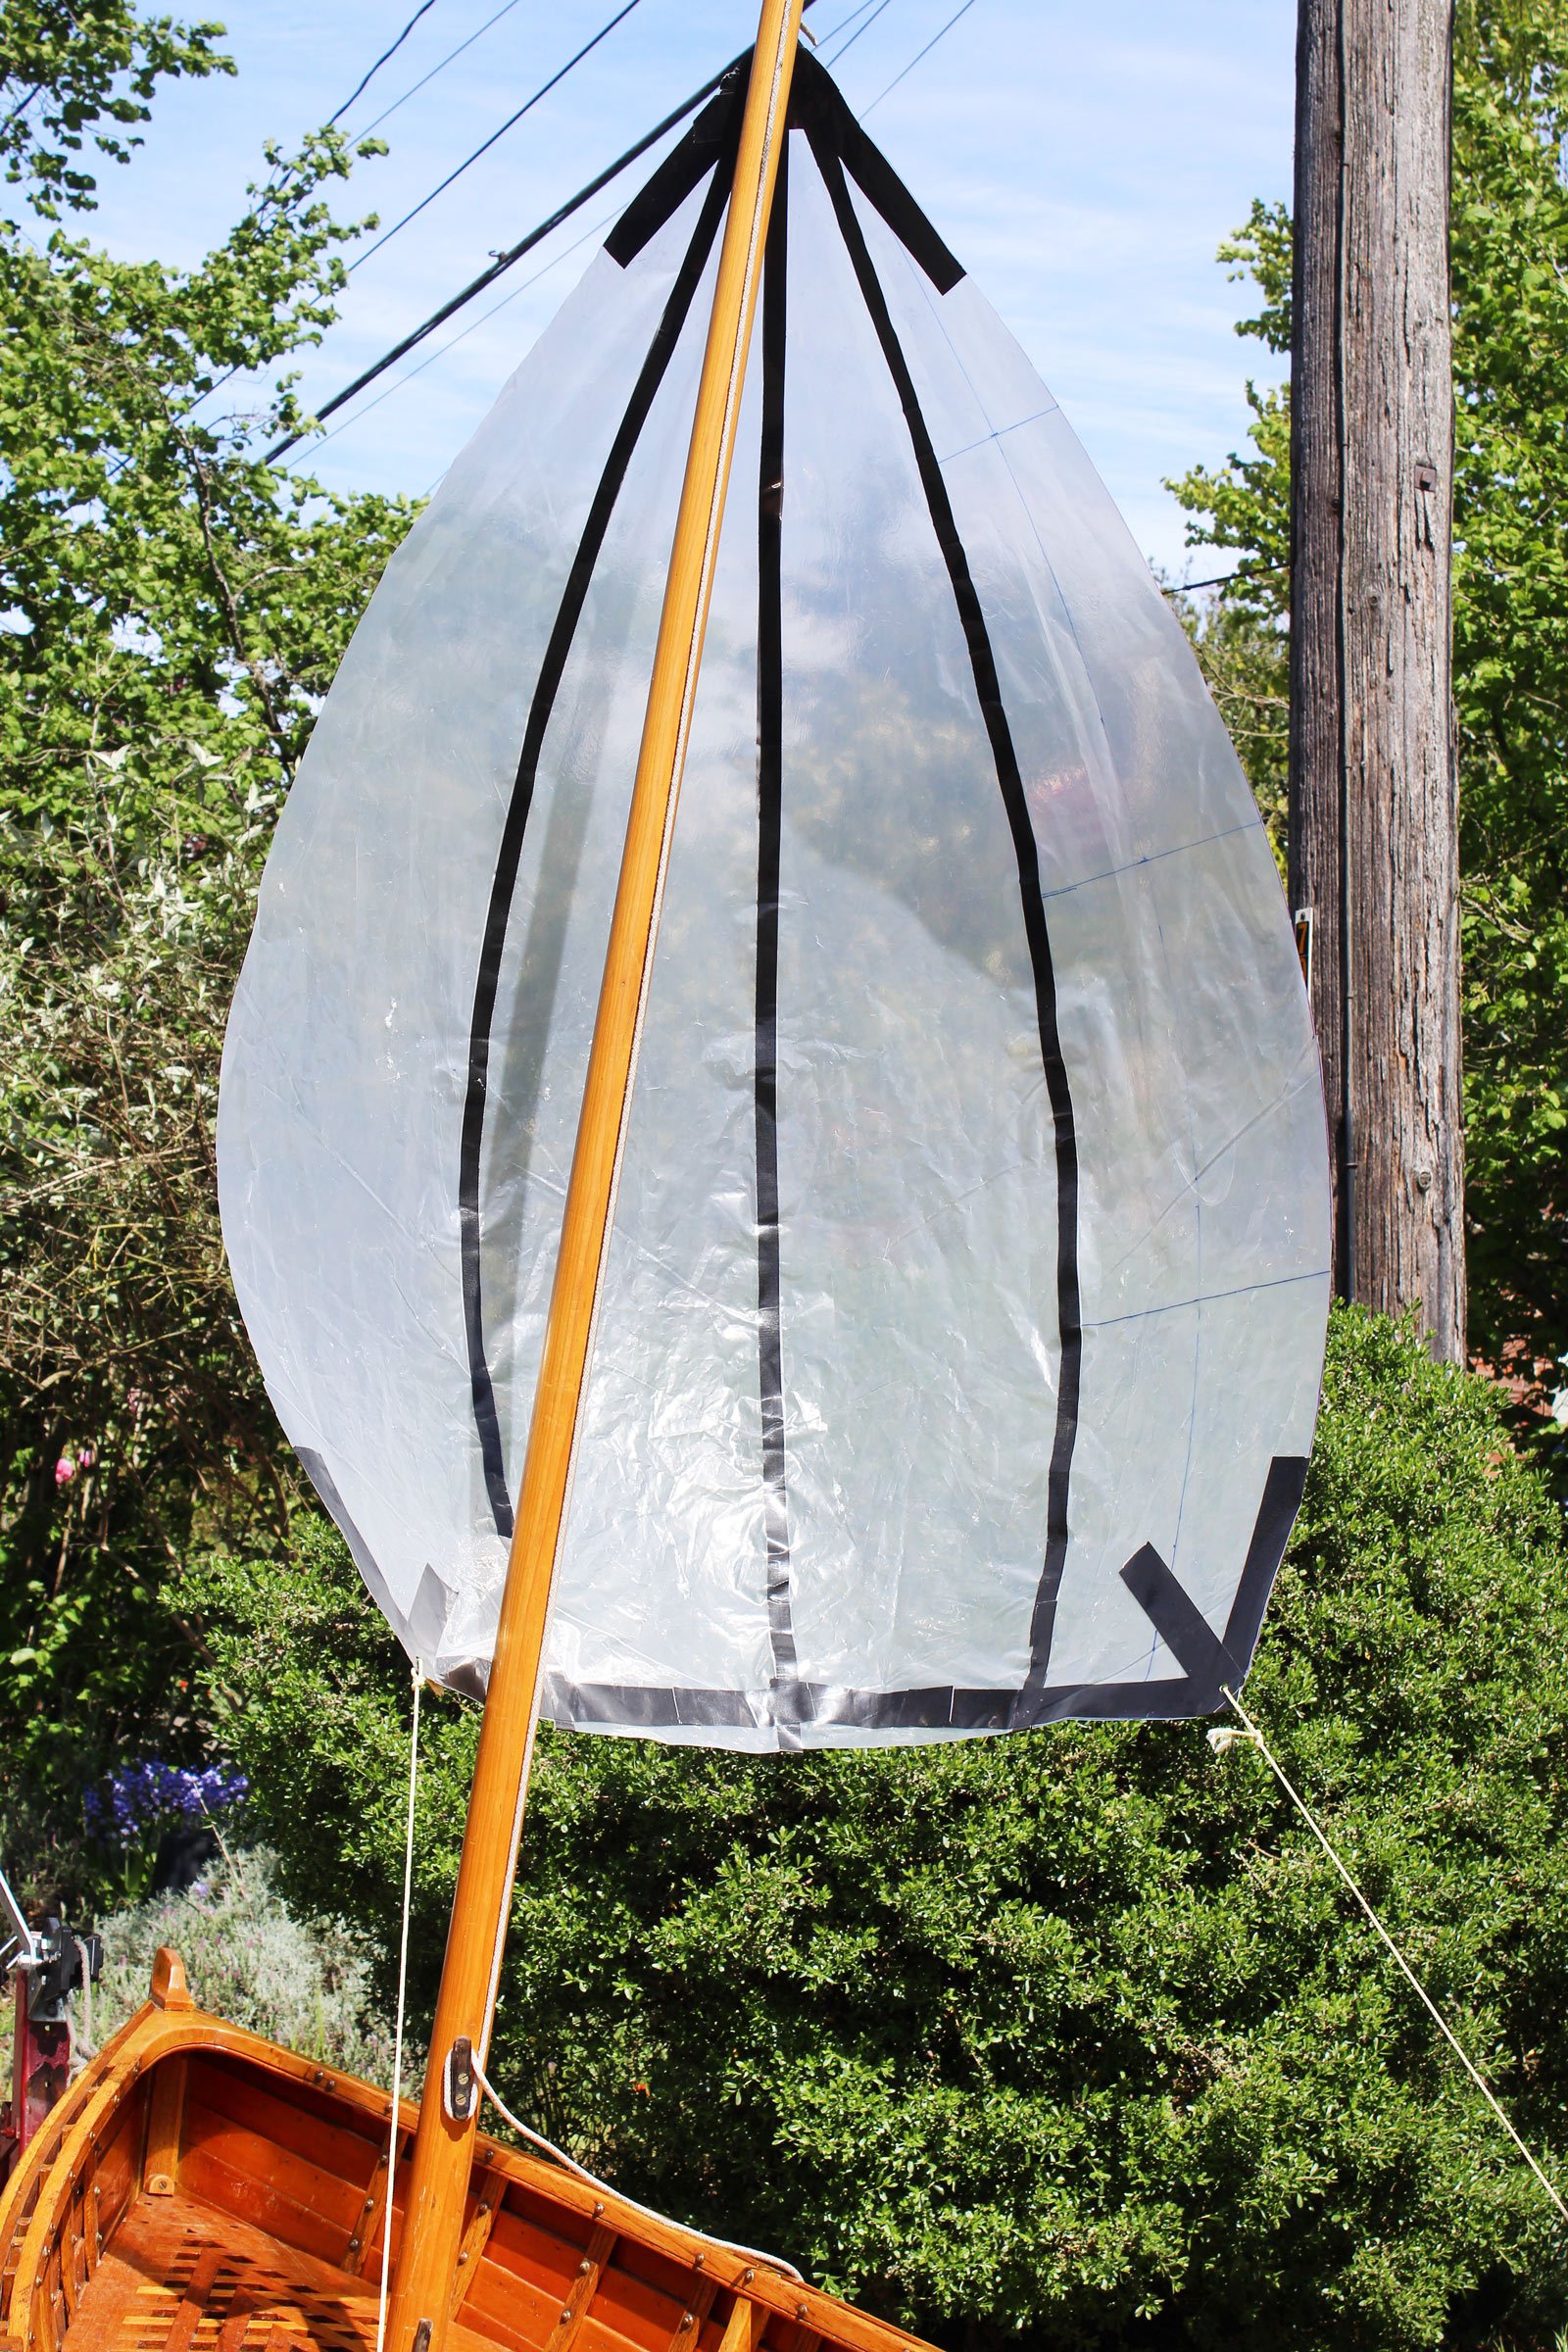
Like me, Nate is eager to raise sail whenever there’s a breeze that can be put to good use. The spinnaker I made to fly from an oar stepped as a mast has become an essential bit of our kit.
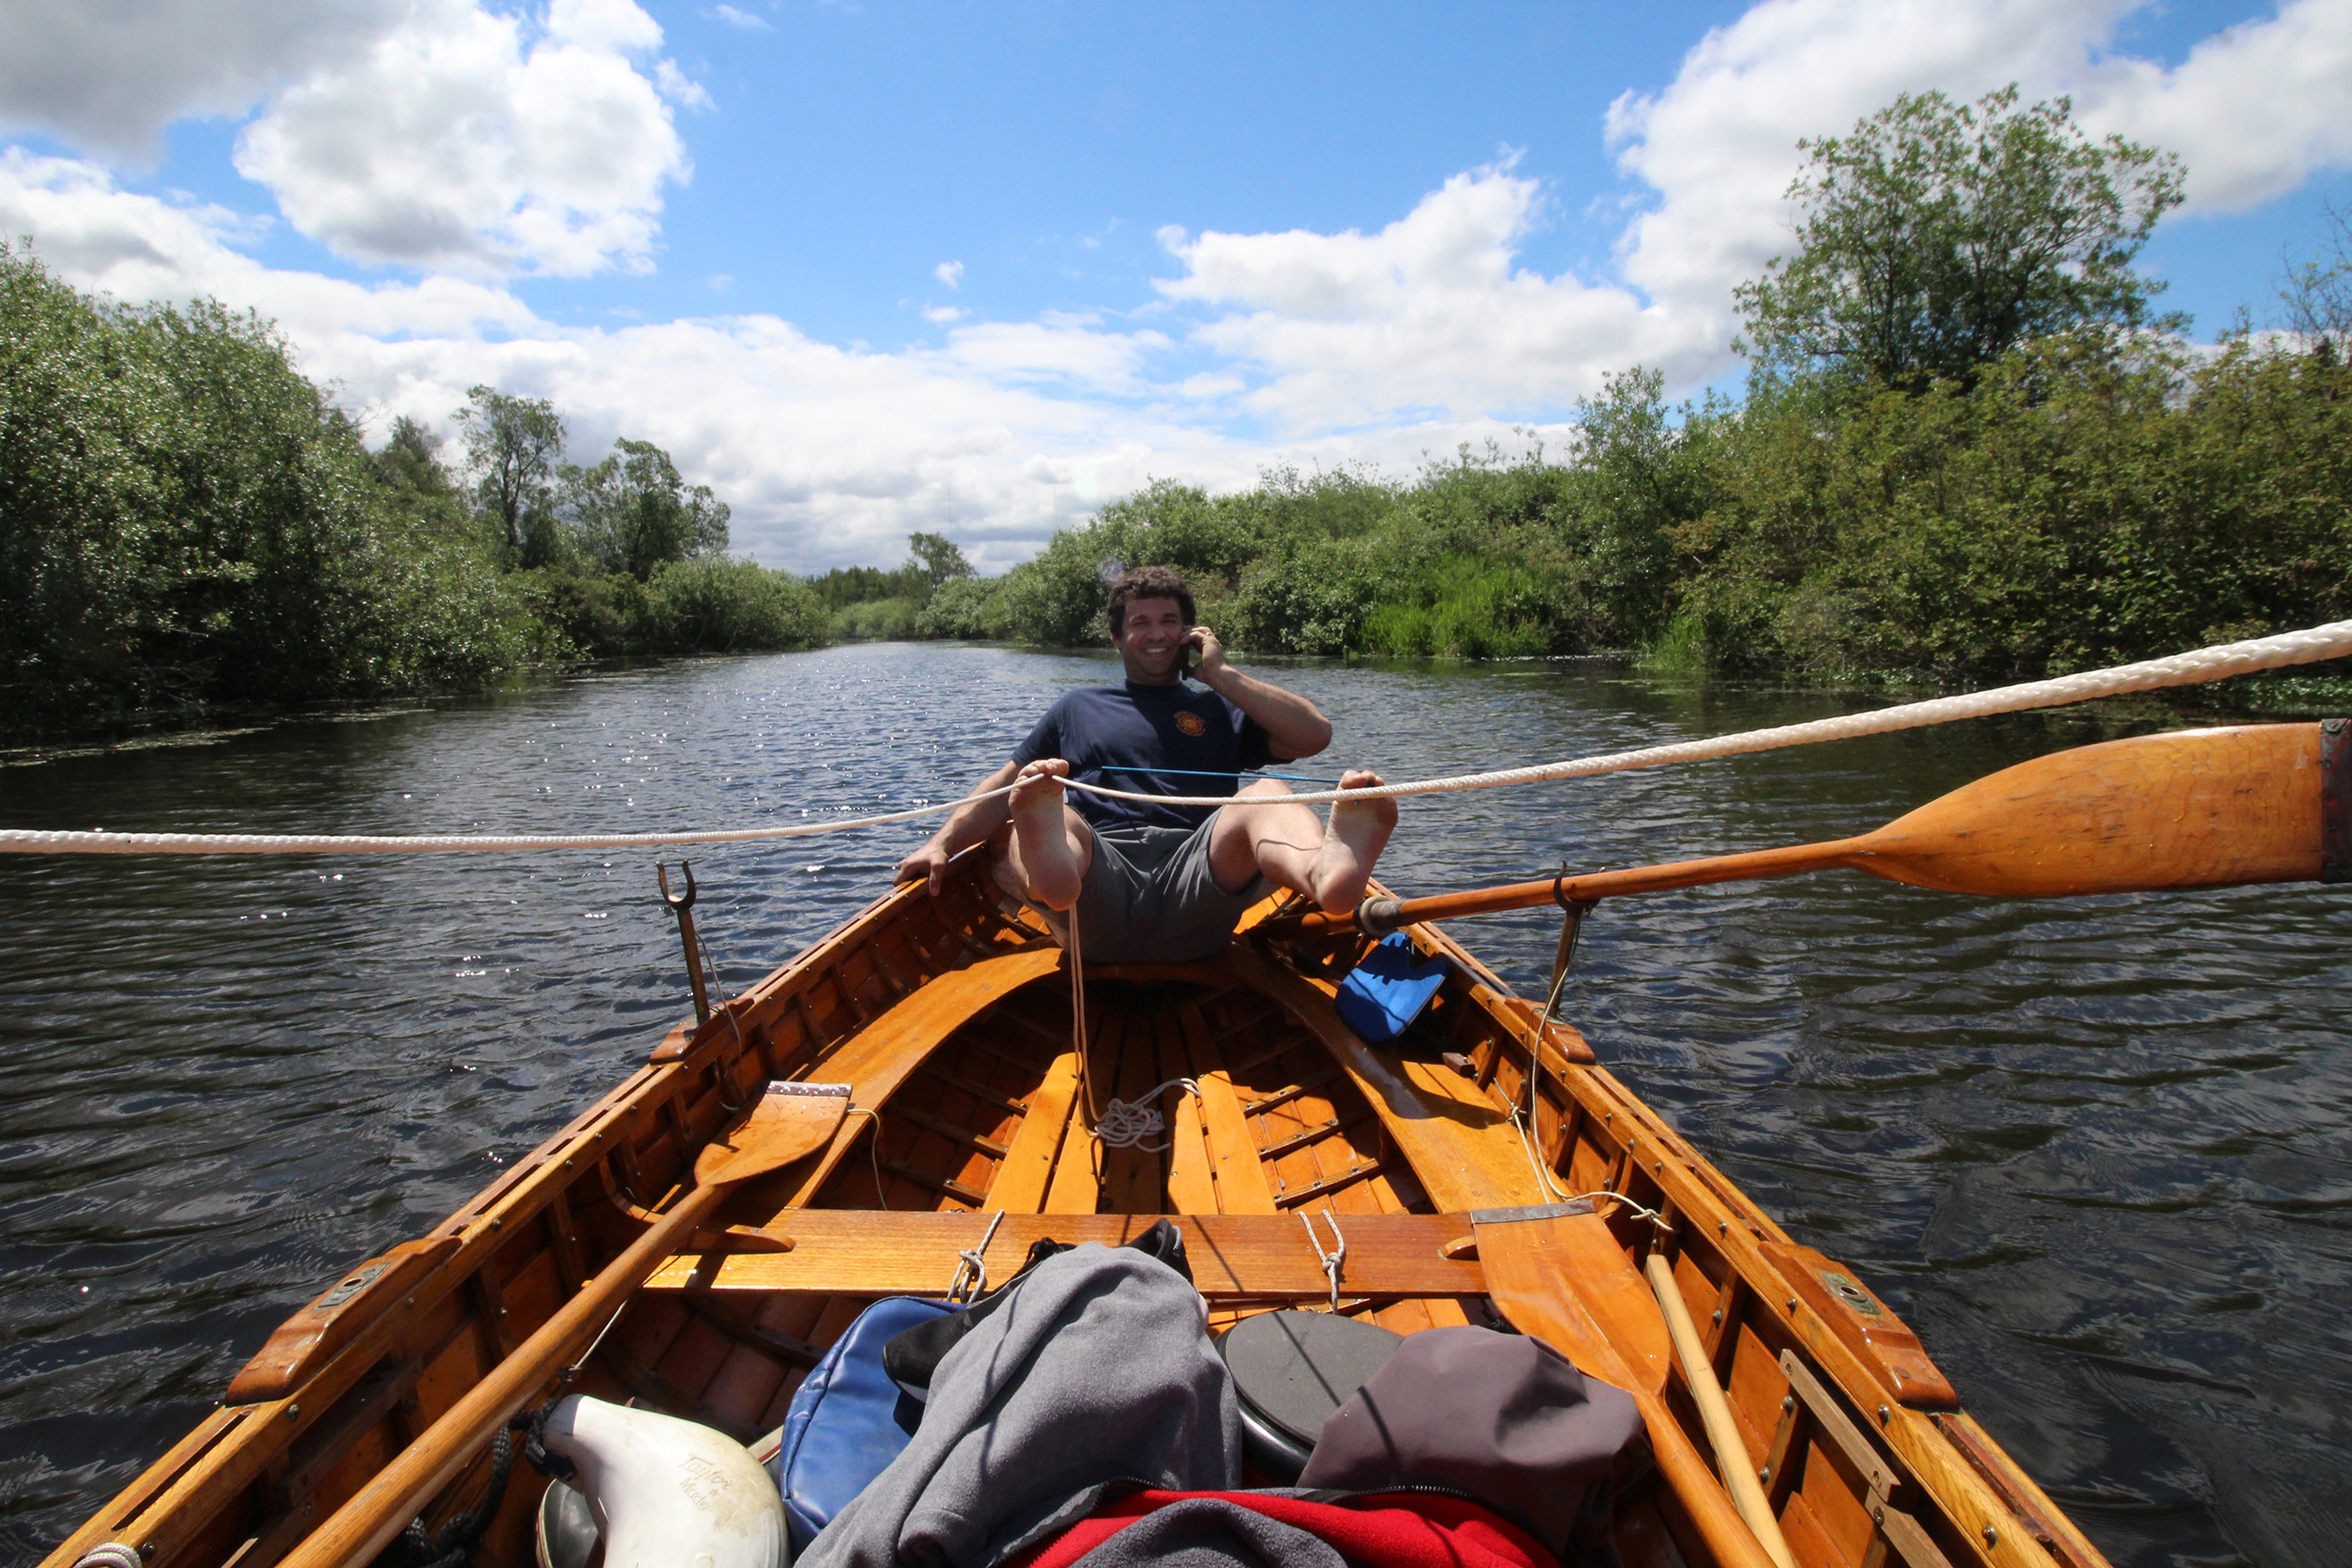
Nate quickly took to stand-up rowing with oarlock extensions. To his left, on the far side of the fence is a blueberry farm that operates within Bellevue’s Mercer Slough Nature Park. Blueberries have been cultivated in the area since 1933.
Nate was in the stern, sailing the Whitehall, when my daughter Alison called to wish me a happy Father’s Day. When I handed my phone to him so he could talk with his sister, he took the phone in one hand and with the other slipped the spinnaker sheets between the toes of his right foot and the tiller-yoke lines between the toes of his other foot.
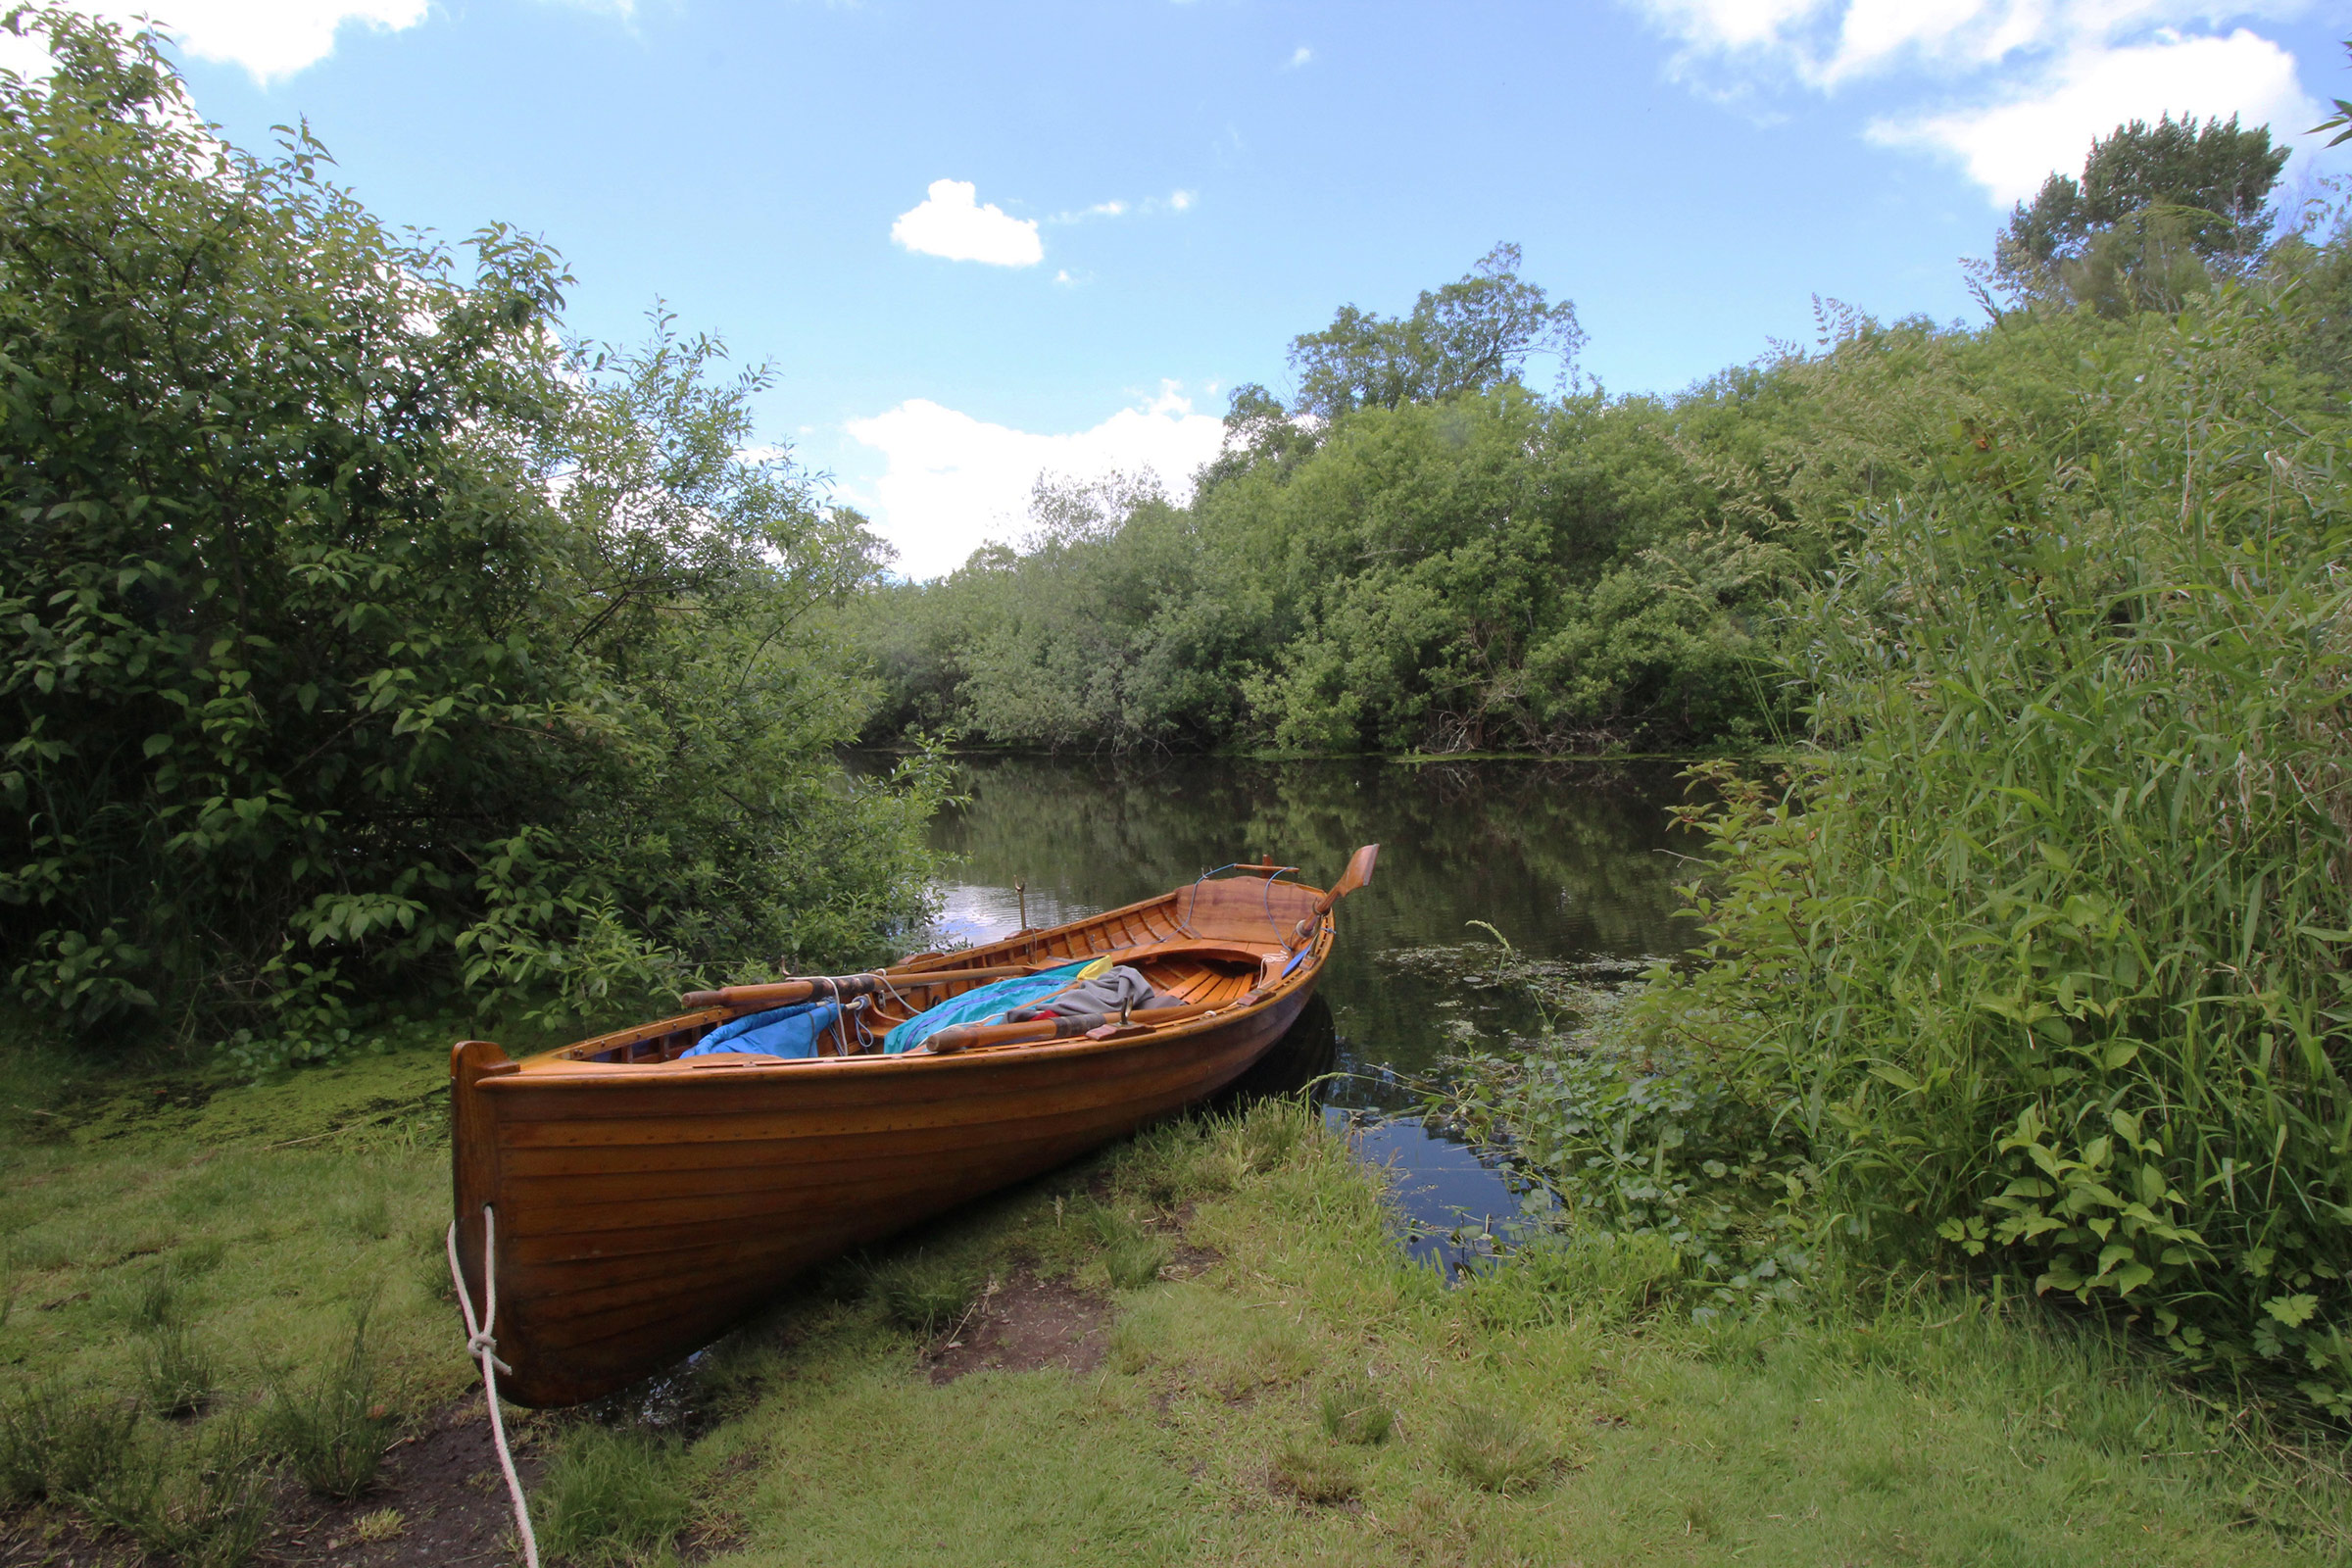
One of the trails that meander around the park curves through this atypical clearing at the edge of the slough. Nate and I pulled ashore and took a lunch break at a bench situated there. The grass beneath the boat grows on floating sod that sinks when stepped on. I took a short walk along the trail to look in the woods for windfalls that might make a taller mast for the spinnaker. The growth was too thick to venture into and I returned to the boat empty handed.
The upstream extremity of the slough leads to the concrete-and-steel Kelsey Creek fish ladder. It climbs to a culvert that was large enough for the Whitehall, but the baffles in the ladder leading up to it were impassible. (There were no signs of any fish.)
Nate took a close look at the culvert. At the far end, about 40 yards away, there were signs of a cattail marsh. The water was cold, and we decided to turn back.
On our way back from the fish ladder we found a stand of bamboo on land outside of the park boundary. Two of the stalks had fallen and were half submerged. A third arched out just a few feet over the water and I used a serrated folding knife to cut it off a few feet from shore. Nate and I trimmed the branches and we had our new mast.
The north end of the slough loops back to itself around a 1/2-mile-long island. Just 100 yards into our return along the alternative route, we passed under a concrete bridge, low enough that we had to duck to pass under it. Between the concrete girders were steel pipes within easy reach and Nate abandoned ship.
On our passage south back down the slough we found the breeze had switched directions since we last sailed it. The spinnaker went up on the new 9′ bamboo mast to catch the breeze above our heads and pull us part of the way home.
The change in my feelings about the Whitehall and my relationship with it happened as Nate and I tethered it at the bottom of the Kelsey Creek fish ladder. I had only one fender and, before I could get it properly situated, the gunwale grated against the rough concrete wall. The gouge in the oak outwale would leave the boat scarred, but I realized that it would be a memento of a day I’d be happy to remember. My own scars have made the events that created them impossible to forget: the crescent scar on my left index finger I got while learning to whittle when I was 10 years old, the stitch-puckered scar on my right knee where a scalpel-sharp flake of obsidian sliced into it while I was making arrowheads at 14, and the pale V at the base of my right thumb I got at 23 when I was running around Green Lake, tripped and tumbled, gored my hand on a jagged edge of broken concrete, and fell into the lake.
The only scar the Whitehall had carried before Mercer Slough is one that you might not notice. It’s a scarf joint 18″ back from the forward end of the third plank up from the garboard on the port side. I’d split the plank’s hood end while trying to nail it into the stem rabbet without steaming. I had to patch on a new piece. For the 39 years after I’d launched theWhitehall, it had been so gently used and so well maintained that there wasn’t another scar anywhere, no visible sign the boat had ever been subject to the mishaps that are inevitable when venturing out into the world. It’s tempting to coddle beauty, but it comes at the expense of character.
My other boats have scars that bring their histories to life. My sneakbox LUNA has a patch on the bottom where I hit a submerged rock when I stopped on the muddy Kentucky shore of the Ohio River to meet Shantyboat legends Harlan and Anna Hubbard. My Gokstad faering ROWENA has a gouge in the garboard where she slipped off a rail cart at the end of a remarkable portage across Alaska’s Admiralty Island. One of my Greenland kayaks has a patch where a harpoon I’d thrown during a traditional skills demonstration didn’t make it past the foredeck.
I’ll still take good care of the Whitehall, but I’ll seek out more opportunities to enjoy using it with my kids and those close to me. We all have scars, boats and boaters alike, and with its recently gouged gunwale the Whitehall seems more like a member of the family just like BONZO, HESPERIA, and ALISON, the other boats in our fleet that share in making memories. It may be time to give the Whitehall a name.
I first got interested in sharpies after building an Arch Davis-designed Laughing Gull and sailing it for some 10 years. I became enamored with its speed and shallow draft. When I moved from Miami to New Orleans, I found that the best sailing here is during the cooler months, but it was hard to find crew willing to take spray on that 16′ open boat on chilly days. I needed a bigger boat, and I wanted it to be a sharpie.
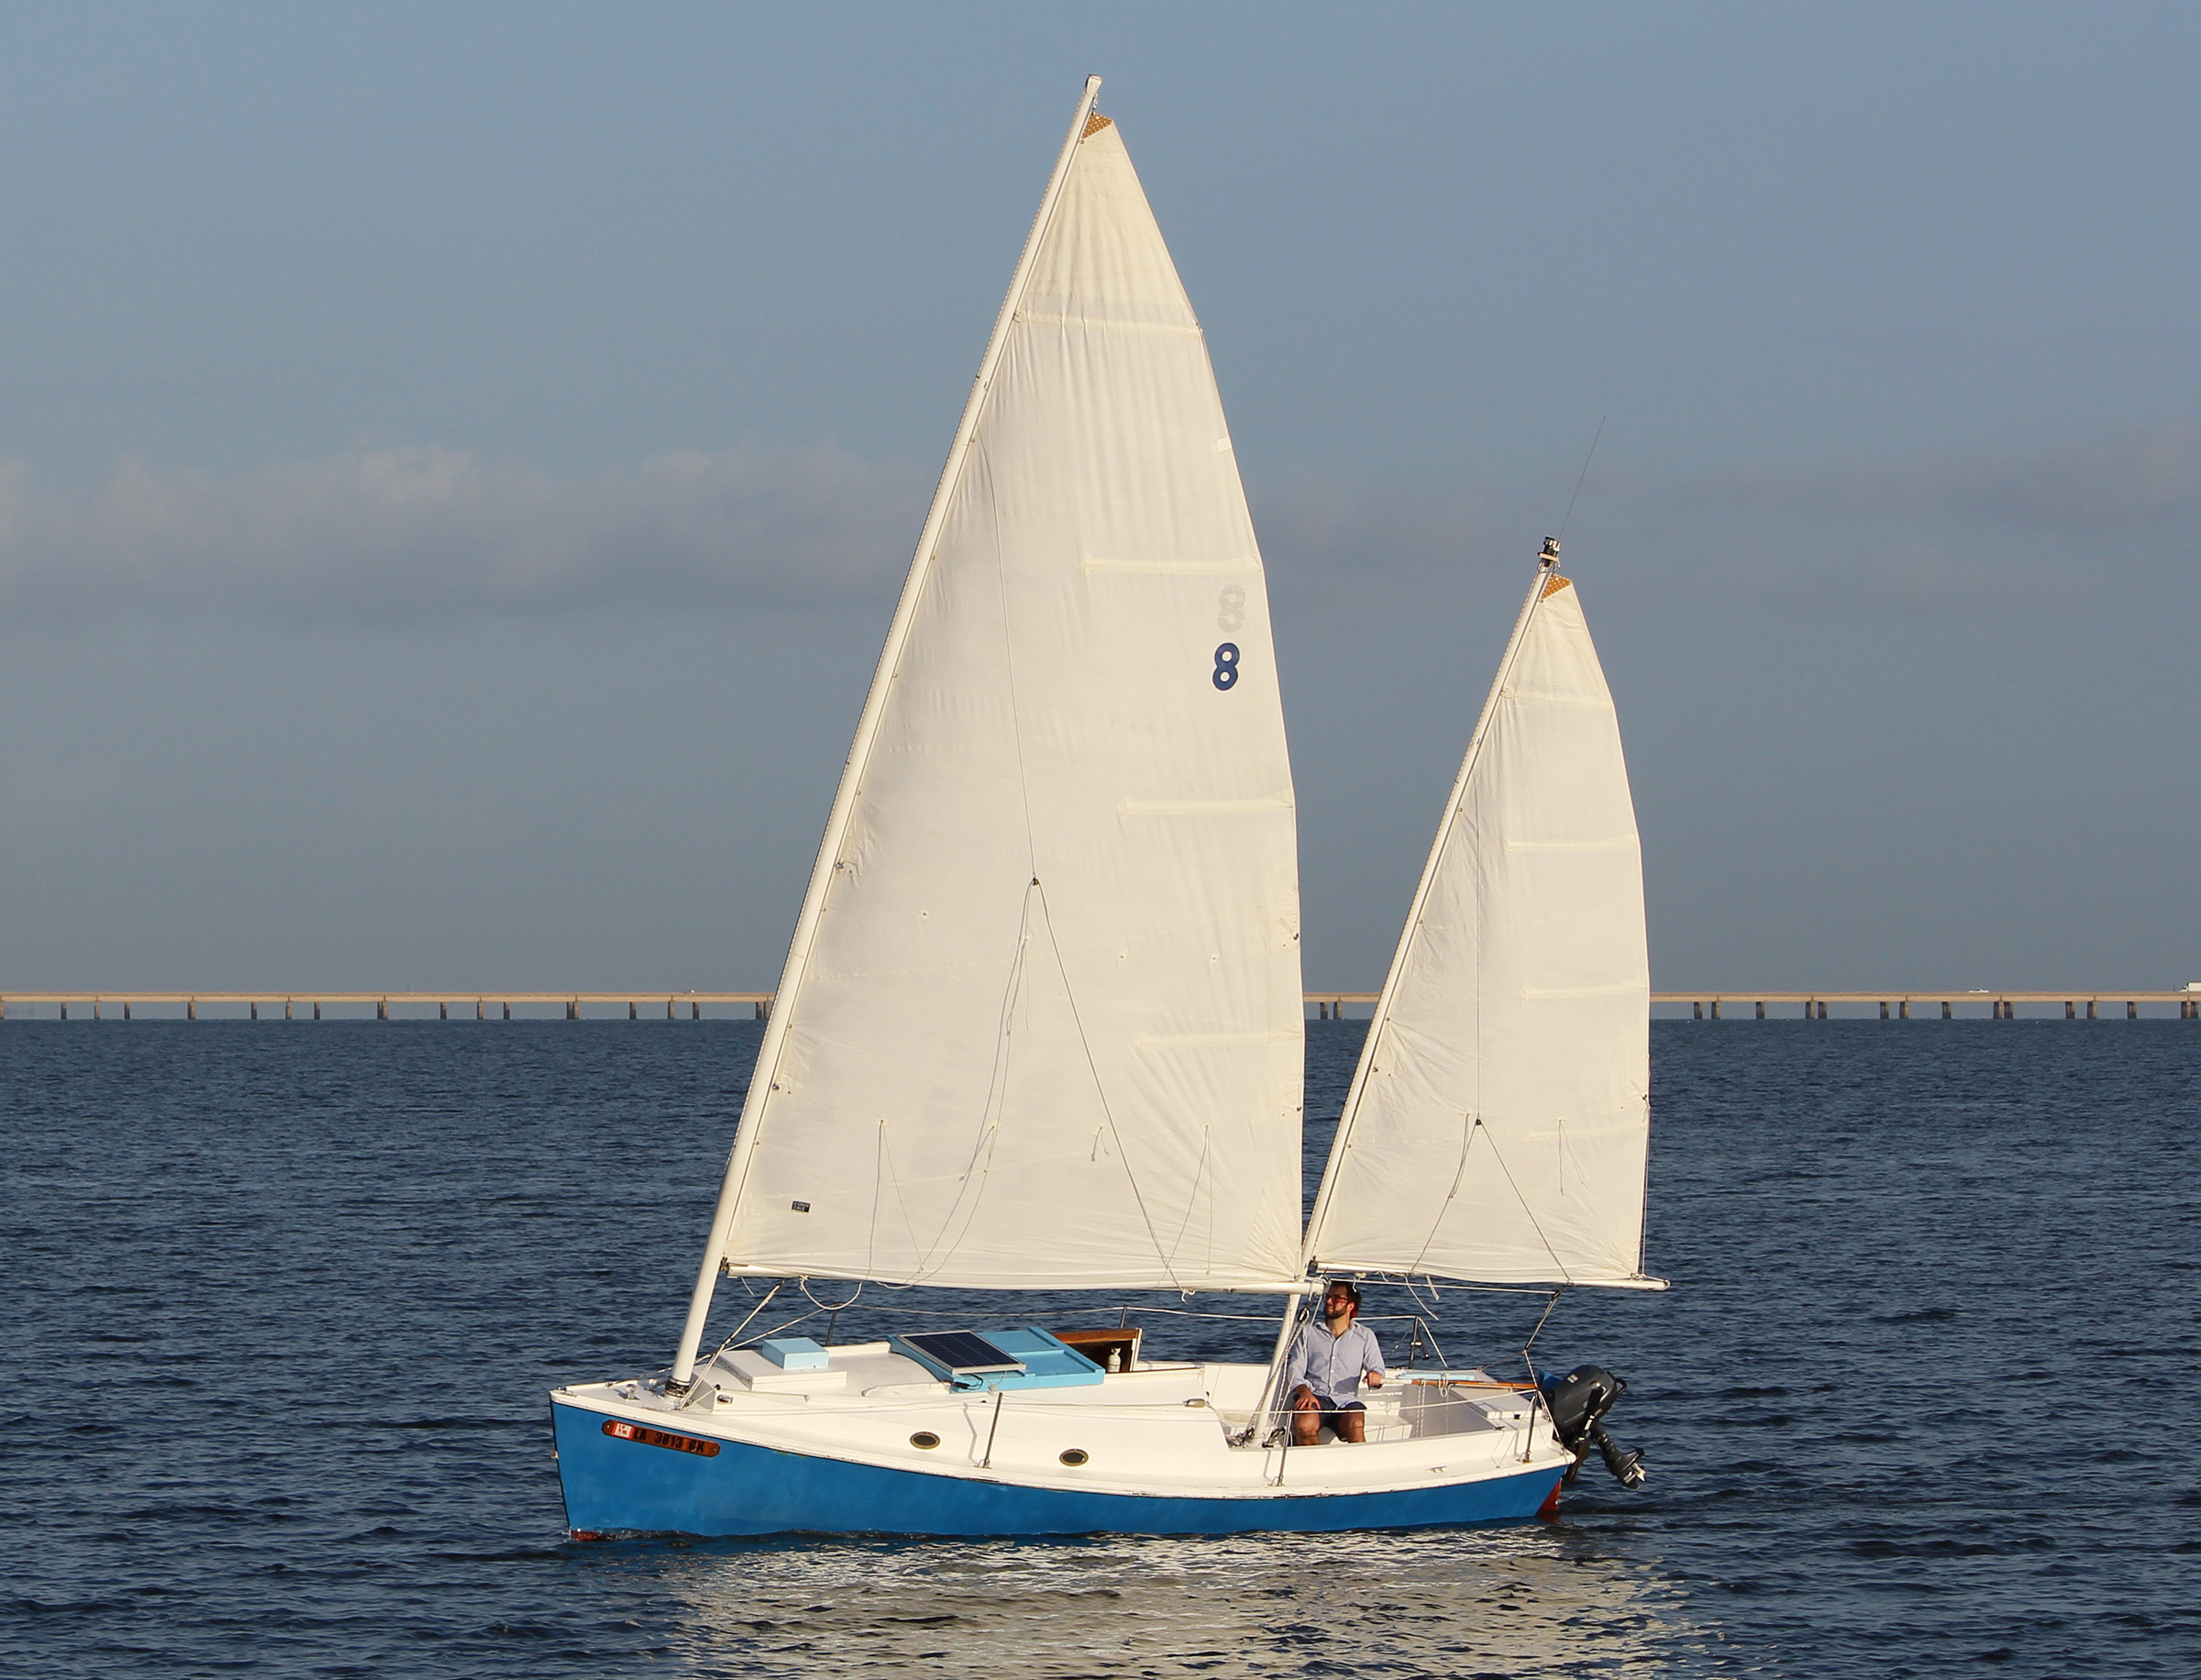
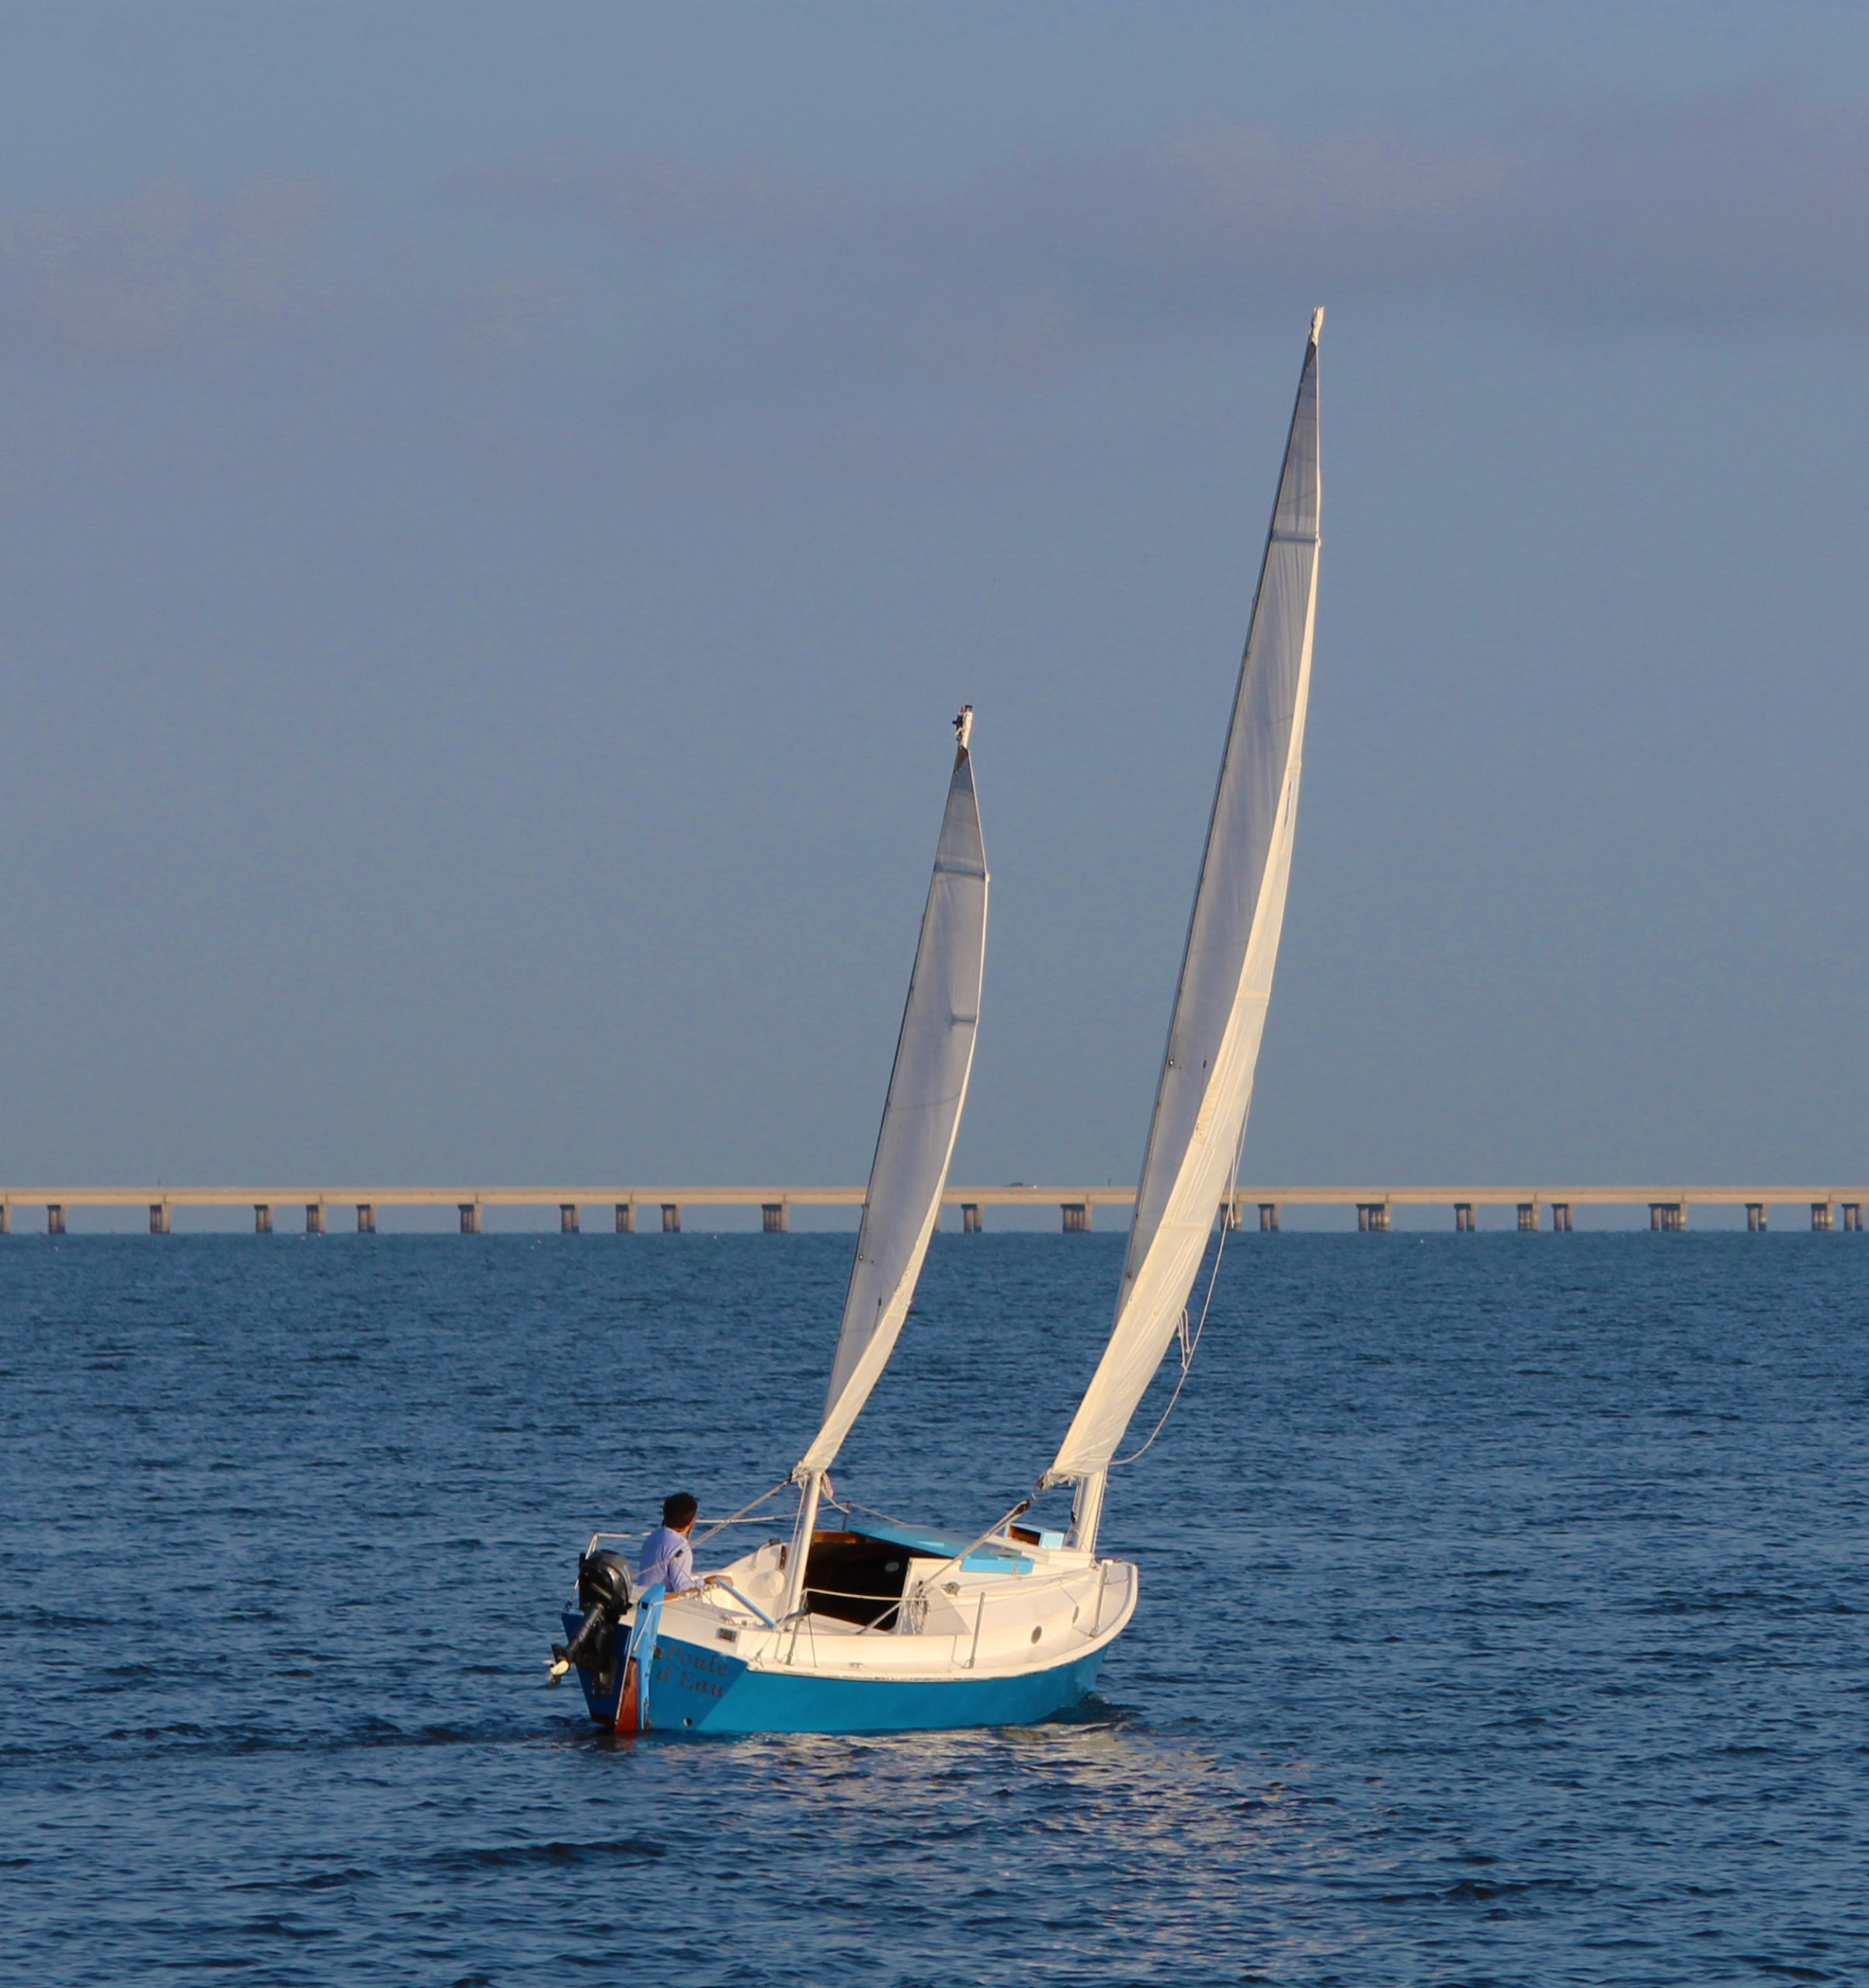
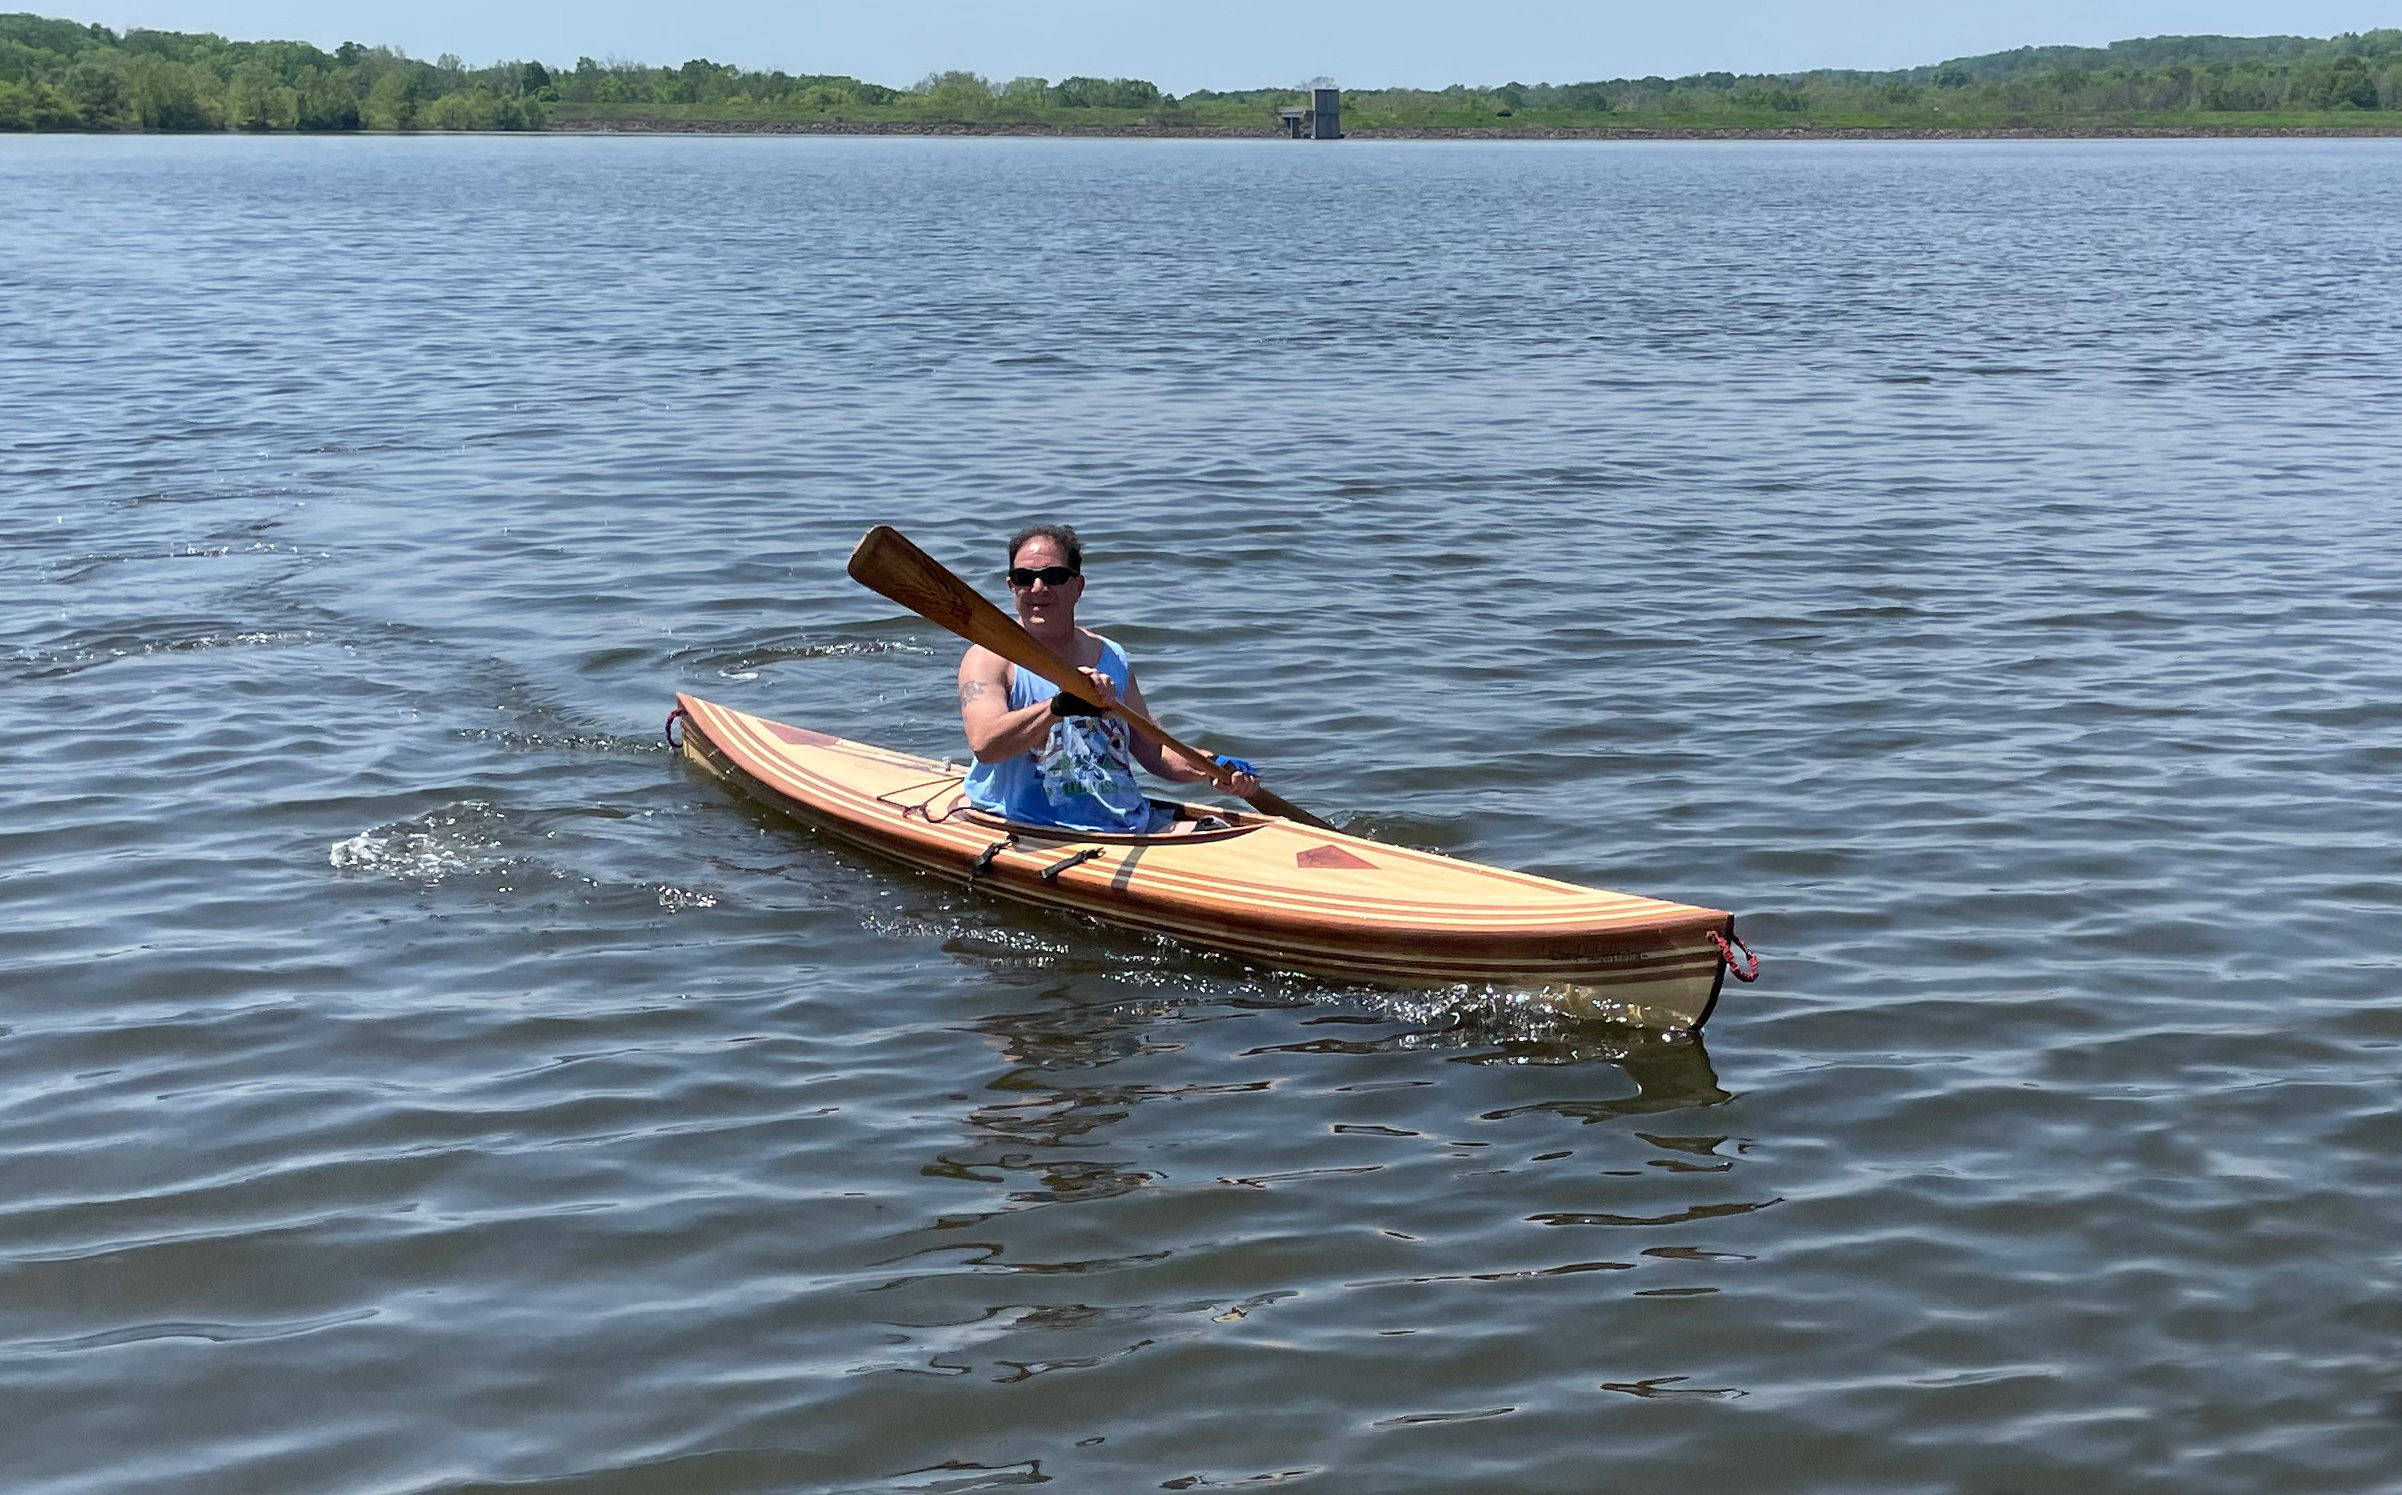
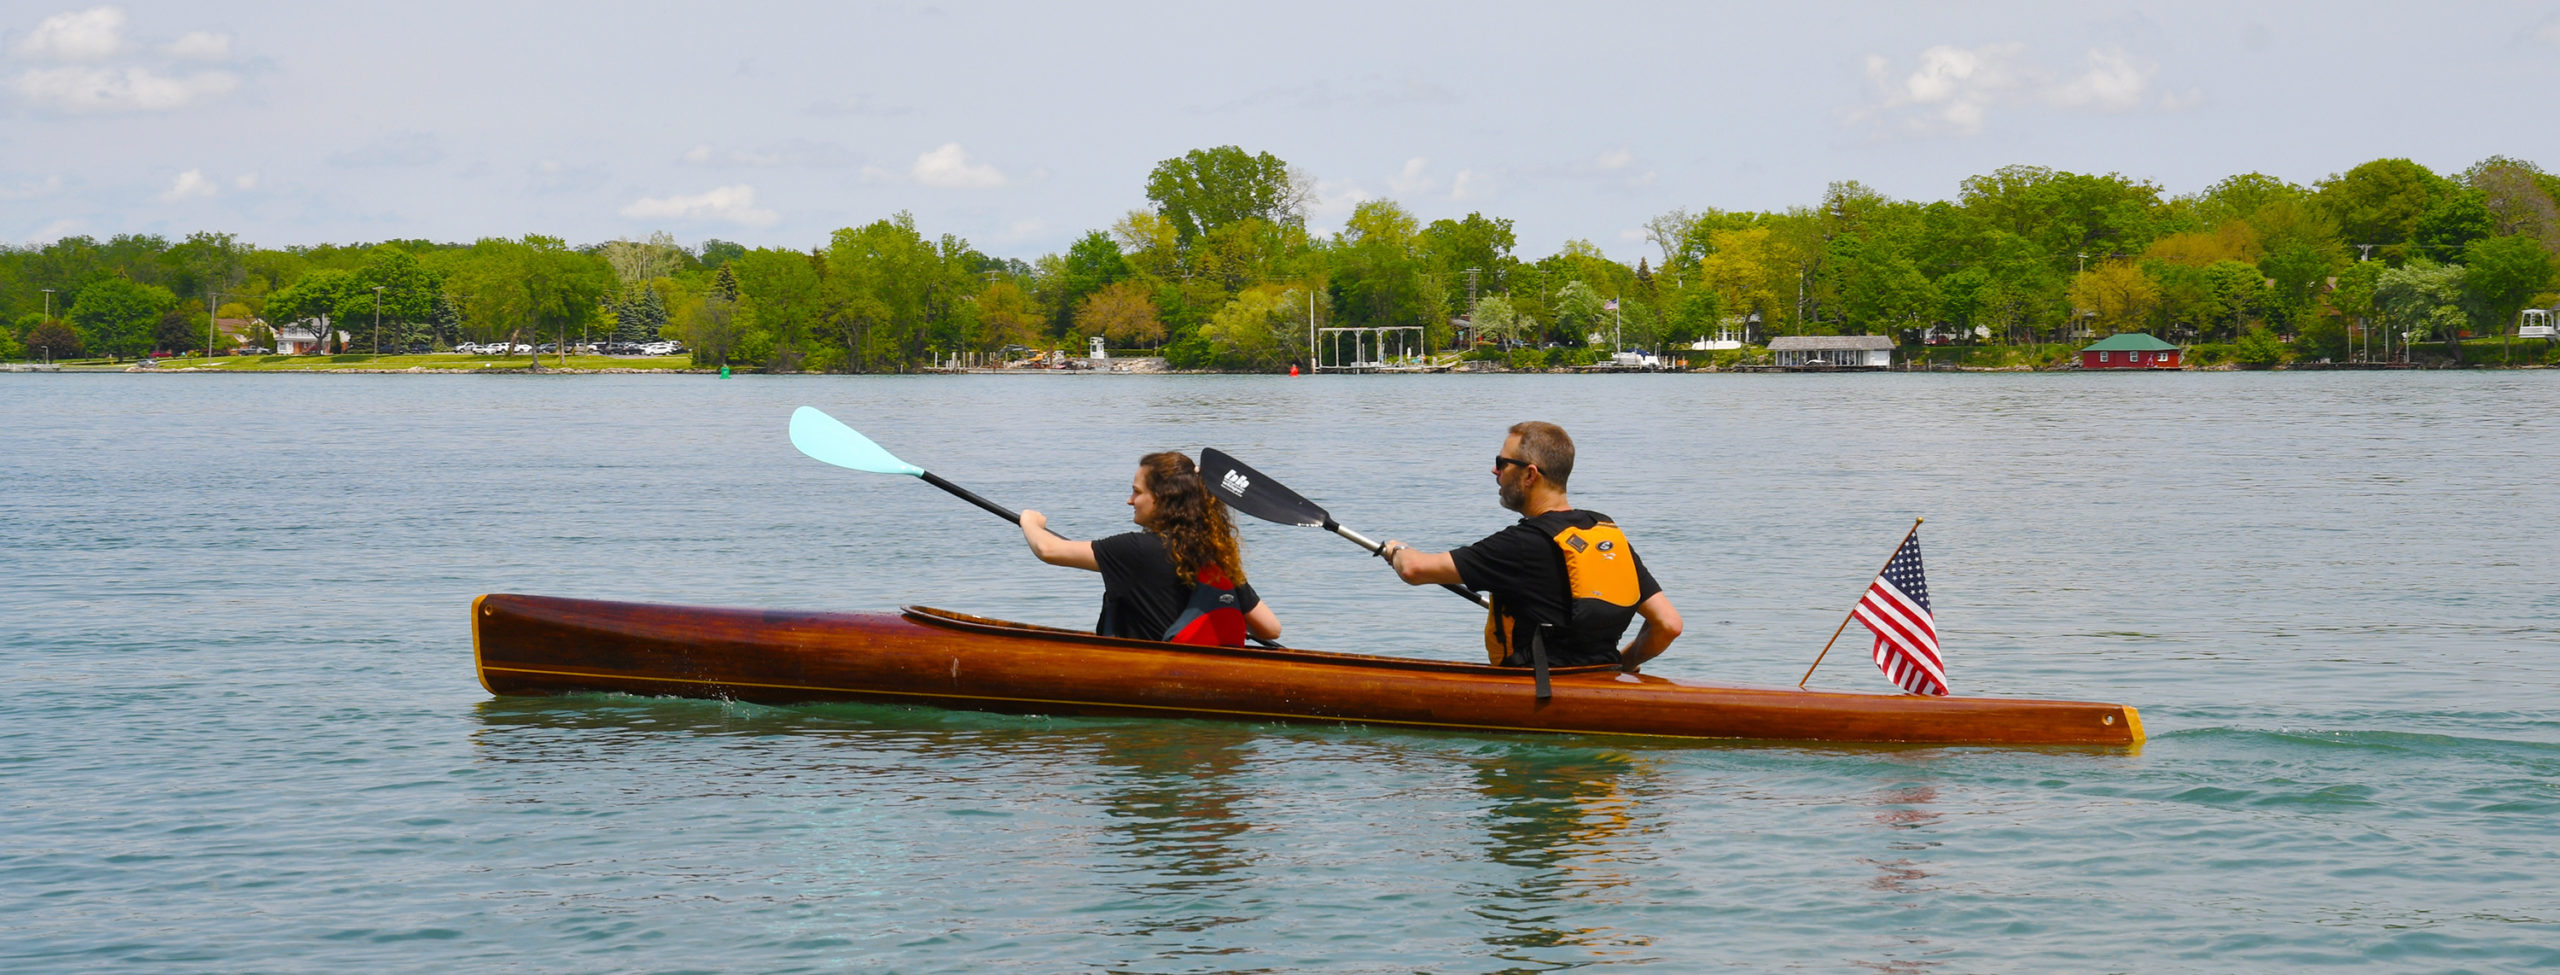
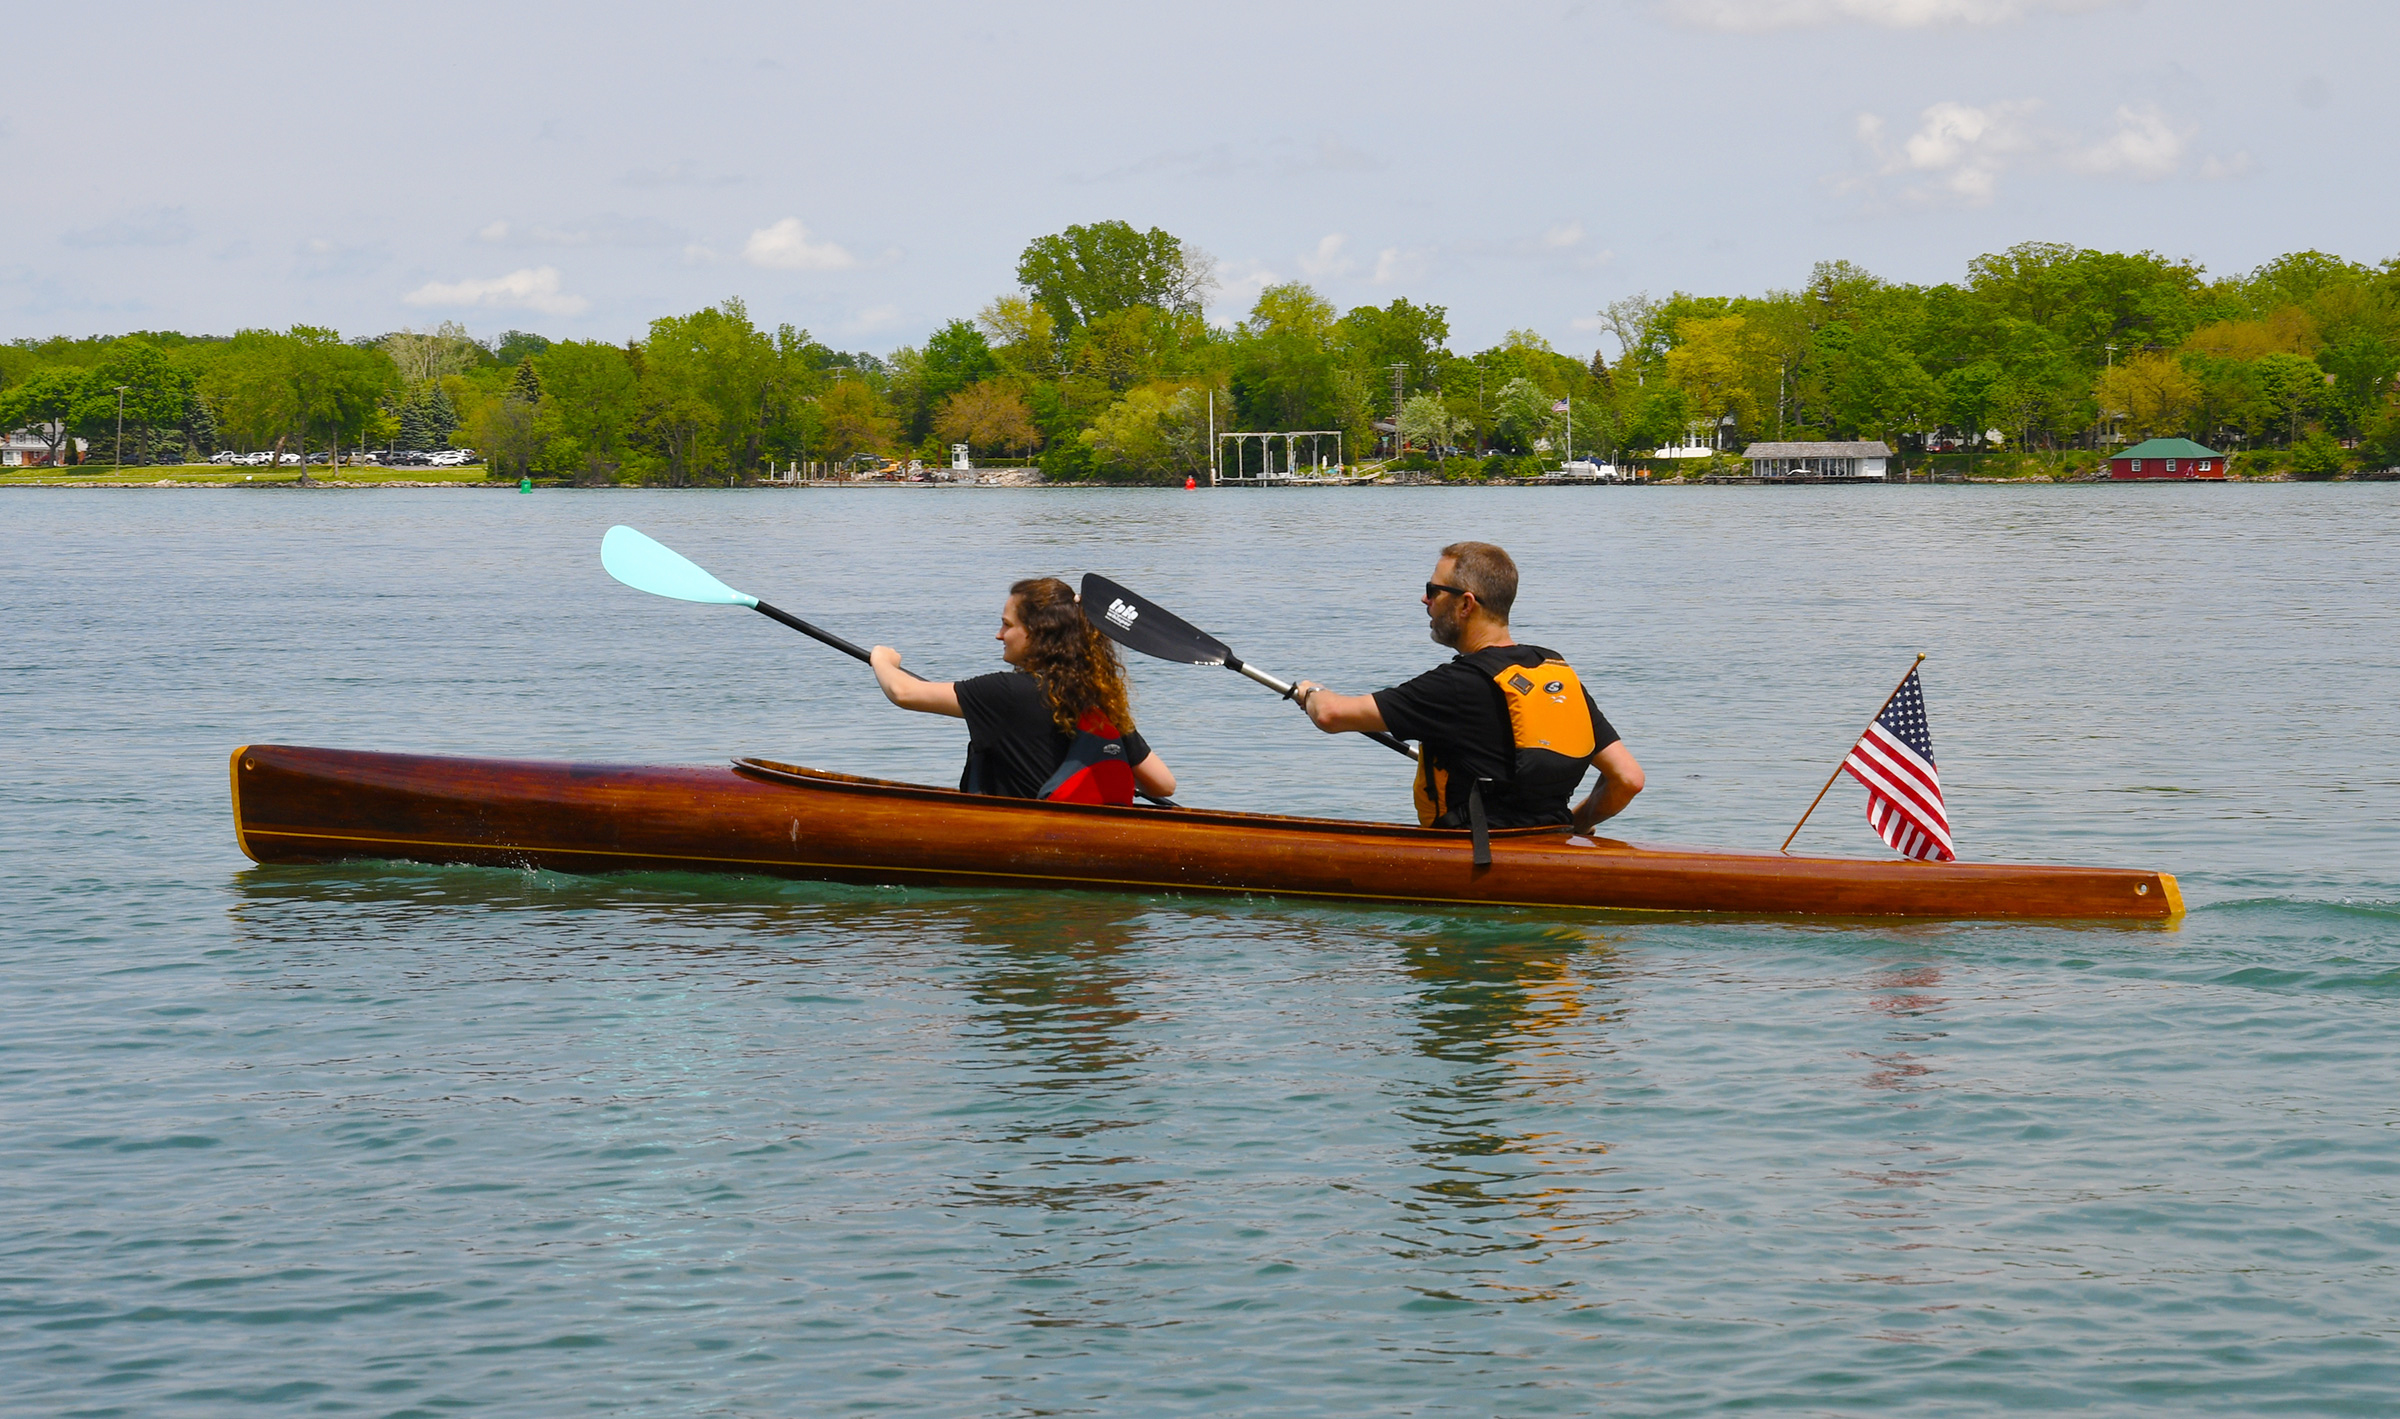
When I discovered the Norwalk Islands Sharpie 23 (NIS 23), I knew that it was the one for me. The NIS class ranges from 18′ to 31′ and was designed by the late Bruce Kirby, who is best known for creating the globally popular Laser. He deemed his Sharpie-class boats “cruising Lasers for grown-ups.” Kirby’s sharpies are flat-bottomed, centerboard cat-ketches with unstayed masts. Prior to getting my hands on a Norwalk Islands Sharpie 23 for myself, I read an article by Robert Ayliffe, arguably the world’s foremost advocate for the class, in Australian Amateur Boat Builder in which he described crossing the treacherous Bass Strait in his NIS 23 and reaching 17.5 knots surfing down swells. The NIS 23 seemed like an affordable way to have a high-performance cruising boat, and I wanted to experience this speed for myself.
W. Peter Sawyer
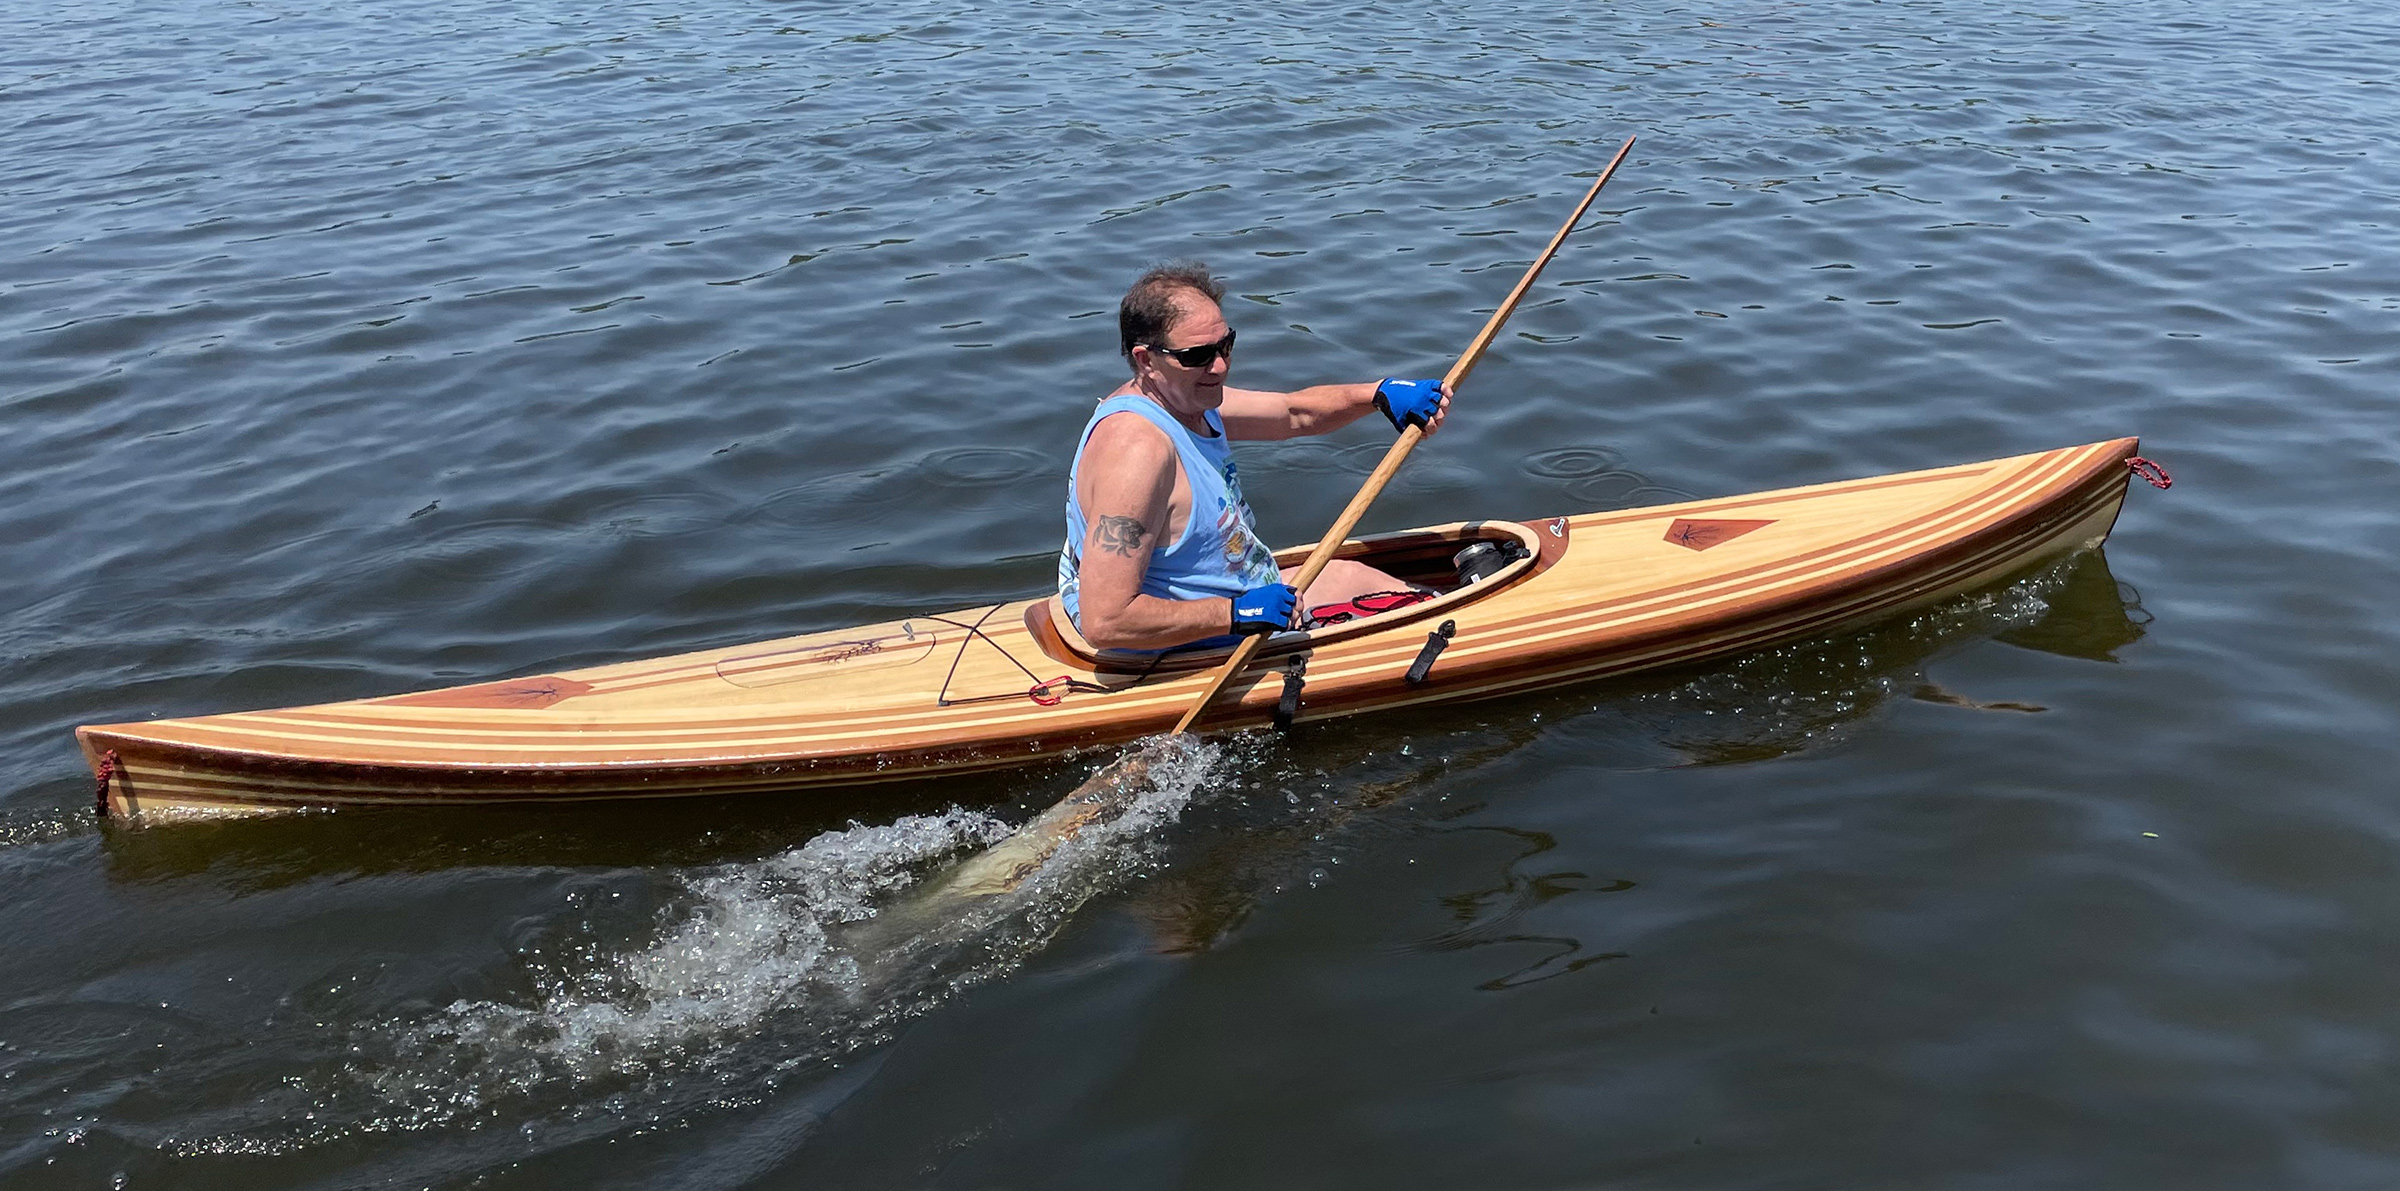
The mainsheet is anchored to a traveler forward of the mizzenmast, and the mizzen’s sheet leads forward to the base of its mast. Both are within easy reach of the helm.
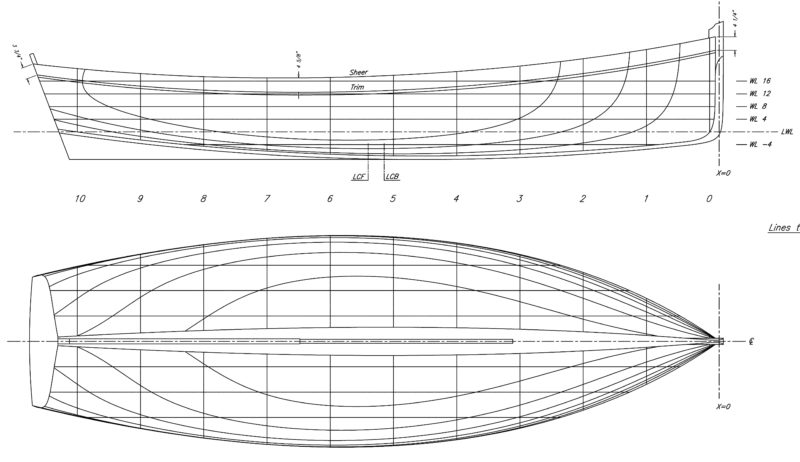
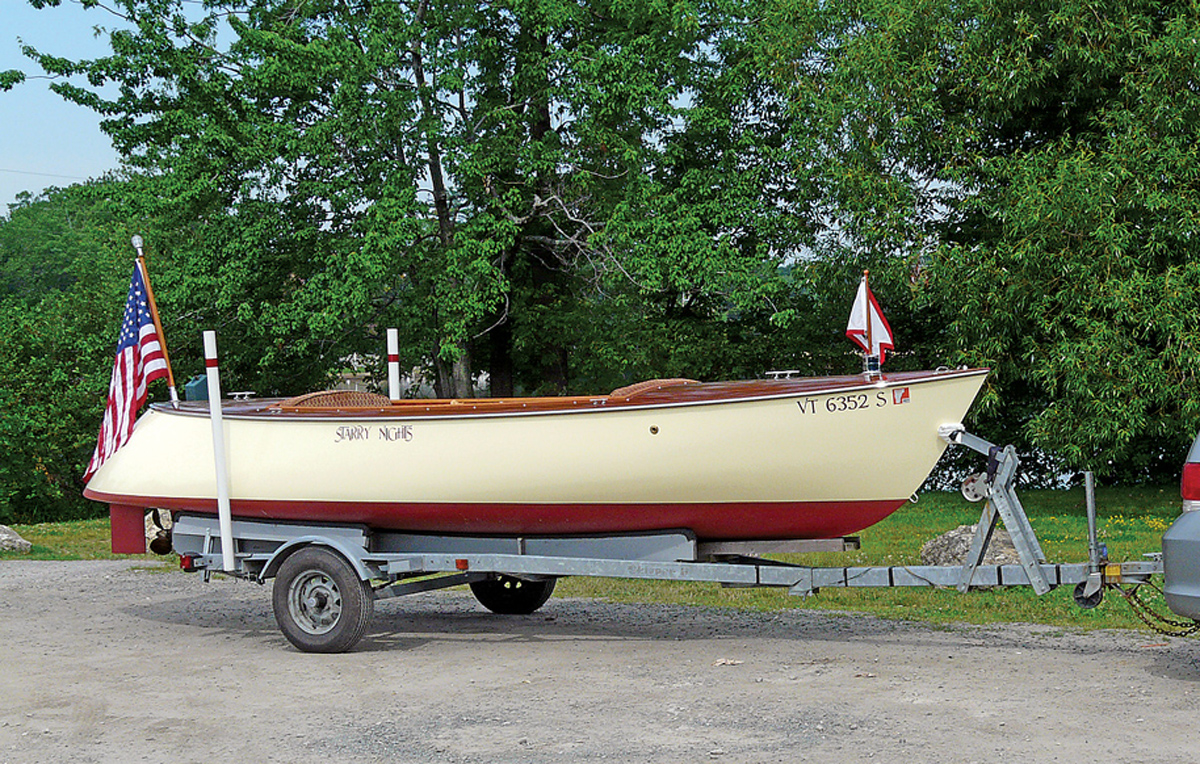
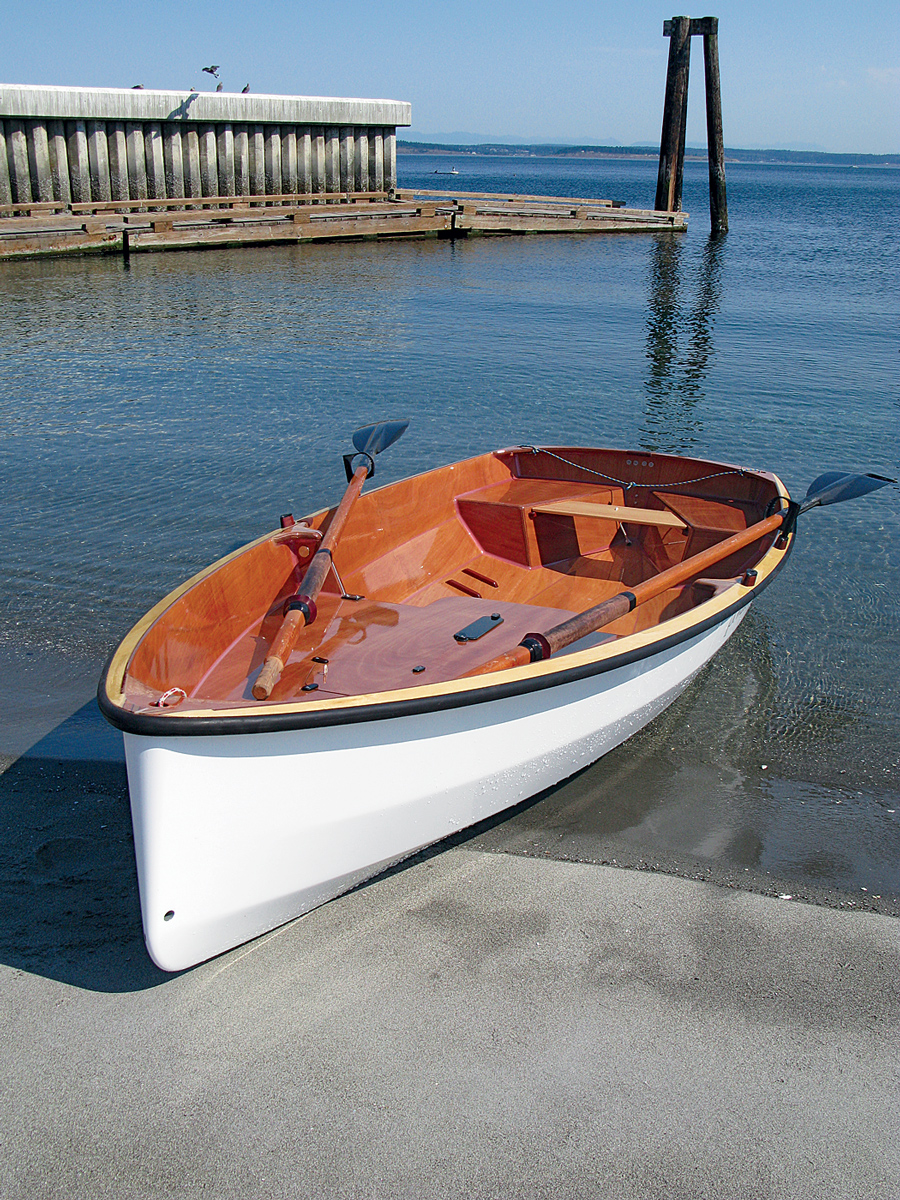
My NIS 23 was built in 1996 at Sea Island Boat Works in South Carolina, though many have built their Norwalk Islands Sharpies at home. The single-chine plywood hull is built over plywood frames and sheathed in one layer of epoxied fiberglass. Ballast is supplied by 2″ of lead that surrounds the centerboard slot on the bottom of the boat, reportedly weighing about 600 lbs. The centerboard is made of aluminum. The construction is solid, and I have felt secure in all conditions.
I keep my NIS 23 in the water, but it is easily trailered. Since it has a centerboard and flat bottom, it comes up on the bunks with no trouble at all. I have towed mine with a Honda Pilot, but I feel much safer on the road when it is behind a pickup truck.
Early versions of the Norwalk Islands Sharpies had aluminum masts; later ones, like mine, carry carbon-fiber ones. They’re stepped in tubes just as you would drop in a mast on a Laser. There are no stays. The mainmast can be stepped by just two people, who are always relieved when it is in—and not lying fractured on the pavement. Ayliffe has designed an optional tabernacle system that would greatly reduce the stress associated with getting the masts into place. Maintenance has been easy—with its simple cat-ketch rig, there is not much to keep up. Varnished wood is at a minimum. Getting the boat from highway and ready for sailing from the dock takes about an hour and a half.
The boat is tender at the dock. When welcoming guests on board, I always stand on the opposite side of the boat so their side does not settle in the water so much when they step in.
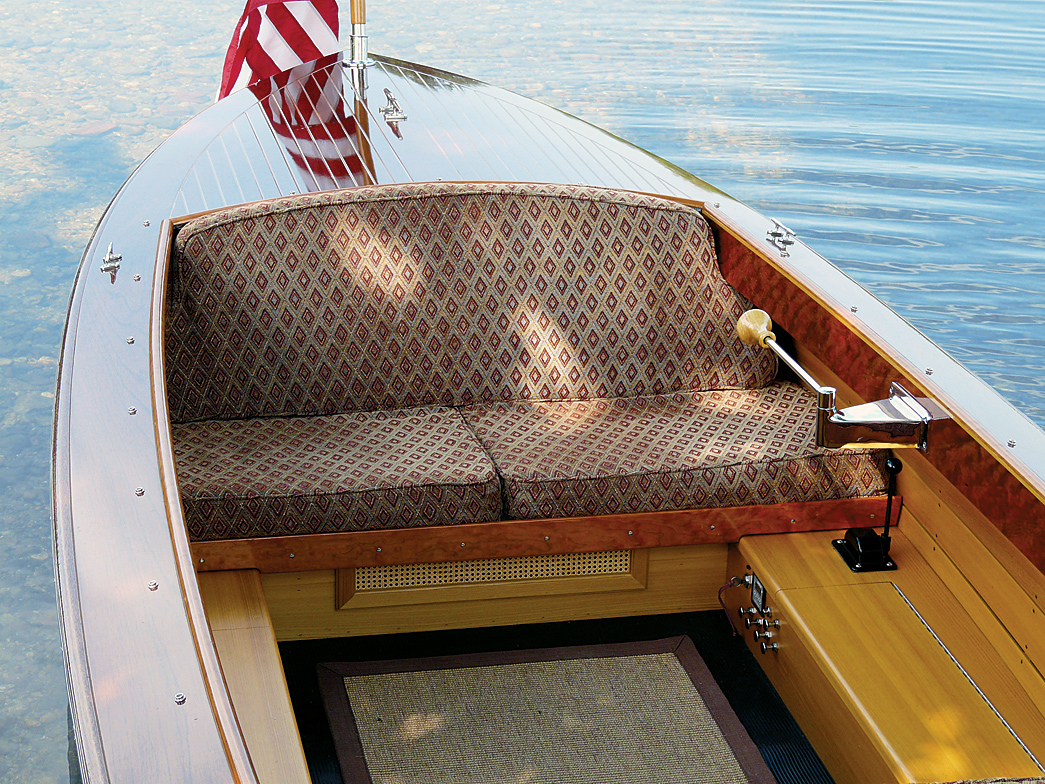
The cockpit is generous for a boat of this size, and four adults can sit comfortably forward of the tiller. When out for a sunset cruise carrying a conservative amount of sail, the cockpit remains comfortable even while heeling. If I’m looking to maximize speed, I release the lifelines and sit on the gunwales. A short hiking stick is needed. Visibility from the cockpit is excellent.
W. Peter Sawyer
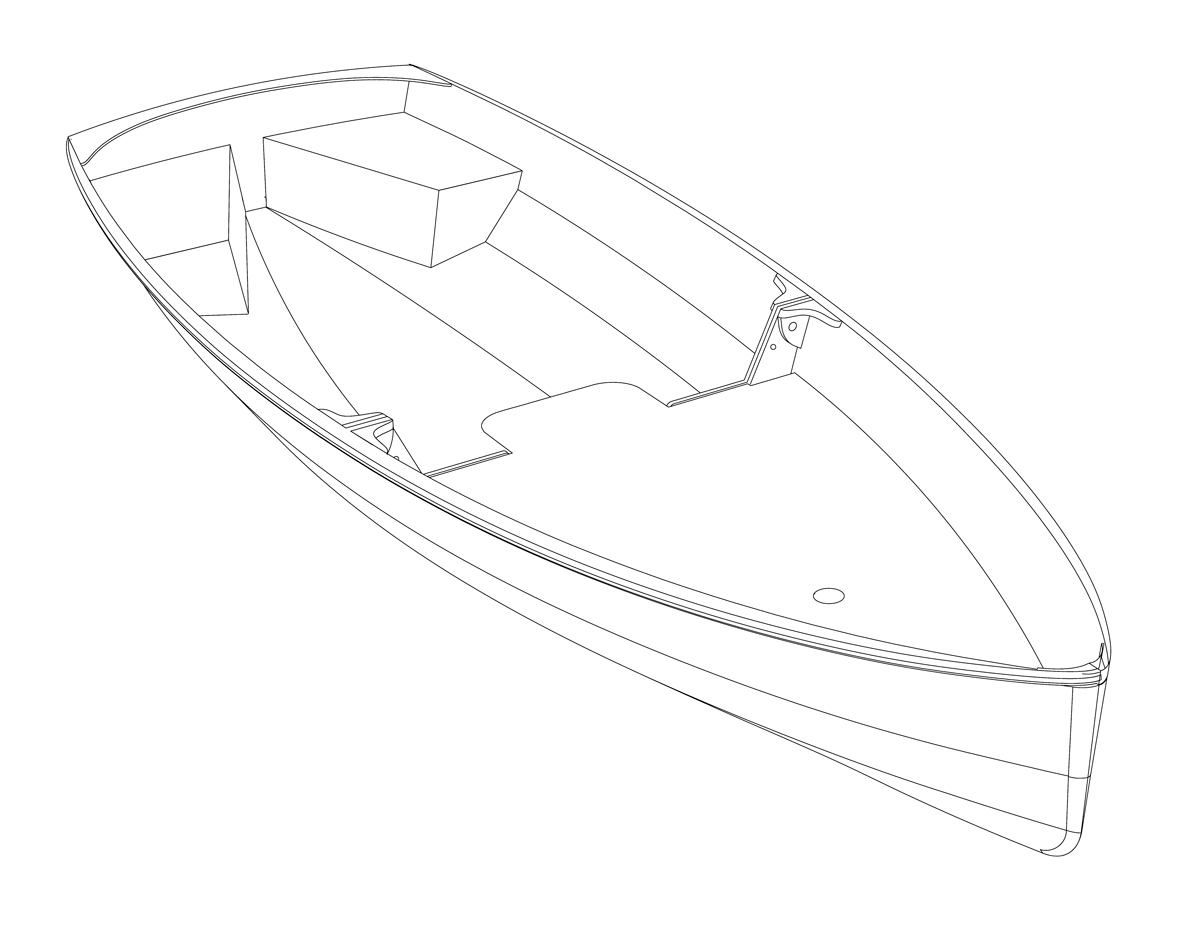
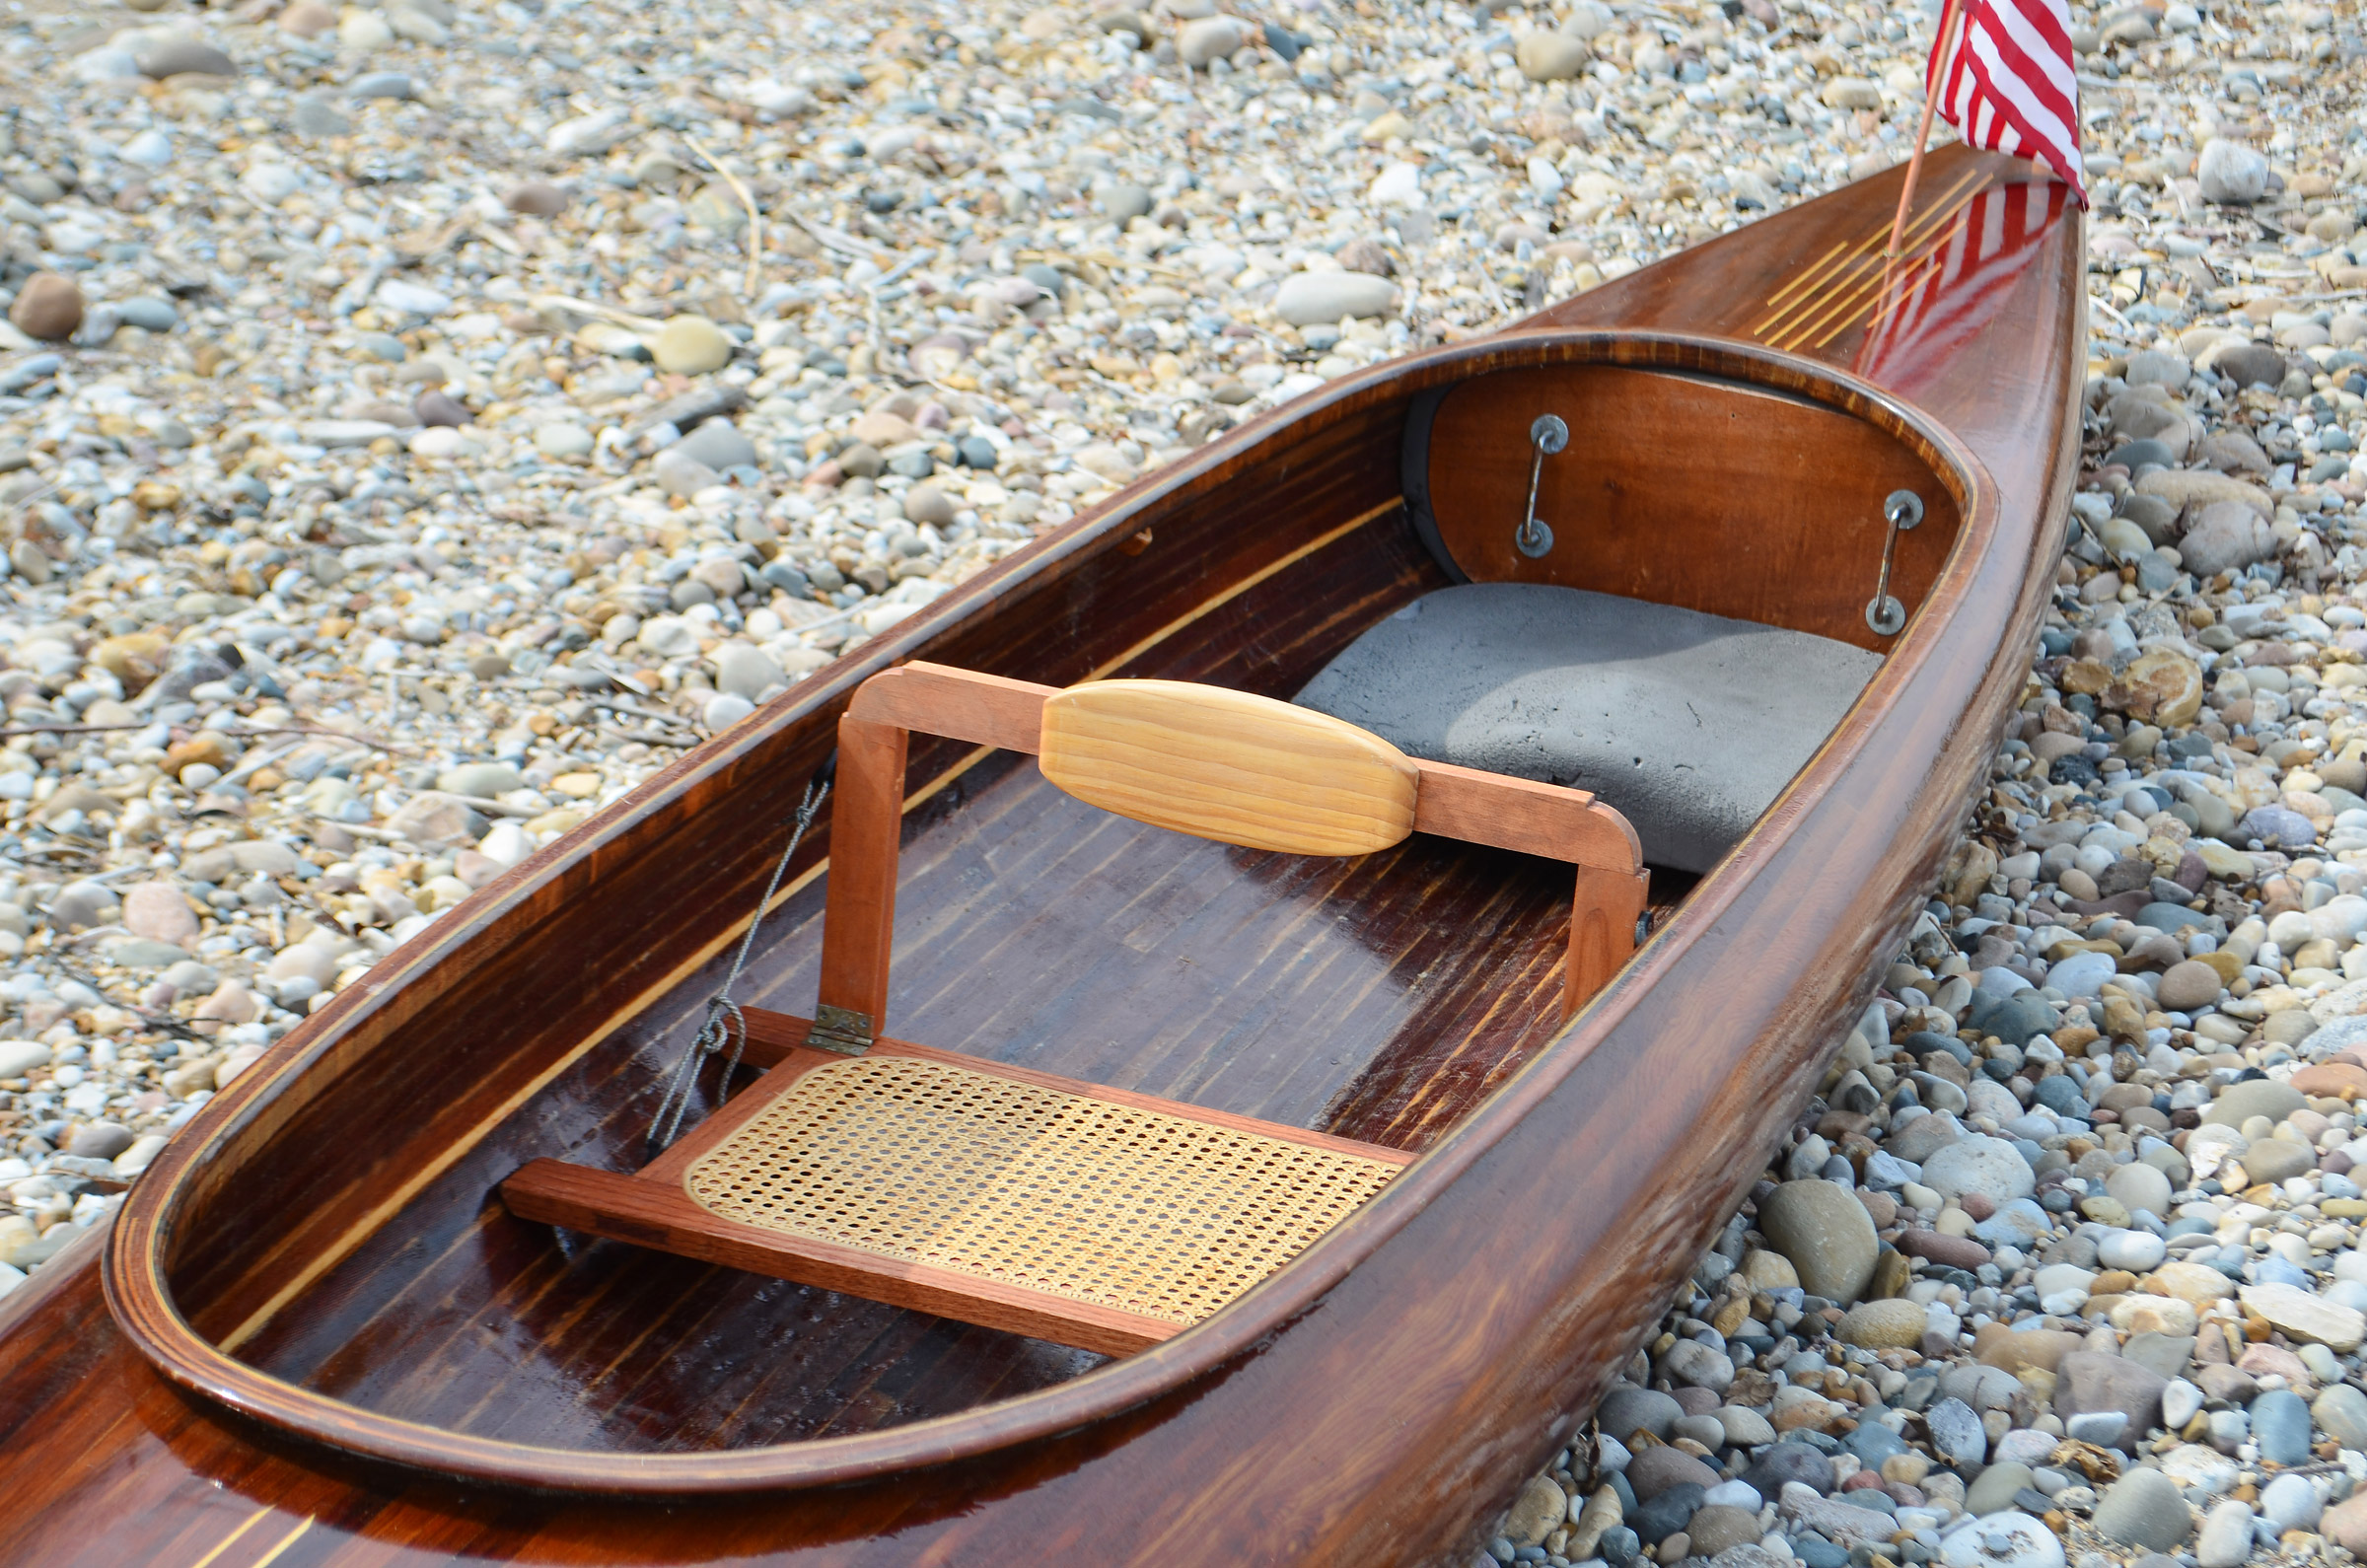
The custom forward V-berth for two, here with cushions in place, is spacious and frees up the aft part of the cabin for storage. The berths flanking the centerboard trunk e have had the cushions of third and fourth berths removed to reveal the plywood panels that cover the footwells either side of the trunk.
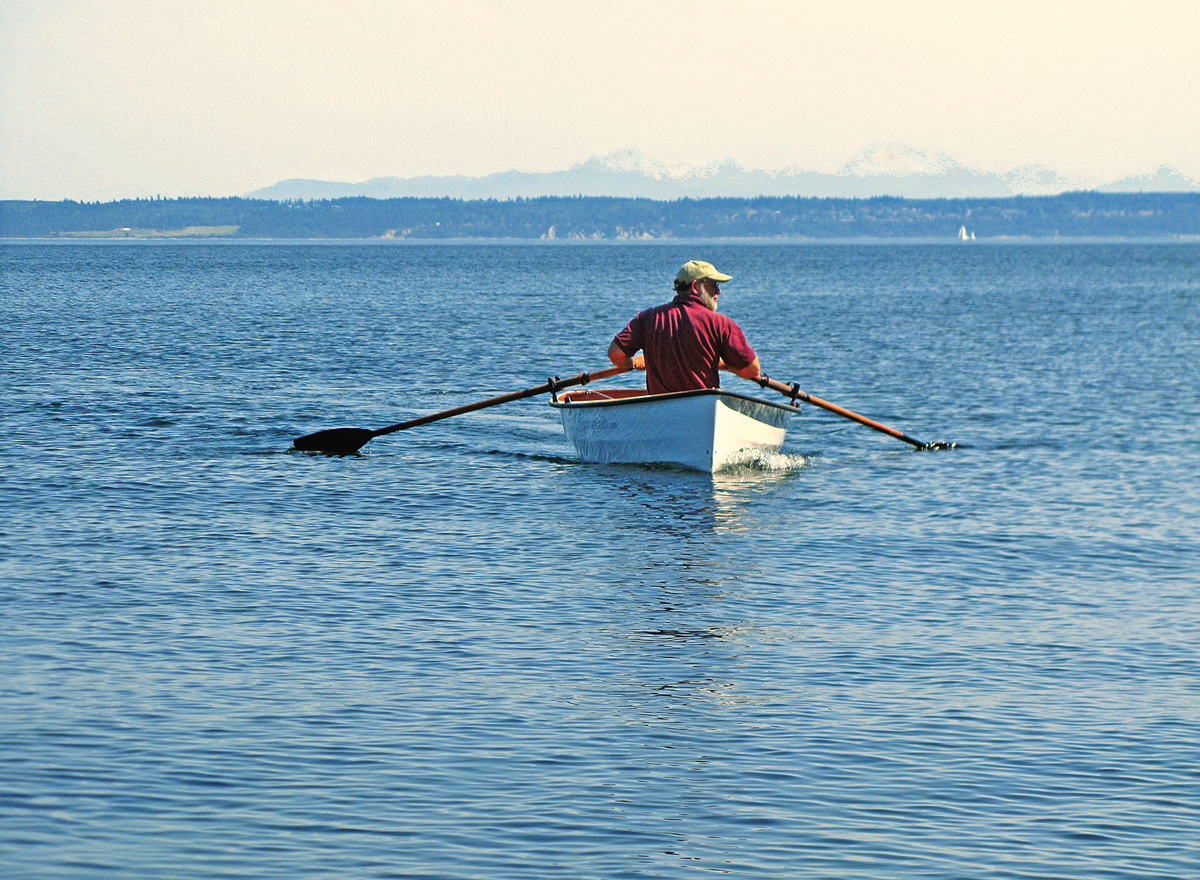
Once underway, the NIS 23 is simple to sail. Being a cat-ketch, it does not carry a jib, but rather a main and mizzen. Both sheets can be managed by the skipper. Tacking involves merely pushing the tiller to the lee side of the boat. With no jib, no handling of sheets is required. I’ve had difficulty making it through irons only in winds above 20 knots and with a steep chop.
The NIS 23 carries plenty of sail, and I am quick to put in a reef if upwind sailing is required. I have two reefing points on the main and one on the mizzen. When the windward chine lifts from the water, it is time to reef. Most NIS have a reefing system that can be controlled from the cockpit. I’ve not taken the time to set it up on mine, but should.
The boat does not love to go upwind—it points to about 55 degrees off true wind and, in a chop, it needs another 10 degrees or so off to maintain boat speed. That said, the NIS 23 will make 5.5 to 6 knots on a closehaul in as little as 12 knots of wind.
Emily Woodruff
The NIS 23 carries a 150-sq-ft mainsail and a 64-sq-ft mizzen.
The boat shines on a beam reach to broad reach when it maintains 6.5 knots boat speed in about 12 knots of wind. It can carry considerably more sail downwind. Its maximum speed I’ve seen was 10.7 knots running a broad reach in 20 to 25 knots of wind with full sails up. It becomes easier to control the boat after coming up on plane, though she only stays on plane while surfing down a wave. When not on plane, the boat’s weather helm is an annoyance. This can be reduced by dropping the mizzen and reefing the main, though the thrill of getting on plane means I don’t use this option much downwind. However, in 30 knots of wind, I’ve made 10.4 knots with the mizzen alone (though the carbon-fiber mizzenmast was bent like a parenthesis).
If the wind is more than 15 knots, the NIS 23 likes being on a run, too; the cat-ketch sail plan makes running wing-on-wing straightforward. If the wind is less than 15 knots, trading broad reaches is faster and more enjoyable. I keep the centerboard down for stability while running downwind.
I’ve sailed the boat extensively on the north Gulf Coast, particularly in Mississippi Sound, in winds up to 40 knots. With two on board, it can continue sailing on all points of sail up to about 20 knots with a double-reefed main and single-reefed mizzen. Upwind, I drop the mizzen at 25 knots and sail with just the double-reefed main. Caught in a squall, alone, I had to go to bare masts when the winds pushed over 35 to 40 knots.
With its flat bottom and centerboard, the boat’s motion in heavier seas is surprisingly comfortable. There is none of the laborious lumbering that’s felt on keel boats.
The sharpie is stable under sail, and I’ve never worried about a capsize. However, it is quick to heel, making early reefing important. The carbon-fiber masts mitigate gusts by flexing and thus dumping excess wind, reducing heel. Crew can move about while underway, but not without being alert. This is particularly the case when sailing upwind.
Despite their flat bottoms and relatively high-placed ballast, the Norwalk Islands Sharpies are claimed to be self-righting. I have never felt remotely close to a knockdown in mine, even while carrying too much sail in high winds.
The mizzen is an excellent sail for maneuvering in the marina. After getting comfortable with how far the boat drifts, I rarely use the engine for anything but backing out of my slip. When returning, I drop the powerful main about 100 yards from the dock and then amble toward the slip under mizzen alone. The mizzen is easily doused while holding the tiller, and I do this about 10 to 40 yards from the slip, depending on the wind. We then glide into the dock, and I arrest the remaining motion by placing a hand on a piling.
Emily Woodruff
The aluminum centerboard and 600 lbs of interior lead ballast help the NIS 23 stand up in a breeze.
Overall, I rate the NIS23’s sailing performance as nothing short of thrilling on a beam reach or broad reach. She is fair upwind and strong on a run—as long as you have a stiff breeze. My favorite characteristics of the boat are its speed and the shallow draft that enables the exploration of marshes and flats.
I have a 6-hp outboard on a bracket off the stern, which is more than adequate. The boat doesn’t need more than half-throttle to reach hull speed, which is around 5.5 knots.
At anchor, the NIS23 is pleasant. I have so far spent about 45 nights on board and, while many have criticized sharpies for pounding at anchor, that has not been my experience. Its extremely shallow draft of just 8″ allows access to very protected anchorages inaccessible to deeper-draft boats. In my cruising grounds, marshes are abundant. My approach is to anchor just 50′ or so off the windward marshland or even in a narrow marsh creek.
One night while anchored off Cat Island, Mississippi, a large storm brought 45-knot winds. Despite my taking cover in a marsh creek, the winds whipped the boat back and forth at anchor all night, making sleep all but impossible. Around 3 a.m., I awoke, and while the wind roared, my berth was paradoxically motionless. Fearing that the anchor had dragged and the boat had been driven into the marsh, I peered out of the hatch. My headlamp illuminated black mud all around me. The wind had driven about 3′ of water out of the marsh and the boat was resting contentedly on its flat bottom. I slept well the rest of the night, and then had to wait about 8 hours for the water to come back.
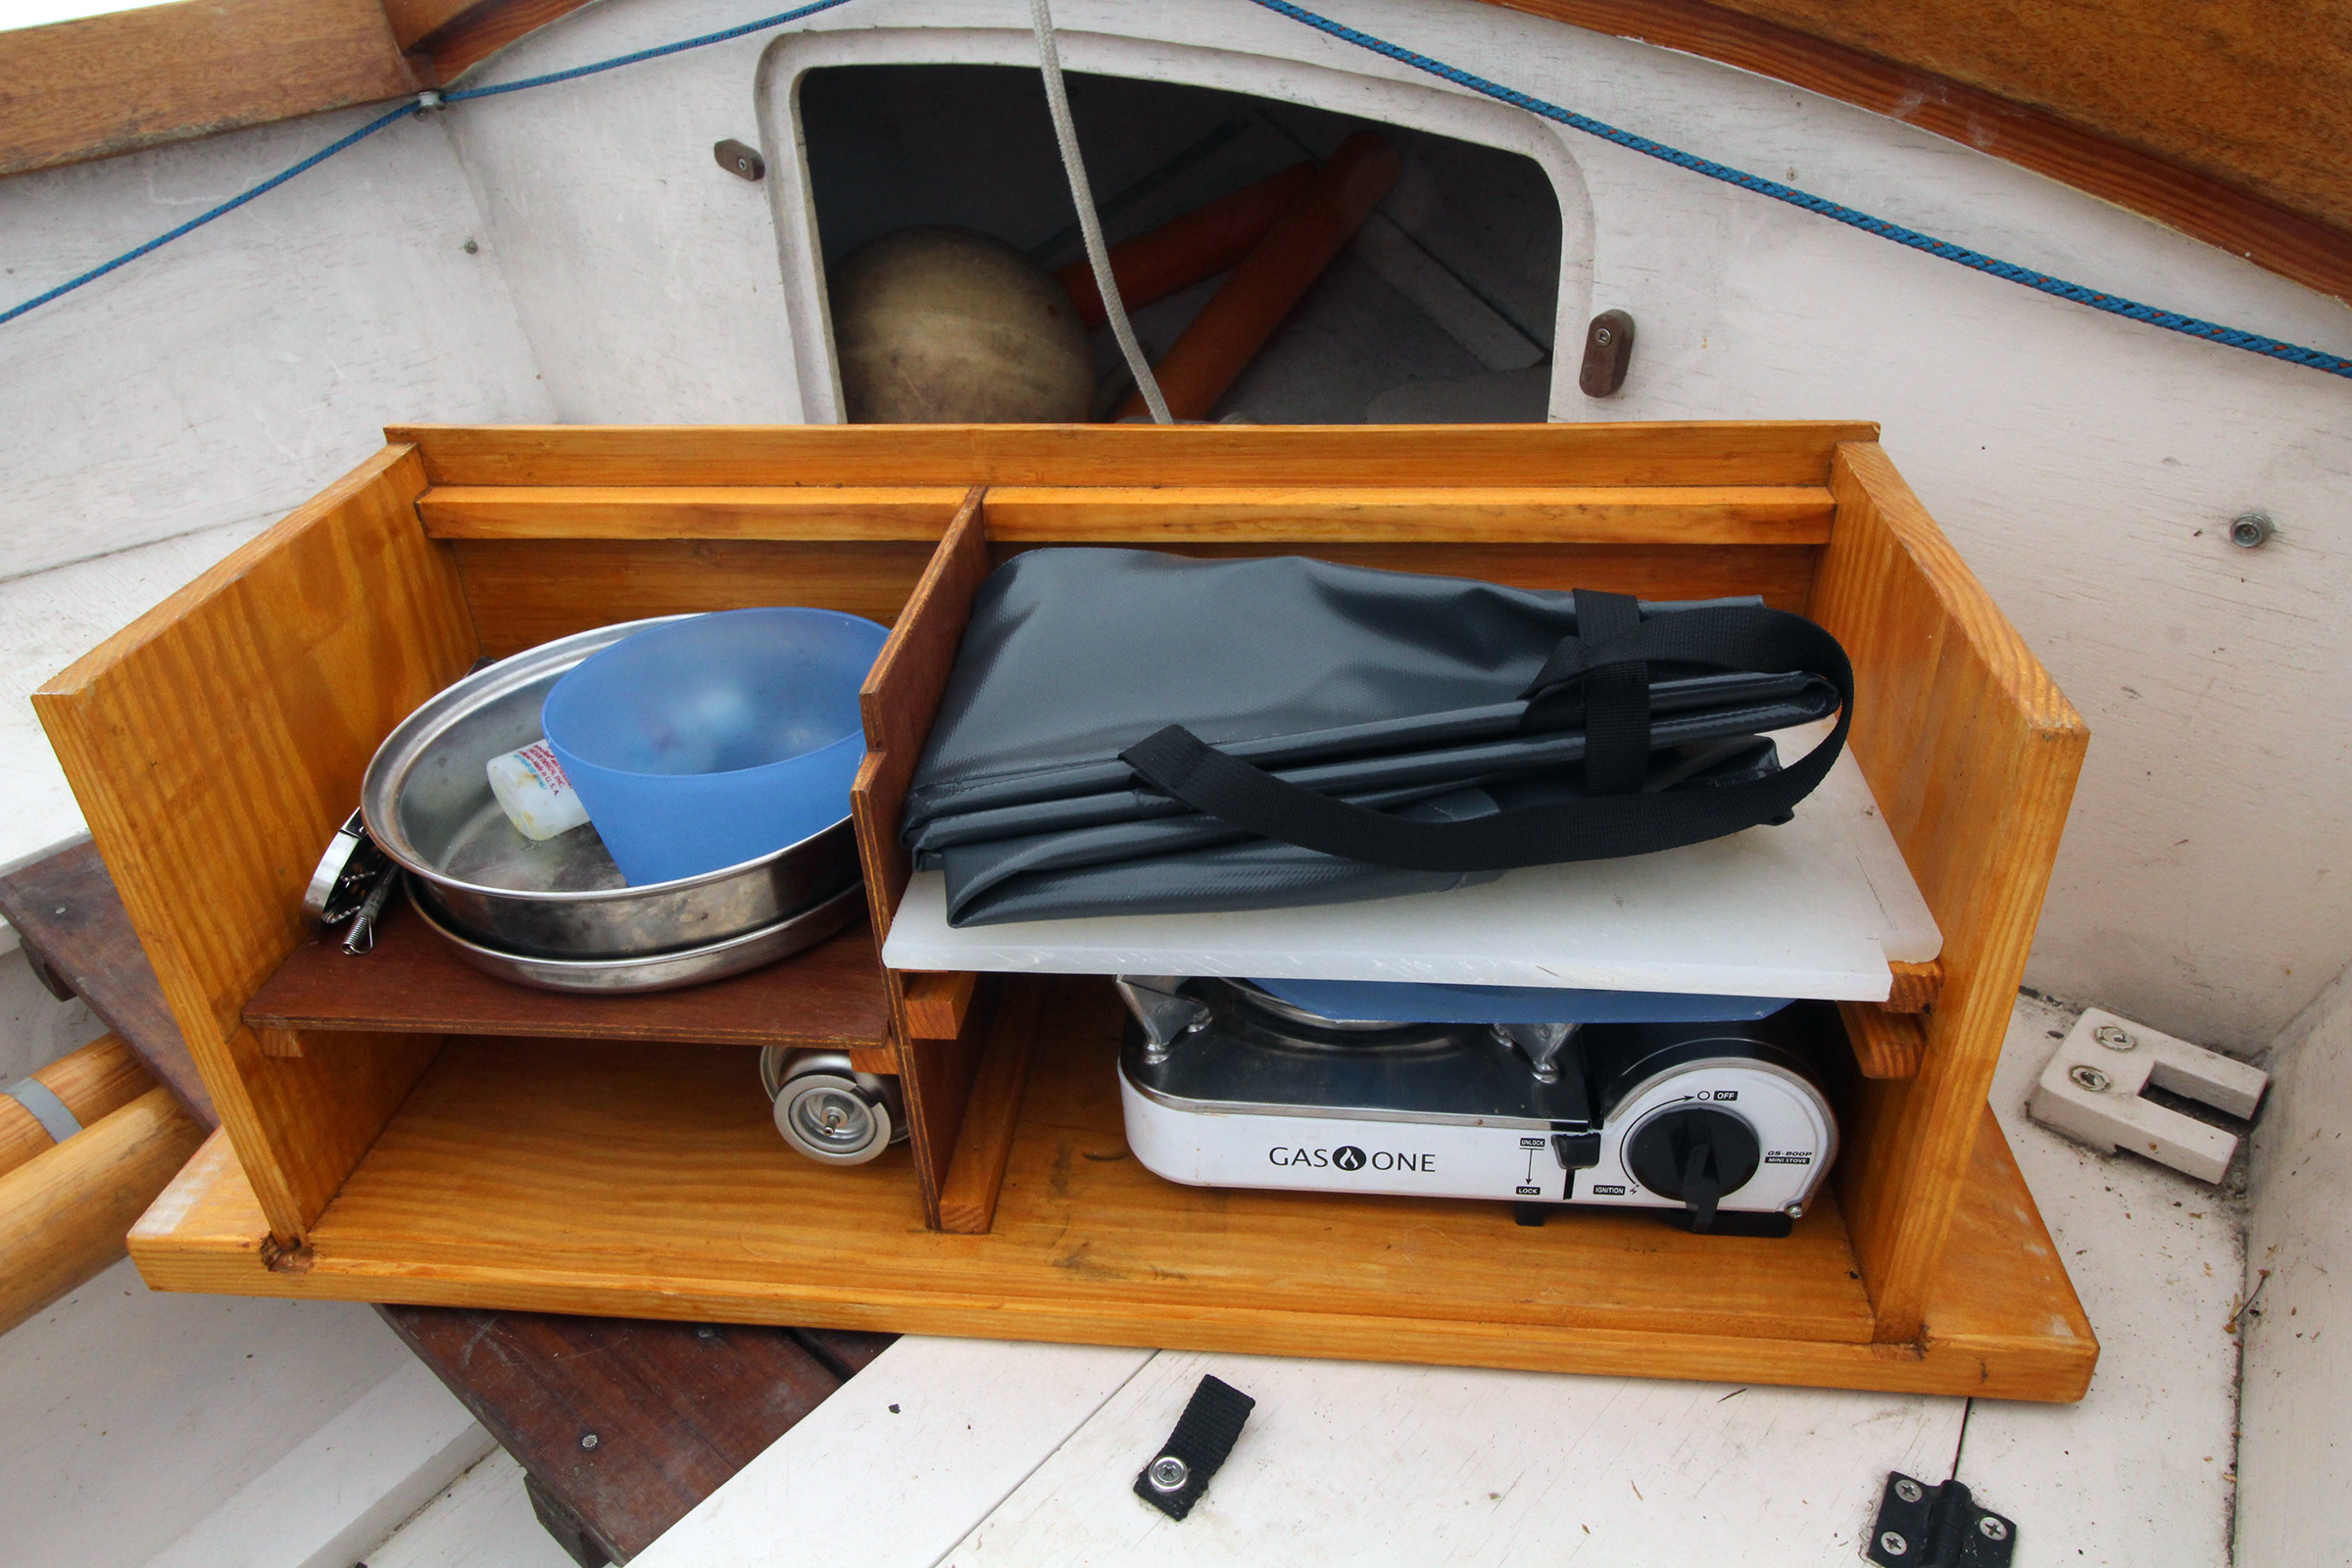
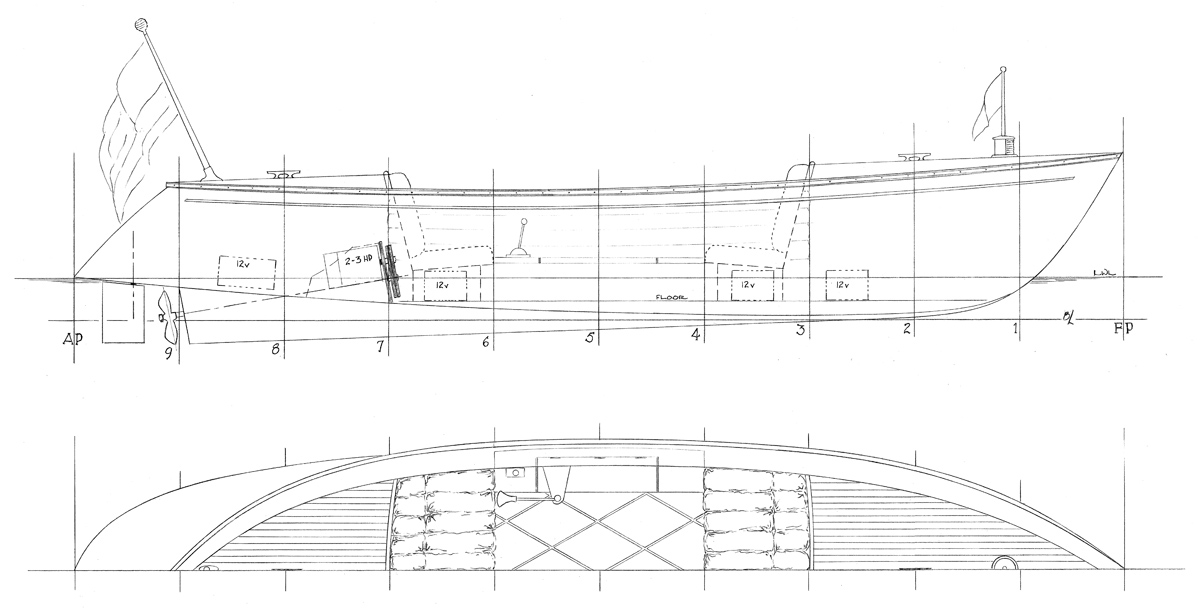
Accommodations in the cabin are limited; I liken the experience of time spent in the cabin to a spacious, floating tent rather than a yacht. If your NIS 23 don’t have the curved-hatch option, which provides 5′ 11″ of headroom, don’t count on standing up. In the after part of the cabin, there are two full-length single berths; I removed part of the cabin’s forward bulkhead to allow for a V-berth for two more crewmembers. Kirby’s drawings have options for a similar arrangement of four berths as well as sleeping accommodations for two with open space for a galley and a head. I have three overhead lights and a ventilation fan powered by a solar panel/battery. For cooking, I bring along a Coleman stove and place it in front of the cabin hatch in the cockpit, which is a good arrangement even when it is raining. Even for a nine-day Gulf Coast cruise, there was plenty of space for provisions and enough sleeping area for two.
The Norwalk Islands Sharpie 23 is a simple, fast boat with exceptionally shallow draft. I bought mine after having done quite a bit of camp-cruising in a 16′ open boat, and while the NIS 23’s cabin is nothing fancy, it is quite nice to not have to worry about finding a campsite at the end of the day, just a protected spot of water.
Peter Sawyer is a general surgery resident in New Orleans, Louisiana. He learned to sail when he was 11 years old at Camp Sea Gull, a seafaring summer camp on the North Carolina coast. He has been at it ever since.
Norwalk Islands Sharpie 23 Particulars
[table]
Length/23′
Load waterline/18′ 9″
Beam/7′4″
Draft, board up /8″
Draft, board down/4′ 6″
Weight/1,540 lbs approx.
Sail area, main/150 sq ft
Sail area, mizzen/64 sq ft
Sail area, total/214 sq ft
Power, outboard/ 2 to 3.5 hp
[/table]
Plans for various arrangements for the NIS23 are available from Norwalk Islands Sharpie. Options include plans for a “from scratch” build, a precut “plywood only” kit, and an “everything you will ever need, including trailer” kit.
Is there a boat you’d like to know more about? Have you built one that you think other Small Boats Magazine readers would enjoy? Please email us!
After seeing a strip-built kayak being paddled many years ago, I started dreaming of building one for myself. When the COVID-19 pandemic hit, I found myself working from home with a little extra time on my hands: it was my opportunity to fulfill my dream, and I started looking seriously at companies that offer complete kits. I had little woodworking experience and wanted a basic beginner-friendly kit, as I had no interest in lofting, building from scratch, cutting lumber, milling strips, etc. I had dreamed of this for years, but strictly as daydreaming. The idea of building my own boat was intimidating, and I never thought I would have the time or skills to make the dream into a reality.
After spending many hours on the water over the last 15 years, I consider myself an experienced kayaker and knew I wanted a recreational boat for easy paddles on my local lake. I am a fair-weather paddler who does not look for whitewater adventures—just lazy days on the water with a sandwich and a few cold drinks. After comparing kayak kit packages and manufacturers, I decided on the 12′ 8″ Excursion model from Newfound Woodworks of Bristol, New Hampshire.
I had many questions about the build process, no prior working experience with epoxy and fiberglass, and was interested in building my first boat in a classroom setting, but when the pandemic hit, all in-person classes were canceled. I really wanted some hands-on experience before taking on the build, and the folks at Newfound, Alan Mann and Rose Woodyard, listened to my concerns and scheduled a day of one-on-one instruction with me. They shared techniques and tips as we worked with the materials, which gave me the confidence to tackle the project and was key in my decision-making process.
Photographs by and courtesy of the author
Built according to the instructions, the Excursion can weigh as little as 37 lbs. Extra fiberglass on the author’s kayak brought its weight up to 44, which is still easy for him to carry to the water’s edge and back.
A Newfound “Pre-Kit” arrived first with instructional DVDs that demonstrated and clearly explained the construction methods step by step; the DVDs proved to be invaluable.
The pre-milled cove-and-bead strips arrived in a 14′-long plywood shipping crate designed to be used as the box-beam stand during the build–a great way to save time compared to building one from scratch.
The Newfound Ladder-LOC Strongback system of brackets and forms was easy and straightforward to assemble—just center each form and square up. The forms are precision-cut from MDF (medium-density fiberboard) on a CNC machine and milled with a slot in the perimeter for clamps, so the boat is stripped without using staples. To me, the finished boat looks much nicer without staple holes.
I wanted full-length strips for appearance’s sake—there would be no joints on the finished boat—and to eliminate spending time to scarf-join every strip. I also ordered extra strips to cover anticipated mistakes. I purchased many of the tools and supplies that I needed from Newfound. Rose and Alan have simply been great folks to work with: always available by phone to discuss concerns, answer questions, offer great advice, and happy to share their knowledge and experience. They’re an invaluable resource for a novice builder.
With an overall length of 12′ 8″, the Excursion is not designed for a high top-end speed, but with its light weight it is quick to accelerate and carries satisfying speed.
For the most part, I stayed true to the Excursion design and did not modify the hull. I deepened the recess for the cockpit coaming by a couple of inches for ease of entry and exit. The cockpit is now large enough that I can bring my feet and legs out and recline in my seat with my feet up on the front deck and my head resting on a rolled towel on the rear deck just behind the cockpit. My foredeck is a bit more peaked than designed—an unintended amateur mistake on my part—but it made it a little roomier under the deck for my cooler bag and I can stretch my legs out. I used magnets in the hatch coaming and flush-mounted the hatch cover to minimize deck hardware and keep the deck as clean and open-looking as possible. The rear bulkhead is marine mahogany plywood, supplied with the kit, but I omitted the front bulkhead for extra legroom and open storage under the foredeck. I can add inflatable float bags when needed
The kit package includes a mini-cell seat bottom pad and a back band, which is mounted to the cockpit coaming, but I wanted a one-piece seat and minimal hardware. I researched various seats and back band combinations but did not find anything on the market that I really liked. However, Redfish Kayaks offers custom seats made from a few pieces of minicell foam glued together and shaped to fit. Its molded sides and good backrest eliminate the need for a separate back band and hip braces. I have not added thigh braces under the deck. The seat is comfortable to sit in for hours on the water and is easy to clean and maintain. It easily pops in and out of the kayak when I want to hose off and wipe down the boat after use.
While the standard Excursion kit includes a seat and back band, the author opted for a custom-made foam seat from Redfish Kayaks. The cockpit coaming will hold the optional Newfound Woodworks spray skirt securely in place.
I added several types of wood as accent and trim pieces, including a nice piece of curly maple plywood for the cockpit coaming, teak veneers for the hatch lip coaming, and Spanish cedar pieces for inlays that I decorated with high-voltage electrical-current burn patterns (see LAZY LIGHTNING). The bow stem is western red cedar and the stern stem is red oak.
With the Newfound Woodworks construction system, the strips are held to the molds with clamps rather than staples, so the finished kayak isn’t marred by speckled bands of staple holes.
The kit kayak as designed should weigh around 36 lbs, but with extra layers of ’glass on the hull bottom and stems, my finished boat is about 44 lbs.
I use my pickup truck to transport the Excursion and can load and offload it by myself, but it is easier to handle with someone to help. I have never had to portage over distances or obstacles, but the kayak is easy to balance on my shoulder and solo carries over short distances are no problem.
The 36″ × 17″ cockpit opening is large and the Excursion has a 24″ beam, making it easy to get in and out. The kayak is very stable and makes a good platform for fishing, photography, birdwatching…or just daydreaming and floating the afternoon away. The Excursion is fast and glides well; it’s a sports car compared to my 12′ 8″ rotomolded plastic kayak. It tracks nicely and handles a cross breeze well for a shorter boat. Newfound notes that the Excursion is “designed to be used in a recreational setting such as day trips on inland lakes and quiet water.” I would not choose to take it out in rough weather, but it does okay in a stiff breeze on the open water of my local lake (I have been out in swells and a couple of feet of chop, and the kayak rides nice and high).
The Excursion has a long cockpit, and paddling without a spray skirt is appropriate for the quiet waters the kayak is designed for. While it has good stability, in the event of a capsize, the large opening makes it easy to exit the cockpit.
I cannot speak to rolling, self-rescue, or wet exit as I have no experience with these maneuvers. As a 60-year-old man, I am strictly a lazy-day-on-the-water paddler and too old for rough water, rapids, or whitewater. More important, I don’t want to bang up my boat, so—no rocky streams.
The whole experience of building the Excursion was interesting, enjoyable, and I couldn’t be happier with how it turned out. The custom kit package enabled me, a complete novice, to build a beautiful recreational kayak that I am proud of and will be happy to paddle for years to come.
A Philadelphia kid at heart, Dave Feder discovered his love of water while spending childhood summers at the Jersey shore and as a young sailor in the U.S. Navy. He has been a recreational kayaker most of his adult life. An electrical engineer by profession, he also enjoys hiking and trail-walking with his dog and playing with his grandkids. In his spare time, he is an amateur woodworker. Building his own boat was a longtime dream.
During 1940 and 1941, the first two years of the German occupation of Norway during World War II, 21 small wooden boats set out across the North Sea to Great Britain. Those who attempted the dangerous voyage, known as Englandsfarere—England Sailors—had one goal in mind: to join the Allies in the fight against Nazi Germany. Over the course of this effort to liberate Norway, nearly 100 people in those 21 boats left from the Agder region in southern Norway. Eighteen of the boats arrived safely. Two boats, each with two men on board, disappeared, and one boat was captured by the Germans—all five who were on board were executed or died in captivity. These escapes were undertaken by heroic young men who put their lives on the line, but in the postwar years they received very little recognition.
More than eight decades later, Jarle Føreland wanted to re-create the North Sea crossing to acknowledge the Englandsfarere who risked all to join the Allied side in the struggle for peace and freedom in the Second World War. I joined him in this vision and became the project leader. Frode Stokkeland and Willy Pedersen were soon on board as crew members.
We would travel in FRI IV, a 22-year-old wooden motor launch, the third boat we had tested. The two previous boats, a 1934 model and a 1954 model, had both proved unreliable during sea trials. FRI IV is a Visterflo sjekte, built in the Østfold region of southeast Norway and powered with a Volvo Penta three-cylinder 18-hp marine diesel engine. It would be an appropriate boat, similar in age to the boats used during WWII. We carried out many sea trials, training to work as a crew in a small boat, getting to know the strengths and weaknesses of our equipment, and strengthening our confidence that we would succeed. Our plan was to follow the route and the story of Finn Narvesen, who fled with Finn Frodesen, Thorleiv Moe, and Hans Syvertsen in SWAN, a 22′ sjekte, from Kristiansand in Agder on September 21, 1940. We would carry Norway’s official postal flag as a sign that we had a letter from the Norwegian government on board.
Courtesy of the author
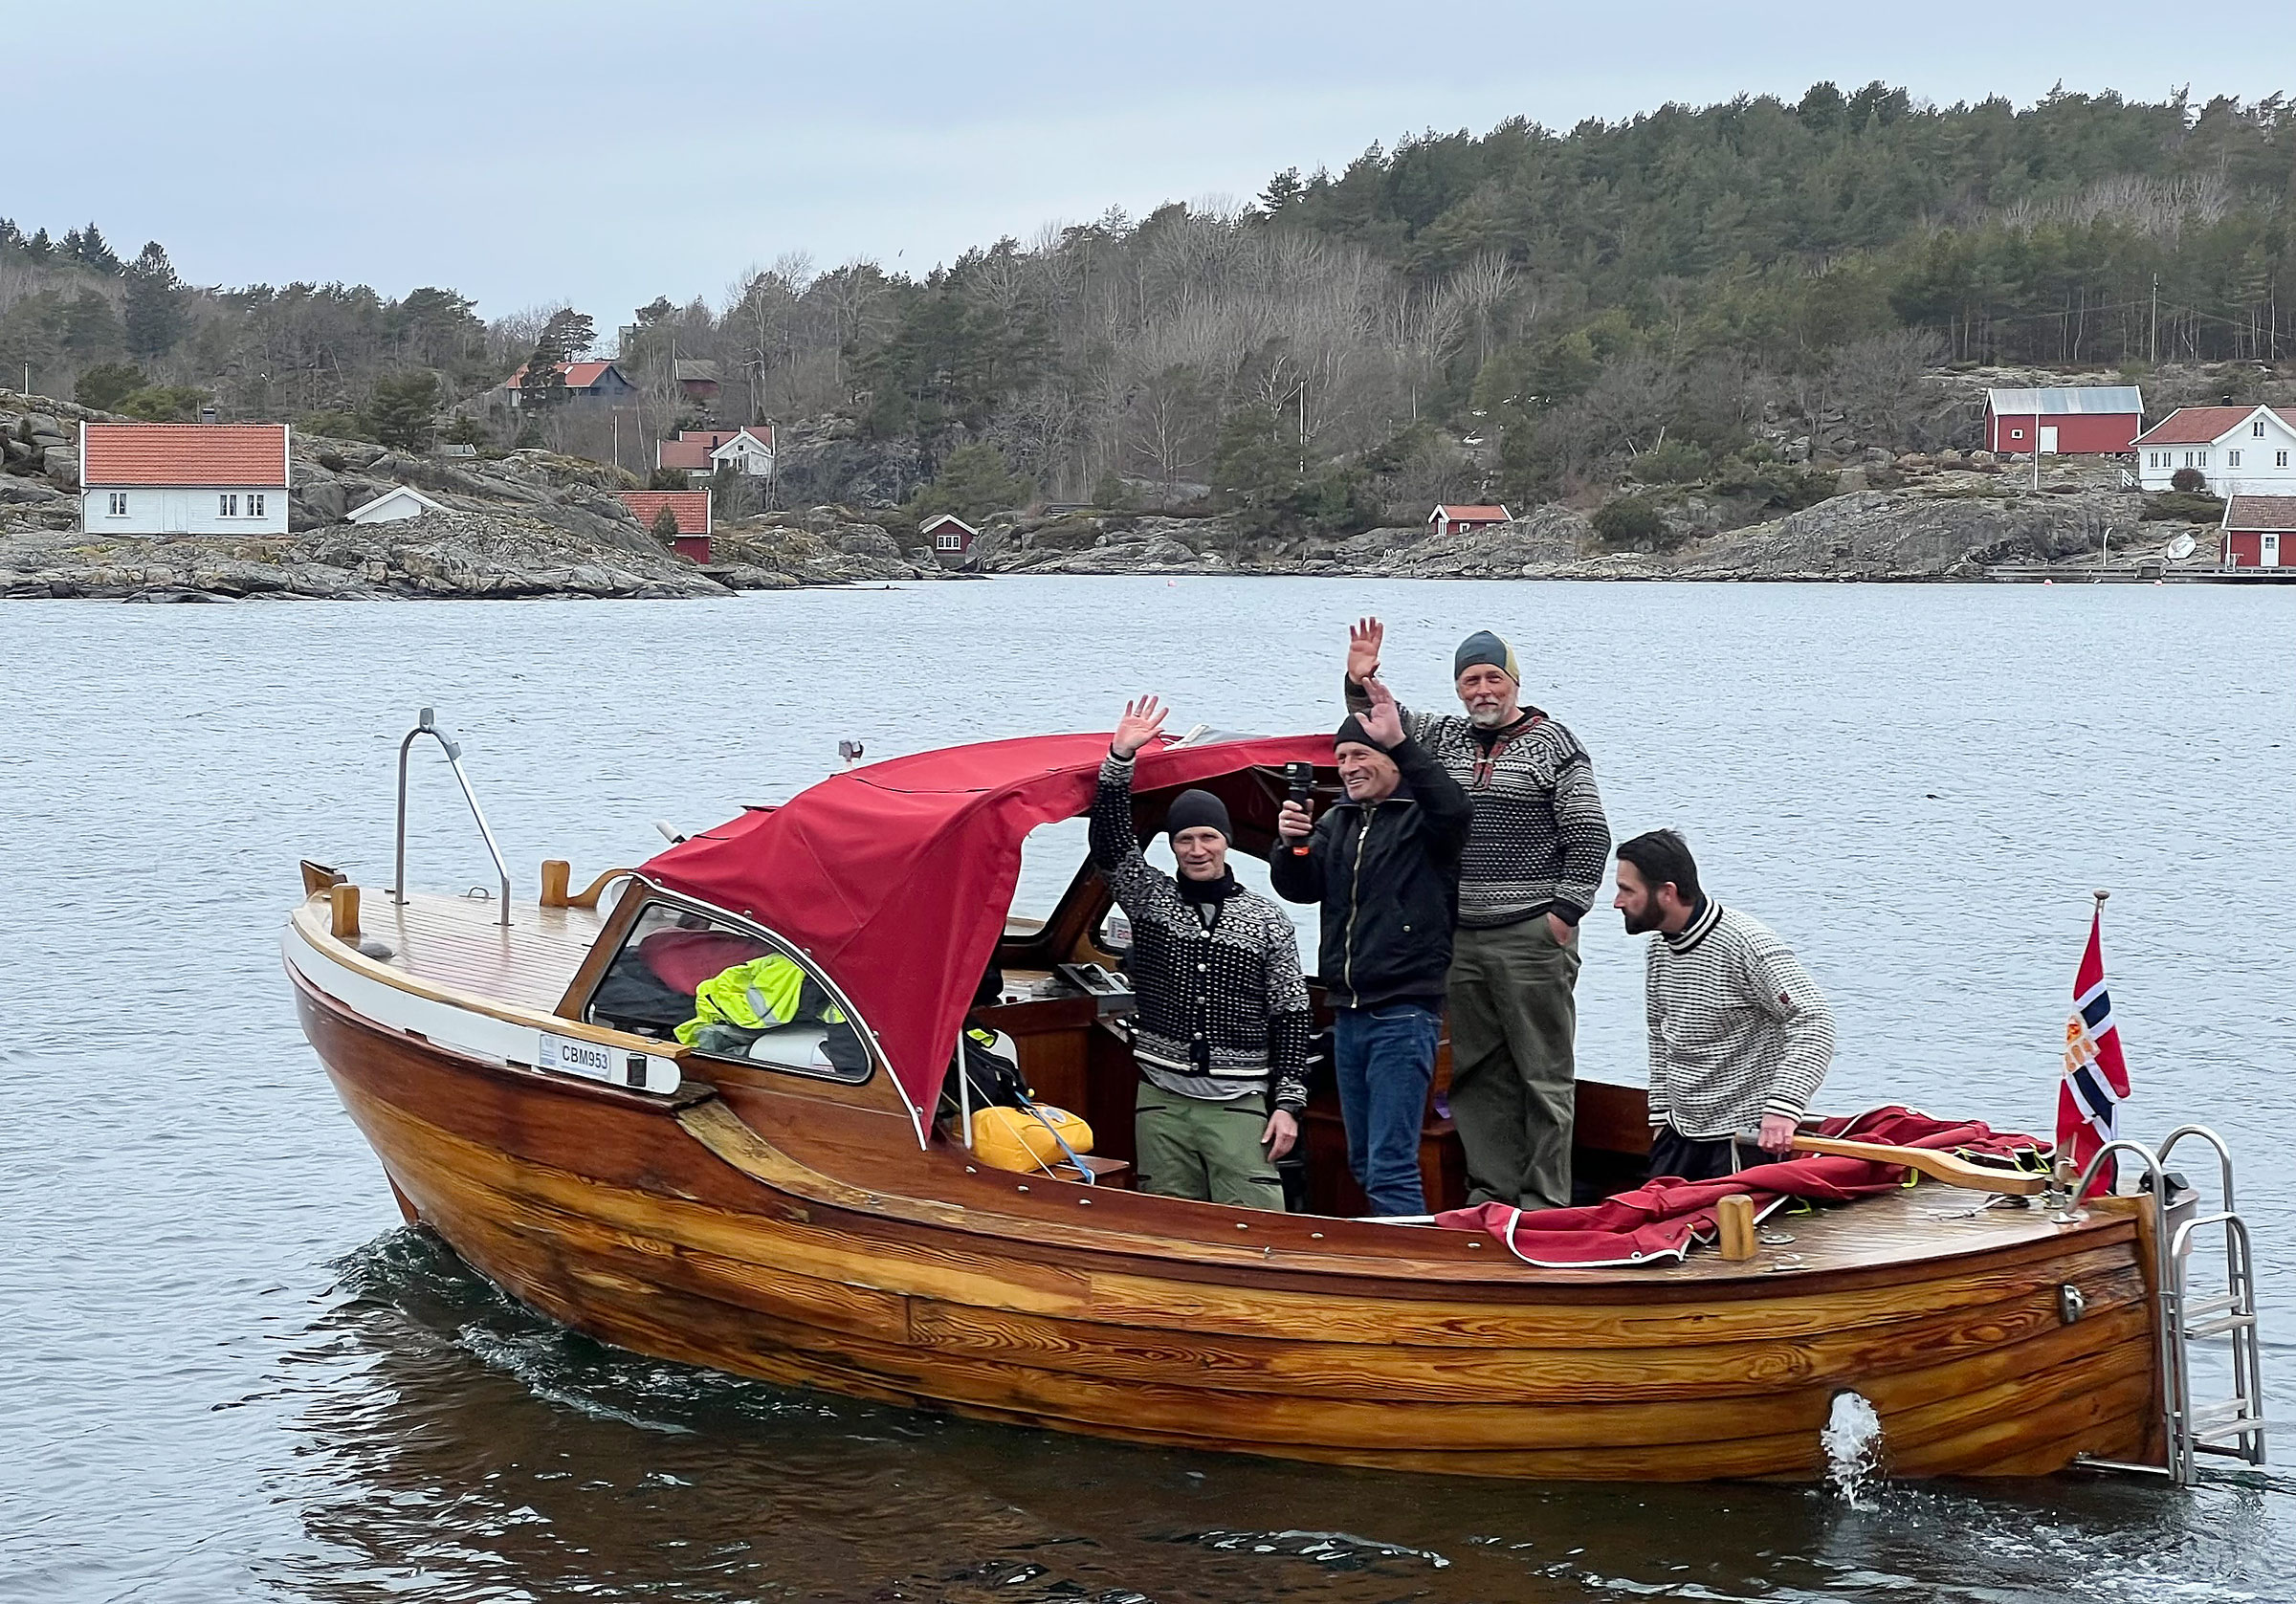
We left from Randesund, near where Finn Narvesen embarked in WWII. It was nice weather, and we were all excited to leave after four years of preparation. From left: Tony Teigland, Willy Pedersen, Jarle Føreland, and Frode Stokkeland
On Tuesday, April 12, 2022, at 9 p.m., the message we had been waiting for from Frode, our captain, came: “THE WEATHER WINDOW IS ACCEPTABLE. We leave at 2 p.m. tomorrow. Arrive at the agreed place with your luggage.” A few days earlier, we had prepared and readied FRI IV to depart from the same place near Kristiansand that Finn Narvesen had, which was described in the report he later wrote about his escape. A compass was the only navigation equipment he had; we had not only a compass but also AIS vessel tracking, VHF, GPS, an autopilot, and a satellite phone. For safety gear we had survival suits, a life raft, and an emergency beacon transmitter.
Before I left my house, I checked our document folder for the fourth time to make sure I had the letter from the Norwegian Minister of Defense to be delivered to Britain. Narvesen had smuggled maps of Norwegian airports, stolen from the Germans and very useful to Allied military forces. I filled my car with my luggage and food for the crossing. On my way to the boat, I stopped by the flower shop and collected the wreath we had ordered. It was beautiful, with roses and ribbons with the Norwegian colors. We would lay it midway in the North Sea, to commemorate those who made the crossing to fight with the Allies in World War II.
When I arrived at the rendezvous, Jarle was already there—he is always early. Willy and Frode arrived shortly afterward. We were quiet but excited. After four years of planning, organizing and training, it was happening.
We had a short chat to set the mood close to what Finn Narvesen and his crew felt in 1940 when they put their lives on the line. They had no weather forecast, no life jackets, and no communication. If they were seen by a German plane outside the legal zone along the southern coast of Norway, they would be reported and inevitably captured.
We concentrated on our tasks and exactly at 2 p.m., we got underway and set our course southwest along the coast. We traveled a nearshore route from Kristiansand headed for Lindesnes, Norway’s southernmost lighthouse.
Roger Siebert
.
Narvesen wrote in his report:
Norway is occupied, there are German patrol ships along the coast. Those we meet must assume that we are out fishing, we relax, acting that we have nothing to hide. When we see them, we must keep our course, we must not arouse suspicion. We pass German boats a few meters away, wave to the Nazis—our hearts racing—and the bag with the maps is ready to be sunk in the sea. It would reveal everything if we were stopped.
After about 2 hours, we stopped by the home of Ingrid Juell Moe in the village of Ny Hellesund on the island of Monsøya. She met us with her husband, daughter, and son-in-law, as well as two grandchildren. In November 1941, her uncle, Sven Moe, was the last known Englandsfarere to escape. She told us about his achievement, and of the silence in the postwar years about his fate during the war. After reaching Scotland, he trained as a radio telegraph operator, and in April 1945 the plane he was working aboard crashed on a mountaintop in Sweden. Ingrid, honoring us with Norwegian flags and wishing us good luck with tears in her eyes, was clearly moved by our adventure and the memories it rekindled.
At 6 o’clock in the evening it started to get dark. After 7 hours of motoring from Kristiansand we reached Lindesnes, and the wind was increasing to 15 to 20 knots. We turned on a course of 270 degrees west, navigated through the Norwegian Trench and out into the North Sea to settle on a direct course for Buckie in Scotland, some 260 sea miles away. The waves grew to 6′ to 9′. It was dark. We raced along at 6 knots. On the high seas, had we been trying to elude the Germans, this speed would have felt incredibly slow, like a snail on an open meadow with hungry seagulls circling.
We put on survival suits. We brought them in case something drastic should happen, and they were good and warm. We turned on the autopilot, which would make the trip more passive than I would have liked, but the crew democracy had spoken. The time was now 10:30 p.m. and we started the watch, four hours on, four hours off, changing on the hour. Jarle and Willy were one watch, Frode and I were the other. As Jarle and Willy started their first shift, Frode lay down between the engine box and the galley and I crawled into the forepeak.
There was more sea and wind now than what I had experienced in the many training trips we had done, and there were some sounds I had not heard before along with some abnormal vibration in the hull. Would the repair we did on the drive shaft and bearing hold? Was the propeller secure? The sounds came and went and sometimes it sounded as if the engine had stopped completely before it shook again. I was tired and restless but eventually fell asleep.
I was nudged at midnight for the change of watch. It felt like I’d been kicked in the face. My gums ached; I must have been gnashing my teeth as I slept, tense about everything that could go wrong. When I got out of the cabin, I heard the engine roaring like a lion and realized that everything was beautifully in order.
We were still in rough seas and the autopilot had stopped working so we steered manually by compass. As the boat’s electrical manager, I checked out the equipment failure and found that a fuse had blown. I replaced it with a new one, but there was still no response. On the autopilot’s cover I saw a patch of melted plastic. The actuator had burned and it was beyond repair. I felt relieved; finally, we can navigate more like the Englandsfarere crews did. There would be more work for us to keep on course, but we could get to know better how it was in 1940. Ingrid had said that her Uncle Sven stole jet fuel from the Germans and used it for his boat’s engine. While crossing the North Sea, he and his crew had to stop every hour to clean the carburetor. Our having to steer by hand and compass was a trifling inconvenience.
Tony Teigland
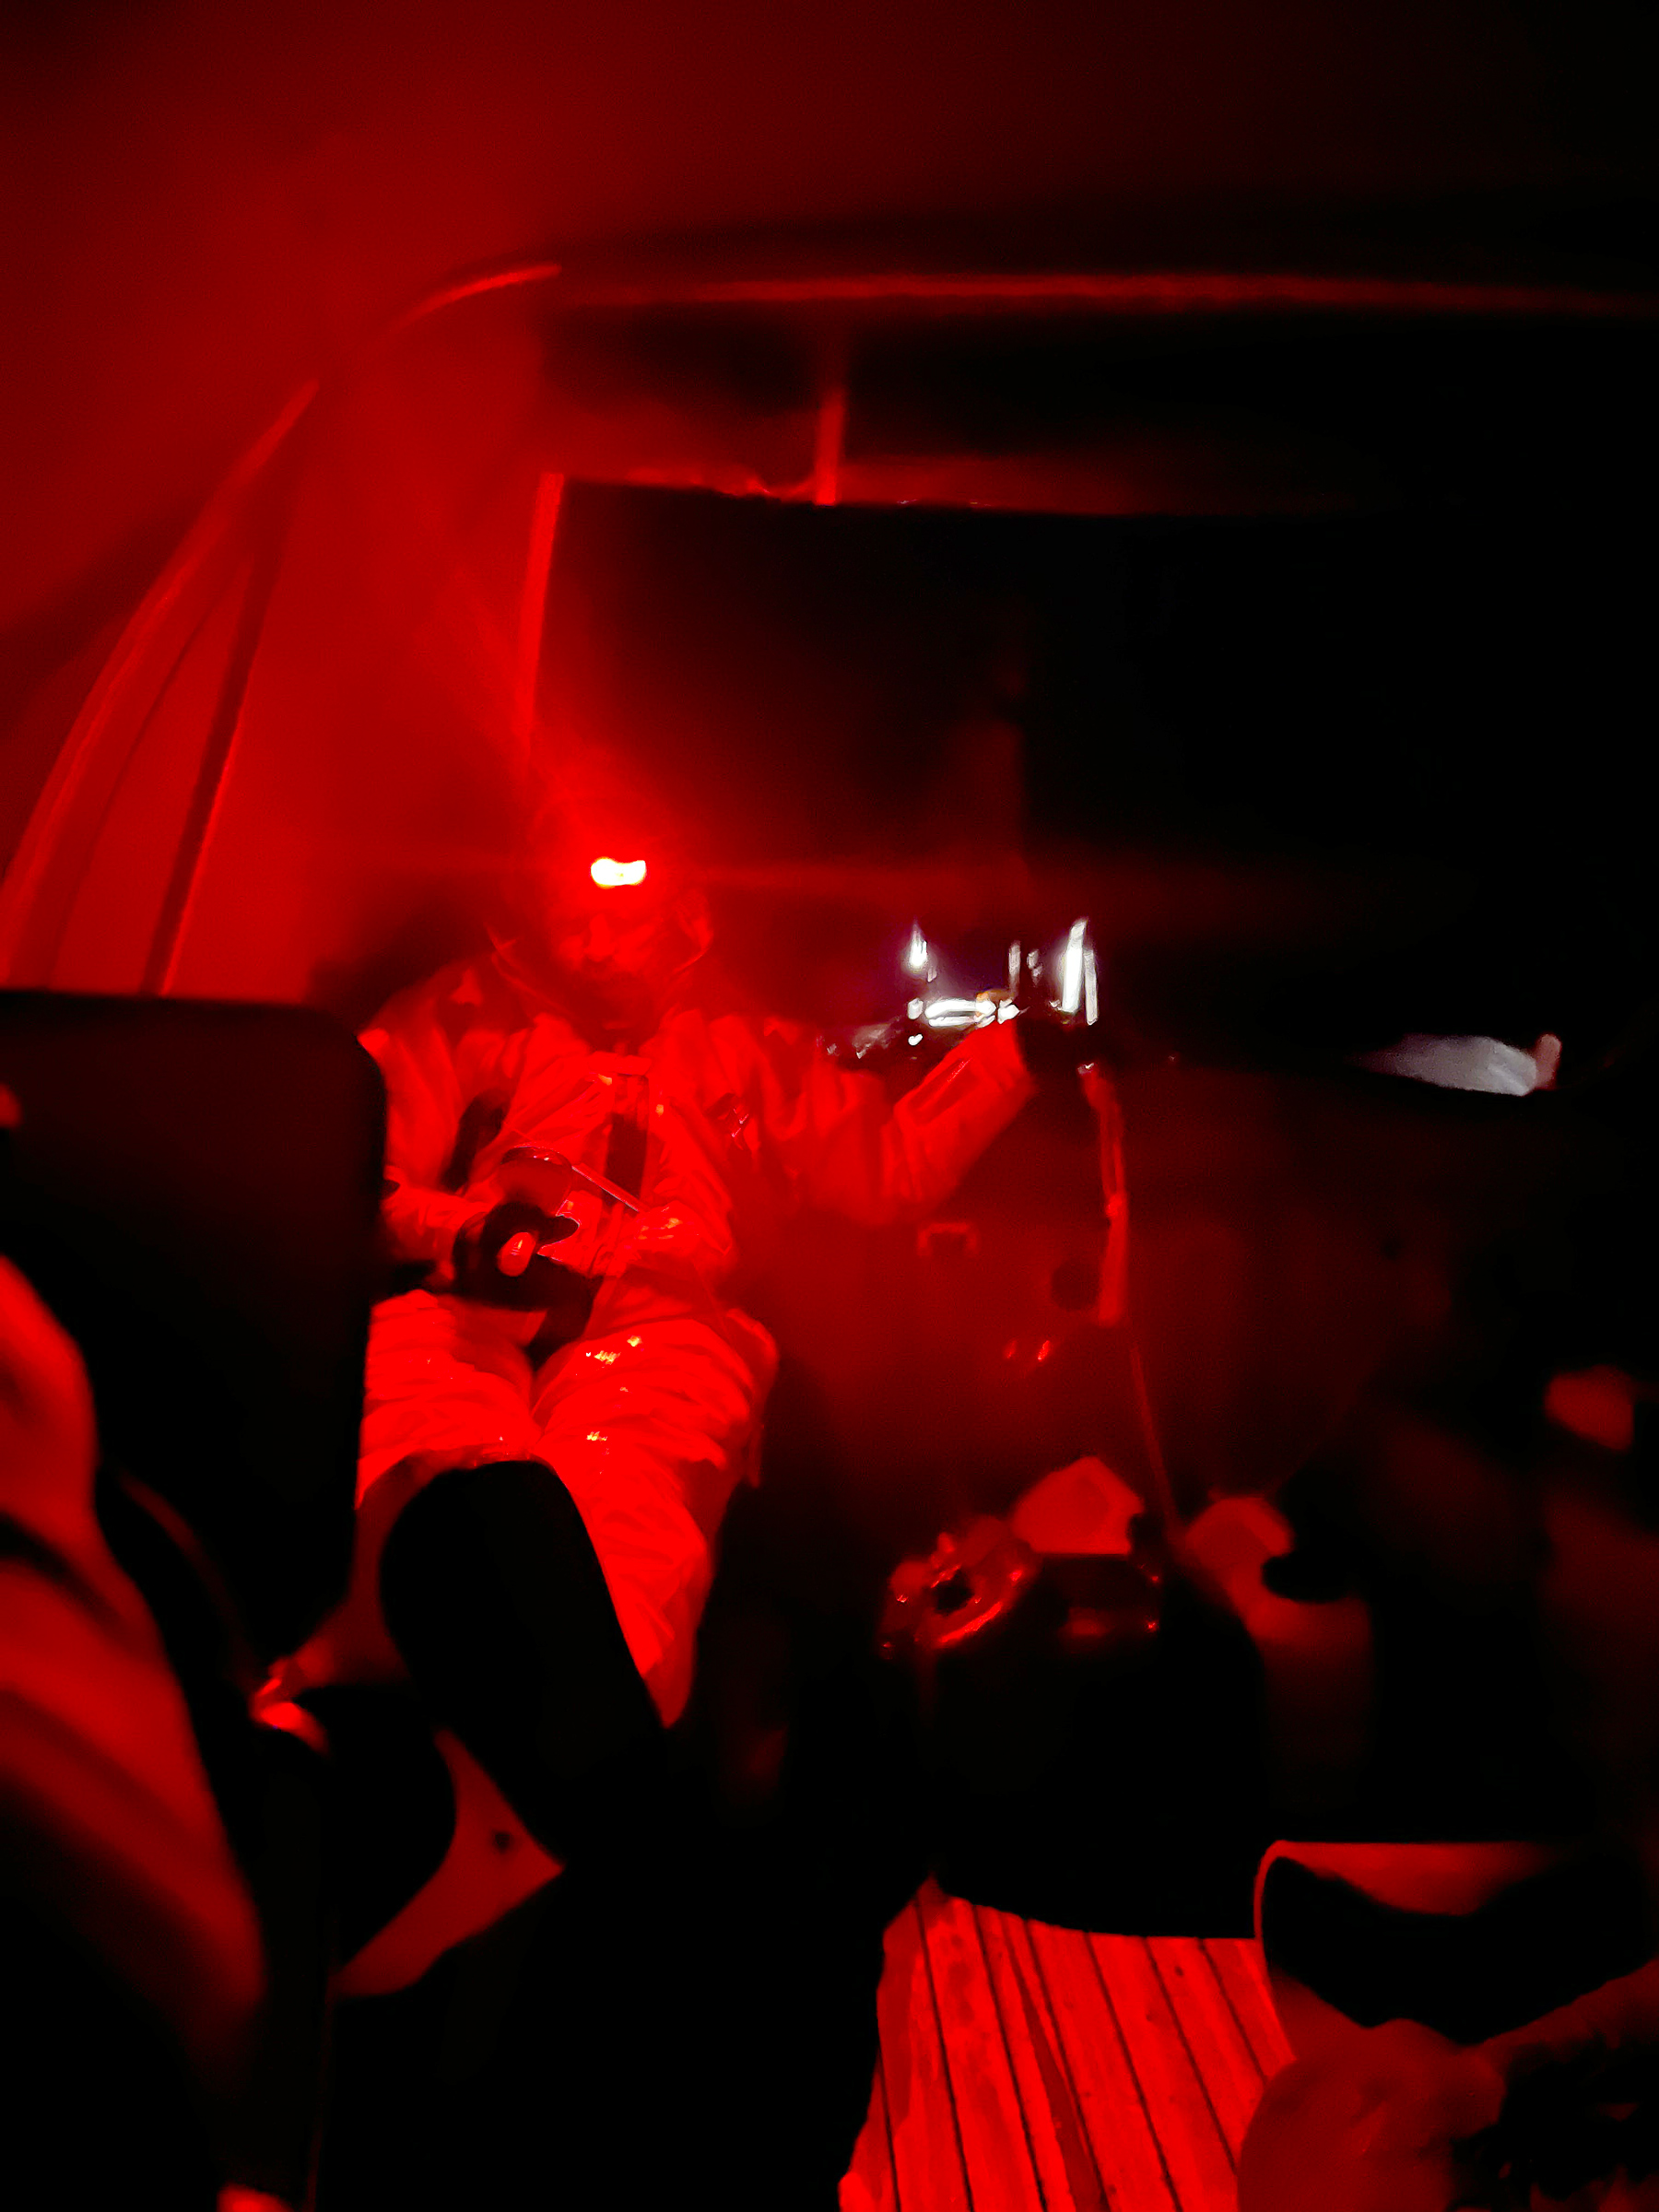
I was happy that the autopilot had destroyed itself so we had to steer manually as our predecessors had. During the night watch we used a red light to see the compass and maintain our night vision.
Frode and I steered through the darkness. There were still 3′ to 6′ waves from the southwest and the boat rolled from side to side, requiring constant work at the tiller to keep our course. We saw some vessels in the dark, set a new course, and managed to get clear of them with a good margin. The biggest threat to us was a collision with workboats or shipping containers that had fallen overboard from freighters and were floating at sea level. While these potential hazards kept us alert and on the lookout, it wasn’t like evading Germans warships in 1940 and ’41. Frode and I had an uneventful watch and at 4 o’clock it was time for us to rest again.
Tony Teigland
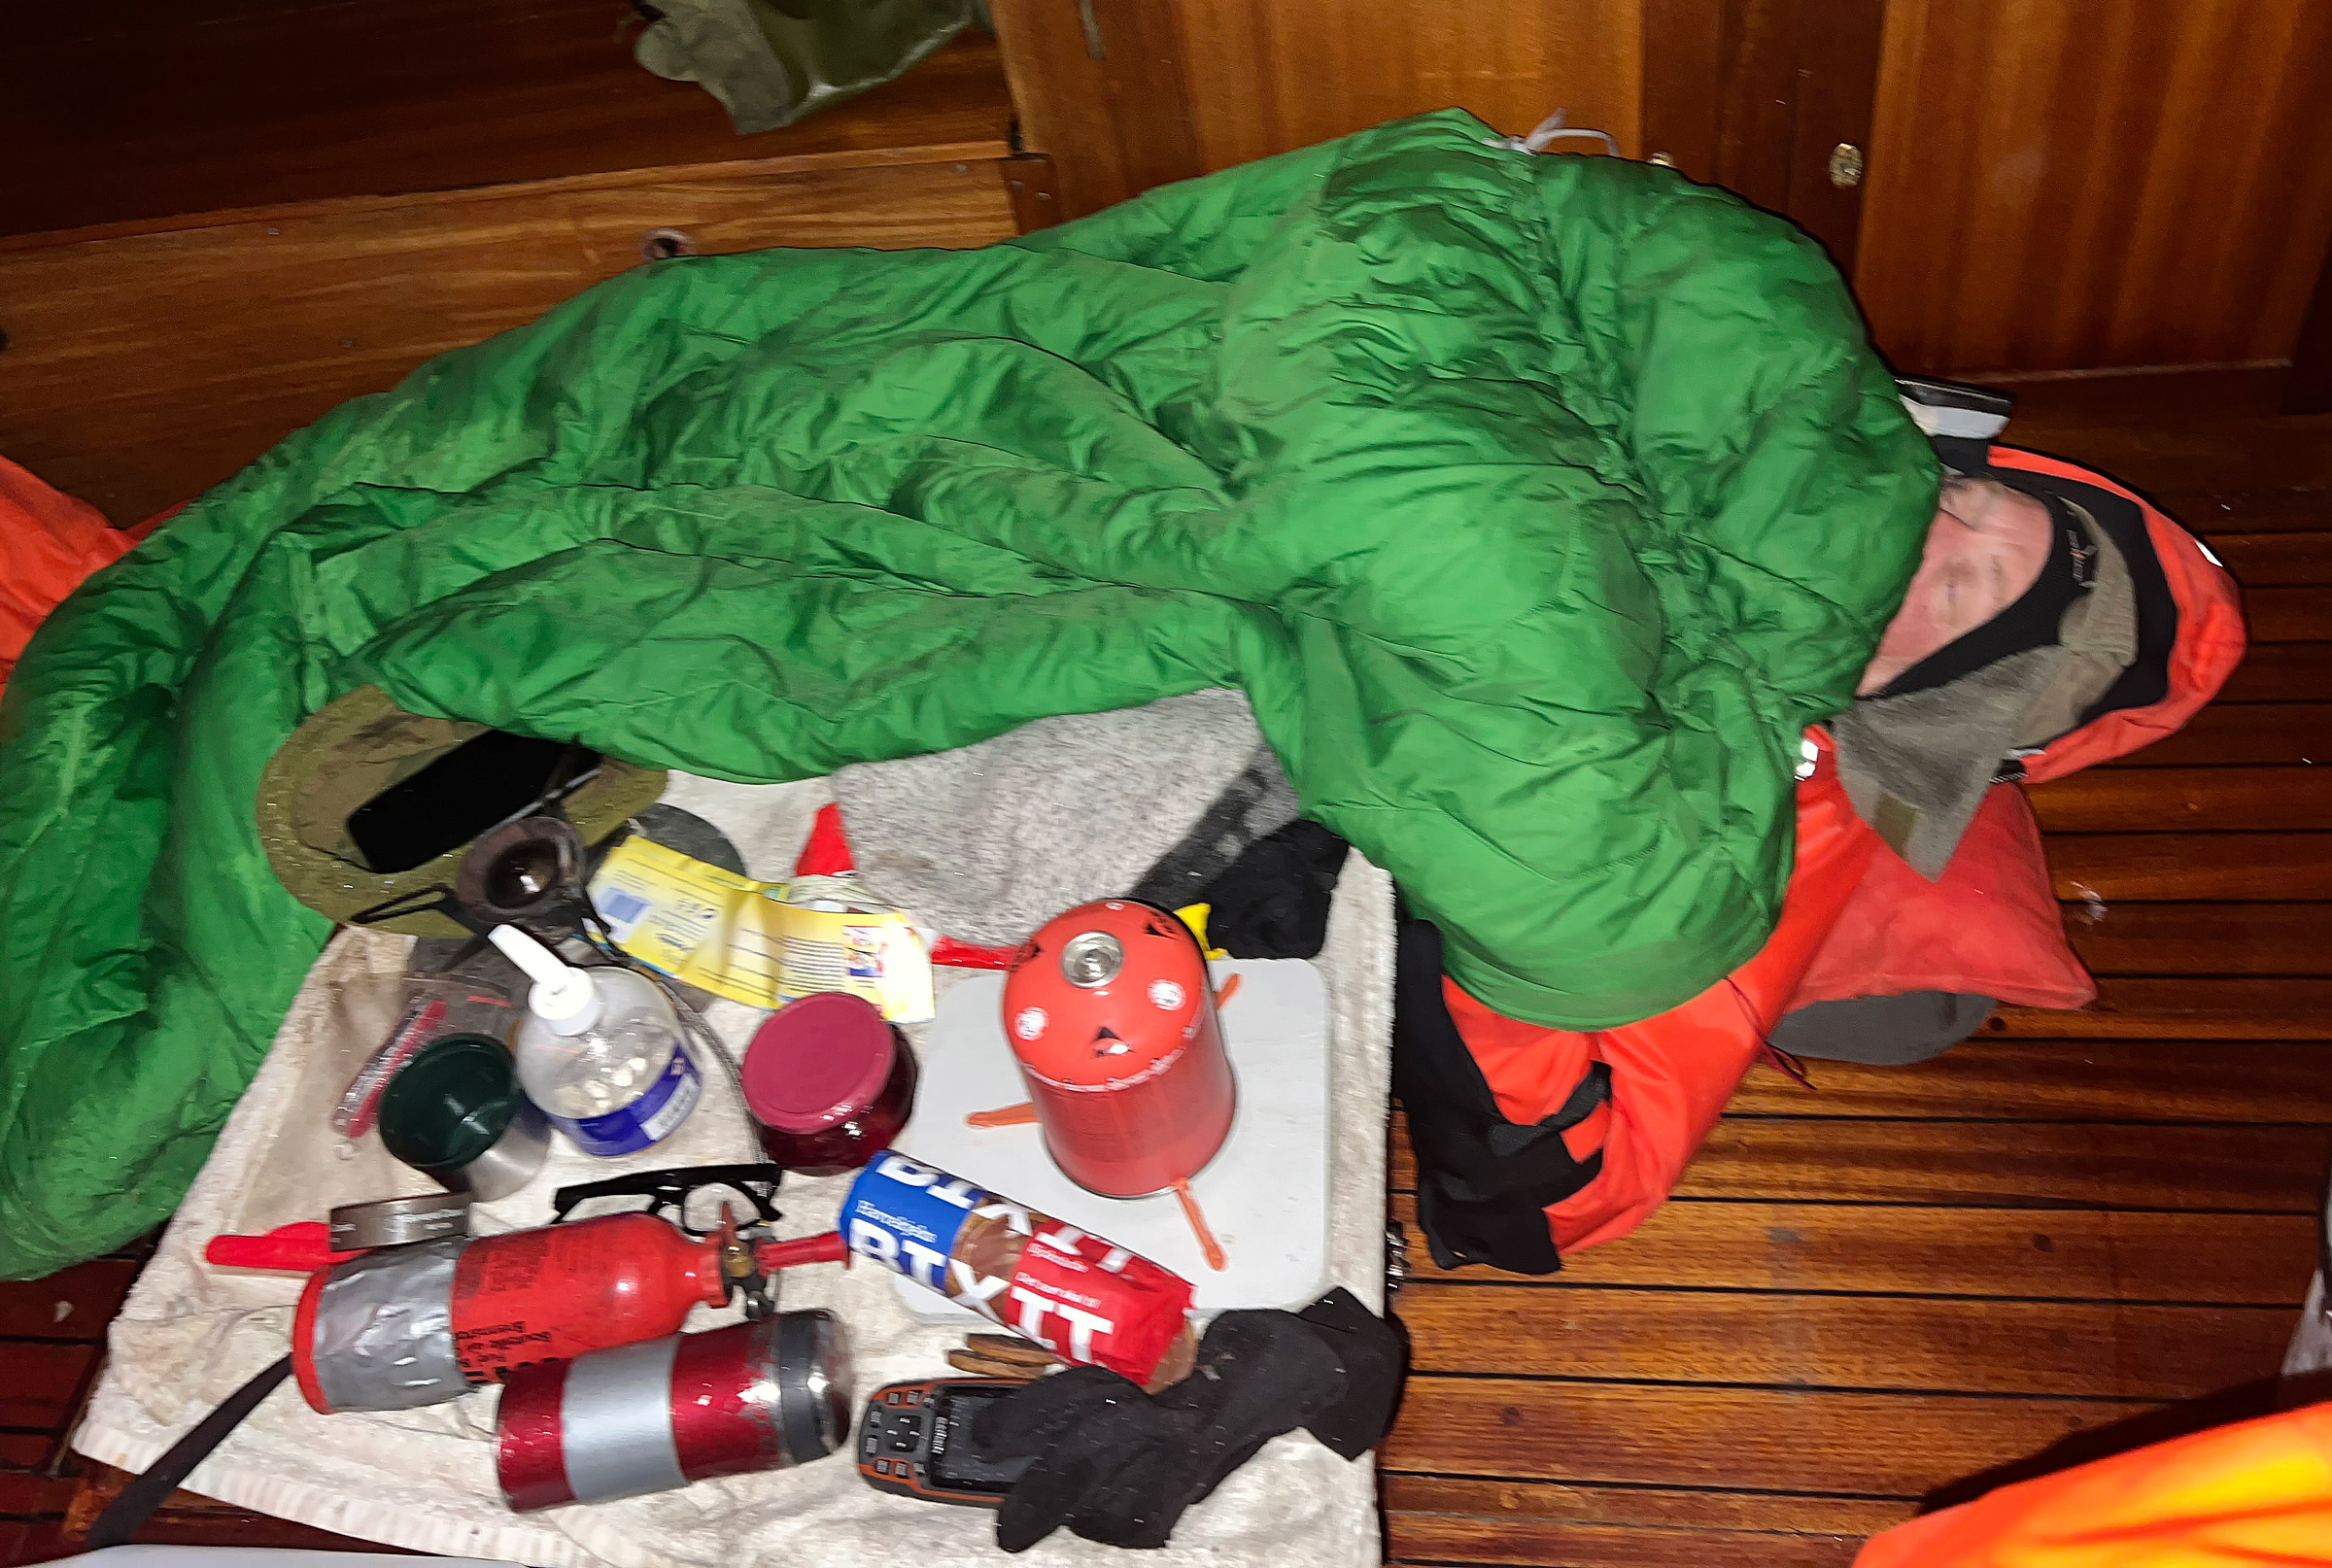
In a small boat you need to sleep where you can. Jarle and Frode had their spots between the engine and the galley where we prepared all the food and coffee.
I was nudged awake at 8 a.m. for hot coffee. I peed dark yellow; I hadn’t been drinking enough water. I was also nauseated, and my salivary glands were gushing; it helped to stare at the horizon.
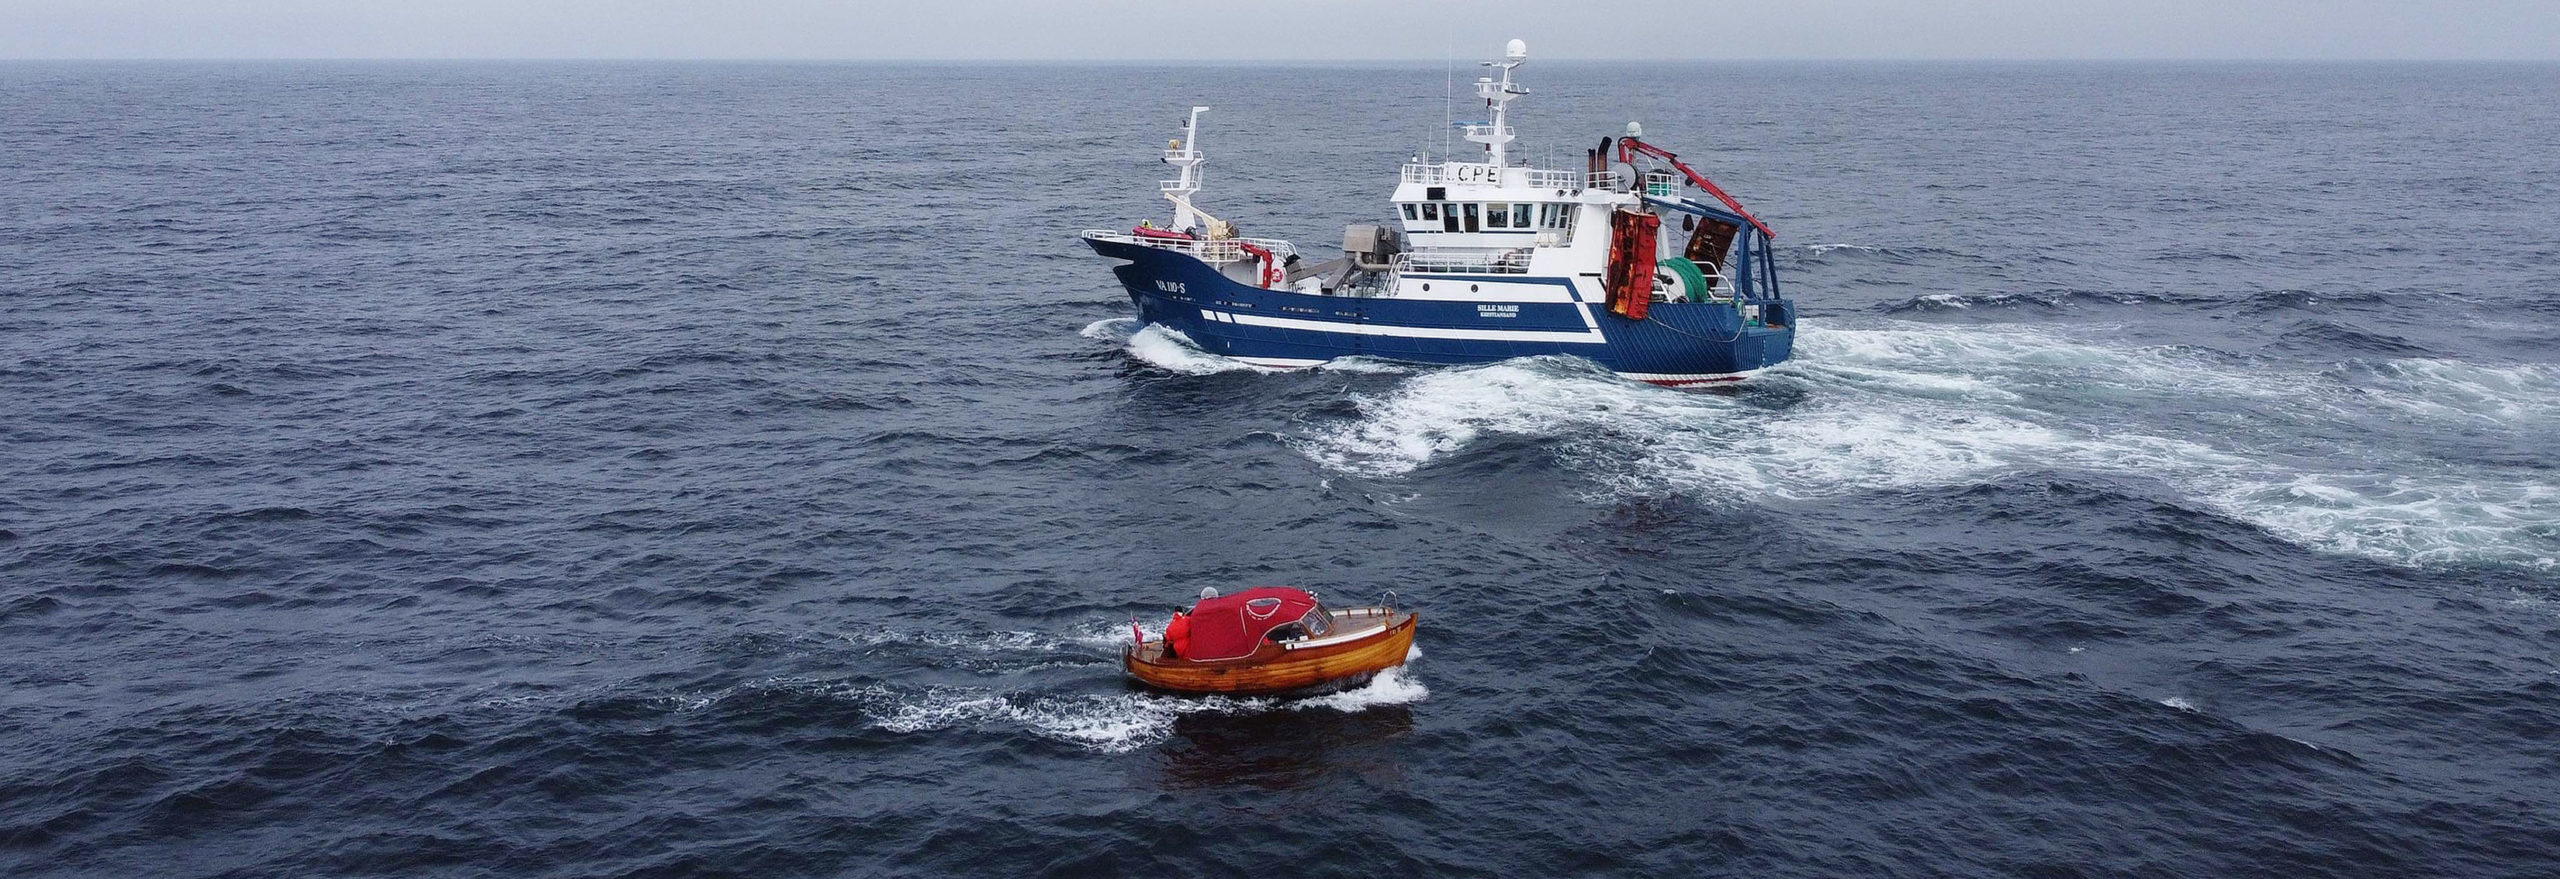
It was Thursday, April 14. There were still some waves, but the wind had gone down a bit, to about 12 to 15 knots. A workboat appeared in the distance on a collision course. We made a dramatic change of course to indicate to the boat’s crew that we had seen them. The vessel, which we now recognized as a trawler, changed course, and we were on an intersecting course again. We changed course a second time and the same thing happened. I wondered how I would have felt if this had been a German ship that had discovered us. Our VHF came to life and a voice on the radio identified the approaching boat as SILLE MARIE, a trawler from Flekkerøya in Kristiansand. The crew had heard about our voyage on the news and wanted to get a close look at us and to wish us good luck on our journey.
Tony Teigland
Willy was a good chef and cooked us pancakes with bacon mixed in. This was our breakfast for two days, but after that the batter started to ferment.
We woke Jarle and Willy at noon, and Willy cooked pancakes and bacon. The sun was shining, the wind was blowing. I thought of those at home: my wife at work, my son competing in a bicycle race in Denmark, and my daughters visiting my mother in Spain. For the Englandsfarere, there could only be worry and fear for those they’d left behind. If their escape was discovered, families at home could be arrested and brutally interrogated by the Nazis as accessories to the crime committed by those who had left Norway without permission. Finn Narvesen’s brother Emil and his father Rolf had both been arrested in Norway, likely for that reason.
Marcus Karlsen
On the second day on the North Sea we were visited by SILLE MARIE from Kristiansand. Her crew had heard about us on the news and wanted to wish us a successful trip. One of the crewmen, Marcus Karlsen, had a drone and took this photo of our two boats. Another crewman told us that they often feel small at sea in their 120′ trawler
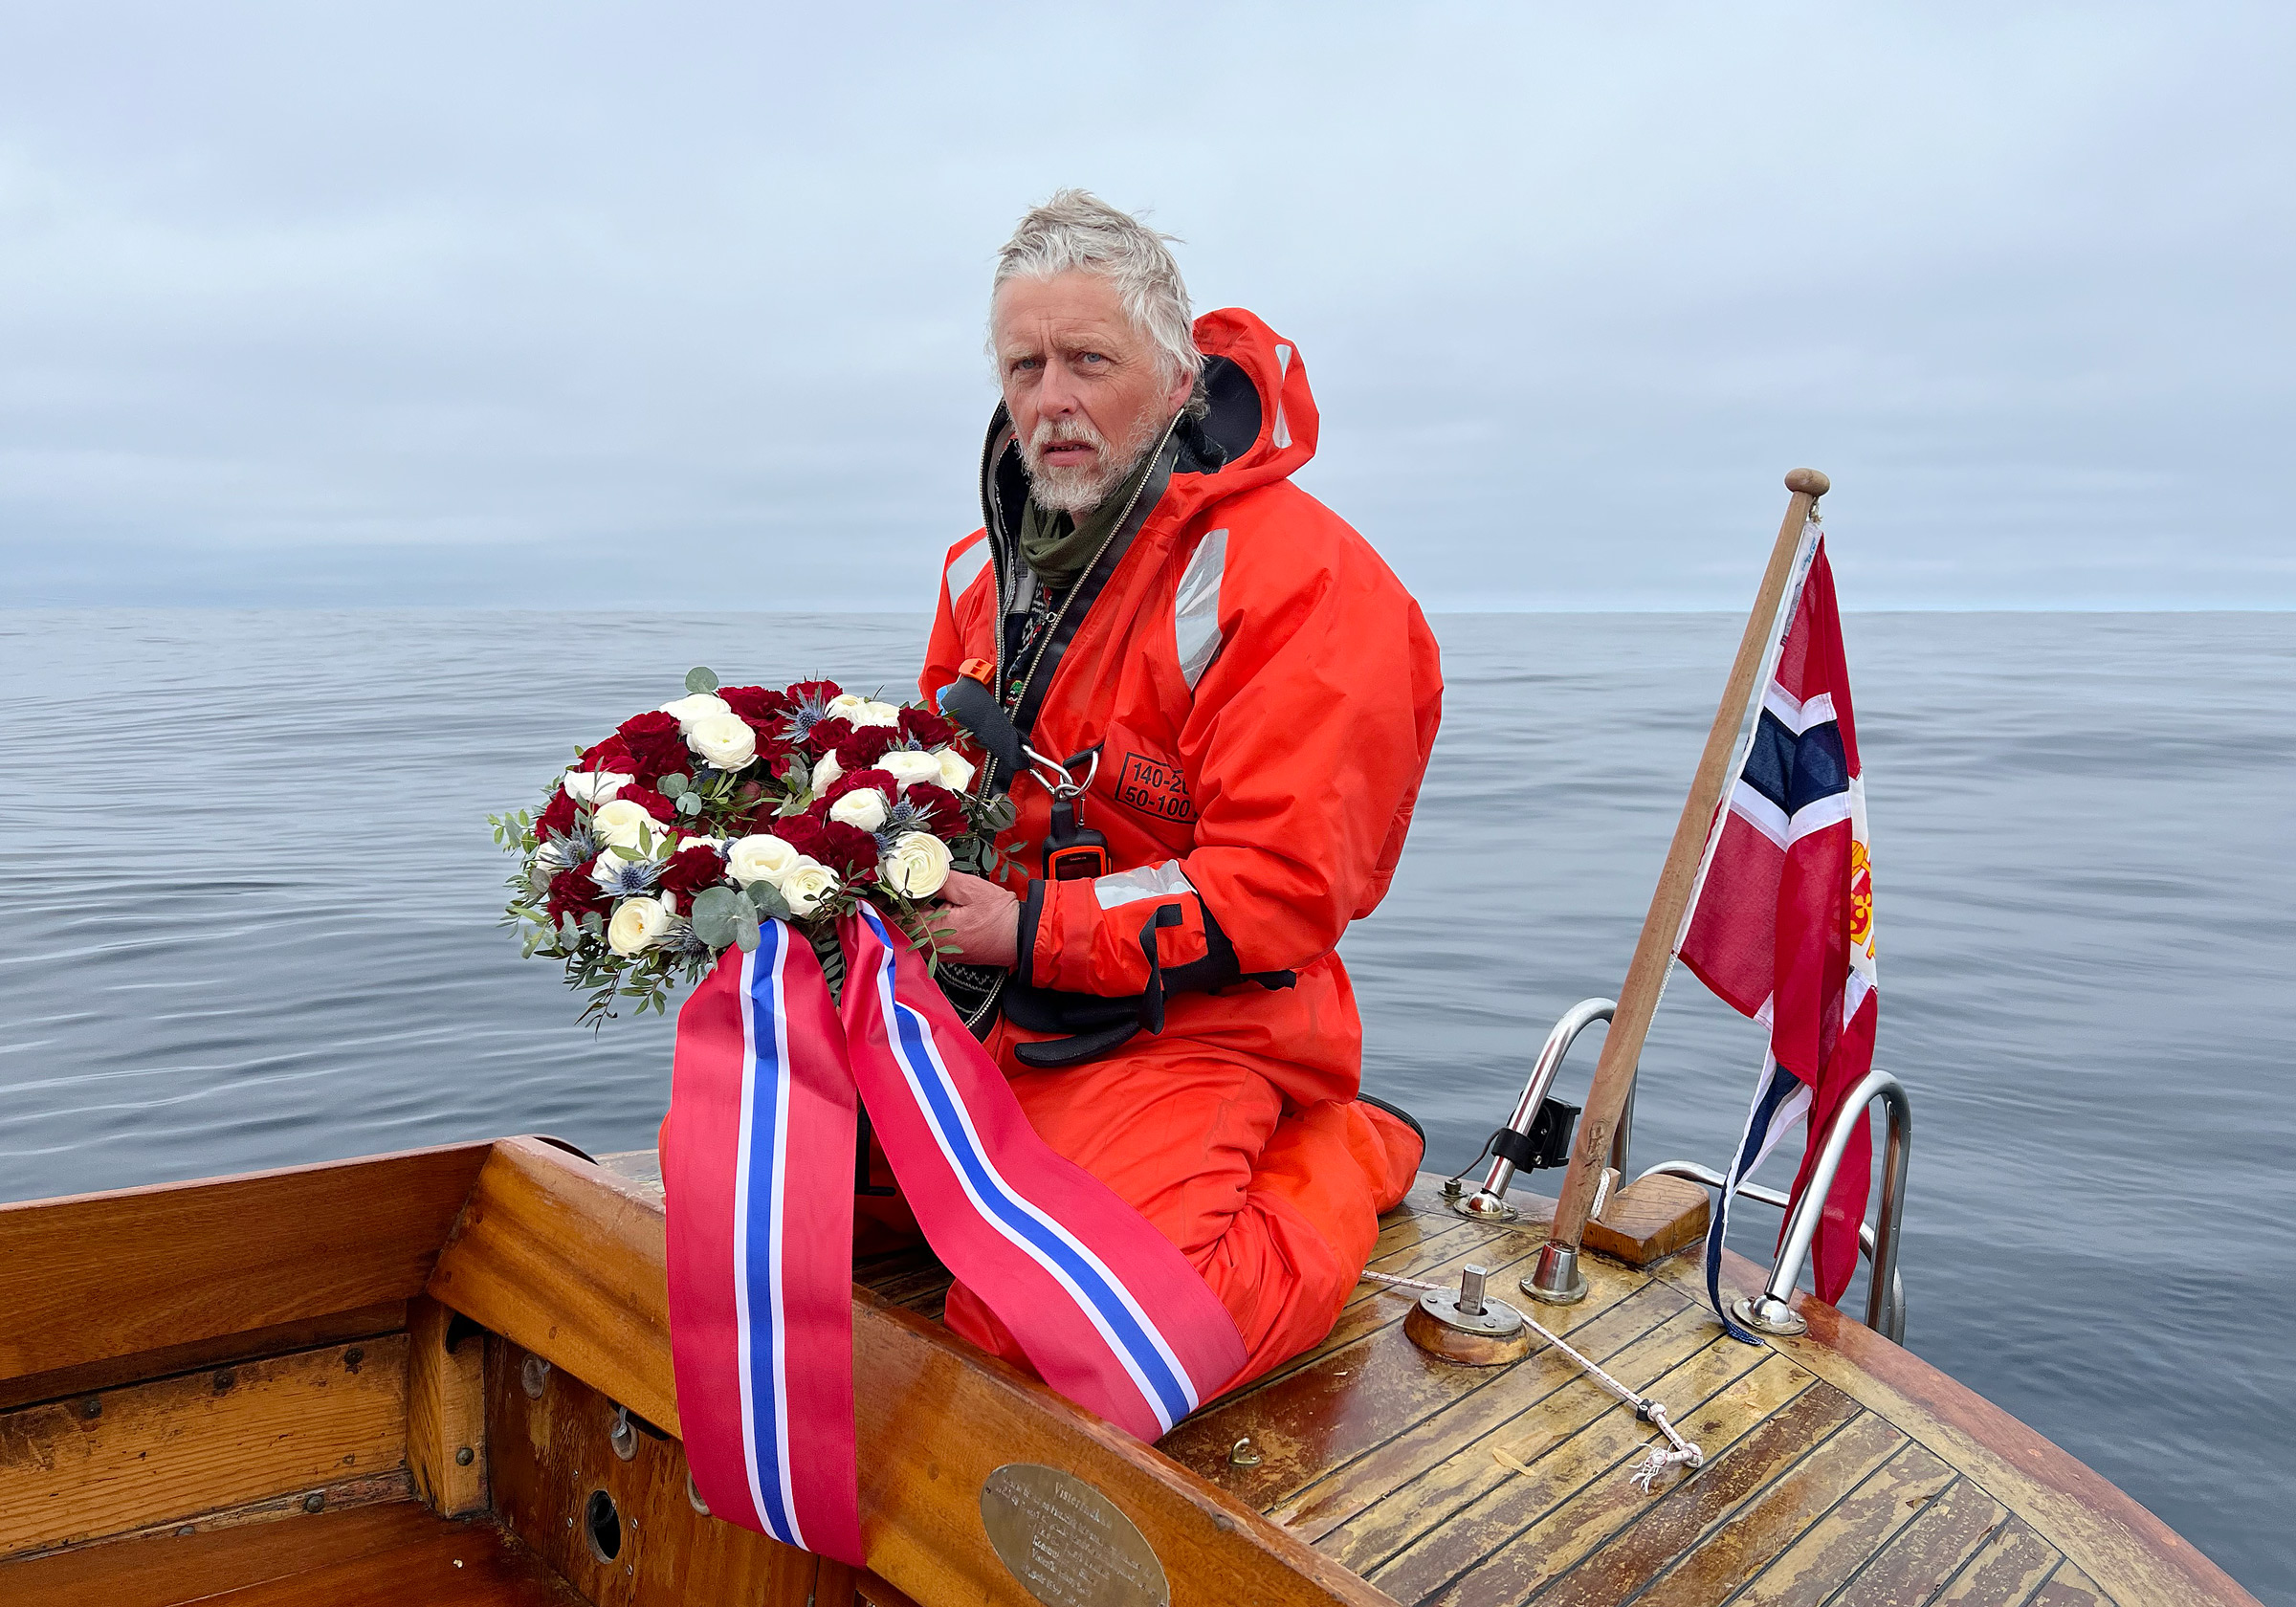
At 4 p.m., I crawled feet first from the forepeak and stuck my head out: the sun was still shining, the wind was calm, and the water in the middle of the North Sea was as smooth as oil. There wasn’t a gust of wind. It was the perfect time to honor our WWII heroes.
When we stopped the engine, our whole world fell completely quiet. The smell of salt water tingled in my nostrils. Jarle picked up the flower wreath, kneeled on the after deck, and said solemnly: “We will remember and honor the 321 people who did not succeed in the effort to escape from Norway, cross the North Sea, and reach Great Britain. They all had a desire to fight the Nazis. For courage, peace, and freedom. Never forget.” After he carefully cast the wreath into the North Sea, we were quiet for several minutes. The wreath stayed by the boat at rest on the sea. We quietly began to sing Norway’s national anthem “Ja vi elsker dette landet” (Yes, we love this land). Our singing went well for the first few lines, but then Jarle and I were suddenly quaking with laughter. Neither he nor I have a habit of not being serious when we should be, but we were tired and perhaps overwhelmed by the emotional weight of the ceremony or releasing the anxiety of the crossing and all the preparation that went into it.
Tony Teigland
The North Sea grew still for one of the highlights of the journey. Jarle held the wreath as we paid our respects to the young men who tried to escape to fight alongside the Allied forces. Not all survived the crossing, and for them we laid flowers on the sea.
We had stopped the engine after 28 hours of continuous operation and didn’t know if it would start again. We checked the oil and cooling water, and it looked good. The oil level was down by about half a pint, which was about right for the run we’d made. Jarle topped off the oil. Willy turned the ignition key to “glow” then to “start.” The engine turned over and ran well. We continued our crossing on smooth water, steering 270 degrees west.
Several of the Englandsfarere kept logbooks about their crossing of the North Sea, and in one of them was described a traditional canned meal that we had decided to repeat: erter, kjøtt, og flesk (peas, pork, and beef).
We heated two cans over the galley stove, and it tasted great—hot, salty, and filling. After dinner the dishwashing was easy at 6 knots: Jarle just held the saucepan in the water for a few seconds and it was clean! The sloshing created by the rolling and pitching boat provided effective wash and rinse cycles.
Frode Stokkeland
We had worn our survival suits since we went offshore. They were warm and if an emergency should arise, the zipper was the only thing to fix before entering the water. I’m at the helm, enjoying the view across the water.
It was Thursday night, and I was on watch. The sea was still calm, with only small ripples disturbing the water. Frode was seasick and had thrown up until there was nothing left. He sat on the port side bench with his eyes closed. It was quiet and dark. While I was at the tiller, looking out over the starboard side, a dim shape slipped up from the water, almost within arm’s reach. Only the starlight and moonlight illuminated the black water. What I then recognized as a dorsal fin broke the sea surface and disappeared again. Then another. Two dolphins were following us. I called Frode. He looked across the water with me for a moment, then retched over the side.
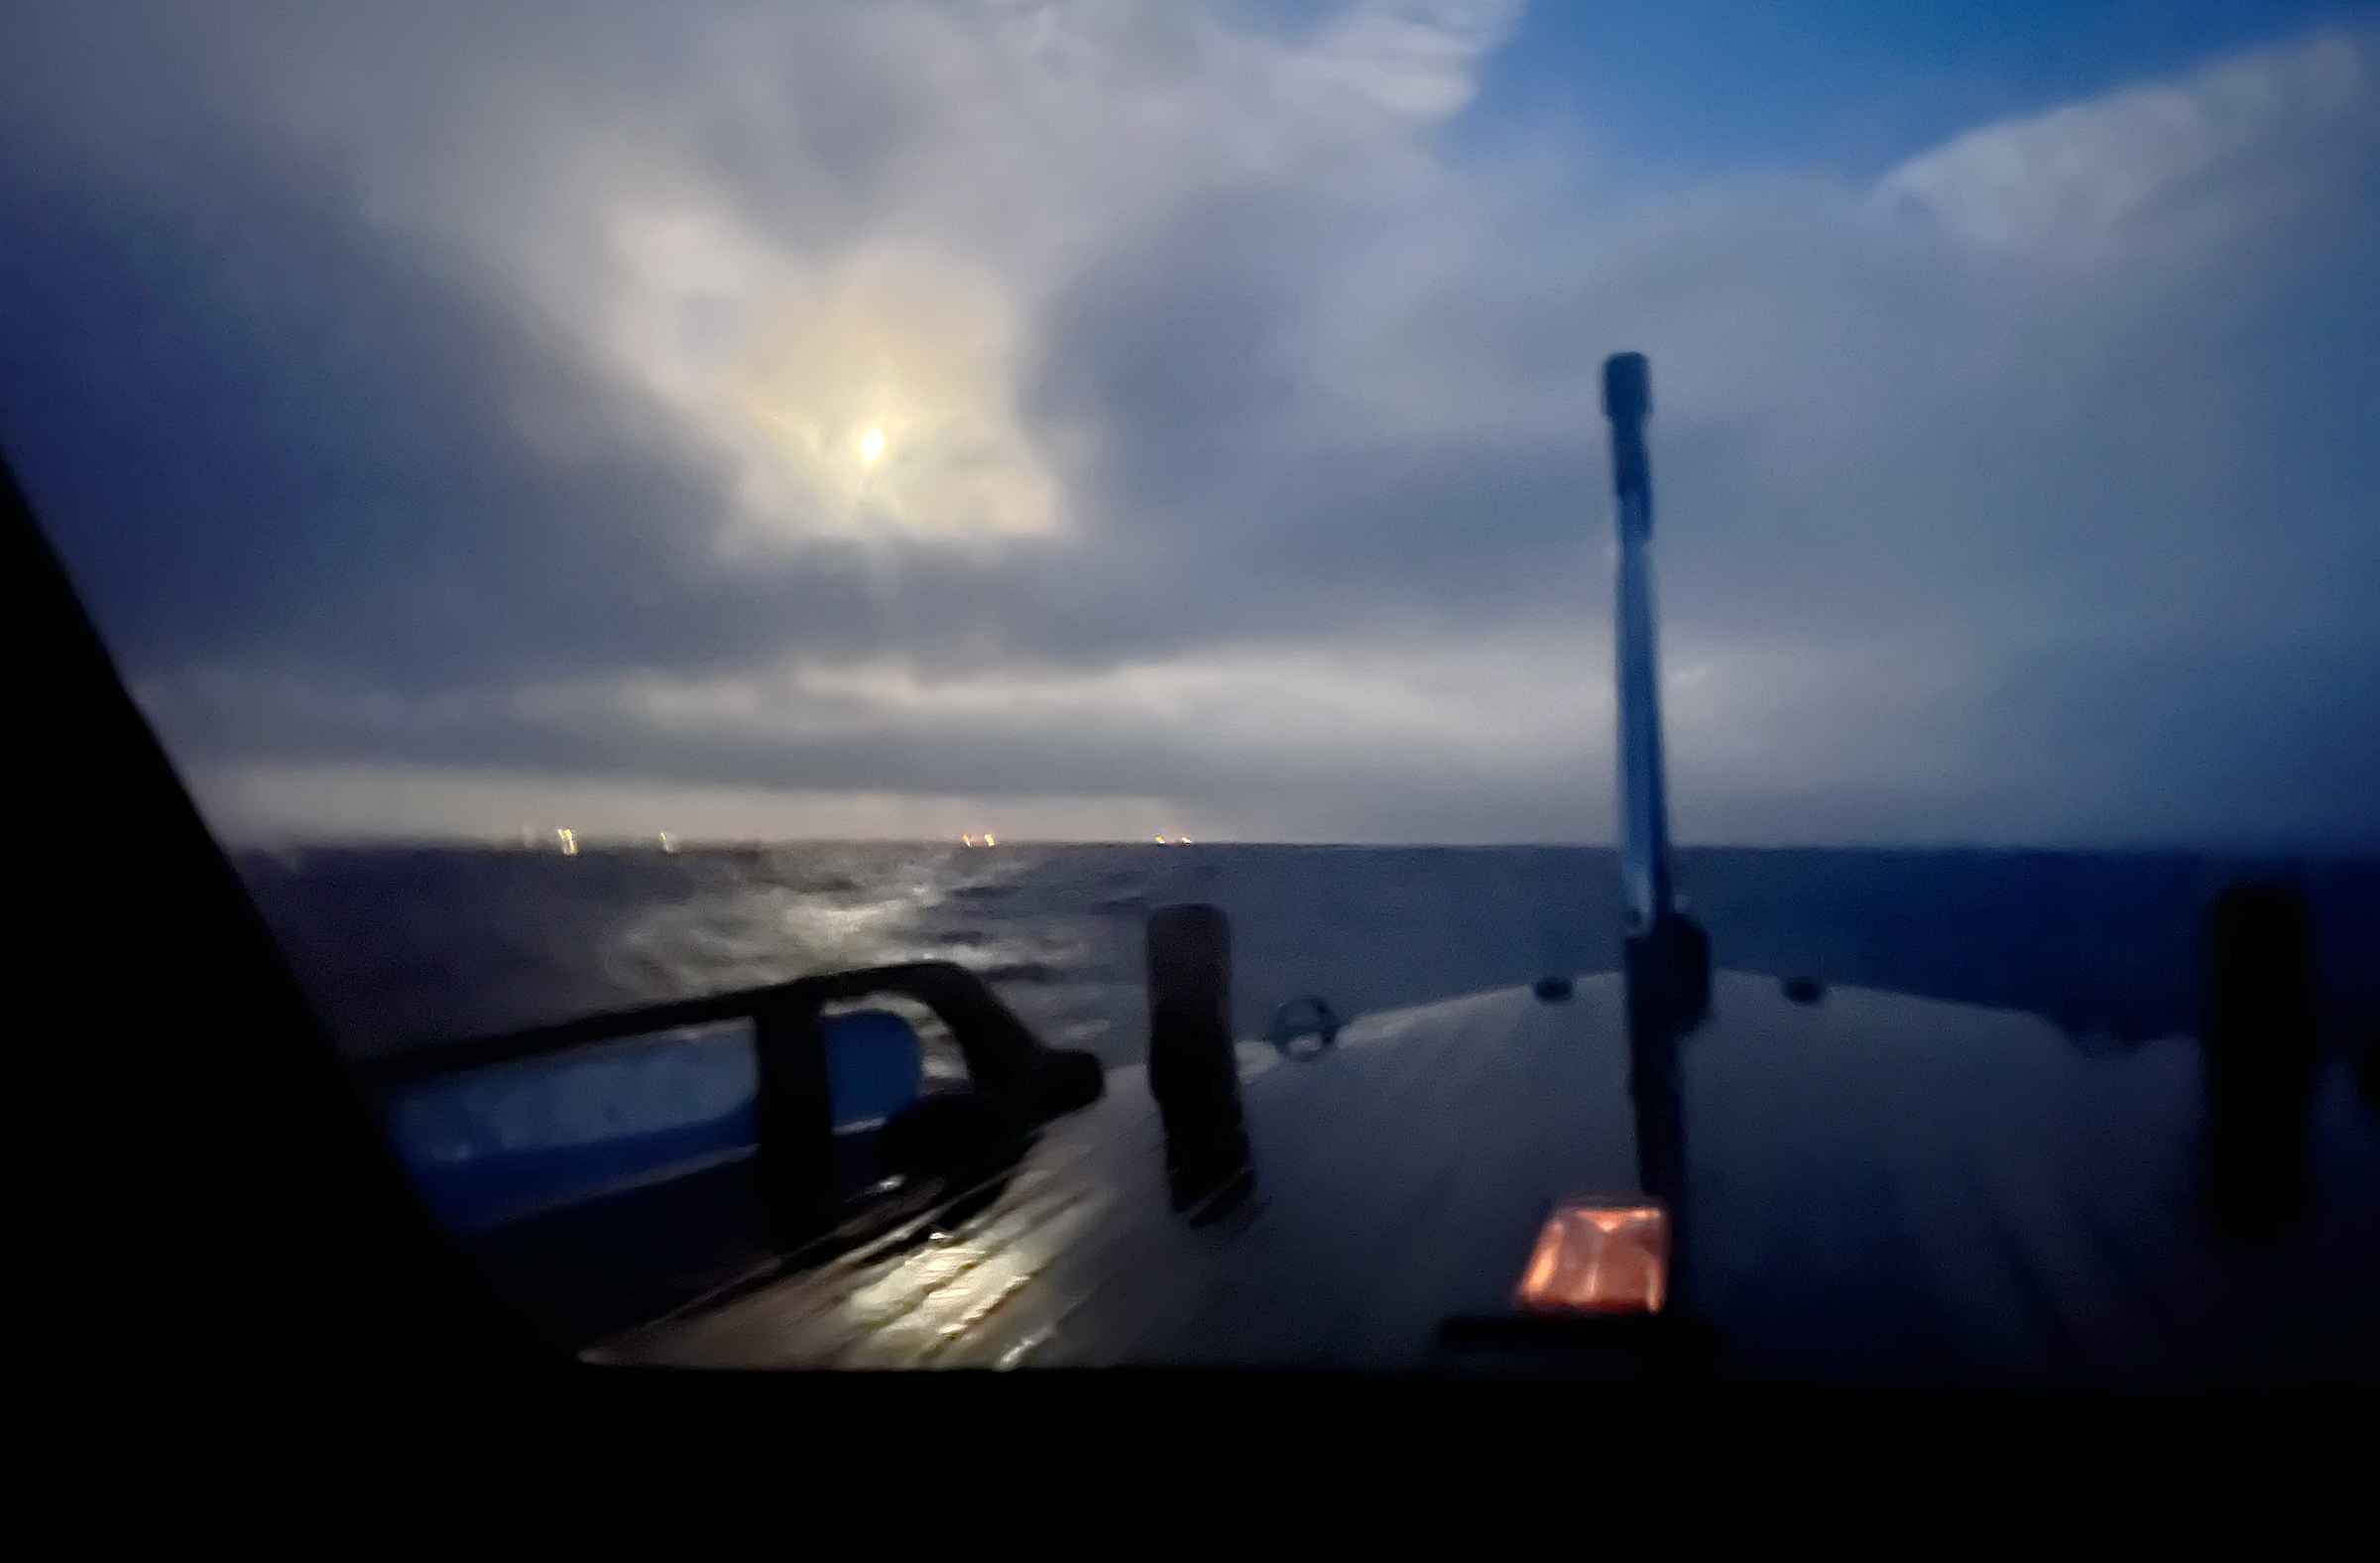
Soon after, scattered lights marked the line of the horizon in the darkness beyond the bow. We were about halfway across the North Sea. At first, I thought the lights were workboats that we’d have to watch closely, but as we drew closer, the lights appeared to be stationary—oil-drilling platforms. Their lights worked as well as any landmark and made it easier to stay on our course without staring constantly at the compass. It took a couple of hours to get close enough to see the lights were flares of burning natural gas.
Tony Teigland
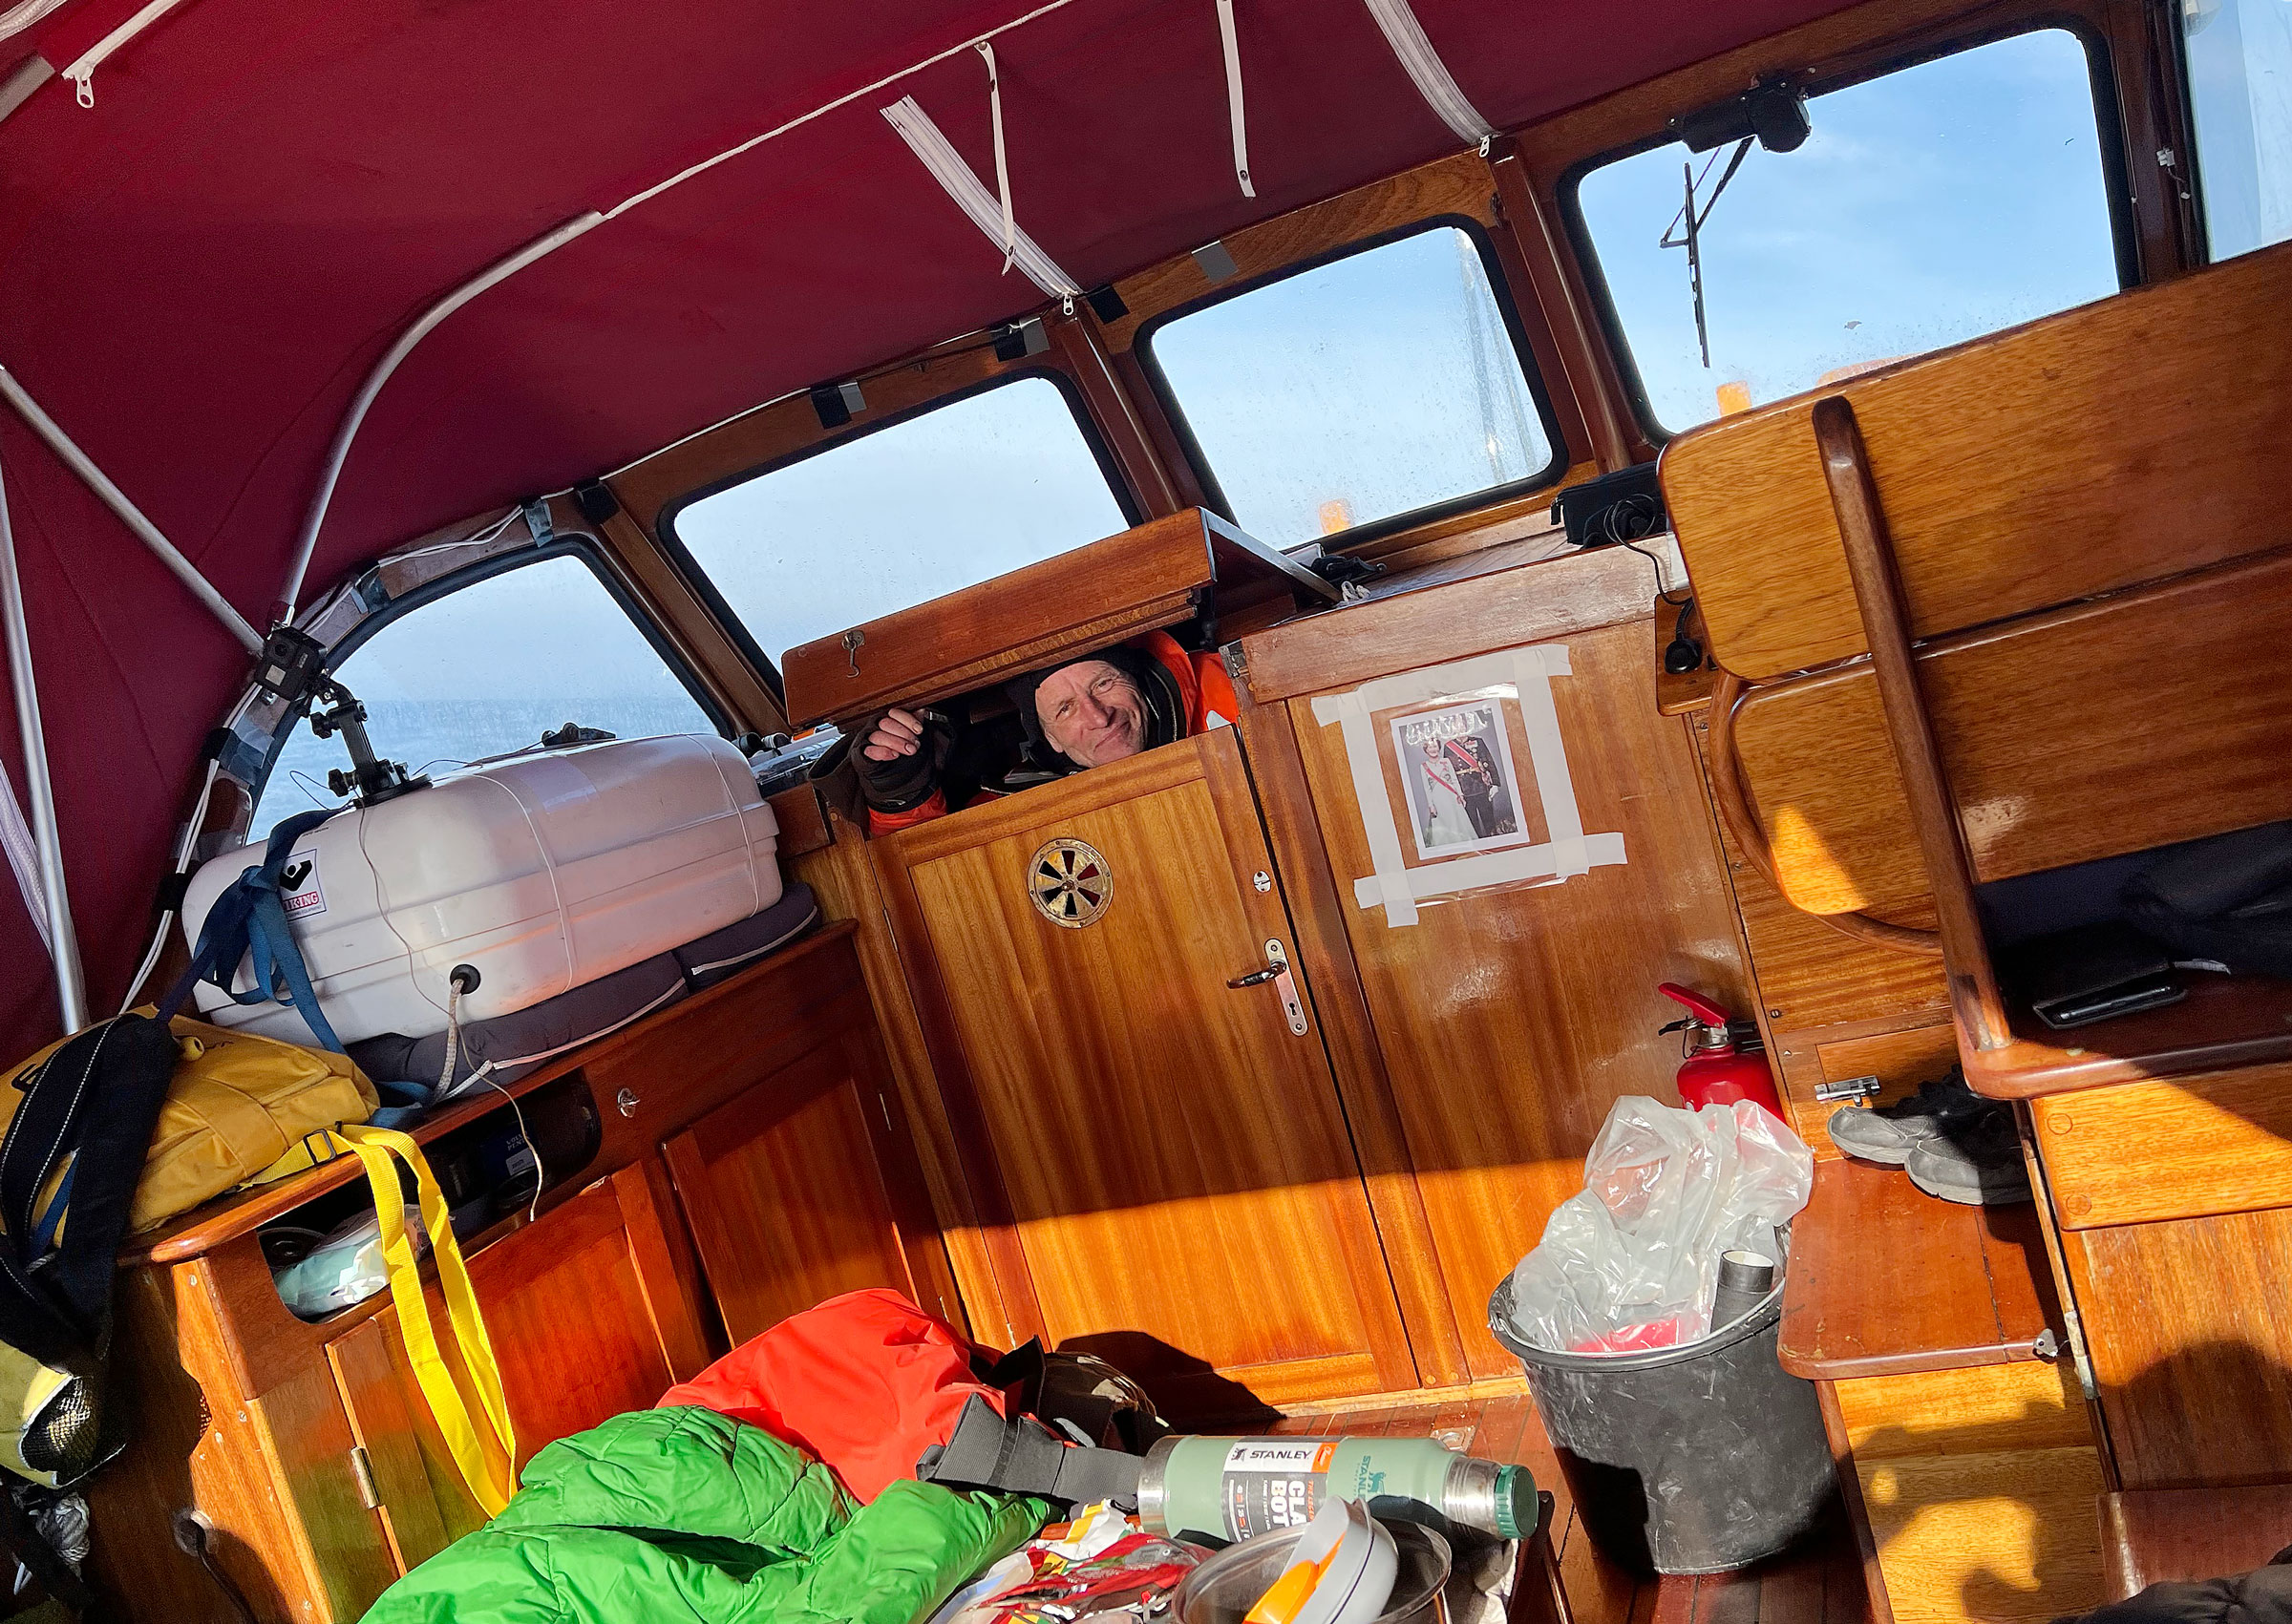
Willy peeked out from the forepeak where he and I had our resting place. Taped to the bulkhead to the right of the companionway is a photograph of the Norwegian royals, King Harald and Queen Sonja.
Jarle woke up at 4 a.m. to a cool and humid nascent Friday morning, and I could tell that we were all getting tired and a bit irritable. Jarle insisted it was time to refuel FRI IV and we had to do it now. He was worried that without enough fuel in the tank, the high seas would cause the fuel line to take in air and the resulting airlock would cause the diesel to shut down and refuse to restart. I was getting a little annoyed but kept my peace and let it go. Jarle is a man I would trust with my life, so I thought it best to follow his instructions.
Friday went slowly. More huge buildings on more oil platforms appeared in the middle of the sea and many hours passed before we got close to them. We passed more platforms on the North Sea’s British shelf and kept our course toward Buckie.
Tony Teigland
Frode steered FRI IV around the oil platforms. In the distance they didn’t look so big, but when we got near them they were as huge as skyscrapers. Visible from miles away, the platforms provided welcome relief from holding the course by staring at the compass.
I called Connie, our weather assistant in Norway, on the satellite phone to get the weather forecast for the last leg to Scotland. She reported that an increase in wind up to 23 knots and waves 3′ to 6′. Wind south-southeast and rain. We calculated an arrival in Buckie around 11 a.m. Saturday. It was 10 am and we had about 25 hours left to go.
It must have been in this area that Finn Narvesen observed the first contact mines floating in the water. The British had laid them out around the coast as a defense against German warships. It would have been the end of the trip for any of the Englandsfarere if they had hit one of them. Most of the crews stopped in this area and waited for daylight to be extra-sharp while navigating the last hours to the mainland.
At 5 p.m. on Friday, the wind increased. None of us had ever been at sea for so long without seeing land. As the waves grew bigger our senses sharpened and the work at the helm to keep a steady course intensified.
At the 8 p.m. watch change we got a call on VHF from an operator on an oil platform who told us to change course. He wanted us to stay a good distance from the platform. After we veered away, we paused to refill the fuel tank and, with the boat rocking, we spilled a good deal of diesel into the boat. It was as slippery as soap on the cockpit sole. When the boat heeled sharply with a wave on the beam, Jarle slipped and landed on his side on the bench. He gave a long groan and sat on the sole for a while to check for injuries. He ached but had no broken ribs. After three-quarters of an hour, the platform operator called again to say we could resume our course. I lay down and listened to the waves crashing against the sides. It sounded like the sea wanted to break through the hull just 1″ from my head, but the boat was solid and built for this. And we were not the first to have sailed a small boat here. I could relax and fall asleep.
Frode and I went on duty again at midnight. The platforms were behind us, and it was completely dark. The sea was still rough and Frode continued to vomit. I was starting to get tired and to feel out of sorts. Sitting at the helm and steering by the compass my thoughts drifted aimlessly, and I found myself getting annoyed that some of the equipment we had agreed to bring wasn’t on board when we started the journey. We didn’t need them now and we had picked up the missing supplies on the way out of Kristiansand, but I was feeling irritated anyway. Frode was in a better state of mind and took over the steering.
I looked ahead over the bow and saw a light. It had to be the lighthouse at Peterhead. A feeling of relief swept over me upon seeing that first glimmer of Scotland. I couldn’t imagine what the Englandsfarere had felt as they finished their crossing of the North Sea and saw that Great Britain was within reach. The four of us had reached our goal, but those who had fled in the 1940s had only completed the first step in their fight against the occupation of Norway to secure peace and freedom.
Tony Teigland
It was an unforgettable feeling to see the lights of villages near Peterhead, the easternmost point of the Scottish mainland.
At 4 a.m. we awoke Jarle and Willy, and we were all in a good mood despite the rough seas and strong winds. We saw light from towns on land. I took a 1-hour rest and woke up suddenly when the bow slammed into a wave. The seas had become stronger and were coming from straight ahead now that we were northwest of the mainland. In the forepeak I was flying up and down like a piston. A helmet and a mouthguard would have been good to have. Trying to sleep was pointless, so I got up in the gray light and joined the others.
The boat hit hard against the waves, so we slowed down to 4 knots and set the course closer to land. The clouds burst open, the sun broke through, and we were embraced by warm spring air smelling of land. It was only 7:15 a.m. and we would be in Buckie by 11 a.m.
Tony Teigland
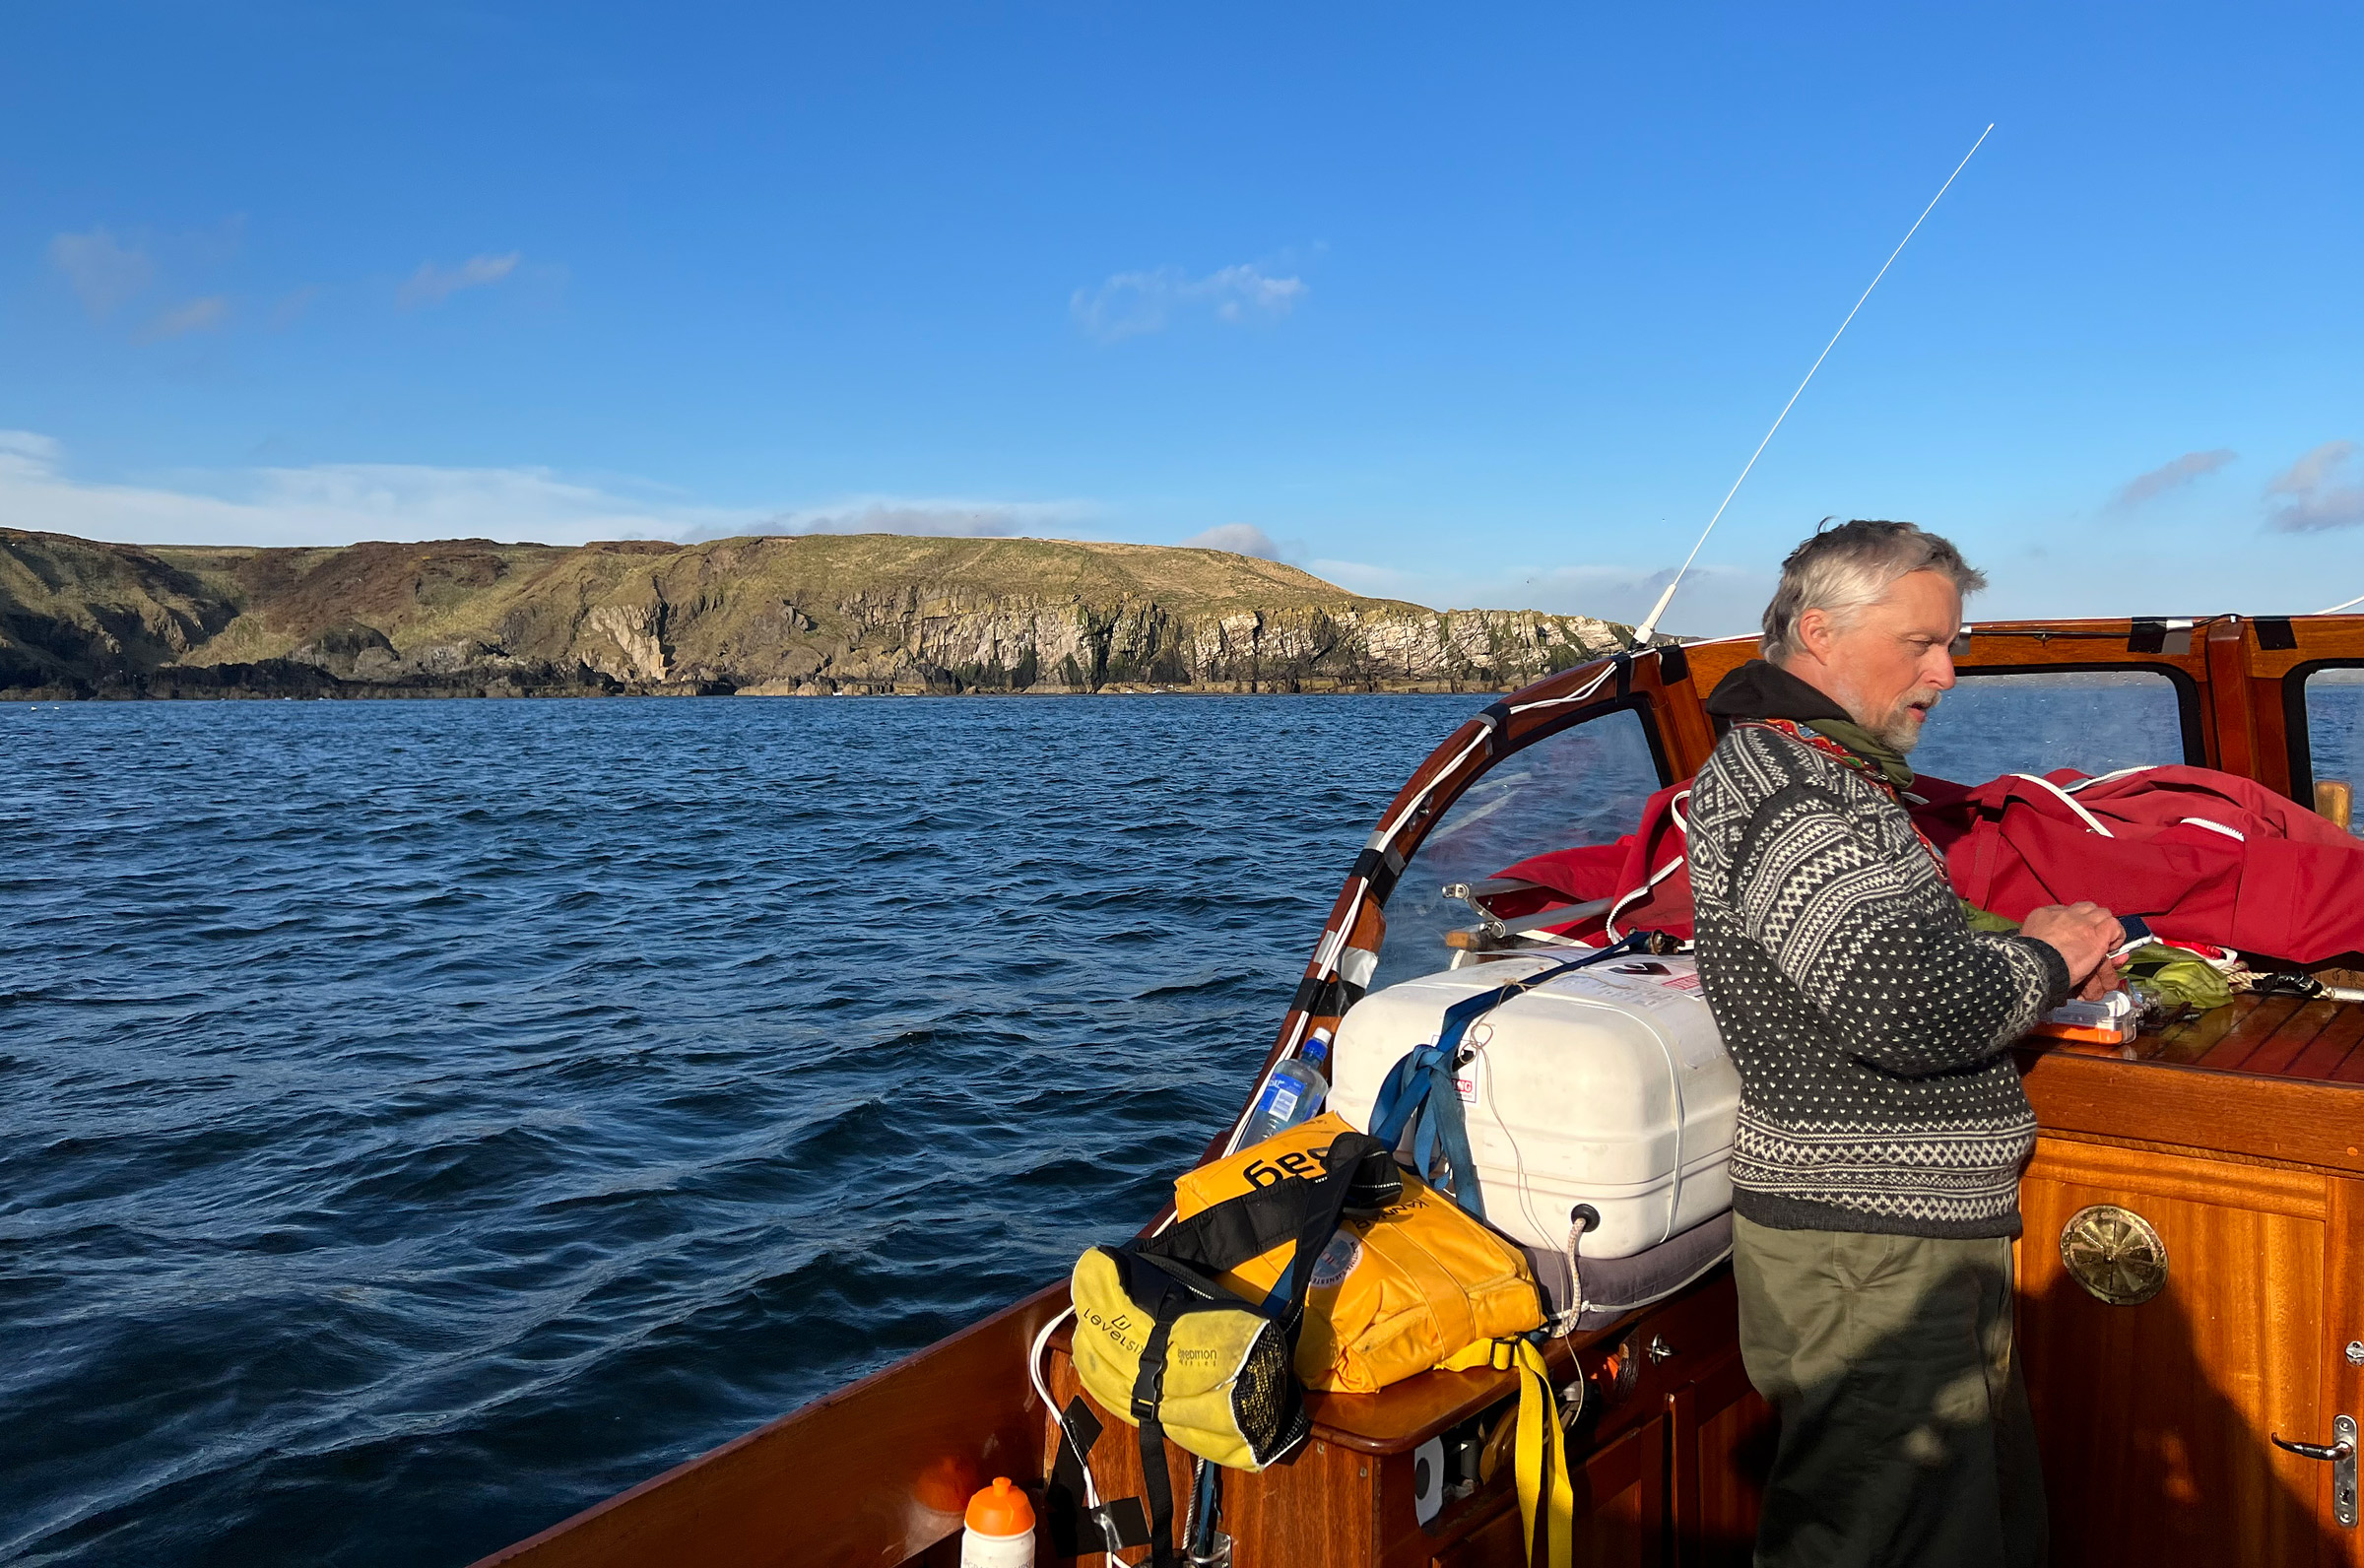
The sun broke through and gave us perfect conditions for our final approach to Buckie. Behind Jarle, already changed into his wool sweater, rise the cliffs along the Moray Firth shore.
The sea in the Moray Firth was quiet, and the sun warming. With a mile left before reaching Buckie we landed on a sandy beach in a small cove and Jarle and I were the first to jump ashore, greatly relieved to be on land again.
We took the canopy off the boat and changed into wool sweaters, the kind many Norwegians wore in the 1940s and still do. We were excited about reaching Buckie and knew we would be formally received there, but not how. At 10:45 a.m., RNLI 17-37, the 56′ Royal National Lifeboat Institution search-and-rescue vessel stationed in Buckie showed up and escorted us the last nautical mile to the harbor. On the way in we heard bagpipes, a dream come true. There were two pipers in their beautiful kilts on the pier, and lots of people—at least 100—had come to welcome us, bearing Norwegian and Scottish flags. Many were wearing wool sweaters like the ones we had on. Numerous residents of Buckie are descendants of Englandsfarere who established themselves in Buckie during the war. They kept their Norwegian traditions, and the town became known as Little Norway.
Courtesy of the author
At Buckie, RNLI 17-37, our escort to the harbor, stood by as we faced a quay crowded with people gathered to welcome us. From left: Frode Stokkeland, Jarle Føreland, Tony Teigland, and Willy Pedersen.
Some even came with photos and newspaper clippings saved by their fathers and families during the war and in the postwar years. We were overwhelmed by this warm reception. I was led to meet Frances McKay, Deputy Lord Lieutenant, a representative of Her Majesty The Queen. Frances gave me a letter on behalf of The Queen, and I read aloud the letter we brought from the Minister of Defence in Norway, Odd Roger Enoksen. I handed it to Frances together with the Norwegian Post Flag and a can of erter, kjøtt og flesk. Still on my sea legs I swayed as if drunk. The bagpipes played again, and we marched to a food truck for food and drink.
After the reception we moored the boat and were driven to the Kintrae B & B. The building served as the Norwegian consulate during the war and was visited by King Haakon VII during the war. Here, too, we were warmly received and were accommodated in a four-bed room.
On Sunday morning, we went down to check on our boat and found her afloat a dozen feet below the quay. We were told that the tide ranges through 14′ here and that the harbormaster had made sure that her docklines were eased during the night, saving FRI IV from major damage.
Finn Narvesen did not end up in Buckie and we intended to continue following in his wake to Aberdeen—another 15 hours of motoring. At 9.30 a.m. we set our course east, back along the Moray Firth coast, past bird cliffs and green cliffs that rise straight up from the sea. At the coastal town of Banff, we dropped Frode off to return to Norway before us. Jarle was appointed to replace him as our new captain.
As we turned south and approached Peterhead, we passed a 9-mile-long sand beach running the length of a cusped coastline. The sea and the wind picked up and we felt the tidal current working against us as FRI IV went from 6 knots to 2.5 knots under the same engine power. The conditions were demanding to manage, but we had gained good experience with the boat. South of the headland, a sandy shore stretched out along an 11-mile-long arc, which led us to Aberdeen.
We arrived in the dark at 12:15 a.m. Large- and medium-sized ships were on their way in and out of the harbor, while others were swaying on their moorings and waiting. There were red, green, and white lights everywhere. We called the port on VHF and were told to wait. We steered away from the traffic and found a quiet spot to idle. In 1940, Narvesen had a bit of a wait, too: his boat ran out of gas just outside Aberdeen Harbor and he was eventually brought in by the British Coastguard.
Our call to proceed came at 12:45 a.m., and we motored into the harbor and moored alongside the pier of Alber Quay. It was low tide, and we scaled a ladder 12′ up to the quay.
Willy disembarked with his gear and took a taxi to the airport while Jarle and I stayed in the boat that night. In the morning we prepared FRI IV to be shipped back to Norway.
Tony Teigland
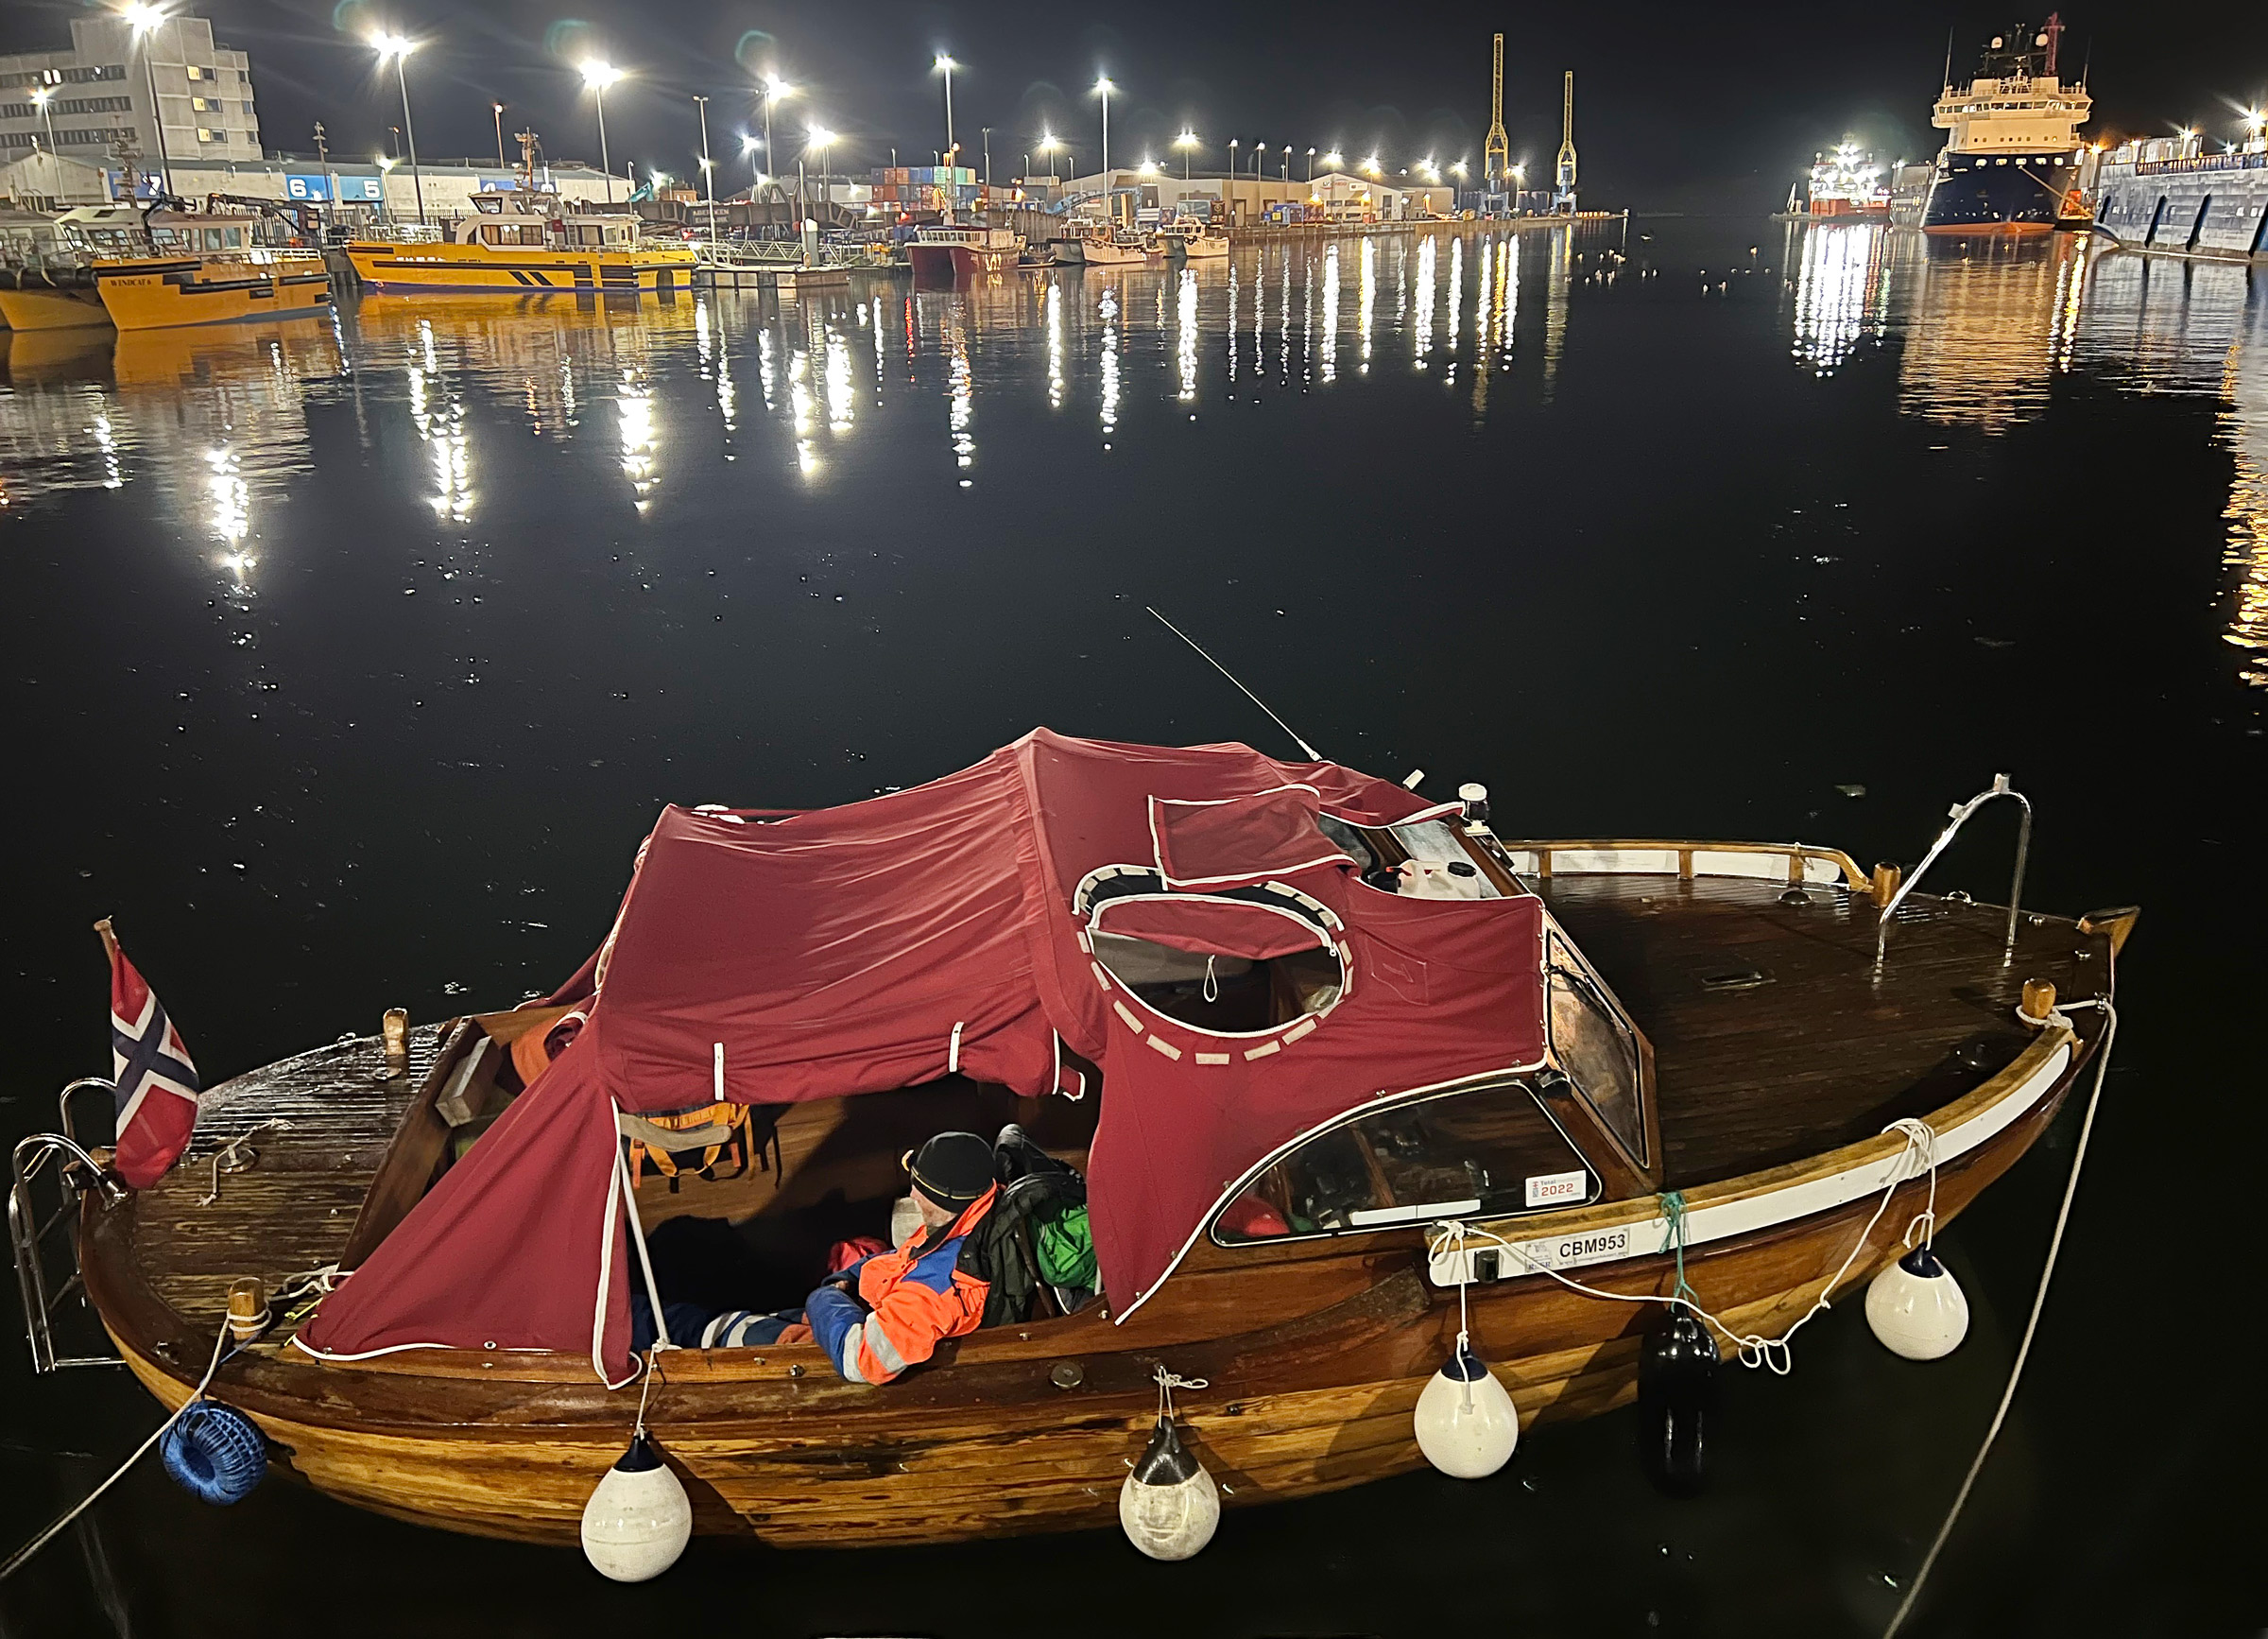
FRI IV had been well mannered for the entire crossing, and here in Aberdeen Harbor, she waits to be shipped back home to Norway.
After Finn Narvesen had arrived in Scotland, he enlisted as a seaman and participated in several high-risk convoys with supplies for the Allies throughout the rest of the war years. Frode, Jarle, Willy, and I all returned to Norway to enjoy the peace and freedom that Englandsfarere like Finn fought for.
Tony Teigland, 55, lives in Kristiansand in southern Norway where he is a social worker working with people who struggle with drug addiction. He loves the sea and is an enthusiastic kayaker and open-water swimmer. He also enjoys waterskiing and scuba diving. In 2017, the North Sea project introduced him to wooden boats.
If you have an interesting story to tell about your adventures with a small boat, please email us a brief outline and a few photos.
Before I took to small-boat cruising in 1980, I did a lot of backpacking and was acutely aware of the weight of everything I had to carry. The longer I planned to stay out on the trail, the more food I needed to pack and the lighter it had to be. Ready-made backpacking meals in the ’70s were expensive and not very interesting, which is putting it mildly for TVP (textured vegetable protein), then a popular camp staple.
Fortunately, I could instead carry real food, thanks to the dehydrator my mother used to preserve some of the fruit and vegetables we grew in our backyard garden. For backpacking, I dried a lot of fruit, especially bananas, and my mother’s black-bean soup, which instantly came back to life with a bit of hot water.
Photographs by the author
Black bean soup—made of canned black beans, boxed vegetable broth, diced onions, minced garlic, cumin, salt, and pepper—takes 15 minutes to make, 30 minutes to cook, and a few hours to dry. Puréed and spread on parchment paper, it dries feather-light and is just as tasty when reconstituted.
A food processor makes quick work of pulverizing dried soup.
The smaller the particles, the quicker they can rehydrate.
Basmati rice takes about 5 minutes to rehydrate and the black-bean soup reconstitutes almost instantly. I chopped some dried onion and added it to the mix without rehydrating. The rice-and-bean pairing adds protein to the diet.
For cruising, the boat takes the load off my back, so I’m not concerned about the weight of the food I carry aboard, but there are many soft foods such as tomatoes, bananas, and strawberries, that don’t travel well even when packed in rigid containers to protect them. Those containers take up a lot of space, even when they’re empty, while resealable plastic bags filled with dehydrated food require minimal space and take up progressively less room as the contents are consumed.
A 16-oz jar of salsa can be spread out on a single parchment-covered rack. Dried, it becomes leather-like and can be reconstituted with lukewarm water in about 10 minutes, faster with hot water. It’s a rather tasty snack, albeit a bit salty, when eaten dry.
To dry foods that are largely liquid—soups, salsa, and pasta sauce—spread them on a sheet of parchment baking paper placed on the dehydrator’s racks. Metal cans and glass jars can be left at home and the dried contents consumed over the course of several days without requiring refrigeration. For the sake of the environment, use compostable unbleached parchment paper. The paper can be used repeatedly, so one roll will last for a long time. It doesn’t transfer flavors from one drying to the next, so you don’t need to keep track of what each sheet was used for.
An entire 25.5-oz jar of pasta sauce takes two racks to dry and the leather it produces folds to fit easily in a small resealable bag.
A bit of water and about 5 minutes on the stove is all it takes to turn these dehydrated ingredients—diced onion, tomato slices, precooked elbow macaroni, and pasta-sauce leather—into dinner.
Parchment paper works for rice and quinoa, too. When those grains have been cooked and dehydrated at home, they require shorter cooking times and use less camp stove fuel when reconstituted during a cruise. To rehydrate rice, for example, bring 1 cup of water to a boil, add 2/3 cup dehydrated rice, turn the stove off, and let the pot sit, covered, for 10 to 15 minutes while the rice absorbs the water. You can turn the stove on for a short while before eating to heat the rice to your preference.
Cooked quinoa dehydrates well on parchment paper. Fully dried, it makes a very crunchy snack.
If you don’t have a food processor for breaking up dehydrated food, a rolling pin works well. Here it’s breaking clumps of basmati rice into individual grains.
Some foods can be quite sticky and difficult to remove from the dehydrator’s trays. Watermelon, which becomes a delicious taffy-like candy when dehydrated, adheres to steel racks. A stiff-bristled fingernail brush (never used for fingernails) can push food off from the back side of the rack. Parchment paper can slow the drying a bit, but it makes it easier to remove sticky food.
If you find that some foods stick to the racks and are difficult to pry loose, a stiff-bristled brush can press them off from the back side of the rack. After this first try with 1/4″ slices of watermelon, I dried the next batch on parchment paper which made it easy to remove.
Dehydrators can also be used for meat—whether beef, chicken or fish—but in the form of jerky. I haven’t yet explored that possibility. There are many books devoted to dehydrating, with instructions and recipes for making different kinds of jerky and drying foods of all kinds.
A sampling of dehydrator projects, from left to right, top to bottom: pasta sauce, salsa, strawberries, onions, homemade black-bean soup, deli Bombay potato soup, Roma tomatoes, bananas, watermelon, croutons, lemons, apple.
There are many makes and models of food dehydrators on the market with prices starting as low as $35. The less expensive ones are made of plastic, with many using BPA-free materials for the food trays. I prefer a stainless-steel type for durability and to minimize my use of plastics. The Cosori 267 I bought has a digital control panel for setting the temperature from 95 to 165 degrees F, and the time up to 48 hours. It has an automatic shut-off to prevent the unit from overheating.
A bonus to dehydrating foods during the cooler months: the dehydrator produces heat, and rather than let that go to waste, I keep it in my study rather than in the kitchen. When I’m at work at my desk, the dehydrator can take the chill off the room, and I don’t need to use a space heater. The only sound is the rush of air moving through the unit, a pleasant whisper of white noise that is not at all distracting.
The 600-watt Cosori dehydrator has six stainless-steel racks and works quietly at 48dB, the range of average room noise. If my house is cold, I’ll move the dehydrator into the study to take the chill off while I work and make it easy to grab an occasional bite to eat.
Dehydrating food will add some time to your preparations for a cruise, but it’s well worth the effort. Some foods, like black-bean soup, are every bit as good when reconstituted and others, like watermelon, are transformed and intensified by dehydrating. And you can save food that might otherwise go to waste languishing in the kitchen.
The banana bread I make with dates and walnuts turns into biscotti when dehydrated. It needed chocolate (of course) and I found I could warm semi-sweet chocolate chips in the microwave for 90 seconds, then apply the melted chocolate with a spatula. A half hour in the refrigerator cools and dries it.
Drying food has a long history, and the possibilities are virtually endless. Turning banana bread into biscotti was a delightful discovery; I’ll do that often, whether I take the biscotti cruising or enjoy it at home.
Christopher Cunningham is the editor of Small Boats Monthly.
You can share your tips and tricks of the trade with other Small Boats Magazine readers by sending us an email.
We are building a Joel White 7′ 7″ Nutshell Pram and will rig it with a 37-sq-ft lug main. We ordered the Nutshell lugsail kit from Sailrite, pressed Skipper’s sewing skills into service for the construction, and are very pleased with the result.
The kit comes with nine pages of instructions, five precut sail panels and six sets of corner and reef reinforcements pre-cut from 4-oz Dacron. Also included in the kit are telltales, a Sailrite logo sticker, spur grommets, a roll of 1/4″ Seamstick double-sided adhesive basting tape, V-69 UV-resistant polyester thread, and 3″ non-adhesive Dacron tape. All the materials were well packaged, and shipping was prompt. When we had questions along the way, Sailrite’s crew and sailmaker were very responsive to our phone calls and emails.
The sail panels are computer plotted with seam lines, hem lines, and reefpoint placement. The sides of each panel are curved to different degrees, so when they are sewn to the 1/2″ marked on the cloth, this broadseaming, as it’s called, helps give the sail its “belly,” and together with the curves in the sail’s perimeter of the sail, create a wonderful three-dimensional aerodynamic shape for driving power.
Photographs by the authors
The main panels in the sail are cut with a curve along one edge so that the seams will give the sails a three-dimensional curve. While the seams joining the panels are uniform in width, the technique is called broadseaming, a holdover from the times when panels had straight edges and the curves were produced by making the seams broader as they approached the sail edges.
Armed with a basic home sewing machine, scissors, and a #2 spur-grommet die set, Skipper was able to assemble the sail in just a few hours (even with my “help”). We used Skipper’s home-sewing Janome machine instead of her Sailrite LSZ-1 walking-foot machine, to validate Sailrite’s assertion that the kit can be assembled with a home sewing machine. A zigzag stitch 3/16″ wide and long is used throughout. The seams between panels get two rows of stitching, each 1/8″ from the nearer edge. If your sewing machine cannot stitch zigzag, the Sailrite instructions say those panel seams get three rows of straight stitching.
Double-sided basting tape holds separate sailcloth pieces together and secures folded edges for sewing. Tearing the tape instead of cutting it with scissors makes it easier to separate the tape from its backing. With a bit of practice you can snap the backing and stretch the tape to make a small tab you can pull.
The corner patches are three layers thick and, when the double hems for the leech and luff are folded and sewn, the corners have a total of six layers to sew through. A light-duty machine will work its way through the layers—a little help with the hand wheel may be required—and extra care must be taken to advance the sailcloth under the presser foot to get an evenly spaced stitch. If you have a heavier-duty machine with a walking presser foot, like Sailrite’s LSZ-1, it controls the slippery sailcloth for you.
The 2″ squares for the optional reefpoint patches must be cut by hand using sharp scissors. The Dacron sailcloth is treated with resins that minimize if not eliminate fraying, and edges don’t need to be cut with a hot knife. The precut pieces from Sailrite are cut with a sharp rotary cutter on a computer-controlled plotter.
Zigzag is the traditional machine stitch for sails. Most home sewing machines have straight and zigzag settings as the most basic selections, but if your machine does only straight stitches, modern Dacron sailcloth in Sailrite kits is well stabilized with resins so that whatever stretch might occur in a small sail is not likely to break the stitching.
The instructions explain the markings on the sail and the sequence of construction. Sailrite has done a good job with the assembly sequence of the five panels and the reefpoint, peak, clew, tack, and throat patches to minimize the number of times that large amounts of sailcloth must be rolled up to run through the sewing machine’s throat, which can be a challenge on a small machine. After the five panels and all of patches are sewn together, the leech and foot are folded twice and sewn with a double hem to reinforce the perimeter and to cover and protect the cut edges of the cloth and lock the ends of the seam stitching. The head and luff are not hemmed but have the Dacron tape folded and sewn over the edges to cover them and serve as a reinforcement for grommets. The brass spur grommets included with the kit provide extra grip on the sailcloth.
The Nutshell pram has not yet left the shop, but with the spars roughed out, the finished sail can show its curves.
The finished sail is laced to the yard and mast, and the sail is set loose-footed on the boom. The vertical seams between the sail panels give the sail a classic look, and the shape will provide good performance for the small pram.
Audrey and Kent Lewis mess about in the Tidewater Region of Virginia, and look forward to the launch of their mighty pram, EXCUSE ME. Their adventures are logged at www.smallboatrestoration.blogspot.com.
The Nutshell sail kit in white Dacron costs $169.90. It is also available in cream ($289.20) and tanbark ($295.20). Sailrite offers sail kits for a wide array of boats as well as fabric, hardware, and sewing machines. If a sail kit is listed as “Out of Stock,” it is still available, though perhaps with some substitutions of materials; call or email Sailrite for further information.
Is there a product that might be useful for boatbuilding, cruising, or shore-side camping that you’d like us to review? Please email your suggestions.
If you ever pack more than you could possibly need for a cruise, you might say that you have everything but the kitchen sink, which is a good reminder of the one thing you don’t have: a kitchen sink. None of my boats have a built-in galley, so instead I have two well-appointed galley boxes, a compact one for solo travel, and a larger one to accommodate cooking for a crew. They each hold cookware, tableware (including a tablecloth), and a stove and its fuel, but while both are equipped with dish soap and a scrubby sponge, neither has had room for a sink for dishwashing. I’ve used a collapsible bucket for doing the dishes, but it’s not well suited to the task. It is awkwardly deep and awkward to work in, and even when it’s collapsed, it still has the same broad footprint and takes up valuable storage space.
When I happened upon Ortlieb’s 10-liter Folding Bowl at one of the Seattle marine hardware stores, I knew I’d found a better sink. (Ortlieb’s original name for it in German, is faltschüssel, folding bowl, but a better term for it would be from waschschüssel, washbasin or sink. I’ll refer to it as a sink.) The sink is made of PVC-coated polyester fabric with 1/2″-wide seams bonded by high-frequency welding, an electrical process that works in the same way a microwave does: it creates heat internally by vibrating molecules, so there is very little deformation of the material on the outside. The seam connecting the bottom to the sides is rounded at the corners, which will add to the life of the Folding Bowl by eliminating sharp points that become focal points of wear. Four semi-rigid rods set in sleeves at the top hold the sink open when it is in use. The 10L size has an opening 11-1/2″ square and is 5-1/2″ deep. The corners are flexible and allow the sink to be folded into a compact package—held snugly together by its webbing handles—that weighs less than 9 ounces.
Photographs by the author
Folded up, the sink takes up very little space and fits nicely above the stove in the smaller of my galley boxes. It can even be carried in a pants pocket.
The sink is a good size for dishwashing at camp or at anchor and makes the job much tidier. I’ve often used my cookpot as a sink, but it is too small to hold anything and soapy water gets all over the place, adding to the post-meal cleanup. The 10-L sink neatly contains the mess. If you cook ashore over a campfire, It can carry just over 3 gallons of water when you’re ready to extinguish the fire. The 10 L/2.6-gal rating is for the sink when set on a flat surface; when carried, the bottom adds capacity by turning from flat to rounded. A full load of water weighs 27 lbs, and the handles are just long enough to make it possible to carry that load with one hand.
The Ortlieb Folding Bowl is just right for washing dishes. I can wash them with soapy water in a cook pot, set them aside in the sink, and then rinse them. It’s very tidy and I don’t get water all over the seating areas.
On board, the Folding Bowl can help keep the boat tidy by providing a place for muddy footwear or a dripping anchor rode. Ashore, it can also serve well for foraging—I like to gather nettles in the spring and blackberries in the late summer. Hand-washing laundry is an option, too, though I don’t ever care much how dirty my clothes get while cruising.
The two webbing handles are just long enough to carry the sink, like a bucket, with one hand.
Now, when I pack for a cruise and look at the mountain of gear it takes to do even a three-day cruise, I can take some satisfaction in knowing that I’ve got everything and the kitchen sink.
Christopher Cunningham is the editor of Small Boats Magazine.
The Folding Bowl comes in four sizes: 5-, 10-, 20-, and 50-liter. Ortlieb is based in Germany and has retailers around the world, particularly outdoor stores and bicycle stores. I purchased the 10L from Fisheries Supplies in Seattle for $36.
Is there a product that might be useful for boatbuilding, cruising, or shore-side camping that you’d like us to review? Please email your suggestions.
Ernest Pattillo was born into a corn-milling family in Tallassee, Alabama, about 30 or so miles from Montgomery, the state capital. The mill and the creek running by it offered everything a boy could want: scrap lumber, nails, hammers, and saws; turtles, catfish, and swimming.
In the mid-1950s, when Ernest was 10 years old, he and his cousin Alton, mindful of summer’s passing, wanted to do something exciting before school started. The creek suggested a boat, and the cast-offs littering the mill suggested building one. They started with a bent and rusted sheet of corrugated metal roofing and a 2×4 bristling with old nails. The boys pulled nails and sawed off two lengths of 2×4 for stems. After they folded the ends of the roofing around the stems and nailed them home, they applied tar to seal the gaps there and the buckshot holes everywhere else. The canoe was only 5′ long and could only hold one of them, so they built a second.
When the cousins got their canoes to the creek, they quickly realized they would have to scale back their dreams for the first expedition. The canoes were unstable and had barely an inch of freeboard. They only had their hands for paddling and had to reach carefully over the sharp edges of the roofing to keep from cutting their armpits. Ernest and Alton used the canoes until their youthful enthusiasm took them in other directions.
Roughly 37 years went by before Ernest seriously considered building another boat. An article by Mac McCarthy in the May/June 1991 issue of WoodenBoat was an illustrated guide to the construction of a strip-built version of Henry Rushton’s Wee Lassie double-paddle canoe. The article included Rushton’s lines for a 10′ 5-3/4″ by 27″ canoe. The drawings on the magazine page were small and without offsets but they were enough to inspire Ernest to take measurements from the picture and stretch the canoe to build a 12′ version.
Ernest stripped his Wee Lassie with fir, gave it a sturdy sheathing of fiberglass, and wound up with a canoe that looked good but was “heavy as lead.” When he launched it for the first time, he got aboard gingerly and was surprised and alarmed when his wife-to-be, Megan, “plopped herself in right behind me. That scared me, as I had no idea if it would even float, much less carry two. But it did, and we paddled upriver and down on the Coosa River, right here in central Alabama.”
Ernest never grew to feel at ease in the canoe, even though it was a significant improvement on his first canoe with its nonexistent freeboard and sharp, rusty gunwale. He put it up for sale and it went quickly.
Ernest and Megan eventually married, settled down, and before long the urge to build another boat struck again. Ernest thought his son from his first marriage might enjoy having a boat for fishing. He read up on marine design, “understood some of it,” and drew up a 12′ flat-bottomed plywood skiff. It looked good, kept the water out, and made good speed with an electric trolling motor. His son was pleased to have it but had no place to store it out of the weather. The boat moldered away. “Sometimes,” Ernest sighed, “all the work in the world seems to be for naught.”
His fourth boat fared better, though it might not truly qualify as a boat because it never got wet. A wealthy stockbroker had heard that Ernest had built a canoe and commissioned him to build one to keep at his lakeside cabin. Ernest studied Mac McCarthy’s book to expand his strip-building knowledge and put his best work into the canoe. When the customer picked it up, he was delighted with the beautiful colors of the western red cedar strips, the mahogany sheer, and the woven cane seat. A few weeks later, he sent a picture to Ernest, showing the canoe, forever high and dry, hanging upside down from the 30′-high living room ceiling of his “cabin” mansion.
Ernest’s fifth boat was another flat-bottomed fishing boat of his own design. It was a 15-footer for a 25-hp outboard. He built the boat to last: 1/2″ plywood on oak frames, fiberglassed inside and out, and painted with baby-blue epoxy paint. It looked great and would last for decades, even if left out in the weather. After launching it, Ernest went fishing a few times and decided to build casting decks for it. Before he finished the decks and had a chance to install them, a storm rushed through and blew a neighbor’s towering pine tree down. It fell across the fence and smashed across the boat from gunwale to gunwale. “It was ruined. I gave it away. I guess it could be made to still float, but I was practically in tears when they hauled it away. And it really killed me when the guy just dragged it on the concrete driveway as he was loading it.”
Photographs by and courtesy of Ernest Pattillo
Ernest drew his runabout as a scale drawing and took careful measurements to scale up to the 14′ boat. A bit of tumblehome at the stern would provide a distinctive touch.
Ernest says that his sixth boat, a 14′ inboard electric cruiser, was his last. He drew a rough plan for a flat-bottomed boat with flat, nearly plumb sides, and tightly radiused chines. He set up closely spaced 3⁄4″×1″ white-oak frames, half-lapped at the chines, and prepared for strip planking.
The white-oak frames were supported by 2×2s screwed to the strongback.
He could get cypress for the 1⁄4″-thick strips from a bandsaw mill not far from his home. He did the bead-and-cove milling on the strips himself and set up a low-angle sanding jig on his standing belt sander to cut the scarfs. After ’glassing and painting the finished hull’s exterior, Ernest flipped the boat right-side up and outfitted the boat with bow and stern decks, bass-boat seats, and a trolling motor.
The cypress strips were light and easily worked. The flat sides and bottom might have been more quickly worked with plywood—yet boatbuilding is not always a means to an end, but often so pleasing a way to spend time that there’s no need to take the shortest path to finishing.
With the strip-planking finished, Ernest applied some fairing compound, a keel, and fiberglass sheathing.
With the exterior painted, the hull could be righted and set outside for a good view before work on the interior began.
Rather than clamp the motor on the transom, he removed the telescoping motor control from the shaft and installed the motor beneath the hull. The twist-grip throttle went forward and to the right of the starboard seat. A mahogany wheel is connected by cables to a tiller on the motor shaft.
Ernest used mahogany for the decks and the inwales. The port inwale lies in the boat ready to be set in the notches at the tops of the frames. He was “really pleased not only with their appearance but the strength the inwales added.” In the stern, visible between the seat backs as a black upright, is a tube sized to fit the trolling motor shaft. It’s welded to a steel plate that’s bolted to several frames. Several O-rings keep the water out, and the top of the tube is well above the waterline.
With the interior only partially complete, Ernest and his friend Jon took the boat out for an early sea trial. There would be an insulated box between the seats for cold drinks, and the trolling motor’s shaft has not yet been cut to its finished length.
Ernest and Megan enjoyed a brief outing on the boat’s first time afloat. The transom is adorned with MEGOLA, a pet name he has for Megan.
With MEGOLA finally finished, Ernest took his grandkids out for a ride.
The boat was christened MEGOLA, one of Ernest’s pet names for Megan. The two of them have enjoyed the boat, and it has been popular with their friends and grandchildren. But now, at 78, Ernest says, “I’m getting a little old to get in and out of it.” When MEGOLA goes to someone else, Ernest will be without a boat. But all of his work will not be for naught. Every boat he ever built will always be his wherever it is and, with the memories he created along with them, Ernest will never be boatless.
Do you have a boat with an interesting story? Please email us. We’d like to hear about it and share it with other Small Boats readers.
If ever there was a toy for big boys (and girls), the Goliath mini-tug is it. While some boats of this type are impractical, the Goliath, with an 18′ LOA and an 8’2″ beam and a draft of 2′ 9″, promises enough room for short cruises and excellent stability for a comfortable ride.
As with most mini-tugs, the Goliath is a character boat and is not intended for use as a true working tug. It does not have the agility and strength for corralling larger boats, and it does not have superior towing ability. The Goliath is made for having fun.
I have always found mini-tugs to be both fascinating and curious. For me, they bring childhood books such as Little Toot and Scuffy the Tugboat to life—and I love that. A lot of mini-tug owners share this desire to capture a childhood fancy. Yet, often the finished boats of this type seem to be too small for their owners; a man at the helm can look oversized and out-of-place, like a circus bear riding a tricycle. Caricature overwhelms usefulness. But that isn’t the case with the Goliath, a Ken Hankinson design now carried by Glen-L. While an attention-grabber on the water, she also earns her keep as a family boat.
Hankinson designed a stable of well-regarded powerboats during his 22-year career (1965–1987). His boats remain popular, particularly among hobbyist builders, who appreciate his well-detailed plans.
On a brisk but sunny afternoon in late spring, I boarded ANDIAMO (Italian for “Let’s go!”) with owners, Tom and Connie Hammermeister, as they launched her near their home in midcoast Maine. The Hammermeisters chose to hire their local hauler for the job of transporting the boat from storage to shore, but the Goliath can be successfully trailered behind a large pickup or SUV.
ANDIAMO is a hefty boat, displacing about 3,200 lbs. She feels solid underfoot and recovers quickly from rolling—even the heavy rolling from the walls of water that peel off the sterns of nearby lobsterboats. She can attain 51⁄2 knots but feels most comfortable underway with her diesel rumbling along at about 3 knots.
Tom, an accomplished hobbyist boatbuilder, took some well-thought-out liberties with the design but stuck to the plan through most of the construction. The hull is plywood over sawn frames as per the plans.
In building the bottom, Tom used plywood near the stem, and then, where that piece leaves off (about a foot or so aft of the stem), he cold-molded the hull down to the amidships area to accommodate the compound curvature of the bottom in that section. He then finished the bottom using plywood from amidships on aft. (Boatbuilder Harry Bryan explains a similar method in WoodenBoat No. 217.) The hull has a hard chine and the topsides are also plywood. Once the wood was fastened in place, the hull was sheathed, inside and out, in fiberglass cloth and epoxy.
Goliath is built in “traditional” plywood construction, which is to say that the topside and bottom panels are joined by chine logs, and permanent transverse frames support those panels.
Then, departing from the plan, Tom redesigned the cockpit coaming to mimic the graceful curve of the stern. This required some judicious laminating, but the result is spectacular. Tom also made some clever additions inside the cockpit. First, he reconfigured the engine box for better access to the boat’s Yanmar 3GM30 (27-hp) diesel. Next, he built two extra boxes at this same height and width. They are placed in a row adjacent to the engine box, reaching aft into the open air of the cockpit and giving quick and easy access to the fuel tank and seat cushions; the boxes double as seating for guests. I think this is a good idea for this boat. It doesn’t crowd the cockpit in any way and it creates a comfortable, central place for several passengers to gather or for one to stretch out and enjoy the ride. Although standing is the preferred position for steering ANDIAMO, Tom built and installed a modest fold-up seat in case the helmsman wishes to sit down.
Steering is velvety smooth and responsive but without wandering. The plans aren’t specific about the steering, so Tom installed a Teleflex system, which includes a hydraulic arm with two-axis articulation that slows recovery and reduces wandering. While it is one of the boat’s more expensive components, it is worth it for the added comfort it provides.
The Goliath featured here, ANDIAMO, is powered by a 27-hp Yanmar diesel, cleverly hidden in a box that doubles as a seat.
The arrangement plan shows a berth in the forward cabin, but Tom chose to leave this space bare for additional stowage. The cabin extends well forward beneath the foredeck and there is good headroom down below. It could easily accommodate two berths and a Porta-Potti if someone wanted to outfit the boat for weekend cruising. The plan suggests a galley inside the pilot-house, but Tom opted not to build one in ANDIAMO. He also decided against cutting holes for the deadlights that the plan details show on the cabin sides and pilot-house. Those could be cut at any time and, if this were my boat, I would install these appealing and well-placed deadlights, especially if I planned to outfit the cabin; it’s nice to look out on the morning from the warmth of the bunk.
I’m not as familiar with tugboats as I’d like to be, and I wondered how this design would hold up under the scrutiny of an honest-to-God tugboat man. Knowing this is a character boat and that I could be in for some chiding, I nevertheless sent the design to a man who has worked tugboats off the coast of Maine for decades. He found the boat appealing and was kind in his remarks, saying, “…picture this design with a small black stack and a rope beard on the bow. Maybe [add] a few lawn tractor tires attached to the port and starboard rails. Throw in a crusty old guy wearing a Greek fishermen’s cap and a cigar in his mouth and screaming four-letter words at his crew—and then you’d have a ‘real’ tug. It’s a cute design, but I’d stay within sight of land if I were running it.”
Tom Hammermeister shies away from falling into character that so departs from his genteel personality, but he did give ANDIAMO a rope beard. He chose not to add tires—and a smokestack was out of the question—but in keeping with that playful outlook he did search out and install an airhorn (a steam horn being too elaborate) that bugles stout and clear over the water. Tom agrees that keeping the boat close to shore is a good idea; he uses her for afternoon excursions with Connie, family, and friends, rarely losing sight of land.
There’s no denying that ANDIAMO was created to fulfill the dreams of childhood whimsy. But her underlying strength, seaworthiness, and sensible construction that are hallmarks of Ken Hankinson’s designs make her a worthwhile choice for years of family fun. As her name implies, everything about her says, “Let’s go!”
Goliath’s plans include full-sized patterns for frames and the stem, detailed instructions, and a materials list. Glen L also sells an optional fiberglass kit, which includes 2 1/4 gallons of epoxy, fiberglass cloth, and application tools.
The Marsh Punt is a humble gem that may not grab you right away, but will quietly grow on you. Designed and built by Tad Lyford, the compact craft has a 13’6″ LOA and a 42″ beam; she weighs about 100 lbs and draws 12″. Like a miniature island in tranquil waters, she provides respite that is quieting to the spirit. Tad and his wife, Ellen, row and pole their punt, exploring peaceful marshlands and other calm waterways that are plentiful in southern Maine and other parts of New England.
When the Marsh Punt appeared in WoodenBoat magazine’s Launchings (see WB No. 213), she drew throngs of admirers. Her simple lines portending an uncomplicated build, thoughtfully placed sparse interior components, and plain finish of linseed oil and paint all come together in a package that is as refreshing as a cool breeze on a hot day.
Tad has been fascinated with punts since childhood. Growing up in Maine and playing on and exploring in small boats led him to create this comely punt, which represents an amalgam of his favorite designs and building techniques.
He holds many designers and builders in high regard, but three who stand out are Reuel Parker, John Gardner, and Hannu Vartiala. Taking Parker’s lead from The Sharpie Book, Tad used plywood and kept the building process as simple as possible. He took cues from John Gardner’s comments on the 18′ Light Bateau that appears in The Dory Book as he developed proportions for rowing. He also found inspiration from Hannu Vartiala’s website, Hannu’s Boatyard, which offers creative approaches to utilizing plywood to make the best use of every last scrap. These concepts, which are central to the boat’s design and construction, coincide with Tad’s desire to build a strong, stable, and enjoyable boat and to do it as frugally and as efficiently as possible.
Even an inexperienced builder will not find this project too difficult to take on. Over a simple ladderback and central mold, Tad bent on white pine chine logs and then attached the boat’s bottom to the chines. He used meranti plywood for the bottom and side planks and secured these components in place with stainless-steel screws. Since there is barely any twist to the single plank that makes up each of the boat’s sides, it can be built without spiling (measuring a complex plank’s shape) or steaming.
The boat’s rocker (the lengthwise sweep along its bottom) is slight—but even a small amount of rocker can create difficulty when bending on the meranti bottom. Meranti is tough but unforgiving under bending pressure.
Marsh Punt’s low sides require an elevated oarlock pad, in order to keep the oar handles out of the rower’s lap.
The boat’s flat bottom and light weight make launching and recovery easy.
With the bottom and side pieces screwed in place, Tad fortified the seams along the bottom, chines, and sides with fiberglass tape and epoxy. Then he added the boat’s two white oak transoms. Once the hull had taken shape, he removed it from the ladderback and coated it with epoxy inside and out. Then he fitted it out with white oak frames, deck framing, and rubrails, and built and installed meranti decks (fore and aft) and white pine risers and thwarts.
With the boat nearly finished, Tad attached a white oak strip down the centerline of the boat’s bottom. This tiny strip (3/4″ thick × 2″ wide) that runs the full length of the bottom may seem insignificant, but it gives the boat remarkable tracking ability underway. It also acts as a skid strip, which protects the bottom when the boat is dragged.
“The Marsh Punt is pleasant to row or to pole and is comfortable for reading, picnicking, or stretching out for a mid-afternoon nap.”
Marsh Punt’s overhanging ends and short decks ease the task of stepping aboard from the shore: The boat can be nosed right up onto the beach, and a passenger can make the short step onto the deck, with dry feet the whole while.
When it came time to install the oarlock pads, Tad found himself in a dilemma. He had already designed the boat with thwarts placed a mere 3½” down from the sheer. This is desirable because it prevents the rower from feeling like he is seated too low in the boat. Tad remarked, “I didn’t want to feel like I was sitting in an open kayak.” That being the case, he found that the combination of traditional oarlock pads and his chosen thwart height caused his oars to land too low in his lap for pleasant maneuvering. His solution was to create tall, scalloped oarlock pads made from white oak. These handsome oarlocks are fine for Tad’s purposes.
However, if I were to build this boat, I would beef up these oarlock pads, adding about 3 ⁄8″ in thickness to better accommodate the inboard step where they attach to the plank. I would probably also forgo the white oak and instead build them in plywood and then paint them. Because these oarlock pads are designed to take the vast majority of the strain with little reliance on the rail to share the load, anything but the quietest rowing on calm waters could snap these oarlock pads along a grain line, especially between the oarlock location and the sheer, where the wood is not supported. White oak is strong but in this application it is only as strong as its weakest grain line between the oarlock and the sheer. Plywood, with its multi-directional strength, would be a better choice for the pads—even though I concede that they wouldn’t be as pretty. One could also laminate some hardwood pieces to create the needed strength and still come close to the nice look that Tad has achieved.
Throughout the design process, Tad kept Ellen’s enjoyment in mind. This leads me to one of my favorite features: the step-aboard decks at each end. There was a hard chill in the water the day I visited Tad, and when it came time to board the boat, I realized that I had forgotten my rubber boots. Not to worry—Tad brought the boat right up to the water’s edge. The deck overhung the shoreline, enabling me to step aboard without dampening a toe. The Queen of Sheba never had it better.
A boat that must be trailered to and from the water may be left in a driveway for weeks at a time between outings. Since trailering is Tad’s only option, plywood was a good construction choice for his hull because plywood doesn’t shrink and swell like solid wood. But the Marsh Punt boat could be built in solid woods, and that would be a fine choice too, especially if the boat were kept in the water or on tidal mudflats all season long.
The Marsh Punt is pleasant to row or to pole and is comfortable for reading, picnicking, or stretching out for a mid-afternoon nap. Like love that comes on softly, the Marsh Punt will be a pleasure to build, and she’ll give her owner great pride in stewardship over the years.
Marsh Punt’s overhanging ends and short decks ease the task of stepping aboard from the shore: The boat can be nosed right up onto the beach, and a passenger can make the short step onto the deck, with dry feet the whole while.
The Sharpie Book, by Reuel Parker, and The Dory Book, by John Gardner, are available at The WoodenBoat Store.
When I think of powerboats I don’t usually equate them with a relaxing ride and quiet conversation, yet the Starry Nights design (20′ LOA, 57″ beam), a new torpedo-sterned electric launch from designer and builder Ken Bassett, handily fulfills those purposes. Her six 12-volt AGM batteries power her 3-hp electric motor, enabling her to cruise at 5 mph for up to six hours.
Karen Wales
The 20′ Starry Nights launch from Onion River Boatworks is a picnic launch in the finest tradition. Powered by a 3-hp electric motor, she is a gentle, quiet presence on the water.
Ken Bassett works out of his own shop, known as Onion River Boatworks, in North Hero, Vermont. He has been designing and building boats for decades. I have long admired his work, such as the lapstrake Whitehall-like pulling boat Liz and the jovial little batten-seam-constructed runabout he calls Rascal. His plans are remarkably detailed and easy to follow, making them accessible to a wide array of builders. Even some first-time builders have had success building Rascal—a tribute to Ken’s abilities as a designer and a communicator. A great plan maker is a great teacher, and Ken’s plans put him among the very best.
Embarking on this article, I found it difficult to understand how a lone designer could be successful with such seemingly disparate areas of boat design— and this new design, as complete as it is, couldn’t have simply appeared out of thin air. I knew that the Starry Nights launch must be rooted in a vast knowledge of boats. But I had no idea just how vast, until meeting Ken one bright morning last July.
We met in New Hampshire, at a lake that runs along the old New England mill town of Laconia. Heads turned as Ken backed the launch down the town’s boat landing. Seeing her on the trailer gave me a good look at her underbelly. Starry Nights is a displacement boat with a round bottom that is nearly flat for much of her length; forward sections are gentle curves that become increasingly tighter at the turn of the bilge and flatter underneath, the farther aft you go. Her keel, which deepens as her hull flattens out aft, accounts for her superb tracking ability.
Starry Nights is steered by a MacLear Thistle Rudder (see text at left for description), which allows for surprisingly good maneuverability at low speeds and in tight quarters.
She has a fishtail rudder—a MacLear Thistle Rudder, invented by the late Frank MacLear, a naval architect. Ken learned of this breakthrough rudder design from an article by Dave Gerr that appeared in Professional BoatBuilder magazine, a sister publication to Wooden- Boat (see PBB No. 102). In his article, Gerr said, “… MacLear had set out to improve low-speed maneuvering in close-quarter conditions, as well as to enhance steering response at speed. As stated, almost all ordinary rudders are ineffective when the helm is put over more than 35° port or starboard. Turn a normal rudder farther than that and it just acts like an unpredictable brake. It can even create eddies that throw the stern about randomly…. The [rudder] shape is essentially a standard airfoil rudder section flared out in a fishtail at the trailing edge. What does all this shaping accomplish? At normal cruising speed the rudder doesn’t change vessel performance much, though it does increase steering response slightly at small course-keeping helm changes. But, during low-speed maneuvers, you can turn the MacLear Thistle rudder over as much as 40°. Water flow is guided around the leading edge and midsection by the rudder’s section shape; then, the flared-out end makes water flow continue to do useful work at the higher angle. The result is a rudder that acts like a stern thruster, allowing very tight turns at low speed.”
I tried it—it’s awesome. Combined with the buttery smoothness of the electric motor and the seakindliness of the hull’s underbody, the MacLear rudder is the icing on the cake, making Starry Nights one of the easiest boats I have ever piloted. She rides like a magic carpet on the water.
Unlike most gas-powered boats, where slow maneuvering is a dance between often-abrupt thrusts and calculated drifting, this intuitive boat is super-responsive with an almost road-traction feel. Even a complete neophyte could land her dockside with confidence.
While she is nearly silent like an electric launch and glides along like an electric launch, I couldn’t get away from how much she reminds me of the torpedo-sterned runabouts of bygone days. Her sheerline and deck treatment in particular show a strong relation to the runabout family. I was about to learn why.
After a relaxing morning boat ride we grabbed a bite at a local diner. There we happened to meet Mark Mason, a heavy-hitter in the runabout world whose accomplishments include the restoration of BABY BOOTLEGGER (see WB No. 150). Previously unbeknownst to me, Ken and Mark had worked together for several years. Mark attributes part of the success of some of his best work to critical participation from Ken. Then it all became clear to me; that long experience with runabouts is what gives this boat its panache.
Karen Wales
Durable strip-planked construction, sheathed in fiberglass, allows Starry Nights to be hauled out when not in use, with no fear of drying out.
The Starry Nights design is a complex-looking boat to build, but the hull actually isn’t overly complex. Strip construction makes it a doable project for even a less experienced builder. Ken used 3⁄8″ cedar strips to create the hull, and then sheathed it inside and out in 20-oz fiberglass and epoxy. While a builder will have an easier time if he comes to this project with an experienced eye, some hand skills, and a familiarity with systems, a dedicated amateur can simplify this enough to have a nice boat, while keeping it honest to the designer’s intentions. I know that amateur builders have been successful with far more “advanced” boat types from this designer—the batten-seam-constructed Rascal runabout being one good example. The clarity and exceptional detail of Ken’s plans greatly reduce the intimidation factor. At the same time, built as shown, his attention to detail can provide enough of a challenge to satisfy the more seasoned builder as well.
Karen Wales
Starry Nights is steered by the simple side-mounted tiller seen here; another lever controls the motor’s RPMs. She’ll cruise for six hours at five mph.
Look closely at the details. Coaming pieces are bookmatched cherry with quilted figure. The turned tiger-maple tiller handle is the result of long experimentation with a variety of materials in order to get the best-looking—and feeling—result. The ventilation register is caned. Each component represents careful study and carries the mark of experience.
When we learn to fish, we often want to snag the largest, then the most, then the best, whatever our tastes deem that to be. Our boat-owning desires are not entirely different; at the onset we may be drawn to size, speed or flash, but when we know more and understand our true desires in a boat, then we are drawn to a specific type. The Starry Nights design is not for everyone, to be sure, but for those who would like a comfortable boat for quiet exploration and pleasant gatherings, this boat has a lot to offer. Sexy enough for the runabout crowd yet with the serenity that could satisfy book club types, she’s a true original—my kind of girl.
The lines plans shows an easily driven hull, with topsides that spiral aft into tumblehome sections, and terminate in a torpedo stern. Starry Night Particulars LOA Beam 4′9″ Draft 15″ Weight 1,100 lbs
Ken Bassett retired and closed Onion River Boatworks in 2017; there are no plans available for STARRY NIGHT. The review is presented here as archival material.
The Old Town dinghy, a classic yacht tender, was once a staple offering in the catalog of the Old Town Canoe Company. It’s a lightweight beauty with a bright-finished interior and a painted, canvas-sheathed hull. Structurally, it looks like a canoe, but it has the shape of a versatile small boat—one that motors, sails, and rows respectably.
I’ve had one of these boats in my life for about as long as I can remember. When I was a kid, my grandfather had a 9-footer in his basement. Nobody knows exactly where it came from, but he’d owned an ACF cruiser in his younger days, and I’d guess that the dinghy conveyed with that boat when purchased, but not when sold. It must have spent a decade or two in that basement, out of the elements, when my parents adopted it as a tender for our 35′ Lion-class sloop.
Island Falls Canoe
For many years, the Old Town Canoe Company of Old Town, Maine, built a line of canvas-covered cedar dinghies using the same construction as that of their legendary canoes. Today, canoe builder Jerry Stelmok, working with his colleague Jonathan Minott, continues that tradition. Shown is a newly built 10-footer.
That was in the mid-1970s. We strapped a 3 1⁄2-hp Eska outboard from Sears on the dinghy’s transom, and I spent uncounted hours tearing around the harbor in that little boat, often with two or three friends as crew. The boat also ferried kids, adults, and supplies ashore for beach picnics. It served us well for several years as a tender, as it towed well and it carried a load, but with a new cruising boat came a new dinghy, and the old Old Town went back into storage. By my mid-teens, I’d laid claim to it, and my ownership has been uncontested for the past 30 years.
The boat was in excellent shape when I decided it was mine—though it needed refinishing. I had the time and inclination to do this back then, and so I spent many evenings—and a fair amount of methylene chloride—removing the old finish, bleaching the bare wood, and building nine coats of varnish. I relaunched that boat with a vintage pair of oars and a British Seagull outboard purchased with my high-school graduation funds, as the old Eska had become something of a lab cat for my older brother and me: We’d learned about internal combustion by taking it apart and putting it back together one too many times.
Thankfully, I did not indulge my youthful impulse to tinker with the Old Town. I’d thought about adding a sailing rig—and thus cutting a daggerboard slot and mast partners, and mounting a rudder. But I didn’t do that, and so the boat is still configured as it was the day it left the factory. Old Town did make a sailing model of this boat, but my bastardization of it would have sullied the boat’s originality. The Old Town dinghy has a design pedigree that I learned of only last year: B.B. Crowninshield, the great early-20th-century Boston Brahmin naval architect, designed it. Originality is paramount for a boat of this lineage and, as luck would have it, you can still have a brand-new— and original—Old Town dinghy if you order one from Jerry Stelmok.
Island Falls Canoe
An Old Town dinghy in Jerry Stelmok’s Island Falls Canoe Shop, nearly ready for its canvas sheathing.
Jerry Stelmok carries forward the tradition of the Old Town Canoe Company, a business named for its location: Old Town, Maine, near the university town of Orono, which itself is home to the legendary oar- and paddlemaking company Shaw & Tenney (see page 40). Old Town Canoe today manufactures a big range of canoes and kayaks in molded plastic. Stelmok, on the other hand, builds wood-and-canvas canoes, and Old Town Dinghies, at his shop in Atkinson, Maine.
Wood-and-canvas canoes are an evolution of the famed Native American birchbark canoes. They are framed in thin cedar (1⁄4″ or so), planked in a similar thickness of cedar, and, instead of birchbark, are sheathed in stretched canvas. The weave of the canvas is filled with a proprietary compound, and the hull is then painted. The result is a strong and light boat, watertight—and heavier than when dry—after a short period of swelling.
Island Falls Canoe
Jerry Stelmok at the oars of a 9’ Old Town dinghy. Old Town’s distinctive oarlock type may still be purchased new from Shaw & Tenney in Orono, Maine.
The woodworking portions of this operation require a robust building jig—a labor-intensive affair justified only by the promise of a healthy production run. The Old Town Canoe Company can no longer justify this sort of handwork, but Stelmok builds and sells Old Town’s dinghies. The dinghy line consists of a 7′ 6″ hull, a 9′ one, and a 10′ one. Stelmok also builds Old Town’s cedar-and-canvas canoes; those boats are marketed by Old Town itself.
Stelmok builds his boats exactly as Old Town did in the 1920s. He fits them out with Old Town’s distinctive patent swivel oarlocks which, in effect, reverse the mechanics of common oarlocks: A plate-mounted pin is permanently fastened to the boat’s gunwale, and the oarlock itself has a hole in it, to slip over and rotate on the pin. Set in a fore-and-aft position, the oarlock is captured by the gunwale hardware; turn it athwartships, and it can be easily lifted free. The boat’s rails— and nearby boats—are protected by a rope fender set into a cove in the outwale. While this arrangement is not as protective as the ubiquitous rubber-cored can- vas gunwale guard we see on many dinghies today, it just looks right on an Old Town dinghy. And it performs well, too, as long as the screws used to fasten the rope guard are set well below the surface.
Island Falls Canoe
Island Falls Canoe builds a range of Old Town dinghies, including 7′ 6″, 9′, and 10″ models.
It’s been said time and time again that every boat is a compromise. If you want a pure rowing boat, efficiency is the key, and the key to efficiency is a narrow, lightweight hull. If you want a motorboat, you might add some buoyancy, or “bearing,” aft to float a motor and to keep the boat from squatting as speed builds. For a sailboat, a clean entry and a fine stern are two factors that contribute to good performance.
The Old Town dinghy is a beautiful average of these three traits. It is somewhat bluff bowed, so it doesn’t grow tiddly when one ventures into the bow to tend the painter. But the waterline entry is sufficiently fine to allow easy progress through the water without plowing it up. Firm bilges keep the boat on its feet when lightly loaded, and the load waterline tucks in slightly at the stern, reducing drag. This tucked-in waterline is complemented by a handsome tumblehome shape in the transom. A shallow cutout in the transom confirms that this boat is, indeed, meant to carry an outboard motor if one is desired. If my earlier memories of this boat are to be trusted, I recall that the boat motors rather well. But I’ve become jaded to the concept of low-horsepower outboards on dinghies, finding them a loud and unnecessary storage burden for short trips between ship and shore. A pair of 7′ oars will give that old Eska a run for its money, and the oars always start.
With only the rower aboard, the boat responds quickly to the oars and carries easily between strokes. A single passenger complicates things, because my boat does not have a forward rowing station. The added weight, therefore, immerses the lower portion of the transom, making rowing, literally and figuratively, a drag. A third passenger cleans up the trim—as would a forward rowing station. I could add this station, I suppose, as Old Town oarlocks are often available where used bronze hardware is sold; indeed, two separate pairs of them on eBay are the subjects of fierce bidding wars as I write this. Perhaps I’ll consider this addition during my next overhaul of the boat, though I’m loath to change anything now. But I would add floorboards, as these dinghies have no floor timbers, and the bilge, built of nothing but soft cedar, could use a little protection—and more even weight distribution. At the moment, I ask my passengers to keep their weight on the keel batten until they’re seated.
My dinghy lay in storage for several years until I needed a tender about 15 years ago. I blew the dust off, gave her a coat of paint and varnish, launched her, and towed her behind a 28′ sloop for 150 shore-hugging miles from Massachusetts to midcoast Maine. After a day of swelling, her cedar planking was tight and she nearly doubled in weight—which is not a bad thing, since, when dry, the boat was shockingly light. She has stood up well to periods of intense use punctuated by dormancy. Despite its light construction, it’s a tough and durable boat—a fact well proven by whitewater canoes built in similar fashion. If you’re seeking a classic yacht tender in this size range, the Old Town dinghy deserves serious consideration.
Courtesy of Benson Gray
Over the years, the Old Town Canoe Co. offered several versions of its cedar-and canvas dinghy. The first, designed by B.B. Crowninshield and shown here in this 1907 catalog, was 9’ long and 45” wide. The boat’s dimensions remained unchanged until 1927, when the “Depth Amidships” was listed as 16”; the 1928 catalog lists the width as 46” with a depth of 18”; catalogs from 1929 until 1971 (and 1983) list the width as 46” with a depth of 19 inches. Naval architect John G. Alden designed three sailing dinghies for Old Town in the 1930s, in 14’, 11’6″, and 10‘ lengths.
Thanks to Benson Gray for sharing details of the Old Town Dinghy’s design history.
I’ll put a case to you, as lawyer Jaggers did hypothetically to young Pip in Great Expectations. Put the case that a boat should be designed, and that this boat should be handy under oars. Put the case that this boat should also sail well, and further that it should accommodate a small outboard motor off the transom, should some unknown person desire to do so. Put the case, as well, that this boat must be detachable into two halves that may “nest” one inside the other so as to be hauled aboard and lashed down in the smallest possible space on the crowded deck of a long-distance cruiser, and therefore must be very light yet equally very strong. Put the case that this boat must also be attractive, and put that last case to yourself very carefully. These expectations are great, indeed.
Compromising to resolve such thorny conflicts is the intellectual challenge that Russell Brown, a designer and boatbuilder of Port Townsend, Washington, took on in working up a nesting dinghy that has one further twist: he wanted his company, PT Watercraft, to be able to market the boat as a kit that could be built by amateurs.
The result is impressive. Brown has been working a long time in lightweight boat construction, with an eye toward engineered solutions tending toward minimalism. Using thin plywood and powerful epoxy to best advantage, he strives for construction that is light in weight yet very strong, as many others have in using these techniques. He also spent a good part of his youth cruising the world’s oceans, first with his parents and later on his own, so he has direct practical experience of what works and what does not.
Tom Jackson
By extensive ocean cruising, Russell Brown came to know what he valued in a nesting dinghy, and his PT 11, which weighs just 85 lbs, balances conflicting purposes of sailing, rowing, light weight, and compact stowage while still remaining a handsome boat.
For light weight, Brown chose 6mm okoume plywood for the topsides and the bottom panel. Almost every part of the boat is made of plywood, sheathed in fiberglass cloth set in epoxy. Though 11′ long when joined, the hull weighs only 85 lbs. With its low weight, this boat’s halves can be manhandled ridiculously easily by two people, and probably very easily by a fit person working alone. To keep the dinghy to a minimum size for hauling aboard, Brown chose to make the hull flat-bottomed, with but slight rocker and a skeg of minimal depth. Plus, he made the boat’s profile very flat at the sheerline, that critically important curve formed by the top edge of the uppermost plank. Giving a boat a flat sheerline risks ungainly appearance, but to Brown it was imperative to do so to allow the boat to stay compact when nested on board: the bundle is only 5′ 10″ long and 1′ 8″ high at one end and 1′ 5″ high at the other, and more sheer would have made for a taller nested stack. Brown anticipates that most cruising sailors will lash down the boat under the swinging mainsail boom, so height is critical.
Brown developed custom stainless-steel hardware to join the two halves together, and the system seems to work well in the water or on land. In this type of boat, the hull is usually constructed in full, then two bulkheads are installed at or near amidships, and then the builder—no doubt after taking a deep breath—cuts his hull in half, a process fully described in the kit’s extensive instructions.
Tom Jackson
The 11’ hull divides to form a bundle only 5’10” long, 4′ 2″ wide, and a maximum of 1′ 8″ high, and the flat bottom makes nesting them easy.
The forward of the two sections is completely decked over at thwart height, which provides necessary hull stiffness and also sees to it that any water coming aboard is directed to the after section for easy bailing. At the top of the sheerstrakes, plywood pieces scarfed together and set perpendicular to the sheer planks make L-shaped gunwales that stiffen the topsides, deflect spray, and provide a flat surface to receive a glued-on continuous, low-profile rubber fender that actually accentuates the boat’s appearance. Brown kept his ’midships bulkheads low, so that the foredeck extends aft of the joined bulkheads when the hulls are assembled. This provides a comfortable rowing position, with no need for a thwart.
The joining hardware, meanwhile, consists of four knobs that screw through bushings in the after bulkhead and into threaded receivers in the forward one, with O-rings making the fittings waterproof. The sequence for attaching the hulls together is well thought out. The forward hull has two custom carbon-fiber brackets mounted on the deck and tight against the bulkhead sides. These brackets extend aft just far enough to have the after bulkhead slip behind them, which is easily managed. They hold the hulls together and in the right alignment while tightening first the lower knobs and then the upper ones. The hull halves join together surprisingly tightly, and in rowing and sailing (admittedly in light conditions) I never saw any water come through.
Tom Jackson
The two hull halves assemble easily while afloat.
Technology and innovations seem to have come together to make nesting dinghies more viable than ever. Lightweight plywood-epoxy construction makes a stiff hull, which is especially important when introducing the added complexity of cutting it in half. The challenge of lightweight structural design is what got Brown thinking about nesting dinghies in the first place. “A dinghy is really a tool, it’s not a pleasure boat. If you’re talking about a dinghy being a tender for a cruising boat, it has to be light, it has to be really tough, it has to be abrasion resistant, and it has to perform all the other functions it has to perform.
“The intent was to make a dinghy for serious cruisers,” Brown said. “I have a nesting dinghy that I built in ’85 that I took on most of the cruising I’ve ever done. It didn’t have the kind of sophisticated attachment hardware that this one does, but it’s what really got me into the whole idea of nesting dinghies. And cruising really led me to see the interest and need for a serious nesting dinghy. There’s more nesting dinghies out there than you can shake a stick at, but none of them that were ever really highly developed, as far as easy assembly in the water, light weight, complete kit package, good sailing characteristics, and really good rowing characteristics.”
Tom Jackson
Two carbon-fiber brackets (visible at the edge of the foredeck near the bulkheads) hold the hulls in alignment while knobs are tightened to hold them firmly together.
Brown started with pleasurable rowing in mind. He noticed other cruisers needlessly struggling with dinghies mainly because they were miserable to row, while his was comparatively easy. “That’s what I ended up doing with my nesting dinghy. I loved it. Other people had these god-awful inflatables, they were hoisting these 18-hp engines on and off, and going for gas all the time. It was my experience that got me going in this direction. This boat’s not a sprinter of a rowboat, but it really has very good cruising speed capabilities.” Brown earlier considered all-carbon-fiber construction for even lighter weight, but actually building a prototype gave him experience that came to the rescue: “I actually didn’t like it because it’s too loud. I don’t like rowing it, I don’t like using it. If you dropped the bow painter snaphook into the boat, the whole anchorage woke up.”
Tom Jackson
Coming onto a beach, the boat’s flat bottom, which is well sheathed in fiberglass cloth set in epoxy to resist abrasion, allows her to stand upright, and the long foredeck makes it easy to step ashore.
During my row, I found that the new boat, largely because of its light weight, feels a bit squirrelly at first, but in short order it’s very simple to find her sweet spot. The boat tracks well enough. The combination of light weight and slight rocker, or longitudinal curvature, to her flat-athwartships bottom, meanwhile, make her extremely maneuverable. She’ll turn with just a flick of the oar. That’s an excellent characteristic in a crowded harbor, where responsive turning and quick stops are often necessary. However, in my judgment she would be plenty able for gunkholing expeditions and amply commodious for ferrying supplies from shore. “We’ve rowed the boat with four 200-lb guys, and it still goes right along,” Brown said. I found her quite a pleasure to row; I could see Canada over my shoulder, and Brown coaxed me back to shore only with some difficulty.
Nosing into shore, the flat bottom proved its worth once more. The boat comes easily to the beach, and it stands upright prettily. The foredeck makes it exceptionally easy to step forward and out of the boat, dry-footed.
The sailing rig is deliberately simple, a modified windsurfer rig with the sail’s sleeve slipping over a two-part carbon-fiber mast, which needs no standing rigging. The mast itself fits easily into a tube mounted between the foredeck and the bottom. The entire rig weighs but a few pounds. Brown, who has long experience in developing foil sections in plywood, has also designed a daggerboard and a kick-up rudder, both of which would be very familiar to any dinghy racer. The designer likes to sit right on the boat’s bottom while sailing; in light air, I found kneeling amidships to work all right for me. It was a light-air day during our rendezvous, so I can’t say much about the boat’s sailing characteristics, though I found her quick for what little breeze we had. Heeling to the few puffs that materialized, she held out the promise of surprisingly good performance. Later, when Brown found a bit more breeze during his time at the helm, I observed that she accelerated quickly and tacked easily. Like any lightweight dinghy, she is very responsive to crew weight, yet she feels stable. An old dinghy racer would be at home here and would not be displeased by her sailing qualities.
Tom Jackson
The dinghy attains good speed quickly, tracks reasonably well, and rows very comfortably. Unlike many dinghies, she’ll make rowing ashore from an anchorage a pleasure.
As I sailed, in my imagination, I thought of anchoring down in some pretty harbor somewhere and spending the few minutes necessary to get the boat launched, rigged, and ready to sail into the golden light of evening. I put the case, further, that doing so would allow anyone so fortunate to enjoy such a harbor in a boat that is fine-looking beyond all expectations.
Russell Brown
To keep the PT 11’s nested dimensions to a minimum, Brown made the boat flat-bottomed with only slight rocker and also quite flat-sheered. Nevertheless, the boat is handsome and sails smartly with her modified windsurfer rig. The boat is available in kit form only, and the designer has developed an extensive instruction manual for builders.
Christo wrapped buildings in fabric and created art; I wrap boats in tarps and I get what looks like an encampment. When I moved into my home in 1993, I had a lawn surrounding the house, a garage in the basement, a detached garage, and two off-street parking spaces in front. There wasn’t a hint of my boatbuilding habit to be seen. Now, 29 years later, my cars have been exiled to the street, the detached garage has eight boats in it, the other garage is my workshop, the off-street parking is occupied by a canal boat and a Garvey cruiser on their trailers, the east yard has a kayak, the west yard a gunning dory, and the lawn in the back yard is all but covered by a Caledonia yawl, a sneakbox, and a teardrop trailer.
Almost all of the back yard is occupied by the Caledonia Yawl (left), the sneakbox (front), and the house for the cabin of my teardrop trailer (back). The sneakbox and the yawl both have ridgepoles to create some airspace under the tarp. The teardrop’s tarp has a hole for the woodstove’s chimney for warming my retreat on cold days.
Each of those vessels has at least one tarp covering it and unfortunately it’s not a storage system I can turn my back on. In the winter I have to sweep snow off the tarps to keep its weight from tearing them. When it rains, I have to bail the water that gets into the boats from the leaks and pull tight the tarps that have sagged and pooled water. When it’s windy, I have to make the rounds and check the tarps for loose lines. On the plus side, I only have to mow half the lawn that I used to. And crawling under a tarp that’s pulled snug against the hull helps keep me agile and forces me to practice patience. I can squeeze my head under the tarp and scrape my midsection around the gunwale, but my trailing foot always get captured by the edge of the tarp, which inevitably gathers in tight creases at my ankle. I can’t see what’s happening back there, so I just trace circles with my toes until my heel pops free.
The 20′ × 12′ 10-mil tarps I bought for HESPERIA, left, and BONZO, right, started out waterproof, but eventually began to leak.
The two tarps covering the boats in the front of the house have cords connecting the tarp of one boat to the trailer of the other. Making my way along the passage between the boats is like ducking under and stepping over laser beams in a jewelry-heist movie.
ALISON, my Caledonia yawl, has a tarp that is 3-1/2 years old covering its full length. I added a second tarp to stop the drips coming through, but it only covers half of the boat. I have to crawl aboard to pump out after it rains.
I keep a pump and a sponge aboard each of the boats that collect water, and once I settle into dewatering, I enjoy the time aboard them, especially on warm days when the heat trapped by the tarp brings out the aroma of varnish and enamel.
My 18′ plywood Greenland-style kayak has a 16′ 2×4 supported above the hull by plywood brackets. With the hull upside down, any water that gets through runs off.
I used to buy the cheap blue 5-mil poly tarps. They’d hold up for a few months, but they didn’t stand up to a summer of sunlight. In less than 2 years they were letting water through with alacrity and beginning to disintegrate. I left one tarp on well past its useful life and a windstorm tore it apart and scattered pale-blue plastic confetti flakes and streamers across the sidewalk and up the street. I spent nearly an hour sweeping it all up.
The gunning dory I built for my dad in 1983 is covered by two tarps. The black one is the back side to a piece I cut from a vinyl billboard. The dory is kept at an angle that lets water flow to the stern and then out the drain there.
I now use 10-mil tarps, and after 3-1/2 years the two oldest of them have begun to leak, but they’re not yet falling apart. The most durable tarps I had covering my boats came from a 48′×14′ 12-mil vinyl billboard for Coors Light Beer. I found it neatly folded and abandoned by the side of the road. It was so heavy I could barely lift it. I spread it out on the less trafficked side street at home and cut it into pieces to fit the boats. The section for the canal boat had on it FRESHM—six letters from “refreshment”—printed so large it could be read in satellite photographs on Google Earth. Eventually, even those tarps grew brittle with prolonged exposure to sunlight and their coating cracked and leaked.
The cockpit of the Escargot canal boat can take on about a gallon of water during a heavy rainfall. I keep a pump and a sponge handy to get it out. It puddles in the corner at right, and I leave the floorboard out to get access with the hand pump.
Until I move out of the city to farm country where I’d have outbuildings or a barn for my boats, I’m stuck taking care of my tarps. I suppose it’s like owning dogs. I see neighbors walking their dogs and tidying up after them every day, year after year, and they don’t seem to mind the demand on their time and attention. The difference is that tarps are outdoor pets, and they never seem happy to see me.
In late August on a blowy afternoon of westerlies gusting to 25 knots, I set out in a small outboard skiff to run from an island retreat, across East Penobscot Bay and down Eggemoggin Reach—a trip of some 15 miles. As I departed the island, conditions appeared lumpy but manageable, but about a mile out it got unpleasant, with a nasty standing chop kicked up by opposing wind and tide. I knew I really had no business out there in a lightly built 16′ skiff vulnerable to being blown about in the gusts and smacked hard by the confused seas.
In spite of her light weight and moderate power (20 hp), my strip-planked Jericho Bay Lobster Skiff, PINK SLIP, handled the snotty conditions like the little lobsterboat that she is. Her straight keel prevented her from slewing in the seas, her fine entry kept her from pounding badly, and her flared bow sections knocked down the worst of the spray and had the reserve buoyancy to resist burying in the steep chop. I can’t say the trip was comfortable, but by throttling back and trim- ming my load slightly forward—weight redistribution is essential in coaxing the best out of any small boat— the skiff ran reliably and responsively in semi-displacement mode at 13 knots. I relaxed more as her seakeeping abilities became clearer, punching her into waves at higher speeds than I had initially dared. The boat continued to track well, responded promptly to the helm, and resisted bow steering, even coming down the wave backs. Boaters with better sense had already quit the Reach as I made my way down to Brooklin, feeling a bit foolish for being out in those conditions and lucky at my choice of boat. By the time I reached my mooring I had shipped only a few bailing scoops’ worth of spray.
This is a forgiving boat.
Matthew P. Murphy
The Jericho Bay Lobster Skiff seen here is a strip-planked, fiberglass-sheathed copy of a plank-on-frame hull designed by Joel White and built by Jimmy Steele in the 1970s.
The Jericho Bay Lobster Skiff was designed by Joel White, who built boats for most of his life in Brooklin, Maine. The boat was meant to be a work skiff for local builder Jimmy Steele (of peapod fame) to produce for local fishermen. Carvel-planked 14′ to 16′ boats of the general type were ubiquitous on Maine’s working waterfronts through the 1970s. There were regional variations and local builders with specific styles up and down the coast, but generally speaking they were tiller-steered outboard utility skiffs that would plane easily with 18 hp, dry out without fuss on the mudflats during a working tide, and safely carry a sizable load of clams, bait, or lobster gear between harbors at displacement speeds. They weren’t particularly high sided or broad, but they were fine tenders for larger working boats and were capable of working the bays and coves on their own in most seasonal conditions. Lobster skiffs were also the first boats local children learned to operate, tend a few traps from, dig a few clams from, and undoubtedly conduct a few adolescent misadventures in. Like any training boat, they benefit from having a tolerant demeanor.
Their graceful sheer and pinch of tumblehome leave little doubt that the best of them were modeled on the larger working lobsterboats of the area that had evolved to run efficiently with modest power in a range of sea conditions. While some larger Maine lobsterboats have successfully made the transition to composite construction, most of the skiffs died out starting in the early 1970s, just about the time Steele built a few of White’s design to test the market. They were replaced by the cheap-to-manufacture fiberglass or aluminum outboard skiffs that crowd today’s working piers.
In 2005 I chanced upon one of Steele’s original boats that had been squirreled away in a barn on Deer Isle, Maine, for at least 15 years. The owner had been a friend of Jimmy Steele’s son Jeff, from whom he’d bought the boat. He said the boat had been built for Jeff about 1970. She was a shapely thing, but I had no idea how she would perform, so I restored her parsimoniously, replacing fastenings and bending in new oak frames to stiffen some of the more limber stretches of the very dry cedar-on-oak hull. Crudely painted and powered with a borrowed 25-hp outboard, the boat confirmed that she was worth the trouble, so I finished her out and added a low steering console before buy- ing a new 20-hp four-stroke outboard (the weight of the 25-hp four-stroke was too much for the relatively narrow hull to handle).
Matthew P. Murphy
The Jericho Bay Lobster Skiff’s strip-planked construction requires no transverse framing. This makes for a remarkably clean and obstruction-free interior.
Two years later the volume of unsolicited compliments about the boat led boatbuilder Tom Hill and me to see if we could find lines for the model. They didn’t appear in the collection of White’s plans, but in conversation with Hill, Jeff Steele recalled seeing lines drawn by White when Steele’s father was building the boats. Jeff also solved a mystery about a noticeable reverse curve, or hook, in the after section of the skiff’s bottom. I had originally attributed it to distortion over years of storage on sawhorses, but Jeff said the hook was an intentional design detail that acted as a sort of primitive trim tab keeping the bow down and the boat running level.
In the absence of original drawings, Hill enlisted the help of Brooklin boatbuilder Eric Dow to take measurements from the hull. That done, Hill agreed to adapt the design for strip-plank construction. I was keen to have the same model in a version that was stiffer and more easily trailerable, and WoodenBoat magazine wanted to present a good-looking outboard skiff that could be built by ambitious amateur woodworkers.
Matthew P. Murphy
The horizontal steering wheel allows for easy access all around it, making steering possible from several stations.
Strip planking is better suited to taking the tight curves of the skiff’s bilge than the wide cedar planks Steele had expertly shaped with a specialized backing-out plane. After setting up molds, Hill constructed the new hull in 1⁄2″ × 1″ bead-and-cove strips of Alaska yellow cedar glued with thickened epoxy. (Details of his build were published in WoodenBoat Nos. 210 and 211.)
In an effort to eliminate the clutter and weight of frames inside the boat, we agreed to try applying heavy fiberglass laminates on either side of the cedar. Outside we installed 24-oz biaxial cloth in epoxy, while the inside skin is a full layer of 10-oz woven roving with a second layer of the same cloth over the bottom and up to the seat riser. We were still worried about the possibility of deflection in the flat sections aft when the boat was run- ning at speed. As a contingency we talked about installing a transverse bulkhead under the after thwart, but the heavy ’glass sheathing proved more than adequate.
My original skiff had all the scars and patina of years of use, including a set of deep grooves where lobster trap line had been hand-hauled over the oak gunwale. I’d cleaned it all up and painted it with a workboat finish, but there was nothing refined about it. My aspirations for the new boat were to repeat the paint scheme, but Hill offered access to a stock of beautiful mahogany that would have been a crime to paint over. So she was varnished into much more of a yacht than I had imagined.
The helm station, with a perfectly horizontal wheel atop a brass pipe, was a solution Hill came up with following long discussions in which he rightly determined that I didn’t want a boxy center console wasting valuable space in this small boat. By retrofitting an off-the-shelf Teleflex steering system with a shaft that would run up through the pipe mounted on a wide spot to starboard in the center thwart, he provided a helm that’s accessible to anyone sitting behind, beside, or even on front of it. This flexibility is very convenient when I’m running alone and want to adjust trim by moving my own weight forward. Often I run across the bay at 20 knots in a slight chop perched on the thwart next to the wheel with an arm draped over it, steering. It helps that the boat tracks superbly. By locating the helm pipe off center, I can fit a 14′ two-by-four in the 16′ skiff, something a big center console would preclude. The helm also looks striking, drawing more comments from passing boaters than the skiff’s more conventionally pretty shape and glossy finish combined.
I use PINK SLIP as an island tender. While she’s small for that task, in the three years I’ve had her I’ve carried loads of groceries, shingles, books, tools, and people in a range of conditions. I’ve only missed one trip that I might have made if I’d had a bigger boat. Of course, that statistic ignores the couple of times when I know I shouldn’t have been out there, which leads to what I still like best about her: She’s forgiving.
The shapely skiff is derived from the larger lobsterboats of the Maine coast. Slightly flared bow sections are beautifully balanced by tumblehome sections at the transom.
Plans for the Jericho Bay Lobster Skiff are available from The WoodenBoat Store.
The microBootlegger is an elegant, cedar-strip boat that is a joy to paddle and draws compliments every time I take it out. Designed by Nick Schade of Guillemot Kayaks for use on small lakes or sheltered bays, it was inspired by a 1924 mahogany speedboat named BABY BOOTLEGGER as well as by Henry Rushton’s double-paddle canoes. Nick calls it a “roomy, efficient tandem kayak,” but I usually propel it with a single-bladed canoe paddle. Most people who ask me about the boat are equally confused as to whether it’s a kayak or canoe, and I use both terms for it.
Building the microBootlegger was my initial foray into boatbuilding, and the choice of this design was as much due to its stunning classic styling and aesthetics as to the fact that it can accommodate a second paddler and/or a small child or two to share the paddling experience.
The slightly raked forward bow and stern stems accented in quilted maple against the dark cedar, along with the contrasting maple waterline strip, give this canoe hints of the early 1920s mahogany speedboats. People have asked if the canoe is old and have remarked that it looks like a Chris-Craft or “the Rolls-Royce of canoes”—nice reinforcement for a first-time builder, and a compliment to the creativity and style of Nick’s design.
Adam Eckhardt
The rounded transition between the hull and deck, known as a rolled sheer, is a feature created in 1924 by George Crouch when he developed the Baby Bootlegger, a speedboat powered by a 220-hp aircraft engine.
The canoe is built using standard cedar-strip construction, a process which is covered well in numerous books and other resources. I purchased Nick Schade’s book, The Strip-Built Sea Kayak, which walks a builder through every step of the cedar-strip process from building the strongback to finishing touches. He also includes a great chapter on hull design and performance, and how to choose the right boat for your needs.
There are several ways to begin building your microBootlegger. You can purchase plans directly from Guillemot Kayaks or contact Chesapeake Light Craft to choose from numerous options, from plans only to complete kits with everything you need including materials for seats, foot braces, and hardware. I chose one step up from plans only and opted to get the CNC-cut forms, which saved me quite a bit of time and ensured accurate shaping.
I recalled seeing pictures of a version Nick Schade built himself out of mahogany strips and wanted a similar look for my boat. To get as close to that mahogany runabout look as possible, I decided to select my own lumber locally rather than order pre-milled strips. I already owned a tablesaw and router, so milling the strips involved only a minor incremental investment in bead-and-cove router bits. While CLC offers pre-milled bead-and-cove strips in light, medium, and dark shades (and you can specify your color preference), I also wanted to use sequential strips—especially on the deck for the most uniform color and grain.
The microBootlegger is a simple build as it does not have any particularly tight curves more common on performance kayaks. That said, as an absolute beginner in the strip-built process, there was one feature that I struggled with—the rear deck-to-side section, which is supposed to have a somewhat sharp transition similar to a hard chine.
As I laid the strips in this area, I was confused about how to manage that sharp transition, and ended up rounding-over the corners of the forms a bit so the strips could actually twist around from deck to side. If I had bothered to think just a bit more about this, contact Nick, or even post a question or two on a forum, I could certainly have accomplished this feature according to the original design.
In the end, my boat is more rounded in this area which looks just fine to my eye. Since I built my boat, Nick has posted a series of videos of an entire microBootlegger build on YouTube, detailing every step.
Builders of cedar-strip boats have many opportunities for customizing them, from artful selection of alternating color strips or grain patterns to actual art in the form of inlay or marquetry. What drew me to this design was its classic form and uniform mahogany color, and I didn’t want to deviate too much from that, but I did want to include some accent on the fore and aft decks. I settled on contrasting maple strips on the decks—understated, but something to give the otherwise blank bow and stern decks some visual structure.
This being my first build and my first time using fiberglass and epoxy, my boat, at 49 lbs, ended up probably heavier than what more experienced builders could achieve. I had turned on a space heater in my basement before applying fiberglass and epoxy to the inside hull. Rising temperature results in expanding air, causing bubbles to form between the wood and the fiberglass skin as the epoxy hardens. While not a structural concern, it was unsightly, and I had to spend extra time sanding and filling.
The bow and stern have quilted maple stems, which are a large part of the visual appeal. I used maple edge banding in the coaming buildup for some accent stripes. I also made two other modifications. First was to add some holes in the bow and stern that I could use for carry loops and as tie-down points while transporting on a roof rack. I did this by epoxying a maple dowel into an oversize hole, then drilling out a smaller hole leaving a cylinder of maple for reinforcement and wear protection. Second, I thought a flag seemed perfectly appropriate, so I epoxied a block of maple on the underside of the stern deck, drilled a hole, and reinforced it with an oval brass plate. I finished my microBootlegger after logging 177 hours over seven months.
Adam Eckhardt
The nearly plumb bow and stern keep the waterline long, just 2.4″ short of the overall length, to keep the potential top speed high.
The cockpit is quite roomy and can be organized in a variety of ways. Nick Schade’s carved wooden seats are stunning. At the time, I did not have the confidence to attempt something so complex. I’ve made a couple of variations of seating since launching but have settled on a carved minicell foam seat in the rear, with foam insulation on the back coaming to provide back support, and a caned seat with collapsible backrest for the front paddler or when paddling solo. It rests directly on the bottom of the boat with leather patches at the four corners to eliminate scratching and noise. This seat can be easily installed and slid forward or aft as needed to distribute weight for various conditions.
I have not yet installed foot braces. I was apprehensive about drilling holes or gluing mounts inside of the hull without knowing where I would want them, and I’ve just grown accustomed to paddling without them. The cockpit is so roomy, I can raise one or both knees and sit almost cross-legged. The ability to adjust position like this makes longer paddles more comfortable.
Adam Eckhardt
While the cockpit is designed for two, a solo paddler can move a seat and backrest just aft of center to achieve proper trim.
Flotation is provided by removable, press-fit, 3″ minicell foam bulkheads reinforced with plywood on both sides. They are not glued in, as suggested in The Strip-Built Sea Kayak. I put them in place, then pound them in with my fist. The fit is airtight, so much so that I had to add tiny air relief holes near the top to allow me to seat them. Without these, the increased air pressure would push them out like a piston. I’ve tested the bulkheads by intentionally flooding the kayak, and they remained in place and kept both the bow and stern nearly dry except for a few teaspoons of water. Making the bulkheads removable allows for greater gear storage options. If I spent more time paddling offshore in open water, I might consider gluing them in with sealant.
Adam Eckhardt
The aft bulkhead is made of minicell foam shaped to seal the stern compartment with a press fit. The wood face provides extra rigidity and the two handles easy removal of the bulkhead for access.
After having paddled this boat for 12 years, I can honestly say that its performance is wonderful and exactly meets Nick’s goal of “a roomy, efficient tandem kayak for cruising a lake or exploring a bay.” At first, I struggled a bit with tracking, and thought that I would want to add a rudder or skeg. However, after having built and paddled some more traditionally shaped canoes, I see that the microBootlegger’s tracking/maneuverability is right in the sweet spot.
Being just over 17′ long and having a nearly full-length waterline, it tracks strongly compared to my more traditional canoes, yet not so much that it is overly difficult to turn. Most of the time I paddle solo and have become quite adept at maneuvering. The only time I struggle is when there are stronger winds. At 17′, and with that large vertical bow, it can be a challenge to keep microBootlegger going straight when the wind picks up. However, it does indeed handle waves very well. I’ve had it on four of the Great Lakes, in the Detroit River as well as the Gulf of Mexico where waves have come completely over the bow and very little water made it into the cockpit.
While it doesn’t have the initial stability of a recreational canoe, it balances initial and secondary stability well. When inexperienced paddlers use this canoe, I generally help them with entry and exit, but once they’re under way they feel stable and safe. My caned seat supports the paddler right about at the surface of the water.
I usually paddle with a group of friends who use recreational kayaks 10′ to 14′ long. My boat has a significant advantage in efficiency, but they struggle much less than I do in keeping on course in wind. Another factor may be that, although my boat is a tandem with a design displacement of 459 lbs, I always paddle it lightly loaded, with only about 190 lbs onboard.
If I were to take the microBootlegger on extended cruises, I would want to add a rudder or retractable skeg. However, for the paddling I do I am entirely happy with the tracking built into the microBootlegger design without adding the extra weight and complexity of a skeg or rudder.
Another unexpected benefit of the microBootlegger design, specifically its voluminous bow and stern compartments and the large open cockpit, is that it serves marvelously as a cartop cargo carrier for camping gear. I carry it right-side up on the roof rack and made a cover for it to protect cargo from rain, wind, and sun. I carry lighter-weight items in it—sleeping bags and pads—as well as the usual paddling gear, a huge benefit since I have a small car.
Jason Eckhardt
The cockpit provides enough room between paddlers to keep them out of each other’s way.
Lifting the microBootlegger to the roof rack is not too difficult with my shorter vehicle’s roof height, and I regularly load and unload it myself. It would likely require two people to put it on a larger SUV.
The microBootlegger is a fantastic boat for a first-time builder, as well as a superb performer appropriate for novice as well as more experienced paddlers looking for a comfortable cruising canoe with loads of capacity. If you will likely paddle solo and/or lightly loaded most of the time, and don’t want the tandem capability, the Solo or Sport versions might be better options for you to consider. Regardless of which microBootlegger you choose, you’ll enjoy the roomy comfort, easy paddling, and the compliments on its beauty and style every time you take it out.
Adam Eckhardt of Flatrock, Michigan, has been a maker of things all his life. He has built a Yostwerks Sea Pup and three Cape Falcon 66 canoes, which he reviewed in the December 2021 issue.
In the last half of the 20th century, the southern New England coast and shores of Long Island were peppered with sturdy and simple workboats known as Brockway Skiffs. Designed and built by Earl Brockway of Old Saybrook, Connecticut, these budget-friendly plywood-and-lumber skiffs were ubiquitous in the region and used by professional watermen and recreational fishermen alike. Flat-bottomed and slab-sided, they were generally built in 14′, 16′, or 18′ lengths, and could be built as either skiffs or scows.
The boats developed a reputation for being able to carry a load, and they spread around the country and as far as Southeast Asia after the U.S. State Department adopted the Brockway design to aid typhoon-ravaged fishing communities. Built with less-expensive lumberyard-quality wood, roofing tar as adhesive, and galvanized nails, Brockways didn’t usually survive more than two decades, but they were easily replaced. With Earl Brockway’s passing in 1996, the boats’ numbers in the the southern New England coast dwindled, but his skiff still retains a strong cachet with backyard boatbuilders and designers alike, including Walter Baron whose refined Lumber Yard Skiff design has strong ancestral ties to the Brockway.
Photographs by Jason Pietrzak
The flat plywood bottom will pound in a chop. Placing the fuel tank forward minimizes the impact by keeping the bow down and minimizing the surface area presented to the waves.
Several years ago, I wanted to have a small, utilitarian, cheap outboard boat that was tied to New England tradition. I was on a strict budget but needed something stable and safe. A coworker showed me pictures of his Earl Brockway–built 14′ scow, and as I originally hail from the lower Connecticut River valley not far from Old Saybrook, the Brockway 14 was immediately a beguiling option. Timothy Visel, an educator and self-appointed Brockway historian, has developed plans for the Brockway 14 Skiff and posted them online. Visel took the lines off a conserved Brockway 14 in 2002. Much like the boat, the plans are straightforward and written with the novice boatbuilder in mind.
This type of boat construction allows the builder to get as fancy or simple as desired. The plywood can be A-C, marine fir, or marine plywood. Clear construction lumber is used for chines, frames, and gunwales. There is also a choice of adhesives and fastenings. I used meranti plywood, fir lumber, and a mix of PL Premium polyurethane construction adhesive for less critical joints and marine epoxy at the stem, chines, transom, and bottom joints. Sikaflex 291 would be another good choice in keeping with the spirit of a budget-built boat without compromising structural integrity. Depending on how long one wants the boat to survive, anything from galvanized nails to deck screws to stainless fastenings (as I chose) can be used. Traditional roofing tar can be employed to seal the joints, but superior modern glues, with only a marginal increase in cost, will improve the strength, watertightness, and life of the boat.
There are no difficult bevels or curves to be plotted during the construction. Straight lines are drawn directly onto two sheets of 1/2″ plywood for the sides, and the shape and rocker of the boat come naturally through the bending of the sides during construction. The start of the build is a fir 4×4 shaped into a stem with two dead-simple bevels. The two side panels, cut and joined with 1/2″-plywood butt straps, are attached to the stem and then bent around a single mold—made of 2×6s—that is temporarily placed amidships. The biggest struggle is attaching the sides of the boat to the 1-1/2″ thick transom, which is laminated from two 3/4″ plywood sheets. A Spanish windlass, explained in the plans, along with a second pair of hands perhaps, surmounts this obstacle.
The skiff is not designed to get on plane. The bottom is rockered from stem to stern rather than straight over the aft half of the hull as it would be for a planning boat.
Chine logs, made from 1×4 lumber, and floor timbers are installed next into the upside-down hull. The floor timbers butt and join the separate pieces of the bottom plywood, so no scarfing is necessary between bottom panels. A 2×4″ is specified as the floor timber, but I used some 4×4s I had on hand. Limber holes allow the water to drain the length of the boat. The 3/4″ plywood bottom is laid on the upside-down hull, fastened, glued, and trimmed. A keel for abrasion resistance is added along the centerline of the boat, usually made out of a 2×4 or 2×6, on the flat. I used an unfinished oak 2×4 and bonded it to the bottom with PL Premium and galvanized nails.
The boat is then turned over for fitting-out the interior. The 14′ version is light and well-mannered enough to be handled and turned over by one strong person with no special rigging necessary, while two people make this process supremely easy. Thwarts are then installed on 1×4 cleats, which tie the vessel together. Again, I used a mix of scrap 2×6s and okoume plywood that I had in my garage for the thwarts, but anything robust enough can be used, such as the stair tread that the plans recommend. The plans describe a center support post for each thwart, but I found the 2×6s to be plenty stiff and did not install posts. Flotation is strongly encouraged by Visel for safety. With the ample freeboard, there is room for high thwarts with stacks of foam underneath.
Because I built my Brockway with meranti marine plywood and epoxy, painted it with enamel Rust-Oleum, and keep it on a trailer, I decided against fiberglassing the exterior of the boat. One could certainly ’glass the boat, but it is not necessary and adds time ,expense, and weight to the project. It took me four weeks to build the boat from start to finish, working around my job. I spent approximately $600 on new materials and used leftover lumber and materials from past projects for the rest, and bought a used 6-hp two-stroke outboard for another $600. I estimate the Brockway 14 weighs somewhere around 350 lbs, and two people can carry the newly finished boat from shop to trailer. It’ll tow with ease behind any car and launching and retrieving it at the boat ramp are a breeze, taking just minutes.
The 4×4 post is not in the plans but the addition provides the skipper with something to hold on to while standing up. A tiller extension makes it possible to occupy a position close to the center of the boat and prevent the stern from squatting excessively.
When I first launched the 14, I was worried that it was going to be too tender—the bow seemed to me far too narrow. To my great pleasure, when I pushed it off the beach and jumped in over the stem, the boat barely knelt to acknowledge my presence. For a 14-footer, it has been rock solid and dependable from the first moments on the water.
The Brockway 14 is a straight-up workboat without any recreational pedigree. It is designed to carry fishermen and fish and whatever else needs hauling. It was not designed for high-speed running. Underway at displacement speeds, the Brockway 14 plows ahead, leaving a displacement-style wake that I take care to mitigate in anchorages and sensitive shoreline zones. When the speed increases, its shortfalls are easy to pick out. The easily drawn, long, straight plywood sides translate into an entire hull that is rockered. There is no flat run aft, as many such skiffs now have after design refinements, such as Baron’s Lumber Yard Skiff. Because of this, motor trim and weight distribution are crucial to keep the bow down as speed increases. If there is any sea while underway at speed, the boat will want to point to the sky as it stands on the rockered stern, and the bottom will start slamming. I have placed my fuel tank under the forward thwart to add weight in the bow. A passenger on the forward thwart with the skipper directly behind the center thwart offers the best balance for quiet handling characteristics.
When solo, I steer from a standing position just aft of the center thwart, using a tiller extension and a “chicken post”—an upright 4×4 that I use to steady myself while underway. The chicken post is a modification I made and is not reflected in the Visel plans. I can get the skiff going quite well from this position and, in calm water, can steer by shifting my weight.
Steering can be achieved by shifting weight to the inside of the turn.
Operated at sedate speeds in rough water, the workboat heritage comes to the fore and the Brockway offers a stable ride, shouldering the waves to the side and plunging forward with confidence. Slow isn’t a bad way to travel. While at full throttle, and with a person on the forward thwart, my skiff can achieve about 10 knots and leave a relatively quiet wake, but it’s hard on the motor to operate at red-line for long periods of time, and I usually cruise at a sedate 6 knots or half-throttle on my 6-hp two-stroke. We make excellent time over distance in a straight line compared to rowing and sailing, with the added pleasure of enjoying the sights along the way that are often missed at higher speeds.
With a 6-hp outboard, the Brockway can hit around 10 knots.
My wife and I spent three foggy days cruising some of the Maine Island Trail in our Brockway, TURKEY DINNER. With plenty of room for coolers and gear, the boat offered comfortable and economic cruising with all the extra amenities for beachside camping. We motored approximately 36 sea miles running at a leisurely 6 knots and consumed only 3.5 gallons of gas over the course of the trip. The skippers of lobsterboats waved as we passed, probably in recognition of the Brockway’s workboat sensibilities. The maximum rated horsepower for the boat is 25, but this would not necessarily lead to any speed benefits as the boat’s bottom was not designed to go high-speed running. I imagine a 9.9- or 12-hp motor would be an ideal intersection between speed and economy. The boat would ride relatively flat with a well-placed passenger up forward and would cruise at 10 knots without having to max out the throttle.
The Brockway 14 Skiff is not the prettiest boat I have owned nor the best performing, but it takes much hard handling and outdoor unprotected storage without complaint. Between the simple systems, steady feel, and absolute ease of use, I find it becoming my daily choice for fun, stress-less motorboating. The Brockway Skiff looks right at home in any shoreline waterway and is a practical option for an economical and approachable powerboat.
Christophe Matson lives in New Hampshire. At a very young age he disobeyed his father and rowed the neighbor’s Dyer Dhow across the Connecticut River to the strange new lands on the other side. Ever since he has been hooked on the idea that a small boat offers the most freedom. His previous Boat Profiles include the Atlantic 17 Dory and the TAAL SUP board.
Brockway Skiff Particulars
Length/14′
Beam/60.5″
Maximum Power/15-hp outboard
Passenger capacity/500 lbs
Passenger with cargo capacity/620 lbs
The book How to Build the Brockway Skiff, by Timothy C. Visel, is available online from The Sound School, Regional Vocational Aquaculture Center, of New Haven Connecticut.
Is there a boat you’d like to know more about? Have you built one that you think other Small Boats Magazine readers would enjoy? Please email us!
A gentle but steady southeast breeze blew across Padre Island’s paved lot at Bird Island Basin and down the three-vehicle-wide ramp, sending ripples out into the wide Laguna Madre toward two tiny humps of islands on the horizon. The sun was already high above wispy veils of cirrus clouds and a scattering of cottony cumulus. On the upwind side of the 200-yard-long paved parking lot, a field thick with waist-high olive and khaki grass waved atop rumples of sand the color of unbleached canvas. A dozen or so pickups with empty trailers, along with my SUV and ARR & ARR’s trailer, sat clustered in parking spaces near the ramp, the rest of the 100-plus spaces in the lot empty, not unexpected on a November Monday morning.
On the northern of the two docks flanking the ramp, ARR & ARR, a Ross Lillistone-designed Flint I’d built, tugged at her bow and stern lines. I ducked under the swinging lugsail’s boom. One skipper gunned his flats boat up onto a half-submerged trailer; a pontoon boat with no bimini sat tied to the opposite dock, its skipper leaning on deeply tanned forearms on its rail, also watching the ramp; and an open skiff approached at an idle. I let the breeze push the bow downwind and fill the lugsail. I ducked a gentle jibe and steered past the idling skiff, following the ripples out toward the islands and, between them, two distant markers, a tiny red triangle and a green square, each atop its own piling maybe a mile out, showing the channel to the Intracoastal Waterway (ICW).
With ARR & ARR making good headway toward the markers, I wiped the sweat from my face and put my wide-brimmed straw hat on. I had hoped to launch earlier, while the air was still cool and plenty of daylight remained for the 15 or so miles to Yarborough Pass, my destination for the evening, but I had slept in and taken my time rigging the boat, double- and triple-checking that I had all my camping and safety gear aboard. The Texas coast between Corpus Christi and Port Mansfield is mostly uninhabited and has spotty cell service at best.
Roger Siebert
.
Padre Island is commonly thought of as a condo-lined beach crowded with swimsuit-clad, sunburned college students binge-drinking their way through spring break. That part of the island makes up only the southernmost 5 or so miles of what is—at 130 miles long—the longest barrier island in the world. The greater part of the island, divided into North and South Padre islands by Port Mansfield Channel—which was cut in 1962 by the Army Corps of Engineers—is an undeveloped, pristine expanse of beach, dunes, grassland and mudflats, with 70 miles of the northern island’s length managed by the National Park Service as a National Seashore and 30 or so miles of the island’s south end designated as a national wildlife refuge.
Laguna Madre runs the entire length of Padre Island and separates it from the mainland. Separated from the Gulf except at the island’s ends and at Port Mansfield Channel, Laguna Madre has an average depth of less than 3′, little rain, and scorching summers.
After only 20 minutes of sailing from Bird Island Basin, I reached the first of the islands and the ICW, where I jibed to a port tack and veered upwind until sailing southwest on a beam reach under full sail, paralleling the island’s bayside shoreline. With a mile’s fetch, the waves were built to 1′ high, which gave ARR & ARR a pleasing motion and sent the occasional whoosh of spray from her bow.
Opposite Padre Island and two to three times as distant to leeward, the mainland Texas coast was a tiny blotted line on the horizon. I checked forward and aft for powerboats and barges, expecting traffic given that Corpus Christi was falling aft just over the horizon, but I was alone.
Half an hour later, I passed the number 85 marker, pushed the daggerboard all the way down, and headed due south, leaving the ICW on a closehaul obliquely back toward the island. The chart showed deeper water, with 3′ to 4′ almost all the way to shore. I wanted to spend as much time as possible out of the ICW away from any potential barge traffic and exploring the undredged parts of Laguna Madre.
Working to windward, ARR & ARR had a sharper motion and tossed puffs of salty mist across my face. I had to occasionally sit on the rail but rarely hiked out. It was wonderful sailing and lasted a full hour before I was back in the shelter of the island, where the wind was calmer and the water’s surface only ripples.
I paralleled the shoreline until in the lee of a stretch of barn-sized, mostly bare dunes. I dropped sail, set anchor, and rested in the warm midday sun enjoying an apple and drinking nearly a liter of water. Out on the horizon, in the ICW, was the tiny silhouette of a towboat pushing two barges one in front of the other.
With the lazy water, a satisfied stomach, and the warm sunlight, I wanted to nap, but there wasn’t time, though I made a point to remember the spot as a potential one for experimenting with sleeping aboard on my second night, on the return trip.
I raised anchor, dunked it a few times to wash a helmet-sized mass of mud and seagrass from its flukes, and set it into its plastic tote in the forward part of the cockpit. I paralleled the shoreline again until near Dagger Hill, where the chart showed the water too shallow for a daggerboard, so I fell off on a broad reach back toward the ICW. The wind was steady and ARR & ARR’s heeling so slight that I lay in the sternsheets with an arm draped across the tiller and my feet propped on the far gunwale.
An hour later and back in the ICW, I approached the 4-mile-wide entrance of Baffin Bay. On my laminated NOAA booklet chart, in the broad unsounded waters near Padre Island across from the bay, a note reads, “Many uncharted rocks exist in Laguna Madre.” These rocks are of two types, those from reefs created by serpulid tube-building worms, unique to Baffin Bay along the Texas coast, and beach rocks of concreted shell, sand, and clay. The serpulid rocks range from 300 to 3,000 years old. Some living serpulid worms still hold on in Baffin Bay but they are no longer widespread or thriving. The beach rocks are 20,000 to 30,000 years old and formed before Padre Island existed, when the Texas coast was where the beach rocks now sit.
All photos by the author
Fishing cabins sit atop spoil islands along the Intracoastal Waterway just north of the entrance of Baffin Bay. Although the cabins were built and are maintained by private citizens they sit on public land and are therefore officially the property of the state, which limits their numbers and issues renewable five-year permits for recreational use only.
With 5 to 10 miles of fetch in several directions, Baffin Bay can be difficult for small boats. I was grateful to be skirting its mouth when there were only moderate waves. Another hour and a half later, with the mouth of Baffin Bay astern and the late afternoon sun painting a shimmering sheen on the water’s surface ahead, I neared the ICW’s number 9 marker, where the chart showed a small cut through the spoil islands and into about a 4-mile stretch of deeper water that ran between and paralleled them and Padre Island. The chart also showed the area peppered with submerged rocks.
At the marker, I tacked and sailed closehauled on the starboard tack due east out of the ICW through a 50′ gap between a jagged dinghy-sized gray rock jutting 1′ above the water and a low 50′-wide island with a short length of corrugated-metal seawall on its northern end. Once through the cut, my plan was to tack again and closehaul on the port tack for about 2 miles, to take advantage of that stretch of deeper water before taking the starboard tack again for the remaining mile to the campground. Just after getting through the cut, though, I heard two knocks like a shovel striking stone. ARR & ARR had hit rock. She hadn’t shuddered or slowed, so the impacts seemed minor, but they were disconcerting: ARR & ARR’s hull is 1/4″ plywood with a single layer of 6-oz ’glass cloth.
The tides for my trip weren’t supposed to fluctuate more than a few inches, and the water would always be at least 6″ above mean lower low water, so ARR & ARR, with only 6″ draft, should clear anything not marked on the chart—without the daggerboard down. Yarborough Pass was upwind, though, so if I were going to sail there, I needed the board down and would draw 2′ to 3′.
Having taken two scrapes so soon after leaving the ICW, and not wanting to slam into a rock at hull speed, I decided instead to row the 2 miles to the campground directly upwind, allowing me to reduce my draft to the 6″ margin the tide provided. Rowing 2 miles in a straight line at 3 knots, instead of sailing 3 miles in a zig and a zag at 5 or 6 knots, wouldn’t delay my landing by any appreciable amount. I should still make landfall by sunset.
I replaced my daggerboard with the slot’s rowing plug, lowered the sail, and bent to the oars. ARR & ARR’s deep-V forefoot made it easy to maintain headway into the waves, and with a hull designed for rowing, she tracked and moved well with little effort even in the moderate headwind.
According to the chart, the campground was 2 miles dead upwind. From that distance, though, the entire island was a low stretch of subdued tans and greens; nothing discernible yet to indicate a campground. After only 20 minutes, I made out the silhouettes of four two-legged shade shelters jutting up from the island like giant half-driven staples. While still nearly a mile from the campground, my oar blades struck bottom. Ten minutes later they did so again. The parts of the bottom I struck varied from sand to mud and seagrass, not rocks, but it became clear that even if I had tried to sail to the campground, I would likely still have had to row the final mile or so.
Once within a couple hundred yards of shore, I saw an inlet on the campground’s south side. I aimed for that and, after crossing half of the remaining distance, could see that it was a slough bordered with low briny land and punctuated with equally low islets, their greenery likely saltwort and glasswort, with larger islets sporting waist-high grass in their interiors. Beyond the briny slough’s shoreline, Padre Island was a vast mix of mostly hay-colored waist- to shoulder-high grass whipping in the southeast wind. Here and there in the distance a bushy mesquite rose in a short pale green dome above the grass.
Only a stone’s throw from shore, ARR & ARR slipped over a field of seagrass just beneath the water’s surface. I stepped out of the boat into what I expected to be shin-deep water, but my feet plunged into mud beneath the grass, and I was suddenly in water up my knees. I tied a line to the foredeck cleat, slung the bitter end over my shoulder, and trudged through the mud toward shore. Black muck roiled to the surface with each step and stank like an aquarium that hadn’t been cleaned in a year.
After a half-dozen steps, my right leg plunged knee-deep into the mud, which put the water at my waist. I assumed it was only a hole and pushed on, but two steps later, my right leg plunged in again. Then my left did. And my right again. The mud was deep everywhere between me and the shore and was thick, black, and hothouse warm, surprisingly warmer than the water.
I pulled the slack out of the line, pulled the boat close for support, and plowed forward. I probably should have switched from oars to push-pole instead of getting out of the boat, but moving to the sternsheets to pole would have raised the bow in the headwind, meaning either fighting to keep the bow pointed upwind or time spent rebalancing the boat’s load while drifting back offshore. Walking the boat had seemed the better choice.
I stumbled twice, and my PFD checked my fall, but the black muck oozed inside it and my shirt. By the time I reached more solid footing 10′ from shore, mud covered me from the neck down. I stood in shin-deep water clouded black from my trudge. Still holding the bow line, I scooped up the opaque water and rinsed off the mud packed on my skin and my clothes and in my pockets.
The shore had a rough seawall, two massive weathered gray logs crudely laid one atop the other horizontally across the shoreline, separating the low muddy beach on the bay side from hard-packed sand, pebbles, and shell 2′ higher on the campground side.
I kicked at the logs to rile up any hidden snakes and peered into the recesses—I had almost stepped on rattlesnakes twice before on trips—and once I was satisfied it was safe, I shoved the bow line through one of the many gaps between the logs and tied it off. I also set my claw anchor on the campground side of the logs, its 15′ of chain reaching all the way to the boat.
Yarborough Pass was dredged between the bay and the Gulf in 1941 and had to be repeatedly dredged until the effort to keep it open was abandoned. By 1950, it was left to fill itself in. The pass is now occupied by a mile-and-a-half stretch of unimproved road running from the Gulf beach to the bayside slough and campsite. The road was currently closed, and no cars driving the beach on the Gulf side could get to the campsite. It was a Monday evening during the school year, so I wasn’t surprised that I was alone.
The campground was a rough circle 100′ across, with four crudely constructed pergola shade shelters spaced around its perimeter, one sagging in disrepair. At the water’s edge on the south end of the site, short pilings crowned by succulent saltwort supported a wall of vertical planks so weathered they had gaps I could have put my fist through.
Along the campground’s north side, the dirt, gravel and shell road snaked off into the expanse of grass and stunted mesquite. Close in and surrounding the campground was a band of shorter grasses, intermixed with knee-high stalks topped with grape-sized puffs of pastel blue-violet mistflower still in bloom, yellow beach daisy mostly gone to flaxen tufts of bristly seeds and, tucked down within, prickly pear and ankle-high meanderings of dark green saltgrass.
Etched into the campground’s crusty, sun-cracked surface were tracks from wide, knobby tires and some large cloven-hoofed animal, perhaps a large deer or a feral hog. I didn’t relish the possibility of hogs rooting through my camp overnight. I tried using my phone to figure out the difference between their tracks, but there was no signal.
After I had pulled everything I thought I’d need for the night from the boat and set it next to the closest shelter in the campground, I stripped off my quick-drying hiking clothes and neoprene booties and thoroughly scrubbed myself with body wipes, hoping to get rid of the black mud’s stench and keep any scrapes I might have accumulated throughout the day from getting infected.
Halfway through my sponge bath, I glanced across the field of grass-colored marigold in the light of the setting sun and spotted, only 100′ feet away, a mature whitetail buck, stock still in the frenzied grass. The buck was hidden from the shoulders down, but his muscular neck and a massive symmetrical cage of antlers were clear and imposing. His eyes, huge and black, were staring straight at me. His fur was cast in gold by the sunset light but for the shock of white on his throat. I turned away for a moment and when I looked back, he was gone. The brief visit put my mind at ease about feral hogs making the tracks I’d seen.
In dry camp clothes and shoes, I hung my wet clothes on a length of paracord tied between a pair of nails driven into the shelter’s legs. The evening breeze whipped the clothes almost horizontal, snapping them like gale warning flags. While the remaining evening light faded, I pitched my bug-net bivy 10′ from the shelter, using my boathook and pig stick as tent poles and set the bivy’s ultralight tarp in a taut A-frame above. The bivy was new for me, less roomy than my usual tent, but with its small footprint and an entry at its head end, I would be able to pitch it on the boat, a way I thought could expand my camping options.
I dug a fire pit on the upwind side of the campground so any sparks that took flight would have the entire length of the hard-packed surface to burn themselves out, well before reaching the grass on the campground’s downwind side.
The wind made it difficult to light the fire, even with the excavated dirt piled on the pit’s windward side. Only a few strikes of the lighter’s wheel managed to produce a flame, and those whipped and vanished like will-o’-the-wisps, none lasting long enough to start the fatwood. I pulled out my emergency fire starter—cotton balls worked through with petroleum jelly—and got flames almost instantly.
After changing into dry camp clothes at the Yarborough Pass campground, I relaxed next to a fire. The pit I dug not only sheltered the flames from strong winds but also made it easy to bury the ashes afterward to leave a minimal trace. Driftwood on the bay sides of Texas barrier islands is scarce so I carry my own firewood from the mainland in a 1-1/2-cubic-foot plastic bin with lid. When the bin is empty, I use it to carry out my trash and a fair bit of refuse left by previous campers.
After I got a few larger pieces of wood burning, I took a meandering route back to the bivy, soaking up the night sounds and letting my eyes adjust to the dark. Ducks grunted in the wetlands, and waves plashed against the seawall. Stars were visible overhead in an arching band from east to the west, but the rest were washed out by the glow from Corpus Christi in the north and Port Mansfield to the south. Venus, however, hung bright and steady in the southwest sky and cast a dancing, dappled reflection on the bay.
My firelight dinner was two pieces of flatbread and a can of chowder, served cold. I preferred not cooking, given the heat of the day, the mildness of the night, and the warmth of the fire. The wind kept mosquitoes at bay and carried the briny and mucky scent of the island’s wetlands.
Once the last of the firewood had burned down to glimmering red coals, I drenched it with saltwater. It hissed and steamed as I walked the perimeter of the campground. The lights of a jet blinked overhead; far to the west, faint green channel marker lights winked out every few seconds; and even more faintly but stretched across the bulk of the western horizon, wind turbine warning lights blinked in an unsynchronized mass like fireflies over a midsummer meadow. Orion had risen in the east, and Venus had shifted to red-orange and tucked among the wind turbines’ lights, betrayed only by its steady glow. My headlamp reflected a scattering of pinhead points of light just inside the edges of the grass bordering the campground, bright and cool like dewdrops in early-morning sunlight; they were wolf spiders’ eyes, deceptively beautiful.
After I checked the boat, I crawled inside the bivy for the night. The tarp thrummed in the wind, beating against the bug netting only a foot above my face, and my clothes on the paracord outside whipped and snapped. Despite all the noise, I fell asleep quickly.
Just before sunrise at the Yarborough Pass campground, a crescent moon hangs high above islands in the slough toward the east-southeast, past the silhouette of a shade shelter and the seawall’s pilings.
I awoke at 5:30. The tarp and clothes were still and the only sound was the whine of one or two mosquitoes between the net and the tarp. It was dark. I rose even though, aching to get out of the confines of the bivy to stretch the stiffness from my joints. There was a breeze but much too weak to move the tarp or the clothes. A sliver of a crescent moon hung in the sky to the southeast and lay a wavering band of light across the still water of the slough. A trail of fresh cloven-hoof tracks lay stamped in the crusty ground, some pressed into my footprints from the evening before; the trail came within 5′ of my bivy.
My new shelter is a mesh bivy with a tapered silnylon tarp. A big-box-store plastic tarp protects the bivy’s bottom from shells and gravel. My hiking clothes hang still in the morning air; I always carry clothespins to prevent breezes from carrying them away.
I buried the ashes of the fire with the dirt I dug for the pit. I made coffee over my backpacker’s stove and sipped it while eating granola and milk in a baggie. The eastern sky finally grew light, cobalt at first, then through cerulean and gold to persimmon. The rising sun fueled the breeze and my hanging clothes swung again. I broke camp with the rising sun and the building breeze, changed back into my hiking clothes, and loaded the boat. The weather channels on my VHF were silent. I adjusted the squelch, but the speaker jumped directly from silence to steady static, no hint at a voice. My phone had no cell signal, so I couldn’t get a weather forecast there, either.
Beyond ARR & ARR, the road at Yarborough Pass snakes off another 100 yards and ends at Laguna Madre. With the boat’s yard, boom, and sail lashed together, the halyard, topping lift, and sheet position the mass out of the way while rowing and for secure storage overnight.
Seacoast bluestem and other grasses swayed in the early morning light. Wind turbines filled the horizon on the mainland two to three miles northwest of Yarborough Pass. The white pelicans, with their distinctive black wingtips, arrive not long after Labor Day to winter along the Texas coast.
I shoved off and climbed aboard, hurrying into position with the oars. The wind blew strong enough by then to threaten to push me onto the mud shallows that ran out from the point between Laguna Madre and me. I rowed around the shallows without grounding and, once in the 1′ to 2′ of water, let the wind push me from the island. I took my time stowing the oars and raising sail. The run back to the ICW was comfortable. The apparent wind was easy, and with the board up, Baffin Bay’s rocks didn’t pose a risk. I reentered the ICW by the same route I had left it, through the little cut between the jutting gray rock and the islet with its corrugated-metal seawall.
Again, the waves along the mouth of Baffin Bay were unexpectedly timid. The wind came in sporadic breezes between calms, the blows too enduring to call gusts but too brief to build anything more than dark flashes of ripples, and in between the water smoothed itself into what seemed like a leaden film. The result was lazing about when there was no wind and fine sailing when there was, leaving a gurgling wake swirling well aft.
I kept an eye on what I suspected was sapping the wind into its lulls. To the southeast, beyond Padre Island and well out over the Gulf, spotty but thick billowy cumulus clouds had built over the previous hour and cast canted gray veils of rain beneath them. None of the clouds had grown into anvil-topped cumulonimbus, though it was early yet. The ominous sky did not match the forecast I had seen on my phone the previous morning. I checked the phone, but still there was no signal.
To the north, at the far side of Baffin Bay’s mouth, the ICW makes a slight eastward turn behind a chain of six spoil islands to starboard. Atop the islands sit fishing shacks, each with a weathered pier, some little more than a row of pilings across the shallows.
Most of the markers along the ICW in Laguna Madre are simple green squares or red triangles atop pilings. Every other marker or so, such as the one pictured here, is topped with a flashing or occulting light. The structure in the distance is a large fishing cabin, its spoil island still not yet visible beyond the horizon.
Over the handheld VHF clipped to my PFD, a deep gravelly voice said, “Come on around. I’m sitting still with a broken rudder.” Another equally gravelly voice replied with a few syllables I couldn’t make out. The two must have been towboat skippers. No smaller boat would need that sort of coordination. The transmissions had been strong, and the ICW was empty astern, so I assumed the towboats and barges were somewhere around the bend ahead.
The ICW along this part of the coast is barely wide enough for one barge to pass another on a straightaway. They need more room when coming around a turn, even one as slight as that. I prefer to be out of the way and on a steady, predictable course by the time towboats with barges or other vessels with limited maneuverability draw near.
The chart showed no soundings between the spoil islands to starboard, which meant the water there was skinny indeed. To port, the chart showed only 1′ to 2′ of water and more rocks. In the fluky air, I doubted my ability to remain safely hugging the channel’s side, especially if in the barge’s wind shadow. I would be at risk of drifting either into the barge or into the shallows and rocks downwind of it. In either situation, I didn’t want to have to scramble to switch from sail to oars.
The easiest solution was to get out of the channel before the towboat and its barges reached me and wait for them to pass. I would need to switch to oars for part of the maneuver whether when leaving the channel for the skinny water between the spoil islands to windward or returning to the channel from the rocky shallows to leeward. I chose the former, guessing that the shallows between the spoil islands were sand or mud instead of rocks and wanting to get the more difficult part of the maneuver out of the way first and simply sail back to the channel afterward on a run with the daggerboard up.
Having a plan bolstered my confidence, so I sailed on, passing one spoil island then another before the barge emerged around the northernmost of the six islands. At the next gap between islands, I dropped sail, lashed it with the boom and yard, used the halyard to raise the bundle out of the way above my head, and rowed into the gap. To the south, the three green-square-topped channel markers lining the ICW from where I had come closed in on one another until they lined up like soldiers in formation—I was at the edge of the channel—then they eased apart again, but on their opposite sides, and I was in the clear.
Once I felt I was far enough out of the channel, I slowed my rowing to maintain my position against the sporadic southeast wind and kept an eye on the lay of the markers to ensure I didn’t drift back into the channel.
To the northeast of the entrance to Baffin Bay, a towboat pushed two barges lashed one in front of the other. A typical 195′ × 35′ barge can carry 1,750 tons of cargo, a load that would otherwise require 70 tractor trailers and four times the fuel.
The towboat pushed its barges past without incident. I stowed the oars, raised sail, returned to the channel on a run, and headed up and on my way.
After I rounded the turn, I passed what I assumed was the towboat with the broken rudder sitting immobile with two tandem barges.
Shortly after leaving them behind, I heard over the VHF, “Sécurité, sécurité, sécurité.” The Coast Guard station in Corpus Christi advised all stations to switch to channel 22A, where they broadcast a weather advisory to expect the wind to back overnight along with an increased chance for rain. The original forecast was for the weather to turn the following day, which was why I had cut my originally planned three-night trip to only two, but if it were now forecast to turn overnight, I needed to be off the water by nightfall.
A norther was the last thing I wanted to confront on the bay side of Padre Island. With a fetch of 5 to 10 miles down Laguna Madre, the wind could rile up breakers over the mile-long shallows and slam them relentlessly into the island’s bayside shore. The spotty line of gray-bottomed clouds on the southeast horizon had yet to build anvil tops or get any nearer to me, and their rain had petered out. They could have been just ordinary Gulf clouds, with the front yet to arrive from the north.
Given the Coast Guard’s advisory, though, my prospects for continuing with my cruise and a night sleeping aboard seemed slim. There was nowhere between Yarborough Pass and the takeout at Bird Island Basin to pitch a tent ashore without breaking national park rules, and there was no excuse for ignoring the Coast Guard’s weather advisory.
I kept sailing toward Bird Island Basin, checking my phone for a signal as I went. I’d decide what to do when I got a detailed forecast. After passing the edge of the shoals stretching out from Dagger Hill, I retraced my outbound route and close-reached in the southeast wind back toward Padre Island. Once a quarter mile from shore, I sailed on a beam reach paralleling the shoreline hoping to find anything protected from the north where I could drop anchor, check for a cell signal, get an updated forecast, and potentially stay for the night, but I found neither protection nor cell signal.
I passed the spot where I had stopped for lunch the day before. The shoreline made only a slight indent there, not enough of a niche to consider a cove and exposed to winds from every direction except for within a couple of points of southeast. I sailed on, but instead of continuing to follow my inbound track by falling off back toward the ICW’s 85 marker, I decided to hug Padre toward Bird Island Basin, still hoping to find a bit of protection in the shoreline. At the very least, I would reach the campground about a half-mile south of the boat ramp and could possibly pull ashore or anchor there. And even if I couldn’t, I’d heard about a cut I could take through the shallows to the boat ramp instead of having to backtrack first to the ICW. Finding the cut might also take some time, but I preferred exploring new ground, and the sun was still high.
A half-hour later, with no promising spots materializing, I saw the distant cluster of boxy white campers and RVs at the Bird Island Basin campground.
Although Laguna Madre is shallow it’s rarely clear, and local sailors sometimes joke about their centerboards or daggerboards doubling as depth sounders. My daggerboard dragged ARR & ARR to a halt several times while I sailed outside the dredged ICW channel. The clouds hanging over the Gulf beyond Padre Island had appeared menacing by midmorning but, as seen here, had abated by early afternoon into just plain old puffs of cumulus.
A single sail glided across the water from the cluster of campers toward the spoil islands, which lie 1/2 mile from Padre, and my mood brightened. The vessel’s skipper might know the way through the shallows to the ramp. Then the sail cut sharply 180 degrees back toward the campers, and I recognized the tight, winglike shape and the efficient undulating motion of a windsurfer, and not a promise of a path through the shallows to the ramp.
I closed in on the campground and spotted a cordon of buoys marked “No Boats.” Three-quarters of the way around the arc of buoys toward the ramp, ARR & ARR dragged to a halt in a mass of seagrass. I lowered sail, cinched the docklines to the foredeck and quarter cleats, hung the fenders back in place, pushed off the seagrass with an oar, and rowed toward the ramp.
The seagrass grew in thick, roundabout-sized masses, and occasionally I had to push off with an oar again. I took my time at it, though, with the sun still high and a reluctance for the trip to end. It had been too brief a trip to the Gulf, but prudent to depart while its gentler side still showed.
Roger Siebert is an editor in Austin, Texas. He rows and sails on local lakes and trailers to the Texas coast when he can.
If you have an interesting story to tell about your adventures with a small boat, please email us a brief outline and a few photos.
We’ve carried tools onboard our boats for potential repairs while underway and in the tow vehicle for any work needed on our trailers. Over the years, the tools have migrated from a Tupperware container to a small tackle box, and we were looking for a better solution when we happened across the Waxed Canvas Tool Roll from Readywares Supply Company. We have consolidated our boat and trailer tools in the tool roll and are quite happy with the light weight and space-saving results.
The tool roll is made of 20-oz waxed canvas, a time-proven material that holds up well in the marine environment (and that also served me well in the U.S. Marine Corps environment for 20 years). Waxed canvas has been in use by sailors since the early 19th century as a substitute for oilcloth and is highly water resistant and exceptionally durable. Audrey, with five decades of experience working with fabric, notes that the stitching on the roll is robust and the construction methods are excellent. The 18 tool pockets are well sized and spaced for tools of medium to small size. At one end of the roll is a pocket for small items; its YKK brass zipper will hold up longer than those made of most other metals and is much less likely to jam because of corrosion. There are cotton webbing straps on the outside to secure the rolled-up bundle; the straps have elastic keepers to keep their tail ends snug against the roll. We really like the plastic side-release buckles because they provide a secure closure that is easier to manage with wet hands than Velcro strips or cloth ties.
Photographs by the authors
The 18 pockets vary in size and are staggered to keep long tools on one side from overlapping with tools on the other side. The black strap down the middle helps keep the longest tools in line. The zippered pocket holds the small items.
The tool roll measures 26″ × 14-1/2″ when laid out flat; filled with our selection of tools, it rolls up to a compact diameter of 3 1/2″ and weighs 3.4 lbs. The size and shape of the roll allows storage in many spaces where our small plastic toolbox would not fit. The waxed canvas can be laid in the boat without the risk of scratching the boat’s finish, and the cloth handle is comfortable to hold. Waxed canvas can be cleaned with a damp cloth and set out to air-dry, while the tools benefit from a light coating of mineral oil to retard rust.
Straps and buckles hold the roll closed. The long tail ends are kept from hanging loose by bands, here on the back side of the roll.
We filled our roll’s pockets with items that we have found useful over several decades of boating and trailering: nylon zip ties, a tire-pressure gauge, cotter keys, keeper rings, clevis pins, a small bit of stranded wire, band-aids, multi-bit screwdriver, flashlight, 12-volt tester, brass wire brush, electrical tape, needle-nose pliers, and wire cutter. The roll also carries a small crescent wrench, small Vise-Grips, a razor-blade utility knife, and three metric box wrenches that fit nuts and machine bolts on our three onboard motors. To round out the kit we carry a few car and boat electrical fuses in common sizes, a hacksaw blade, propeller shear pins, and nylon gloves. And who could go anywhere without a red cotton rag? It all fits in a durable tool roll that’s handy to use and compact to stow in car and boat.
Audrey and Kent Lewis mess about in the Tidewater Region of Virginia with their small armada of canoe, kayaks, sail and power boats. Their adventures are logged at their blog, Small Boat Restorations.
The Waxed Canvas Tool Roll is offered by Readywares for $42.99.
Is there a product that might be useful for boatbuilding, cruising, or shore-side camping that you’d like us to review? Please email your suggestions.
I’ve been impressed by the Silky line of tools. Made in Japan, they have good steel and hold sharp edges. After discovering and using the Silky Nata, a traditional type of Japanese hatchet, I was curious to see how the same materials performed in Silky’s Ono, a Western-style hatchet.
The Ono weighs a hefty 1 lb 11 oz and has an overall length of 12″ and a blade length of 4-5/8″. Its full-length tang has the same removable and replaceable rubber hand grip as the Nata, and the 7/32″-thick SKS-51 steel is ground to a 20-degree double bevel, also just like the Nata. A chrome plating resists rust.
The Ono’s case is made of heavy-duty nylon fabric and its interior is lined with plastic sheets to resist damage from the blade. In its case, the hatchet can be hung from the aligned holes in the case and blade. A hole in the end of the handle is provided for a lanyard
Photographs by the author
A little stropping of the factory edge made it sharp enough to cut cleanly into the edge of a piece of paper.
Although the Ono came with a sharp edge from the factory, I gave the blade a quick stropping. With that finishing touch, the Ono could cut cleanly into the edge of a piece of paper. In the woods, I found a fallen branch from a maple tree. The wood was well dried and quite hard, but the Ono cut though a 1″-thick section of the branch, set on a log, with one blow; a 1-1/2″-thick branch took two blows. I sawed a length from the 3″-thick end of another branch, set it on end on a log, and easily split it into kindling.
The Ono’s heft and sharp blade give it good chopping power.
The rubber handle has an oval cross section and a textured surface for good grip. It is just soft enough to absorb the shock of impacts. For such a short hatchet, the Ono’s well-balanced mass of steel packs a good wallop. The blade is especially long for its overall length, making it easier to hit the target. I never overshot the wood and struck the handle of the hatchet, and even if I were to, there’d be none of the damage that would be inflicted on a hatchet with a wooden handle.
The Ono’s weight provides plenty of power for chopping and spitting.
Using the Ono as a carving tool, I easily shaped a small piece of western red cedar into the tip of a paddle blade, chopping first to rough out the shape and then using the hatchet as a chisel of sorts to smooth the surface.
The sheath for the Ono has a webbing loop on the back side for hanging, handle up, from a waist belt.
Most hatchets have a poll or butt on the back end of the head that can be used as a hammer. The back of the Ono is only the thickness of the steel and while it’s narrow, I’ve used a hammer for as long as I can remember, and my aim is pretty good—I didn’t have any trouble hitting nails on their heads. For improvised tent stakes, I chopped a quick point on a stick, then rotated the Ono handle 90 degrees to use the side of the blade to drive the stake. I felt that was safer than having the sharp blade coming toward my face in between blows.
I like the configuration of the Ono—a small hatchet with a big blade—and found it as able a cutting tool as the other Silky tools I’ve bought.
Christopher Cunningham is the editor of Small Boats Magazine.
The Silky Ono is available from Silky for $119. Online outdoor recreation sites also carry it at the list price.
Is there a product that might be useful for boatbuilding, cruising, or shore-side camping that you’d like us to review? Please email your suggestions.
I love rowing, but I’m not so enamored with it that I don’t think of raising a sail when I feel a breeze coming over the transom. While my Whitehall has a spritsail and a rudder, I don’t carry all that gear when I’m out rowing.
Two years ago, I spent an afternoon with the Whitehall, and on the way home a following breeze piped up. I couldn’t ignore it and tried sailing with my cagoule as a sail, one oar as a mast, and the other oar as a rudder. The hood of the cagoule fit over the blade of the oar and, with its draw cord cinched up, it stayed put. A couple of lines tied to the hem served as sheets. The boat briefly surged forward whenever the cagoule caught a puff of wind, but as a sail it wasn’t stable in the wind, and I struggled to keep it open and pulling. I needed a proper sail. I’ve had great success with a squaresail with my other larger boats, but it requires two spars. I decided I needed a spinnaker. It would work with an oar as a mast, and the head of the sail would just need a bag to secure it to an oar blade.
I found a pattern for a simple “M-Class Balloon or Parachute spinnaker” in an article first published in Model Yachting Monthly in June 1945. The pattern just needed to be scaled up for the Whitehall, so I lengthened the pattern from 48″ to 80″ and made it slightly more slender. The instructions in the 1945 article noted: “Make in 3 segments or in 4 if desired.” I planned for four and settled on five segments.
Photographs by the author
The pattern for the model sailboat was for panels 48″ tall and a little over 11″ wide for three or four panels across. For my 14′ Whitehall, I scaled the length up by a factor of 1-2/3 to 80″ and the width by 1-1/4 to 13-1/2″, a proportionally narrower panel for a spinnaker four or five panels across.
I used 4-mil plastic sheeting to make a prototype and drew the pattern on top of sheeting later twice folded over on itself to make four layers.
I assembled the four panels with Gorilla tape to see how the spinnaker would look. I later decided that I could add a fifth panel for more sail area and still have the sail set well.
The cloth, whether the spinnaker cloth I used or ripstop nylon, needs to be heat-cut to keep the edges from fraying. A wooden template will serve as a guide for the hot knife. I didn’t have any plywood to use for it, so I cobbled together some 3/8″ boards.
A piece of 3/4″ plywood served as a work surface for cutting the fabric. A pencil soldering iron with a small ball point works well as a hot knife. Mine is a Weller 25-watt iron, sold in a woodburning kit (WSB25WB) with 10 different tips. It has enough heat to cut the lightweight fabric and seal the edges without excessive melting.
With the cloth clamped tight on a plywood work surface, the template is set on top for hot-knife cutting.
After making the first cut, I moved the template over 1/2″ to provide a seam allowance (I traced along the template with a chalk pencil to mark the allowance). A couple of weights helped to keep the template from shifting while the heat cutting was being done.
After the panels are taped together, a batten sprung along the foot of the sail provided a guide for cutting a smooth arc.
After I had taken this photograph, I decided on a fifth panel, inserted it in the middle, and faired its bottom end in with the curve of the foot. With the foot cut, the spinnaker is ready for sewing.
The panels are sewn together with double-stick tape and two rows of zigzag stitching. The edges are covered with folded 1-1/2″ fabric tape. If rolls of the spinnaker cloth or rip-stop nylon like the one here aren’t readily available, you can heat-cut strips from the fabric leftover after cutting the spinnaker panels
Each of the three corners of the sail get sewn-on patches before the edge tape is applied. Webbing creates loops for attachment points.
To prevent the bag from being pulled off by the spinnaker, it is cinched tight around the base of the blade and its draw cord gets tied tightly at the oar’s throat.
The bag that fits the oar blade also serves for stowing the spinnaker: the head of the sail is sewn into the bottom of the bag. A loop of webbing provides an attachment point for the spinnaker when used with other masts.
I also sewed a bag for the straight-bladed oars I made for my dory. A webbing loop at the top is fitted with a spring hook that clips into the loop at the head of the spinnaker. The long loops of webbing at the bottom were initially for shrouds (a failed experiment). Smaller loops would be fine for attachment points for a line tied around the throat of the oar to keep the bag in place.
With an oar in the mast partners, the spinnaker sets nicely and provides enjoyable downwind runs.
A second oar serves as a rudder. I added an oarlock, set to starboard on the transom, for the purpose. A line tethers the oar to the boat to keep it from going astray if it slips from the lock. With my weight in the stern and the spinnaker pulling at the bow, the boat tracks well without needing any steering, so the oar can trail with the back of the blade skimming on the water. I rotated the blade to face the side I wanted to steer to when I needed to change course.
The spinnaker has also been a pleasure to use on the tandem canoe with the bow paddler holding a painter’s telescoping extension pole as a mast and the stern paddler in charge of the sheets.
If the boat you row isn’t rigged to sail, a forward thwart just needs a hole to serve as mast partners and floorboards can have a hole or a step screwed in place to secure the oar handle. Alternatively, the forward thwart can have a hole as a step for the oar handle and a partner can bridge the gunwales. If you assign a crew member to mast duty, a backstay will take the pull of the spinnaker.
The next time you’re out rowing and a friendly following breeze pipes up, think of how pleasant it would be to put the oars to use as a mast and a rudder, take a comfortable seat in the stern, and leave the labor to the wind.
Christopher Cunningham is the editor of Small Boats Monthly.
You can share your tips and tricks of the trade with other Small Boats Magazine readers by sending us an email.
Joe Lanni’s first-build, 3’S A CROWD, appeared here as the Reader Built Boat for our September 2020 issue. She’s a three-piece plywood sectional, built to plans that provided the option to forgo curves. That simple construction appealed to Joe as a novice boatbuilder, but a boat constructed with straight lines, angular corners, and flat surfaces might not be regarded as a first step into the boatbuilding arts. “It was,” writes Joe, “like making three wood boxes that connect.”
There are three good reasons for a boat to be, instead of boxy straight lines and angles, a composition of curves flowing one into another: even a quick glance at any creature evolved to move quickly through water makes it obvious that smooth curves don’t impede its flow; the curves of a hull, like the arch in stone and steel architecture, have more strength than straight lines; and curves are simply more beautiful.
Photographs by and courtesy of Joe Lanni
With Joe’s first boat, there were valid practical reasons for building it with the sheerline made of straight segments, but one’s eye cannot follow it without coming to a stop at the angles created.
For his second boat, Joe was interested in another easily built plywood boat, this time a kayak or double-paddle canoe around 11′ long and light enough to be easily cartopped. He liked the look of Wee Lassie canoes but wasn’t ready to take on the traditional cedar-on-oak lapstrake construction. His online search led him to the Wacky Lassie, which designer Fritz Funk describes as “an instant double paddle canoe to be built and used by kids.” Joe finally settled on the Wackless Lassie, David Beede’s take on Fritz’s boat.
David’s website provides a guide to each step in the construction and measured drawings for the plywood pieces and the temporary forms. The 10′9″-long sides, cut from 1/4″ plywood and each butt-blocked from two pieces, are straight and parallel sided. The sides’ straight lines get their curves from the spread and the angle set by the temporary forms. The chine logs, as well as the outwales, are glued on the outside of the side panels. Having the chine logs on the outside makes them easier to bevel to provide a landing for the bottom—just glue them along the edge of the plywood and plane the proud corners flat after the sides are bent around the forms. The bottom gets a keel, glued on the flat, and, after the three forms are removed, two spreaders hold the sides out.
When it came to build an 11′ boat that was too big for the workshop, it was Daddy’s turn to use the swing set.
Joe made his Lassie in his yard using his kids’ swing set as his workshop. The only shelter the boat had from the weather while under construction was a tarp. The project sat idle for weeks at a time during the New Jersey winter.
The finished canoe belies the fact that its sides can be cut in a single pass on a table saw with its fence set 11″ from the blade.
The finished Lassie came in under 40 lbs. For the accommodations, Joe uses a sit-on-top seat/back support with fittings on the rail to hold it upright and in place. He finds the canoe “easy to paddle; it tracks really well and is a joy to use.” It hasn’t yet been christened, but the name he has in mind (another inspired by the passenger capacity) is PARTY OF ONE.
A sit-on-top kayak seat and backrest provide simple but comfortable accommodations.
The curve of the port rail, deepened by this view, invites the eye to swing back and forth like a slow pendulum. Even while the canoe is at rest, it invites motion.
The Wackless Lassie sits nicely in the water with the ends just touching the surface.
With a simple bend around angled forms, Joe transformed the ruler-straight sides of two pieces of plywood into an eye-pleasing sheerline. He has already been musing about building a third and larger boat. On the road he is traveling to become a boatbuilder, there are more curves ahead.
Do you have a boat with an interesting story? Please email us. We’d like to hear about it and share it with other Small Boats Magazine readers.
Continue Reading - Enter your email to log in or subscribe
New to Small Boats? Create a free account to get our weekly emails and two free articles each month.
Time to upgrade!
You've read all of your free content for the month. Upgrade to a paid subscription for unlimited access.
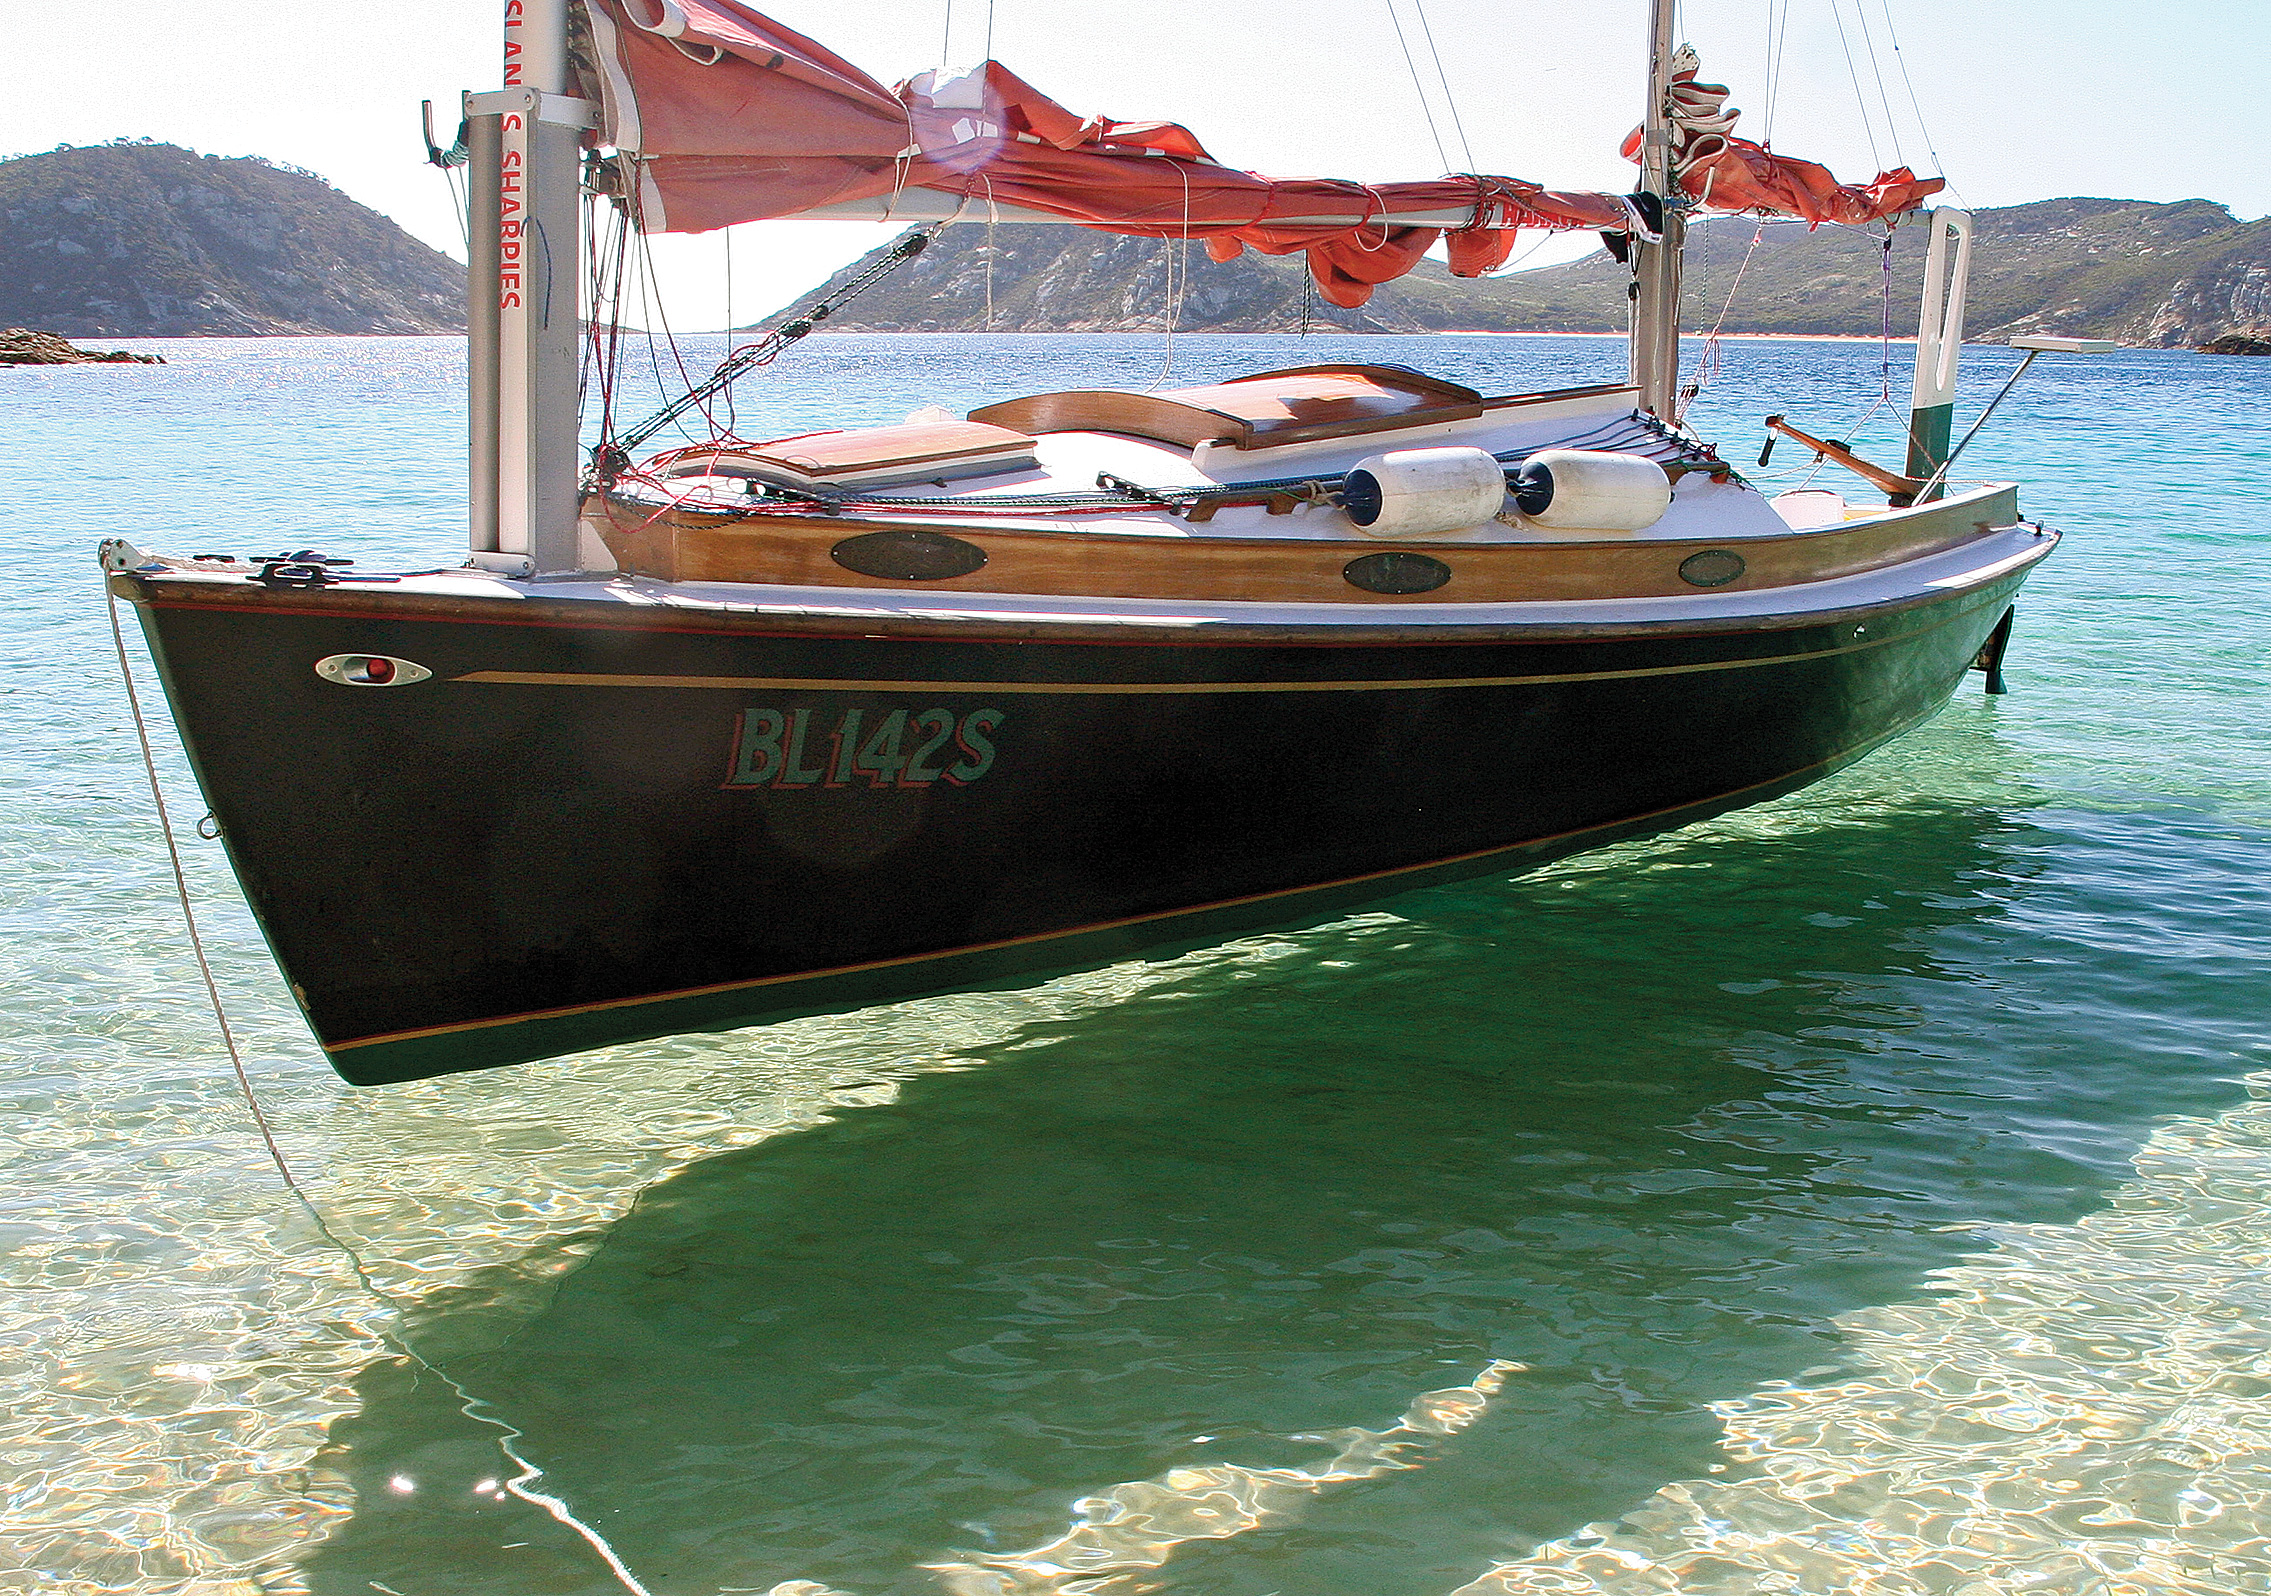
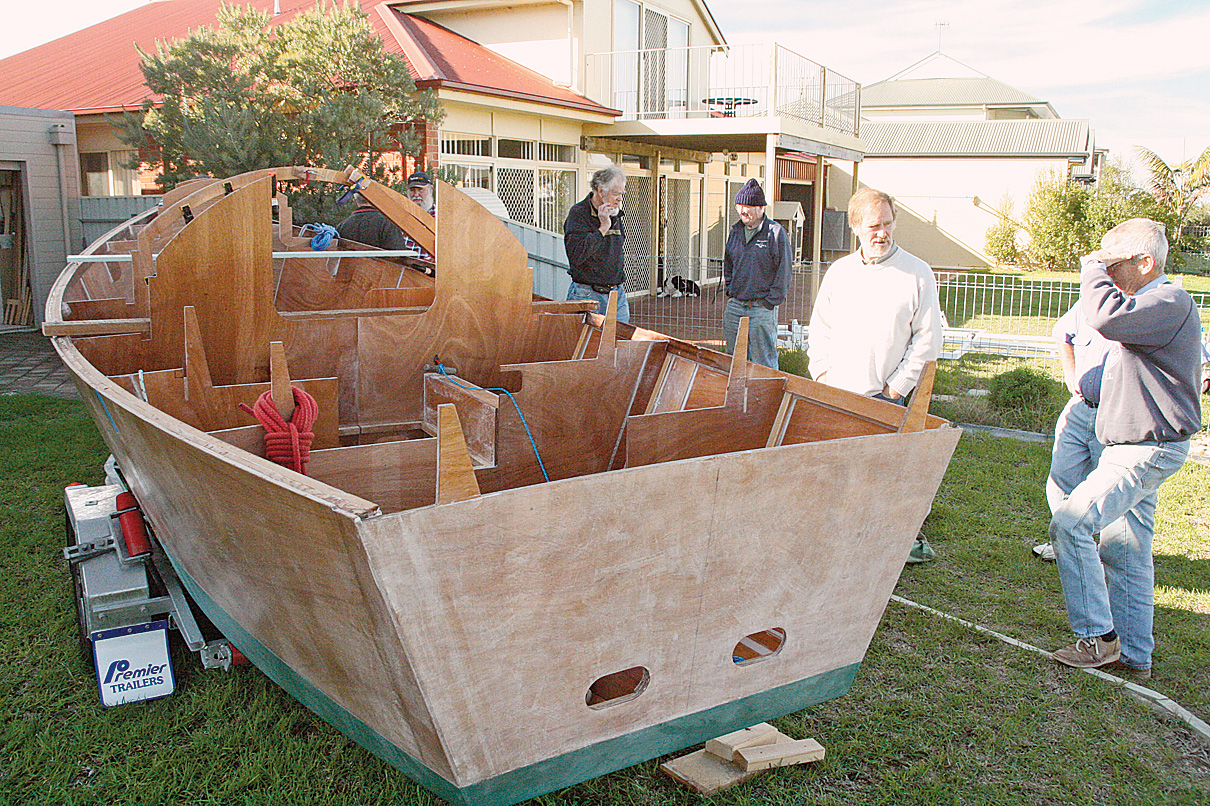 Courtesy of Stray Dog Boatworks
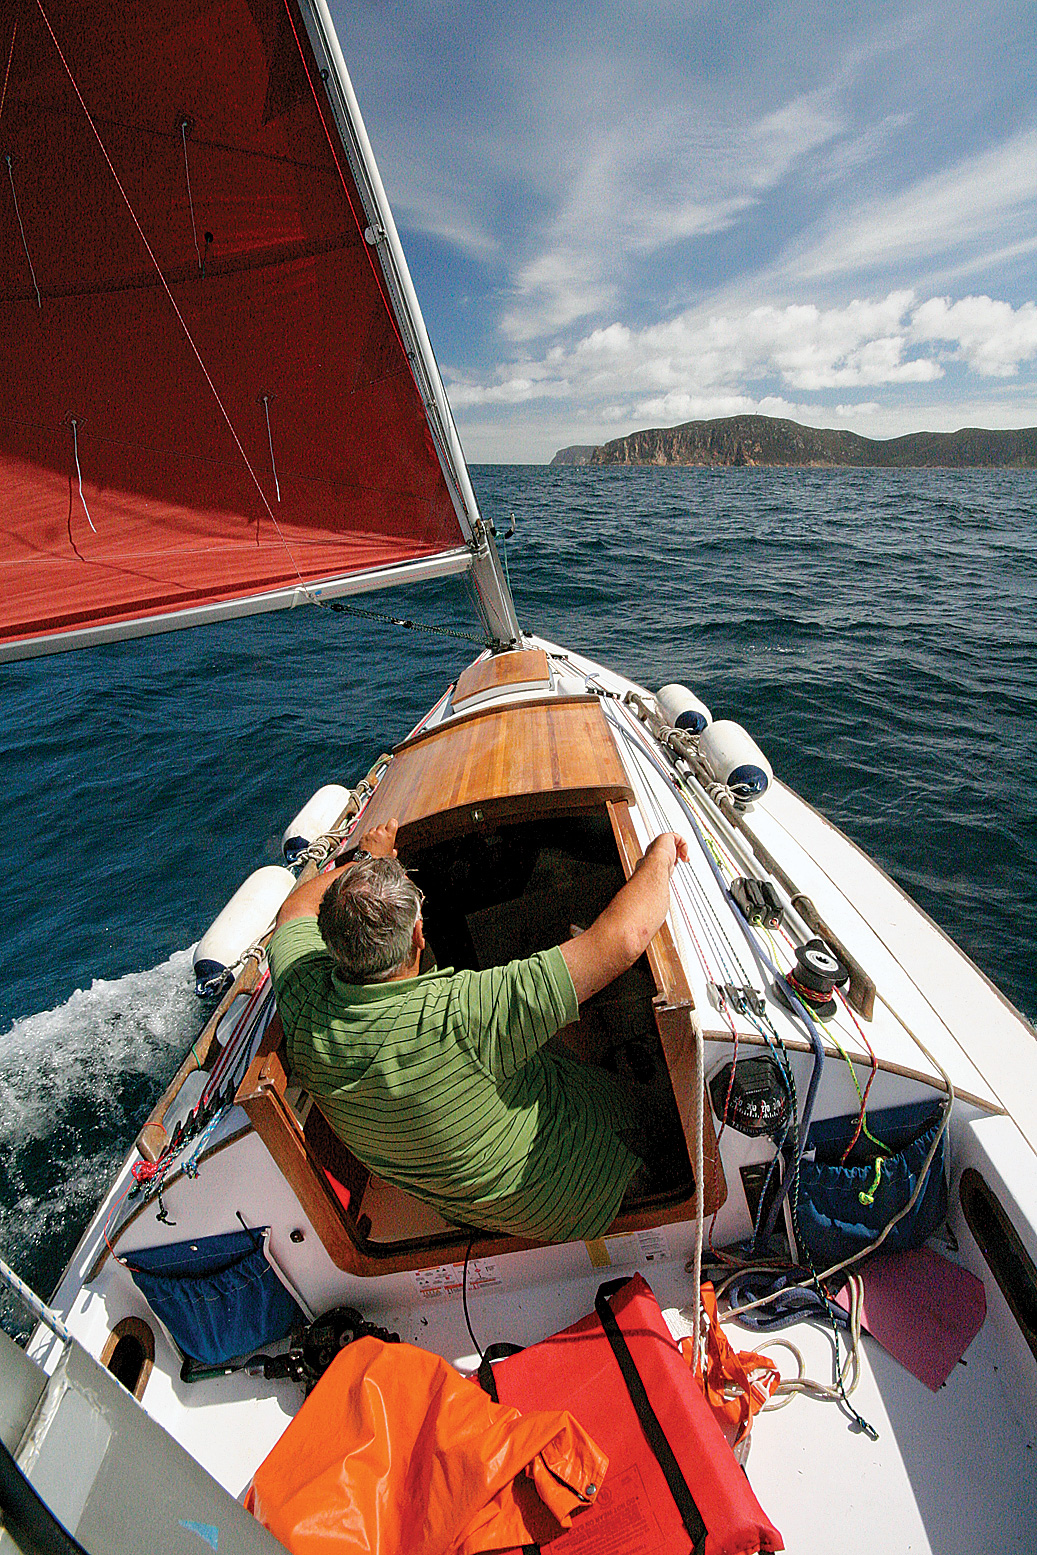 Courtesy of Stray Dog Boatworks
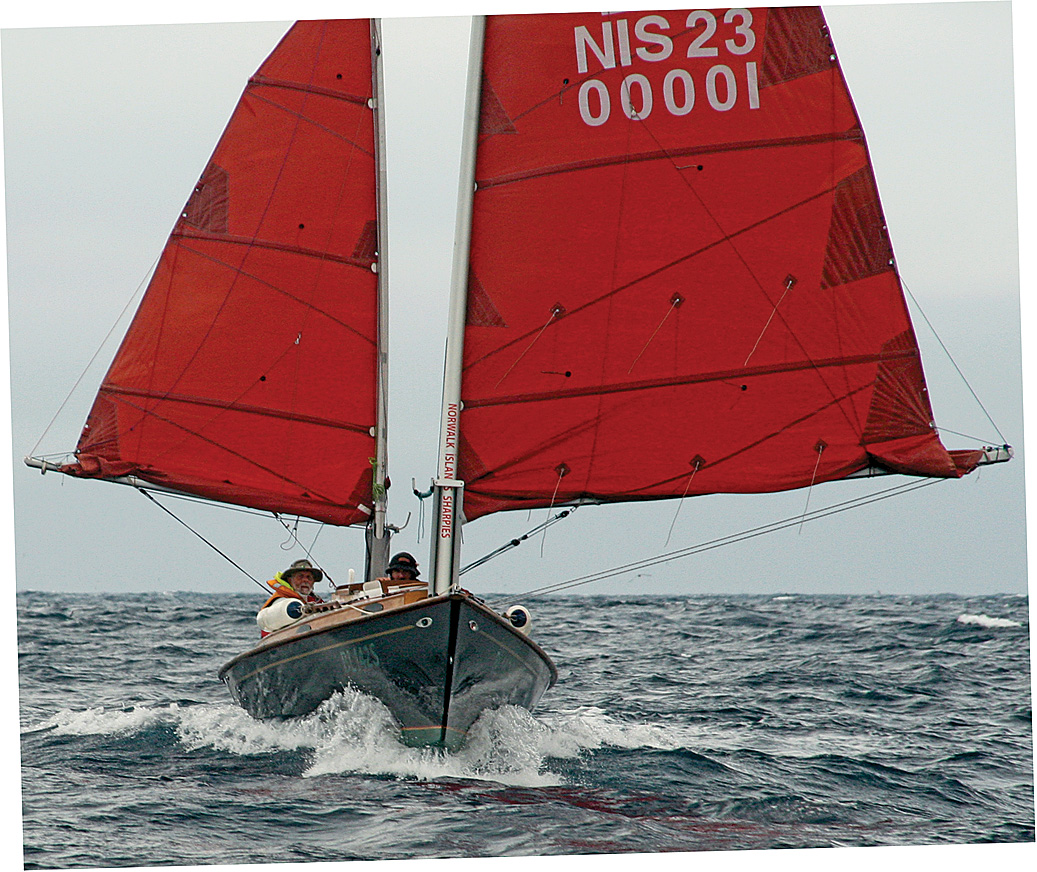 Courtesy of Stray Dog Boatworks