How to Repair Varnish on a Wooden Boat
This is a general outline of the process for a basic annual-maintenance varnish job. Healthy, well-maintained exterior varnished surfaces will require one maintenance coat per year, unless the boat is in a boathouse or under cover. Additional coats might be needed on surfaces subjected to high traffic, abrasion, or ultraviolet exposure, and more frequent recoating might be needed in the tropics.
In areas where damage requires touch-up varnishing of bare wood, or if starting a varnish project from bare wood, I apply nine coats of varnish minimum (seven coats on interior surfaces). On transoms, masts, or deep-grained oak, I recommend a minimum of 12 coats.
Note that with any exterior varnish, you may need additives to keep your varnish flowing in hot sun, windy weather, or on particularly large expanses of wood. Conversely, when varnishing off-season in cold shop or storage spaces, you may require additives to help your varnish dry.
Gather Your Tools and Materials
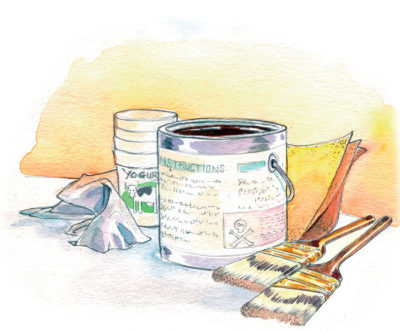
Tools
- Power sander with a hole-punch pad and adaptor to fit a standard vacuum hose.
- Vacuum with brush and floor attachments
- Extension cord with two-way splitter
- Heat gun fitted with nozzle ends
- Scrapers (I use carbide ¼”, ¾” triangle blade, 1½” blade.)
- Hard and soft sanding blocks plus small wood blocks for fairing touch-ups
- Rubber mallet
- Screwdrivers (square, slot, and Phillips-head)
- Long awl (to unseal thinner and additive containers, clean caulk nozzles, and poke drain holes in varnish cans)
- Paint-can opener key
- Five-gallon bucket
- Varnish brushes (I use Redtree badger-hair brushes, and 1” (25mm foam brushes for a few limited instances.)
- Varnish roller trays (I use white plastic trays with a bubbled surface; they can be reused if cleaned well.)
- Roller frames and foam rollers (I use yellow foam rollers: 3” (76mm) for small jobs, 7” (178mm) for large surfaces.)
- Sharpie pen for labeling
- Tack rags and rags (and scissors to cut them)
- Rubber gloves, eye protection, dust masks, respirator, ear protection, knee pads, and protective tape for fingers
- Cone paint filters and a filter “donut” (a plywood or cardboard cutout with a 4” [102mm] hole to hold the filter over a bucket)
- Stir sticks
- Brush spinner and combs
- Two plastic buckets with lids (2 qt [2 liter]) for cleaning brushes, and a 1 qt [one liter] to hold brushes)
- Jug labeled “Used Thinner”
- Umbrellas (to shade my varnish tray as I work)
Materials
- Sandpaper—80 grit, 120 grit, 240 grit, and sticky-back 240-grit sheets (Use quality sandpaper such as Norton. It’s worth it.)
- Red Scotch-Brite scouring pads. Half a pad fits on a ¼-sheet sander (for deglossing only).
- Tape (I use 3M Scotch green masking tape #256—for exterior use up to five days— and 3M blue 2090 tape for bare wood and double-taping around touch-ups for heat-gunning.)
- Denatured alcohol in a spray bottle
- Turpentine
- Varnish and additives
- Scrap cardboard and boxes (for under buckets and for workstation)
Prepare Your Boat for Varnish
Wash the boat. This removes grime and saves sandpaper. When removing hardware that would interfere with your varnishing, label each piece for re-installing afterward. For any hardware you leave in place, be sure to tape it thoroughly to prevent contamination with splatter or stray varnish.
Identify and mark with tape any damaged or blistered areas that require touch-ups. (When you find “blown” varnish, that is, varnish that has turned yellow and milky, and no longer adheres to the wood, think about why it’s blown—sun, moisture—and fix the source of the problem if you can.) Deal with these areas first, because they will need nine coats to match the surrounding varnish.
Remove blown varnish with a heat gun and scraper, scraping into the damaged or bare spot (see more in TIPS AND DETAILS, below). Fair the edge of intact varnish into the bare spot with 120-grit paper on a small hard block until smooth. Sand the entire touch-up area with 240-grit paper. Wipe with alcohol and seal with a 50/50 varnish-and-turpentine mix. Do this with each touch-up.
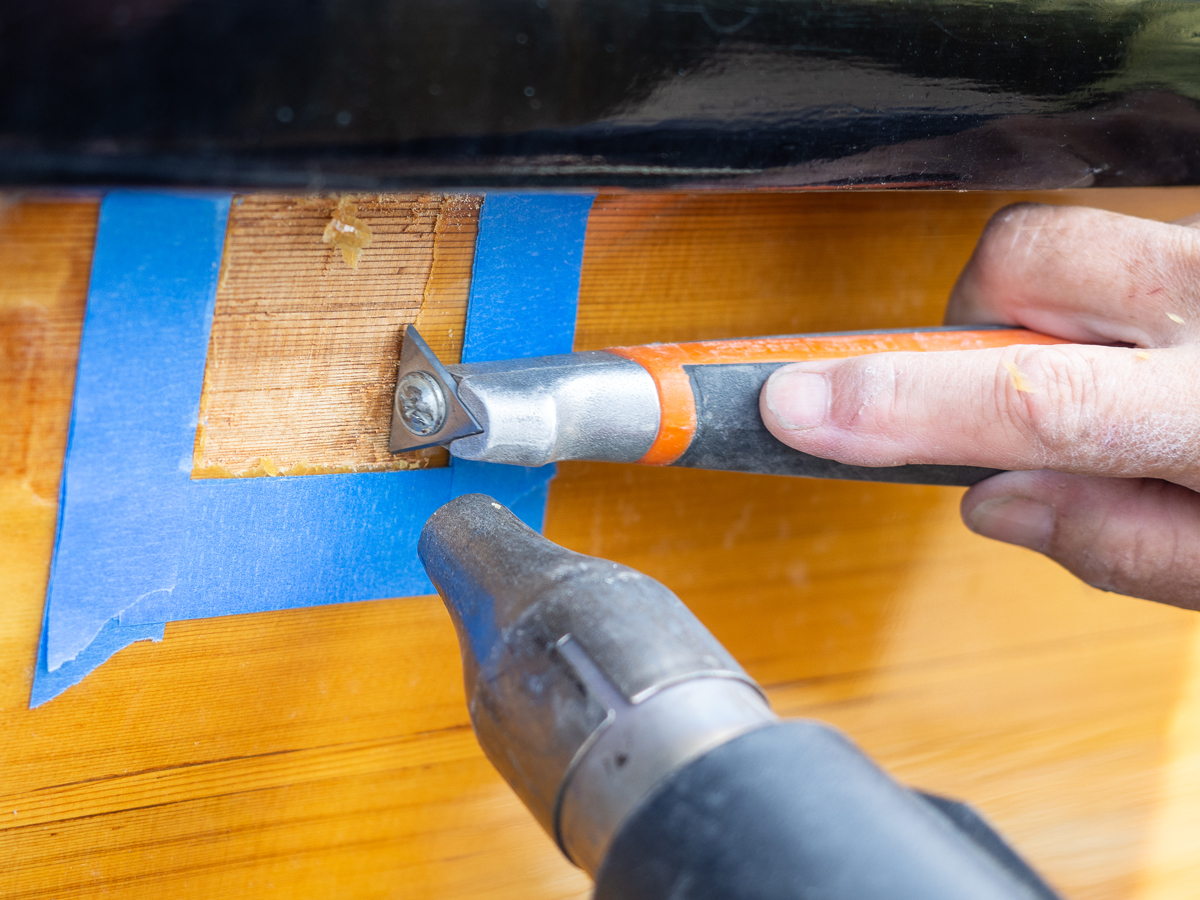 Dieter Loibner
Tape off with a double layer of blue 3M tape and carefully remove blown varnish with a heat gun and scraper.
Tape will not stick to sanding dust, so before sanding it’s best to tape off the surface to be varnished, and be very careful not to disturb the tape while you sand. If sanding up against glass in portlights, hatches, or windshields, it’s best to tape first just for insurance; scratches in glass often cannot be undone.
When touch-ups are sealed and you’re building coats on them, you can begin to sand areas with intact varnish. On sunny days, you can get two or three coats of varnish on touch-ups if they dry enough to the touch in between; on cold days, you may get only one on.
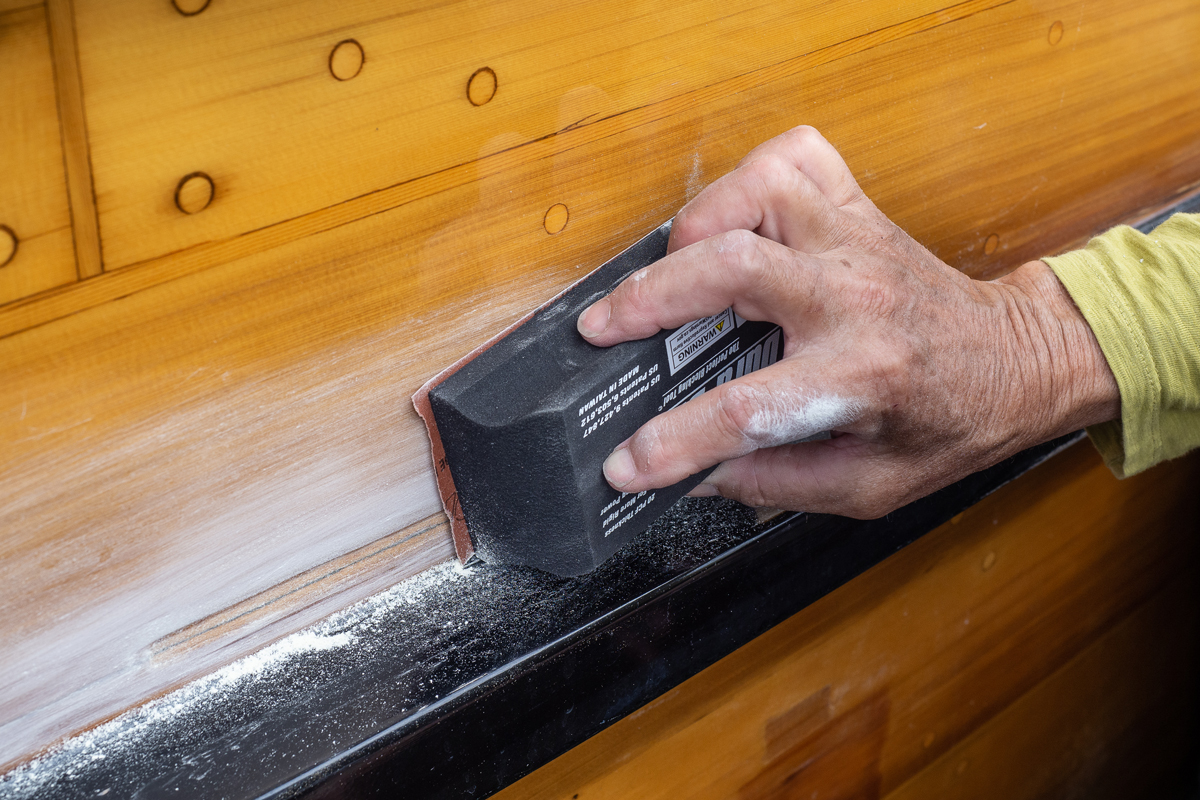 Dieter Loibner
Fair the edge of intact varnish with 120-grit paper, and then switch to 240-grit to sand the entire touch-up area.
For surface preparation of healthy varnish, it’s important to degloss everything. I start with 240-grit paper on a ¼-sheet palm sander to do a quick deglossing and overall sanding. It does the bulk of the work quickly and easily. Then I hand-sand using a soft block with sticky-back 240 grit to remove swirls from the mechanical sander and hit any missed spots such as seams and corners.
For surfaces with prominent brush strokes or uneven varnish, it’s best to hand-sand with a hard block to fair them. For deglossing line holes, detailed scroll pieces, or hard-to-reach undersides of cleats, Scotch-Brite scouring pads work well, but they will not remove sags, drips, or hairs.
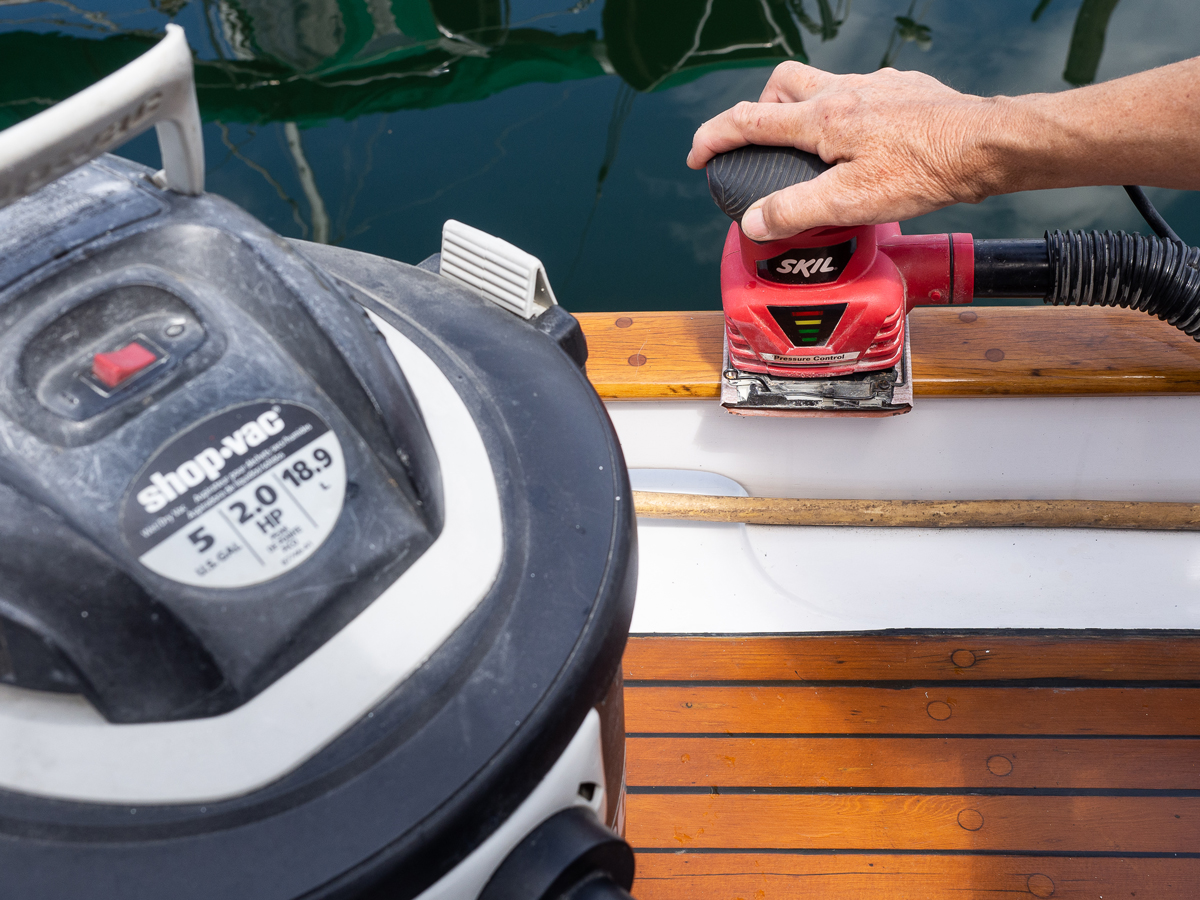 Dieter Loibner
Degloss with 240-grit paper on a 1⁄4-sheet palm sander connected to a shop vacuum, and then handsand with a soft block to remove swirls.
Work around your wet touch-ups. If you need to, skip the midday touch-up coating so you can sand parts near touch-ups without the dust embedding in very wet varnish. Usually after a couple of hours, touch-ups are dry enough to sand nearby them without them becoming embedded with dust.
If you’re doing more than one overall coat, sand everything out, and apply your first full coat as soon as you can, rather than wait until all your touch-ups are done. This allows your first overall coat a few days to dry before sanding for the topcoat once your touch-ups are ready. (If only doing one overall coat, you’ll need to wait until your touch-ups have eight coats on them before doing your finish coat on everything.)
 Dieter Loibner
Wet-sand in dust-sensitive areas, e.g., to wet varnish. The specially formulated paper cuts faster than dry sandpaper.
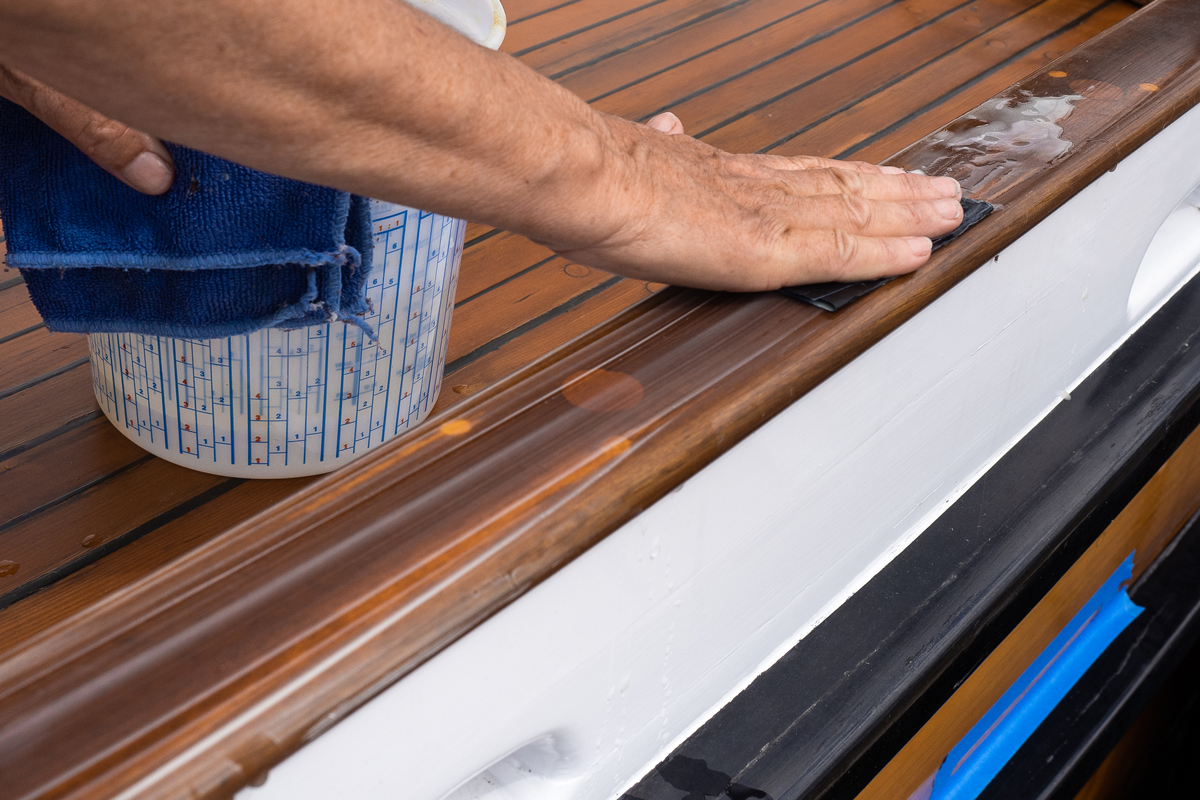
Wet-sanding, which produces no dust, is useful when you need to sand a surface next to wet varnish or touch-ups. It’s also useful when prepping any exposed exterior varnish when you shouldn’t produce dust or you don’t have power for vacuuming.
Specially formulated paper for wet sanding cuts much faster than conventional dry sandpaper. I use it with a 2-qt bucket of water and a microfiber cloth, sprinkling water on my sanding area with my fingers or dipping the paper in water before sanding a section. Then I wipe the wet dust slush off with my wrung-out cloth. Leave the bucket of sludge water in the sun to evaporate. Do not dump it at the shop or marina. Dry wiping and vacuuming aren’t necessary. Just wipe the surface with alcohol, tack, and varnish.
 Dieter Loibner
Dip your fingers in a small bucket of water to dampen the area, or dip the wet-sand paper. Afterward, clean up the area with a microfiber cloth.
After dry-sanding, wipe down with a dry rag. When the rag gets too full of dust, I clean it by letting the vacuum hose suck it in while I hold the end. Next, vacuum to clean any leftover dust off the surface and surrounding areas, and then wipe down the surface with a clean rag and denatured alcohol. I put alcohol in a spray bottle for economy and convenience.
 Dieter Loibner
After dry-sanding, wipe down and vacuum the surface and surrounding areas. Then spray with denatured alcohol and wipe again with a clean rag.
If you didn’t tape off the perimeters of the surface to be varnished before sanding, do it now.
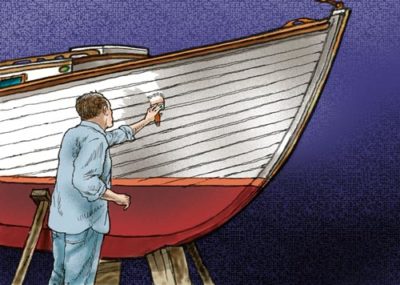
Apply Varnish to Boat Wood
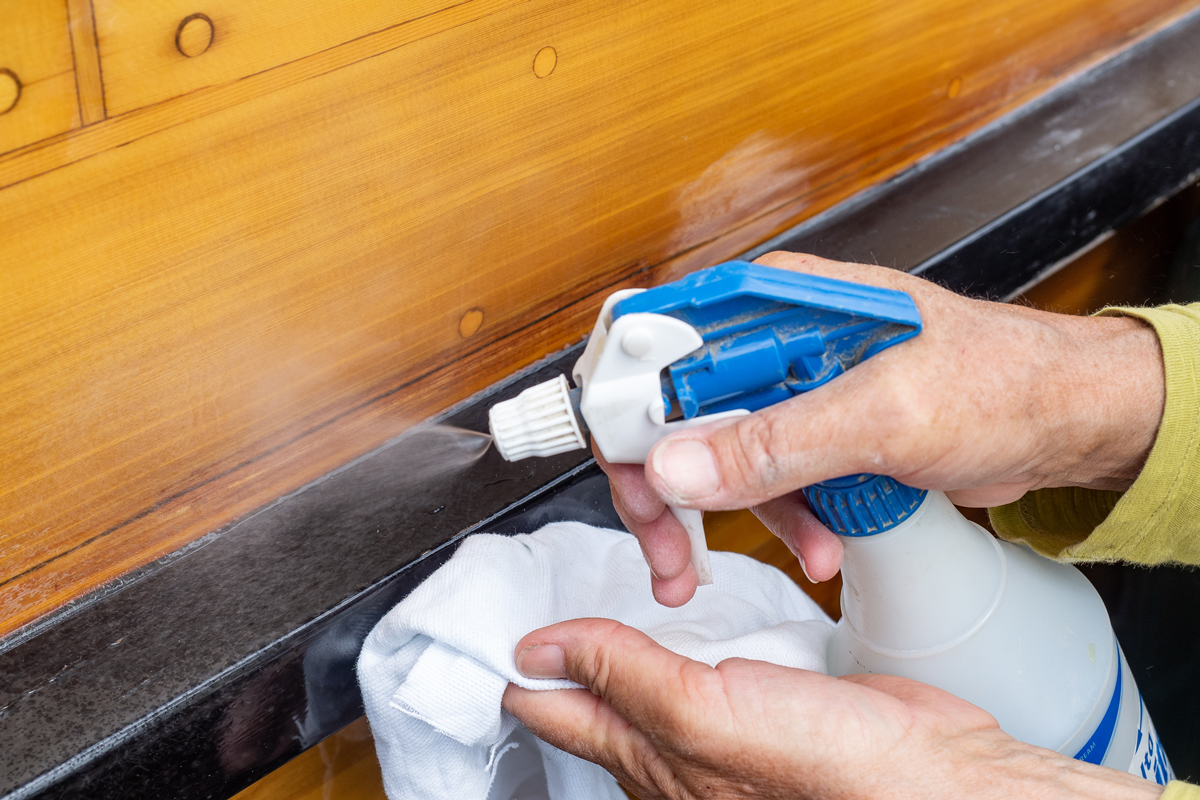
Just before varnishing, wipe the surface with alcohol again, and then tack with an unfolded gauzy tack cloth to pick up any last bit of dust. Wear gloves to keep the tack cloth wax off your hands, and never press a tack cloth hard against the surface (it will leave wax, and your varnish will fish-eye and not adhere).
If varnishing interior surfaces the same day you sanded, it’s best to spray the air above with a mist of alcohol to drop any airborne dust and then wipe surfaces with alcohol. Also wipe any work lamps you may have positioned over your varnish. Pull your hair back and mind your clothes. A wool sweater or any cloth that sheds fibers isn’t good varnishing attire. I roll and tip my varnish.
 Dieter Loibner
For final prep, gently wipe with an unfolded gauzy tack cloth. Wear gloves and never press a tack cloth hard against the surface, as it will leave wax.
For most surfaces I use a 3″ yellow foam roller with a white plastic bubbled tray. The roller should be flaked to remove lint from it, and its cardboard ends should be rubbed—even if the packaging declares “NO LINT” in big bold letters. The roller puts the varnish on quickly and evenly.
First, I roll the varnish on in short sections—roughly 1.5′ x 2′ (0.45m x 0.61m). Next, using a high-quality badger-hair brush, I brush the rolled varnish gently forward, then brush it back into the finished section and move on. This sequence helps reduce the stop-and-go buildup lines and keeps the varnish flowing into itself.
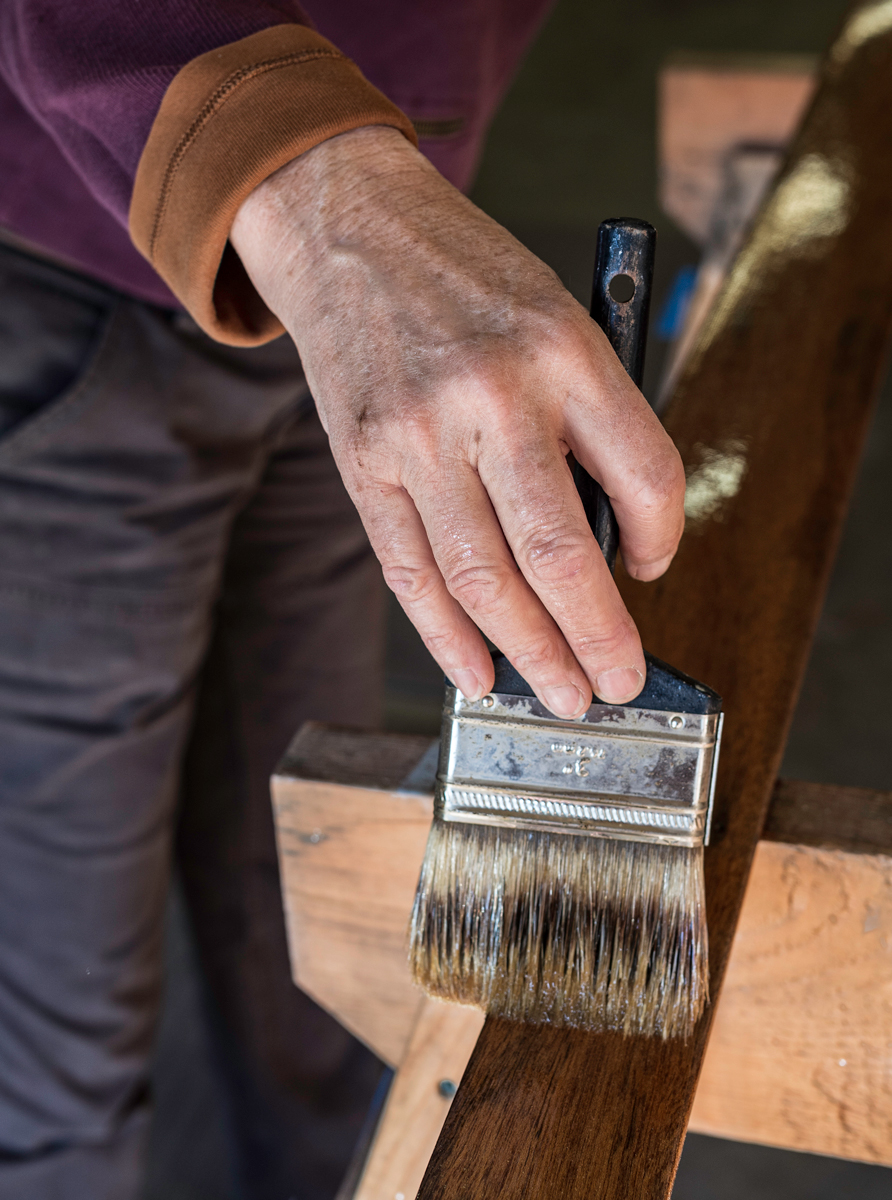 Dieter Loibner
Brush rolled varnish forward, and then back into the finished section. This helps reduce buildup lines and keeps the varnish flowing.
If I have a large expanse to varnish or if it’s breezy, it’s helpful to add a little flowing agent, such as Epifanes Easy-Flow or Penetrol. But if it’s not breezy and the expanse is not large, I use the varnish straight out of can, without any I hardly ever use thinner in varnish. The exception is when I’m coating a large expanse, such as a hull, on a windy day.
When varnishing caprails or cabin trim, I first roll the underside edges just up to the visible round, and tip with a foam brush, which leaves a nice beveled edge to meet up with when I come back and tip the adjacent visible surfaces with my varnish brush. This sequence keeps me from having to slow down to get those unseen spots and break my flow on the visible surface. With the undersides done, I’ll quickly coat the sides first, then the top for a short length—roughly 1.5′ x 2′—then move on to next section.
As I varnish, I keep my varnish tray in a cardboard produce box with a magnetic clip on the side to hold my brush. I also keep a rag and my tack cloth in the box in case I need them as I’m going along.
It’s important to block the sun from shining on the tray of varnish. The box flaps can help with that, but I also use my own shadow, shadows from the boat, or umbrellas I set up strategically.
 Dieter Loibner
Protect varnish from the sun by putting the container into a high-sided box. If necessary, you can make your own shade with a small umbrella.
When you’re finished applying varnish, go back around, and, while it’s still wet, clean up any varnish you may have gotten where you don’t want it.
Cleaning Up
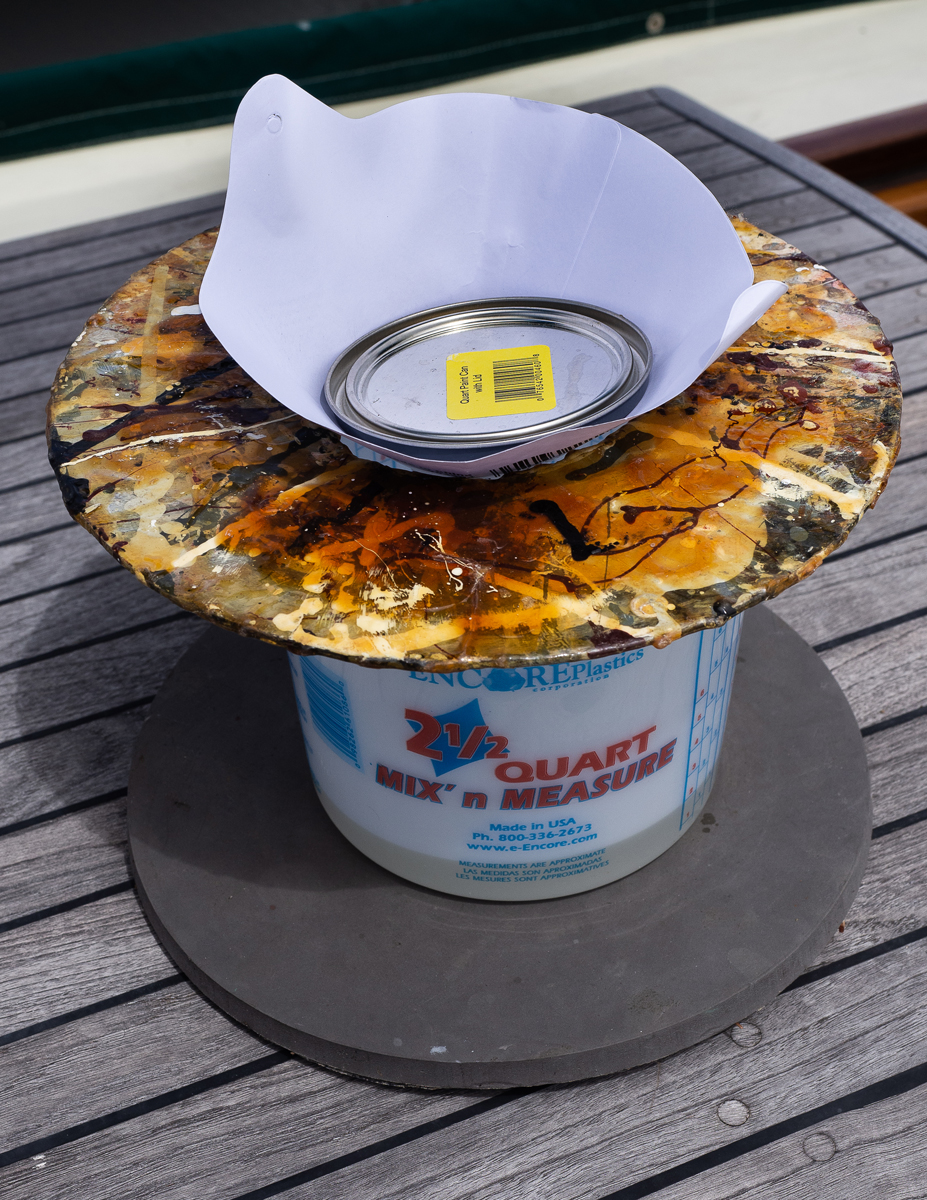
Pour leftover varnish into a separate can from your fresh varnish.
 Dieter Loibner
Use paint filters and a filter “donut”—a plywood or cardboard cutout with a 4″ (102mm) hole to hold the filter over a bucket.
If you clean your bubbled tray well with your brush, you can let the tray dry and reuse it.
Pour a couple of inches (about 50 mm) of turpentine into a 2-qt plastic bucket, and then discard the used yellow roller, but put the roller frame in the bucket and clean it well using your brush. Wipe the frame with a rag, and put it away. (If you don’t clean your frame, it won’t roll next time you need it.)
 Dieter Loibner
To reduce expenses, maintain all your brushes well. Cleaning them with a brush comb and turpentine is only the first step.
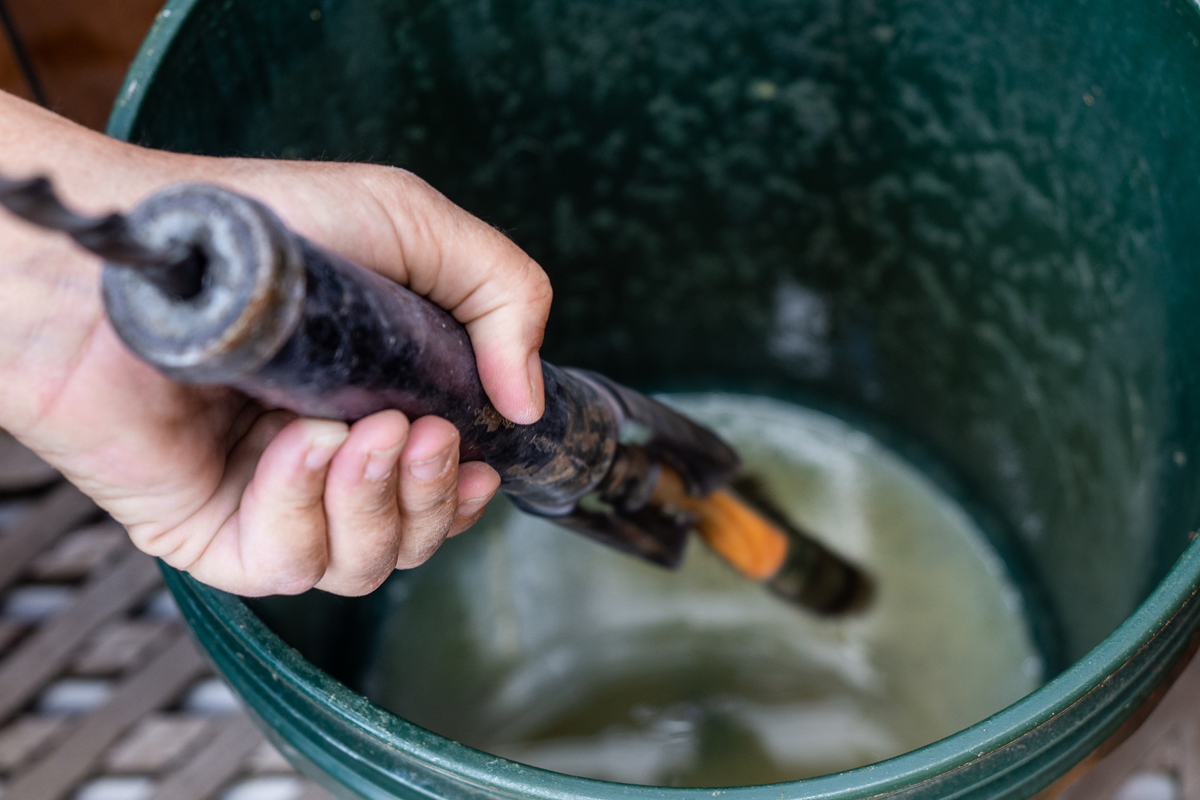
Clean your brush well with a brush comb and turpentine, and spin any solvent lingering in the bristles into a 5-gal pail with a brush spinner. If you use your brush frequently, after cleaning it you can store it in a quart plastic bucket with 1″ or 2″ of turpentine. Cut a slit in a plastic lid to push the handle through. Then each time you need to use it, you just comb it out and spin it, and you’re ready to go.
 Dieter Loibner
Next, mount the handle to a brush spinner and spin hard into a 5-gal pail to remove all the remaining solvent from the bristles.
I keep a lid on the 2-qt cleaning turpentine bucket and reuse it for quick cleaning of my brush through the day, or for setting my brush in while going for lunch. (Leave your brush in turpentine only. In paint thinner or mineral spirits, varnish in the brush will turn to goo in just an hour.) When the cleaning turpentine gets too murky, pour it into a labeled “Used Turpentine” container, and take it to a hazardous waste disposal facility when it is full.

Sponsored by: WoodenBoat’s Mastering Skills
More Tips and Details on Applying Wood Varnish
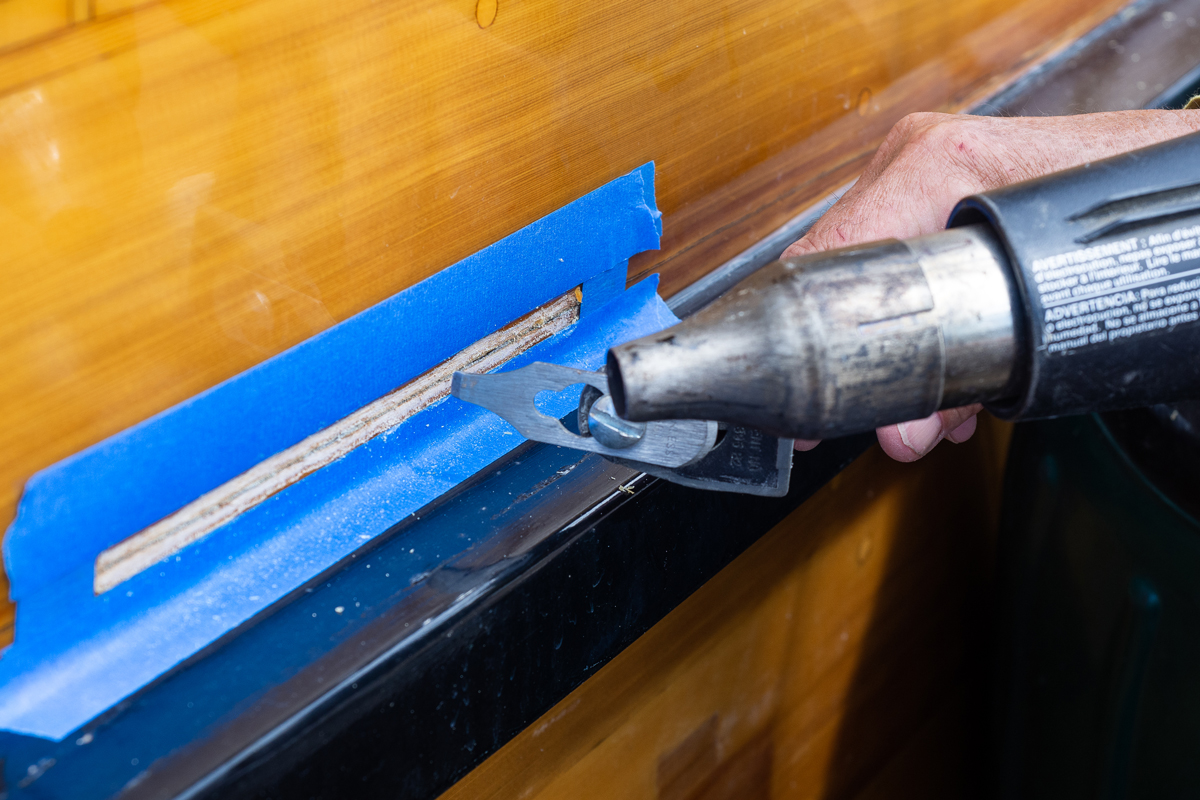
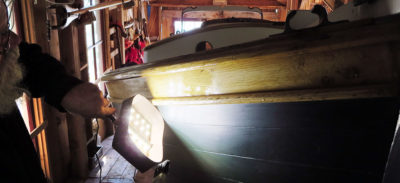
When spot-stripping varnish, use a heat gun set on medium and fitted with a narrow nozzle to help keep varnish from bubbling up adjacent to the intended touch-up. Double-taping with 3M blue 2090 tape right around your touch-up will also help limit the area you strip. And remember, you need only a bit of heat on the varnish. It doesn’t need to be a gooey mess before scraping.
 Dieter Loibner
To spot-strip varnish, use a heat gun set on medium with a narrow nozzle to direct the heat and keep adjacent varnish from bubbling up.
When applying touch-up varnish, always brush in toward the patched area to reduce buildup on the edges surrounding it. This makes for easier sanding when your many repair coats are done.
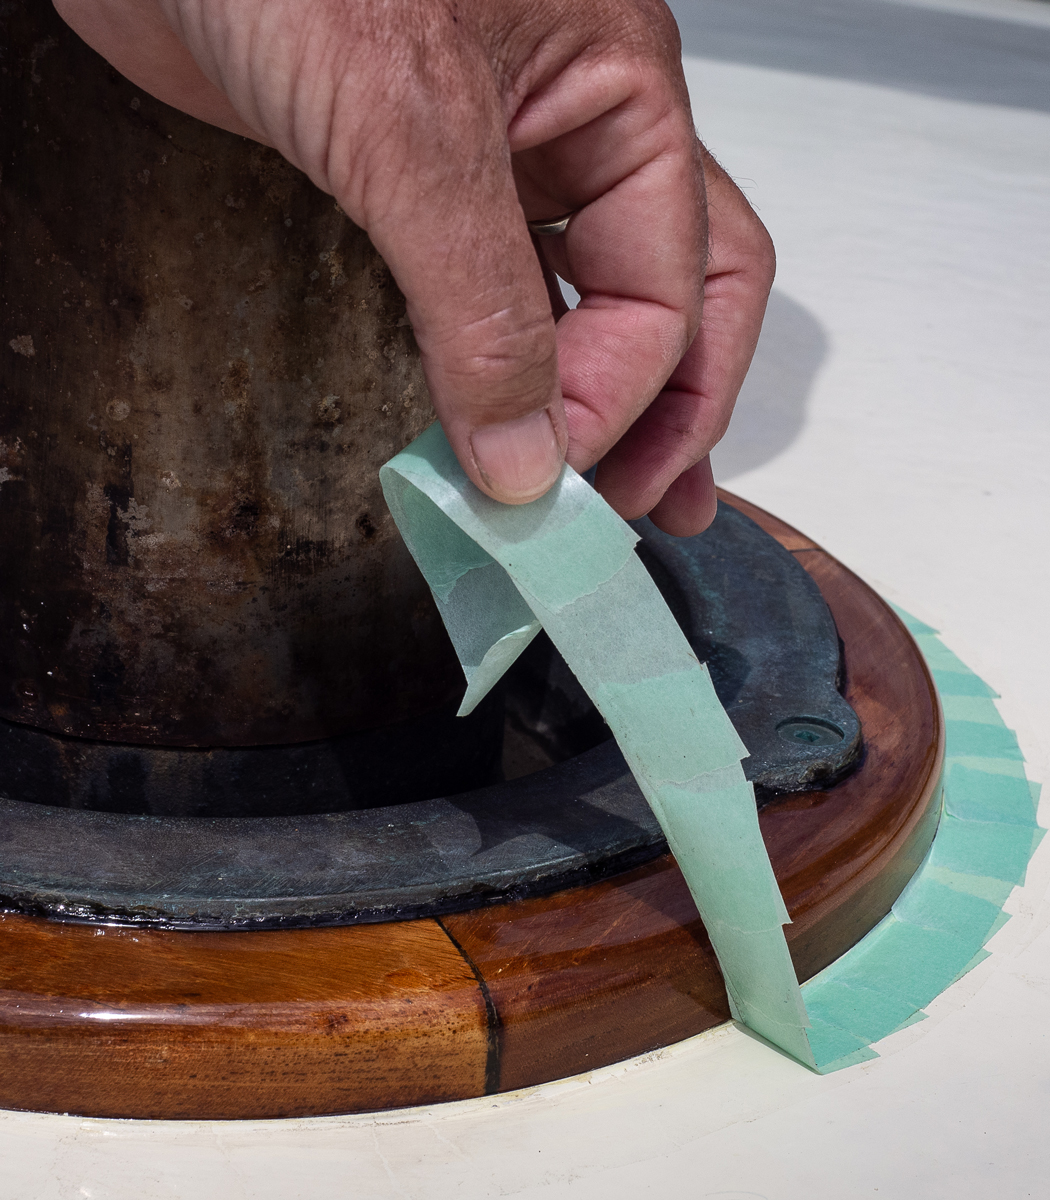
Never let more than three coats of varnish dry before pulling your tape. When doing nine coats, I’ll pull my tape after the fourth coat before it’s dry, then again after the eighth coat before it’s dry. I always retape just before the topcoat.
 Dieter Loibner
A double layer of 3M blue 2090 tape limits the strip area. Never let more than three coats of varnish dry before pulling the tape.
For sanding and varnishing bare wood, I will sand up to only 120 grit and then seal with 50/50 varnish and turpentine.
“Hot-coating” is recoating within 24 hours of the prior application, before that coat has completely cured but is dry enough to rub your hand over. When hot-coating or recoating without sanding, tack between each coat. To keep the surface fair, it’s best to let the varnish thoroughly cure after three hot coats, and then sand it, especially on open-grain teak or whenever the finish shows too many brush strokes or any unevenness.
Don’t pile more varnish on top of flaws. Spot-sand out any sags, drips, hairs, or bugs before applying the next coat. If you have a thick drip or sag, get rid of it before the next coat—scrape it down with your scraper, let it dry, then sand it out. In the meantime, just varnish around it.
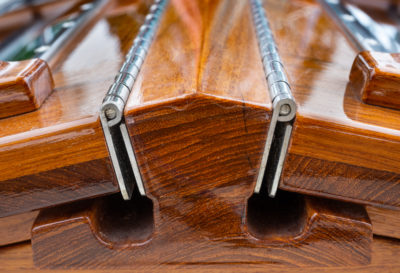
When taping around curves, use a series of small pieces.
 Dieter Loibner
Taping around curves is tricky, but a series of small pieces going in the same direction will make it easy to pull the tape after the job.
Be aware that sanded surfaces—whether they are to be painted or varnished—will usually pull adhesive from your tape and leave it on the surface. It’s hard to see this residue, so always double check for it and clean it away before varnishing or painting that area. It will otherwise show up in your finish.
Never pool varnish in corners or on low horizontal seams. It tends to blow within a year.
Dip only your brush tip into varnish, and never hold your brush upside down long enough to let varnish get in under the ferrule.
When you set your brush in turpentine, you need the solvent to come only an inch or so up the bristles. Don’t immerse your brush up to the ferrule in turpentine.
Be mindful of sharp tools in your pockets as you move about the boat; also beware of any metal snaps, rivets, and buckles on your clothing that could scratch the finish.
Wear a dust mask for dust, a respirator for chemicals (keep respirators in sealed bags for longer life), gloves for wipe-down and cleanup, and kneepads.
 Dieter Loibner
Dust mask, respirator (with replacement filters), gloves, kneepads, and tape (to protect fingertips) are the basic necessities for personal protection.
While gloves are important when handling solvents, I never wear them while varnishing. It’s too easy to get varnish on the tips of the gloves’ fingers without realizing it, and then to go around the boat leaving little varnish prints everywhere.
Always put lids back on tight each time you use anything.
Be especially careful with your rags. Always hang them to dry or put them in a fireproof bucket with water in it. Never leave a chemical rag balled up or resting on varnish.
Unplug your heat gun whenever you turn your back on it, and be mindful of how and where you set it down when it’s hot.
Check for residual adhesive after pulling your tape when the job is done. Rubbing a dirty hand or rag over where it was will make the adhesive show. Clean away the adhesive with an orange citrus cleaner if you need to. Do not use an acetone-based cleaner.
In a cold shop in the winter, I sometimes add accelerator to speed up the drying time so that I can coat the next day. (It’s also good to slightly hasten drying time if rain is on the way.)
Random-orbital sanders can be problematic with varnish. For the most part, they are overkill. You must be very careful not to create circular ditches and ruin the fairness of the finished surface. It won’t show up until you put the glossy finish on. Also, the friction created by sanding at high speeds with paper as fine as 320 can heat up and lift the varnish.
To make unfolding cold tack cloths easier, just set them in the sun or on a lamp for a minute.
Keep it flowing smooth, shiny, and bright!
May the flow be with you.
Joni Blanchard is the owner of Leatherwood Finishing Company and the author of Tricks, Cheating, & Chingaderos: A Collection of Knowledge and Tips for Varnishing/Painting Wooden Boats.


After reading this review, I surely know what’s best for my boat or water vessel. Thanks a lot for perfect article.