The Nutshell Sailing Pram is, in our opinion, one of the best tenders ever designed. She’s a beauty in looks, easy to build, and does her job far, far better than most boats of her length. She rows very easily, and can carry three adults with a comfortable margin of free board. She tracks exceptionally well and, even in a chop against a breeze, she holds her own like a true pulling boat.
7′ 7″ Nutshell Sailing Pram Particulars
The Nutshell tows steadily and with little disturbance. An ideal yacht tender, she can also be rigged to sail. Very stable, yet swift under the lug sail, she’s a great “fun” boat for kids and adults alike.
Joel White, who created the design, has this to say about the Nutshell Pram: “Little boats are fun to develop, but not easy, since the design constraints are so strong and the requirements so firm. One of the requirements was that it must be constructed from 8’ plywood panels, so the pram became 7′ 7″ overall. An earlier plywood pulling boat I built with glued laps proved to be such a success that the same construction is used here in Nutshell. It produces a strong, light, easily constructed hull, and one that is so uncluttered inside that cleaning and painting become easy.”
Plans Redrawn for Publication by Dave Dillion
The Nutshell Pram is planked upside down on a building jig. Consisting of only 22 wooden parts (Rowing model), the design was a natural for a kit, and WoodenBoat first offered her as a complete kit boat, one of the most attractive and best performing for her size of any we’ve seen. (The Nutshell Pram Kit is still available in a Rowing Model for $700, and in a Sailing Model for $895, freight collect.)
In WoodenBoat No. 60, we ran a “how-to-build” article on the Nutshell, and we now offer a plans package for those who prefer to furnish their own material. Plans for the Nutshell Sailing Pram consist of eight sheets, including building jig details, template sheet, scaled plank patterns, patterns for structural members, and construction details. A how-to build manual and video can be purchased separately. WB Plan No. 41. $75.
Construction Plans
Completed 7′ 7″ Nutshell Sailing Pram Images
Photo by Audrey and Kent Lewis
This Nutshell’s sail has a row of reef points, described in Maynard Bray’s book as “a prudent step.” He also advises “Hold the sheet; don’t belay it. Being able to instantly let it go in a puff will avoid a capsize.”
Photo by Audrey and Kent Lewis
The belaying pins on the forward thwart serve to belay the halyard. While they may seem more sentimental than practical, when properly used, they can be pulled in an instant to drop the sail. And unlike cleats screwed in place, they can be removed to clear the thwart for rowing. For builders who don’t have a lathe, they’re available for purchase. The function of the long pintle on the transom is explained in this article by Kent and Audrey Lewis.
Photo by Audrey and Kent Lewis
For rowing, the daggerboard, rudder, and tiller fit neatly behind the aft thwart. The lug sail can be rolled up around the spars and laid in the boat; the 8’ 3” mast will extend past the transom.
Photo by Audrey and Kent Lewis
With a single occupant aboard, the Nutshell sits with the bow transom clear of the water without a lot of overhang shortening the hull’s waterline.
Installing the Rudder of a Nutshell Pram
The Nutshell’s split gudgeon rudder hardware employs a single 11 7⁄8″-long brass pintle and places both gudgeons on the rudder. The split gudgeon has overlapping top and bottom bronze “hooks,” similar in shape to open fairleads.
Photo by Audrey and Kent Lewis
Step 1: Hold the rudder perpendicular to the transom and slide the lower gudgeon onto the pintle.
Photo by Audrey and Kent Lewis
Step 2: Bring the rudder to vertical. The hooks of the lower gudgeon will grab hold and the rudder can be slid down until the upper, conventional gudgeon engages with the top of the pintle.
Here is a pair of boats that will feel right at home on the working waterfront. Both would make fine boatyard skiffs or small harbor-ferries. Both would be fine for a little recreational fishing or getting around the lake on a summer vacation, or ferrying out to that island camp. The larger boat would make a fine skiff for some entry-level lobstering or shellfish harvesting.
Drawings
Garveys originated as shallow-draft, burdensome, and easily built boats for working the shallow bays and estuaries of the Jersey Shore. The advent of the internal-combustion engine, and later, the outboard motor, ensured their survival since the hull form is actually better suited to mechanical power than to the sailing rigs of the early boats. Doug Hylan has refined the Ben Garveys somewhat from their original form: They show a strong sheer and more rake to the bow transom for good looks, the buttock lines aft have been straightened out for planing speeds, and the construction is updated to make use of plywood and epoxy. But they still display the same characteristics that made their forefathers popular: ease of construction, shallow draft, good stability, and great load capacity.
Plans
You build the Ben garveys of plywood, upside down on a ladder frame over temporary molds. Lofting is required, but it is extremely simple. The chines are easily made using epoxy fillers and fiberglass tape. Flotation compartments ensure that a swamped boat will float level and support the motor head above the water.
Plans
Ben Garvey design plans are printed on five sheets (four for Big Ben) and include lines, construction, details, and building jig. Also included are instruction sheets that cover tool and materials, scarfing plywood, construction, and use. WoodenBoat Plan No. 126 is for the 15′ 9″ Ben Garvey design, BEN, and WoodenBoat Plan No. 127 is for the 19′ BIG BEN Ben Garvey Design. $75.00 each.
Ben Garvey Design Details
15′ 9″ Ben Garvey
LOA – 15′ 9″
LWL – 11′ 9″
Beam – 5′ 7″
Draft – 4″
Displ. – 460 lbs.
Construction: Plywood planking over bulkheads
Skill level: Basic
Lofting is required
Propulsion: 15-35 hp
This Ben Garvey has its outboard motor mounted in an inboard well. Designer Hylan lobbies against building that well for general use as it reduces the boat’s efficiency, occupies space, and adds construction time.
Photo by Benjamin Mendlowitz
Designer-builder Doug Hylan and his daughter head out across the Benjamin River in his Ben Garvey. The stable boat is easily built with plywood and epoxy, and requires only modest power.
Photo by Bill Thomas
“They can perform every manner of waterfront task with easy competence and honest grace.”
Photo by Bill Thomas
Denny Robertson, a Maine waterman, built a house way aft on his 19′ Big Ben Garvey. The boat ferries people and supplies to an island camp in Blue Hill Bay.
Photo by Mike O'Connell
Mike O’Connell built this center-console Big Ben. The husky boat earns its keep by assisting rowing crews near Pittsburgh and working for the local Riverkeepers.
Inspired by Alton Wallace’s highly regarded West Pointer workboats of the Maine coast, designer David Stimson has drawn the striking 19′ 6″ Ocean Pointer outboard skiff. The traits that make Ocean Pointer well suited for its ancestral job of inshore fishing allow it to perform all manner of waterfront tasks for pleasure or profit.
Ocean Pointer Particulars
A sizable flat to the bottom provides good initial stability—have you ever try hauling something heavy over the side of a typically tender deep-V hull? The flat bottom also permits this boat to plane with modest power. Substantial freeboard forward, combined with a relatively fine entry, allows Pointer to blast through a harbor chop smoothly and at speed.
This skiff runs dry. Relatively low deadrise angle (V-shape to the bottom) around Stations 2, 3, and 4 reduces or redirects spray. The bow wave tends to roll down and out, rather than to climb the sides of the hull.
Construction Plans
A sweeping sheerline puts the rail down to a comfortable height back where you’ll be working, or playing, and it looks fine. As for that pronounced tumblehome back aft—well, that just looks fine.
Hull construction consists of cedar strips over plywood semi-bulkheads. The designer specifies silicon-bronze fastenings. Dynel set in epoxy covers the deck. Building this strip-planked hull will prove fairly straightforward, but it will require some time. Designer Stimson, also a professional boatbuilder, tells us it takes him about 600 man-hours to build an Ocean Pointer. He estimates that if an amateur builder works carefully “the project should give close to a thousand hours of enjoyment.”
Construction Plans
In addition, because this building process involves small pieces, it’s well suited to part-time work. You can come home from the office and install a strip-plank or two before turning in. This would seem far preferable to spending time in the vast wasteland of network television. In any case, Stimson’s well-illustrated book How to Build the Ocean Pointer (WoodenBoat Books, 2002) can provide a helping hand and a good read.
Ocean Pointer will carry a considerable load at reasonable speeds while driven by modest amounts of power. And it makes a striking appearance in any company.
Completed Ocean Pointer Images
Matthew P. Murphy
Owner-builder John Blatchford with his Ocean Pointer skiff near Bucksport, Maine. Using detailed instructions from designer David Stimson, Blatchford built the boat over the course of two years.
Matthew P. Murphy
Ocean Pointer uses a classic center-cockpit layout, with ample storage under the foredeck, in the console, and under the helm seat
Phil Thiel was enamored of the canals of England and France and found the slow pace along the waterways, the pauses at the locks, and the proximity of verdant shores not only relaxing but also conducive to connecting to the world around him. Near the end of his 93 years, he designed several boats in the spirit of the canal boats he traveled in every summer for almost two decades.
Escargot Particulars
The Escargot, at 18’6″ by 6′, is the smallest of his canal boats and is designed so that almost anyone could build it. The construction couldn’t be simpler and his plans are meticulously detailed, right down to the drip grooves under the windowsills. Construction requires only a few basic tools and minimal woodworking skills. There are only two significant curves to contend with: the transverse curve of the cabin roof and the upward turn at the ends of the bottom. Neither poses a problem when bending the plywood over the forms.
The hull is built upside down. The four bulkheads and two transoms all have affixed to them posts the same height, and when the boat is assembled upside down the posts support her structure and make it easy to level and square. When the bottom is finished, the structure is sturdy enough to be rolled over and set on a couple of level sleepers for the remaining work. A sketch for a galley is offered as a suggested layout for the starboard side of the main cabin, but a more versatile option that provides a fourth berth is to have the port-side dinette/bunk duplicated. If your crew is in the range of 6′ tall, a modification well worth considering is raising the cabin roof by 6″. (The plans include a four-sheet supplement for L’Ark, a version of the Escargot with 6′ standing headroom under the center of a flat roof with straight sloping sides.)
The Escargot canal boat draws just 6″, so you can sneak into some very thin waterways. A 2.5-hp outboard will push the boat along at 4.5 knots, and while a bigger motor would help buck a headwind, Thiel designed the Escargot for “sheltered inland waterways” and that is indeed where the boat is most at ease.
Escargot Patterns
With a calculated weight of around 750 lbs, the Escargot is not a heavy burden for towing. It’ll draw admiring stares whether on the road or on the water.
Plans for the Escargot canal boat include 16 pages of drawings with basic instructions, dimensions, details, the layout of pieces on each of the 23 pieces of plywood, and the L’Ark supplement. Construction is considered “simple box-like” marine ply construction for the advanced amateur. Please note: page J which shows plywood needed omits the 1/2″ ply for the aft deck shown on page E.
Particulars
Length: 18′ 6″
Beam: 6′
Draft: 6″
Weight: about 750 lbs.
Propulsion: 2-5hp outboard, will gently push you to about 4 mph.
Skill needed: Basic
The storage space on this Escargot was used to add a wood-burning stove to ward of the cold of off-season boating.
The catwalk added to the cabin roof proved to be a popular perch aboard this Escargot. The bow often allows stepping ashore with dry feet, though in this case , with very muddy boots.
The Escargot plans include drawings and dimensions for a rudder, but BEULAH manages well enough being steered with the outboard. The cabin here has been raised.
The Escargot boat wasn’t designed to sail but, equipped with a leeboard and a mast supporting a square sail, it makes for very pleasant sailing on runs and broad reaches.
The Escargot provides a cozy nest for overnights in sheltered backwaters.
With its minimal draft and ample windage, the Escargot makes a lot of leeway when the wind is on the beam. The leeboard (not in the plans—see “A Leeboard for a Motorboat.”) solves the problem and greatly improves maneuverability by creating a pivot point for sharp turns.
Those who know the sport of rowing know Graeme King to be one of the world’s top designers and builders of wooden racing shells. The rowing shells that come out of his King Boat Works are built not only to stand the test of time, but have also put their crews and designer in the record books. The Harvard and Navy crews, as well as other outstanding crews, use King-designed boats.
Kingfisher Particulars
Recognizing a strong resurgence in recreational rowing today, WoodenBoat commissioned King to design a single shell that the home builder would be capable of constructing. The result is the Kingfisher Shell, a graceful, V-bottomed shell that does not require a lot of expensive jig and mold making, and is very well suited to one-off construction by the amateur builder with intermediate boatbuilding skills.
Stability is a delicate matter in a shell, as any beginner discovers when he or she first settles onto the sliding seat! Kingfisher’s 1’4″ waterline beam provides a good compromise, giving inexperienced rowers a shell they can learn to handle, but also proving to be very satisfying to the experienced oarsman. She can be rowed in a variety of conditions, ranging from a glass-smooth river to a two-foot open bay chop (only the oarsman very familiar with shells, of course, should try to row in anything but smooth water). The prototypes were thoroughly tested in two pulling boat races (which included a variety of other shell designs), one on Narragansett Bay off Newport, and one in Boston Harbor in very rough conditions. The boat proved to be excellent to row on flat water, handled chop very well, and had a surprisingly fast turn of speed; she won both races handily. Intended as a recreational rather than all-out competition boat, Kingfisher can still reach an estimated 93% of the speed of the best competition shells.
Construction is of 3/32″ or 1/8″ mahogany plywood for the hull and bulkheads, with spruce stringers and a deck of shrunk Dacron. The boat is 22’6″ overall, l ‘7″ beam, and has a 4″ draft. With a weight of only 45 pounds, she may be readily transported to your rowing site on a car roof, and is easily carried by one person. A key to comfortable and efficient rowing is the rigging, as the designer knows very well, having formerly been rigger for the Harvard crews and the U.S. National teams.
Kingfisher Patterns
The four sheets of plans for the Kingfisher Shell include general arrangement, fitting details, bulkhead details and strongback, keel and patterns. WB Plan No. 51. $75.00.
A complete construction kit for the Kingfisher is also available from King Boat Works, and the kit comes with everything you need to build your boat, except varnish and oars. For those who are building from plans, outriggers and hardware can be purchased separately from King Boat Works as well. Write to WoodenBoat for details.
Completed Kingfisher Shell Images
Photo by Karen Wales
Graeme King (shown) has devoted his career to designing and building wooden rowing shells. He developed the Kingfisher single for the home builder who desires a fast and elegant recreational shell.
Photos by Karen Wales
King builds the specialized sliding-seat mechanism and outriggers required by the Kingfisher and Kookaburra. Lightweight oars are purchased separately.
Kingfisher Details
Photo by Karen Wales
Here is hull No.1 of nearly 1,000 Kingfishers that have been built over the past 25 years. Her sapele plywood hull glistens in the afternoon sun.
Photo by Karen Wales
The Kookaburra is a double version of the Kingfisher. Like its predecessor, the Kookaburra double is a fast and able recreational shell. Long, quiet expanses such as straight rivers and oblong lakes provide the best conditions for this type of craft.
The Haven 12 1⁄2 was inspired by the history and tradition of Nathanael G. Herreshoff’s renowned Herreshoff 12 1⁄2, a class of keelboats just under 16′ long (with a waterline length of 12 1⁄2′-hence the name). Long known for their seaworthiness, their charm, and their fine turn of speed, the Herreshoff 12 1⁄2s—or Bullseyes, as the marconi-rigged versions came to be known—have carried sailors young and old since 1914. The elegance of the design is timeless.
Marconi sail plan
The Haven 12 1⁄2 was born when our friend Sam Neel found himself in search of a good small boat for his use on Squam Lake in New Hampshire, where he has a summer cottage. Sam had owned a Herreshoff 12 1⁄2 for some years, but he needed a boat that he could haul and launch conveniently by himself, since there is no boatyard facility nearby. The draft of his Herreshoff 12 1⁄2 made her too deep for this or easy trailering, but Sam still had a classic looking, seaworthy boat in mind, this time with shallow draft and a centerboard. Yet, there was no design we could recommend which incorporated all the attributes Sam wanted, and, after some discussion with him, we decided to create a new design.
Midsection
The new boat would embody as much of the character of the beloved Herreshoff 12 1⁄2 as possible, yet draw significantly less water. The beam would be increased so as to retain the stability of the original, and the spars, rigging, and sails would remain unchanged. She would be a keel/ centerboarder. Joel White would be the designer, and Maynard Bray would build the prototype, working under Joel’s guidance. Jon Wilson, Editor of WoodenBoat magazine, provided encouragement and support in the belief that the design would likely become popular among sailors and the accomplished amateur builders.
Construction of the boat followed the method developed by Nathanael Herreshoff for the efficient building of both small boats and large yachts: upside-down, with a station mold placed at every frame location, such that each frame is bent over a mold. For the development of boats built in series, as the original boats were, the system was an ingenious and indispensable one. Building upside-down is always easier, if the tooling is properly developed, but for a single boat it became a question of whether a mold for every frame was necessary. What the molds provided was the precise shape for each frame and an absolutely precise relationship of one frame to the next-which results in a faithful hull shape, and adds dramatically to the appearance of the inside of the boat. It seemed worthwhile.
The project progressed, questions arose and were answered, and in time, the boat was completed and launched. She was, in both appearance and performance, a wild success. Sam’s new boat was named PETREL, and he suggested that we find an appropriate name for the class, since it was very likely that a class would form. One suggestion seemed to take hold: the Haven 12 1/2, named for the summer colony on Eggemoggin Reach in Brooklin, where Sam has another small cottage.
Afloat, PETREL so closely resembles the original Herreshoff 12 1⁄2 that, were it not for the low centerboard trunk which shows above the floorboards, even an experienced eye could not discern the difference. And, as nearly as we can determine, the speed and handling of the two designs is identical. The big difference is that PETREL draws a foot less water: 18″, as compared with 30′ for the full-keeled original design.
Haven 12 1⁄2
None of us connected with the Haven 12 1⁄2 class claims to have created something revolutionary; rather, we’ve simply tried to make a near-perfect boat a little more versatile. Reducing the draft while preserving much of the seaworthiness provides opportunities for sailing in shallower water and beaching for picnics ashore (without having to tow a dinghy). Hauling, launching, and even storage in the family garage is much easier than with a full-keeled boat. Admittedly, a keel/centerboard configuration adds something to the boat’s cost and complexity, but it seems more than a fair trade-off.
Construction Plans
The Haven 12 1⁄2 is not a quick-and-easy boat to build. Like anything worth doing, it is worth doing well, and it seems only proper that something this wonderful would require a little more than average effort. In fact, however, it is not very complicated; it simply requires care and concentration. We have done everything we could to make the building process understandable: the plans for the Haven 12 1⁄2 are very detailed, and they include full-sized templates for the hull molds, transom, and other key pieces. The need for lofting is thus eliminated.
There is an exceptionally comprehensive, illustrated instruction manual which describes the construction steps in detail. We believe that anyone with reasonable woodworking experience and access to the standard books on boatbuilding can build the boat, if he or she is willing to work with patience and care. More important, we believe that the effort will be more than amply rewarded—perhaps for generations to come.
Pattern plan for stem, transom half-breadth, stern knee, tiller, centerboard and trunk.
Spar, hardware, and bulkhead plan. Hardware and pattern plans are drawn to full scale.
Completed Haven 12 1⁄2 Images
CRACKER JACK, part of the WoodenBoat School fleet, is a cold-molded version of the Haven 12 1/2.
CRACKER JACK swings to her mooring at the WoodenBoat waterfront.
Thanks to the genius of N.G. Herreshoff and Joel White, the Haven 12 ½ has gained a reputation for being a versatile beauty.
The Haven 12 ½ JACKAROO, strip-planked with a fiberglass skin, gets a boost from the outboard during a lull in the wind.
During the COVID pandemic, Melbourne, Australia’s second largest city, was second to none when it came to lockdowns. From March 2020 to October 2021, the city endured six lockdowns for a total of 262 days, more days by far than any other city on Earth. In the midst of the pandemic, Gary Hardy realized the looming threat of another long spell of being homebound could be put to good use as a compelling argument to build another boat.
Photographs courtesy of Gary and Anne Hardy
There wasn’t much room in the shed for building the 15′-long Skerry. When the weather permitted, the hull could be rolled out on a dolly and set on sawhorses, where there is fresh air and a lot more elbow room.
He had been retired for a few years and could do with his time pretty much as he wished, and what he wished to do was build another boat. That required a negotiation with his wife, Anne. The 17′ plywood kayak he had built before retiring had taken over their home’s lounge room, and when Gary finished the project he had to take out a window to move the kayak out of the house. Anne was reluctant to have another boat built on a diagonal across a room meant for relaxing, and the two agreed on something much smaller: a cradle boat. Gary bought the plans for Chesapeake Light Craft’s 7′ 9″ Eastport pram and scaled it down to bunk a grandchild. Christened SEA PUP, it has remained unused as no grandchildren are yet in the works.
Working outdoors in the Australian sunshine often provided good lighting for work on the Skerry. Gary has a cordless drill, but sometimes a vintage hand-cranked drill is the right tool for the job.
When Gary foresaw another lockdown coming, he once again entered negotiations with Anne about building yet another boat. This time it was Chesapeake Light Craft’s Skerry, a 15′ double-ender for oar and sail. “I argued that building a boat was an important mental health measure.” To up the ante even further he put the Skerry kit on his pointedly specific Christmas and December birthday wish lists. He also placed the order.
DERRY was launched after SEA PUP, an Eastport pram scaled down and equipped with rockers to serve as a cradle boat for an as-yet nonexistent grandchild. The Hardy’s cat, Maggie, is a rescue like their dog Ozzie, but that shared background doesn’t make them good friends. Maggie bosses him mercilessly.
Gary didn’t get to build the Skerry in the lounge. The project was relegated to the shed, and he had to sell his Mirror dinghy to make room. It was a tight fit. “Somehow, either my shed was smaller or the Skerry bigger than I anticipated, but I managed.” The lockdown he had seen coming did indeed happen, and Melburnians once again spent most of their time at home. For Gary, “building during lockdown was a blessing and kept me sane and happy.” Building a boat in cramped quarters required some gymnastics, adding to the mental health measures some physical benefits: “Squeezing round the edges to build that boat was extremely good for stretching and flexibility.” After the hull was finished, he put the Skerry on a dolly so he could move it out of the shed during fair weather and work on it in the garden.
Getting away from Maggie may be one of the pleasures Ozzie takes in boating. Flat water and a light breeze are to his liking.
Gary christened the finished boat DERRY, his mother’s maiden name. It was what his father called his mother since their courtship, when he gave her a book he had inscribed “for Derry is my darling.”
Ozzie took in the scene while Anne, Gary’s wife, took to the oars. The cart used to get DERRY to the water rests on the stern.
Gary has been pleased with the Skerry’s performance: “a real delight to sail and row.” And Anne “loves it, much more than any of the boats I have owned in the past.” Gary added side benches in the bow to provide a comfortable spot for Anne to be while sailing. With the boat’s two rowing stations they can also row together; “a nice companionable activity.”
Anne has also taken to sailing DERRY. Ozzie, taking a snooze in his yellow PFD (bottom center), seemed a bit indifferent to it.
Ozzie, the couple’s two-year-old Australian Cattle Dog, is Gary’s other sailing companion. “A key characteristic of this breed is an extraordinary level of loyalty. Ozzie is profoundly miserable if I go out sailing without him. Australian Cattle Dogs are also extremely good at communicating how they are feeling. He has an unerring way of letting me know he will go with whatever we are doing because he is a good, loyal dog, but he may be very, very unhappy about it.” While getting doused with spray while DERRY was beating to windward, Ozzie glared at Gary through eyes narrowed with reproach.
With DERRY beginning to heel, Ozzie wasn’t in the mood for napping.
Gary then devised a dodger to shelter Ozzie. After making a prototype from a poly tarp, he sewed up a canvas version to be supported by a curved PVC pipe anchored in the forward oarlock sockets. “Ozzie certainly approves of the enhancement, and I have found it is very cozy to snug down behind it for a morning coffee. If I can persuade Ozzie to move over.”
As the breeze freshens and the spray began to fly, Ozzie hunkers down. His PFD is just below the mast and his glaring eye is visible by Gary’s kneecap.
The dodger Gary made for Ozzie’s comfort got a good looking over by Maggie.
Gary has entered DERRY for next February’s Tawe Nunnagah 2023, a raid that runs over nine days and 140 nautical miles up the east coast of Tasmania—what he describes as “a fantastic but wild stretch of water.” If all goes well, he’ll finish in Hobart in time for the Hobart Wooden Boat Festival.
The dodger keeps Ozzie out of the wind and spray and makes sailing a bit more tolerable.
While DERRY is getting put to use frequently and has a busy post-pandemic future lined up, the cradle boat SEA PUP gathers dust. “My children have so far studiously avoided taking the hint of the cradle boat, and SEA PUP is still waiting for her crew. But Anne and I live in hope.”
Do you have a boat with an interesting story? Please email us. We’d like to hear about it and share it with other Small Boats Magazine readers.
I don’t think Lao Tzu got it right when he wrote in the Tao Te Ching: “A journey of a thousand miles begins with a single step.” All my long cruises began with a daydream, an idea that captured my imagination and made every step possible. Those that kept their hold on me pleasantly occupied my thoughts for months if not years and carried me through whatever work I had to do to bring that daydream to life, even if it meant devoting the best part of a year to building a boat, carving oars, and sewing sails.
It’s not likely that I will take any cruises as long as those I did in my late 20s and early 30s, but even the least ambitious of my boating endeavors now begin with daydreams that knit ordinary days and weeks together with a sense of purpose.
It was late in the afternoon of the last day of October last year when it first occurred to me, here on a backwater of Lake Washington, that my recently acquired Piccolo canoe could be a very pleasant place to nap or even sleep on an overnight cruise.
Six months ago, when I first took out the Piccolo canoe I’d been given, I lay down in it for a few minutes before I landed and hauled out. It was very relaxing and, if I added floorboards to keep me out of the bilge water fed by my feet and paddle, I could sleep in the canoe perhaps even on an overnighter.
I brought the canoe into the basement and spent the winter working on it, installing floor timbers, refinishing the hull inside and out, and making a pair of floorboards. The canoe stayed in the basement while I made a cart for it and fussed with an arrangement for a canopy. During that time, I often set a camping pad in the hull, lay down on it, and pulled a sleeping bag over myself. It made a very comfortable nest, and I imagined falling asleep as a light rain fell on the vault of forest-green nylon stretched over me.
To photograph the canoe’s relaunching and my first onboard nap with my GoPro camera, I would need a floating monopod. On my second cruise up the Inside Passage I used my faering’s mast, rudder, and anchor chain to cobble one together to float like a spar buoy and support my 35mm SLR. For the GoPro, I made a much smaller one of plastic pipe, lead shot, and a piece of pool noodle to float vertically, in spar-buoy fashion, and support the camera in the middle of the pond I’d chosen for the outing.
I picked a drizzly Wednesday afternoon to take the canoe to Twin Ponds. I parked a few yards from the head of the trail that leads to the south pond. I was on the street side of my car casting off the rope that I’d used to tie the canoe to the roof rack when a panel van approached. I stepped quickly around the back of my SUV to get out of the way, but I failed to duck under the stern of the upturned canoe. I hit the left side of my head just above my ear. If it had been somewhere along the length of the outwale, it wouldn’t have been so bad, but I was hit by the rounded corner at its end, which had the shape and effect of a ball-peen hammer. Bent double by the blow, I stepped to the grass strip paralleling the sidewalk and, with my elbows on my knees, pressed my palms to the sides of my head until I could unclench my eyelids.
There is a place to park closer to the Twin Ponds, but I much prefer walking this winding path through the woods.
The cart rolled smoothly along the eighth-mile gravel walkway to the edge of the pond, but I had to haul the gear in several trips along the narrow, windfall-strewn path to the south end of the pond where I would put in. I finished the carry by hoisting the canoe overhead and picking my way through the maze of pewter-gray pine-tree trunks. With my last step to the bank at the water’s edge, I tripped on a root and twisted my left knee, the fragile one with the torn and surgically excised meniscus.
The pond was as tranquil as I had hoped it would be. There were even occasional sprinkles of light rain, just the thing to doze off to once I tucked myself under my tarp.
After I got the canoe afloat, I loaded everything in its ends and got aboard. I tried to push off, but it wouldn’t budge—it was high-centered on a root that had been invisible on the dark-silt-covered bottom and hemmed in by a fallen tree at the bow and the overhanging bank at the stern. I had to get out and stand in the muddy shallow to swing the bow away from shore and step back aboard over the backrest. As I did, water, pouring from my neoprene bootie, pooled in the hollow of the seat.
Underway finally, I paddled around the pond for a few minutes before setting up the GoPro on its floating monopod. I had thought that the bolt I’d threaded into the cap would be okay without a locknut to hold it there, but it wasn’t, and the camera flopped around like an inflatable tube man at a Jiffy Lube. I’d planned on operating my GoPro from my phone, but I spent 20 minutes without making the necessary connection, stuck on endless command loops on Wi-Fi and Bluetooth. (I found out later that day that my old GoPro 3 is no longer supported by the app.) I gave up after I drifted into the water irises on the north side of the pond and set the camera to take a photo every 5 seconds while I paddled back and forth in front of it hoping I’d get some useful frames.
I was worn out by the time I got to setting the canoe up for a nap and rolling the pad out under myself exhausted me further. Imagine making your bed while you’re on it…you can only lie on your back or sit up. During one of my contortions to get the pad under me, I pressed my left elbow against the upright that holds the seat back in position and there was a loud crack on the port side. I’d pried the gunwale apart, splitting five of its spacers as easily as if I’d jimmied the inwale and outwale with a crowbar.
This was as close as I got to the vision I’d had for the canoe. It was far from restful.
The outing was off to a bad start, but I was determined to get the photo of “napping” in the canoe. I pulled the tarp over myself and held the GoPro up high with the monopod.
I paddled back to the south end of the pond, dragged the canoe out of the water, and carried everything to the unobstructed part of the trail. With the cart reassembled and the canoe strapped on it, I loaded up and limped back to the car.
That day certainly didn’t bring the daydream to life. I wound up with a knot on my head, an aching knee, and a busted gunwale. But even if I ultimately have to abandon the idea of spending an afternoon napping or a night sleeping aboard the canoe, the five months that I have been happily occupied with the vision were their own reward; the success of each of those days well spent won’t be diminished by an afternoon gone wrong.
In 2019, I built a 14′ lug-rigged double-ender. It was lightweight, nimble, and smart looking, but lacked the gravitas to handle the Pacific swells and chop beyond the Santa Barbara breakwater. By 2021 I was ready for something just as beautiful but more capable, and spent a lot of time looking for a bigger trailer-sailer. The key constraints were space and weight. Our century-old cottage sits on a postage-stamp-size lot and our family vehicle is limited to 2,000 lbs towing capacity. The new design had to be less than 20′ long and under 1,500 lbs light displacement.
When I discovered François Vivier’s extensive portfolio of Breton workboat-inspired designs, I was really smitten by his Stir-Ven 22—a beautiful gaff-rigged lapstrake sloop with a roomy cockpit, a cuddy cabin, and a history of swift passages in European raids. The problem was it was just a little too long and heavy. Bring on the Stir-Ven 19, the newer, smaller sister Vivier designed with similar attributes but with a simple water-ballast system to facilitate launching and retrieval. At just under 19′ long, 7′ wide, and 1,200 lbs light displacement (without water ballast), it would meet my space and towing requirements. The designer estimates a build time of at least 700 hours, depending on the level of fit and finish.
Mark Gallo
The water-ballast tanks either side of the centerboard trunk add a level of complexity to the Stir-Ven build but are a vital component in keeping the weight down for trailer-sailing. We oversized the structure of the centerboard trunk to accommodate our custom-made plywood-lead centerboard. Beneath the seats there are generous storage bins and astern of these is a large flotation tank; a second flotation tank is built in under the foredeck.
I had Maine-based Chase Small Craft, a Vivier licensee, produce a kit for the Stir-Ven 19, but I needed to find a site spacious enough to build the boat. I contacted local builder Eric Bridgford about the prospect of building the Stir-Ven 19 at his shop, Carpinteria Boat Works, and he agreed to partner in a collaborative effort where I would work alongside him.
Clint Chase supplied CNC-cut planks, decking, seats, and floors from 9mm okoume plywood, and bulkheads, centerboard trunk, and rudder from 15mm okoume per Vivier’s digital files. The centerboard was tricky to source. Vivier calls for a 260-lb cast-iron foil, but neither Clint nor I could locate a foundry in either Maine or Southern California willing to cast one. Chase came up with an elegant compromise. He sandwiched a 100-lb sheet of lead between okoume plywood sheets CNC-cut to the final foil shape. Eric and I satisfied the balance of the permanent ballast (160 lbs) by arranging lead ingots around the centerboard trunk below the cockpit sole in the water-ballast compartments.
A 67-page set of instructions guides the builder from start to finish and includes plywood-sheet diagrams of nesting parts, timber and fittings lists, photos of a fully rigged SV 19 with helpful details called out, and most importantly, CAD drawings of structural components including transom, bulkheads, centerboard trunk, rudder, and stem. A separate file has 20 pages of detailed drawings of bulkhead details for fillets, cleats and clamps, trim, and drains, as well as dimensional drawings of rudder, centerboard, spars, and sail plans. The pictures and plans provided good guidance and insight for the project.
Eric Bridgford
With practice I can get the boat rigged, launched, and ready to go in under 45 minutes.
Once we had laid out and leveled the strongback, we bolted the bulkheads to their supports and turned our attention to the keystone of the structure: the centerboard trunk and water-ballast tanks. The trunk interior sides had to be ’glassed to resist abrasion, coated with graphite-infused epoxy, and supported by chunky end posts (slightly oversized from spec to accommodate our unique plywood-lead-sheet centerboard). The roughly 4′-long trunk, once complete with end posts, cleats for deck floor, and bottom logs, was substantial and strong.
We wrestled the assembly into the hull form and installed the remaining half bulkheads to stabilize it from the sides. The water-ballast tanks flank the trunk and provide 200 liters of capacity. They’re created by fitting longitudinal plywood pieces into bulkhead notches about 8″ from the trunk sides. A second set of longitudinal bulkheads aft of the trunk form the cockpit-seat lockers; the double-layered transom fits on these longitudinal bulkhead ends. We spent a lot of time filleting joints, being especially careful around the ballast tanks as they must be watertight. After the laminated inner stem was glued up, shaped, and installed we could lean back and appreciate the hull form before moving on to planking.
We hauled the sole and planks from the storage shed, having glued and faired the puzzle joints, and epoxy-coated them inside and outside. Eric took one side of the boat, and I took the other, and we proceeded to cut bevels and gains, starting with the garboards, and worked our way down toward the sheer. We managed to get each corresponding starboard and port plank end to line up, and installed and faired the outer stem. Once the skeg was installed, we laid down 10-oz fiberglass cloth on the garboards, filleted the lapstrake joints, and epoxied and faired the hull. While the hull was still upside down on the strongback, we painted it with one coat of primer and three coats of semigloss vintage marine blue. Friends and family helped us lift and carry the hull out from under the shed roof, flip it right-side up, and return it to its shelter.
Mark Gallo
The attention to detail is key to the Stir-Ven’s appearance and functionality: ceiling slats forward of the cockpit seats look good and can also be used for lashing down gear. The spray rail around the foredeck—complete with limber holes—mirrors the cockpit coaming and works in concert with it to keep water out of the boat. The multi-purchase uphaul for the centerboard is housed on the side of the trunk in easy reach of the helm. The barber haulers are fed through the side decks to give simple adjustment control to the crew.
We scraped the stray epoxy drips and sanded all compartments, filleted more joints like the inside of the strakes, and ’glassed the water-ballast compartments around the centerboard trunk and underdeck buoyancy tanks at the hull ends. I painted the interior and applied nonskid to the cockpit-sole panels. Clint provided trim pieces rough-cut from red grandis wood, a plantation-grown eucalyptus variety native to Australia. The grain and reddish color look like mahogany but the wood is softer. We trimmed the interior of the boat first: the centerboard trunk, ceiling planks, and cockpit seat edges. After we installed the plywood deck, Eric cut, fit, and installed the more demanding trim pieces like the coamings, toerails, and rowing thwart. He eagerly took on the task of forming and brazing a bronze stemhead piece rather than sourcing from our pricey overseas supplier. I shaped the spruce bird’s-mouth mast and solid gaff and boom in the adjacent shed, and built oars out of poplar at my home shop.
The plans provide some guidance should you want to strip-plank over the plywood deck. At this point, nearly 1,200 hours into the project, I was eager to launch, so we opted to cover the deck in fiberglass and apply a light epoxy coating so the fabric weave would provide some grip, and finished it with several coats of light-yellow polyurethane paint. We flattened the gloss paint with an additive to reduce glare in keeping with my workboat-finish vision. To minimize preparation and maintenance of the eucalyptus trim pieces, I used a varnish alternative from Epifanes that does not require sanding between each coat. I chose to paint the spars a semigloss salmon color.
Courtesy of François Vivier
The mainsail is almost 167 sq ft in area and the boom is high enough that the crew barely needs to duck when tacking or jibing.
After several solo excursions I can now raise the mast and rig the boat in about 30 minutes on the trailer. Backing down the ramp and launching, raising the sails, and lowering the foils takes another 10 to 15 minutes. So, if nothing gets tangled, twisted, or overlooked it takes about 45 minutes to get underway.
For anyone interested in overnight accommodations, the uncluttered cockpit allows two people to sleep under a boom tent (the rowing thwart is removable). The aft cockpit seat lockers are long and deep enough to swallow up loose gear like seat cushions, PFDs, thwarts, and even the electric outboard. Vivier has a nice-looking cabin version available as well.
Vivier designed the Stir-Ven 19 with safety a priority. In addition to buoyancy compartments at the ends of the boat, he provides port and starboard cockpit drain boxes which, when fitted with Elvstrom bailers, will drain a flooded cockpit whether underway or at the mooring. I built in the drain boxes but refrained from installing the bailers for the time being as my boat sits on a trailer.
Courtesy of François Vivier
Despite her modern construction, the Stir-Ven carries a traditional rig: a high-peaked gaff, loose-footed narrow-paneled mainsail with traditional points reefing, and a slightly overlapping jib, also narrow paneled to match the main.
The first time out on the Stir-Ven was, of course, thrilling for me as the co-builder—the gurgling of the water rushing by, the arc of the sails, the rush of the hull driving through the chop. At the dock the boat hardly heels to my movement, and underway it stiffens up well before the water reaches the side decks at 5 to 6 knots boat speed in 12 to 15 knots of wind. Initially the Stir-Ven’s upwind pointing capability was disappointing, but I was confident that with Vivier’s deep design experience there was room for improvement. With a little more reading and research, I made a couple of changes. I tightened the jib control lines (aka barber haulers) that Vivier specified to bring the jib clew inboard when going upwind, and tightened the jib luff as much as possible before leaving the dock. The boat points much better now.
I’ve sailed mostly singlehanded and found myself single-reefing the mainsail for winds of 10 to 12 knots. The big 160-sq-ft mainsail warrants early reefing to keep the boat from being overpowered. It tacks easily, even in light air, and we’ll point within 45 degrees of the wind. Designed with ample freeboard, the Stir-Ven 19 throws little to no spray going into a 15-knot breeze. I’ve had only one opportunity to use the water-ballast system and filling the tanks with an estimated 20 gallons of water (160 lbs) noticeably stabilized the hull. With time and experience I’ll get out in more blustery conditions and utilize the full water ballast and double-reefed mainsail, single-reefed jib combination.
Eric Bridgford
With generous reefs in both sails and the ability to take on 440 lbs of water ballast, the Stir-Ven should be able to stand up to building wind strengths with ease.
The boat can be rowed, although I have yet to attempt it. If the wind dies, and the motor dies, then I’ll have no choice but to pull the 10′ 10″ oars out from under the side decks and give it a go. However, the nearly 7′ beam and 1,200-lb displacement will mean it’s a lot of effort, better suited to two people manning the oars side by side as Vivier depicts in his photo gallery. At the end of a day’s outing, I rely on the Torqeedo 1103 long-shaft electric motor (3-hp equivalent) to reliably and quietly drive the boat back to the launch ramp at half-throttle.
The Stir-Ven 19 has met my performance expectations and can be comfortably singlehanded or it will accommodate up to five adults in the spacious cockpit. It’s more stable and drier than an open dinghy in the Pacific swells, but is straightforward to tow, rig, and launch. While the water-ballast tanks complicate the build, they make it possible to keep the hull relatively lightweight for trailering and launching yet provide stability options should the need arise on the water. Bravo, François Vivier, for creating a beautiful daysailer with traditional lines!
Mark Gallo is retired after a career in retail and catalog; he lives in Santa Barbara, California.
In 2020, with COVID restrictions in full force and not much work on my plate, I decided to leap into the world of trailer-sailing. Scouring through various trailer-sailing groups, I decided that a Siren 17, a popular Canadian 17′ trailer-sailer last manufactured in 1987, would be a good start. After years of sailing on mid-sized cruising sailboats, it took a bit of time to adjust to this much smaller craft, but I found the freedom of trailering the boat to explore new bodies of water quite compelling.
By the end of our first season of trailering and sailing, I felt that the Siren 17 lacked performance and thought we would enjoy a boat with a bit more cabin room. I stumbled upon the Flow 19, a stunning design built in La Rochelle, my hometown in France. In 2019, Voile Magazine, one of France’s leading sailing publications, named the Flow 19 the “Trailer-Sailer of the Year,” so I figured it had to be a good one.
Photographs by Thierry Humeau
The Flow 19 has a generous sail area with a square-headed 151 sq ft mainsail and overlapping 91 sq ft genoa.
I soon reached out to Antoine Mainfray, the boat’s naval architect and owner of Atelier Interface, the shipyard where Flow 19s are built. Antoine had never exported a vessel to the U.S., but even with much left to figure out for the freight and import process, our mutual excitement quickly concluded in a firm order for Flow 19 hull #5. Construction was set to begin in the fall of 2020 with delivery planned for spring of 2021. With the pandemic dragging on and the supply chains in disarray, things got bogged down, but by late November 2021 our shiny Flow 19 finally showed up on its trailer at the port of Baltimore, Maryland.
All About the Flow 19
The Flow 19 is a trailerable sport cruiser designed for performance sailing with ample storage and cabin room for comfortable cruising, built using the well-proven wood/epoxy stitch-and-glue method. Antoine, who is an expert in composite structures, also utilizes molds and vacuum-bagging to fabricate the boat’s critical components. The rudders, swing keel, and coach roof are built from a mix of carbon and ’glass materials, which provide great strength and durability. The shipyard prides itself in working toward a more sustainable model by integrating natural fibers and bio-sourced resins into the building process. For example, bamboo cloth is used in the coach roof as an alternative to carbon. The bamboo also provides a nice and natural finish inside.
The lines are pure and racy, and the first few times I showed up at a boat ramp, I quickly understood that the boat is a head-turner. With its flat bottom and fully retracted keel, the Flow 19 draws a mere 4″, which makes it particularly suited for beaching and gunkholing in shallow waters. With a dry weight of 992 lbs, it can be easily towed by a mid-sized car or small SUV.
Thanks to its shallow draft and fully lifting centerboard, the Flow 19 can be anchored in shoal water, making it the ideal beach-cruiser.
When filled, the twin water ballast tanks add 264 lbs low in the hull. Located under the cabin settees, each tank is equipped with a large-sized Andersen automatic bailer. This ingenious and simple device, found on dinghies and other small craft, makes it easy to fill the tanks after launching the boat. Using the Venturi effect, the bailers can also be opened underway to drain the water, though it is much easier to empty the tanks by opening the bailers after pulling the boat out of the water. The Flow 19 can be sailed with empty ballast tanks in light winds (up to 17 knots with an experienced crew, according to Antoine), but since I do not notice a big difference in performance, I tend to keep the tanks full for convenience and safety.
The plumb bow and wide transom are reminiscent of the planing hulls seen on today’s larger offshore yachts. A generous cockpit accommodates up to four sailors and will keep them dry even in windy conditions and choppy waters. Two large watertight hatches give access to roomy lockers, perfect for storing fenders or other items such as a small inflatable tender. With the wide beam carried aft, the cabin and storage volume below the deck is quite remarkable for a boat of this size.
While the double berth in the bow is comfortable and wide enough at the shoulders for two, we decided on the extension option, which lengthens the berth by 16″ to 8′ 4″, providing storage space underneath for the porta-potti or other large items. The settee berths can accommodate small adults or kids. Thanks to the composite coach-roof structure, there is no need for a compression post in the cabin to support the mast and, with 51″ of headroom, there is enough comfort to play a card game or work on a laptop at the optional cockpit table. There are good-sized cubbies on each side, with additional storage under the settees and plenty of extra room aft under the cockpit for longer or voluminous objects. To maintain positive buoyancy, the space under the double berth and aft of the settee is filled with closed-cell foam.
Despite her “sport“ credentials, down below the space is light, simple, and functional, with sleeping space for four people making the Flow 19 the ideal cruiser for coastal voyages. The coach roof is lined with bamboo cloth, used for its light weight and to complement the warmth and more natural appearance.
During the boat’s construction, I was in regular communication with Antoine and came to appreciate his focus on keeping things simple. Simplicity not only reduces the need for maintenance or parts but, especially on a small craft, helps keep the deck uncluttered and prevents the crew from getting snagged on hardware. The Flow 19’s running rigging is solely based on block-and-tackle, and even the fully retractable keel is controlled by a 9:1 pulley system built inside the keel trunk. The keel’s lifting and control lines are readily accessible in the cockpit. There are no mechanical winches or jib cars to control the jibsheets. Instead, cam cleats and a 2:1 purchase with small blocks at the clew provide enough force to sheet in the sail by hand. Barber-haulers and friction rings help move the jibsheets toward or away from the boat’s centerline. The mainsheet comes to a swivel cleat in the center of the cockpit and runs aft to a Dyneema bridle attached to the transom. All control lines are led aft.
A twin-rudder steering system that is easy to disassemble for trailering keeps the boat on track regardless of the angle of heel. Thanks to auto-release cleats, the rudder blades will automatically pop up when beaching the boat or hitting the ground in shallow waters. The mast is securely held in place by a set of shrouds, lower shrouds and a single spreader. The headstay doubles as a structural furler, which helps keep the foresail luff nice and tight. There is no traveler and no backstay. Often overlooked on smaller craft, there are four good-sized mooring cleats and an anchor locker, which Antoine considers vital on cruising boats. While the Flow 19 is a production boat, the shipyard welcomes customizations and offers quite a few options.
Launching the Flow 19
At the boat launch, the lightweight 20.5-lb aluminum-alloy mast is easy for one person to raise without the use of additional hardware. The mast crutch I made to support the mast when it is brought down for trailering is extendable to set the mast at a good angle while I lock it in its step. Once the mast is up, the jib or spinnaker halyard attached at the bow holds it vertical while securing the headstay. While the boat was being built, I sent Antoine a forestay tensioning lever from Johnson Marine. This wonderful device is the best friend of trailer-sailors. It puts the entire rig under tension in one step without the need to adjust the shrouds’ turnbuckles.
The twin rudders mean that the skipper can sit on either side to steer, while the lack of a bridging mainsheet traveler leaves the cockpit uncluttered and remarkably spacious for a 19′ boat.
Once the mast is up and the rig secured, it’s time to install the running rigging, boom, sails, and rudders, which are kept inside the boat during transportation. The Flow 19 is not as quick to rig as a cat- or gaff-rigged boat, but with practice it can be done in 30 minutes or less. Once the boat is ready for launch, it easily rolls off the trailer with a gentle push and, thanks to its shallow draft, a foot or two of water at the ramp is all that is needed.
We opted to go full electric for auxiliary power and purchased a 3-hp outboard from ePropulsion with two batteries (one is kept fully charged as a spare in the cabin for safety). Prior to making the purchase, I was concerned about the battery range, but with the power output kept at one-third throttle—in the 300- to 350-w range—a fully charged battery will move the boat at 3 knots for three or four hours, which is plenty of runtime for short trips.
The Flow 19 boat comes with a set of Dacron sails, but radial-cut performance laminate sails are also offered. As one can expect, the good-sized square-top mainsail and the 110 percent overlapping jib provide good thrust to the light but powerful hull. Hoisting or dousing the main is straightforward, but after a few times out I felt that adding a lazy bag sail cover would greatly help store the sail on the boom while on the hook or at a mooring. A lazy bag is also quite handy to keep everything together on the boom during transportation. Our boat is fitted with the optional carbon bowsprit, which can accommodate a variety of downwind sails. We chose a Code D, a hybrid cut between an asymmetrical spinnaker and a large genoa, that is easy to handle and provides a good deal of power when sailing off the wind.
Off the wind, the Flow 19 can set a variety of headsails. An asymmetric spinnaker, set on a retractable bowsprit provides a good deal of power and introduces an extra element of fun downwind.
The Flow 19 loves light air, and with as little as 5 knots the boat will start gliding elegantly at 2 or 3 knots. As the wind picks up to 10 to 12 knots, closehauled, it will point at 45° to 50° off the wind and find comfort heeled on its hard chines. Depending on the sea state, the boat’s speed is in the 4- to 6-knot range. Once the wind speed reaches 12 knots, it’s time to consider taking a reef; the main has two reefpoints, which provide enough sail reduction up to 20 knots of wind. (I should note here that in harsh conditions, the boat will sail much better under main-only rather than solely on the jib.) I have sailed solo, beating into winds over 20 knots with two reefs and just using the main, and felt that the boat was still manageable. However, as in most sailboats, sailing off the wind on a beam or broad reach will bring more comfort to the crew and will unveil the full abilities of the planing hull. Without the kite up, we had beautiful and long stretches of 7 to 8 knots downwind. With an extra sail on the bowsprit, reaching 10 knots should be easy. Antoine said he has pushed the boat up to 12 knots with an asymmetrical spinnaker.
In its first season, we took our Flow 19 through diverse sailing grounds, from the warm waters of Florida to the northern lakes of Maine. Our typical trips are two to three days long. This capable coastal cruiser is a good mix of comfort and performance for a boat of that size. It surely feels bigger than the 19′ length, and the high freeboard and voluminous hull provide a safe and joyful ride on the water.
Thierry Humeau was raised in France and started sailing at age eight on Optimist and 420 dinghies. In his teenage years, he joined his hometown kayak club and became a successful competitor in whitewater slalom, culminating with participation in the 1992 Olympics canoeing event in Barcelona. He later moved to the U.S. and worked as a cameraman for a variety of television programs. He returned to sailing in 2012 and enjoys family cruising on Chesapeake Bay.
Flow 19 Particulars
LOA: 19′
Beam: 7′ 6 1⁄2″
Draft: 4″ (swing keel up); 4′ 3 1⁄4″ (swing keel down)
Weight (water-ballast tanks full): 1,146 lbs
Towing weight (tanks empty): 992 lbs
Ballast (weighted keel + water): 418 lbs
Sail area: 243 sq ft
Main: 151 sq ft
Genoa: 91 sq ft
Cabin headroom: 4′ 3″
The Flow 19 is made in France by Prodesign3D and has a base price of $59,000. It is also available as a kit or a decked hull.
Is there a boat you’d like to know more about? Have you built one that you think other Small Boats readers would enjoy? Please email us.
Check Out These Other Stitch-and-Glue Boat Designs
Stitch-and-glue is one of the simplest ways to build a wooden boat hull. And you can use it for a variety of boat style, from sailers like the Flow 19 to boats powered by oar or motor. Here are some examples.
Of all the historical boats in the world, those built by the Vikings are the ones that capture my heart. From the 9th-century Gokstad ship, and the small boats found with it, to the 21st-century DRAKEN HARALD HÅRFAGRE, there is nothing more atmospheric for me: The shape of the hulls, the upswept ends, and even the building methods fascinate me. I’m a regular visitor to the website of the Viking Ship Museum in Roskilde, Denmark, and watch the museum’s videos of traditional boats being built and sailed. I have followed the Skuldelev excavations and reconstructions at the museum and read numerous books about their construction. A series of articles by Jean-Pierre Guillou in Maritime Life and Traditions magazine detailed the history and construction of the Norwegian faering and introduced me to the book Inshore Craft of Norway by Bernard Færøyvik. This led me, in 2012, at the start of retirement, to the idea of building my own faering.
I had been building boats, as an amateur, since the late 1980s, and had five double-enders under my belt. Færøyvik’s book was filled with line drawings of boats that he surveyed along the coast of Norway in the early 20th century. Of all these designs, the Sunnhordland faering was the most appealing to me. It was built around 1935 by Johan Slettskog of Onarheim, on Norway’s southwest coast. It was 18′ 11″ long, 5′ 4 1⁄2″ wide, and had just three very wide strakes.
Craig Hohm
I wanted a Viking axe, so I built this forge and made one prototype. Then I quickly decided to go with conventional tools for building the faering.
I intended my faering project to be as traditional in build as feasible—riveted lapstrake with minimal framing. Watching the ship-reconstruction videos on the Roskilde museum’s website, I was fascinated by the planks split radially from logs, curved frames cut from grown crooks, and the work achieved by simple tools, especially the axes. Another major inspiration was Roar’s Circle, by Henrik Juel, which chronicles the construction by a bunch of amateur volunteers of a replica of one of the five 11th-century Skuldelev wrecks. I got it into my head that I needed an axe like the ones they used, but after finding they cost more than $500, I ended up making a timber-frame building for a forge and filled it with the tools I’d obtained from a derelict blacksmith shop in northern Pennsylvania. I have yet to make that axe, but the forge has been handy for making other gear.
Staying with the idea of tradition, I decided to source wood from trees that I could harvest and from logs awaiting sawing at small local mills. Knowing it might take a couple of years to get the stock together, I began looking for the lumber the faering would require.
Sue Hohm
I felled the biggest locust tree in my woodlot. I shudder to think of the number of stupid things I did when I was learning about tree cutting. I am privileged to be alive.
In the U.K. larch is often used for planking, and there is plenty of it growing in upstate New York where I live. I had asked one mill owner to keep an eye out for good larch logs, and he found me two that were 14′ long, 20″ diameter; one with a sweep of 18″ in curve along its length. These were flitch sawn on the curve and produced about 300 board feet in total at a cost of only $0.80/bf. These boards were stickered in my 19th–century timber-frame barn where they joined the other 2,000+ bf of hardwoods that I’d harvested and milled over the past 30 years. Much of this wood I will never use, but it is there for my son and others, as sure a treasure hoard as any found in a Viking barrow grave.
Black locust is another superior boatbuilding wood and, as people around here say, it lasts about 20 years longer than rock. Some years ago, I cut down a locust from the 20-acre lot at my home. It was 24″ diameter, 30′ to the first branches, 80′ high, and straight. I wanted it for framing and keel stock. By decree, I am required to have my wife, Sue, with me when I cut trees like this, and she dutifully stood, cellphone in hand (to call 911) as it came down without issue. I hauled a 12′ section out of the woodlot with the tractor, and with a combination of rollers, cant hooks, and tractor power, managed to get it on the trailer to take to my friend Rob Ringer for milling.
Rob Ringer
Rob’s sawmill has a 9.5-hp engine and a 22′ capacity. It doesn’t propel itself, so here I’m pushing it along its rails. Rob agrees that the fresh-cut locust wood smells like sneakers; to be exact, a 14-year-old boy’s sneakers.
This was a big log, by Rob’s estimate weighing about 1,900 lbs. Why bother with this when I could go to a local sawmill and get white oak? For me it was not about the money. It was about the idea of making it myself, not just the boat but the materials, the self-sufficiency, the adventure. And there is the ultimate satisfaction of knowing the boat was built from wood from my property. So, Rob and I levered the log with peaveys up onto the bed of his gas-powered horizontal bandsaw mill and slabbed it up. The mills made little fuss gliding along on rails cutting at about 1″ per second. We sawed some as 4⁄4 lumber and about a third as 8⁄4, the widest about 20″ with no knots. The wood smells like sneakers and is a faint greenish color when cut but takes on a honey-yellow color when dry. When finished with a coating of pine tar and linseed oil, it has almost a cherry color. I have heard people complain about locust dulling their tools, but I can’t say that was ever apparent to me. Tools regularly need sharpening no matter what the wood, and I find marine ply to be harder on edges. The freshly milled locust boards were heavy, but I got them stickered in the barn to air-dry.
Faerings, meaning four-oared boats, are little changed in their basic shape and construction in the last 1,000 years. They have three main frames and two canted frames, called stammerings or rangs, one in each end, all made of crooks. I knew I was not going to be able to find grown crooks, but I was fortunate to run across Adrian Osler’s book, The Shetland Boat. In the 1800s, boats in Shetland were very similar in hull form to the Norwegian faerings; some were even built in Norway, taken apart, and shipped to Shetland as kits. Those boats were made with sawn frames instead of frames from crooks, and, fortunately for me, the book described their construction in detail and served as a guide for scantlings, structural details, and sail dimensions.
Craig Hohm
My hoard of wood has grown over the 30 years I have been buying lumber from local mills, have had mills come to my woodlot, or from select pieces I’ve inherited from friends. I even have exotic jarrah wood from an old hot tub.
I lofted the Sunnhordland faering from the drawings in Færøyvik’s book. There were no offsets, and the plan and profile views of the boat were only 4 1⁄4″ long so I had to increase their size on my copier until the dimensions fit my architect’s rule. Then I drew it 1:10 scale and measured that drawing for offsets. I put inexpensive lauan plywood on the floor of my shop and painted it white. My scaled-up offsets were accurate enough that the full-sized loft required little tweaking.
Prior to buying my place in 1985, I had not been a woodworker (aside from making a cutting board in 8th grade). The house was built in the 1850s and close by was another old building that the seller, a builder, had used as a shop to build cabinets. The first time I walked in there, I saw a lapstrake mahogany Barnegat Bay sneakbox that he had just finished, and I said, “Where do I sign?” The shop has an L-shaped layout, and the main bay with a garage door at either end is 40′ × 16′; there is a 14′ × 14′ side room where my power tools live on wheels. It has a wooden floor, ideal for lofting and backbone setups. The walls are lined with workbenches and all the hand tools are ready at hand.
Craig Hohm
After I set the keel and stems up on the strongback, I glued the scarfs between them and then glued the horizontal T cross-section of the keel. In traditional construction, these would be short scarfs (about 1:4) nailed with tar in the joint, and I would have carved the T-shaped keel with that axe I’d planned to make.
I built the faering upright, in the traditional manner, but with six molds mounted on the keel and braced with cross spalls and struts to the ceiling. The old-timers did not use molds but rather had a system of measuring each plank-face angle relative to plumb using a simple protractor, the batlodd. I’ve read that all the information needed to build a boat could be reduced to a few measurements on a stick…that, and the contents of the builder’s head.
I didn’t have larch boards wide enough for the original Sunnhordland faering’s three strakes, so I went for five. Most of the internal structure was based on Shetland methods, using sawn frames in lieu of grown crooks. Iain Oughtred reassured me that the traditional method of beveled plank ends landing on and screwed to an un-rabbeted stem would be strong and durable.
Sue Hohm
In the corner of the workshop is my moaning chair where I would sit when I had done something boneheaded, holding my bony head in my hands and moaning. This moment of repose didn’t require the chair.
My one nod to modern materials was to scarf the planks with epoxy, rather than seal them with tar and fasten them with clench nails or rivets. I am sure if epoxy was available 1,000 years ago, the Vikings would have raided for it, along with marine plywood. Even after increasing the number of strakes, I had to joint some boards and epoxy them edge-to-edge to have planking stock wide enough for some of the upper strakes. I did the glue-ups prior to thickness-planing the stock to 1⁄2″. I used up that larch in its entirety.
I sealed the laps with thickened pine tar cooked to the consistency of honey in a deep-fat fryer from the thrift shop. I got that idea from the DRAKEN HARALD HÅRFAGRE book. Real pine tar has a wonderful smell, distinctly nautical with notes of adventure. The tar in the laps was overlaid with wool yarn. The laps were closed with square-shanked copper rivets and conical roves.
Sue Hohm
As I painted hot tar along the lap, I laid a strand of wool in the sticky black stripe, and it would stay put during riveting. It is a traditional method that, I would later learn, leads to leaky seams, which are equally traditional. I could have gone with thicker wool, or for that matter, I could have used some contemporary commercial goop.
I was used to building hulls upside down, which works well with glued-lap plywood. Building the faering upright made it possible, while working alone, to buck the rivet heads on the outside with one hand and peen the heads over the roves on the inside with the other. The work was tedious and noisy. I wore hearing protectors—ear goggles as we call them here. The lap rivets were placed 4″ apart.
After the third strakes were in place, I fit the lower portion of the frames and fastened them to the planking with locust trunnels, wedged with the growth rings perpendicular to the long grain of the frame. The trunnels are 5⁄8″ in diameter and I turned them on my mini lathe, after splitting the stock out with an axe. (The head design was originally a conical section that swelled to 7⁄8″ and was flush outside, but I found after the first season that the trunnels tended to pull through the plank when the wood soaked up—the lateral expansion of the planking wood stretched them out. I was interested to learn that in the original Viking ships, the frames below the waterline were tied into raised cleats on the plank with withies, which allowed the planks to move without straining the fastenings. So, the next year I pulled the lower frames out and redid the trunnel heads into a dome shape with the head raised above the outside planking.)
Sue Hohm
Tap tap tap tap tap. Each of the square-shank copper rivets took more than 50 hits to flare it over its rove. It was nice to be able to do each plank as it was hung, holding the bucking iron on the outside, rather than riveting the whole boat after planking.
After the top two strakes were in, I extended each frame to the gunwale, then fastened a trunnel through the joint of the top and bottom frame. I found out later that Jay Smith, a boatbuilder who specializes in traditional Nordic boats, does not fasten through this joint, allowing for more flexibility in the hull. In another deviation from tradition, I riveted a crossbeam to the upper frame ends; in the past this beam would have been made of crooks. Their horizontal ends would overlap each other with a scarf joint to form the crossbeam, and the other ends would extend up to the top of the frame. I made each of the canted frames in the bow and stern of glued pieces rather than grown crooks. These frames are a tricky fit over the laps of the planks and pine tar is an excellent marking device, showing the high points where the fit could be improved. Every frame had a limber hole at each lap.
I made the floorboards in four sections to fit between frames, using the Scandinavian transverse orientation of the boards in each section. I used local hemlock I’d stockpiled in the barn. The deep gulleys of New York’s Finger Lakes region where I live are filled with stands of big hemlocks and the wood is moderately rot resistant, like larch but more brittle.
Sue Hohm
Fitting the angled rang—a glued V of locust—was a tricky task. I used pine tar to show where the fit touched the planks. The sticky residue would dissolve later when I applied the linseed-oil finish.
The locust outwales are full length, tapering in height and width at the ends. The inwales, also locust, ended at the rangs, and the whole sheer assembly was through-fastened with rivets. Instead of using the traditional kabe oarlocks made from crooks with ropes restraining the oars, I mortised locust crooks into the gunwale and, to keep the oars in place, I installed pins made of pine, meant to break in the event of a serious crab rather than breaking the oar.
I made a pair of 10′ oars from local quarter-sawn spruce, another treasure from my barn cut especially for me from a spruce about 28″ in diameter. They have narrow blades and square-section inboard ends for balance. The distance between rowing positions is an ell, a historic measure about a yard long. In practice this distance is less than in the usual modern rowboat but encourages shorter strokes, perhaps more efficient and less apt to catch a crab. The blades on the oars are quite narrow, as befits a boat used in rough seas.
Craig Hohm
The upper frame extensions had a crosspiece riveted to them above the joint with the lower frame. Here the port side of the hull has been oiled, showing the contrast with the uncoated wood on starboard.
Færøyvik did not offer any indication of a rudder for the Sunnhordland faering, so I adopted a design used in the Shetland boats. The lower pintle on the rudder slides onto a long rod that parallels the curved sternpost to the bottom of the keel. With the long overhang of the aft stem, this makes getting the rudder down to a strong point on the keel easy. To fabricate the fittings, I started by making wax patterns, encasing them in a mold-making material called luto. The wax was then burned out, leaving a space for the bronze to fill. I did the casting with my friend Dexter. The crucible, filled with bronze, weighed 300 lbs, and was lifted out of the sub-floor-level oven by a bridge crane. Pouring the liquid bronze was like pouring lava, and just standing next to the crucible curled the hairs on my legs, even through my Carhartt workpants.
I based the proportions of the sailing rig on diagrams from Osler’s book by measuring the various historical rigs and their relation to each boat’s length and beam. The square rig is not what I’d call practical. Its tack moves forward on the bow for close reaching, back for a broad reach. The yard has a halyard, lines on the clews for sheets and for the tack attachment (which reverse with every tack), a bridled downhaul on the foot of the sail, braces to the yard, and a bowline arrangement on the luff, which also changes with each tack. While its handling is complex and was in time replaced with an asymmetrical square sail, a dipping lug, and ultimately by fore-and-aft rigs like the sprit, I just had to see it on this boat. Using the 1:10 scale drawing, I laid out likely positions on the gunwale to drill holes to serve as the attachment points for the tack and sheet positions.
Craig Hohm
A bronze rod runs between the middle gudgeon and the bottom one. The lower pintle on the rudder is a fork that fits over a flattened section at the top of the rod. Below that flat spot the fork is trapped by the rod’s unmodified diameter. There needs to be a fair amount of slack in this system since the two fittings are not on the same axis.
I had the 100 sq ft trapezoidal tanbark Dacron sail made by my friend Douglas Fowler, a sailmaker in Ithaca. I gave him the dimensions and he did the rest. It is a practical sail, no tarred manila or sewn cringles, just roped edges, stainless-steel pressed cringles, and three lines of reefpoints. I didn’t want to go overboard on period details here.
I made the mast from a 40′-tall Norway spruce that I had planted 25 years before. In Iain Oughtred’s book on glued-lap construction he wrote about the moral imperative of using wood responsibly, and he promised to plant some trees. Over the years I’ve planted 12,000 locust and Norway spruce trees on my property, which used to be a vineyard. The land would rather be a forest. My county rents out a planter that fastens to a three-point hitch. It allows me to ride behind the tractor and plant at a walking pace. I shaped the mast with the chainsaw mill and broadaxe. I got the mast and the yard out of a 20′ section of trunk.
Craig Hohm
These Viking shroud needles work! I used rawhide Turk’s head knots to capture the needles for the first season and then replaced them with bronze rings. The mast has a step on the keel and a slot in the thwart; the thwart has a loose fit on the frame and is removable.
The mast has a forestay and a shroud on either side tensioned with shroud needles. These needles are locust crooks that have a hole on one end through which the shroud passes; the shaft goes through a rope grommet below the gunwale and levers up to meet the descending shroud like a pelican hook, locking there with a circle of horn or metal. These needles really work, making the shrouds taut. In keeping with the rig, the lines are traditional-looking three-strand Dacron.
I finished all the faering’s wood with a 1:10 mix of pine tar and raw linseed oil. I got these materials from a local firm that imports the real stuff from Scandinavia, the same products used in the DRAKEN HARALD HÅRFAGRE and not the petroleum-based “pine” tar often seen for sale in the U.S.
Dexter Benedict
In the midst of making the anchor, I opened the plaster cast to remove the wooden pattern for the flukes. The plaster mold is made in two sections separated by aluminum shims so the mold will come apart cleanly. The shank and its mold are by my left hand. The cross bar is bronze rod with a stopper welded on and an R clip on the other side of the shank to lock it in place. The rectangular hole in the flukes fits a taper at the bottom of the shank.
Finally, I cast a bronze anchor, an 18-lb three-part fisherman’s that breaks down for storage. I made wood patterns, molded them in plaster, and used the molds to make duplicate parts in wax. Those were then cast in molds and the wax was burned out to open a cavity for the molten bronze.
The first day I pulled the faering out in front of the shop, an elderly Finnish woman, whom I had never met, stopped to tell me it looked just like the boats her father built when she was a girl.
Sue Hohm
The faering turned out to be a wonderful rower and felt right at home in the fjord-like waters of the west branch of Keuka Lake, one of the smaller of New York’s Finger Lakes.
After two winters of work, I launched the boat in 2016. I admit to some remorse at not using modern goop in the laps below the waterline. If it is launched dry off the trailer, water will be above the floors after about an hour. But then leaking was part of the traditional experience. I’m told the Vikings retired a boat when they had to bail it out more than twice a day.
It is a fabulous rower, and an equally aggravating sailer. It can be sailed solo, but it is, as I said, not practical. You can imagine the mess of lines, and I have yet to train someone to help me with it. It will not come through the wind on a tack, only making about 20 degrees into the wind after leeway. The best way to tack is to lower the sail, and while the bowman is exchanging the luff for the leech, the helmsman rows the bow through the wind. Wearing (coming about by turning away from the wind) is easy but loses ground in the nearly 270-degree turn. I can also tack by backing up to come through the eye of the wind.
Sue Hohm
As pleasant as it was to be ghosting along in a gentle breeze, I would have preferred the faering pose for her photo in a wind blowing like stink.
My pine-tar friends asked me to bring the faering to their tent at The WoodenBoat Show at Mystic Seaport in 2017. The boat was a hit, but my wife, unbeknownst to me, had conspired with my family and friends to have them show up wearing red T-shirts emblazoned with “Ask me about Craig Hohm.” I was mortified. I am sure that such TSP (tireless self-promotion) is frowned upon by the Yankee community. (I will get her back; still thinking about the best way.) For all my griping about Sue, never was there such a woman: she encourages me in all these mad capers. Some years ago, I was building a 30-footer and a friend said, “Good Lord, where are you going to put it?” I said I thought it would fit in the barn, but that if it didn’t my wife said we should put up a new building for it. There was a pause and he asked, “May I have her when she is through with you?”
Craig Hohm is a retired emergency doctor and worked for 30 years where the rubber of health care meets the road. He lives in Penn Yan in western New York. Before moving to Penn Yan, he had never been in a sailboat but survived residency by reading books about sailing and boatbuilding. He has six boats currently on the property and is not allowed to sell any of them on the orders of the Warden (wife Sue). He can be found most days between the months of May and October on one of the state’s 11 Finger Lakes. The other months with an R in them are for building. Craig adds, “I owe a lot to Iain Oughtred for years of advice on various topics. May he rest in peace.”
If you have an interesting story to tell about your adventures with a small boat, please email us a brief outline and a few photos.
Over the past few years, I’ve been experimenting with different ways of finishing wood kayaks. Most homemade kayaks are finished bright to show off the wood grain and color, but other techniques can be used to make a kayak unique and expressive. On the most recent boats I’ve built, I’ve painted the whole kayak one color, and on another I stained the wood and added touches of paint. I’ve used high-tech fabric blends for their aesthetic appeal and I’ve added colorful designs by laminating patterned fabric under fiberglass or using specialty fiberglass that has been custom printed.
None of these techniques is difficult for anyone who can put down a layer of fiberglass and epoxy clean enough to be finished bright. I’ll start with the simplest and work through the materials I’ve tried on these kayaks.
Paint
Photographs by the author
I finished this kayak with a carefully buffed and polished coat of marine-grade enamel, keeping it simple and elegant. Beneath the paint is a stitch-and-glue okoume plywood hull.
Paint does not have to look cheap. I’d always wanted a solid-white, Greenland-style stitch-and-glue kayak. The 3mm okoume plywood I used to build it had no grain with any figure to it, and without stain wouldn’t have an appealing color, so paint was a good option.
I went to some trouble to ease all the edges during construction and then buff out the final paint finish to a fine polish. Most people think it’s a fiberglass boat. To most builders of wooden boats, this may seem an odd result, but sometimes a good, shiny coat of paint is just the right kind of bling.
After I had ’glassed the kayak and filled the weave of the 5-oz fiberglass with two additional coats of epoxy, I mixed titanium dioxide pigment into the final coat of epoxy to begin the transition to white and to ensure that the usual dings and scratches wouldn’t stand out. After that final coat of epoxy had had several days to cure fully, I applied a high-build white primer. While that kind of primer is standard practice on wooden boats, it’s not used much over fiberglass, but it provides a really smooth base for the topcoat, even on epoxy-filled ’glass.
The paint used for the topcoat is important. I’ve long used Pettit EZPoxy, a one-part polyurethane topside enamel, because it goes on very nicely, self-levels, and has proven to hold up well to weather and use. There are other brands of marine-grade topside paints, and they can also produce good results. The local hardware store exterior enamels are far cheaper, yes, and they do look okay after initial application, but they don’t hold up like the more expensive marine paints do. One $40 to $50 quart is more than enough, and I find it’s worth the extra $20 or $25.
After the primer has been block-sanded smooth, apply the topcoat with a short-nap roller. Apply a light coat, then tip it off, working by sections, with the brush of your choice (I use a disposable foam brush).
To get a really smooth gloss on the finish, there’s work to be done after the topcoat is dry. Go at it the way auto-body paint-shop guys do: working over the last coat of paint with increasingly fine sandpaper—800-grit, 1,500-grit, 2,000 grit—wet-sanding the finest levels, and then break out the buffing compound. I have an electric buffer, but the panels on a kayak are so narrow, I prefer to do it by hand. Once you have a truly smooth and shiny surface, add a coat of wax and your kayak can have a finish that looks totally professional. All that elbow grease pays off well.
Stain and Gold Trim
I achieved the look of Prohibition-era speedboats with stained cedar and gold paint. Brass and bronze hardware and leather straps complement the Art Deco style.
Strip-built boats with patterns created with different species of wood can look spectacular, but when I strip-built a 17′ kayak, I wanted a different look, something in a style that would suggest the speedboats of the rumrunner days of the 1920s. I used northern white-cedar strips for the entire boat, stained it a mahogany color, and then used gold paint to add the stylized wing motif popular on trains, planes, and even clocks and doors in that era of Art Deco.
Not all stains are suitable to go under epoxy. Oil-based stains are out—epoxy and oil don’t get along. Water-based stains are available in a wide range of colors, but there’s a risk of raising the grain on stripper boats (however, for okoume ply, that’s not an issue). Alcohol-based stains are easy to use and don’t affect the wood, so I went with Behlen’s medium red mahogany. (This product is no longer available, but Mohawk Ultra Penetrating Stain is comparable.)
After the boat was ’glassed and finished with System Three Silvertip epoxy I was ready to add the gold trim. I thought gold leaf would be the perfect touch, but after some frustrating trials on a sample piece, I gave up on it. Serious skill is needed to get the leaf to lie flat on a smooth surface and make a clean edge. At a local art-supply store I found Sign-Painters’ One Shot Lettering Enamel made specifically for sign-painting, and selected one with a rich gold color. At the same store I picked up some rolls of masking tape in various widths to help ensure crisp borders. The closest match I can find to that tape is Dick Blick’s Intertape Masking Tape, although the 1⁄2″ size is wider than the narrowest widths I had found. FrogTape gives a very clean edge that I appreciate, but you can’t get it in the narrow widths that readily take to curves. I recently bought some narrow stuff from Amazon, but it doesn’t seal like the Intertape or FrogTape.
Once the paint was on, I added several coats of System Three Marine Spar Varnish. This UV-blocking varnish is designed to cure properly over System Three epoxy; I found on previous projects that other varnishes don’t work well over this brand’s epoxy. I completed the boat’s period look with brass hardware and leather straps. I even covered the plastic seat and backband with leather. To top it off, I made a paddle to match.
Fabric Underlay
A printed-fabric deck underlayment is the highlight of this stitch-and-glue kayak. The side panels and hull are stained to echo the colors in the fabric.
My wife, Caroline, had a hand in choosing the decorative finish of the stitch-and-glue kayak I built for her. As is often done with stitch-and-glue boats, I stained the plywood side panels and hull with two water-based stains from Minwax. But for the deck, we ordered fabric from Spoonflower, a company that prints designs to order and has over a million patterns available, all of them uploaded to its site by individual designers. You can create and upload your own fabric pattern, but with so many to choose from it’s hardly necessary. Caroline found an undulating purple, pink, and blue pattern that she liked.
You can get sample swatches of any print on any of the many fabrics available to create sample pieces. I strongly recommend doing this. Colors change when the fabric is saturated with epoxy, and the color of the substrate can show through. I tested quite a few swatches before I determined that Spoonflower’s Satin fabric, a satin-weave 100% polyester, shows best under fiberglass. I also found that the pattern we chose needed a thin white undercoat painted on the wood before applying the fabric. The cloth goes on the boat before fiberglass is applied to the exterior panels.
These are just some of the many sample pieces that I made to test and practice application techniques and colors.
First, tape off the area that will be covered with the fabric. I like stucco tape for this. It’s a stretchy red polyethylene masking tape that comes in a 2″-wide roll. It forms a nice tight edge that epoxy doesn’t sneak under, and that same edge shows well when it’s time to trim off the excess fabric. It’s also less prone to tear when removed. Home Depot carries it.
For the undercoat, I used Zinsser Bullseye 123 primer. It settles into the wood rather than creating a film on top. It’s water-based, and I’ve found that adhesion of epoxy-bonded materials over it is very good. Once the undercoat is on and thoroughly dry—a full day at least—it’s time for a light sanding before applying the fabric. The 2.2-oz Satin material from Spoonflower takes some care to get out all the wrinkles and air bubbles. After the fabric is saturated with epoxy, squeegee off all the excess resin—every last drop—because extra epoxy underneath will float the very light fabric up from the substrate, creating an uneven surface, and drips and ridges on top can’t be sanded off the next day without the risk of sanding into the printed design.
Once the fabric is down and the epoxy has cured overnight, run a utility knife with a fresh blade along the top edge of the tape, which will show through the fabric. The tape and excess fabric will strip off easily. Then proceed with fiberglassing the hull in the usual way.
One bonus with this fabric: it comes in a 54″ roll that’s more than twice as wide as a kayak deck, so there’s plenty of extra. I sewed up a matching neck scarf for Caroline.
Printed Fiberglass
This okoume plywood boat is sheathed with printed fiberglass on the deck and a carbon-Kevlar woven fabric over the hull. The metallic trim was achieved by mixing pigment powders into epoxy. With this combination of materials, the boat was given a stylized fish design, with an eye forward and the suggestion of a tail aft.
My most recent boat, a Shearwater 14, was built to be light and simple for quick, casual day trips. I wanted the plywood deck to be uncluttered by bungee cords and hatches and to have a special look. I chose an Art Deco pattern that suggests fish scales, and had it printed on fiberglass by BoardLams in California. This company has been doing fiberglass prints to order for surfboard builders since 2008, and I know of no other company that provides the same service. What’s good for a surfboard can be great for a kayak. I chose a repeating graphic, but they can print absolutely any graphic pattern you send them.
You need to create your graphic on a computer and save it as a jpeg file the actual size to be printed, with a print quality of 200 dpi or better. The website offers standard print sizes geared to surfboard makers, but if you call, they can print just about anything you want in any size. I used a photo-editing program to tile a small sample into the 32″ by 15′ graphic that BoardLams printed for me on a roll of fiberglass.
The standard BoardLams material, a 3-oz, tight-weave fiberglass, is easy to work with. I used MAS LV, a low-viscosity epoxy, that saturated it well, and this fabric will follow the contours of the boat if they’re not extreme. A wood substrate may darken the appearance; a white undercoat on the wood is a remedy.
BoardLams also offers a premium fabric. It’s the same 3-oz ’glass, but it gets a white coating before the pattern is printed. The pattern will show more brightly, but the coated fabric is less flexible—I struggled to get it to lie properly on the radiused edges of the deck—and the epoxy doesn’t penetrate it readily. To ensure a solid bond, I wet the deck with epoxy before laying down the fabric.
Applying printed fiberglass from BoardLams is like using prints from Spoonflower. Squeegee off all excess resin, understanding that sanding this ’glass risks cutting into the printed surface. To protect the design and give the deck a deep gloss, I added a layer of 2-oz fiberglass, finished normally with a fill coat, a topcoat of epoxy, and sanding to get it ready for varnish.
High-Tech Fabric Blends
The black and gold weave of the carbon-Kevlar covering the hull inspired the color scheme of this kayak. The gold-pigmented epoxy decorating the stern conceals a strip of carbon-Kevlar that didn’t blend in with the rest of the fabric.
For the Shearwater hull, I covered the outside with a carbon-Kevlar blend for its extreme strength, resistance to abrasion, and classy appearance. There are many different options and colors in very strong fabrics that aren’t as pricey as they used to be and look great. Most are as easily applied as fiberglass, but there are some caveats.
Carbon-Kevlar blends have a very loose weave that makes pulling the fabric over the contours of a kayak hull even easier than fiberglass, but these materials don’t cut readily. You can buy scissors specifically made for Kevlar, which have a finely serrated edge on one blade to grip the fabric while the other blade does the cutting. Some tin snips and kitchen shears are also made this way and are less expensive. The shears I used worked well, but I did have to periodically dress the cutting edge with a diamond stone. If you’re only going to cut a small amount, just take an old pair of scissors and run one cutting edge across a medium grinder wheel. Leave the coarse edge as it is, and it will cut the Kevlar.
If you sand into Kevlar or cut an edge roughly, the yarn’s extremely fine fibers will fuzz out and be very difficult to tame. One trick is to put masking tape over the line to be cut and leave the tape on the raw edge as long as is practical.
When you unroll the blend material over the boat, handle it carefully. The weave is so loose that you can accidentally distort or spread out the threads in one spot. It doesn’t look pretty and it’s hard to straighten it out.
I started with a sample of a plain weave carbon-Kevlar fabric from Composite Envisions. It goes on like a medium-weight fiberglass and is easy to fill and finish. I used the small piece inside the cockpit to reinforce the hull there and get used to working with the fabric. For the exterior, I switched to the twill weave of the same fiber mix and color, which readily wrapped around the bow. The stern had too much of an angle for the material to pull over, so I trimmed it flush and wrapped a 3″ strip of the fabric over the end of the kayak. The twill weave does not lie as flat as the plain weave. It has a slight corduroy texture and takes several fill coats to achieve a smooth surface. Once these fabrics have some cured epoxy in them, they can be trimmed with a utility knife.
The strip I’d put on the stern had the awkward look of a patch, but after fairing it and adding the accent striping, it became invisible.
Pigments for Fiberglass
A variety of pigments from different suppliers can be used to color the epoxy.
To complete the Art Deco style of the Shearwater, I added some brass- and bronze-colored highlights. Pigments sold to craft hobbyists (search “craft pigments” at Amazon) come in a startling array of colors. Many are quite showy, and they mix easily into epoxy. Some of these pigments have reflective glitter that provides a metallic look that isn’t possible with paint. Another option is to do an incomplete mix and let the resulting swirls and whorls show in the finish. You can make your boat sparkle. After much experimentation, I settled on a single pigment for the bronze-toned cockpit coaming and hatch, and a blend of three pigments to get the brassy color I was looking for on the accent stripes on the sides.
Mixing these powdered pigments into the epoxy is just like mixing in various thickeners. And they do act as thickeners while imparting lots of color. In most cases, only a small amount is needed. Conventional epoxy thickeners can be added if you want an accent to stand proud of the hull. The brassy stripes I made are textured to give the appearance of hand-forged metal.
The possibilities for finishing techniques do not stop here, and the ideas I have presented can be combined in different ways. You can create almost anything you can dream up.
David Dawson lives in Pennsylvania but stretches his passion for boating up and down the East Coast, paddling and sailing the waters from Maine to Florida. Since retiring in 2012, he has built six kayaks and a sailboat.
You can share your tips and tricks of the trade with other Small Boats readers by sending us an email.
Aeré makes an inflatable beach roller that works wonderfully well on all kinds of beaches from sand to shingle, but at 5′ long they’re much larger than I need for my canoes and kayaks, the boats I normally pull ashore. The Florida-based company also makes a wide variety of inflatable fenders that are built in the same manner as the rollers. Their core of heavy polyester fabric is coated with a thick layer of PVC inside and out. The seams are welded and reinforced with strips of additional material, glued in place.
Photographs by the author
The Aeré fender’s sturdy construction and tough material enables it to double as a roller for small boats.
The smallest Aeré fender measures 9″ in diameter and is 22″ long, a very good size for my canoes and kayaks. It has the same spring-equipped valve as the roller and a stainless-steel D-ring on each end. Aeré rates the roller’s capacity as 2,000 lbs but doesn’t offer a figure for the fender. I measured the thickness of the material of the fender and the roller by pinching a fold flat between the jaws of a caliper. The material is compressible, and the results varied, but the fender material seemed to be about 90% as thick as that used for the roller and presumably would have 90% of the strength. While the numbers for the fender work out to a capacity of 1,800 lbs, that’s far more than I’d ever subject it to. I put a load of 345 lbs on the fender and it was unaffected.
A pressure of just 1 psi is all that’s required to ready the fender for use. According to the manufacturer, the fender will feel “like a soft grapefruit” when properly inflated.
My 18′ 9″ lapstrake tandem canoe weighs about 80 lbs and has a beam of 30″. The Aeré fender works well for moving it across a beach that has bands of shingle, wet sand, and dry sand. The fender isn’t inflated to a high pressure—while Aeré tests its fenders to 45 psi, their standard operating pressure is just 1 psi. That low pressure allows the fender to mold itself to the hull it’s supporting and to flatten against the ground to smooth the ride over rocks and keep it from sinking into soft, dry sand. There is none of the friction caused by one surface sliding across another, so the fender should last a long time and protect hulls from damage caused by dragging them ashore.
Each end of the fender has a stainless-steel D-ring as an attachment point. The valve is a Halkey-Roberts type.
Of course, the Aeré fender will also serve its intended purpose admirably. With a D-ring securely attached to each end, it can be hung vertically or horizontally. Its usefulness doesn’t end there. It can serve as a buoy if one is needed, and in camp it can make a very comfortable seat. My knees no longer fold well enough to sit on it, fully inflated, on flat ground, so I prefer to set it on a log or a rock for a bit of height. I can partially deflate it to provide a softer, broader surface. With more air let out, the ends of the fender curl around and make contact with my hips, a feature that will come in handy if I need a change of seat in my canoe with something that will keep me held on the centerline. With the fender partially deflated and covered with a fleece jacket, it’s an exceptionally nice pillow. I sleep on my side, and I can adjust the fender to get my neck straight and neutral.
Deflated, the fender is compact and easy to stow.
Fully deflated, the fender is easily packed and doesn’t take up much space. The key to getting the most use out of it is to have a way to inflate it quickly and easily. The standard manually operated piston pumps used for inflatable devices are bulky and would take up more space than the deflated fender, so they’re not a compatible option. Compact rechargeable air pumps can do the job if you happen to have one, but there’s no need to go to the expense of buying one if you don’t. I tried just blowing into the fender’s valve, but that didn’t work. The fender’s valve is spring-loaded, and I can’t generate enough pressure to get air past it. To make an oral inflation device, all I needed was a short piece of plastic pipe, a bit of dowel, and some tape.
The fender is normally inflated with a low-pressure pump, but with a simple homemade device it can be inflated orally.
I took a piece of PVC 1⁄2″ schedule 40 pipe—standard water pipe that is available at almost any hardware store—and drilled a 1⁄4″ hole through it about 3⁄4″ from one end. I tapped a piece of 1⁄4″ dowel into the holes and cut the ends flush. The pipe is a slightly loose fit in the fender’s valve, so I wrapped a few turns of plastic electrician’s tape around the end of the pipe, starting high to cover the ends of the dowel and finishing with three or four turns around the end.
To inflate the fender, I press the taped end into the valve. The dowel depresses the spring-loaded stopper so I can blow on the other end of the pipe and the air will pass freely into the fender. It can flow freely out too, so between breaths I let the valve press the pipe out.
The dowel inside the inflation device depresses the fender’s valve stem to allow the easy passage of air.
I wasn’t able to measure how much pressure I could generate to inflating the fender orally, as my tire gauges didn’t register even my strongest effort. On the web I found that we average humans can generate 1 psi to 2 psi, which is right on target for the fender.
There’s no need to fully inflate the fender orally and get light-headed in the bargain. I hook an index finger in each of the D-rings and press the valve with my thumb. As I pull my hands apart, air is drawn into the fender as if it were an accordion. I release the valve and then use the pipe to top it off with three breaths. It takes under 15 seconds. (I used the same trick on my Aeré roller. With its long sides, it didn’t pull in quite so much air, but it took only 20 breaths to fill it to normal pressure.)
The 9 × 22 fender from Aeré serves so many purposes, it would be difficult to come up with an excuse not to take it aboard any of my boats.
Christopher Cunningham is the editor of Small Boats.
Iain Oughtred, the Australian-born boat builder and designer whose boats frequently appear in Small Boats, passed away on February 21, at the age of 84, in a hospital near his home on Scotland’s Isle of Skye. During his career as a designer, which began in 1967, Iain designed well over 100 boats. They ranged in length from his 6′ 8″ Feather, a pram dinghy, to the 41′ 8″ Gipsy Queen, a clipper-bowed ketch. Between Small Boats and the Small Boats annuals, we’ve reviewed 15 of Iain’s boats. I corresponded with him in connection to the reviews but never met him and most of my impressions of him came through his drawings, his book Clinker Plywood Boatbuilding Manual, and the Caledonia Yawl I built 20 years ago to his plans.
Nic Compton
Iain, here at his drafting table while living in Findhorn, is wearing several layers to keep warm. Nic Compton, who took this photo, noted that Iain was a frugal man and preferred bundling up to the more costly option of using central heating.
Iain did his beautifully detailed drawings by hand with a precision equal to those produced by CAD programs. There was seemingly nothing he overlooked, and I never had questions that his drawings didn’t address. In the complex construction views, he drew wood grain where it helps to distinguish adjoining pieces from one another. His text is all handwritten and dimensions are given in both imperial and metric figures, which he may have intended to help builders become numerically bilingual. His fractions are presented without slashes, which makes them easier to read especially when the drawings inevitably lose clarity when scanned and then printed. Such fine details may seem unimportant, but Iain must surely have given them some thought.
Tordis Ødbehr
Iain designed this boat-like structure in Findhorn, on the east coast of Scotland. When he moved to the Isle of Skye on the west coast, he took it with him and used it as his drawing office.
Clinker Plywood Boatbuilding Manual was first published in Scotland in 1998 and by the time I bought the book in 2001, it was in its second reprint and published by WoodenBoat. My copy spent a year in the workshop and still has sawdust trapped in the creases between many of the pages. The manual is well illustrated with drawings and photographs. Someone’s hands, presumably Iain’s, appear in a multitude of the photographs, but we never get a good look at his face. It’s usually in a corner at the top of the frame and mostly cropped out. And even in the author photo on the second page, Iain is rowing his 25′ faering, Elf. The boat is fully in the frame and shows the full sweeping curve of its starboard sheerline, but Iain has his back to the camera and the turned-up collar of his jacket covers the lower half of his face and his knit cap and glasses obscure the rest. Two people I asked about Iain confirmed that in his life, as in his book, he wasn’t one to call attention to himself.
Laurie Cunningham
While I was drawn to Iain’s Caledonia Yawl as a boat for relaxed summer cruising with my kids, the 127 sq ft balance-lug mainsail was meant to give the boat the speed it needed to be a contender in the small-boat cruising races for which it was designed. It has exceptional stability, even when lightly loaded and here showing a glimpse of her keel amidships.
In 2004 I began building Iain’s Caledonia Yawl, designed in 1988 and destined to become one of his very successful models. I had seen one in the livery at Seattle’s Center for Wooden Boats that summer, and I was immediately drawn to the double-ender’s bold, broad strakes. I didn’t know who had designed it, but it seemed, on looks alone, the clear choice for the next boat to build. I brought my son and daughter, then 15 and 12, to the center and took the boat out for a row. The boat had plenty of room aboard for all three of us and they quickly agreed that we had to have one. I bought the plans, built the Caledonia over the winter and the following spring christened it ALISON after my daughter.
Laurie Cunningham
In all the years since 1988 that I have been building boats, about 40 of them, it wasn’t until I launched the ALISON that I had the company of another boat of the same design. The appeal of the Caledonia Yawl spread around the world and there were four built just in my area of Seattle’s north end. Here, the late Bob Kellett aboard NAUTY, eased the mainsheet to let the ALISON catch up. Two other local Caledonia Yawls are Todd Waffner’s LUNA and Roger Coulter’s SPINDRIFT; both carry the optional gunter yawl rig with jib.
In A Life in Wooden Boats: The life of Iain Oughtred, author Nic Compton writes: “Of all of Iain’s designs, the Caledonia Yawl combined the key ingredients needed on a successful ‘raid’ boat: ability under oar and sail, seaworthiness to cope with variable sea conditions and, last but not least, speed.” Raids combine multi-day racing with overnight beach camping, and while the island hopping the kids and I had in mind would be a lot like raids, with only the one boat, winning the race was assured.
Christopher Cunningham
Ali had her sketchbook, Nate had his guitar, and we were never in a hurry to get anywhere because aboard the Caledonia Yawl we were already right where we wanted to be.
The kids and I made several summer cruises aboard the ALISON and when we reached islands new to us, they often had little interest in going ashore. They were content to stay in the nest they’d made for themselves in the bow. We often spent all but about an hour of each day and all night onboard. My kids are grown now but the memories we created aboard the boat remain. While I may have built the ALISON and she has a valued place in our family, our Caledonia will always rightfully be an Oughtred boat.
Brice Avery
In 2007, during a local get together of traditional small wooden-boat designers and builders on the west coast of Scotland, Iain took the helm of the JEANNIE II, a scaled-down, sloop-rigged version of the Ness Yawl that he built for himself.
There are doubtless many people who crossed paths with Iain who can offer more insight into his life and his work than I can, but I know from my time with Small Boats that the number of lives he touched is beyond counting. He certainly touched mine.
I’ve been using the same five countersinks for decades. While they’re all different—one has a single flute creating a cutting edge and two have a pair of flutes; one has five flutes and another has seven—the one thing they have in common is that none of them works very well. On all of them, the cutting edges of their flutes are square to the circumference, so they scrape rather than cut. And as scrapers, they’re rather crude, lacking the sharpened burr of a cabinet scraper. What’s even worse is that countersinks chatter. The irregularities in the wood’s density cause the countersink to get nudged off-center, and the resulting vibration makes for some odd-shaped recesses that are anything but round. (Countersinks that are attached to tapered bits for wood screws are prevented from chattering by the drill bit. That’s also the case with countersinks with integral pilot tips sized to fit a particular predrilled hole.)
Photographs by the author
The set I bought came in a padded case. The countersinks are precision tools with sharp cutting edges and are well worth protecting.
Small Boats reader Steele Hinton recently mentioned that there is one type of countersink that cuts cleanly and without chatter, by not having any flutes at all: the zero-flute countersink. It has a smooth conical tip with an upward-angled hole bored in one side. The sides of the hole meet the conical surface at an acute angle, about 45° (the equal of a bench plane’s blade to its sole), so it’s poised to shave rather than scrape. I could hold that edge against pine and oak and carve curls of wood, which is impossible with an ordinary countersink.
The cone machined on a zero-flute countersink may appear to be a simple geometric shape, but it has an important difference. Just as a plane blade protrudes through the sole to cut, the edge on one side of the countersink stands slightly proud of the other edge. This cutting relief, as it’s called, is what makes the countersink work only in one direction, clockwise. A zero-flute countersink cuts quickly and needs very little pressure to make a deep hole.
The holes that create the cutting edges and the exit passages for shavings pass through the heads of the countersinks.
Each of the zero-flute countersinks has a small flat milled on the very tip of the countersink. It can work its way into wood without a predrilled pilot hole, but it makes slow progress and doesn’t pick up speed even when the hole’s sharp edge starts cutting. The countersinks are meant to follow predrilled holes.
The zero-flute countersink does very clean work whether cutting for a screw to be set flush or to be set deep and then covered by a wooden plug. The set of countersinks I bought came in four sizes: 5⁄8″, 1⁄2″, 3⁄8″, and 5⁄16″. The three largest are true to size and make holes that are a good fit for wooden plugs. They have an 82° point, which matches the angle of screwheads manufactured in the U.S. and Canada to the Unified Thread Standard. Zero-flute countersinks are also available milled to a 90° point for fastenings that meet the international ISO standard.
The countersinks can recess flat-head screws flush or bury them for plugs. There are no stops for controlling the depth, so that must be done by eye. The 1⁄2″ and 3⁄8″ stops from my Fuller pilot bits fit but they block the exit for the wood shavings.
This type of countersink is also well-suited for metalworking. Holes drilled in metal often have sharp burrs around the edges. I’ve been filing them off, but while that makes the holes safer to handle, the marks left by the file don’t improve their appearance. The countersinks, on the other hand, cut a clean, shiny bevel. The deburring function works just as well on holes drilled through wood.
I kept my set of zero-flute countersinks handy while I was building a new boat cart for one of my canoes and used them to dress up every hole I drilled. They have worked beautifully in fir, mahogany, oak, ipe, and aluminum and are a pleasure to use.
Christopher Cunningham is the editor of Small Boats.
The four-piece 82° set as pictured here is available from multiple outlets, including Arch Cutting Tools where the current price (November 2025) is $98.47.
Is there a product that might be useful for boatbuilding, cruising, or shore-side camping that you’d like us to review? Please email your suggestions.
The Glen-L Squirt is a small boat with big ideas. Only 10′ long and with room for just two people, it’s limited in what it can do, but it has the undeniable good looks of a mid-20th-century runabout. The Glen-L website acknowledges the small size but sees it, and the lightweight construction, as a strength, stating that “this little boat will move out quicker with less horsepower than the average production boat…” and concludes that the Squirt is often a “first boat” for the “young at heart,” and “a good boat for the younger set.”
For Bill Bains of Port Angeles, Washington, the Squirt brings back memories of teenage adventures. “When I was a kid in California,” he says, “a friend’s father built a small plywood motorboat, a little smaller than a Squirt. It was painted black and had a 20-hp Mercury, which we could sometimes get started. I had a 1959 Ford Ranchero and a home-built trailer with Model-T wheels. We’d take the boat out to Lake Havasu on the Colorado River and motor around just as fast as we could go. It was a hoot. I remember the weather being about 110 degrees and we’d spend as much time sitting in the water as riding in the boat.”
Bill Bains
Building the stem, breasthook, and frame members was straightforward, says Bill, thanks to the full-sized templates supplied by Glen-L.
In 1970, after college, Bill took a job at Sierra Middle School in Riverside, California, teaching woodworking to 7th and 8th graders. Seven years later he moved to the high school to teach woodworking and architectural drawing. He stayed for 27 years. He recalls that in 1974 he and the metal-shop teacher would often eat lunch together and the conversation would turn to boats. “We were always talking about getting a sailboat and taking it all over the country and around the world. But I could never afford a sailboat big enough.” Instead, Bill bought a used Catalina 22, a trailerable ’glass pocket cruiser, which he sailed from Los Angeles across to Catalina Island or out of Dana Point, a city farther south, and sometimes on Lake Perris on the outskirts of Riverside.
When Bill retired in 2004, he sold the Catalina and moved with his wife, Robin, to Port Angeles, Washington. He’d heard that the salmon fishing there was good, so he bought a 17′ fiberglass cuddy-cabin runabout with a 90-hp Evinrude and a 9.9-hp kicker. “It was a really good fishing boat. A friend of mine had one just like it. He also had a motorcycle and said I should get one of those, too. I’ve ridden motorbikes my whole life, but I couldn’t afford the boat and the bike. In the end we realized we didn’t need two boats, so I sold mine and bought a bike. Then he decided he didn’t want to fish anymore, so he sold his boat, and that was that—I had a nice bike but no boat!”
Bill Bains
With the backbone, chines, and deck frame set up, the plywood side panels were screwed and glued in place. Bill struggled to bend the chines, breaking two before setting up a steambox and softening up the third and fourth so they would take the bend.
With time on his hands, Bill decided to build his own boat and started looking for something suitable. His first requirement was that the project must fit in his shop. “The North Olympic Peninsula here in Washington is cold for a good part of the year and I like to stay warm.” Next, it had to be a project for which he had the appropriate skills. “I’ve been a woodworker most of my life, but I’ve never built a boat.”
During his online searching, Bill came upon the Glen-L website and its many designs specifically aimed at the amateur builder. He was struck by the Zip, a two-seat “deluxe sport runabout in the classic style,” but at 14′ it was too long. Then he saw the Squirt. “I immediately felt that this was the one. It has those classic lines of the early Chris-Crafts, and at only 10′ or 11′ it would fit in the shop. Also, being a small boat built of 1⁄4″ plywood, I figured it wouldn’t cost a fortune to build.”
He ordered the plans.
At over 6′ tall, Bill knew that fitting into the Squirt would be a challenge and so, with Glen L’s approval, he would stretch the boat. “I was aiming for 11′ but somehow ended up with 10′ 8″—an extra 6″ in the cockpit and 2″ in the foredeck. Glen L advised against increasing the beam, so I left that at 4′ 4″.”
The only other departure Bill made from the original design was in the transom. The plans call for a 10-hp engine, but Bill was looking for a bit more power, so he reinforced the transom.
Bill Bains
All dressed up and ready to go. While the engine may be modern, MISTY B’s aesthetic is pure vintage from the paint scheme to the chromed fittings, the wooden steering wheel, and the faux laid decks. Even the trailer is painted to blend in with the overall theme.
The project, says Bill, was not overly challenging but, despite his lifetime of experience with the tools and materials, there was, he reflects, “a lot of learning. A lot of exercise with assorted planes. A lot of learning how to do boat things.” Among the more taxing aspects was achieving the required bend in the chine log. “I broke two different chines trying to get them where they were supposed to be.” Not to be daunted, Bill created a steambox with a 10′ length of 4″ plastic pipe, a saucepan with a lid, and a Coleman stove. “I fed steam into the pipe and, after about 30 minutes, I took the chine log out and it bent nicely into place.”
He had a similar problem bending the plywood side panels to create the tumblehome in the stern. “I created a plastic-sheeting tent around the back of the boat and boiled water inside the tent. After about half an hour the plywood was pliable enough that I could screw it into place.”
From start to finish, the Squirt was in Bill’s shop for about two-and-a-half years. He took his time, working most afternoons, but only for an hour or two at a time, and always alone. “I’m a bit of a loner when it comes to work,” he says. “I like to do what I like to do when I like to do it, and I enjoy learning and figuring things out. Fairing the frames was one of the harder parts, and there was a bit of a learning curve to the process of fiberglassing with epoxy resin. And when it cured, the final sanding took a very long time. But it was all really satisfying.”
Peter Harrington
MISTY B’s paint scheme was, says Bill, heavily influenced by Art Atkinson’s Squirt (Small Boats, June 2016). It was a new challenge for Bill but, he says, it was very satisfying to see it all come together.
Bill had always known that he wanted more than the recommended 10-hp outboard, and that he wanted an engine that fit the Squirt’s aesthetic. He went in search of a vintage two-stroke outboard. There was an outboard-motor repair shop near his home, and Bill stopped by one day. The owner showed him a pile of old engines out back. “It must have been 20′ × 20′ and about 4′ or 5′ high,” says Bill. He told the mechanic he was looking for an antique Johnson or Mercury around 20 hp. “We wandered about a bit, and then he said, ‘I think over by that tree there’s something like that.’ Sure enough, there was an old Johnson. It was only 10 hp, but it looked like it was all there, so I paid him $100 and took it home.” Bill laughs, “I shouldn’t have done that. When I started playing with it, I realized it had no spark and not much compression. I spent another $150 on parts and then put it aside—I was still working on the boat.”
He decided to cut his losses and look for something else. “I found a 1969, 20-hp Mercury for sale. It had a red stripe around a black cover. It looked really neat. I paid way too much for that one, too. It did have a spark and some compression, but I couldn’t get it to run.”
Bill started taking the engine apart and for a while things went well, until, partway through the restoration, he got cold feet. “I had this thought one day: I’m not an outboard mechanic. I’m going to be stuck in the middle of Lake Crescent one day and I’m going to be pulling on the rope of the motor and I’m not going to be able to get it started.” The thought wouldn’t leave him and the more the scenario haunted him, the more uncertain he became, until “I did what I should have done at the beginning. I bought a new motor. A 20-hp four-stroke Suzuki with electric start and electric trim tilt.”
Peter Harrington
The new 4-stroke 20-hp outboard is heavier than the suggested vintage 10-hp, but after placing additional ballast up forward, Bill has corrected the trim and MISTY B now handles well at all speeds and especially through turns.
Bill finished his Squirt late summer 2023, named it MISTY B after the family dog, and launched on Lake Sutherland about 12 miles to the west of Port Angeles. On his first outing he discovered his one substantial mistake. The larger motor, combined with the battery and gas tank, both located in the stern, adversely affected the boat’s trim. Not only did it sit stern-heavy, but at speed it tended to porpoise. With hindsight he realized he should have placed the battery forward of the cockpit, but it was too late to move it. “It’s impossible to get up in the bows to do anything constructive. I did manage to get a 25-lb bag of shot up there, though, and she now rides nicely at about 26 mph, nice and flat.”
Bill went out in MISTY B three times in 2023. His friend Peter, who owns a 15′ Rascal outboard skiff, came with him as support vessel and also took a turn at the wheel. “We never went out together,” says Bill, “but it was fun to see someone else take it out. It’s a hoot to drive.”
As for building another boat, Bill is pretty sure that won’t happen. “It was a lot of fun, but I think it was a one-off. I’ve got to come up with something else, but it won’t be a boat. I don’t need another boat.” Despite that, in September 2023, Bill exhibited MISTY B at the Wooden Boat Festival in Port Townsend. He couldn’t believe all the compliments they received. “One man came by and said he’d looked at all 300 boats at the festival, and he liked mine the best. That made me pretty happy.”
Jenny Bennett is managing editor of Small Boats.
Do you have a boat with an interesting story? Please email us. We’d like to hear about it and share it with other Small Boats readers.
In our March 2024 issue, we marked the passing of boat builder and designer Iain Oughtred. In the comments that followed my “From the Editor” column, several readers wrote about their experiences with Iain and the boats he’d designed. I took a special interest in this comment from Drew Britten: “You can add my BONNIE LASS to the number of Caledonia Yawls in the North Seattle area. I bought her in 2022 from a Camano Island man who bought her from Seattle’s Center for Wooden Boats (CWB) in 2014.” It’s the very Caledonia Yawl that I had written about in the March issue and which inspired me to build my own 19 years ago.
Courtesy of Peter Mumford
When Peter Mumford sailed ERIKA, her mainsail was a standing lug. It was later replaced with a balance lug and the Caledonia Yawls that followed also carried a balance-lug main, which had a boom that increased the spread of the sail for better performance off the wind.
After Drew bought the old double-ender, he got in touch with Iain and learned that it was the first Caledonia Yawl ever built. It also marked an important point in Iain’s career. In Iain Oughtred: A Life in Wooden Boats, author Nic Compton writes: “With so many designs available for amateur construction nowadays, it’s easy to forget what a landmark the Caledonia Yawl was.” And while it did not come early in Iain’s work as a designer, trailing his first design by 21 years, “…the Caledonia Yawl and the range of double-enders which followed soon came to be associated with Iain more than any other design of his.”
Courtesy of Peter Mumford
Peter discussed the tiller options with Iain and opted for the simplicity of a standard tiller albeit made short to swing behind the mizzen mast. It required sitting well aft to take the helm.
Iain, in response to Drew’s email, wrote to him in May 2022: “Glad you’ve got yourself such a fine boat! The design was first drawn up in 1988, after the prototype, ERIKA, was done for a friend (became a friend), Peter Mumford in PA (moved to the Pacific Northwest).” After a year of research, Drew was able to track down Peter, who had named the boat ERIKA after his mother, and wrote to him with a few photos attached. Peter replied: “That certainly does look like ERIKA to me. What a lovely boat. She was built in 1988 from Iain’s plans in Bruynzeel mahogany plywood. I’d be happy to know she’s still sailing. I started corresponding with Iain in the early 1980s. I still have his beautiful letters.”
Joe Donahue
Joe Donahue, the third owner of ERIKA, took this photo after launching at a boat ramp on the north end of Camano Island in September 2014. While she has her original sails here, Joe would eventually sew a new set for her.
Peter continued: “I was volunteering at the Apprenticeshop in Rockport, Maine, one summer, and they had a commission to build a lovely Shetland Island Sixern out of cedar planks. Iain and I discussed this and he loved the type, and thought a smaller plywood version would make a nice dayboat. So, that was when I asked Iain to draw ERIKA. My dad was paying for most of the project because he thought it was interesting. Iain and I discussed rigging her with a mizzen and balanced lug. These ideas partly came from Phil Bolger and partly from a chapter of Sail and Oar by John Leather, which includes a passage by Herbert Warington Smyth about the wisdom of a mizzen for exploring by dinghy: ‘The small West Country mizzen is somewhat of a nuisance to many sailors, but to anyone accustomed to it, its conveniences are innumerable. It is often of great assistance to the oars and with its aid I have worked to windward with a weather oar miles to windward in a lump of southwesterly sea that no boat of such size could have faced under sail. It is very useful for sail balance when the boat is loaded by the stern and it is easily taken in by a pull at the topping lift. It is the most tactful kind of sail because it is always there handy and yet is quite out of the way.’”
Drew Britten
After Drew Britten got the boat home, he raised the sails that Joe Donahue had sewn, with the main now a balance lug. The unpainted metal plates aft of the registration number, probably installed during the time at The Center for Wooden Boats, may have been added to reinforce the mast-partner fastenings.
“I wish I could say I built ERIKA,” Peter continued, “but I didn’t have the carpentry skills. In one of Phil Bolger’s books, he mentioned boatbuilder Ernie Tarr of Gloucester, so I looked him up and he built the boat. When she was completed, I sailed her out of Tenants Harbor, Maine. I did have trouble with the lack of detail in the plans at the time regarding the interior. Iain had not yet designed the interior, and it took me a while to make good seats. I did not have longitudinal benches, just thwarts. In Seattle, I sailed her across Puget Sound for a few years. She had a graceful way of slipping over and through waves, while heeled a bit. She was a lot of fun to sail in a bit of a breeze with one reef. I thought of her like a lively pony bounding along through fields. I ended up donating ERIKA to the CWB.”
The boat stayed at CWB for 20 years and was part of the livery fleet. CWB’s founder and elder statesman, Dick Wagner, passed away in 2017, and the origin of the boat was lost. After years of service as a rental, ERIKA was eventually put in storage, rather worse for the wear. In 2014, she was sold to Joe Donahue of Camano Island some 35 miles north northwest of Seattle.
Drew Britten
When Drew Britten acquired ERIKA, she was 35 years old and in need of attention. Many of the structural elements, like the floor timbers and the battens running along the middles of the garboards carried over to the finished plans for the Caledonia Yawl, but the full-length risers at the bottom of the sheerstrake and the partial frames attached to the floor timbers did not.
ERIKA had been out of the water for years and leaked around the centerboard trunk when Joe first launched her. She nearly sank when he left her at his dock overnight. Joe hauled her out to work on her and using only hand tools he built a new trunk, which stopped the leak. He also sewed a new set of sails and rebuilt the mainmast to make it taller and better fit the new lug main. With the boat seaworthy again, Joe used the Caledonia for crabbing and did a few cruises with a couple of friends from Camano to Whidbey Island, which lies a few miles west. After a few years with ERIKA, Joe moved on to a different boat, but he was reluctant to part with ERIKA. She spent five idle years in his driveway under a deteriorating cover.
Christopher Cunningham
Drew Britten, here rowing on northwest Washington’s Lake Cassidy, with Mount Pilchuck in the distance, is the current owner of ERIKA, now BONNIE LASS. While he’s an oarsman with a local racing crew, this Oughtred beach boat is the introduction to fixed-seat rowing and small-boat sailing for him and his family of four.
Joe sold ERIKA to Drew Britten. “In spring 2022,” Drew writes, “I became the most recent caretaker of this Caledonia Yawl and christened her BONNIE LASS, in honor of my Scottish-Irish heritage and my late mother, Bonnie. I was a huge fan of the Caledonia Yawl design and was saving money to buy a kit and build my own. However, I was delighted to find an already completed one for sale by Joe Donahue of Camano Island. It was over 30 years old and showing its age, but I was looking for a project boat. Joe was offering the Caledonia Yawl at a fair price, so I brought her home and have been working on the boat’s restoration ever since. When I bought the boat from Joe, all he knew of her history was that she was built in the 1980s. As an avid history lover, I looked into the boat’s origins as I worked on making her seaworthy. After a year of research, including correspondence with the designer and becoming a volunteer at CWB, I tracked down her original owner and uncovered her amazing story.”
Christopher Cunningham
Drew’s work on the boat has put her back to rights and, as BONNIE LASS, she has much to offer to her new family in the years, if not decades, to come.
Iain must have been pleased to learn that the prototype of his Caledonia Yawl was not forgotten or lost but in good hands with Drew, who writes “I am honored to have uncovered her history and honored to have been entrusted with her care.”
When I happened upon a Caledonia Yawl II at the 2019 WoodenBoat Show in Mystic, Connecticut, it was love at first sight. The original Caledonia Yawl, a rugged 19′ 6″ double-ended beach boat designed by Iain Oughtred for clinker plywood construction, has four strakes; this second iteration has seven, and was originally commissioned by a customer in Germany in 1999. The new design proved more stable for sailing while possibly sacrificing some rowing efficiency. Iain based his design of the Caledonia Yawl on the seaworthy double-ended working boats of the Hebrides, Scotland, his adopted home.
I had built a Lumber Yard Skiff in 2017, a very simple 16′ design for first-time boatbuilders, and it was a major confidence-builder in my decision to take on the Caledonia Yawl II. That said, I don’t think previous building experience is a prerequisite; my skill level is at best described as a capable handyman around the house. Also, there are many tutorial videos available online that became indispensable during my project.
The plans arrived with 17 pages of notes and 10 blueprint-style sheets of drawings, including full-sized patterns for the molds and stems. Lines and offsets are also included with ample information to loft the boat, although lofting is not required. I purchased CNC-cut molds and planks from Hewes & Company of Blue Hill, Maine. The planks are delivered in 8′ sections and must be carefully scarfed together.
Donald Sullivan
The Caledonia Yawl II has plenty of room for sailing with the whole family, especially with the open configuration. The decked version limits the cockpit area but provides covered storage areas and built-in flotation. The side benches provide a place to secure inflatable flotation like boat rollers or, in this case, a collection of fenders. The kick-up rudder blade is an option that makes beaching easy.
I built my boat to Iain’s specifications, which are impeccable in detail and readability. For a novice boatbuilder, the exquisite plans can eliminate many frustrations along the way.
The plans include options for the open-boat design or the decked-boat design, which adds built-in compartments in the bow and stern for storage and flotation. I chose the open-boat model, which has a real workboat look in keeping with its ancestry, and ample seating on three thwarts and two side benches. And while the plans call for the side benches to be 8″ in width, I would recommend adding an inch, or even two, for added comfort. The open-boat design requires adding flotation as an afterthought as it is not called for in the plans. The underside of the side benches provides a nice location to attach inflatable beach rollers. The sealed storage areas in the bow and stern of the decked version serve as its flotation.
Details for the oars—length and construction—are not specified in the plans, but Shaw & Tenney, a longtime supplier of oars for the Caledonia Yawl, provided recommendations, and I purchased my 11′ 6″ oars from them.
The plans come with three sailing rig options: a balance-lug yawl, a gunter yawl, and a balance-lug sloop. I chose the balance-lug yawl; it is a very popular rig for these small sail-and-oar boats, and I had once owned a yawl and love the way a boat lies head-to-wind with the mizzen sheeted in.
Michael Lonsdale
The Caledonia Yawl II tracks well under oar. The 11′ 6″ oars are long but a good length for the boat’s 6′ 4 ½″ beam. Shorter oars would be easier to stow, but would elevate the handles too much during the drive of the stroke.
The plans arrived August 2019, and by January 2020 she was ready to launch. Our first summer with the Caledonia, christened SPARGE, was a time of learning.
For rowing, once I get a head of steam, the Caledonia Yawl II rows and tracks amazingly well for its size. However, when against both wind and tide, it’s a lot of boat for a solo rower, and I’m guaranteed a workout. For sailing, I had to get used to the Norwegian tiller, which passes to one side of the mizzenmast.
Because the luff of the boat’s rather large lug main is not attached to the mast, and the rig has a large yard, the sail can become unruly as you raise and lower it. We have found the quicker we raise and lower the main, the better it behaves. And the luff must be taut—very taut—for the best performance, especially to windward. I added a second block on the downhaul to create more purchase and tension.
Once we overcame these teething troubles, my wife Dawn and I enjoyed many good day sails and picnics on the boat, but we shied away from going out when the whitecaps appeared. On a warm August day in our first season, in 10 to 15 knots with a double-reefed main, we capsized. A large gust pushed the lee gunwale under the water, and before I knew it the boat was on its side and we were in the water (when back on the beach I was told that the sudden blast of wind had come out of nowhere and sent most of the umbrellas flying). Fortunately, the mainmast, with its hollow bird’s-mouth construction, had enough buoyancy to keep the boat from turning turtle.
Patrick Sullivan
The Caledonia Yawl’s beam and full midsections stand up to the press of the sail in a good sailing breeze.
I had seen videos on how to recover from a capsize, and I was able to right the boat by standing on the centerboard, but with no built-in flotation the gunwales were at the waterline and the sea was breaking in with no hope of bailing. We were towed to a nearby beach by a good Samaritan and recovered there. The incident revealed the need to have the right amount flotation to keep the boat high enough to be boarded and bailed out in the event of a capsize.
In retrospect, I can point to our inexperience with the Caledonia Yawl and several mistakes that contributed to our capsize. First, my wife was comfortably sitting on the lee side of the boat; second, after reefing I did not sufficiently retighten the downhaul on the mainsail, making the upwind tack more difficult; and third, I don’t recall if the mainsheet was cleated or not, but I clearly did not react quickly enough to release the sheet in those conditions. Since then, I have human ballast only on the windward side except in very calm conditions, I never cleat the mainsheet, and I always keep the downhaul really taut.
That whole experience got me thinking about the alternative three-sail gunter-yawl rig: jib, main, and mizzen. I thought we would benefit from having a jib, which would allow me to drop the main altogether and sail happily on jib and mizzen when unexpected weather arrives. During the off-season I took almost all the steps necessary to convert the rig, including new boom, yard, mainsail, and jib. I elected not to move the mast partner aft for the gunter rig as shown on the plans because I wanted to be able to go back to the lug rig easily if desired. I do not think the gunter rig suffered any performance issues as a result.
Michael Lonsdale
The gunter-yawl rig, one of three rigs detailed in the plans, provides several reefing possibilities when dealing with building winds. While this rig and the lug rigs have similar total sail areas, some may find it easier to manage the 108-sq-ft gunter main than the 136-sq-ft lug main. However, the forestay, shrouds, jibsheets, and two more halyards add a level of complexity that isn’t necessarily compatible with simple trailer-sailing.
We sailed the entire second season with the gunter yawl and enjoyed the benefits of the three-sail rig. I believe the boat pointed a bit higher than with the lug rig, and most important, she sailed quite well and balanced under jib and mizzen alone, which we enjoyed often when the weather presented itself and the wind piped up.
I also added the recommended flotation that winter, which should ensure the centerboard trunk opening is above the waterline after righting the boat in the event of another capsize.
What wasn’t obvious at the beginning of this conversion was how many additional parts and pieces I was adding to my boat. This list includes a forestay and two shrouds (the balance-lug rig requires no shrouds, just a free-standing mast), a peak halyard, a throat halyard, a jib halyard, a kicking strap, and two jibsheets, all detailed in the plans. If my goal was to simplify sailing in rougher weather, I sure created a lot more lines to worry about, and an additional 10 to 15 minutes of rigging and de-rigging time at the ramp. By the season’s end I was very happy with the new rig, its appearance, performance, and versatility, but I could not stop thinking about the less-complicated lug rig and suspected I had not given it a proper chance.
Patrick Sullivan
The lug main is a powerful sail but doesn’t require the standing rig that the gunter uses, so it’s easier to set up at the launch site.
For season three, I reverted to the simpler balance lug rig and set out to master it. I sailed alone in all kinds of weather. I added an outhaul on the mainsail, which, in addition to the highly tensioned luff, allowed the balance lug to perform at its peak. I now was sailing unreefed comfortably in up to 12 knots of wind. The balance-lug yawl rig is self-tending, so I need not touch a line when tacking. I go to a double reef in the main at about 13 knots and sail there comfortably up to 18 knots for pleasure. I can add a third reef if needed but have not yet had to; all three reefpoints are in the plans. The Caledonia Yawl is an amazingly dry boat, and other than inadvertently dipping the gunwale into the sea, I don’t believe I have taken on more than a teacup of water over the bow. And, I can confidently say that with my renewed effort to conquer the lug rig, I am regularly weathering gusts and seas in rough conditions without issue.
I have now just finished season four, and my Caledonia Yawl II is one of the fastest, prettiest boats on Long Island Sound. I often hit 8 knots on a broad reach, 6.5 knots on a close reach. And while it might have taken a while, the boat now exceeds even my wildest dreams. I trailer her from the same garage she was built in. I can rig and de-rig her at the ramp in 20 minutes, although it often takes longer as I take time to talk with interested bystanders who inevitably ask about the boat.
And while my bones are a bit too brittle for camp-cruising, something I did 25 years ago, four-to-five-hour gunkholing excursions and short-tacking up creeks are a delight with the Caledonia. The Norwalk Islands present many opportunities to go either by sail or by oar where many others cannot.
Building SPARGE was one of the great joys of my life; 500 hours of sheer pride, dedication, and pleasure, and it has become a vehicle for clear thoughts, enjoyment of these natural surroundings, and appreciation for the genius of Iain Oughtred. For anyone looking for these qualities in a boat that you can build yourself, I can’t recommend the Caledonia Yawl highly enough.
Donald Sullivan and his wife have sailed extensively throughout their 45-year marriage. They have owned a mahogany-planked 20′ Pennant Sloop, a 28′ gaff-rigged wooden sloop, an 18′ Drascombe Lugger, a 22′ Pearson Ensign, and a 1966 Hinckley Pilot 35. The boats each served a purpose well in their time, but at 71, Donald enjoys the simplicity of trailer-sailing, the performance of a great design, and the beautiful looks of a traditional boat.
Caledonia Yawl II Particulars
LOA: 19′ 9″
LWL: 16′ 1″
Beam: 6′ 4 1⁄2″
Hull weight: 450 lbs, all up 650 lbs
Displacement WL: 1,090 lbs
Sail area: 164 sq ft
Nearly all wooden boat enthusiasts and amateur builders know of an Iain Oughtred boat. The Australian-born designer and builder developed his 7′10″ Acorn as a dinghy for oar and sail and expanded on the popular design to create its now most popular 11′8″ and 13′ versions. This family of lapstrake skiffs draws inspiration from the famous New York and Boston Whitehalls of the 19th century. They have sharp forefoot entries, slack ’midship bilges, and twisting garboards that finish on a heart-shaped transom. The Acorn 17, the longest of the versions, is a dreamy rowing instrument.
While kits are available for the Acorn 17, I built mine from plans. The 17’s plans are the same as those for the Acorn 15 but with the station spacing stretched 13.5 percent. The seven-sheet set includes lines, construction plan, rig, spar, and oar options, all to scale. Three of these sheets are full-sized drawings for the 11 station molds, the stems and knees, as well as the fore and aft transom faces to aid with proper beveling so no lofting is necessary to set up the jig. The instructions include a packet with a discussion on thwart layout suggestions, depending on the intended number of rowers and passengers. There is a handy materials and tools list included with a few paragraphs on construction notes.
Photographs by the author
The Acorn’s glued-plywood lapstrake hull gains strength from seven laminated floor timbers and laminated quarter knees and breasthook, and stiffness from a tapererd outwale and spacered inwale.
To build the 17, the builder simply increases the spacing of the 15’s station molds from 15″ to 17″. The stem and transom bevels can be cut according to the plans to start, then the inboard edges trimmed back until the bevels are flush with a fairing batten. Oughtred most often depicts the Acorn hulls to be glued lapstrake with 6mm marine plywood, seven strakes. The plans note that a traditional build—lapstrake plank-on-frame—would have 3⁄8″ planking with 5⁄8″ × 5⁄8″ frames at each half station, and that the hull could have eight strakes instead. The construction notes explain wood species options, depending on what is available to the builder. These planks, likely eastern white cedar here in Maine, would be copper-riveted to and between frames, and the laps should be bedded rather than glued. This traditional version would also add a full-length riser to support the thwarts, rather than the partial risers glued under the thwarts in the glued-lap plywood version.
The boat has seven laminated floor timbers that support a five-board sole. Additional structure is supplied by laminated quarter knees and a breasthook. The sheer is stiffened by a tapered outwale and a spacered inwale, as well as laminated thwart knees that make the curve to the gunwale but don’t fill in the angle between them and the thwart and planking. The plans show a two-piece stem, which can be beveled before assembling, a process easier than cutting a rabbet in a one-piece stem. Oughtred notes a traditional builder might opt for a single stem with a rabbet, though he states, and I agree, that the inner/outer stem system is best. The number of laminates needed to build the various parts suggests milling a nice pile at 3⁄32″, leaving them rough-sawn for better gluing.
Owing much to the Whitehalls that influenced its hull shape, the Acorn 17’s fine entry and deep skeg below a classic wineglass stern, provide excellent rowing capabilities with one or two rowers.
While the Acorn skiffs are primarily for rowing, Oughtred drew the sailing rig for the Acorn 15, and didn’t revise it for the 17. The standing-lug, spritsail, and gunter options each offer 60 sq ft of canvas. Spars are to be made of fir or spruce and the spar diameters are detailed along their lengths. Iain’s plans show a partner interrupting the forward thwart and the trunk landing between the sixth and seventh stations, through a widened keelson. The rudder and daggerboard are laid out on a grid to aid in scaling up the drawings to full-sized patterns.
The plans detail both flat- and spoon-blade oars with cross sections of the loom and blade. According to the plans, 8′ oars are best for the 15. The 17 is not specified but most oar length formulas go by the beam, thus with the same beam it’s safe to say 8′ will work.
The Acorn 17 is perfectly trimmed for a single rower sitting amdships using the aft rowing station. If joined by a passenger, the rower would move to the forward station to balance the passenger in the stern. The Acorn’s fine lines give her an efficient performance through the water, but being beamier than most rowing shells or canoes, she has good stability making her suitable for novice and experienced rowers alike.
Adjustable foot braces, included in the construction plans, are highly recommended. These are notched lengths of wood that capture a dowel stretcher, which allows the rower to choose a comfortable position for their feet. With solid wood thwarts, rowers of the bony-seat type may want a strap-down foam pad for long rows. While a drain plug is not indicated in the plans, I built my Acorn 17 with one under a sole for cleaning purposes and draining rainwater. The plans don’t indicate flotation either, but float bags could be considered to make the boat recoverable if capsized or swamped. I opted to add plywood bulkheads and decks forward and aft with watertight hatches to serve as dry storage as well as flotation. Fiberglassed garboards, sacrificial bilge runners, and brass half-rounds provide abrasion resistance underneath. A removable sliding seat, which Oughtred does not mention, is always up for discussion with a boat this size, to allow the rower’s legs to supplement the power of back and shoulders over a daylong trip.
Even built as light as possible, at 130 lbs this boat is not one to be carried on a roof rack; it is best trailered or docked. My compact SUV comfortably tows the 17 and its trailer. Getting aboard from a dock is somewhat like stepping into a typical canoe so it’s best for many to start from sitting on the dock. A rig would immediately solve this athletic move. Departing from a beach, the rower will get just their feet wet if the boat is parallel to shore. At rest ashore on its keel and bilge runners, it lists about 15 degrees.
The Acorn 17 can be built to sail, but if built solely for rowing, adding a stern deck gives it additional buoyancy in the event of a capsize or swamping. It also provides a backrest for a passenger on the aft thwart, as well as a location for a mooring cleat and a couple of fairleads for docking lines.
Stretching the 15 while the beam remains 46″ adds waterline length and yields a greater theoretical hull speed for the 17, which rarely disappoints. By the second stroke the rower can feel the boat’s consistent momentum through the water, even with a low stroke rate. The long keel has little rocker and when combined with the 6″-deep skeg, the Acorn 17 tracks nicely. Some effort is required to make sharp turns when gunkholing. As with most lightweight rowing skiffs that have shallow draft and high freeboard creating windage, a stiff wind can cause some leeway. The heavier traditional build, while not as handy for beaching or hand-hauling, may track better on windy days. In some significant chop, first time rowers will stay confident in the Acorn’s stability. Most are tempted during their row to stand up and stretch.
Ample space allows a singlehander to stow cruising gear evenly fore or aft of the ’midship rowing station. With a passenger aft, the rower takes the forward station to trim the waterline. When tandem rowing, everything should be stowed aft to avoid being bow heavy.
With two rowers and a passenger in the stern, the Acorn 17 glides along, tracking well, and maintaining momentum even if the rowers slacken the pace.
I built the Acorn 17 to serve as an attractive rowboat for use on the Maine Island Trail and similar recreational waterways. Overall, this longest of Oughtred’s Acorns is a delight and yields satisfying speed without the tender stability of some narrower pulling boats. It can provide excellent low-impact exercise opportunities for the solo rower, ample space for a comfortable picnic outing for two, and exciting performance with two at the oars.
Plans for the Acorn 17 are available from Oughtred Boats for AU$194 (AU$210 outside of Australia). In the U.S. Kits are available from Hewes & Co. for $2,368.
Is there a boat you’d like to know more about? Have you built one that you think other Small Boats readers would enjoy? Please email us.
The Newfound Wherry, which began in 2004 as a rowboat and now has an add-on sail package, was created by Michael Vermouth, the founder of Newfound Woodworks of Bristol, New Hampshire. The design went through several modifications of the sail placement and centerboard in 2007 but was laid aside in early 2008. When it was resurrected in the fall of 2022, I built the updated version—equipped with a daggerboard and a larger spritsail—with the help of the Newfound Woodworks team and the Chase Small Craft team of Saco, Maine.
I bought the plans and complete kit provided by Newfound Woodworks. The kit came with a bundle of 18′ strips of western red cedar, northern white cedar, and Alaska yellow cedar for the hull; oak and ash for the tiller, keel, skeg, and daggerboard; a strongback and precision-cut forms; fiberglass and epoxy; varnish and hardware needed to build the boat. The plans consist of two 2′ × 3′ blueprints that clearly depict how the boat fits together, a 31-page step-by-step instruction book with dozens of detailed colored pictures. The large-format blueprints are generated by a computer-aided design program that provides information regarding spacing, angles, length, and specific assembly details.
Newfound Woodworks
Building the hull upside down, the strips are laid from the sheer up to the keel, glued to one another and temporarily held in place with staples through to the forms.
I also purchased a Newfound Woodworks Pre-Kit: a 75-minute strip-building video instruction DVD with more than 100 detailed color photos of all phases of construction, a fiberglassing video instruction DVD, a CD with dozens of construction pictures, and Woodstrip Rowing Craft: How to Build, Step by Step, a 288-page color-illustrated how-to book by Susan Van Leuven.
The Pre-Kit gave me ample guidance to build the boat. As questions arose, the Newfound Woodworks team was always available, friendly, and ready to help via a phone call or email. The Chase Small Craft team had developed the wherry’s sailing rig and helped me build the spruce bird’s-mouth 10′ 1″ mast as well as the sprit and sprit boom in a three-day seminar.
While I had already built three of Newfound’s kayaks, constructing the boat is straightforward and requires only basic woodworking skills. After assembling the strongback and positioning the forms 12″ apart (which took me a day), the transom is attached to a form at the stern end of the strongback. Next, the inner and outer stems are laminated, followed by shaping the inner stem and attaching the bottom board before stripping begins. The bead-and-cove cedar strips are attached from the sheer up to the keel and glued to one another. Once the strips are attached, planing and sanding fair the hull. The bow’s outer stem is glued and screwed in place, then shaped. The hull is sheathed in 6-oz ’glass and epoxy: a first layer to the hull exterior from the keel to the waterline, and a second layer for increased strength. The exterior required three filler coats of epoxy to smooth out the fiber weave. A layer of bias fiberglass is applied to the keel and skeg from the transom to the tip of the outer stem at the bow.
Jim Creighton
The timeless interior layout is defined by a pre-assembled wrap-around bench seat in the sternsheets, two solid cedar thwarts, and the daggerboard trunk.
Once the exterior is sanded smooth, the hull is lifted off the forms and flipped over for cockpit fitting. The interior of the boat is sanded and faired prior to applying a coat of epoxy and a layer of fiberglass and bias ’glass at the bow and the perimeter of the transom. Only one coat of epoxy is needed over the fiberglass, as the texture of the fiberglass weave is helpful for traction in the interior of the boat.
The kit includes a pre-cut U-shaped marine-plywood bench cockpit. Two 9″ × 48″ Spanish cedar thwarts brace the daggerboard trunk, which has a 10″ slot in its forward end for insertion of the daggerboard. The daggerboard has holes drilled at 4″ intervals to allow for a pin to adjust its depth in the water. The foredeck is built with two shaped pieces of 6mm okoume plywood, which have circles cut halfway into the ply to properly place the opening for the mast. The deck is covered by cedar strips and sheathed in fiberglass. A piece of 2″-thick hardwood is epoxied into the hull on the centerline to serve as a maststep that will set the mast at a 5-degree rake.
Working in my free time, it took six months for me to build the Wherry. When construction was complete, I put four coats of varnish on the deck and on the hull. The 95-lb Wherry tows well and glides off the trailer easily. To rig the sail, the mast is guided through the opening in the foredeck and seated into its step. The sail is permanently attached to the mast with a 1⁄4″ line which wraps around the mast and through eyes in the sail. Once the mast is set in the foredeck, the sail is hauled to the top of the mast and the halyard is anchored by a cleat located on the aft edge of the foredeck. The sprit is 8′ long and 1 1⁄2″ in diameter. I opted to add a 7′ boom to the rig to spread out the foot of the sail for better downwind performance. The ends of the two spars have 2″-long notches to accept snotters inboard and loops of line at the clew and peak on the outboard ends. Stepping the mast, raising the sail, and setting the boom and sprit is a simple process that takes me less than 5 minutes.
Jim Creighton
Even in light airs the simple boomed spritsail powers the boat smoothly through the water. Note the partially raised daggerboard held in position by a pin slotted into holes drilled through the board at 4″ intervals.
The hull provides plenty of stability for standing in the boat, without feeling unsteady even with a 75-lb Labrador retriever moving about. The cockpit is well appointed for daysailing and there is plenty of room for two sailors, a large dog, a cooler, and a picnic basket. Four adults could fit comfortably with plenty of legroom.
Newfound Woodworks
Initially meant for rowing, the Wherry has fine ends and is sensitive to weight in the sternsheets. The crew here, seated amidships, could improve the trim by sitting farther forward to balance the skipper seated well aft.
When the wind is up and the main is trimmed, the Wherry picks up speed quickly and handles well on a reach or closehauled. It is fun to sail in light or heavy winds, although the boat tacks best with wind speeds over 5 knots; below that it can get sluggish. We have sailed in winds gusting to 10 knots, and control and maneuverability improve as the wind speed increases. The boat performs well in light and moderate wind with minimal splash over the bow. The kick-up rudder blade has enough bite to turn the boat in all the current and wind conditions we have encountered.
The boat tacks well with the skipper in the sternsheets and the crew on the forward thwarts. I placed cleats 2″ aft of the after rowing station’s oarlocks to assist in mainsheet control. The daggerboard is adjustable as needed for water depth, wind, and point of sail. Fully deployed for reaching and beating, it keeps leeway to a minimum.
Mike Kilian
Conceived as a rowboat, the Wherry performs well under oar. With one oarsman and no passengers the aft rowing position provides the best trim. With two rowers or a passenger in the stern, the forward rowing position can be used.
When the wind dies or if I want to go rowing or fishing without the sail, I use a pair of 7′ oars as auxiliary power. Each of the two rowing stations has its oarlocks positioned 14″ aft of their respective thwarts. The boat was originally designed as a rowboat and performs exceptionally well under oar power; it glides straight and true. With every stroke the Wherry seems to leap forward as it slips through the water. It maneuvers easily. When there is not enough wind for sailing, I take the boat out for a satisfying workout or to catch fish in local lakes.
Newfound Woodworks
With a family crew aboard, the Wherry trims well and glides well.
I thoroughly enjoyed the experience of building the Newfound Wherry. It is ideal for an intermediate craftsman who loves to sail on lakes and bays. It has proved a perfect vessel for family outings, picnics, and adventures on the inland waters of New Hampshire.
The Honorable Jim Creighton is a retired Army colonel whose love of the outdoors led him to Antrim, New Hampshire. He serves as a state representative in the New Hampshire State Legislature and works as a member of the Crotched Mountain Ski Patrol. He is a leadership coach at the Tuck School of Business at Dartmouth College and runs a small wilderness guide company, Ursa Major Northeast Guides, LLC, which provides healing experiences for the Wounded Warrior Project and experiential leadership courses for Tuck and other schools. Jim spends his winters in his basement where he has built three Newfound Woodworks cedar-strip kayaks and the Wherry. He lives on the North Branch River where he paddles his kayaks to prime fly-fishing spots almost every day during the summer. He built the Wherry at the behest of his wife, Lieutenant Colonel (Retired) Tamasine Wood-Creighton, who has renewed her lifelong love of sailing. The boat is named SEANMATHAIR—grandmother in Irish—in honor of the skipper’s grandmother, Anne Nee of Rosmuc, Ireland.
Someday in the not terribly distant future, I will realize a long-held dream: I will set sail, alone, in a boat I have built myself, on a west-to-east voyage across the Atlantic Ocean. The boat will be a version of a cat-yawl I’ve already built and sailed, with some important modifications: it will have a single square-rigged sail; it will not have a rudder; it will be 31″ long, with a 12″ beam. Me? I’ll lie snug below for the entire voyage, however long it may last. I’ll be dead, reduced to a few pounds of ashes, stowed below deck in the cabin.
People weaken with age; dreams don’t. I’m 84 years old, in pretty good health, with enough marbles left to know that I shouldn’t make plans that extend too far into the future. No regrets; I’ve lived a full life, and it’s still an ongoing pleasure.
When I started building boats as a pastime almost 30 years ago, I thought a solo transatlantic voyage in a home-built hull would be a nice project. I did my research: I admired Blue Moon—the Thomas Gillmer 23′ gaff-rigged yawl—enough to contact someone who had built one. But it would have been a bad choice; I would probably be still planking it today.
I settled on Iain Oughtred’s 22′ Grey Seal, which I thought had the bones and stones for the passage. I had built his 14′ Whilly Boat, a superb design that offered good lessons for building Grey Seal. I talked to Iain, and he didn’t try to dissuade me. He did suggest building the centerboard rather than the keel version; he thought it might slide down the face of a wave better. Maybe that was meant to dissuade; it didn’t.
Photographs by the author
PIAF, the Phil Bolger Micro I built a few years ago, was the inspiration for CROW, the scaled-down boat that will carry my ashes to sea. The design offered a nice combination of simple construction and ample space for gear and passengers—and it sailed well.
The plan quickly ran onto a shoal: My wife thought it was unwise; still does and never will be persuaded otherwise while I’m alive. I understand. She was and is quite reasonably concerned that the voyage might kill me. But a thought came to me: What if I were already dead? No risk. No worry. That got her hesitant assent.
Though I was free to scheme, I put it off for a decade or so: Who thinks about dying when the wind’s fresh, the sea beckons, and there are other boats to build? But advancing age at last got me thinking. I won’t call old age a curse—it’s interesting if you take it the right way—but as Bette Davis observed, it’s not for sissies. Strength goes, pain arrives. There’s an Irish saying, “Death is the poor man’s doctor.” Death is also the old man’s inevitable companion; decent company, though, if you wish him to be.
As these thoughts arose, I finally turned to the task. I found there was much to plan. First, the boat. It would have to carry about 5 lbs of ashes, which would take up about 200 cubic inches—about the same as a six-pack of beer. It would have to be carried by hand, because I was planning to have it taken aboard a boat and launched as far offshore as possible—out from Montauk or, better, the elbow of Cape Cod—to give it the best chance of clearing North America. And it would have to be simple to build. I work slowly.
I thought it best to find plans for a full-sized boat and adapt them to my needs. It took about five minutes to realize that Grey Seal was not going to be the solution. I had taken Paul Gartside’s excellent course on boat design at WoodenBoat School and remembered that every vessel is a symphony of physics—it cannot have sour or misplaced notes. Shrink a 22′ lapstrake hull to a tenth of its length? Think about it if you wish, but don’t hope to send it across an ocean.
The original Micro plans, copied at twice the original size, gave me patterns that only needed to be traced and cut out for CROW. I modified bulkheads B, C and D to create a single enclosed “cabin” under a slightly raised cockpit deck.
But I had to come up with something. As it turned out, someone already had: Phil Bolger, he of Boats with an Open Mind. He called it Micro. I had, in fact, already built Micro—twice. One was full-size—15′4″ long with a 6′ beam and a cat-yawl rig. The other was a 1:12 scale model.
The full Micro and the model were (as our British friends say) a doddle—an easy task. Micro’s hull is a box, sides plumb to the bottom, shaped around four bulkheads to meet bow and stern transoms. For the model, I simply traced the parts from the 1″-to-1′ plans onto basswood sheets and glued them together. Building the full-sized Micro was the same process, just on a larger scale. I built it alone, only needing help to turn the ballasted hull right-side up to build the deck and interior. There came a time when I was able to lie below in the unfinished cabin and imagine evenings at distant docks or anchorages. It was deeply satisfying. Fifteen such minutes would refresh me, send me back to building with a new enthusiasm.
Something similar happened when I began planning my posthumous voyage. I found myself imagining the passage, feeling the boat’s roll and pitch, hearing the thunder of a breaking wave, the quavering note of wind in the rigging. If the weather worsened, I thought, what should I do?
At first, I laughed at myself: I would not even have a finger to lift to help my boat. I would be ashes. But I allowed myself to think: Might I be an observer? I am agnostic about the afterlife, though I incline strongly to the belief that The Big Sleep is much more likely than The Heavenly Choir. And yet…
I had already built this 1:12 model Micro, half the size of CROW. It shows the open wells fore and aft in Bolger’s design. I decked these over in CROW to create flotation chambers.
Some months ago, I was talking to a close friend in his last hours.
“Frank,” I said, “if you find anything on the other side, try to send me a message. Make it about…”—I thought of our mutual fondness for birds—“Make it about crows.”
Later, after he was gone, I received a posting in my inbox by an artist I didn’t know and had never heard of. It was a picture of three crows. The title was, “Dark Angels.” When we put Frank’s ashes in the ground, six crows arrived and sat on the church steeple. When our little ceremony ended, they left.
Proof? Certainly not. But it did give me license to think about the voyage in a different way: as a participant. Which meant that I really owed it to myself to optimize chances for success. And it gave me a name for the boat: CROW. This fit well with my big Micro’s name: PIAF, French for sparrow.
Micro checked a lot of the necessary boxes: It would be easy to build a robust version with enough room below for my remains. I took my old plans to a copy center and had them printed double size to make the hull about 31″ long and 12″ wide. I traced the sides onto 1⁄8″ okoume plywood; I used 1⁄4″ okoume for the bulkheads and transoms.
Even models demand a lot of clamps. Here, CROW gets her rubbing and sheer-strakes. These have a structural role in both the full-sized Micro and the model.
I altered the bulkheads to maximize cabin volume. On the real boat, the cabin is a 6 ½′-long space between the first and second bulkheads, A and B on the plans. Aft of the cabin is a space under the cockpit defined by the second, third, and fourth bulkheads—B, C, and D. Forward of A, and aft of D, are open wells.
First, I partially cut back the second and third bulkheads—B and C—to create an open cabin space about 21″ inches long. By raising the cockpit deck—no one was going to be leaning back against the sides—I got about 220 cubic inches of space below. I replaced the cockpit footwell with an 8″ circular plastic hatch, giving access to the now-enlarged “cabin” below.
I extended the cockpit deck over the aft open well to create a flotation chamber and decked-over the forward well to serve as a mast partner with flotation under. The undecked hull went together with fillets of thickened epoxy and strips of 6-oz fiberglass cloth. I epoxied wood strips in place to support the decks.
To be honest, the inside of the boat is not pretty. It was awkward to work in the confined space, and I had other fish to fry; I rushed the work. If I were to build another, I could and would make it nicer. But who needs a second coffin? This hull is sturdy and watertight. It will serve.
CROW may spend a long time at sea, so she wears a coat of ablative bottom paint. Changes to the underbody are evident: The Micro’s long, shallow keel runs twice as deep on the model, and there’s no rudder. CROW will run downwind, period.
At this point, I had solved the easy problem of how to build the containment vessel, but now I faced a much more daunting task: figuring out how to get it across an ocean. I thought first—please don’t laugh—of rigging CROW as a cat-yawl, just like its big sister. I spent rather too much time studying self-steering systems for model boats. They exist and have the same limitation that such systems have on big boats: they are slaves to the wind. If it changes, they alter course with it. They are elegant in design, but they’re complex and have moving parts that can fail.
Eventually, I bowed to some incontrovertible facts: the little Micro would have to submit to nature. It would be at the mercy of the winds and currents; it could only go where they sent it, when they sent it. This was not a killer problem for a west-to-east passage across the Atlantic. Despite global warming, the Gulf Stream is still running, and for much of the year the prevailing winds are out of the west. It is sometimes suggested that all one needs to do to make the crossing is to bring enough food and water, stay afloat, be patient and let nature take its course. I wouldn’t need food, water, or even patience.
Hence the squaresail—with no running sheets or braces—and the modified keel. The sail is small, of 1.9-oz ripstop nylon, set on carbon-fiber-tube yards lashed to a carbon-fiber-tube mast. I have some reservations about the carbon fiber; it is very rigid and very strong. I spent some of my youth as a merchant seaman; I went through three Pacific typhoons, and I know the sea can be…difficult. Even if CROW can run, pitchpoling is possible, and I do have fears that the rig might wrench or lever-apart the hull. In that case—hello, abyss. I’ll end up under two miles or so of water. Can’t be helped.
Bolger’s Micro has a long, shallow keel with 412 lbs of lead ballast. For CROW, I designed a keel that, in profile, looks more like a Friendship sloop: shallow forward, deep aft. Built to Bolger’s lines, the model would draw 3 1⁄2″. My modifications give it a 7 1⁄4″ draft.
I also modified CROW’s decks, keel, ballast, and rig to make her fit for purpose. As soon as the hull was partly assembled and ballasted, I loaded in 6 lbs of lead “cargo”—the expected weight of my ashes—and set her afloat to check trim.
The idea is to keep her sailing downwind. If the wind falls and current takes over, CROW will, in my thinking, turn to breast the current and drift. If it’s wind against water, I’d be surprised if the result were a perfect balance. More wind, she sails; more current, she drifts. We’ve all sailed backwards against real-life tides at one time or another. When it happens to CROW, it’s not likely that I’ll care.
The real Micro’s ballast is a lead slug, shaped and sandwiched inside a box keel. When I built my full-sized Micro, I didn’t want the bother of casting lead. I thought and calculated a lot and decided to make the keel box wider and to use recycled lead shot set in epoxy instead.
It worked, so I used the same system with CROW: a lead-ballasted box, wider than the plan. Like its big sister it has lead shot set in epoxy but carried low in the box rather than up against the boat’s bottom. The ballast shape in profile resembles but doesn’t match the plan; I had to calculate how much the new keel would displace and rejigger the ballast placement to keep CROW on her waterline.
I am an overthinker. I recently found my planning notes for a weeklong hot-showers circumnavigation of Deer Isle I did by kayak some years back. I had to laugh at myself. The notes didn’t cover tsunami or meteor impact, but they did cover everything else.
The cockpit from aft, with a look into the cabin. There’s no running rigging; Kevlar-cord sheets are doubled, fixed and fastened to pad-eyes port, starboard, and amidships. Port and starboard control a lower yard; amidships an upper yard.
As I was overthinking CROW’s ballasting, I realized I was planning—well, overplanning—for events that could have no effect on me. Nothing was going to make me more dead than I would already be.
Did this change my approach? Not in the least. I was solving problems in the here and now that could only strike in the by and by. I was doing everything I could to get a boat across a vast and often angry ocean. I had my hands and wits, a few tools, some epoxy, fastenings, cloth, wood, and carbon tubes. Would I win out against the Atlantic? It didn’t matter. I was again enjoying the great gift of boatbuilding—of always having a sweet problem to solve. Who among us hasn’t drifted off to sleep on that tide of thought?
One lesson that boatbuilding—and boating itself—reinforces is that problems often don’t have or need perfect solutions. For the after end of the keel, I could have brought the sides together in a fair trailing edge, as one naturally would with a rudder. But this would have made calculating the keel’s volume and geometry—and hence its displacement and required ballast weight and placement—more complicated. So, after some bedtime thought, I just squared off the keel aft, drag be damned. I won’t be in a rush to get wherever I’m going.
This willingness to compromise reached its peak in the rig, where I jettisoned thousands of years of sail evolution in the interest of simplicity and durability. No elegant curve between the clews for CROW; the foot of the sail is rolled and glued around the lower yard, as is its head. The leeches are reinforced with 100-lb test Kevlar cord and are glued with Gorilla fabric glue, which impressed me with its tough, waterproof bond. There will be little belly in the sail for the wind to fill. It will be a surface with a non-compound curve.
Under full sail, thanks to an electric fan. The original idea was to paint CROW’s decks and house white, but the okoume looked so good in its natural state that I decided on varnish.
And yet, this should serve. The sail won’t be asked to assume a complex shape for sailing closehauled. All it need do is run downwind. To arrange this, I pop-riveted small pad-eyes inside the bulwarks near the stern transom. I’ll fasten fixed-length sheets of Kevlar cord here from the ends of the lower yard—doubled, in case one carries away. Same aloft, to a centered deck pad-eye.
CROW’s first sea trial was makeshift. Because the rig’s weight is inconsequential—mast, yards, and sail together weigh 7 oz— as soon as I had the keel fastened, I put 6 lbs of lead in the cabin, put the hatch and cabintop in place, and set her afloat in Coecles Harbor, Shelter Island, at the east end of New York’s Long Island. She floated on her lines as she should, a bit down at the stern because of the absent rig and haphazard cargo stowage.
This encouraged me to finish the boat with some leftover bottom and topsides paint, red below and green above, like her big sister. I had planned for white decks and cabintop, but the natural okoume looked so good I slapped on some varnish. Overall, it’s a decent 4′, maybe 3′ finish: get any closer and my haste will be evident.
A second sea trial with rig, sail, and proper stowage resolved all doubts: CROW sat to her marks and, yes, sailed before the wind to the end of a tether. (I used Bolger’s design waterline, wondering only later if that, too, needed rethinking. We—or rather you—will see.) Wind vs. current tests will be done later in an operational setting, with me aboard.
CROW holds course in my workshop/studio—about two-thirds of the space is for boatbuilding, the rest is for painting and graphic arts. A sampling of my art is on Instagram @drewfetherston. Building a boat is easier than drawing one.
If the eventual voyage goes well, my hope is that CROW will be found on some distant shore, and that my survivors will learn who found it, where and when. To encourage this, I wrote a note to be put in the cabin:
This boat contains the ashes of Andrew Fetherston, 1939–20___, of New York. Please scatter them near where you stand. The boat was launched from the East Coast of the United States on __________, with the hope that it would cross the Atlantic Ocean. You will find half of a $100 note. If you inform the persons named below where and when you found the boat, they will send the other half. They will also pay you a fee and all shipping costs to send the boat hull back to them, if you wish to undertake the task. Contact them for details. Thank you.
Using Google Translate, I made copies of this note in 13 languages, covering all countries bordering the North Atlantic from the United States across and down to West Africa: English, French, Danish, Icelandic, Norwegian, Irish and Scots Gaelic, Dutch, Frisian, German, Spanish, Portuguese, Arabic and on down the African coast to Dakar.
There remains a very big IF: the boat must be found, and the request understood and answered. There is a lot of history about such voyages, and the odds don’t favor success. People have been setting notes afloat since bottles were invented, and the rate of response in the North Atlantic region is about 3%. Lucky American bottle-tossers sometimes hear back from European finders in a matter of weeks. Others take longer. Much longer. Some spend more than a century in the water, waiting to be discovered.
The first true sea trial, in the chilly late-winter waters of West Neck Harbor on Shelter Island, NY. Seventeen pounds empty weight, plus six pounds of lead tire weights for cargo. She rode nicely to her marks.
Sometimes, bottles launched off the East Coast turn up on Caribbean beaches after a year or two in the water, having journeyed around the entire North Atlantic gyre, bypassing Europe and Africa to return to the New World. And many bottled messages are found, despite the odds. Clint Buffington, a Salt Lake City musician, has made a hobby of finding bottle messages and tracing their histories. He’s found more than 100 since 2011 and chronicles his efforts on his website.
I’m encouraged, too, because these are bottles, less noticeable and more fragile than a 31″-long boat with, perhaps, a surviving mast and sail. So the odds of someone finding CROW and me may be better—10%, maybe 20 or even 25%? I can hope, but I can’t say.
There is one further step I could take to let those I leave behind know where I have gone: I could mount a small solar-powered satellite tracking device on CROW. The cost and weight are not prohibitive, and twice-daily location reports would cost a few dollars a month.
And the wind bears her away—at least to the end of a tether. If these light-air-fair-wind-flat-water conditions were to last indefinitely, my back-of-the-envelope calculations say CROW would reach Europe in about nine weeks. The Gulf Stream might shorten that.
I am of two minds about this. Yes, I would like the people I leave behind to know of my progress, of the success or failure of the venture. If CROW showed herself on some foreign coast, they might try to initiate a search. At the least, they could know where the journey ended, even if on some isolated, weather-wracked, and rocky shore.
And yet, I’m drawn to the idea of a simple disappearance, a vanishing, a lingering mystery of what happened. We sent him off in CROW. No one ever learned what happened. Perhaps he’s still at sea. Perhaps he’s lost on some coast. Perhaps his boat is on someone’s mantelpiece, and he still aboard. Perhaps he’s in the abyss of the ocean. No one knows. Mysteries have a long life. I still cannot help but wonder what happened to Henry Hudson, John Cabot, and Amelia Earhart.
The author and his creation.
There is, of course, another possibility: a burlesque ending, the kind the gods seem to enjoy. Sometimes the prevailing winds don’t prevail, and things that are expected to sail eastward are driven west. A stretch of weather like that, with lots of east wind, would send CROW ashore in New England or Nova Scotia. Consider the Long Island high-school class that, at their teacher’s suggestion, tossed a message in a bottle into the Atlantic Ocean in 1992. It wasn’t found until 2024. In its 32-year journey it traveled to Shinnecock Bay, also on Long Island, a scant few miles from its launching point.
Andrew Fetherston, born in New York City, has owned boats since he was 11, including eight (not including CROW) that he built himself since retiring from a career in journalism. He is an artist and the author of two books. He worked on tugboats, freighters, and railroads in his youth. He has three grown children and eight grandchildren. He and his wife, the writer Amanda Barton Harris, live in Manhattan, Shelter Island, and Pestillac, France.
If you have an interesting story to tell about your adventures with a small boat, please email us a brief outline and a few photos.
I’ve built a few boats using traditional methods, and they would all look just like boats from over a century ago if not for the bright white synthetic rope I’ve used for halyards, sheets, and painters. Manila cordage would have been used on those earlier boats, but that natural fiber isn’t as readily available, strong, or affordable as today’s ropes made of nylon or polyester. Unmanila, a three-strand rope made of tan-colored polypropylene, is a good match for traditional boats, but it’s not to be found in local hardware stores or even marine suppliers.
A few months ago, I saw a beautifully appointed Caledonia Yawl, rigged with what I thought was Unmanila. I asked the builder, Mark Bratton, about it and he said the running rigging was ordinary white nylon three-strand that he had dyed a lovely café-au-lait hue. Nat Wilson, a Maine-based master sailmaker specializing in sails for traditional ships, had told Mark how to dye synthetic rope, and Mark passed the technique along to me.
The dye Nat and Mark have used is Cabot’s Salt Marsh water-based exterior stain. When I began looking for it on the web, I was quickly bewildered by the variations. Stains come in transparent, semi-transparent, semi-solid, and solid, indoor and outdoor, water-based, and oil-based; and in off-the-shelf colors or tinted at the store.
Looking for an easier path to follow, I tried dying nylon rope with Rit fabric dye, the stuff I’d used in the 1960s to make tie-dyed T-shirts. It didn’t work at all well, even though I followed the instructions for nylon, getting the water up to 140 degrees and adding vinegar. The tan dye I’d bought turned the rope green (I might not have stirred it soon enough or thoroughly enough before putting the samples in) and didn’t color the five test samples to the same degree; one was merely tinged. I trudged back to the web to resume my search for stain.
Photographs by the author
There are many types of stain. Water-based exterior stain in solid or semi-solid is what to look for. My favorite is Valspar’s Solid One-Coat Exterior Stain & Sealer tinted Spicy Brown.
At Home Depot I bought a quart of Behr Premium Fast-Drying Water-Based Wood Stain in Golden Oak. I diluted as directed by Mark’s instructions, and it worked beautifully, giving all the test samples a rich color. It was only afterward that I noticed, in small type on the back of the can, that it was for interior use. My boats are stored under cover, out of the sunlight and rain, so the stained cordage isn’t likely to fade. But it wasn’t what I was aiming for.
Lowe’s, the other local big-box home-improvement store, has Cabot’s One-Coat Exterior Stain and Sealer in four grades from transparent to solid. Each is a base for the color to be mixed in, and only the solid version is water-based. I also found a half-pint can of the Cabot’s solid stain in Salt Marsh. It’s a soft gray color that looks good on Mark’s boat, but not what I envisioned for my boats. I did buy a small can of Cabot’s Salt Marsh in oil-based semi-transparent. It took to the rope well, but I much preferred working with the water-based stain. Nylon is not degraded by mineral spirits—the bristles of many paintbrushes are nylon. The mineral spirits solvent used to dilute the stain is slower to dry and has a strong odor.
Lowe’s also carries a line of stains from Valspar. Their One-Coat Exterior Stain & Sealer are all water-based, have UV protection, and come in three formulas: Transparent, Semi-transparent, and Solid. I bought a half-pint can of the Solid and had it tinted Spicy Brown, a coconut-shell hue that I thought would look right. On the color chart at the store, it was a bit darker than what I hoped to achieve, but I knew it would be lighter when applied to rope. It didn’t take long to dye the samples, and it was right on target for color and ease of application.
About 16 ounces of the diluted Spicy Brown solid stain in a small bucket doesn’t cover the rope but mixing it by hand saturates the fibers.
Here’s how to give ordinary white nylon rope or cord, braided or laid, some appealing color:
•Buy a half-pint can of water-based stain in either solid or semi-solid. When diluted you’ll have a quart to work with.
•In a plastic bucket that you don’t mind getting stained, dilute one part stain with three parts water. Stir well.
•Drop the rope, loose, into the bucket. Wear rubber gloves and keep the rope moving for 1 or 2 minutes.
•Fish one end of the rope out of the bucket.
•Pull the rope through a closed gloved hand to squeegee out excess stain, letting it drip back into the bucket.
•Hold a rag around one end and pull the rope through to wipe off any remaining stain.
•Flake the rope on a sheet of plastic to dry.
•Let the rope dry thoroughly.
The Valspar solid water-based stain worked well and had consistent color across the nylon samples from 1⁄8″ braided to 3⁄8″three-strand twisted rope.
The stain penetrates the rope well, but if you’ll do any splicing, it should precede the staining.
A quick sanding on the stained rope (above) will sever some of the fibers to give the rope (below) an old-time look.
Another touch that will make new nylon laid rope look even more like old-time manila, is to sand it with 150-grit sandpaper to cut some of the outside fibers. I don’t think it would significantly reduce the strength of the rope. The sanding will create uniform tufts of fiber and make the rope look a bit like a caterpillar. A going-over with a heat gun will give the fibers a random look, more like an old rope.
This new 3⁄8″ nylon rope was annoyingly bright in sunlight. Stained, it is much more pleasing to look at.
Braided nylon cord was introduced in World War II, so it’s not a good match for boats designed in the 19th century, but it is useful nonetheless. The length that I stained had been in use for years and was likely contaminated with substances that resulted in some irregularities in the color.
None of this, of course, serves any practical purpose, but if you’ve built a wooden boat and appreciate the beauty of traditional construction and brightwork, giving the rigging the right look is worth doing and hardly any trouble at all.
Christopher Cunningham is editor of Small Boats.
You can share your tips and tricks of the trade with other Small Boats readers by sending us an email.
Growing up we had a string of small wooden boats. My parents took care of the daysailers, while my sister, brother, and I were expected to take care of the dinghies. In our early years, that meant sanding, sanding, and more sanding. Eventually we would take on more interesting jobs, but the sanding never went away.
My father had a variety of softwood blocks to wrap the sandpaper around. Having a block in hand was easier on the fingers than holding a piece of paper, and it didn’t seem to take away from the quality of the finish. Ever since those early years, I’ve continued to cut and wrap sheet sandpaper around wood blocks.
Photographs by the author
3M’s Stikit hand blocks are ergonomically designed to fit comfortably in an adult hand—large or small.
A few years ago, I took a part-time job in a local boatyard that carried painting and varnishing products; among them were some bright-yellow foam hand-sanding blocks. They were not cheap, and yet we sold several every fitting-out season. I pooh-poohed the idea of spending good money on something I could pull out of the offcuts pile, but one day, after I’d spent the previous evening sanding my own boat at the yard, one of the varnishers noticed me flexing and stretching my hand. He handed me his yellow foam sanding block and a short strip of self-adhesive sandpaper and said, “try it.”
That 3M Stikit Soft Hand Block felt good in my hand. It was flexible and soft enough that I could sense the surface below, and it molded to the curves on which I was working, rather than sanding right through them. Indeed, I seemed to get a smoother, more even surface, not only with less effort, but also in less time. I tossed the wood block back into the offcuts bin and have never looked back.
If the vinyl pad is dusty before applying the sandpaper the corners may lift, but the paper stays attached and the performance remains unaffected.
The bottom of the Stikit Soft Hand Block is faced with vinyl and measures 2 3⁄4″ × 5″ to work with 2 3⁄4″-wide self-adhesive sandpaper. The flexible molded body is curved and sloped to fit comfortably in the palm with the thumb resting in the groove along the bottom edge and fingers curling around and pressing down on the top. It can be used for sanding flat and gently contoured surfaces, and replacing the sandpaper couldn’t be easier.
After years of use the hand block continues to do good service. The foam has become discolored, but the texture remains soft and comfortable in the hand, and the foam has not stiffened.
The Stikit paper adheres well to the vinyl face and stays put when being used but is easily peeled off when you need a fresh piece or a different grit. 3M says the paper can be peeled and reused but in my experience the adhesive’s grip loses its effectiveness. If I do peel off paper that still has useful grit, I tend to keep it for using by hand without the block. The 2 3⁄4″ width is a standard size and there are several brands available, but I have only used the Stikit. Depending on the grit, it comes in 15-yard to 45-yard rolls and local stores will often sell it by the foot.
The Stikit paper itself has provided an unexpected bonus: In recent years I have found holding a piece of sandpaper becomes quickly uncomfortable. For gentle finish sanding I have pressed down on sandpaper without holding it, which is fine until you’re working on a vertical surface and release the pressure—many a piece of paper has ended up beneath me in the bilge under the foredeck. With the Stikit paper, I simply tear off a short piece and stick it to my fingers. Now, when I release the pressure, the paper stays attached to my hand.
Both the hard and soft hand blocks have vinyl bottom faces 2 3⁄4″ wide to take 3M’s Stikit Gold sandpaper.
The 3M Stikit Soft Hand Block is not the cheapest on the market and square-inch to square-inch, the Stikit paper is pricier than 9″ x 11″ sheets, but I have never regretted paying more. Sanding has never been easier, nor my finishes better, and I seem to have far fewer scraps of sandpaper lying around the shop.
Jenny Bennett is managing editor of Small Boats.
The 3M Stikit Hand Blocks are available from many hardware retailers and online vendors and are currently priced starting at around $28. The 3M Gold Stikit paper is available in grits ranging from P100 to P500; a 45-yard roll of P220 is currently listed at $69.20.
Is there a product that might be useful for boatbuilding, cruising, or shore-side camping that you’d like us to review? Please email your suggestions.
Transporting a canoe, kayak, or a small skiff on a pair of car roof racks is a convenient way to get to the water, but once the boat is on the racks, access to it is not at all convenient. I’ve seen some boaters bring ladders to the launch site, but they are bulky things to pack in a car with all the other gear brought along for an outing.
Photographs by the author
The Tooenjoy (above) and Ekepin (below) car-door steps are compact enough to stow easily in a glove compartment or car-door pocket.
Rodney Lewis of Santa Barbara, California, realized that cars didn’t need ladders, they just need a step. Coming up with a step was easy; how to support it was the hard part. The genius of his solution was recognizing that vehicles already had built into them the place to attach the step: the door striker plate. The striker is attached to the vehicle frame and anchors the door latch. It’s strong enough, as required by federal regulations, to keep a door from flying open in the event of a crash, so it can easily support a person’s weight. The cast-metal step Lewis created has a horizontal platform to stand on and a vertical hook that engages the striker and hangs from it.
His concept was patented in 2017. It went to market under the name Moki, after the steps carved by the ancient Anasazi of the American Southwest as handholds and footholds to climb vertical cliff faces. Since 2017, many devices that serve as car-door steps to get access to loads carried on roof racks have appeared on the market with the Moki. I bought two: one has the step below the striker, like the Moki but hinged to fold flat; the other, also folding, has its step at the level of the striker.
The Ekepin Foldable Car Step closely resembles the original Moki in size, shape, and function, but its hook isn’t fixed. It folds into a recess in the step so it’s easier to store when not in use and won’t take up much room in a glove compartment.
A slip-on rubber cap prevents the inboard end from marring the car-door frame, and a low conical insert on the outboard end is designed to break tempered auto glass in an emergency. The step measures 5″ × 3″—room for one foot—and has a diamond pattern for traction. It is very easy and intuitive to hang from the striker and is rated to support up to 440 lbs.
The Ekepin has a textured platform with a slot for the pivoting hook. The shiny conical point is for breaking auto glass in an emergency.
With the Ekepin step, I can reach over or into any canoe or kayak on the roof racks. There is only room for one foot on the Ekepin, so I stand on one leg and steady myself with the other.
The Universal Car Door Step with 5 Gear Adjustment from Tooenjoy also folds for storage, but its step is on the same level as the vehicle’s striker. It is supported by a pivoting steel arm that rests against the door frame below the striker and can be adjusted to accommodate the contours of the frame in the rear doors of a four-door car. The 7″ × 2″ aluminum step provides enough room to stand on it with both feet. Its top has a series of raised ridges and a textured coating for a non-slip surface. The support arm has two pivoting rubber feet that won’t mar the car’s finish. When installed and in use, the step and support arm grip around the striker like pliers, ensuring it won’t accidentally slip off. A quick adjustment is required to find the best of the five ratcheted settings to bring the step to a horizontal position. It has a load rating of 400 lbs.
The Tooenjoy pinches the striker securely when weight is applied to the step. The fittings at the bottom pivot and compress slightly to prevent damaging the doorframe’s finish.
Even though I wear size-13 shoes, I can get both feet on the Tooenjoy step. It sits at the level of the car’s striker rather than hanging below it. I’m 6′ tall, so I don’t need the extra height, but those who are shorter in stature or have a taller vehicle will welcome the higher perch.
The Tooenjoy’s support arm is ratcheted and can change its angle to accommodate different door frames.
While the rear doors of many four-door vehicles have to accommodate the rear wheel wells, both steps can work in the contoured opening. The Ekepin is short enough to fit the available vertical space and the Tooenjoy, seen here, has a support that can be adjusted to fit.
Both of the steps have performed well for me and provide a solid platform to stand on. The car-door frame around the strikers on my SUV show no signs of flexing when my full weight is on either step. I’m 6′ tall, so I don’t need the extra 3″ of height provided by the Tooenjoy, but I like having the room it provides for both feet. Climbing up on either step requires both hands on the car, so it’s not practical to lift a canoe or kayak to roof racks while ascending. Once in position, it’s important to take care to stay upright and solidly planted. The height the steps provide is helpful for checking straps, hatches, and cockpit of a kayak carried upright on the racks. They also make a good perch for cleaning the roof of a car. Just remember to remove the step before slamming the door shut.
Christopher Cunningham is the editor of Small Boats.
When Cooper and Lucca were eight and six years old, their dad, Nathan Greenawalt of Madison, Wisconsin, decided to build them a boat. Cooper had just started learning to sail in Optimist dinghies, and Nathan thought it would be fun for the brother and sister to have their own boat, but one that was a “little bigger, a little more stable, a little safer, a little cuter.”
Nathan had been introduced to both sailing and woodworking when he was 16. He had built some wooden tables at home, and when his family moved to a house on a small lake his brother bought an old fiberglass dinghy. The boys sailed it together, and when the wood trim needed fixing one summer, Nathan made the repair.
Photographs by Nathan Greenawalt
Nathan’s design called for a curved bow. Wrapping the plywood around the 40″-diameter arc drawn onto the bottom sheet caused him some headaches but he persevered.
In more recent years he bought a 26′ sailboat, which he sails with friends, and he’s done a bit of kayaking. And while there has been no more woodworking beyond the occasional repair around the house, Nathan had wanted to build a boat for as long as he could remember.
“I really wanted to build something from scratch, design it myself from the ground up,” he says, “but that seemed like a project I might never actually move forward with. So, one fall, I bought a stitch-and-glue kayak kit and set myself up in the basement of our house.” He built it over the winter and, by the end of a “really enjoyable project,” had a “great little boat.”
The foredeck, also curved, was cut from the same sheet of plywood as the bow. Wrapping the bow introduced a few minor cracks, but Nathan reinforced them with extra fiberglass and epoxy.
The experience whetted his appetite, and a year later Nathan was “ready to do my own design. I really wanted to go buy lumber and do it!”
Bringing a Homemade Plywood Sailboat to Life
Nathan loosely based his design around the Optimist. He wanted to keep things simple, and determined that the length should be no more than 8′, “so I could use one sheet of plywood for the bottom.” He also decided to use Optimist spars and sail for the rig. He drew a few loose sketches and went off to buy three sheets of 1⁄4″ plywood and a 4 × 8 sheet of 2″ pink insulation foam board.
The side panels and side-to-bottom panel joint were strengthened by two standing knees on either side.
Nathan had in mind a stitch-and-glue, flat-bottomed plywood sailboat built of one sheet for the bottom, one for the bow and foredeck, and one for the transom and aft section of the two side panels.
The only tricky part of the construction, says Nathan, was the bow.
The interior faces of the bench seats were formed with foam board. Nathan filled the cavity between these and the outside panels with expanding polyurethane foam for flotation.
“I built that first. I wanted to create a nice curved, angled bow. It took me awhile to figure out the curve, but I worked out the beam of the boat, drew the curve on the bottom sheet of plywood, and cut it out. Then, I wrapped the bow sheet around and stitched it to the bottom panel as I went. Eventually I managed to make the 40″-diameter semicircle. There was some minimal cracking, but I reinforced those spots later with extra fiberglass. Once the plywood was completely wrapped around, I used a laser level to define the top edge, and cut it out.”
What Nathan hadn’t foreseen was that the arc of the bow would lift the forward end of the bottom panel and introduce some shape athwartships. “It worked out nicely,” he says, “but it was pure accident. I had expected the bottom to be completely flat, but there’s curve there too.”
The bench seats were created with plywood tops and the bottom of the cockpit was lined with ’glassed and epoxied foam board. The daggerboard slot was reinforced with a solid alder block, which doubled as a mounting block for the maststep.
Once he had wrapped the bow panel, Nathan built the foredeck. Again, he wanted the deck to have a sweet curve and eyeballed it. He suspended a string from two pins, set apart by a distance equal to the beam, to create the arc he wanted and cut a deckbeam out of a leftover piece of plywood. He screwed and glued that to the sides, cut the deck panel out of what was left over of the bow sheet, and laid it across. The arched deck was quite rigid and required only the one deckbeam.
The finished boat. The foam traction sheet that lines the cockpit sole was added after a mishap with the rig. The spars and sail are standard Optimist-dinghy parts.
After that, Nathan’s boat was all straight edges. He stitched and glued the aft sections of the side panels, attached the transom, and then glued in some standing knees—two per side—to add some strength and rigidity to the sides. He wanted the cockpit to be more comfortable and less cluttered than the Optimist’s where the daggerboard and ’midship bulkhead divide the boat in two. He did away with a daggerboard trunk, opting instead to have the daggerboard set into a simple slot and, not wanting to sit on the floor or gunwale, he boxed in side benches, using pink foam board for their inboard faces and plywood for their tops. Before installing the tops, he filled the cavities with expanding polyurethane foam for flotation. He also laid foam board on the sole between the benches and for the length of the cockpit.
The uncluttered cockpit and full-length bench seats mean that Cooper and Lucca have plenty of space to sail together even though RIPPLE is only 8′ long.
With the interior nearly complete, he installed a block for the daggerboard slot and an adjustable stainless-steel maststep that makes it possible to adjust the rake of the mast to balance the rig. Nathan cut the slot for the daggerboard and reinforced it with offcuts of alder. Because the opening of the slot was above the waterline but low in the boat and would let water slop aboard occasionally, he cut two holes low in the transom for valved scuppers to make the cockpit self-draining. Everything was coated, inside and out, with ’glass and epoxy, and finished with epoxy paint and varnish.
Not wanting to get into designing and building sails and accessories, Nathan had bought Optimist parts: “the sail, the spars, the hardware for the rudder, everything.” By the time the boat emerged from the basement, the kids were ready to go. Rigging the boat for the first time was an exciting moment, but it was then that Nathan had his first mishap. “As I was getting everything ready, I dropped the sprit, and it pierced the epoxy, the ’glass, and the foam in the cockpit—right through to the plywood.”
Courtney Greenawalt
Nathan Greenawalt sailing RIPPLE on Lake Mendota, proving that three sheets of plywood, a simple rig, and a bit of determination are all it takes.
It was a low moment but a good wake-up: “It was pretty clear that I needed to reinforce the cockpit sole. But I didn’t want to add weight.” He fixed the hole and then laid a skin of self-adhesive EVA foam traction sheet on the sole. “It’s been great, looks good, protects the pink foam below from abuse, and it’s nonslip, which is a bonus.”
Since launching RIPPLE, named after the title of a Grateful Dead song, Nathan and the kids have used her at every opportunity on Lake Mendota. “She’s very stable,” he says, “With the kids sitting on the windward bench it would take a lot of wind to tip her over.” Even without the daggerboard trunk, RIPPLE rides high enough that the kids can go out on their own and stay dry. “If I go with them, water comes in through the slot, but it goes straight out through the scuppers so it’s just our feet that get wet.”
Cooper and Lucca sail RIPPLE together. With just the two of them in the boat everything stays dry. If Nathan joins them some water comes in through the daggerboard slot but drains out through the scuppers in the transom.
The family hasn’t yet sailed in company with an Optimist pram, but given that she’s a “touch longer and a touch shapelier,” Nathan thinks RIPPLE would be just a little faster. Cooper agrees. “She cuts through the water really nicely,” he says. “And she’s more comfortable than the Optimists.” Lucca, too, is happy with RIPPLE. “I like it because not very much water comes in,” she says. Nathan laughs, “Always important to keep the water out.” Cooper nods, “Dad did a good job.”
Jenny Bennett is managing editor of Small Boats.
Do you have a boat with an interesting story? Please email us. We’d like to hear about it and share it with other Small Boats readers.
Continue Reading - Enter your email to log in or subscribe
New to Small Boats? Create a free account to get our weekly emails and two free articles each month.
Time to upgrade!
You've read all of your free content for the month. Upgrade to a paid subscription for unlimited access.
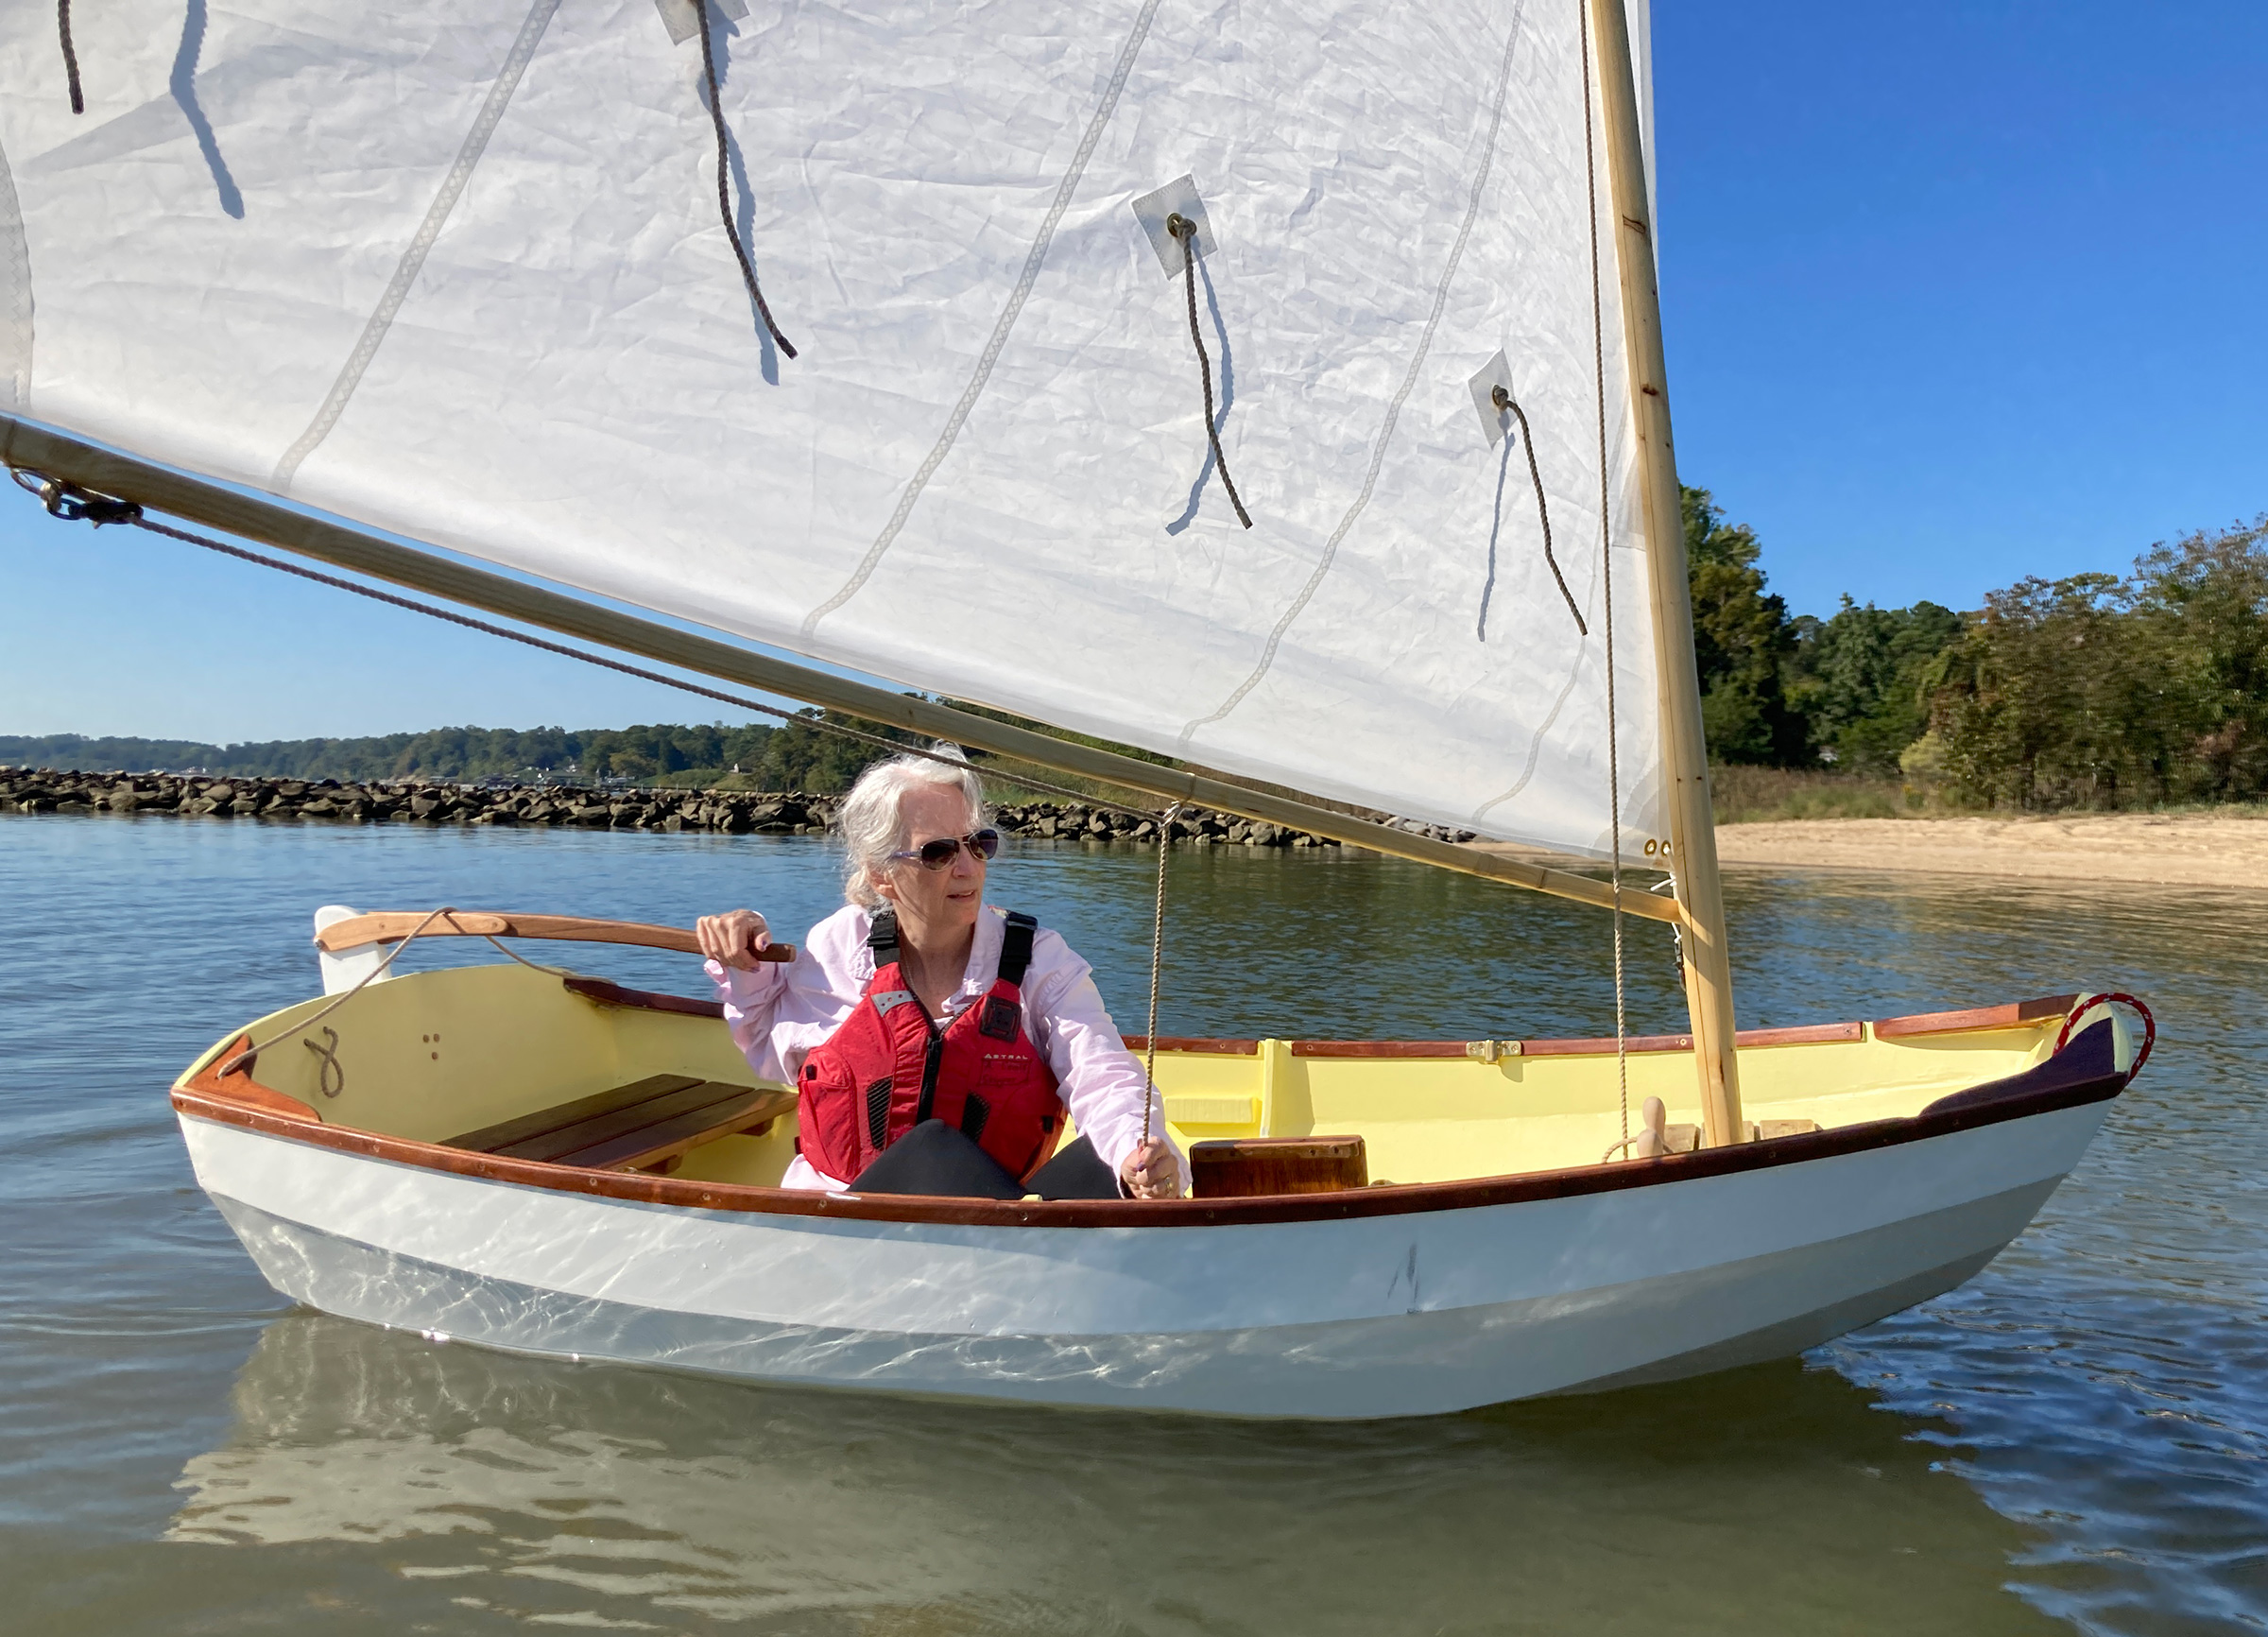
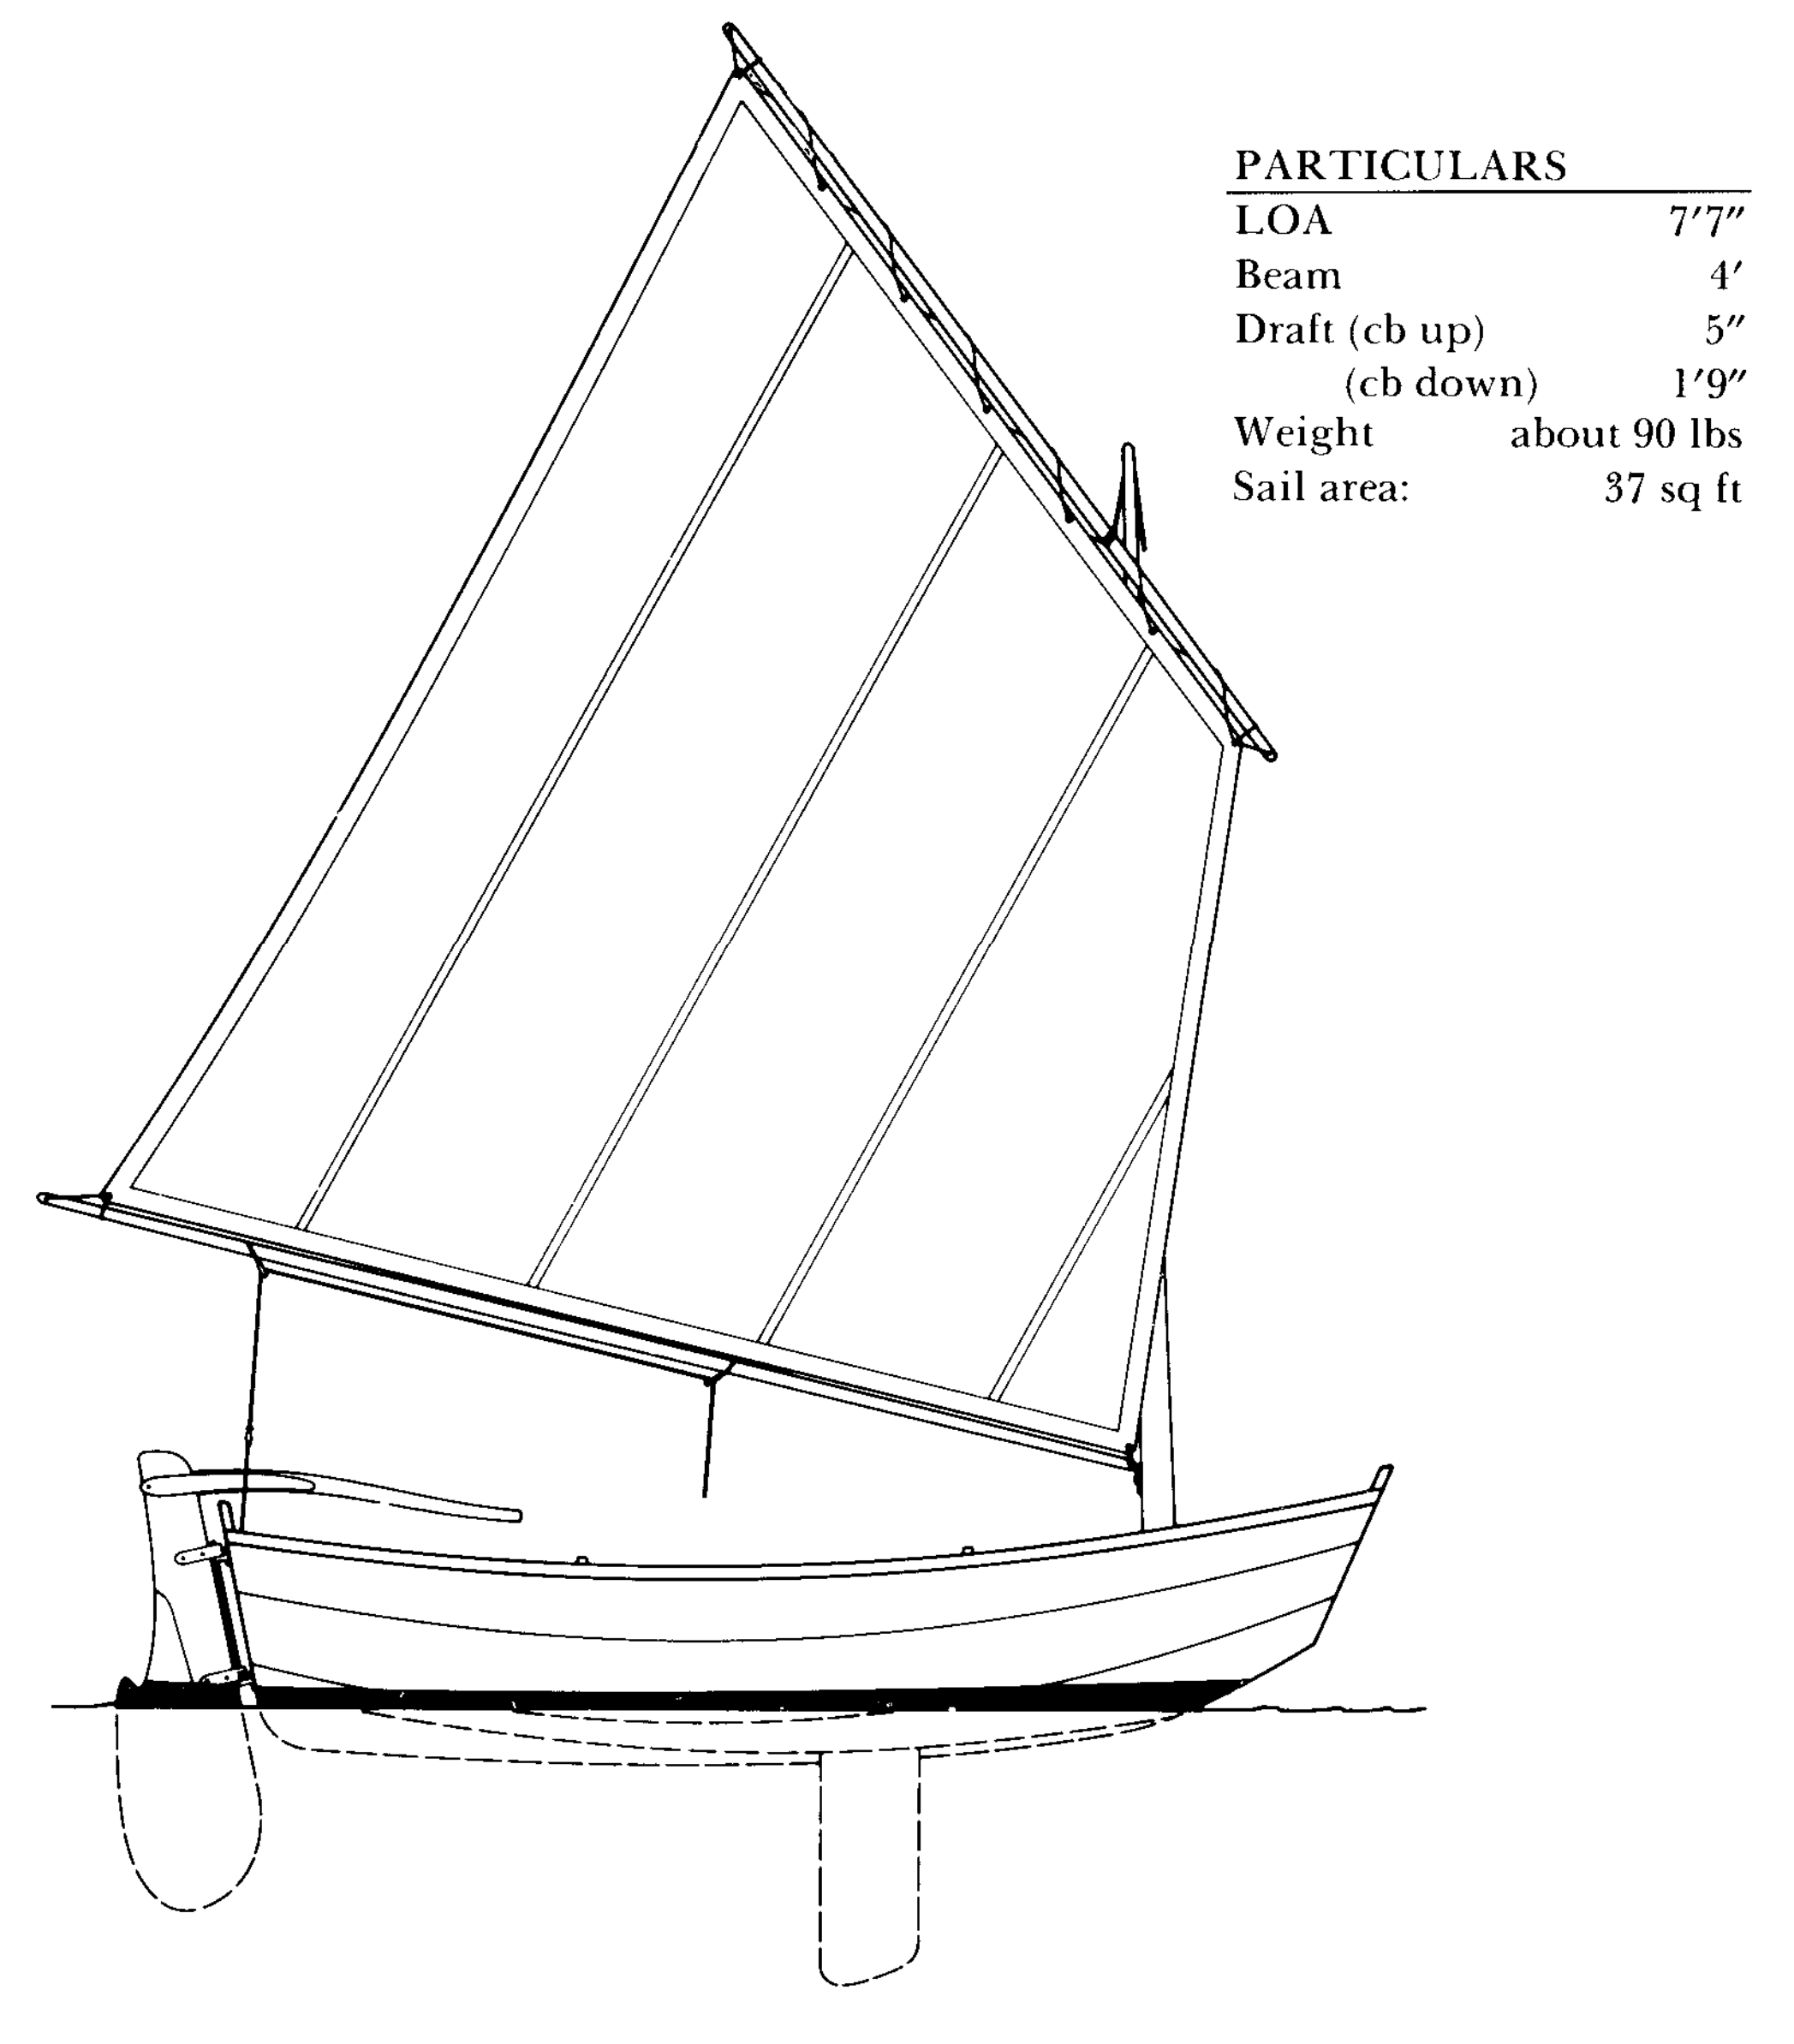
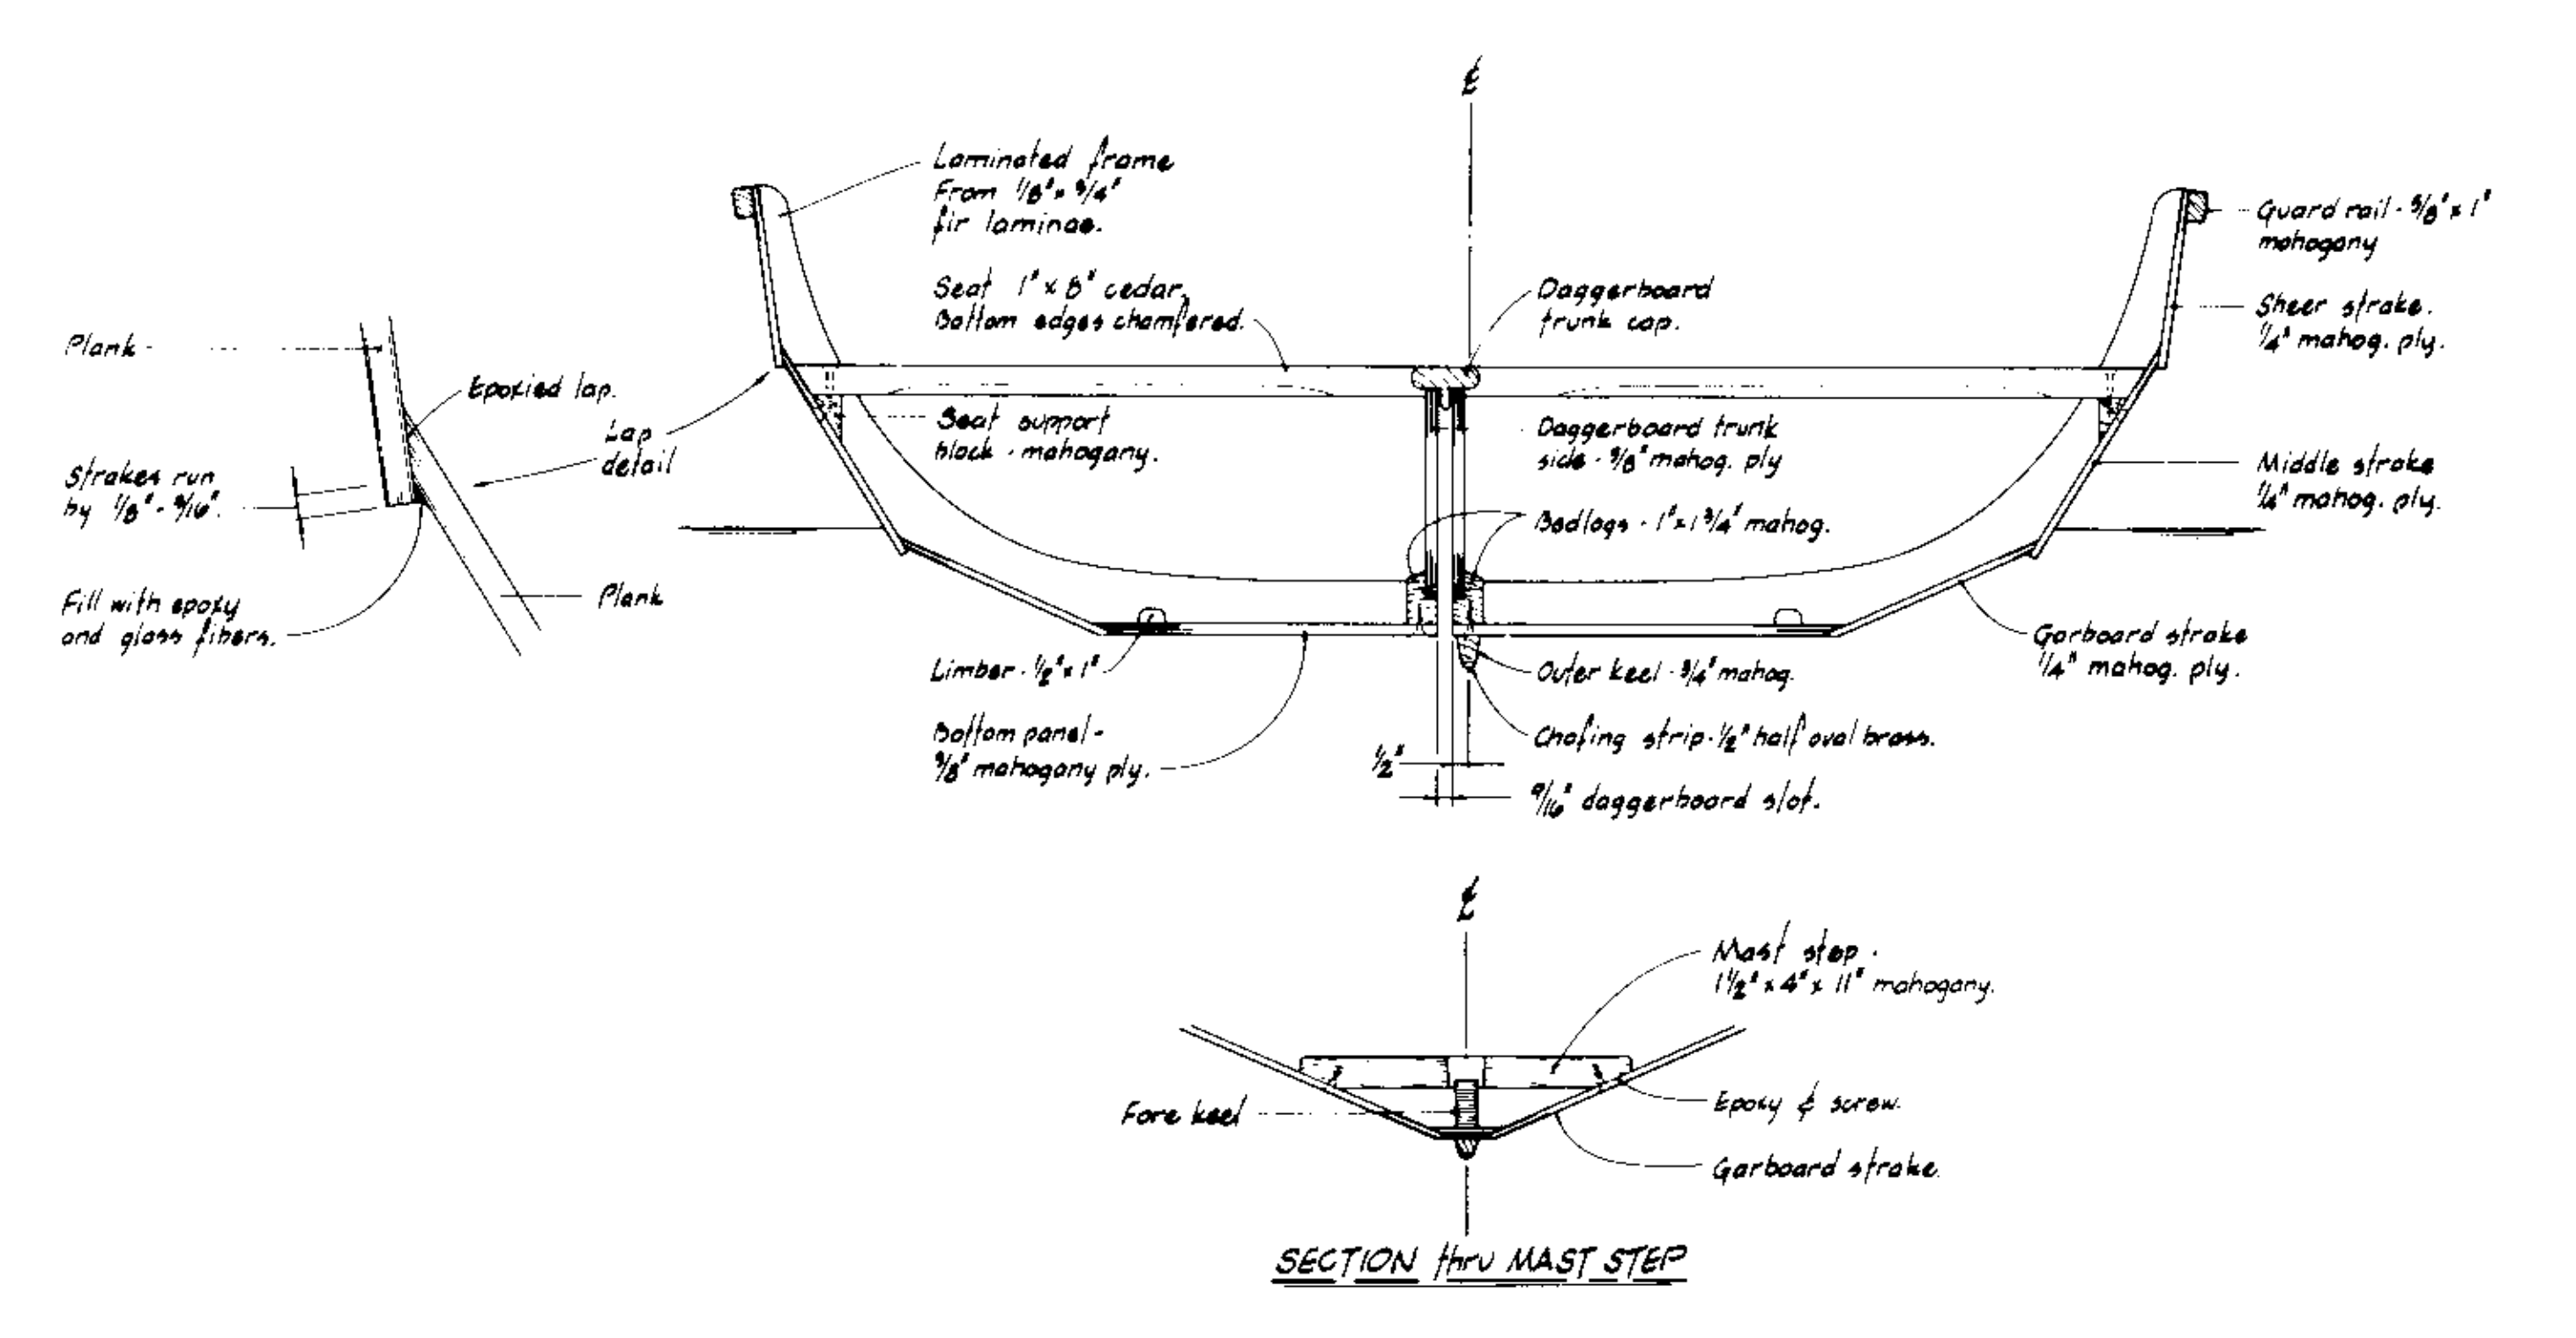
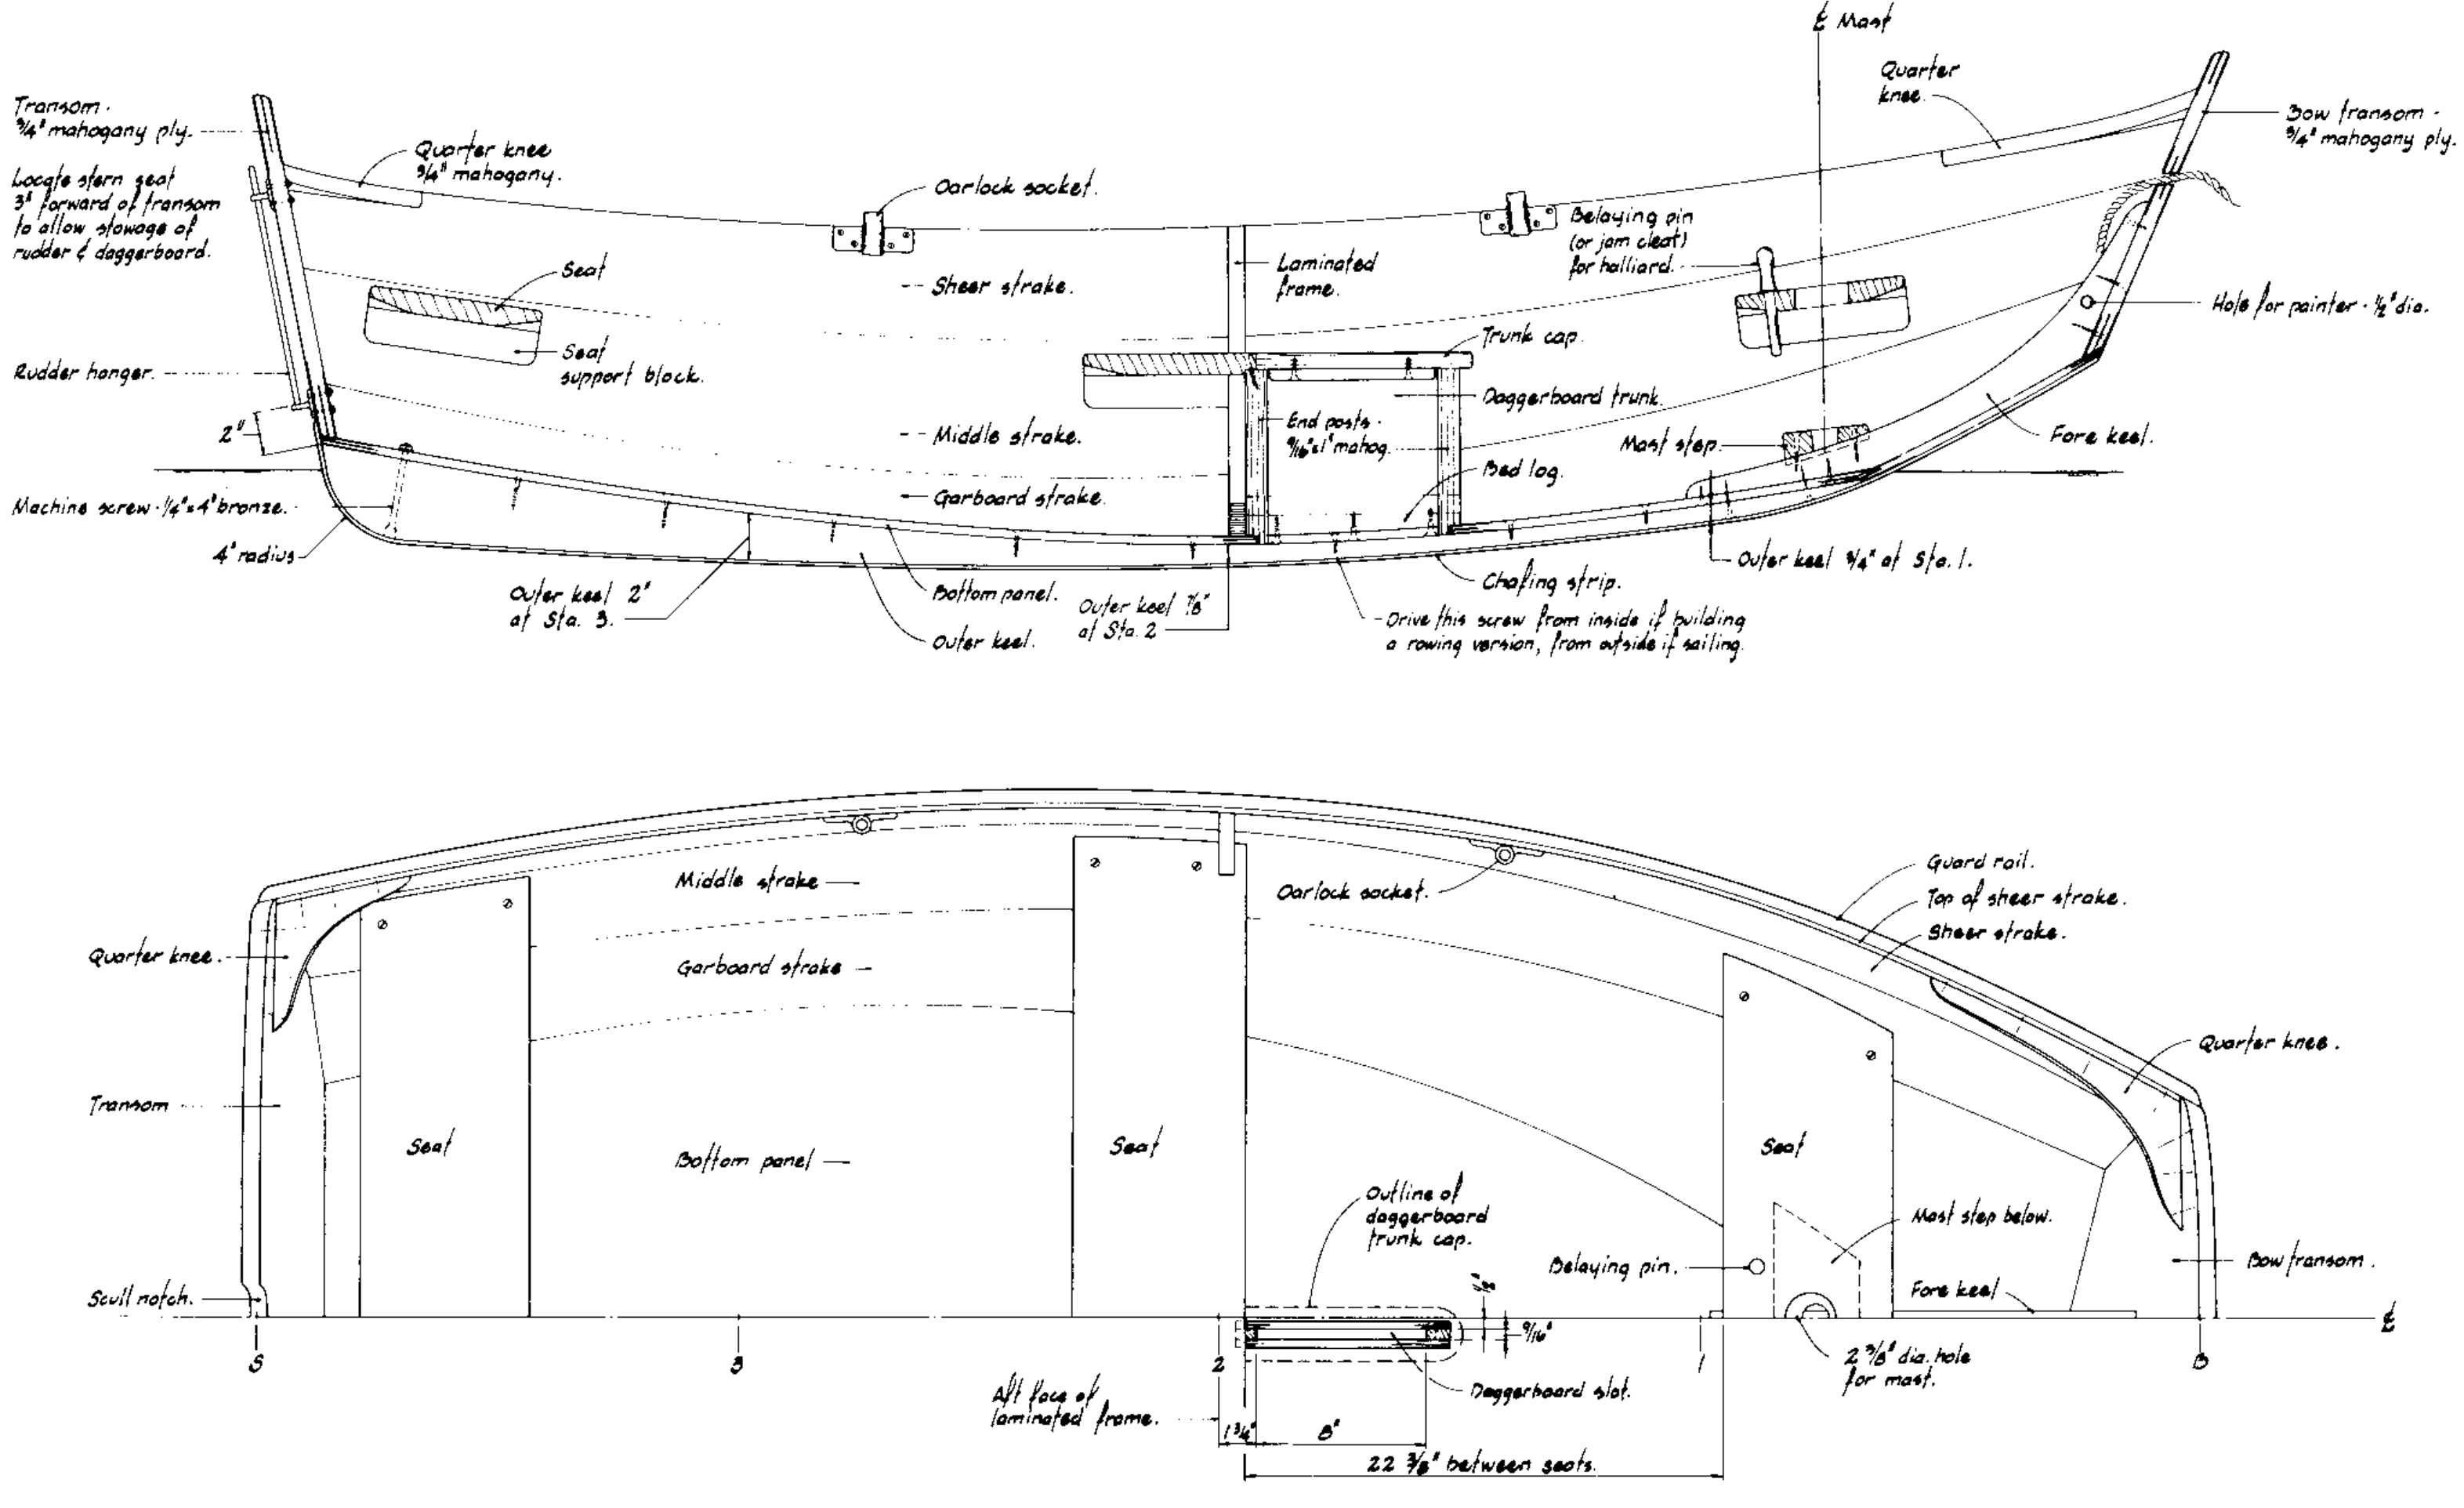
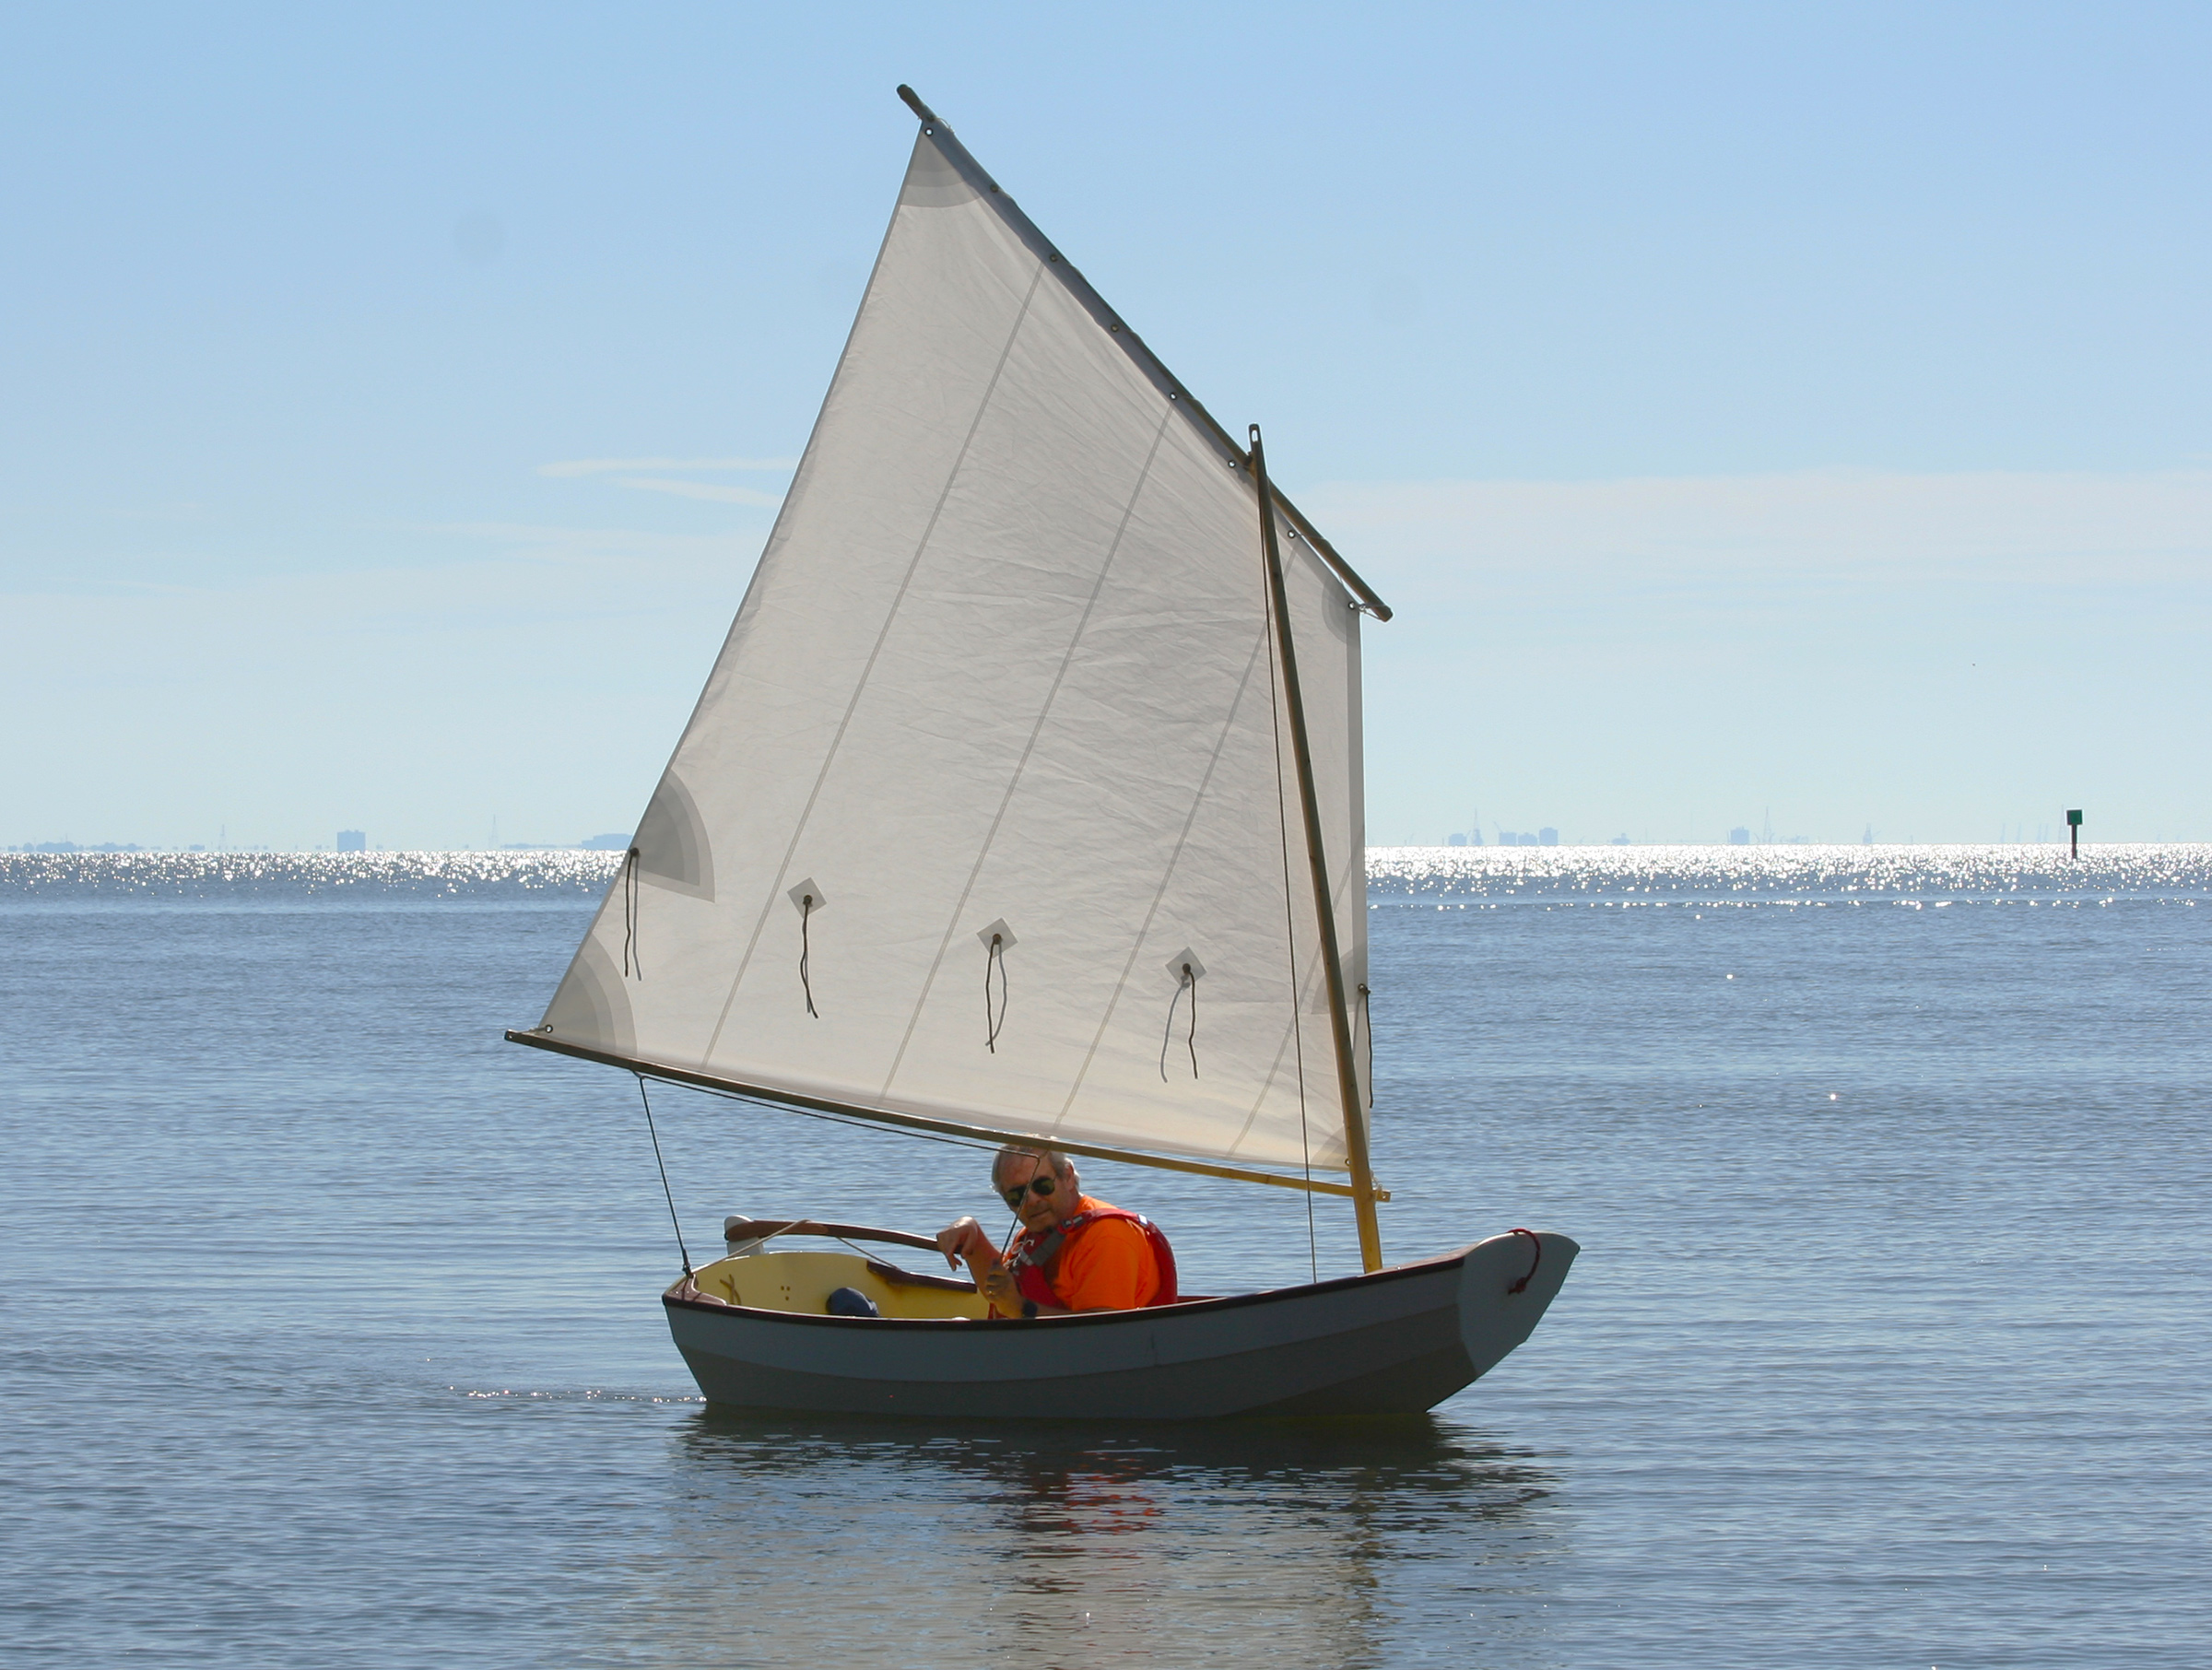 Photo by Audrey and Kent Lewis
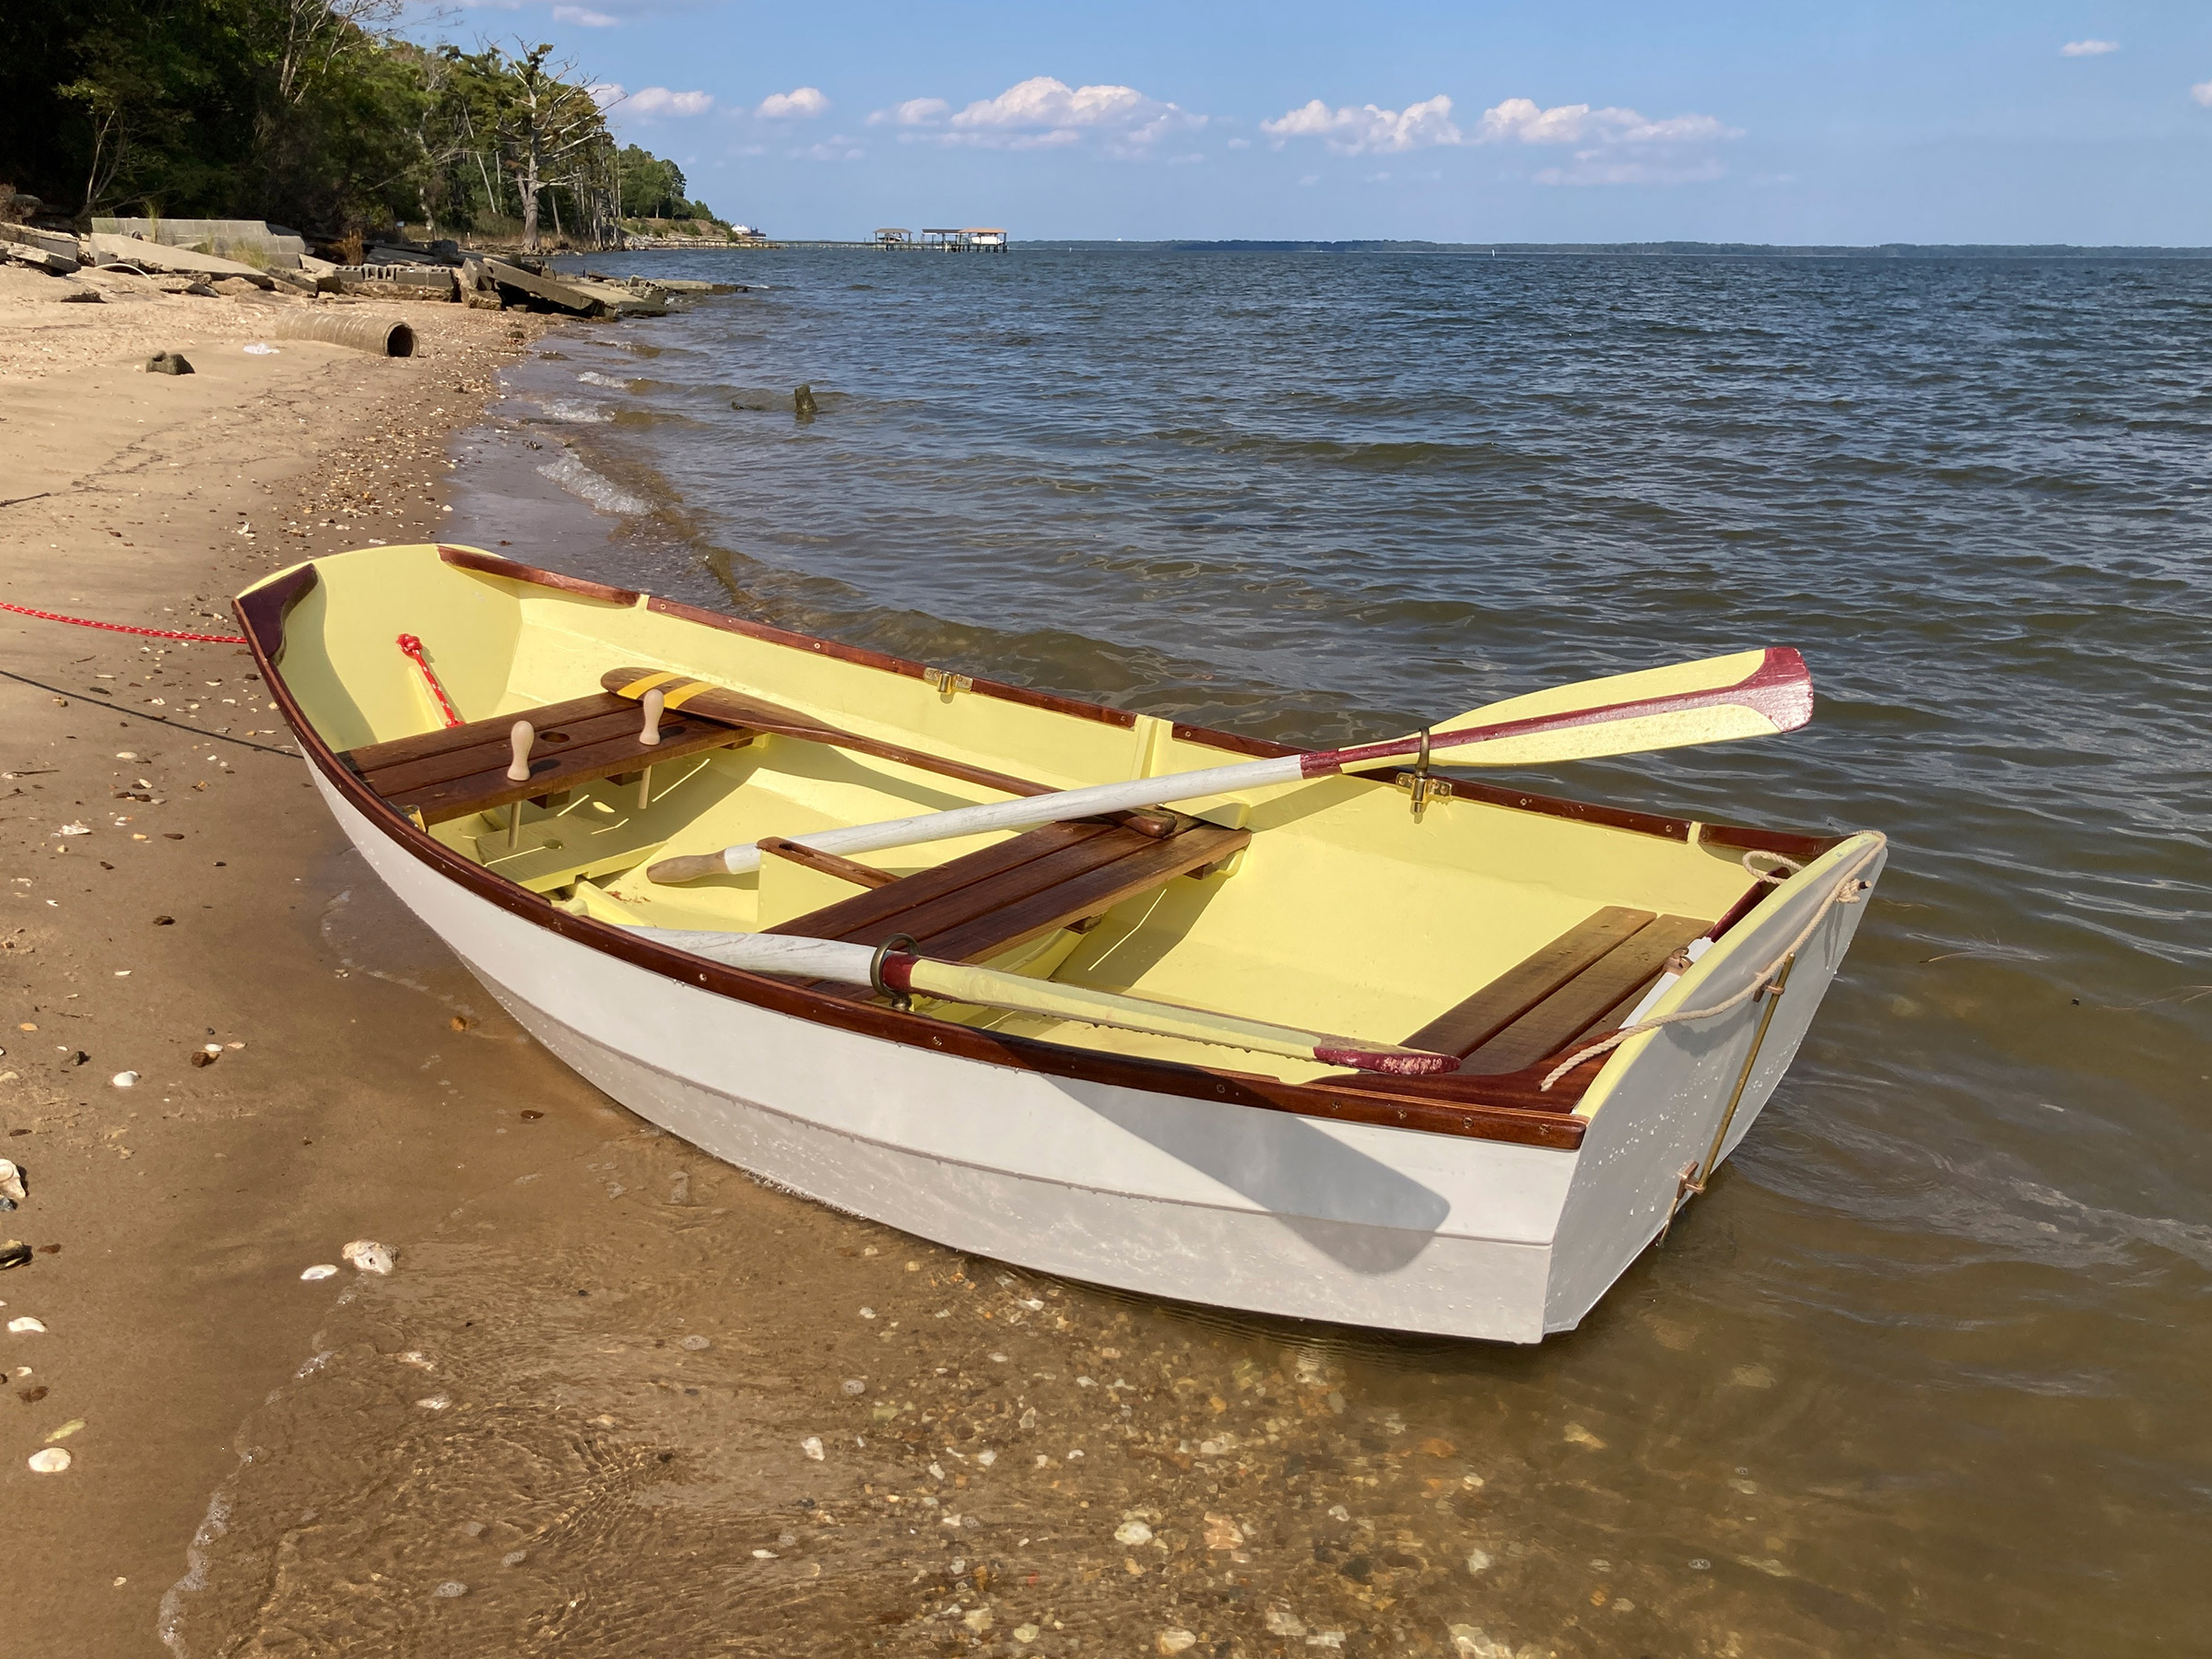 Photo by Audrey and Kent Lewis
  Photo by Audrey and Kent Lewis
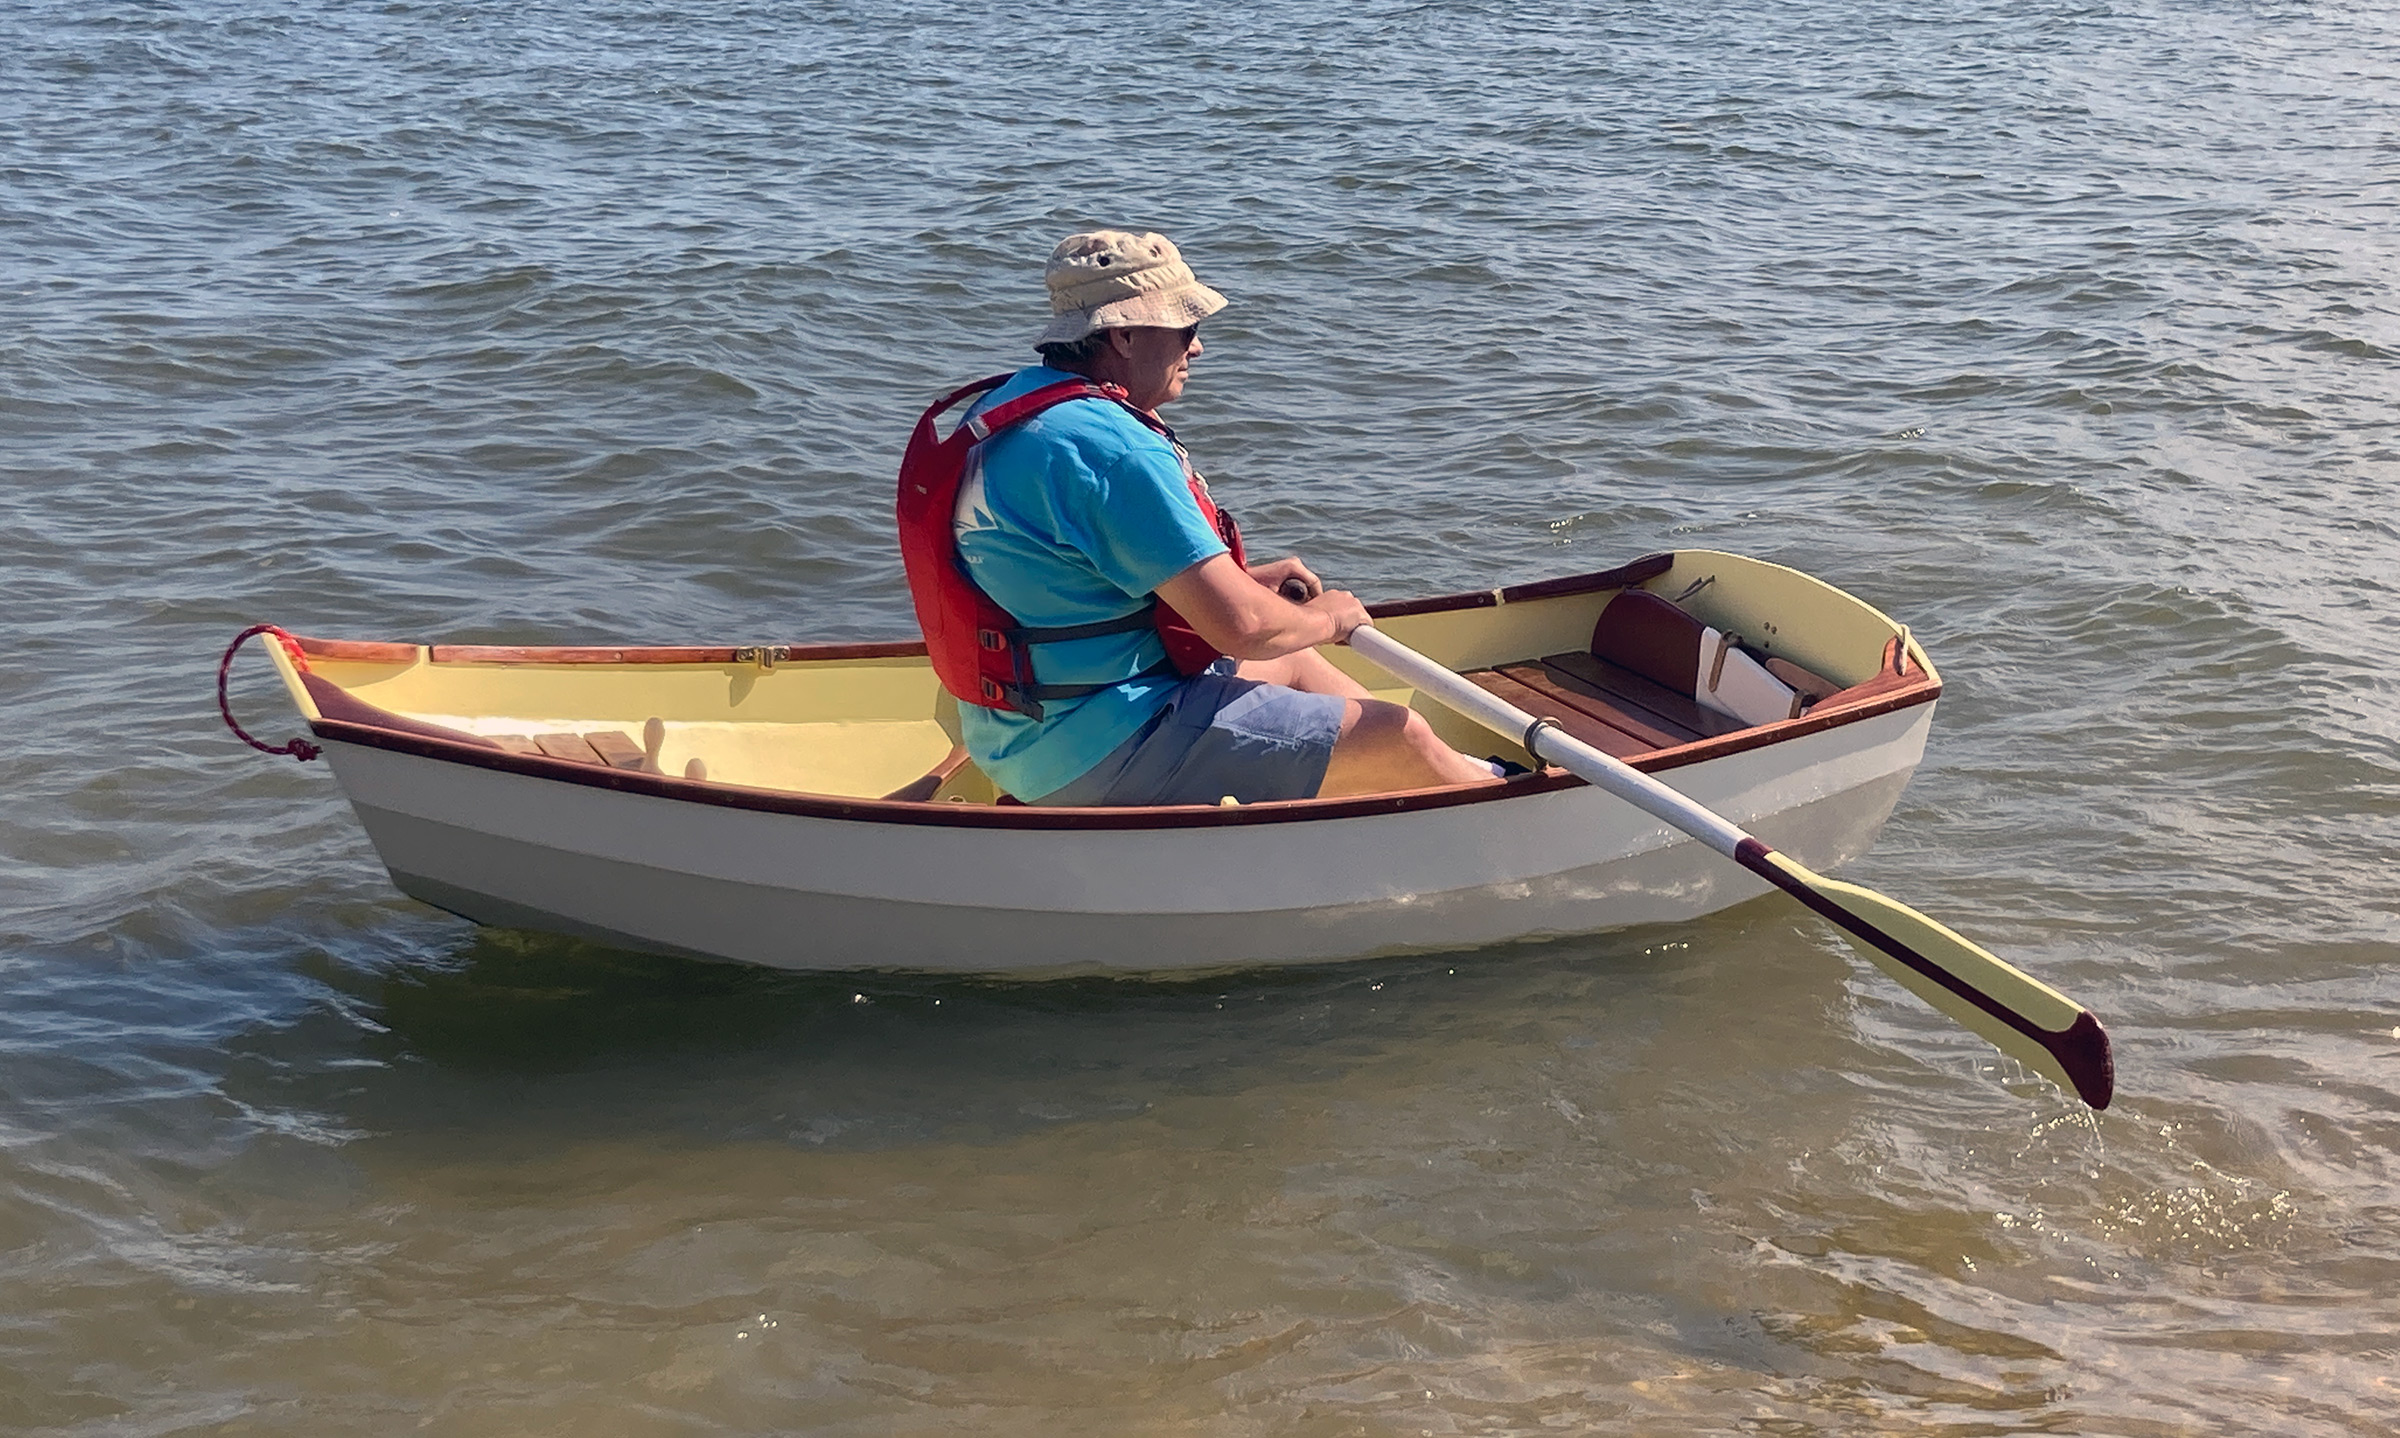 Photo by Audrey and Kent Lewis
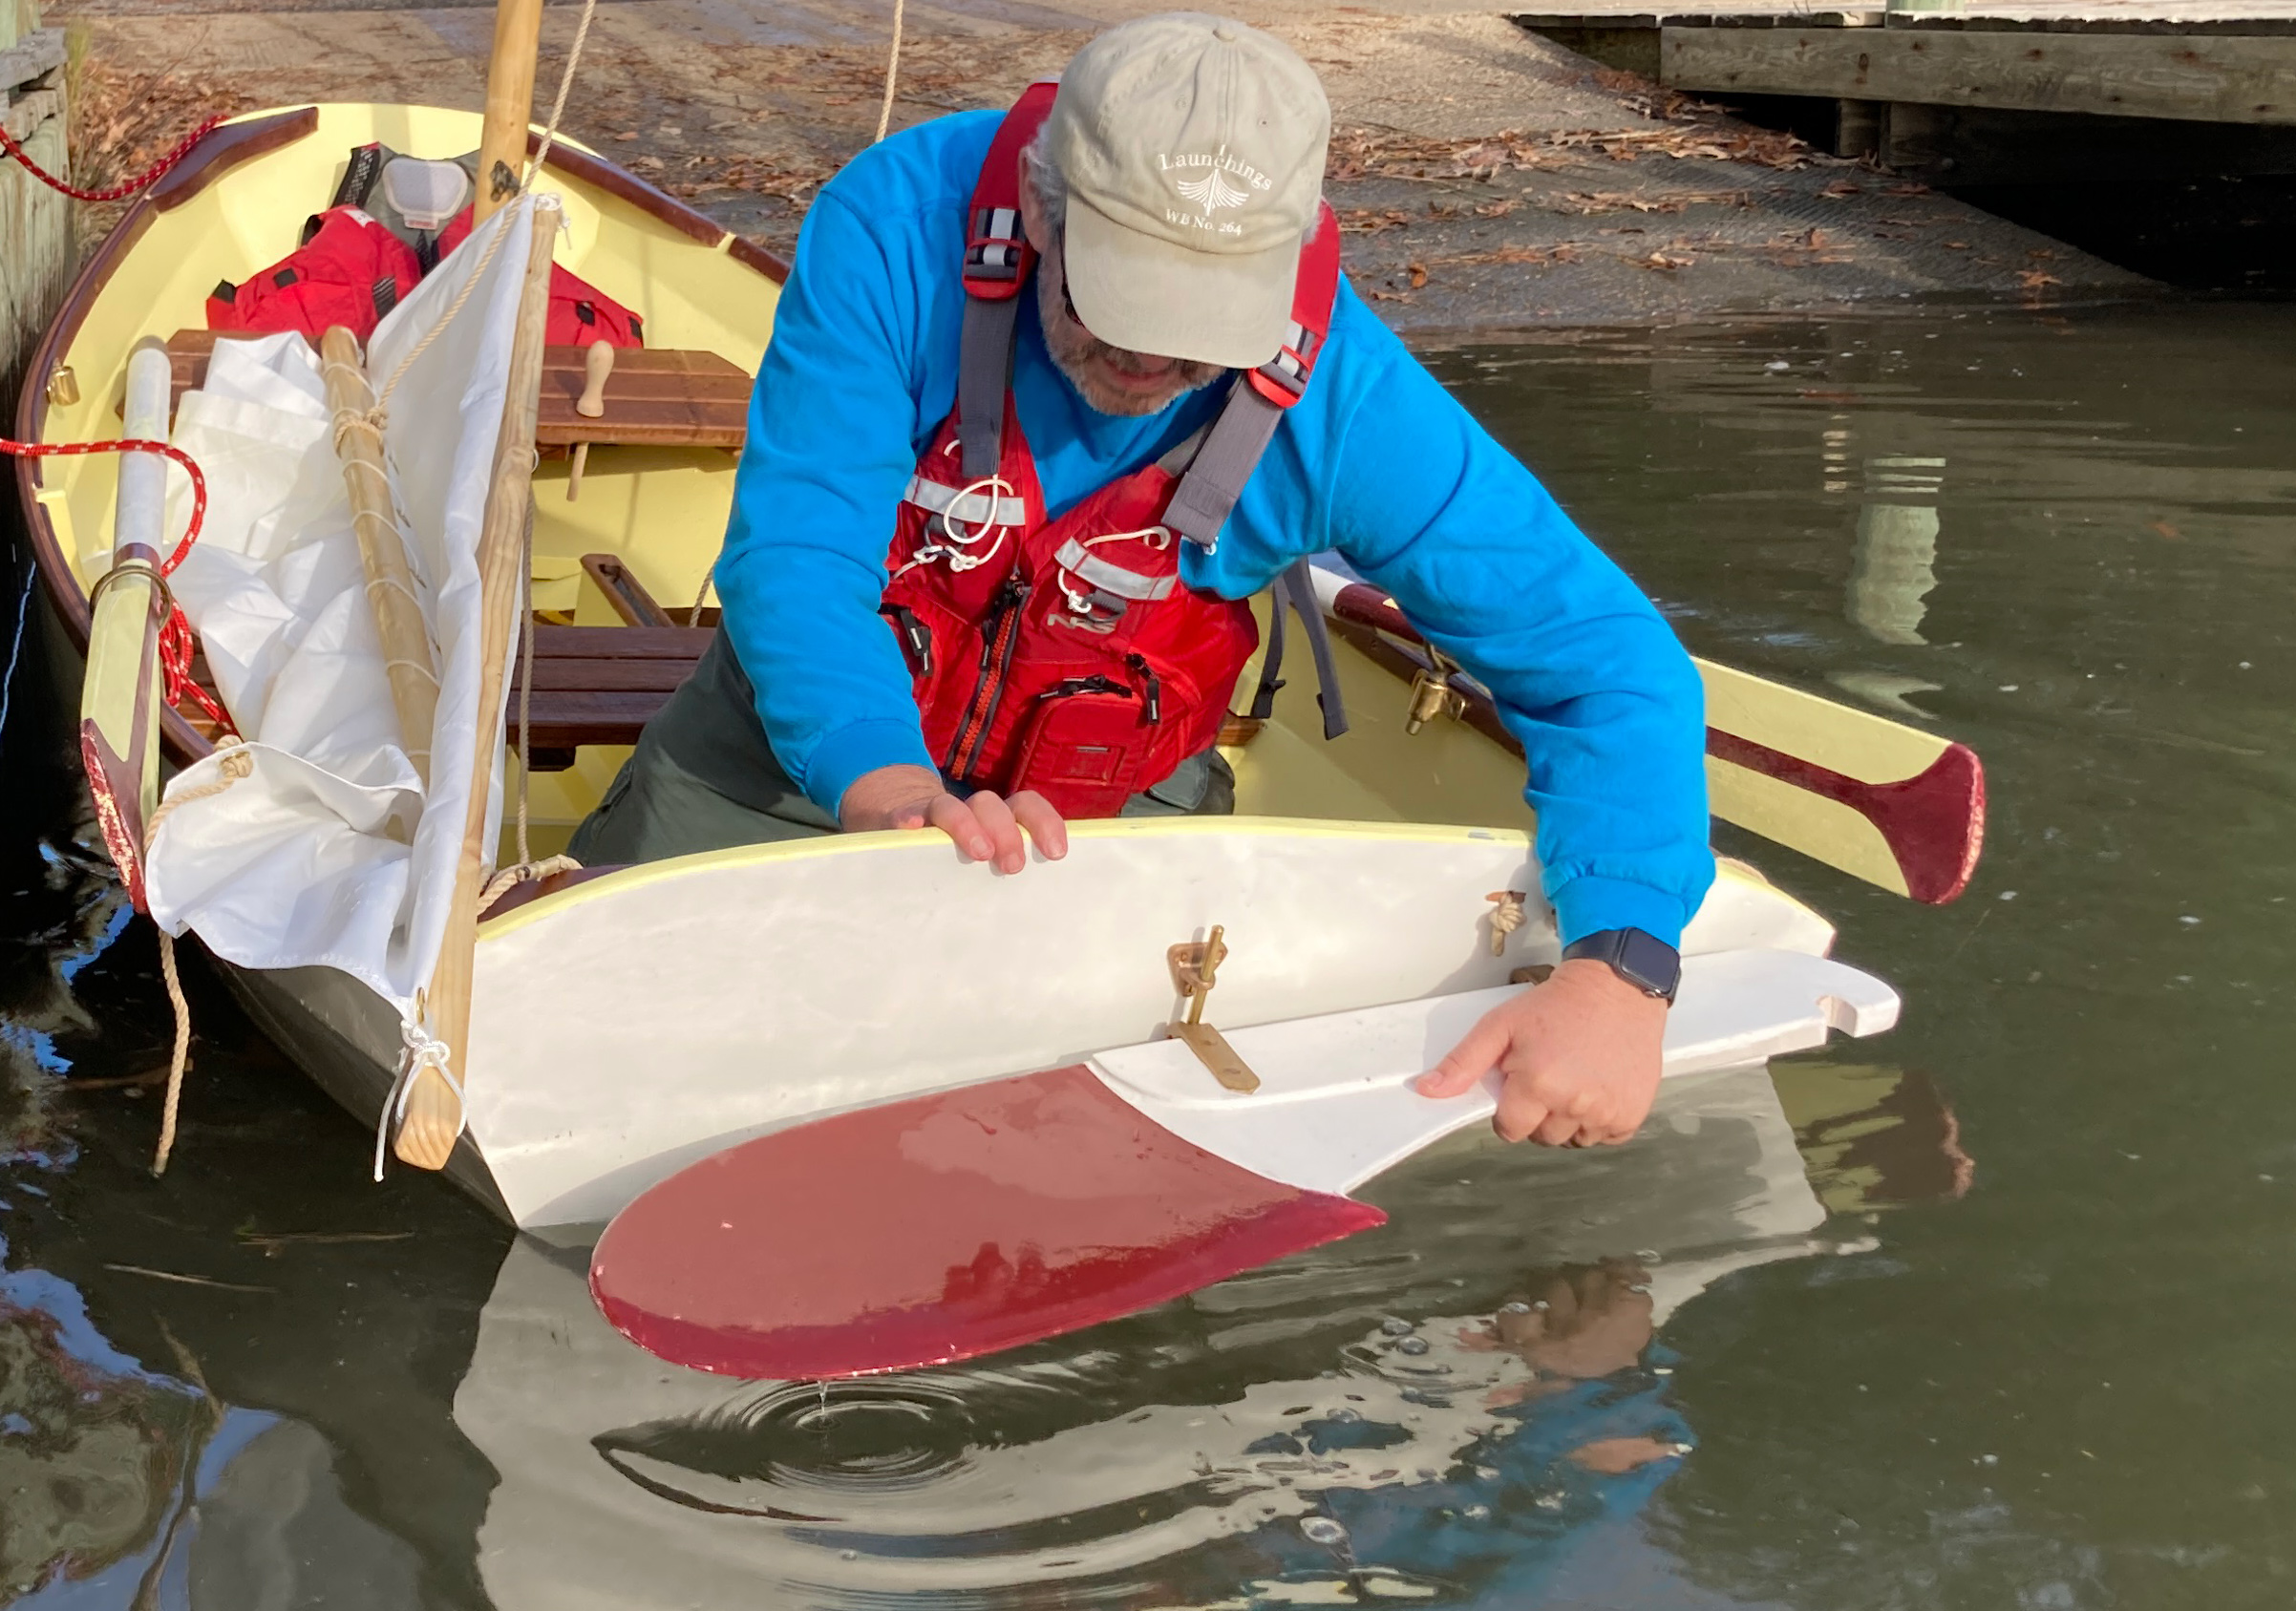 Photo by Audrey and Kent Lewis
 Photo by Audrey and Kent Lewis
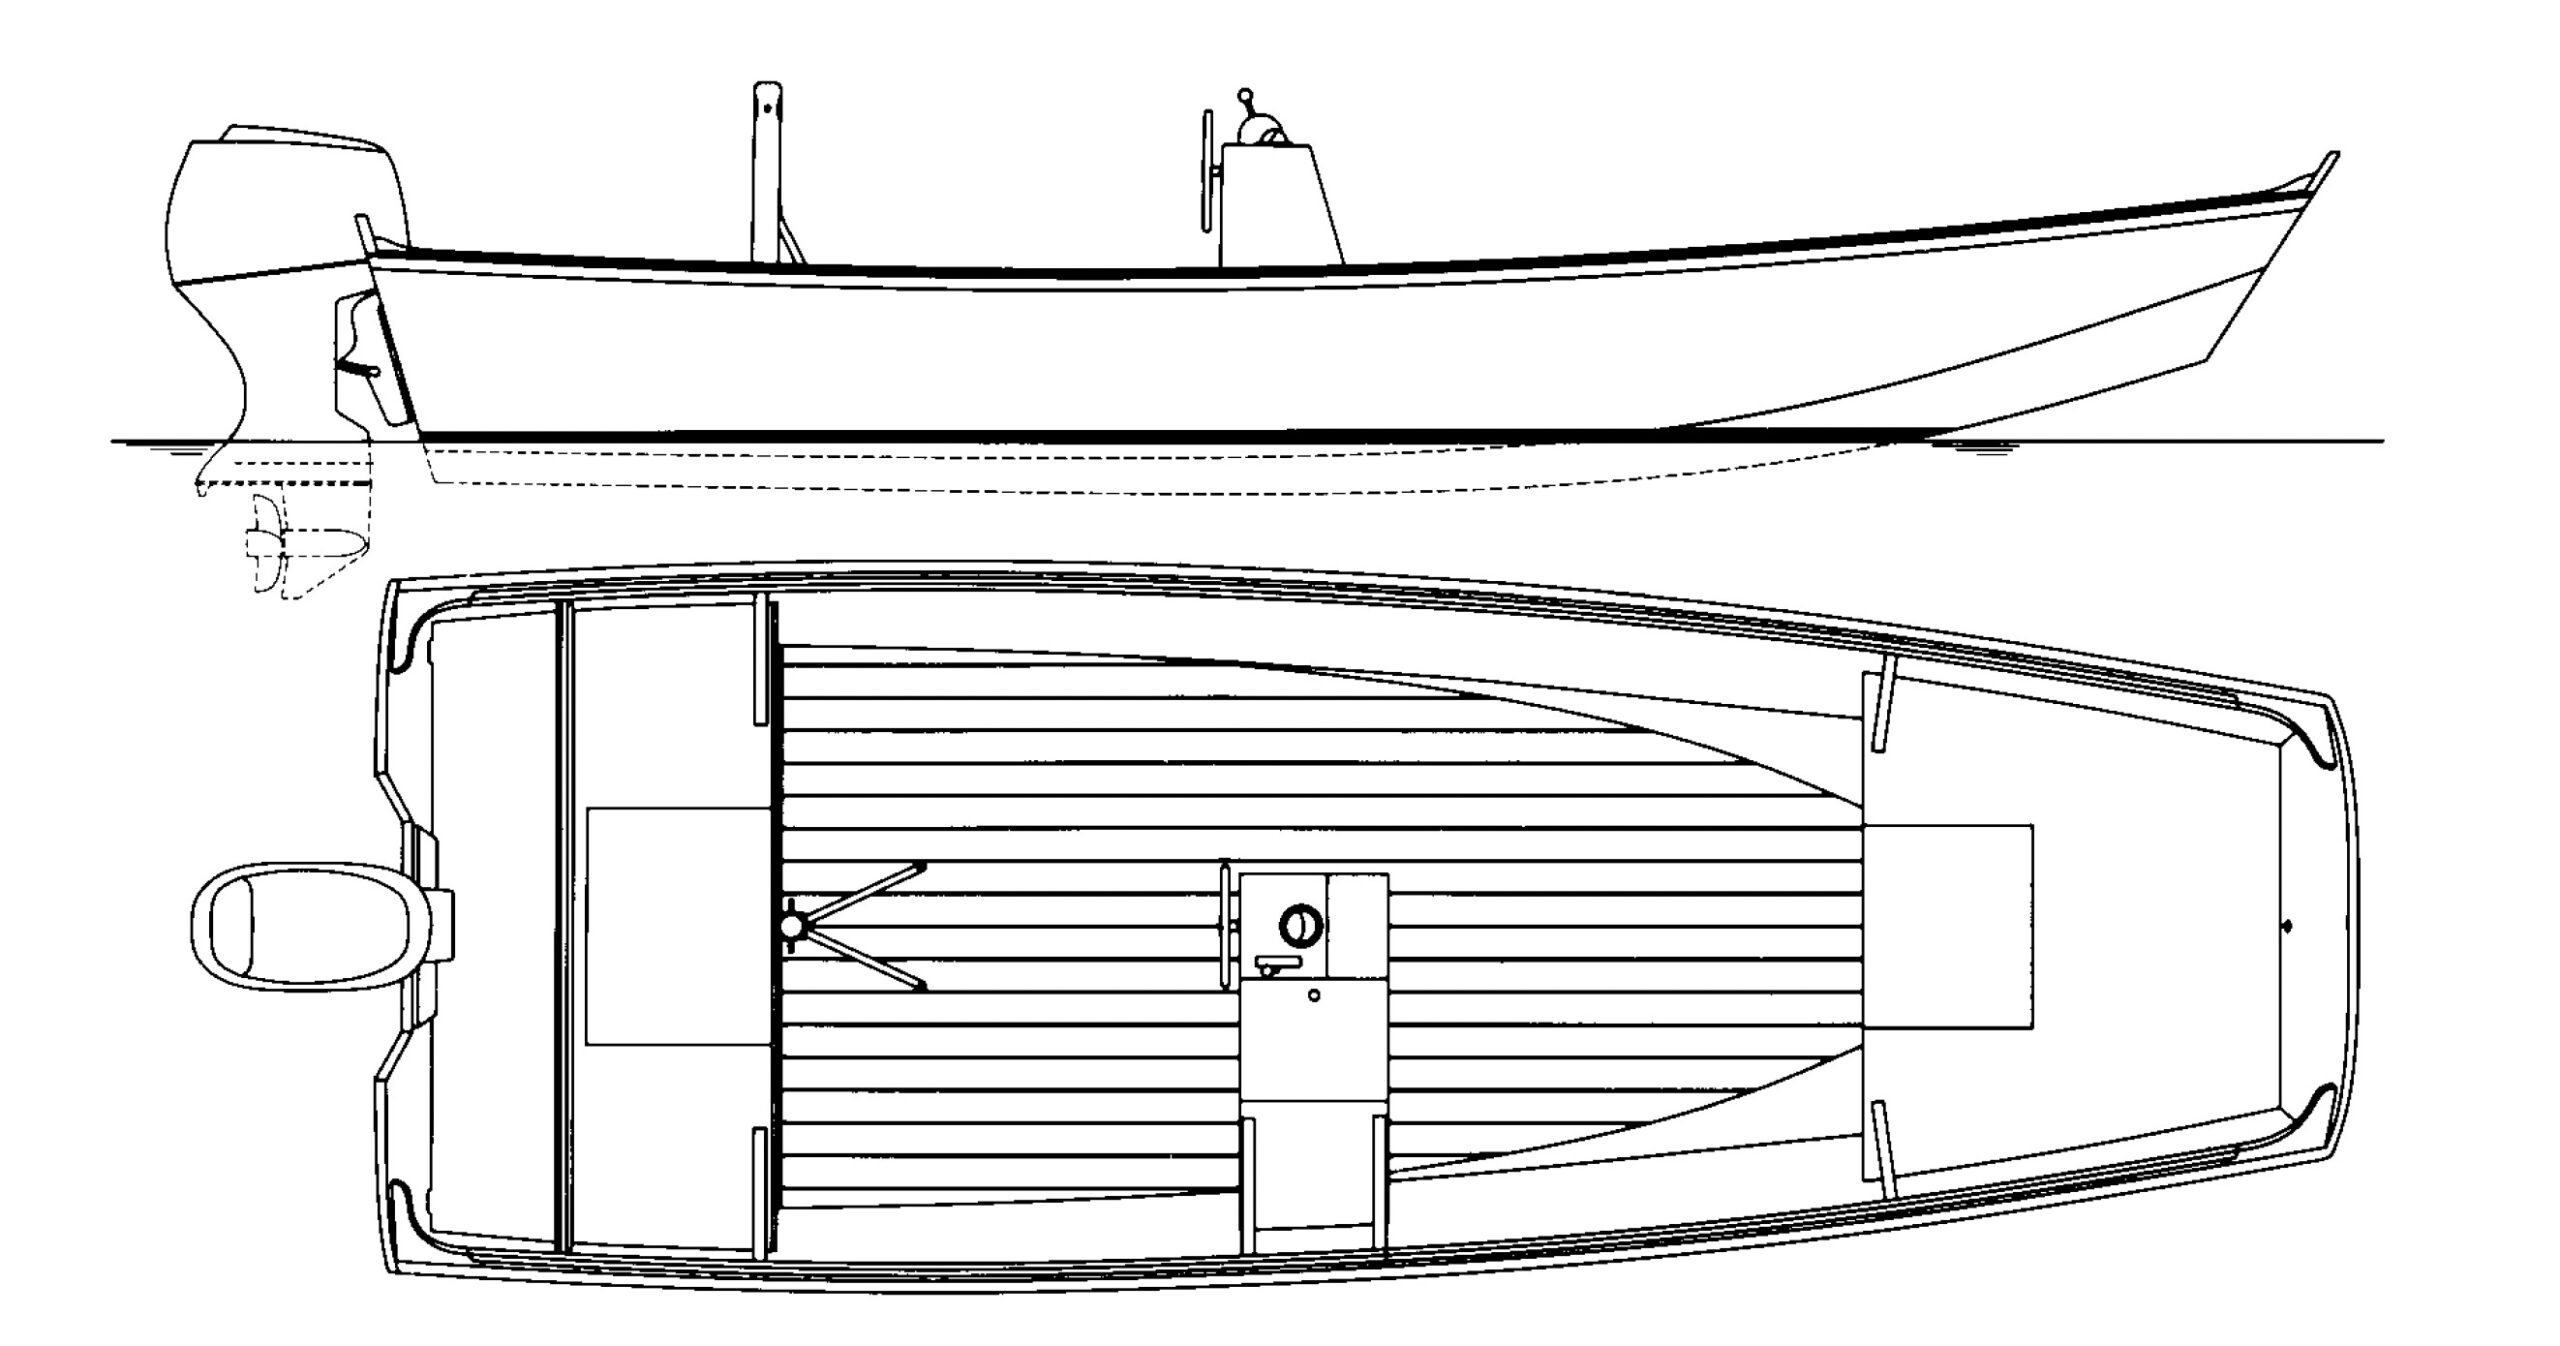
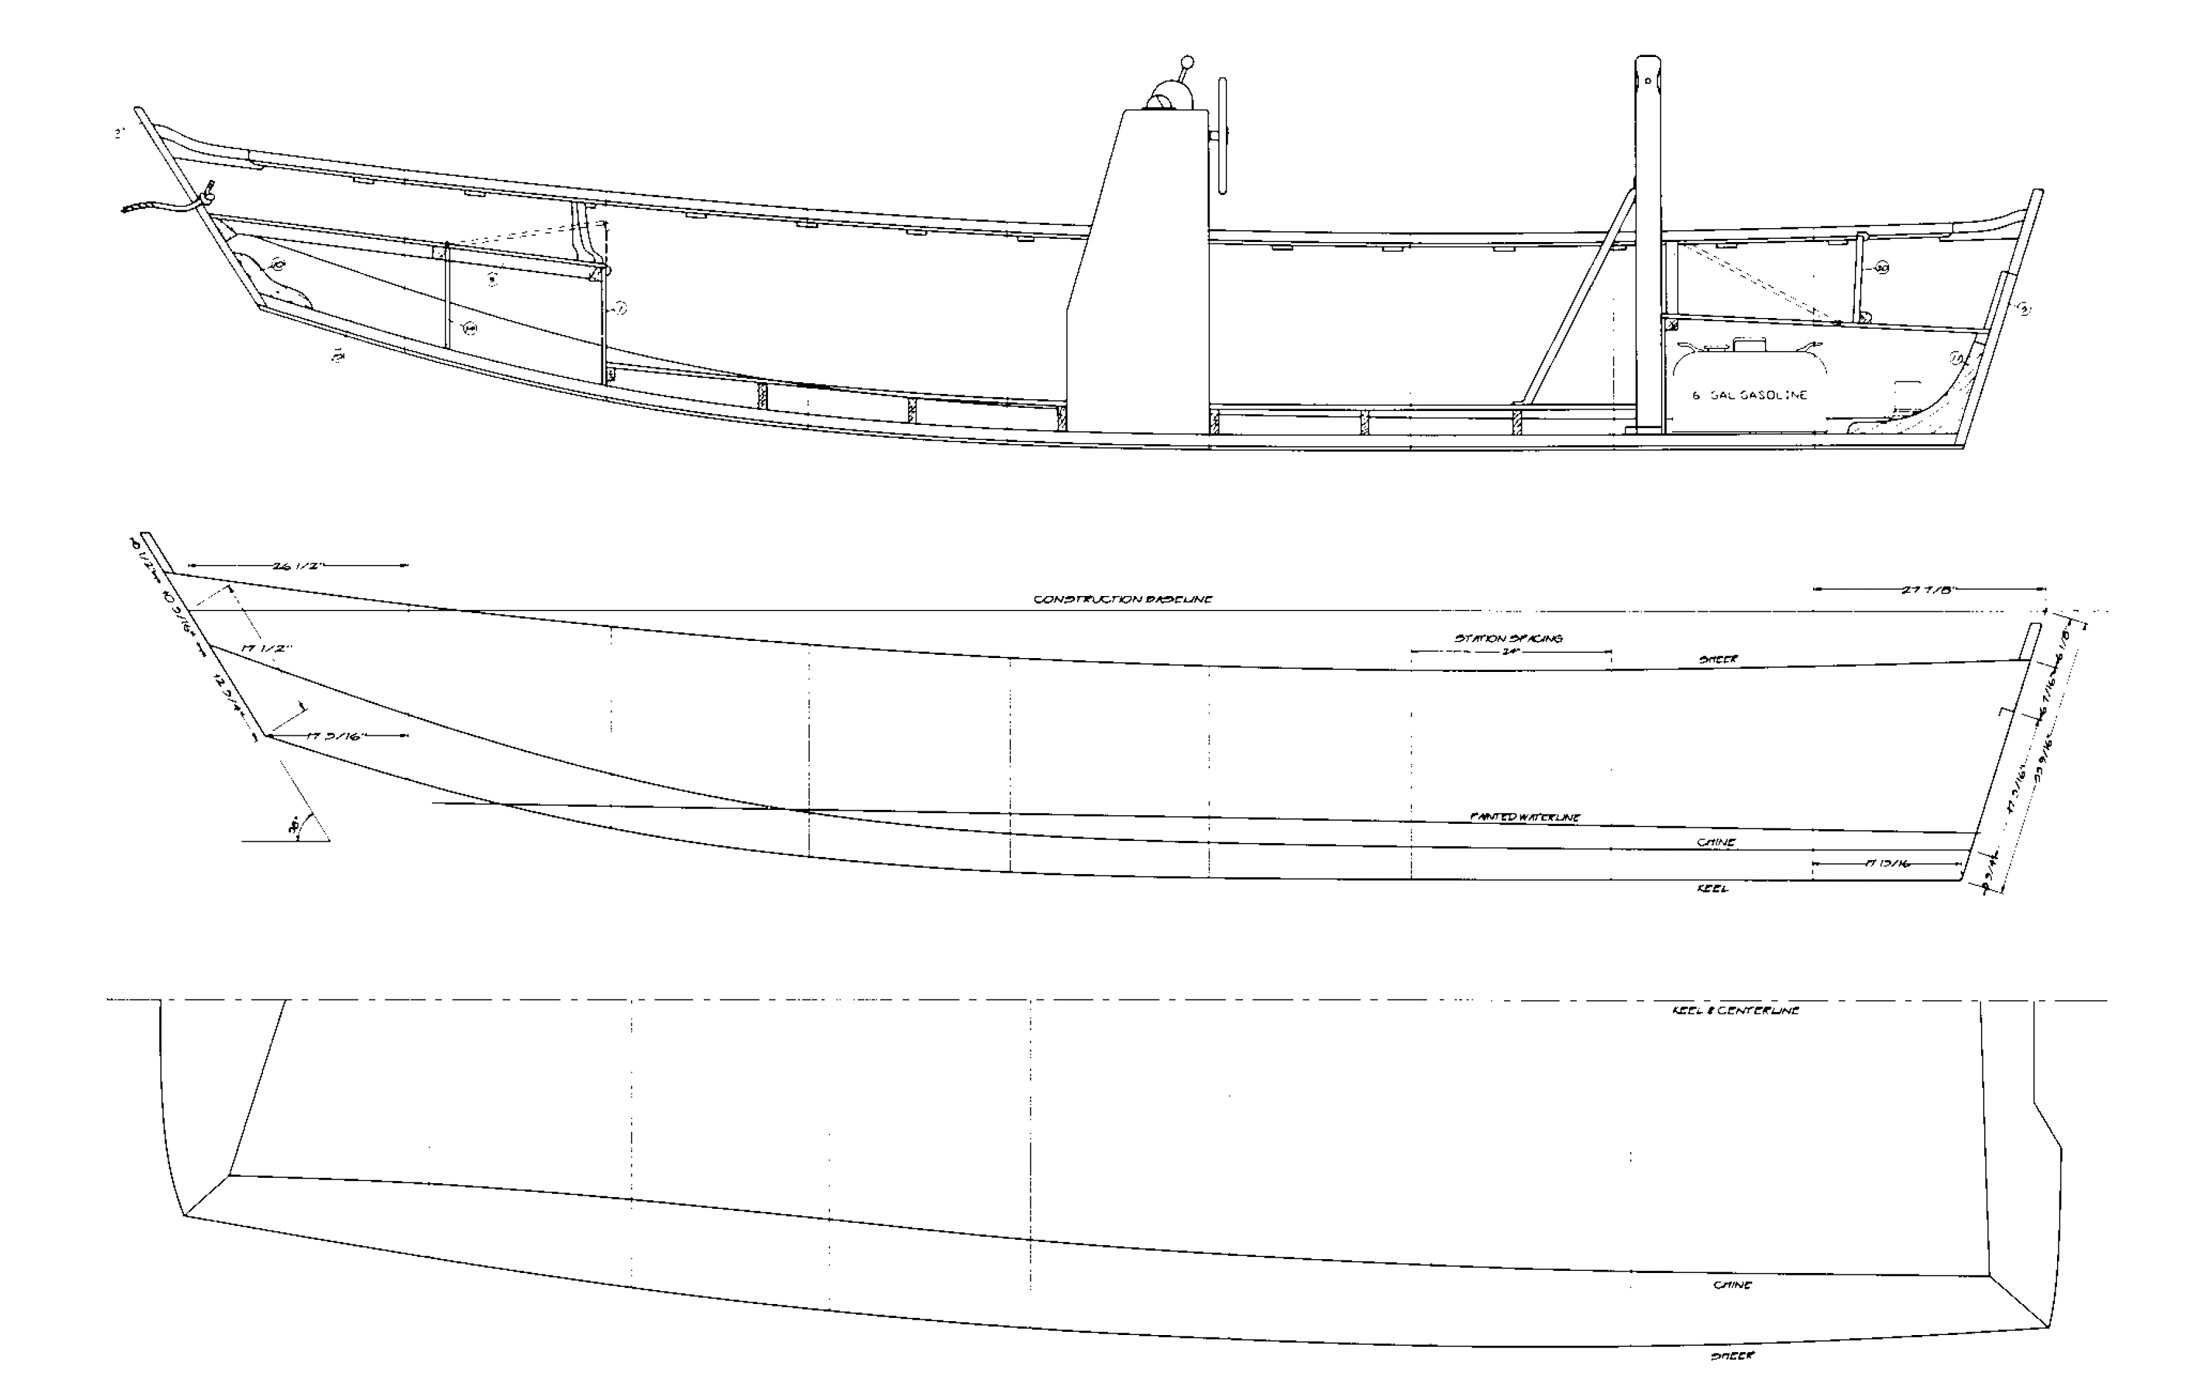
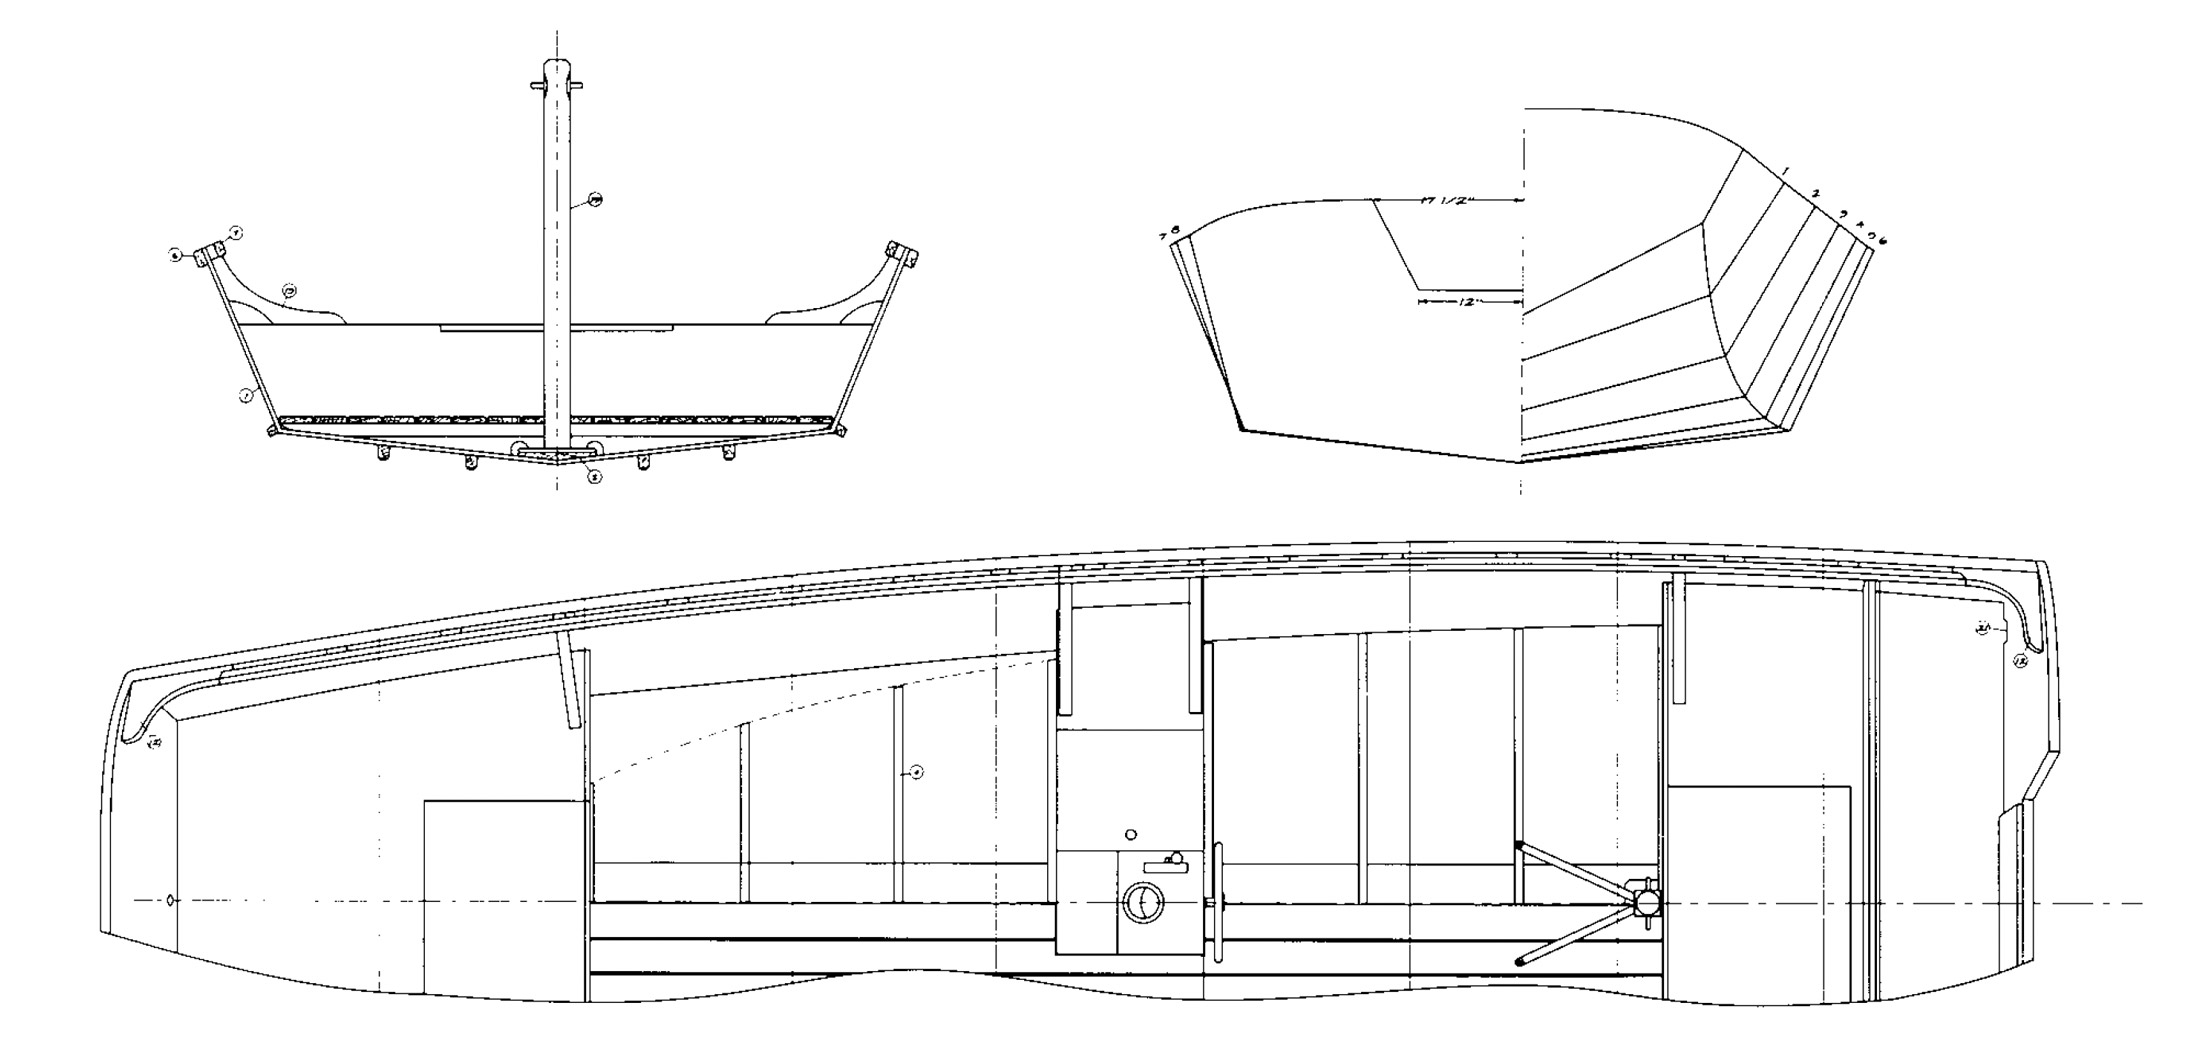

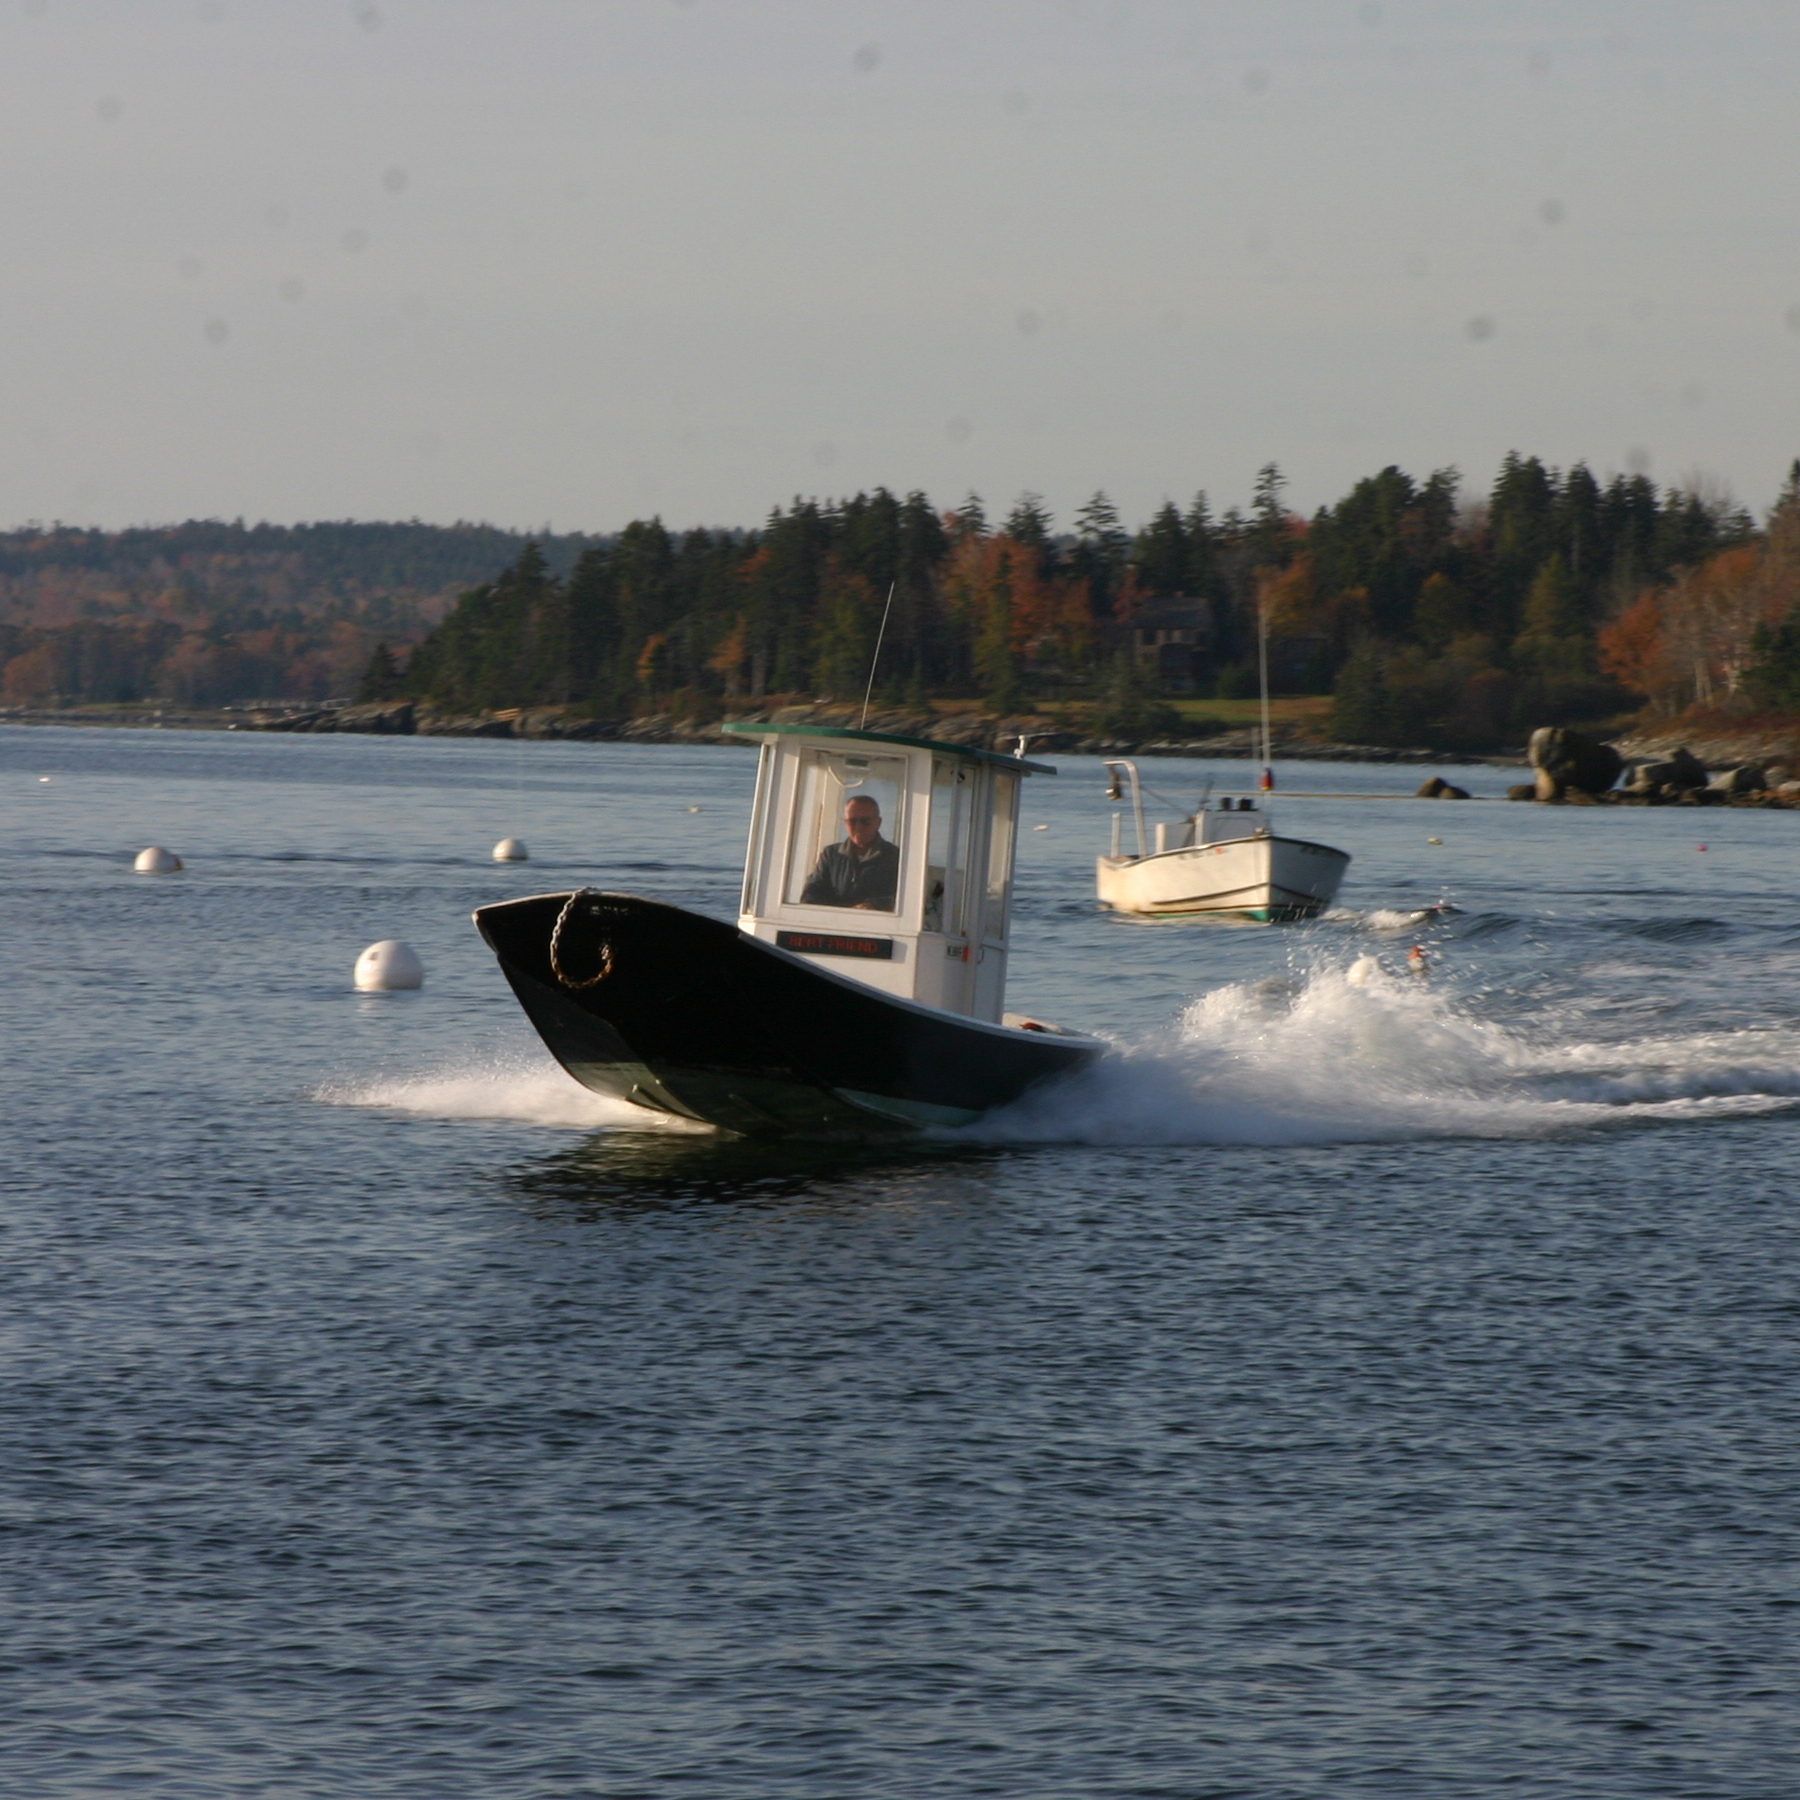
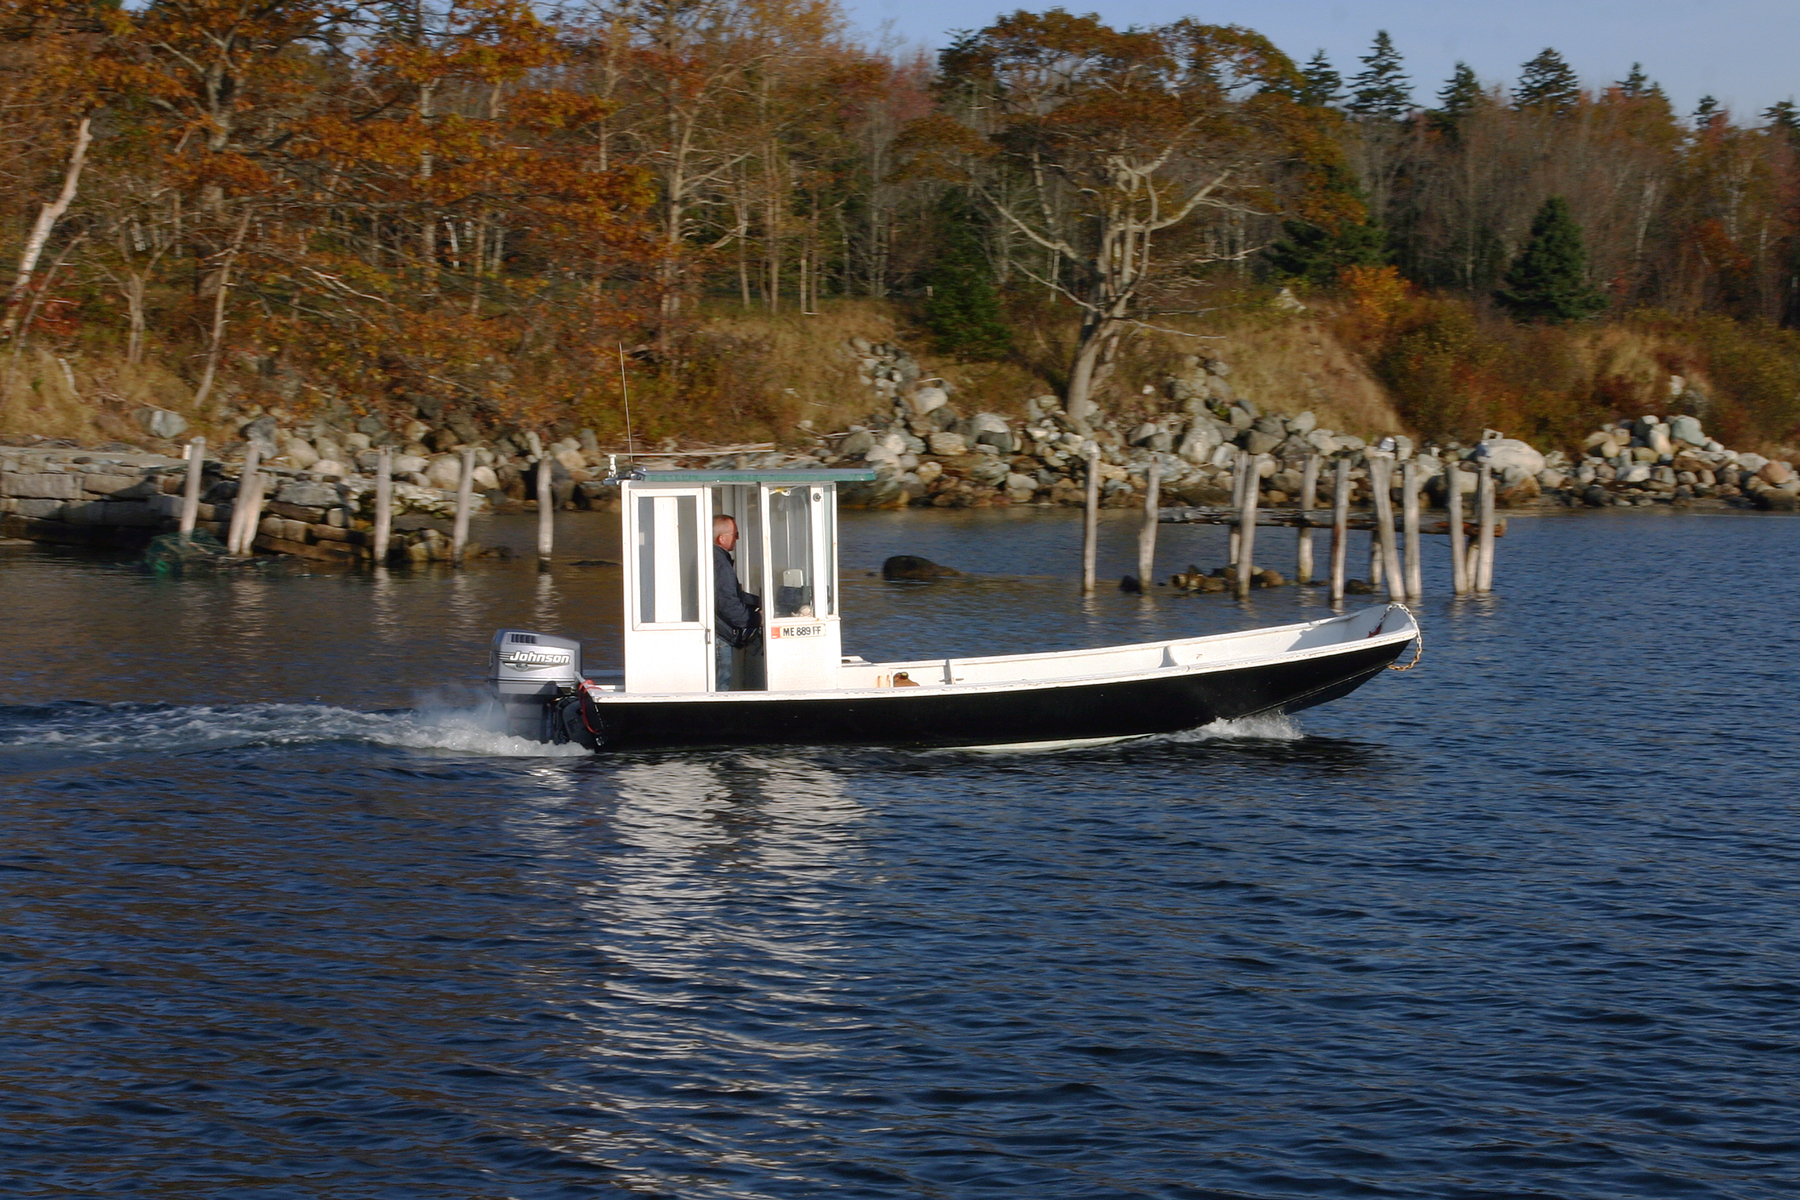
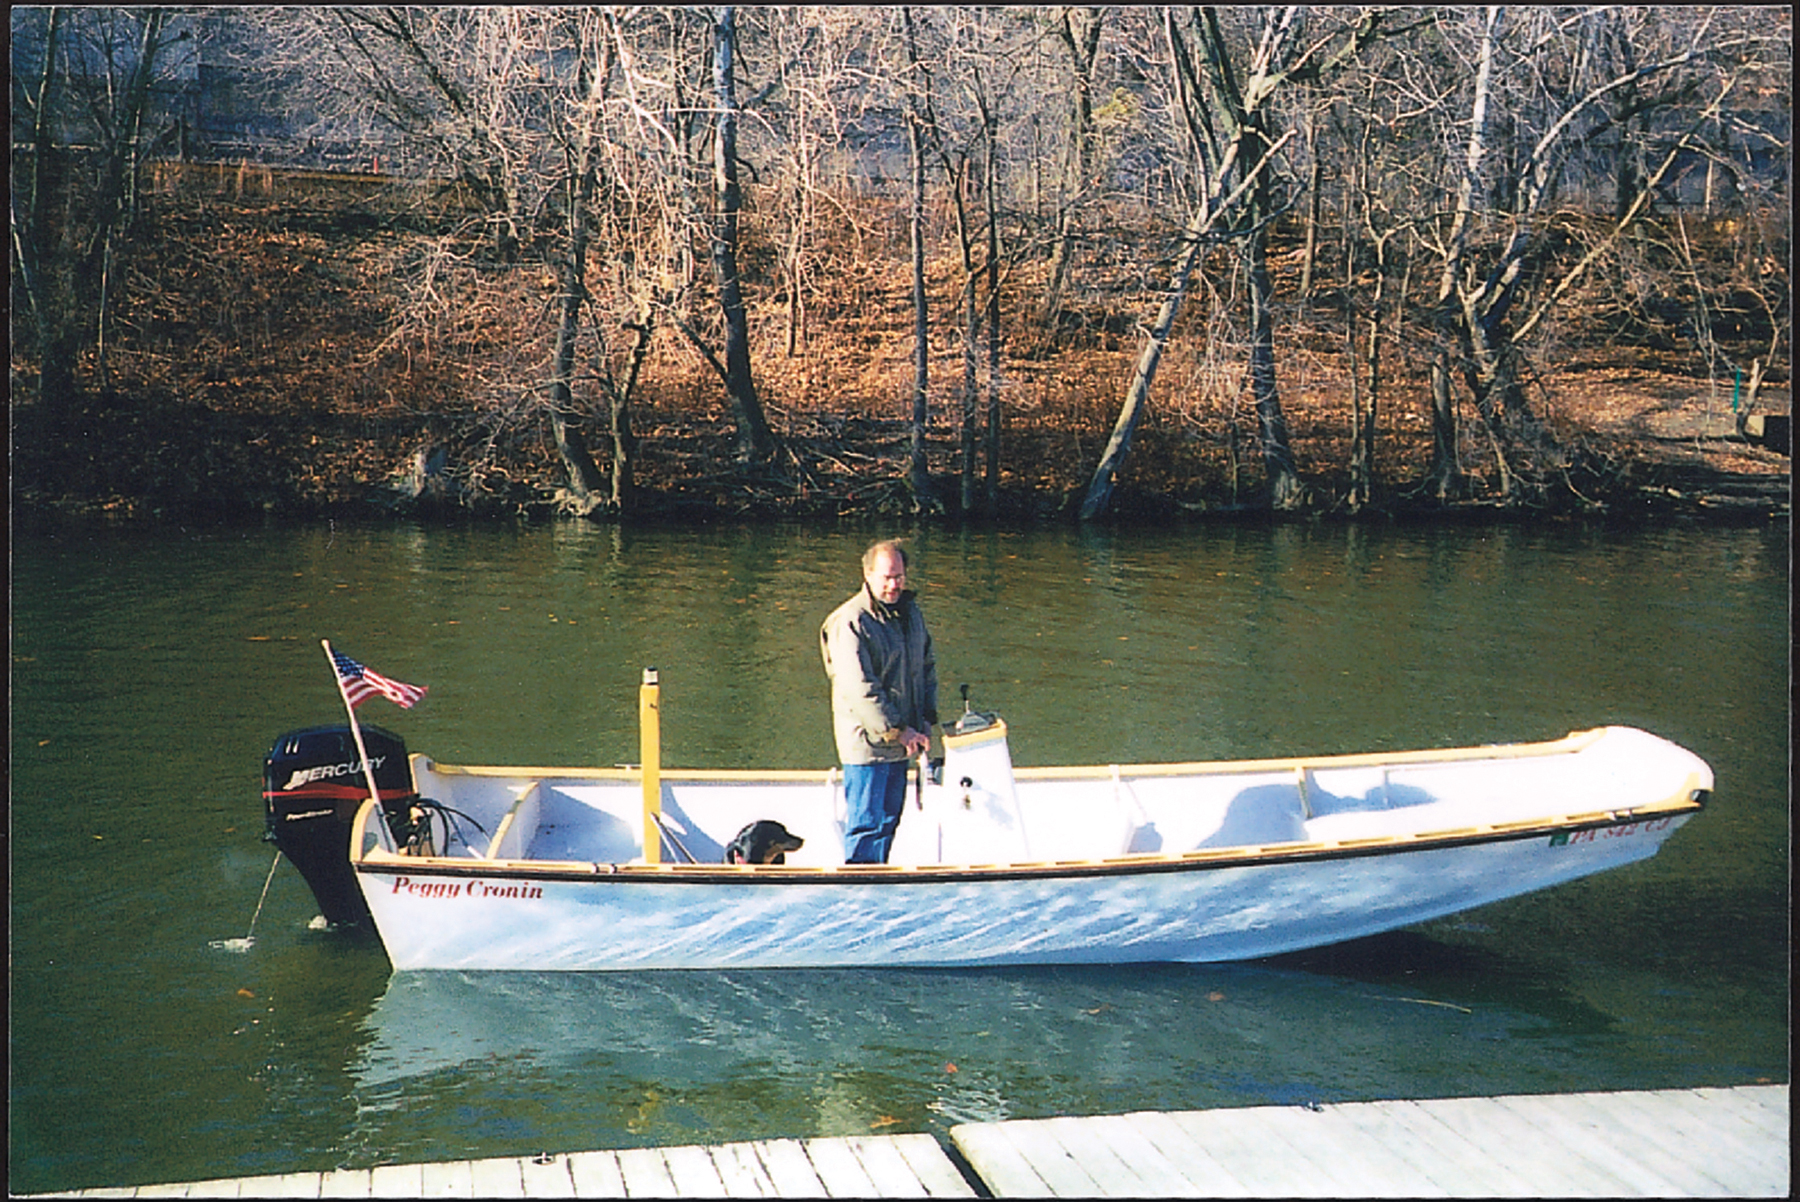

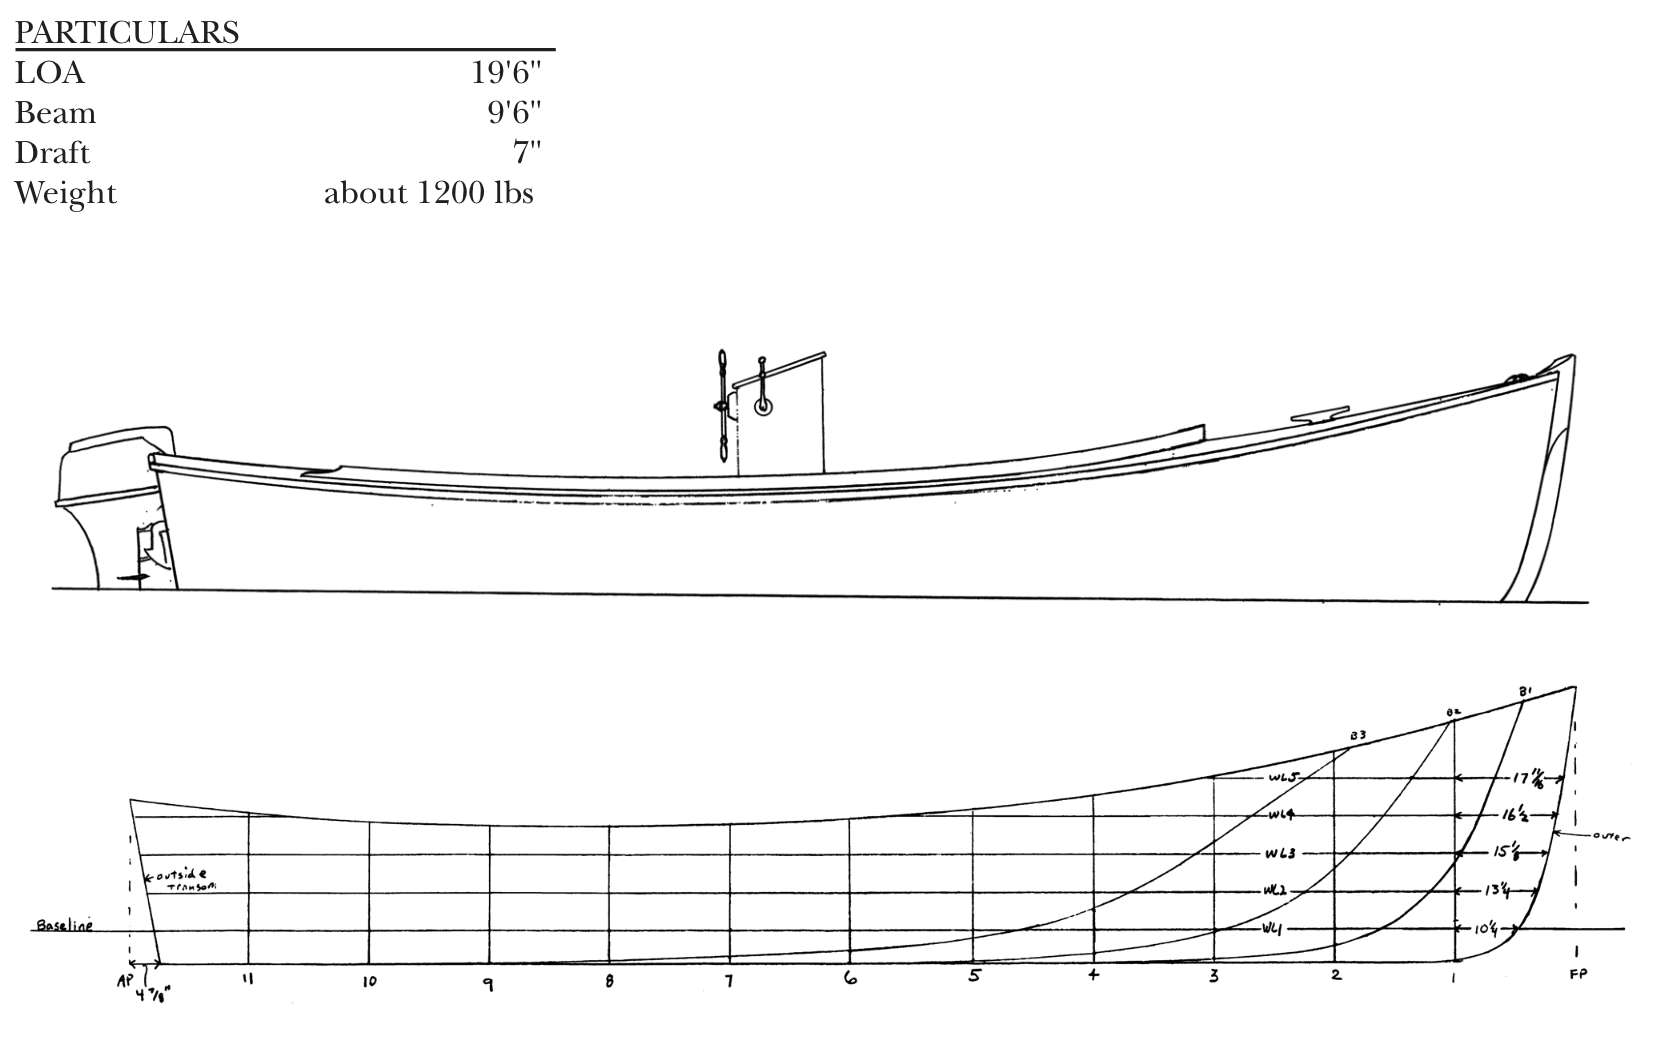

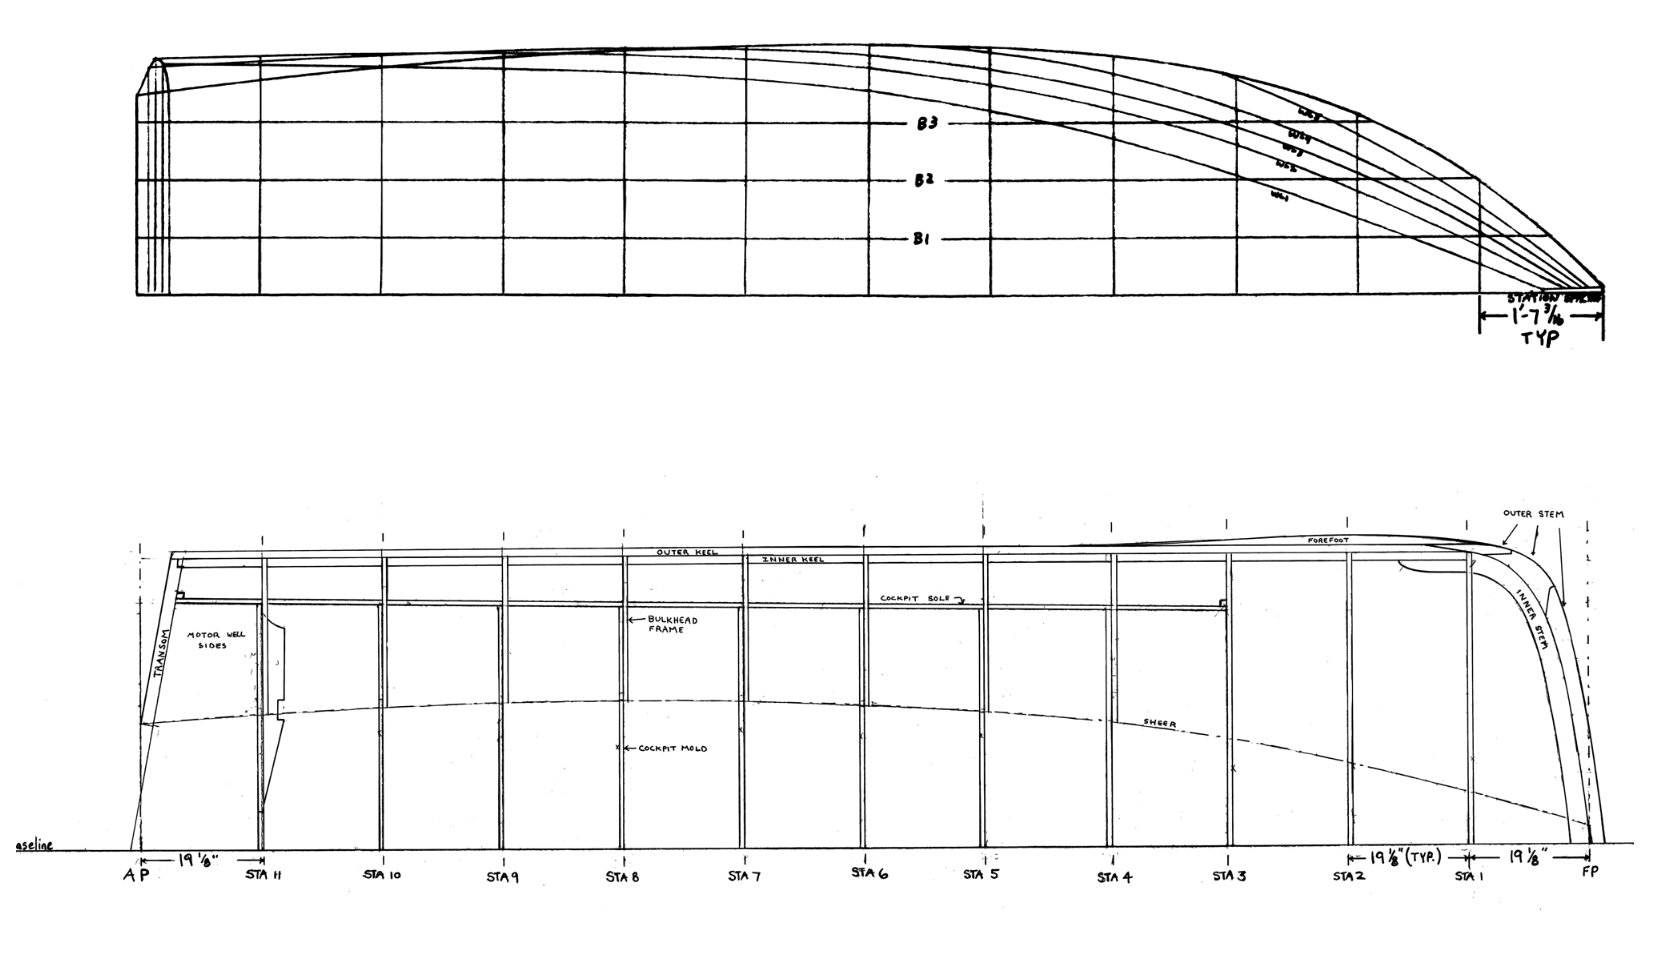

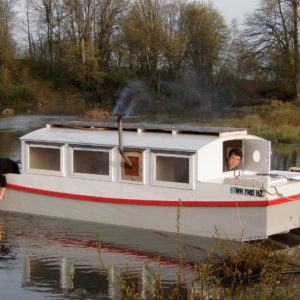
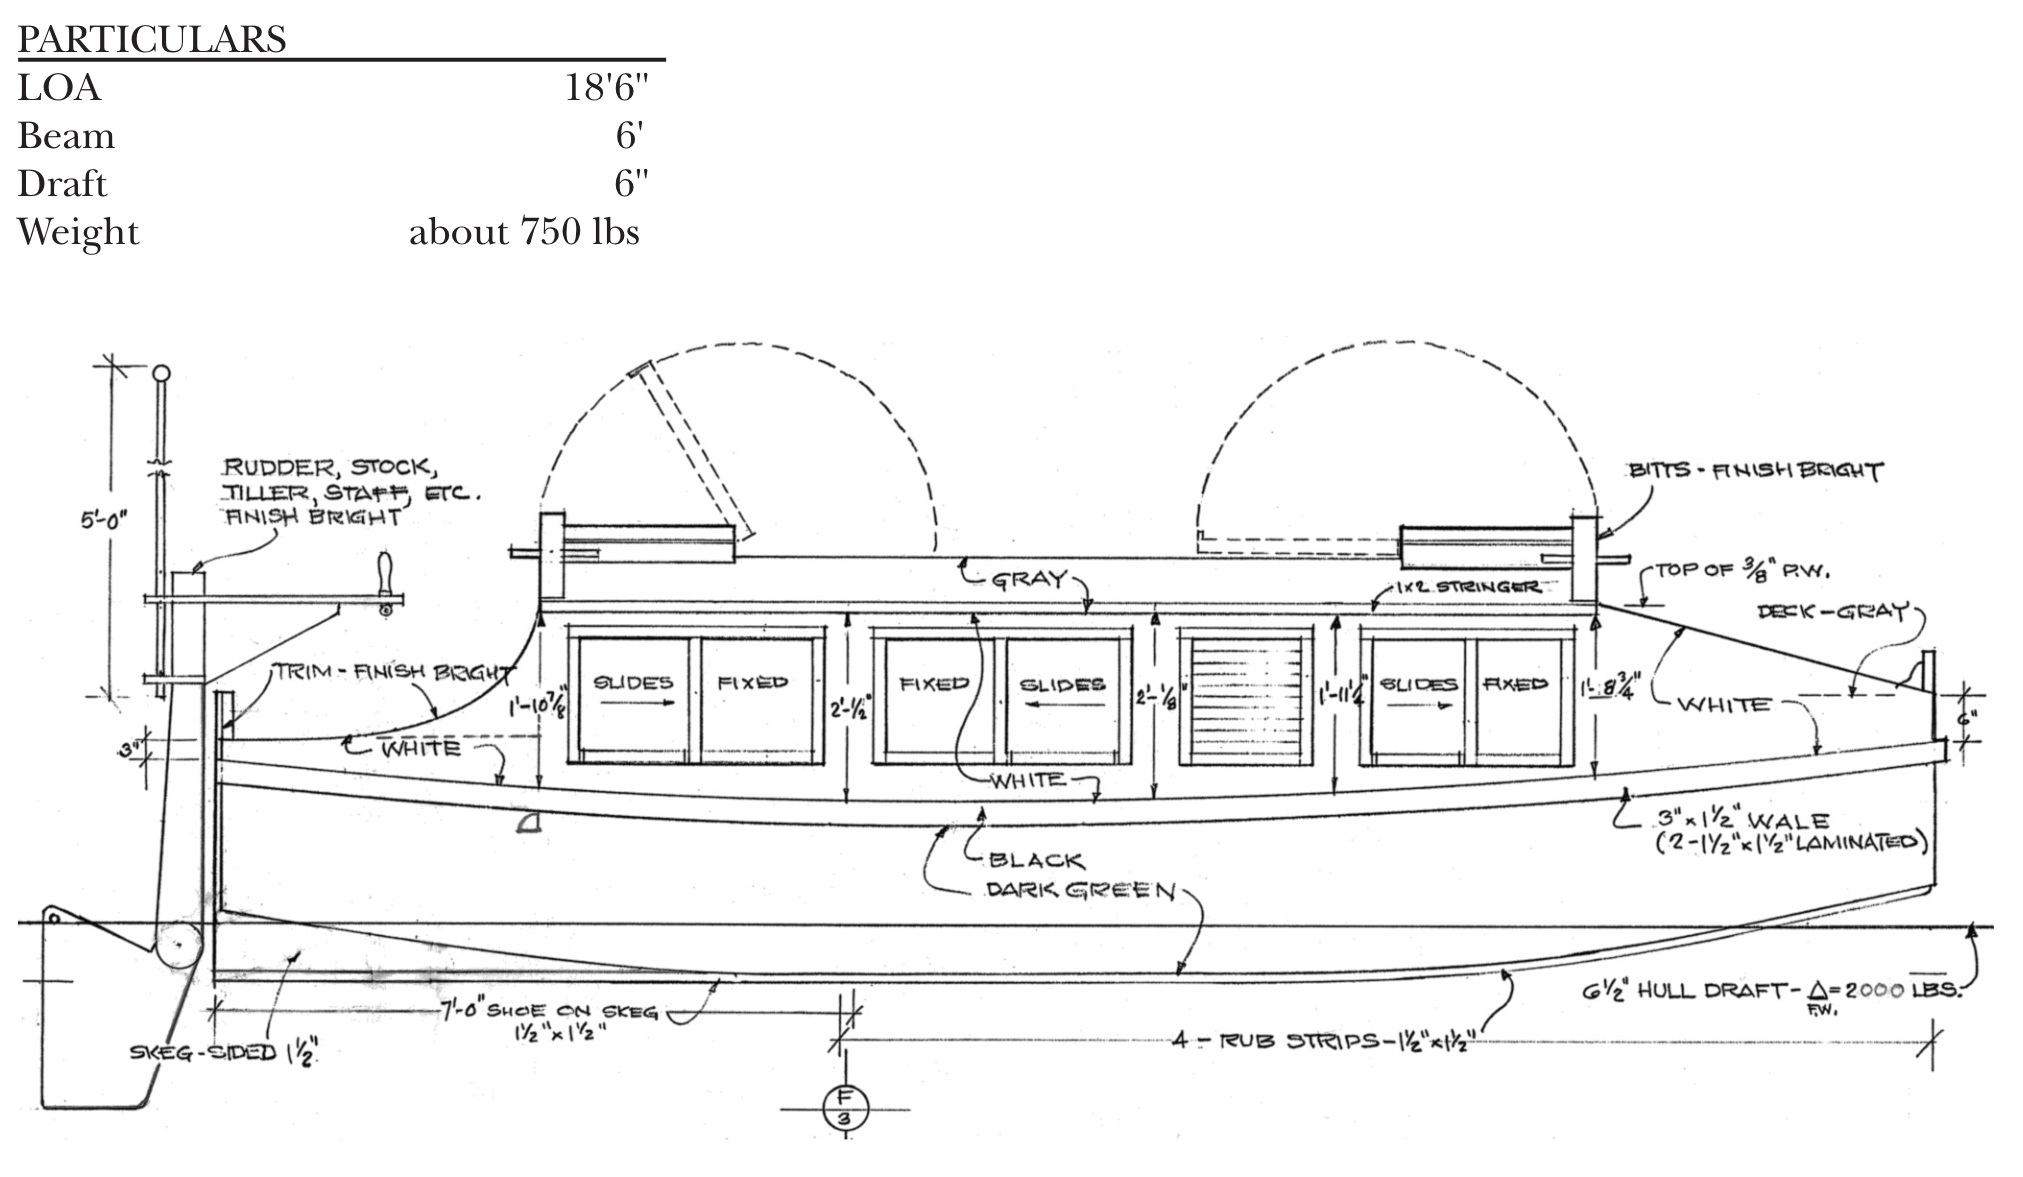
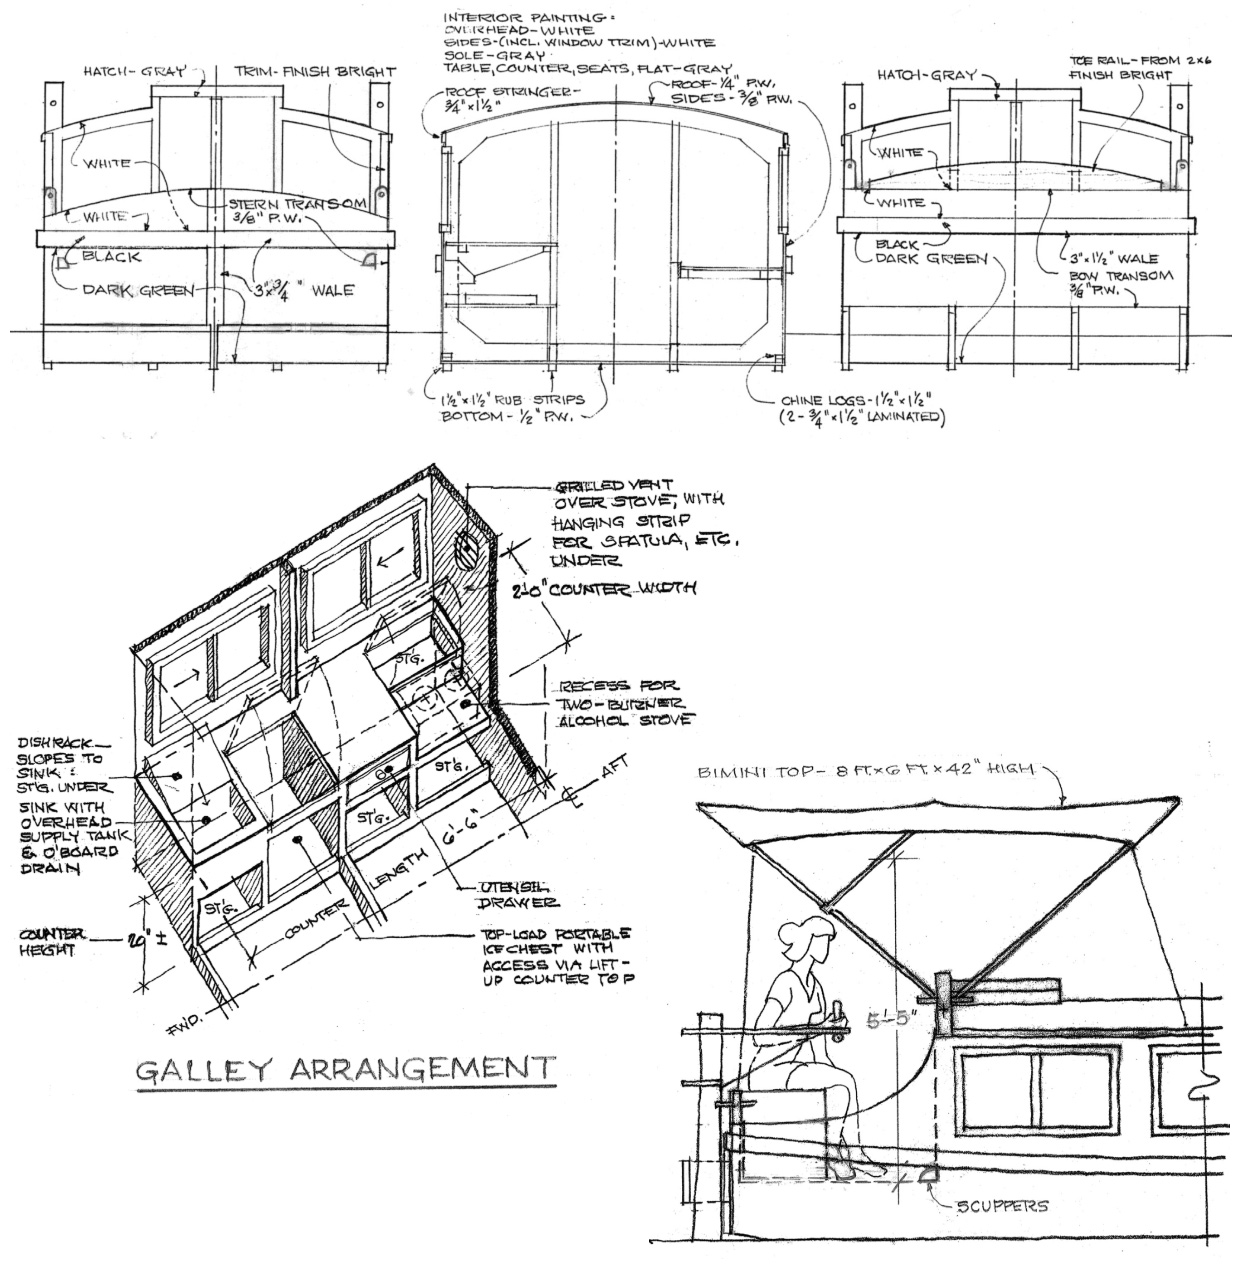
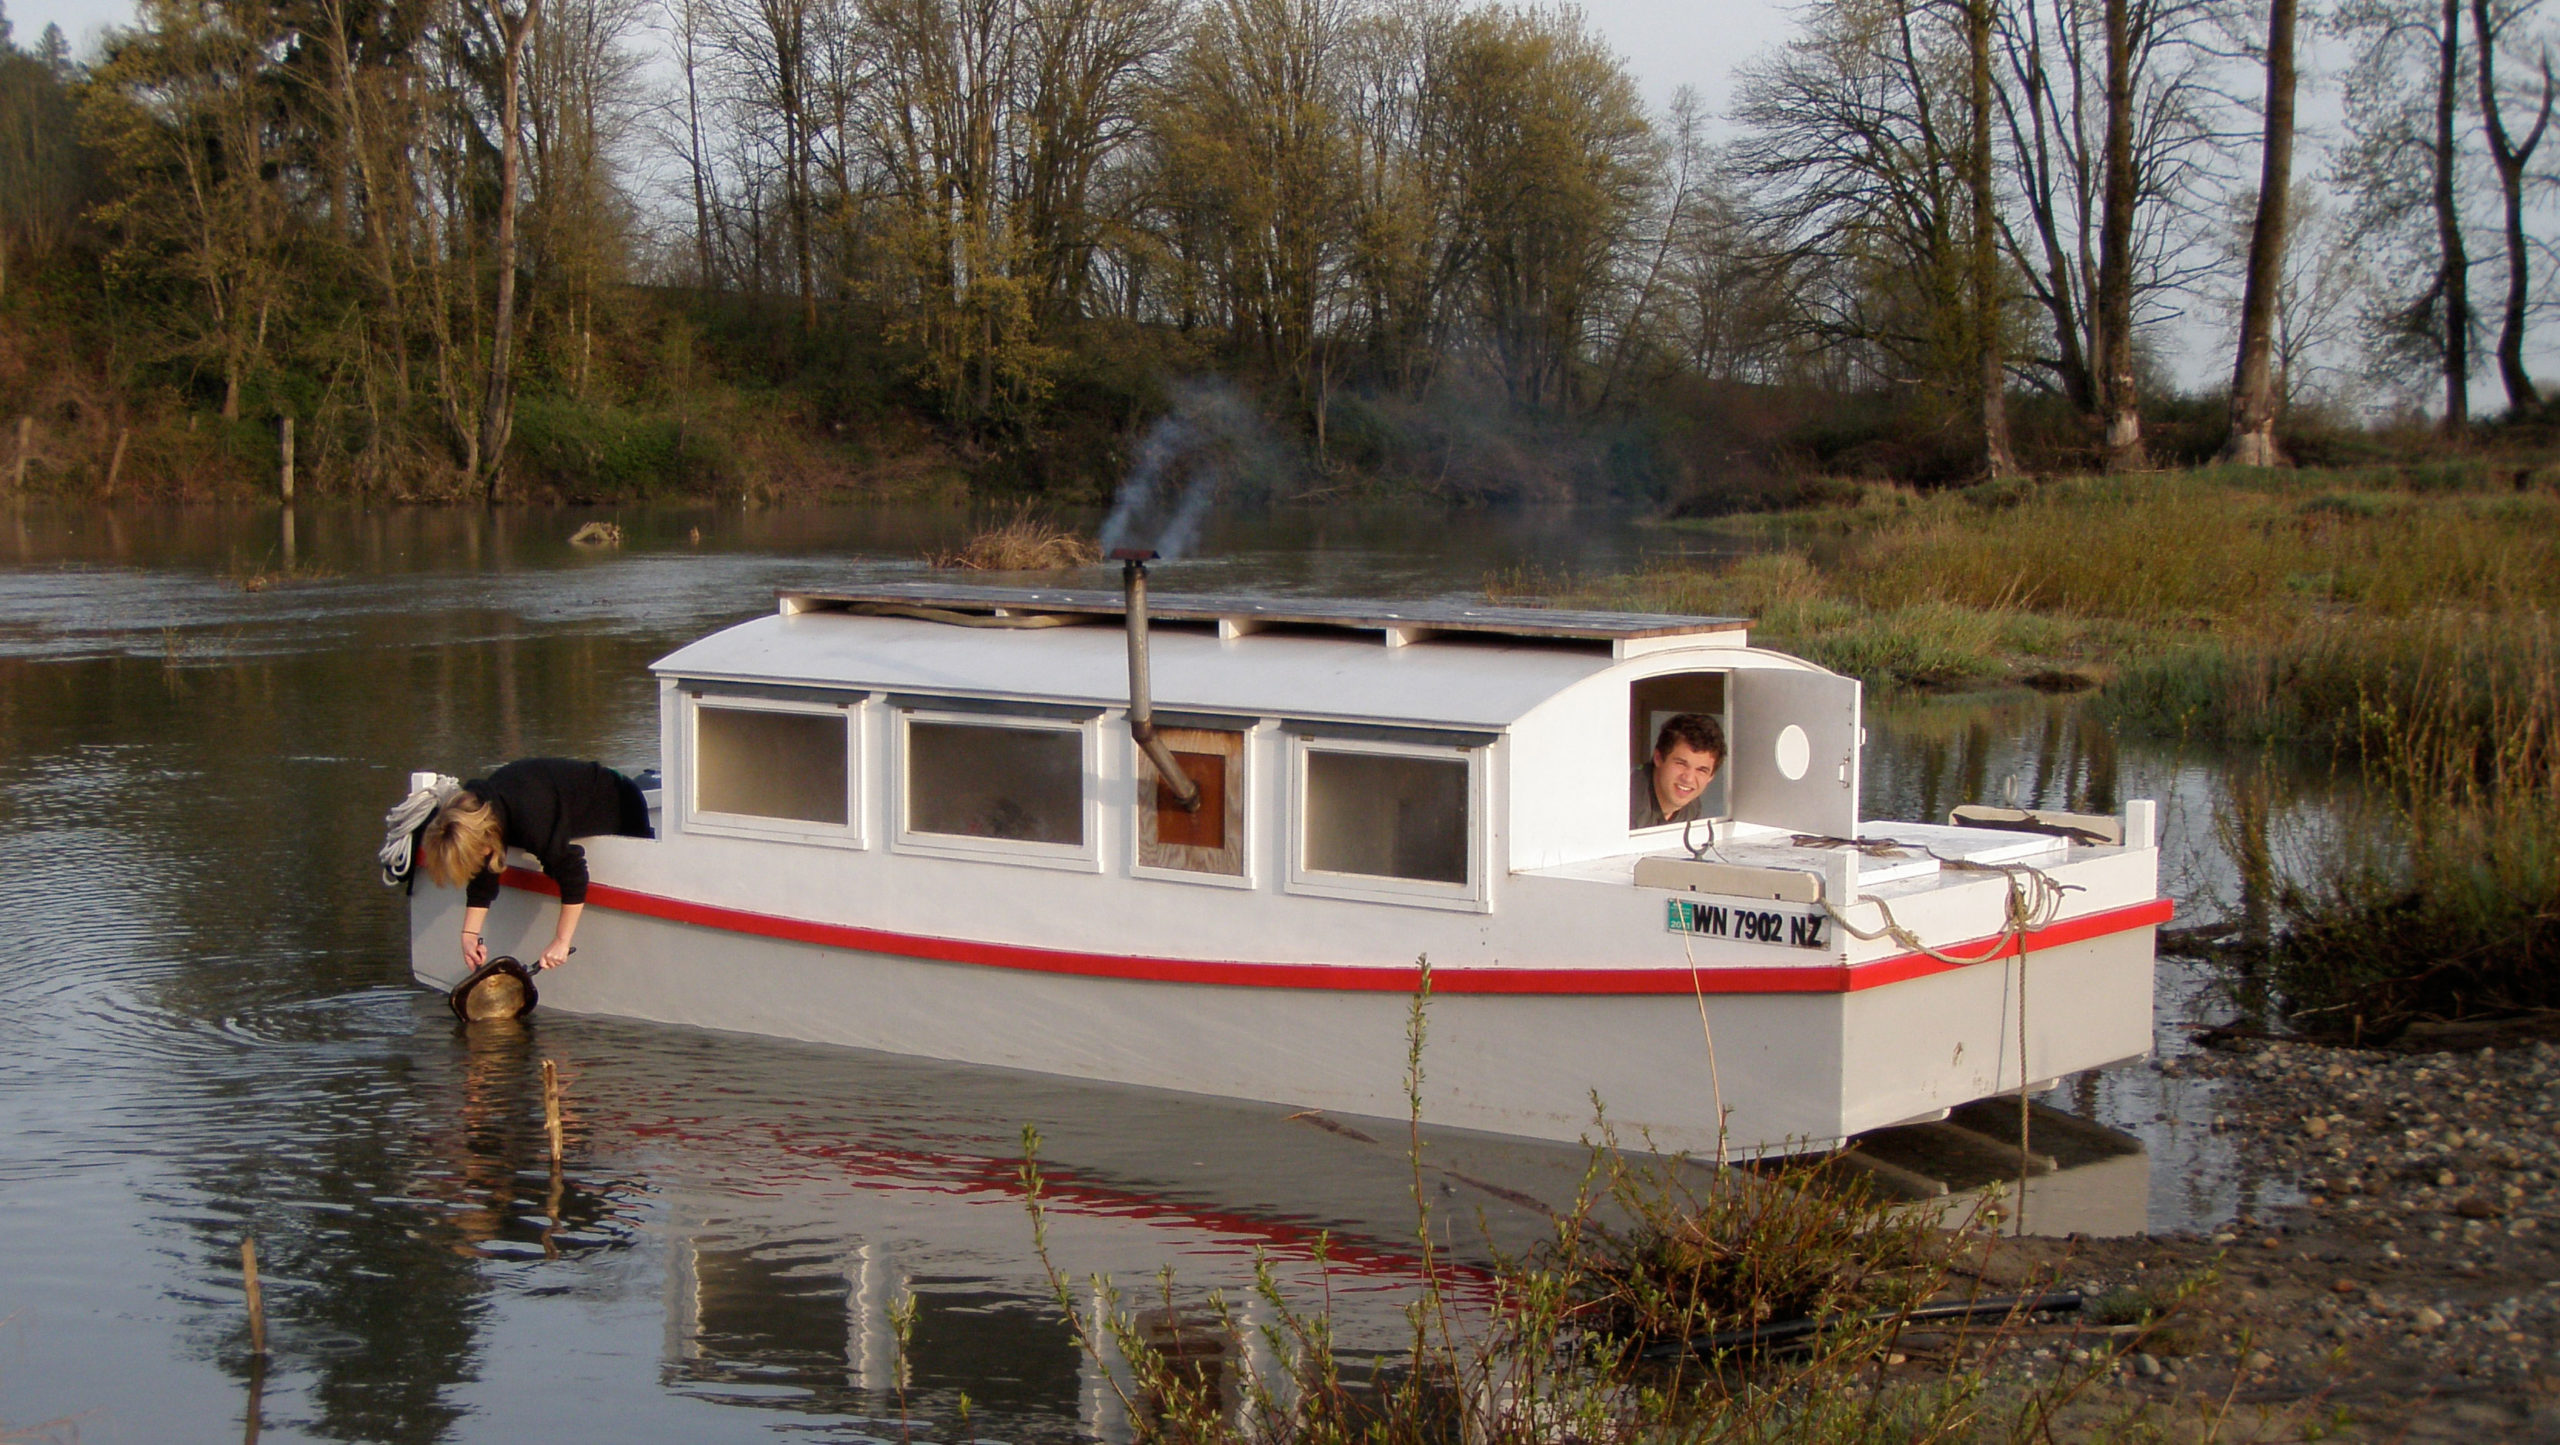
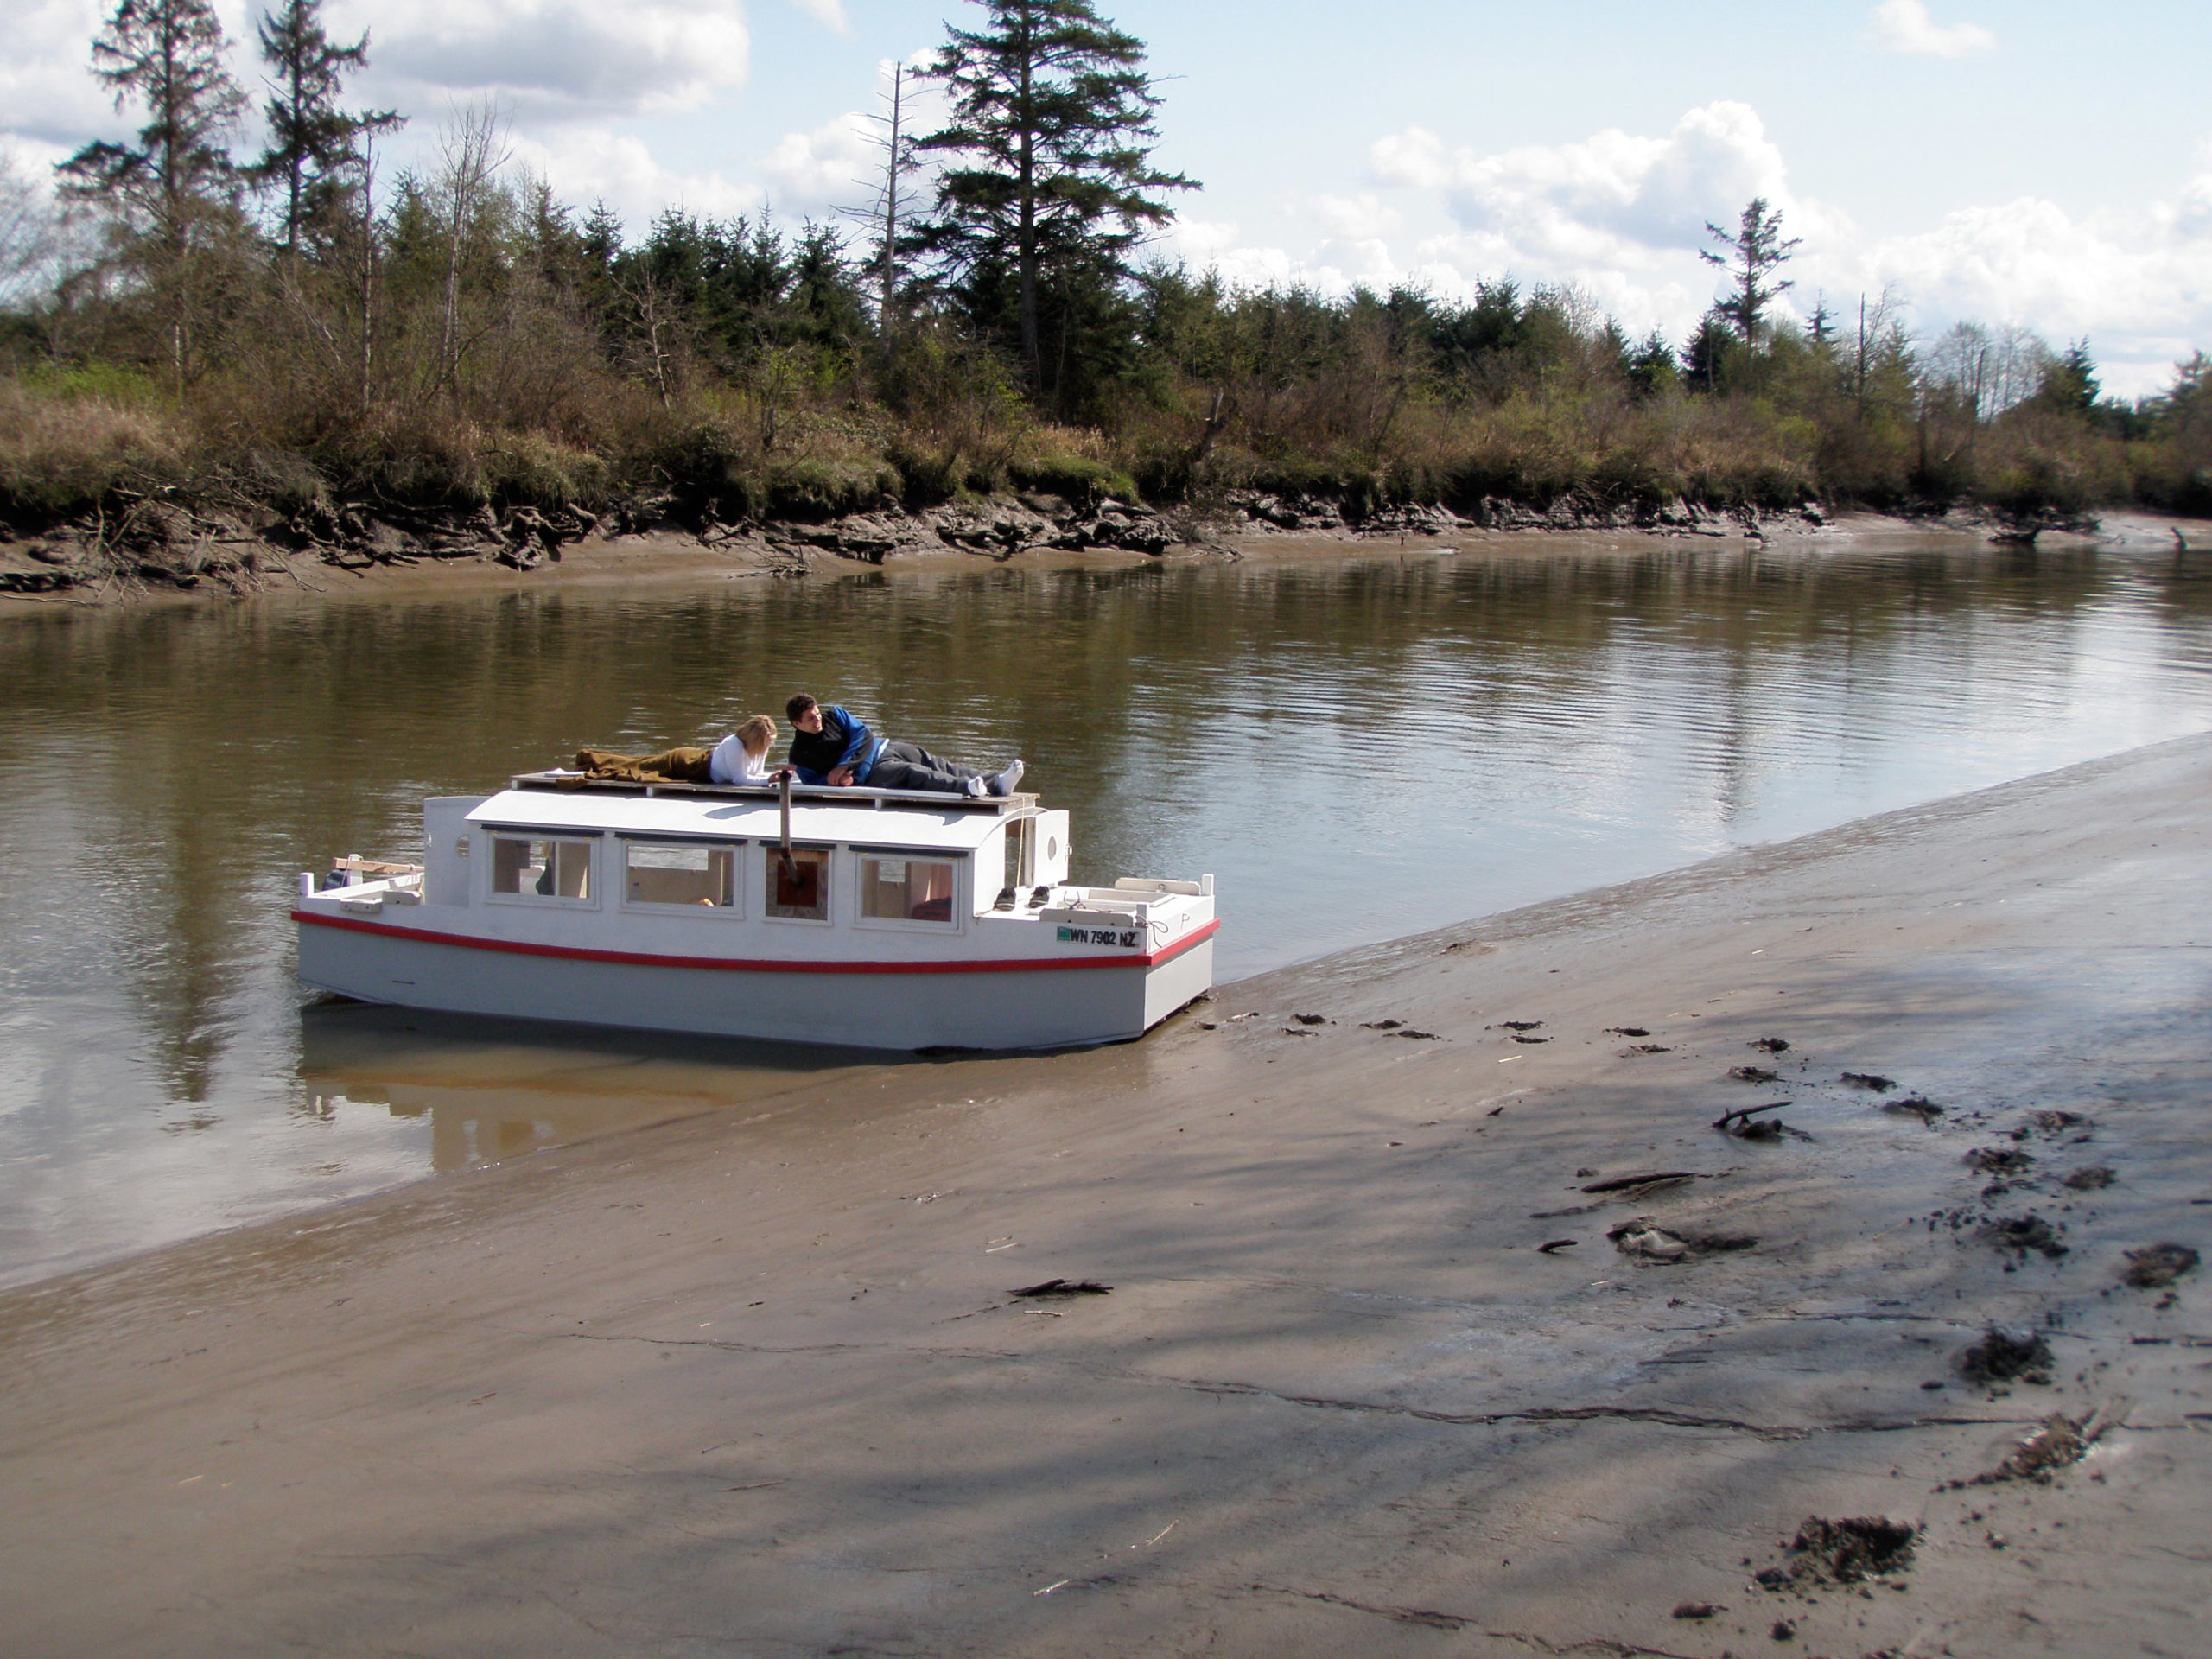
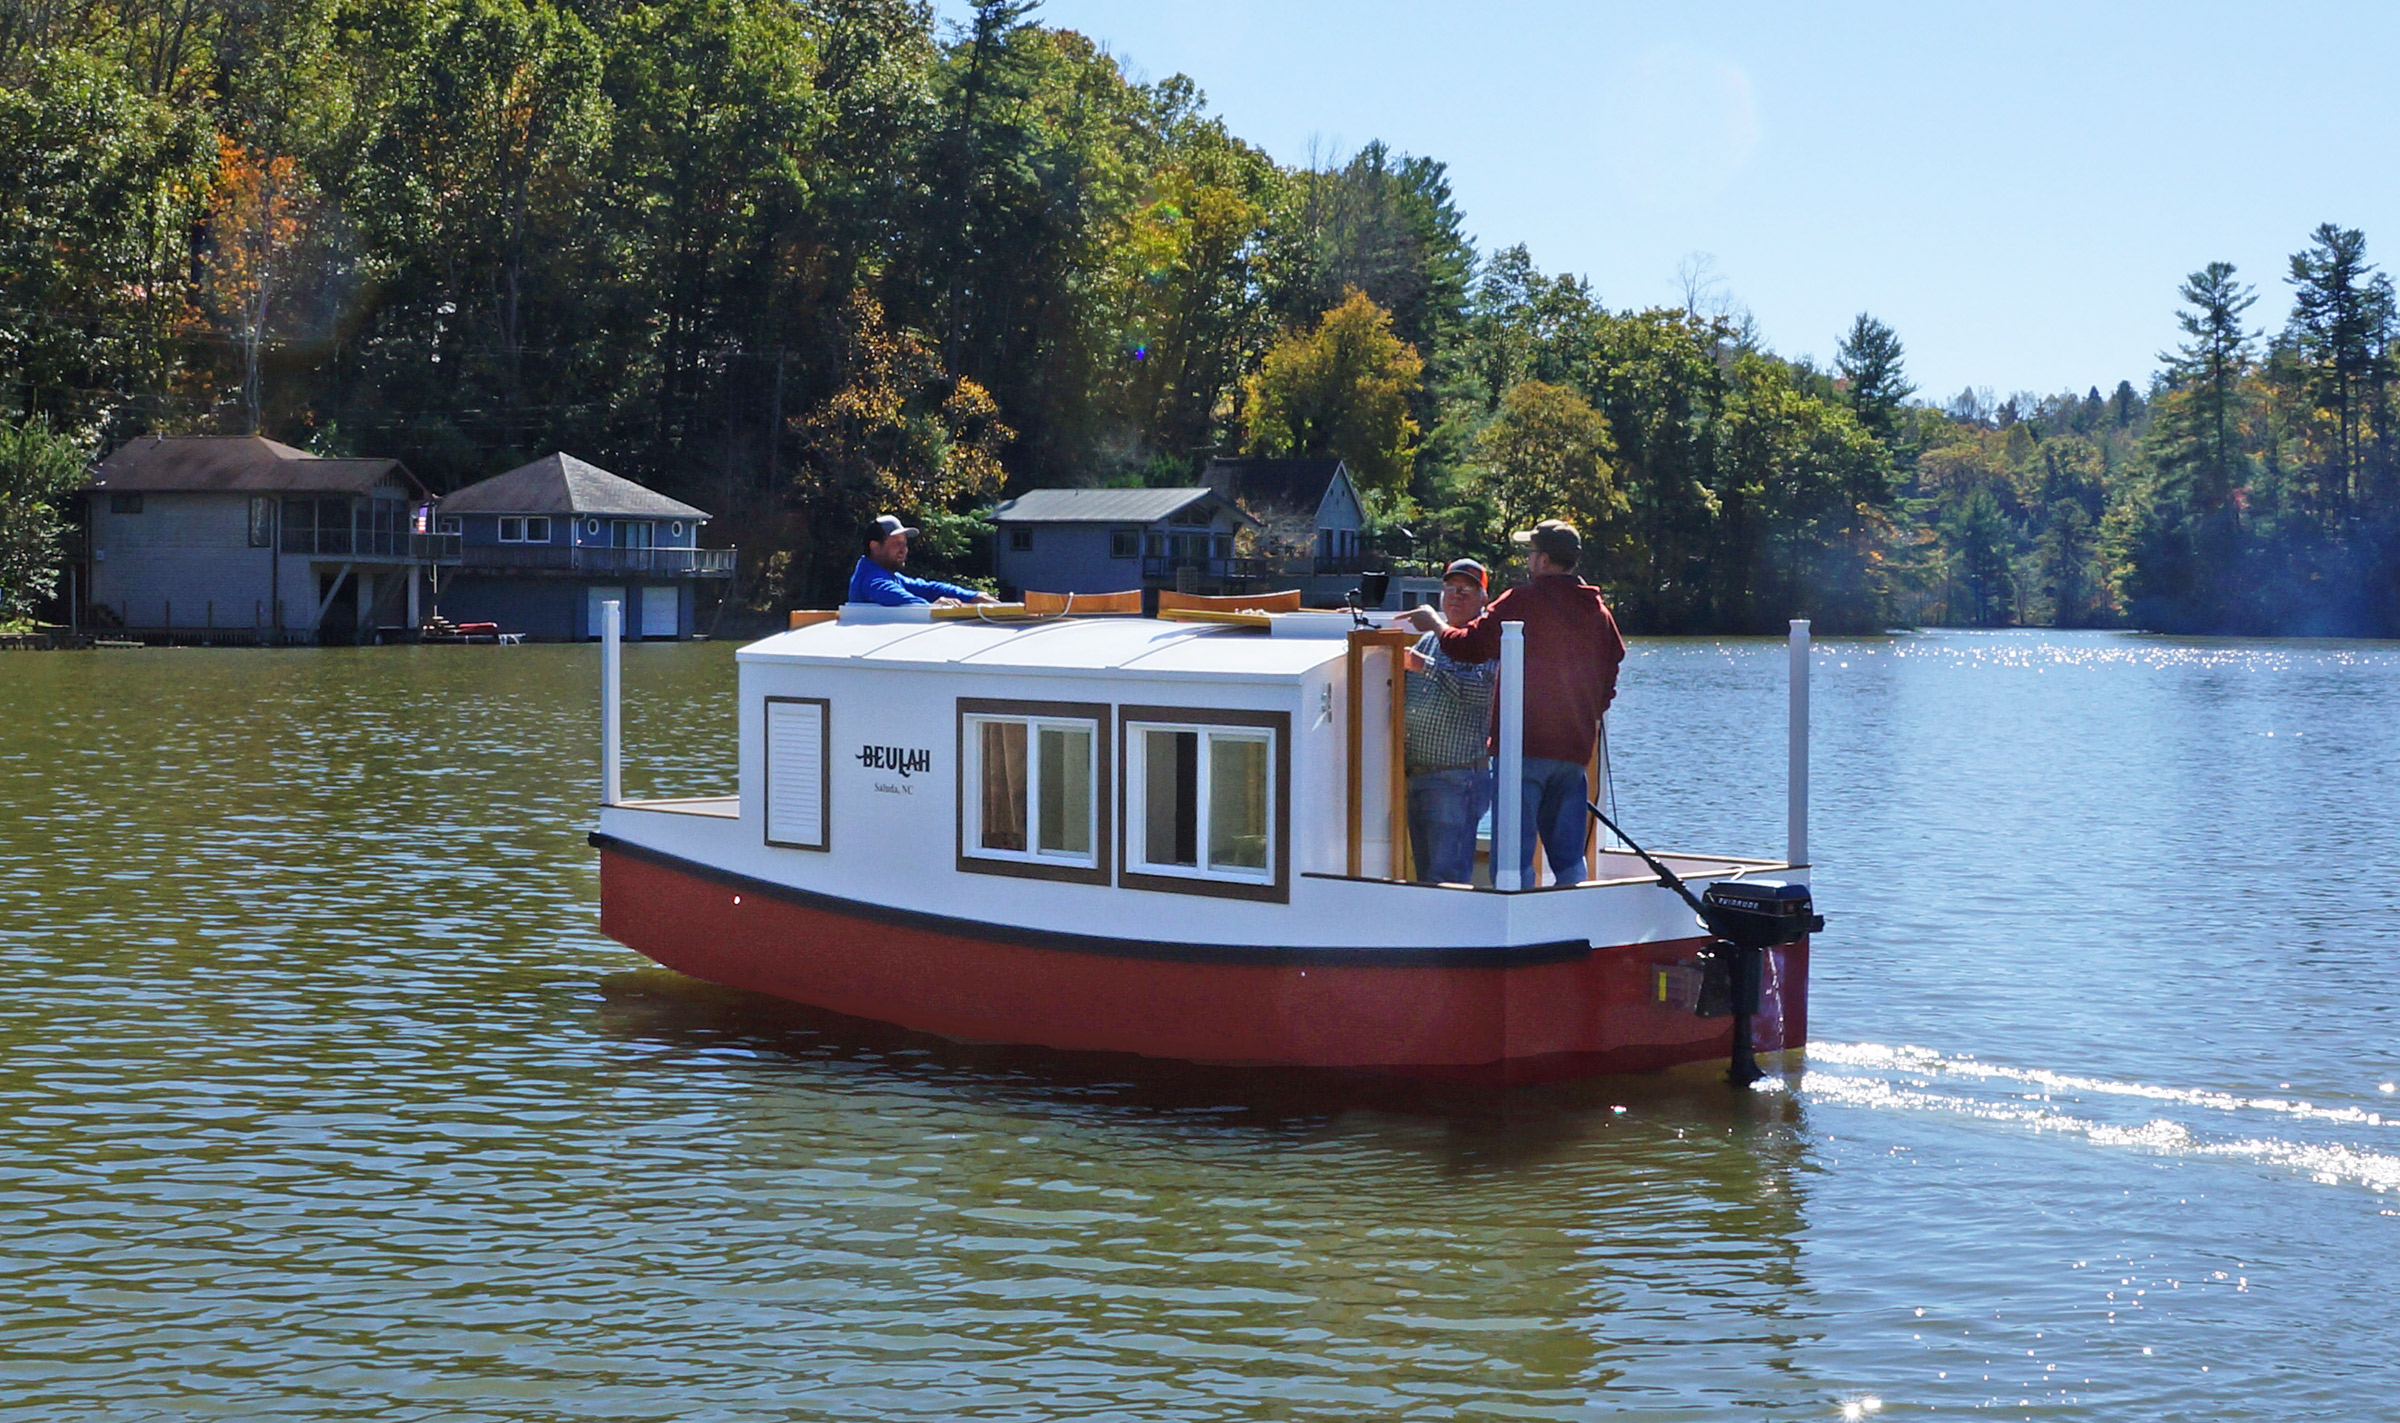
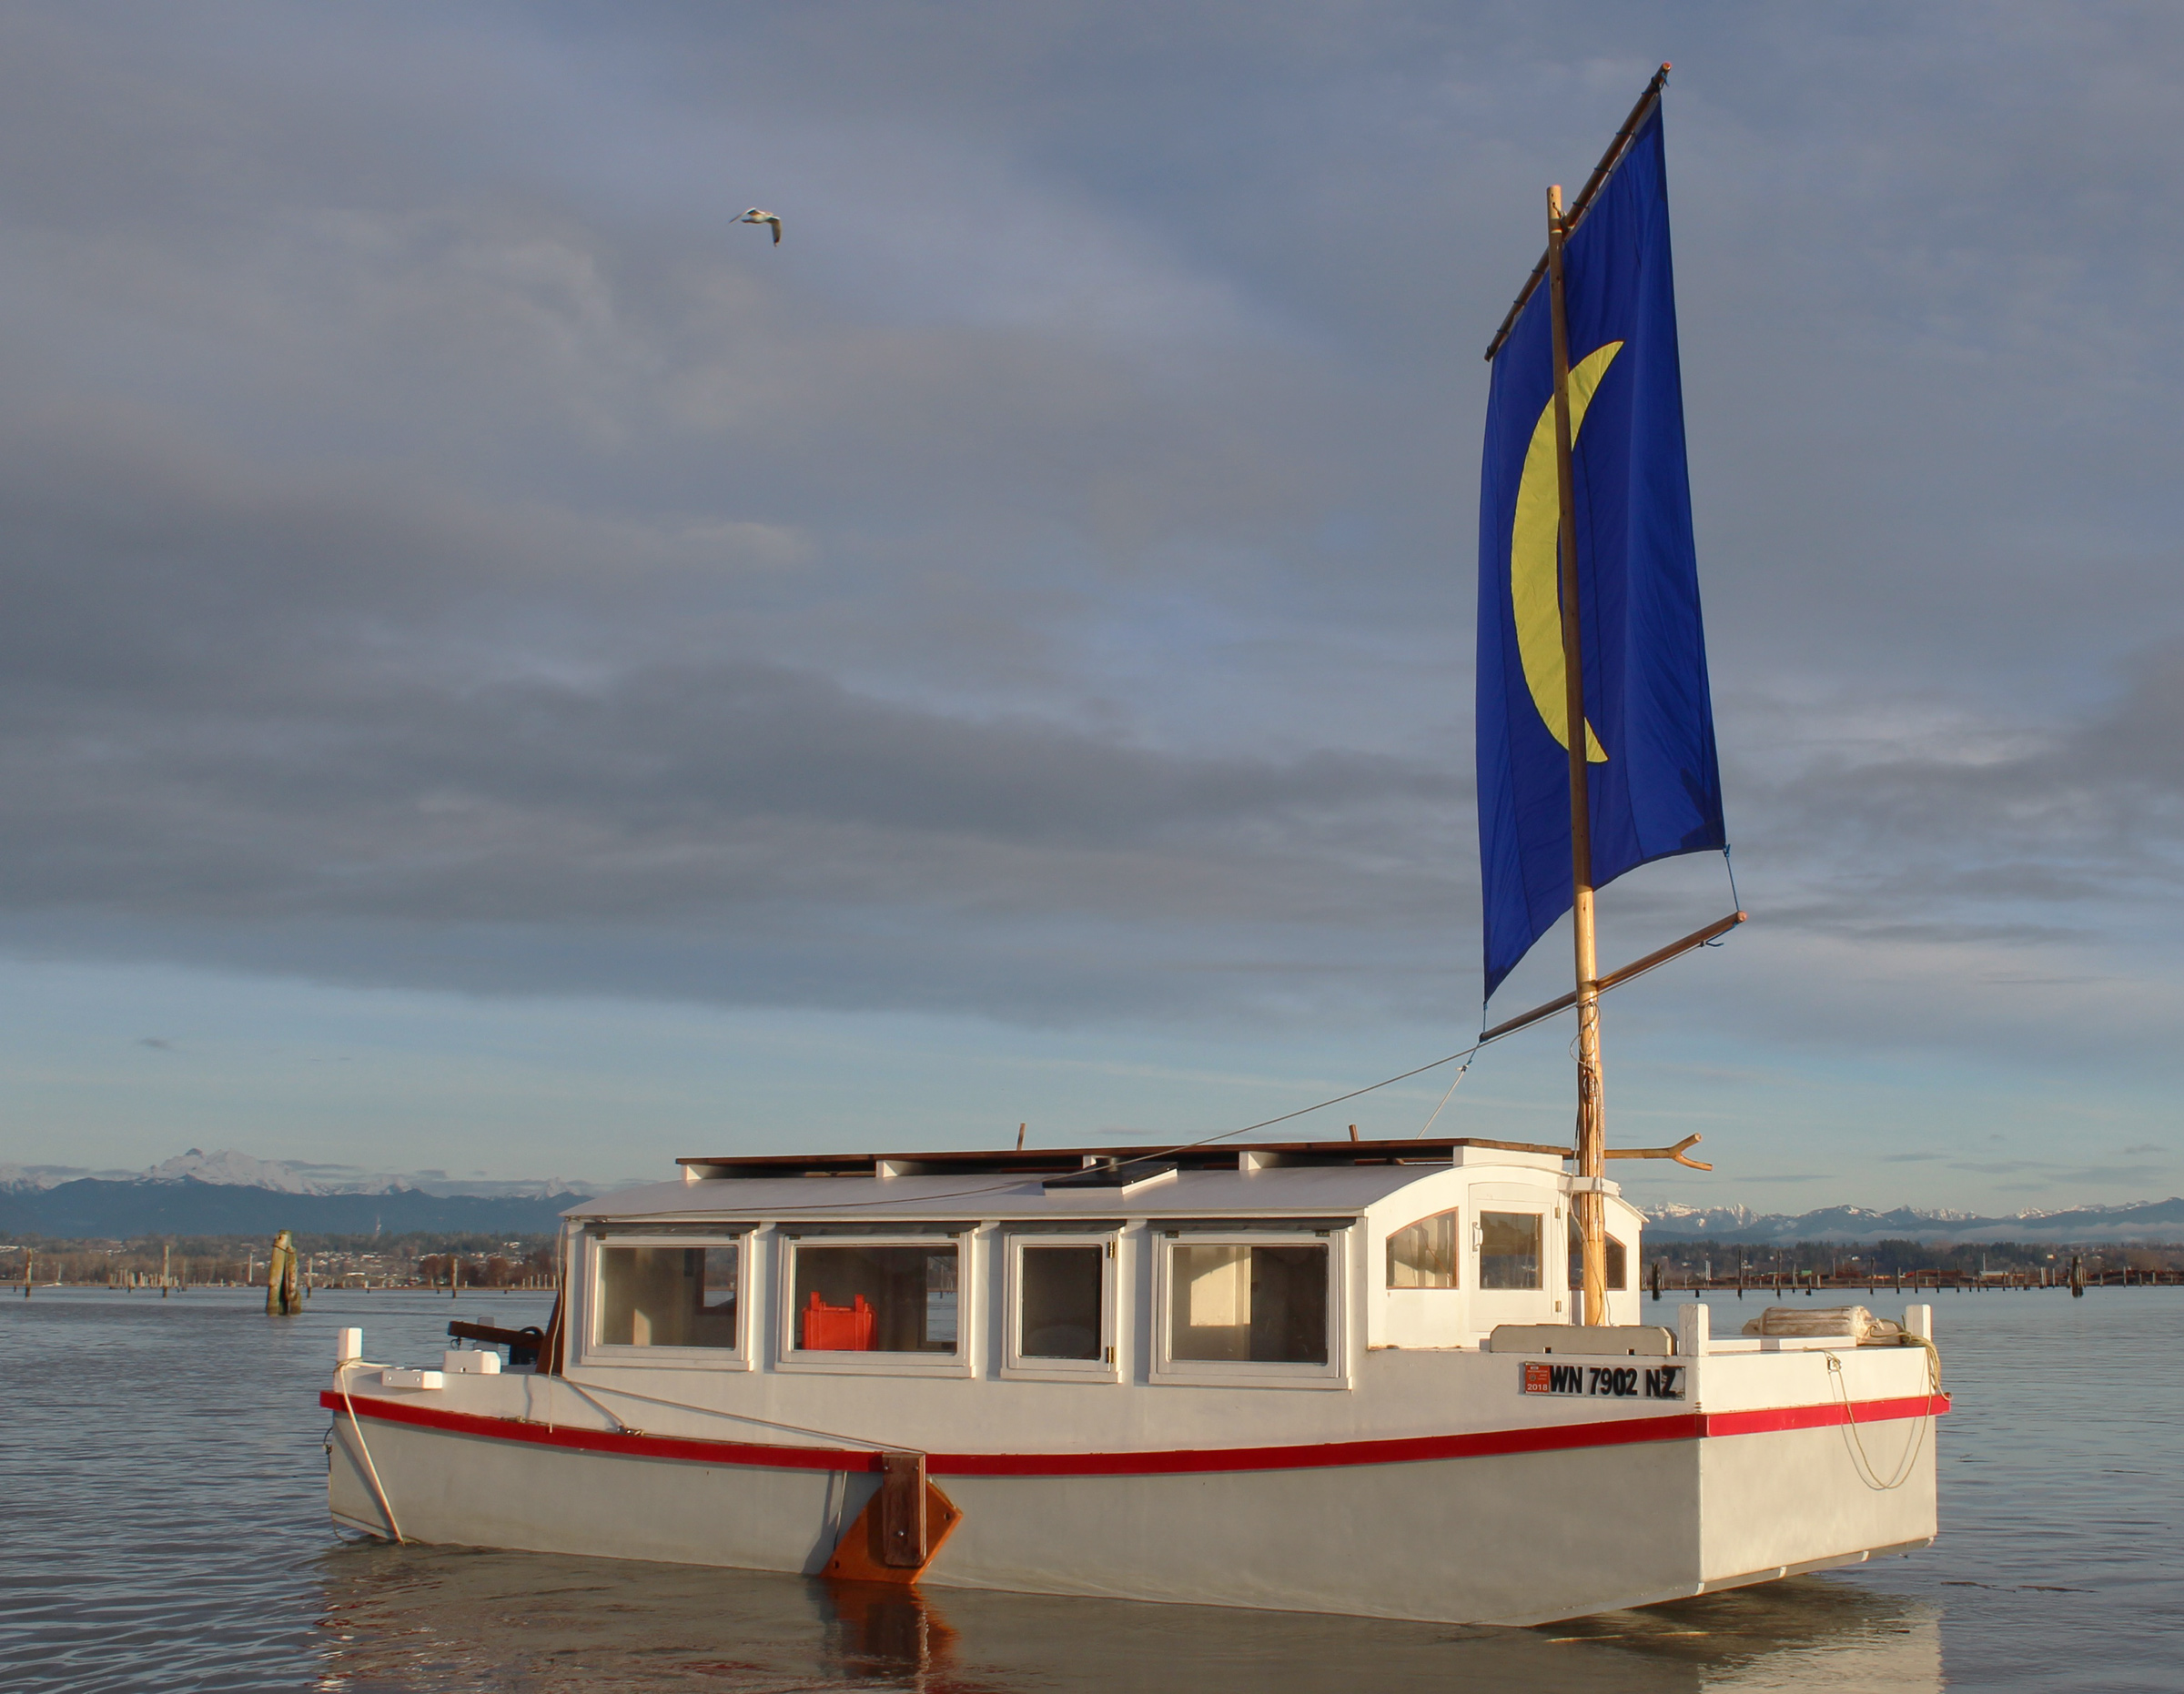
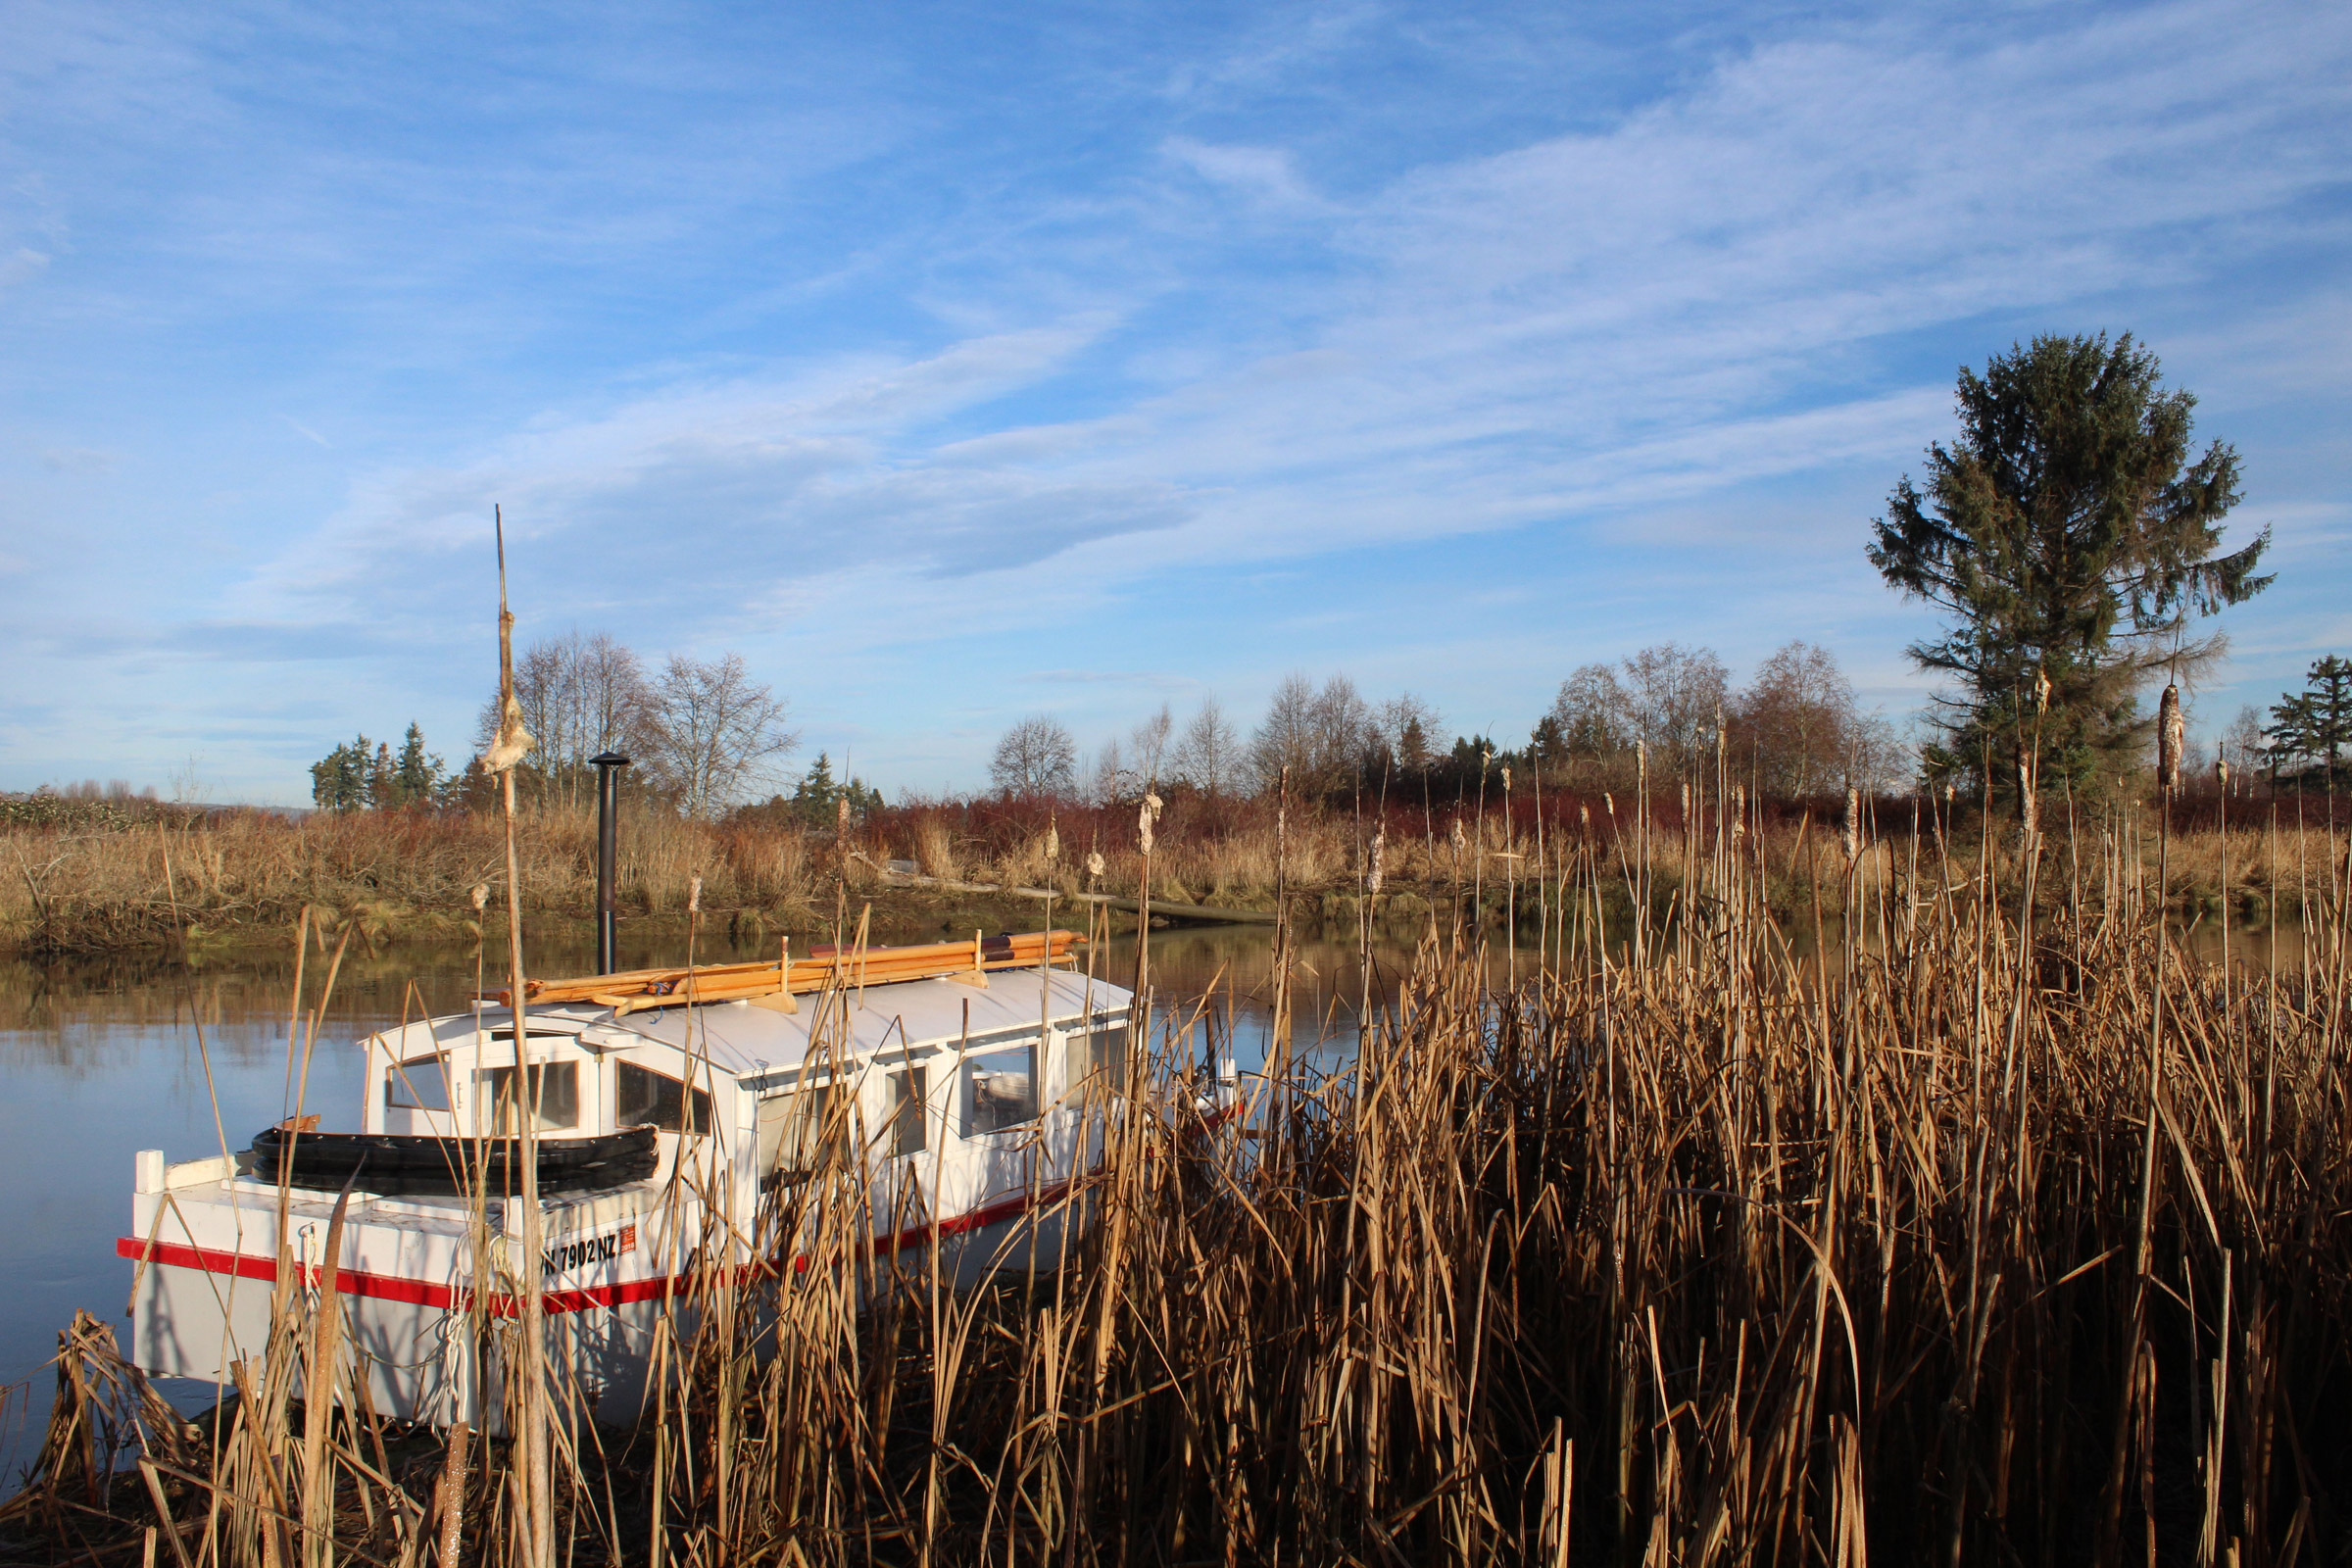
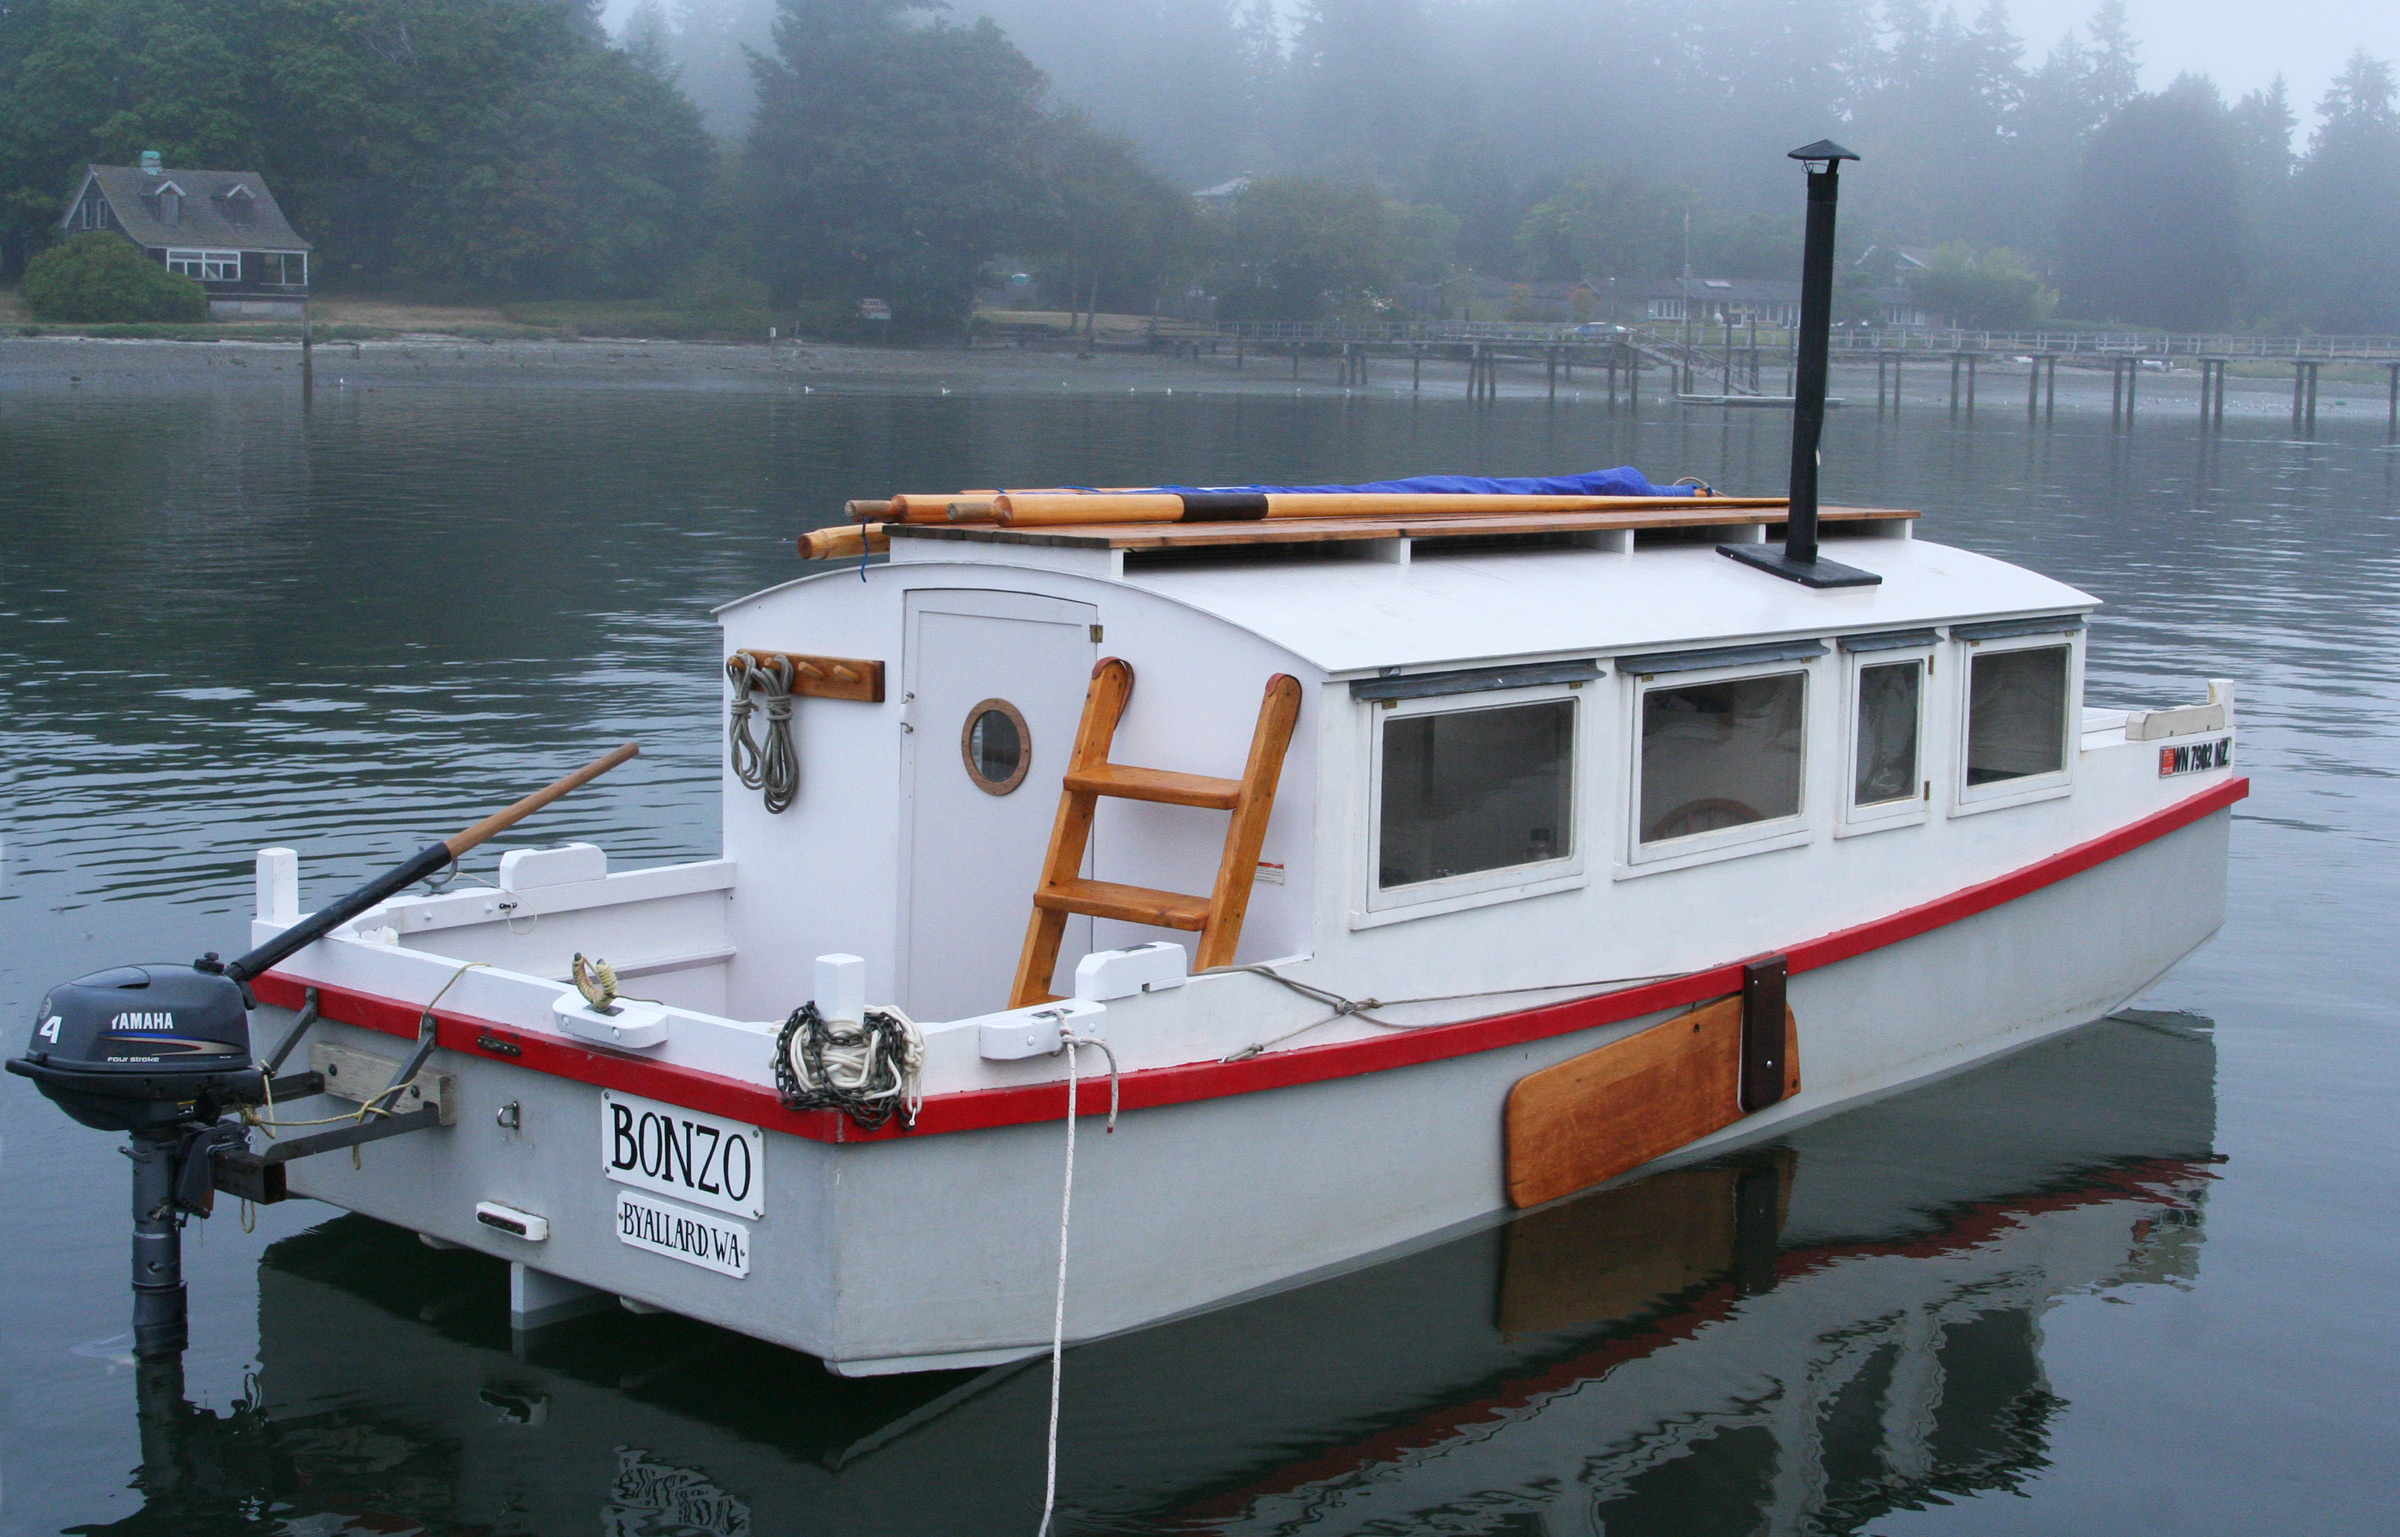
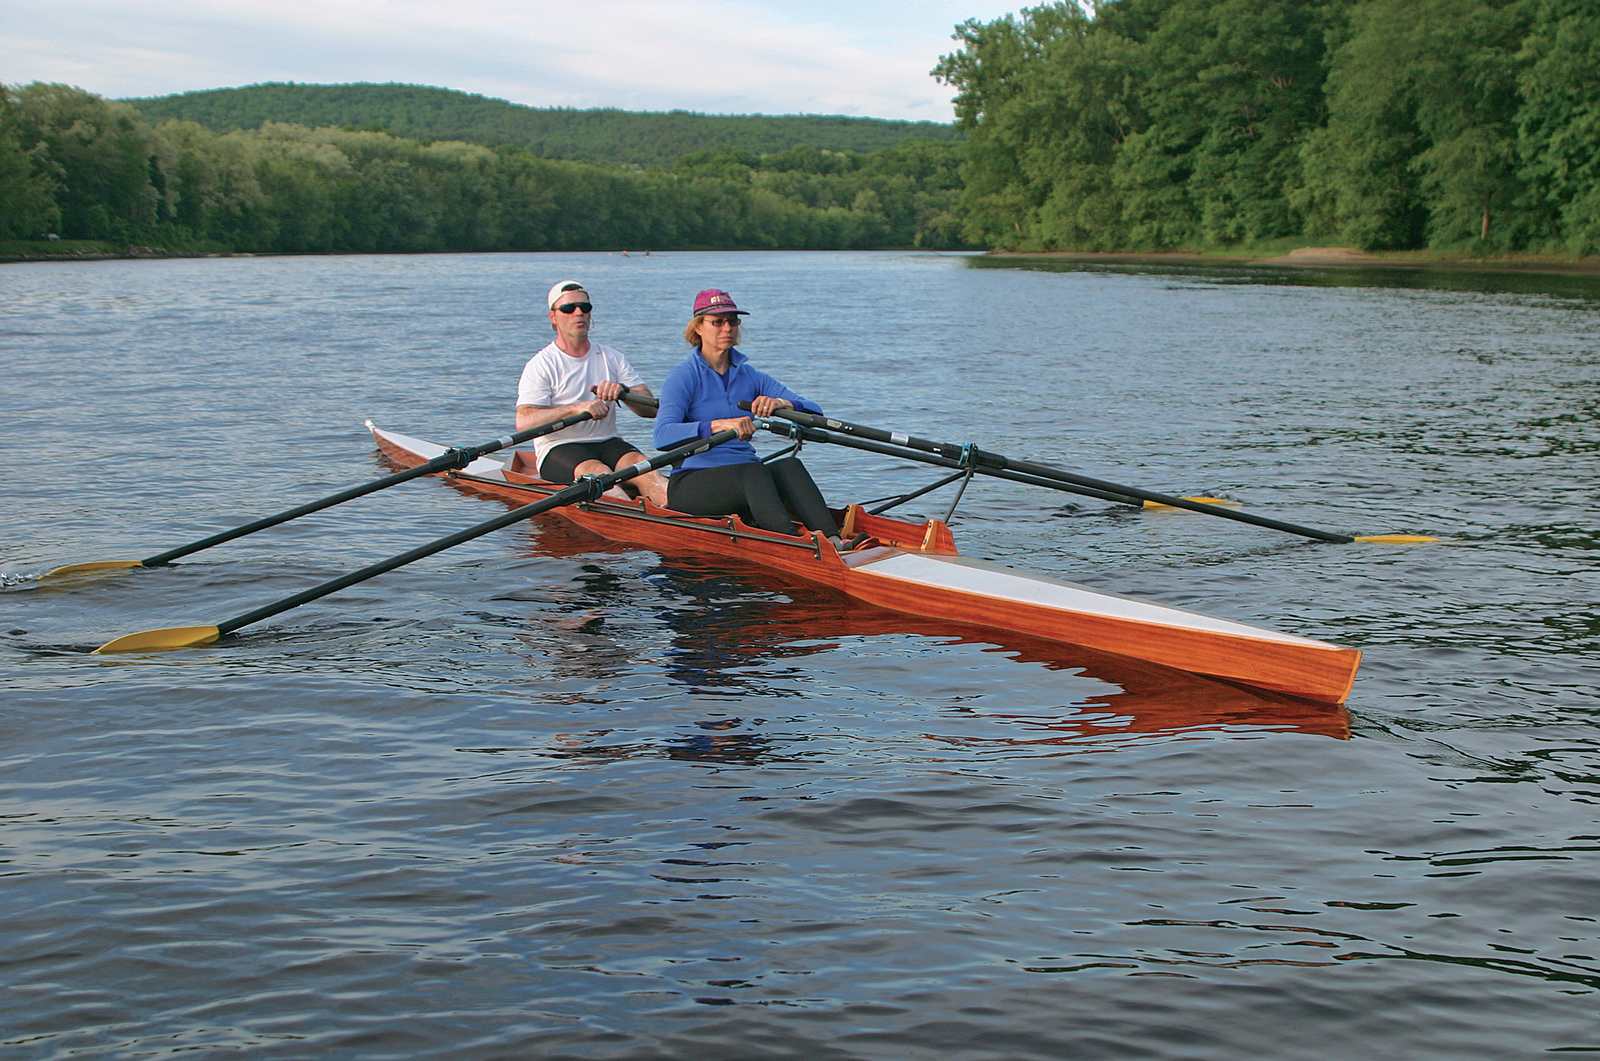
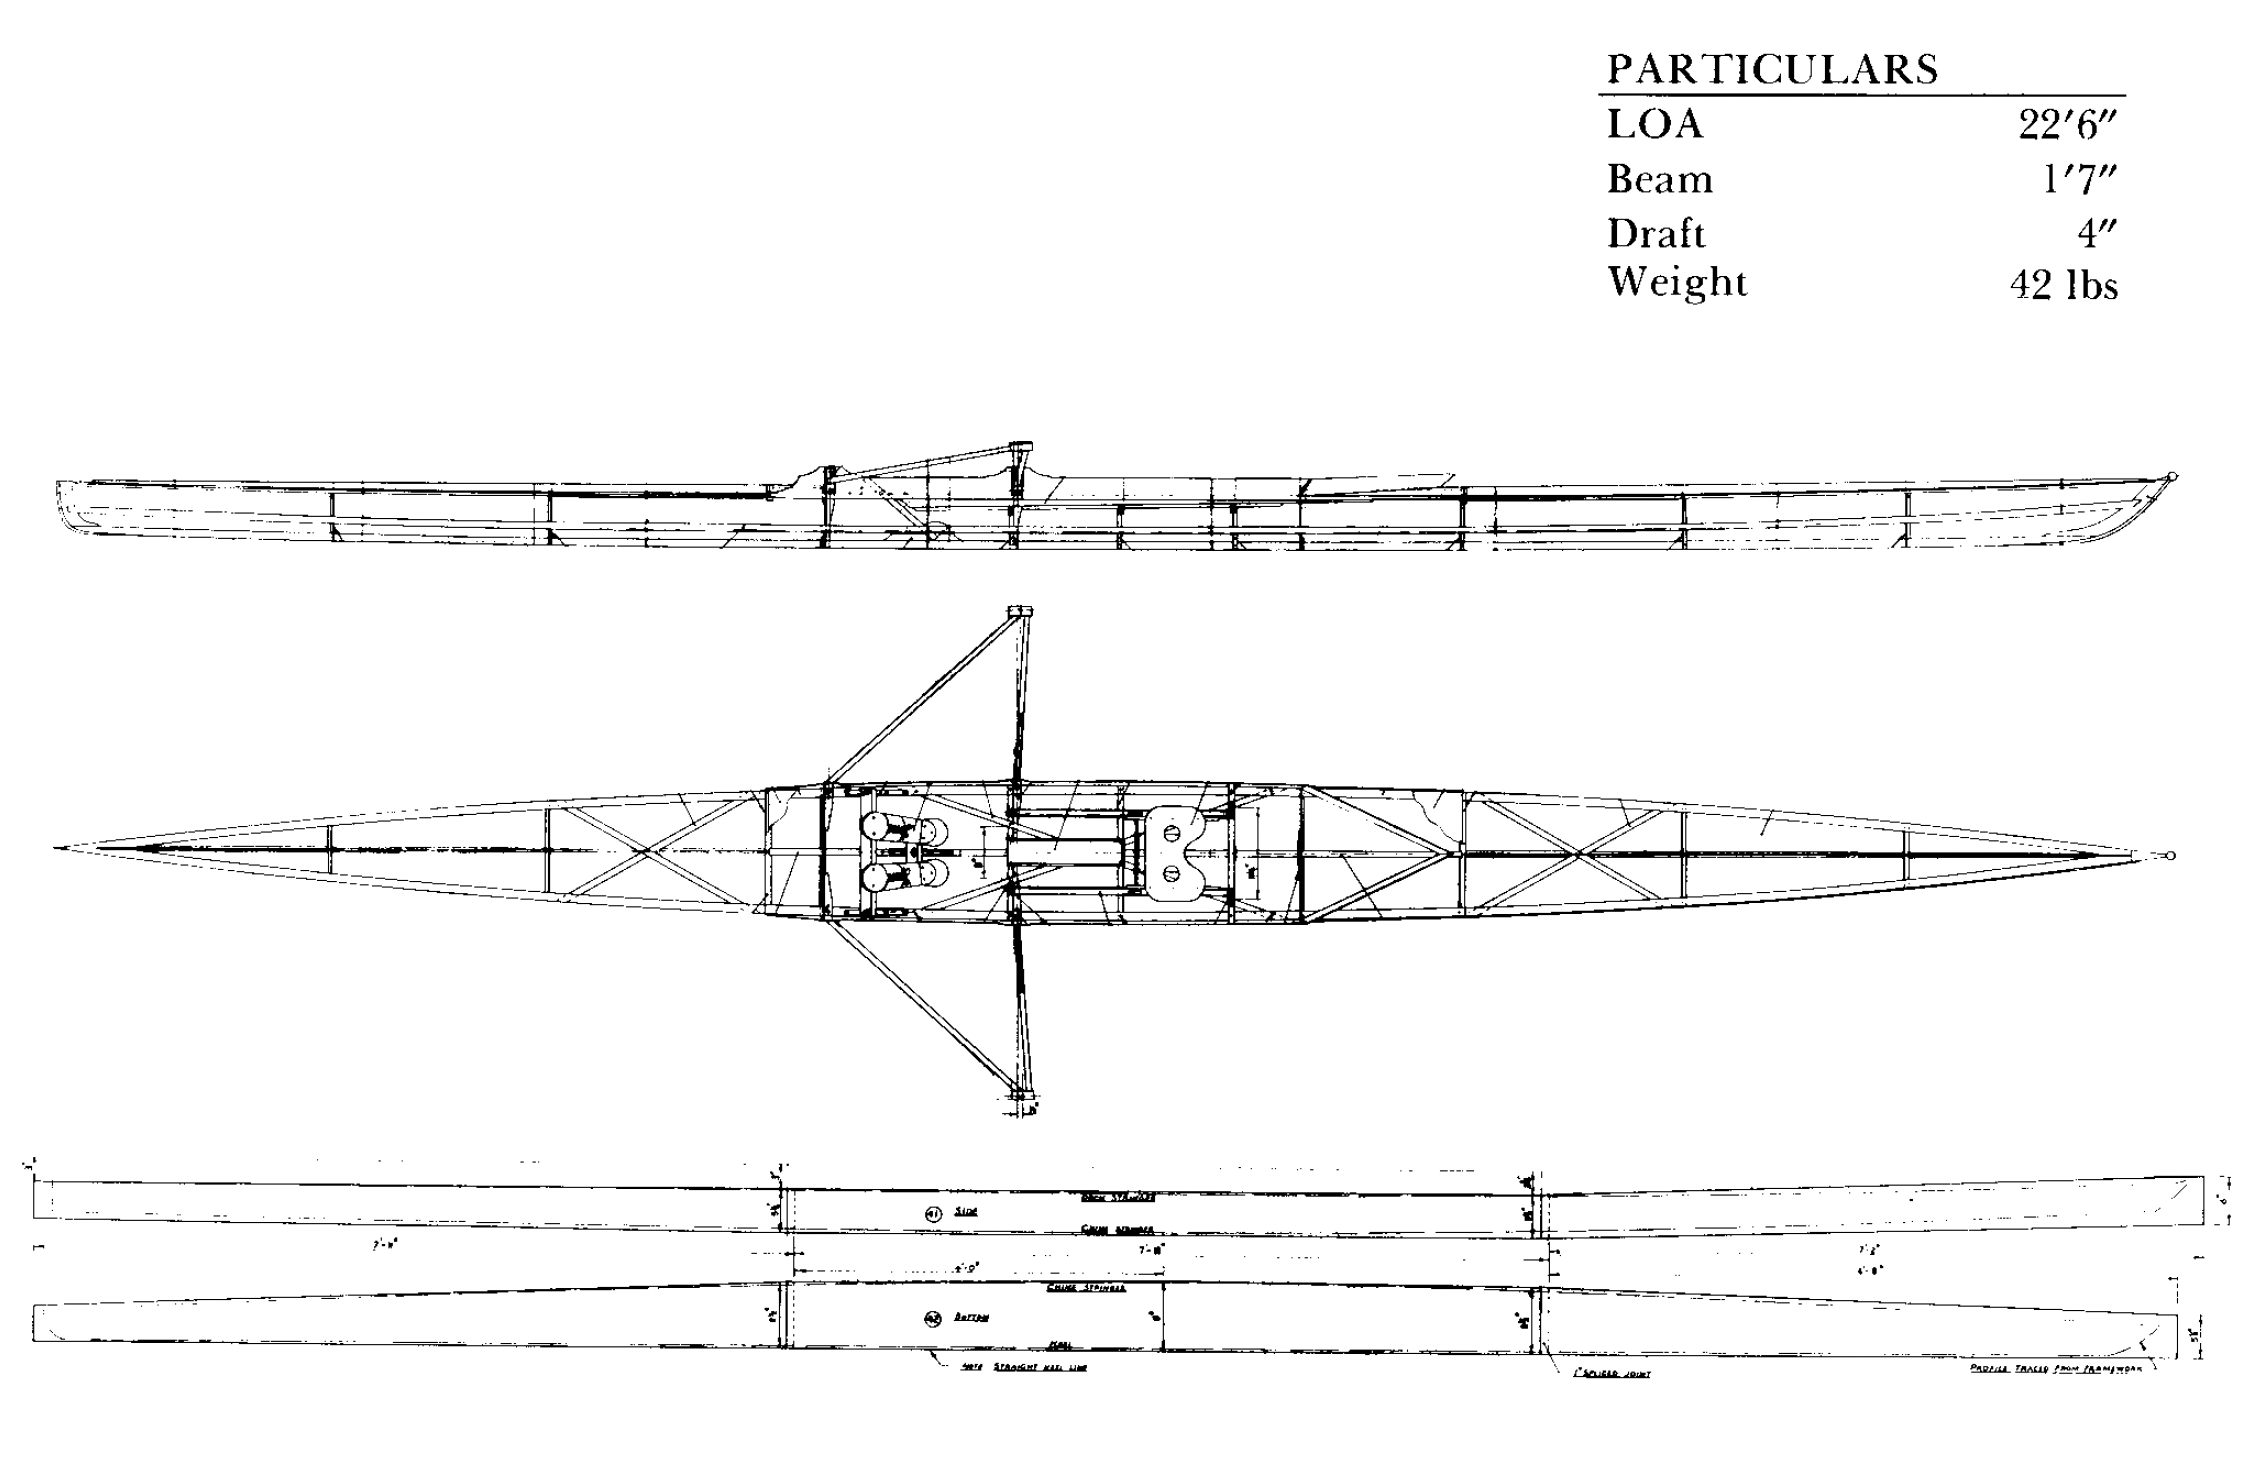
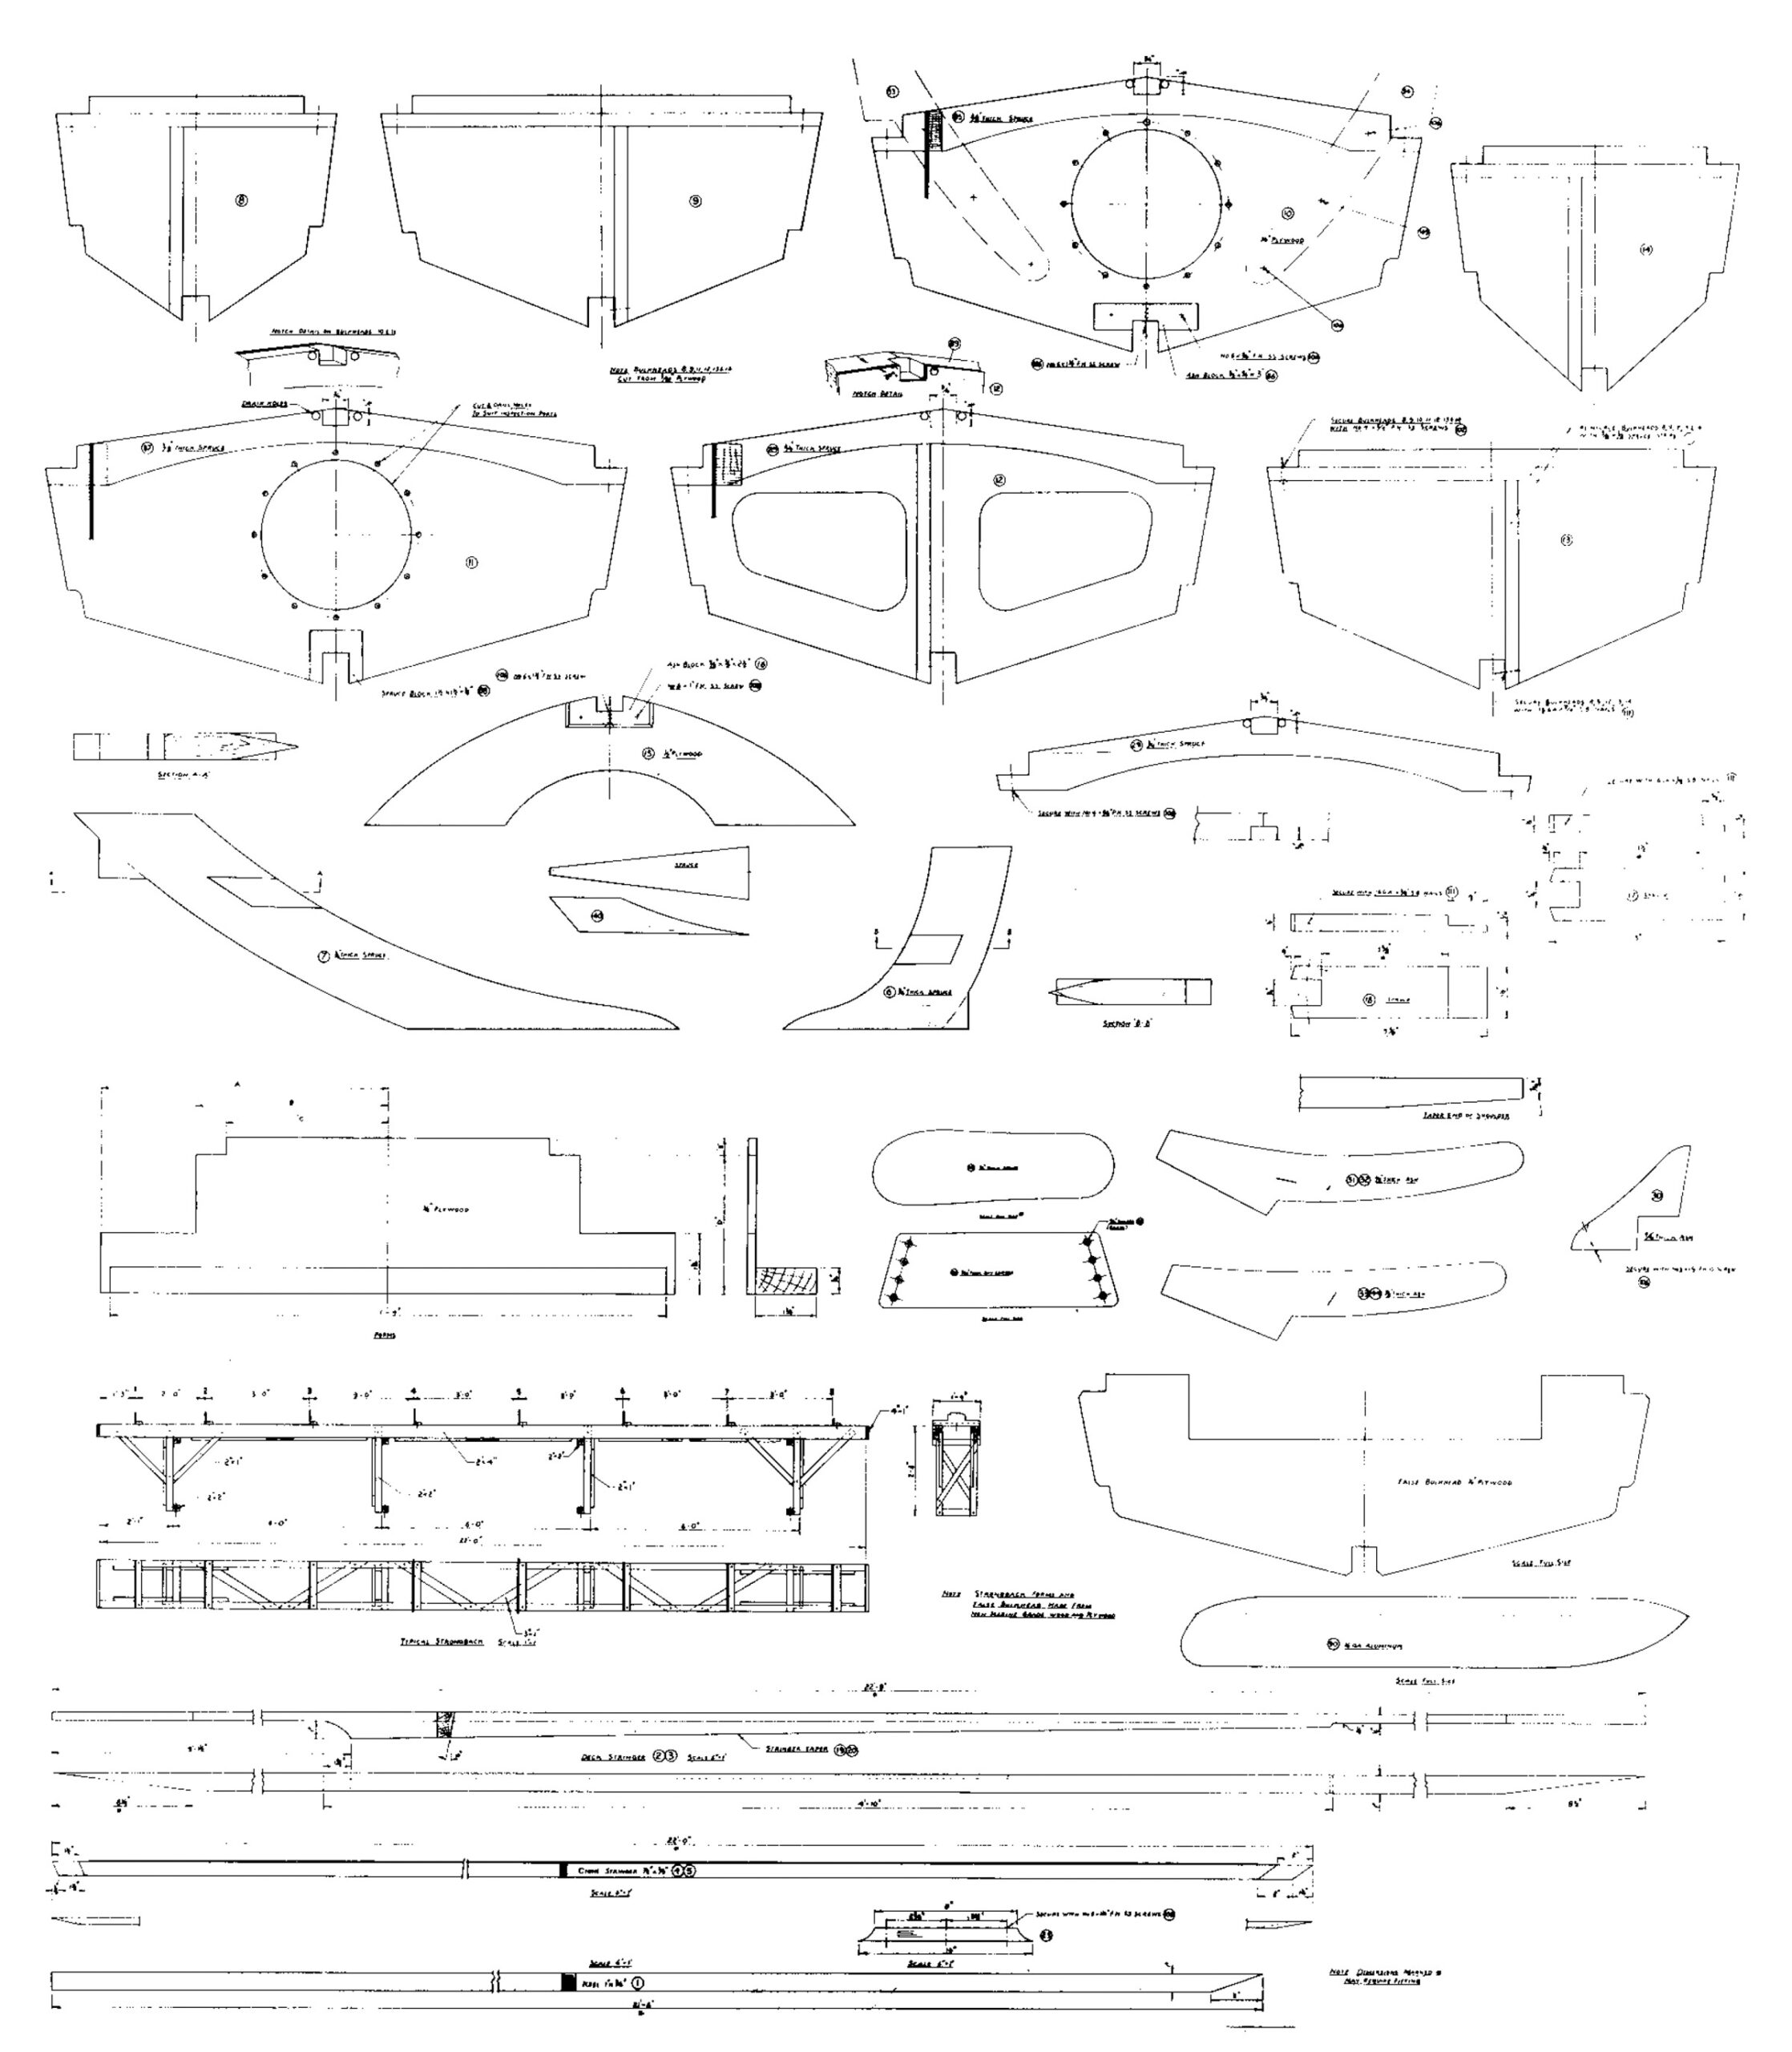
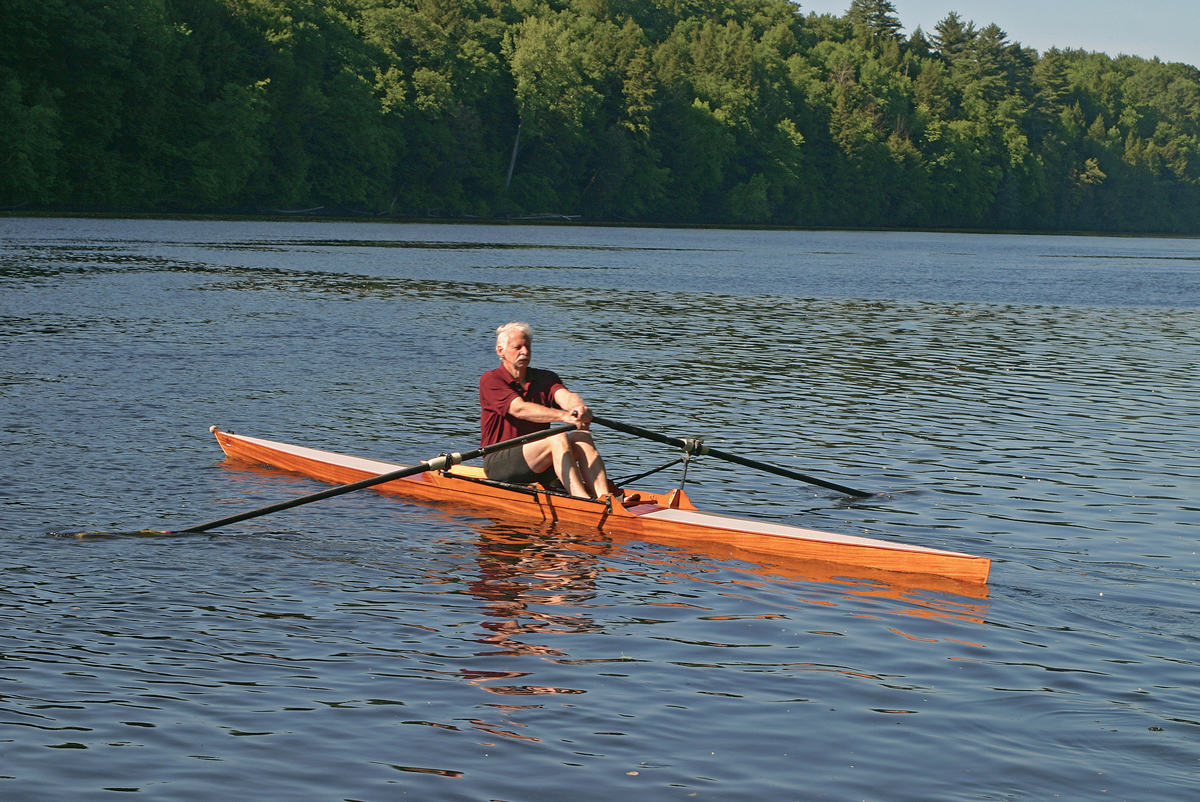
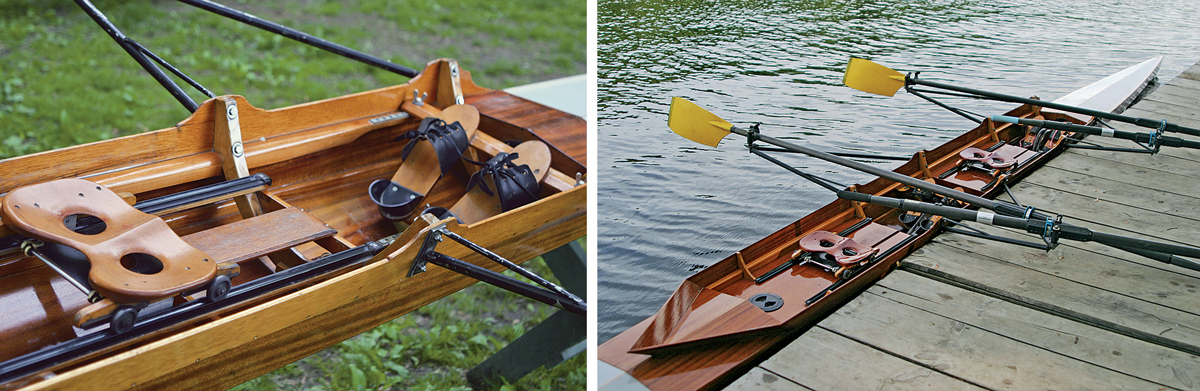
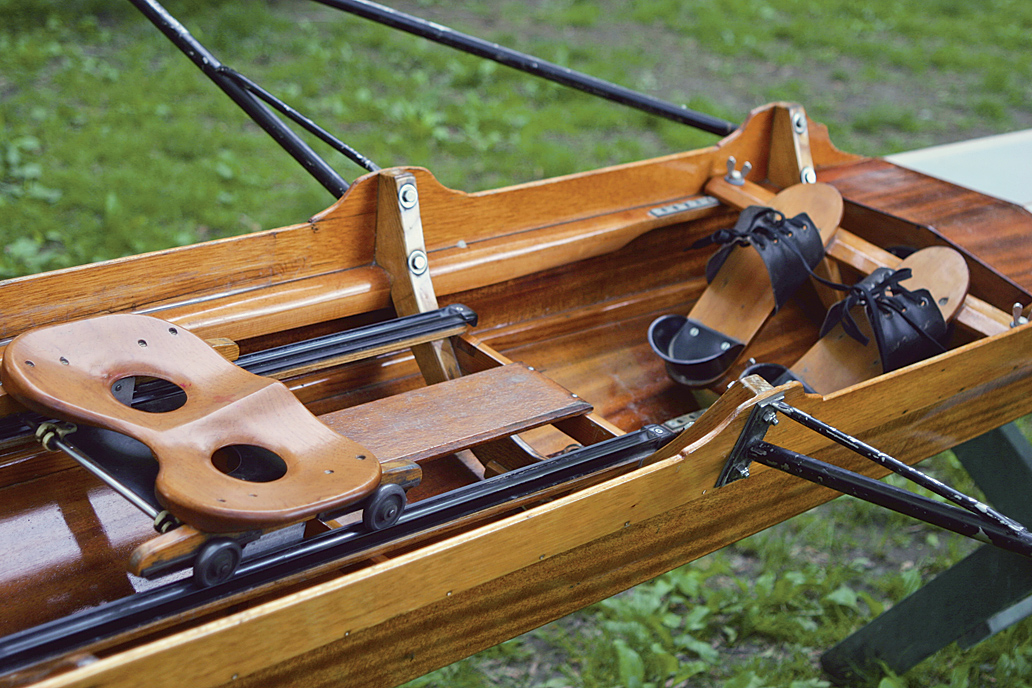
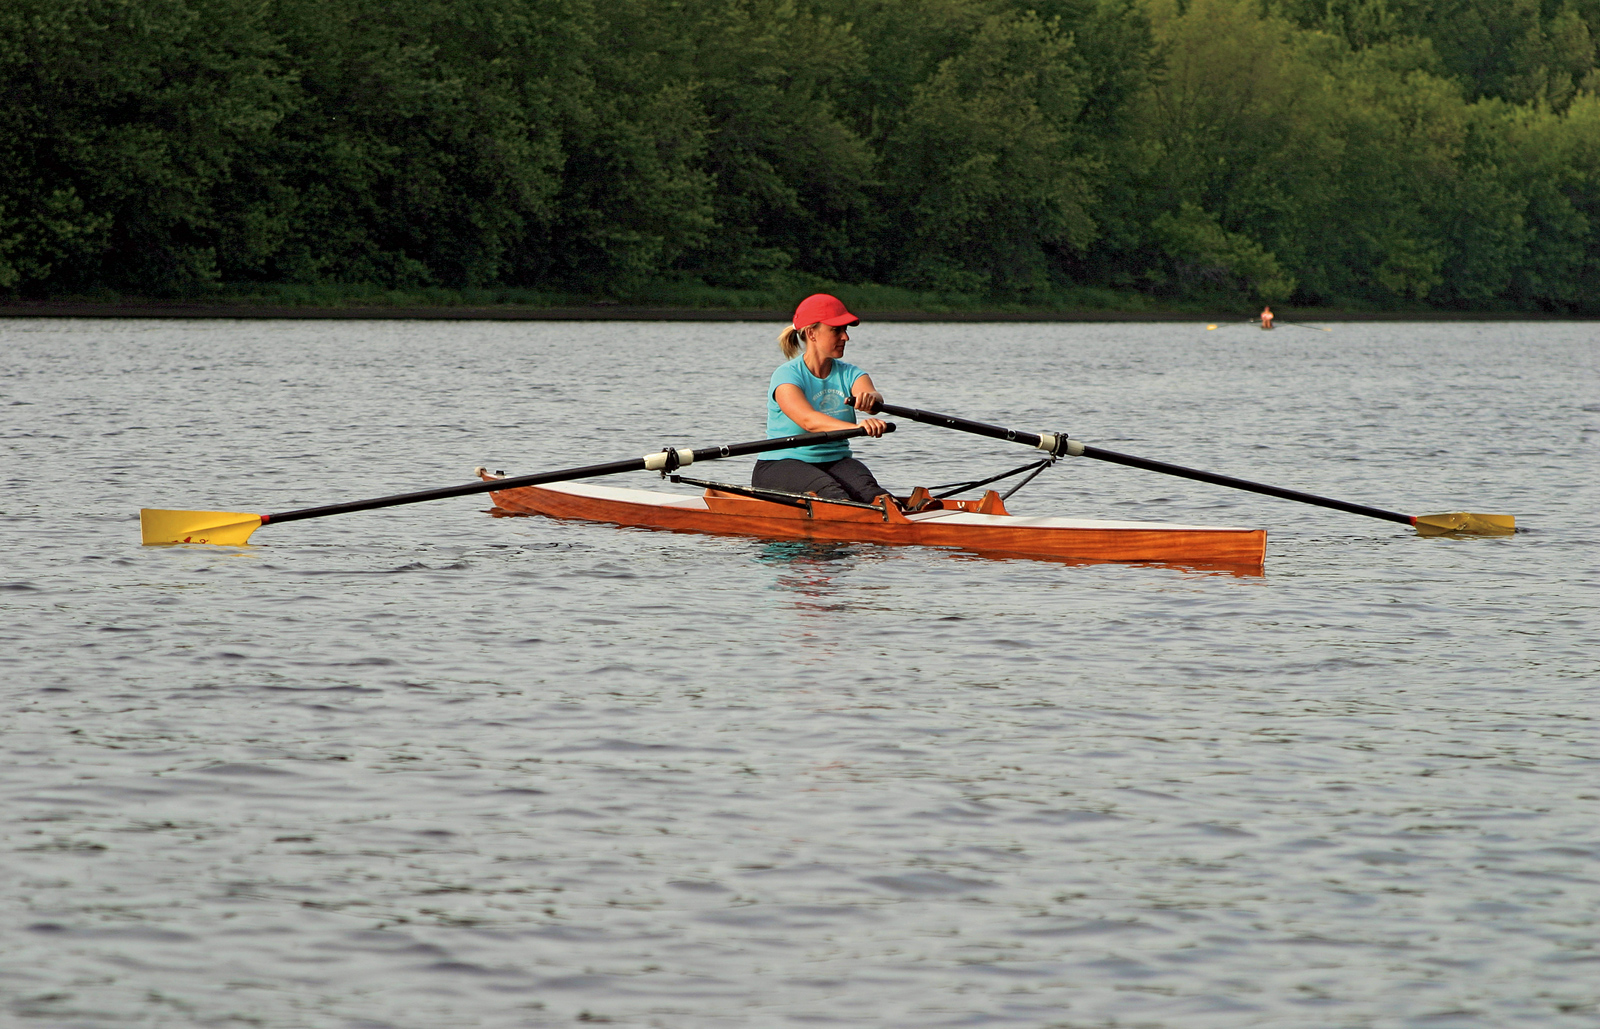
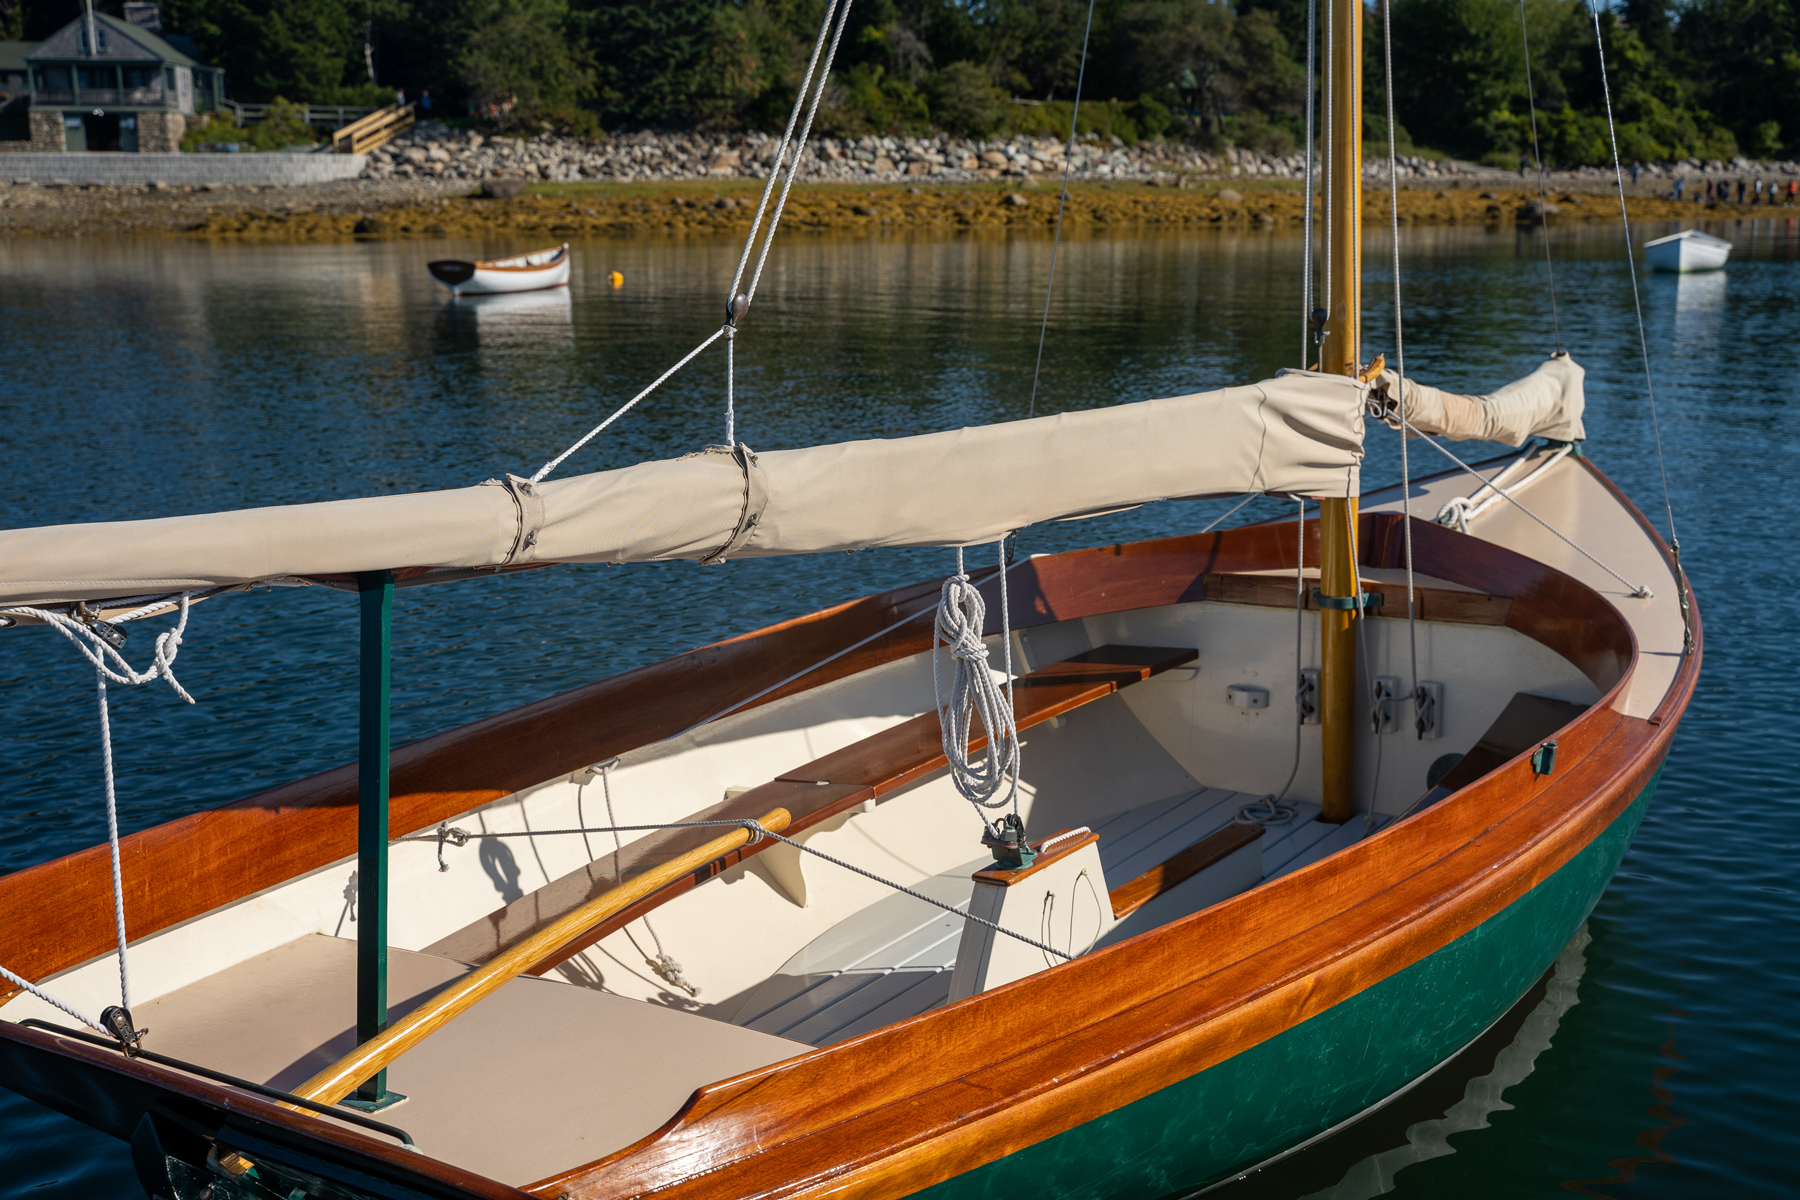

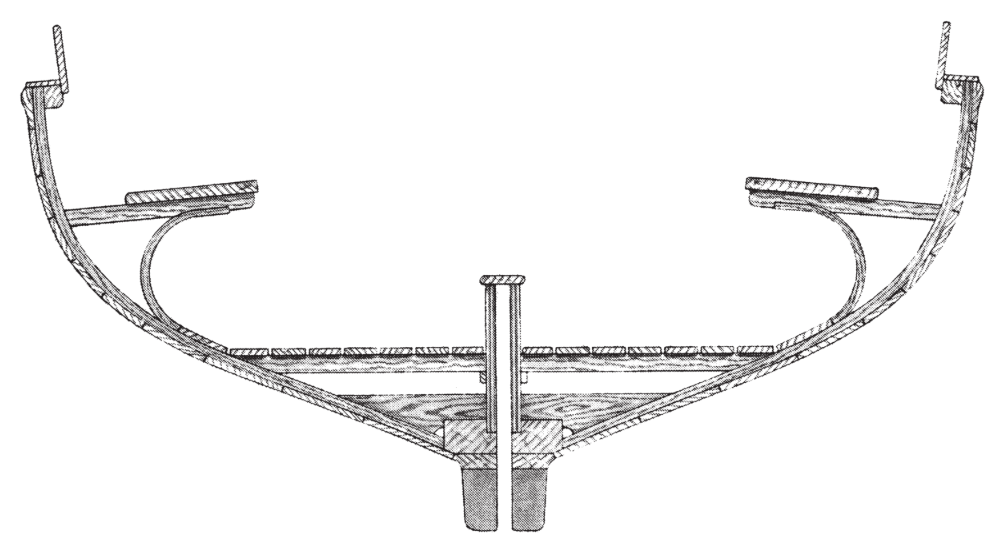
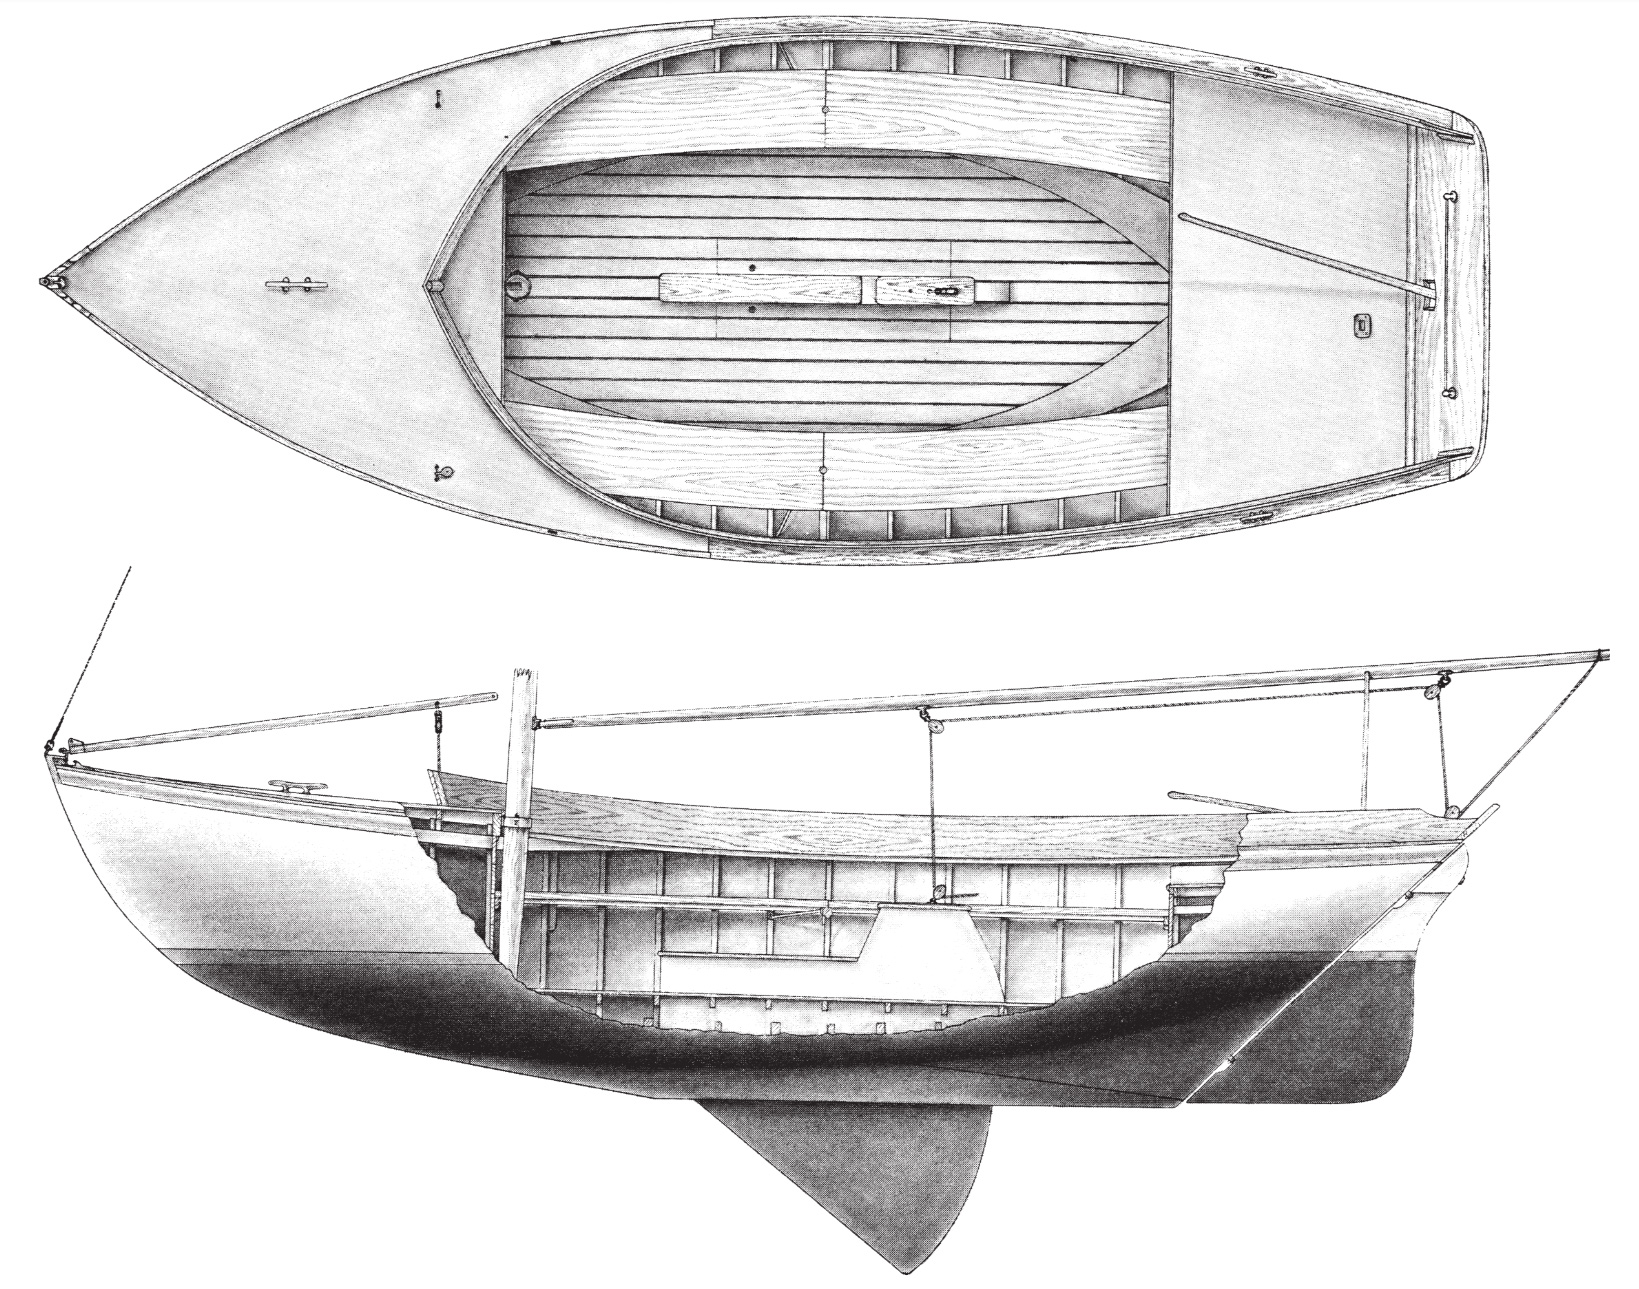
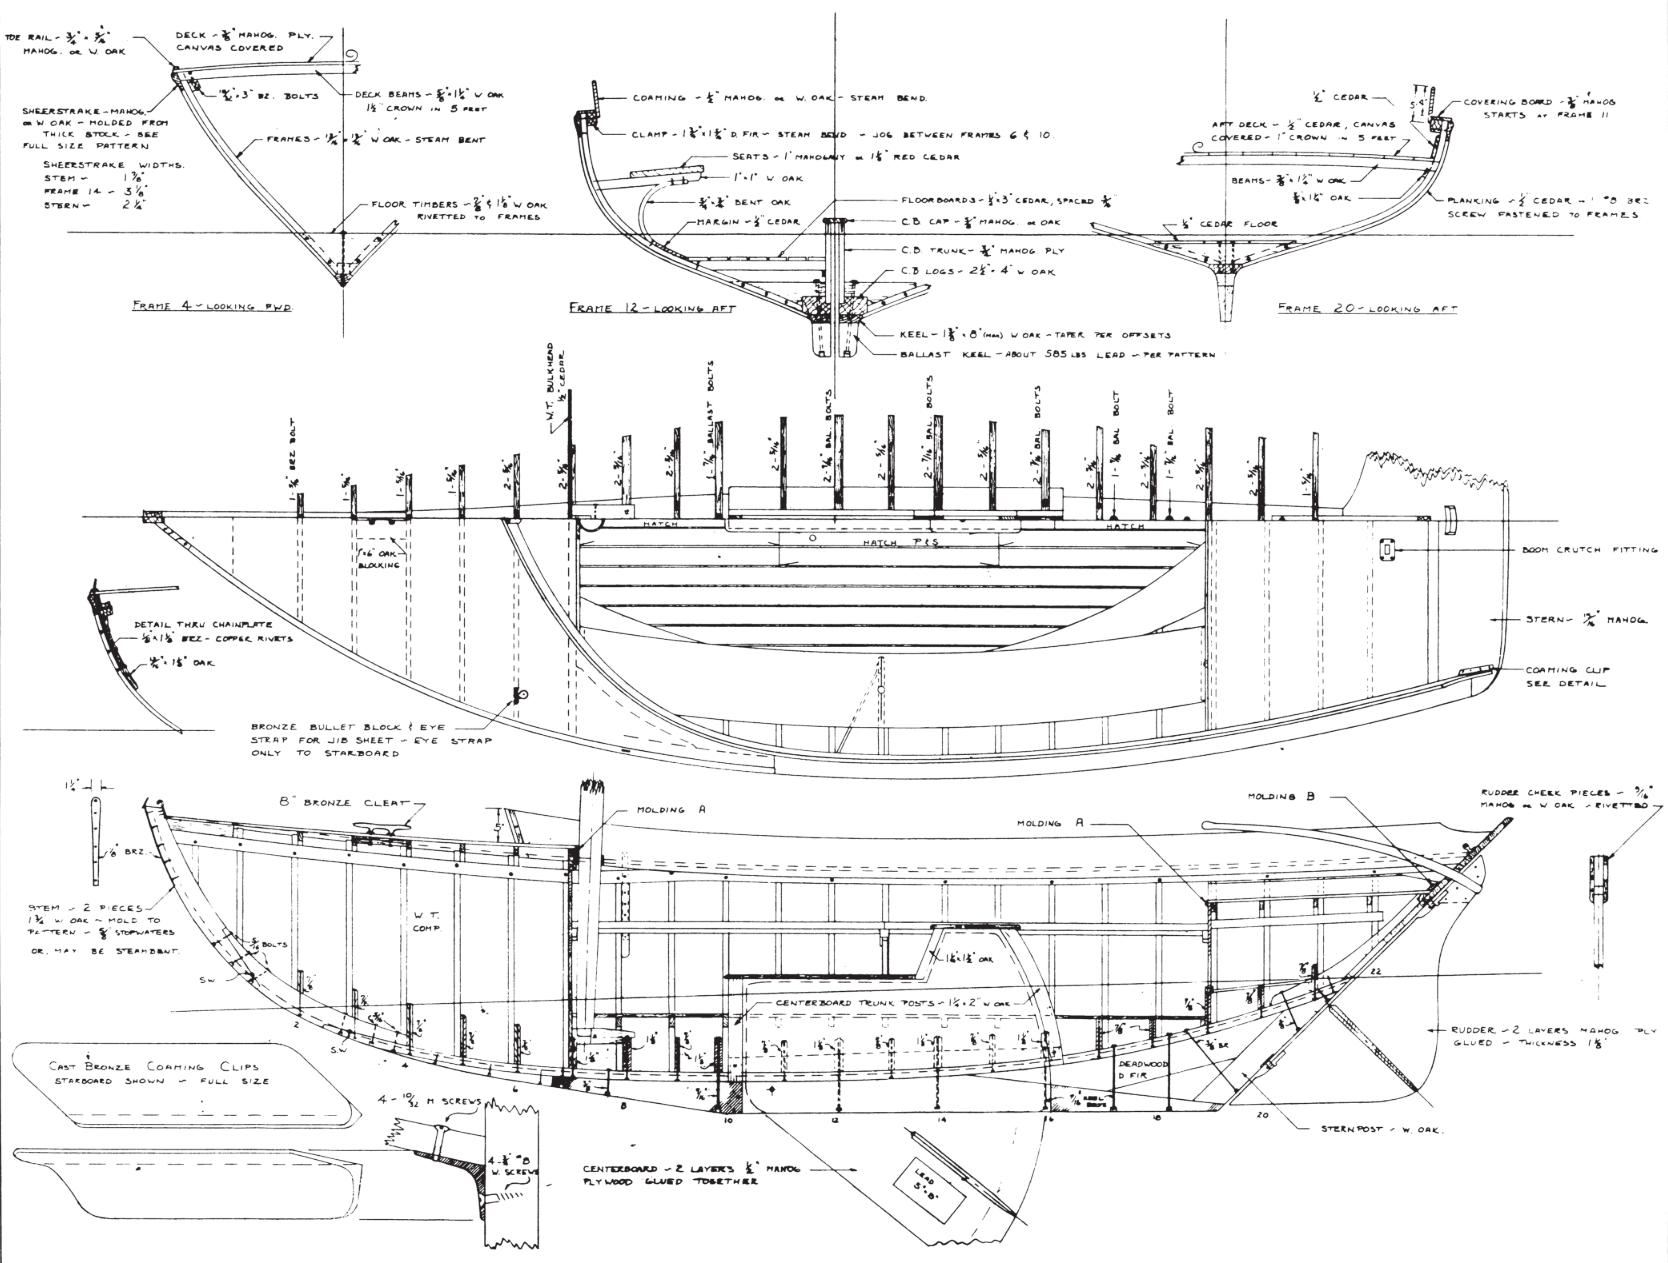
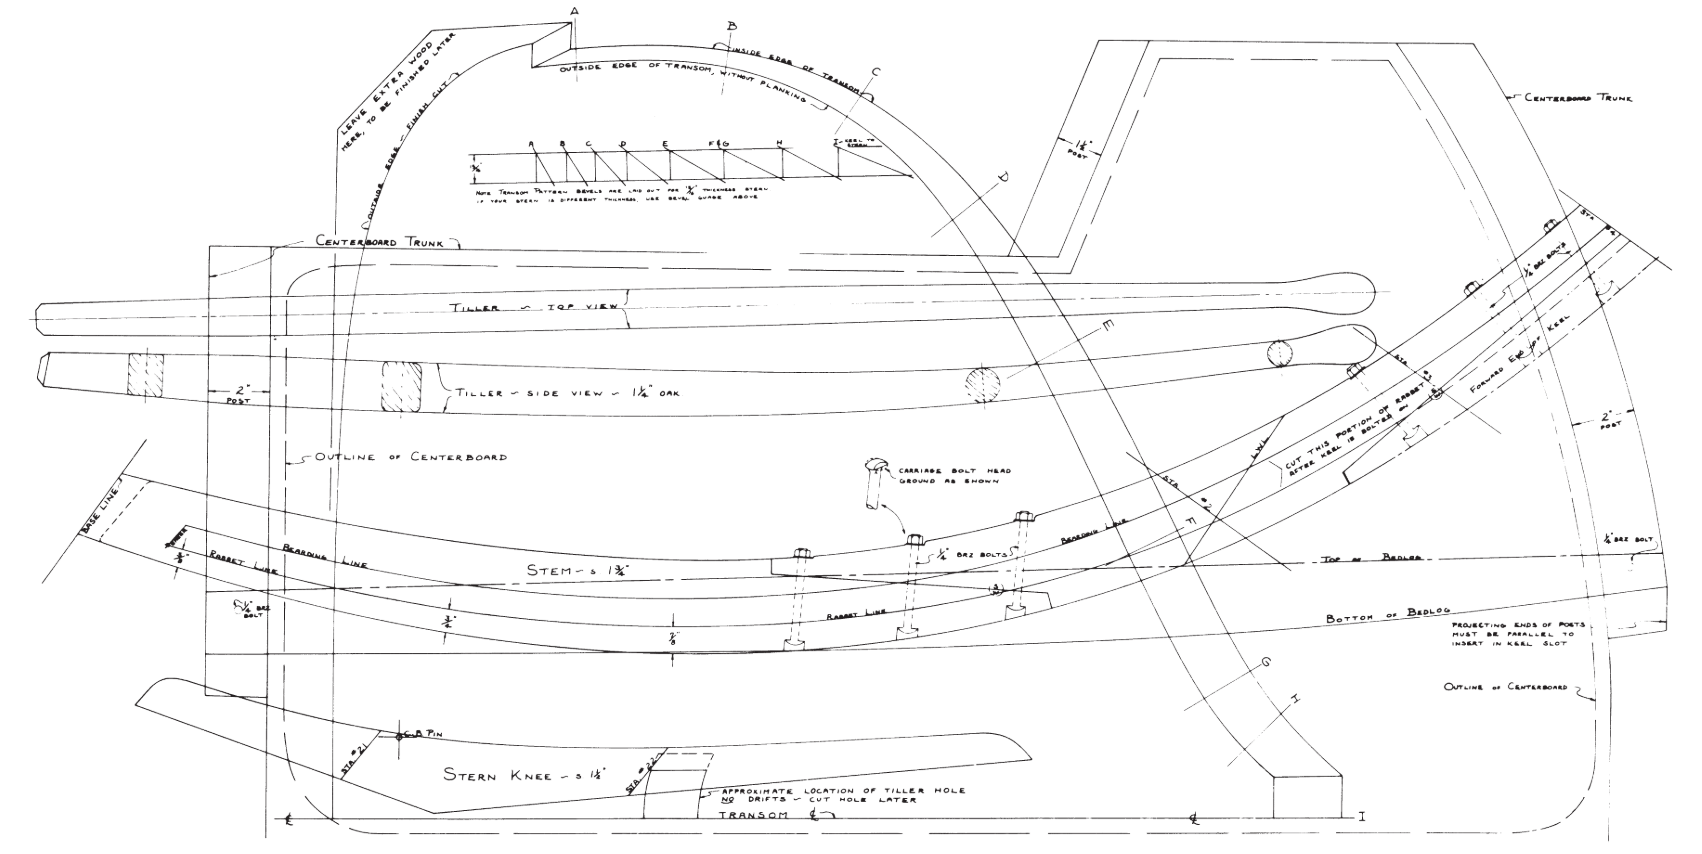
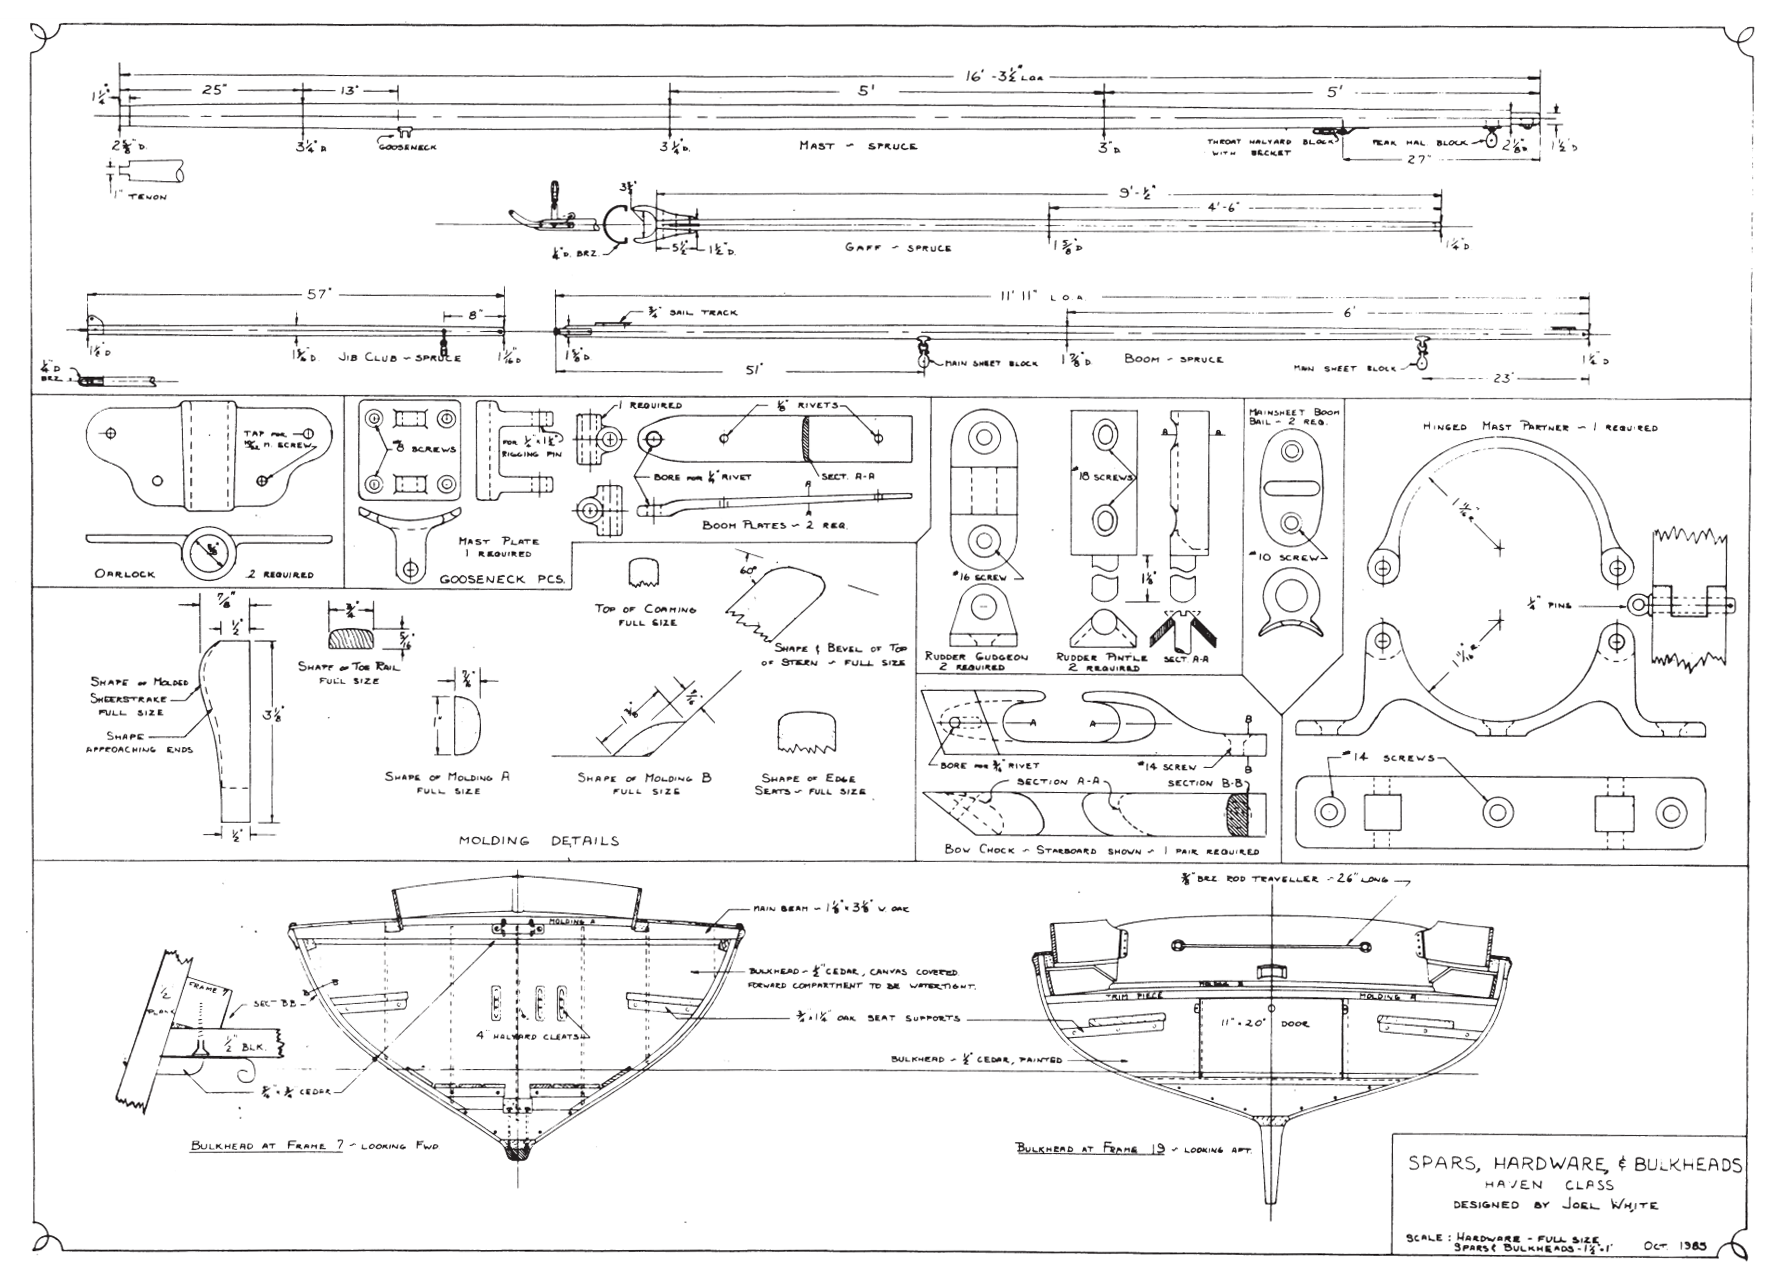

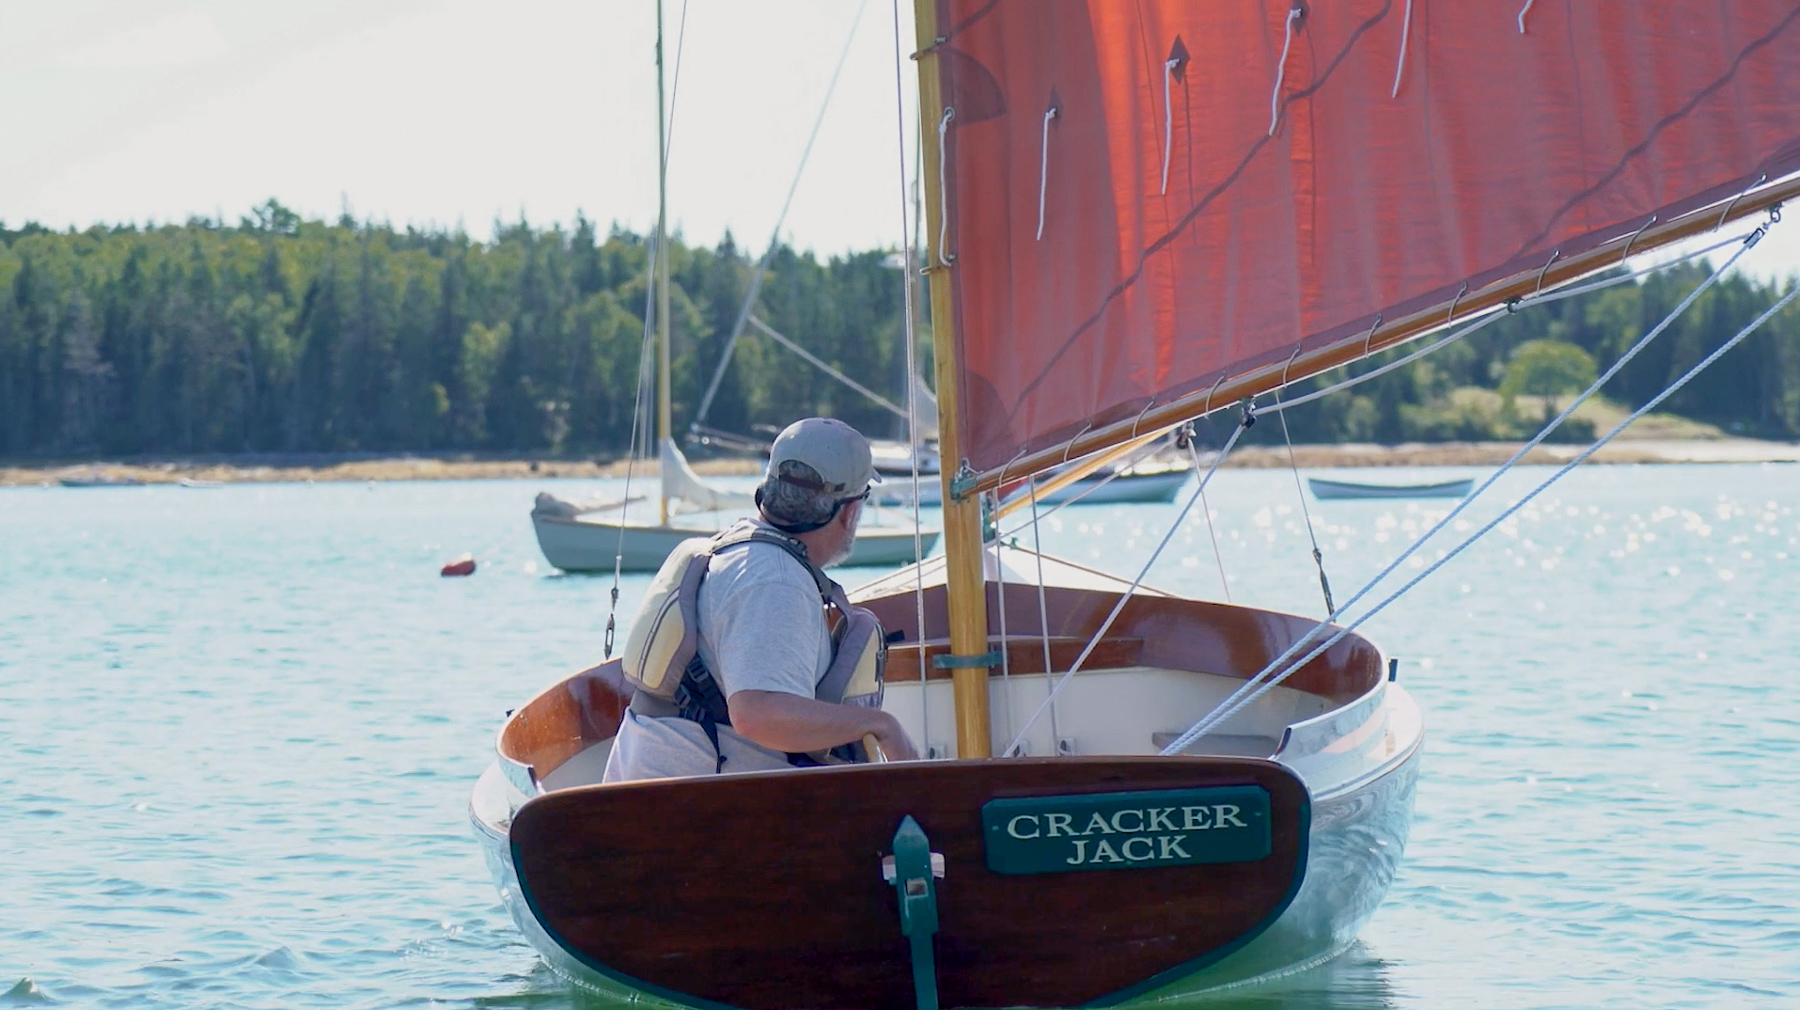
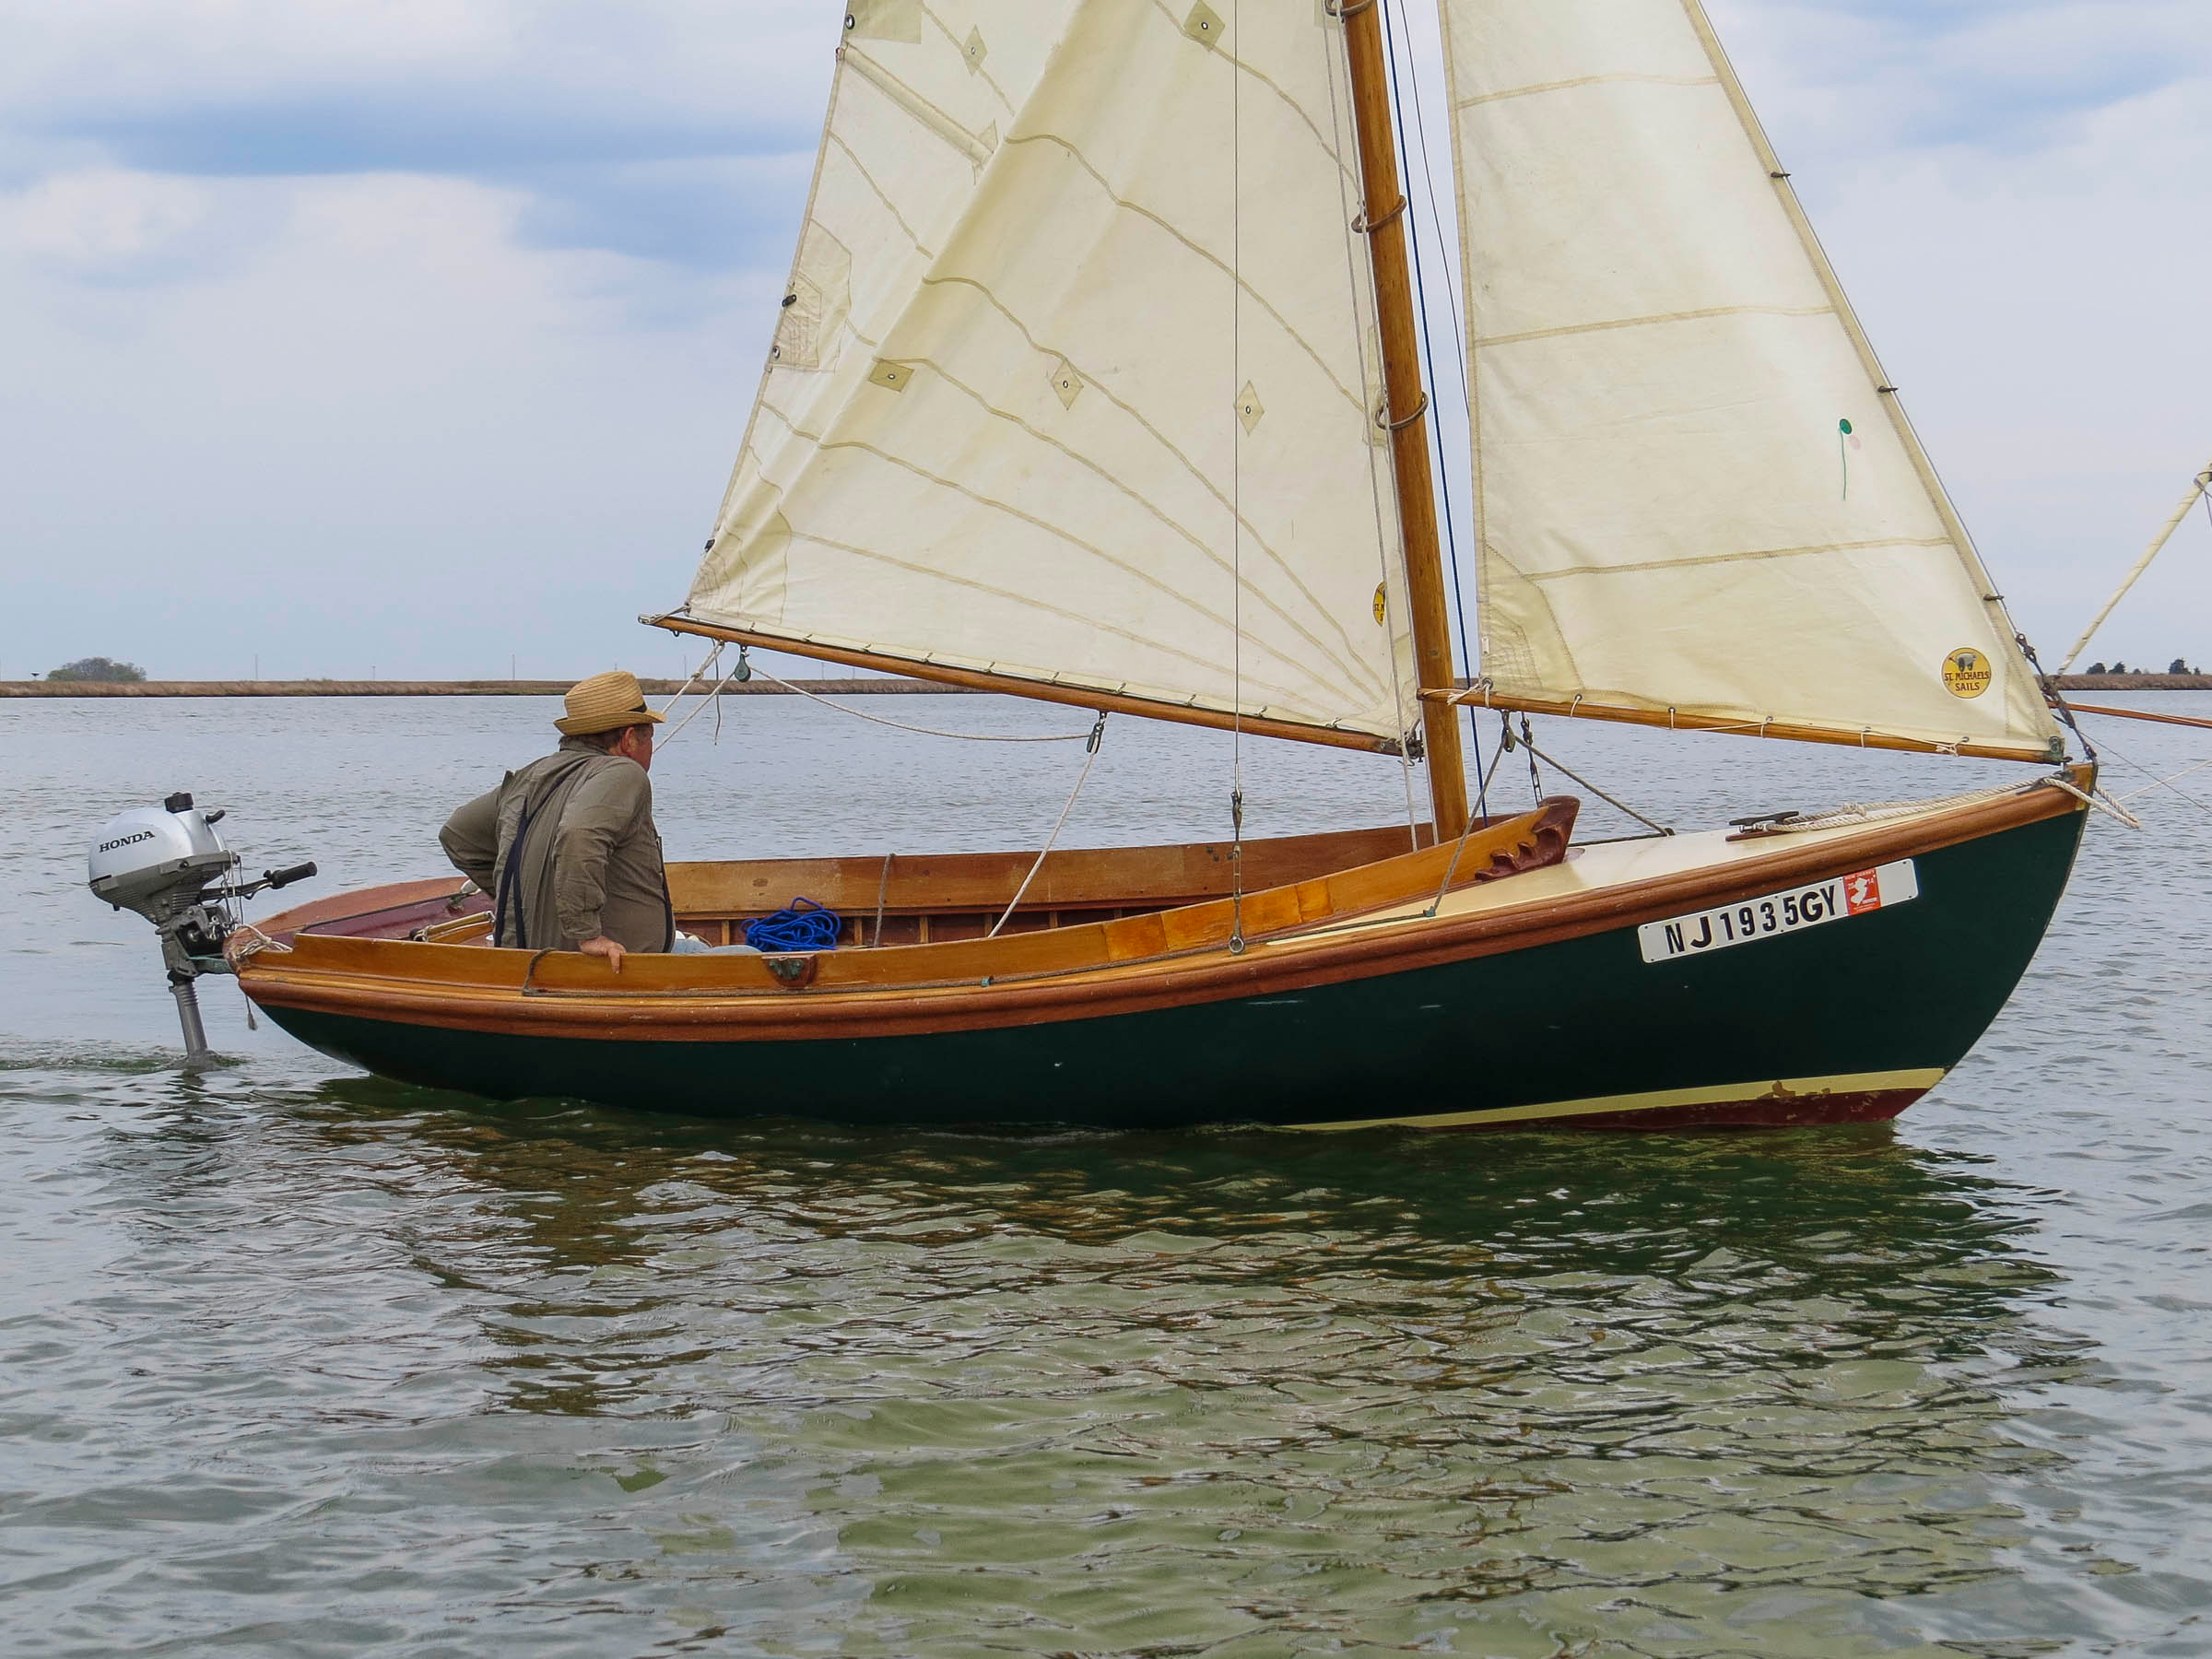
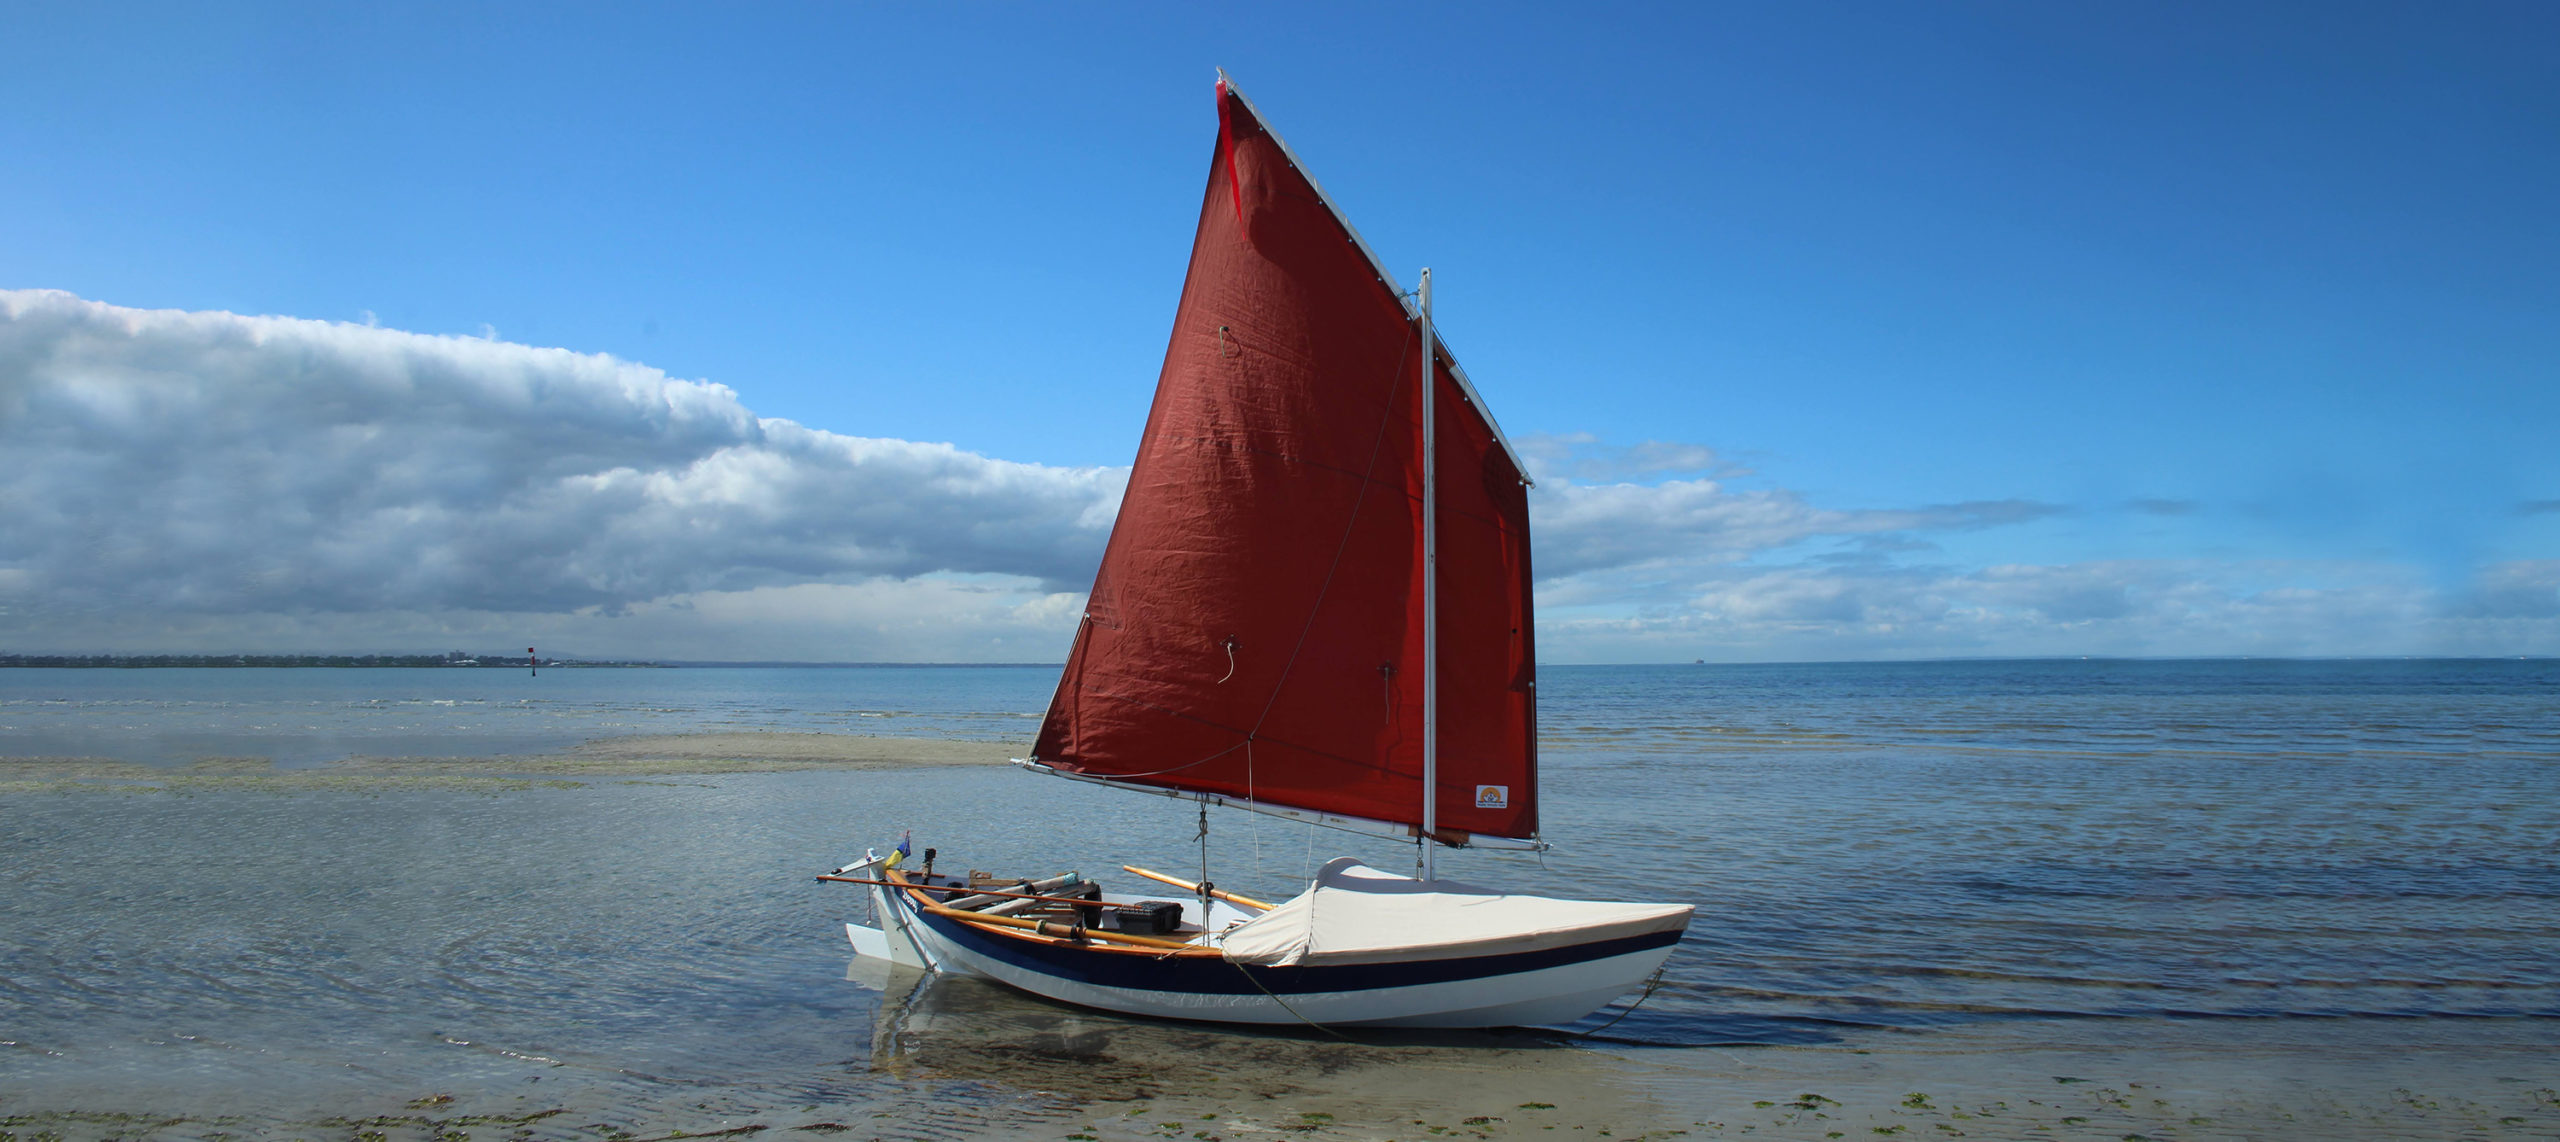
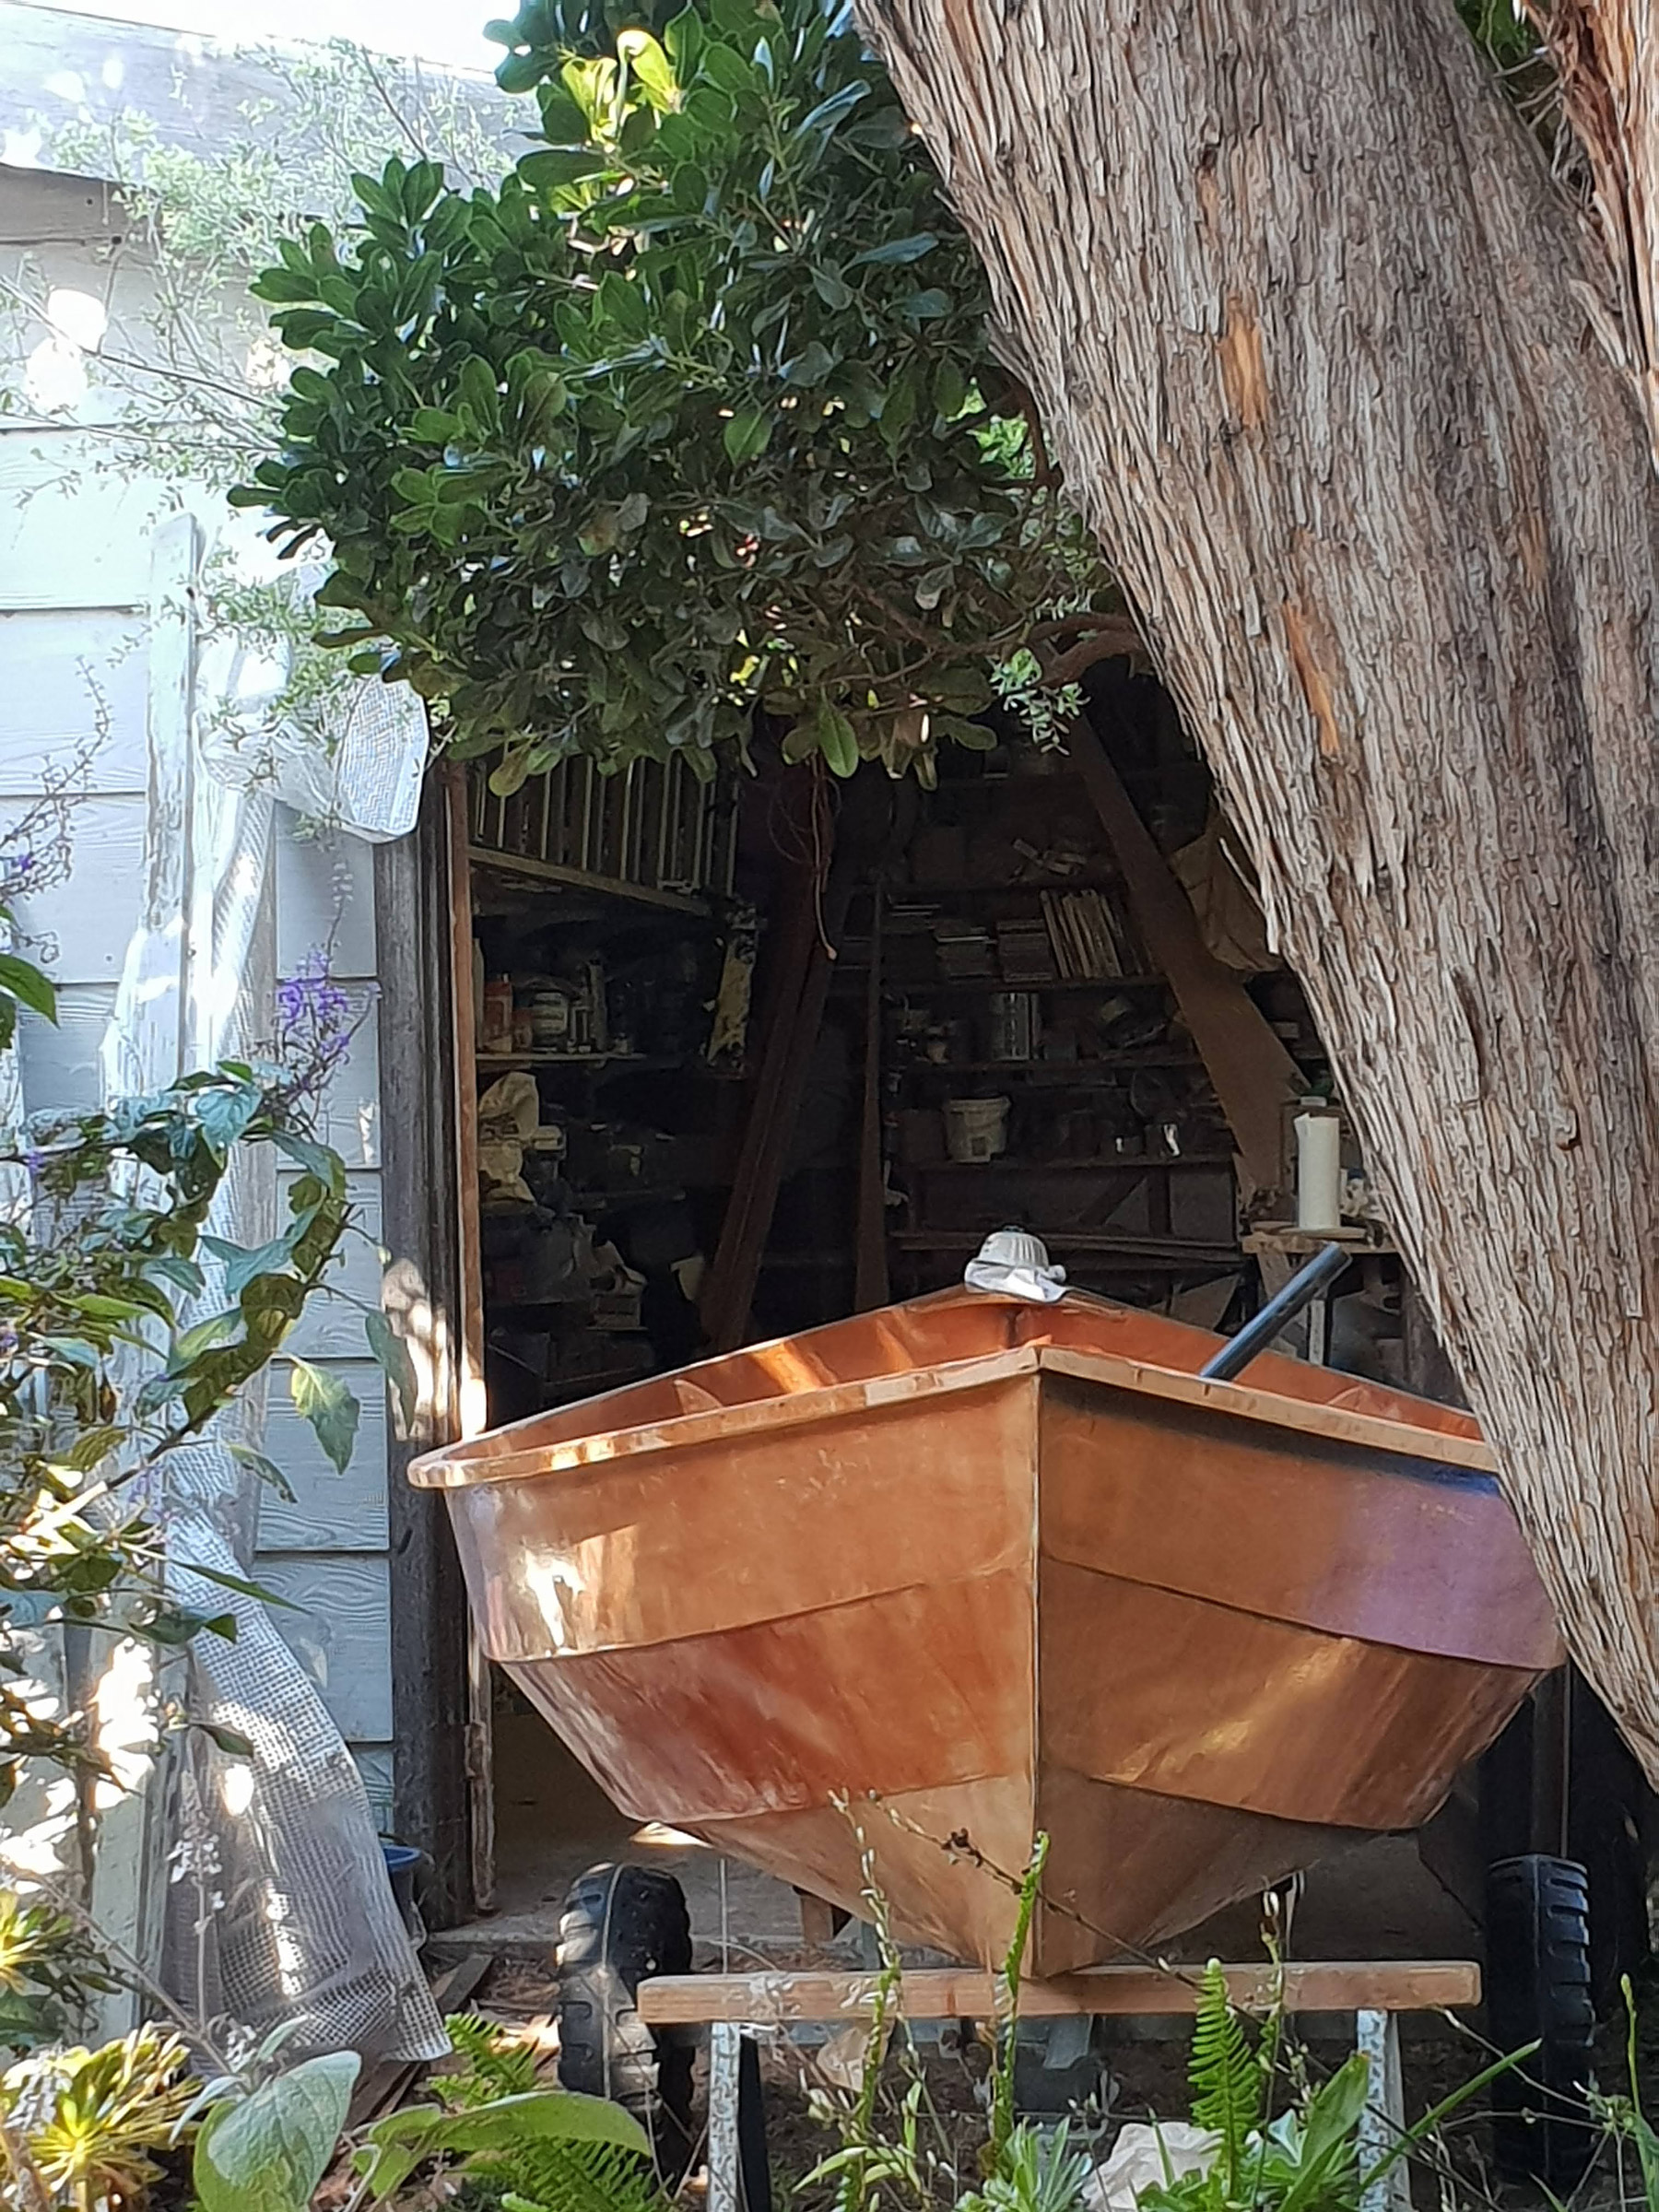


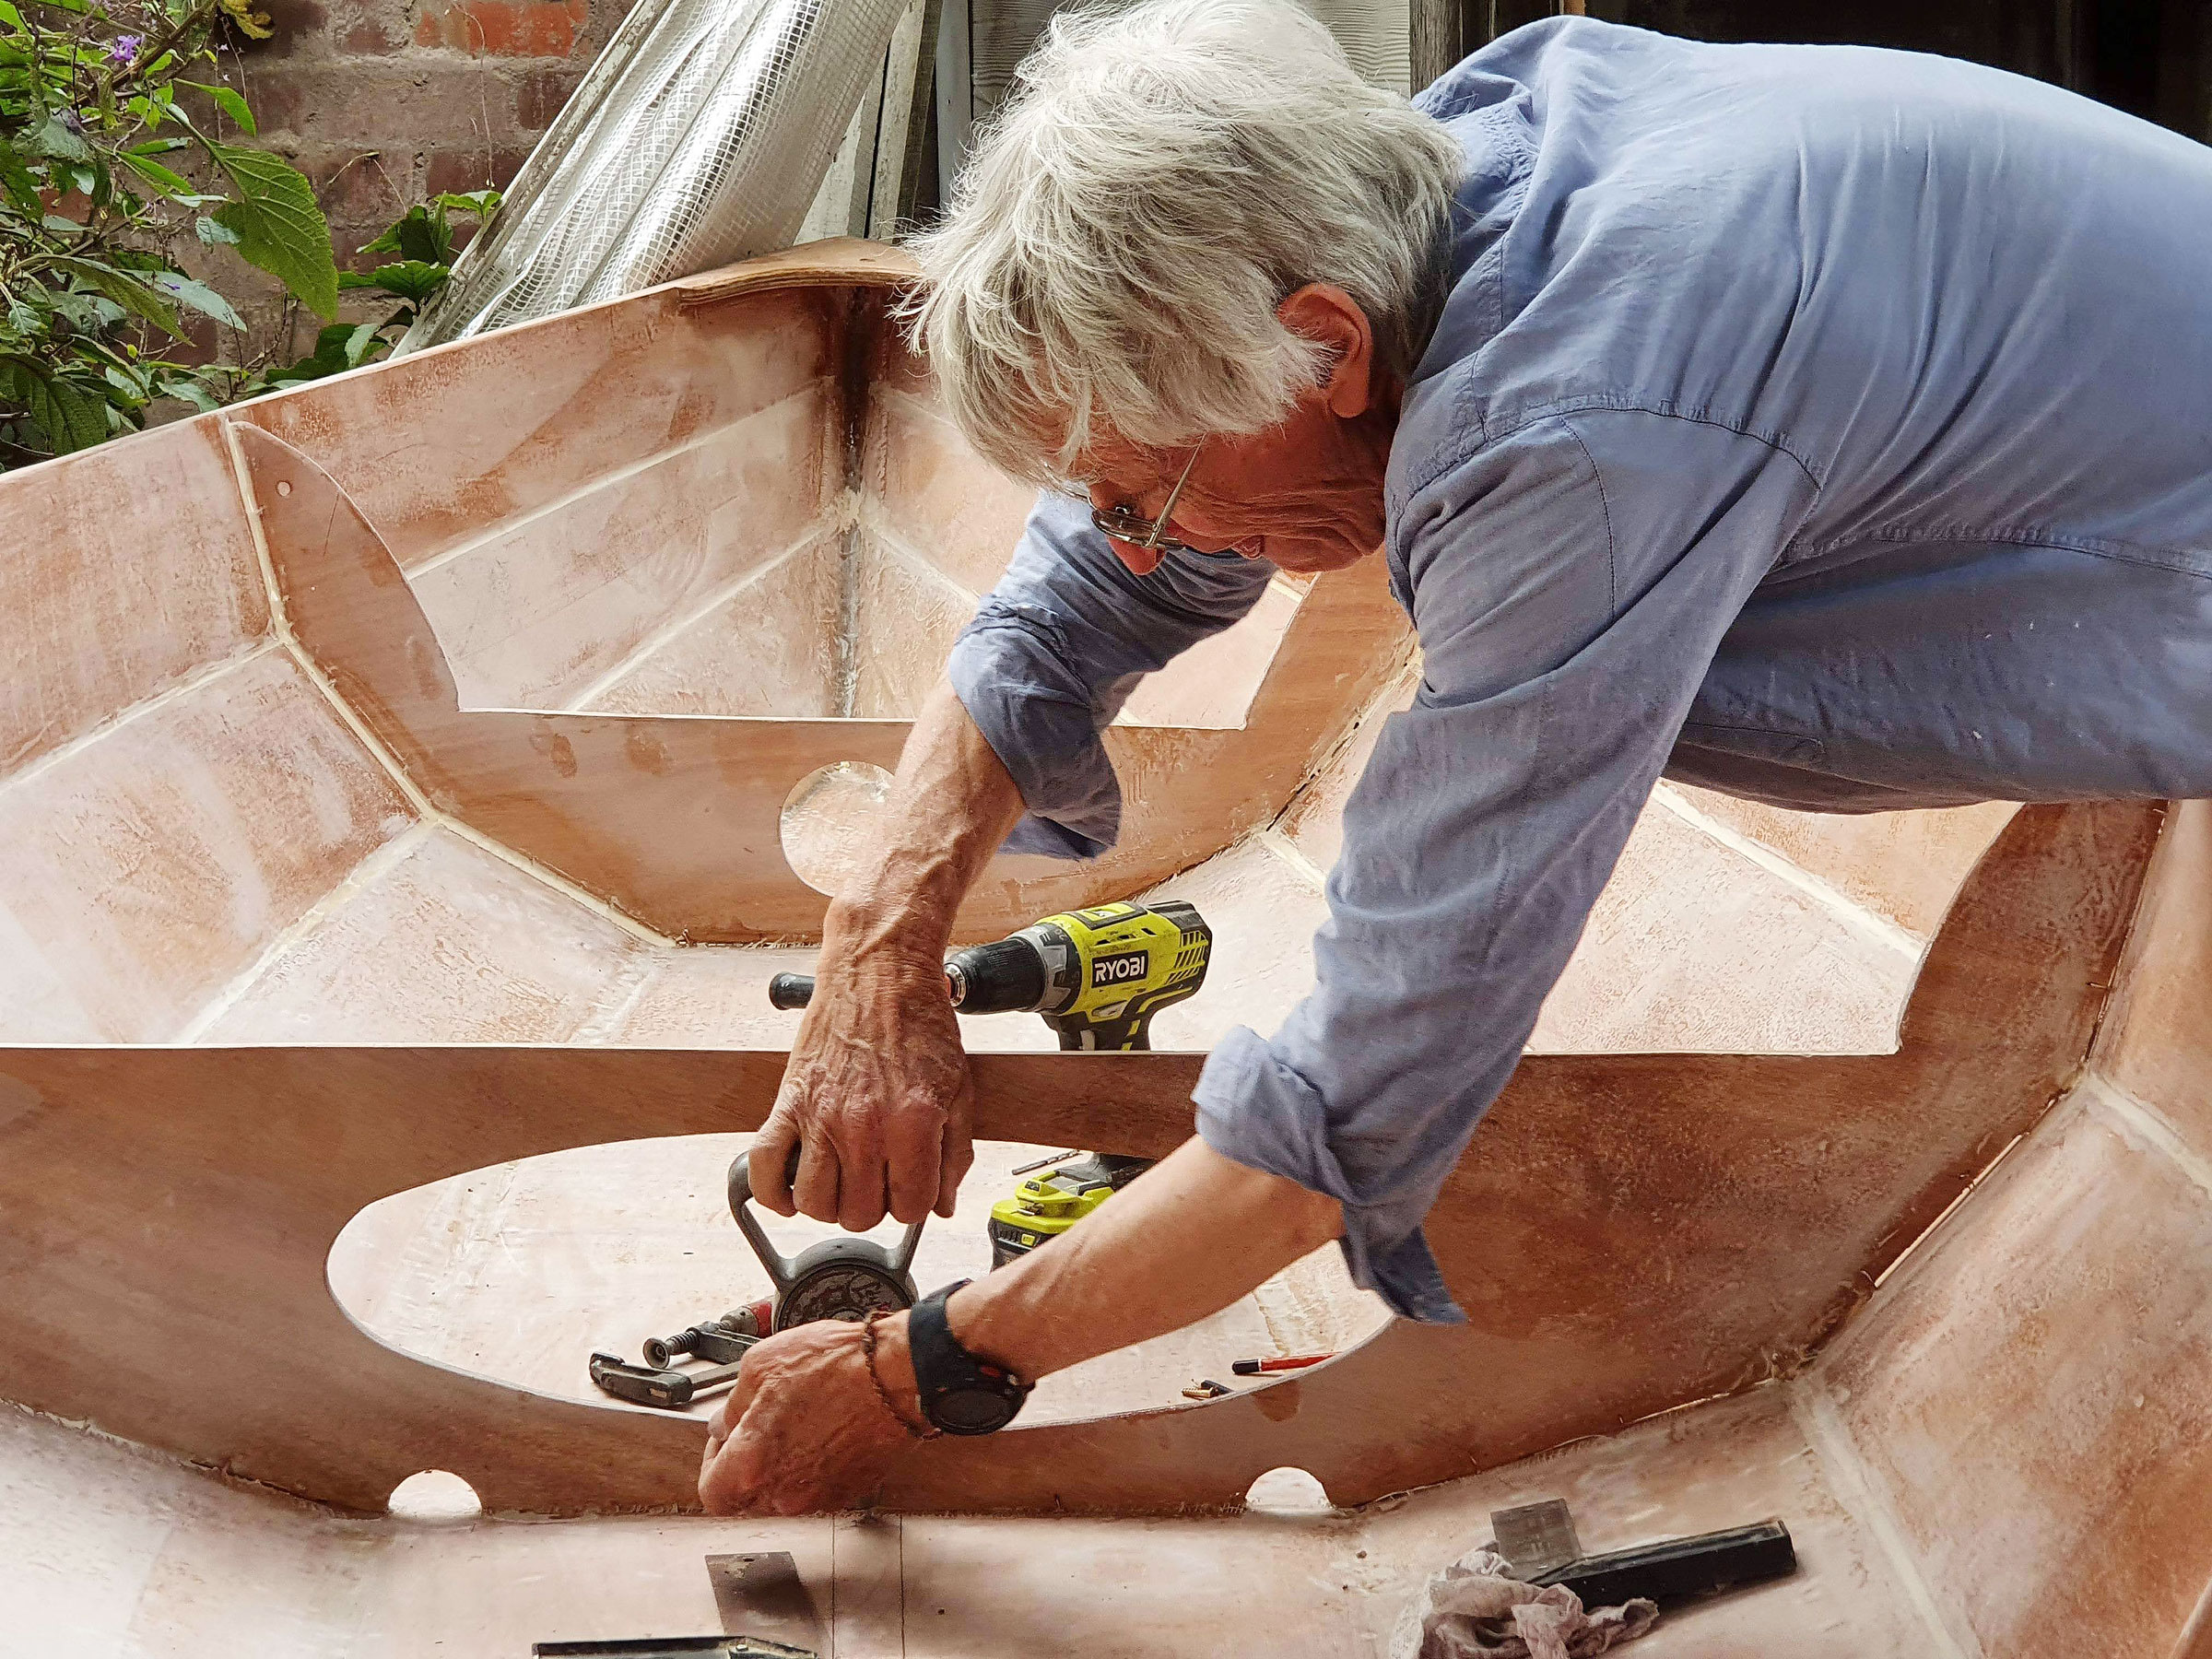
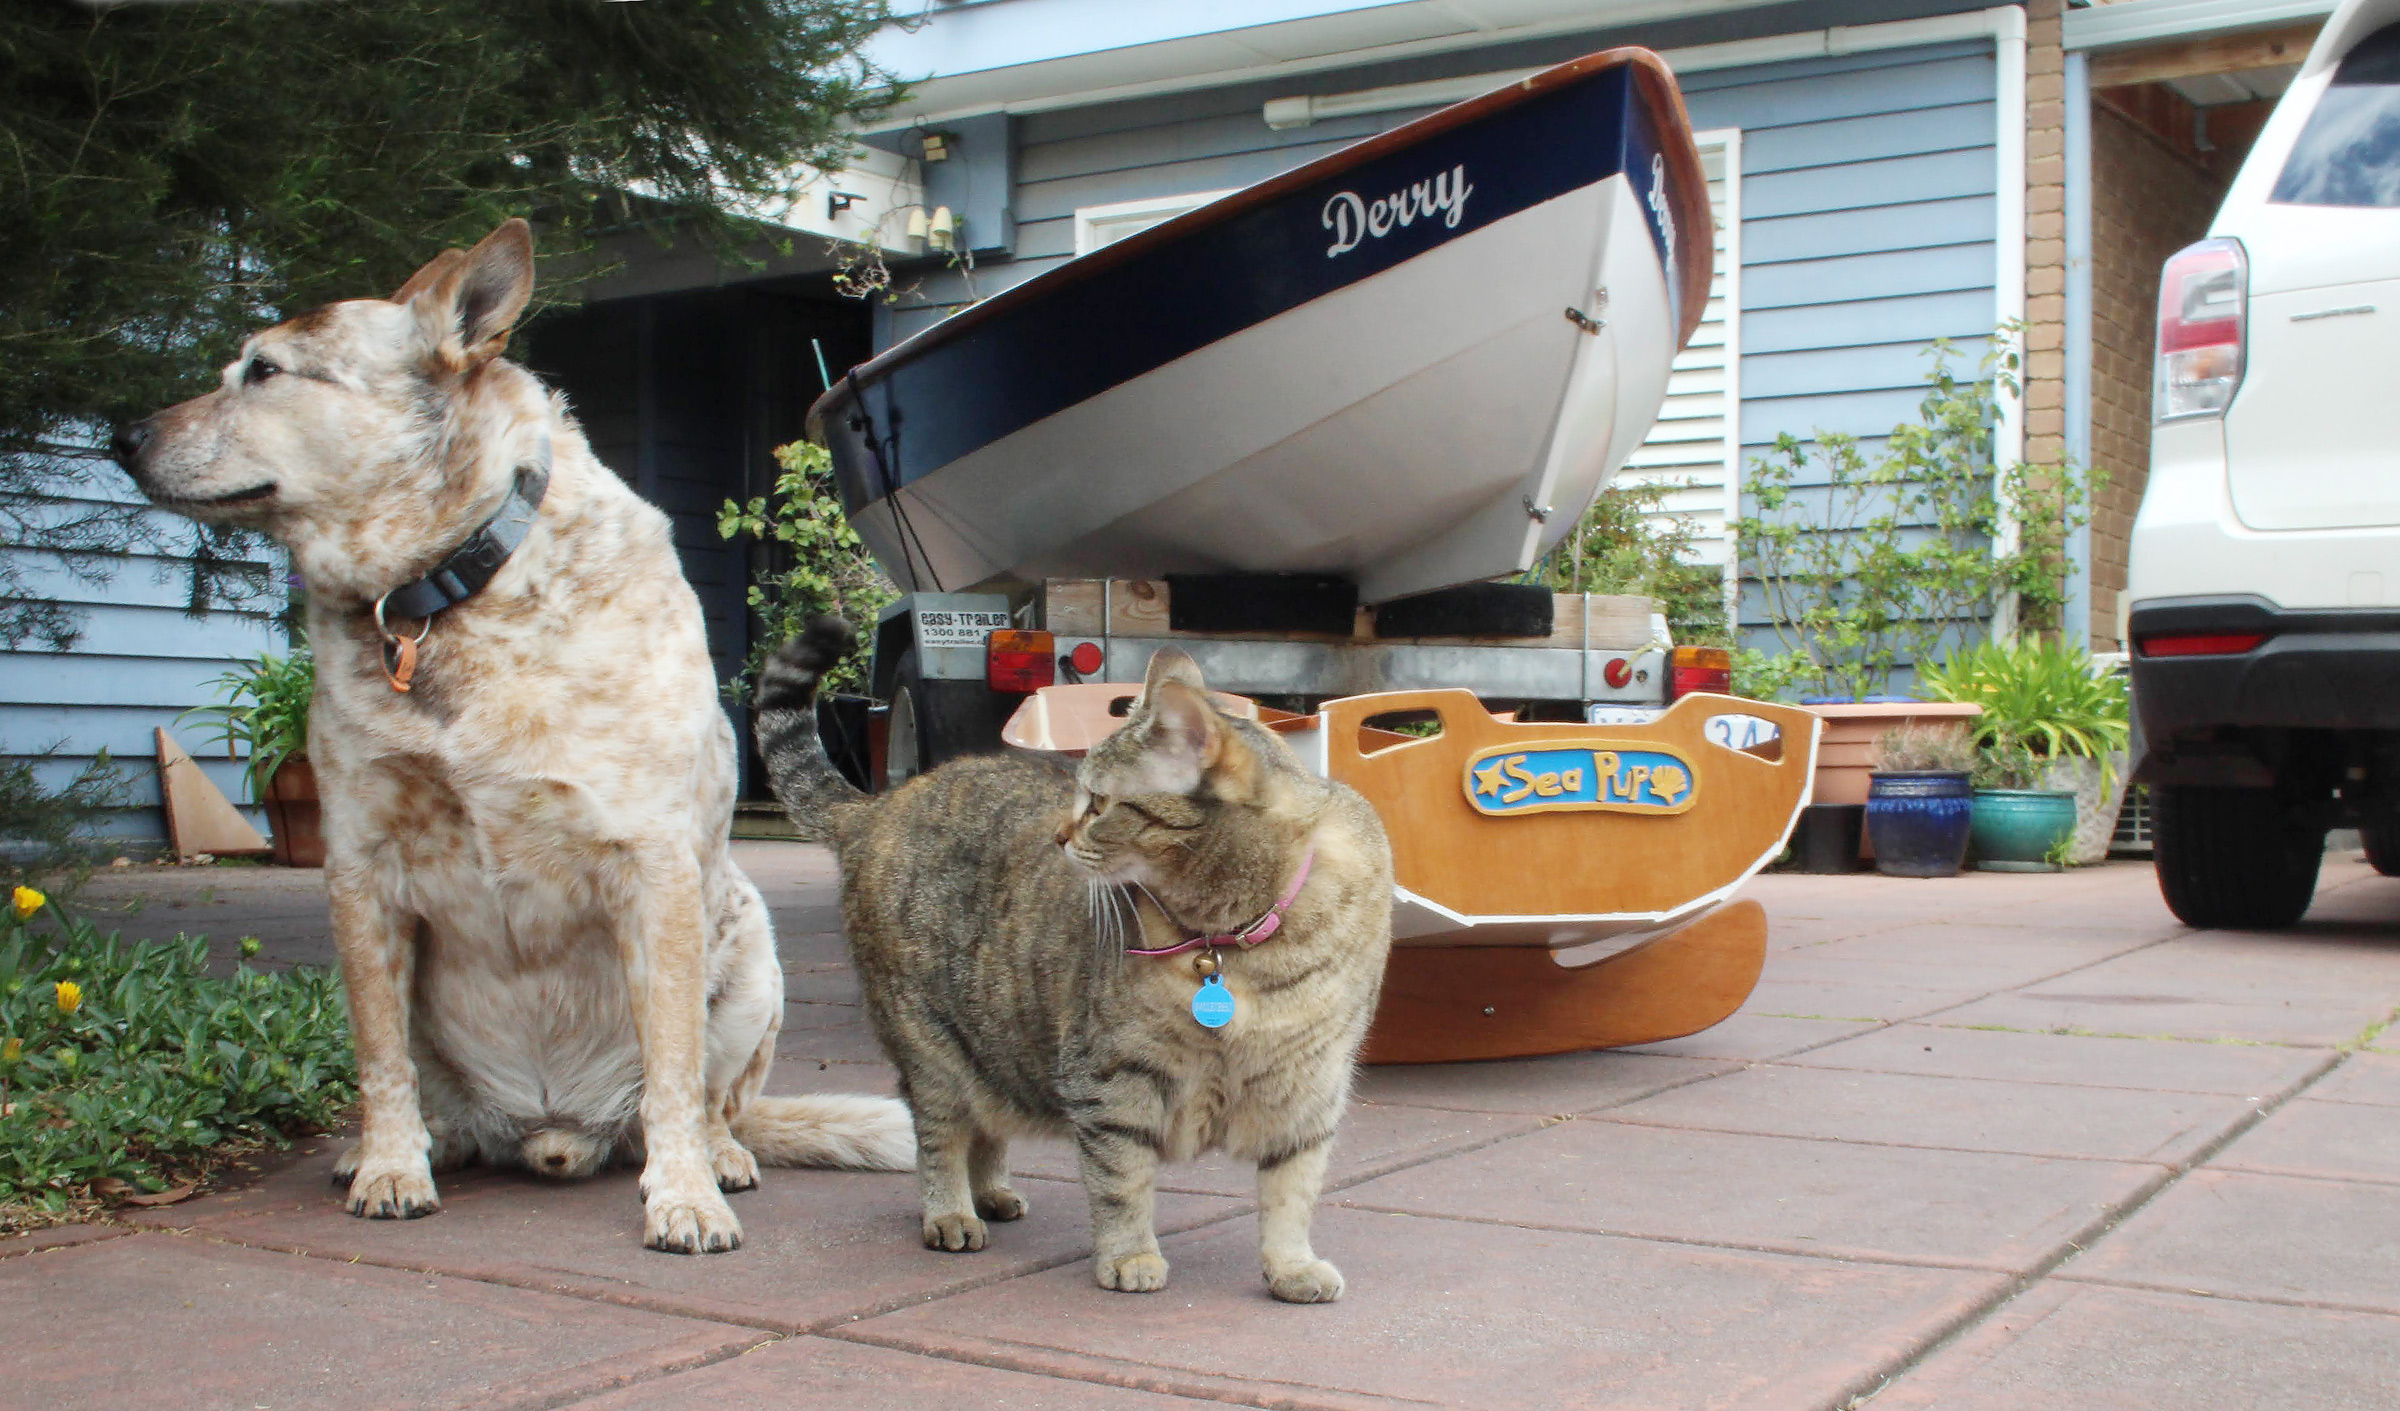

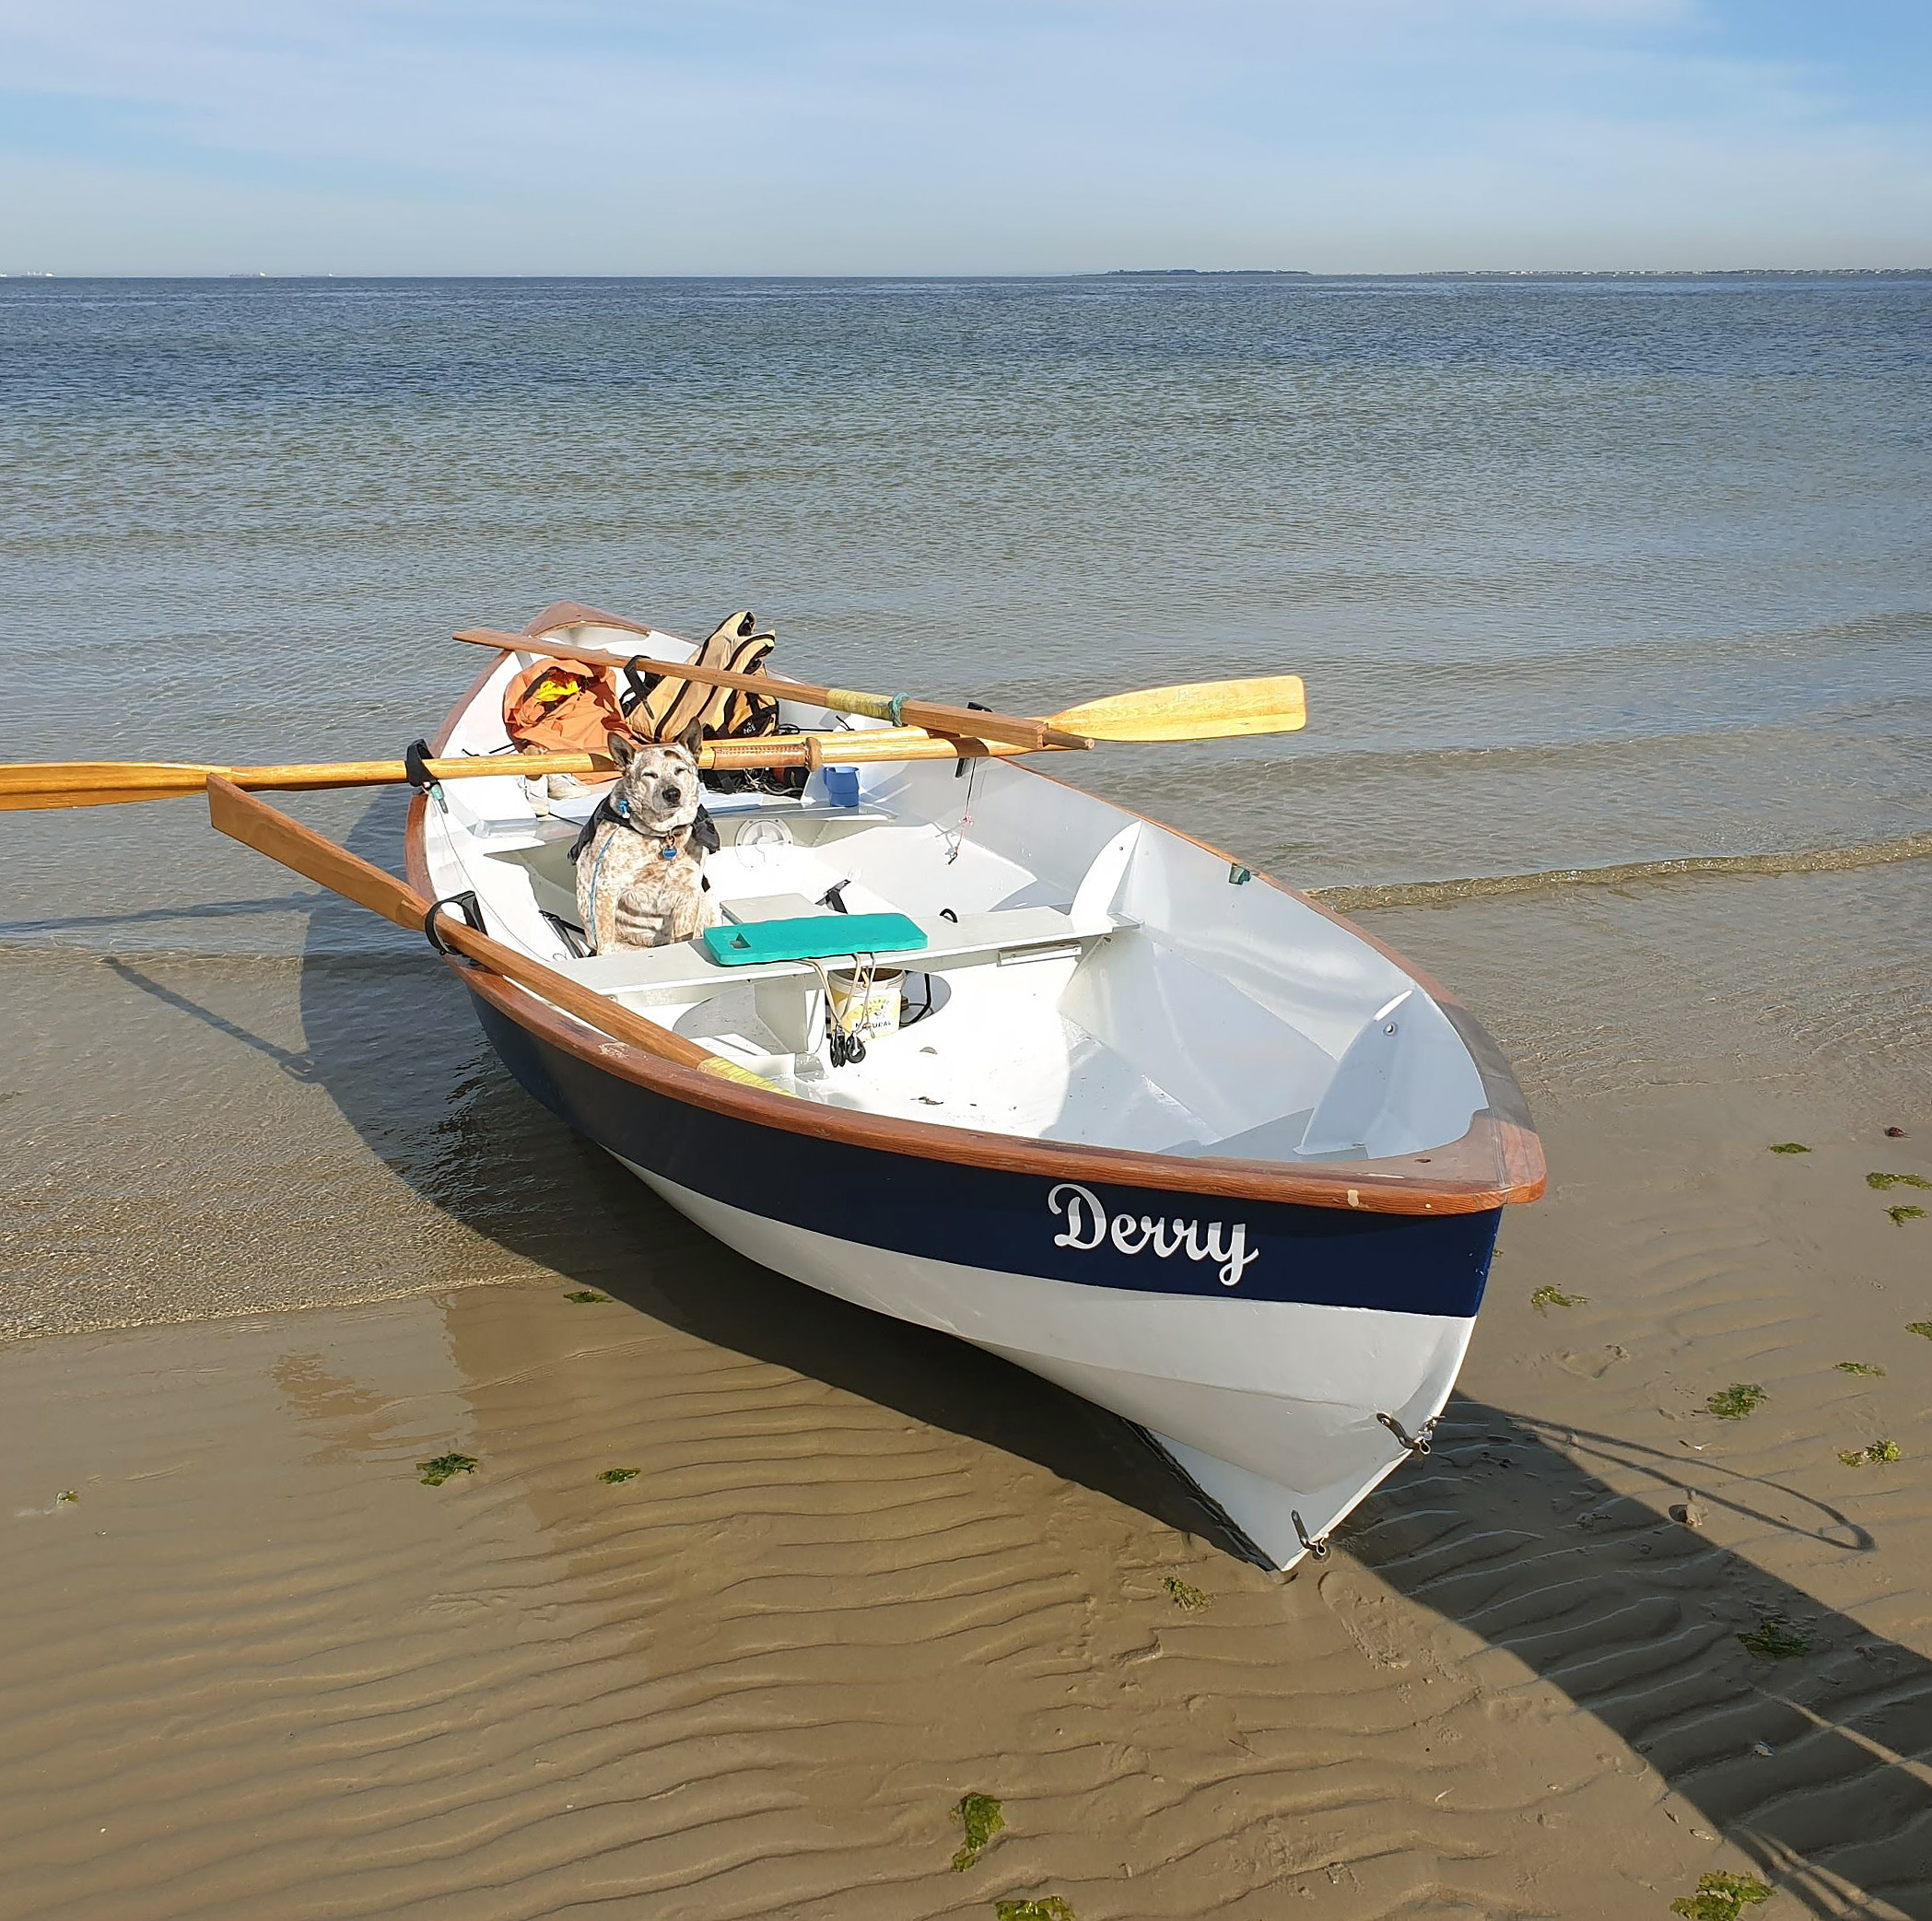
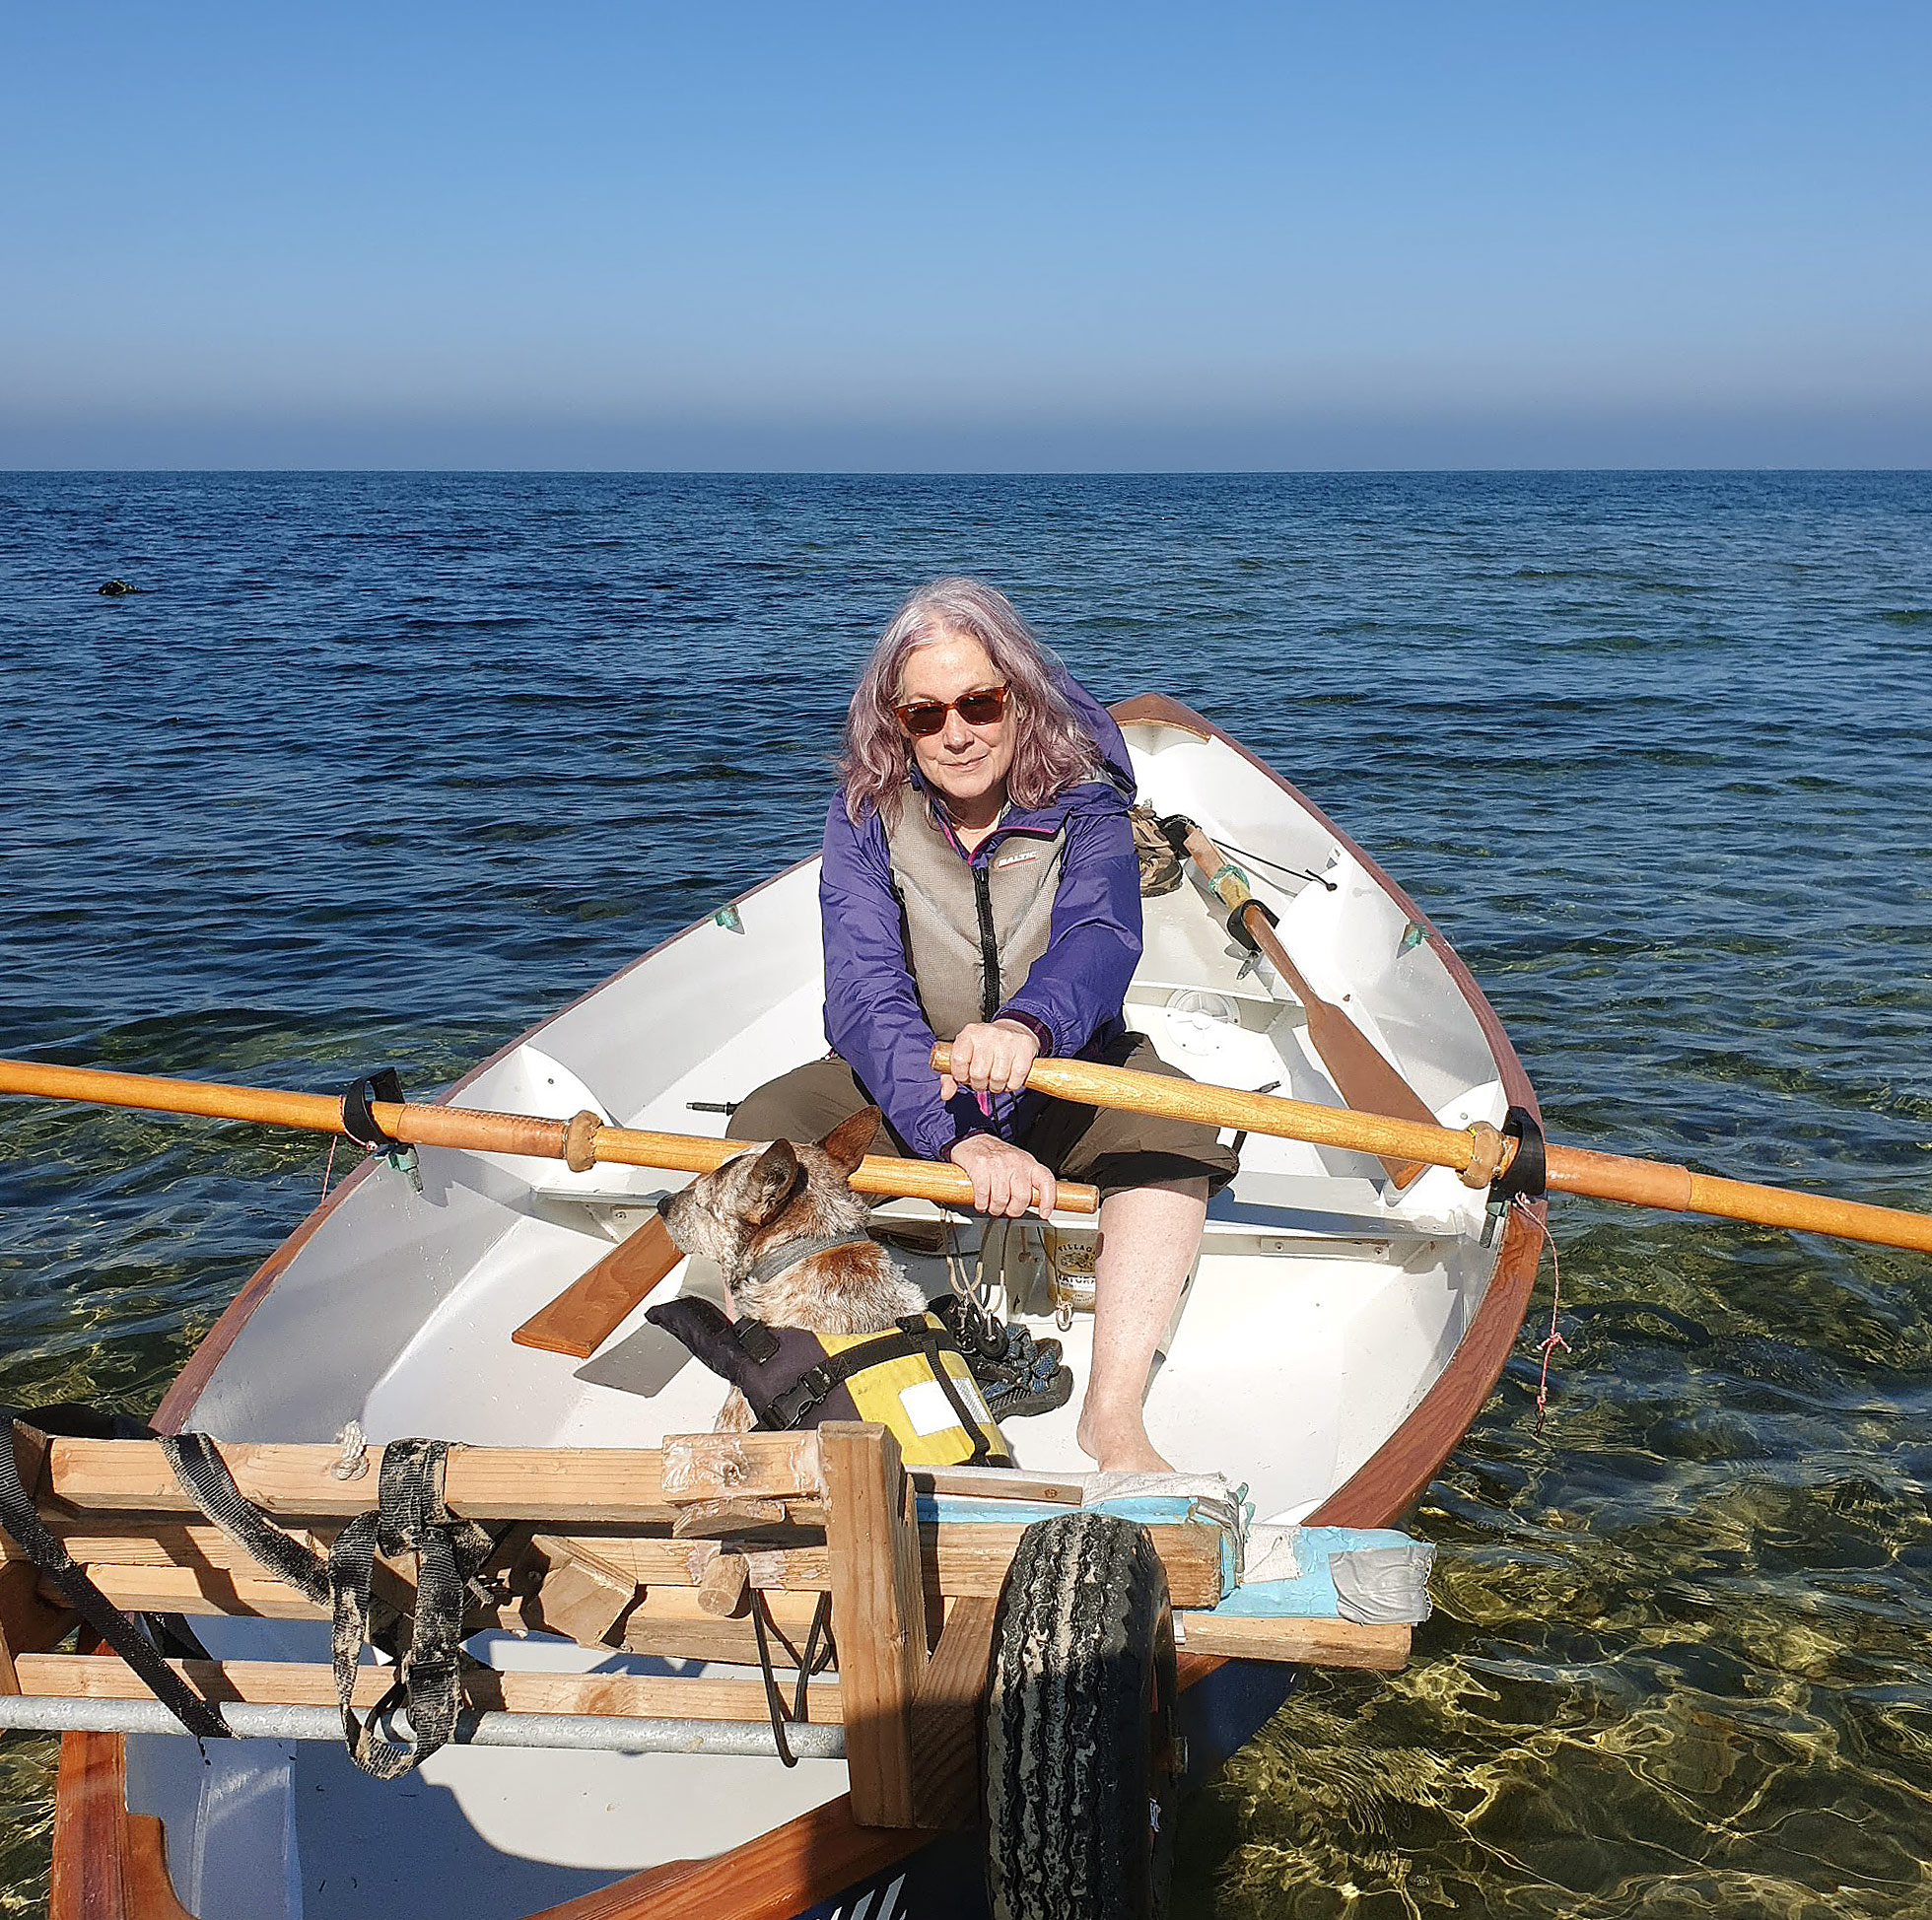
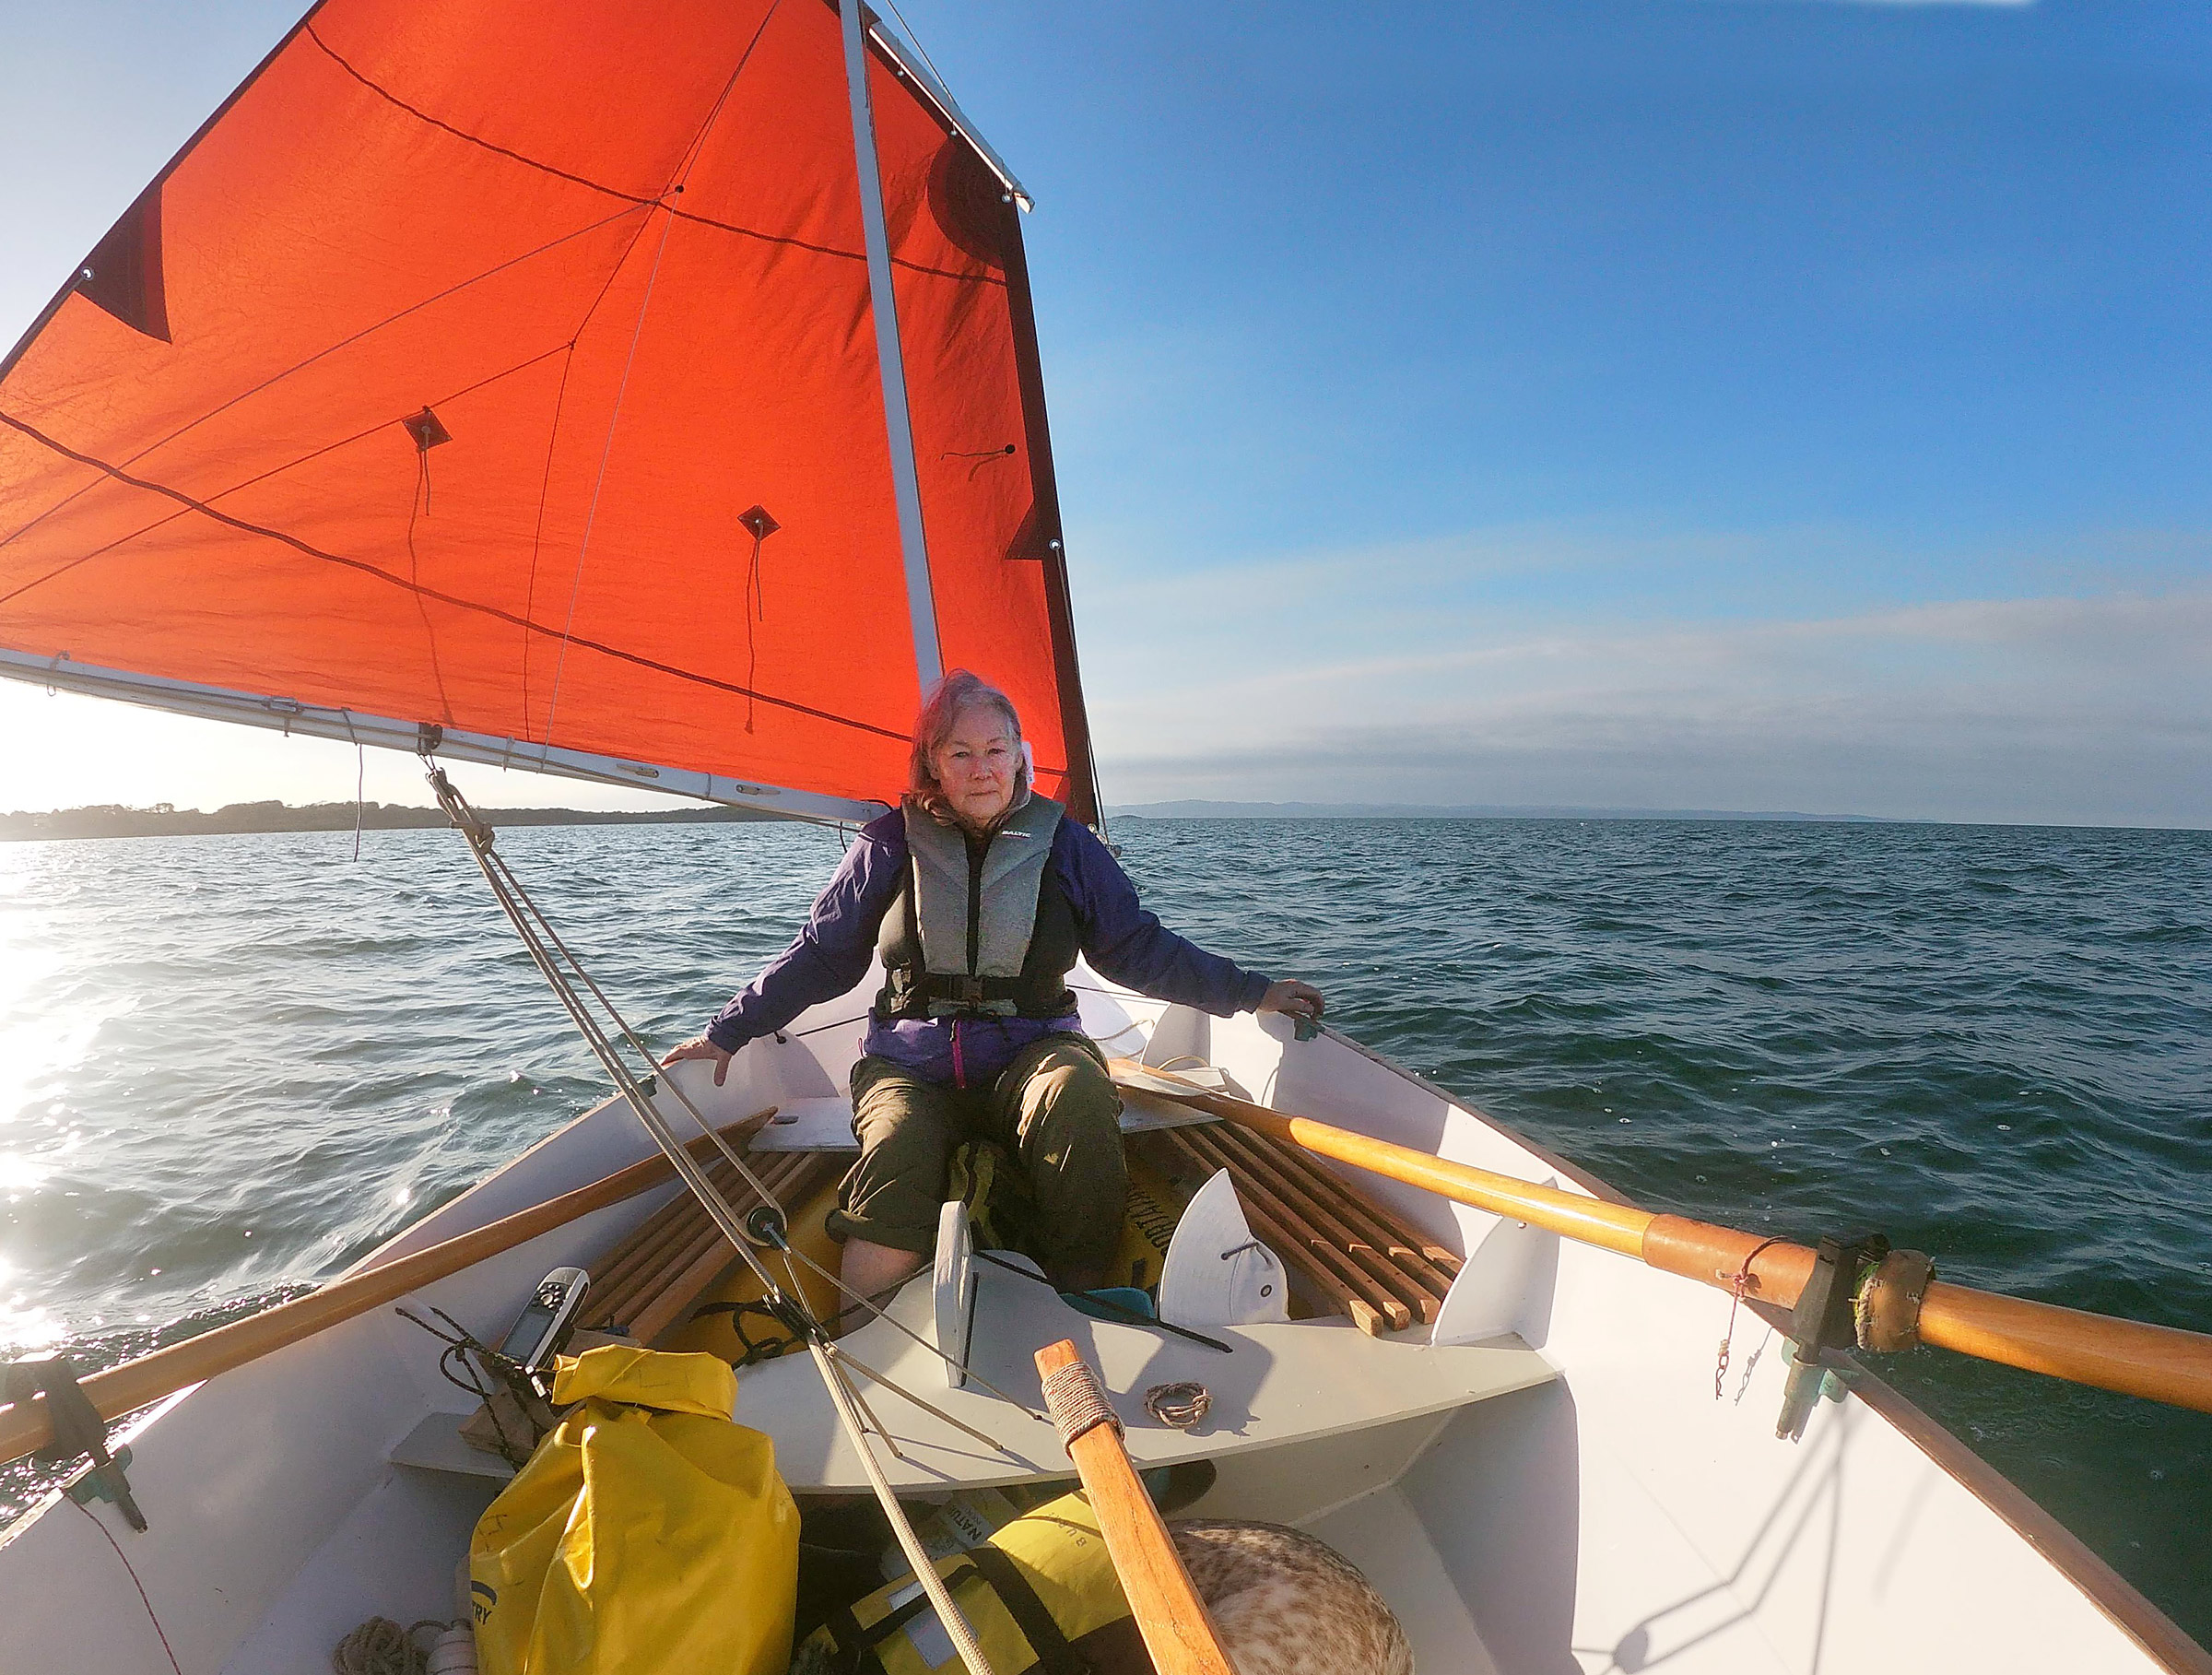
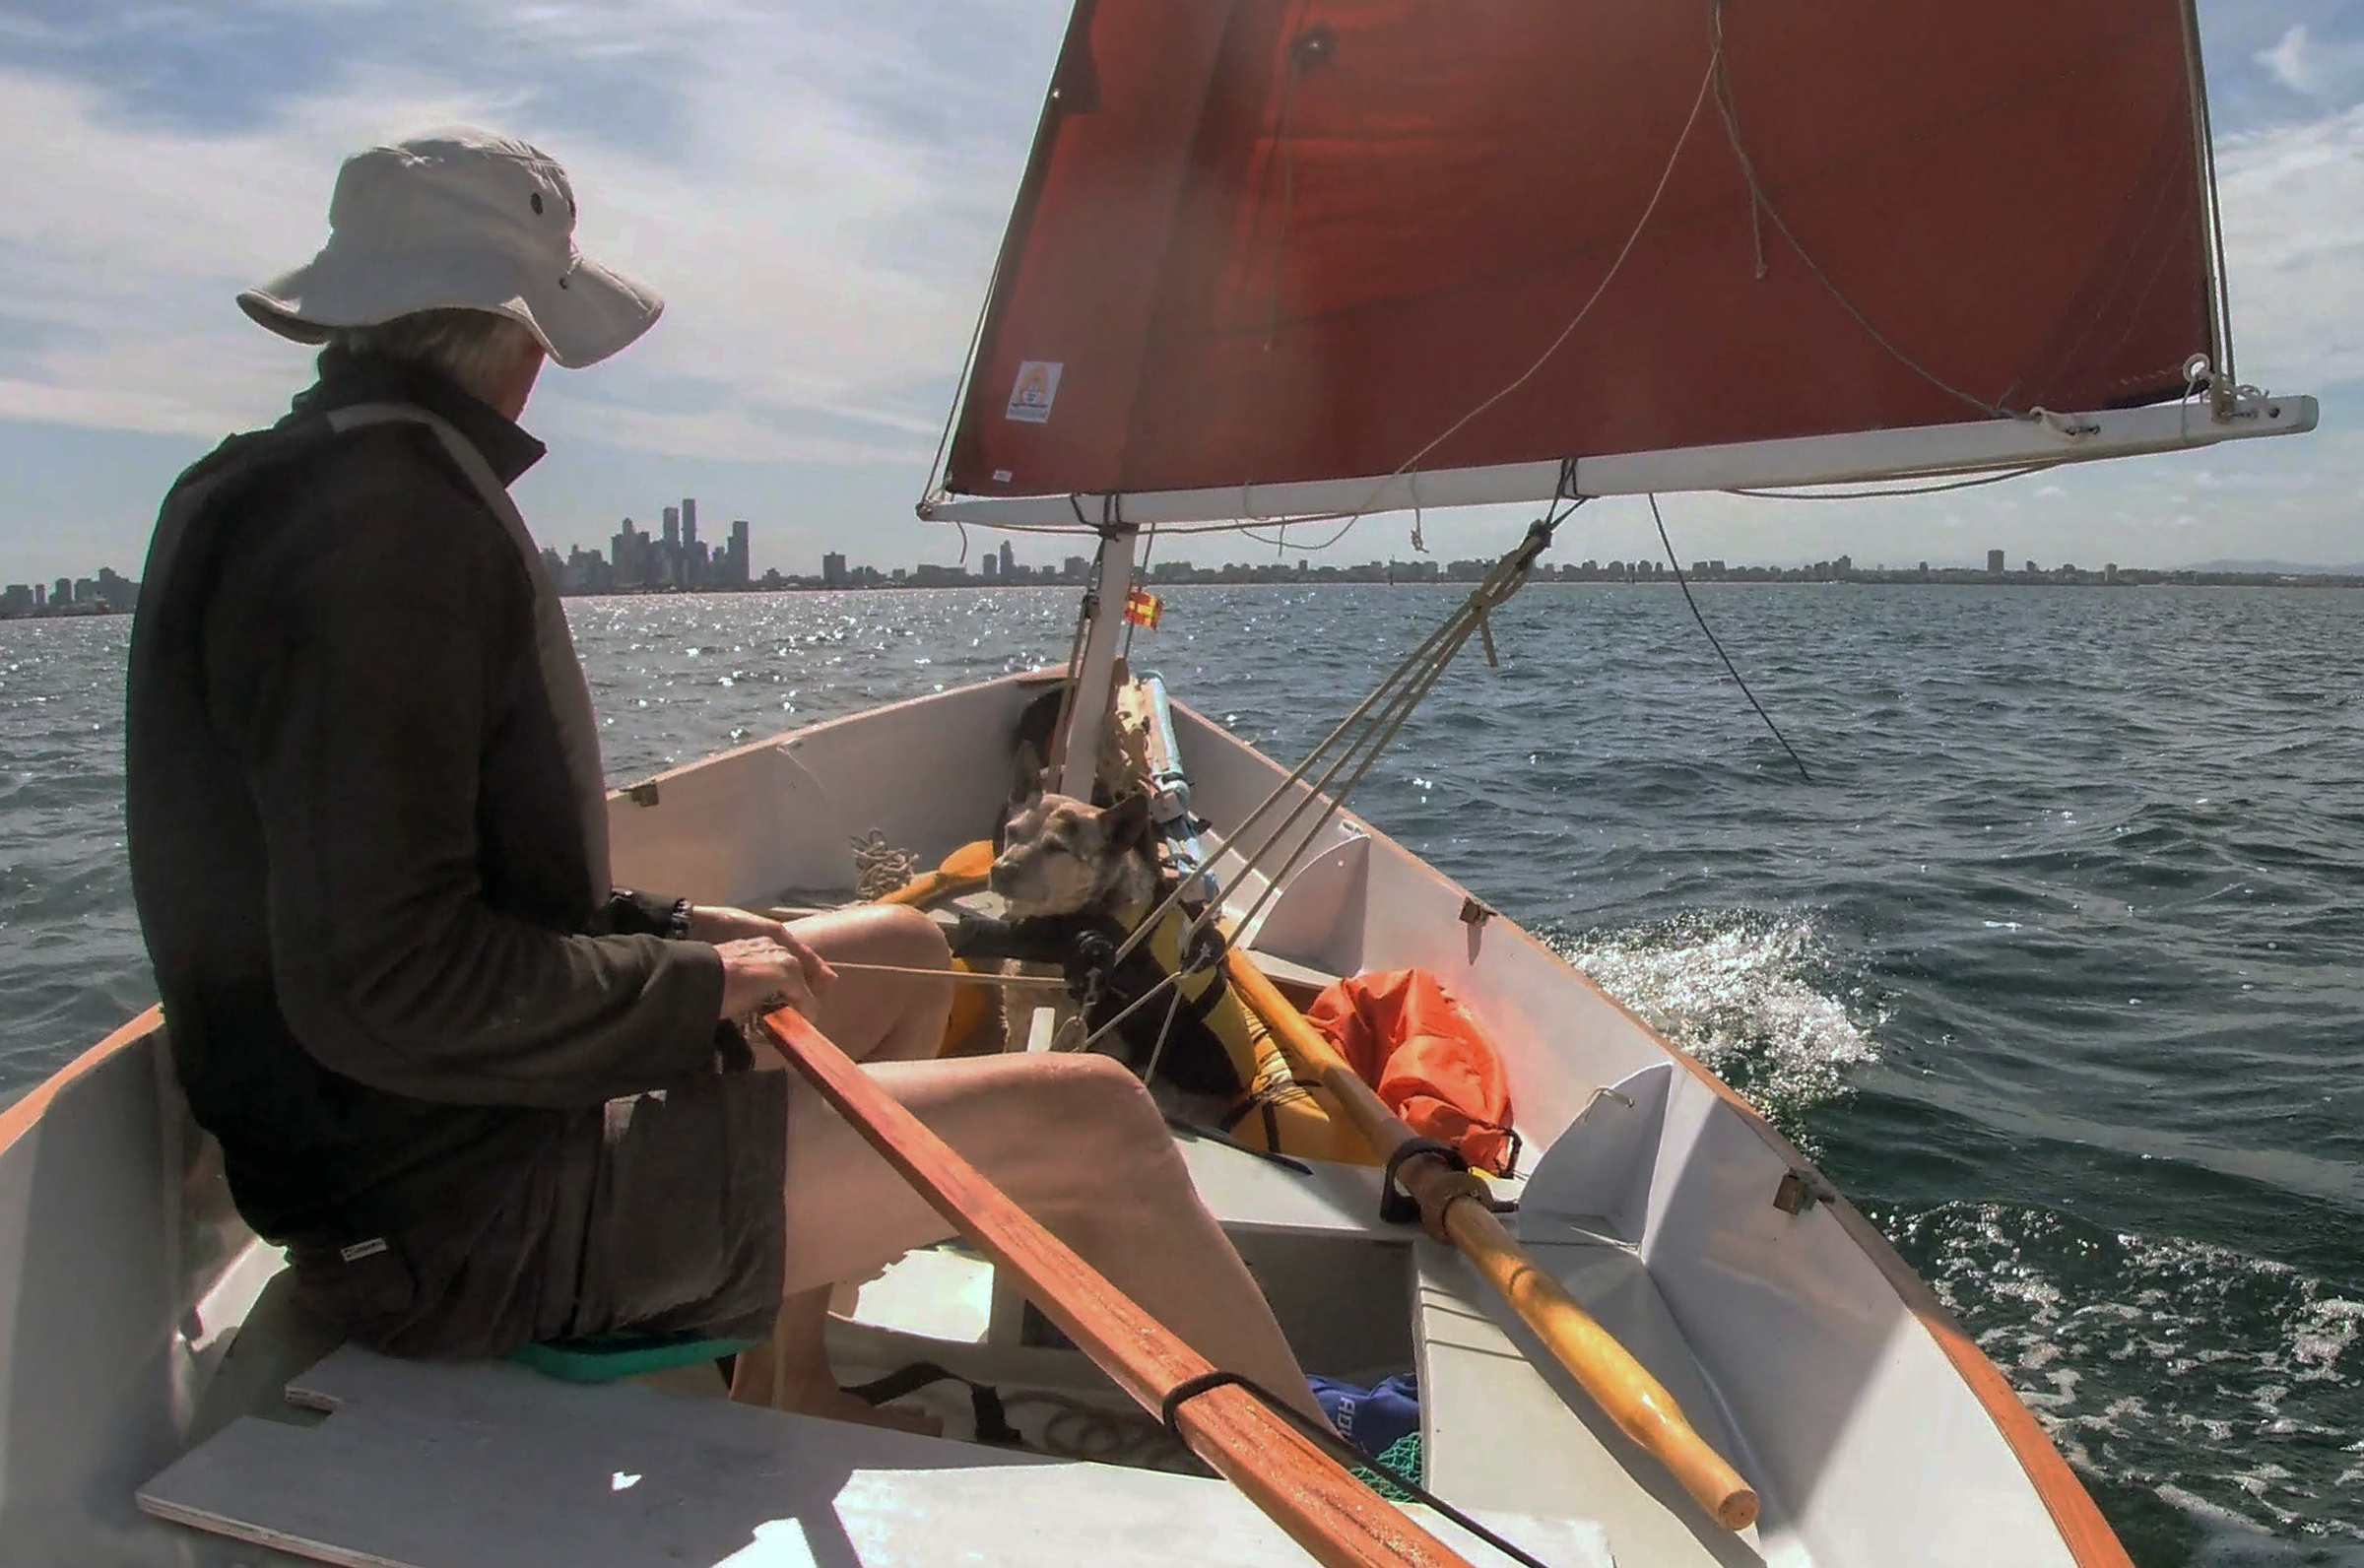
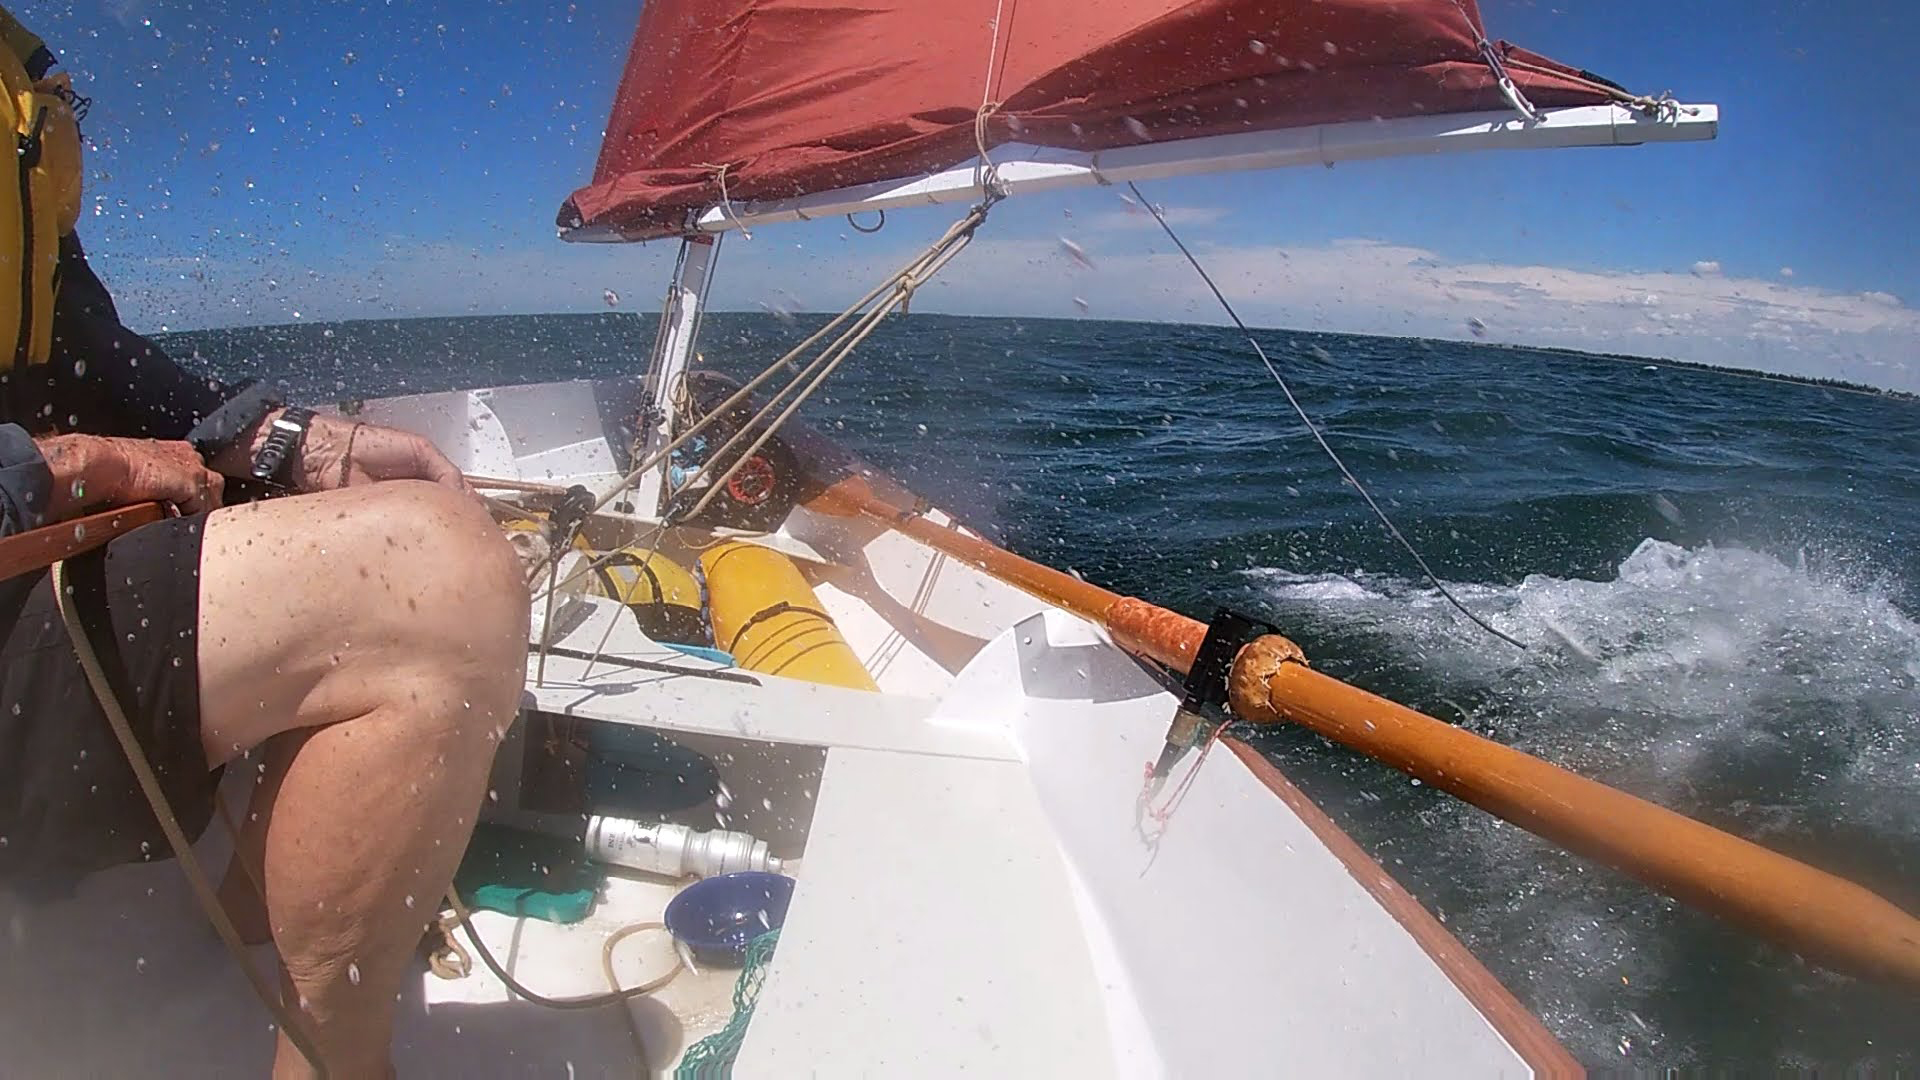


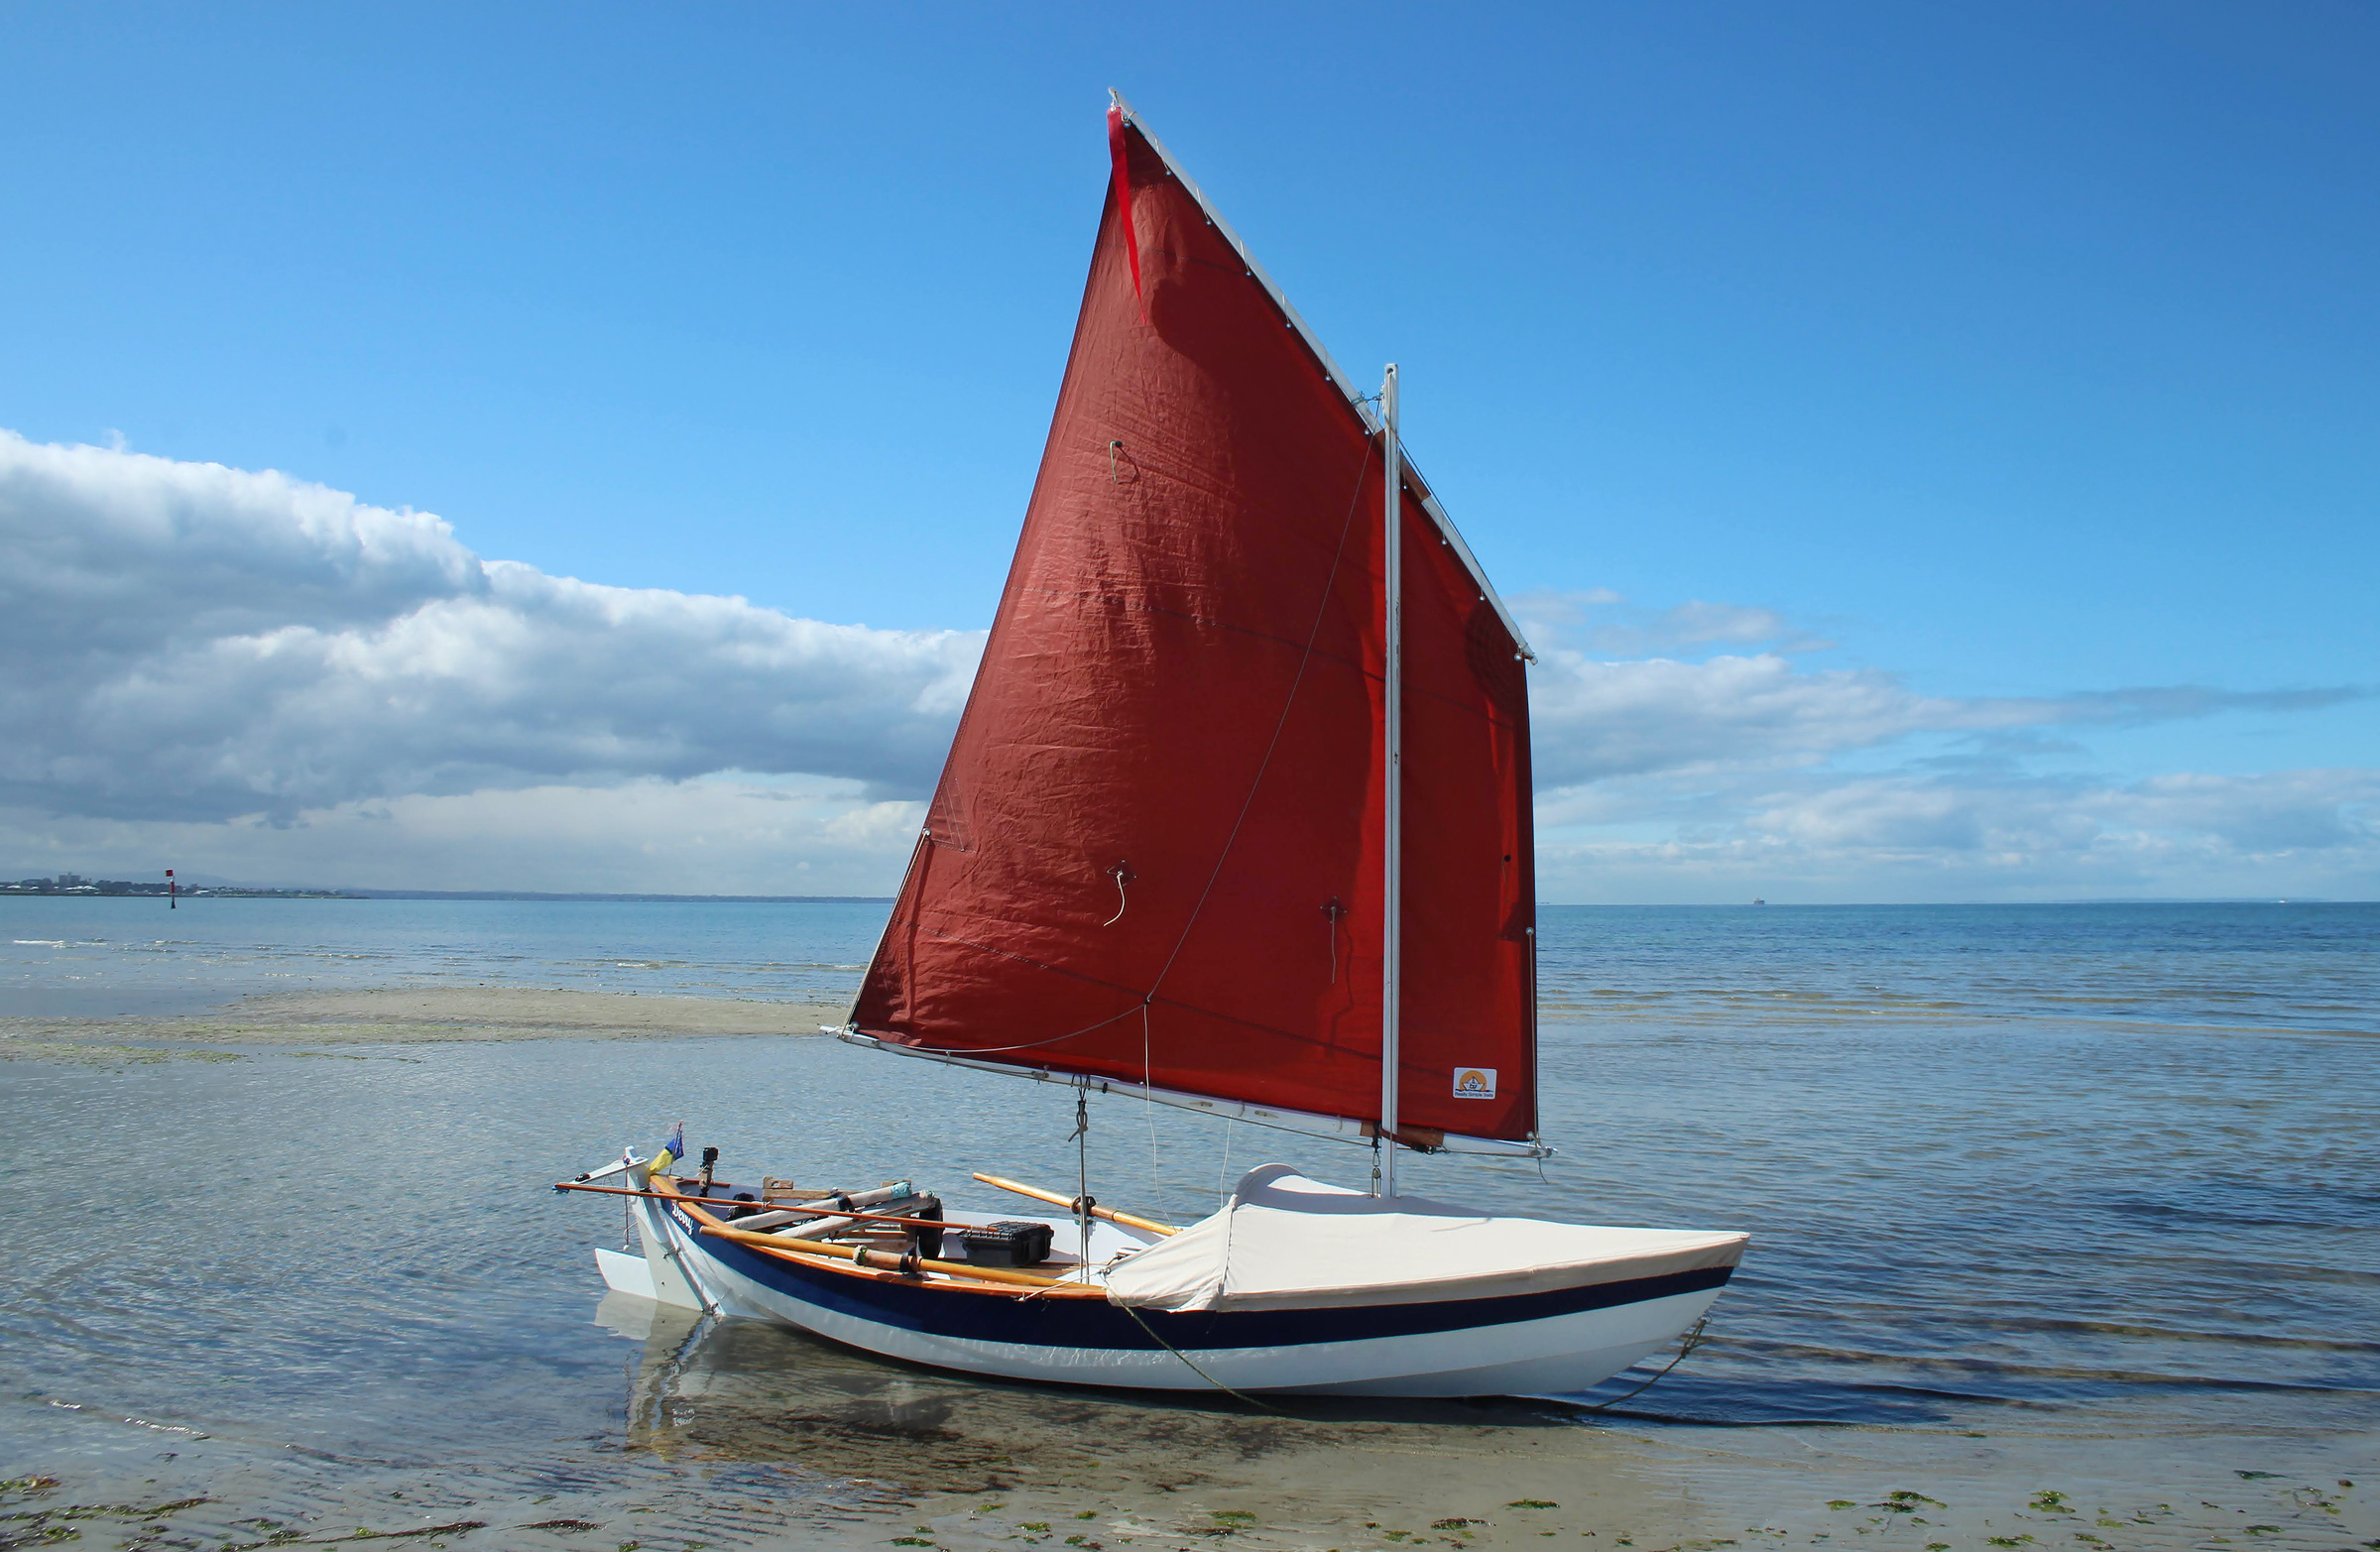
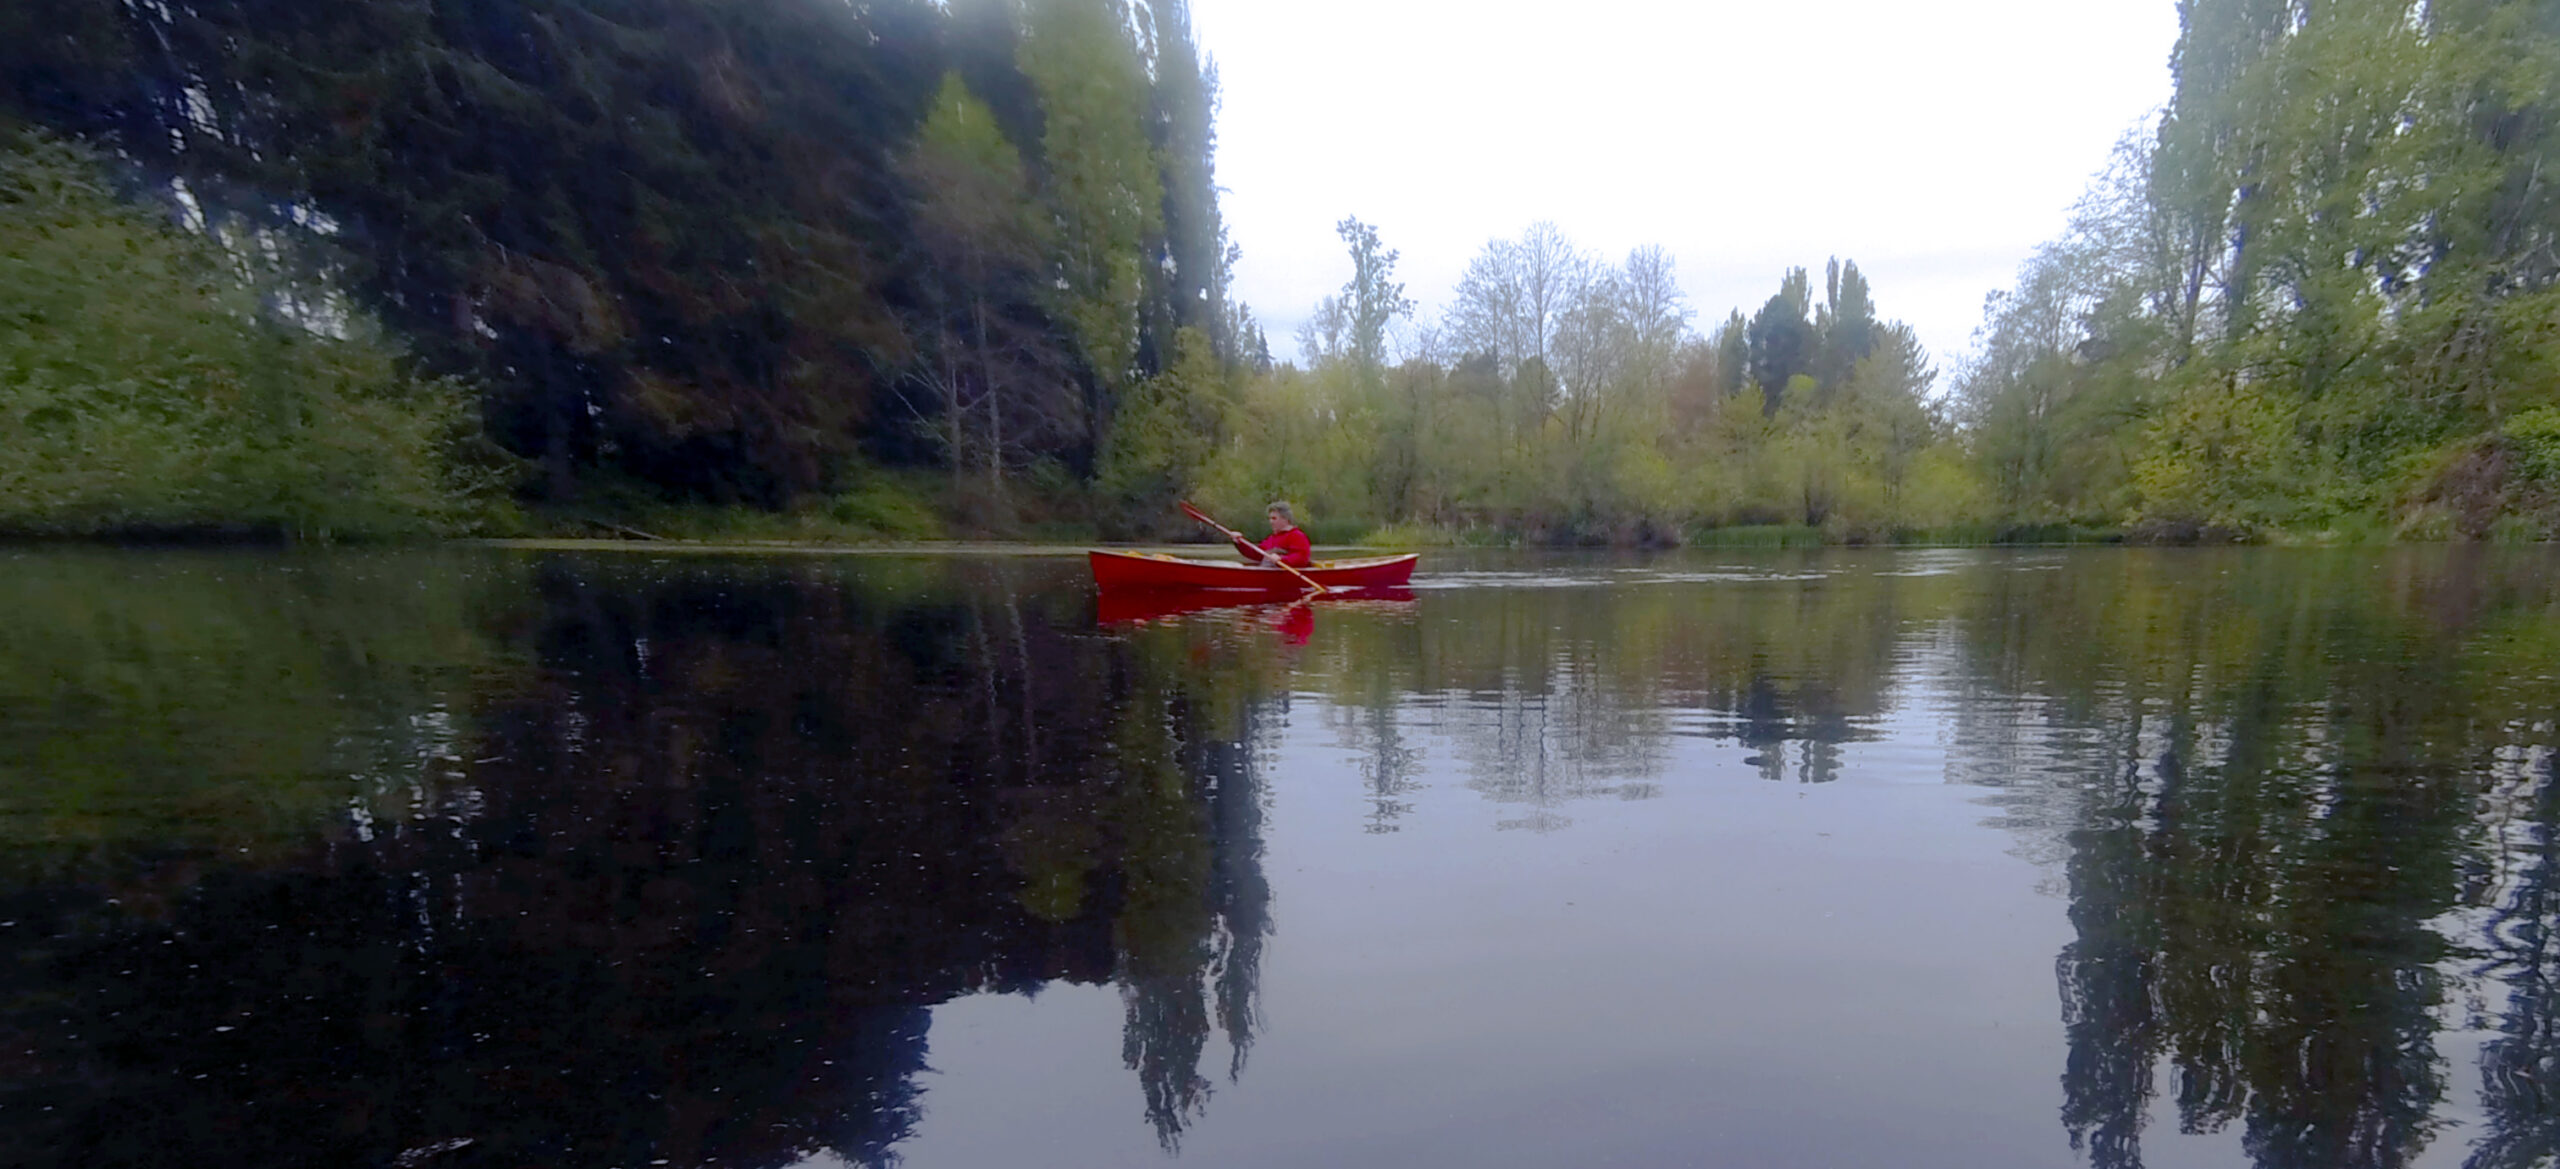

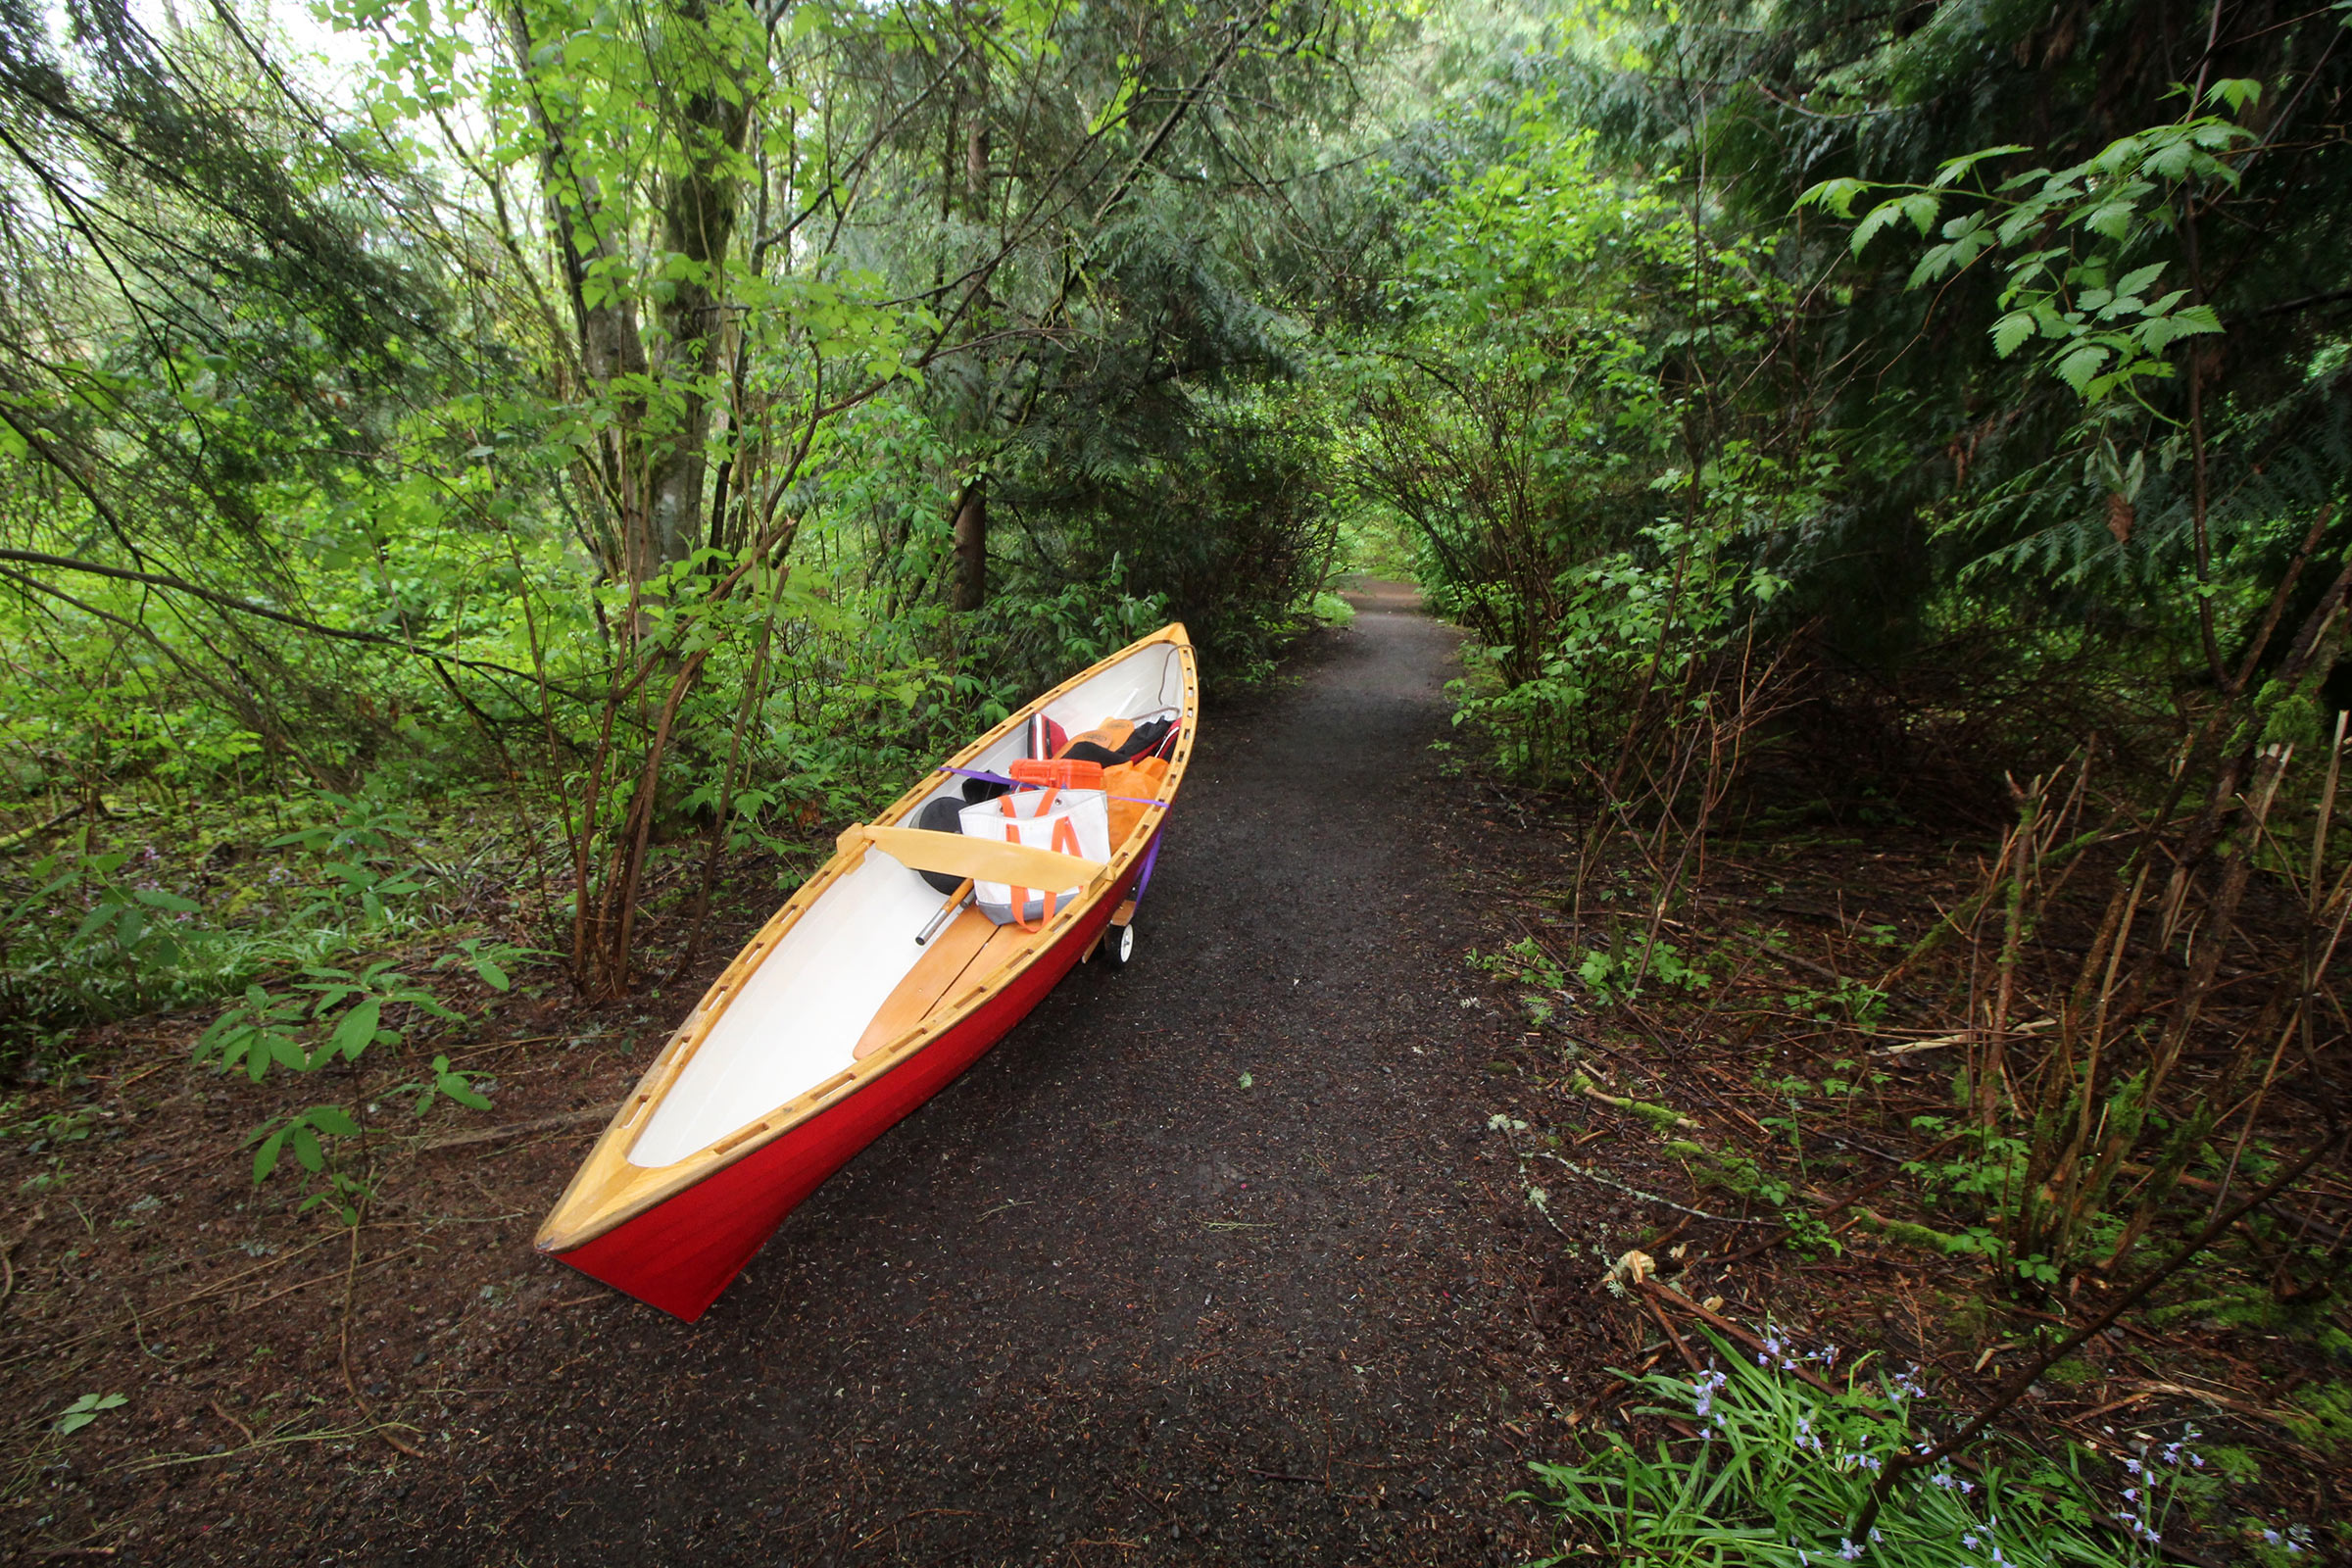


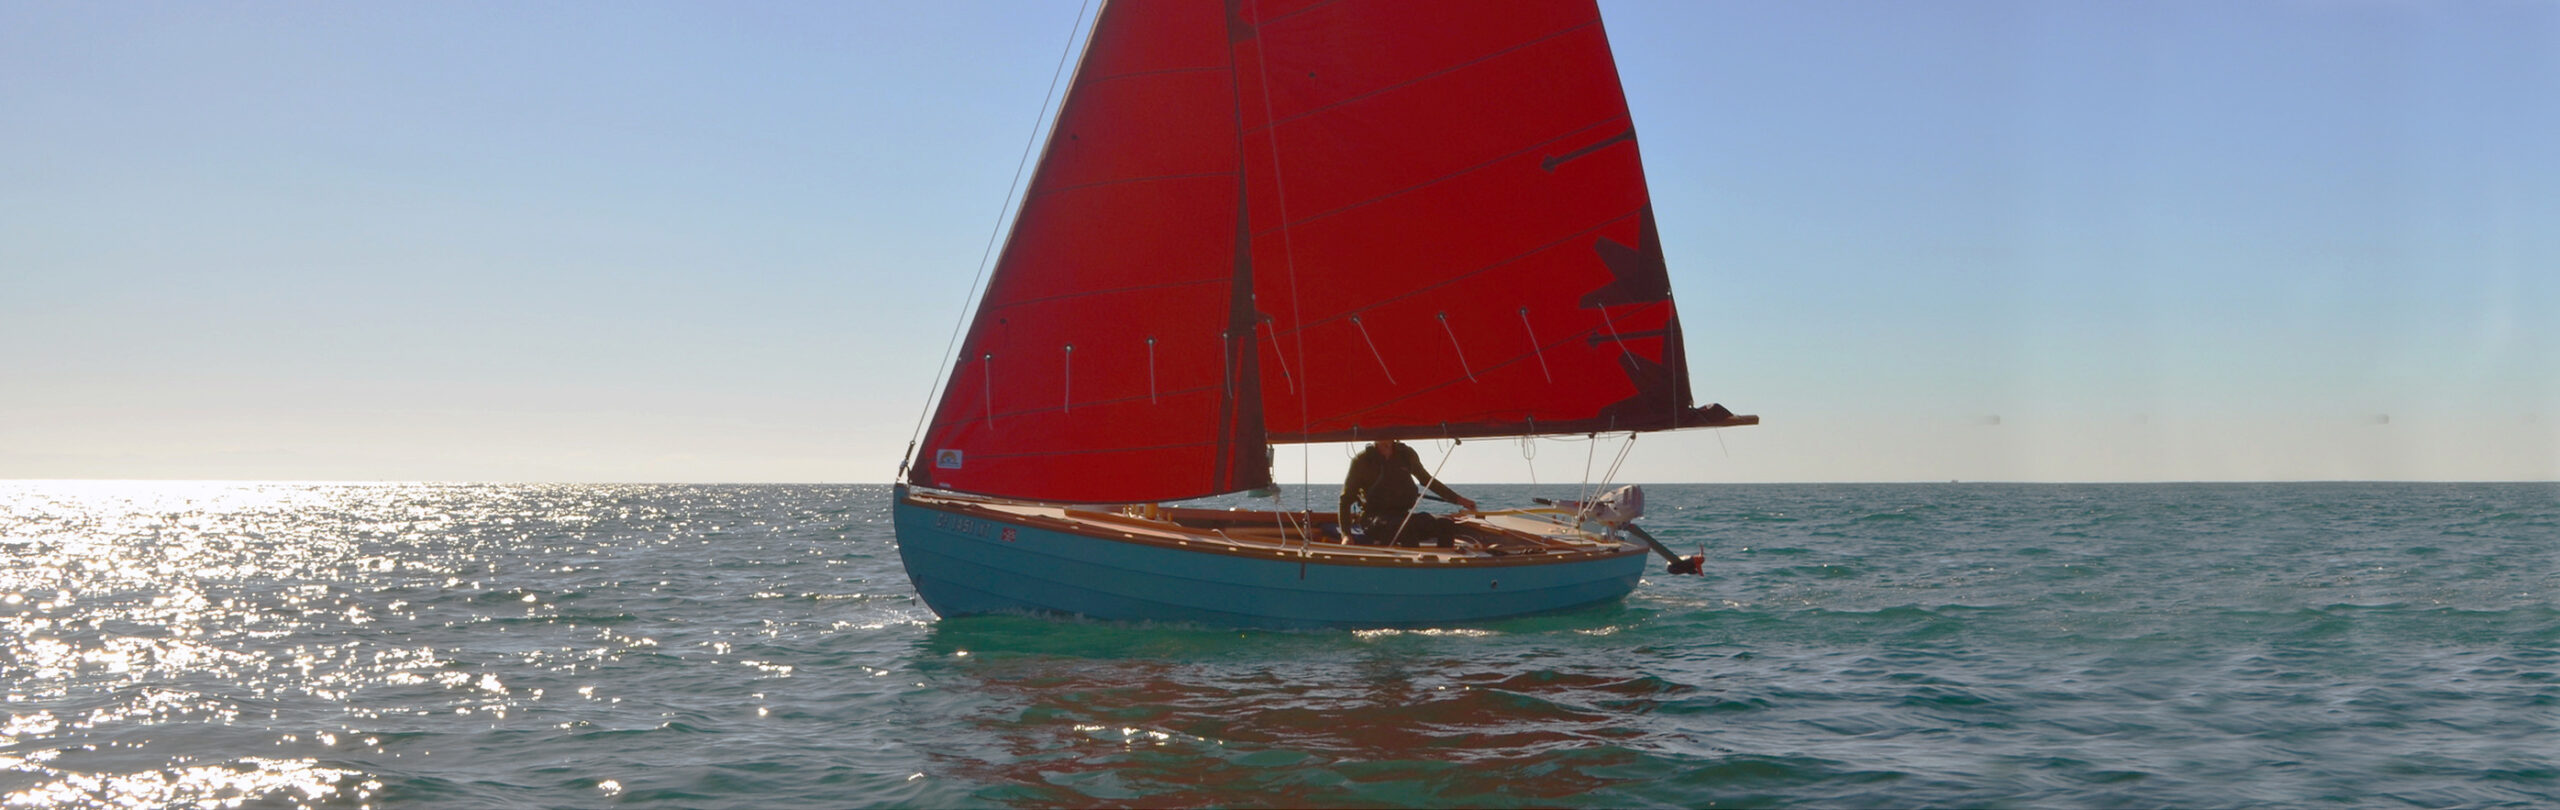
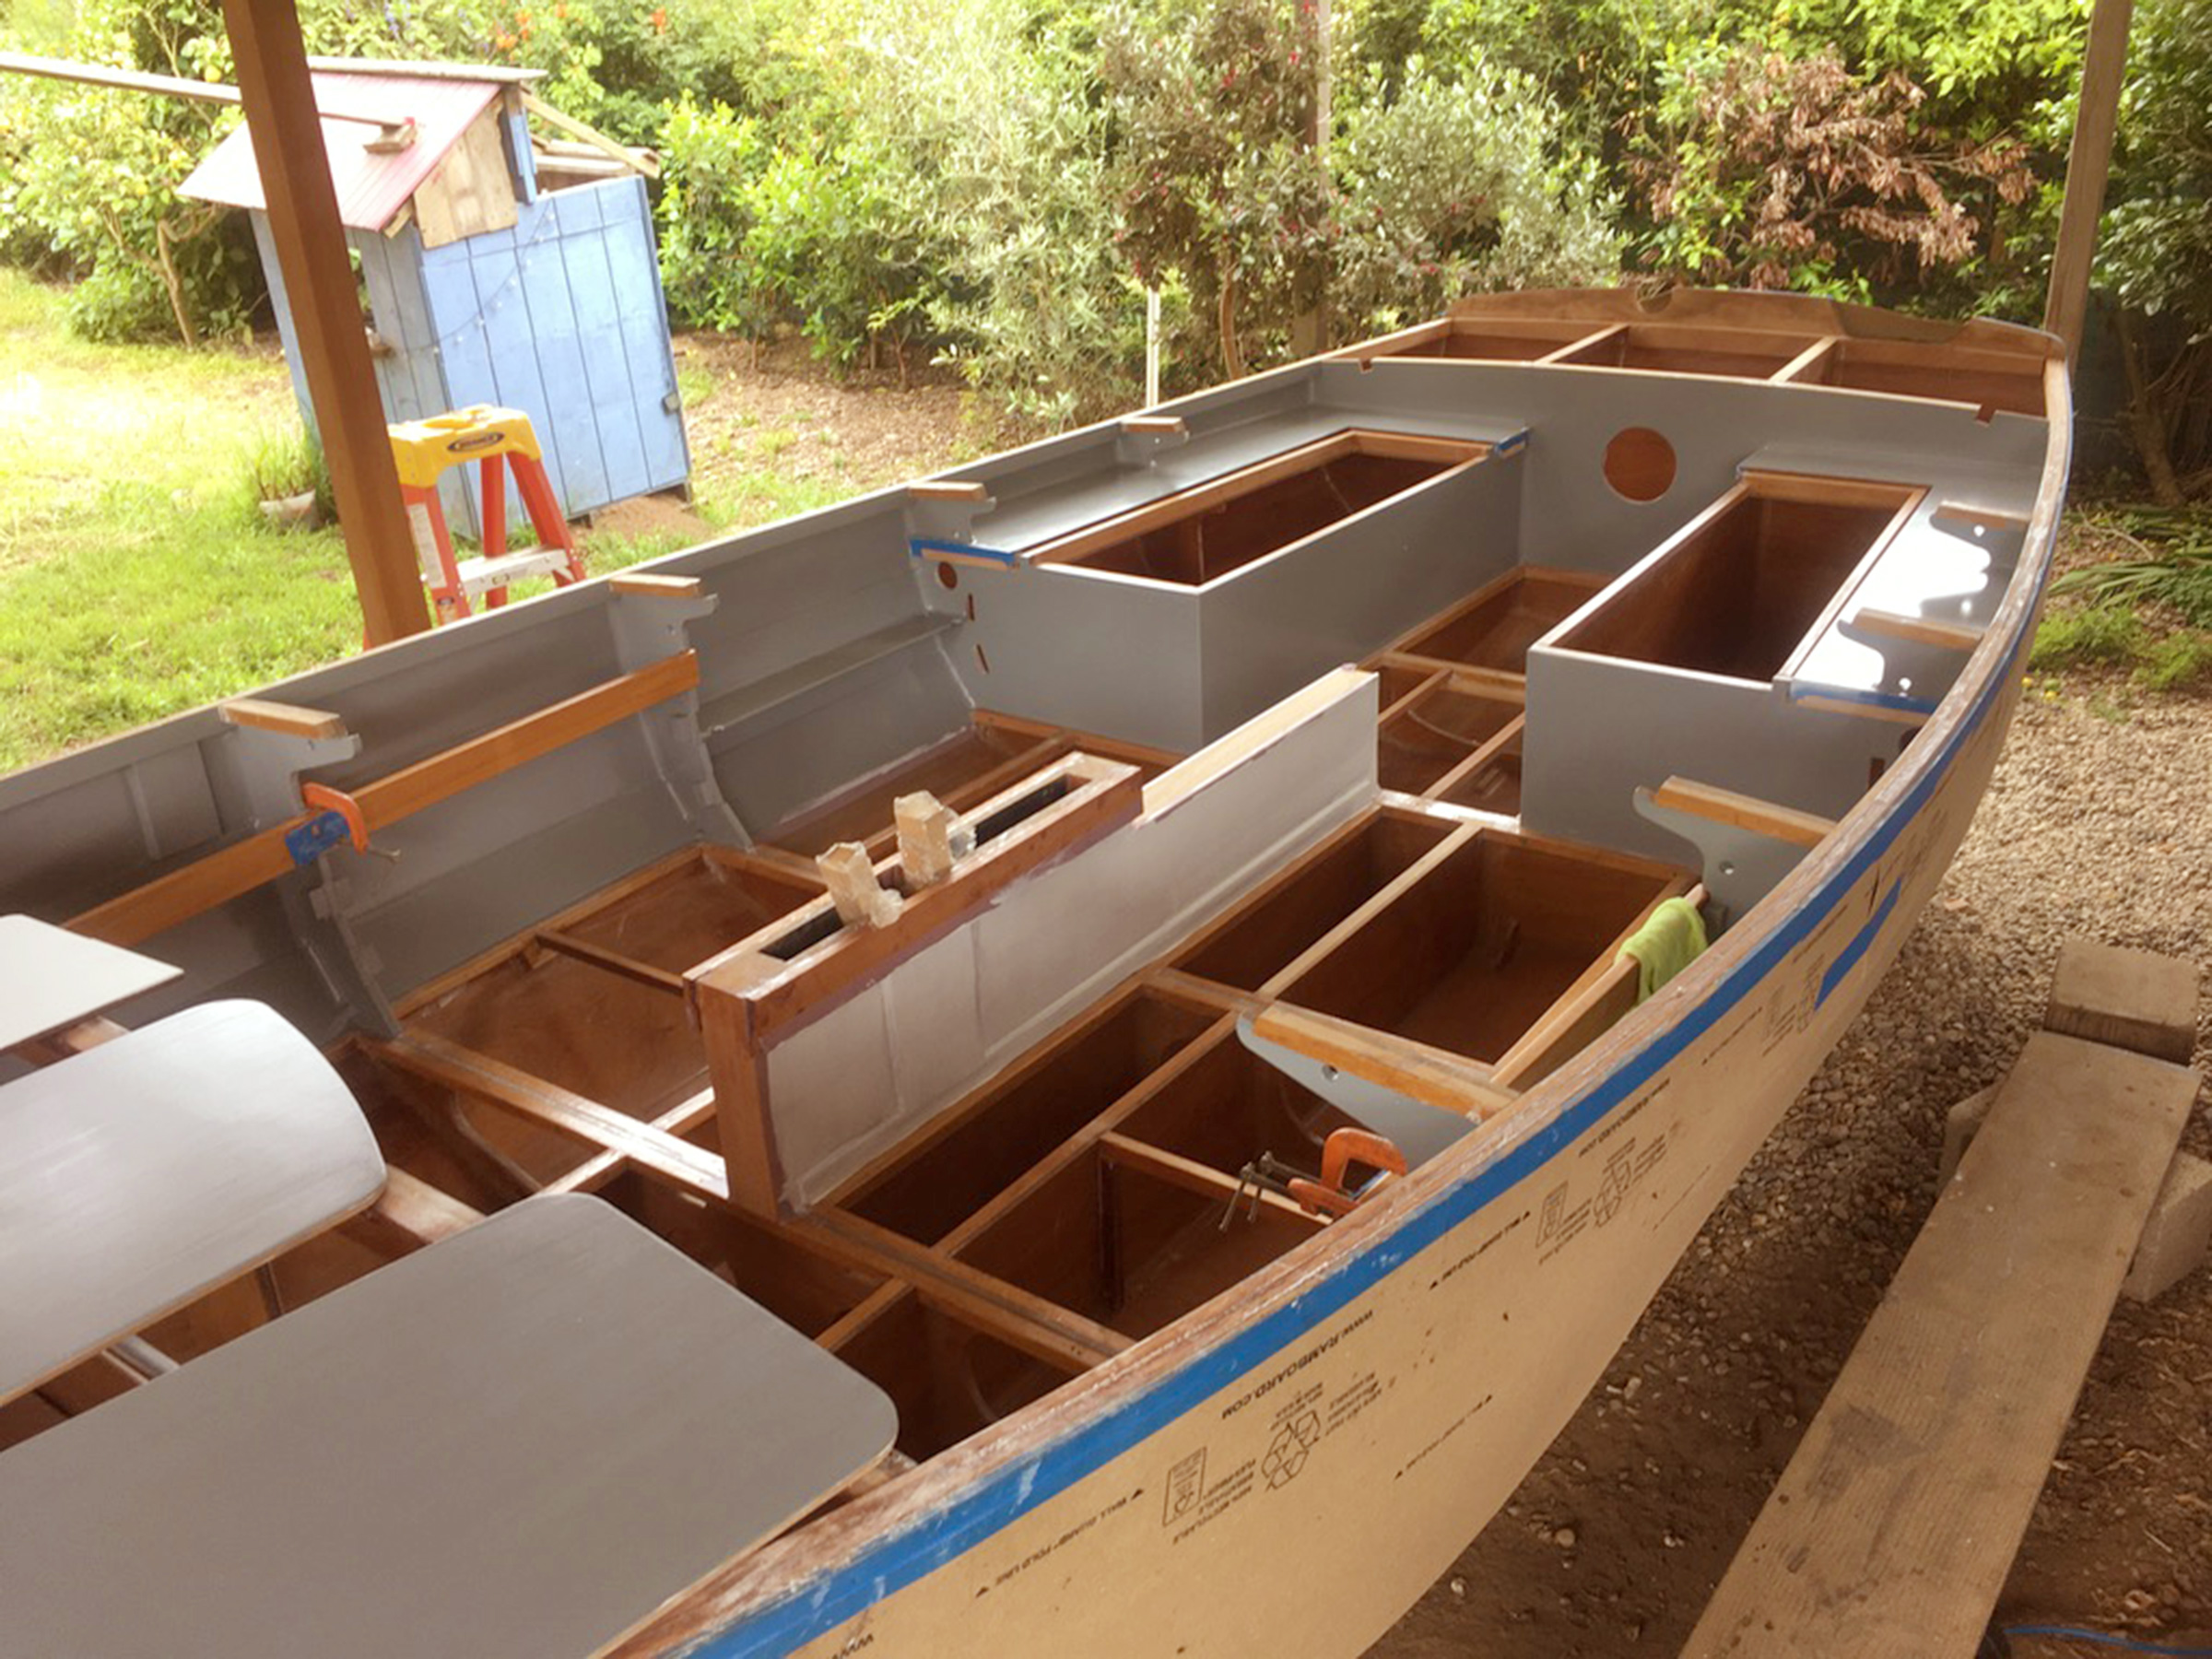
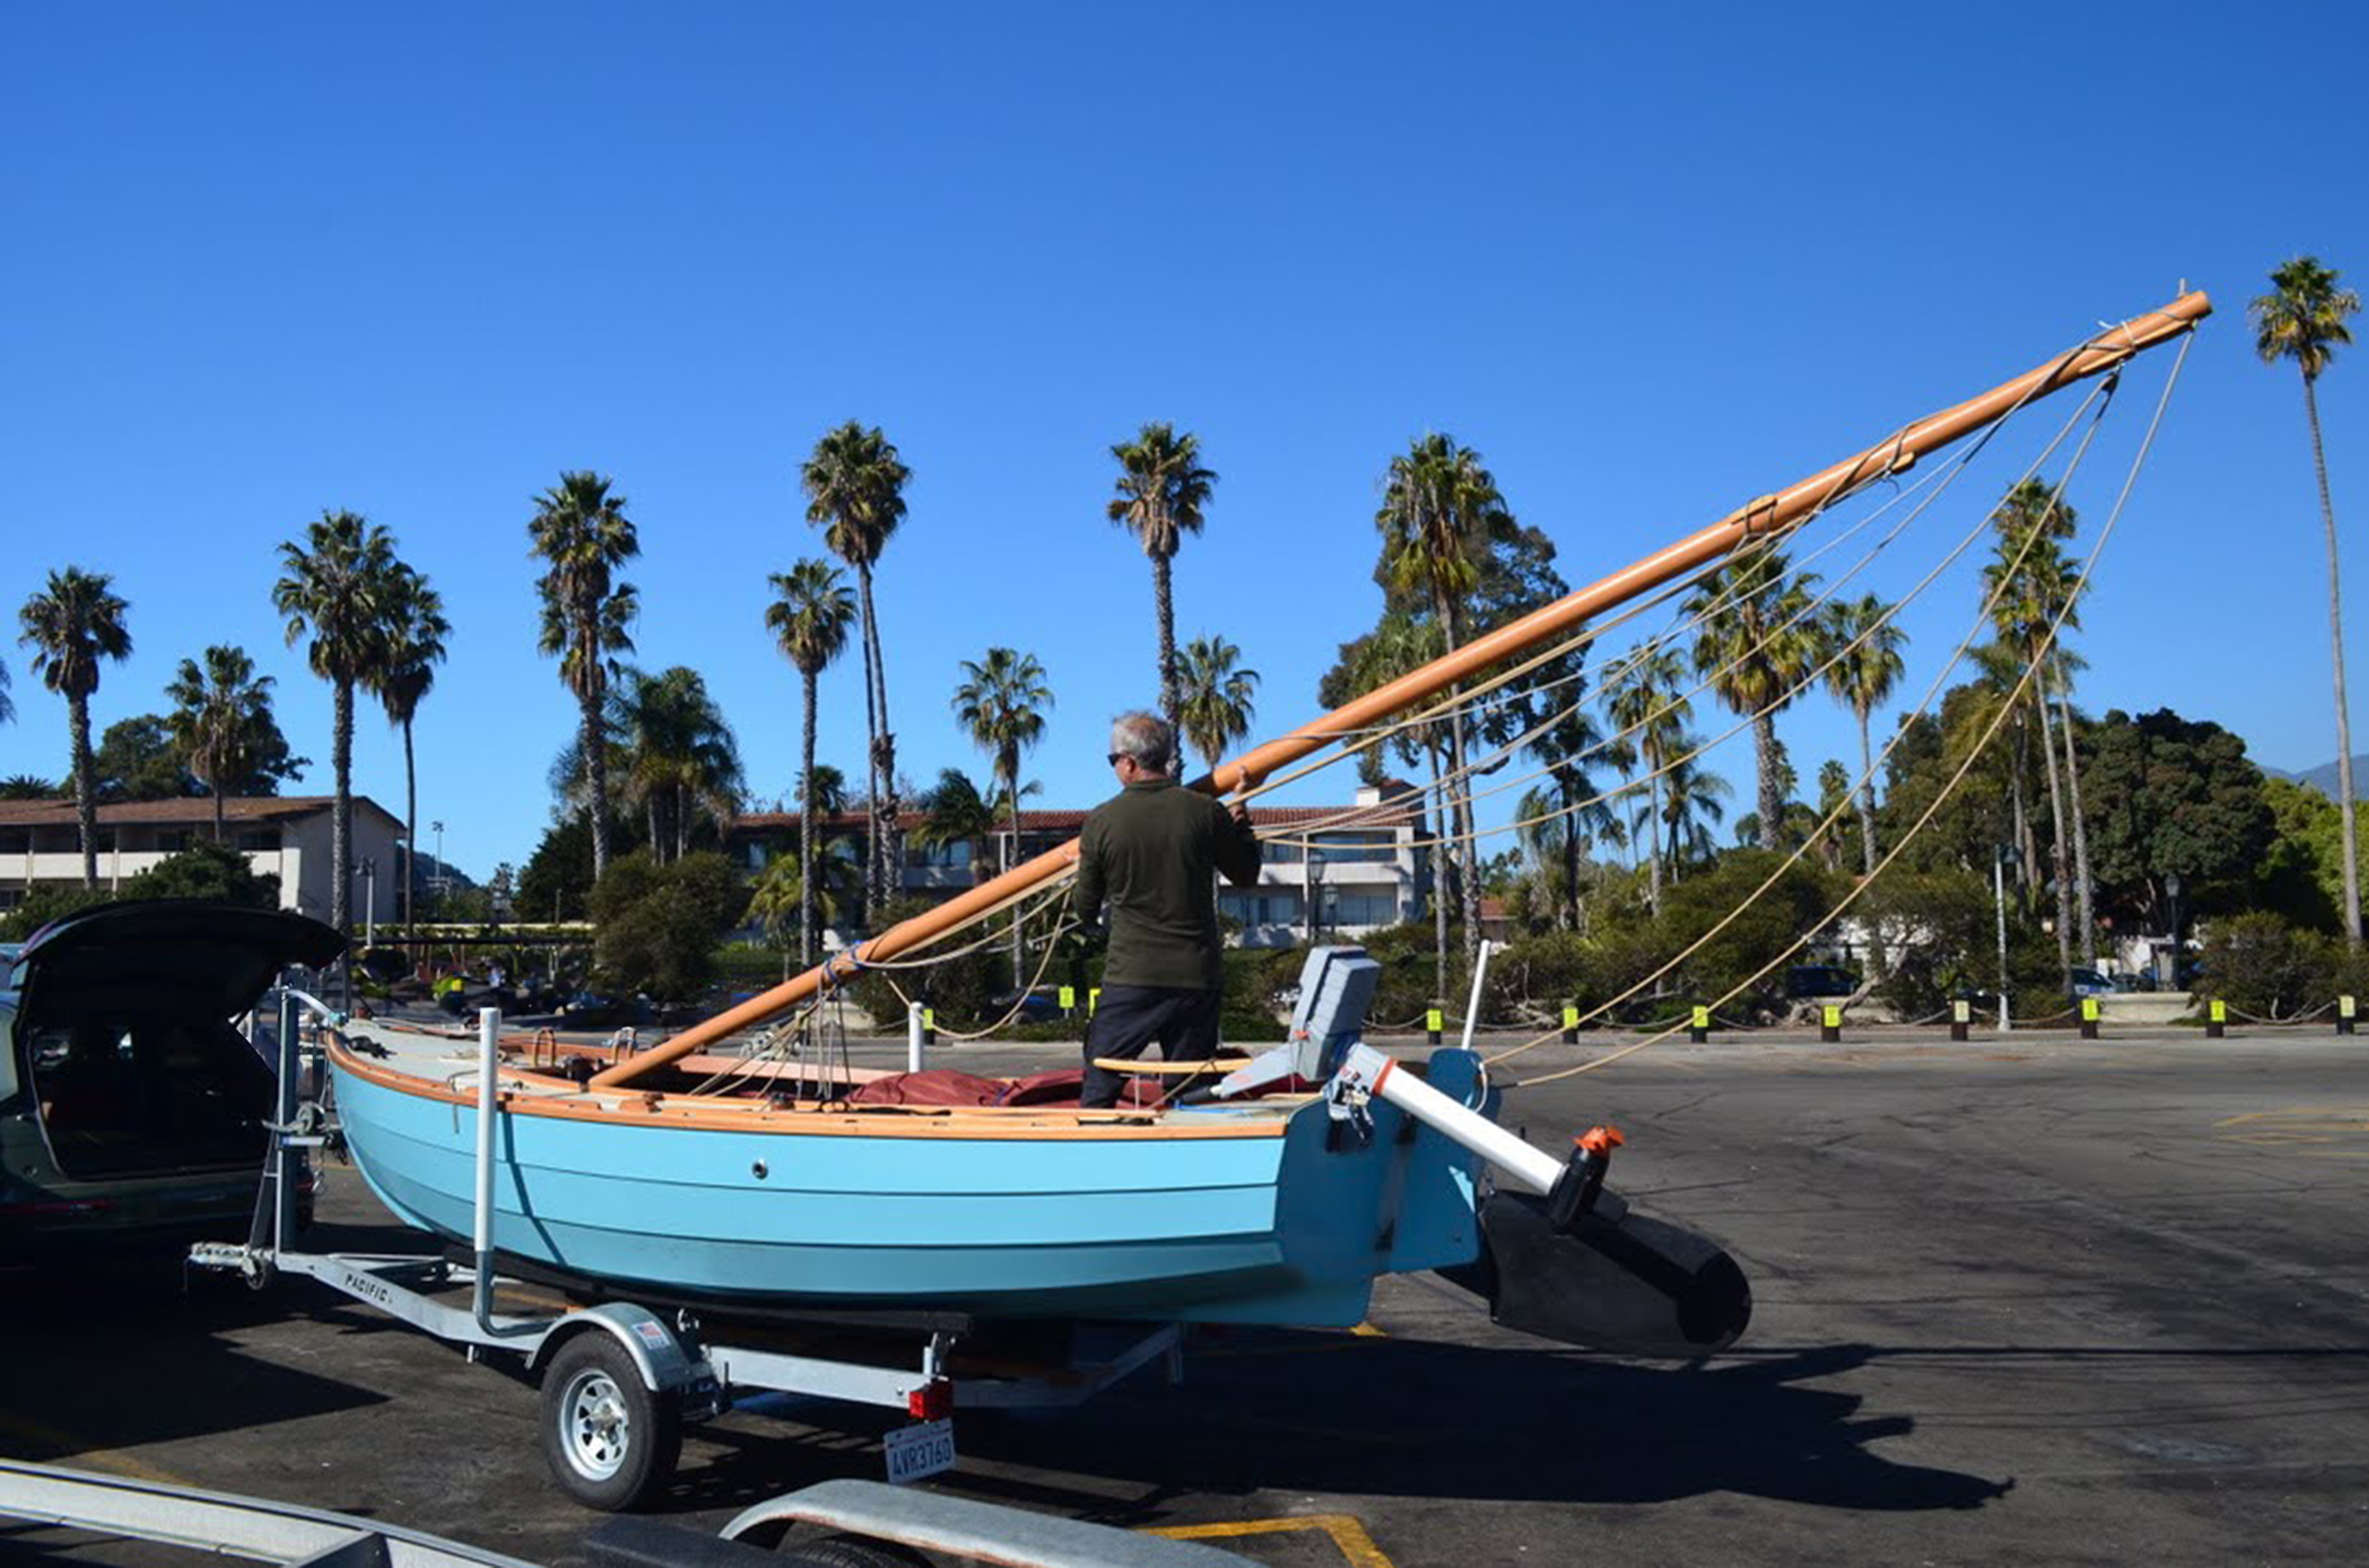
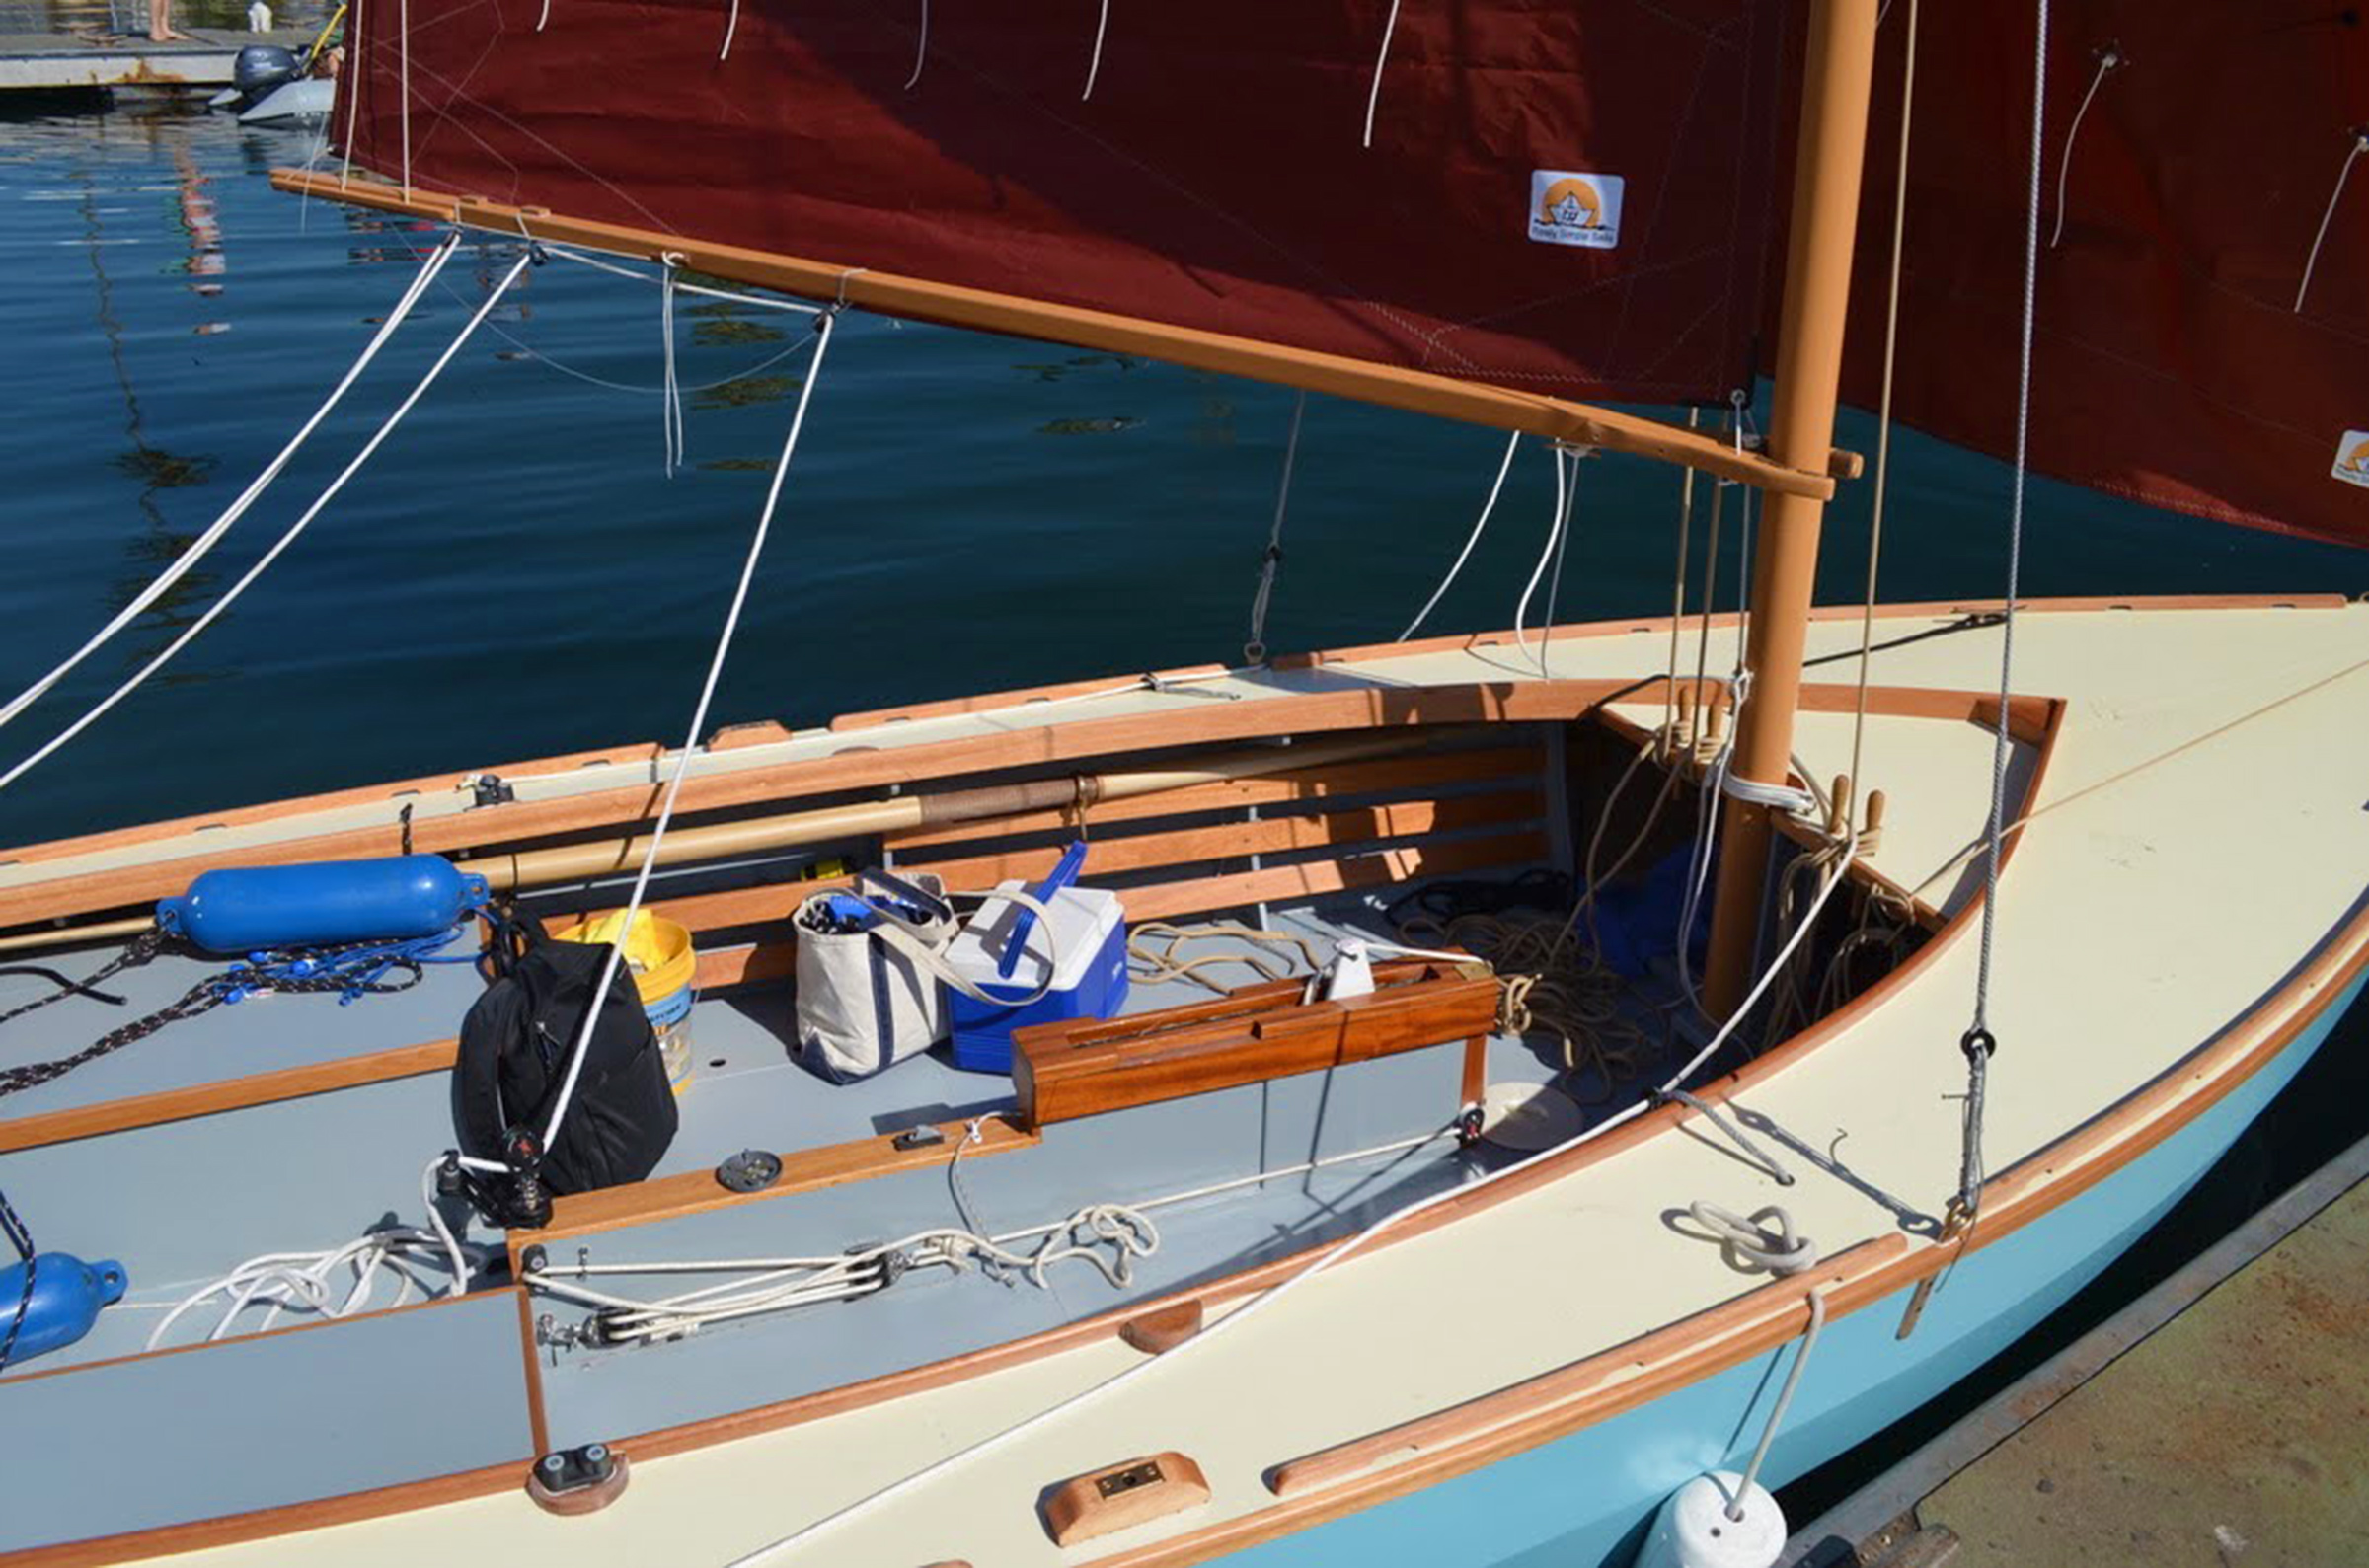
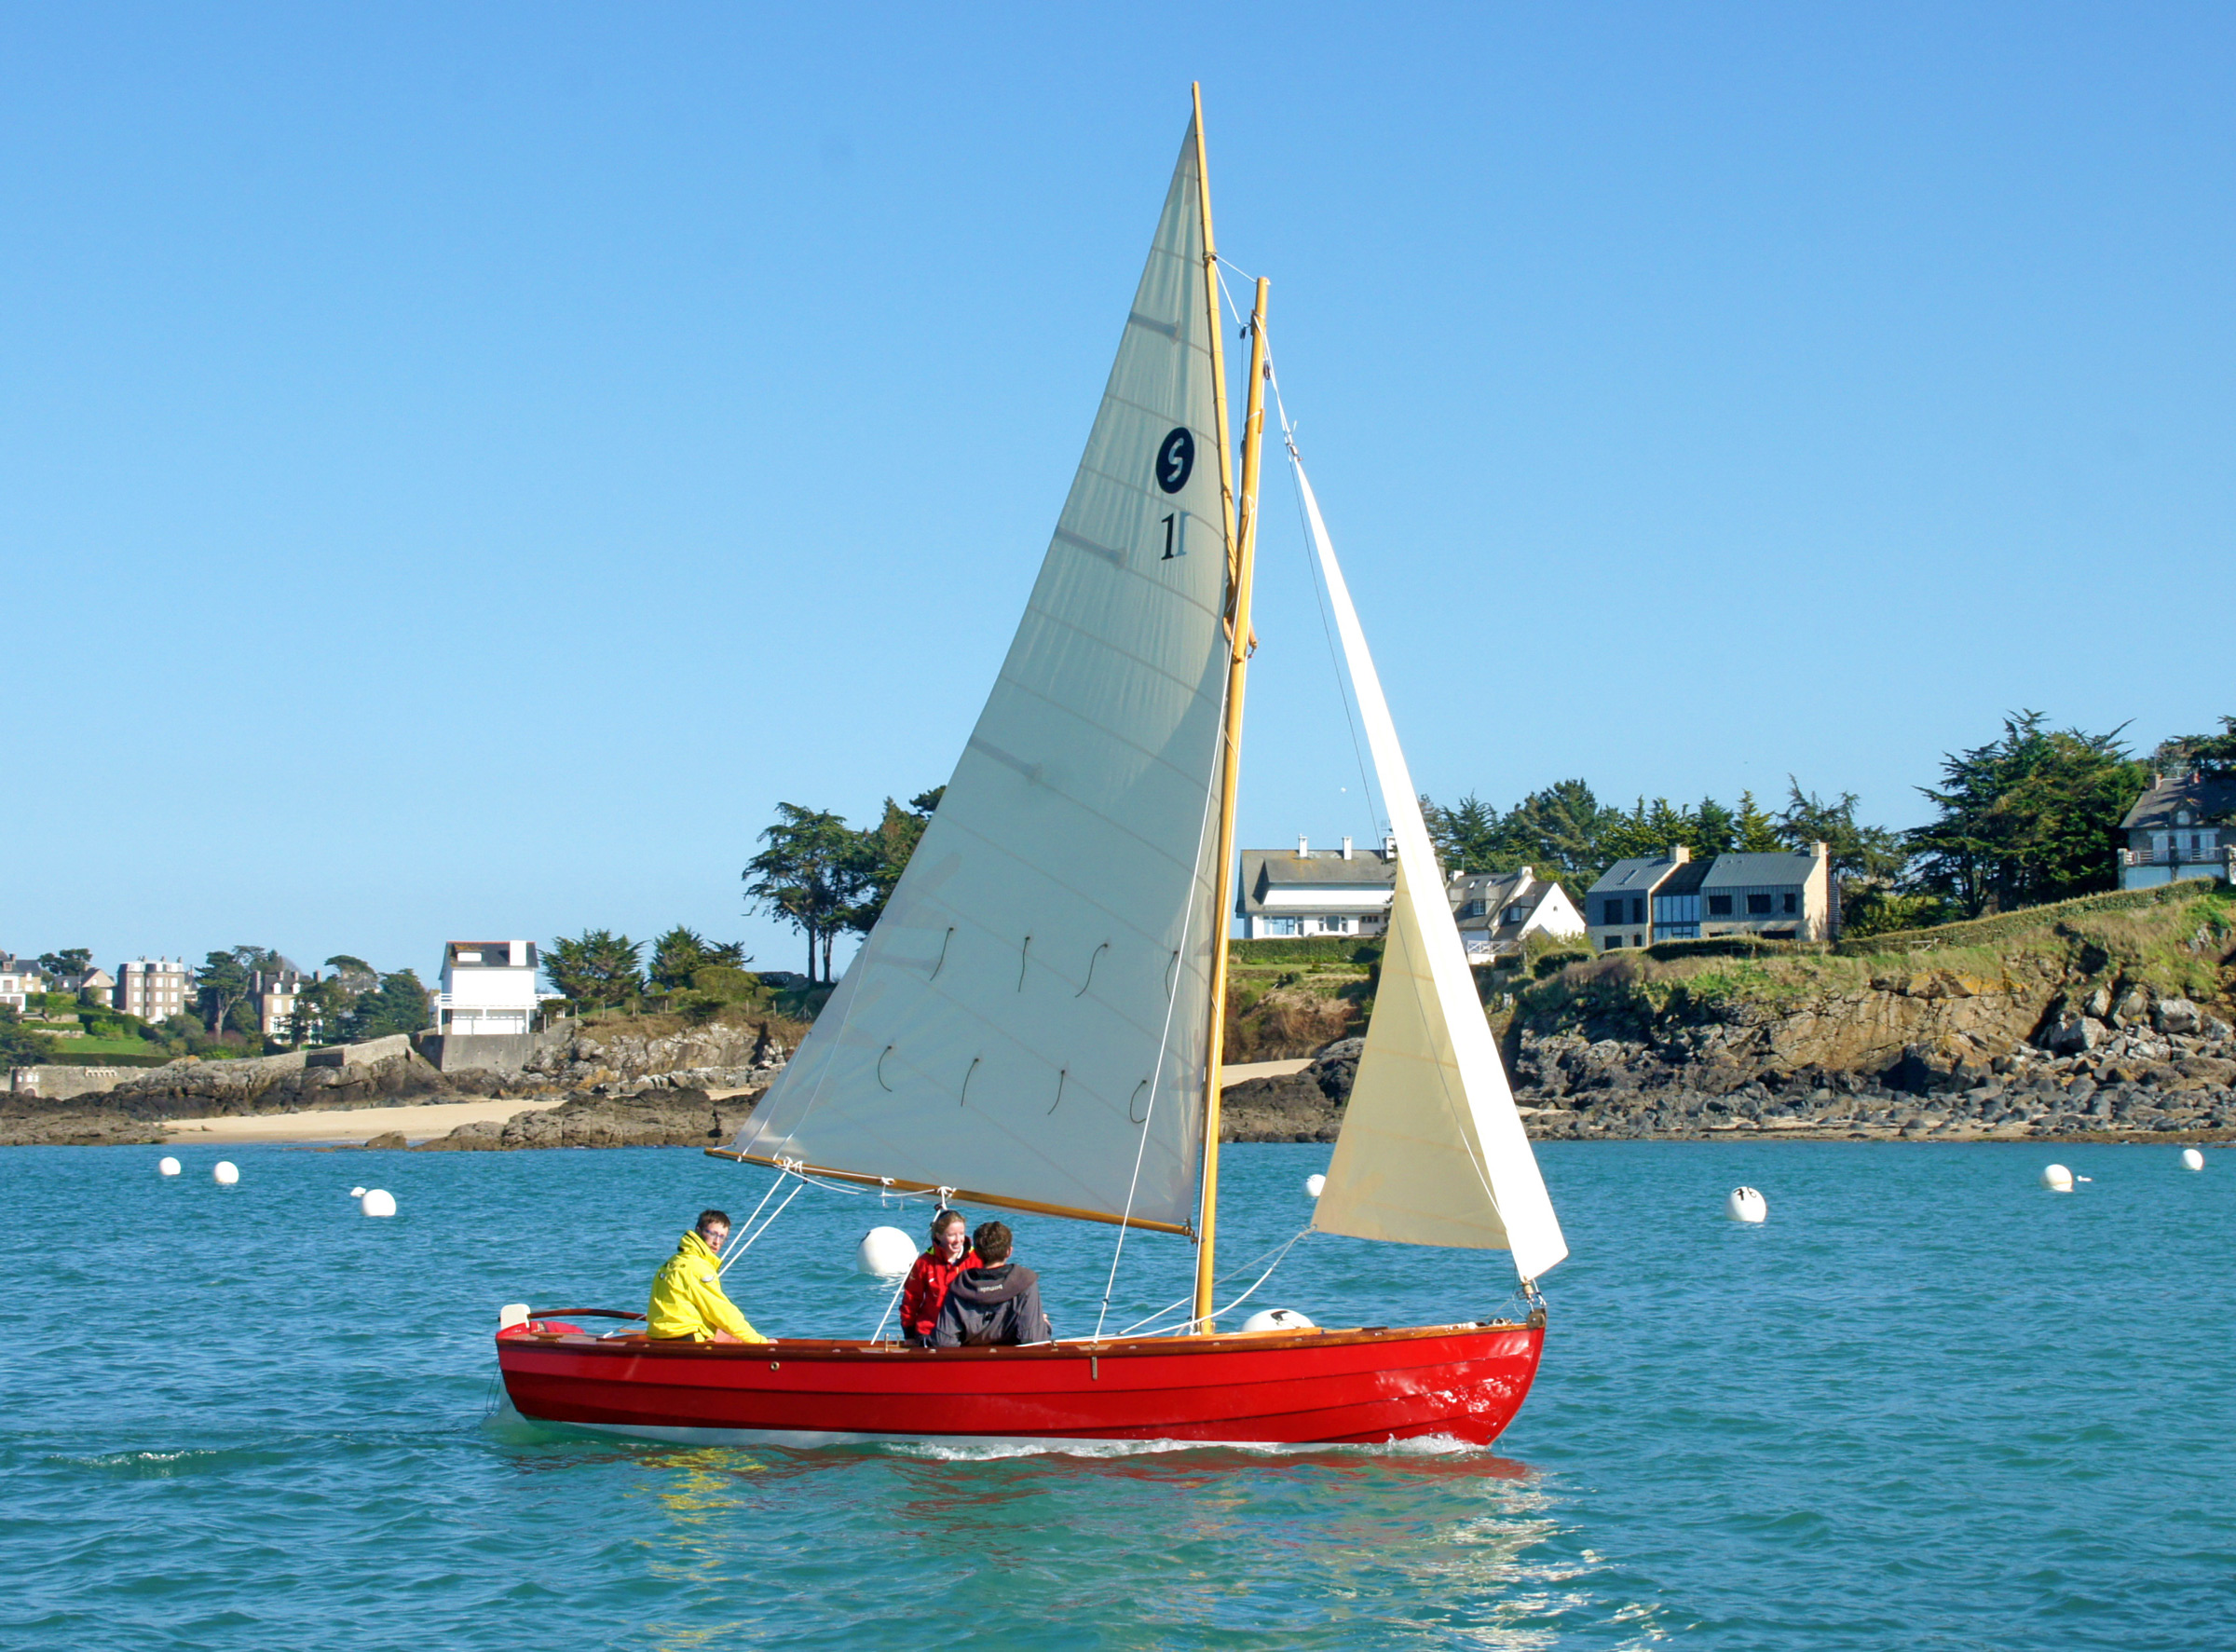
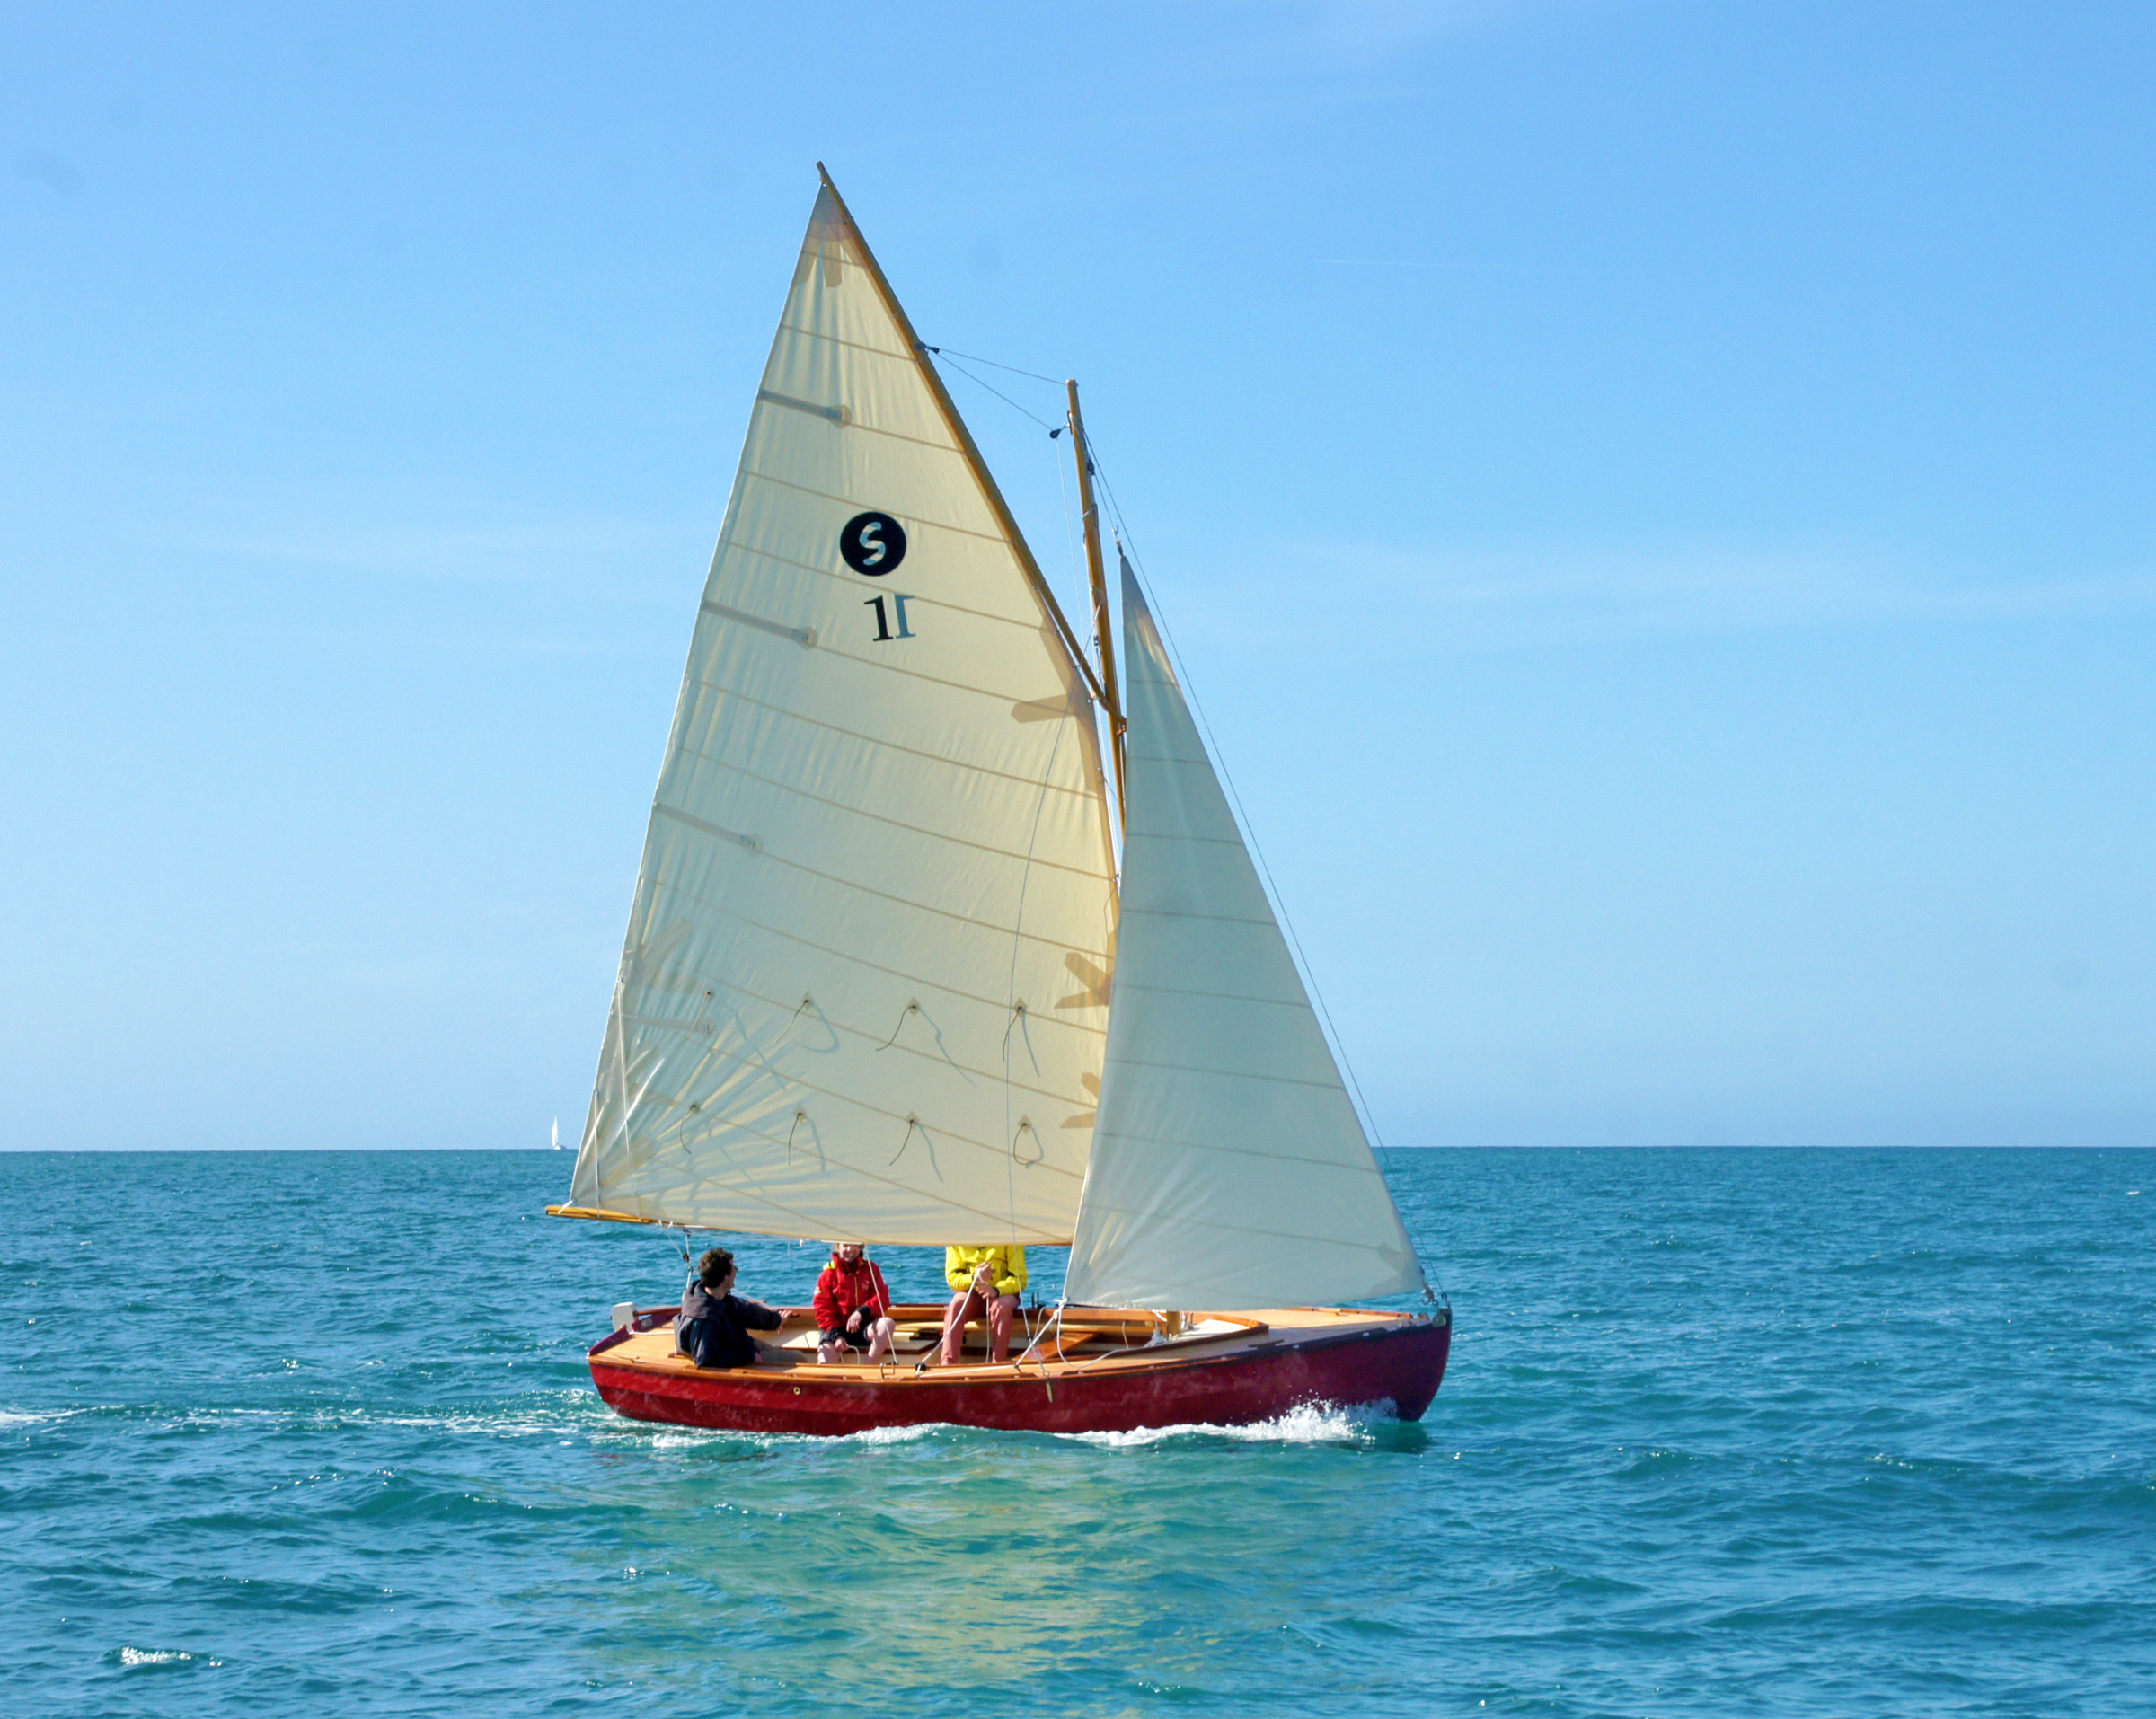

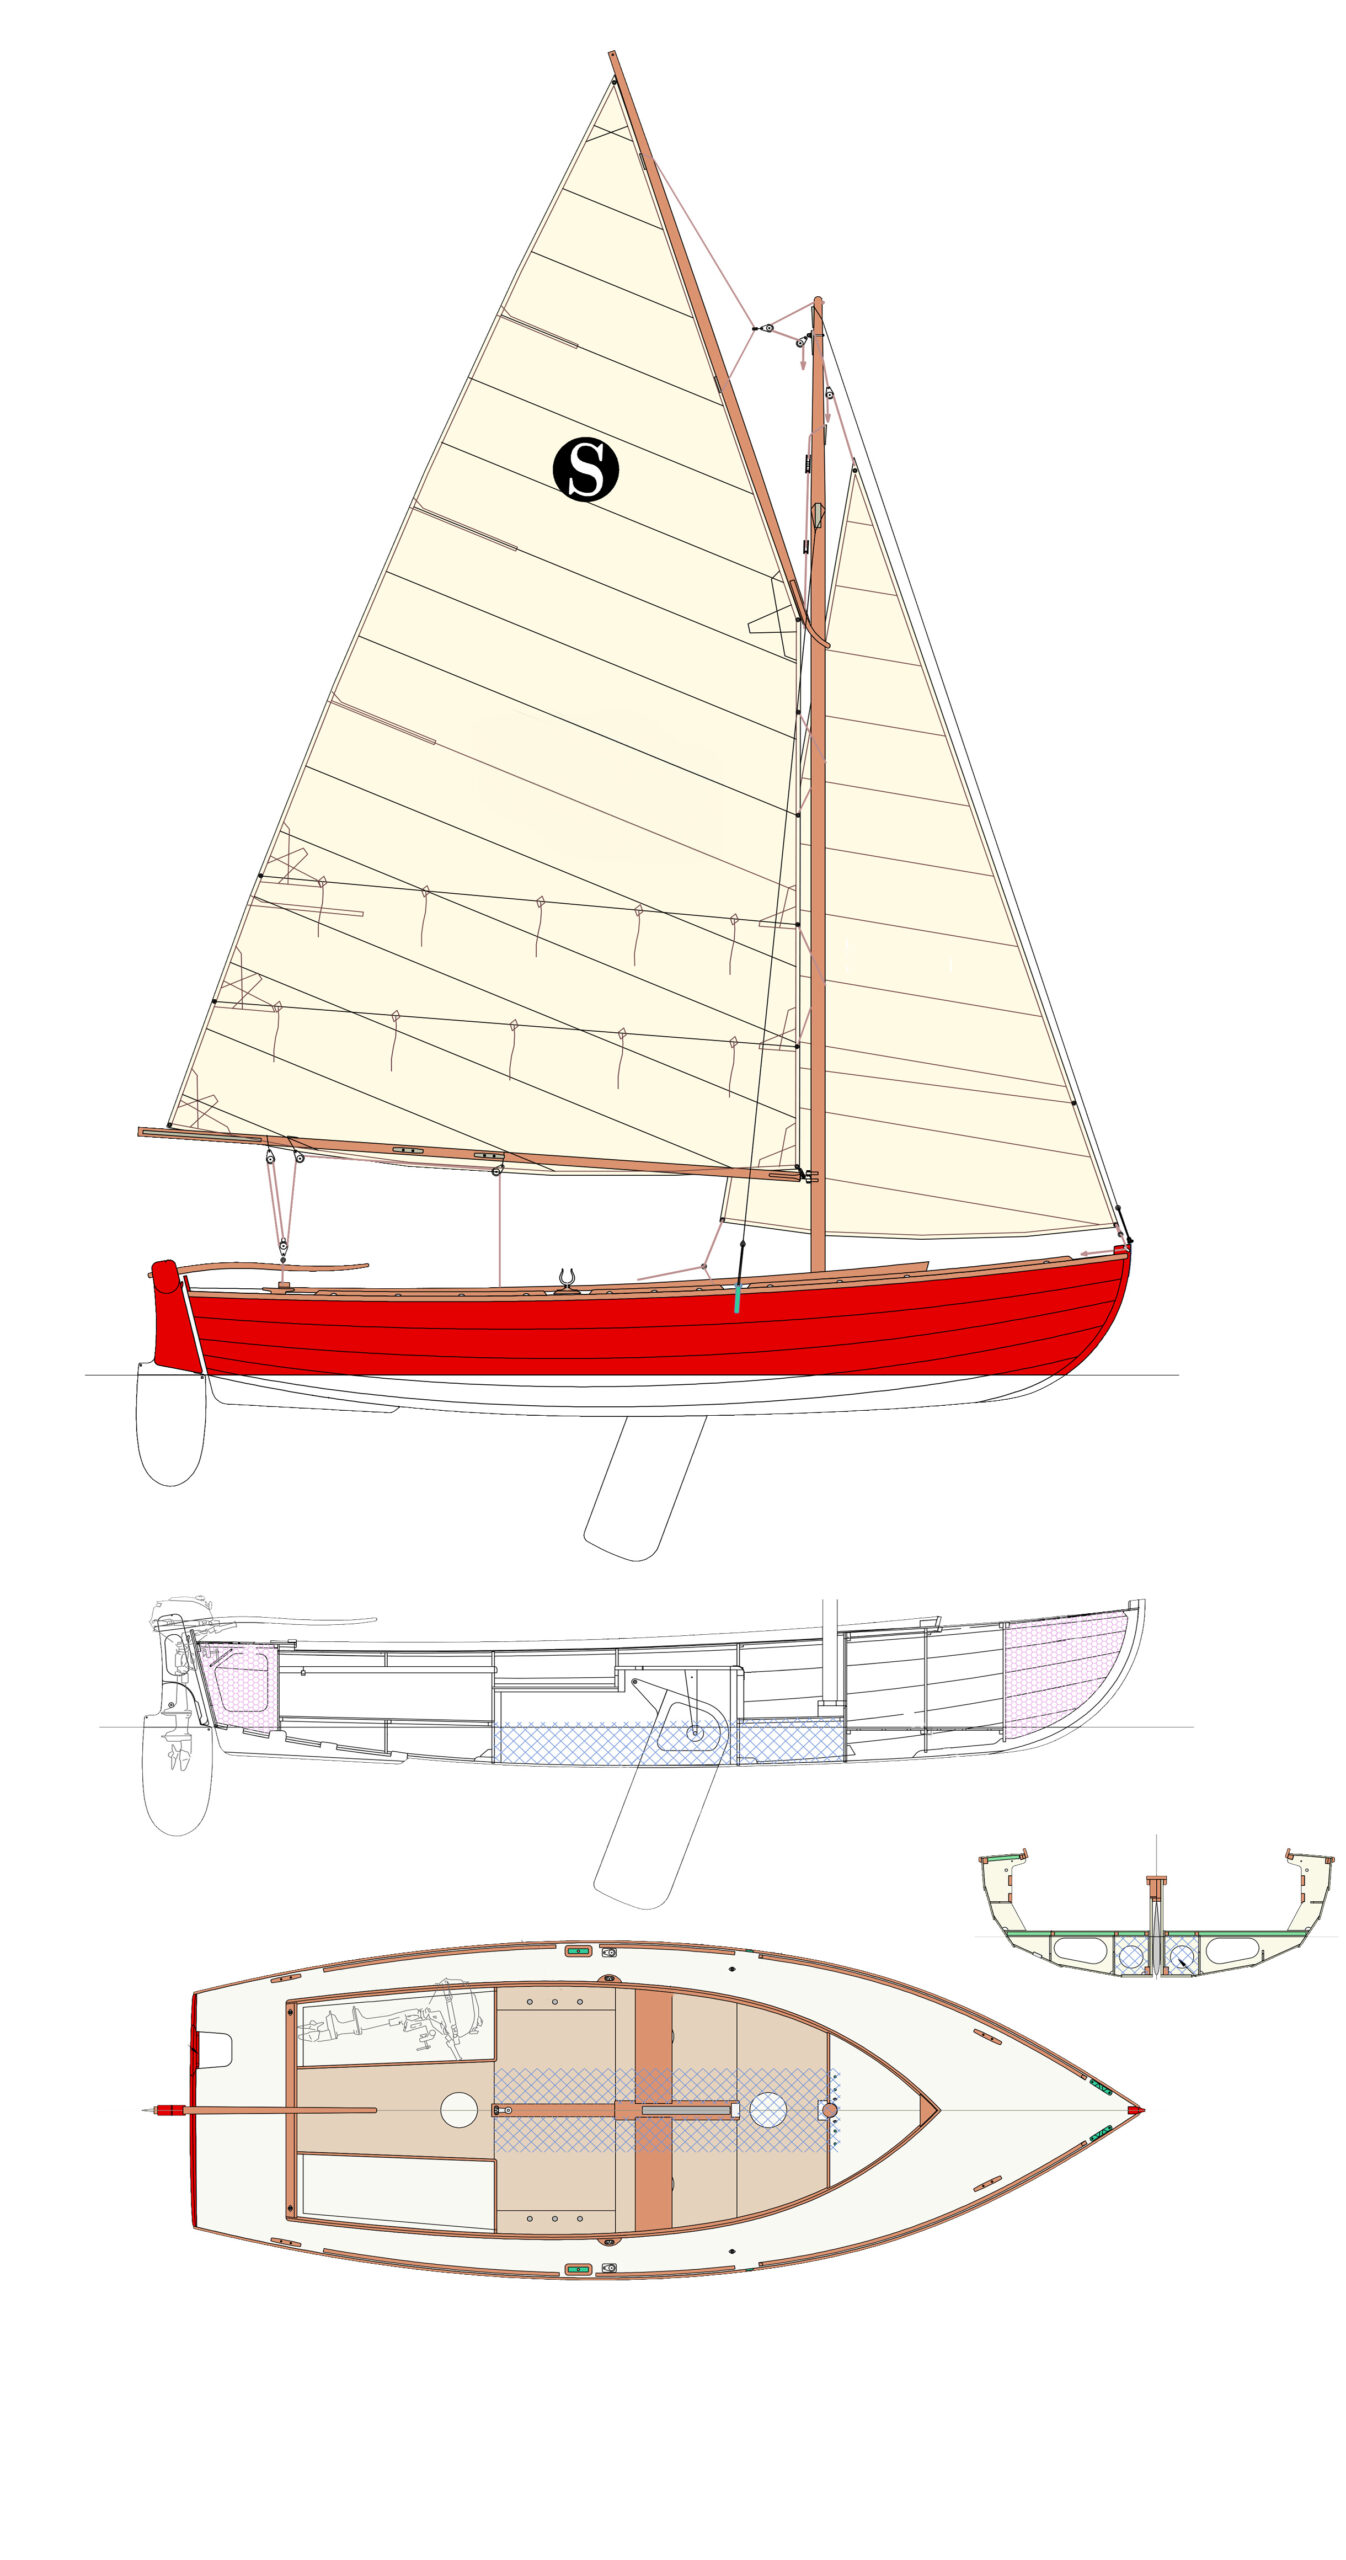
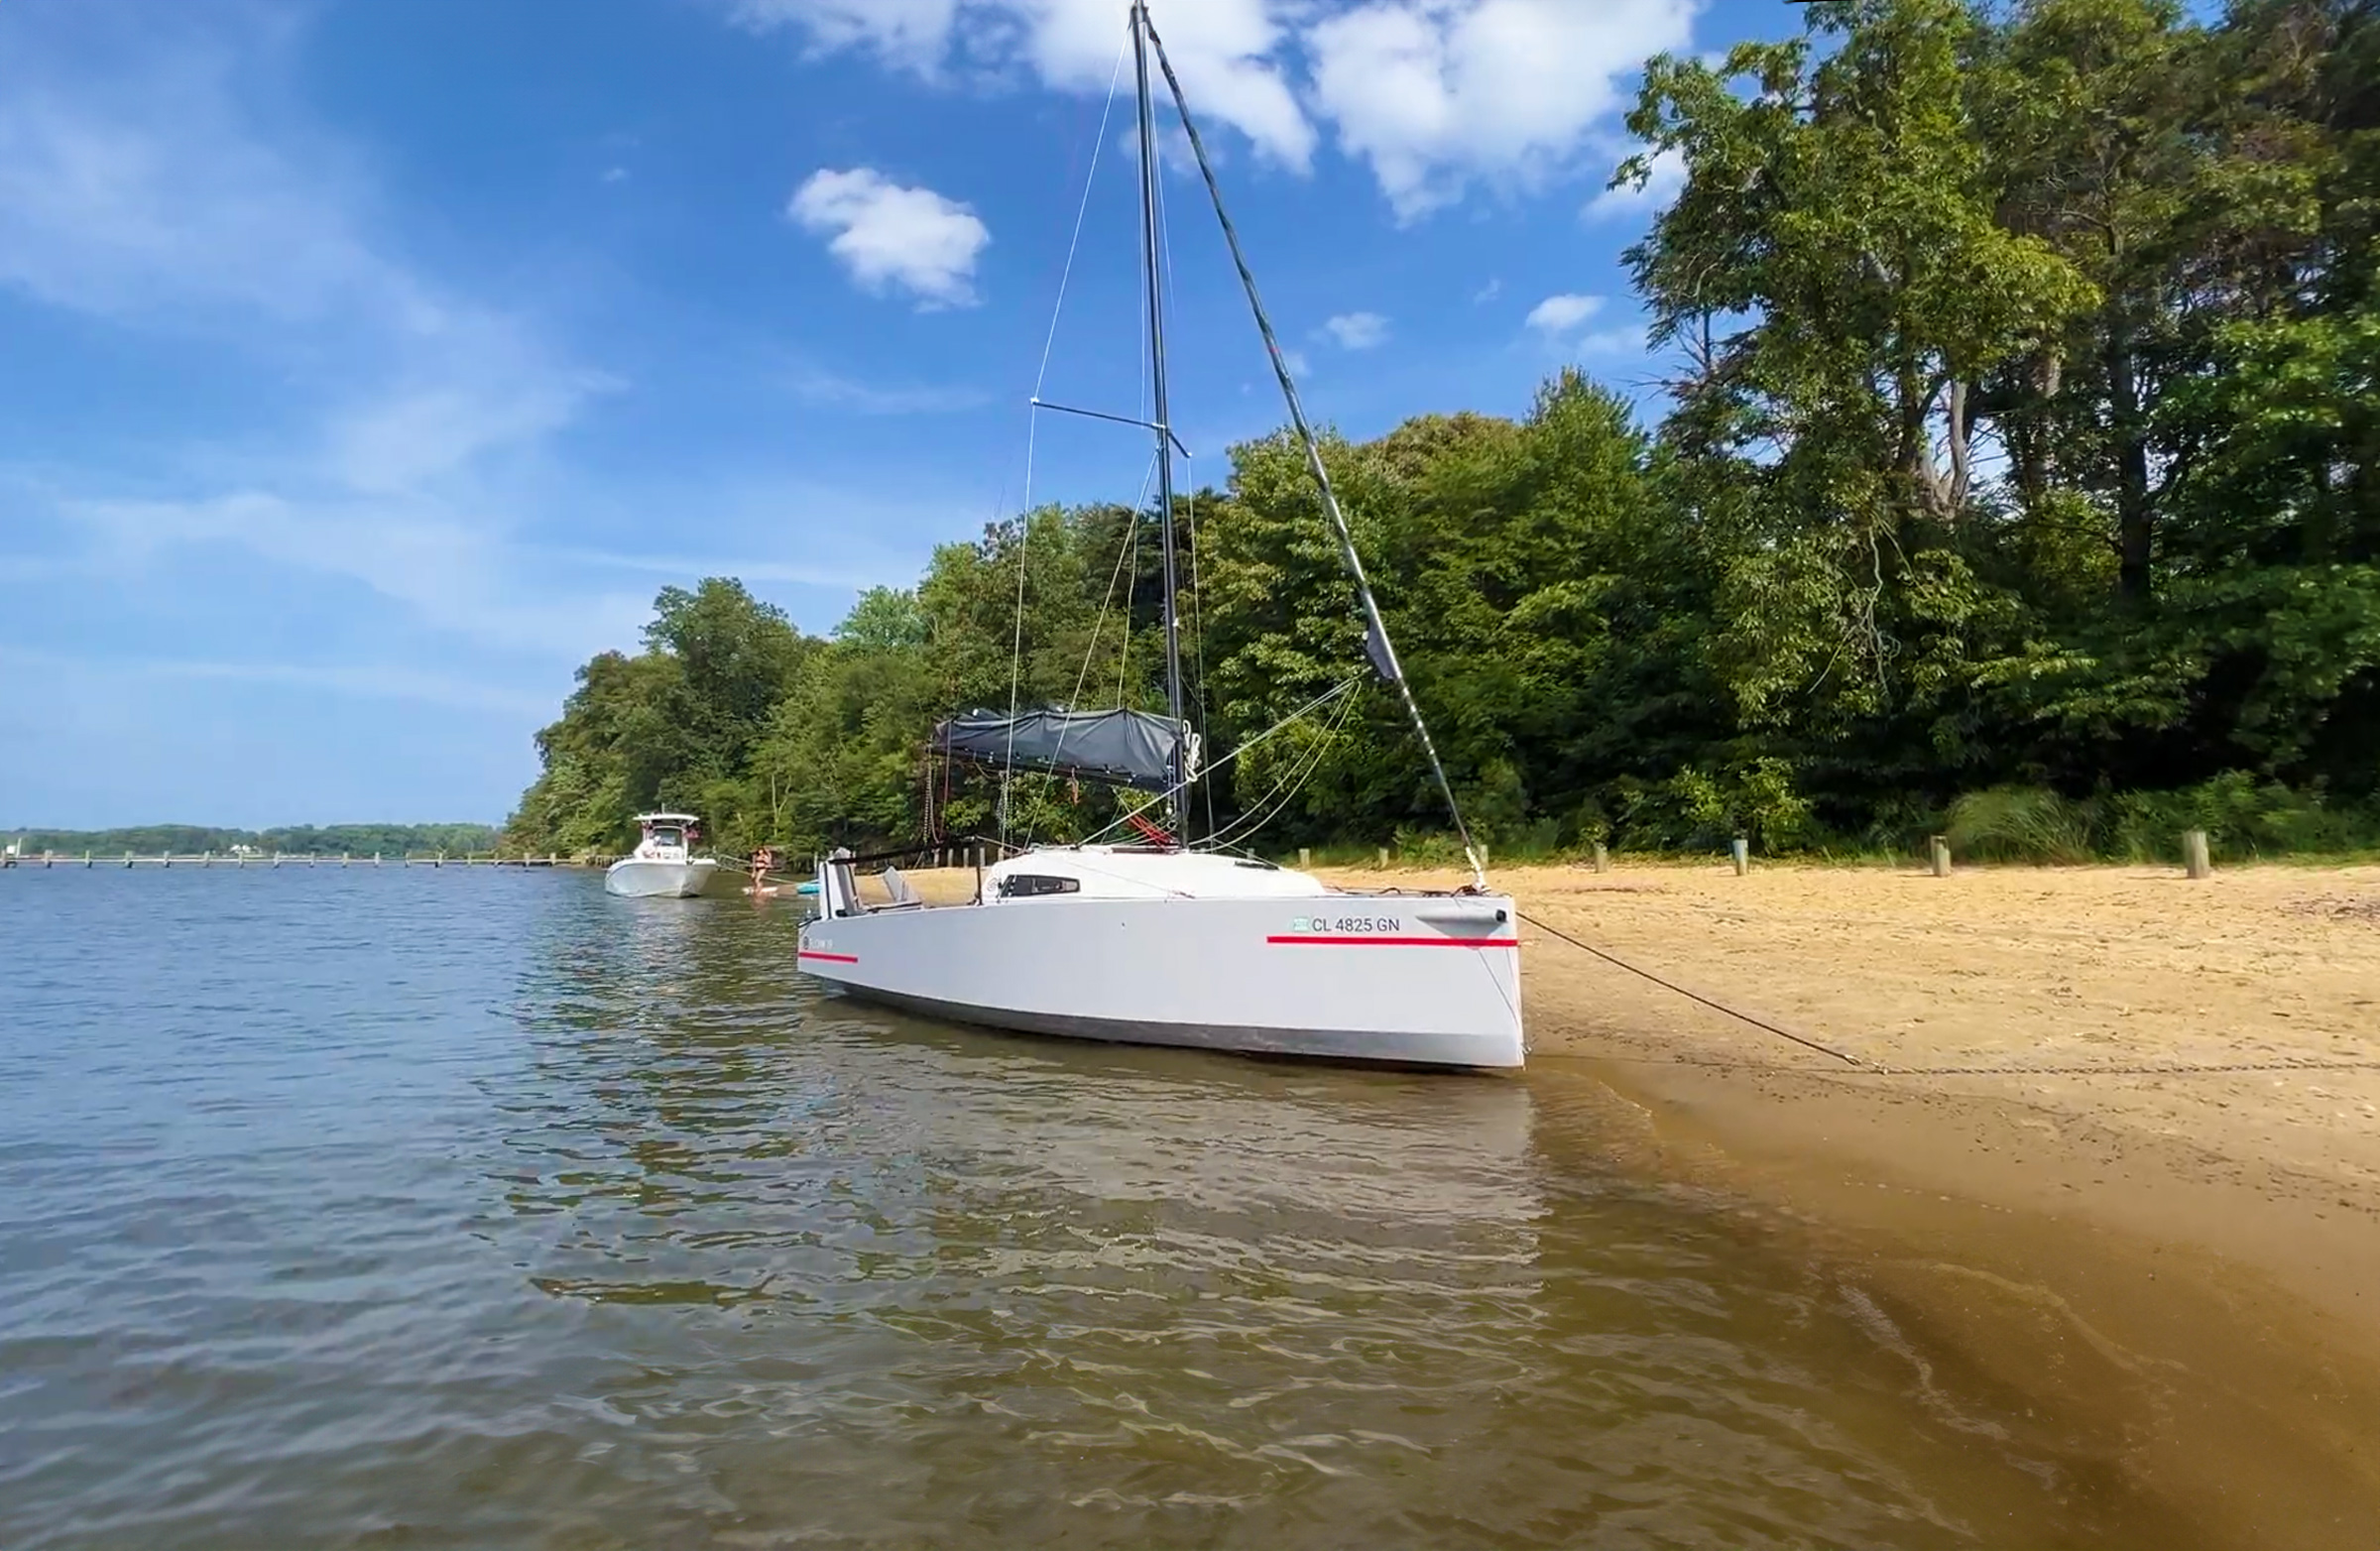
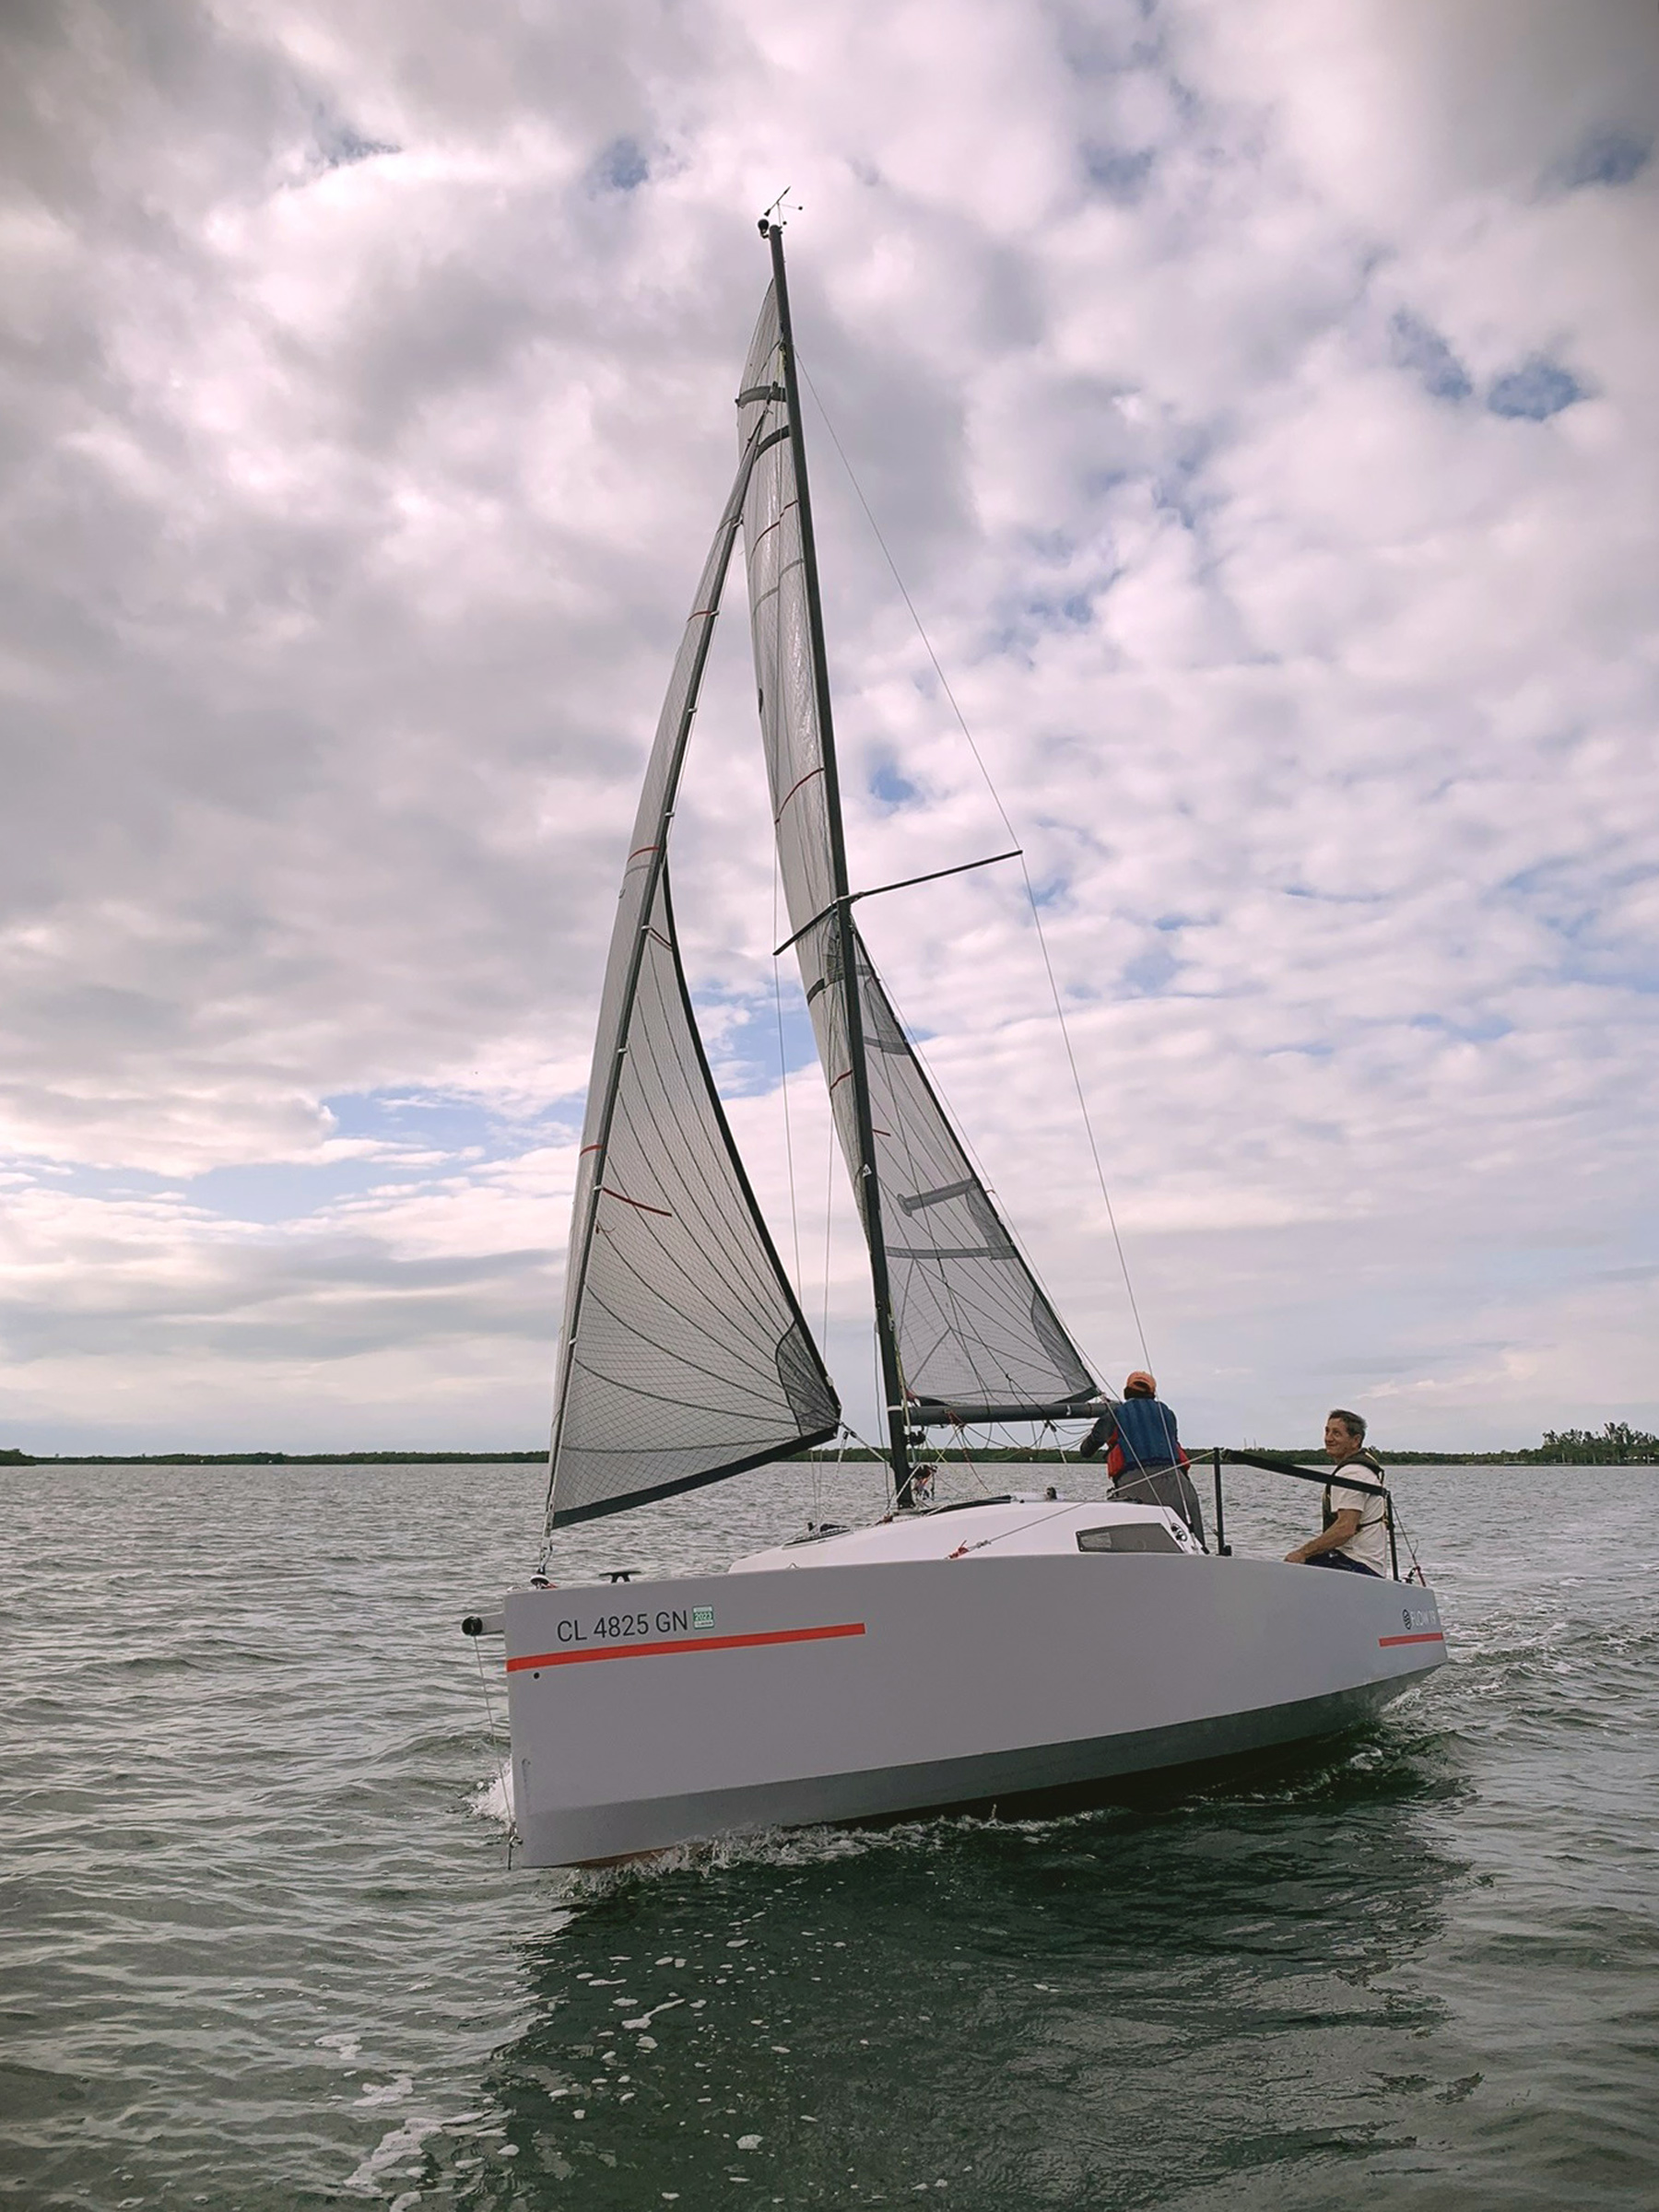
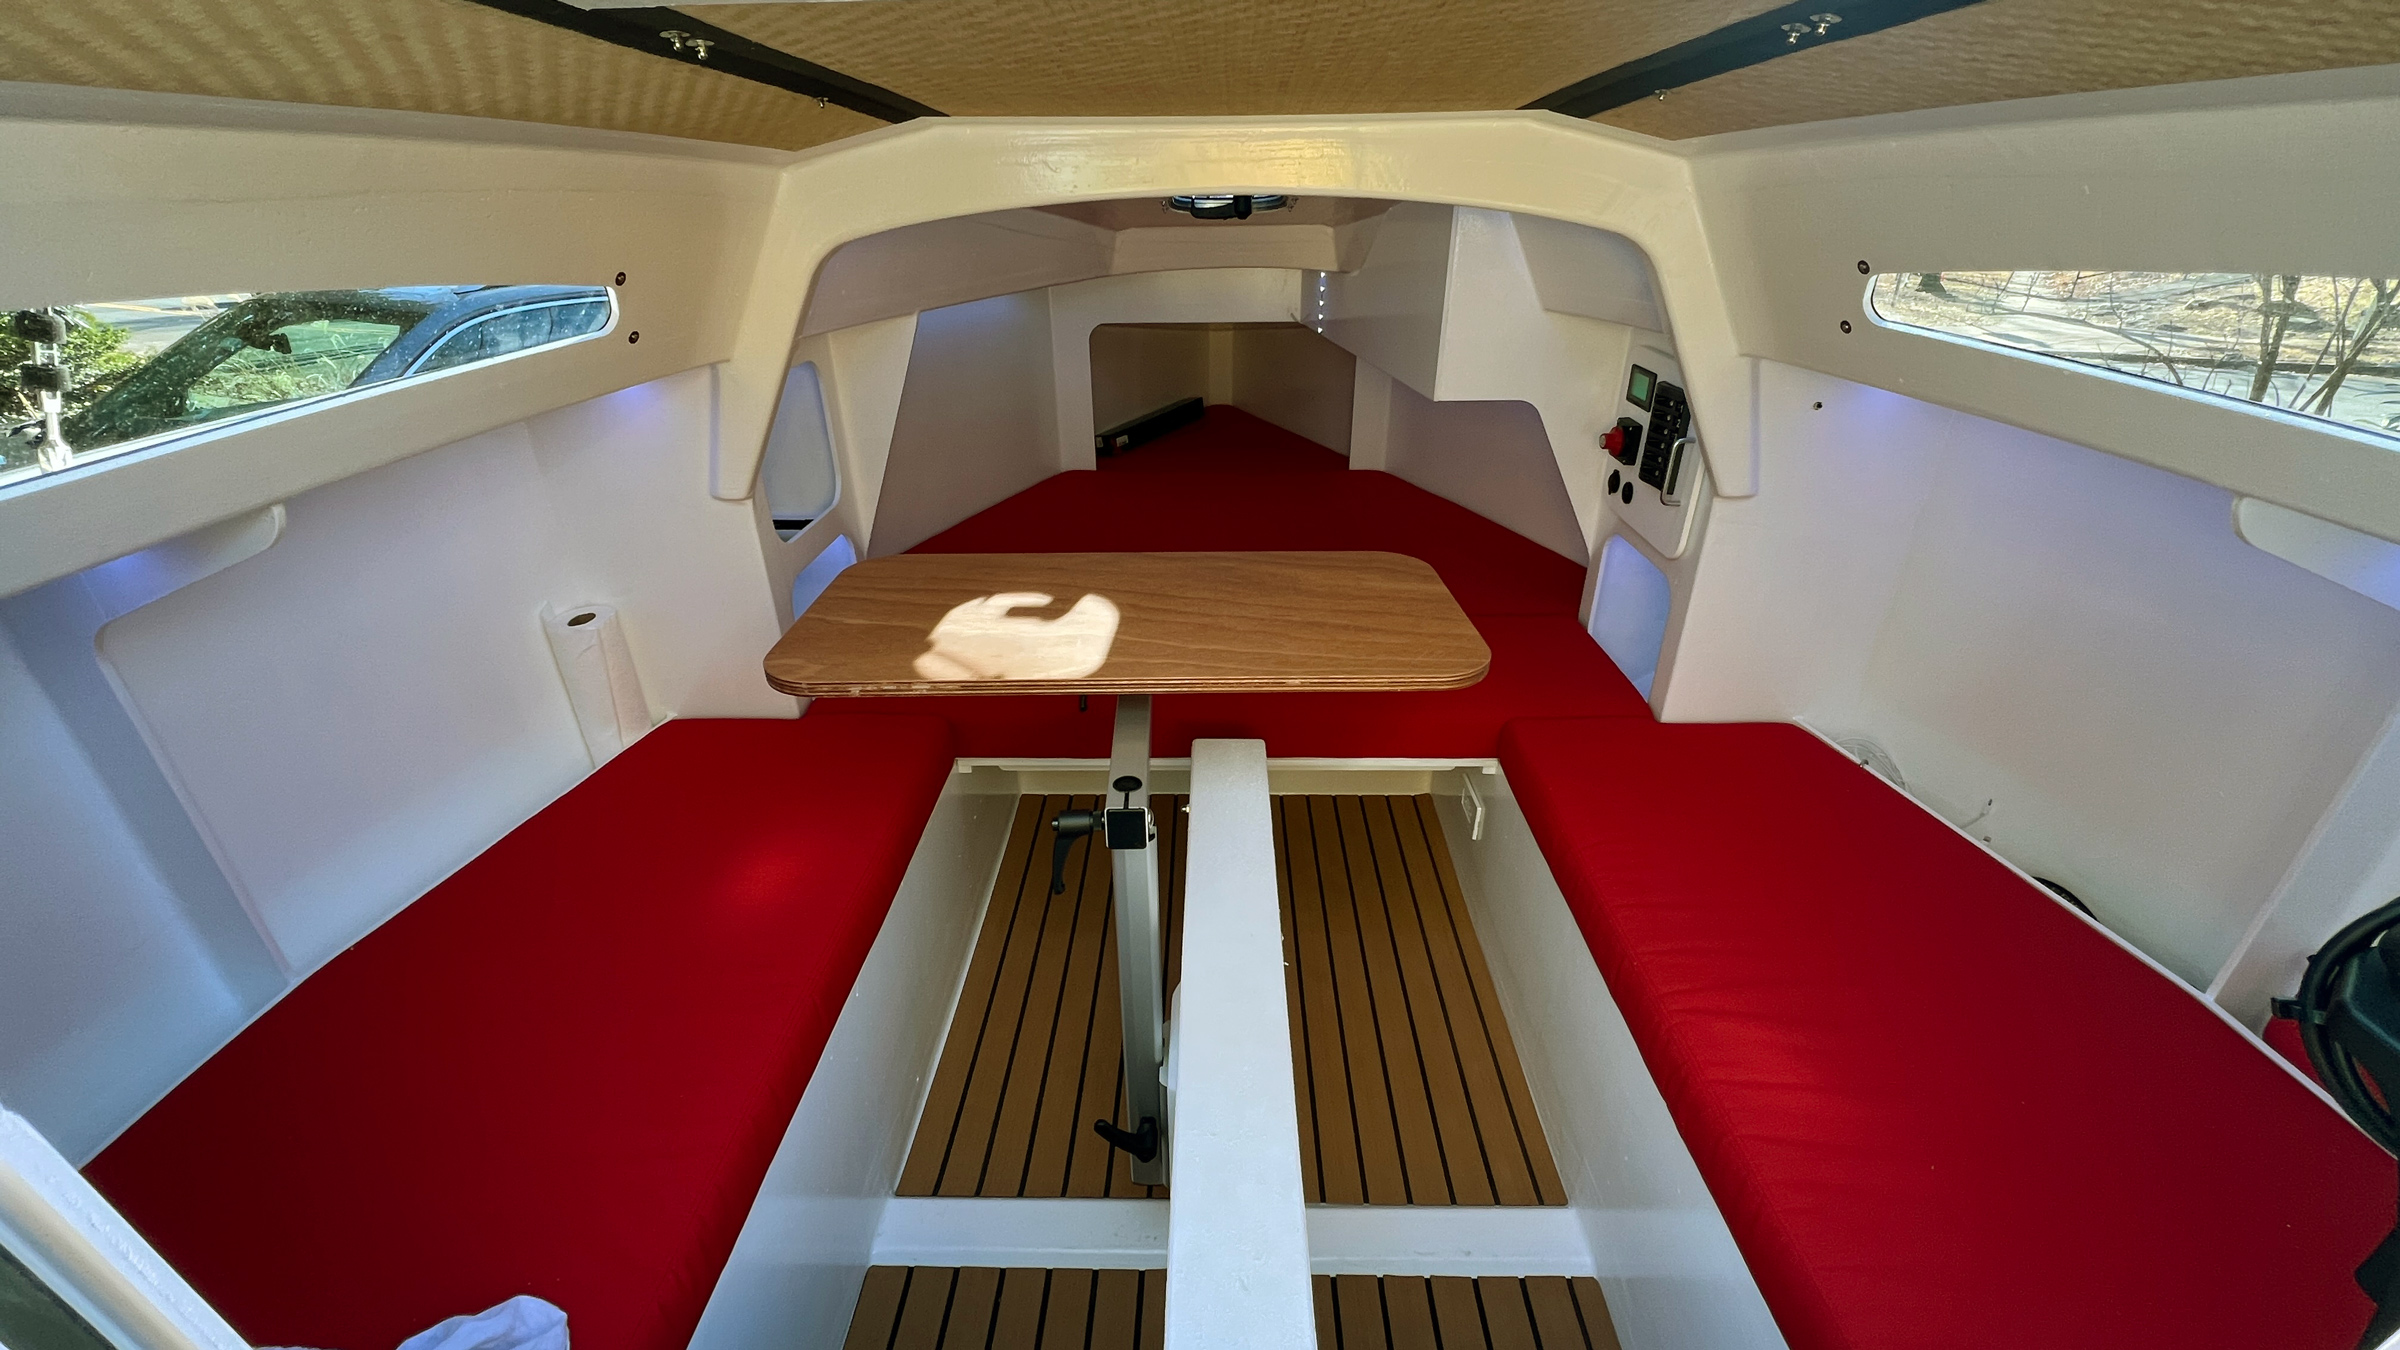
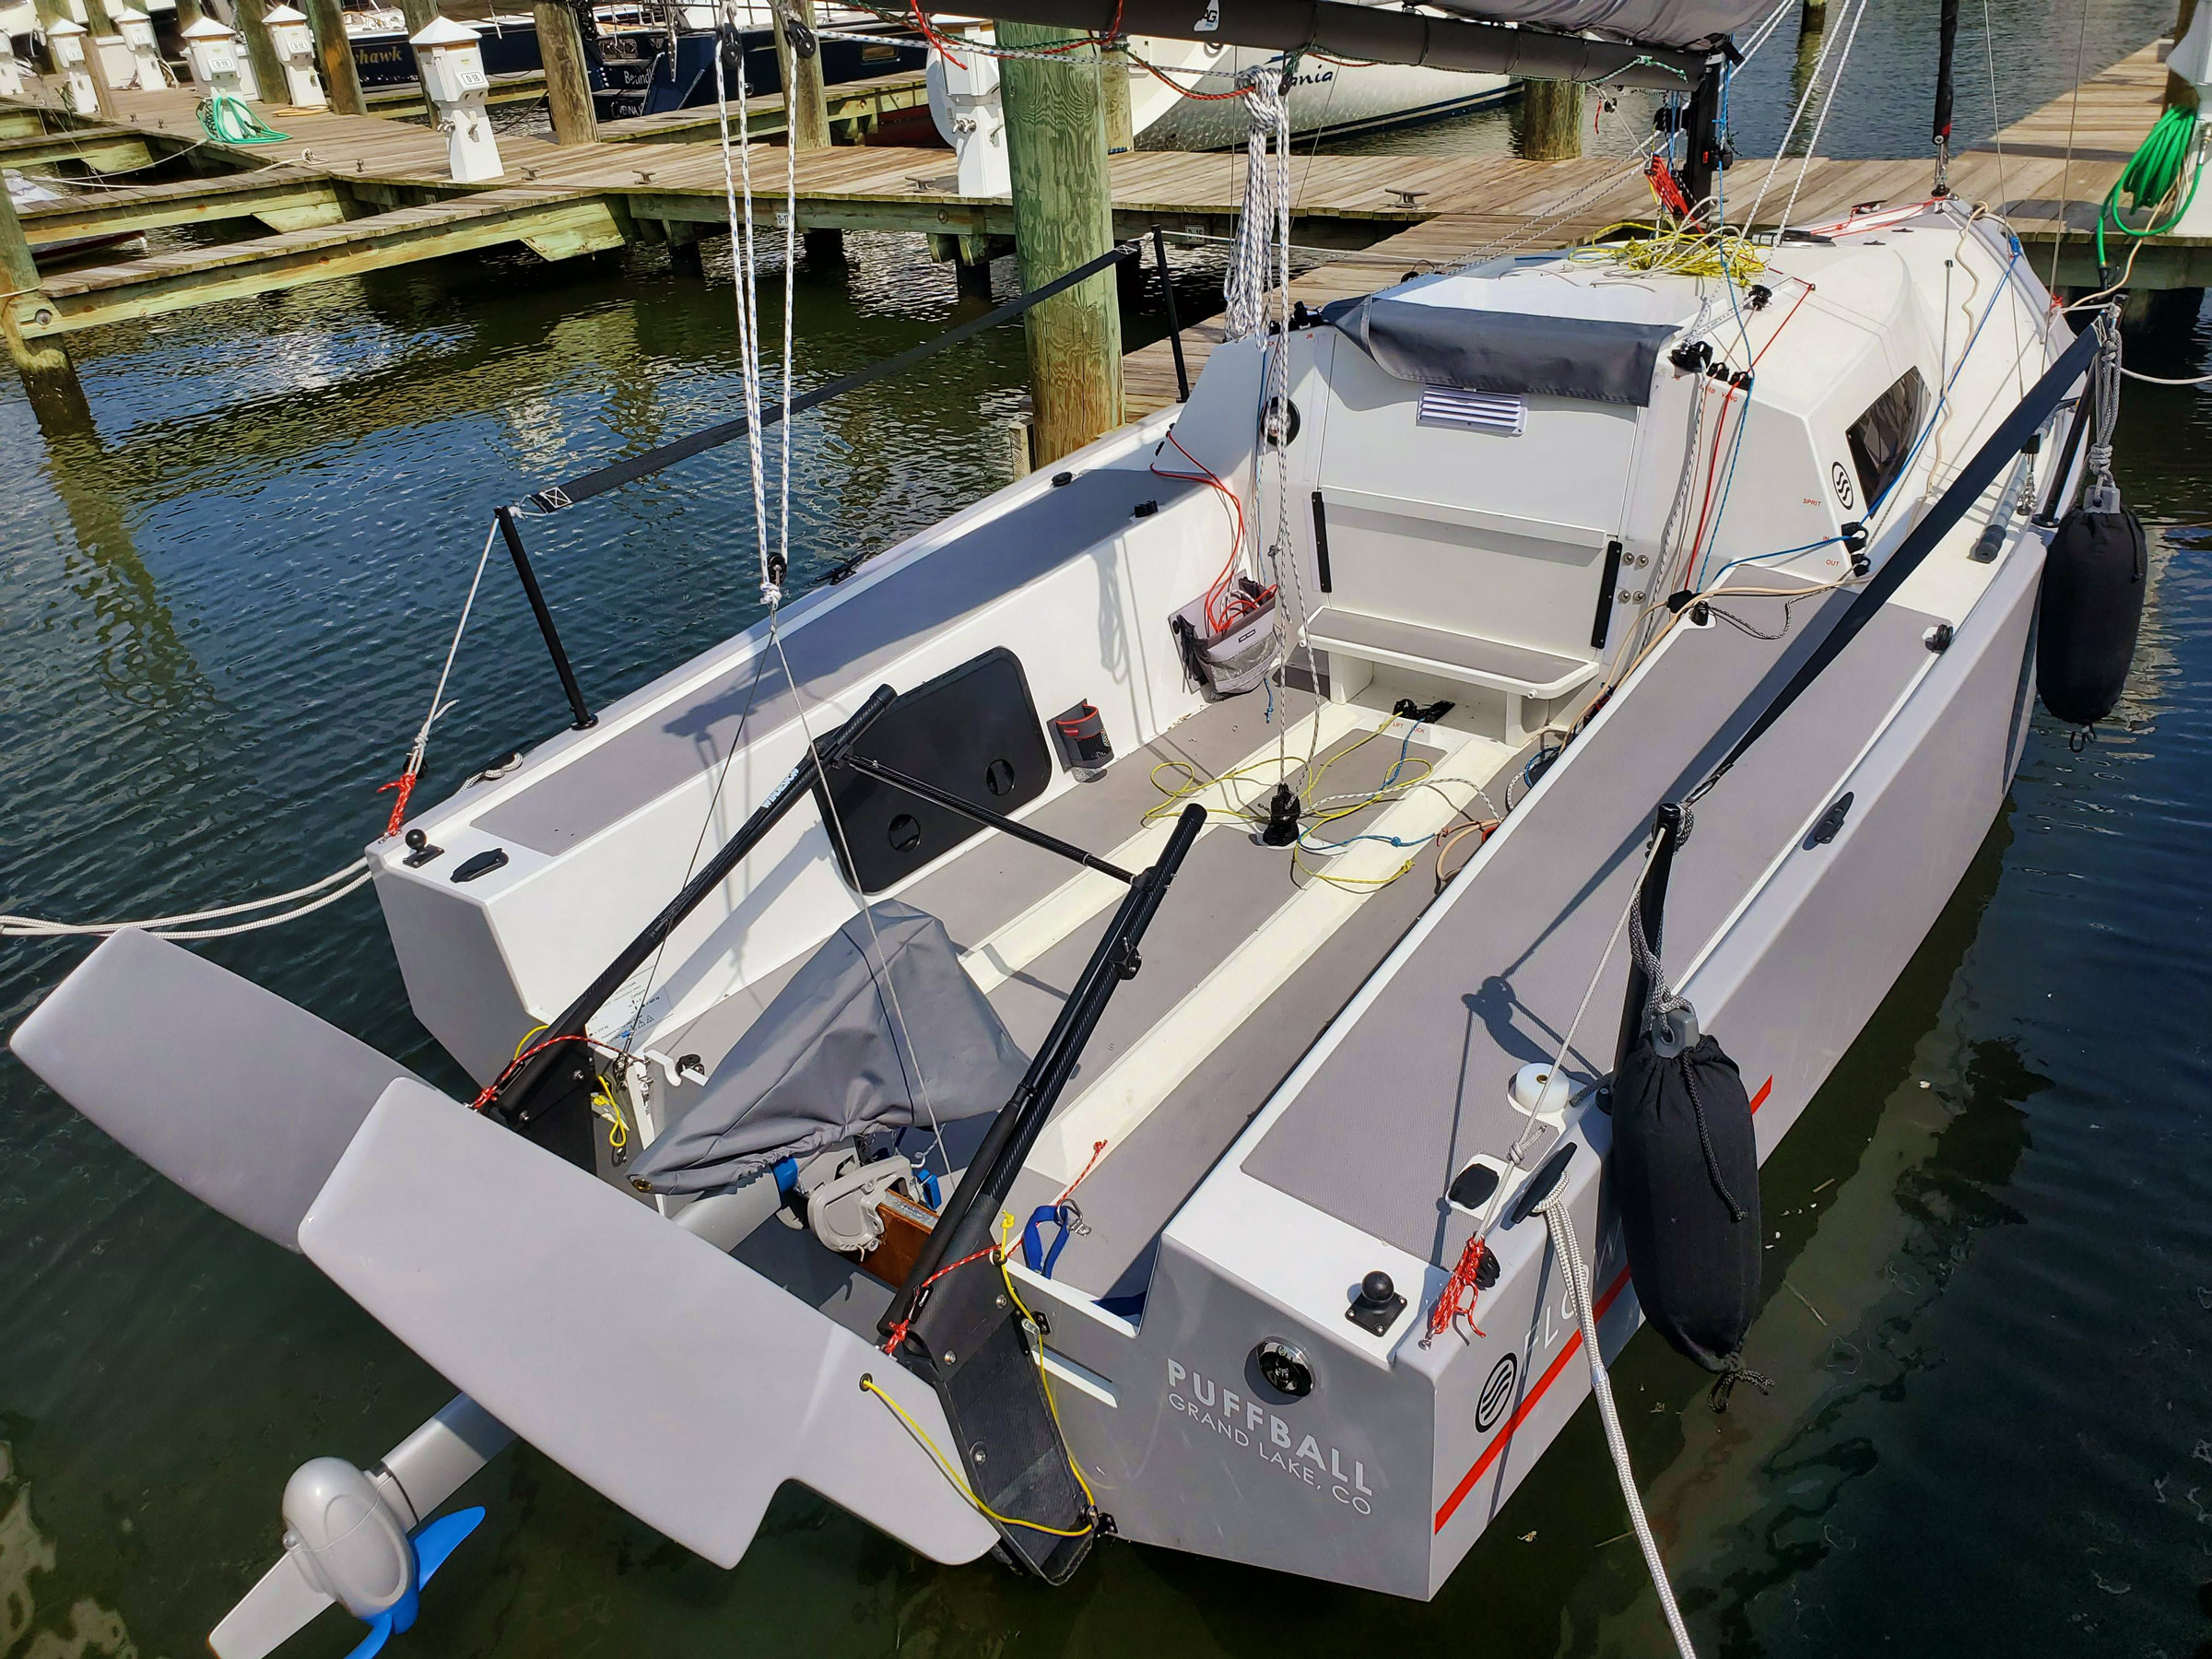
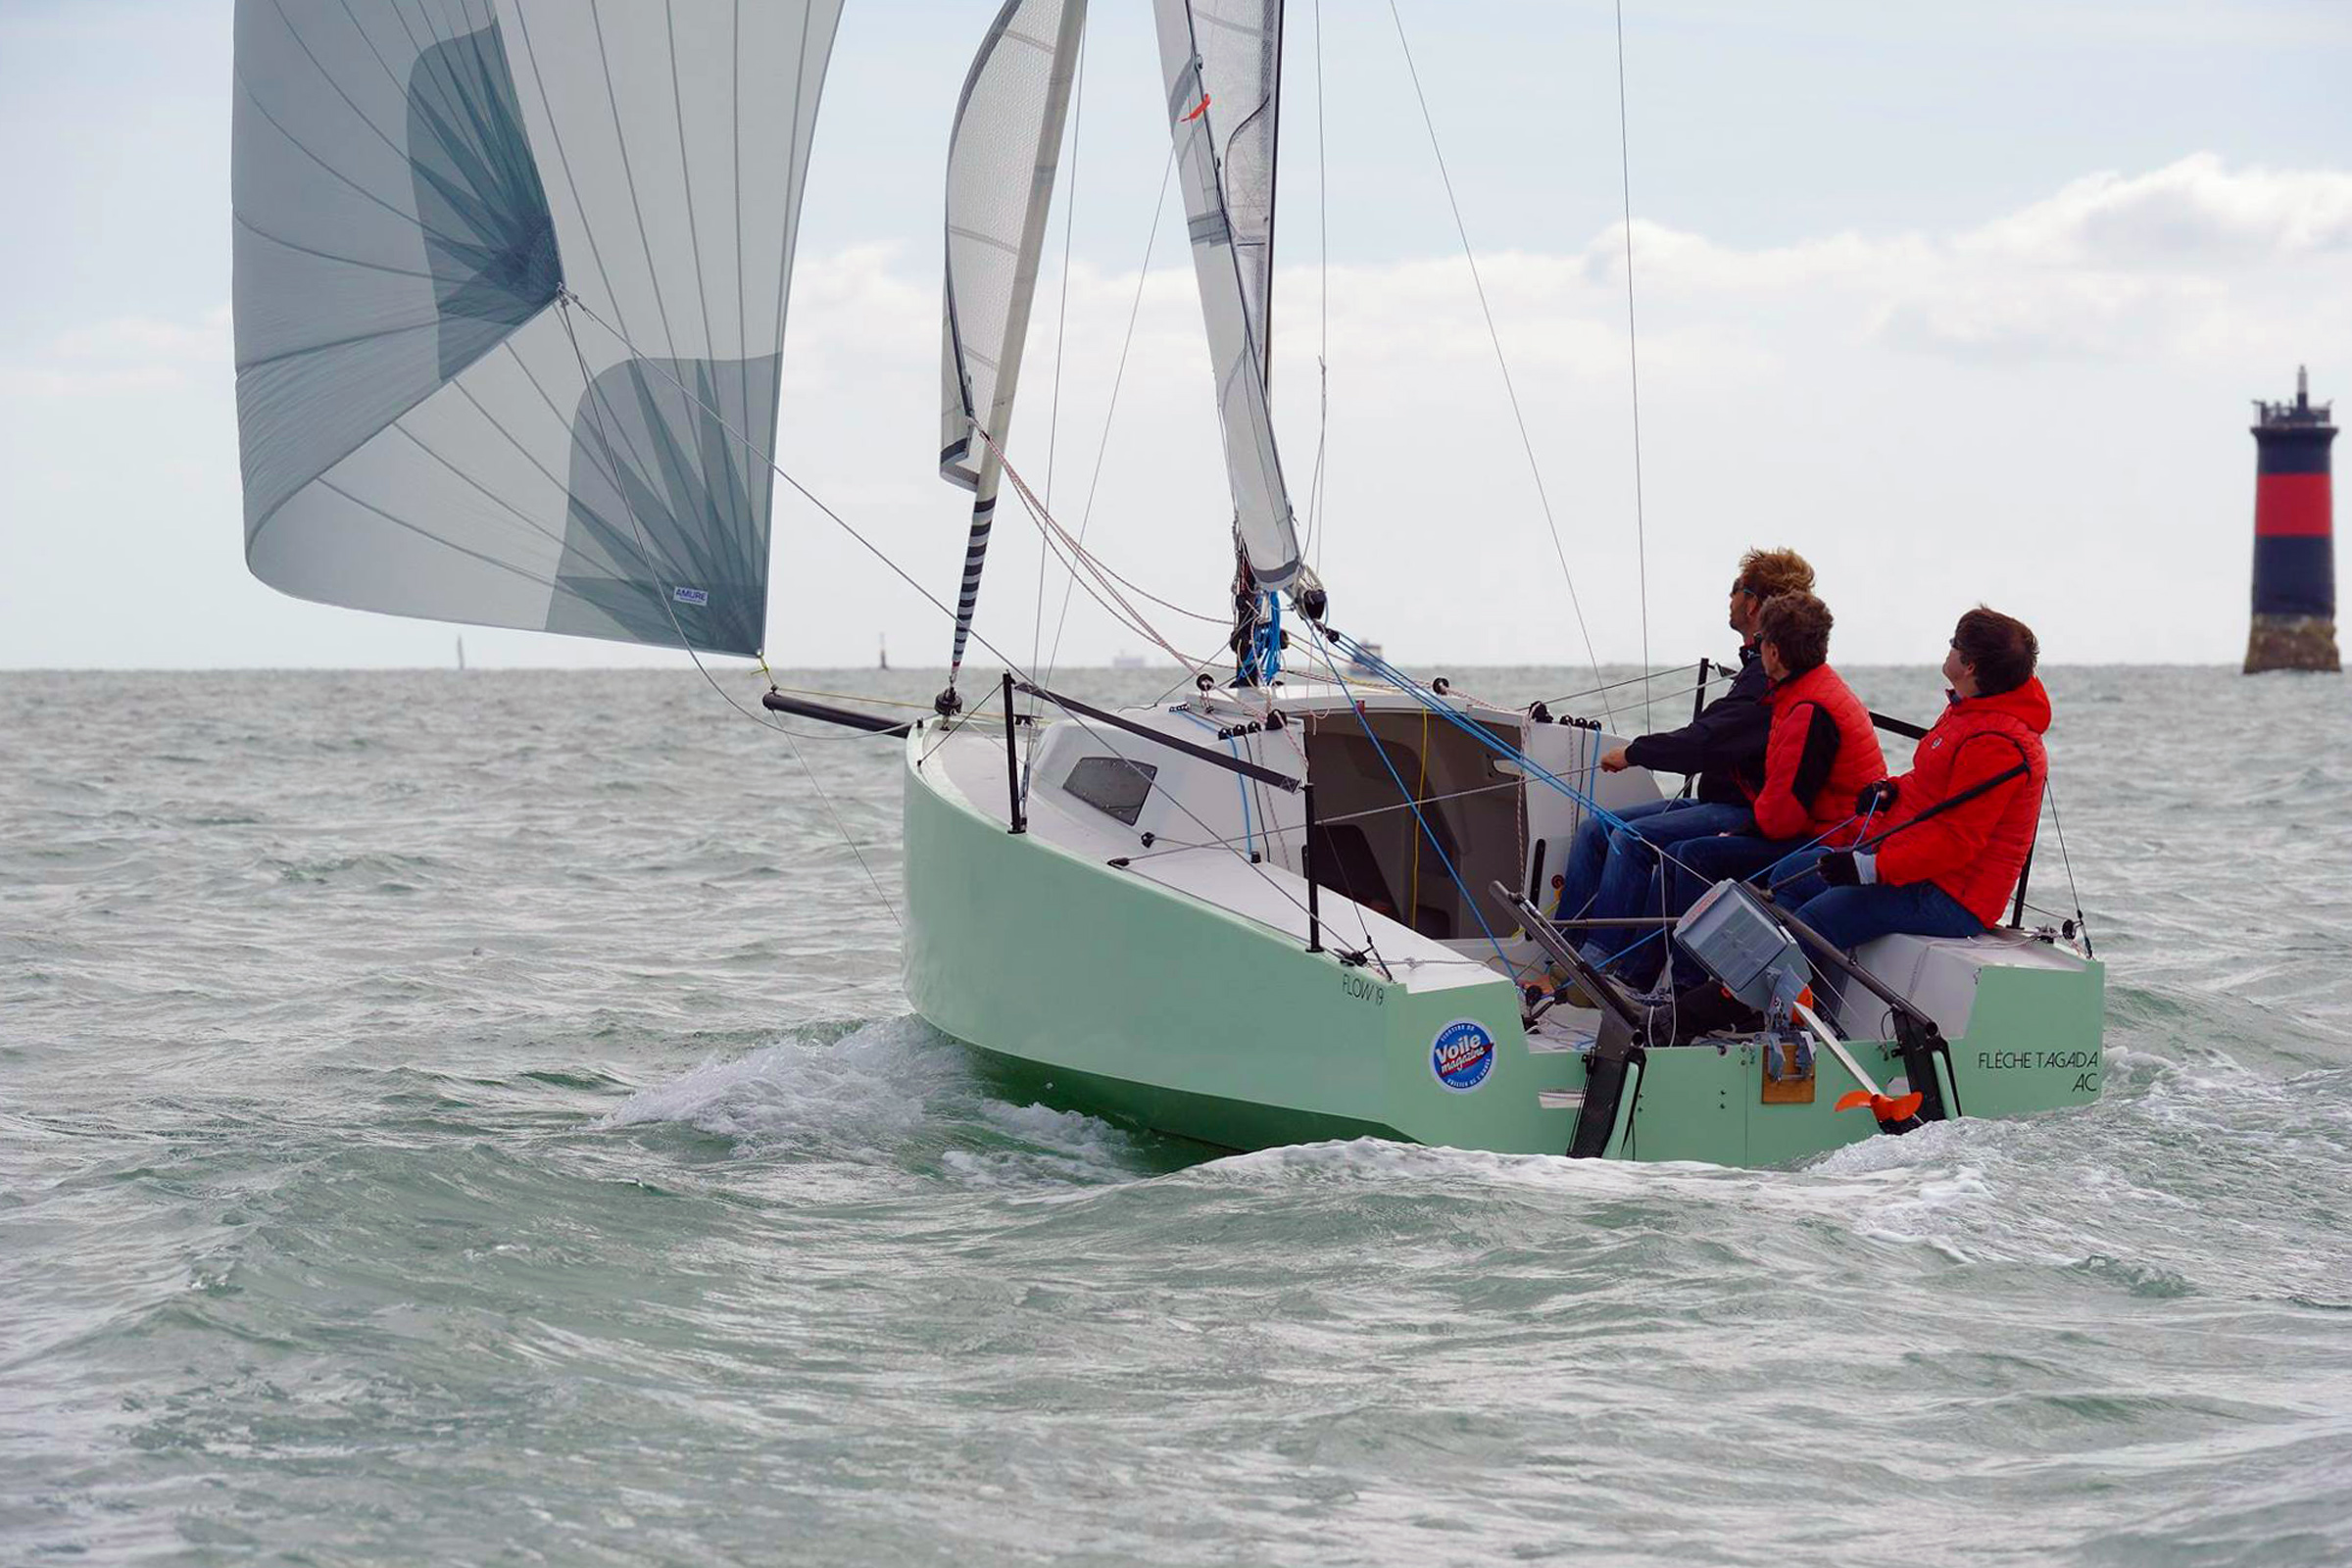
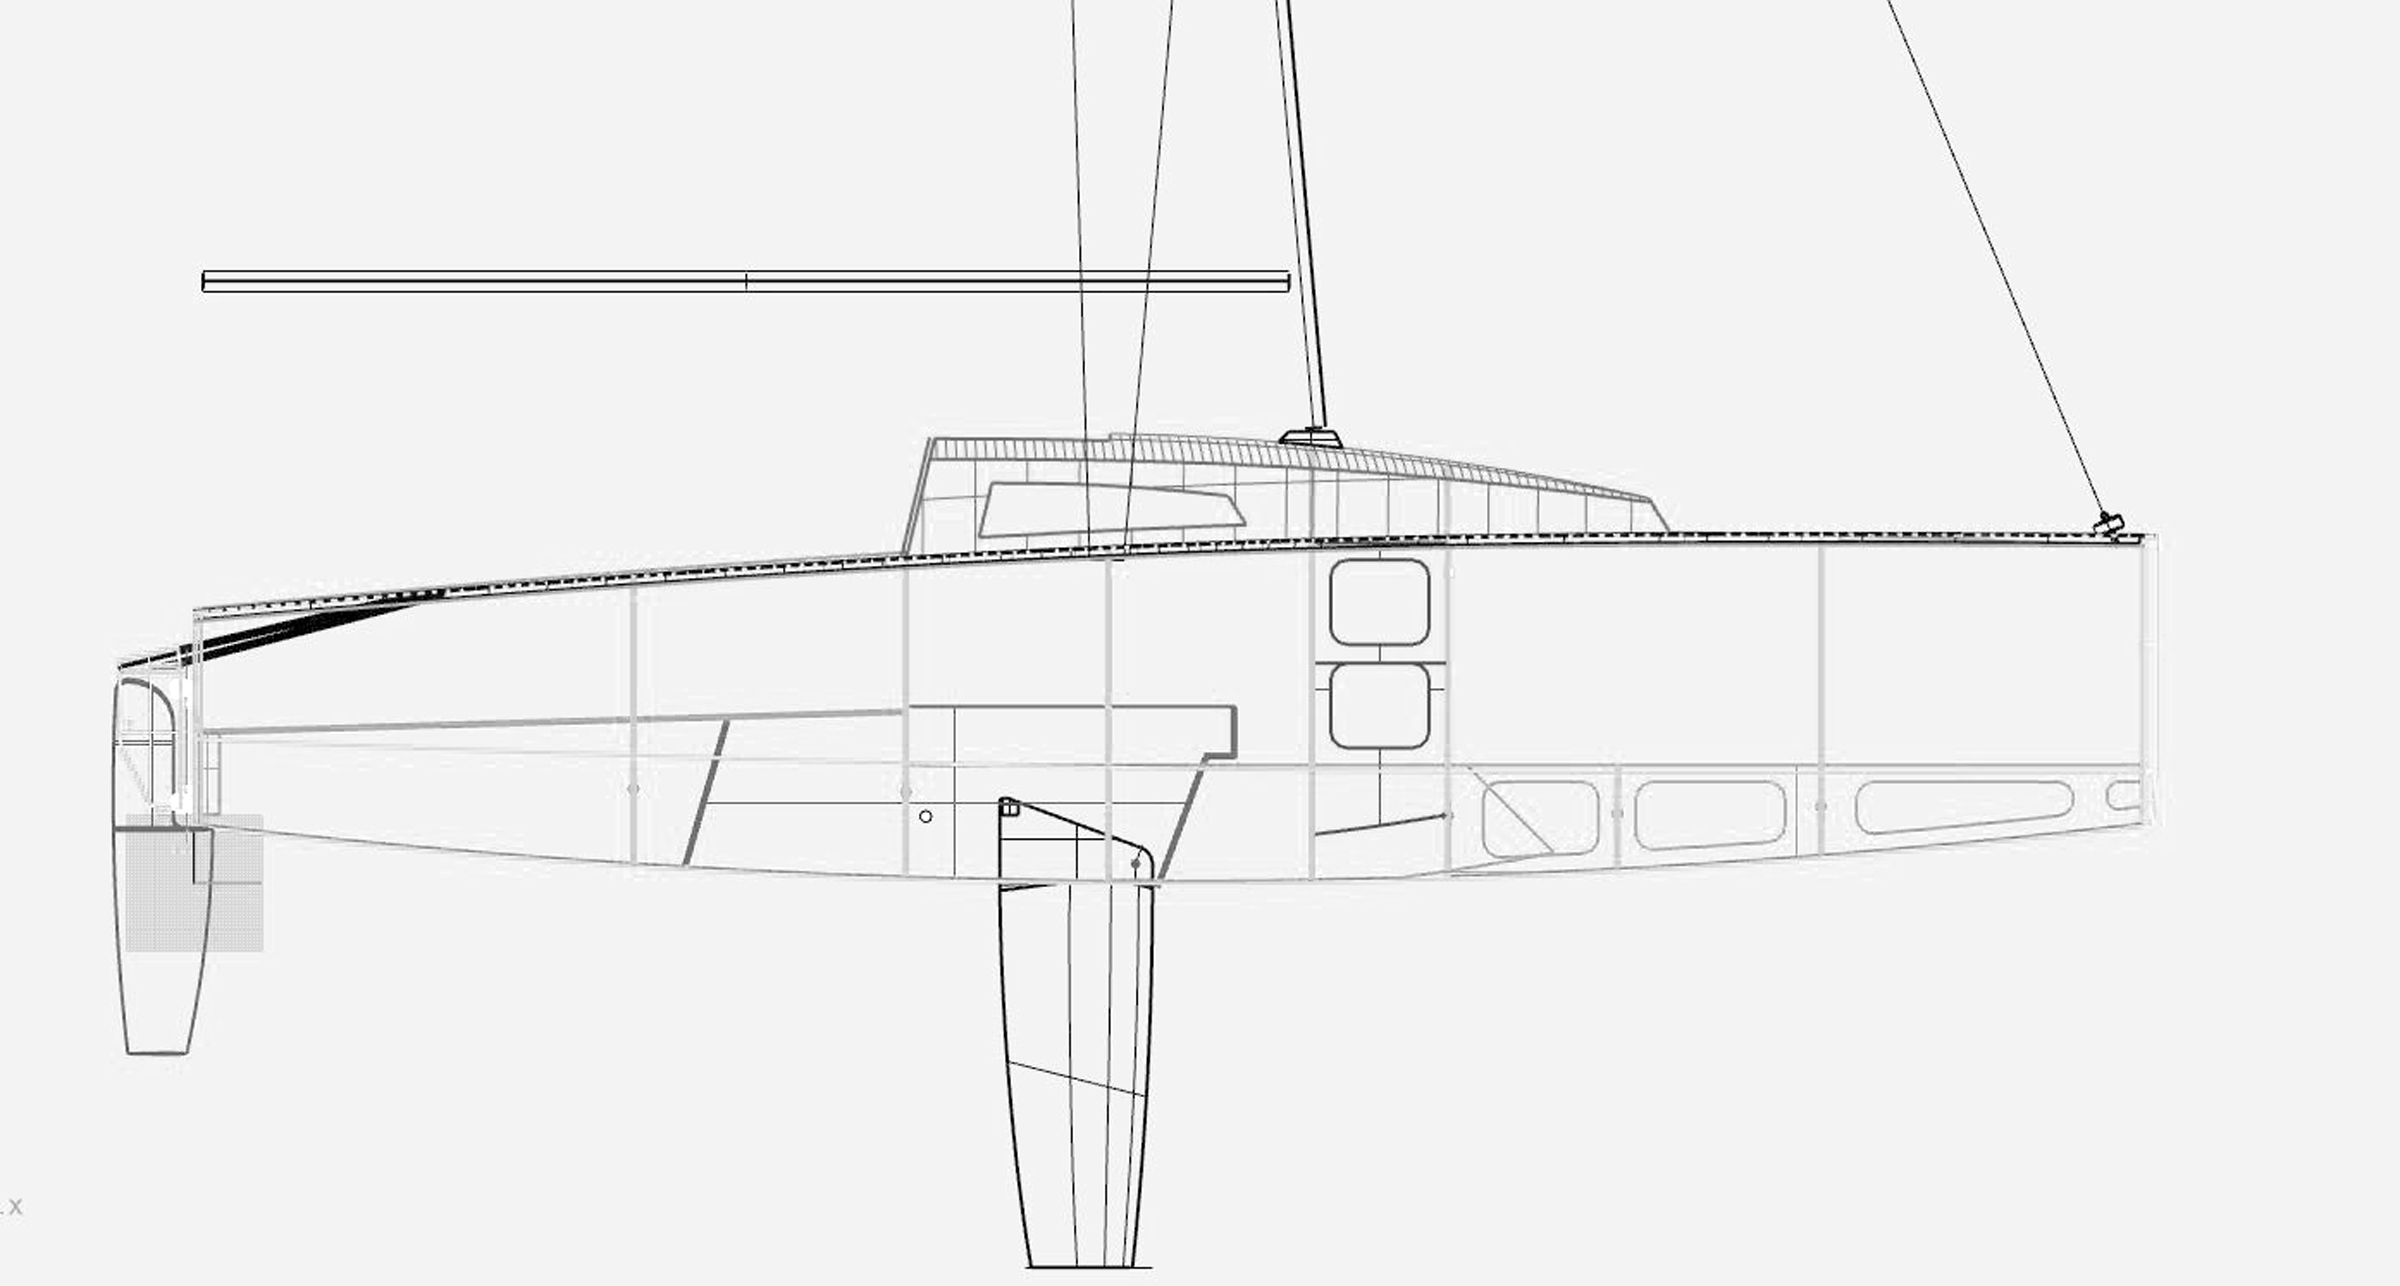
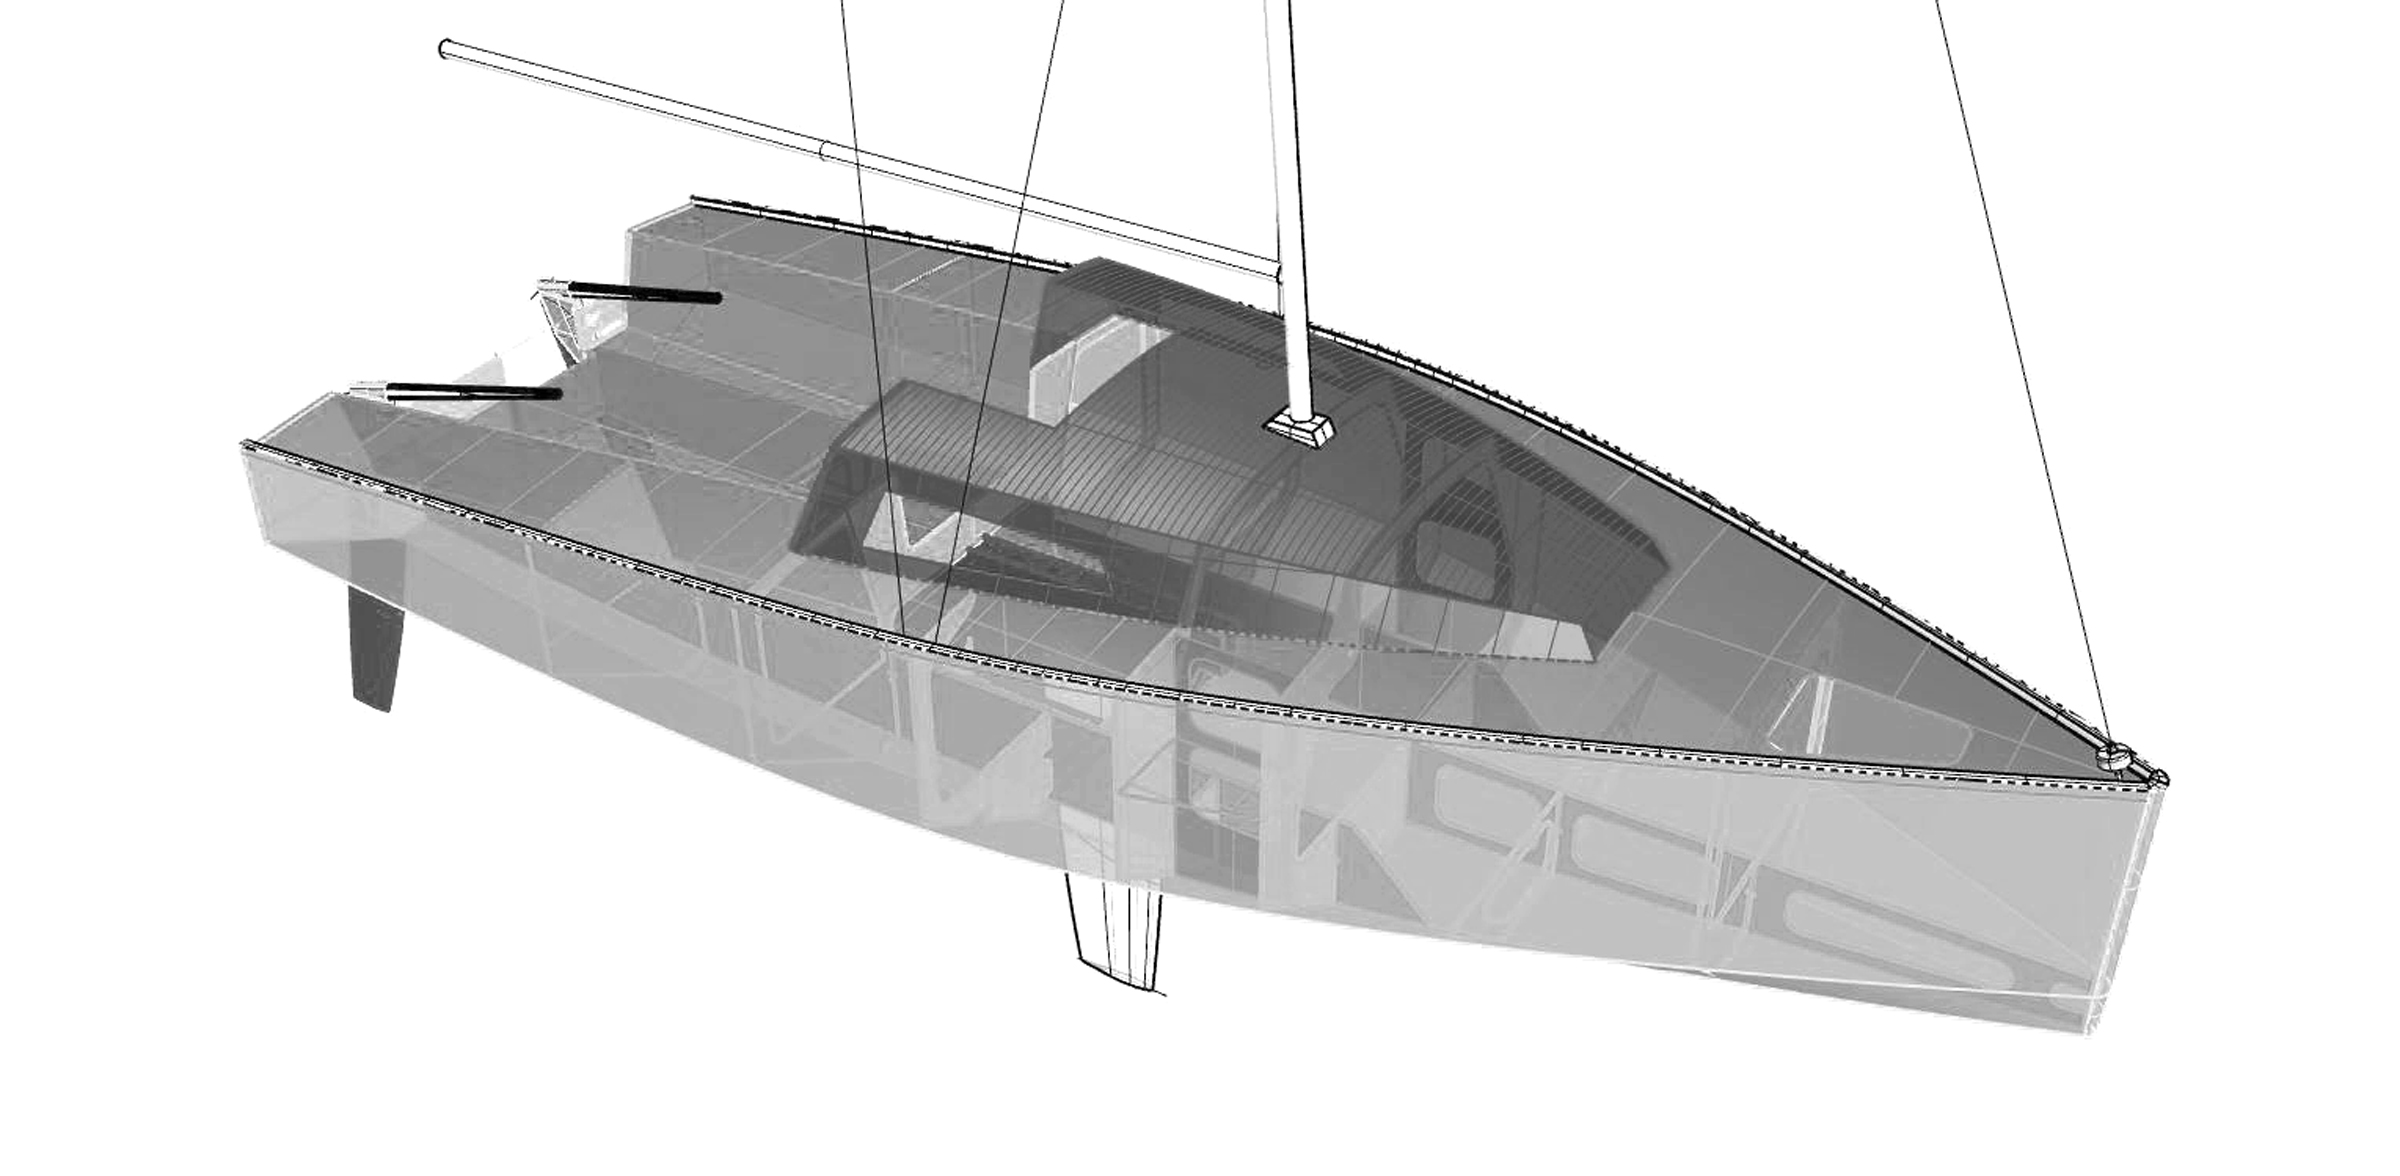
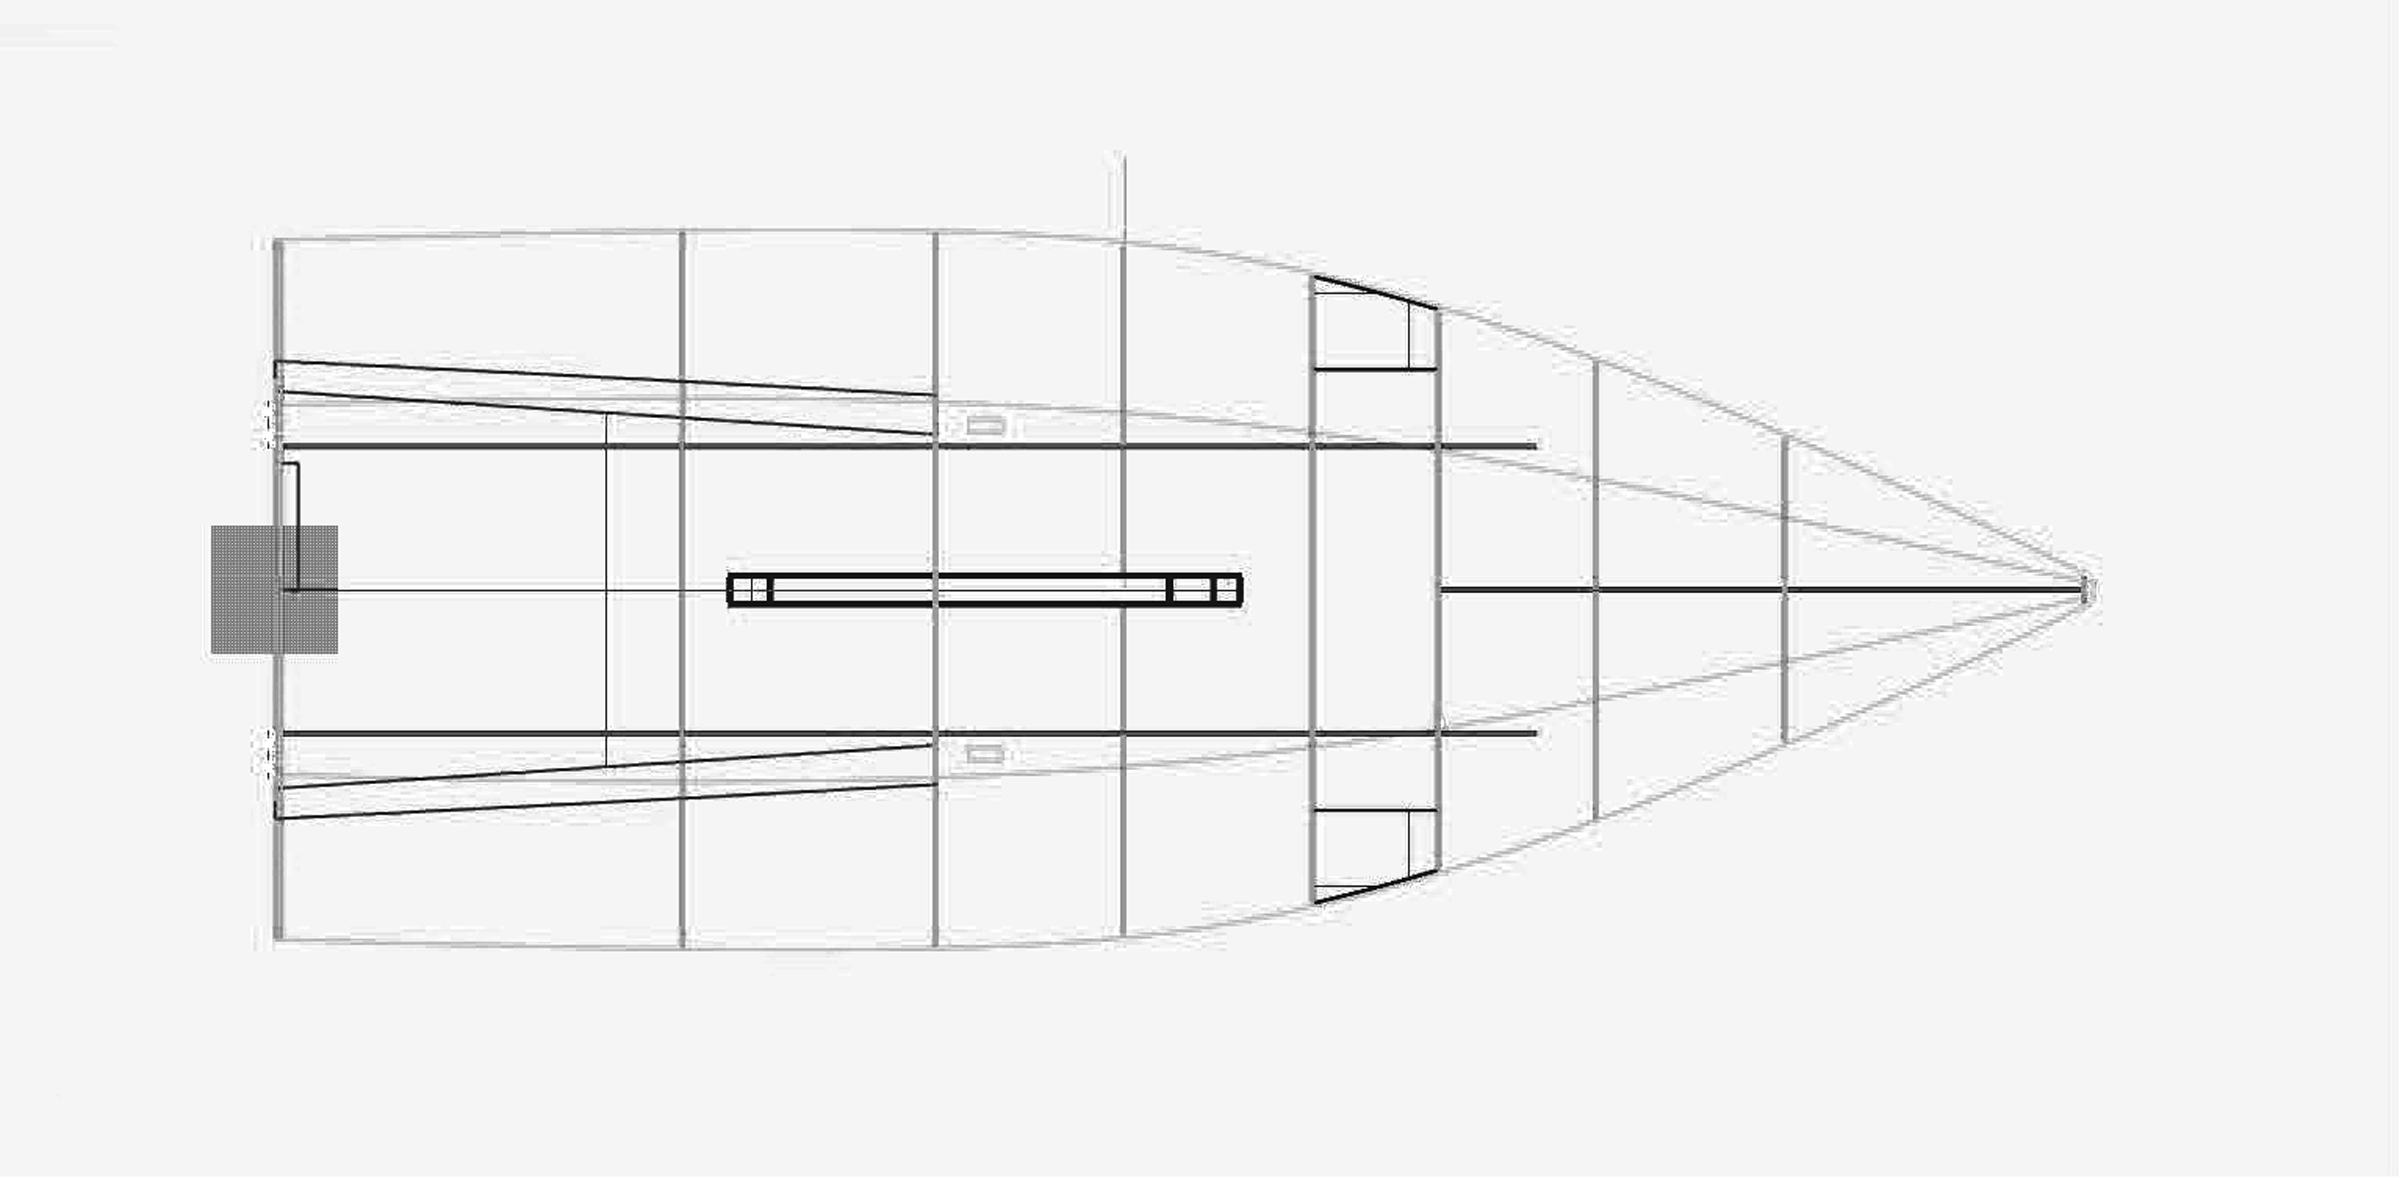

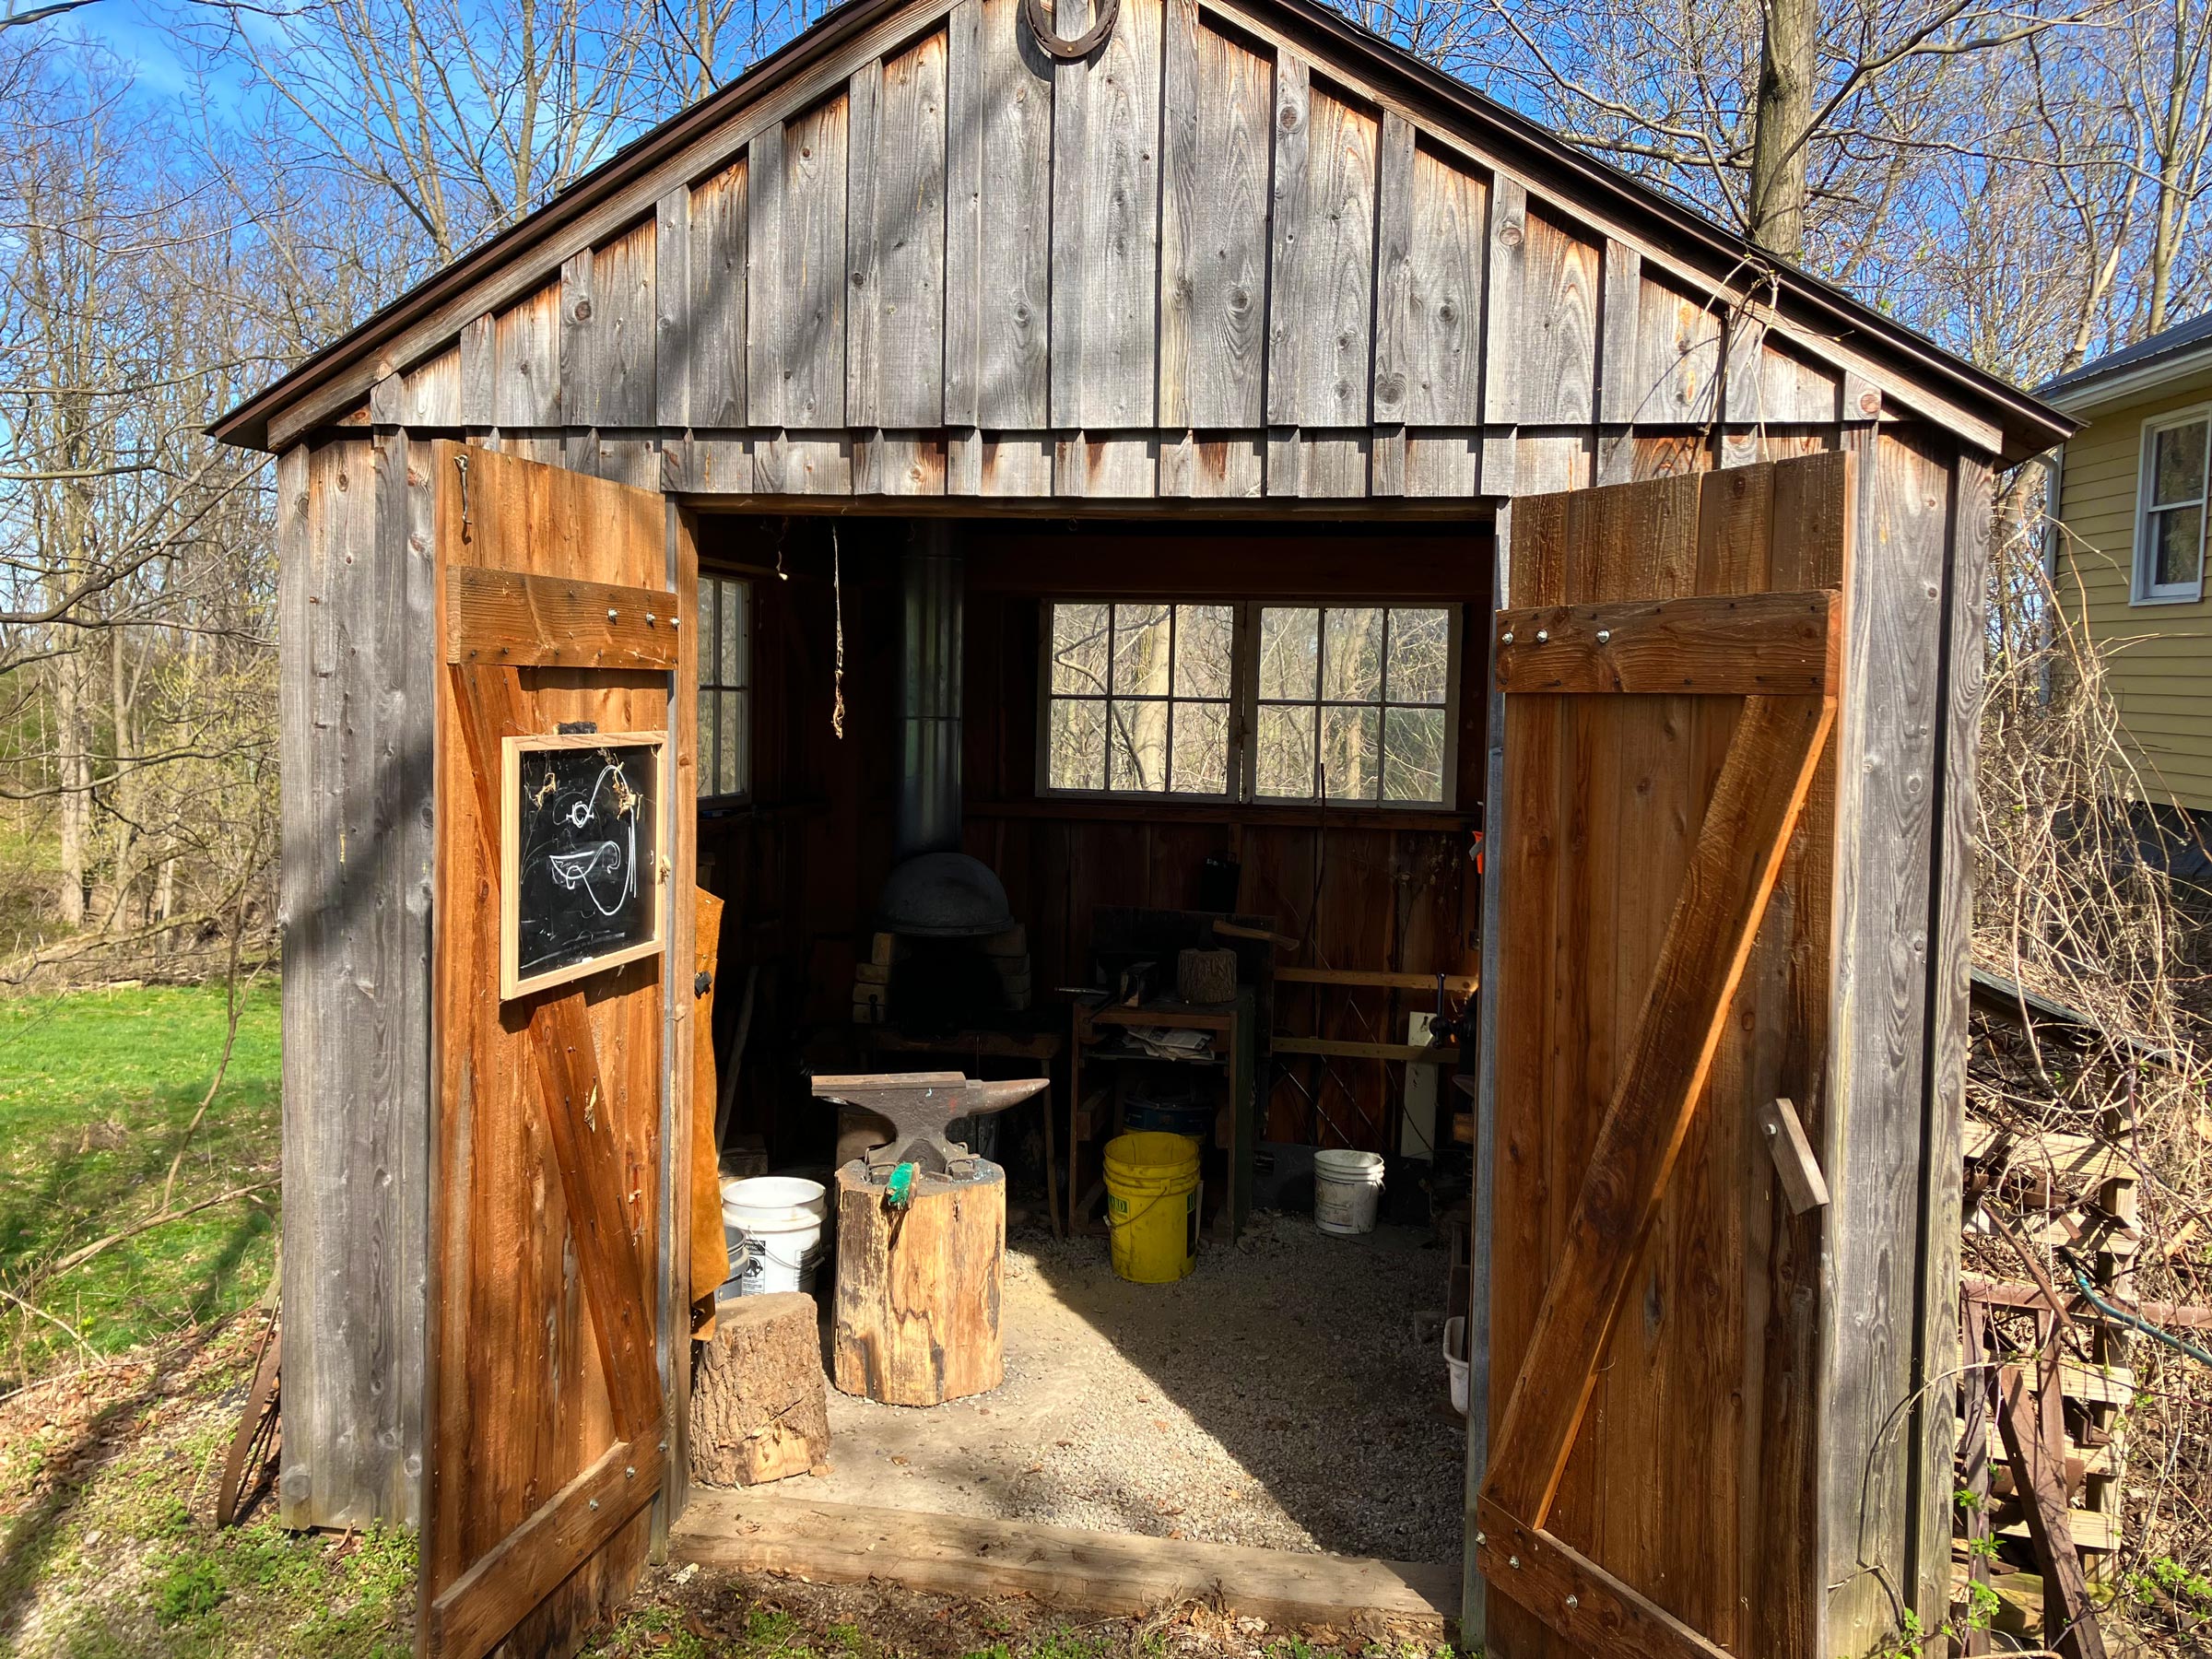

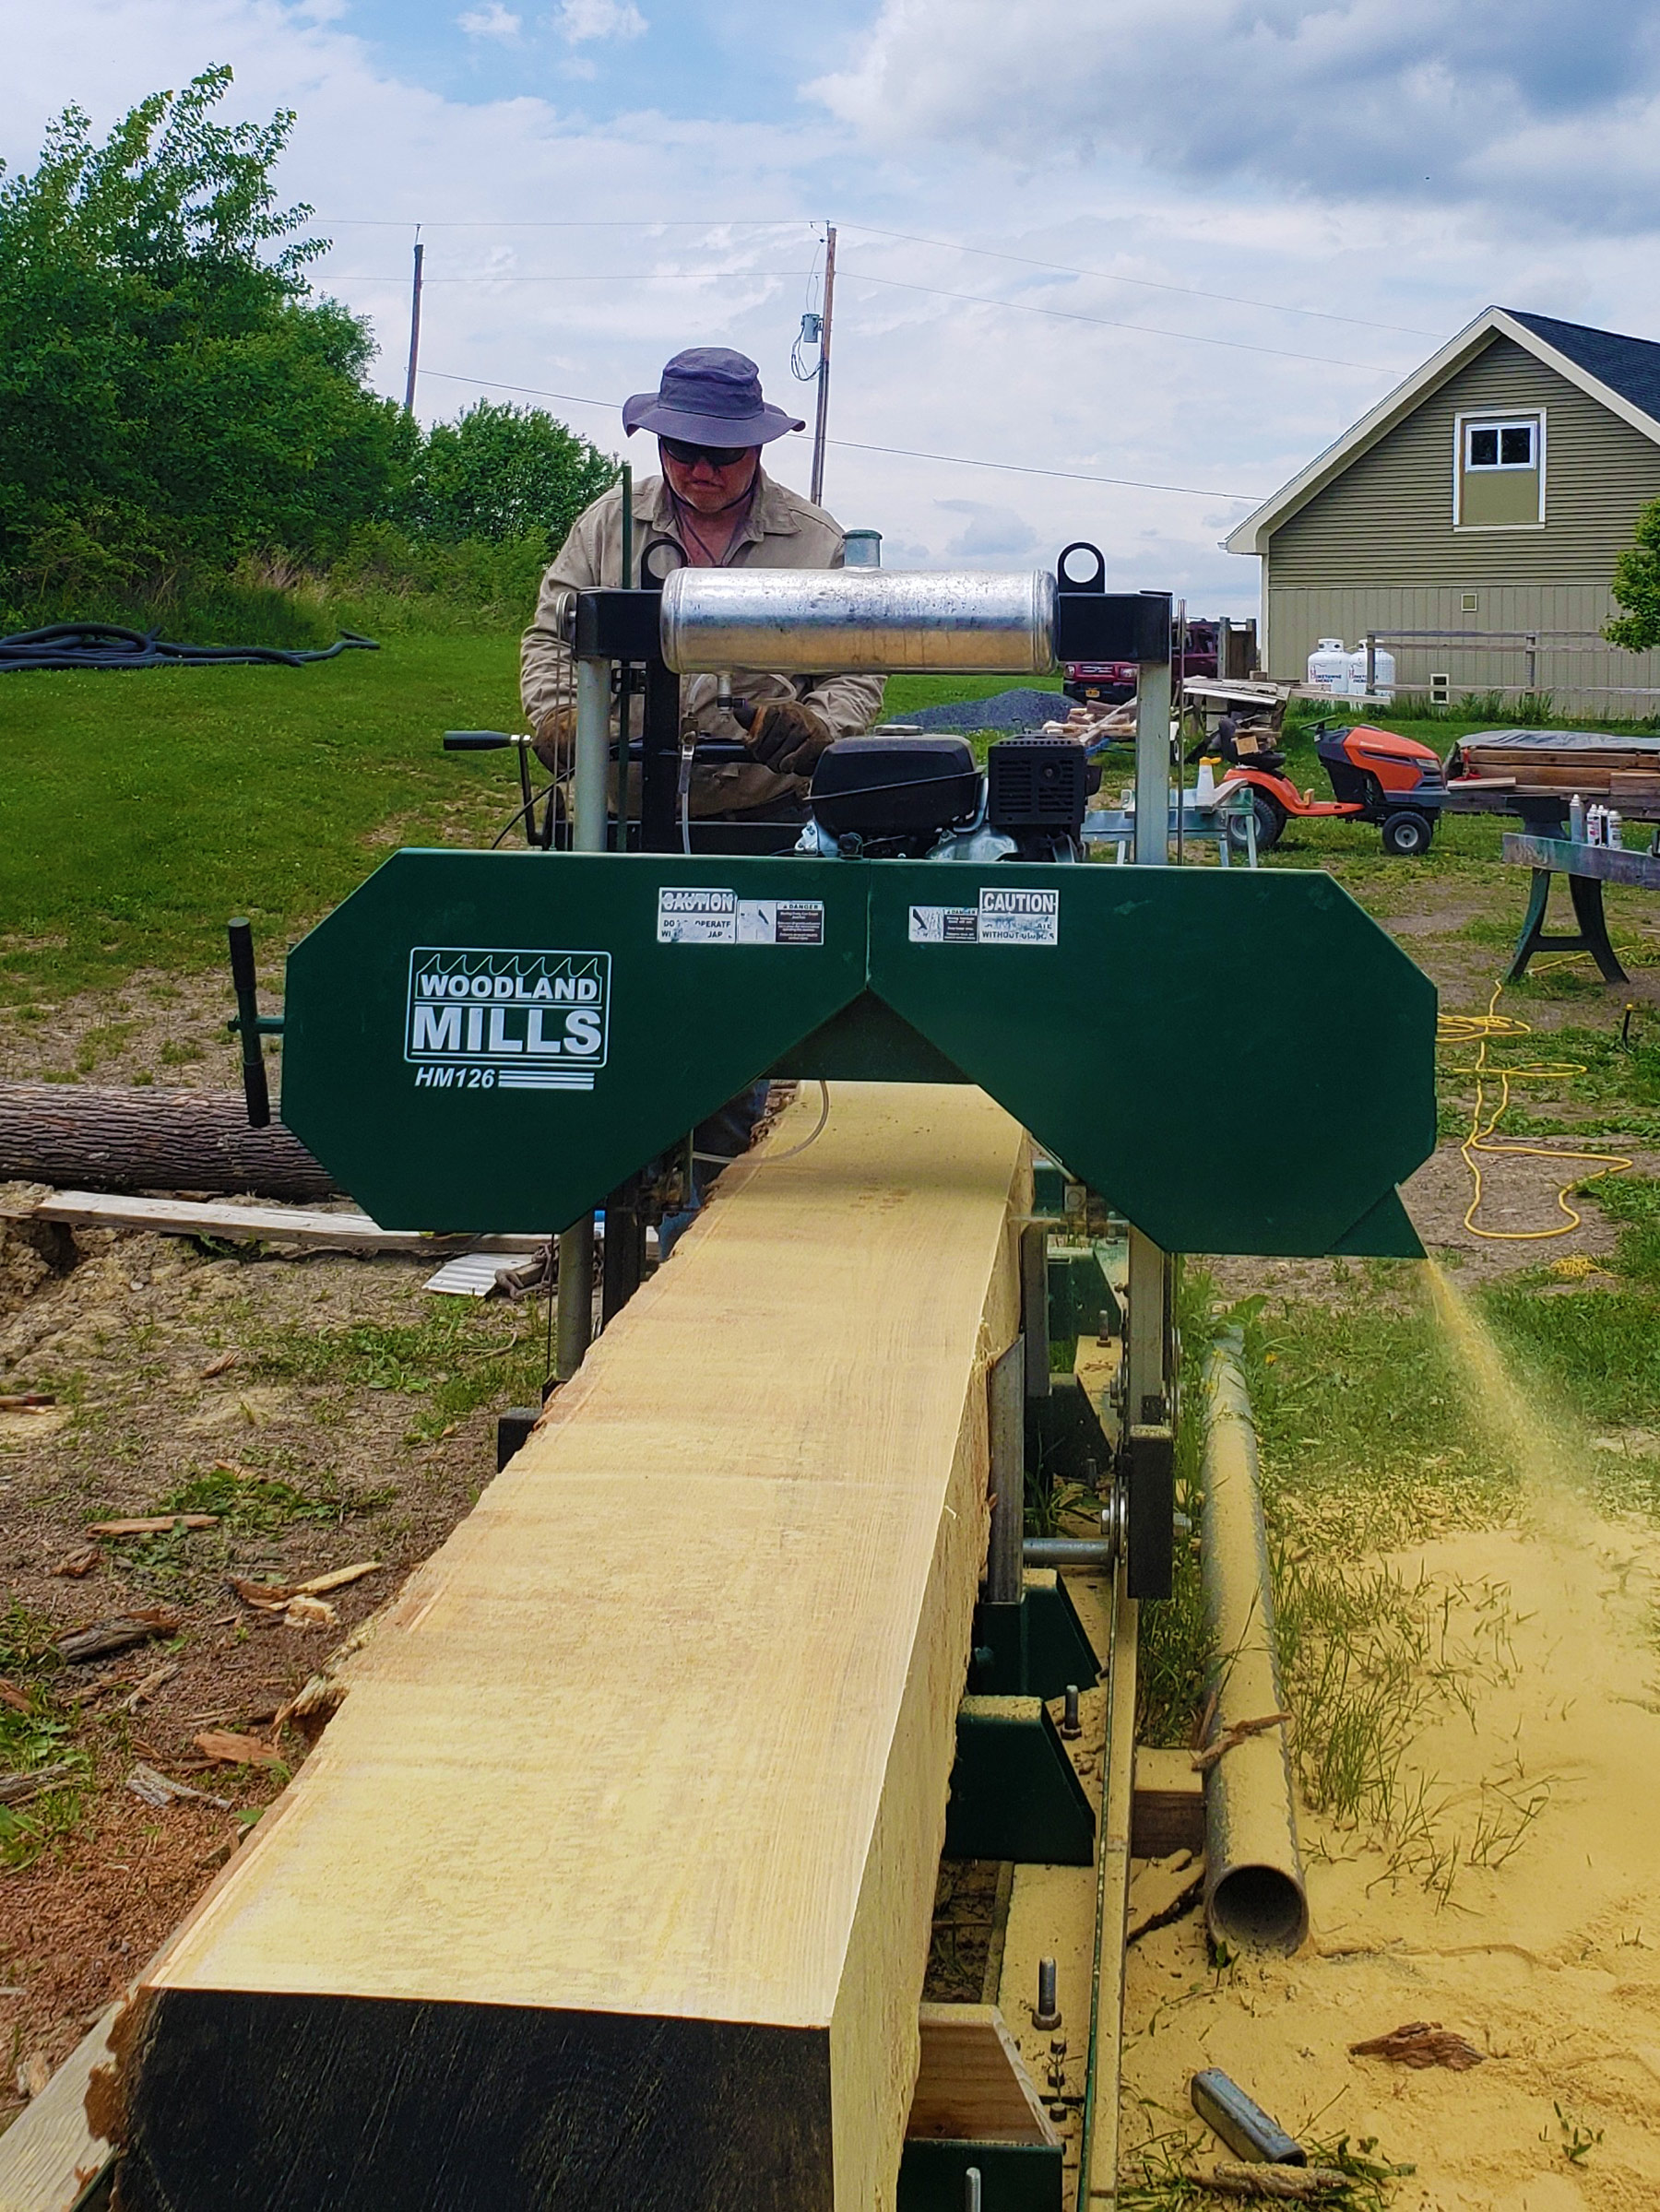
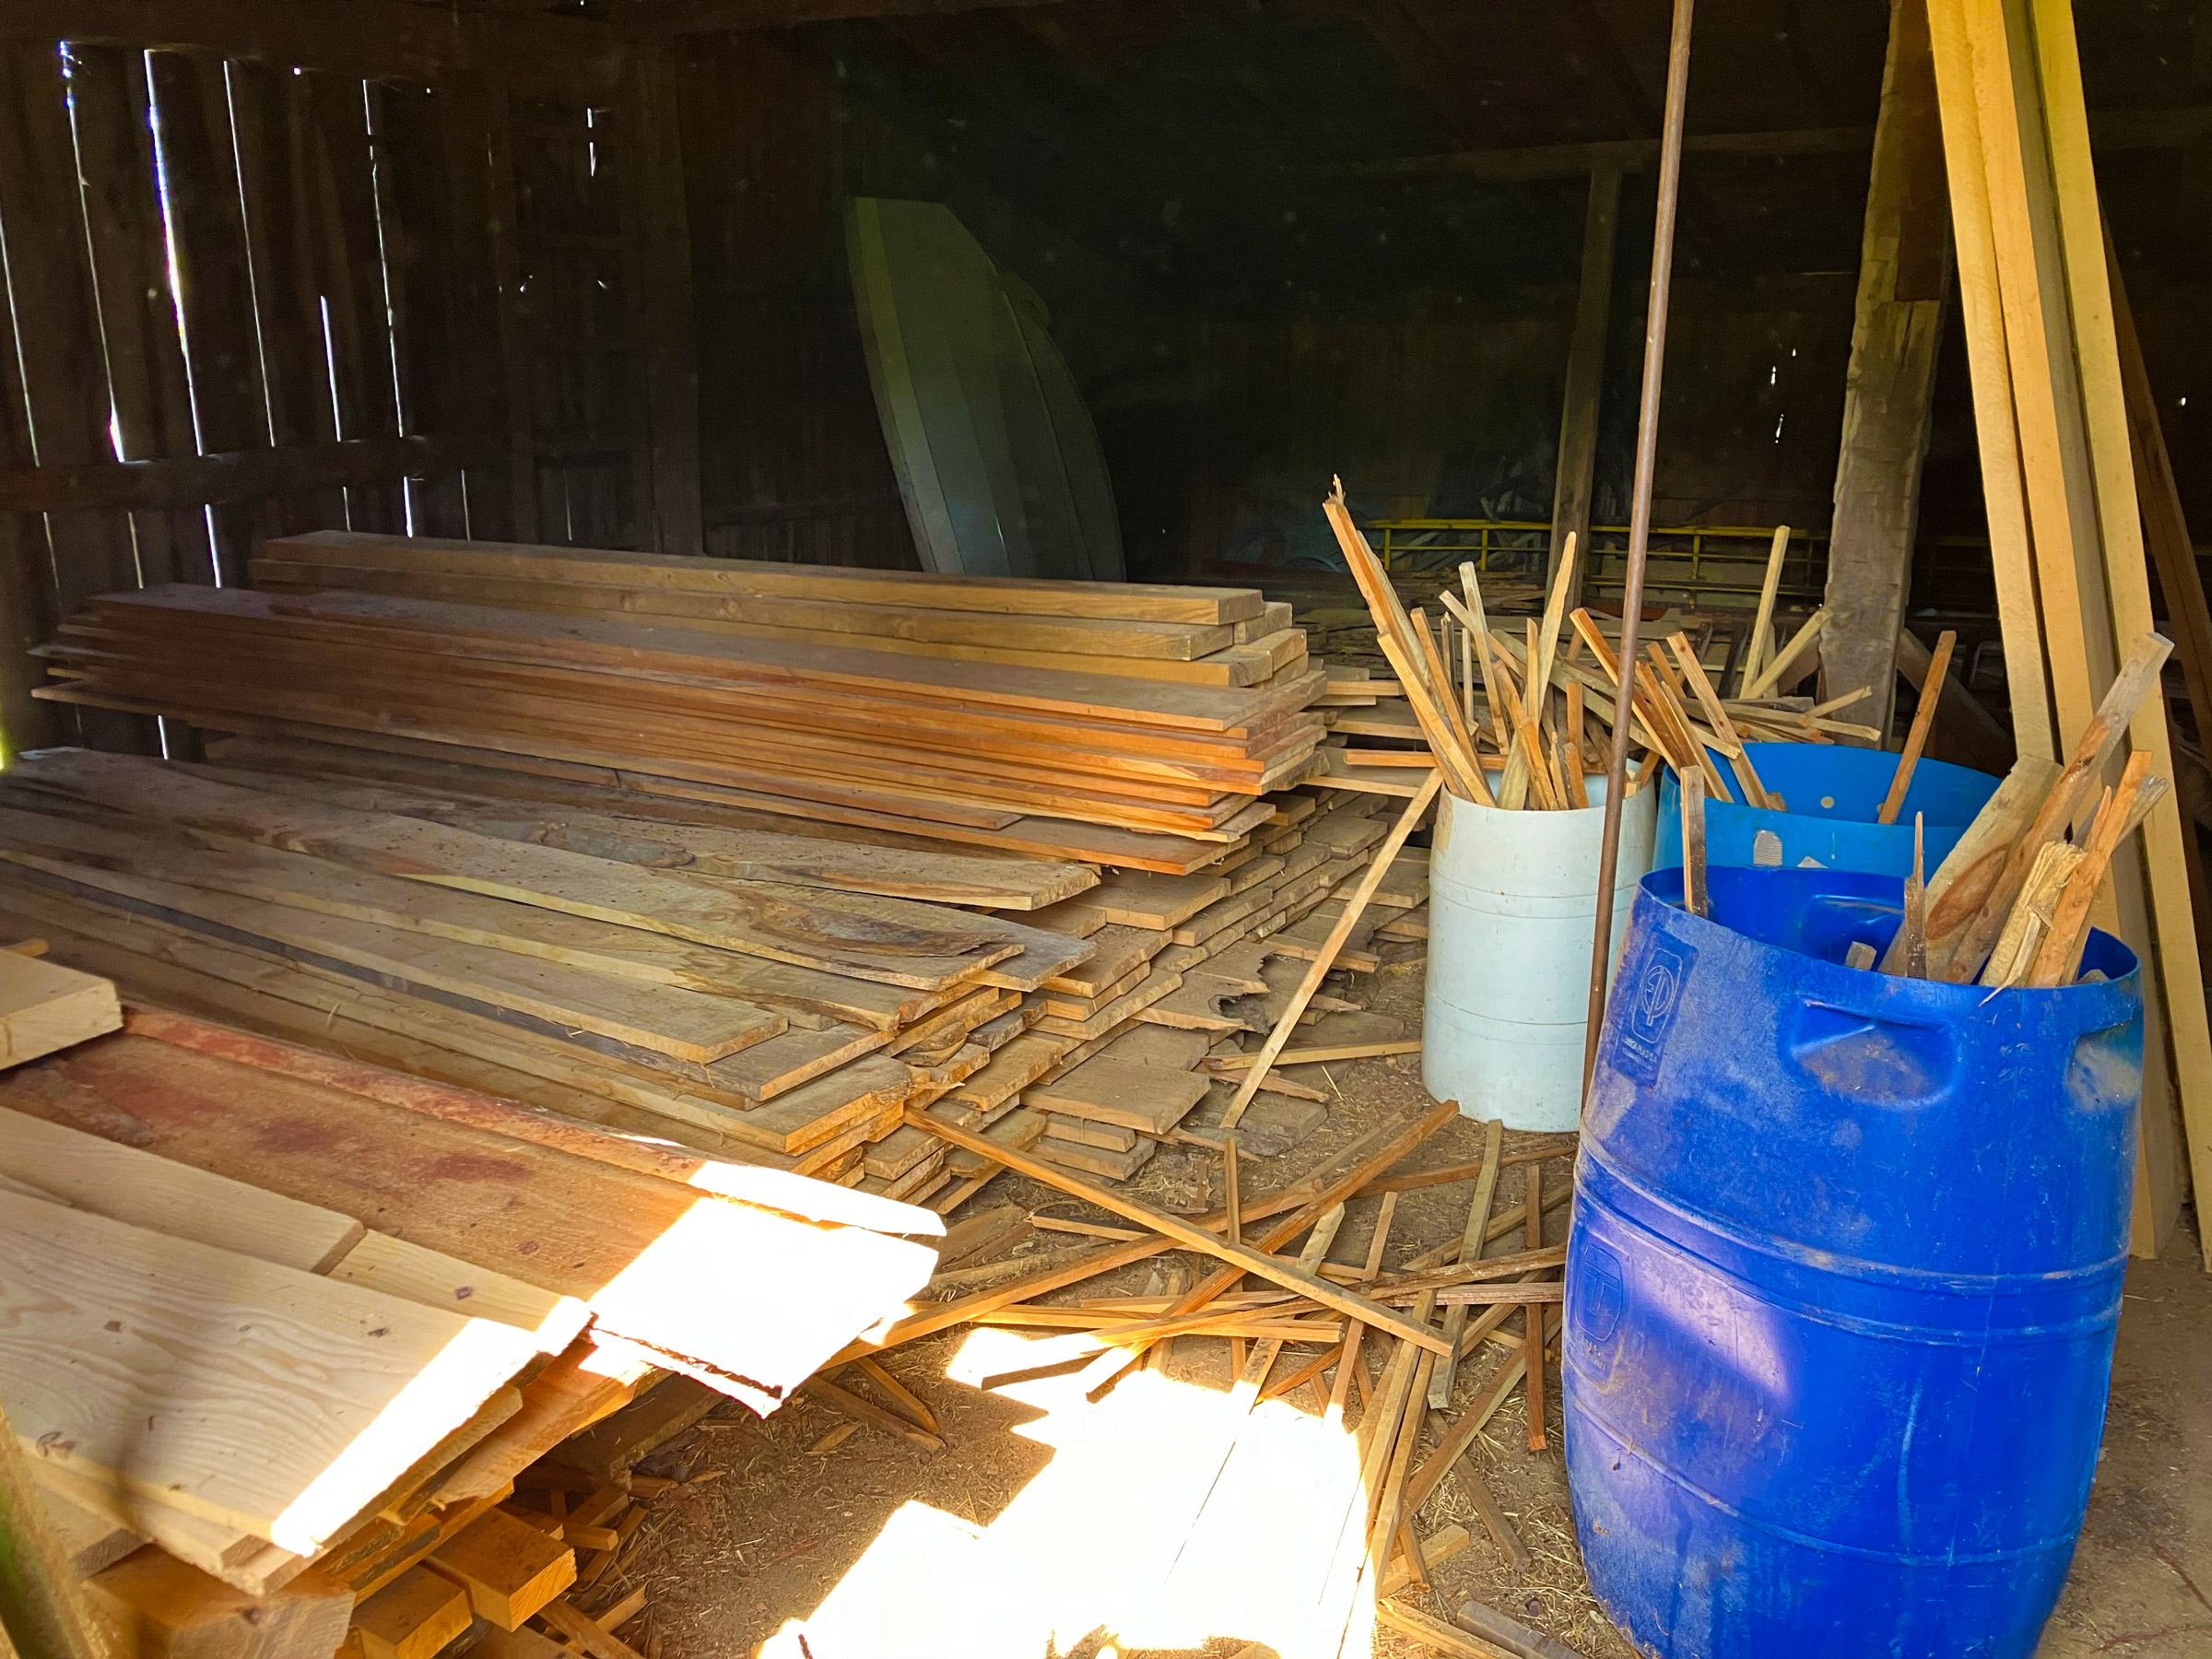

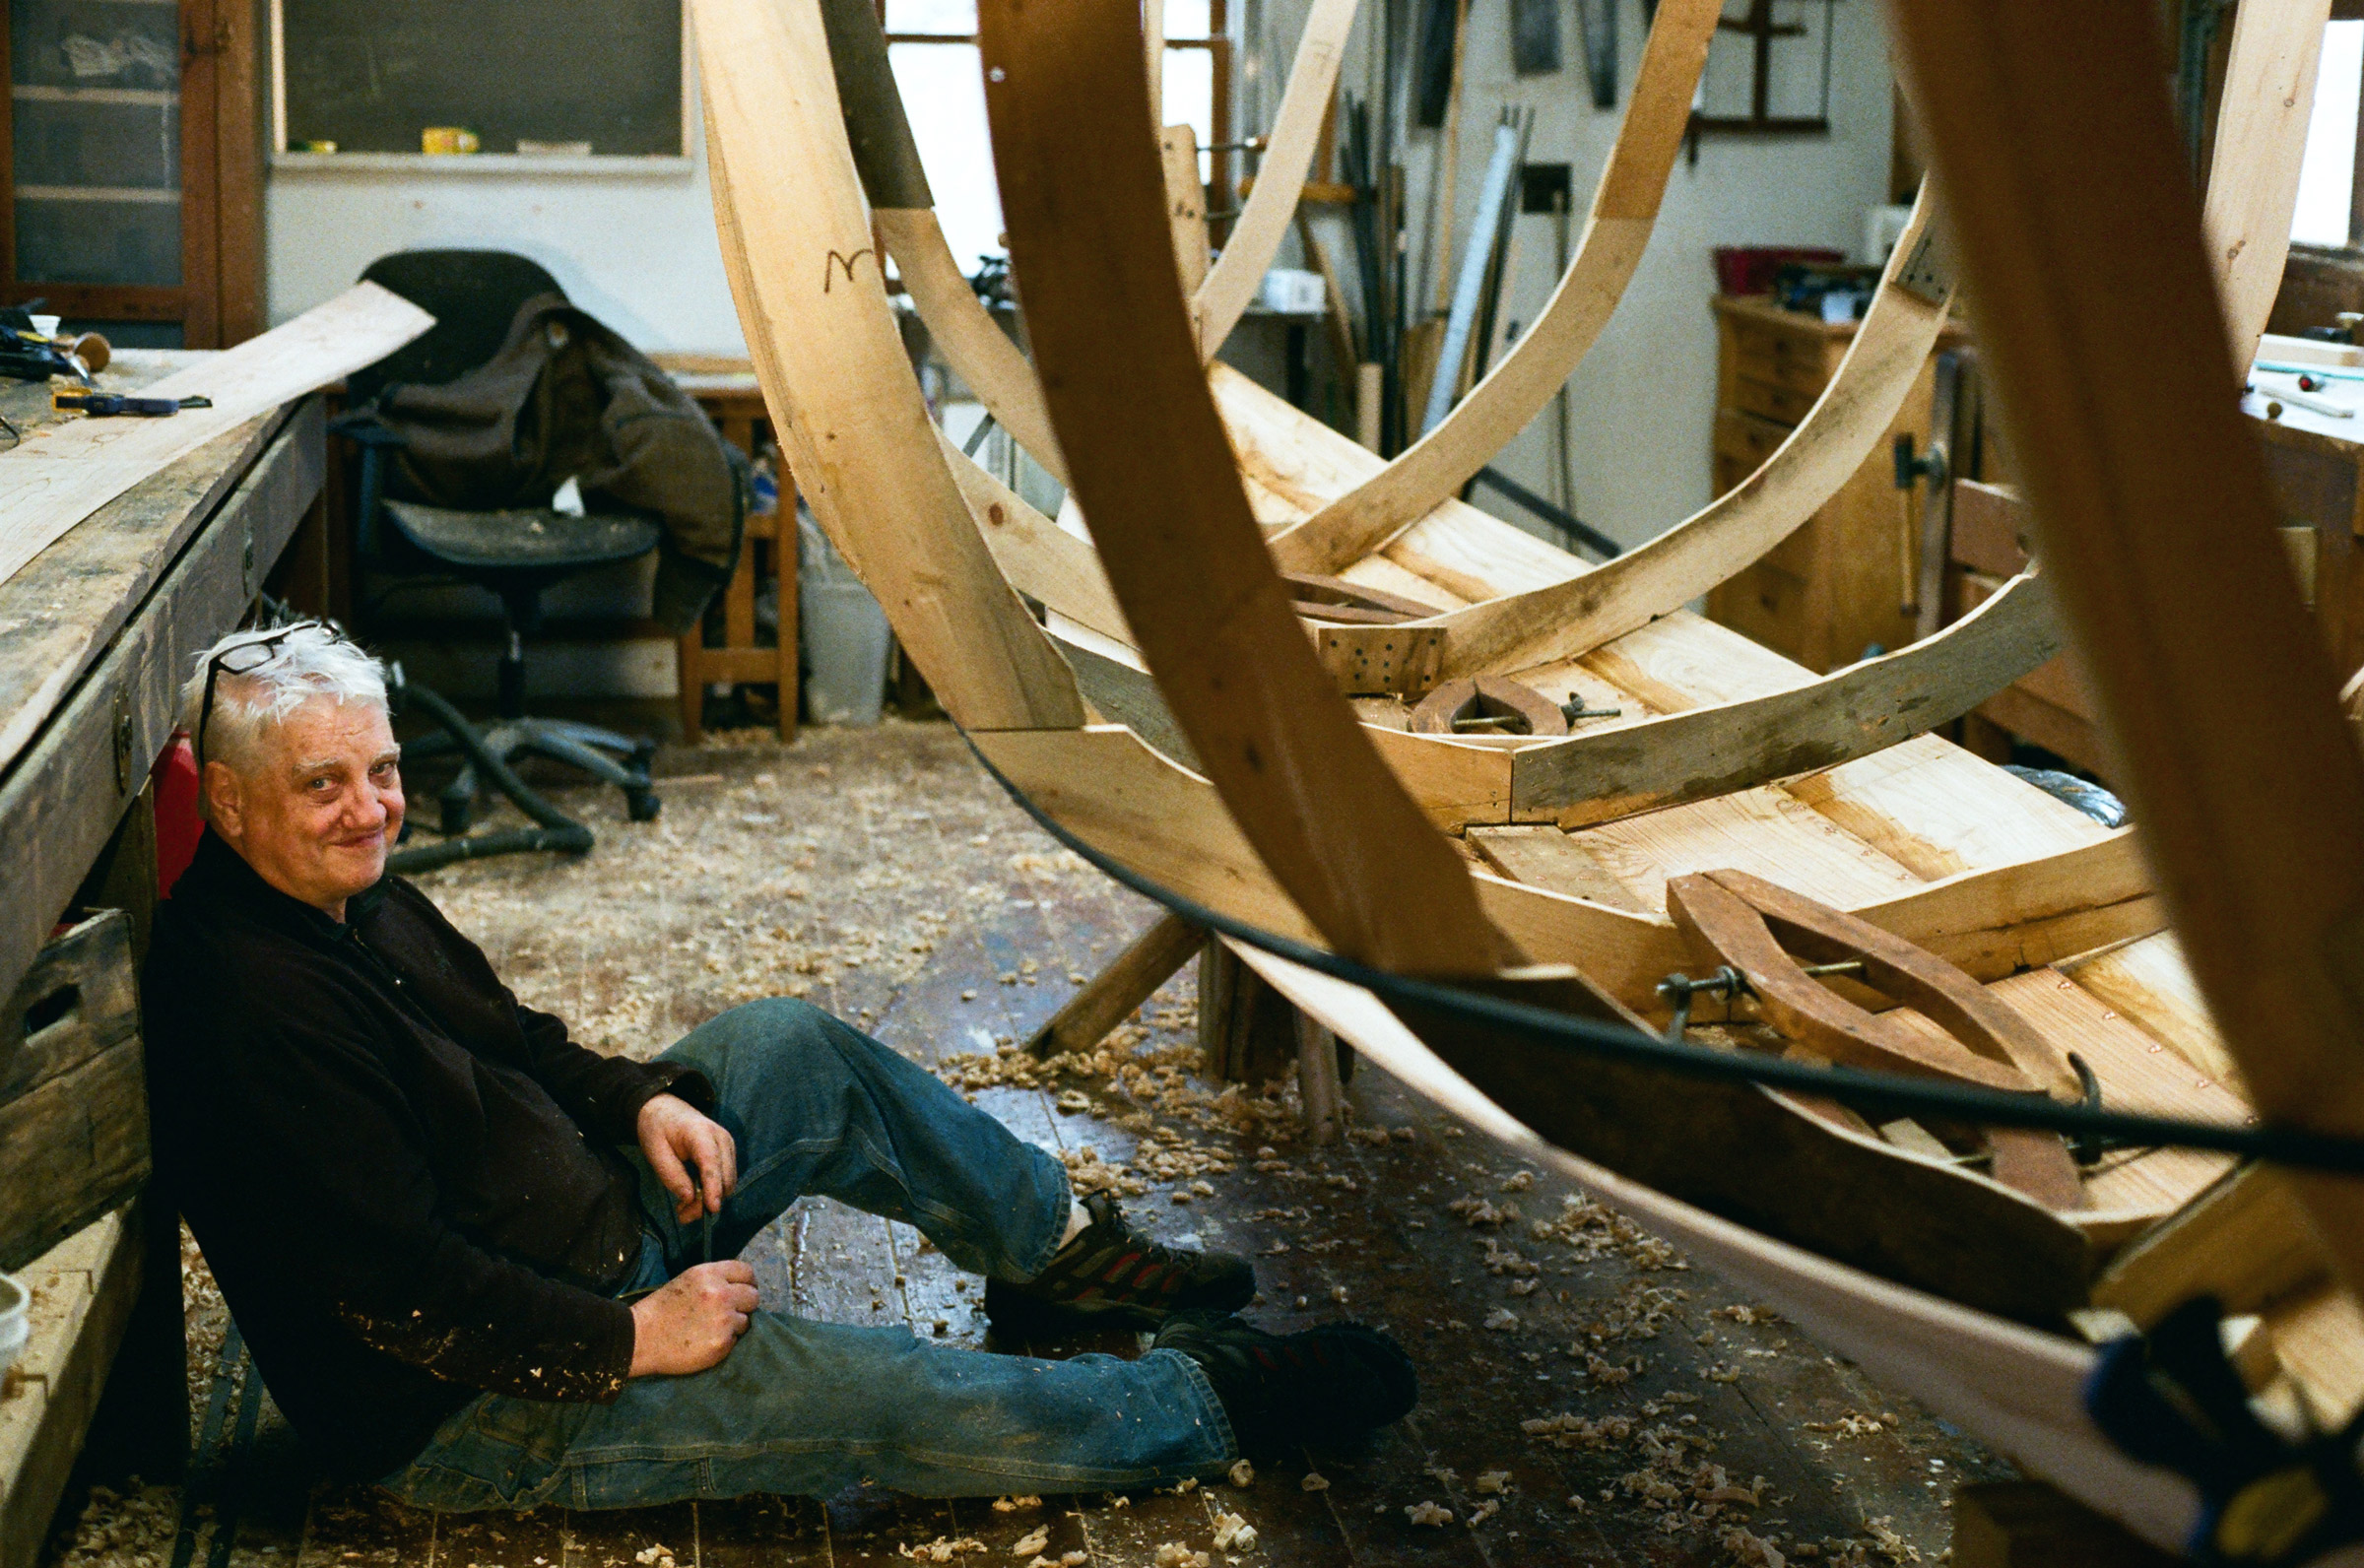
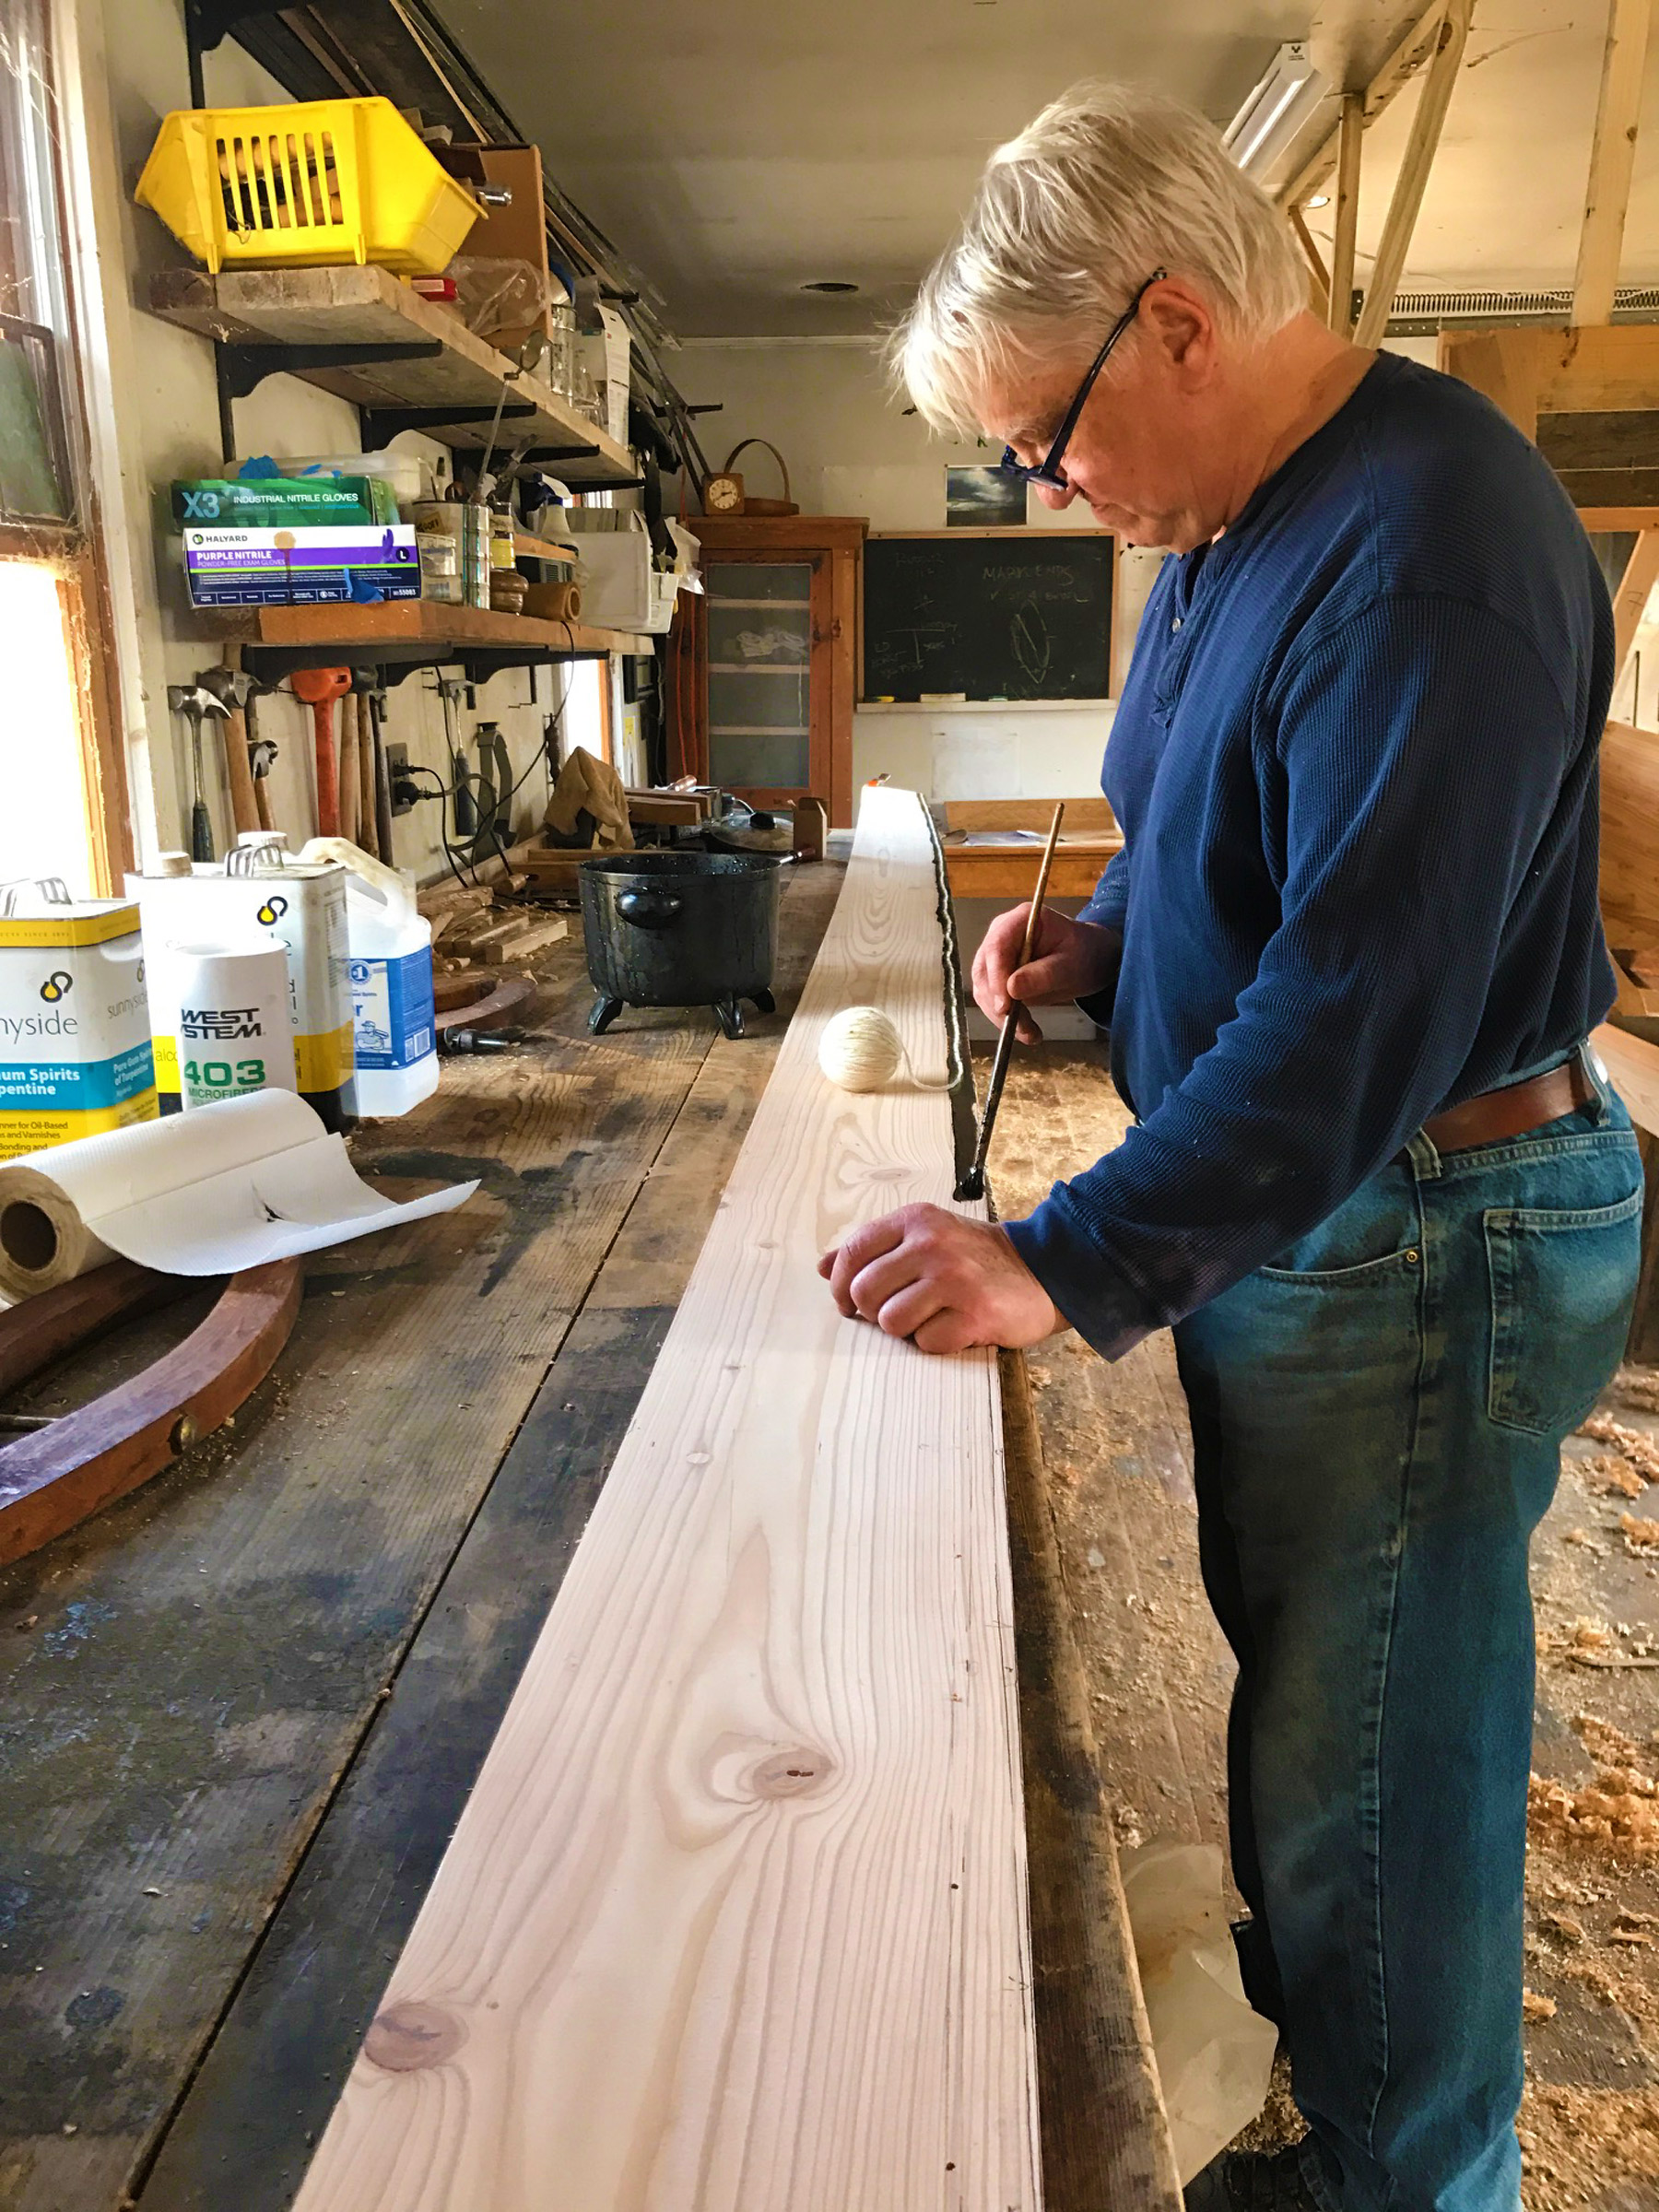
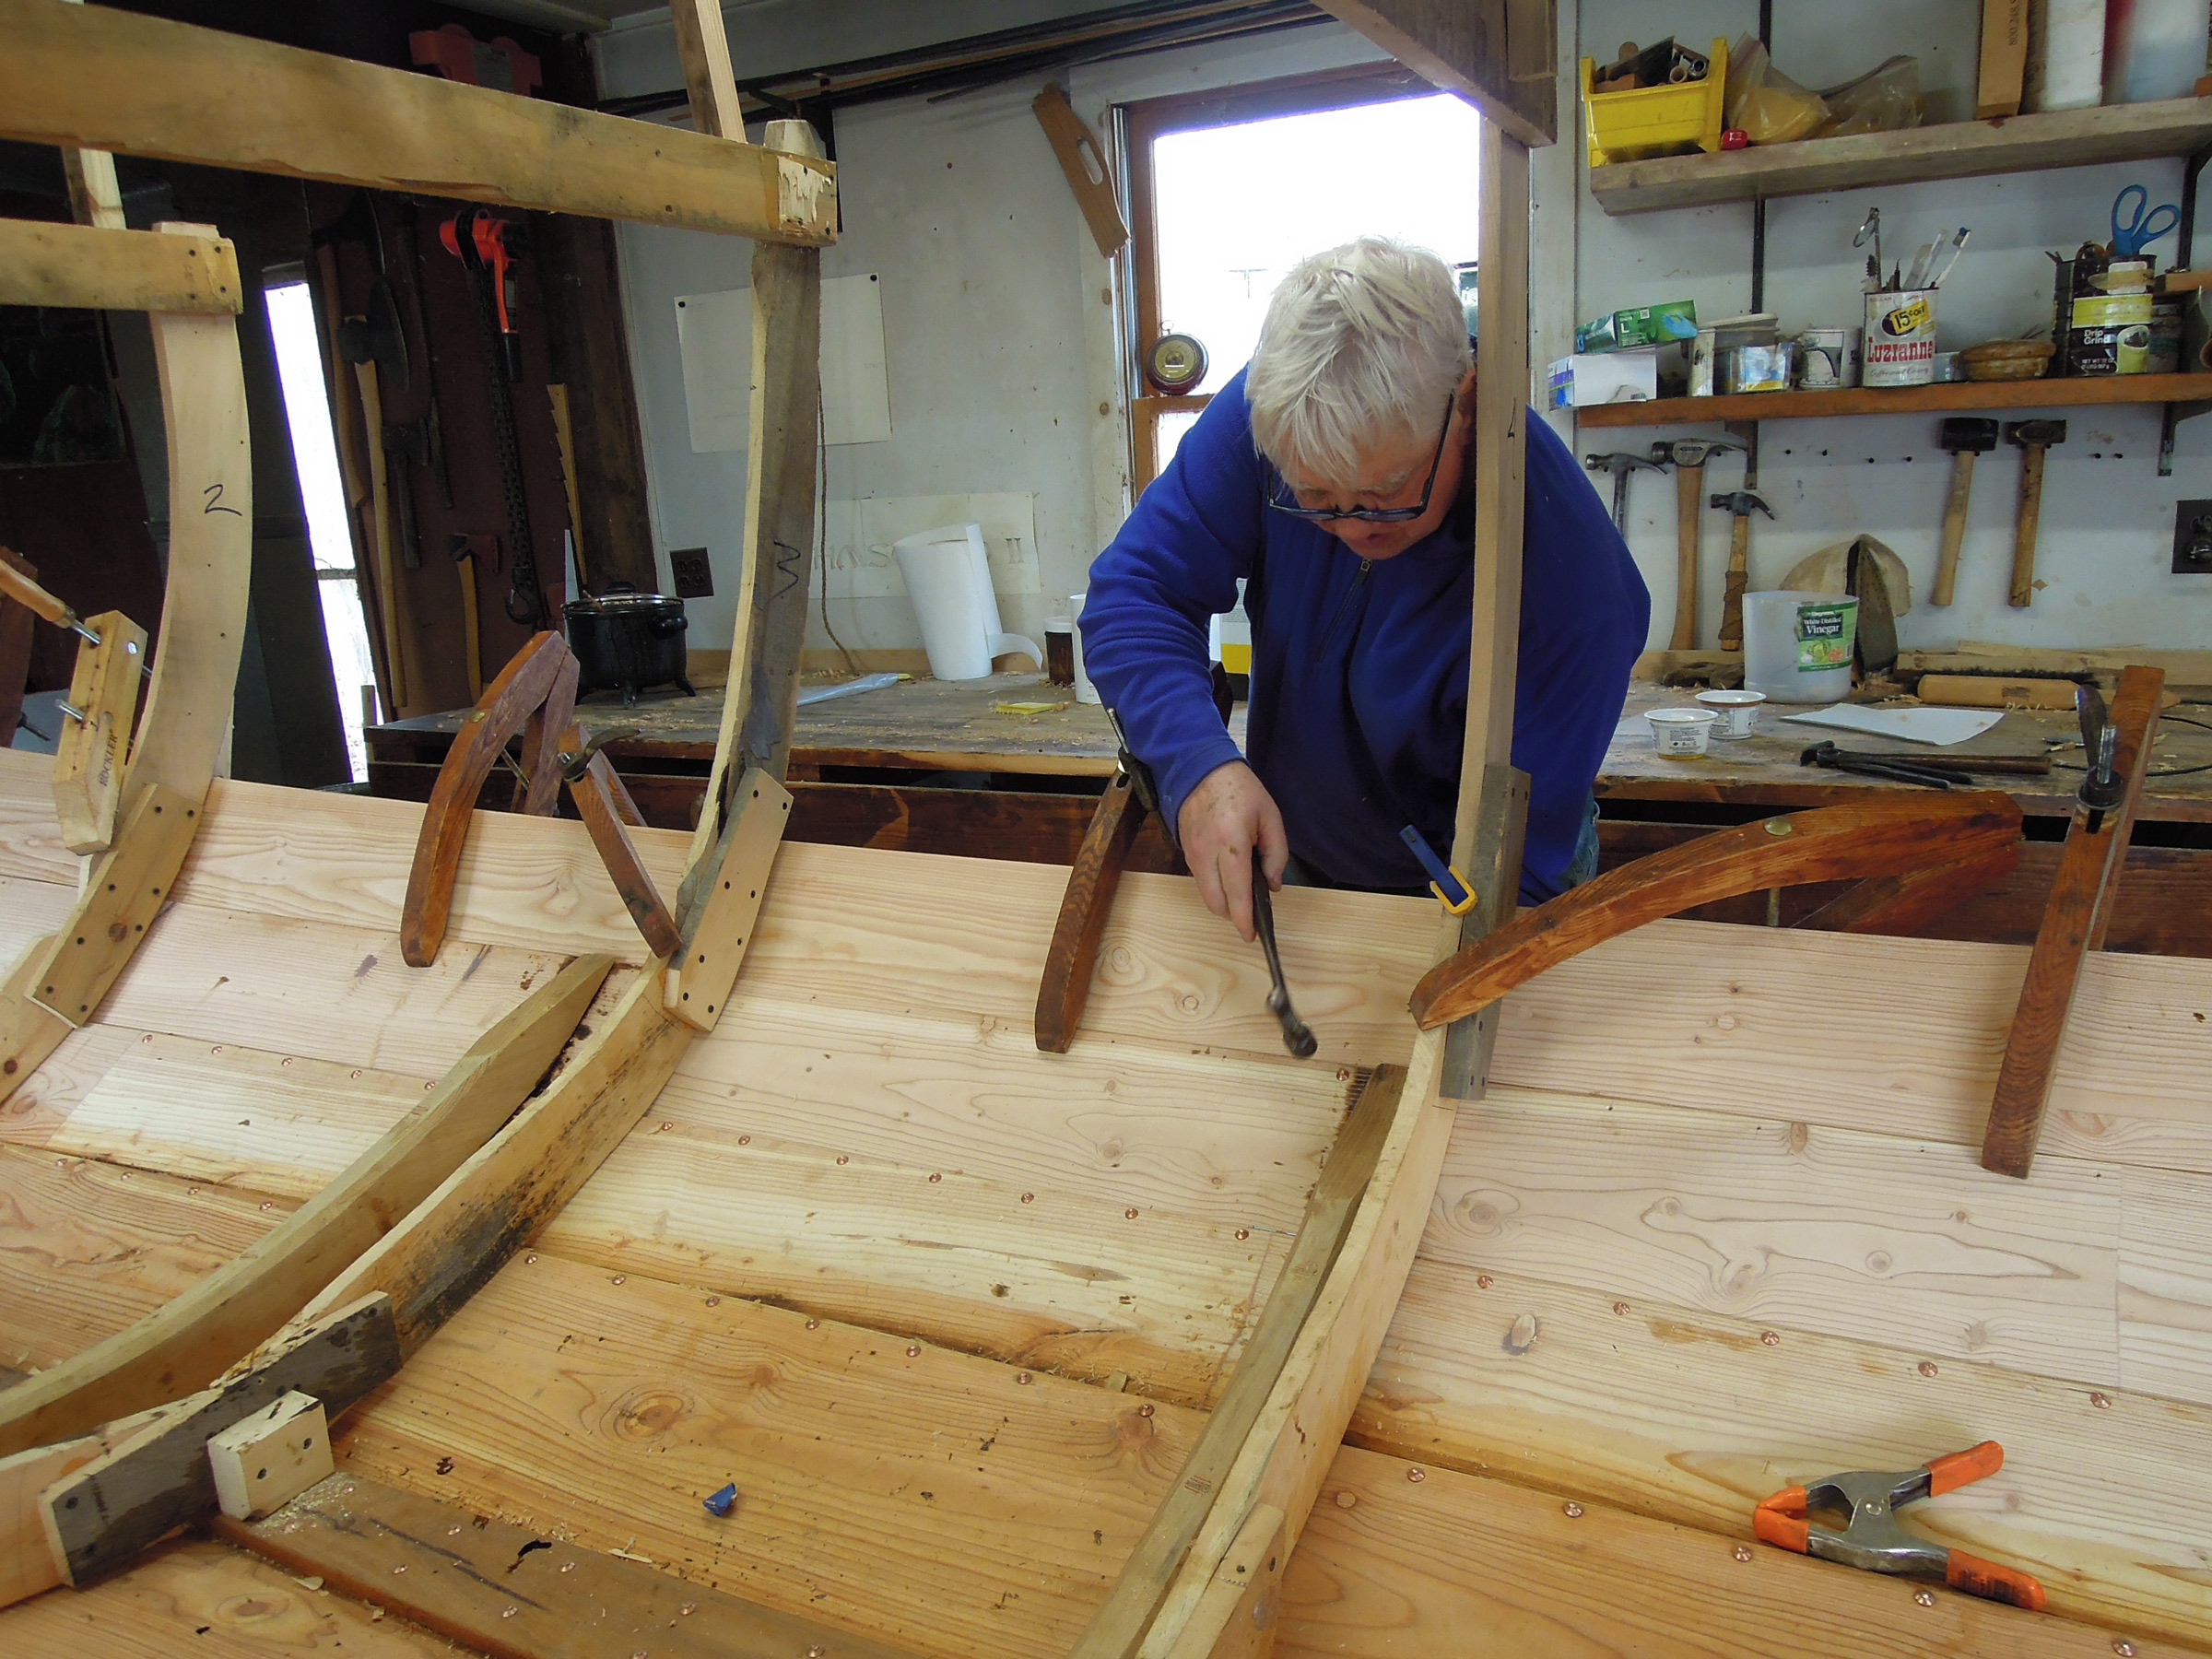
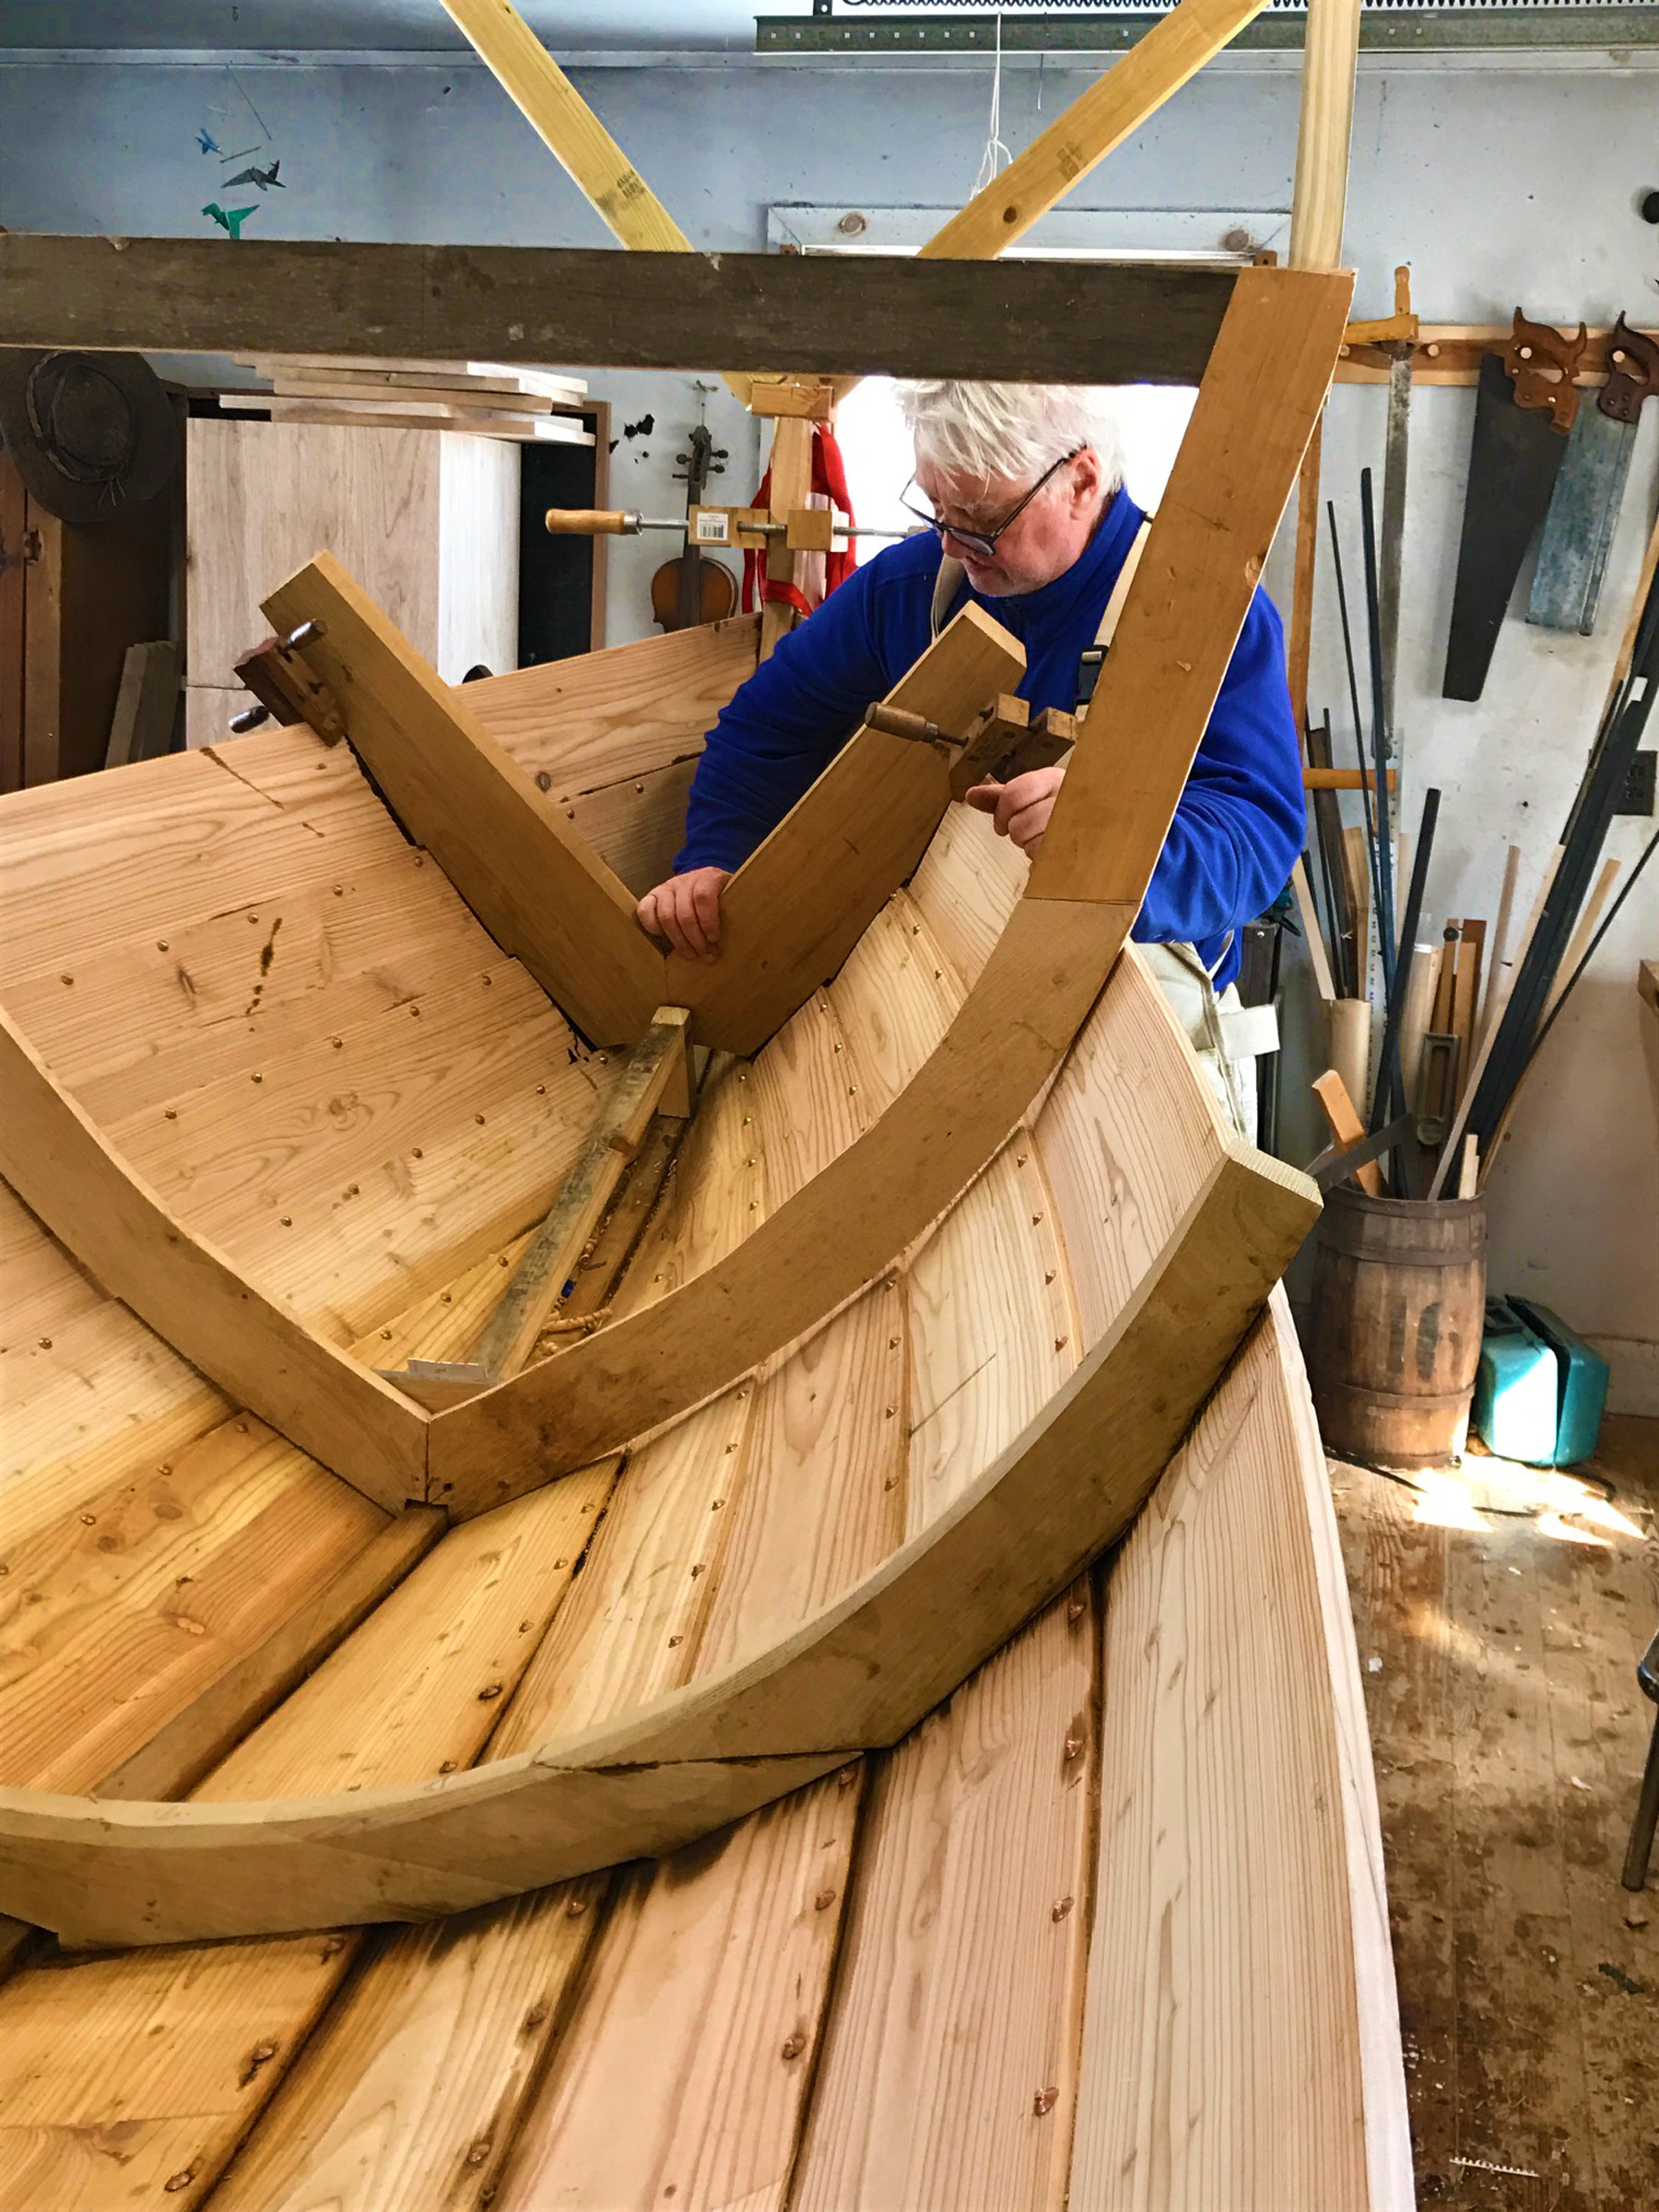
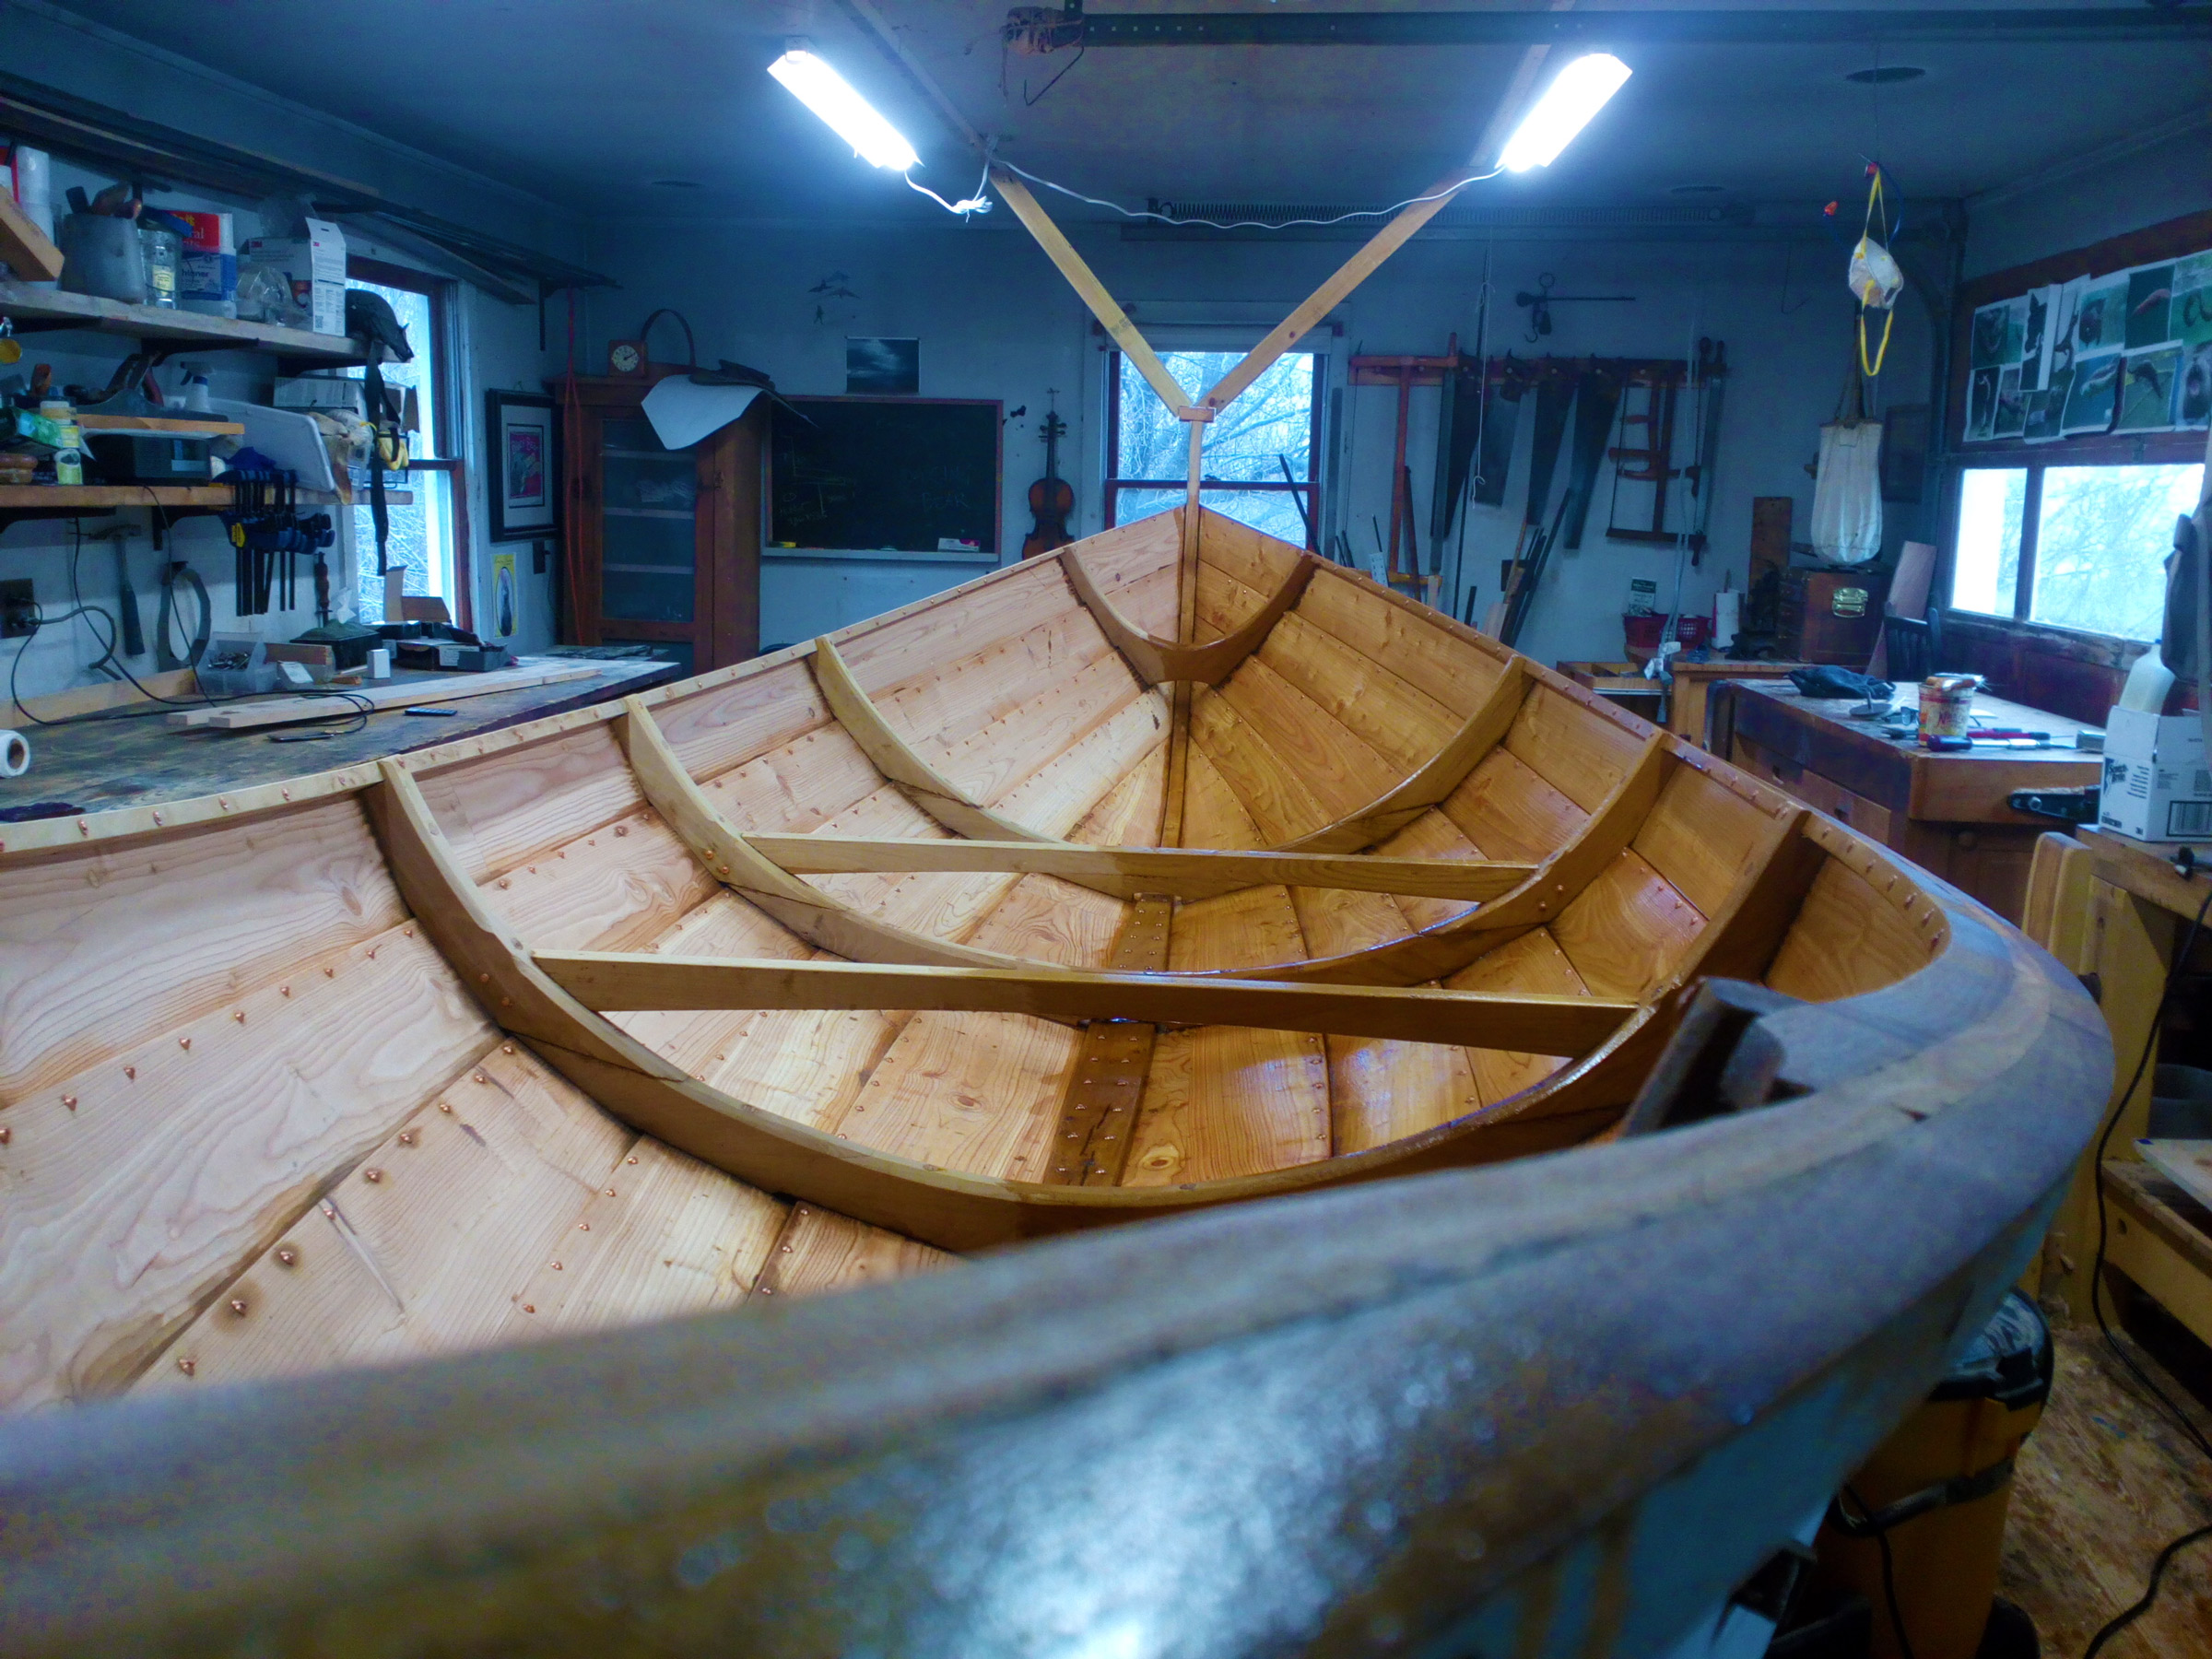
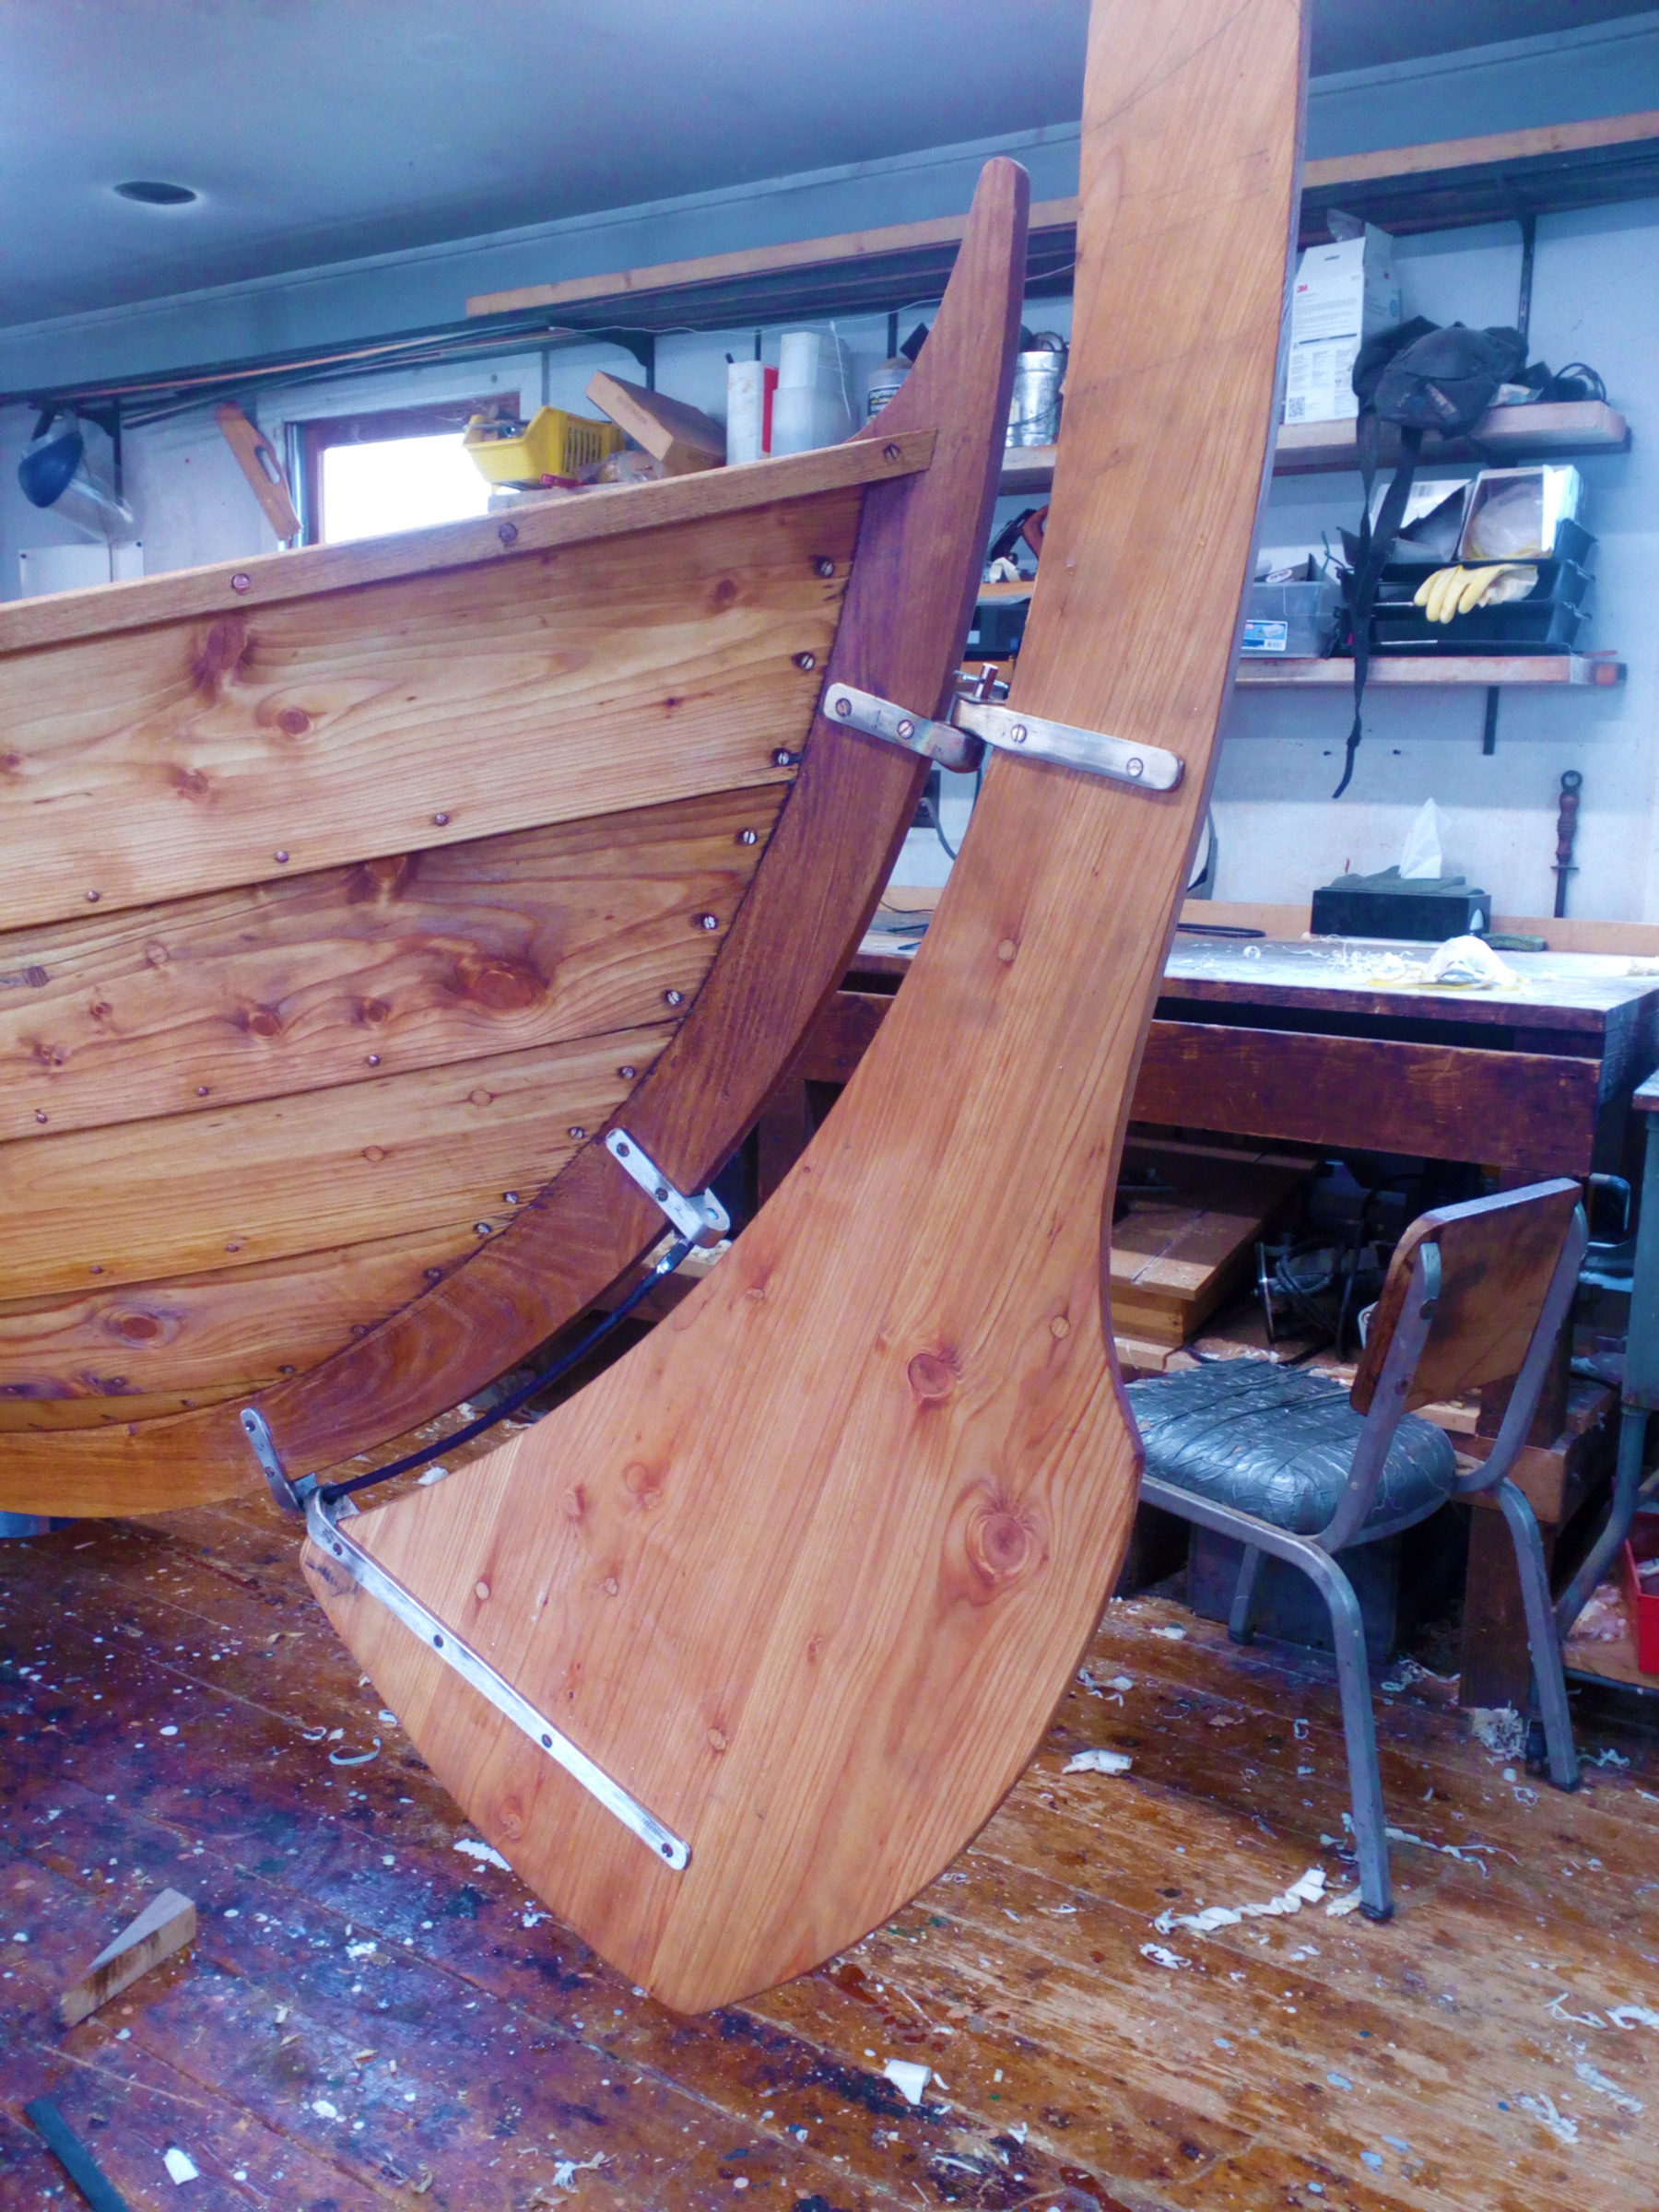
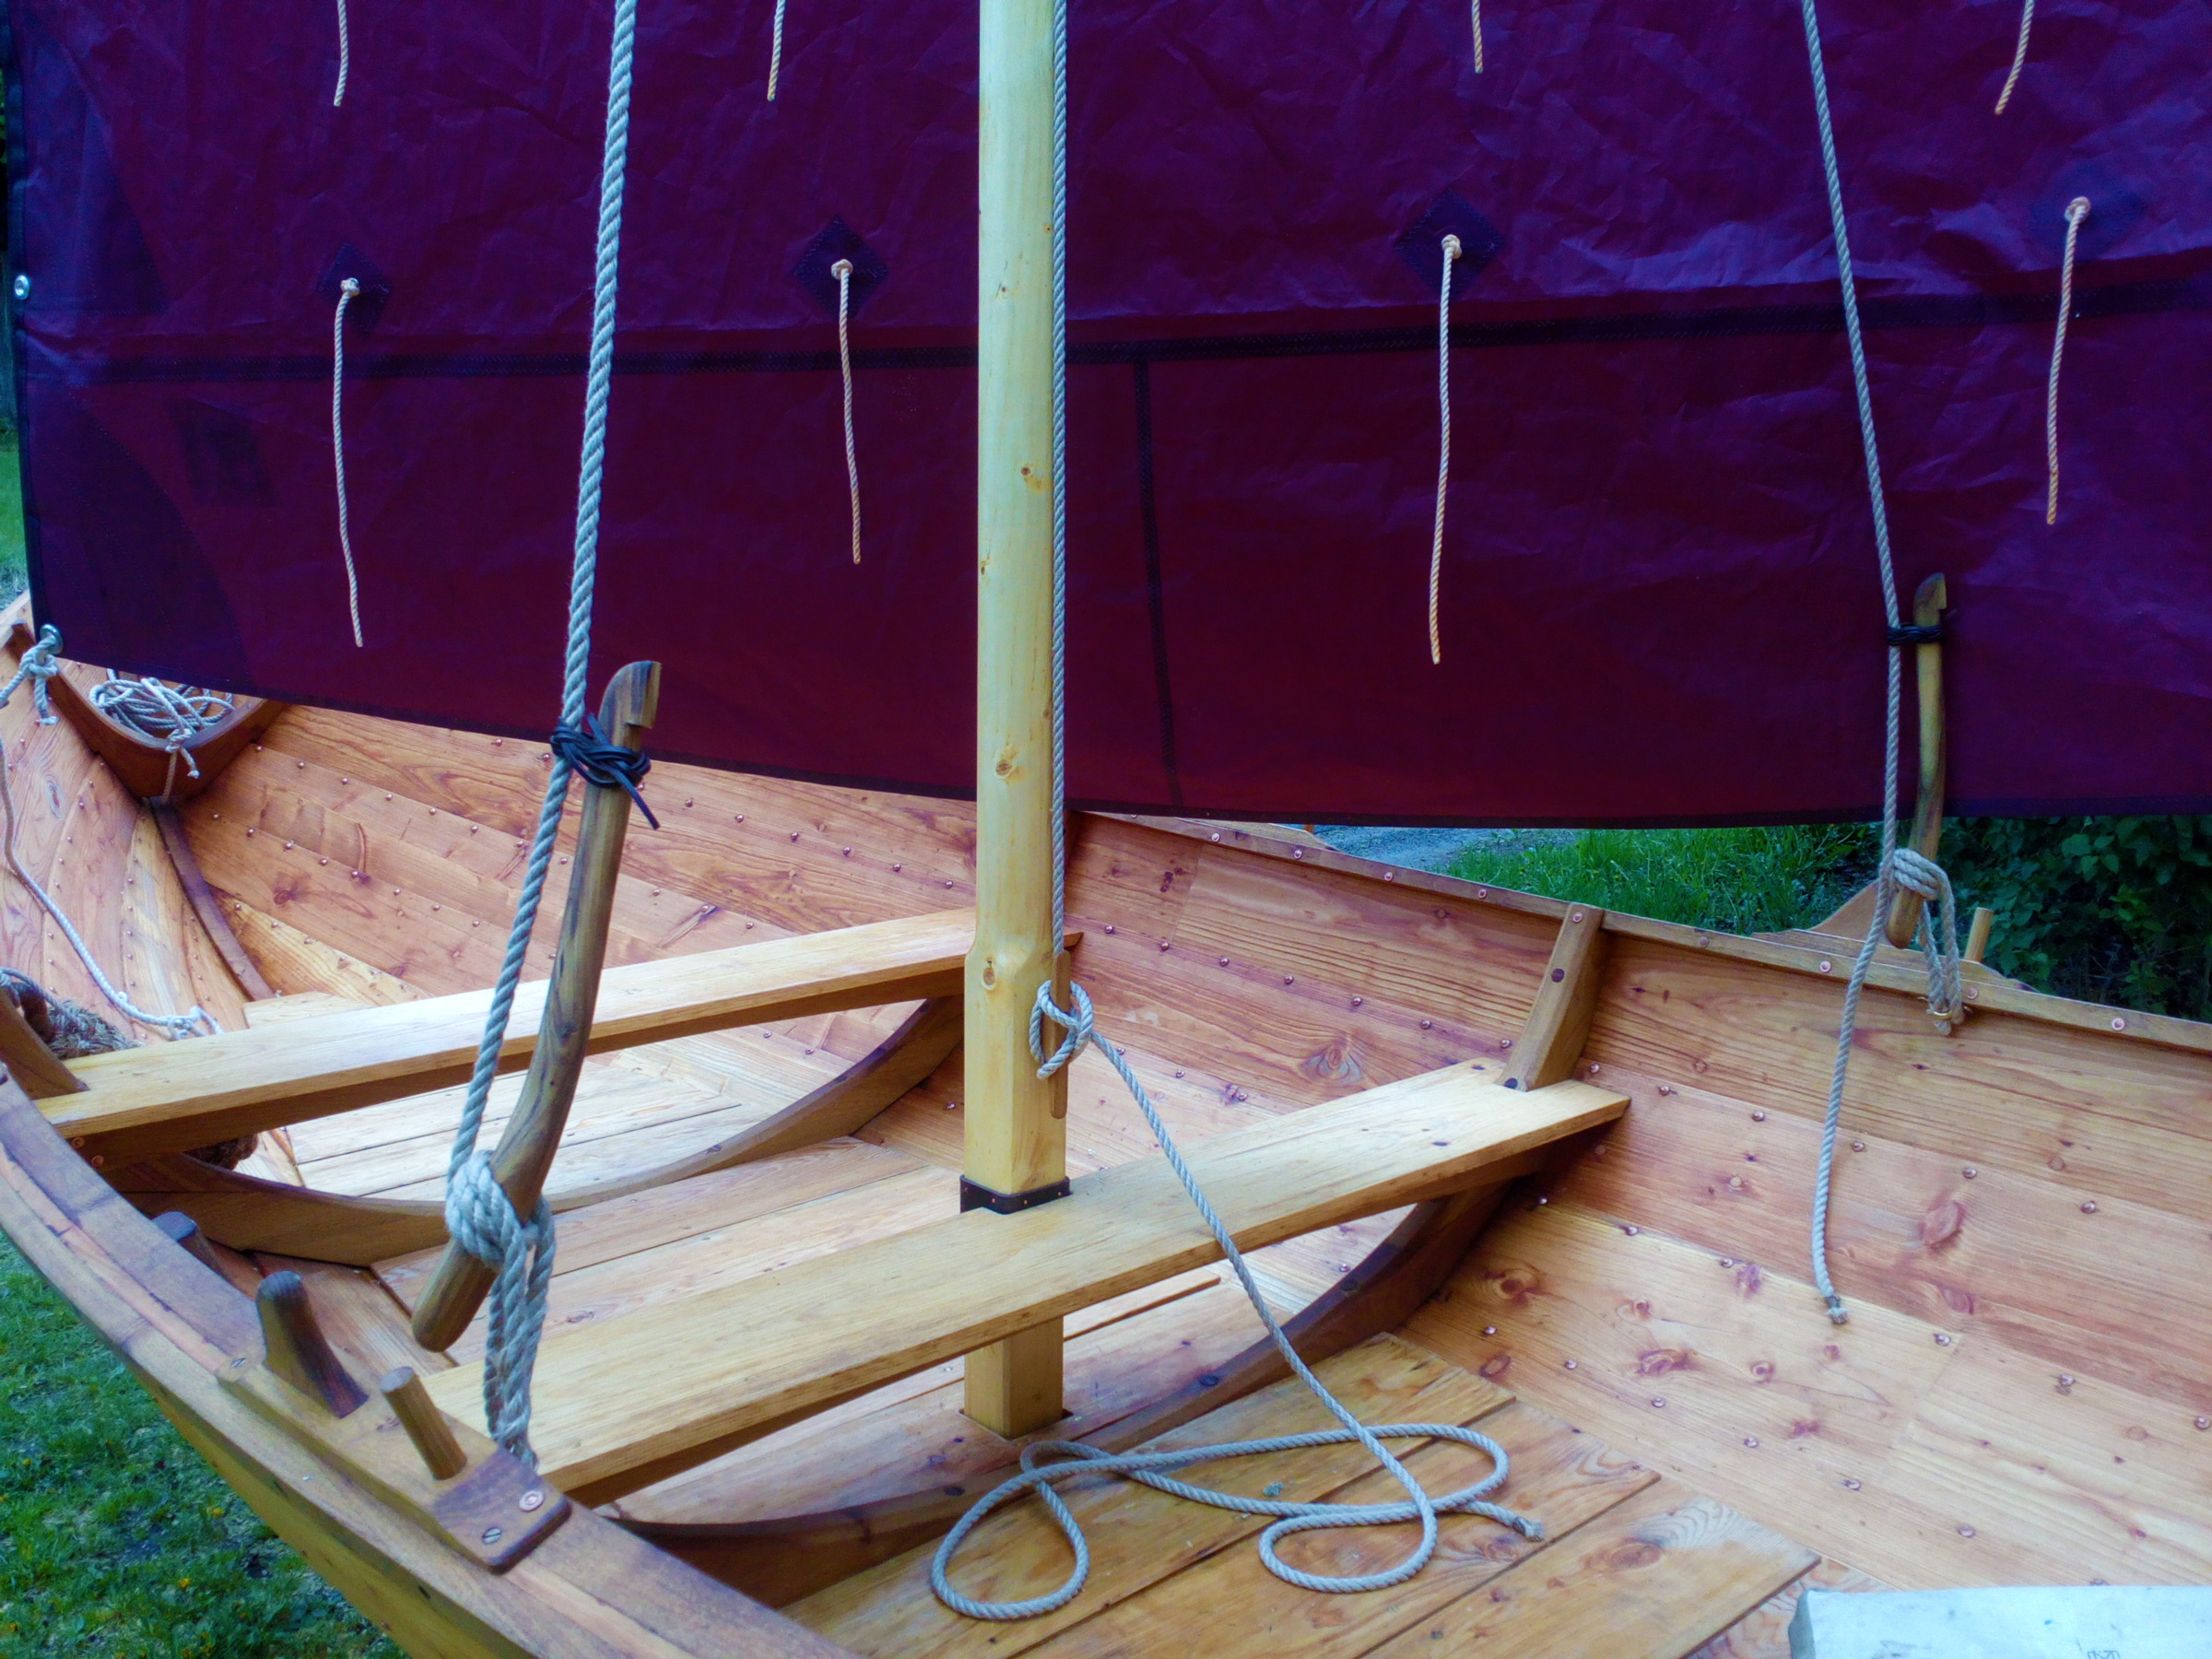
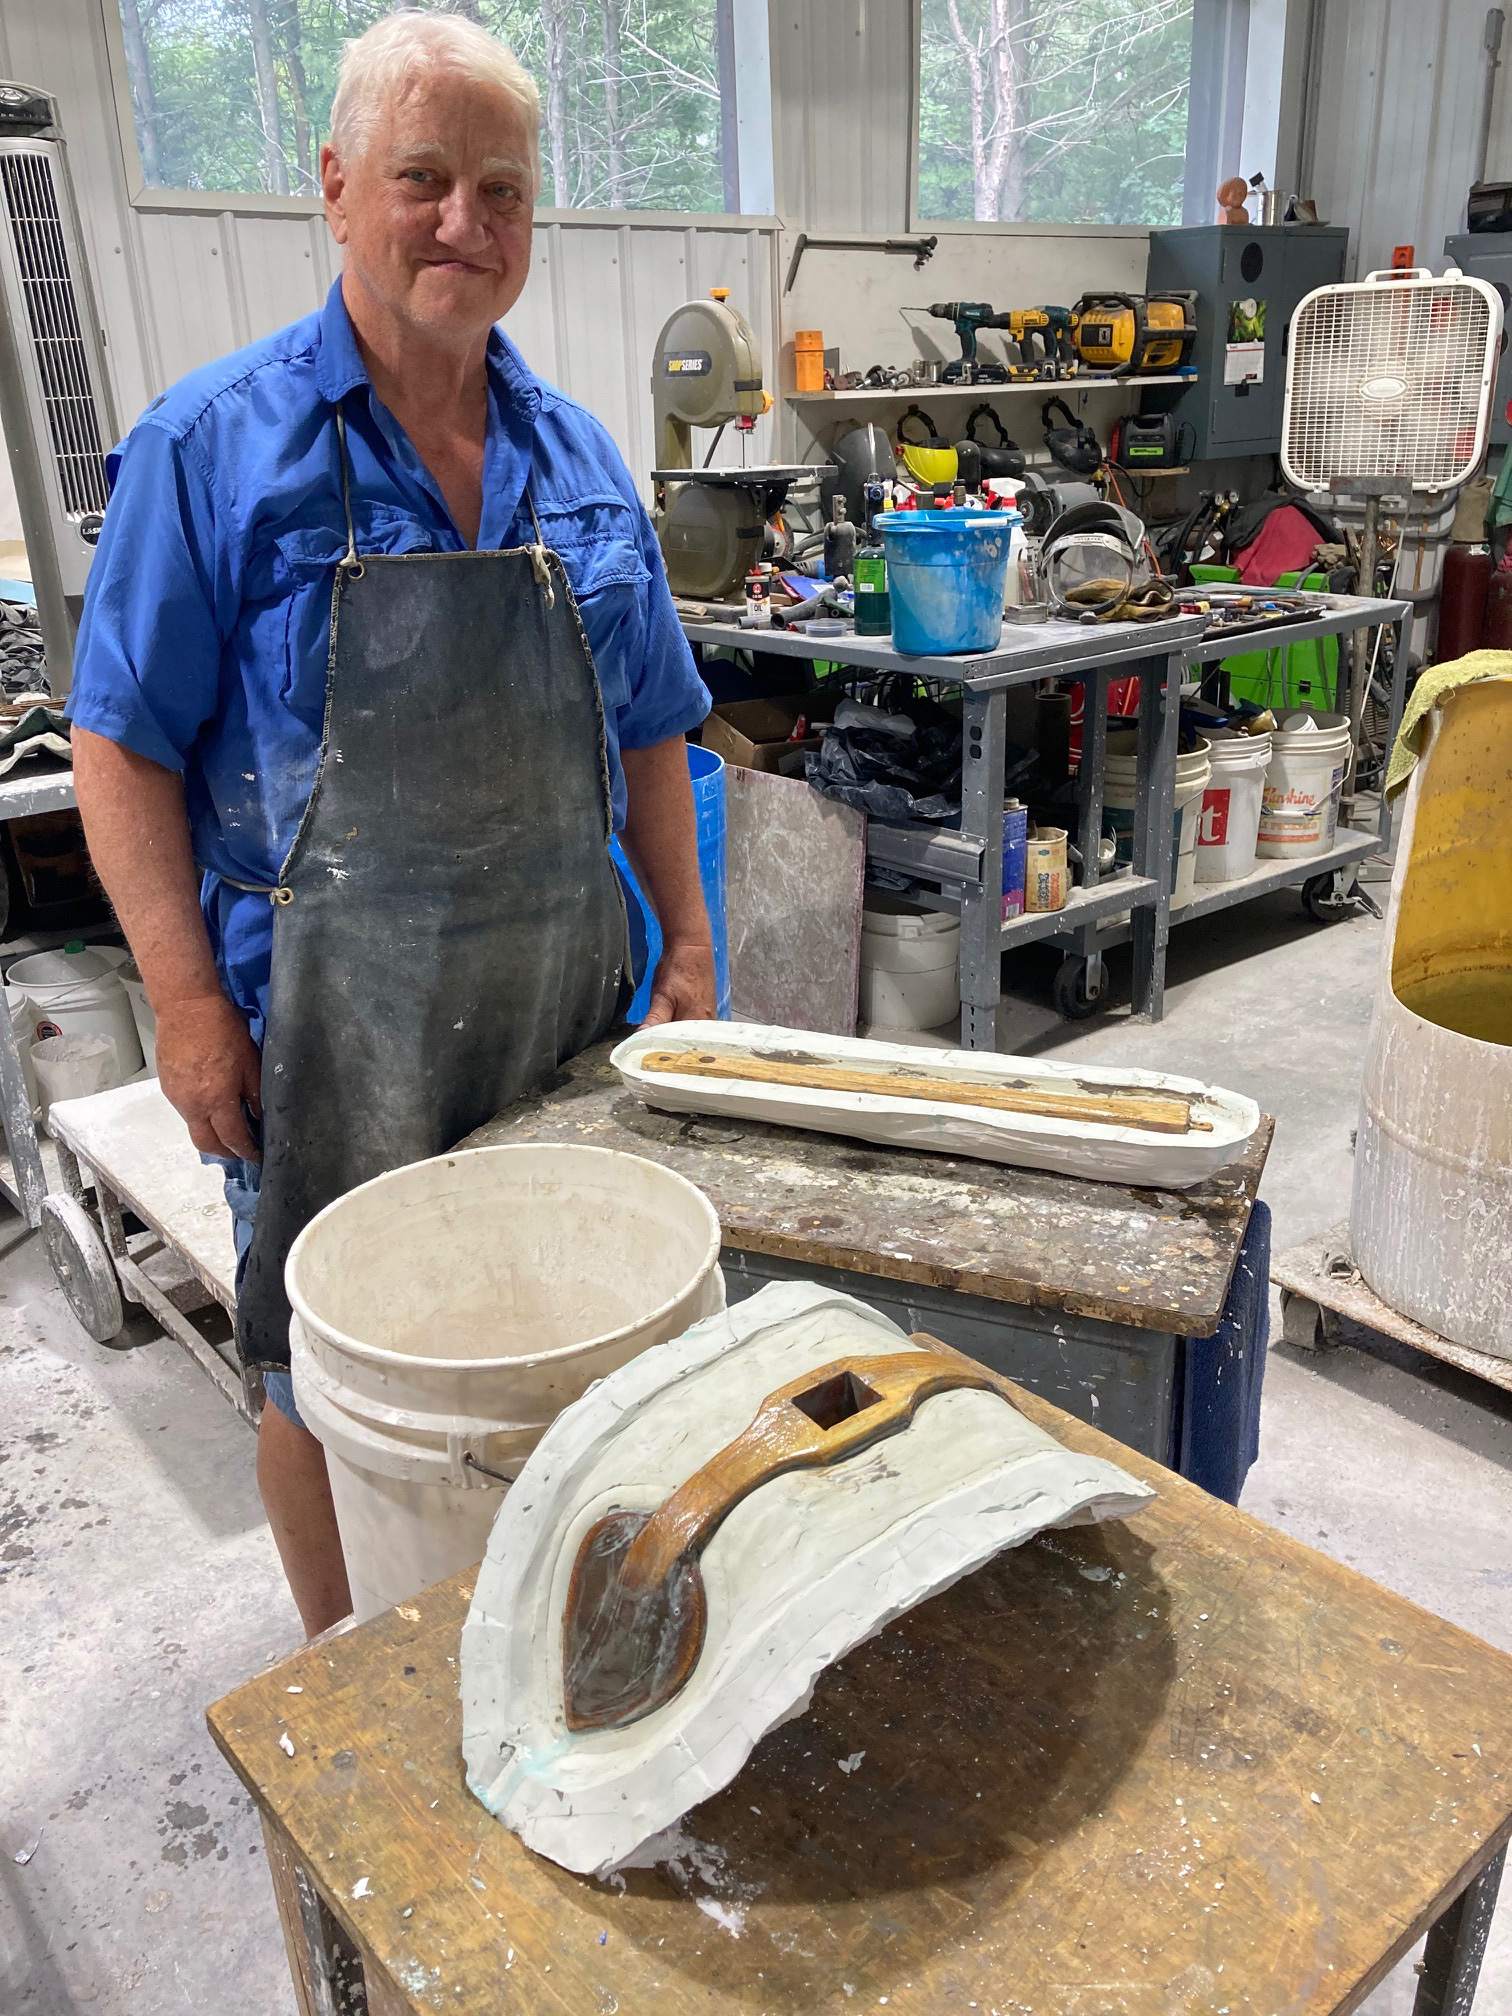
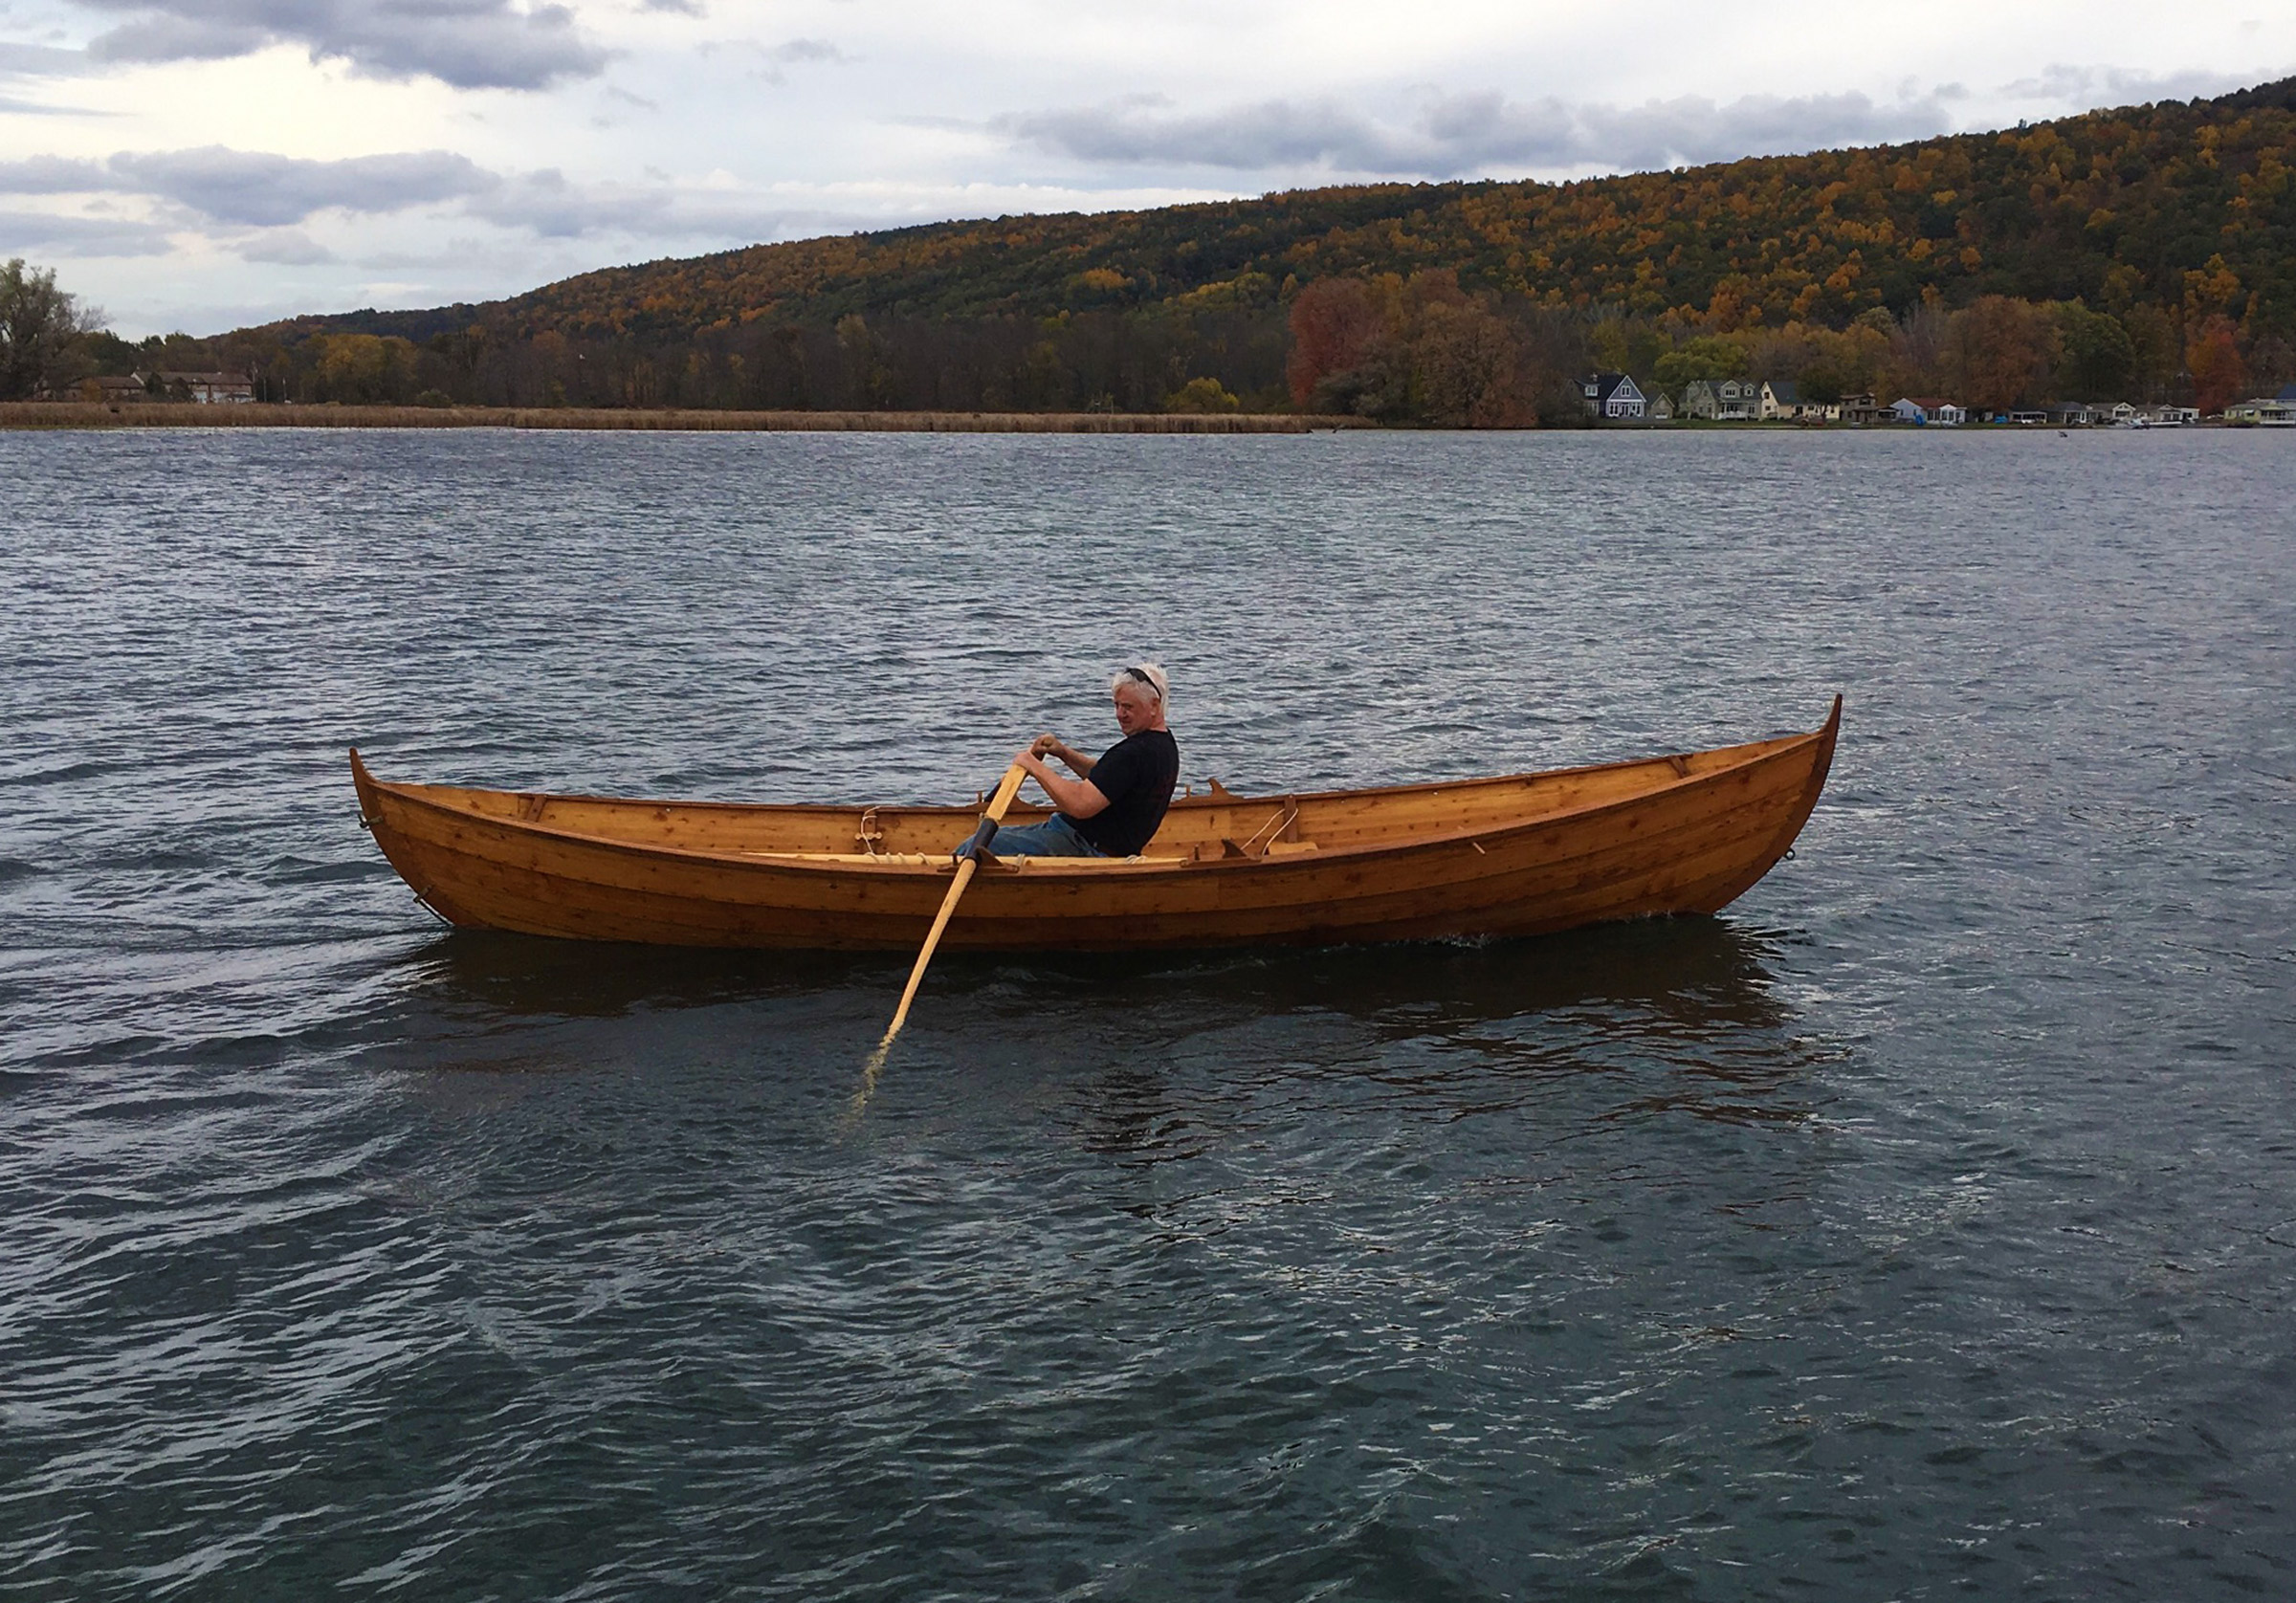
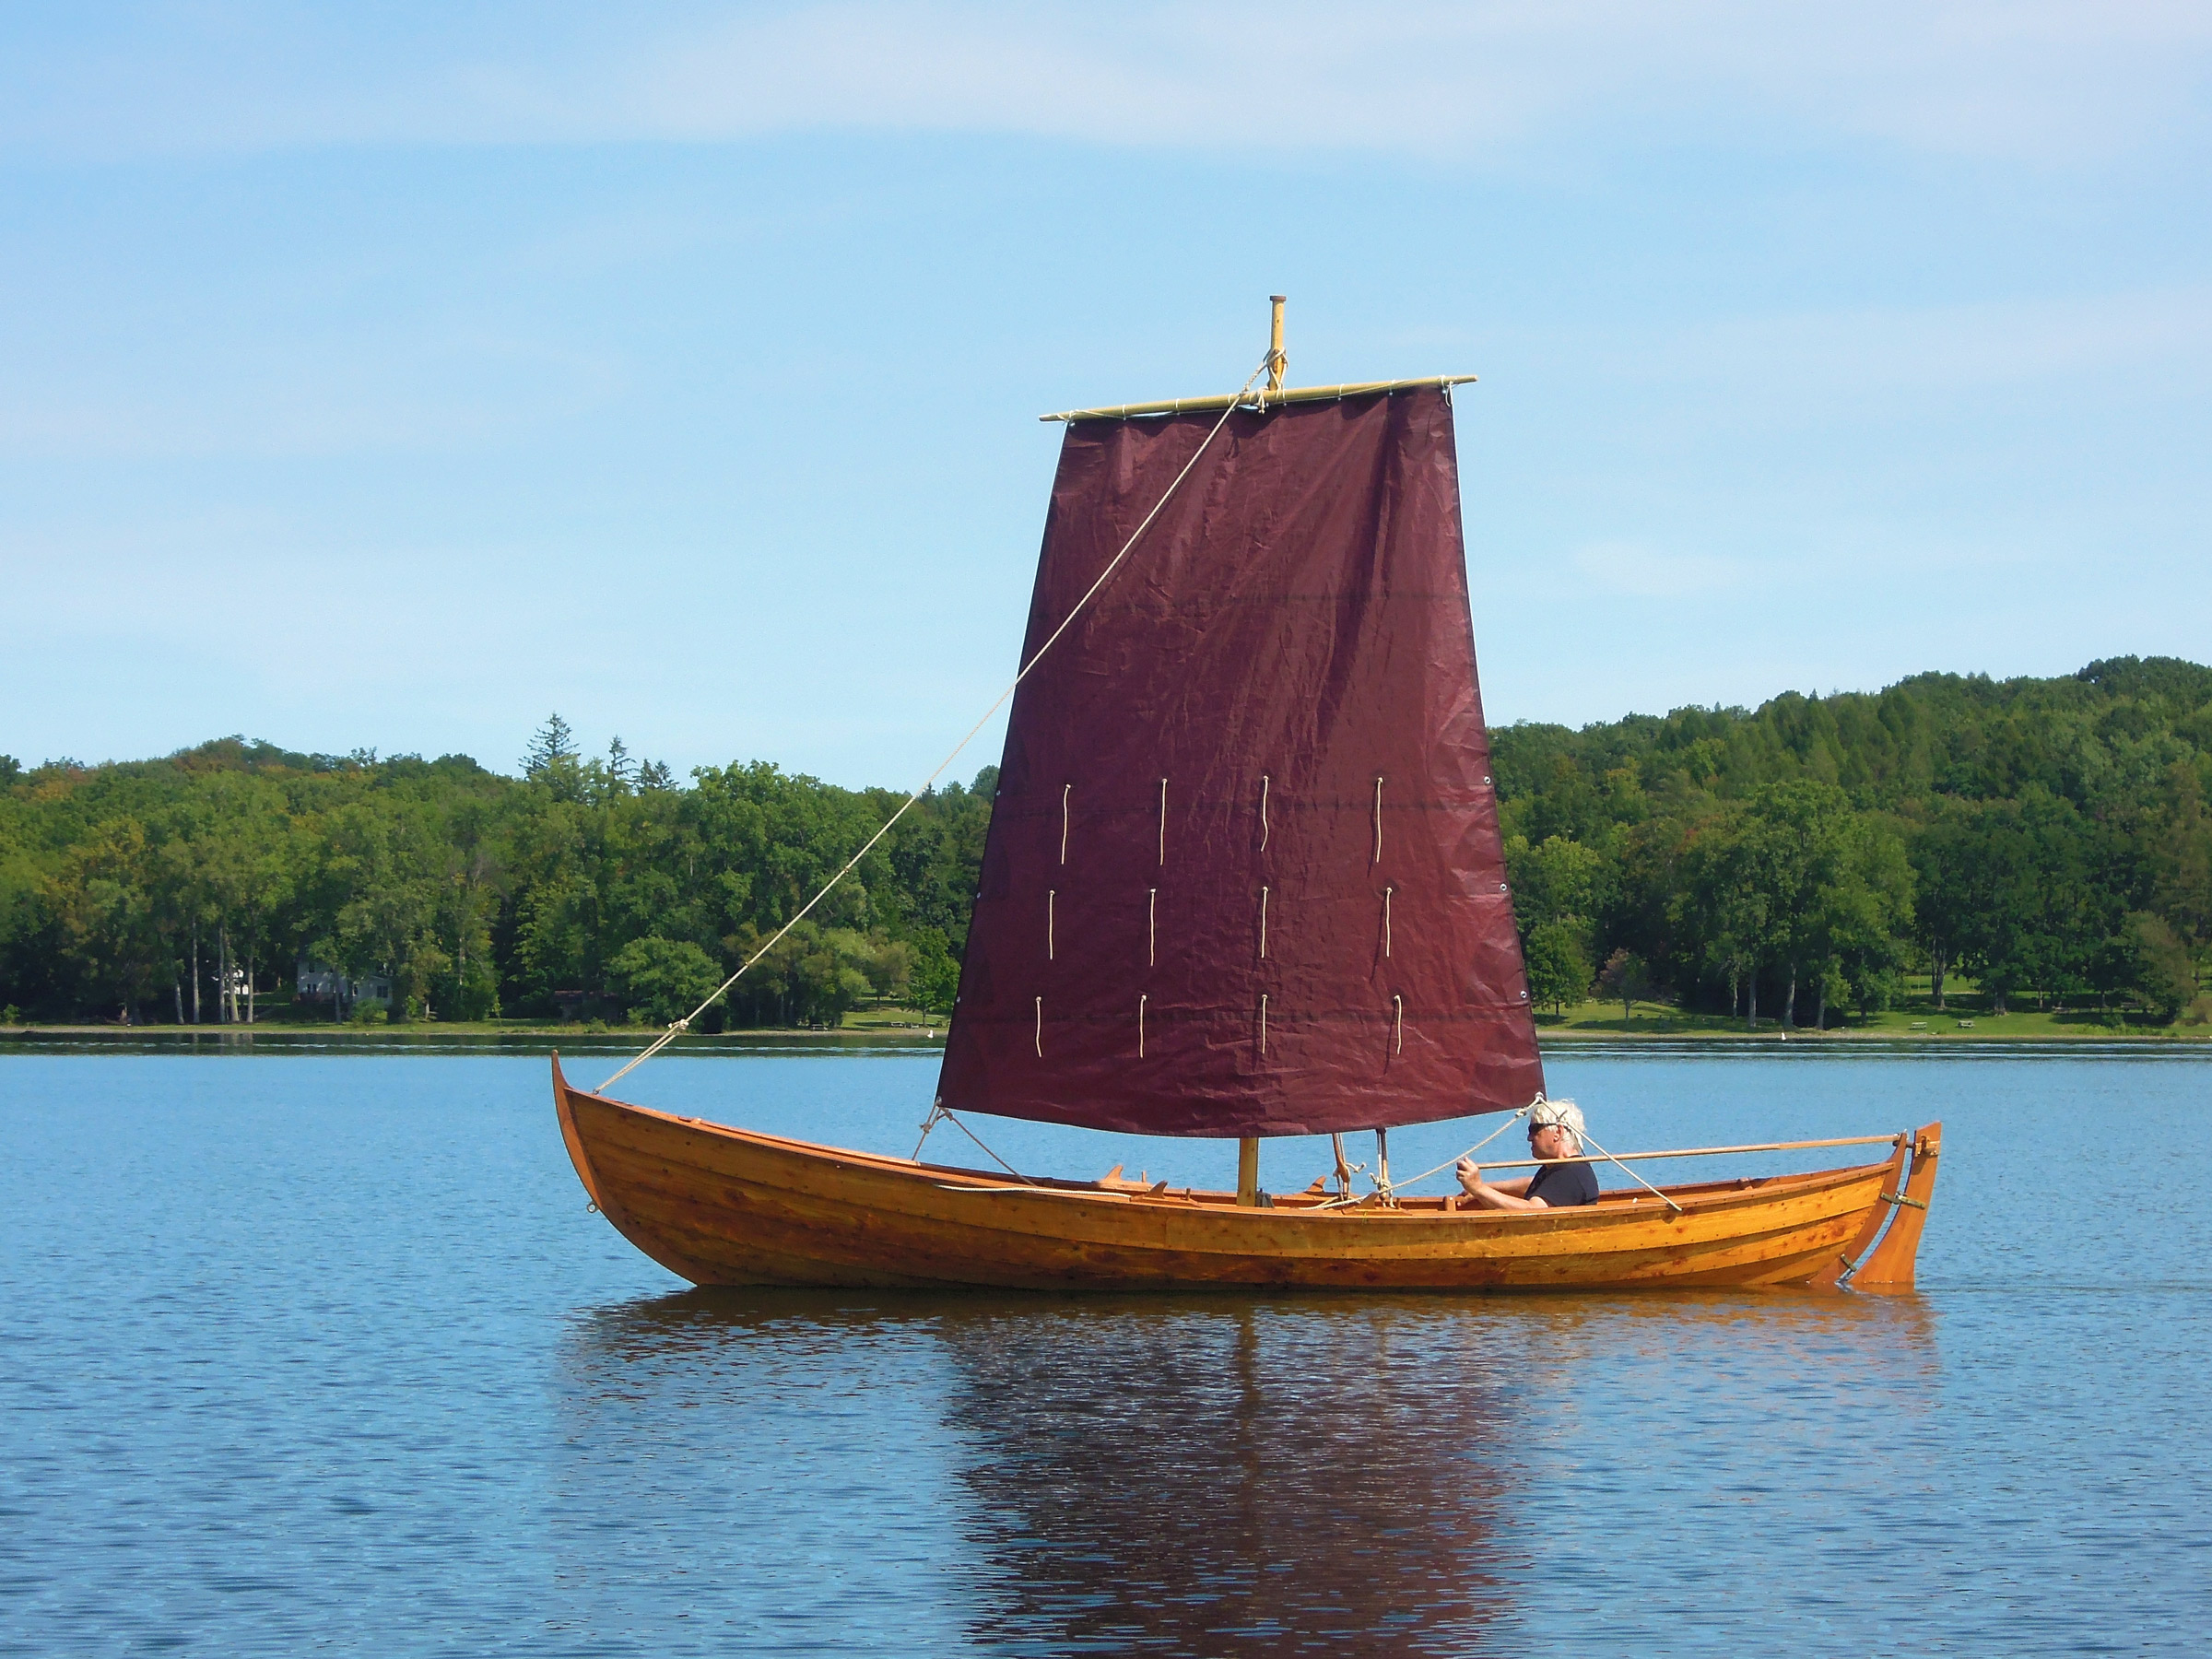
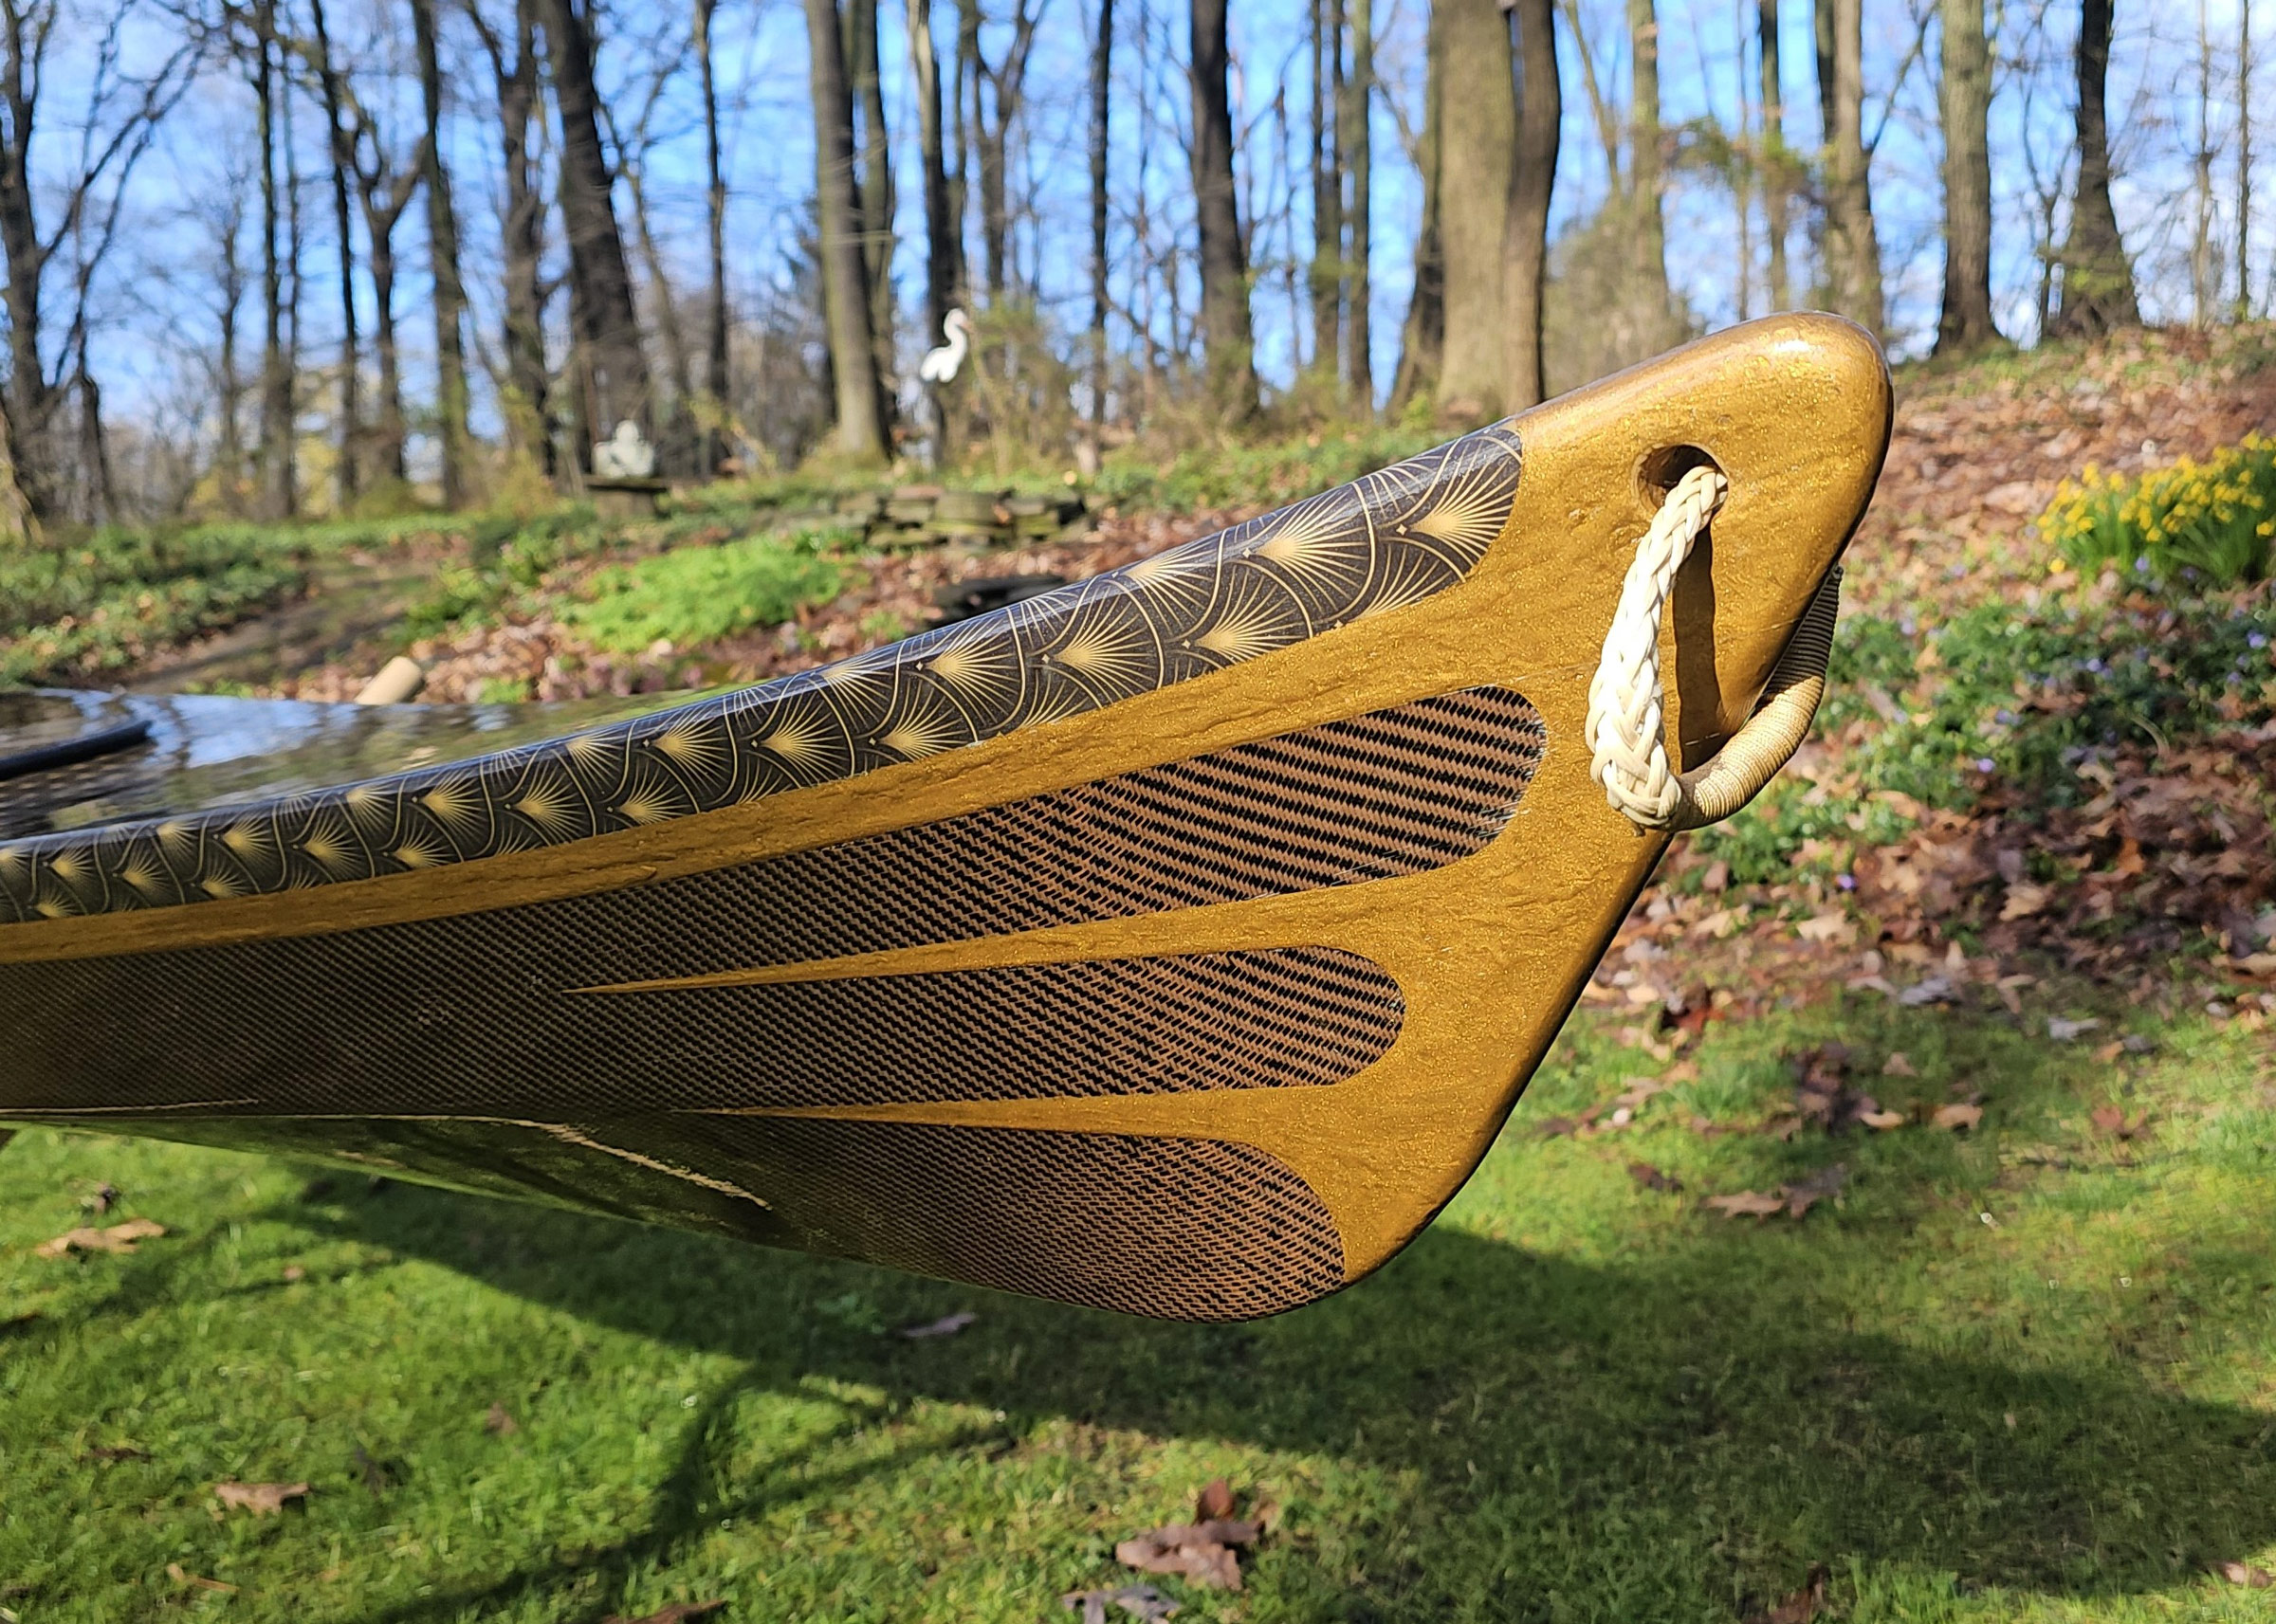
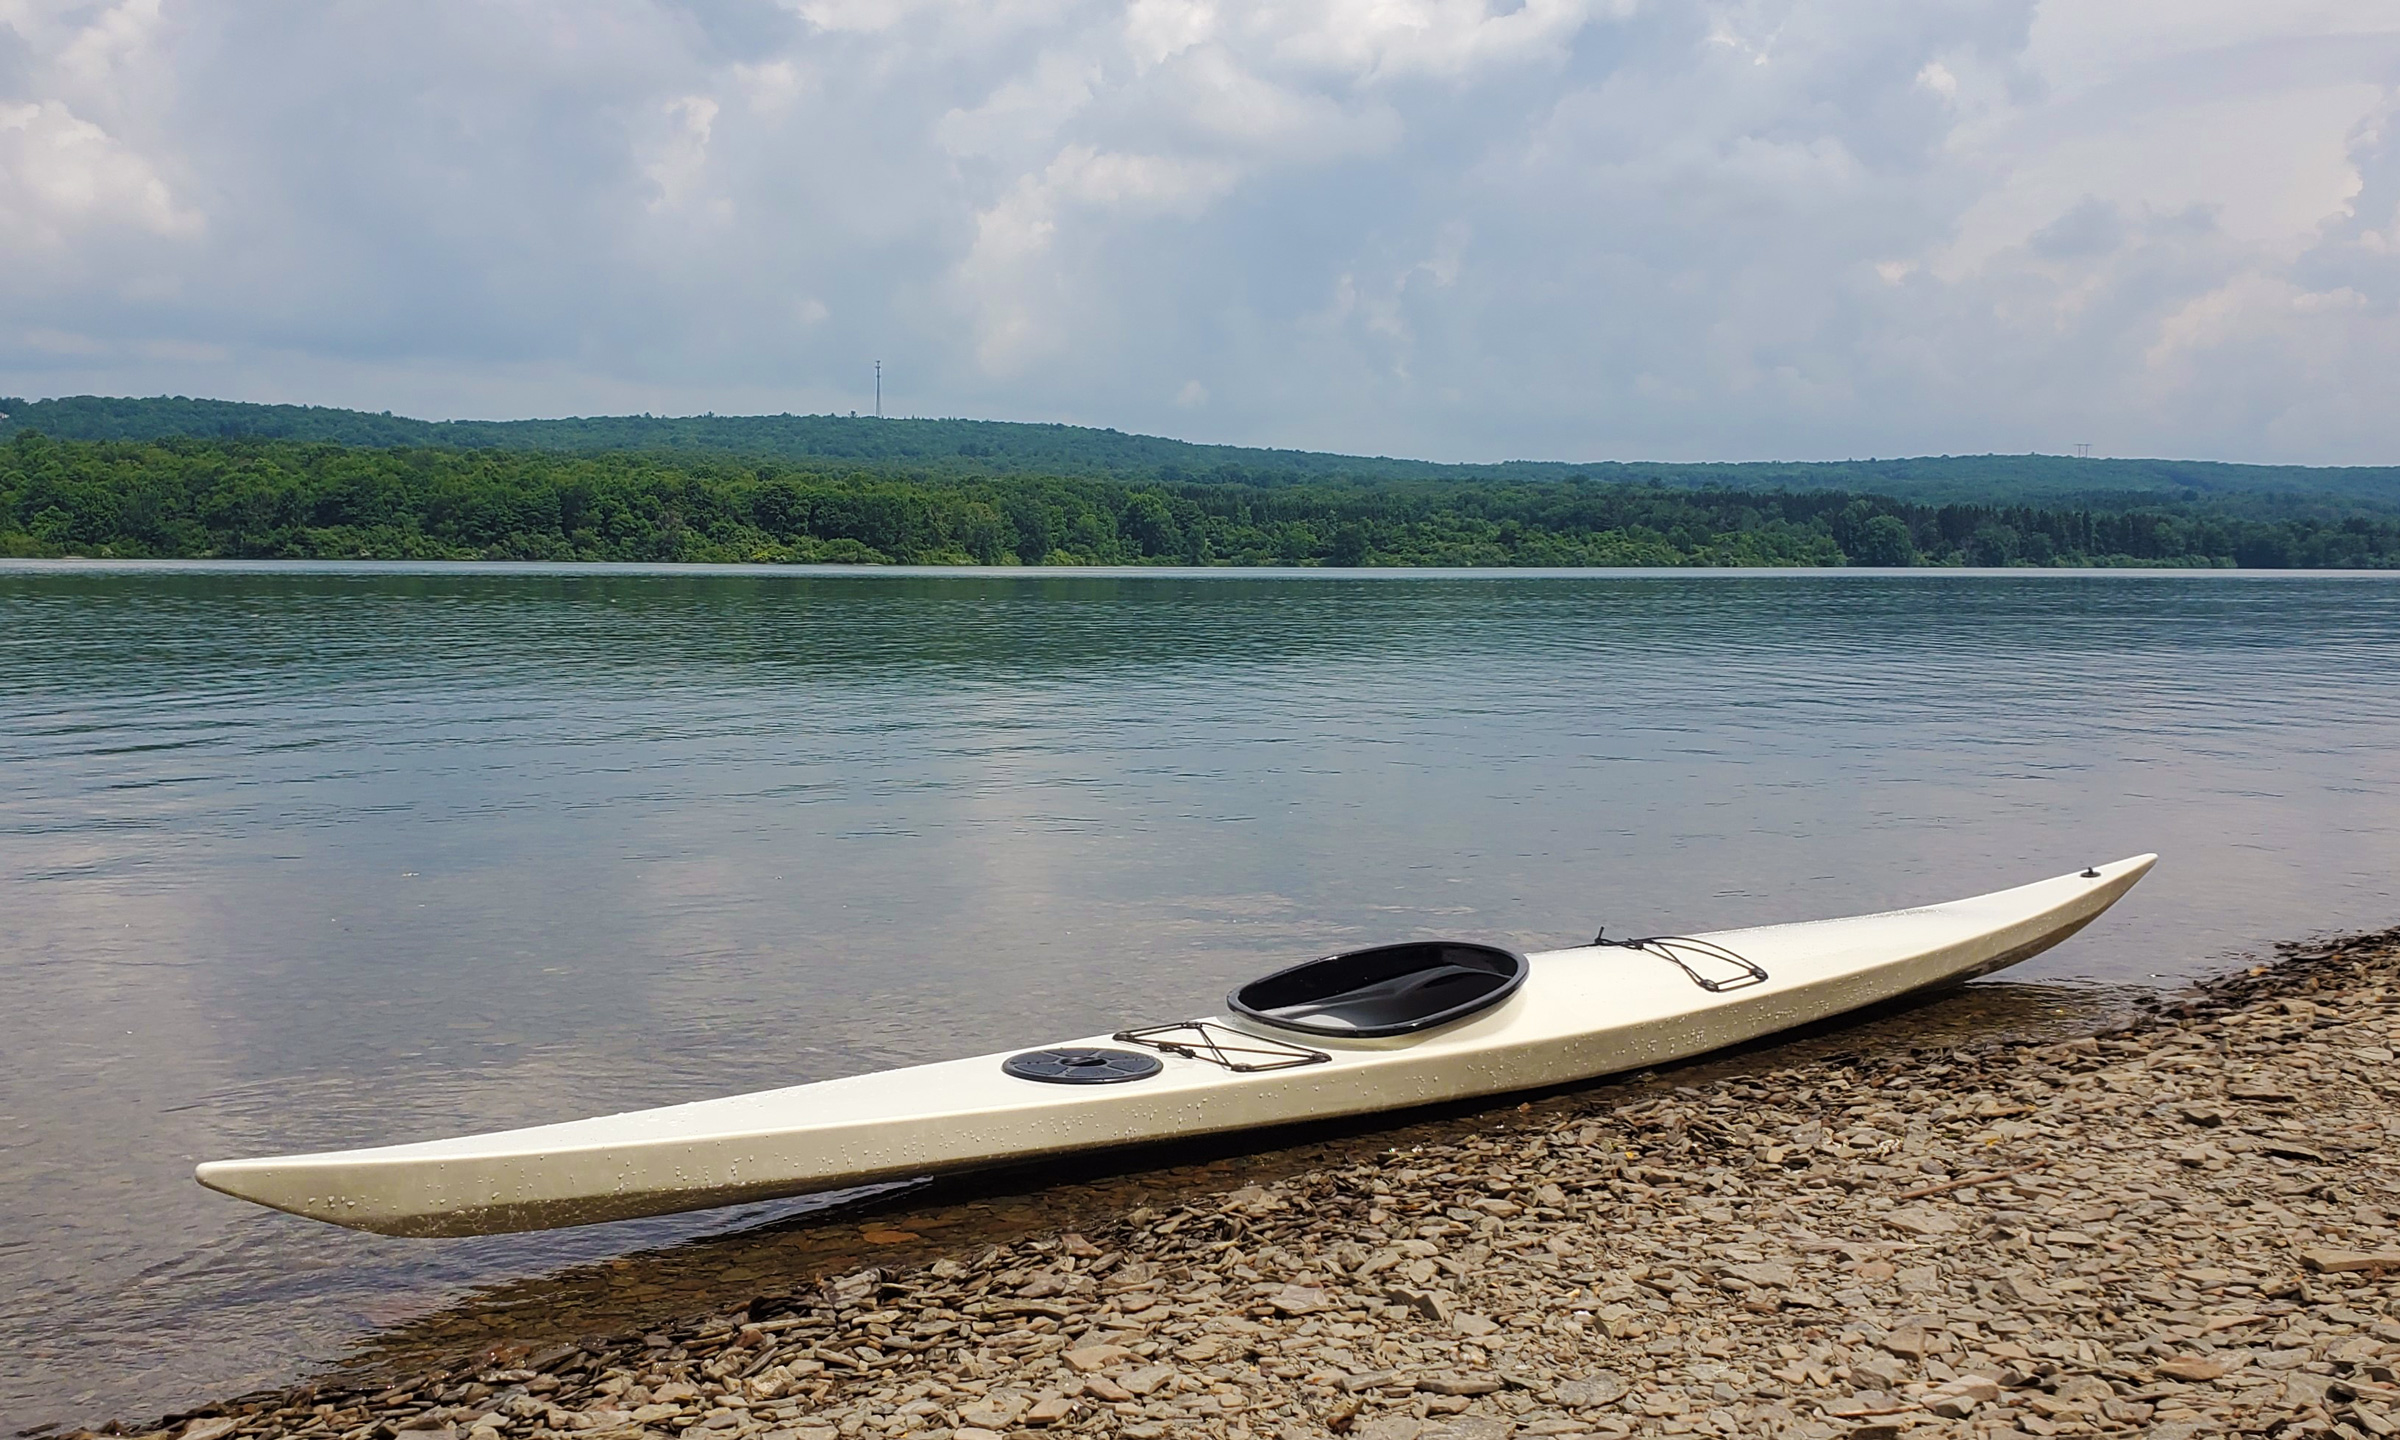

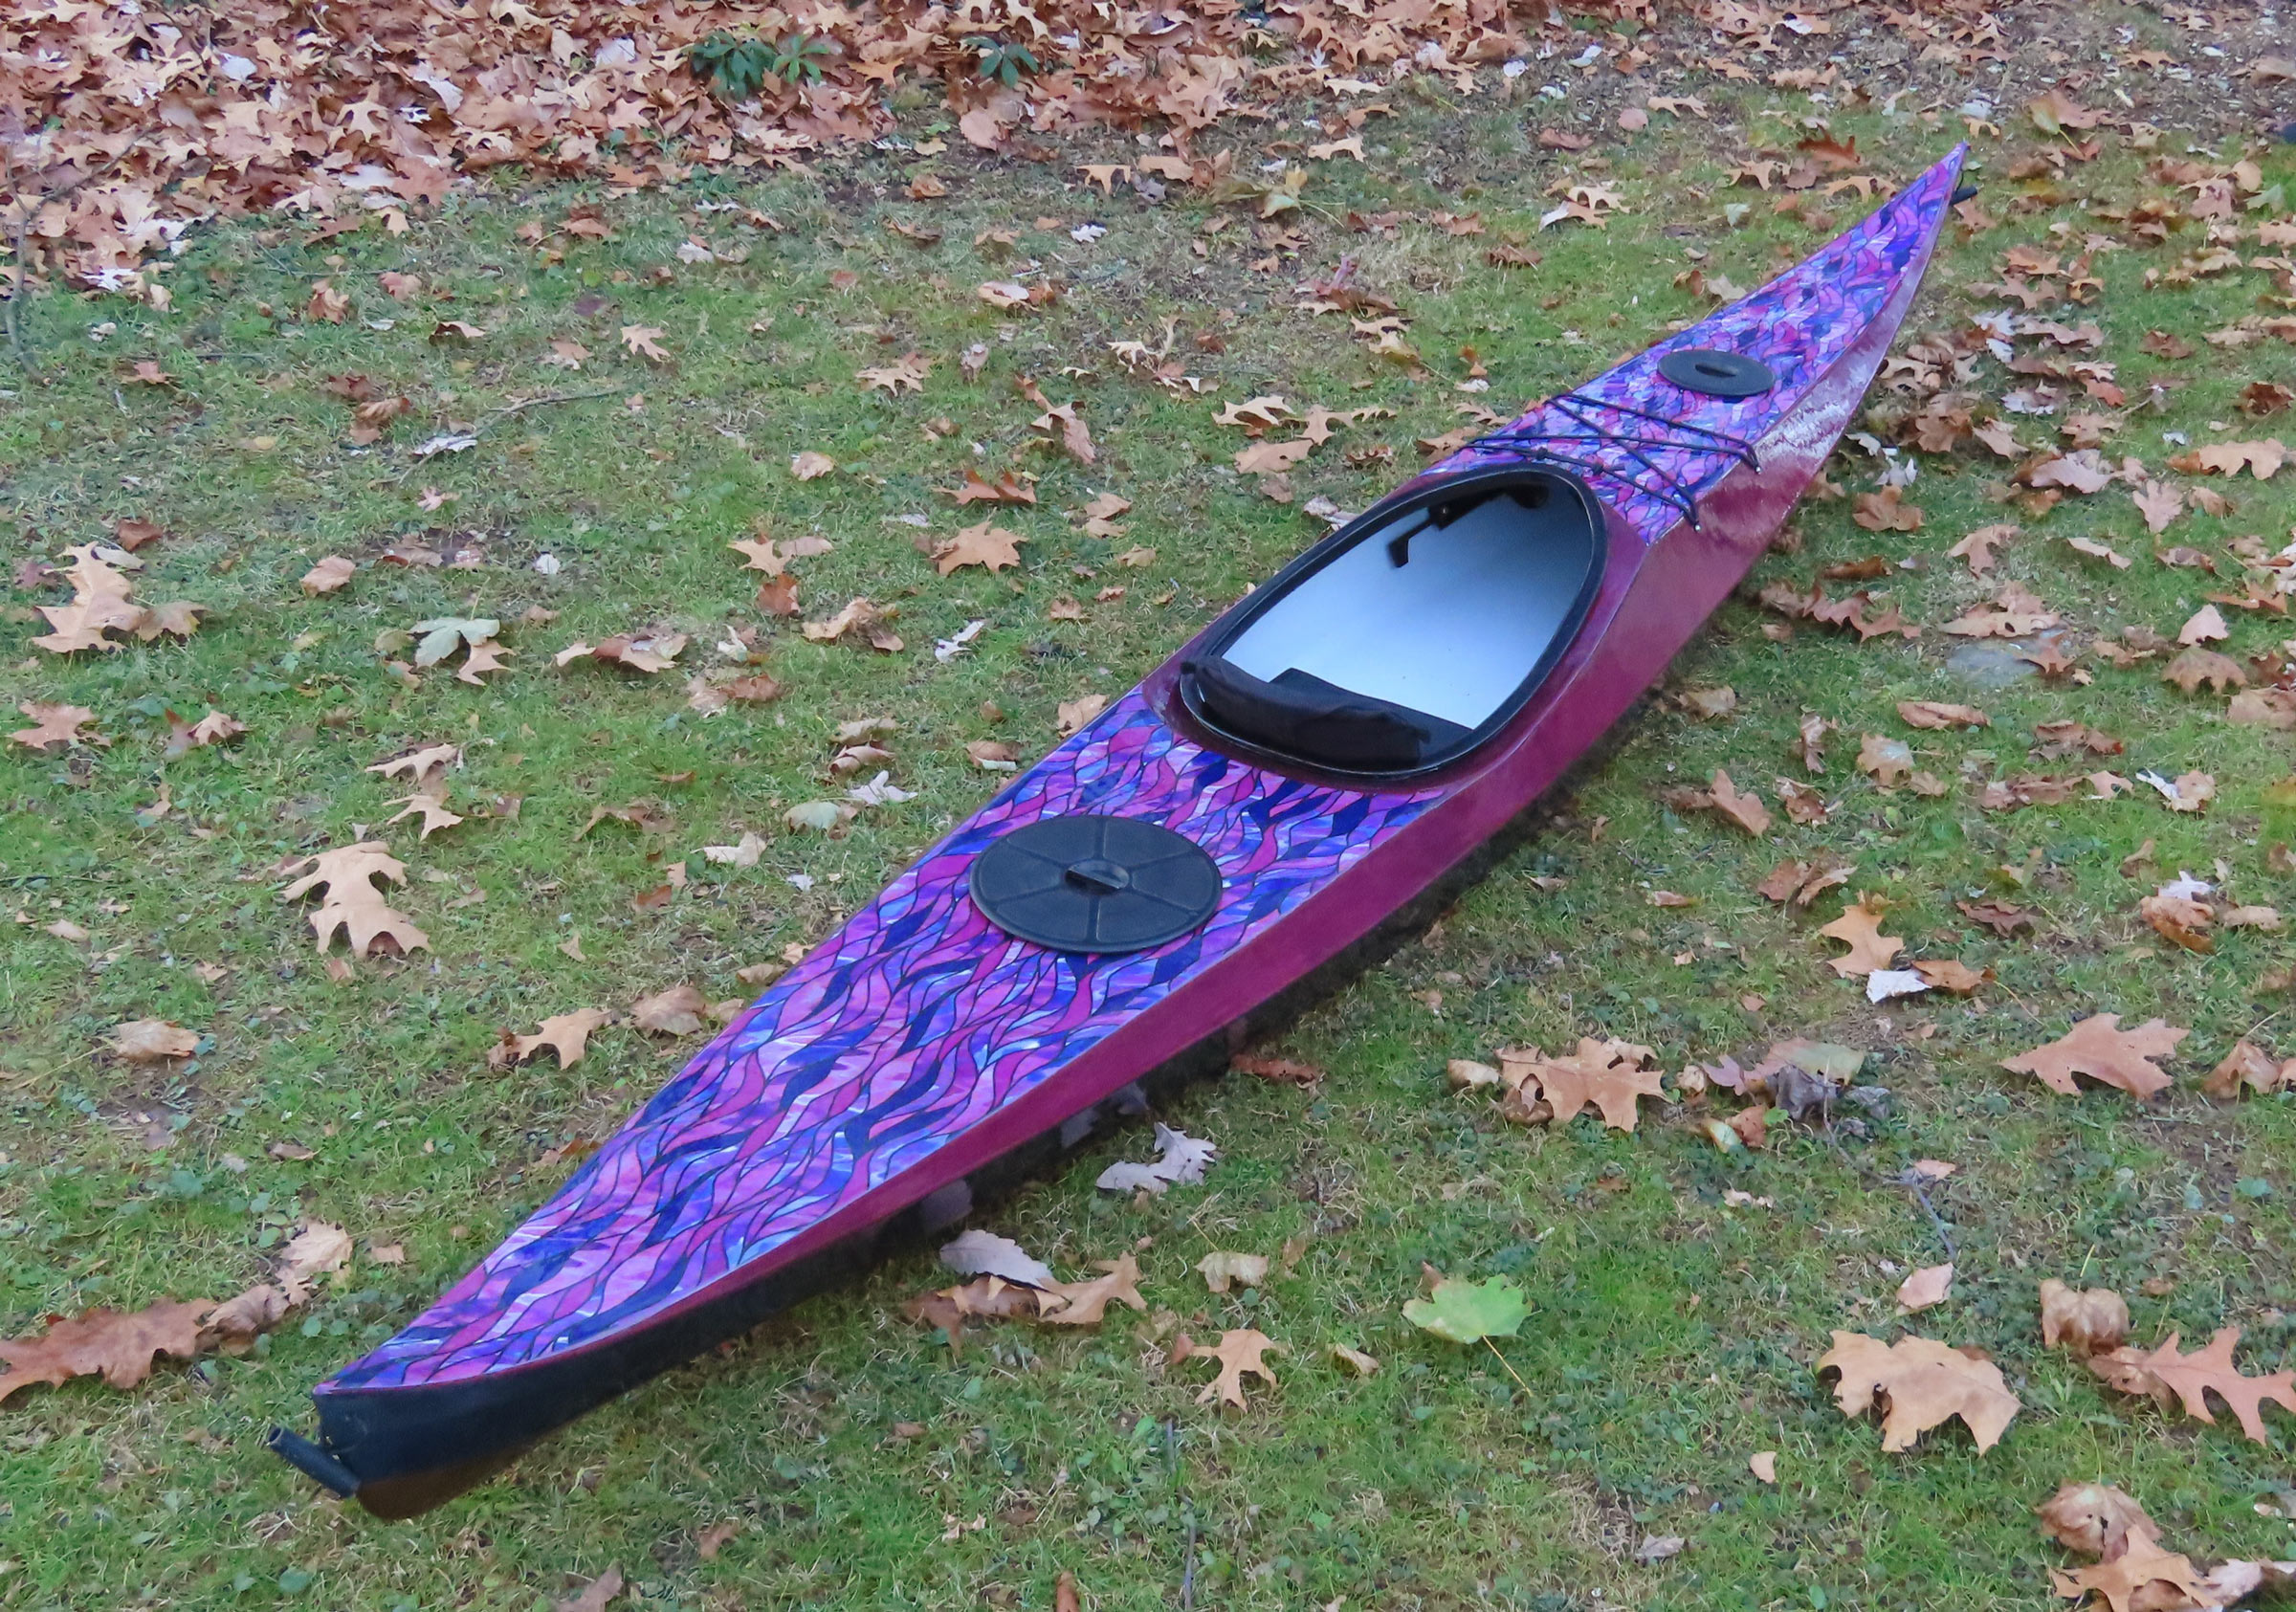
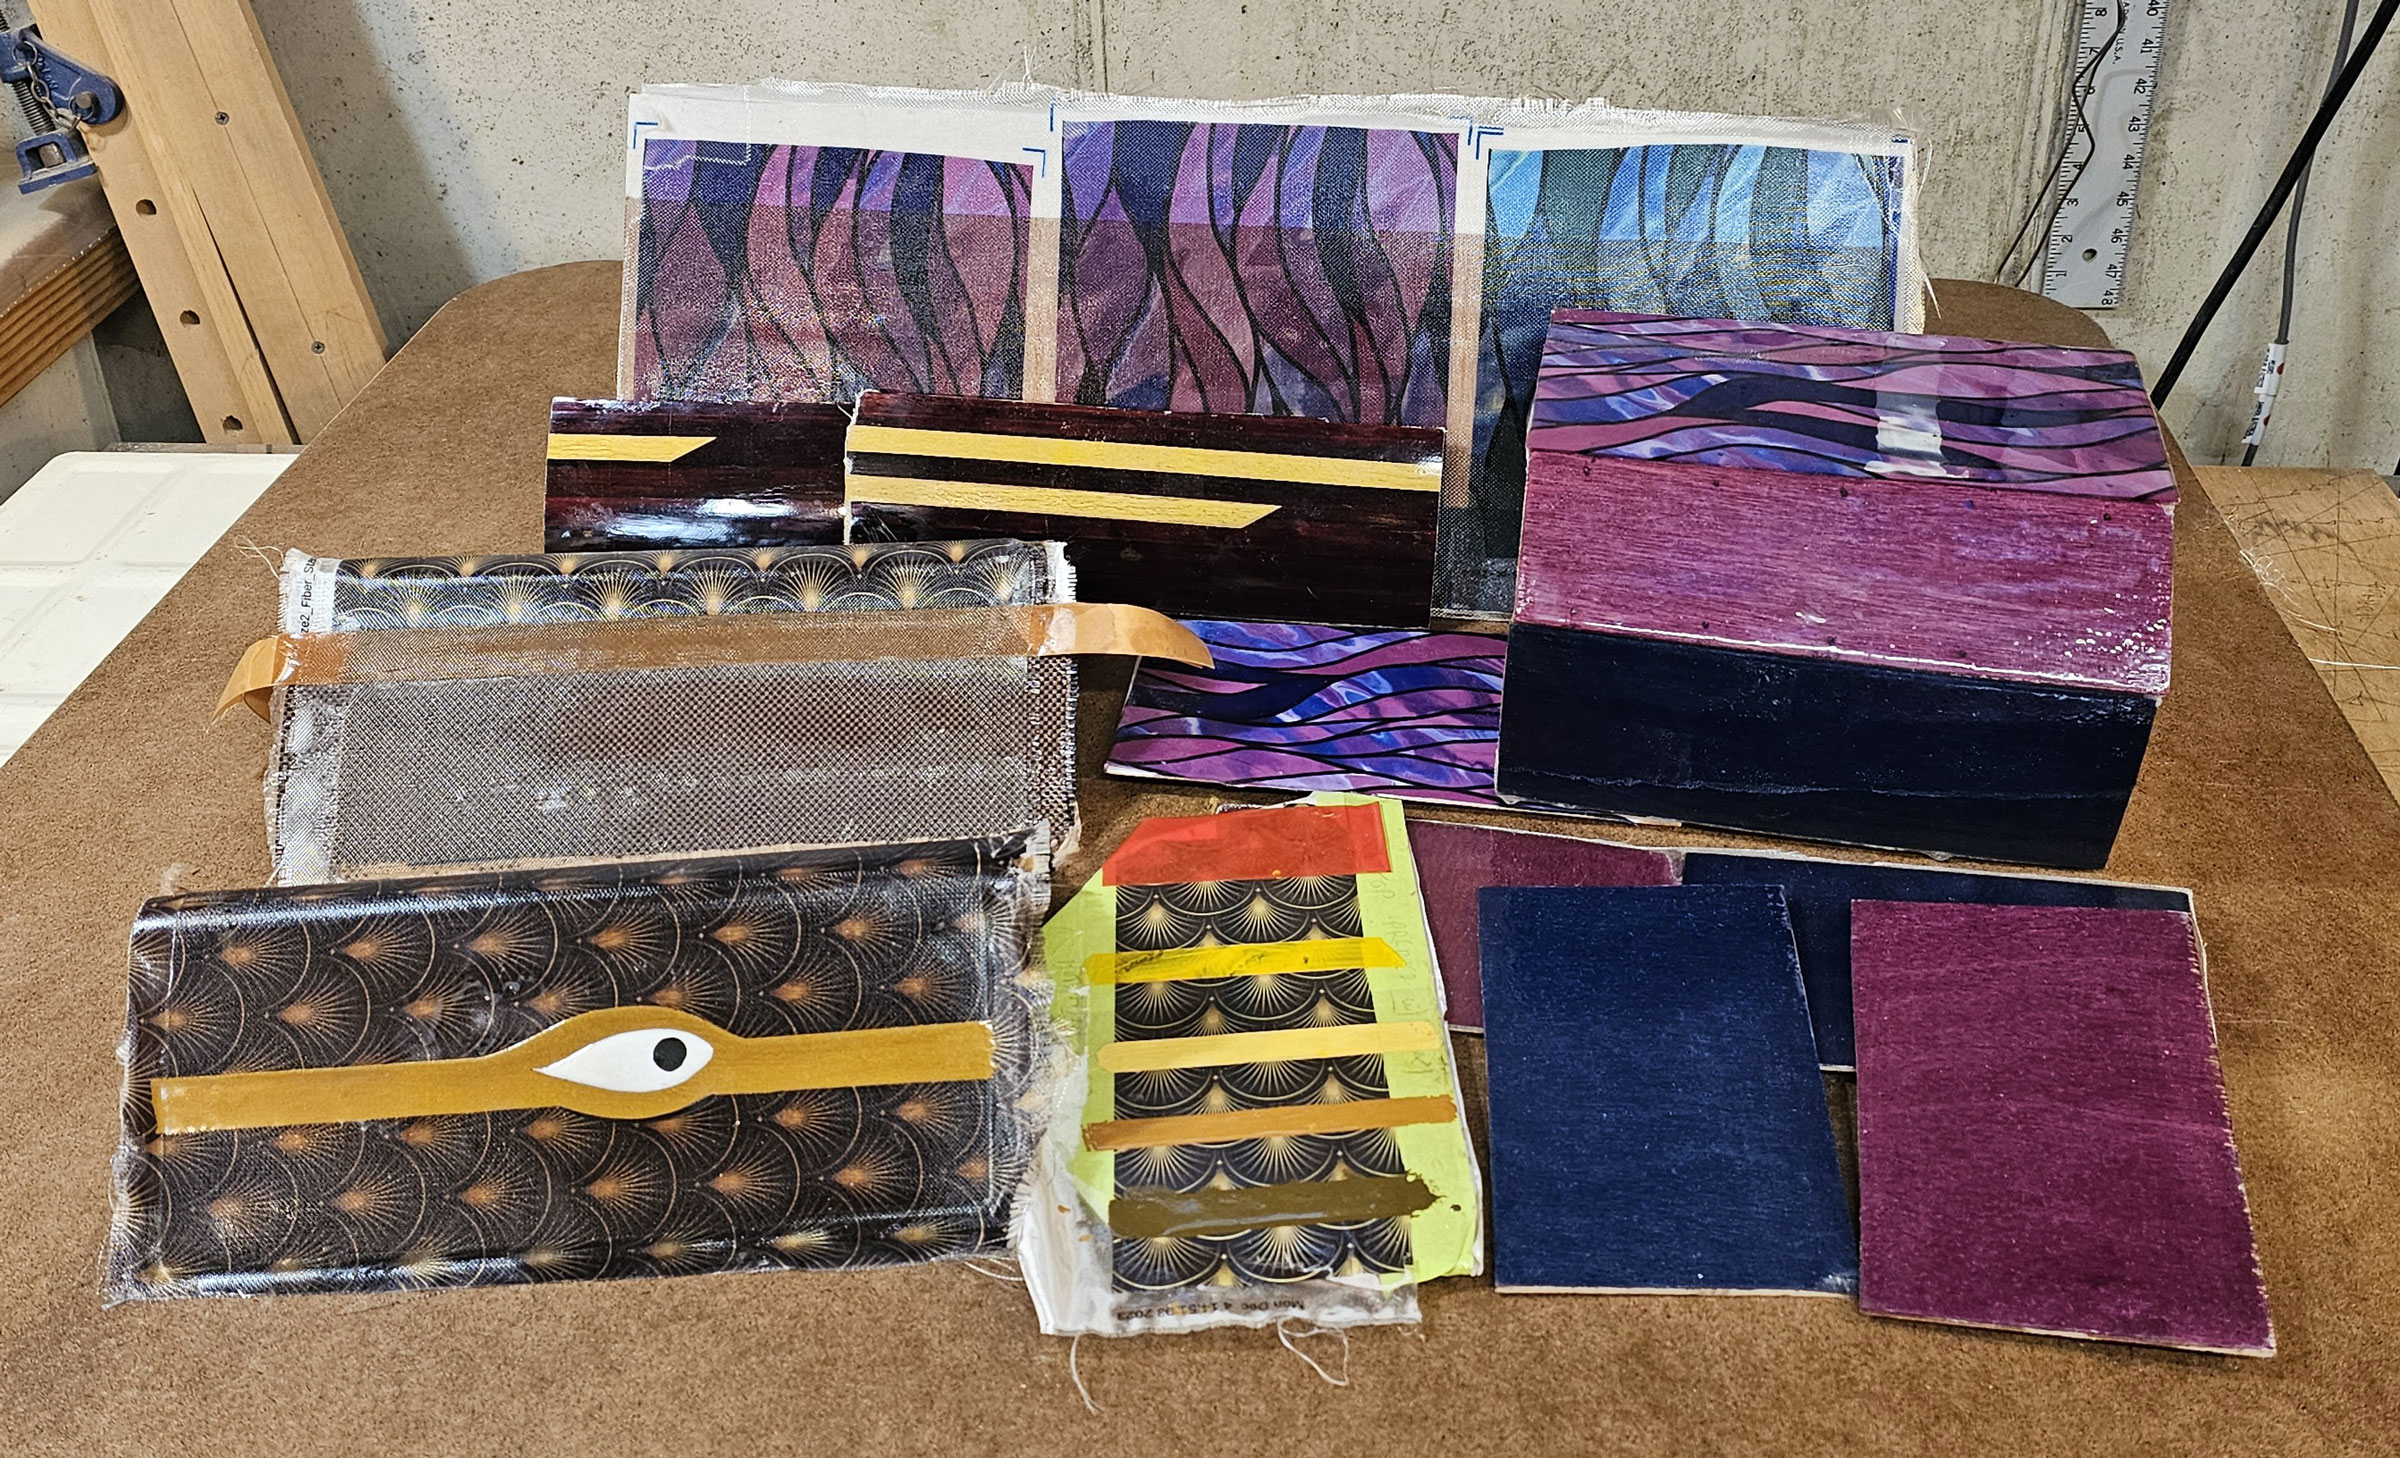
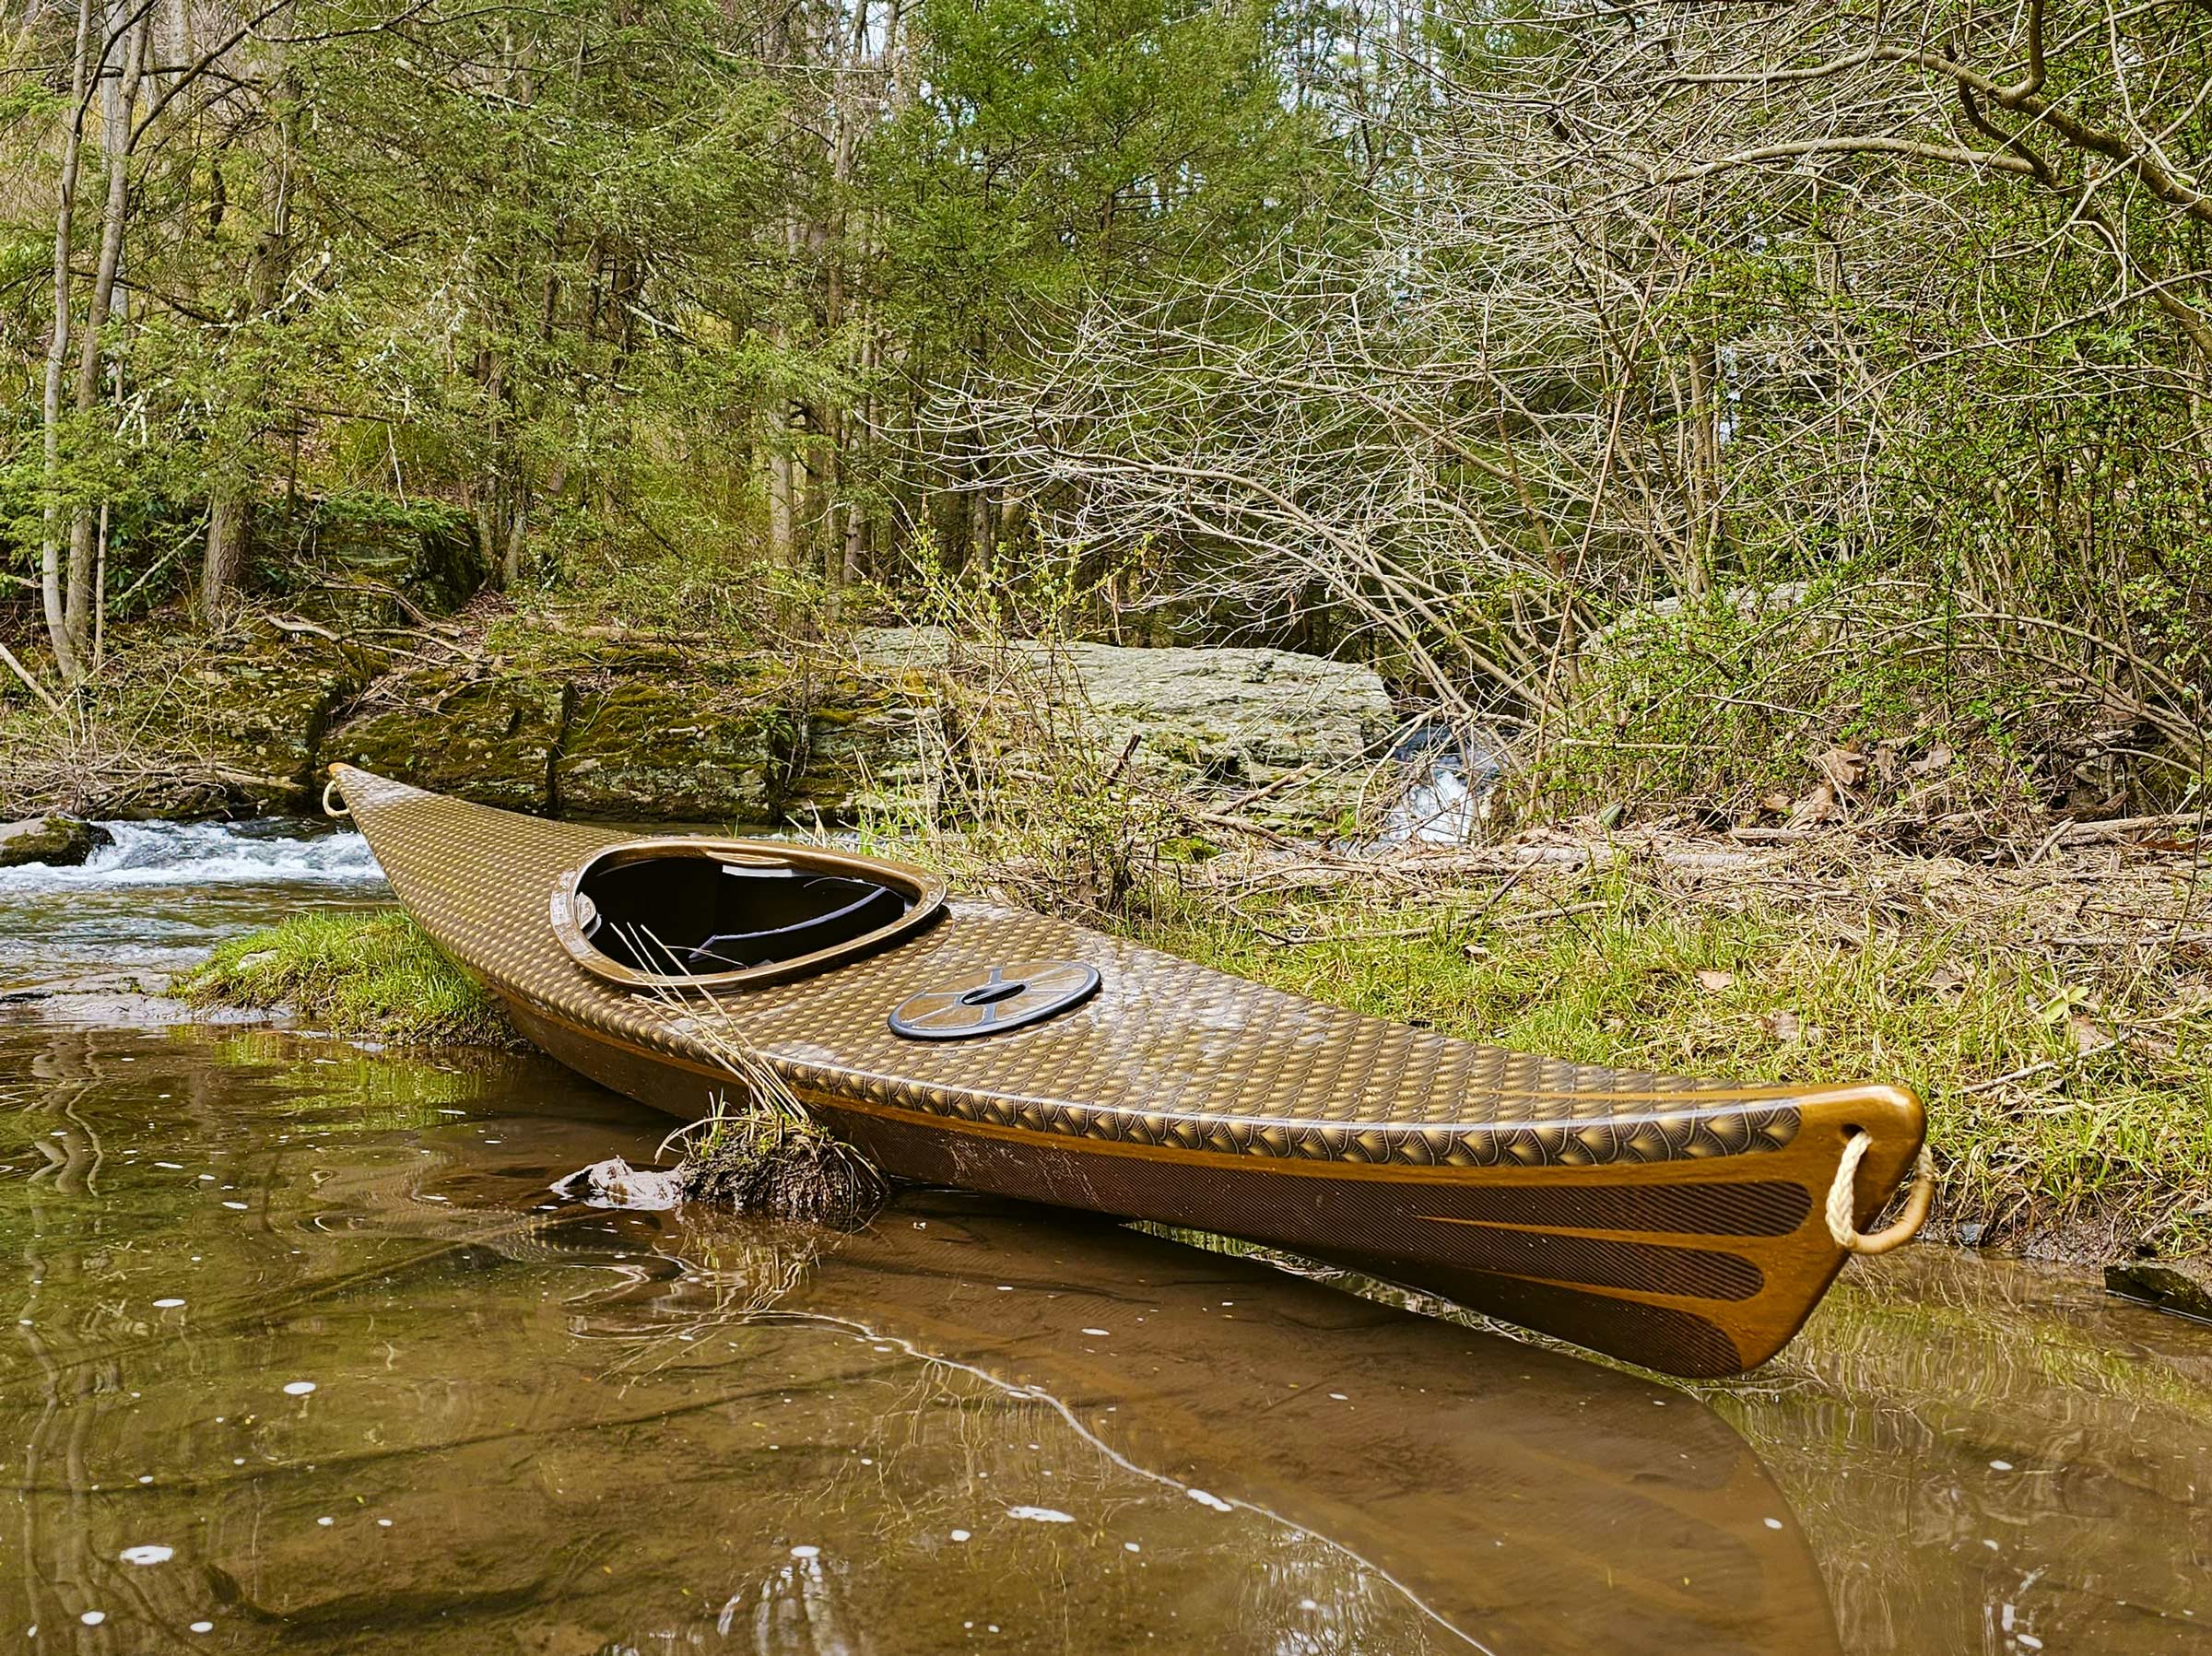
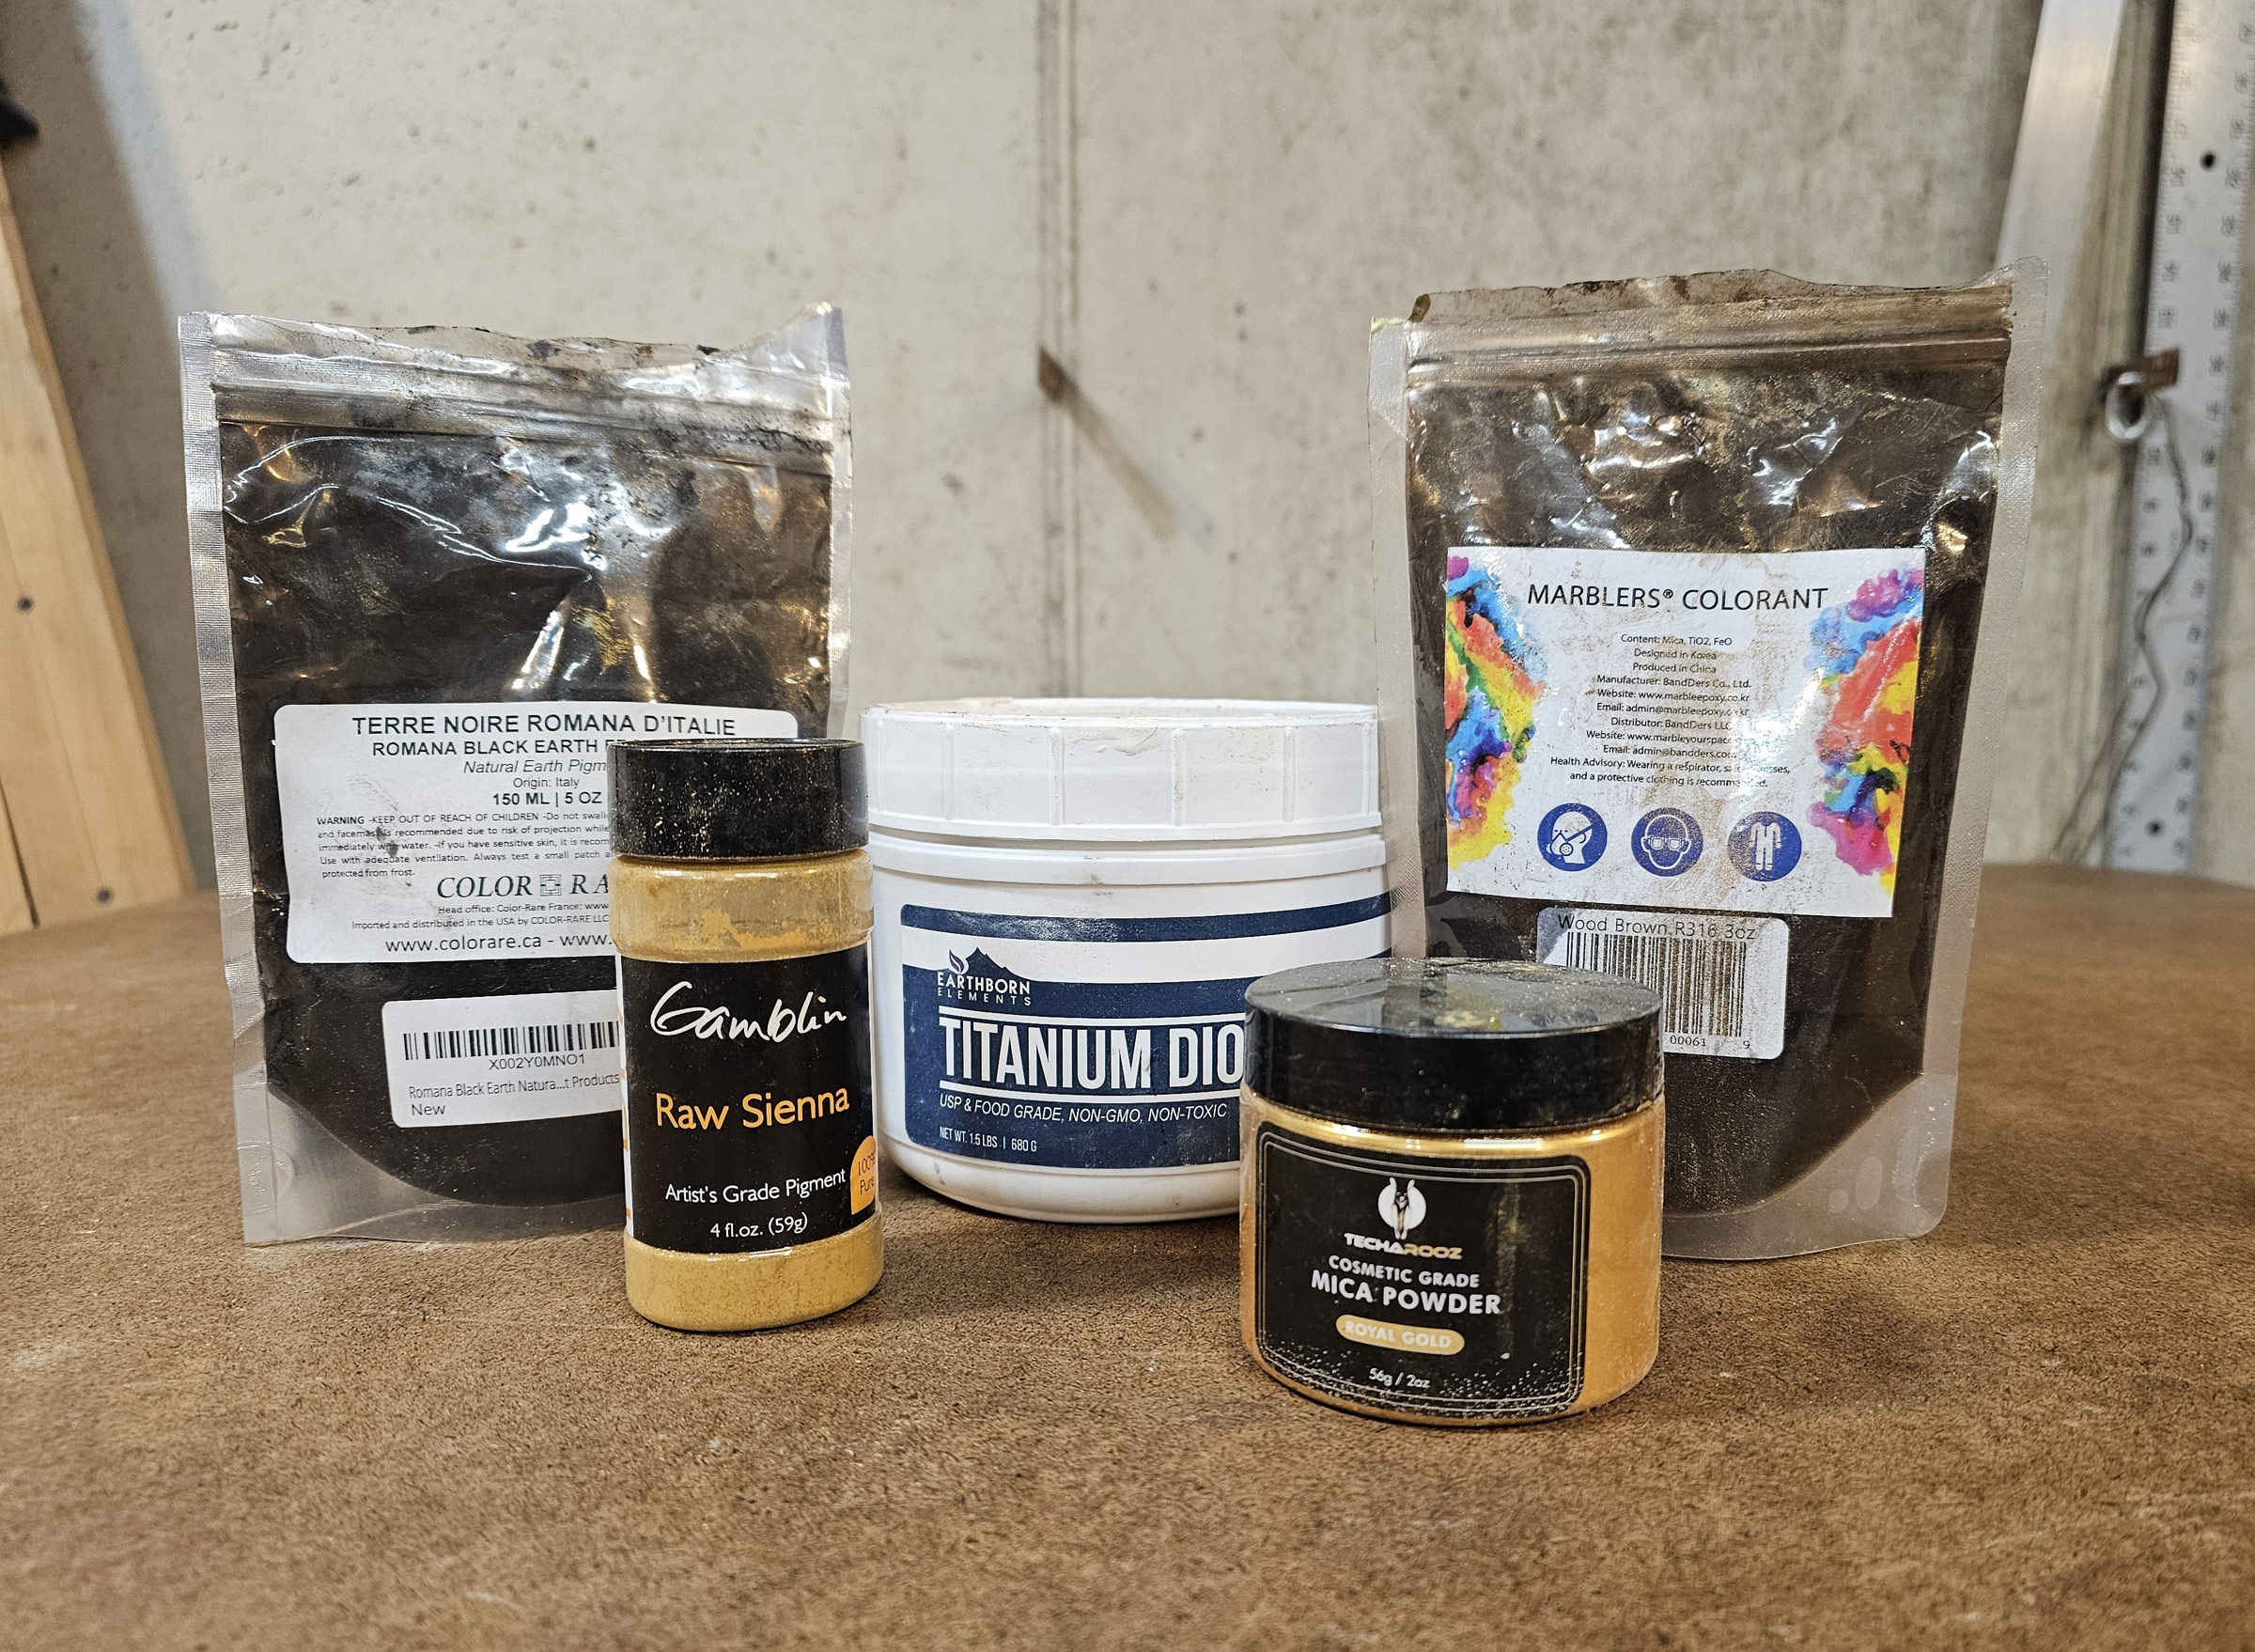
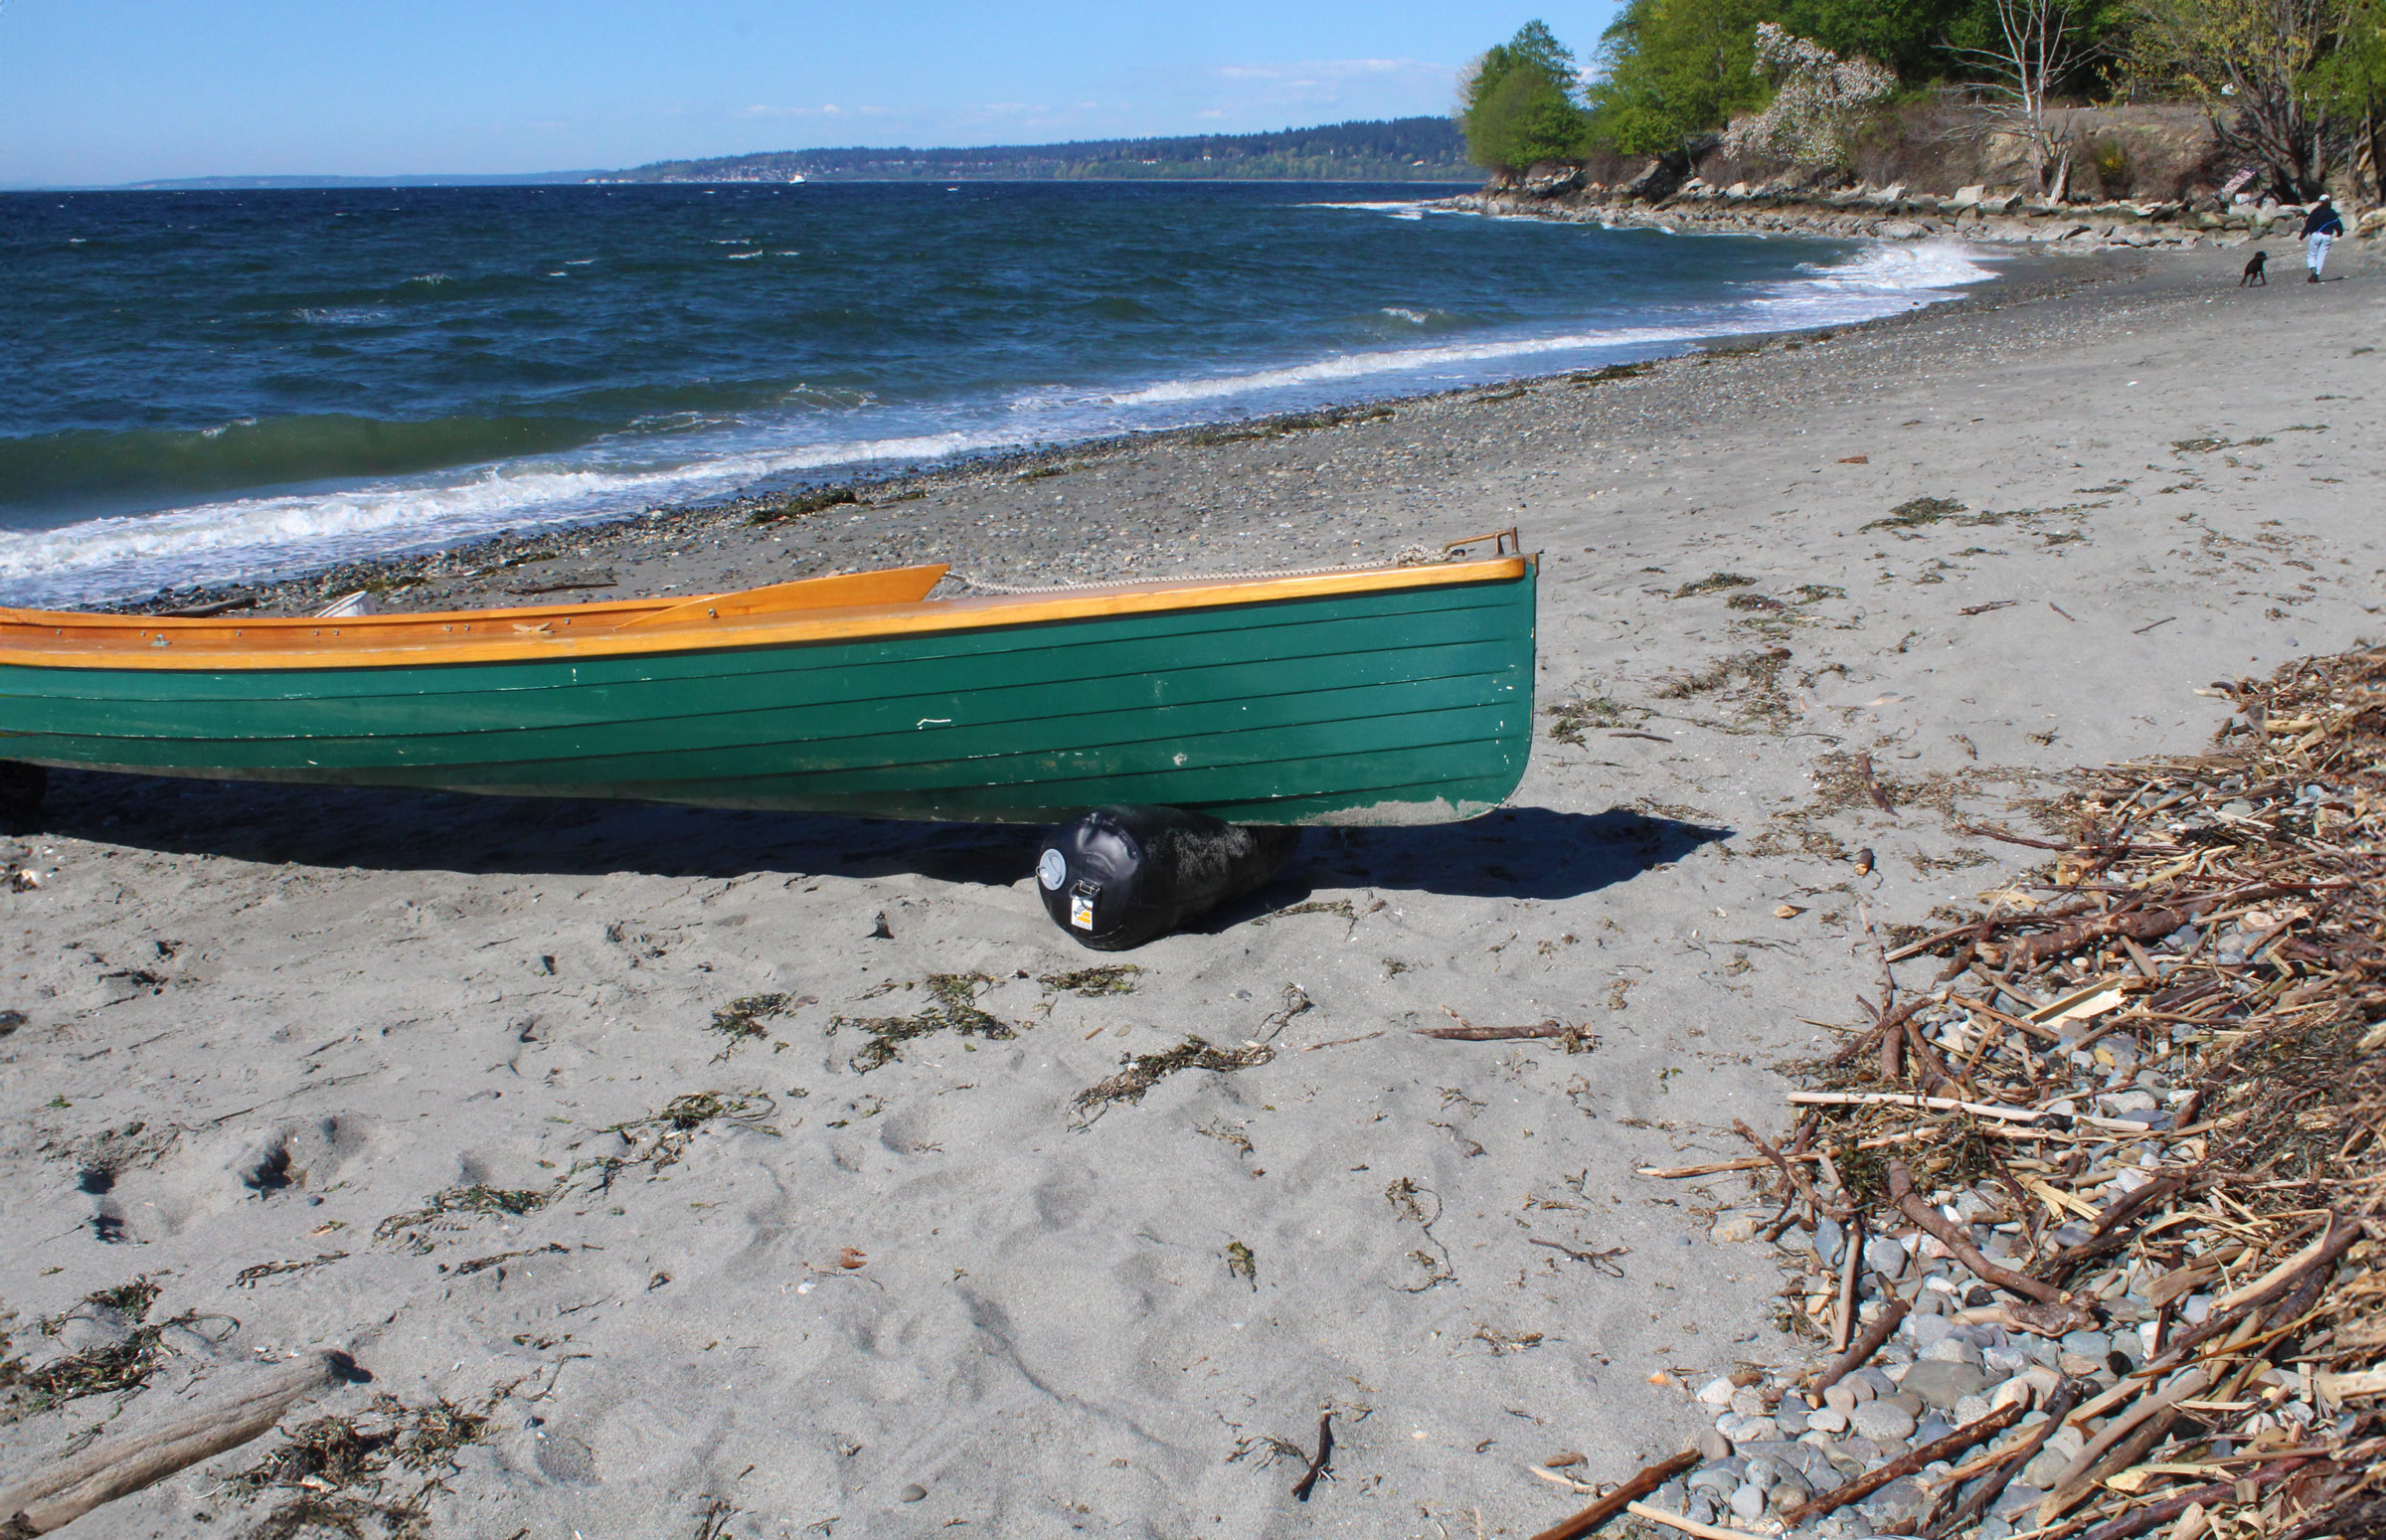
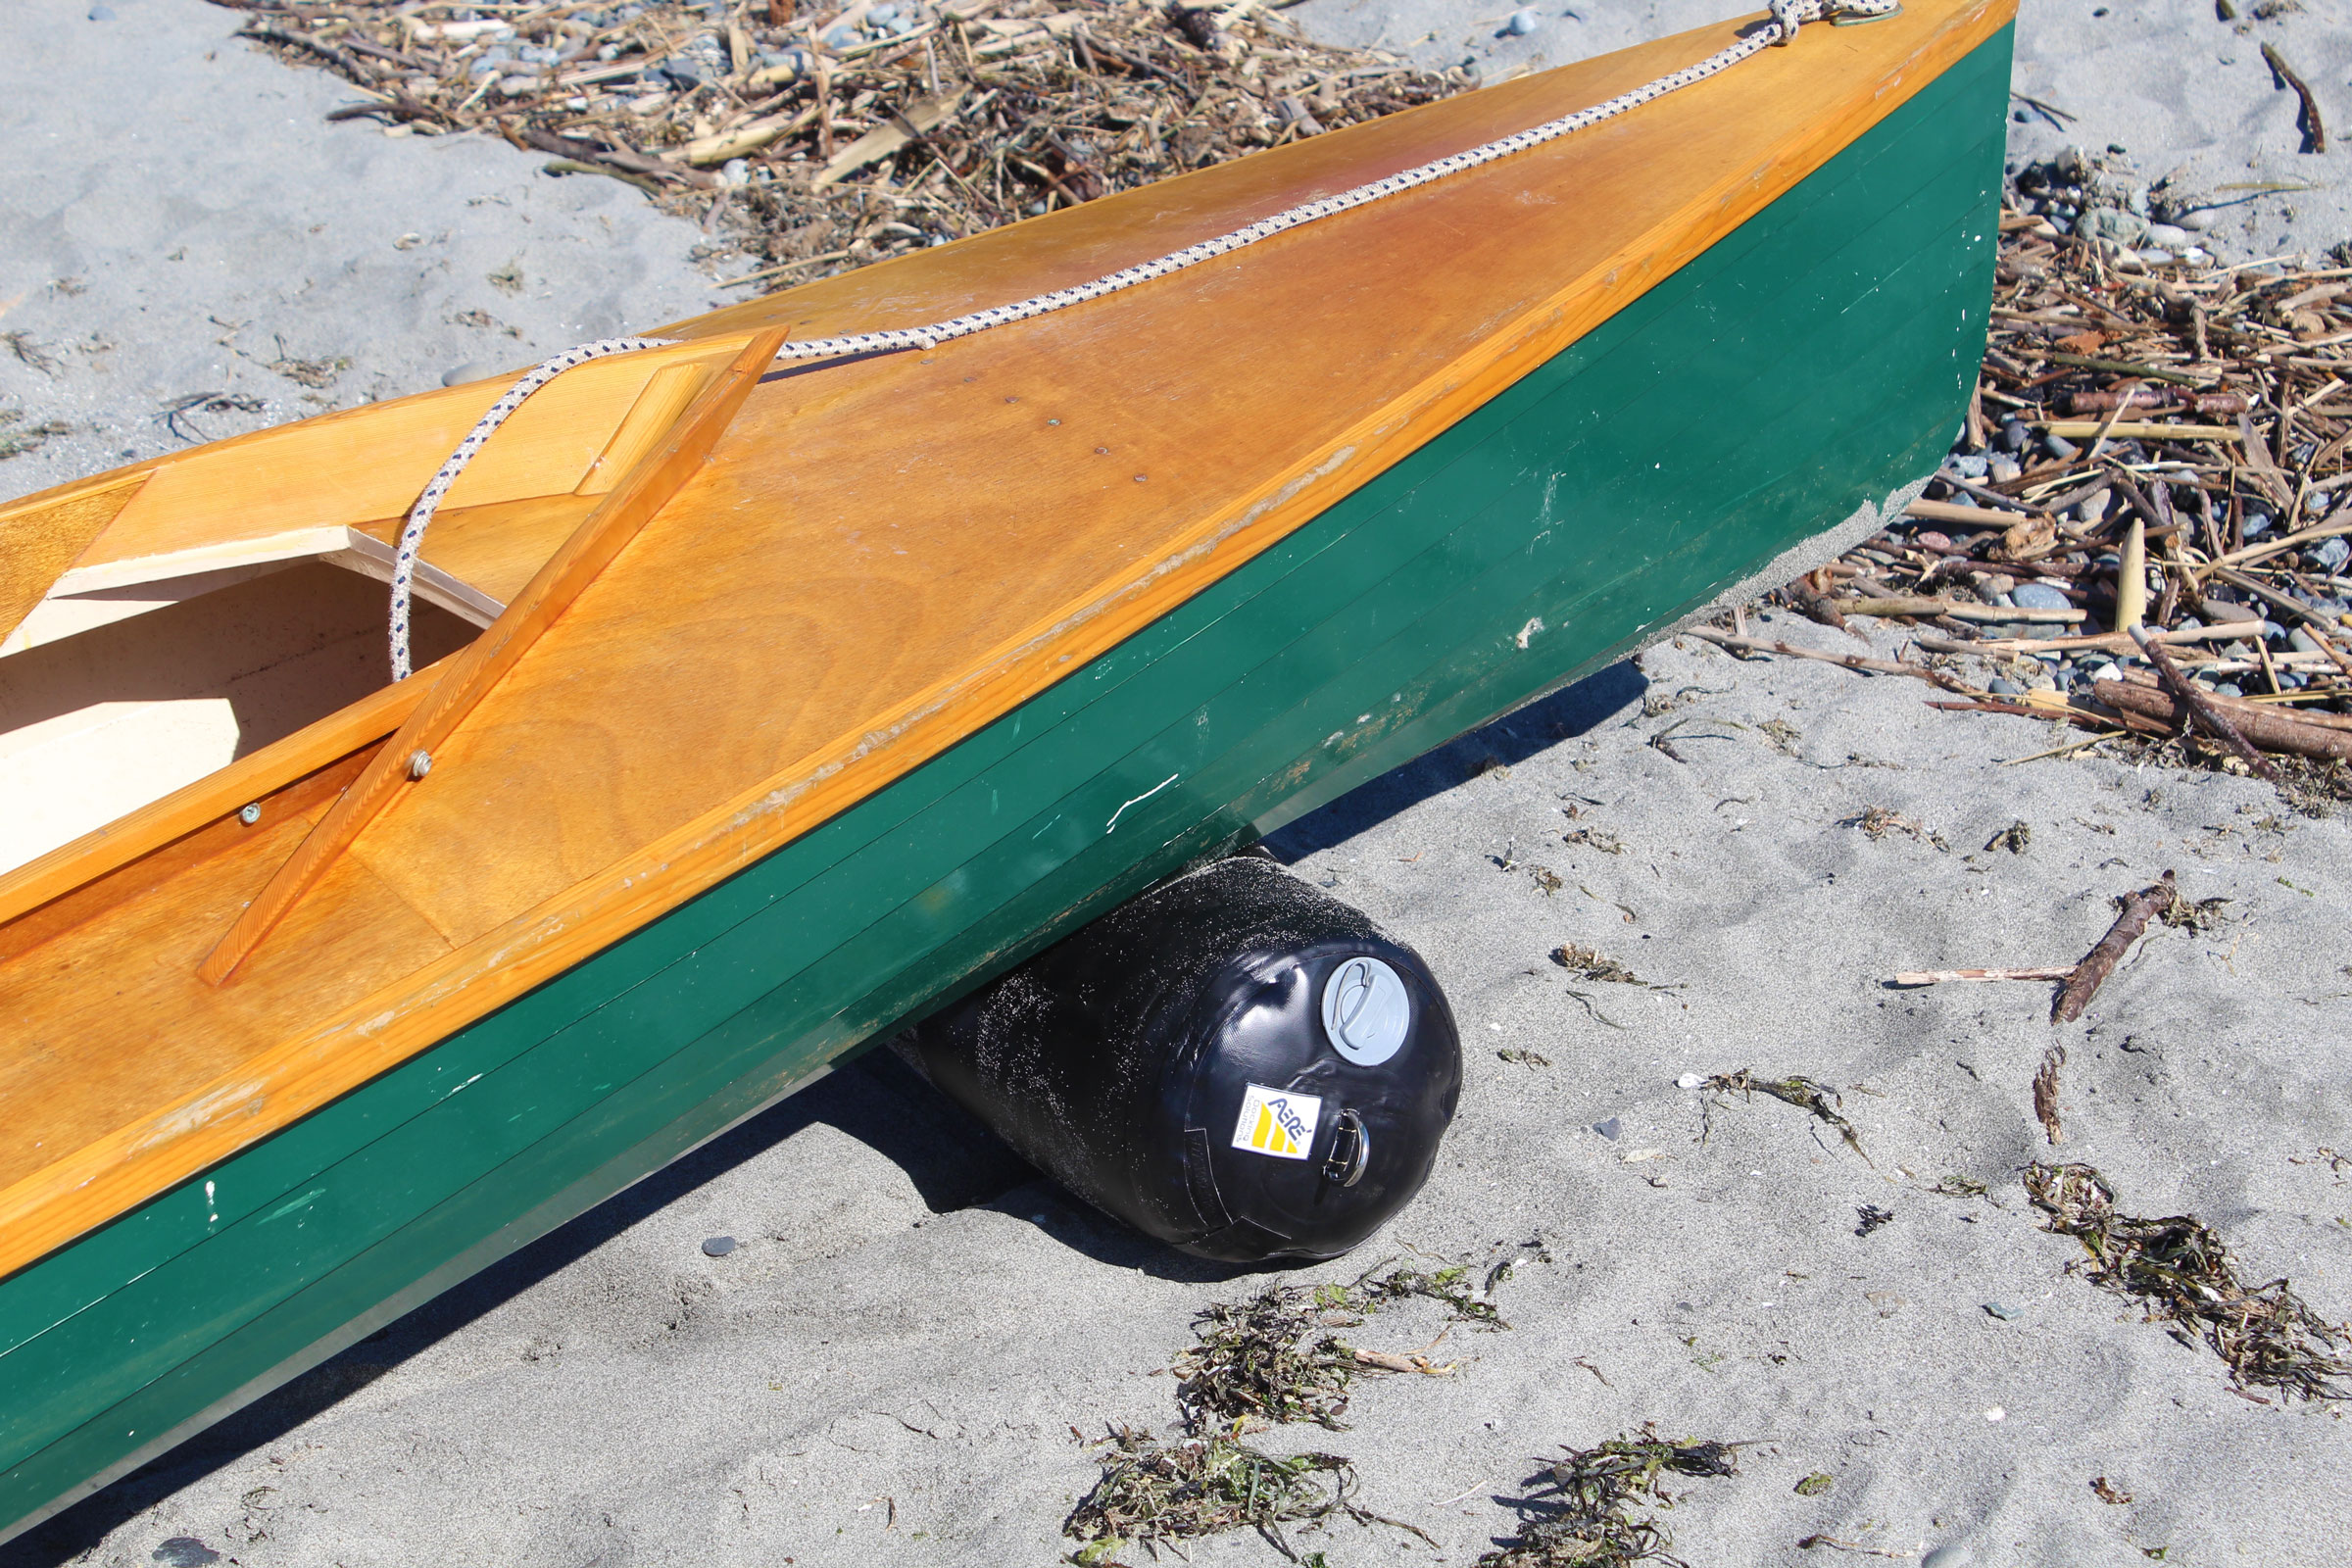
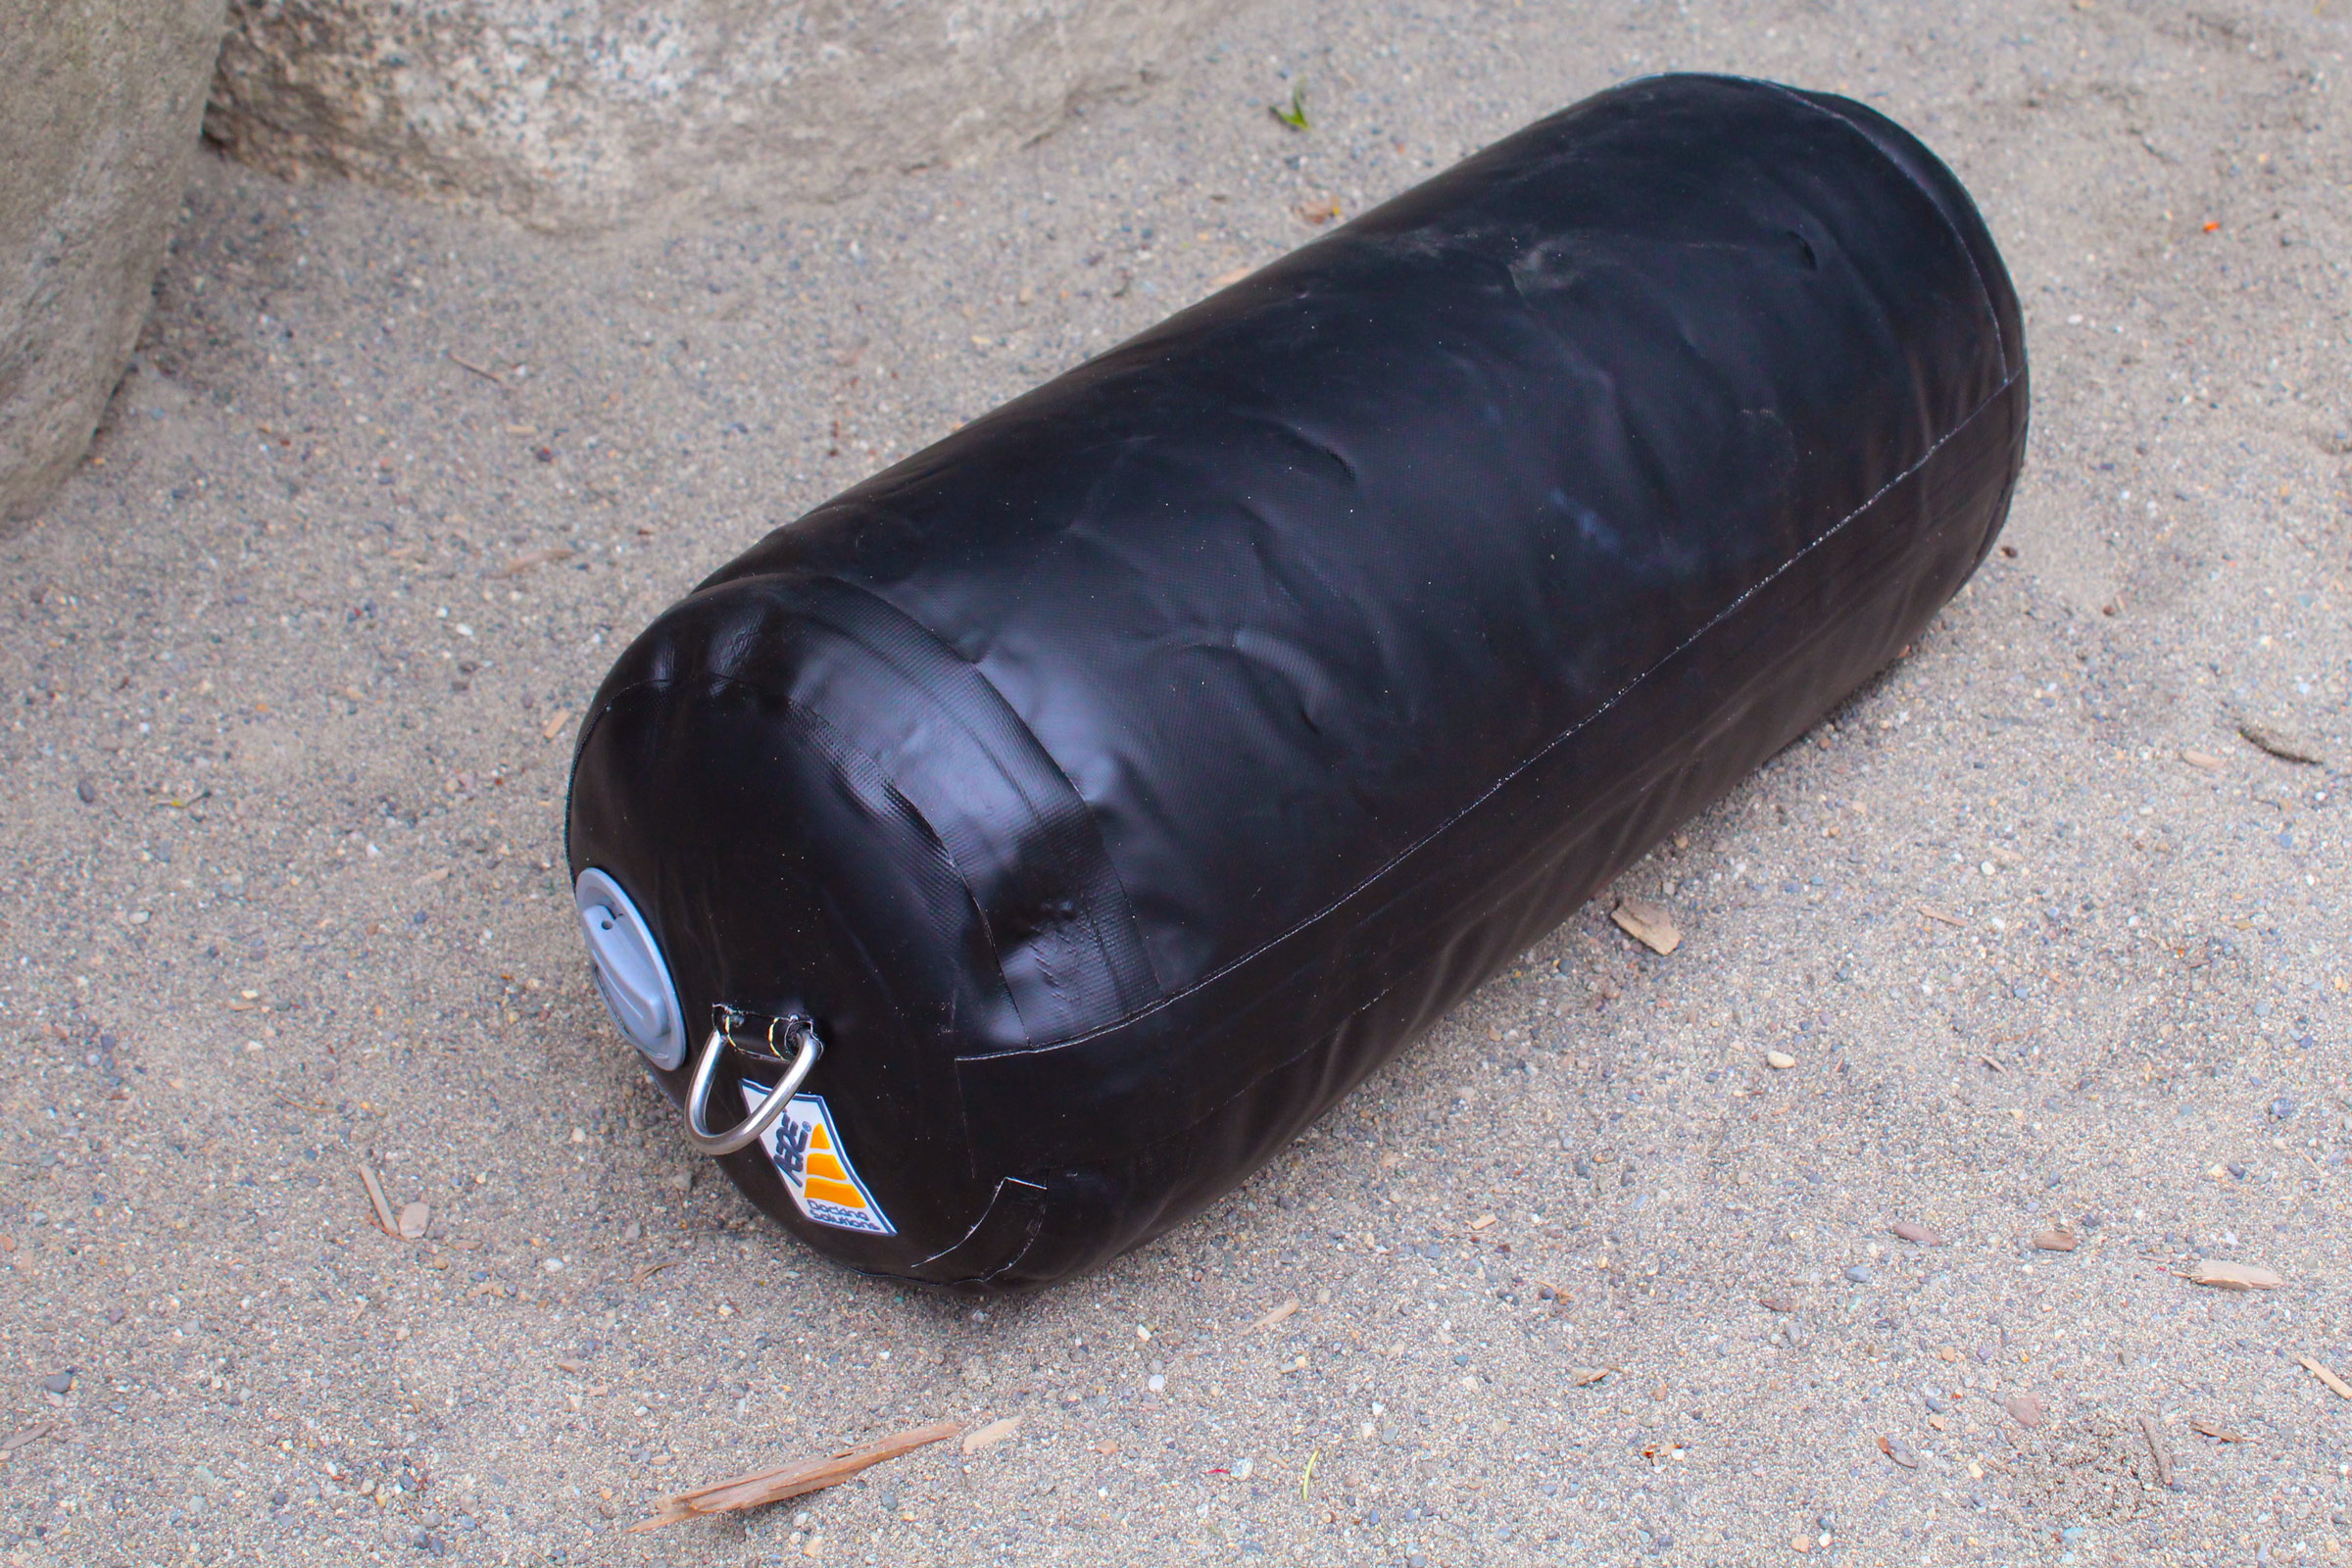
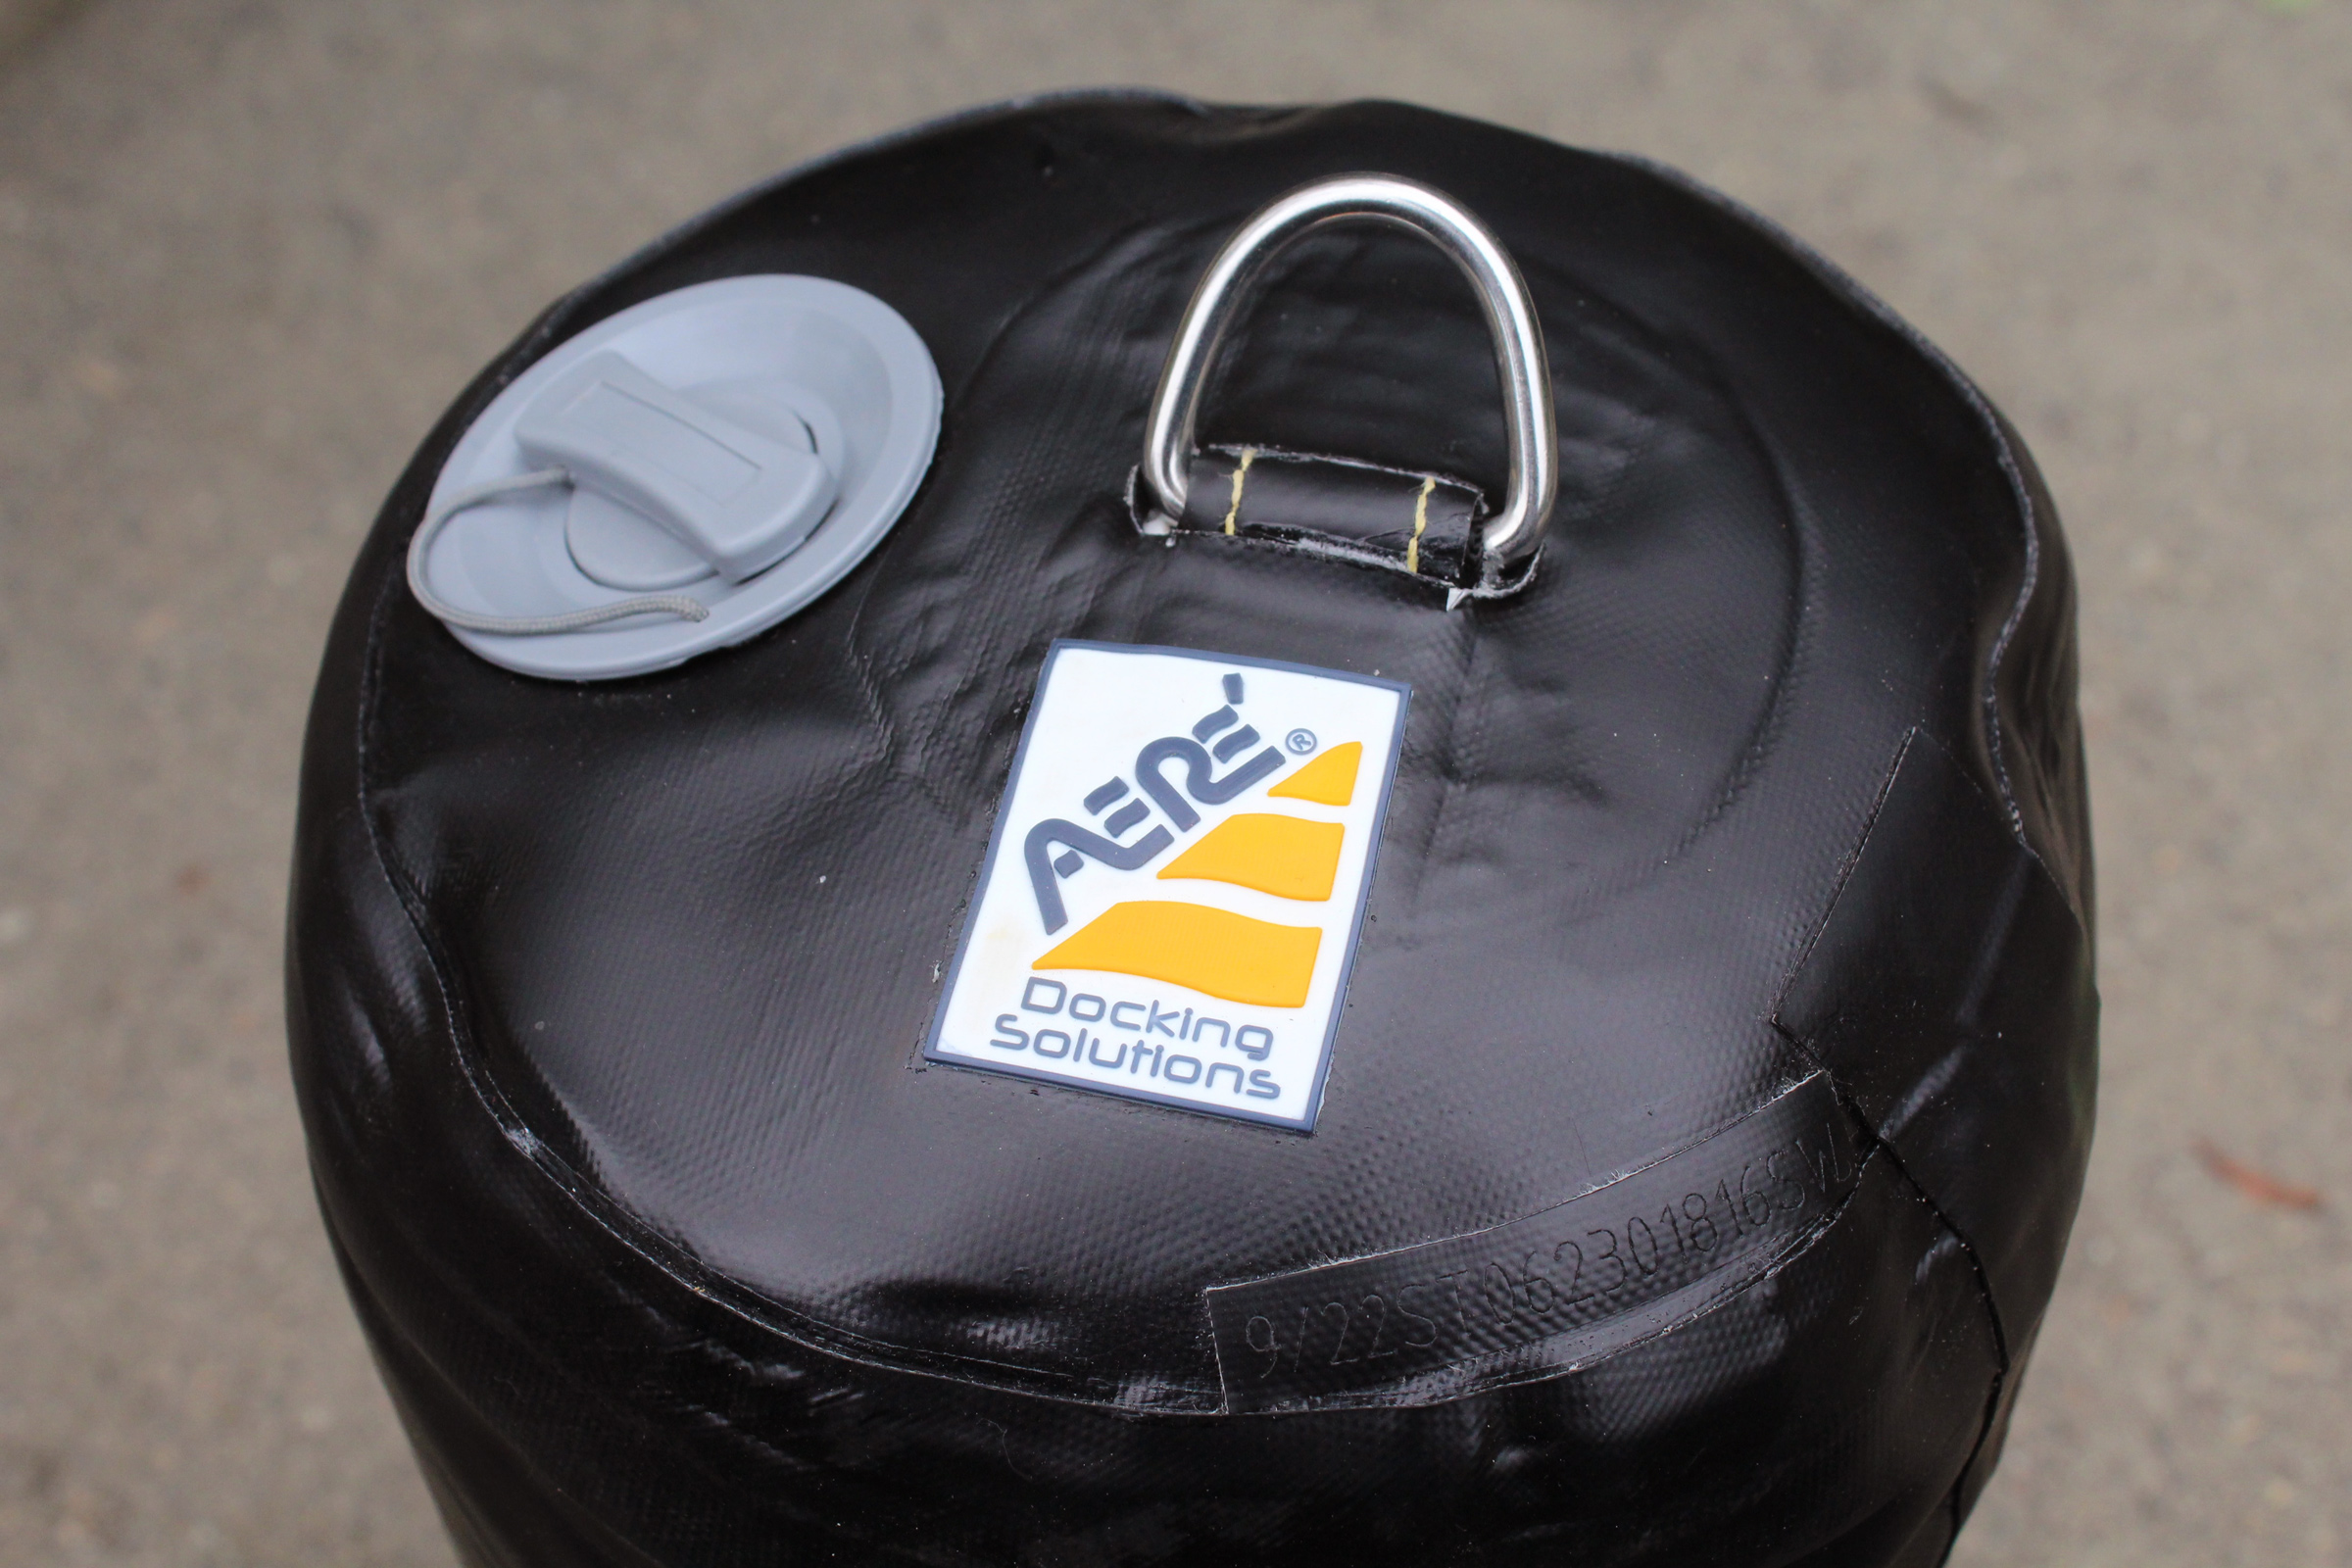
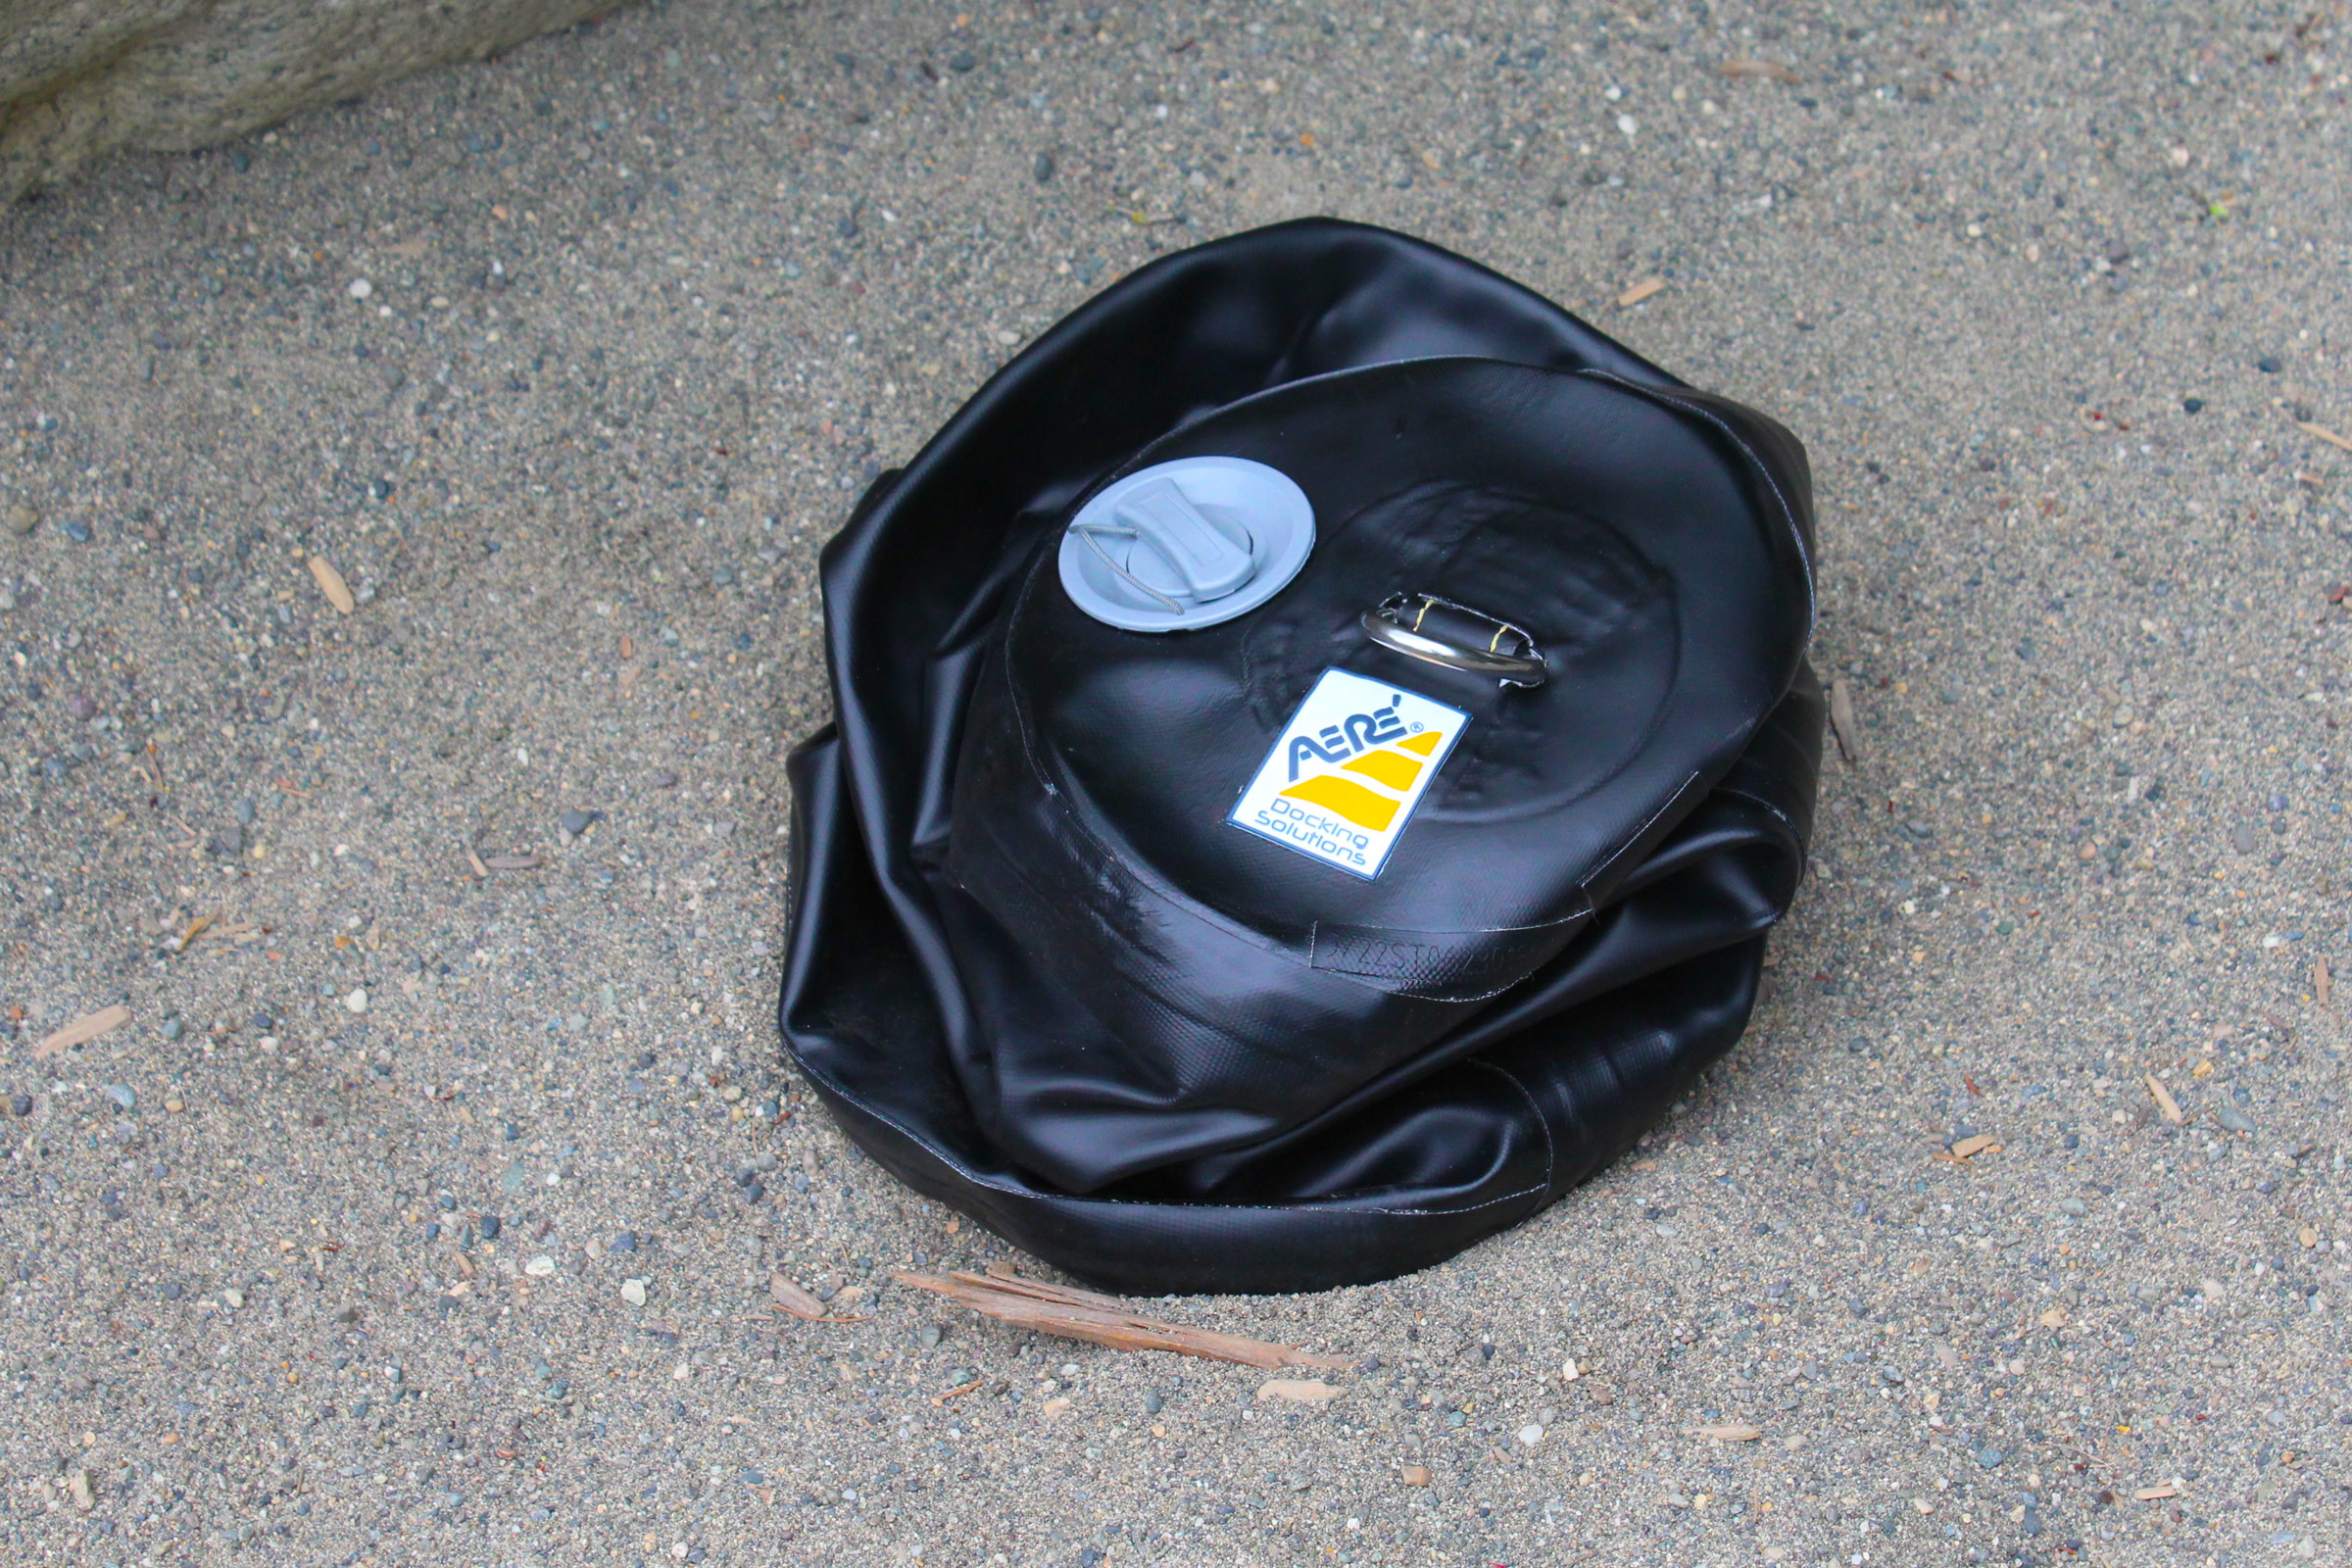
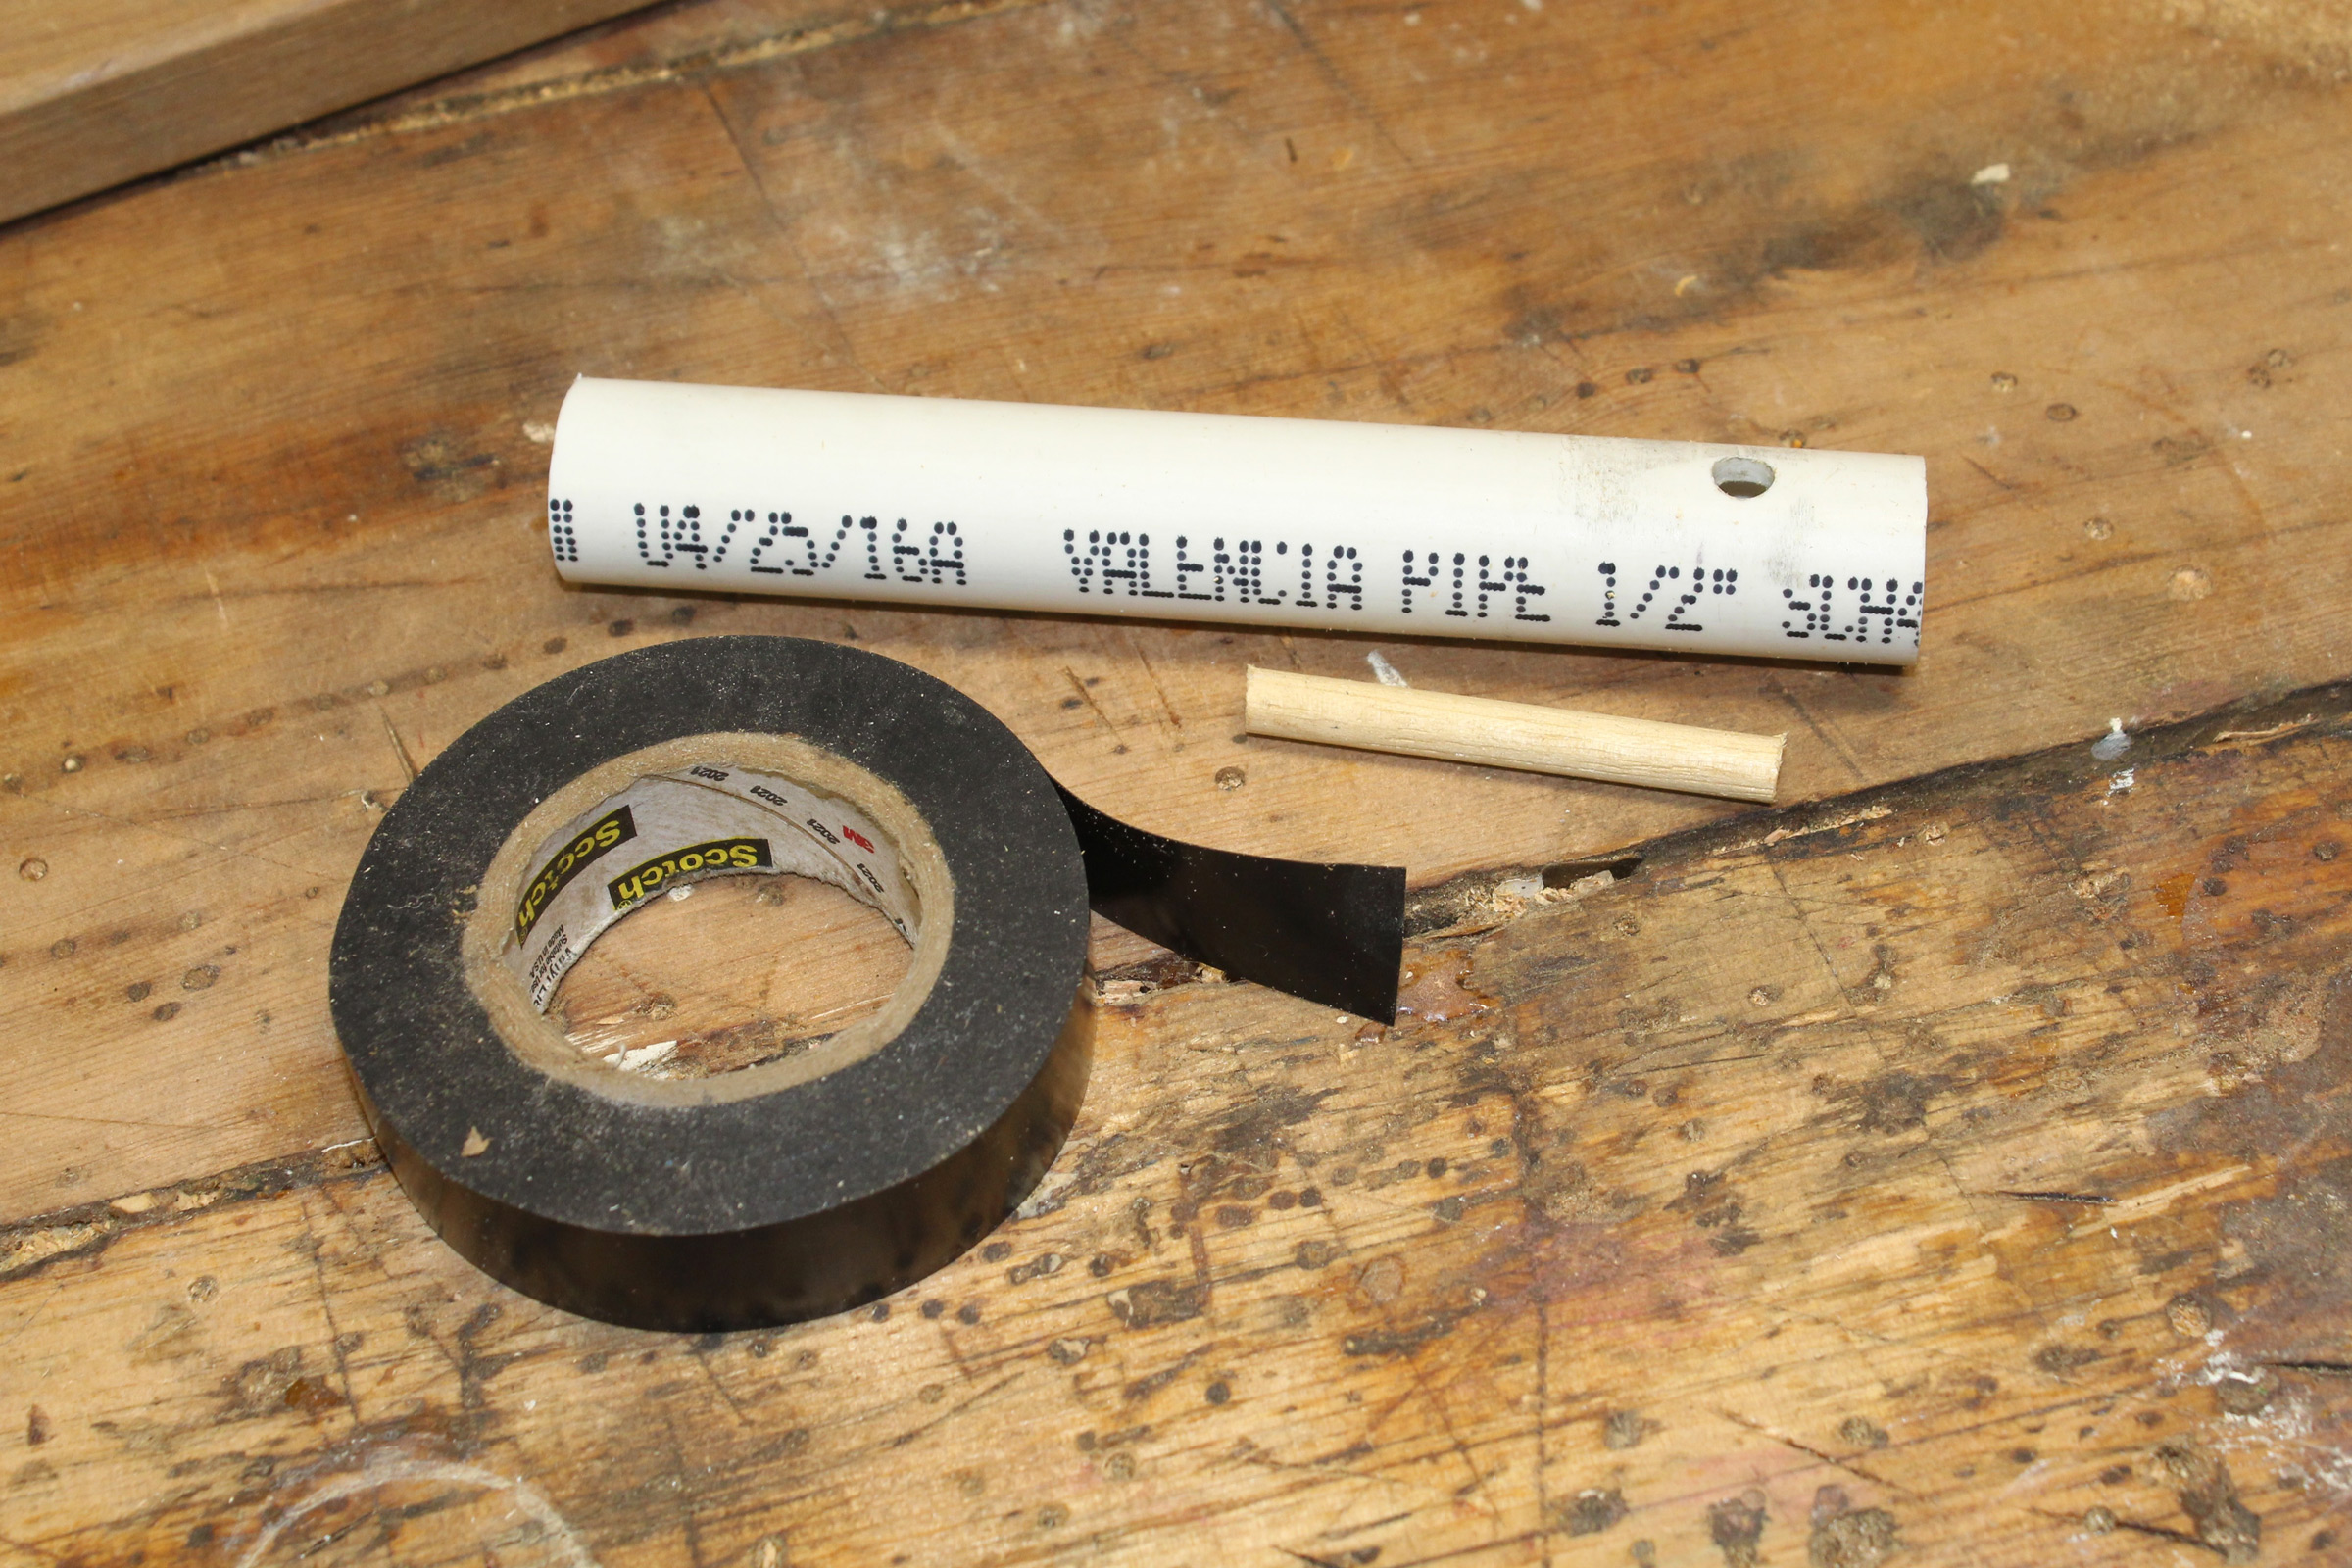
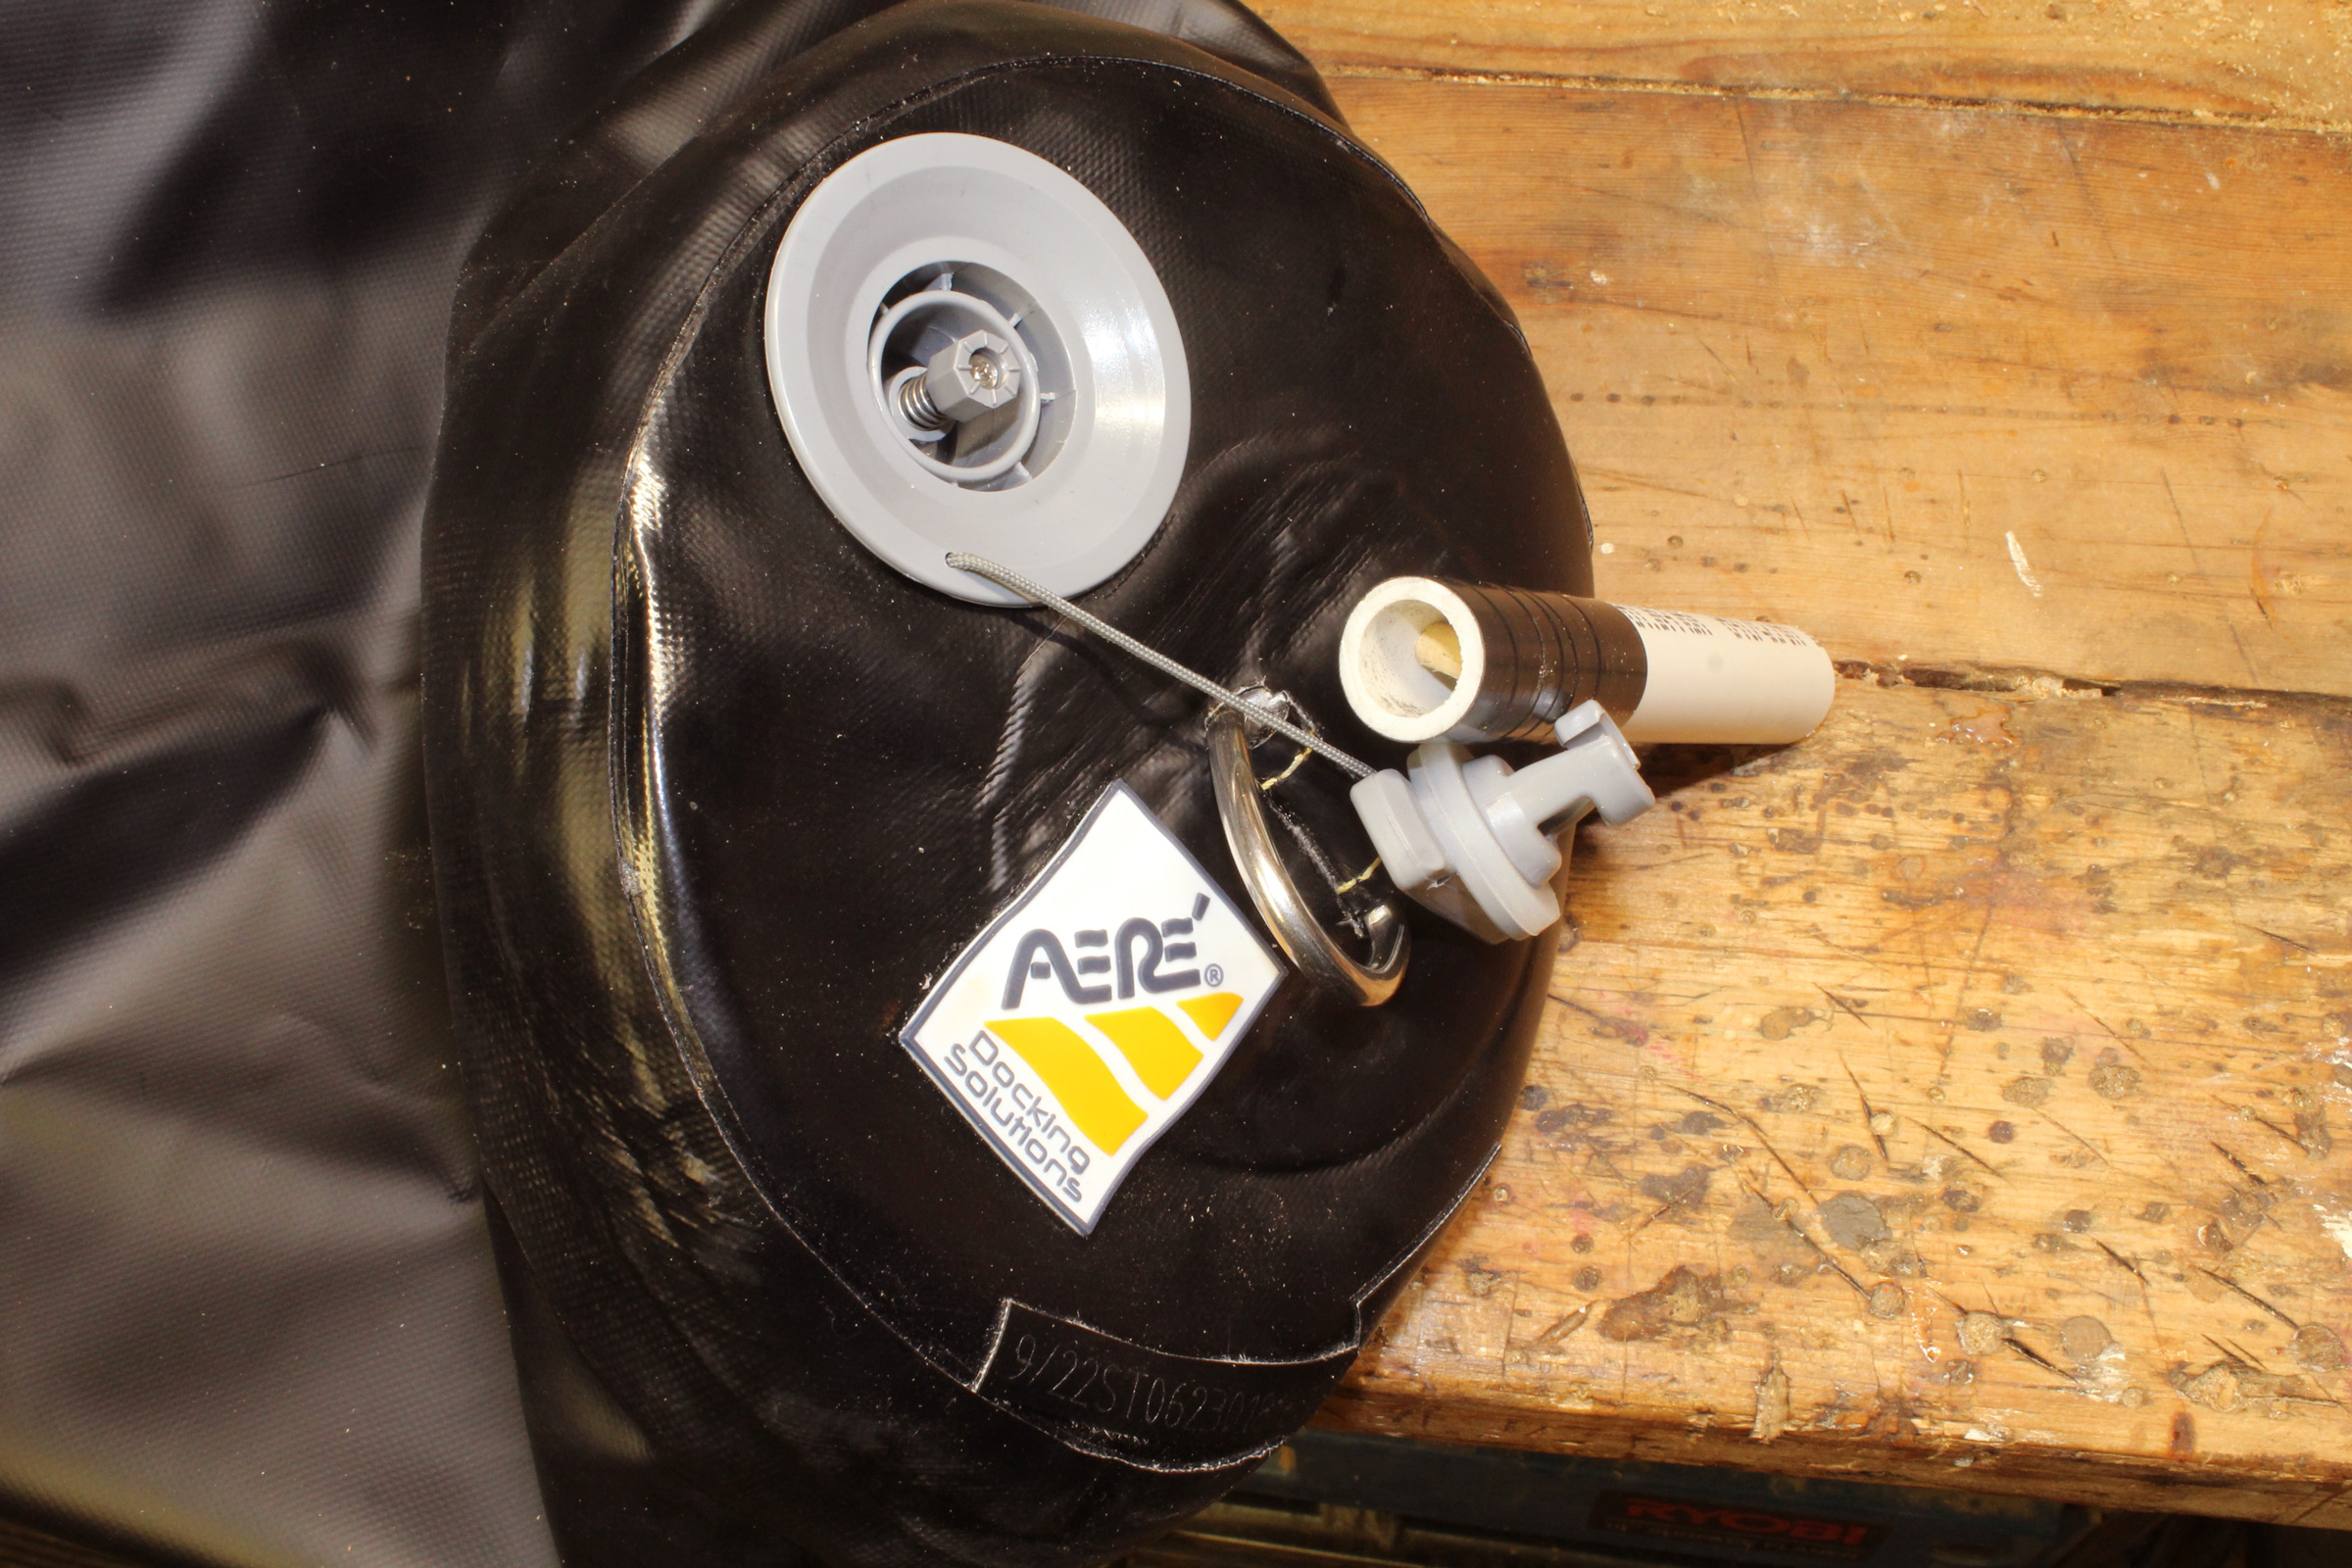
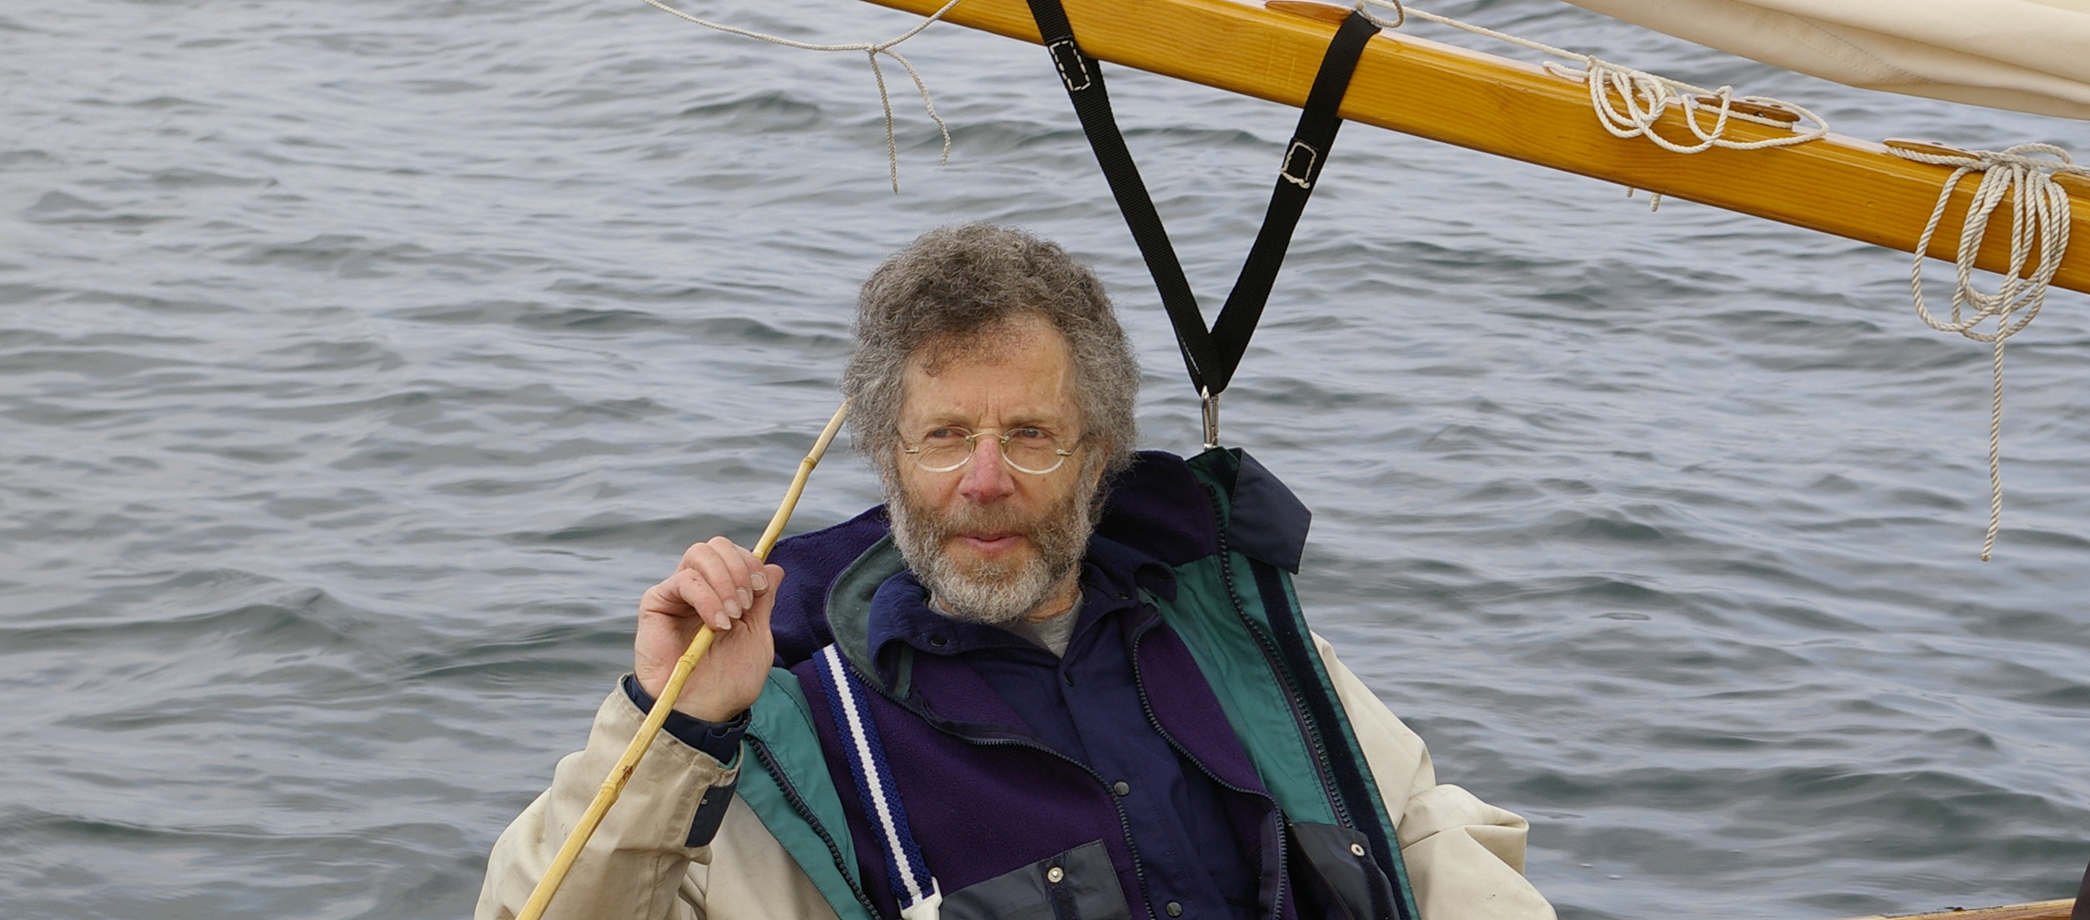

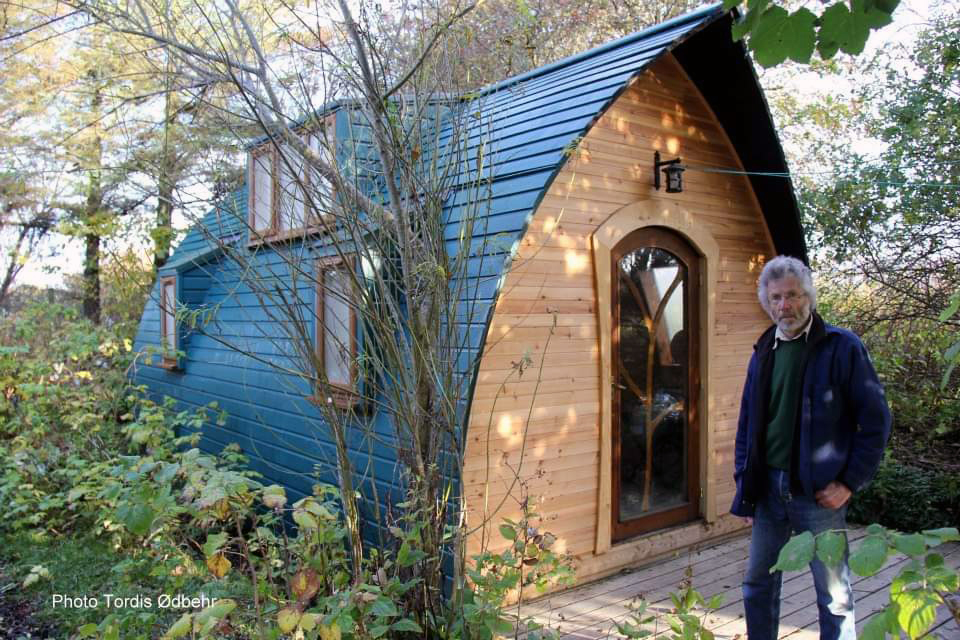
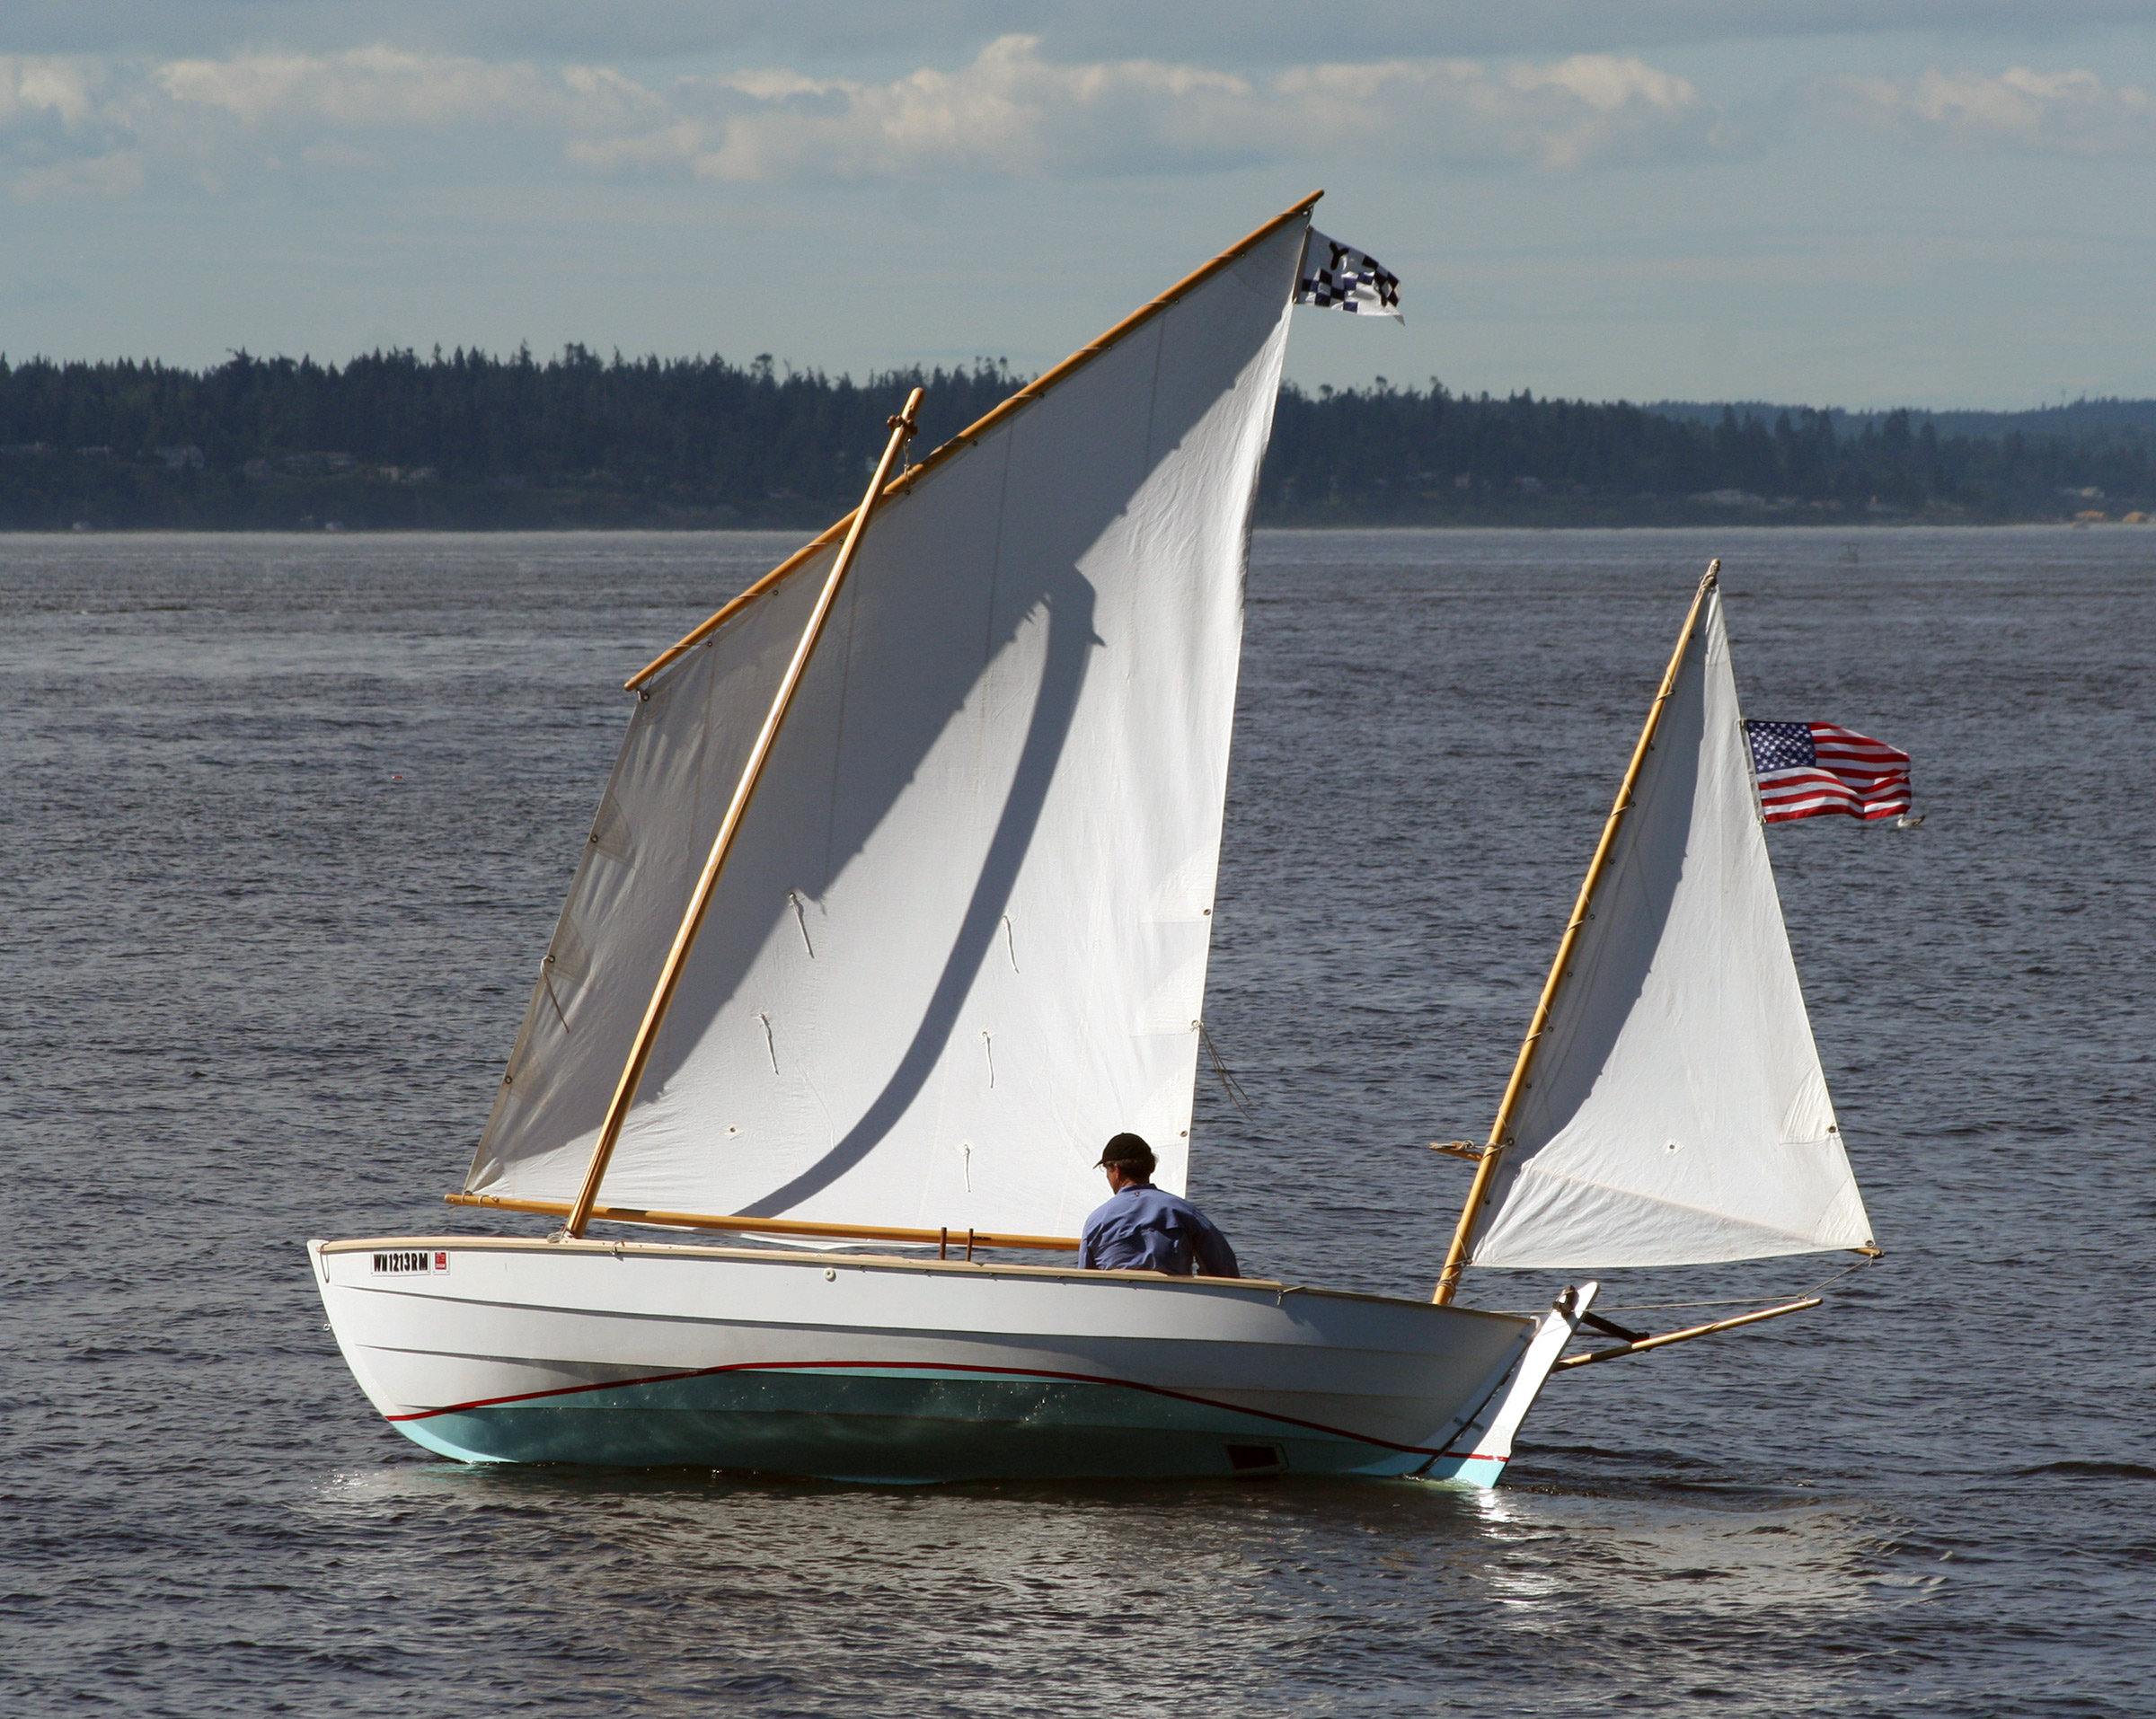

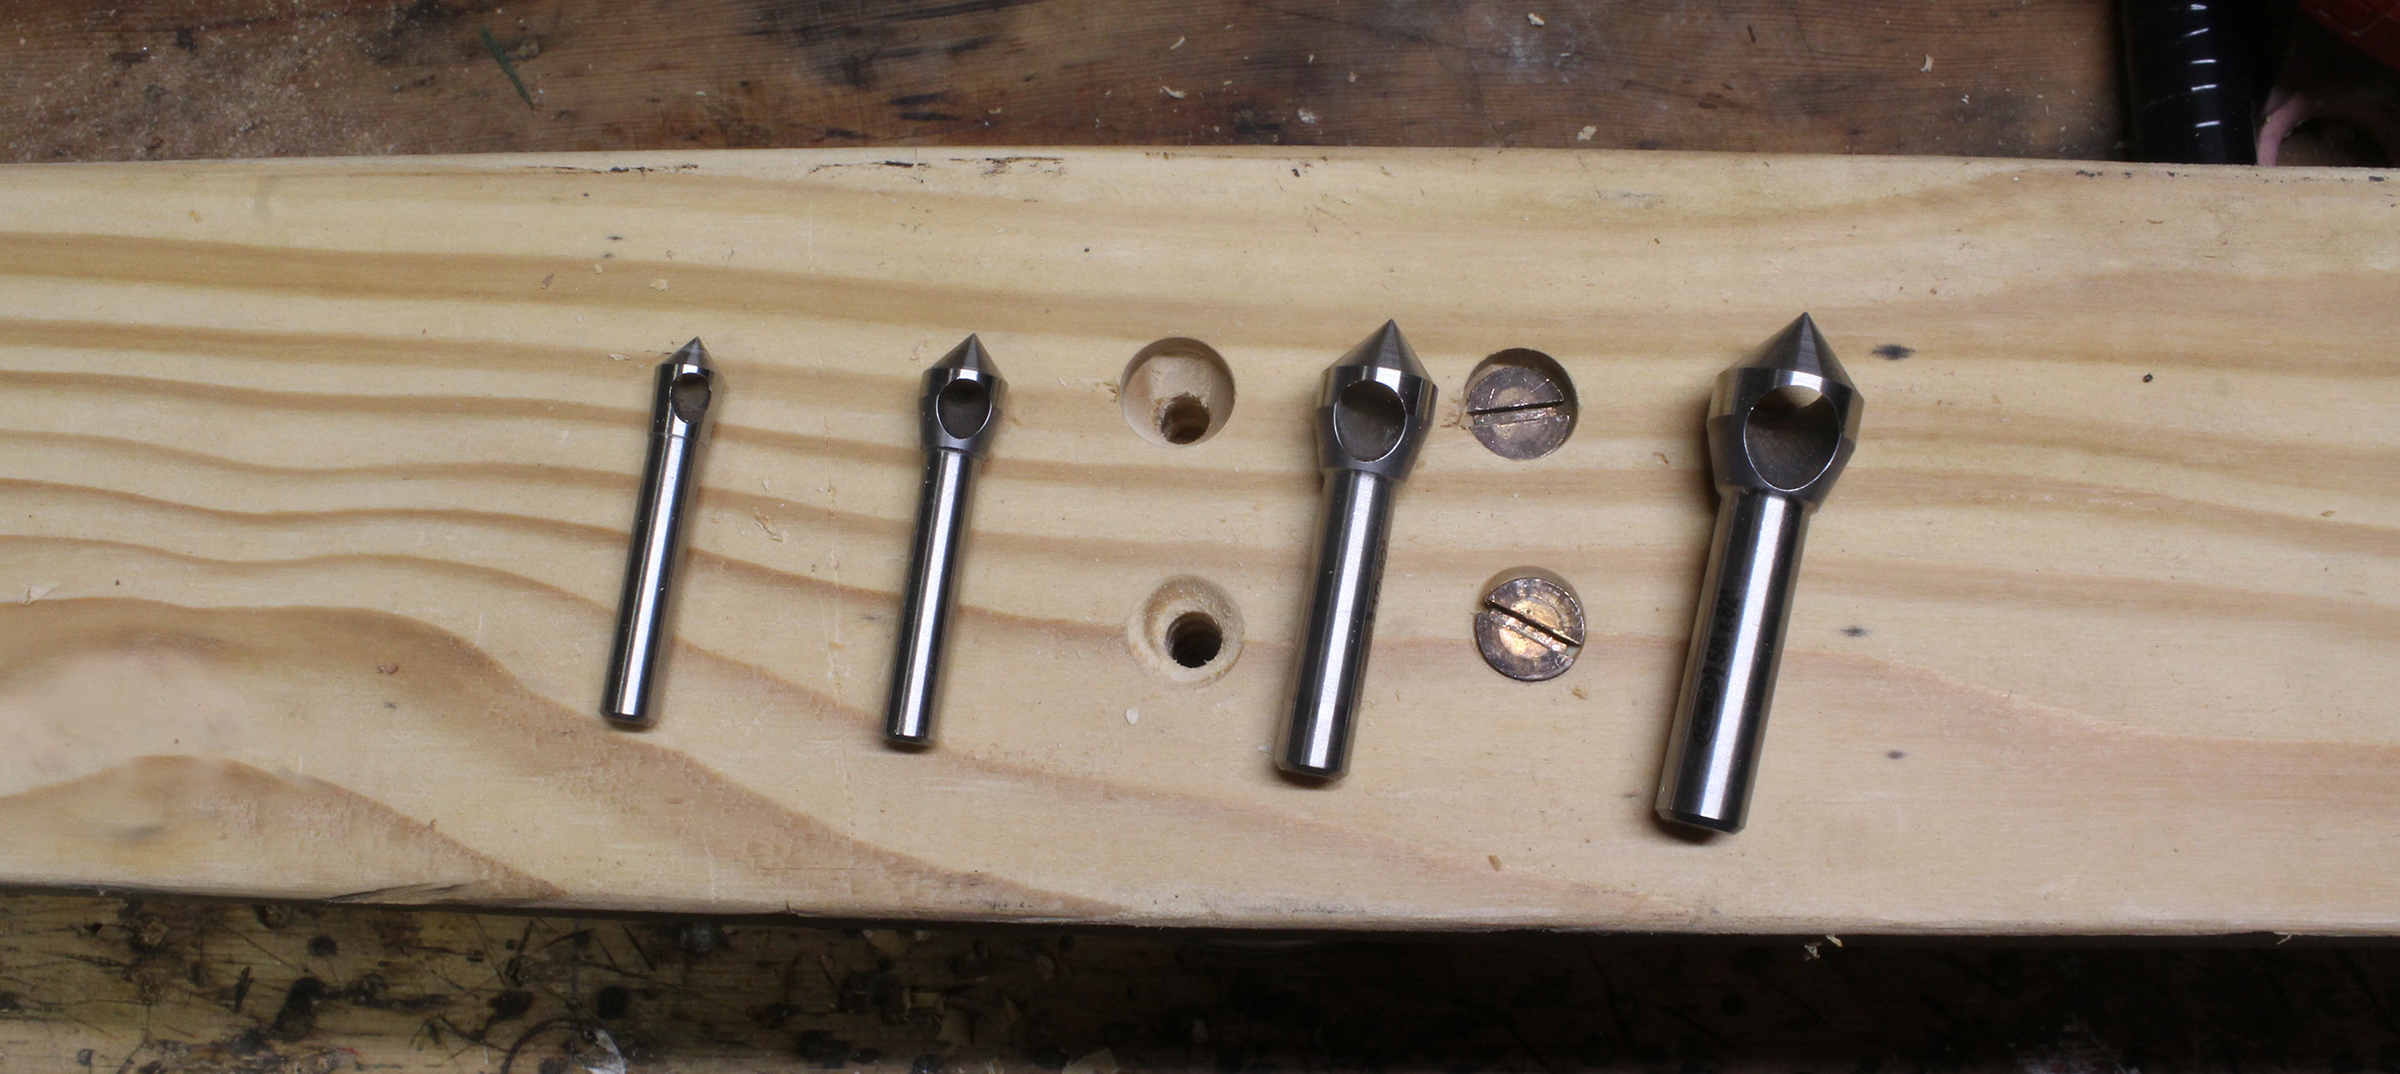
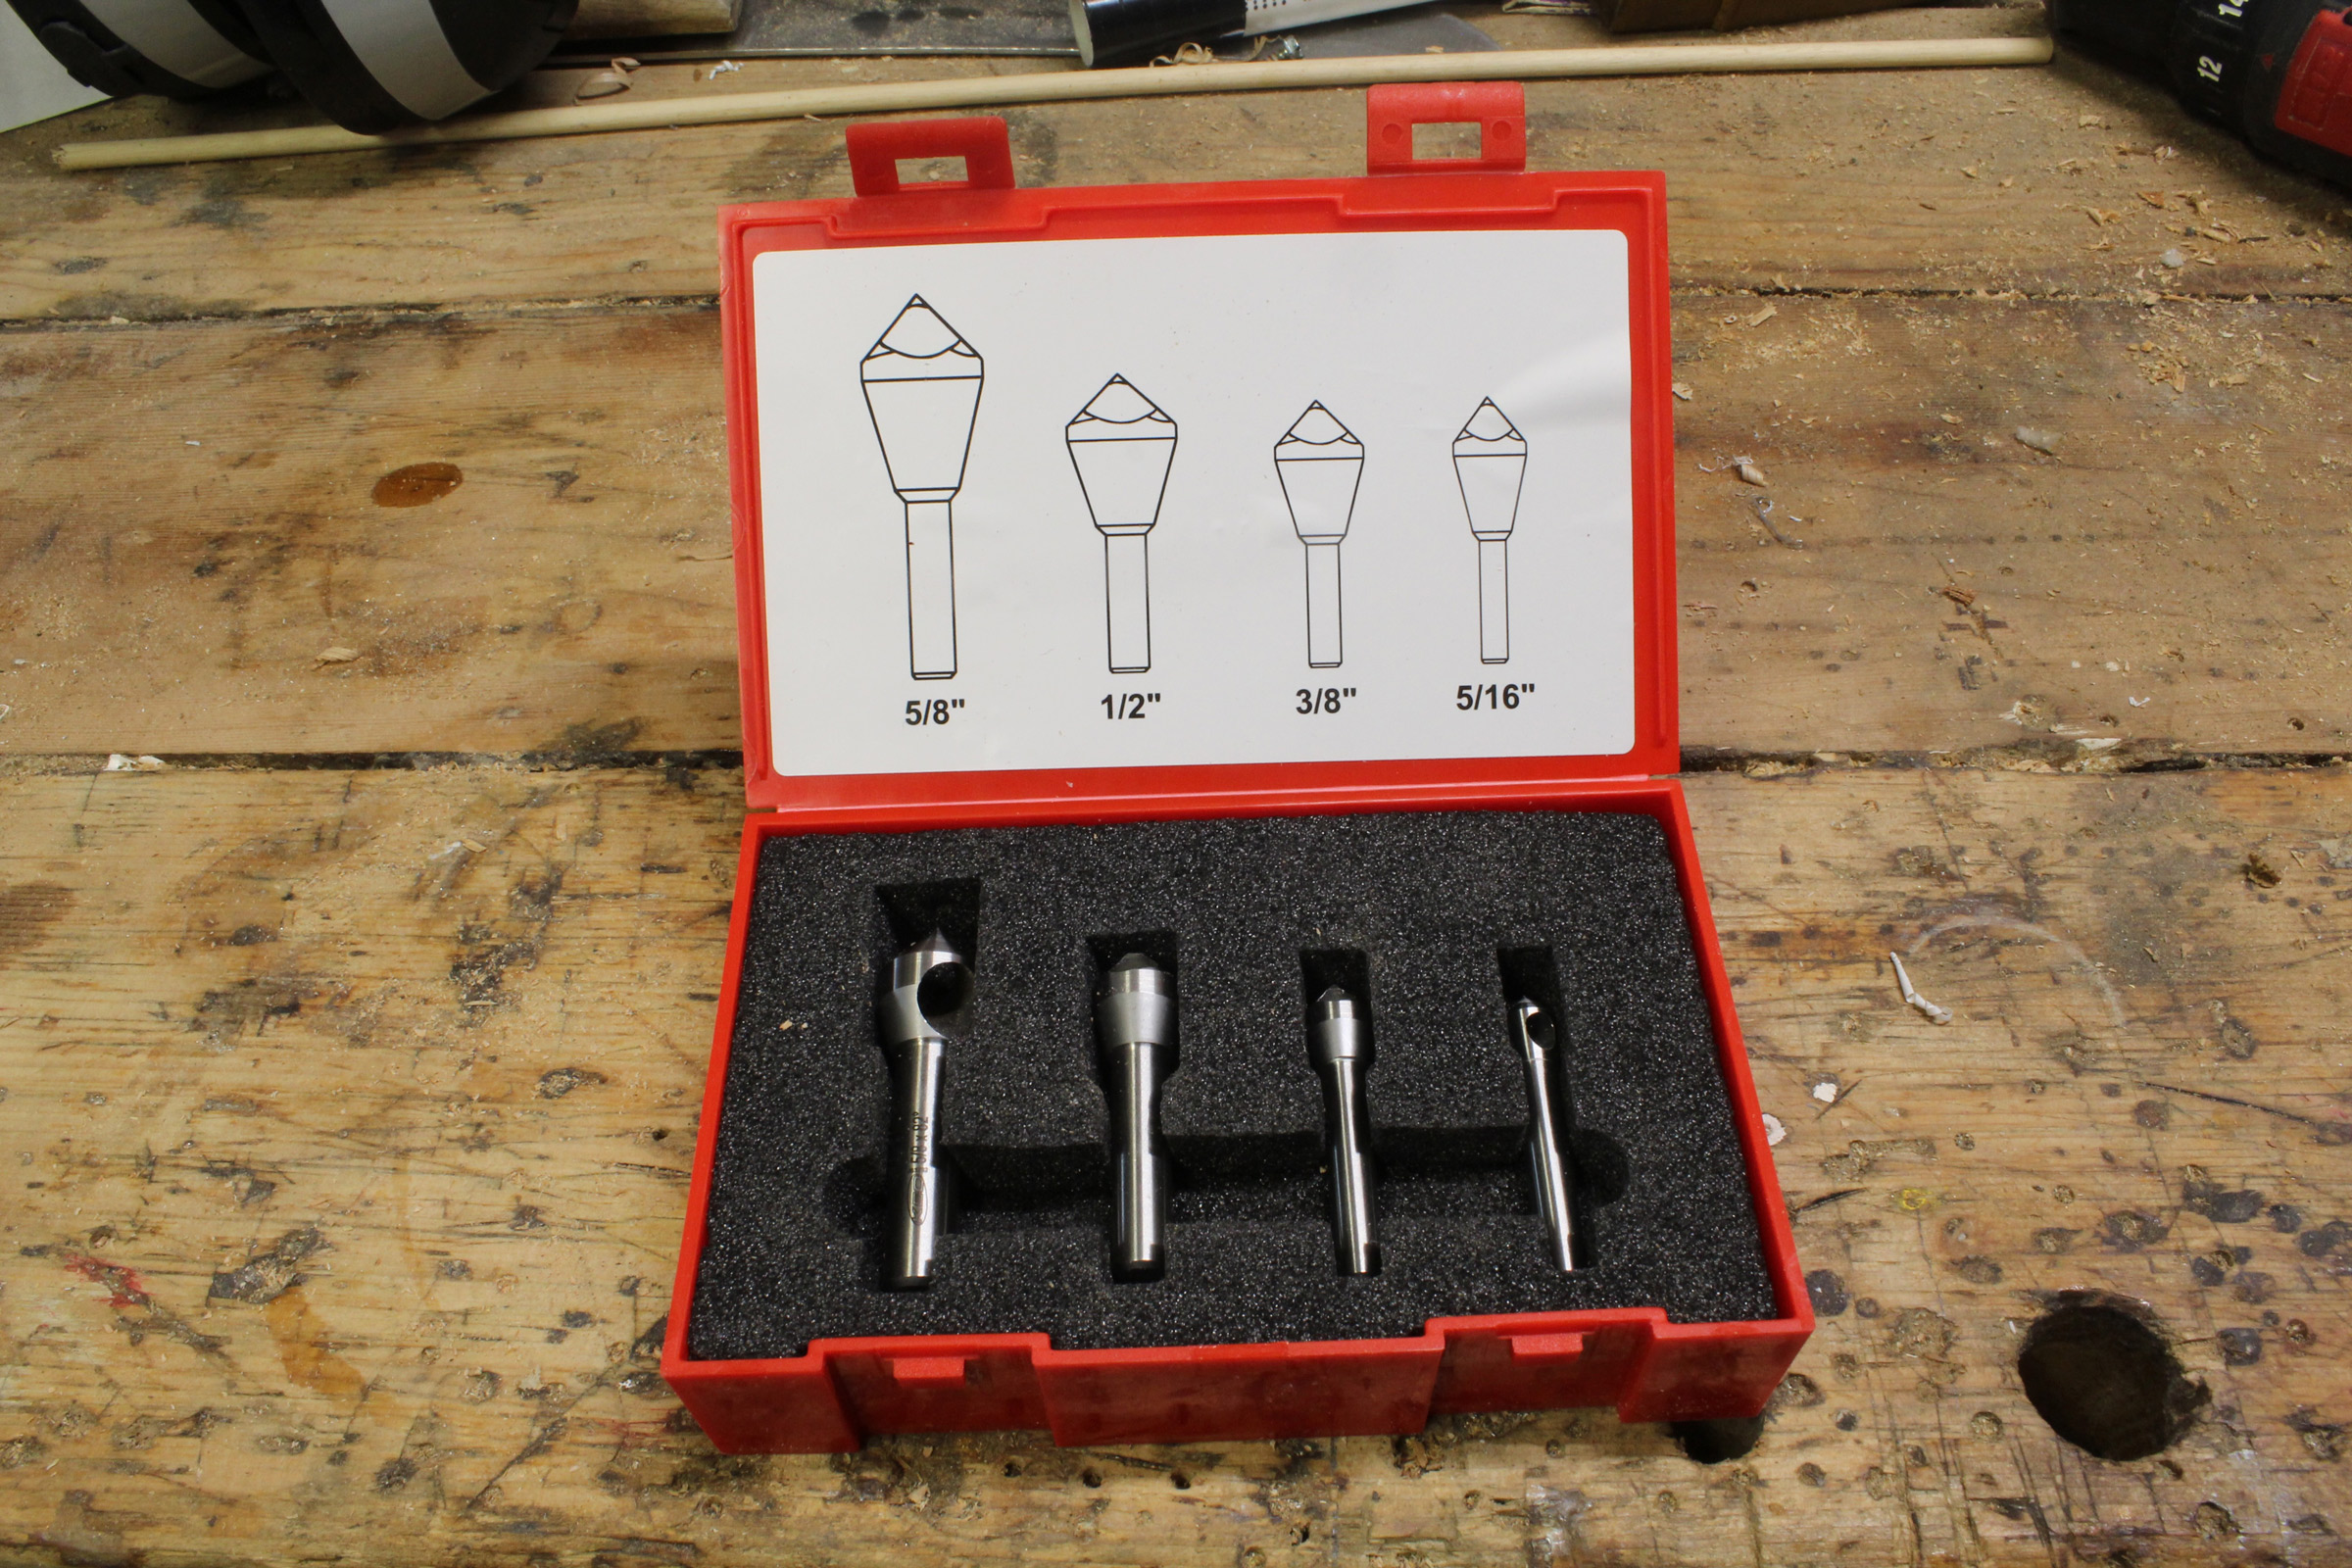
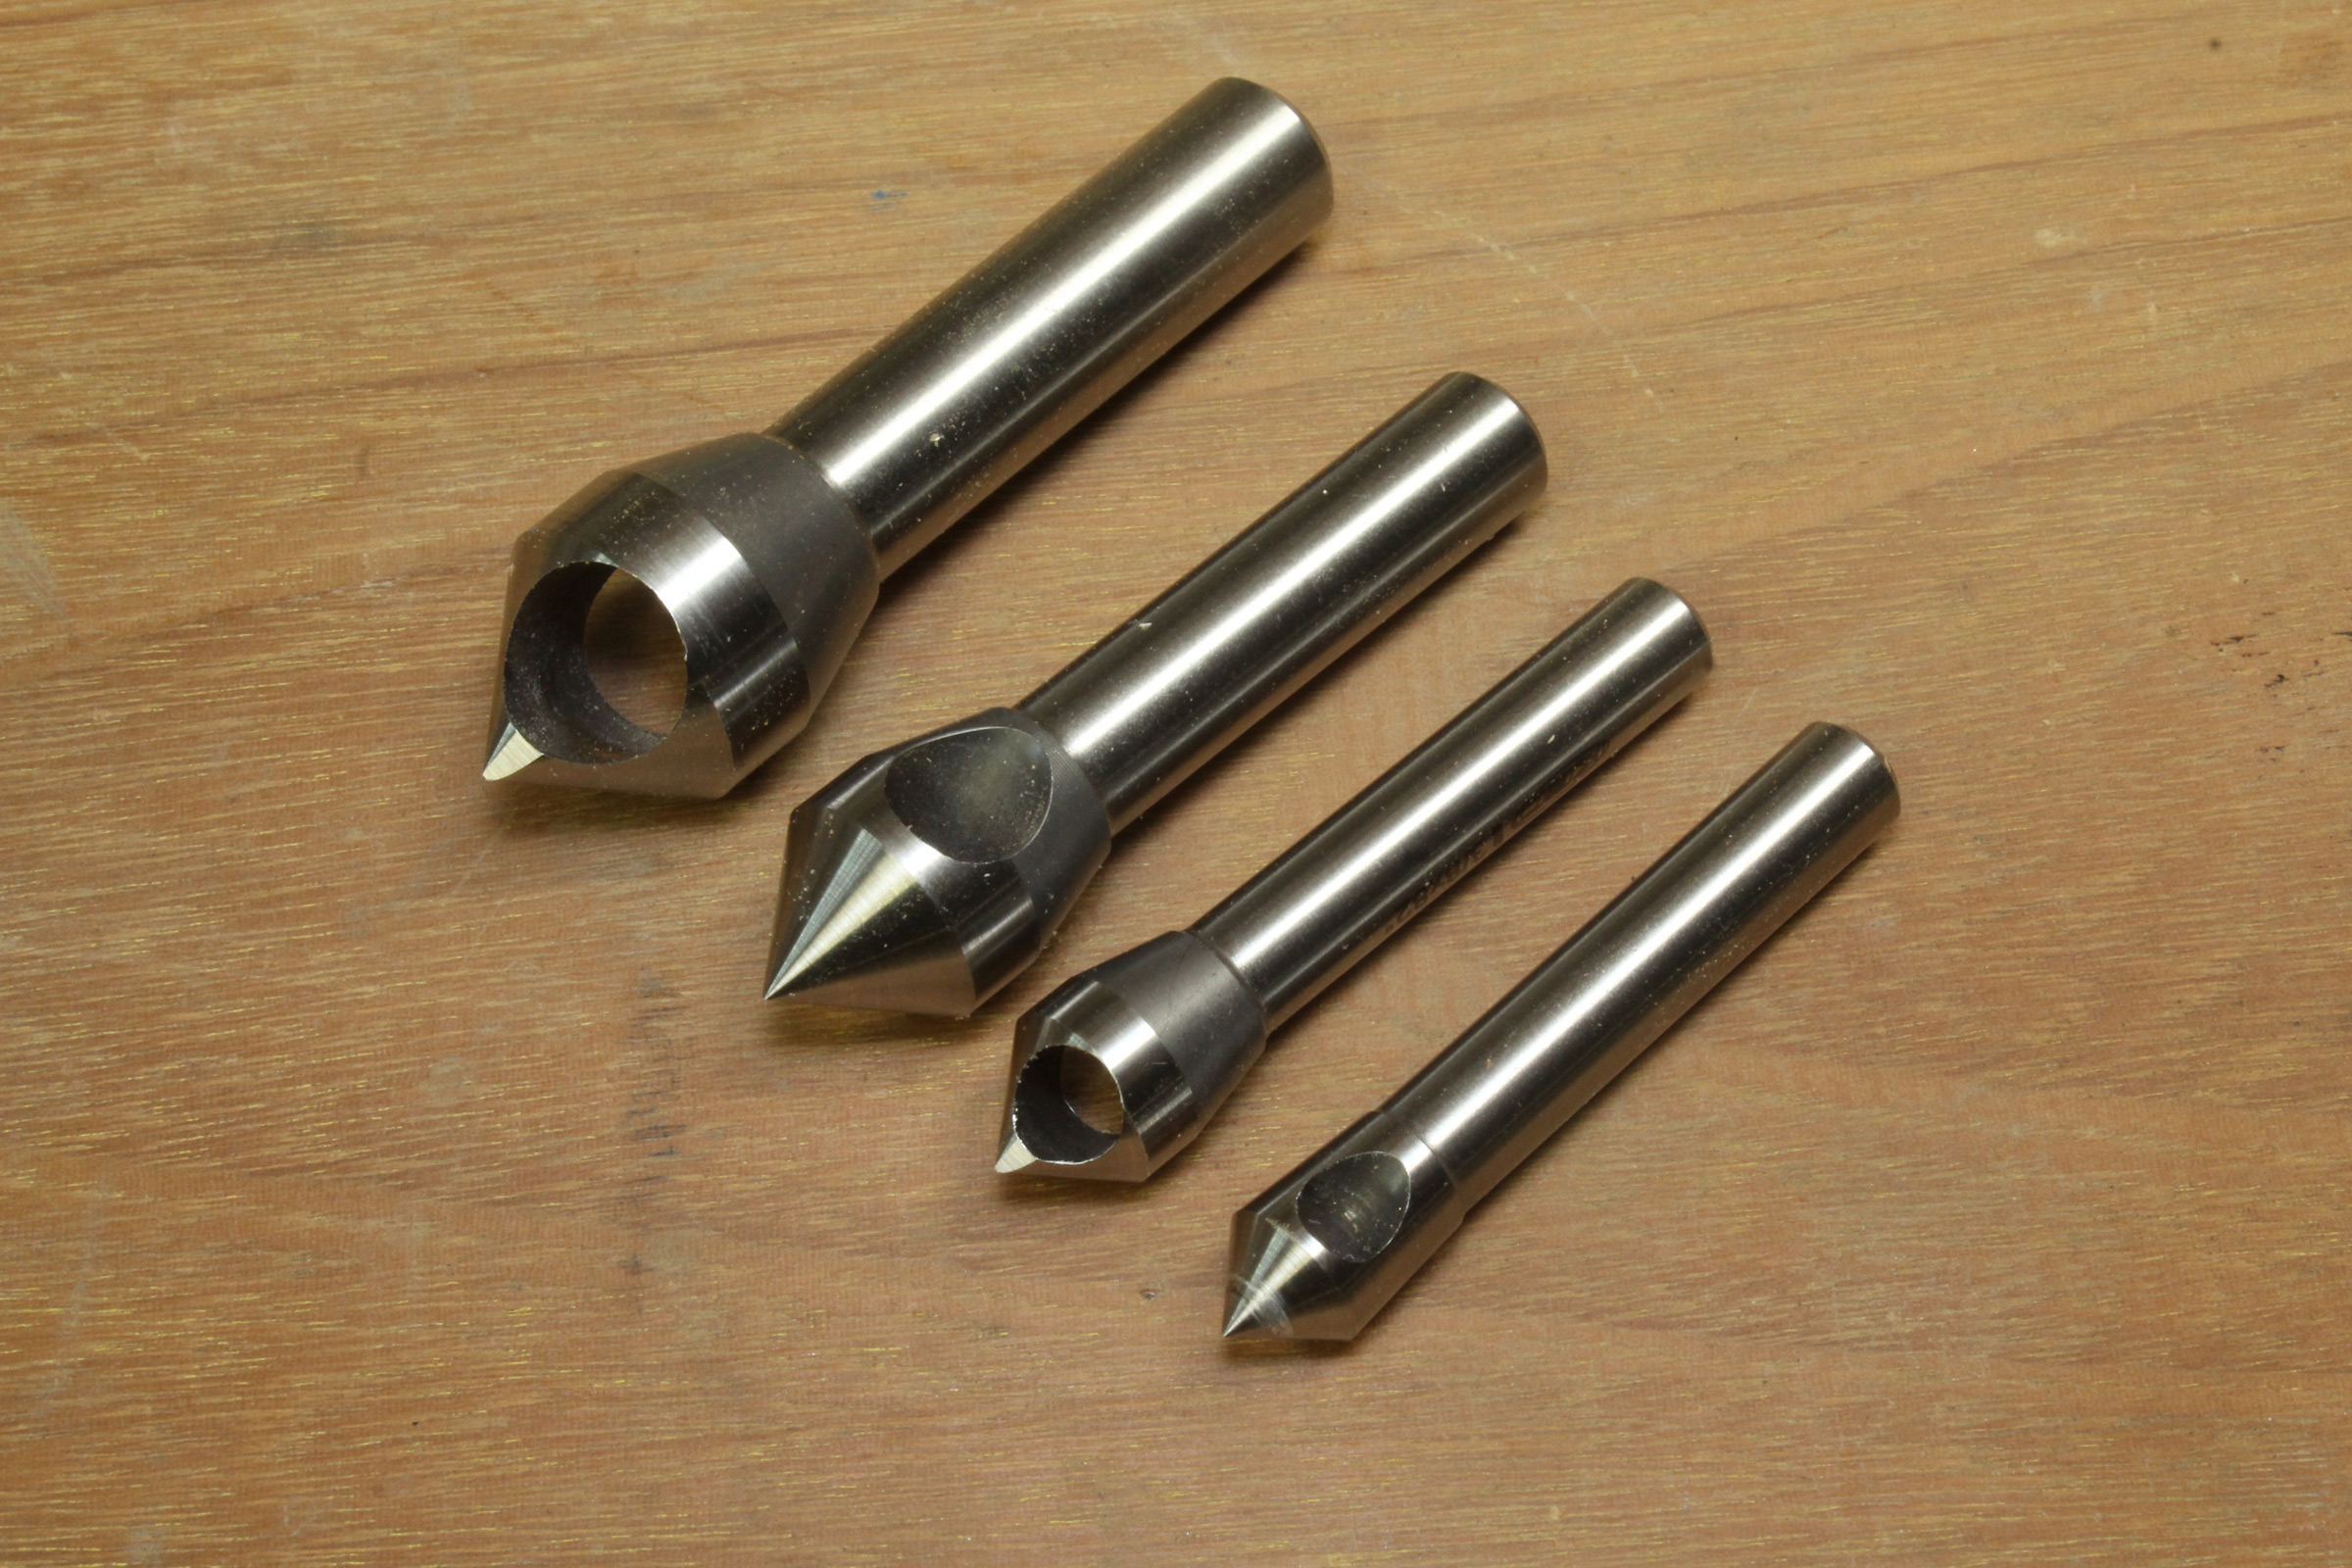
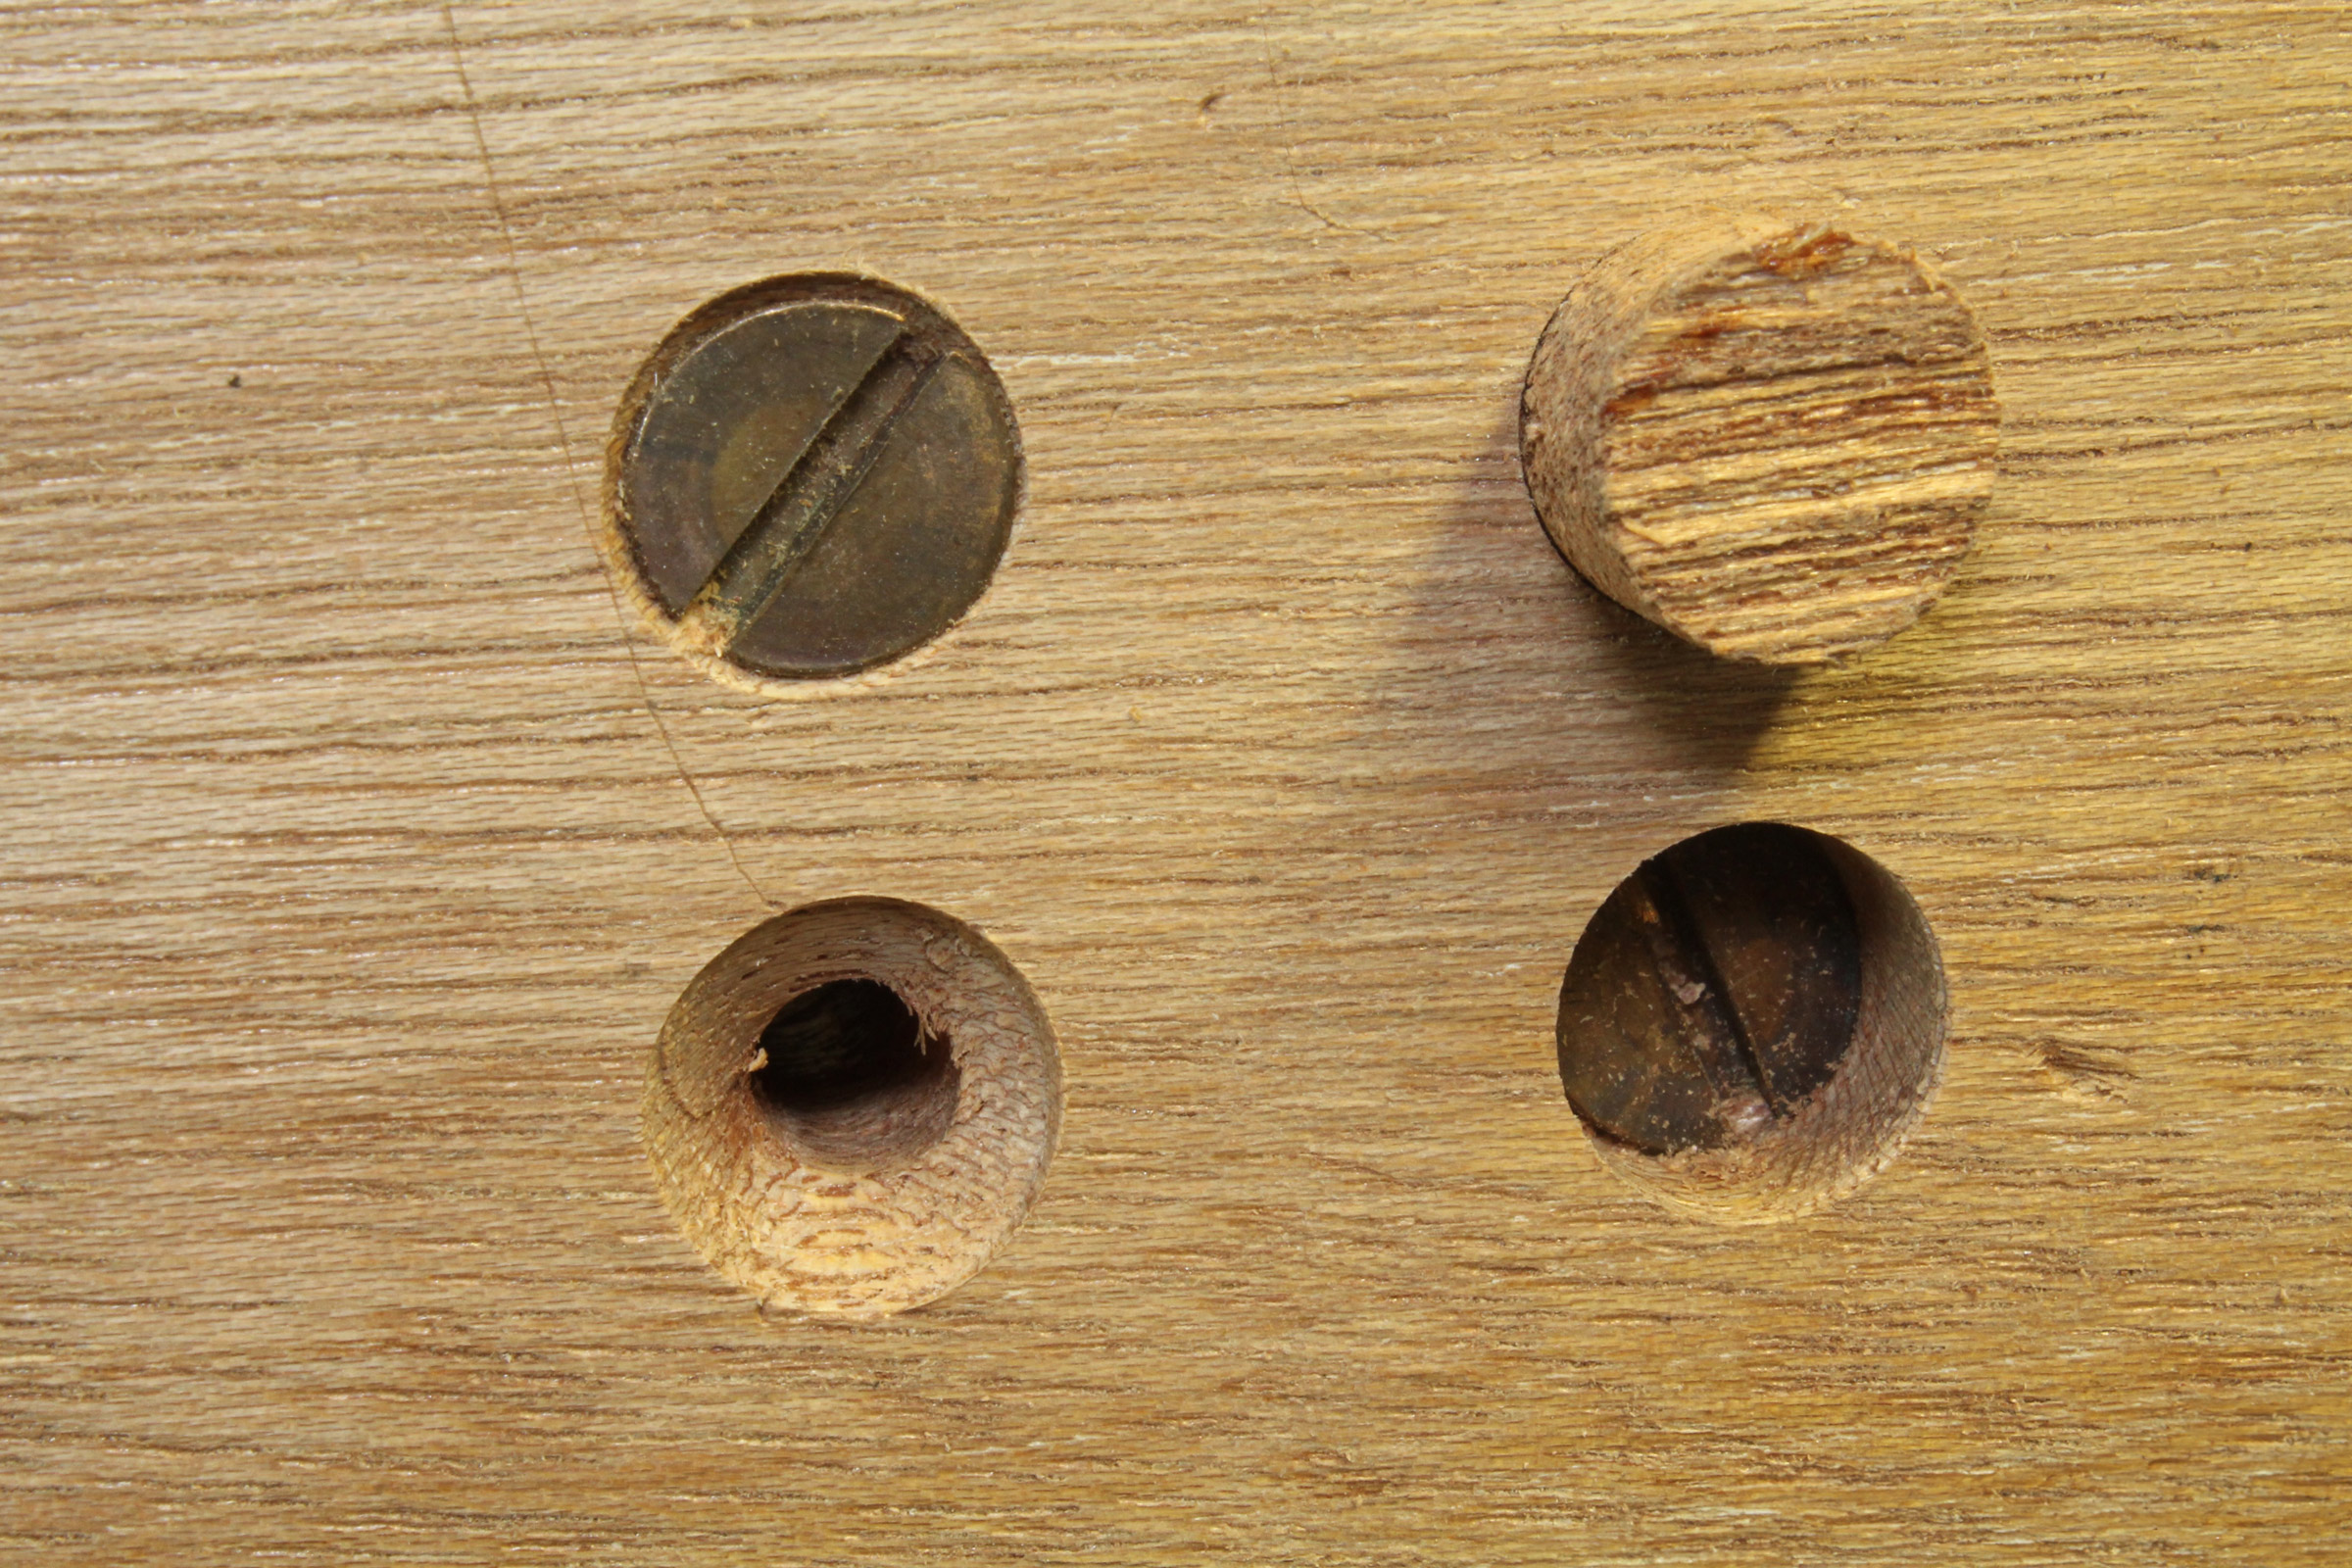
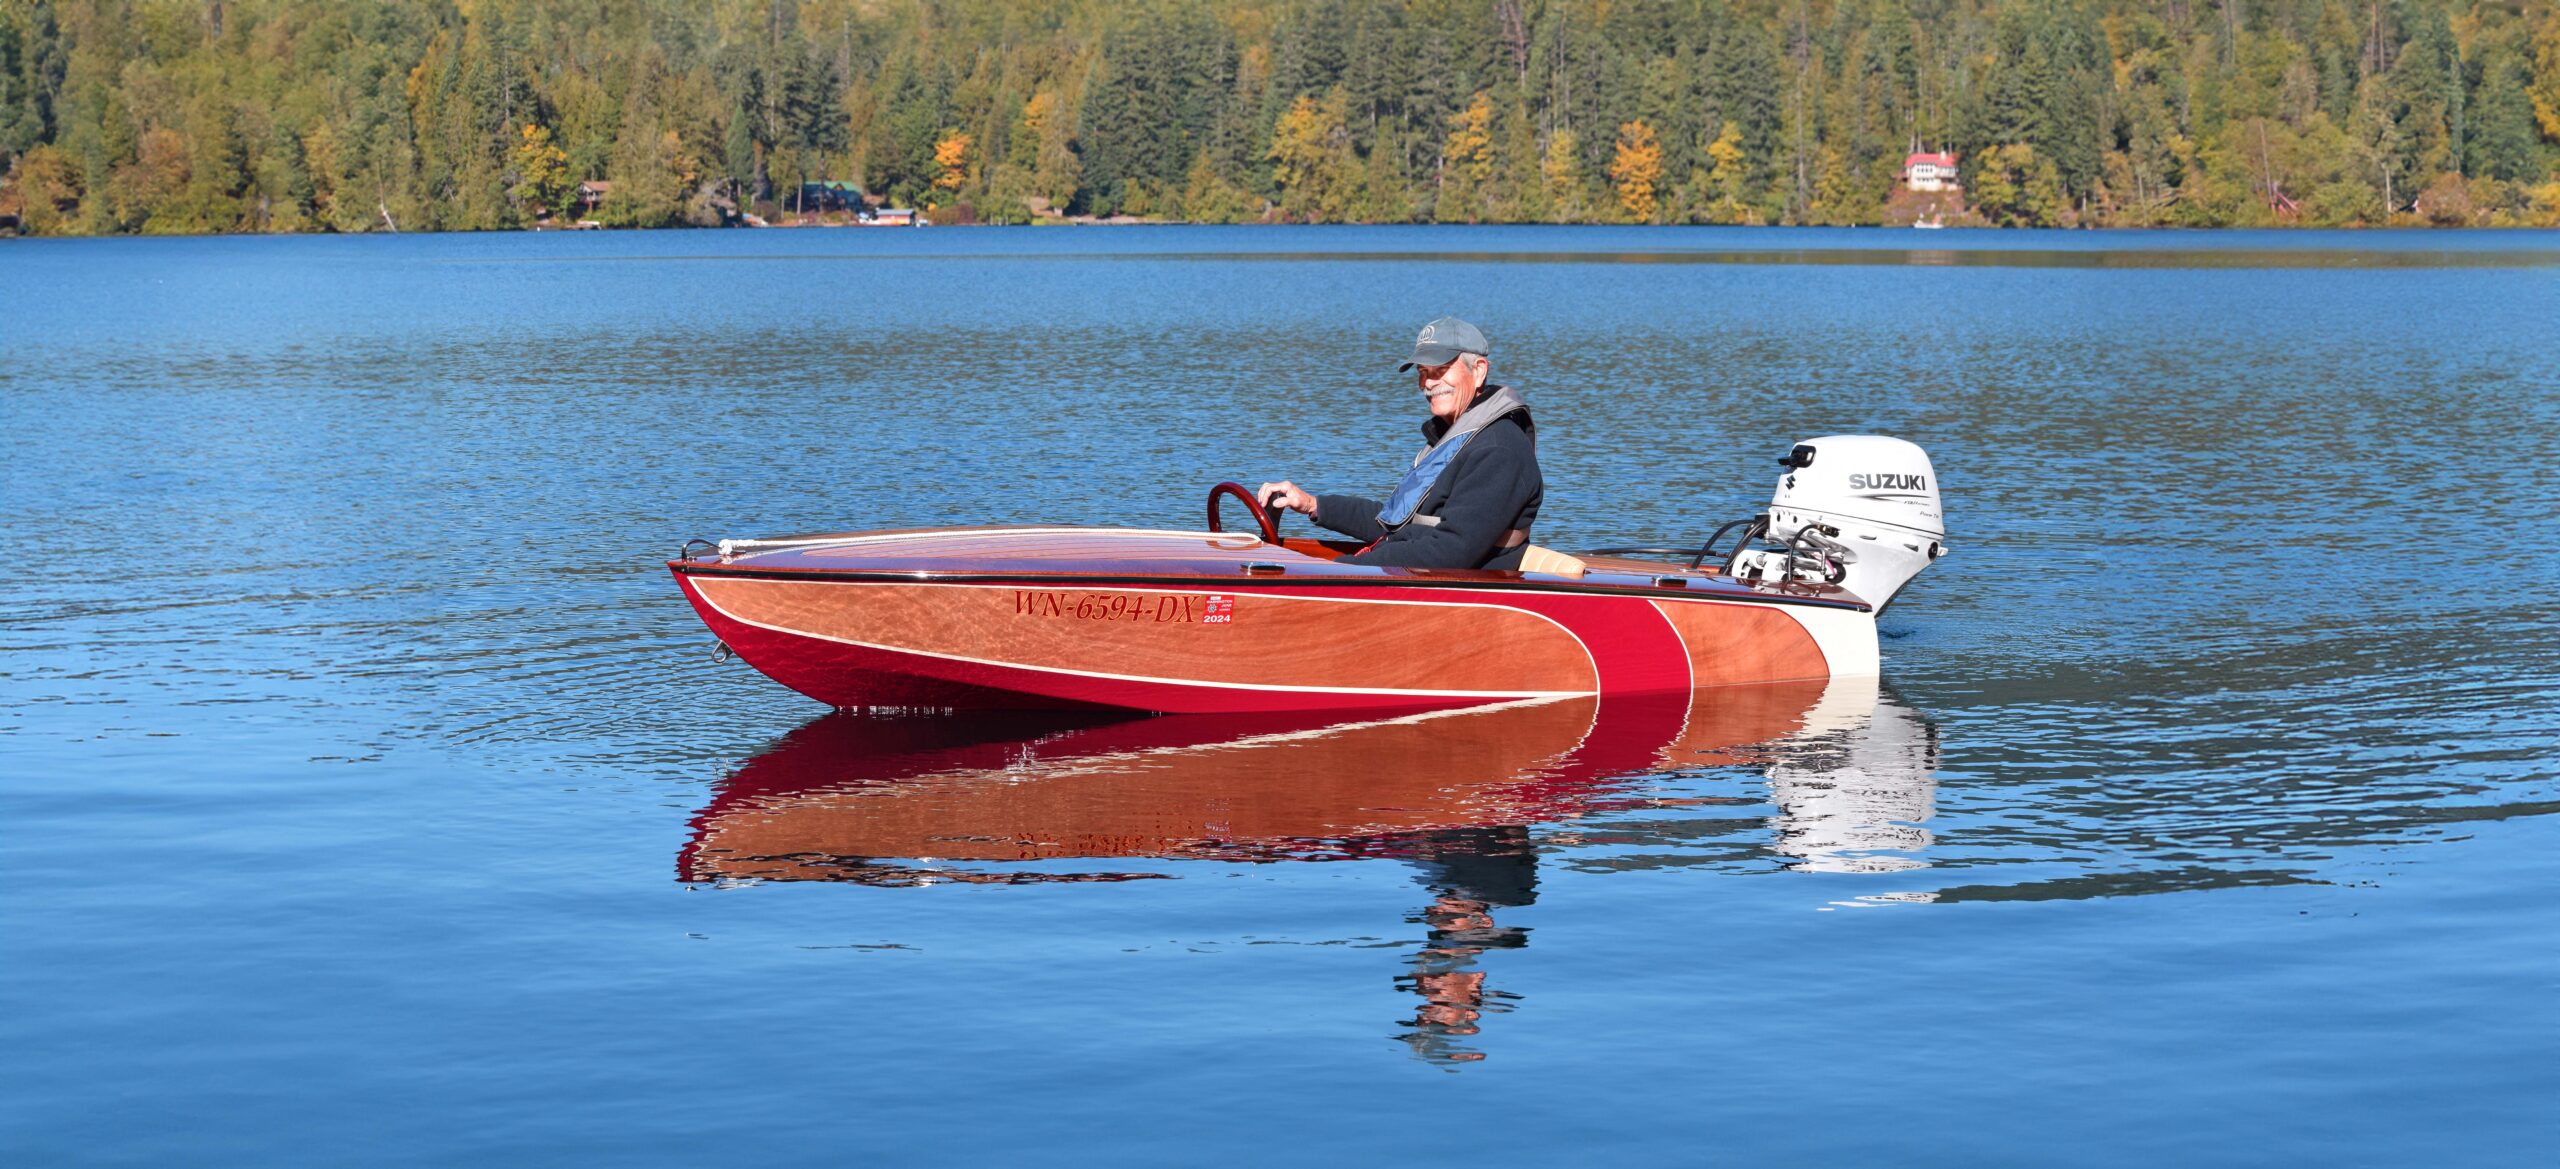
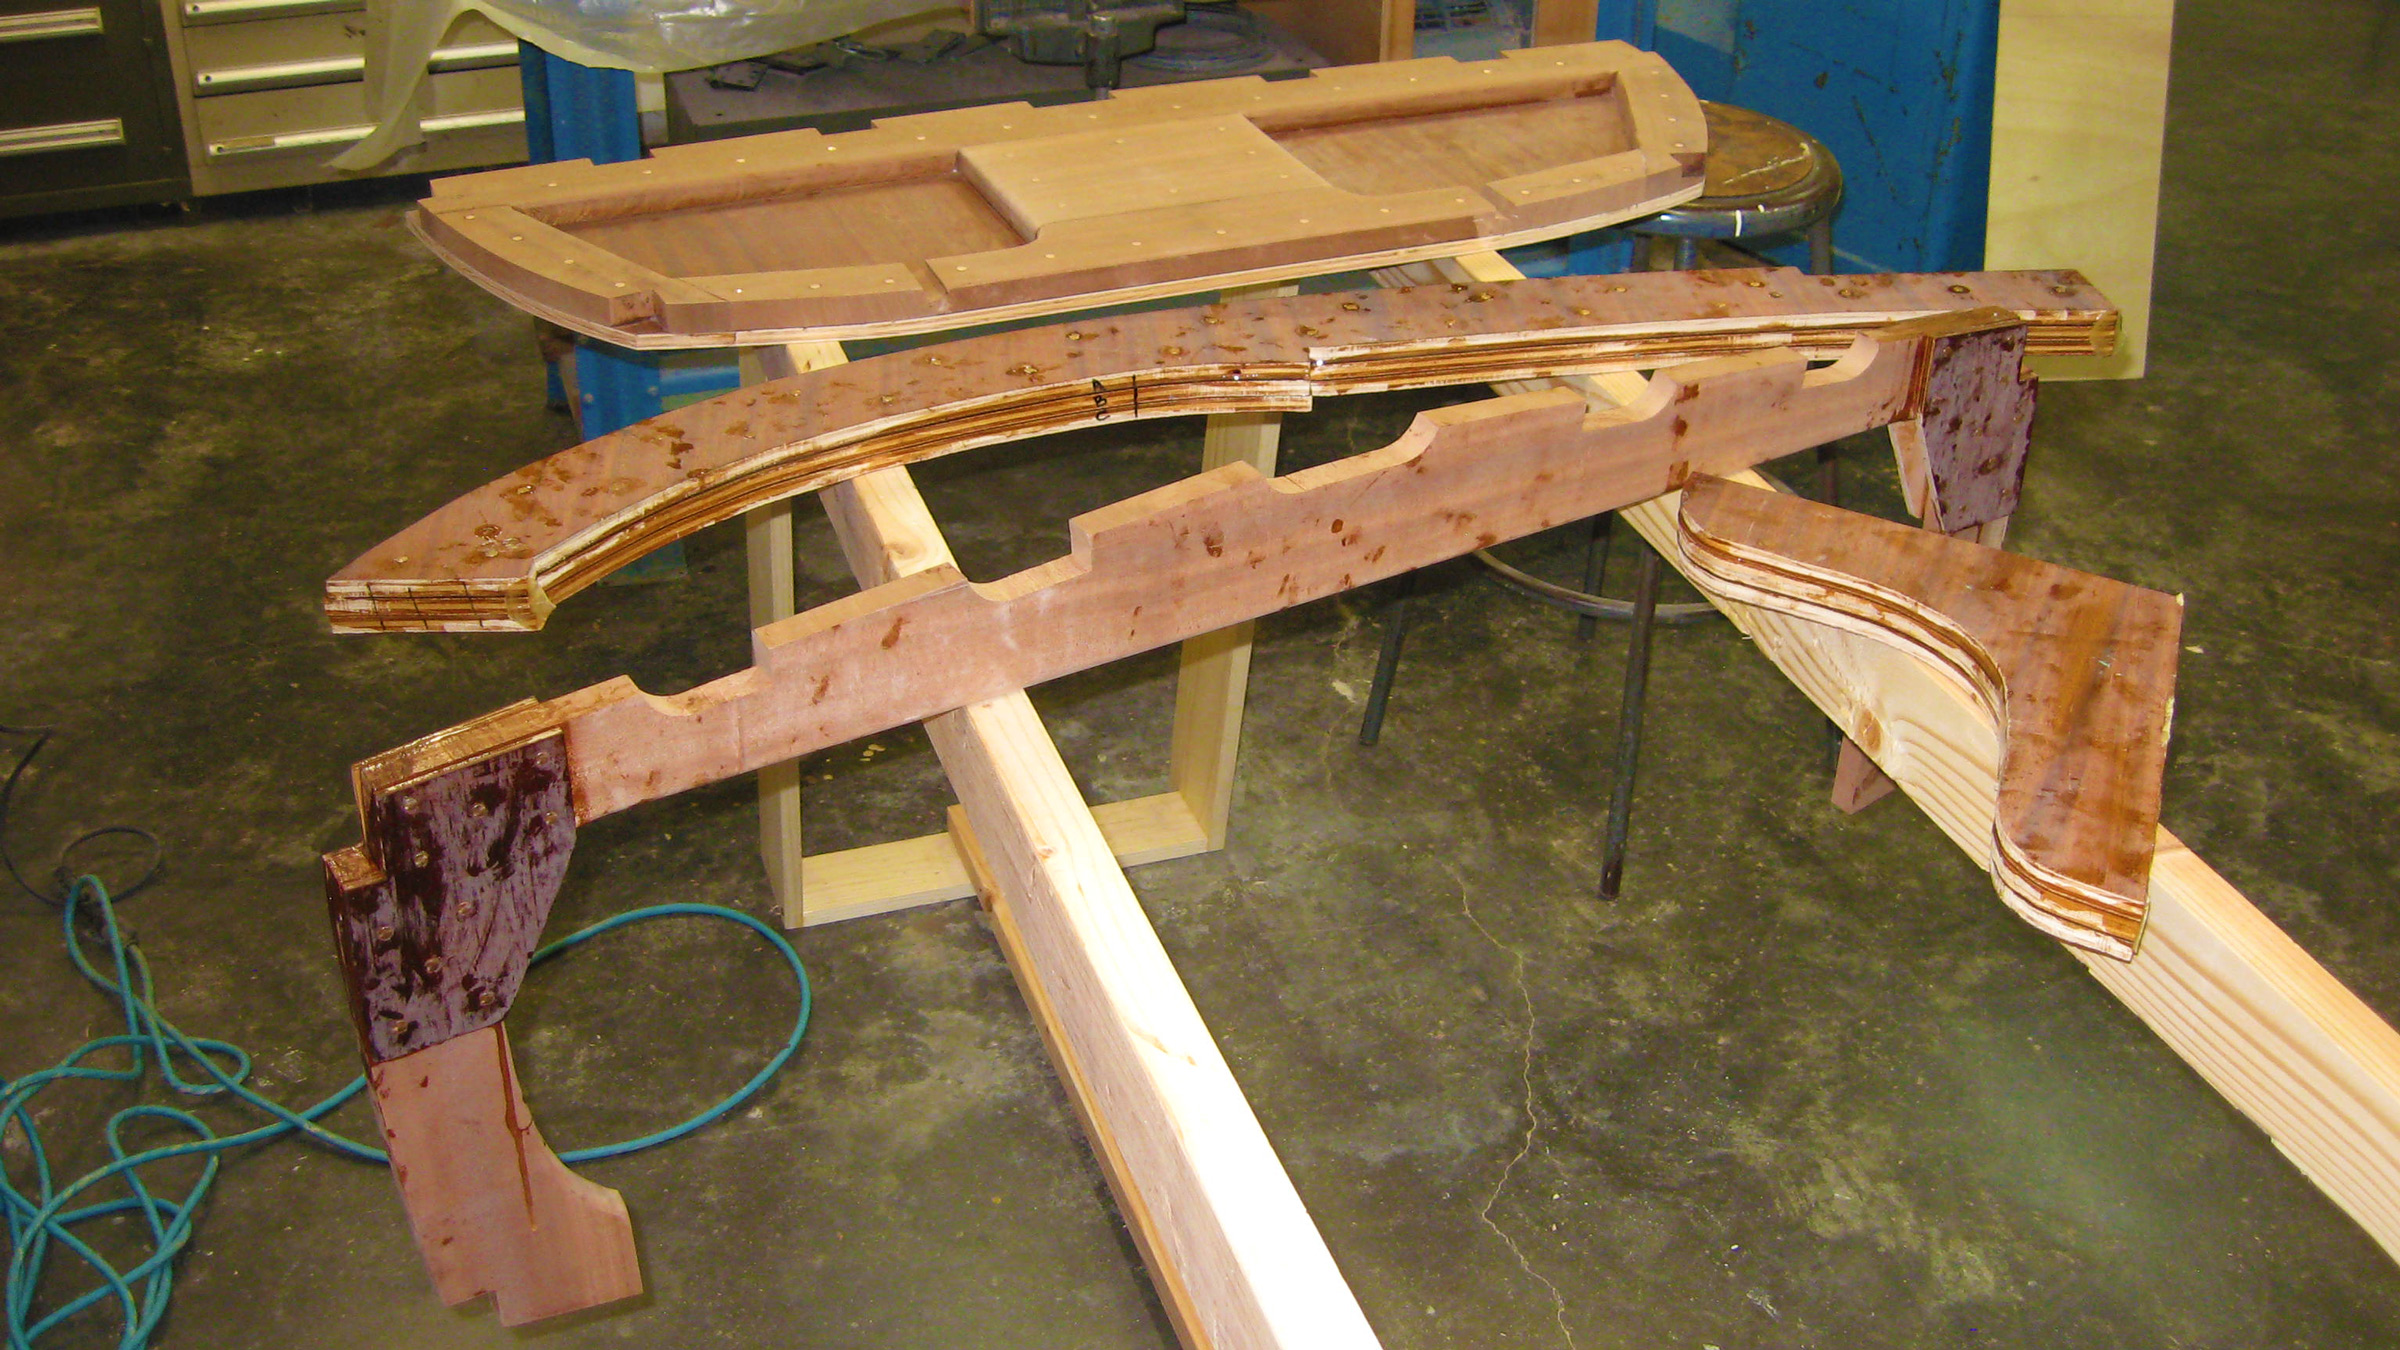
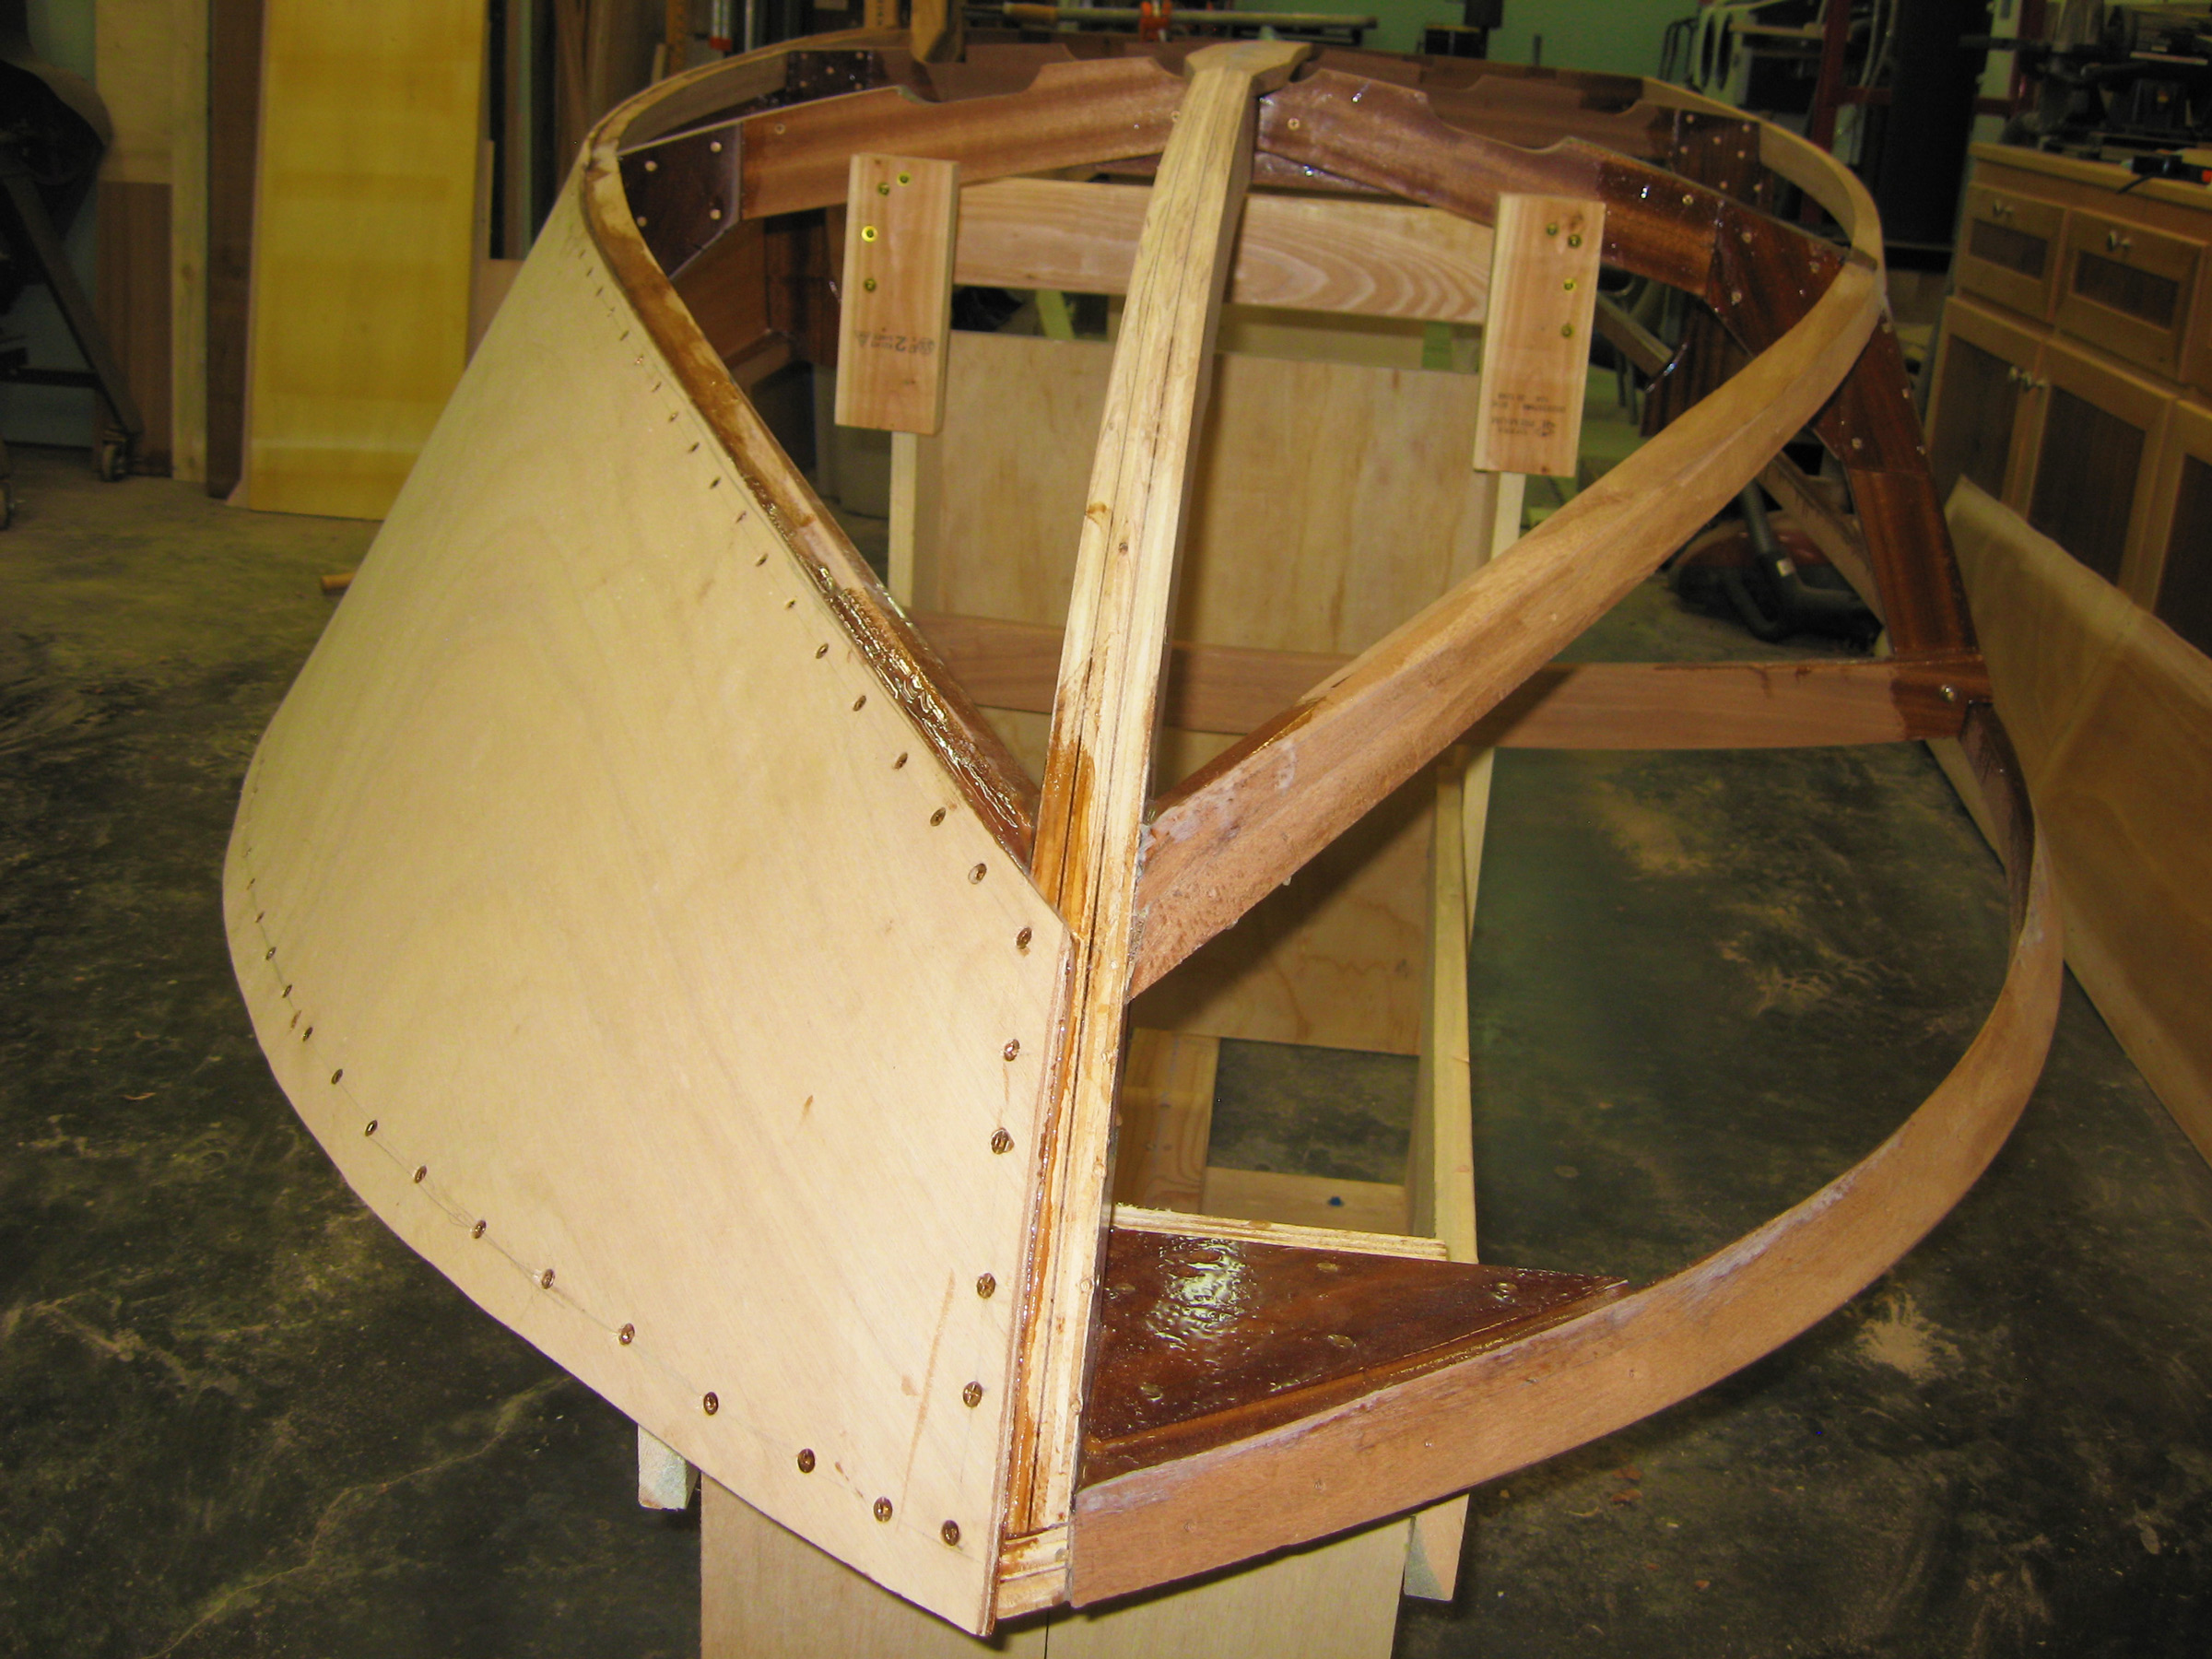
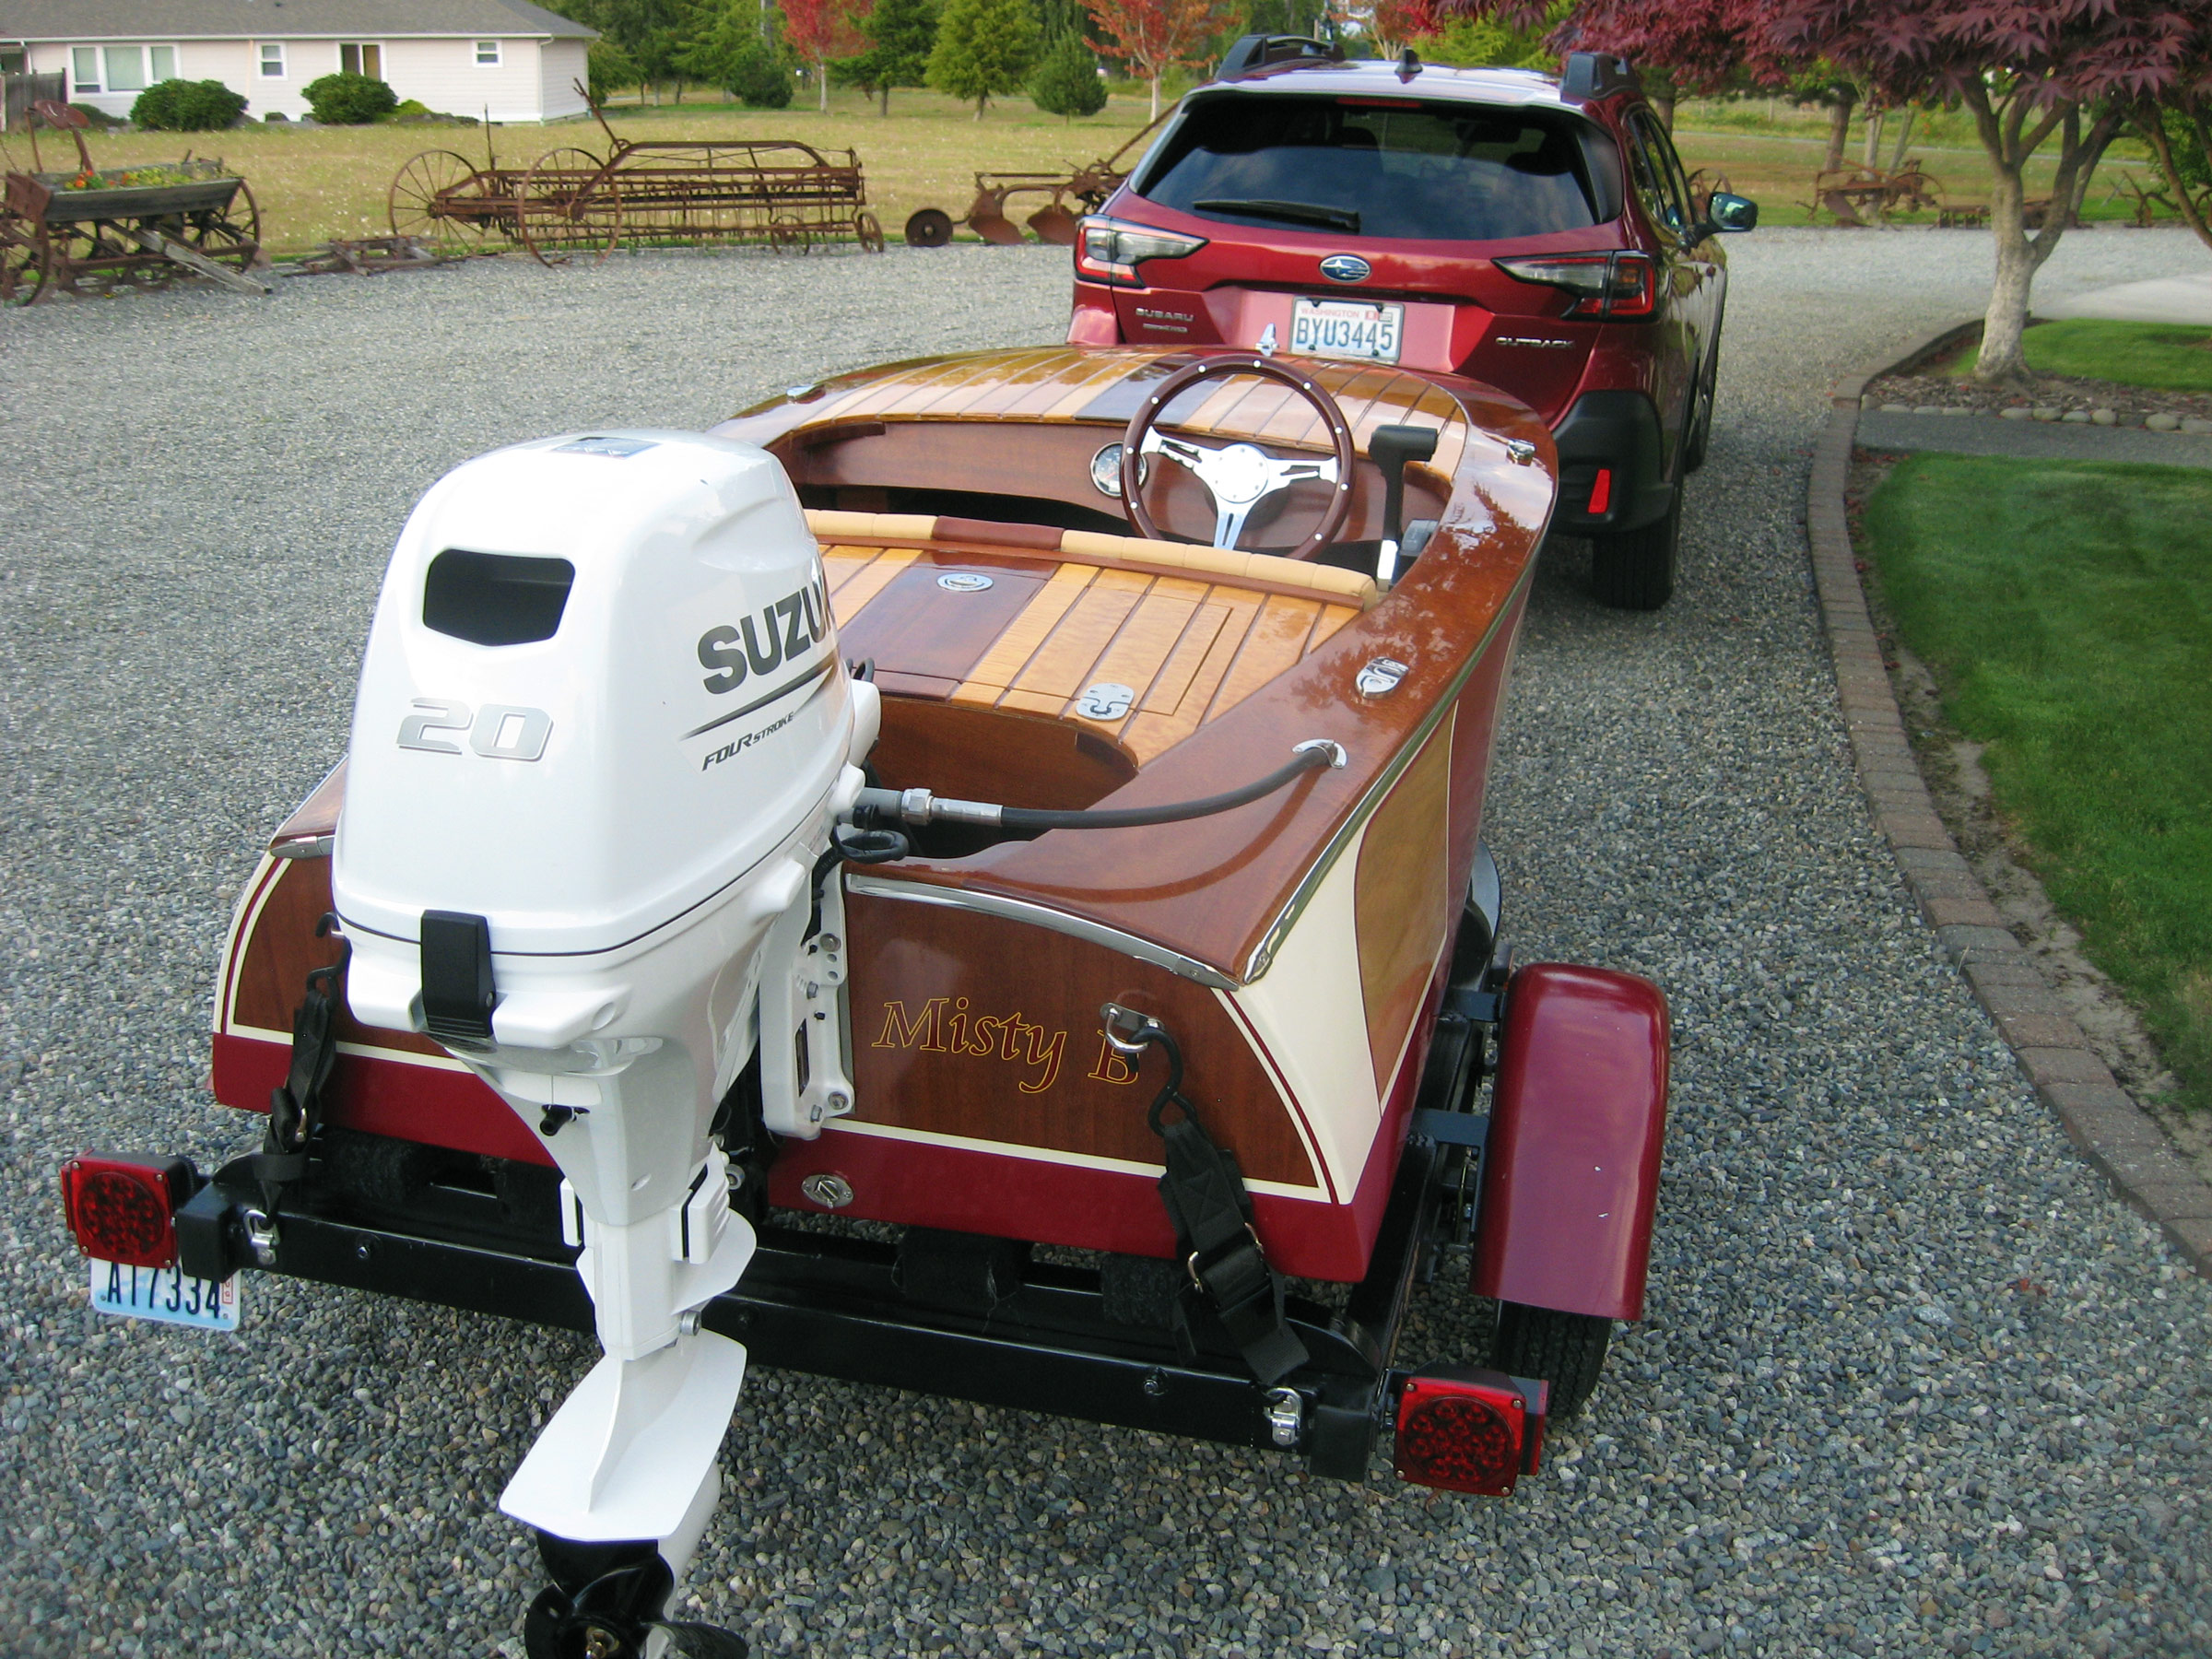
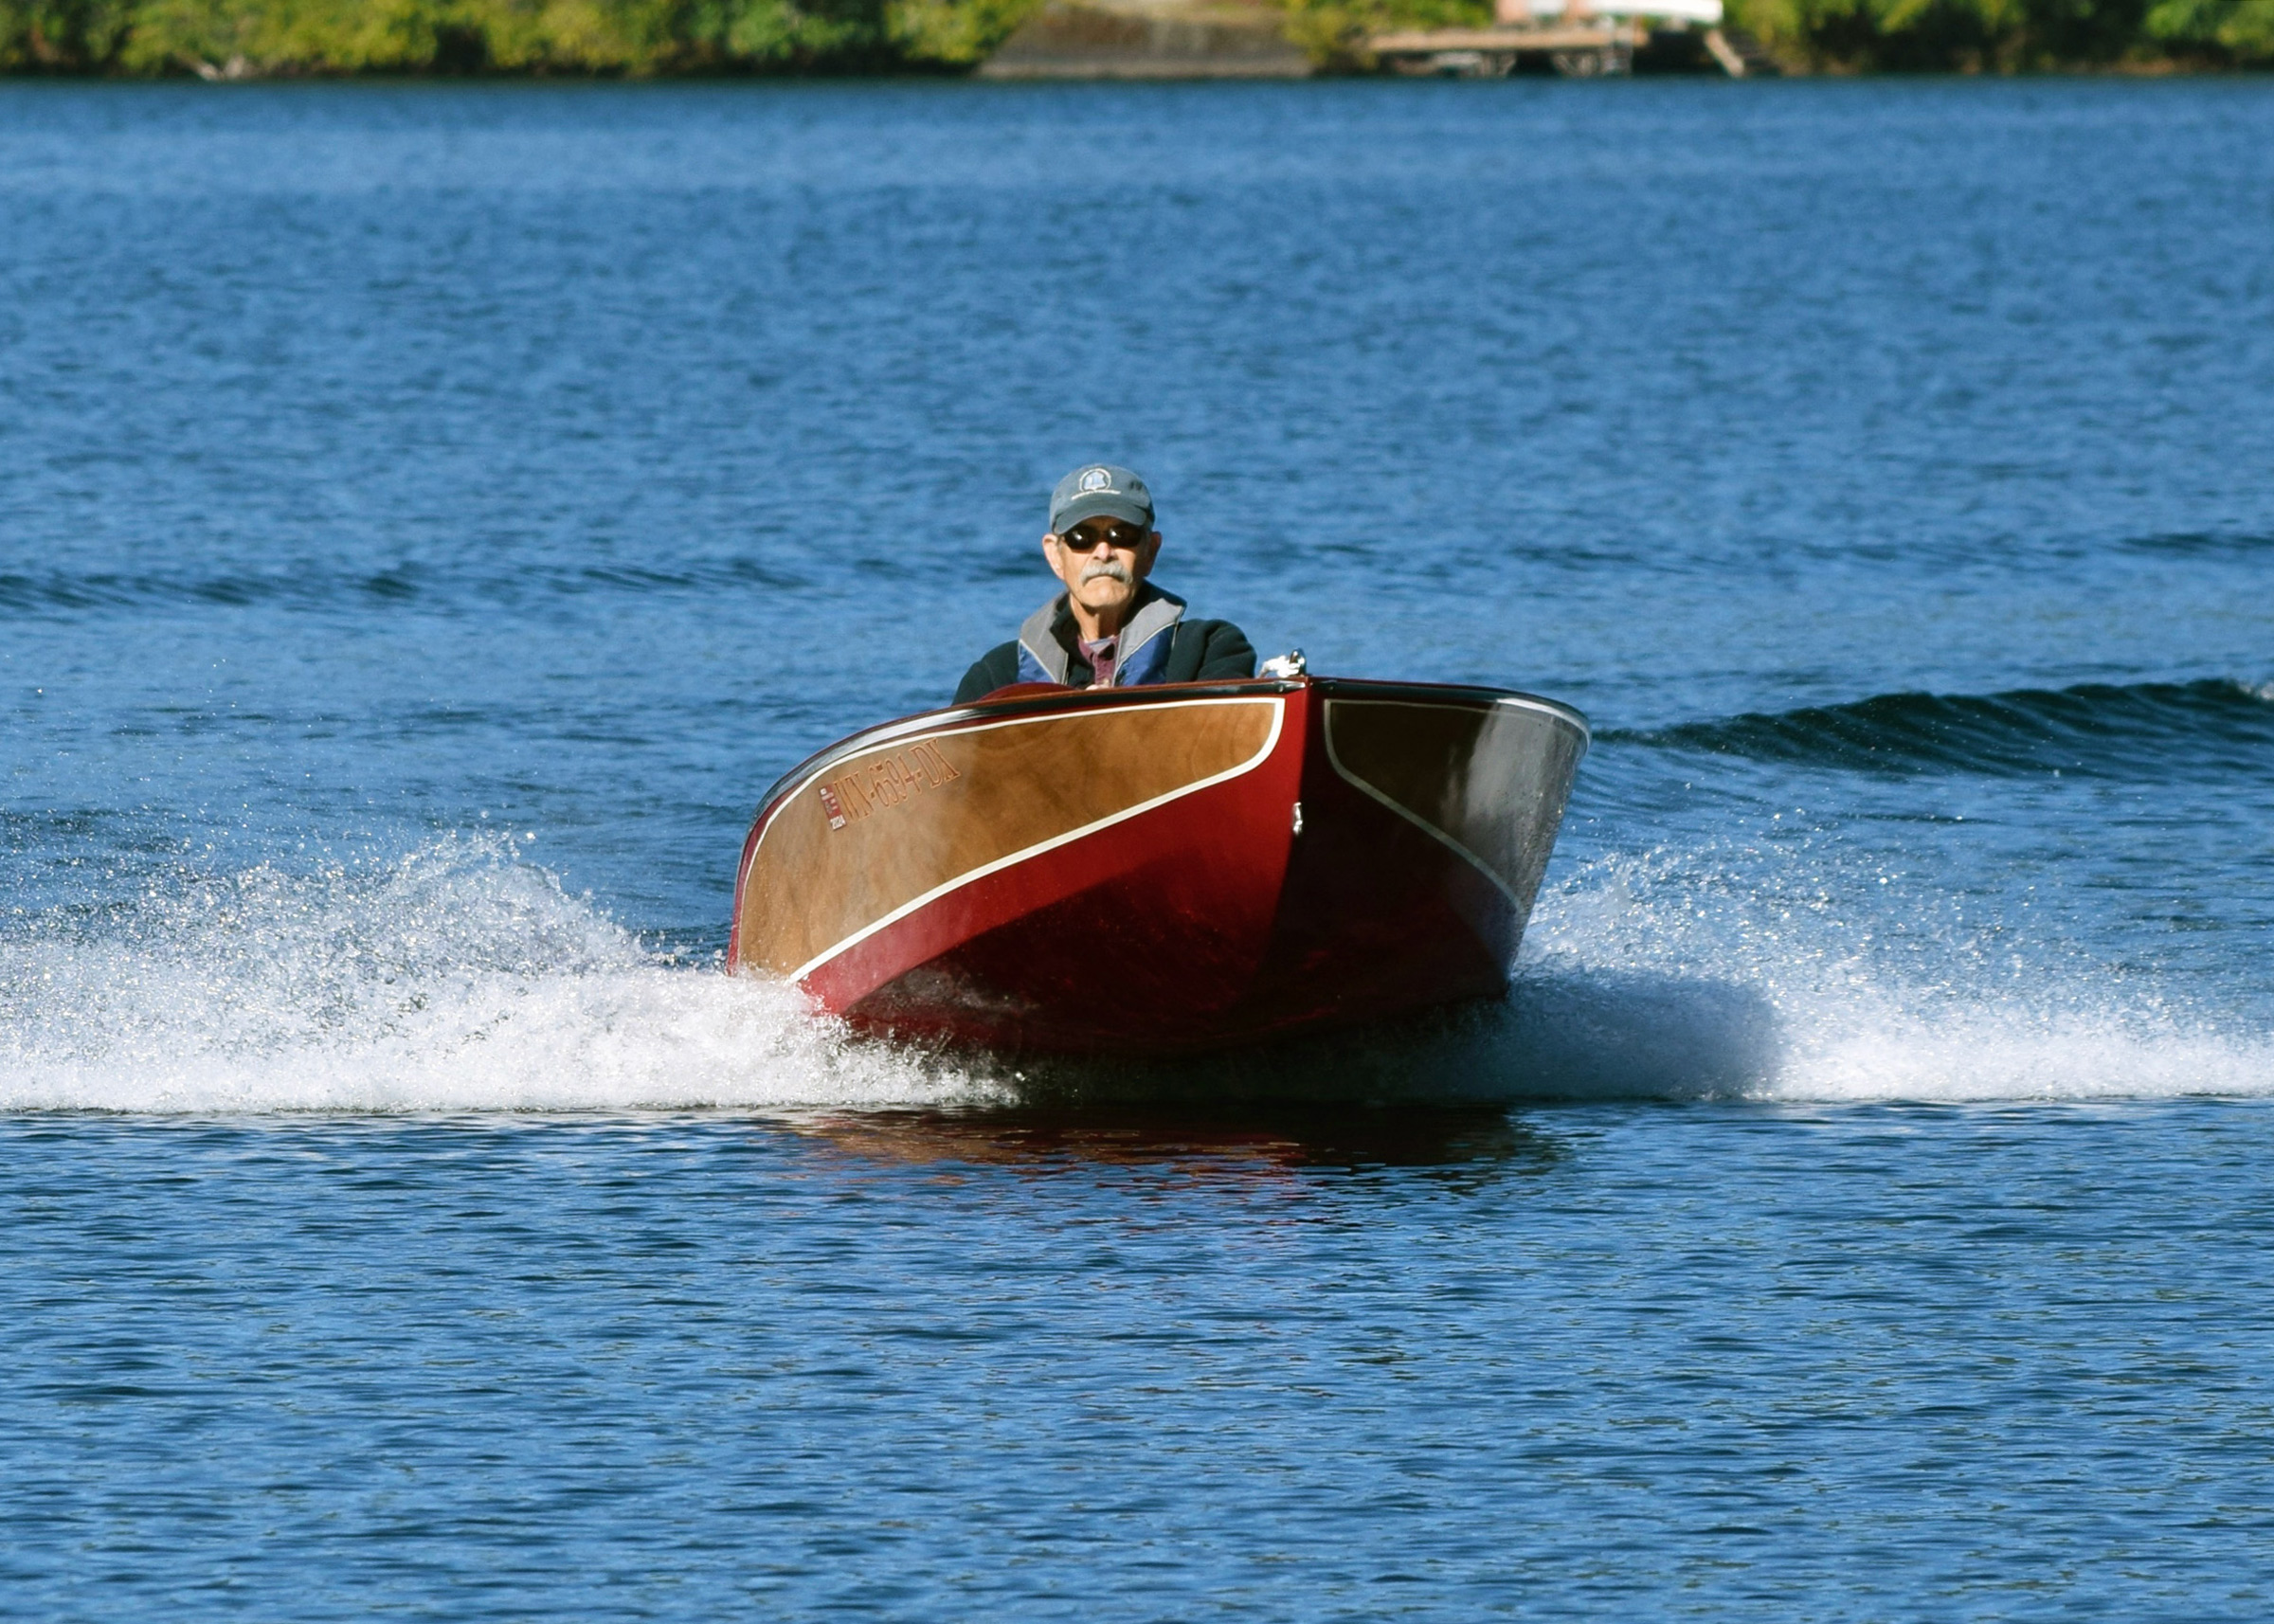
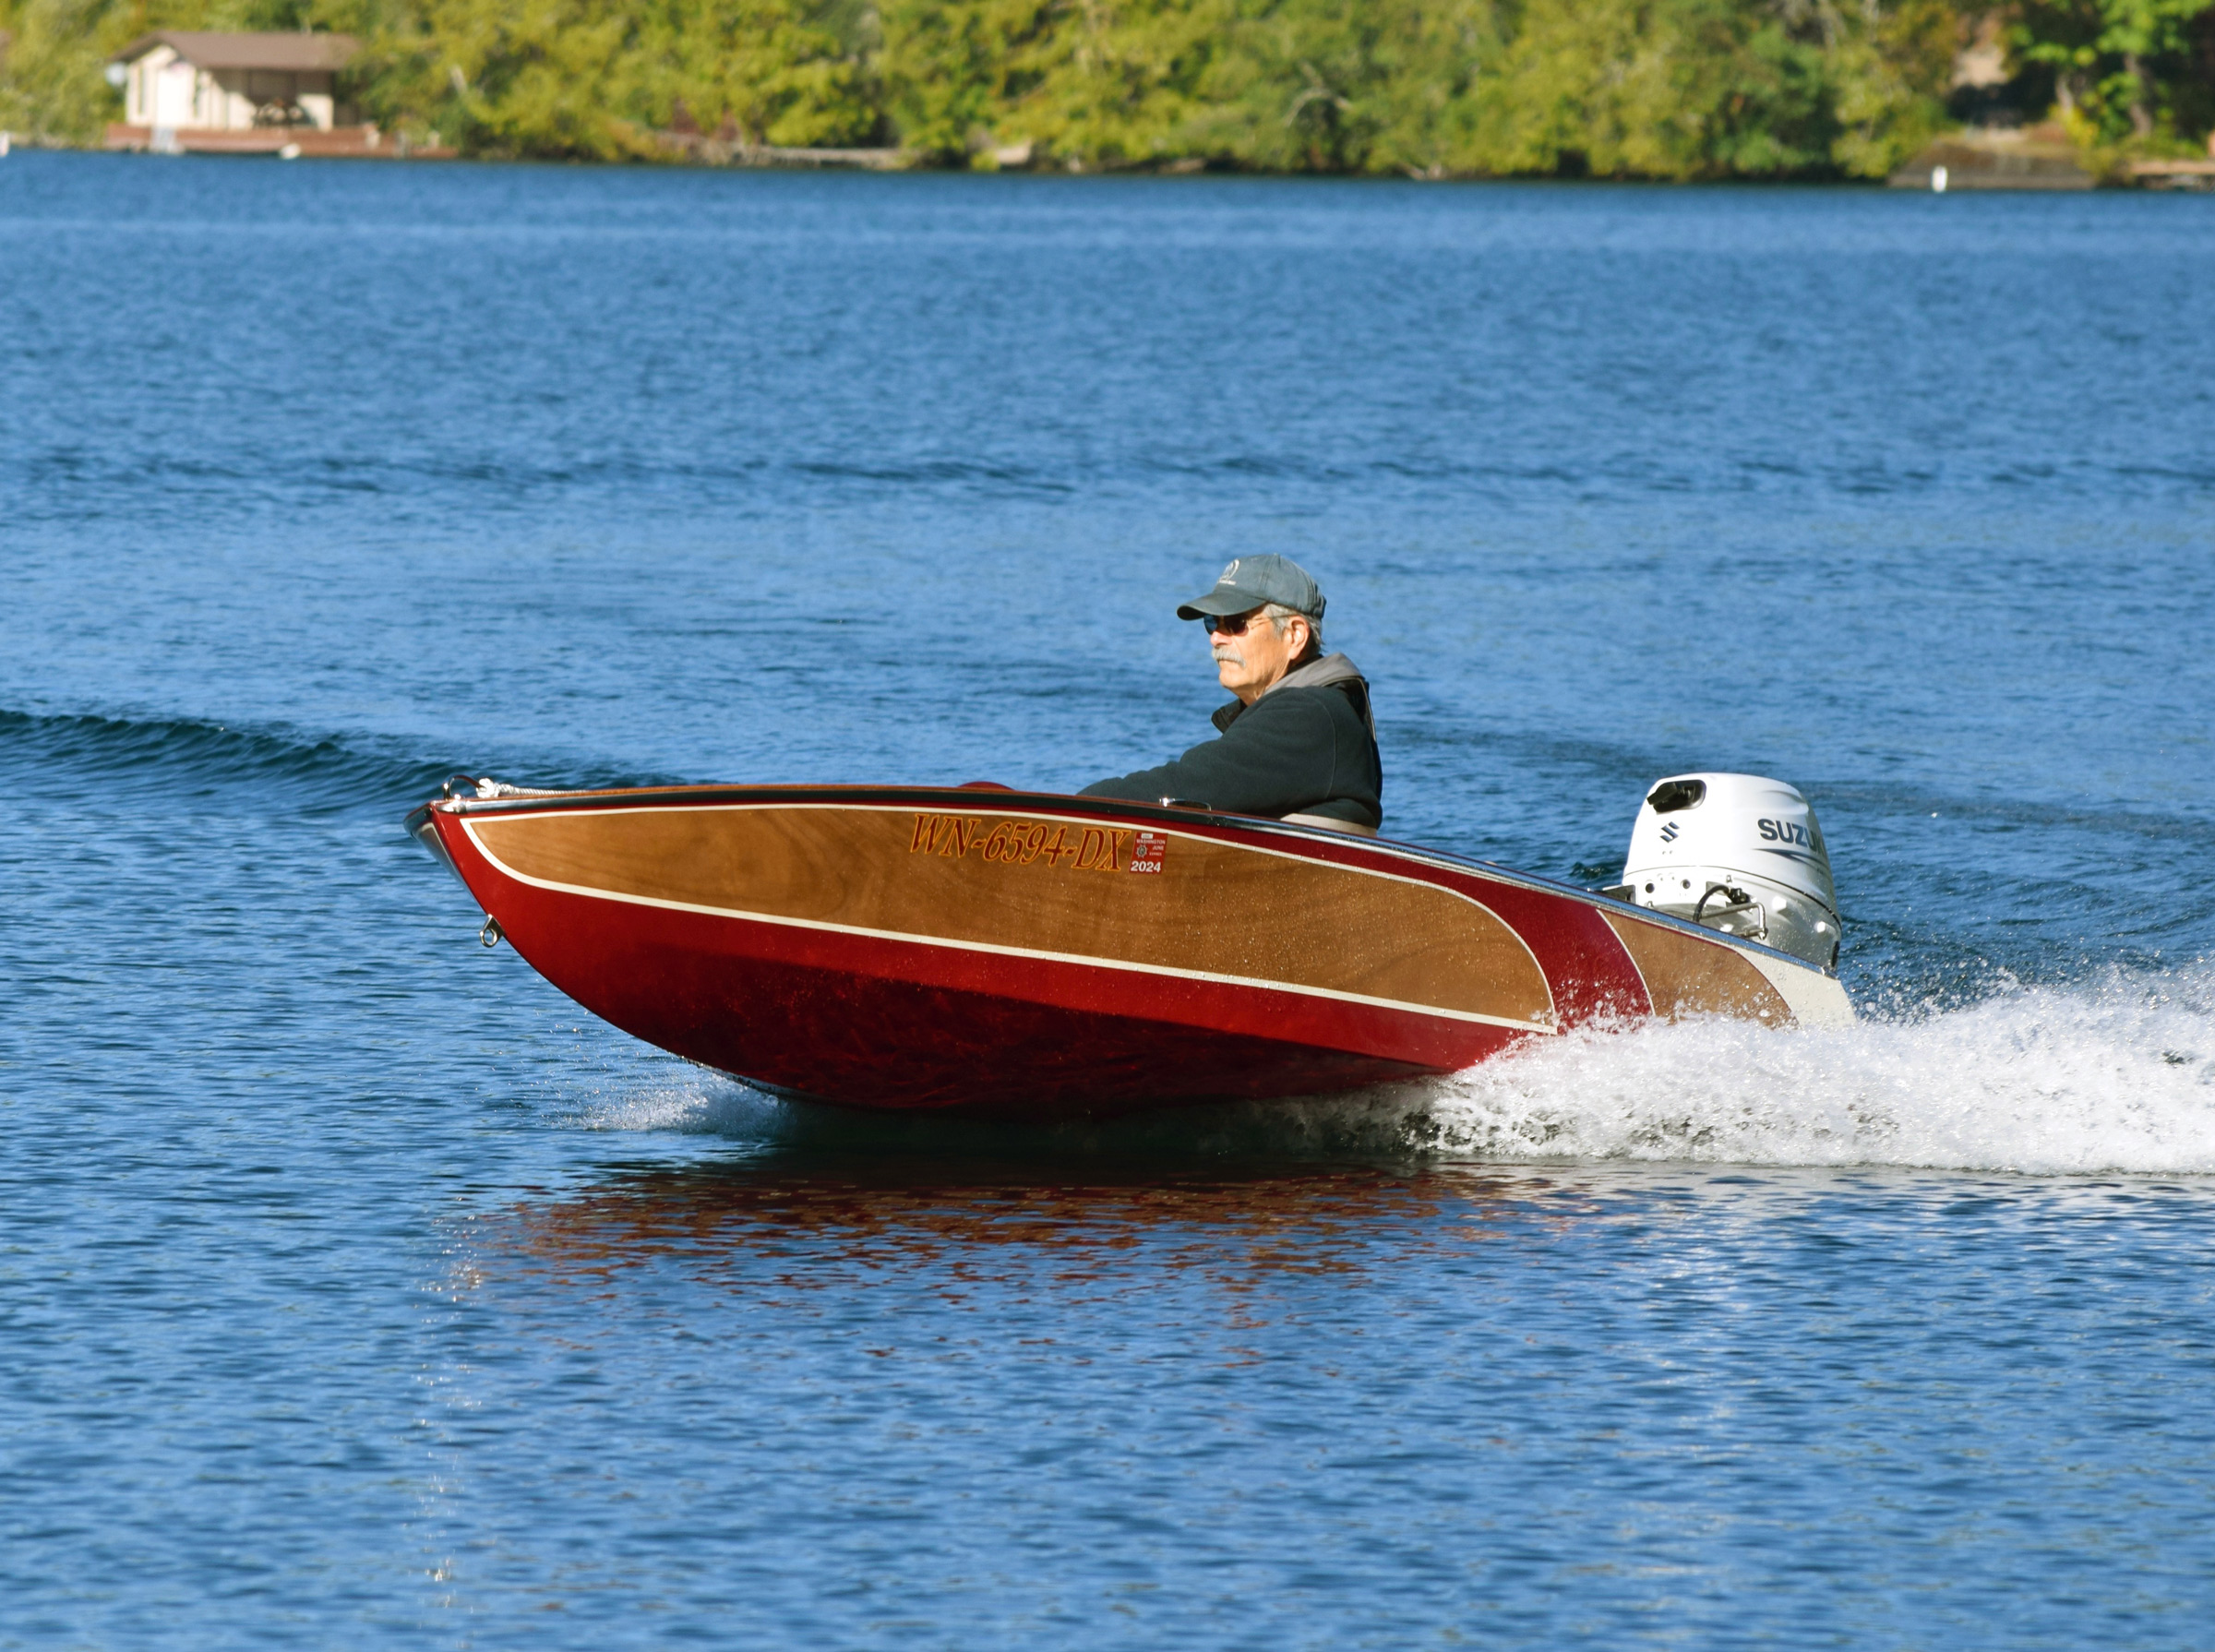
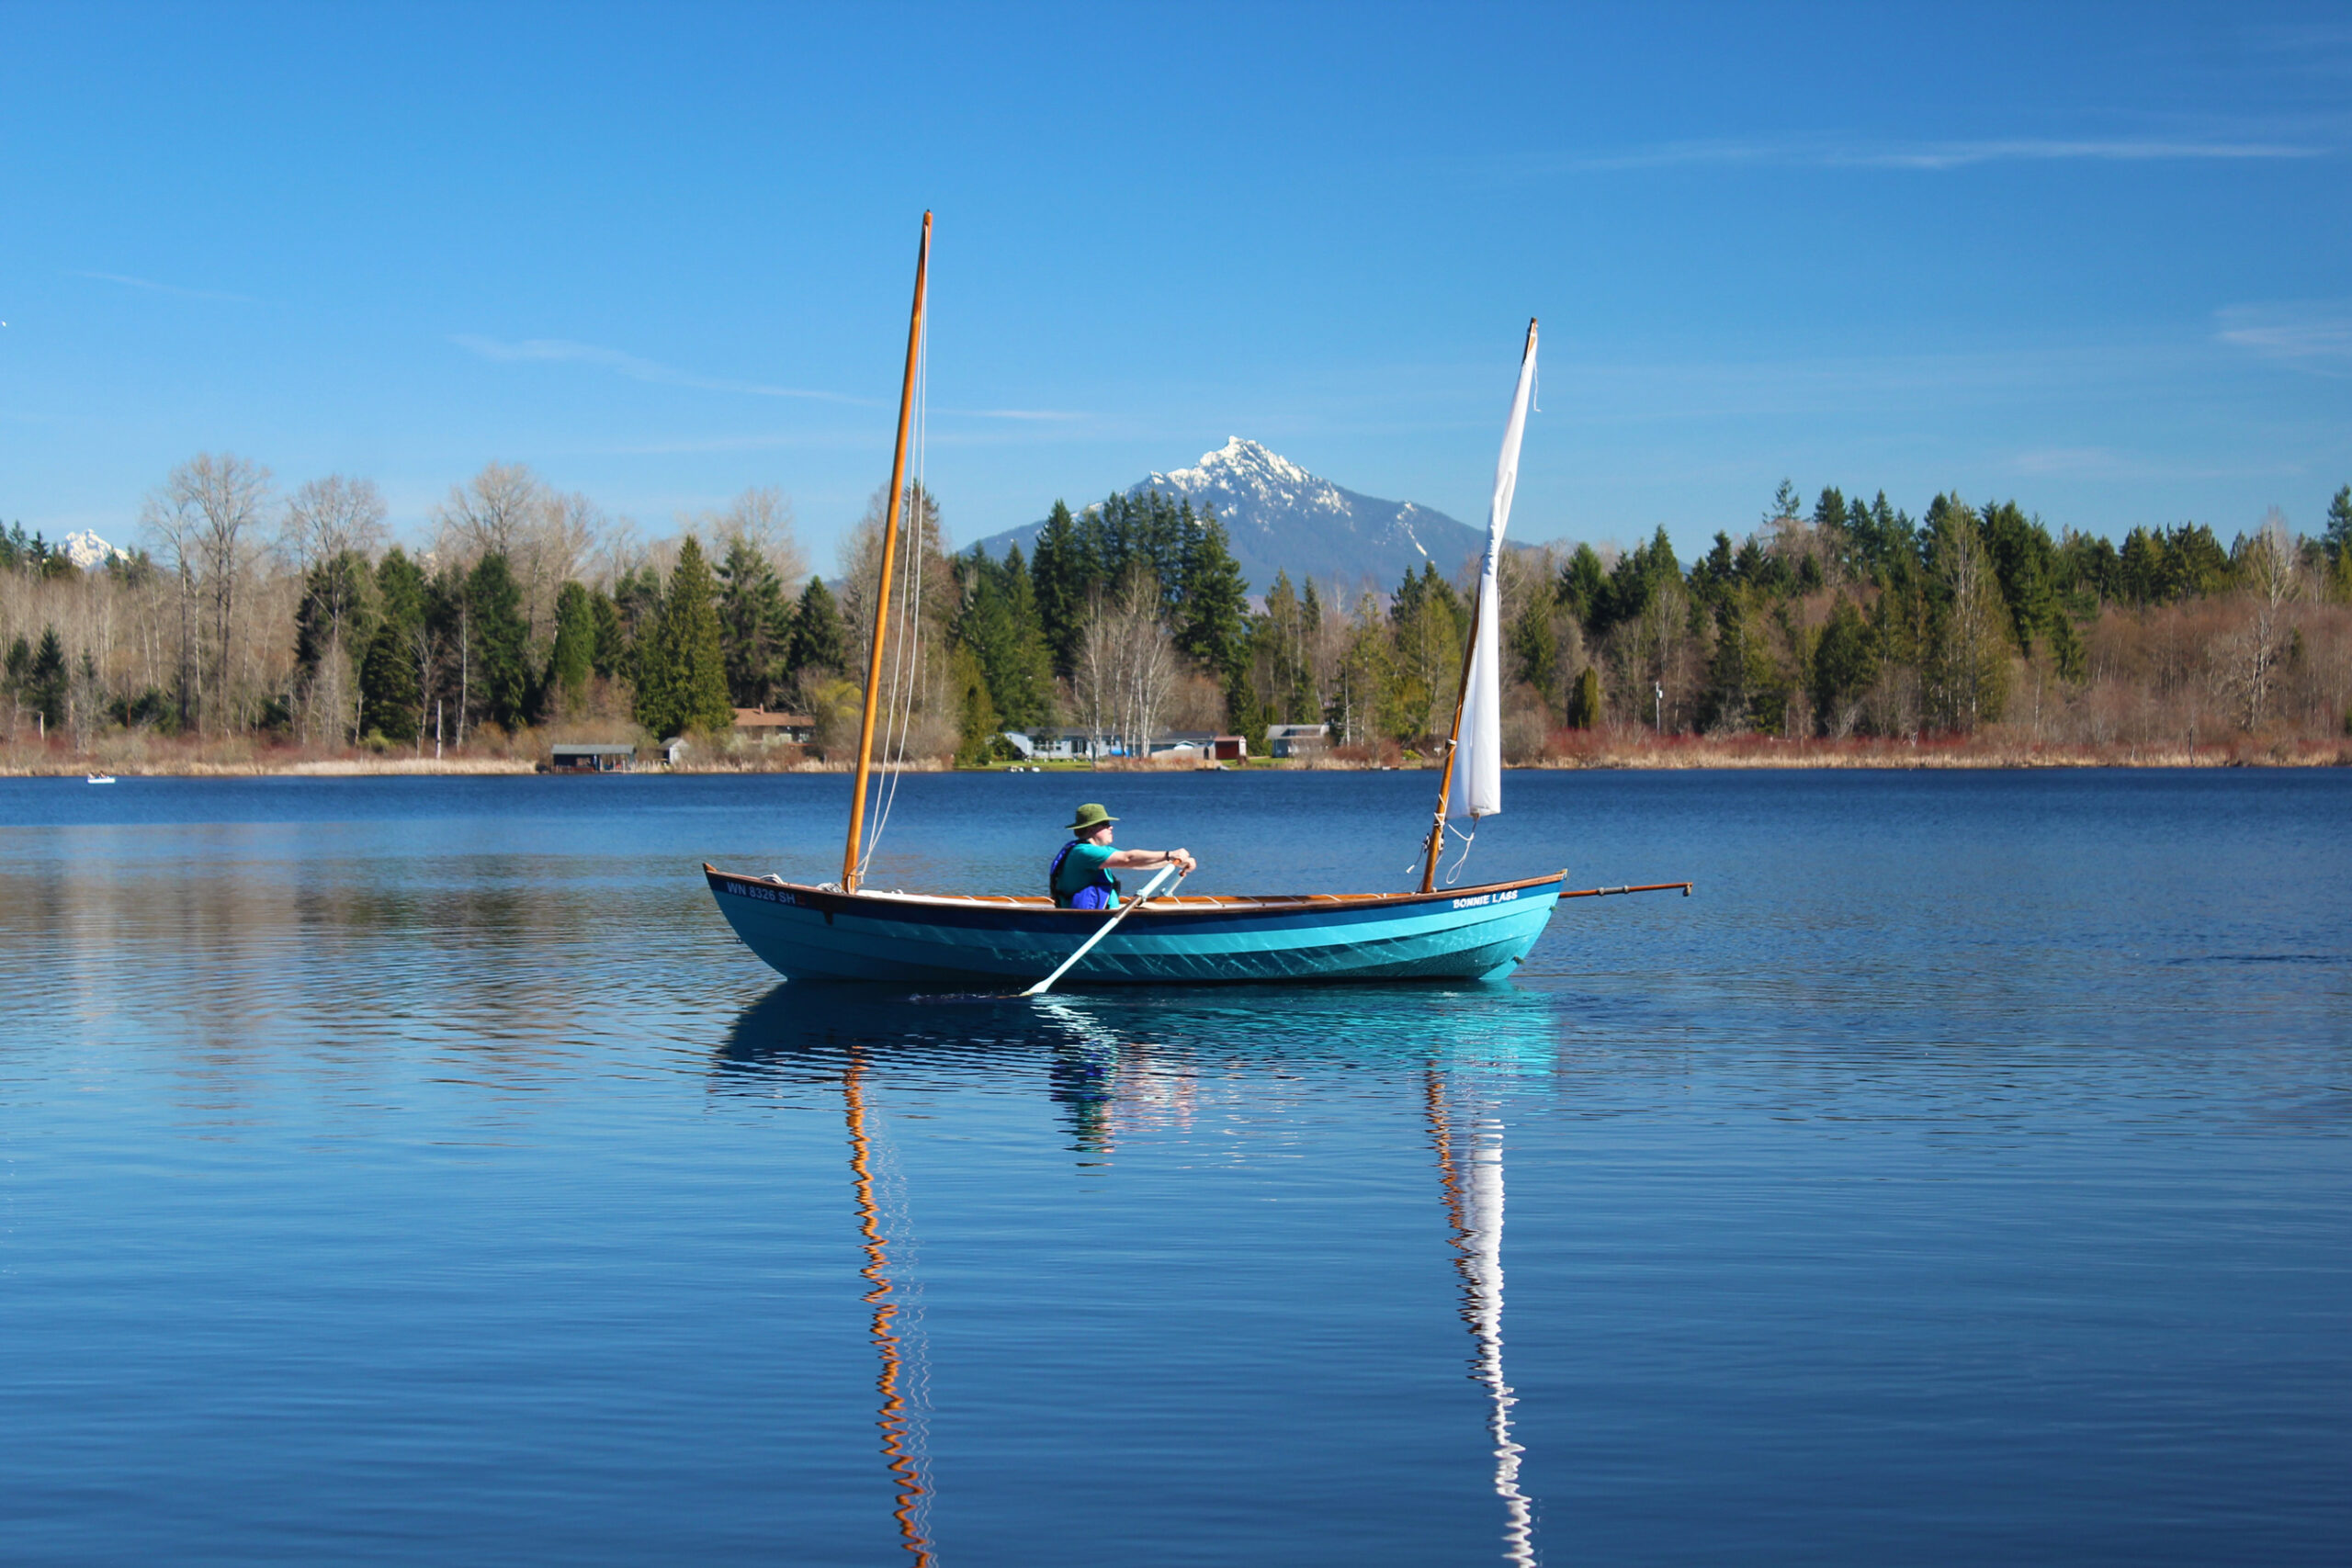
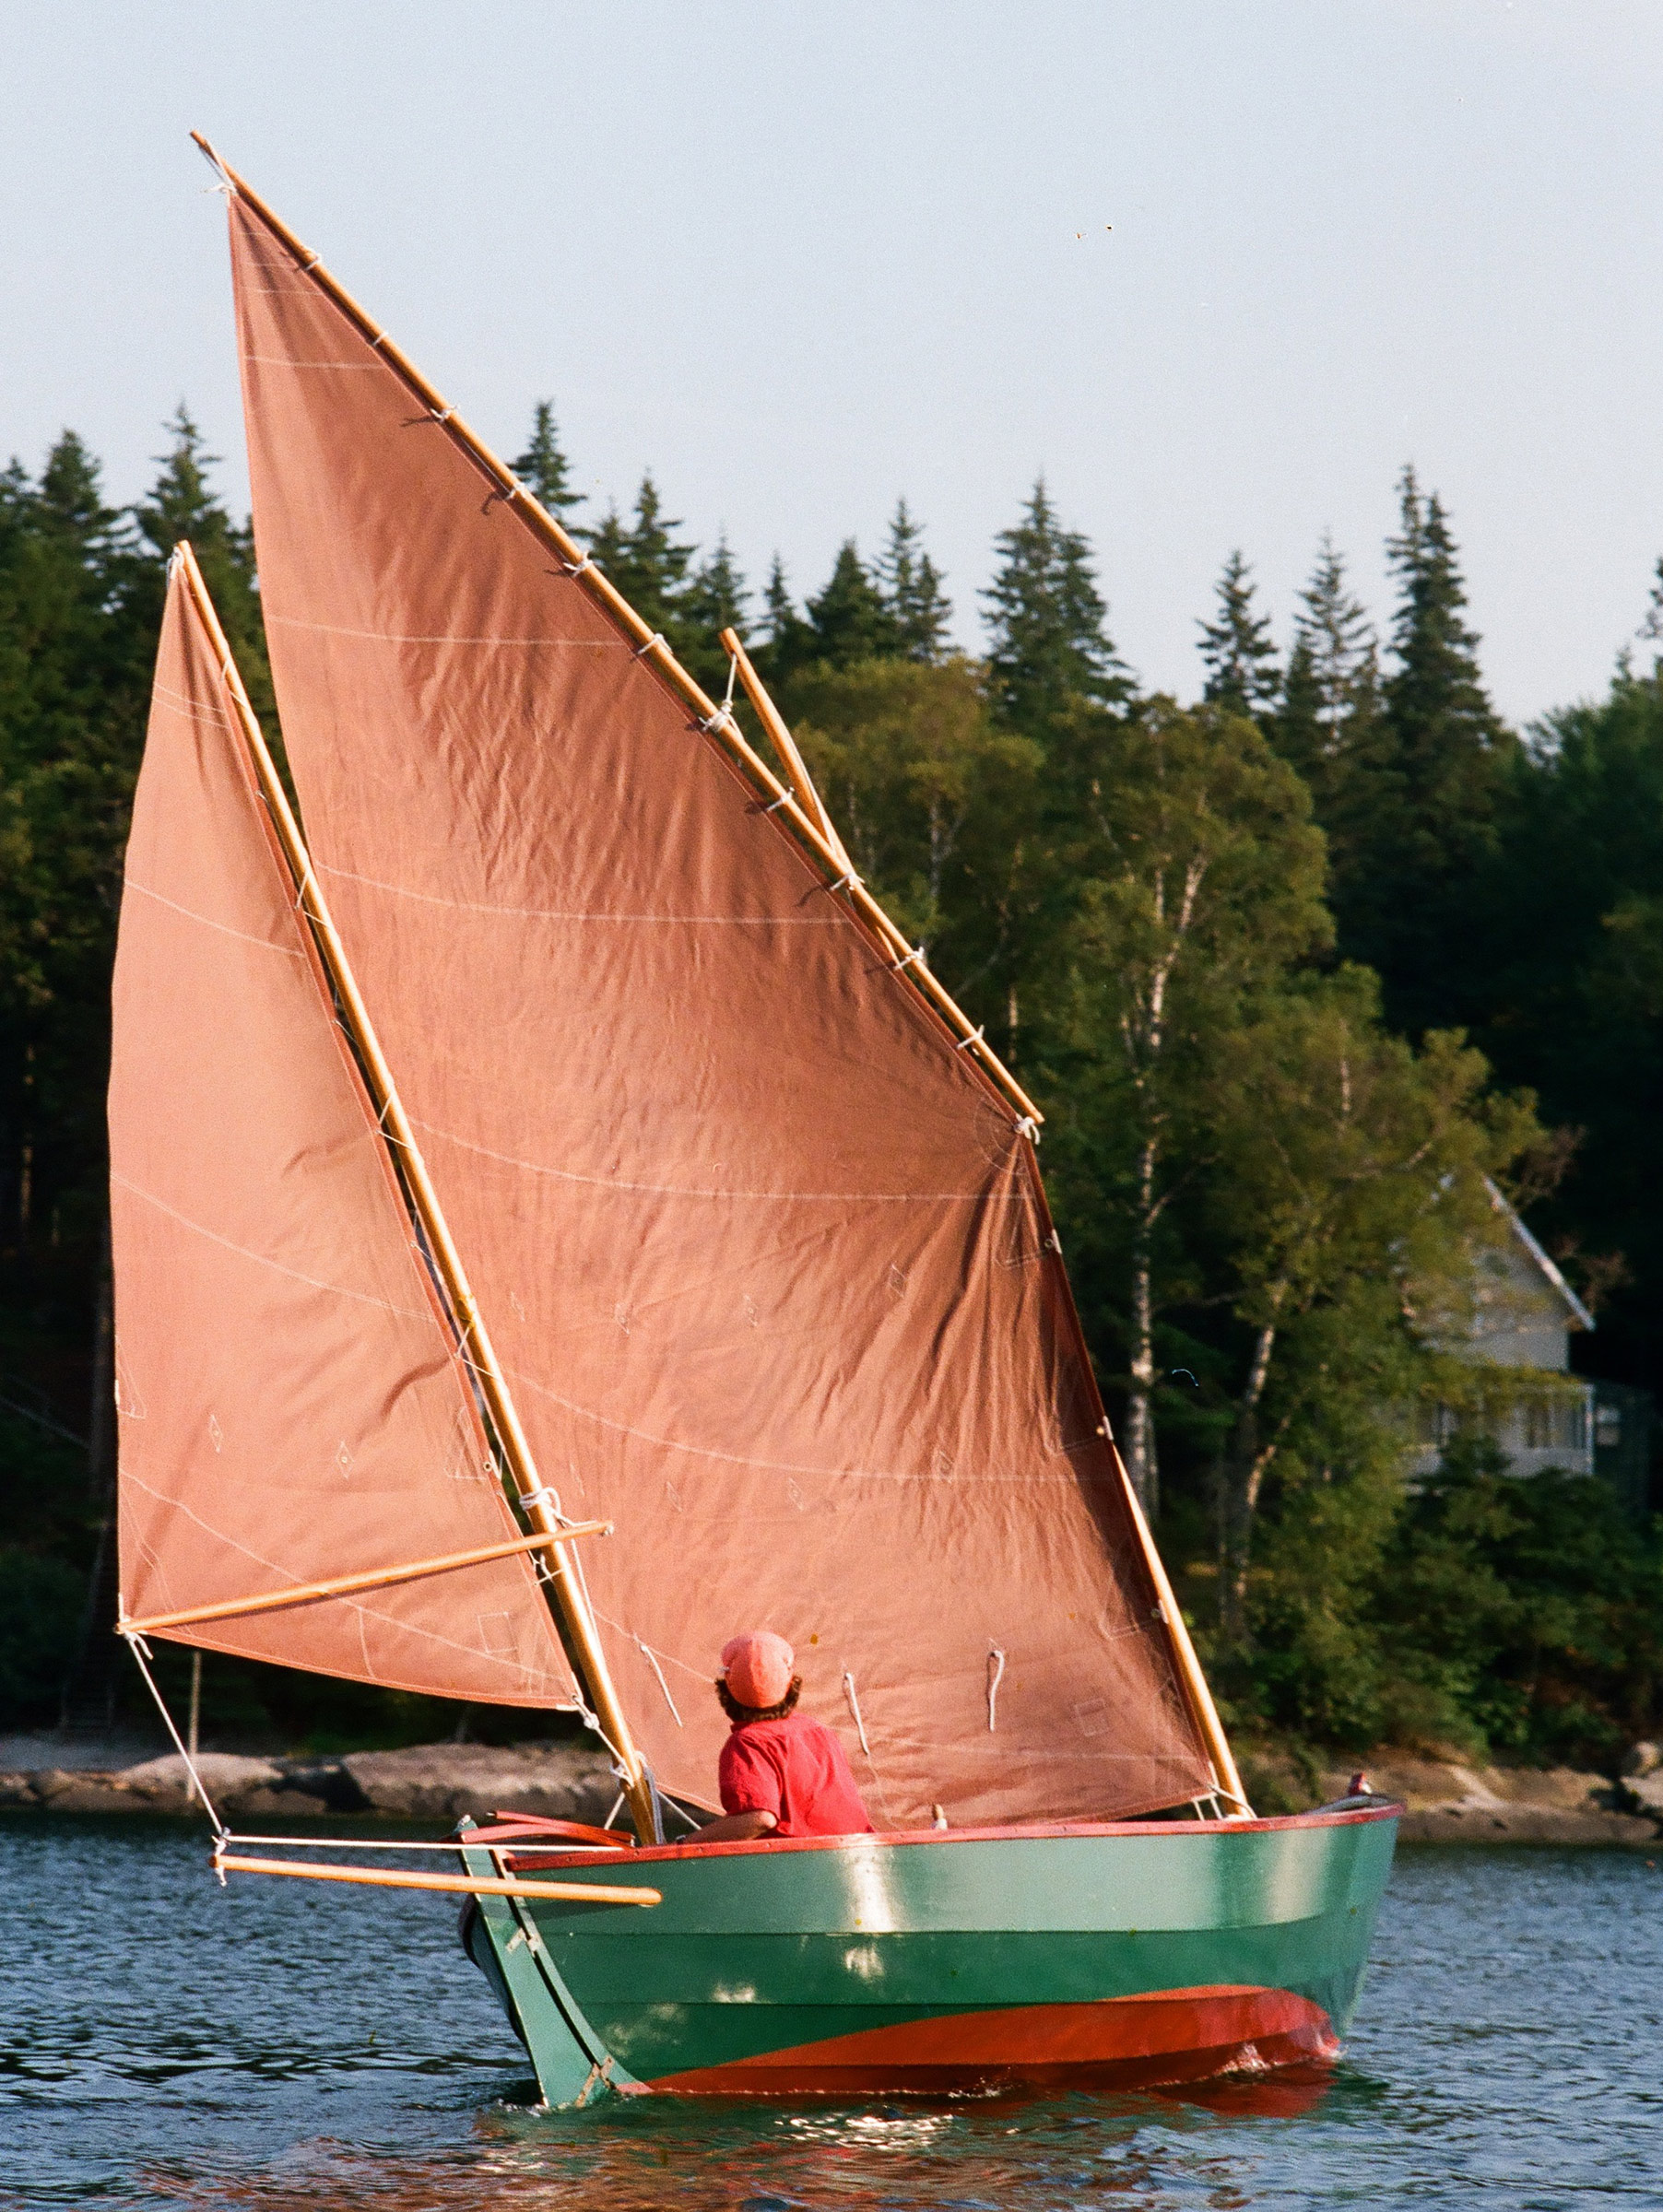

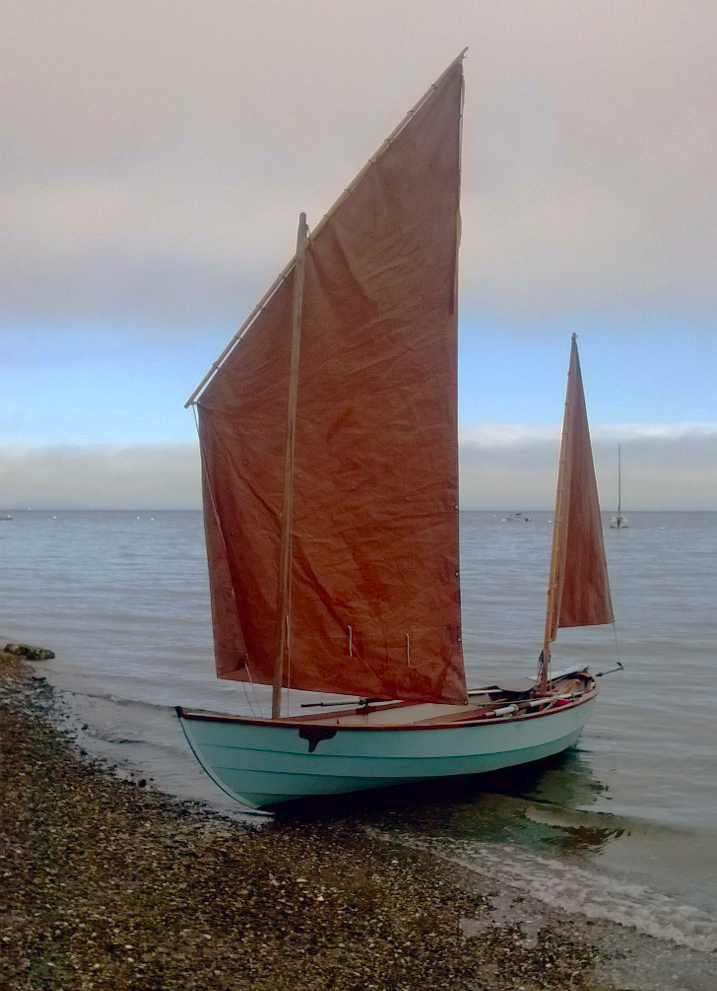
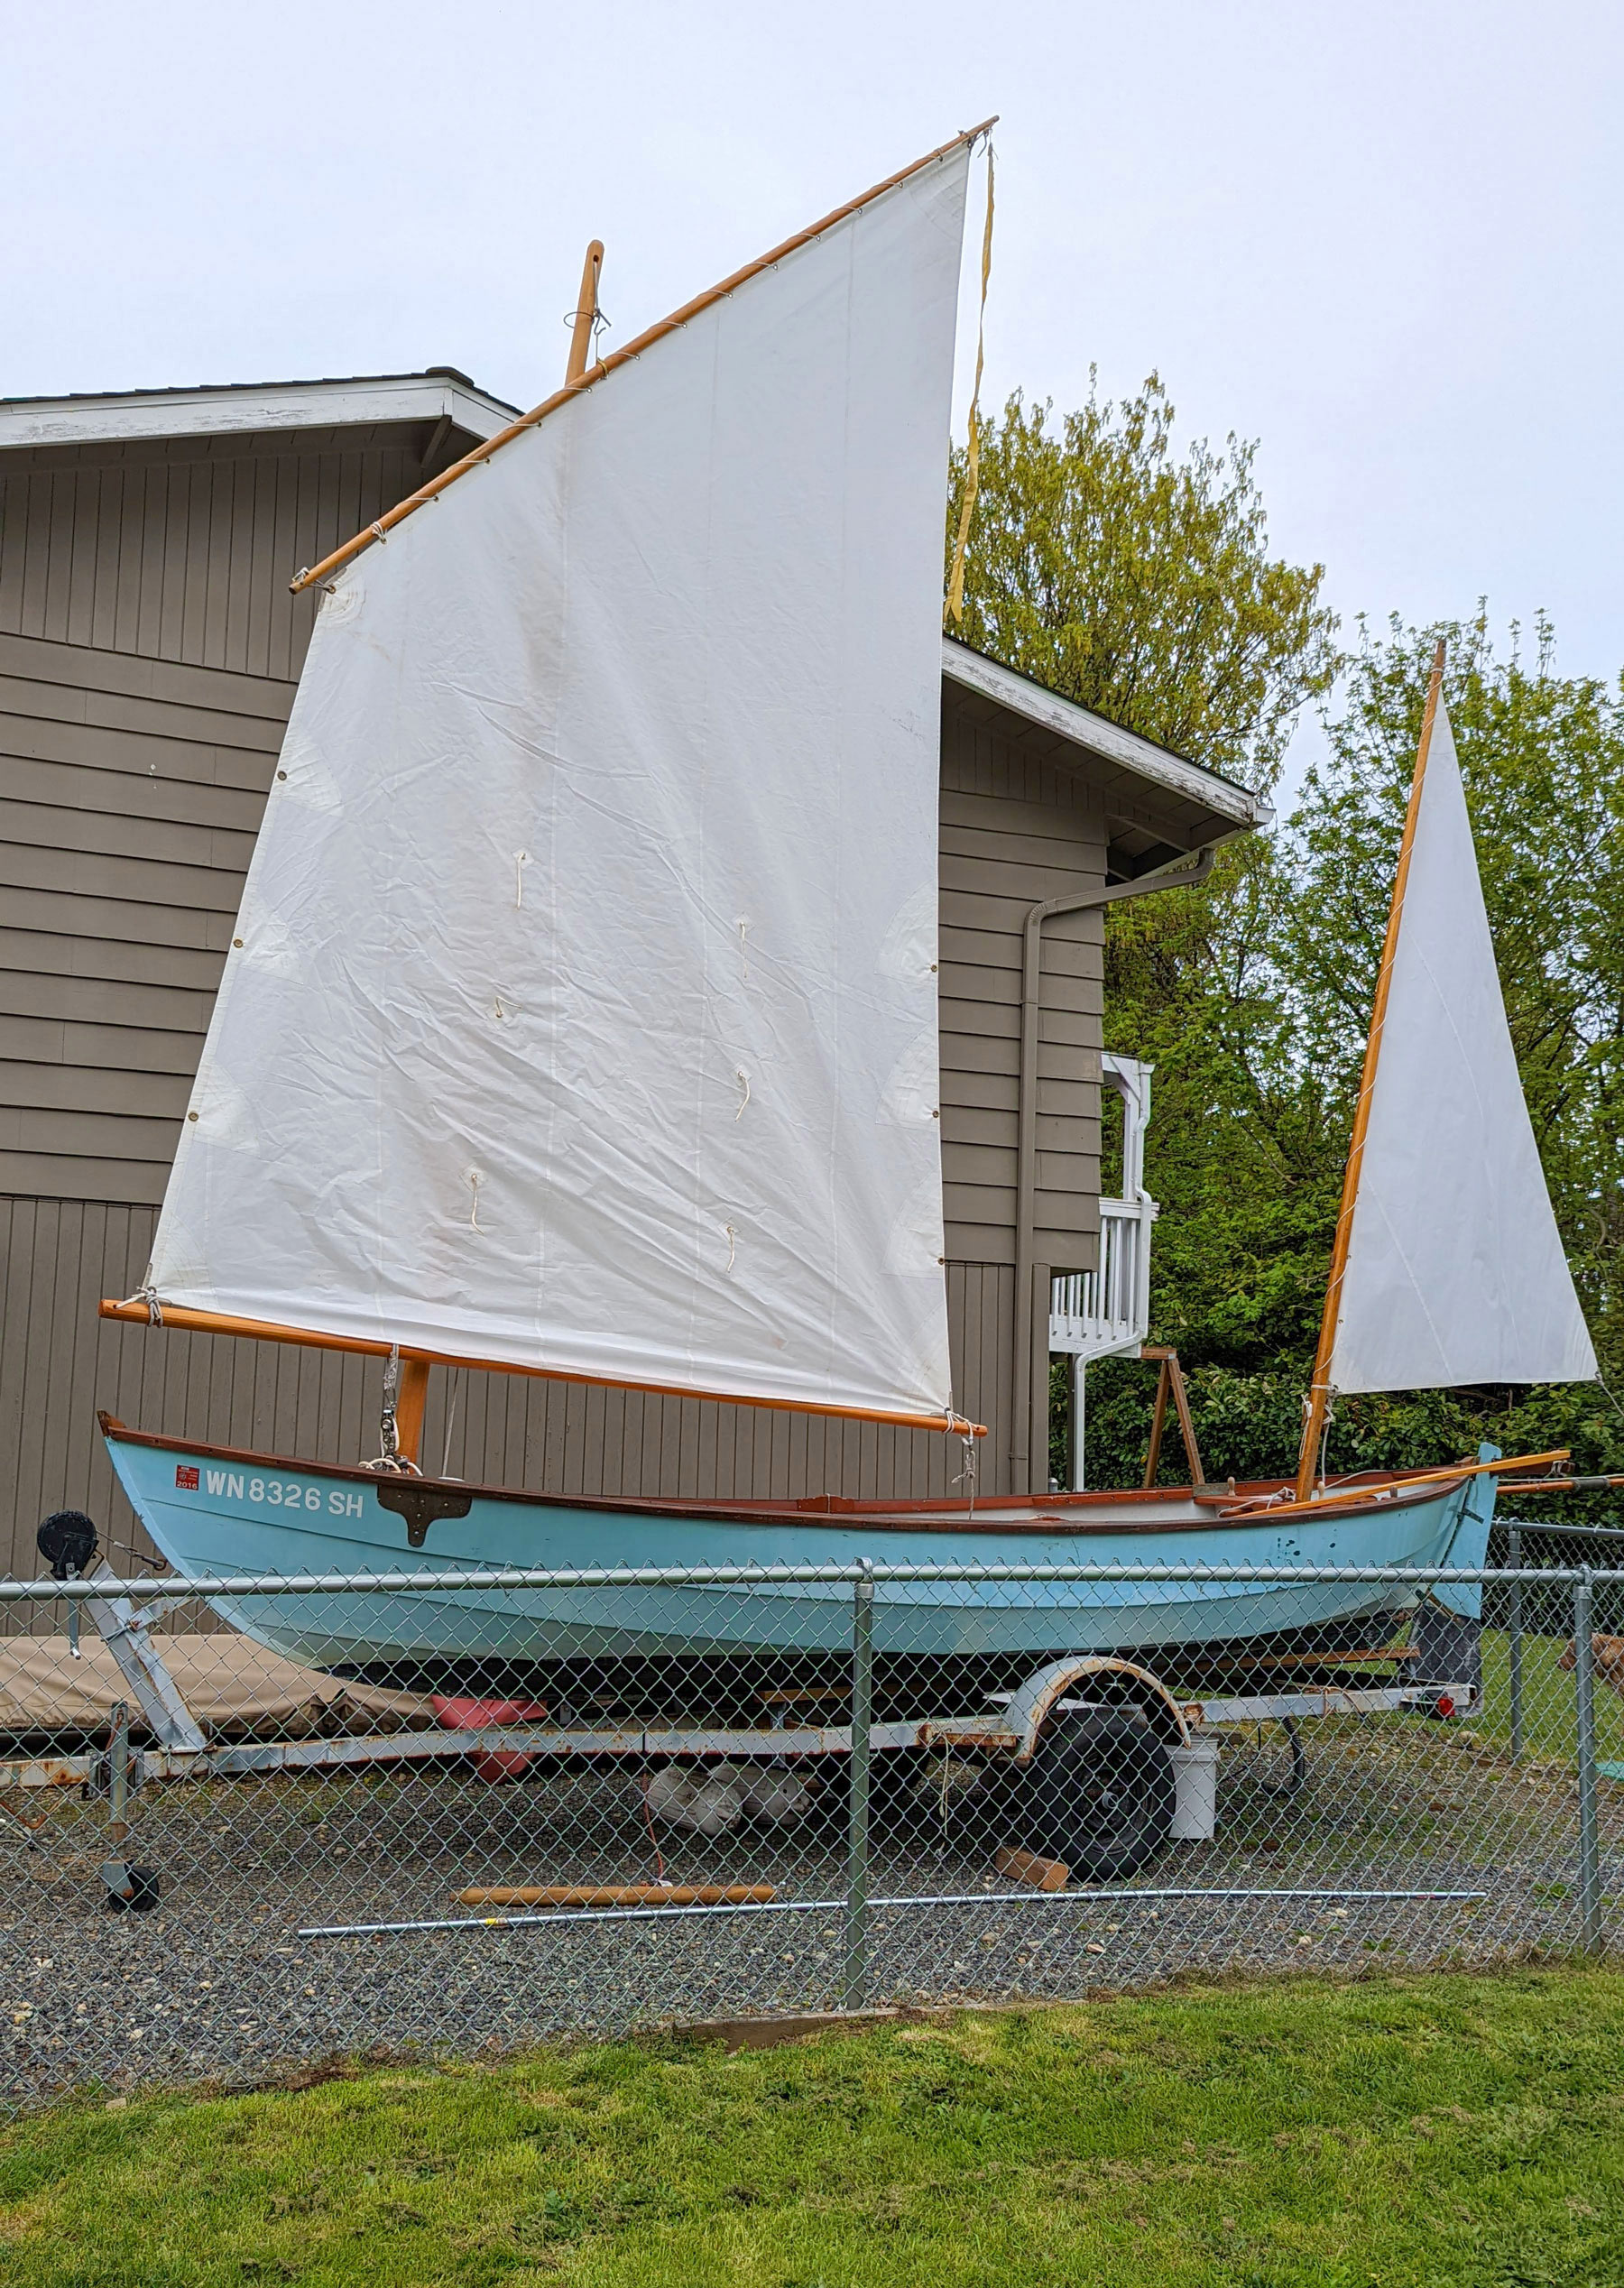
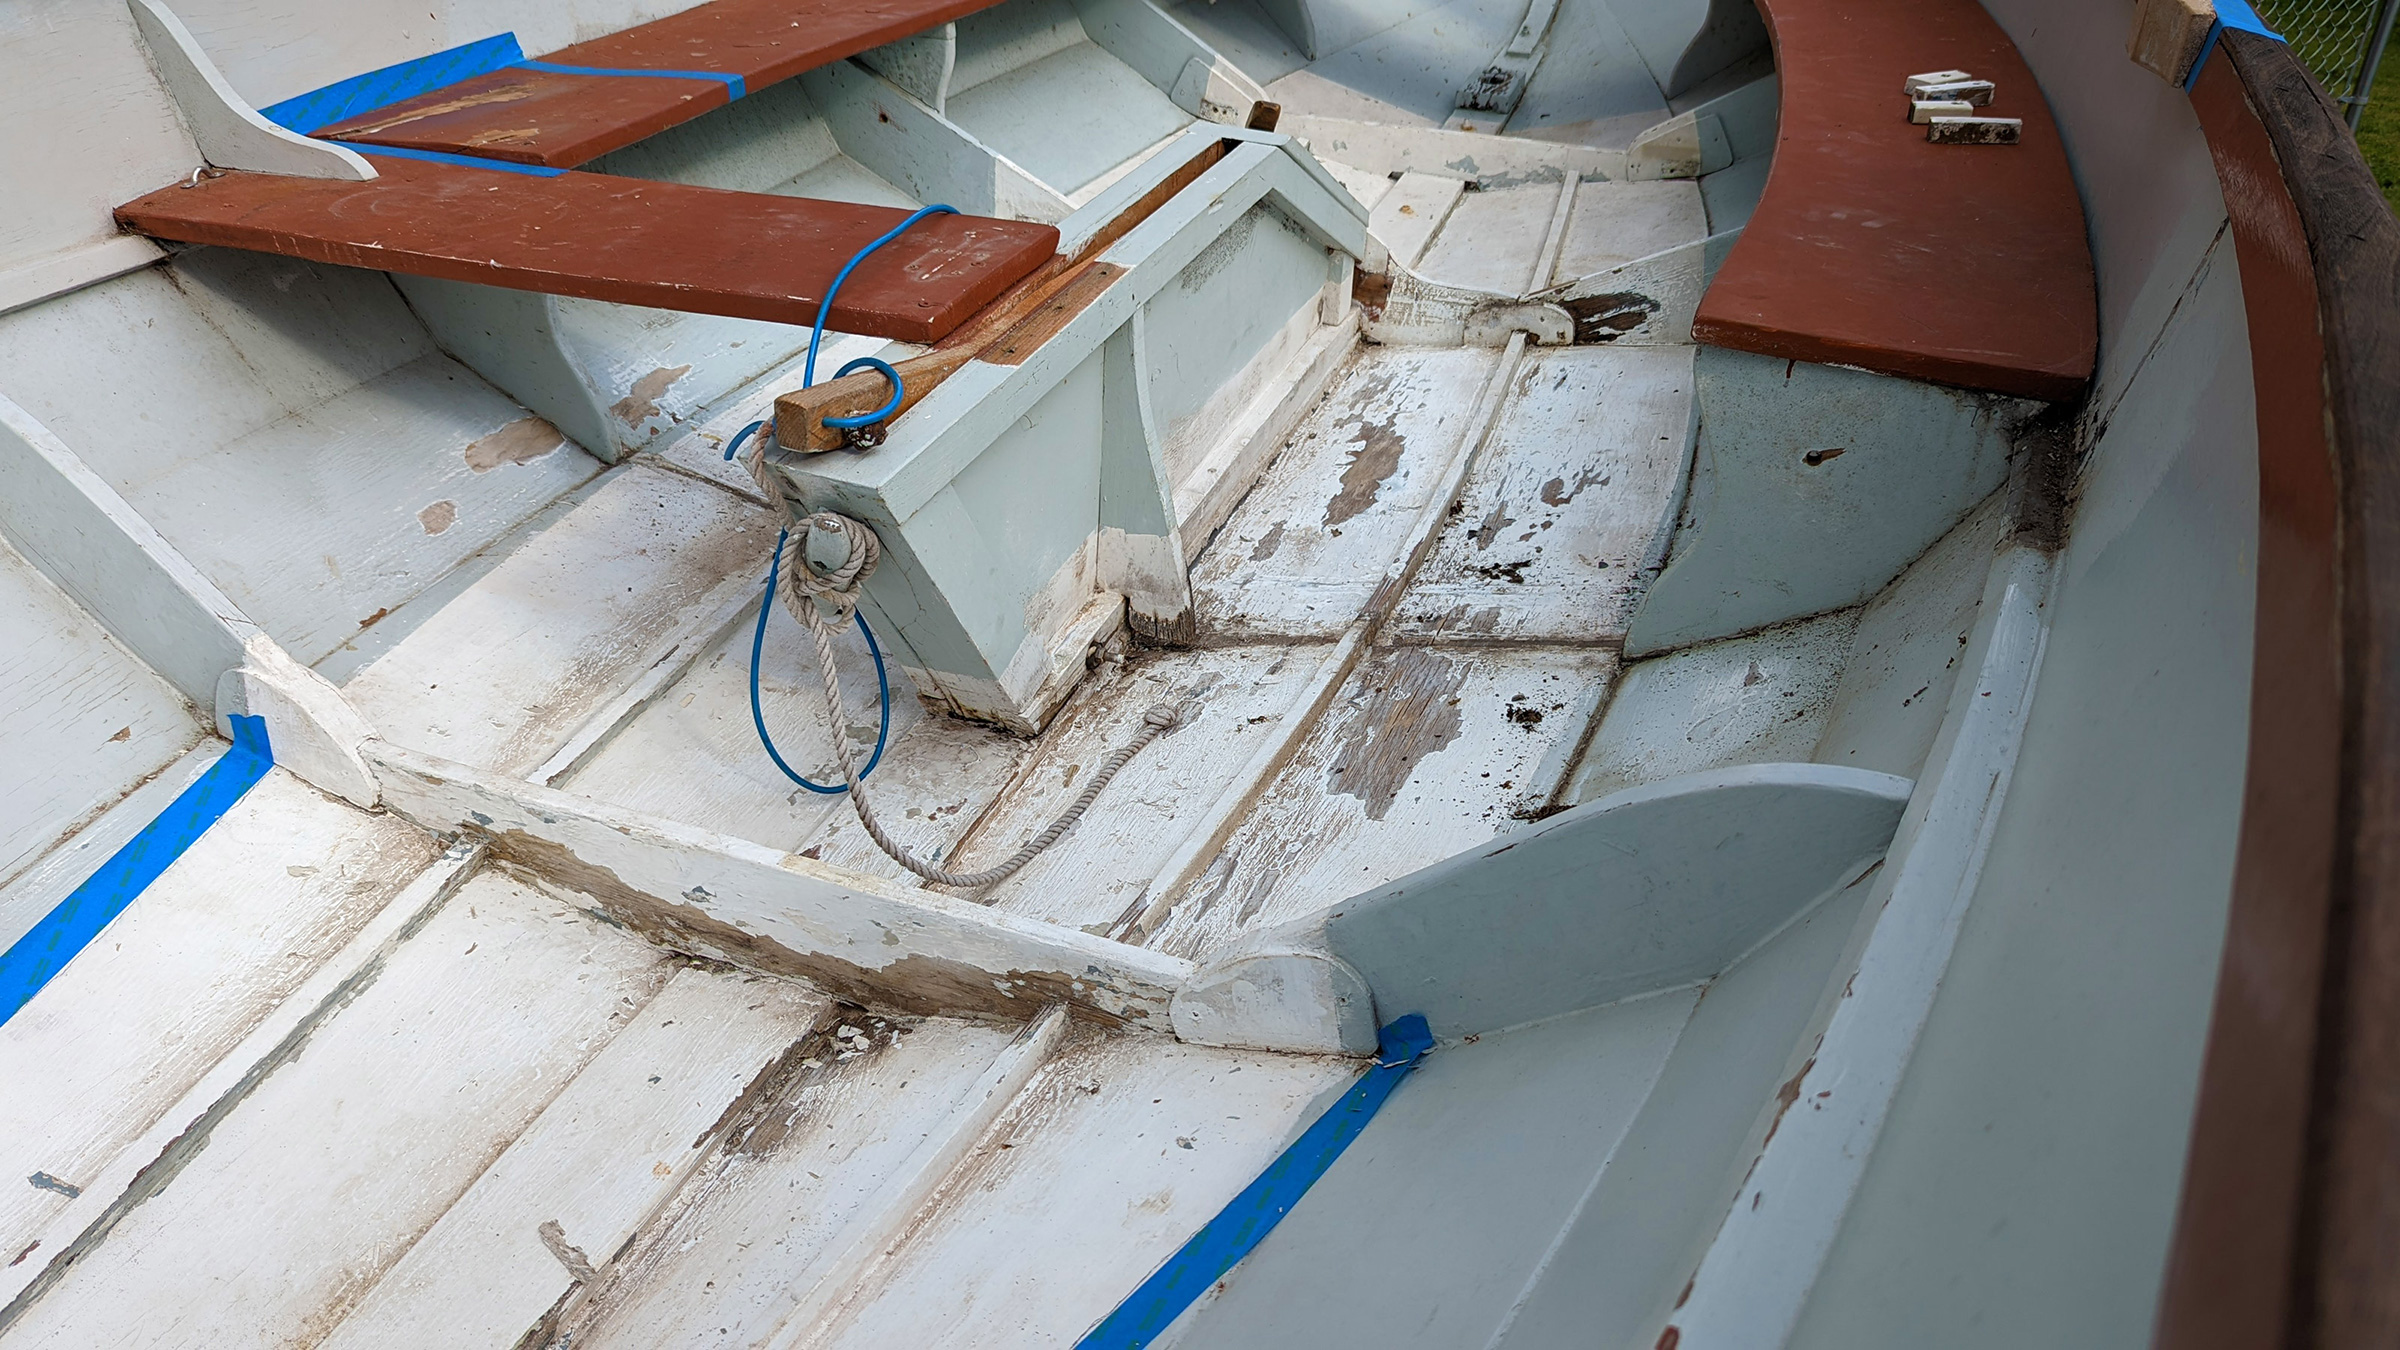

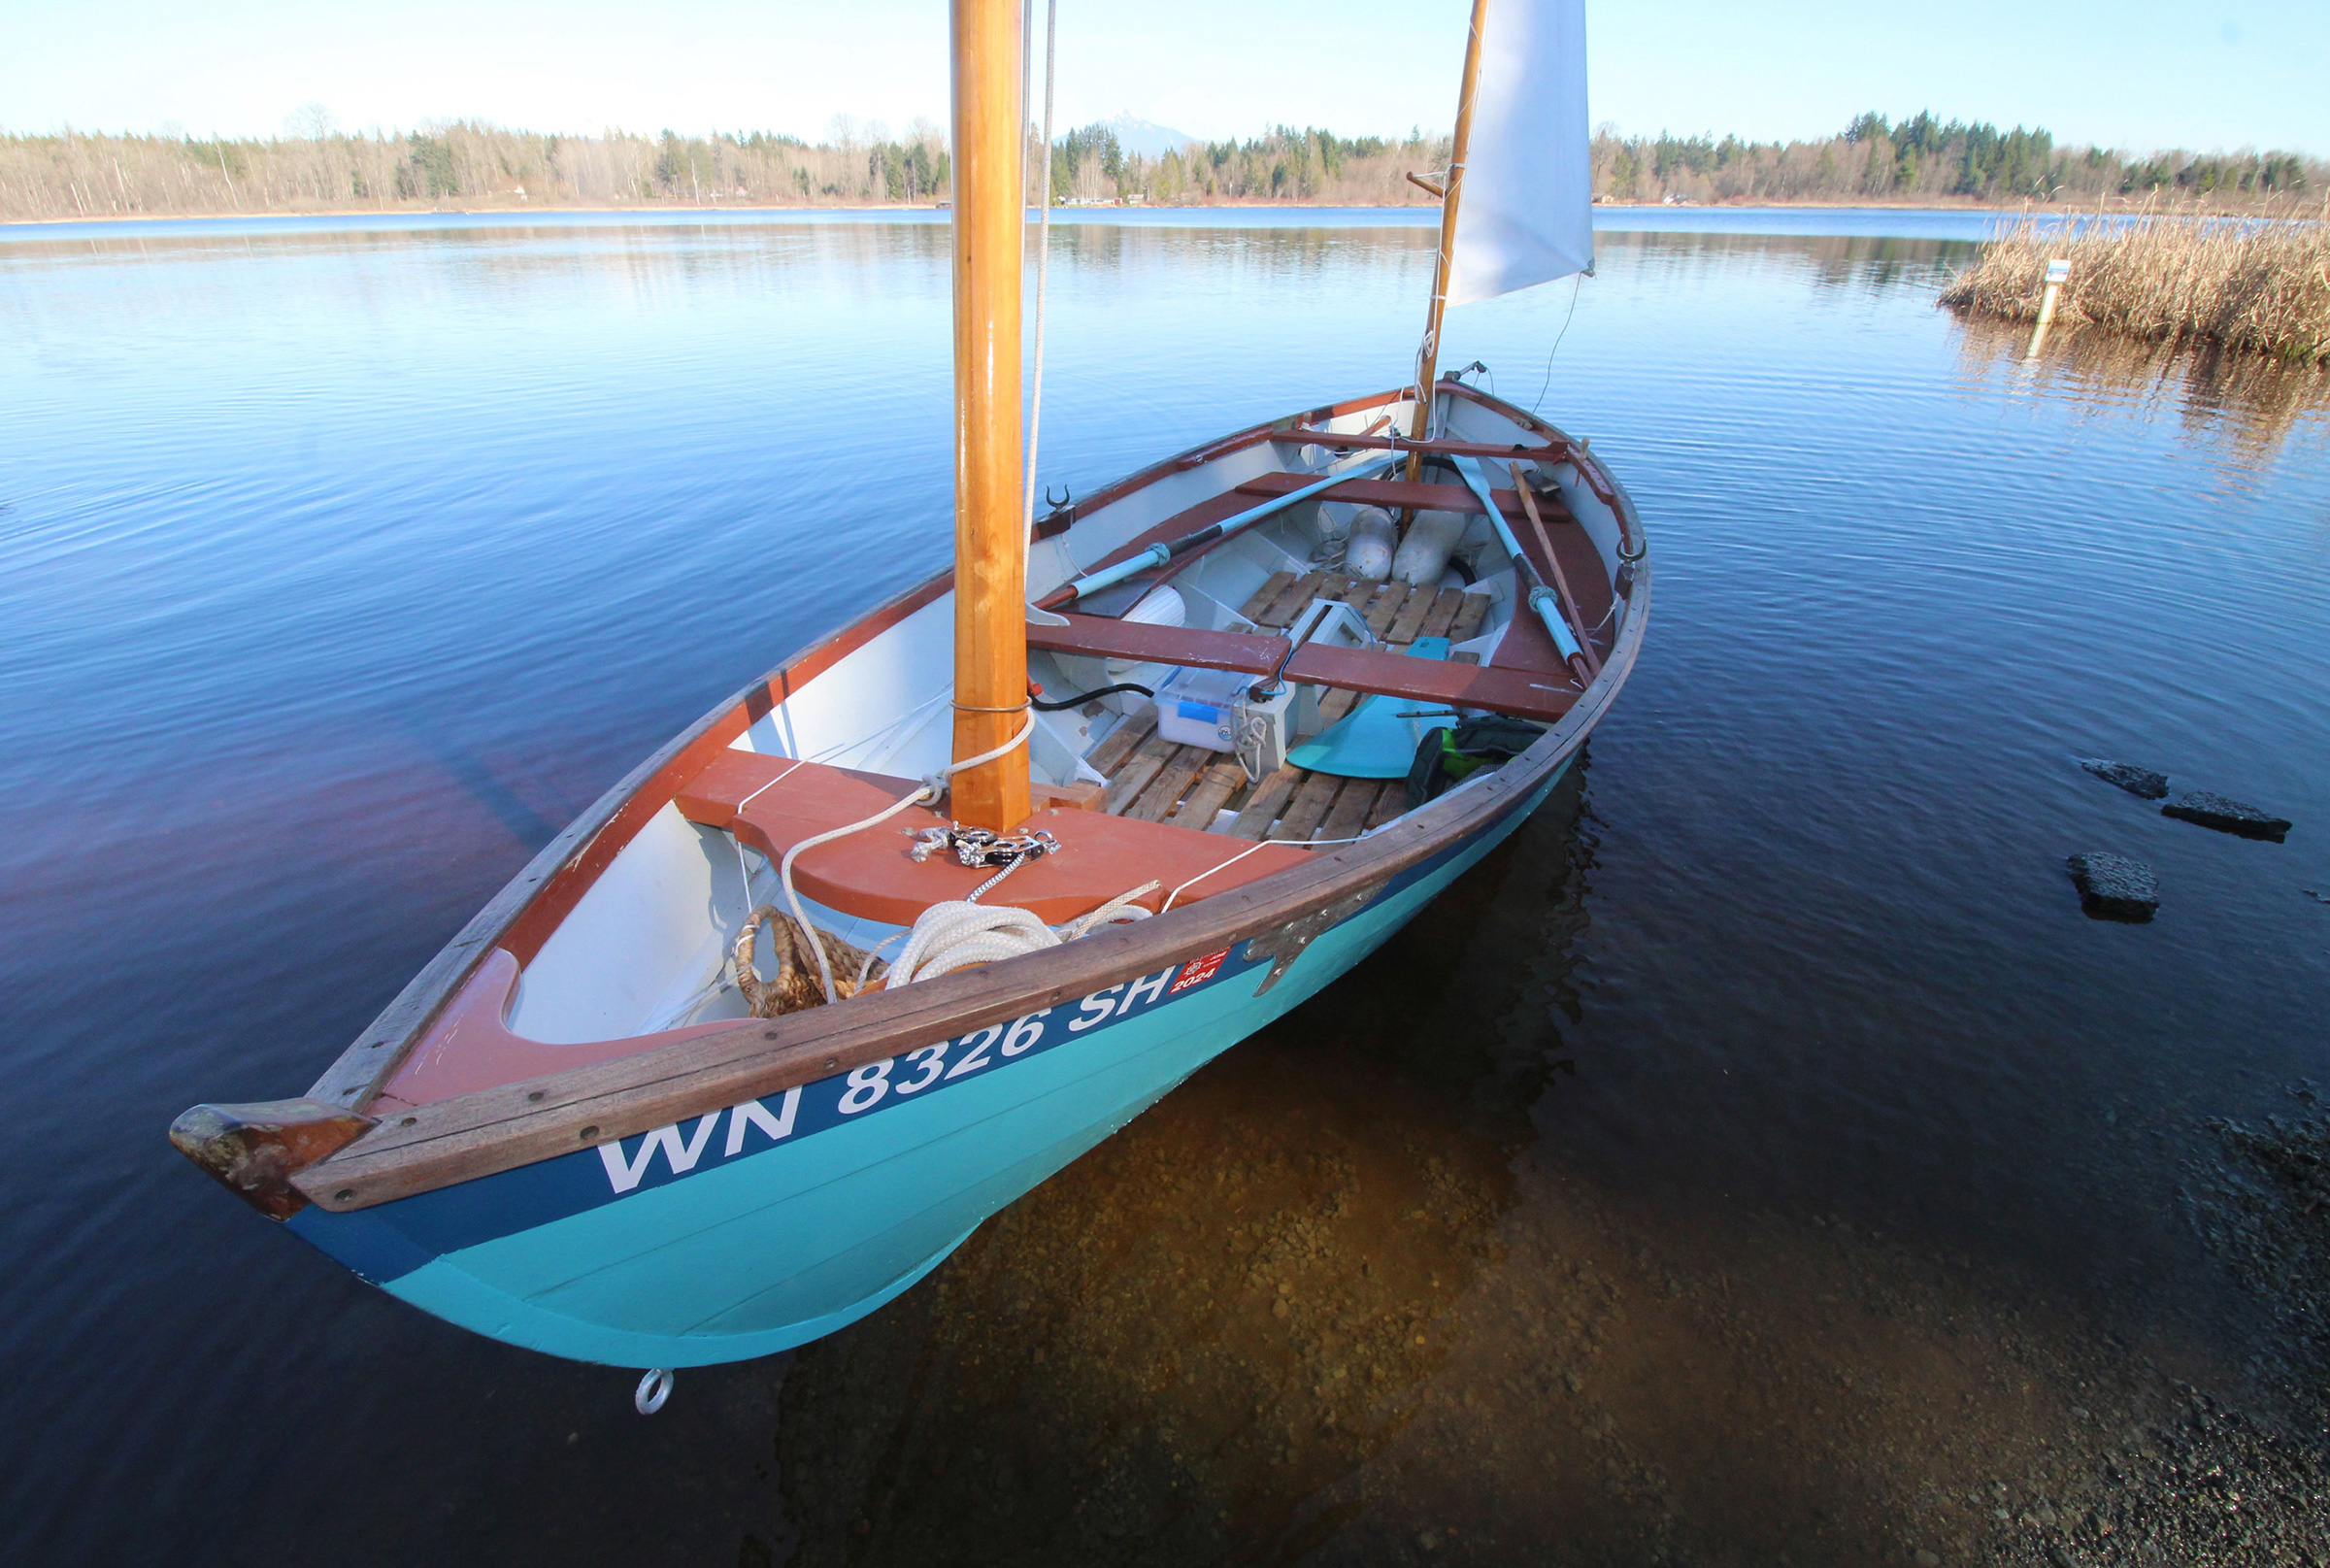
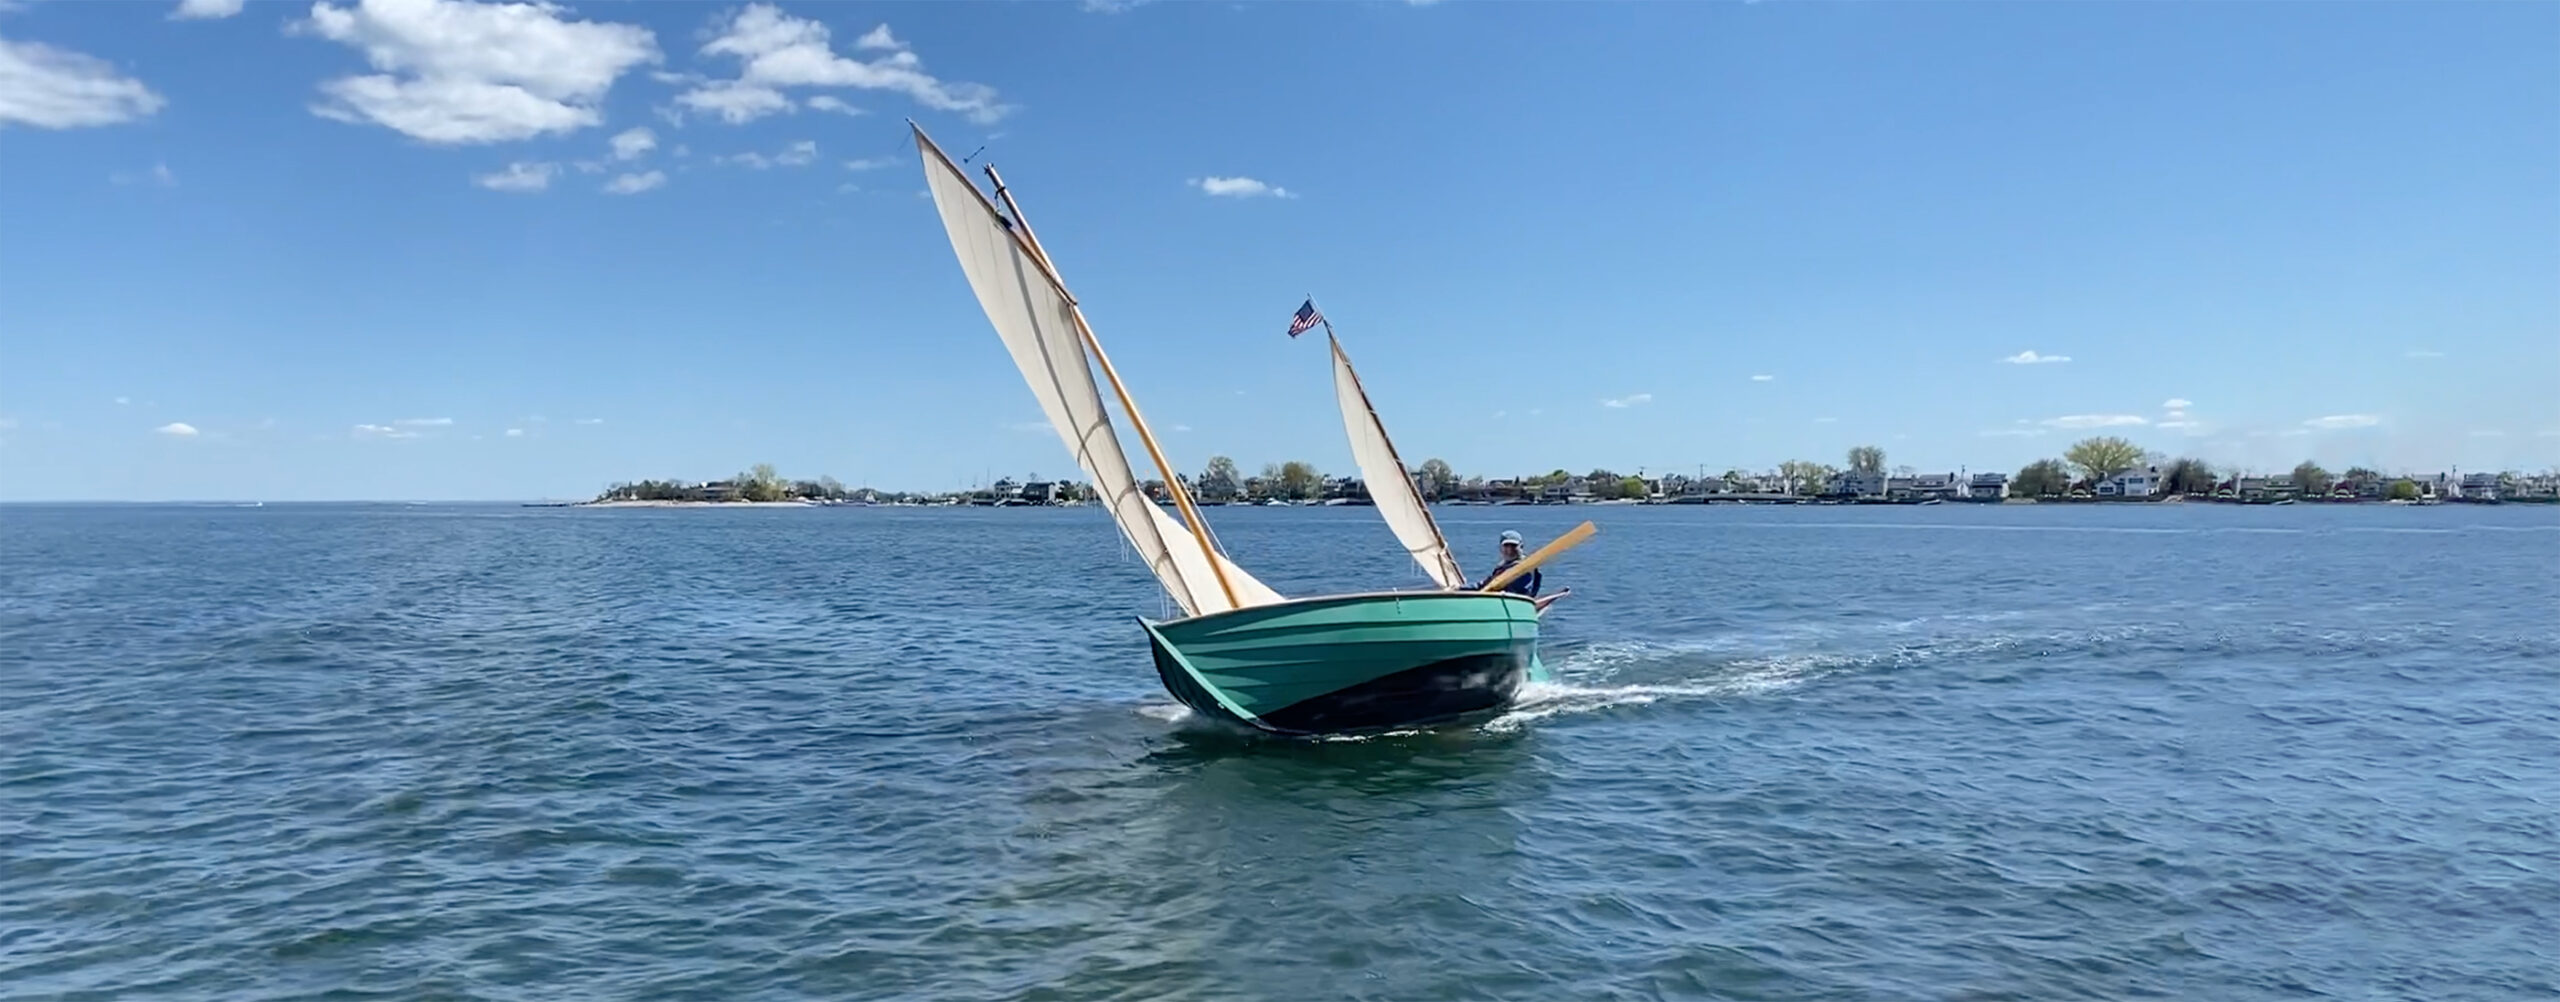
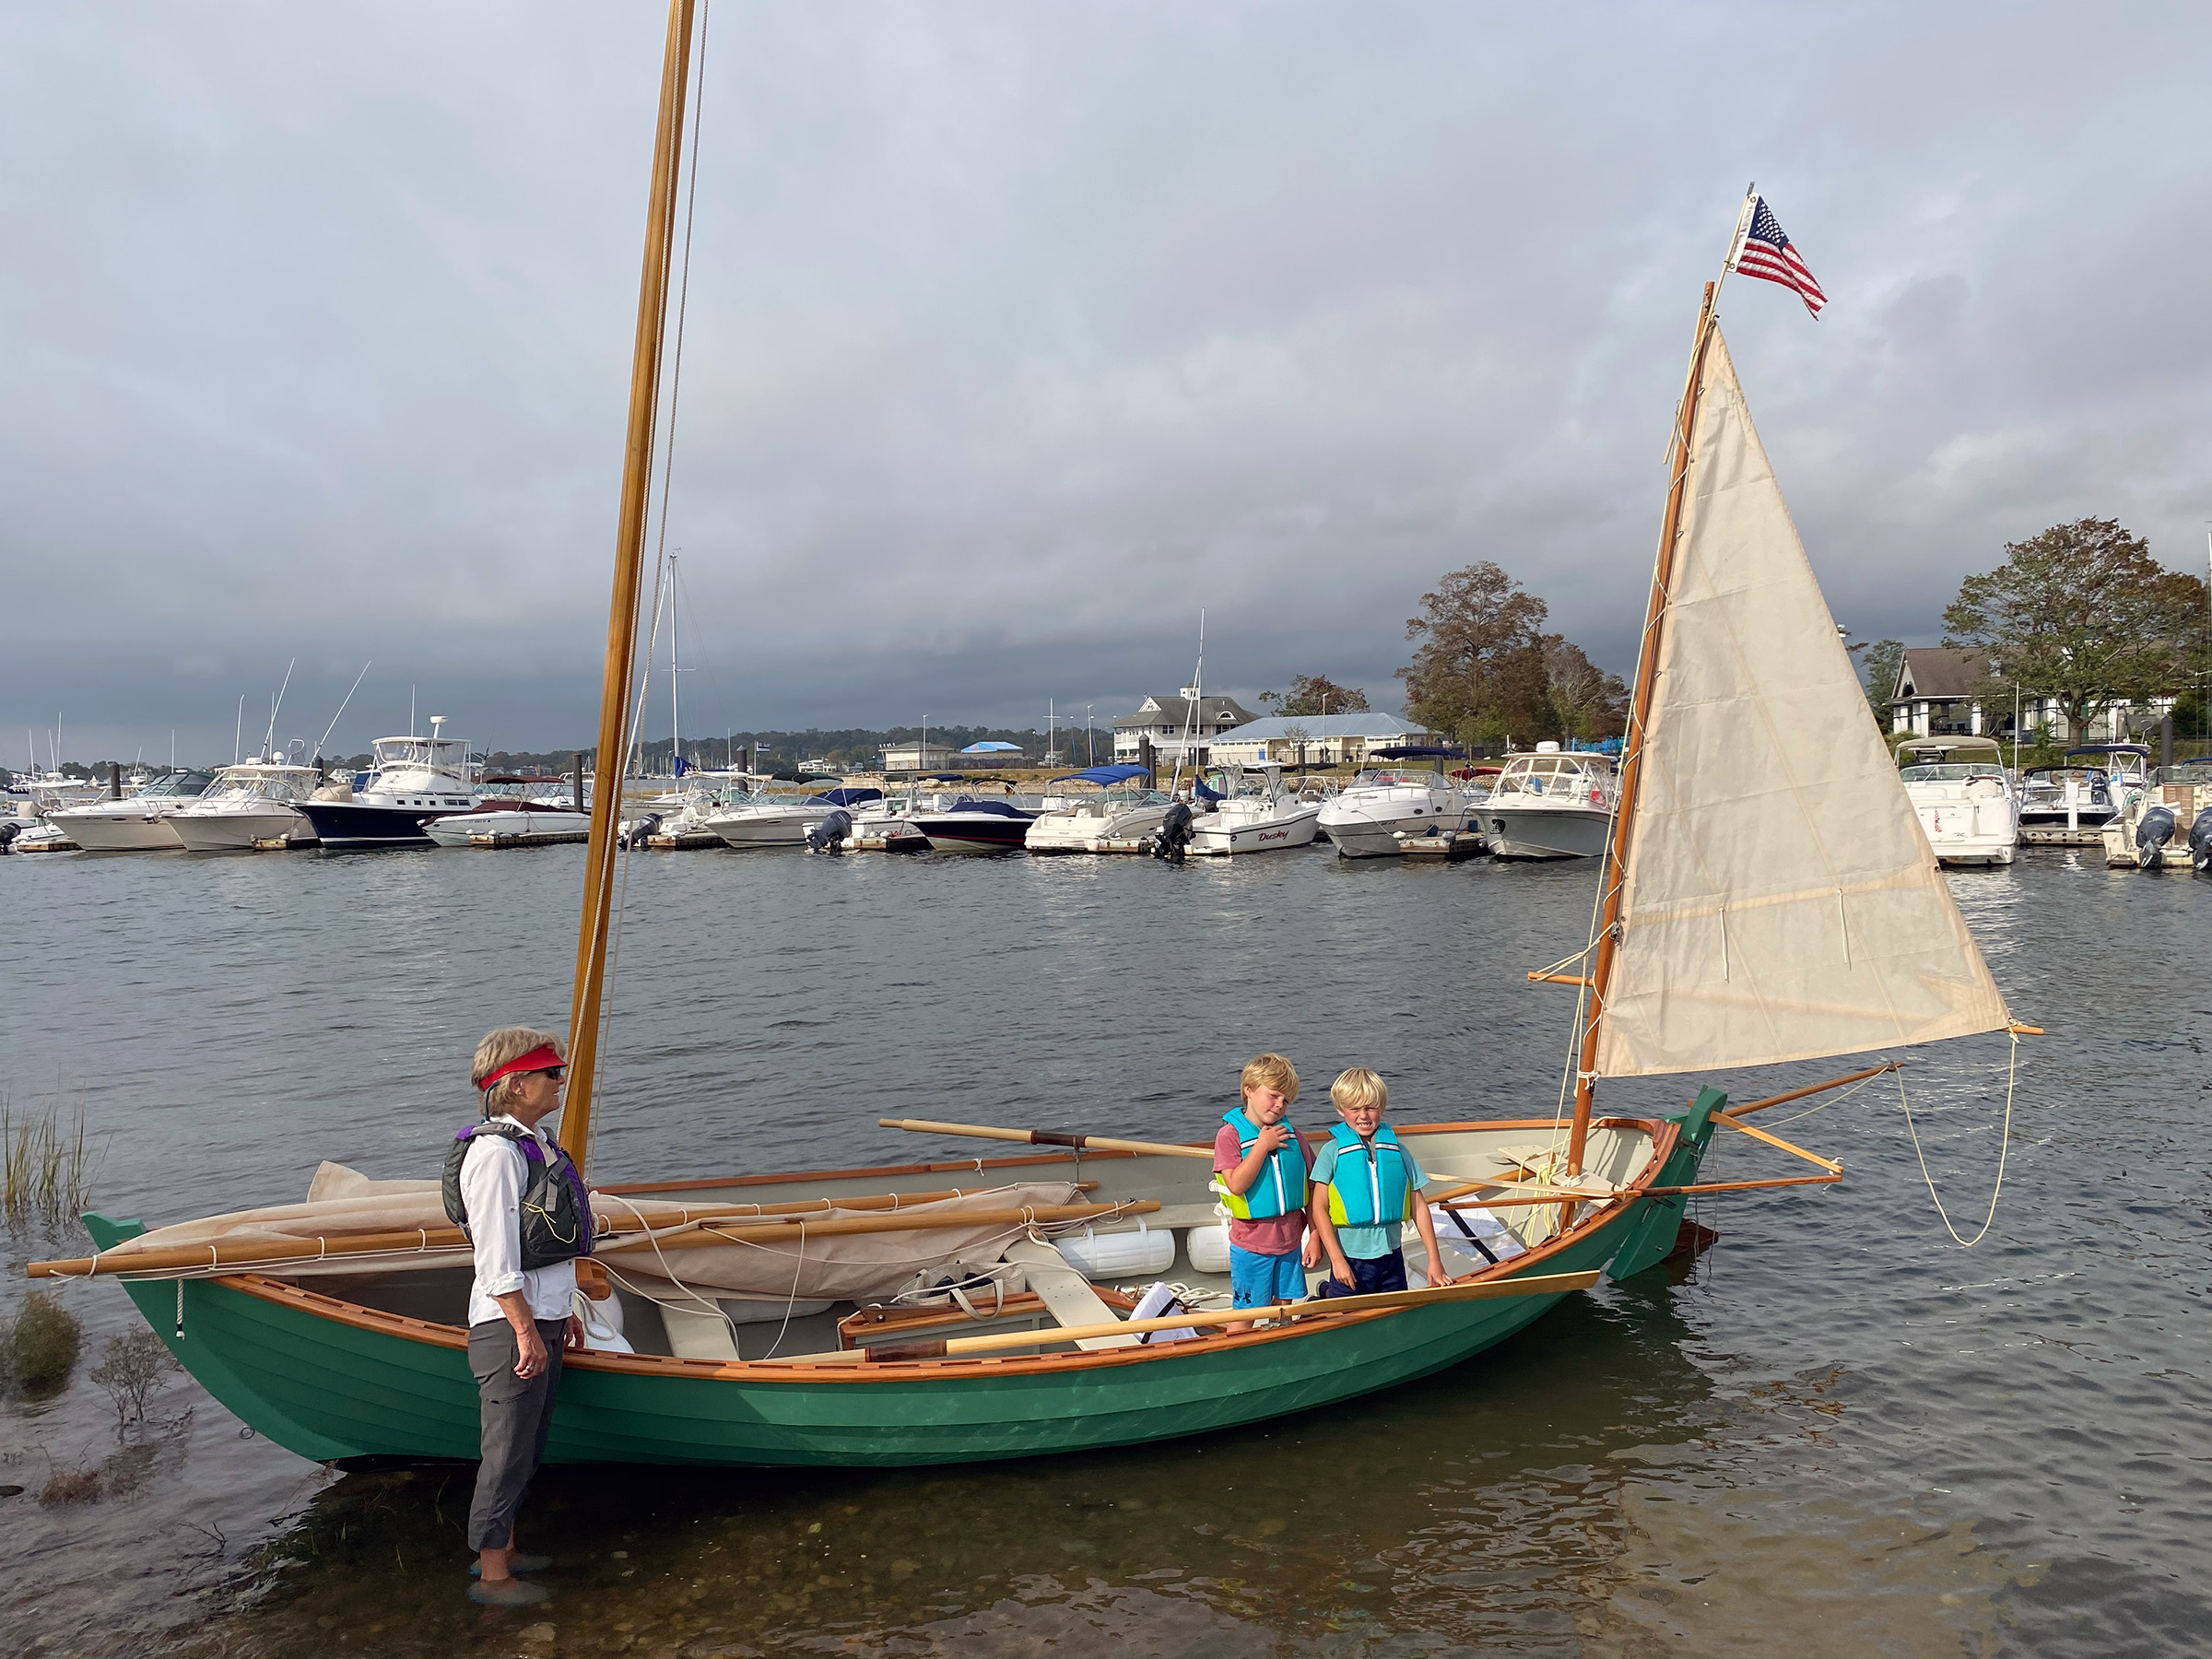
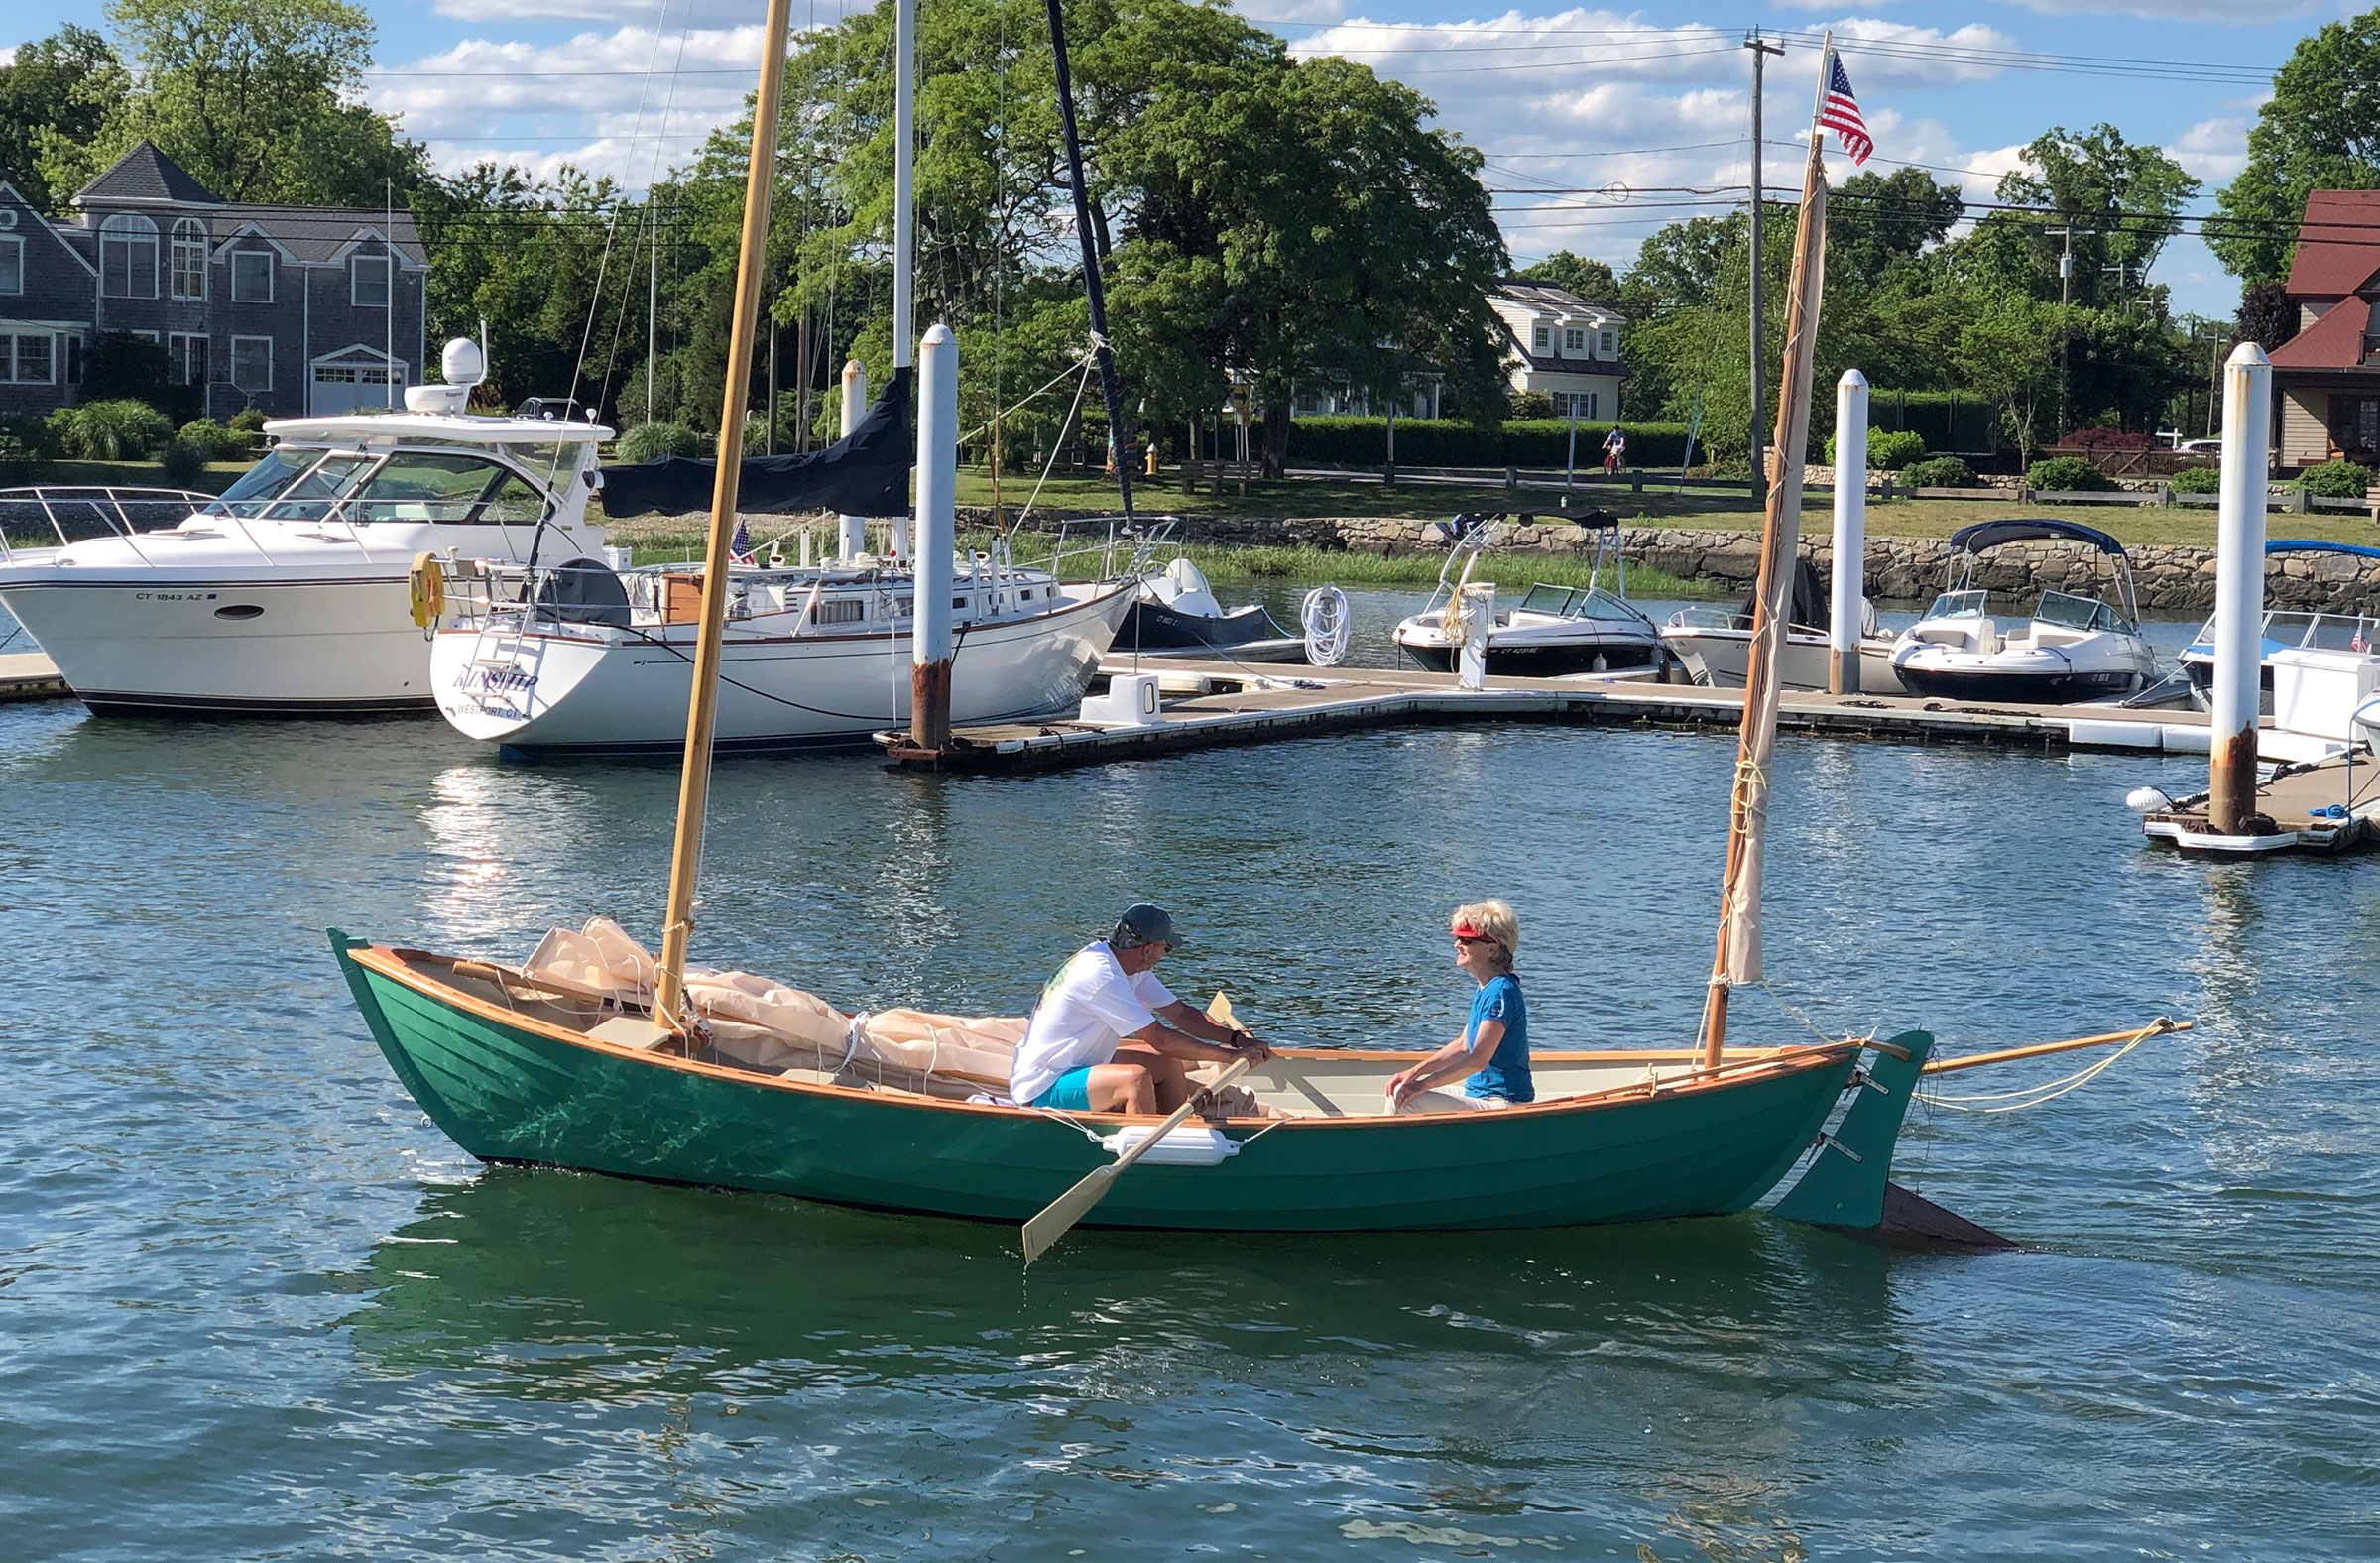


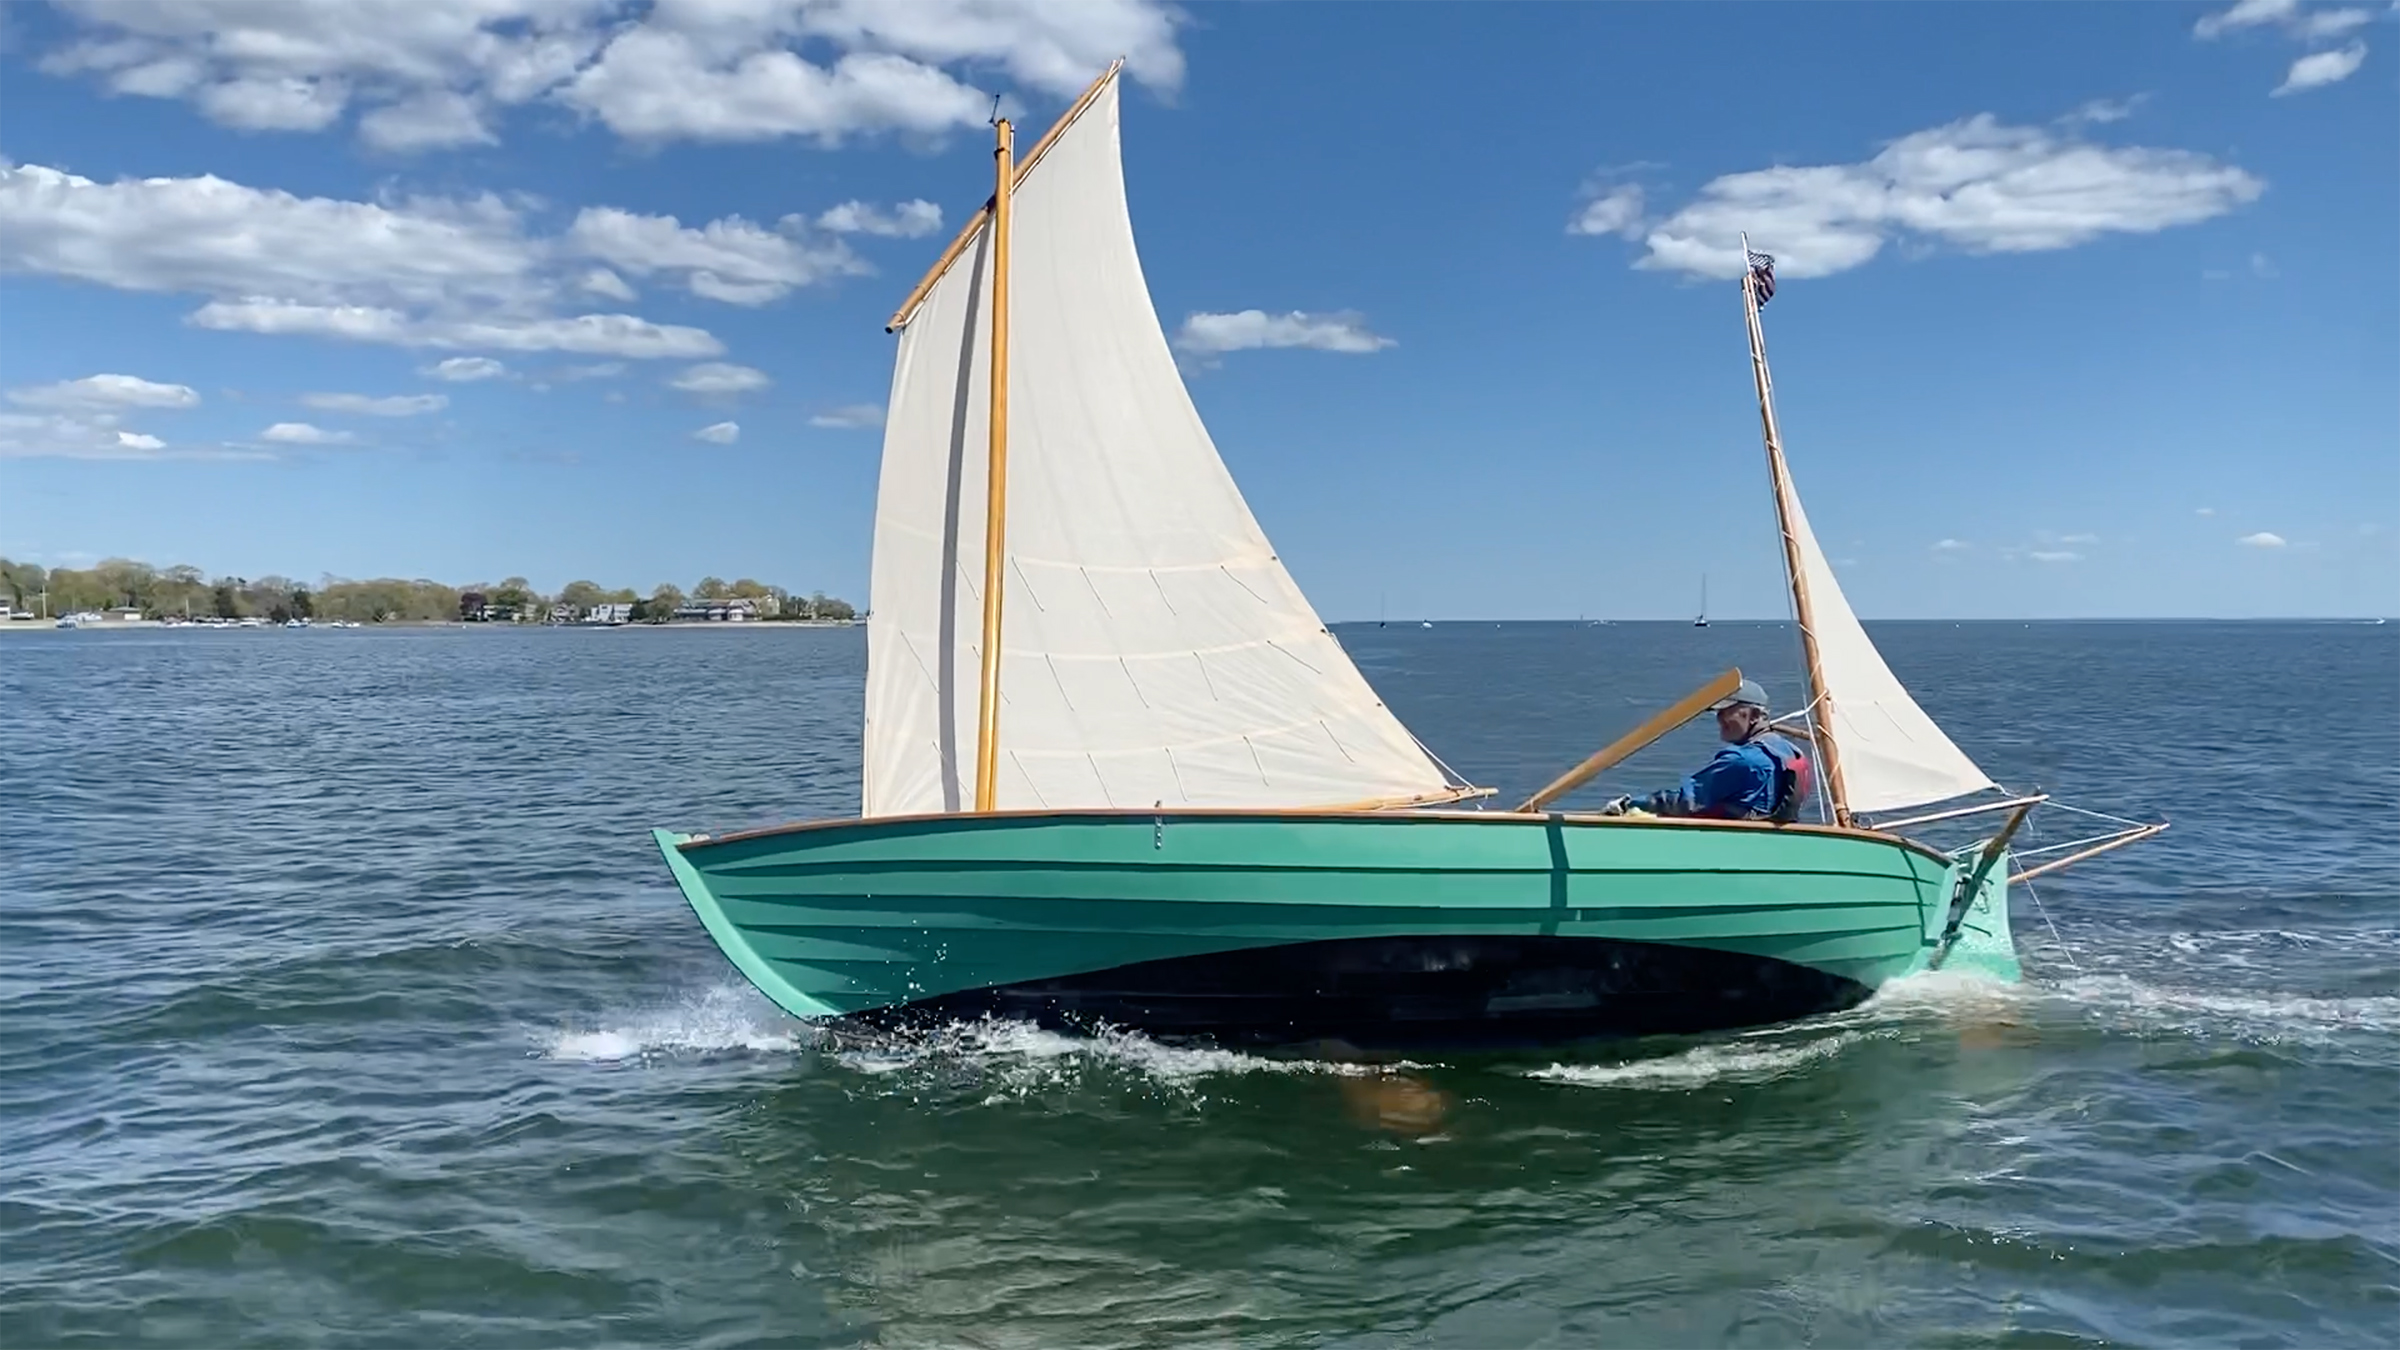
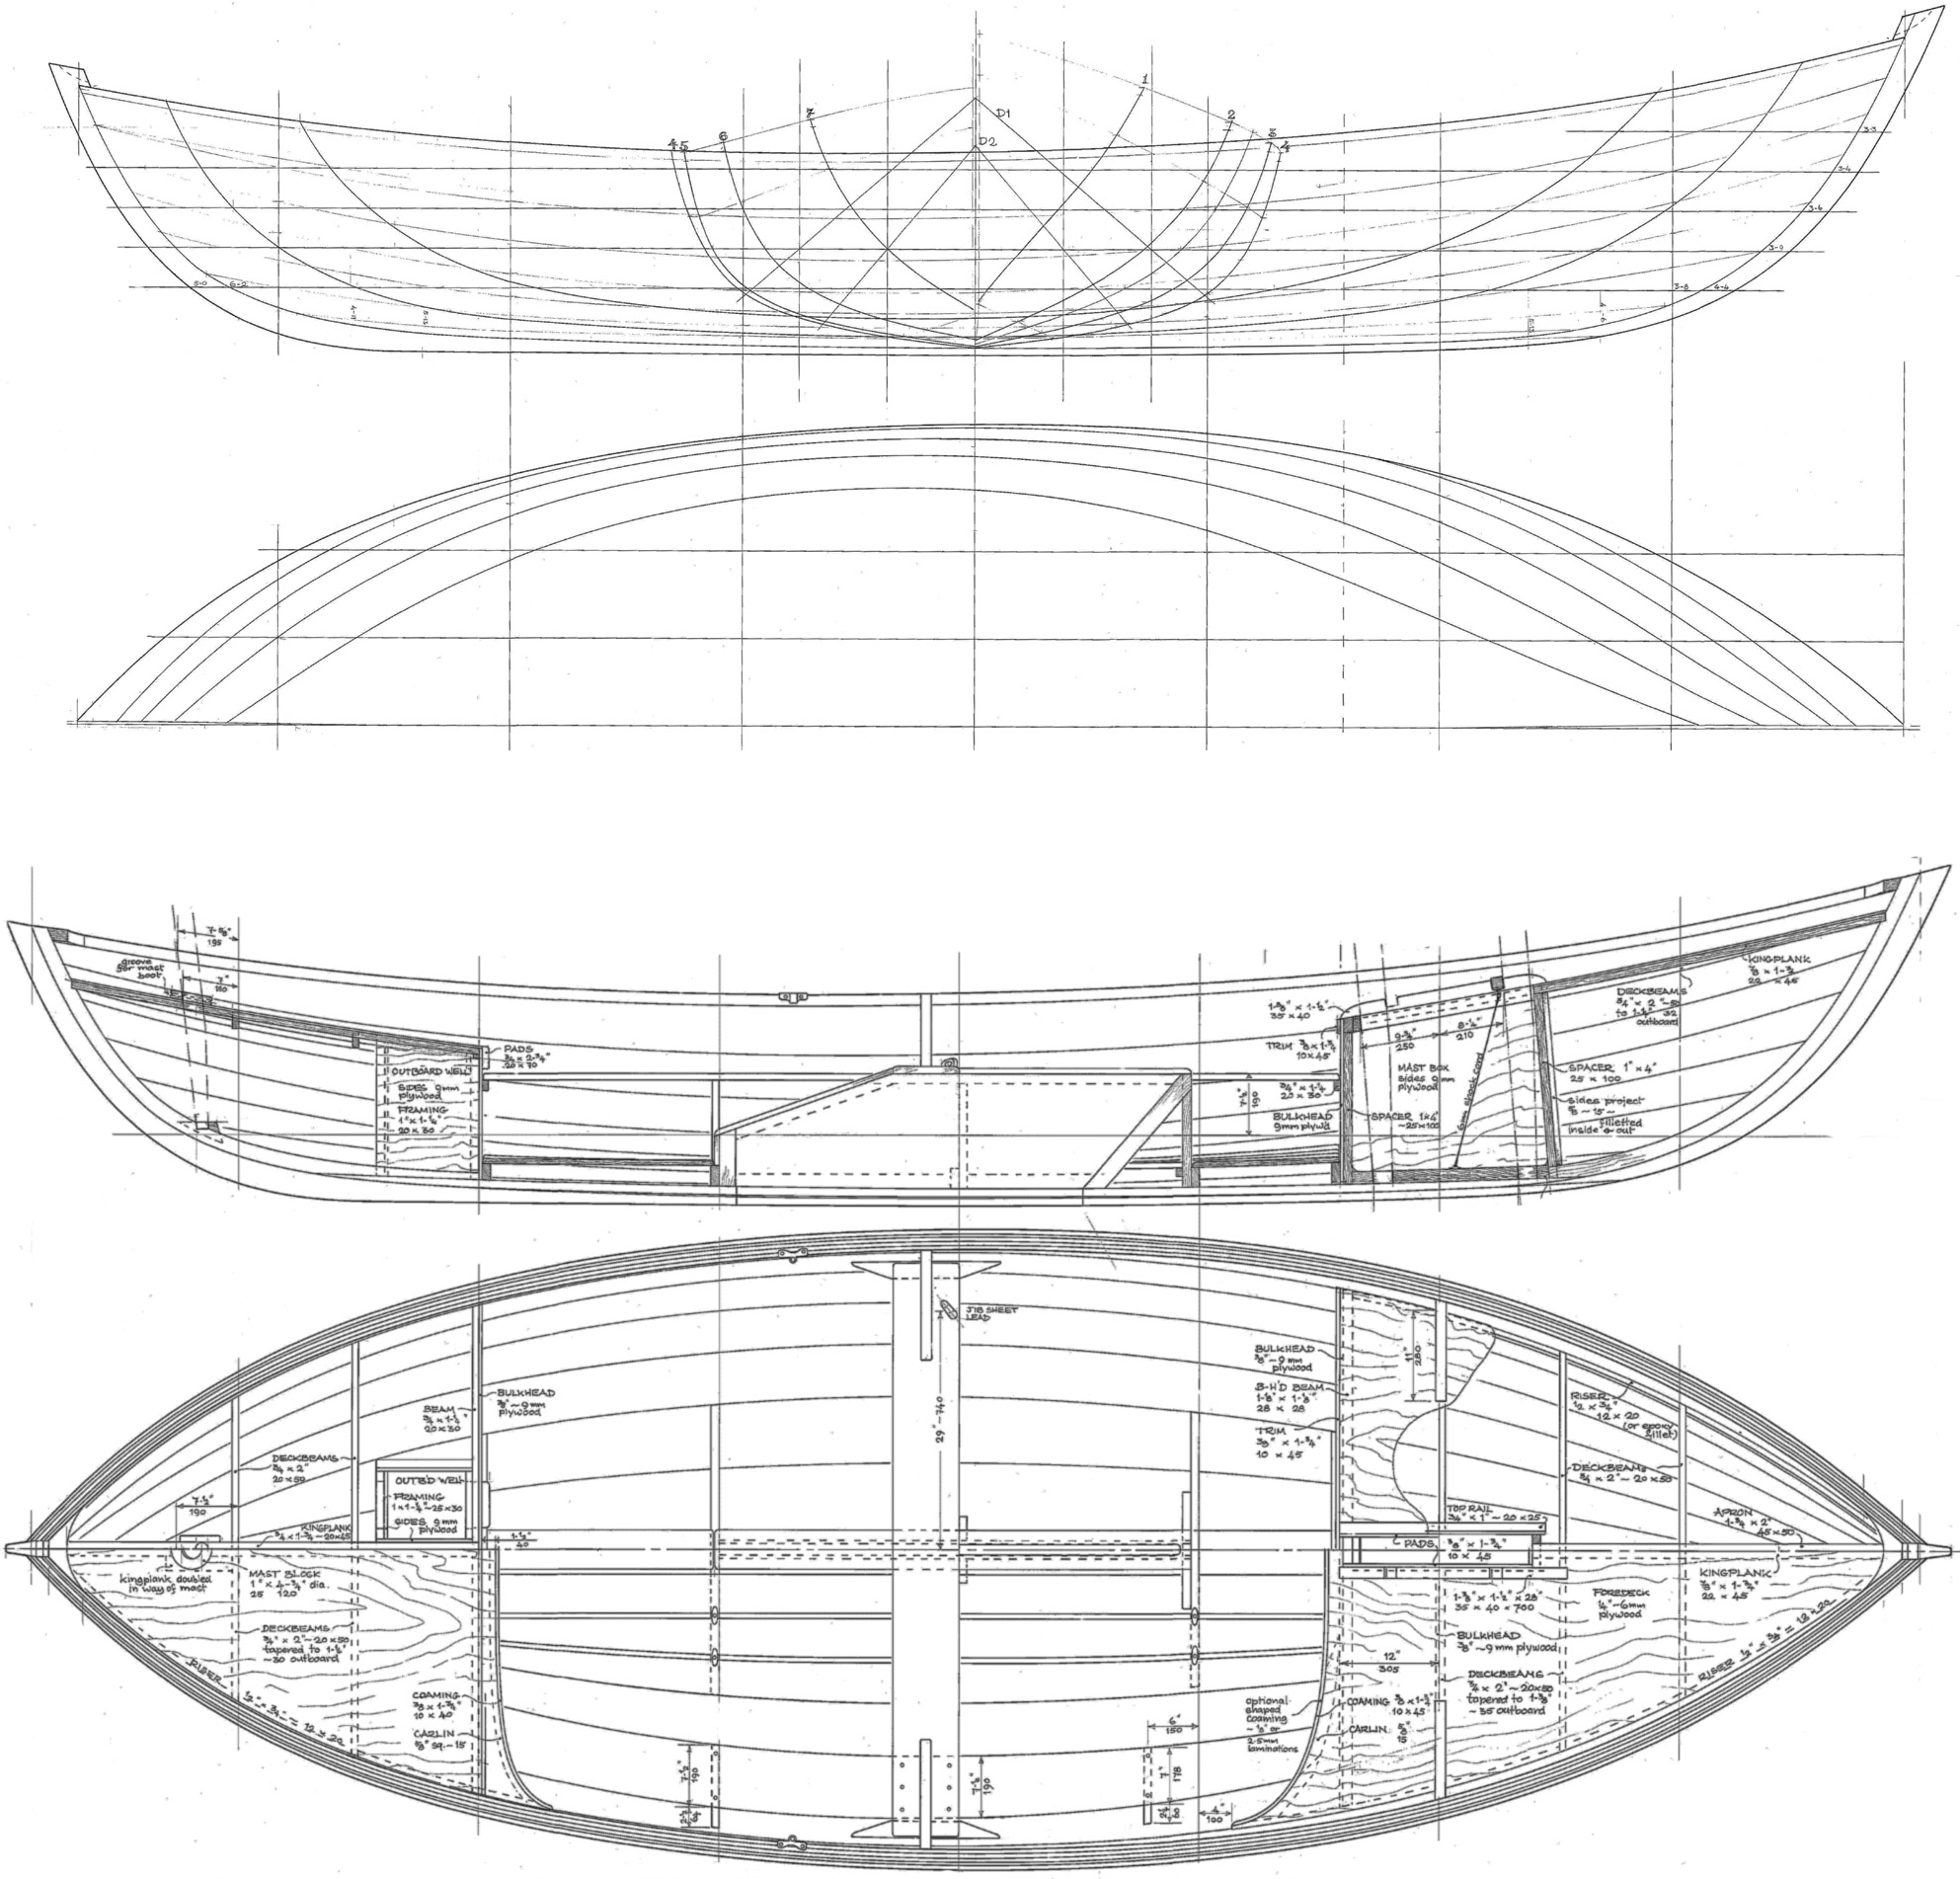
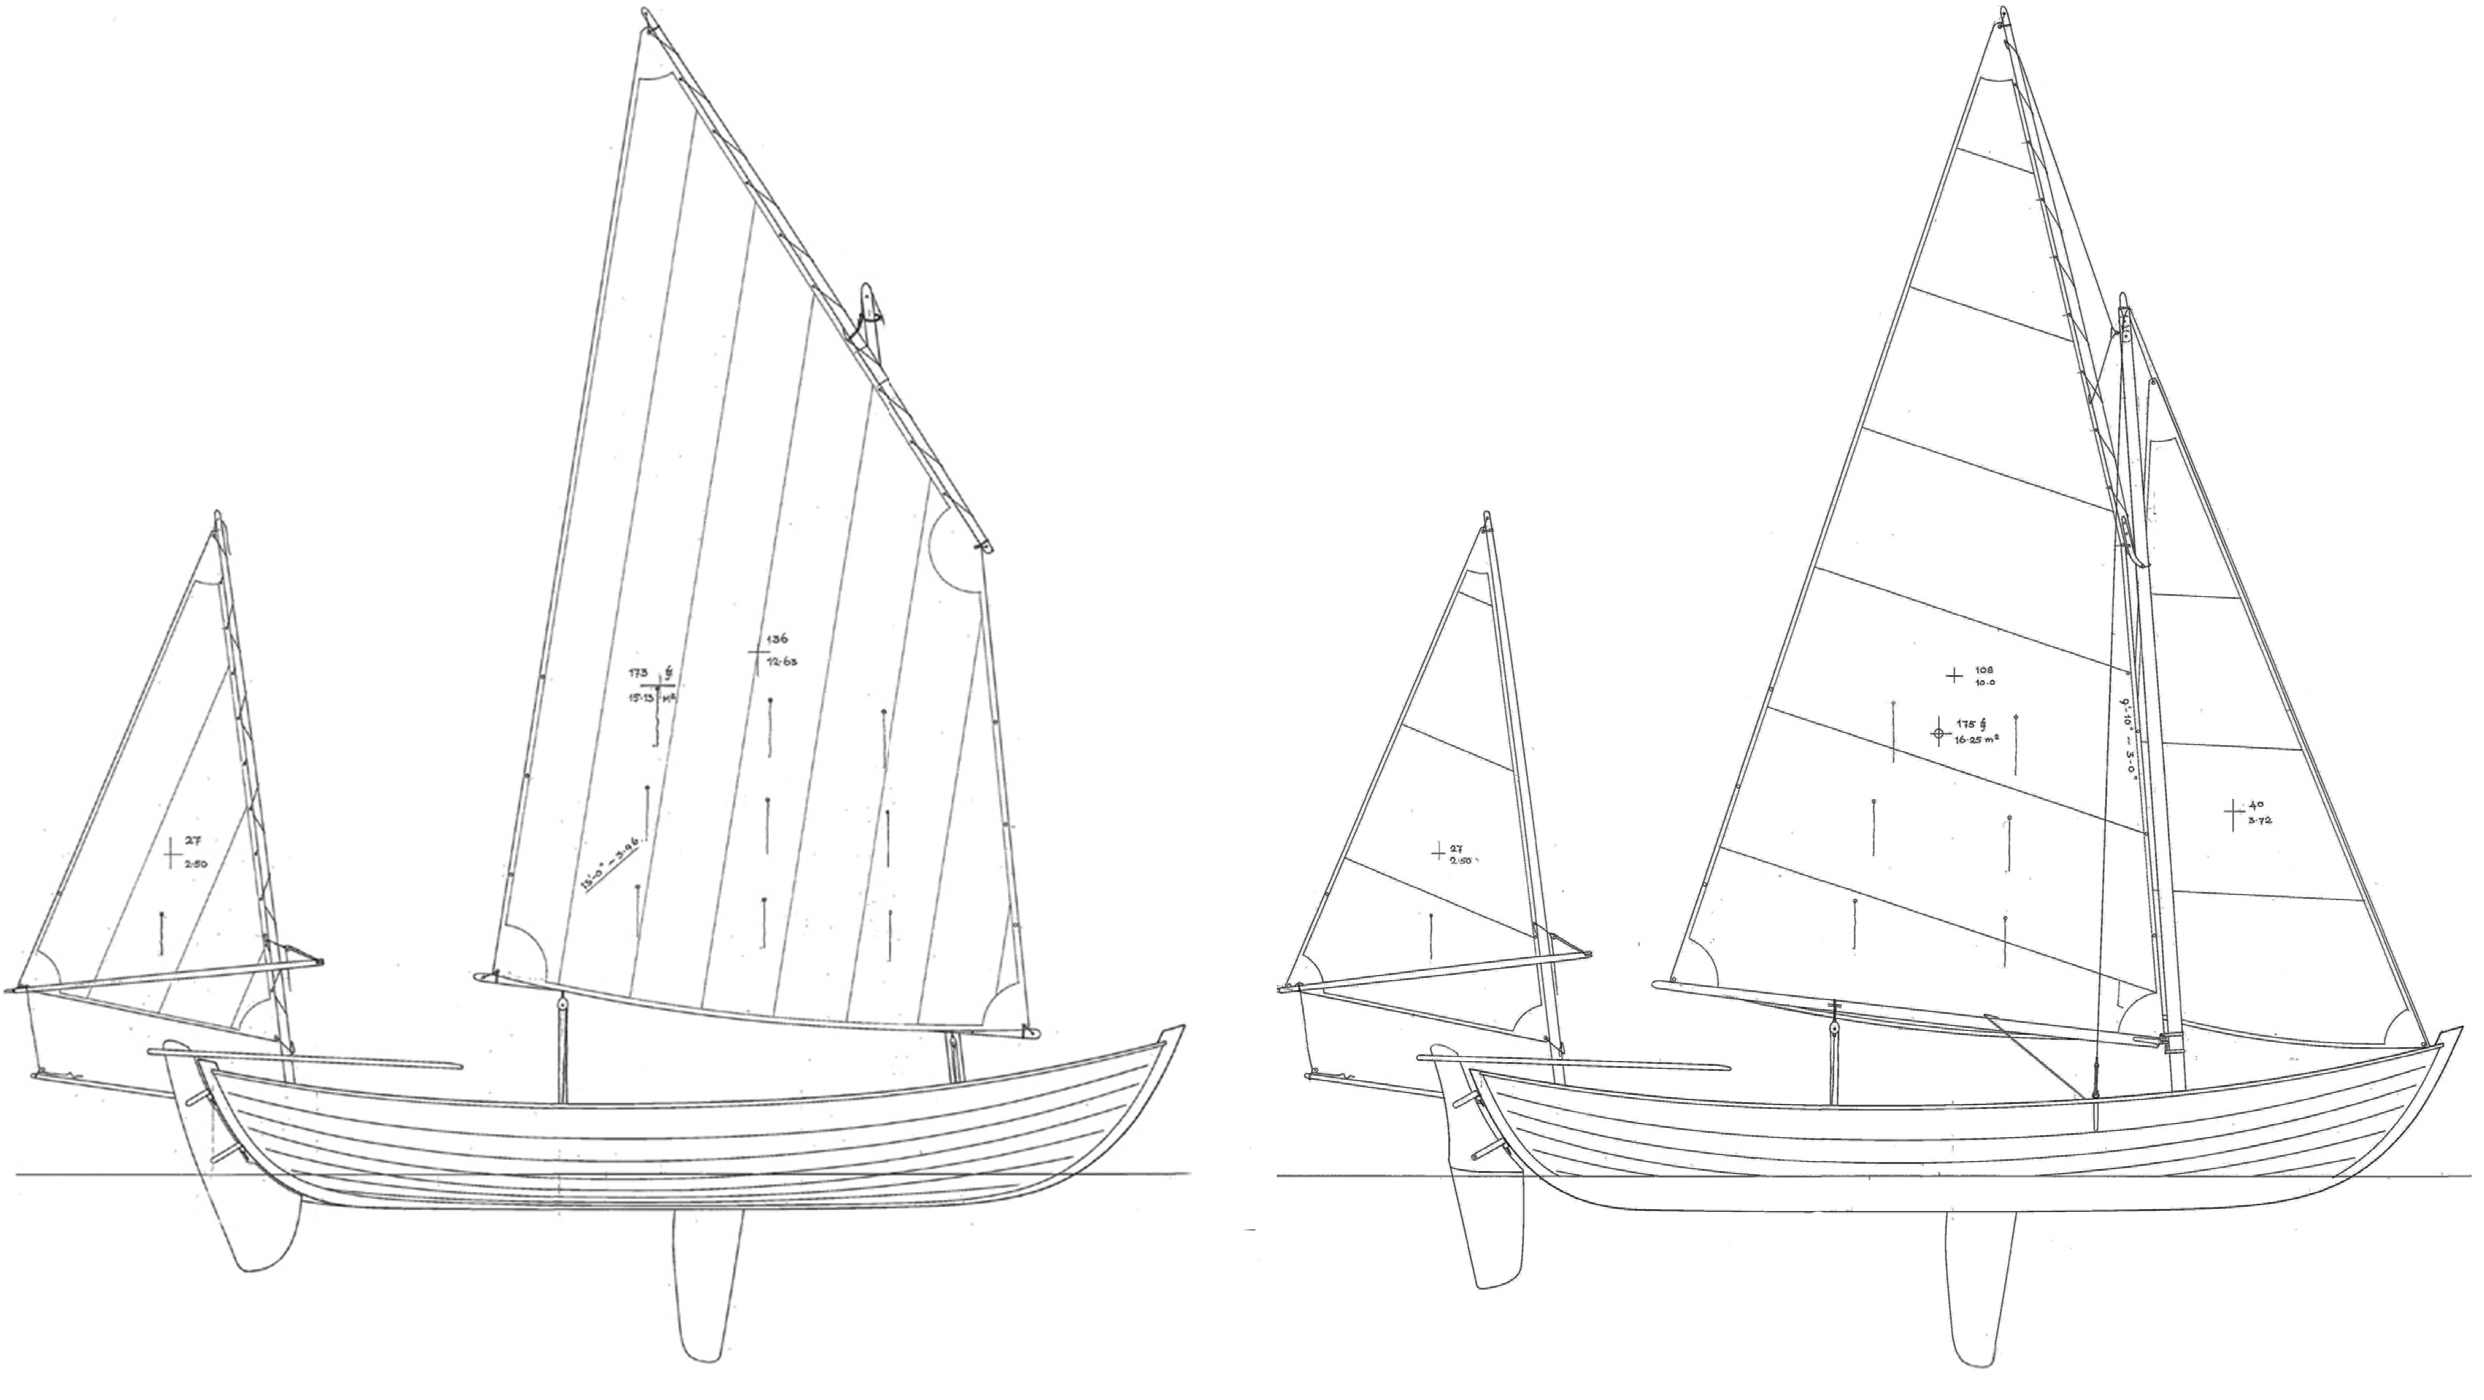

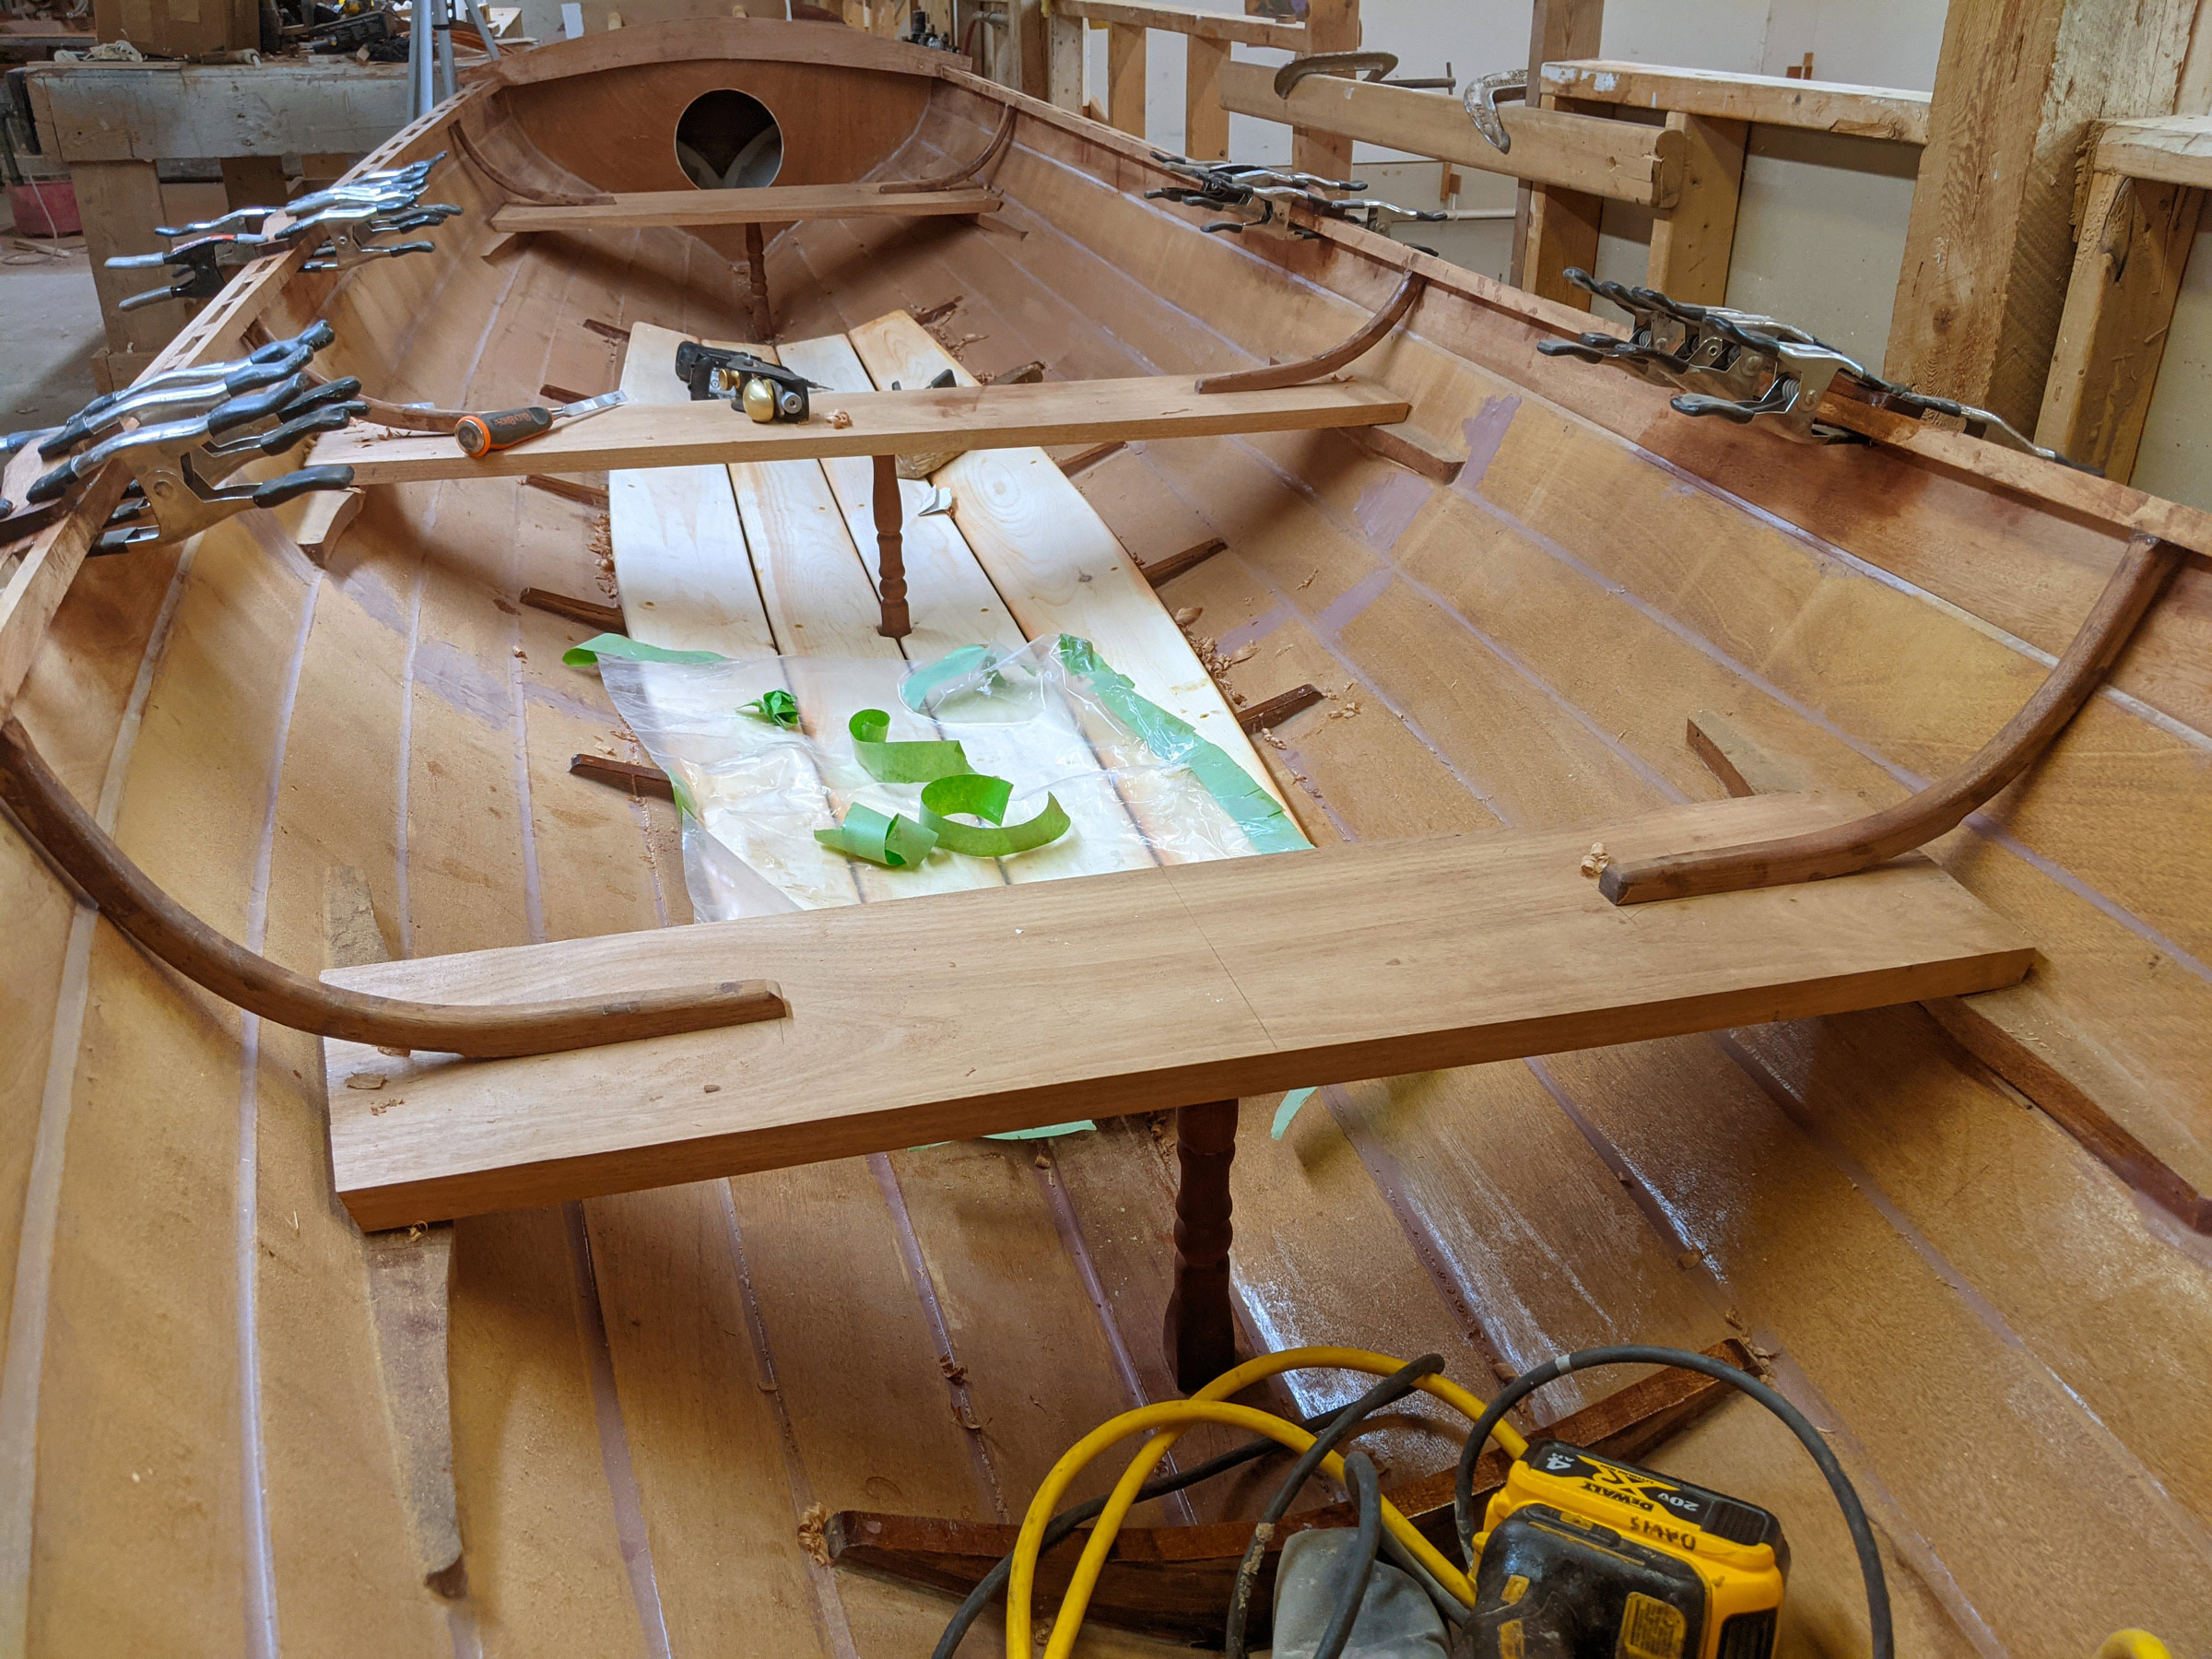
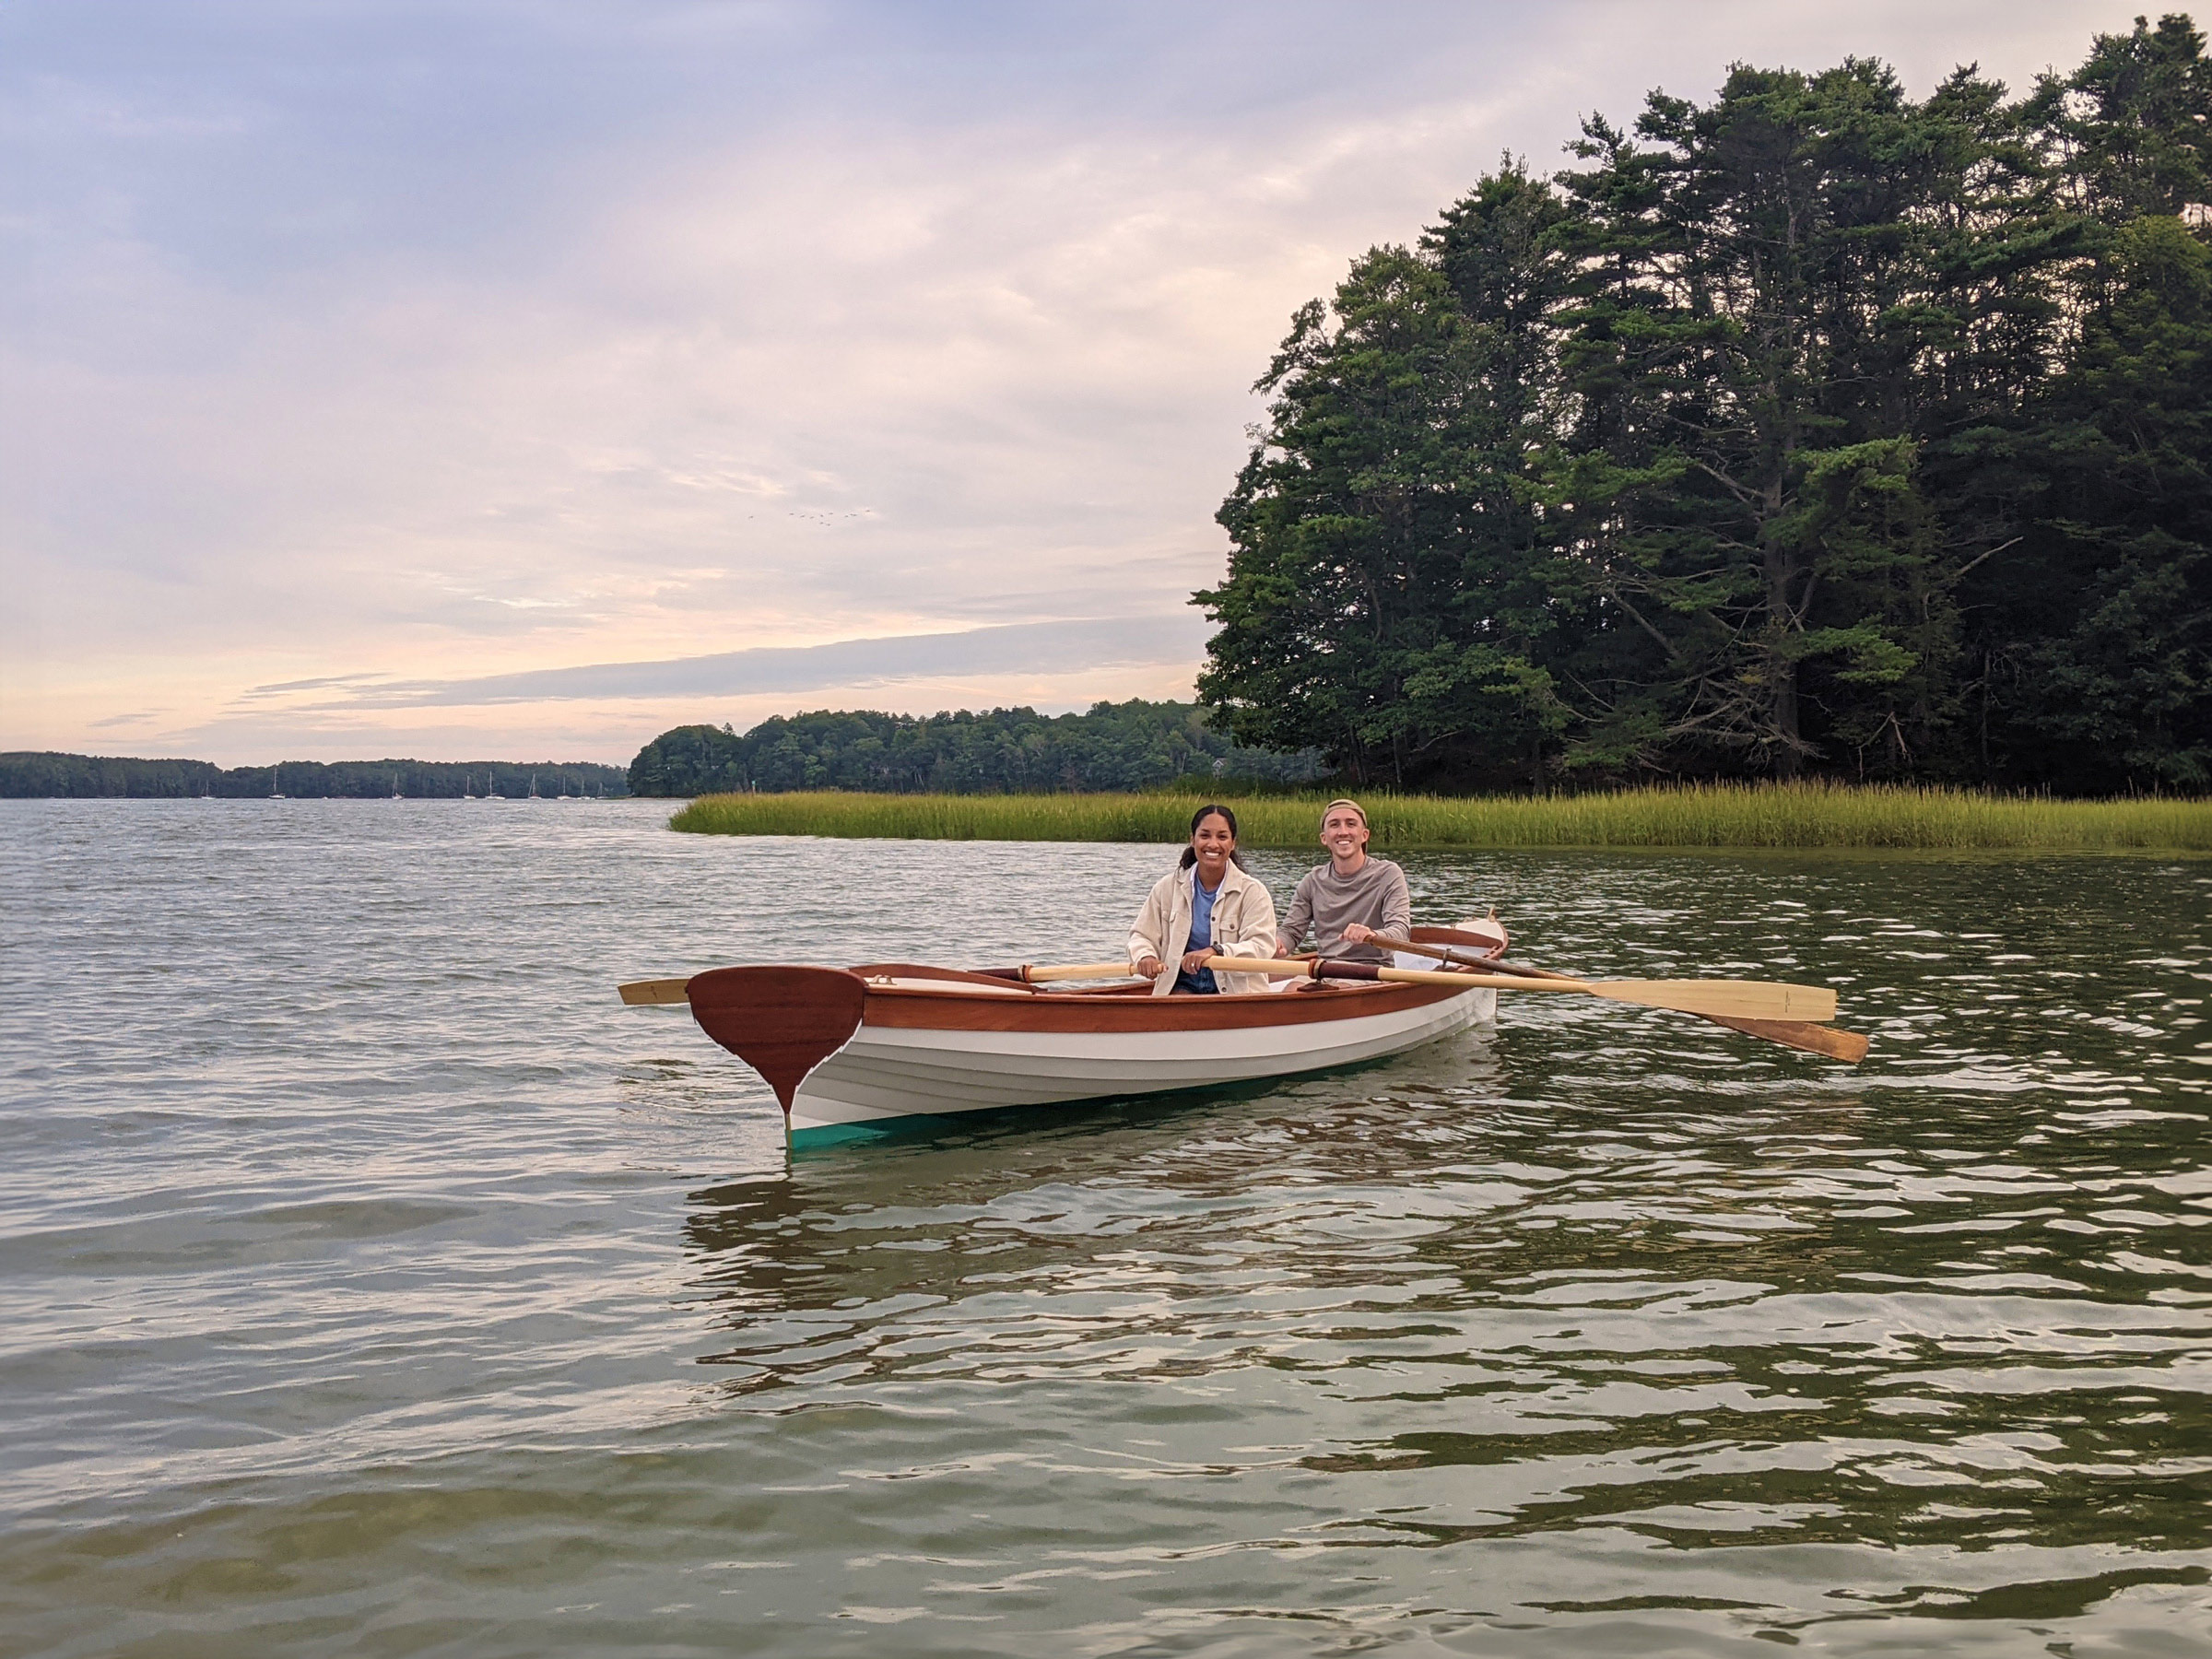
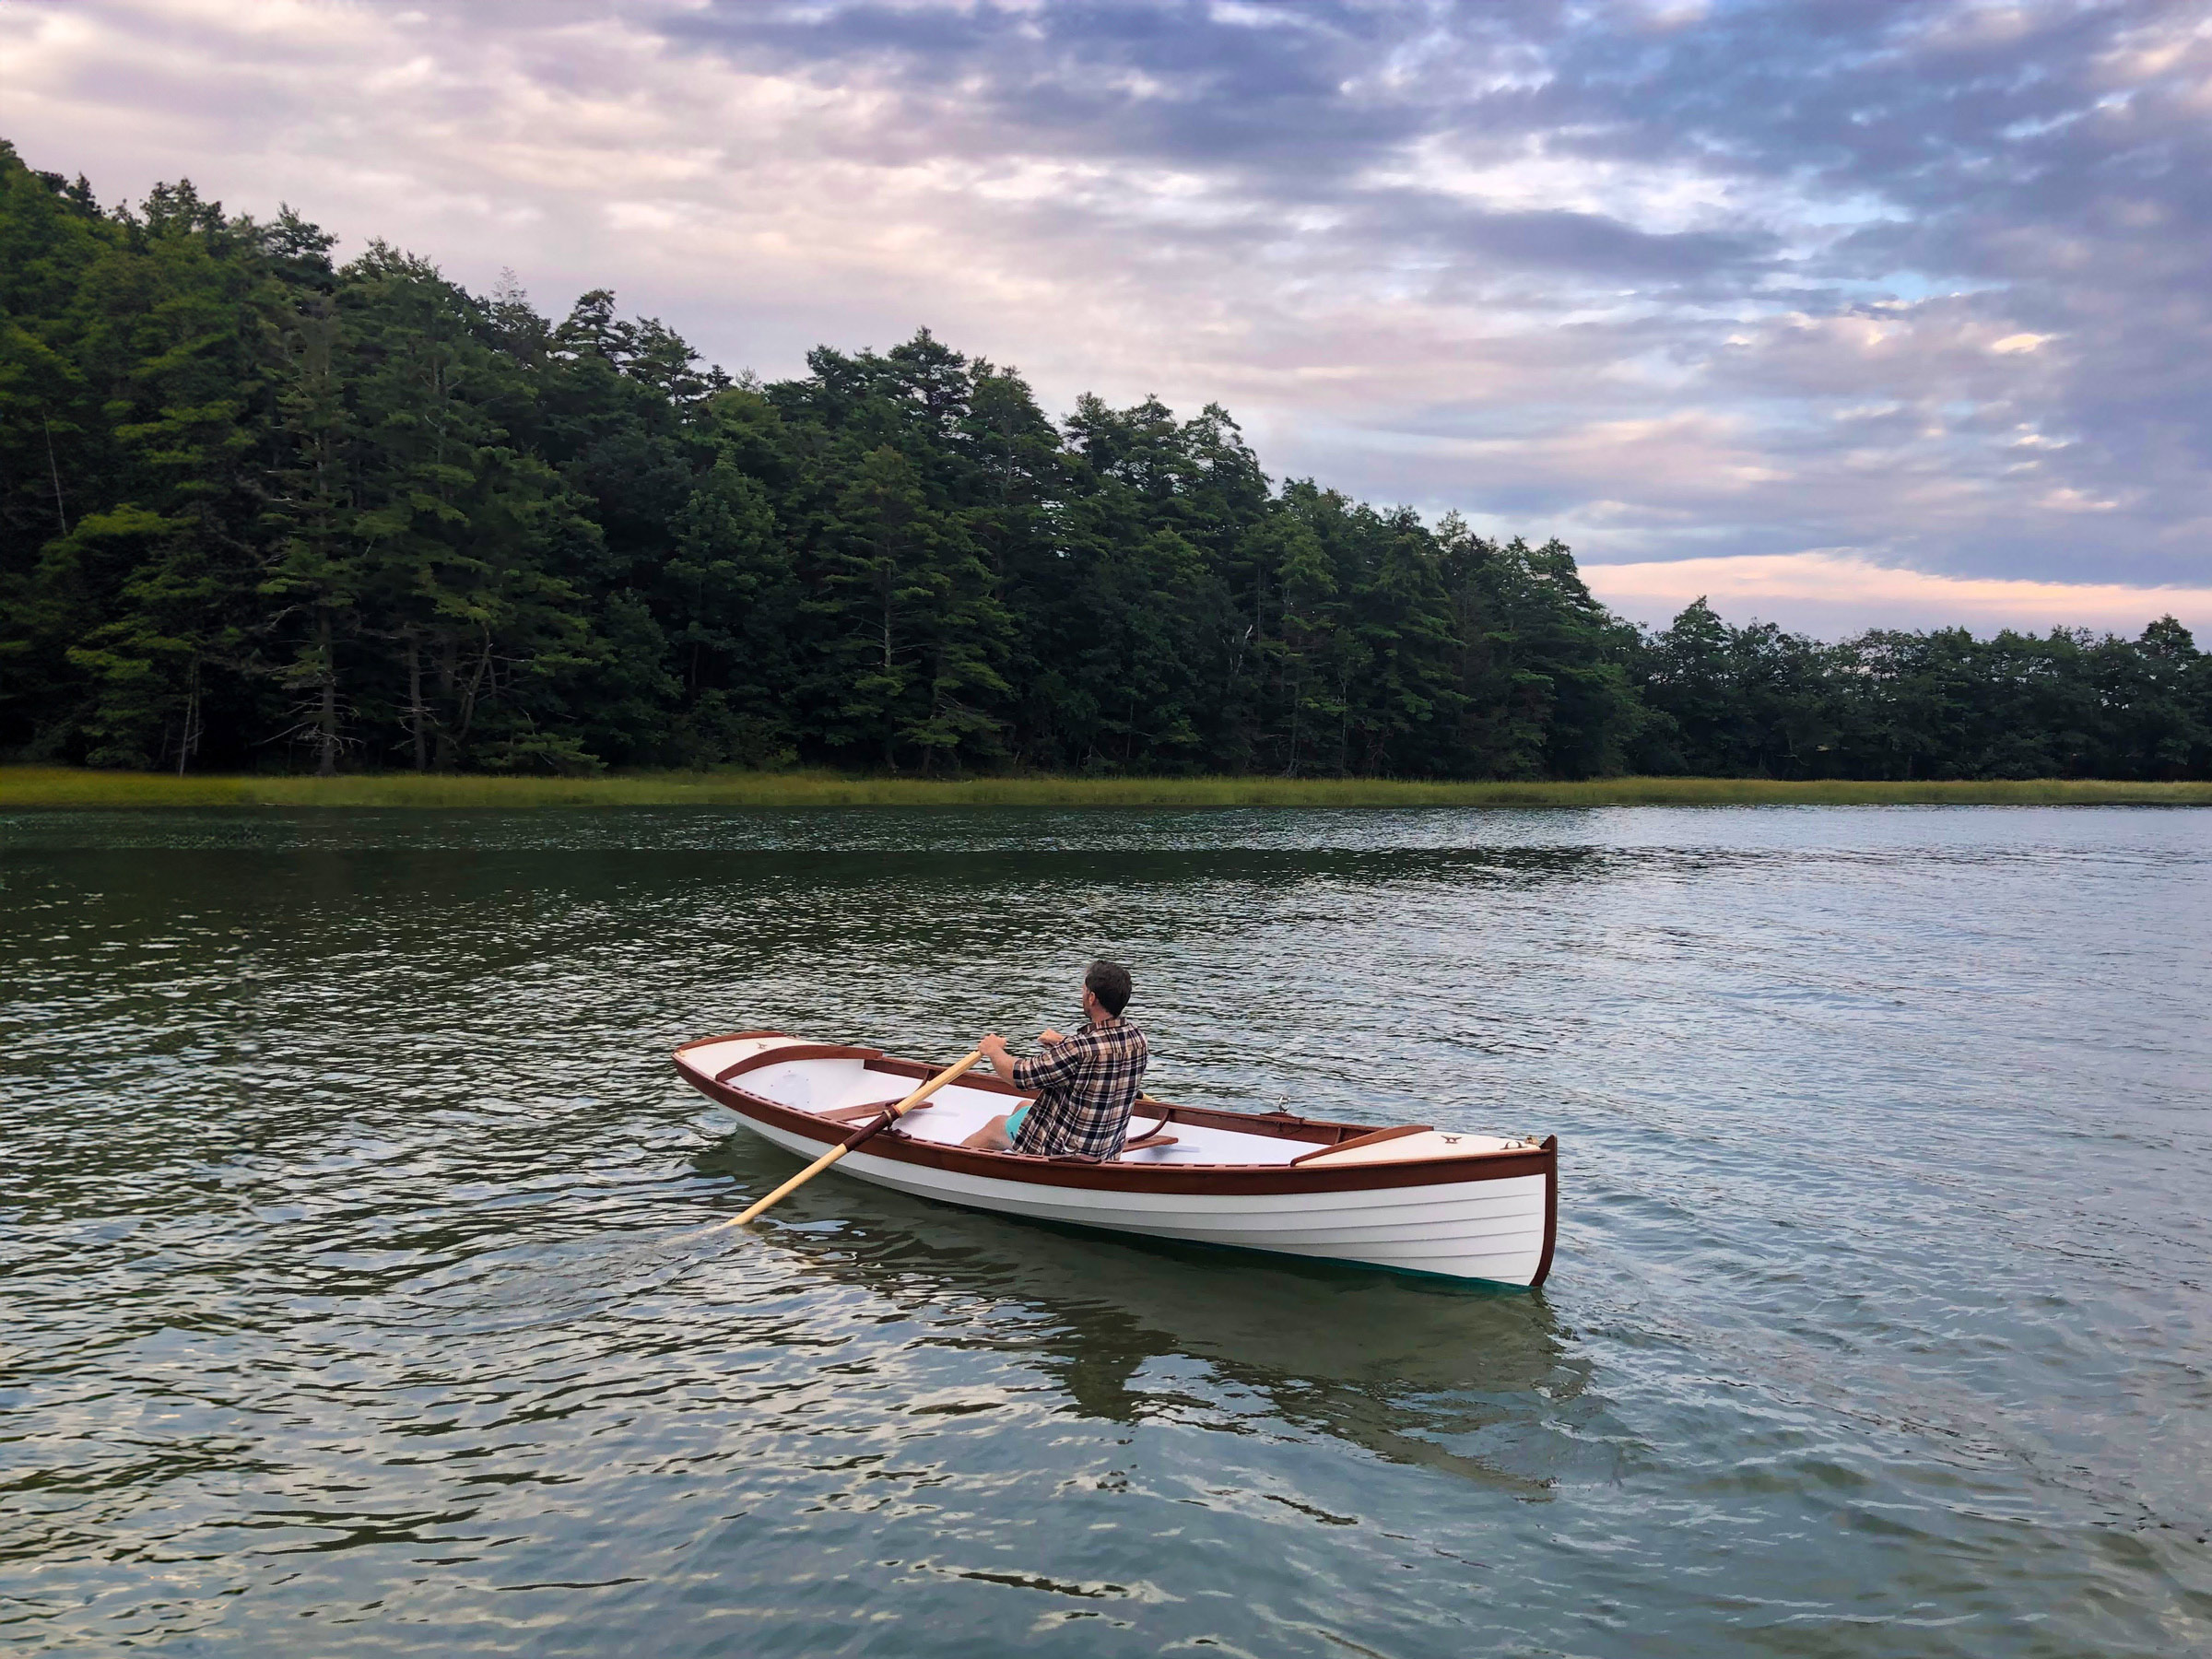
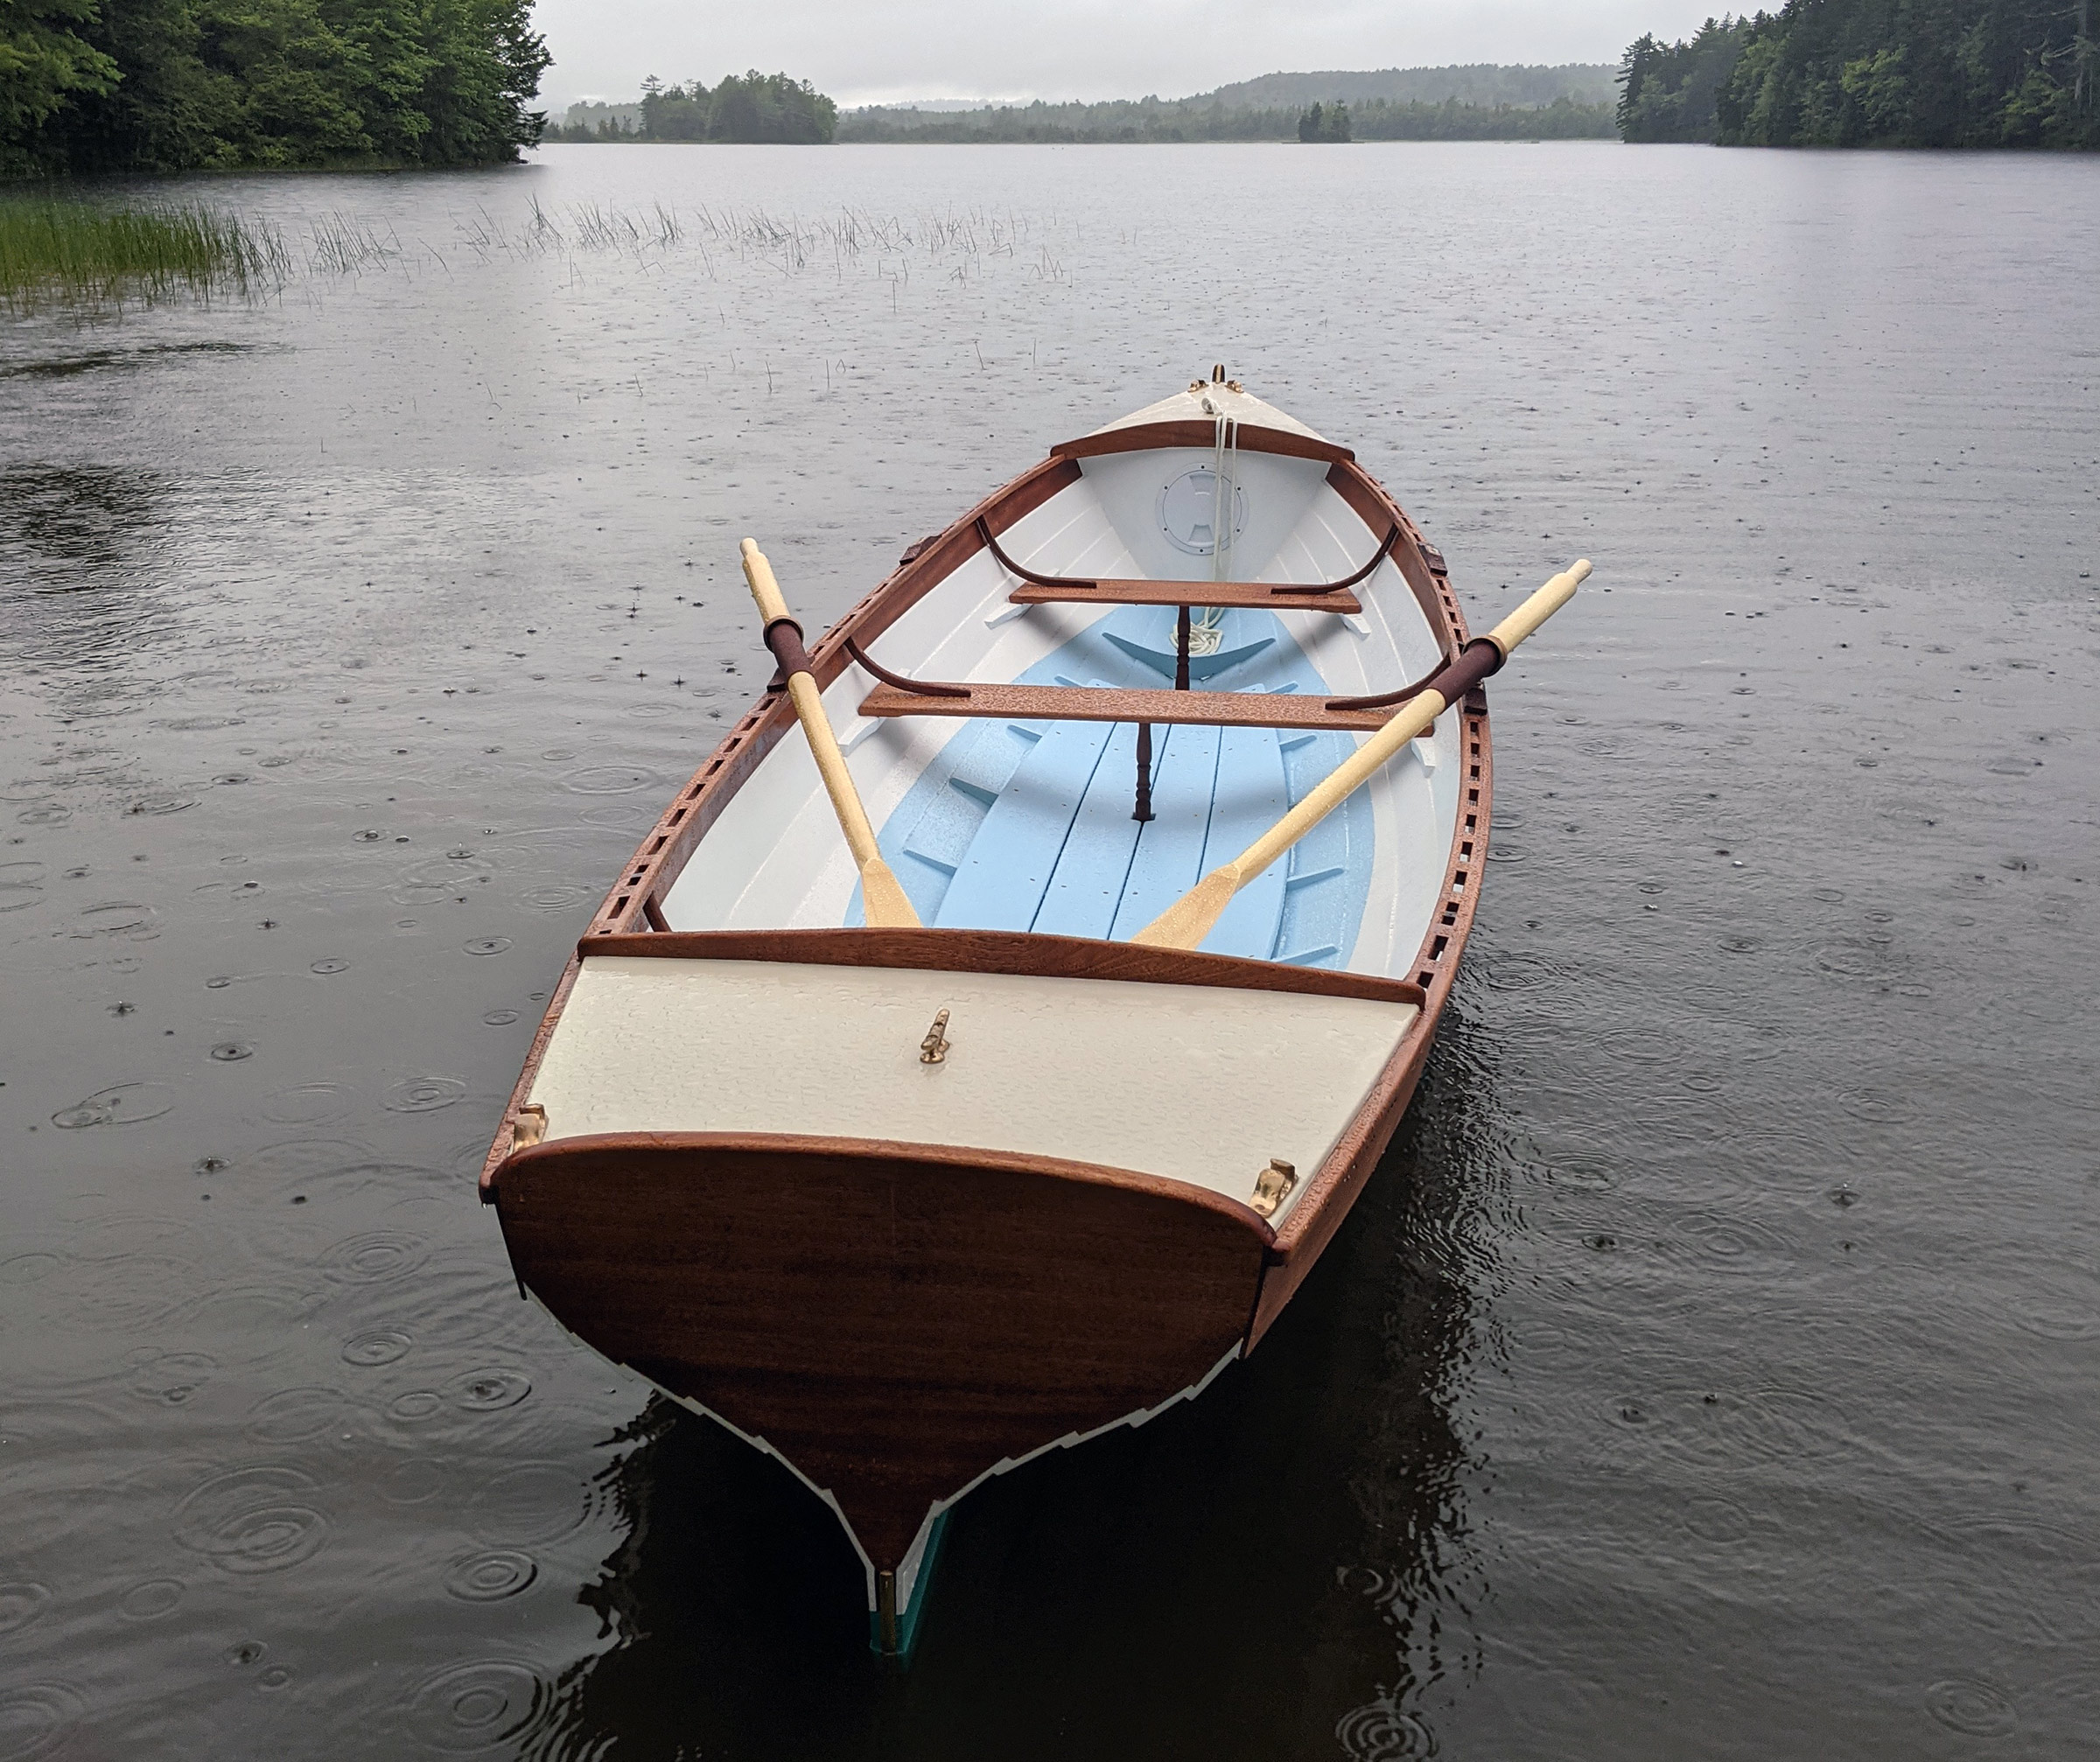
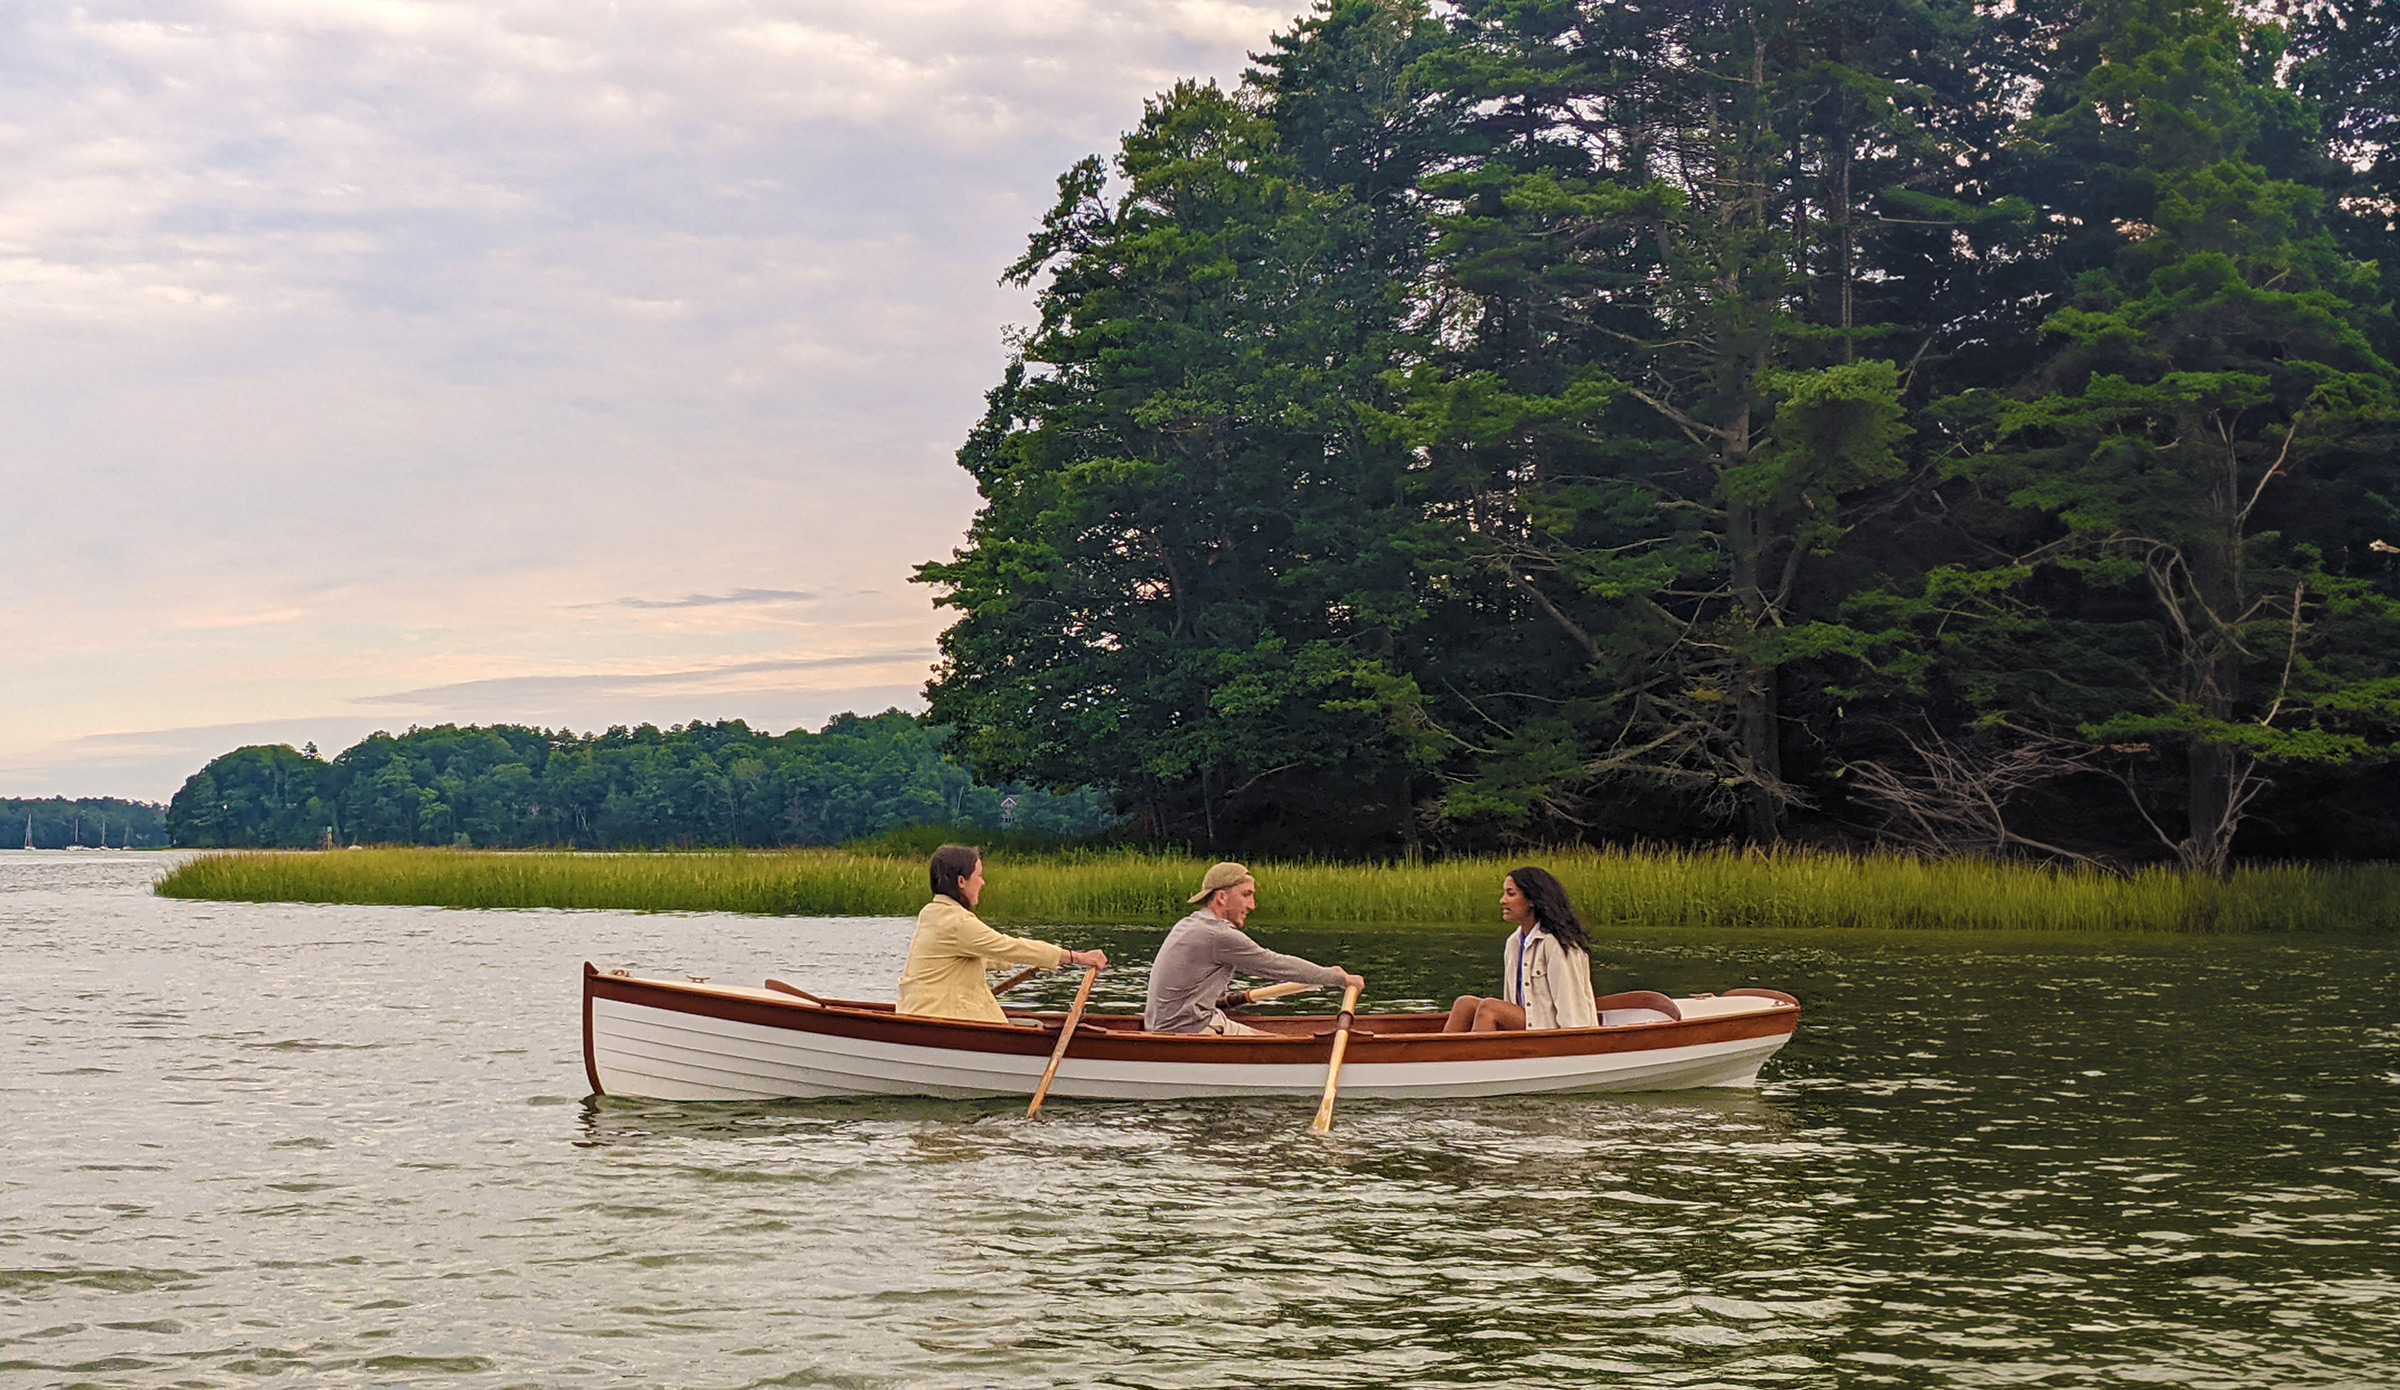
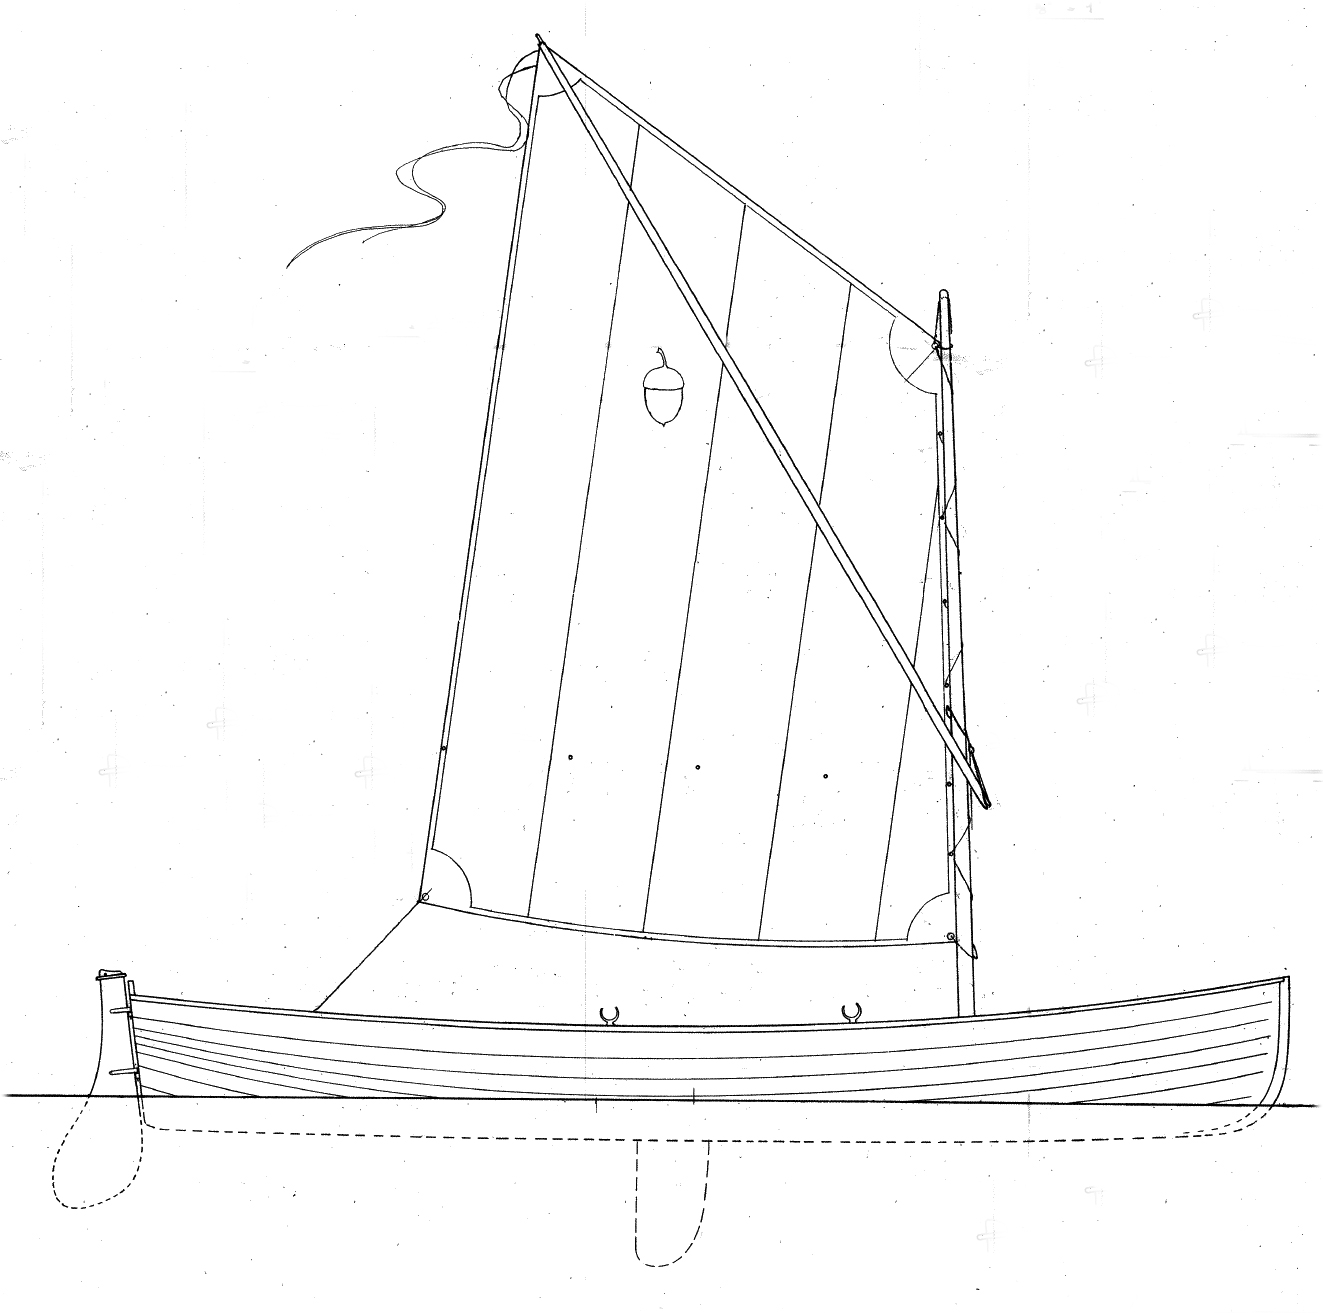
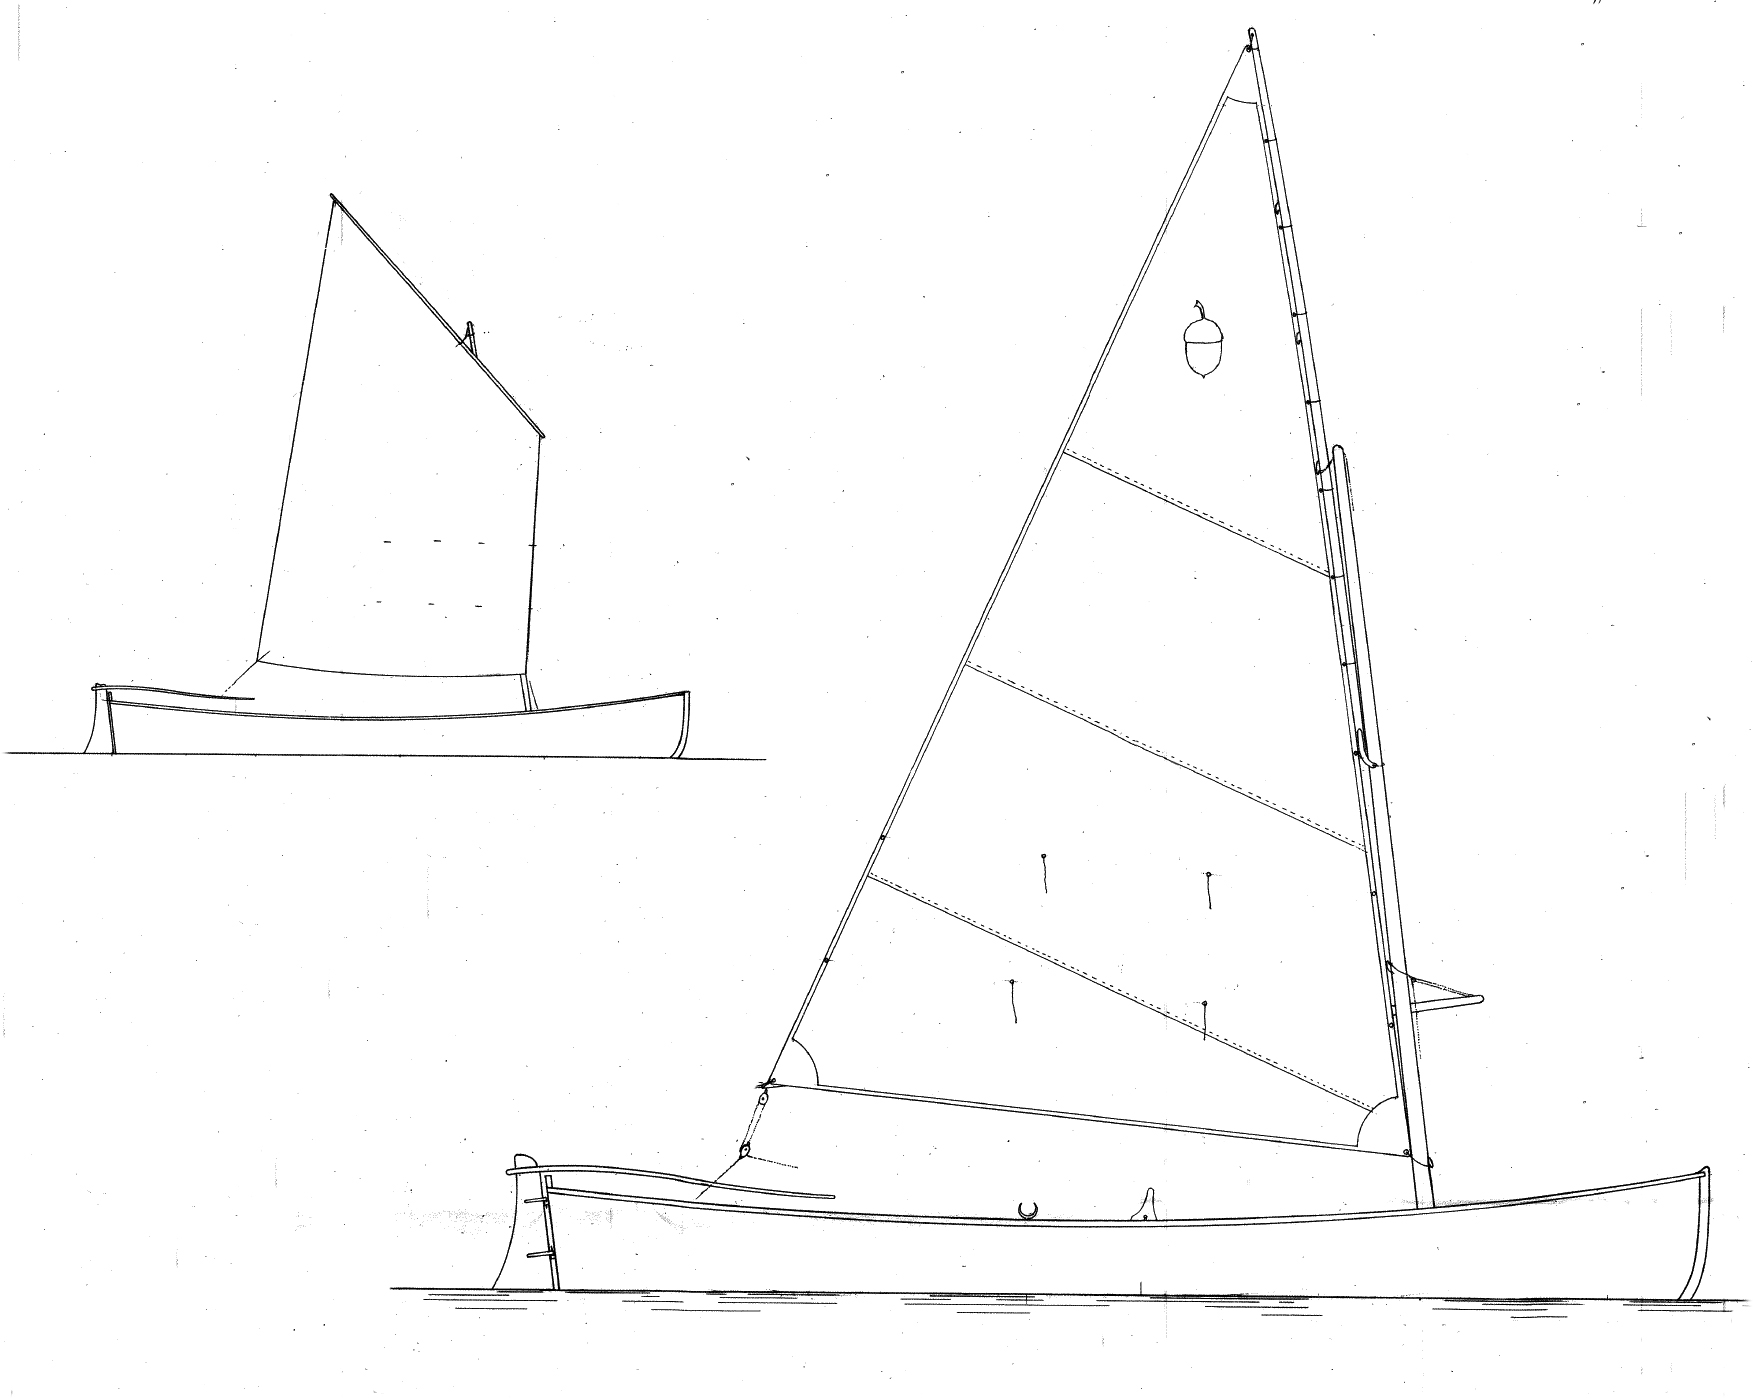
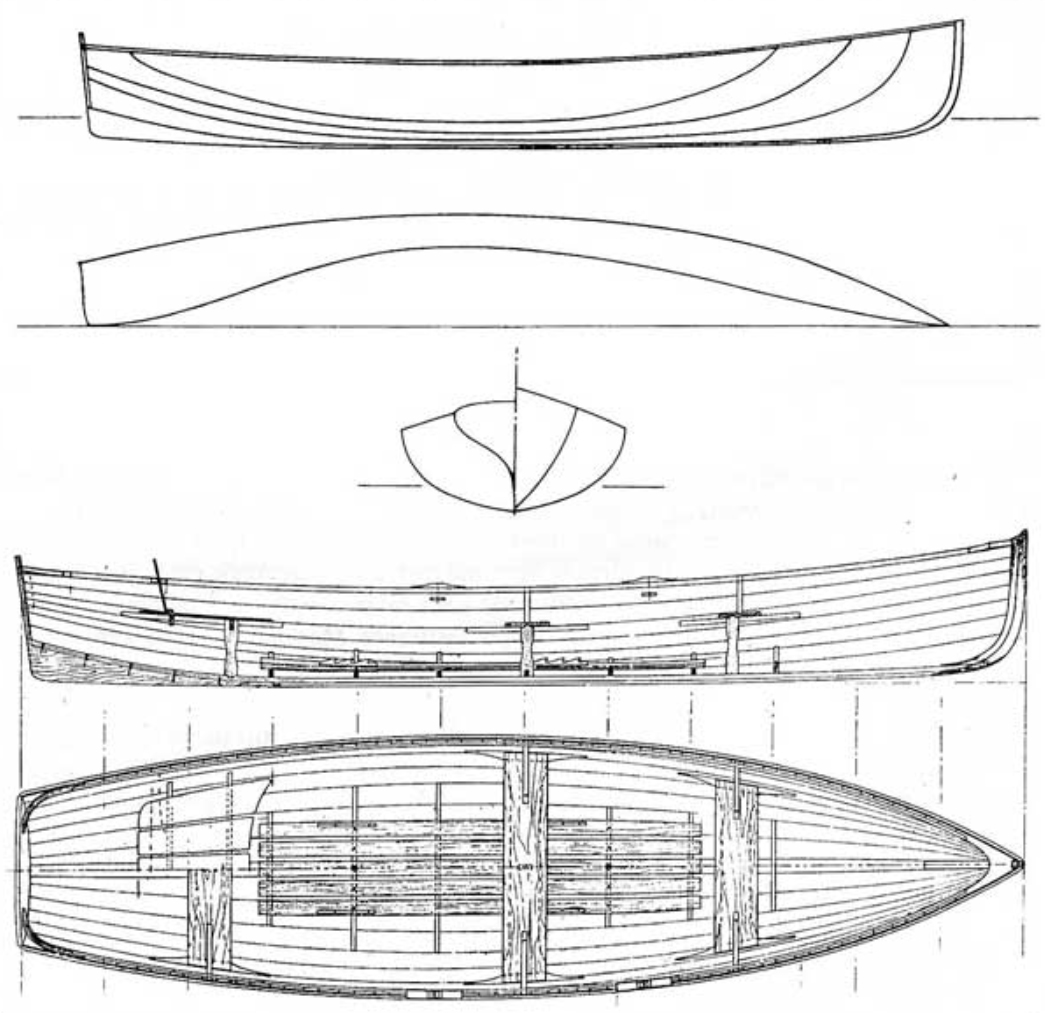

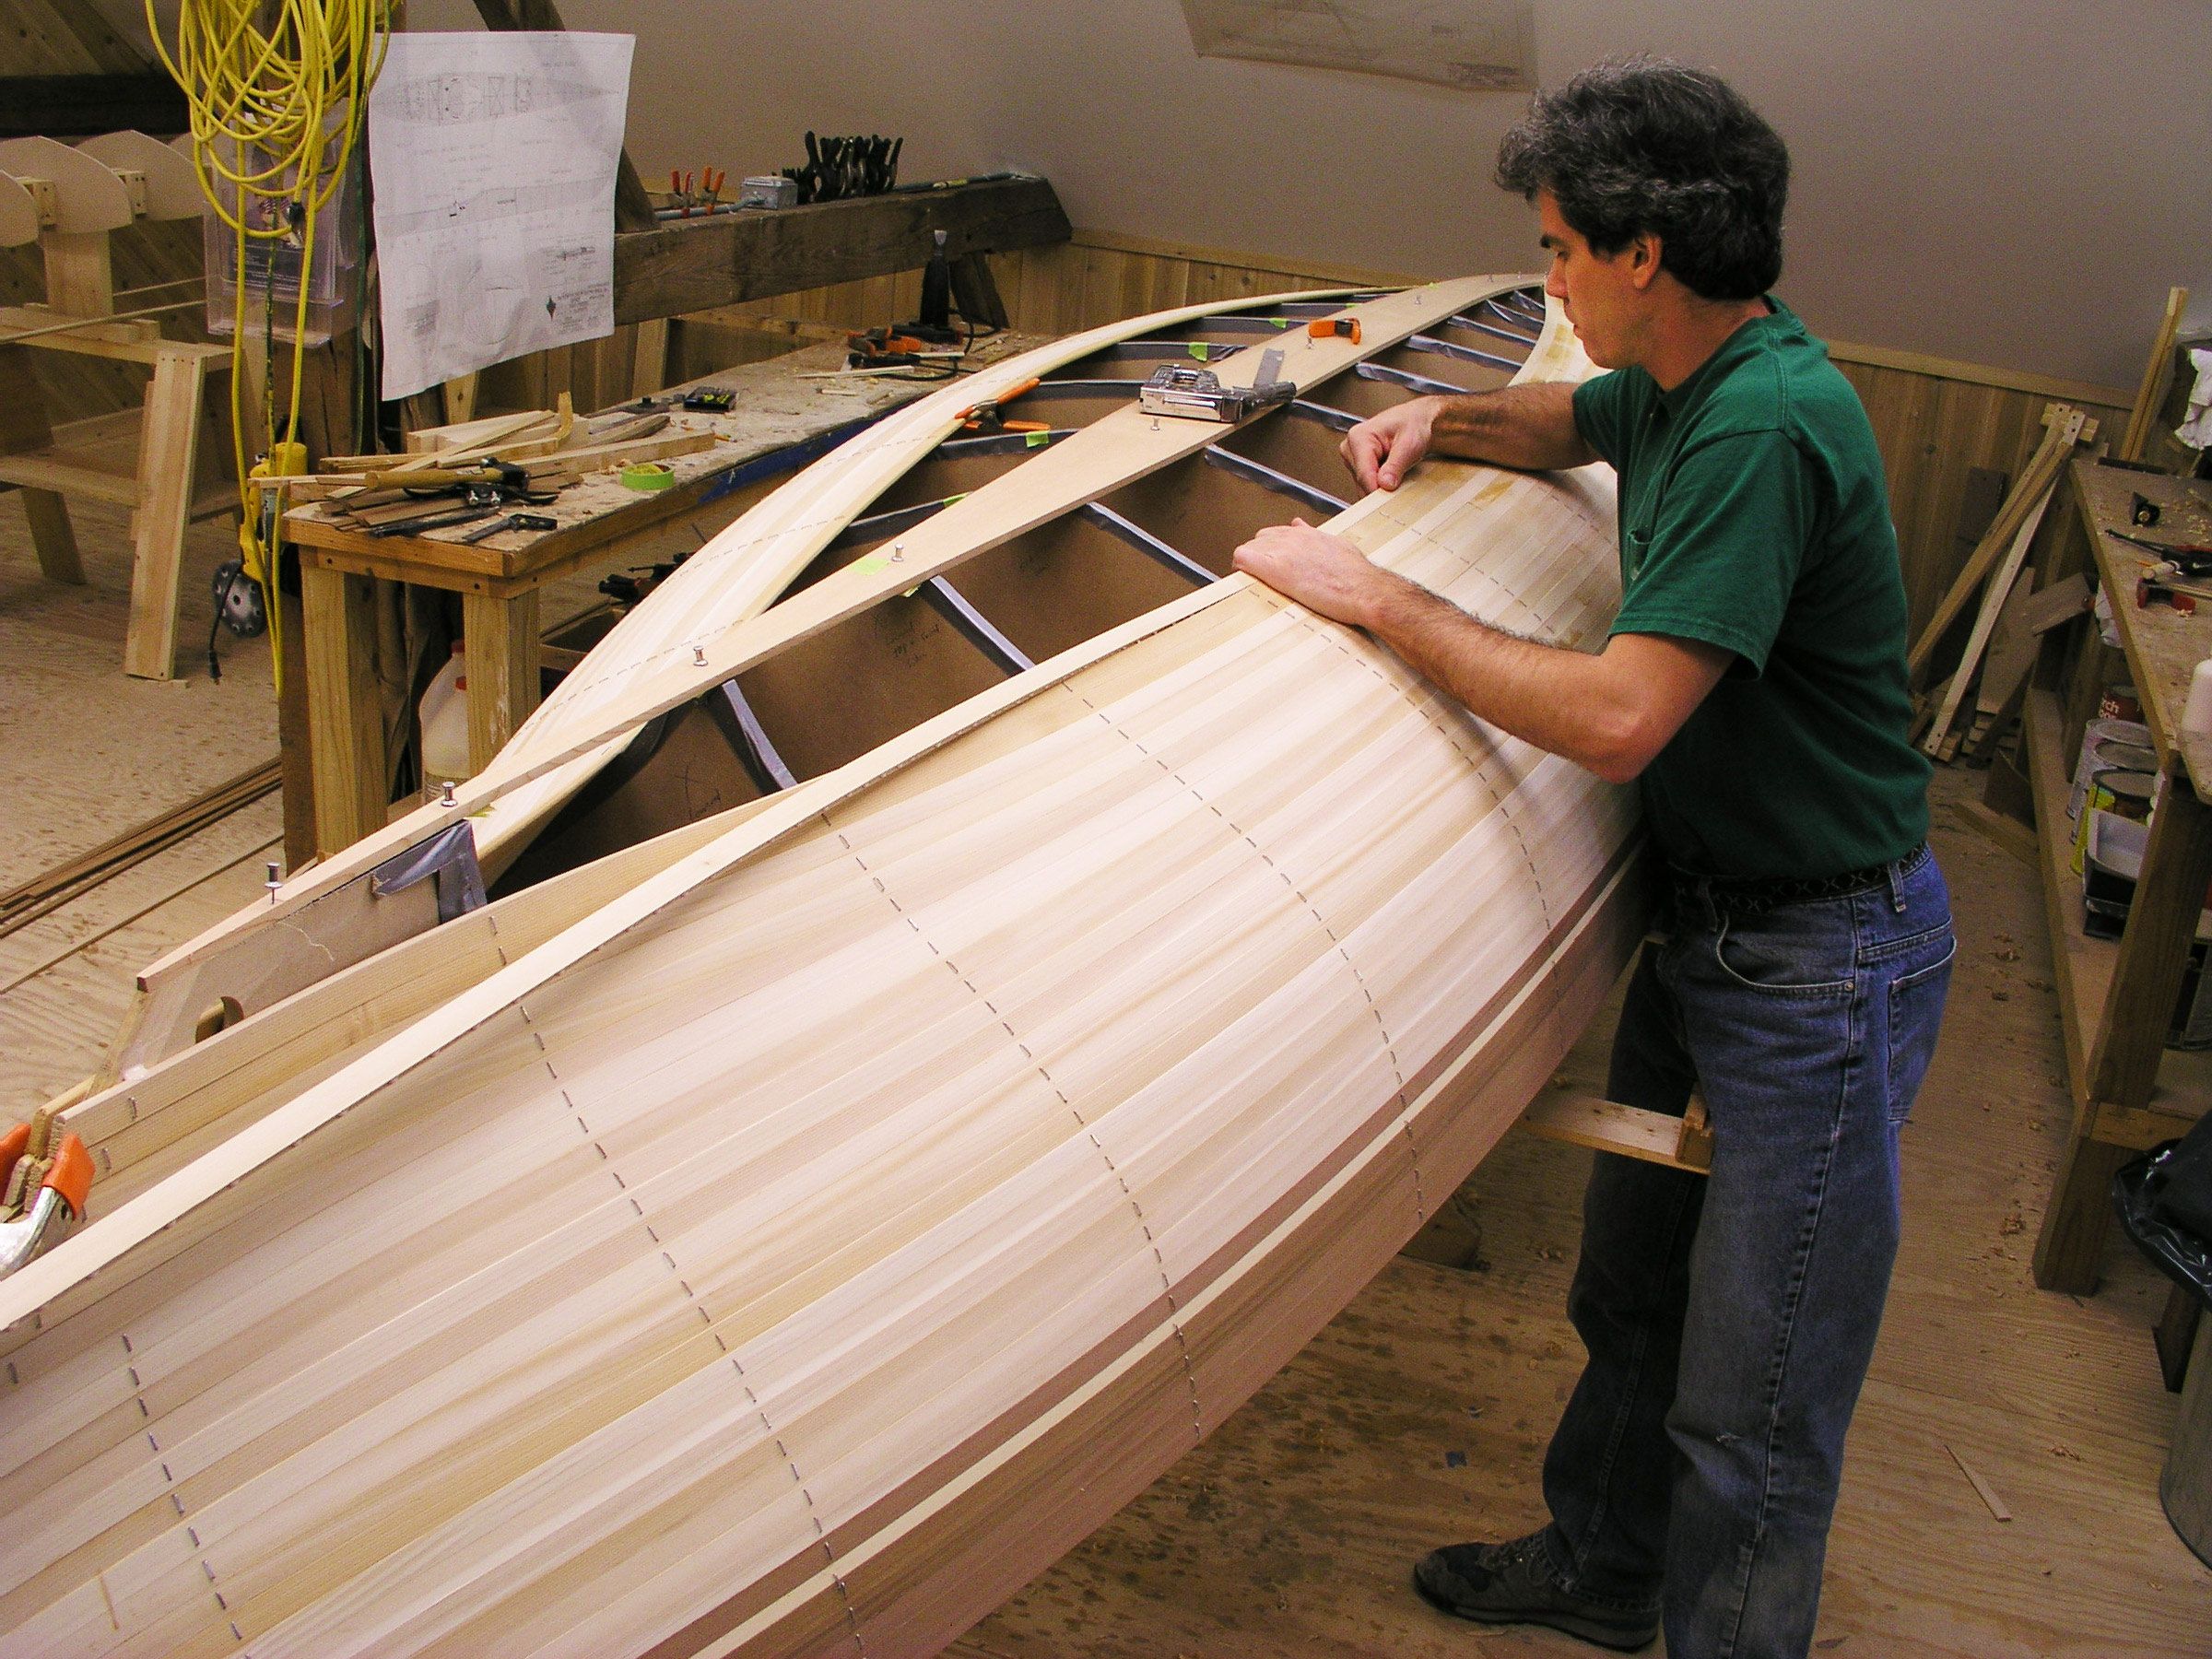

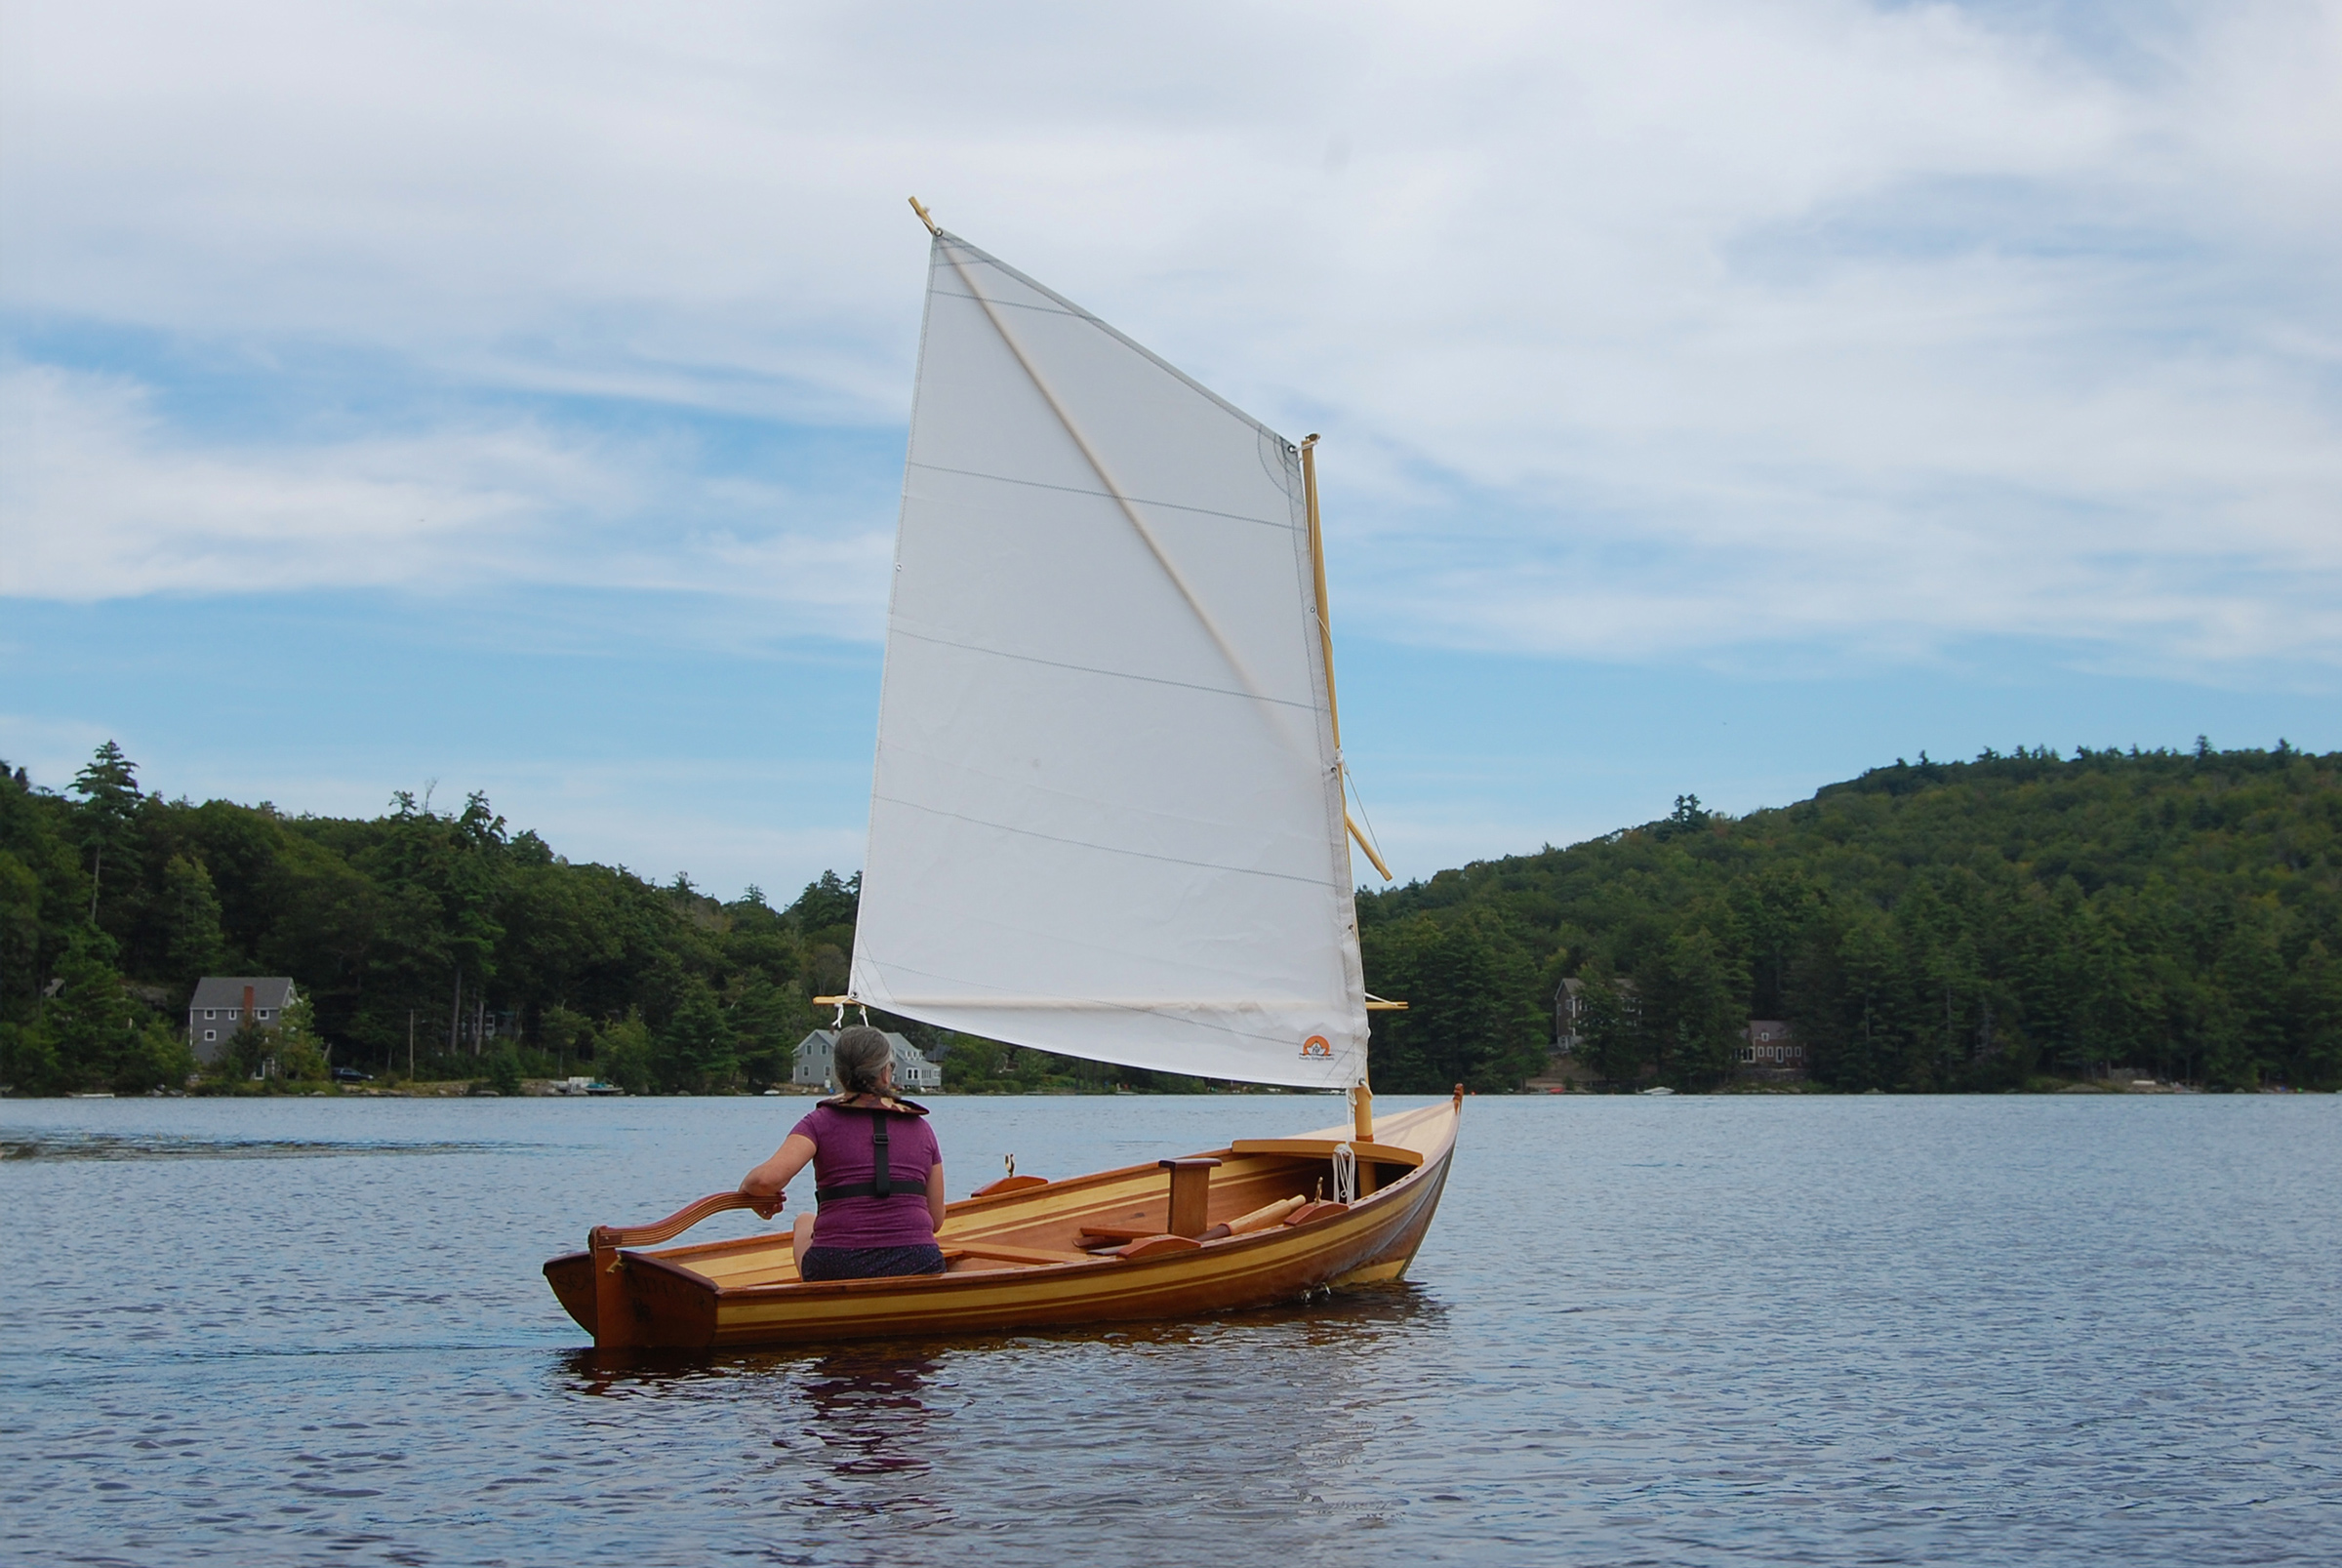

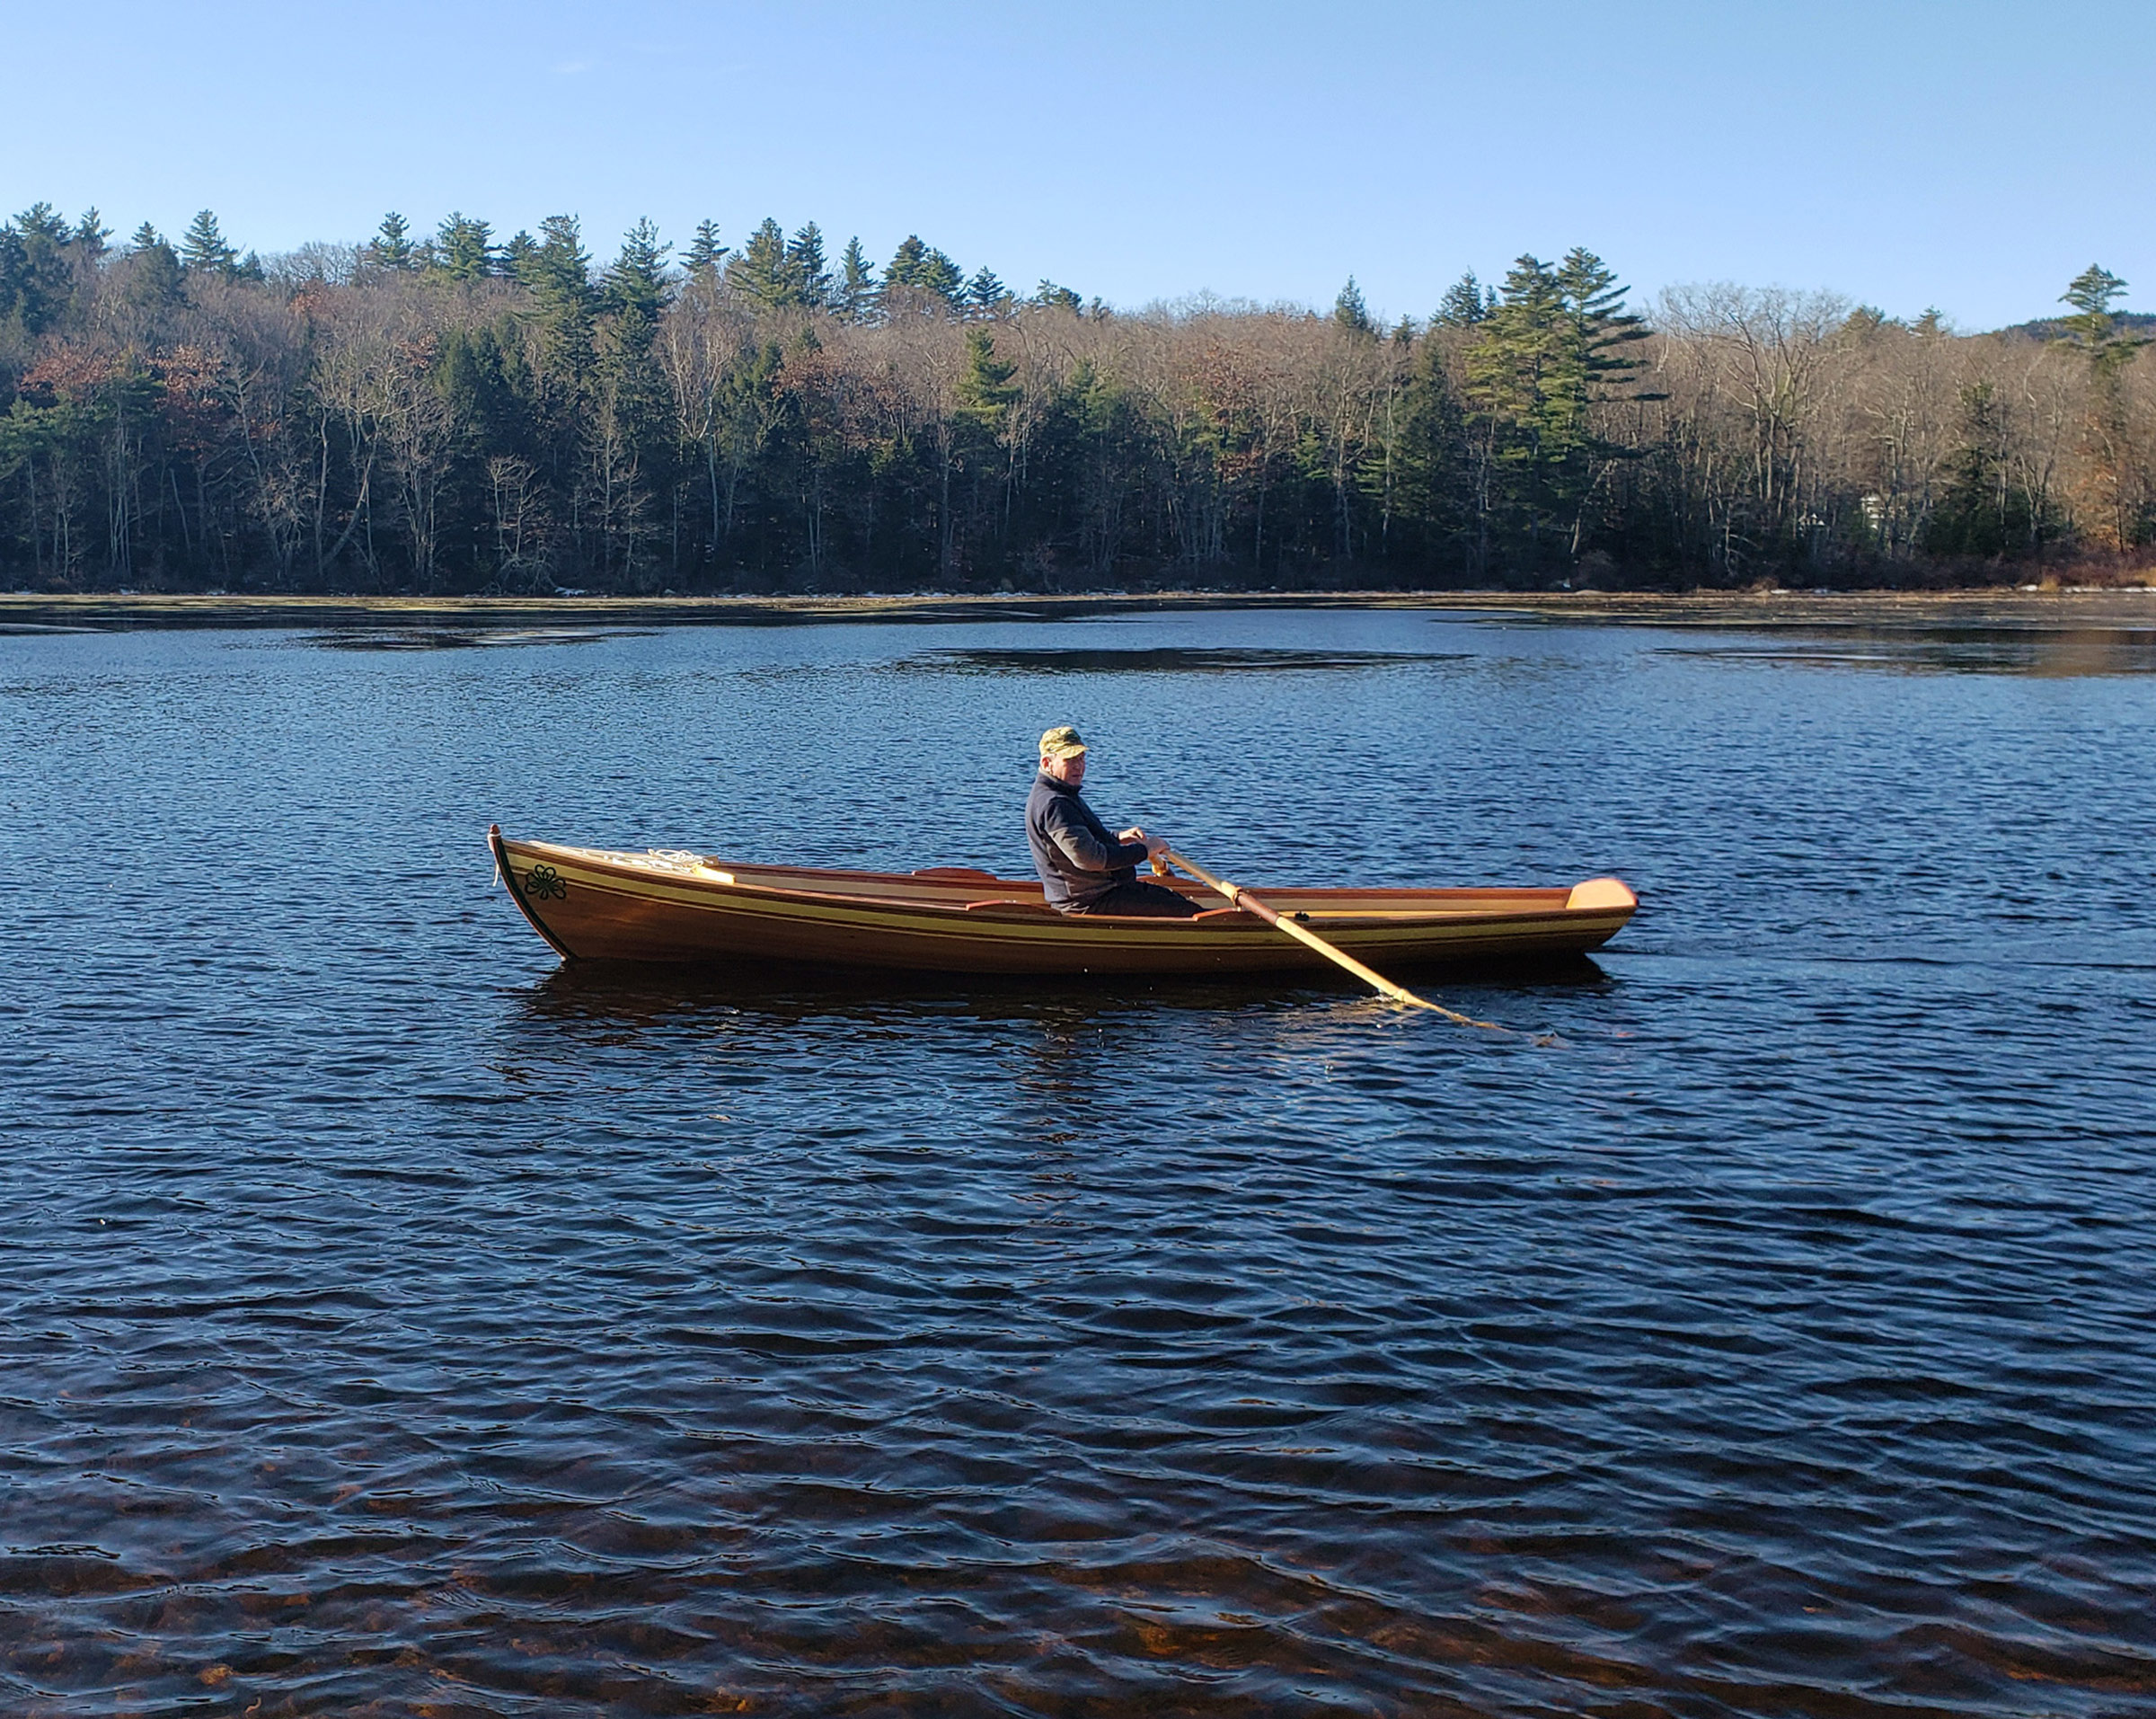
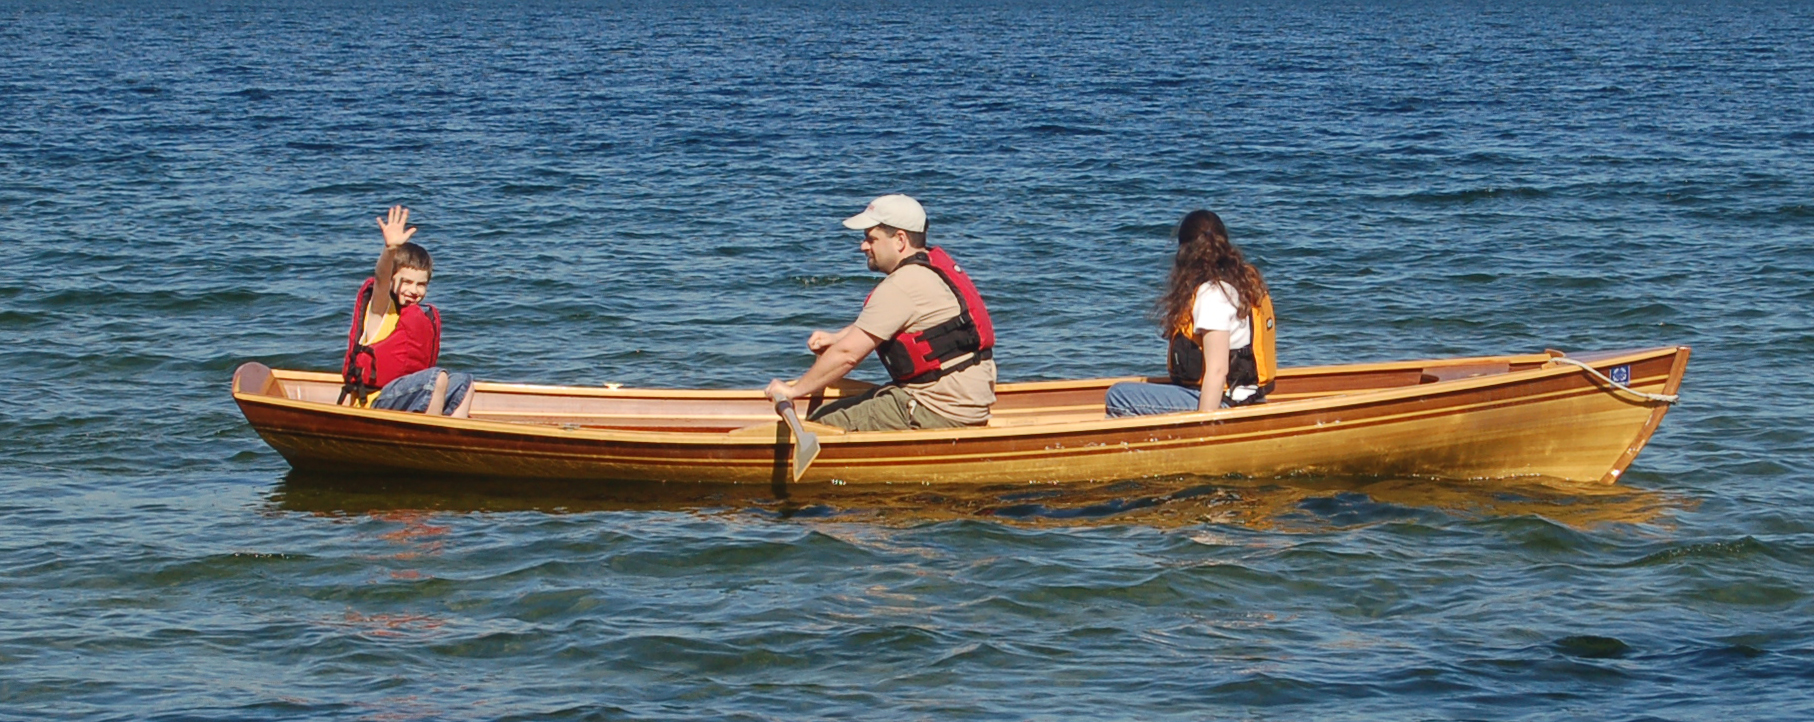
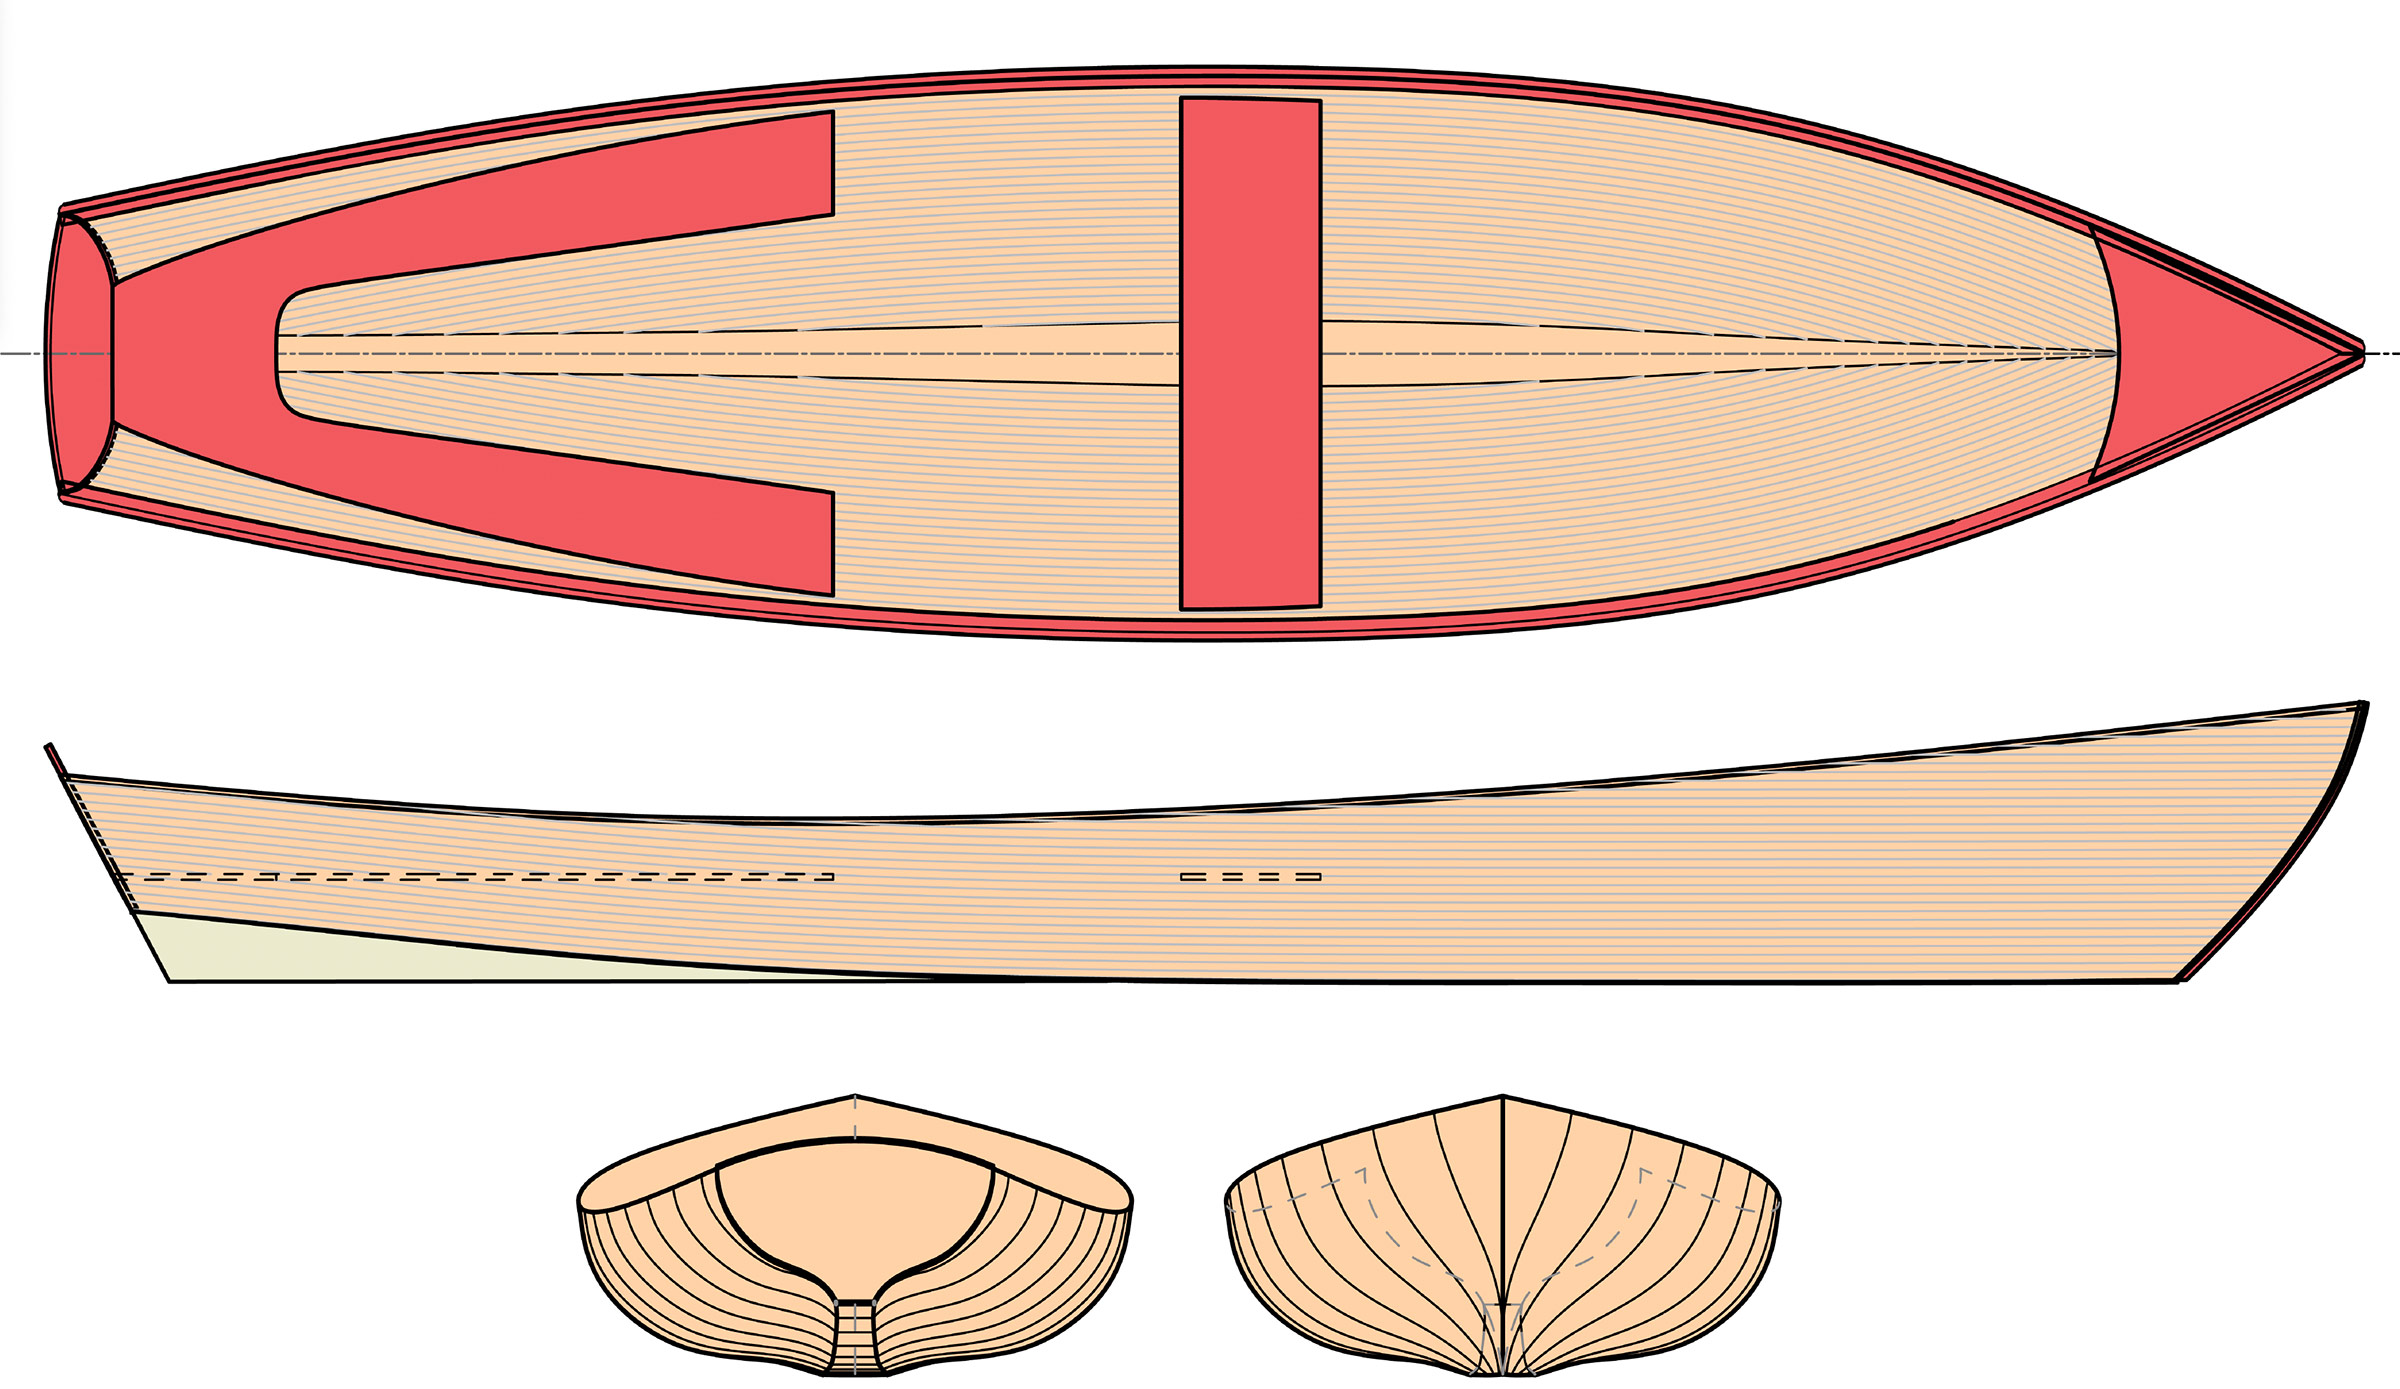
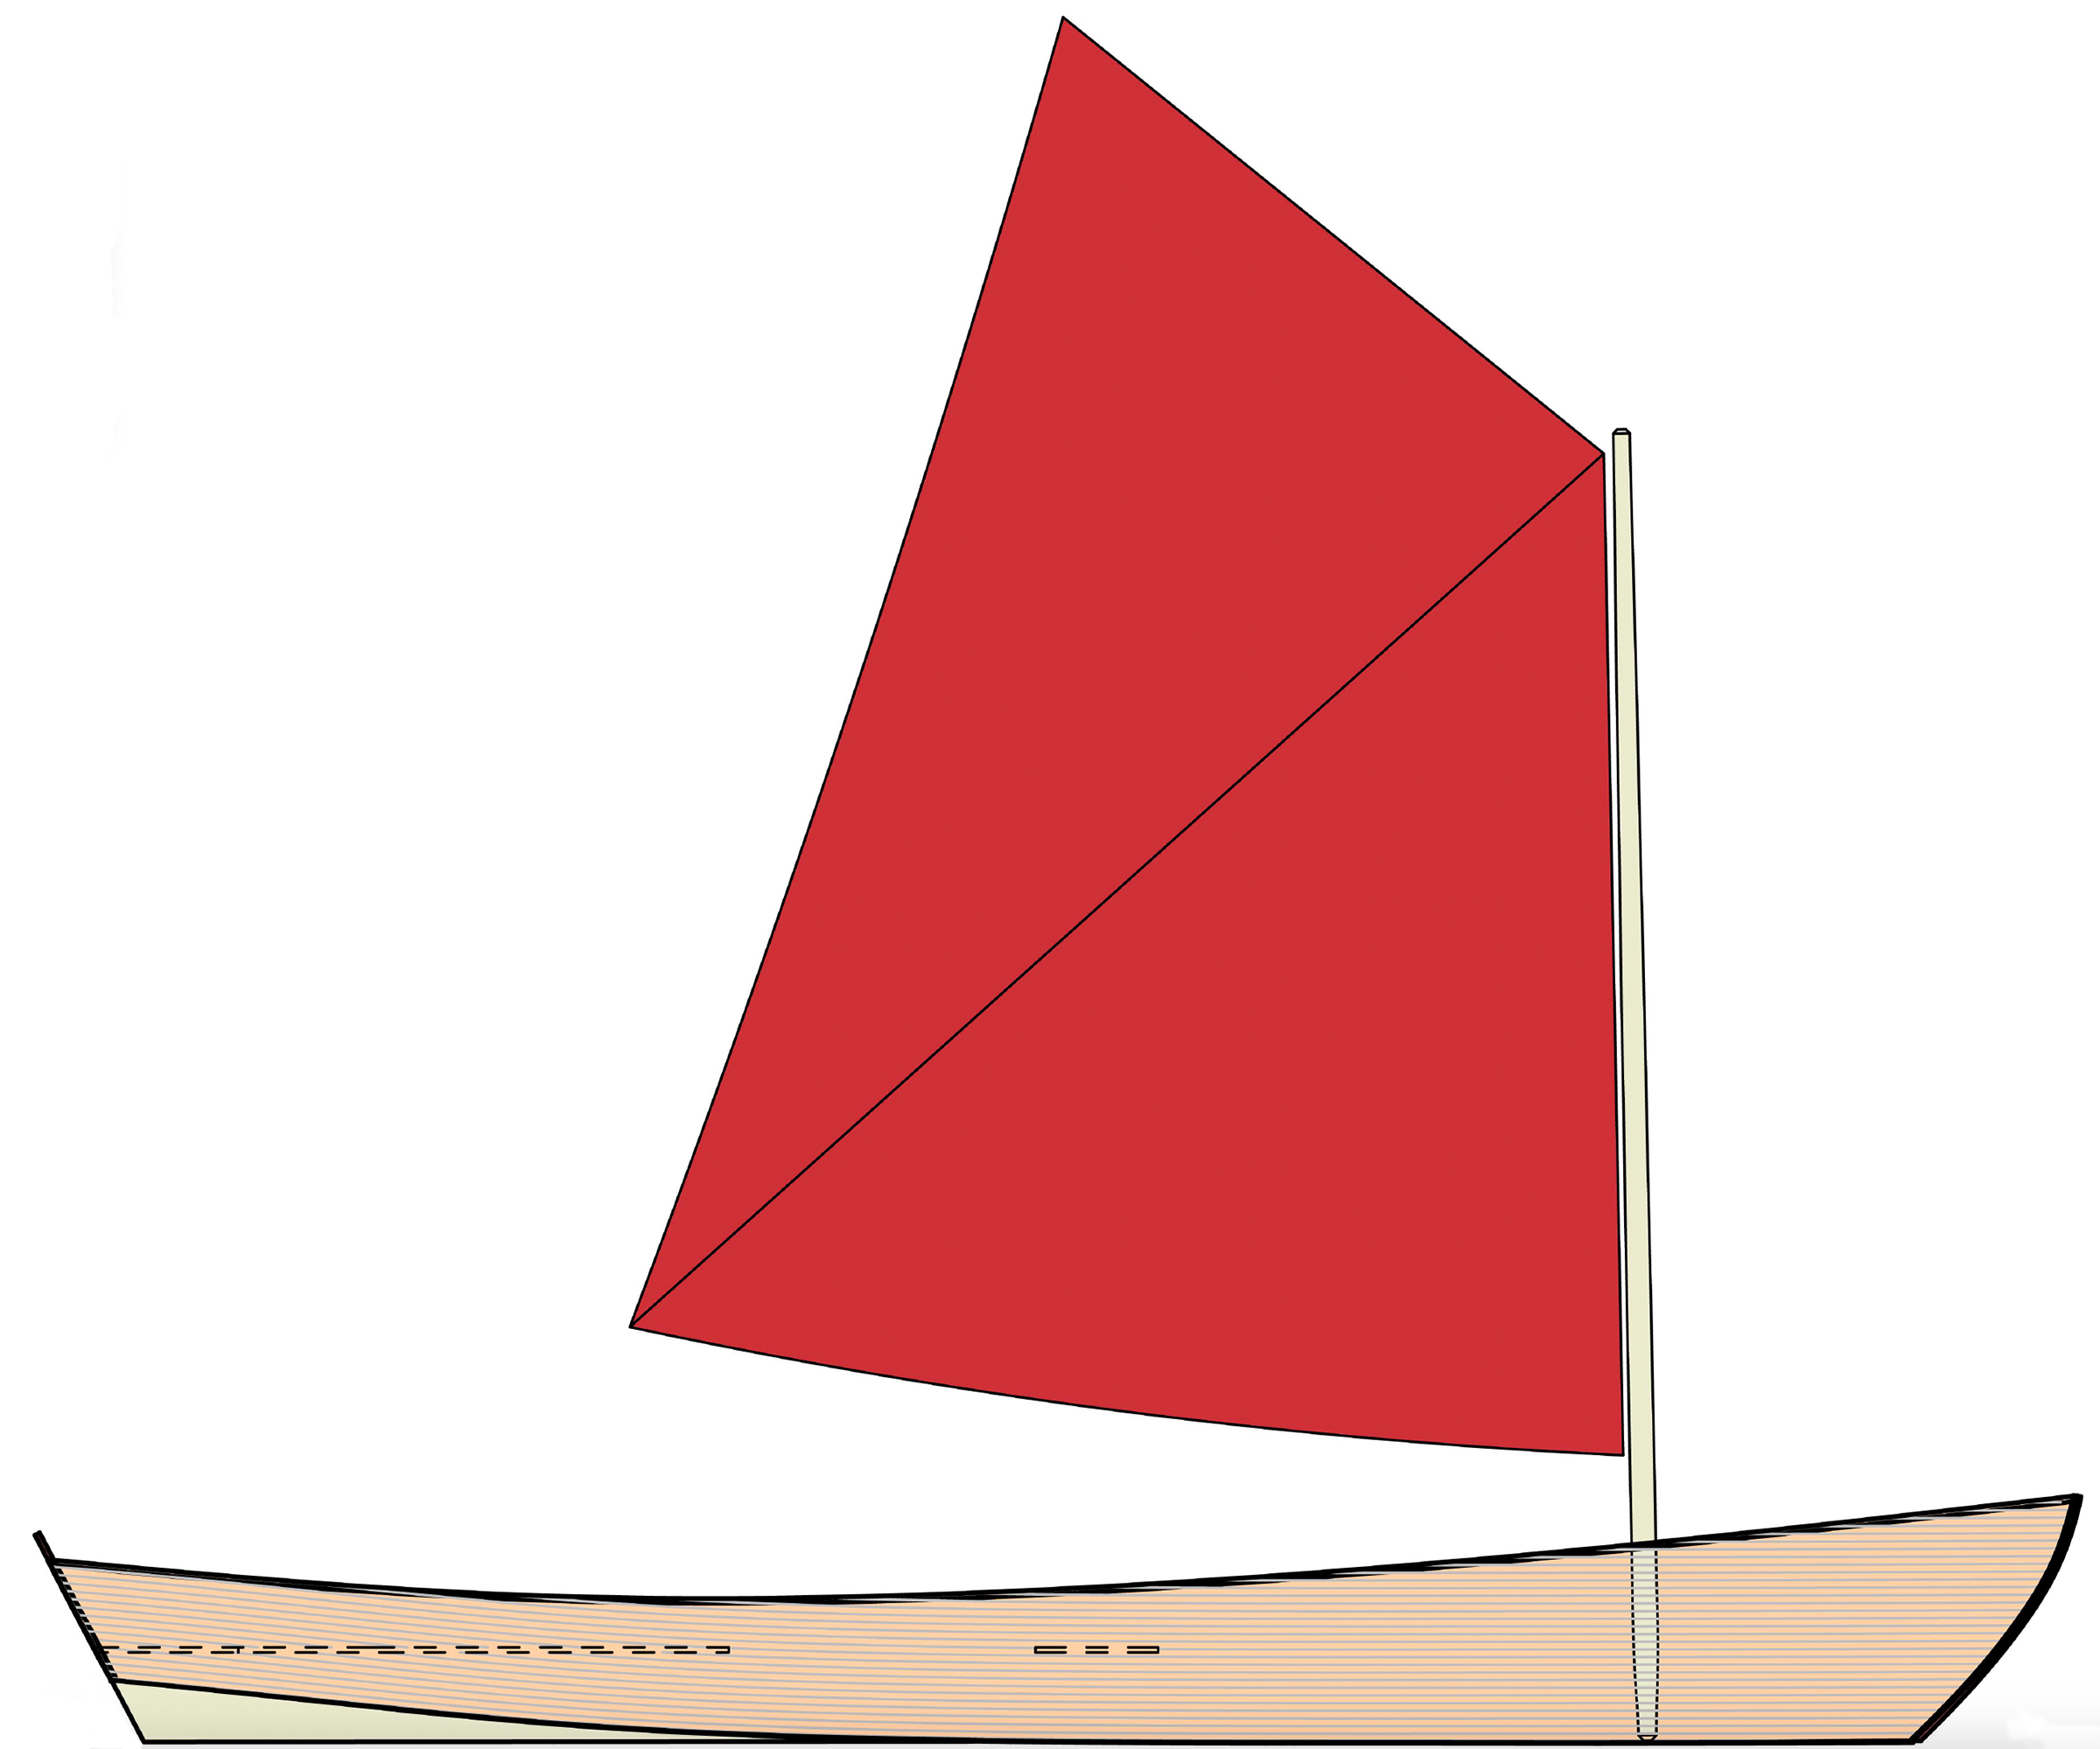
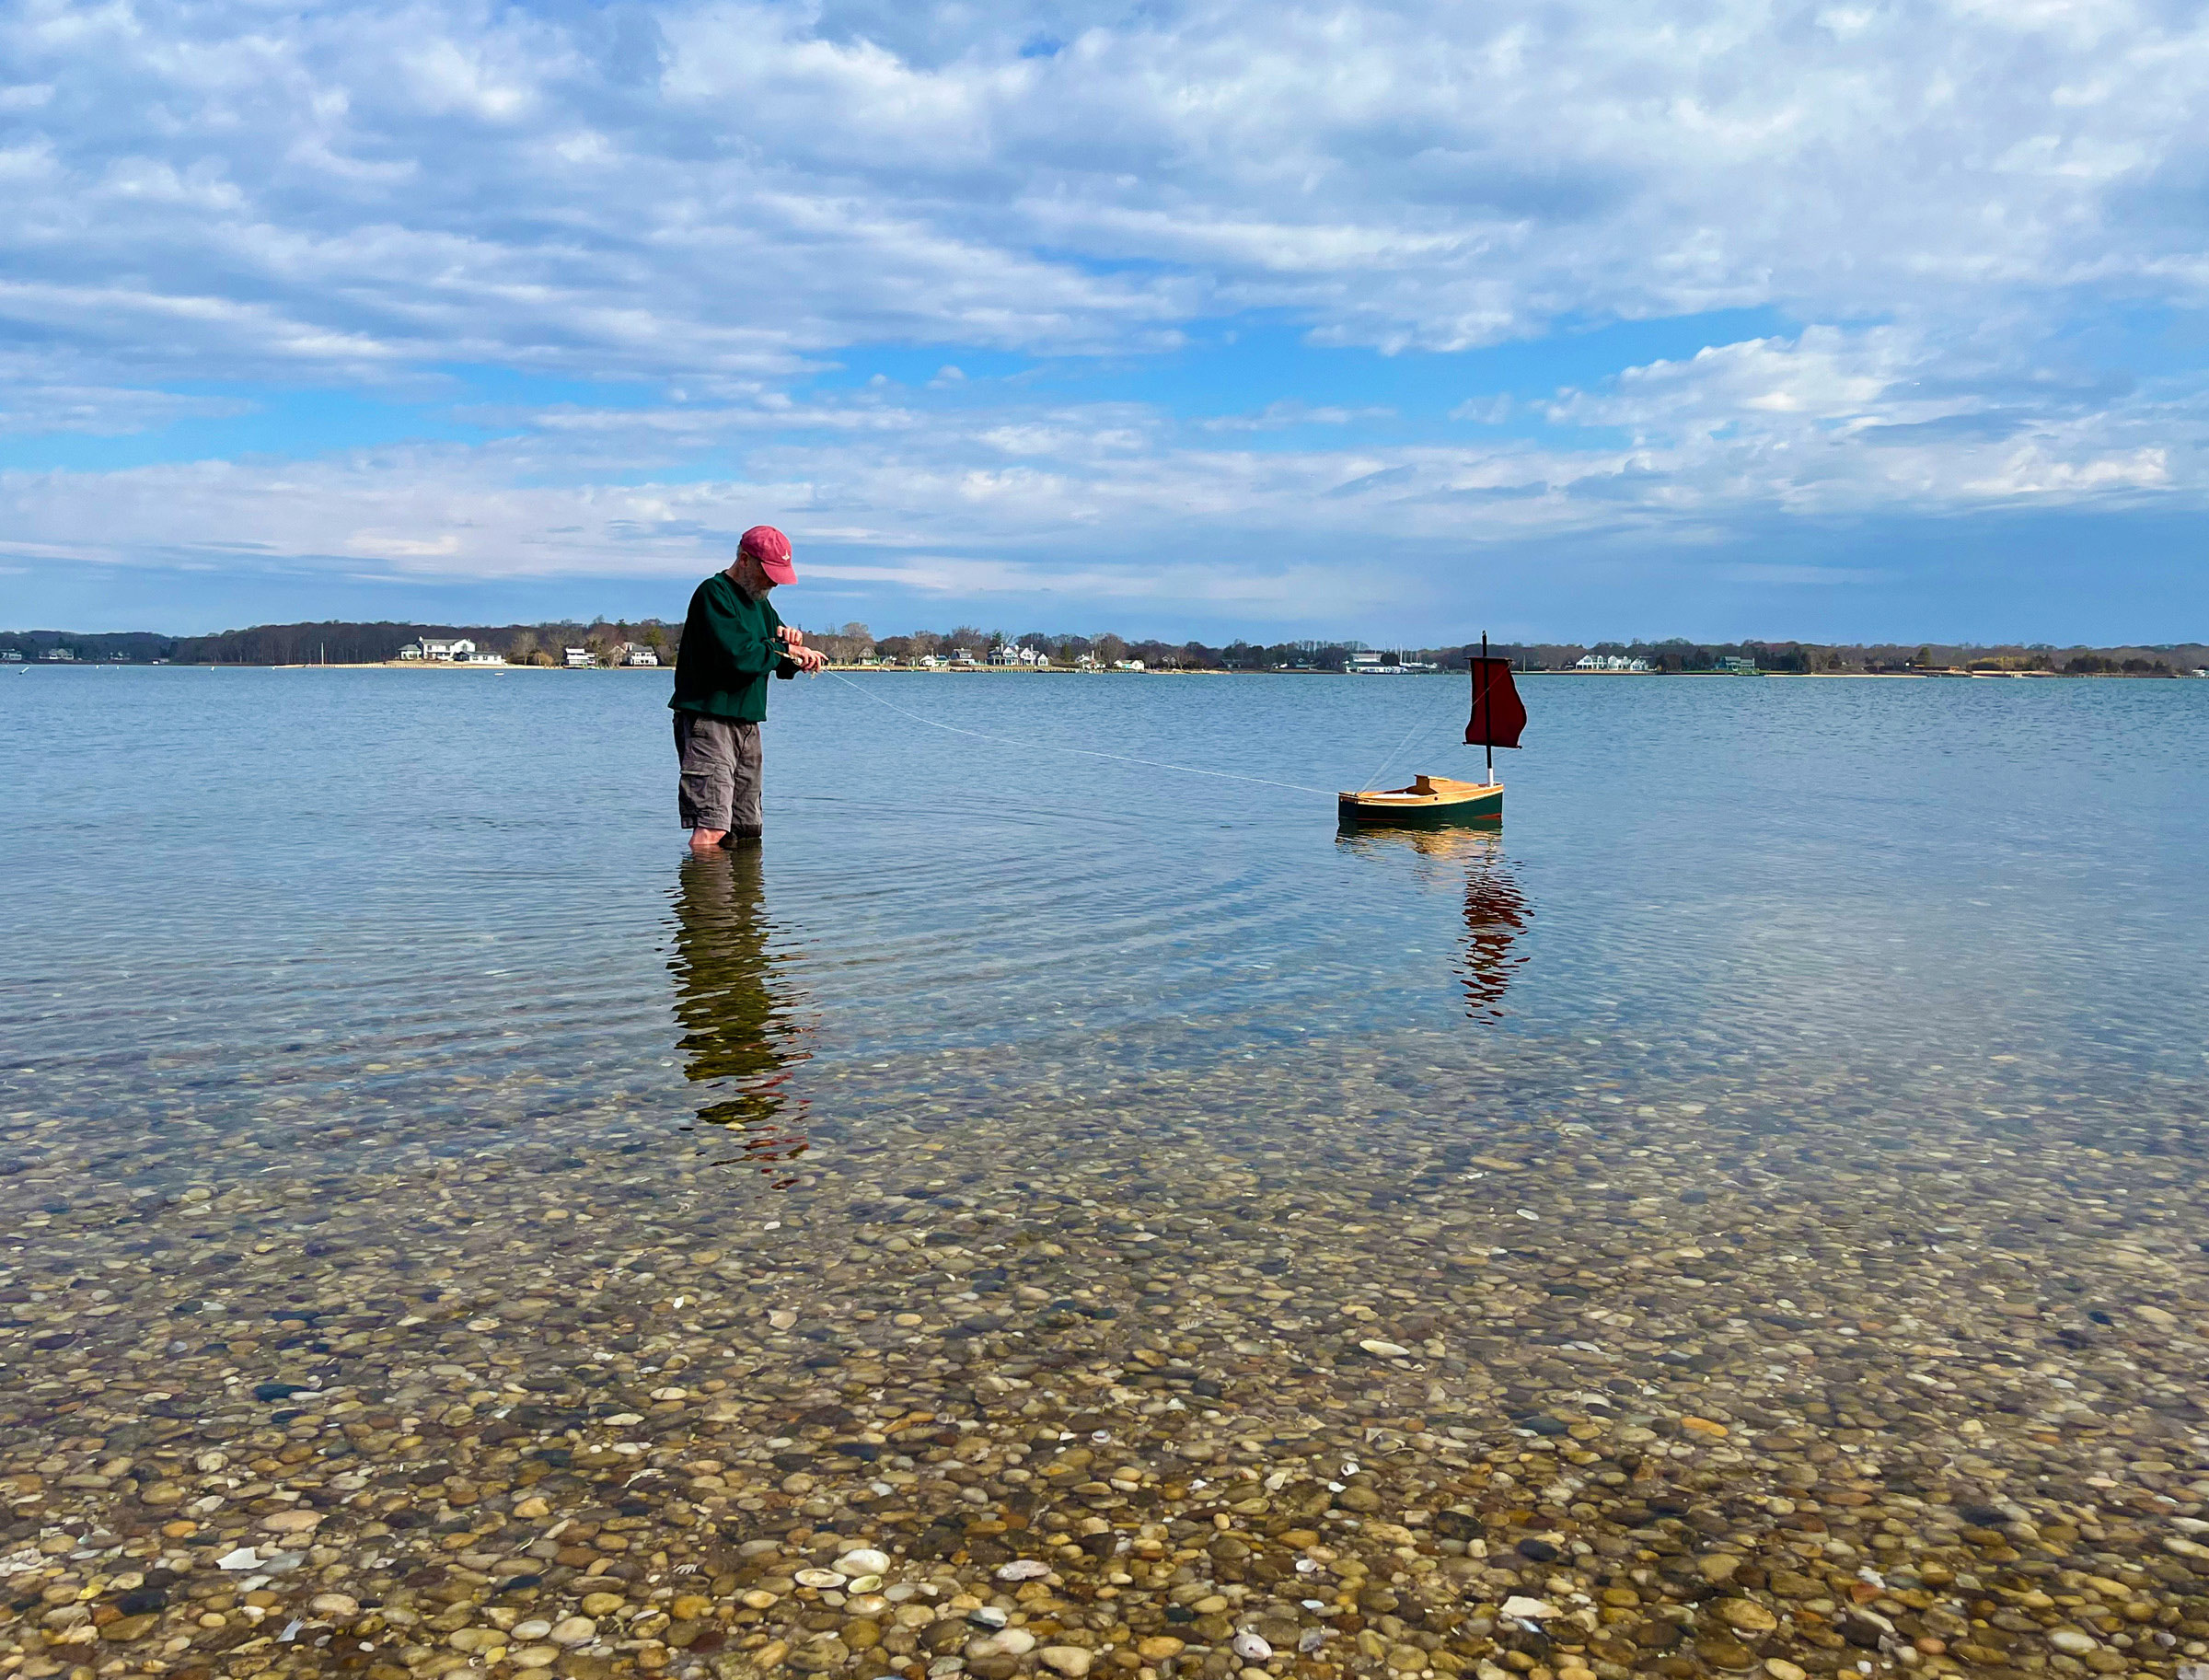

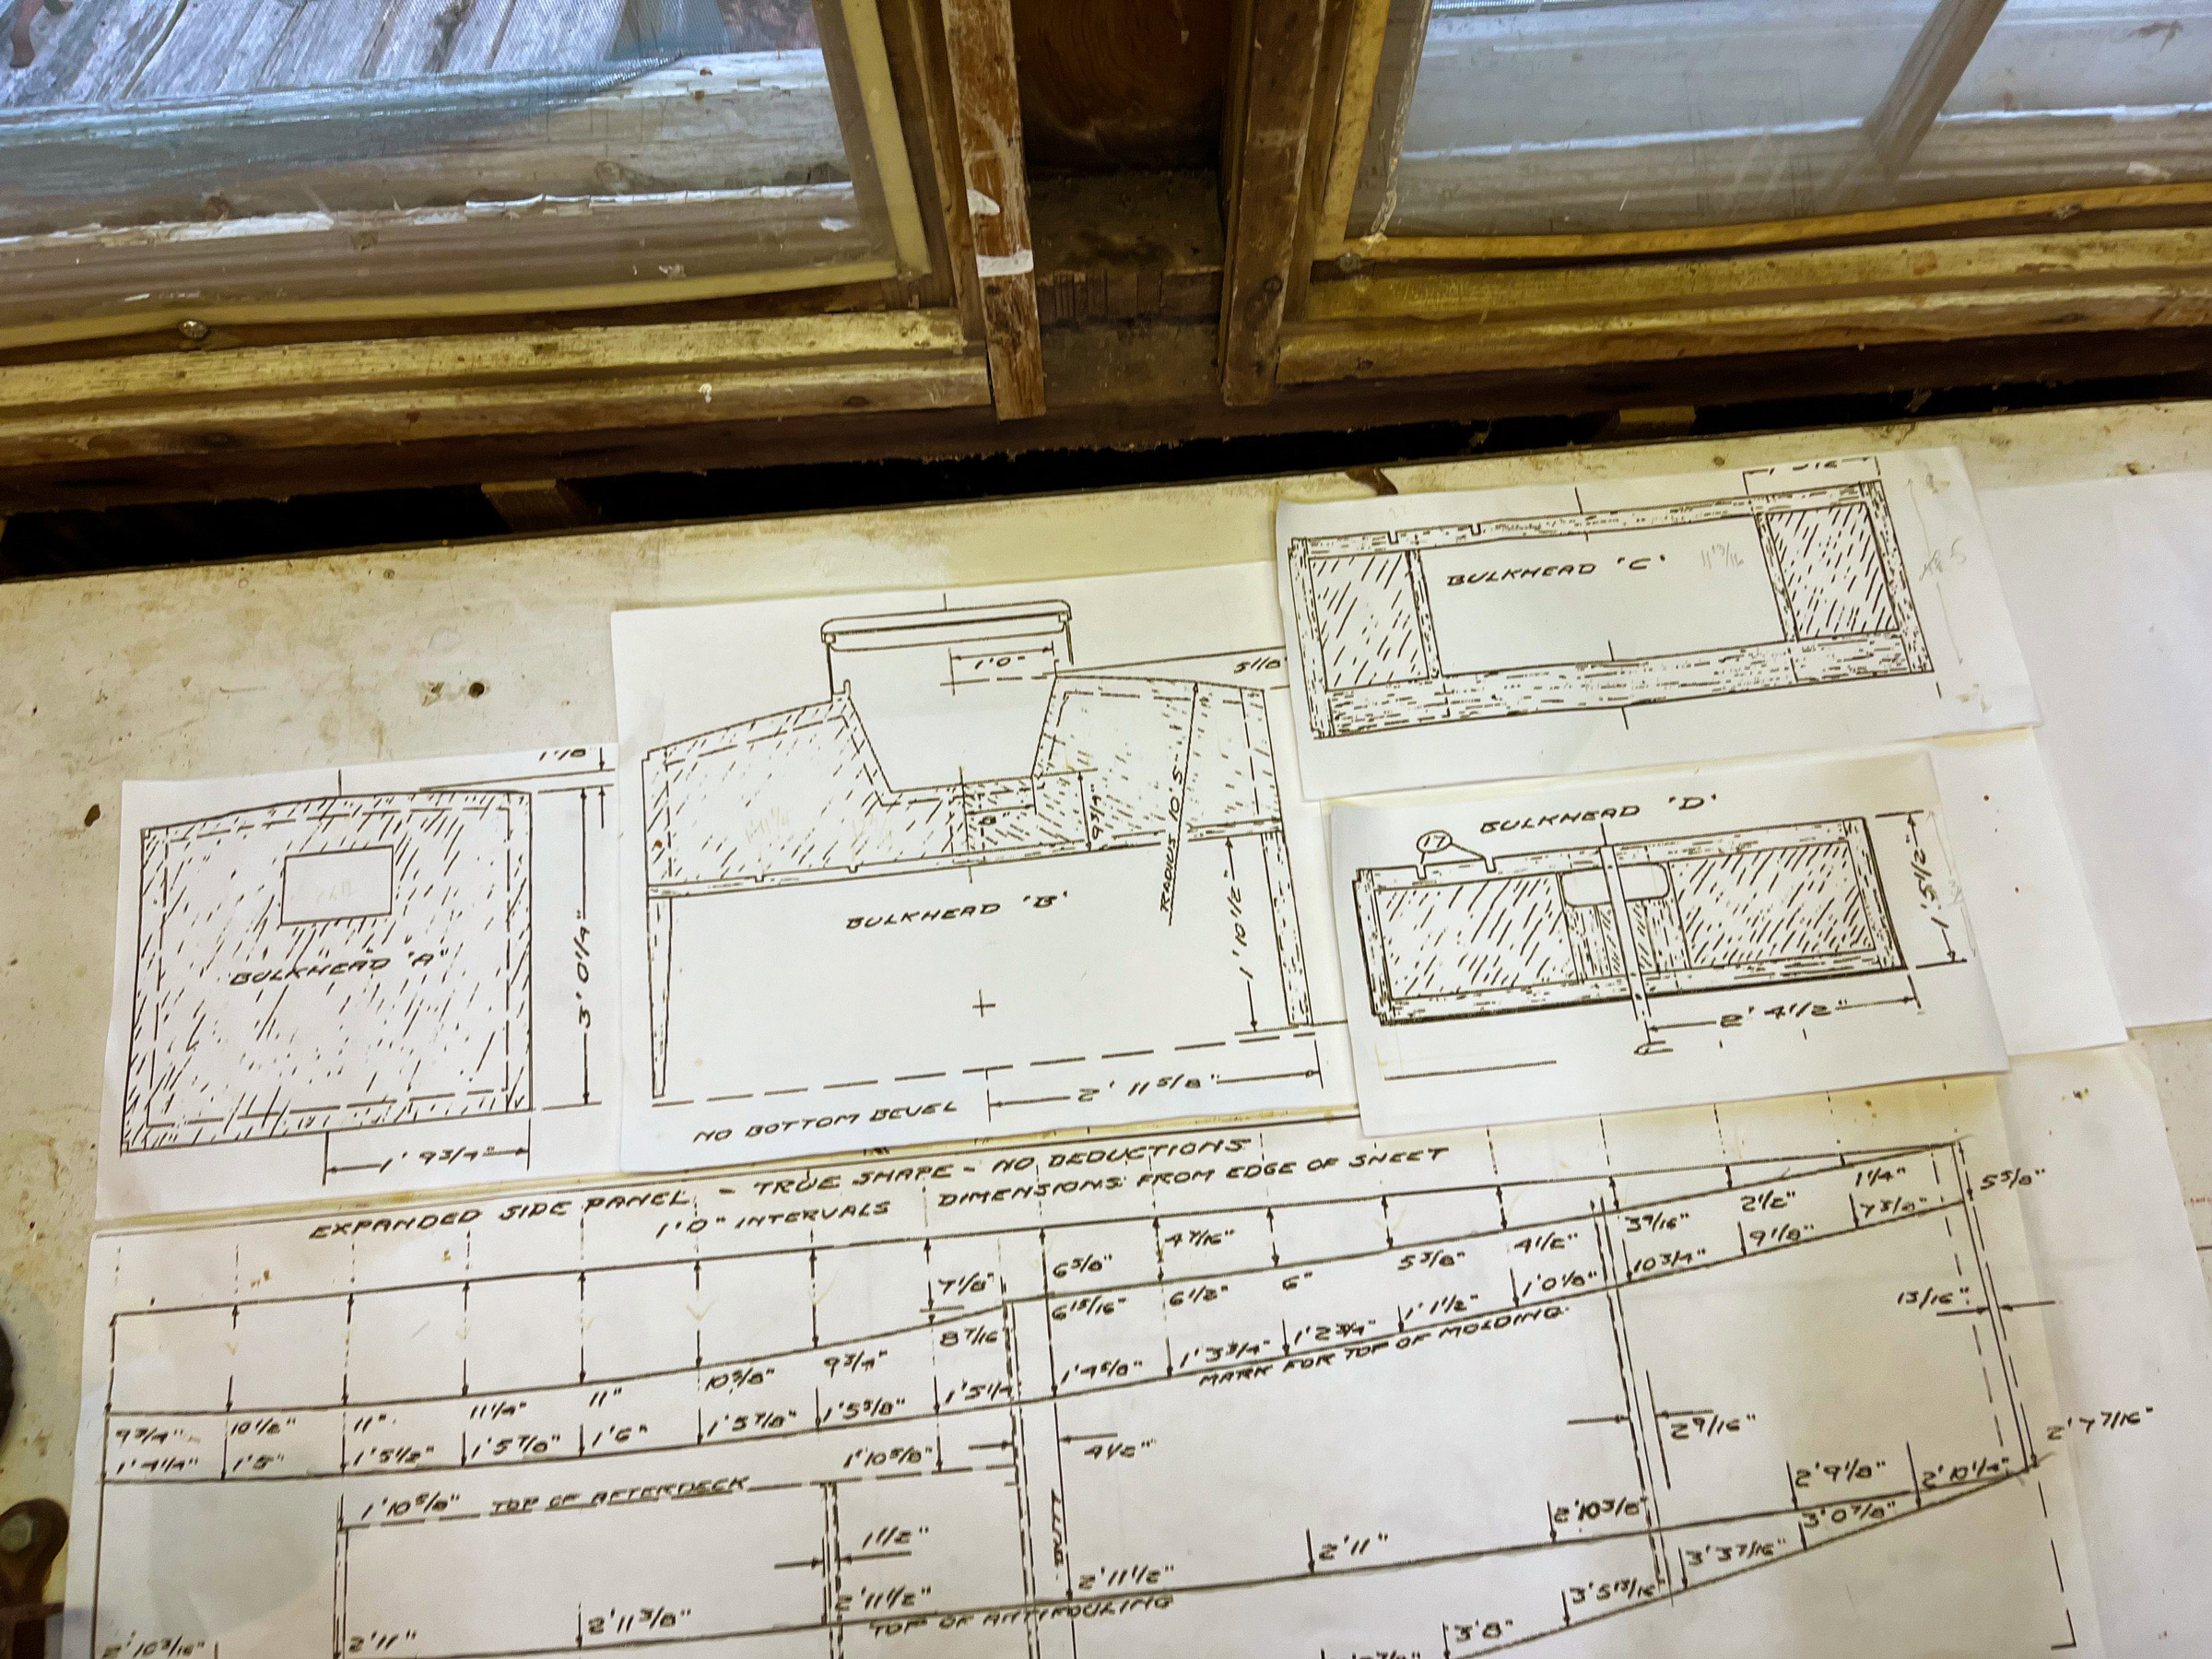
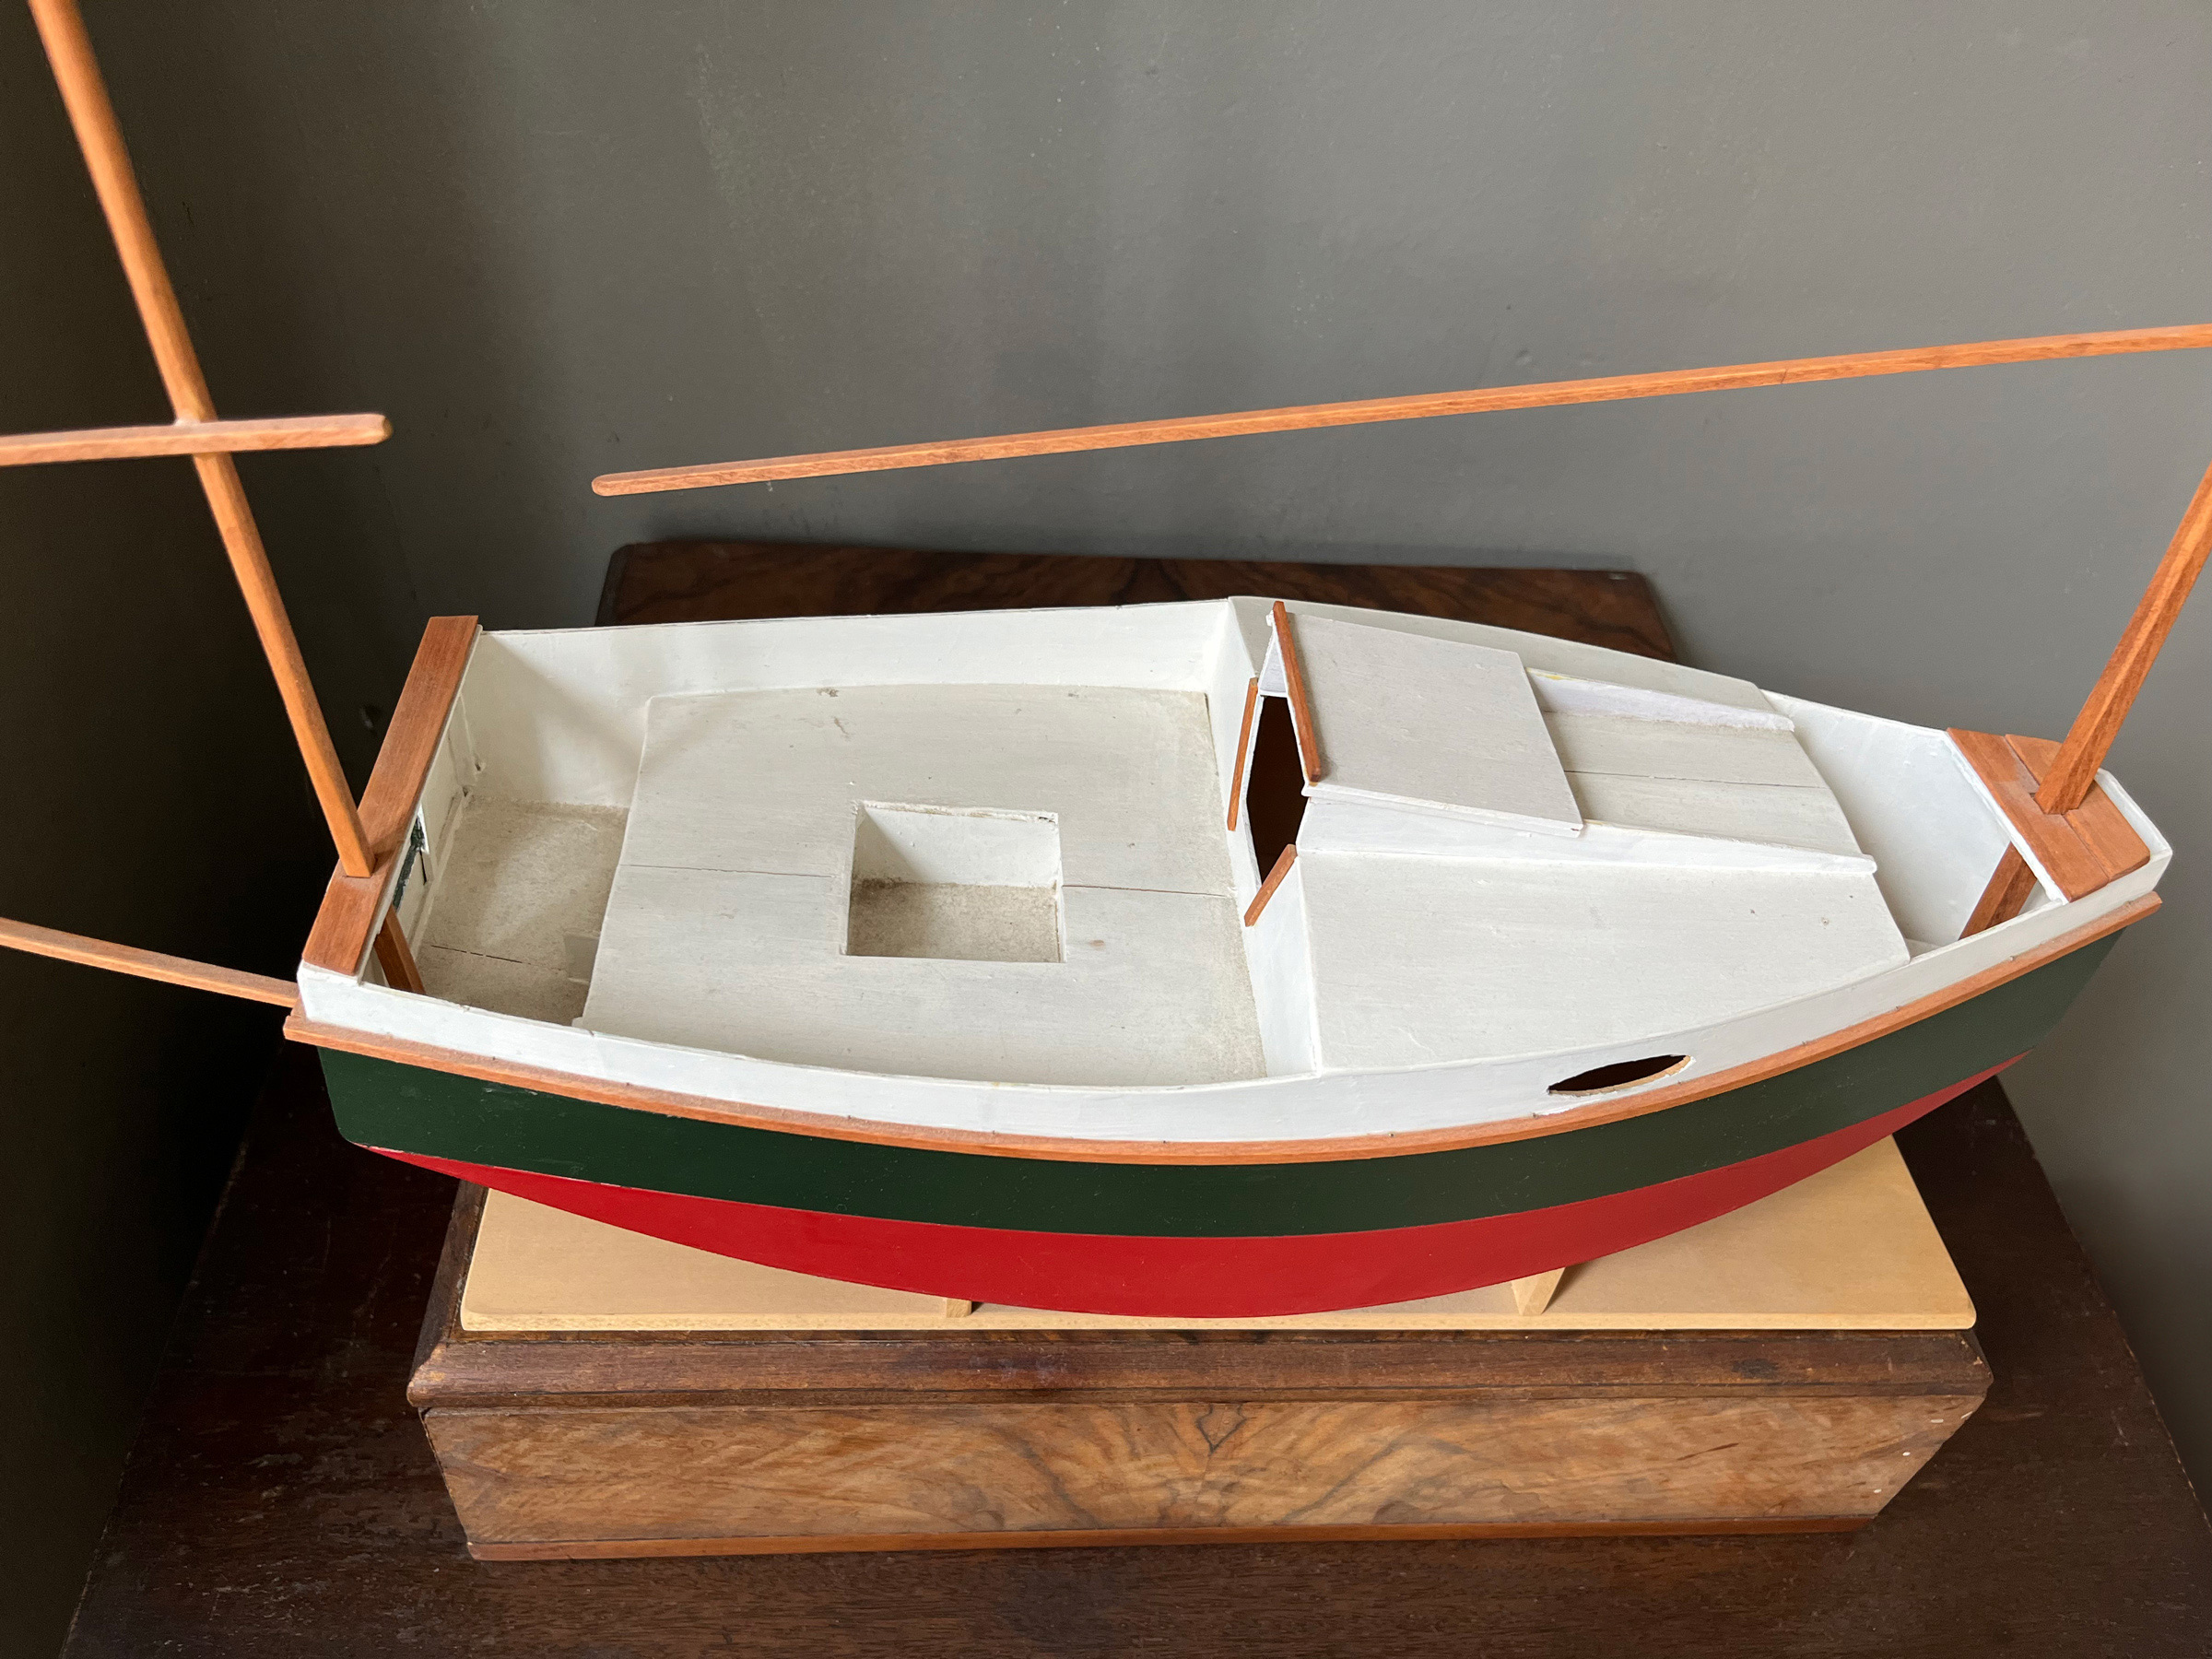
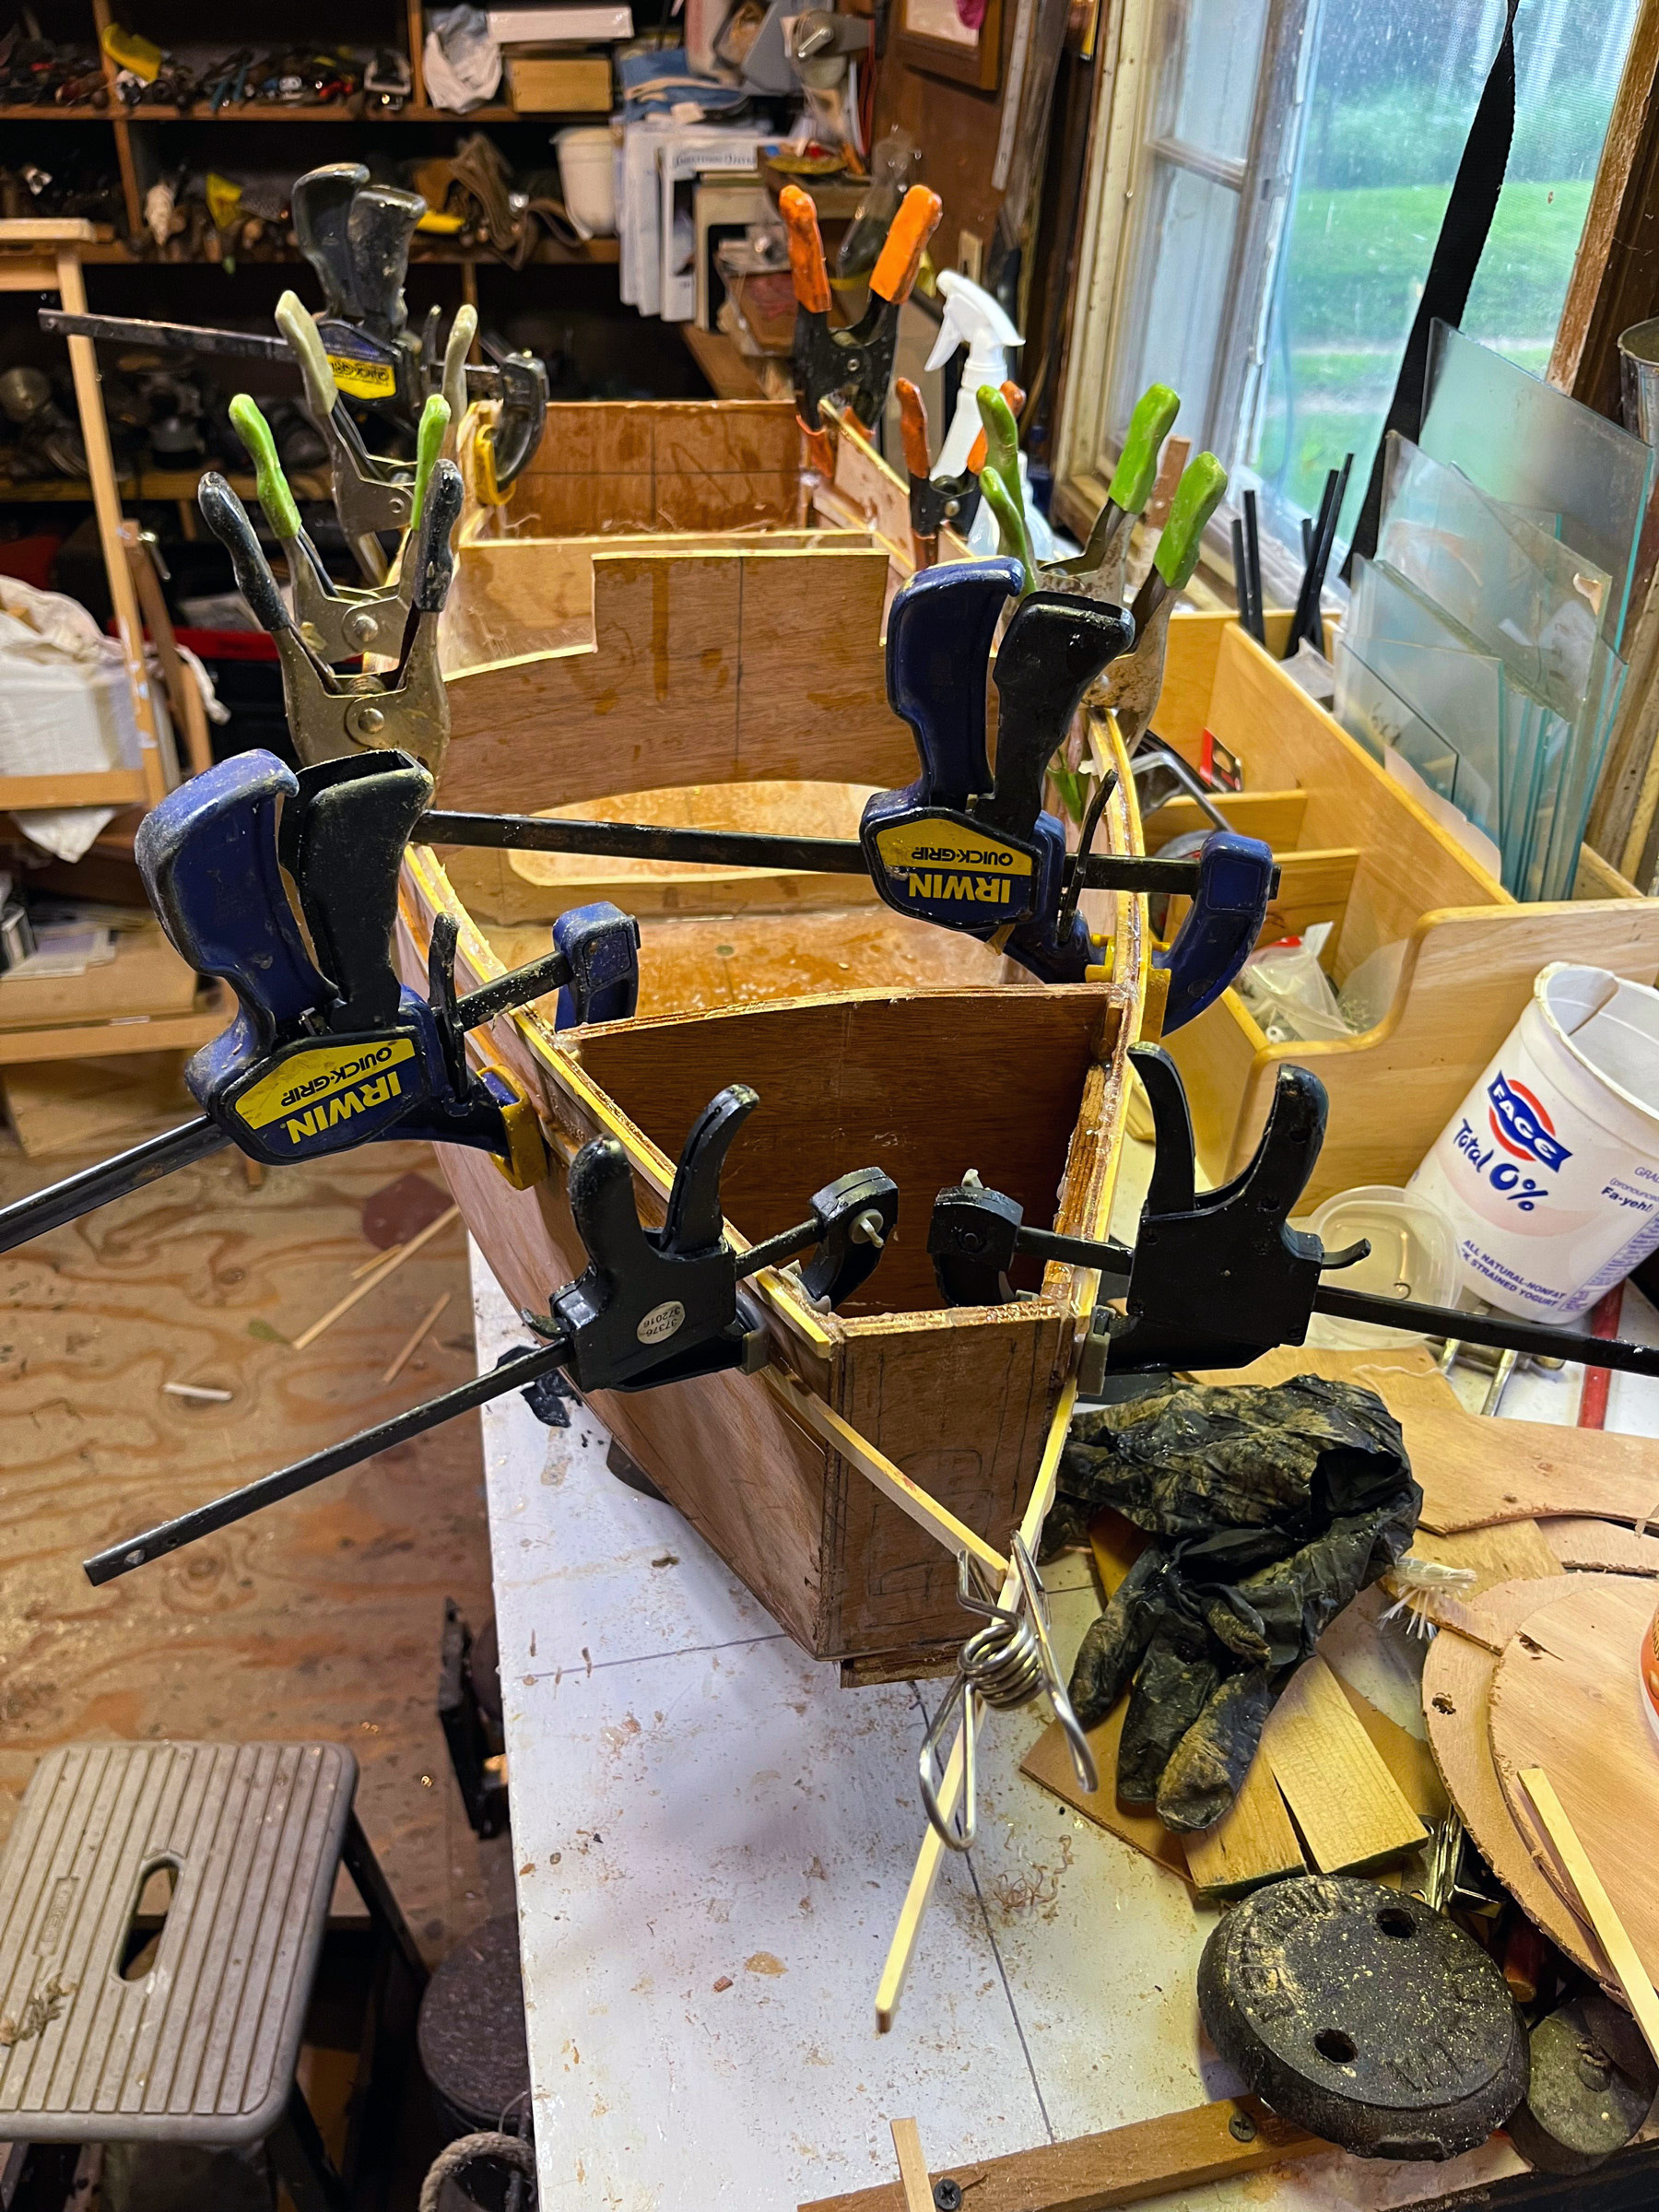
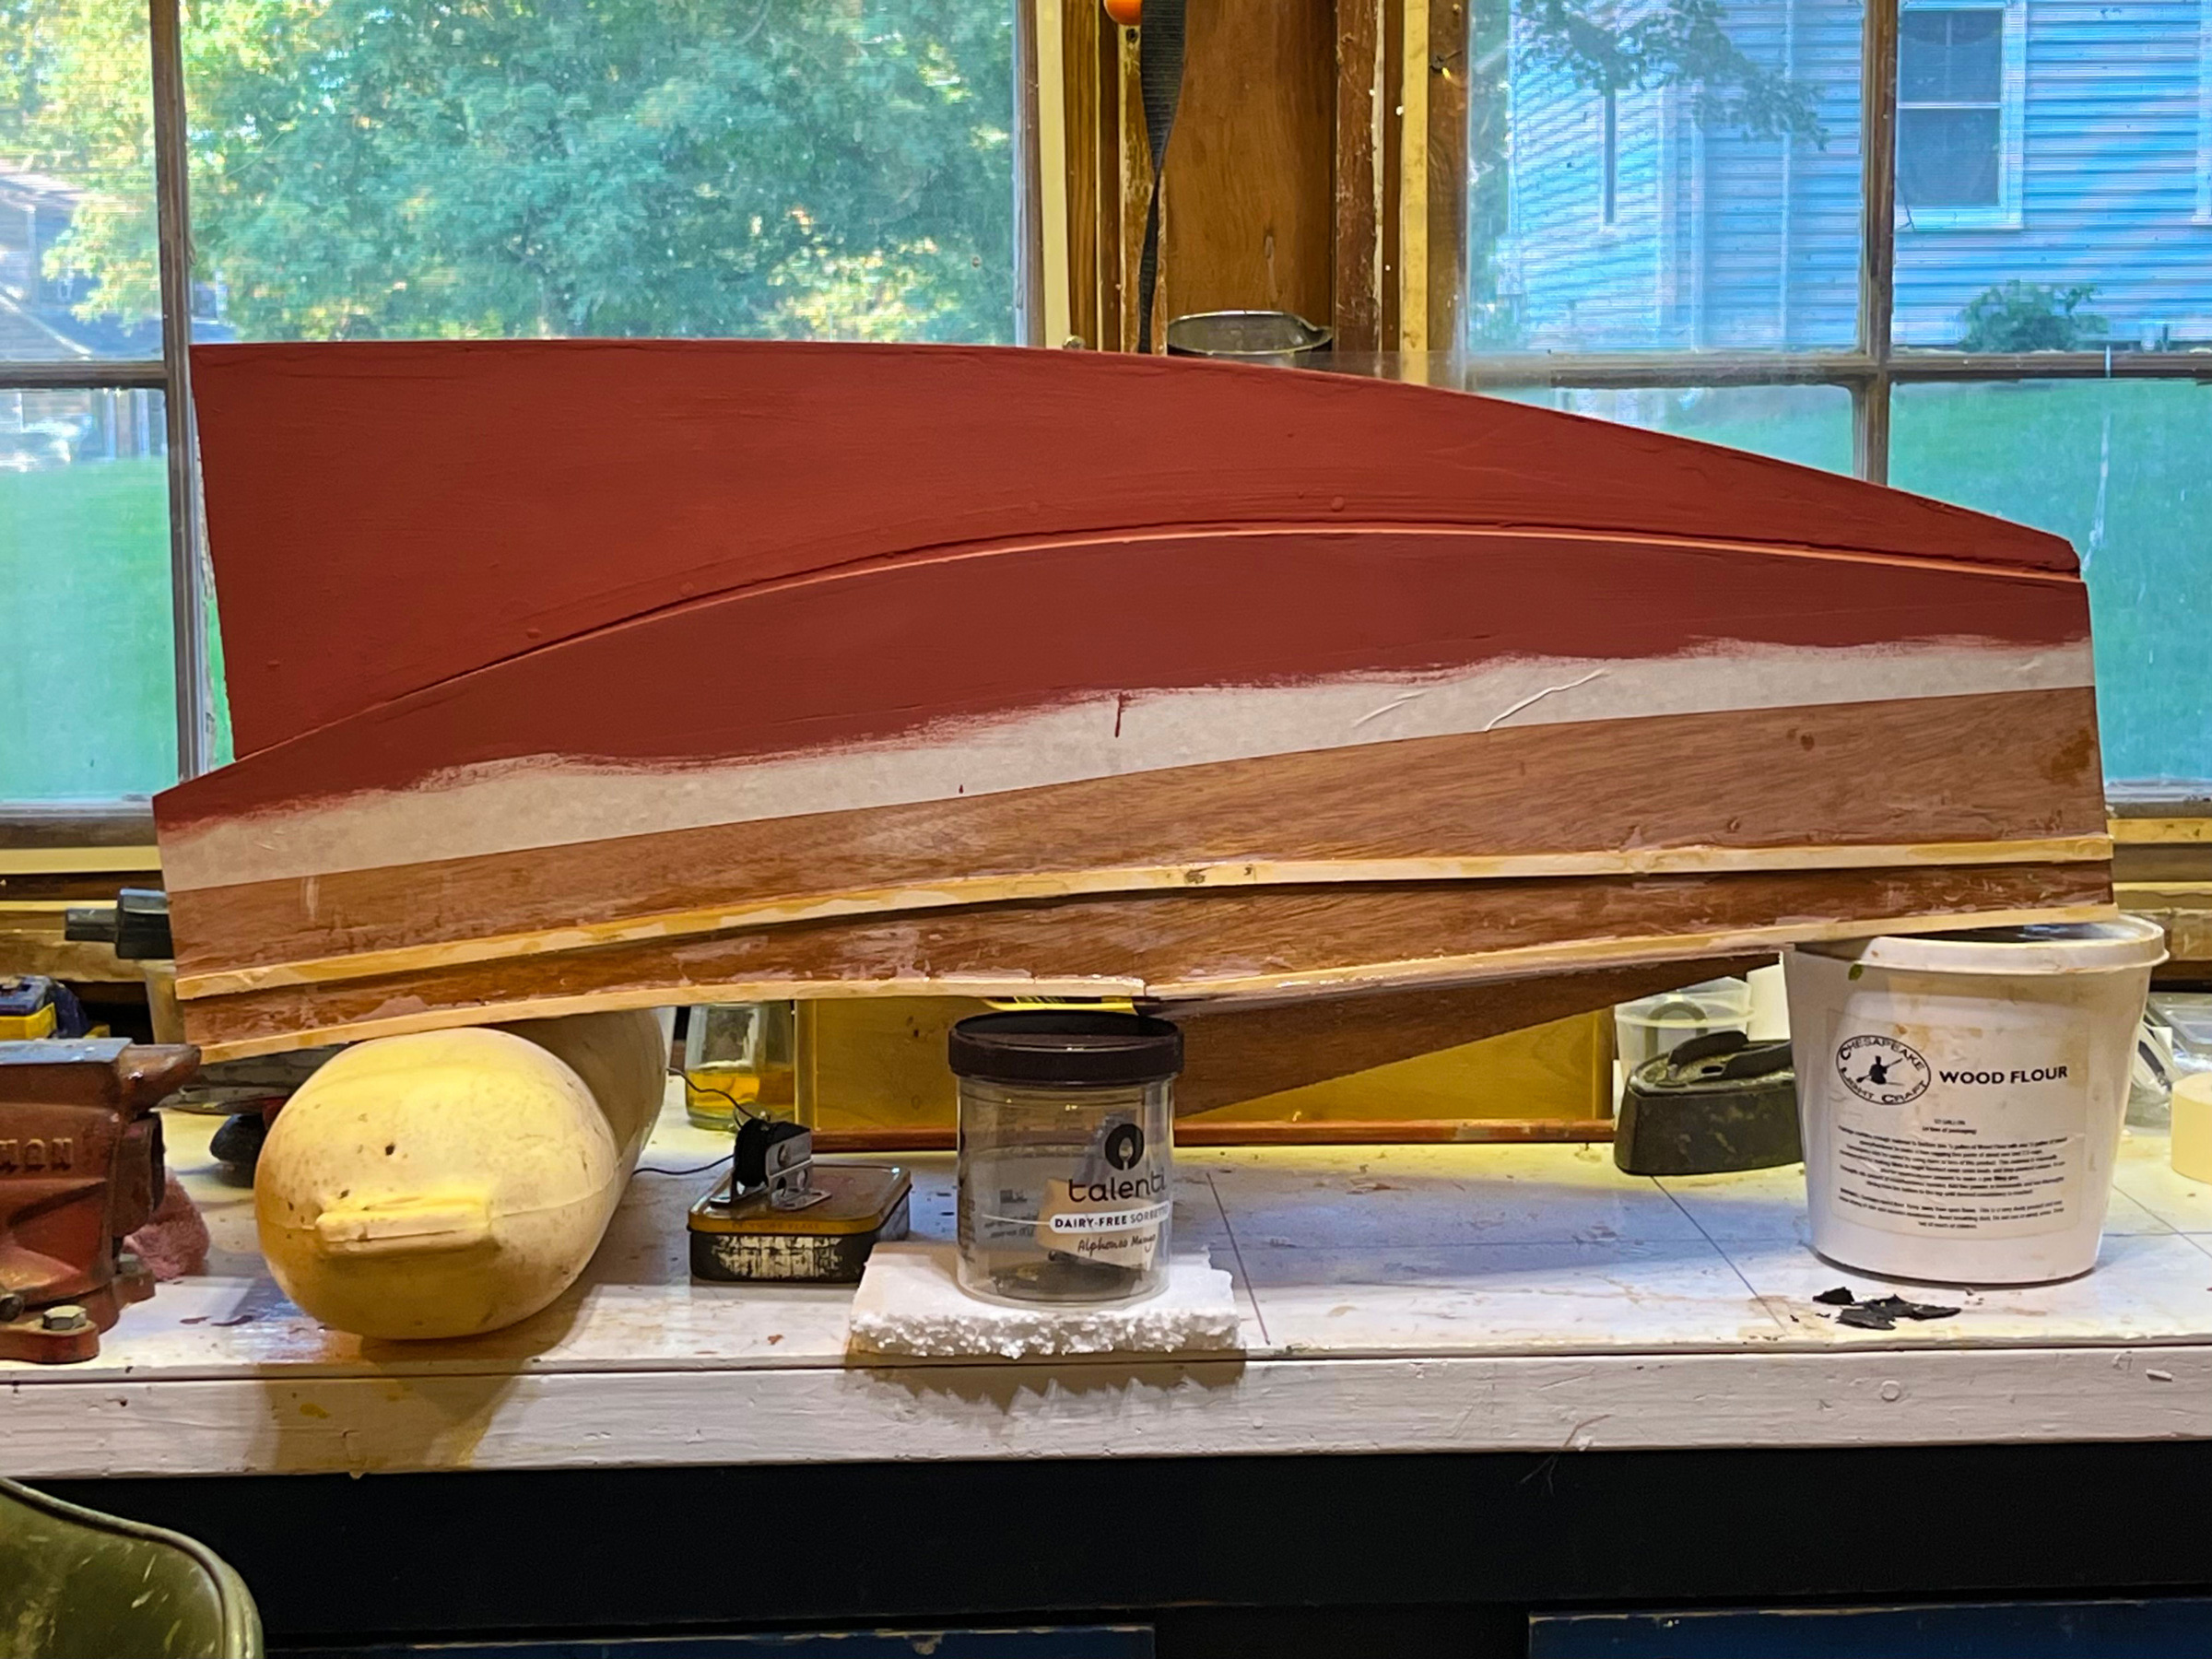
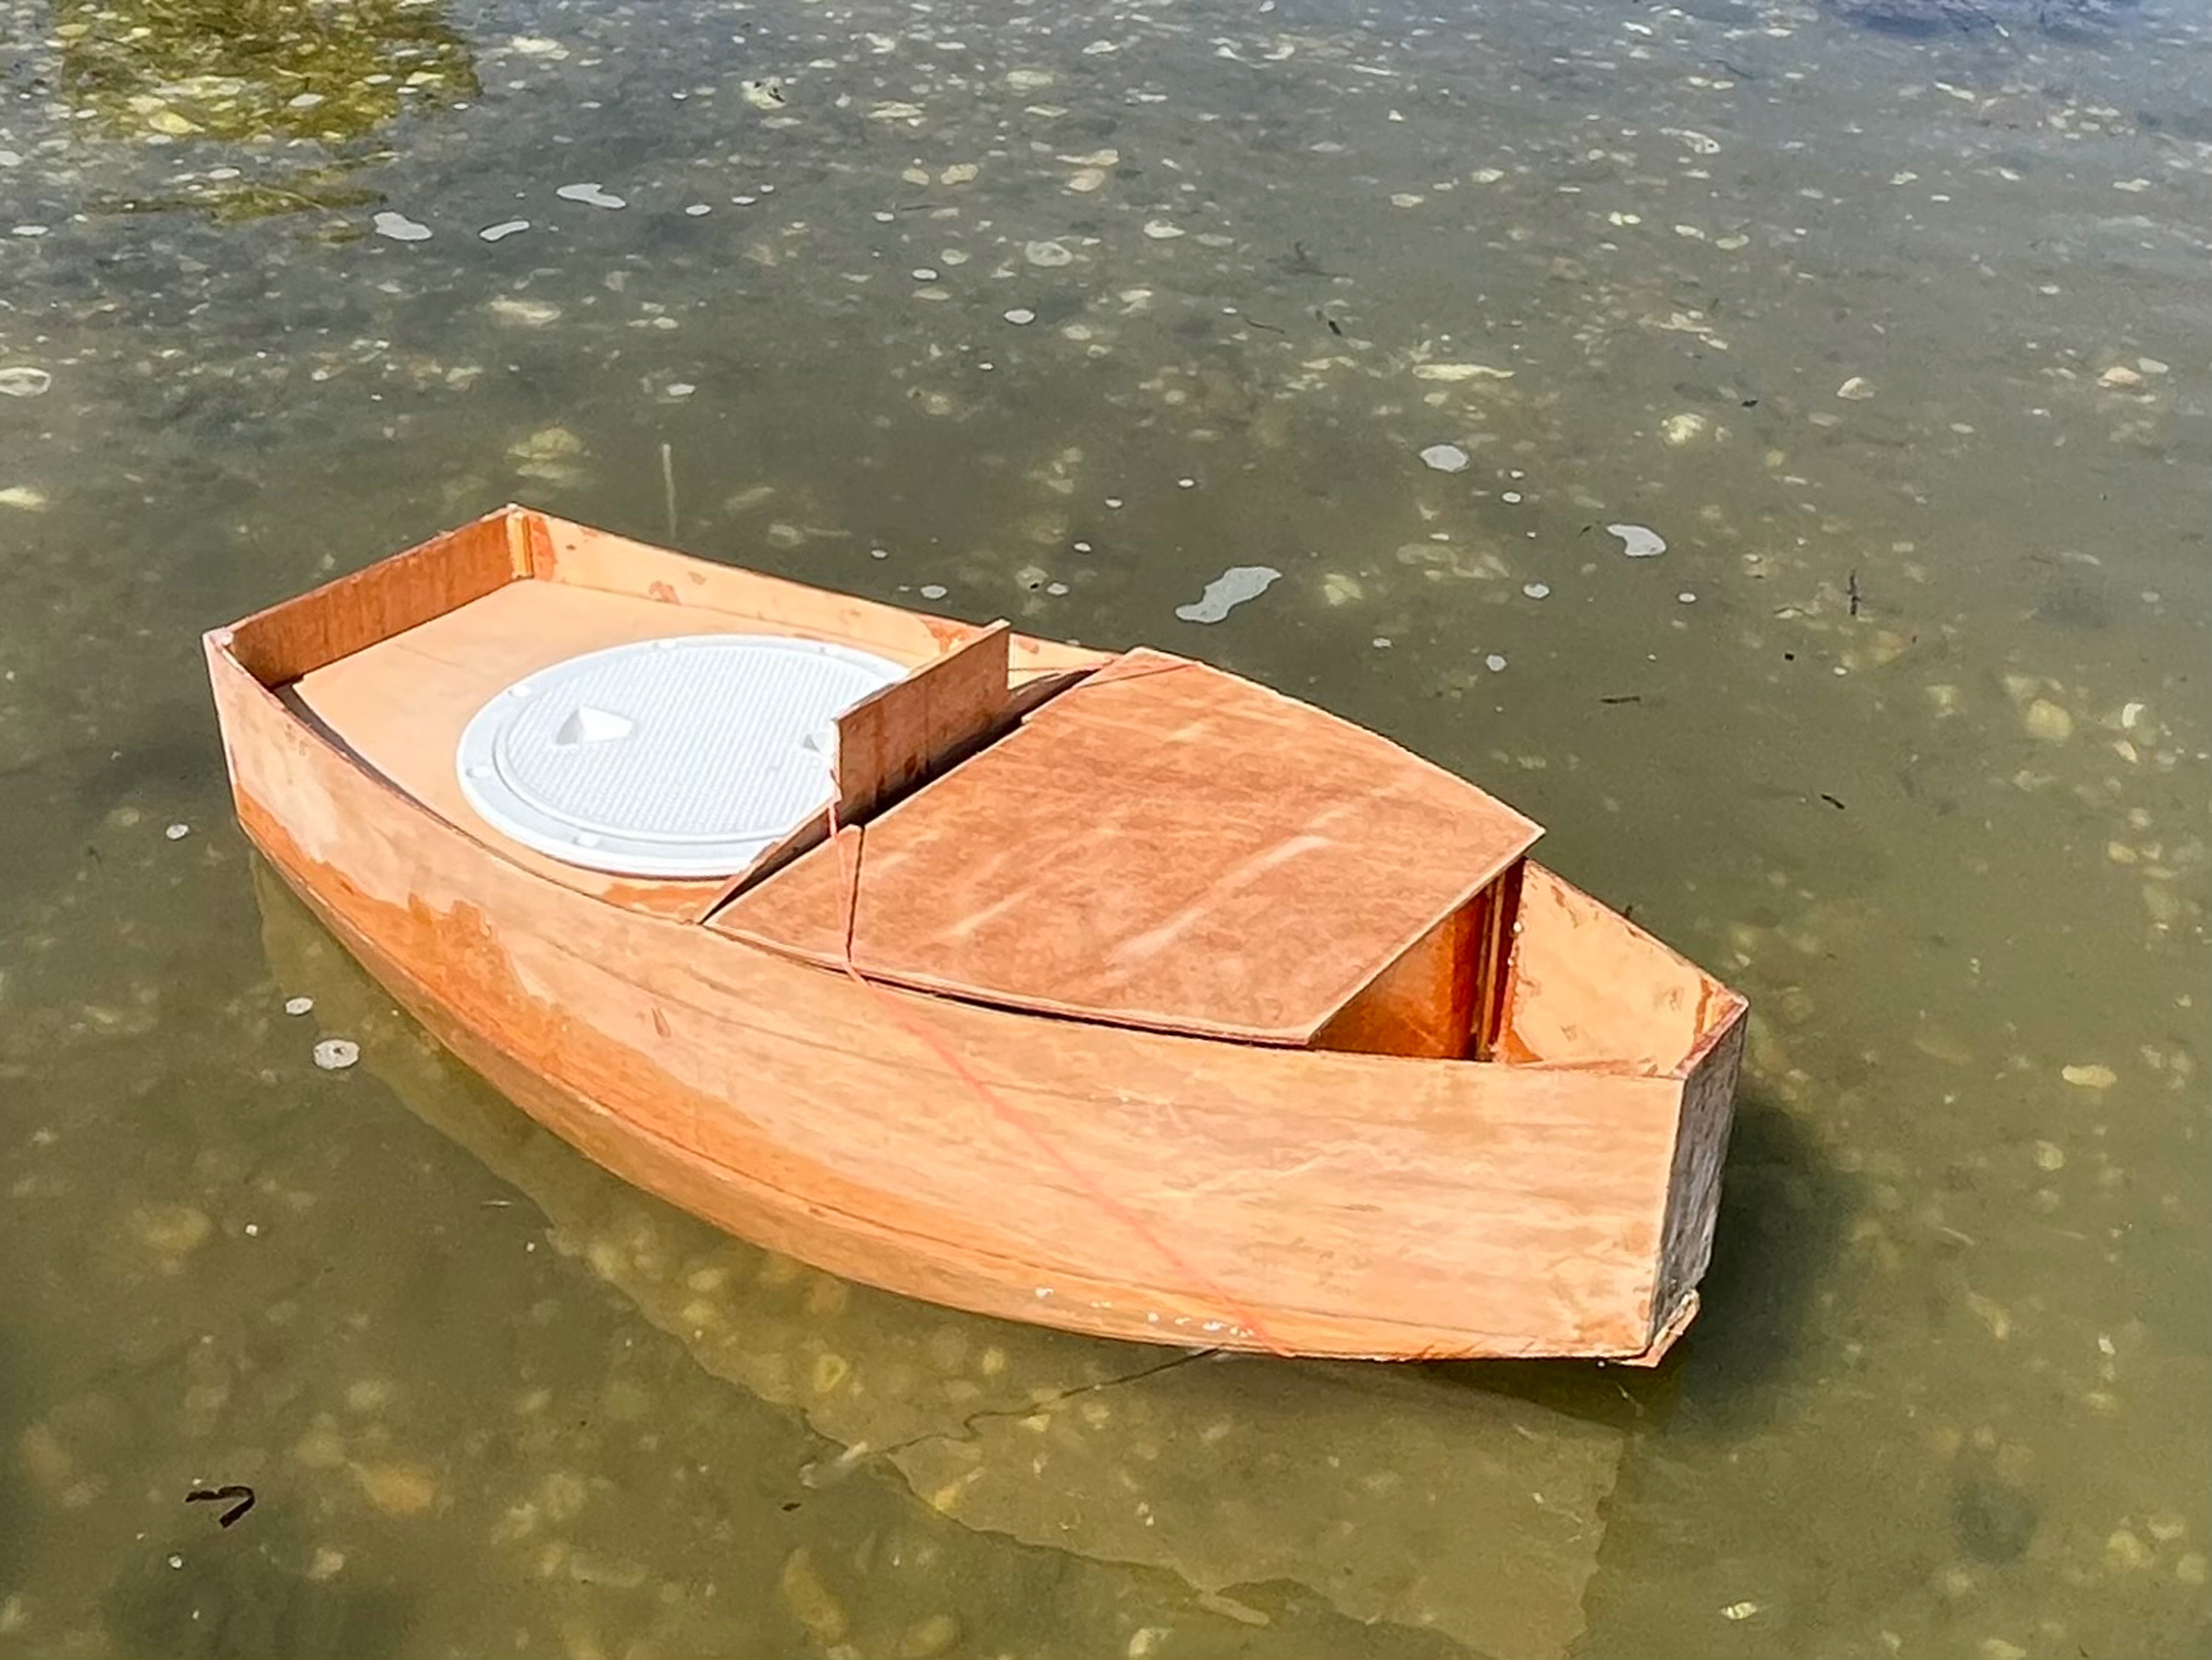
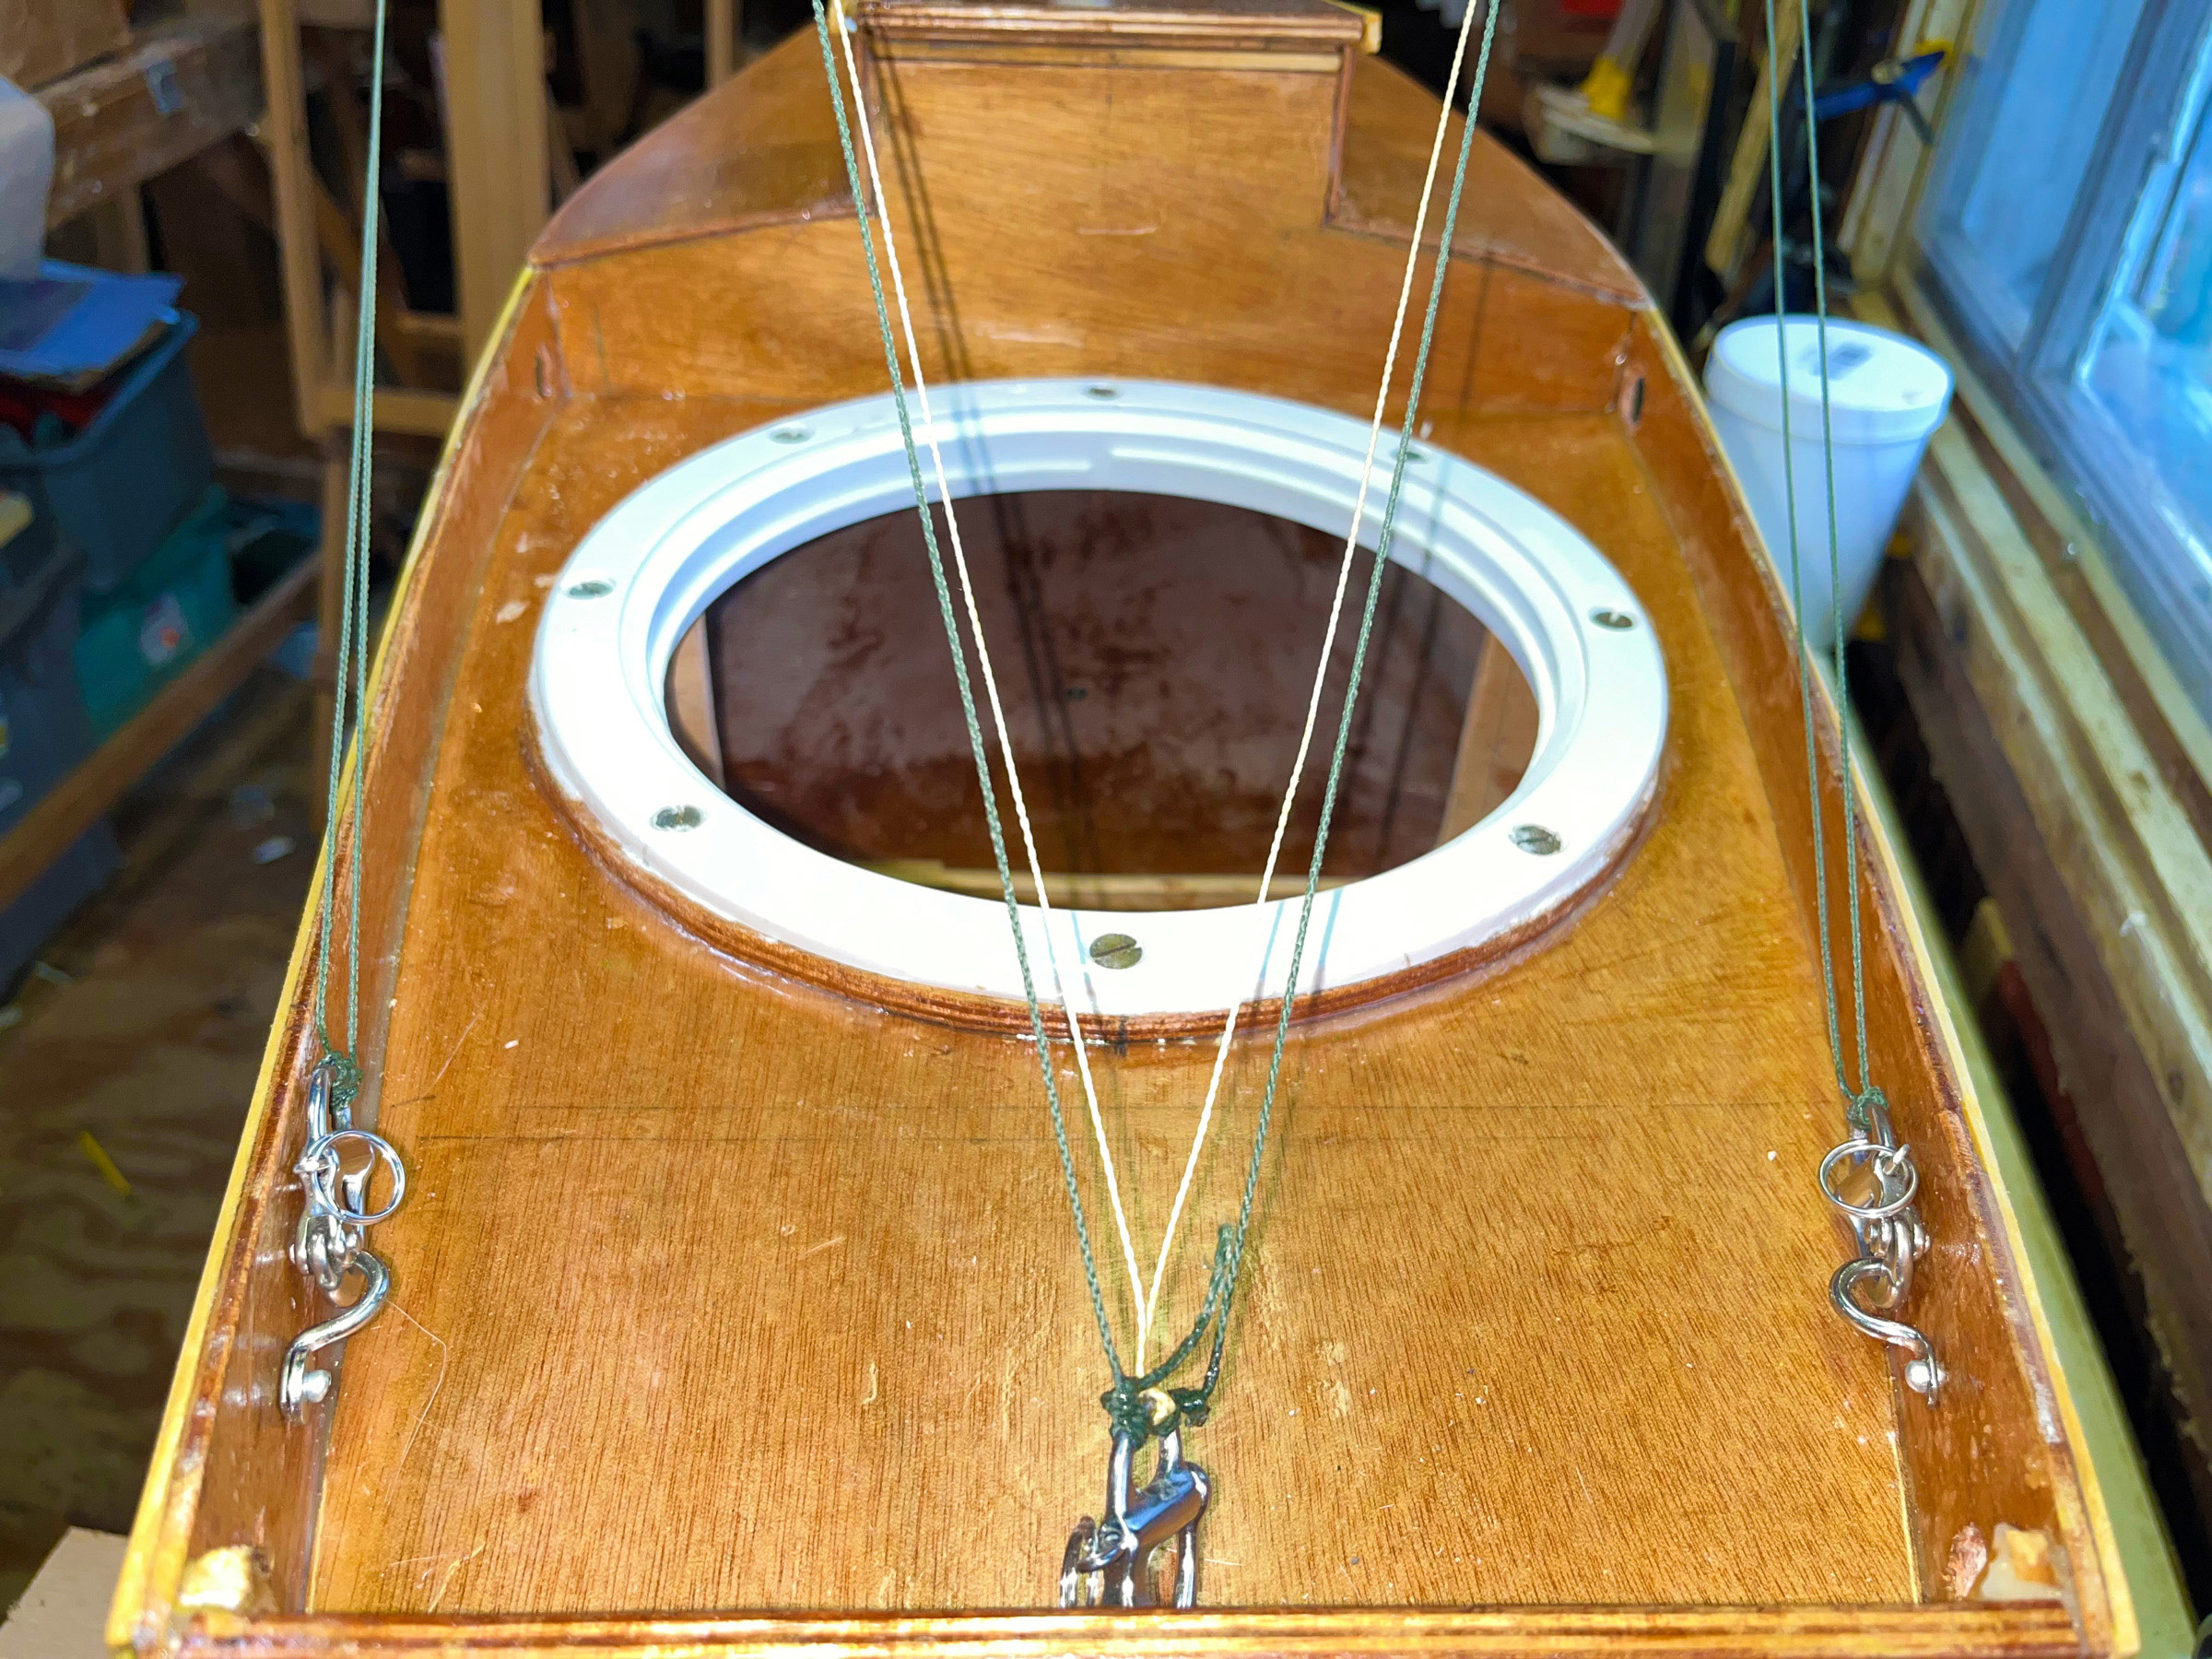
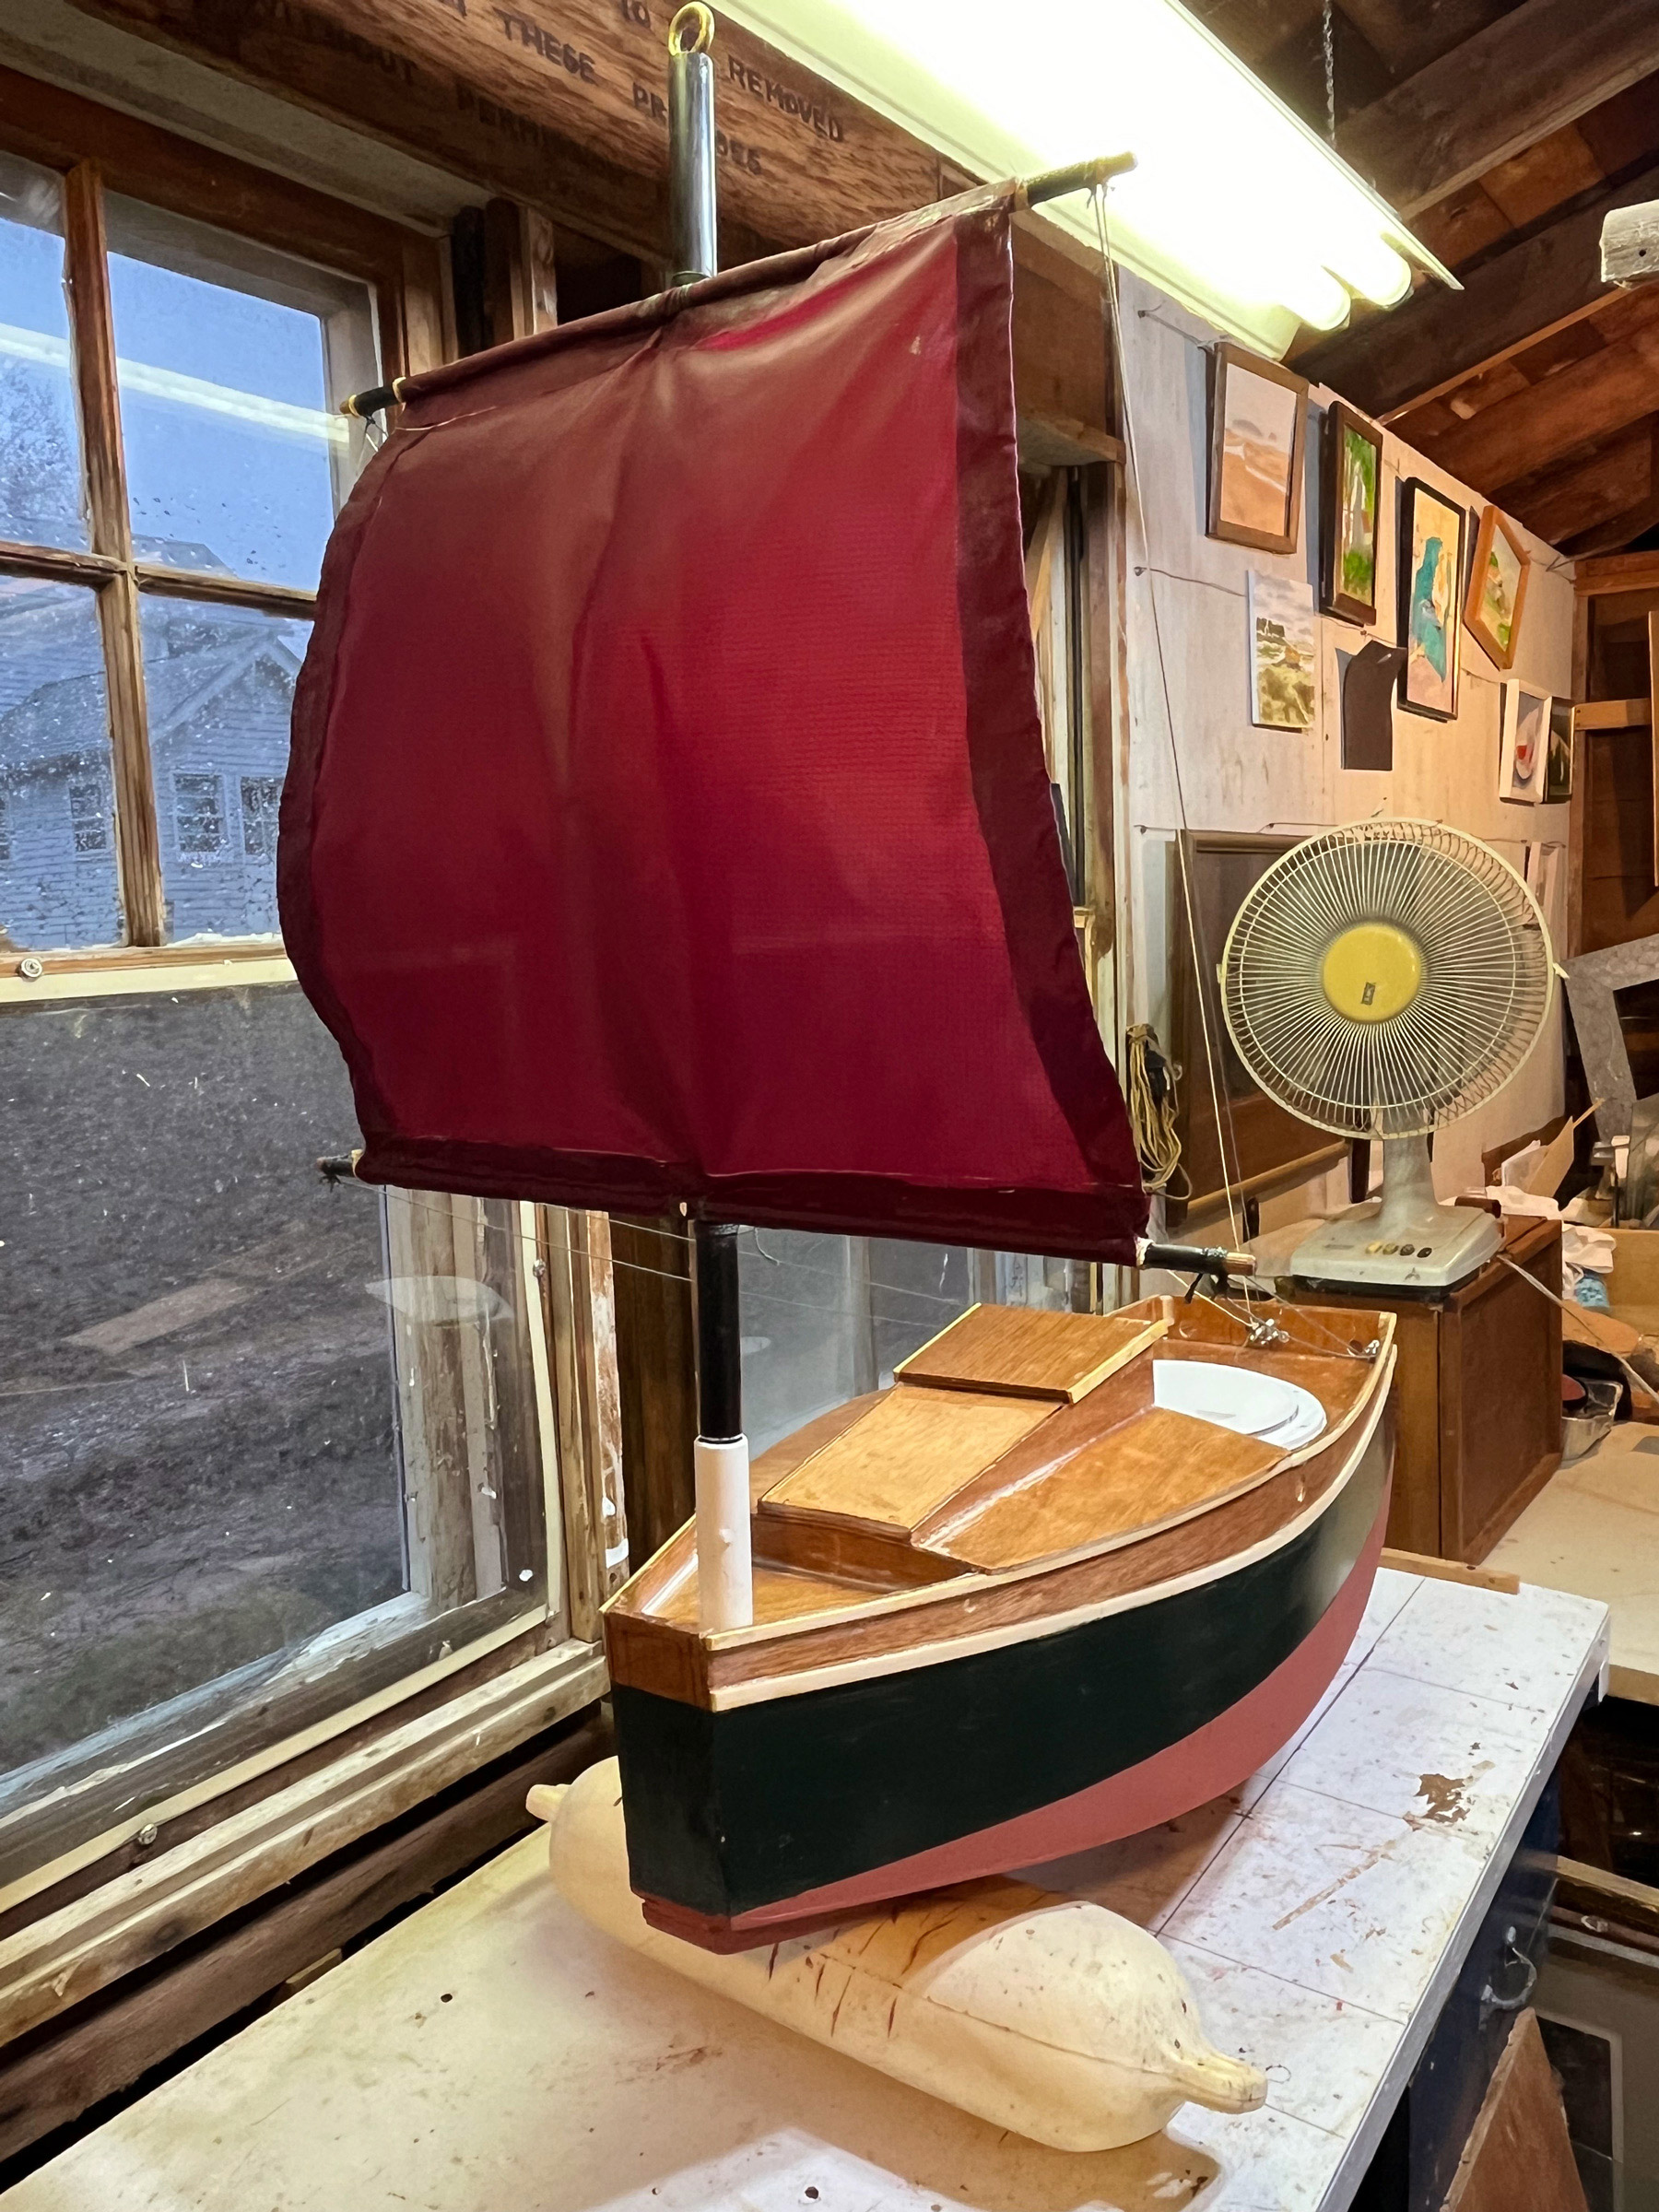
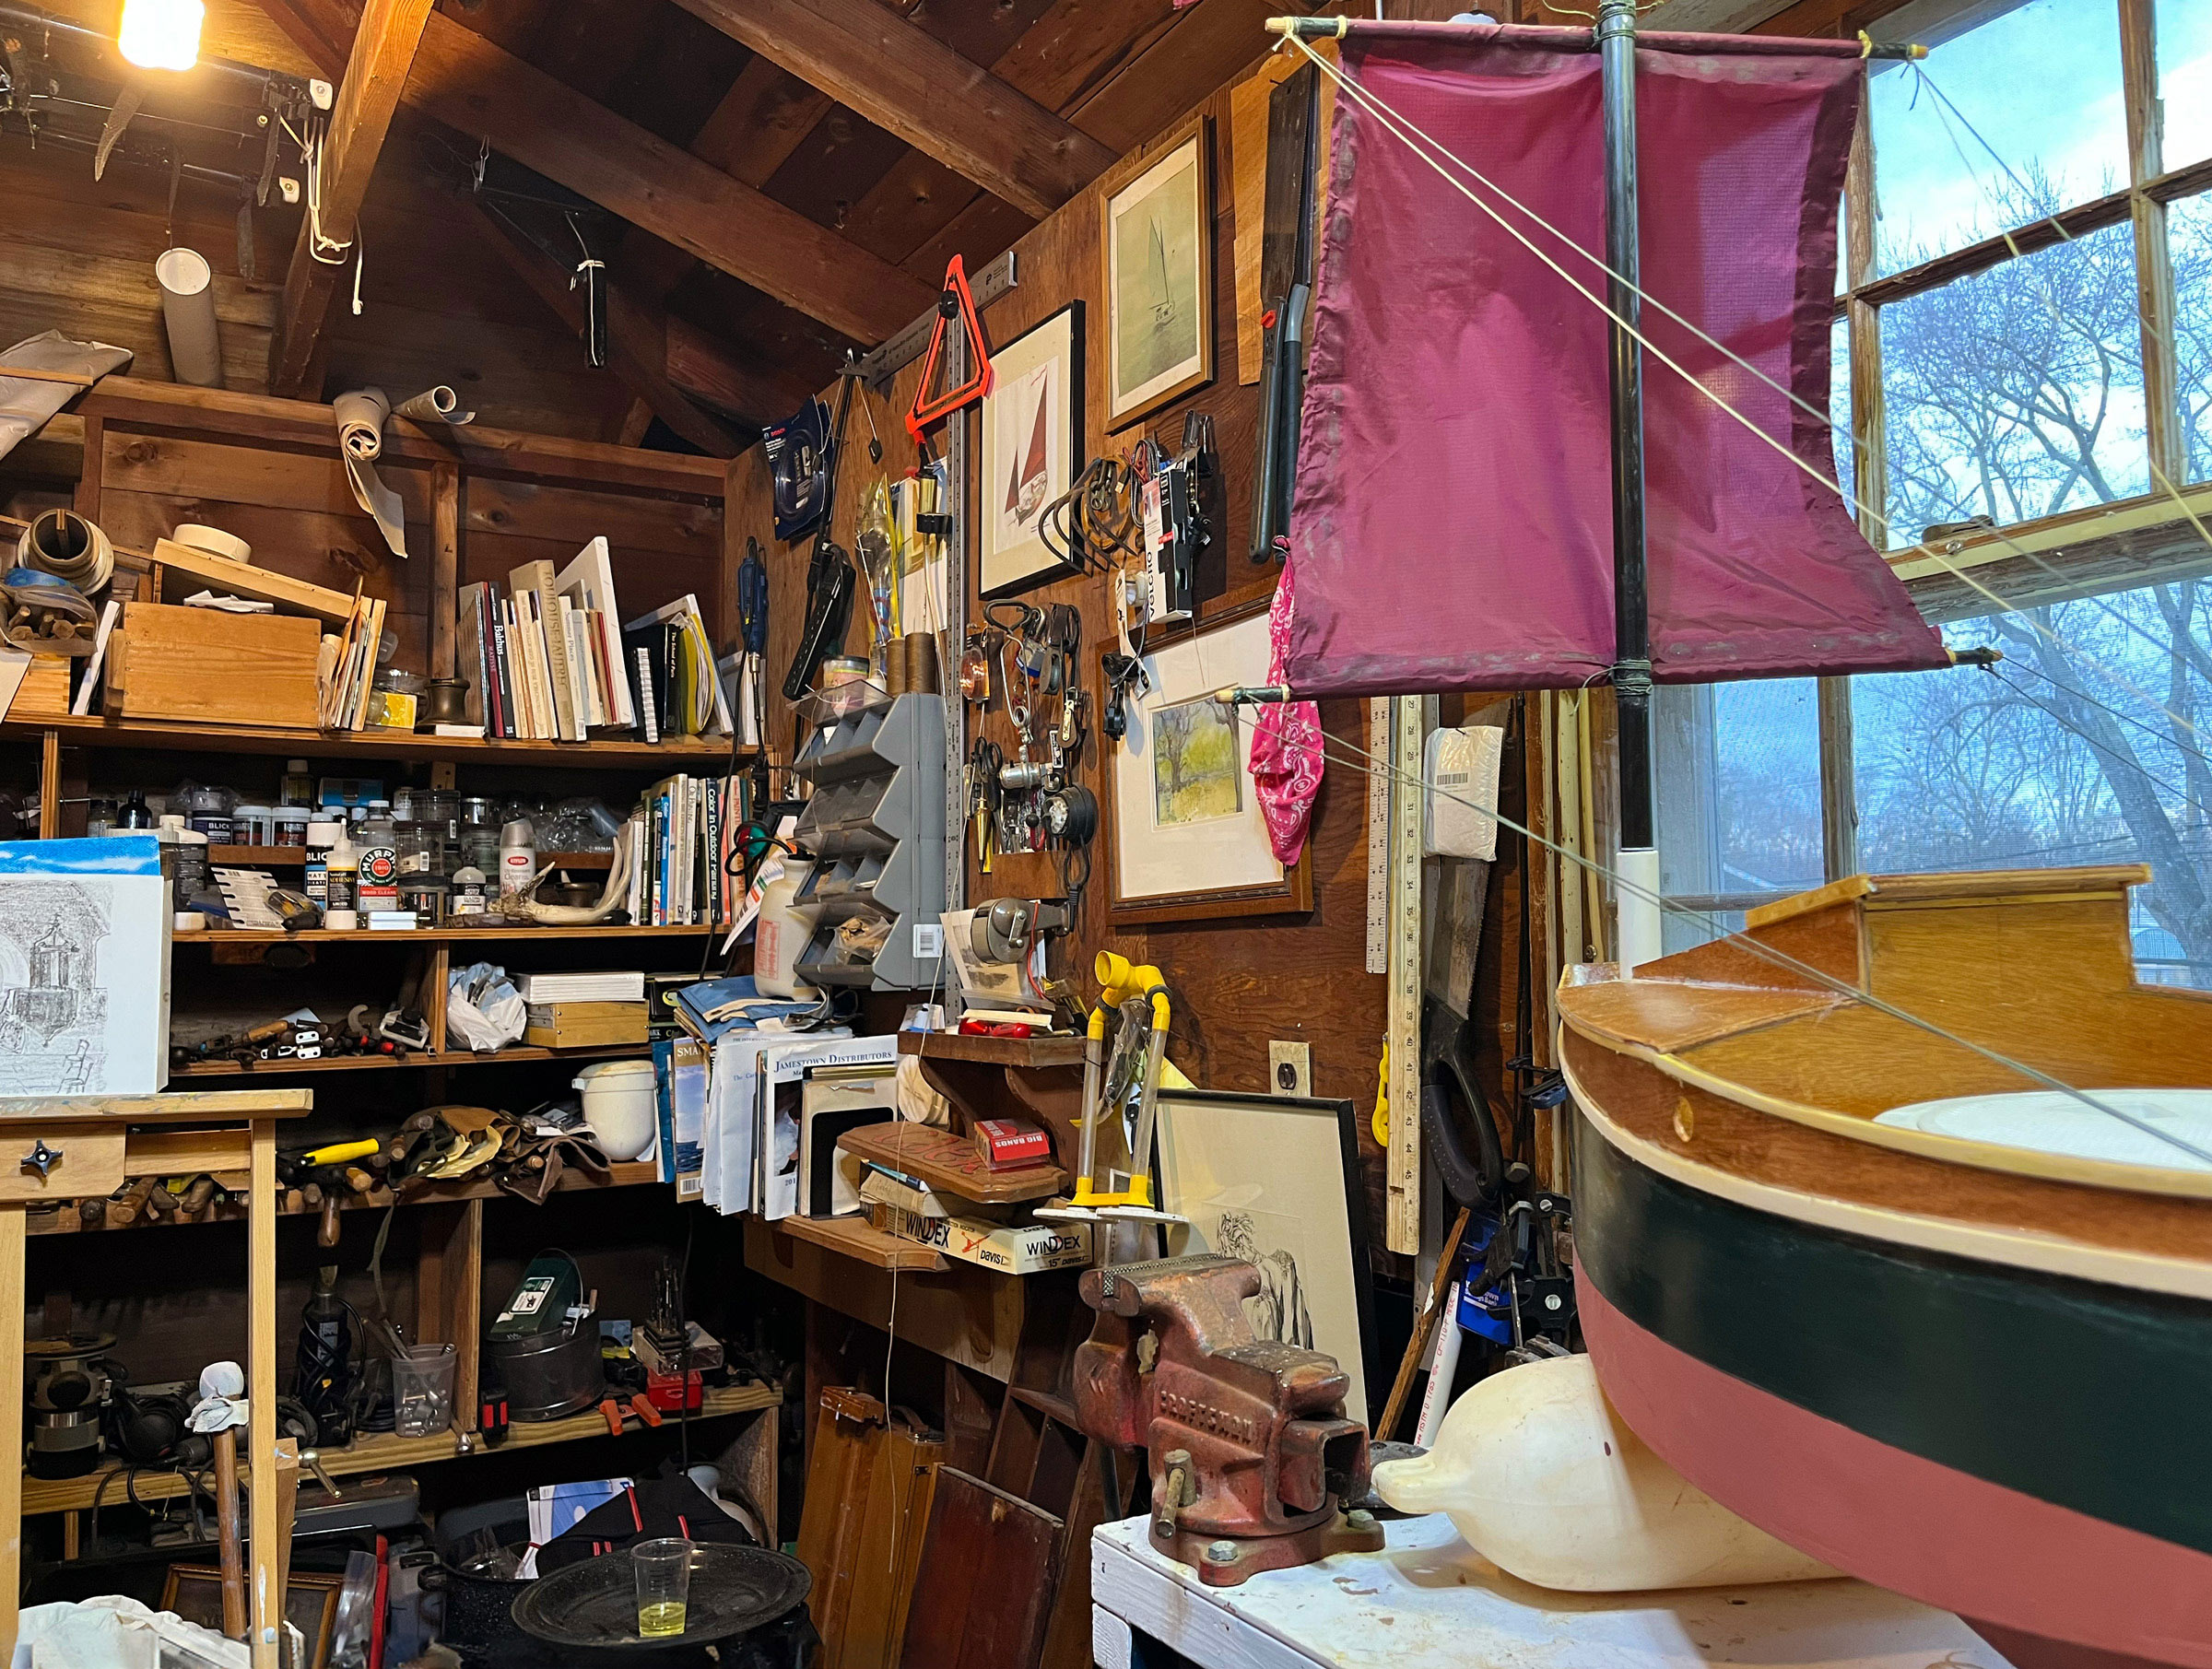
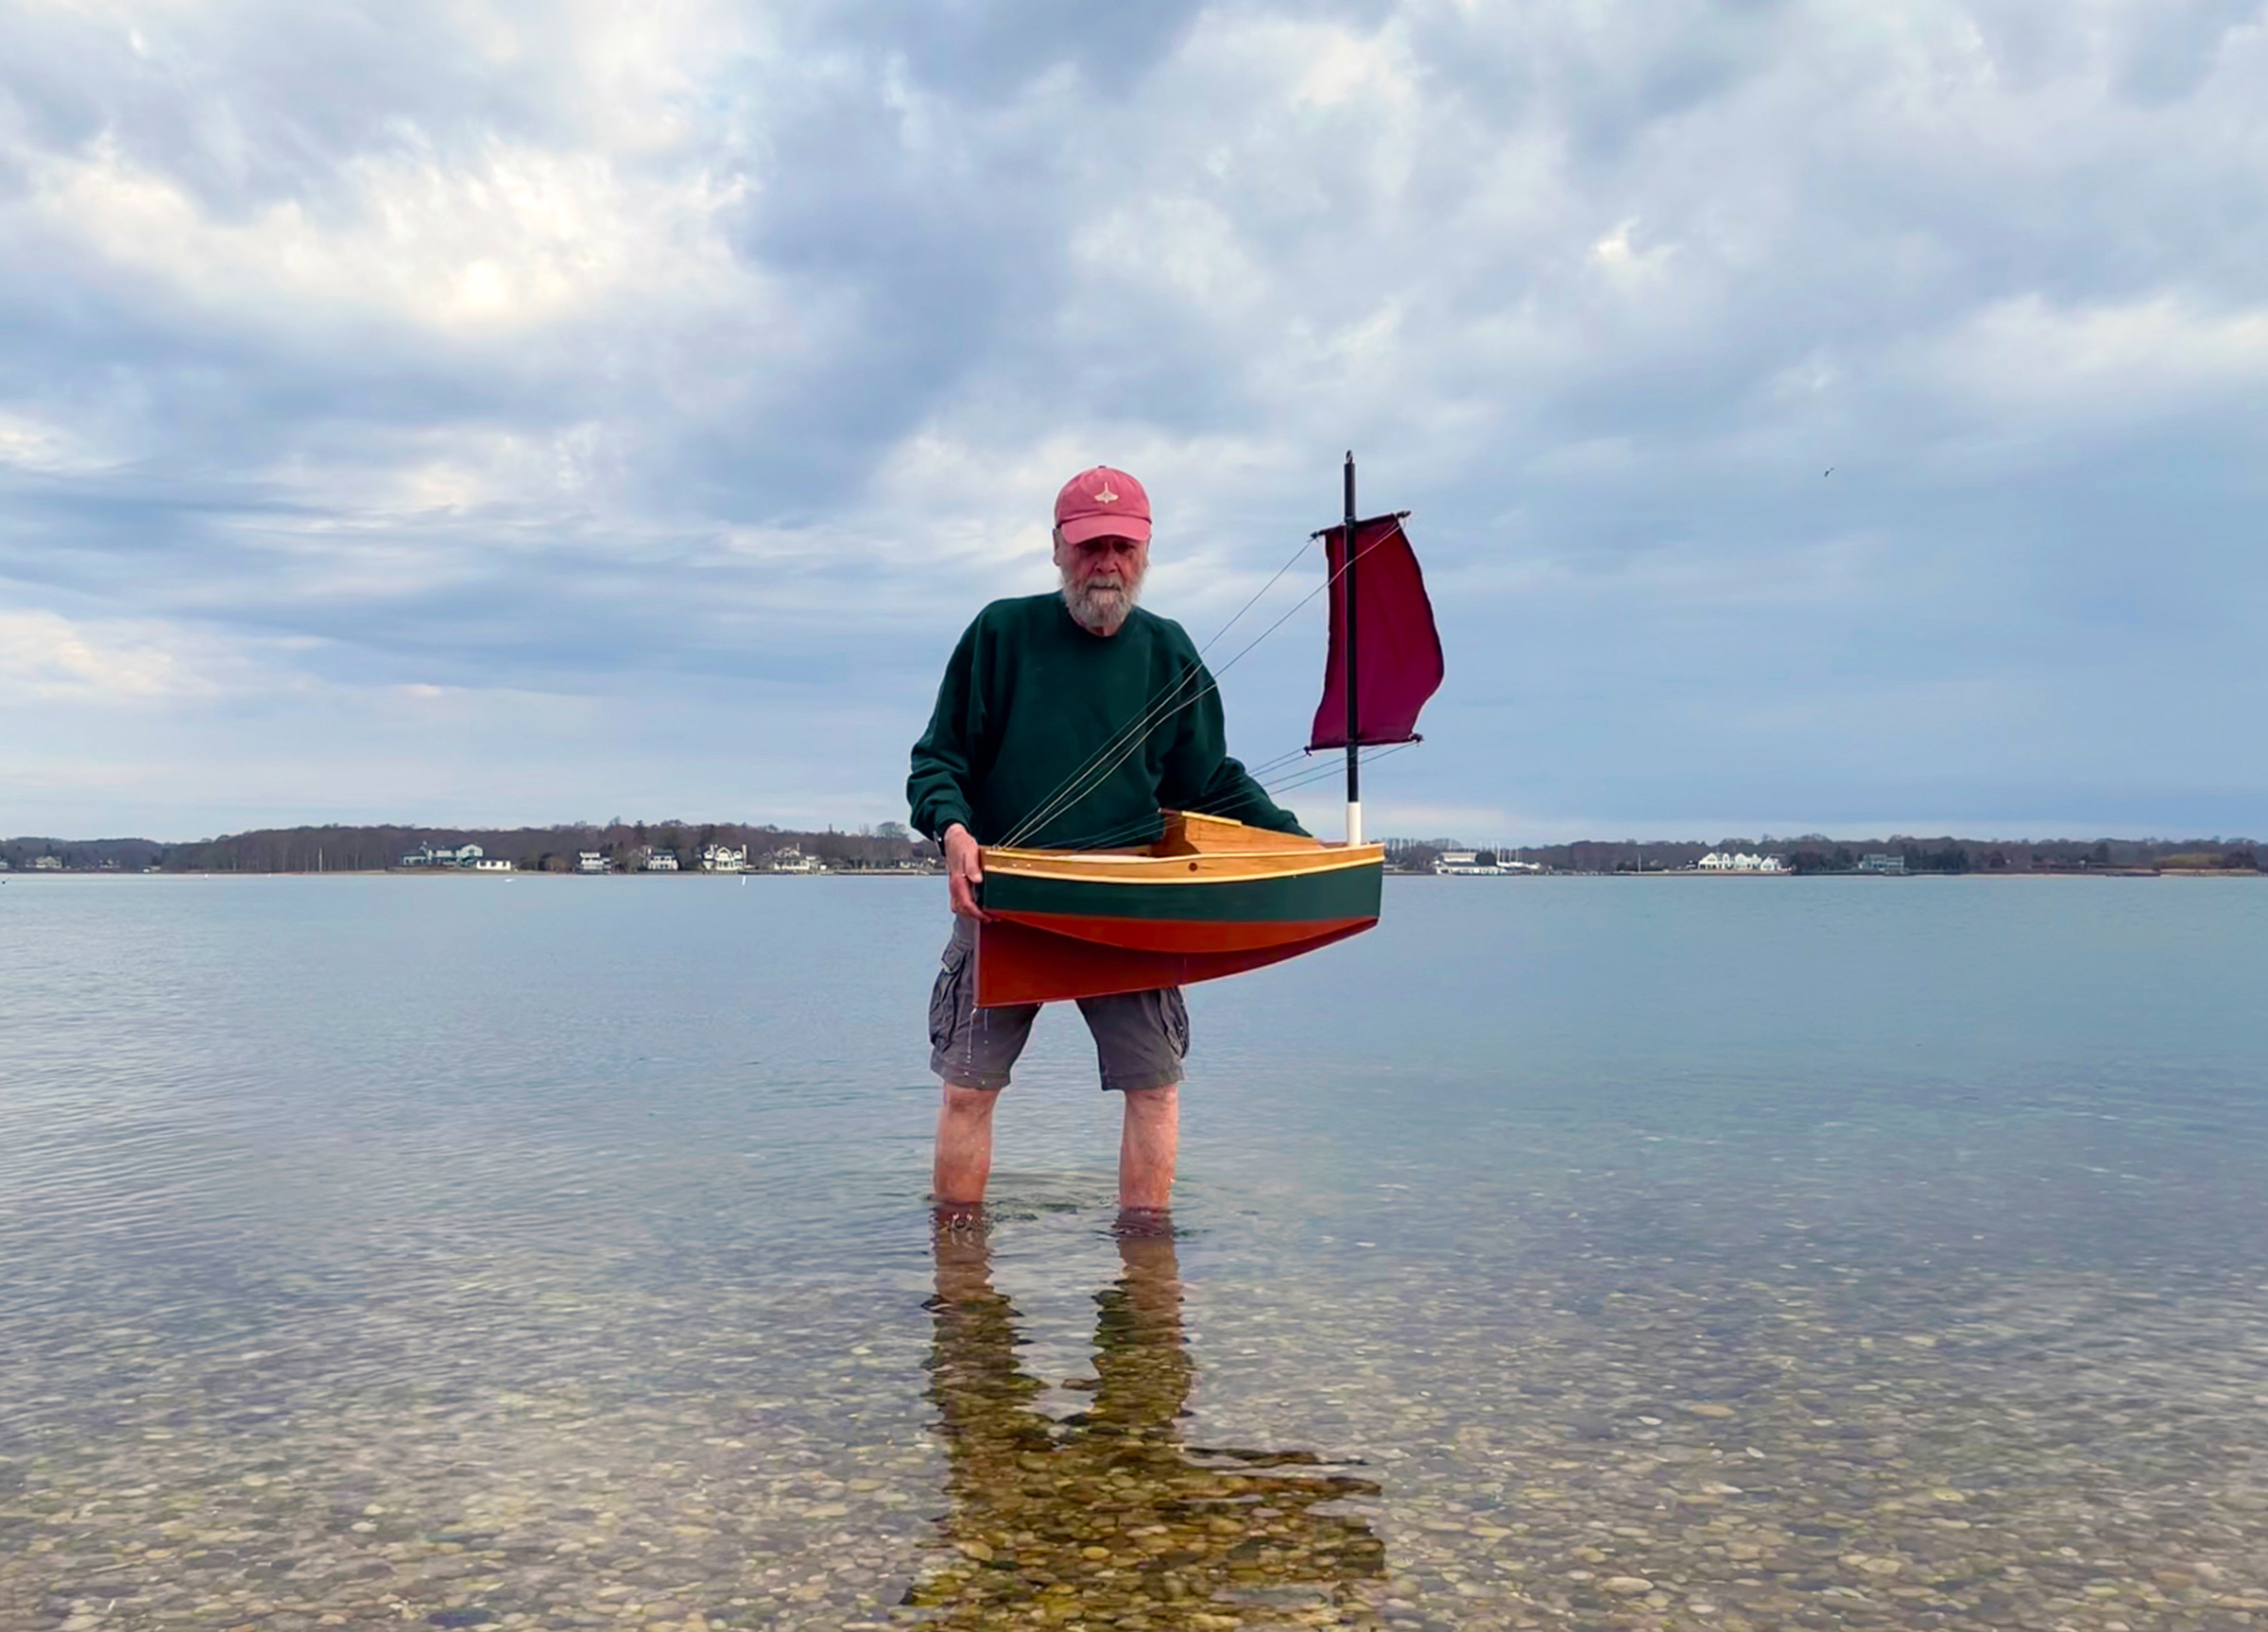
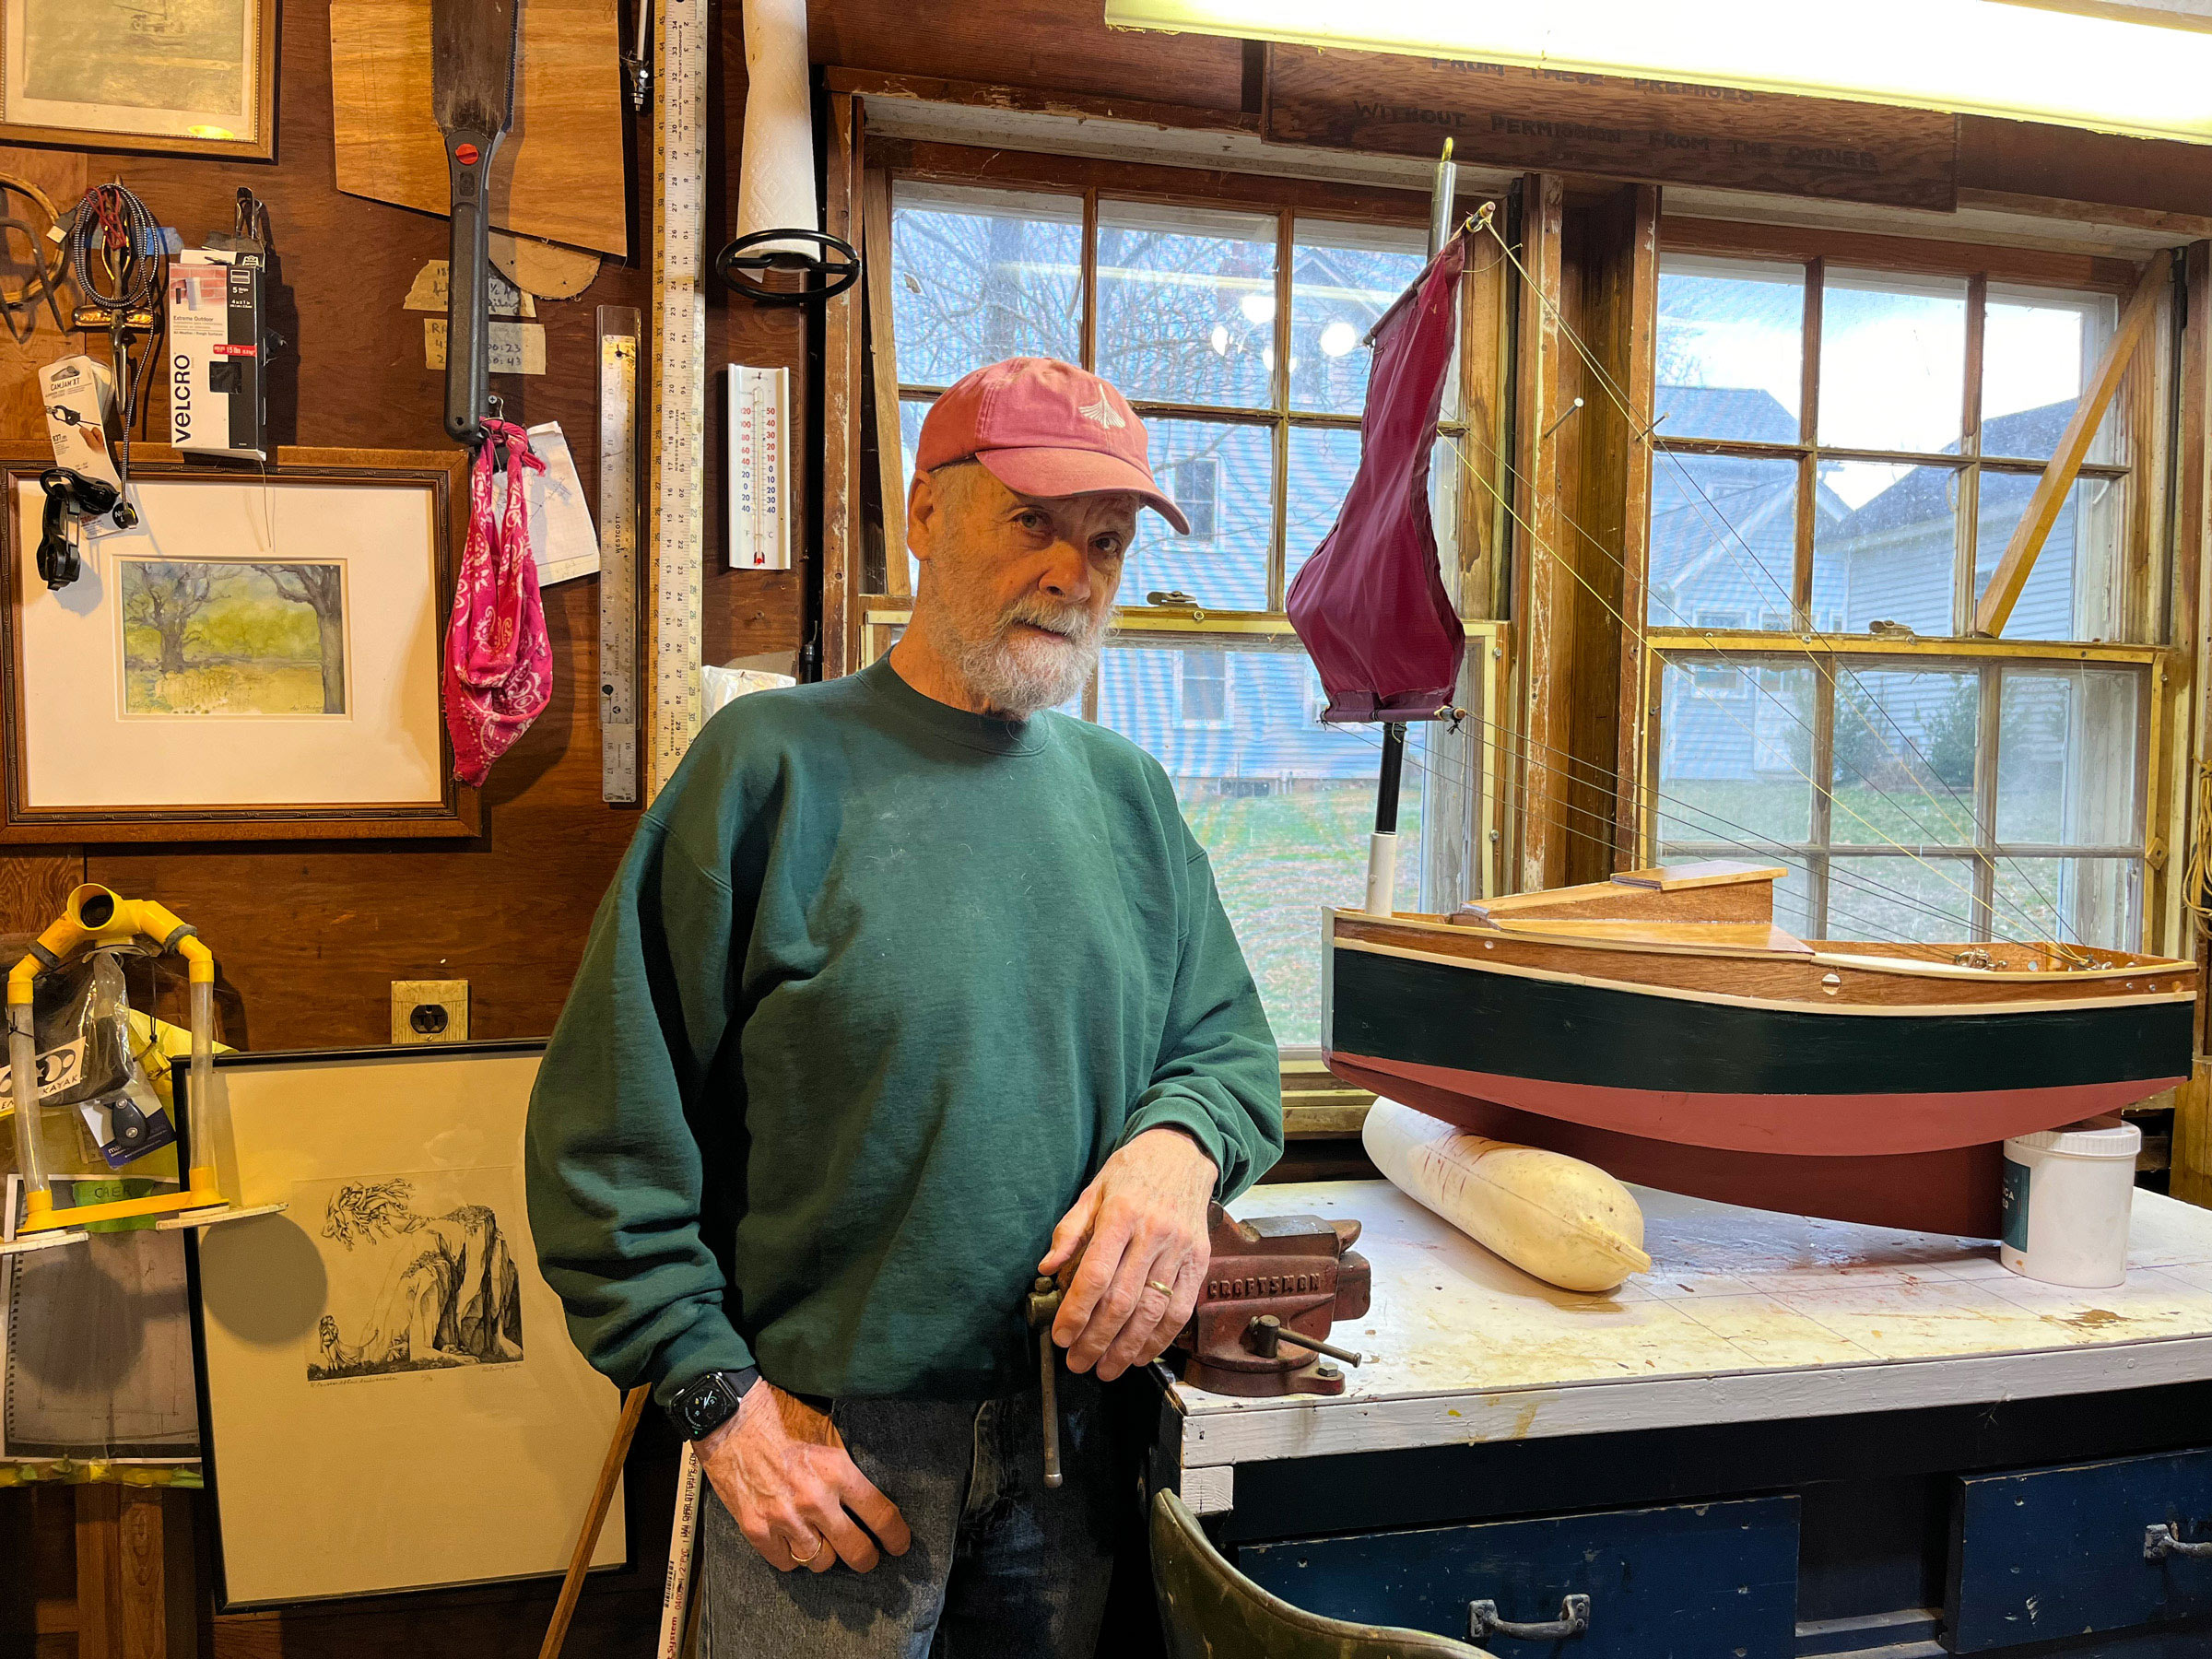

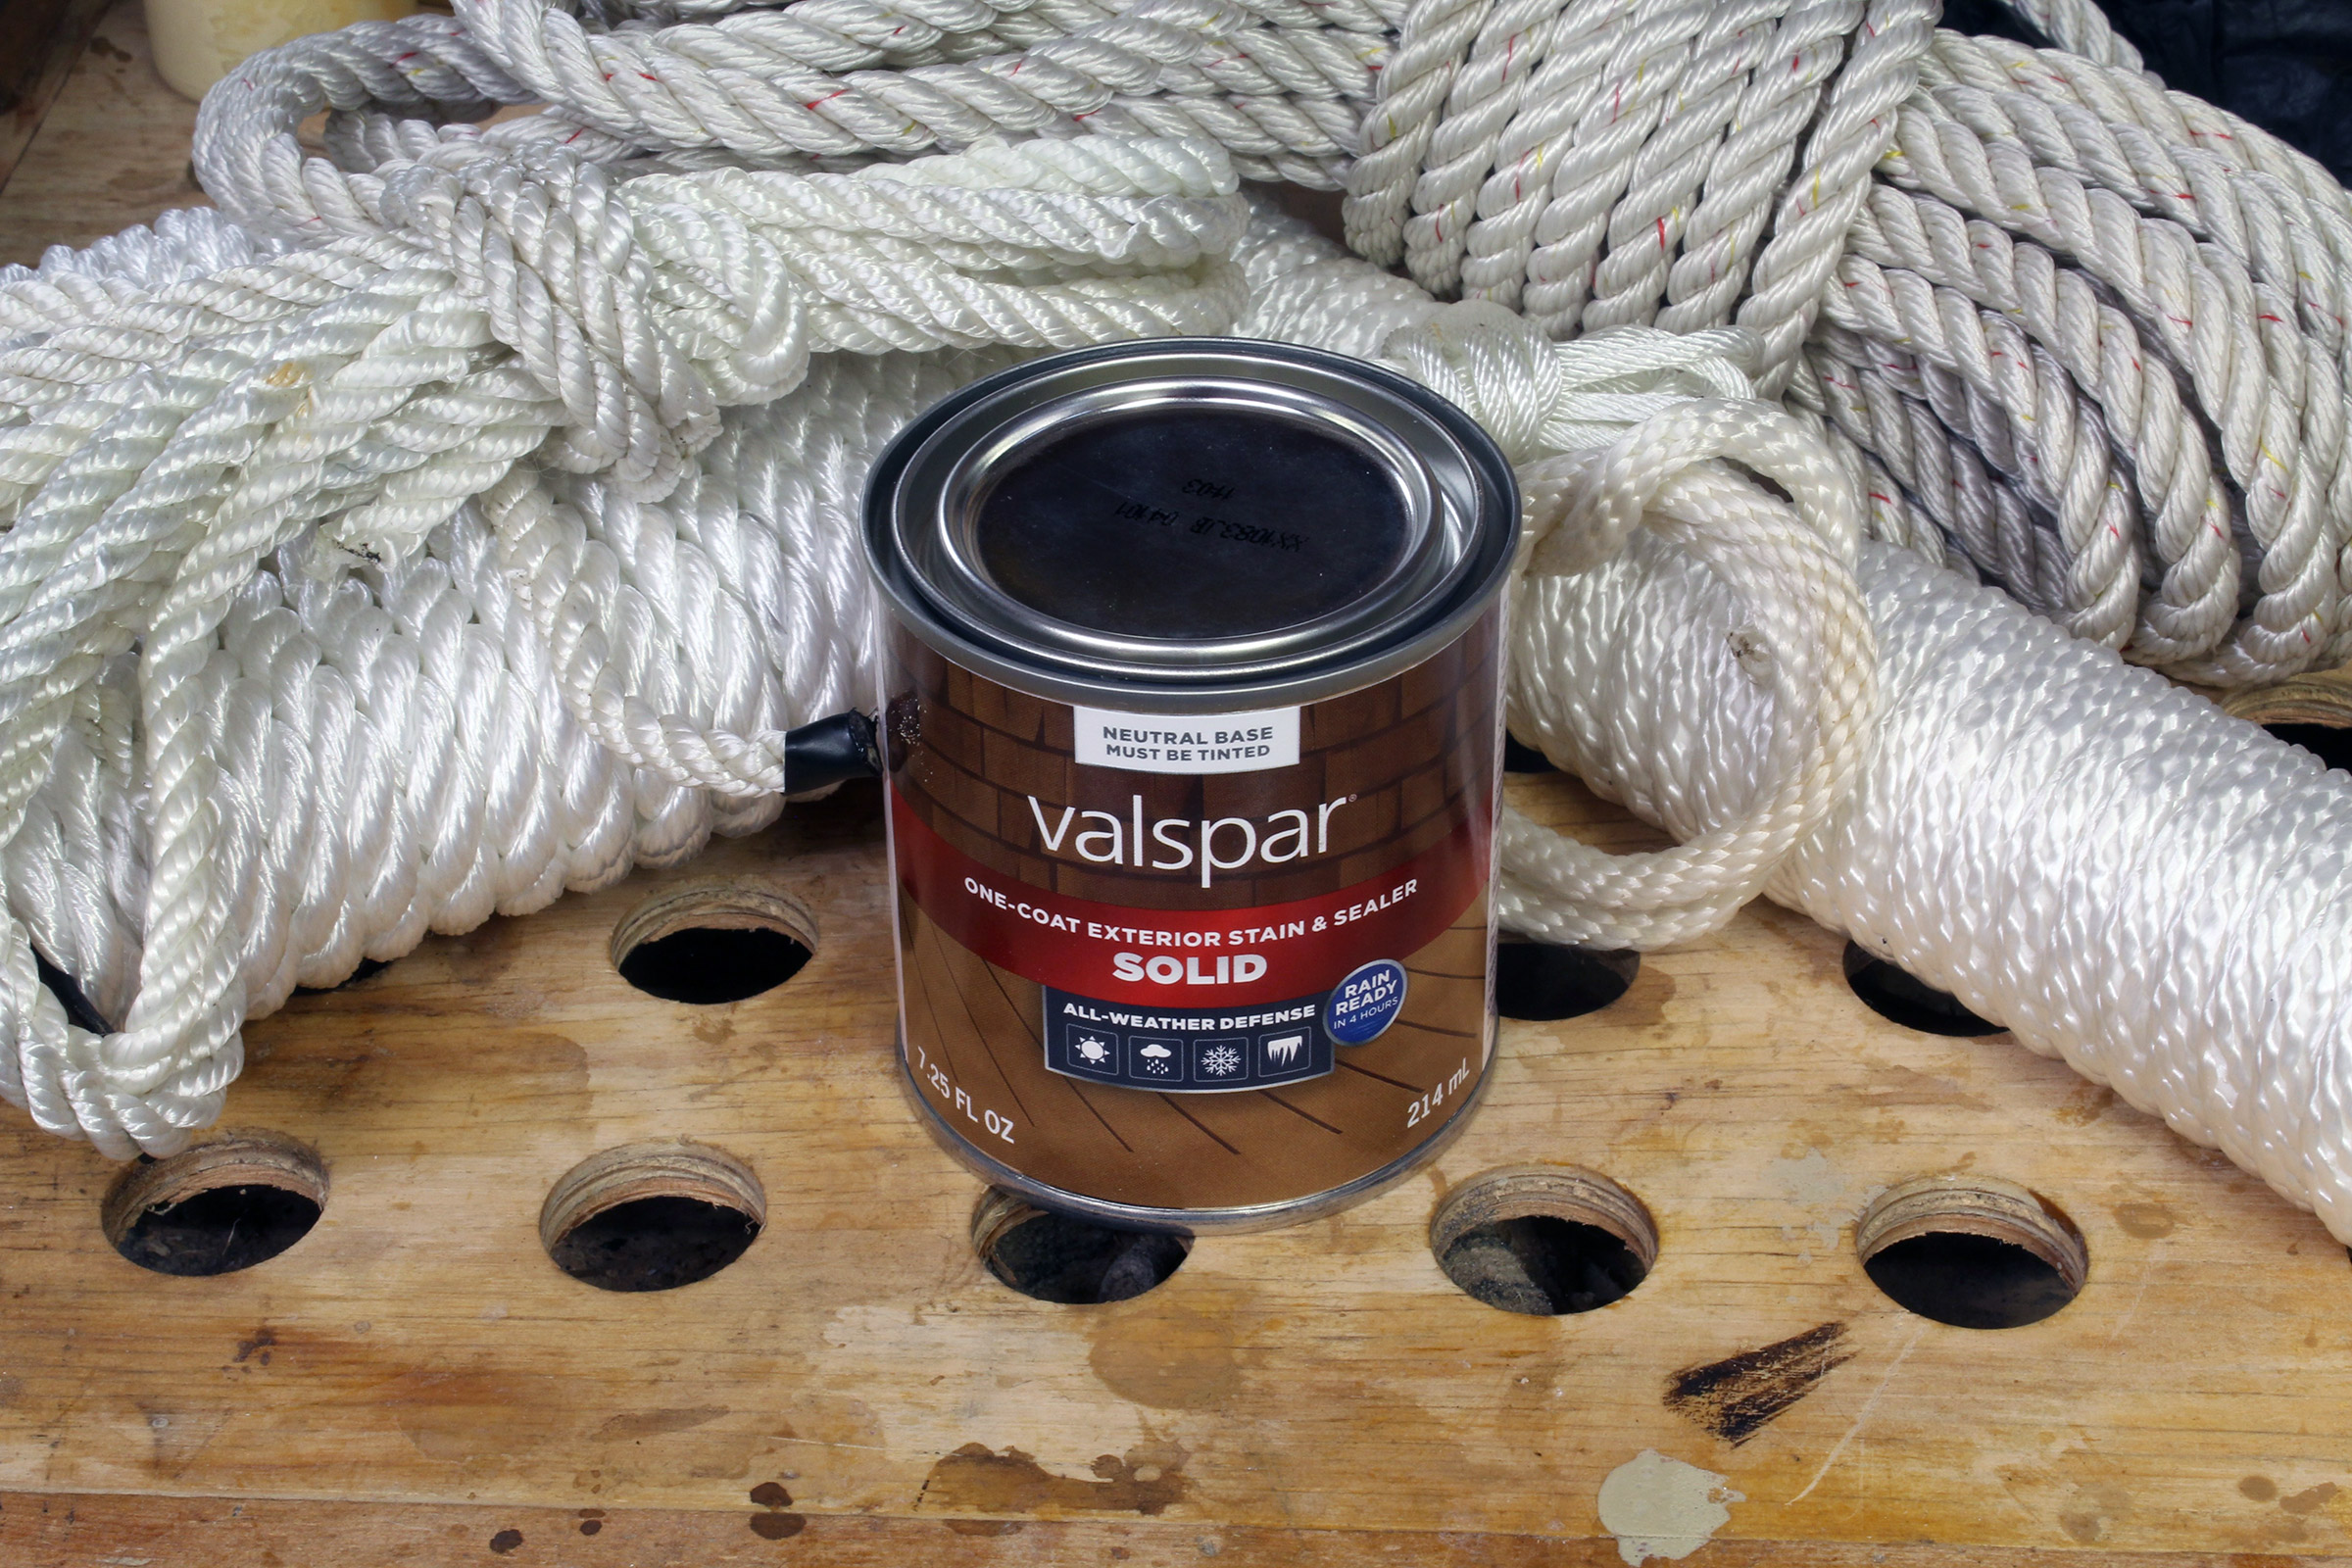
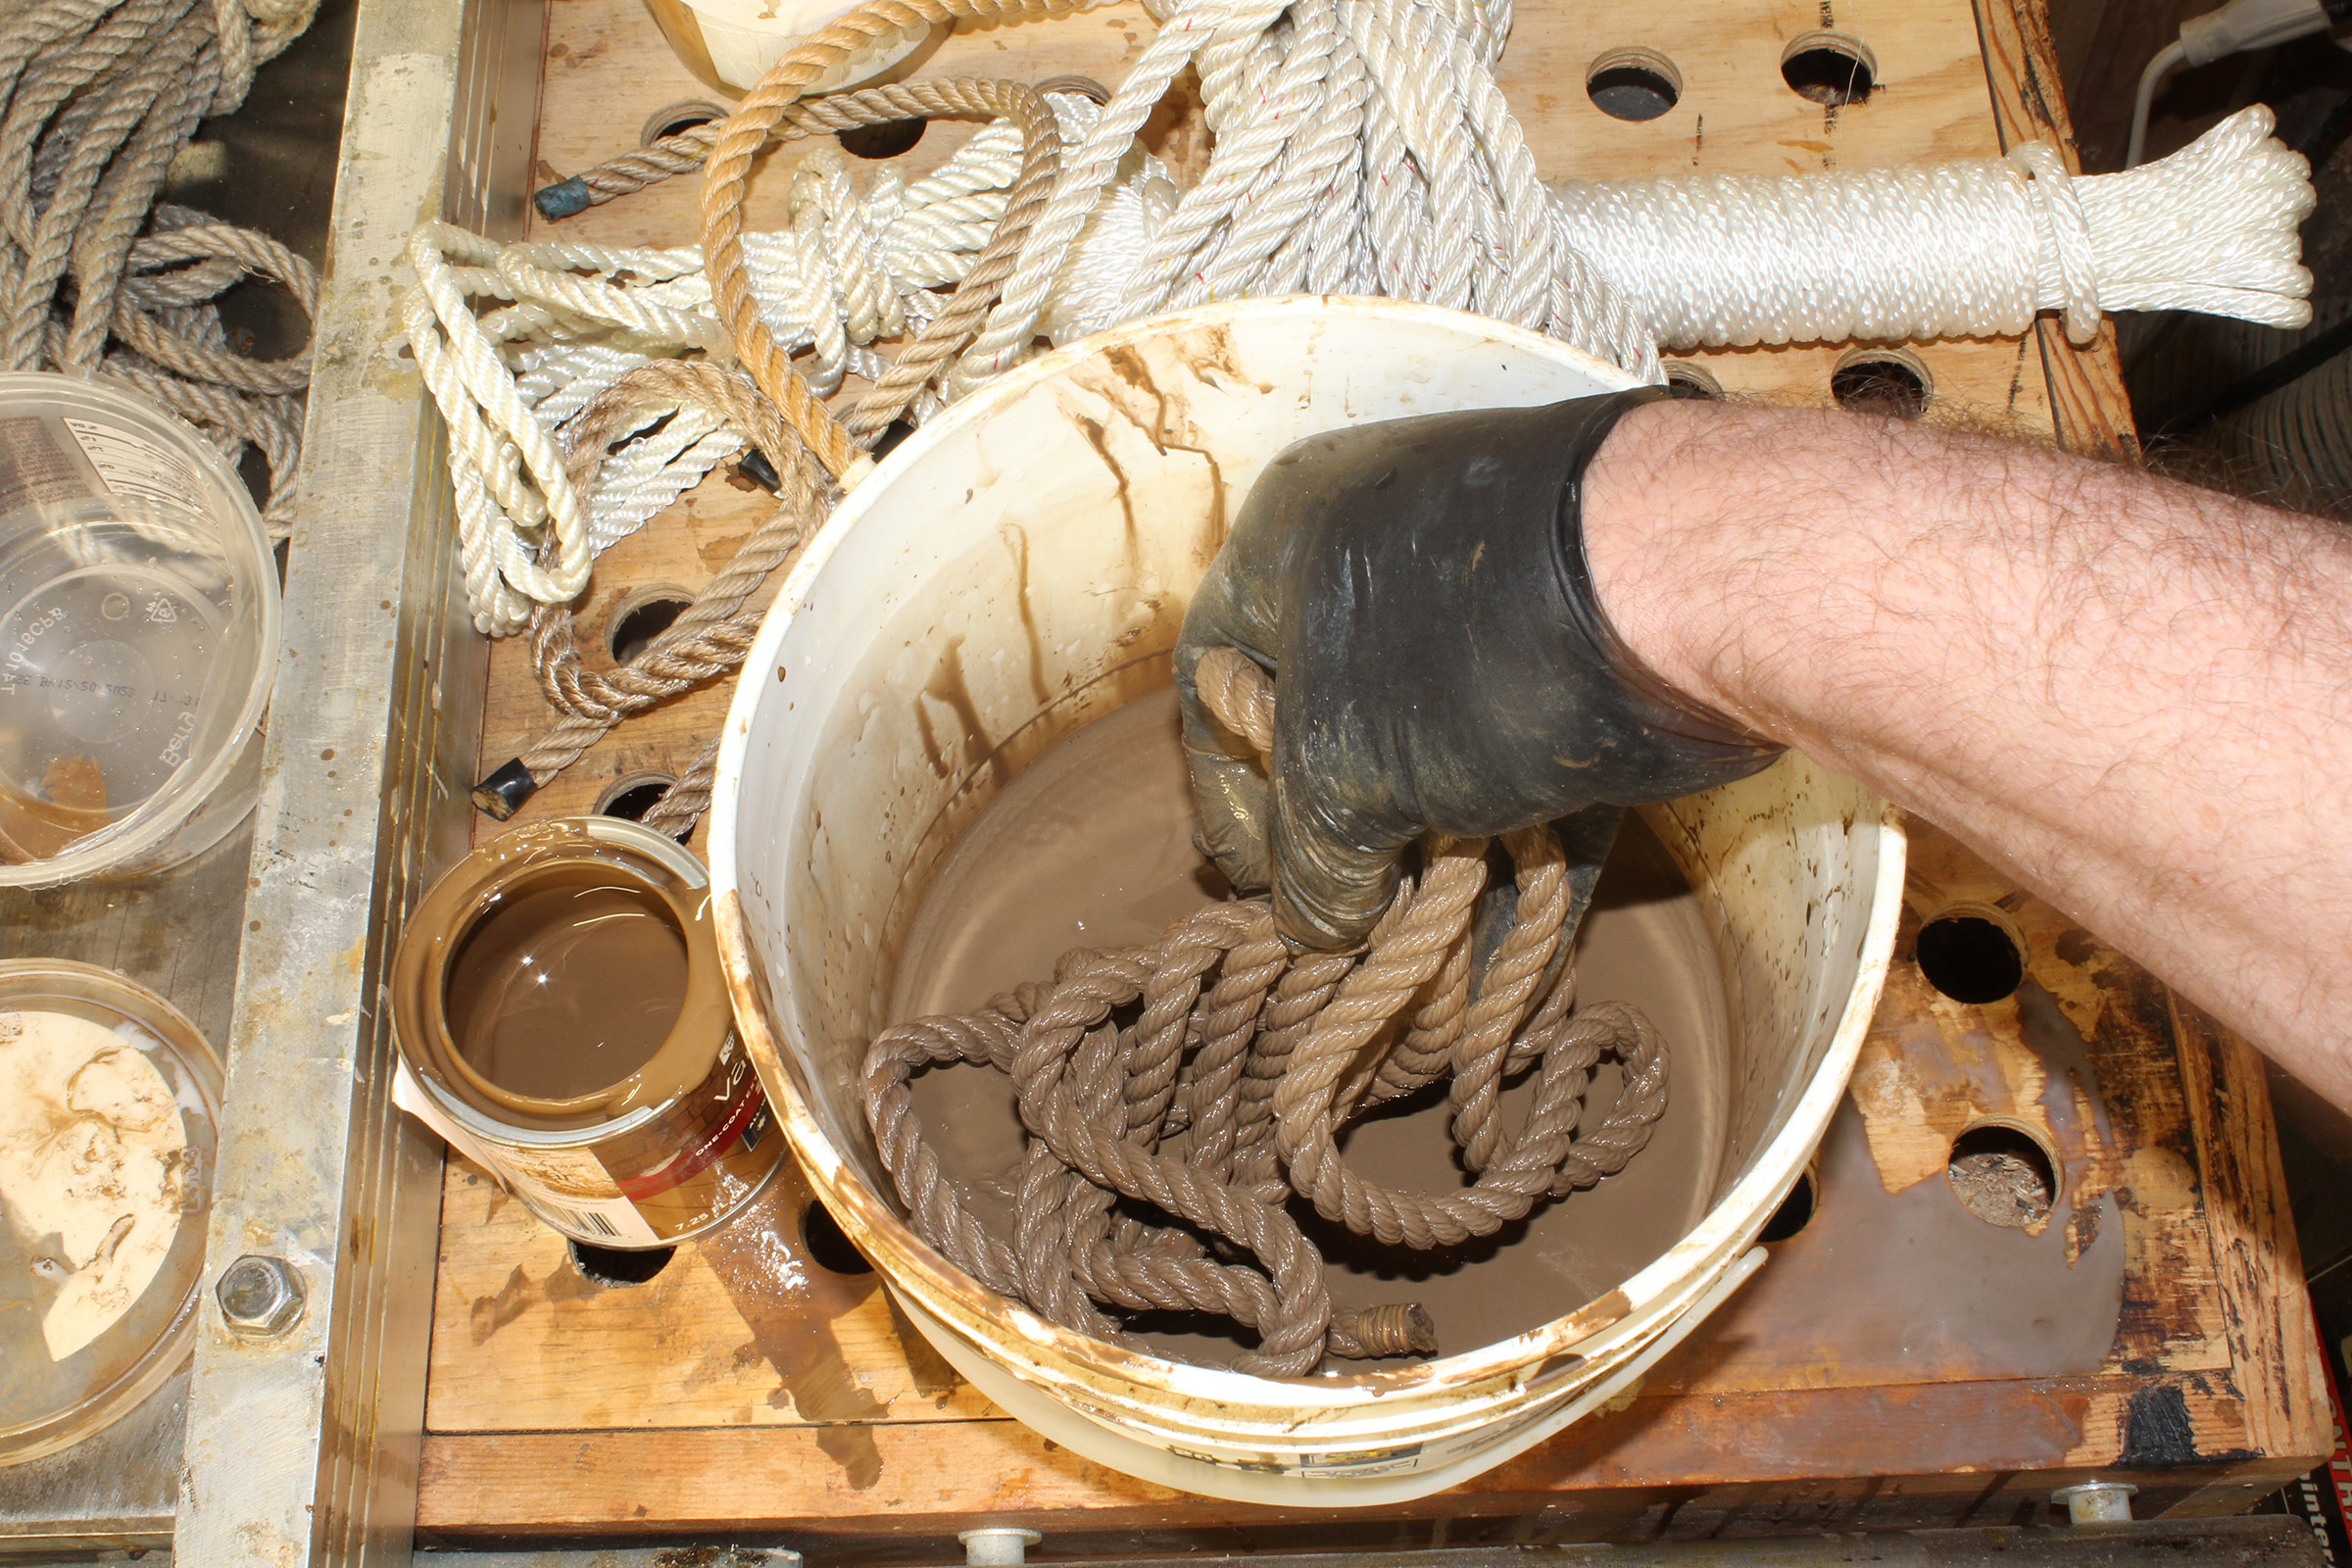
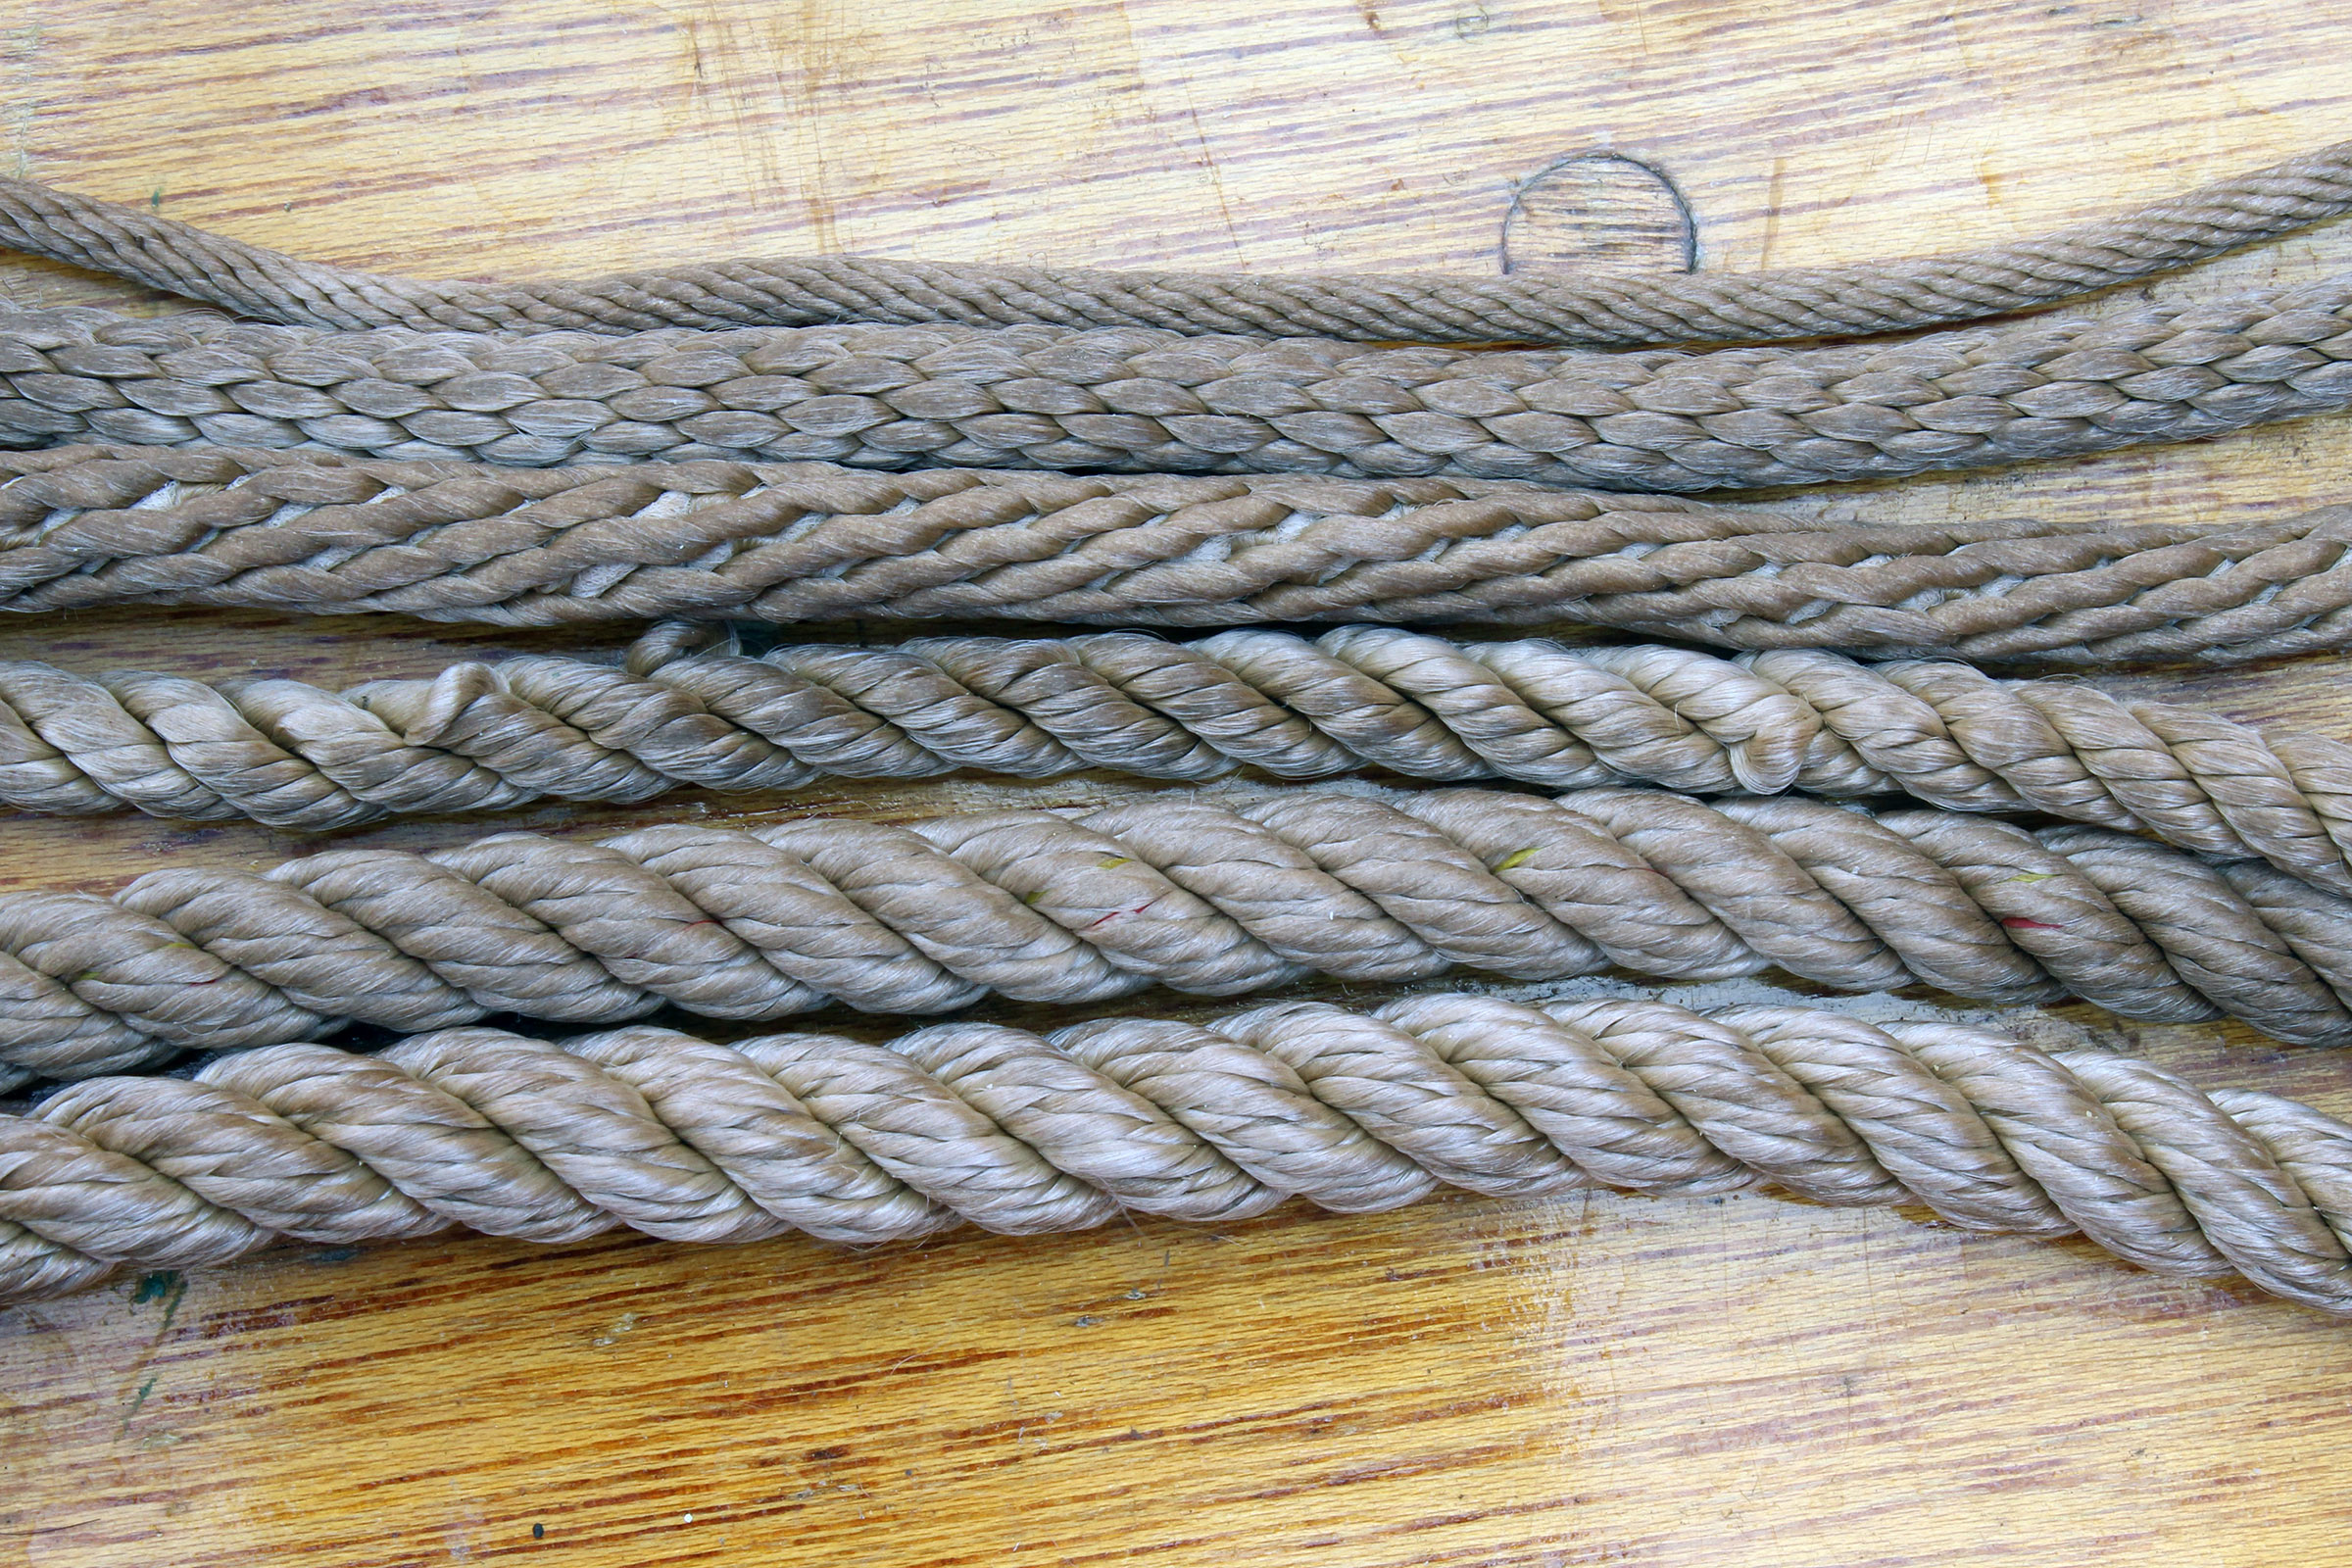
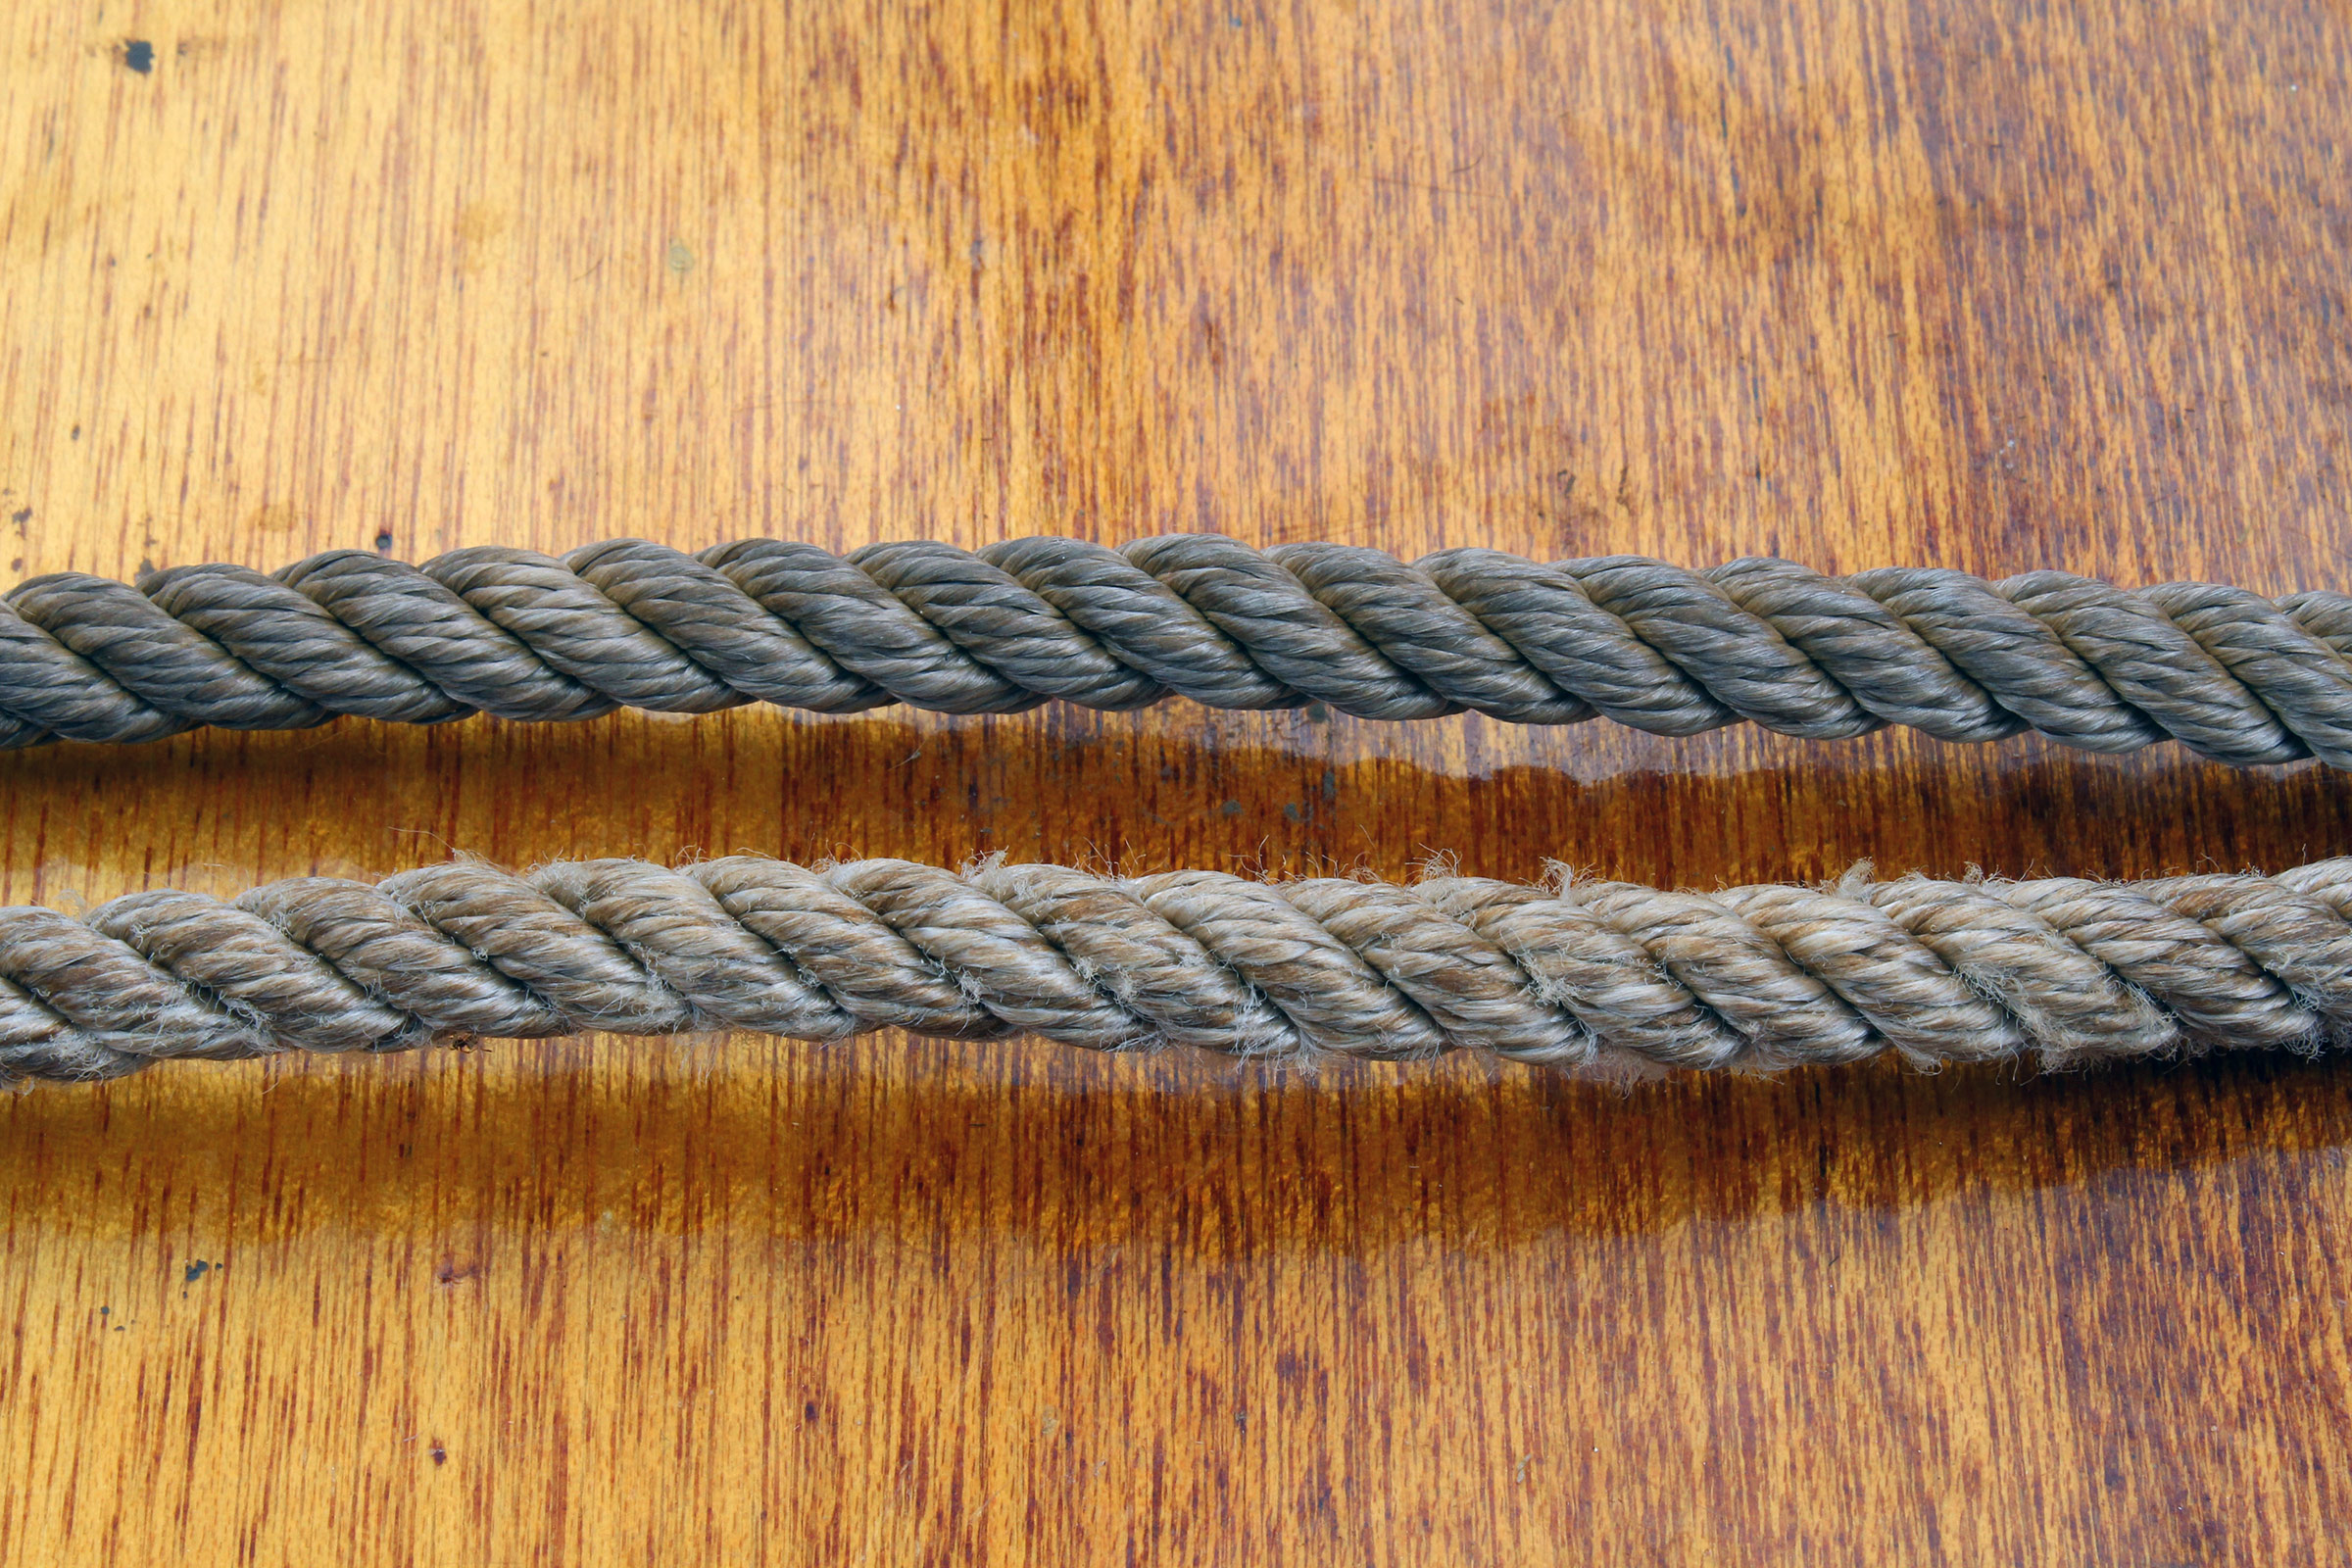
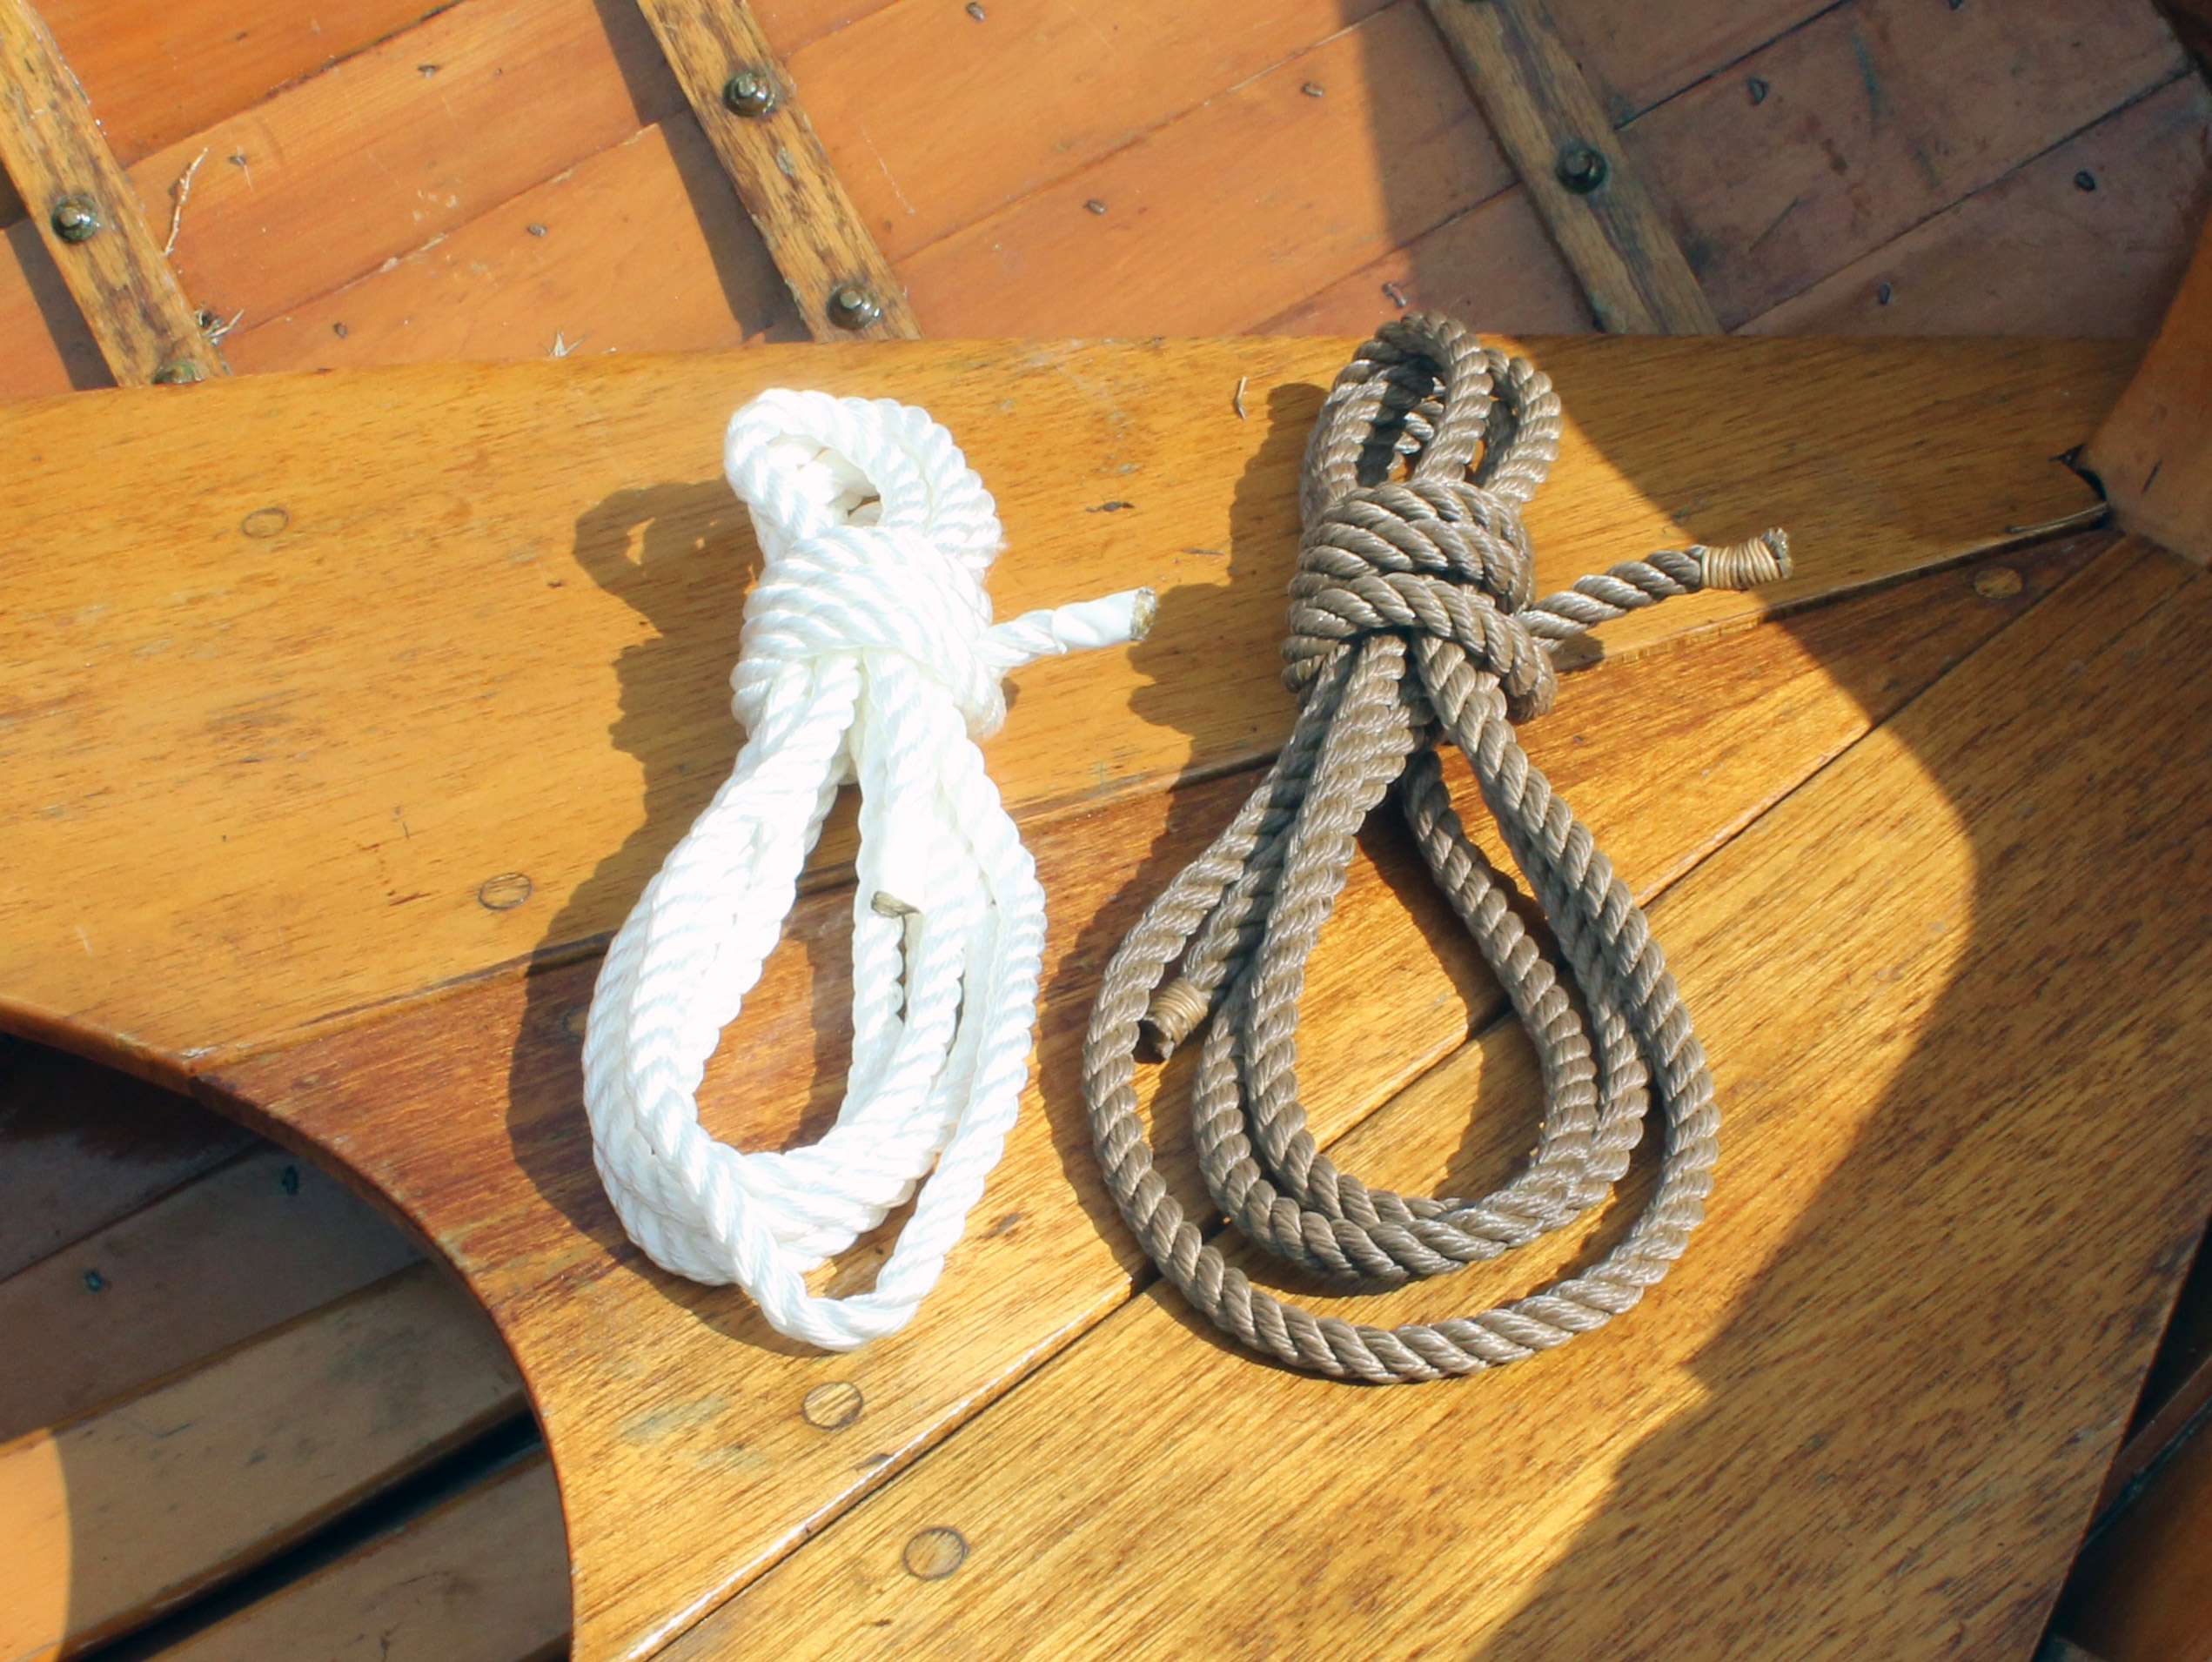
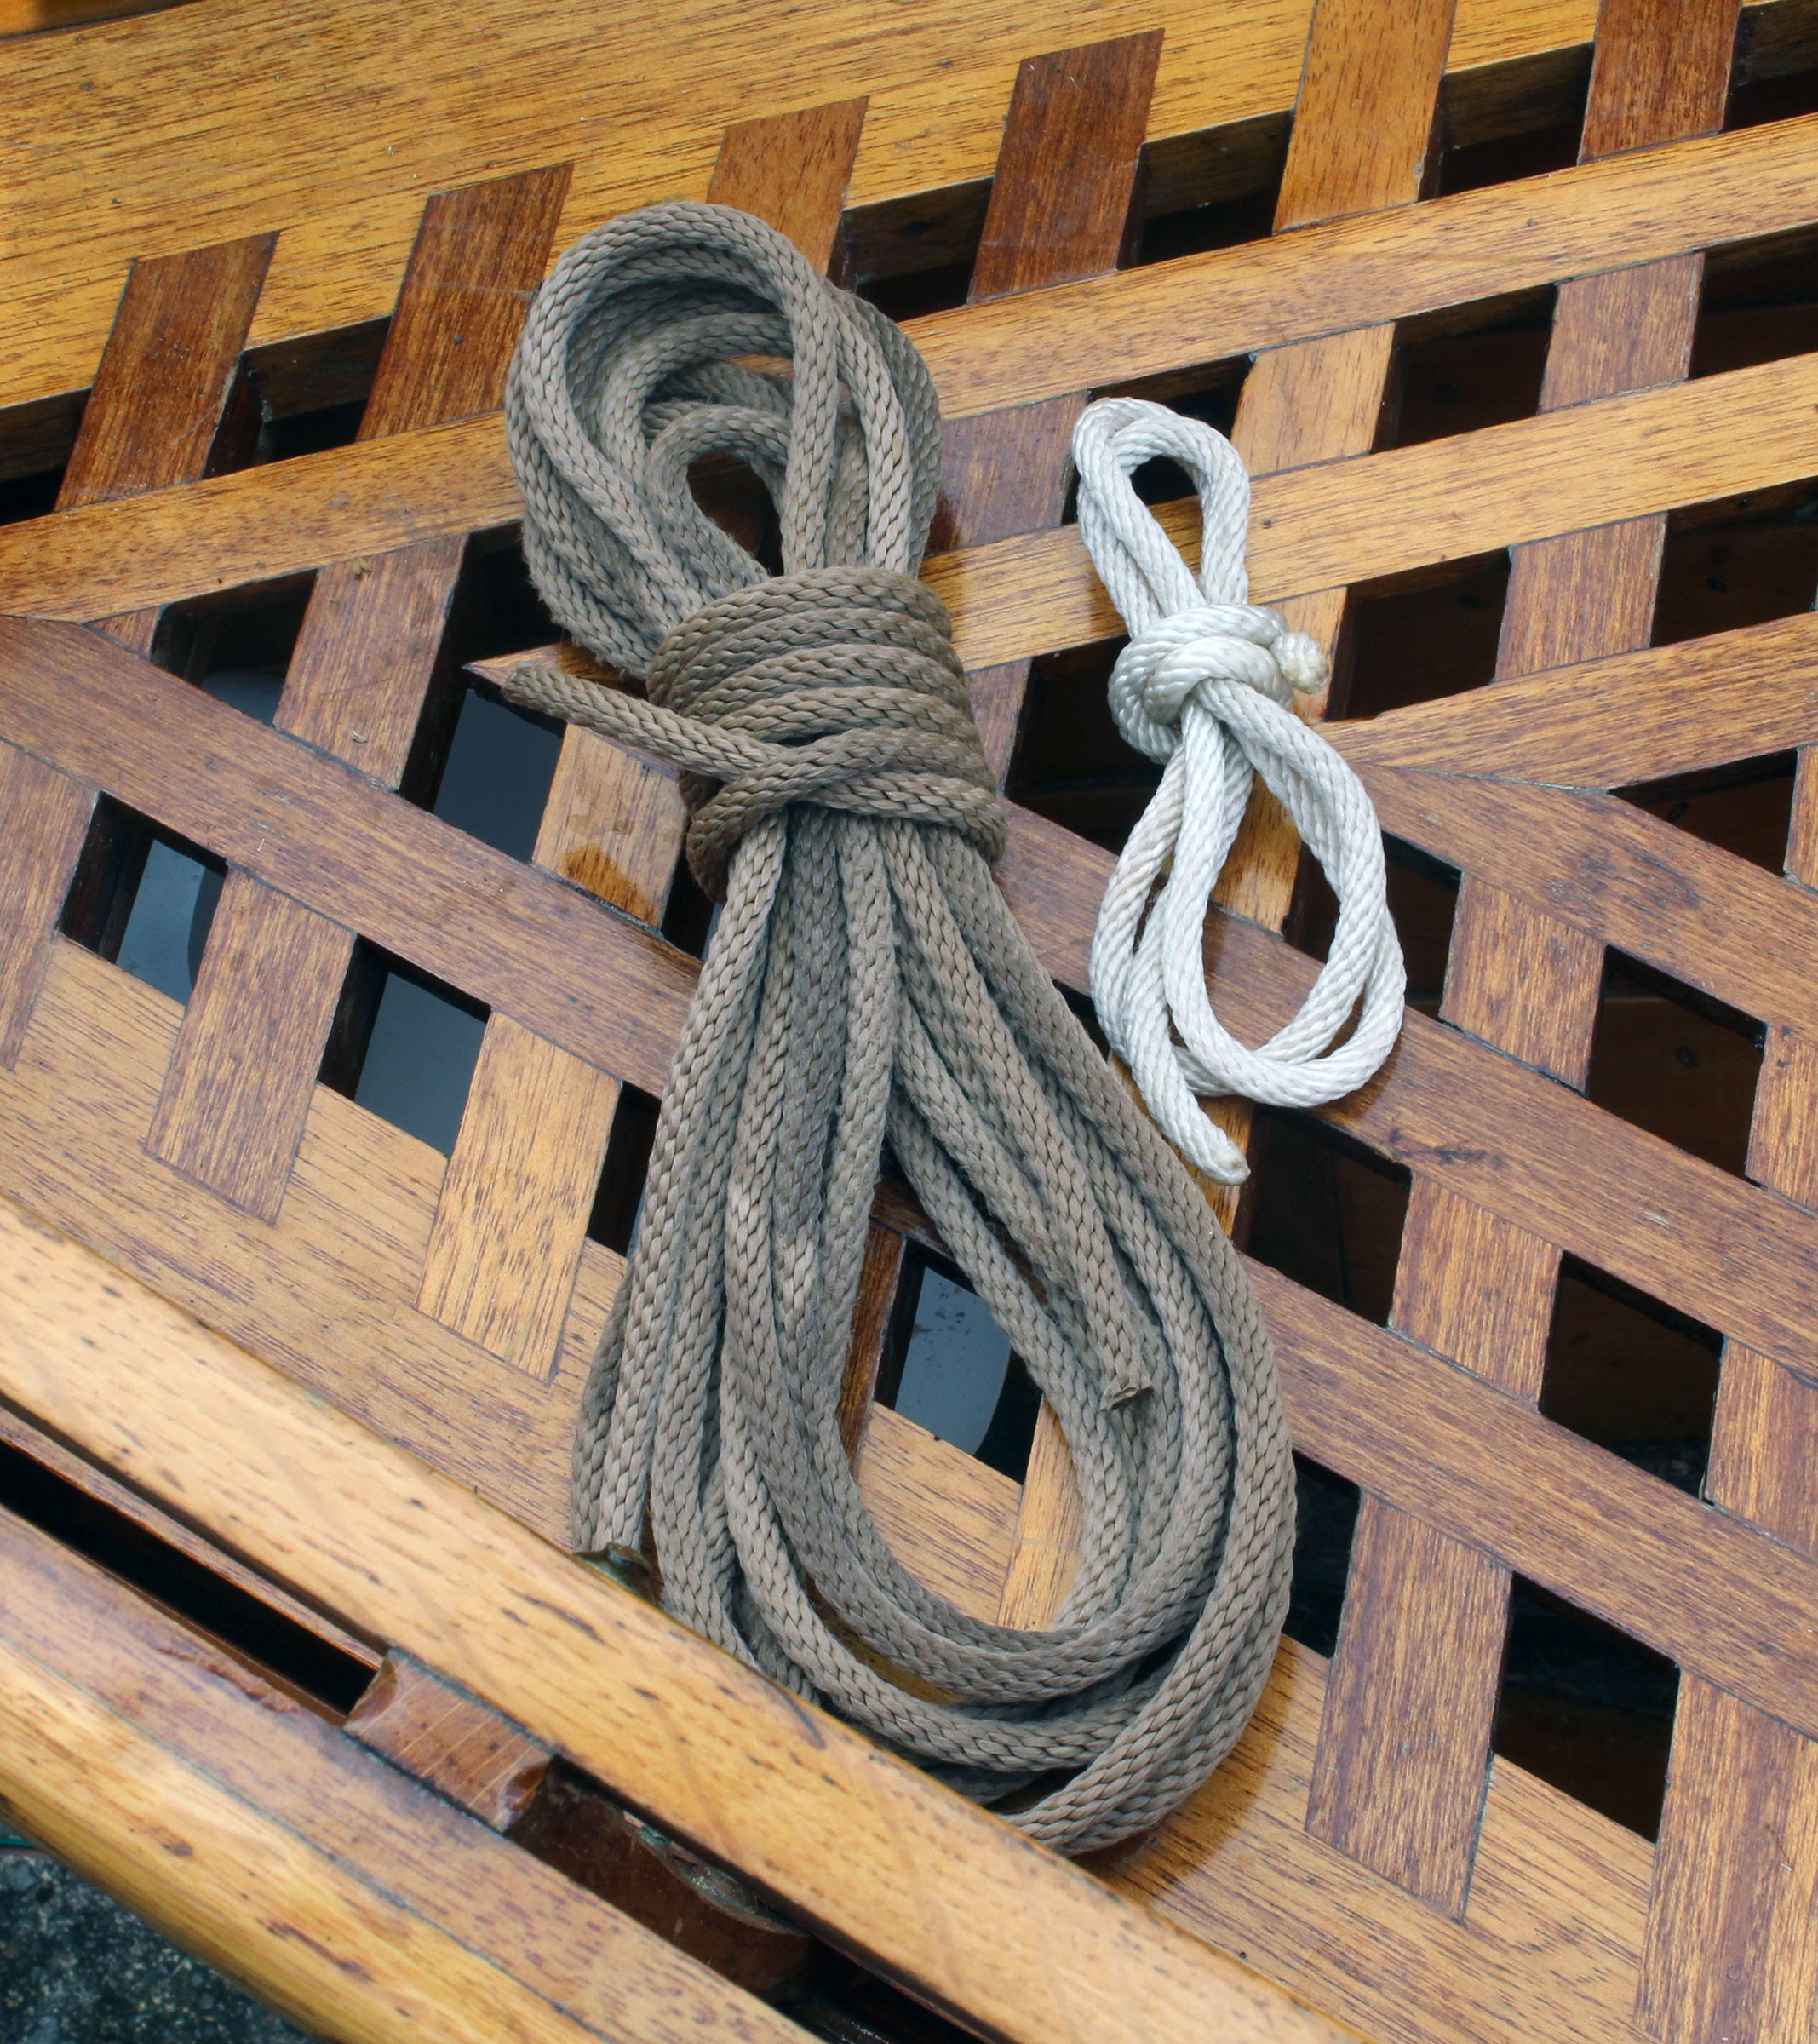
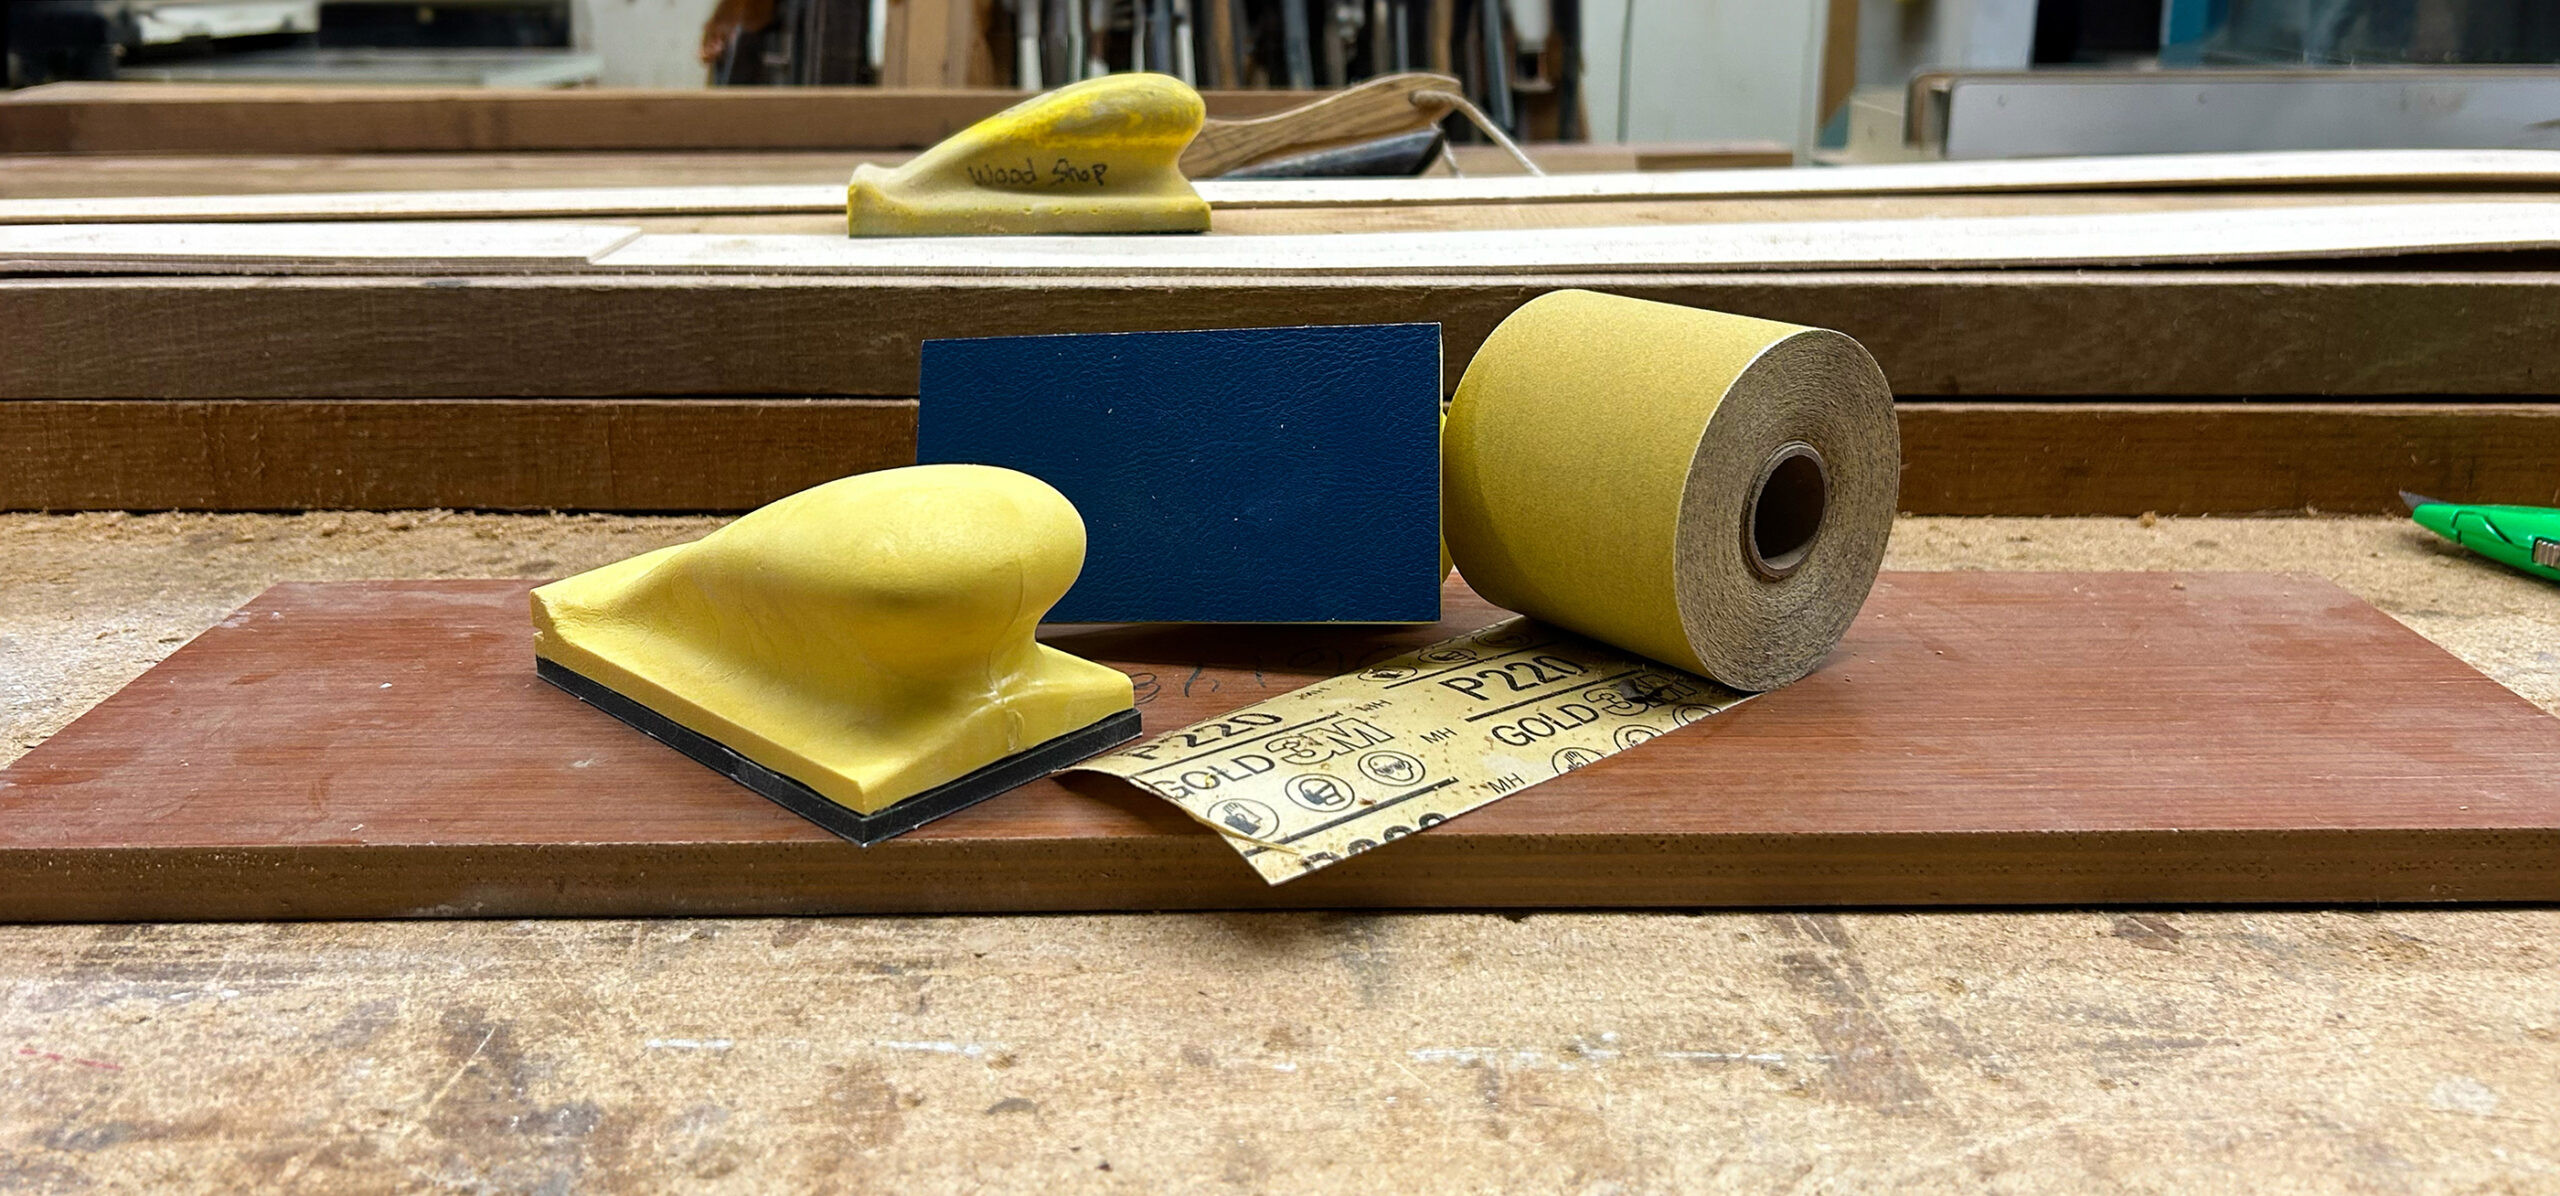
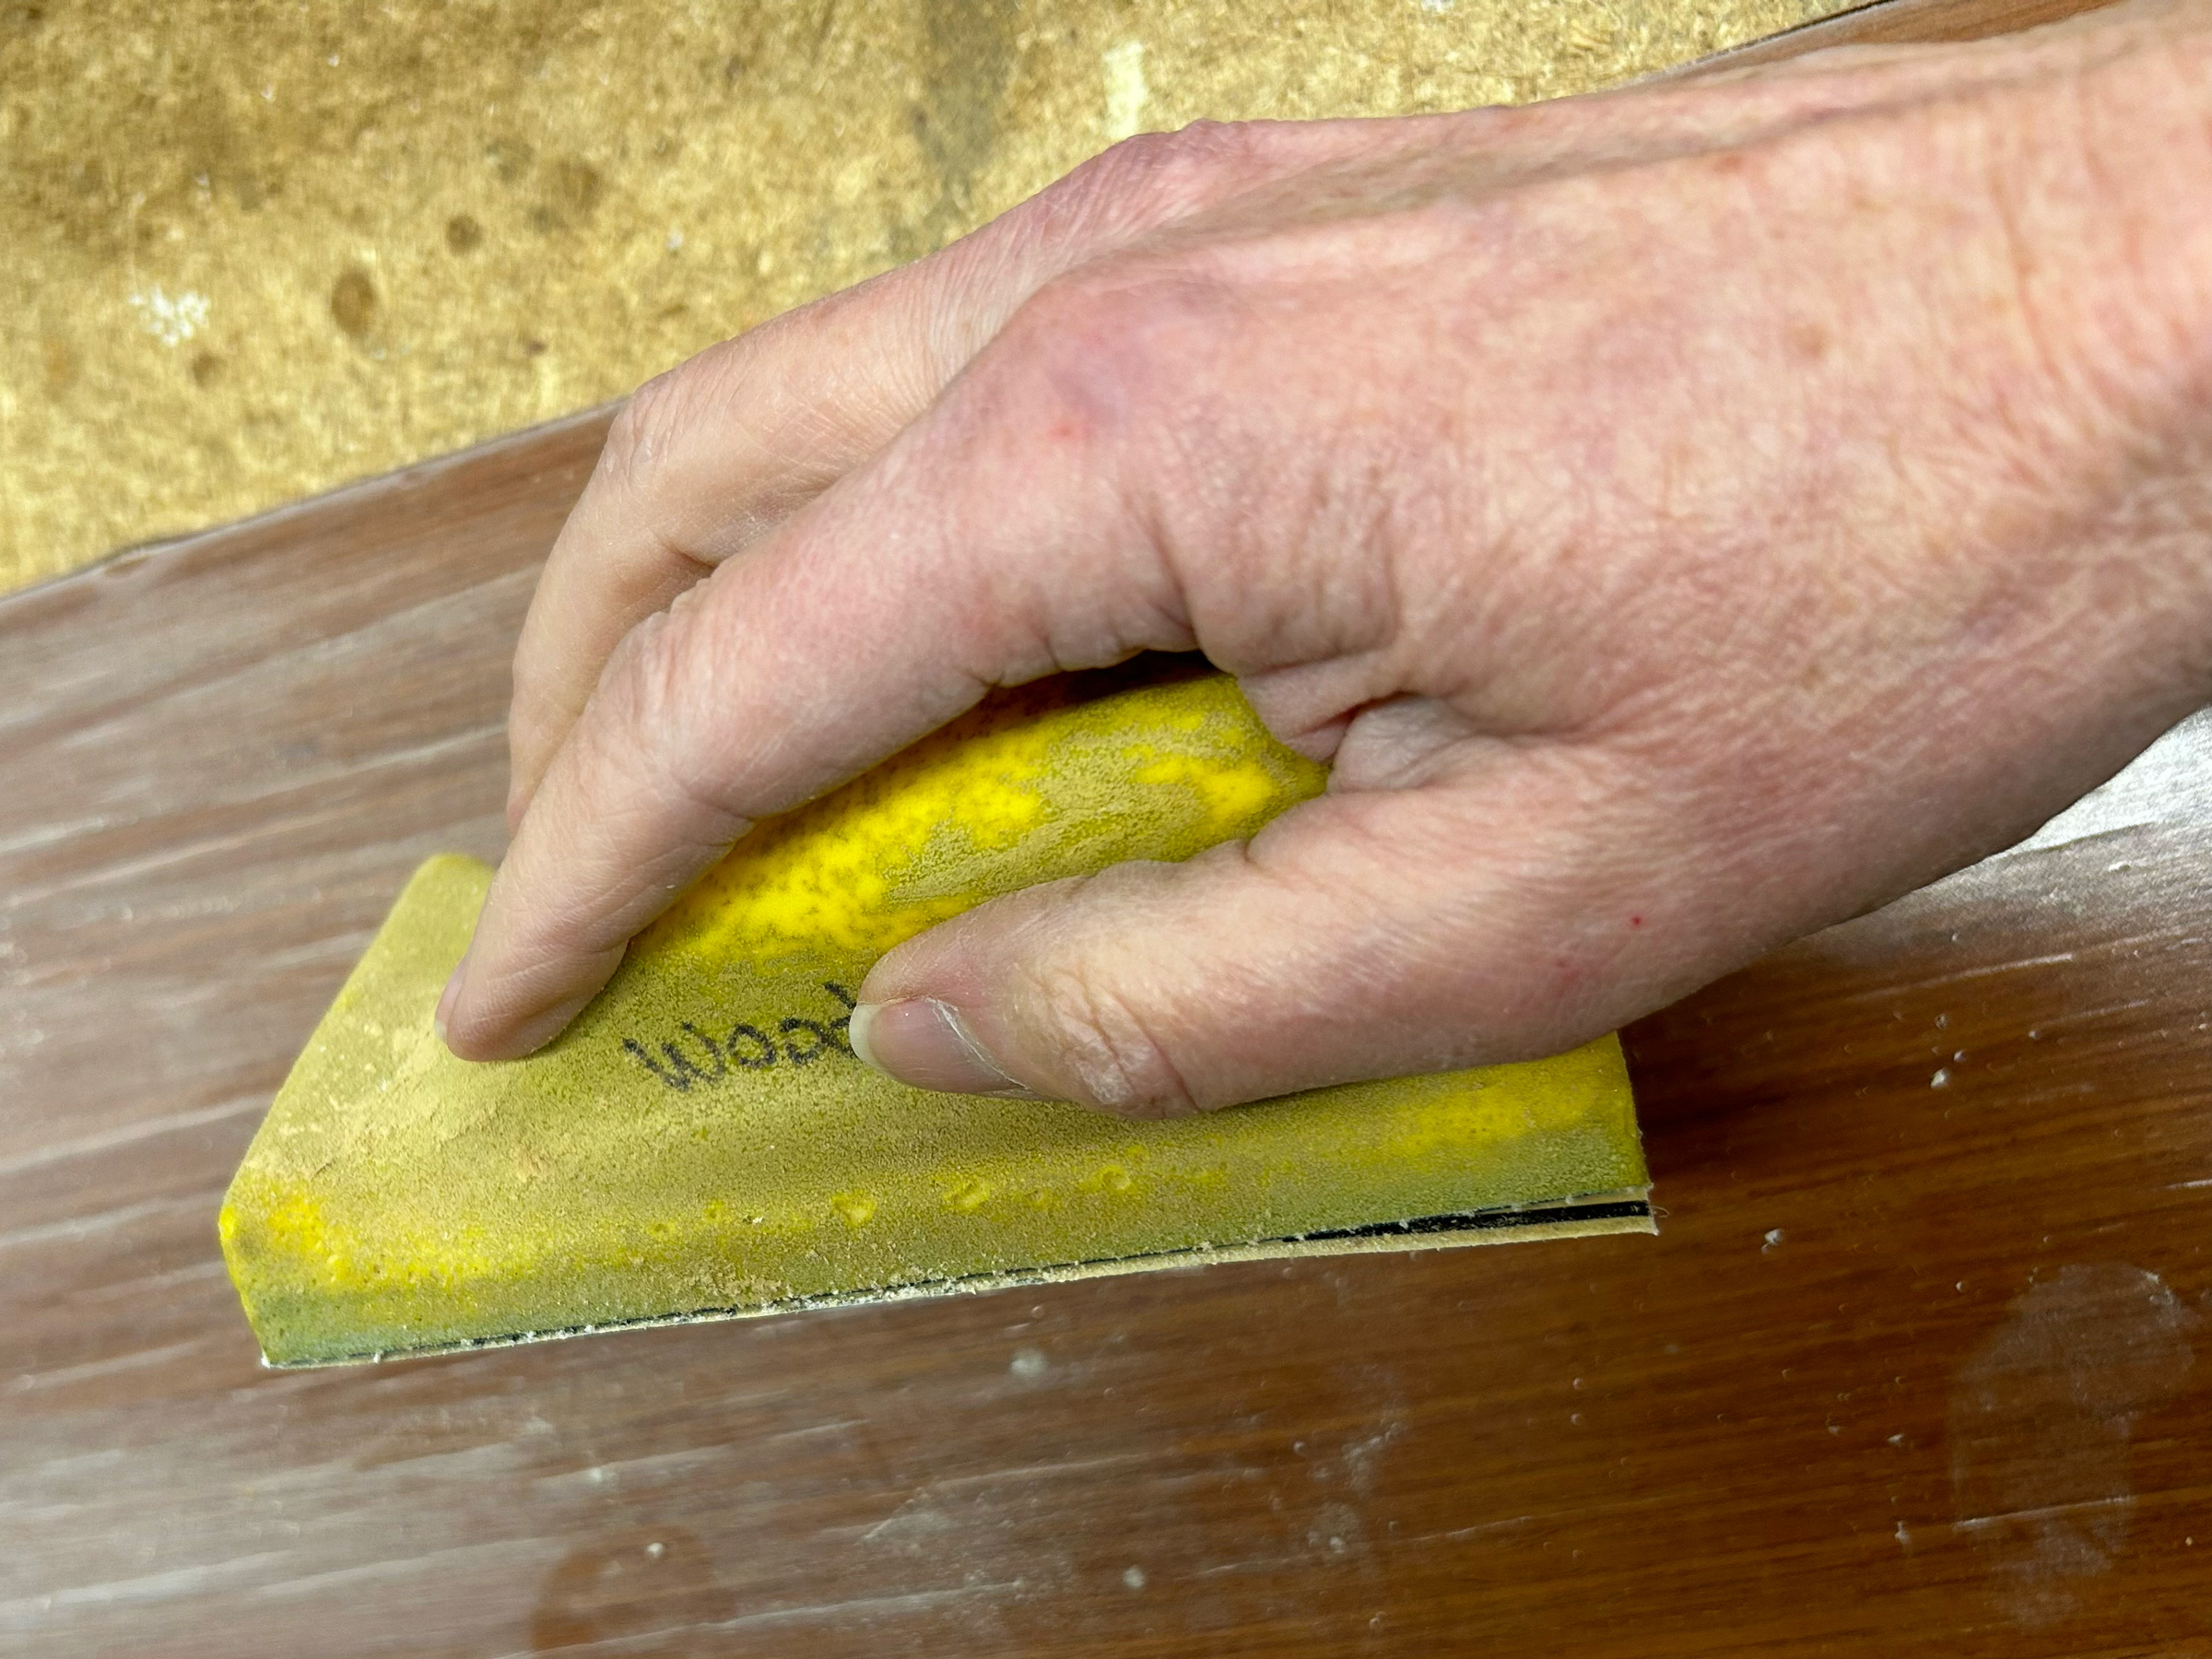
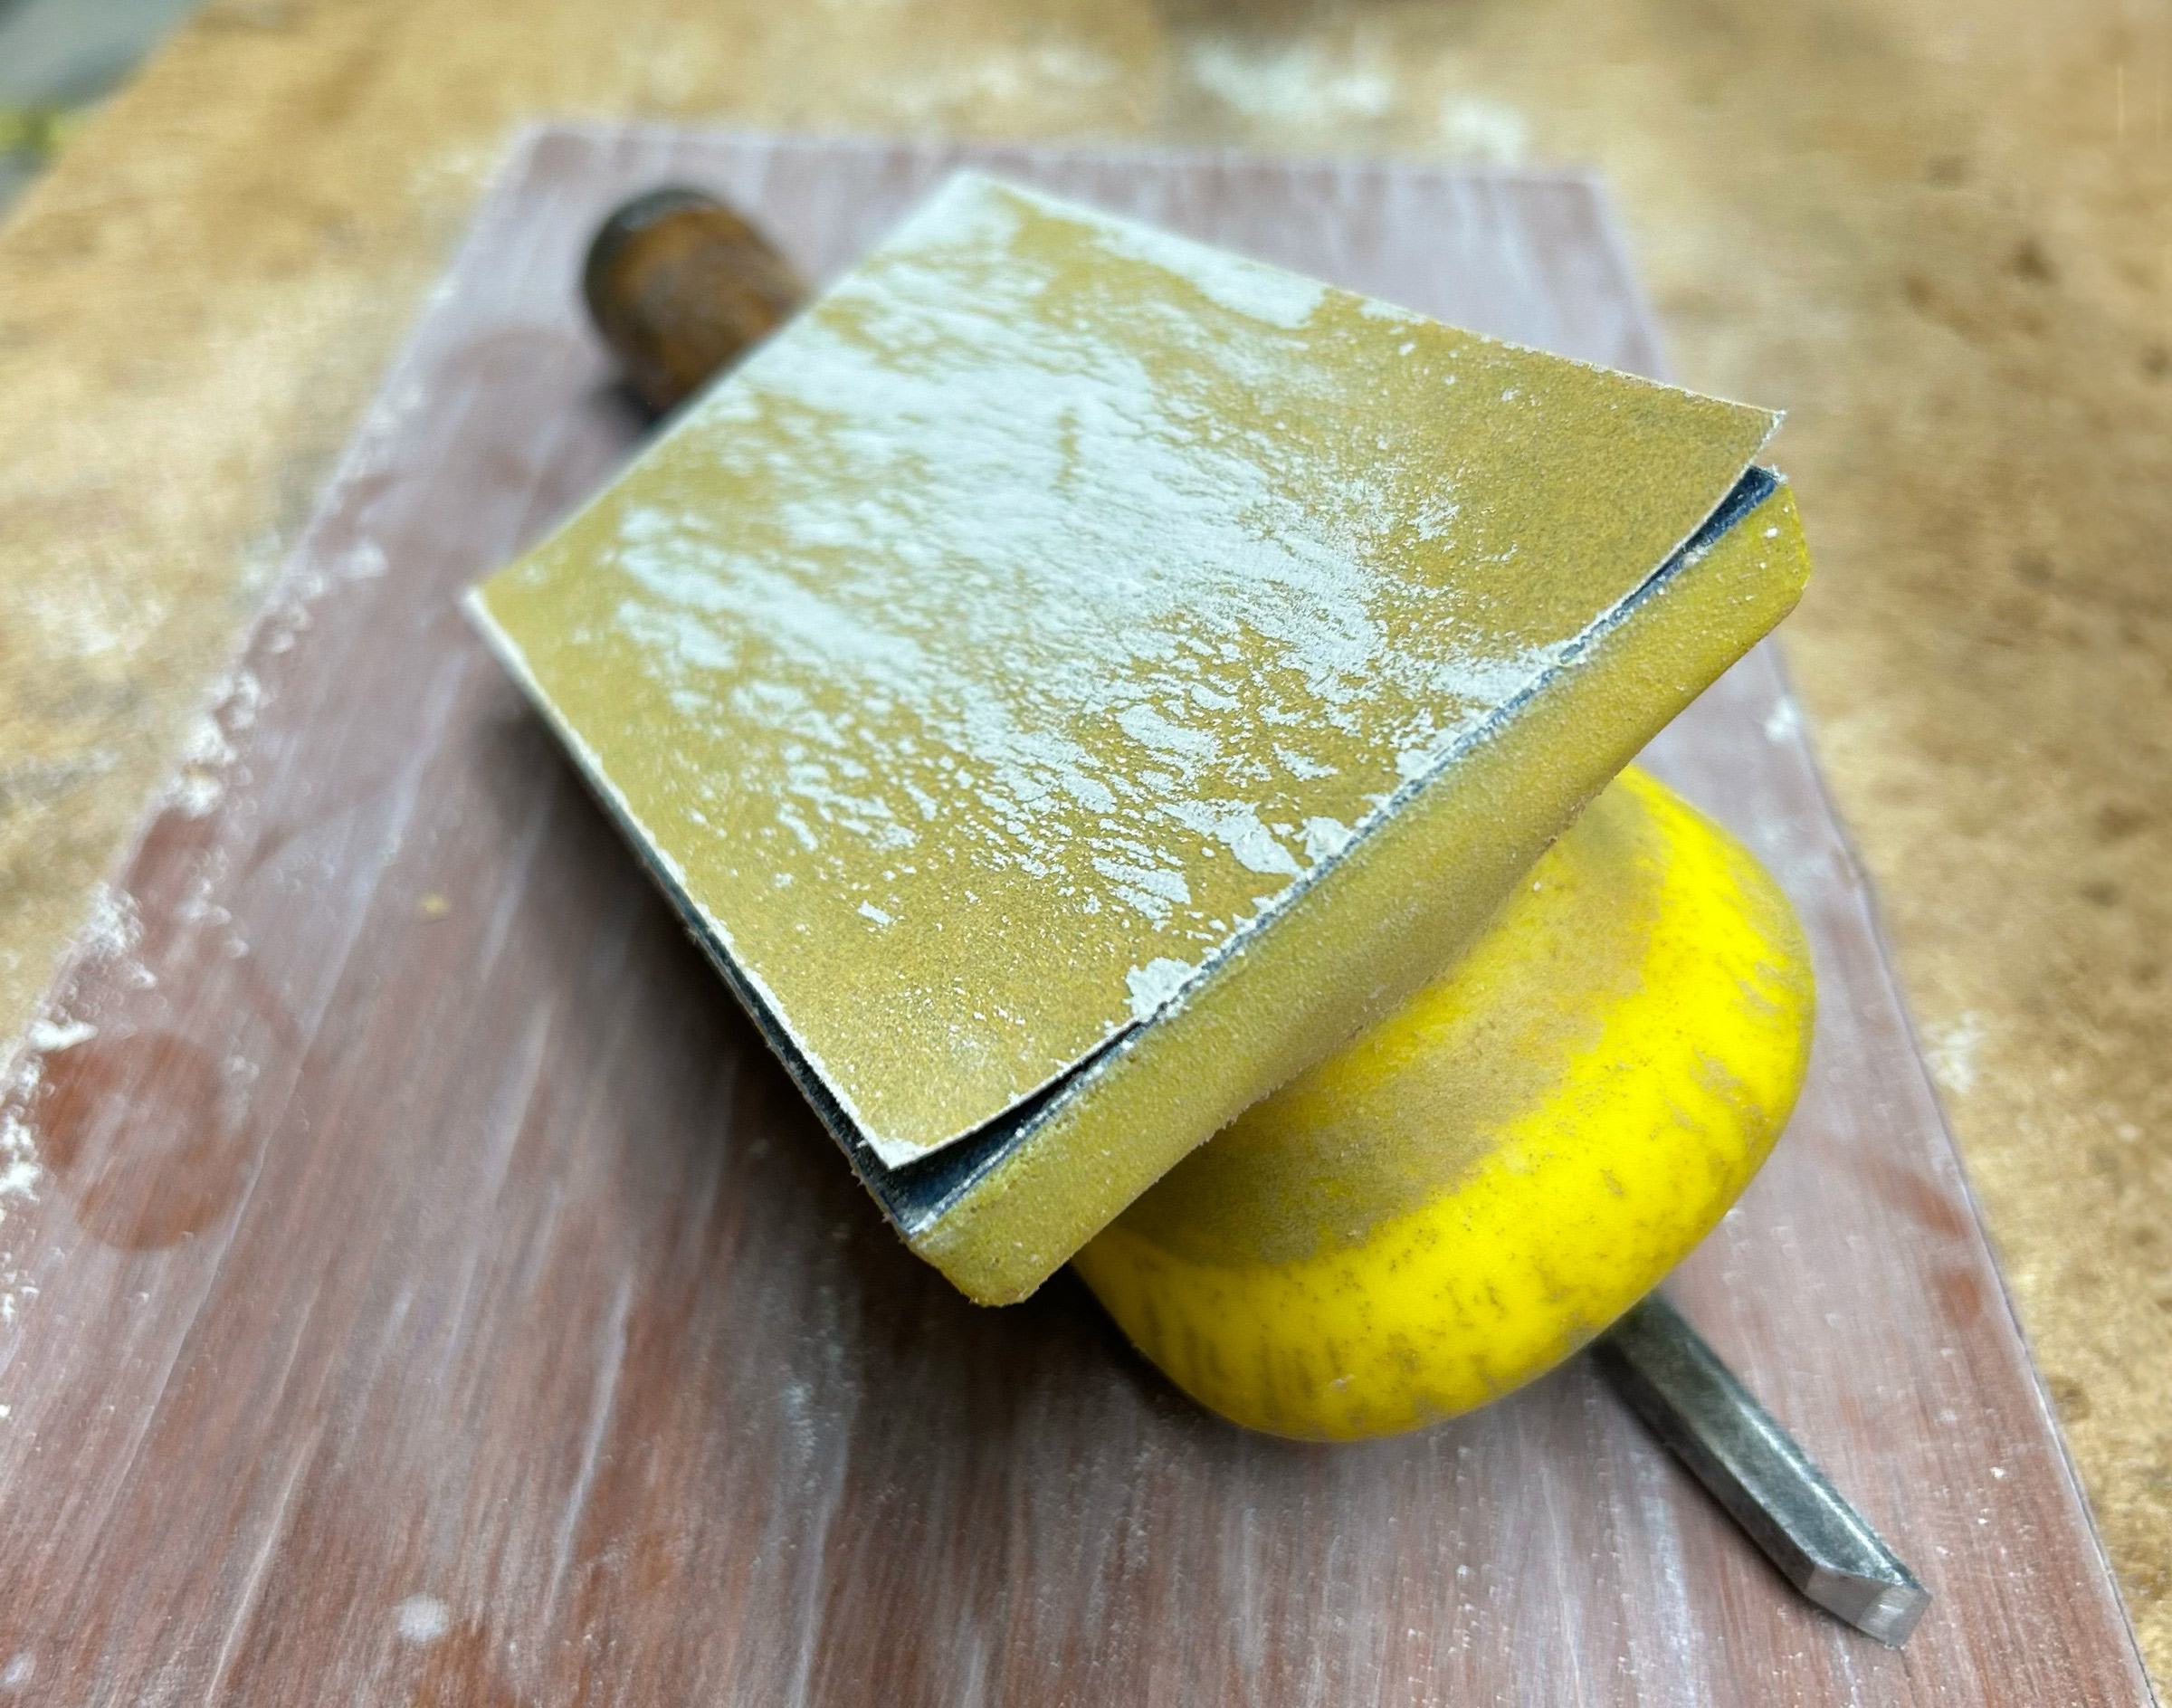
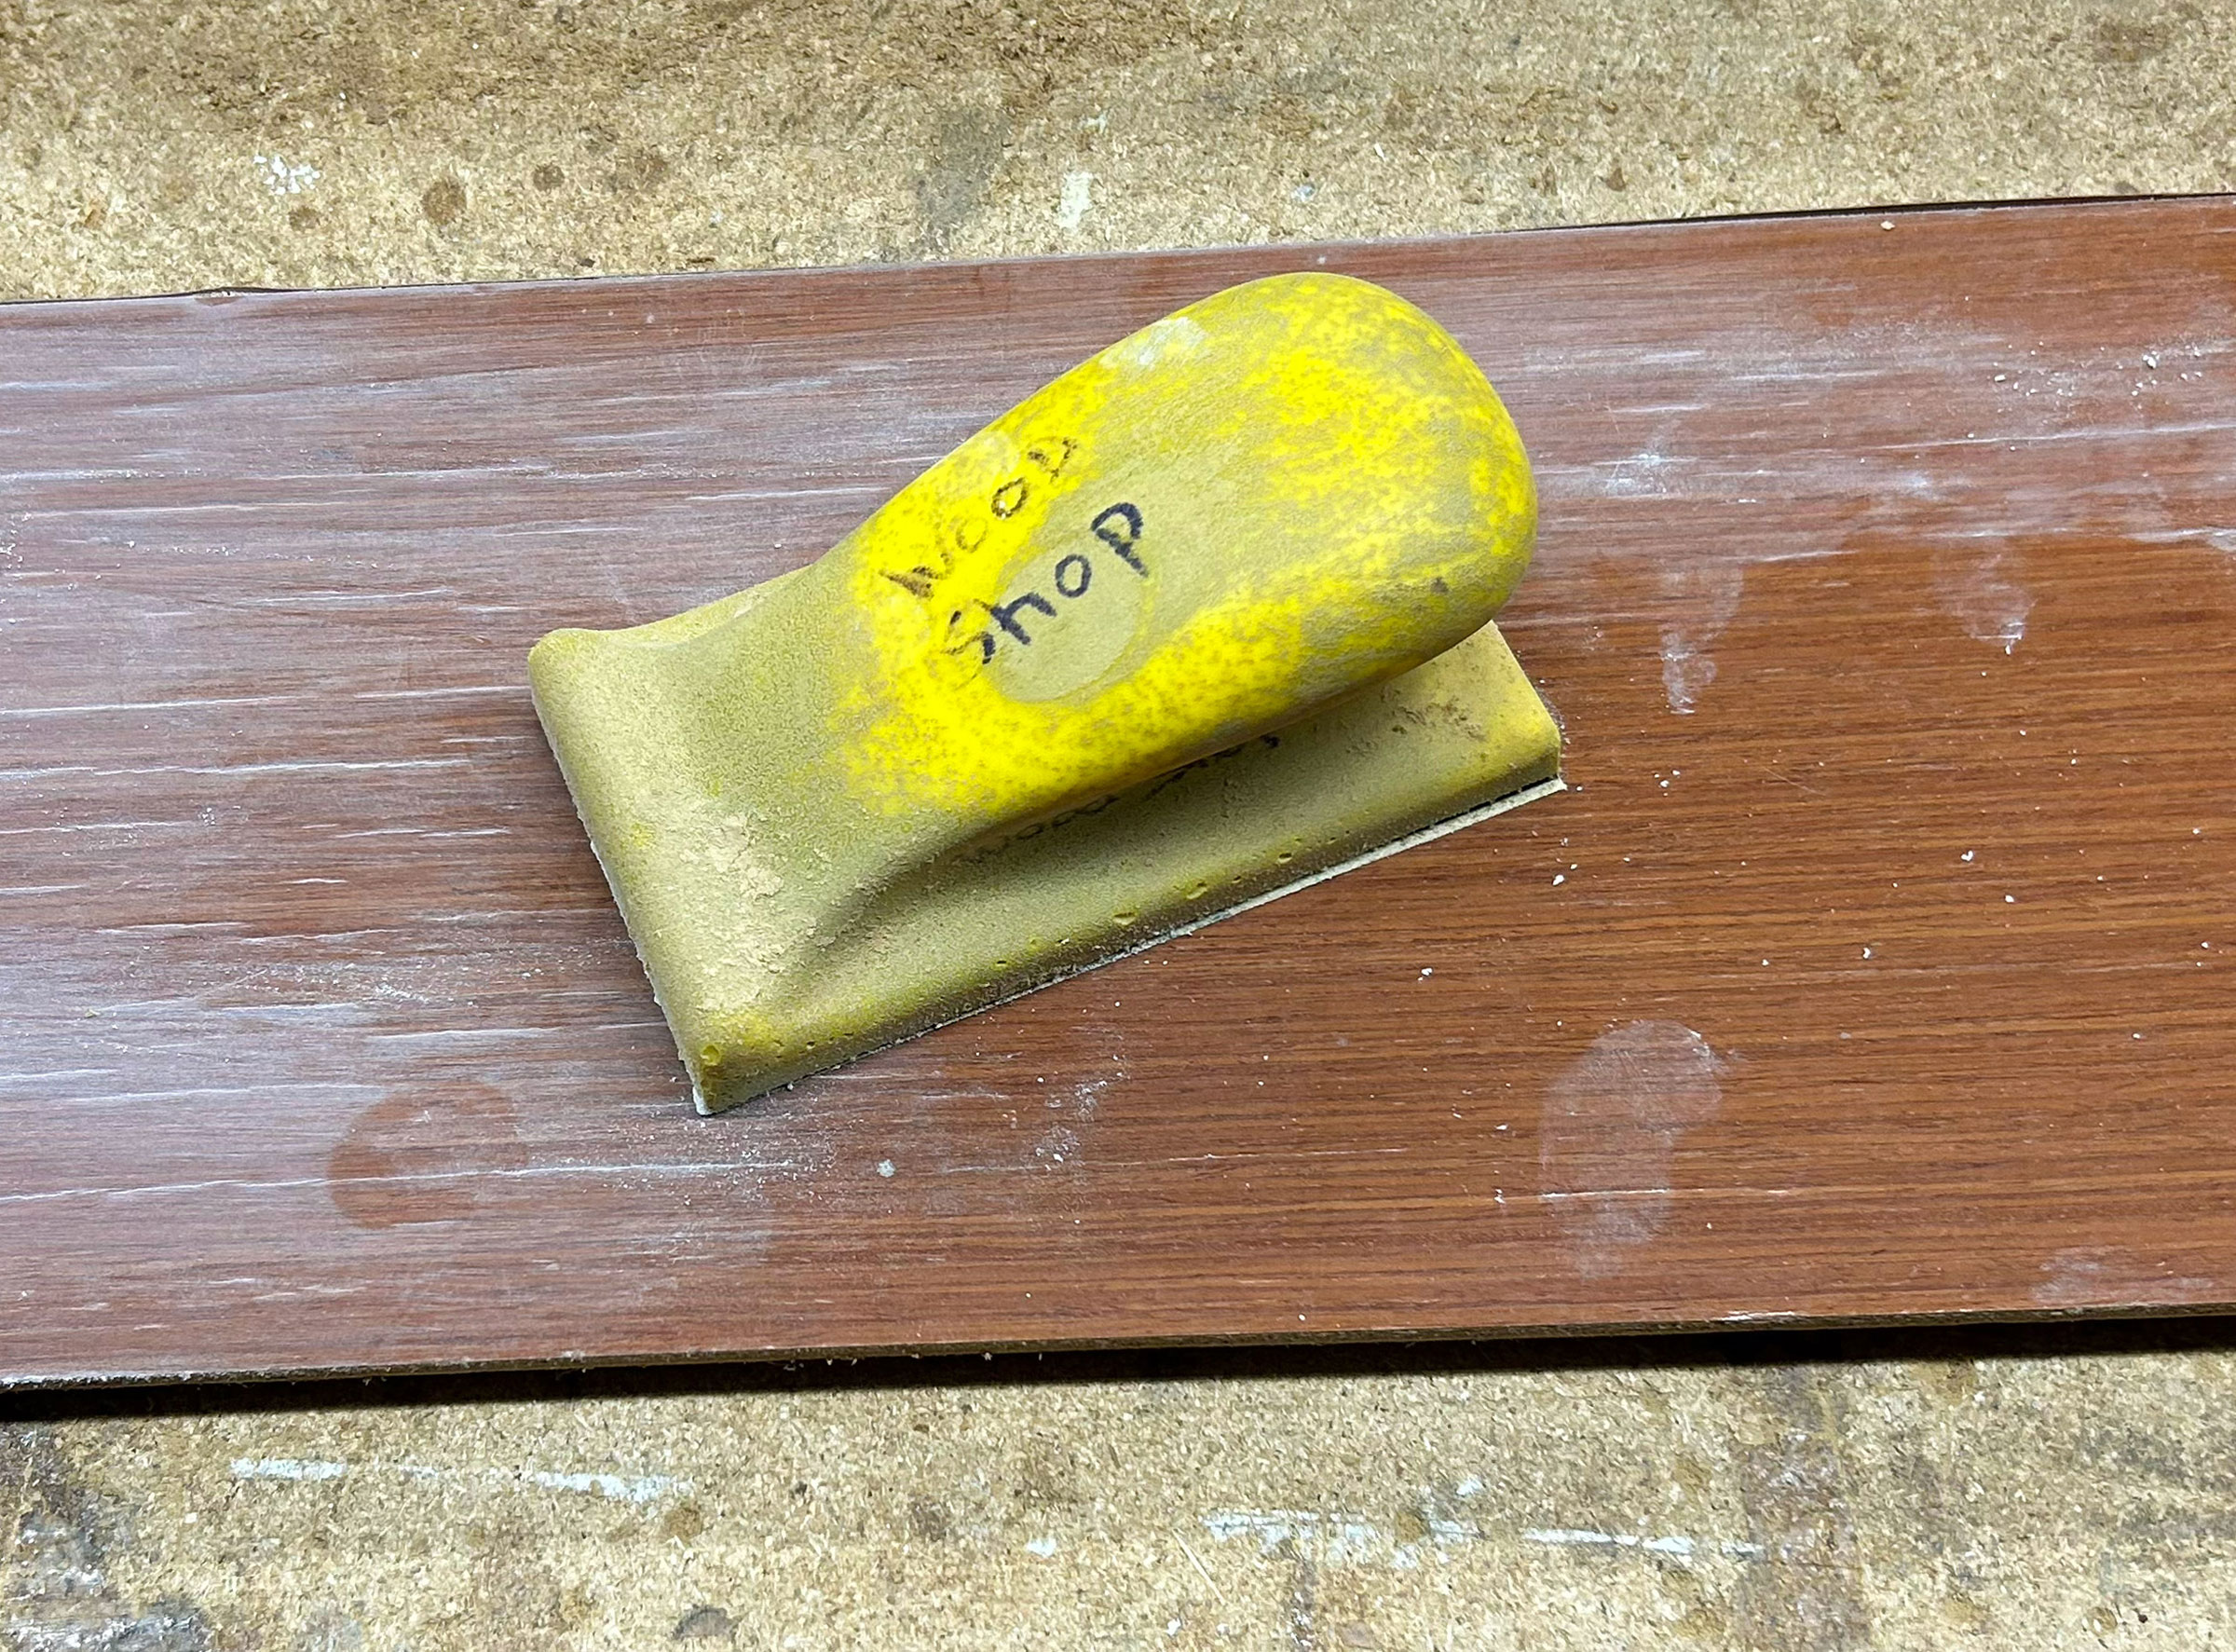
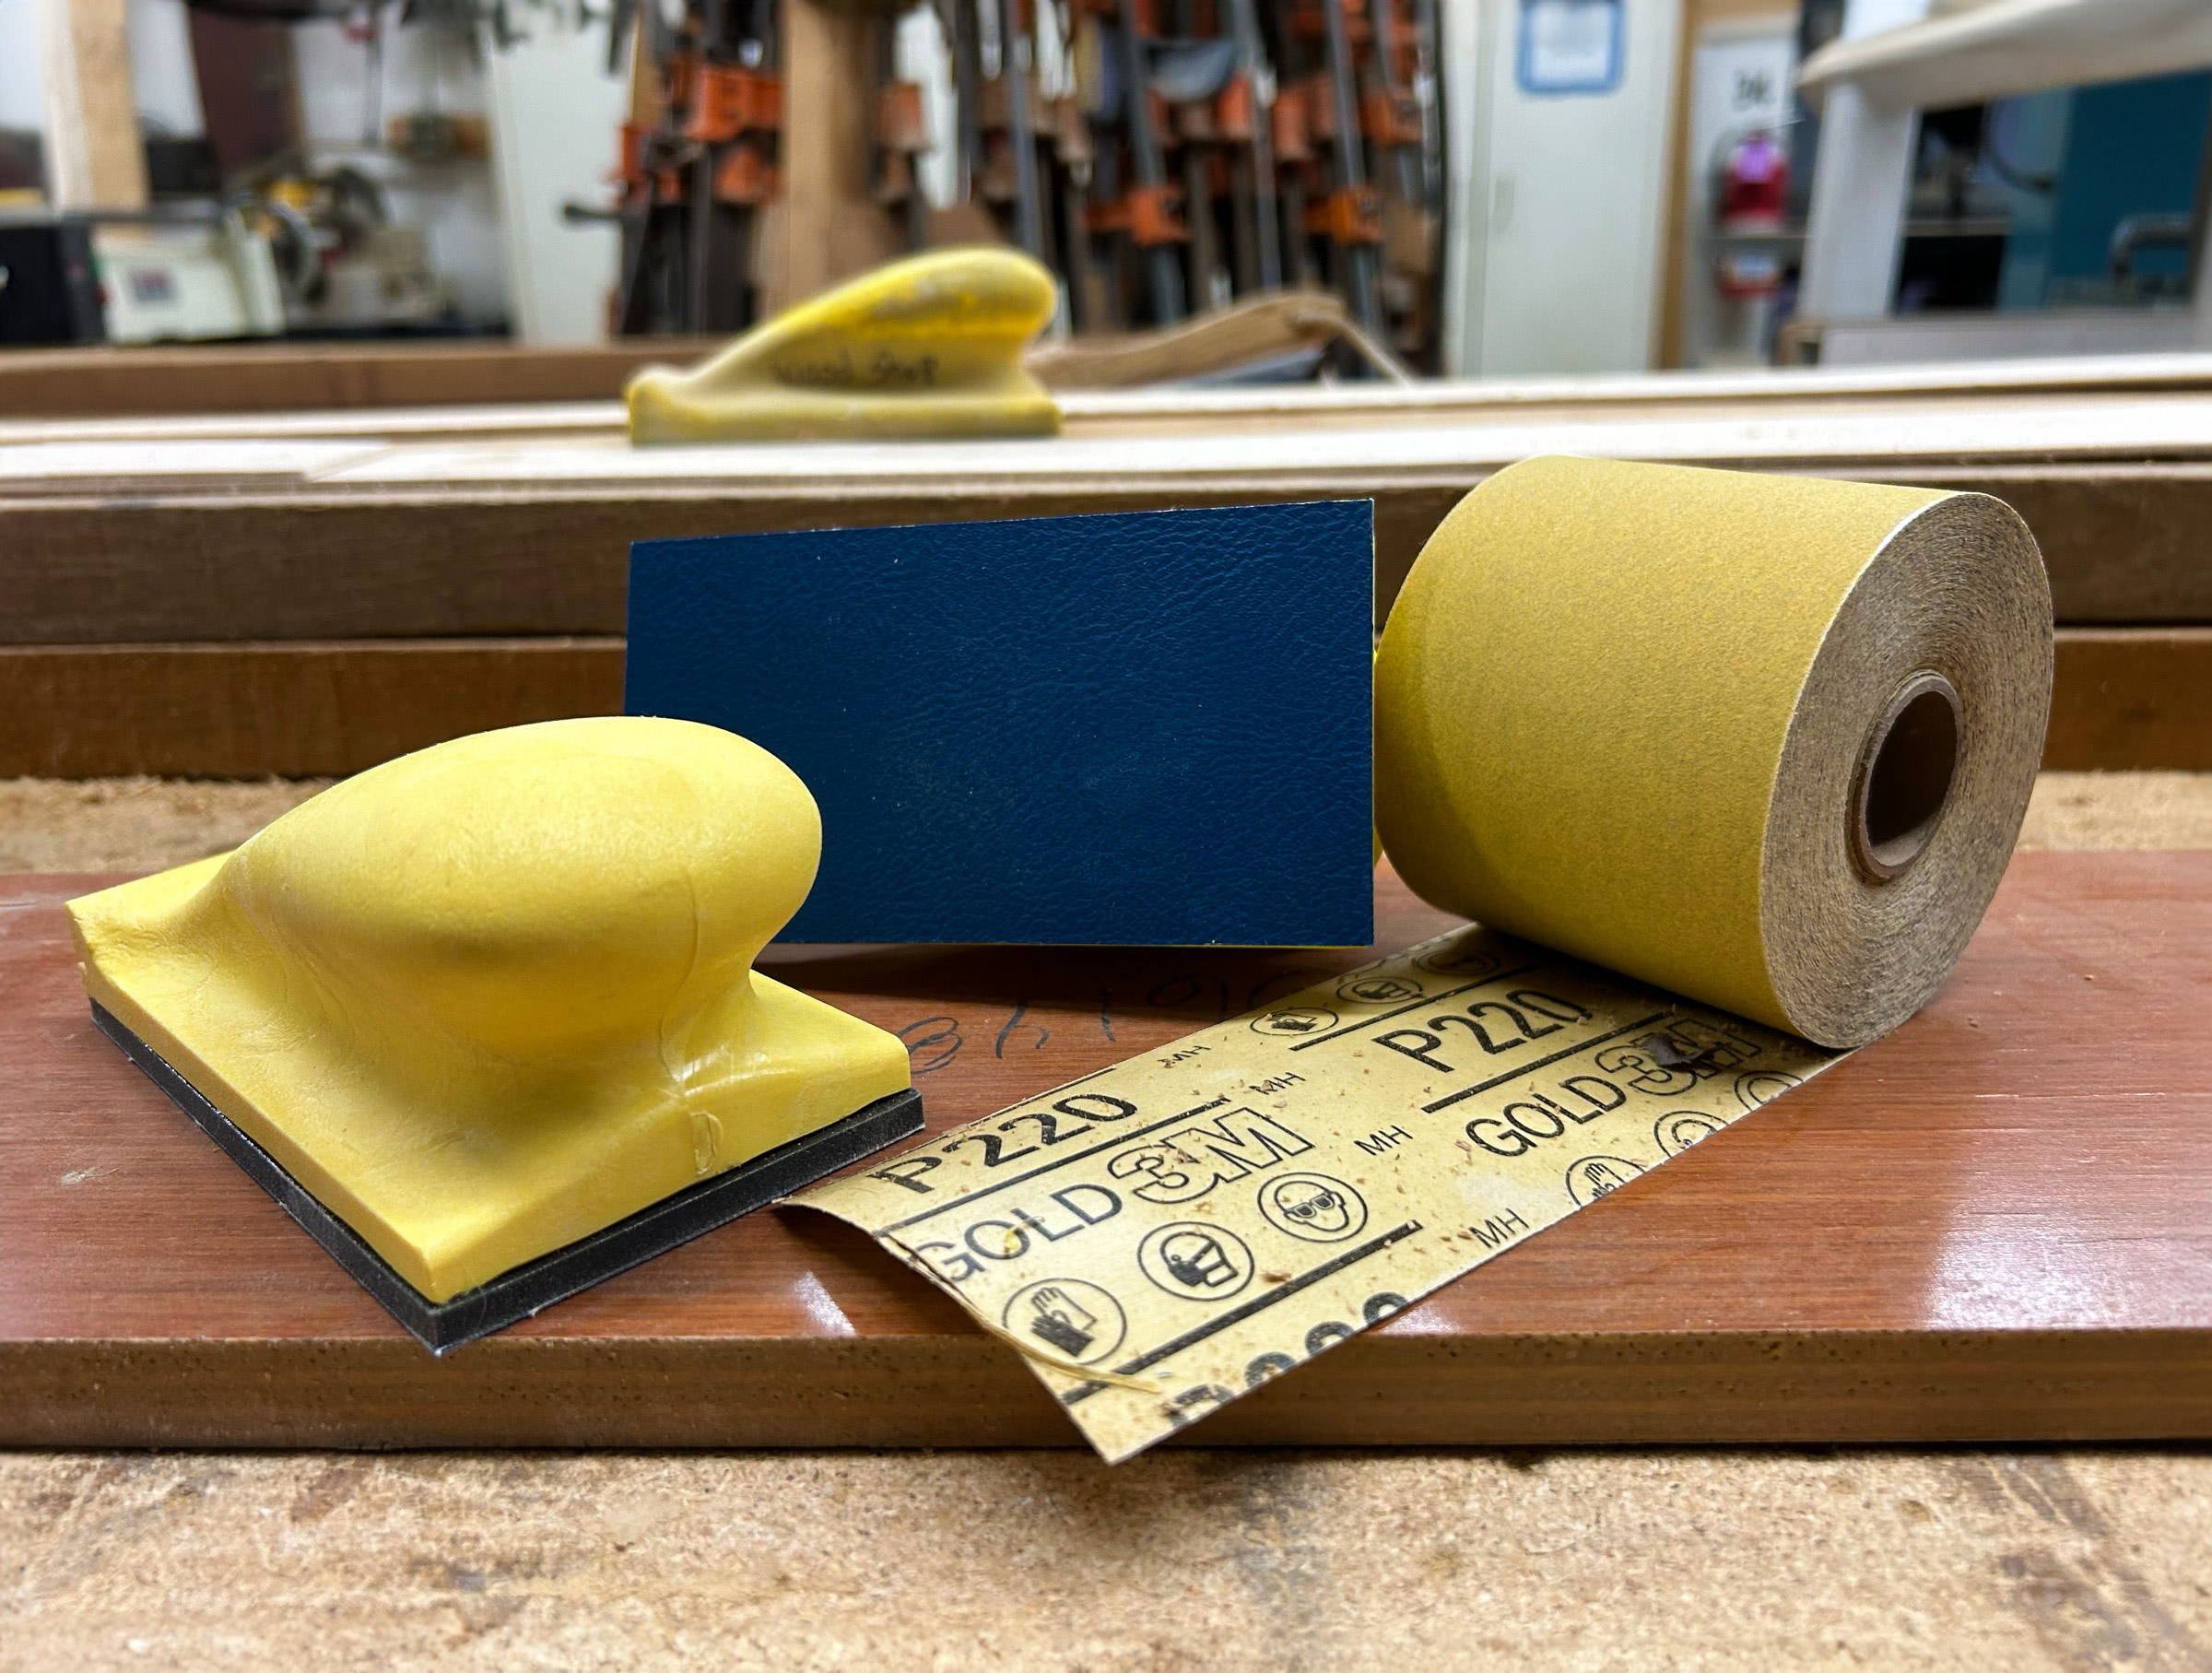
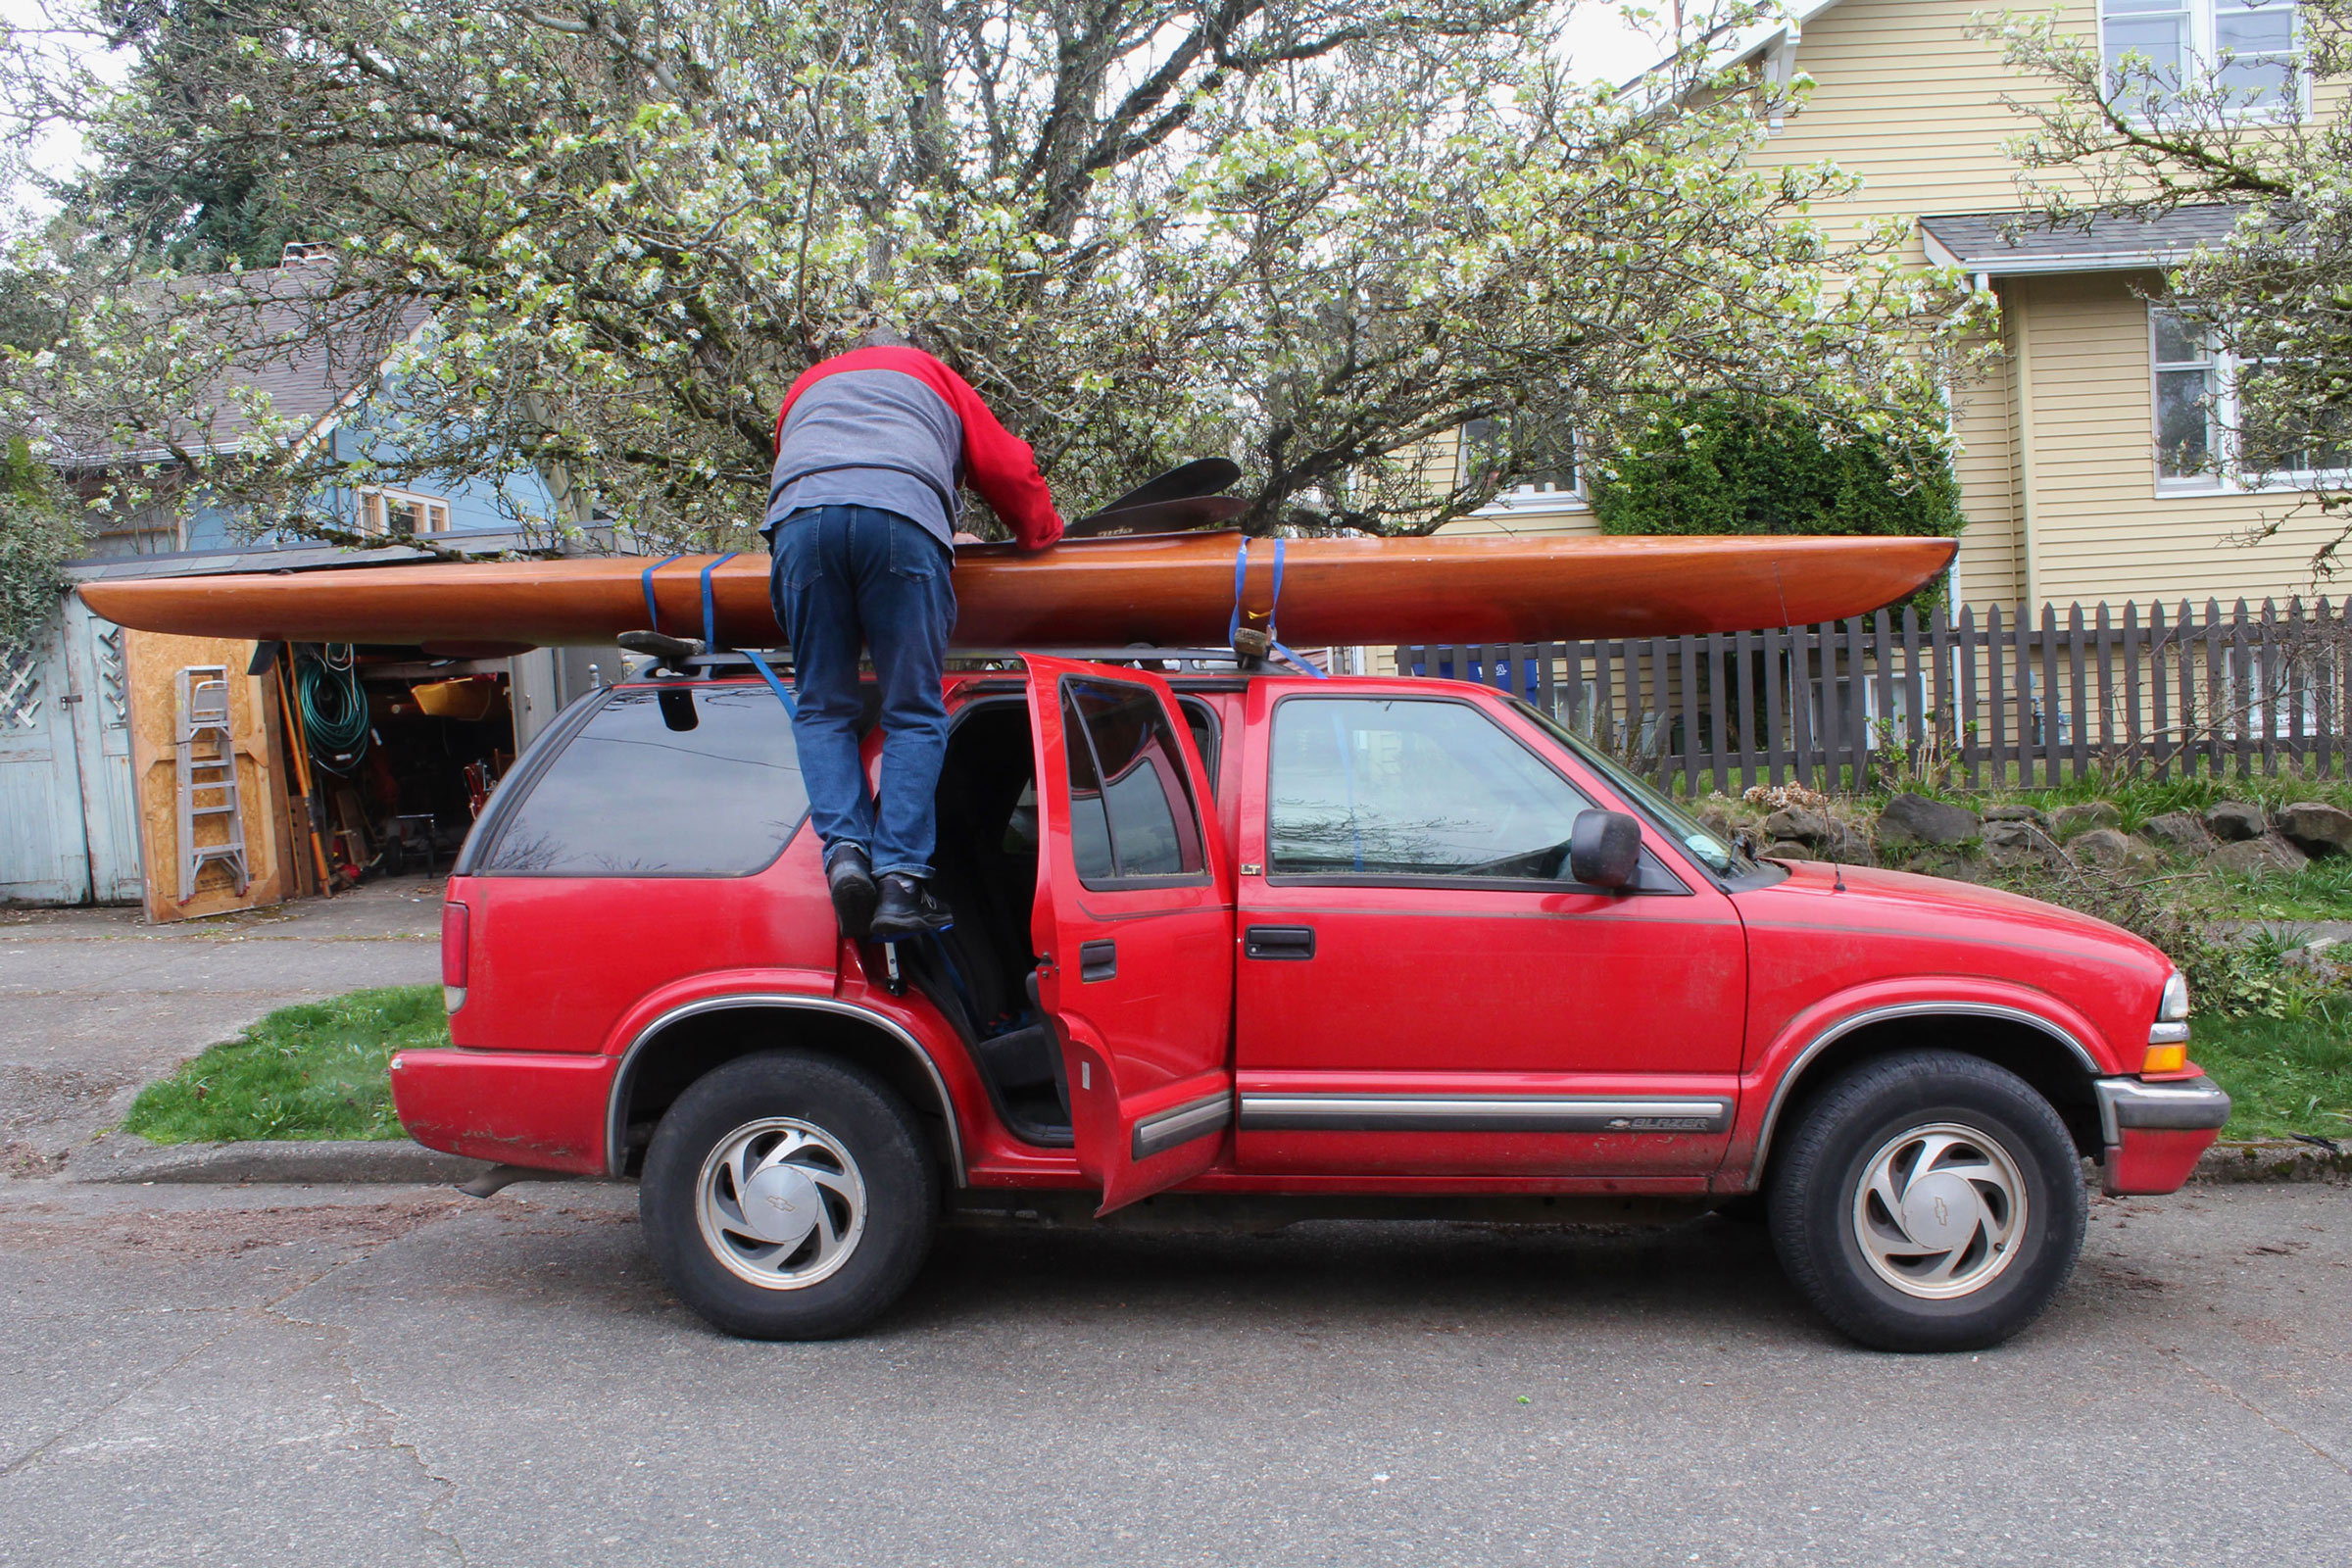
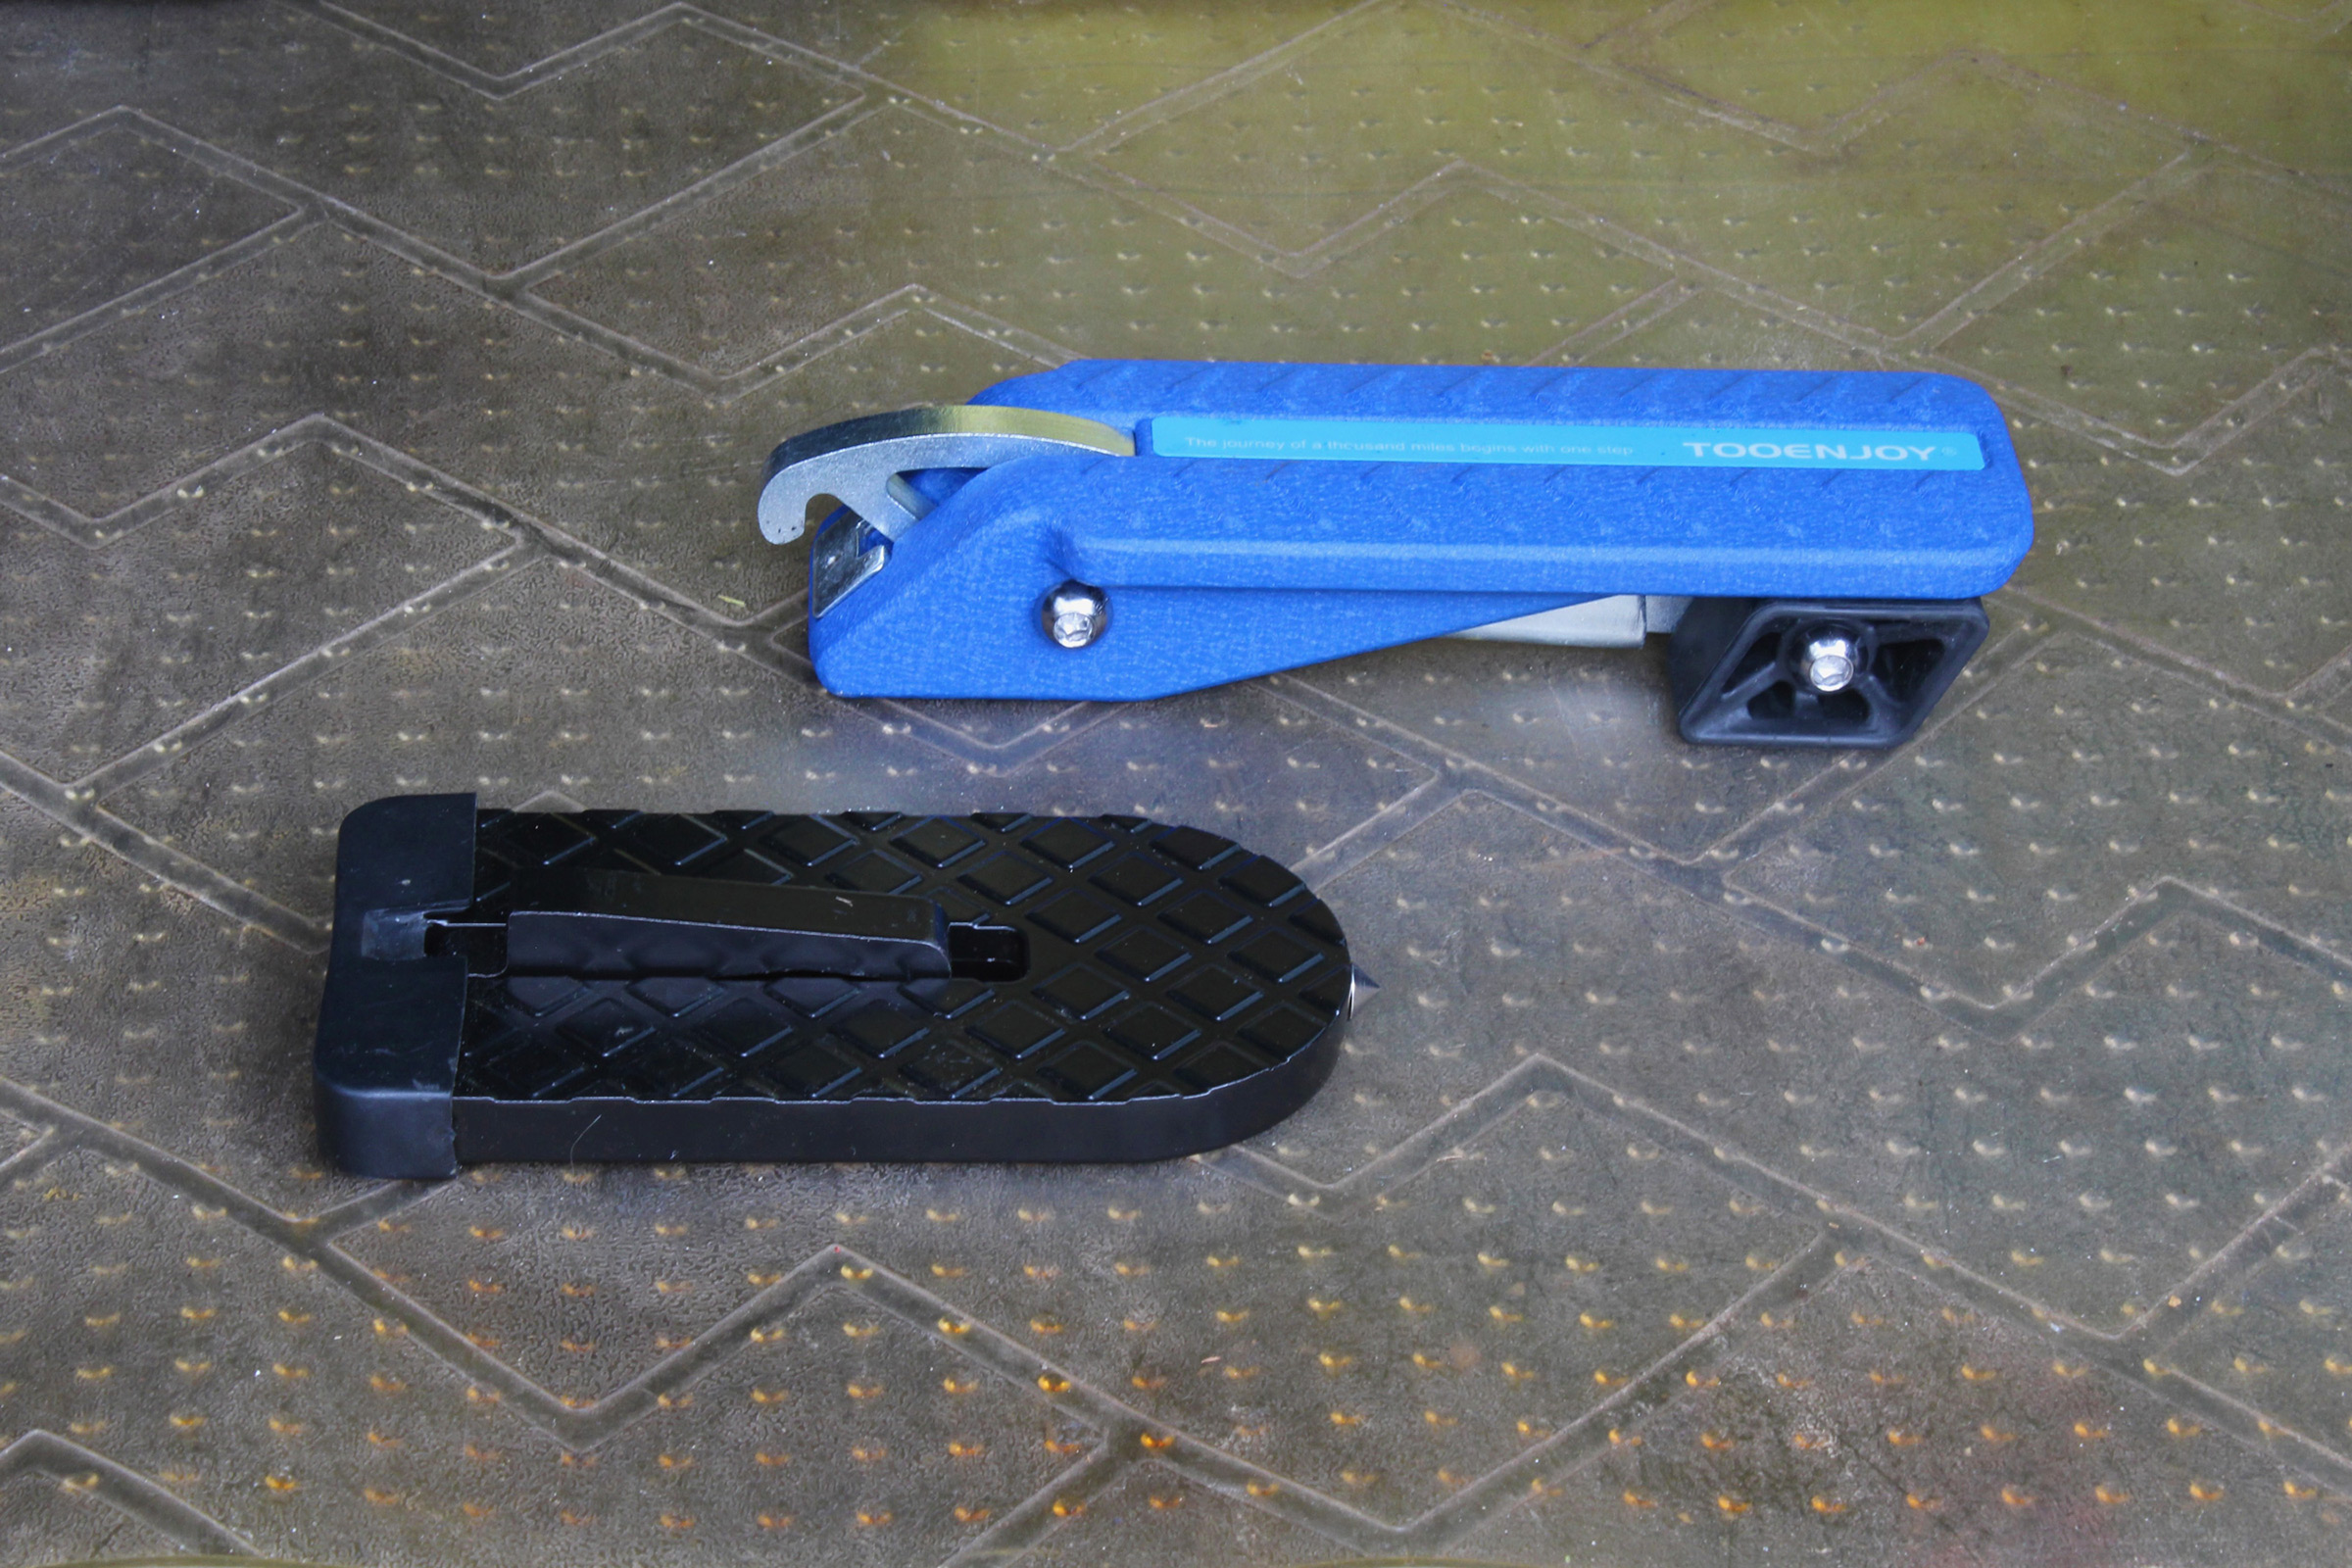
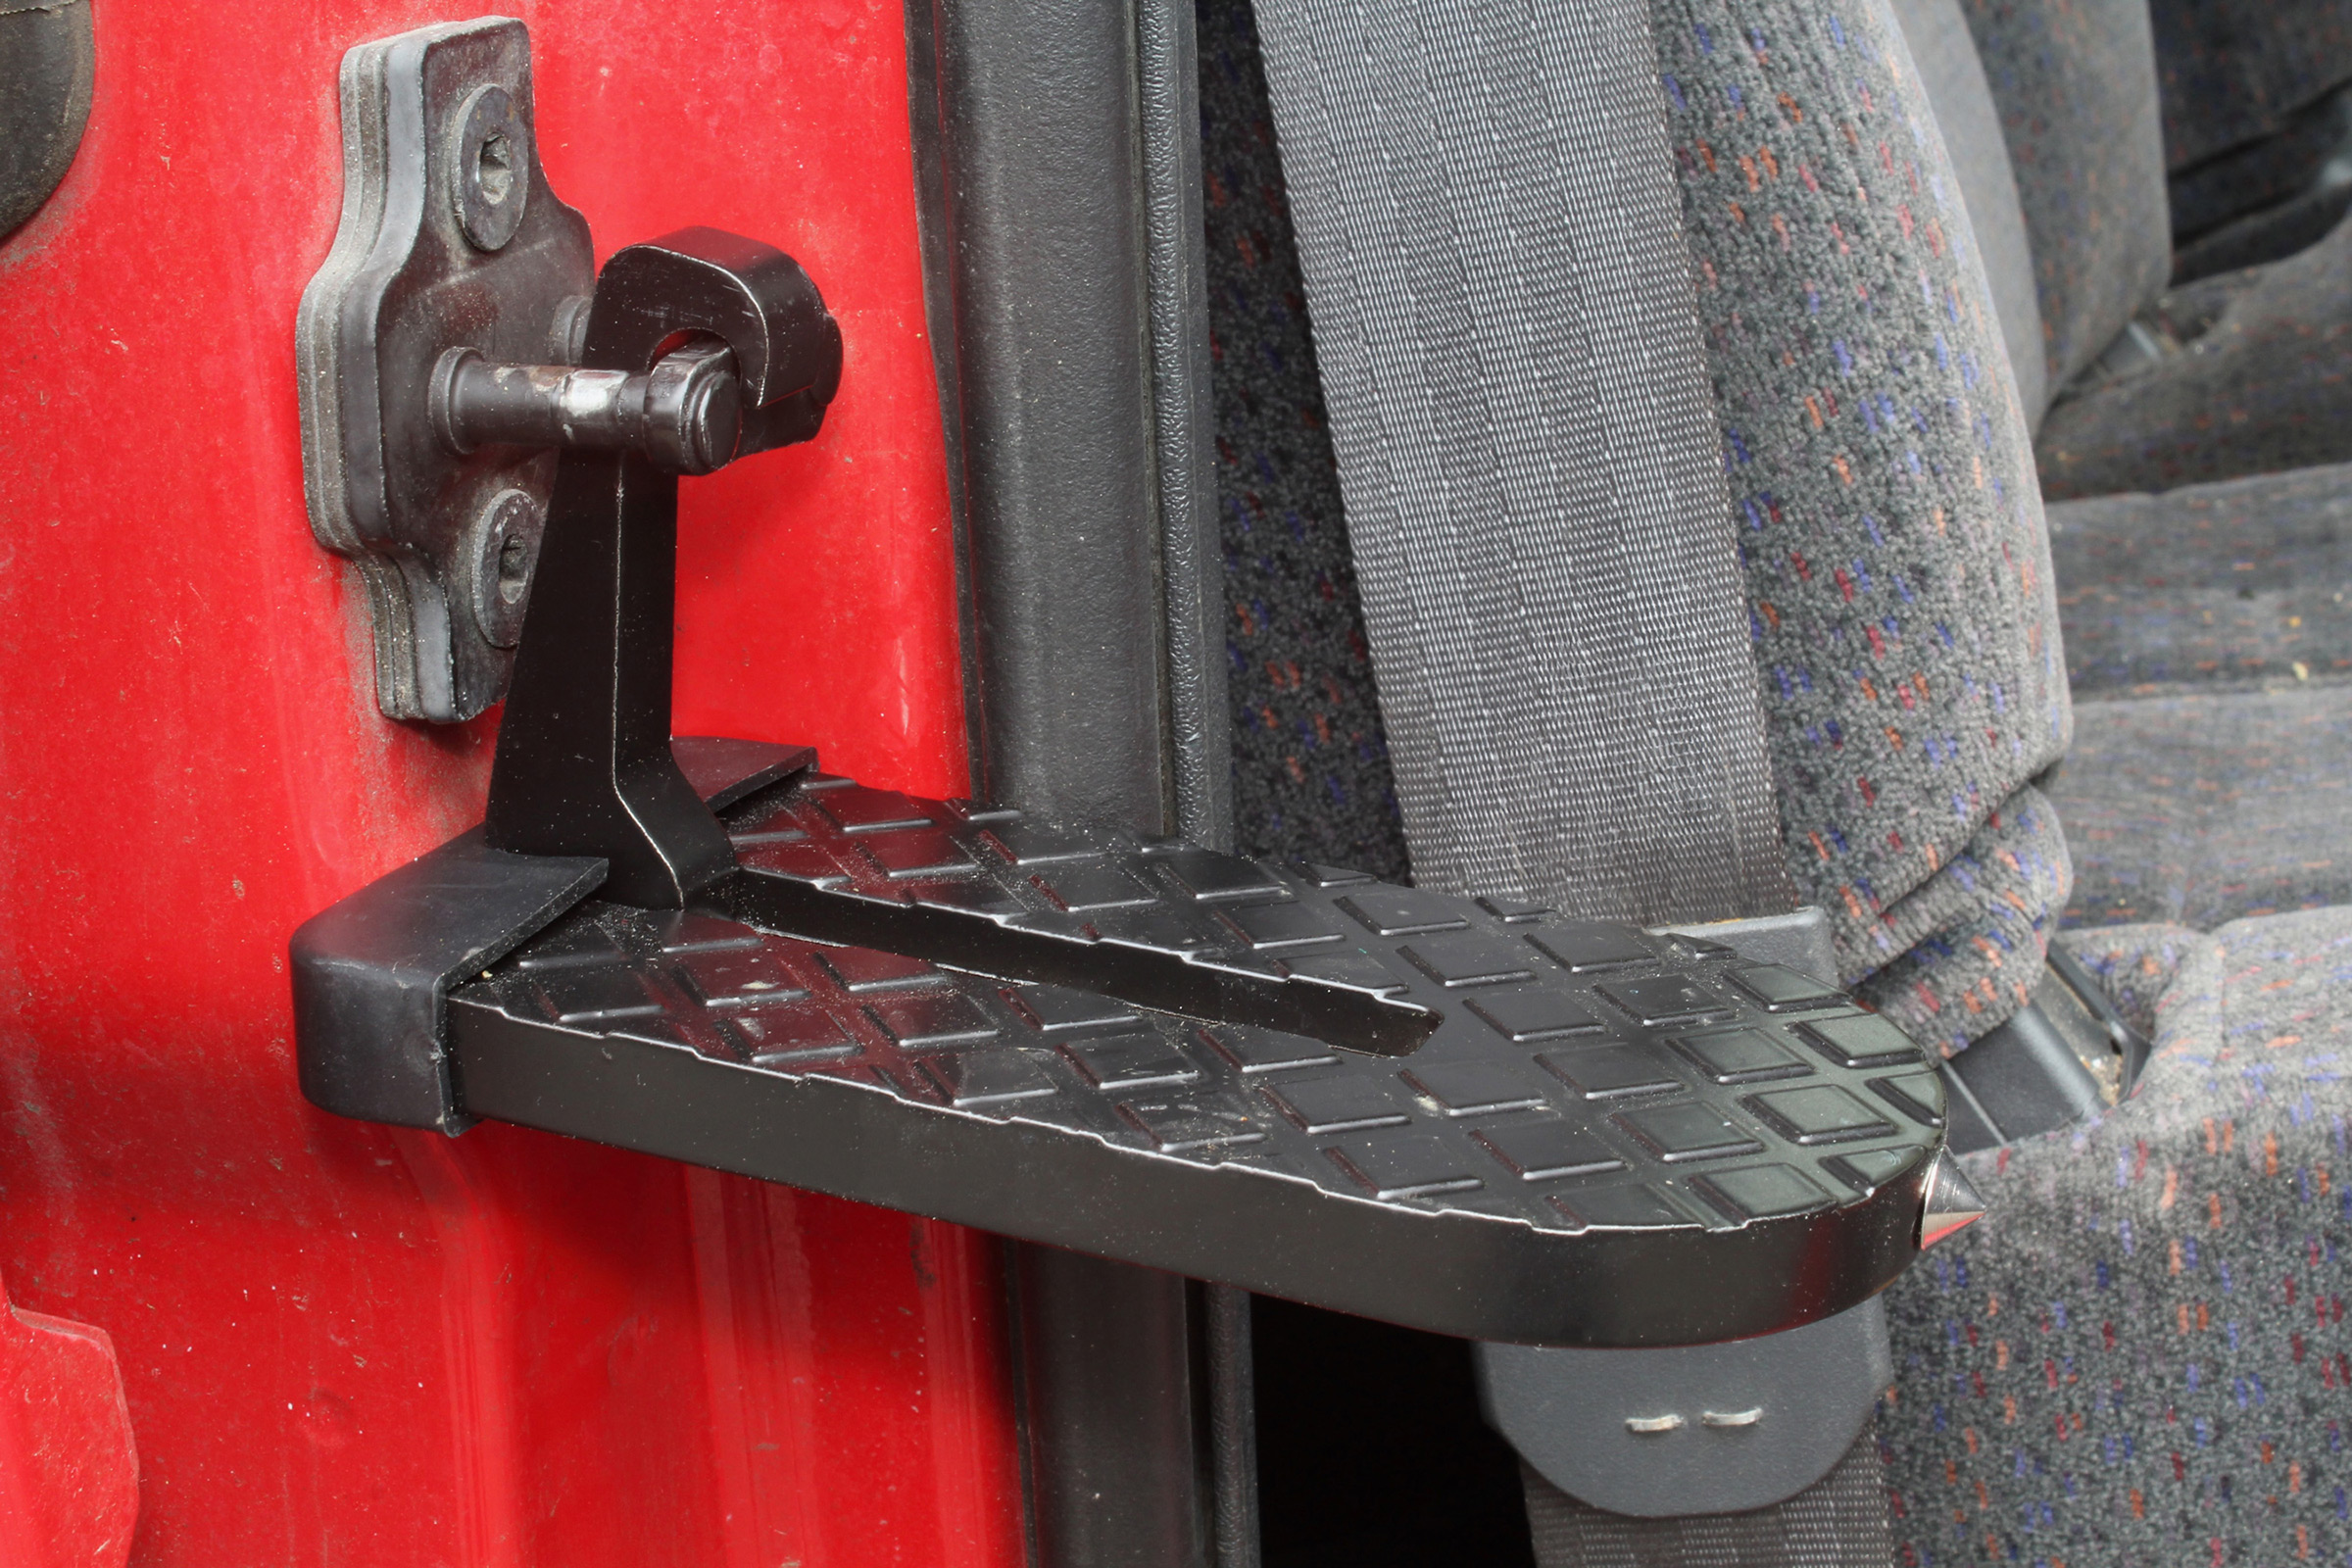
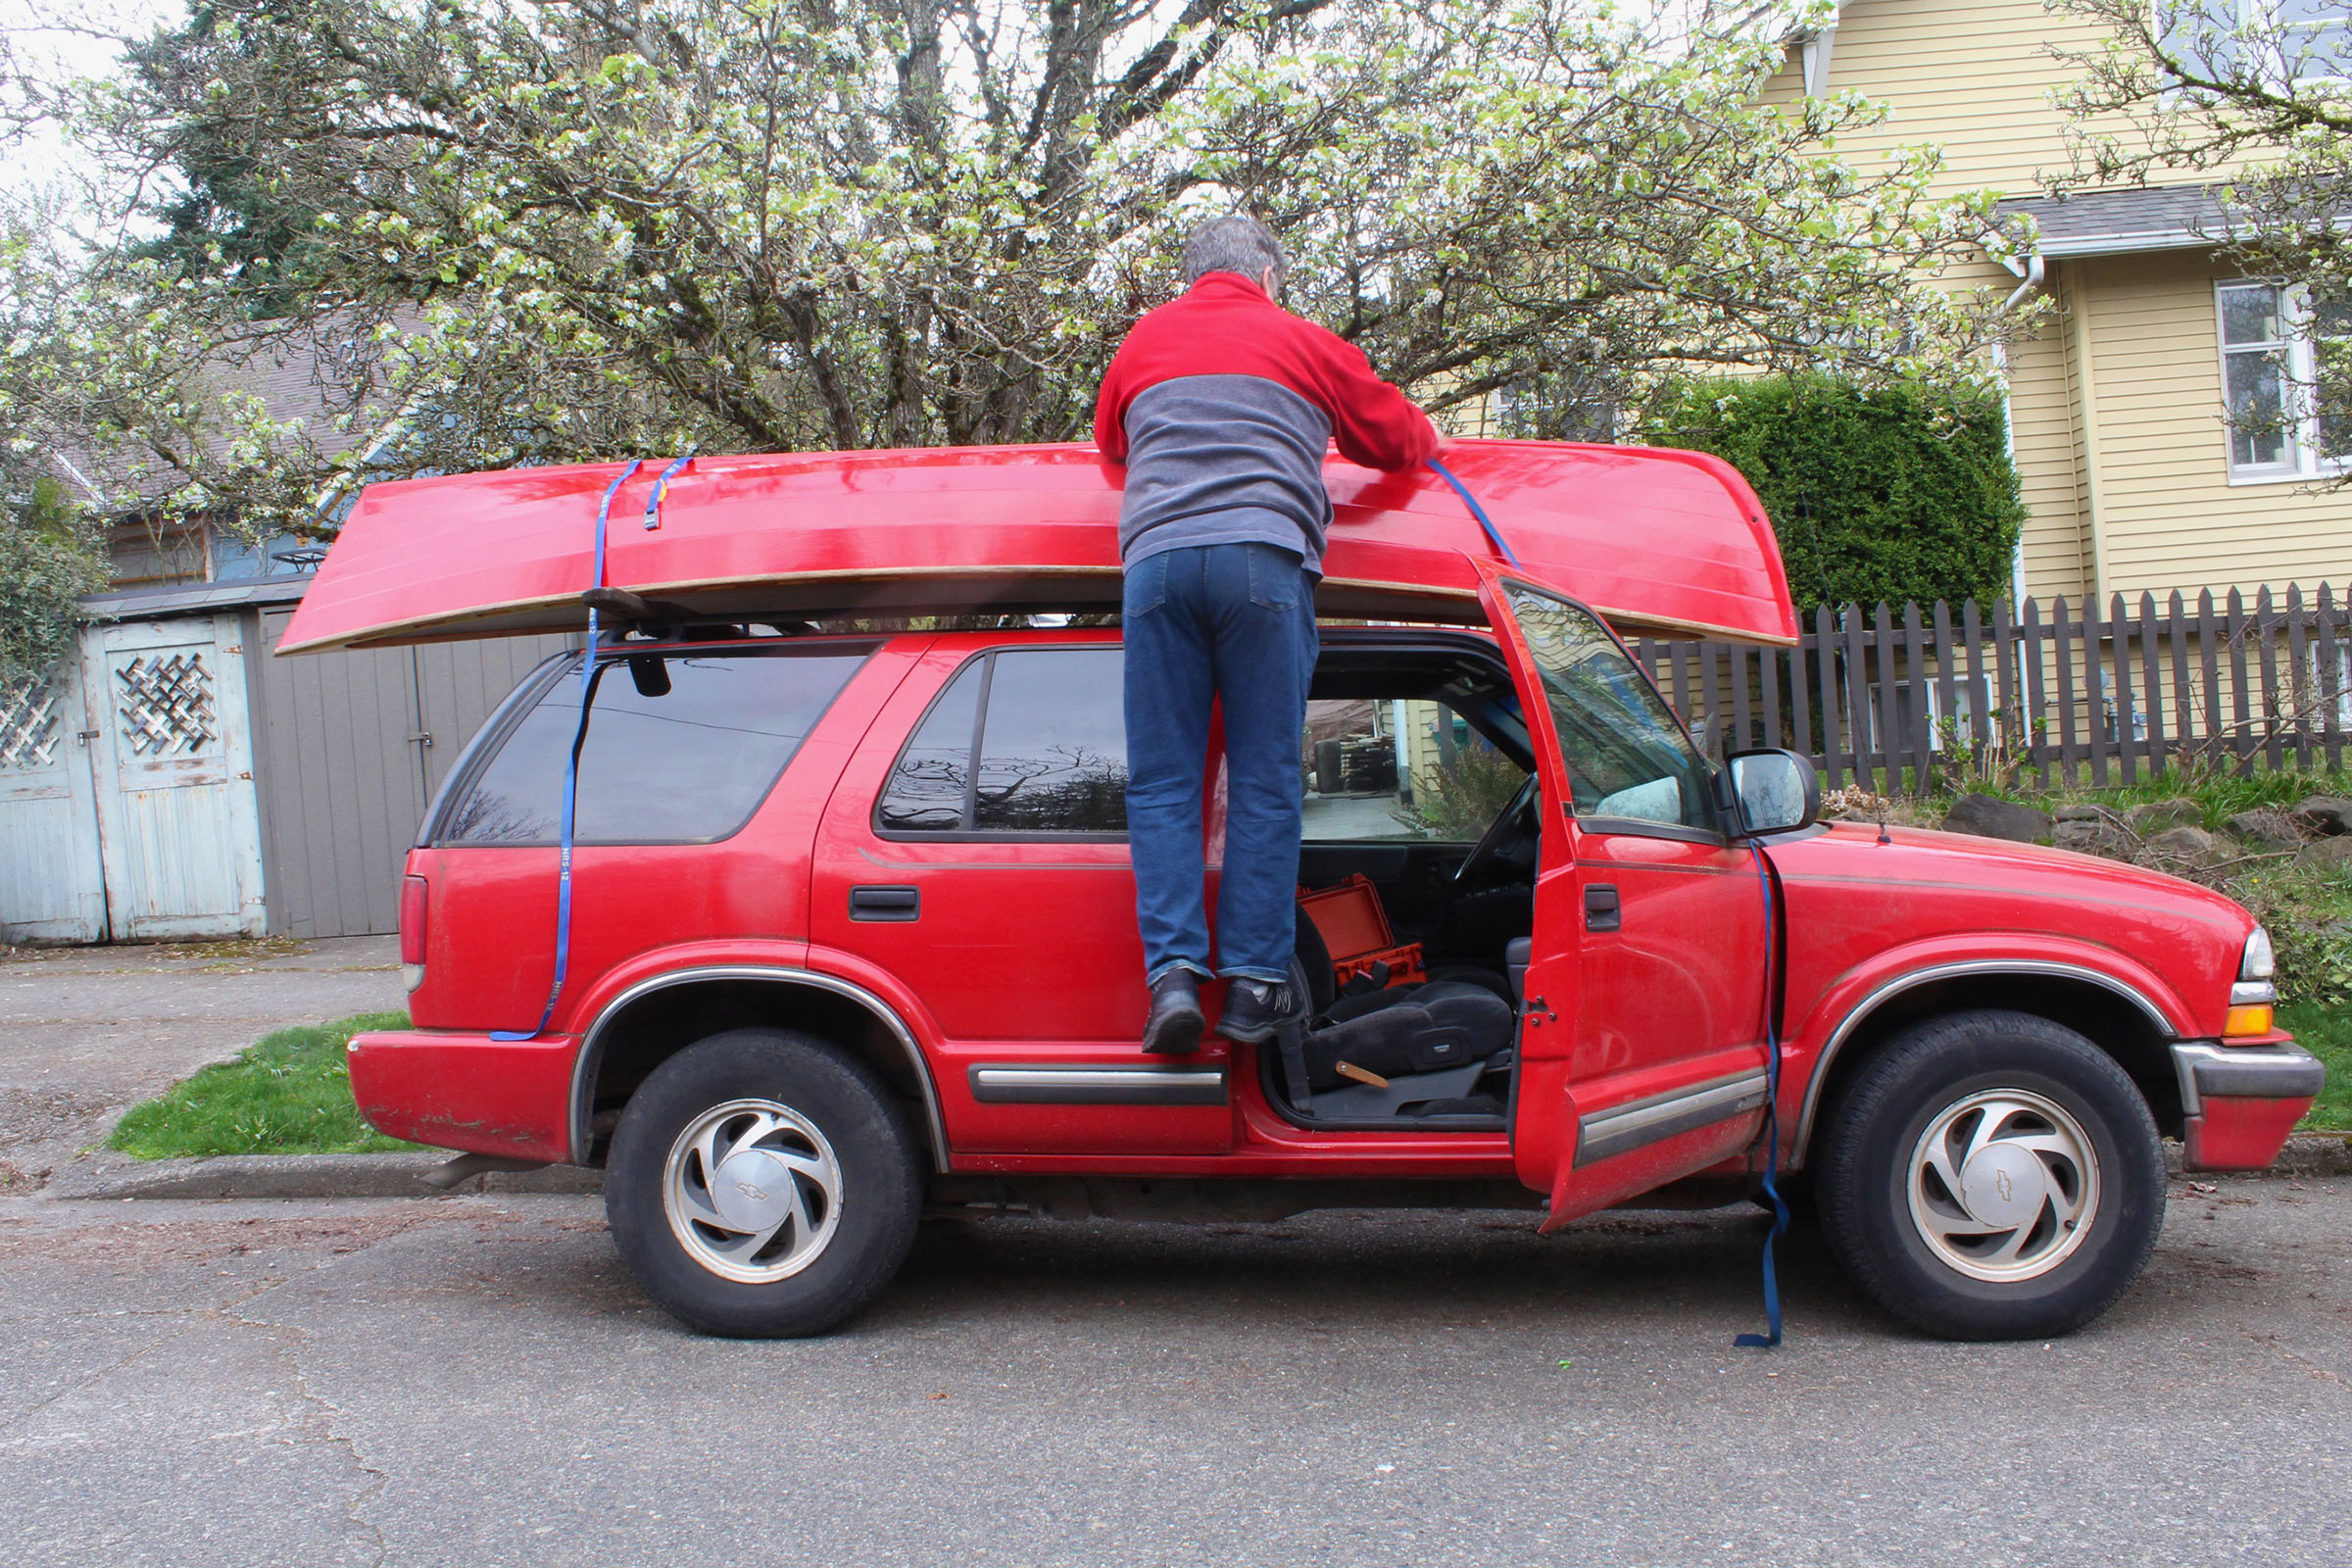
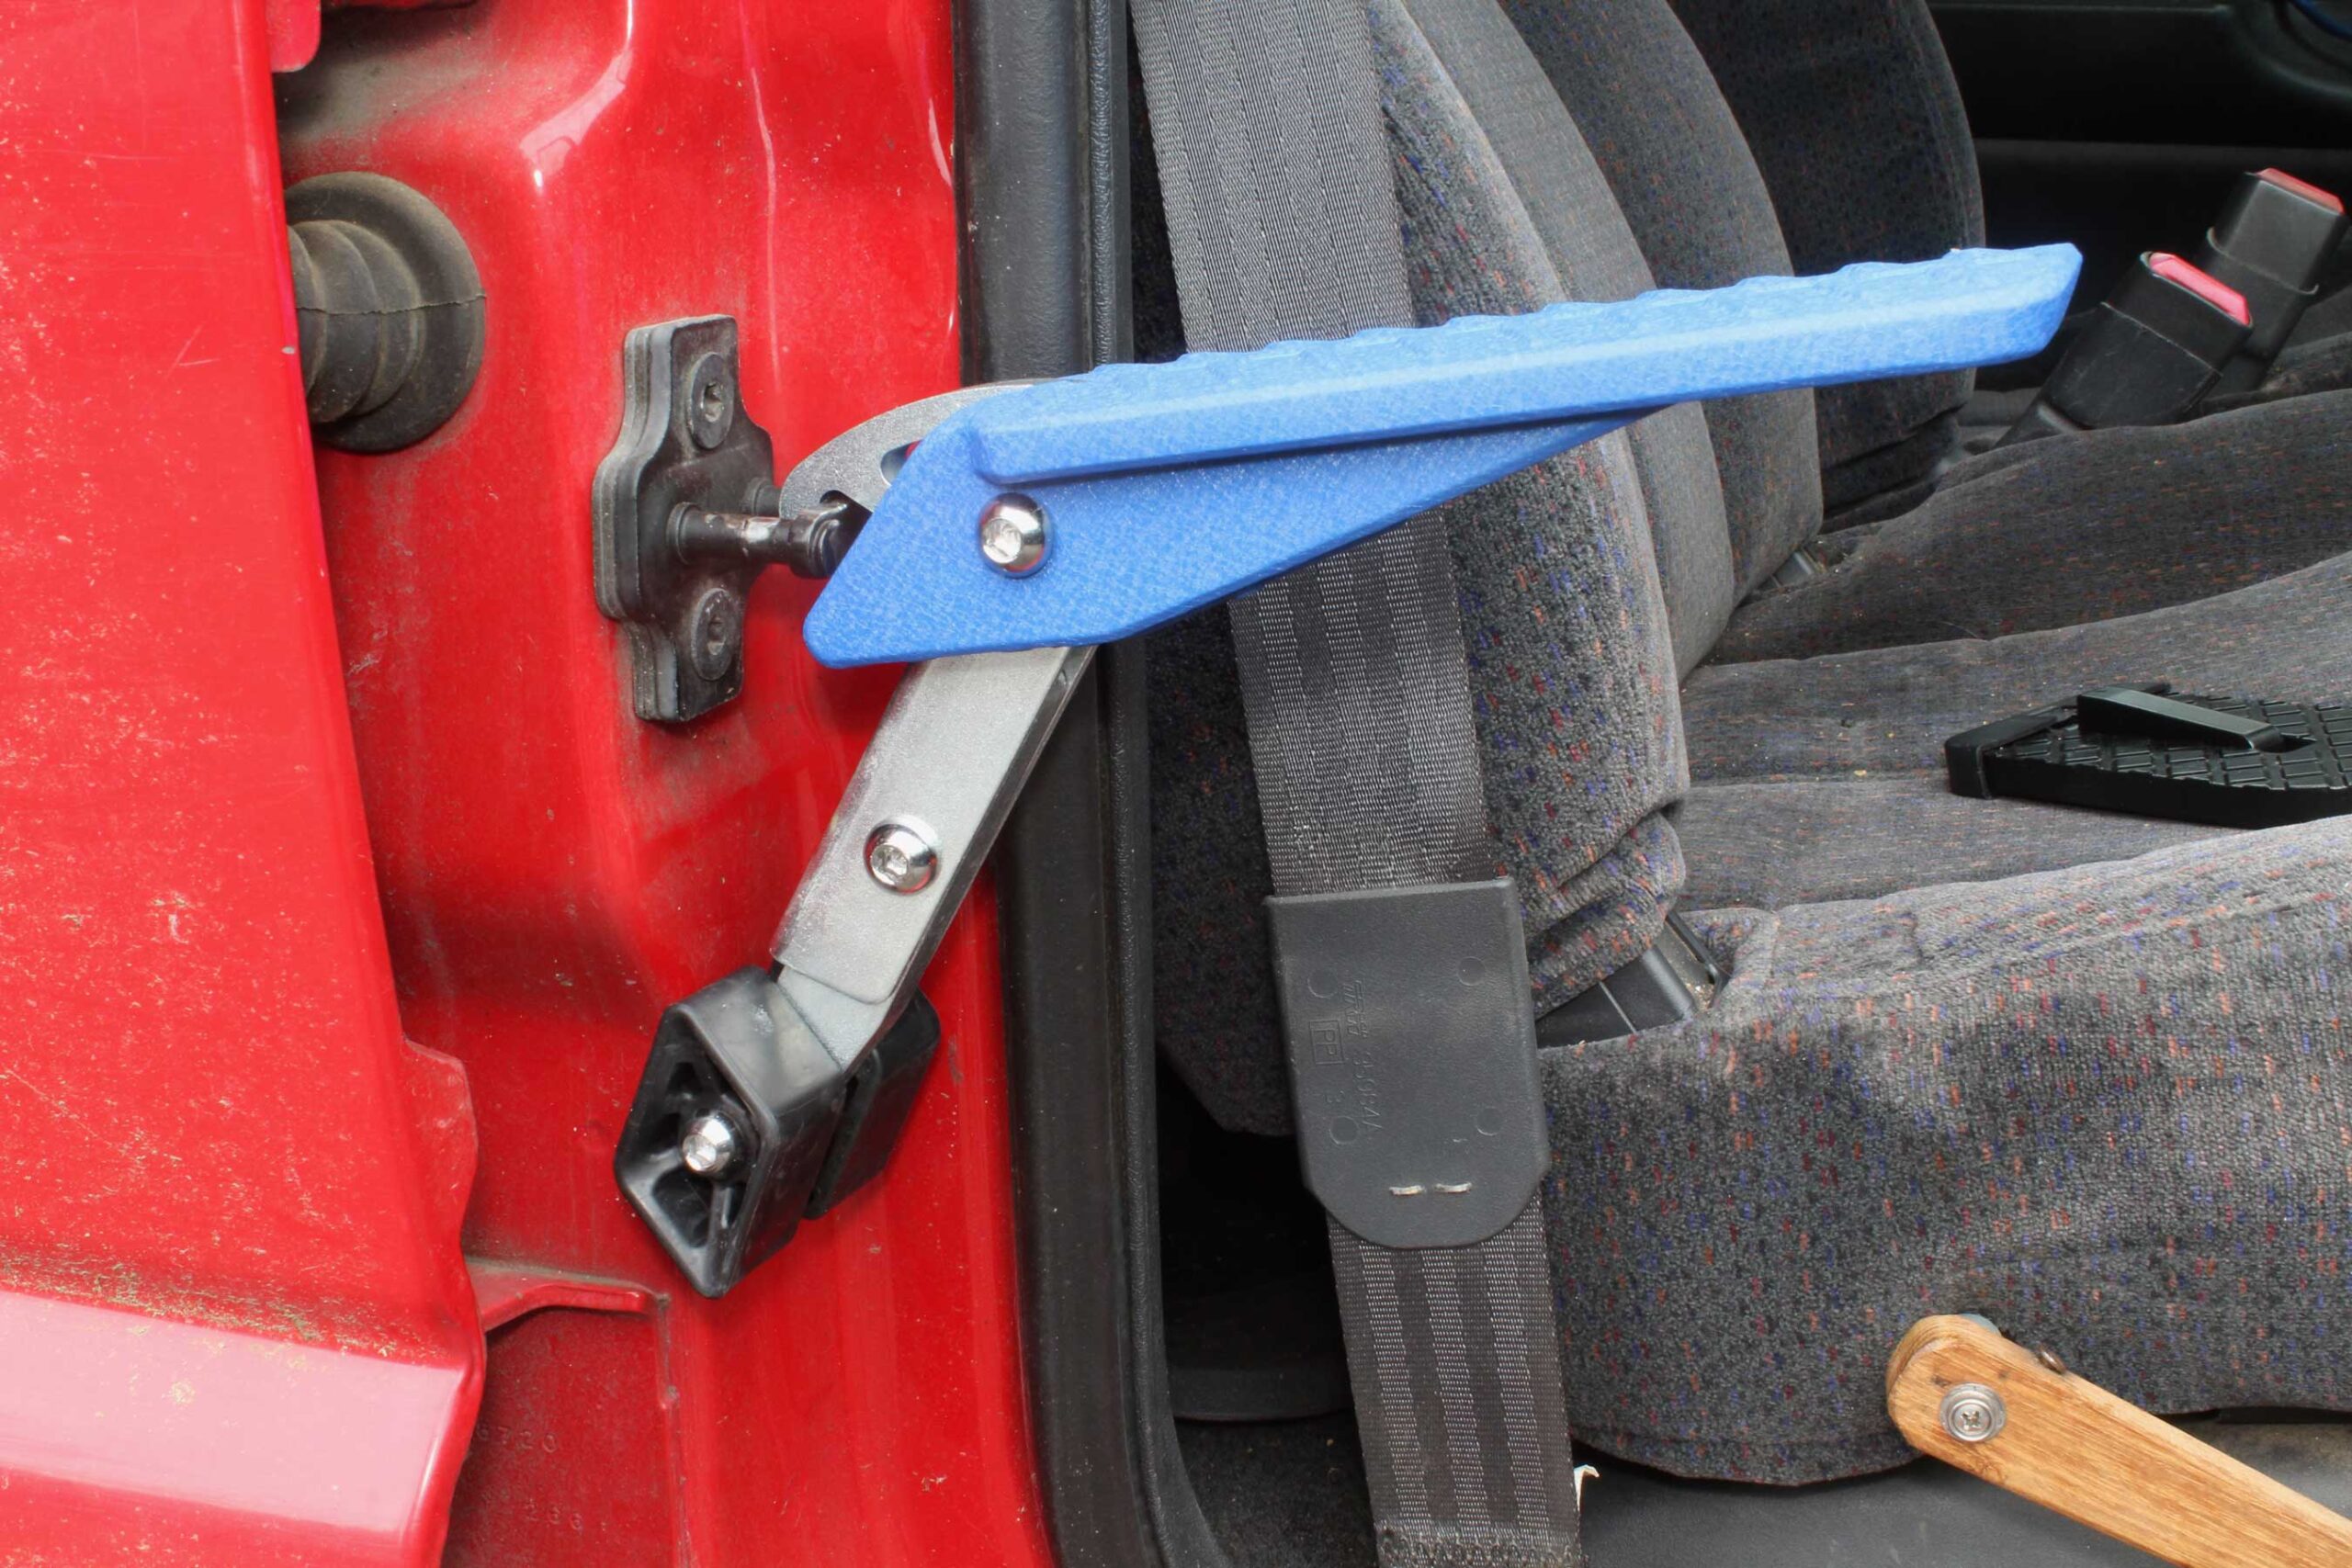
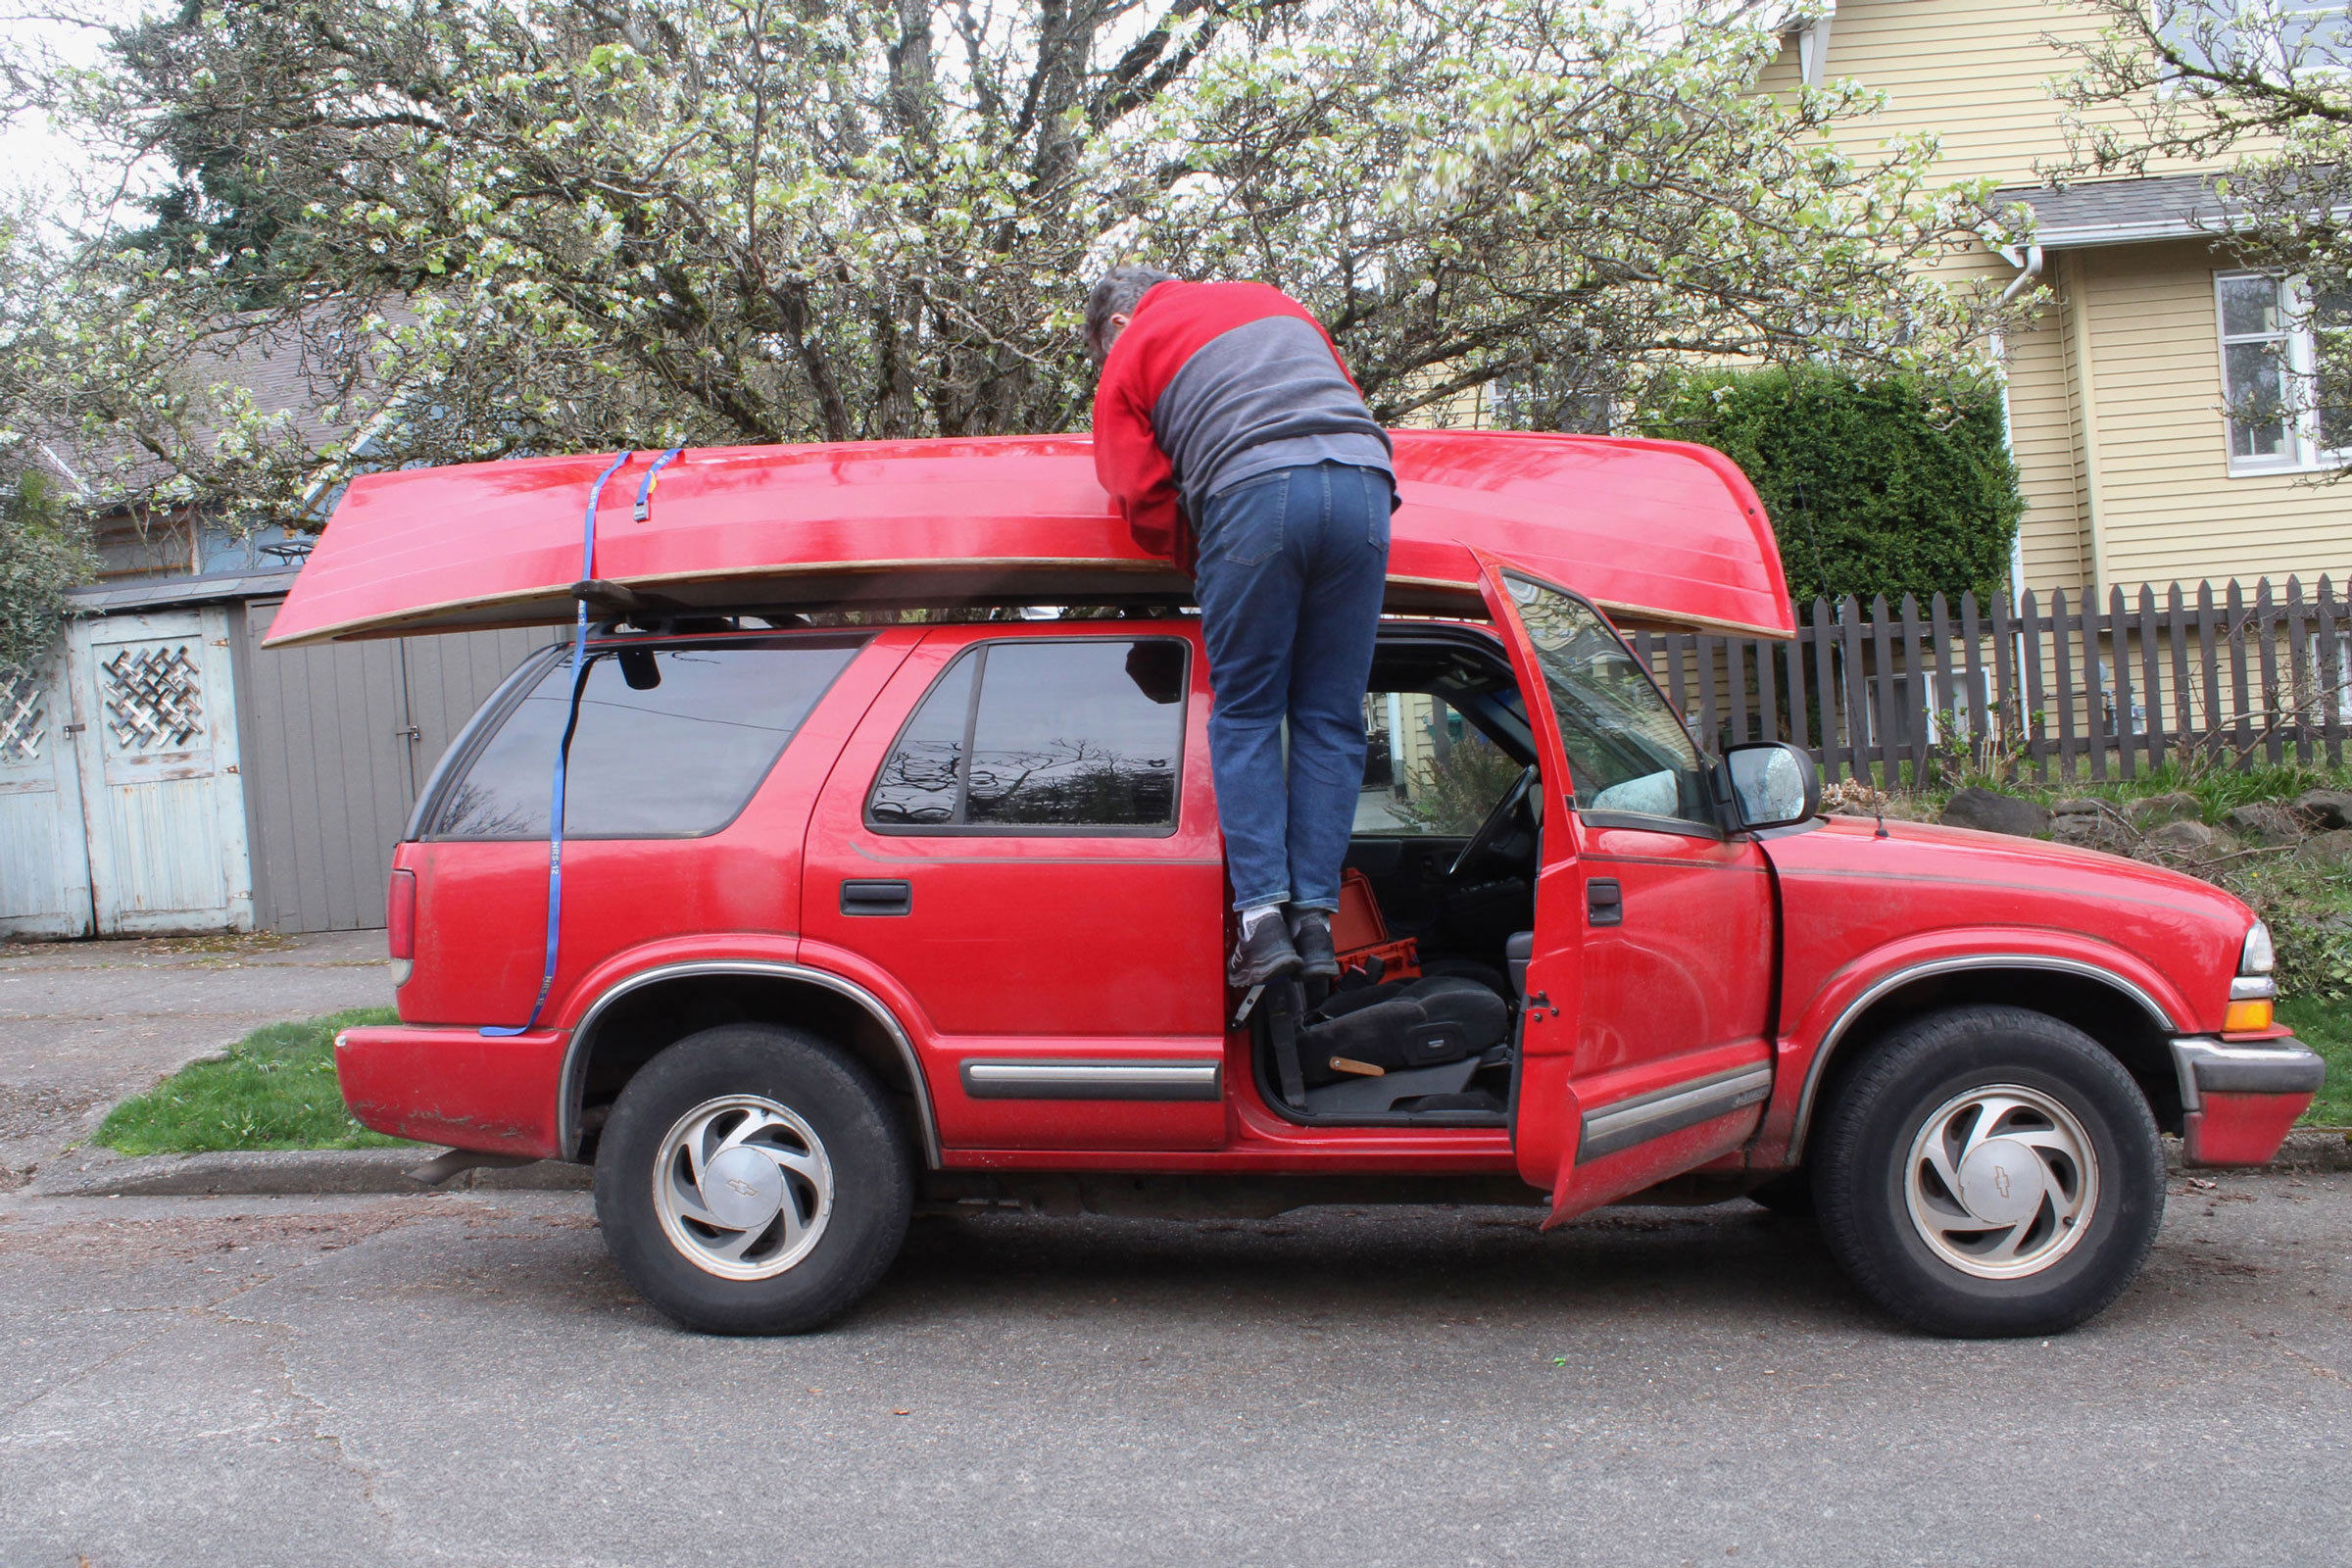
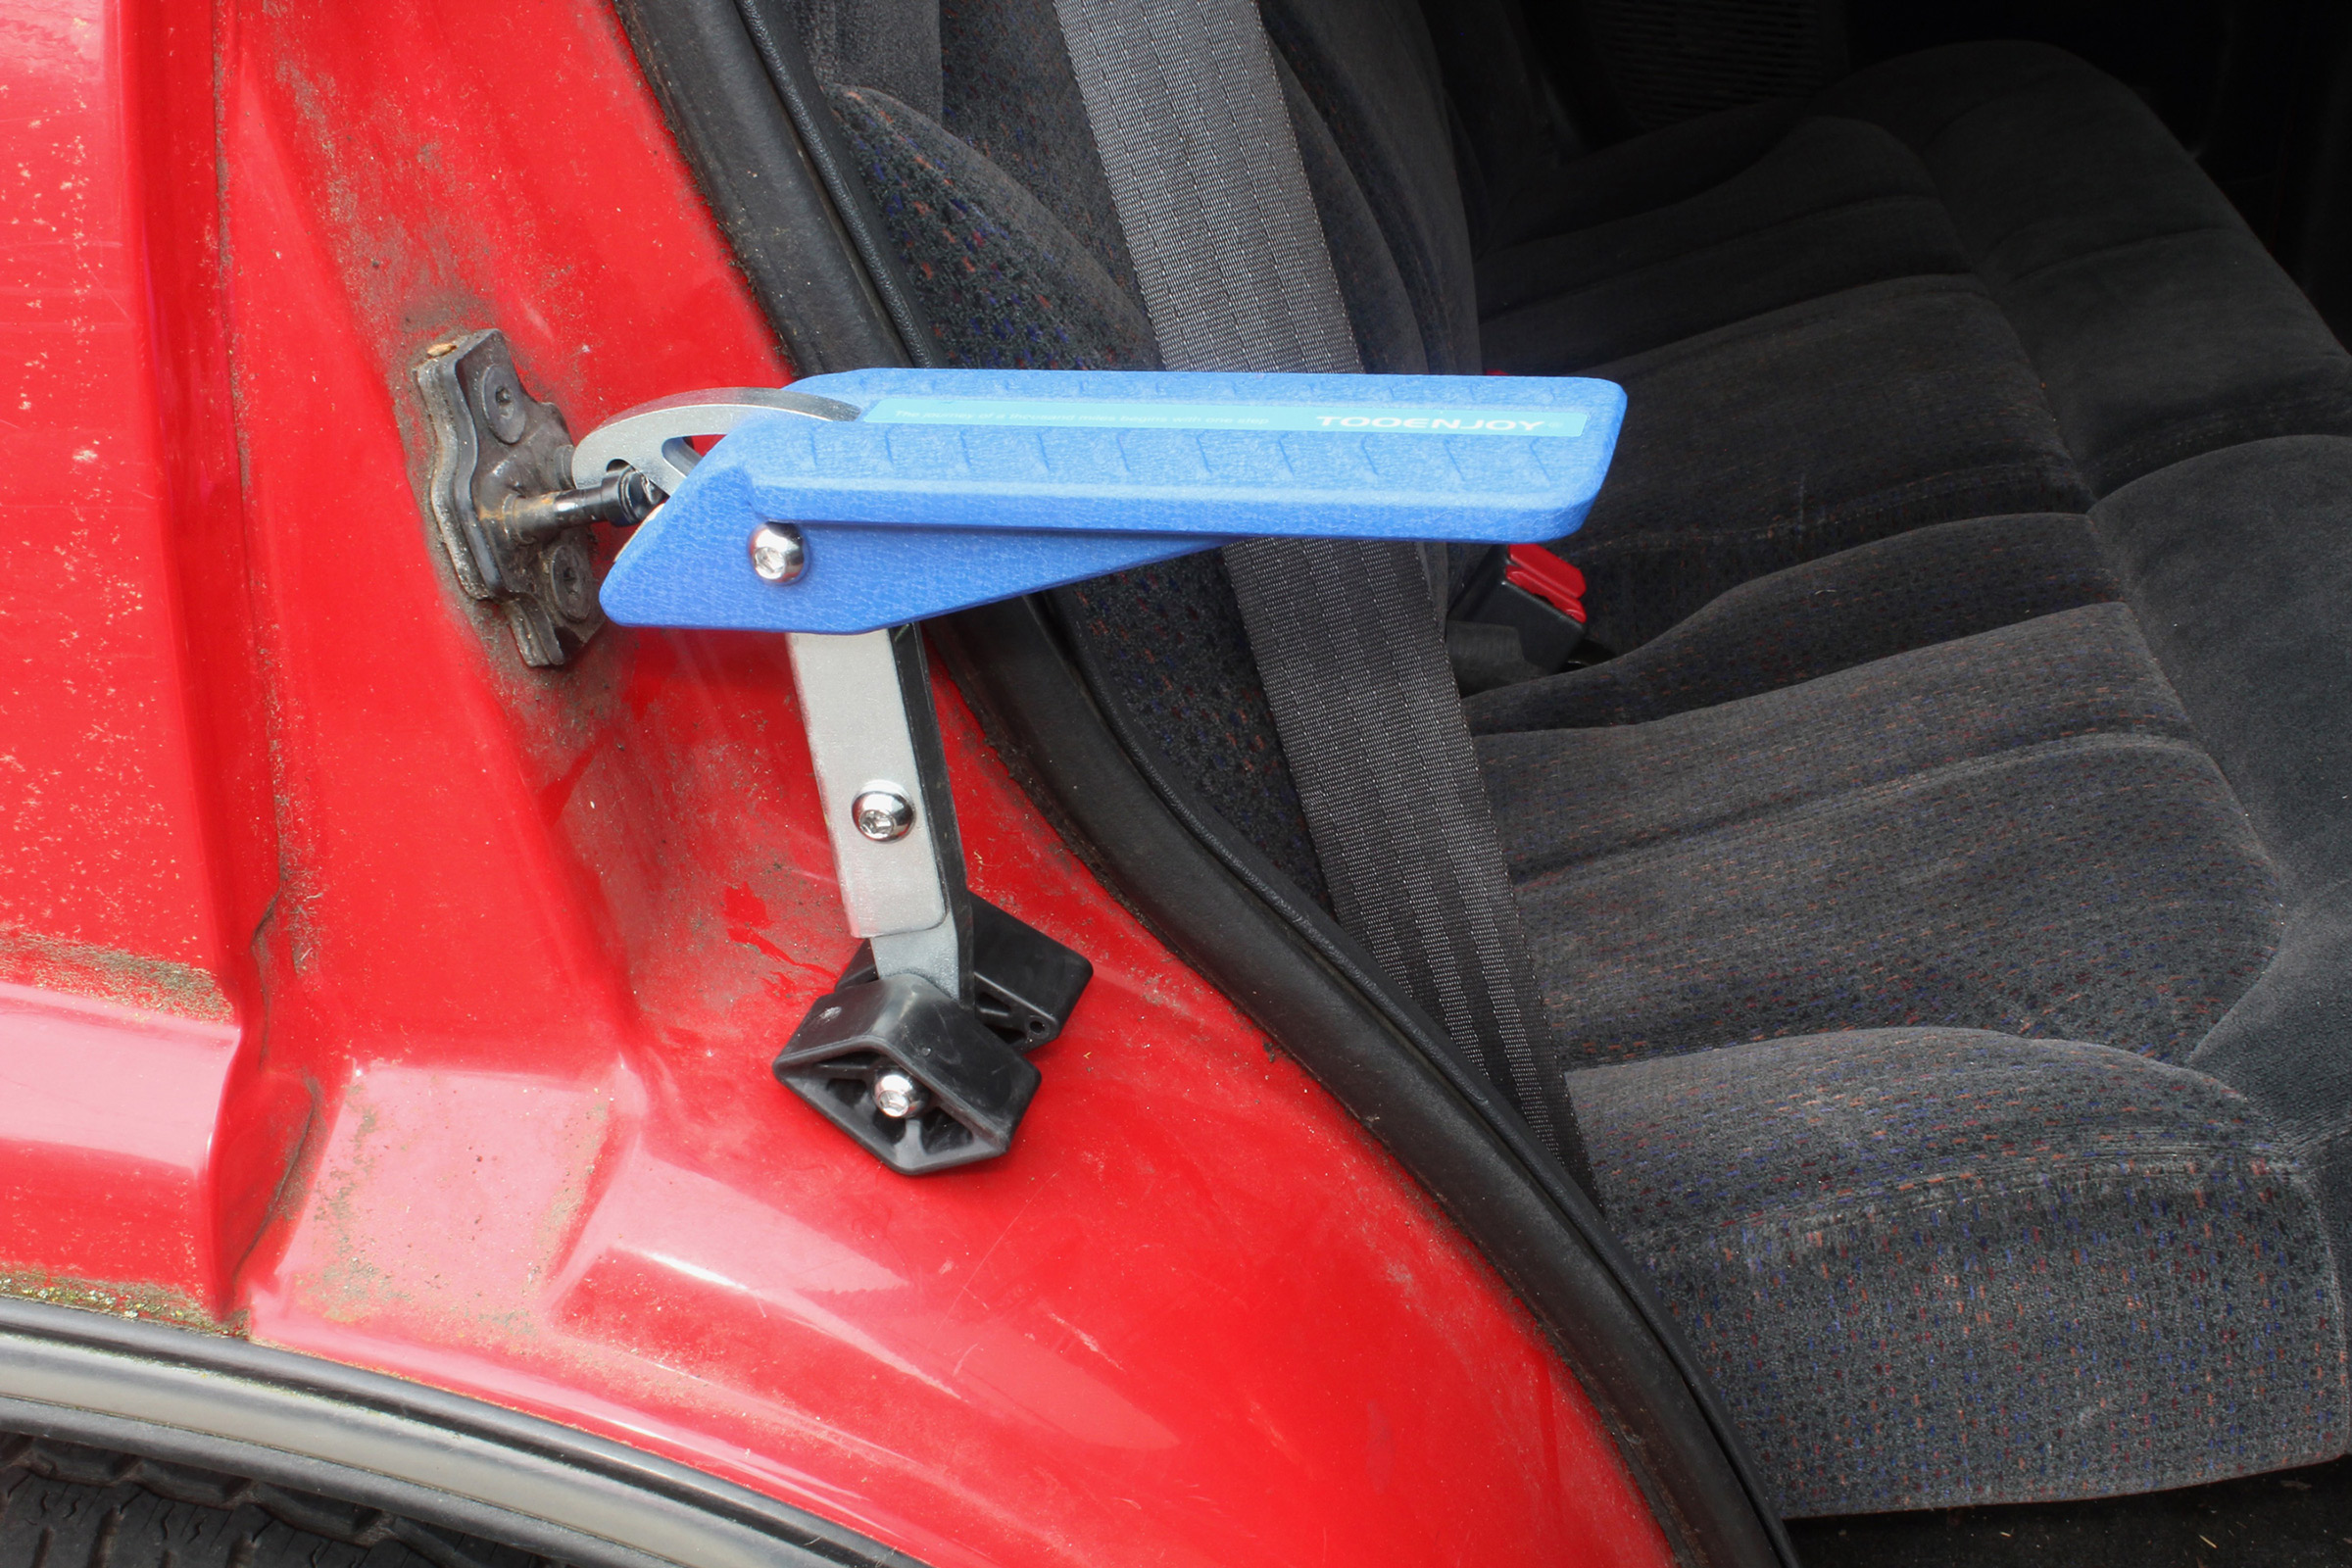
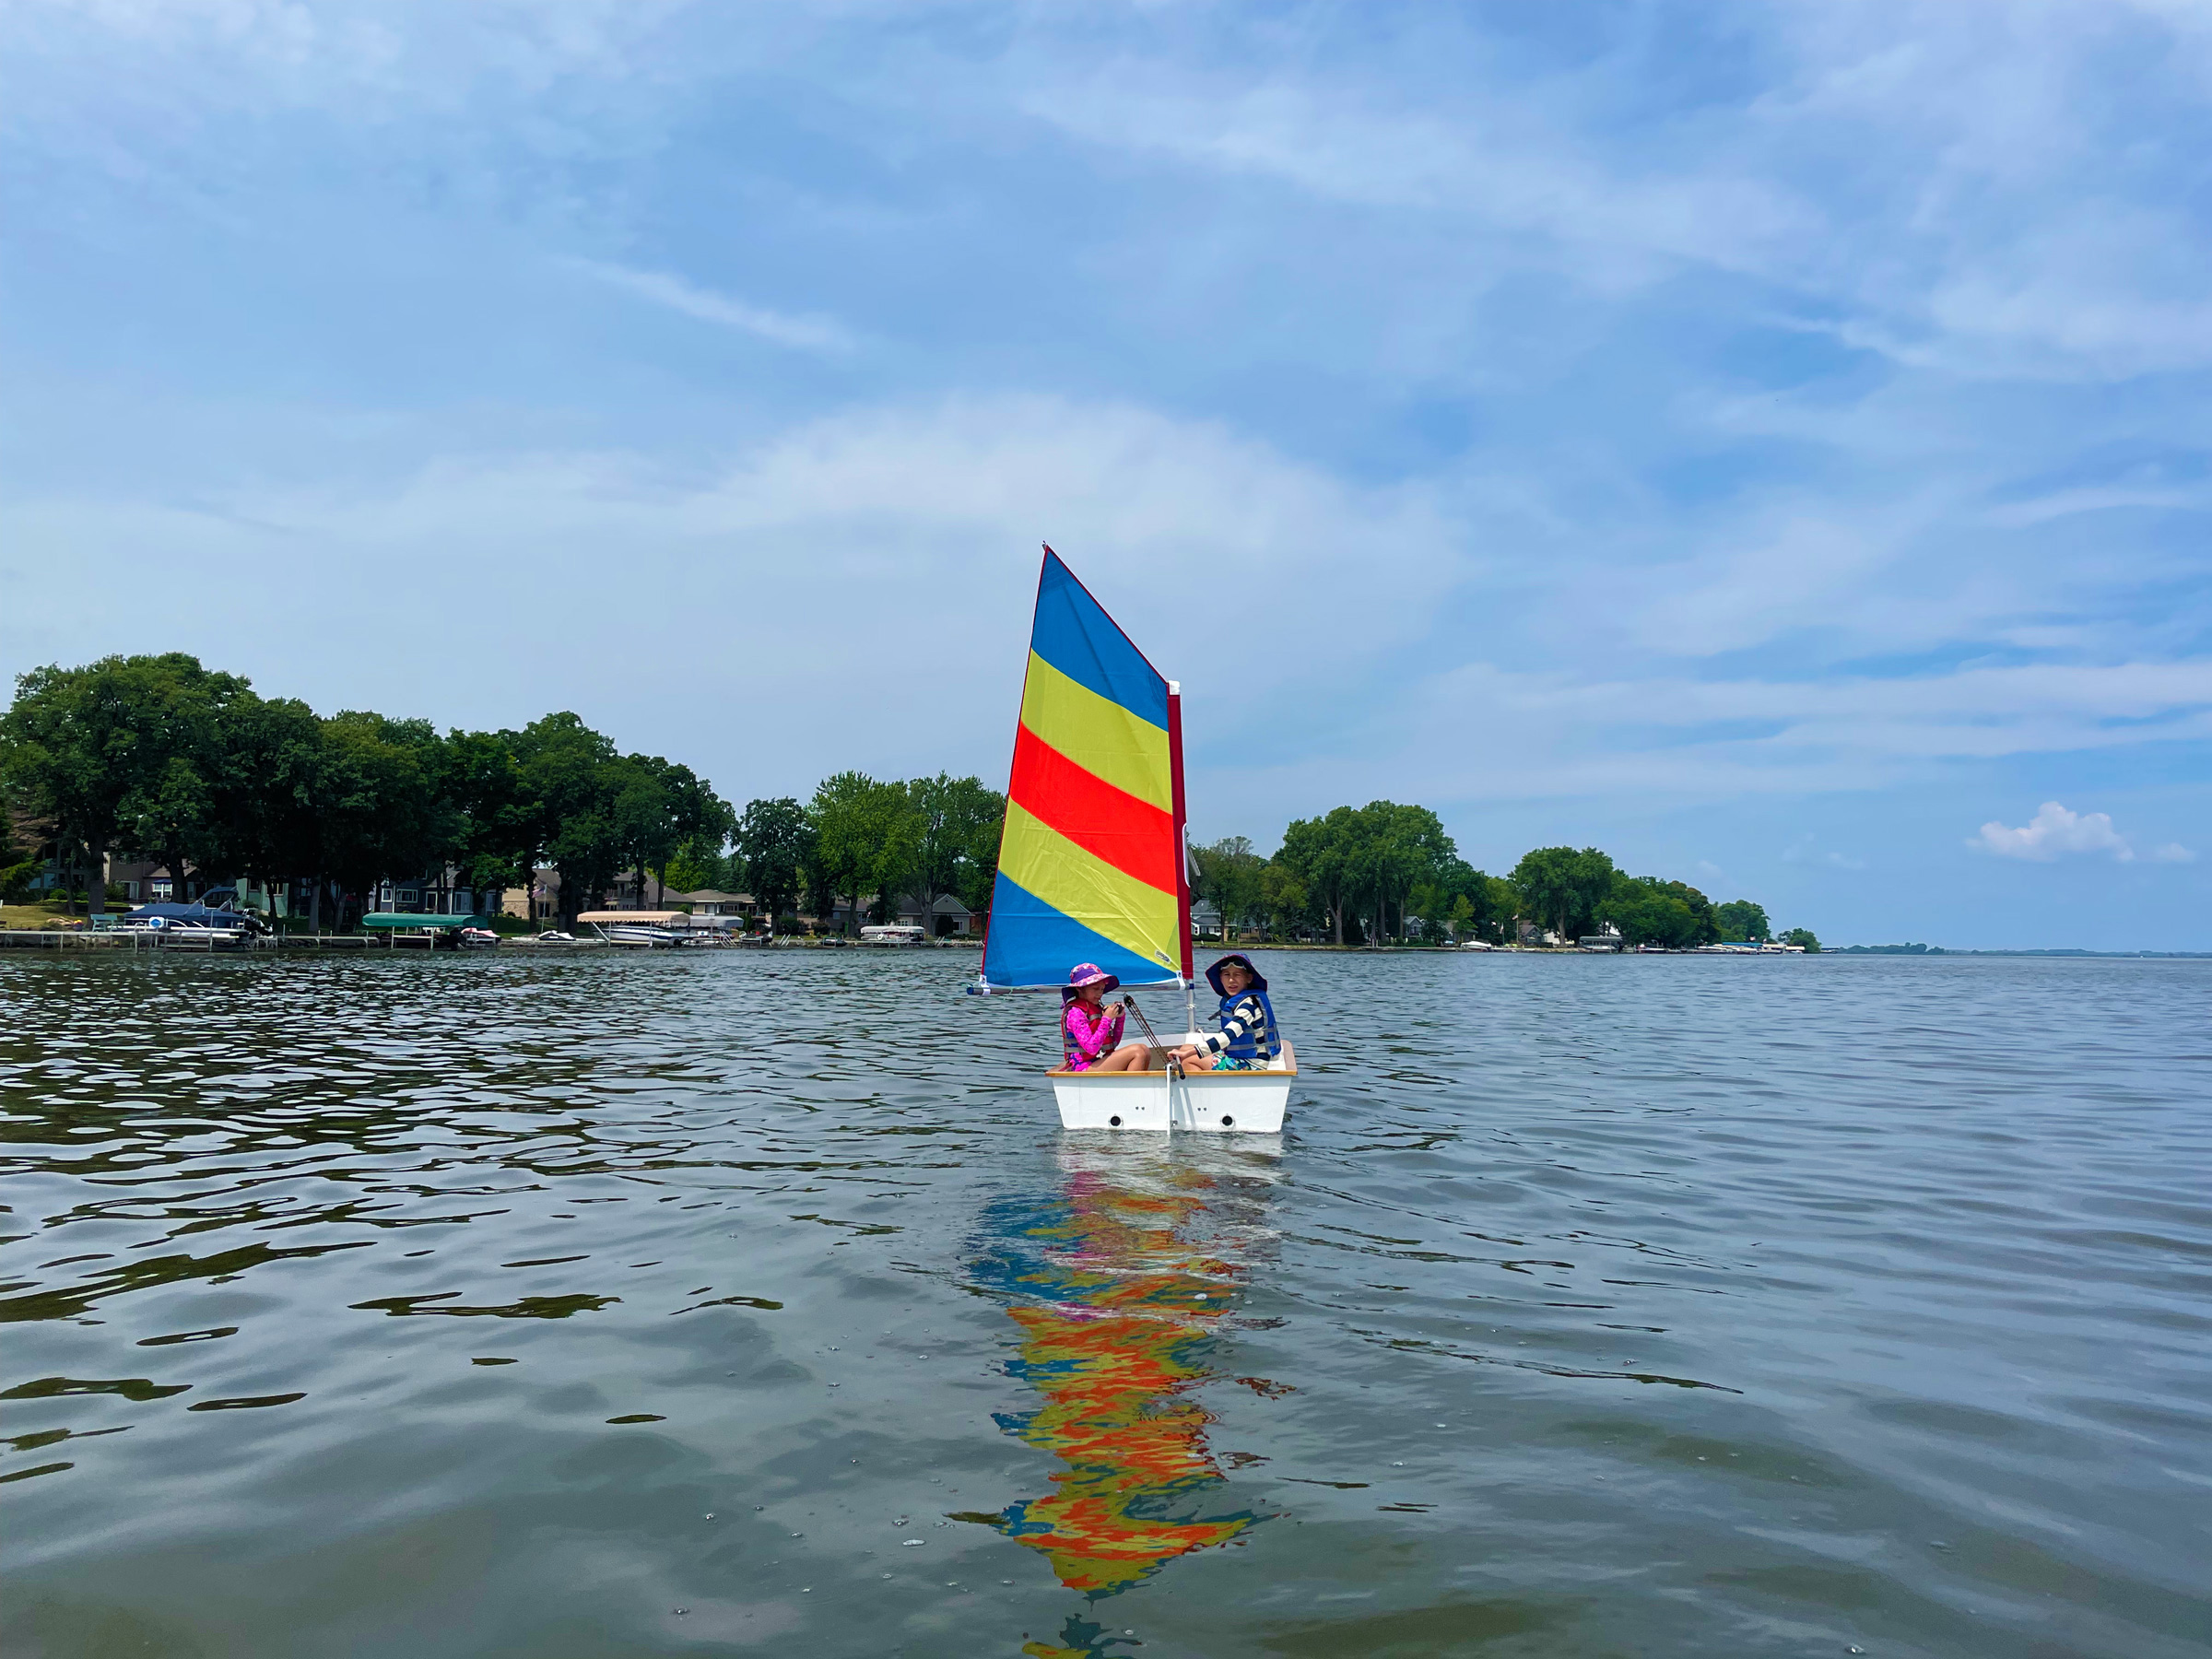
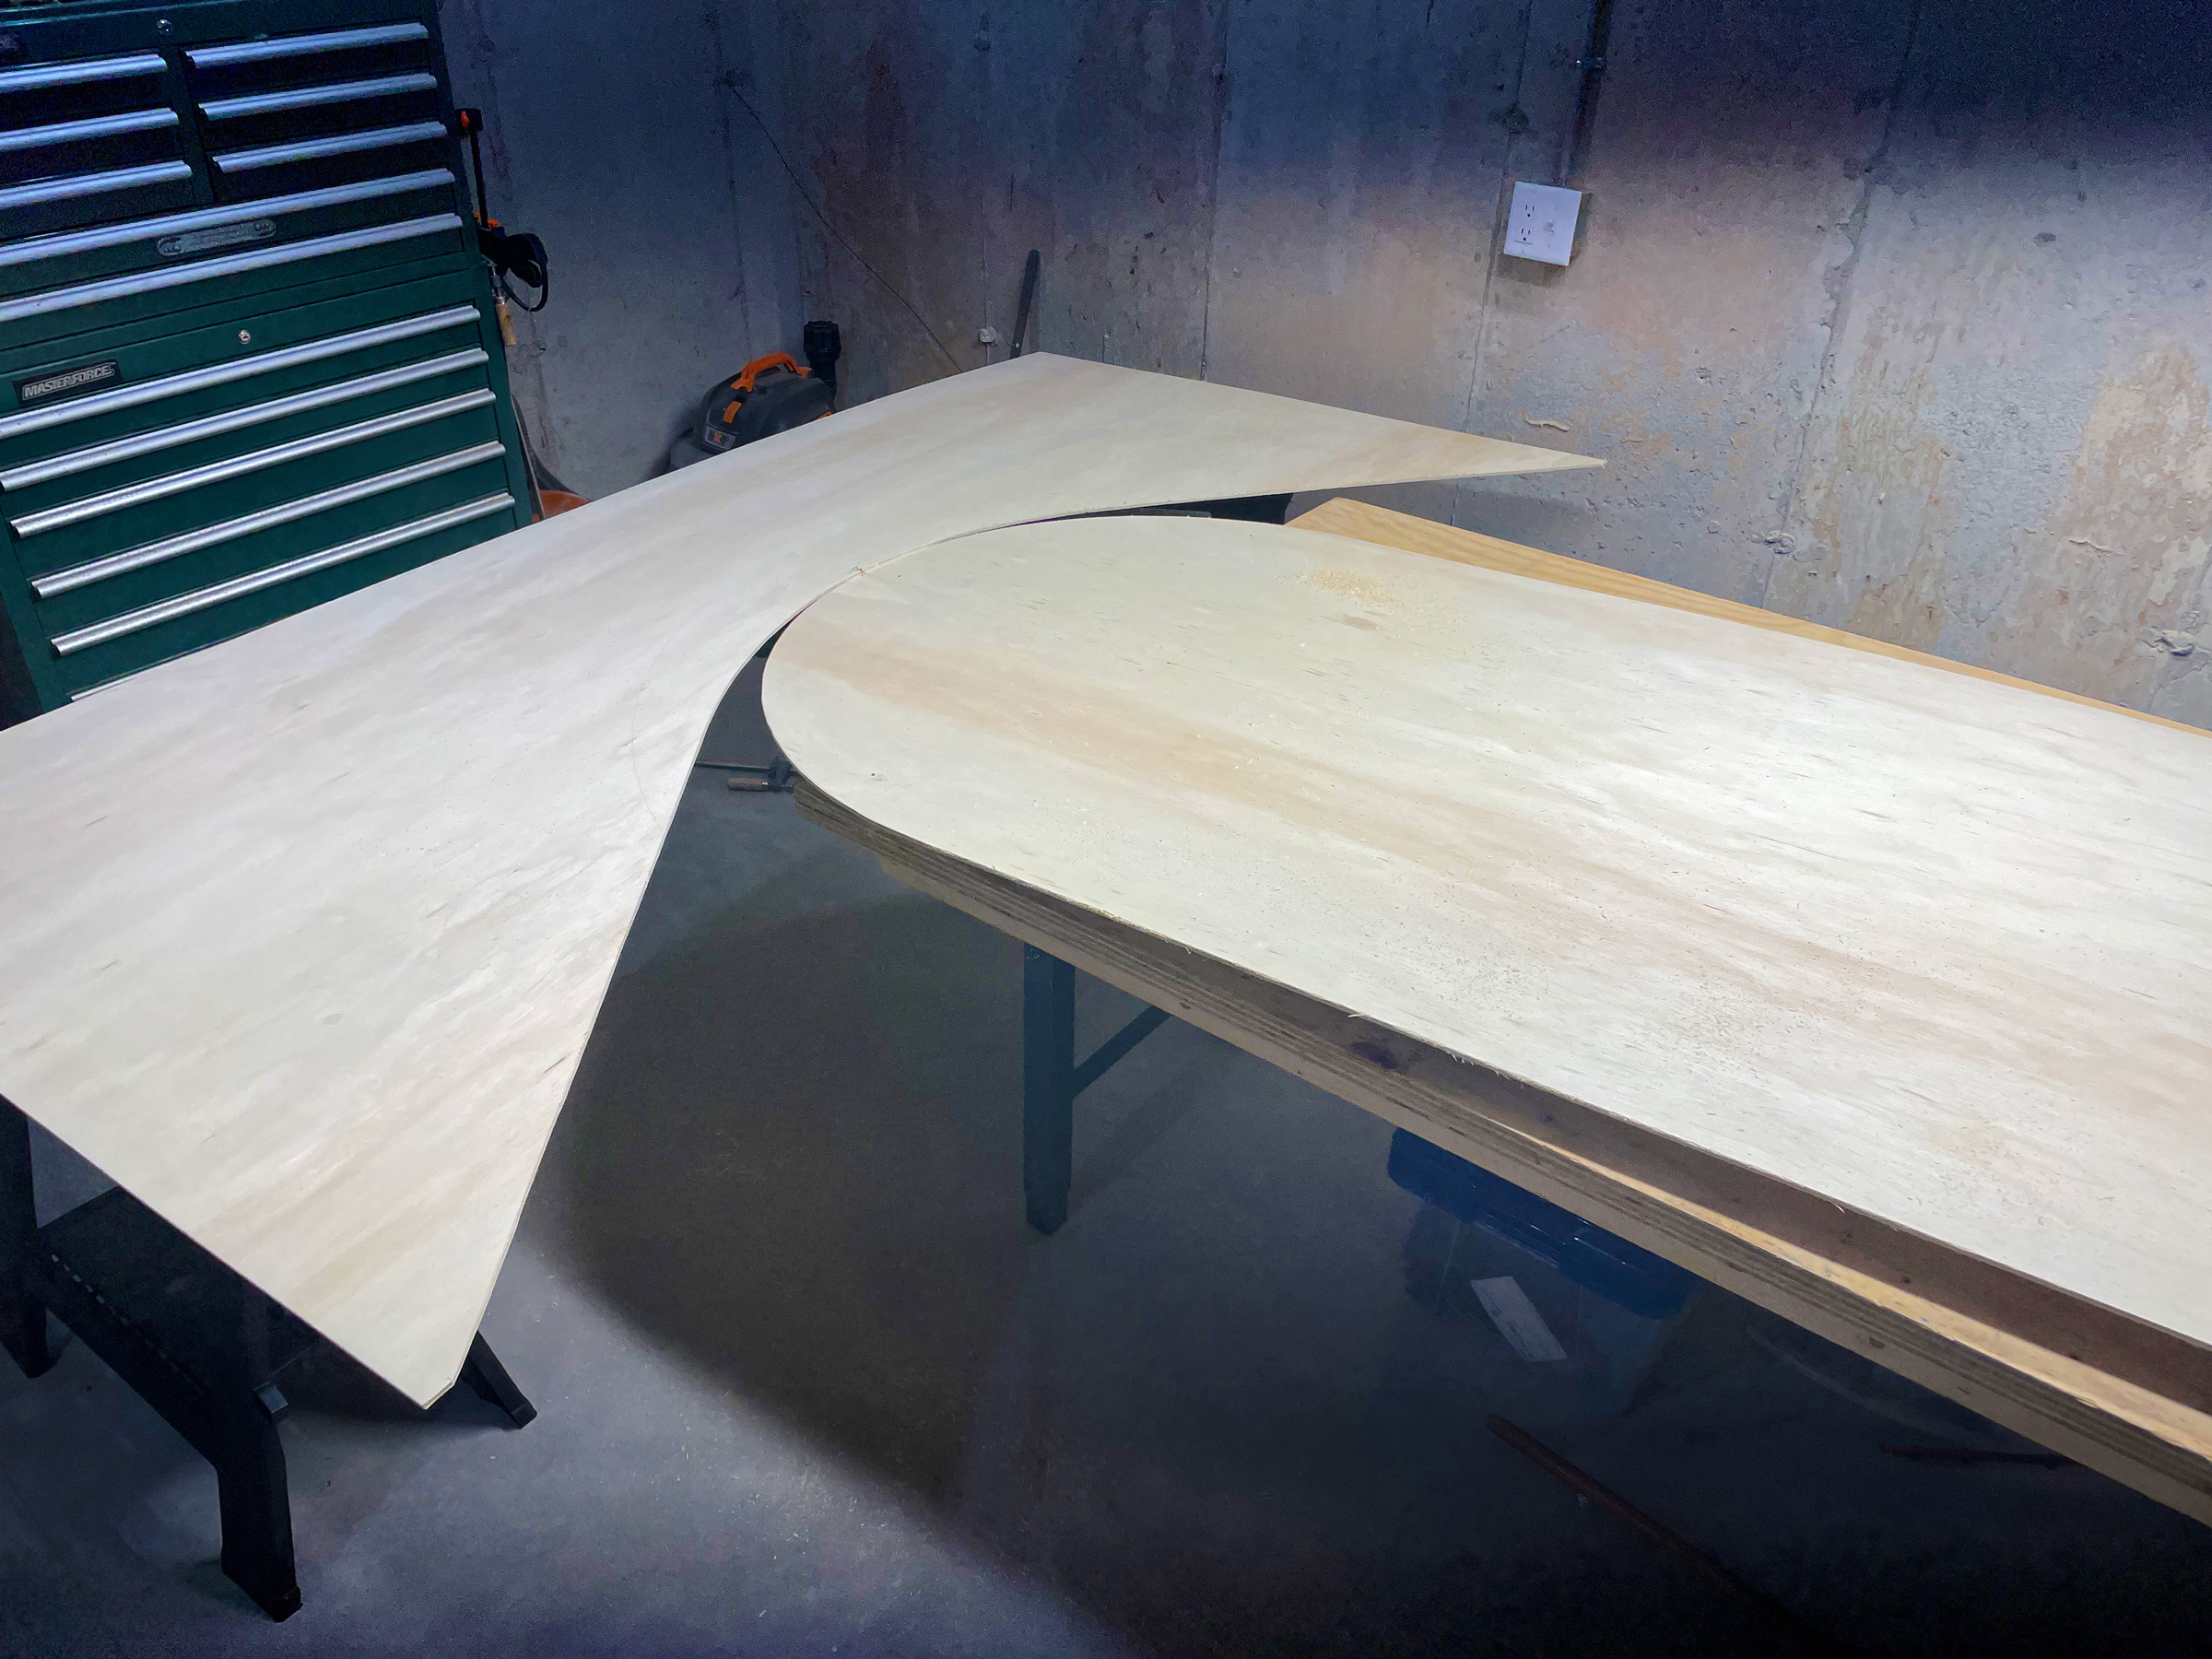
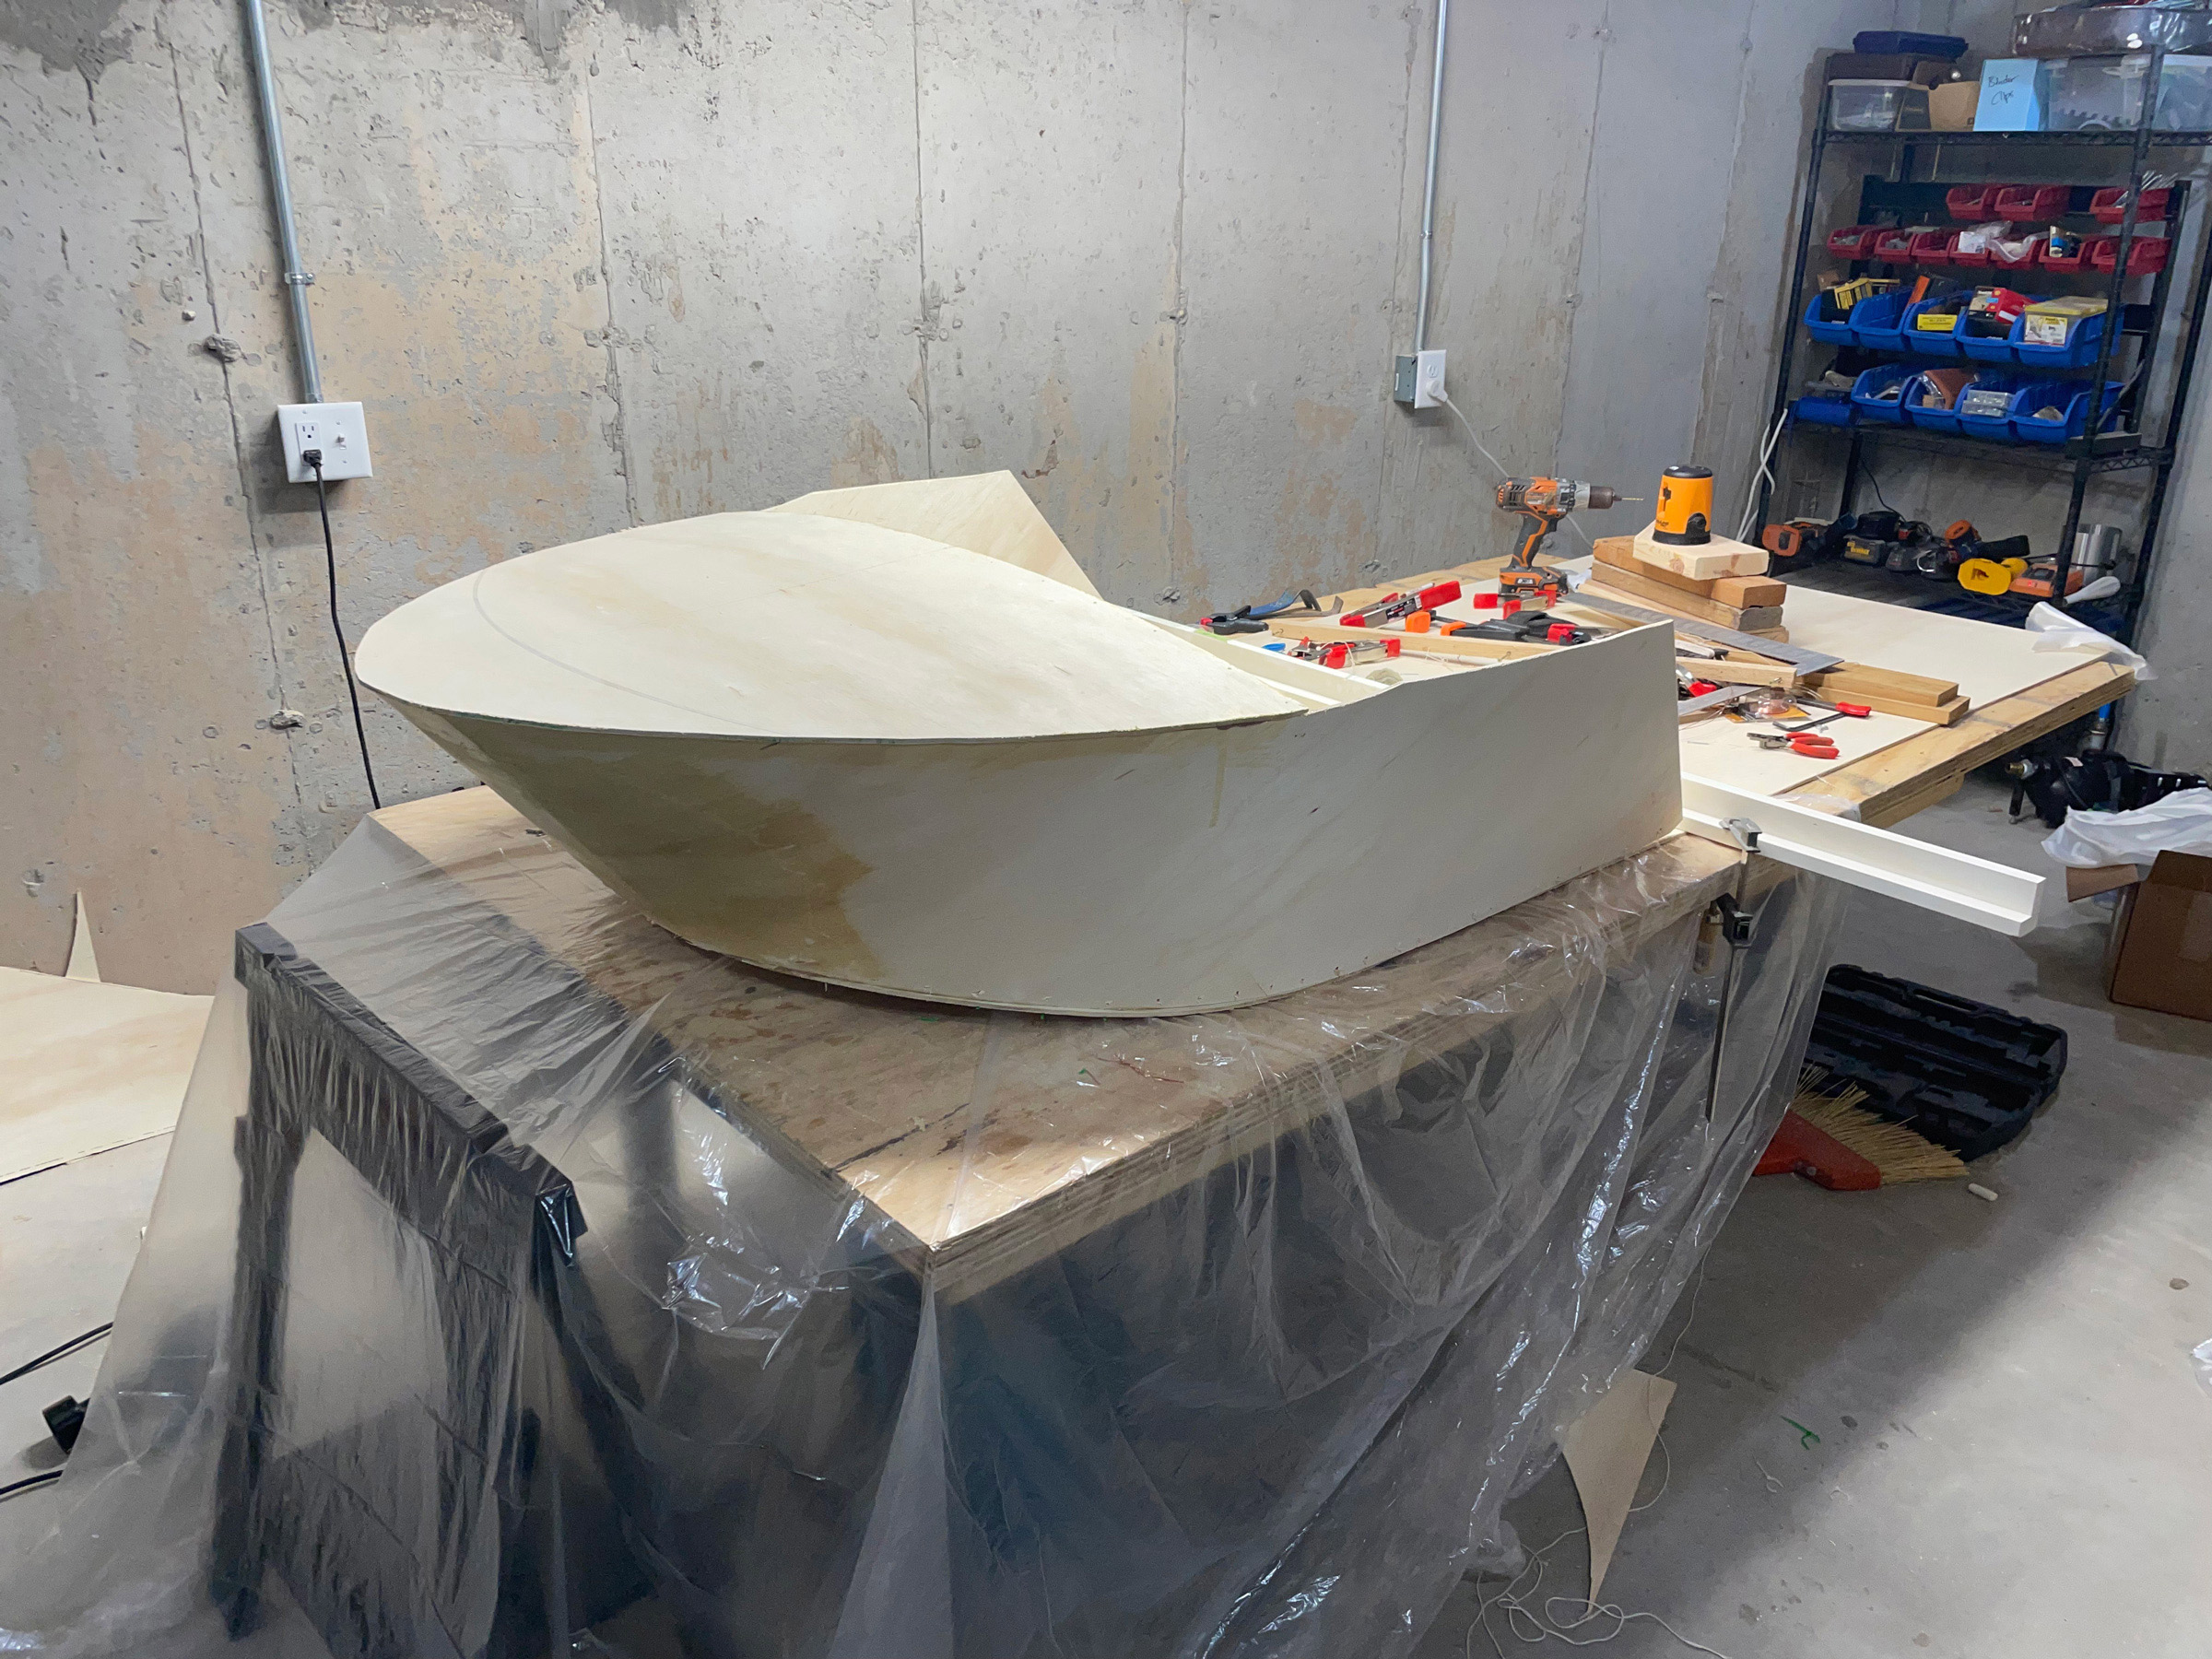
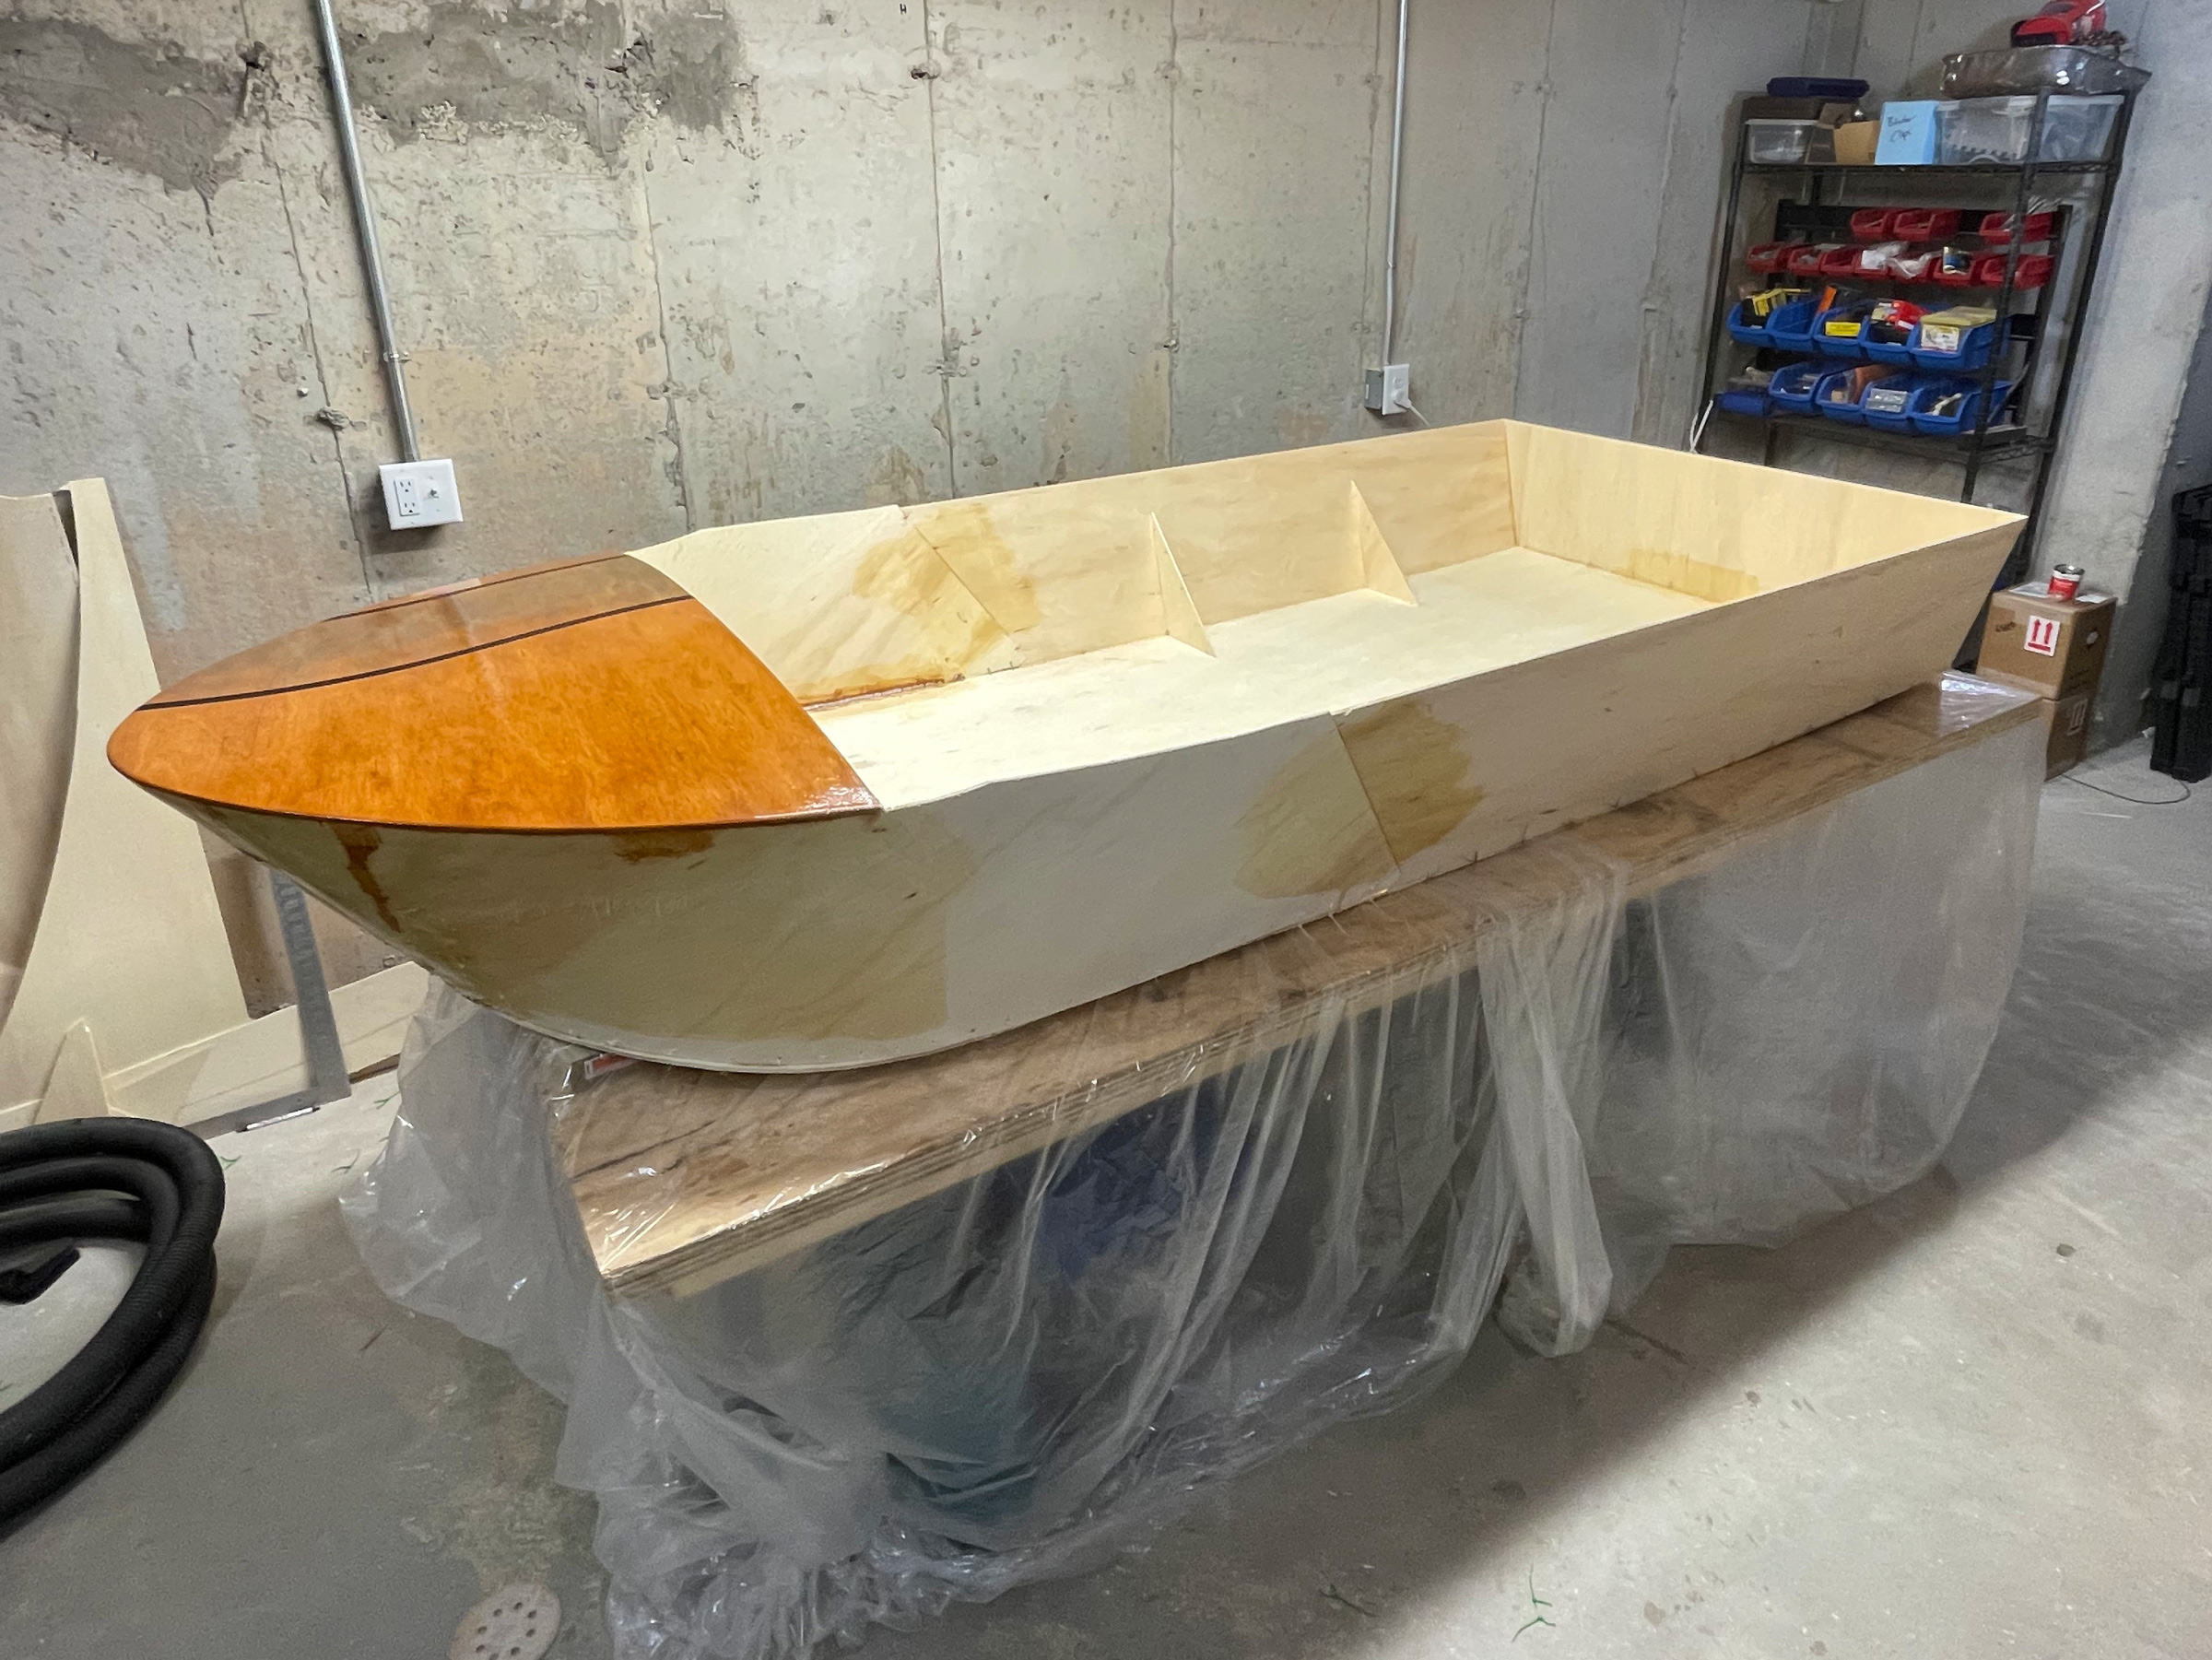
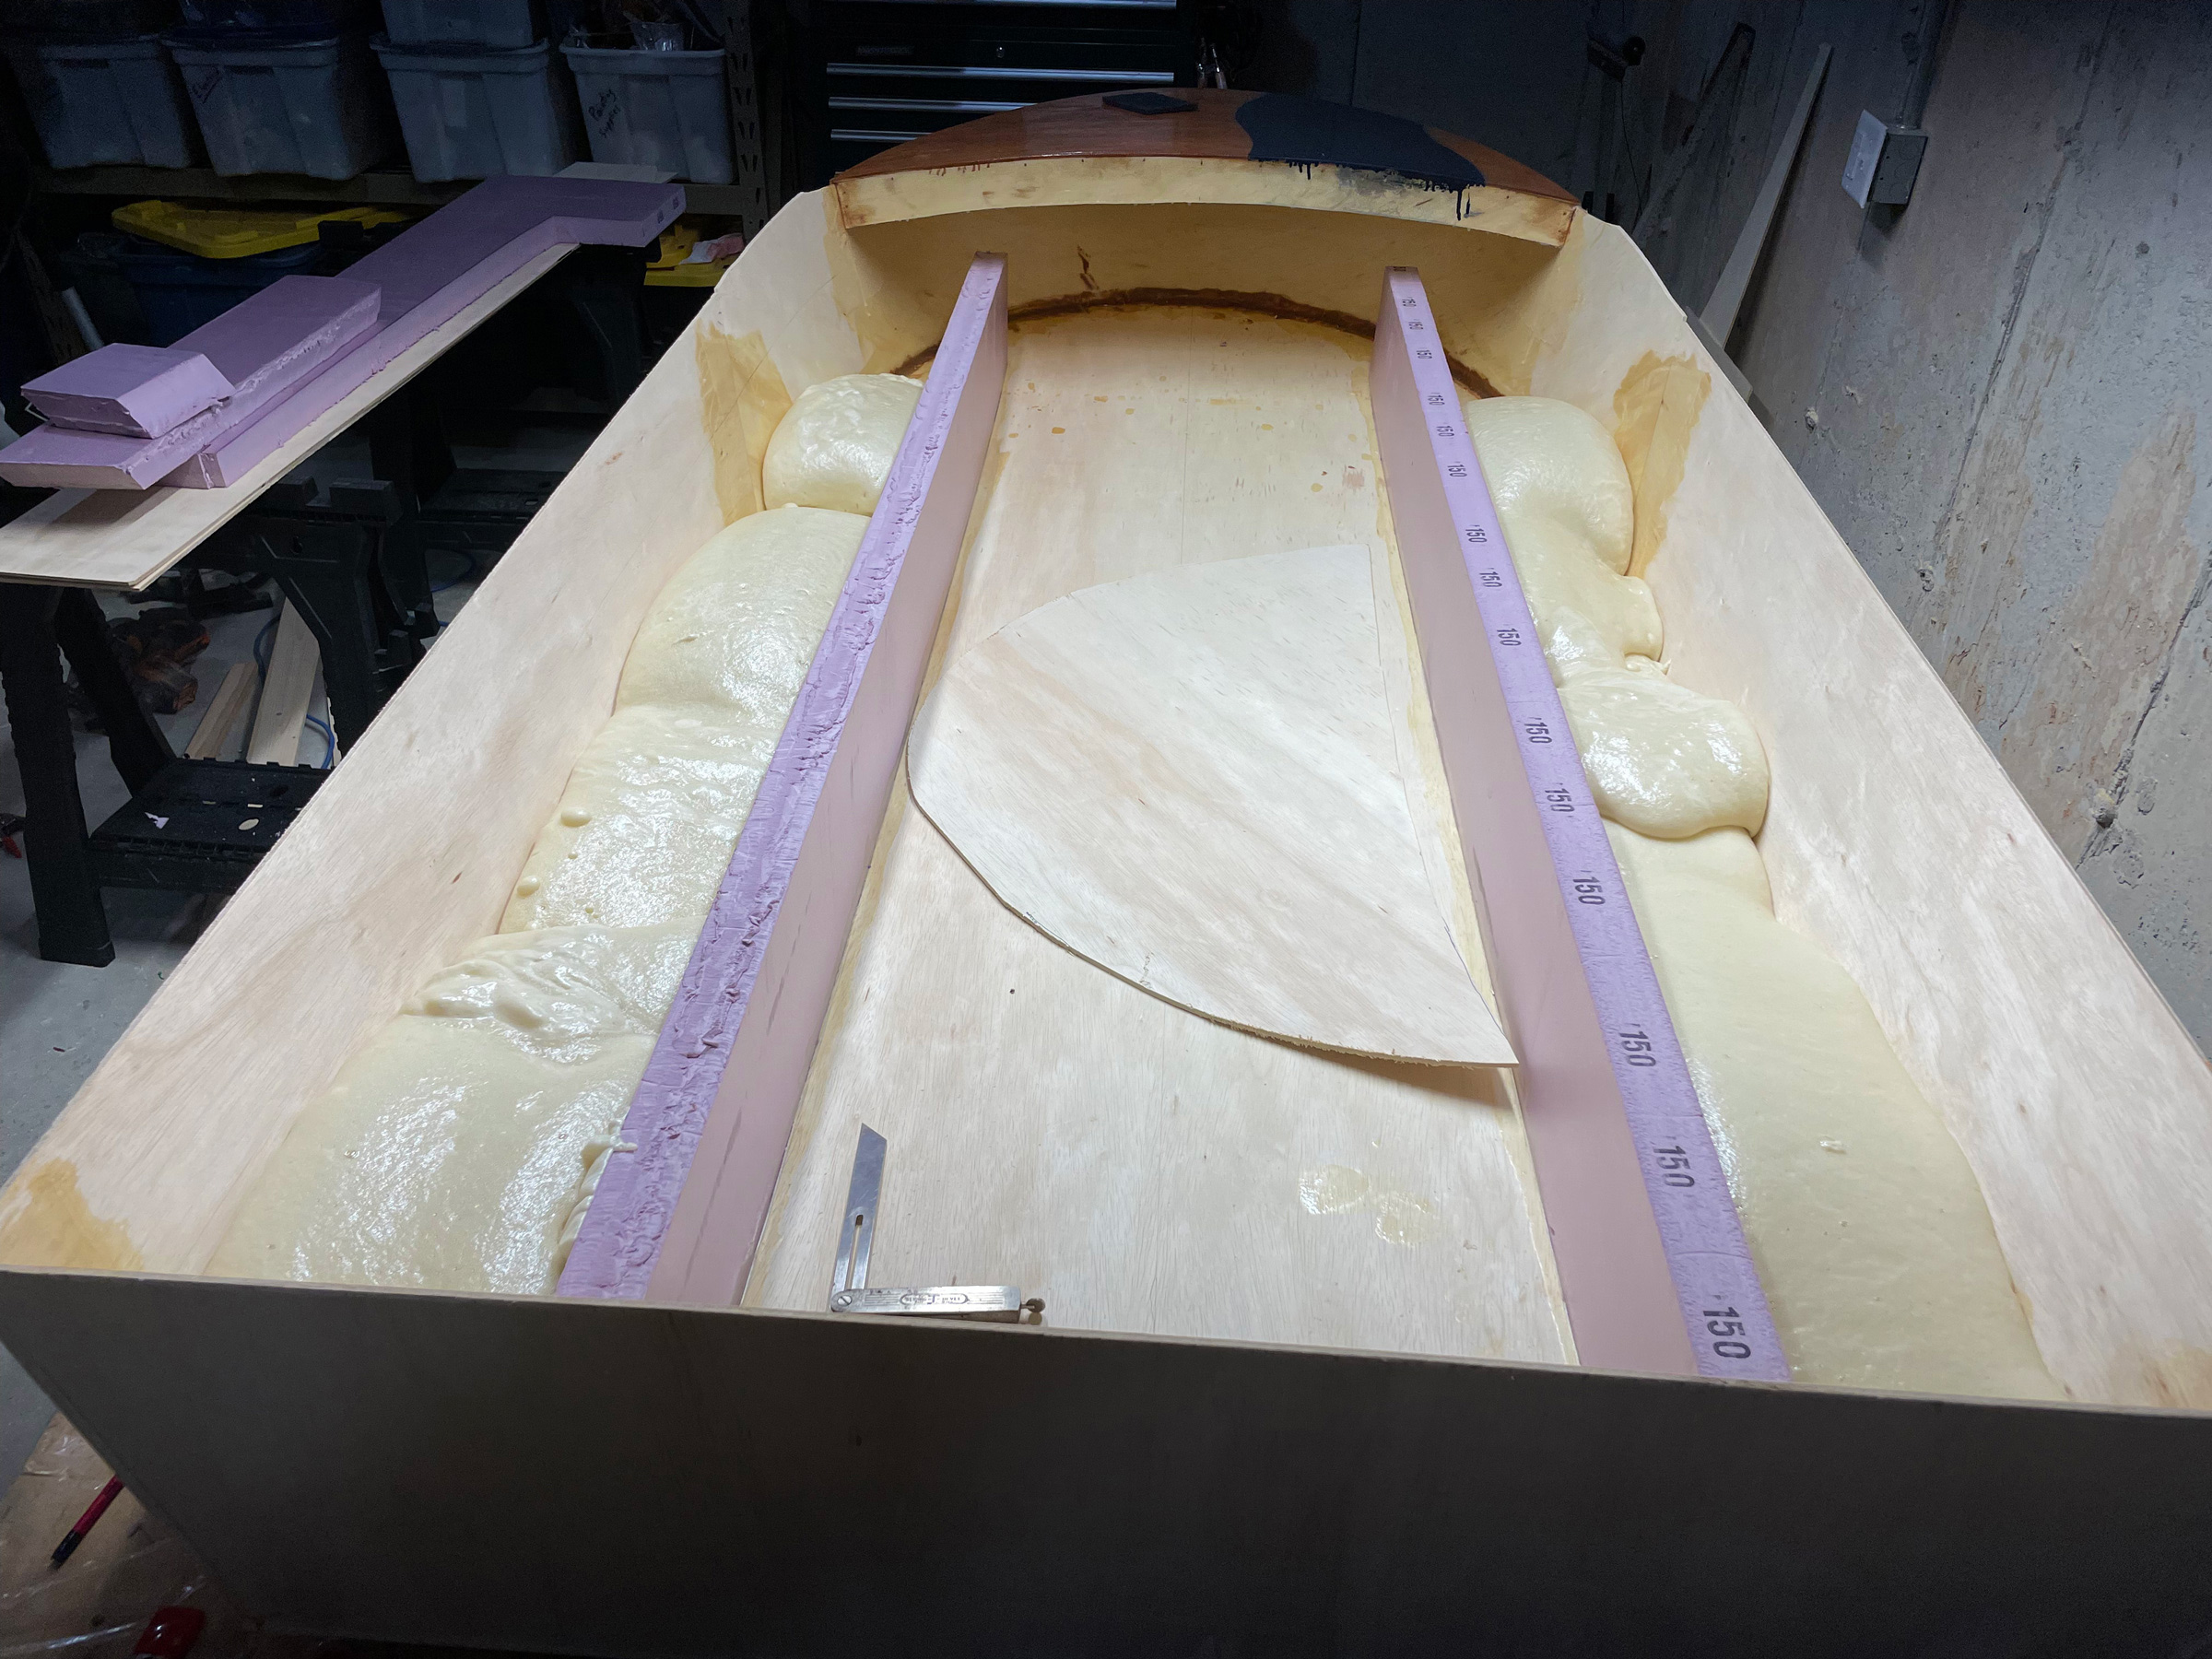
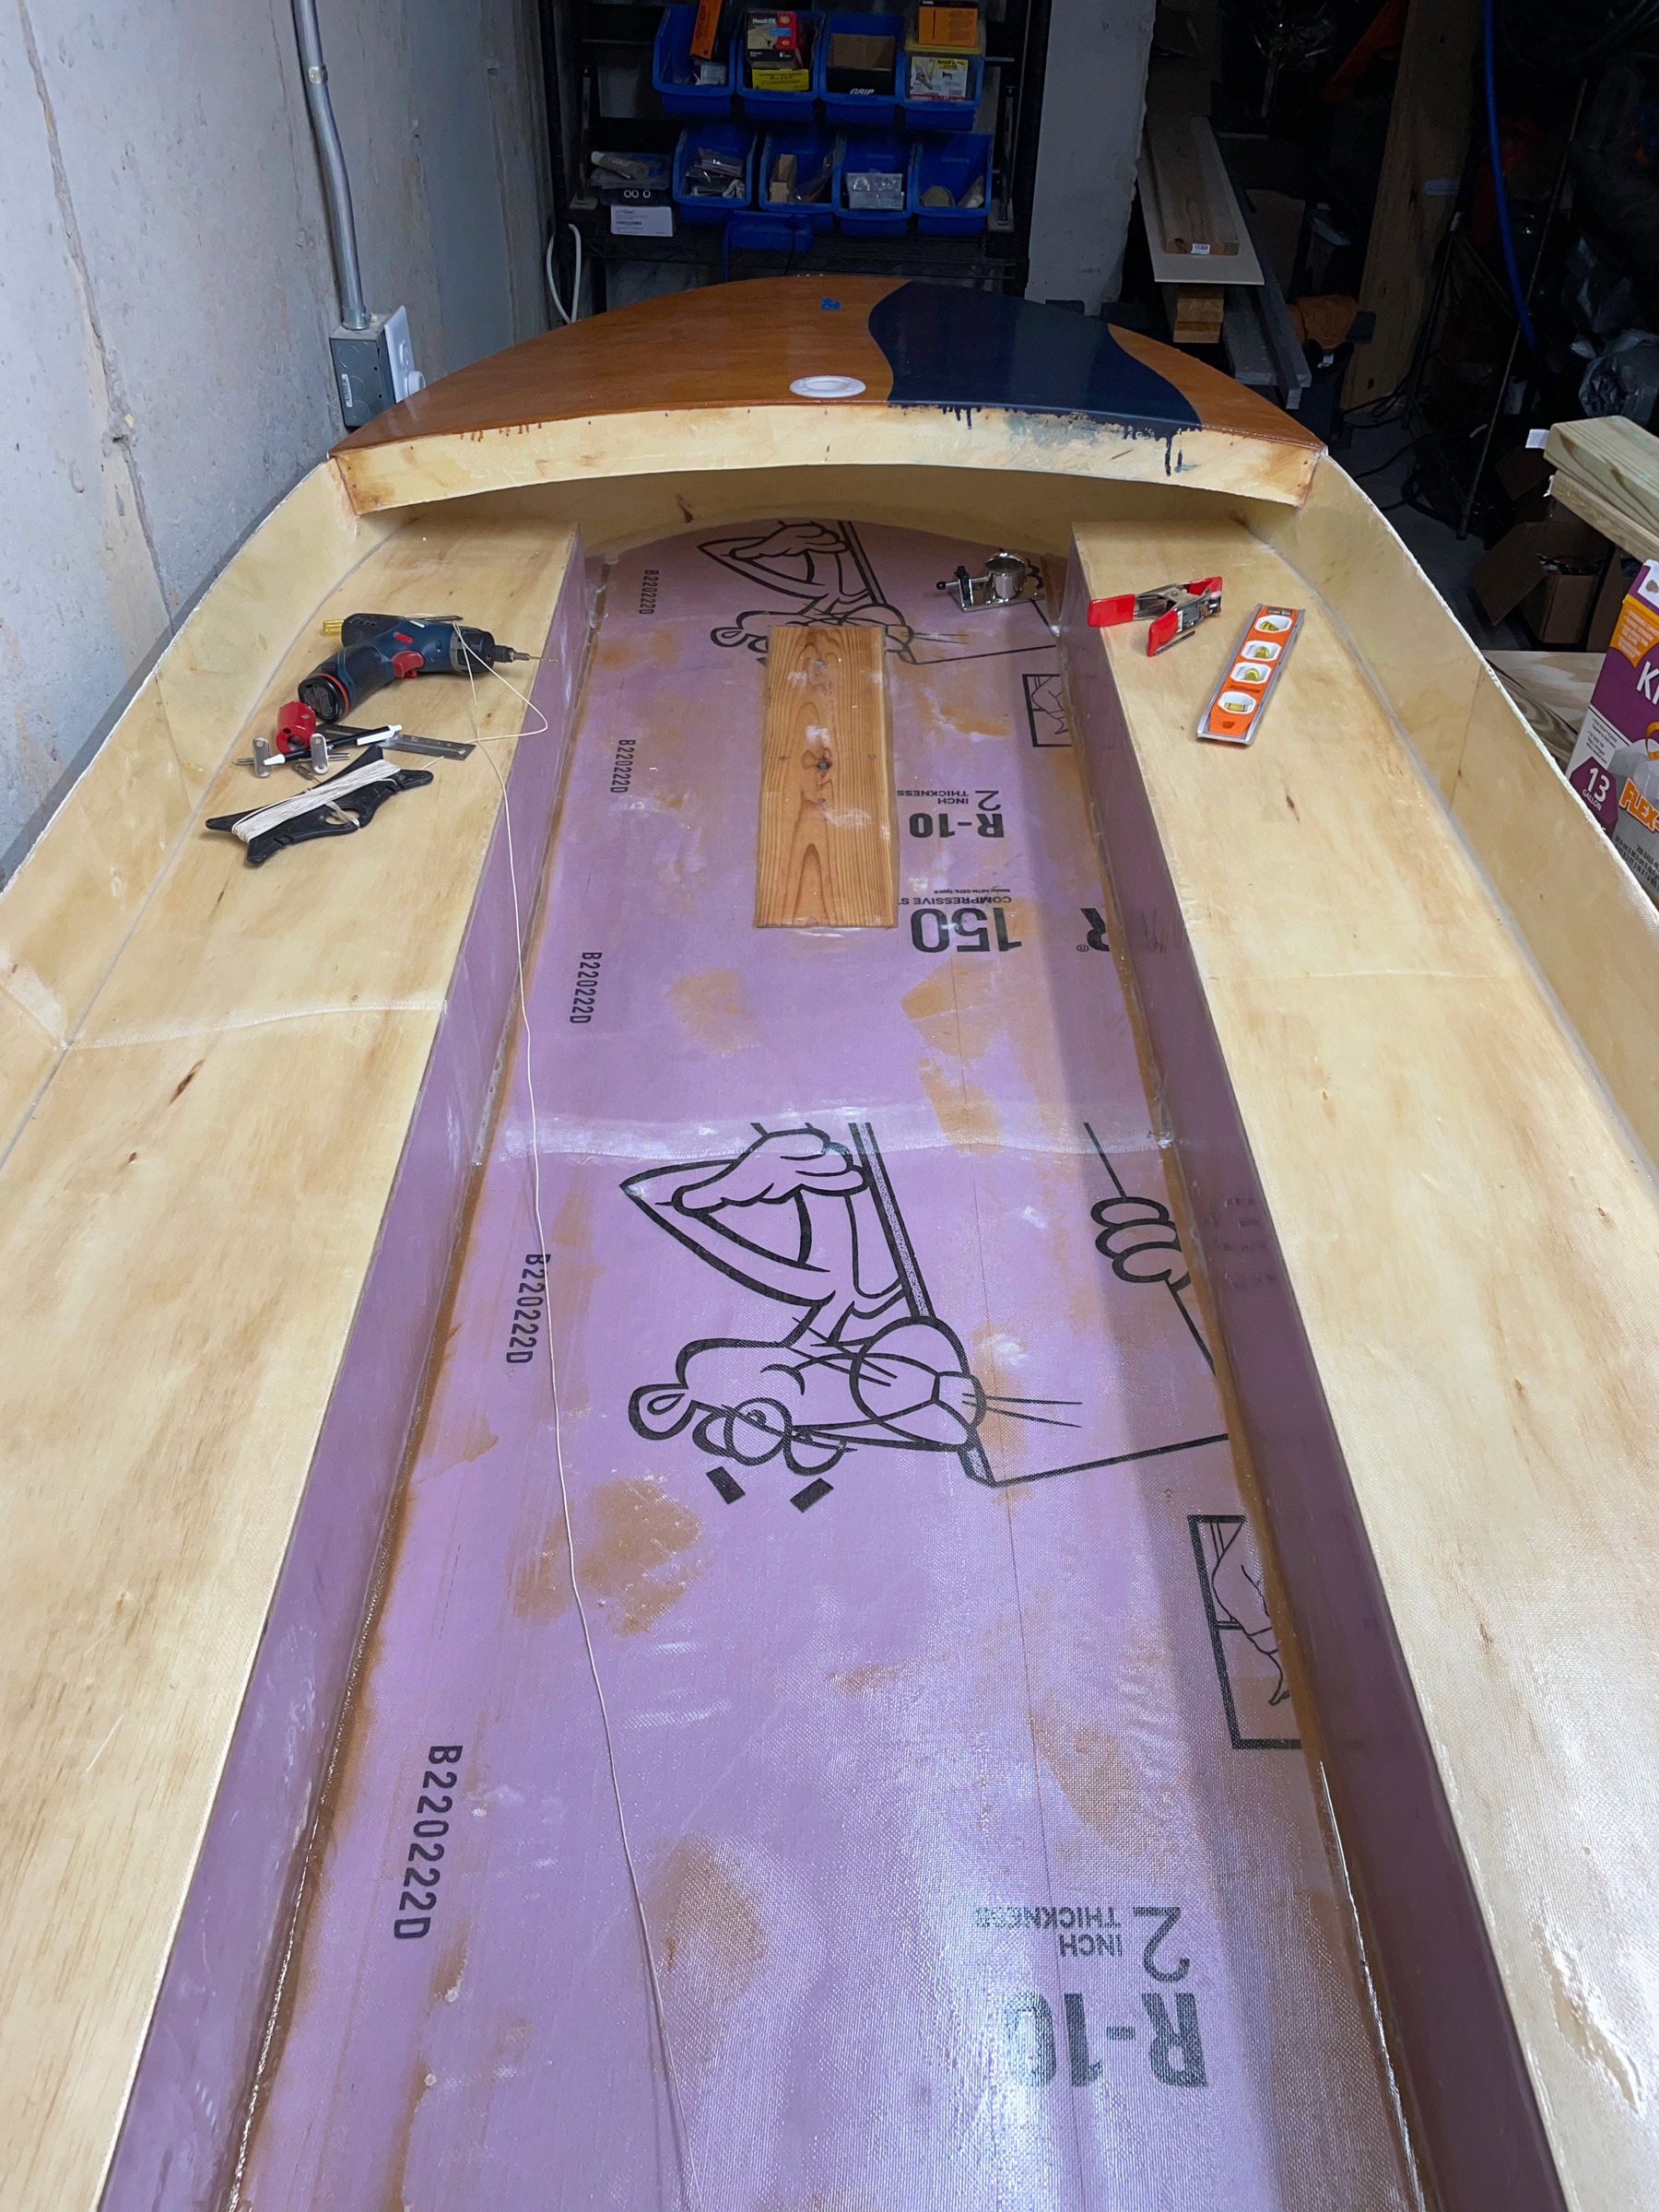
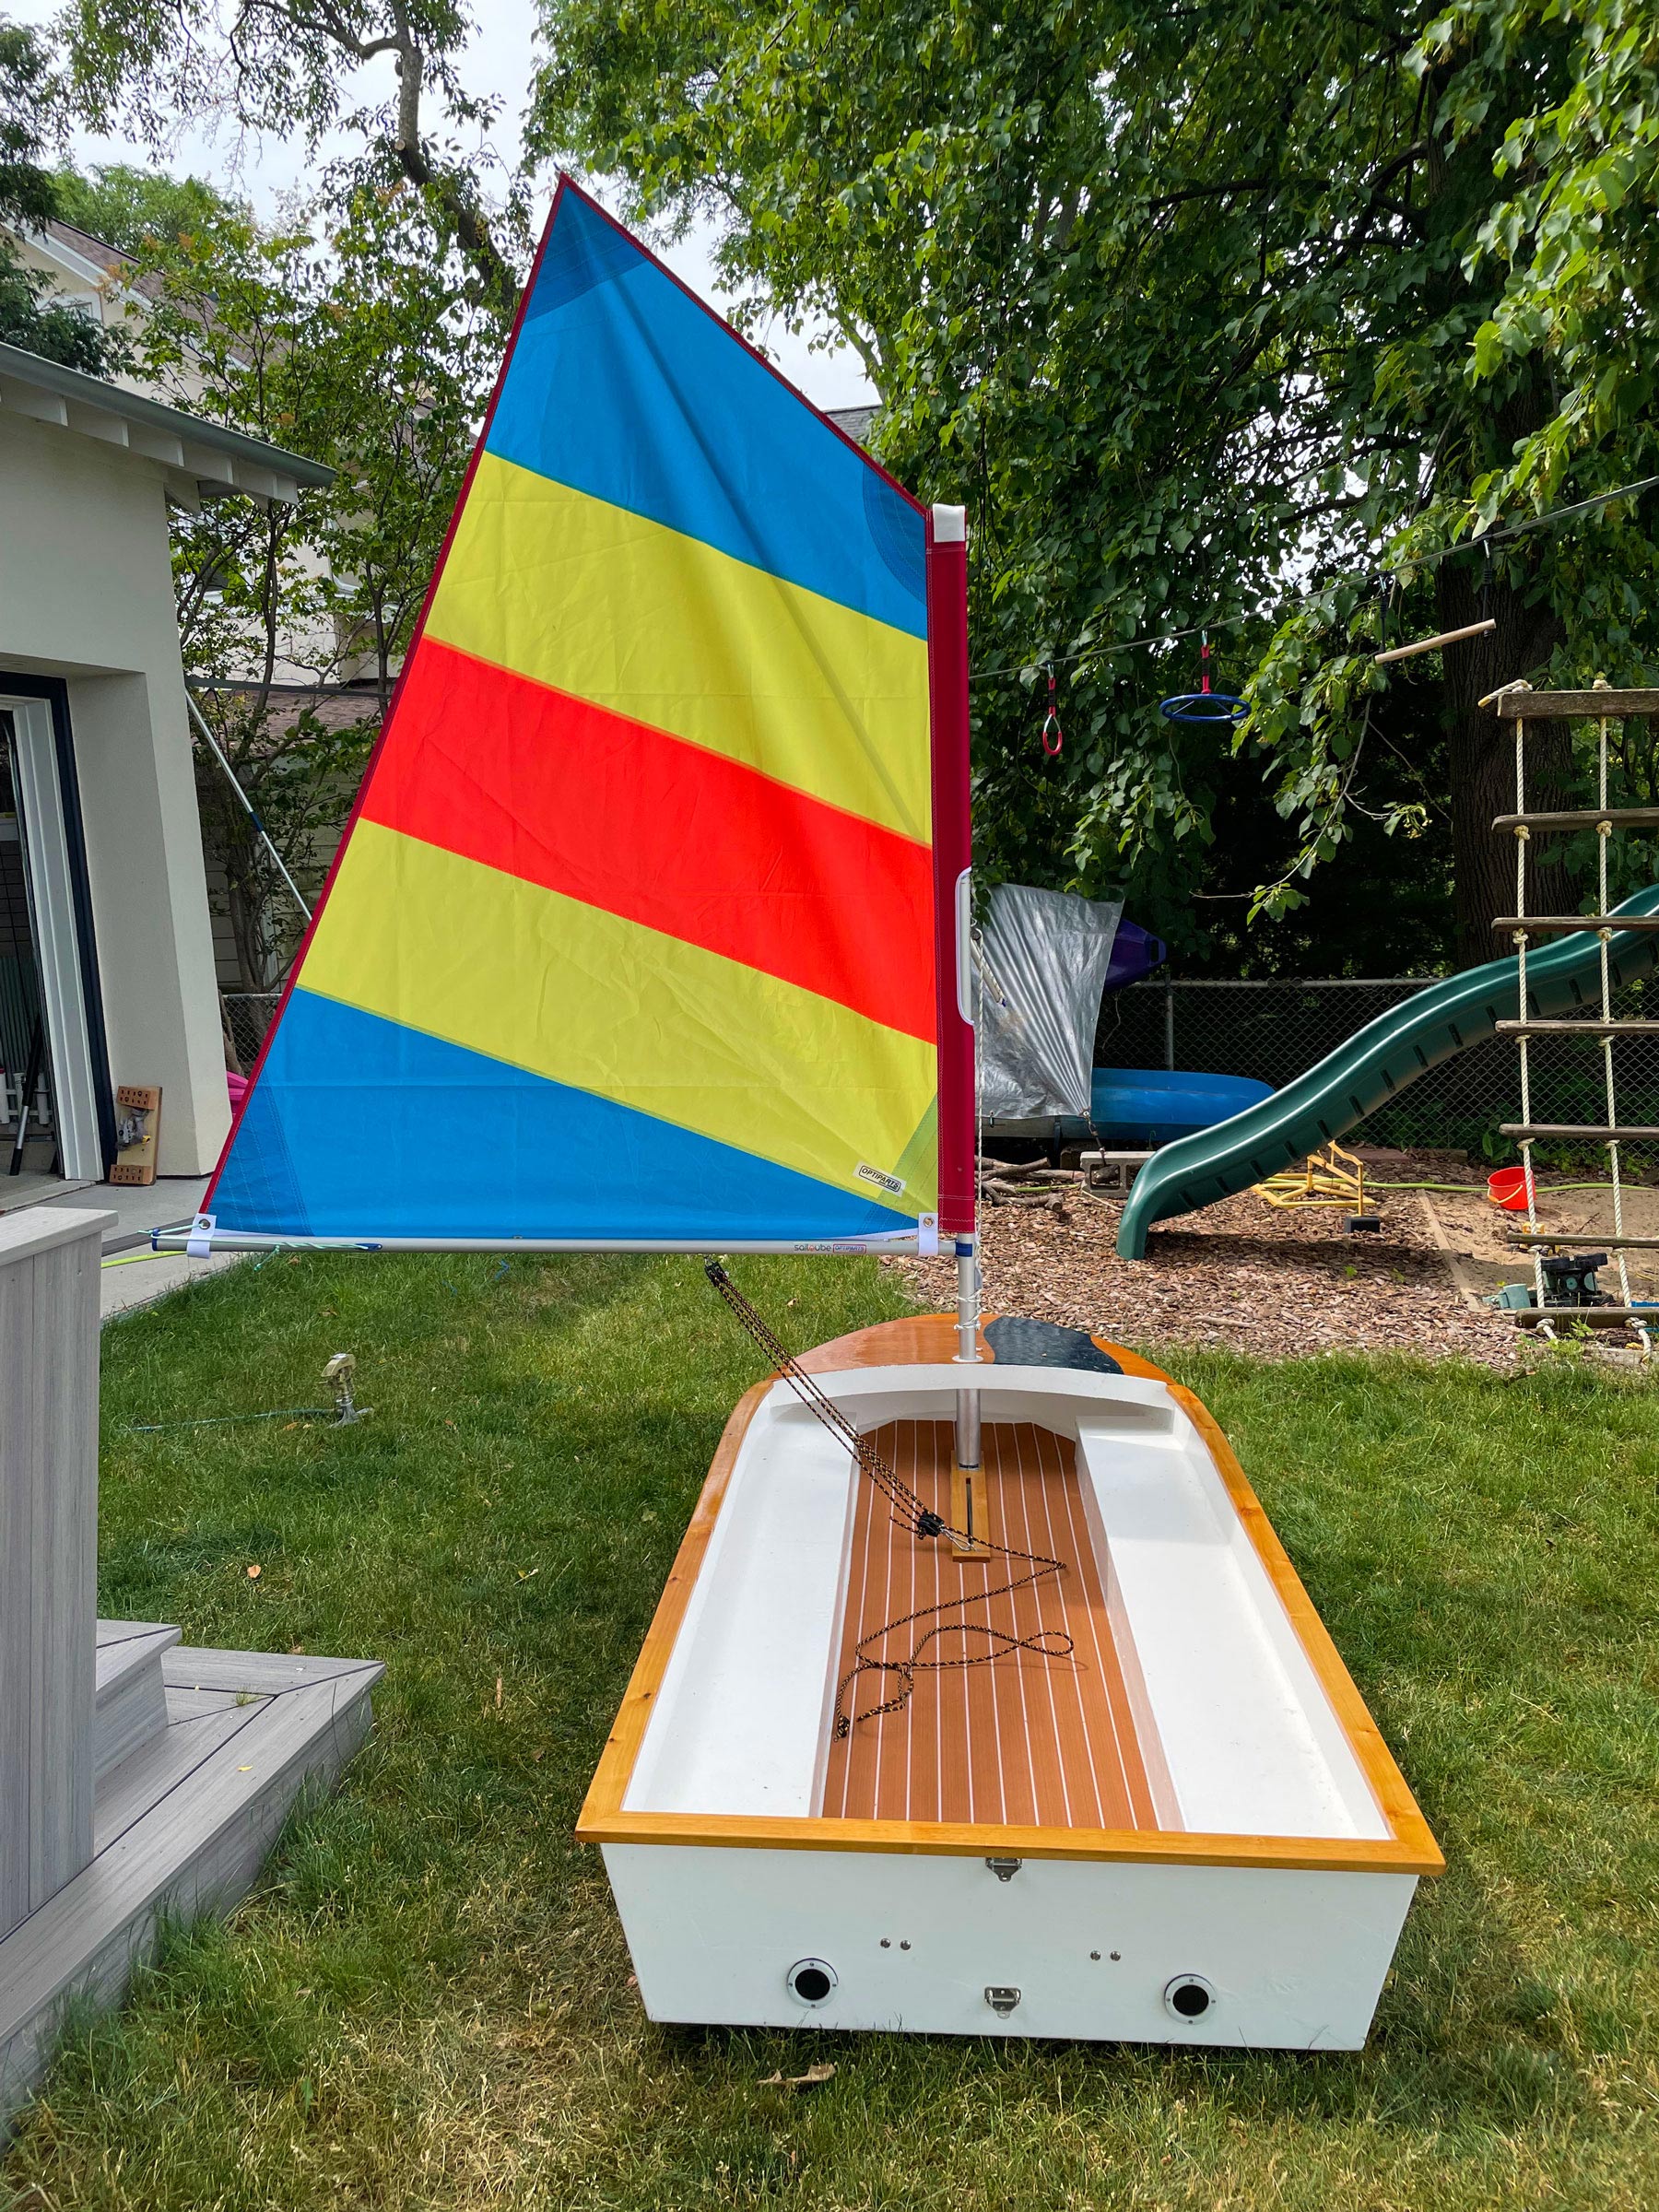
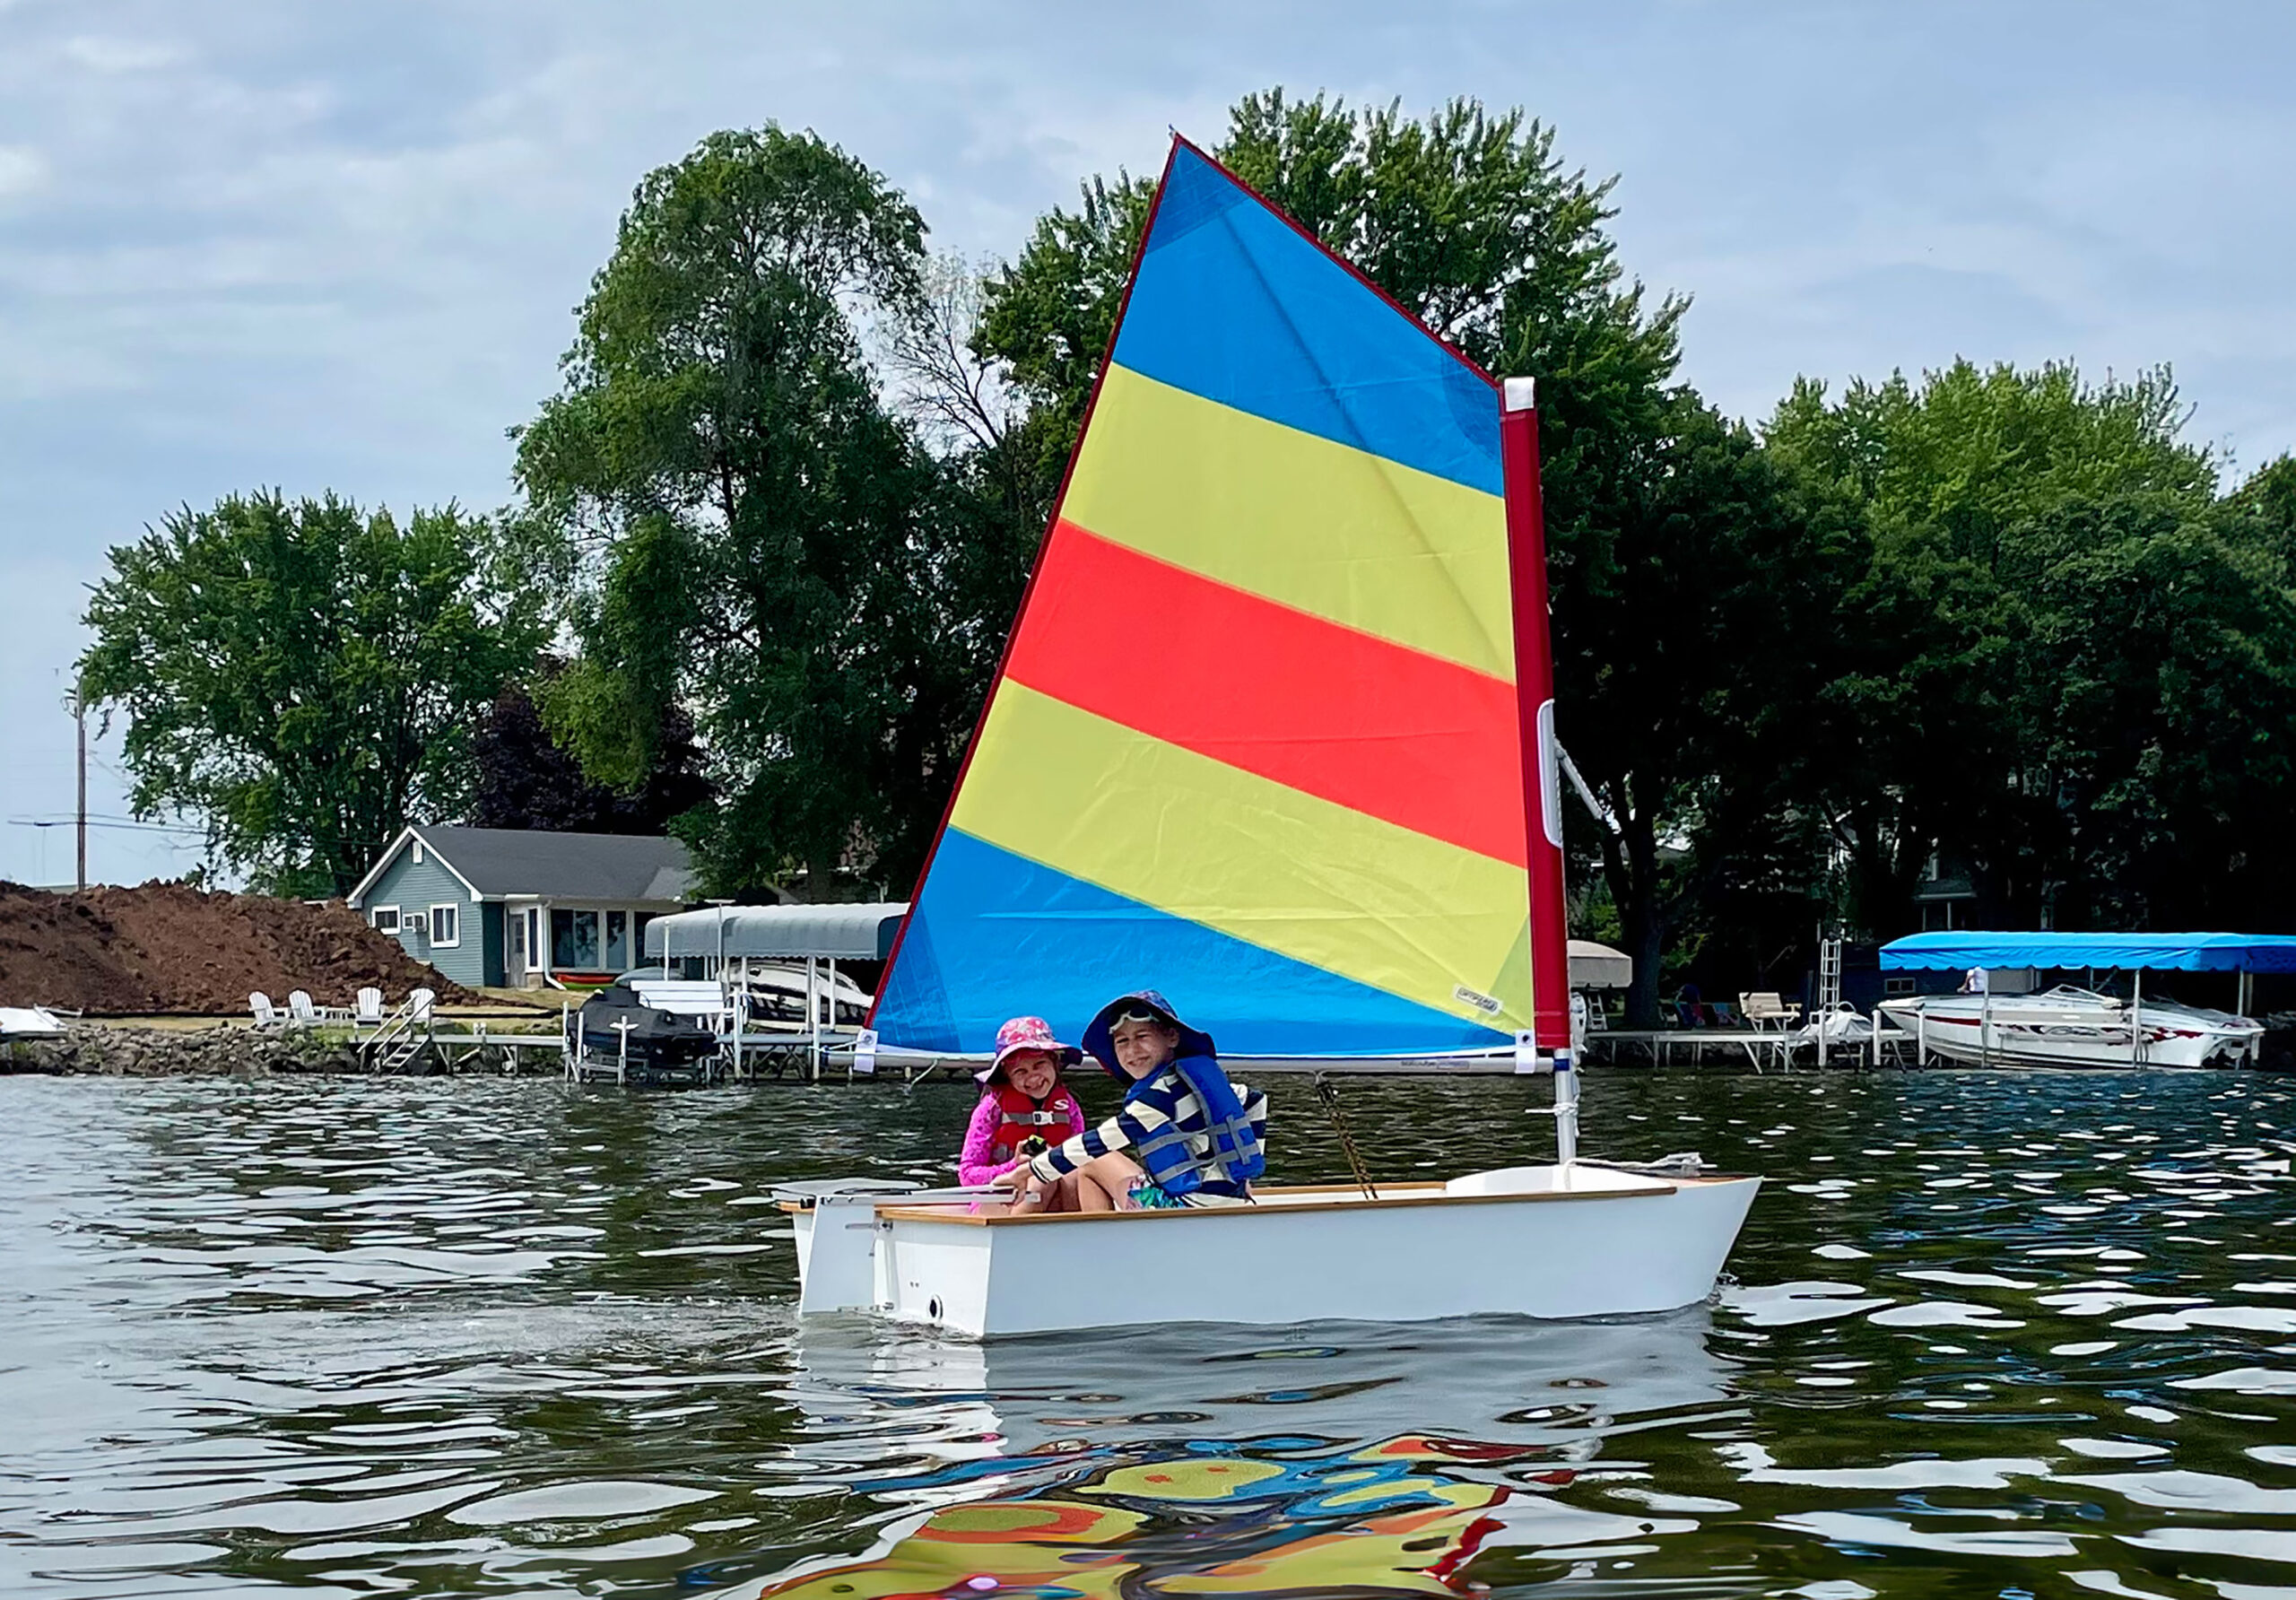
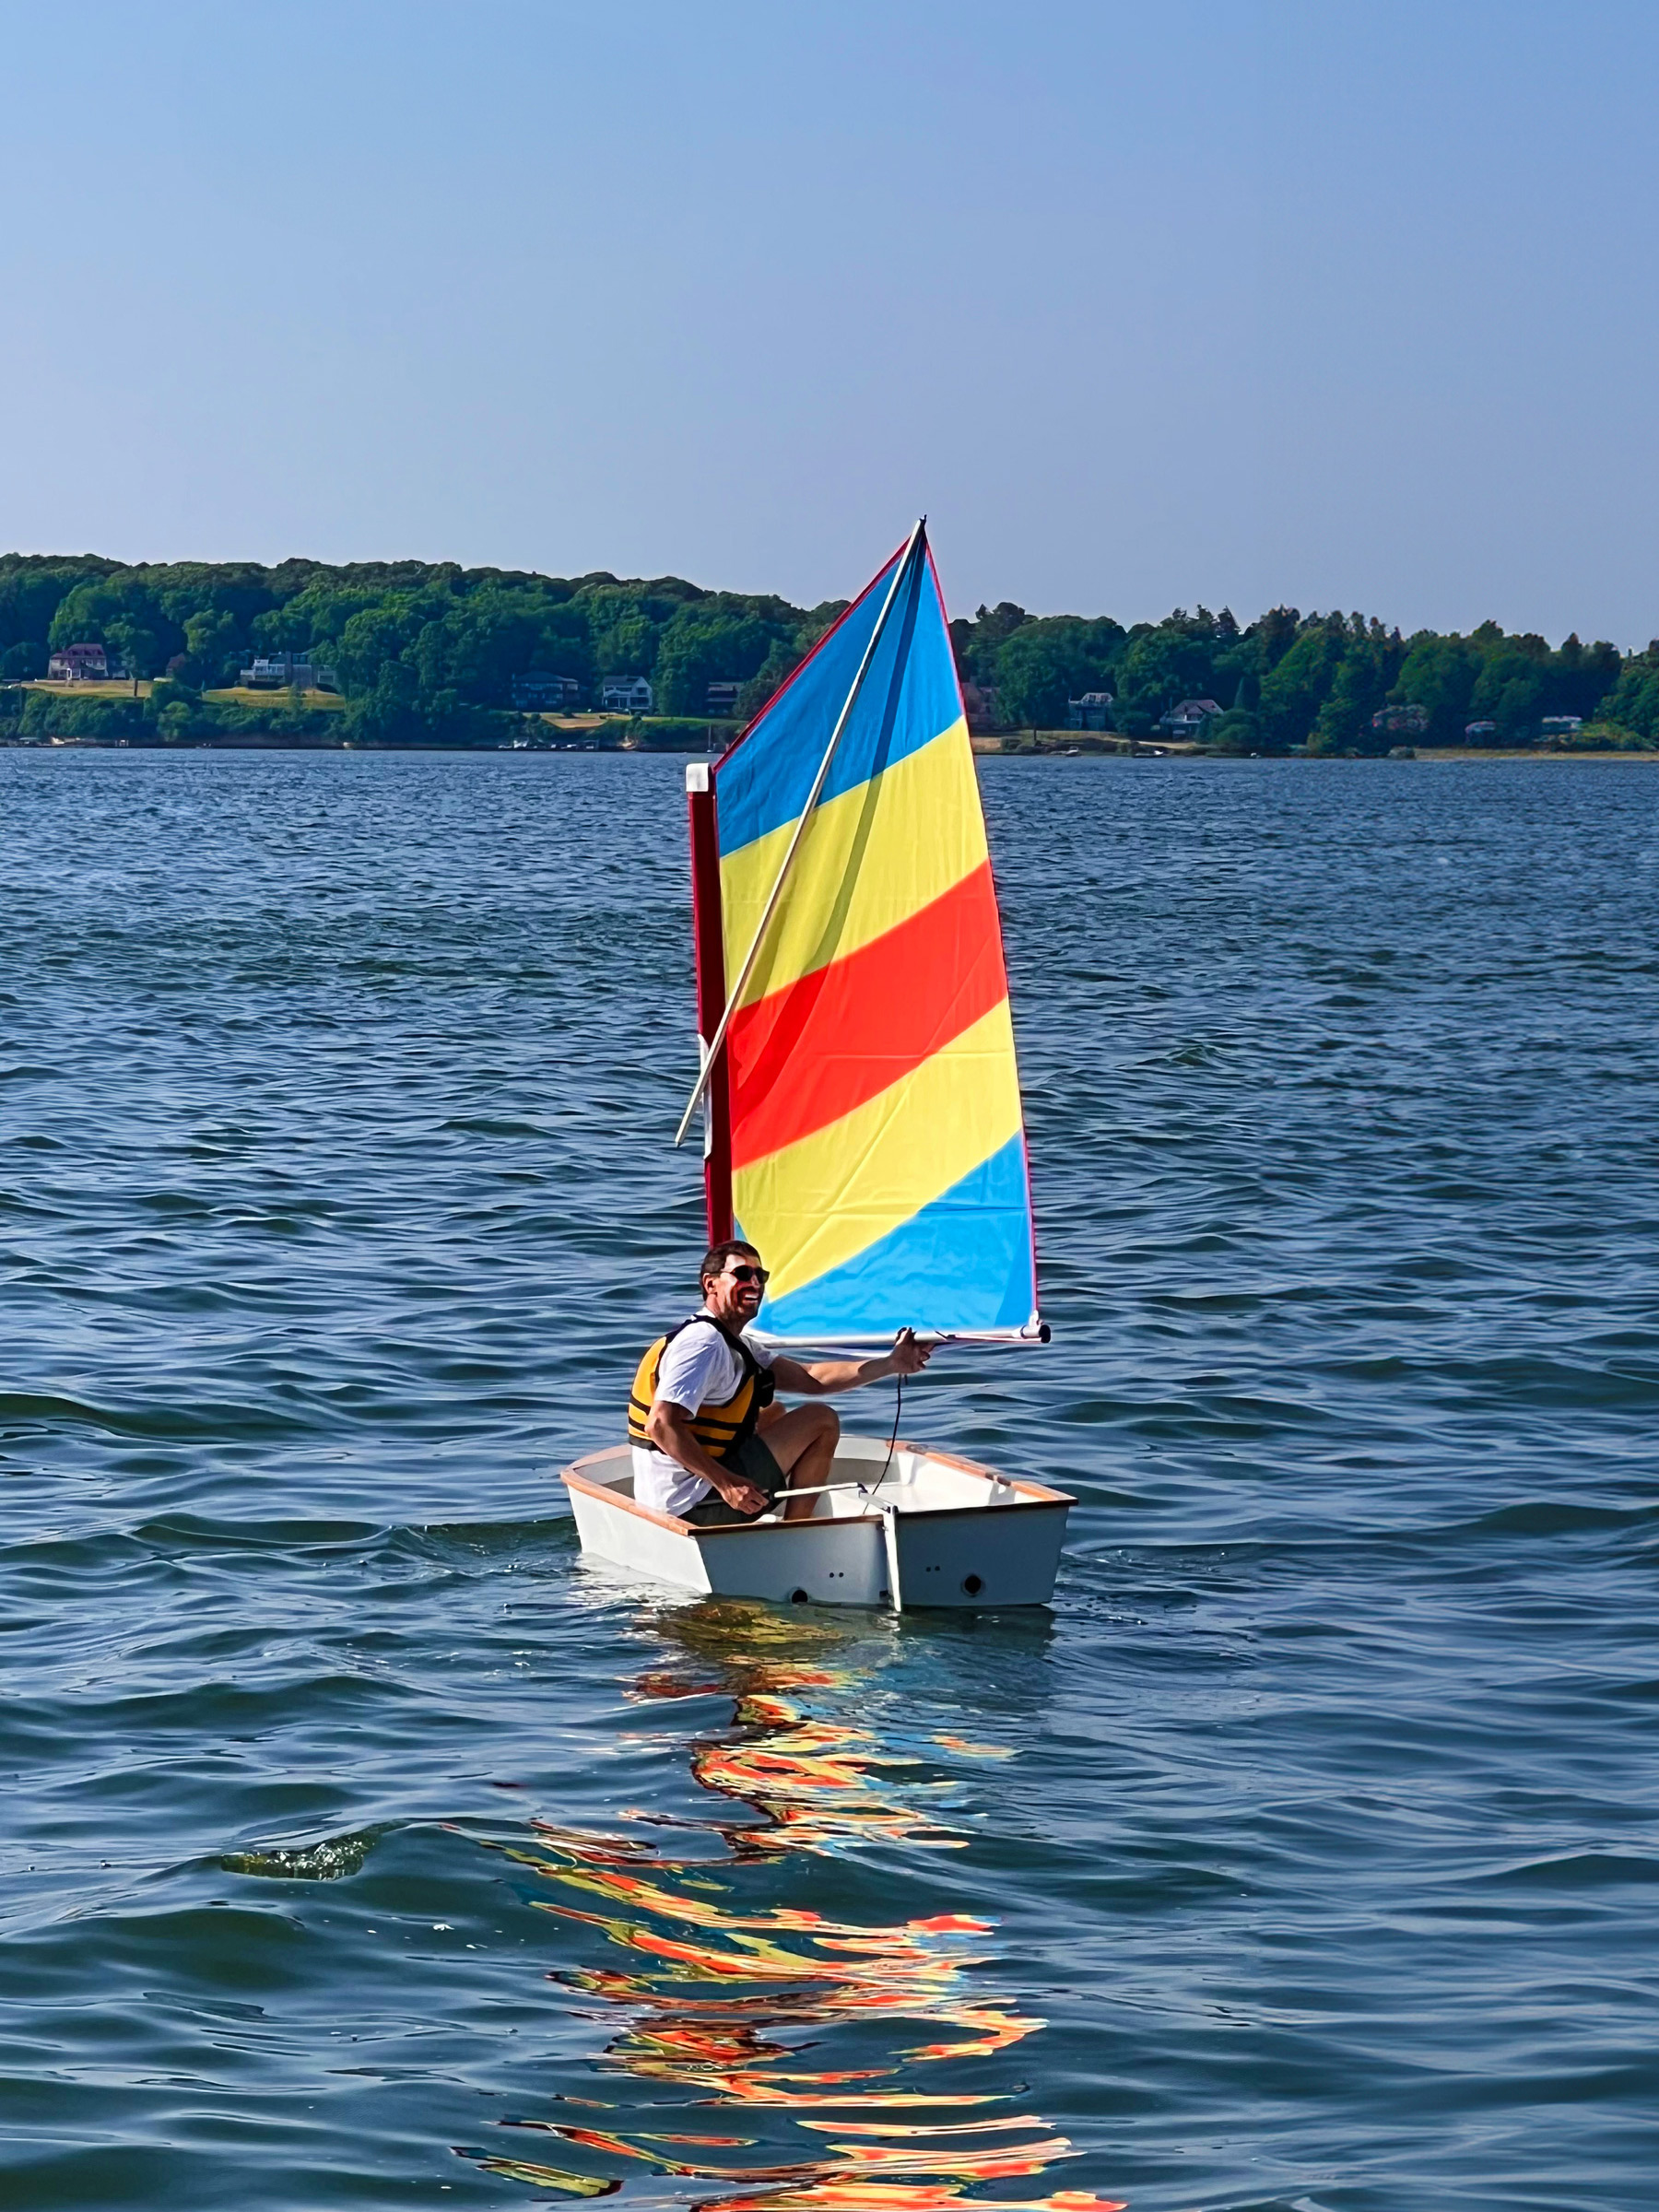