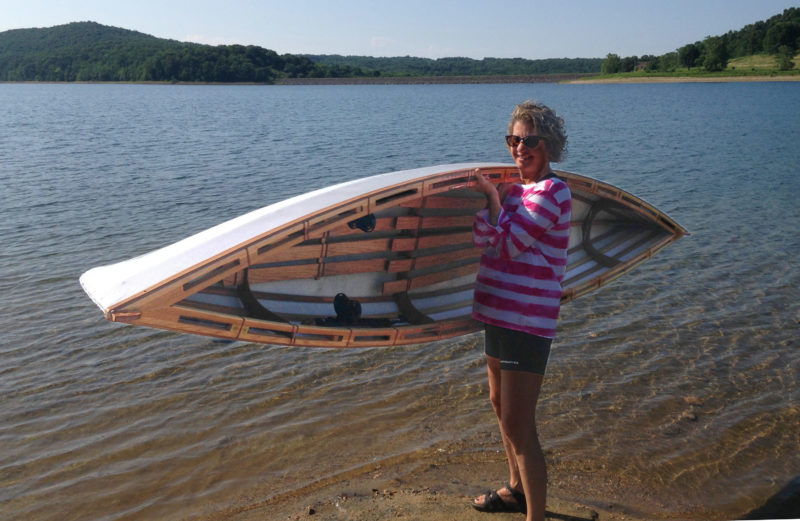
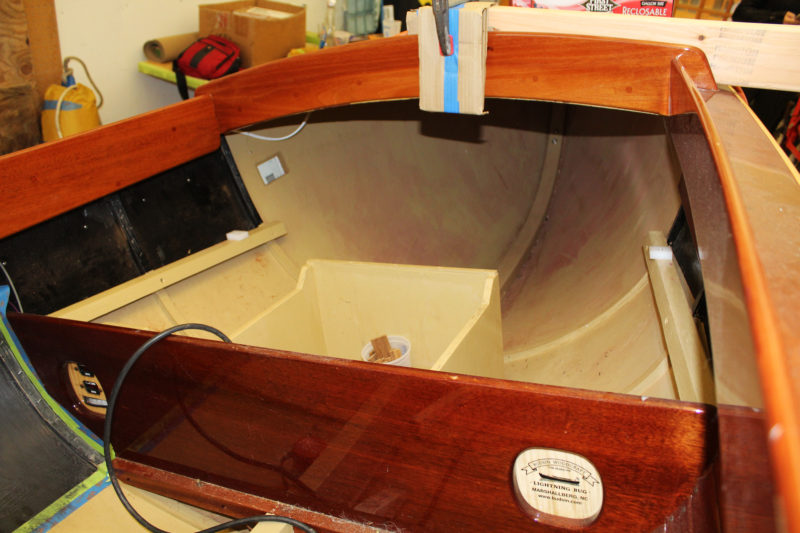
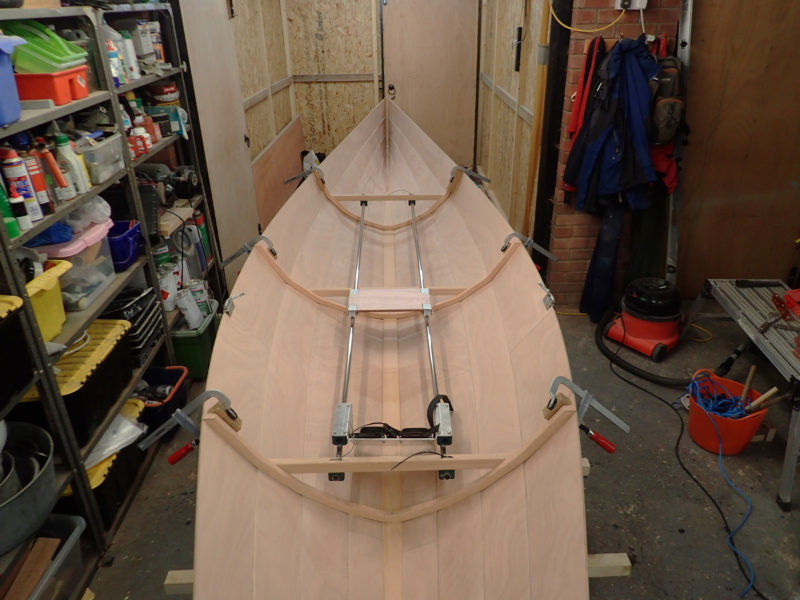
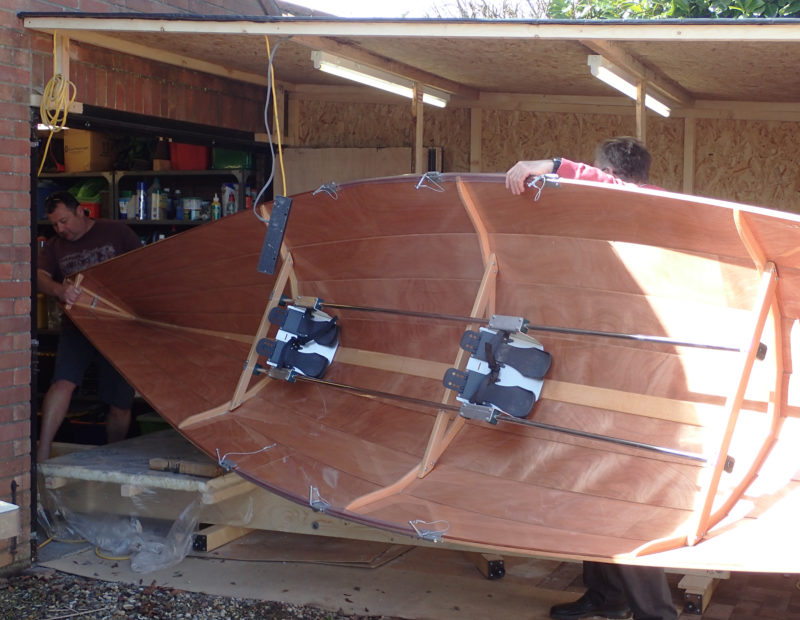
The peapod might be one of the most easily identifiable, traditional small craft found on the coast of Maine today. Peapods were used as nearshore lobstering boats; a lobsterman could stand on the gunwale and haul a trap by hand without the boat swamping. The shallow draft of these vessels allowed fishermen to work the various shallow nooks and crannies that dot the Maine coast. They were also quite seaworthy in deeper water and were favored by lighthouse keepers to get to and from offshore lighthouses.
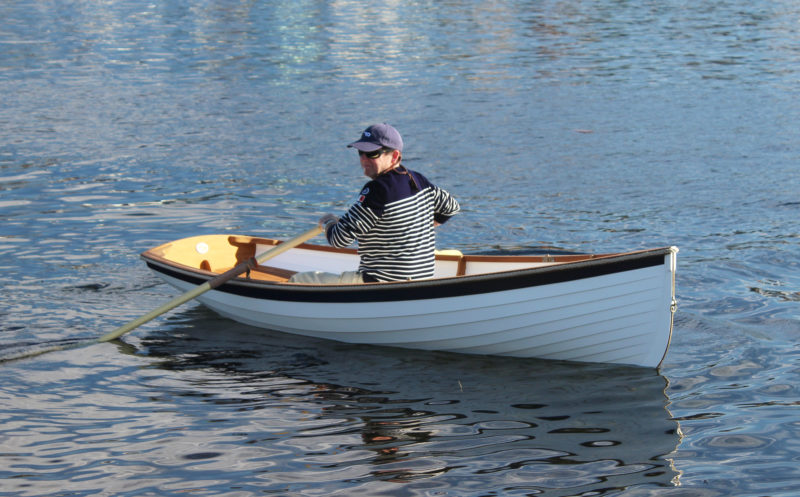
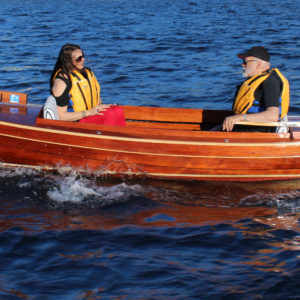
Joel White’s 14′ Maine Coast Peapod is a classic take on this timeless design, perfectly suited for both sailing and rowing. His design is intended for recreational boaters, not working fishermen, and has a deeper draft than a traditional workboat for better tracking during sailing. They are sleeker for better speed under oars, a design element that trades away the stability required for hauling traps.
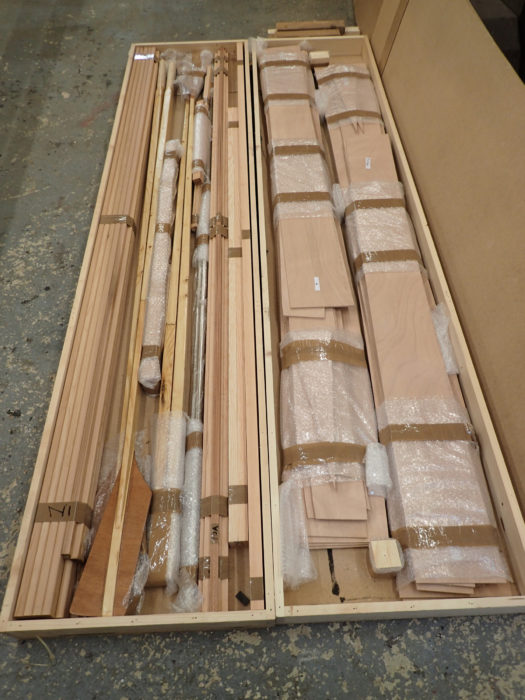
When my wife and I decided that we wanted to build a small boat that our family and friends could use, there was never much of a question as to what type. We were sold on the Maine Coast Peapod by our friend Dale, who owns one built by the Apprenticeshop of Rockland, Maine, during the late ’90s. For years he had graciously let us use his boat almost whenever we wanted, and after spending hours upon hours cruising around Rockland Harbor, both alone and with the boat loaded with friends, we decided that we’d have to build one of our own.
The Maine Coast Peapod is a design for traditional plank-on-frame construction. It’s a good project for someone with moderate carpentry skills interested in learning how to do carvel planking, cotton-caulked seams, copper rivets, and steam-bent frames. The plans I ordered from The WoodenBoat Store are straightforward and easy to follow. No lofting is necessary, as the mold patterns are drawn out to full size. This peapod is symmetrical stem to stern, so the three patterns in the plans are all that are necessary for the six molds. The stem and stern posts are identical, and in the plans their profiles are drawn out full size with the rabbet line, stopwater, and bolt locations identified. The remaining parts such as centerboard trunk, spars, and rudder are diagrammed to scale. A full fastening schedule is also provided to simplify ordering materials.
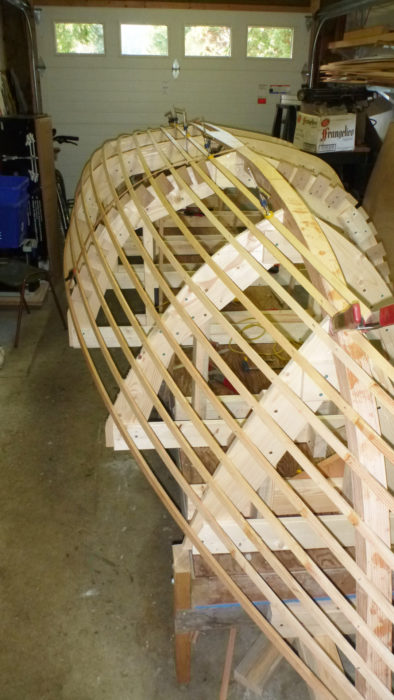
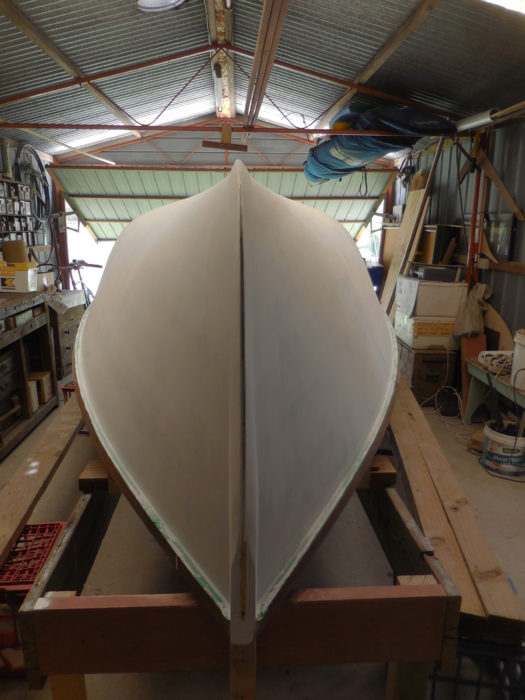
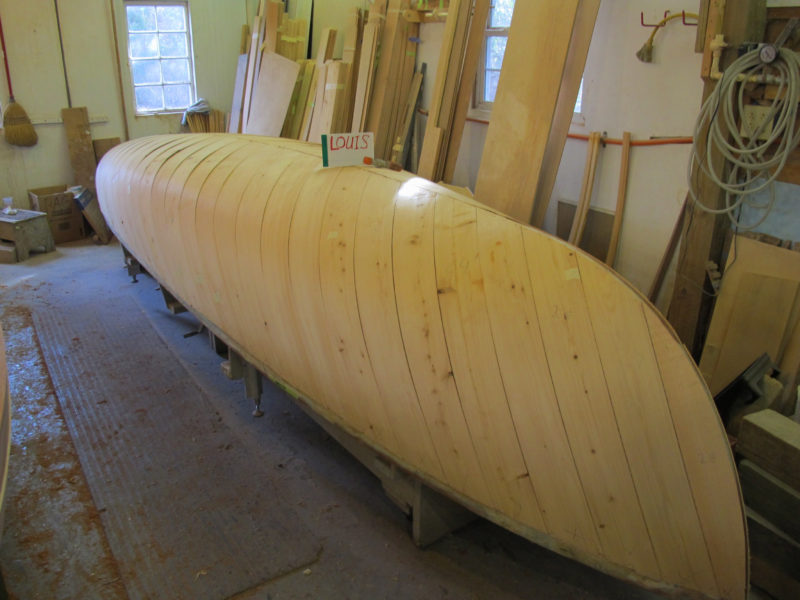
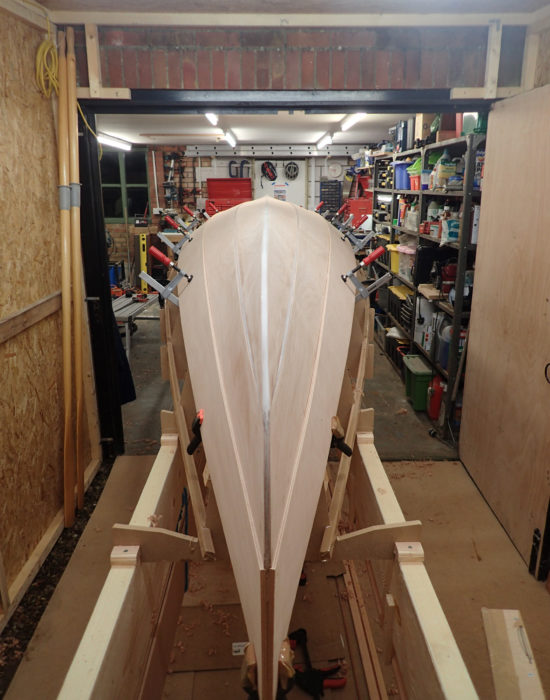
I set the molds up on a strongback about waist-high for easy access. The stem and stern posts connect to a 1-7/8″ by 2″ keel, and this backbone is then placed on top of the molds and temporarily held on with screws. The molds are drawn to the inside of the frames, so the ribbands are let into notches in the molds. The 1/2″-thick, white-oak frames are steam-bent over the ribbands and fastened to the backbone with bronze ring nails. The frames are spaced 5-1/2″ apart, with the first four frames on each side as half frames connected to the stem and sternpost. The remaining frames are bent full length over the keel from sheer to sheer. Framing required two people, one on each side, bending the frames and zip-tying them in place to the ribbands.
photographs and video by the author
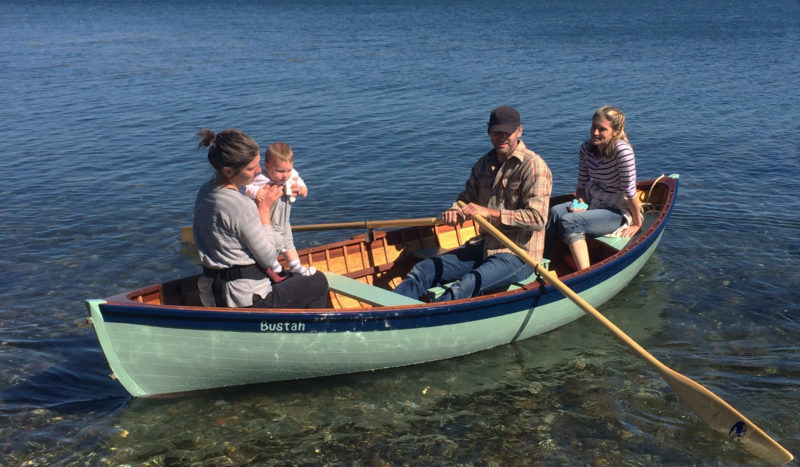
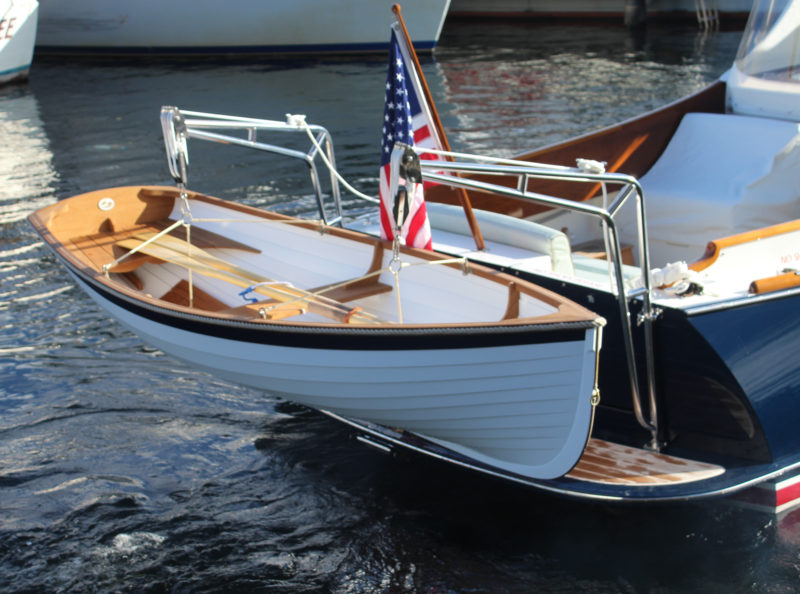
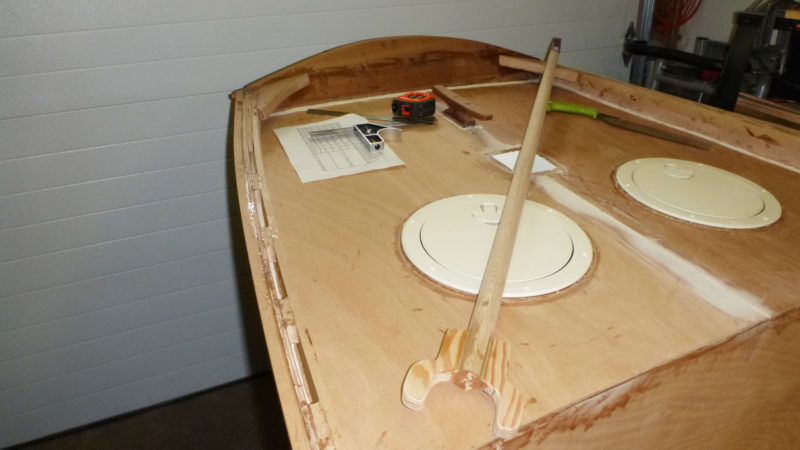
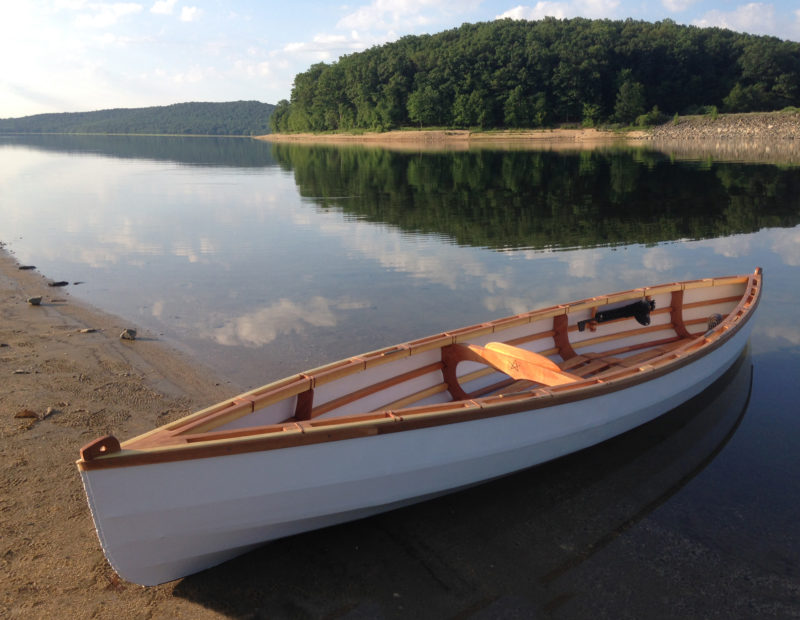
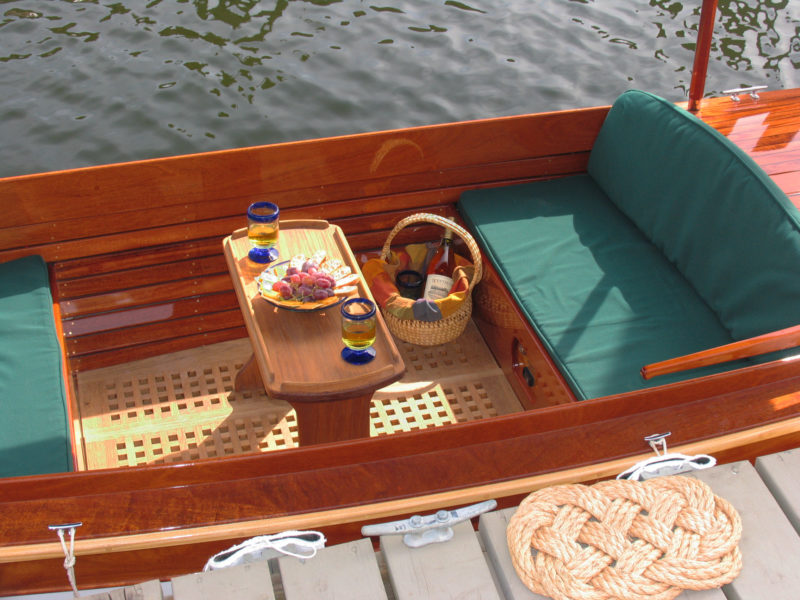
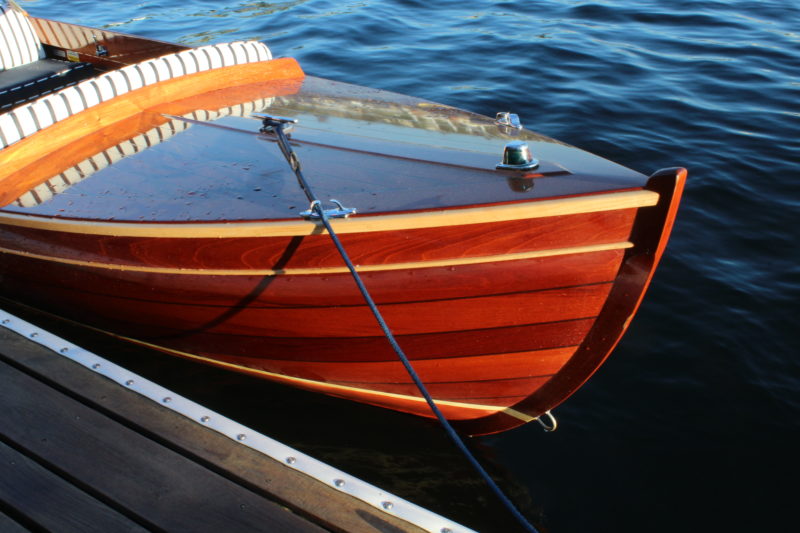
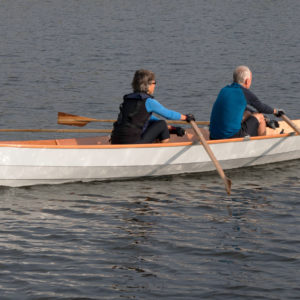
Freshly oiled, the peapod awaits launching. The aft side thwarts provide ample room to put your feet up and lean back while out for a ride.
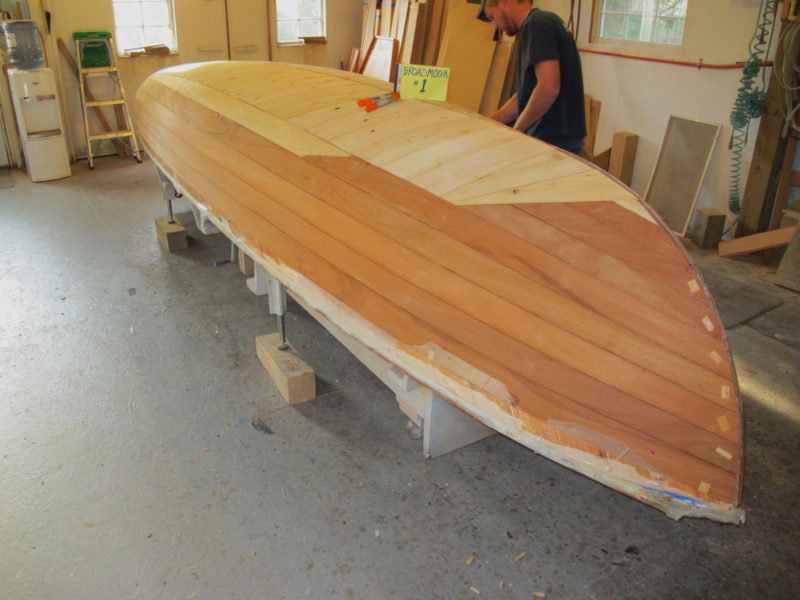
The plans show the plank widths at the two middle stations, which is a helpful starting point for lining off where the 10 strakes go; I used battens to line off by eye. I spiled each plank using strips of 1/8″ pattern plywood and swinging arcs with a compass. The plans, drawn in 1988, call for butt-blocks to join plank sections, but I find scarfing with today’s epoxies simplifies the planking process and makes joints stronger and less prone to leaks. Each plank, other than the sheer, needed to be backed out (a concave surface planed on the interior side of the plank) to accommodate the curve of the frames. I made the garboard out of mahogany, which was commonly done on other larger boats I’ve worked on, in order to provide some extra strength and durability. The hood ends of the planks need to be steam-bent to take the bend and twist into the stem rabbet, so I clamped the shaped plank to the frames and then wrapped the ends in a trash bag to create a pouch. I then poured in boiling water and after 15 to 20 minutes removed the bag, clamped the plank into place, and let it sit overnight.
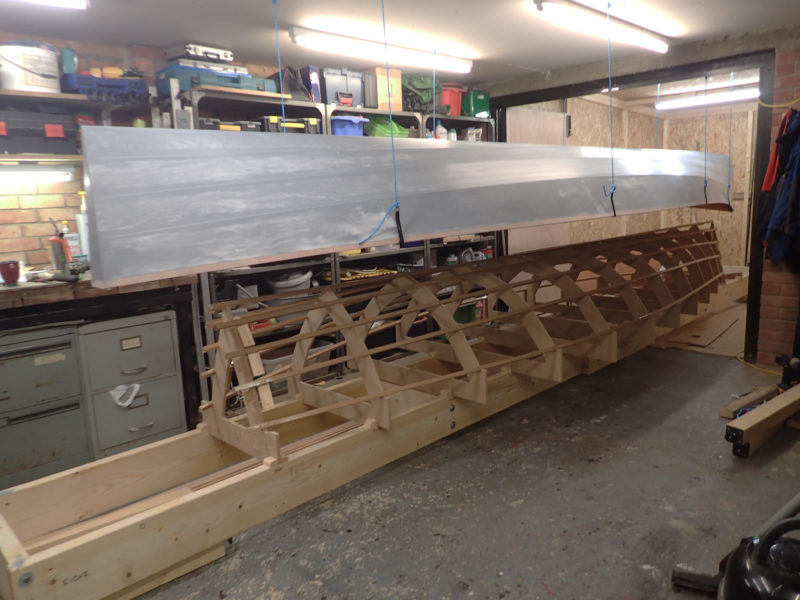
The plans call for an oak sheerstrake, but I opted to use mahogany as I thought it would look a little nicer while being just as structurally sound. The planks are initially nailed to the frames with copper rivets, and when planking is finished the roves are set. Peening the rivets over the roves requires two people, one bucking the rivet head, the other peening the clipped rivet end over the rove. While the plans call for the rivets to be peened once the boat is off the molds and upright, I contorted myself around the molds and peened most of the rivets while the hull was still upside down. By leaving the hull in the strongback I could fair the hull more easily after all the nail heads were bunged.
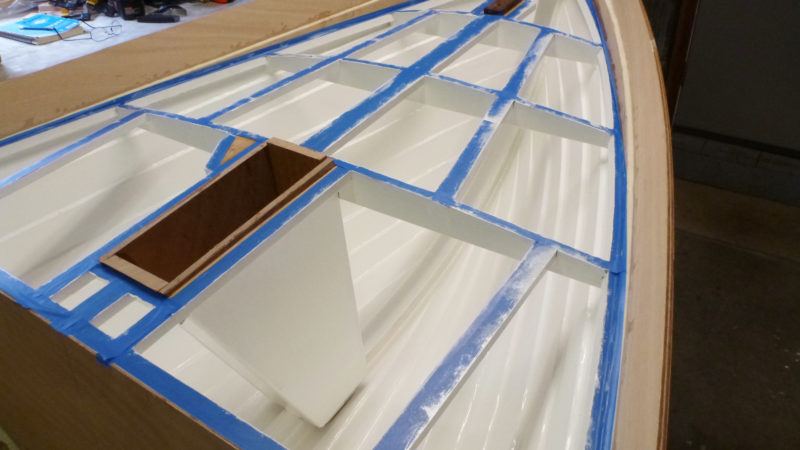
The centerboard trunk is slightly offset so that the board emerges along the edge of the keel. One of the trunk’s bedlogs is fastened to the keel and the other to the port garboard. The trunk is a key structural part of this boat as it is tied into a center thwart, which ties into risers as well as the sheer via steam-bent knees. One of the reasons I used hardwood for the garboard was to provide extra rigidity for fastening the base of the trunk. The plans call for the garboard to be caulked right to the keel without the use of a keelson. In my experience, small boats without keelsons tend to leak along the garboard as they age. Additionally, the mahogany garboard I used wouldn’t swell up against the keel as much as a cedar plank would.
The plans call for a liberal amount of 3M 5200 adhesive along the centerboard trunk, which would make replacing the garboard quite a challenging task. For these reasons I chose to edge-glue the garboard to the keel with epoxy. I then notched the frames into the bedlogs and epoxied the trunk to the backbone and garboard in an effort to prevent leaking as the boat ages. While this technique may seem controversial, a boatbuilding shop I used to work for has had success in this way. I talked with a couple of boatbuilding friends whose shops have started experimenting with edge-gluing hardwood garboards on traditional craft. So far, after one full season, my garboard has held up perfectly.
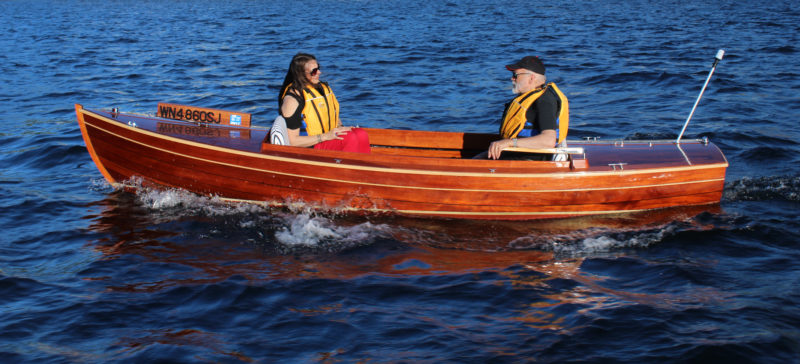
Friends and family explore the shallows along the tide line. With the centerboard up, the peapod only draws 7″.
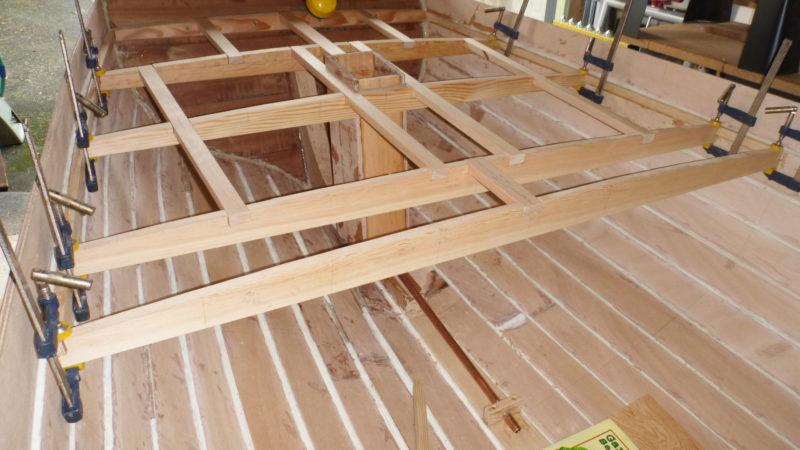
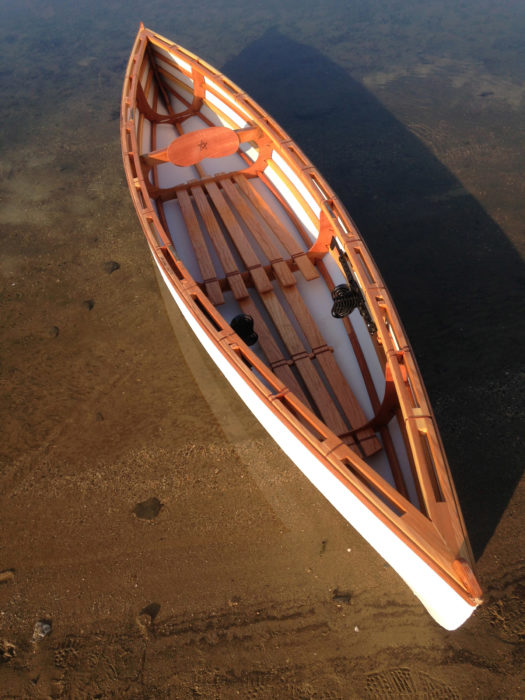
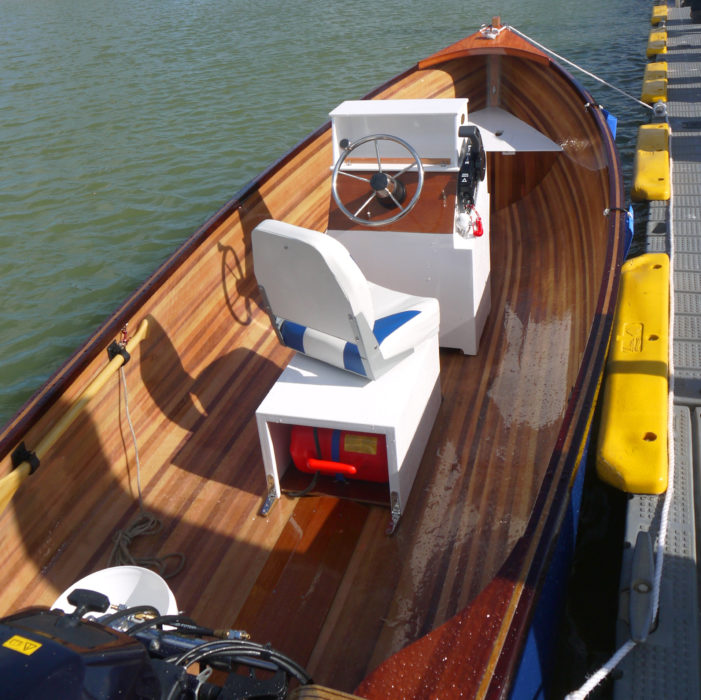
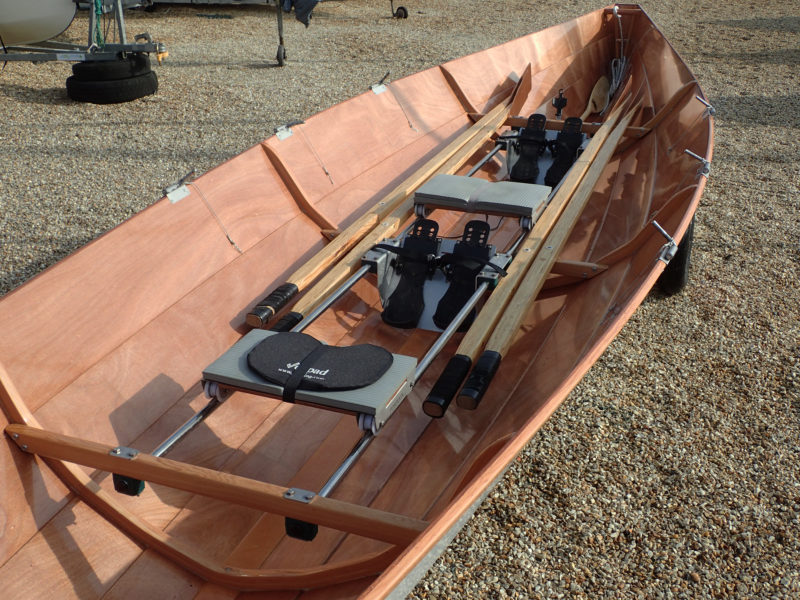
The peapod is designed with four thwarts; I connected the aft two thwarts with side sheets. My friend’s peapod was built that way, making it easy to put your feet up while sailing. There are two rowing stations at the forward thwarts, although I suspect the forward oarlock pads are for rowing while standing up facing the bow. Rowing this boat with two people would be quite difficult, and rowing from the forward thwart would be awkward. Although the plans do not call for one, I added a teak sole to keep feet off the planking. The boat is designed to carry a lug rig with a boom, yard, and 12′ mast. The rig is not all that heavy or long and can be easily stepped at the dock.
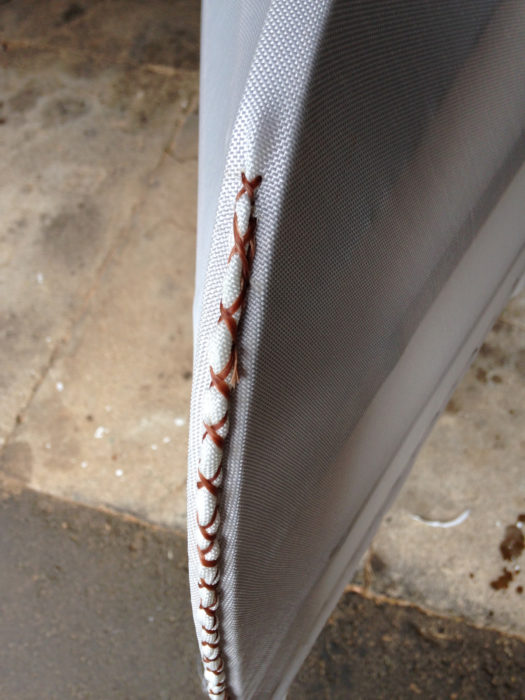
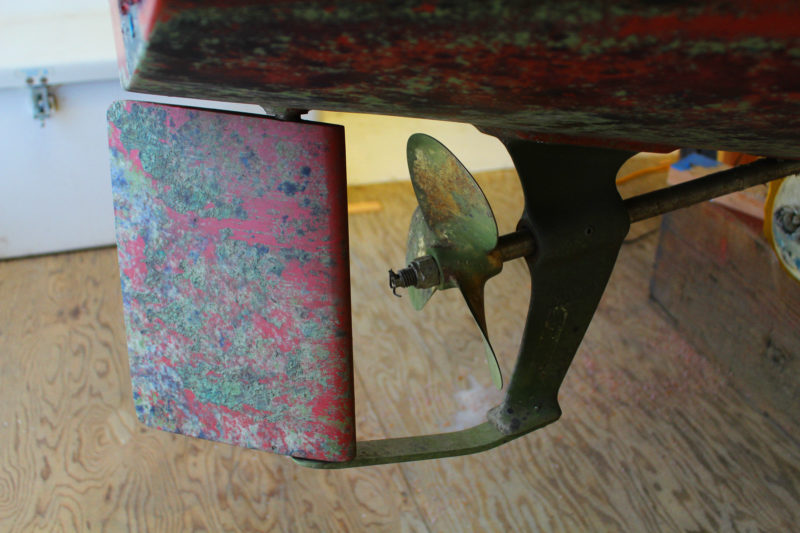
A challenging yet rewarding aspect of building this peapod was procuring the necessary materials. The planking came from a cedar tree that had recently been struck by lightning. A friend gave me black locust, which I used instead of oak for the keel, stem and stern posts, and teak for the cockpit sole. Most of the hardware, such as the oarlocks, came from various yard sales and antique shops. The rudder hardware was among one of the most difficult pieces to find. The plans call for a V-shaped, custom-cast bronze gudgeon that fits around the sternpost, but I found gudgeons that mount on the face of the sternpost, with a curved bronze rod used in lieu of pintles to secure the rudder.
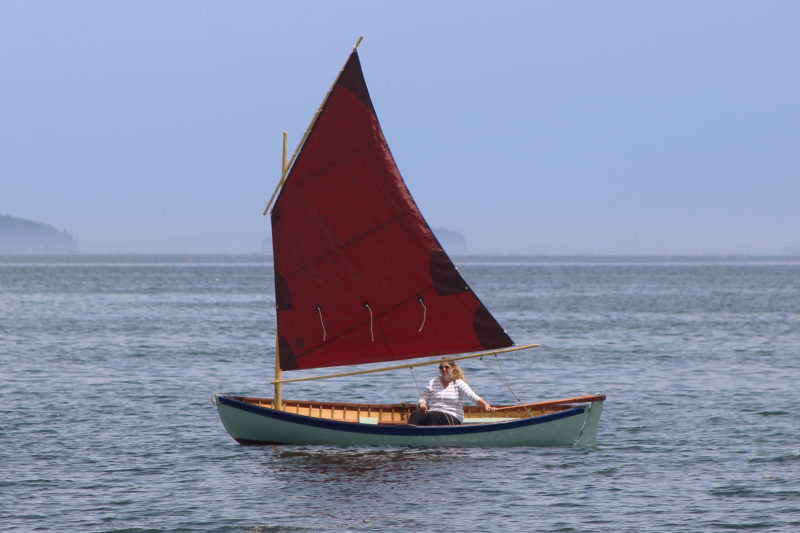
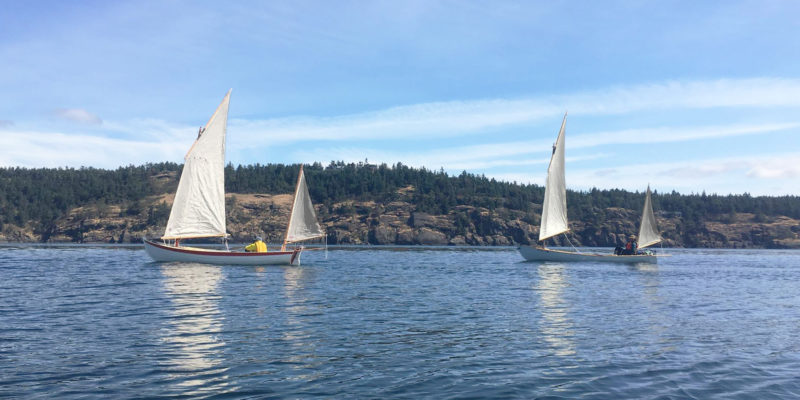
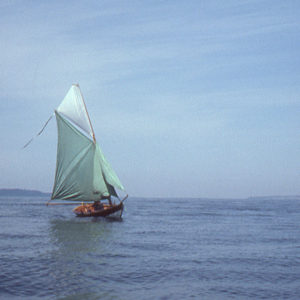
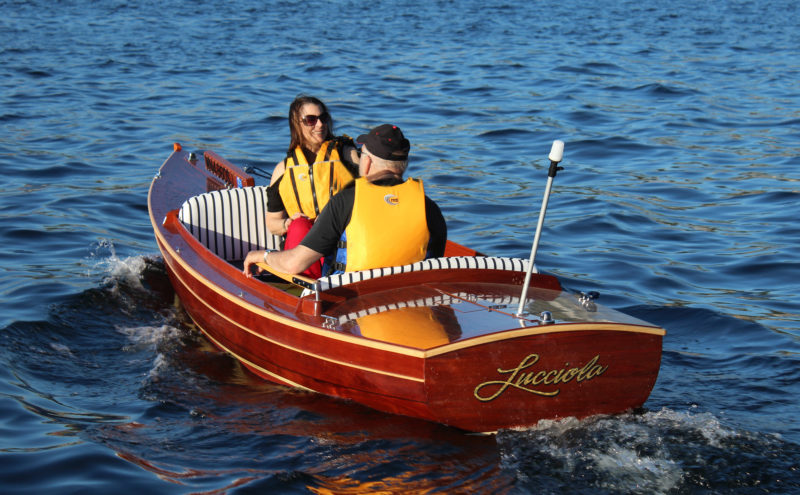
The wide beam gives the hull good stability, while a simple lug rig makes sailing a breeze.
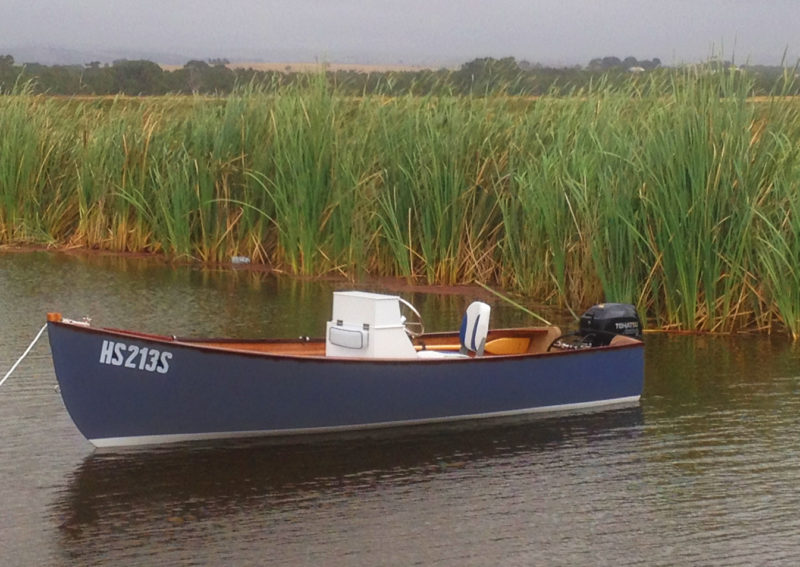
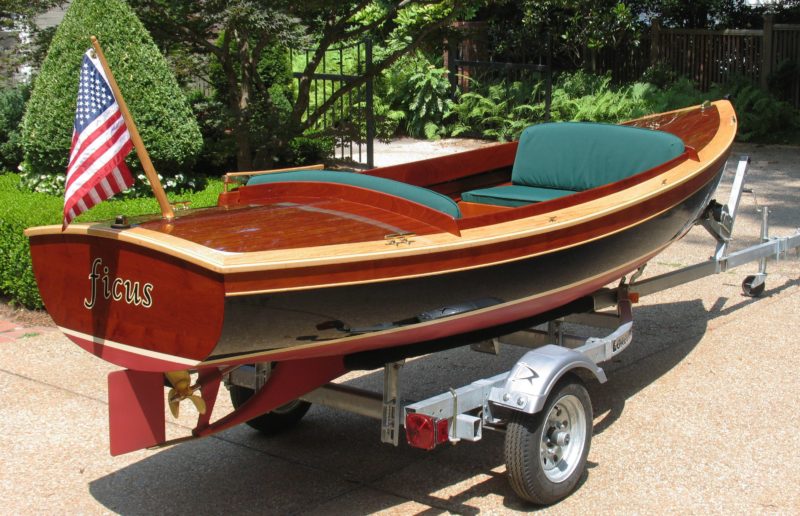
I applied a workboat finish to my peapod in order to minimize the springtime maintenance needed. The boat’s topsides are painted with Kirby marine enamel, and the bottom with an Interlux semi-ablative paint. The boat’s interior and spars are saturated with a mix of boiled linseed oil, turpentine, and a pinch of pine tar. Over time, the oil turns a beautifully weathered black, hiding dings and scratches that naturally come with use. The mixture is applied easily with a rag, encouraging annual reapplication. Prep time for the peapod in the spring usually only totals around three hours.
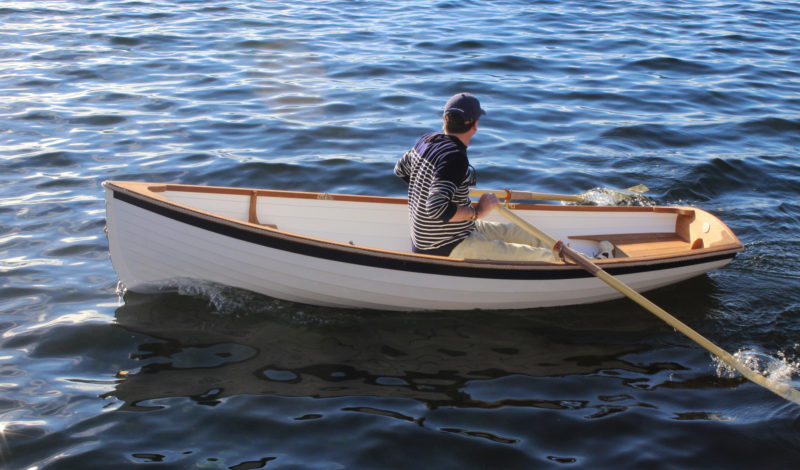
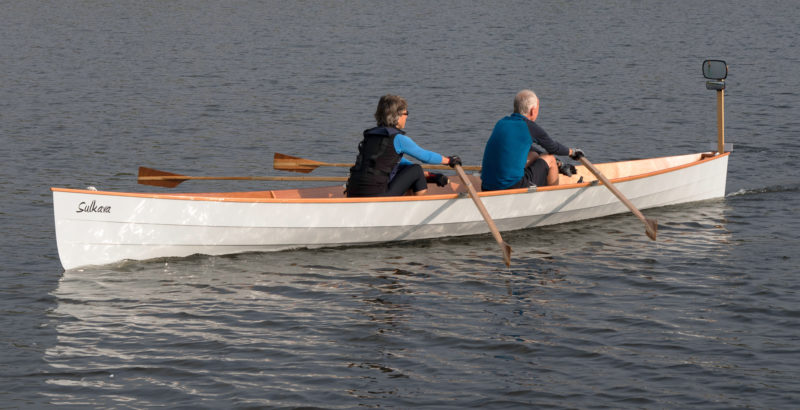
Joel White’s peapod is an excellent daysailer and an able tender. It tracks well when towed, is small enough to be tied to a dinghy dock and easily launched and retrieved with a trailer, yet it’s large enough to comfortably fit two or three adults and their gear.
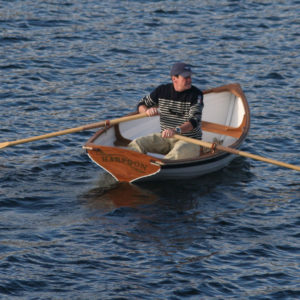
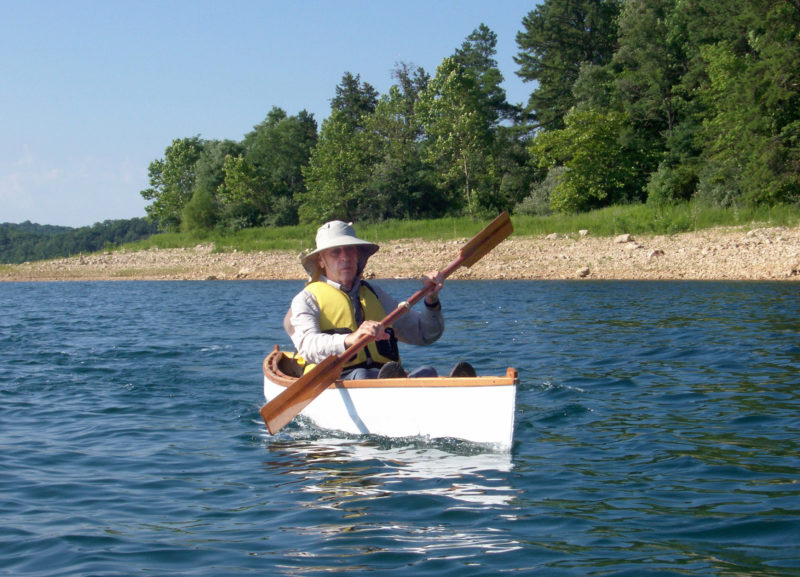
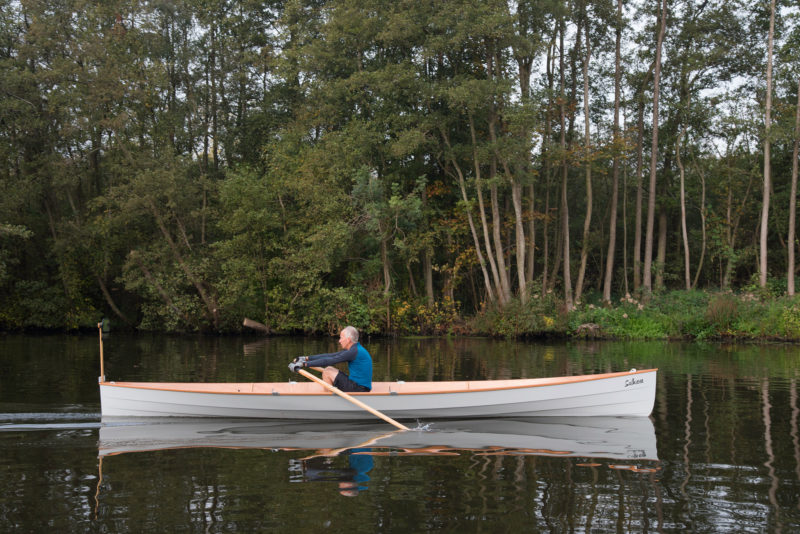
The boat is fun to row, the perfect vessel to explore the coastline around an anchorage. It tracks well yet is easy to maneuver, and a single rower can make a pretty good speed. The double-ended design allows for rowing backward when leaving a beach or getting the boat off a trailer.
While heavier than your average yacht tender, the peapod can be carried by two adults a short way down a beach without too much trouble. We usually set a small anchor if we’re stopping on a protected beach to save ourselves the hassle of carrying the boat any great distance, especially if the rig is in and the boat is loaded with gear; an outhaul anchoring system would be ideal.
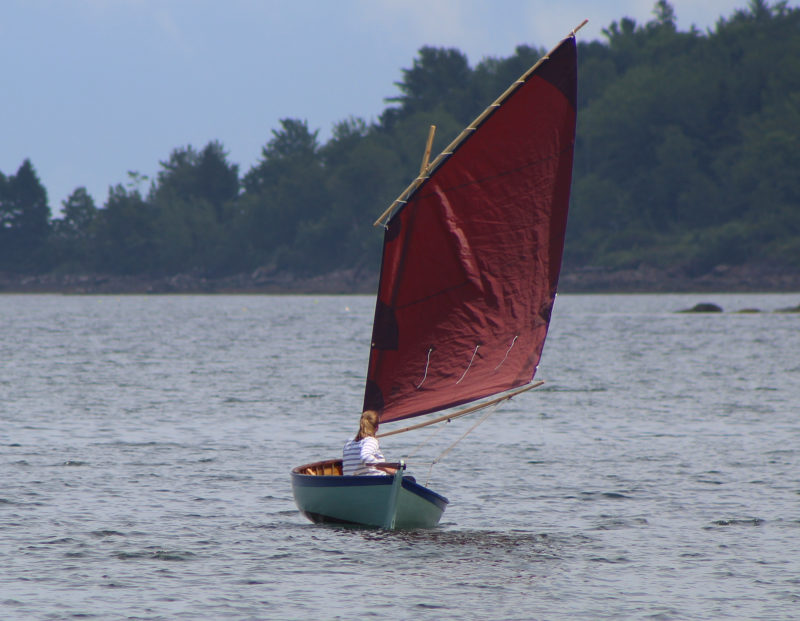
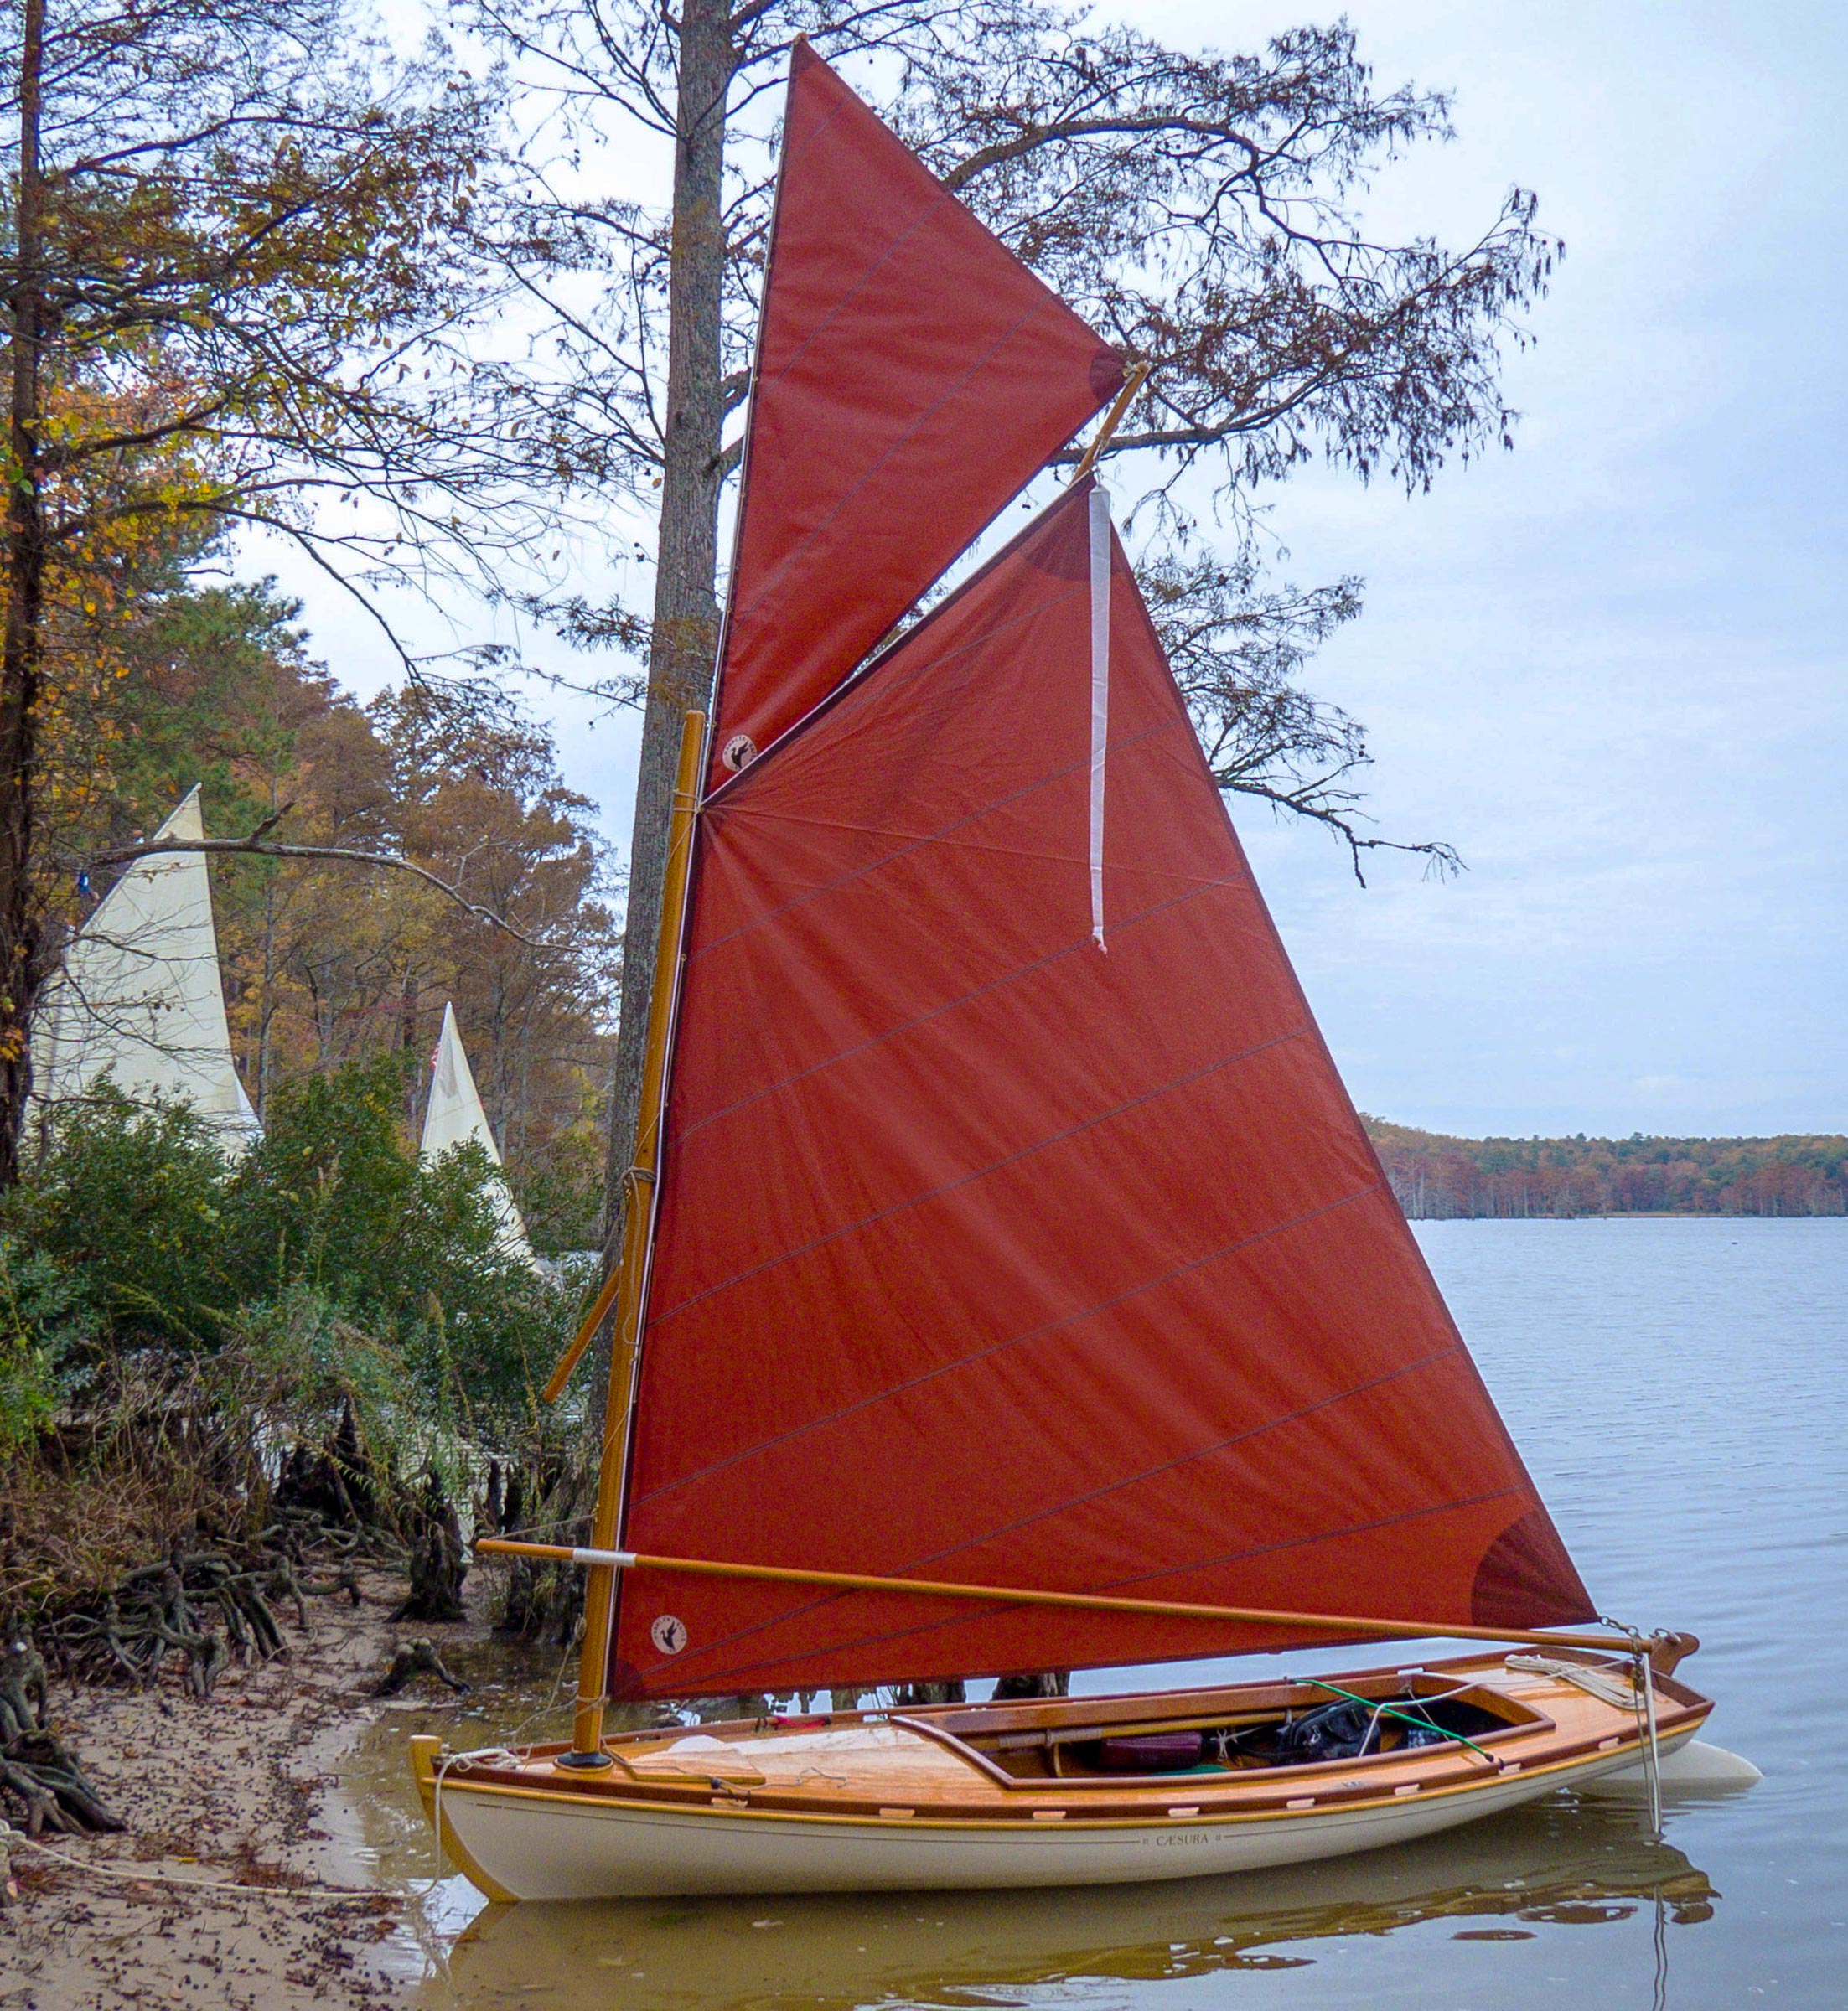
With just the halyard and the sheet to manage, the rig makes solo sailing easy.
The peapod performs just as well under sail as under oars; she ghosts along easily in light airs and holds her own in a stiff breeze. The simplicity of the rig makes the vessel very easy to use under sail, even for a novice. It tacks easily, except in the lightest of airs when there’s not enough forward momentum to avoid getting stuck in irons. Then it is easier to tack by wearing ship—jibing around to avoid getting stuck in irons. In higher winds, the peapod does well and stays relatively dry unless there is a lot of chop. In a lot of wind the boat will sometimes become overpowered, which is probably an indication that you shouldn’t be out in such a small boat in the first place. For safety’s sake we added a set of reefpoints to our sail.
There are a few other tweaks to the rig that make things a little easier. For singlehanded sailing the halyard can be led through a small hole in the forward thwart to a small block or fairlead mounted on a frame and then aft to cleat. This allows one to set or douse the sail without having to leave the tiller. The tiller as drawn in the plans is rather long and best suited to sailing singlehanded. With passengers aboard it would be more advantageous to use a shorter tiller with an extension, so that the helmsman can sit farther aft.
We named our peapod BUSTAH, my great-grandfather’s nickname. The boat now sits in the water in front of his cottage in Owls Head, Maine, where we hope that our friends and family can enjoy sailing and rowing it for years to come.
Josh Anderson attended the Apprenticeshop boatbuilding program in Rockland Maine, and has since worked at several boatbuilding and carpentry shops. He and his wife, Sarah, restored a 25′ Friendship Sloop, operated a charter business with it, and spent several years sailing the Maine coast. Josh has a Masters in Maritime Management from Maine Maritime Academy and is now the Lead Boatwright for the Center for Wooden Boats in Seattle, Washington.
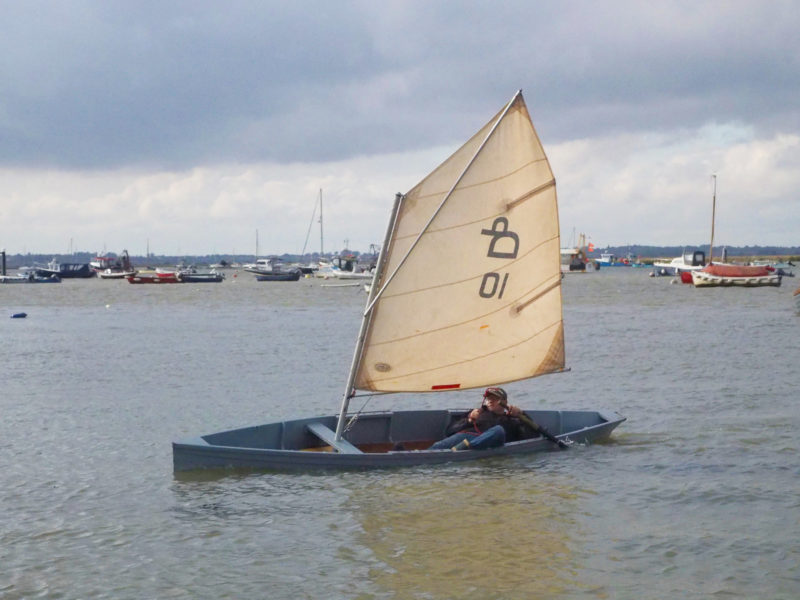
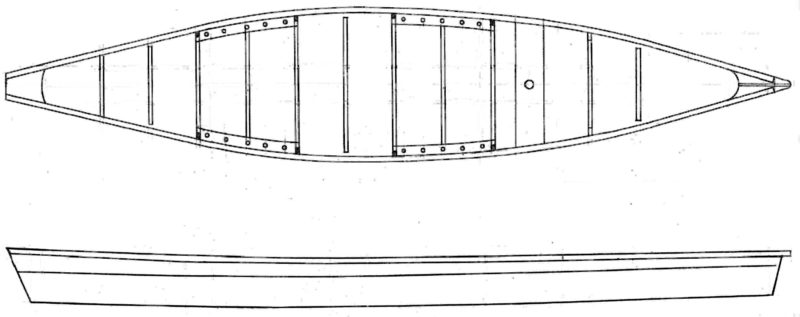
When Dale Cottrell started building boats in the 1970s, he was working with fiberglass, not wood. At first he made fiberglass canoes, and then in 1984 he designed and built the Puffin Dinghy. He built a business around the Puffin and ultimately did quite well with it, selling thousands of them at a rate of 300 or more per year. But popping ’glass boats out of molds wasn’t where his heart was. He wanted to build wooden boats, and in 1994 he established Cottrell Boatbuilding in Searsport, Maine. He and his son Seth now build about a dozen small boats a year, rowing boats mostly, but a few for oar and sail. Their Tadpole Tender is a boat Dale designed and built for a customer looking for a boat that could be used to teach his kids to row. Drawn along the lines of a Whitehall, the 10′ Tadpole also proved to be popular as a tender.
photographs by the author
The skeg does a good job keeping the Tadpole on track, eliminating the need to maintain course with the oars. The rope incorporated in the rub rail is one of several options for the gunwale guard.
The Tadpole is built in glued-lap plywood fashion with meranti marine plywood and epoxy. The 10 strakes are lined-off well, and the laps run fair from stem to stern. The hull is painted, making it easier to maintain and less stressful to use than a varnished hull.
courtesy of Cottrell Boatbuilding
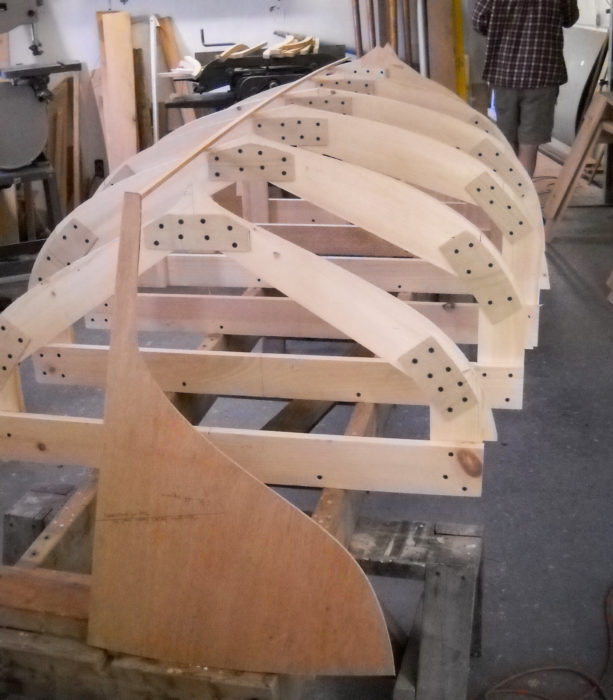
The molds for the Tadpole, set up here in the Cottrells’ shop, show the gentle curve of the full bilges that give the hull good load-carrying ability.
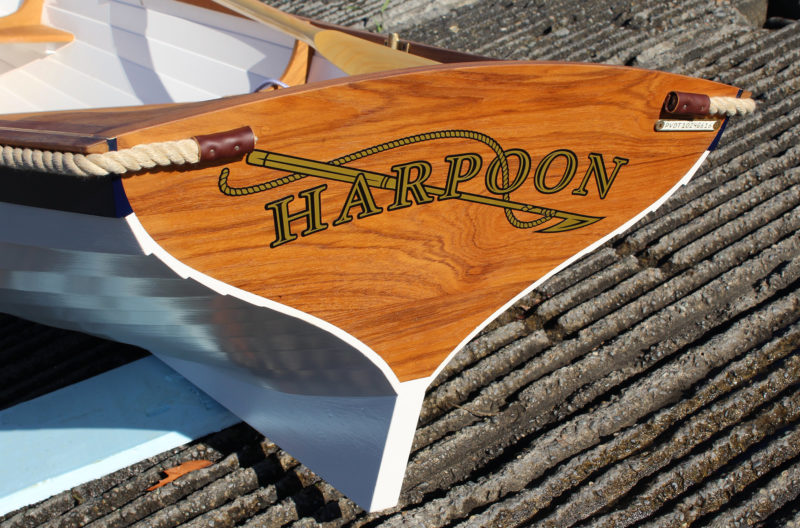
Wooden trim, thwarts, floorboards, and transom are of oak, mahogany, or teak. The gunwale can have a number of different treatments: a sheer guard of oak, mahogany, or teak, a canvas and rubber guard, or the traditional treatment on HARPOON, a 1″ rope set in a grooved outwale. The trim provides plenty of eye candy in the plywood construction, but if you’ve got your heart set on a traditionally built boat—copper-clenched cedar on steam-bent oak frames—and want to surround yourself with brightwork, the Cottrells will be happy to oblige.
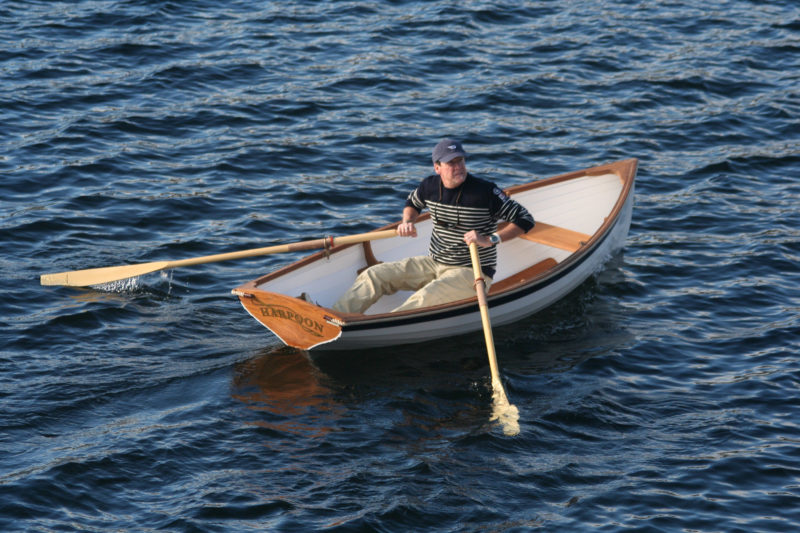
The Tadpole will easily maintain 3-3/4 knots without much effort at the oars. It tracks well and is very maneuverable.
I met up with Jeff Bowlby to spend some time rowing his Tadpole, HARPOON, on Seattle’s Lake Union. He had brought the boat in the back of his pickup truck, and it was quite easy for the two of us to lift the 90-lb boat and carry it down the launch ramp. The boat is also light enough for two to lift on a roof rack or even for a strong, determined solo rower to lift one end up on the back rack and then to slide it forward. With a beam of 45″ it wouldn’t need extra-long racks to accommodate it.
The contemporary glued-lap-plywood construction keeps the boat light and the interior easier to clean and maintain.
While Jeff parked the truck, I stepped aboard. The Tadpole, delivered with a pair of Shaw & Tenney spoon-blade oars, has two rowing stations equipped with bronze oarlocks. I took the bow position and rowed around while waiting for him to get aboard. With my weight so far forward, the stern rose up quite high, but there was enough fullness in the bow to keep me afloat and stable. When Jeff got settled into the stern sheets, the Tadpole trimmed well and still had plenty of freeboard. With the two of us aboard, the boat had respectable speed for a 10-footer. My GPS logged 3 knots at a relaxed pace, 4 knots at an exercise pace, and 4-1/4 knots when I was pulling as hard as I could.
After rowing around with Jeff, I dropped him off back at the ramp. The plan was to reunite HARPOON with her mothership, a 37′ Hinckley Picnic Boat. Jeff would drive to the marina where he kept that boat, and I’d row nearly 1-1/2 miles down the lake to meet him there. That’s not a daunting distance, but there’s plenty of room there to begin to loathe a rowing boat if it doesn’t get up and go. That wasn’t the case with the Tadpole. Its skeg did its job nicely and the boat tracked well; the hull carried its way without a lot of check between strokes and did a good job of maintaining trim as my weight shifted from catch to finish. The forward edge of the stern sheets served well as a stretcher, being just the right distance from the center thwart for my leg length (I’m 6′ tall) and high enough to catch me at the balls of my size-13 feet. The ergonomics worked out well for me to get a lot of power into the stroke, so I made good speed down the lake. I could have loped along at 3-3/4 knots, but I opted to make a quick run to the rendezvous and maintained 4-1/4 knots at my exercise pace.
The Whitehall form is nicely expressed by the Tadpole, even though it is only 10′ long.
Jeff had told me he’d have his Hinckley out in front of the marina to wait for me, but when I arrived there was no sign of him. He may have overestimated how long it would take me to get to the marina. I went looking for him and circled the marina, spinning around to scoot stern first through some skinny passages and enjoying the quick maneuverability of the Tadpole. We eventually met up just off the entrance to the marina with Jeff idling the Hinckley’s twin diesels. The name on the transom was QUEEQUEG. That explained the name he had given the Tadpole as its tender. (Jeff had been a fan of Moby Dick from a young age.) I rowed up to the stern, and Jeff lowered the falls while I connected the two harnesses to the lifting eyes in HARPOON’s keel and the eyebolts that slip into the oarlock sockets. Rings at the intersection of the three lines of each harness take the hooks from the davits’ falls. QUEEQUEG is quite a handsome boat and HARPOON looked like it belonged at its stern. It just wouldn’t do to have a second-rate tender hanging from those davits. While the Tadpole spends most of its time there when QUEEQUEG is underway, Jeff reports that HARPOON also tows well.
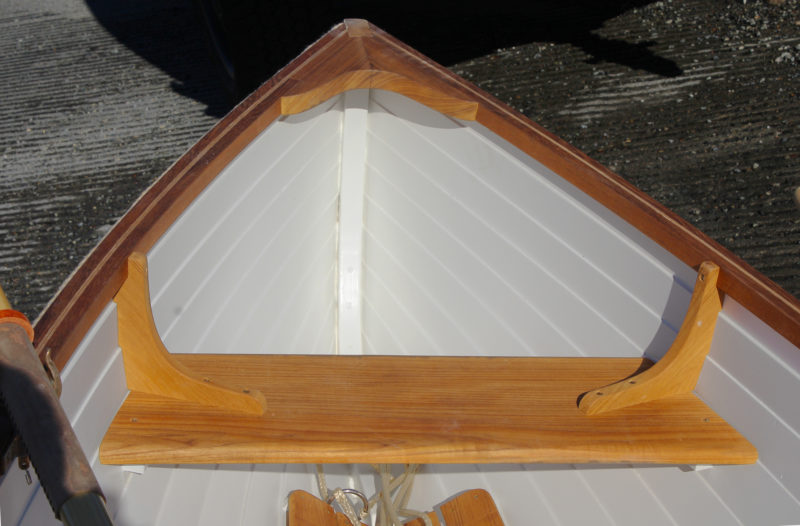
The forward edge of the stern sheets provides a sold foot brace for those with legs long enough to reach it.
As a boat designed to teach kids to row, the Tadpole should perform admirably. The boat is light and easily driven, stable enough to tolerate youthful horseplay, and well mannered whether going straight from point A to point B or following an aimless, meandering path. The Tadpole is a playful boat, so I’d suggest letting the kids play—they’ll figure out how to row in due time. They aren’t likely to have legs long enough to use the stern sheets to brace their feet, so it would be wise to install foot braces that are adjustable to suit each child and keep up with them as they grow. As a parent I was grateful for the times that my kids tired themselves out—a footbrace will quicken their becoming tired and docile. The glued-lap plywood construction is tough, so don’t sweat the scratches and the dings. Introducing kids to boating in boats such as the Tadpole that are pleasing to look at even to an untrained eye is, I think, a good way of fostering a love of boats and an appreciation for traditional forms.
HARPOON was equipped with lifting eyes and harnesses to bring the boat up with davits. The light weight of the Tadpole makes it an easy lift.
The Tadpole will do yeoman’s duty as trainer for budding rowers and as a tender ferrying people and cargo, and it is as attractive as it is utilitarian; it deserves to hang from the davits of an elegant motoryacht.
Christopher Cunningham is the editor of Small Boats Monthly.
Tadpole Tender Particulars
[table]
LOA /10′
Beam/45″
Weight/72 lbs
[/table]
Finished boats are available from Cottrell Boatbuilding starting at $8,496 depending upon trim: oak, mahogany, or teak. Floorboards are an available option. The Tadpole can also be built in 12′ and 15′ lengths as well as in traditional plank-on-frame construction. Plans are not available.
Is there a boat you’d like to know more about? Have you built one that you think other Small Boats Monthly readers would enjoy? Please email us!
I moved to Vancouver from Ontario after I graduated from university in 2009. I was drawn to British Columbia by the mountains but immediately fell in love with the coast, taking a keen interest in surfing, open-water swimming, kayaking, and sailing. Among the very first people I met on the West Coast were two sisters, Karen and Lisa Bodie, who shared a love of climbing and hiking, and we became fast friends. Karen had built a stitch-and-glue plywood kayak when she was in high school. The boat was gorgeous, and when we went paddling it was impossible to launch without having at least a few people come up to say how beautiful it was and sometimes take photos of it.
The outdoor activities I wanted to pursue outweighed the time and money I could afford to spend on them, so kayaking took a backseat to ski touring, climbing, and mountaineering. In early 2015, I was finally ready to invest in my own touring kayak, and Karen encouraged me to make my own rather than buy one. She was planning to build a second kayak, a strip-built one this time, and she showed me some pictures. I ordered plans for a strip-built kayak the next day. I had done some woodworking and had built a few small tables and cabinets, nothing fancy, and I was ready to try something more challenging. There’s lots to say about the kayak—the short version is that was I absolutely loved building it—but this story is about a canoe.
Early in March of 2016, I received a wedding invitation from Lisa and her fiancé Mike Conlan. I had made countless rock climbs with Lisa, skied down glacier-flanked volcanoes with Mike, and been on plenty of ski tours with them both. The way they always interacted with each other and their shared love of the outdoors made them the kind of couple you just knew would end up together for the long haul.
At the time I received the invitation, I was just about to start making my next two kayaks (never one to do something halfway, I had plans to build many more boats right after I’d finished my kayak), but as I contemplated what I might do for their wedding gift, it became obvious. I’d give them a canoe! I am not especially fond of canoeing, but they love it, and the type of boat I built next didn’t matter much as long as I could fan the flames of my newfound passion for boatbuilding.
My kayak project had given me many of the skills I needed to build a strip-built canoe and I had until September 24 to finish and deliver the project—it was on. I wanted the canoe to be a wedding-day surprise, so I only told few people about it. At first, my few confidants raised questions: “How long will this take you?” “Will you be able to finish in just six months?” “Won’t this be kind of an expensive wedding gift?” Blah, blah, blah. I had a once-in-a-lifetime chance to make the wedding present of all wedding presents. Yes, it would take a lot of time; yes, I’d have to hustle to finish on time; and yes, it would cost more than I would have probably otherwise spent on a gift to them, but I love making boats, love the pair of them, and there wasn’t a single reason not to go for it.
Dave MacDonald
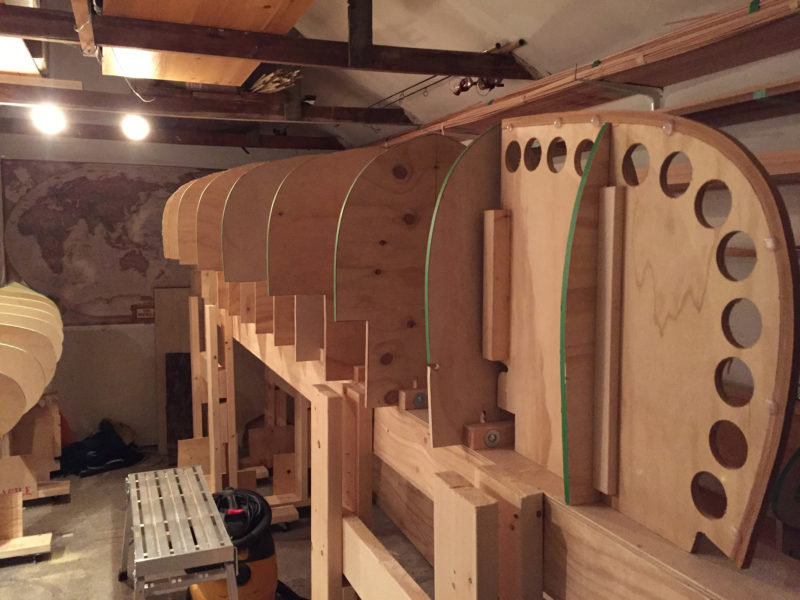
As the building form came together, it was evident how much the canoe would dominate the tiny workspace. The molds for a strip-built kayak would have to wait until after the wedding.
I bought the plans for their canoe: a Chestnut Prospector 16 from Bear Mountain Boats. High on my list of challenges was keeping the boat a secret—not usually considered a strength of mine. Aside from a small handful of people, everybody else would be kept in the dark, thinking I was working on the two kayaks as I had planned. Luckily, Mike and Lisa live in Calgary and don’t often make it back to Vancouver, but both were very familiar with the first kayak and the fact I’d rented a shop to make more of them. They were always curious about how my boatbuilding was going. I couldn’t count how many times Lisa asked for me to send some pictures of the kayaks. “Ahhh sorry! I forgot to take pictures yesterday,” I’d say. “I’ll get some next time I’m there,” or, “I took some but the shop is too small and the canoe doesn’t really photograph well.” I was quickly running out of excuses, but luckily as the wedding drew near her focus turned to planning the event.
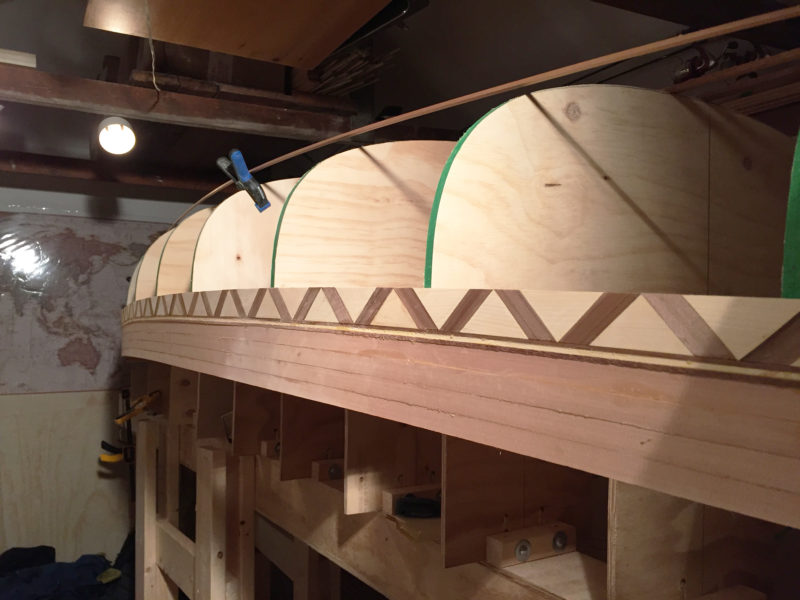
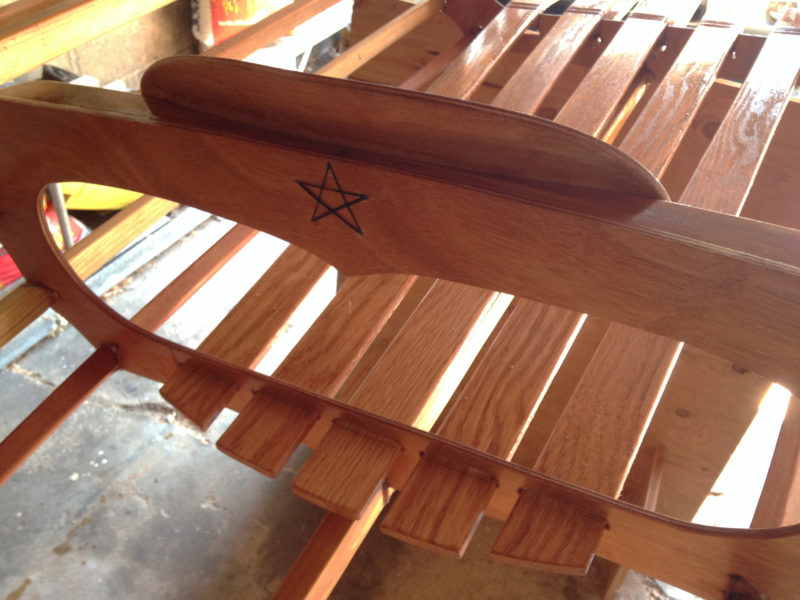
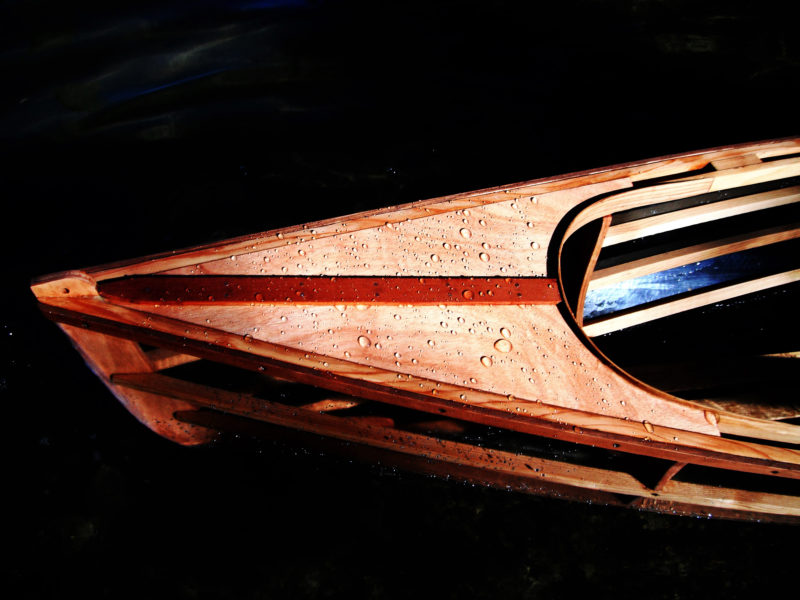
I looked around at a number of different decorative strip-building accent patterns and eventually settled on a diagonally hatched horizontal stripe. I liked the appearance much more than few horizontal stripes of contrasting cedar, and from a woodworking perspective, I looked forward to the challenge, in spite of the extra work it added to my tight timetable.
When I finally got down to building the canoe, I had just as much fun as I did with that first kayak. Assembling the forms, milling the lumber, and watching a boat appear from a pile of rough-sawn lumber was wildly rewarding. I had to schedule the canoe construction around my day job—I’m a structural engineer—and so I spent many late nights and full weekends in my shop. Time was short, but I knew if I kept at it, the project would come together for the wedding.
Dave MacDonald
A radial-arm saw cut a mountain of inlay pieces for the decorative band. Stops on the table made cutting the pieces quick work, but each had to be custom fit in its place on the curved surface of the hull.
The most difficult part of the fabrication was the accent stripe. Using a couple of jigs, I cut a ton of pieces for the different shapes, but each would need to be adjusted and angled to account for the curvature of the boat at their given location. There were over 320 pieces in the strip detail alone, so this definitely took a while. I can’t even remember how many weeks I spent on that particular part. I was running on enthusiasm and caffeinated energy drinks and it’s now all just a blur.
Dave MacDonald
With the zigzag strip detail complete, work on the hull could get going at a fast pace again to finish the canoe in time.
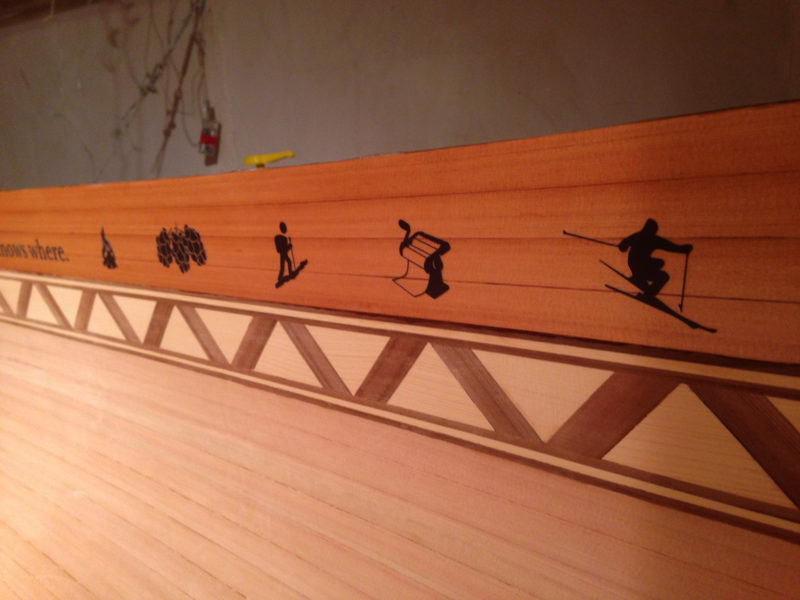
When the strip-planking was finished, the canoe was beautiful, but I knew I had to do something more to make it uniquely Mike’s and Lisa’s. I don’t know a lot of poetry, but I knew of one particular verse that would mean a lot to outdoorsy folks like the two of them. From “The Spell of the Yukon,” by Robert Service (a fellow Canadian): “There’s a land where the mountains are nameless,/ And the rivers all run God knows where….” I decided to put this excerpt on the inside of the hull below the gunwales, surrounded by images that would capture Mike’s and Lisa’s personalities and relationship. The symbols included mountains, a skier, “Love” and “Happiness” in Japanese characters (they’d traveled together to Japan several times), a hiker, hops, and even a pasta maker. Even someone who doesn’t know them can look at this canoe and get a good sense of what kind of people they are. The script and logos are UV-resistant die-cut decals and they’d be covered by the fiberglass and varnish.
Dave MacDonald
The decals that personalized the canoe included a number of images that related to activities—camping, hiking, and skiing—that could have related any outdoorsy couple, but the hops and the pasta maker would make it clear the canoe was for Mike and Lisa.
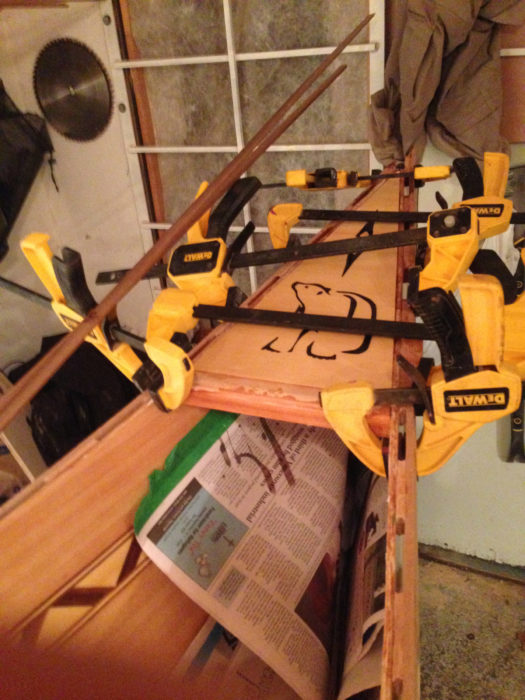
Karen was living and working in Zurich, and despite the distance, she was very much involved in the project. I emailed her hundreds of photos and consulted with her on many phases of the canoe’s construction. She arrived in Vancouver several weeks before the wedding to help out with the final arrangements, and was finally able to make a hands-on contribution to the canoe: a bear and Polaris, the North Star, carved in the stern deck. I carved a maple leaf in the bow.
Dave MacDonald
The stern deck that Karen made would later inspire the name Lisa and Mike gave the canoe: NORTH STAR.
When I ’glassed my first kayak, it went very well, but it was the most stressful part of the process. Given how much time I’d invested by this point in the process of building the canoe, the consequences of screwing up were high. I kept meaning to wear my exercise monitor during a fiberglassing session, because I’m pretty sure my heart rate was through the roof. I was still new to boatbuilding, but I knew enough to recognize that getting a flawless layer of fiberglass is an art. The second most stressful part was the timeline. I took a week off from work just before the wedding so I could give the canoe my full attention.
The day the last coat of varnish dried, I loaded up the canoe for the 560-mile drive to the wedding at Bow Lake in Alberta, Canada. I hitched a ride with Lisa’s Uncle Rob. His car didn’t have great roof racks—we used a lot of ratchet straps and the canoe seemed secure, but there were some slightly scary gusts of wind as we wound our way through the mountain passes of BC. I did my best to just stay asleep during the drive so I wasn’t too stressed about every minor creak or shift of the precious cargo.
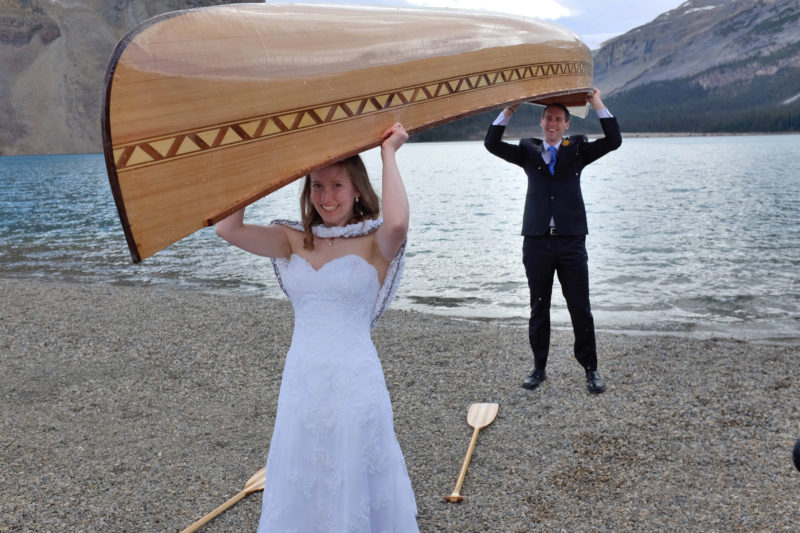
Bow Lake is nestled in the Canadian Rockies at 6,300′, and in late September the weather there is anything but predictable. When Rob and I arrived Saturday morning there had been a fresh sprinkling of very heavy wet snow and it was quite cold—not the most inviting weather for paddling. Most of the wedding guests were out for a day hike. Ernie, my “man on the inside,” helped me arrange our arrival with my all-too conspicuous wedding gift, which we stashed, undetected, in the trees at the lake’s edge.
I could barely contain myself. I had put in so much work to get to this point, and somehow managed to keep one of the biggest secrets I’ve ever kept. Sure, everyone in the wedding party was happy, but I’m sure I was smiling like an idiot.
The wedding service was taking place about 100′ or so up from the lake, and afterward the newly married couple would head to the water with the guests for champagne and photos. In order to deliver the canoe during the celebration afterwards, I recruited Noel, the partner of one of Lisa’s aunts, to help me. Prior to the ceremony I was busy herding folks from the lodge to the wedding site. I was also the master of ceremonies getting the guests where they needed to be, keeping things moving, and playing guitar while the couple walked down the aisle. When the ceremony got under way, I took a seat with Noel at the back. After the vows and the “I do’s,” while the couple was busy taking care of marriage paperwork, Noel and I slipped away. We took off as fast as we could, ran around to where we had stashed the canoe, slipped off our shoes and socks, rolled up our pants, put on our PFDs, and carried the canoe into the lake.
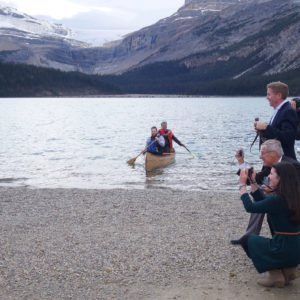
This was the first time the canoe had touched water. After all the planning and effort, I couldn’t believe it was finally about to happen. We hopped in and paddled out quite far into the middle of the lake. I couldn’t stop laughing/smiling. The canoe felt super stable, even though the wind and chop had picked up a bit.
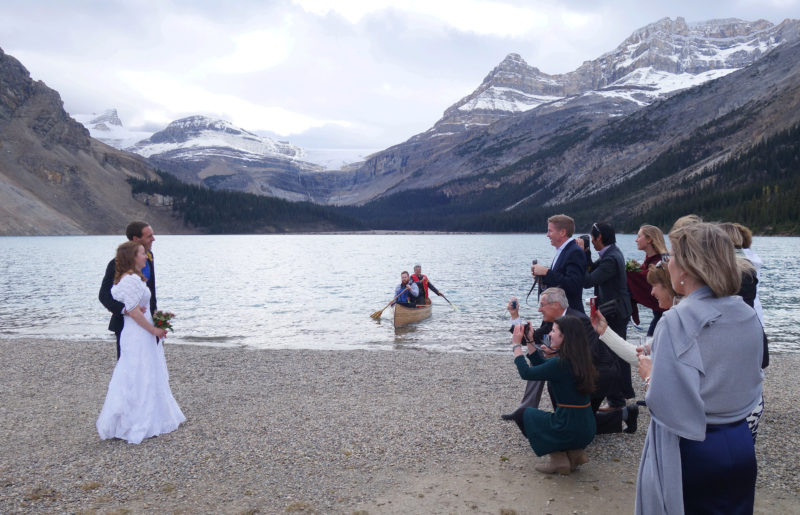
Noel and I sat in the canoe in the middle of the lake, and watched the wedding party make its way down to the water’s edge. In this stunning mountain setting, it was impossible to hide the fact that somebody was enjoying a paddle, but we were out far enough that it was impossible for anyone to see who it was or what they were paddling.
As Mike and Lisa walked toward the lake, they noticed us right away. I was later told they said “How Canadian!!” jokingly adding, “We should try and get them in the background of our wedding photos.” The couple carried on to the beach and at the water’s edge turned away from us to face the wall of “paparazzi” snapping photo after photo. Noel and I had been waiting for the right moment, and this was it. Ernie knew what was about to happen, he was in position to take a photo of us as we paddled up to the beach. Mike and Lisa were focused on the photographers, the photographers were focused on Mike and Lisa, and not one of them noticed us coming ashore.
Ernie Bodie
Noel and I paddled to within a canoe length of the beach before any heads turned our way. It was as though we had dropped out of the sky.
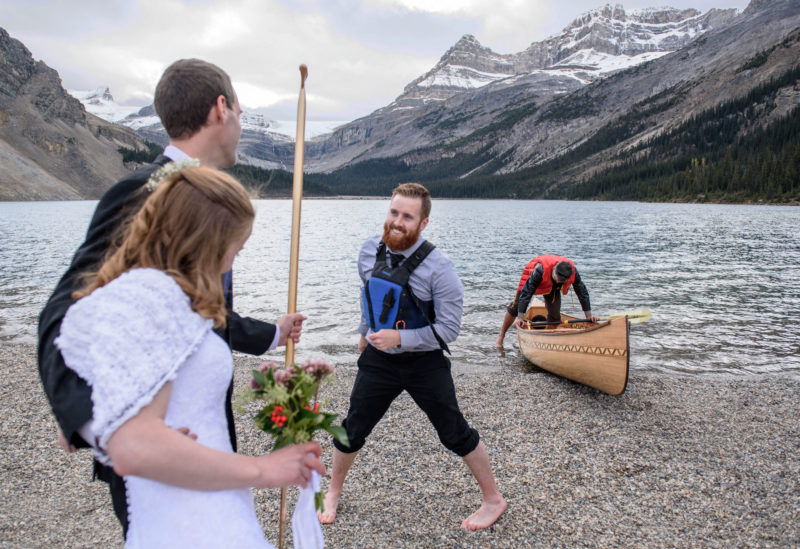
We had managed to keep this a secret up to the last second. We were only a few feet from shore when Noel and I brought the canoe to a stop and everybody finally turned our way. Noel and I popped out; Mike and Lisa were shocked and confused, not so much about the canoe, but about why the hell Noel and I were out paddling during their wedding celebration.
Rich So
When I tossed the paddle to Mike he had no idea that the canoe was a wedding present and didn’t believe it when I told the couple it was theirs.
I tossed my paddle at Mike, vertically, and super hard. He caught it but was now even more back on his heels.
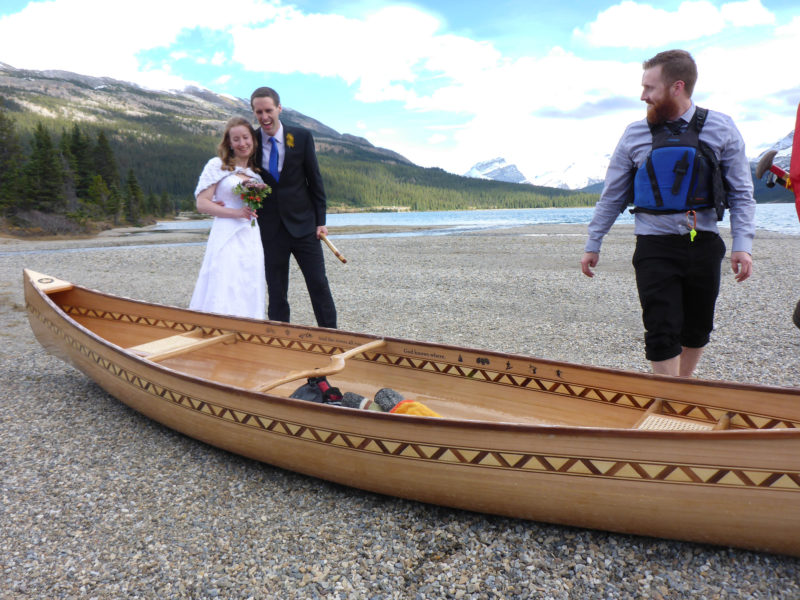
“Congratulations you two! Here’s your boat!”
Mike looked at the canoe again for another couple seconds and replied, “No, it’s not,” as though he believed I had mistakenly thought this was their boat, and was bringing it to them. Noel and I carried the canoe ashore, and set it right next to Mike and Lisa. I’ll never forget the completely blank look on their faces as they looked down at the canoe, just staring at it with eyes like dinner plates.
Mike Edwards
Mike and Lisa couldn’t take their eyes off the canoe and I couldn’t take my eyes off their faces. Their smiles made all the effort I’d put into the canoe worthwhile.
Once they had time to take in all of the decorative elements, they realized there was nobody else this boat could be for. I could hear some of the guests as they came to the same realization: “Oh my, did he make that?” and “What the hell? I just got them a toaster!”
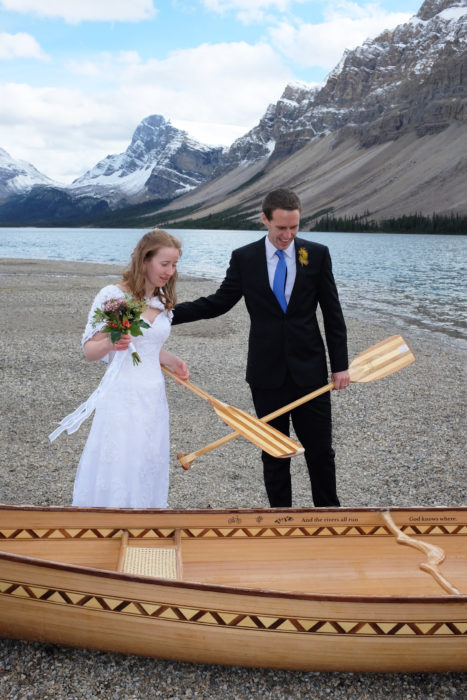
Ken Dittrich
With paddles in hand, it wouldn’t be long until the couple decided to take the canoe out paddling. The wedding reception would have to wait.
In an instant, Mike and Lisa were posing for pictures with the canoe. The weather had broken, and though the day started off with light snow we were seeing beautiful blue skies. Attention turned from photos to the canoe, and it wasn’t long before they were off to the races, carrying their boat to the water.
Ken Dittrich
It was time to go canoeing and wedding finery would have to do as paddling garb.
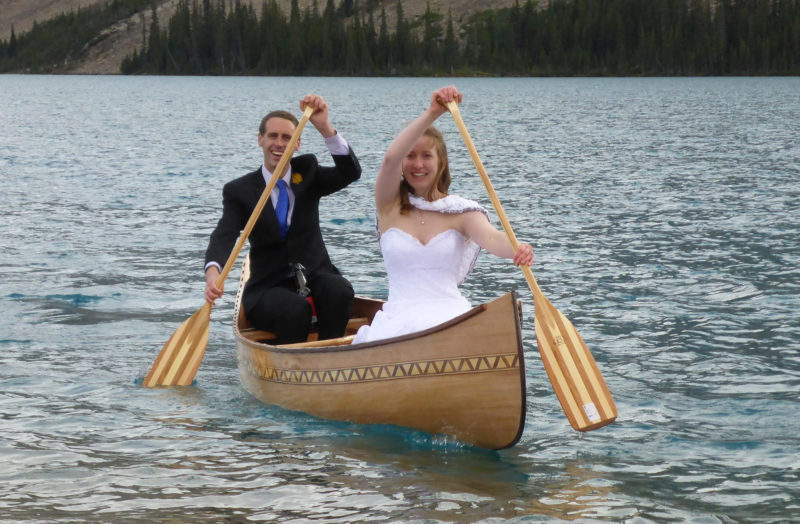
With the stern afloat and the bow resting on the gentle slope of the gravelly beach, Mike stepped aboard and made his way to the stern seat. Lisa hiked up her white lace wedding dress. Noel Swain, the only member of the wedding party who was wearing waterproof boots, slipped the bow off the shore, pushing Mike and Lisa out into the lake.
Mike Edwards
Lisa and Mike showed their good paddling form as they put the canoe through its paces. They reported that it was quite stable and handled well.
Mike and Lisa are good paddlers and quickly had the canoe up to speed. I liked how it looked in the water and how well it responded to their paddling. I was so happy to see them in the canoe. They were beaming, and it was clear they loved it. I had never doubted that the gift would be worth the time and effort, but seeing how much they were enjoying it confirmed it. We sometimes get opportunities to do something extraordinary for other people, and it’s important to take those chances. I’m glad I did; I feel lucky that I could do something I love for people I love.
Dave MacDonald is a structural engineer in Vancouver, British Columbia, who spends most weekends in the area’s mountains or on the water. The first few boats he built elicited overwhelmingly positive feedback and with passion, enough wood stock, and ideas, this won’t be the last boat we’ll see from him. He plans to continue this as Howe Sound Wooden Boats, named for one of his favorite regular paddling locations.
If you have an interesting story to tell about your adventures with a small wooden boat, please email us a brief outline and a few photos.
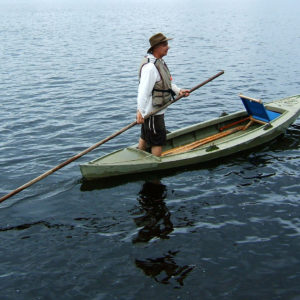
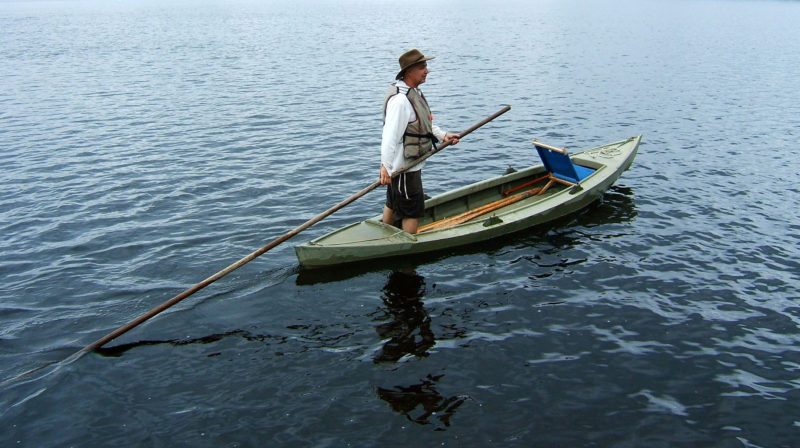
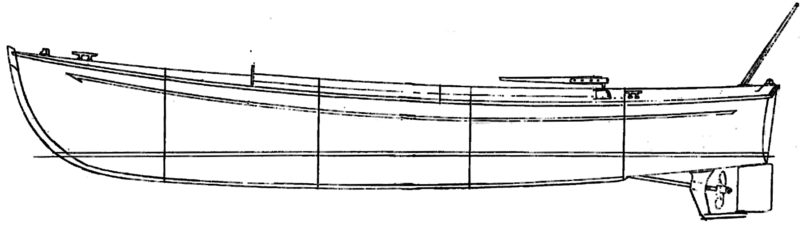
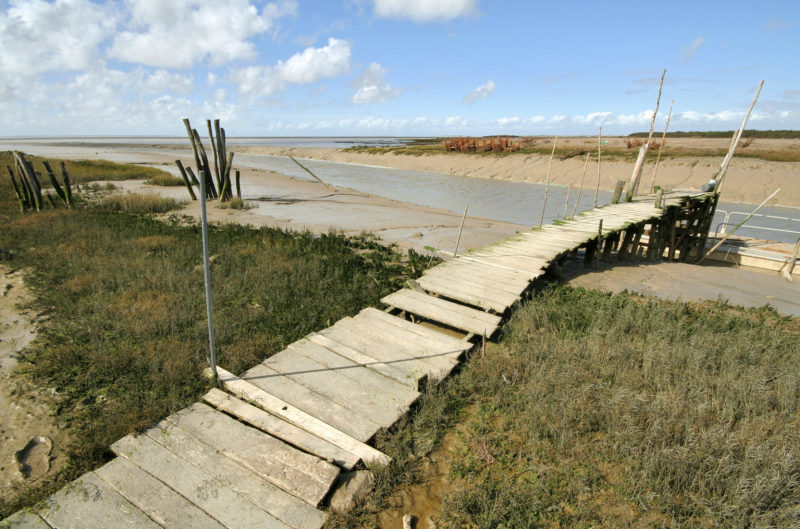
Tom Shepard poles a railbird skiff in the shallow waters of the Delaware River basin. The skiff is in the collection of Independence Seaport Museum in Philadelphia, Pennsylvania.
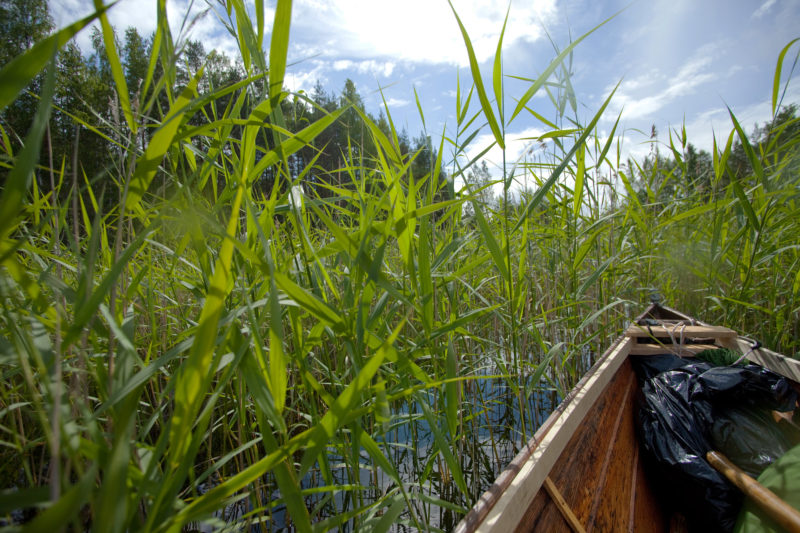
A while back, I read a blog post that urged those of us with small boats to explore the shallows and marshes by poling our craft where the water’s too shallow for motors, and the grass and reeds are so tall that you can’t see much more than 20′ through them if you’re sitting down to paddle or row. The post concluded that we should all head to the lumberyard, grab a piece of closet rod, and start poling. If that seems a bit simplistic, it is, but if there are marshes or thin water in your area that you’d like to explore, poling is well worth considering.
Protected shallow waters such as narrow estuaries and wetlands, where grass blocks the wind and breaks up the waves, are good poling country, but you can pole almost any shallow, protected water that is flat and calm with depths from about 8″ to 3′. A pole isn’t very effective in water much deeper than that, and it’s easy to decide when it’s time to row or paddle because you’ll be working frantically to reach bottom, only to travel a yard or two.
Roger Siebert
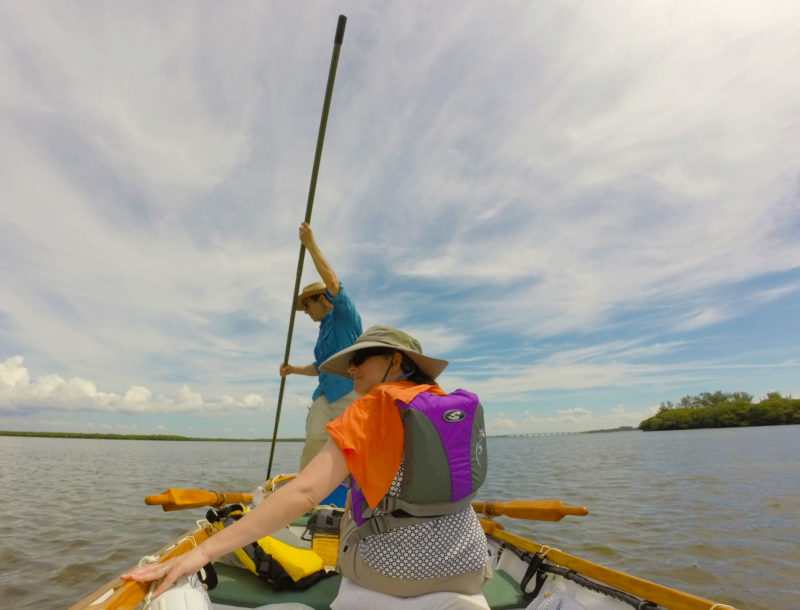
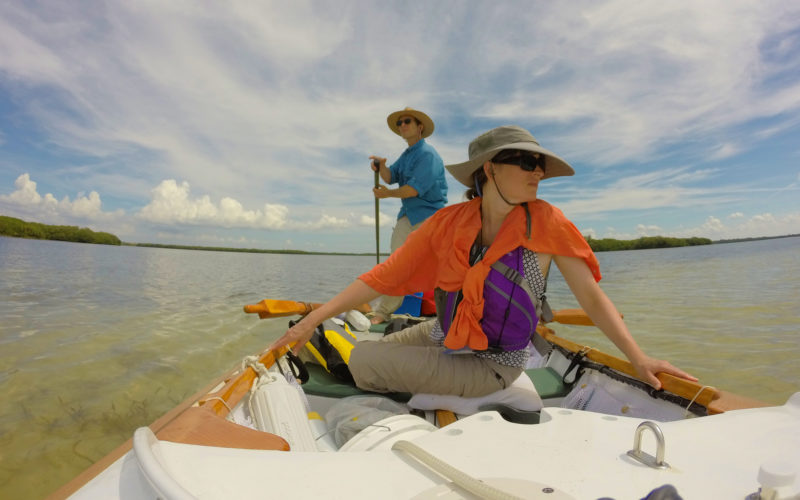
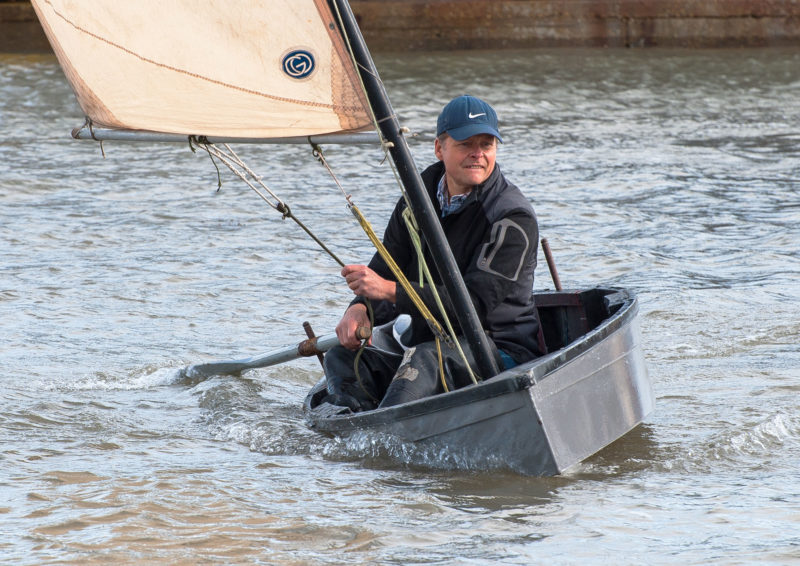
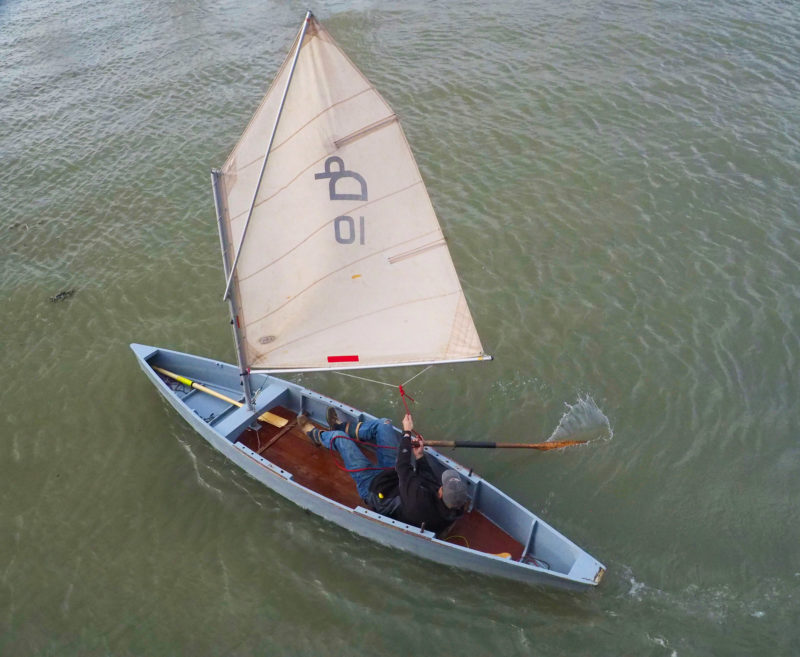
Near the mouth of Florida’s Tampa Bay, Roger Siebert and his wife Victoria switched from rowing to poling to explore the shallow waters around Shell Key.
Roger Siebert
The Siebert’s boat is a Lillistone-designed Flint; the pole is aluminum and extends from 5′ to 12′ and has a folding duck-web foot on its business end.
I’ve picked up a lot of tips from guides, hunters, and naturalists from the Maurice River in southern New Jersey, the Susquehanna Flats in Maryland, and the Patuxtent River marshes near Washington, D.C. With a pole you will always travel very slowly, at less than a walking pace, leaving the environment relatively undisturbed. You see a lot more wildlife, and it’s a relaxing way to travel.
Boats designed to be poled have some special attributes. In general there is no rocker to the bottom, as upward-curving ends tend to make steering squirrelly. Low freeboard reduces both windage and visual impact, which is useful for hunting. A little outward flare in the topsides adds a touch of secondary stability, but only a touch. The beam on most boats runs 36″ to 44″. Double-ended boats work well moving through grass and reeds; the bottom should be flat and smooth, with no external stringers or battens. Traditional push boats are quite slender and consequently they’re not very stable; poling one of them is a pretty refined skill. These boats are unmanageable without a person or equivalent ballast in the bow. With the boat we call a gun punt or railbird boat in the upper Chesapeake, known as a pirogue in most other places, the pusher stands on a platform mounted at or slightly below the stern gunwale, sort of like a seat or a large breasthook.
One doesn’t need a particular boat to ply thin waters; larger, more stable boats can be poled. Flats boats in Florida are outboard skiffs that reach fishing grounds under power, then are poled once they reach the shallows. Your boat may fall somewhere in between a push boat and a flat boat; poling may be a new way for you to go exploring, take photographs, and go messin’ around in waters you’d previously steered away from.
Though a wooden boat is paired nicely with a wooden pole, I wouldn’t blame anyone for choosing a lightweight fiberglass or carbon-fiber pole. Weight makes a difference—think logger boots versus sneakers. Preferred woods for poles are spruce, red cedar, or sassafras. Of those, spruce has the best strength-to-weight ratio. The Upper Bay Museum in North East, Maryland, has about a dozen very old push poles, all between 2″ and 2-1/4″ in diameter. They are not light but remarkably straight, all about 14′ long and perhaps made from old lifeboat oars. It’s important to choose a pole that’s appropriate for your boat’s length. As for diameter, railbird guides in the Chesapeake Bay area seem to prefer 1 1/2″ for wooden poles.
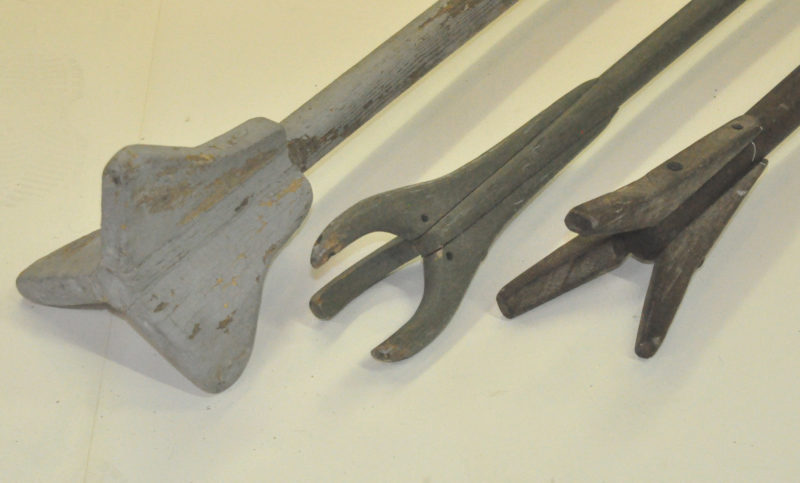
Lori Burskey Bouchelle
All of these poles in the collection of the Upper Bay Museum of North East, Maryland, are native to the upper Chesapeake, probably not much south of the Sassafras River. The one on the left was used by the Coulter family for over fifty years, starting about 1900, with a converted gun punt. Its design is unique, an Abrams tank of a general-purpose pole, and it is really heavy, perhaps too heavy. The center pole may have been meant for use in to thick grass. At the time it was made the waters where it was used were nearly a lawn, and the only clear water was in the ” ditches,” as the natural channels are called. The pole on the right is a very common general-purpose design, perhaps a bit lightly built but very much like many other examples of its era.
What matters most is what you put on the bottom end of the pole. Poles with pointy ends are good for a hard or rocky bottom. If a pole gets stuck and won’t pull out, don’t hang on to it. A stuck pole can pull you off the boat (as a very capable friend of mine proved), so let go before you lose your balance.
Poles with folding feet have been commercially available for a hundred years to prevent, in theory, a stuck pole, but in the Chesapeake they are considered useless except you’re collecting grass samples. Most pushers simply give the pole a twist to break any suction when they retrieve it. A few will do the twist as they set the pole. You move the boat forward by walking your hands to the dry end of the pole, not by pushing with both hands fixed on the pole and putting your weight into the push.
Christopher Cunningham
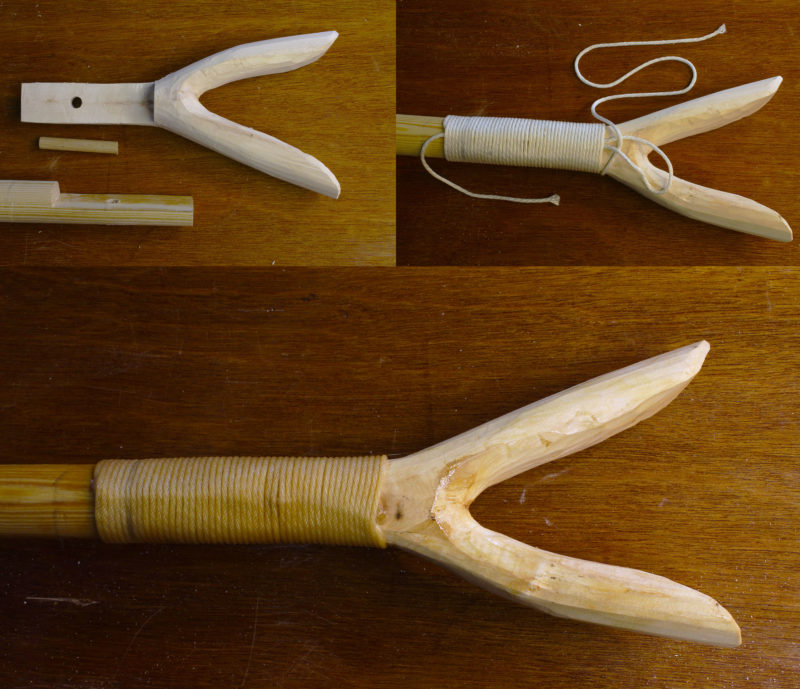
The Chippewa of the Lake Superior region harvest wild rice by canoe, using a pole, usually cut from a slender hackmatack, and a foot carved from a Y-shaped crook. A half-lap joint, a peg, and a lashing hold the two pieces together
In most cases, you’d lift the pole over your head and switch it to the other side to change direction. One characteristic of a pirogue is the narrow beam of its sharp stern, which eliminates the need to for the over-the-head maneuver: you can keep the pole on one side and steer both directions from the same side. Push a little left and the boat goes left, a little right and it goes that way. You can also steer by edging the boat like a kayak: Put your weight on your right foot, and the boat goes left, and vice versa.
The Susquehanna Flats—near my home in Havre de Grace at the north end of Chesapeake Bay—are about 5 miles wide and 9 miles long. The flats may look like the Great Lakes, but in most places they’re only 6″ deep at low tide. The silt there is 2′ deep; propellers get mired in it and oars and paddles merely paw at it. Poles don’t mind it at all, and there are lots of waters like the Flats you can have to all yourself if you have a boat you can pole.
Charlie Gerhardt lives in Havre de Grace, Maryland, on the Susqehanna Flats. His interest in wooden boats and classic small craft evolved through disappointment with the characteristics of “market driven” fiberglass designs. He currently serves on the board of the Upper Bay Museum in the nearby town of North East, and restores historic small craft at the Chesapeake Bay Wooden Boat Builders School.
You can share your tricks of the trade with other Small Boats Monthly readers by sending us an email.
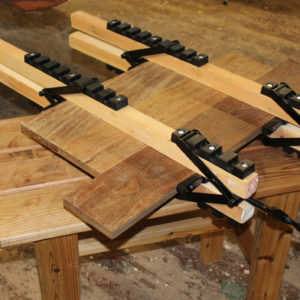
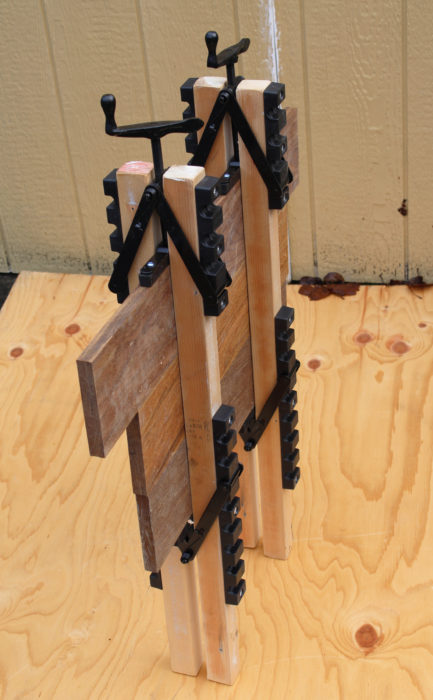
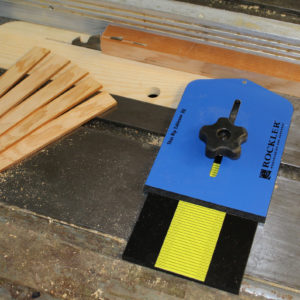
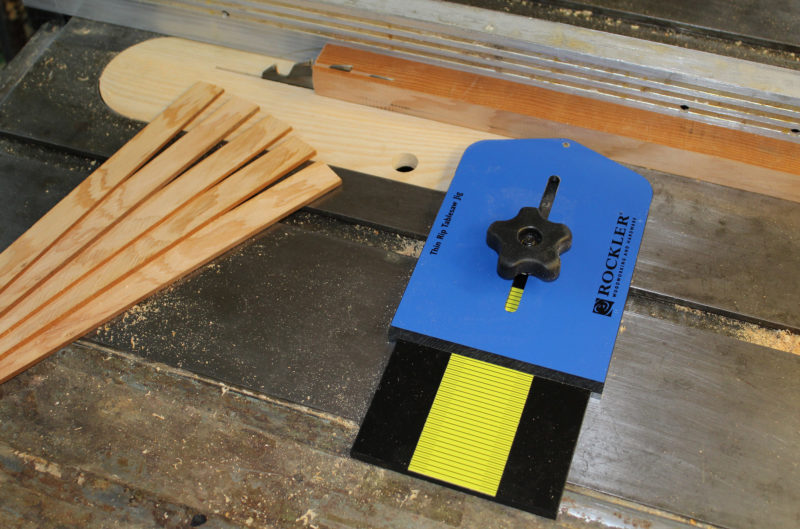
The angled arms of the system pivot to allow the clamps to accommodate work up to 6″ thick as well as apply pressure to the faces of the boards being clamped.
It is often necessary to edge-glue multiple boards to get the width necessary for parts such as centerboards, rudders, trunks, transoms, and thwarts. Anyone who’s ever built a wooden boat knows that gluing up these wide panels can be tricky. The WoodRiver 4-Way Clamping System makes this task a breeze by providing clamping power that squeezes the glue joint tight while keeping the boards aligned with each other.
The most common way to edge-glue wide panels is to lay the boards out and sandwiched the ends between straight sticks clamped to keep the boards aligned and flat; then pipe clamps or bar clamps are used to squeeze the glue joints tight. But these clamps tend to cause the panel to bow away from the pipe or bar, and so the clamps need to be placed on alternate sides of the work piece. This is often a messy affair, as there is a pile of clamps needing to be tightened with equal pressure on both faces of the panel to keep it flat, and it has to be blocked up so clamps can slide underneath.
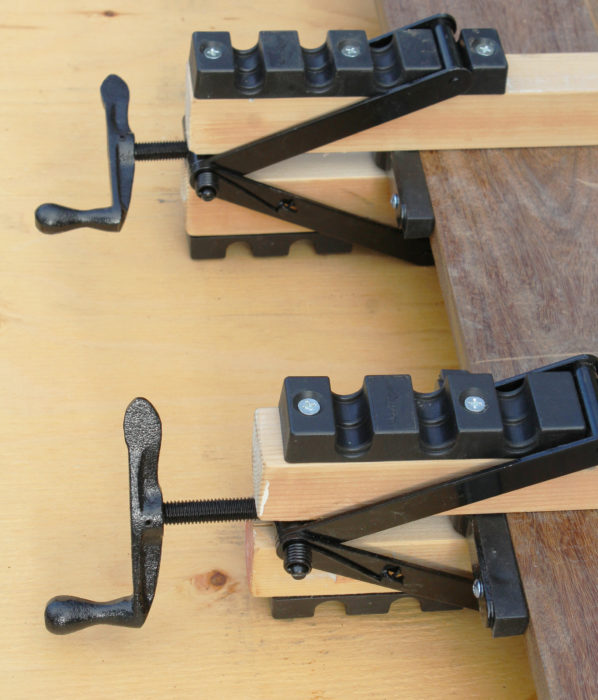
The screw element of the clamp is used on the short notched bar. Some of the pictures of the system on the packing and the drawing in the instructions have the screw side of the clamp engaging the longer notched bar, but only the short bars prevent the 2x2s from interfering with the screw handle.
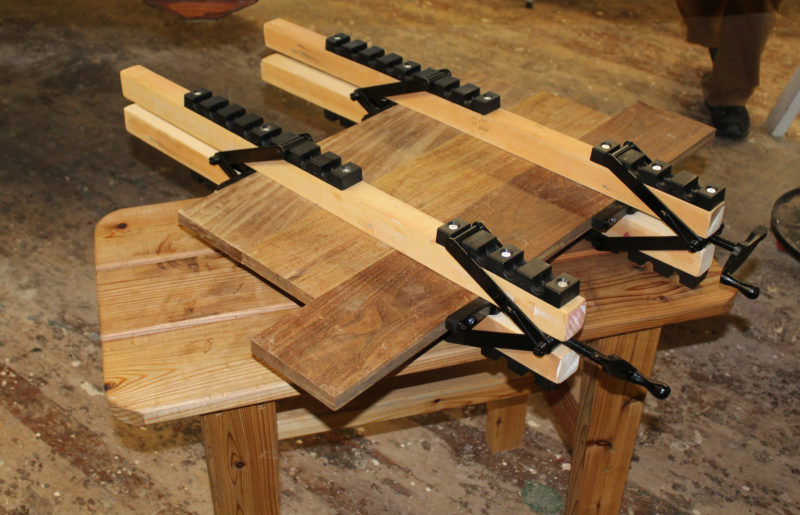
The WoodRiver 4-Way Clamping System simplifies this process by cutting down the number of clamps necessary, and by applying pressure to the edges and the faces of a glue-up. The device includes two clamping mechanisms and four notched plastic pads. The pads are attached to the ends of a 2×2 (or a halved 2×4) with the screws provided. The V-shaped arms have crossbars at the ends that fit into the pads’ notches and springs on the arms hold them there. In the center of each V is a 6″-long clamping pad, one fixed, the other at the end of the clamp’s screw. When pieces to be glued are set in the clamp, tightening the screw squeezes the glue joints tight and pulls the 2x2s together, flattening the panel between them.
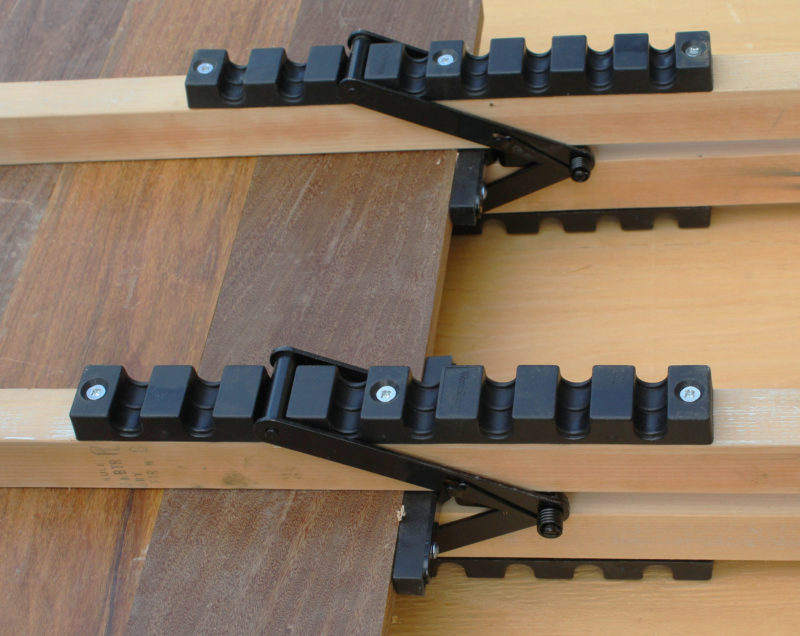
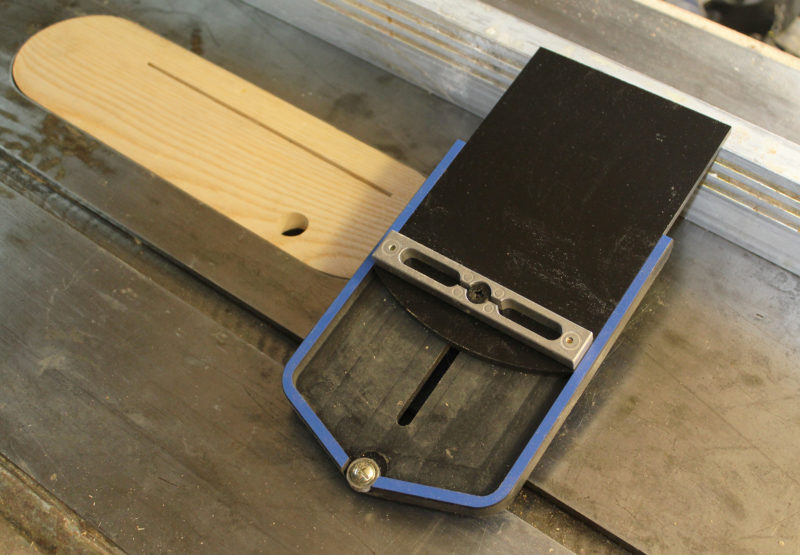
The long notched bars provide for about 12″ of adjustment on the tail end of the 2x2s.
The multiple notches on each pad allow for an adjustment range of 18″, and the system can extend that range by using longer 2x2s. I used two 24″-long pieces cut from a common softwood 2×4. A wrap of packing tape keeps them from getting bonded to the workpiece. The clamping system can accommodate stock between 3/4″ and 6″ in thickness.
I found these clamps relatively easy to use after a couple of practice runs. They take some getting used to, but aren’t any more complicated than using sticks, C-clamps, and bar and pipe clamps. Once I determined which notches to use, I attached the clamping mechanisms to the pads of the 2x2s set on the workbench. I placed the boards, edges coated with glue, on the 2x2s and then slid the top 2x2s into the clamps. I then tightened the handles and that was it. My work piece came out flat with even glue lines, just what I was looking for. I was even able to stand the whole piece against a wall while still in the clamps so I could clean the glue squeeze-out on both sides, which was pretty handy. My pipe and bar clamps tend to add a lot of weight to the work and don’t offer convenient footing to support it on its edge.
The system provides the work with legs to stand on so it can be set out of the way while the glue cures. Unlike bar clamps and pipe clamps, these clamps can’t be accidentally knocked off.
The only knock on these clamps is that they don’t appear to be as durable or as strong as pipe clamps and bar clamps so they shouldn’t be used to eliminate gaps of poor jointing. They’re at their best for straight, flat edges that don’t need to be squeezed tight to make a good joint. The most commonly used adhesive, epoxy, doesn’t require high pressure to create a good bond. Prompt attention is needed to clean up any glue that ends up on the springs to keep the clamps in good working order.
With some practice, the WoodRiver 4-Way Clamping System can save you time on wide glue-ups by simplifying the process. Given the better results they produce, they would be a welcome addition in any shop.
Josh Anderson attended the Apprenticeshop boatbuilding program in Rockland Maine, and has since worked at several boatbuilding and carpentry shops. He and his wife, Sarah, restored a 25′ Friendship Sloop, operated a charter business with it, and spent several years sailing the Maine coast. Josh has a Masters in Maritime Management from Maine Maritime Academy and is now the Lead Boatwright at the Center for Wooden Boats in Seattle, Washington.
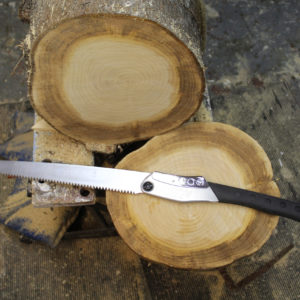
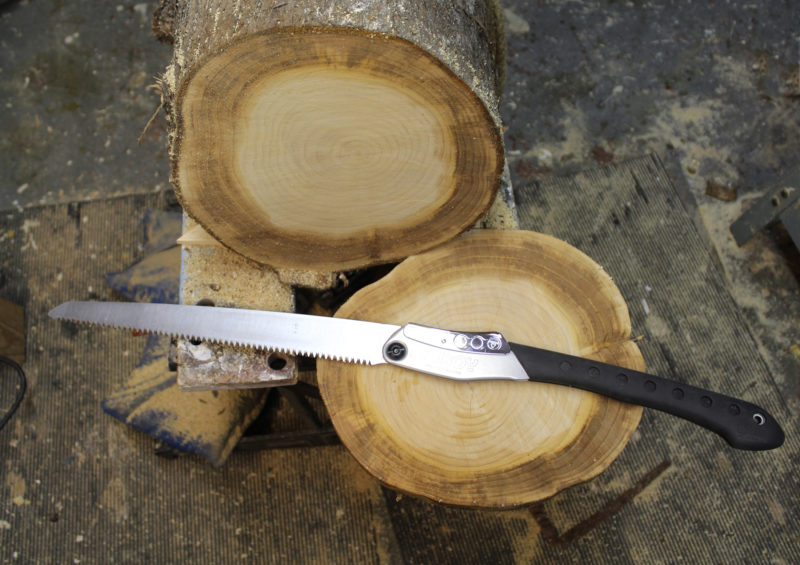
Open, the Bigboy is 30″ long. It cut through this 6″ alder limb in just 24 seconds.
When I was living in a cabin I’d built in Washington State’s Cascade mountains, I was way off the grid and miles from the roadhead. I relied on my chainsaw to cut firewood for heat and to harvest vine maple as well as downed red and yellow cedar for some of my woodworking projects. On my coastal cruises I also gathered windfalls and driftwood and I carried a small folding Japanese pruning saw and a pocket chainsaw—both a far cry from my gas-powered chainsaw, but better than nothing. I’ve recently added a Silky Bigboy to my boating toolkit. It too is a Japanese pruning saw, but it is no more like the one I’ve been using than a piranha is to a guppy. Like all Japanese saws, it is designed to cut on the pull stroke while the blade is in tension, so the blade doesn’t need to be as thick as that cuts on the push stroke. The Bigboy’s kerf is much narrower and consequently consumes less energy. The saw is available with medium or large teeth. The large teeth are suited for cutting green wood and are a good choice for arborists working with live trees. I got medium teeth, since wood I collect for firewood and woodworking is usually dry.
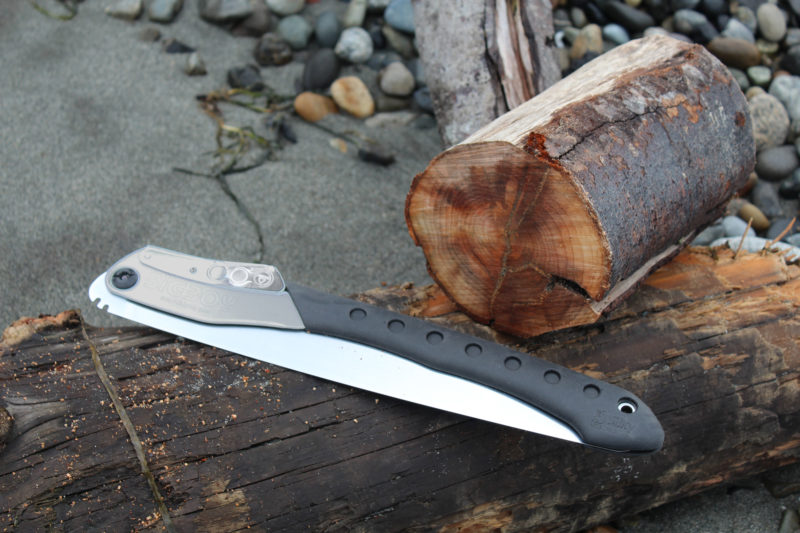
Folded, the saw is 16″ long. A rubber grip covers a portion of the aluminum handle, with the rubber wrapping into the slot for the blade, protecting the teeth from wear.
The aluminum handle is 15″ long, 11″ of which is covered with rubber that provides grip and good purchase for two hands; it feels like wielding a samurai sword. I can use the saw with one hand, of course, and use the other hand to steady the wood, but that cuts my power in half. If I brace the wood so I can use both arms to power the saw I spend less time sawing, and the chances of the saw binding and bending are significantly diminished. Being able to cut larger logs makes fuel for a campfire that will last longer without having to stoke it with smaller, more quickly consumed sticks.
The blade is tapered along its entire length, and the tooling marks indicate the taper was cut by a circular tool, slightly canted, so the blade is also tapered from teeth to back and slightly hollow. That eliminates binding in the kerf without having any set bent into the teeth. The milling stops where the blade is joined to the handle, so the steel in the pivot is at its full thickness and has flat parallel faces. The blade locks in two positions, parallel with the handle and at an angle to it, creating clearance for the hands when sawing through something resting on the ground. The teeth are truncated at their tips with a third facet, making the points less fragile than they would be if shaped with just two facets meeting at a more acute angle. A slight darkening of the tips shows that the teeth have been tempered where the cutting takes place. The rest of the steel isn’t brought to the same hard temper, which prevents a brittle blade. The teeth are too hard to sharpen with a file; replacement blades are available.
I took the saw to the beach and put it to work on the 6″-thick branch of a rather soggy alder driftwood log. I worked quickly, but I didn’t have to work hard. The Bigboy got through the branch in 30 seconds; a second cut took 24 seconds. To put that speed in context, my hand-powered pocket chainsaw with power-chainsaw teeth every third link, took 2 minutes and 40 seconds to get through the same log, jamming a half dozen times and leaving me quite winded. My other pocket chainsaw, with two triangular teeth on each link, cut through in 90 seconds and while it didn’t jam, it was hard work and I was panting with the effort. With both pocket chainsaws I’d have to rest before making another cut. Back in the shop, my 14″, 1/2-hp bandsaw with a blade past its prime got through the log in 23 seconds; my 10″ 1/3-hp bandsaw with a brand-new blade took 17 seconds.
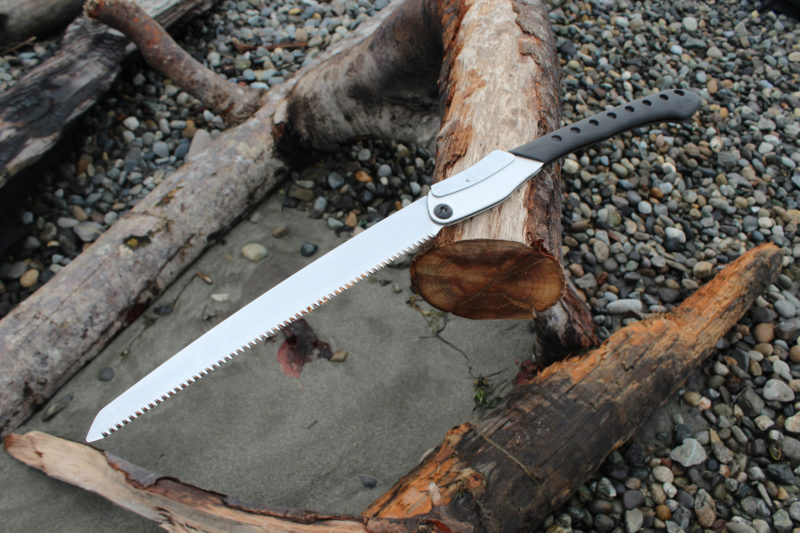
This 12″ Alaskan yellow cedar log wasn’t too big a job for the Bigboy. It cut through in five minutes.
To put the Bigboy to a challenge I wouldn’t even attempt with the pocket chainsaws, I attacked a section of a yellow cedar log with a diameter of 12″ (not counting the bark). I got through it in 5 minutes and 2 seconds. The wood was wet and I could feel a bit of binding, but the blade never got hung up or bent on the push stroke. That job tired me a bit, but I never felt the need to stop and rest. The cut surface was quite flat and exceptionally smooth.
The saw weighs 14.7 oz and is 30″ long when open and 16″ folded. The 14″ blade has 8-1/2 teeth per inch (tpi). Blades with 6 tpi for green wood and 11 tpi for hardwoods and bamboo are available. The Bigboy isn’t cheap, but it’s a well-designed, sturdily built tool that is very effective and a pleasure to use.
Christopher Cunningham is the editor of Small Boats Monthly.
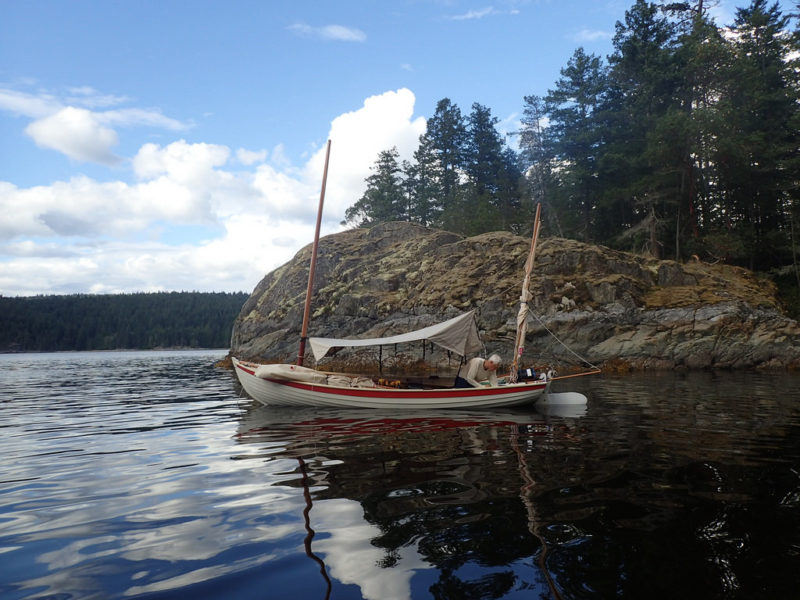
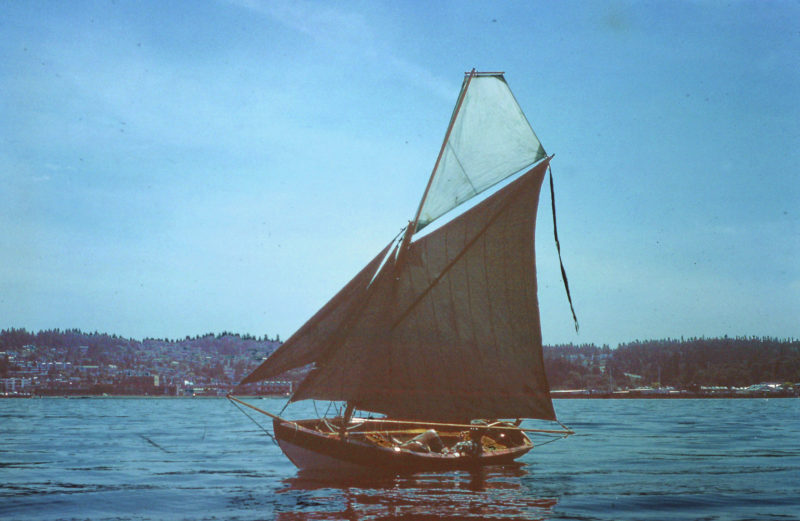
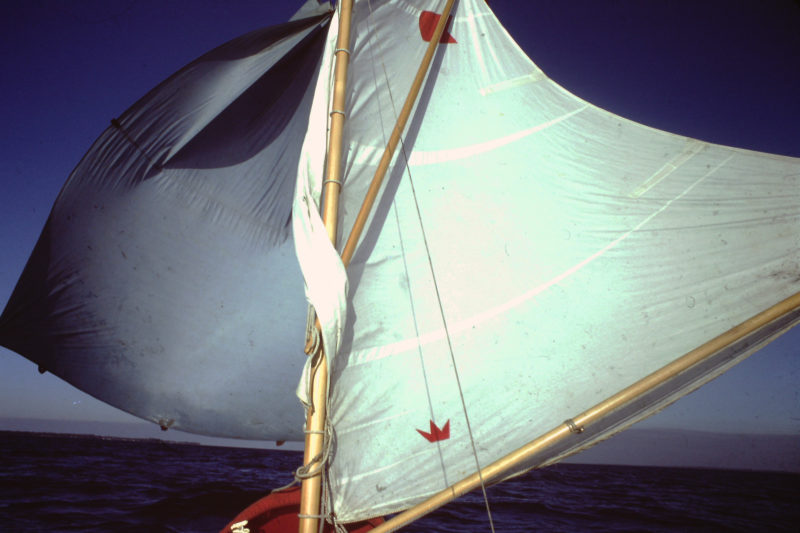
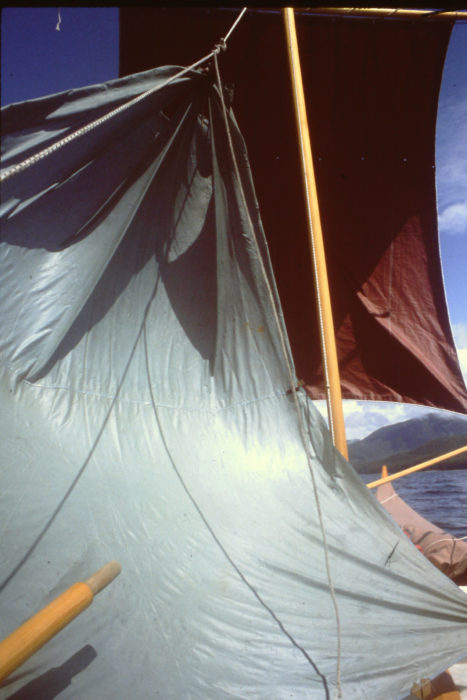
The yawl rig has advantages beyond those for sailing. The two masts support a fly that can be set open for shade and a cooling breeze, or…
Tim Yeadon
…snugged down to keep wind, rain, and bugs out.
Alex Zimmerman lives in Victoria, British Columbia, just a half mile from the shores of Haro Strait, a channel that overlaps the border between Canada and the U.S. From the beach nearest his home the American San Juan Islands lie 7 miles to the west, the Canadian Gulf Islands 7 miles to the north. It’s a place synonymous with boating. Alex had done a lot of sea kayaking in the area and the years of paddling were getting to his shoulders, so he decided to switch to a boat that he could row and sail.
Alex Zimmerman
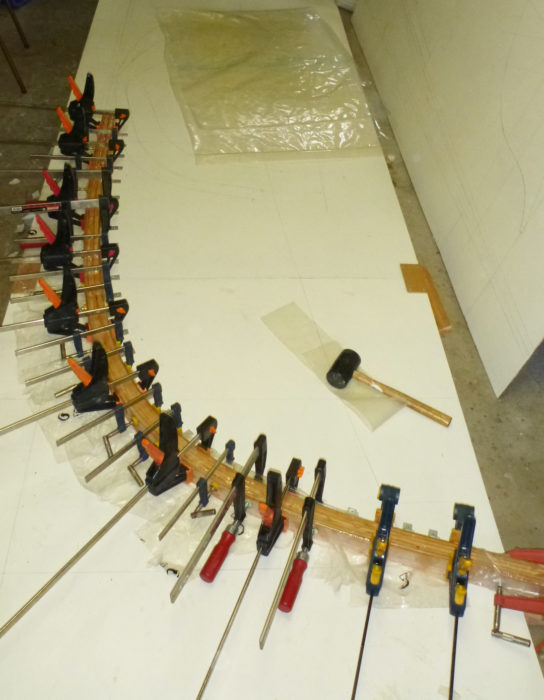
The stem was laminated directly on the lofting. Metal angle brackets screwed in place along the the inner curve created the form that the lamination was clamped to.
He took an interest in an updated design of a traditional Whitehall, built the boat, and cruised with it, solo and in the company of other boats, for seven years. He explored many miles of BC’s coast with the Whitehall, and it served its purpose, but as his experience grew, so did his dissatisfaction with the boat. It was time to build something better.
Alex Zimmerman
Battens mark the placement of the 11 strakes. The tabs on the third mold show where the battens corrected a problem in the preliminary design.
The garage in which he would build the boat set the maximum length at 18′, and he had a number of other requirements: a lug yawl rig for its practicality, built-in flotation tanks for safety’s sake, space for sleeping on the floorboards, a centerboard to avoid the risks posed by a daggerboard, and a curve from keel to stem that would take kindly to beaching. He wanted a boat that could carry more sail when the breeze picked up and a rig that could point higher than the Whitehall and make better progress to windward in rough water. The old boat would point fine in flat water, but would fall off at least 10 degrees as it got rougher.
Alex Zimmerman
Copper tubes drain water from the mast-step boxes to the cockpit where it can be pumped out.
None of the designs he studied seemed to fit the bill, so he decided to design the boat himself. During his time in the Canadian navy, he had worked as a maritime engineer, so he knew enough about hull design to take on the challenge. He drew the boat using a CAD program, and then built a scale model at 1″ to 1′ to better see the form he had created.
Alex Zimmerman
The lines for FIRE-DRAKE
Alex Zimmerman
Some of the hydrostatics for FIRE-DRAKE
Alex Zimmerman
Raising the mainmast is eased by the elongated box that guides the heel to the step as the mast is brought upright.
As Alex was making the final adjustments to the design, his friend Tim Yeadon began building the first of Eric Hvalsoe’s Hvalsoe 18s (later reviewed in the June 2016 issue of Small Boats Monthly). Alex liked the design and believed it would meet his requirements, but Eric didn’t want make his design available until he’d had a chance to see how Tim’s 18 performed. Alex had already invested a lot of time and effort in his own design and decided to proceed with building his boat. He began work in January 2015.
Alex Zimmerman
The aft compartment is sealed with watertight hatches for flotation and dry storage.
He made the molds, set them up on a strongback, and sprang battens to line off the hull for glued-lap plywood construction. Stepping back from the form he noticed that the third mold from the bow was pulling the battens in, creating a flat spot. It hadn’t shown up in the scale model, but with another look, he did find a view in the CAD drawing that revealed the problem. In his efforts to achieve the ideal angle of entry, he had pinched the bow slightly. Alex freed the battens from their fastenings at the third mold, and they all popped out and faired themselves. He added some tabs to the molds to keep the battens where they wanted to be.
Dave Lesser
FIRE-DRAKE sails well to windward, but there are times when it’s best to drop the rig, retract the centerboard and rudder, and row.
Alex used a NACA (National Advisory Committee for Aeronautics) foil section in designing his new centerboard—the airfoil shape, thicker and broader than that of a typical centerboard, would provide better upwind performance, particularly in rough water. To assure the board was properly shaped, he gave his CAD program files to Matt Weaver, who could use a CNC machine to carve the board.
James McMullen
FIRE-DRAKE (left) ghosts along with Tim Yeadon’s HAVERCHUCK.
Alex finished his boat, christened FIRE-DRAKE, in June 2016. By that time, Tim Yeadon had also launched his Hvalsoe 18, HAVERCHUCK. They both did a few shakedown cruises and in July of 2016 traveled north together along the section of the Inside Passage tucked between Vancouver Island and the BC mainland. They covered 300 nautical miles and encountered a wide variety of conditions—a good test for both boats. Alex discovered FIRE-DRAKE is “more work to row than my previous boat, but I knew it would be, with 10” more beam and more wetted surface. She stands up well to her sail area and sails to windward as well as I’d hoped.” He came back from the trip with some minor improvements to make, but added, “I think I got the fundamentals right and met my design objectives.”
Have you recently launched a boat? Please email us. We’d like to hear about it and share your story with other Small Boats Monthly readers.
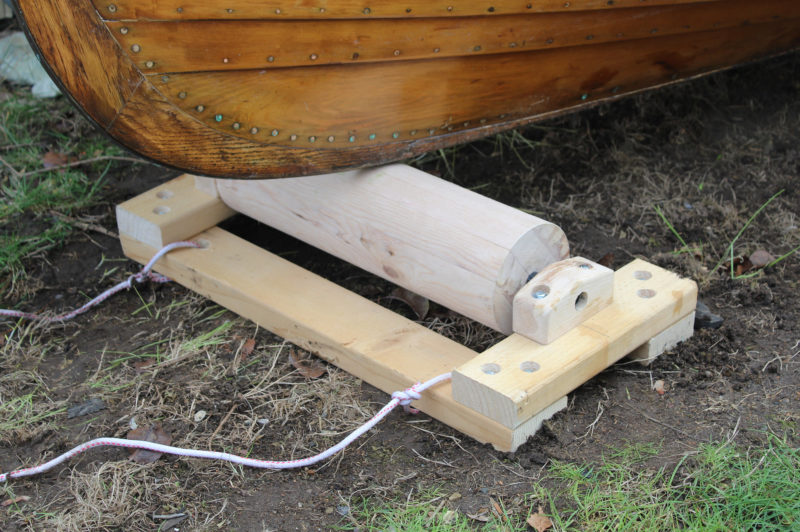
Like Ben Fuller, I have more boats than trailers to haul them, so when I read his article on the roller cart he built with Joe Liener, I was convinced that I needed one or two to shuffle my boats.
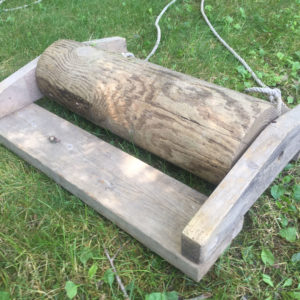
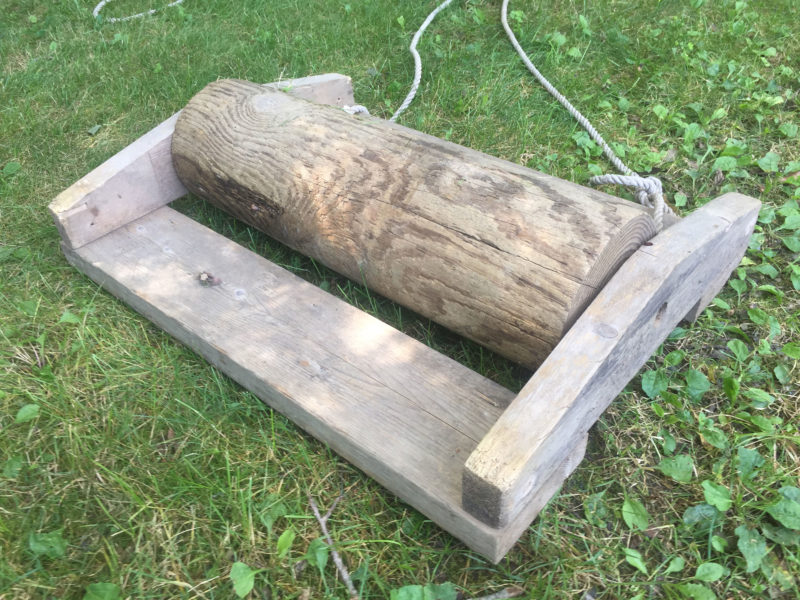
How to Make a Wooden Roller
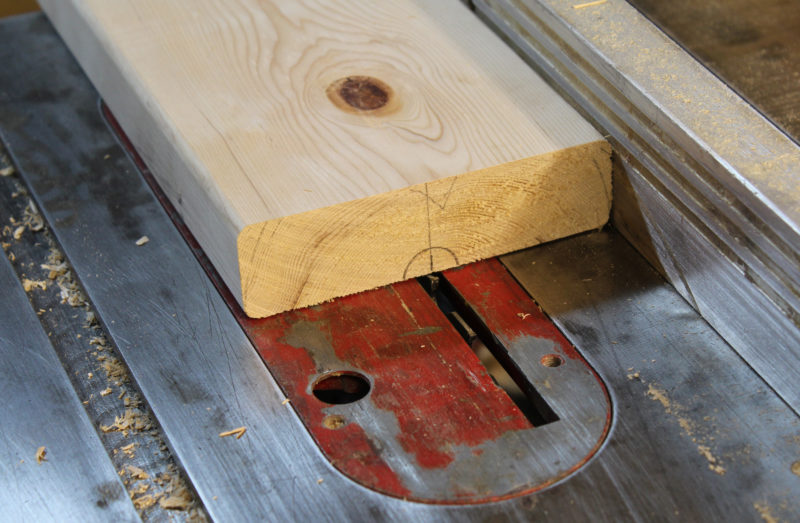
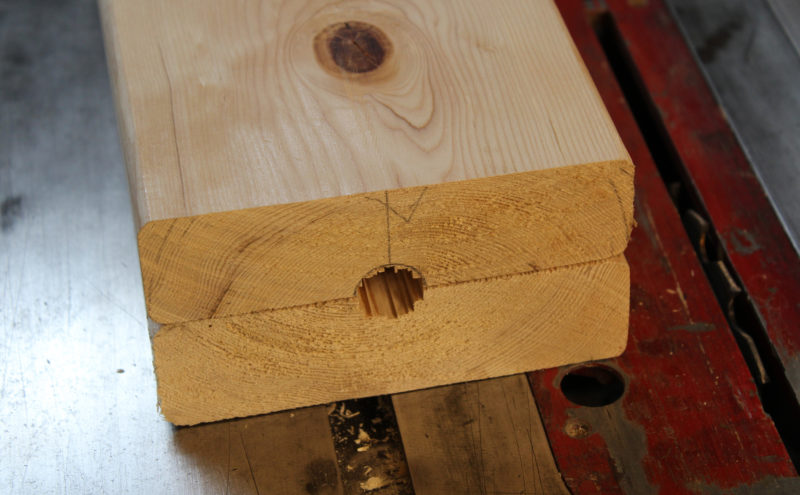
I didn’t have a section of an old mast to use for a roller and even if I did, I’ve never had much luck drilling long holes accurately, so I had to take a different approach. I bought an 8′ length of 2×6 and cut four 18″ pieces. I ran two of the four pieces through the table saw, making several passes, to cut a groove that would become a hole for the axle when I glued up the blank for the roller.
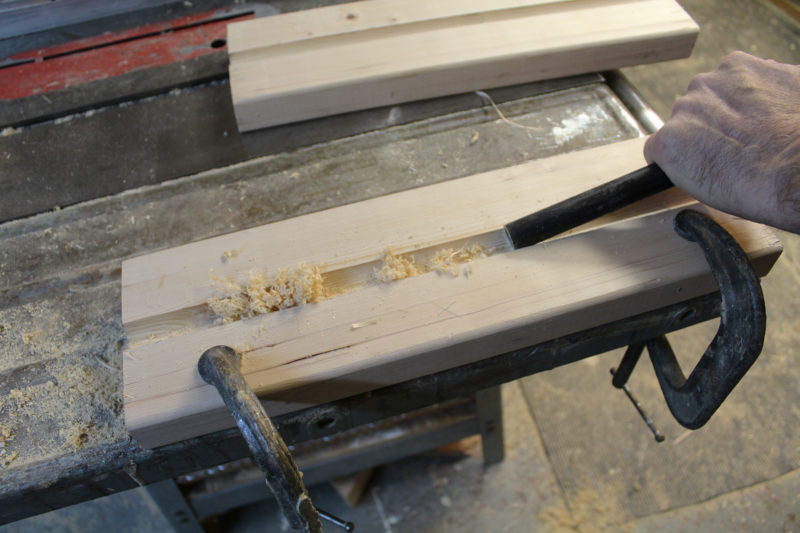
Each of the inner pieces of 2×6 needs a semi-circular groove to to accommodate the axle. Repeated passes on the table saw with adjustments to the fence and depth of cut, will remove the bulk of he wind inside of a half circle with a radius to match that of the axle.
Each of the inside pieces of 2×6 get sawn a pass over the tablesaw for every blade setting.
The axle itself is the tool for finishing the grooves. The working end is sawn off and occasionally sharpened with a file. The length of the axle makes it possible to apply a lot of force, and the rather crude cutting edge will produce shavings. With a piece of sandpaper wrapped around a 3/4″ dowel, I finished the grooves.
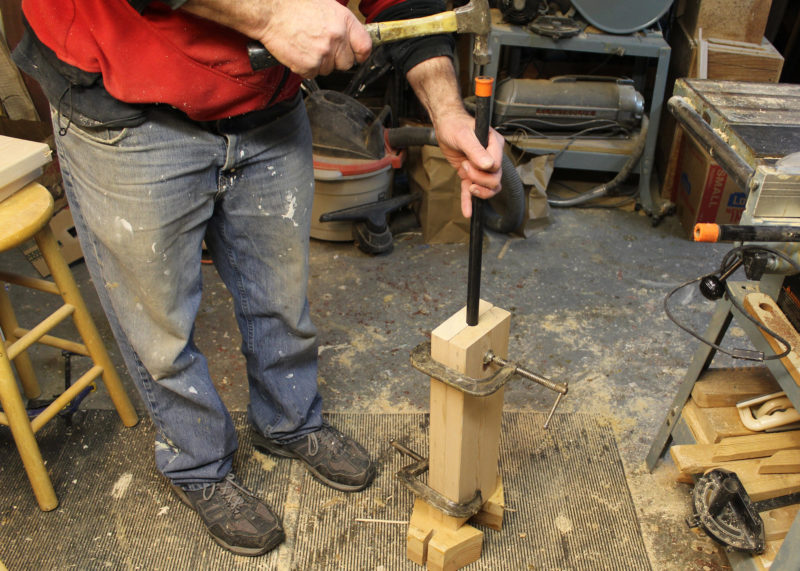
For the final fitting, I clamped the two grooved 2x6s together, lightly at first, and hammered the pipe through.
The 2x6s get clamped together with pipe aligning the grooves, then removed as the epoxy cures.
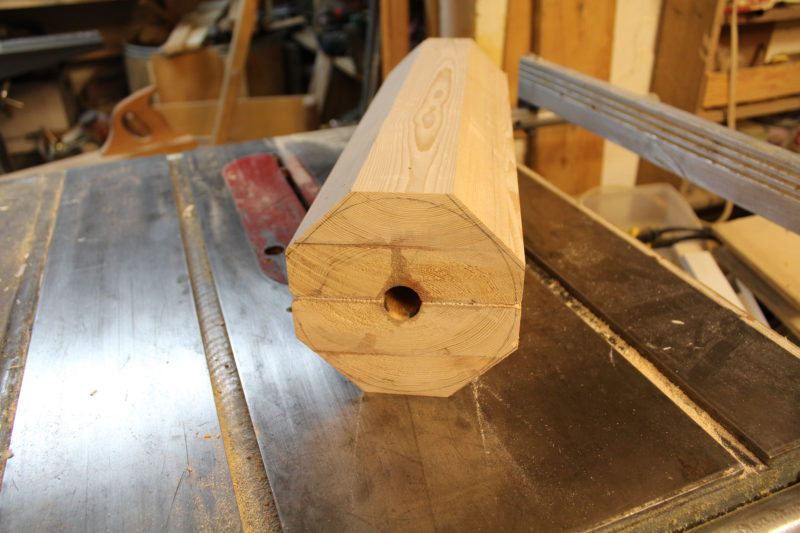
After gluing the four pieces together with epoxy, I eight-sided the block on the table saw, bringing the blank down to a size small enough to be mounted in the frame.
To make the blank round I used a technique I was forced into a few years ago when trying to make a few quenas, a type of South American flute. I bought a long ship auger to hollow out the stock for the quena, but I couldn’t keep it from veering off line, so I made extra-large blanks and then drilled the holes though them. Then it was a matter of trimming the wood around the hole to provide a uniform wall thickness.
The lathe was out—the hollowed-out softwood was too delicate for that kind of work. I turned instead to my table saw and set up a jig on a sled. With the blade spinning and the quena blank rotating slowly above it, I could gently and accurately trim the wood down to a straight and uniform cylinder. The method worked well for the delicate musical instrument and I figured it would do the job for a roller.
With the frame resting on the table saw and the fence adjusted to center the eight-sided blank over the blade, I could rotate the blank with a cordless drill connected to the pipe axle with a socket driver and socket (a drill bit inside the pipe would work as well) and lots of masking tape. I set the blade to take a fine cut on the high spots and turned the saw on. I got the blank spinning and pushed the frame along the rip fence.
Partway through the first pass, the table saw is taking the corners off. The blue tape is all that was required to connect the axle to socket driver chucked in a cordless drill. Watch the video below to see how it worked.
It took four passes to get the blank turned down to a nice even cylinder.
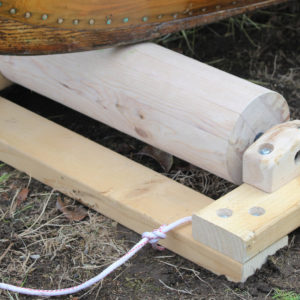
The finished roller cart with a wooden roller
The wooden roller cart as a stationary roller
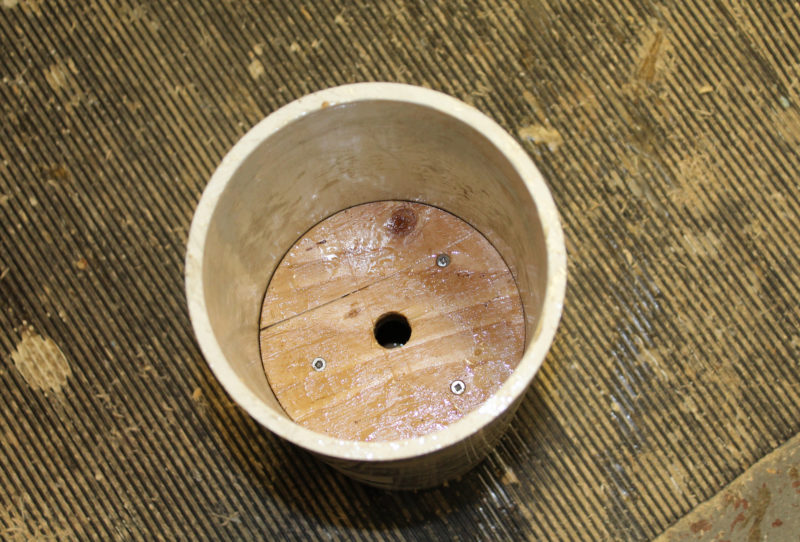
How to Make a Plastic-Pipe Roller
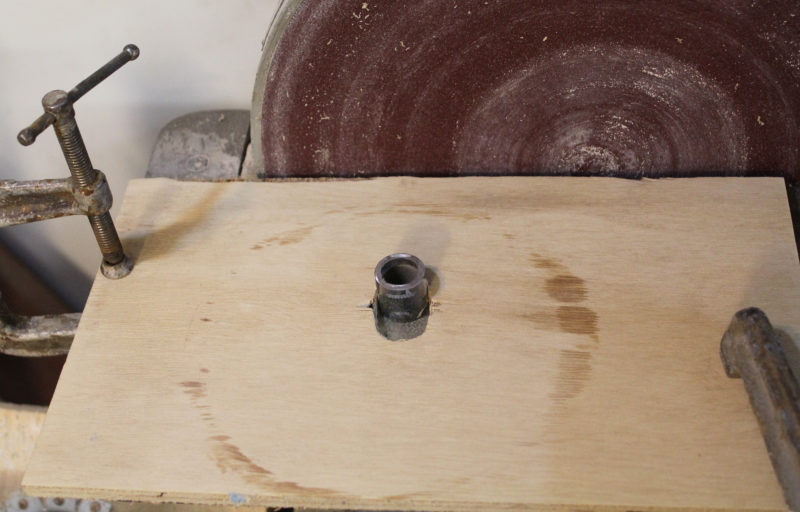
I made a second roller cart using a piece of very stout 7″ PVC pipe I had on hand. I made six disks of 3/4″ plywood with a 13/16″ hole in the center.
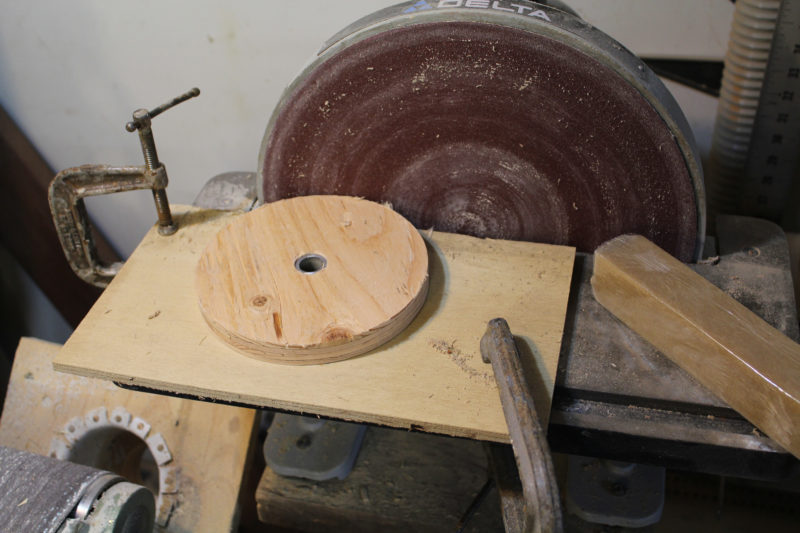
To trim the discs after they’ve been roughed out on the band saw, I used a disc sander with a piece of plywood clamped to its table. An oblong hole, cut to fit a piece of the pipe serves as a pivot that slides the closer to the disc, and stops when the disc has been trimmed to the correct size.
I put a short piece of the 1/2″ pipe in a plywood disc blank, pushed the pipe in into the oval below, and rotated the disc while pressing it against the sanding disc. When the pipe hit the end of the oval the plywood had a diameter to fit the inside the pipe.
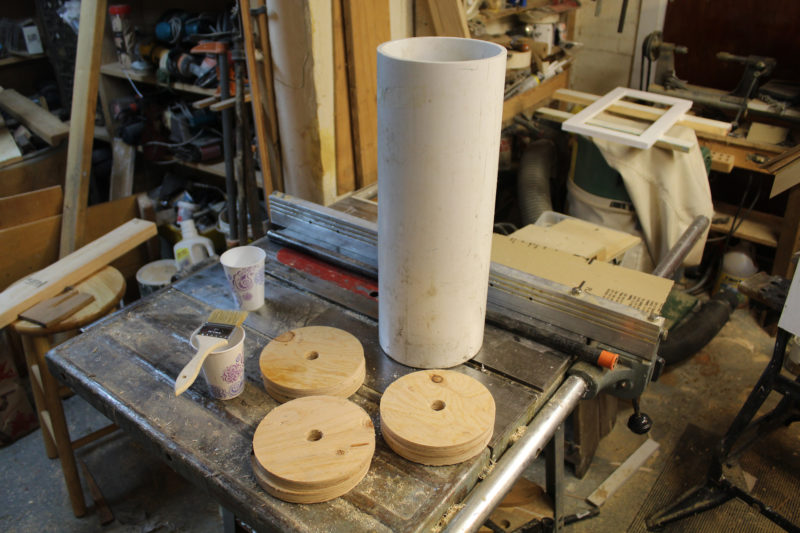
Ready for assembly: plywood discs, a cup of mixed epoxy, roller and black-pipe axle. I epoxied the discs together in pairs screwed together with stainless steel screws.
Two of the discs, joined with screws and epoxy, were tapped down to the middle of the pipe. Then one pair was tapped into each end.
The 1/2″ pipe I used for axles wasn’t truly round. There was a slight ridge where the edges of the steel strip that form the pipe were welded together. A little dressing with a file smoothed the lump and made the roller rotate more freely when assembled with the frame. The entire frame for the pipe roller was made of scraps of pipe, a dense tropical hardwood. It’s very durable but quite heavy.
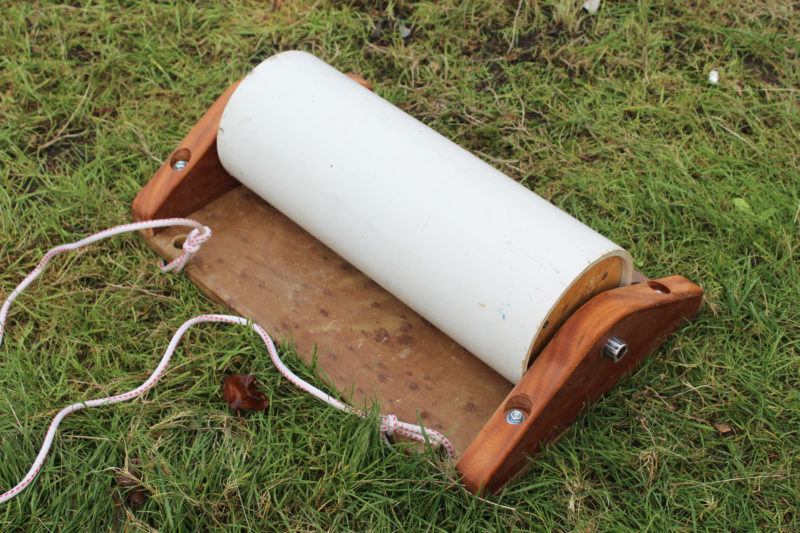
The finished plastic-pipe roller cart
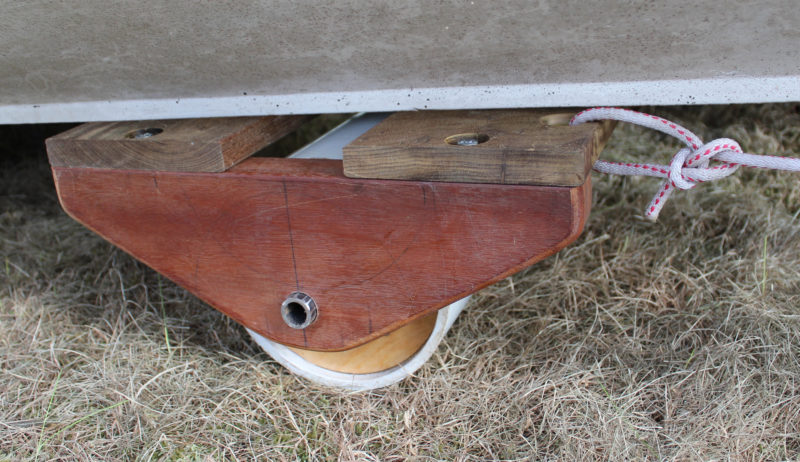
The plastic-pipe roller cart as a moving cart under a dory.
I have some inflatable rollers that also work very well for moving boats, but I’ll save them for cruising and let the roller carts do the dirty work of heavy lifting at home and for short outings at the local ramps.
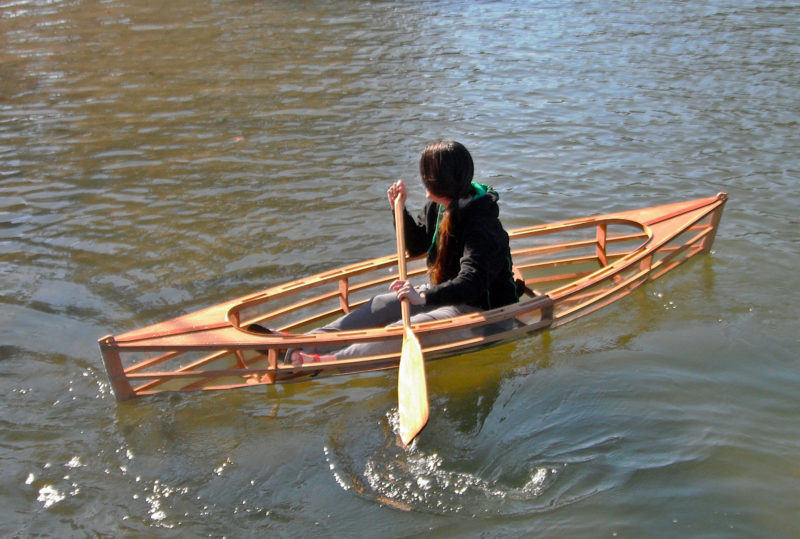
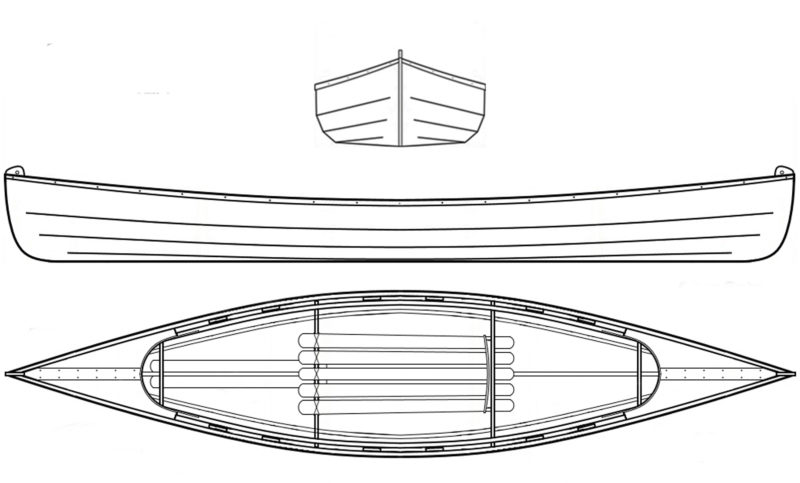
I already had a sailing dinghy and a sail-and-oar skiff in our two-car garage, but I thought there was room for one more boat, a small one, alongside my wife’s car. I decided to build Dave Gentry’s Wee Lassie. In the 1880s, Henry Rushton designed the original Wee Lassie as a beautiful lapstrake canoe and since then, his iconic design has been rendered many times, in many ways, by many builders. Gentry’s skin-on-frame (SOF) version is 10′ 6″ by 27″, just like the original, and, at 19 lbs, about a pound less. With his advice I also lengthened mine to 11′ 6″ by extending the keel 12″ and moving the two end frames out from the center.
Tom Clarke
Building a Wee Lassie from plans takes an estimated 20 to 25 hours, a remarkably short time to get afloat.
Building the Wee Lassie
The four frames, two stems, and backrest are cut out of a half-sheet of 12-mm okoume plywood, using the full-size patterns included in the plans. The third frame from the bow supports a backrest; I used a piece of red cedar to make a sturdy cross beam at the top of the frame. Cut with a curve in the middle at about 20 degrees, it has a comfortable shape and angle.
The keel, three pairs of chines, inwales, and gunwales were all ripped from western red cedar to dimensions provided in the comprehensive building manual. The instructions call for the chines, gunwales, frames, and keel to be held together with wood screws and epoxy or artificial-sinew lashings. I had previously built a baidarka using lashings so I used that option for most of my Wee Lassie’s fastenings. I notched the longitudinals to recess the lashings and avoid wear-prone lumps in the skin.
Tom Clarke
The seating slats float freely in slots cut into the plywood frame that serves as the backrest; the slats flex when the paddler is seated, providing an even distribution of pressure for greater comfort.
courtesy of Gentry Custom Boats
The decks can be quite simple or used as an opportunity for some elegant woodworking.
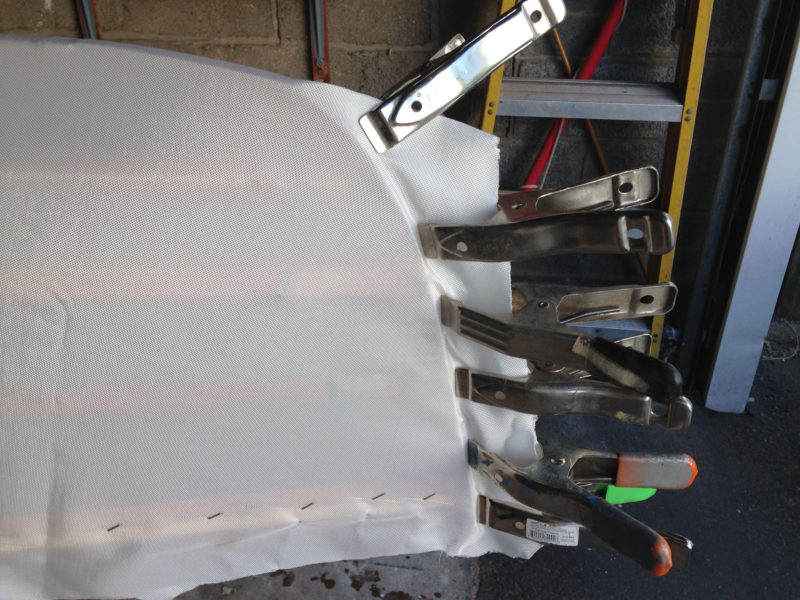
I sealed the frame with multiple coats of penetrating oil before turned it keel-up to attach the 10-oz polyester cloth. Starting in the middle of the hull and using 1/2″ stainless-steel staples, I stapled the cloth to the port gunwale every 3″ for about 2′. Then I stapled the opposite side to the starboard gunwale. I alternated sides, working toward both ends of the hull.
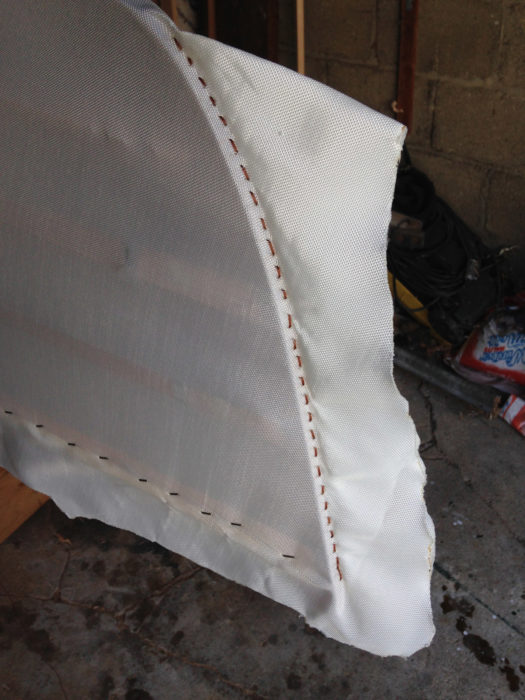
Wrinkles appeared as I got closer to the bow and stern. Heating the polyester cloth would shrink it and eliminate the wrinkles, as long as I tucked small puckers of fabric between every staple to avoid creating any wrinkles too big to be removed with heat. To finish fastening the cloth, I drew it tight along the stems and held it with spring clamps.
Once clamped, I ran a simple stitch with artificial sinew every 1/2″ close to the stem. With excess cloth cut about one inch from the hem stitching, I then rolled the fringe tightly and used two needles to do a cross pattern of sinew stitches to hold the roll tight against the stem.
Tom Clarke
Spring clamps help tension the skin and smooth any puckers after it has been stapled along the gunwales.
I shrank the fabric with a heat gun, removing the wrinkles along the gunwales and tightening the cloth over the entire hull. Since it is very easy to burn a hole in the cloth with the heat gun, it has to be kept moving. As I applied heat, I continually tapped the cloth with my finger to test its tension—the resonant drum-like sound was the best indicator of a tight skin.
Tom Clarke
After the fabric has been tensioned along the stem and held by a row of stitching, the excess cloth is trimmed with a hot knife to keep it from unraveling.
Any waterproof coating you put on the outside of the fabric will bleed through to some extent to the inside. If you don’t mind a mottled appearance on the interior, let it bleed. Dave suggests painting the inside surface of the cloth before putting it on the frame; the fabric will still stretch and heat-shrink. Another option is to apply a thin coating of polyurethane construction adhesive (specifically, Loctite’s PL Premium) on the cloth’s exterior surface after it is on the hull and shrunk. The PL Premium does not bleed through, and it provides an additional protective layer on the cloth that helps to resist abrasion and puncture. This is the technique I used and would definitely do again if I were to build another SOF canoe.
Tom Clarke
A crossing stitch sewn with two needles finishes the seam at the stems.
The PL Premium dried overnight, and left the surface bristly, like a two-day growth of beard. I sanded it lightly; it took just 5 minutes to do the whole hull. I then applied two coats of Rustoleum latex primer over the PL Premium, lightly sanding between coats. This was followed by four coats of Rustoleum latex white exterior paint, again sanding lightly between coats, resulting in an almost mirror-smooth skin.
Once the painting was completed, I turned the hull back right-side up and trimmed the excess cloth about 1/8” below the top of the gunwale. I fastened a 1/4″ by 1″ rubrail of western red cedar to the gunwale with 1/2″ stainless-steel screws every 10″, covering the staples and edge of the skin.
courtesy of Tom Clarke and Paul Truszkowski
Construction time for the canoe is about 20 to 25 hours, according to Gentry. The foot braces, designed for kayaks, aren’t required, but improve a paddler’s connection with the canoe.
For the seat I ripped five oak slats to 3/8″ by 1-1/4″, soaked one end of each in water overnight, and then clamped them on the bench to lock in a curve at their forward ends. This curve prevents the slats from digging into your legs. Three additional slats serve as floorboards. All of the slats then got coated with oil and inserted in the slots cut into the frames. Even though the 3/8″ oak flexes quite a bit in both the seat and floorboards, there have been no fractures.
courtesy of Tom Clarke and Paul Truszkowski
The polyester fabric is quite tough and unlikely to fail in normal use. While it is possible for a very sharp object to puncture the skin, damage won’t spread by tearing.
The plans don’t call for them, but I installed a set of adjustable kayak foot braces, bolting them to vertical struts set between the gunwale and the upper chine. The foot braces help provide power to the paddling stroke and keep the knees slightly bent, a position more comfortable than having one’s legs resting flat on the floorboards.
courtesy of Tom Clarke and Paul Truszkowski
The Wee Lassie, according to the designer, is best suited for “exploring lazy rivers, hidden coves and backwaters or just tooling around the pond or lake.”
At the top of each stem, I drilled a 3/8″ hole used to tie down the canoe for cartopping. Where the gunwales rest on the car rack, I screwed four 4″ lengths of 1/2″ half-round brass to protect the wood from chafe.
I’ve built a number of boats, and building skin-on-frame was the most fun. At every step in the process, the boat makes steady, discernible progress toward completion, and the finish work isn’t a barrier. It’s certainly not like a stitch-and-glue build where 20 percent of the time is devoted to building and 80 percent of the time is devoted to sanding and applying layer upon layer of finish.
courtesy of Tom Clarke and Paul Truszkowski
Skin-on-frame construction achieves the same light weight as Rushton’s original lapstrake canoe, but without the expense and complexity.
Hauling and Paddling the Wee Lassie
It’s a joy to have a boat that I can single-handedly onto the car rack, tie it down in two minutes, and drive without the limitations imposed by a trailer. And launching is just as easy: Throw it into the water, get in, and start paddling. The seating position is low and contributes to the good stability; I’ve felt very comfortable from the outset and have never felt at risk at any time.
courtesy of Gentry Custom Boats
The original Wee Lassie was intended for use with a double-bladed paddle, but a single-bladed paddle can be useful in tight quarters or in discreetly observing wildlife. The transparent skin is an optional way of finishing the hull.
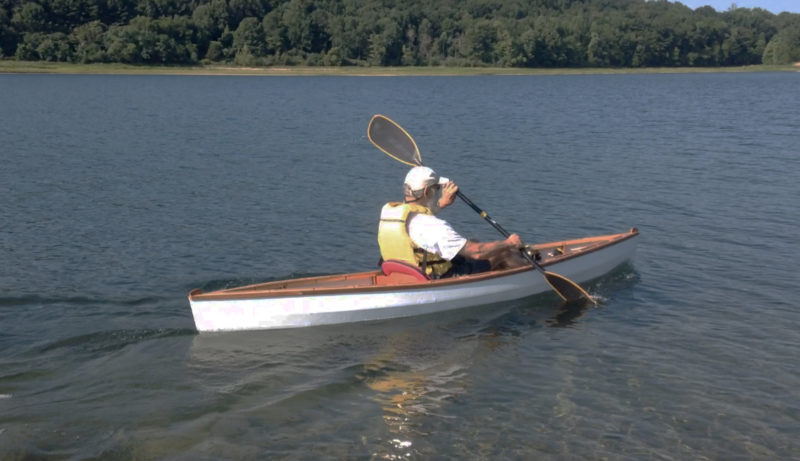
Paddling at a leisurely pace—for me, 3 mph—takes virtually no effort because the canoe is so light. My GPS reading was 3.7 mph average speed for an hour’s paddle and top speed was 4.1 mph, using a Greenland-style, double-bladed paddle.
courtesy of Tom Clarke and Paul Truszkowski
A double-bladed paddle, the type used for sea kayaks, is the best choice for general paddling in the Wee Lassie. It offers better course holding than a single-bladed paddle.
The canoe tracks very well and its bow yaws only a couple of degrees with each paddle stroke. It takes about 10 sweep strokes to do a 180-degree turn. Because it has no decks, I would not take it out in conditions rough enough to create white caps. However, it is so light and responsive; I’ve never shipped water from any motorboat wakes I’ve encountered.
The Gentry Wee Lassie is easy to build, store, and carry, and is an ideal boat for that spur-of-the-moment call: “Hey, let’s go out for a quick paddle.”
Tom Clarke lives in New Jersey and does his boating in local North Jersey reservoirs, New York Harbor’s Upper and Lower Bays, and Barnegat Bay. He has been around boats his entire life. His father was a boatbuilder and Tom had lots of boats while he was growing up and lived on a boat for a couple of years. He has built a number of boats and writes a blog—TheOarCruising.Blogspot.com— primarily focused on oar-powered small boats that can be cruised in.
I’ve built more than a few boats for myself in the past 38 years, and in all that time I have never been tempted to build a multihull. Why go to all the work of building two hulls, let alone three, when I’ve never found any of my single-hulled boats lacking in any significant way?
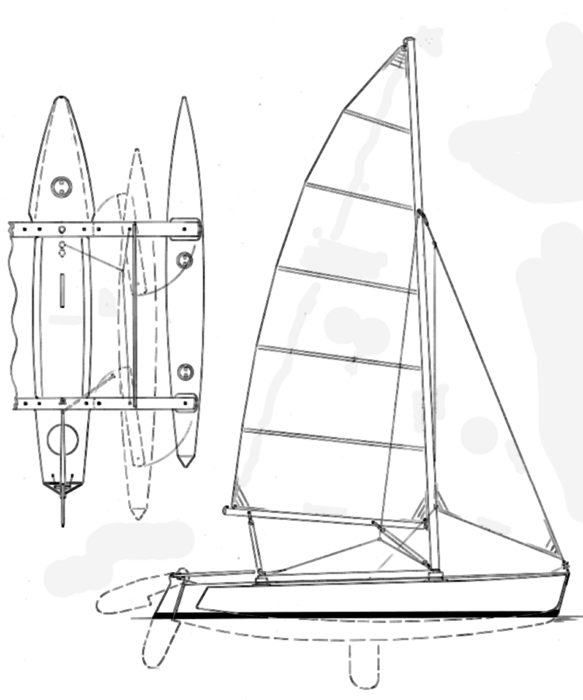
I started getting answers to that question as soon as I stepped aboard a Seaclipper 16 designed by John Marples of Searunner Multihulls and one of nine designs in the Seaclipper series of trimarans. The hull is constructed of 7 sheets of 1/4″ six-ply marine plywood, five sheets of 3/8″ nine-ply, and lumber in commonly available sizes. Fiberglass-and-epoxy sheathing is optional.
Seaclipper 16 Design and Build
The instructions are geared for novice builders; full-sized templates for the bulkheads are provided in the plans. Stringers connecting the bulkheads define the shapes of the plywood panels for the hulls. The 15′ 11″ vaka (center hull) has a flat bottom that will take to landing on the beach without digging in or causing the kind of wear you’d get with a sharp V hull. The amas (outrigger hulls) have bottom panels set at an angle, deeper outboard than inboard. This configuration adds a fin-like element for increased lateral resistance for sailing in shallow water with the daggerboard pulled up.
The angled ama bottoms also present an edge to the water, keeping the amas from slapping the waves when they’re close to the water’s surface; it’s a quieter ride. The amas’ bottoms are positioned higher than the vaka’s bottom, so their edges are not subjected to wear when the boat is hauled up on a beach.
photographs and video by the author
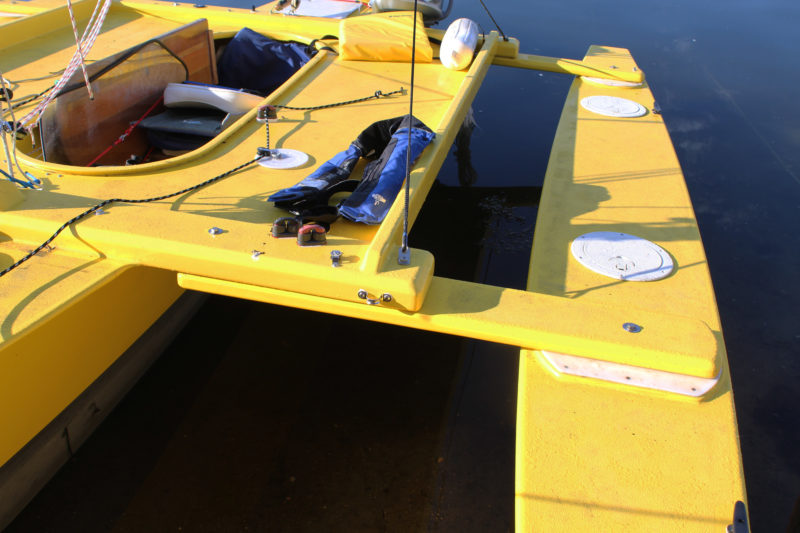
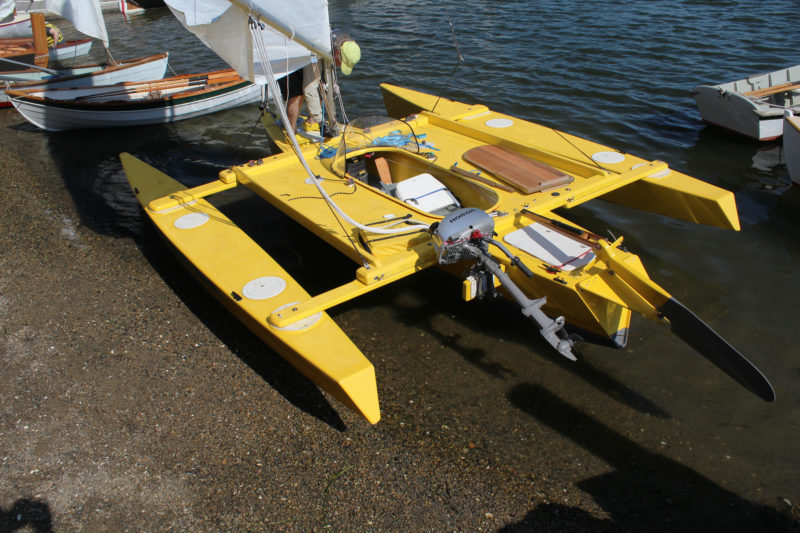
Each of the four swing-arm akas has three bolts: one securing the pivoting part of the aka to the ama, and two (one of those anchoring the shroud bridle) connecting the pivoting part of the aka to the fixed central section on the vaka. Removing the inboard bolt allows the swing arm to pivot, moving the ama aft and inward.
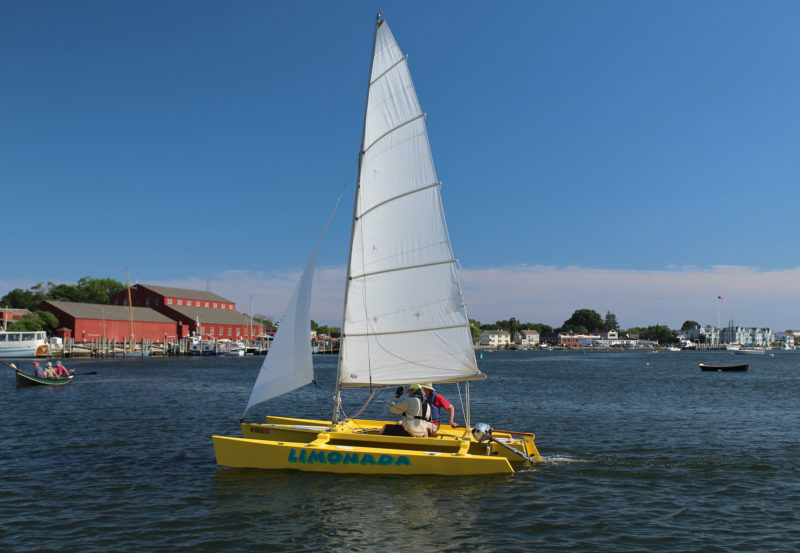
The akas (crossbeams) can be made in three ways: as one piece bolted to the three hulls, hinged to fold the amas on top of the vaka, or as swing-wings, like LIMONADA shown here. With the swing-wing, the amas pivot aft and nest against the vaka, bringing the beam down from 11′ 3″ to 7′ 7″ for trailering and to fit in a standard marina slip. The swing wings can function whether the boat is afloat or on a trailer, so they are handy when launching or landing at a crowded boat ramp. The swing wings don’t require any hardware beyond nuts and bolts, and have an advantage over the hinged akas: there’s no need to lift an ama and set it down gently on the vaka.
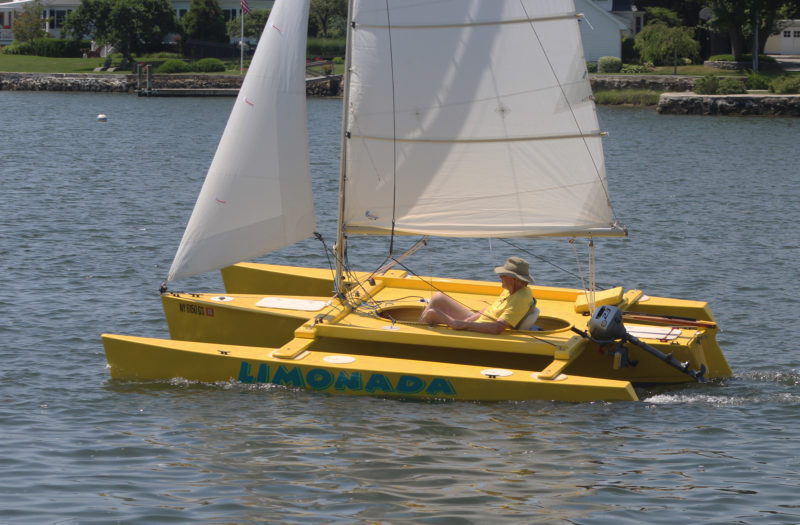
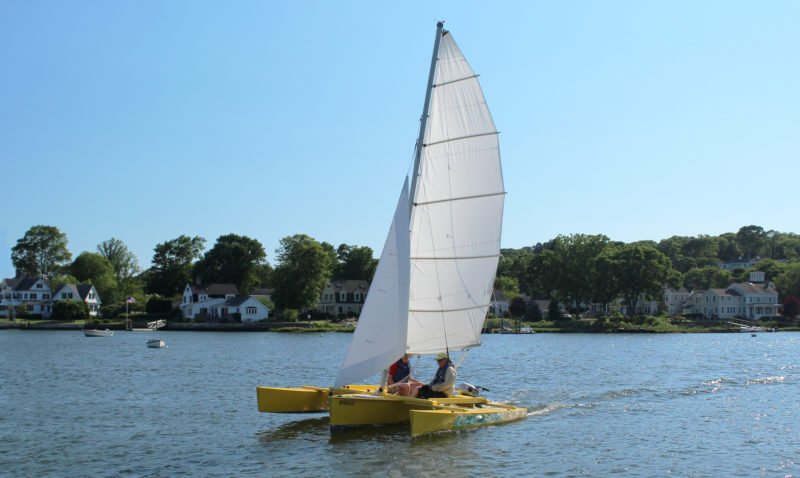
The Seaclipper 16 can be built as an open-cockpit cruiser, or as a daysailer with a tandem cockpit, with the helmsman sitting in the aft position, legs straddling a centerboard trunk and the crew sitting forward. The 7′-long open cockpit has side decks between the akas that offer more options for seating, moving around while under sail, and sleeping aboard while moored.
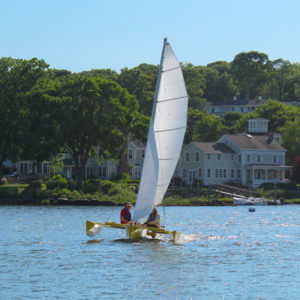
John Marples, designer of the Seaclipper 16 and builder of LIMONADA, goes for a sail on the Mystic River.
LIMONADA, as an open-cockpit version of the 16, has a daggerboard deployed through a slot in the cockpit sole. A softwood stick wedged in the slot keeps the board down; it has a loop of line at its top for quick removal and raising of the board. The cockpit sole is high enough above the waterline that any water coming into the cockpit drains right out.
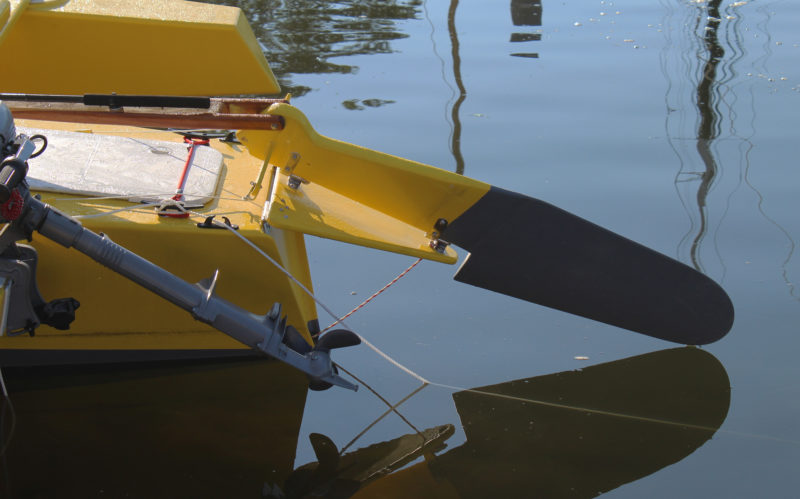
The rudder is mounted on a false transom, hinged at the top, that allows the rudder to kick up when meeting an unexpected shoal or to be retracted when coming ashore. The downhaul at the bottom of the false transom leads to the cockpit for easy operation. The rudder blade is balanced and has enough of the blade ahead of the pintles and gudgeons to lighten the load on the skipper when coming about. It also allows the arms of the rudder yoke to be short and unobtrusive. The lines from the yoke lead forward to pedals in the cockpit to for hands-free steering. A tiller above the yoke allows steering while sitting on a side deck and is the means of raising the rudder when coming ashore.
A hinged false transom allows the rudder to be kicked up. The tiller pulls the rudder up and holds it. The line at the bottom of the false transom holds the rudder down while the boat is underway.
The Seaclipper 16 is designed to take a Hobie 14 sailing rig. The pivoting aluminum mast, roller-furling jib, and fully battened mainsail are readily available from a wide network of Hobie dealers and may be found used in online classifieds. The Hobie 14 has a beam of 7′ 8″, so the Seaclipper 16, with a beam of 11′3″ can take better advantage of the 146-sq-ft sail rig without flying a hull to the brink of capsizing. Dyneema shrouds, secured to bridles spanning the side decks, support the mast. The plans include specifications for an unstayed wooden mast. For auxiliary power, a short crossbeam aft of the port aka serves as a mount for a small outboard.
The side decks provide seating when two are aboard, and the steering is then done with the tiller, not the foot pedals.
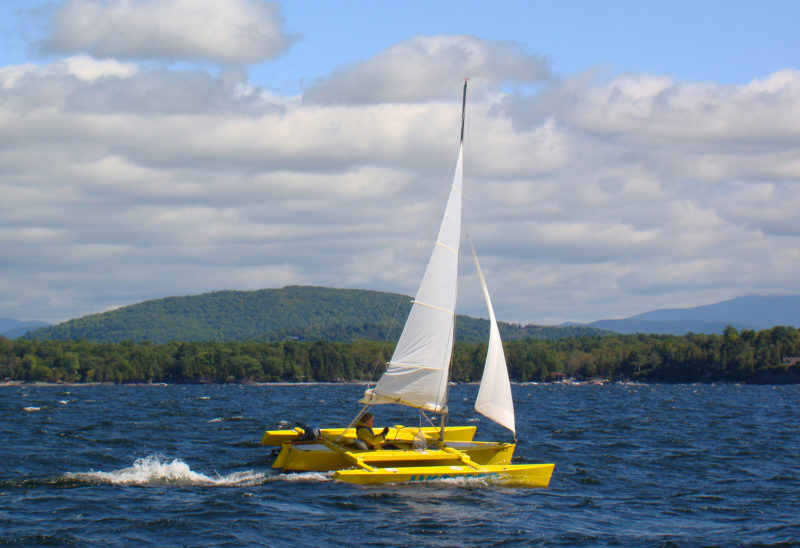
Seaclipper 16 Performance
I had a chance to sail LIMONADA, the Seaclipper 16 built by Marples for Mac MacDevitt, on Mystic River near Mystic Seaport. Stepping aboard, I got my first lesson in the values of a multihull. I didn’t have to lunge for the centerline as I do with my monohulls to keep them on an even keel. The trimaran has plenty of stability no matter where I put my weight and the amas (outer hulls) have enough volume of to support my 220 lbs. Without having my movement aboard the boat restricted by the nagging demands of a monohull, I could wander around the boat. The decks are all flat, so the footing is good everywhere. While I like the sweep of a curved sheer line, the Seaclipper’s flat decks simplify the construction of the boat and provide the geometry required for the swing-wing akas.
The deck surrounding the cockpit is large enough to set up a tent for sleeping at anchor. The windshield was added by the builder to block spray when sailing into a brisk breeze.
I liked being able to walk around the boat while it was under sail with Mac at the helm. I never get to see my own boats moving through the water, so stretching out on an ama to watch the vaka’s bow at work was a treat. The 7′-square deck around the cockpit offers a place to pitch a tent. Mac has a two-person tent with an oval hole in its floor to match the cockpit opening. He can sleep to one side of the cockpit, sit comfortably upright with his feet in the cockpit and have access to the gear stowed there. The amas and vaka offer plenty of room for cruising and camping gear; commercial plastic hatches offer access.
I took LIMONADA out by myself and enjoyed steering with my feet and having my hands free to manage the sheets. Nestled down in the cockpit on a padded seat with a backrest, I was very comfortable and relaxed. The sheets were right in front and could be cleated off, making sail-handling a breeze; there was no need to switch sides or do-si-do with a tiller when coming about. During my outing the weather was warm and the wind was light, perhaps 8 to 10 knots at best with a few gusts, but in a cold wind, being mostly below deck level would be a boon. Mac had made a removable windshield that wraps around the forward end of the cockpit for even greater protection from cold wind and spray.
With Marples and owner Mac MacDevitt aboard, LIMONADA flies the windward ama. The leeward ama still has plenty of freeboard.
The light wind was more than enough to get Mac’s Seaclipper going at a brisk pace and fly the weather ama. There was no spray, so I stayed dry, and even with the boat moving at a good clip I didn’t notice any water coming up through the daggerboard slot.
I was surprised by how well the Seaclipper could come about. With three hulls in the water, I thought there would be a lot of drag in the turns and that the boat would get bogged down, but the rudder blade and the centerboard have enough area to swing the bow around before the boat loses momentum. I never got caught in irons, but I backed the jib for a moment to hasten the bow’s falling off and the filling of the main.
Ben Breckenridge
LIMONADA owner Mac MacDevitt reports that his Seaclipper 16 is “super fun in a stiff breeze.” Here, sailing with a reefed main on Lake Champlain, he estimated his speed at about 13 knots. “It was exciting, but I felt safe and secure.”
By the end of my time aboard a Seaclipper 16, I could see the good sense in building three hulls to get one boat. Having a pair of amas take on the job of keeping the boat upright under the press of sail made manning the helm much easier; it didn’t require the athleticism and flexibility that I’ve always associated with sailing small boats. And at anchor, a trimaran is a bit like a small island, while my boats are more like hammocks that swing with every move I make. The Seaclipper offers the potential for some exciting sailing. Mac has sailed LIMONADA up to about 13 knots. That’s a speed I’ve never seen aboard any of my boats.
Christopher Cunningham is the editor-at-large of Small Boats Monthly.
A couple of years ago I spotted a long, lean traditional Finnish rowing boat for sale online. It had been designed and built for bi-stroke racing with a rower on a sliding seat and a paddler using a single-bladed paddle in the stern. I had no experience in competitive rowing or even cruising under oars, but I fell in love with the boat and bought it. Its lines promised good speed and tracking, but it had been neglected and had some broken frames and split planks. During the following winter I restored it and added a second sliding seat for doubles rowing. We launched the boat in the spring, and call it TURBO.
Finland is dotted and laced with thousands of lakes and waterways. The Saimaa area in the southeast is the country’s largest watershed with 9,300 miles of shoreline, more per square mile than anywhere else in the world. The 14,000 islands in the region add to the complexity of Finland’s vast Lakeland. In the past, rowing was the fastest way to get around Saimaa and many other watery inland parts of the country, and rowboats were essential to the traditional ways of life.
Each region has its own native boat designs, with characteristics that have evolved over hundreds of years to suit local tastes and conditions. I had been spending my summers sailing all around the Baltic Sea and staying with my family in our summer place in the archipelago along the south coast, so the inland waterways and lakes weren’t familiar to me; I’d only seen them from a car window or through some occasional visits to friends or relatives with summer cottages. Now that I had a boat descended from Finland’s rich inland traditions, it was time to explore Saimaa.
Roger Siebert
.
For my first trip, a 111-mile circumnavigation of Sääminginsalo Island, the largest island in Finland, my oldest son, 14-year-old Verneri, would be the one pulling the second pair of oars. He is an outdoorsy person with a great interest in nature, animals, trekking, camping, and just about anything that requires a good deal of physical effort.
With the car loaded with camping gear and food we drove to Rantasalmi, a small town near the northwest part of Saimaa. As we were loading gear into the boat at the top of the launch ramp, I began to feel a bit anxious. How would this racing boat handle all this extra weight in waves and wind? Would Verneri and I really be able to row the 20 to 30 miles we’d planned for each day of the week we had allowed for the trip? The sun was shining and the wind was light and the fine weather soon put me at ease. We loaded up and organized all of the gear in the boat—food box, cooking equipment, camping gear, clothes packed in watertight bags—and still had enough room around the sliding seats for rowing. We took off and once we settled into our rhythm, TURBO was like a train, running fast and true, as she charged across the half-mile-wide bay toward more open water.
As we crossed the Hauki Waterway, a 30-mile-long, 5-mile-wide lake in Saimaa’s network, most of my worries about the boat and our ability to row it well were vanishing. I didn’t find it too difficult to read the compass or to glance at the map while I was rowing. With fresh reserves of energy and the wind behind us, Verneri and I managed to keep speeds between 5 and 5.5 knots and were thrilled about how well the boat was performing. We glided beneath blue skies as nearby islets capped with dense green forests of pine and birch slipped between us and distant islands dotting the horizon.
As sailors, Verneri and I weren’t used to having our backs to the bow, and I paid more attention to the compass and the map than to what was ahead of us. After we almost ran straight into the rocky shore of a tiny island at full speed, we made more frequent glances forward while rowing. We worked more carefully through the Hauki archipelago and landed on an island no larger than a tennis court. With TURBO in still water, nosed up against the lichen-dappled granite shore, we took our first break, ate some sandwiches, and took a dip in the clear and, to Finnish standards, warm water.
all photographs by the author
The calm waters and mild weather at the start of the tour were perfect for rowing. A light tailwind helped for a while but died completely during the crossing of the Hauki Waterway. The compass, meant for forward-facing kayakers, had to be installed backwards for the rower in the bow rower to see the card, and that required some mental gymnastics to set a course. Rowing here on a course of 105°, ESE, the compass reads 285°, WNW.
About 7 miles out from the launch site near Rantasalmi, we passed Linnan Island, a national park almost in the middle of Hauki. The island, 2 ½ miles long and a mile wide, is covered by forest right up to the water’s edge, save for a couple of clearings for campsites. (The park gets visitors year-round; in winter visitors arrive not on boats, but on ice skates.) We rowed around the south end and chose a smaller island close by for our first night. It was shielded by Linnan to the north and by a pair of half-mile-long islands neighboring south and east, but the wind had died, and mosquitoes found us while we were preparing a meal. Before calling it a day we took a stroll around our little island, which was still big enough to have a dense forest and plenty more mosquitoes. We took our time exploring—the summer sun wouldn’t set until well past 10 pm—and when we retreated to our tents they were still warmed and illuminated by the slanting daylight.
Beyond the bridge that spans the canal at Oravi is a quiet village that occupies the site of a busy ironworks that closed in 1901.
The following day we had only a few miles to row before entering the narrow, tree-lined channel that separates the islands of Little Ahvensalo and Sääminginsalo. Beyond the arched bridge that spans the 20-yard-wide waterway, the village of Oravi lines both sides of the channel with colorful wooden houses, gardens, and gently sloping, rocky banks. We craned our necks, keeping a sharp lookout ahead as we approached the docks on the north side of the channel. Oravi has a small restaurant and a shop, so we picked up some additional supplies and had coffee with some treats.
Refreshed, we continued north to the end of the mile-long channel, rounded the narrow peninsula that is Sääminginsalo’s northwest corner, and then rowed an eastward-winding route through a group of islands to the Enon Waterway. After we reached its more open waters we had the wind behind us, so we decided to try our jury-rigged sail. We had outfitted TURBO with a pivoting A-frame mast, which folds forward and rests out of the way along the inwales when not in use. Pulling a rope that becomes the backstay raises the rig, and the sail, a parachute-cloth hammock, follows. Its 32-sq-ft pushed our sleek TURBO along the Enon at 3 knots in the light 9-knot wind.
Sailing was a welcome break for rowing and kept TURBO moving while the crew relaxed. The A-frame mast didn’t interfere with the forward rowing station and it took just seconds to raise or lower the sail.
Verneri and I made ourselves comfortable in the bottom of the boat with our backs resting on the footrests, both of us happy to be facing forward for a change. I used the aft pair of oars as rudders. The tholes run through holes in cleats fixed to the looms, so the blades can’t be feathered and are always vertical, ideal for steering. To turn I dropped one of the oars’ blades in the water, and TURBO would veer to that side.
Sailing east across the 7-mile-long lake with nothing in sight but water, rocks, forests and sky, it was easy to imagine we were like Vikings, searching for new lands and escapades. I mentioned to Verneri that the Vikings had found their way through the rivers of Russia and the Black Sea all the way to Istanbul. He replied, “We should go too.” I could tell he wasn’t kidding.
Toward the end of the day the wind waned and we pulled out the oars. We rowed north from the middle of the lake, looking for a place to spend the night. We found a small island, only 30 yards wide and about 40 yards long, and well suited for camping. Its center was flat and free from bushes; old crooked pine trees were rooted in the thin layers of soil nestled between outcroppings of bedrock around the clearing. We had views of the lake in every direction, and best of all, the island was free of mosquitoes. There was a previously used stone fire ring, so Verneri gathered fallen branches for a fire. Before turning our attention to dinner, we took a swim and then let the sun dry us as we rested by the island’s smooth and warm granite flanks. We gazed north to the mainland, a landscape unmarred by houses or any other signs of people.
This tiny island located in the Pyy Waterway was a ideal for camping with its unobstructed views all around, clear, flat ground for tents, and absence of mosquitos.
I had forgotten to pack our fishing rod, but we had bought some fishing line and a spoon lure in Oravi. Verneri fished by flinging the lure into the water. After a few tries he shouted, “I got something!” He pulled the line in carefully and a 16″ pike came to the surface, but as it approached the shore it thrashed, pulling itself free from the lure and escaping into the lake. Encouraged, we kept fishing, but there were no more bites. We retreated to camp, dug into our food box, and had smoked lamb with potatoes for supper.
Verneri fished without a rod by slinging the lure in to the lake. At 62° North, the summer days were long and provided plenty of time for fishing after coming ashore.
The following morning it started raining soon after breakfast but we managed to pack most of our gear before it got wet. There was little or no wind and the temperatures were mild, so it was a good day for rowing. We headed east and passed through the Straits of Hanhivirta where a small ferry crosses the 300-yard-wide passage between the Enon and Pyy waterways. The landscape was getting more rugged as we traveled east and many of the steep shorelines were guarded by jagged boulders.
After rowing for about three hours in the rain, we were hungry, tired, and wet. We decided to make a detour to the north to the town of Savonranta, in the hopes of finding a place to have a hot lunch indoors. The zigzagging, mile-long entrance into the harbor seemed to go on forever, but right next to the harbor was a restaurant with pizza-buffet lunch. Verneri gorged himself on slice after slice; I counted and he stopped when he had eaten what amounted two whole pizzas. I had a lighter lunch—salmon soup.
With full stomachs and dry clothes we set out again and headed east, passed under a bridge, and entered Ryttyselkä Bay. Feeling a little drowsy after all the food, we each took turns rowing while the other trolled for fish at the stern. After clearing the bay, we were entering the most open crossing of our tour, Paasselkä, which is Finnish for Stone Lake. The 6- by 7-mile oval lake is uniquely free of islands. While all of the other lakes in the Saimaa were gouged by Ice Age glaciers, forming relatively shallow furrows aligned along a diagonal from northwest to southeast, Paasselkä is a deep impact crater formed by a meteorite about 231 million years ago. This origin of the lake was confirmed by a deep drilling of the surrounding rock in 1999, and beyond its unusual shape and magnetic anomalies, the locals had a sense that this basin was different. Light phenomena over the lake has been reported for centuries—known as “Paasselkä devils”—shining spheres thought to be created by evil beings.
The devils let us be and Paasselkä was a benign, flat calm. According to weather forecast, there were no winds in the offing, so we took a course—southeast, then veering south—well clear of the rocky western shore.
We were headed for Pistalan, a 3-1/2-mile-long lake, and then Raikuu channel, a series of three small canals connecting the small lakes in between them. We rowed into Pistalan and saw a long and narrow promontory to port and a sandy beach to starboard. There was something tempting about the beach and the headland rising above it, so we rowed our bow into the sand and went for a walk. After walking a few yards up the steep ledge we could see the headland was a maze of eroded trenches, dug in the early 1940s by Finnish civilians during the creation of the Salpa Line, a 750-mile line of bunkers running the entire length of Finland’s border with Russia. The line never saw military action—the Soviet offensive ended when the advancing Red Army was stopped in 1944 at the Viipuri-Kuparsaari-Taipale (VKT) Line before reaching the Salpa Line. The sight of the moss-covered zigzagging pathways and trenches made me think about the sacrifices my grandparents had made during the Winter War.
These eroded trenches by Pistilan Lake were a part of the Salpa Line defenses built against the Soviet threat in the early 1940s. The line never saw military action, but was nonetheless a haunting reminder of the battles fought farther east.
Day was slipping into evening as we rowed across to Paksu Point, where we found a fire pit and wooden lean-to built for visitors. The land was sandy and flat, with many good places for tents. We foraged some boletus mushrooms, grilled them with sausages for dinner, and soon turned in for the night.
The next morning Verneri told me that he had woken up in the middle of night to throw up. The mushrooms hadn’t been good to him but he did feel he was now ready to row. We packed the boat and headed southeast along the length of Lake Pistalan, which was getting narrower toward its southern end. We were expecting to see the entrance to the Raikuu channel, but there was no way out of the lake through the dense bed of reeds filling its southern bay.
Trusting in the map instead of what we could see, we rowed straight into the rushes and eventually came to a small bridge. The passageway beneath it was only about 3 yards wide, and the water in the channel beyond it was just a few feet deep. The Raikuu canal, dug around 1750 and now little more than a ditch, along with the Pistalana canal and the Nurmitaipale canal and the Raikuu canal—collectively called the Raikuu channel—are all that qualify Sääminginsalo as Finland’s largest island. A mere 500 yards of narrow canal allow water to encompass Sääminginsalo, which is arguably a 413-square-mile peninsula.
It took a leap of faith to plunge into the dense reeds choking the bay that concealed the entrance to Raikuu channel. The slender manmade waterway separates Sääminginsalo Island from mainland and makes a full circumnavigation of the island possible.
Verneri and I stood up, each paddling with a single oar, to better see and follow a meandering route through small ponds and channels. The western shoreline we passed was part of the Salpa Line fortification—granite ramparts rose straight out of the water. Overgrown with birch trees, bushes, and flowers, these remnants of war are being swallowed up by nature.
Standing up to paddle Raikuu channel made it possible to face forward and enjoy the views of the most scenic part of the trip.
The end of the chain of narrow canals and small ponds ended at a bridge and boat ramp at Lintusalmi. We stopped at the concession stand there for a snack and a coffee to gather our strength for the wide waters of Ruosteselkä Bay. We rowed under the bridge and straight into a 10–12-knot headwind.
The waves surging into the bay were building up, and we had to do some serious pulling to keep TURBO moving. Eventually we reached the lee of Hevossalo Island and took refuge in a small breakwater-protected harbor located between the channel separating Sääminginsalo and Hevossalo islands. As we cooked a hot lunch, the wind and waves calmed down a bit, and with our energy restored, we continued south into Puru Waters, a large lake to the southeast of Sääminginsalo. It was still an upwind battle, but TURBO made good speed, and as the afternoon was turning into evening, we landed at Pieni-Pekka after covering 12 miles since leaving the sheltered waters at Lintu Strait. The island was small, only 50 by 100 yards, and on its northern shore there was a gently sloping rock surface that looked just like a boat ramp. We rested TURBO’s bow on the rock, found a fire ring close by, and rested our backs lying on mattresses over the flat expanse of stone. This eastern part of our circumnavigation was more rugged and solitary than the western parts of the northern Saimaa waters, and was more to my taste.
After a 12-mile upwind battle to reach the island of Pikku-Pekka even solid granite offered a welcome measure of comfort.
I was too tired to scout the islet for a better place to camp, so I popped the tent up on sloped stone. Verneri found a softer spot higher up. After our evening meal we turned in and fell asleep to the sound of heavy rain beating on our tents.
I woke up early, having slept exceptionally well in spite of the rain and my hard, slanted perch on the bare rock. The wind was coming from the southwest at 15 knots and gusting to 20. We set out, taking the wind on the nose, and worked our way into the lee of the islands to south of us, and then crawled westward and into the shelter of northwest corner of the Enan peninsula. We peeked into the unprotected waters of Enanselkä to evaluate the wind and wave conditions. This 1 ½-mile crossing would be the challenge of the day.
I decided that it was a go, so we started rowing as fast as we could in the rough conditions. TURBO rolled but rode up and over the waves nicely, only occasionally letting some spray get to us. It was difficult to avoid slamming our oars into the wave crests between strokes, but after about 15 minutes the worst of it was over, and we reached the western and more sheltered part of Enanselkä. Verneri had faced the challenge head-on and fearlessly. The harder it got, the more he seemed to enjoy it.
We took a shortcut through Laukan Bay, a small pond isolated from the surrounding waters by the Punkaharju Esker and the roads running along that ribbon of land. We ducked through two small tunnels and out into the bay. A thunderstorm passed over and heavy rain thoroughly drenched us. Weary, cold, soaked, and hungry, we turned north and rowed into Tuunaan Island harbor. After a satisfying lunch in the restaurant at the water’s edge, we got to a sauna to warm up and dried our soaked clothes.
After our sauna it was already early evening, but we wanted to find a more solitary place to stay for the night, so we launched again and rowed southwest. While rowing across the 1-1/2 mile-wide waters of the Jänne Waterway, we saw a huge dark gray cloud front approaching us, and it was obvious we would be soaked again. Verneri was rowing in the aft station, and as he looked over his shoulder at the approaching storm, I noticed he was smiling. “What’s up?” I asked. “Everything is going so well! We even had a sauna,” he said. What a wonderful companion. The rain came on hard and fast and set the surface of the water dancing. Pulling through the downpour we found a small, densely grown island to camp on, just a few hundred yards off our route.
Getting soaked once more by a thunderstorm, just after drying our gear in the sauna on Tuunaan Island, Verneri didn’t mind any of the challenges of the tour but seemed the enjoy them all the more when the going got tough.
The next day the skies had cleared and the sun warmed us as we began the day’s rowing. Not long after leaving camp, a black head the size of a football popped out of the water about 50 yards behind us. It was a rare Saimaa ringed seal. With a total population of only about 310 individuals, it is one of the most endangered species of seals in the world. Trapped inland by the rising of the land following the Ice Age, the Saimaa ringed seals are one of only three species of freshwater seals. The seal followed us for 10 minutes, popping up every now and then, each time closer to us.
This was the first really warm and sunny day of our tour, and we had grown so accustomed to rowing in rainy and cloudy conditions that we forgot to put sunscreen on—an oversight we would later regret. After 11 miles of rowing in a generally northerly direction through tightly packed clusters of islands, we reached the small city of Savonlinna. For lunch we were intent on finding a certain restaurant by the market, famous for its vendace, a freshwater whitefish found locally. The meal lived up to its reputation and was the best fish I had ever had, fried crispy in butter and served with a special dipping sauce. Verneri and I were in no hurry to continue, so we strolled across a floating walkway to Olaf Castle and took a tour of the 15th-century fortress with three tall round towers and ramparts that rise right out of Savonlinna’s bay.
We got back aboard TURBO, left the town behind us, and headed north. The weather forecast for the next day was for stronger winds, so I wanted to find a place for the night where we could continue our journey sheltered from the coming southeasterly wind. We found a tiny island only 20 yards wide, close by the eastern shoreline of Little Hauki Waterway, the southern extremity of the waters we had crossed at the beginning of our tour. The evening was peaceful and beautiful; the low, shining sun made rocks, bushes, and flowers glow in a coppery tone. We sat on a cliff, looking at the western sky across another of the many beautiful waterways of Saimaa.
As forecast, the wind had increased by morning and was blowing 14 knots from southeast. Our route was perfect, though, heading northwest, with some sheltering islands east of us. We started rowing, but with the following wind and waves coming from an angle that kept pushing the stern to port, we were continually pulling only the starboard oars. We stopped fighting it and hoisted our sail. We sped through narrow channels and past summer cottages where people might have been wondering about our hammock sail and the speed it produced. TURBO was exceeding 5 knots from time to time. The rig was working perfectly. The center of effort was low, and on a broad reach or a run, the boat was not heeling at all, but charging effortlessly through the water.
After sailing for two hours we reached the bay leading back to our starting point. We rounded the point, took the sail down, and started rowing to the southwest with the wind to our port side. The wind had increased to 20 knots, and the last half mile was hard work. When we finally reached the harbor and ramp, it started raining and the wind seemed to increase even more. We had finished just in time. We unpacked the boat and trailered TURBO. We had conquered small part of Saimaa, and there were 9,200 more miles of coastline to explore.
Mats Vuorenjuuri is the father of three and an entrepreneur, making a living in graphic design, photography, and freelance writing. He has sailed all his life, and wooden boats, sailing, and boating are his passions. He has restored both sailboats and motorboats, and in recent years has discovered the simplicity and joy of small boats. He currently owns a small, open plywood motorboat, a Herreshoff Coquina, and TURBO. He wrote about cruising the Finnish coast in his Coquina in our May 2016 issue.
If you have an interesting story to tell about your adventures with a small wooden boat, please email us a brief outline and a few photos.
Joe Liener, here with his ducker, GREEN BRIAR, used his roller cart to get his boats to and from the water.
Decades ago, my friend Joe Liener introduced me to duckers and melonseeds at his little boathouse in Wittman, Maryland, on the eastern shore of Chesapeake Bay. Joe had retired some years back from his job as the master of the Philadelphia Naval Yard boatshop where he used what he called a spar cart to move heavy spars and beams. He used a small version of one to get his boats from his boathouse to the water.
The carts are simple, just a roller, an axle, and a frame. Joe’s was pretty light, a 4″ roller, a frame with some plywood for a top, and a couple of boards on it to fit his boats and keep them from rocking. Cheek pieces fastened to the frame had holes to take the roller axle. The cart could also be used, frame down, as a fixed roller, handy for getting a boat out of the water onto a dock or bank or sliding it off or on a trailer.
I thought a cart would be handy for my 13′ 6″ Good Little Skiff, especially since I had no trailer. The bugeye EDNA LOCKWOOD at the Chesapeake Bay Maritime Museum where I worked was getting new masts, so Joe suggested that we take a section of old mast for a roller and bore it for a steel-pipe axle, then make the frame.
A section from a bugeye’s retired mast serves as the roller.
That 2′ x 8″ roller has now been through several frames, one of which was destroyed in getting several thousand pounds of sandbagger off a marsh. My current frame has cheek pieces incorporated into it and is 26″ wide by 20″ long, all made out of 2x stuff. A piece of steel pipe (1/2″, schedule 80, 0.840 O.D.) works as an axle. Drilling the hole down the center of that old spar was not for the faint of heart. It took Joe’s assistance with a second set of eyes and a big drill for me to bore the hole. There are easier ways to make a roller.
I have made several roller carts using 4″ PVC pipe. Bigger pipe is available and better for going over rough ground. Using a holesaw I cut discs to fit the inside diameter of the pipe and drill a hole to take the axle. I use four discs, evenly spaced along the roller, which is somewhere in the 18″ to 24″ range. I position the hole for the axle so that the roller is about 1/2″ lower than the load, keeping it as low as possible if you need to lift something heavy onto it. Sleeves or bushings of nylon or other slippery stuff would make it easier to roll; I’ve just made a loose hole in the wooden cheek pieces.
I now have more boats than trailers, so I use my roller frequently to swap boats. To take a boat off a trailer, I tie the boat to a solid fixed point and pull the trailer until the boat is at the balance point. I put the roller cart down, roller up, and drop the boat onto the roller so I can slide it into the boathouse, usually using a bunch of 4″ pipe sections for additional rollers. When I use the roller cart to transport a boat, those with fairly flat bottoms like a dory, a skiff, or my ducker sit nicely on the frame. Boats with a very round or V bottom, or a shallow keel, need a hand or chocks on the cart frame to keep them upright.
I’ve used my roller to move heavy stuff like my catboat mast, and I tuck it into the back of the pickup when I am going to do a trailer launch on a shallow beach. It works well moving boats over marsh where I can’t take a trailer. For moving heavy, bulky stuff, Joe’s cart is hard to beat.
For tips on making roller carts, see this month’sFrom the Editor.
Ben Fuller, curator of the Penobscot Marine Museum in Searsport, Maine, has been messing about in small boats for a very long time. He is owned by a dozen or more boats ranging from an International Canoe to a faering.
You can share your tricks of the trade with other Small Boats Monthly readers by sending us an email.
The looms of the author’s carbon-fiber sculls are not much larger than the grips, and the opening in the side of each pogie is smaller that it would need to be for wooden oars with larger looms.
If I can keep my head, feet and hands warm while I’m rowing in cold weather, the rest of me stays warm; pogies are my winter hand covering of choice. I sewed my pogies 14 years ago from wind-blocking fleece and I’m still using them to row on cold winter days.
Pogies are remarkably simple and easy to make. Their primary purpose is to keep wind from reaching your hands, but they can be insulated and waterproofed as well. You can use fleece, windstopper fleece, Cordura, Gore-tex, and many other outdoor fabrics. Some of these technical fabrics can be expensive but, depending on fabric width, with just a half yard you can make two or three pairs of pogies.
SBM
The shape isn’t critical. Err on the large side if in doubt, then resew to fit.
The simple drawing here is the basic shape of a pogie. Unlike gloves, pogies can fit almost any hand, large or small. A good starting point for the pattern’s overall size is around 12″ tall and 8″ wide. The side opening should fit the loom; if the loom is larger than the grip, the pogies should slip over it and not crowd the rower’s hands. The bottom opening should provide good clearance for the sleeve of a coat as well as the hand. You can easily customize this for your needs. I’m right-handed and need to get into and out of the right-hand pogie more often, so I made the opening a bit wider than the left.
Make a paper pattern similar to the drawing. Leave a 1/2″ allowance for seams and hems at the openings. The exact shape isn’t critical. Fold your fabric in half. If it has an exterior face make sure it’s inside the fold. Lay the folded fabric out on a flat surface and align the pattern’s straight edge with the fold of the fabric. Mark the outline with chalk and carefully cut. When cutting two layers of fabric, it helps to pin them together before cutting. Machine or hand sew the seam. Backstitch the seam ends at the openings to reinforce them. (If you aren’t equipped to do any sewing, you can use a Dritz Liquid Stitch Permanent Adhesive for the seams.) Depending on your fabric you can hem the openings to prevent fraying. Some thickly woven fabrics like fleece do not fray or unravel on cut edges. Synthetic fabrics like nylon and Gore-Tex can be cut with a hot knife to seal the edges.
Christopher Cunningham
Two-layer pogies with Gore-Tex shells and fleece liners. The set on the right is inverted to show sewing details. The editor used these pogies during a November-to-January rowing trip from Pittsburg, Pennsylvania, to Cedar Key, Florida.
Some do-it-yourselfers hem their pogies with webbing at the hand openings. That prevents the material from collapsing as you try to slide your hands in. And, depending on the material you use, you can also flatten the seam allowances and top-stitch them. This also provides a bit more stiffness to the pogie for easier entry. If you’ve used a waterproof fabric you can apply iron-on seam-seal tape or liquid seam sealer to waterproof them.
I put my pogies on the oars first, then slip my hands in. Some rowers do it the other way around. If it’s especially cold, I start out rowing with fleece gloves inside pogies and as I warm up, the gloves come off but I keep my hands in the pogies where they stay very comfortable.
Dale McKinnon began rowing in 2002 at the age of 57 and in 2004 rowed solo from Ketchikan, Alaska, to her home town, Bellingham, Washington. In 2005 she rowed from Ketchikan to Juneau. Her previous articles for Small Boats Monthly include rowing the Columbia River and the Columbia River estuary, how to row rough water, and reviews of NewGrips and CrewStop rowing gloves, Exped sleeping pads, and the Devlin Duckling 17.
You can share your tricks of the trade with other Small Boats Monthly readers by sending us an email.
The ball-bearing equipped jig, along with a shop-made, zero-clearance, table saw insert, makes ripping strips for laminations safer than sawing thin stock the on the fence side of the blade.
If I had my druthers, I’d make knees, breasthooks, and stems—all those angle-reinforcing structural parts of boats—out of grown crooks, but they’re hard to come by and take time to season. Laminating these parts is a good way to get the wood grain in them to turn around corners, and they’re fairly easy to make. The part of the process that I like least is cutting the required thin strips of wood on my table saw.
For decades I’ve set the rip fence up close to the saw blade and run the stock through with push-sticks. At the end of each cut it was always a struggle to get the new strip pulled past cleanly the blade. If I walked around to the back of the saw to pull the strip through, I’d interrupt the steady feed of wood through the blade, and the strips could easily bend or twist into the blade, resulting in some gouges or burns. There was also the risk of having the saw shoot the strip across the shop.
I recently came across a better way: thin-rip jigs. There are a few different versions available from woodworking supply stores, and a number of do-it-yourself versions described on the web. I bought Rockler’s Thin Rip Table Saw Jig. It has a metal device on the bottom that locks into the table’s miter track. The top of the jig slides side-to-side, and a knob locks it at a chosen setting. A ball bearing acts as a gauge and a guide for the wood being sawn.
The bottom of the jig has a metal bar that fits and locks in the table saw’s miter track. The ball bearing reduces friction as the wood being sawn is pushed by the jig. The zero-clearance jig shown here is made of ash and is splined at the ends to prevent splitting.
When working with any thin stock on the table saw, a zero-clearance insert is better for the wood and safer for the operator. If the gap in the saw’s standard insert is wider than the strip, the strip won’t be supported and can get pulled down by the saw blade.
I ran the stock through the saw blade (taking off just a bit of wood to assure that the stock had parallel sides), set the jig in the tracks, and placed it so its ball bearing could be set against a saw tooth that would be cutting the kerf on that side. The jig’s scale is marked in 1/16″ increments, making it easy to slide the bearing away from the blade to set the thickness of the strips. Partially tightening the knob locks that setting and leaves the jig to slide back along the track away from the blade; further tightening the knob locks everything in place.
With the rip fence pressing the stock lightly against the bearing, sawing can begin. At the end of the cut, a strip falls safely to the side of the blade with no binding, burning, or gouging. For every subsequent strips, the fence gets unlocked and moved to put the stock again against the bearing.
The last bit of each board may be thick enough to provide another strip, but the jig won’t be able to work with it because the fence would come in contact with the blade. The remnants could be run through a planer or carefully fed through the table saw in the conventional manner, between the blade and the fence.
The Rockler Thin Rip Jig is economical—it would cost me more in time and materials to make a jig that would work as well—and makes reducing a board to a pile of uniform, ready-to-laminate strips a whole lot faster and safer.
Christopher Cunningham is the editor of Small Boats Monthly.
Although EMZARA didn’t wind up with the concave bottom section that makes the Jericho Bay Lobster Skiff distinctive, she still gets up on a plane quickly. The intentionally hogged bottom is more of an advantage for a tiller-steered outboard where there is a lot of weight in the stern.
John Adamson visited the WoodenBoat campus in the fall of 2009 and was taken by two Jericho Bay Lobster Skiffs: the original plank-on-frame version built by Jimmy Steele in the early 1970s, sitting on a trailer parked in front of the WoodenBoat Store, and a strip-planked version built by Tom Hill, at anchor near the WoodenBoat boathouse. The skiff has an unusual feature: a hogged bottom. This concavity in the aft half of the hull, usually associated with old boats that have been improperly supported in storage, serves the same purpose as trim tabs, creating lift at the stern and keeping the bow down.
When John retired a few years later, he found himself with some extra time on his hands. He had enjoyed doing woodworking in the past and was ready to take on the challenges that boatbuilding provides. Living a dozen miles down the South Australia coast from Adelaide in Port Wilunga, he has the St. Vincent Gulf at his doorstep and the River Murray beyond his back yard, so he’d have lots of waterways to explore.
The memory of the Jericho Bay Lobster Skiff was still with him, and he purchased plans from The WoodenBoat Store. When the plans arrived, he got to work. To mill the strips for the hull, John had the good fortune to have a friend with a well-equipped cabinet shop where he could mill western red cedar into ninety 1″ x 1/2″ cove-and-bead strips for the hull and Douglas-fir into laminates for the stem.
John Adamson
The strip-built skiff is lighter than its lapstrake predecessor and the interior, without laps and frames, is just as smooth as the exterior and easier to finish and maintain.
He made molds from the full-sized patterns, and when he had them set up on the strongback, the unusual and intentional reverse curve in the bottom became apparent.
Whenever John found himself mulling over some part of the construction that he was unsure about, he posed his questions to the WoodenBoat Forum. Several forum members—“WildBill,” “MichelW,” and “Woodpile,” among them—had built Jericho skiffs using the same plans and were happy to give John the benefit of their experience. “Woodpile” even sent his drawings for the center console that John would eventually install in his boat. Tom Hill’s two-part article on the construction of the Jericho Bay Skiff in WoodenBoat Nos. 210 and 211 also helped point the way.
John used WEST System epoxy to join the strips, laminate the stem, and build up four thicknesses of 1/2” marine plywood for the transom. The planking went well, but when he removed the planked hull from the molds, the hog in the bottom all but disappeared. He realized too late that he should have preserved the reverse curve by installing the keel before releasing the hull from the strongback.
John Adamson
Tom Hill writes about the skiff: “Her high, full, and flared bow makes for a surprisingly dry ride to windward in a chop. Running downwind, her gentle stem curve, moderate deadrise, and round bilges make her forgiving and steady.”
After ’glassing the hull inside and out, he used jarrah, a species of eucalyptus common in Western Australia, for the inwales and outwales. The strips of ramin that grace the inboard face of the breasthook were cut from a slat of a Venetian blind he found lying on the side of a road—John’s father had taught him the importance of picking up anything that might be useful someday. He finished the interior bright with a two-part polyurethane varnish and painted the exterior with marine alkyd enamel—Oxford blue with a white boottop.
John bought a 20-hp Tohatsu four-stroke outboard to power his skiff. A hydraulic steering system took to the routing from the center console to the outboard without the wide curves that a cable system requires.
John Adamson
The fuel tank is secured under the seat to keep its weight out of the stern. The fuel and hydraulic steering lines are under a narrow cockpit sole, out of sight and out from underfoot.
John christened his skiff EMZARA. One his friends had taken to calling him Noah during the construction of the boat; Emzara was Noah’s wife. In the summer months—January to March in Australia—John fishes for squid, taking great pains to keep his catch from ink-staining the bright-finished interior. Later in the year, during the antipodal autumn, EMZARA takes to the lakes of the River Murray and the islands of Lake Alexandrina at the river’s mouth. Finnis River and Currency Creek both have deltas where they join the lower reaches of the River Murray. There in the safe haven of reeds and bulrushes, John finds black swans, pelicans, ducks, shags (cormorants), waterhens (coots), egrets, ibis, terns, snipe, bitterns, stilts, seagulls, and a myriad of small insect-eating birds.
John Adamson
EMZARA often explores the lower reaches of the River Murray in South Australia.
Like many who own small wooden boats, John laments that “there seem to be too many distractions that keep me off the water, but one is always optimistic.”
Have you recently launched a boat? Please email us. We’d like to hear about it and share your story with other Small Boats Monthly readers.
I was pleased to have Barry Long write an article on topsails. I get impatient in light air and I, too, like having more sails, either custom-made or cobbled-together ones, as much to get the boat moving as to have more things to fiddle with.
GAMINE, my 14′ Marblehead skiff started out with a sprit main and a jib and that was enough when there was a decent breeze, but sailing during the midsummer doldrums wasn’t much fun. I added a bowsprit and an outer jib and they helped a little, but if I was going to catch more wind, I needed to raise the rig. I added a topsail yard and a topsail much like the ones Barry writes about in his article in our December 2016 issue. I cut my topsail from a salvaged dinghy sail and used a club at the peak to gain a little extra sail area.
I have a few photos of my Marblehead dory skiff with a topsail and outer jib added, but no record of the fifth sail, a flying jib.
The topsail was a step in the right direction and it seemed to utilize breeze beyond the reach of my mainsail. But between the tip of the bowsprit and the top of the topsail yard there was room for one more sail, so I made a flying jib. That brought my little dory skiff up to five sails. I thought it looked great, even though I only ever saw the full suit of sails at the dock. Once I was aboard I couldn’t see the two new jibs. To trim them, I watched the sheets and took up slack until they stopped shaking.
For a long downwind run aboard my sneakbox I set my tarp as a spinnaker.
My most versatile extra sail was a lightweight coated-nylon tarp that I sewed up to use as a boom tent for nights spent aboard the skiff. Downwind, I used the topsail yard as a sprit and set the tarp opposite the sprit mainsail. An oar served as a whisker pole. A few years later I used the tarp as a spinnaker aboard my sneakbox, LUNA. A few bits of webbing I’d sewn along the hem allowed me to gather the top edge, giving the tarp a nice curved shape, albeit rather puckered. While sailing the coast of the Gulf of Mexico I picked up a 6′ 1×3 on the beach and used it as a spinnaker pole swing forward for a long broad reach.
The tarp came in handy aboard my Gokstad faering as an addition to its square sail.
The same tarp came in handy aboard my Gokstad faering ROWENA when there was too much wind to set the square sail oar not enough wind to make satisfactory progress. The last time my tarp was used as a sail was on Lake Ozette on Washington State’s Olympic peninsula. I had paddled with a group of eight kayakers to an island on the lake’s south end. In the morning we had the wind at our backs for the return trip. We rafted up and two kayakers held their paddles upright as masts. There was enough wind that we needed backstays tied to their paddle blades. We were going so fast that one of the kayaks on the outside of the raft got peeled off and he had to sprint hard to catch us, so I guessed we were doing over 6 knots.
I added a mizzen staysail to my Caledonia yawl and discovered I could raise a square sail alongside my cruising garvey’s sprit main and double the area for running downwind. Neither of those boats has a topsail. Not yet.
Afterword
I found a photo of my dory skiff GAMINE with its fifth sail, a jib topsail. I took it in July 1980 on the morning I set out from Mukilteo, Washington, to head north along the Inside Passage.
I happened upon a Lightning Bug while I was kayaking around Seattle’s Lake Union. There is no shortage of fine wooden boats around the lake, but this 15’ motor launch built by Budsin Wood Craft of Marshallberg, North Carolina, drew me in for a closer look. LUCCIOLA, moored in front of one of the more interesting floating homes that line the east shore of the lake, was luminous in the autumn afternoon sun. The boat’s name, Italian for Lightning Bug, was written on the transom in gold leaf, outlined in black. Not every boat can carry off a gilded name, but the Lightning Bug’s lines and workmanship are exceptionally fine and deserve no less.
The Lightning Bug has a vacuum-bagged, cold-molded hull. Finished bright above the waterline, LUCCIOLA’s hull has two inner diagonal layers of cedar and an outer layer that is a combination of fore-and-aft mahogany planking above the waterline and diagonally laid cedar below. Fiberglass applied below the waterline protects the bottom. The seams between the mahogany planks are routered to a uniform width, then filled with epoxy and mahogany sanding dust. The mix is quite dark, almost black, and looks a bit like the shadows cast by lapstrake planking. It’s a nice touch and accentuates the boat’s shape. An ash outwale and guard outline the sheerstrake with a bright accent. The finish on the boat is flawless. Budsin puts at least 12 coats of varnish on the woodwork, and the result is radiant wood grain and a glassy shine.
courtesy of Budsin Electric Boats
This hull will be finished bright above the waterline and has an outer layer of mahogany planking to cover the topsides.
Boats ordered from Budsin with a painted hull have three diagonal layers of cedar and are ’glassed from keel to sheer. The hulls of all of the boats are braced inside by eight pairs of laminated cypress half frames, ultimately concealed by a ceiling of mahogany slats and the cockpit sole.
courtesy of Budsin Electric Boats
Hulls destined to be painted have three layers of diagonally laid cedar planking.
The transom, decks, and coaming are all mahogany. The aft deck of LUCCIOLA has a small hatch that is the lid to an optional built-in cooler that has plenty of room for ice and drinks, even tall wine bottles.
courtesy of Budsin Electric Boats
The optional teak-grate sole and the folding table make for a well appointed cockpit.
The cockpit has two benches, with room for two to stretch out or for two couples seated shoulder-to-shoulder. The helmsman sits on the aft bench. The throttle is secured to the coaming, and the tiller is at the aft port corner of the coaming and connected to the rudder by the same kind of steering cable used for controlling an outboard motor from a wheel forward. The arrangement has no detectable play, makes operating the boat quite easy, and the swing of the tiller doesn’t interfere with the occupants. The controls are on the port side, leaving my right hand free for taking notes and shooting pictures. With the optional folding table, I could just as easily have eaten dinner while touring the lake with a companion.
Christopher Cunningham
Removing the forward seat reveals the box for the main batteries and the storage area under the foredeck.
The seat backs fold down to provide access to the spaces under the foredeck and aft deck. There’s plenty of room in the bow for stowing items such as PFDs, a picnic basket, a cooler, and blankets. The batteries, a pair of 105 amp-hour, absorbed-glass-matt (AGM) batteries, are easily accessed: Sunbrella-covered seat cushions can be removed, the hinged seat back and seat folded down, and the whole unit lifted out. The aft seat covers the power plant: a 700 watt, 24-volt DC motor. There is room either side of the motor for two more AGM batteries, which would provide 1 ½ to 3 hours of reserve power. With the aft seat back folded down, there is access to a bit of storage space under the aft deck. Bulky items might not slip past the crossbeam that supports the motor, but smaller items such as fenders will find a spot there. Foam to meet Coast Guard flotation requirements is secured to the inner face of the transom. (Boats shipped to Europe have additional foam secured in the bow to meet the applicable requirements.) LUCCIOLA’s removable cockpit sole is made of two panels of 1/2″ marine plywood and covered with carpet. A teak grate is an option if you prefer a more traditional look. Beneath the cockpit sole there is an automatic electric bilge pump.
Christopher Cunningham
Removing the aft seat reveals the motor and two boxes for reserve batteries.
The motor is remarkably smooth and quiet—I was never aware of it, even though I was sitting right over it—and drives a stainless-steel shaft supported beneath the hull by a bronze strut. A bronze skeg attached to the strut guards the bronze three-bladed propeller and supports the bottom of the rudder. Budsin offers a keel that provides additional protection for the prop in shallow waters where running aground is a possibility or if you’d like to pull the boat up on a beach.
Christopher Cunningham
LUCCIOLA has the standard arrangement for rudder, prop, and strut.
courtesy of Budsin Electric Boats
A full keel is an option for boats that require extra protection of the prop and rudder.
If LUCCIOLA had been equipped with Budsin’s optional sound system, I could easily have missed seeing it while I was aboard. Six speakers are discreetly installed along with an auxiliary cable connecting them to whatever gizmo you use to store your music collection on, and a discreetly located volume control is near the throttle. I didn’t miss having music. When a boat is as quiet as the Lightning Bug, I’m content listening to the sound of water lapping a wooden hull.
Christopher Cunningham
The planking seams have been routed and filled with a dark mix of mahogany dust and epoxy.
Budsin sets the Lightning Bug’s top speed at 5 ½ mph, with a running time of 4-1/2 hours on fully charged batteries. Throttling back to 5 mph should stretch the running time up to 7 hours. The only instrumentation is a battery-charge indicator set forward of the helmsman where it’s easily seen, so I used my GPS in a part of the lake sheltered from the wind for speed trials. It recorded a top speed of 4.5 knots (5.2 mph).
A power cord is connected to a charger secured under the aft deck. Having the cord with the boat is a good idea; it’s safer to carry the cord from the boat to the power source than to carry an electrified cord from the power source across the water to the boat. The charging time is usually double the time that the batteries have been in use, so in most cases an overnight charge will bring the batteries up to a full charge.
Christopher Cunningham
The Lightning Bug’s electric power plant can maintain 5 knots for 7 hours.
The boat responds quickly to the helm. It’ll do a 180 in a boat-length radius, and at top speed it will bank into turns. Putting the boat in reverse requires a firm grip on the tiller and judicious use of throttle and helm. As with almost any rudder with a tiller, the blade will want to flop to one side and come up hard against its stops if the tiller is left untended.
Christopher Cunningham
The Lightning Bug is equipped with running lights; the stern light is removable and its socket can be used for a flagstaff.
For shading the summer sun, Budsin offers a Sunbrella-fabric canopy supported by mahogany posts. In the fall, Lake Union is especially appealing in the evening when the lights of the city illuminate the skyline and their reflections are painted across the water; Lightning Bugs are outfitted with running lights fore and aft, cockpit illumination, and an all-around white light on a staff that fits and draws power from the flagstaff socket.
The Lightning Bug’s range of 35 miles between charges will theoretically get it to points with a 17-mile radius from home. That’s a lot of territory, but a boat that is so easy on the eyes and ears isn’t about merely getting from one place to another. The vessel is in and of itself the destination: a place to relax, enjoy solitude or the company of friends, and take in the view, both within and beyond the boat.
Christopher Cunningham is the editor of Small Boats Monthly.
Lightning Bug Particulars
[table]
LOA/15′
Beam/50″
Draft/14″
Weight/525 lbs
[/table]
The Lightning Bug is available as a finished boat from Budsin Electric Boats. Prices begin at $24,800 and vary according to options.
Is there a boat you’d like to know more about? Have you built one that you think other Small Boats Monthly readers would enjoy? Please email us!
Mersea Island, tucked into England’s Essex coast about 50 miles east northeast of London, is only truly an island twice a day, when the high tide covers the causeway that connects it to the mainland. There’s open water to the island’s southeast side at the junction of the Colne and Blackwater estuaries, and to the northwest mile after mile of tidal salt marsh with a wealth of wild waterfowl. This is the spiritual home of the Milgate duck punt.
The village of West Mersea occupies the southwest quadrant of the island, and has always lived by whatever the water and marshes could provide, so boats have long been an essential part of daily life. One of the many local businesses was a boatyard once owned by William Wyatt, who, as well as repairing the local fishing smacks and yachts, was also the local punt builder of choice. John Milgate, born in a cottage called Smugglers’ Way, just a few yards from Wyatt’s punt shed, started work at the yard at the age of 13, just after the Second World War. His retirement, 55 years later in 2001, didn’t stop him working on boats; he simply carried on in his own shed at home. The restoration of his 1892 smack, PURITAN OF COLCHESTER, was always going to be a lengthy job, so John wanted a simple, inexpensive boat to get him onto the water quickly, whenever the mood took him. He decided he needed a duck punt.
Gill Moon
Setting the leeward chine deep in the water gives the hull lateral resistance for windward work.
The problem at that time was that no one in West Mersea was building them anymore, so he’d have to come up with his own design, as well as rethink the construction process. The original shape had evolved over the best part of a century and a half, but construction techniques and materials had moved on radically. Many punts were home-built by eye, resulting in a lot of variation. Since many wildfowlers had to contend with shallow pockets, as well as shallow water, they built their punts out of whatever affordable materials happened to be available, and did the building as well as they could. The professionals, though, set higher standards, having good reason to build commissioned punts properly. No one wanted to lie in freezing bilgewater during a hard winter’s night on the marsh, so there was a penalty to pay for a leaky boat. The rule was that if a new punt leaked, its owner was due an amount of beer equal to the water the boat let in.
Professional builders also tended to evolve styles of their own, and the 1919 punt in the Mersea Museum shows that of William Wyatt. Milgate’s study of it revealed a slightly longer hull than some of its contemporaries, but the same 3′ beam. It was built solidly with 9″ × 3⁄4″ planks and 2 3⁄4″ of rocker in her otherwise flat bottom. A sheerstrake is clench-nailed onto the side, resulting in a couple of inches more freeboard than in punts from other parts of England’s east coast; this is probably because unlike many of those, it’s an open boat. The other obvious difference is that it isn’t quite double-ended, sporting a small triangular transom above the waterline. The short extended nose at the breasthook has a groove to take the punt-gun barrel. The matte gray finish was no surprise—there’d been plenty of Admiralty-surplus paint available in 1919. Not only was it inexpensive, it was also ideal for making stealthy progress among the mud banks, while stalking highly suspicious ducks. Powder and shot were expensive, so to have a chance of making a profitable bag, getting to within 70 yards of a flock to assure hitting the target was essential.
Marc Davies
Having just come about, the punt sailor has dropped his steering oar over the new leeward rail. There is no accommodation for seating other than the cockpit sole.
Milgate’s plan was, in the spirit of both the amateur and professional punt builders, to make his new boat as quick and economical to build as possible, while retaining the William Wyatt aesthetic. The 17′ length of the museum’s boat would have been wasteful in terms of plywood, so the new design was shortened to 15′ 8 3⁄4″, with a beam of 32 1⁄2″. Milgate’s punt is built with just three sheets of 10mm (3⁄8″) plywood, using softwood frames in place of the original oak.
The Milgate duck punt could hardly be simpler to build, and architect Mies Van der Rohe, with his guiding principle that “Less is more,” would certainly have approved. There’s no daggerboard, rudder, or decks. It’s just a sleek, flat-bottomed sharpie that’s not quite double-ended. Instead of building the bottom first, adding the stem and sternposts, side panels, and finally the frames, the Milgate design is built upside down on a jig, starting with the side panels. The result of using ply and softwood is that the boat usually comes out rather lighter than a 19th- or 20th-century version, at around 140 lbs, and lighter still if you opt for a stitch-and-glue version. The build isn’t a long process, and many Milgate punt builders are convinced that the majority of the time is taken up by painting.
Marc Davies
Punts built to the Milgate plans may appear to have two lapped strakes, but each side is made of a single plywood panel. A kerf about 28″ long allows the upper part of the panel to flare to meet the transom. The lap is created by a false sheer strake applied over the side panel.
The fitting-out is equally straightforward. Floorboards are essential unless you’re partial to lying on the frames and soaking up bilgewater. A couple of tholepins, or preferably, in my view, oarlocks for the steering oar are a must-have. A punt rows very well too, so budget for a pair of oars—you can even use the same oarlocks. When it comes to the sailing rig, most West Mersea duck punts use cast-offs from Optimist dinghy racers. The sails you see with the enduringly cool logo of a duck made up of a D and a P are custom-made by Gowan Ocean Sails, about 50 yards from the old Wyatt punt shed. The shed is now part of the facilities owned by the Dabchicks Sailing Club, founded in 1911 by William Wyatt and other West Mersea sailors.
So, now that it’s built, what exactly have we got? Getting to and around the marshes, while occasionally eluding unexpected game keepers, required an adaptable boat that was light to handle ashore, quick to launch, easy to push over mud, and comfortable being sailed, poled, paddled, or rowed. The Milgate Duck Punt is all of these things, as well as a good weight carrier in the bargain; it’ll comfortably take a couple of adults and a fair amount of gear.
Once aboard a duck punt, several things are immediately apparent; the first is just how stable she is, with her flat bottom and low crew position. Next comes the discovery of just how few inches of water are needed to sail her off the beach. Once afloat, a shift of weight to engage the leeward chine and the punt can go to windward. There’s no need to find water deep enough for a centerboard or rudder. Once you’re off the beach, you’ll also discover that the duck punt is no slouch under sail, either.
Marc Davies
Martin “Lurch” Blackmore makes himself comfortable on the floorboards as he works to weather.
Steering becomes progressively more intuitive, as you get a feel for shifting your weight forward to initiate a gentle luff or aft to bear away, with more major adjustments being done with the short steering oar—usually referred to as a paddle. While this might sound like a case of coarse and fine adjustments, the reality is that you’ll soon be using both methods pretty much at the same time. It’s a bit like steering a bicycle on a winding road by leaning while turning the handlebars. The paddle is key when tacking. Four good strokes, the total allowed under the racing rules, should be more than enough to get the bow around before switching the paddle to the new leeward side for steering.
Duck punts are sailed with the helmsman lying down. There have been experiments with various types of backrest; according to Milgate, the most exotic of these was also the cause of the only recorded capsize. They are usually pretty comfortable for recumbent sailing, and taller skippers, like Martin “Lurch” Blackmore who sails No 10, POINTYBIRD, often stretch out with a leg draped over the side.
Gill Moon
In the hands of a skilled sailor, a duck punt can take on a stiff breeze.
The Milgate punts can stand up to a bit of weather. In over 20 knots of breeze they’ll be absolutely flying, but still nowhere near the ragged edge. They’re quite maneuverable as well. The close racing in the tight spaces along the foreshore shows that with a bit of practice, the rudder and centerboard won’t be missed.
Aside from breaking out the oars if the wind dies or taking a punt out for a leisurely row on an evening tide after dusk, duck punts are also rowed quite seriously. The West Mersea Town Regatta, an annual event first held in 1838, includes rowing events for duck punts rowed as singles or as pairs.
The duck punt can do anything you’re likely to ask of it in and around thin water. It’s easy, quick, and above all inexpensive to build; the plans are free, and the build itself can be done for about $150. All these things helped convince my wife that I’ve got to have one. The only problem is convincing her that I also need to keep those more complicated and expensive boats that lurk in our garage.
Marc Fovargue-Davies is a Research Associate at the University of London’s Centre for Corporate Governance & Ethics. More importantly, he also works with Adrian Donovan, (who built, among others, his Morbic 12, CADFAEL, as well as a particularly fine pair of Whitehall skiffs), and the International Boatbuilding Training College at Lowestoft, England. Marc regularly contributes to both Water Craft and Classic Sailor.
The French love sailing, but the big and expensive racing and cruising yachts often get all of the attention. Two years ago I got together with a group of friends and we organized a new event, called Challenge Naviguer Léger, Sailing Light Challenge, an unsupported, 100-mile tour along France’s Bay of Biscay coast in small boats under sail and oar.
This year’s participants and I arrived at the Corps de Garde harbor near Charron, and waited with our gear-laden boats for the ebb tide to give us a favorable current down the Sevre River to its mouth at Aiguillon Bay. Almost all of the 15 boats being launched for the journey were open boats rigged for oar and sail. I wasn’t sailing; I’d be shepherding the fleet aboard our safety boat, a 17′ rigid inflatable boat (RIB) with a 50-hp outboard.
The waters of the Charente Maritime, located on the French Atlantic coast halfway between Britanny and Basque territory, are mostly shallow, and for the next four days, the tides would set a strict schedule for our travels. A lot of the stops we’d make were on shores that are inaccessible during low tides. Some of the marinas in the area even have locks to keep them from running dry as the ebb pulls the water back a mile or more from shore. While our route was protected from the Atlantic Ocean by Ré and Oléron islands, each about 16 miles long, the waters between them, Breton Strait and the Strait of Antioche, can be quite choppy.
photographs by the author
The 2016 Challenge began on the tidal reaches of the Sèvre River, which winds to the sea through the farmlands of Marans on the west coast of France.
When the high slack tide brought the Sèvre River to a standstill, we launched the boats. Carried by the quickening flow of the ebb we followed twists and turns of the river and dodged dozens of idle oyster barges anchored midstream. The wind was blowing from the east, as it usually does in the morning, so everyone had their sails set, taking advantage of the cool air that was sweeping across the farmlands to the Atlantic Ocean 24 miles to the west. We reached the buoy marking the mouth of the river and entered Aiguillon Bay, a 4-mile-wide apostrophe of shallow water tucked into the coast. At low tide it would be a vast expanse of mud, with the river’s channel through it widening as it approaches Breton Strait.
We set a course southwest for the Isle of Ré, about 11 miles away. The difference in speed between the boats spread the fleet out as we traversed Aiguillon Bay. LILI and EMJO 2, the two largest boats of the fleet, each 20′ long, were the first to first pass the concrete navigational tower at the mouth of the river channel, 3-1/2 nautical miles from shore. WHIMBREL, a Wayfarer dinghy, and FOXY LADY, an ultralight coastal trekker prototype, followed closely behind. This group of four would cross the finish line first every day of the challenge. The rest of the fleet, fanned out on their separate tacks, passed the tower one by one.
Roger Siebert
Charente Maritime
As we approached Ré’s east coast, we began to make out two streaks of tightly packed buildings with whitewashed walls and terra-cotta tile roofs—the towns of La Flotte and Rivedoux—separated by cream-colored, banded cliffs beneath verdant forests and farmlands. We veered south along the island’s east coast toward Sablanceaux Beach at the island’s easternmost extremity. The Ré bridge, a scalloped line of arched concrete spans, sweeps up from the island there and links it to the mainland with a 2-mile-long colonnade of eight-sided piers.
We stopped, as planned, at Sablanceaux to regroup, but the swell from the northeast waves came tumbling across the shallows. I was tempted to beach my boat but decided to anchor a few yards out from the breaking waves. The waves were not big enough to make landing dangerous, so several other boats did go ashore.
About an hour later, when we were ready to depart, the increasing swell made getting off the beach much more difficult for many of the boats. WHIMBREL and TOURNEPIERRE, an Ilur designed by François Vivier, both got through the shore-break, but sand and seashells churned up by the waves jammed their centerboards. With a lot of jostling, Emmanuel managed get TOURNEPIERRE’s board down again; WHIMBREL’s board remained jammed in spite of Stéphane’s best efforts. I took him in tow behind the RIB and our fleet set sail, passed under the bridge, and headed south toward the Isle of Oléron.
In the straits, the chop can make crossings a rough and wet ride.
Nearly 3/4 mile beyond the Isle of Ré we passed the Chauveau lighthouse, a round red-and-white tower at the edge of the tide flats; the waves became steeper and whitecaps streaked across the Strait of Antioche. The northwest wind, as usual here for a summer day, was building and could easily reach 15 to 20 knots. For most of the boats in the fleet, it was time to put in a reef for the 10-mile crossing to Oléron. Our course for the last but longest leg of the day was a close reach, taking the waves on the starboard bow, and many of the boats were shipping a lot of water. Most of us had to do some bailing but we all had drybags and watertight compartments to keep our gear dry. The fleet stayed much closer together than it had in the light morning winds, keeping an eye on each other and making good progress toward a harbor located on a sparsely populated part of the north coast of Oléron.
After four hours of sailing, we were all wet with spray and tired but the fleet had made the crossing without incident and we arrived together just offshore from the harbor. The surf on the shore was much too high to make landfall on the beach as we had planned, so we had to make our way into the harbor. Its entrance channel was well marked by green and red buoys but quite narrow. On either side the water was quite shallow and glowing in the tawny light reflected off the sandy bottom. The channel takes a sharp, almost 90-degree curve to the west and led us between stone breakwaters set just 60′ apart. Having made the turn, the fleet was head-to-wind but had no room for tacking, so everyone had to switch quickly from sails to oars. All the while, the waves around us were crashing on the large rocks at the harbor entrance.
The transition to oars was effortless for ATYPIK, Pierre’s Chester yawl that he had modified by installing a small sailboard rig with a rotating carbon-fiber mast, and outriggers with gated locks. It took him no time at all to get the sail wrapped snugly around the mast, and because he kept the oars in locks while he was sailing, he just had to swing the blades swung out of the bow to start rowing. Others with more conventional rigs had halyards to let go, sails to drop, and oars to retrieve—no easy task when sailing alone.
About 100 yards in from the ends of the breakwaters we reached the opening that leads to the harbor’s floating docks. We rowed through the gap, and over a wall submerged by the high tide. During the low tide the wall blocks the way in and out of the harbor, but holds back enough water to keep the boats afloat. Our flotilla found a safe berth for the boats and we hauled our camping gear across the parking lot to a lawn bordered by the beach on one side and a four-tiered, white house that looked like a the superstructure of a mid 20th-century ocean liner on the other. With our tents set up, we were soon asleep.
In a dead calm of the morning, the fleet rowed out the Douhet harbor channel on a high tide. As the tide ebbs here, the water in the channel will drop and expose a wall, submerged here, that will retain enough water in the harbor to keep the boats in the background afloat.
On Friday morning, we woke to a grey sky and light drizzle and made quick work of breakfast and packing our camping gear. At 8 a.m., the first boats left the dock, rowed through the gap in the breakwater and headed out through the channel. A light westerly breeze helped us sail downwind across Maleconche Cove where closely spaced 50-yard-long rows of wire oyster cages were suspended from shore-side pilings for nearly two miles. Oystering is one of the main fisheries in the region and oyster farms such as this one create a landscape in the intertidal zones equivalent to a farmland’s fields and furrows.
It took more than 60 years to build the Boyard fortress, and it was never used for the military purpose it was intended for.
As we rounded Saumonards point to starboard, we could see Boyard fortress perched on the horizon to port. The four-story stone fort sits on a shoal halfway between Oléron and the Isle of Aix. Construction of the 220′ by 100′ oval fort was begun in 1801 during the reign of Napoleon Bonaparte, but by the time it was finished in 1837, the range of cannons had increased and the fort was no longer needed guard the 3-mile-wide straight between the two islands.
The tidal current was slowly but surely building up, bringing out a lot of bass fishermen in small motorboats. Our fleet was widely spread among oyster beds that outline most of the region’s coastline. We sailed along the passage between Oléron and the mainland from one navigational marker to an other; each three-tiered concrete tower had its name painted on it in tall, black, block letters: ARCEAU, LAMOUROUX, and JULIARD.
The current running northward against us grew stronger as we approached the narrowest part of the strait between Oléron and the mainland peninsula of Bourcefranc-le-Chapus. Before we were brought to a standstill we all anchored along La Mortanne bank, a sandbar bordering the deep-water channel on its south side and surrounded everywhere else by rows of oyster cages. To the west of us, a mile away on Oléron, was the Citadel of the Château d’Oléron, a 17th-century fortification with two sharp-edged bastions jutting into the strait like the bows of ships.
Charente Maritime waters are the most important place in Europe for oyster and mussel farming.
While we waited for the current to subside and reverse with the turn of the tide, I had a good long lunch as the ebb uncovered the oyster cages. As soon as the cages broke the surface, oystermen began harvesting the oysters and loading them onto aluminum outboard-powered barges. The heavily laden boats then skimmed along at 20 knots back to the harbor at Château d’Oléron.
When the slack arrived we pulled our anchors aboard. During the two hours we had spent waiting at the bank, what had been a light breeze was now blowing harder, around 15 knots and gusting to 20. Just as we were setting sail, PLÉNITUDE, a 16′ sharpie, was just rounding La Mortanne bank a full two hours after the fleet front runners had arrived. By far the slowest boat of the group, especially sailing upwind, PLÉNITUDE was always struggling to finish the legs in time to take advantage of the tides.
With the tide and a Force-5 wind behind us, we flew along a muddy channel dodging oyster beds, steel stakes, and oyster barges. We rounded Fort Louvois, a small horseshoe-shaped fortress with its toe poking out into the strait and a single tower rising at its back. It was built for Louis XIV in the late 17th century and sits on an island a quarter mile beyond a narrow peninsula on the mainland side. Soon after leaving the fort astern we passed under the slightly curved, concrete girders of the 1-3/4-mile-long Orléon bridge.
Now privately owned, the Louvois fortress was built at the end of the 17th century as part of a coastal defense system devised by Vauban, a famous military engineer working for King Louis XIV.
With a strong wind and current pushing us along at a good clip, we needed to turn east from the main channel into the mouth of the Seudre River, and we’d get only one chance to find the river channel make our turn at its entrance. If we were to miss it, turning back against wind and tide would be close to impossible.
We were able to make the turn with the fleet intact and sailed east under the bridge spanning the mouth of the Seudre. The river runs in a nearly straight line to the southeast, so with the wind and the current again at our sterns, we made good speed covering the 8 miles toward the channel that would lead us to the village of Mornac. I knew from previous trips that the entrance was narrow and very difficult to find. I looked very closely at all of the channels dividing the riverbank to starboard and fortunately, a sign—MORNAC—had been nailed to the top of two pilings crossed in a tall X. Just a few boat lengths in from the sign, the wind was gone and the waters were quite still. The fleet furled sails and took to the oars in a channel so narrow that blades often simultaneously touched the muddy banks both sides.
A sign guided the fleet into the tiny Mornac channel. Sails soon came down and the oars went out.
We looped through two oxbow bends, passed a long row of oyster shacks perched on stilts along the channel’s south bank, and nearly a mile in, arrived at Mornac, an old village of homes and shops with whitewashed stucco walls. The harbor was scarcely large enough to accommodate our fleet. Although we take pride in being self-sufficient, our Challenge rule of autonomy is meant to be broken now and again so we all sat down to a good meal at the local restaurant to recover from the strain of the day.
After dinner I put my tent on a small grass field on top of a channel bank. A steady western wind was blowing all night long, and I knew it would make our exit along the Seudre River quite difficult.
Early in the morning, I woke to an unwelcome Force-4 wind. We left Mornac and when we emerged from the little channel, the 100-yard wide stretch of the Seudre was waiting for us with an unpleasant 8 miles of choppy conditions and headwinds.
Once again, the varying windward abilities of our boats made a huge difference in our progress. Some set sail and tacked downriver, others chose to row against the wind to the river mouth. The fleet was soon spread all along the length of the Seudre, with PLÉNITUDE, as usual, trailing behind and gradually diminishing in the distance.
Near the mouth of Seudre river, the fleet regrouped at the large launch ramp at the little riverside village of La Cayenne.
A mile shy of the bridge at the river mouth we stopped at the harbor in the little village of La Cayenne to bring the fleet together. The westerly was now a mild Force 3, which would make our four-mile course to the south end of Oléron easier.
Emmanuel, a professional boatbuilder, had fitted a jiffy reefing system on his Grand Skerry. Here the fleet is beating toward the bridge spanning the mouth of the Seudre river. The bridge in the far distance connects Oléron Island to the mainland.
Together and under way once more, we zigzagged through acres of oyster beds and steel stakes to a sand bank situated at the 3/4-mile-wide mouth of Maumusson strait between Oléron and the mainland, waiting for the rising tide before sailing northeast to the entrance to a channel that would lead us to Gatseau beach. Turning west into the channel put us on a beam reach, a welcome relief after spending the whole morning working to windward. The beach, cradled in a cove surrounded by a forest of maritime pines, gave us plenty of room for the fleet to pull ashore. An hour later, after a good lunch and a rest, it was time to launch the boats, just as PLÉNITUDE, under her red sail, was arriving at the beach. Unfortunately for Jean-Bernard, builder, designer, and skipper of the boat, we had a schedule to keep us working with the tides and there was no time for him to come ashore. He brought PLÉNITUDE about and followed the fleet as we headed northeast on our way to Brouage, an old village on the mainland.
We passed back under the Oléron bridge and then rounded Fort Louvois once again to head east. The northwesterly wind was building up again as the day wore on. The frontrunners of the fleet were moving at a good pace across the waters of the Marennes-Oléron Basin and quickly closed in on the lone red buoy that shows the Brouage channel entrance. Beyond it, the only navigation marks along the path we had to follow were made of slender tree trunks, driven into the bottom and rising only a few feet above water level. We had to take care to keep at the right distance from the markers because water around is quite shallow even at high tide, barely deep enough for centerboards. The 2-1/2-mile-long channel is a large stretch of muddy water on a strange twisting course up to the coast, even heading back out to sea before finally reaching land.
At low tide, the Brouage channel is surrounded by soft slippery mud. It meanders meanders for 2 1/2 miles from the deep water of the Marennes-Oléron Basin and then winds another 1 3/4 miles to the village of Brouage.
Running the 25-yard wide waterway with the wind and being helped by a strong fair tidal stream, we sped by oystermen’s huts and dozens of docks, all on the right bank of the channel. The low land did little to shield us from the wind and we were going too fast for such a narrow stretch of water with small working boats moored very close by on the starboard side. Sails came down and the fleet took to the oars for the last 1-1/2 miles of the day. Brouage’s tiny harbor, if it could be called that, is nothing more than a long sloped bank along a road. We ran all of the boats aground there, side by side; the channel would empty completely at low tide and leave a bottom exposed, entirely covered by a thick layer of sticky mud. That evening, with official permission from the town, we set up our tents nearby on the grounds of an old oyster farm.
During 14th century, Brouage was an important commercial harbor with more than 200 ships moored around it. The sea has long since retreated, leaving the fortress town over 1-1/2 miles inland.
The next morning, while we were waiting for the tide to rise, I took a 15-minute walk around the fortified village of Brouage, which was established in 1555 and was the birthplace of Samuel Champlain, founder of Quebec City in Canada. The village is surrounded by ramparts built between 1569 and 1575 to protect the wealth accumulated by the local salt industry. During the 17th century, sea level began to lower, leaving the fortress like a stone ship lost in the salt marshes.
Sections of the Marennes-Oléron Basin coast are fringed with carrelets, fishing shacks equipped with nets and winches. The nets are lowered into the water, left on the bottom for a while, and then raised quickly to catch any fish that have gathered over them.
At 9:30 a.m. we started the last leg of the Sailing Light Challenge by rowing 1 1/2 miles back out to the Marennes-Oléron Basin. The tide was in, but the channel across the muddy shoals was still the only place deep enough for the fleet to sail. Some boats short-tacked into the wind between the tree-trunk markers in a channel only 20 yards wide. For boats with poor windward abilities and slow to come about it was hard work; the few boats being rowed also made slow progress.
The northwest wind was light at first, but as usual, slowly and surely it built up, as the sun warmed the land, pulling air in from the Atlantic. Waves grew as the wind strengthened and by late afternoon our boats were pounding upwind in a very choppy sea and Force-4 to Force-5 breeze. It was time to reef and to have a quick hand on the tiller if we were going to reach our final destination, the marina at La Rochelle.
On board YOUKOU LILI, Jean-Michel learned about prudent reefing the hard way. Ten miles into the last day’s passage he capsized just off the north coast of the Isle of Aix when he was carrying too much sail and a wave bigger and steeper than the rest knocked him over near a huge field of mussel aquaculture lines and floats. He climbed onto the daggerboard, righted his boat, and got back aboard into a hull full of water, but the bucket he needed for bailing had only been trapped under the thwart, not tethered, and was now gone. A small hand bailer was all he had to empty endless gallons of water. While he was bailing, another big wave capsized YOUKOU LILI; Jean-Michel climbed on the daggerboard again, but his mast lacked flotation and his sails were partially submerged. Jean-Michel put more pressure on the daggerboard. Unfortunately it was made of plywood and not as strong as one made of solid timber, and it broke off flush with the hull. Jean-Michel dropped into the water and his boat rolled upside down. As it wallowed in the 4′ swell, the mast and its partner broke. He retrieved his anchor and set it to keep the boat from drifting into the mussel field. With his boat stabilized, he climbed on the inverted hull and shot several flares to attract attention of the boaters around him. A powerboater nearby saw the signal, brought him on board and took him to La Rochelle marina, 9 miles to the north. I retrieved the YOUKOU LILI, righted and bailed her, then towed her to the marina.
Jean-Bernard was also fighting in the chop and trying to drive PLÉNITUDE upwind, taking a route closer to the mainland, just off the town of Angoulins. He hoped to find a safe haven there but missed the entrance of Angoulin’s haven, a small harbor on the peninsula that extends west from town. A strong gust broke his lugsail’s yard, so he dropped the sail, took the oars, and headed for shore. He landed on a small sand beach backed by Angoulin’s cliffs and pulled PLÉNITUDE ashore. For him, the Sailing Light Challenge was finished. He found a safe place to leave his boat until he could bring his car and trailer from the Corps de Garde launch ramp. The rest of the fleet made it safely to La Rochelle, and we gathered in the La Rochelle marina.
All of us were enthusiastic about the cruise, both for the times we enjoyed and the times that gave us things to think about and improve upon. We decided upon some new standards for next year. The boats must meet minimum standards for speed to make it easier for the group to keep together; gear and flotation must be securely stowed to provide a better measure of safety in the event of a capsize. Small boats are still the best means of traveling the French coast and there are more bays, forts, villages, and channels for us to explore. The Glenan archipelago in South Brittany and the Chausey Islands in Normandy are beautiful playgrounds we’re considering for the next Sailing Light Challenge.
Jean-Yves Poirier is a dedicated amateur boatbuilder with 19 boats to his credit and a freelance writer working in France. He is a frequent contributor to WoodenBoat’s sister publication, Professional Boatbuilder.
If you have an interesting story to tell about your adventures with a small wooden boat, please email us a brief outline and a few photos.
I have always liked sailing in light air. Ghosting along close to shore on a quiet evening feels like magic, especially in a small boat. But light-air sailing, though relaxing, is surprisingly challenging. In moderate winds, any boat competently handled can attain hull speed, but light wind requires sharp skills and careful attention to detail to get the most out of what’s available. Sail shape and trim make a big difference, and having a little extra canvas adds a sharp arrow to the quiver.
photographs by the author
The placement of a melonseed skiff’s mast so far forward rules out setting the topsail while afloat. Boats that have the mast set farther aft offer the sailer better footing and stability and may not have to be rigged while ashore.
My two melonseed skiffs, like most of their type, have small, simple rigs. The single 62-sq-ft spritsail is easy to set and moves the boat along nicely in most conditions. It takes very little to make a melonseed go, but to make things more interesting in faint wind, I tweaked the rig to accommodate a topsail. This complicates the setup, but that’s sort of the point–it offers something fun to tinker with when conditions are calm and less demanding.
When my boats were still under construction, I contacted Stuart Hopkins of Dabbler Sails with the idea of a topsail and he found the proposal intriguing. He agreed to help with design challenges and to make the sails. His suggestions were instrumental in coming up with a solution that works well.
The sails themselves are small and, according to Stuart, relatively easy to make because they require very little draft.* The difficulty is in establishing final dimensions to enable the sail to set well. The topsail needs to overlap the top of the mainsail near the mast to maintain clean airflow but requires a gap at the aft end, near the tip of the sprit, to allow room for sheeting adjustments. My original drawings did not account for either of these details. In fact, when assessing the photos of our first attempt when it was installed on the boat, Stuart decided it did not meet his exacting standards, so we made further adjustments and tried again. The second try nailed it. The topsail is permanently laced to a long, 1-1/2”-thick yard of Douglas fir, so it flies like a flag on a thin pole. On a small boat such as a melonseed, with the mast far forward, there’s no easy way to raise or douse sail while afloat, so rigging is done at the ramp before launch and the topsail is only used when conditions are mild and predictable.
The sail and yard are raised together as a unit. The halyard is lashed to the yard above its midpoint, runs through a bee hole at the top of the mast, then down to a cleat near the deck. The point on the yard where the halyard attaches can be adjusted until proper set is achieved. The foot of the yard is then lashed to the mast, which keeps the whole assembly upright.
For sheeting the topsail, a lightweight line runs from a grommet at the topsail clew, through a bee hole at the tip of the sprit, then down the length of the sprit to the mast. I tension the sheet until the sail looks right, then just tie it off to the sprit. A small cleat here would be handy.
A topsail for a sprit-rigged main requires a sheet led through a beehole in the sprit (upper left inset), a halyard for the yard (upper right), and a lashing to hold the foot of the yard to the mast (lower right). The topsail sheet is tied off around the lower end of the sprit (lower right).
Getting a good set of the sail required a lot of trial and error. All the component parts of the assembly—mainsail, topsail, spars, and lines—are surprisingly interdependent. Small adjustments anywhere in the rig affect the other parts. For example, I found that tightening the snotter of the mainsail’s sprit boom is important when using the topsail, as this adds tension along the whole leech, from the top of the sprit to the mainsail’s clew. This detail helps reduce twist, which will first appear at the top of the rig. If you don’t tension the boom, the top of the sail will still flutter and luff while the bottom is sheeted in too far, which simply makes the boat heel and reduces efficiency.
The topsail only increases the sail area by about 25 percent, but it does so high on the rig where it counts most. It also extends the length of the luff, where the most power is derived when going upwind.
The actual performance enhancement is marginal, given the effort that was involved. However, when the topsail is set well it definitely improves the aesthetics, adding a nice traditional look to an already classic design. And it makes you feel like the boat is going faster, whether it is or not. Often, that’s all it takes to bring a big smile.
*The Sailmaker’Apprentice recommends that a topsail be “quite flat” with only a slight curve in the luff, a slight hollow centered in the foot—about 1″ per 6′ of length—and a straight leech. For a look at another topsail, check out this month’s From the Editor—Ed.
BarryLong is a writer, photographer and media arts professional from the Chesapeake Bay region, where he sails his two of Melonseed skiffs. He keeps a blog at eyeinhand.com
You can share your tricks of the trade with other Small Boats Monthly readers by sending us an email.
A pin that’s included with the WeatherMeter provides the option of connecting the device to the phone so they can be handled as a single unit.
The smaller your boat, the greater the bearing of weather on your travels. With a VHF radio or a dedicated weather radio, one can get reports from weather stations in the area and forecasts for what’s likely to come, but it’s still good to keep an eye on the conditions in the immediate vicinity. The WeatherMeter from WeatherFlow collects then provides data via smartphone, giving boaters an accurate and objective record of what’s going on in a given location.
From left: The display as data is being recorded, the report at the end of an observation, the complete record, and the collected history of all saved observations.
TheWeatherMeter packs an anemometer, a thermometer, a barometer, a magnetometer, and a hygrometer into a device is about the size of a Roma tomato, only flatter, and uses Bluetooth technology to feed its readings to a smartphone. There are five windows on the opening screen of the phone app, showing some of the current readings from the device—temperature, pressure, humidity, and wind direction and speed (momentary, average, lull, and gust). There are also 13 calculations each window can display, including dew point and wind chill. The settings for the meter include all of the units of measurements commonly used. Wind speeds, for example, can be displayed in miles per hour, feet per minute, knots, kilometers per hour, meters per second, and Beaufort numbers.
The unit is powered by a replaceable CR2450 lithium button cell that will last for 300 to 500 hours depending on usage. The blue silicone covering peels off to provide access to the battery compartment. The on-off switch has a flashing light to indicate when the unit has been turned on or off and the smartphone will also indicate if it is powered up.
The Bluetooth connection has a range of about 75′ when the phone and the WeatherMeter were separated. The wireless connection makes it possible to protect the phone in a waterproof case.
The base has a 1/4 x 20 threaded insert that accepts a fitting for a lanyard or a dummy 3.5 mm audio jack to connect the meter to the smartphone (the data connection remains via Bluetooth). While it’s handy to have the two connected, in wet weather the phone can be protected in a waterproof case and the WeatherMeter, rated as splashproof (an international Ingress Protection rating of IP44), can fend for itself rain and spray.
In order to determine the direction of the wind, the WeatherMeter uses its magnetometer to indicate the orientation of the device when it’s aimed at the wind while taking a reading. Facing the wind is fairly intuitive for some, but a telltale could be attached to the bottom of the unit if a visual aid were needed. The product specifications claim that the unit’s anemometer will record wind speeds from 0.4 to 110 knots, but I found that the display never kicked in with anything under 1.2 knots while I was walking indoors. I didn’t think that was a significant flaw—if the wind is under 1.2 knots, I won’t be sailing.
The readings get stored so it’s easy to see trends in the weather such as a falling barometer or a change in wind direction or strength. Scrolling through the time- and date-stamped entries allows a quick assessment of changes in wind speed and direction, temperature, pressure, and relative humidity. A tap on each record brings up the data selected for the meter’s main display, and tapping “More” gives the full list of the data collected during a single observation.
“Wind & Weather” is the app that makes the WeatherMeter work with your phone. Another app, “WindAlert,” connects to a map of the world (satellite view, street map, or terrain map) and a global network of weather stations.
The WeatherMeter is a compact and inexpensive device that provides data that leads to a more objective observation and better understanding of weather conditions and patterns.
Christopher Cunningham is the editor of Small Boats Monthly.
The WeatherMeter, with case, is available direct from WeatherFlow for $79.95 and at the time of publication from Amazon for $67.72 and West Marine for $39.95. The instructions and specifications for the WeatherMeter are available online.
Is there a product that might be useful for boatbuilding, cruising or shore-side camping that you’d like us to review? Please email your suggestions.
Everything about your day trip has gone wrong—you’re wet, cold, and far from your haulout—but if you’ve packed a bivy bag, your day has just gotten a bit brighter. The Exped BivyBag Duo UL, made of silicon-coated ripstop nylon, is similar to a large poncho and in seconds it can get you and a friend out of the wind and rain. Weighing in at about 10 oz, and only 4″ x 6″ when packed, the BivyBag is compact enough to easily carry, even aboard the smallest boat.
photographs courtesy of the author
As the name suggests, the Bivibag Duo can be used for a bivouac, in tent fashion for one, or as a double emergency sleeping bag for two.
Removing the BivyBag from its storage sack takes just seconds—quick deployment is a must for any piece of emergency gear. The bag itself is shaped like a giant T-shirt, with a 56″-wide opening at the hem and three smaller openings at the other the top. Each of the four openings is equipped with a drawstring and toggle to adjust or close it. The neck opening is wide enough to pull on like a turtleneck, leaving one’s head free, or it may be worn over the head as a hood. My arms easily fit through the two smaller arm openings, even when I was wearing a shirt, fleece sweater, and jacket.
The Exped BivyBag’s fabric is thin, but it easily sheds water. The fabric isn’t breathable, and so on a rainy day, the inside of the bag was somewhat clammy; but on a cold day the impermeable fabric holds heat in addition to moisture. Despite the thinness of the fabric, I found that the bag provided a noticeable insulating effect. With an air temperature of 48 degrees F and under cloudy skies, the temperature inside the bag rose nearly 8 degrees in about 15 minutes.
When worn as a poncho, the BivyBag is long enough to come down past my feet (I am 6′1″). To keep from tripping on it, I fashioned a belt out of a piece of webbing. While I’m sitting I can pull my feet inside and close the bottom of the bag with the included drawstring.
In a worst-case scenario, the bivy bag can be fashioned into a temporary—albeit floppy—tent by tying it between a few trees, its openings cinched to eliminate drafts but allow enough airflow for comfortable breathing. In less dire conditions, the bag can be a discreet covering for changing clothes in a public location, such as a beach or dock, or for privacy using a camp privy.
In punishing conditions, it can be tempting to hurry on to escape the elements, a course of action that might lead to hasty decisions. The bivy bag helps prevent that scenario. If the wind is blowing hard during a rainstorm, and you need to consult a chart or unroll a dry bag, pull out the Exped BivyBag and you’ll be surrounded by relative calm and a dry place to work. It creates not only an instant shelter but also the peace and presence of mind that comes along with a measure of comfort, allowing for the thoughtful decision making that is essential to any successful outing.
Bruce Bateau sails and rows traditional boats with a modern twist in Portland, Oregon. His stories and adventures can be found at his web site, Terrapin Tales.
The BivyBag Duo is available from Exped’s retailers for around $125 (prices vary by retailer).
Is there a product that might be useful for boatbuilding, cruising or shore-side camping that you’d like us to review? Please email your suggestions.
The post at the stern supports two mirrors; the larger one at top provides a good view forward, and the wide-angle mirror below it takes in a broader view. Mirrors are common fixtures on rowing boats used in races in Finland.
Tim Murfitt of Norwich, England, has been puttering with small boats, mostly power boats, for more than 40 years and grew weary of their speed and noise. He thought taking to the water with a pair of oars would be a good change of direction for his boating, and although his only experience with rowing was on dry ground with a rowing machine, he felt confident that he’d enjoy rowing. He wasn’t so sure that his wife would. Walking was Wendy’s preferred exercise and she wasn’t comfortable around boats or water.
Tim Murfitt
The garage wasn’t long enough to house the building of the 21′ 4″ boat, so Tim built an extension for the boatshop bay.
Tim wanted the option of rowing with someone as well as by himself, and it wasn’t likely that whomever he rowed with would have much experience, so the boat had to be stable and forgiving, and easy for novices to adapt to. And while he had turned away from fast powerboats, he still wanted his rowing boat to be fast and easily driven. Narrow racing shells and trainers were out—they’d restrict his rowing to protected waters and he’d miss touring nearby coastal estuaries, which can get a bit choppy when the easterlies hit England’s east coast. The boat had to have some sea-keeping abilities and still be light enough to car-top.
Tim Murfitt
The Savo 650 kit arrives in two boxes and includes parts for the oars.
Tim didn’t find any ready-made boats on the market that met his practical requirements and standards of beauty, so he expanded his search to kit boats. Most of the offerings were hard-chine, stitch-and-glue boats, and not to his liking.
Tim Murfitt
With the sheerstrake yet to go, the Savo 650 shows its shallow-V bottom.
His meandering search led him to the Puuvenepiste web site. When he saw the Savo 650 he knew instantly it was what he had been seeking. The 21’4” lapstrake boat, designed by Ruud van Veelen, had performed well in races on Finland’s inland waters.
Tim Murfitt
After the planking was completed, the hull was lifted and suspended by cords so the stringers and molds could be dismantled. The strongback remained to support and align the hull when it was set right-side up for the remainder of the construction.
Unfortunately, Puuvenepiste didn’t offer the Savo 650 as a kit, so Tim kept daydreaming and visited the web site often. He went to the site one day and saw that a kit was now being offered. He got on the phone to Finland and ordered it. He’d be the first amateur builder to produce a Savo 650.
Tim Murfitt
The continuous rails make it easy to switch from two rowing stations to one and back again. The bow occupies the garage extension.
His garage wasn’t long enough for the boat, and after the kit arrived he added a temporary 10’ extension to his garage. The boat is built over molds on a strongback, as opposed to assembling pieces by the stitch-and-glue method. The result is a truly fair hull lighter than a stitch-and-glue equivalent that requires filets and fiberglass tape. Like many first-time builders, Tim thought putting the hull together would be the hardest and most time-consuming part of the job, but when he got to the painting and varnishing he discovered that the work was challenging and perfection was unattainable. Varnish ran and paint collected dust. He had to find a level of finish that was good enough and leave it at that.
Tim Murfitt
Getting the boat out of the shop required dismantling the garage extension.
Tim Murfitt
The oarlocks, typical of those used in Finland, are pivoting pins that fit in holes in the oars. The arrangement doesn’t allow the oars to be feathered.
After six months of work he had the boat, a cart, and a cover ready to go. The side of the garage extension was removed and, with the help of a few friends, the boat emerged. Tim launched the boat at the beginning of this summer and christened it SULKAVA, after the town in Finland that hosts the country’s biggest rowing race. Over the summer and fall Tim rowed 90 miles on his own, 20 with rowing partners, and to his delight, 130 miles with Wendy. Switching SULKAVA from solo to double takes just a few minutes.
He has done all of his rowing to date on the waters of the Norfolk Broads, a network of lakes and streams that flow into the North Sea on England’s easternmost point of land. There is a speed limit for power boats of 4 mph on the rivers and 6 mph on the lakes. The good side of that is that the powerboats keep their wakes down, but the bad side is that they often block SULKAVA’s way and slow her down. She cruises easily at 5 mph, and Tim, a 160-pound, 59-year-old, can keep up a good 6 mph rowing solo if he goes at it hard and steady. SULKAVA has hit 8 mph when rowed flat-out.
Mark Wilson-North
SULKAVA does well just as well as a single as a double. Tim and Wendy do their rowing in Norfolk Broads, a network of rivers and lakes on the easternmost coast of England.
The Murfitts’ car can carry the 100-lb boat on its roof racks, but it takes the help of another strong back to get it loaded and unloaded. A trailer is in the works this winter and next year Tim and Wendy will head for more distant horizons.
Kits for the Savo 650 and other Puuvenepiste boats are available from Puuvenepiste in Finland and Swanson Boat Company in the US.
The 21′ Gokstad faering I built in 1987 wasn’t a boat I could bring myself to paint or slather with boat soup that would turn black with age. The straight-grained, knot-free Douglas fir I used for the planks and sculpted stems deserved to be seen, so I varnished the whole boat inside and out. That may not have been the wisest choice for a boat built to row up the Inside Passage from Washington to Alaska, but I managed to get it through the 1,000-mile trip with only two scratches.
The boat was only hauled ashore once or twice, so it was almost always afloat, day and night for eight weeks, long enough for a few barnacles to start growing below the waterline. To keep the varnish intact I had to be very careful with my anchoring, especially in waters where the tides could fall up to 20′ between the highs and lows. I didn’t want to wake up, as John Hartmann did in his Deer Isle adventure, to something going bump in the night and gouging the brightwork bottom.
Many of the coves along the northern British Columbia coast and the Alaskan panhandle were narrow, rocky, and steep-sided, so anchoring or dragging the boat ashore were out of the question. That’s when one of the variations on the Pythagorean mooring system that Hartmann describes, came in handy.
Keeping a bright-finished hull of the rocks was the main challenge camp-cruising the Inside Passage.
The most challenging cove was a notch in the west side of one of the Copeland Islands north of Lund, British Columbia. The water in the cove was clear, so I could see the bottom—all rocks except for one small patch of sand. I measured the depth of the water over the sand, checked the tide tables, and figured the boat might go aground in the early morning, but not by much. With lines running ashore from each end of the boat, I managed to scramble around the rocky flanks of the cove and get the boat strung up right over the sand. I left enough slack in the lines to let the boat drop with the tide, but not so much that the boat would wander off target. I was worried about the lines getting snagged on the bottom so I clove-hitched splits of yellow-cedar driftwood in to keep them floating on the surface. Hoping for the best, I retired to the camp for the night.
In the morning the boat was afloat on the newly rising tide. I cast off the lines and brought her ashore to load up the camping gear. Before leaving the cove I paddled to the middle and took a look over the side at the patch of sand. Running right down the middle of it was a shallow groove where the keel had gently come to rest. The varnish had survived the night unscathed.
Ron Rantilla’s Odyssey 165 is an unusual rowboat for touring and exercise. It is specifically for use with his FrontRower, a drop-in forward-facing rowing system. With the oars fully supported by the rowing rig, there’s no need to make the boat wide enough to provide a workable span for conventional oarlocks, or stout enough to take the strain of rowing on the gunwales. The Odyssey has the proportions of a canoe, offers the same view over the bow, and is similarly efficient converting effort into forward progress.
The FrontRower occupies a fair bit of space in the middle of the boat, but the ends have plenty of room for gear and I could easily imagine taking extended cruises. With one’s legs taking on the lion’s share of powering the oars, covering long distances with a heavily laden boat would save the hands, shoulders, and back wear and tear. There would also be a benefit in being able to keep the boat moving with legs alone while looking at charts or GPS, taking photos, and keeping well hydrated and fed.
photographs and video by the author
Each oar comes apart at a joint just outboard of the hand grips, and it is easy enough to assemble and disassemble the oars while afloat.
Let’s take a look at the FrontRower. With all of its wooden struts and cords, it looks like a fancy trebuchet; it won’t hurl a rower out of the seat but it will hurl the rower and the boat forward. The inboard ends of the aluminum oar shafts are anchored to pivots at the top of the FrontRower. The brackets the shafts are mounted to bear against a slick plastic plate and the bolts holding the ends are pulled downward by springs underneath the plate. The arrangement holds the oar blades out of the water between strokes. Eyebolts on the looms are attached to cords that have springs at the other end that pull the oar blades forward during the recovery phase. Other attachment points are for handles to add arm power to the stroke. Attached to the handles are cords leading aft to pulleys, then forward to the swinging foot pedals. It all looks very complex, but it works like a charm.
Despite all of the moving parts in the FrontRower, the action is quite smooth and without any ticks, clicks, or apparent friction. The only sound it makes is the hum of braided line running through pulleys.
I’m quite particular about rowing style and wouldn’t expect a contraption like this to row with anything approaching elegance, but the FrontRower has beautiful blade work with the same grace and economy of effort as the Thames Waterman stroke I was taught by my father. The handgrips and the pedal cords are attached to the loom at an angle that brings the blades off the feather at the moment power is applied at the catch. The blades flip directly into the water without being squared beforehand. At the release, cords attached at an angle on the forward sides of the looms, rotate the blades while they are still immersed; the water moving past the blades helps rotate and lift them. It’s a lovely thing to watch.
The Odyssey is fastest with both arms and legs powering the stroke. The hands need to be used to speed the recovery.
At the finish of the stroke the blades come off the feather quickly and stay low. Note that the trim of the boat here is the same as it is at the catch.
The FrontRower can be powered by legs, arms, or both. Switching between arms and legs gives each set of muscles a break and all the while the boat keeps moving. Using both arms and legs doesn’t require any unusual coordination—it’s very much like rowing with a sliding seat—and like sliding-seat rowing, can really burn calories in a sprint. It’s a great full-body exercise.
The seat is adjustable to accommodate different leg lengths. Getting it set in the right position is critical. I started out with the seat too far forward and felt quite bunched up, especially with my arms, and unable to put on the power. Moving the seat back a few inches made a world of difference.
The padded seat and mesh backrest are quite comfortable and remained so for the duration of my morning outing. The backrest keeps the lower back in a fixed position, so my layback was limited to the range of motion of the shoulders and upper back, but the principal source of power comes from the legs, and the backrest is required to lock the hips in place. Restricting the layback minimizes the weight shift, a good thing for forward-facing rowing. With conventional rowing the weight shifts toward the bow during the layback at the end of the drive, and then when weight shifts toward the stern at the recovery, it pulls the boat forward. With forward-facing rowing the weight shift works the other way around, pulling the boat backward during the recovery. With the FrontRower the legs are engaged in rowing, and as they extend forward during the drive and layback, they nearly eliminate the effects of the upper-body weight shift.
The handgrips are padded and have snaphooks to clip into fittings on the looms. The grips are vertical and have plenty of play, so I could adjust their angle for comfort. It’s easier on the wrists to pull vertical grips than horizontal ones and with the FrontRower grips the wrists don’t have to bend constantly to follow the changing angle of the oar during the stroke. To back the oars, take hold of the looms directly at their padded grips. It’s easy to put the blades on and off the feather manually and hold or back water to maneuver in tight quarters.
At the catch the blades are close to the water and will come off the feather and bury themselves as soon as the pressure is applied at the beginning of the drive. Here the boat is being rowed with the feet only.
With my GPS recording speed, I rowed with my arms and logged 3 knots at a relaxed pace, 4 knots at an exercise pace, and peaked at 4-3/4 knots in a short sprint. Rowing with my legs I also did 3 knots at a relaxed pace, but that was the end of the legs-only trial. The springs that pull the oars through the recovery couldn’t work any faster. With both arms and legs powering the stroke (and the arms hastening the recovery), I clocked 4 knots at a relaxed pace, 5 knots at an exercise pace, and in a short sprint did 5.75 knots, beating the 5.36 knot hull speed listed on the Odyssey web page.
I had calm conditions while I was rowing the Odyssey, so I couldn’t evaluate how well the boat and rowing rig would take on wind and waves. The designer notes that his hulls “are great for flat water rivers, lakes, and bays, where they can handle reasonable chop and wakes from motor boats. They are not suitable for extreme conditions: whitewater rapids, heavy surf, breaking waves, high winds.” I’d agree with drawing the line at those challenging conditions. For very rough water I prefer sitting on a thwart to have my whole spine free to keep myself upright over a rolling boat, and having my hands on conventional oars so I can control where the blades are.
The greatest beam is not at the sheer, but at the chine below it, so a guard is added to protect the hull.
The Odyssey’s stitch-and-glue plywood hull has a flat bottom with no rocker. The bottom can be constructed from a single layer of plywood, or as a sandwich of plywood around a foam core. The foam core provides built-in flotation and stiffens the hull, making framing unnecessary. The lower planks flare outward above the waterline to provide stability. At the stern, they meet to give the hull a double-ended waterline below the reverse-rake transom. The sheerstrake has a pronounced tumblehome and provides clearance for the oars angling down from the apex of the FrontRower. The chine between the strakes has an unusual curve, rising upward at the stern but veering subtly downward to the bow, according to the designer, “following the wave curve.”
The plans provide full-sized patterns for the stem, breasthook, and quarter knees. Offsets are provided for the bottom and planks. The instructions cover making the foam-core bottom as well as the stitch-and-glue assembly of the rest of the hull. The kit includes all of the wooden parts for the boat, including plantation-grown okoume plywood in CNC router-cut panels with wavy finger-joints to align them accurately for full-length planks.
The Odyssey 165 and the FrontRower make an appealing combination of an easily driven hull and a powerful, ergonomic propulsion system, well suited for exercise, leisure days on the water, and extended cruising.
Christopher Cunningham is the editor of Small Boats Monthly.

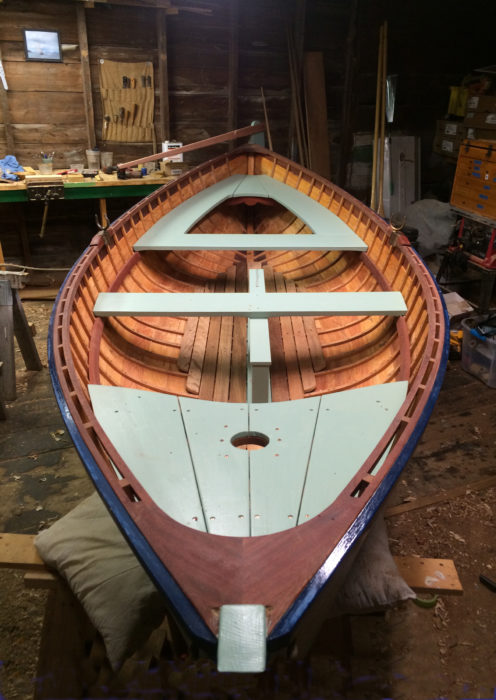 photographs and video by the author