A good finish depends on many factors, including the quality of the paint or varnish, the preparation of the surface, and the expertise of the painter. However, even with the best possible paint quality, preparation, and skill, success will be elusive without good lighting.
Light intensity alone is not enough. It’s the reflection of light from the surface that allows us to judge the quality of a coating: at the right angle of reflection we can gauge whether we have applied the paint too thick, too thin, or whether there are places missed altogether—so-called holidays. We can see the work better if we lower the angle of the light source relative to the surface.
My shop does not have the best lighting; one side of the boat gets far more light than the other. The lighting isn’t much better in the boathouse, where our 20′ sloop gets an annual paint upgrade. When varnishing round-sectioned spars in either of these spaces, it is particularly challenging to get enough light to reflect at a favorable angle.
 Harry Bryan
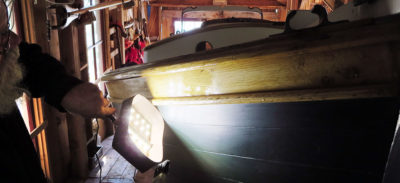
Photo 1 — In the subdued natural lighting of a boathouse, the handheld LED lamp accentuates the difference between sanded surfaces and new finish, in this case varnish on the sheerstrake.
I think the natural light coming from a window gives a better reflection for painting than artificial lighting does. But of the artificial lights I’ve used, I have come to favor the LED type. LED lighting has an intensity of reflection that is lacking in incandescent or fluorescent technology, especially if the LED bulbs are of the “daylight” instead of “soft white” variety. It seemed worthwhile, therefore, to explore the possibility of making a lamp for painting that would use daylight LED technology. If this light were handheld, then it would be possible to position it easily so that the light would bounce off the surface at a favorable angle without having to contort my body to get that perfect low-angle reflection from a distant window.
Sponsored by: WoodenBoat’s Mastering Skills
A single household LED bulb proved unsatisfactory, because the area of reflected light was too small to assure even paint coverage. Also, this type of bulb is designed to diffuse light in all directions and therefore doesn’t reflect as intensely as I had hoped. I then bought a battery-powered LED flashlight of the type that has a cluster of small bulbs; I found that they were concentrated to give a spot of light, which worked better than a single bulb but still didn’t cover enough area for my needs.
 Harry Bryan
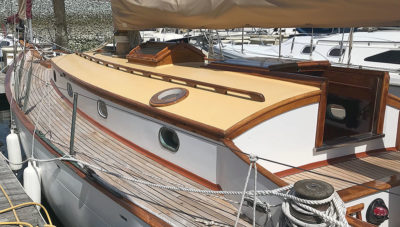
Photo 2 — Shining light at the correct angle and exactly where it is needed can help achieve an even coat of varnish or paint without holidays or sags.
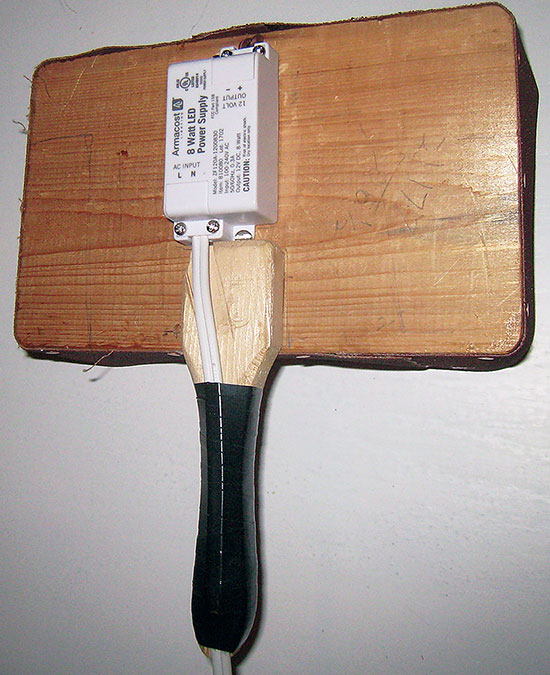
Success has come with a shop-made lamp, shown in use in photo 1, that adapts LED strip lights intended to be mounted under kitchen cabinets so that they shine down on a countertop. The strips are 3/8″ wide, with an LED bulb every 11/4″. The strips can be cut to length and fastened to a surface with their peel-and-stick backing. Several strips can be wired together and then connected through an included 12-volt power supply that plugs into a 120-volt outlet.
I mounted the LED strips on a 3/8″-thick cedar board, to which I attached a handle and then a cowling made from a sanding belt ripped to a width of 21/2″ and tacked around the board’s perimeter. In use, I hold the lamp so that its light reflects off the surface being painted while the cowling prevents the lights from shining directly into my eyes.
This lamp has significantly improved my ability to turn out good paint and varnish work. I now have almost no holidays, and the few that do appear are easily found with a sweep of the light before the paint begins to set. Sags and “curtains” are also easy to catch and correct in time. The constantly adjustable angle of reflection required in finishing spars is far easier to achieve with this lamp, and poor ambient lighting is less of a problem, as shown in photo 2. I have even found the lamp useful outdoors on a sunny day, during which the intense backlighting while working on the shady side of the boat can impair vision.
 Harry Bryan
Photo 3 — Attach the handle to the back of the lamp’s wooden back piece, making sure to leave room to mount the power supply, as shown, and also leaving room at the top edge for a 1/4″ hole for wiring. Vinyl electrical tape secures the cord to the handle and makes a comfortable grip.
To make the lamp, first cut out the back from a piece of cedar or other lightweight softwood, as shown in photo 3. The dimensions are 3/8″ thick, 5″ wide, and 8″ long. Round the corners to a radius of about 1/2″. The back can be coated with shellac or varnish if desired.
Make the handle 5/8″ thick, 11/2″ wide, and 7″ long, shaped below the back to fit the hand. Fasten the back to the handle with two No. 6 × 3/4″ screws. Also fasten the power supply above the handle on the back, as shown in photo 3.
The LED lighting strips are cut into five 8″ lengths, with the cuts made through the middle of the copper pads that show through the white strips every 4″. The positive and negative polarity of the strip is indicated in print adjacent to the copper pads on the strips themselves. Cut a notch at both ends of each strip, removing the negative (lower) half-pad at the right-hand end and the positive (upper) half-pad at the left, as visible in photo 4. Peel the backing from the adhesive strips and stick them to the back in five evenly spaced rows, as shown in the photo, leaving 3/8″ of wood above the top strip where a 1/4″ hole will be centered to lead the wires to the power supply. It is important to keep the writing on all strips right-side up, as the polarity of the top of each strip is positive while the bottom is negative.
 Harry Bryan
Photo 4 (left) & 5 (right) — Left—Cut the LED strips into 8″ lengths, with the cut made through the middle of the copper pads, which are printed to show polarity. Then cut the lower (negative) pad away from the right-hand edge of each strip and the upper (positive) pad from the left end. Right—Solder a bare copper wire, shown at left, to the remaining pads at the left-hand end of each strip, which are labeled as negative. The black insulated wire soldered to its top end reeves through the hole at center and then connects to the negative pole of the power supply. Similarly, the bare copper wire at right should be soldered to the positive pad at the right-hand end of each strip and is, in turn soldered to the red insulated wire, which reeves through the hole and connects to the positive pole of the power supply.
Next, solder a piece of bare copper wire at each end of the LED strips, as shown in photo 5, connecting all the positive pads on the right side and all negative copper pads on the left. I used 14-gauge wire (1.84mm) taken from scrap left over from a household wiring project, although wire as small as 18-gauge (1.16mm) will carry the small current required.

Sponsored by: WoodenBoat’s Mastering Skills
Solder insulated wires to the upper ends of the bare wires, as shown in photo 5, and lead them through the 1/4″ hole at the top center of the back. Cut these wires to length, strip their ends, and fasten them to the appropriate positive and negative terminals of the power supply on the back of the lamp.
The cowl, visible in photo 1, is made from a coarse-grit sanding belt 30″ long. A used one will work fine. The perimeter of the lamp’s back is 26″, so cut the belt to a length of 27″ to allow a 1″ overlap. Then cut the belt lengthwise to make it 21/2″ wide. Attach the belt grit-side out; otherwise, it will not bend around the corners of the back. Tack it to the back with 3/8″ or 1/2″ tacks, and use contact cement to bond the overlapping ends.
Materials
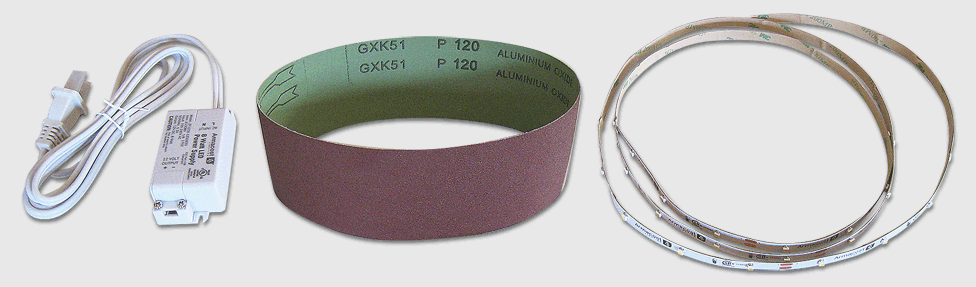
- LED lights and power supply. The strip lighting and 6-watt power supply used for the lamp shown in this article are made by Armacost Lighting, www.armacostlighting.com, and are available from Lee Valley Tools, www.leevalley.com, specify indoor natural white LED tape lights, with 30 LEDs per meter. The strips are sold by the foot; a 4′ piece is needed for this lamp.
- Sanding belt. The sanding belt for the cowl can be readily found at hardware stores, but a used one would work fine. (Another dark, dense, flexible material could be substituted.)
- Wire. The necessary lengths of bare and insulated electrical wire (16- or 18-gauge), are readily available at hardware stores. The red-and-black wire visible in the photos was left over from another project and came from an auto parts store.
- Wood. The back and handle can be made from cedar or any scrap wood that can be shaped to 5″ × 8″. A thickness of 3/8″ works well.
Trailing the power cord is a minor inconvenience that could be eliminated by using a rechargeable 12-volt battery pack, but only at the disadvantage of its cost and ungainly weight. Another small inconvenience is that holding the lamp prevents holding a paint container. For me, these problems are a small price to pay for achieving a consistently better finish on my boats.
Contributing WoodenBoat editor Harry Bryan lives and works off the grid in Letete, New Brunswick. For more information, visit www.harrybryan.com.


Harry’s lamp is an inspiration to me as I do have some of Lee Valley’s LED strips left from a previous project. The handle looks suspiciously similar to a paintbrush handle, but since my scrap box has some broken hockey sticks I may have the first carbon-fiber lamp handle. (I am very careful with the sawdust from this technique.)