 Photographs by the author
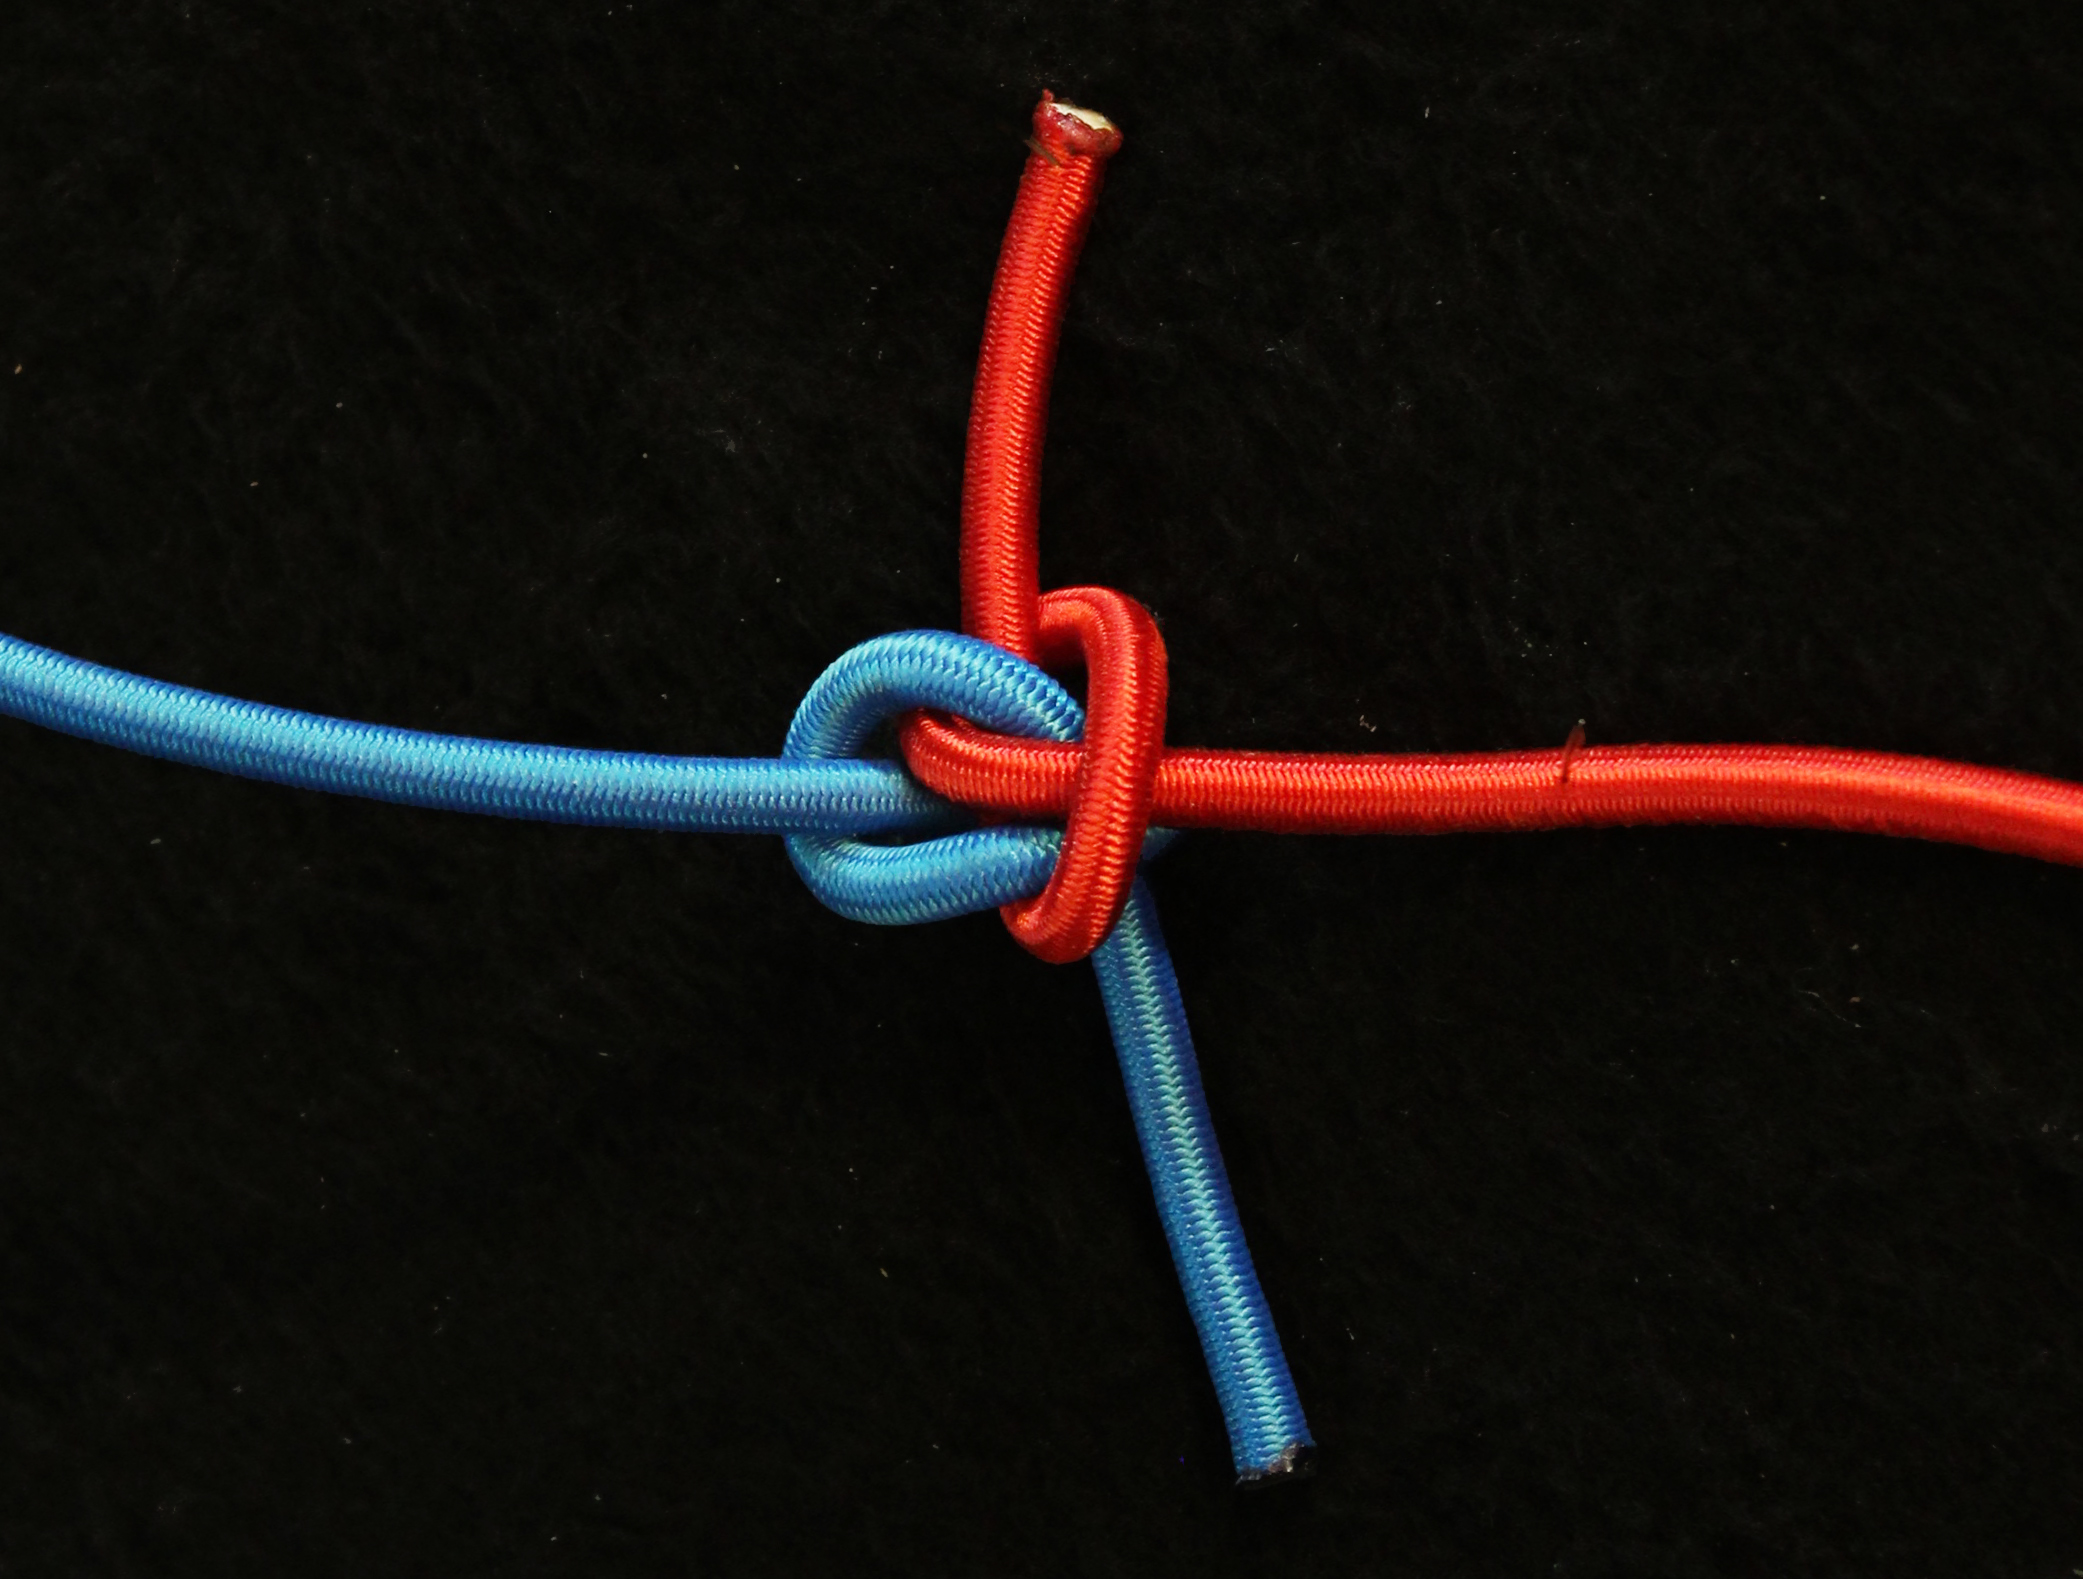
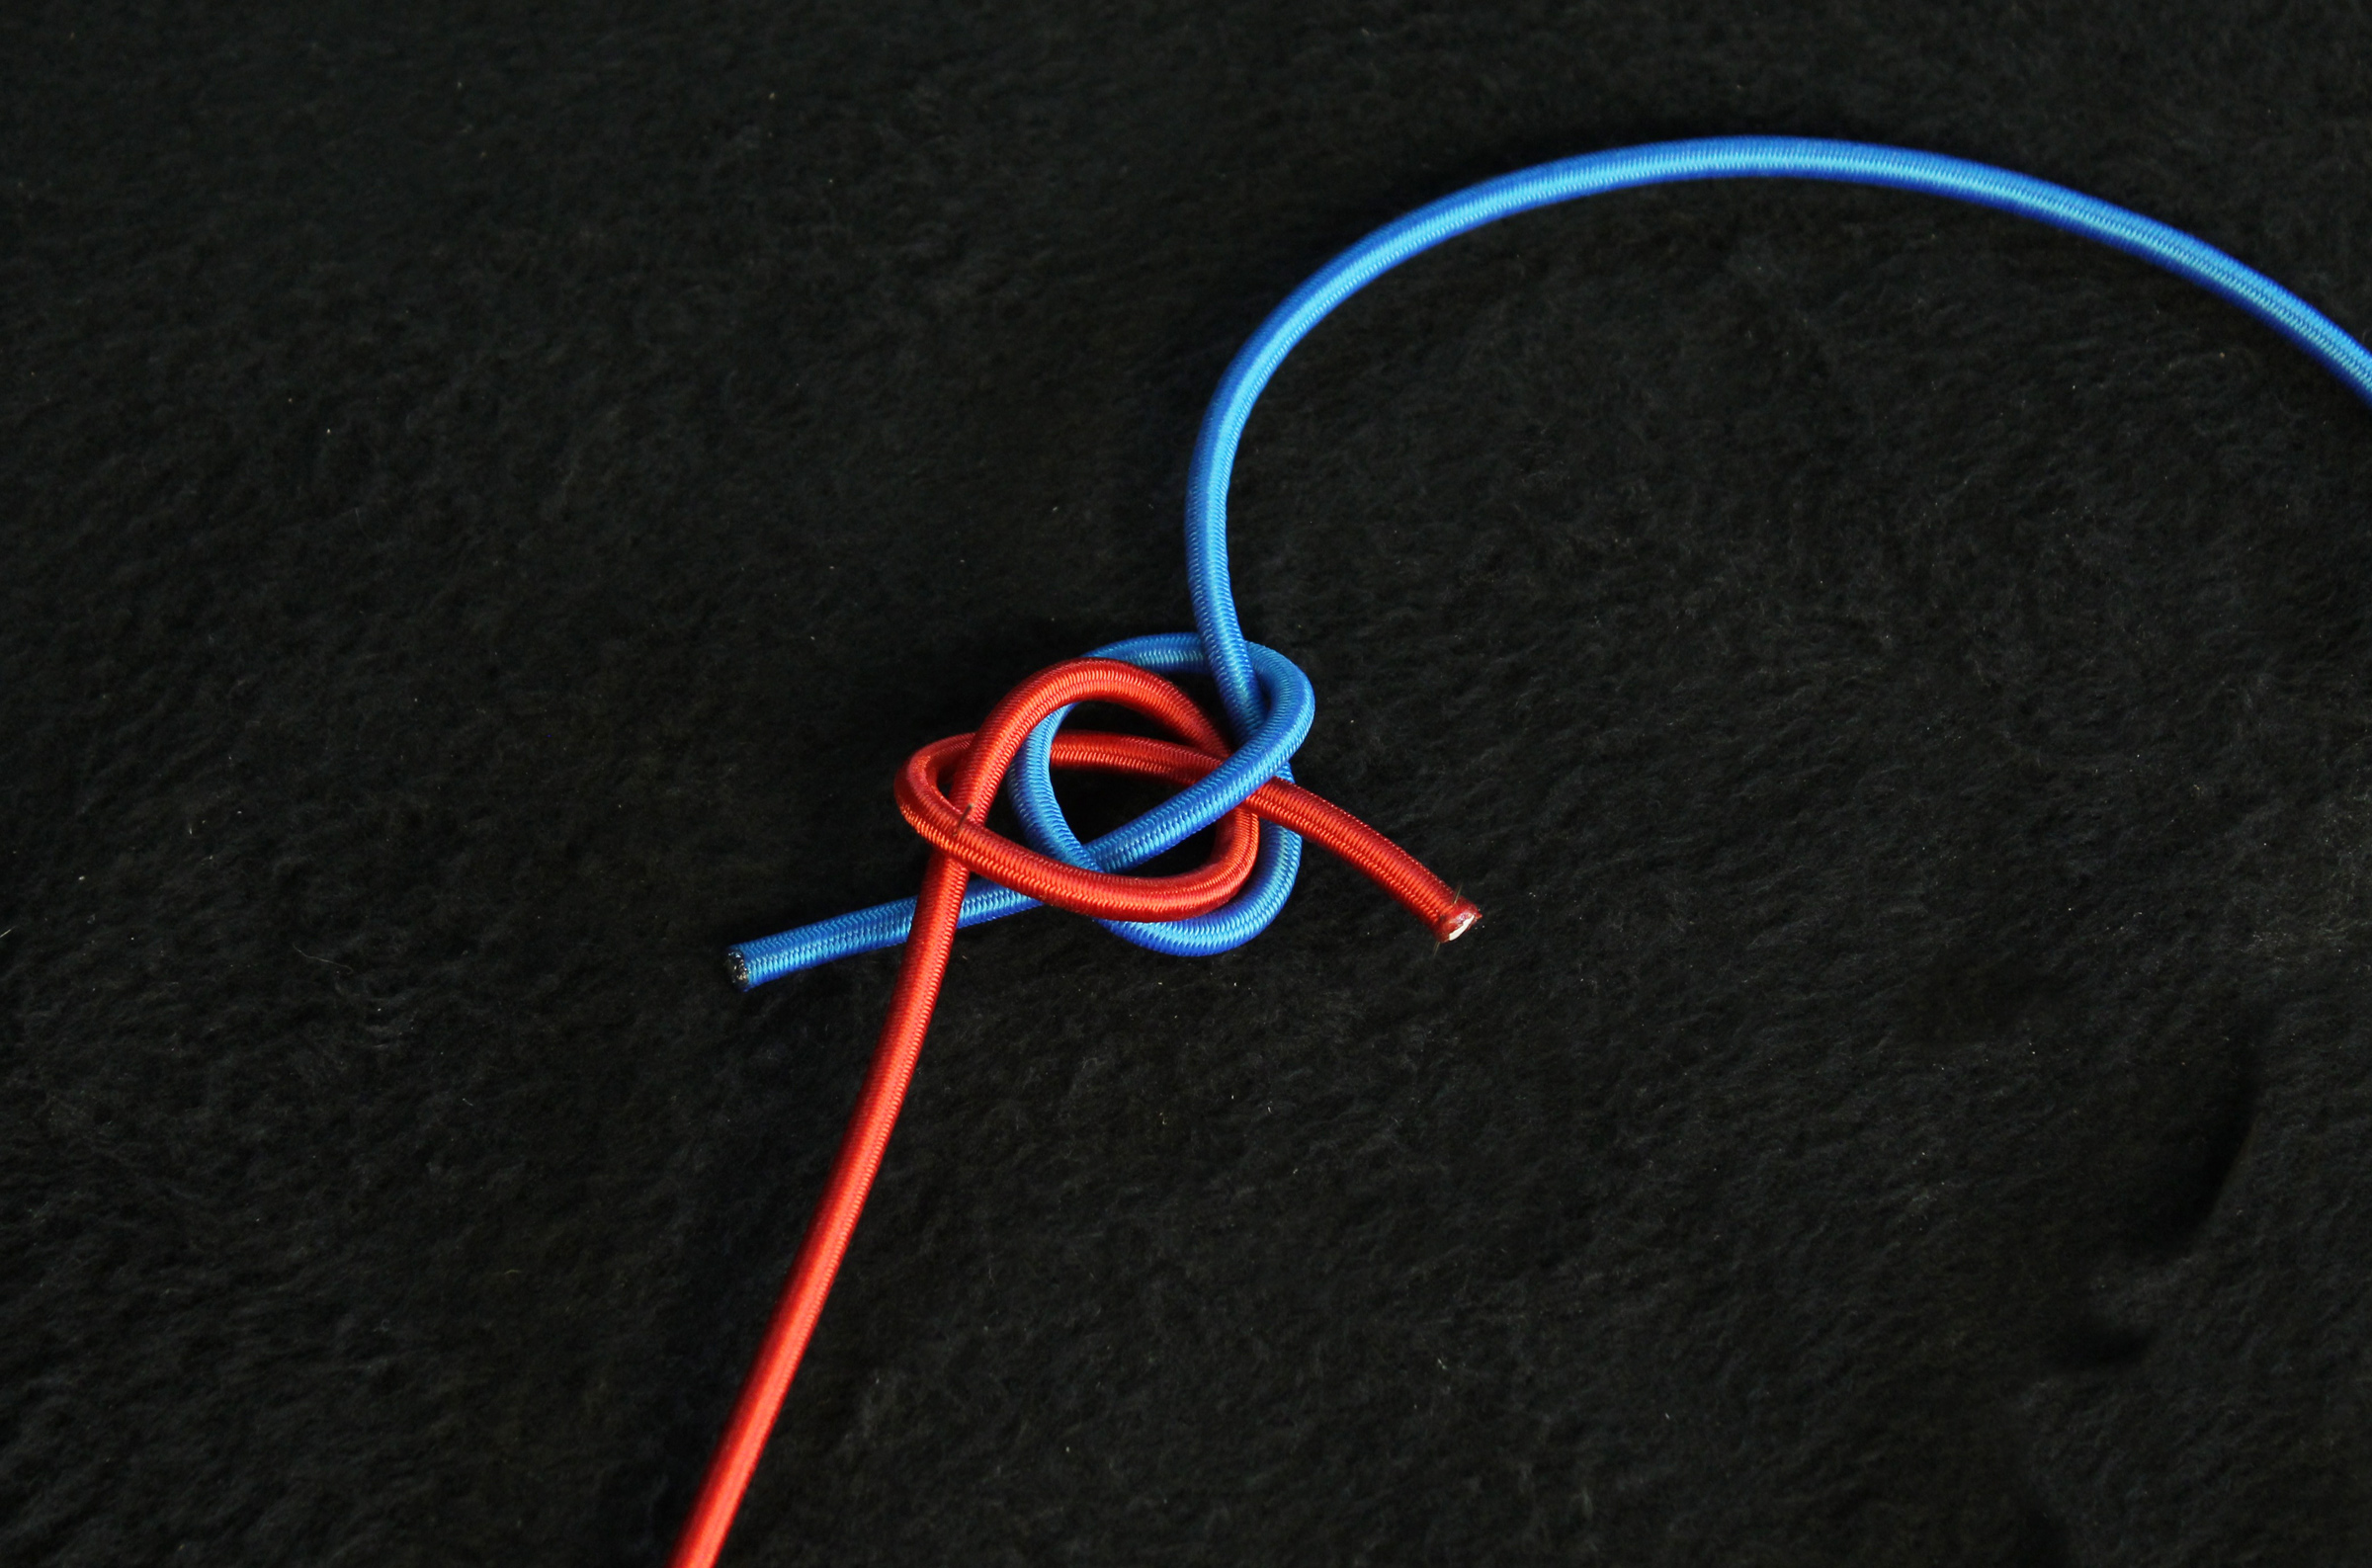
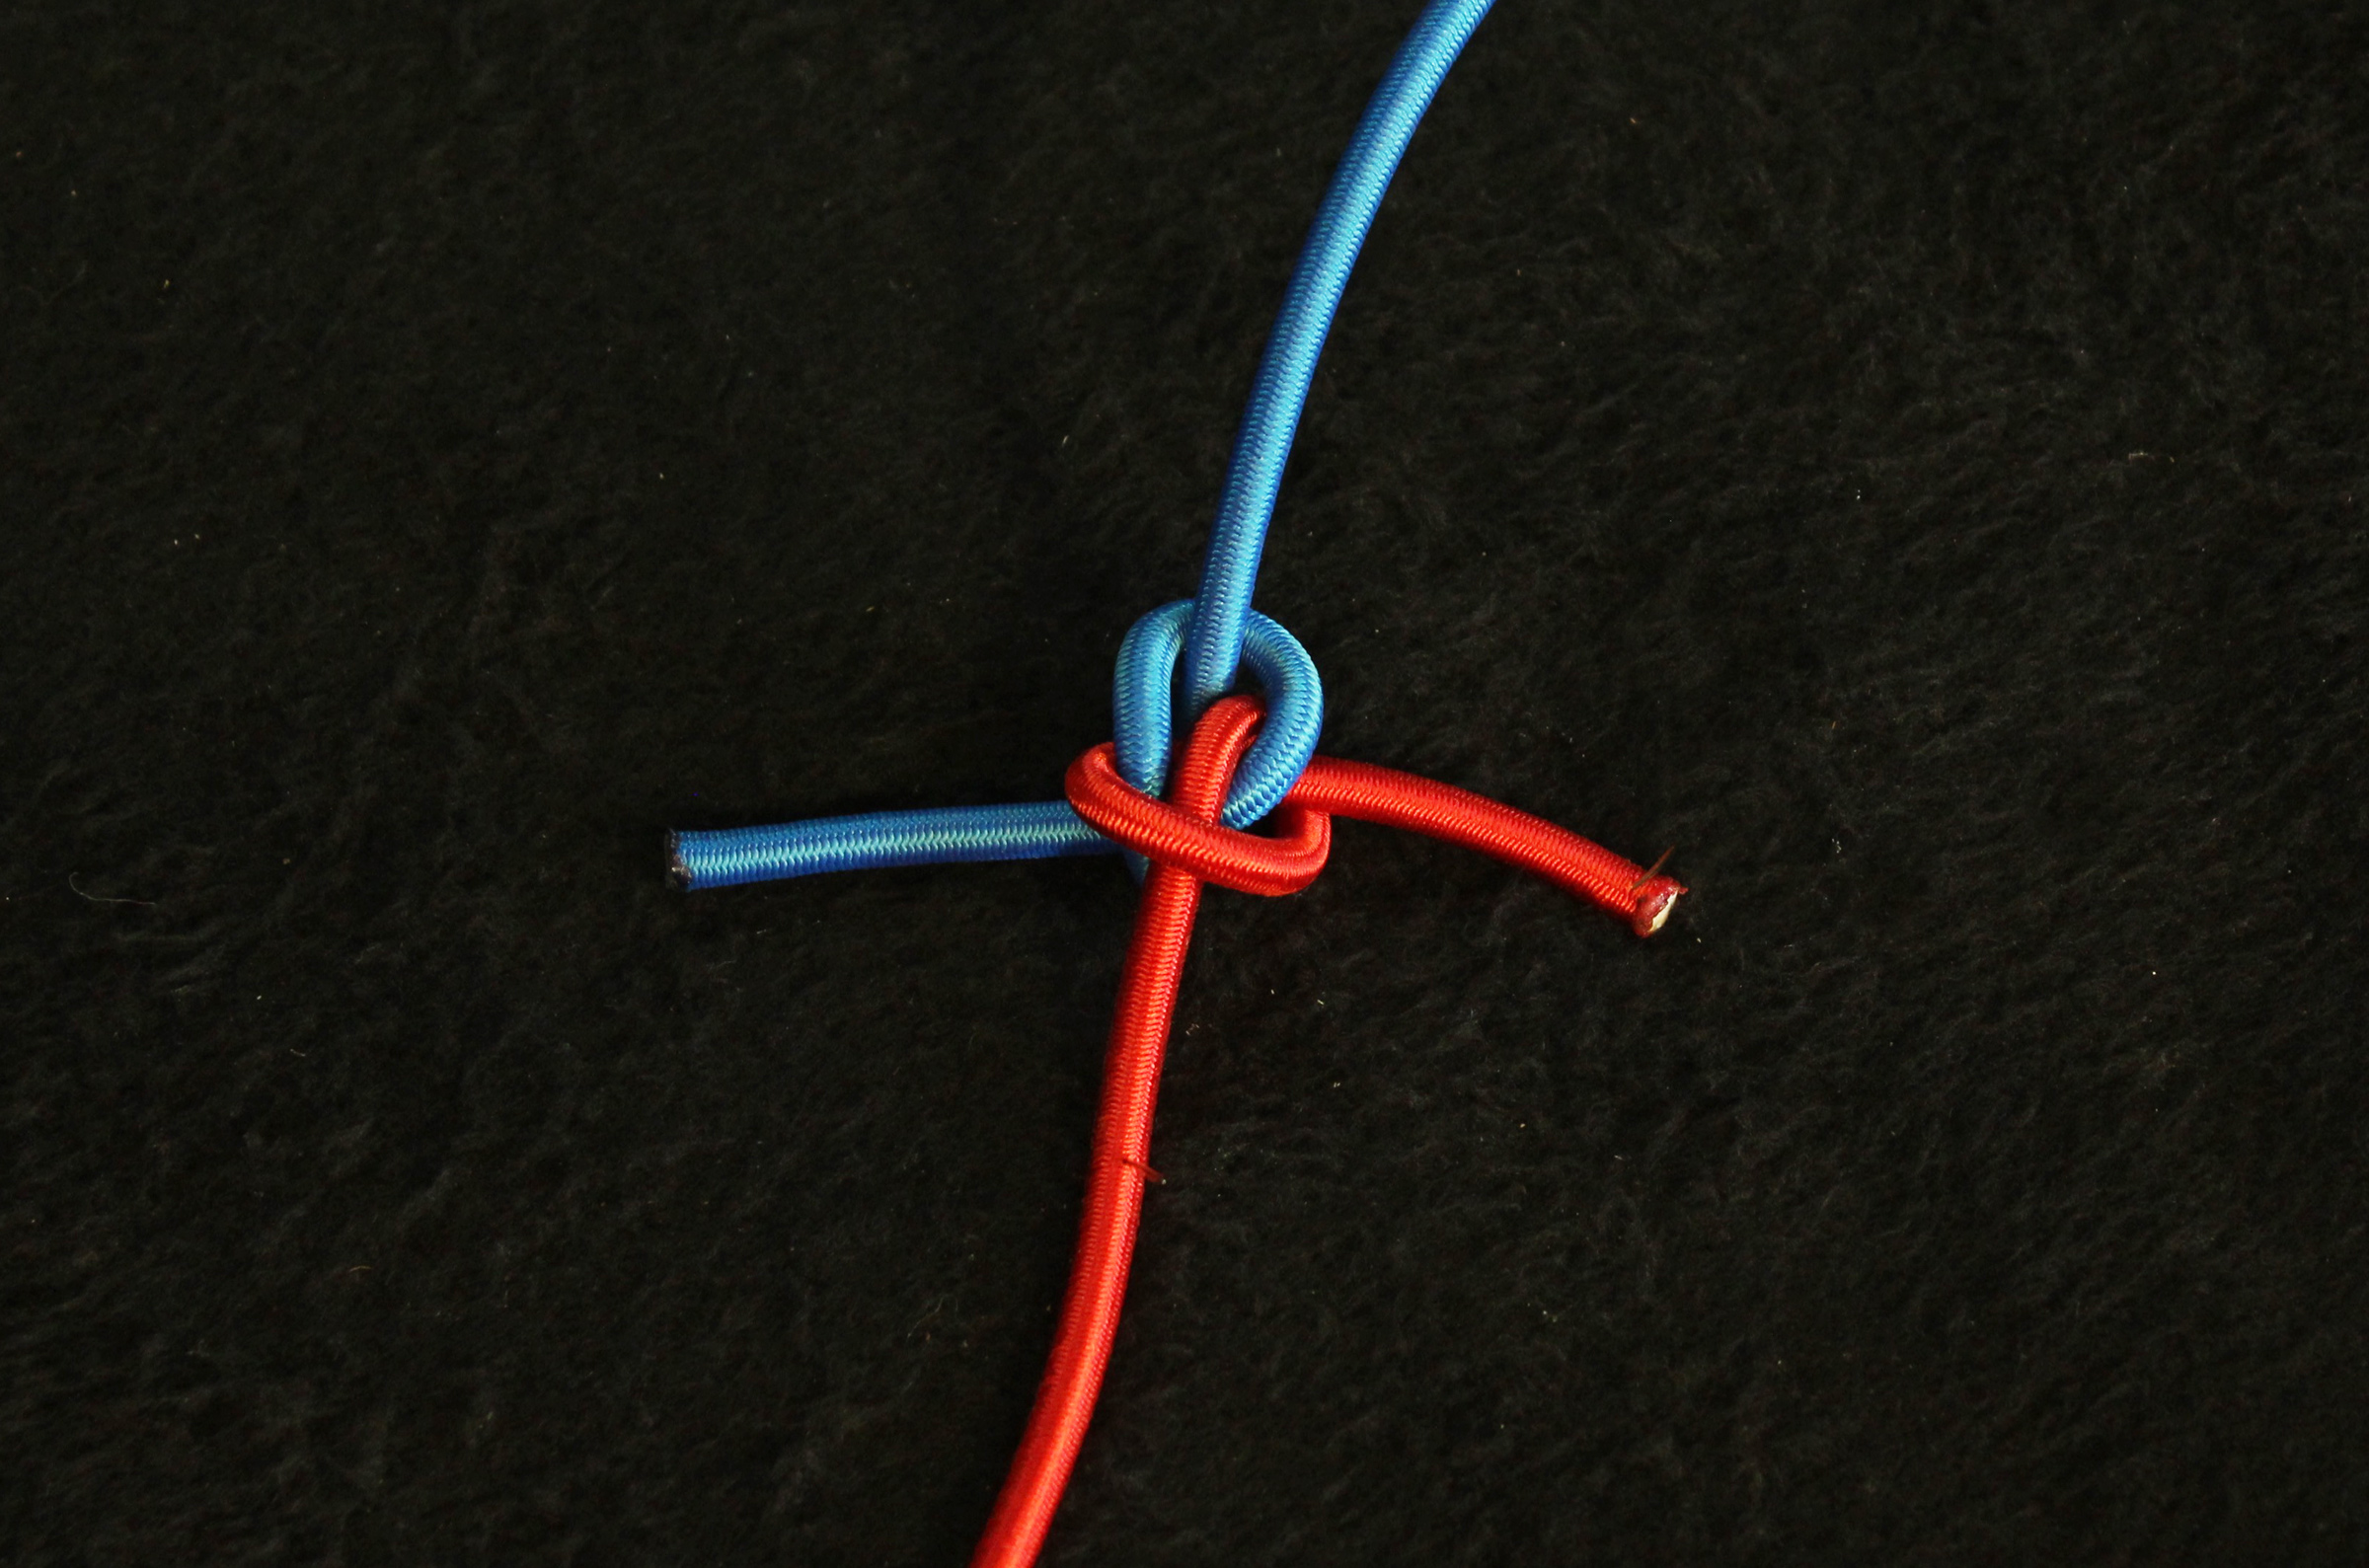
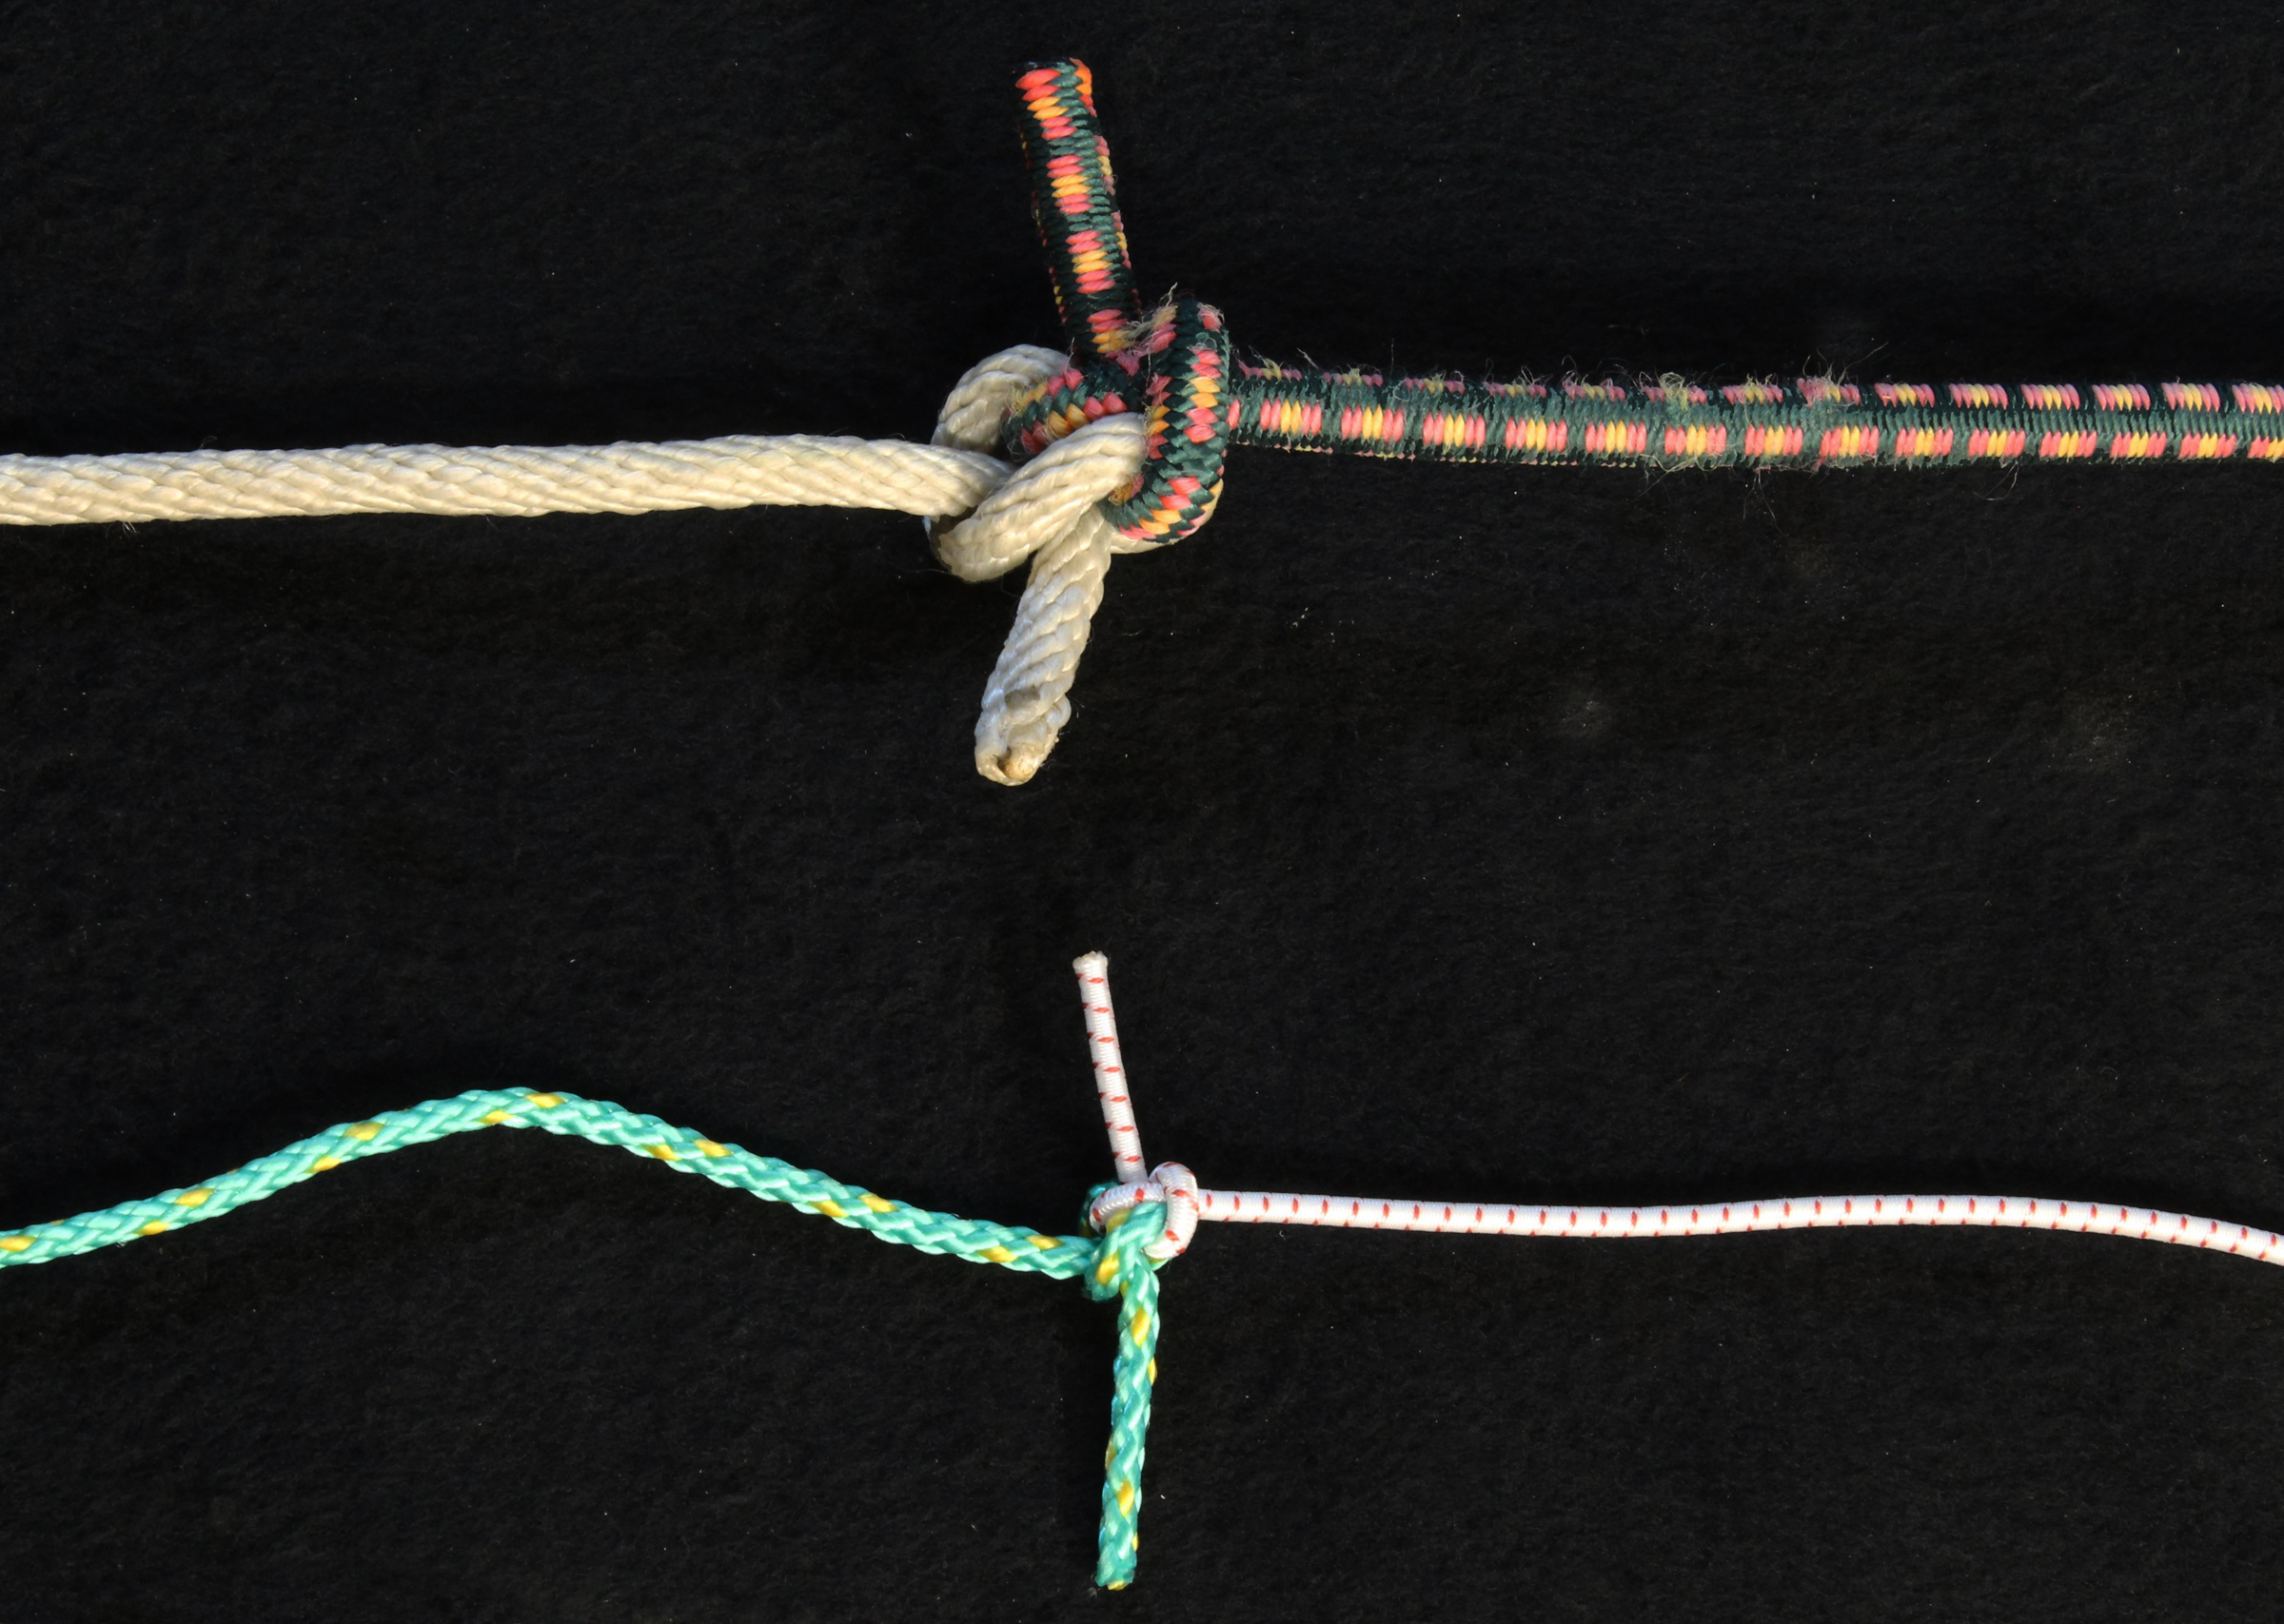
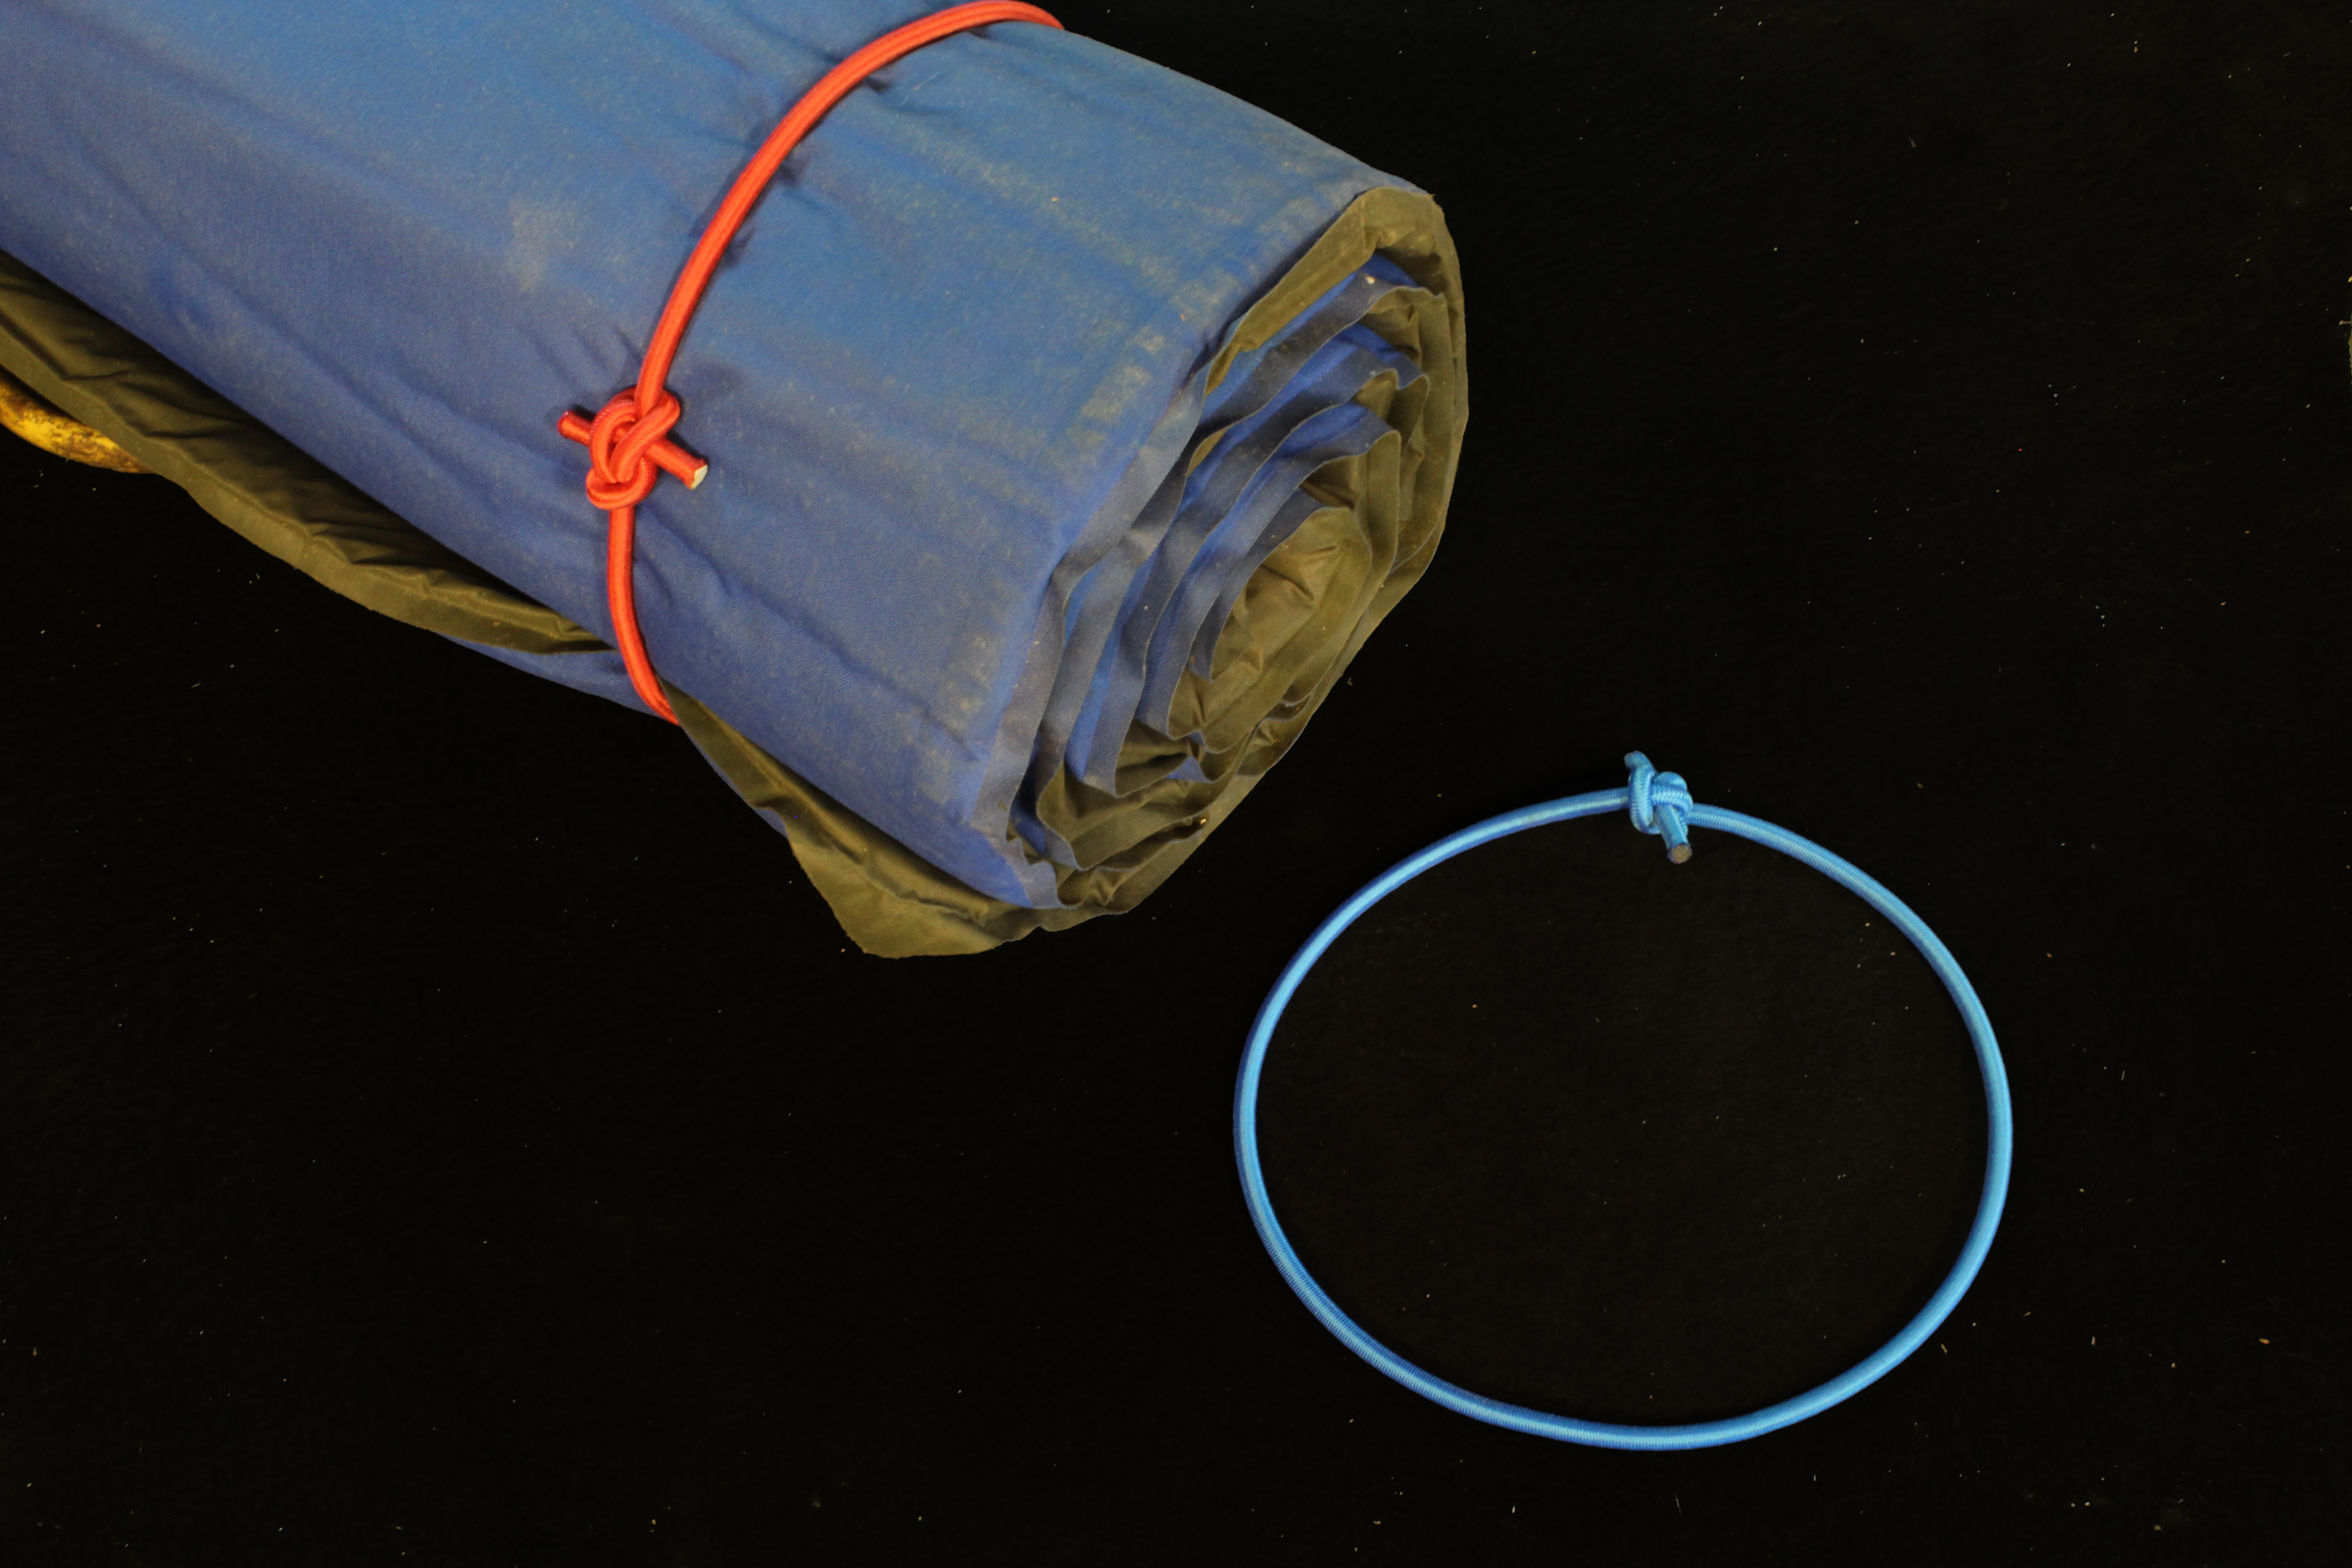
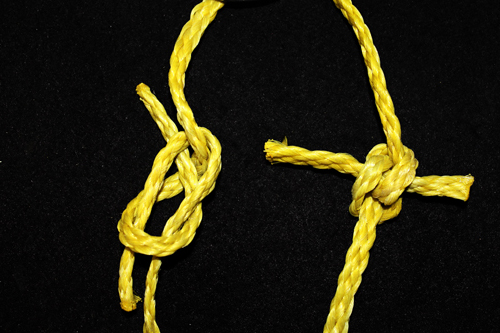
The Angler’s Loop (horizontal cords) and the Zeppelin Bend (vertical cord) will hold in bungee cord without coming undone or jamming.
Bungee cord is very useful stuff aboard a boat, but the precut bungees, fitted with metal hooks or plastic balls on the ends, are not always well suited to the applications I have in mind. The stretch of the cord itself might accommodate the length required for a particular job, though if the bungee is on the short side, the extra tension makes it hard to work with, and if it’s too long, making extra wraps to take up the slack takes time, often when there’s good reason for haste. I’ve never liked the metal hooks because they often snag things, and the plastic balls sometimes get loose and whip around like a monkey’s fist on a heaving line.
Most of the knots meant for rope don’t work with bungee cord. A sheet bend, even a double sheet bend, will come apart if you push the joined lines together, and a bowline will start to undo itself as quickly as it’s tied.
To make bungee cords for specific uses, I’ve used hog rings to create eyes in bungee cords and covered up the rings and the tail end with heat-shrink tubing. I don’t carry any of the equipment to do this work in the field, so if that were the only way to fabricate custom cord, I’d be stuck with what I’ve had the foresight to make at home. And the hog rings I have are sized for thick bungee cord; I’m not aware of hog rings small enough for 1/8″ bungee.
There are two special knots that do work with bungee cord, and while they are a bit more complex than a sheet bend and a bowline, they hold themselves together and can be easily untied.
Two Useful Bungee Cord Knots
The Zeppelin Bend
The Zeppelin Bend will securely tie two bungee cords together. As its name suggests, the knot was used by the crews of lighter-than-air ships to join together two lines and hold under great strain without breaking or becoming hopelessly jammed. To add a bit of bungee cord to a rope, or to make a ring of bungee cord like an oversized rubber band, the Zeppelin Bend is the one to use.
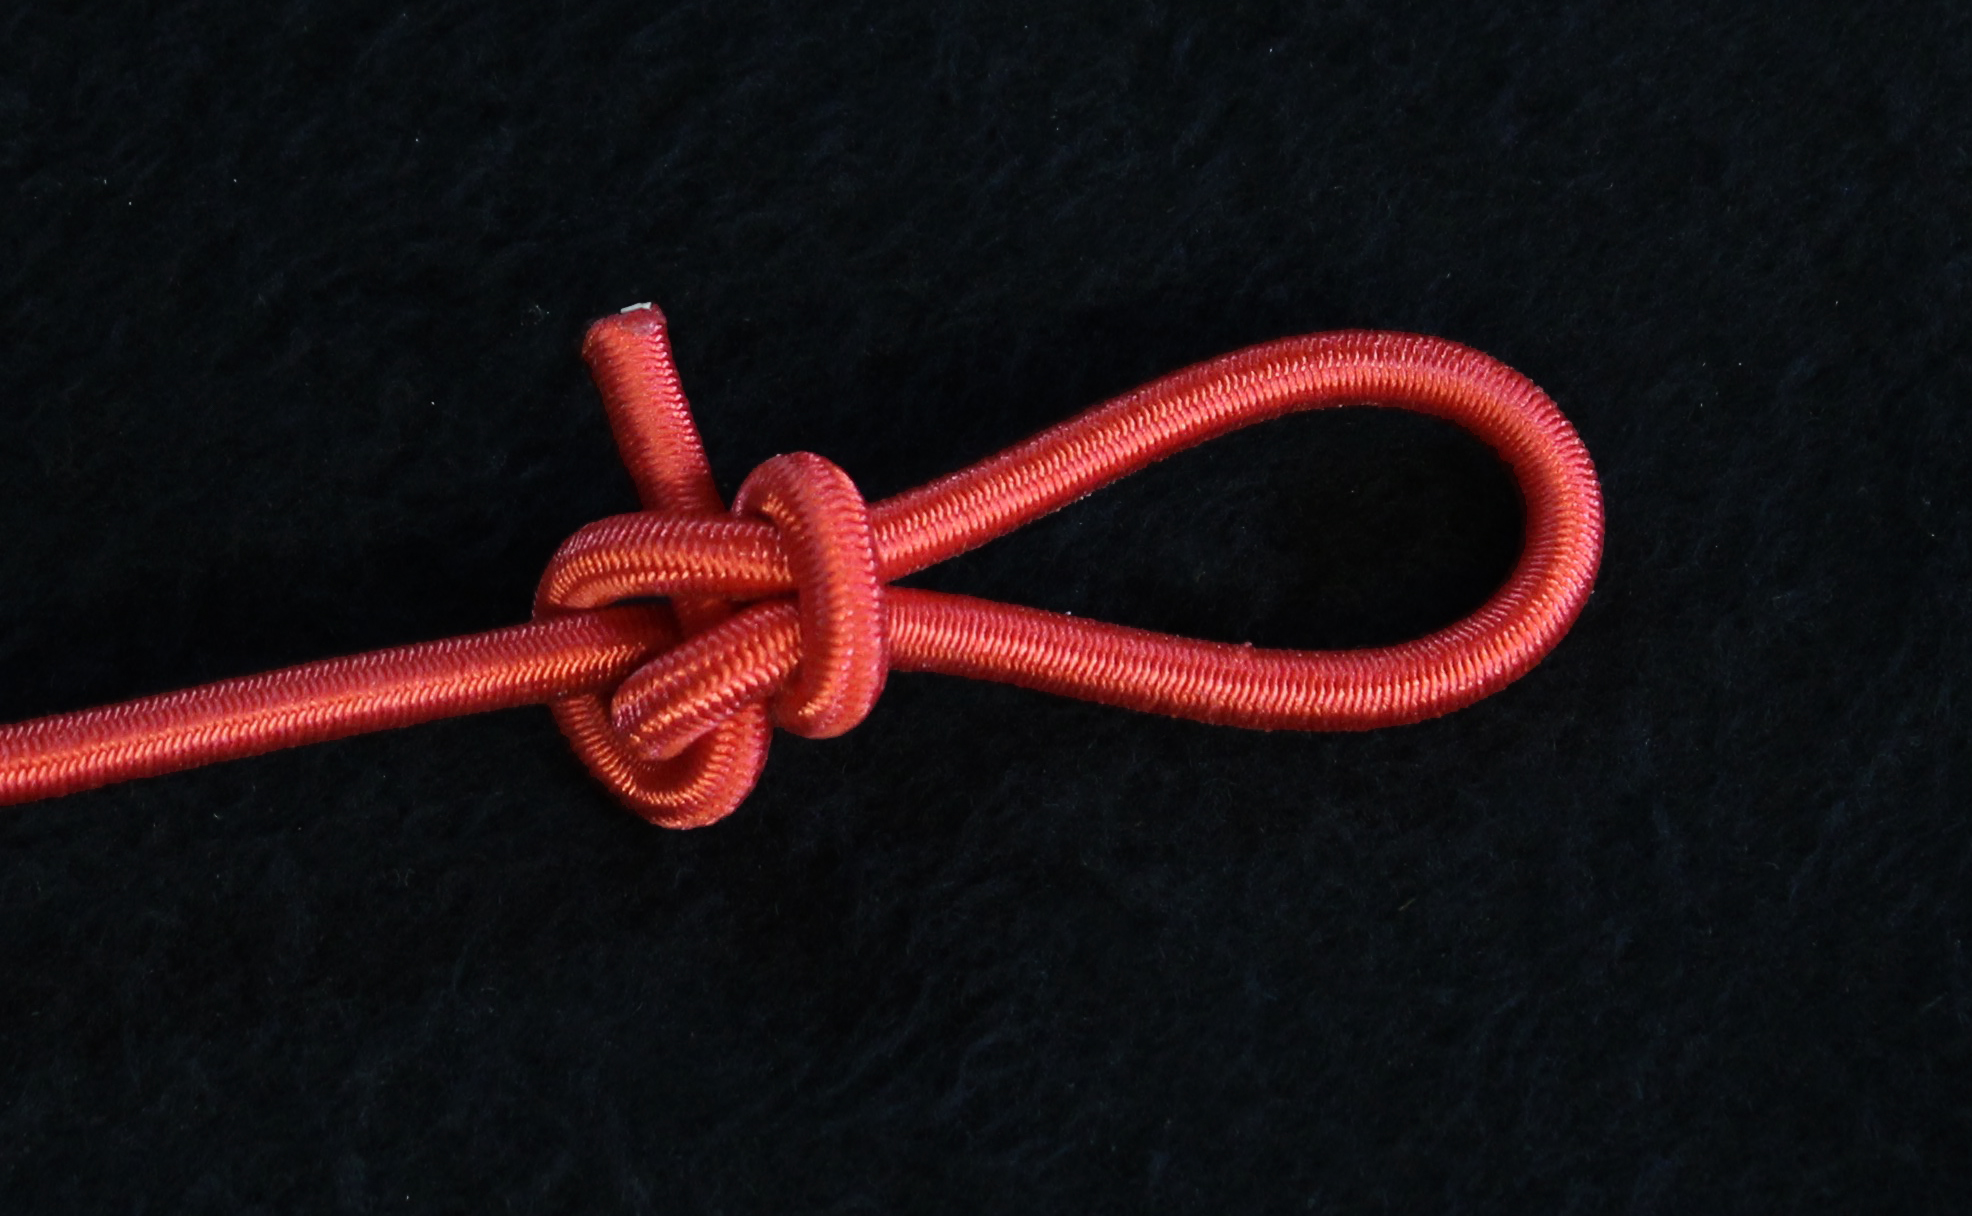
The Angler’s Loop
The Angler’s Loop is the bungee equivalent of a Bowline. I’ve read that it was used when fishing line was made of gut of some sort, which must have been slippery and stretchy. Learning to tie the Angler’s Loop is the first step, and the next is learning to tie it with the loop the right size and the tail end neither too long nor too short. That just takes a bit more practice. With a Bowline, it is easy to tie the loop to something; after you thread the line through that, you just carry on tying the knot as usual. To tie the Angler’s Loop to anything, the thing gets involved in the tying and has to slip through the first loop you make.
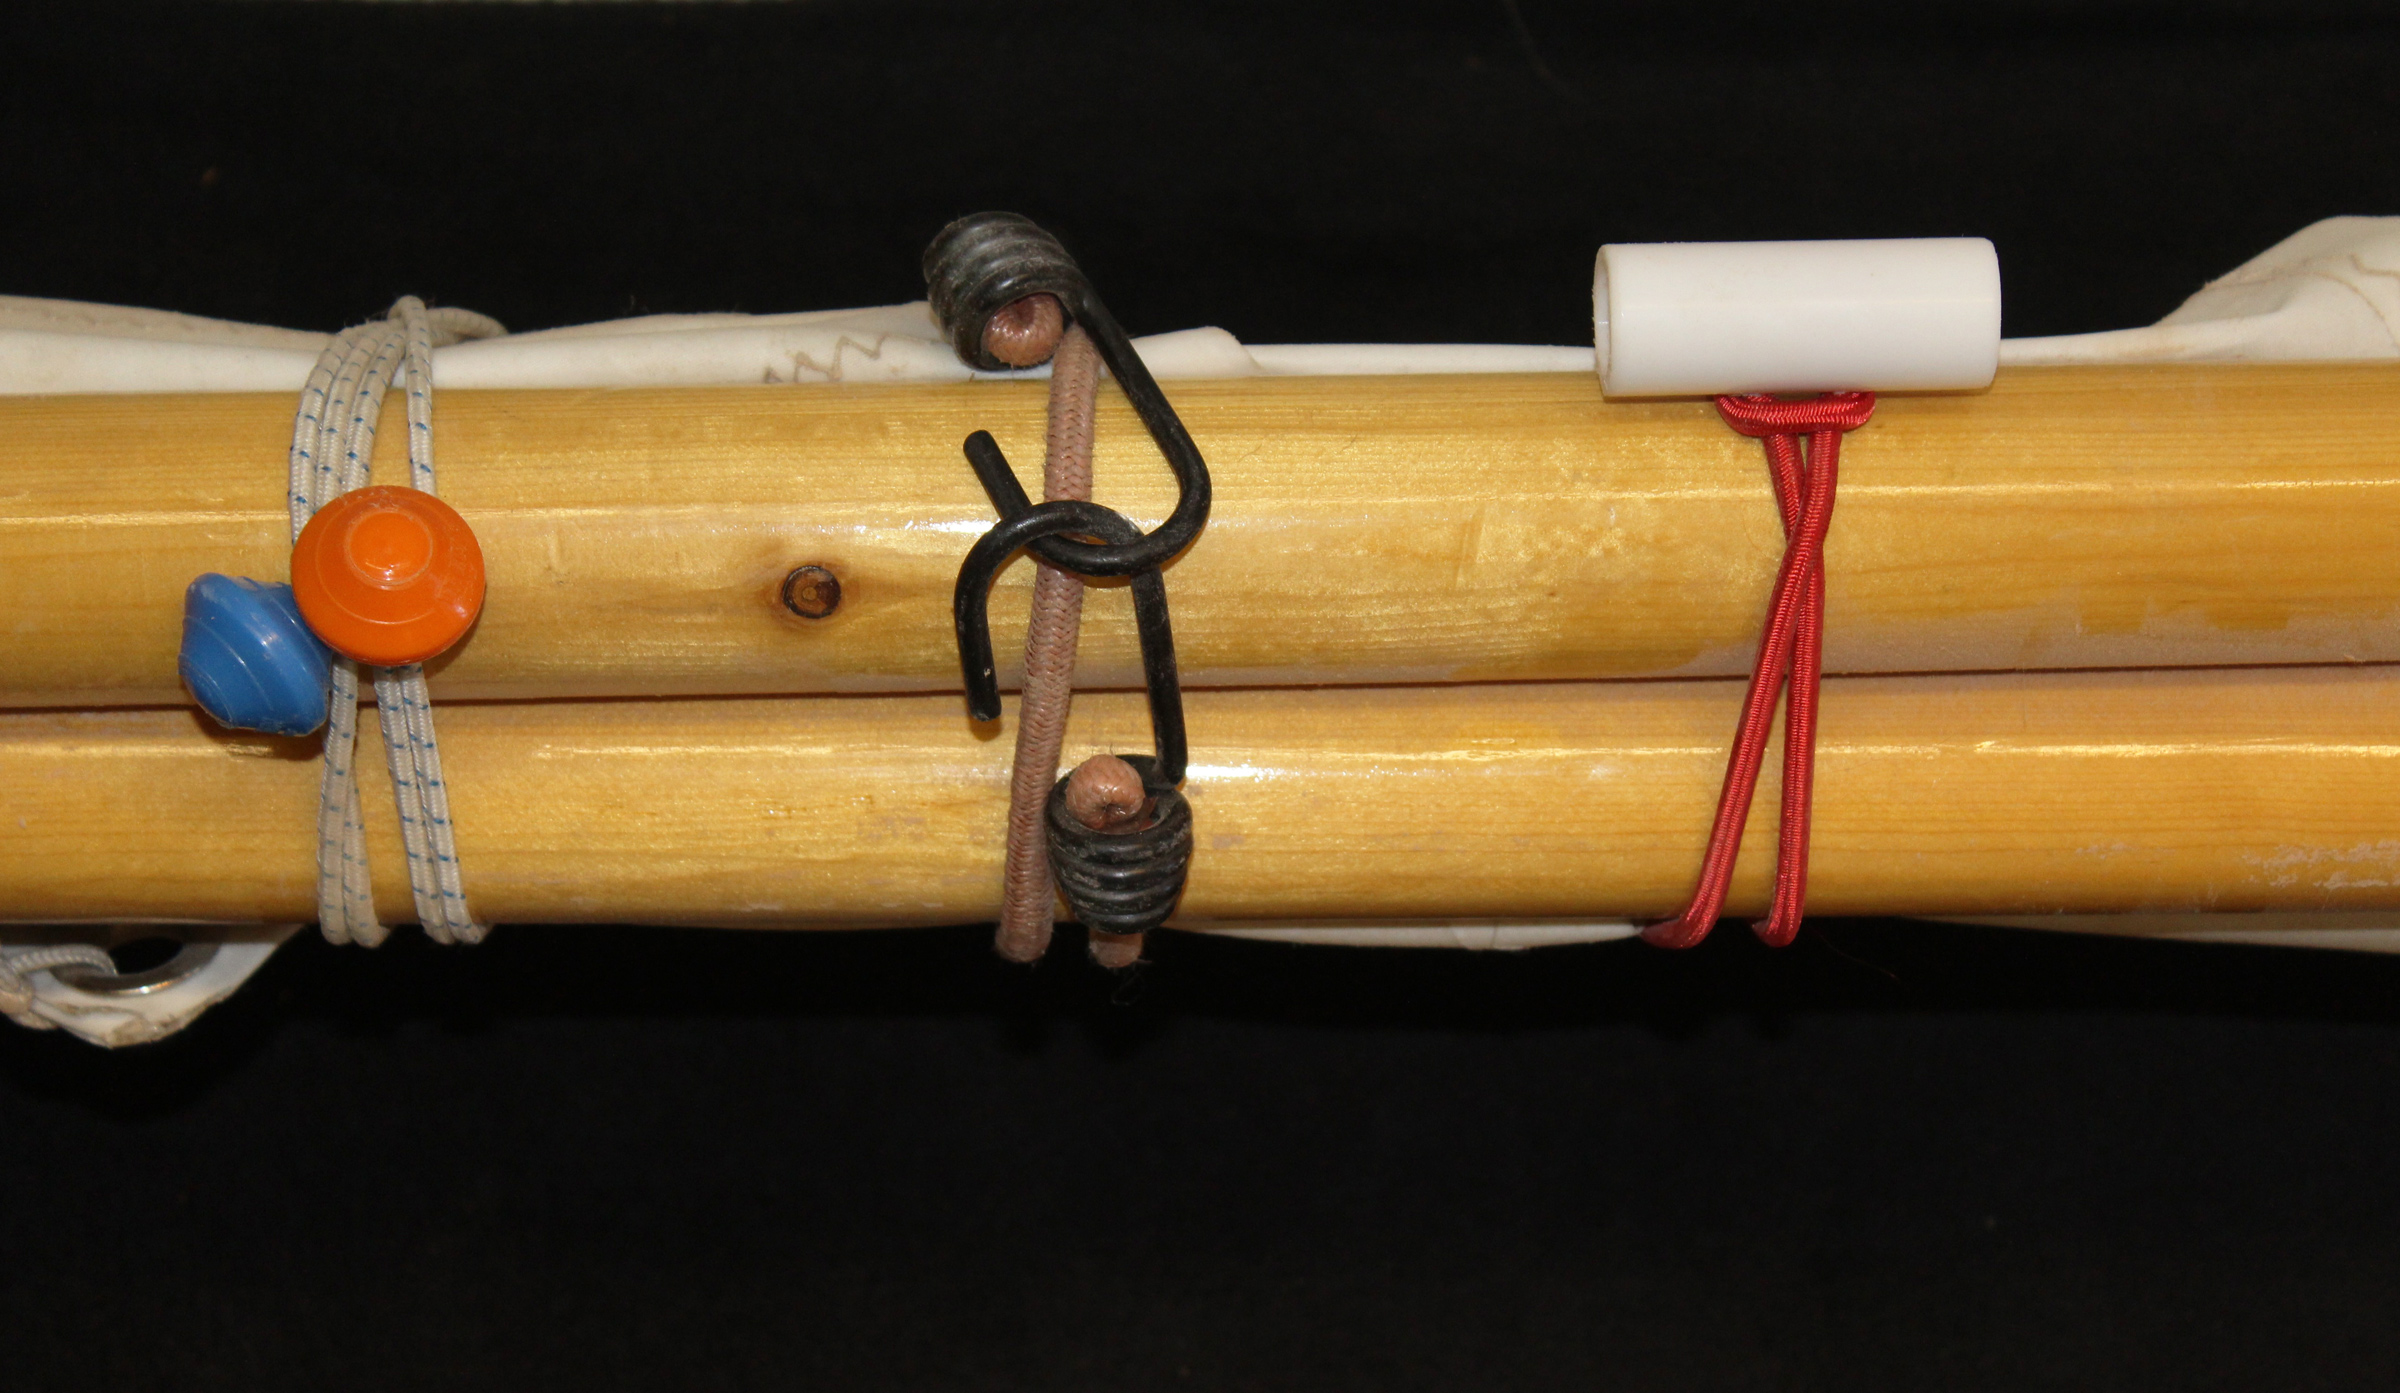
A spritsail, wrapped around its mast, gets bundled with the boom and sprit. The bungee with knobs on the end takes an extra wrap, and then is too tight to connect the ends easily. The bungee with the hooks take an extra wrap too; the hooks engage easily enough but can dent the soft spruce spars and snag things. The homemade toggled loop, cut to fit, is quick and easy to apply, and won’t dent spars or snag.
For a stopper knot, the common Figure-8 works well with bungee cord and is useful for making toggled loops. I like plastic-pipe toggles better than the plastic balls used on commercial products. The pipe toggles are easier to engage with the bungee under tension and less likely to slip free.
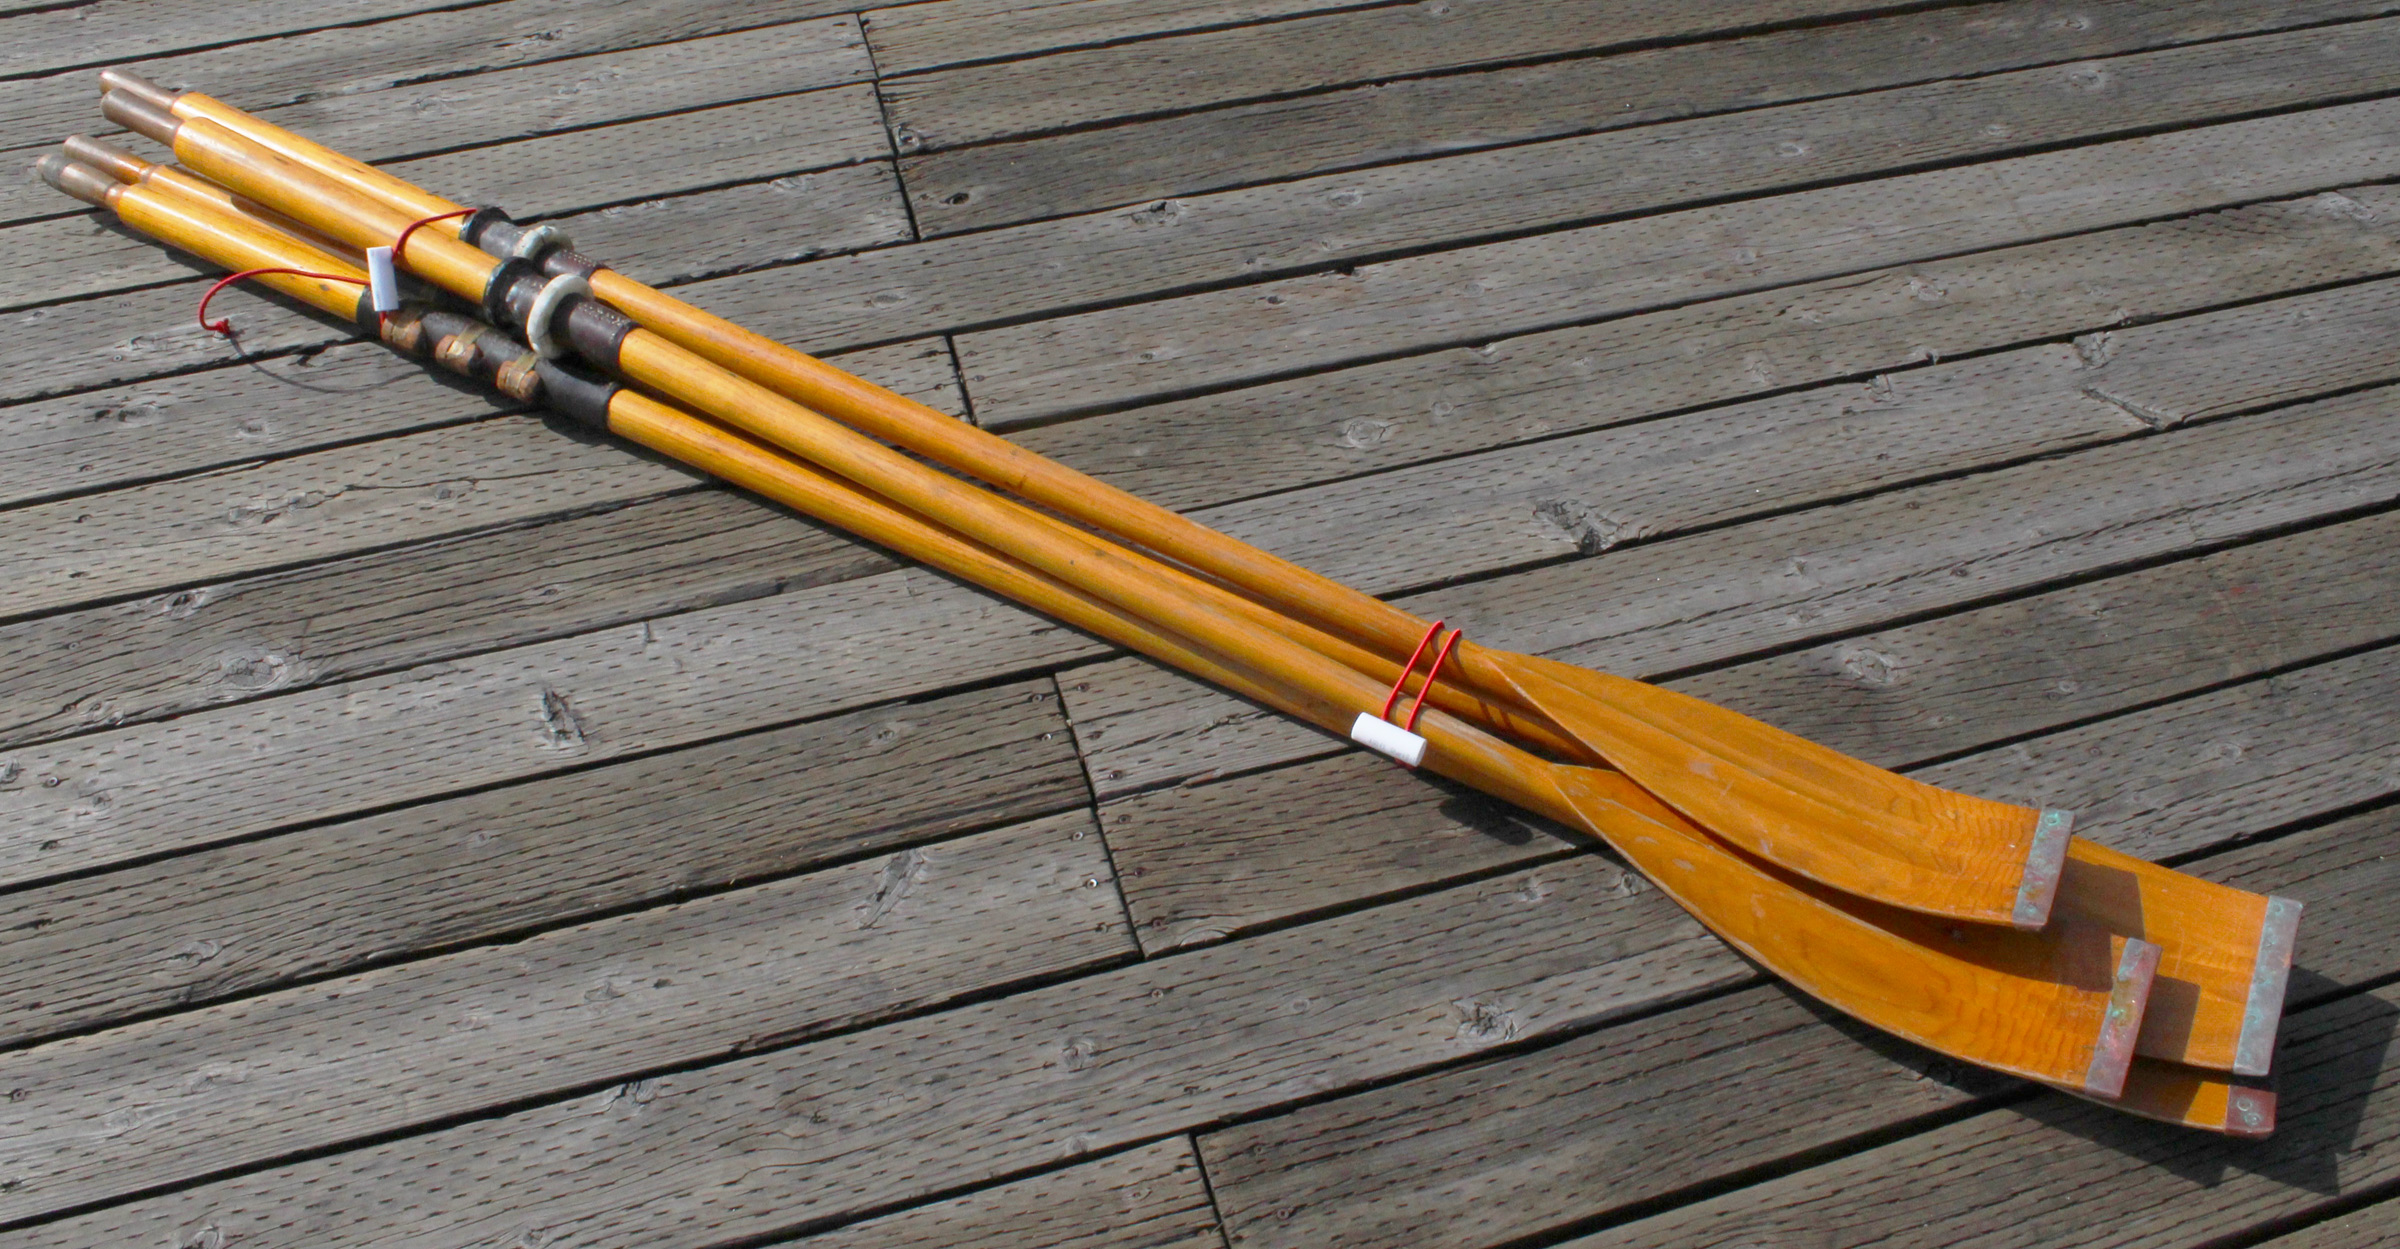
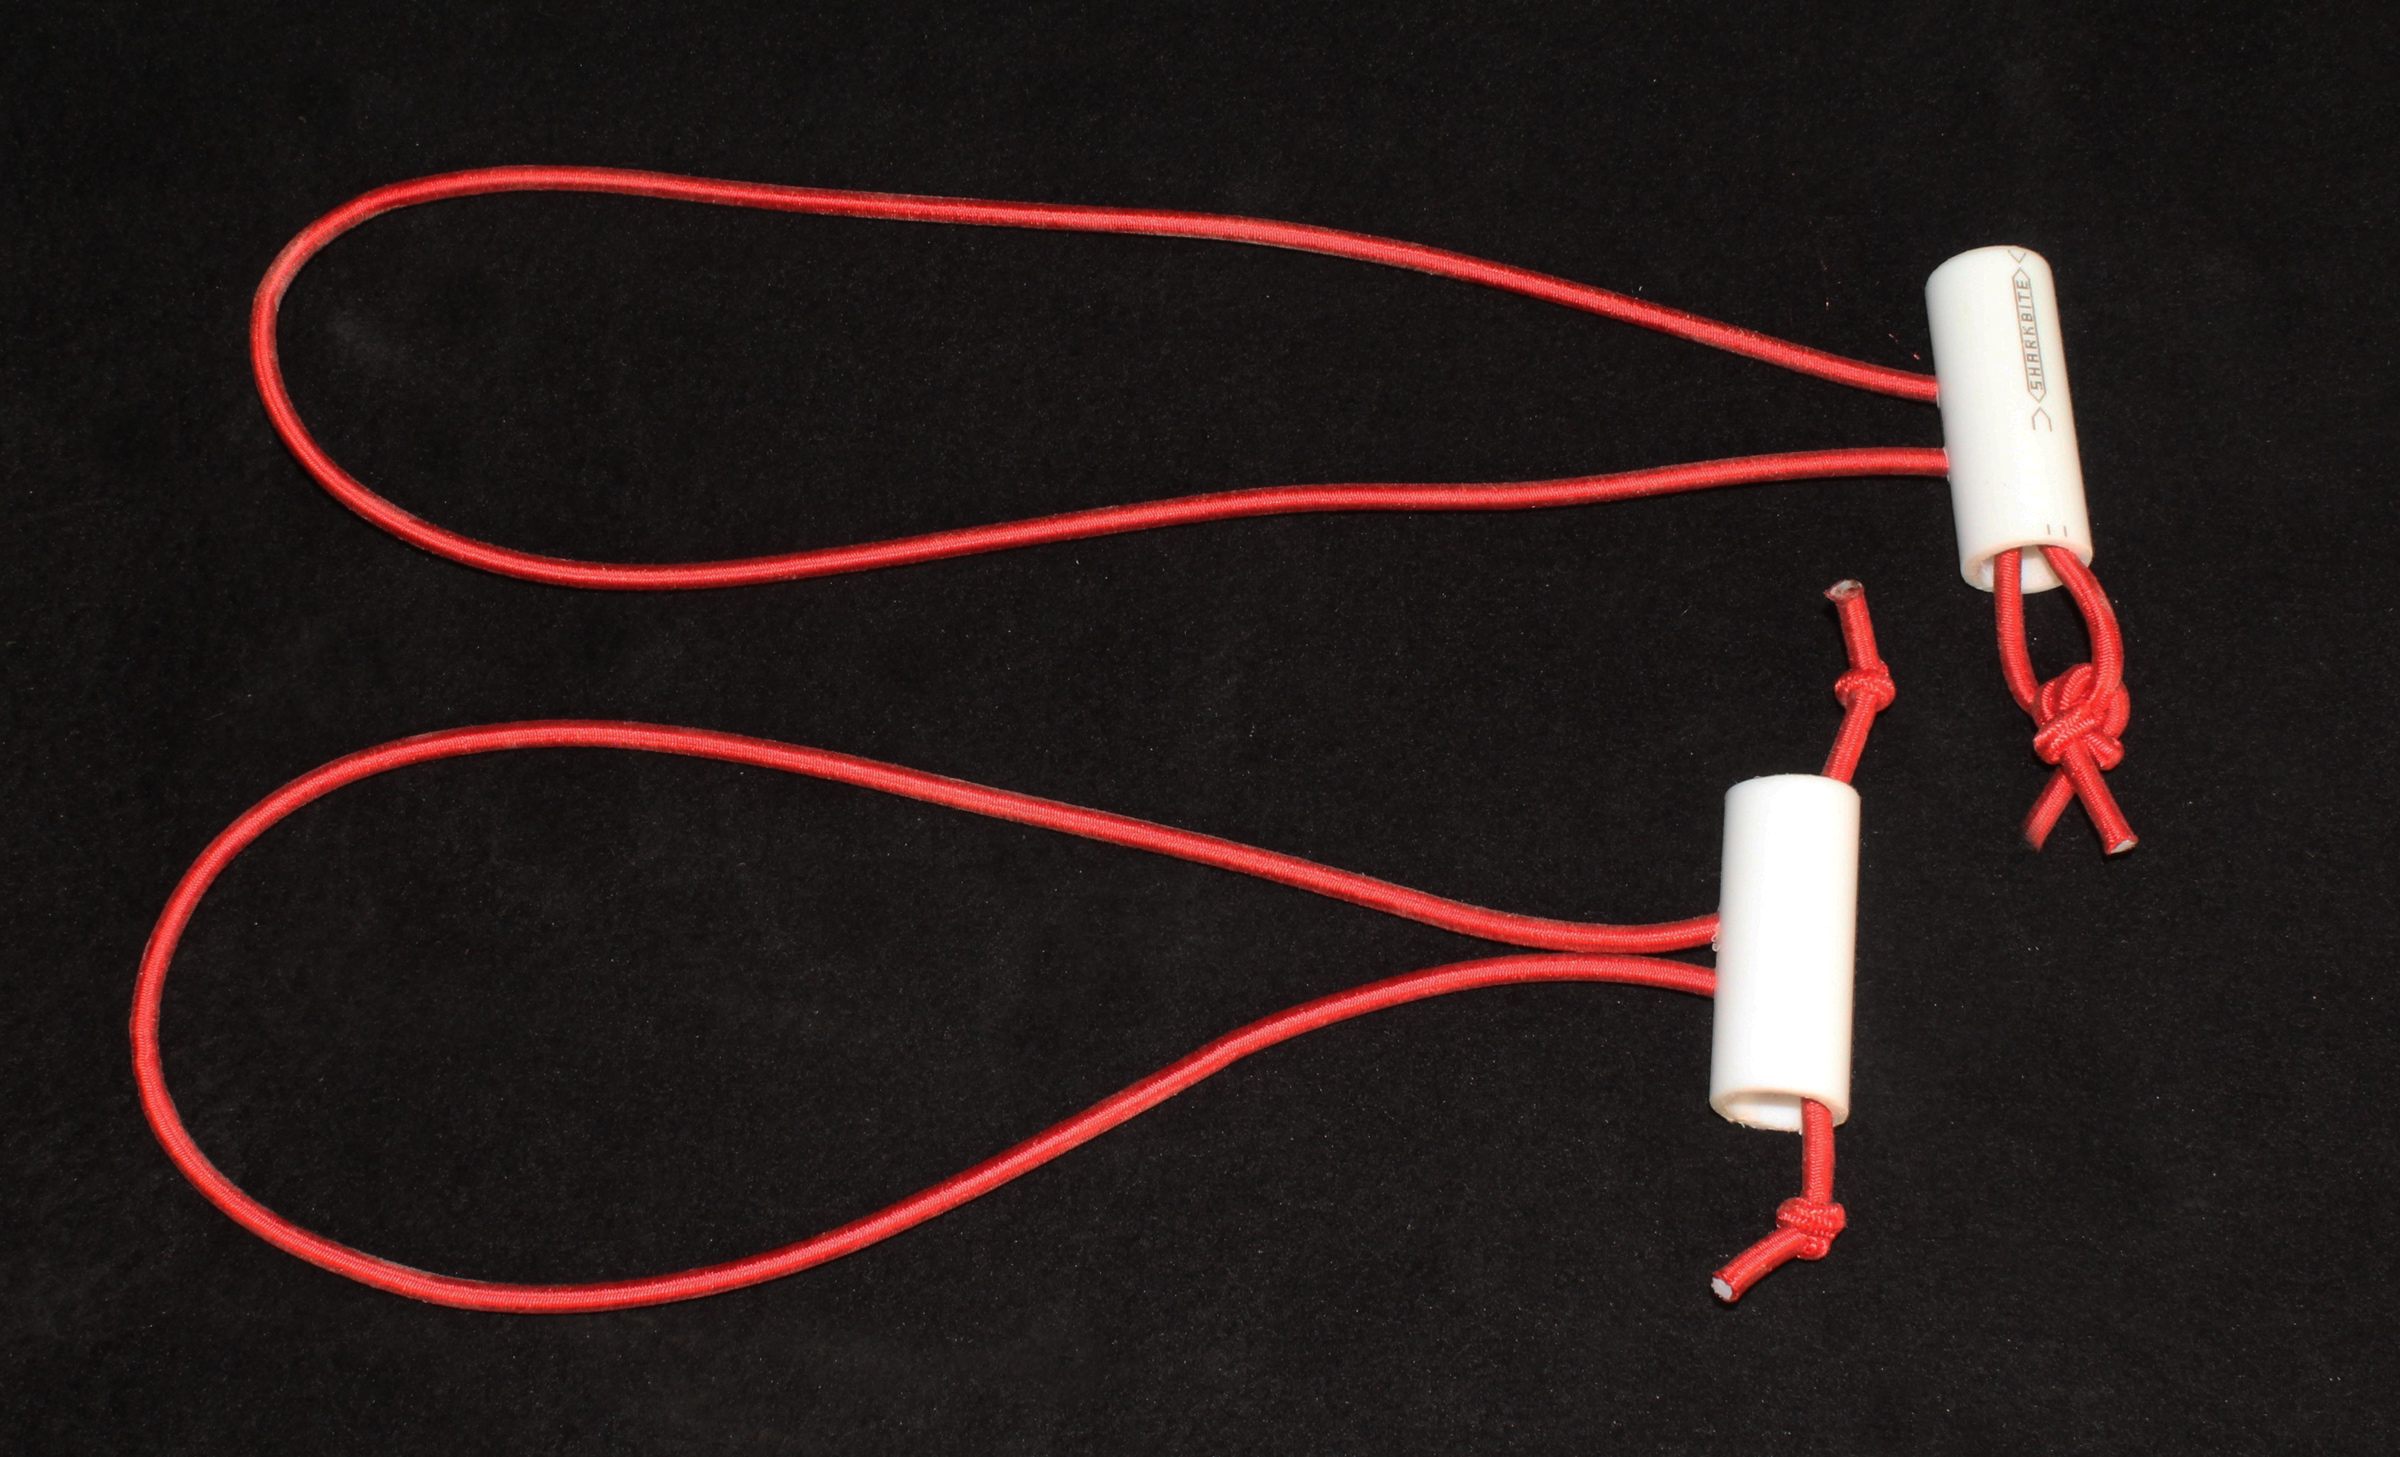
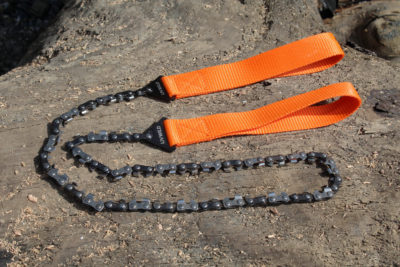
With a toggled loop at the throats and an adjustable loop above the leathers, two pairs of oars become an easily carried bundle.
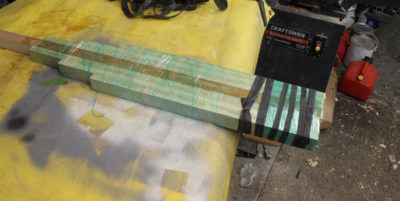
I get long lengths of bungee cord in an assortment of diameters cut from spools at my local marine supply store and stock them my shop. I cut off whatever I need, making allowances for the length taken up by the knot, melt the ends’ woven sheaths to keep them from unraveling, and in a couple of minutes I have just the right bungee for the job.
How to Tie Secure Knots for Bungee Cord
Tying the Zeppelin Bend
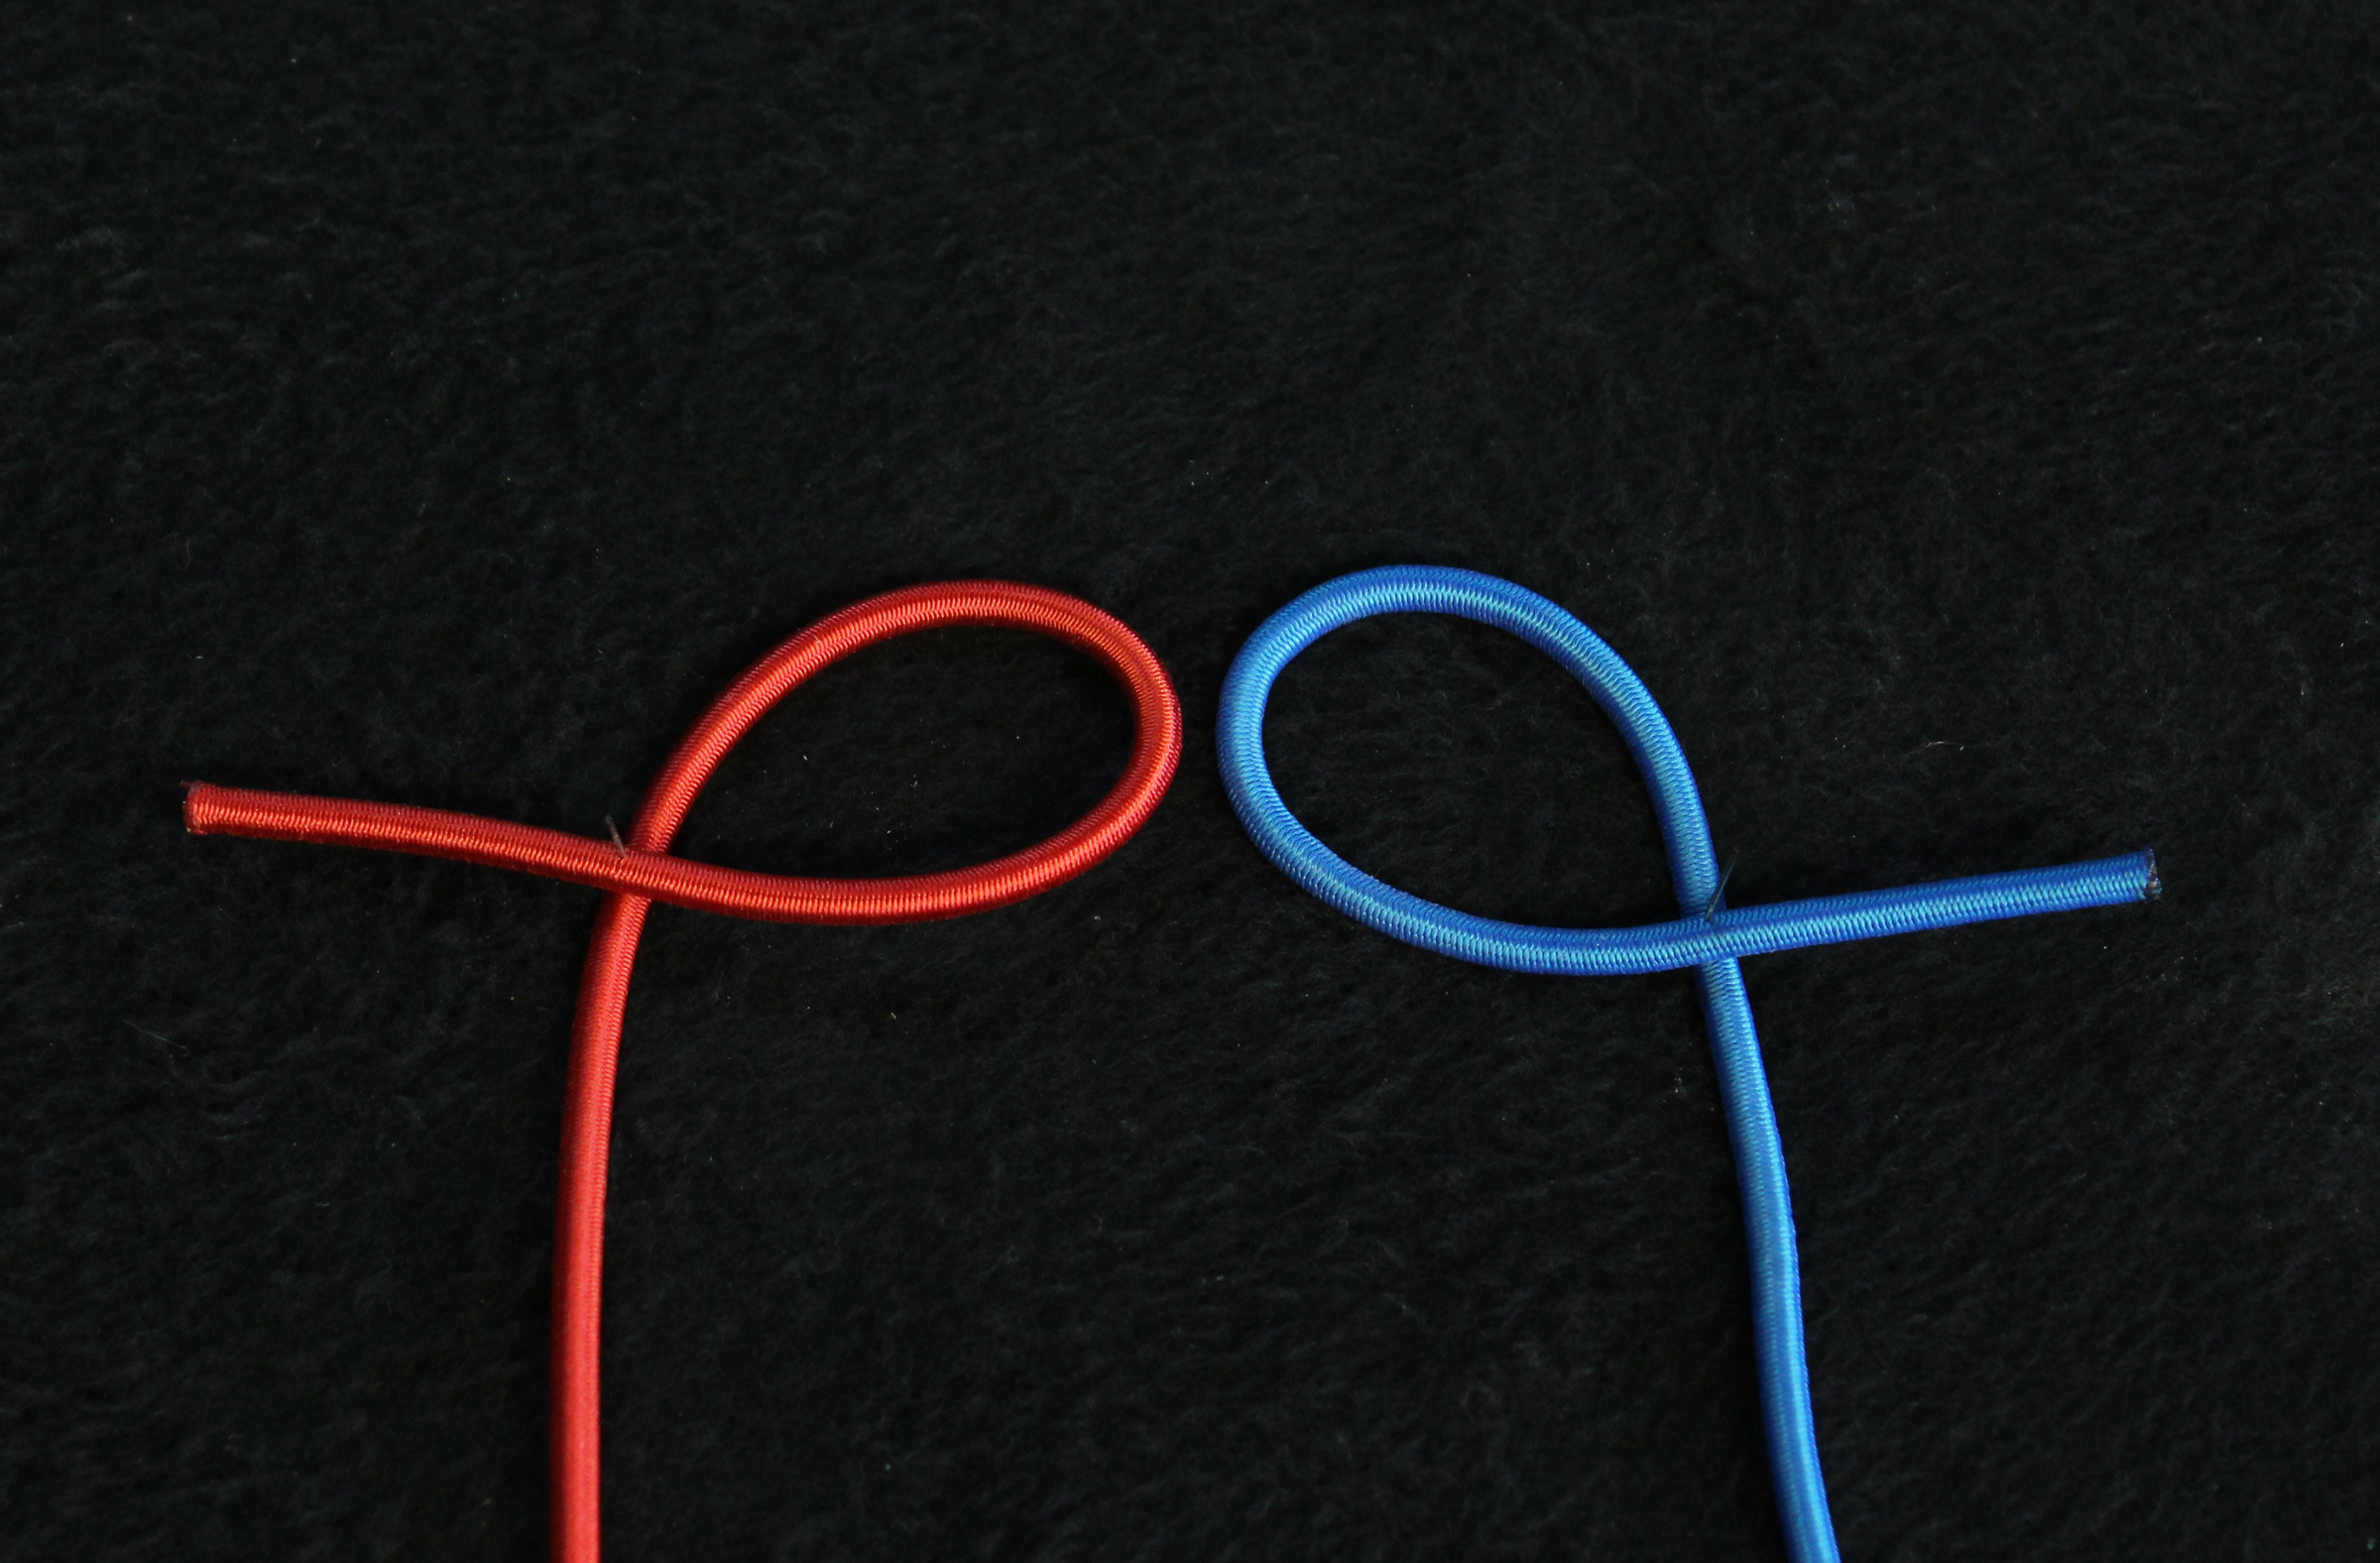
The Zeppelin Bend starts with two mirror-image overhand loops. Think a P and a 9.
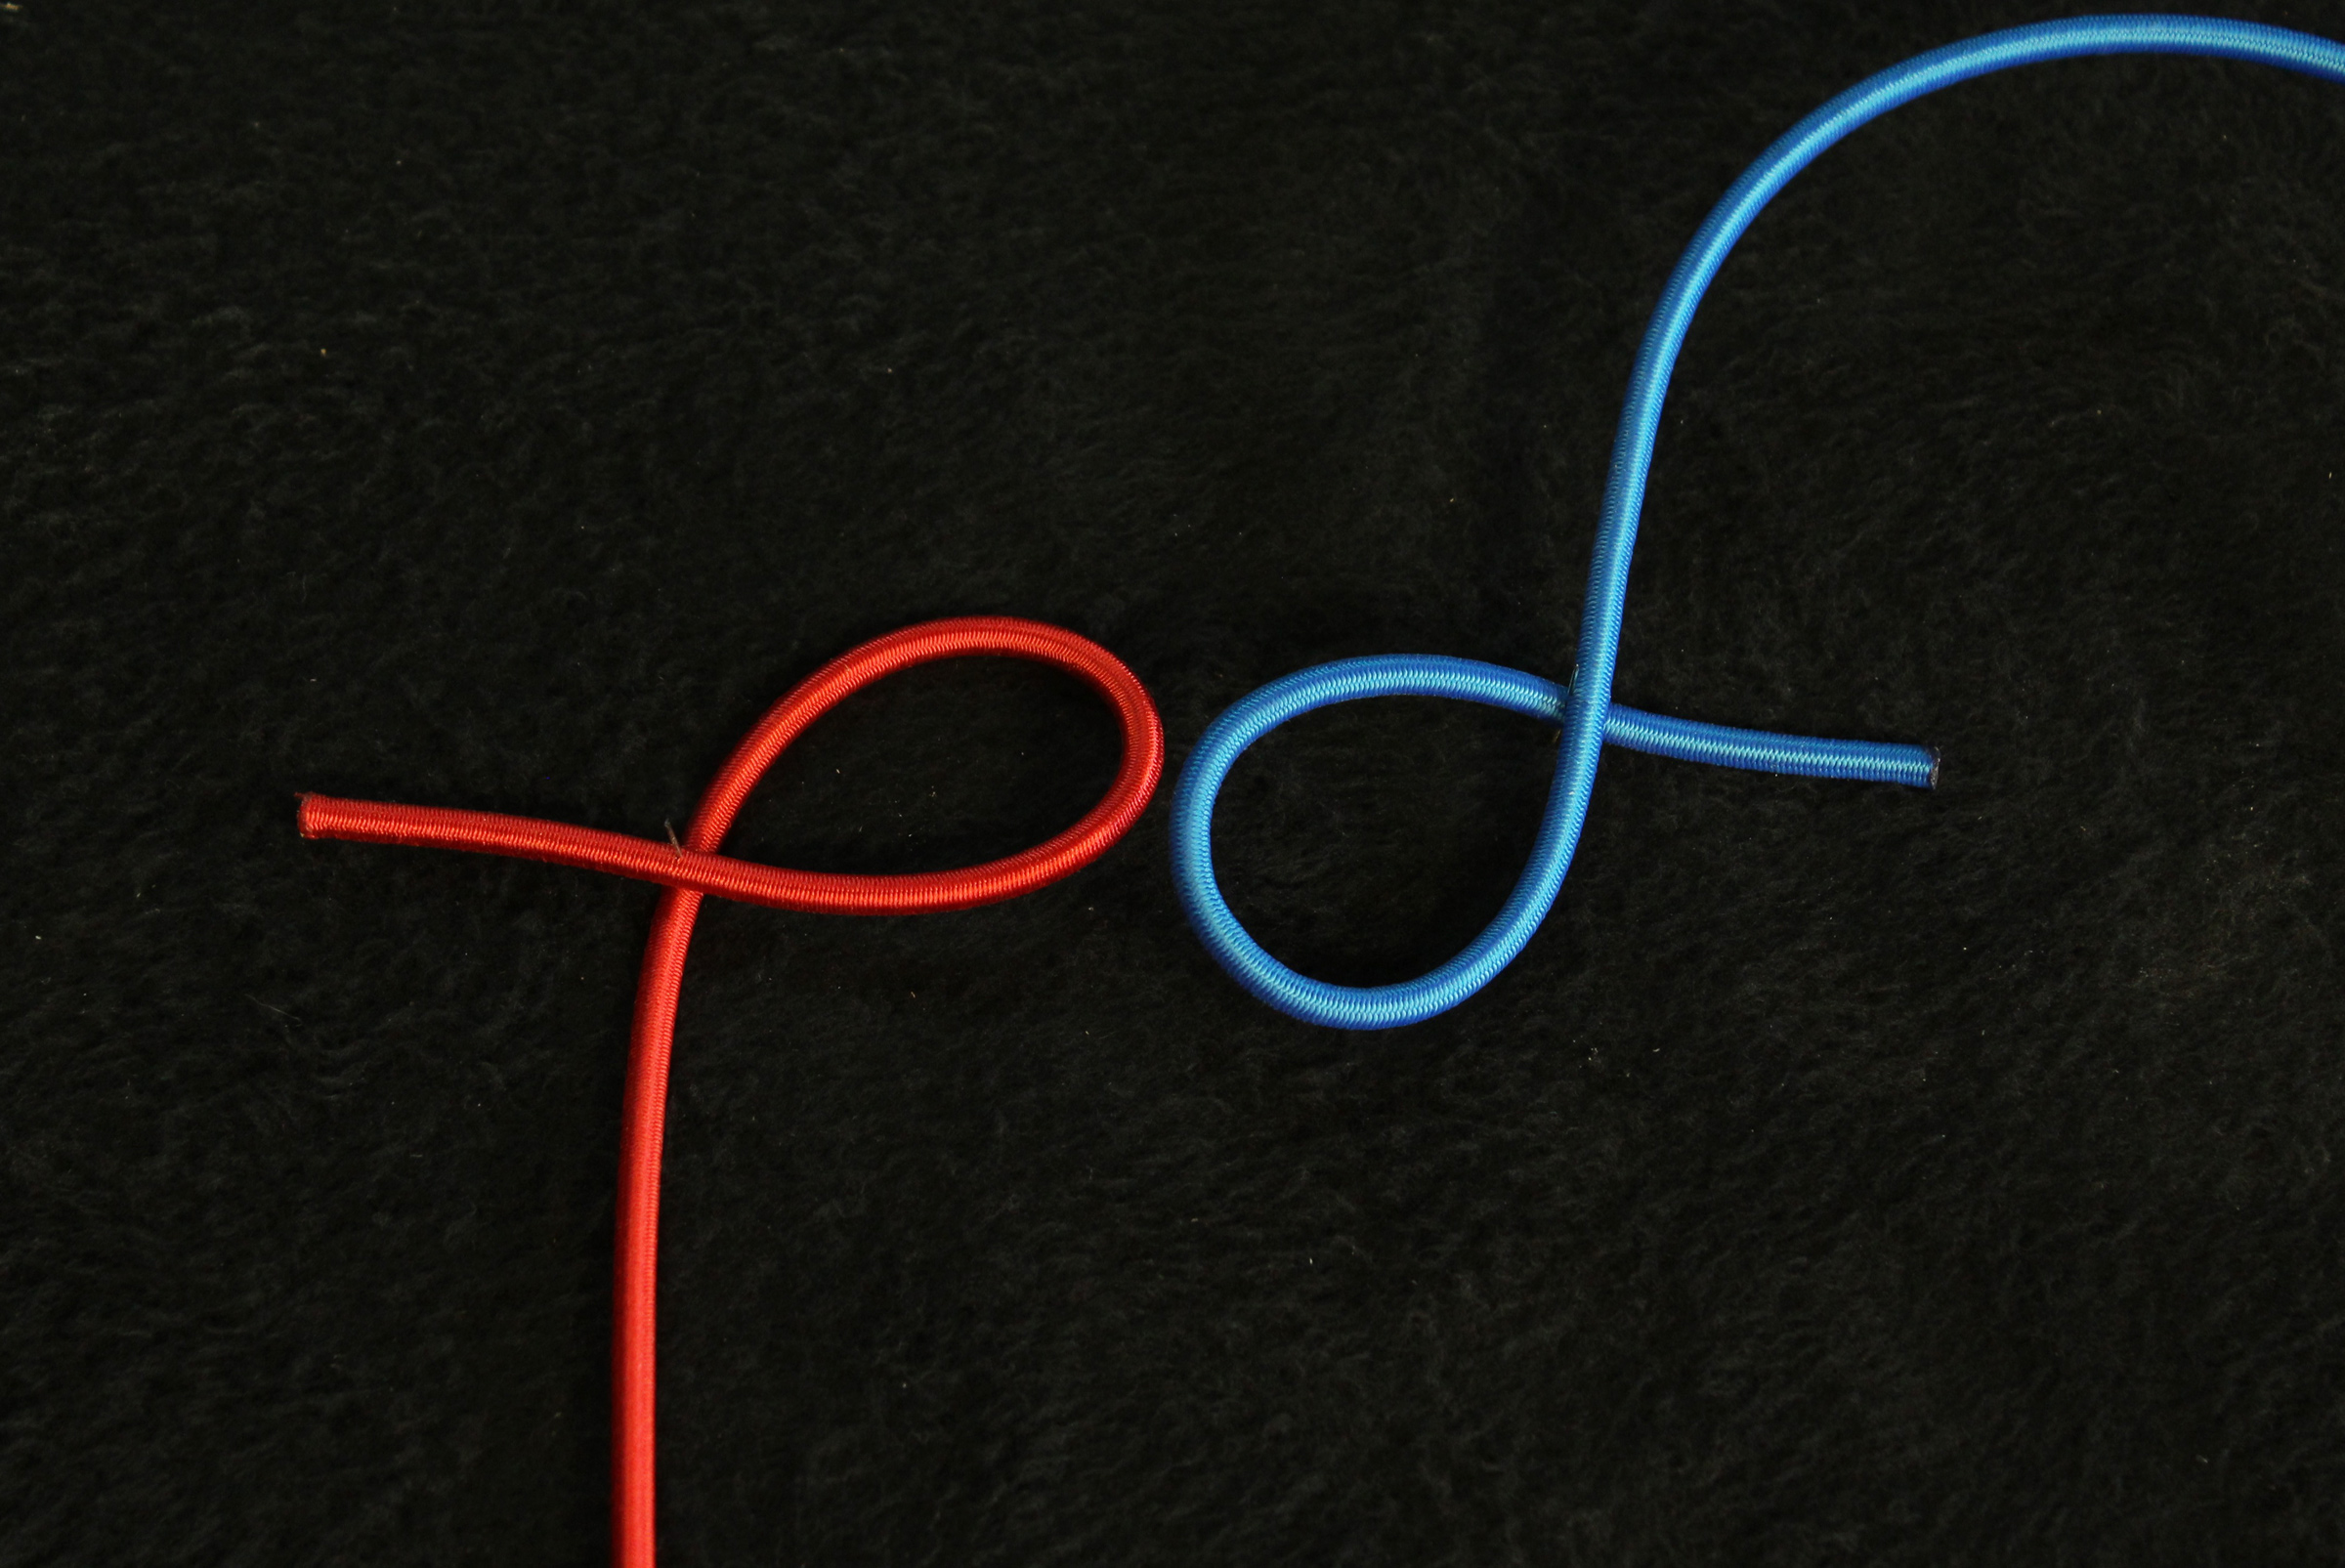
Flip the right loop vertically.
Slide the flipped loop under the other loop. The working ends are on the outside of the loops, top and bottom.
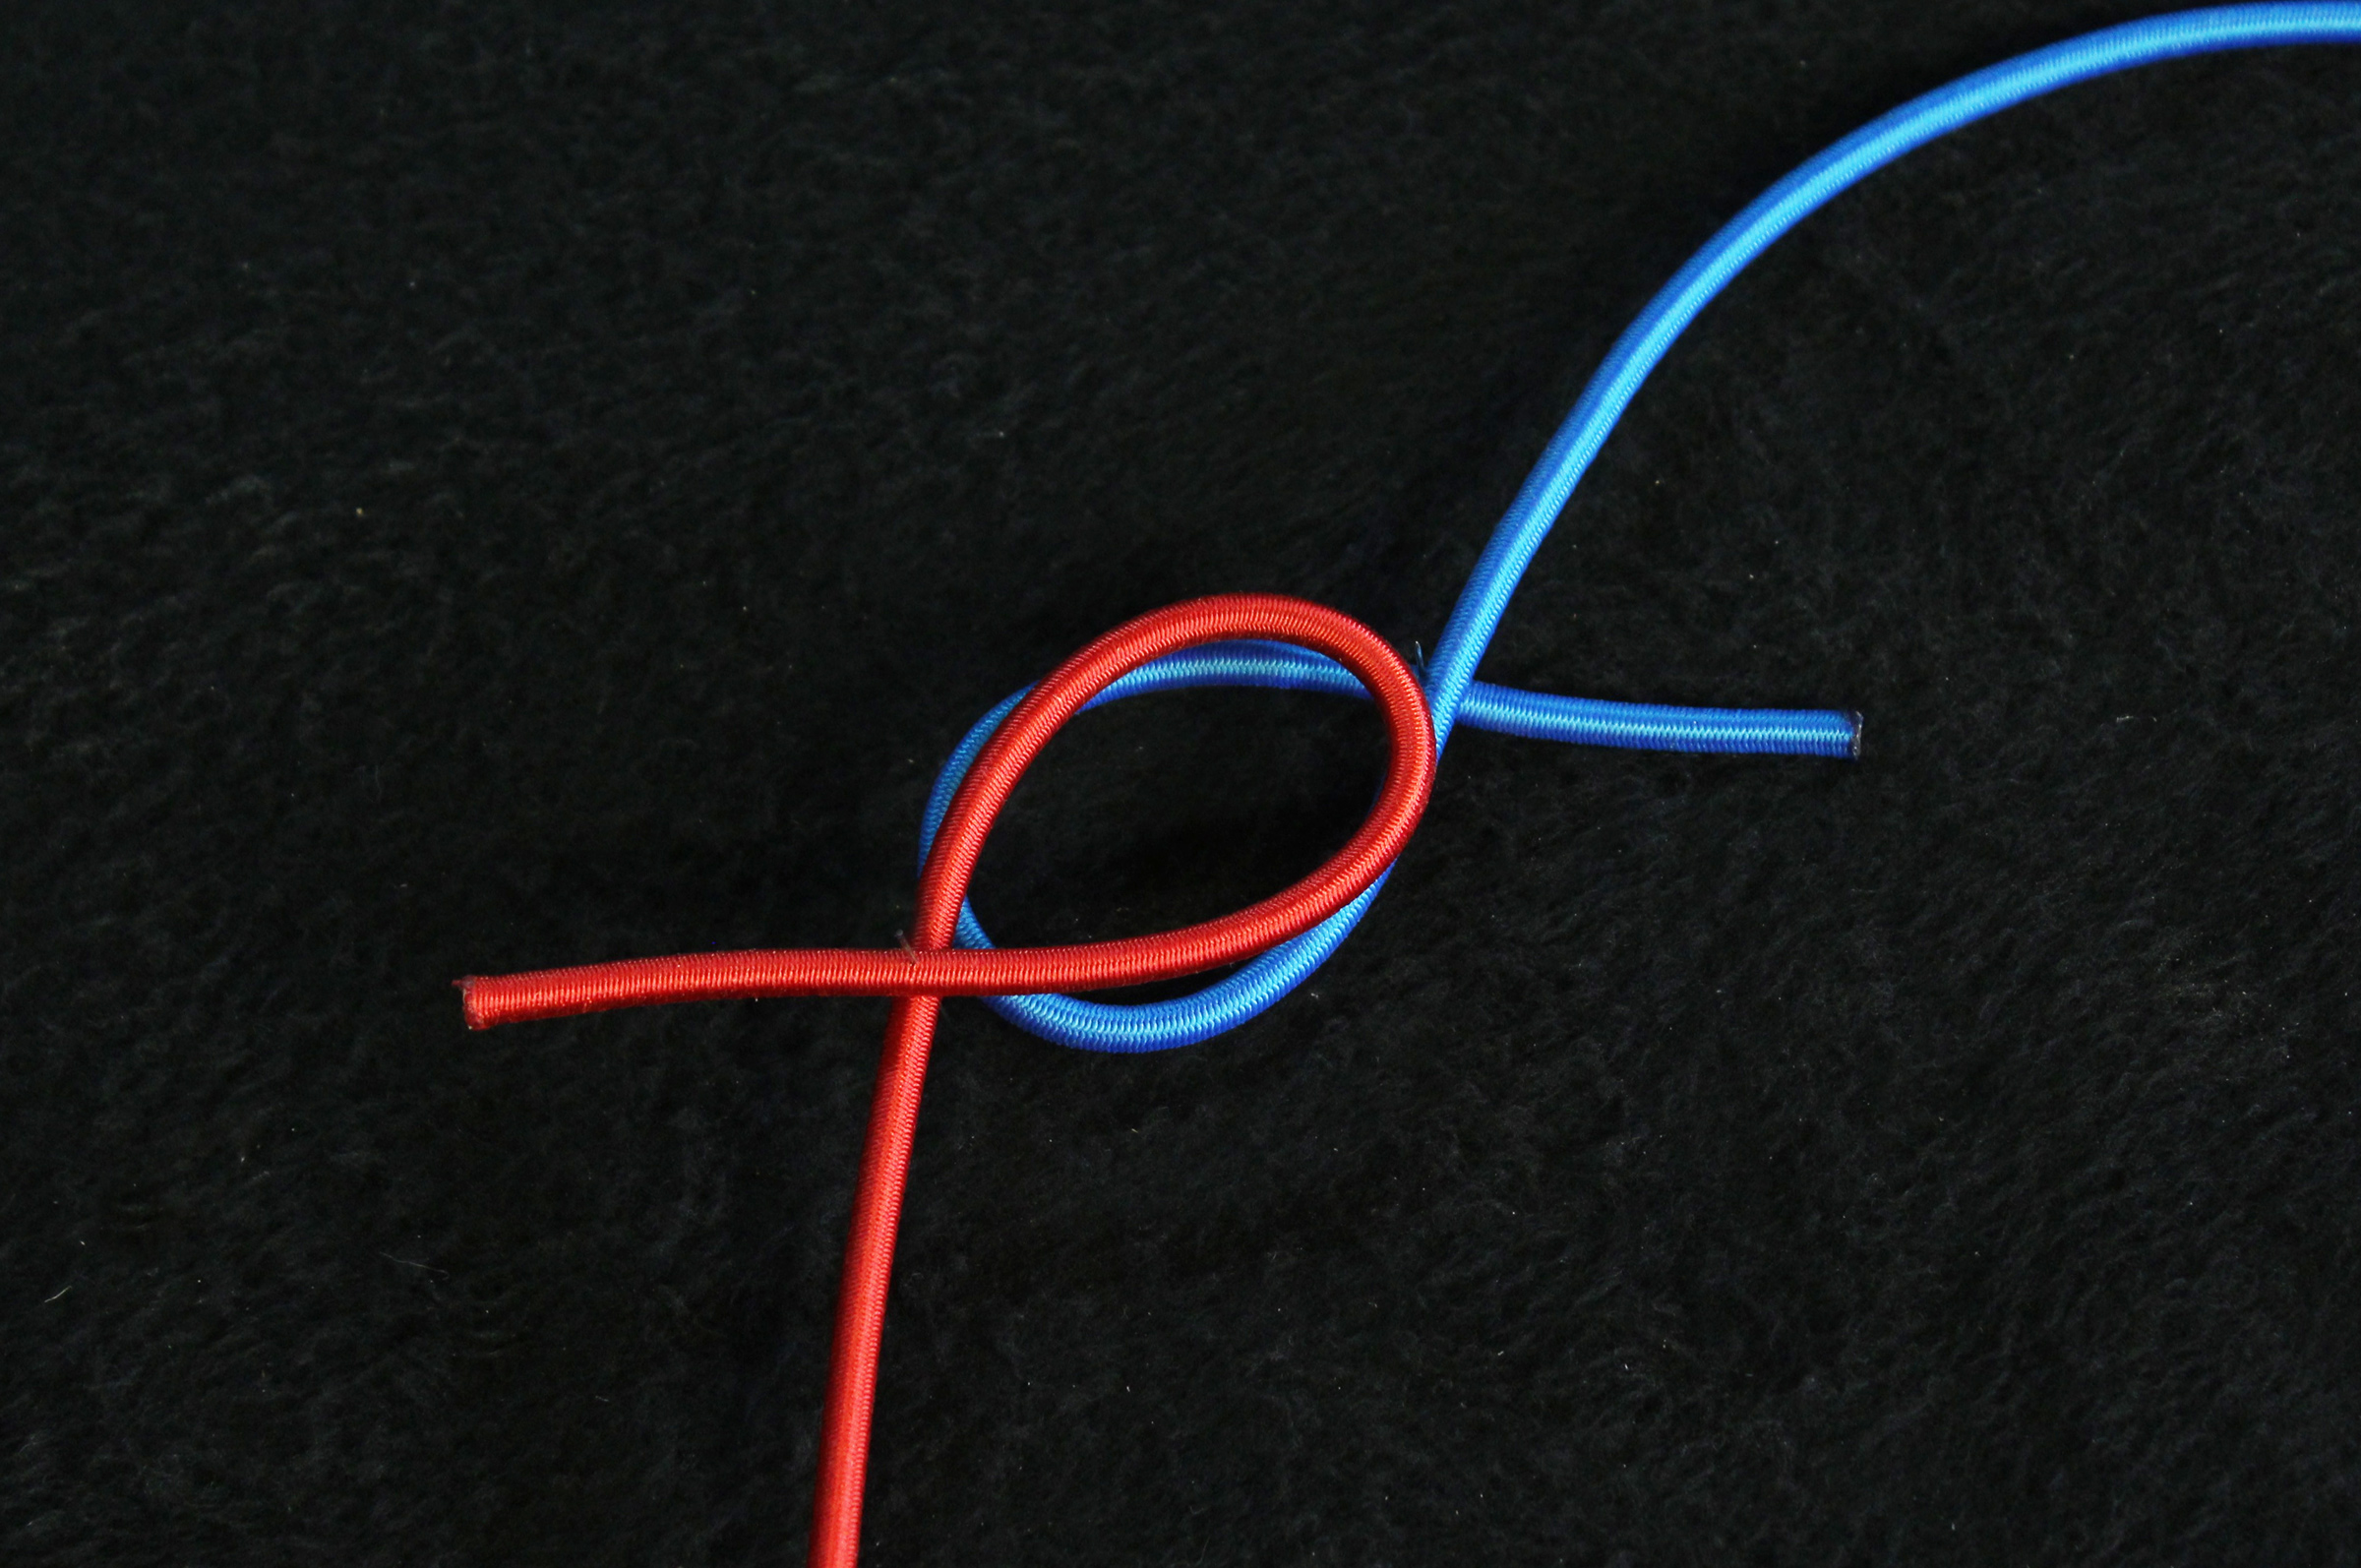
The top working end goes through both loops from underneath.
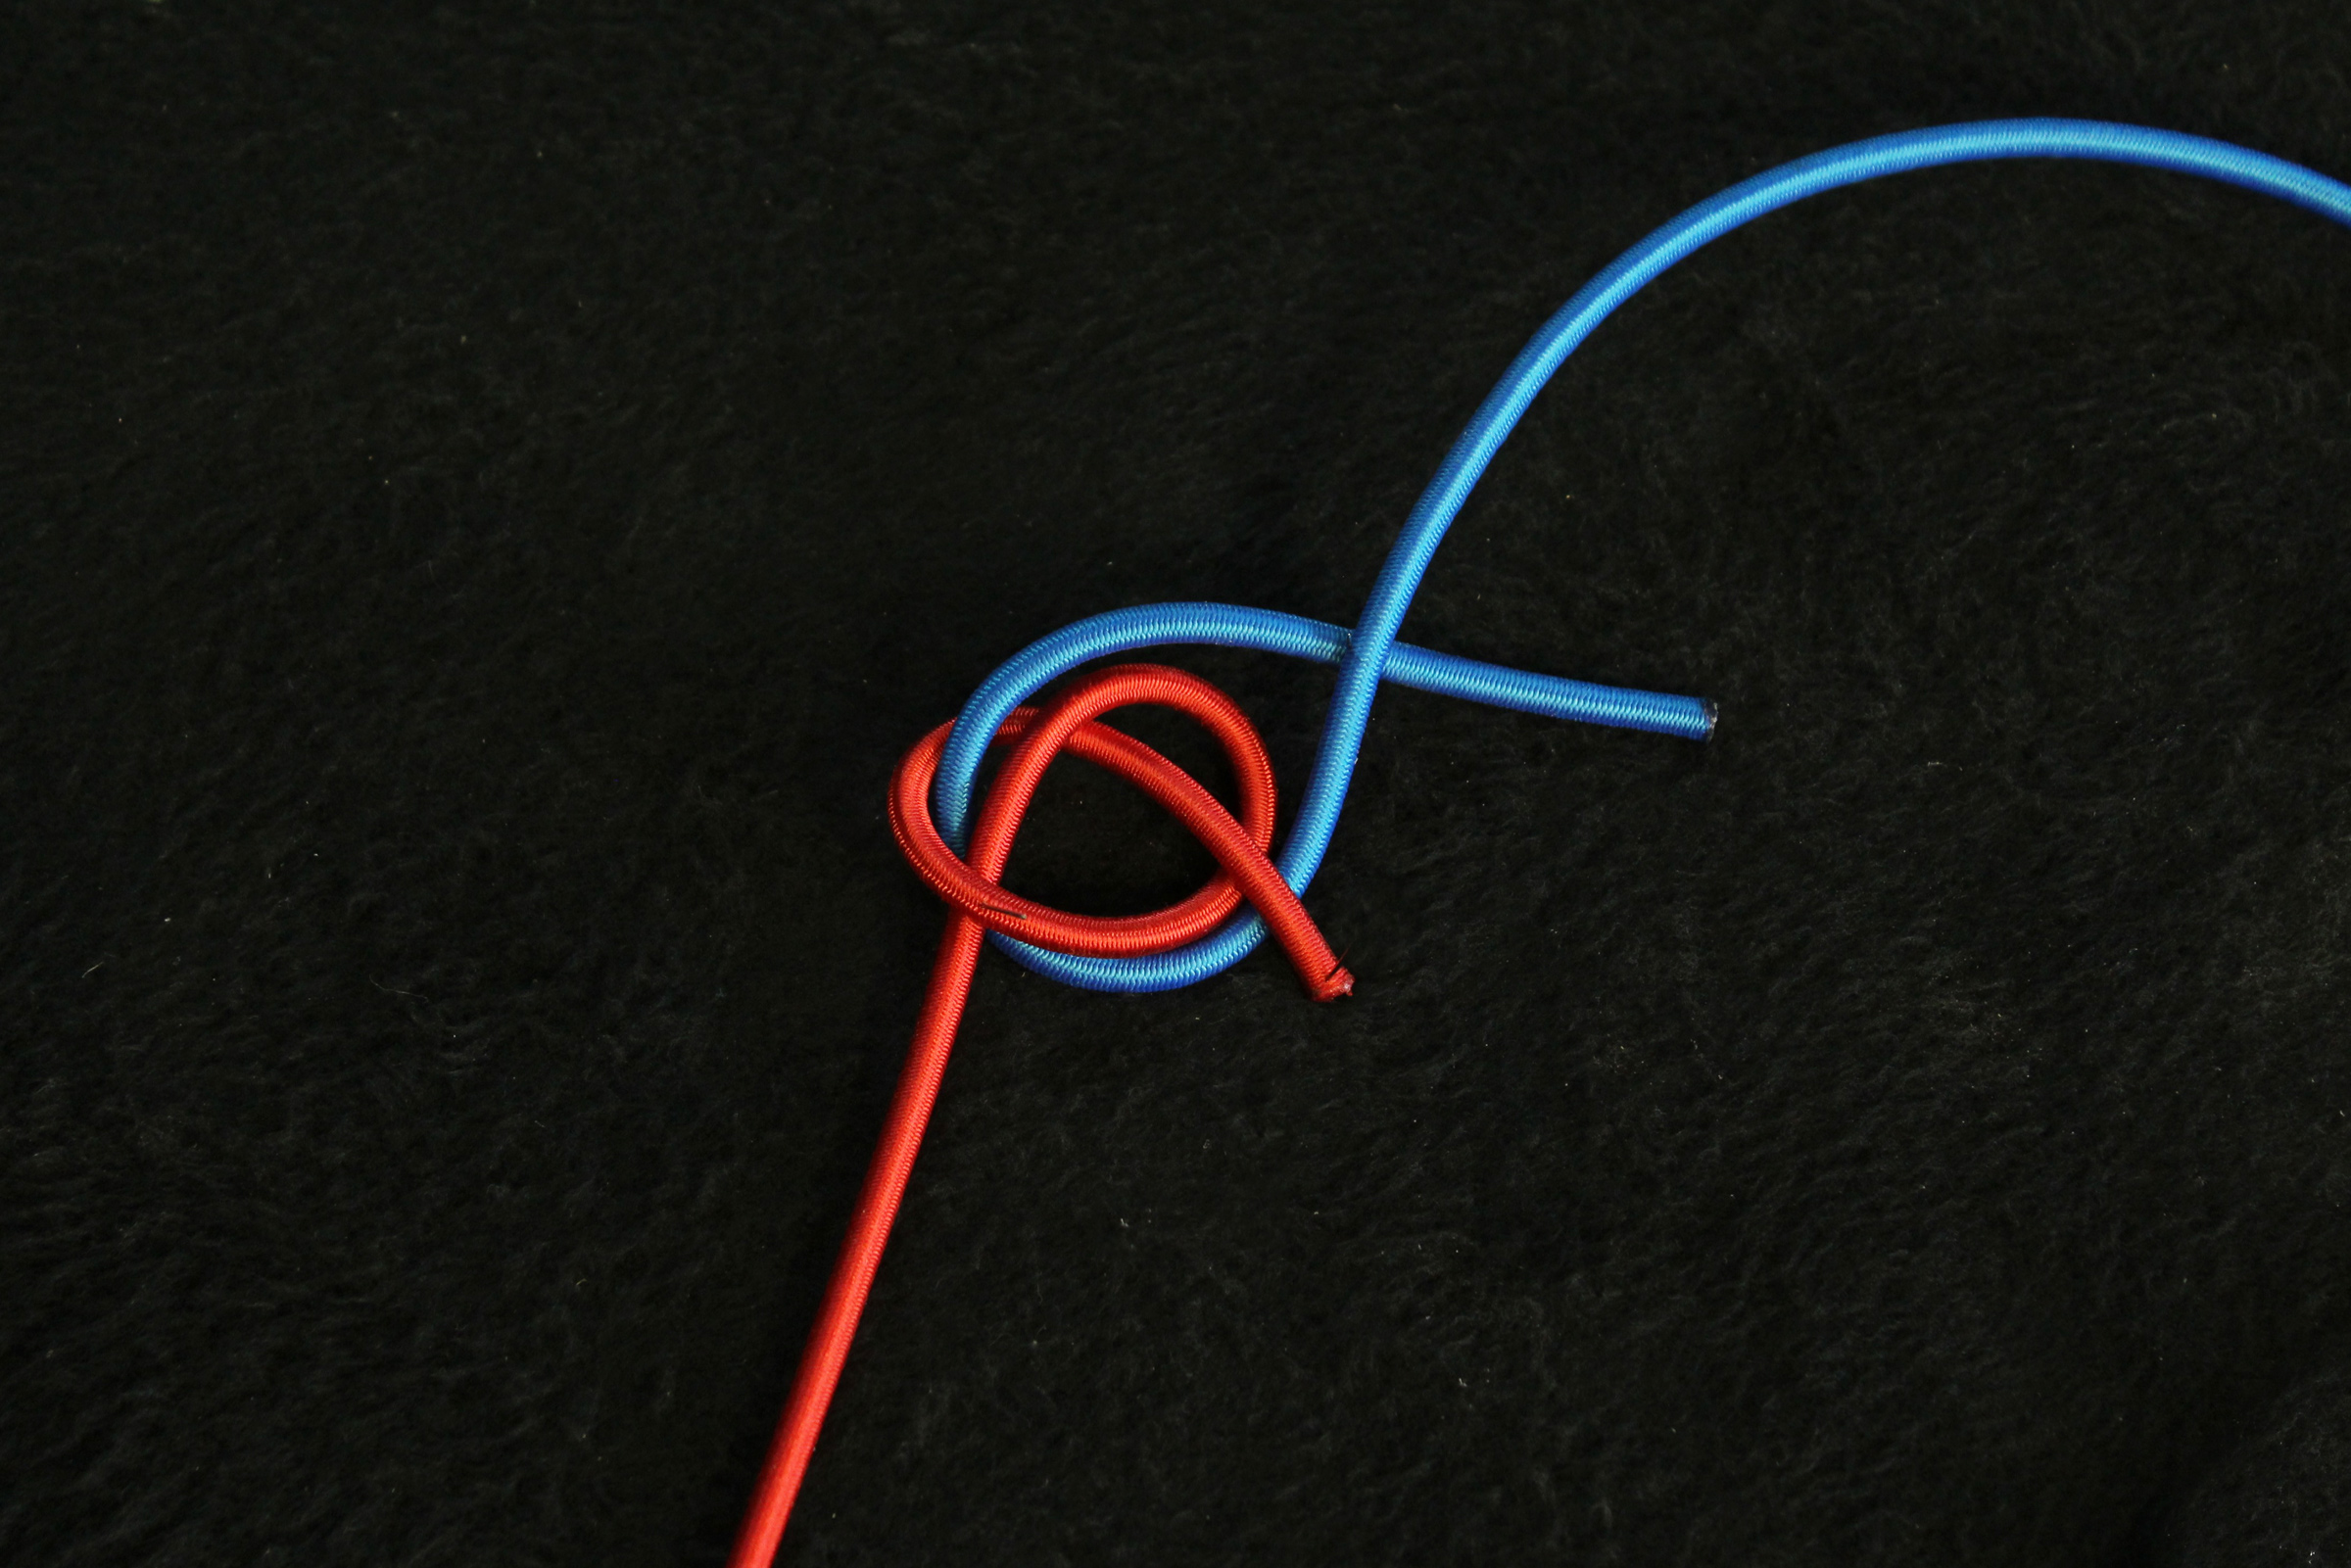
The bottom working end goes through the loops from the top. Notice how the bungee cords create two interwoven half-hitches.
With the bend drawn up tight, the working ends will stick straight out.
Tying the Angler’s Loop
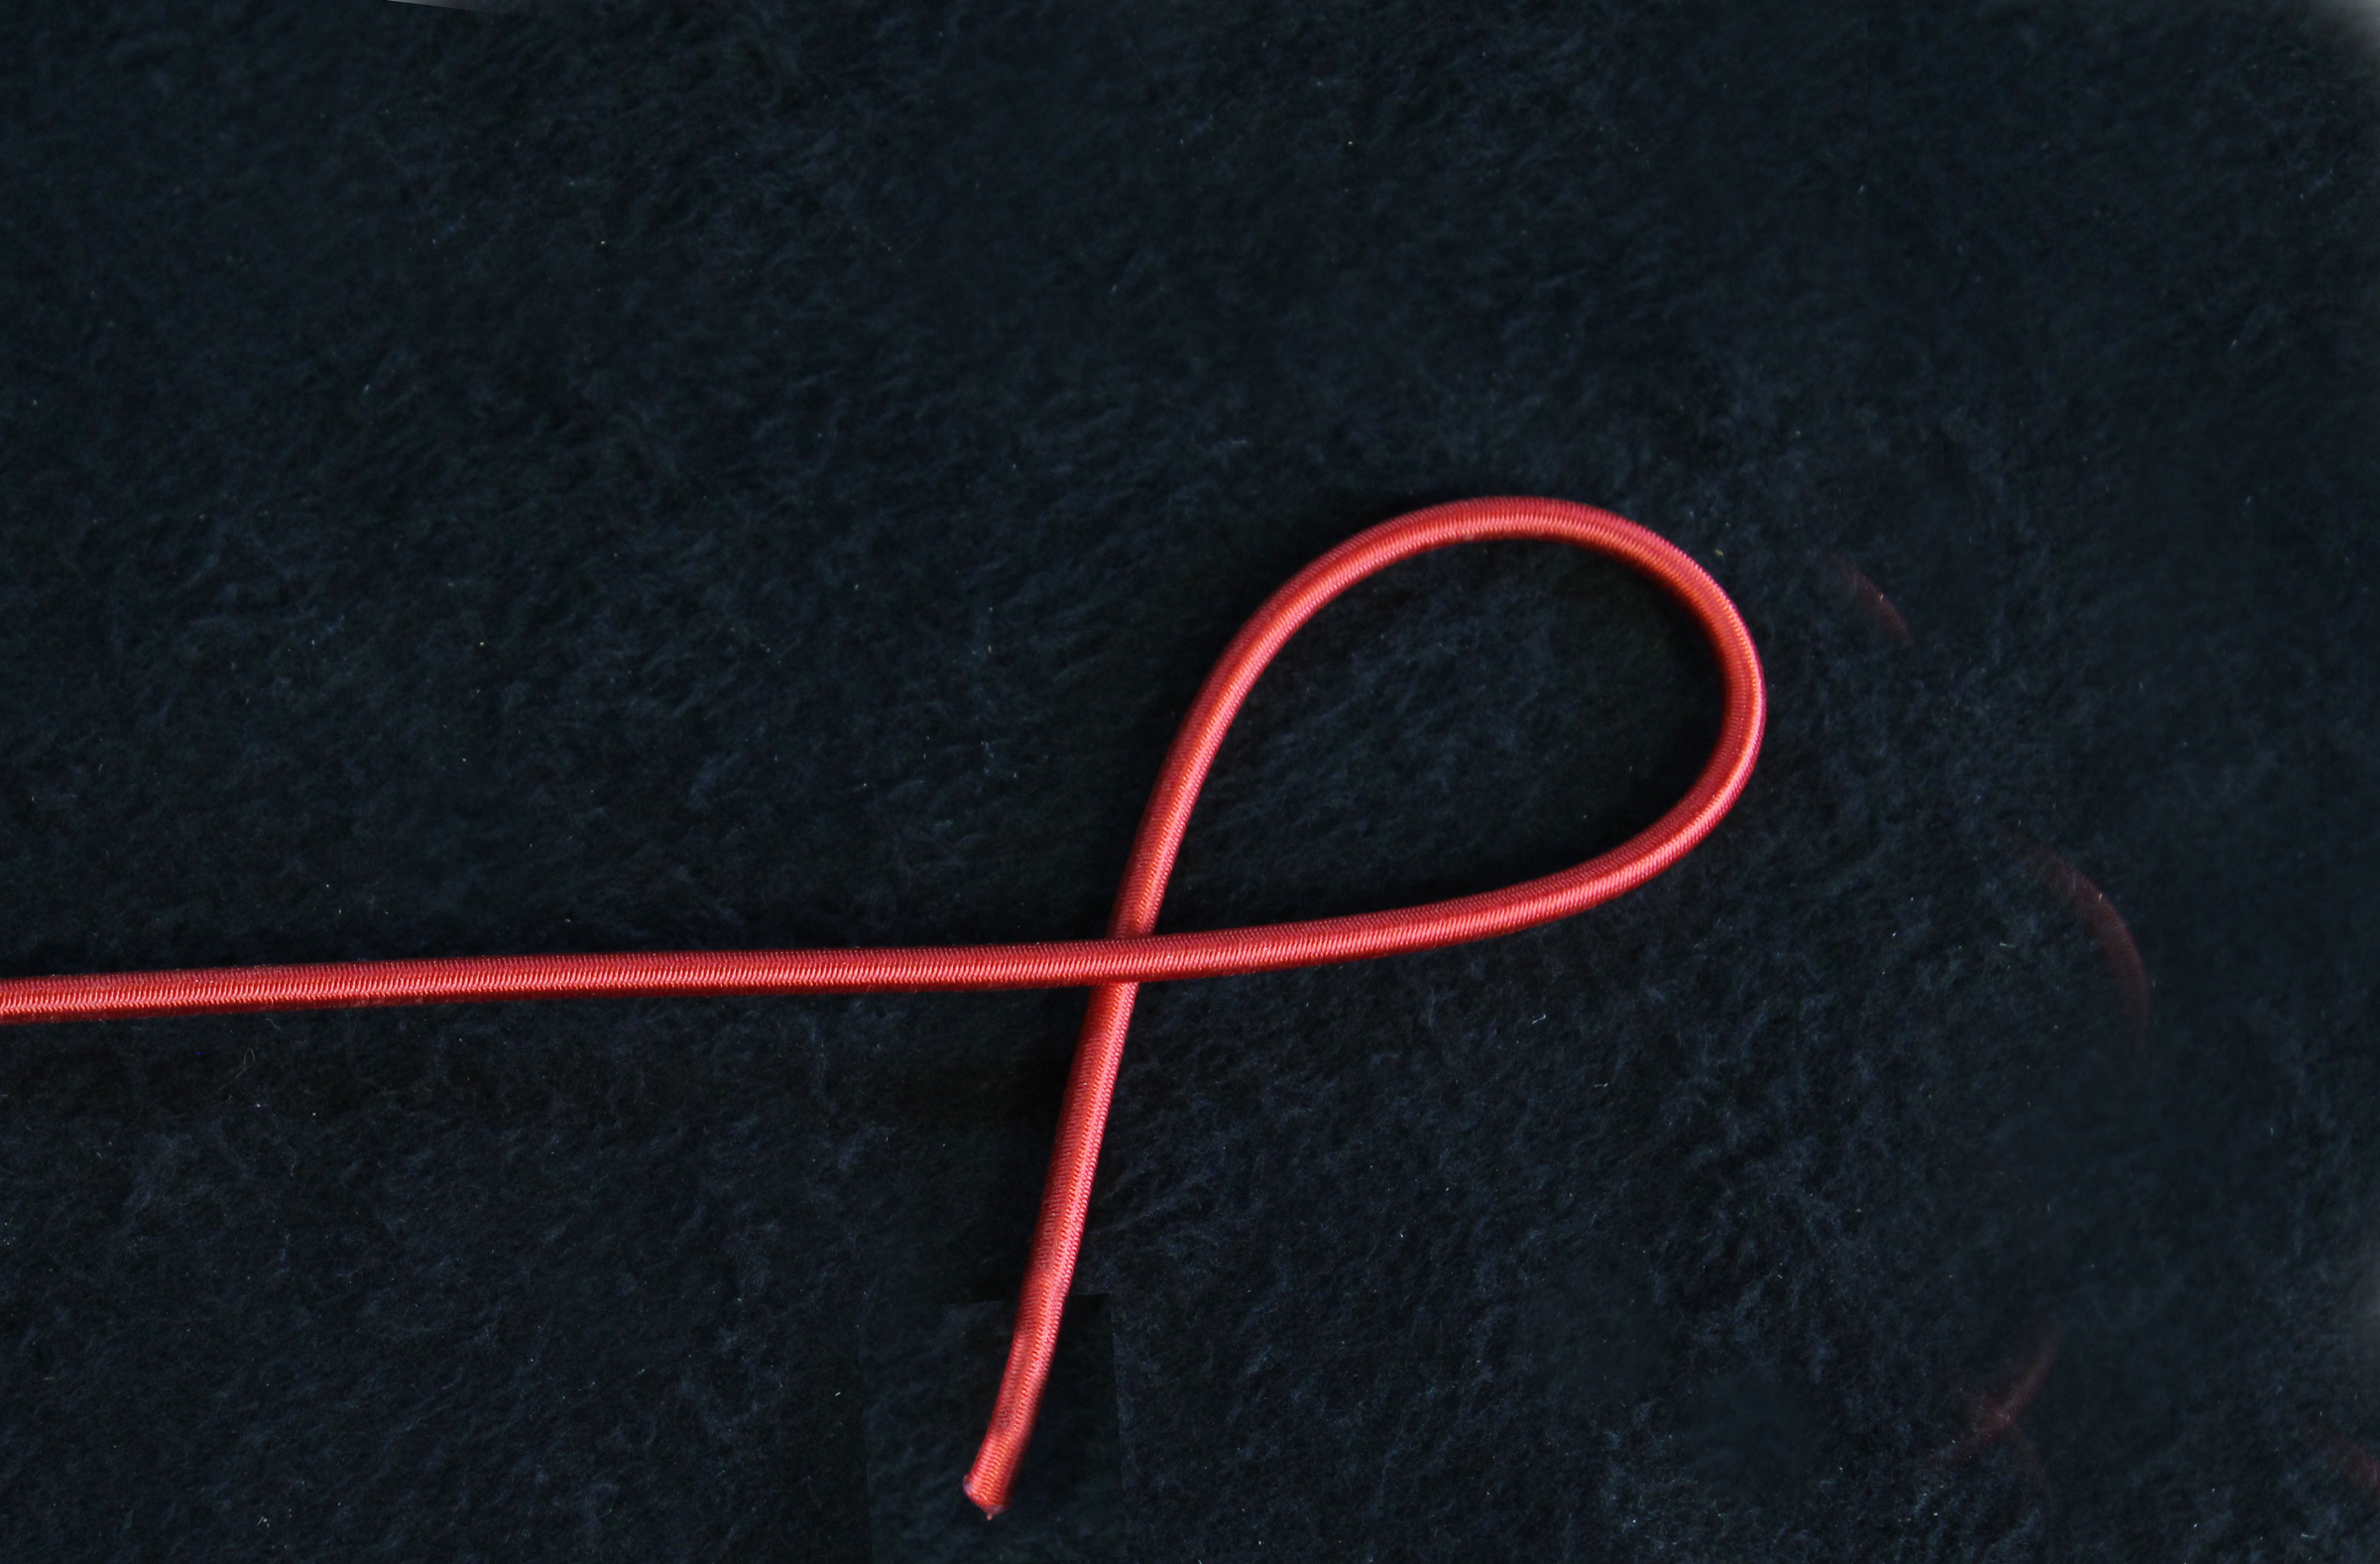
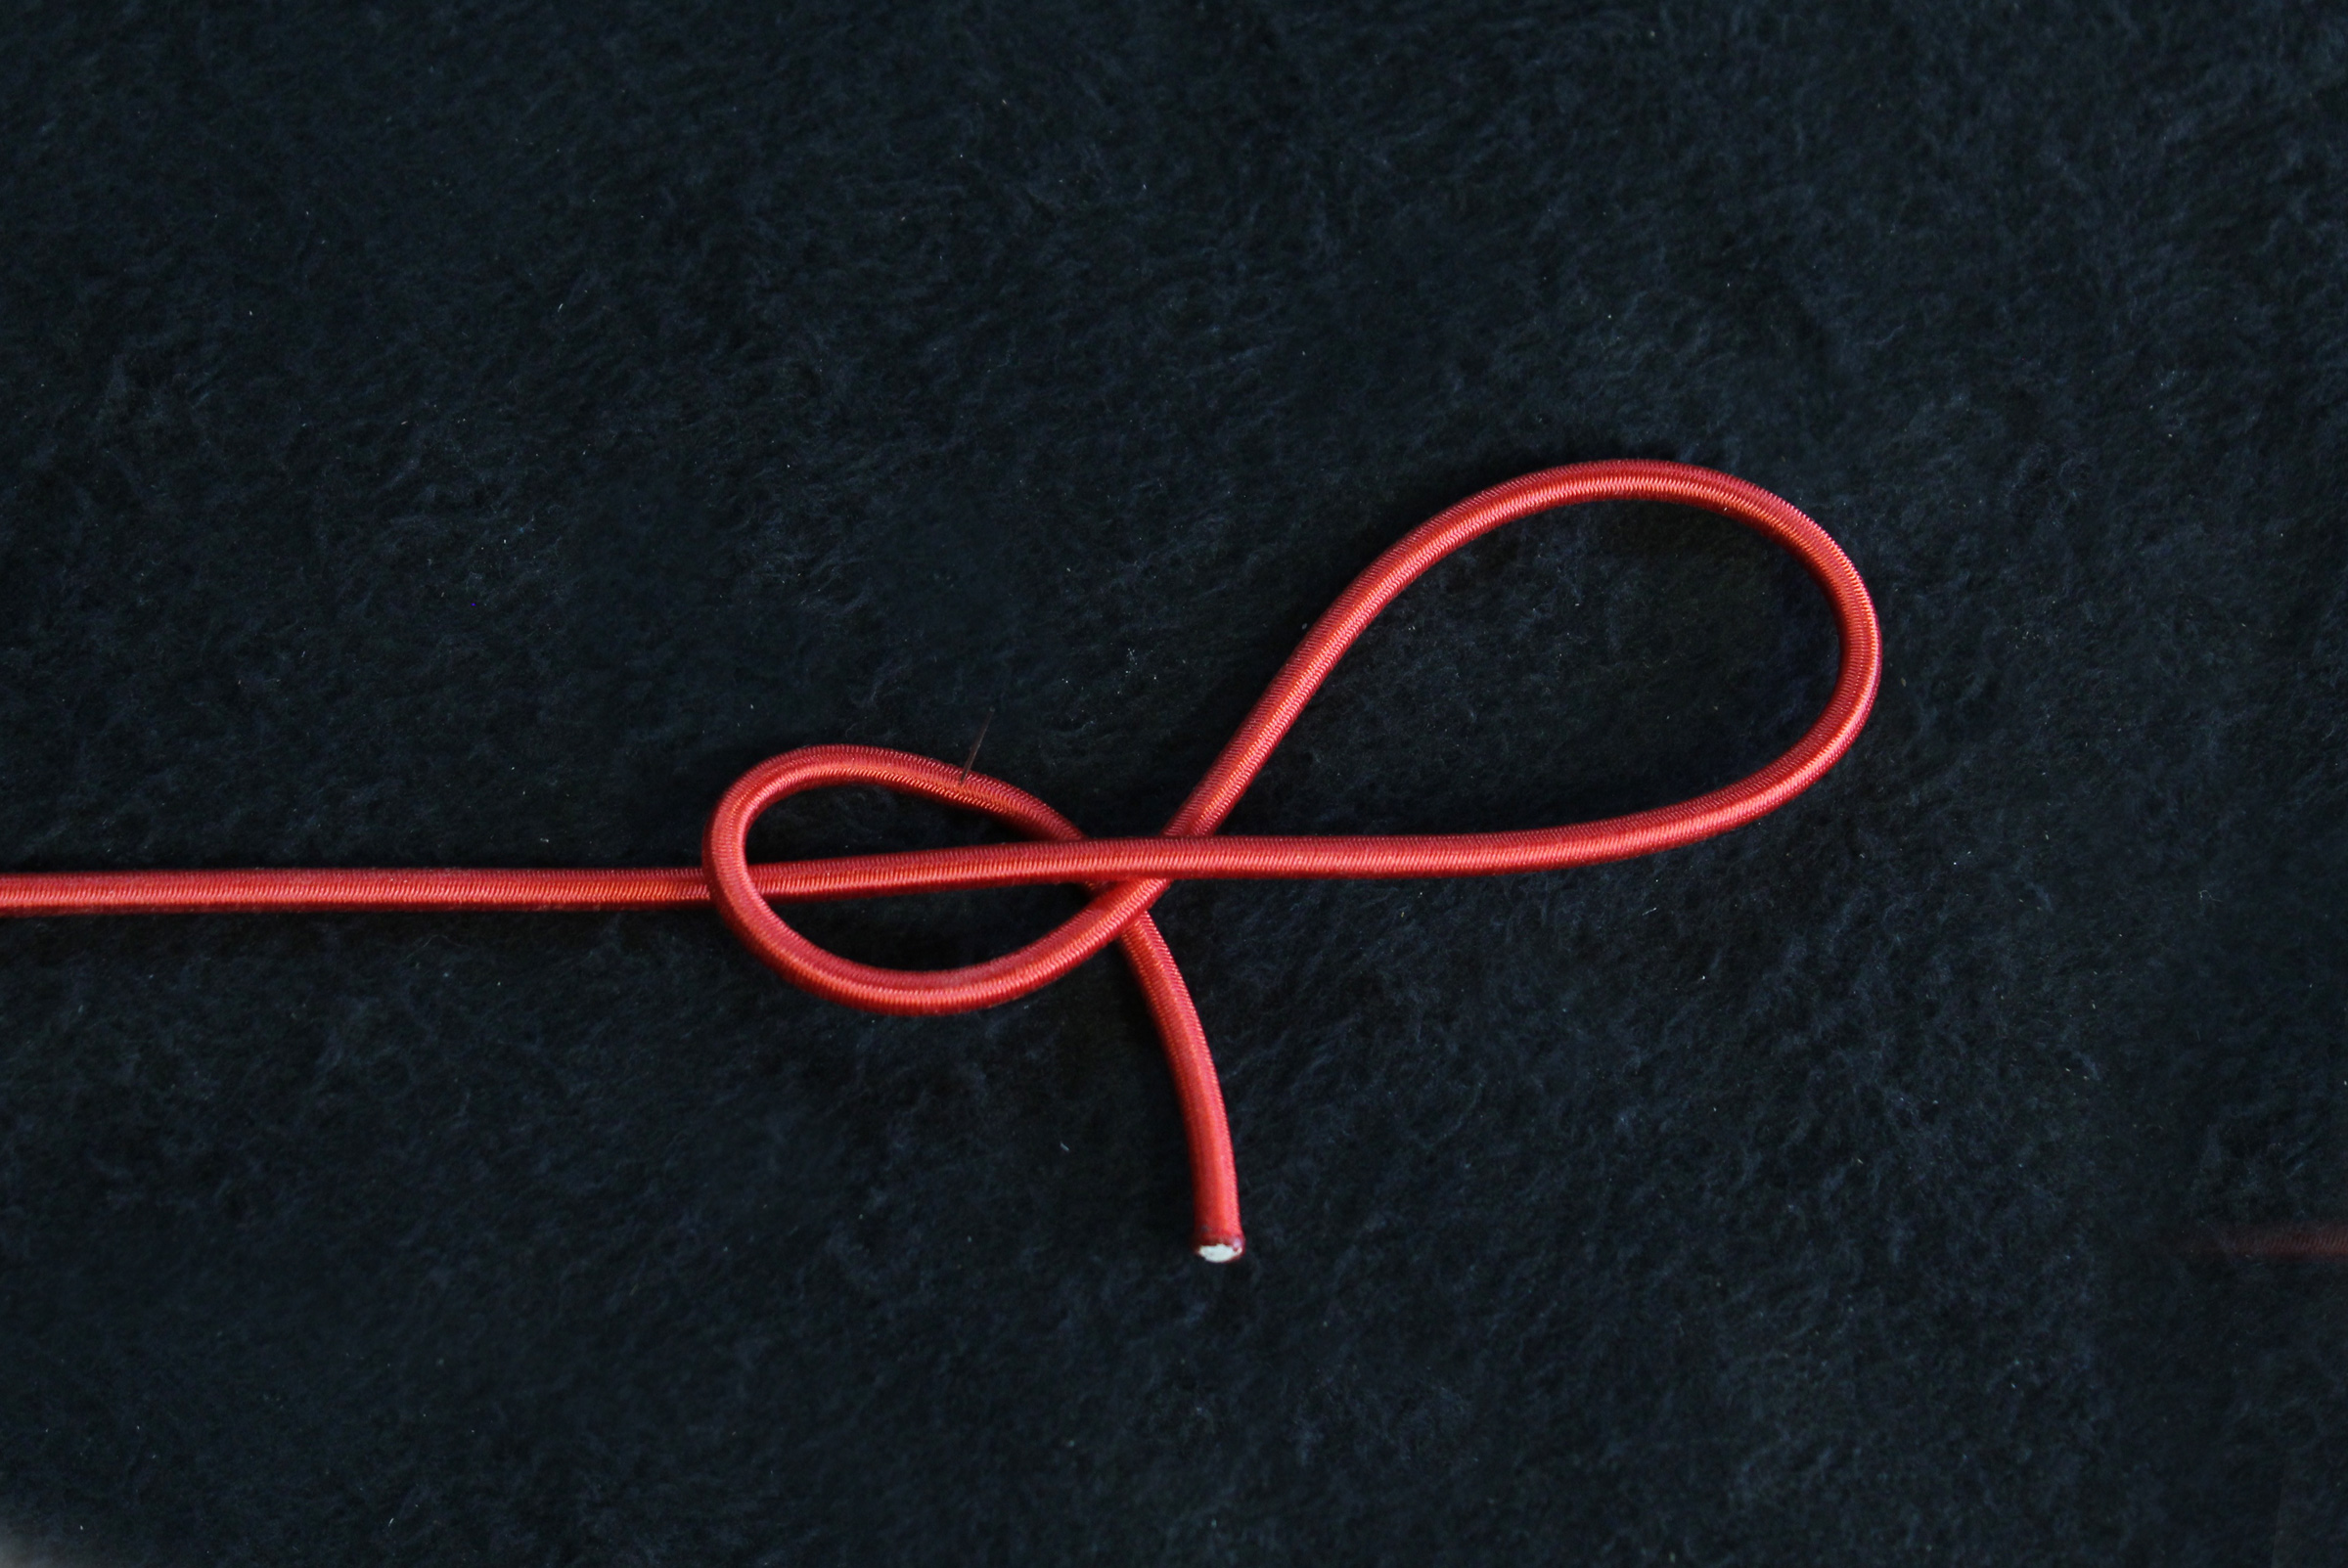
The Angler’s Loop starts with an underhand loop. The working end is under the standing part.
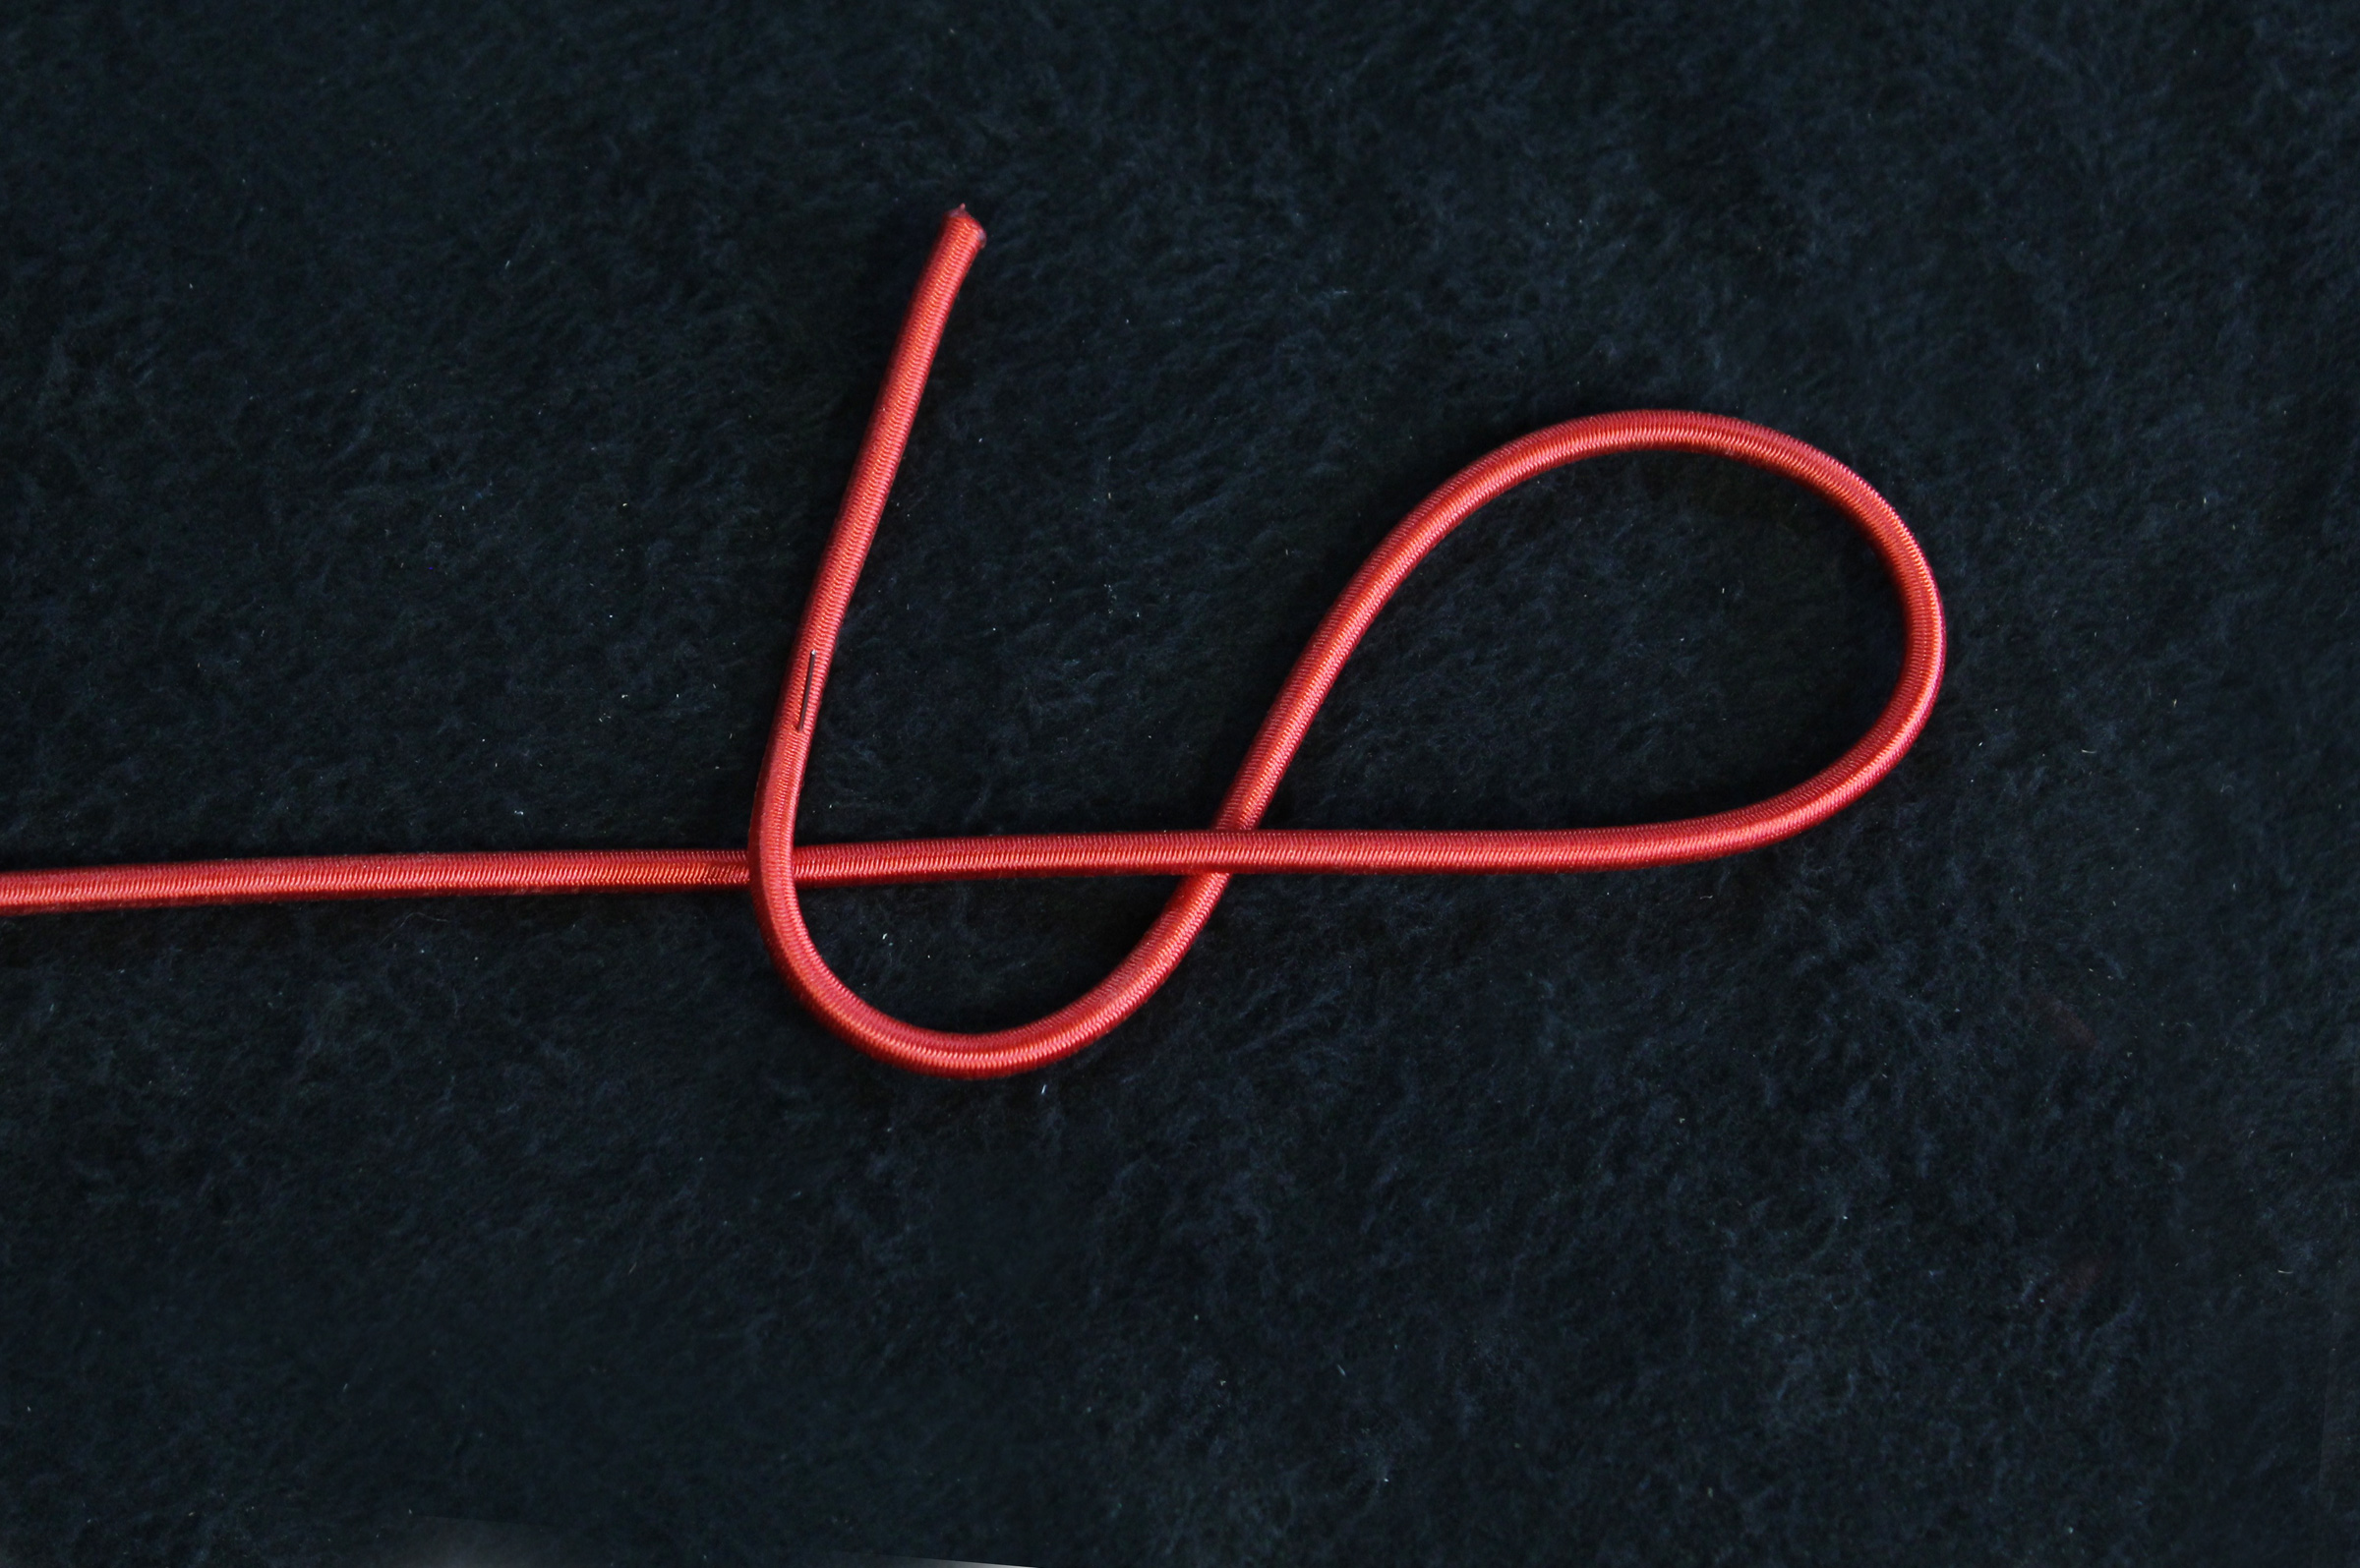
The working end then crosses over the standing part…
…and makes an underhand loop under the standing part.
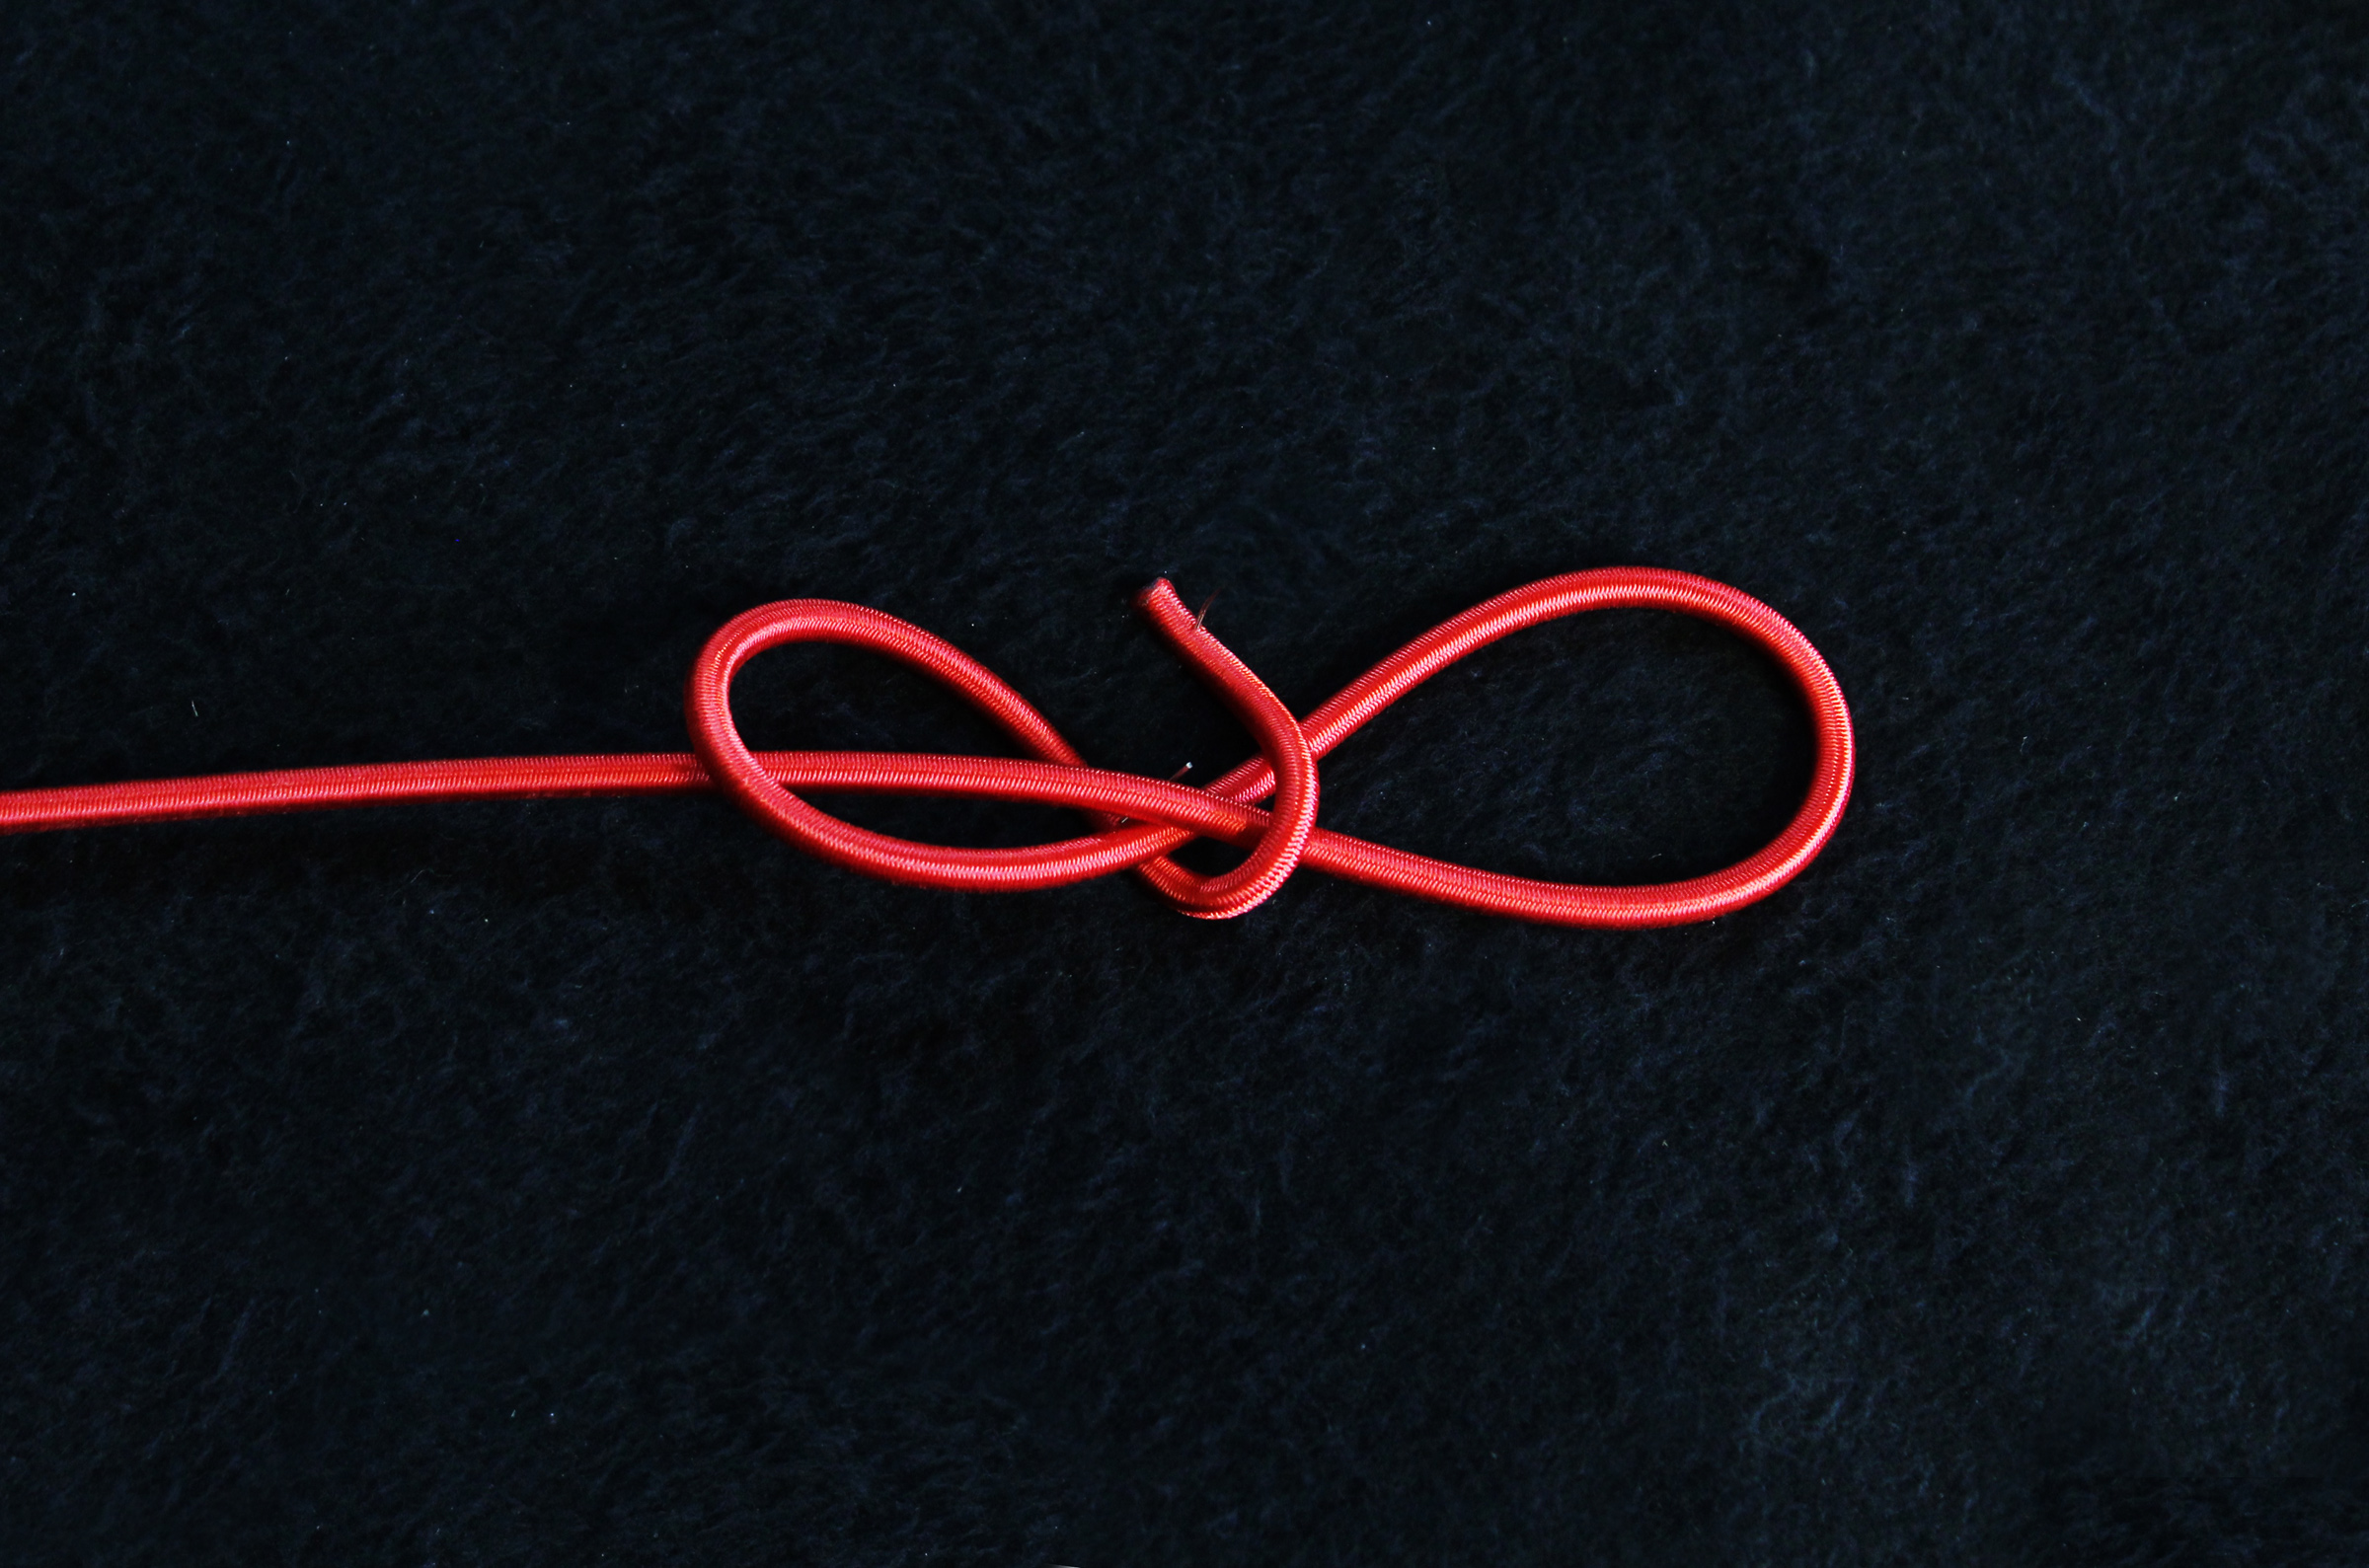
The working part crosses over the intersection and is held there.
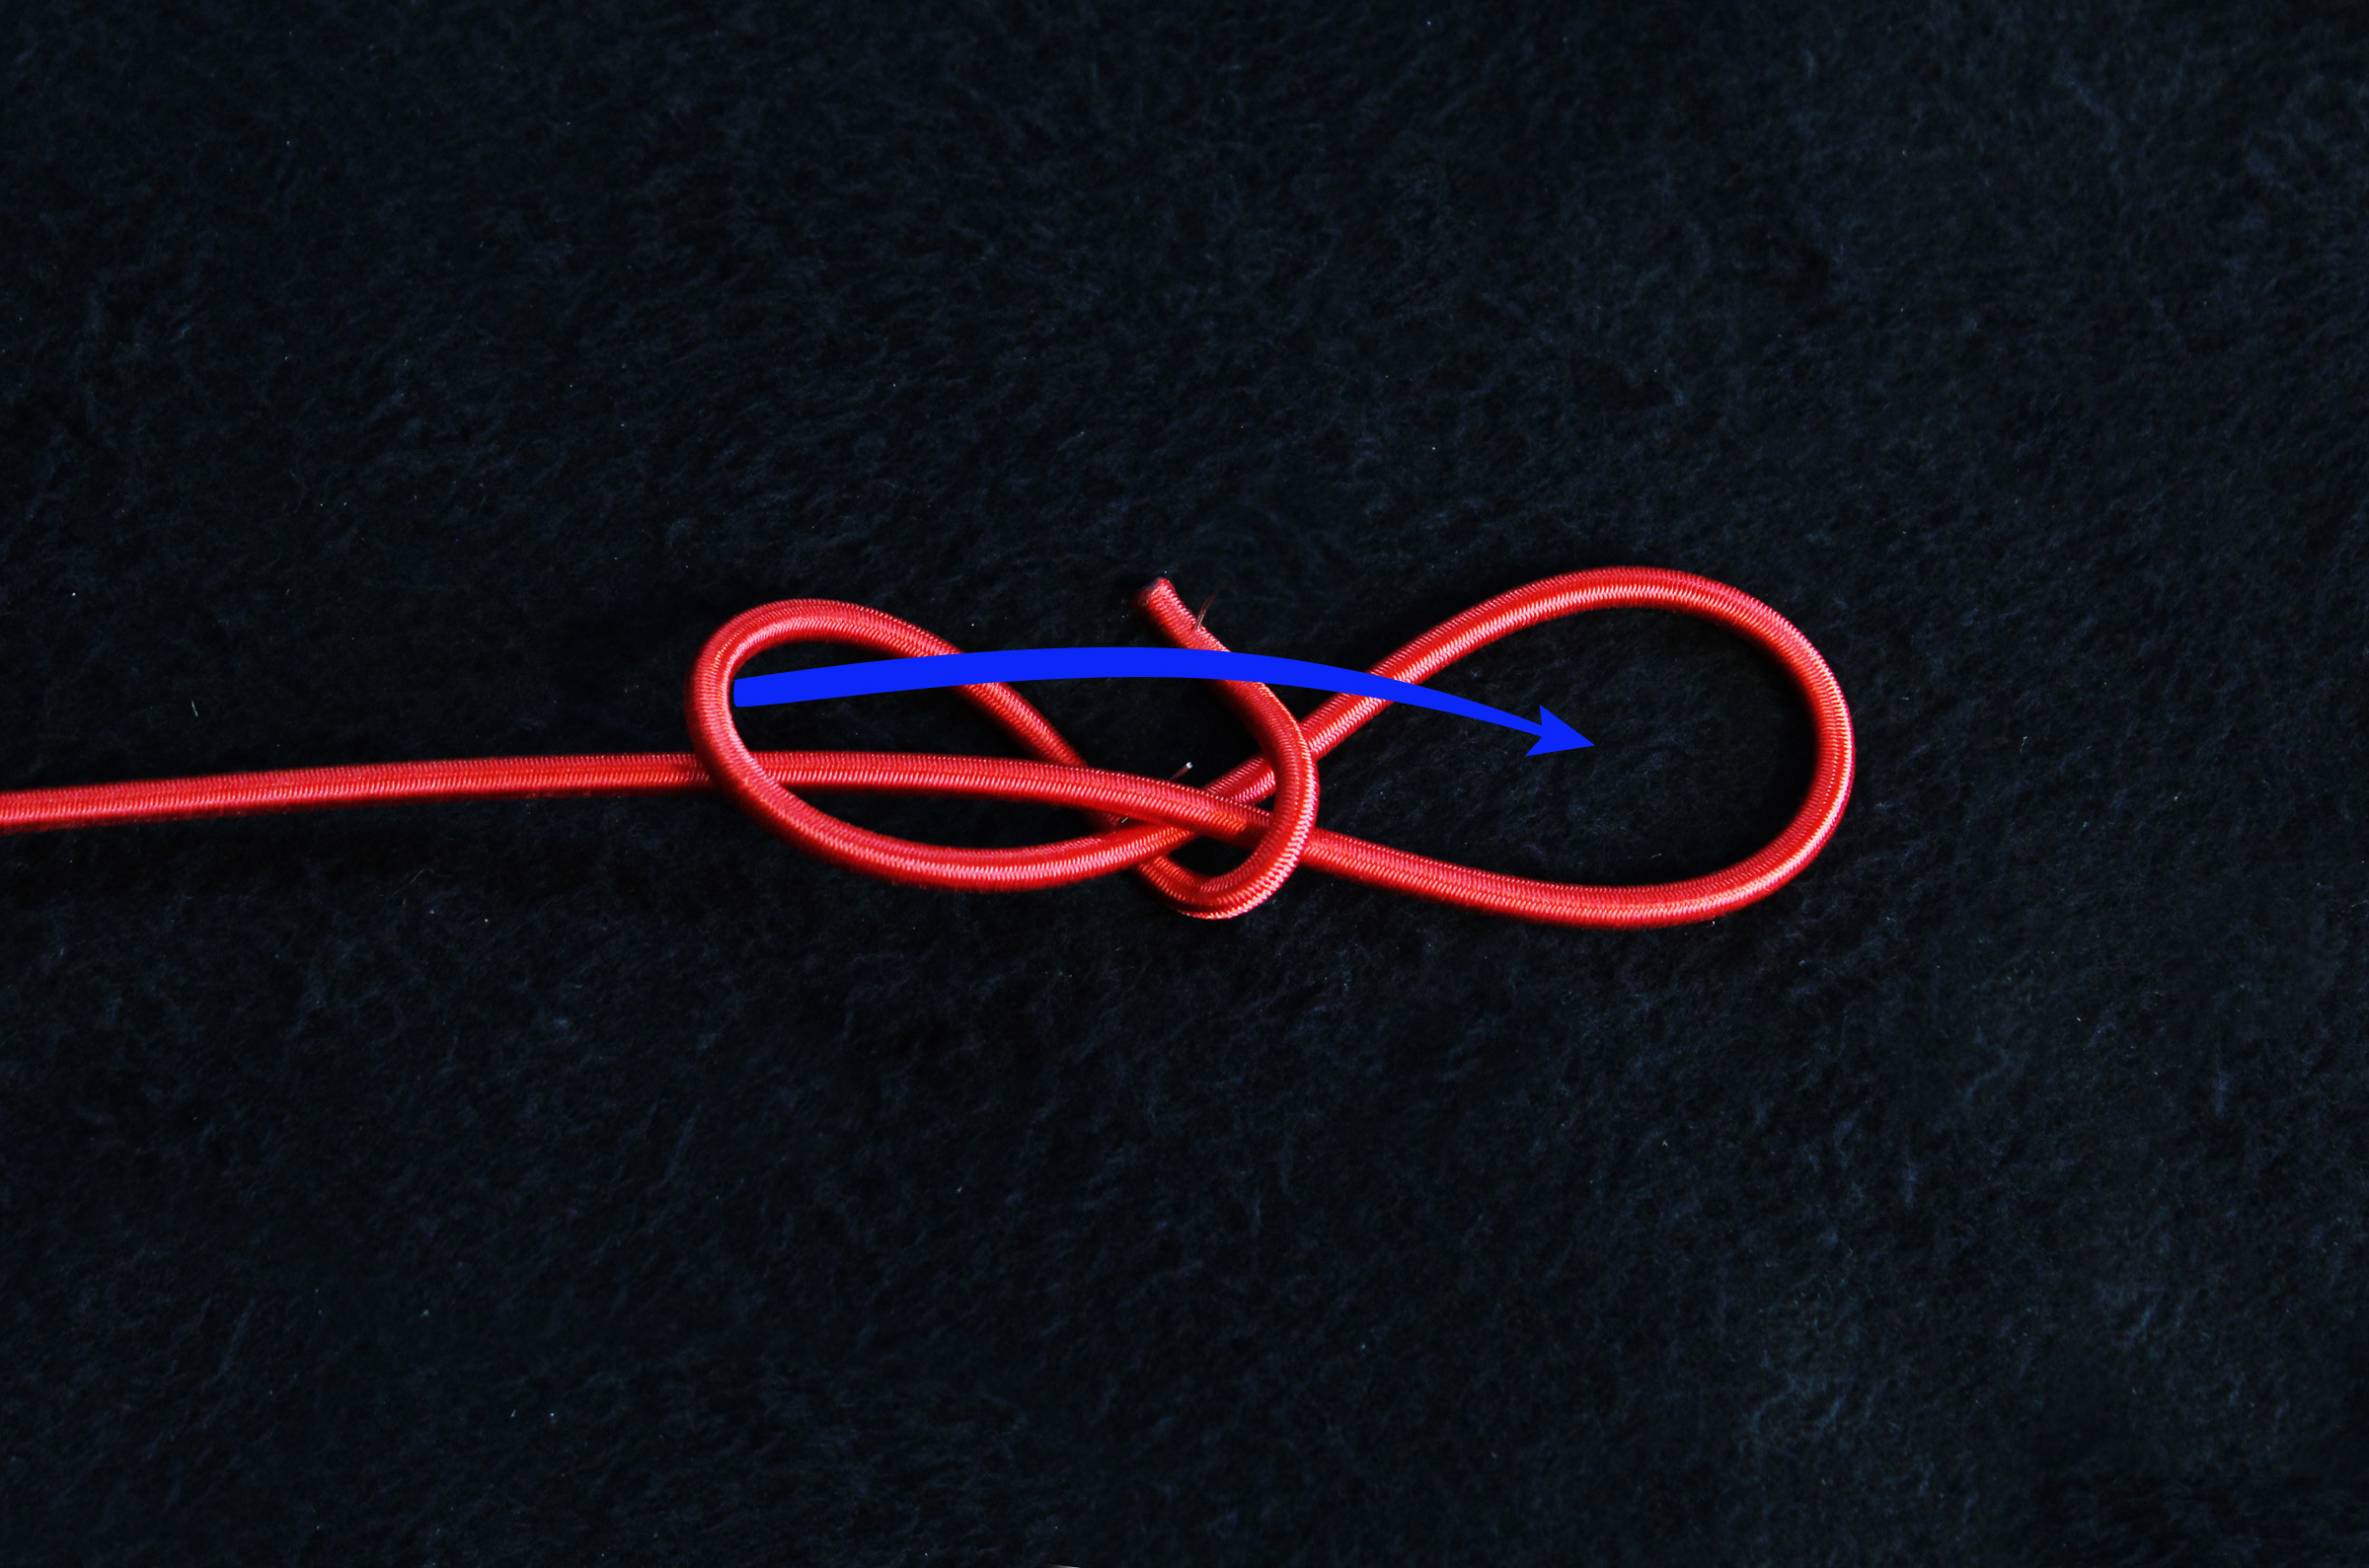
The loop at the left is pulled over the top of the working end…
…and passed through the first loop.
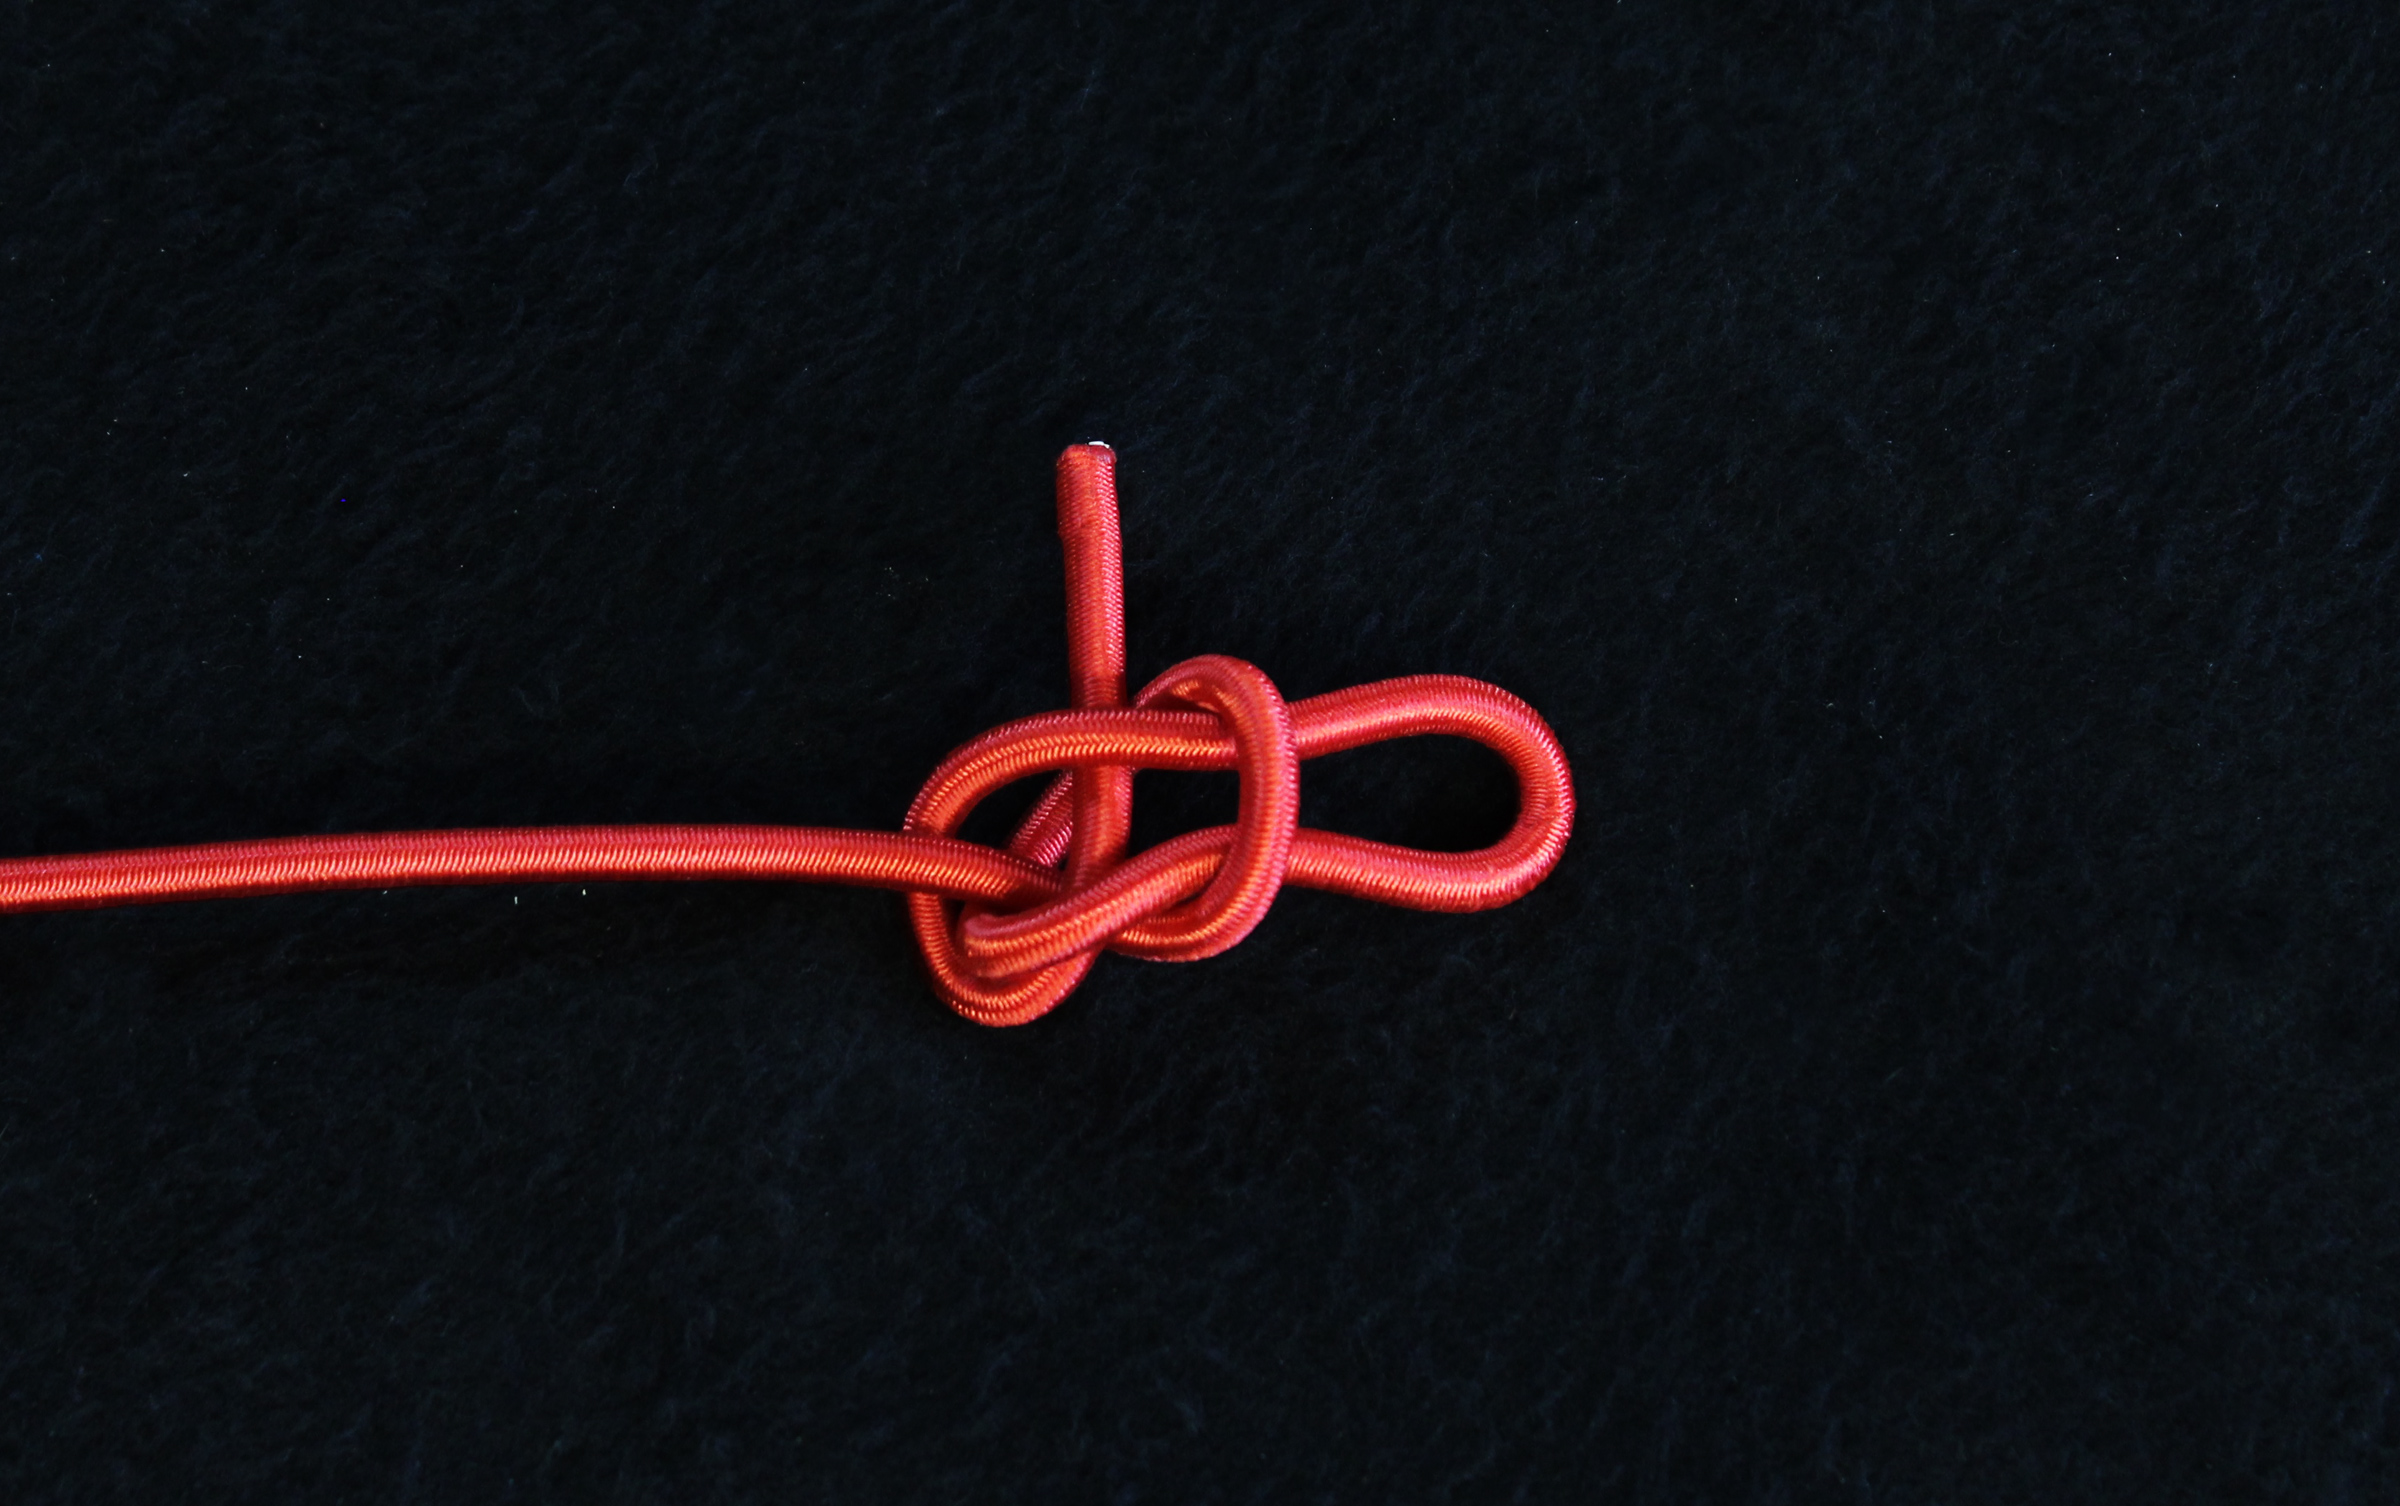
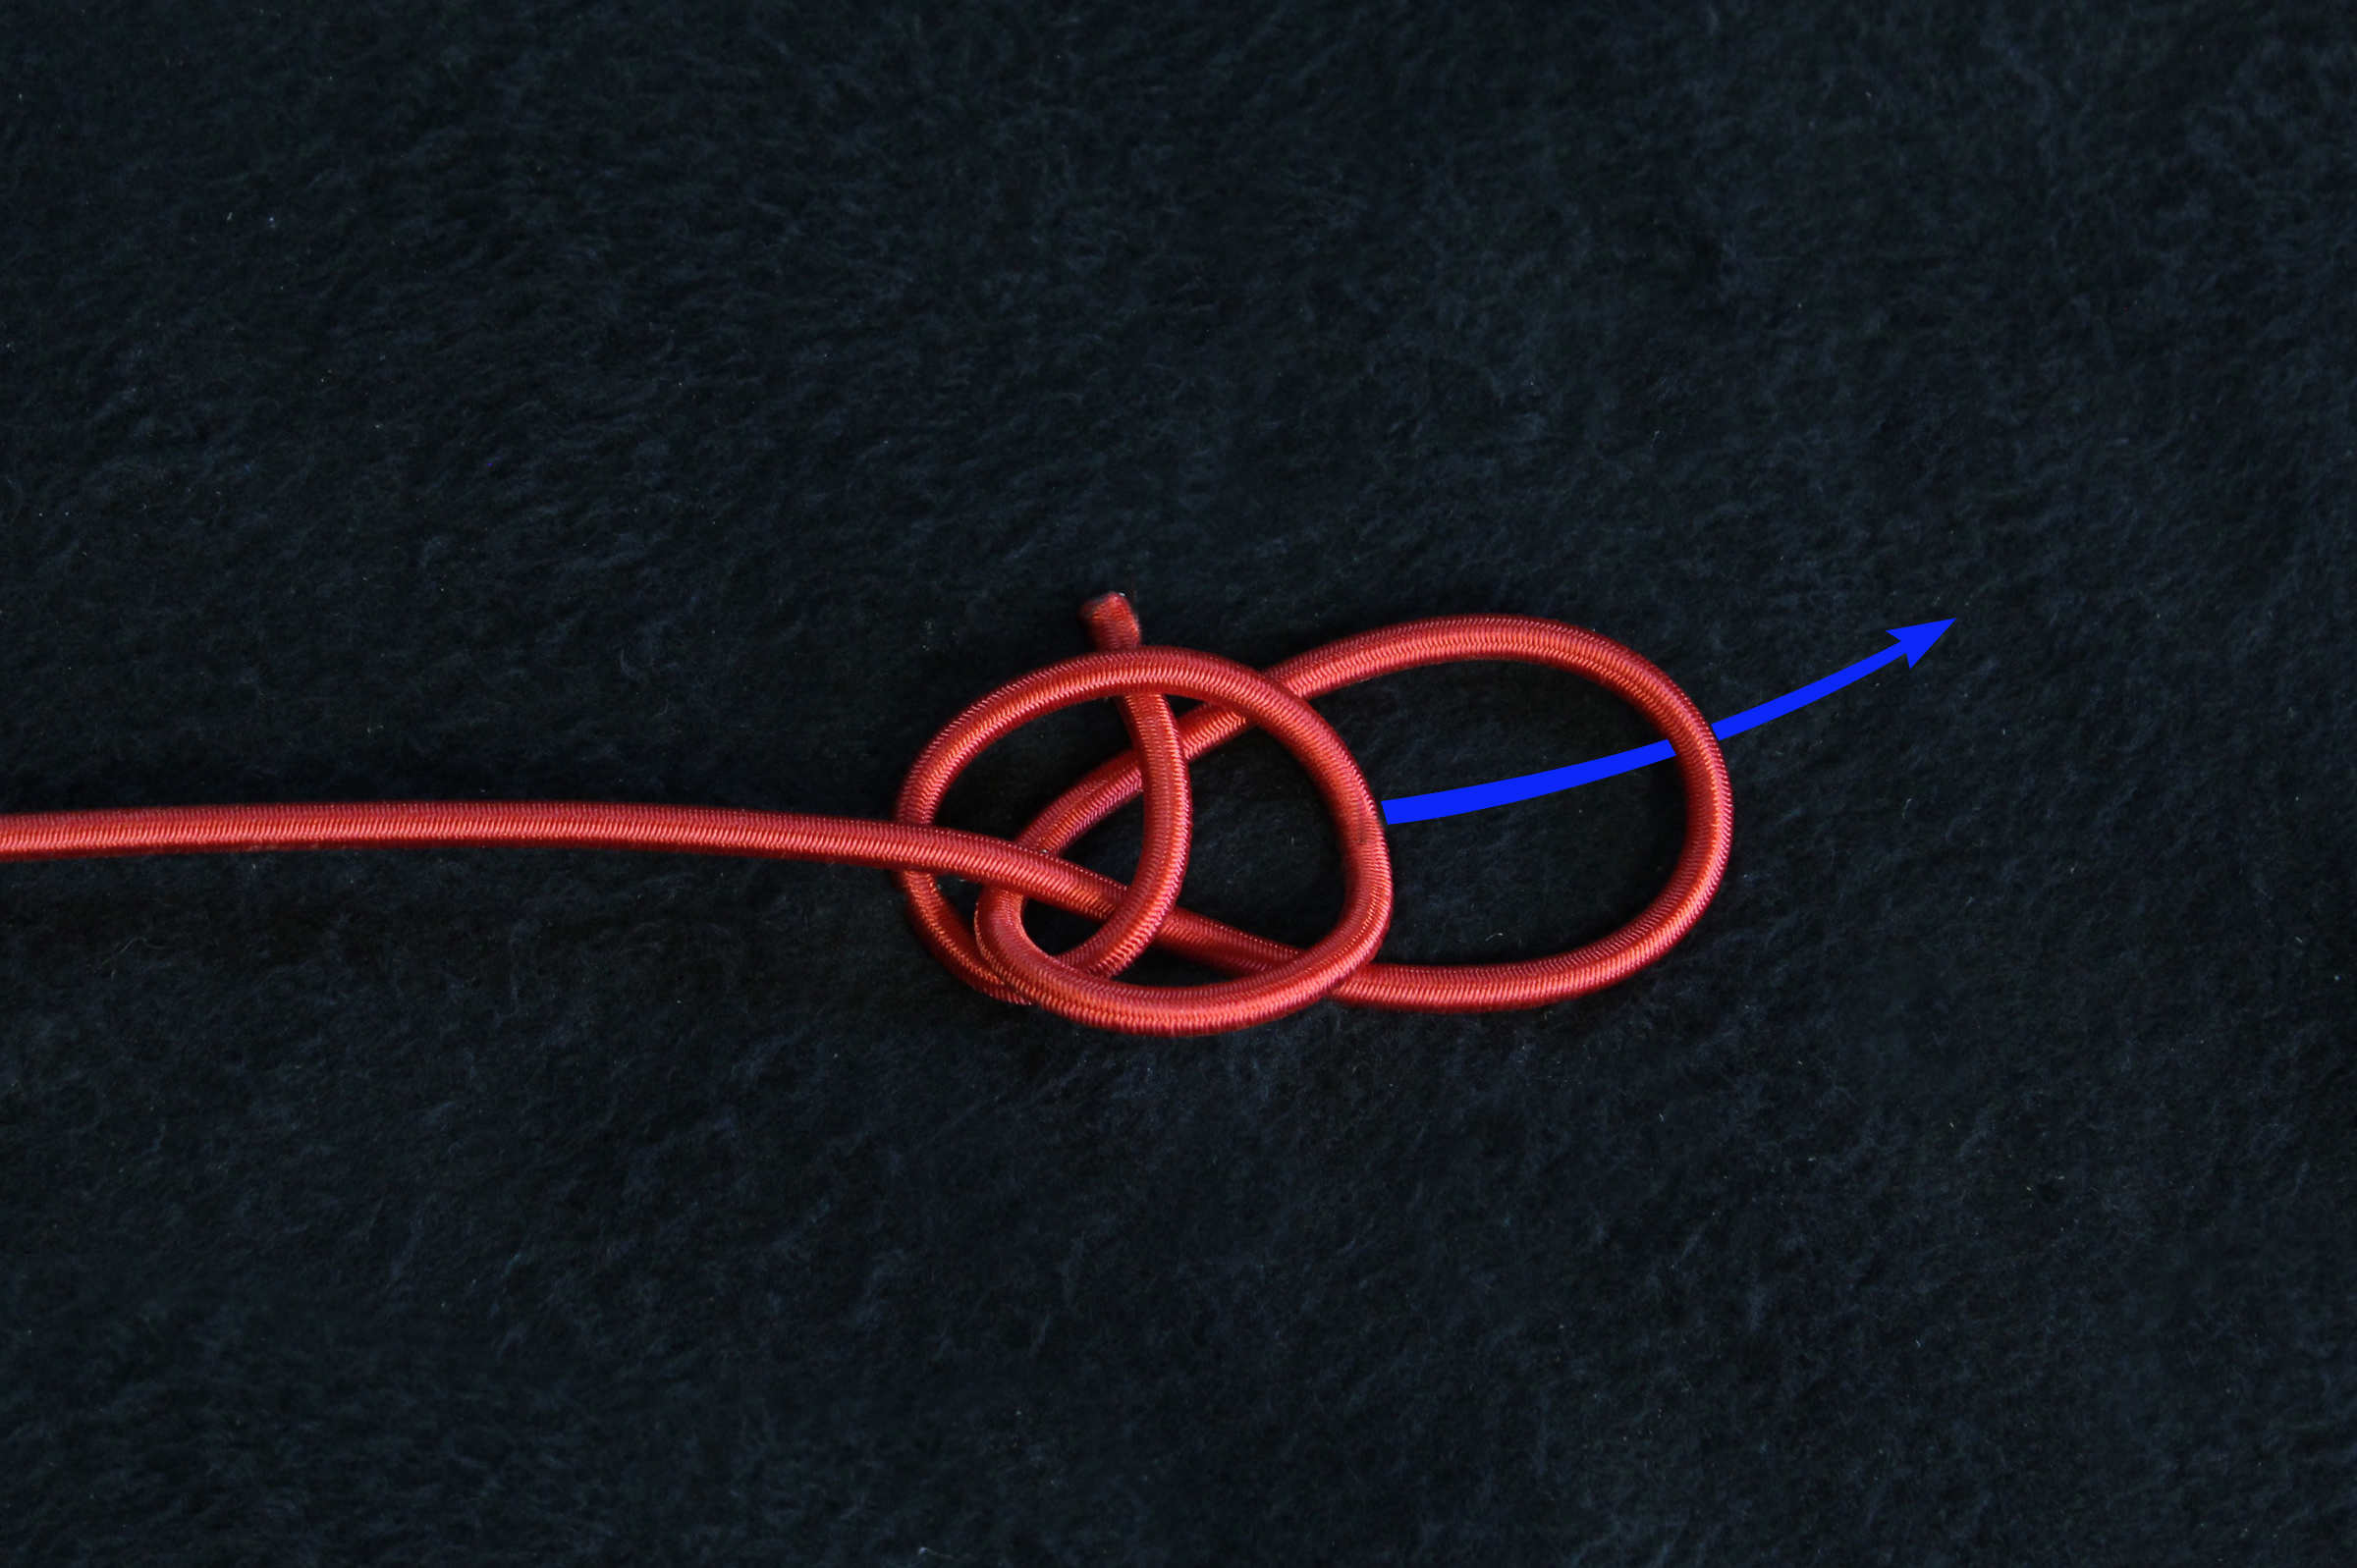
As the second loop is pulled through, pulling the standing part will draw the first loop tight and into the knot.
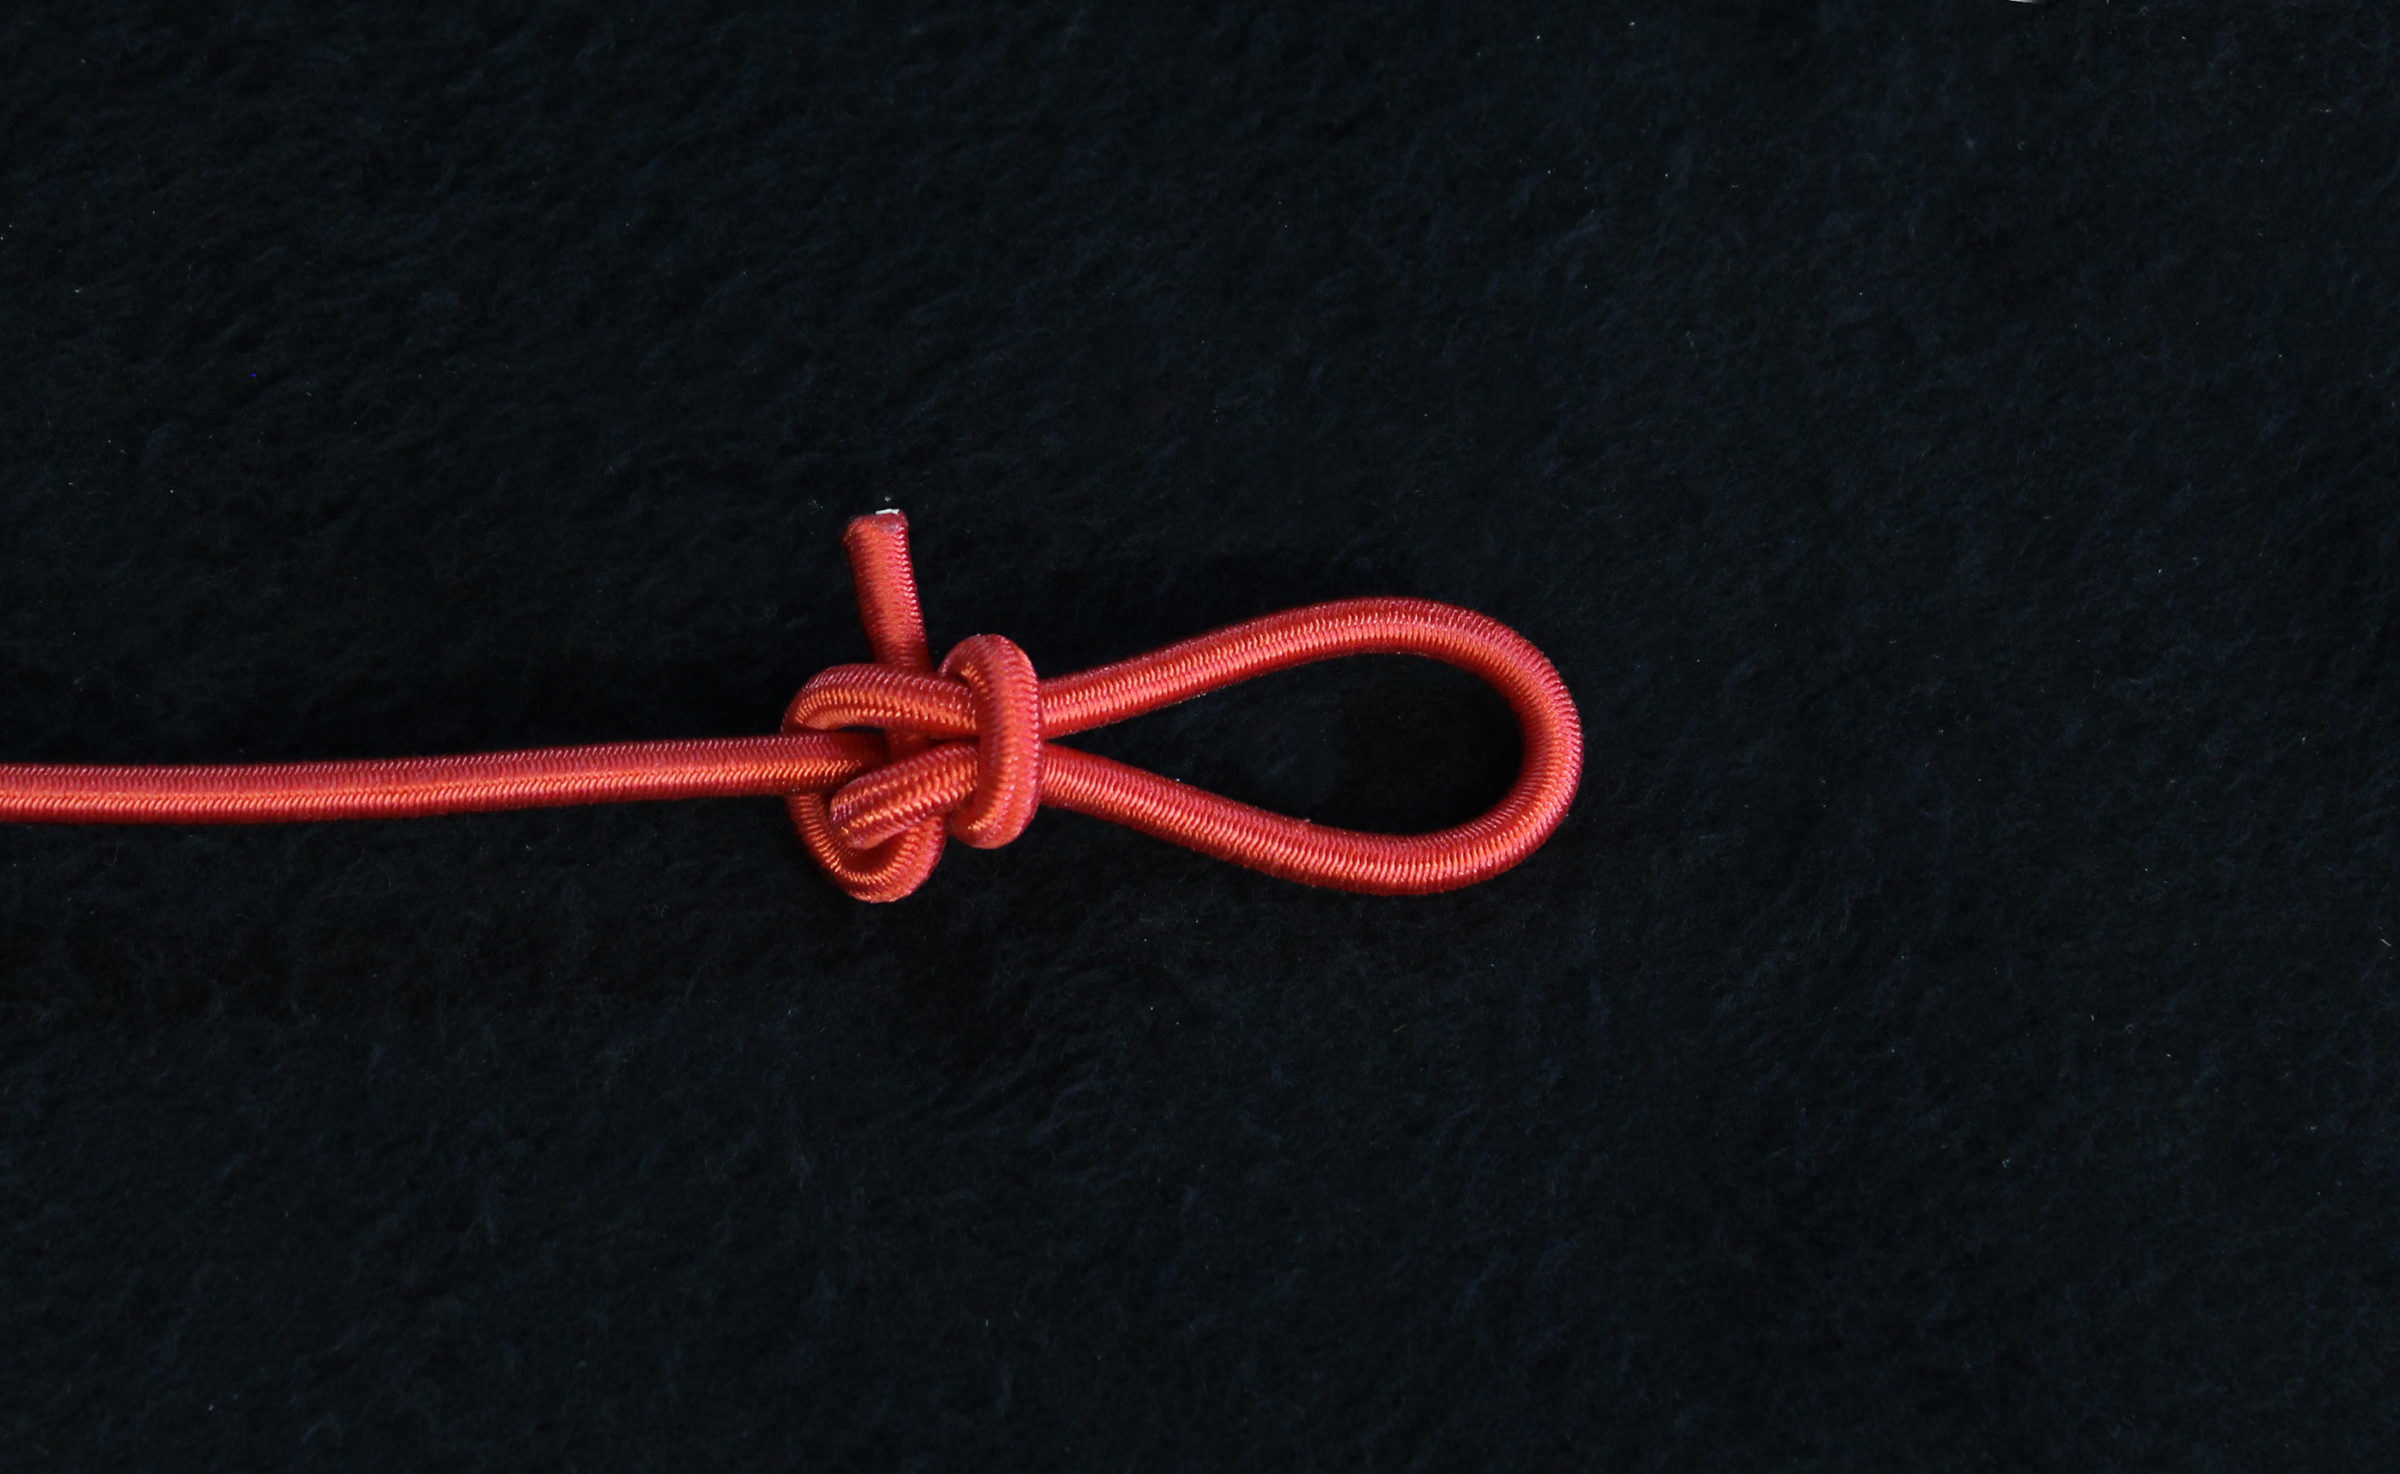
Cinched up, the bungee cord will stay put and the knot will stay tight.
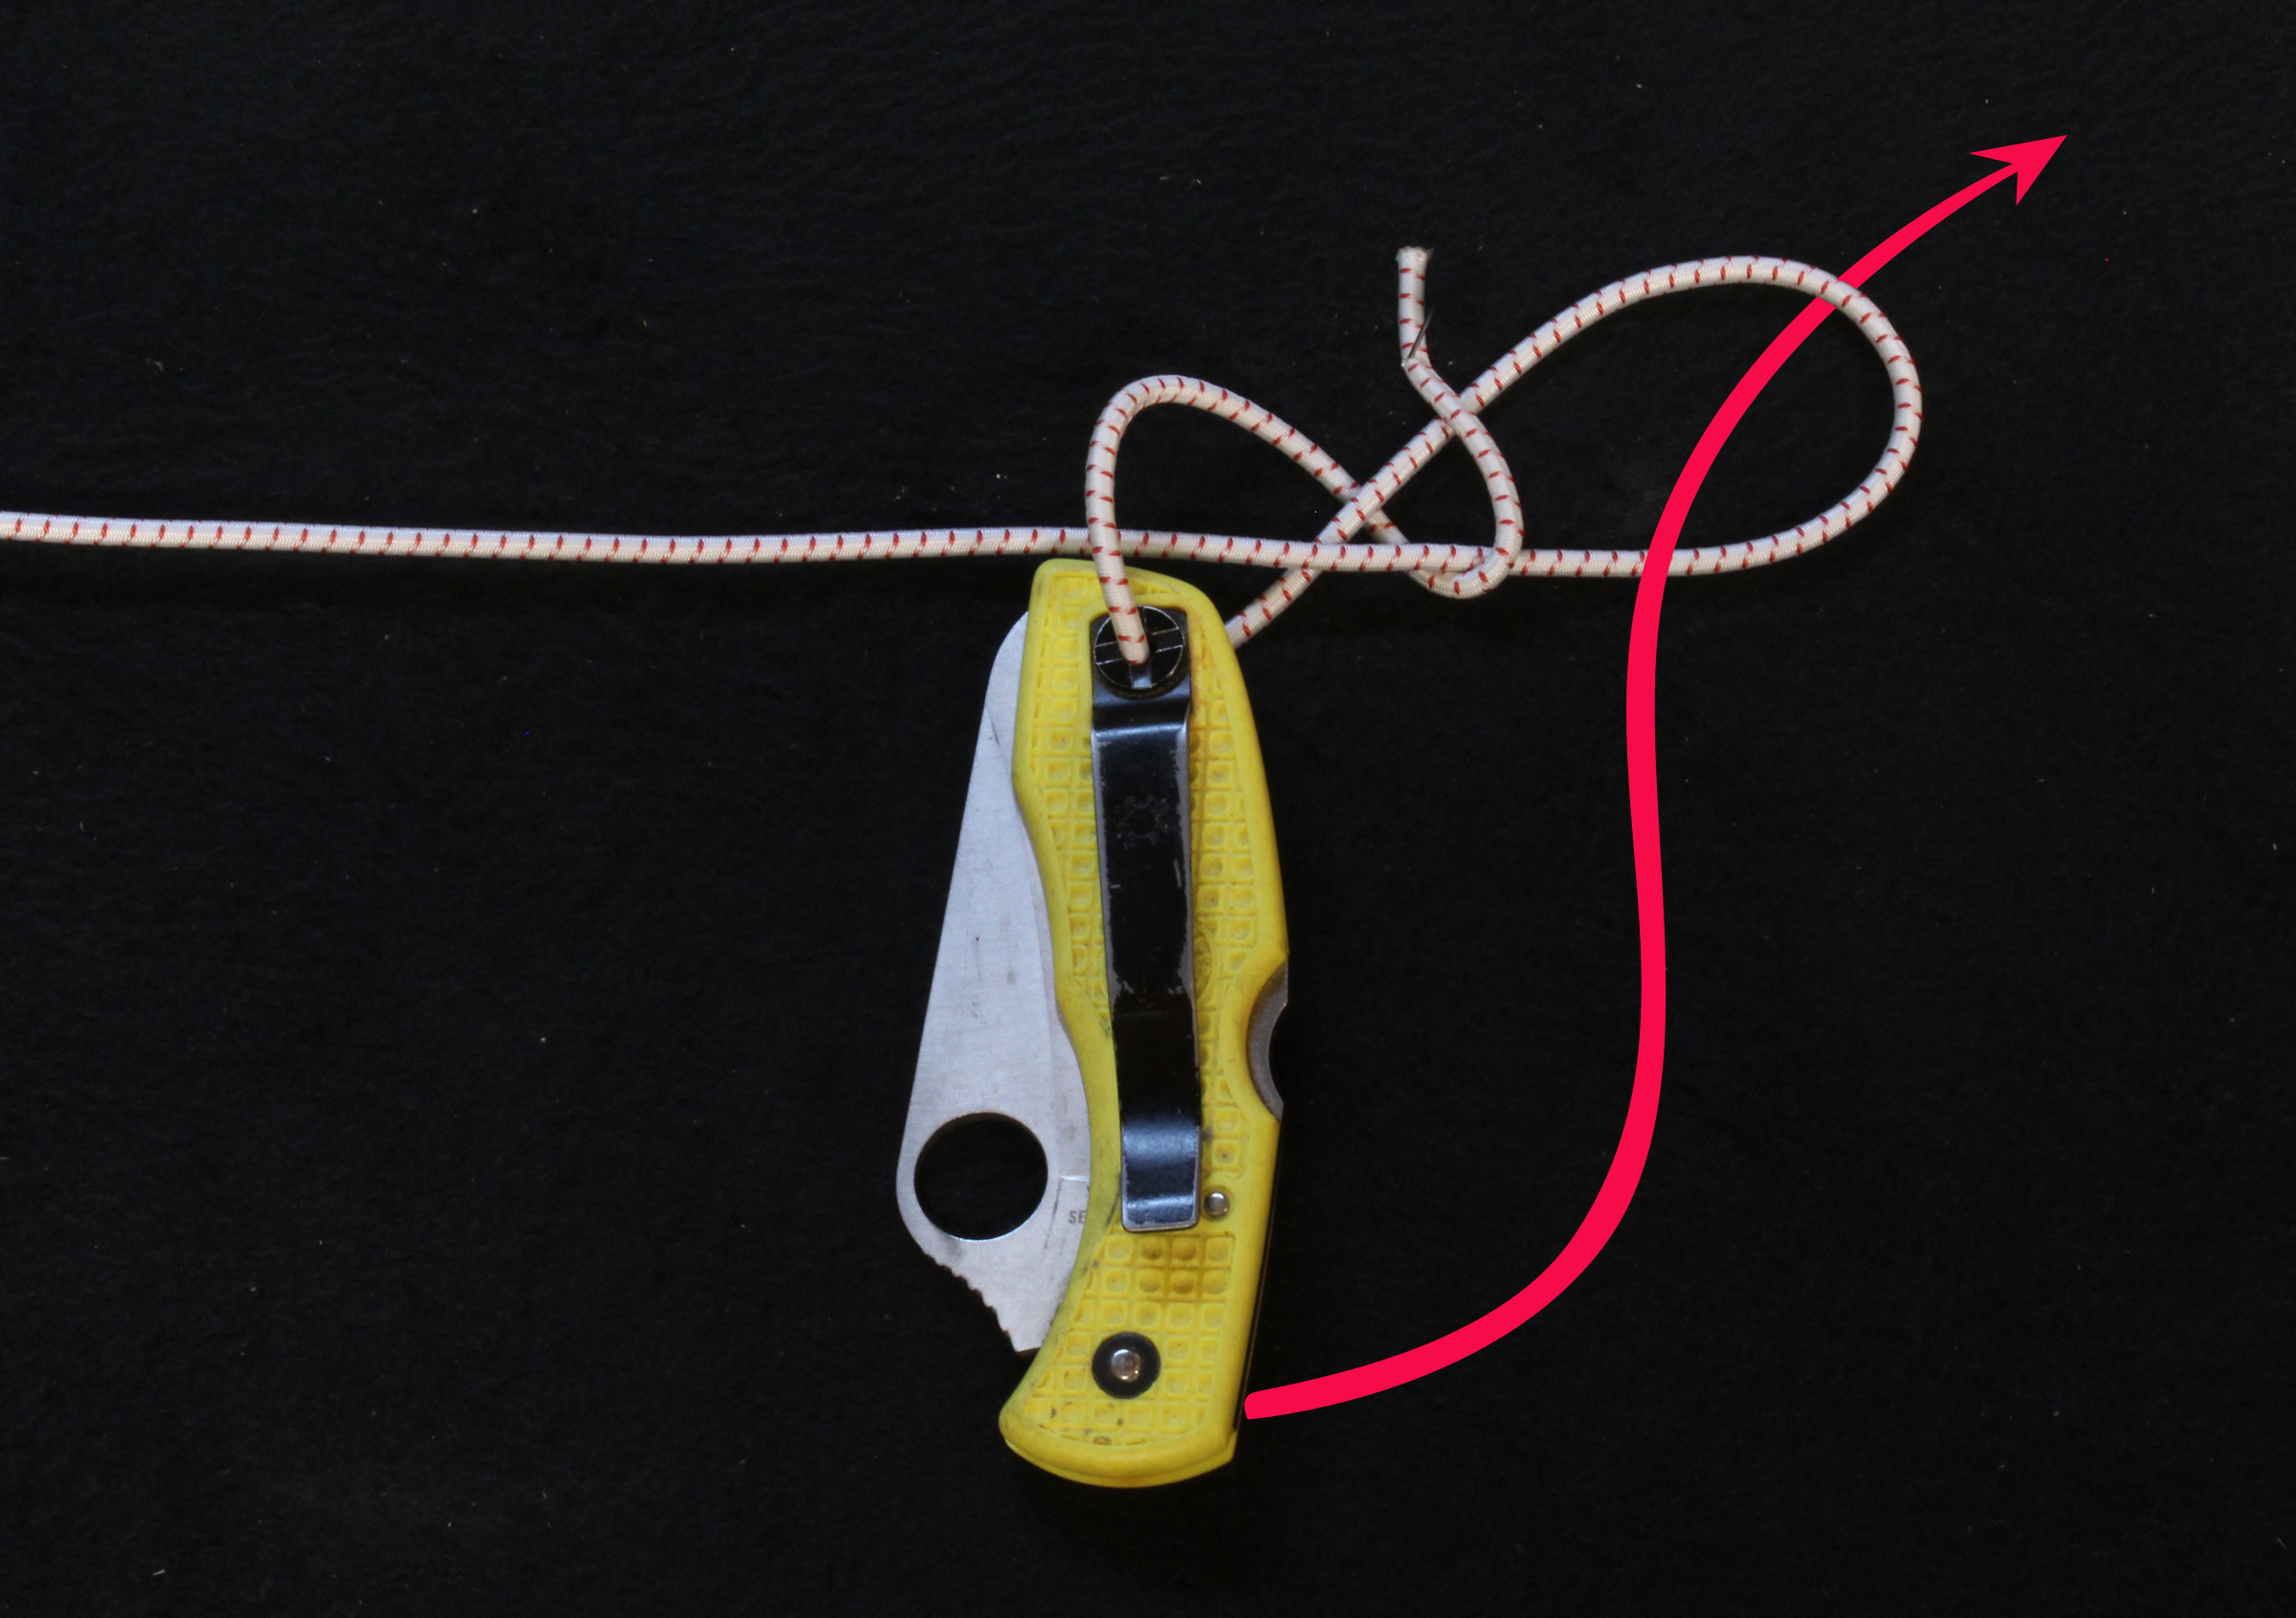
Tying the Angler’s Loop as a Tether
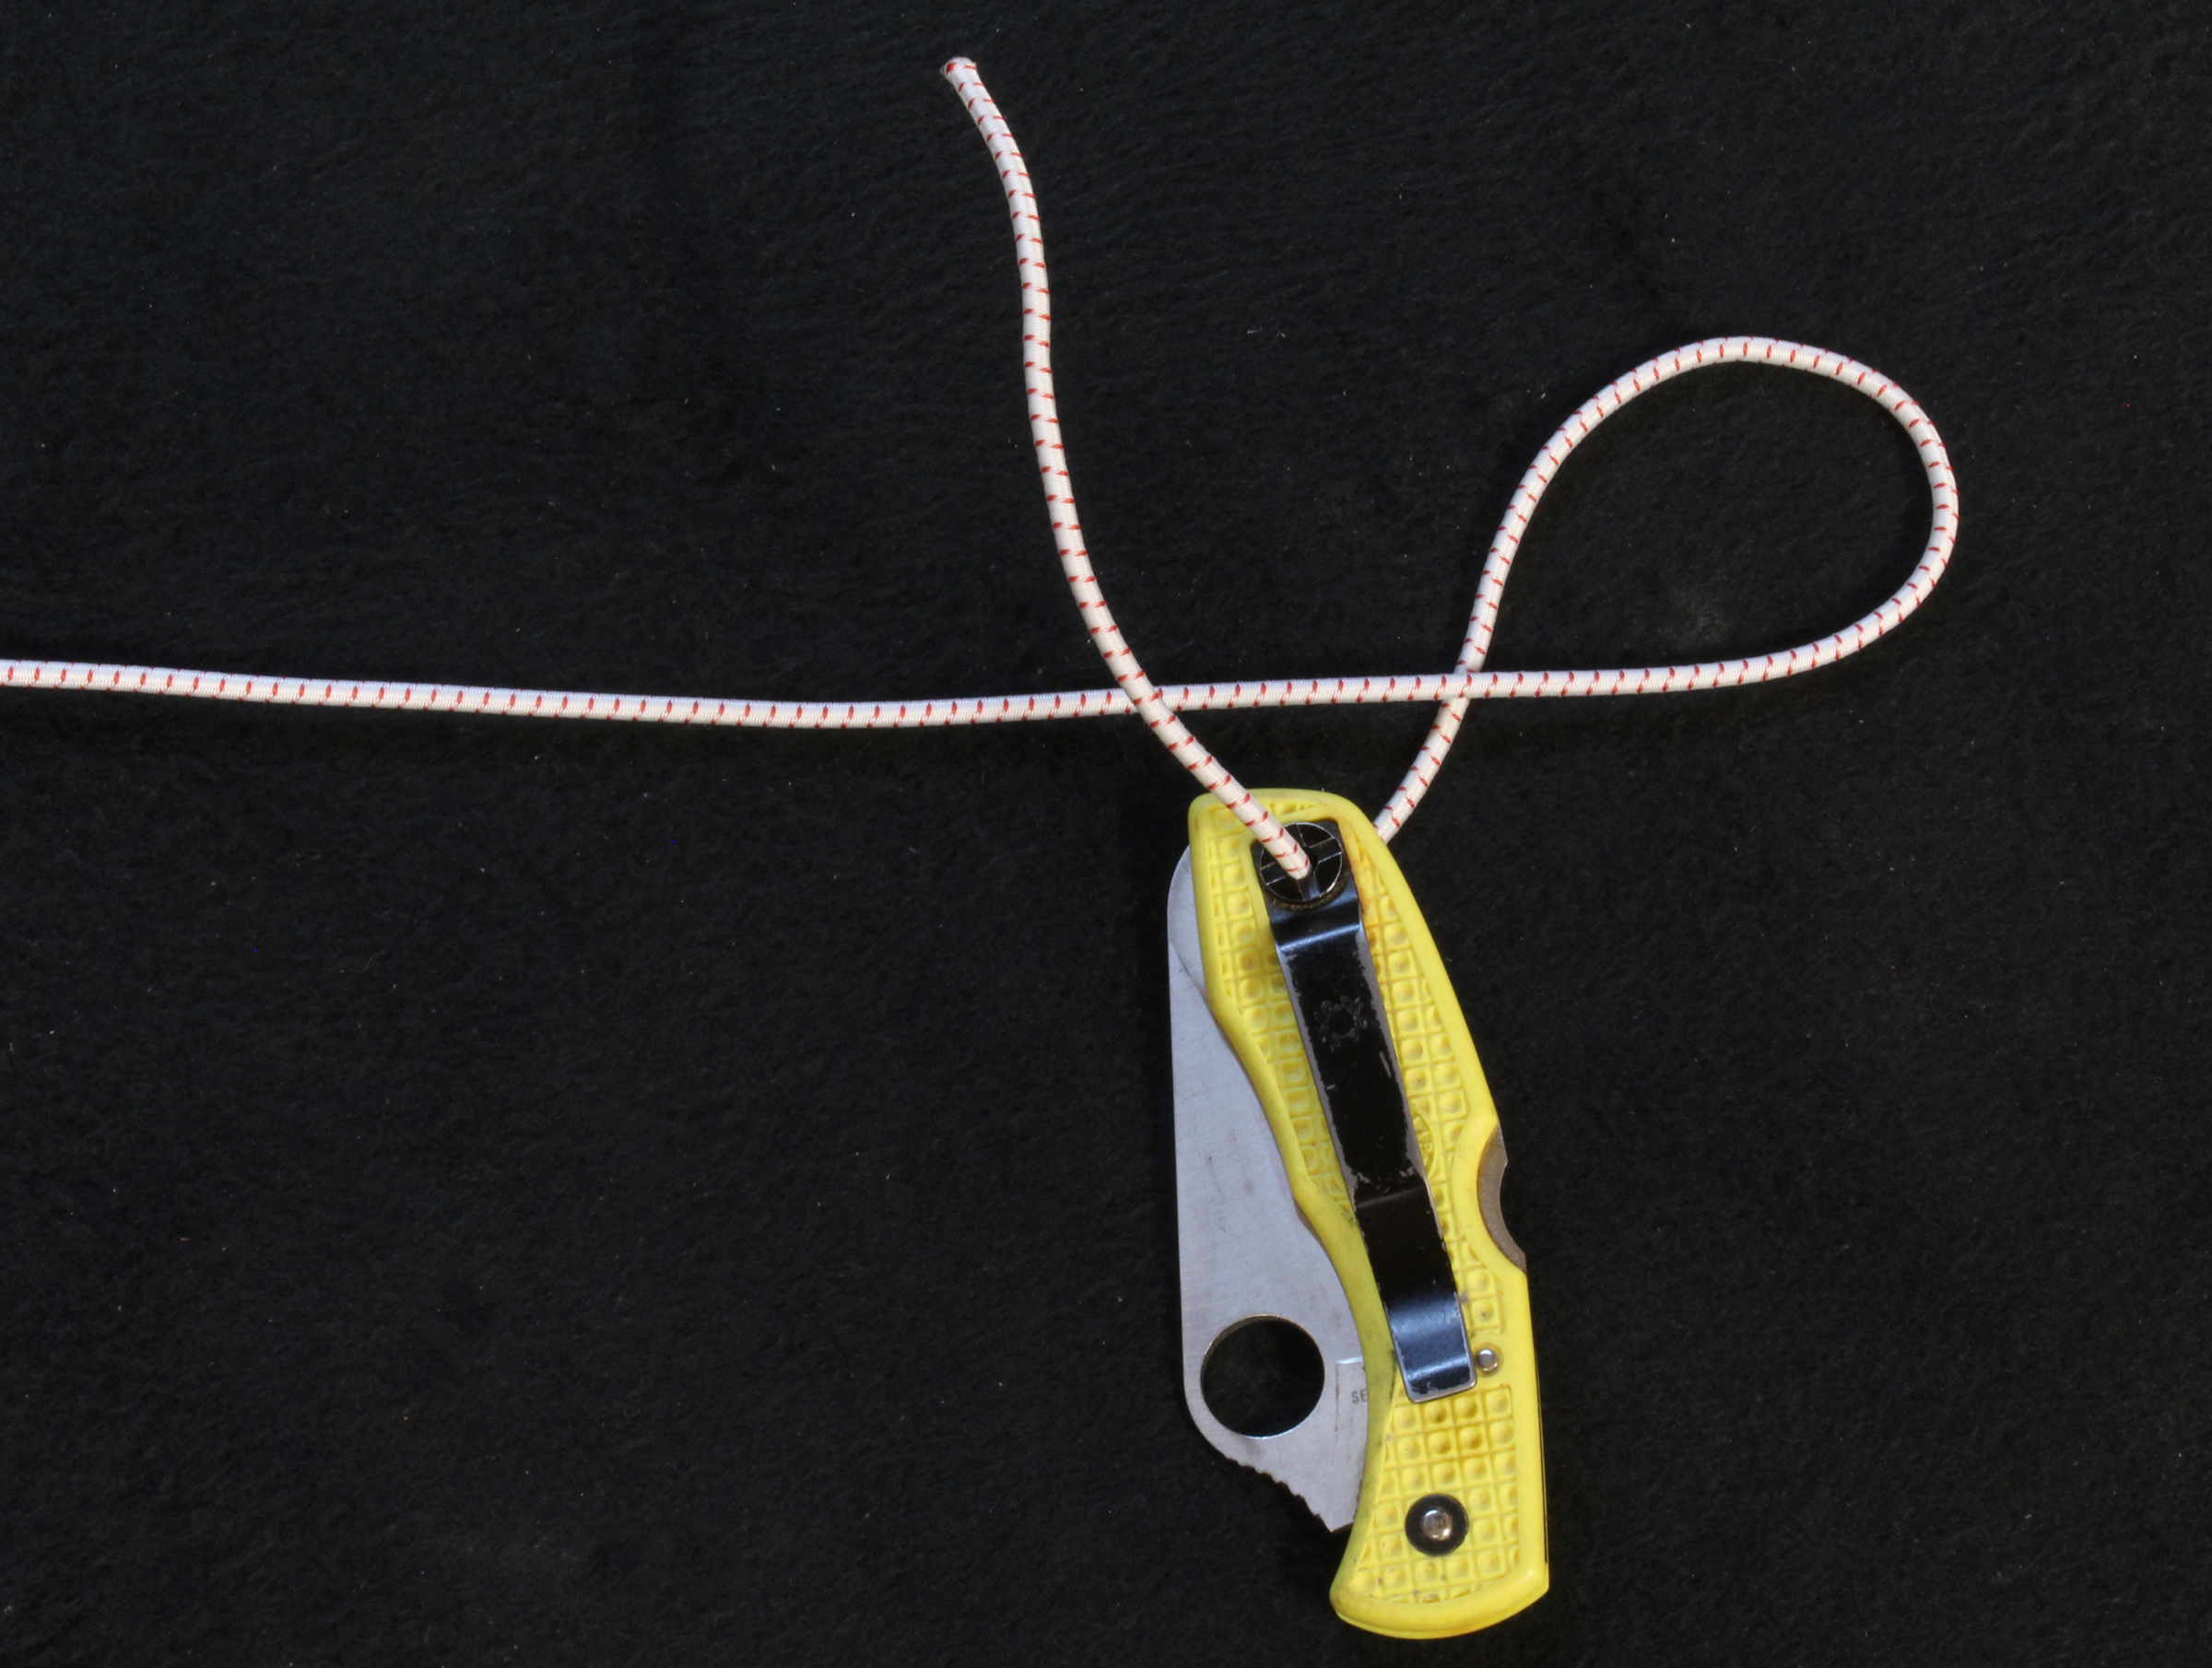
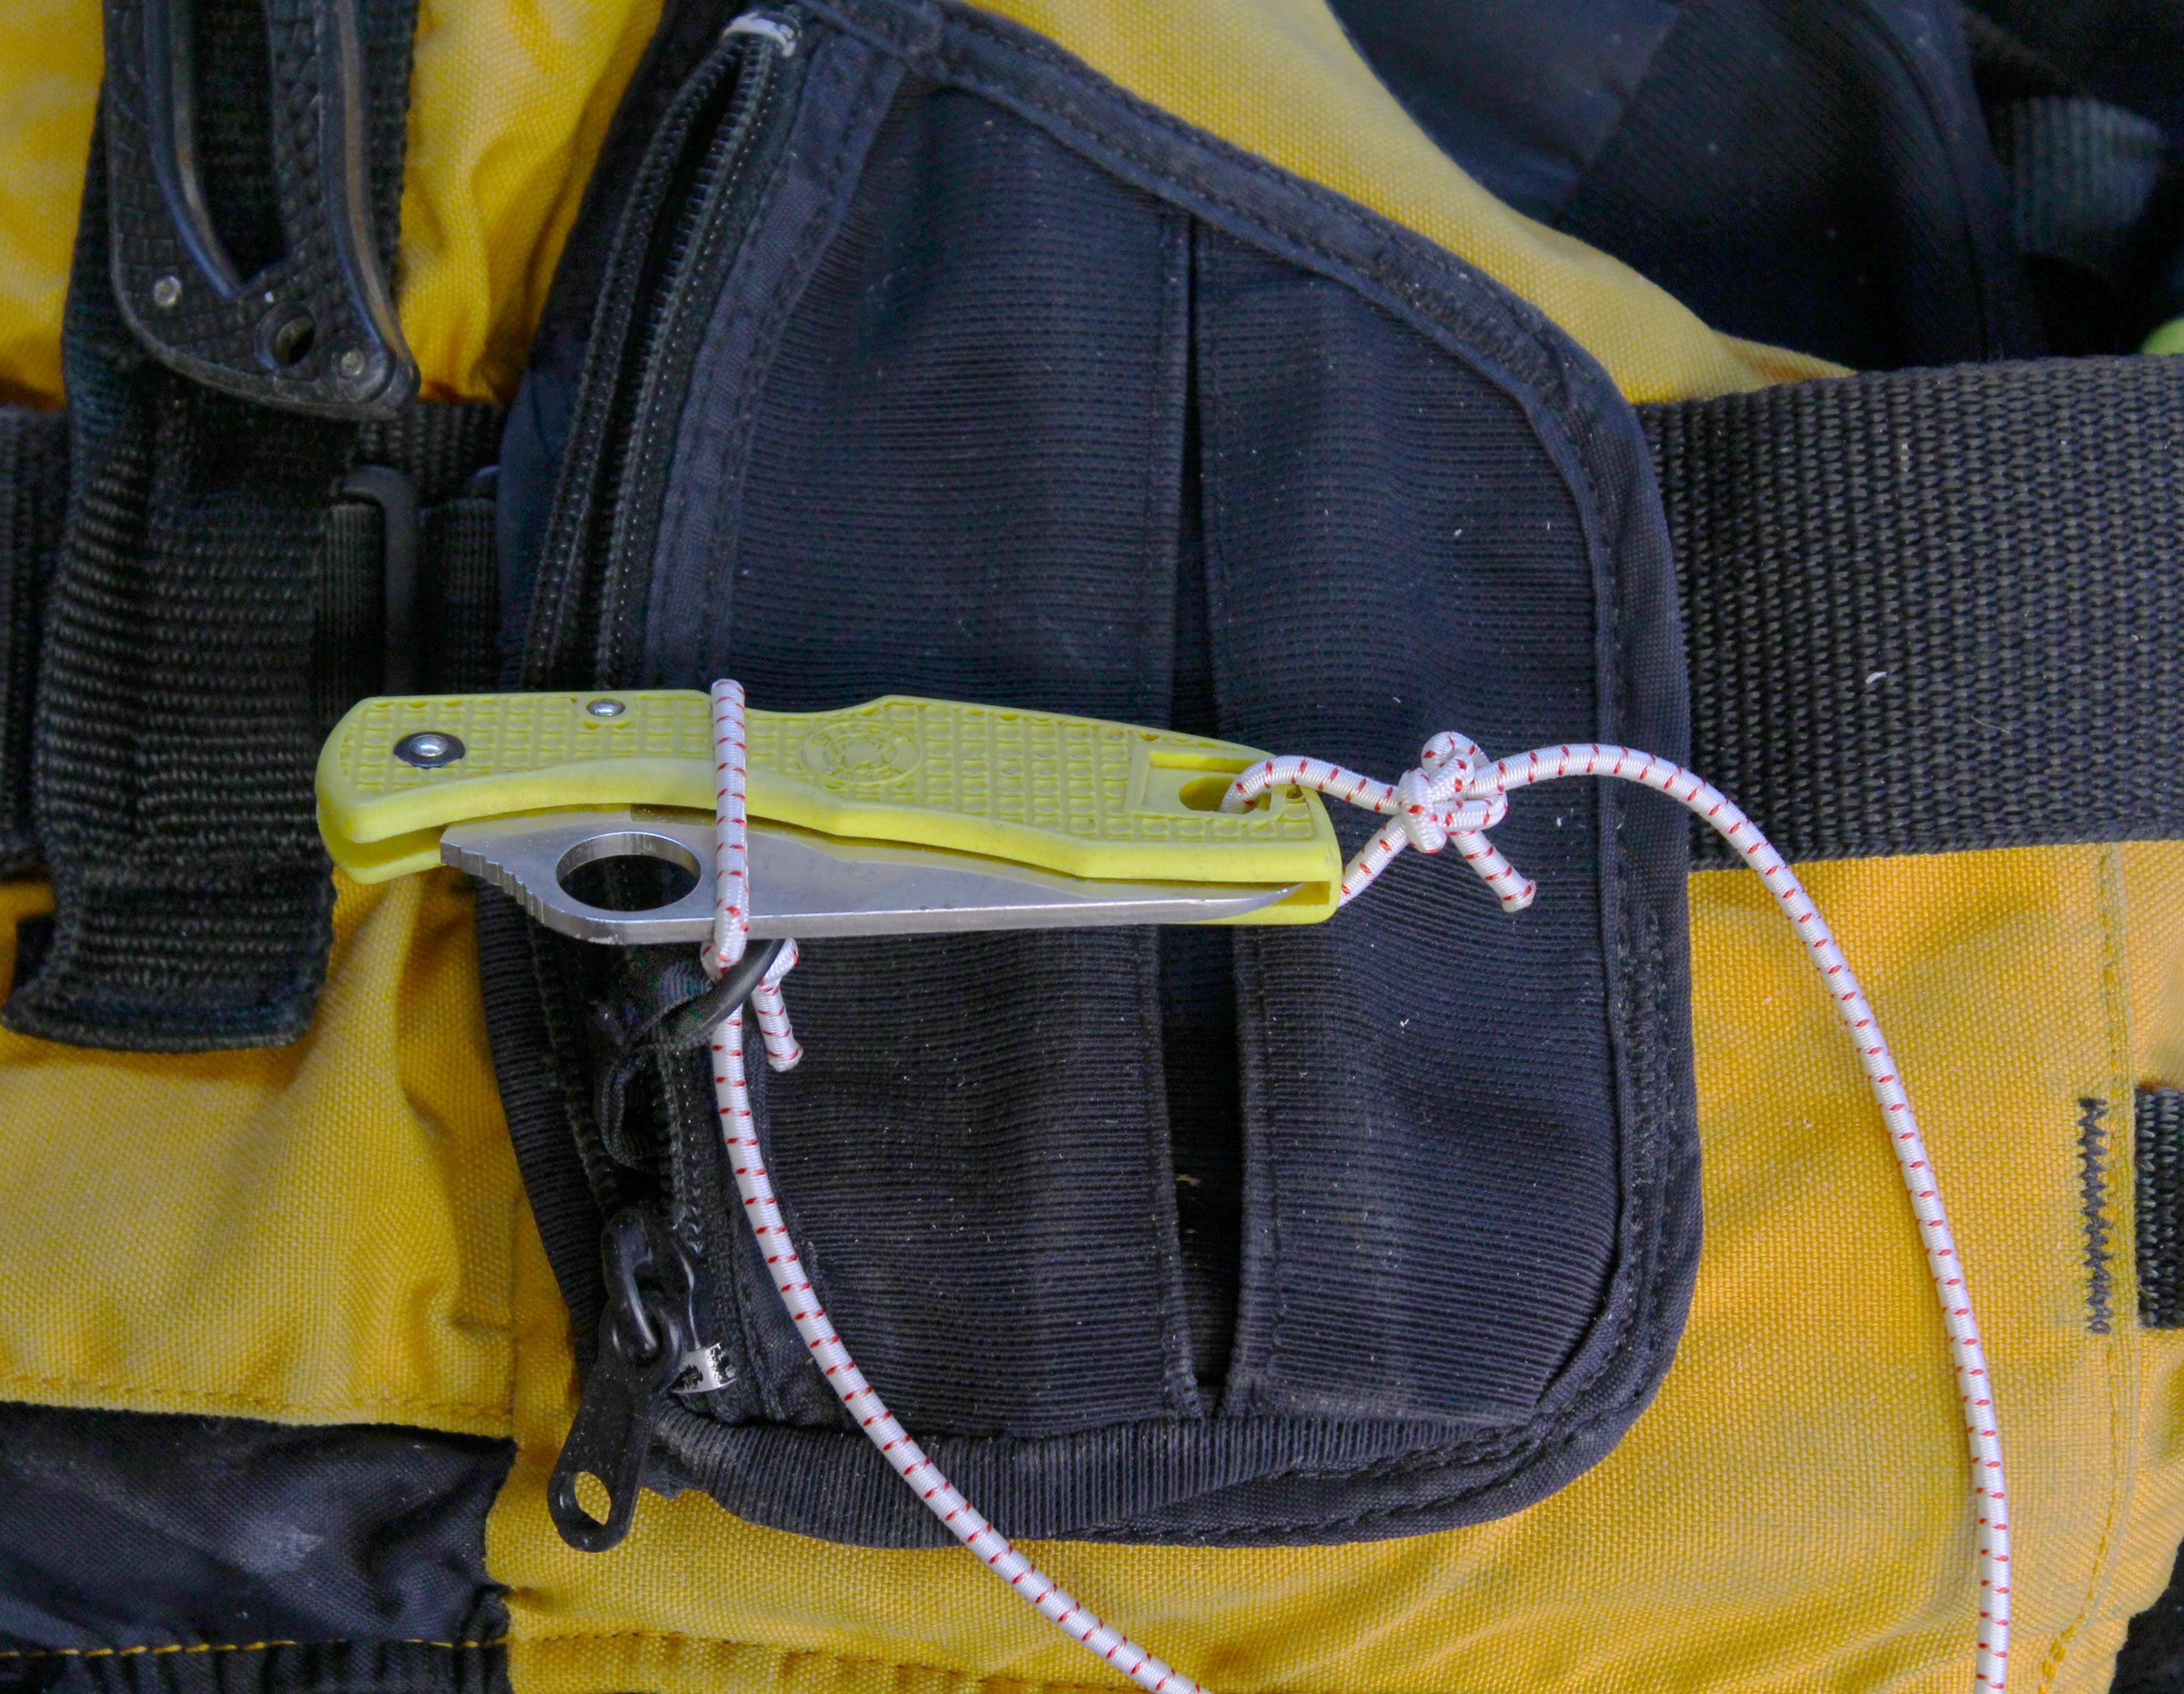
To tie a small bungee tether to an important bit of gear, like the knife here, start with the underhand loop, as usual, and then thread the cord through the item at the start of the second loop.
Make the left underhand loop, with the working end below everything.

The working end then crosses over the top.
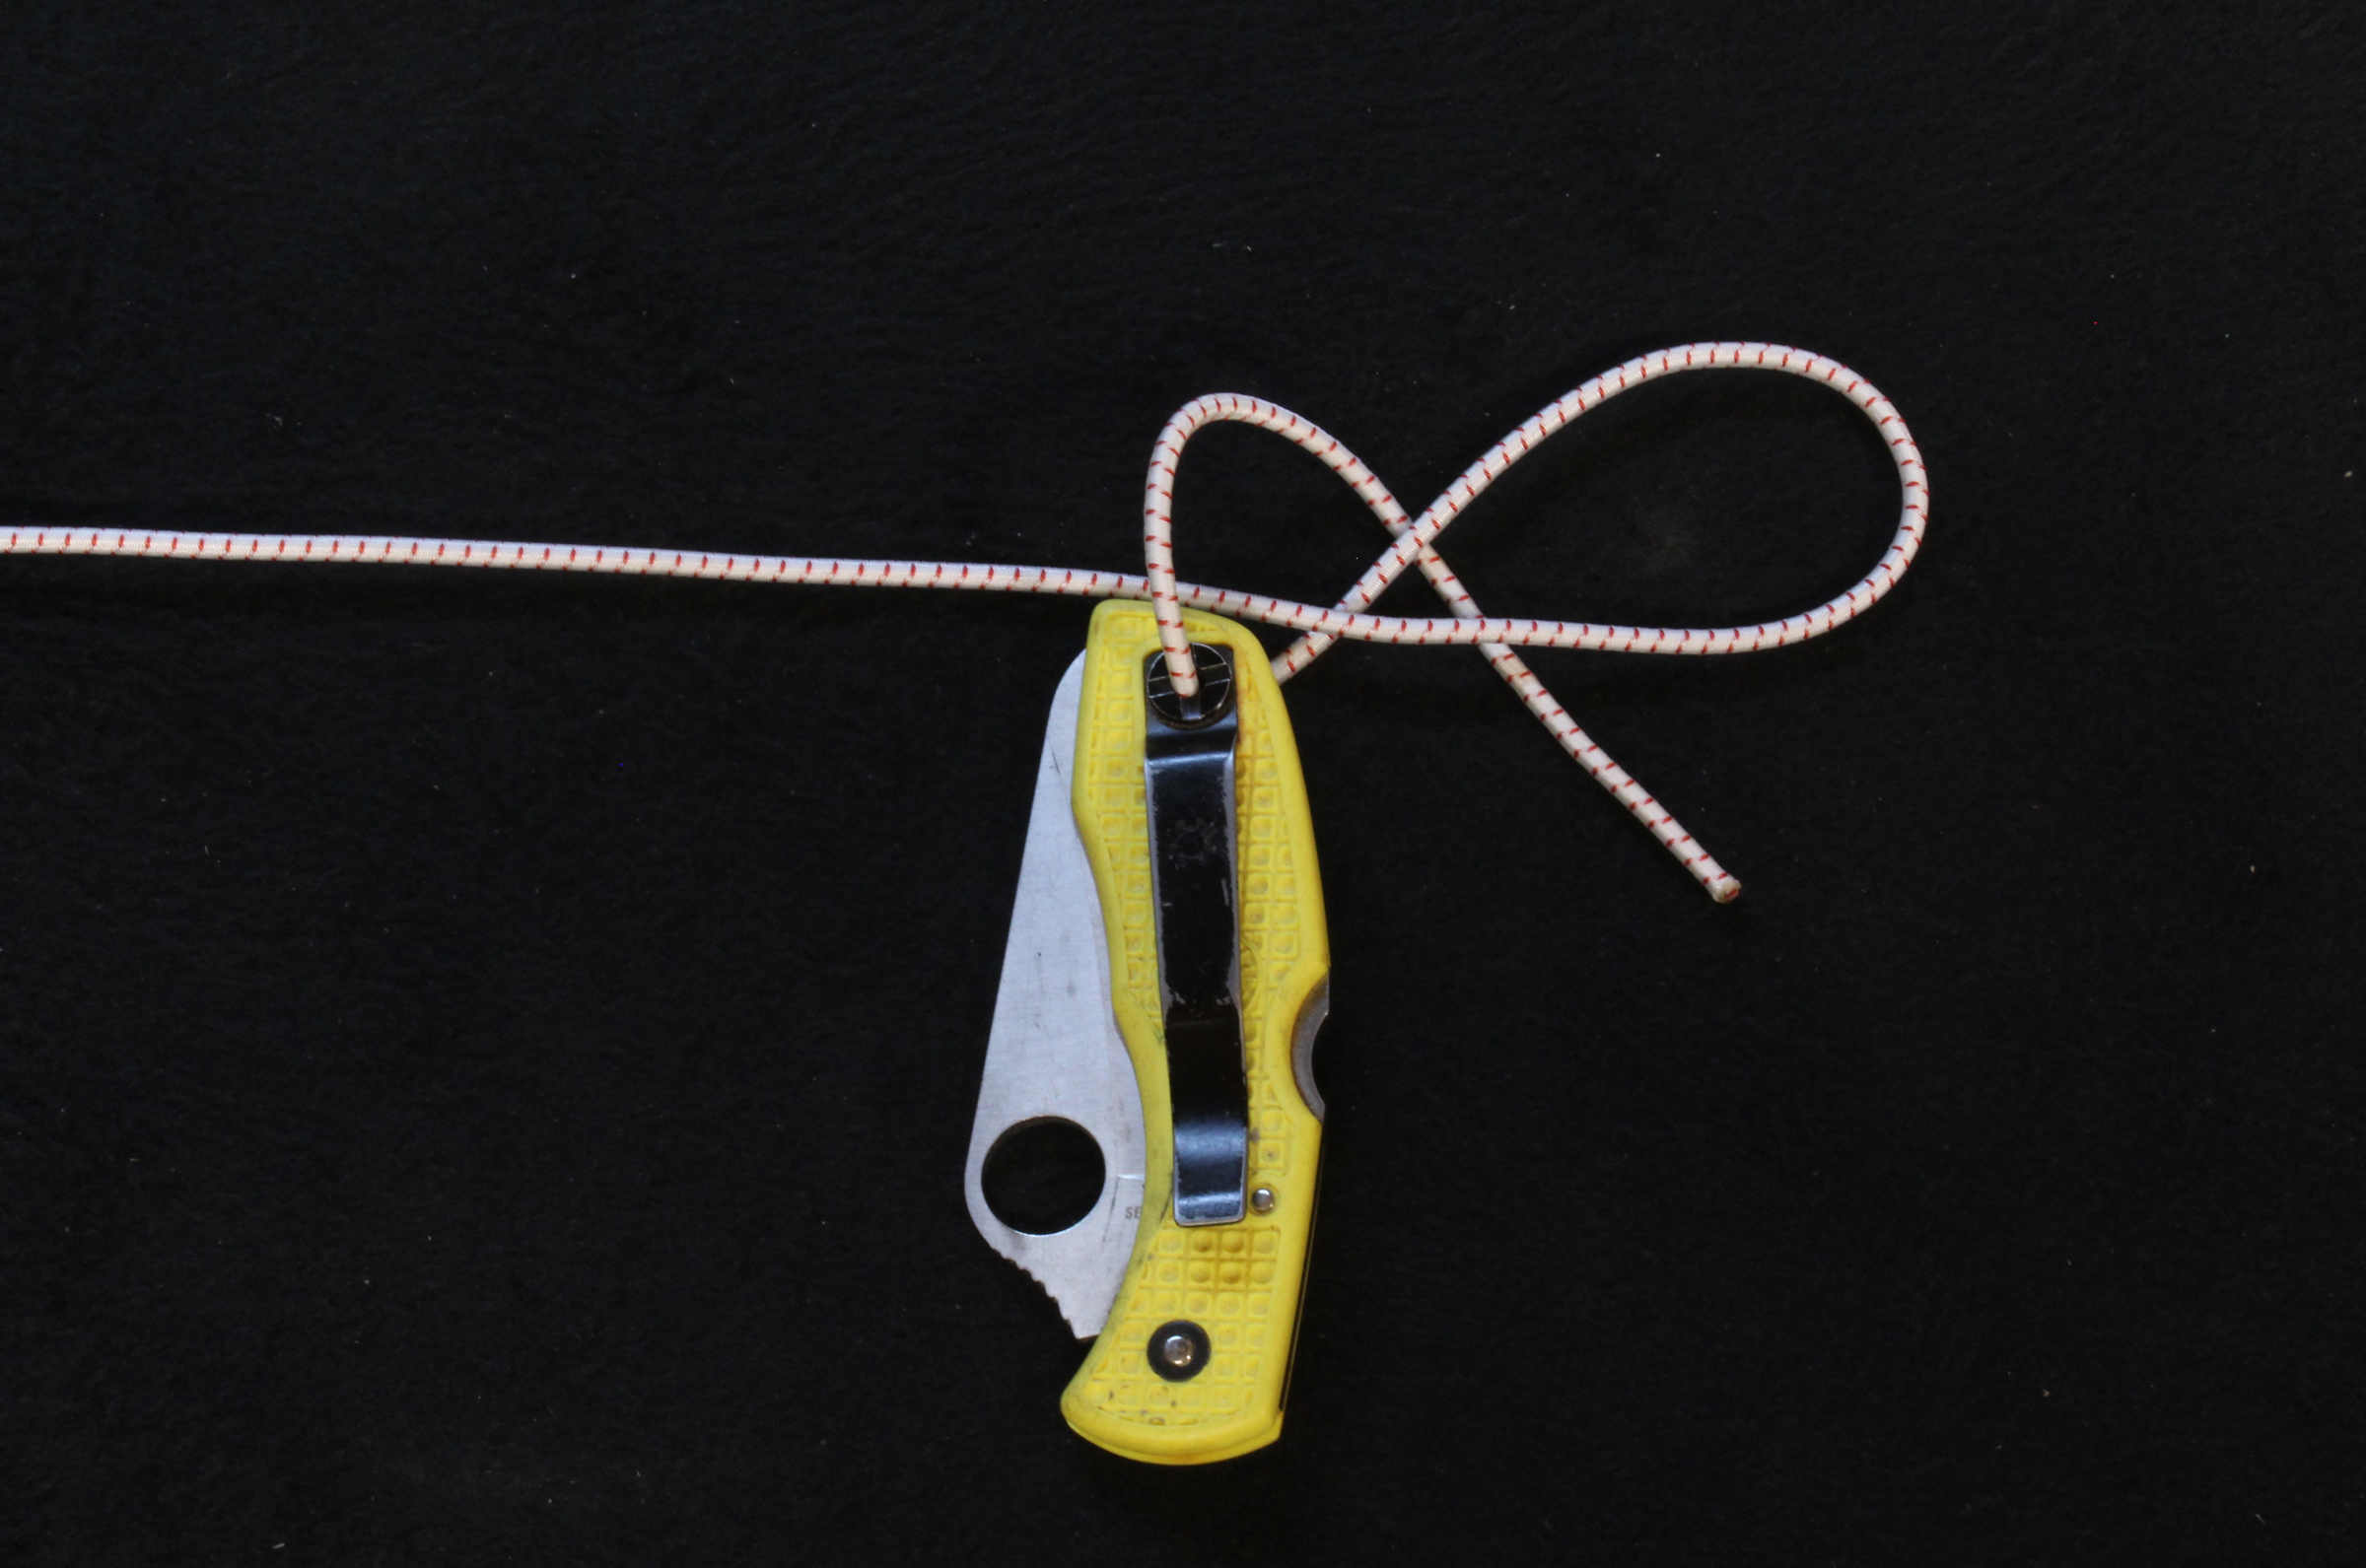
The knife gets threaded through the first loop…
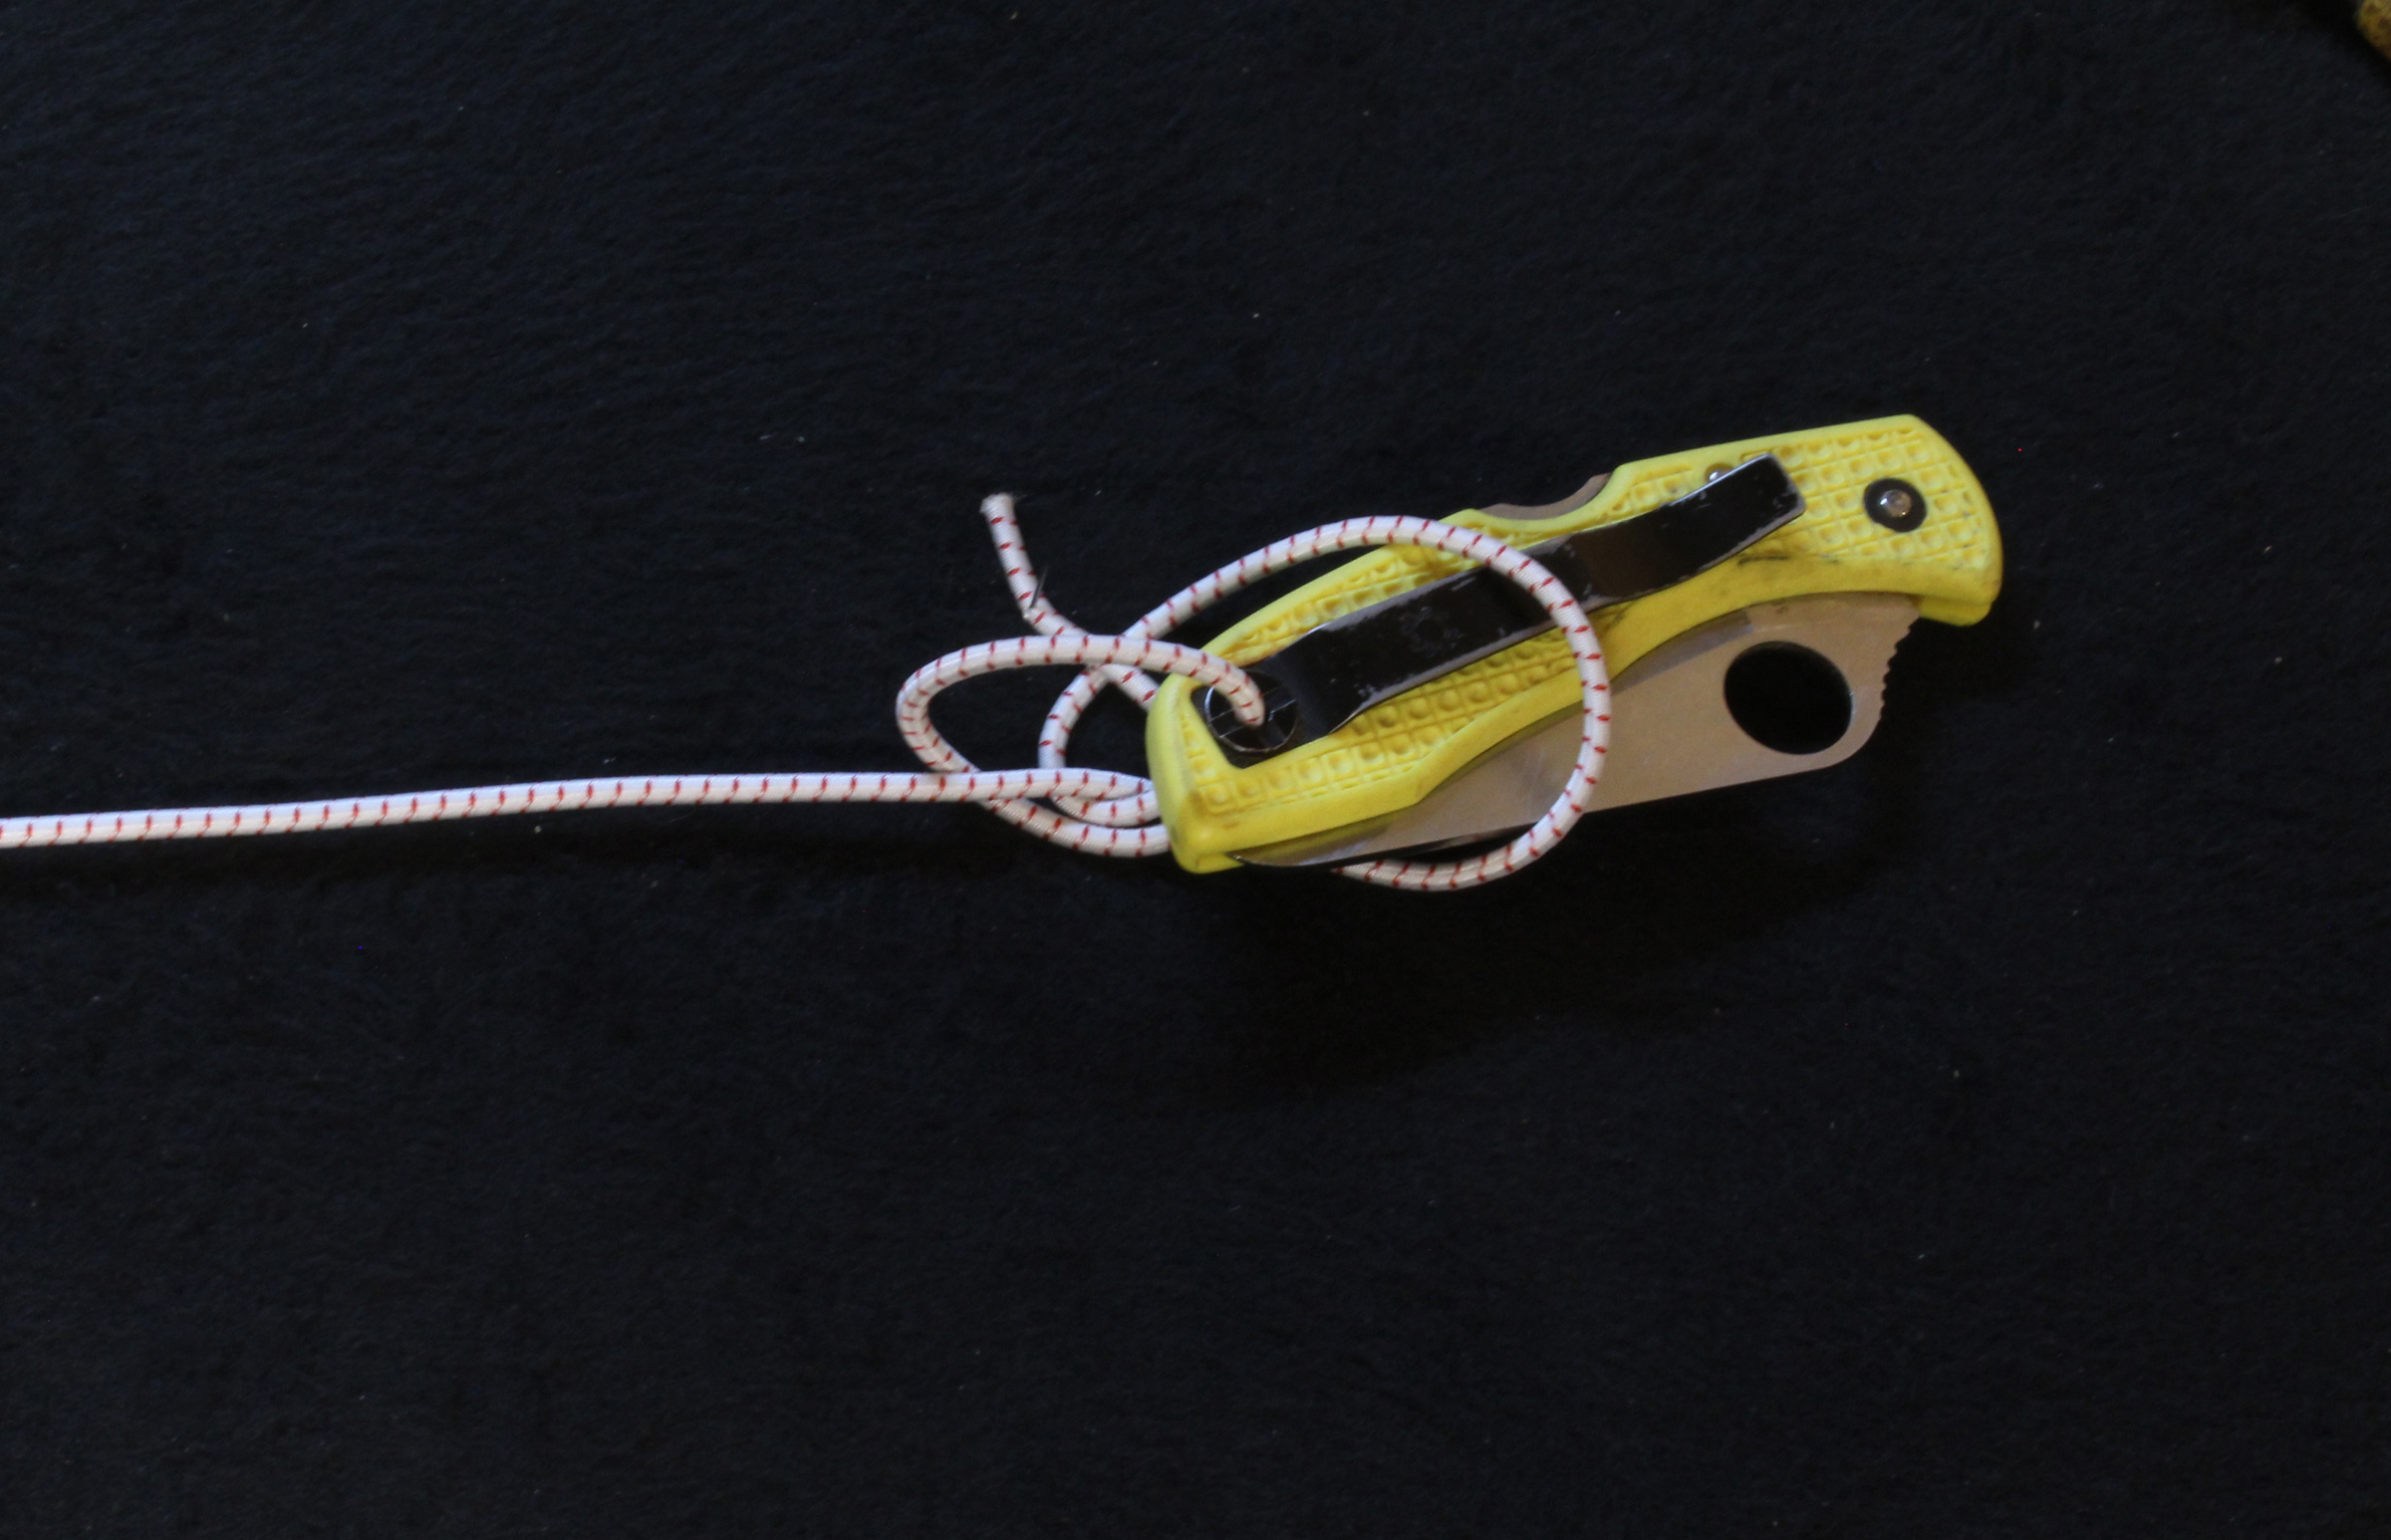
…and pulls the second loop through the first loop.
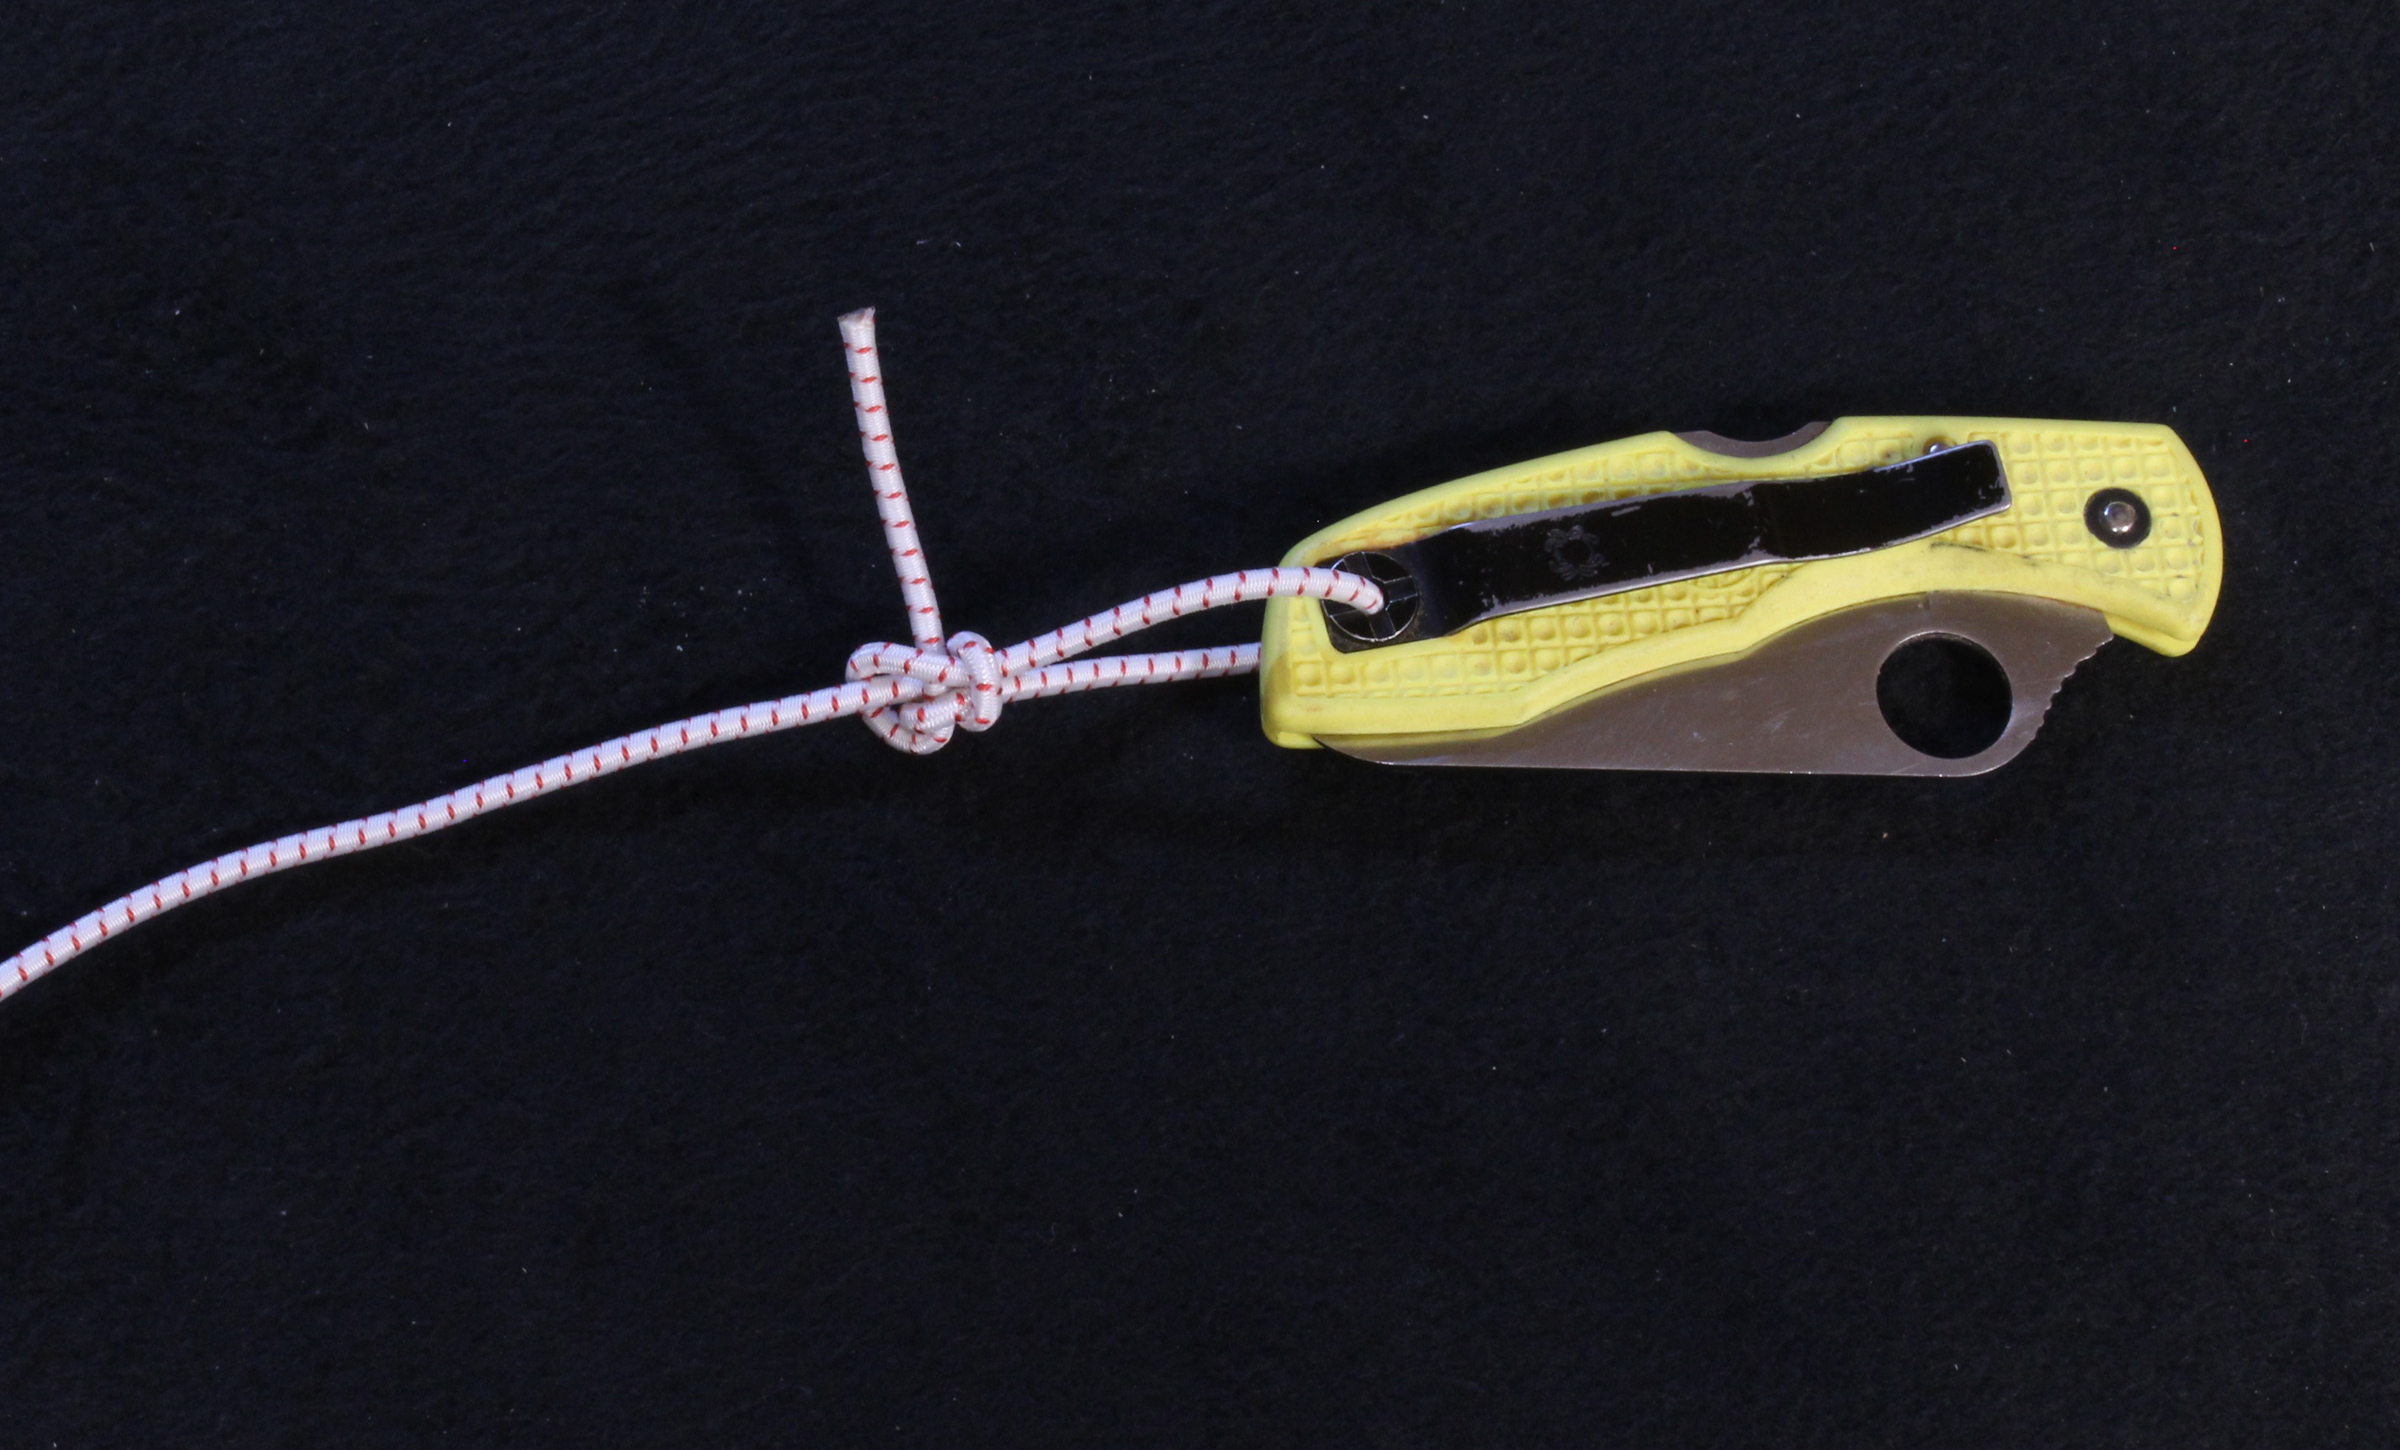
After the Angler’s Loop is tied, you can shorten the working end and tighten the loop through the gear by chasing the slack out from the working end, through the knot, and into to the standing part.
Anchoring a Bungee Tether
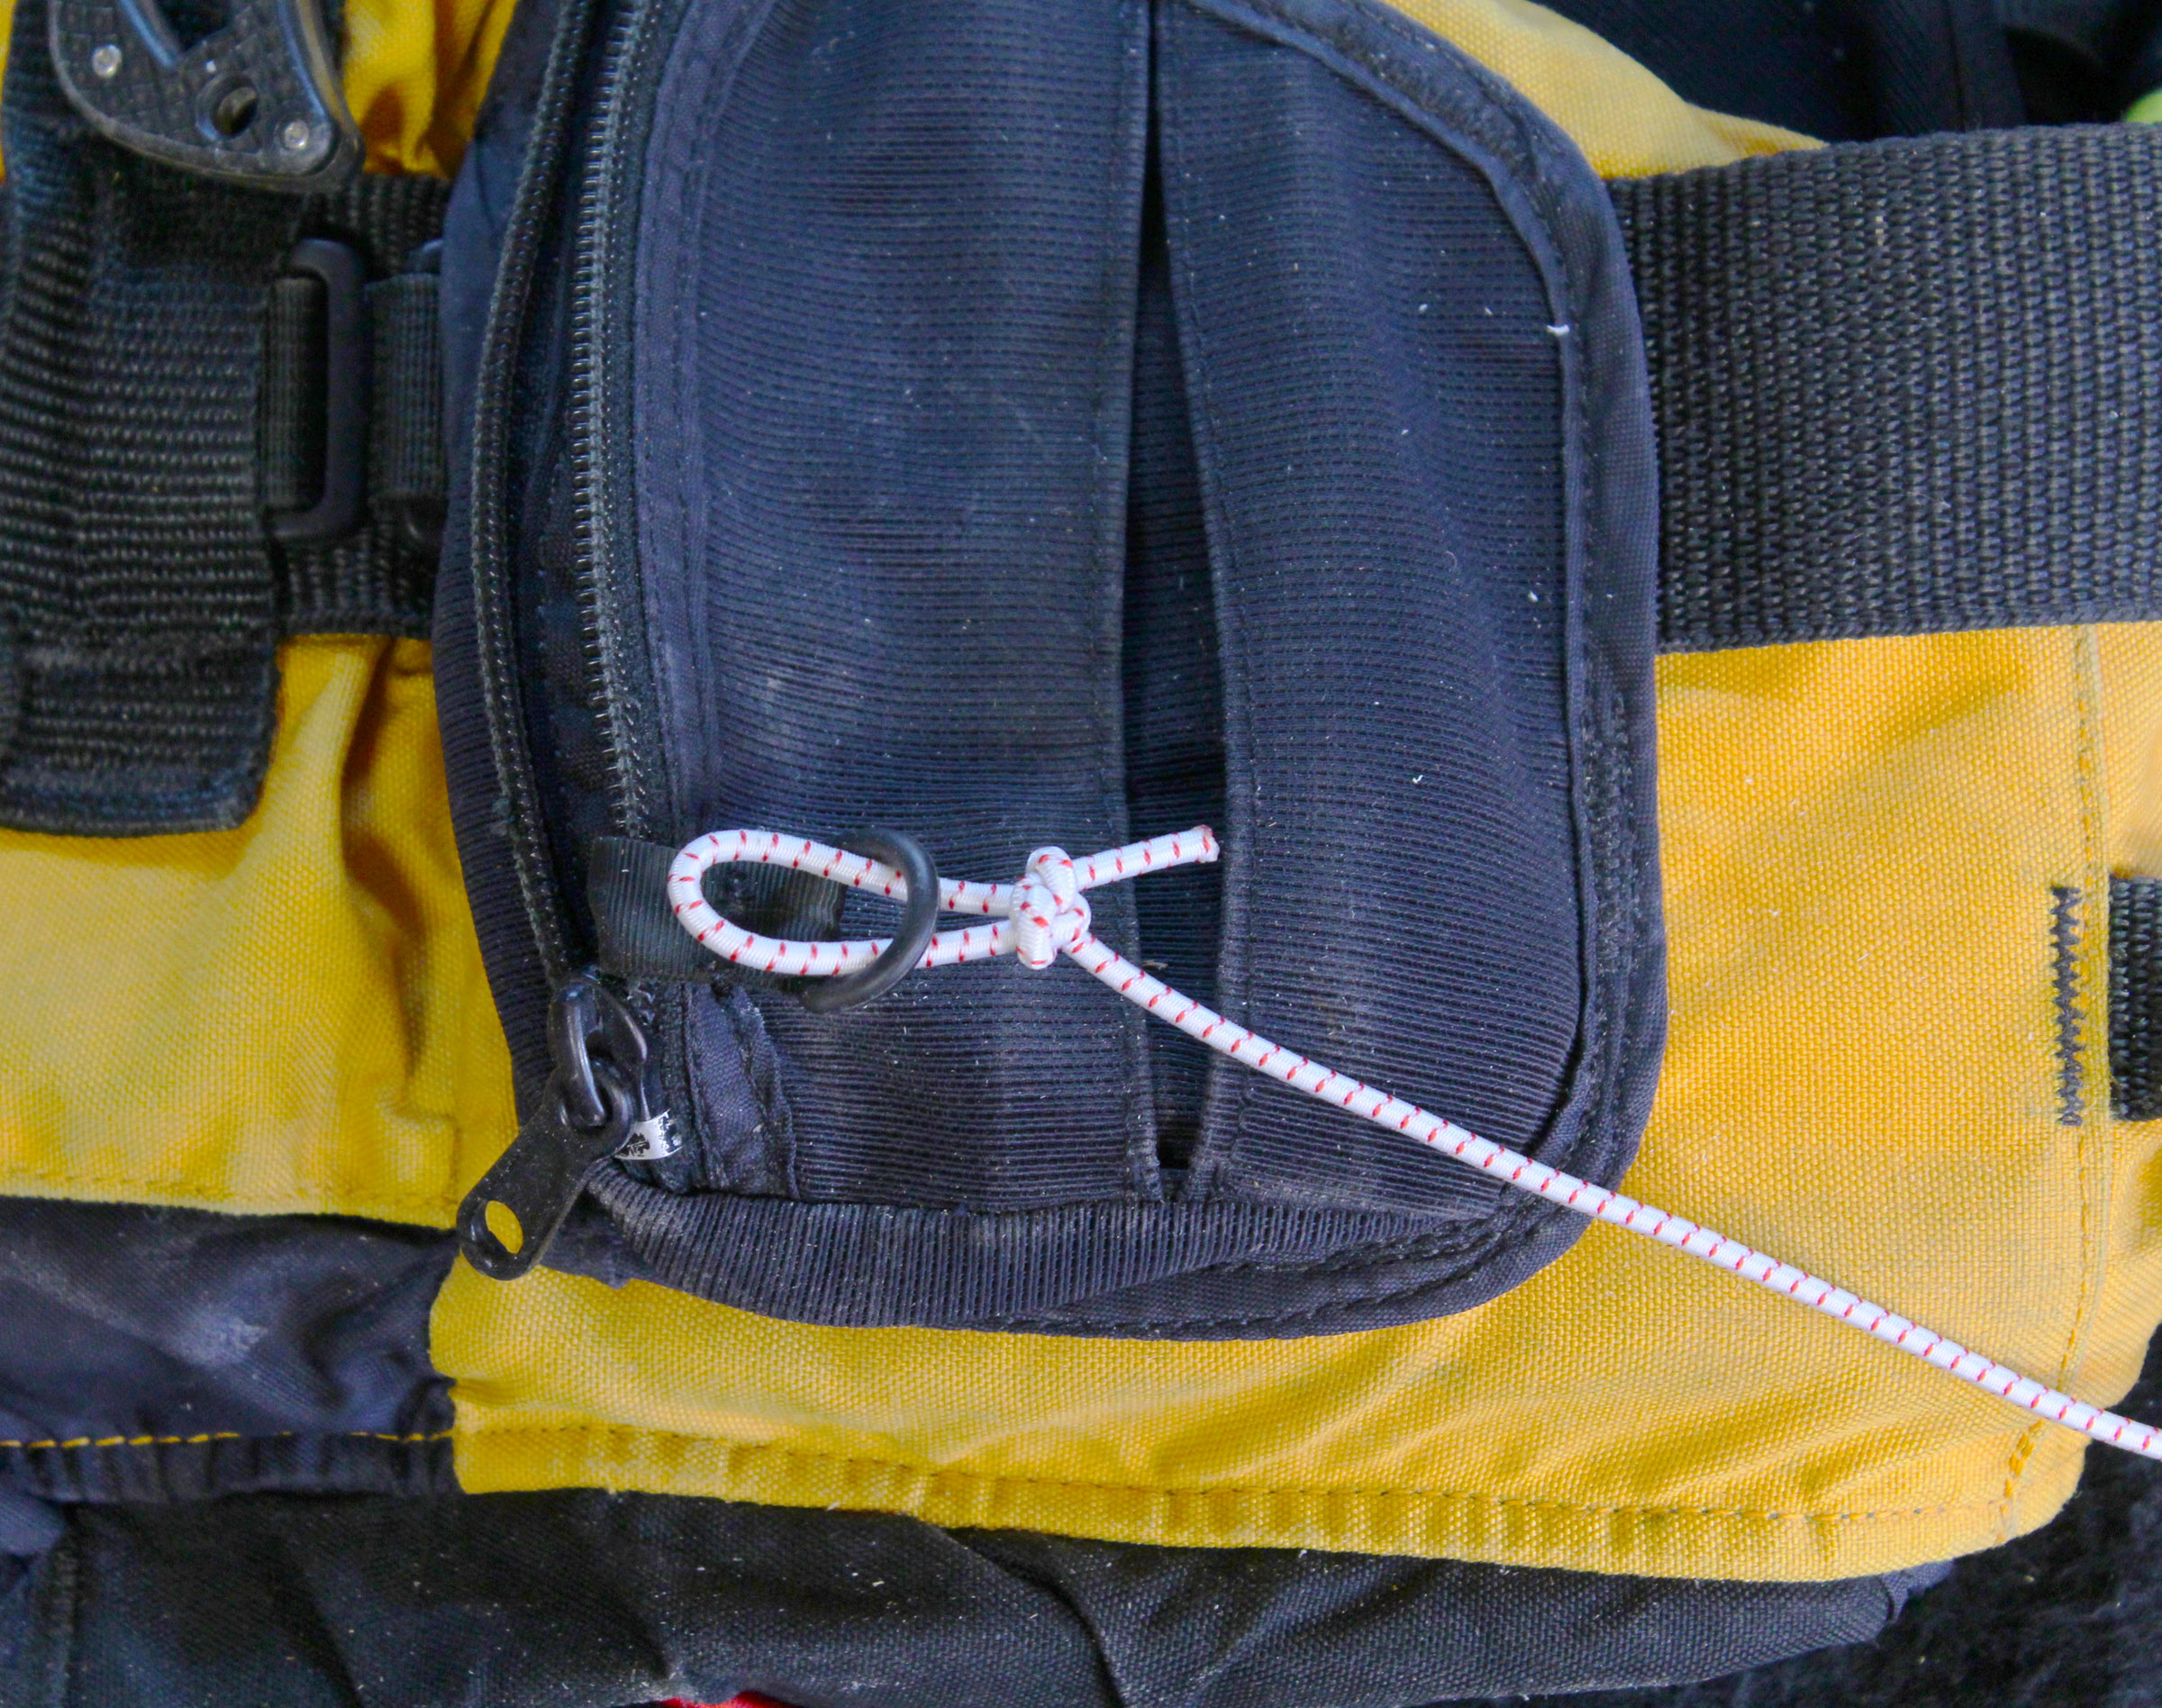
To anchor a tether, slip an Angler’s Loop through the ring.
The object to be tethered, here a folding knife, gets slipped through the Angler’s Loop.
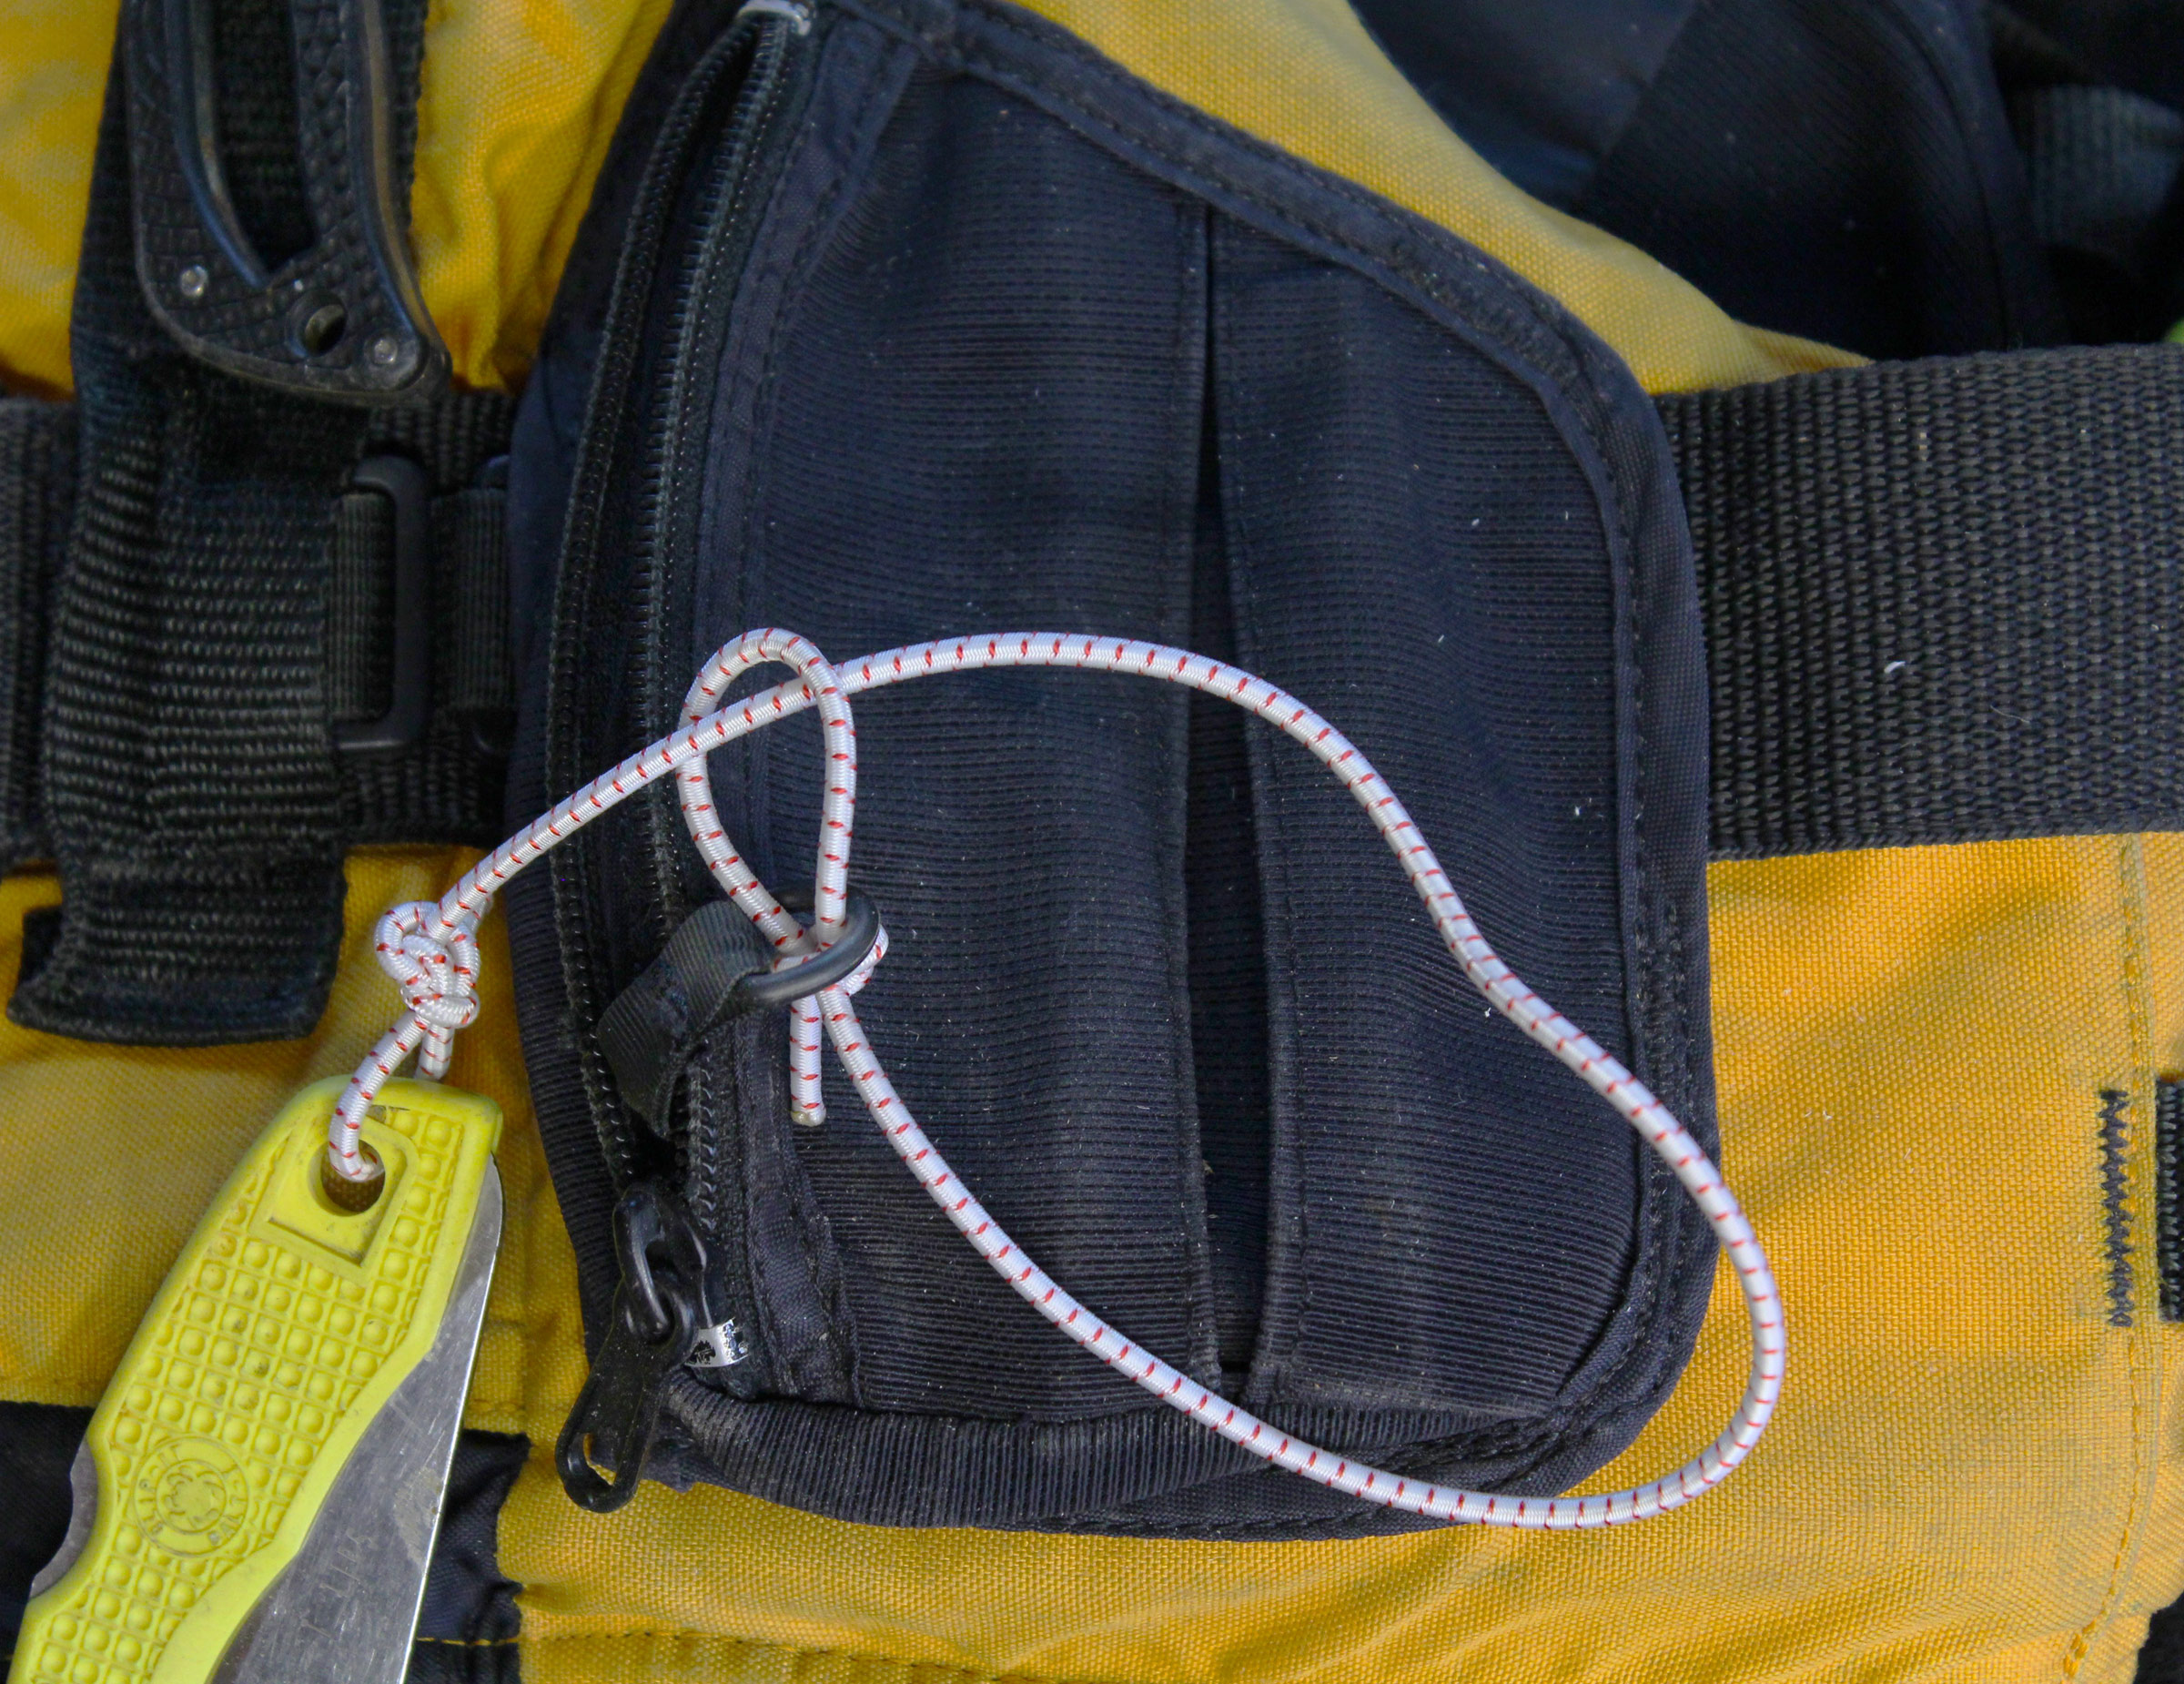
With the knife through, the rest of the tether, including the knot at the base of the Angler’s Loop, is pulled through.
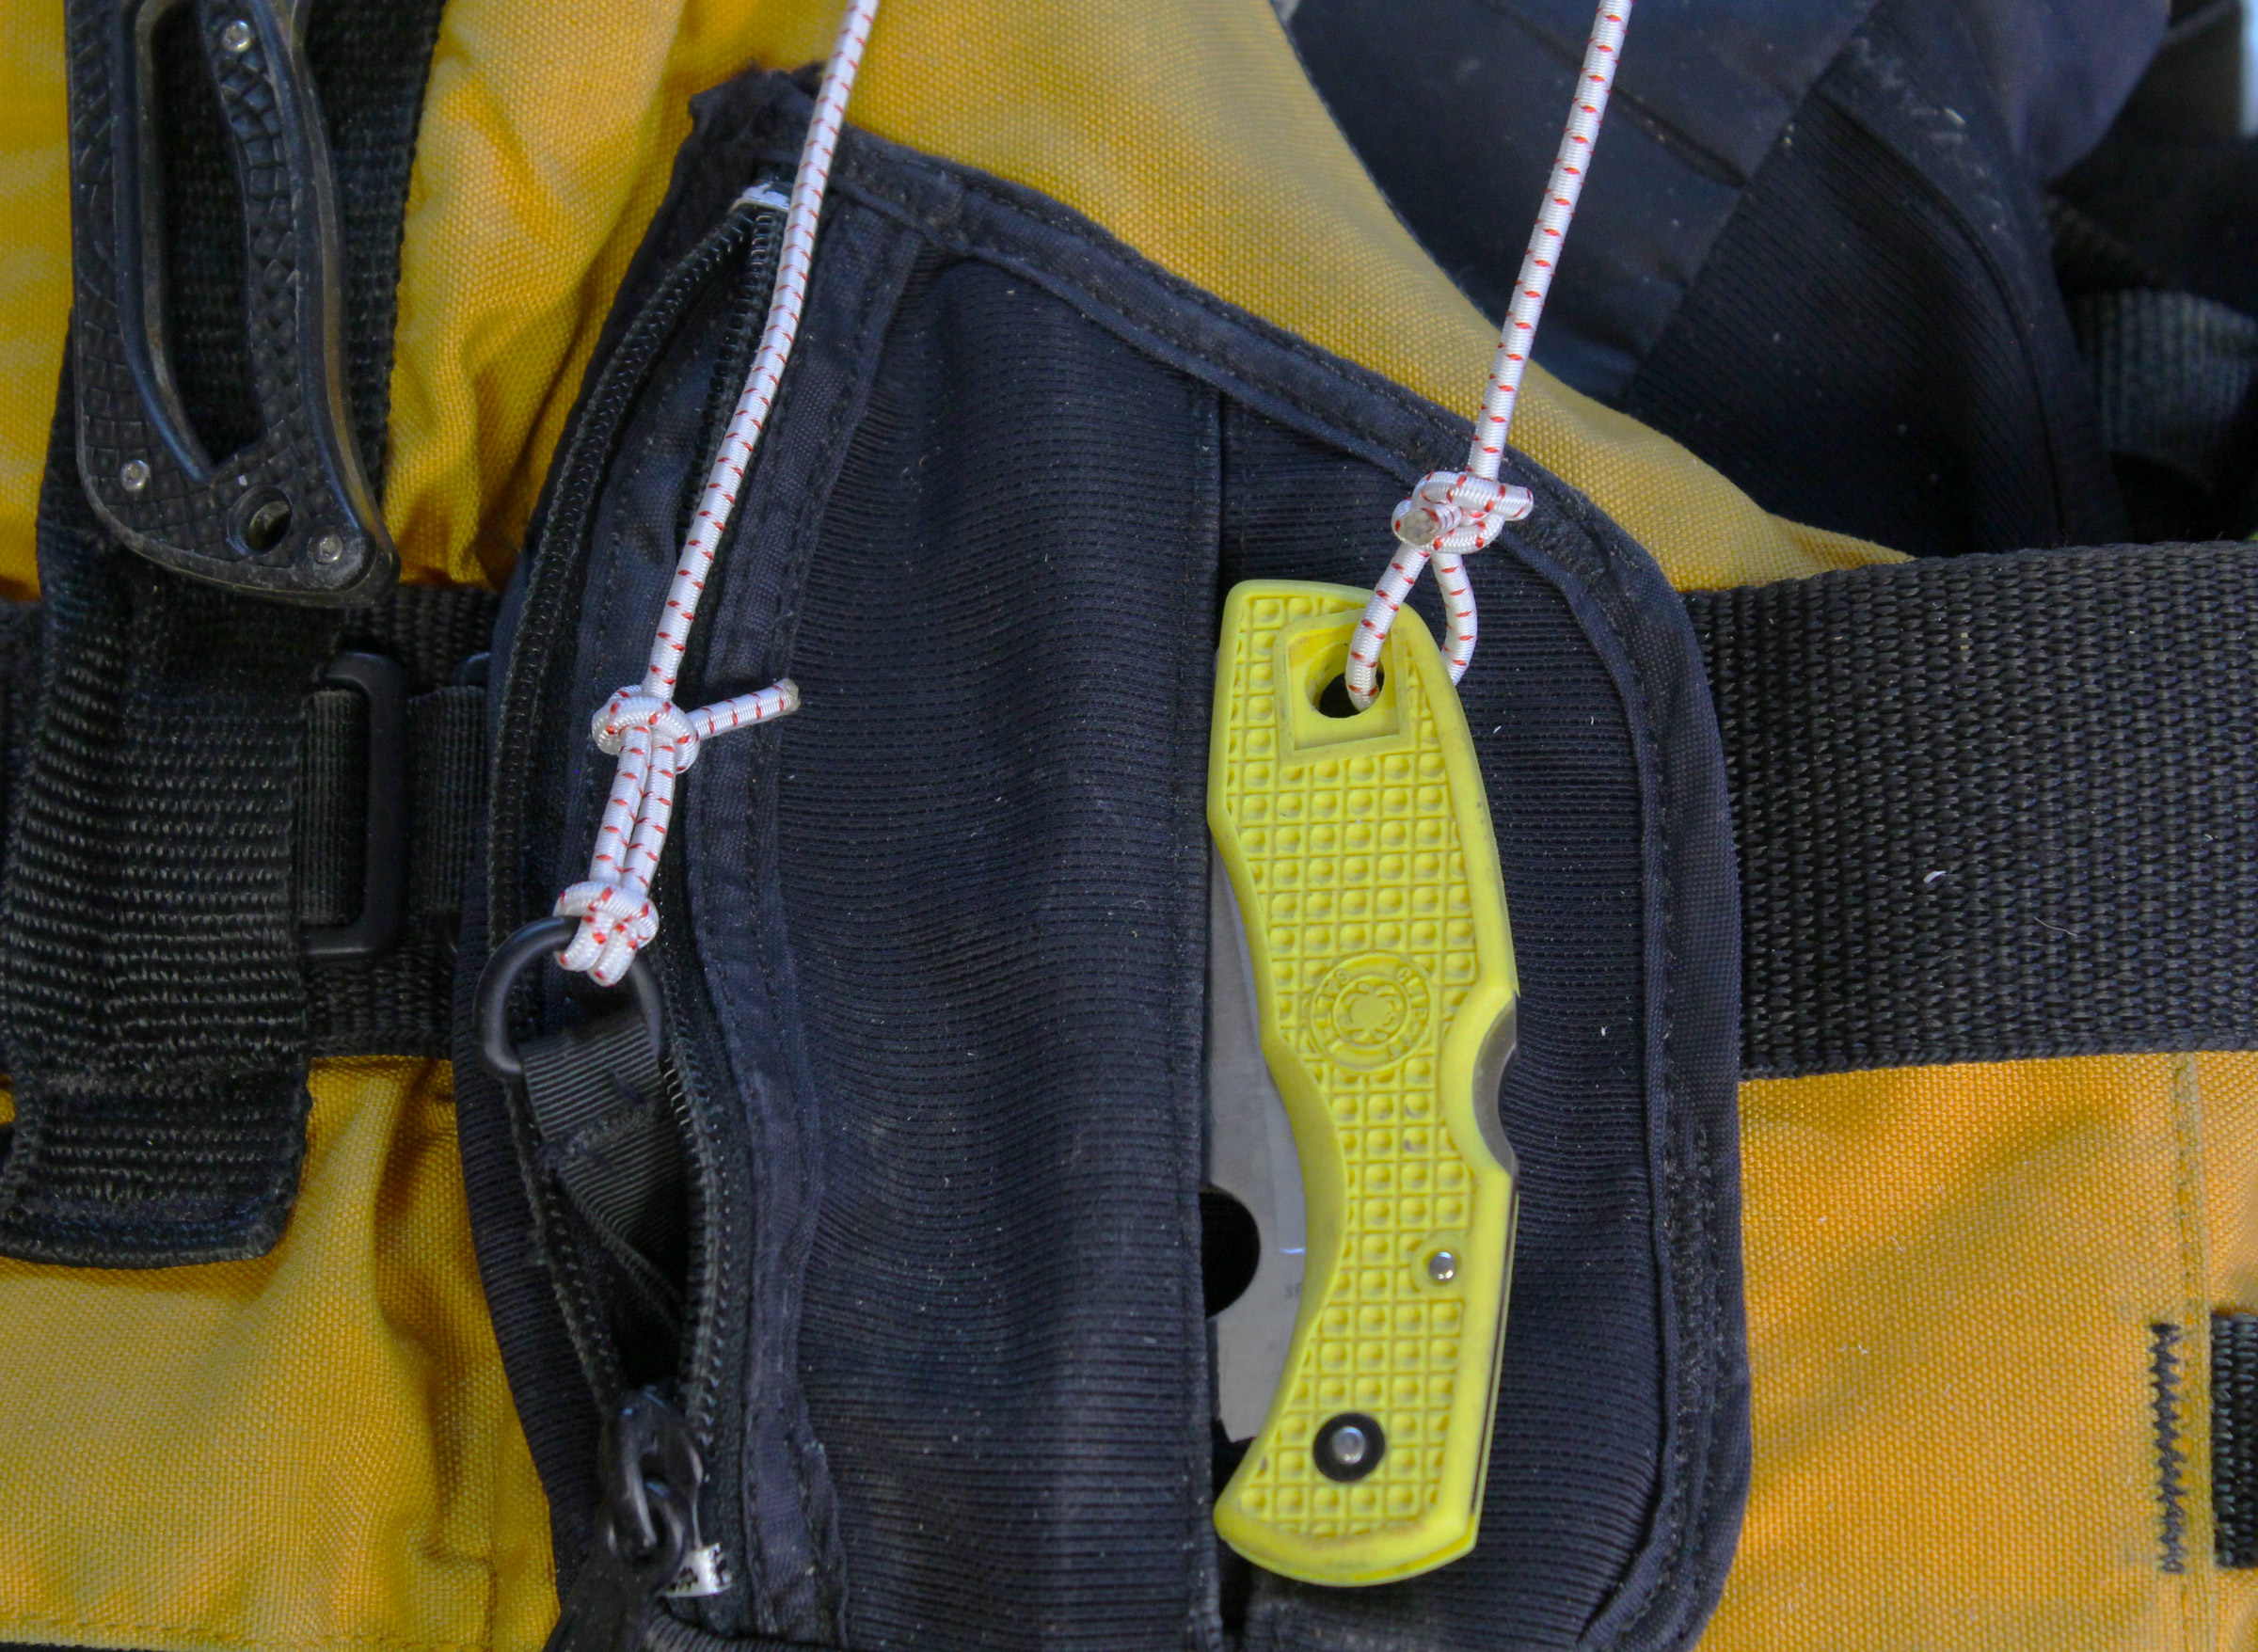
Pulled up tight, the Angler’s Loop makes a Lark’s Head Knot around the anchor ring.
Great Uses for Bungee Cord Knots
The Zeppelin Bend will work for tying rope (left) to bungee cord (right).
A length of bungee, with its ends tied together in a Zeppelin Bend, makes an oversized “rubber band.”
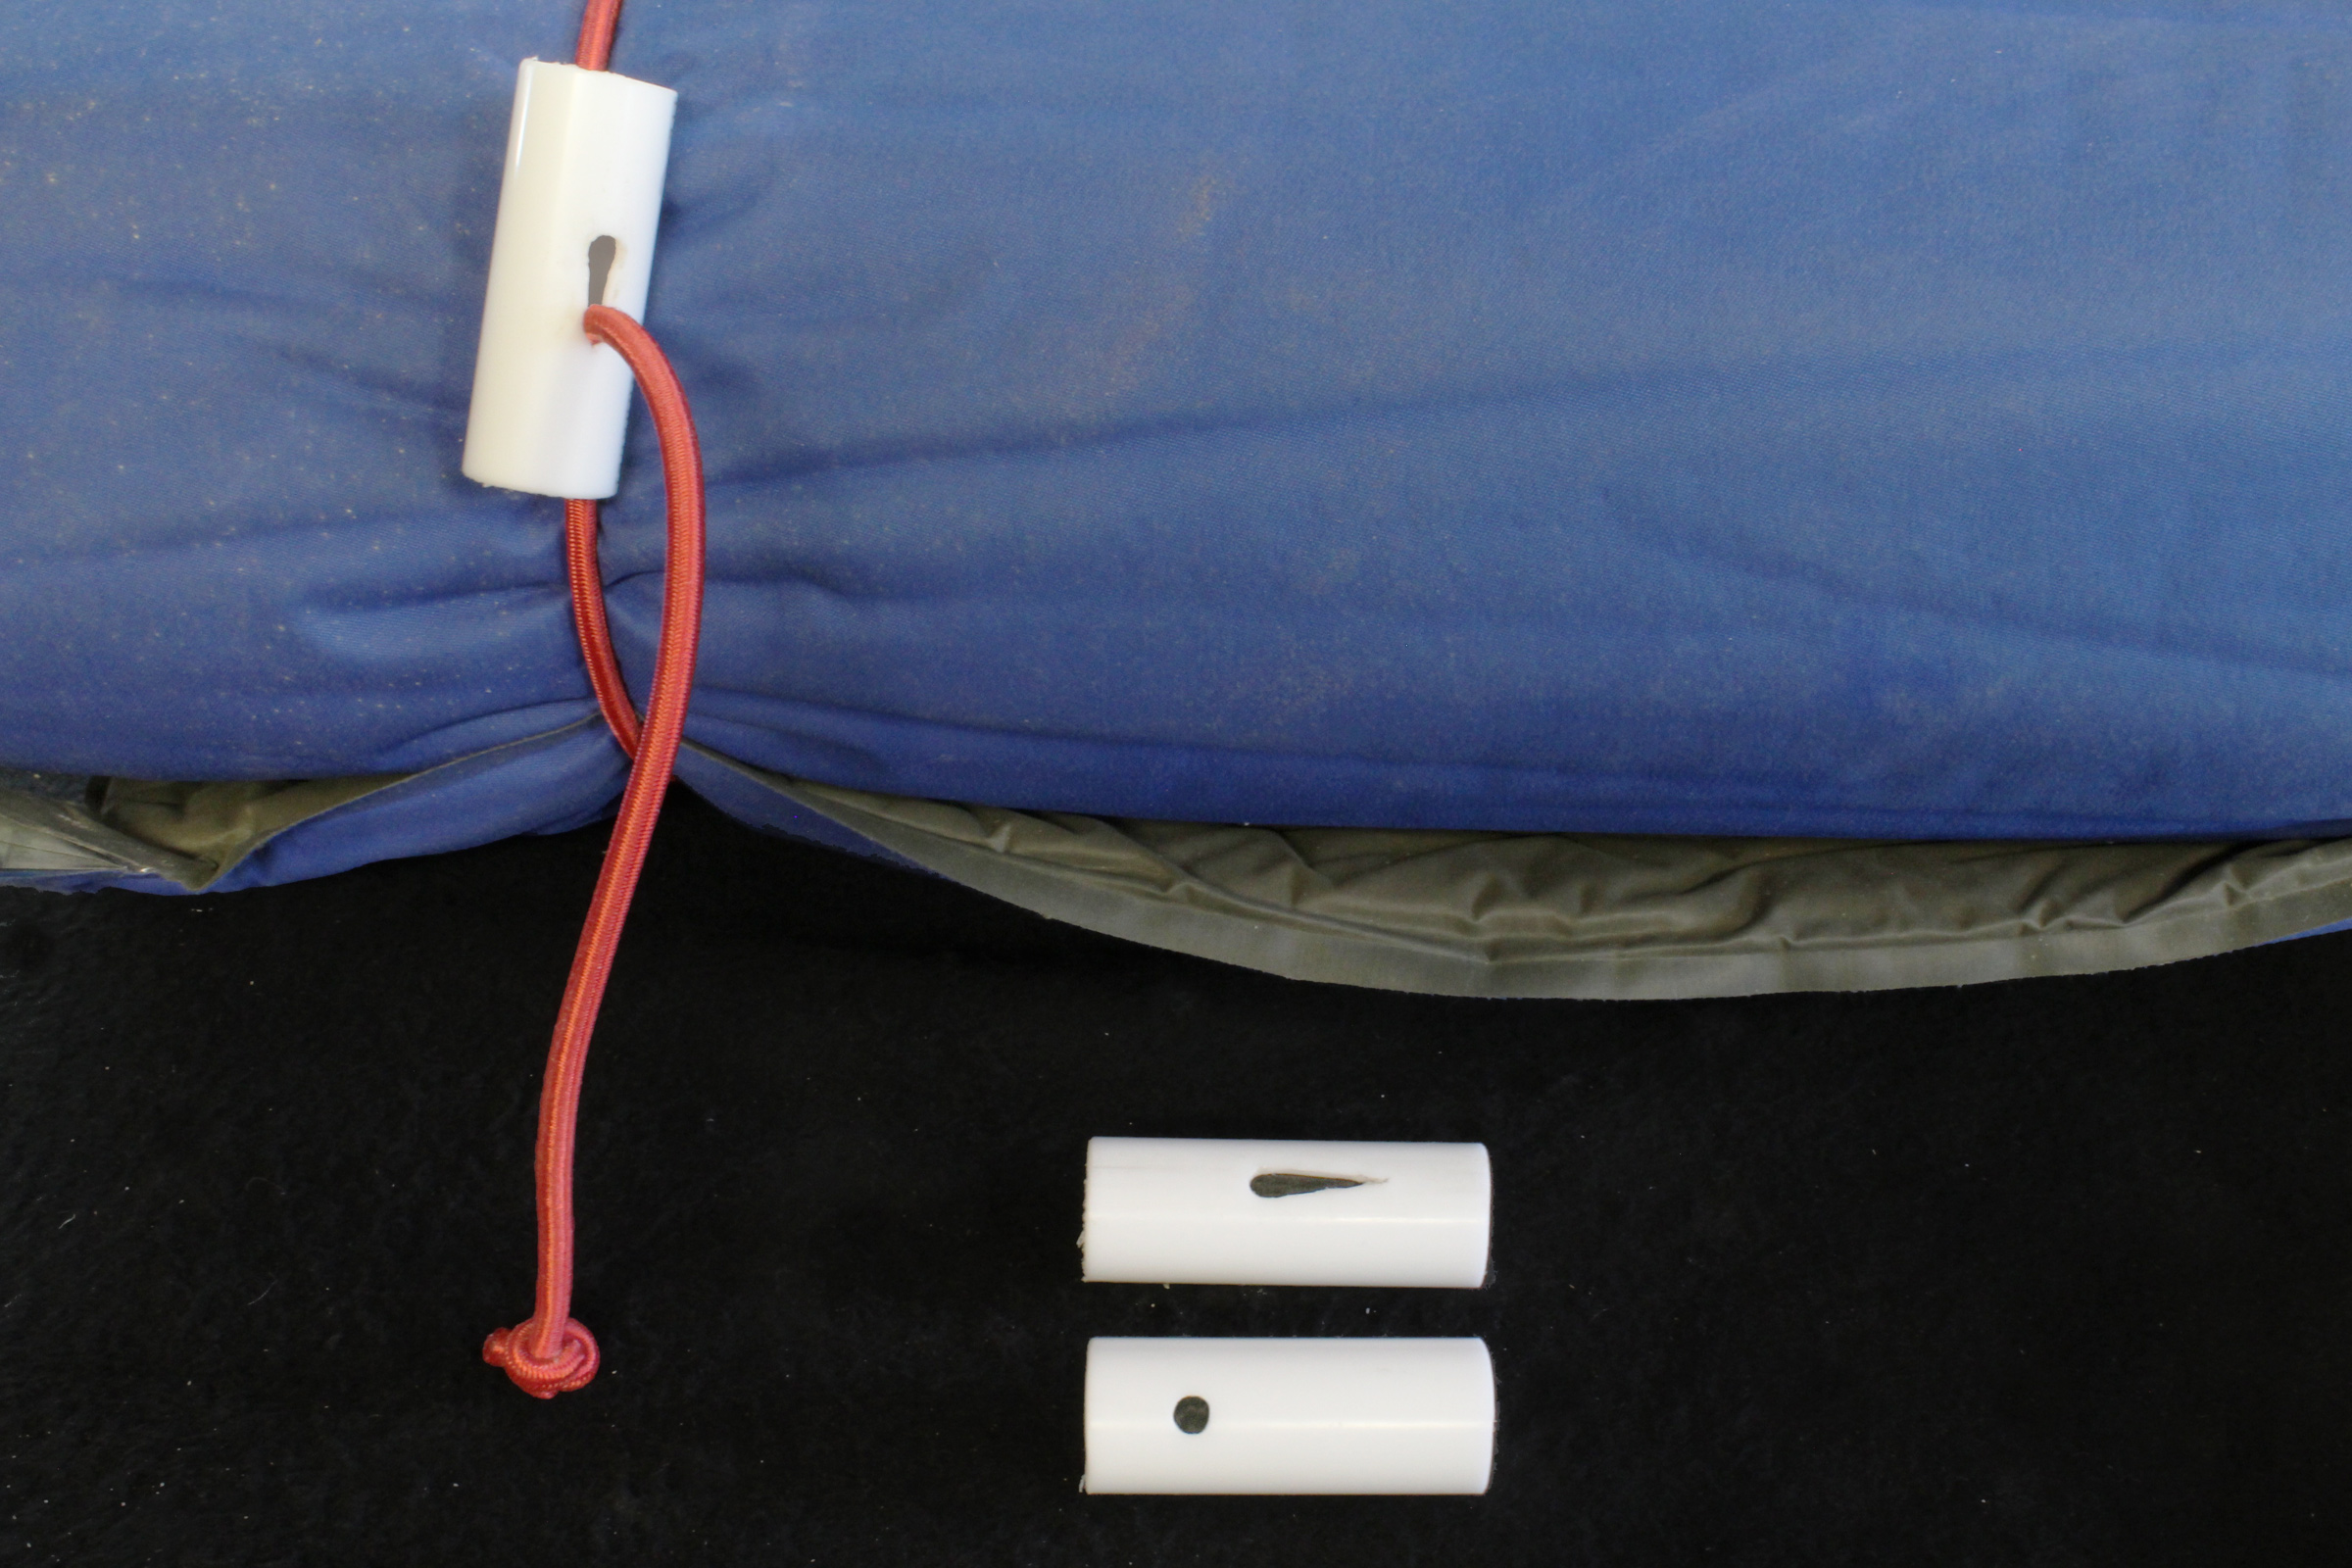
To make loops with toggles, drill two holes in one side of short lengths of plastic pipe. The bungee ends, threaded through the holes, can be tied off with a Zeppelin Bend or with Figure-8 stopper knots. The Figure-8s require some extra length in working end to allow for the knot’s travel as it is pulled tight once inside the pipe. The Figure-8s will be very difficult to untie.
![]()
For an adjustable cinch, cut a short length of plastic pipe and drill a hole in the back near one end and another on the opposite side near the middle. With a sharp knife, cut an elongated V from the middle toward the end opposite the hole in the back.
Undercut the sides of the V so the outside edges will be tighter than inside edges. Tie a Figure-8 in one end of a bungee cut to length, then slip the other end through the hole with the V and out the end of the pipe. Then thread the end of the bungee through the hole in the back from the outside, tie a Figure-8 in its end, and pull the knot tight inside the pipe.
Christopher Cunningham is the editor of Small Boats Monthly.
Check out these articles for more useful Bungee tips and tricks:
You can share your tips and tricks of the trade with other Small Boats Monthly readers by sending us an email.


Slick. Wish I’d known this last year, but that’s another story.
When cutting bungee (or synthetic line) I first wrap it with a short piece of masking tape–twice around, at most. Then with a sharp knife, I cut across at the middle of the wrap. The severed ends can then be sealed with heat in the usual way. Stinky, I know, but what else can you do? When it’s cool, unwrap the remaining tape, and you have a very neat, clean end that will slip easily through any hole you need, and it won’t unravel.
I just tried your tape-and-melt method and it is indeed a great improvement over my methods—going tapeless and letting the cord’s sheath flare or rolling the melted-but-not-yet-cooled material between my finger and thumb.
Our favorite tape for that is gaffer’s tape, it doesn’t char or smolder as much as the blue masking tape we used to use.
Great article. I’m always trying to figure out how to secure bungie cords. The solution usually includes a Figure-8 at some point. These are elegant knots. Most knotting instructions are confusing at best, but your diagrams are beautifully clear.
By the way, your diagrams for the Angler’s Loop read like a mini detective novel: “There’s the loop, the main suspect. Doesn’t seem right though, looks like it would slip.” Then the twist and the denouement: “The character I least suspected is the culprit.”
I’ll certainly be putting those knots to good use this season. I’ve owned a copy of Ashley’s Book of Knots since I was a teenager. The Angler’s Loop was easy to find (#286 & #1017). The Zeppelin Bend seems to belong to a fairly large class of bends that involve intertwined overhand knots, but I haven’t identified it in Ashley yet.
Thanks, Andrew. Have you seen my thriller about the Brummel Eye Splice?
I don’t see the Zeppelin Bend in Ashley either, but there is a variation of it called the Hunter’s Bend, number 1425A on pages 260 and 261. The description of the knot notes that it’s a new entry, added in 1979. While the Zeppelin Bend has the two loops stacked with the working ends on the top and bottom, the Hunter’s Bend has them in the middle.
Nerds! 🙂
That was fun to read!
I avoid hollow braided poly rope because it’s natural state is snarled, but because it floats it’s often the only kind of line that I find in the driftwood. If it’s the only thing available for improvising camp shelters, the Zeppelin Bend and the Angler’s Loop are the knots to use. As it is with bungee cord, the sheet bend and the bowline (at left below) will start to undo themselves as soon as you take your hands off them. The Zeppelin Bend and the Angler’s Loop (at right) will stay tied.

What material plastic pipe is that in the article?
The pipe I used for the toggles in the photos is 3/4” white PEX (cross-linked polyethylene) water pipe. I’ve also used 1/2” PVC water pipe. The PEX is made flexible so it can be plumbed around corners, while the PVC is stiffer and requires fittings to change direction. PEX is sold in 100’ coils, but it’s also available in short pieces from 5’ to 10’ for about 35 cents per foot. The two types of pipe are about the same size; PEX is softer material and has thinner walls than PVC, so it’s easier to carve V-slots into it for the adjustable toggle. Both types equally easy to drill.
I’ve carved the V-slots with the toggle standing on end on the workbench, but putting it in the vice, squeezing the ends rather than the sides, is safer and easier because I can put both hands on the knife.
If you find that the bungee comes loose in the V after being tossed around, tuck the working end under the tensioned bungee wrap to keep the bungee pulled into the V.
Hi, Chris. Great article! Your oars look like our Collar Oars that we got for our Alden Ocean shell double decades ago.
My trick for working with bungee cords is to put a couple of drops of Hot Stuff (cyanoacrylate) or equivalent on the piece before attempting to cut. The extremely low density glue gets through the outside sheathing an in among the rubber strands quite handily. A couple of minutes later you can cut with a sharp blade without any problem and the ends are sealed, so need for heat-shrink tubing. Or if you insist for esthetic reasons, the glue makes it a lot easier to slip the tubing over the cut end of the cord before shrinking. Hot-knife cutting does work but the burning rubber stinks.
More useful tips of the trade for us small-boat owners. Thank you.
I’ve used a version of your homemade bungee made with wine corks instead of plastic pipe. Natural cork and the newer plastic corks both work. Two holes drilled perpendicular to the axis of the cork with the cord going through both and secured with a figure 8 knot. Overdrilling a small amount into the cork lets the knot sit recessed for a smoother appearance. While the cork doesn’t lend itself to an adjustable cinch version, it does provides more fun collecting the raw materials!
Great article full of useful tricks (as are the comments!). Thanks.
I have found the most secure, permanent bend for bungee to be the Vice Versa Bend. It’s the only bend I know of that holds permanently even when the resulting “rubber band” is repeatedly stretched and relaxed. It’s not well known because it doesn’t have much of an advantage in applications outside bungee.
The Reever Knot is almost the same thing, and only the lay of the tag ends differs. In my experience the way the line exits the Vice Versa works better when making loops out of bungee. See both at Wikipedia.
For 1/8″ hog rings check out HTB Bungee Cords. I have purchased both 1/8″ bungee cord and the hog rings from them.
Can you tell me how to put a stopper knot in the end of bungee cord? Will a figure 8 knot suffice, don’t want it to ‘roll’ off out of a knot under load as I know can happen with bungee if not tied correctly. Thanks in advance.
I’ve had good luck with the Figure-8 as a stopper knot. As I mentioned in the caption for the toggles I make from plastic pipe, it’s important to tie the Figure-8 with a long tail end. The knot will travel as it tightens, but it will get to a point where it will stay put.
Thank you! I want to make some exercise cords for arm and leg exercises. I needed knots for handles and loops.
Can one make the anglers knot on a ring that is attached to a wall? A wall cannot be pulled through the loop like the pocket knife. I have two of these rings opposite each other.. What knot or modification would you advise?
Thanks in advance!
The Poacher’s Knot seems to work well on bungee cord.
Thank you!! I’m practicing as we speak.
The angler’s loop/perfection Loop can be tied around a post or ring. See the Popular Knots video on Youtube.
It’s often useful to tie a knot according to someone’s directions, then untie it (and maybe film the untying) by working an end back through the knot.
I look at a lot of knot-related sites to learn how to tie.
This website has some of the best step-by-step illustrated instructions I’ve seen.
There are many ways to tie the Anglers loop – some of which are easily tied around an object (and dont need the object to flip inside a loop).
– Take a piece of line.
– Form an overhand knot .
– Take the bitter end around the object and re-enter the “loop” of the overhand knot. You must reenter the loop so that the returning line and outgoing line are side-by-side.
– Take the bitter end around the standing part of the line and turn toward the loop.
– Complete a full turn around the standing part by passing the bitter end under the two parts of the knot forming the loop.
If that’s too complicated – form the knot as in the guide above and untie-it from the bitter end.