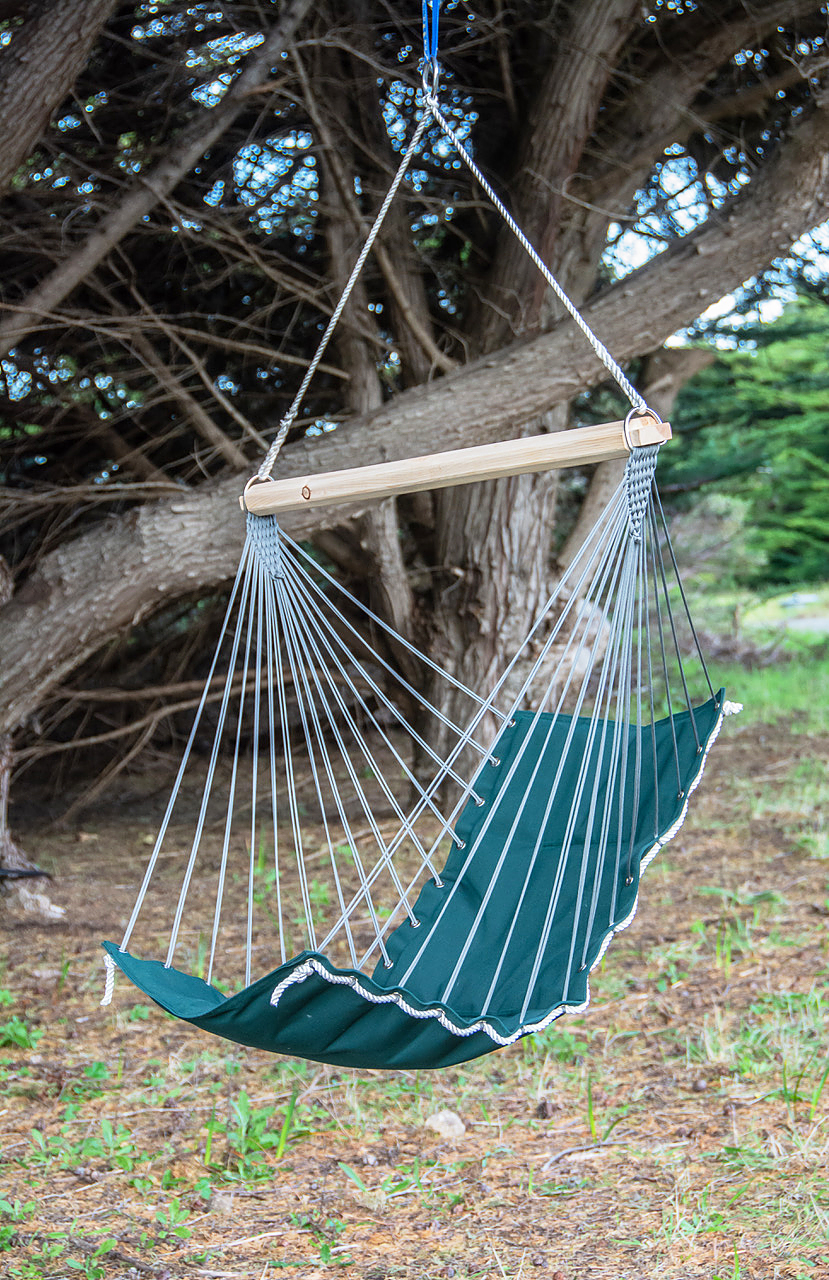
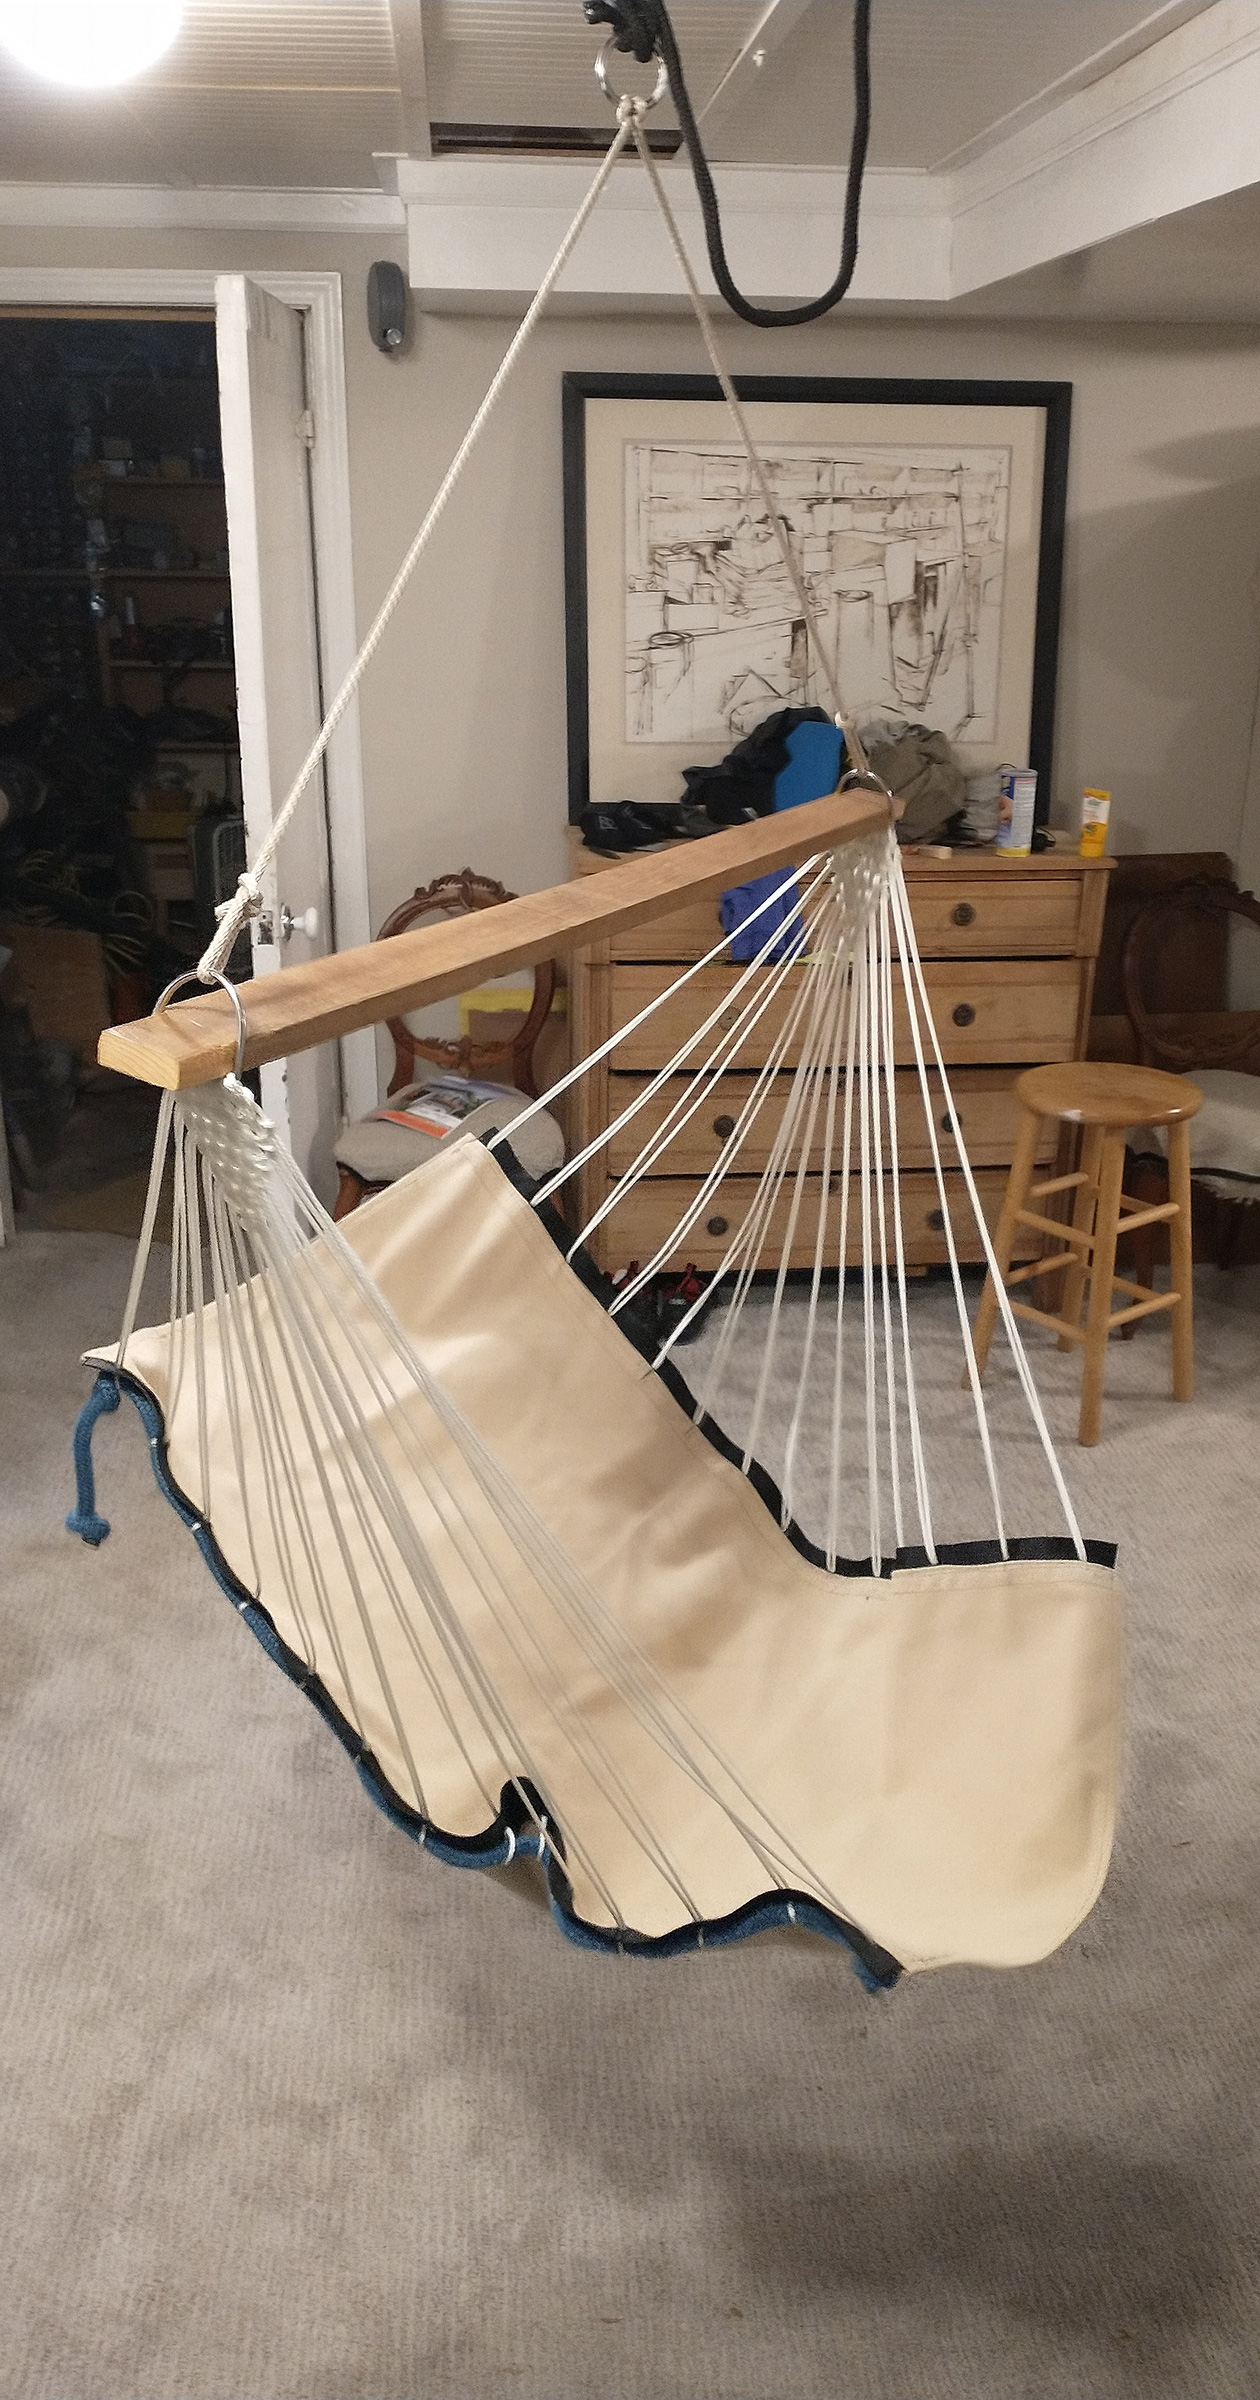
Here’s a luxurious recliner you can take on your next camping trip. It is wonderfully supportive, perfectly comfortable, small to stow, relatively easy to make, and looks more polished than just about anything you can buy. The canvas and cordage skills you’ll use making it can extend to other kinds of hammocks and small-boat accessories. Your biggest challenge will be clearing your companions out of the chair when you want to sit in it.
Materials:
1-1⁄4 yards of roughly 60″-wide canvas. (For chairs that will stay outdoors at home year-round I use Sunbrella.)
28 #0 spur grommets
About 200′ of paracord
16′ of 3⁄8″ three-strand nylon line
Two 2″ D-rings
One 2″ round ring
A stick of wood roughly 2″ × 4″ × 38″
Heavy-duty sewing-machine thread
High-loft polyester batting 23″ × 40″
Tools:
Sewing machine
Scissors or rotary cutter
Grommet hole punch and setting die
Start with the body of the chair. The finished article is 41″ x 24″ with 14 evenly spaced grommets on each long side. The body can be as simple as a single layer of canvas cut to 43″ x 30″. The double-fold hems on the long sides must be 1-1⁄2″ wide. The resulting three layers work best with the grommets. Fold 1-1⁄2″ in on each long side, then fold this over again. For the short sides make a 1⁄2″ double-folded hem. For the simple version, skip the next two paragraphs and resume with the one that follows them.
Photographs by the author
The “Cadillac” version, which is made of two layers of fabric with batting in between, starts with two pieces of fabric cut to an overall dimension of 27″ x 42″. With single-fold hems—½″ on the ends and 1-1/2″ on the sides—the finished size will be 24″ x 41″.
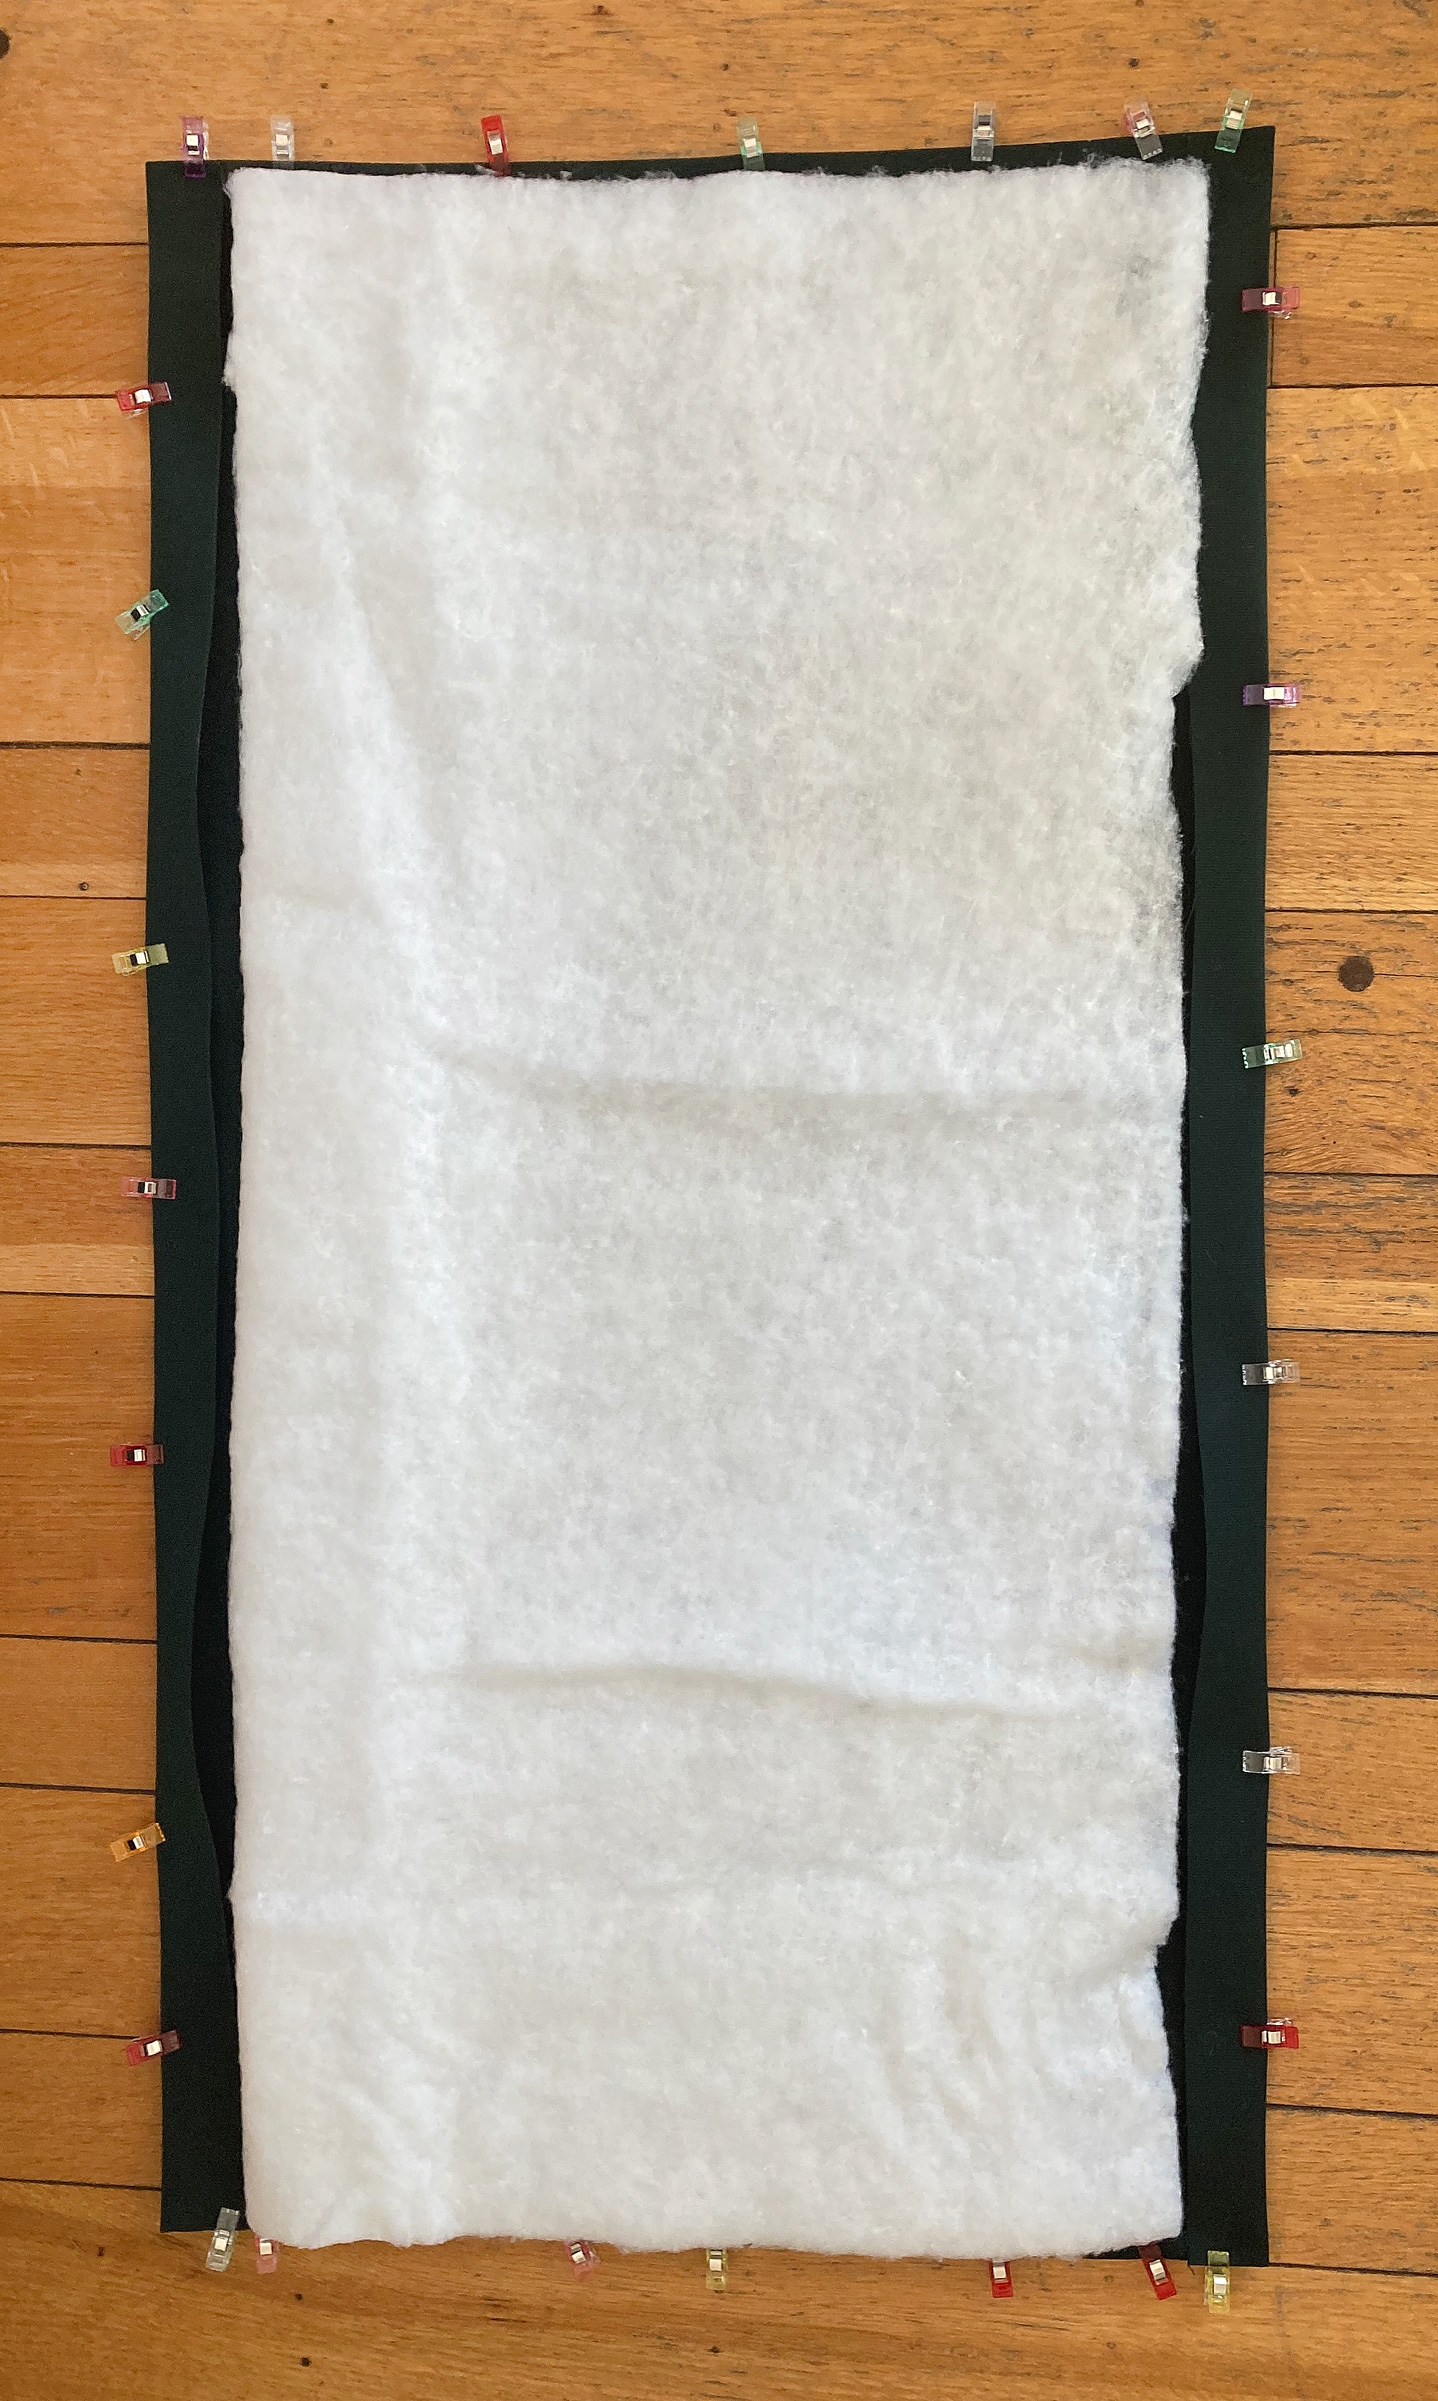
For the “Cadillac” option, two layers of canvas with soft polyester batting in between them, cut two pieces of canvas at 42″ x 27″. On each piece, fold a 1-1⁄2″ single-fold hem on the long sides and a 1⁄2″ single-fold hem on the short sides. Hold the hems with double-sided seam-stick tape or sewing clips.
The batting is cut to fit within the hems.
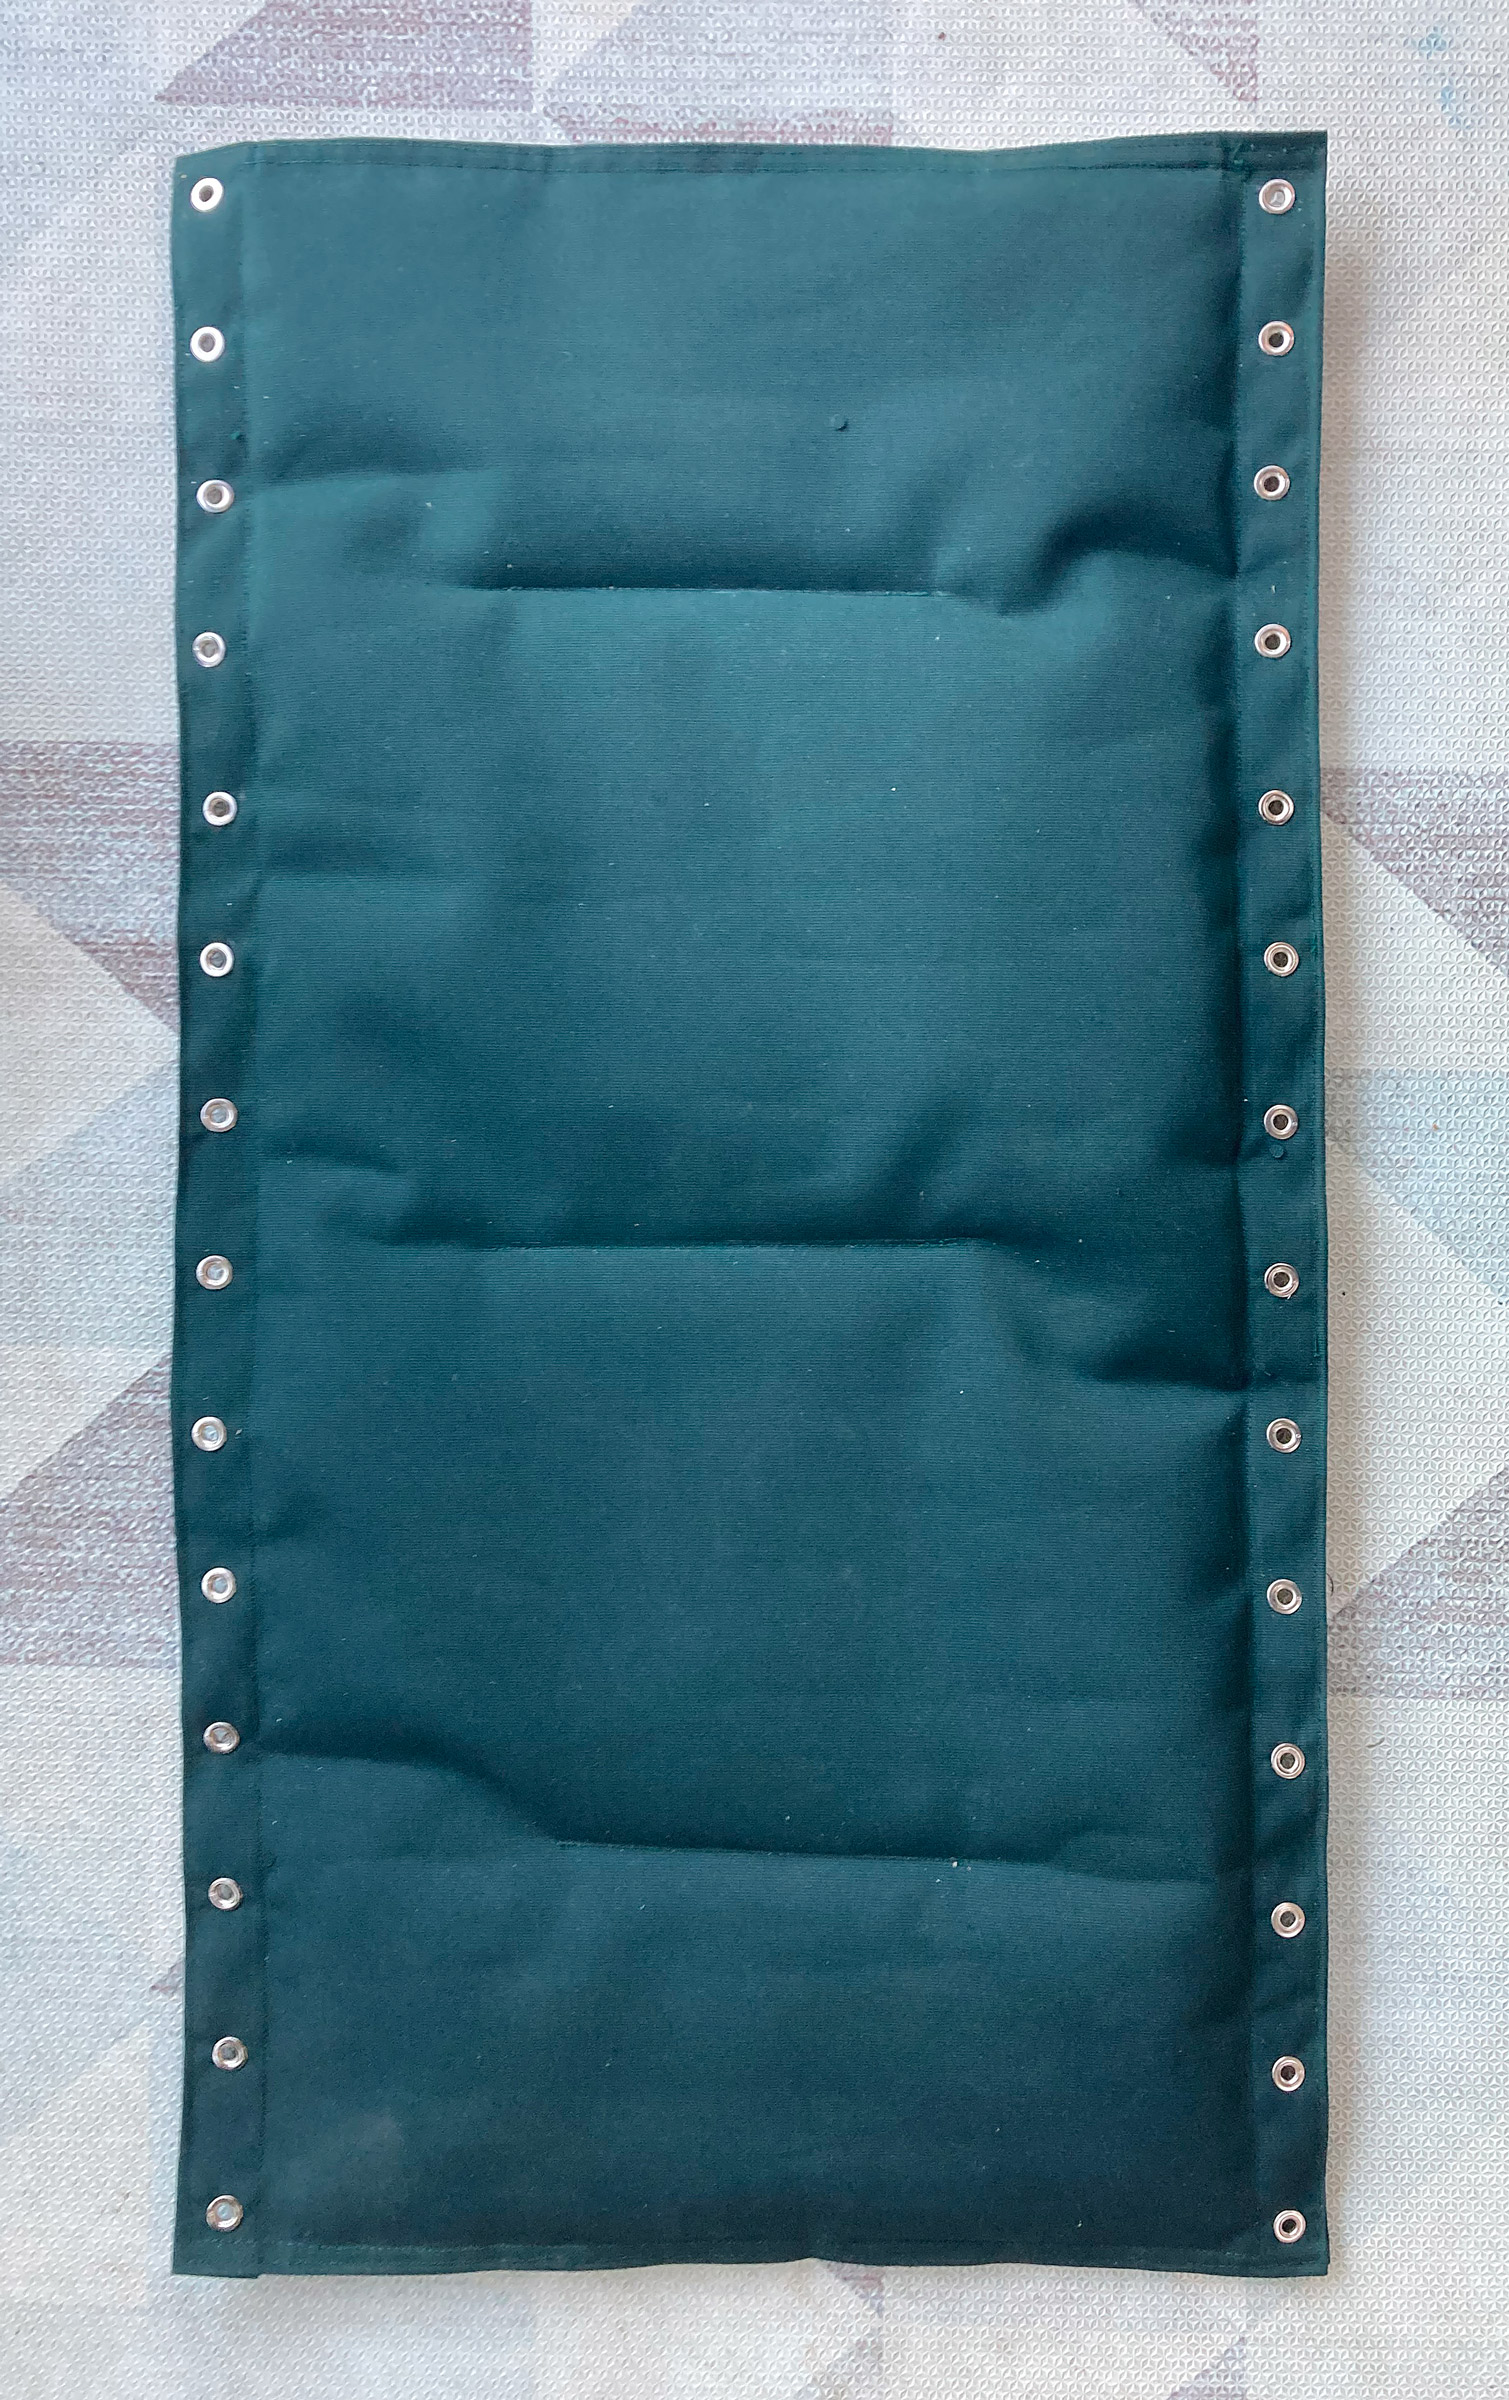
A 40″ x 23″ piece of batting should fit 1⁄2″ from the outside perimeter of the hemmed fabric. Sandwich this batting between the two canvas pieces with the hems facing inward; be sure no batting overlaps the hems. Secure the edges with tape or clips, then sew around the perimeter of the rectangle using the longest straight stitch your machine can make. Sew additional lines 1-1⁄4″ in from the long sides to capture the 1-1⁄2″ hems inside. The body of the chair should be quilted to hold the batting in place. For the chair pictured here, I did just three horizontal lines of stitching, but you can decorate your chair with quilting in a pattern of your choice.
After the two layers of fabric are sewn together, grommets are installed. The three lines of stitching in the middle hold the batting in place.
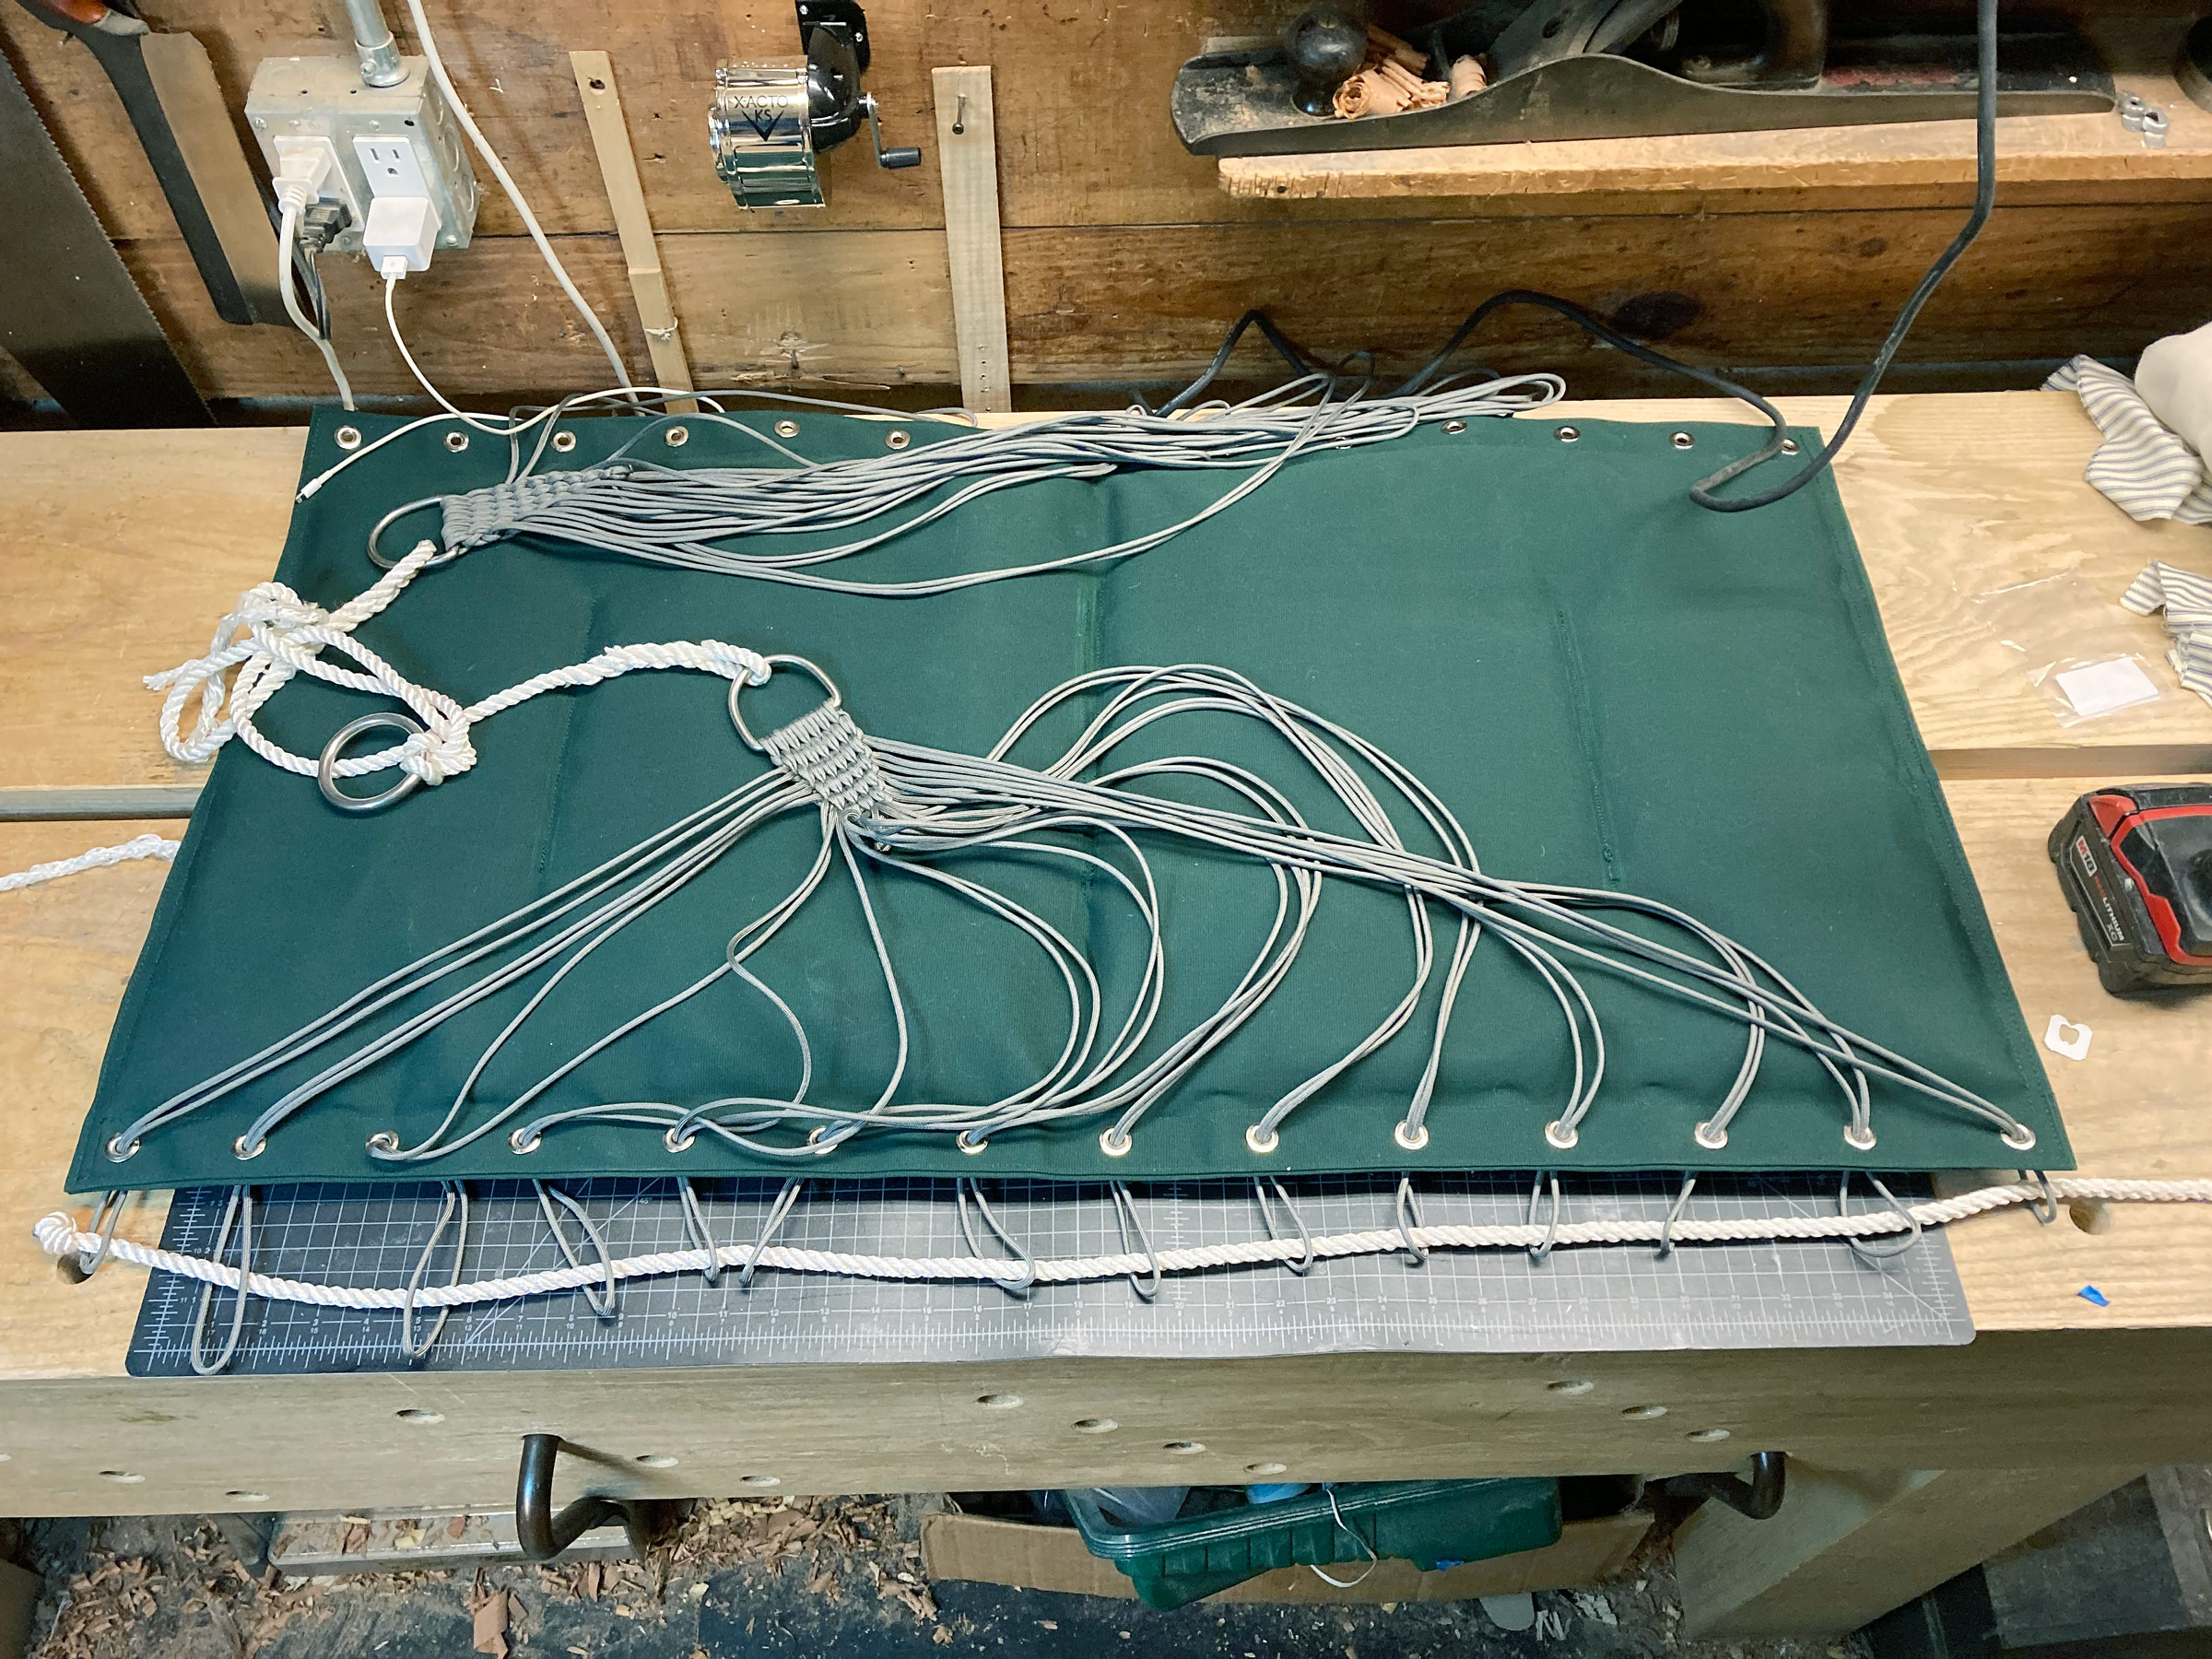
Layout for grommets: Make a mark in the center of the long-side hem 1″ in from the end of the chair. Continue to mark every 3″ until you have 14 evenly spaced marks along each long side. Punch holes and set grommets. The chair body is complete.
Each grommet will anchor a loop of line called a nettle, and all of the nettles hang from a D-ring on each side and are woven into sword-mat clew knots. It may look far more complicated than it is; with the jig (described below) I can weave one in 10 minutes.
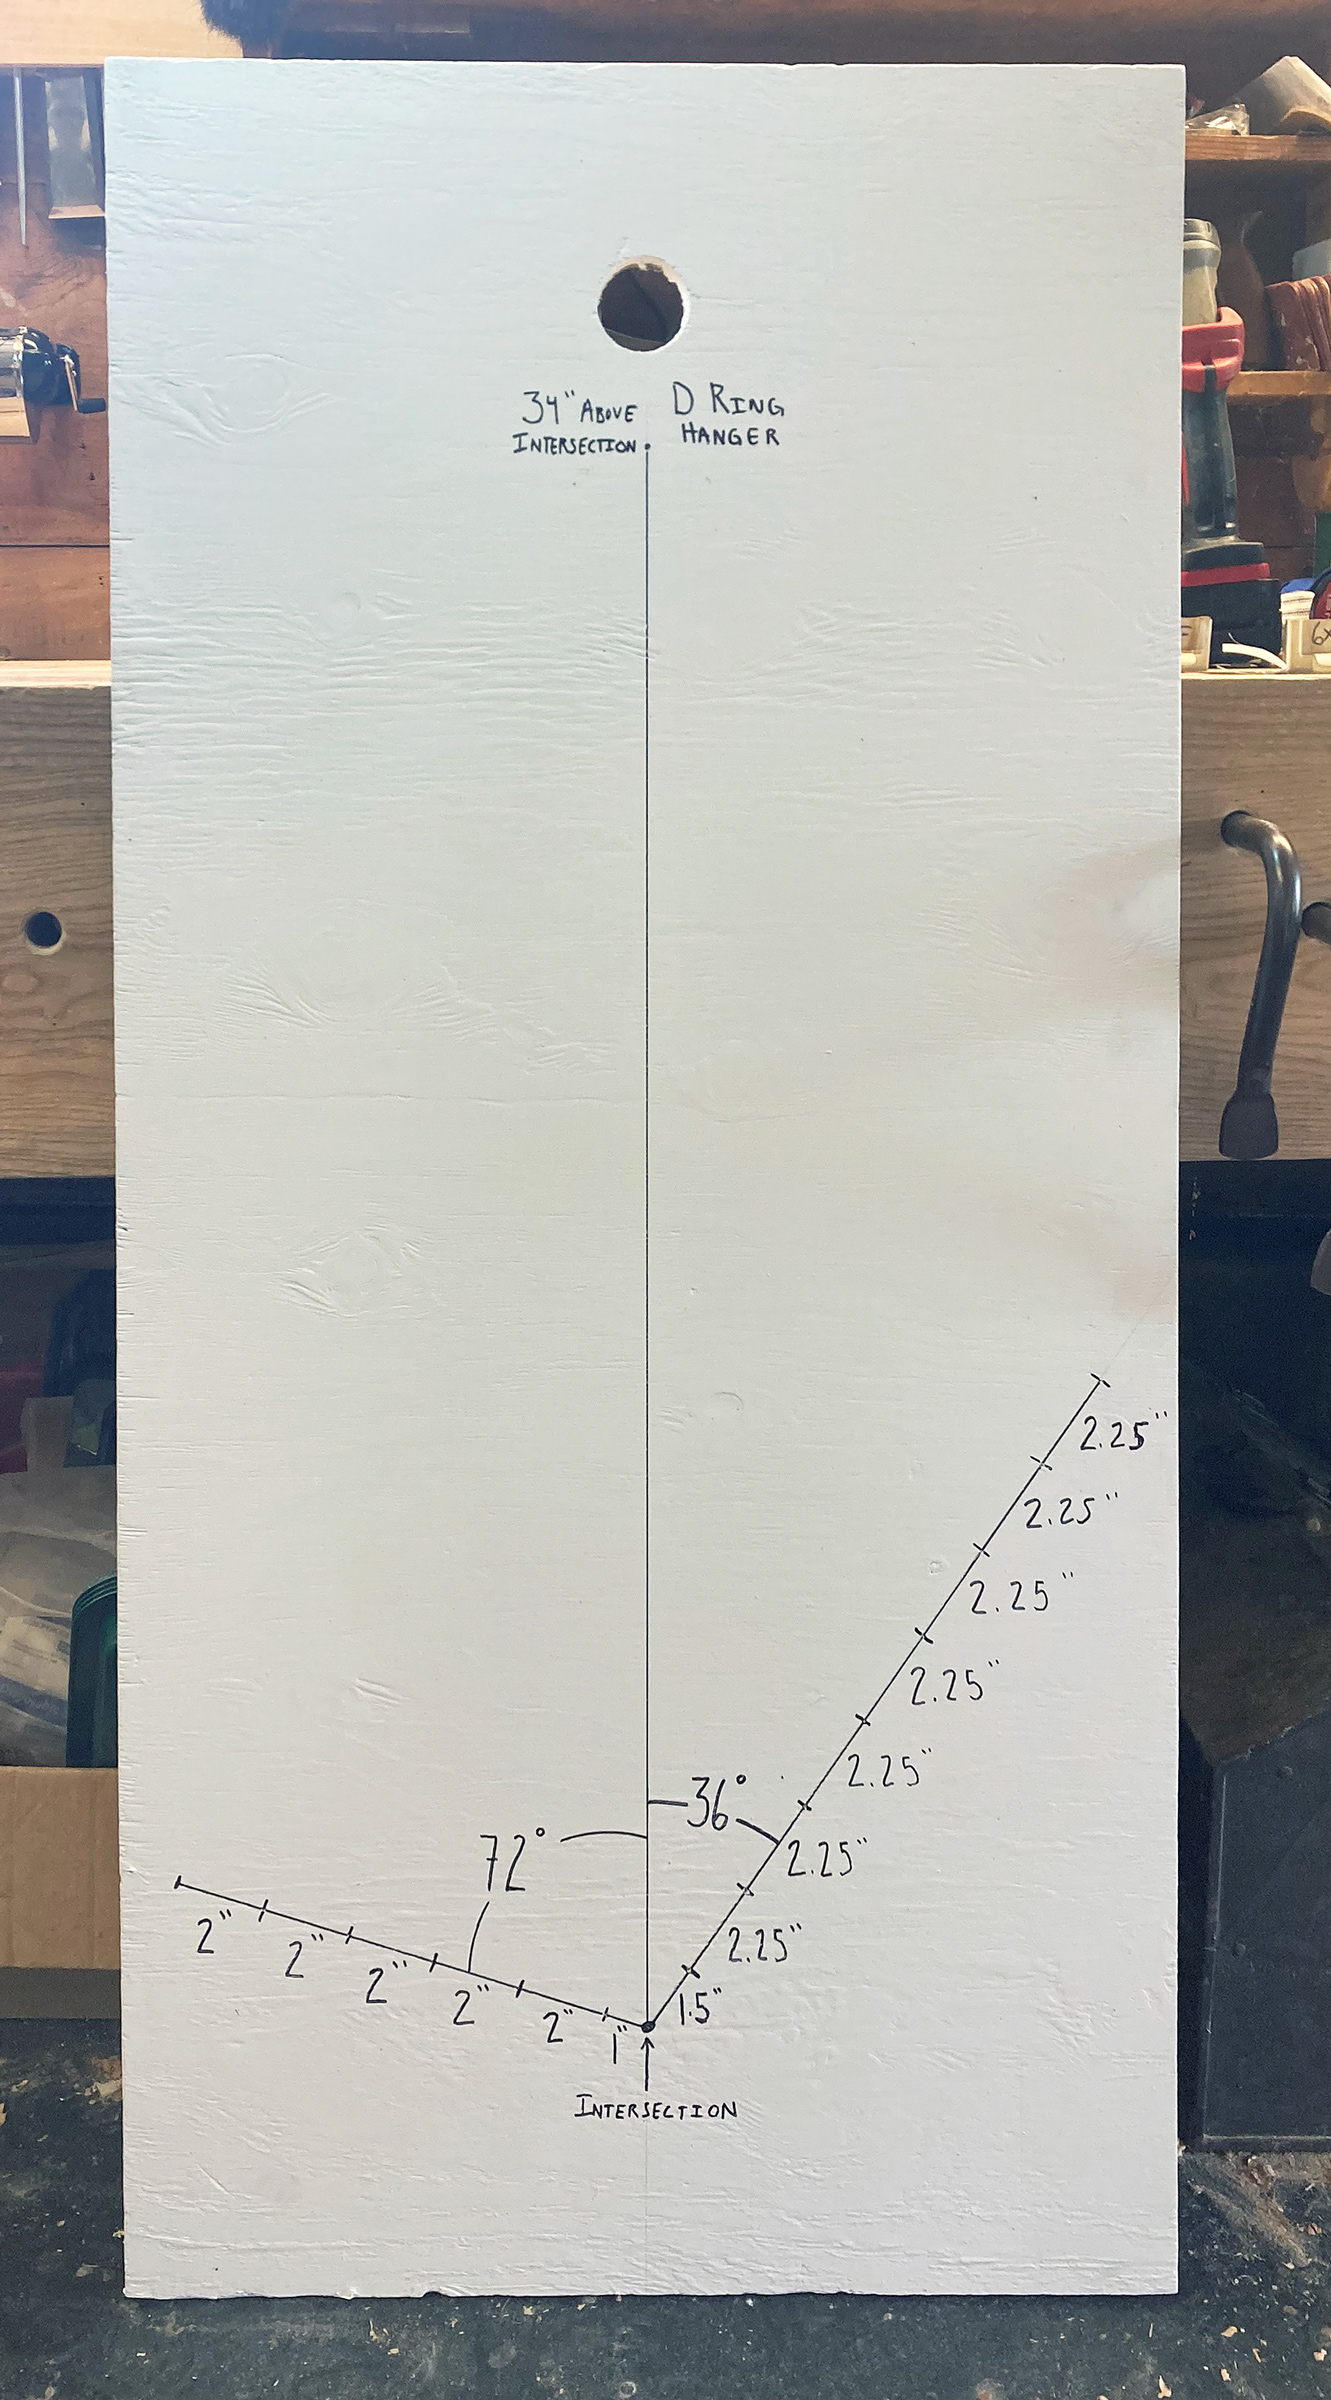
Screws driven into a wood panel create the jig for making the suspension system for the hammock chair.
The jig is made from a piece of plywood, particle board, or other sheet material roughly 40″ x 24″ and thick enough to hold screws. Draw a vertical line down the center of the sheet. Make a mark about 6″ above the bottom of the board to locate the intersection of the back and the seat. Subsequent measurements will be made from this point. Mark 34″ up from the intersection for the screw that will hold the D-ring.
Draw a line to the left of the intersection at 72 degrees from the vertical. Measure 1″ along this line from the intersection and mark for the first screw. Proceed outward along the line, placing marks at 2″ intervals for five more screws. Draw a line to the right of the intersection at 36 degrees from the vertical. Measure 1-1⁄2″ along this line from the intersection and mark the location of the lowest screw for the backrest. Proceed along the line, marking 2-1⁄4″ intervals for seven more screws. Drive screws on all of the marks, leaving enough of the screw proud to catch a bight of paracord. Your jig is complete.
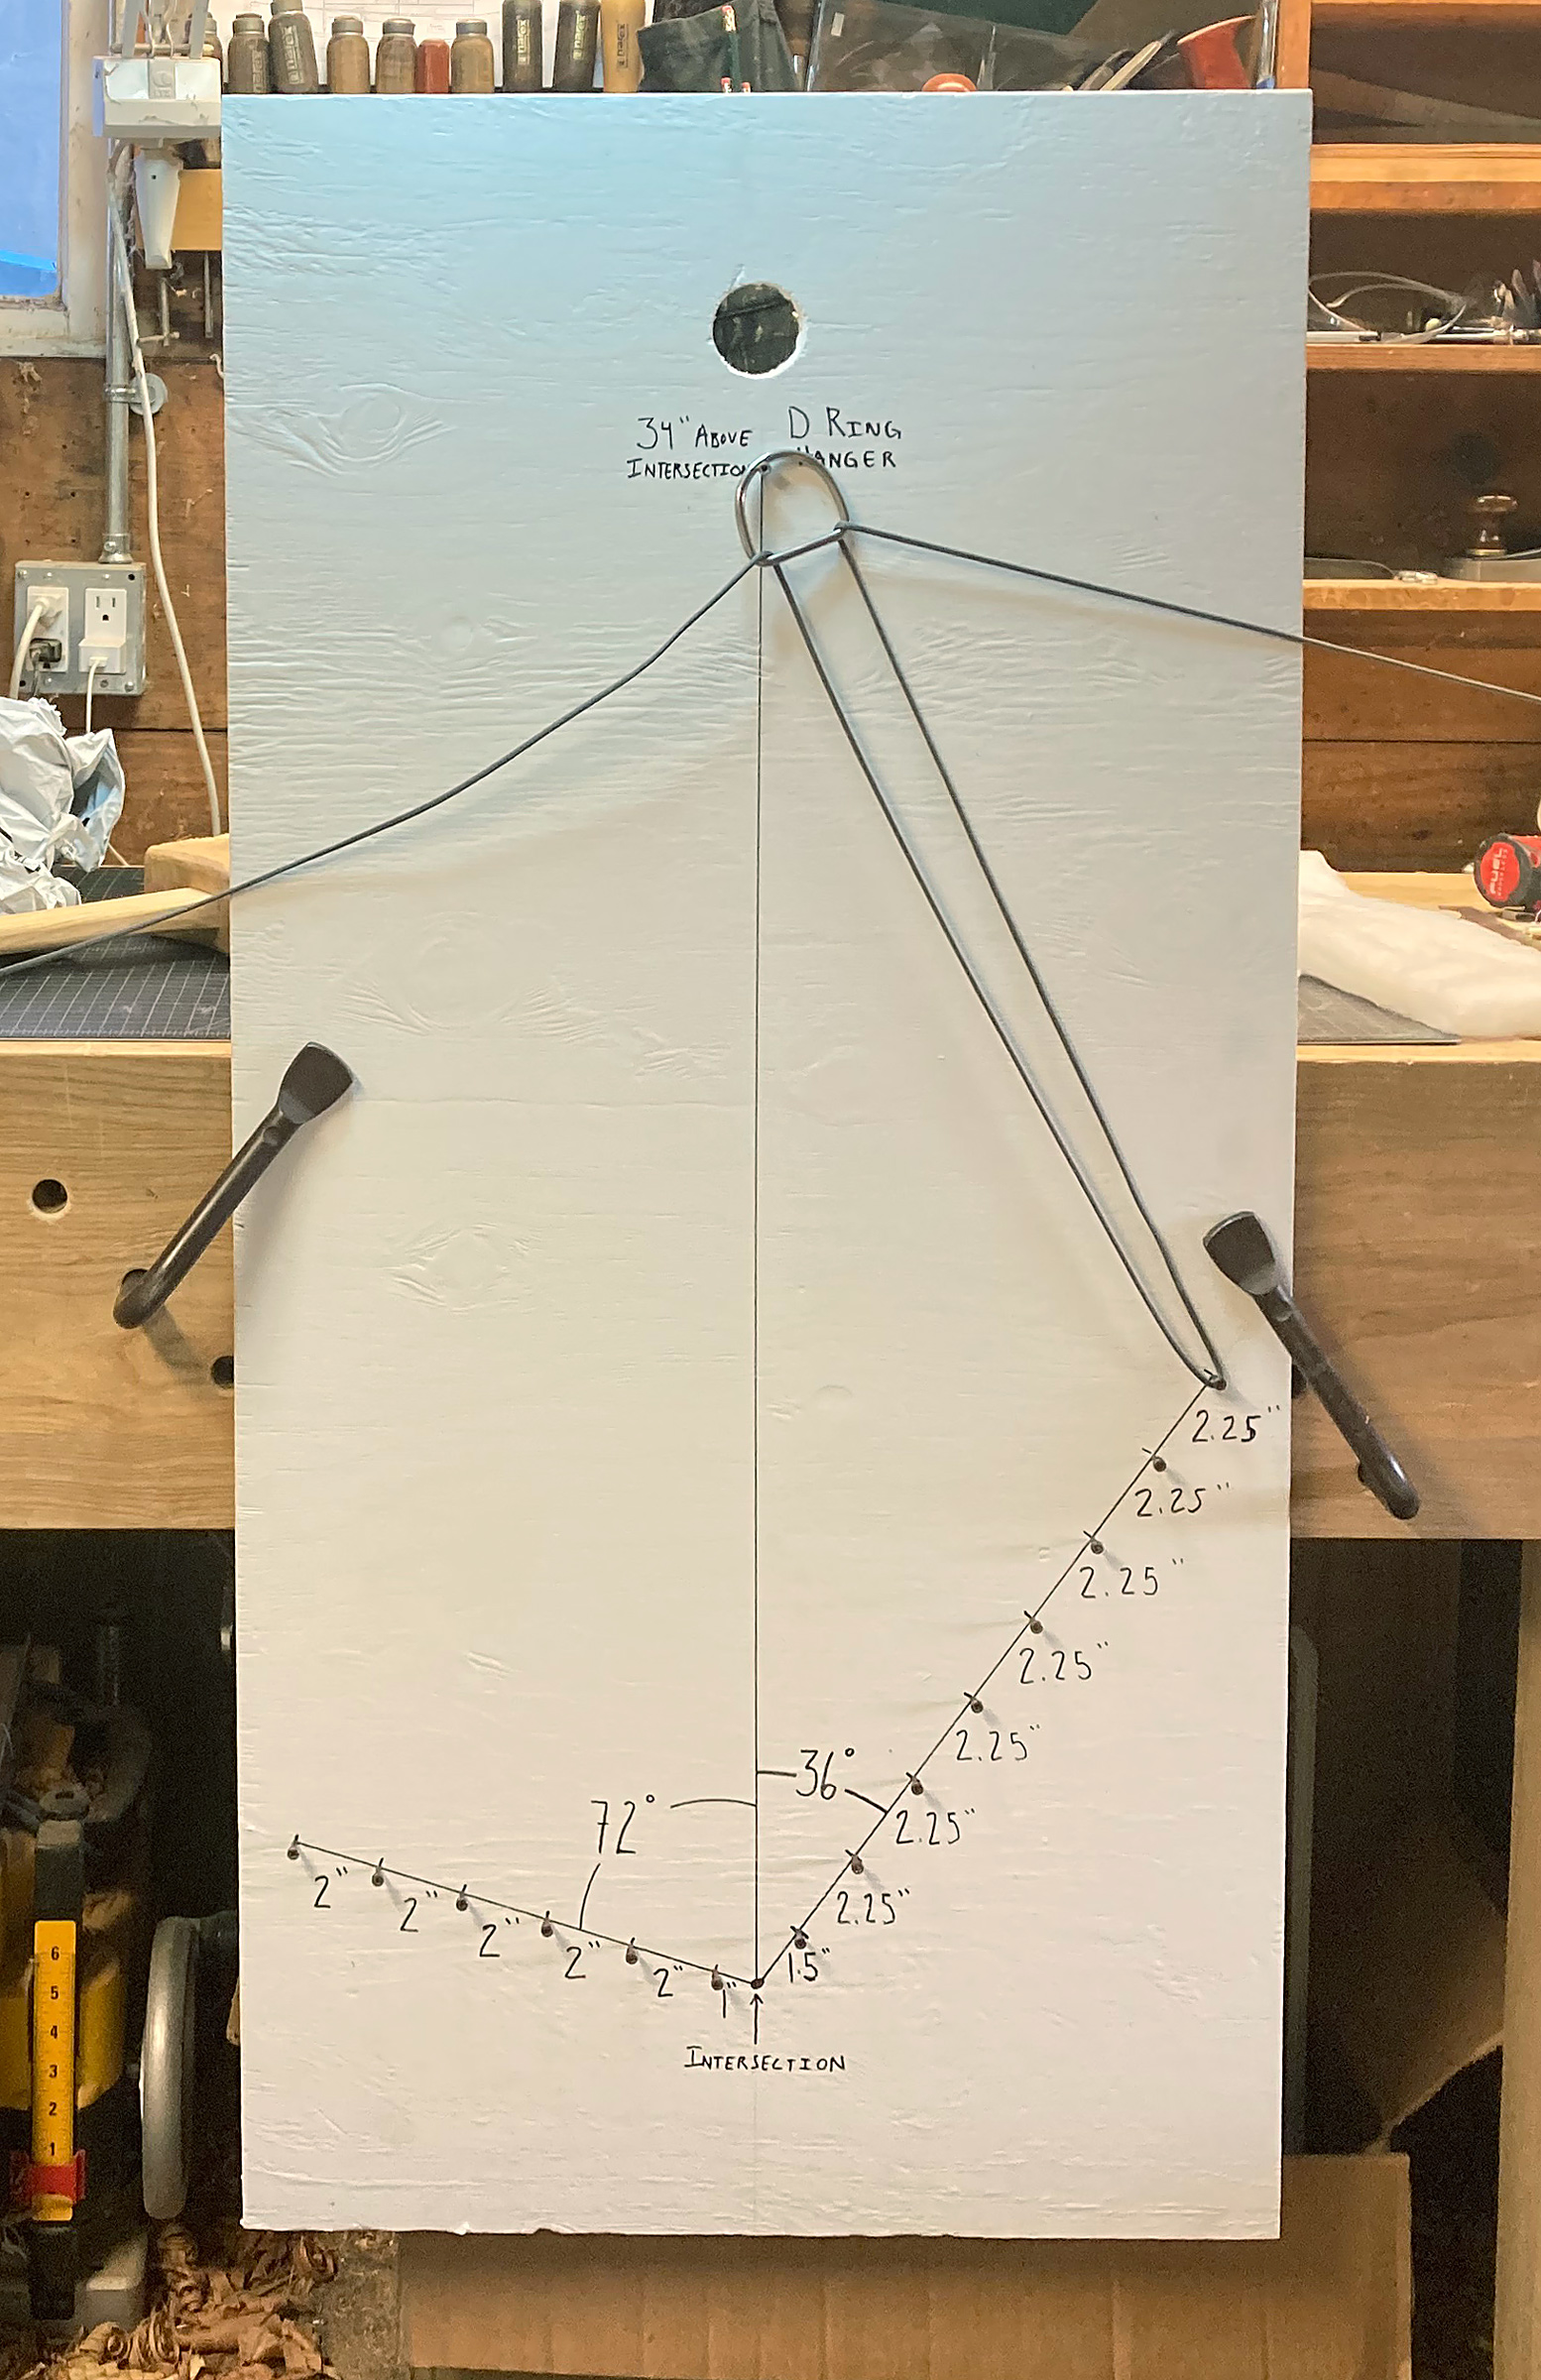
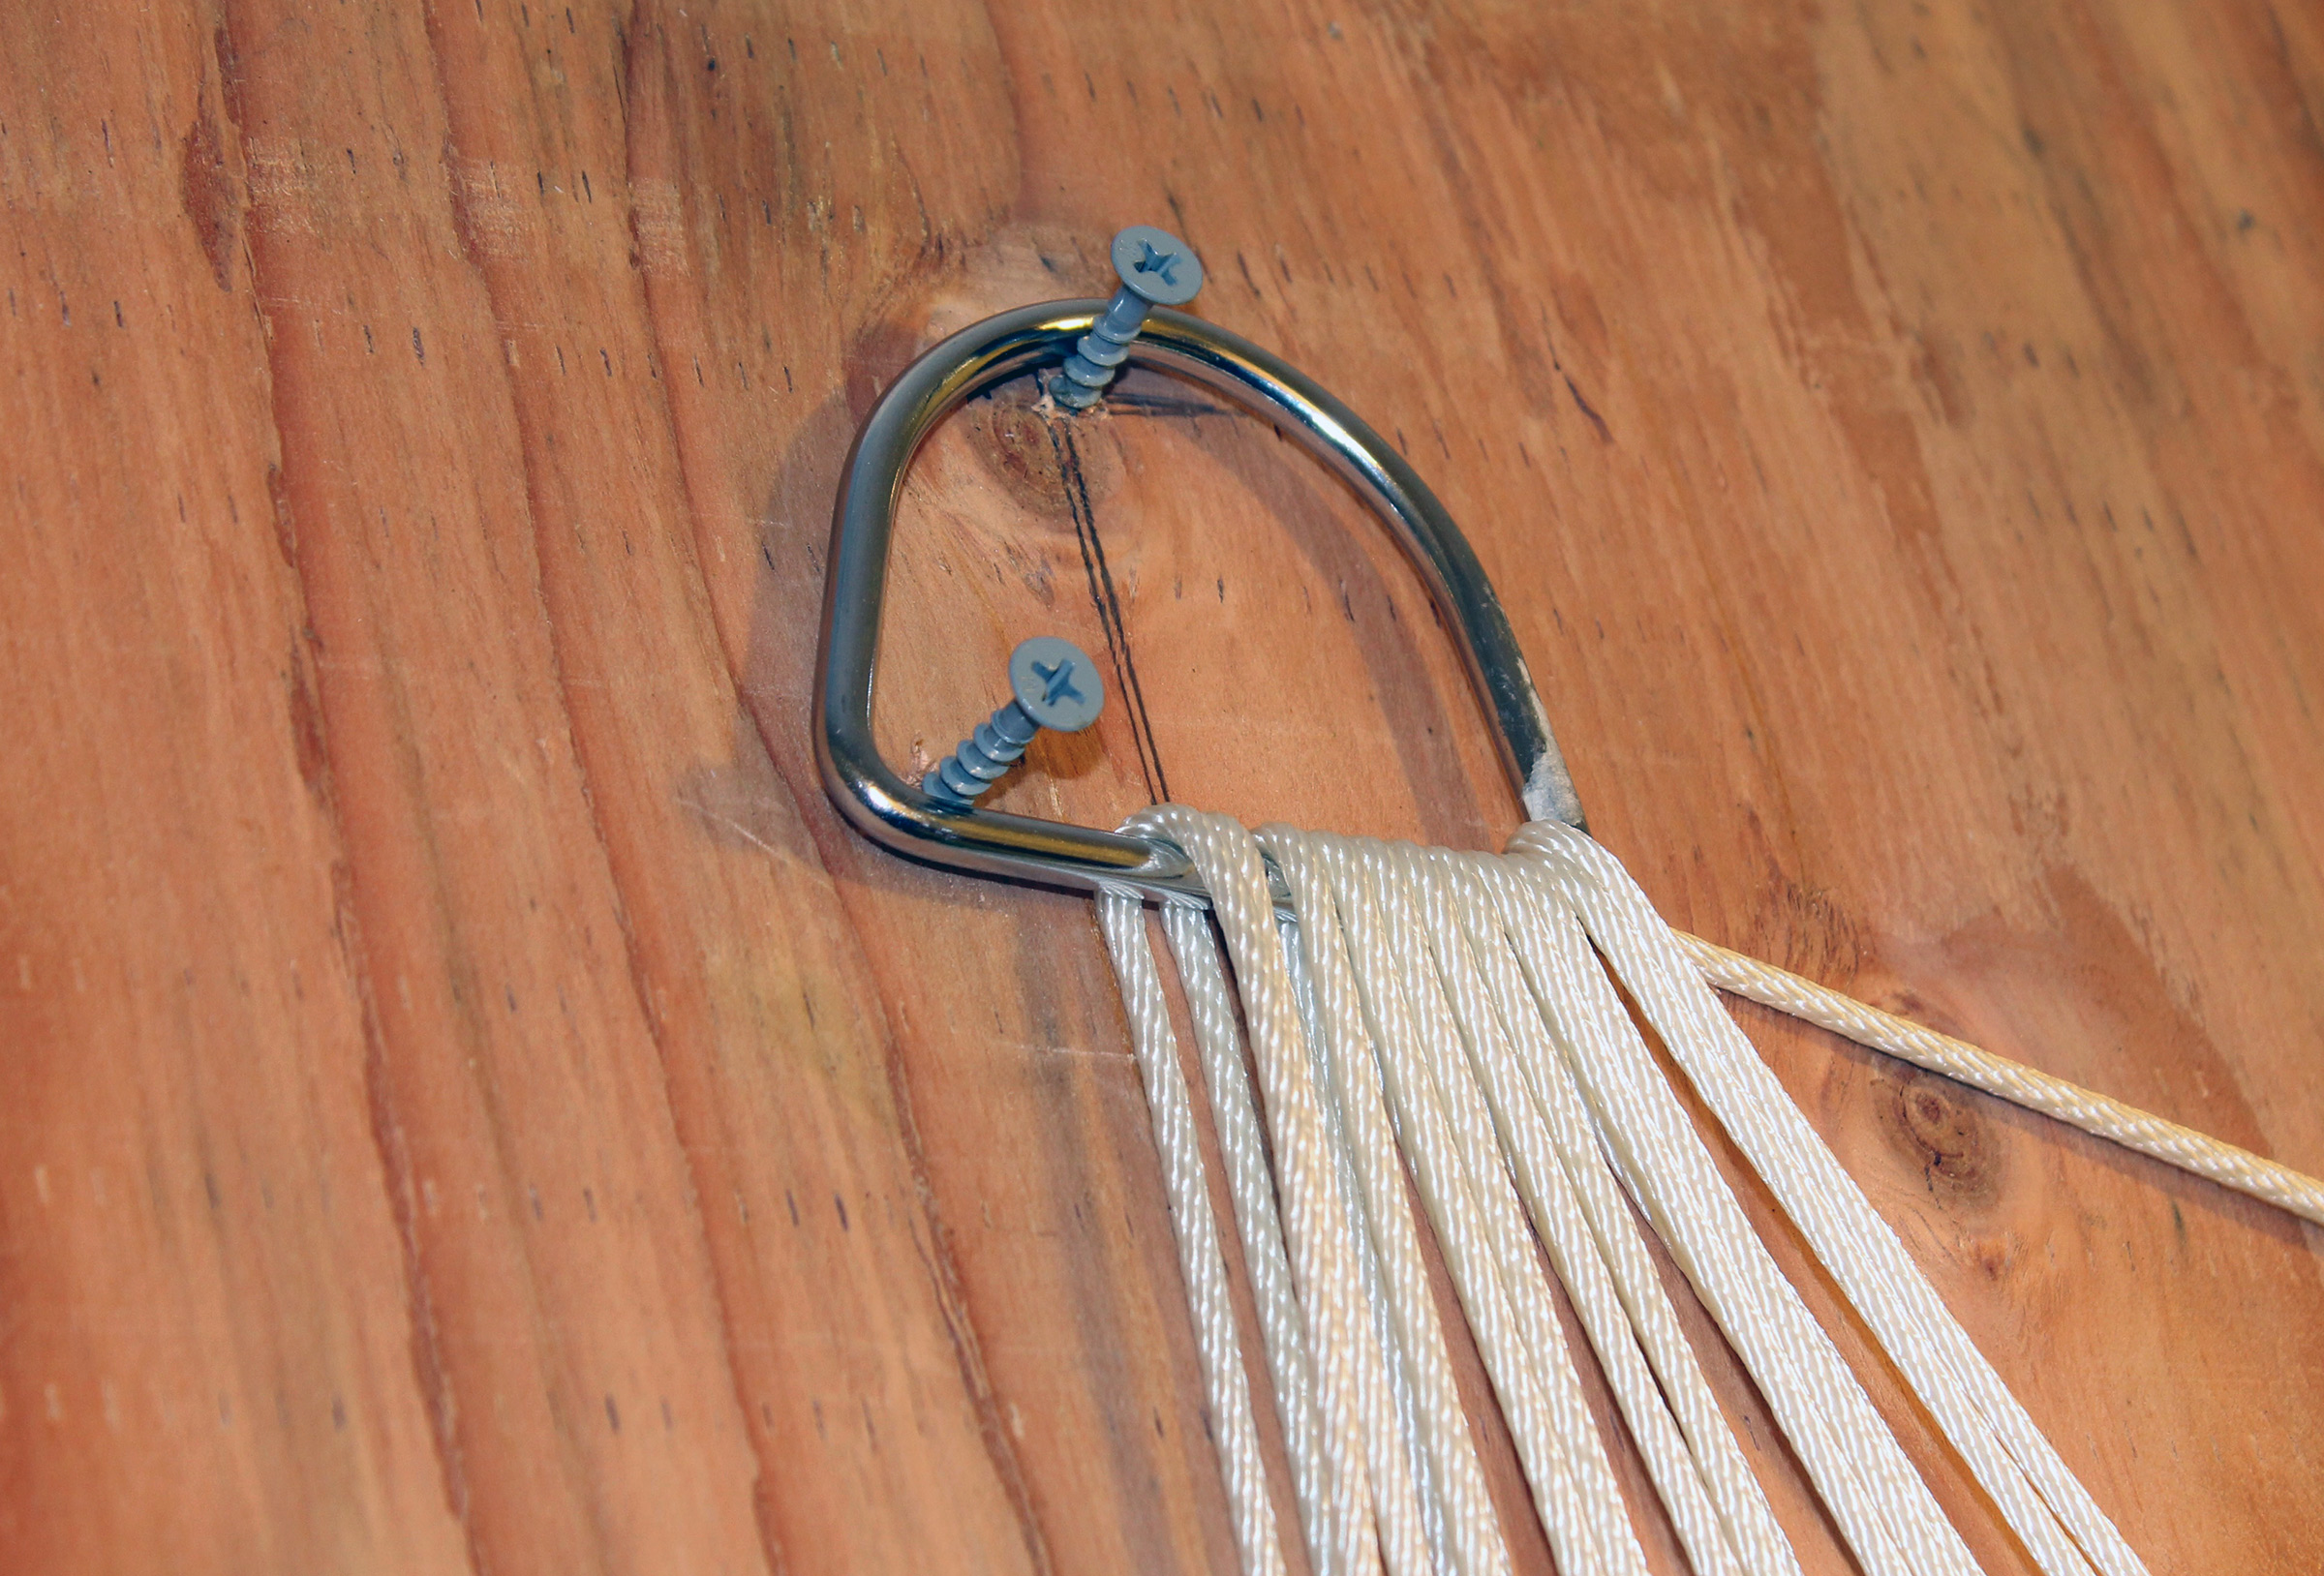
Begin the clew by hanging a D-ring flat-side down on the uppermost screw of your jig. Place the paracord coil or spool to the left side of the jig, then pull the line to the right to a point about 5′ past the D-ring. Make this line fast. Now, pull a bight of line through the D-ring—in the front and out the back—and loop it over the rightmost screw.
The cord coming off the spool is looped around the second screw. A bight is then made in the cord between the screw and the spool and inserted through the D-ring, as before, from front to back.
Take the line running from the D-ring to the coil and loop that over the next screw. Pull a new bight of line through the D-ring, again from front to back, and loop it over the next screw.
The process is repeated until all the screws have been looped by the cord. The line at the left, coming off the spool, will be inserted through the D-ring and cut to have an end 5′ from the D-ring.
Repeat until all screws have a bight of line on them. Cut the cord off the coil, leaving 5′ beyond the D-ring.
The two 5′ ends of the cord are inserted through the space created by the nettles under the D-ring.
Pass each bitter end under the D-ring through the space between the lines in the front and the lines in the back. There is no need to haul the lines tight at this point, just keep things snug.
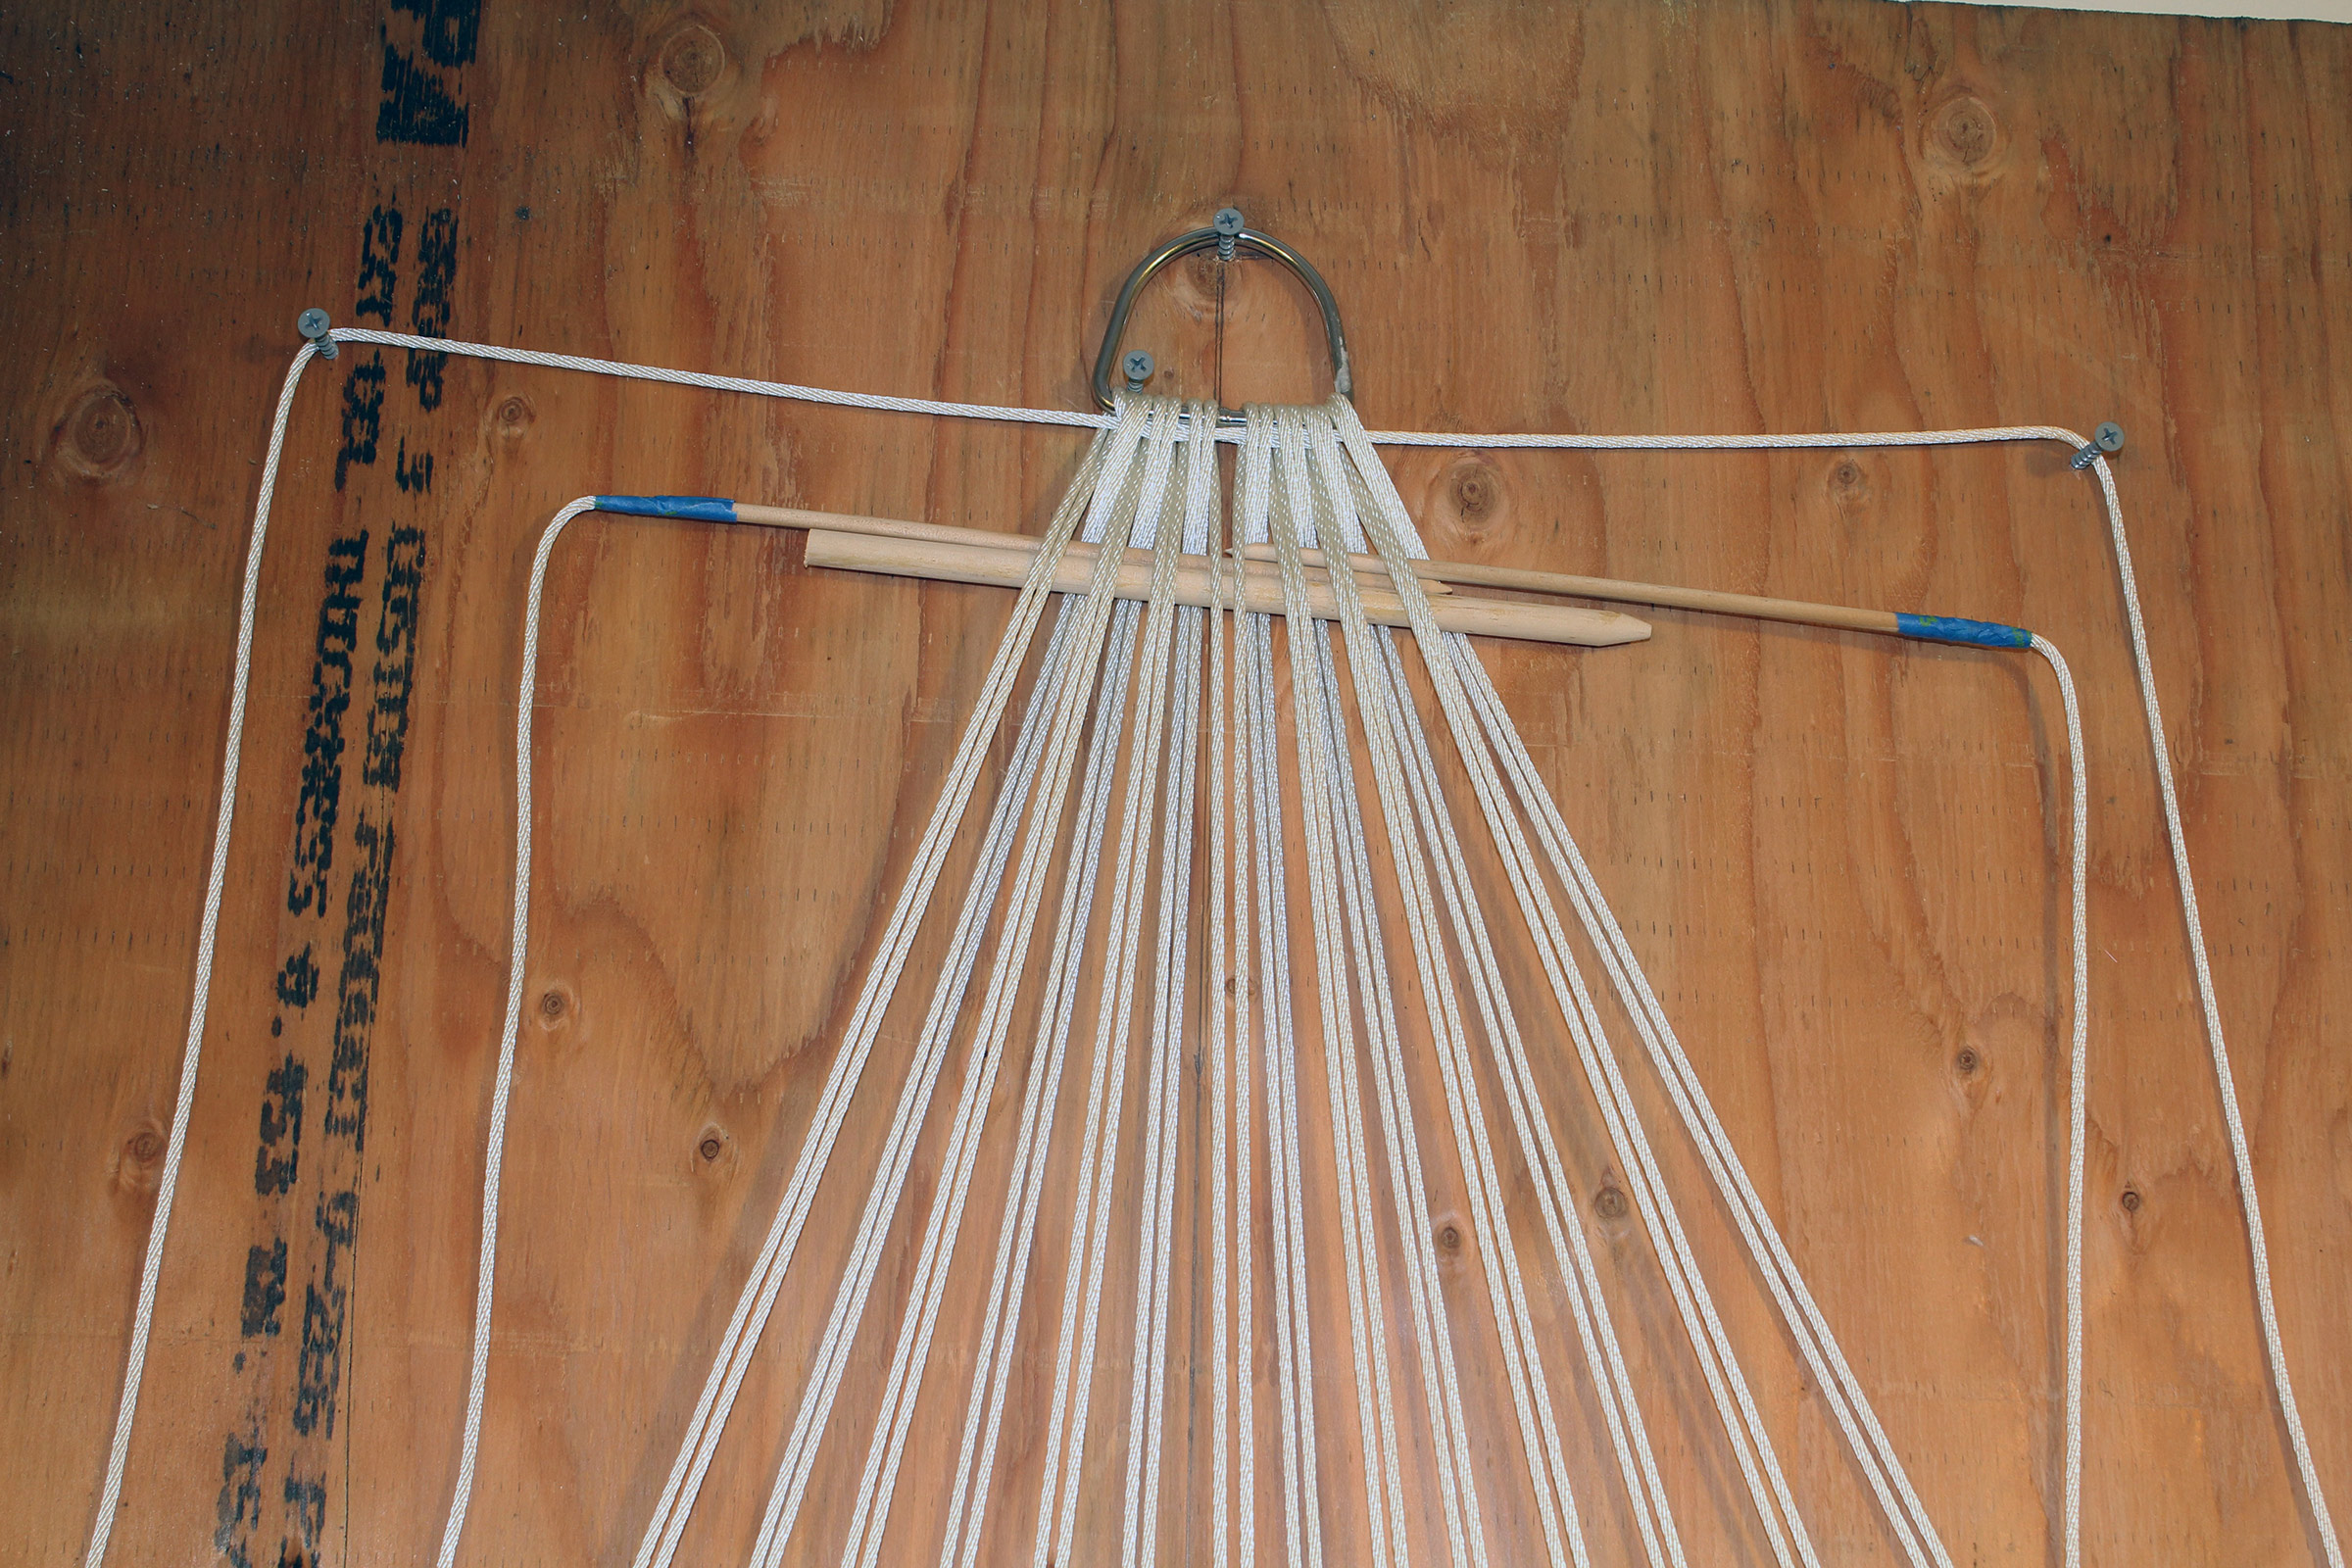
A dowel is woven through the nettles pulling the nettles at the back forward while pressing the nettles at the front to the back.
Cut a dowel about as wide as the jig and put a smooth point on one end. Starting at one side of the nettles, pick up the nettles that are at the back and push down the bights that are at the front. It’s easier to sort the nettles out low on the jig where the nettles are apart from each other, then slide the dowel up to the D-ring for weaving the clew. Pass the bitter ends through the space under the dowel.
The cords are slipped through the space above the dowel.
Slide the dowel out, then re-thread it across the nettles to pick up those that are now at the back and push back those that are now at the front. Skip the nettle at each end this time and pass the bitter ends along the stick in the space beneath it.
The process is repeated, skipping the outermost pair of nettles with each weaving of the dowel.
Repeat this process, dropping the outer nettle with each course. When you are down to the last bight, go back through your work tightening each line to harden up the weave.
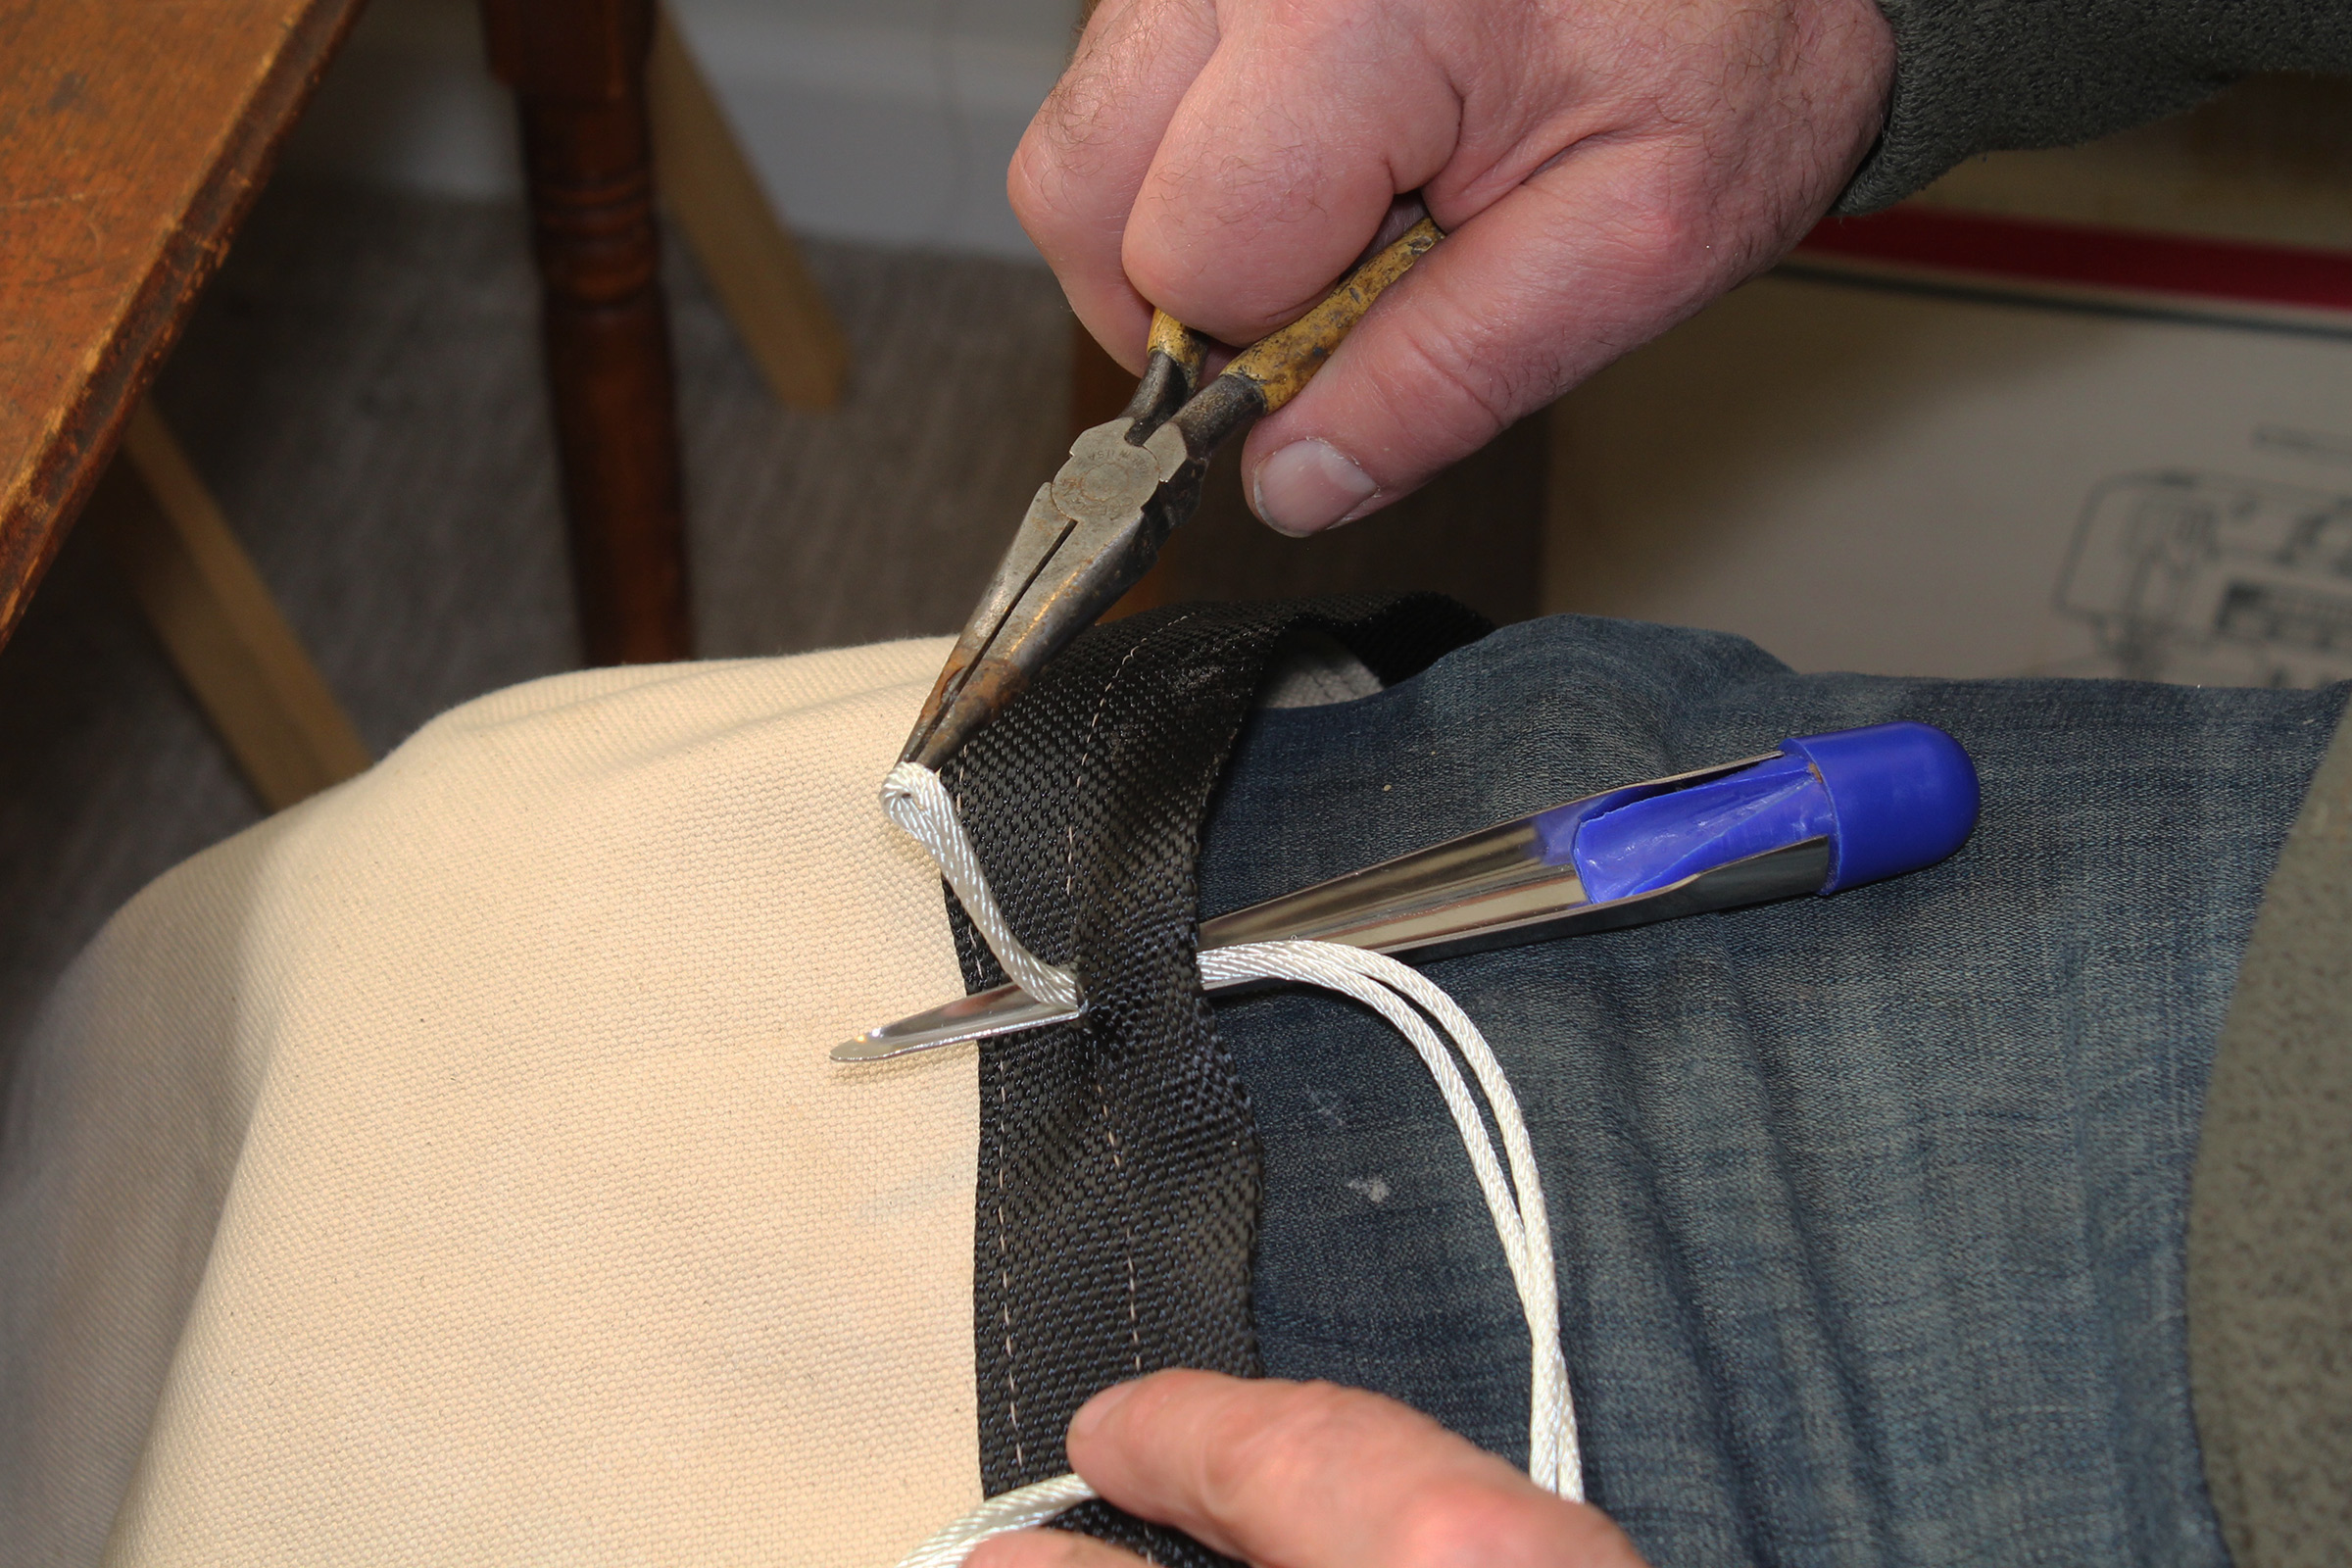
A pair of needle-nose pliers helps tighten the woven cords.
I find smooth-jawed needle-nose pliers helpful here.
Tying the cords in a square knot finishes the weave.
Once the weaving is tight, tie a tight square knot, cut the lines, and melt the ends to prevent fraying and keep the knot tied.
The ends of the cords are cut close to the square knot and then melted against the knot to prevent fraying and keep the knot from untying itself.
Your first clew is complete; repeat the process to weave the second clew.
The nettles are slipped through the grommets and a thicker line is slipped through the bights.
To connect each clew to the chair body, pass the nettles, in order, through the grommets on one side of the chair, then a length of 3⁄8″ line through all the loops at the ends of the nettles. Tie a stopper knot in each end of the 3⁄8″ line, cut it short, and melt the ends. Repeat for the other side. The 3⁄8″ lines will be on the outside of the chair when you sit in it.
A spreader holds the D-rings apart.
To hold the D-rings apart, I make a 40″ stretcher from whatever wood is lying around the shop, and shape 1″-long shouldered tenons on the ends to slide into the D-rings.
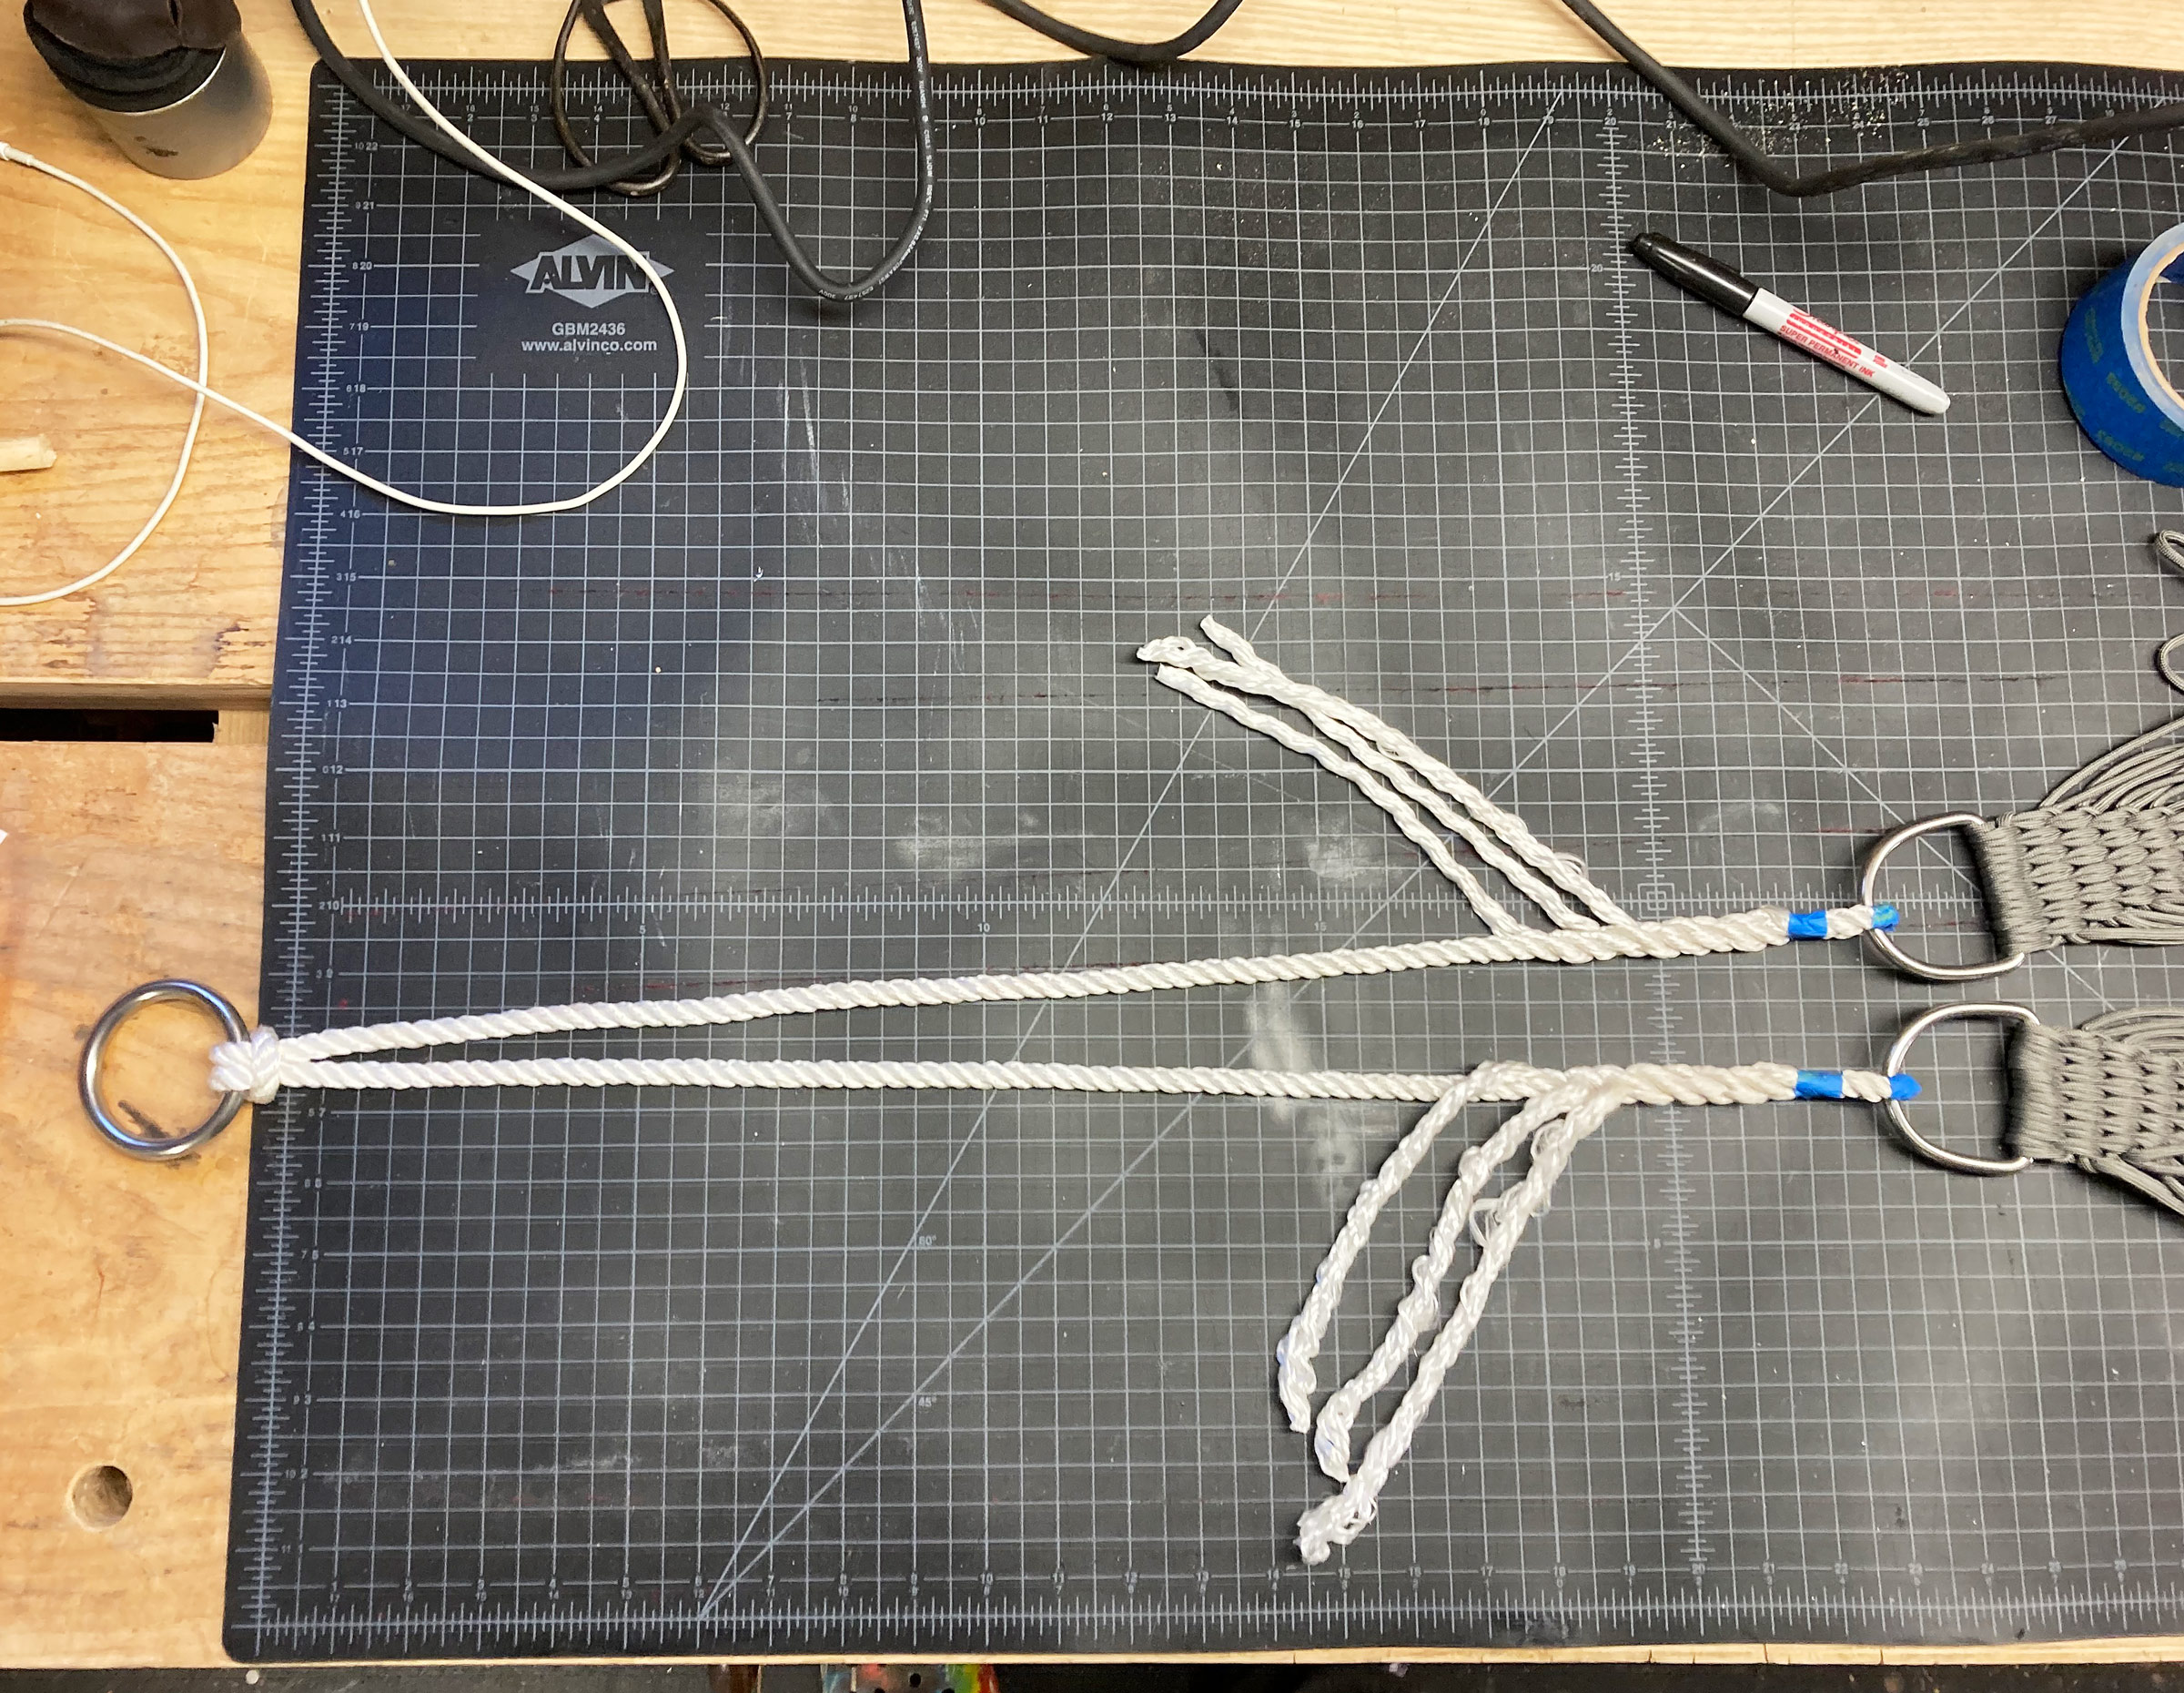
A 6′ length of line connects the D-rings with a circular ring at the top. Here the ends are spliced. They may also be tied with bowlines for a quicker though not-so-elegant finish.
To connect the D-rings to the round ring, fold a 6′ length of 3⁄8″ line in half, then cow-hitch this midpoint to the round ring. Splice or tie each end to a D-ring so that each leg of the line is 24″ long.
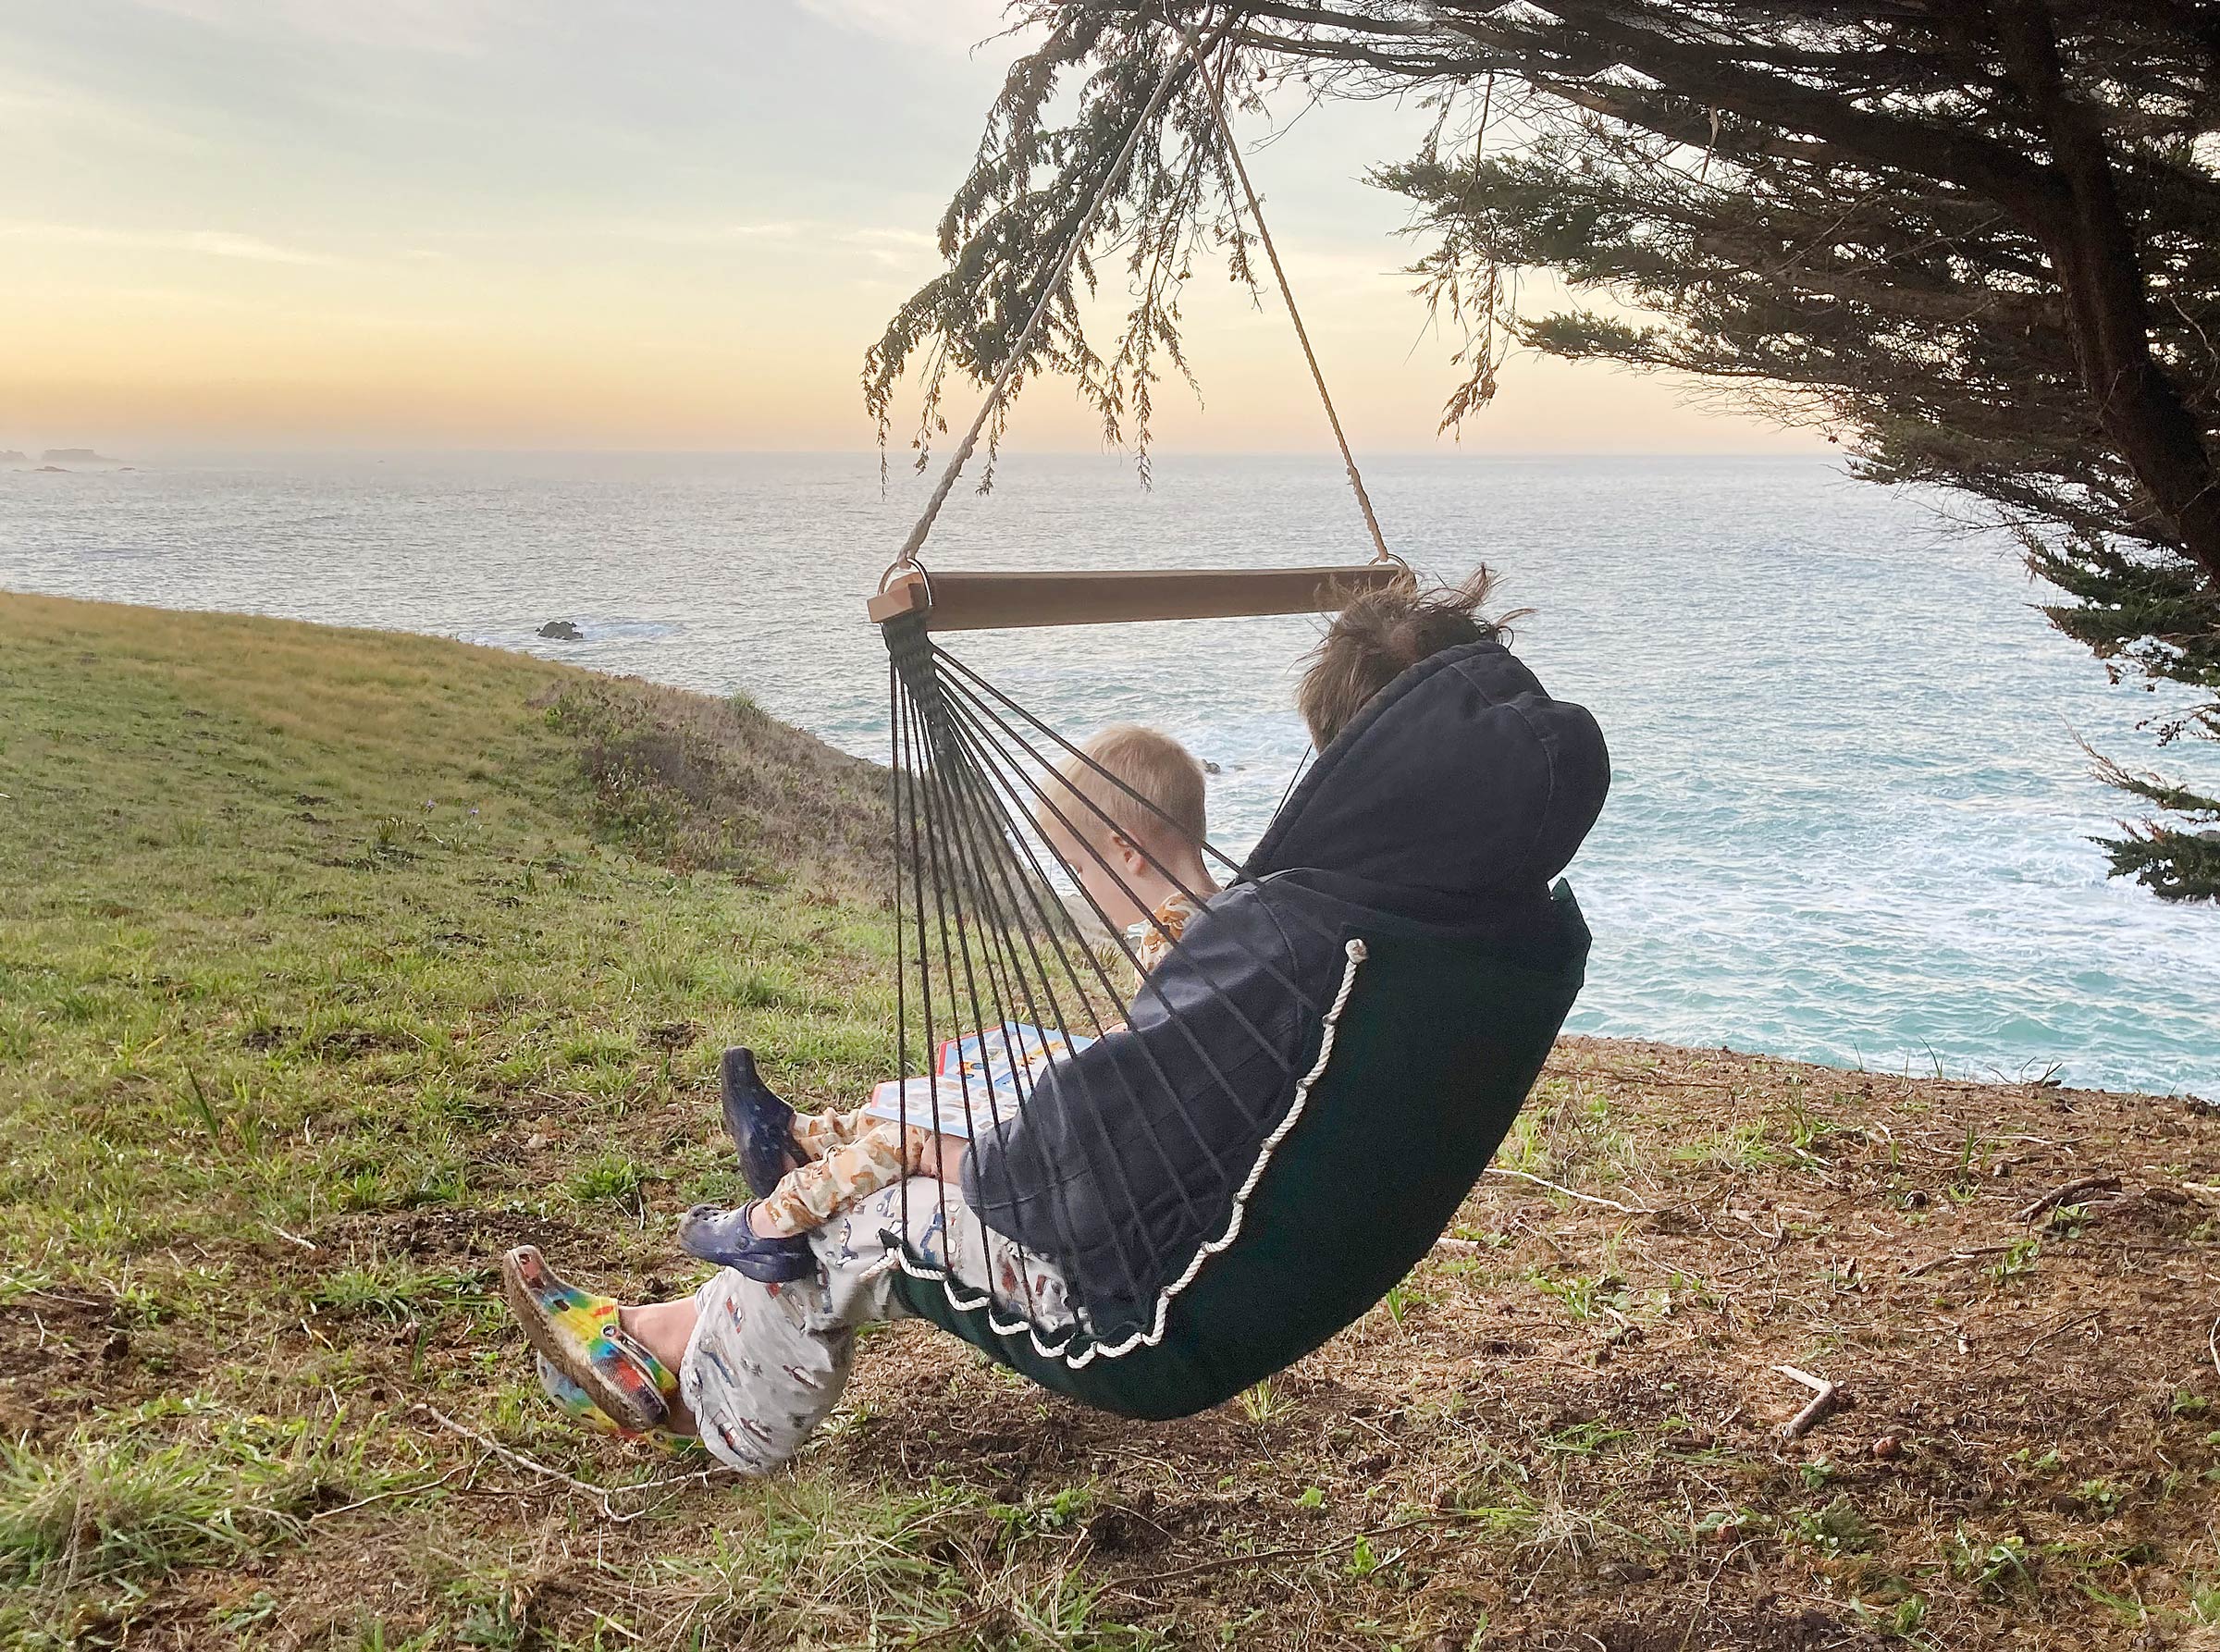
The chair is quite strong and can hold an adult, a child, and a storybook.
Your chair is complete! Good luck keeping everyone out of it.
James Kealey lives and teaches in Richmond, California. When he’s not chasing his two young sons, he can usually be found banging away on some project in his garage workshop. In high school, he rowed in racing shells. He still gets away most summers for sail-camping trips on mountain lakes.
Editor’s Notes:
While my small-boat cruises have taken me to a lot of interesting out-of-the-way places, only one of them has had a place to sit that was as comfortable as my living-room sofa: a recliner someone had left on the Kentucky side of the Ohio River. I hadn’t imagined that there could be a chair that I might carry aboard a boat as small as my sneakbox that would be every bit as luxurious.
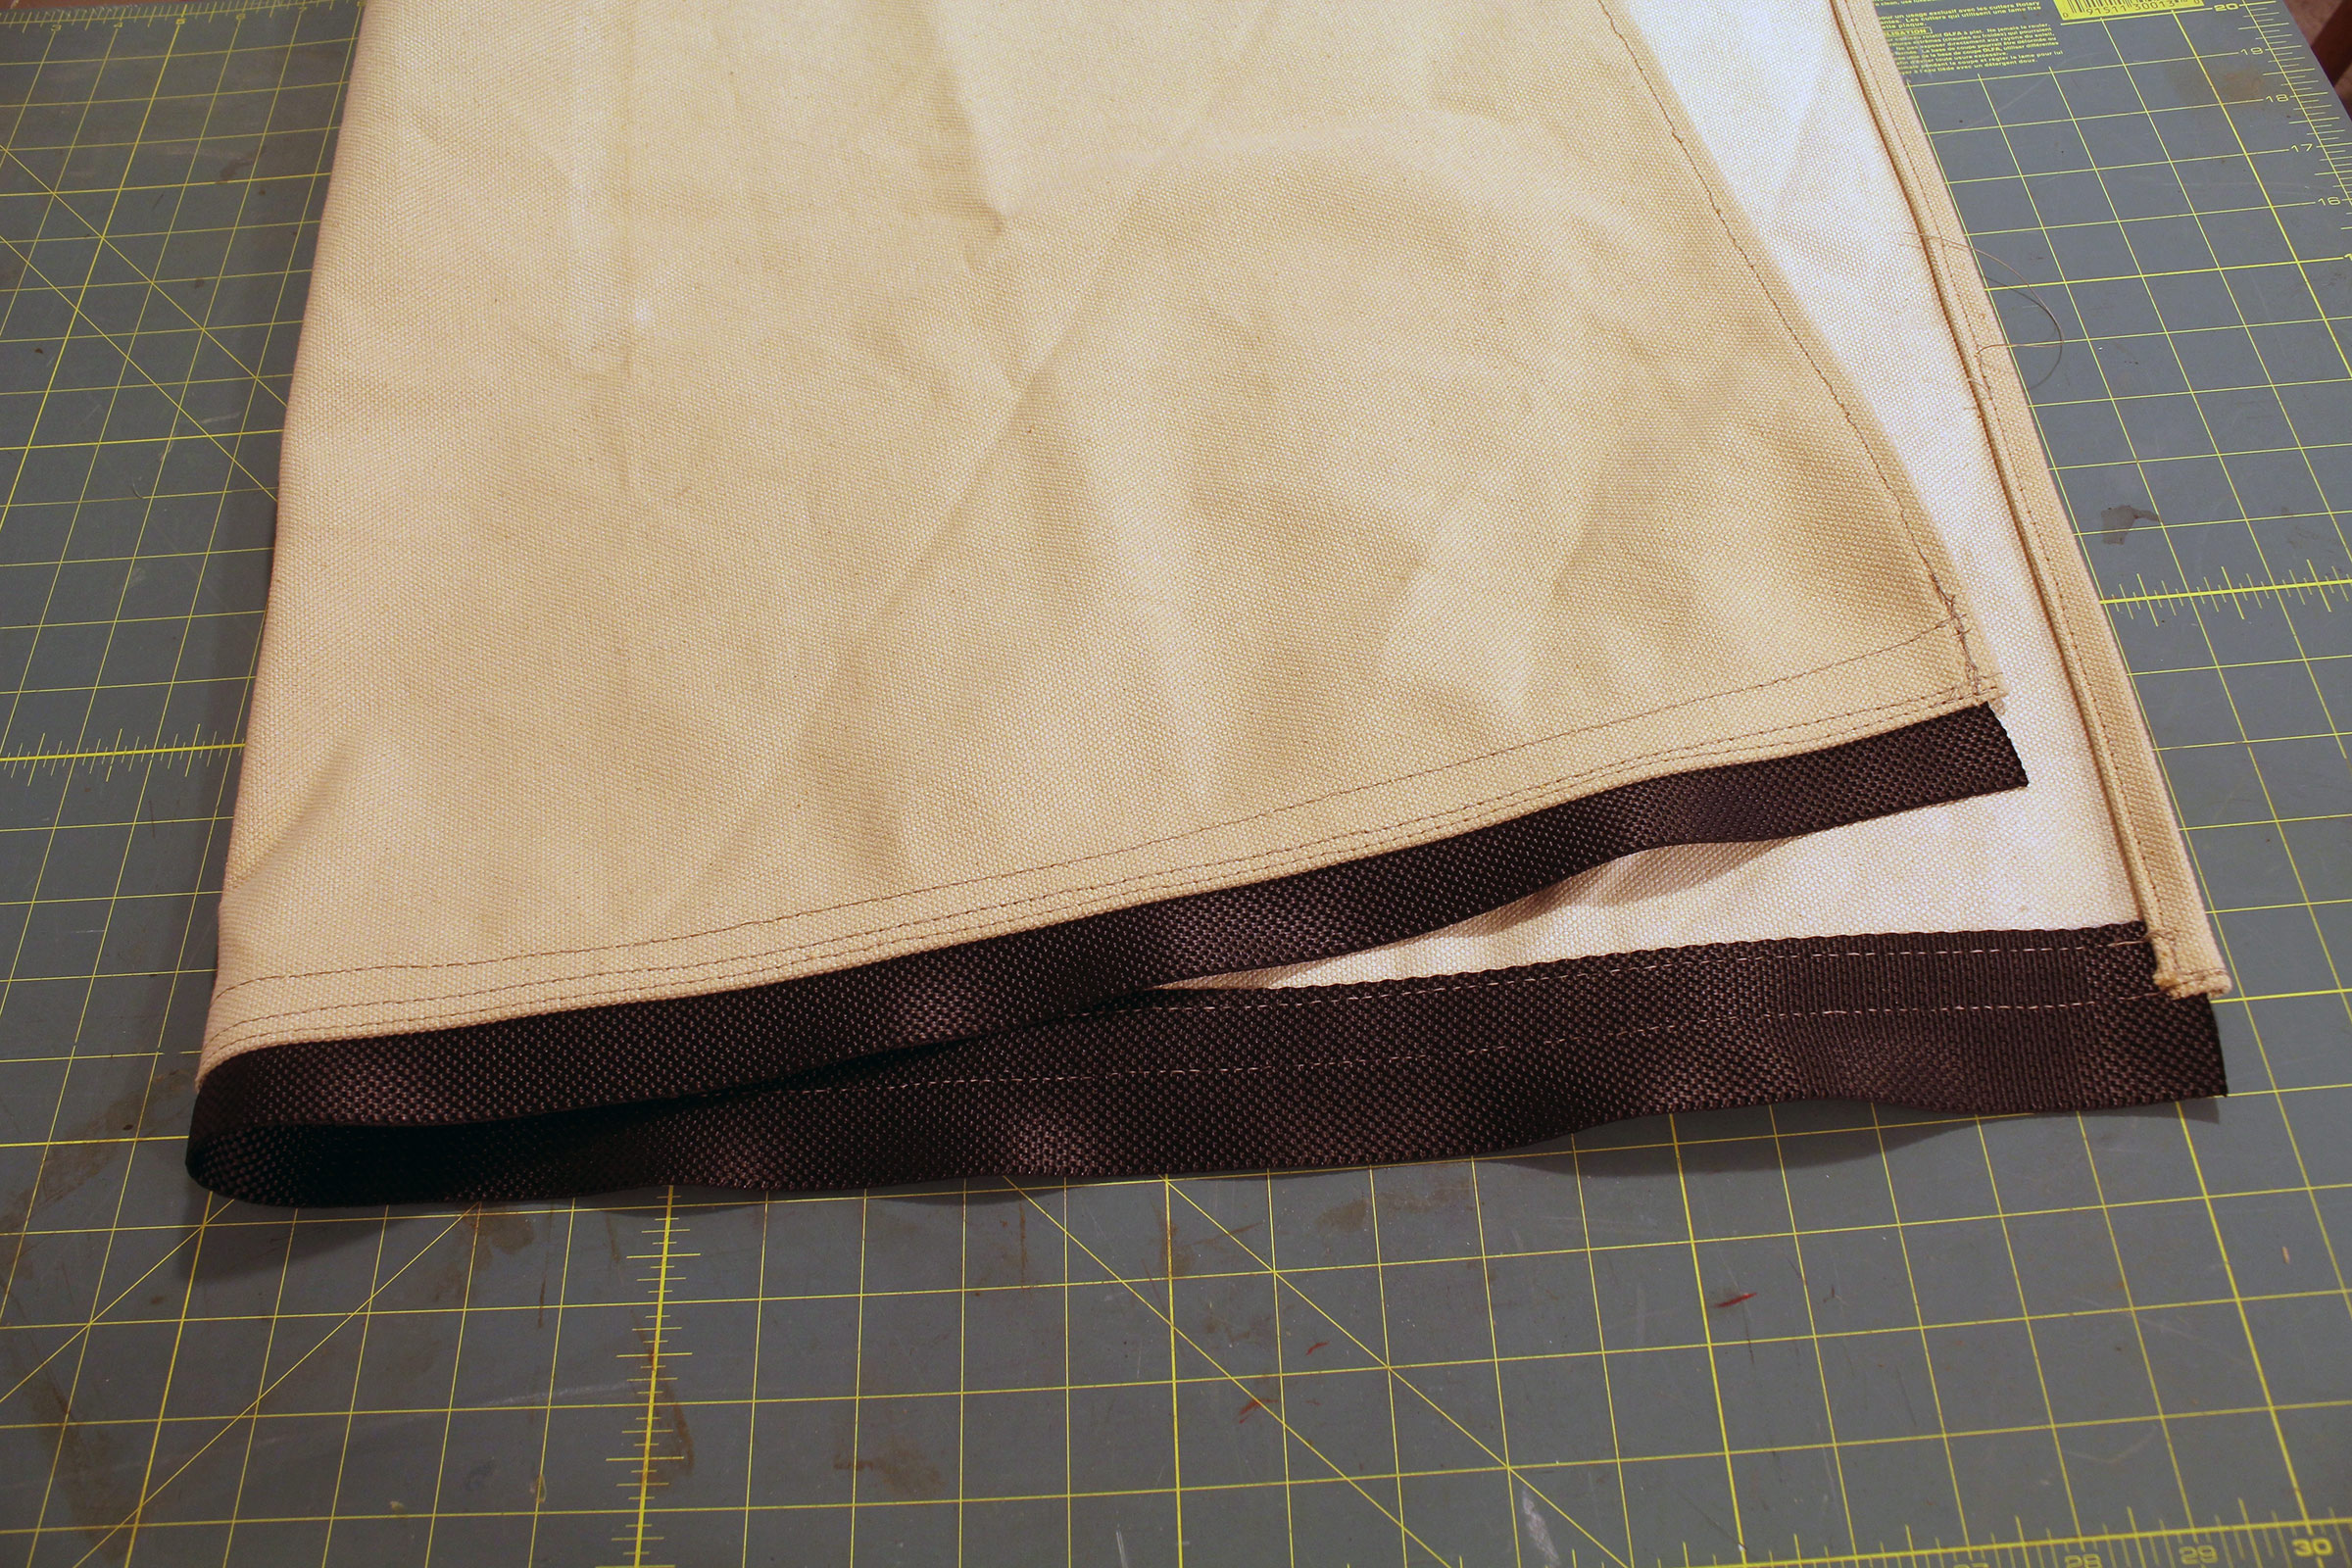
James’s hammock chair looked like it would offer a way to relax and take in the scenery, so I set out to make one for myself. I had a piece of heavy canvas, just enough for a single-layer chair without batting, and plenty of rope and wood for the bridle and spreader. I didn’t have enough paracord or the small spur grommets and the tools to install them. I found online a 500′ spool of 1⁄8″ solid braid nylon cord at a good price. It was more than enough for one or even two chairs, but I always have a use for that cord for boats, camps, and around the house. I bought stainless-steel 2-3⁄8″ D-rings and a stainless 1-1⁄2″ round ring for a few bucks, but nickel-plated steel rings are cheaper. To avoid the cost of the grommets and the tools they require, I used strips of 2″ nylon webbing. (I also tested the webbing of an old ratchet strap and it would have worked, too.) A Swedish fid can open holes for the nettles without significantly damaging the webbing. After the fid is removed, the webbing will close around the nettle and won’t open up or distort when a load is put on it.
Strips of 2″ webbing are sewn overlapping the single-fold hem on the long sides of the chair body. The webbing ends, cut with a hot knife to prevent fraying, are tucked in the second fold of the double-fold hems of the ends of the chair body.
A second screw keeps the D-ring from being pulled to the side by the nettles as they are looped through it.
A pair of 1⁄8″ dowels help thread the ends of the cord along the dowel that holds the nettles. The two screws to the side of the D-ring keep the cord from getting mixed up with the nettles.
As the weaving progresses, an outside pair of nettles gets skipped for the next weave. Taping those pairs away from the rest of the nettles helps keep track of which nettles go where.
Be sure to ensure the square knot won’t untie itself. Either melt the cut ends to the body of the knot or leave the tail ends of the cord long and whip the ends together, perhaps to the center nettle. I had only melted the ends and the square knot shook itself out and the weave came undone. To reweave it, I’ll hang the chair and put some weight in it to tension the nettles. That will save having to rebuild the board with the screws.
The hole for each nettle is opened gently with a Swedish fid, right next to the canvas. Pencil marks on the canvas indicate where each hole goes.
Needle-nose pliers poke the bight of the nettle along the hollow in the fid and through the hole in the webbing.
The pliers pull the nettle through.
The chair, like a hammock, feels cool on my back, so the batting in James’s double-layer Cadillac version is a good idea for cool weather. I can use a blanket or a foam pad on top of my single-layer chair if I need some insulation.
The comfort of the chair and its swinging are very conducive to relaxing, even napping, but having some head support would be a welcome addition. I can tuck a throw pillow between the chair and my back to serve as a headrest or put it against the nettles on one side, but if I make a second chair (and I very well might) I’d make the back 9″ taller with the addition of three more nettles at the same 3″ spacing. That would require another 20′ of cord, 85′ on each side instead of 75′.
The hammock chair is so pleasant to sit in that it now spends its non-cruising time in the rec room.
The chair exceeded my expectations for comfort and made the project well worth doing.
You can share your tips and tricks of the trade with other Small Boats Magazine readers by sending us an email.
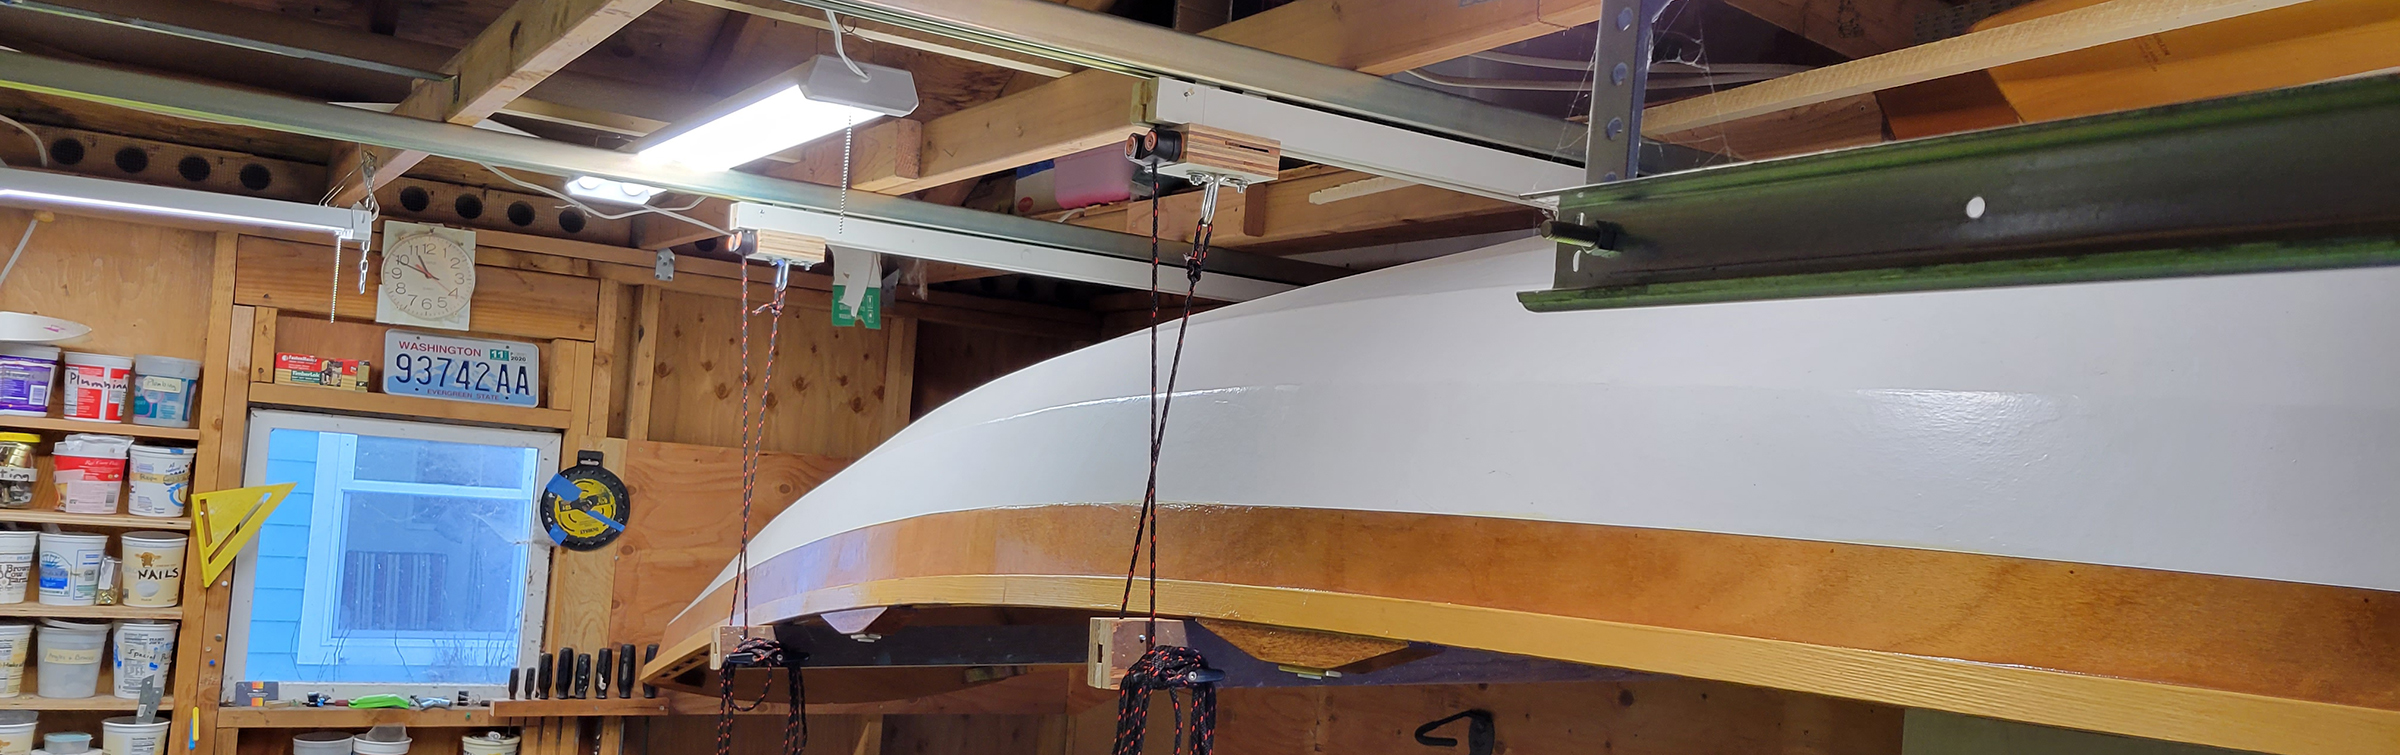
My wife and I live about 15 minutes from a gently flowing river perfectly suited to canoeing, but for a long time we didn’t paddle often because loading the canoe into the truck was a two-person job that took nearly 30 minutes.
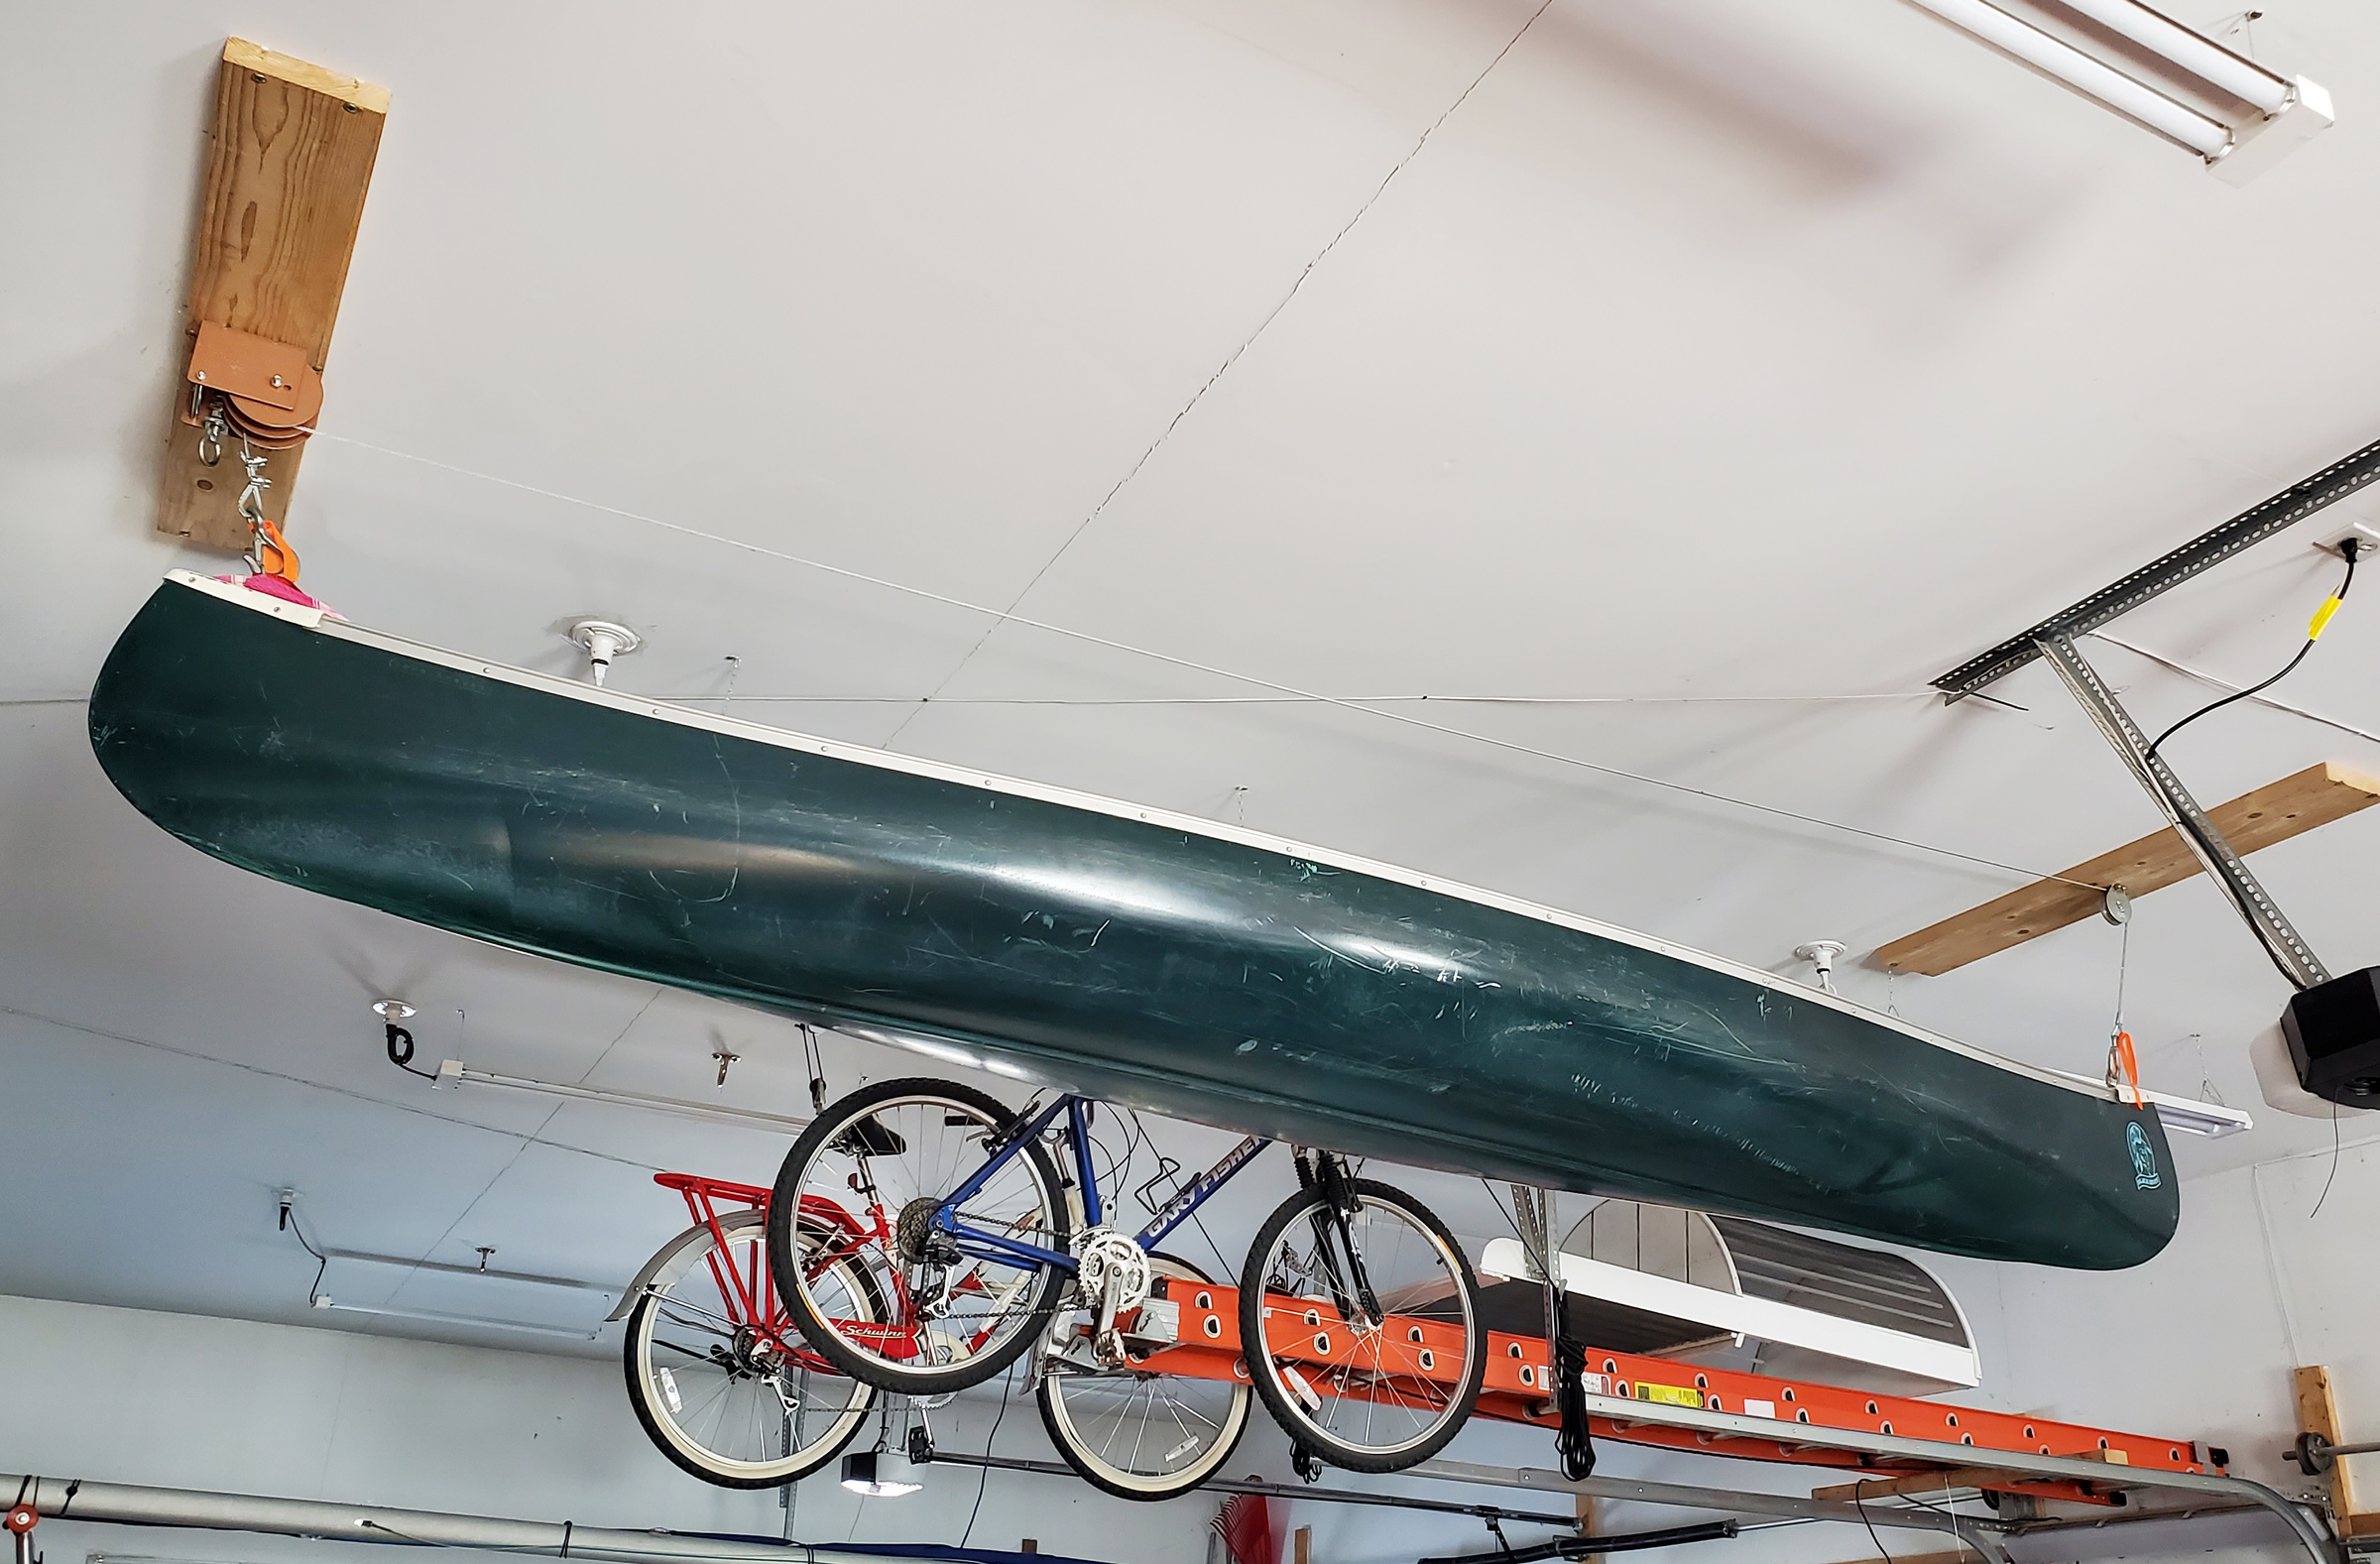
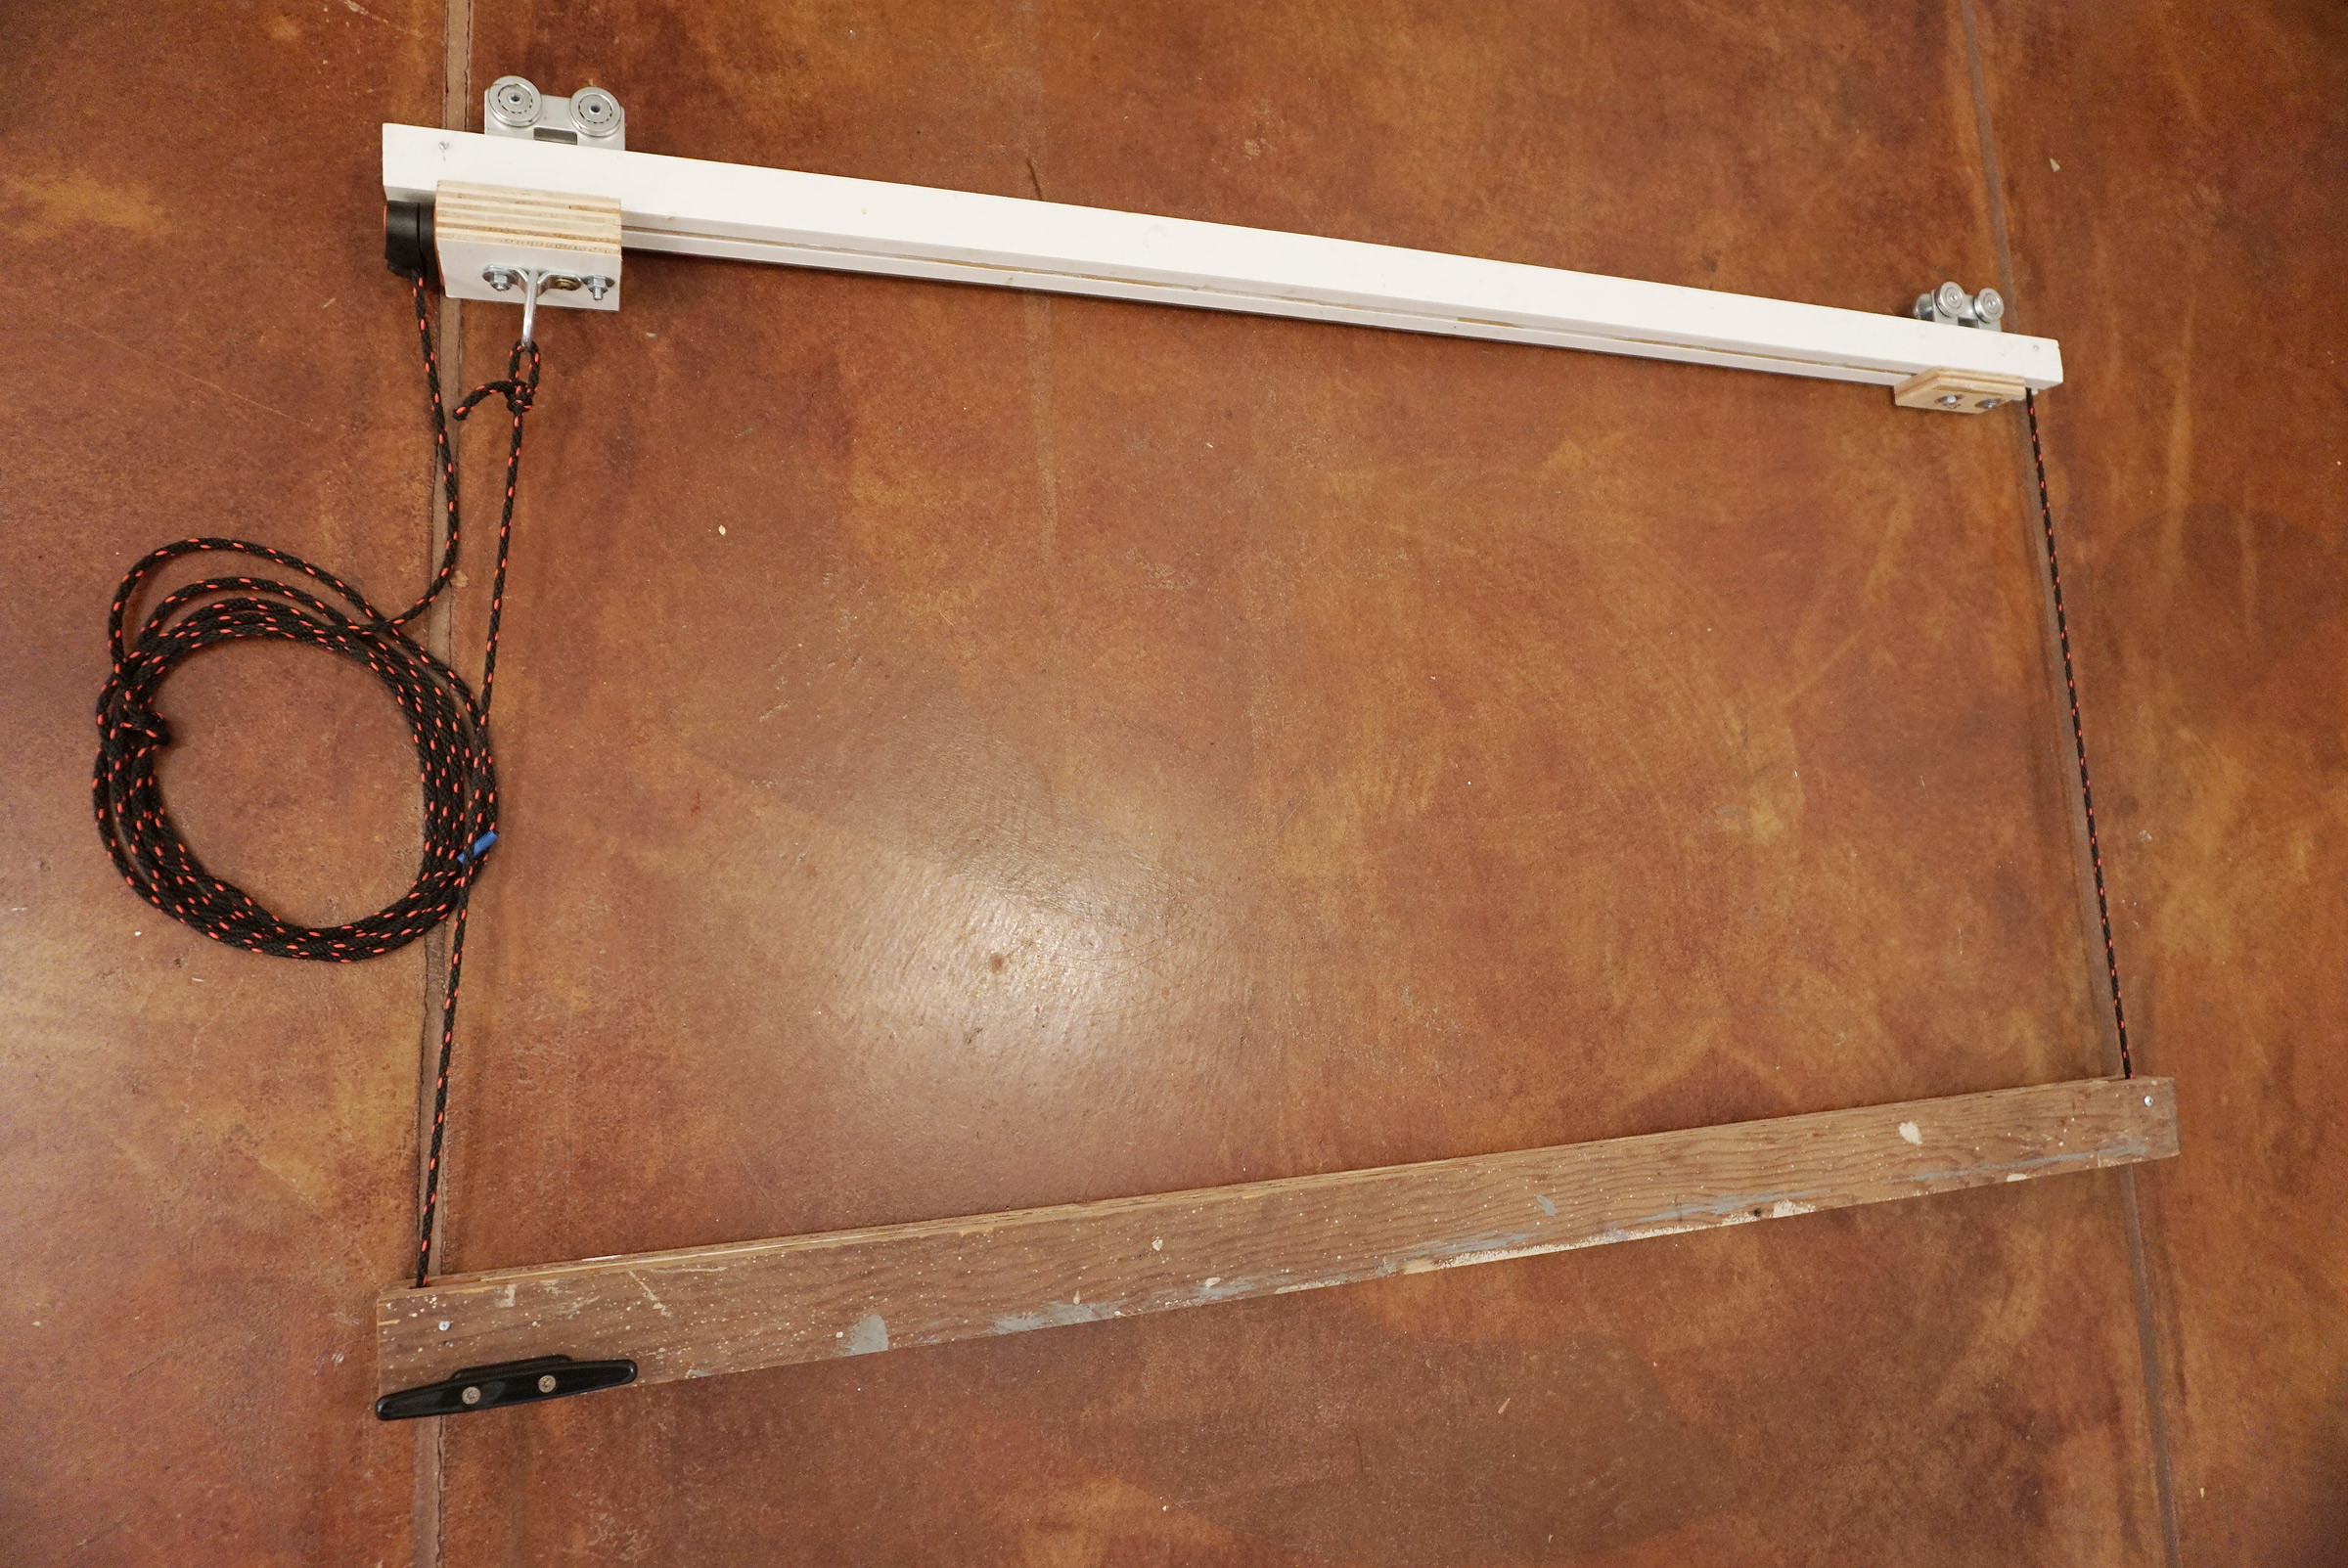
To make the task easier, I decided to store the canoe above the overhead-door tracks in our 12′-high garage directly above a parking bay. To raise and lower it directly into the truck bed, I installed a worm-drive, double-reel winch. The winch is operated with a cordless drill at the end of a 6′ pole. It’s easy up, easy down, no sweat, and no lines have to be routed from the ceiling and down a wall to a cleat or a winch with a ratchet. The winch is self-locking, making it very safe to use because the boat is locked in place when the worm gear stops turning. Moving the canoe between the ceiling and the pickup is now a one-person job that takes less than five minutes.
Photographs by the author
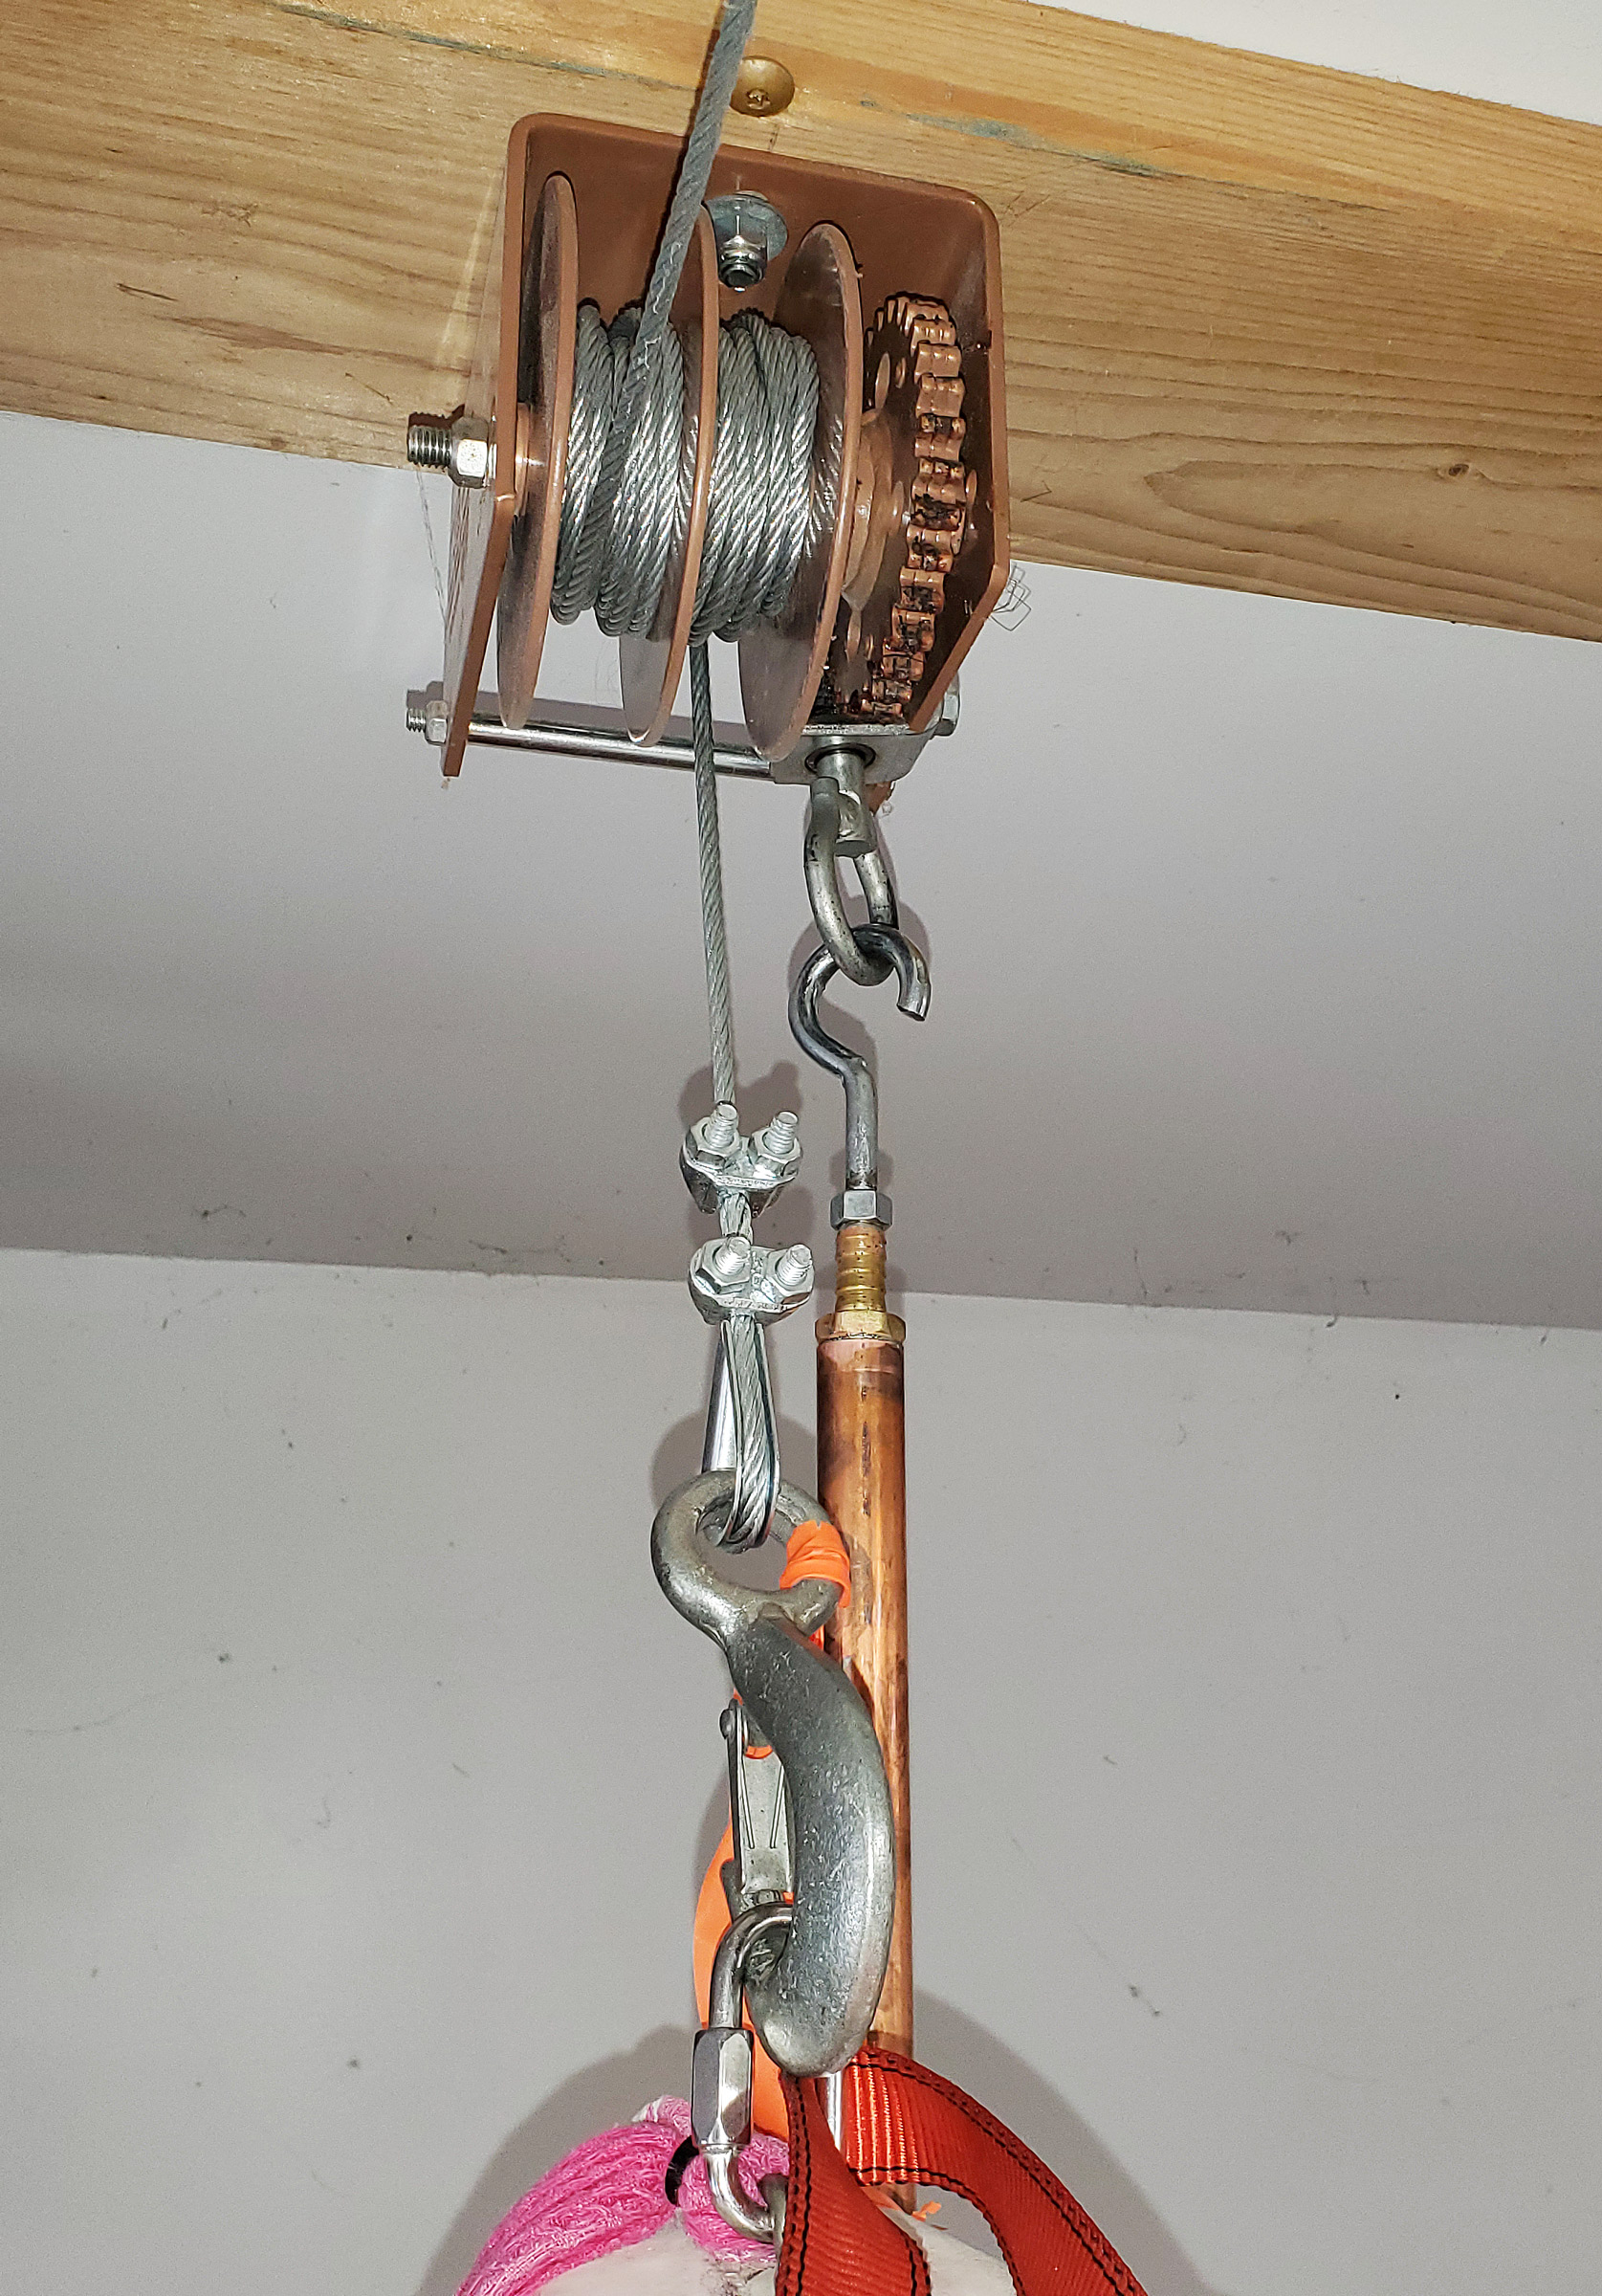
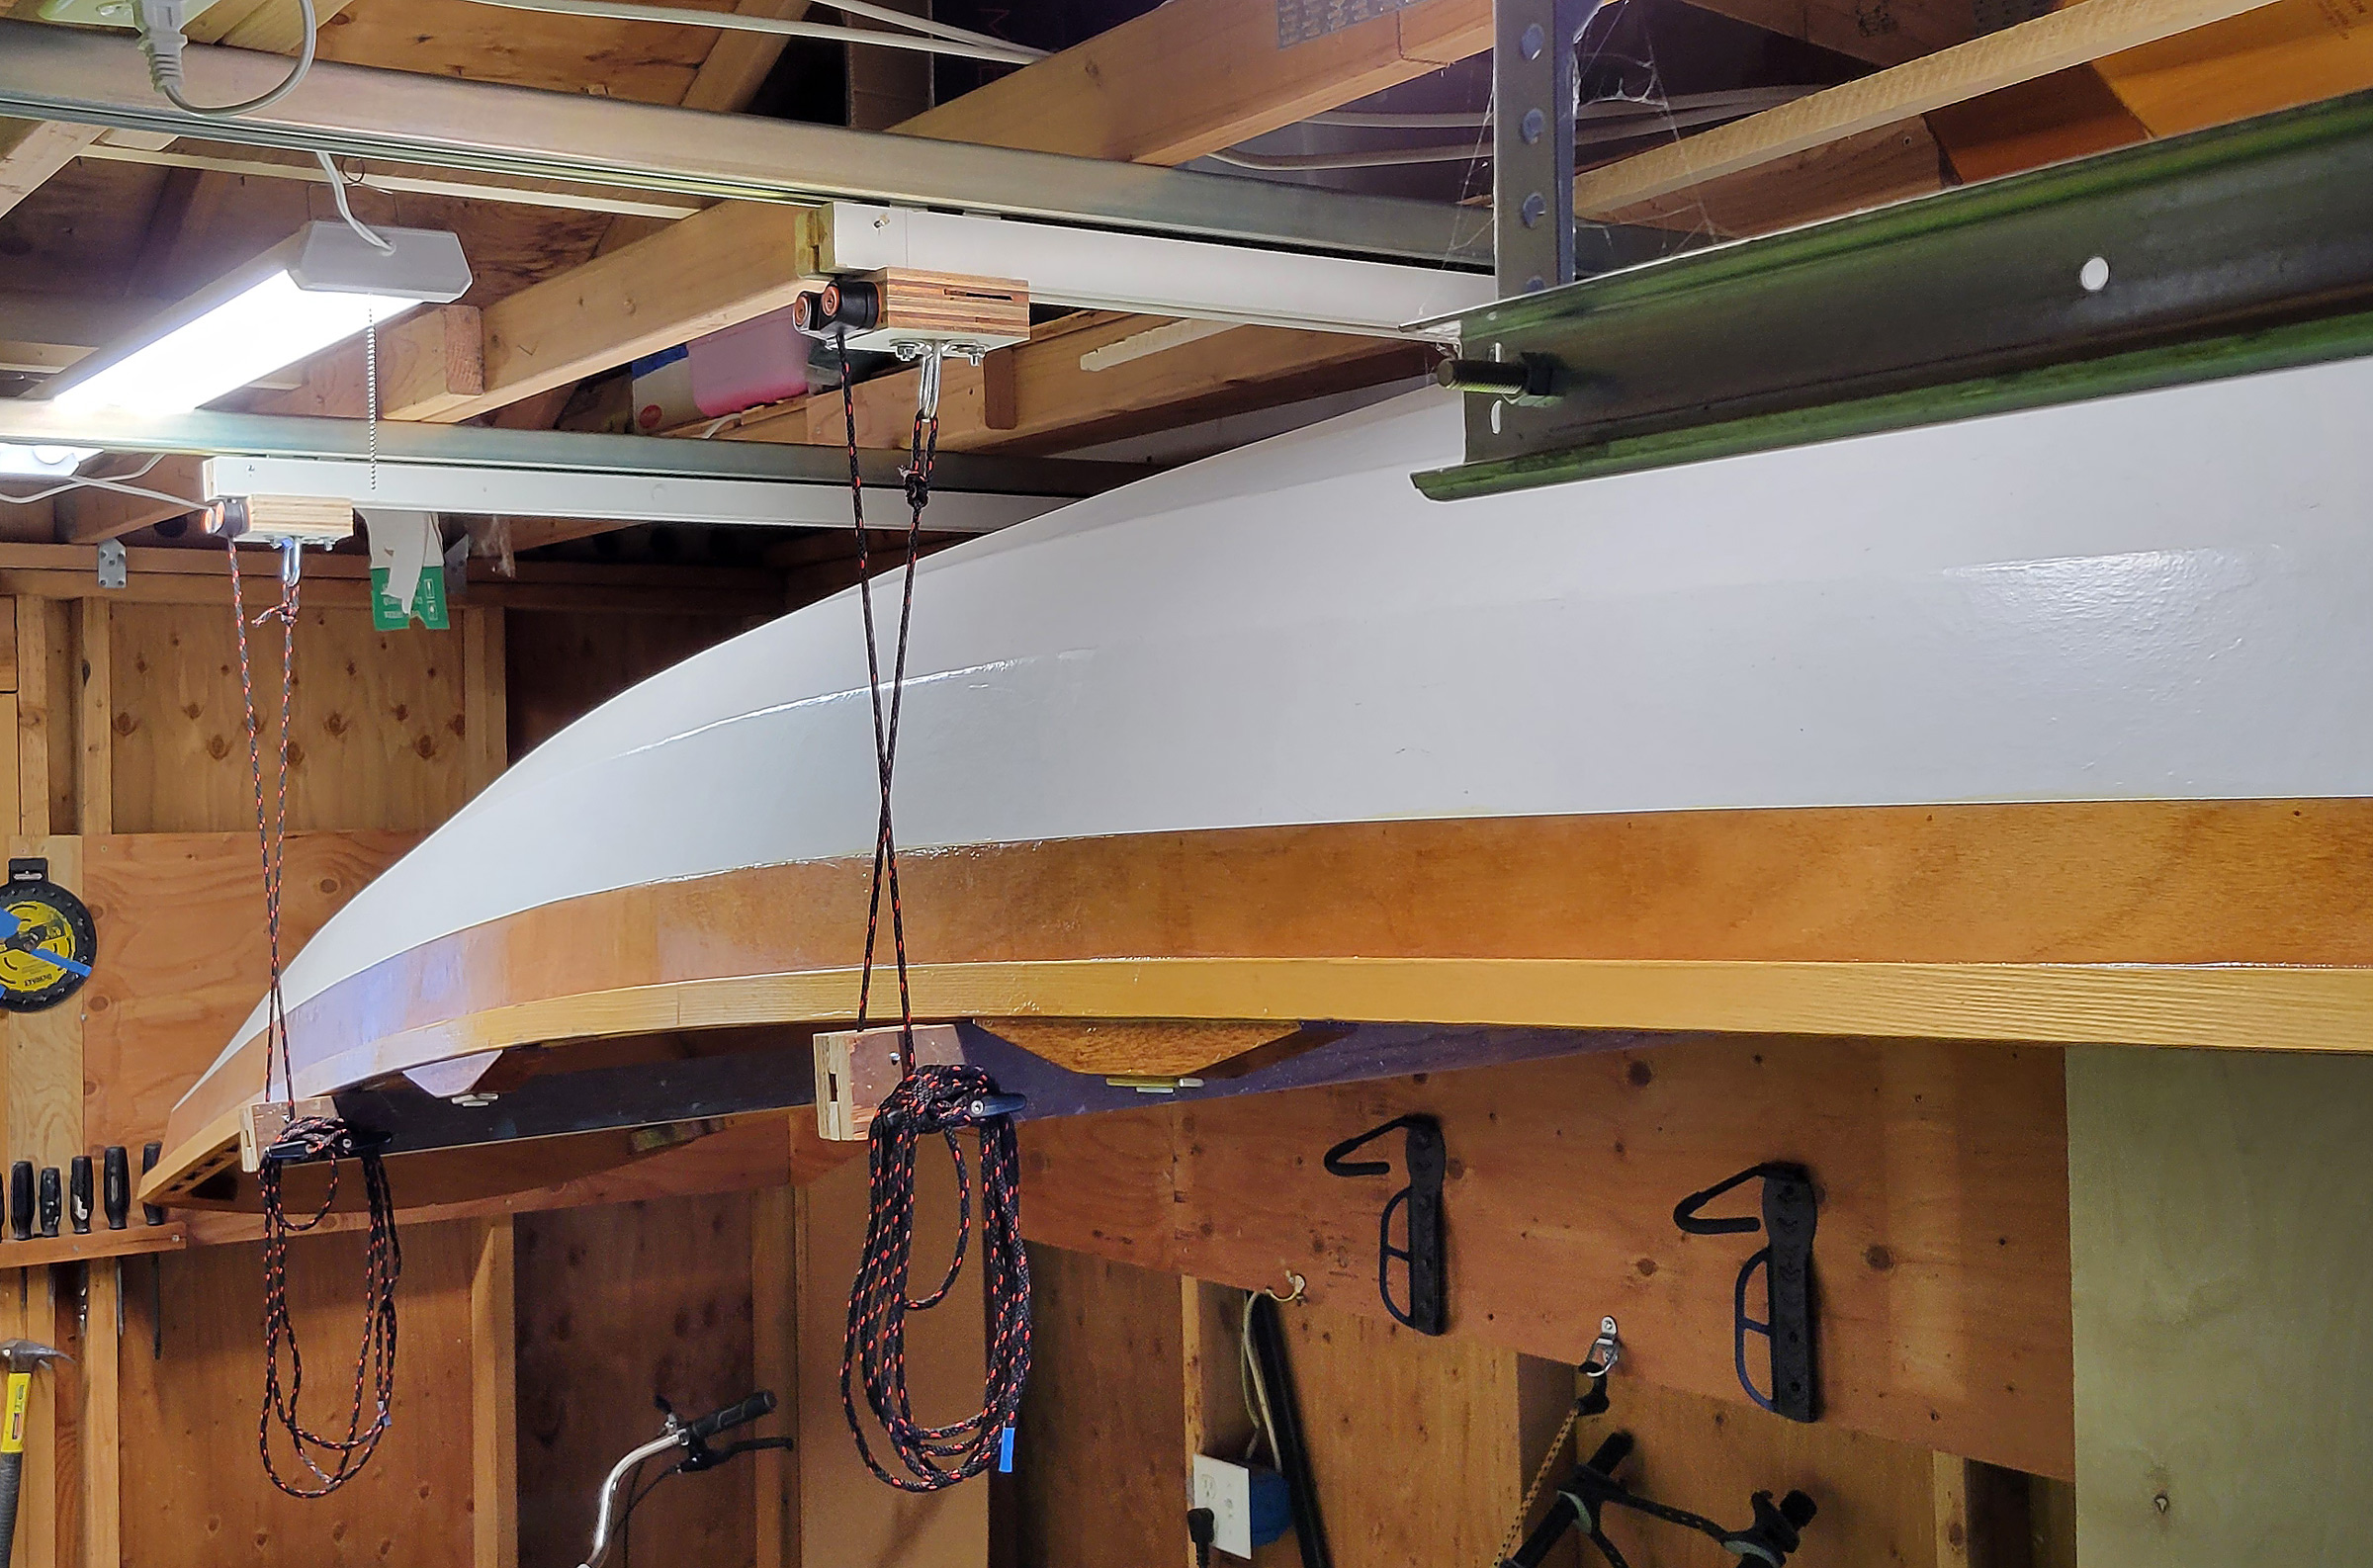
The winch, suspended from the ceiling from a 4′ length of 2×6 board, is operated from the floor. The author made a 6′ pole out of copper tubing, with a hook at one end and a square drive at the other. The hook end attaches to the gear of the winch, while the square drive is connected to a cordless drill that rotates the pole and thus turns the winch.
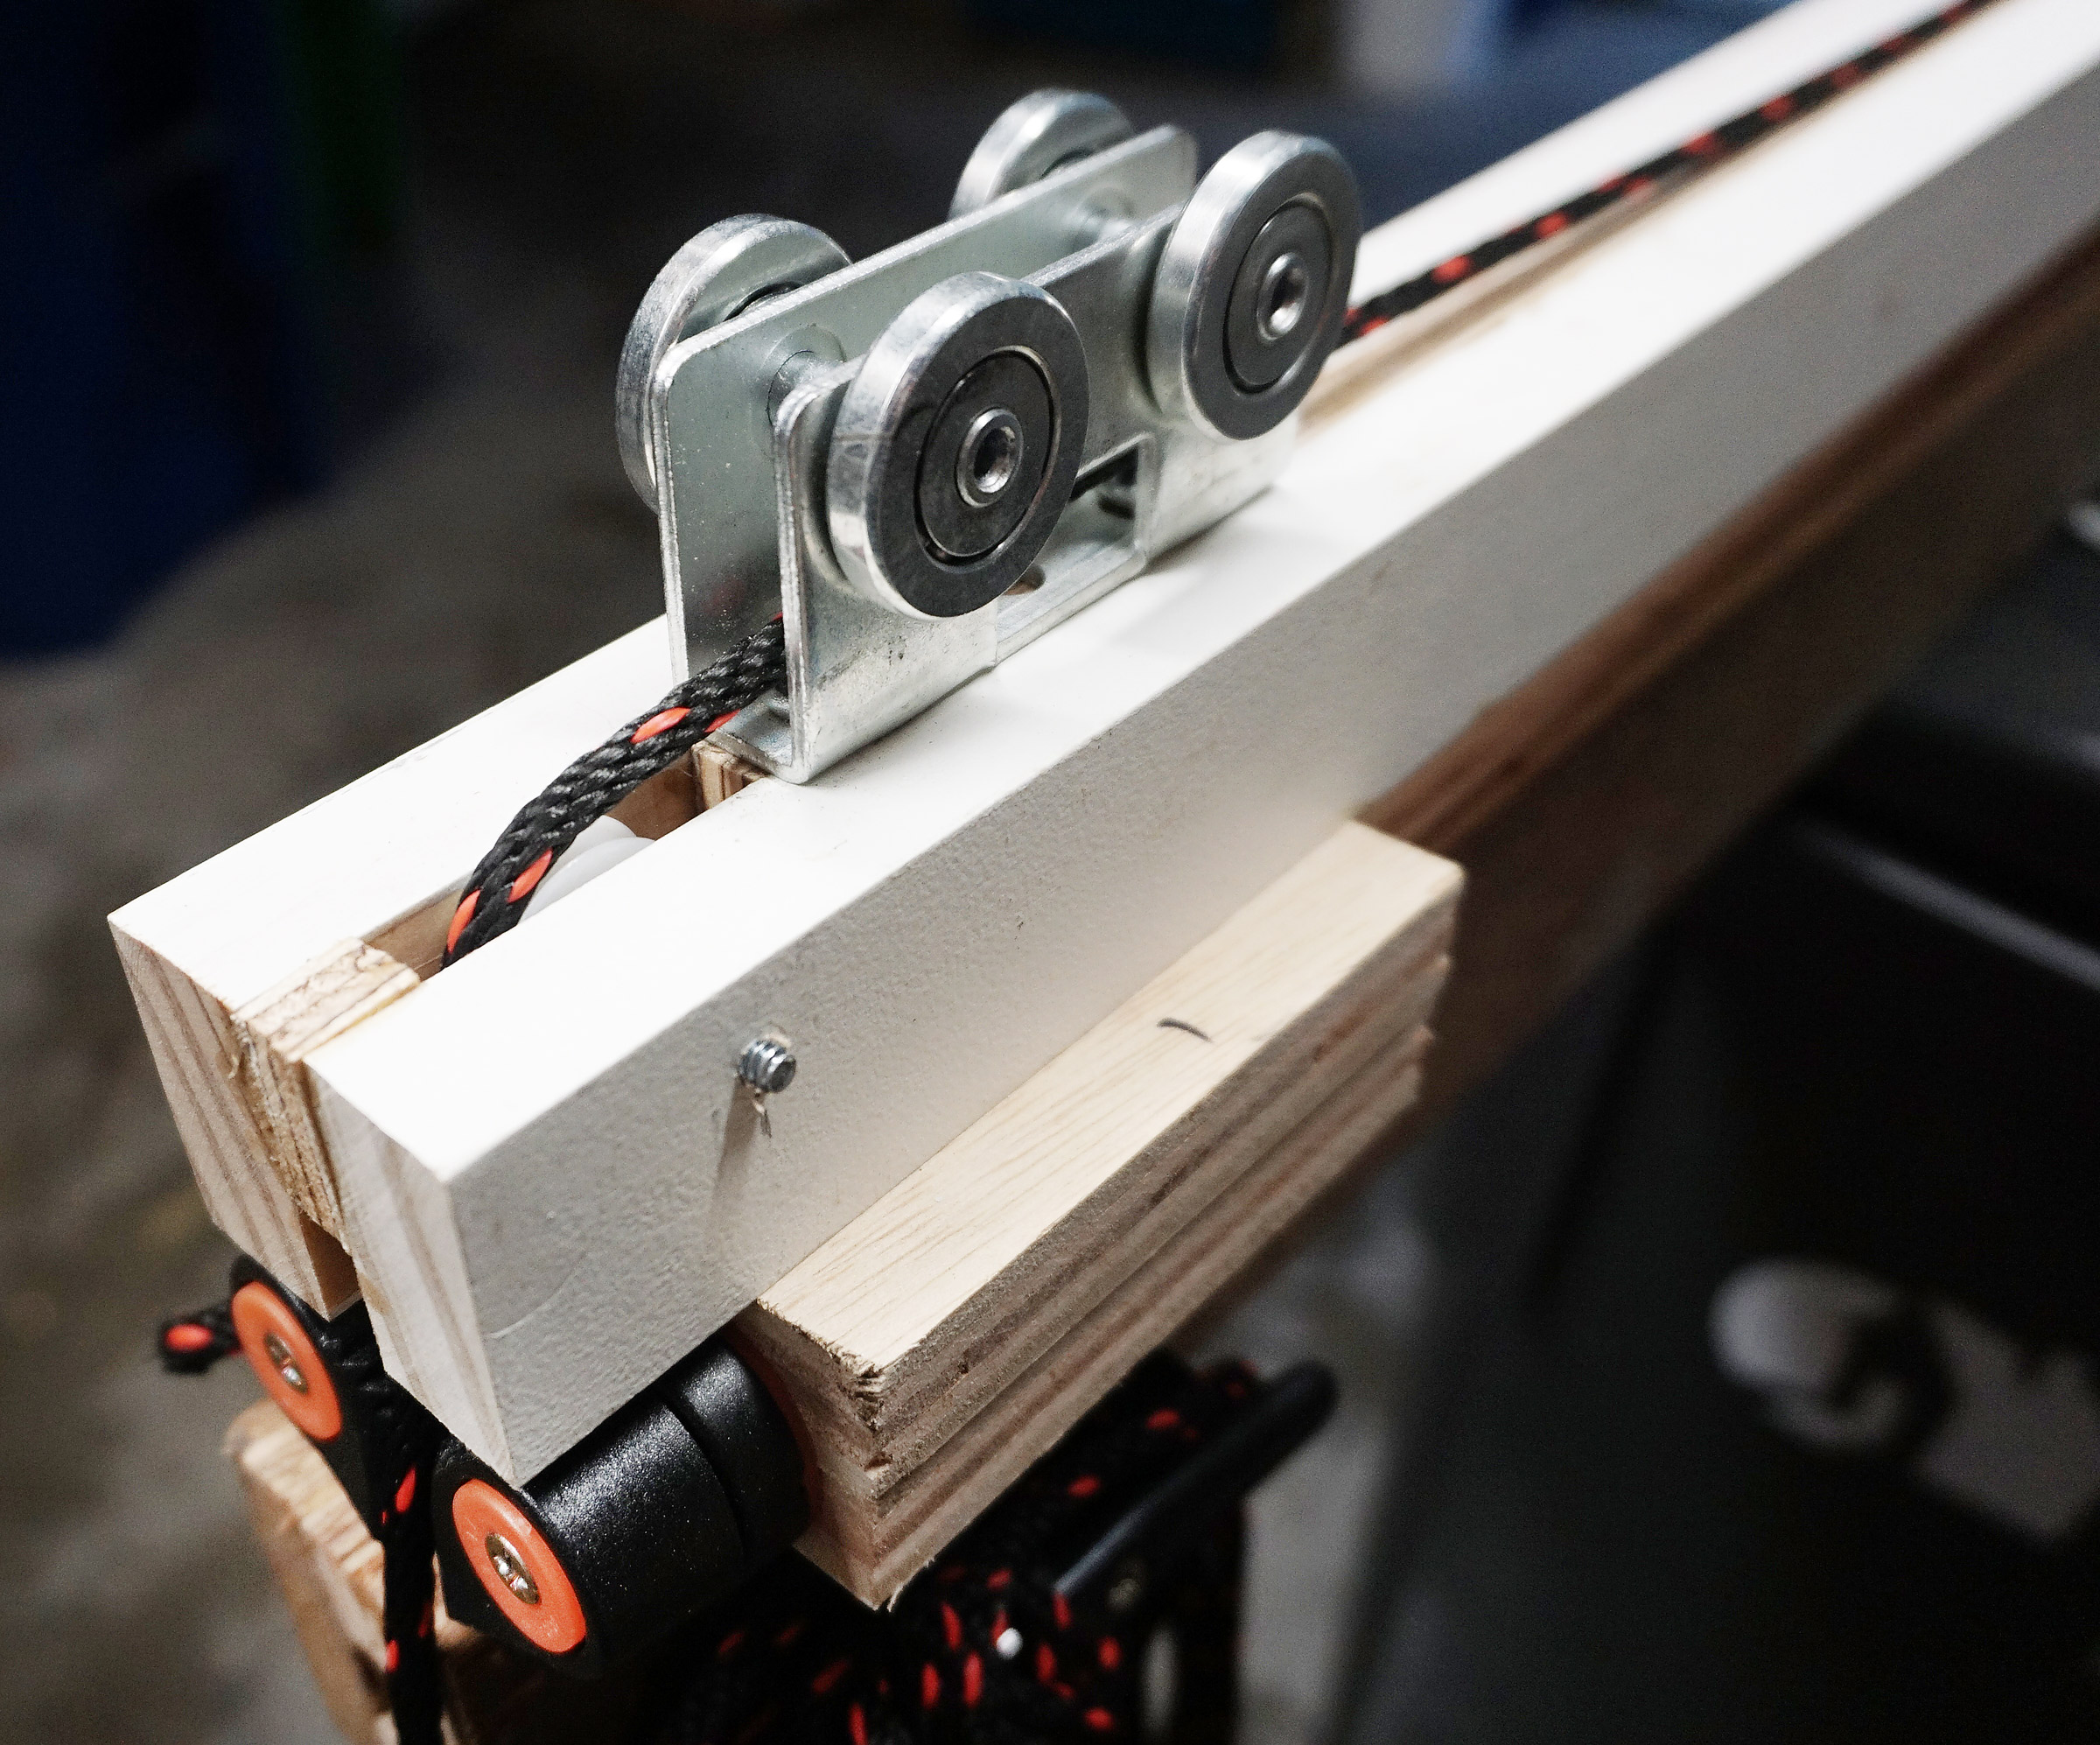
The installation is neither complicated nor costly—roughly $200 in 2014. The key component is the loop-drive Dutton-Lainson worm-gear winch with a split reel that has a capacity of 21′6″ of cable on each side of the centered divider.
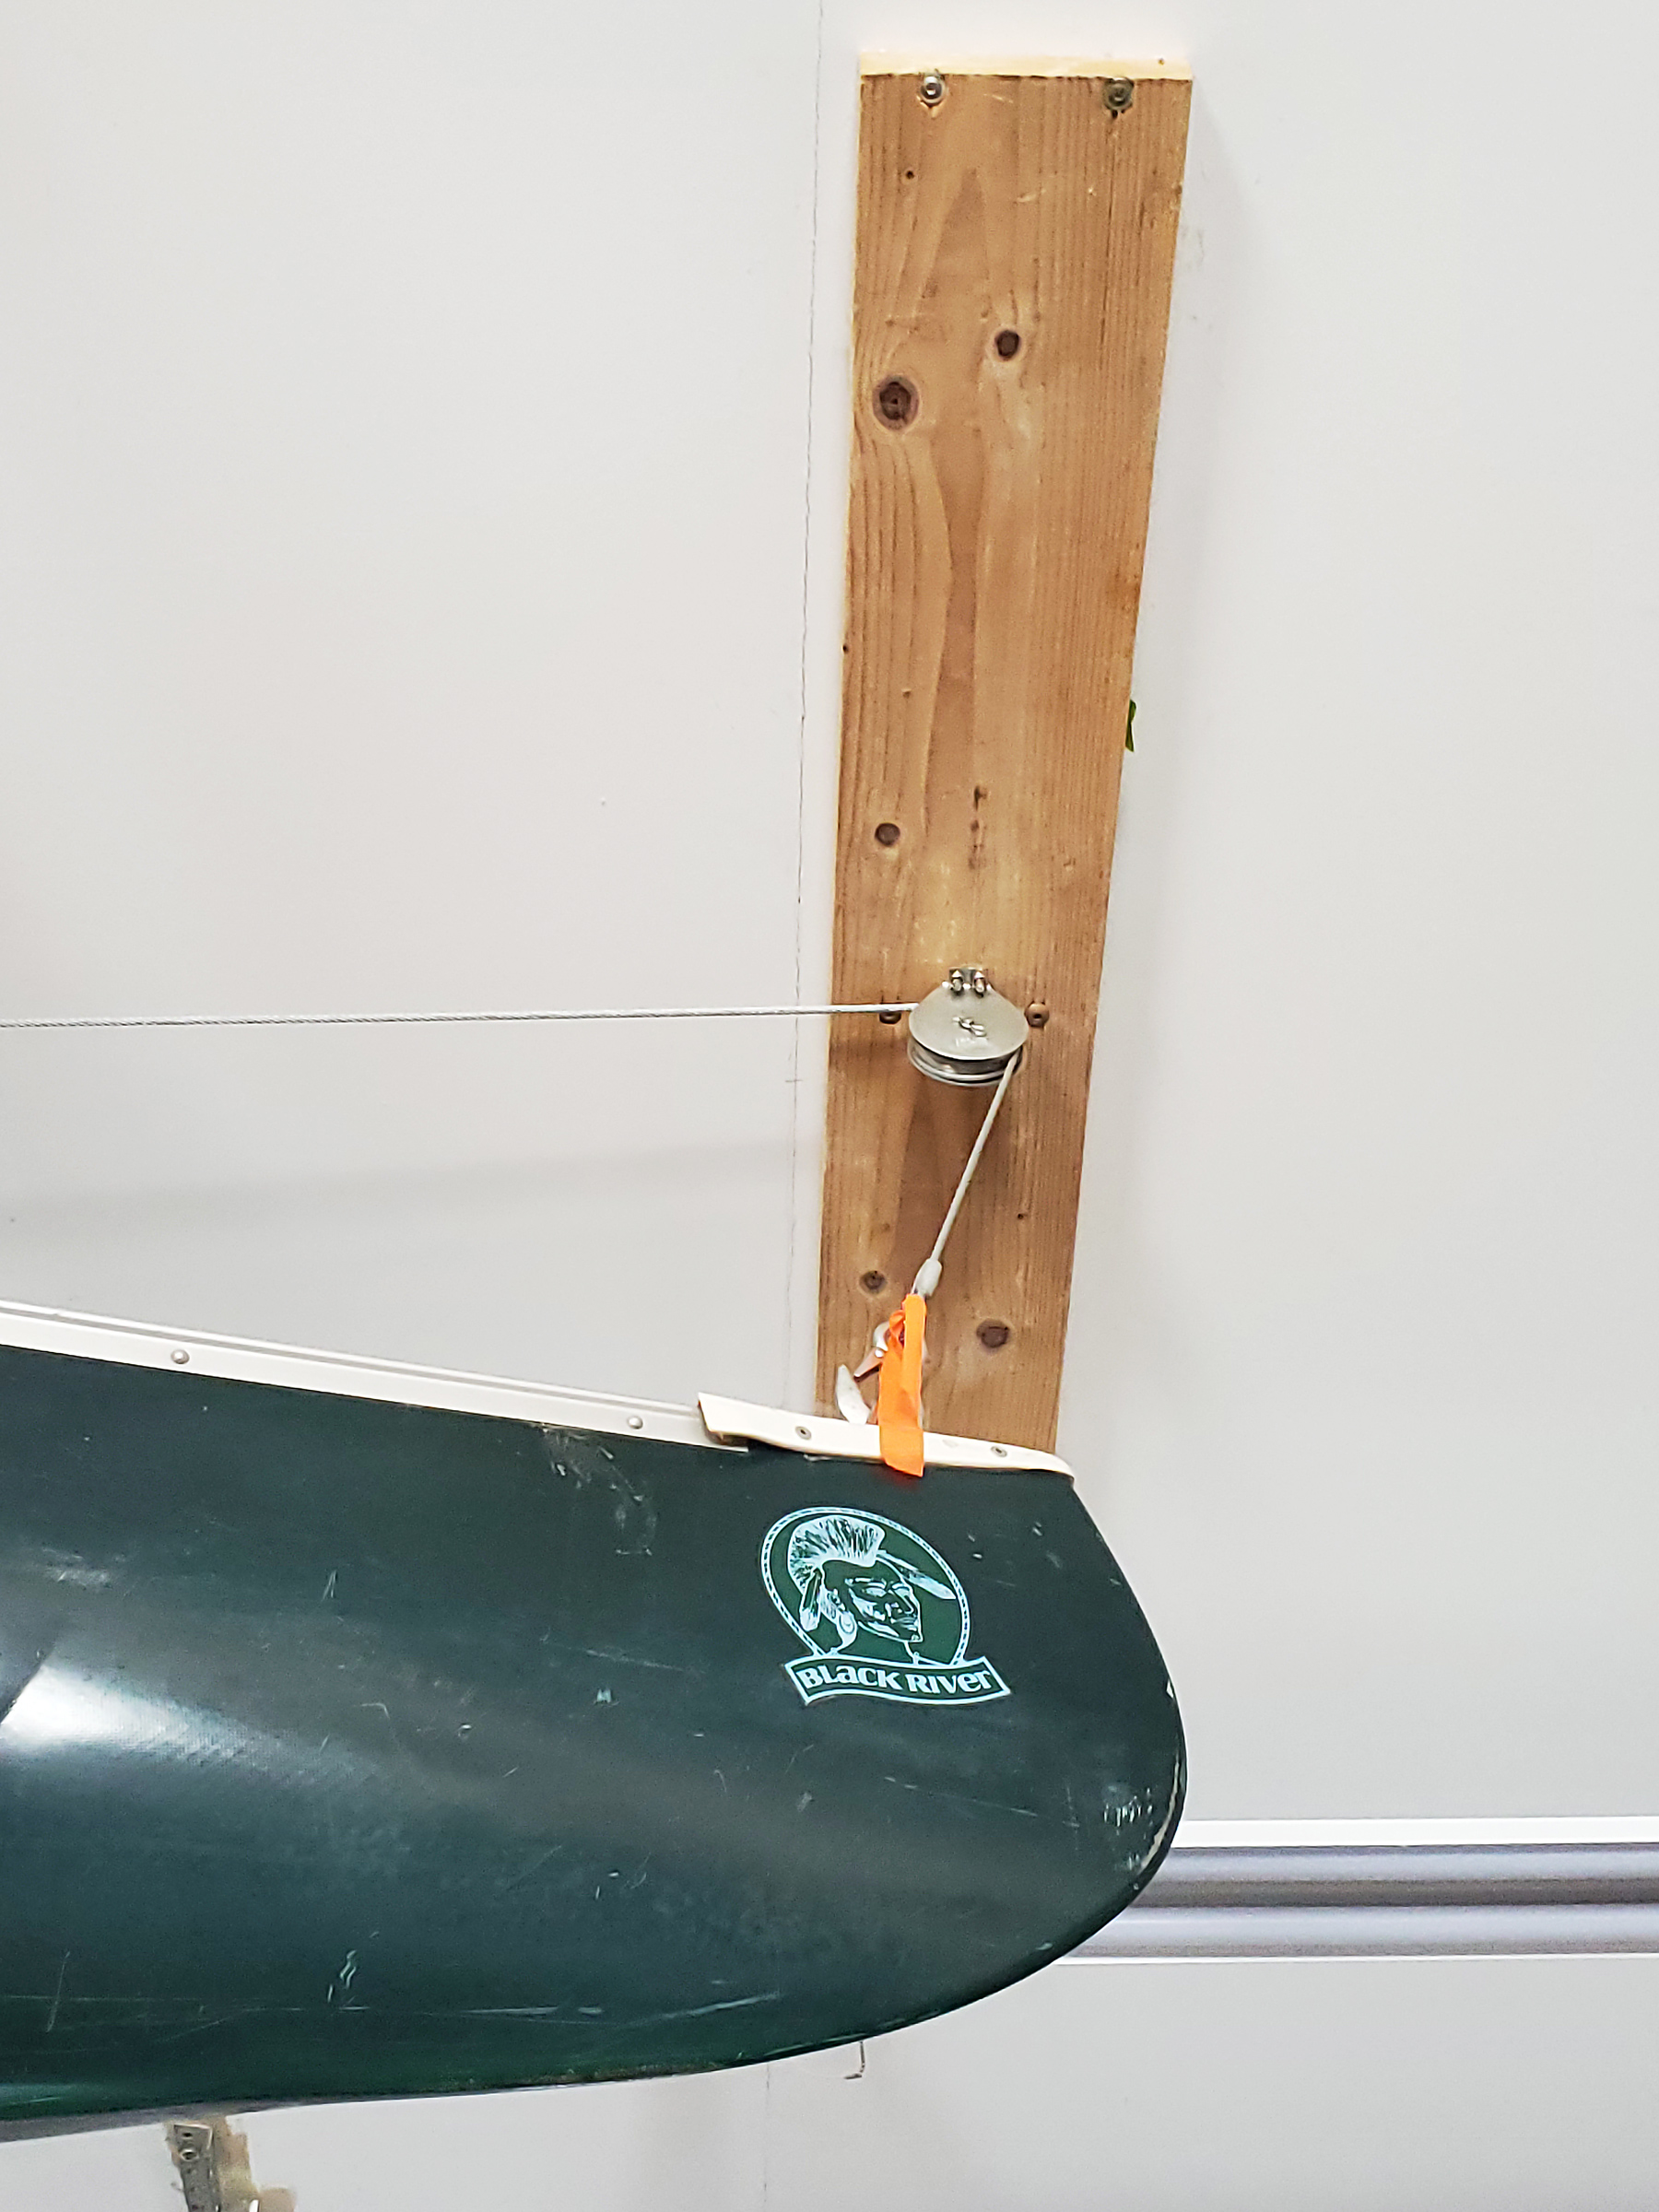
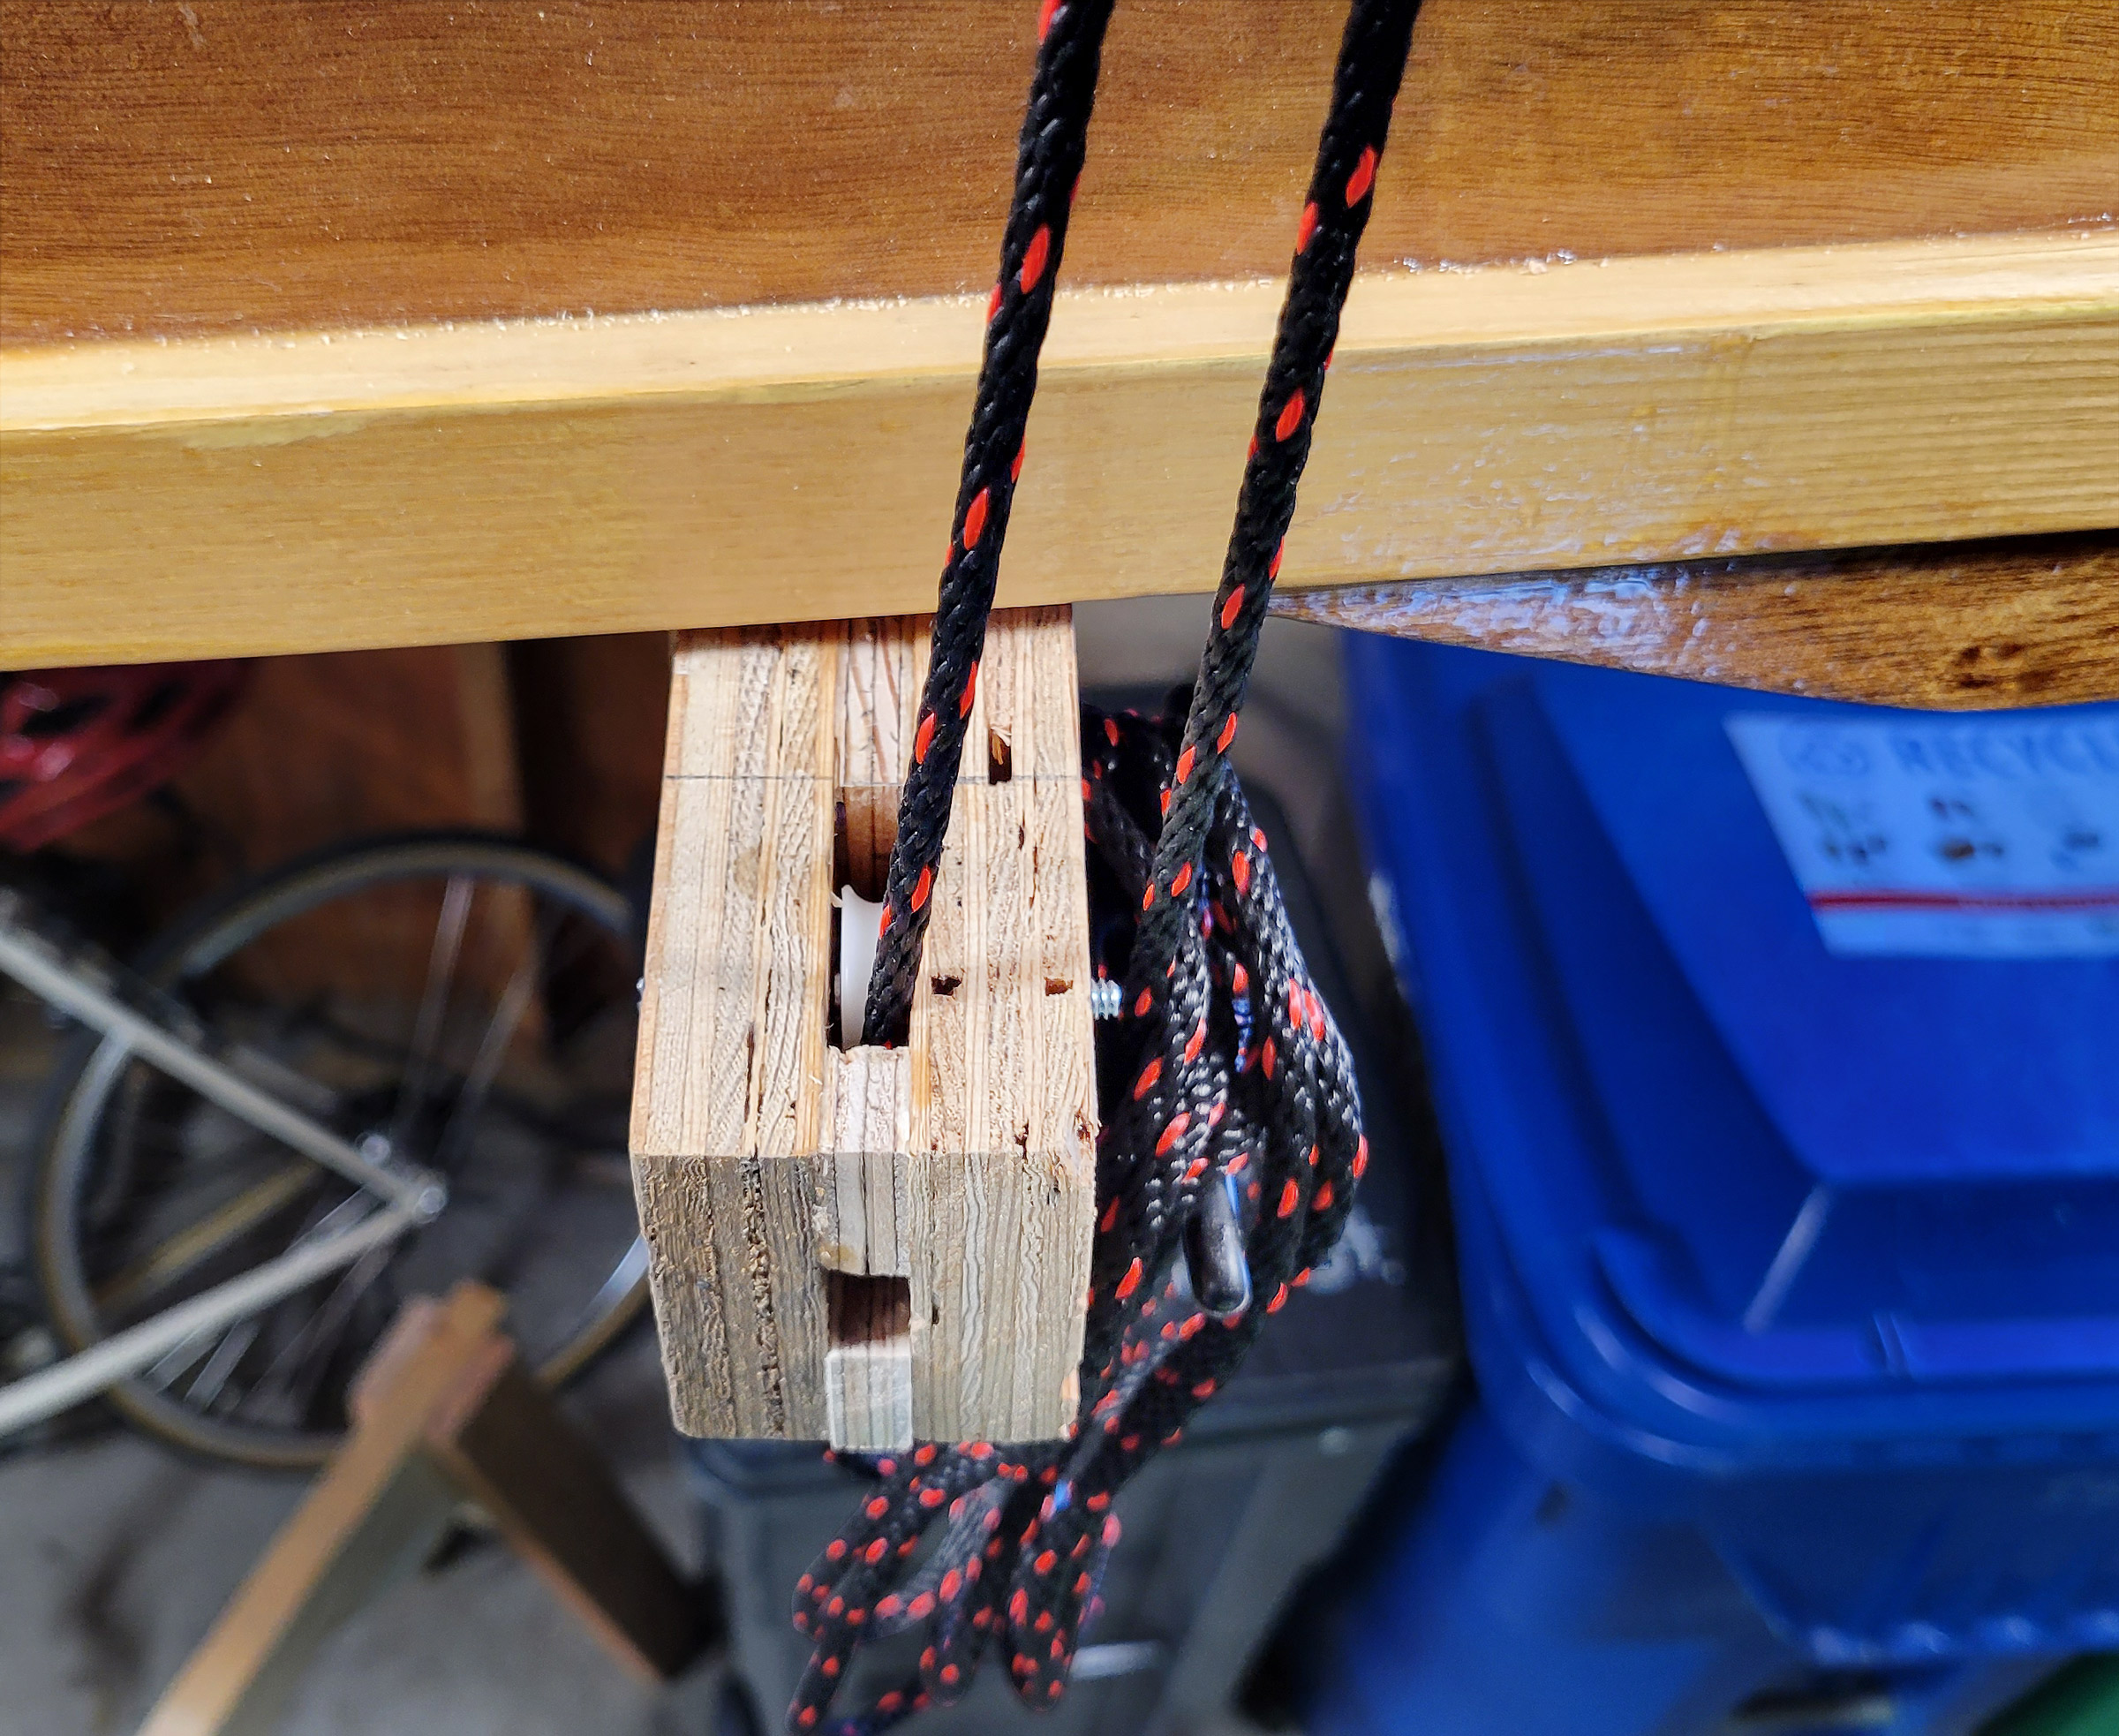
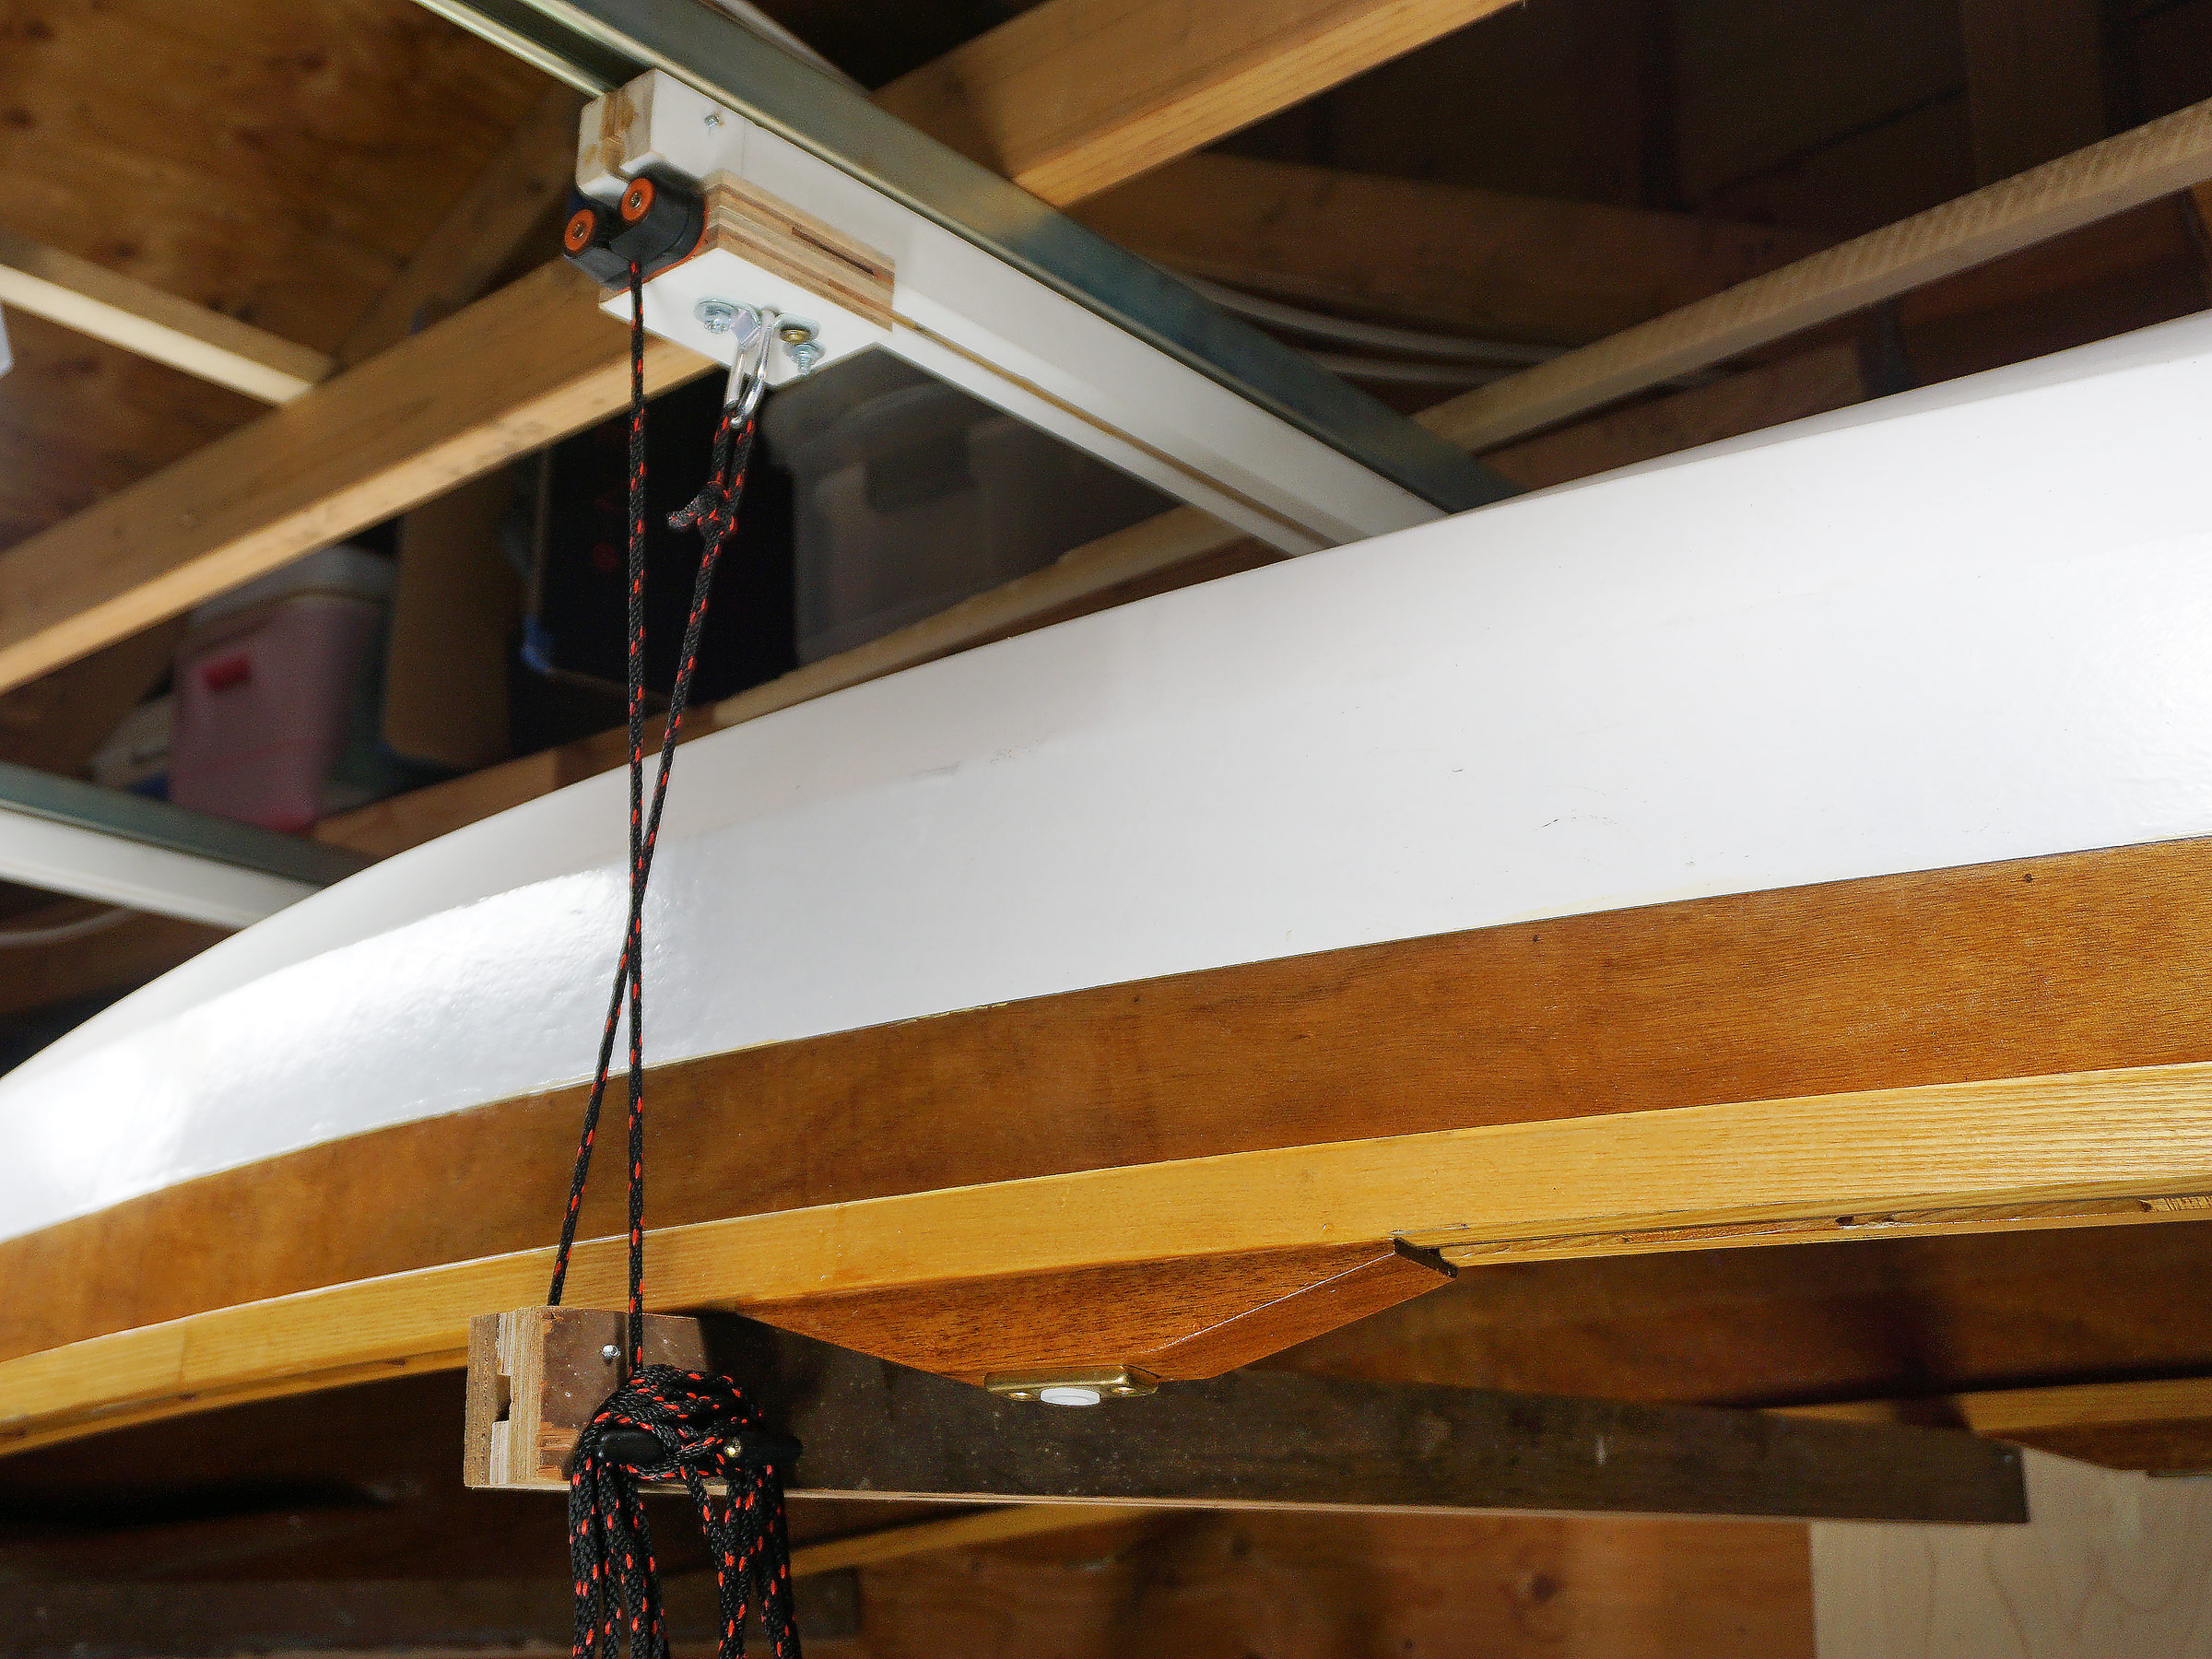
On a second board, also long enough to span three ceiling joists and mounted 12′ from the winch board (a distance dictated by the 13′ canoe’s lifting points), is a flanged block with 3″ sheave. The cable is led through this block and ends in another hook that attaches to a padeye on the canoe.
The load is spread over three ceiling joists in the garage ceiling by bolting the winch to a 4′ length of 2×6. Carriage bolts, washers, and Nylok nuts attach the winch to the board. In turn, the board is attached to the joists with six structural screws. The fixed-flange cable block with 3″ sheave is bolted to a second 4′ 2×6, also screwed to the ceiling joists. Spacing between the winch and turning block is dictated by the boat’s lifting points and clearance to garage door in the raised position. My 13′ canoe has 12′ between lifting points, and that determined the distance between the winch and turning block. I used a 50′ galvanized 3/16″ 7×19 replacement winch cable with a hook attached. The tail end of the cable is routed up around the turning block, over to the winch, through holes in the winch drum axle and center flange, and then straight down. A second hook is then attached with a thimble and two wire-rope cable clip clamps to the cable’s free end.
The hook (simply an eyebolt with a piece cut away) sits in a brass barbed hose fitting that fits inside the copper tube. The eyebolt, barb, and tube were all soldered together to ensure the hook remains centered.
The bottom end of the pole has a 1/4″ square drive, which takes a 1/4″ adapter from the cordless drill. When raising or lowering the canoe, it is best to use the drill on the low-speed setting—41 pole rotations raises the canoe 1′.
To operate the winch from the floor, I made a pole from a 6′ length of 3⁄4″ copper pipe (nominal, outside diameter of 7⁄8″) with a hook on the top end and a 1⁄4″ square drive on the bottom end. The drive hook is an eyebolt with a piece cut away. A brass barbed hose fitting, which fits inside the copper tubing, is used on the top end to center the eyebolt in the tubing. I cleaned and fluxed these parts and soldered them together. At the bottom end of the pole, an orphan 1⁄4″-drive socket with an outside diameter just smaller than the inside diameter of the pipe is slid into the pipe and soldered in place. A 1⁄4″ square-drive adapter connects the cordless drill to rotate the pole. The drill is best operated in its low-speed setting.
The torque required to raise the canoe is low, so a skylight hand crank with a hook end is a ready-made option to operate the winch. At the top of travel, 41 turns raise the canoe 1′. More turns are needed at the bottom of travel when fewer layers of cable are on the reels. The lift distance from the canoe’s storage position to sitting in the truck bed is 6′, requiring between 250 and 300 revolutions.
Thanks to the new hoist, one person can easily maneuver the canoe into and out of the pickup truck, and, when it’s not in use, the canoe is stored out of the way, well above head height.
The winch has a maximum weight capacity of 1,500 lbs, so the 2×6 crosspiece to which it’s mounted is likely the weakest link. While this hoist may be overkill for our lightweight canoe, I am very happy with it. It does all the heavy and awkward lifting and gets us out canoeing frequently and with ease.
Joe Whitehead, a retired automotive engineer, lives outside Ann Arbor, Michigan. He started sailing off the beach on Lake Michigan as a teenager and now sails on Lake Erie. Joe enjoys restoring and modifying trailerable sailboats. His latest project, a rescued Sanibel 17, THREE SHEEPS TO THE WIND, will be launched this spring.
The WG 150 worm-gear winch, item #10956, is available from Dutton-Lainson for $114.99; Q C Supply lists it for $81.18; Etrailer.com lists it for $89.21.
You can share your tips and tricks of the trade with other Small Boats Magazine readers by sending us an email.
Living in Maine, where the winters are cold and long, I am ever on the hunt for new ways to keep warm, especially ones that will help to extend my boating season.
The Hüga cushion, handsewn in Maine, comes from Hüga Heat. Owners Jocelyn Olsen and Colin Grieg describe it as “a smart seating solution that provides long-lasting, steady heat,” and sent me one to try.
Photographs by the author
The nylon-web straps that can be used to secure the Hüga cushion to a bench or thwart also serve as comfortable carrying straps.
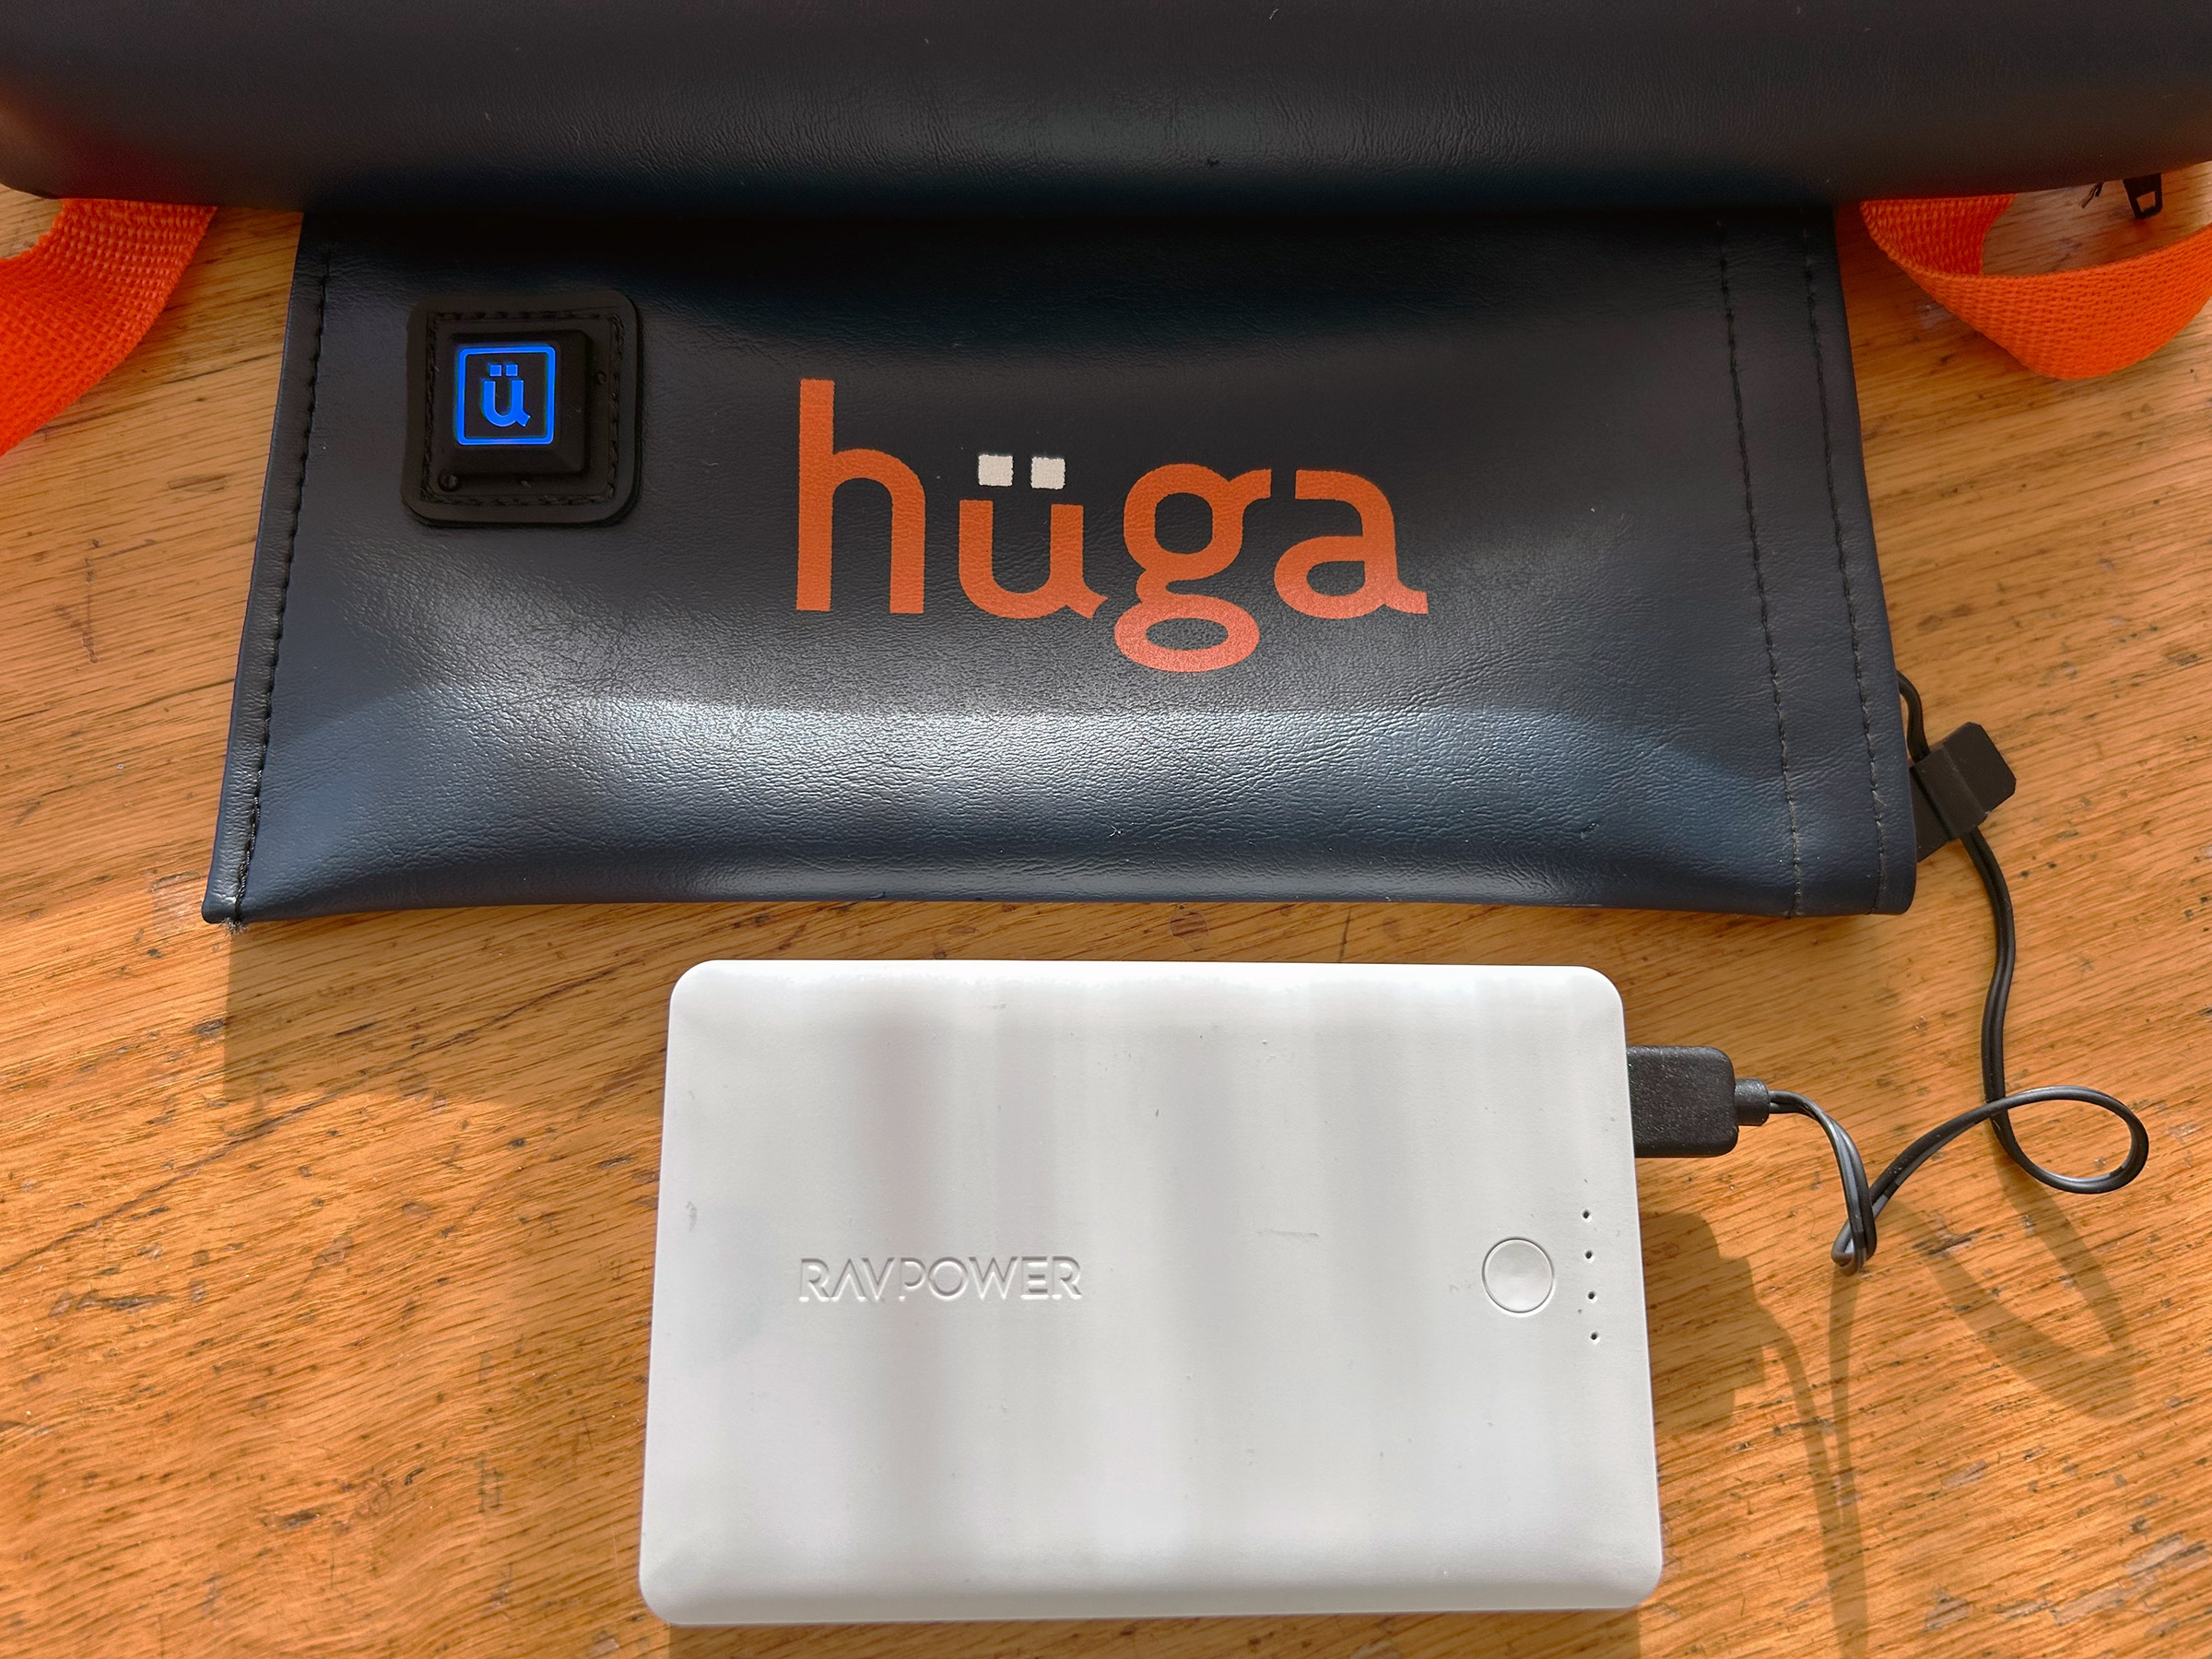
The Hüga is a polyurethane-foam pad encased in removable water-resistant Cordura or marine-grade vinyl. Beneath the cover, on top of the foam, is a heating pad powered by a 22W, 16.75Ah battery. Complete with battery, the Hüga measures 16″ × 14″ × 2″ and weighs approximately 2 lbs. It comes in navy, two different greys, or white, and with a 3+hr, 6+hr, or 10+hr battery—the rating indicates the duration of the charge if the pad is kept at the highest temperature setting.
Out of the box my 6+hr battery had no charge. I plugged it in and after five hours, three of the four charge-indicator lights were illuminated. I left the battery plugged in overnight and had a full charge in the morning.
After dousing the cushion with water, the battery was found to be bone dry inside the pouch. To check on the charge, the battery must be pulled out of the pouch so that the charge lights are visible, and the button can be pressed. In bad weather this may not be ideal and a clear viewing panel on the backside of the pouch might be a good addition.
When ready to go, the battery slips into the Hüga’s pouch where it is plugged into a USB cable. The pouch is then closed with Velcro. For use around water, I would have liked an additional flap to come over the Velcroed opening to give the pouch and battery greater protection, and it might also be useful to have a transparent panel through which to see the charge level on the battery—for now, the only way to check the charge is to open the pouch and pull the battery out 1″ or so.
The on-off button to the left of the Hüga’s logo is illuminated when the cushion is on. Blue indicates the medium setting, green is the lowest, while red is the highest. In the lower settings the battery charge lasts longer.
The Hüga Heat website notes that the Hüga gets up to between 105° and 120°F on the highest setting, 95–105° on medium, and 85–95° on low. The website also says that when exposed to the air—i.e., when no one is sitting on it—the cushion’s temperature will drop slightly. When I measured it with a digital kitchen thermometer, I recorded 116°F on the highest setting while sitting on it. I also wanted to test the longevity of the charge. Starting with the fully charged battery, I left the Hüga unattended on the hottest setting and it ran for 6-1⁄4 hours with no drop in temperature; it simply switched off when the battery charge ran out.
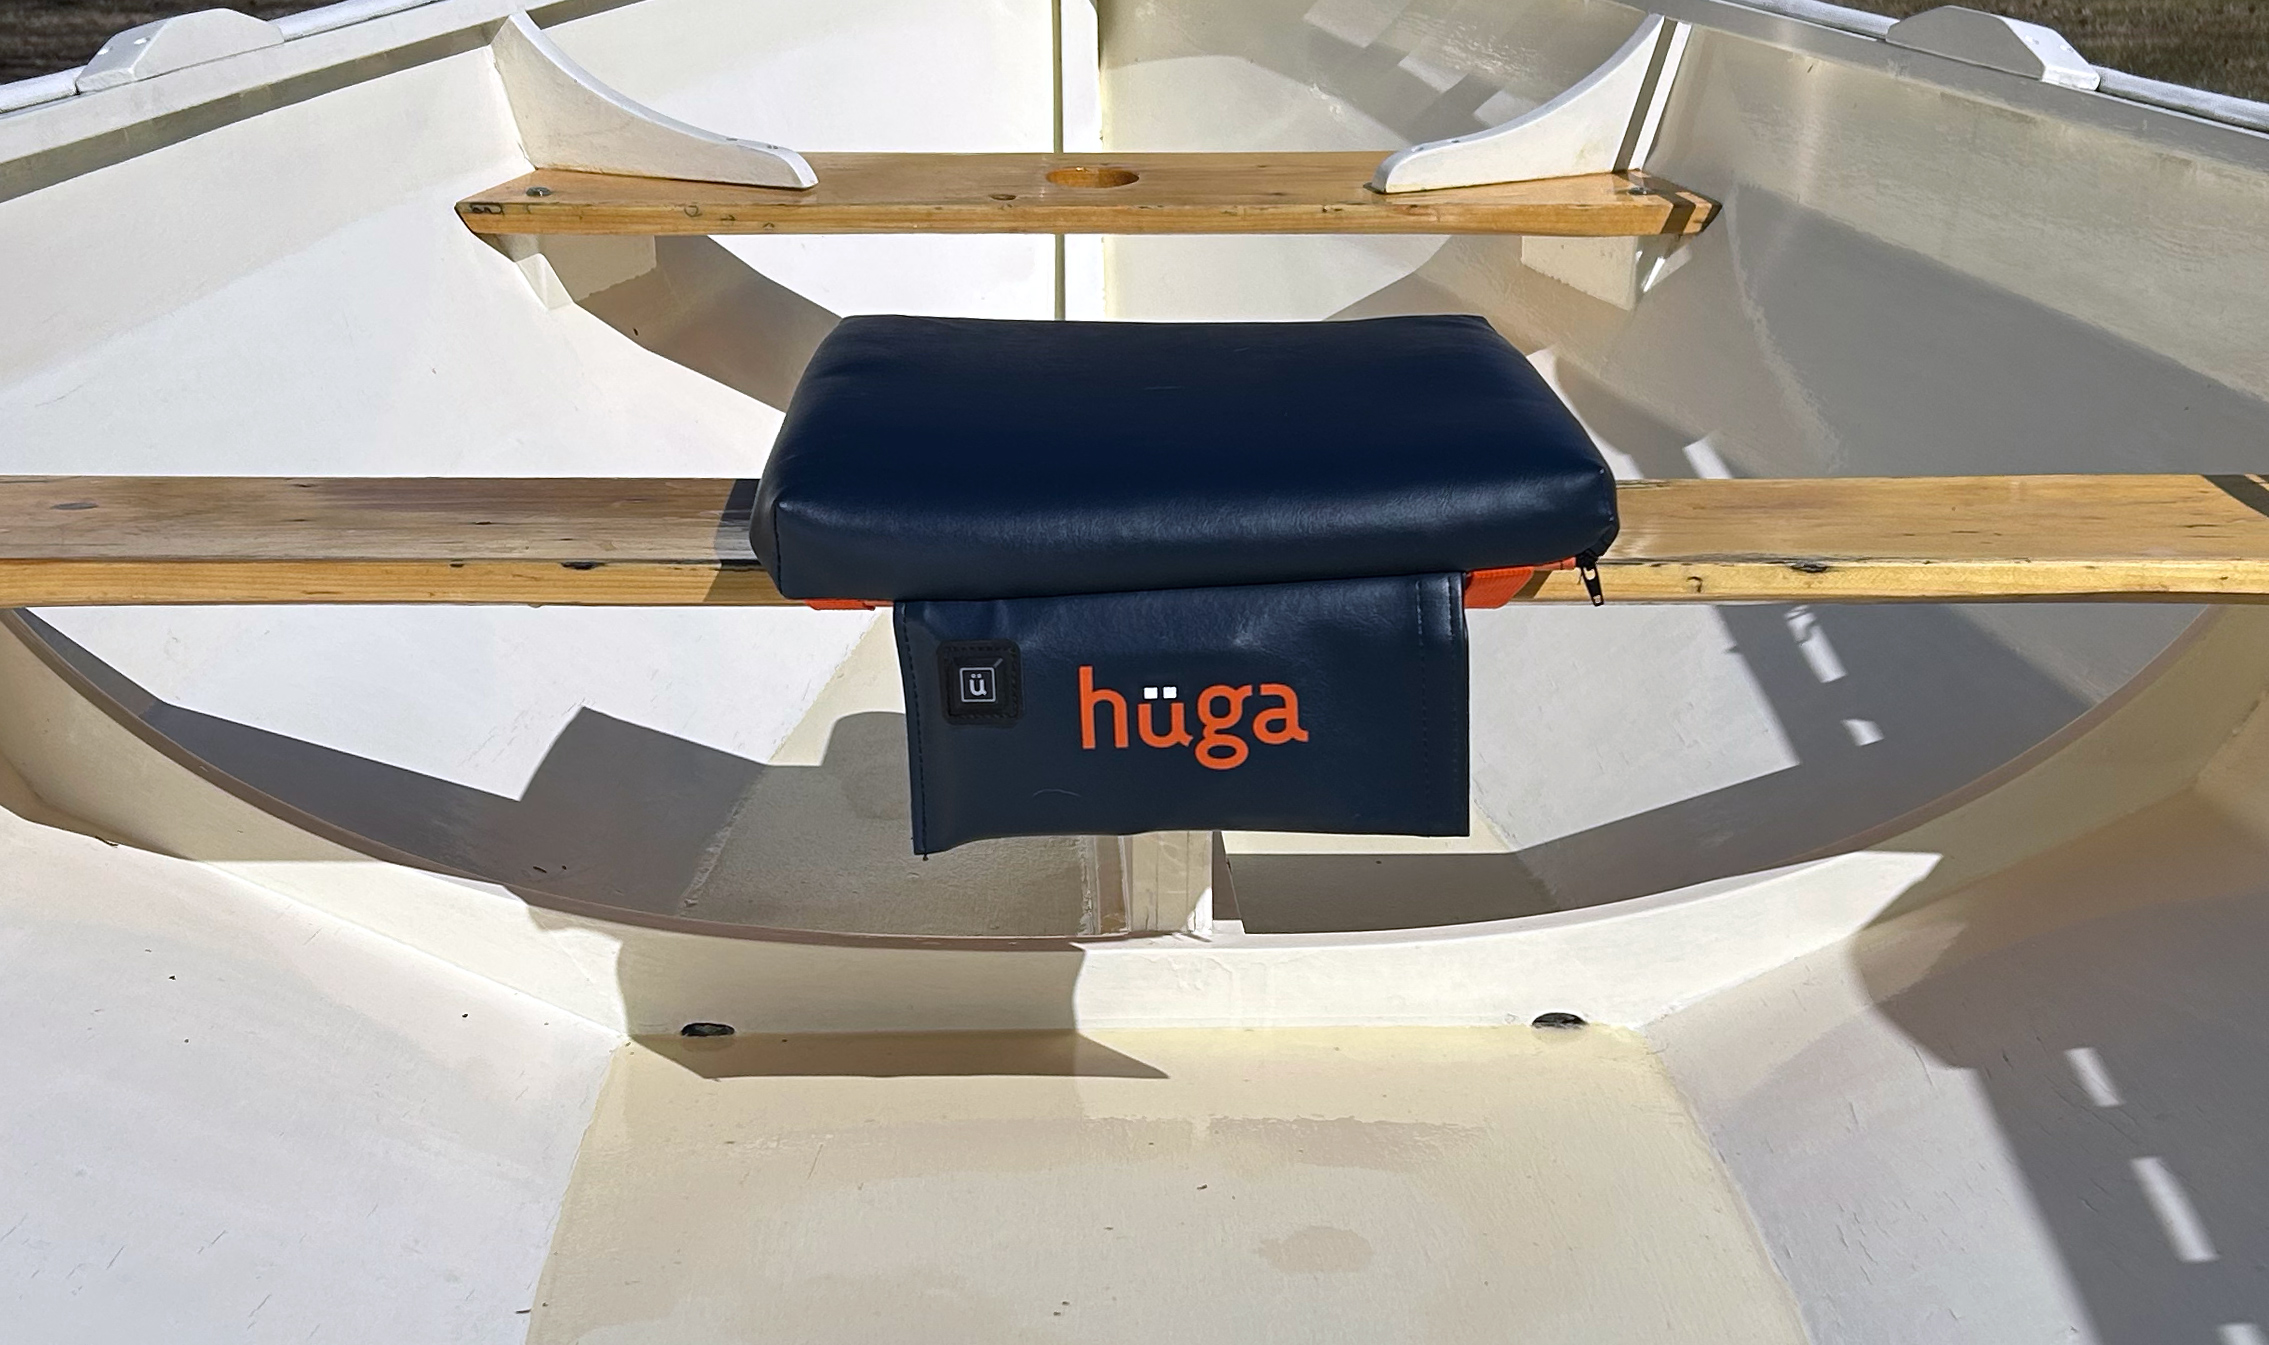
Next, I took the cushion out to our Shellback dinghy on a 40°F March afternoon. The Hüga is wider than the boat’s thwarts but once I had cinched the straps—1″-wide nylon webbing adjusted through snap buckles—it stayed put, was comfortable to sit on, and was a big improvement on a bare wooden thwart. For rowing, the additional height of about 1-1⁄2″ isn’t difficult to get used to, especially if you’ve already used a thick seating pad and you have enough clearance for the oar handles. I wasn’t out for long but even on a very cold day would probably use the cushion on its coolest setting and only raise it up to one of the higher settings if I stopped rowing for more than just a few minutes. For a serious rower, the thick, flat cushion may not be a good fit with a finely tuned rowing arrangement, but for a casual rower, or a passenger in the boat who isn’t getting the benefit of rowing to warm up, the heat from the Hüga would be welcome.
The cushion can be used on a narrow thwart thanks to the straps that can be cinched to hold it in place. Because the battery pouch hangs down so that its opening is vertical and somewhat protected by the cushion above, the likelihood of rain getting inside is slight.
Back from the boat, I sat outside in a lawn chair. The air temperature was still about 40°F but now there was about a 10-knot breeze blowing. The heat from the cushion beneath me was wonderful and, after about 10 minutes, I felt too warm and reduced the setting from high to medium by pushing the button on the front of the pouch. There was no immediate sense of temperature change, but after a few minutes I was more comfortable—still warm, but no longer overheating. I sat for a while, taking notes, until my fingers became too cold and then, rather than reach for my gloves, I slid my hands beneath me and let the Hüga warm them.
I am perennially cold outdoors and the heat that comes from the Hüga is subtle but effective—it seeps into your body and lingers, warming you gradually so that you barely register it’s happening. It doesn’t give you the instant rush that can be gained from a roaring fire, but a more sustainable heat that would make sitting out on an open boat on a cold day or coming ashore on a late-season boat-camping trip, a much more comfortable experience—even for me.
Jenny Bennett is the managing editor of Small Boats Magazine.
The Hüga is available from Hüga Heat starting at $119.99.
Is there a product that might be useful for boatbuilding, cruising, or shore-side camping that you’d like us to review? Please email your suggestions.
Moving my boat and trailer around my backyard has been a dreaded chore and, at times, an injury-causing one. My Welsford Pathfinder with motor, sails, anchor, and other gear, weighs about 485 lbs, and add to that about 700 lbs for its aluminum trailer. My yard is no putting green with its clumpy grass, random divots, and hidden debris which all impede progress. It’s really a two-person job, but I am usually alone in getting the boat across the lawn to the driveway. As I move through my late 50s, the task grows more challenging.
For many years, I relied on a cheap 12-volt winch, combined with a two-wheeled trailer dolly. This worked okay but it was a hassle to haul out the winch, the deep-cycle battery, and the dolly before dragging out the cable, adding some chain or rope, and finding an attachment point. When the winch failed this past year, I was ready for an upgrade.
Photographs by the author
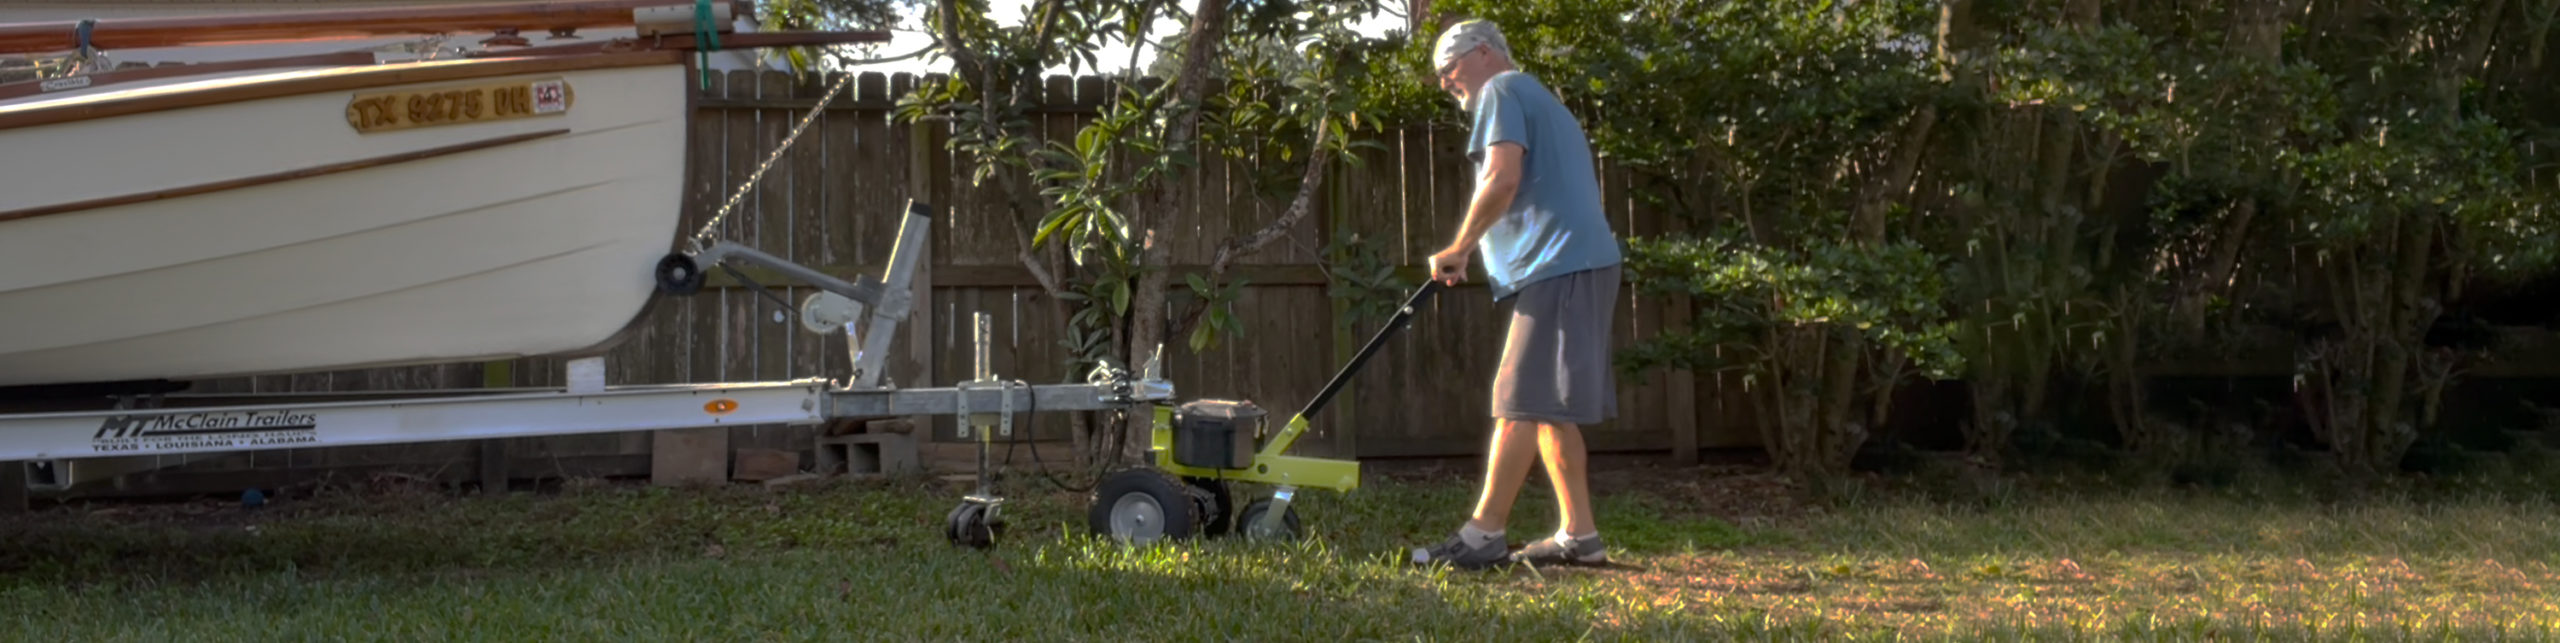
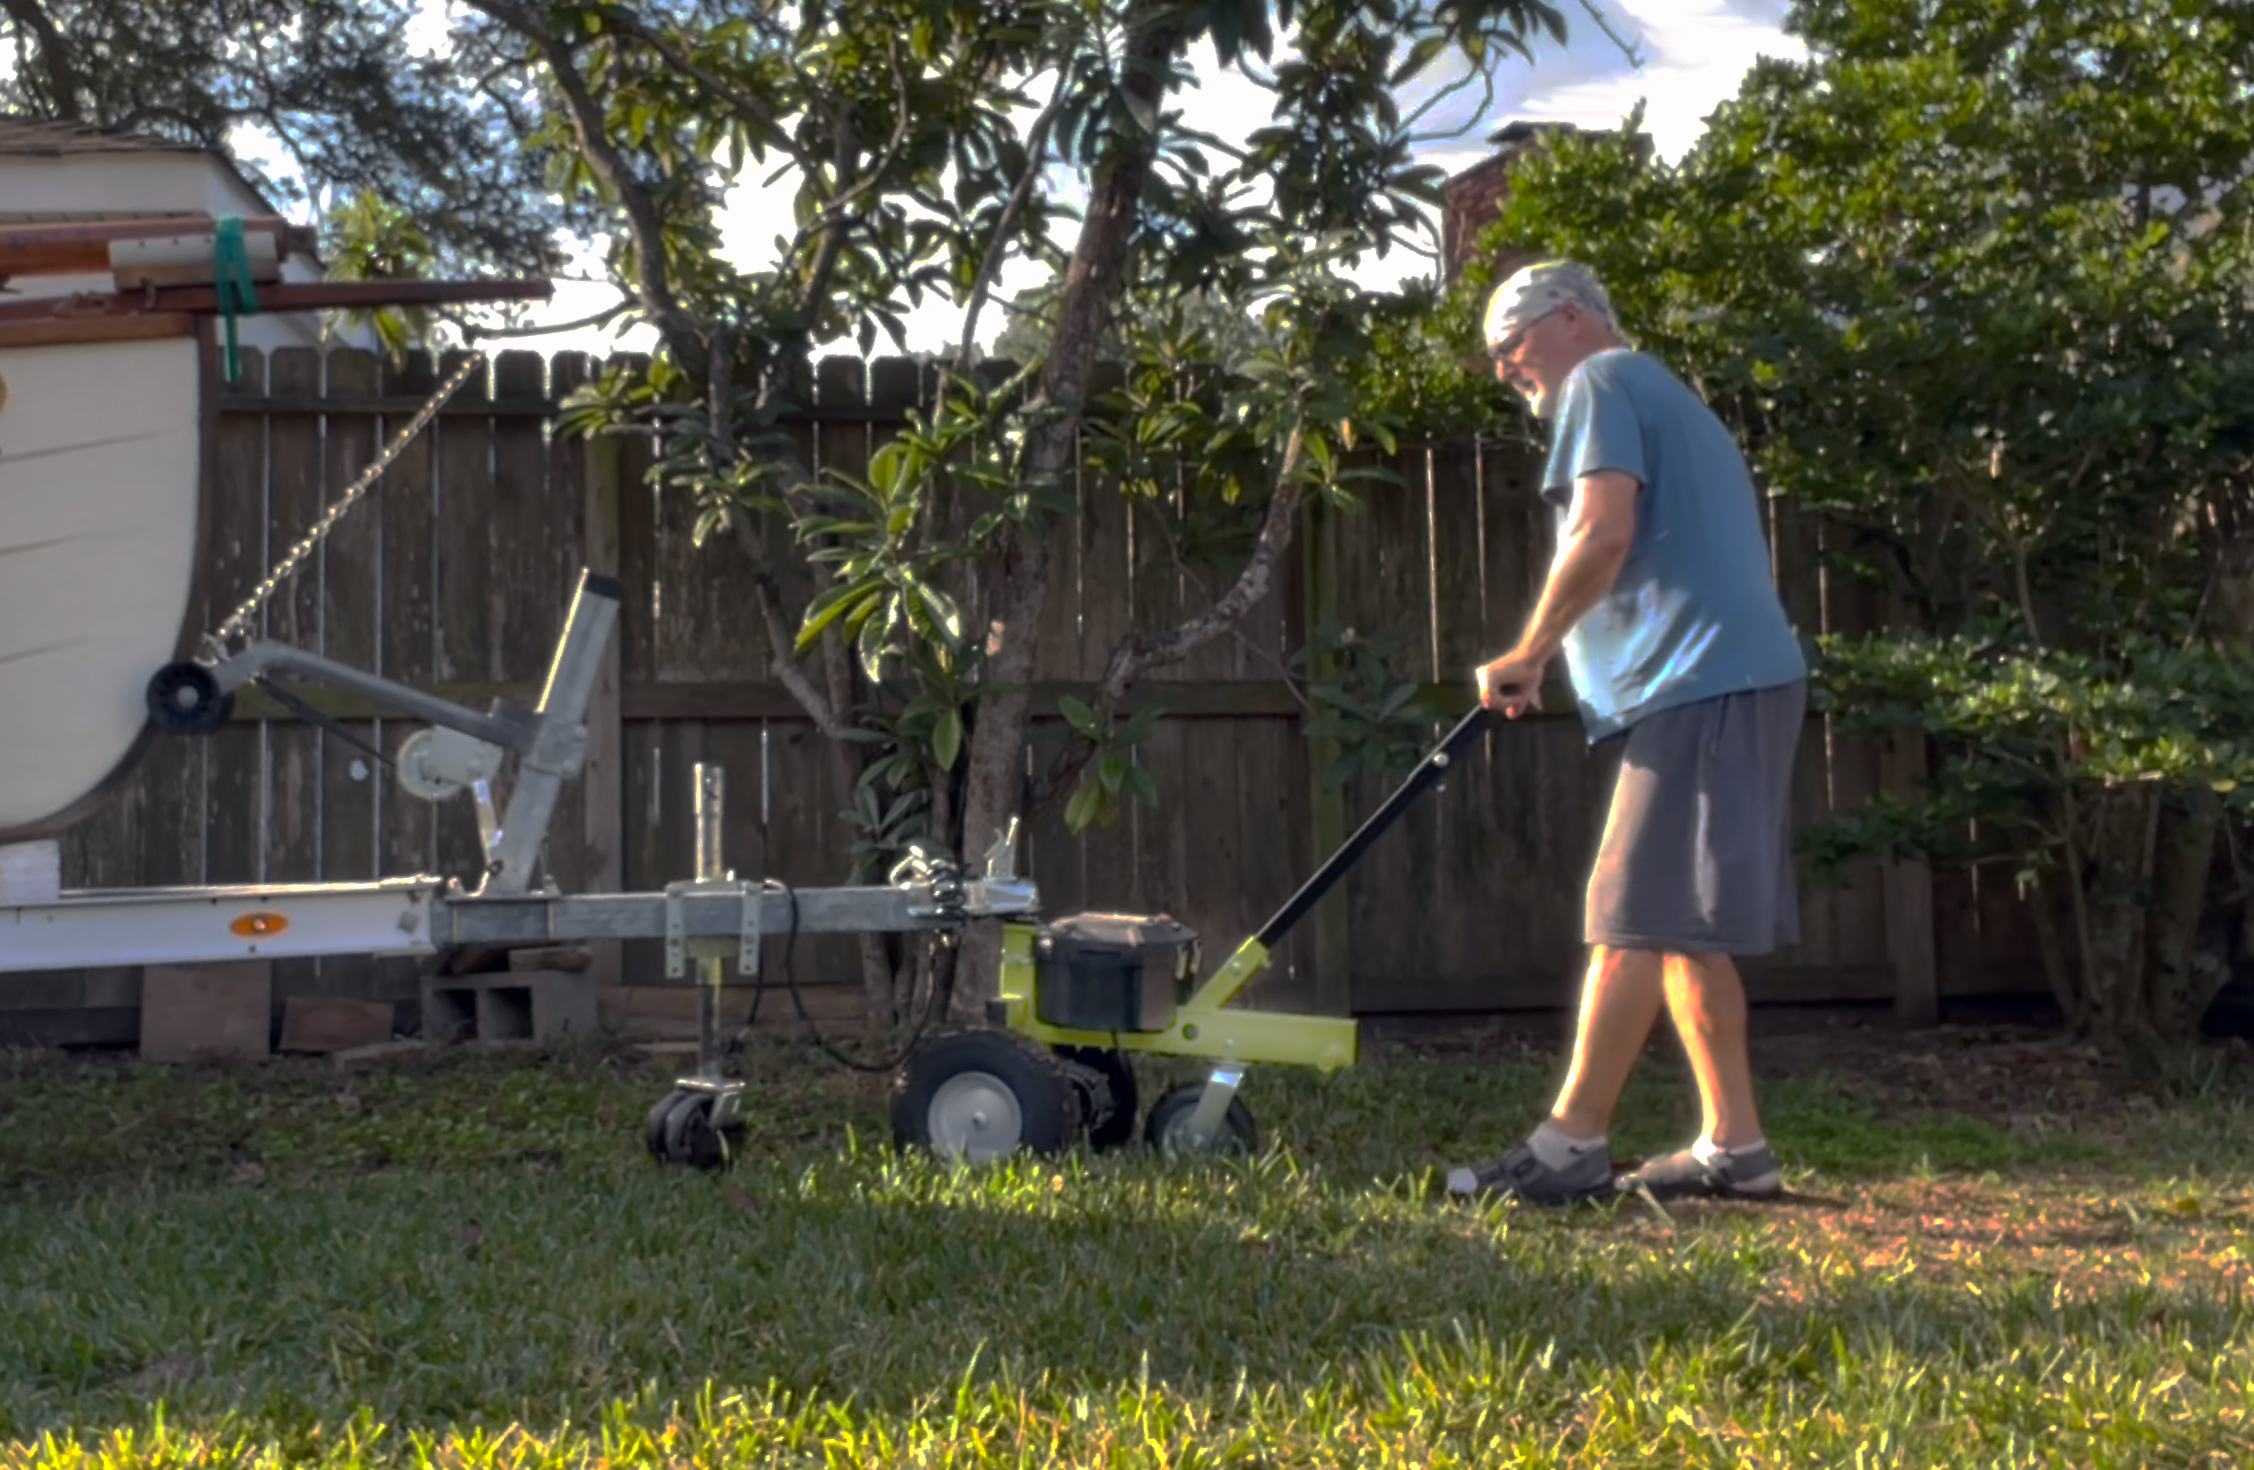
Flat and even ground is ideal when using the Tow Tuff but there can be few yards that meet those criteria. The author’s Tow Tuff handled the bumps and lumps of the lawn, as well as a 3-degree ramp up and over a 6″-high deck. Thus, he was able to move his Welsford Pathfinder singlehanded and with energy to spare.
I ordered the 24-volt Tow Tuff TMD-3500ETD Electric Trailer Dolly from Northern Tool & Equipment, and it arrived at the store nearest me a few weeks later. The 110-lb box fit easily in the back of my Subaru Outback. I’ve assembled a lifetime’s worth of furniture and assorted other stuff, so the assembly was straightforward for me and took less than 30 minutes. It required not much more than attaching the wheels and handlebar and threading some wires through the metal tubing.
The dolly is powered by two sealed 7 AH 12-volt batteries. It can travel up to 1.5 mph with variable speed in forward and reverse and has a capacity of 3,500 lbs with a 600-lb tongue capacity. The dolly is intended for relatively flat and even ground. The 13″ main tires need traction, so they may not move a heavy trailer over loose gravel, wet grass, or slick pavement. It comes with a 2″ ball, which can be swapped out for a different size. The ball height is adjustable from 22″ to 28″.
The dolly can move up inclines of up to 4 degrees, according to the owner’s manual. Plan ahead: the Tow Tuff, like manual two-wheeled dollies, has no braking mechanism (although backing off the throttle adds some resistance to the drive wheels). If the trailer starts rolling down the driveway, it’s going to be difficult, if not impossible, to stop it unless you have a helper with wheel chocks standing by or can rig up a system that you can deploy by yourself (I picture a board that you drag in front of the tires via rope that you can strategically drop).
The route from my trailer’s parking spot in the grass to the concrete driveway includes riding up and over a 6″-high deck via a wooden ramp. This obstacle was my biggest concern: would the dolly have enough torque to pull or push the trailer up the ramp? Would the tires have enough traction? That test was the first one I tried, and the power dolly handled it with ease. I measured the ramp with a digital angle gauge, which indicated a 3-degree incline, well within the specified 4-degree parameter.
The Tow Tuff comes with a 2″ ball as standard, but this can be swapped out to suit a smaller or larger trailer hitch. The welded bar beneath the dolly handle allows the operator to use their own bodyweight to bring more traction to the tires and to keep the swivel caster in contact with the ground.
The Tuff Tow has three wheels: two 13″ pneumatic tires attached to the drive train, and a swiveling 8″ caster. When pushing the trailer, the torque on the tires pushes the tongue weight down onto the caster. However, pulling the trailer sends the torque and tongue weight in the other direction, where there is no caster. The result is, anytime you encounter additional resistance, the dolly handle wants to pull up and out of your hands. The heavier the load, the more pronounced this is. To help manage this force, and to add more weight/traction to the larger tires, there is a bar welded on the dolly frame that you can step on.
The variable-speed thumb throttle on the right handle is convenient to use and responds quickly, controlling movement up to 1.5 mph, an easy walking speed. There is no jerking or lurching even when the dolly is full throttle. Forward and reverse are selected via a rocker switch on the left handle. The throttle also has an LED gauge to indicate remaining battery life.
My experience with the electric dolly has been fantastic, especially when compared to my previous system. I was a little surprised that the dolly had trouble managing a small lip: I park the trailer tires on top of some thin paver stones to keep them off the wet ground. It’s only a 3⁄4″ lip, but it brought the tires to a stop. I was able to overcome this by backing up the dolly several feet and giving it a run at it with full throttle. I have learned how to maneuver the Tow Tuff to easily align it exactly where I want.
Do some research before dropping $1,000 or more on this convenience. You will find plenty of negative reviews, most of which appear to result from high expectations for moving trailers weighing much more than mine and using it on questionable surface conditions. From my perspective, the electric dolly works well and is much cheaper than multiple trips to the chiropractor followed by three days of Icy Hot, immobilized on the couch. Been there, done that.
Mike Olson lives in Houston where he retired as a marketing communications writer in the financial industry. He sails his Pathfinder, CRUCIBLE, on the Texas Gulf Coast and inland lakes.
The author’s Tow Tuff TMD-3500ETD was purchased through Northern Tool, but Target, Walmart, Amazon, Tractor Supply, and other retailers also list it on their websites. The Tow Tuff is not likely to be stocked at a brick-and-mortar store. The dolly has a one-year limited manufacturers’ warranty on parts. A reputable retailer might make things easier should you decide to return it.
Is there a product that might be useful for boatbuilding, cruising, or shore-side camping that you’d like us to review? Please email your suggestions.
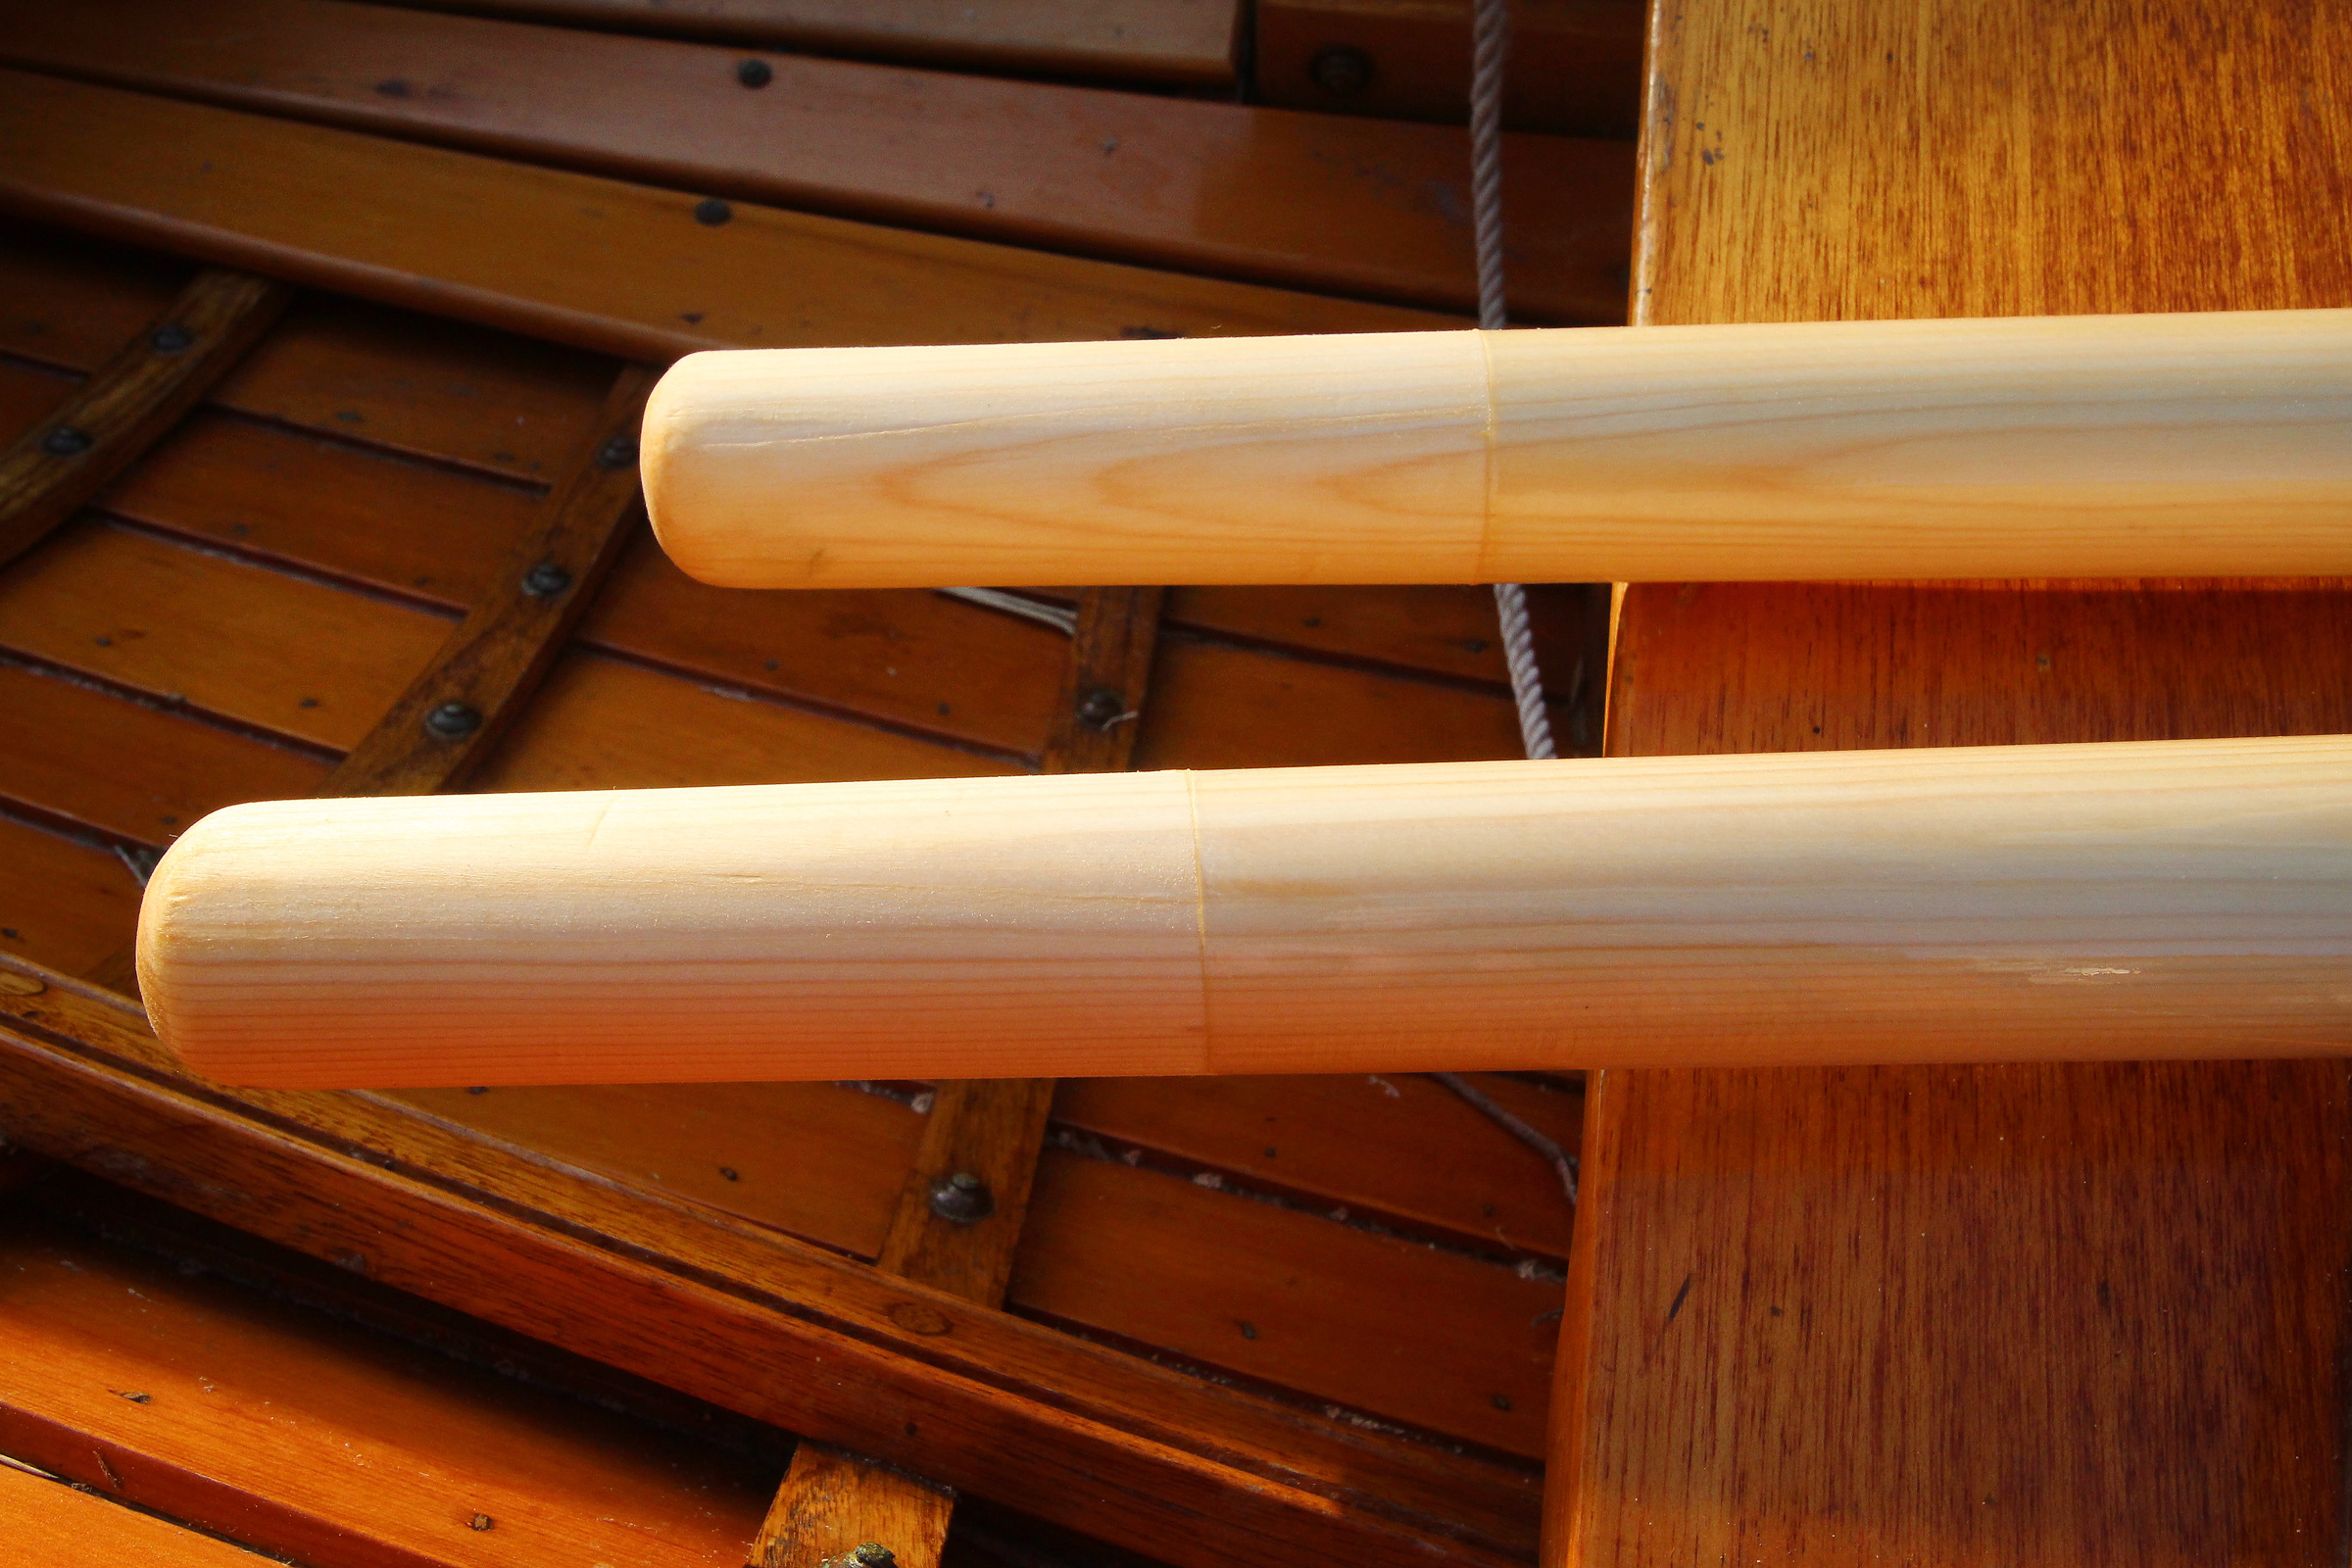
While I’ve never carried a boathook aboard any of my boats, it’s not because I wouldn’t find one useful. Where space is limited, boathooks—even telescoping ones—are awkward to stow, so I learned to get by without one. For instance, I always approach a dock on its upwind side so I won’t drift away from it; when I can’t sail within arm’s reach to grab something from the water, I’ll make another pass; to push off a rocky beach I’ll use an oar.
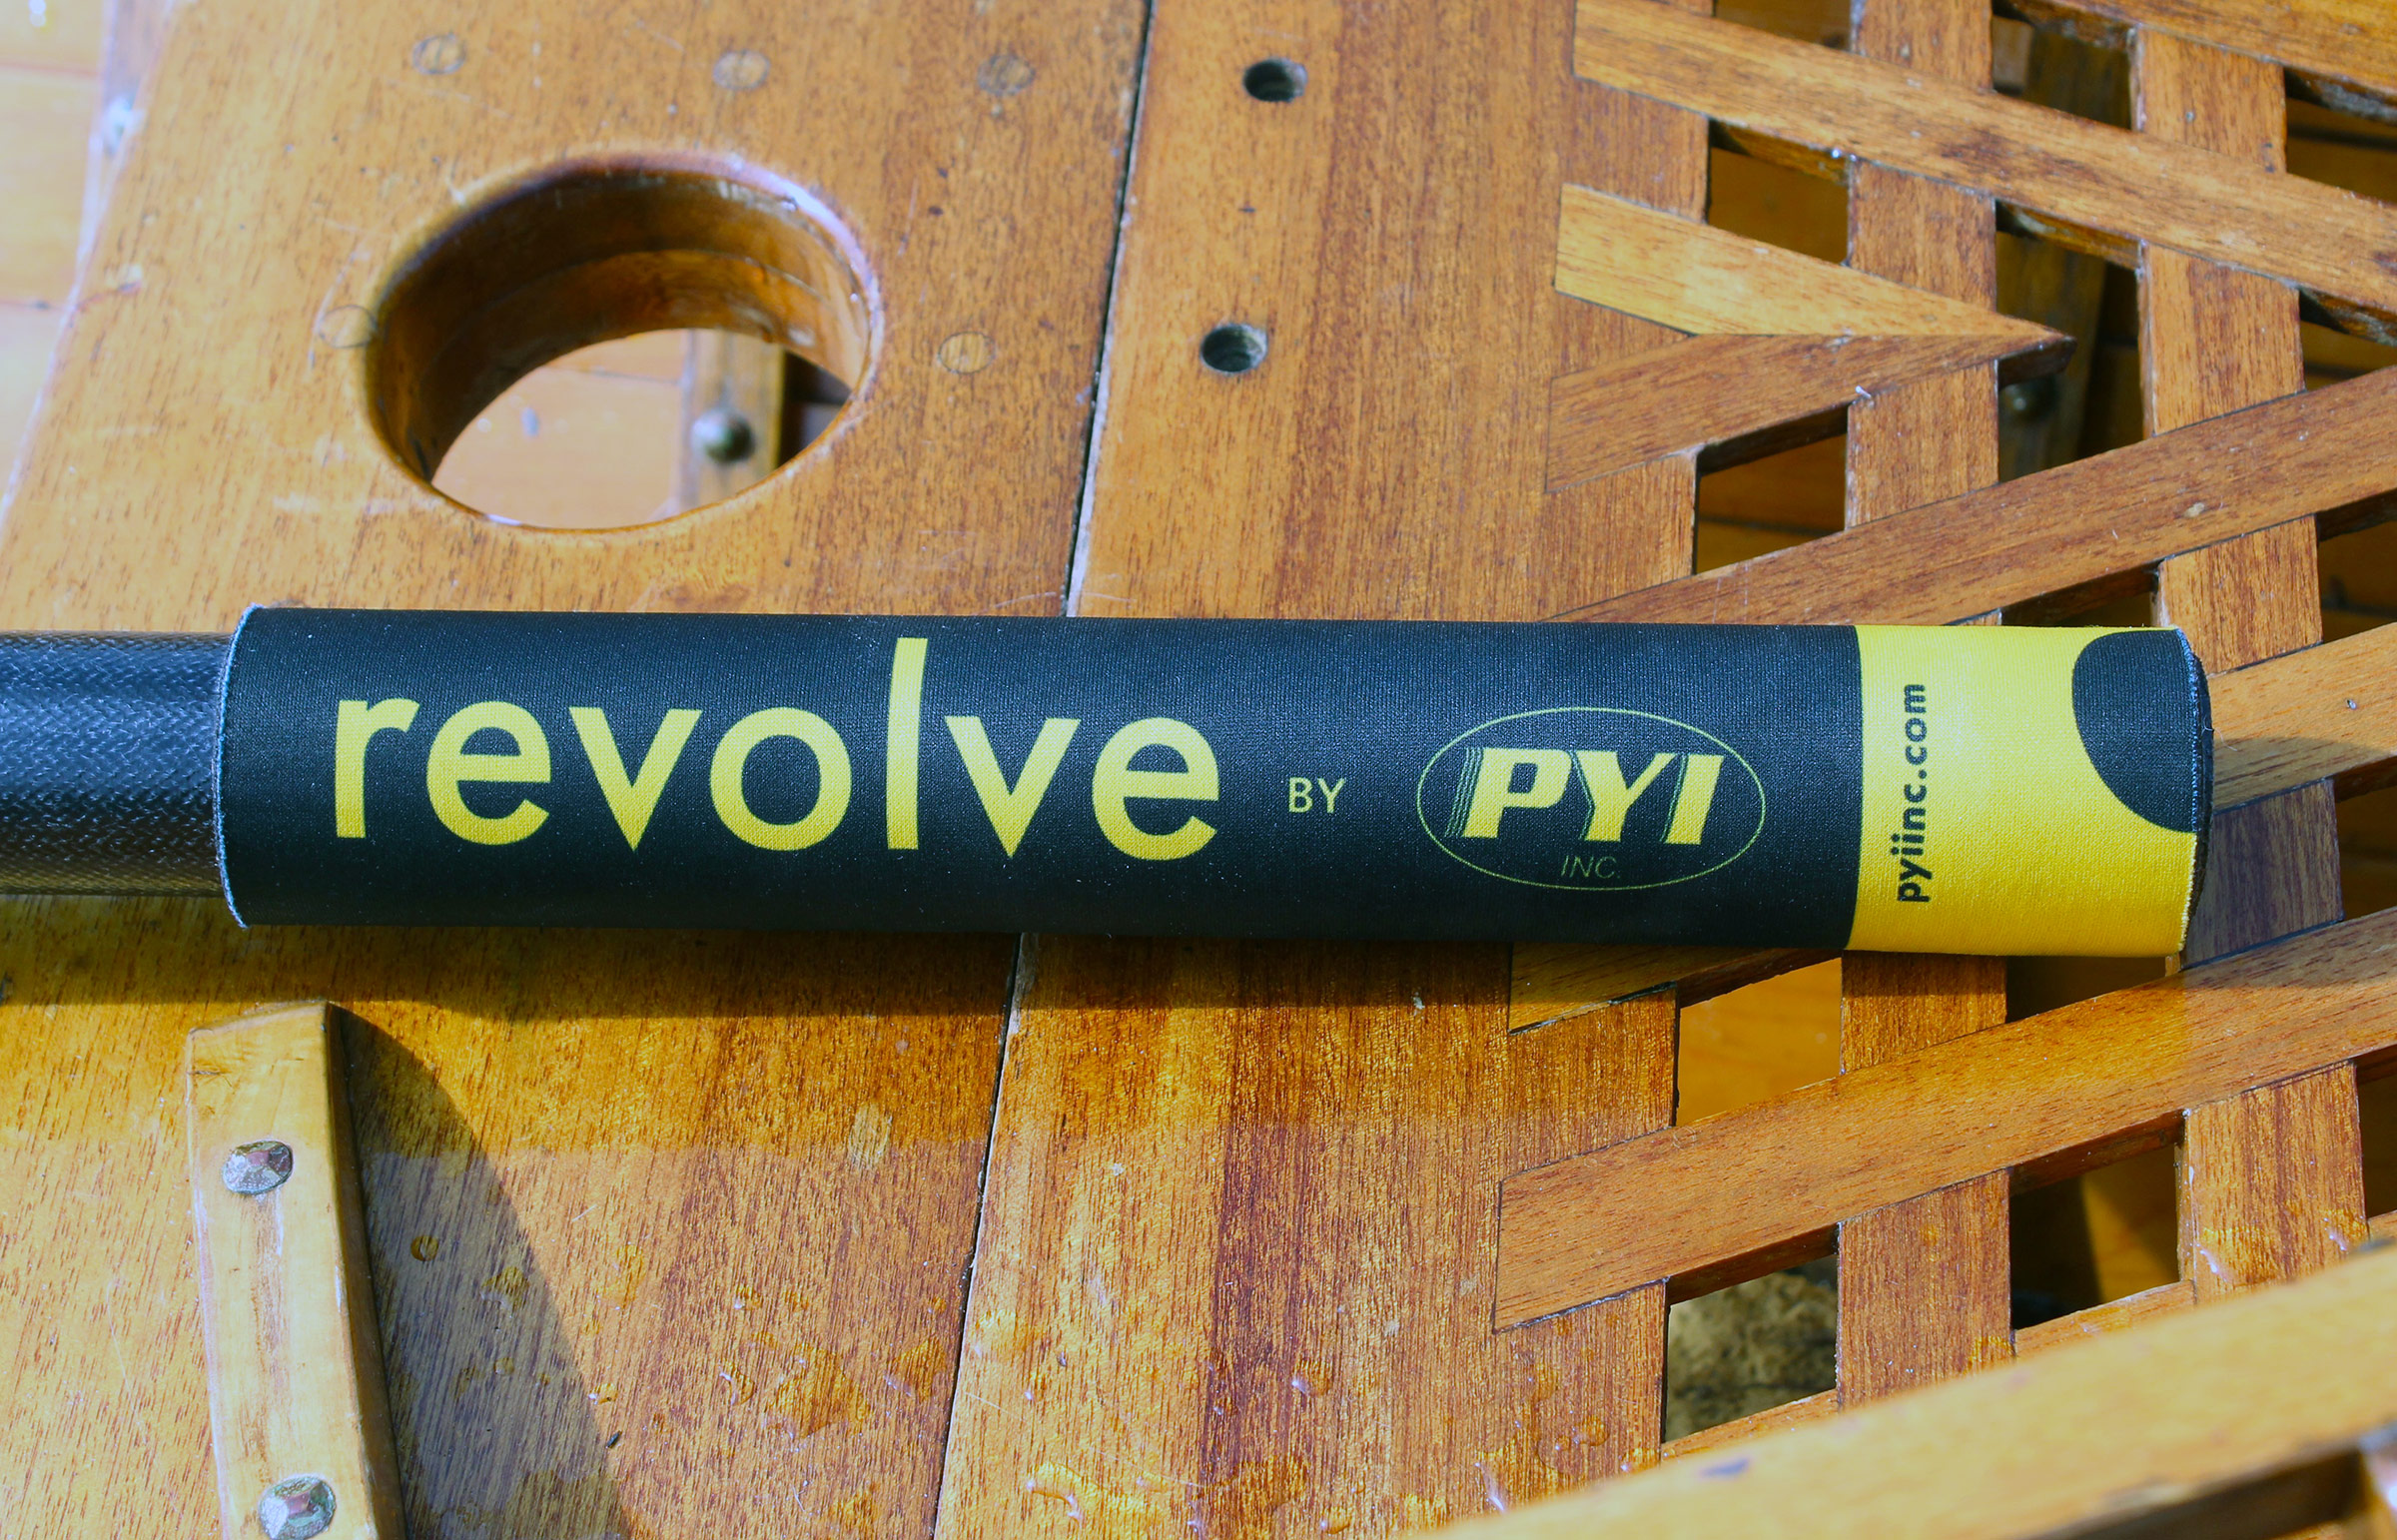
The Revolve Rollable Boat Hook solves the stowing problem by using a concept you’ve seen in the common measuring tape: the steel tape curves across its width to make itself rigid and yet can curl up along its length. The 6′ Revolve does the same thing with a 4″-wide strip of what its manufacturer, Rolatube, calls “bistable rollable composite.” It appears to be made of a fabric infused with black plastic.
Photographs by the author
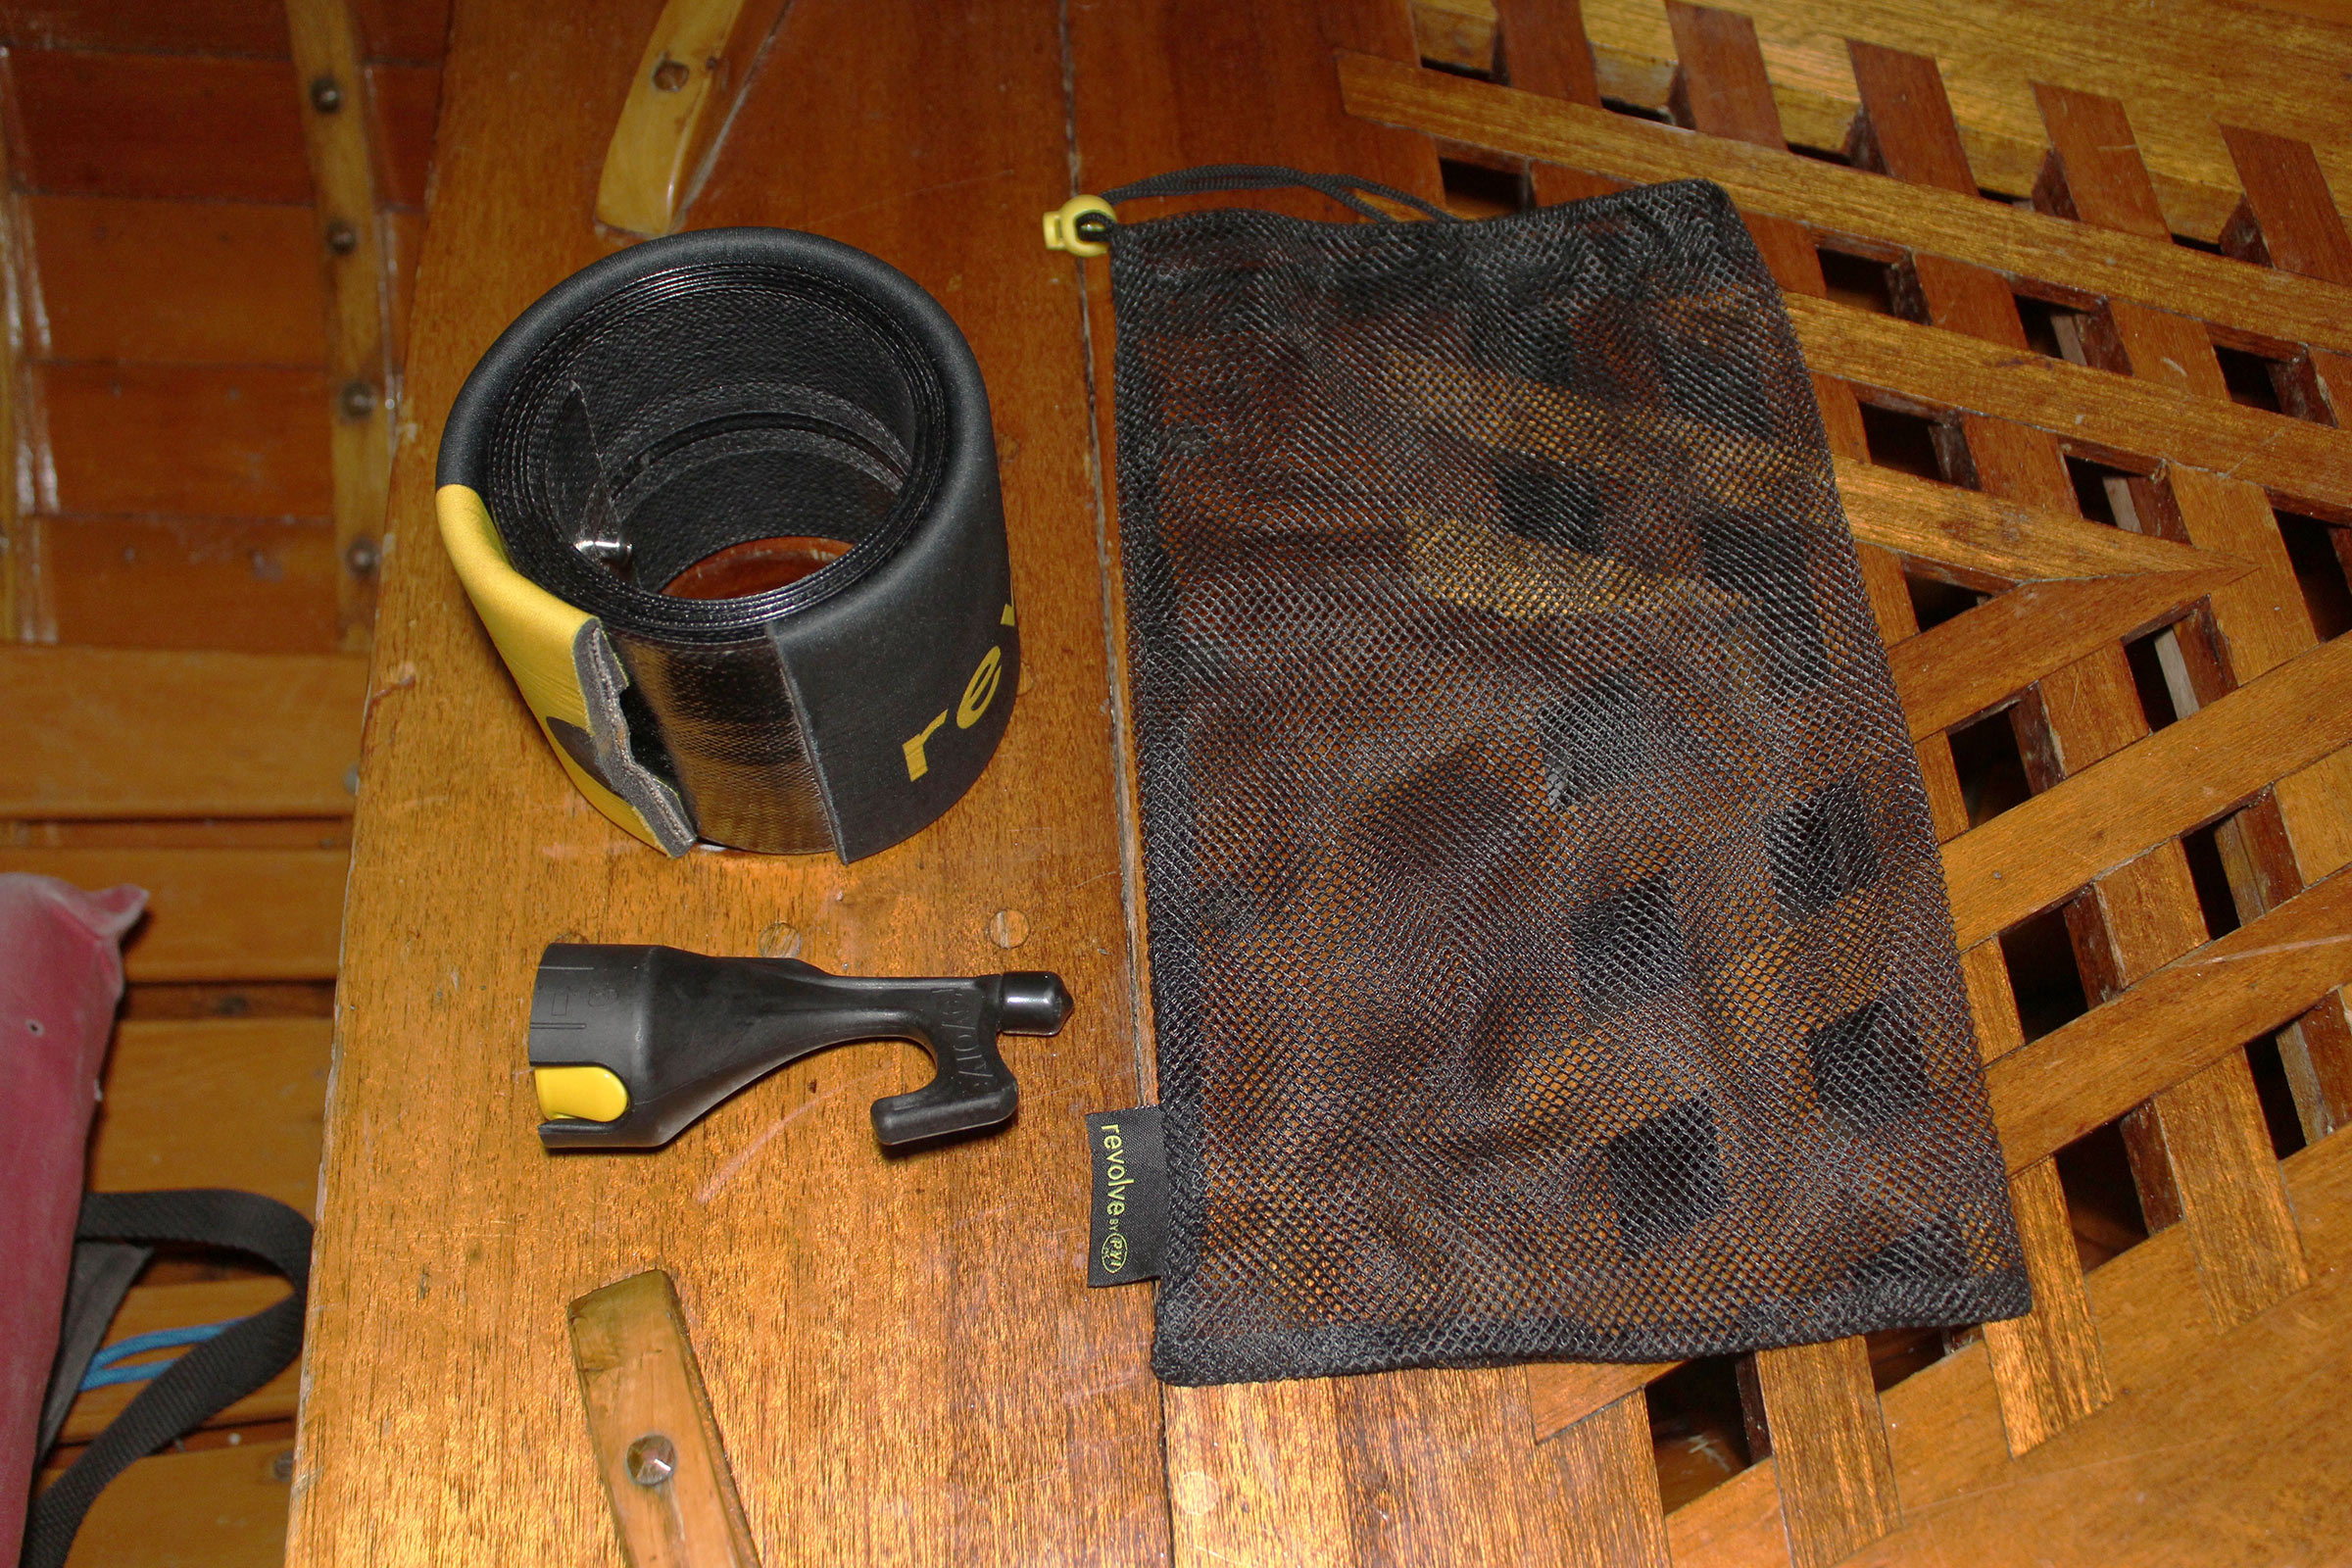
For storage, the detachable hook stows inside the rolled-up shaft and the two pieces are kept together in a mesh bag.
Rolled up, the Revolve is about the size of a coffee mug in a thick neoprene cozy. The detachable hook fits inside the rolled shaft, and then the two pieces are stowed together in a mesh bag to keep them from straying from each other when the boathook is not in use. The whole package weighs just a shade under 1 lb.
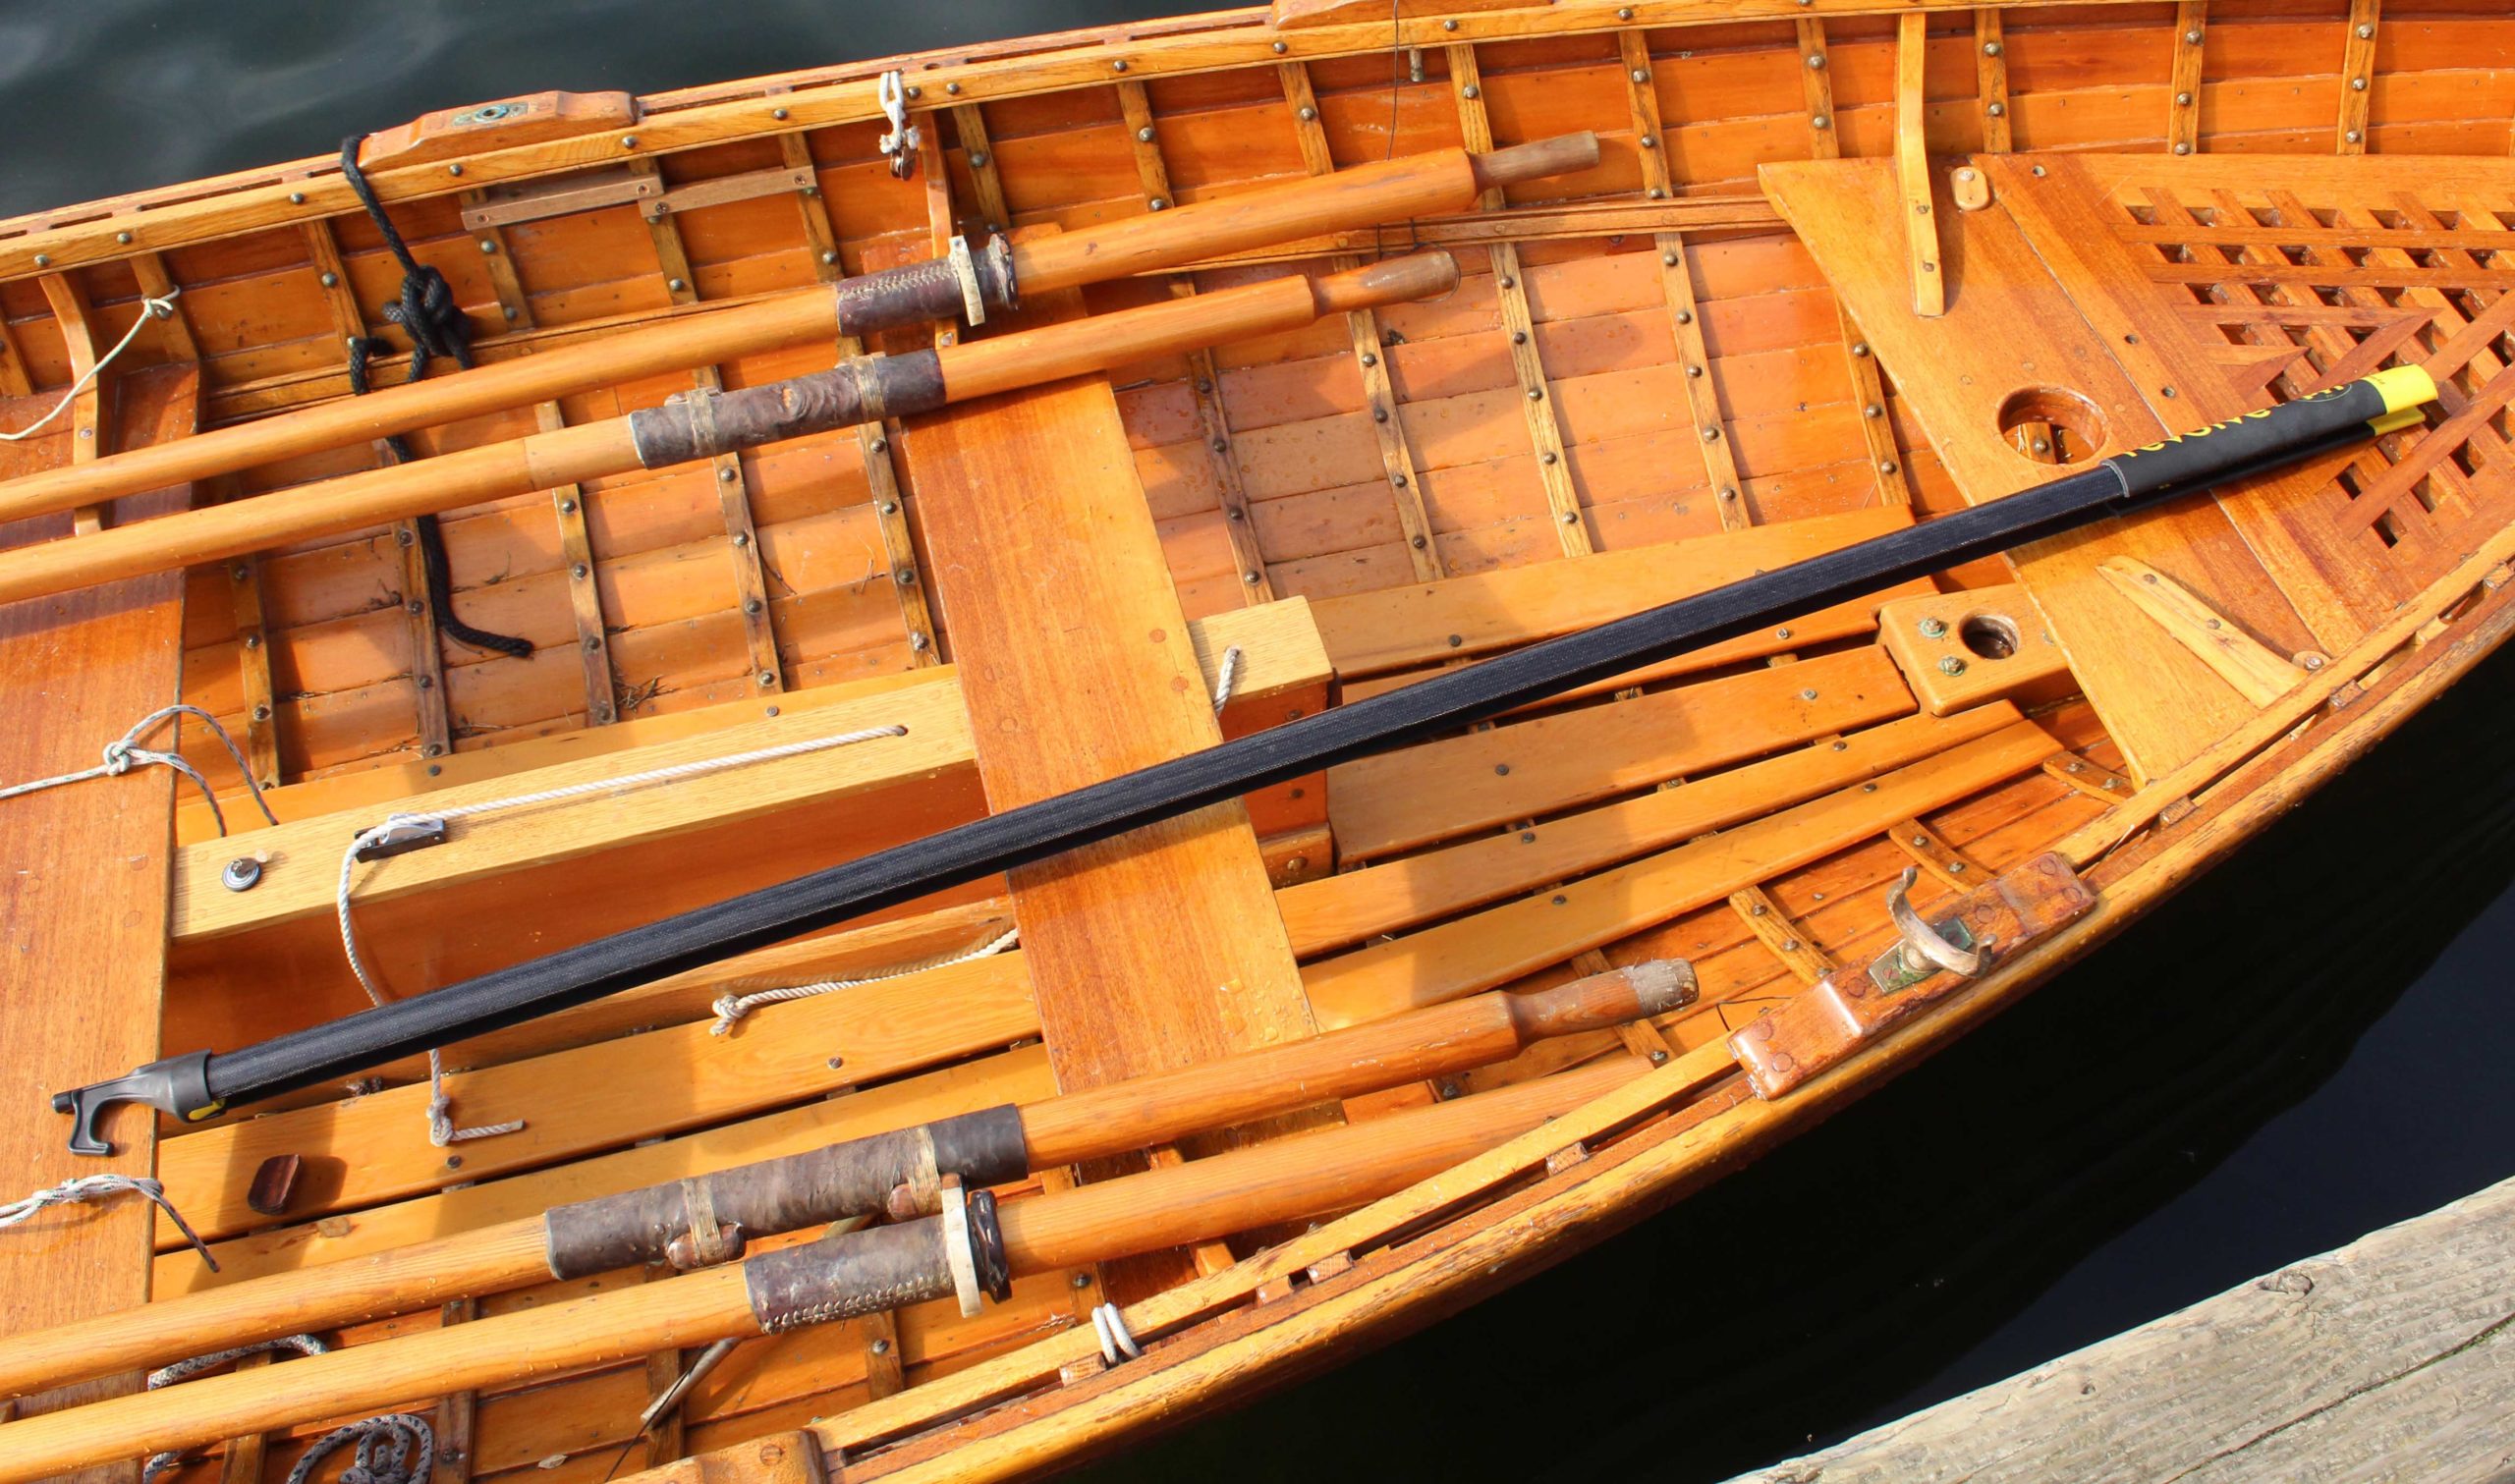
The yellow button unlocks the hook for removal. The dark area to the right of the button is the open side of the shaft.
When the boathook is unrolled for use, the edges curl toward each other to make the better part of a cylinder, leaving a 3⁄4″ open slot between them. The hook slips over the end and locks in place with a twist. Pressing the yellow button unlatches it for removal.
You can extend the Revolve by hand, but for a touch of panache try flinging it out as if briskly drawing a sword and it will uncurl by itself to its full 6′ length (it helps to squeeze the grip end tightly). Rolling the Revolve up again can’t be done with a snap like that, but you can curl the end and then push it into some corner and have it spin while you push the shaft into the roll.
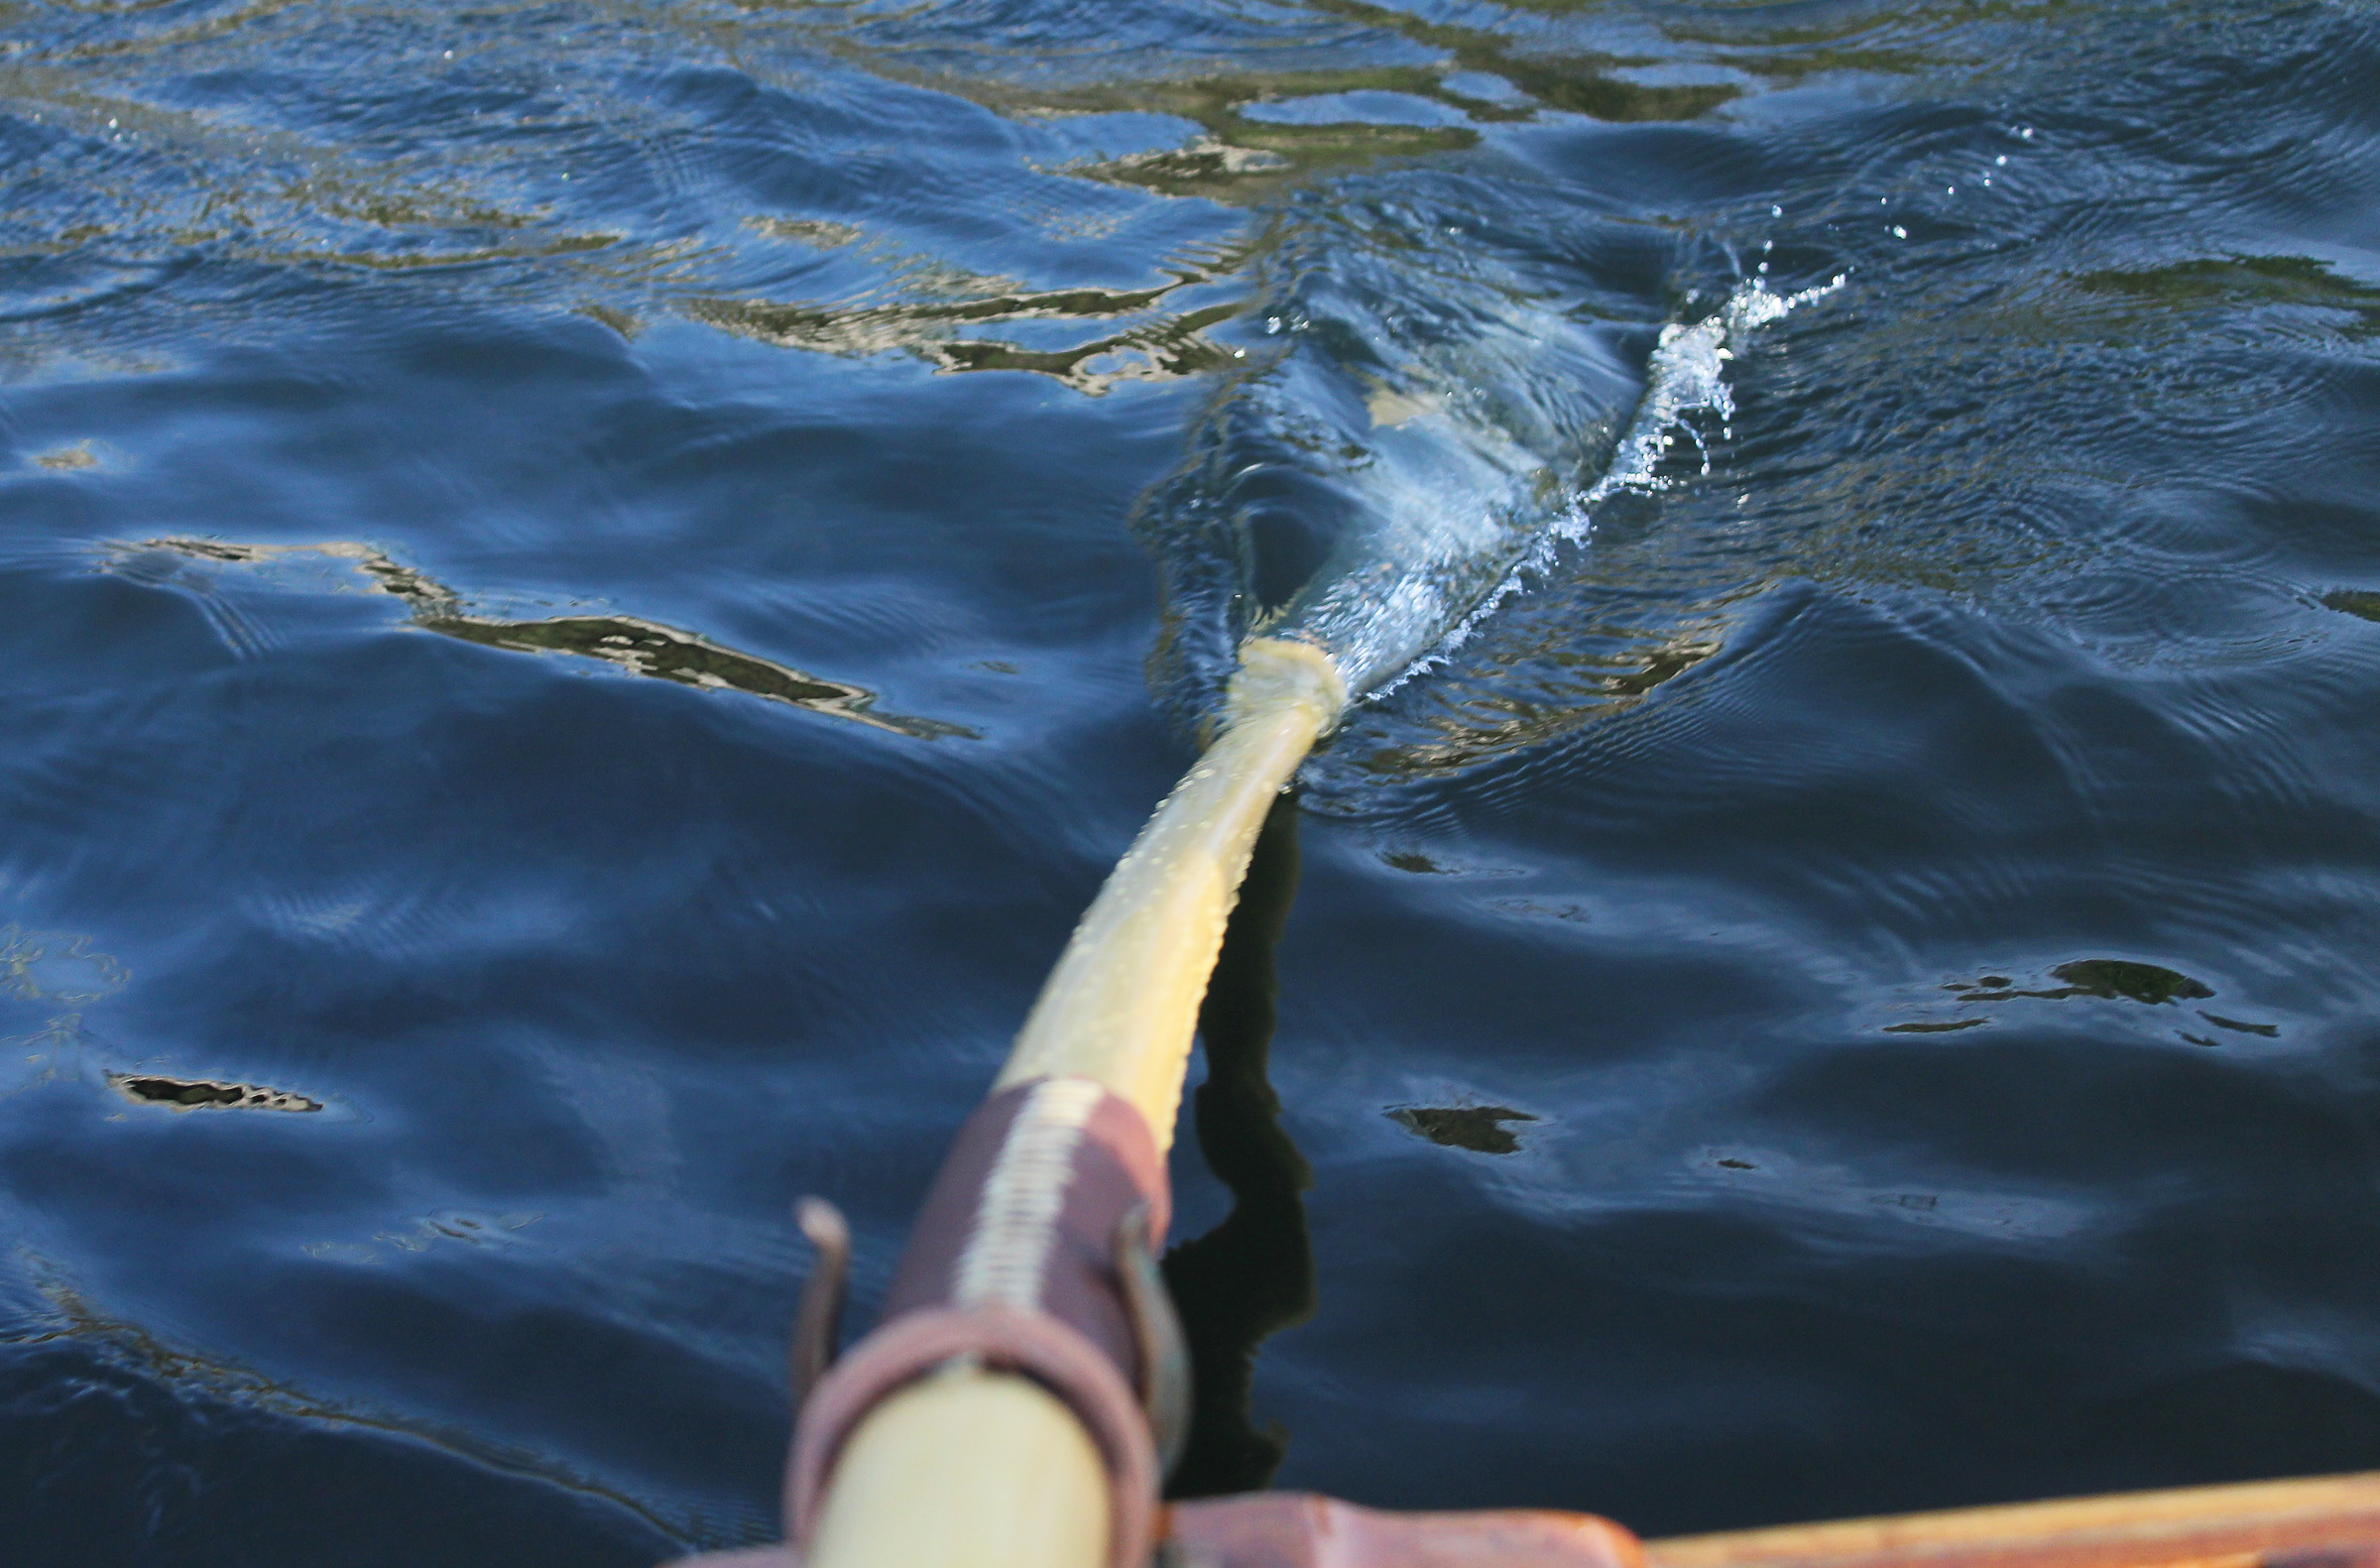
The foam grip gives the Revolve the buoyancy it needs to float, and like a proper boathook, it floats vertically. Only a couple of inches rise above the water’s surface, but that part is bright yellow to make it visible.
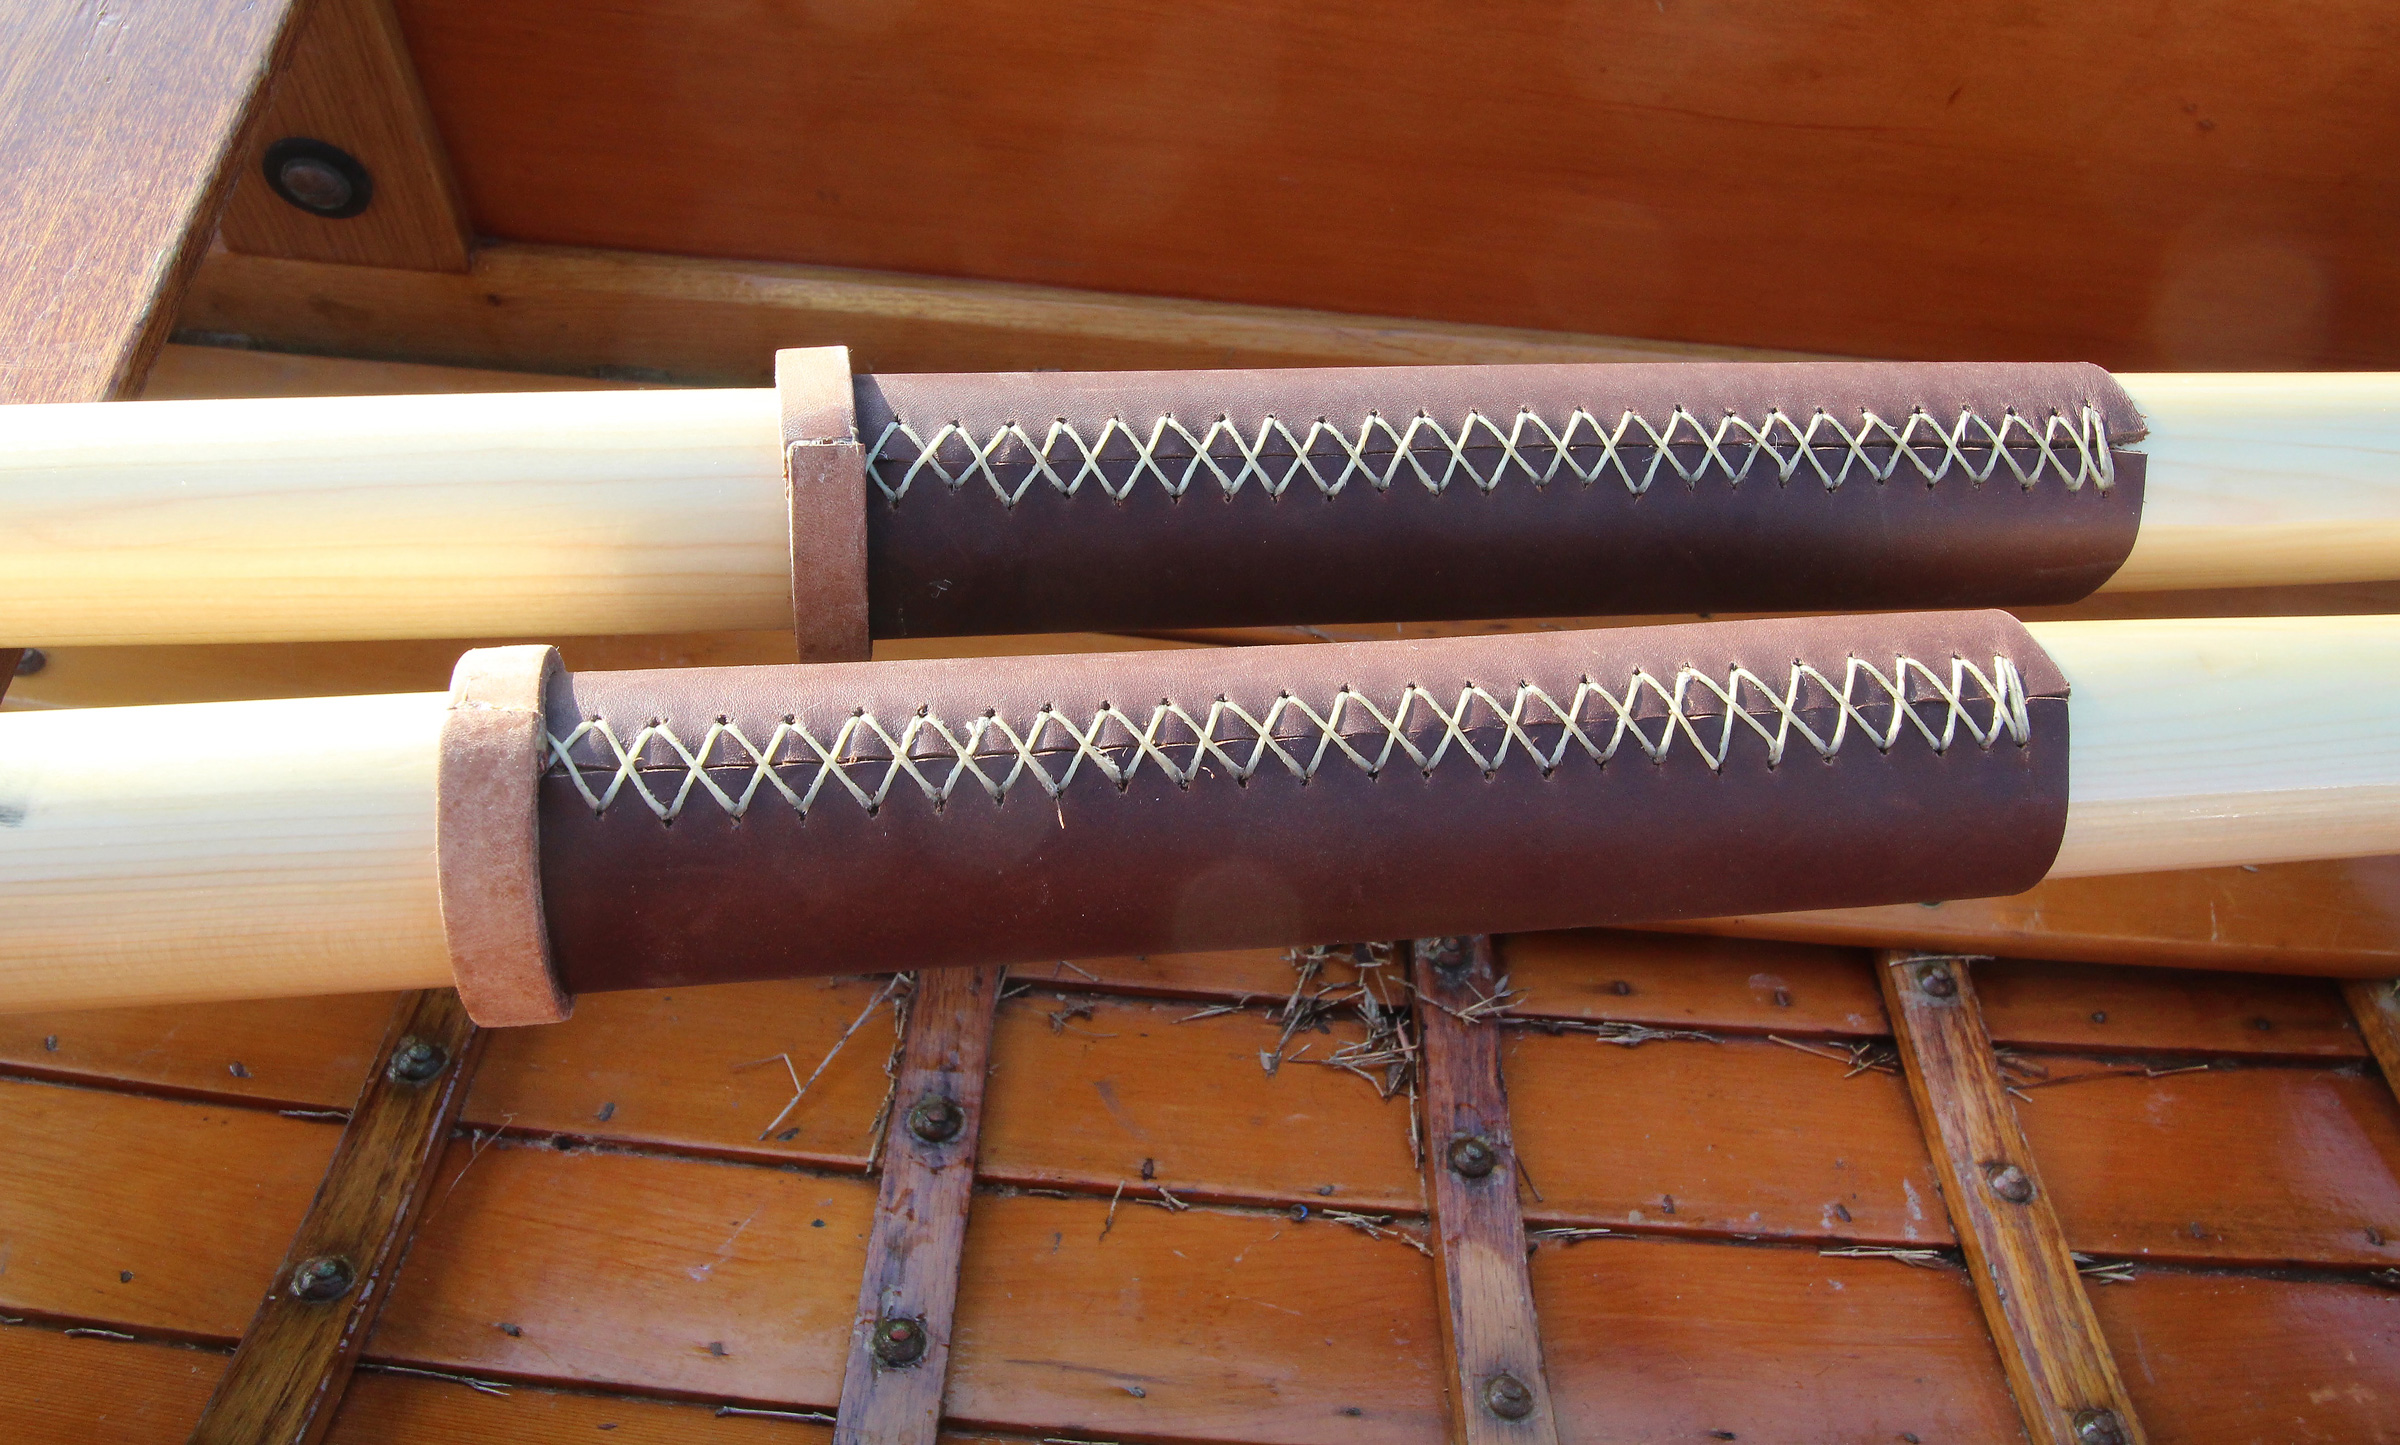
The handle is well padded for a comfortable non-slip grip.
I was concerned about the Revolve’s strength when I first unrolled it. It twisted easily and didn’t feel very strong, but the torsion wasn’t a good measure of how well it would work for pushing and pulling. I set the boathook against a bathroom scale and with both hands on the grip, pushed as hard as I could. The scale registered 100 lbs and the Revolve showed no sign of buckling. Standing to one side and with the hook on a hanging scale, I could pull 90 lbs before beginning to lose my footing. I didn’t expect the Revolve to buckle under tension, but I was pleased that the hook end didn’t break and pull off. Boathooks aren’t always used for pushing or pulling but sometimes are used for prying, with one hand on the top end and the other closer to the middle. The force applied to the hook end is at a right angle to it, not in line with it. I could press against the Revolve sideways against the scale with 80 lbs of pressure. The shaft bowed but didn’t buckle when its open side was facing the scale. With the open side facing the opposite direction, it doesn’t take much force to buckle the shaft. In all my tests with scales, I applied more force than I could imagine needing for a boathook’s intended use.
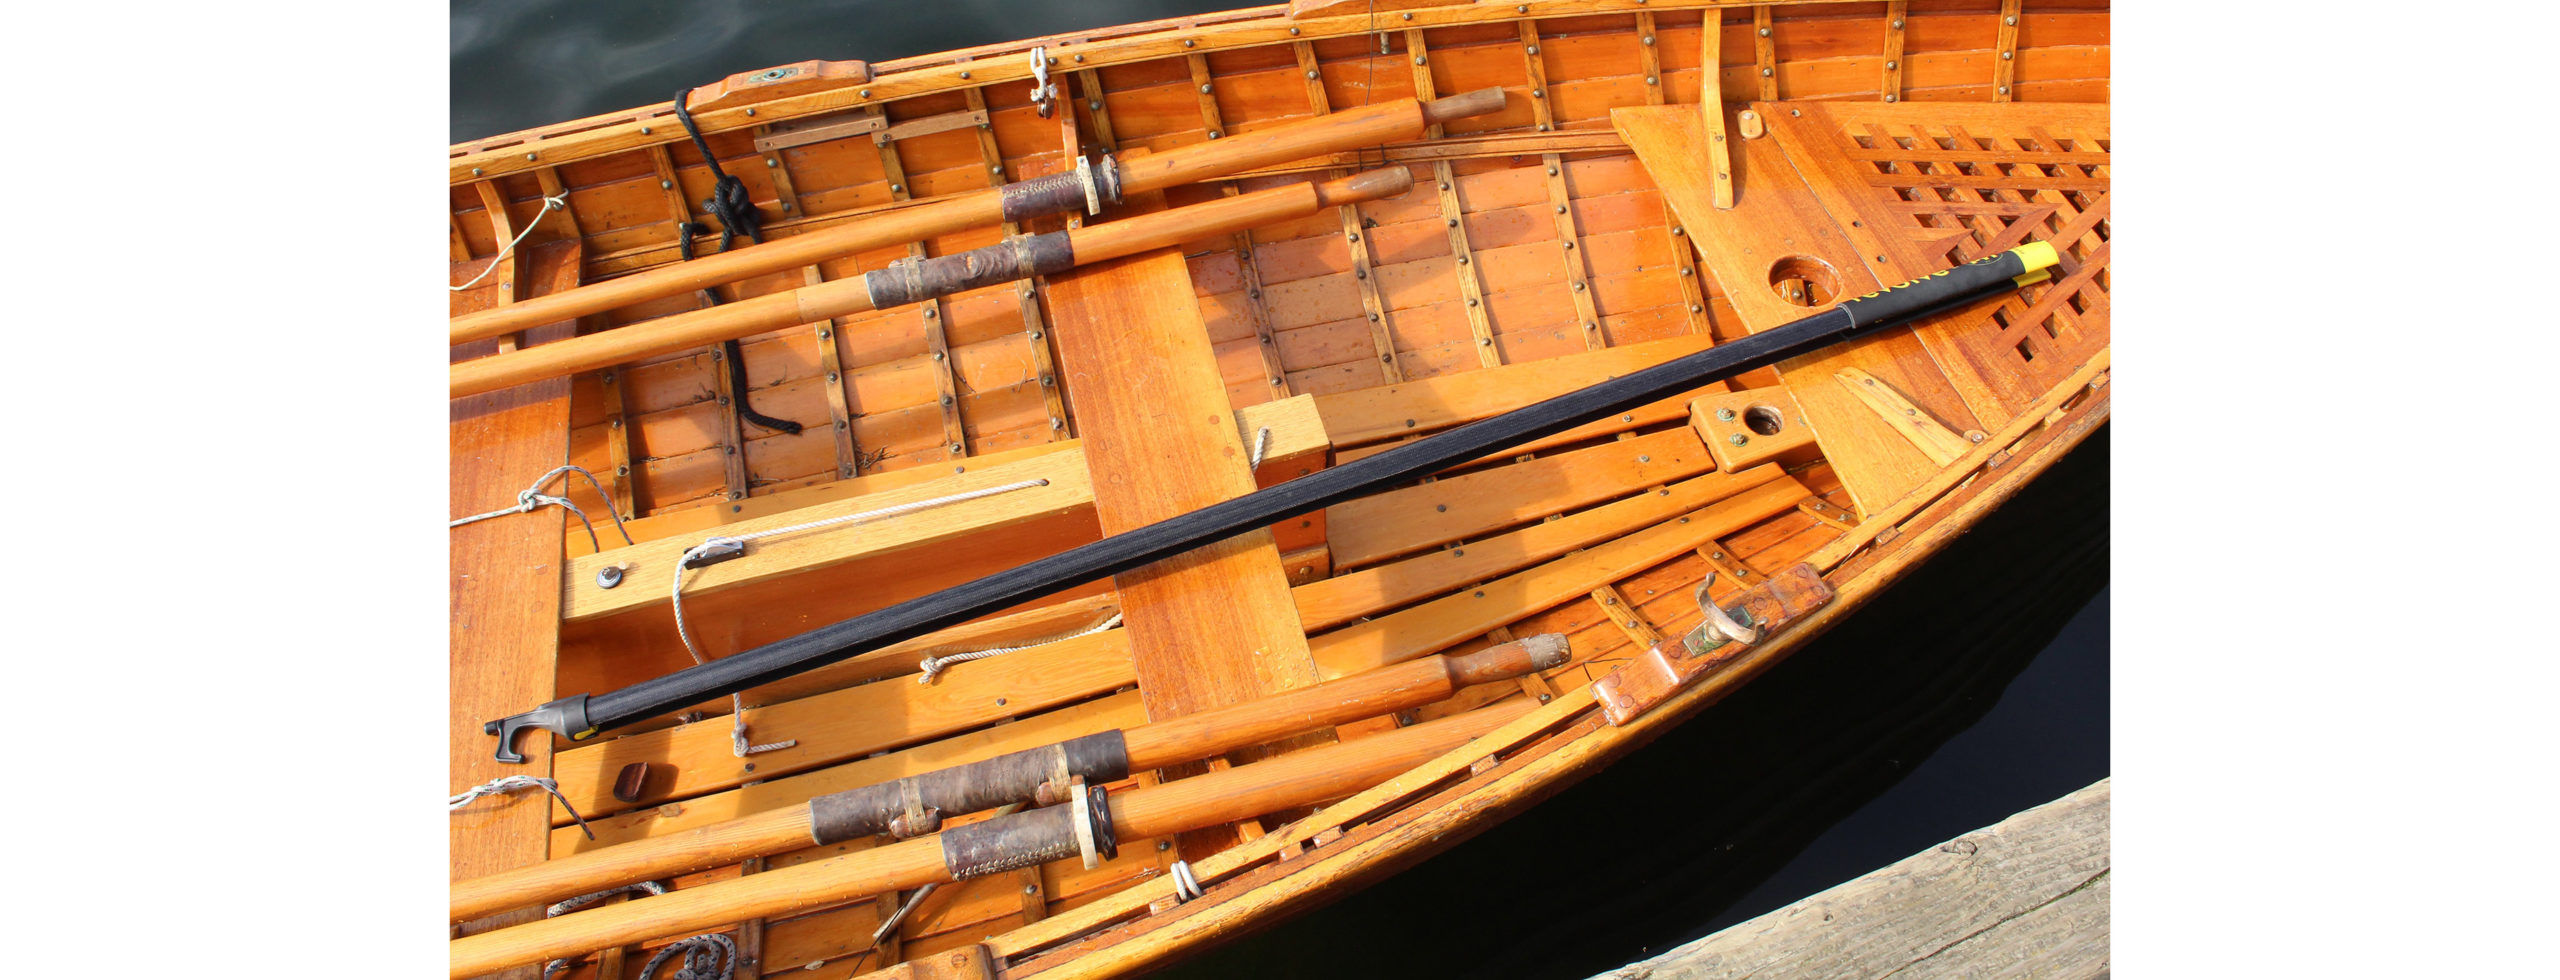
If it weren’t able to roll up into a small package, the 6′ Revolve would be awkward to stow in a 14′ boat.
In use aboard a boat, the Revolve has served well. I don’t have to be so precise pulling up to a dock as long as there’s a cleat to snag with the hook. And in a recent outing I was able to save my Whitehall from taking a beating on a rocky beach by using the Revolve to get the bow into the waves and shove off.
There are three accessories available that can be used instead of the hook end: hard and soft deck brushes, and a universal mount that has a 1⁄4″ x 20 screw compatible with most camera-mount systems. I may spring for the mount so I can use the boathook as a selfie stick. The only issue I can imagine having with the Revolve is remembering where onboard I might have stowed it. Rolled up, it could be in the tiniest, and most out-of-the way-places.
Christopher Cunningham is the editor of Small Boats.
The Revolve Rollable Boat Hook is made by Revolve, a Rolotube Group company in the U.K., and is listed at £84.95. In the U.S. it is distributed by PYI at a list price of $119. I purchased mine on Revolve’s Amazon website for $105.
Is there a product that might be useful for boatbuilding, cruising, or shore-side camping that you’d like us to review? Please email your suggestions.
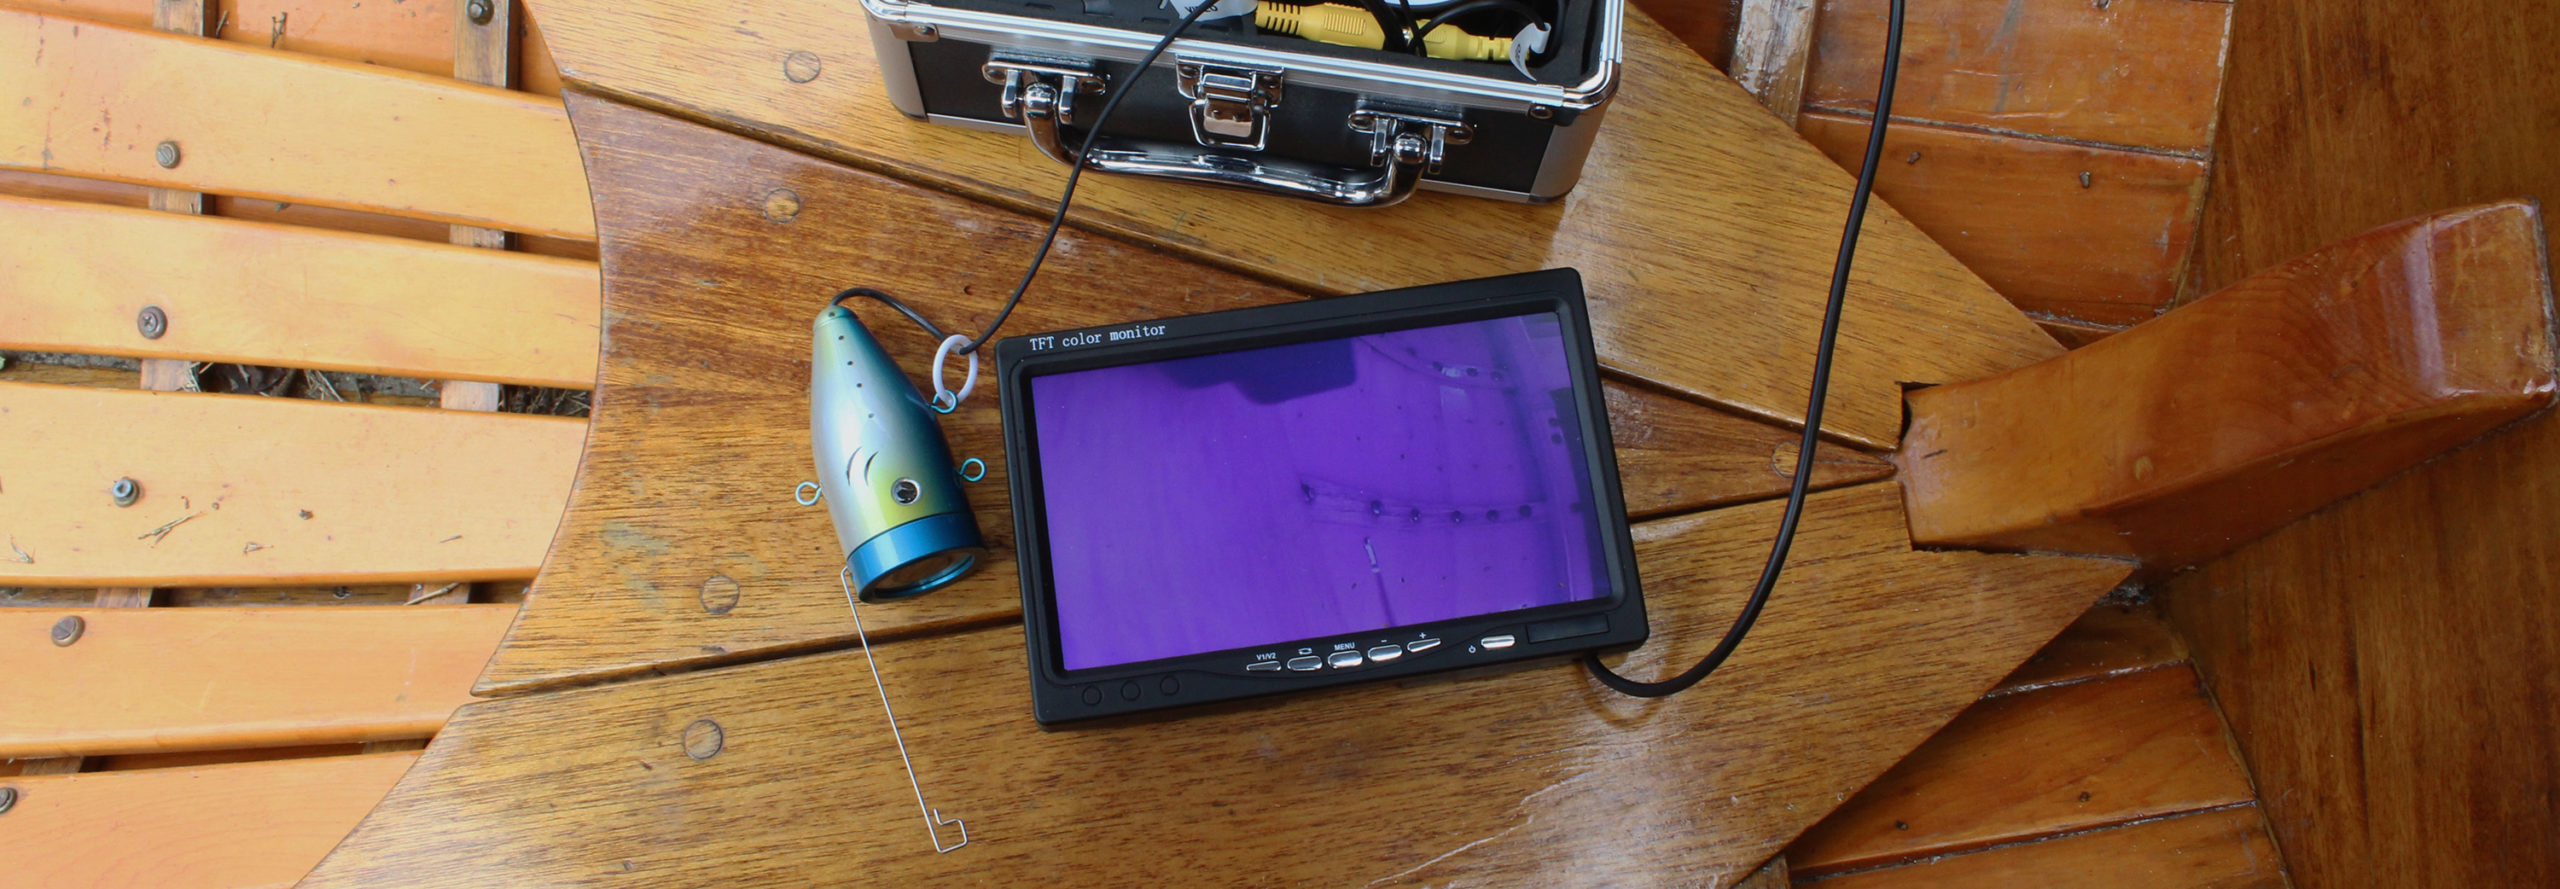
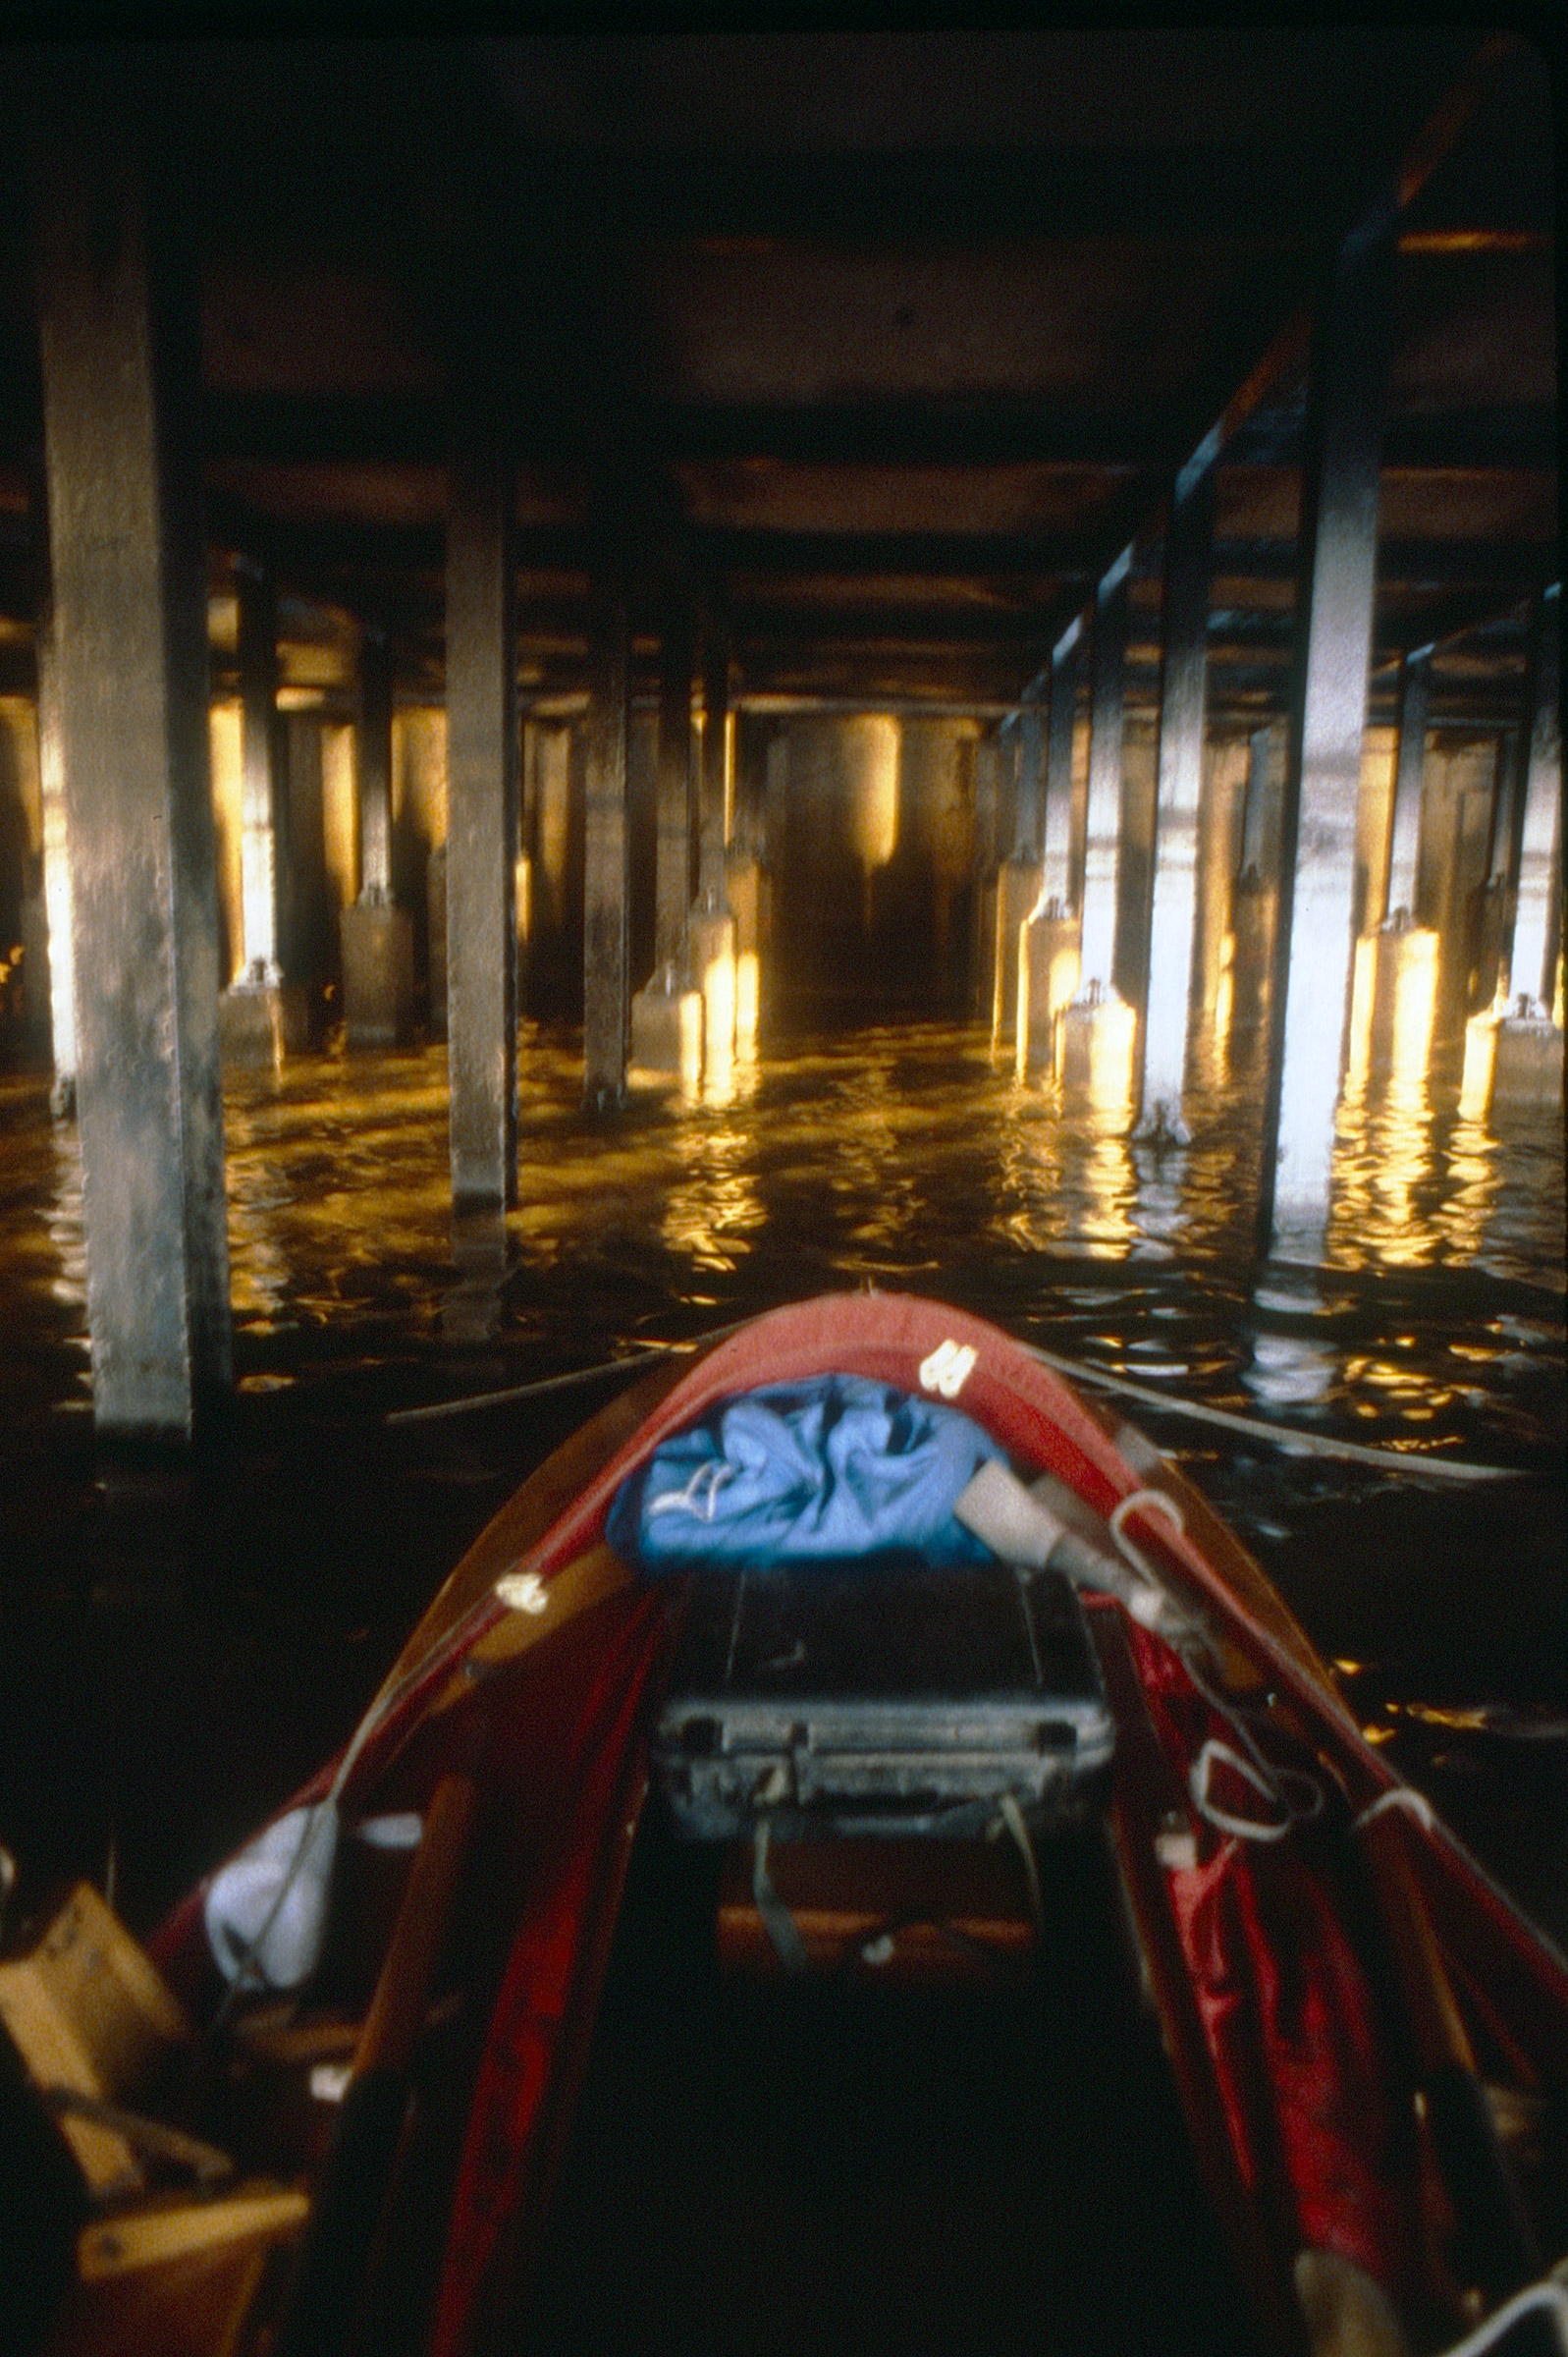
Some 20 years ago, before the advent of LEDs and LCD screens, I bought a black-and-white underwater video system from Harbor Freight for $99. The monitor was a small television with a cathode-ray tube and the power source was a sealed lead-acid battery. My kids and I enjoyed using it to peek at whatever might be lurking beneath the boat. For a long time, we had never used it for anything practical, but I wished I’d had it before I lost an anchor on the foul bottom of a shallow slough. With the camera, I might have been able to see that the bottom was littered with submerged logs that would certainly hold and keep my anchor. We did find a practical purpose a few years later, when we attached the camera to a grappling hook, and my son and I located and retrieved an outboard that had peeled itself off its transom and had sunk in 35′ of water.
As much as I liked that video system, it was packed in a zippered fabric case the size of a toaster oven—too big to be included as standard gear on any of our boats. Over the years I’ve been hoping to find a new version that was more compact and equally affordable, and recently decided to take a chance on the $140 Eyoyo Underwater Fishing Camera that I spotted on Amazon.
Photographs by the author
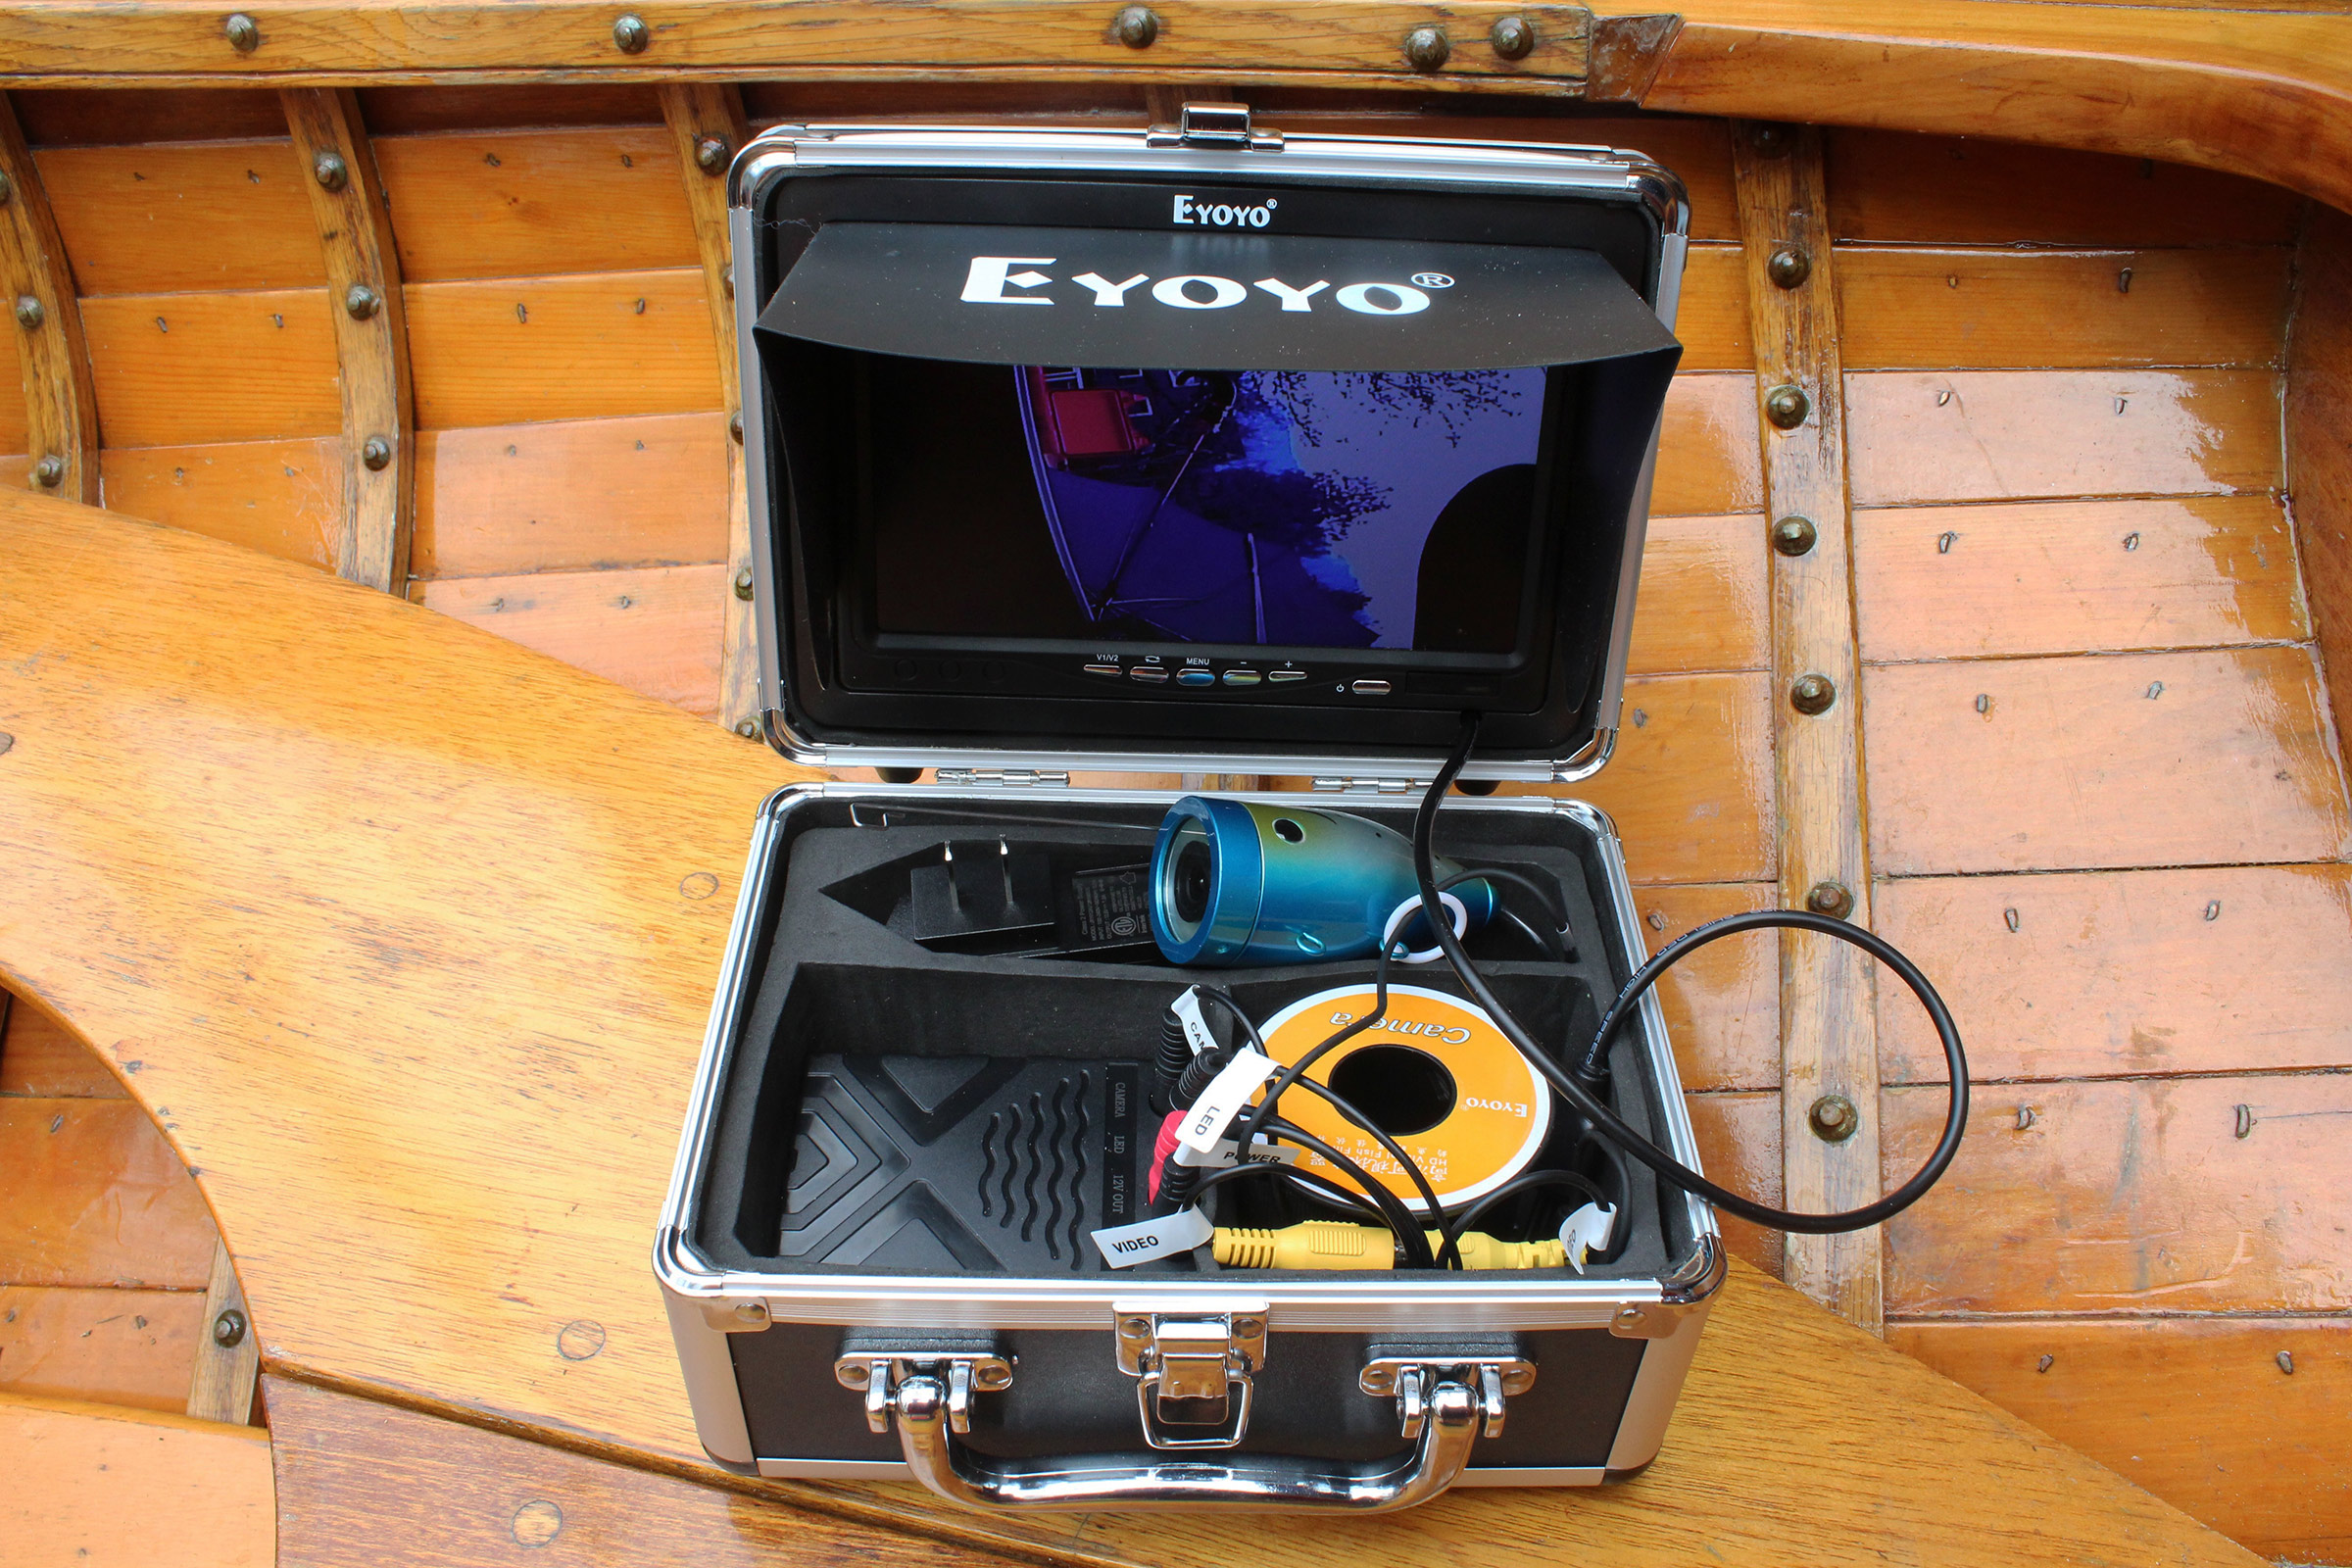
The 8-1⁄4″ long, 6″ wide, and 4-1⁄2″ deep case holds the sunshade, detachable monitor, charger, camera, battery, and cable. The buttons on the monitor control aspect ratio, screen rotation, brightness, contrast, and color. There is also a selection of 15 languages for the menu options. The 16:9 aspect ratio selection fills the screen, but it is only a horizontally stretched version of the 4:3 ratio, which appears with vertical black bands on either side of the image. I wasn’t aware of the horizontal stretch until I aimed the camera at the instruction booklet and noticed a circle showing as an ellipse on the monitor.
The kit includes a 6″ x 3-3⁄8″ (7″ diagonal) flat-screen LCD color monitor, a waterproof camera with a ring of infrared lights around the lens, a cable to carry power and image, a 12V/4.5Ah battery, a charger, a fishing float, hardware to connect the cable to a fishing rod, a folding shield to reduce glare on the screen, and a rigid foam-lined carrying case. The case is much more compact than my old B&W system—about one-sixth the size. The screen is set in the lid of the case and can be removed for more convenient viewing.
The camera is rated IP68: dustproof and suitable for prolonged submersion. The usable depth isn’t specified, but the kit is available with cable lengths of 49′, 98′, and 164′. I bought the kit with the shortest cord, so I won’t be pushing the camera’s limits.
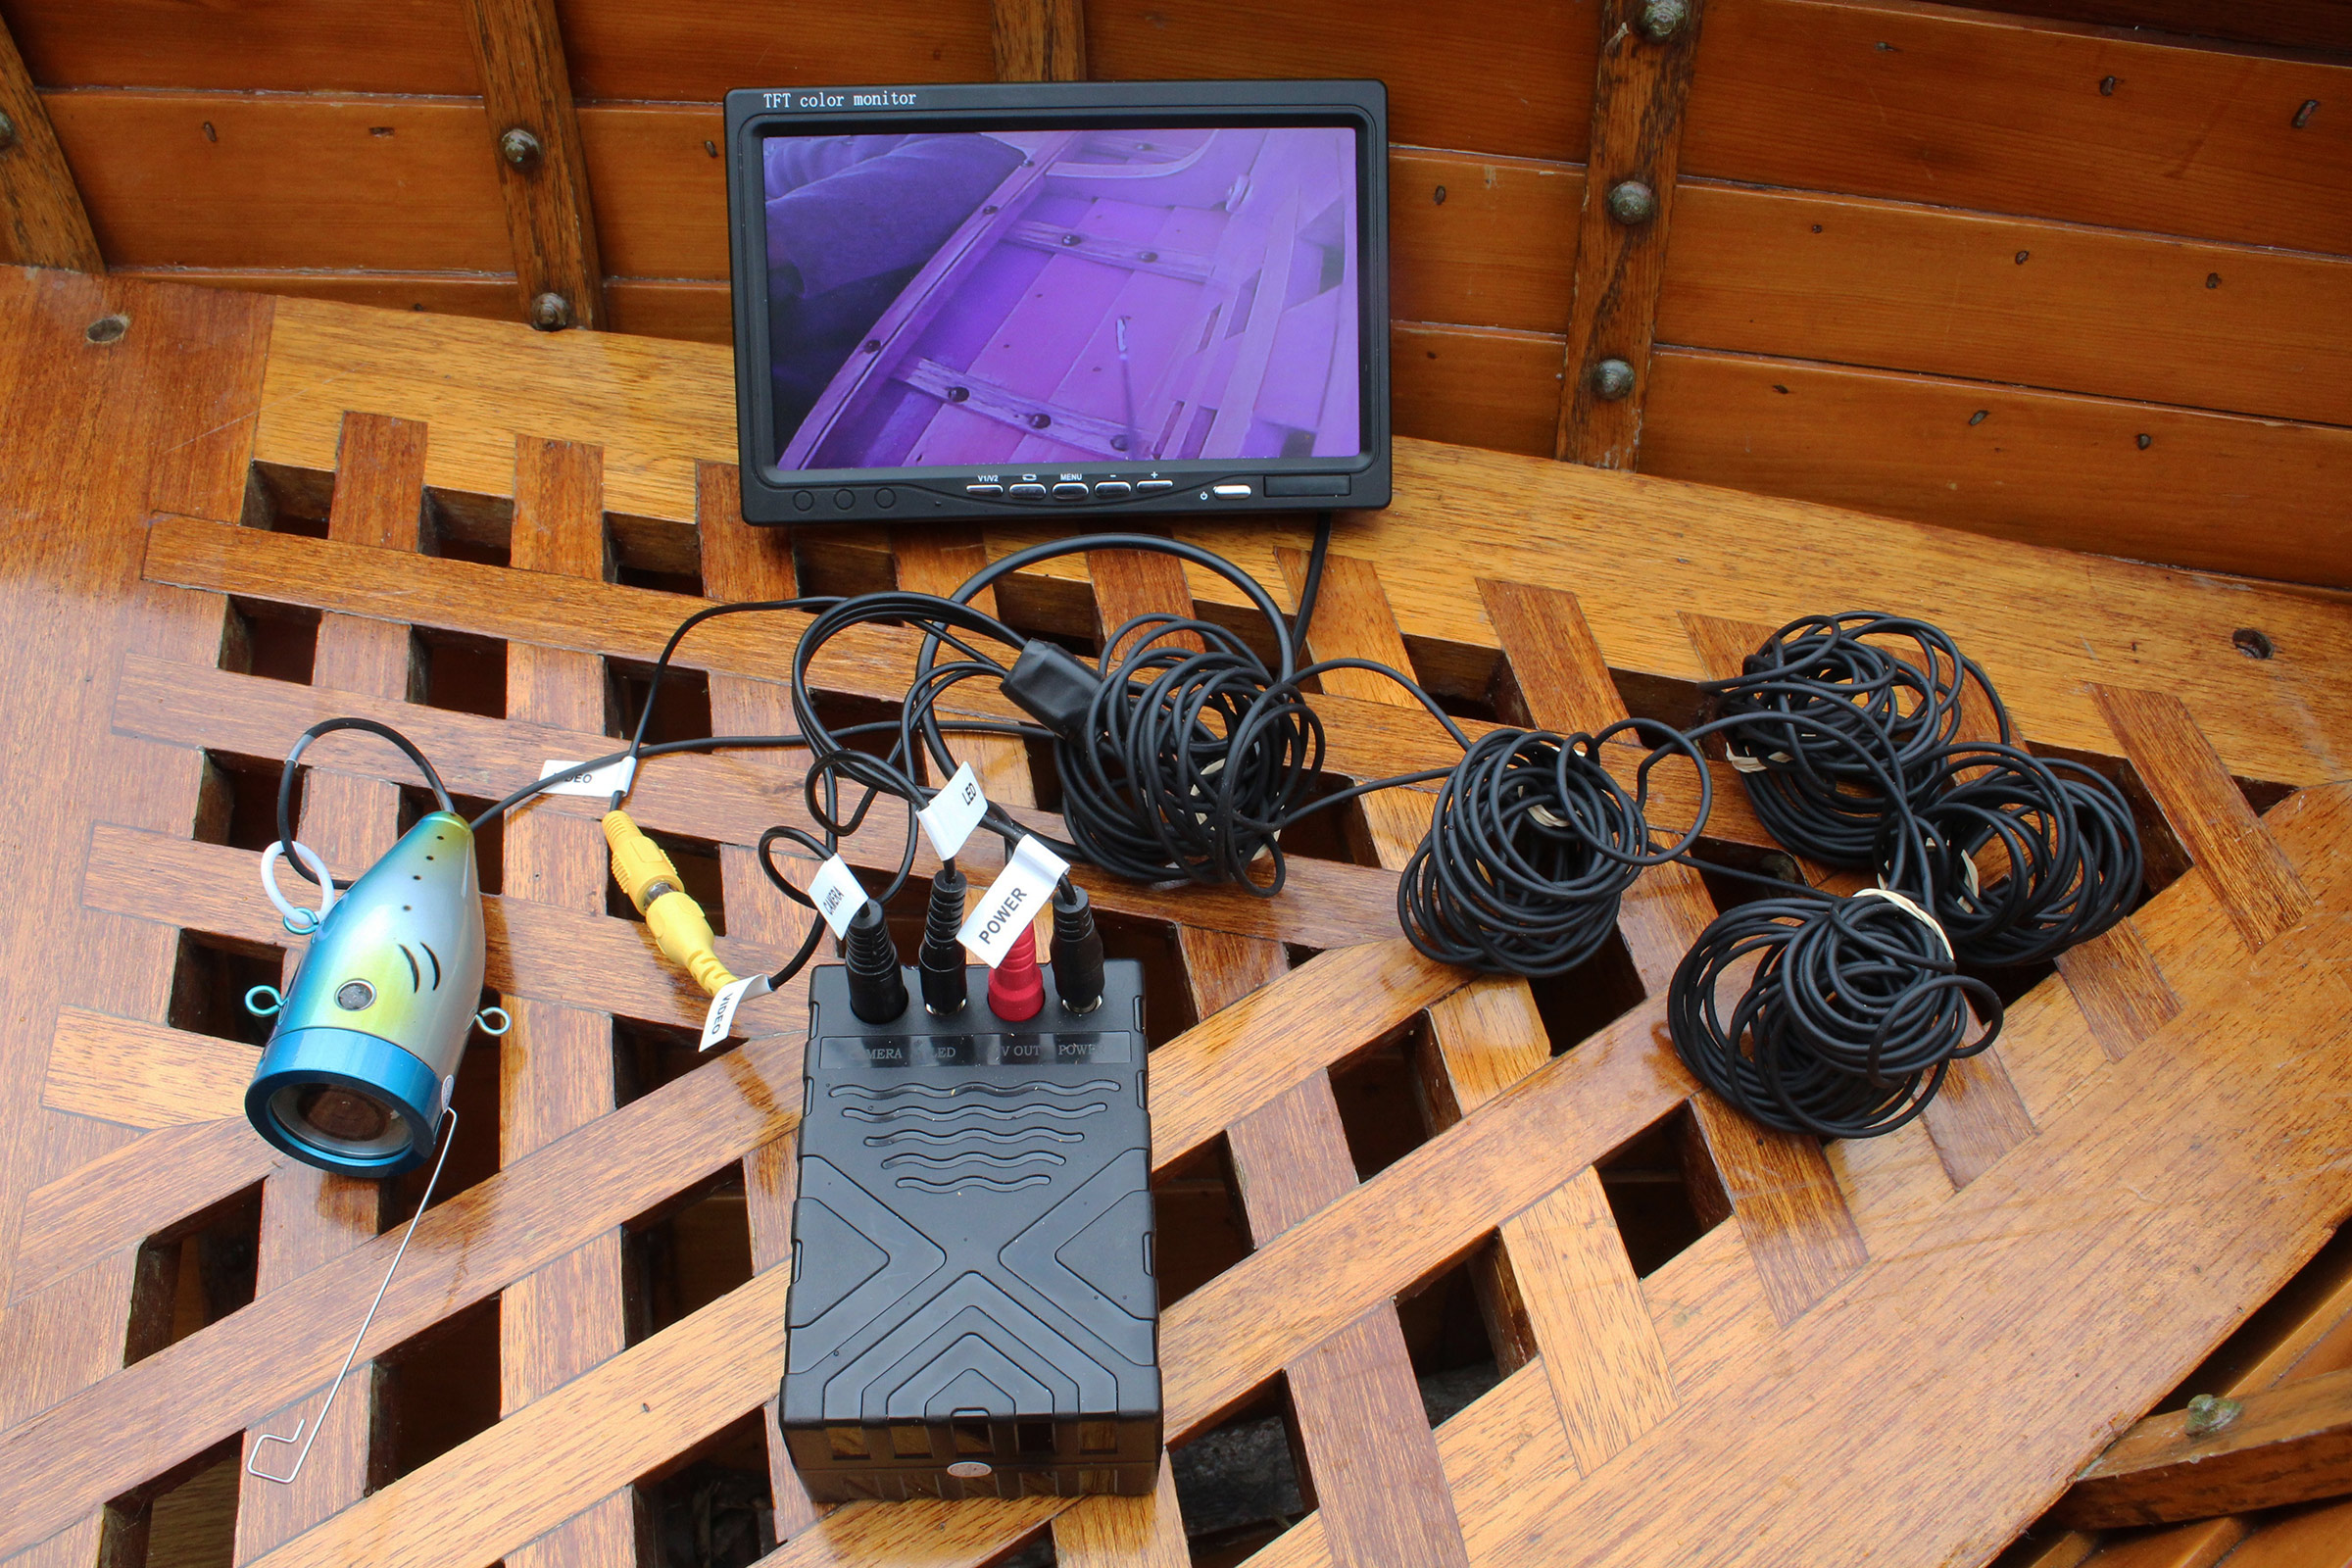
The monitor can be more convenient to use when removed from the case. The spool that came with the cable, on the other hand, isn’t at all handy. I removed the cable from the spool and coiled it in figure-eights that don’t get twisted as they’re payed out when the camera is deployed.
The electrical cord comes on a spool, and it would be nice if there were a way to reel it out and back in neatly. To do that I’d have to disconnect all the plugs to the monitor and battery and fit some sort of axle and crank for the spool. The temptation is to cast loops off the end of the spool, but each loop creates a twist, and the twists make a tangled mess of the cord. I cut a slot in the spool to remove the cord and gathered it up in four hanks by making figure-eights around my thumb and pinkie. Rubber bands hold the hanks and the figure-eights come undone without twists.
The picture of the monitor on the Amazon site was misleading, but I didn’t expect the system to capture a vivid underwater scene with the color and clarity of a tropical-fish aquarium. I was pleased with the color from 35′ down in Seattle’s ship canal. I expected to see a palette of green water and brown detritus on a muddy bottom, and that’s what the Eyoyo delivered. At that depth, the camera adjusted to the available light, and I didn’t need to plug in the power for its ring of LEDs. Their infrared light is well suited for nighttime use: it is invisible and the image conveyed to the monitor is monochromatic—bluish-black and white.
Eyoyo notes that the visible range from the camera is 0 to 3 meters (10′) and with clearer water than I’ve had, that would seem possible. I could see objects out to about 6′. The wide-angle lens spans 92 degrees and fills the frame with a satisfying view where objects appear neither too close nor too far away. Because the lens is designed to work at close range, things go by quickly when the camera is moving. Skimming just above the bottom from a slowly drifting boat feels like flying. To retrieve something from the bottom, the camera is attached to a grappling hook. It’s challenging to navigate the hook—patience and persistence are required. I’ve attached the camera to an oar grip to provide full control in shallow water—my 14′ push-pole is the limit for the depths I can view with that method.
The video system also has uses out of the water. Attached to the end of a pole with rubber bands or tape, the camera can go places you can’t or don’t want to go. I’ve used it to check for things that have dropped behind my workbench without having to move a chop saw, a planer, and a crate of C-clamps out of the way and stick my head through dusty cobwebs.
The Eyoyo video system is compact and effective and is sure to get more use than my old Harbor Freight kit. I’ve long been using a depth-sounder when anchoring to make sure there is enough water to ride out the tides while I sleep. With the Eyoyo system I will be able to see what the bottom looks like and sleep better knowing that the anchor will get a solid grip.
Christopher Cunningham is the editor of Small Boats Magazine.
Jeremy Kyncl is new to boatbuilding, but he certainly isn’t new to woodworking and traditional crafting. He grew up in Denver, Colorado, but moved to the Pacific Northwest when he was 19. He graduated from Bastyr University in Kenmore, Washington, having studied the science, history, and traditions of medicinal plant usage. In 2019, after a seven-year spell in Spokane, Washington, where he and his wife, Michelle, had started Hierophant Meadery, they moved to a 1915 homestead on Whidbey Island with their two young sons, George and Leos. They relocated the meadery to the island and focused on bringing together their knowledge of plants and love for native culture in a business based largely on traditional methods and the ethos of respecting and working with nature rather than against it.
Life on an island suits the family. They love anything that involves being on and in the water: body surfing, swimming, boating. When they first moved to Whidbey, Jeremy and Michelle bought a fiberglass lake canoe, but it was heavy, and loading it on the car was a strain; plus, Jeremy felt its low freeboard made it unsuitable for use on the Puget Sound waters that surround Whidbey. Familiar with building and fixing around the homestead, Jeremy now turned his thoughts to boatbuilding.
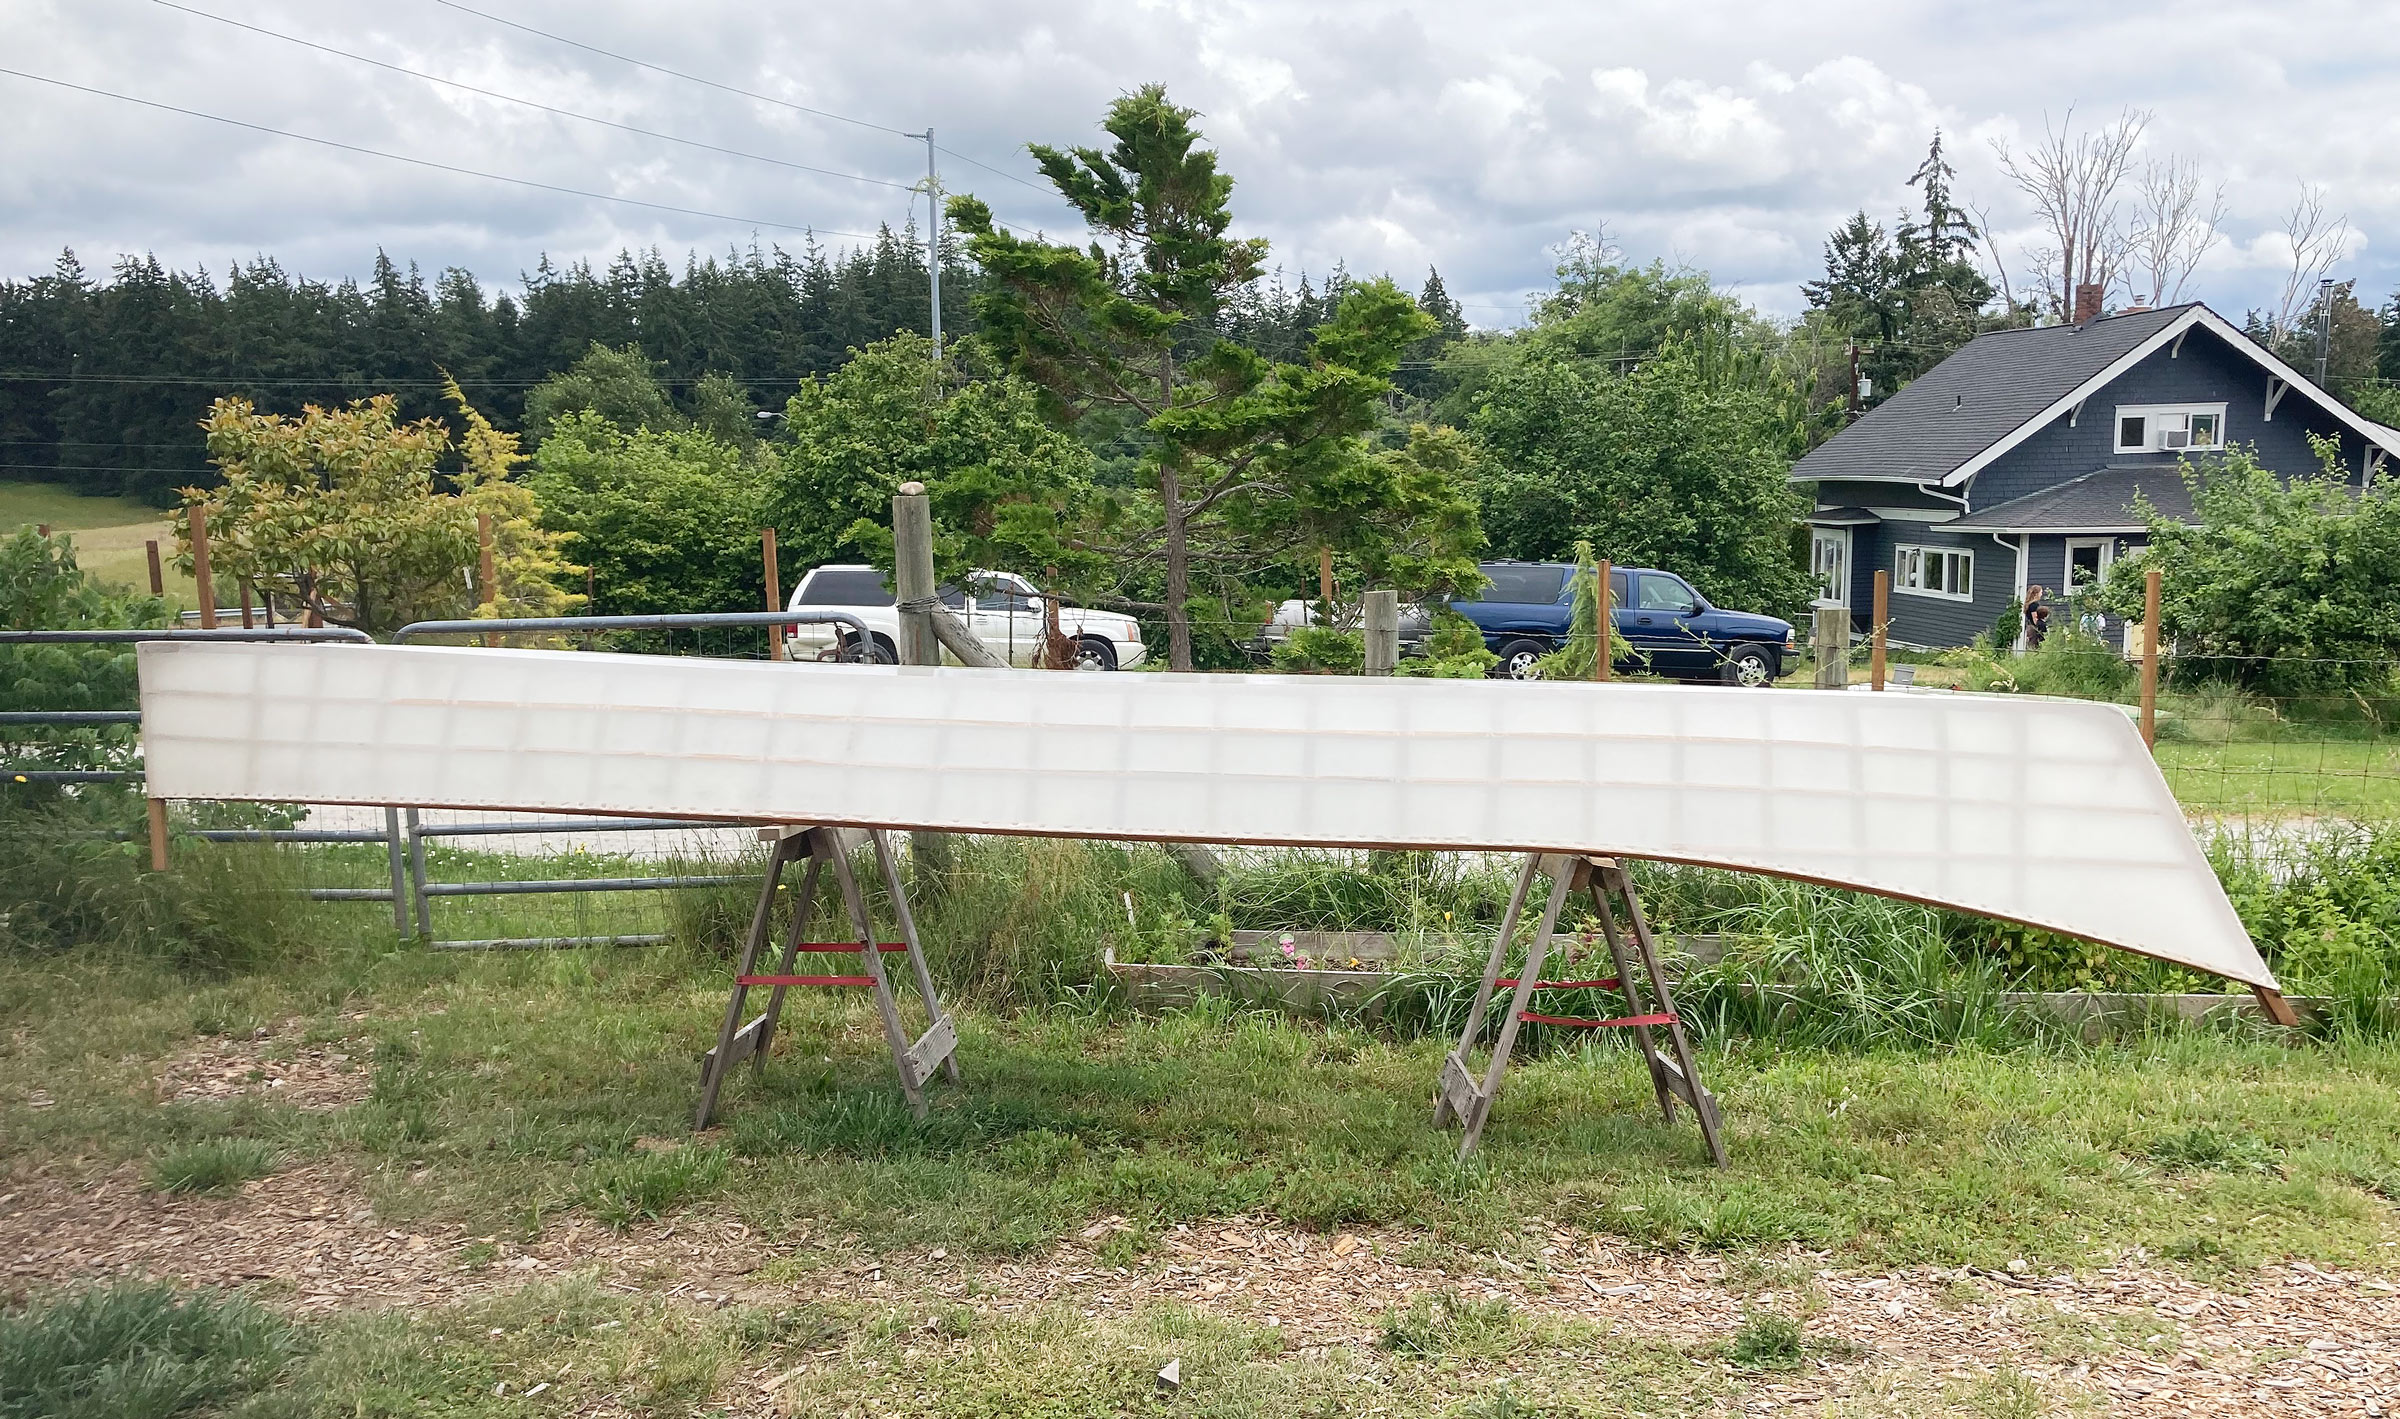
The construction technique was purely traditional, but for the lashings and skin Jeremy sourced modern materials: ballistic nylon for the skin, waxed nylon for the lashings.
“I wanted something light enough to cartop myself, seaworthy enough to handle being out on Puget Sound, and kind enough for a first-time boatbuilder.”
Through 2021 Jeremy pored over books and websites, plans and magazines. He remembers spending about six months “looking at all the usual suspects in small-boat design.” When he stumbled upon Building Skin-on-Frame Boats by Robert Morris, he “fell in love with the ingenuity, simplicity, and efficiency of the technique.” Having spent time in the Scouts, he was confident he had the skills for the necessary knotwork.
Jeremy set about figuring out which skin-on-frame boat he would build. He knew he wanted to go with a “home-grown Northwest hull form,” but it would be another two months before he decided on a native Pacific Northwest canoe. Then he found a drawing of a Nootkan cedar dugout that was used for trade in North Puget Sound in 1905. He was attracted to the shape and decided he would make a skin-on-frame version.
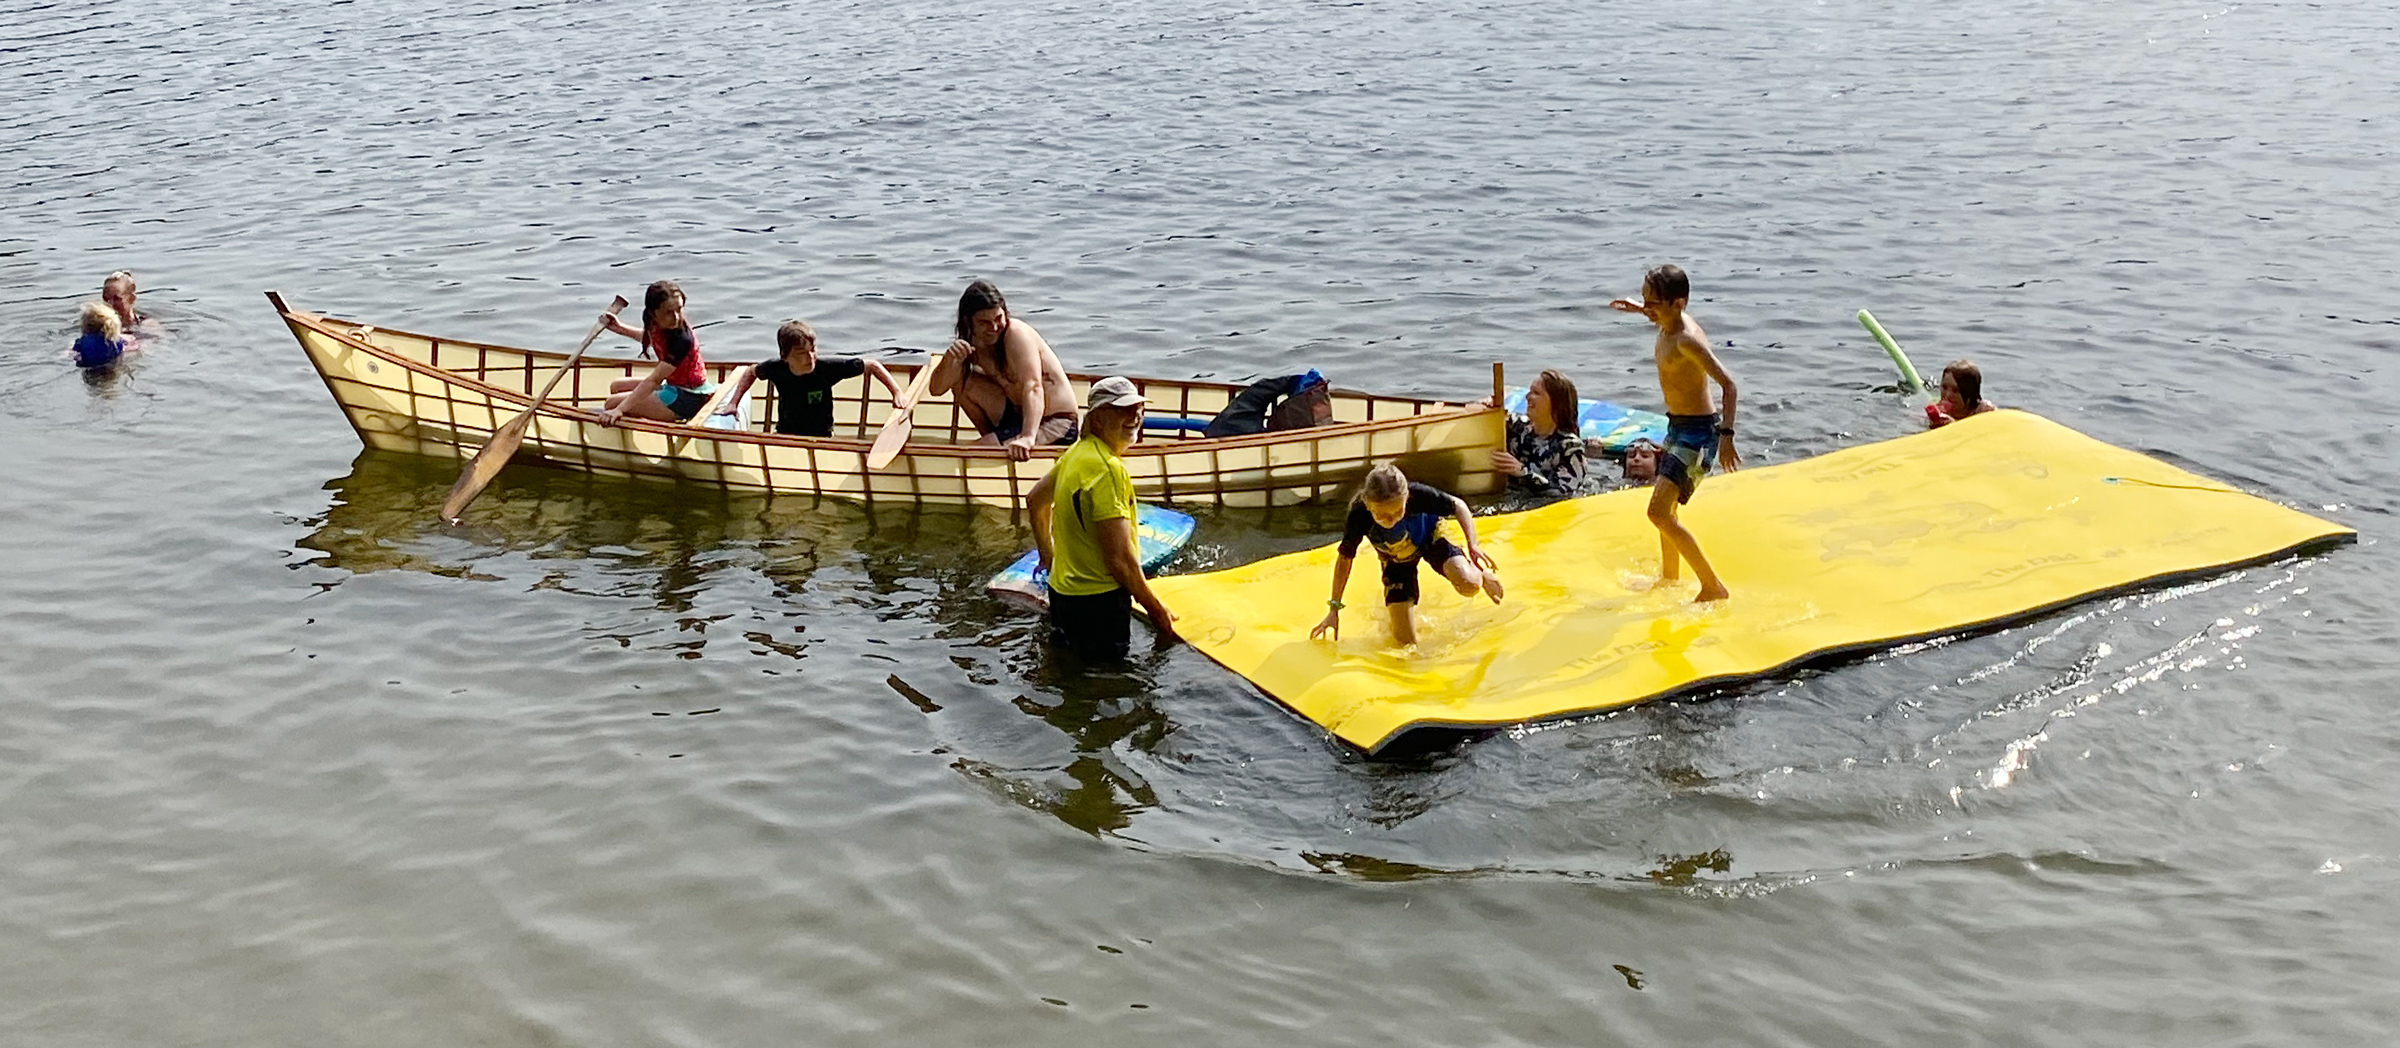
“The original hull was 25′6″ with a 42″ beam. That was too big for us,” he says, “so I scaled it back to 17′6″ with a beam of 36″.” With three adults on board, the canoe draws only 4″. The bare frame weighs 44 lbs.
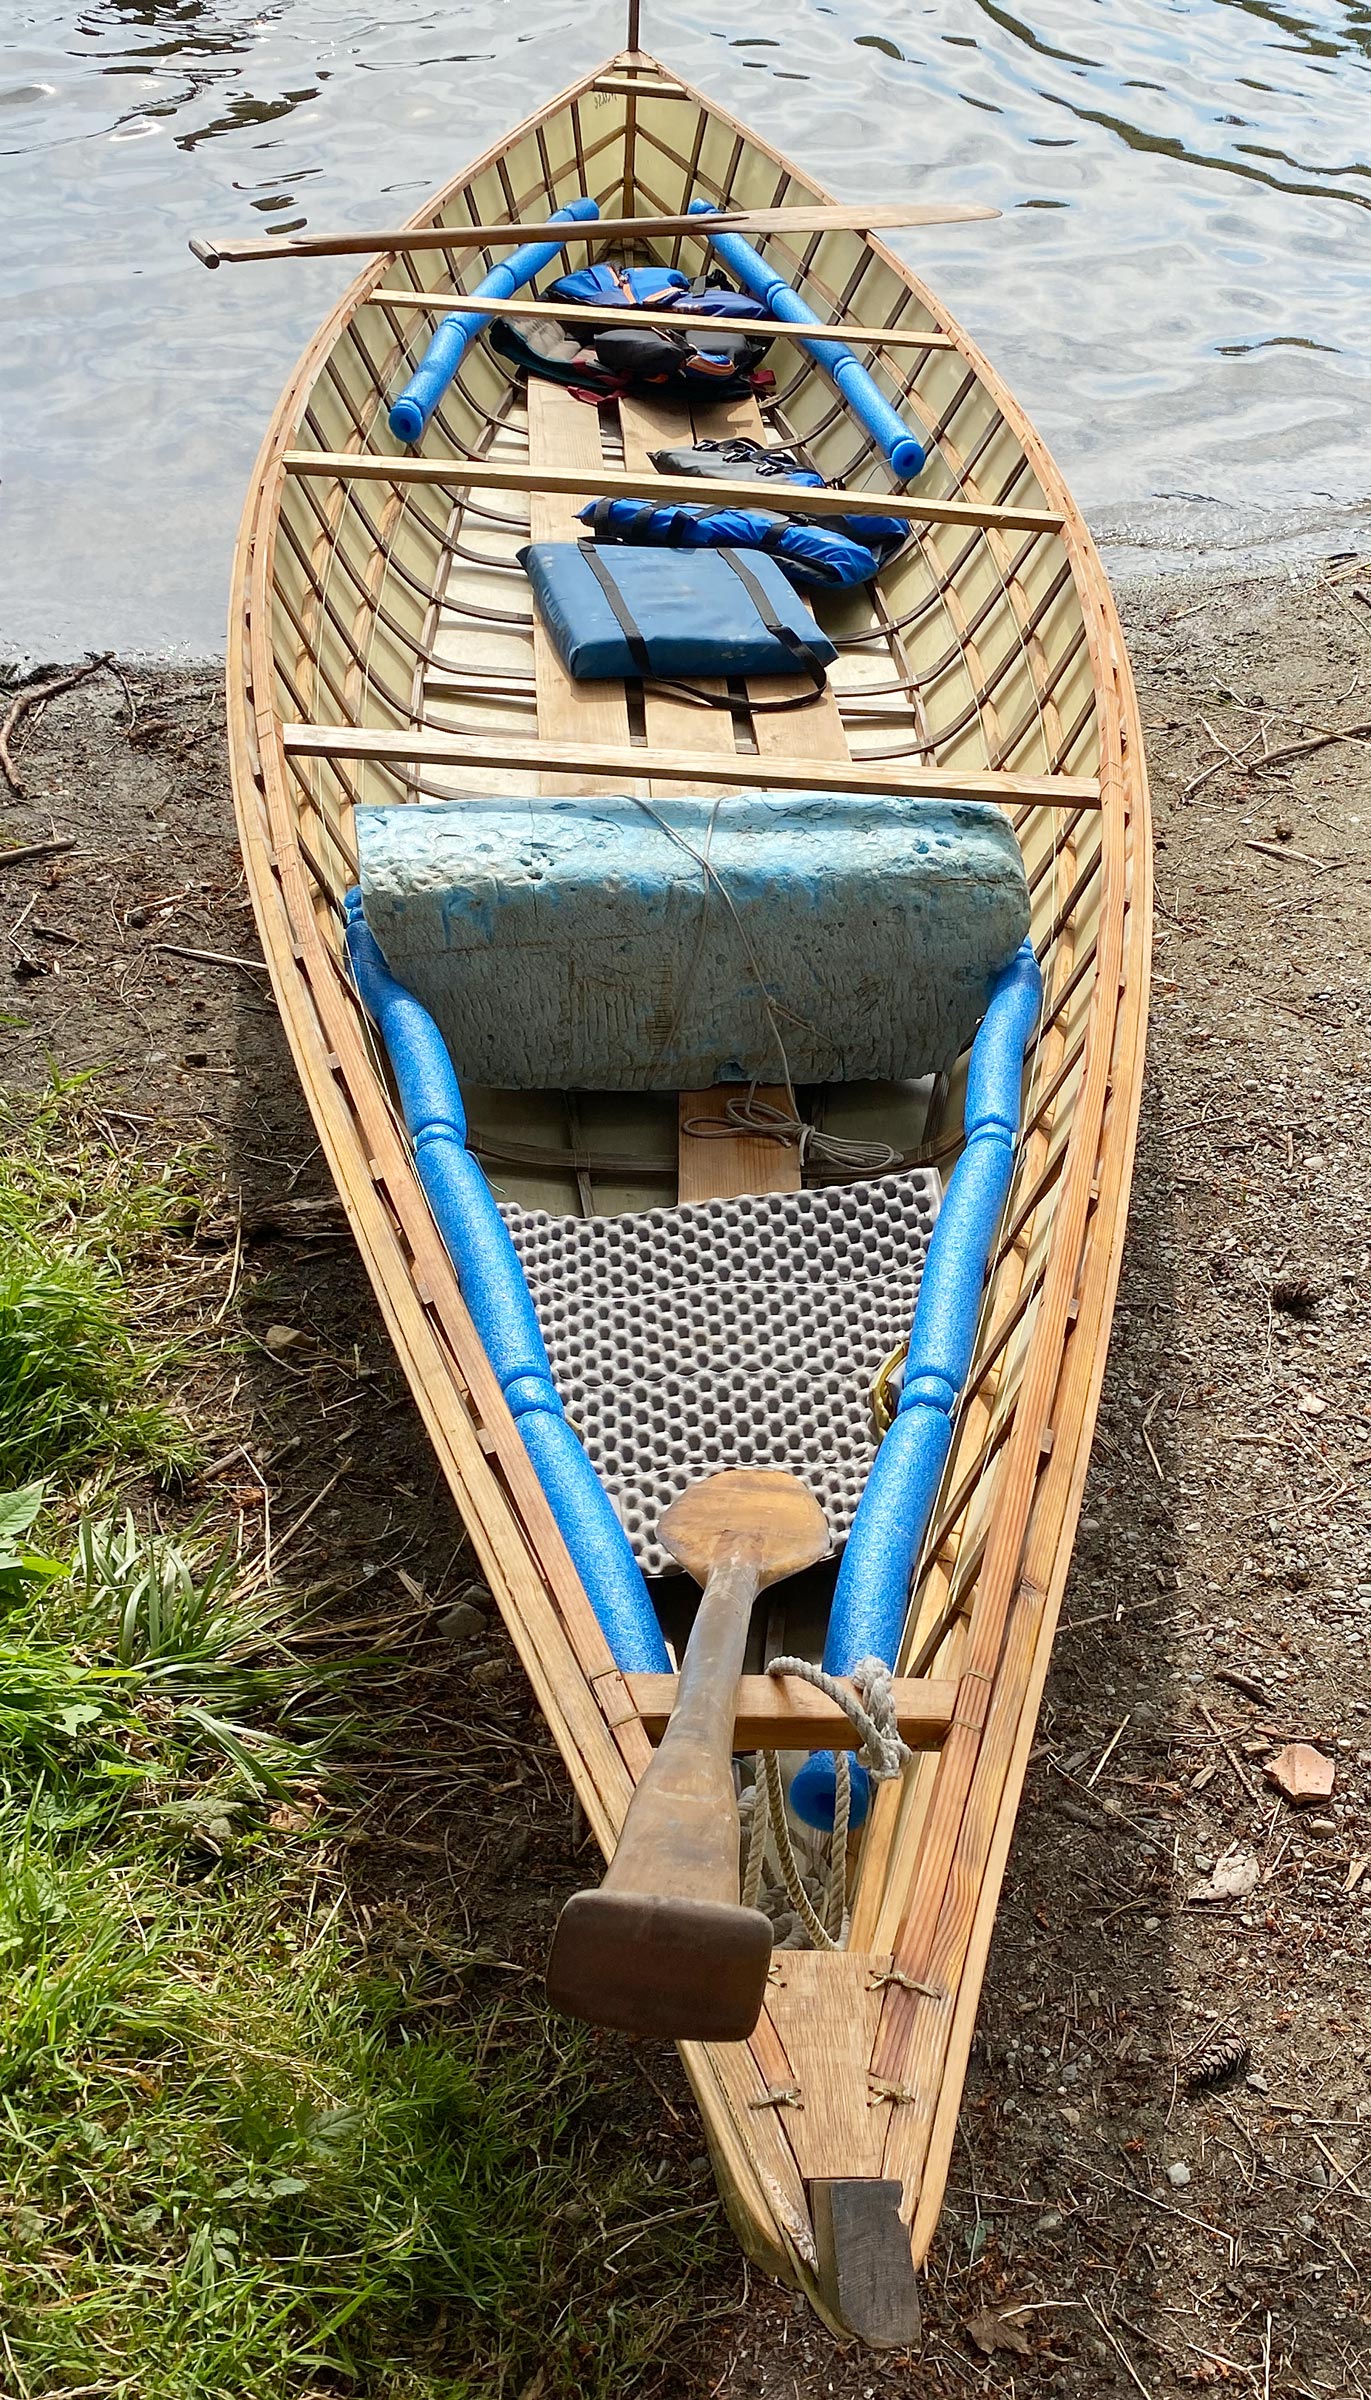
For her first season MUSE had temporary crossbeams that gave the canoe structural strength but were not strong enough to support the weight of a person. Jeremy plans to replace them with better-sized split-cedar posts. Similarly, MUSE was launched without seats. Instead, the family made use of a Styrofoam block and a cooler. The Styrofoam also provided buoyancy, as did the four swim noodles tied to the frame.
Jeremy sourced all the materials locally and even incorporated salvaged wood and driftwood. The breasthooks were fashioned from a barrel that came from a local winery and “never did get filled with mead at our facility.” The stem knee came from a cherry tree on the homestead, and the stern knee was milled from windfall Douglas-fir found in the woods that border the property. The stringers were split from red-cedar driftwood.
Jeremy began the build in the first week of January 2022, and for the next three months he worked on the canoe every Tuesday. There was an unplanned interruption for most of March and April, but by May he was back on track and hard at work.
Throughout the build, Jeremy sought and received plenty of good advice. Corey Freedman of Spirit Line Kayaks was a “huge help, as were the folks at Cape Falcon Kayak in Portland, Oregon.” Both organizations supplied information and materials, especially in the early research stages when Jeremy was getting himself “mentally prepared for the task at hand.” And when it came to the actual construction, there was help closer to home: “the boys helped with the myriad lashings.”
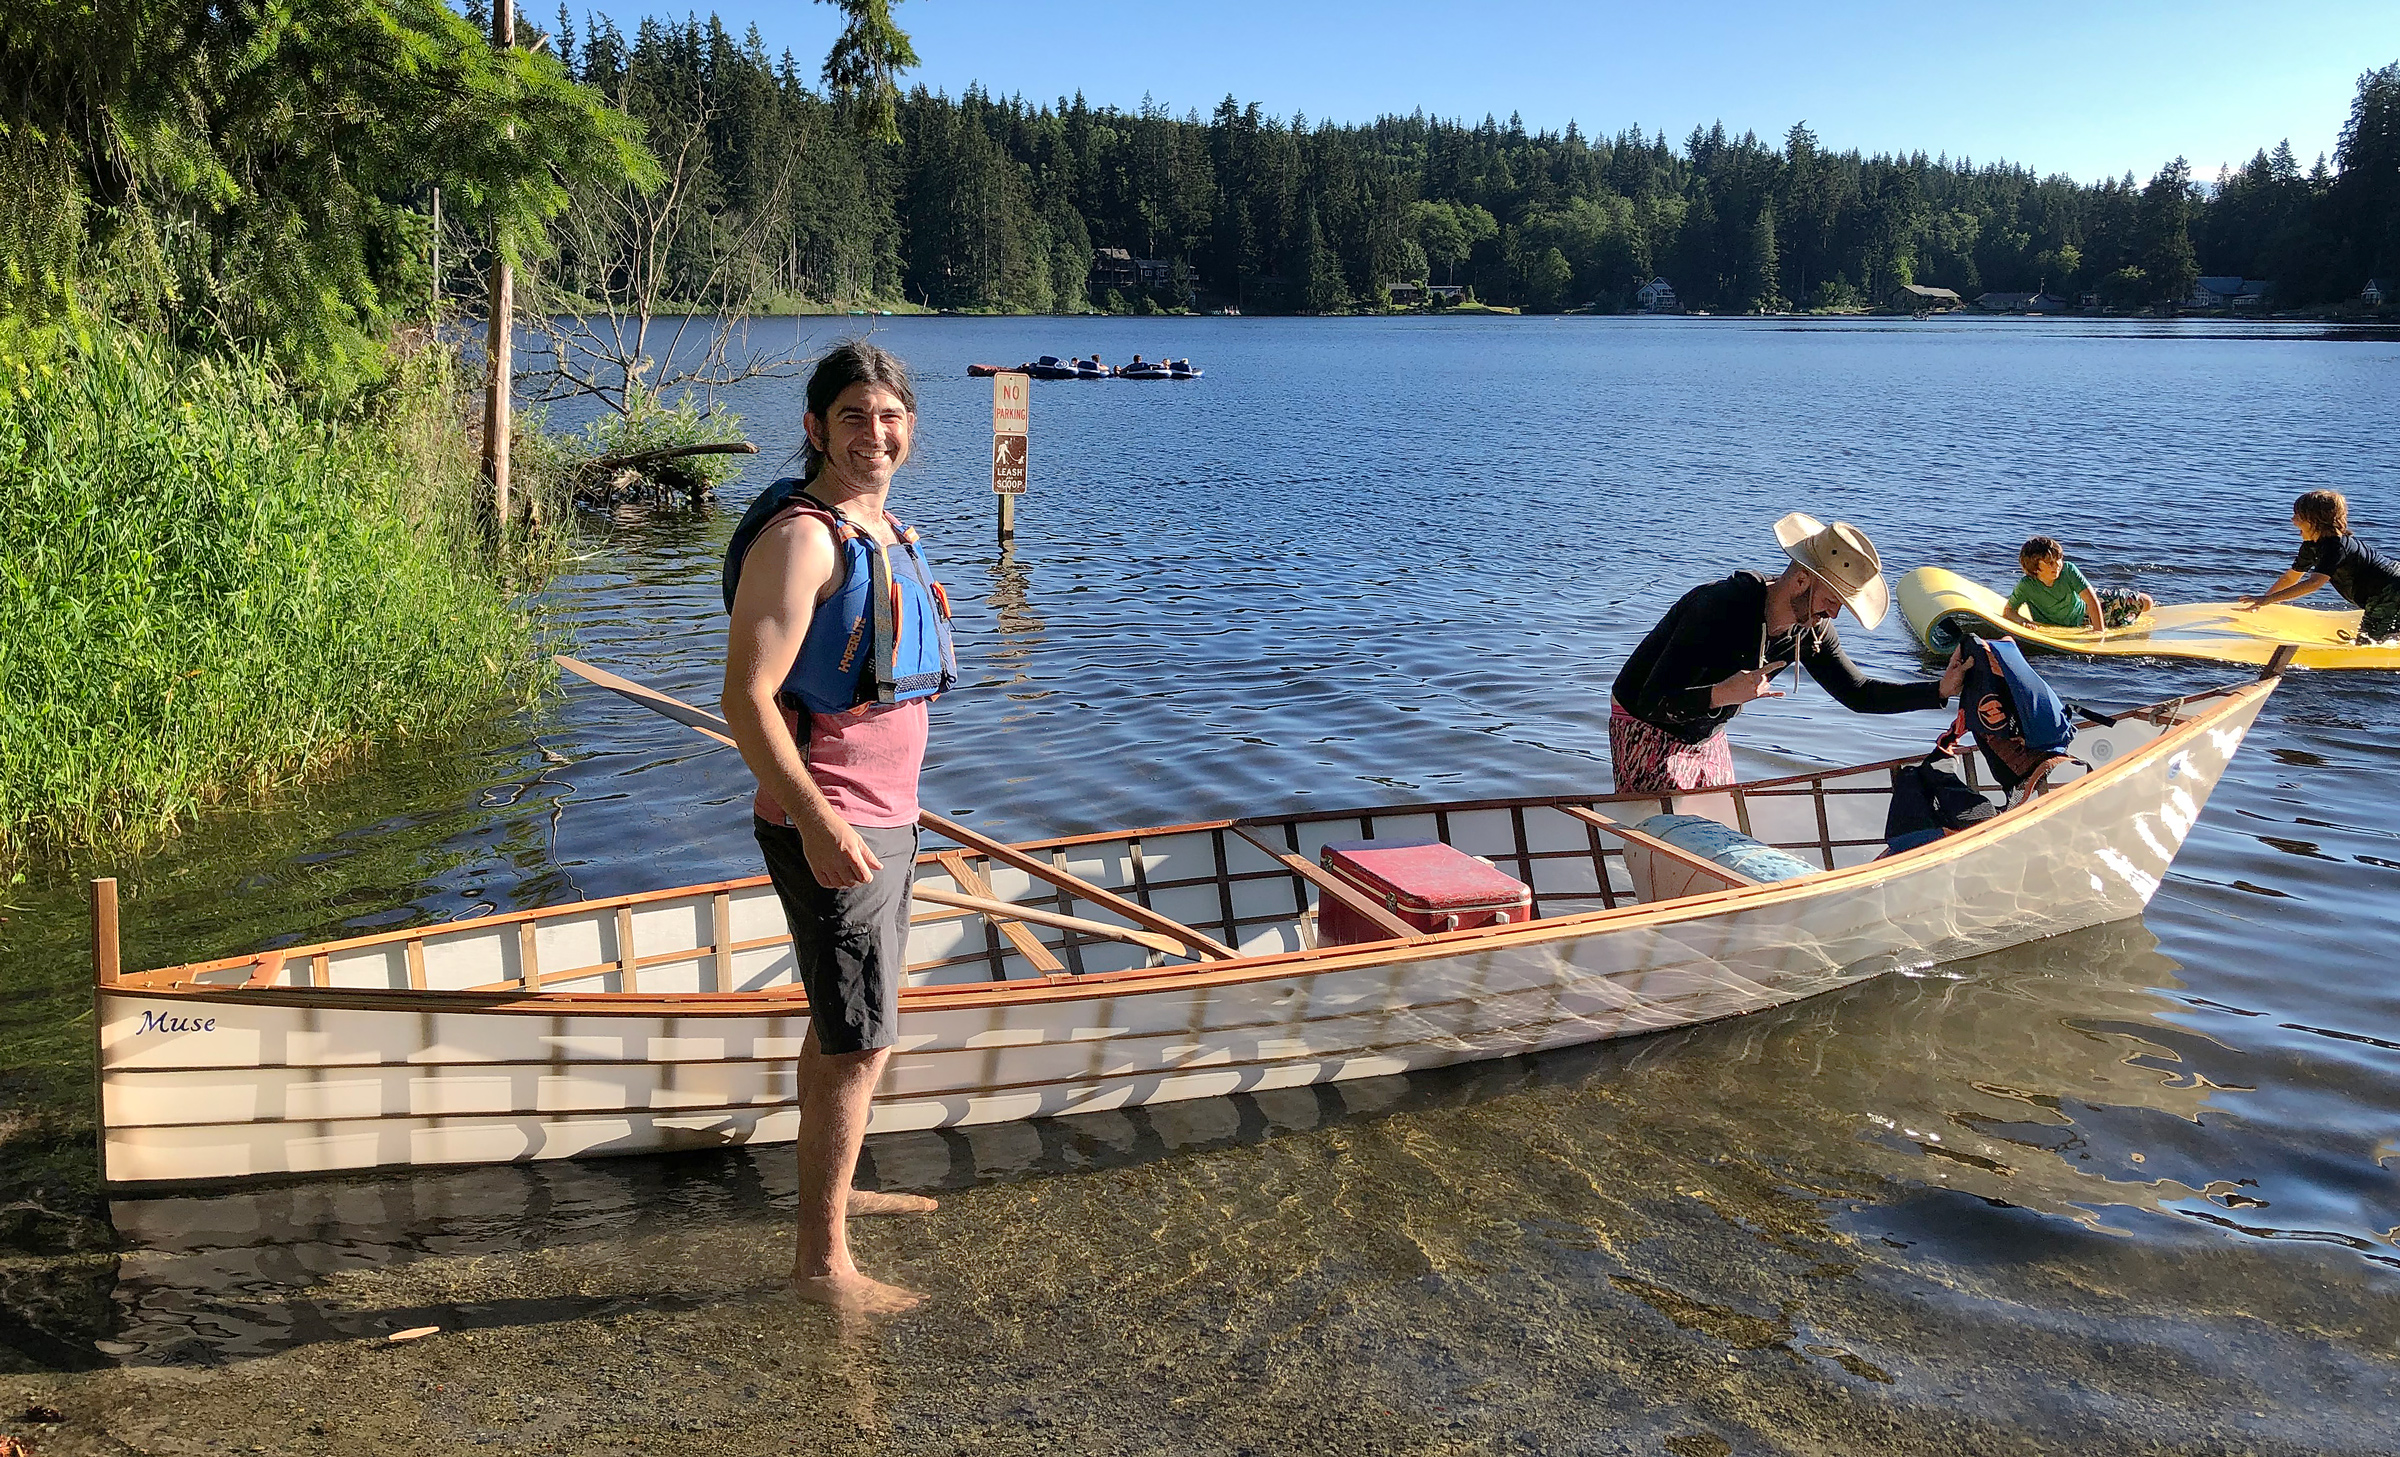
With her minimal draft, MUSE is the ideal boat for exploring the shallows at the lake. Her unloaded weight is under 50 lbs, making her easily cartoppable, even when Jeremy is on his own—a rare occurrence in MUSE’s first season.
Inevitably, as with most first builds, not everything went according to plan. “One thing I would definitely do differently,” says Jeremy, “would be to use oak instead of laminated bamboo for the ribs. It was difficult to get the bamboo soft enough to bend without delaminating the glue joints.” While that can’t now be changed, Jeremy is thinking of redoing another part of the boat: “I didn’t get the skin as tight as I would have liked, so I’ll probably replace it relatively soon.” He would also like to modify the chines, which make very sharp corners and subject the fabric to excessive abrasion. If Jeremy does replace the skin, he will be able to round the edge of the chine so that the abrasion won’t be focused on such a small area.
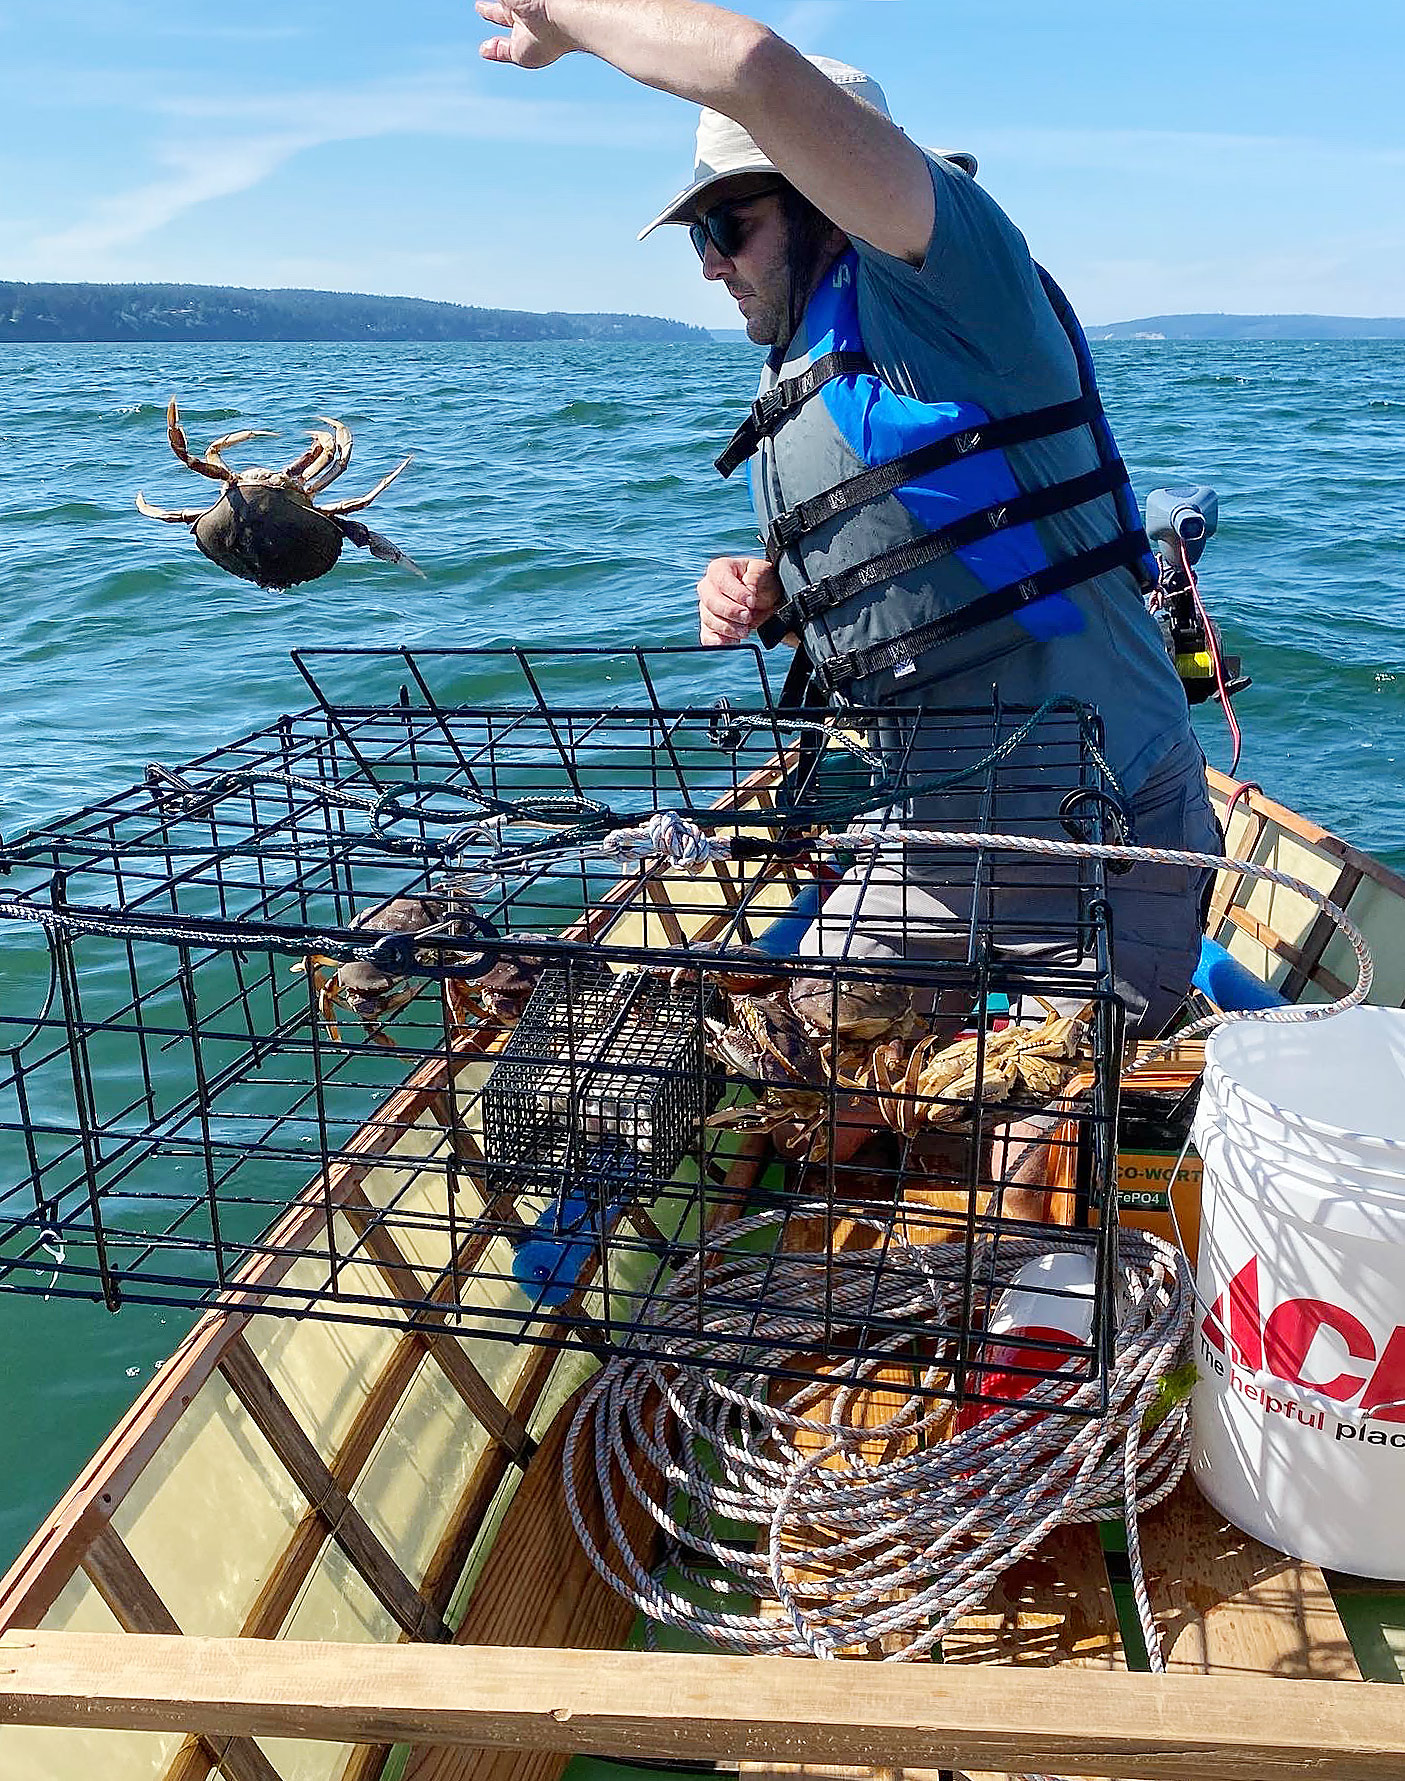
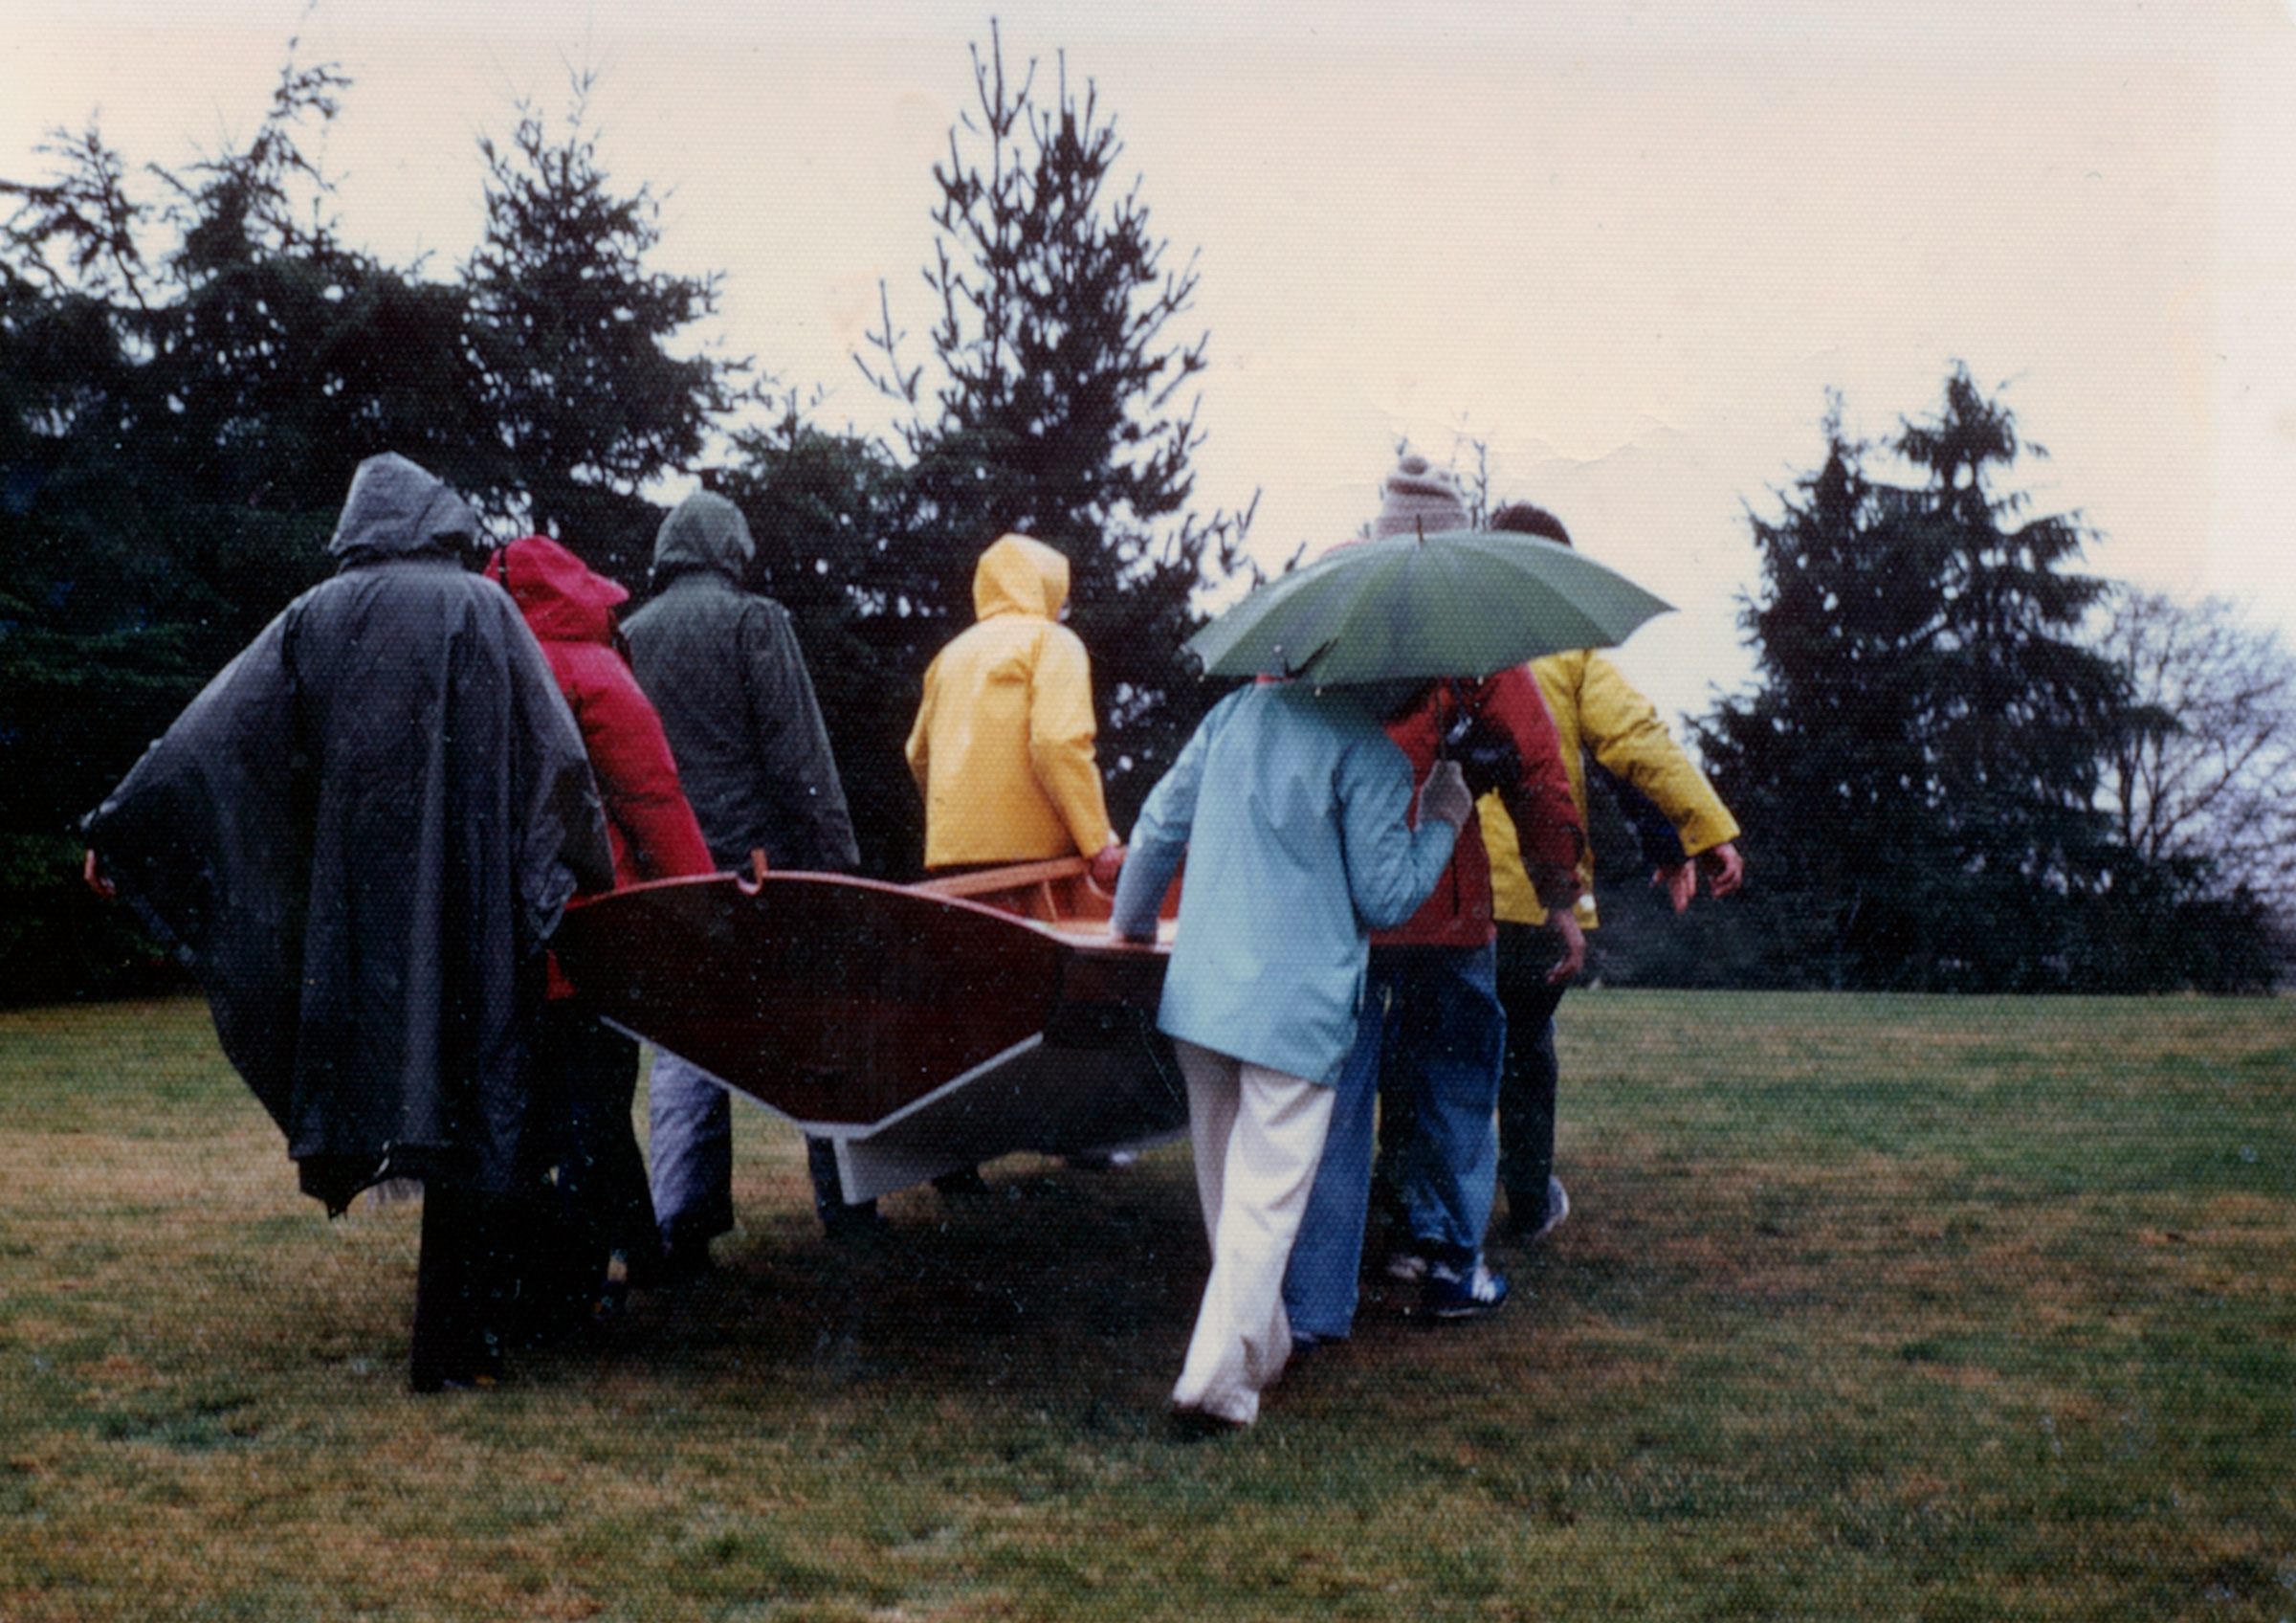
Not every crab is a keeper. The family used MUSE extensively for crabbing and fishing in her first season, confirming that Jeremy was right to believe an indigenous boat type would prove its worth and suit the needs of the family.
By late June, summer had arrived, and the family was eager to be afloat. One hundred hours into the build, the canoe was far enough along to be used. The seats were not yet installed, but there’d be plenty of time for that and the other tweaks over the winter. There was crabbing and gunkholing and salmon fishing to be done, to say nothing of days at the lake swimming and lounging in the sun. For the summer of 2022, passengers and crew could sit on the floor, a cooler, or a block of Styrofoam.
Photographs courtesy of Jeremy Kyncl
The canoe is light enough to be powered by a small electric trolling motor, but sturdy enough to accommodate family and friends.
The Kyncls launched MUSE on June 30, 2022, in Goss Lake, “our favorite little lake on Whidbey.” It was the first of many outings.
“We loved our first year,” says Jeremy. “I love that I can launch anywhere that has a parking lot by the beach, and that we can slip into bays with just inches of water. She’s a real joy. A lively little boat. With the electric trolling motor—which both boys quickly learned to operate—she rode happily and proved game for the chop and blustery conditions common off Whidbey. There’s a steady, peaceful ease to how she carries herself and happily surfs downwind waves.”
Simple pleasures: MUSE became the much-loved ferry and focal point for multiple schoolchildren at the lake in her first summer.
Between catching Dungeness crab—“we’ve paid for the cost of the build with the amount we’ve eaten”—and acting as passenger ferry for “half the school at the swimming hole,” MUSE is, says Jeremy, just what he hoped for when he set out to build her and he’s glad to have taken “so many hints from thousands of years of indigenous experience.”
Jenny Bennett is the managing editor of Small Boats Magazine.
Do you have a boat with an interesting story? Please email us. We’d like to hear about it and share it with other Small Boats Magazine readers.
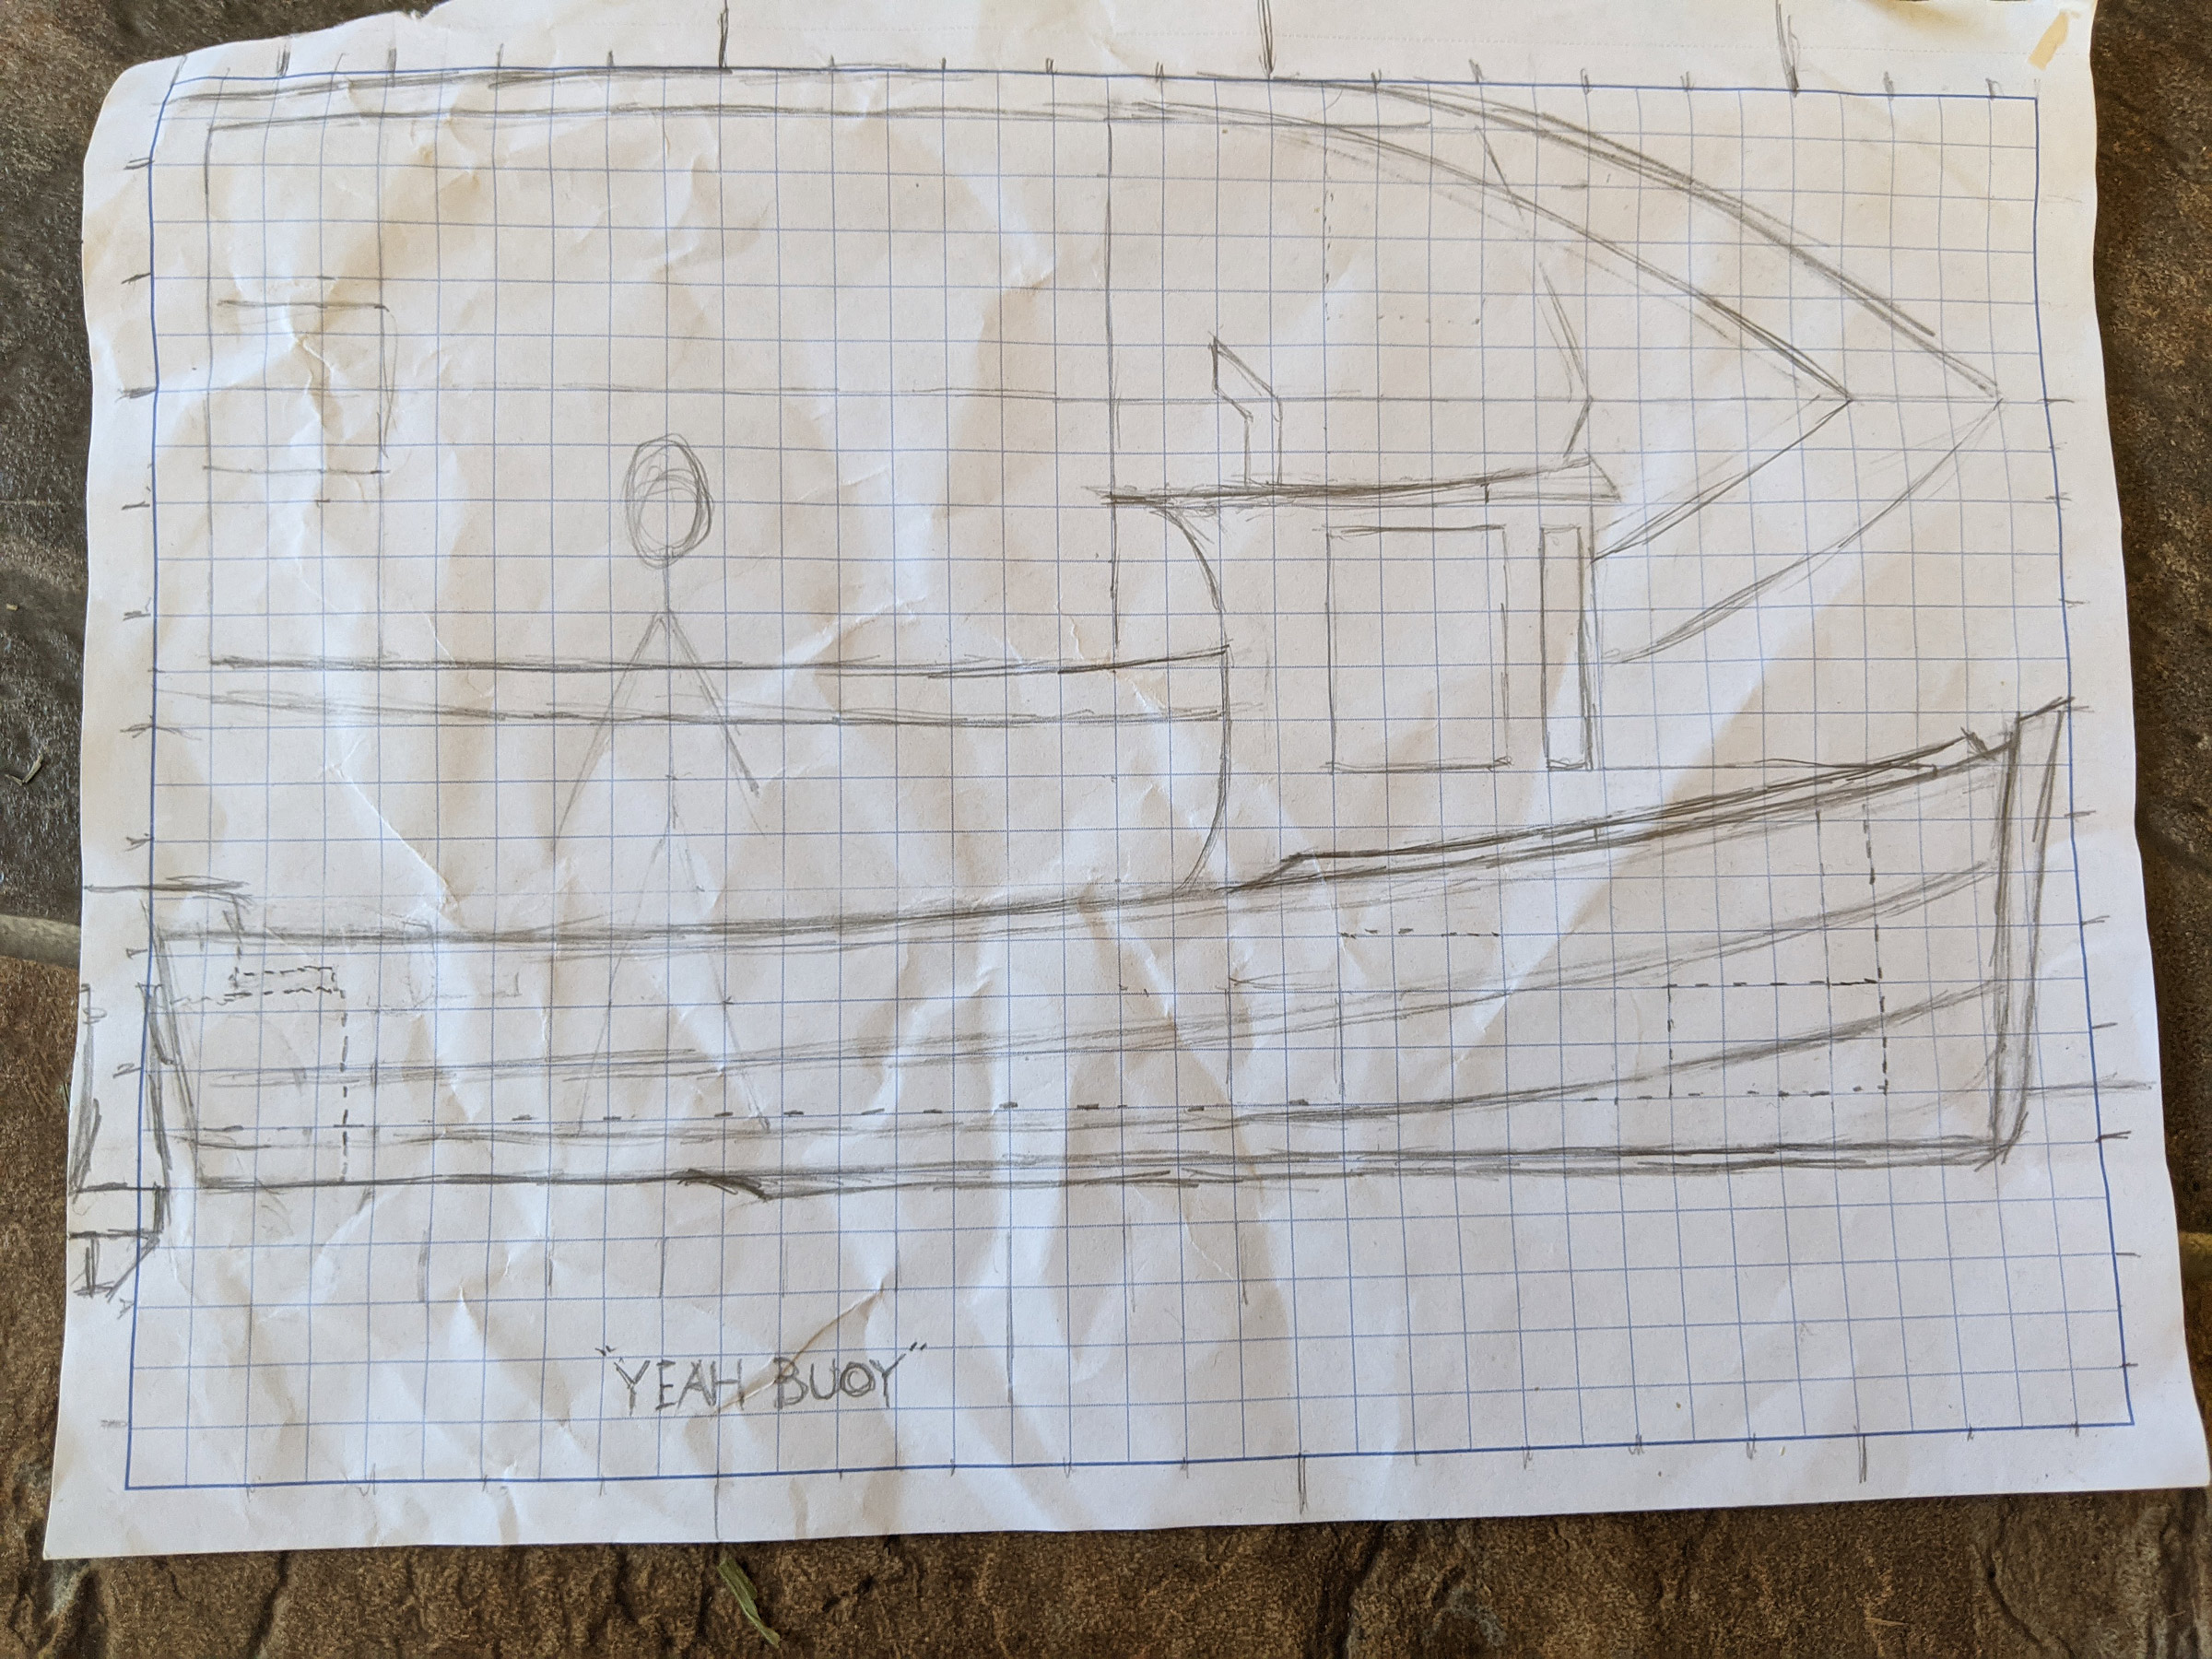
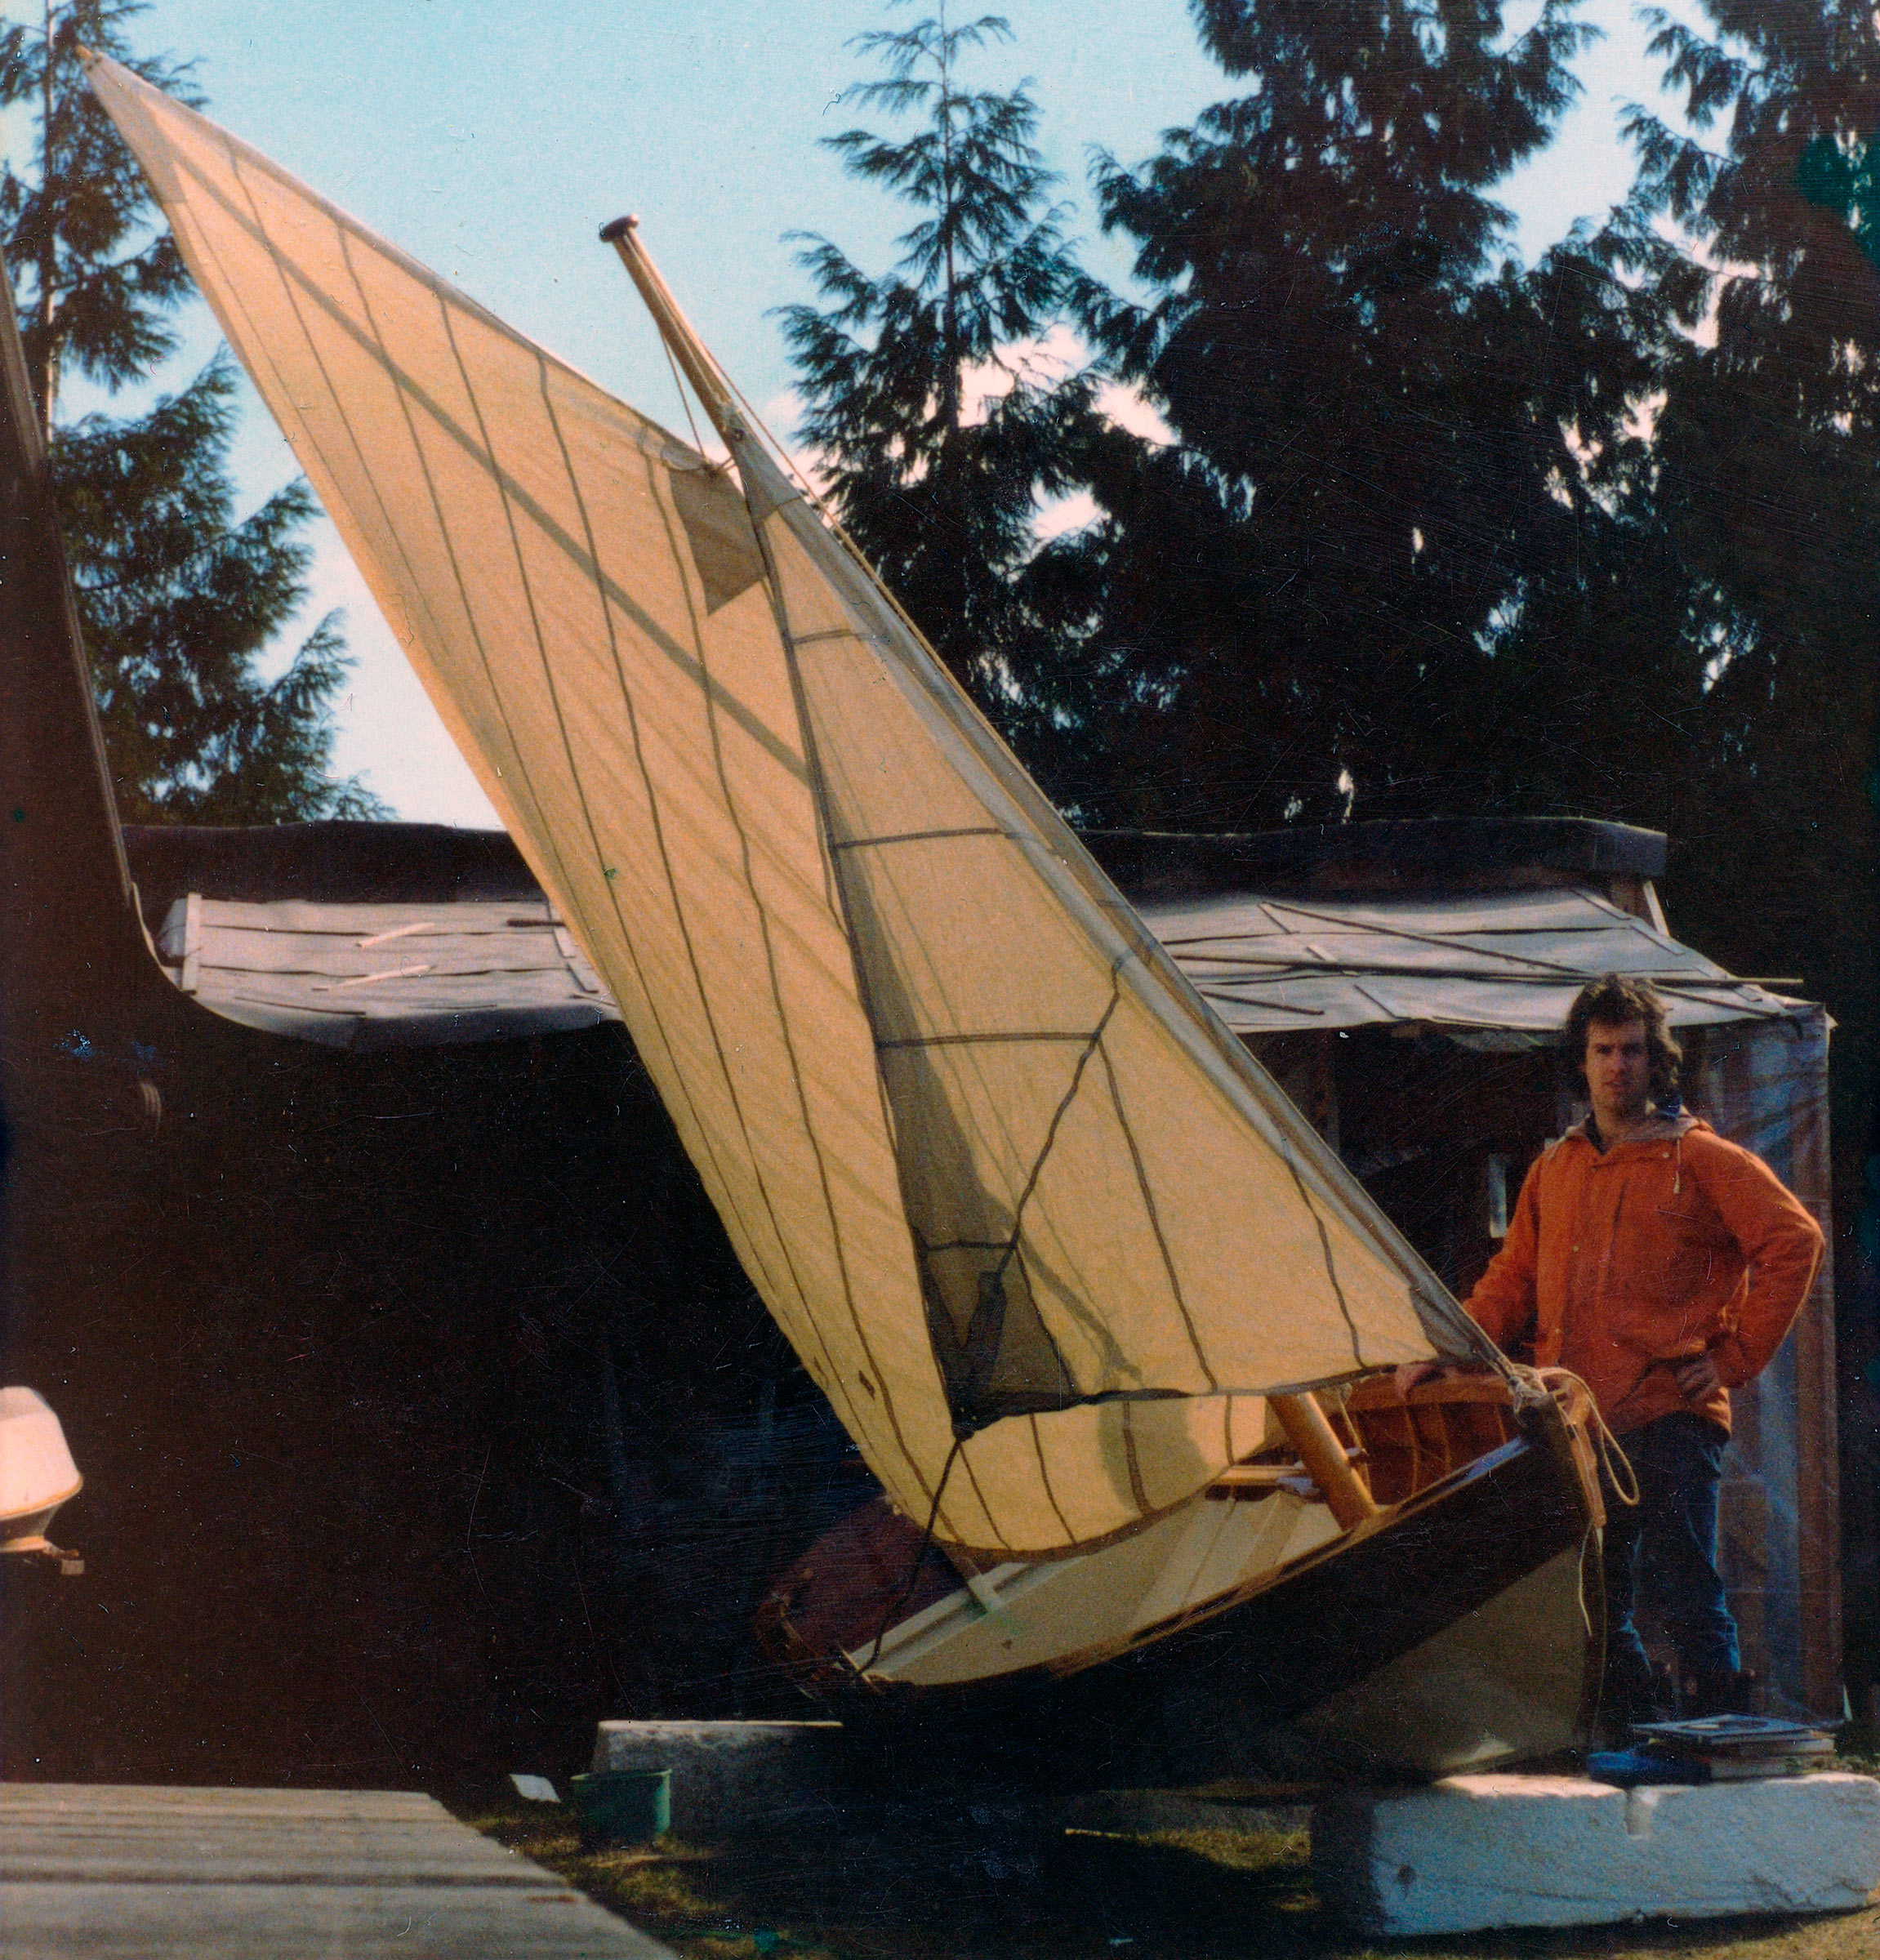
Geordie Pickard’s dream boat began in mid-2020 with a sketch and culminated in June 2021 with a launching.
The Pickard family lives on Vancouver Island in British Columbia which is where Geordie grew up. They also own a cabin on the tiny, off-grid Ruxton Island, one of the Gulf Islands north of Victoria. For much of 2019, Geordie and his wife, Erin, lived on Ruxton and commuted back and forth to Duncan on Vancouver Island. At the time, says Geordie, they owned a “big heavy production boat with an I/O engine. It was built to handle Georgia Strait and was unnecessarily big for the shorter, more sheltered run to Vancouver Island. And the gas we used on the daily commute was killing me.”
Photographs courtesy of the Pickard family
The original sketch shows the wide open cockpit but also a pilothouse; the boat was launched without it, but Geordie plans to build one over the winter. The removable pilothouse will have molded-rubber cooler latches to make it easy to put on and off the boat.
Just before their son, Alaric, was born, Geordie and Erin moved off Ruxton to Vancouver Island, and it was then that Geordie decided to build a boat that was more efficient and purpose-designed for their needs. They were no longer commuting on a regular basis, but they still liked to get out on the water as much as possible.
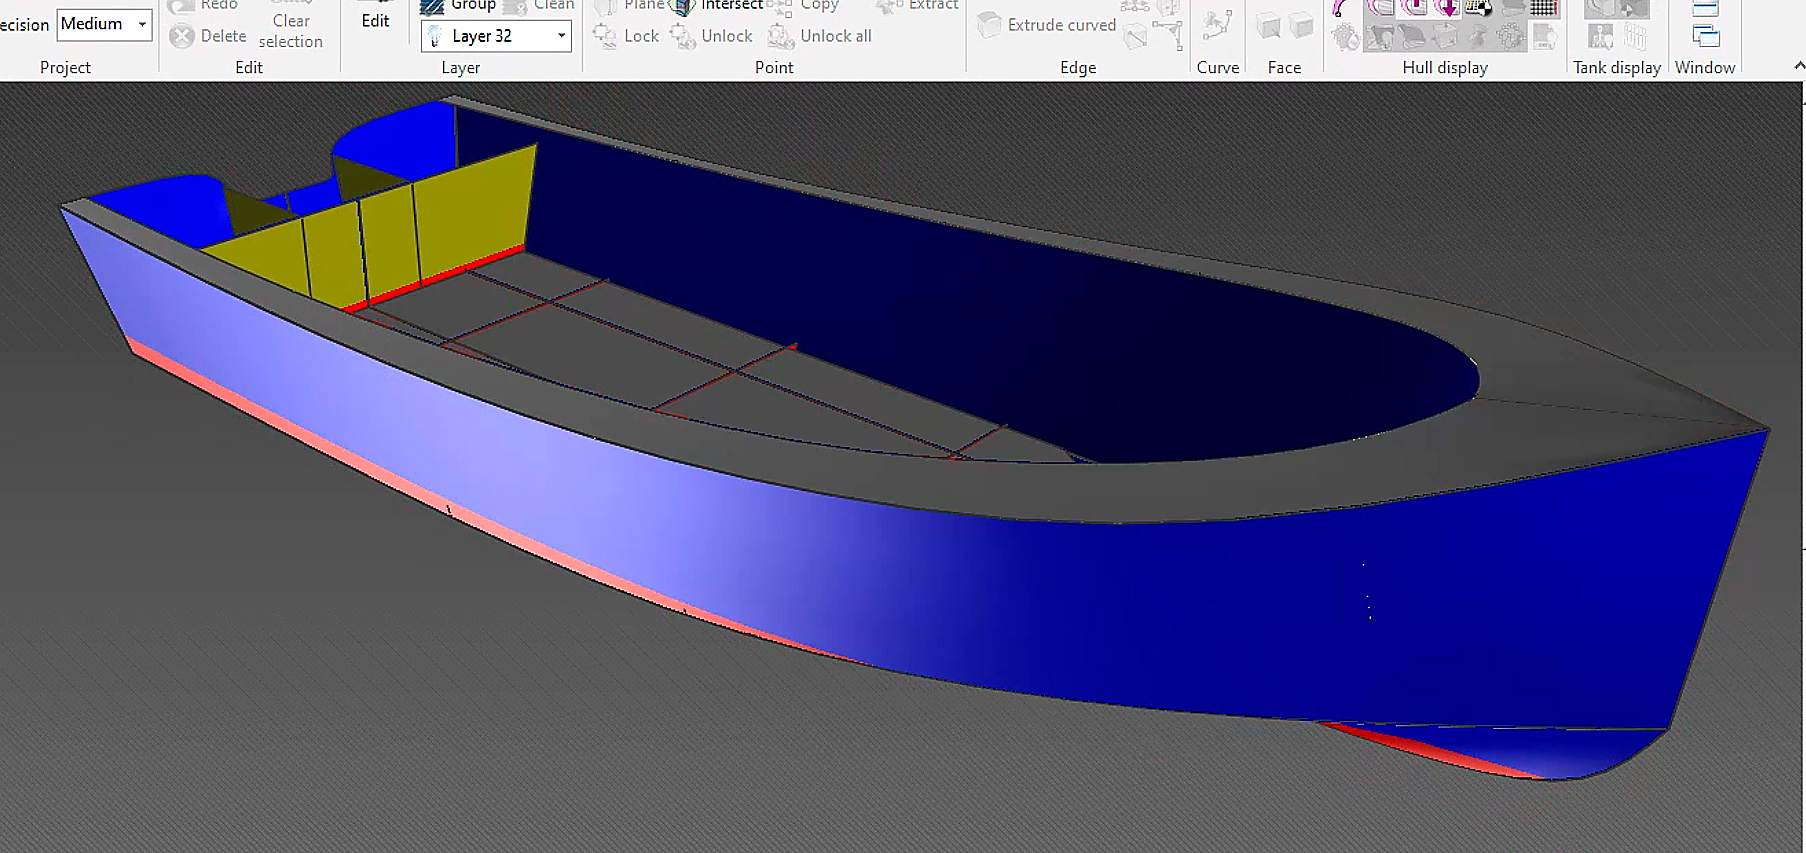
With a background in technology, Geordie made full use of CAD software. Being able to see a computerized 3-D image of the boat from all angles was key in his design process.
“I really wanted an open boat with a large cockpit. I grew up drift-fishing with my dad, who’s a fanatical fisherman. He hated noise, so we’d motor to a spot, shut down, and cast homemade jigs for salmon or lingcod or greenling. I still mostly fish that way, and I got tired of having a boat that was enclosed and needed 200-plus hp to move. I wanted something that had a ton of cockpit space, would run with a small motor and plane at low speeds. Plus, I enjoy building boats.”
Geordie tested the integrity of the scarf joint over the deck railing just outside.Unable to lay out two joined plywood sheets end-to-end anywhere else, Geordie plotted the hull side panels on the bedroom floor, taking the offsets from his laptop.
In earlier years Geordie had built a couple of boats, including a “sailing skiff of my own design when I was about 20 and wanted to learn to sail.” He began a search for the perfect skiff design. At one point he considered building the Marissa 18 from B&B Yacht Designs, but Erin pointed out that Geordie had spent so much time researching boat design he could “probably do a decent job” himself.
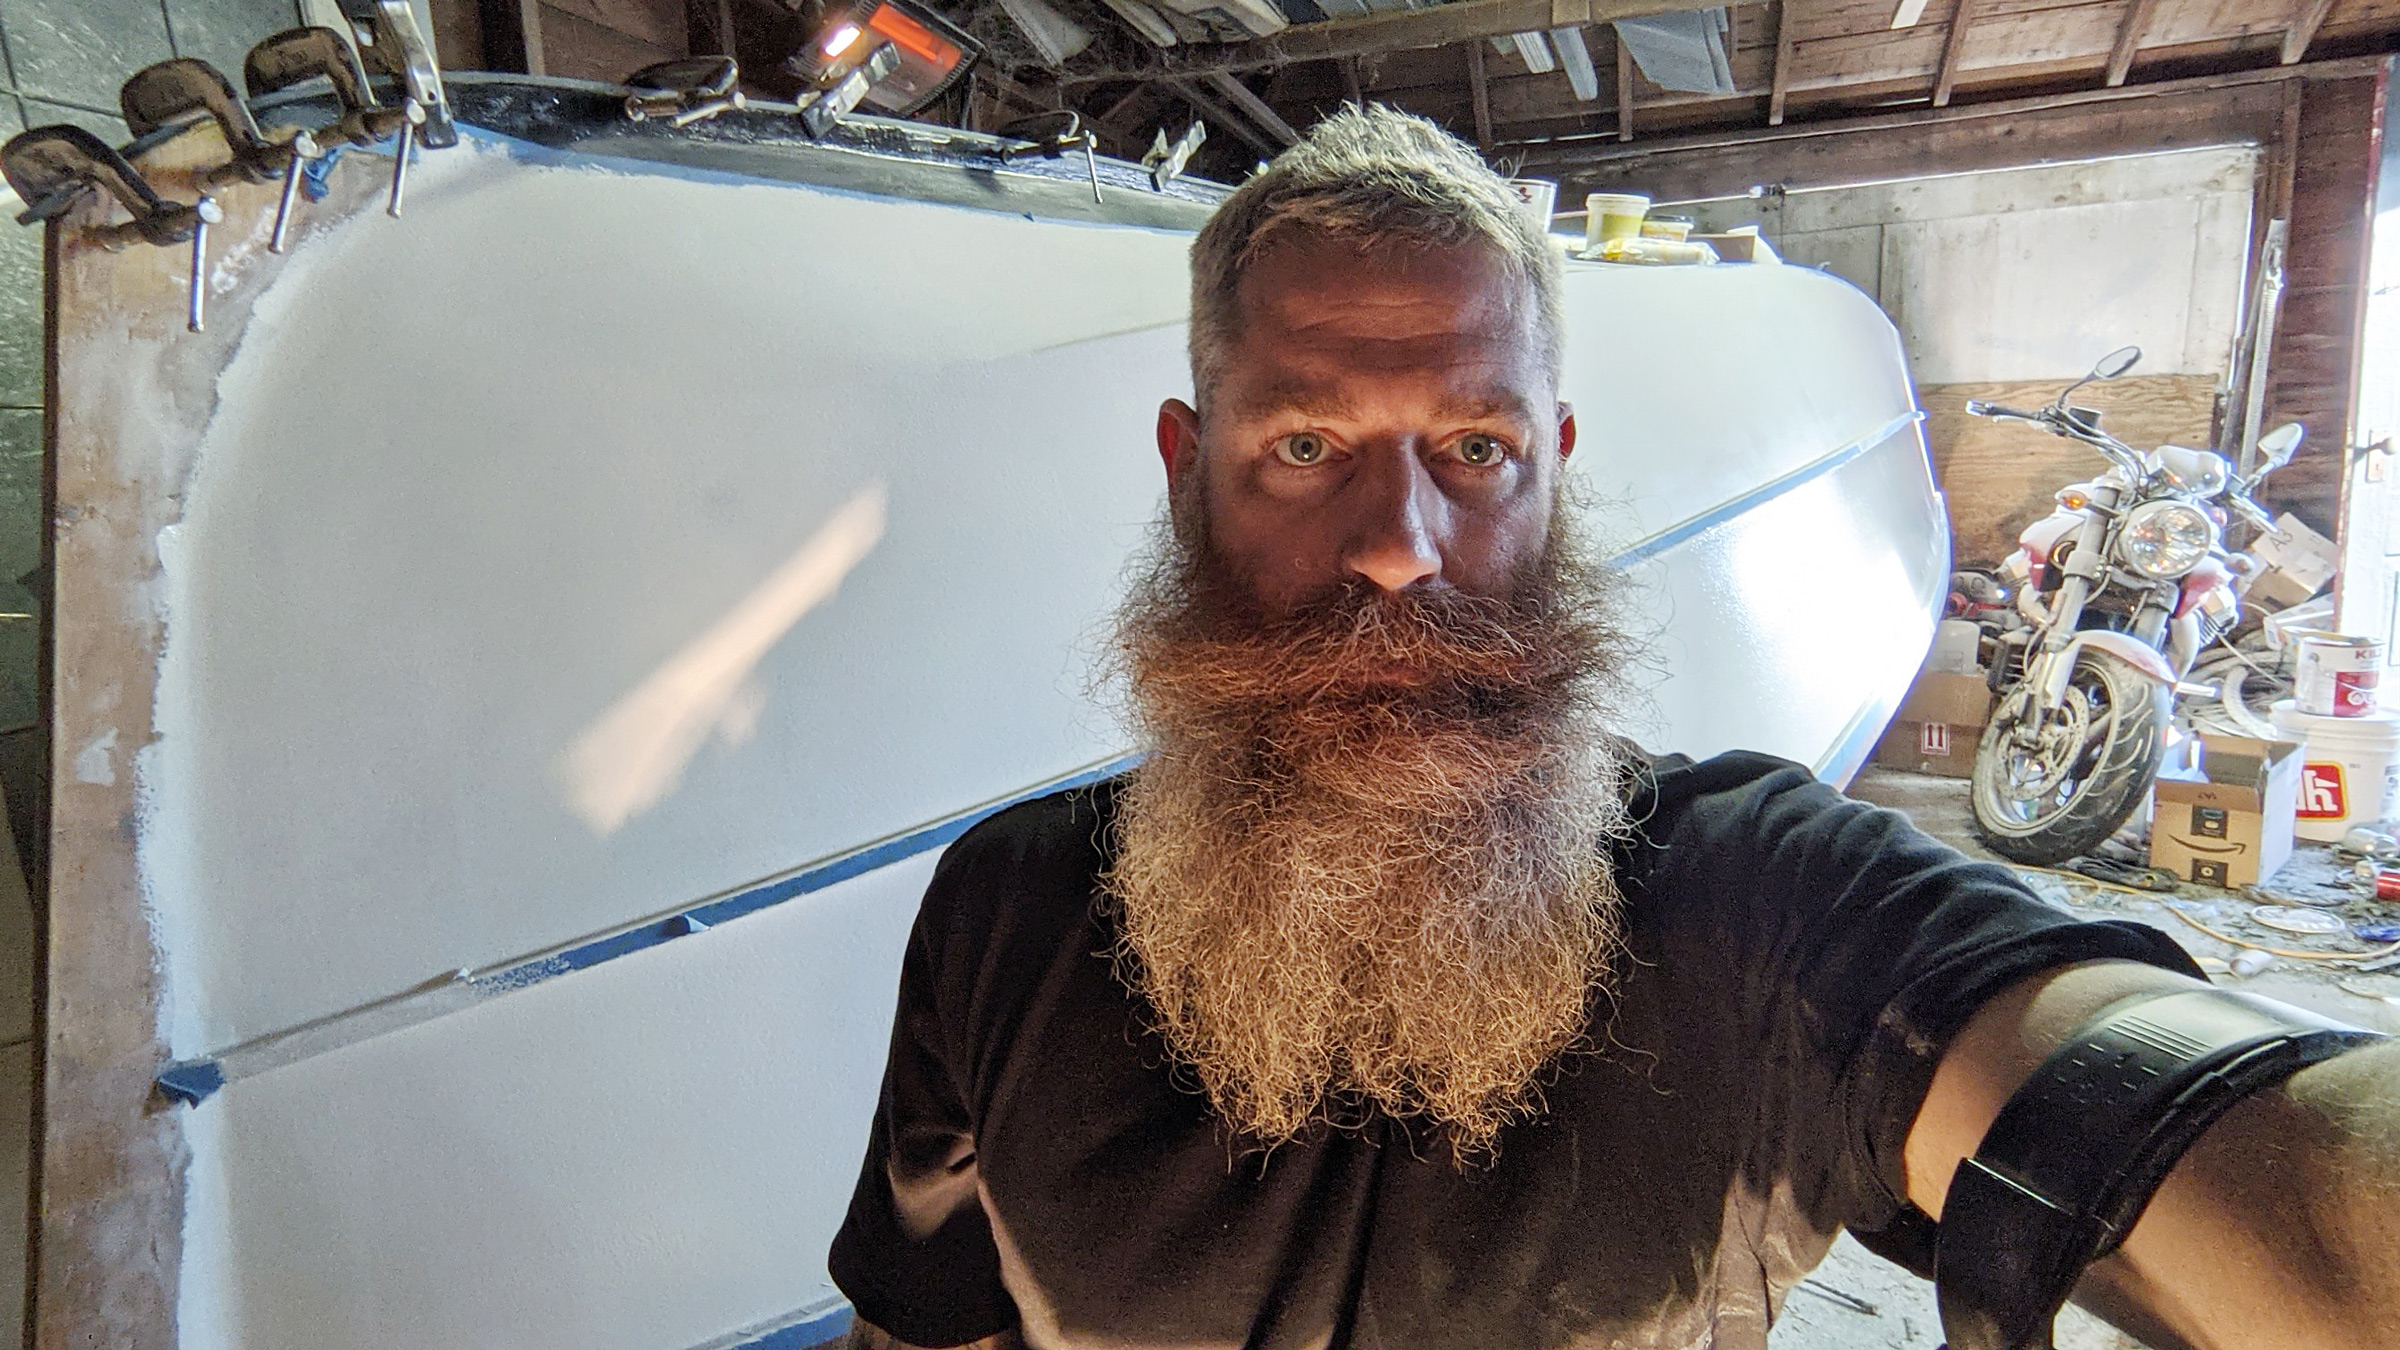
The size of the boat was determined by the size of the garage. There was not an inch to spare and juggling boatbuilding with everyday living was not always easy. When it came time to fair the hull, everything, including the motorbike, acquired a fine layer of dust.
“That really got me thinking,” he says. “I don’t have any formal training in naval architecture, but I was pretty confident I could handle any math that came up. Honestly, I think a lot of people overthink it. I’ve spent enough time on similar-sized boats that I felt I had a good handle on realistic scantlings, so I just went for it.”
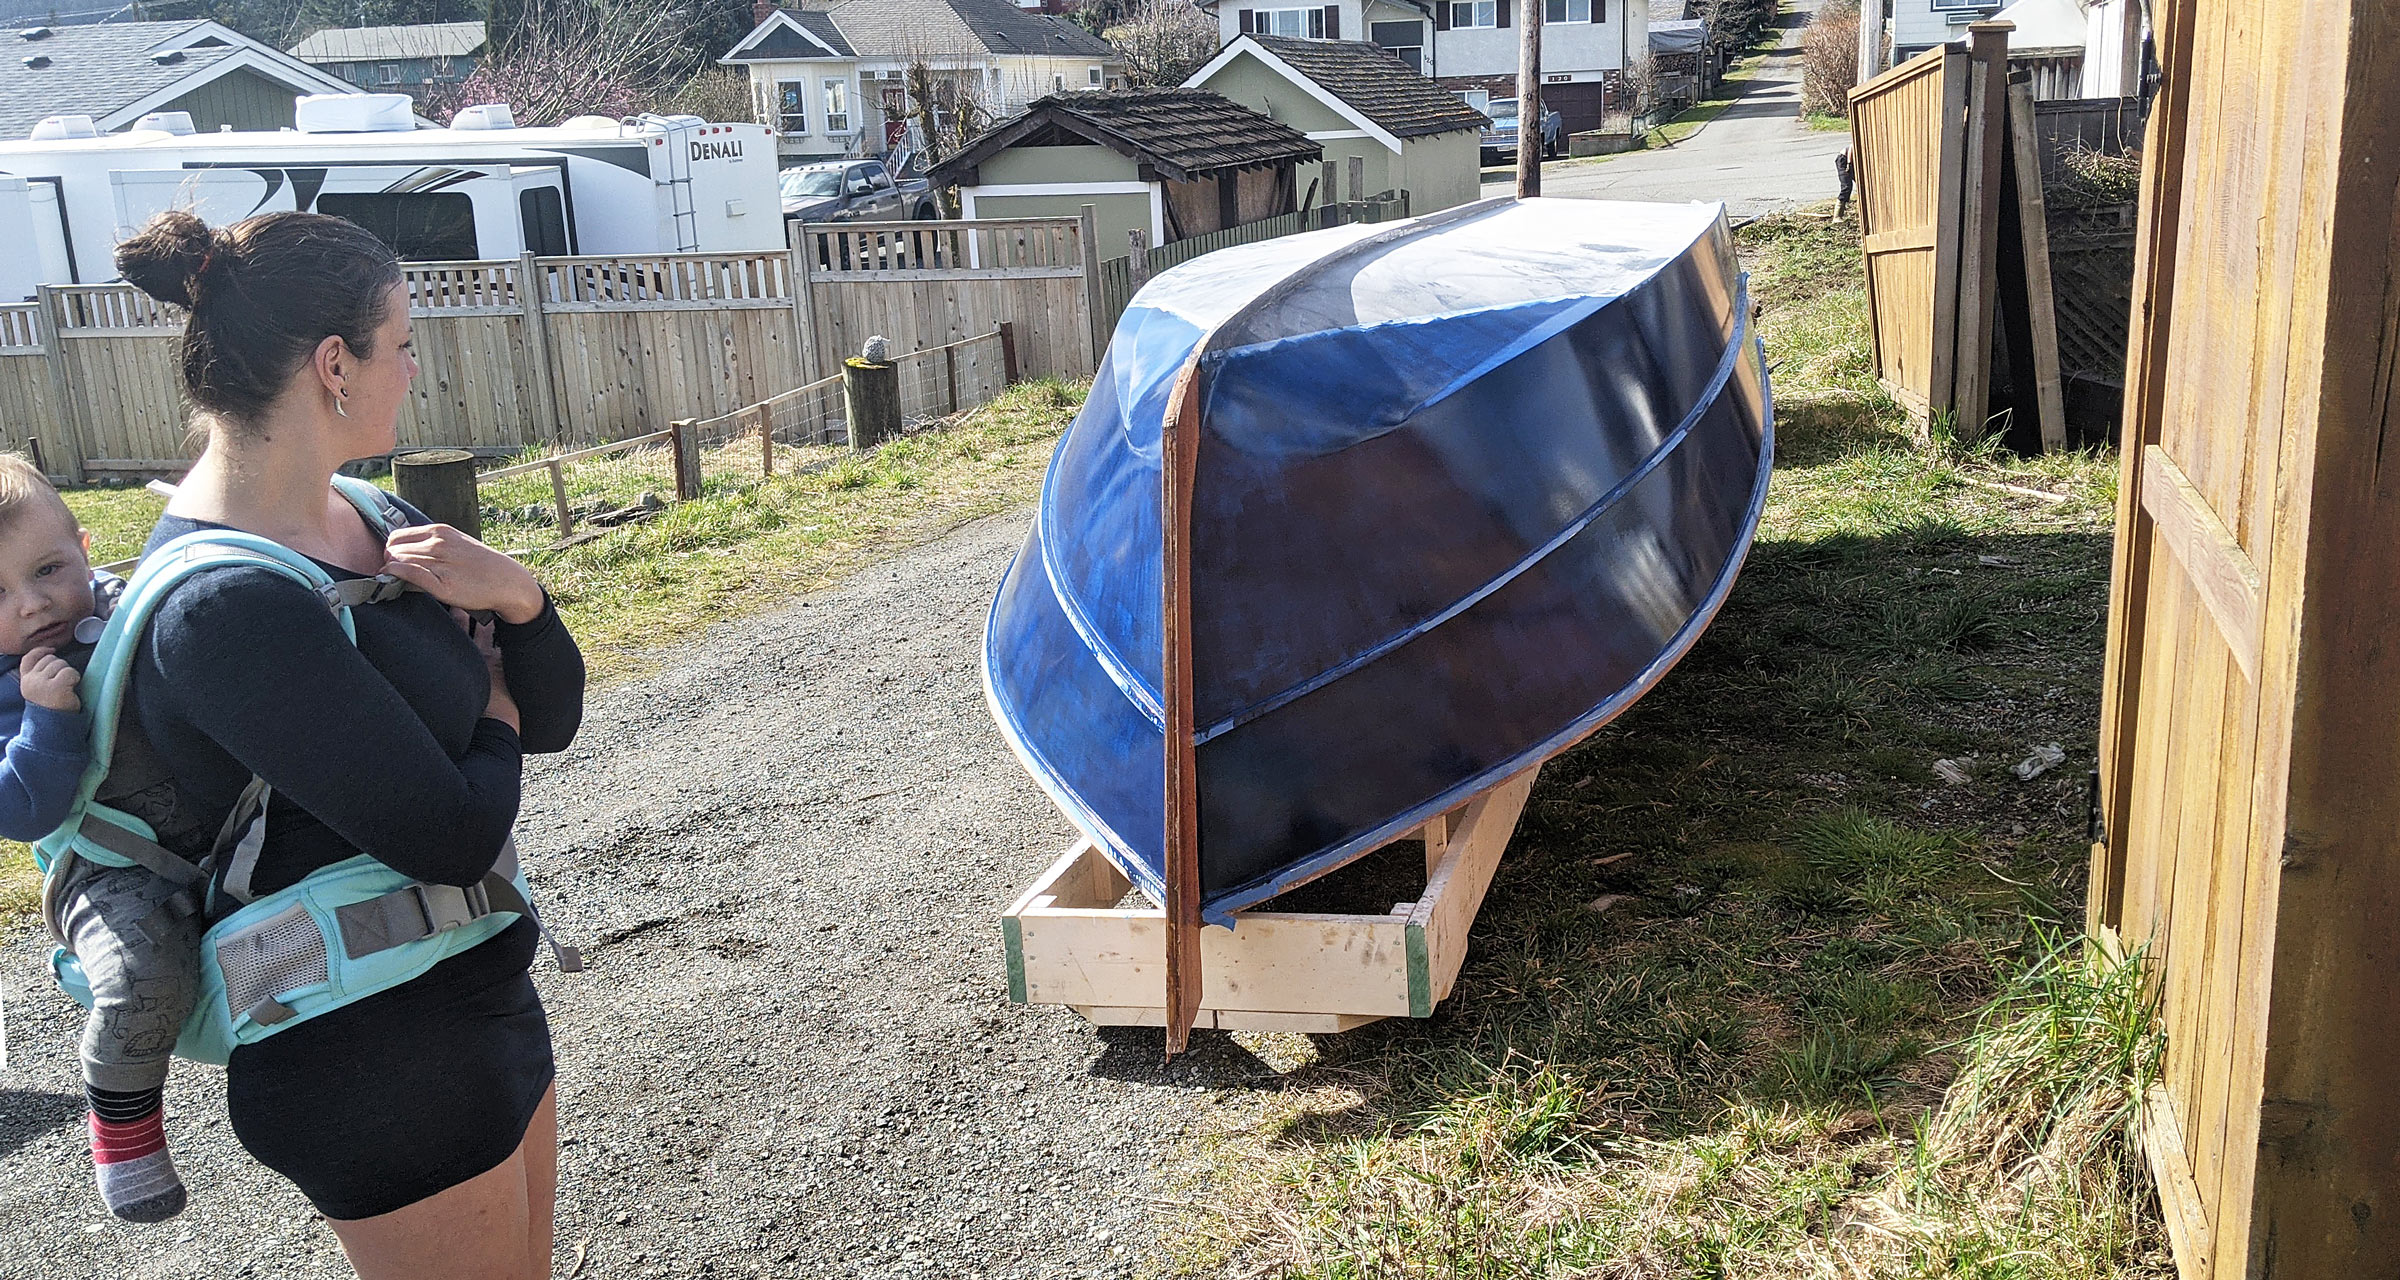
Geordie built the jig on a rolling platform so that the boat could be moved in and out of the garage with relative ease while remaining fully supported. Only when the boat was moved outside could Geordie stand away to see the hull from all angles.
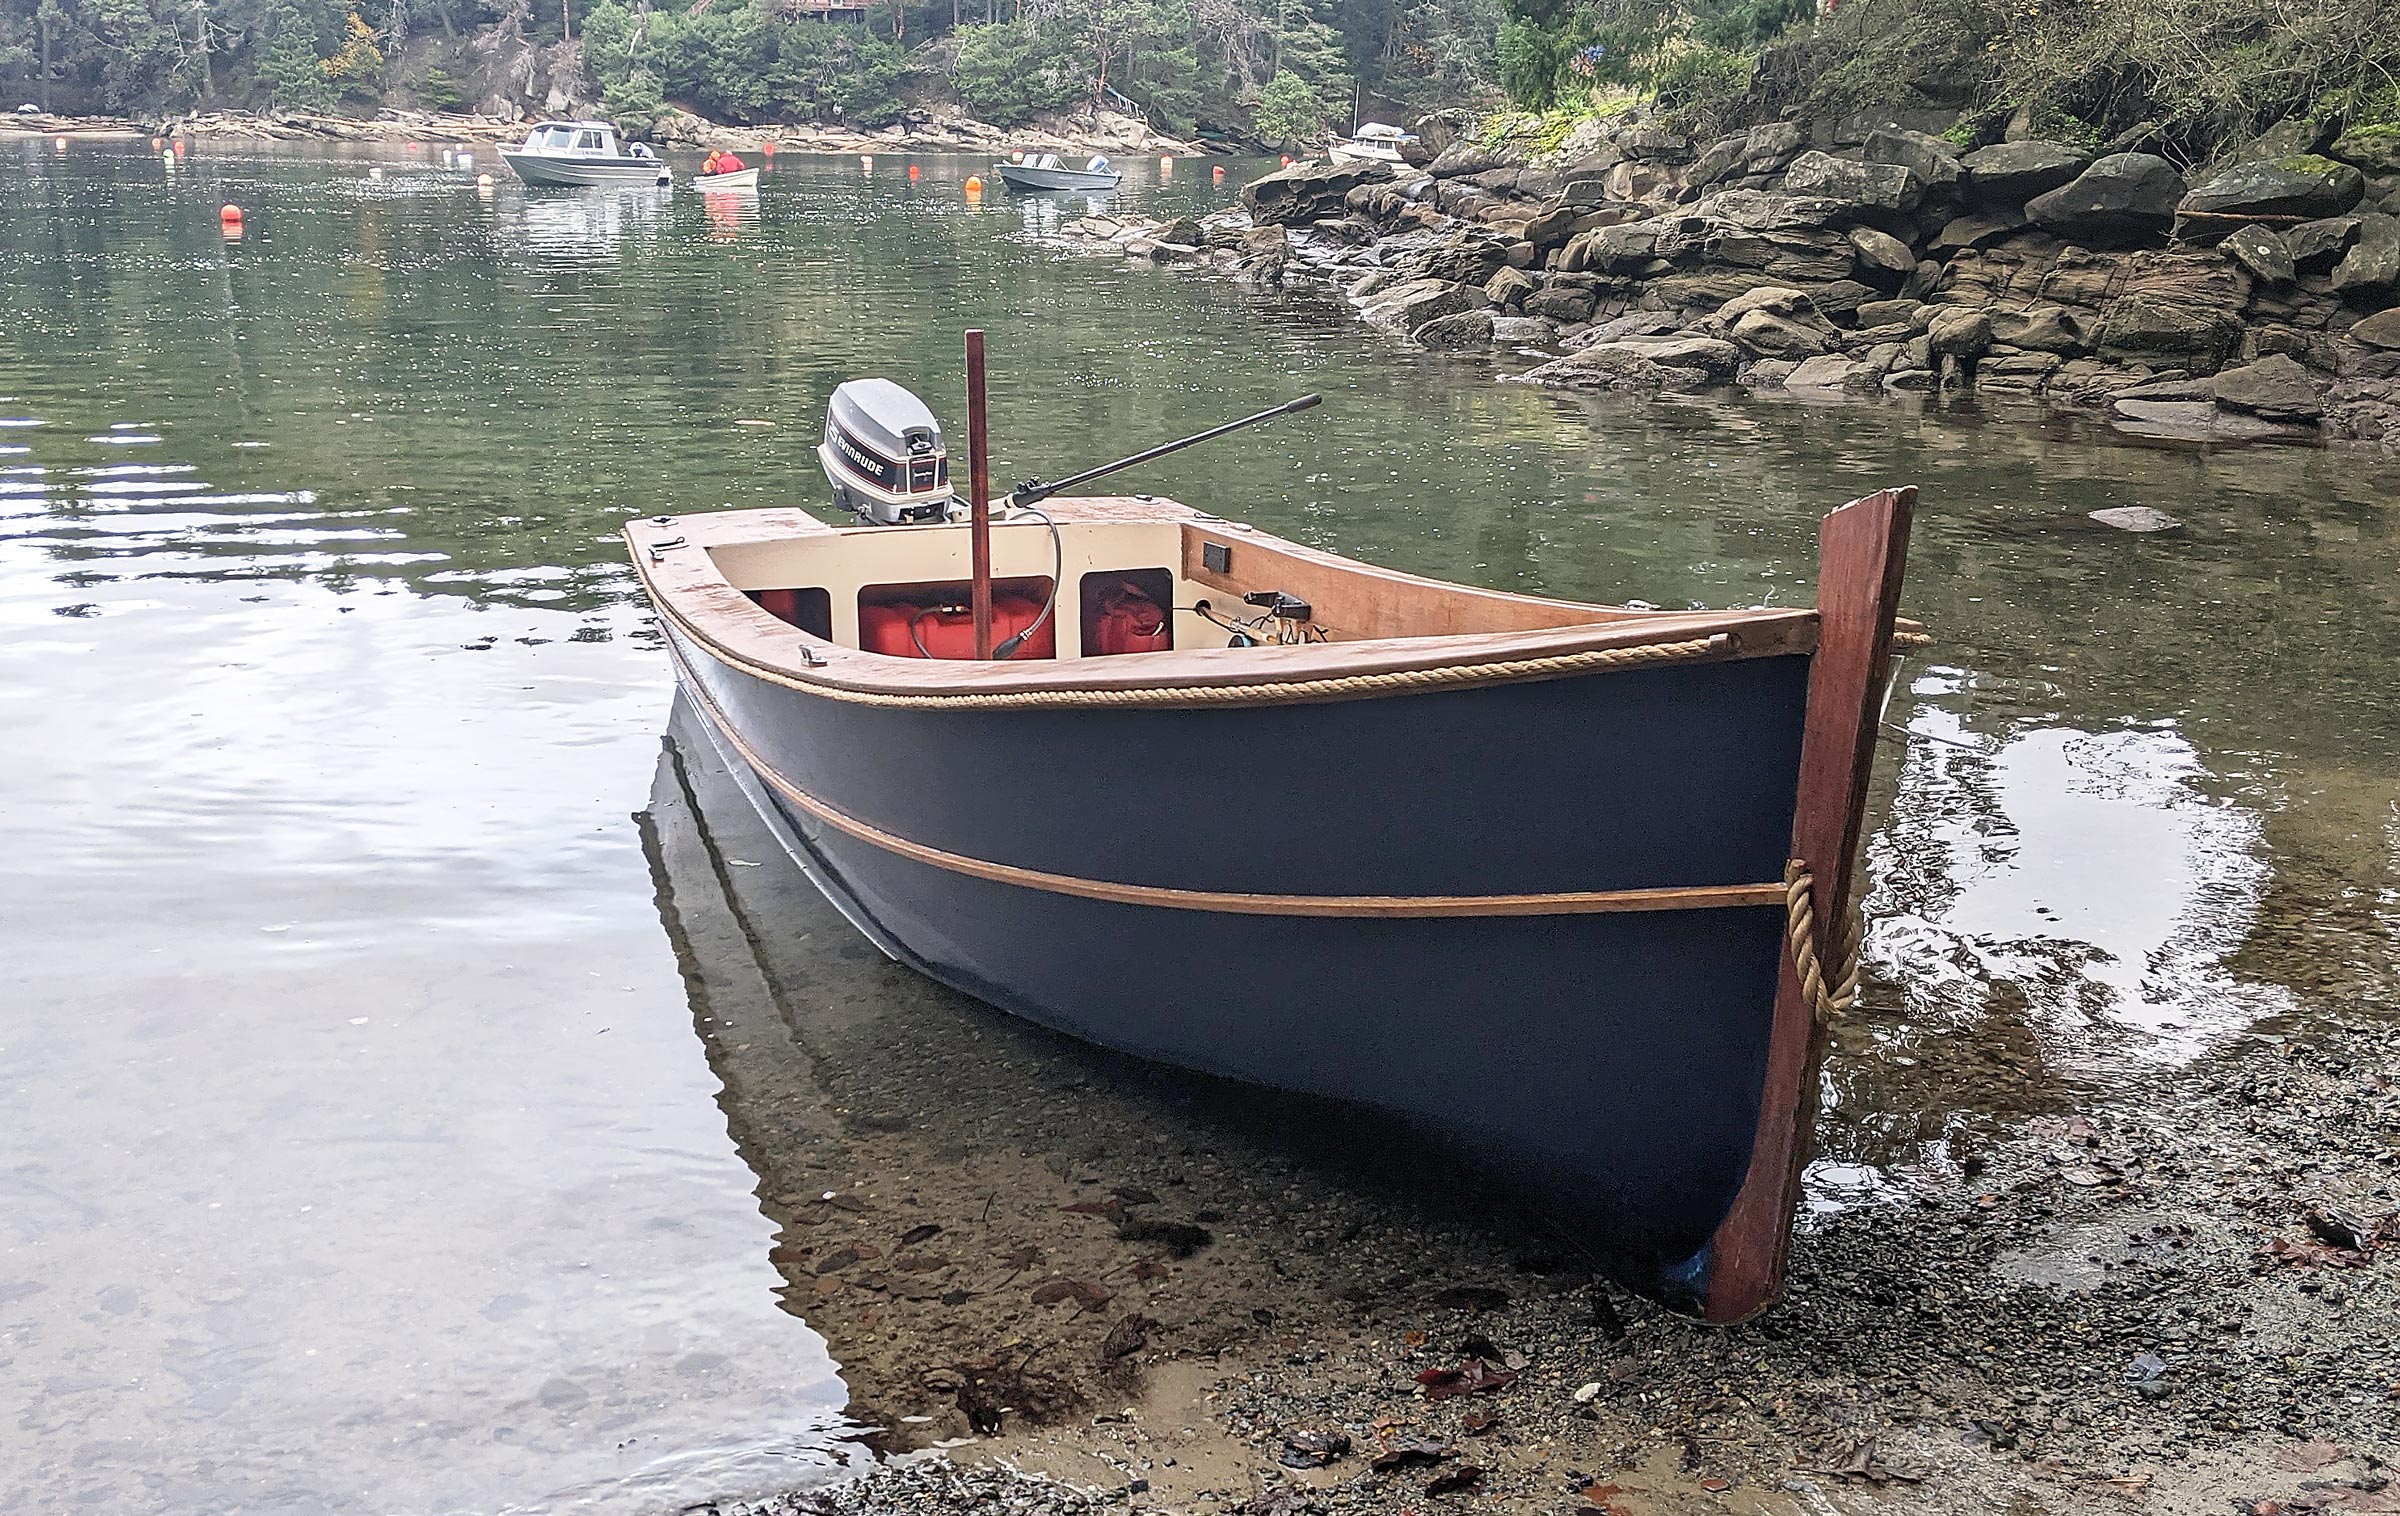
Geordie designed an open 17′ by 6′6″ skiff that would be built of stitch-and-glue plywood with bright-finished mahogany trim. He says she’s “just a simple low-speed planing skiff with a shallow V and a sharp entry to ‘mush’ through the waves.” He designed her with no internal obstructions. “Even the ‘console’ is just a pole—enough for me to hold on to. It’s stepped through a threaded fuel fill onto a block so I can pull it out if I ever need more uninterrupted deck space, like when I’m carrying plywood sheets out to the island.”
Installing the outboard bracket. The boat’s chines have an almost unnoticeable downward angle along their length so that they act as very slight permanent trim tabs helping the boat to get up on plane at relatively low speeds.
The shallow hull was influenced by his earlier experiences in the “commuter boat.” That had a deep V and Geordie found it horribly uncomfortable when drifting in any sea. “It just rolled and rolled.” He wanted the new boat to be light and stiff, but also didn’t want it to slam into the waves at speed, so he compromised with a deep forefoot and a shallow V. He also angled the chines along their entire length so that they act “like very slight permanent tabs. It means the boat planes at extremely low speeds and gets up on plane smoothly…there’s no dead zone that you have to climb out of, it’s an almost unnoticeable transition.”
Geordie built the boat in his garage—the 17′ length was predetermined by the need to fit the project into the available workspace—using marine plywood ’glassed on both sides. “Even the underside of the cockpit sole is ’glassed. It’s overkill, but I wanted strength. Essentially, the plywood is core material, and the ’glass does 99 percent of the structural work. Even the stem is mostly unnecessary structurally, but we get so many logs in the water around here I wanted a semi-sacrificial ram to bull stuff out of the way. Sometimes we have to do that just to get into the bay at the cabin.”
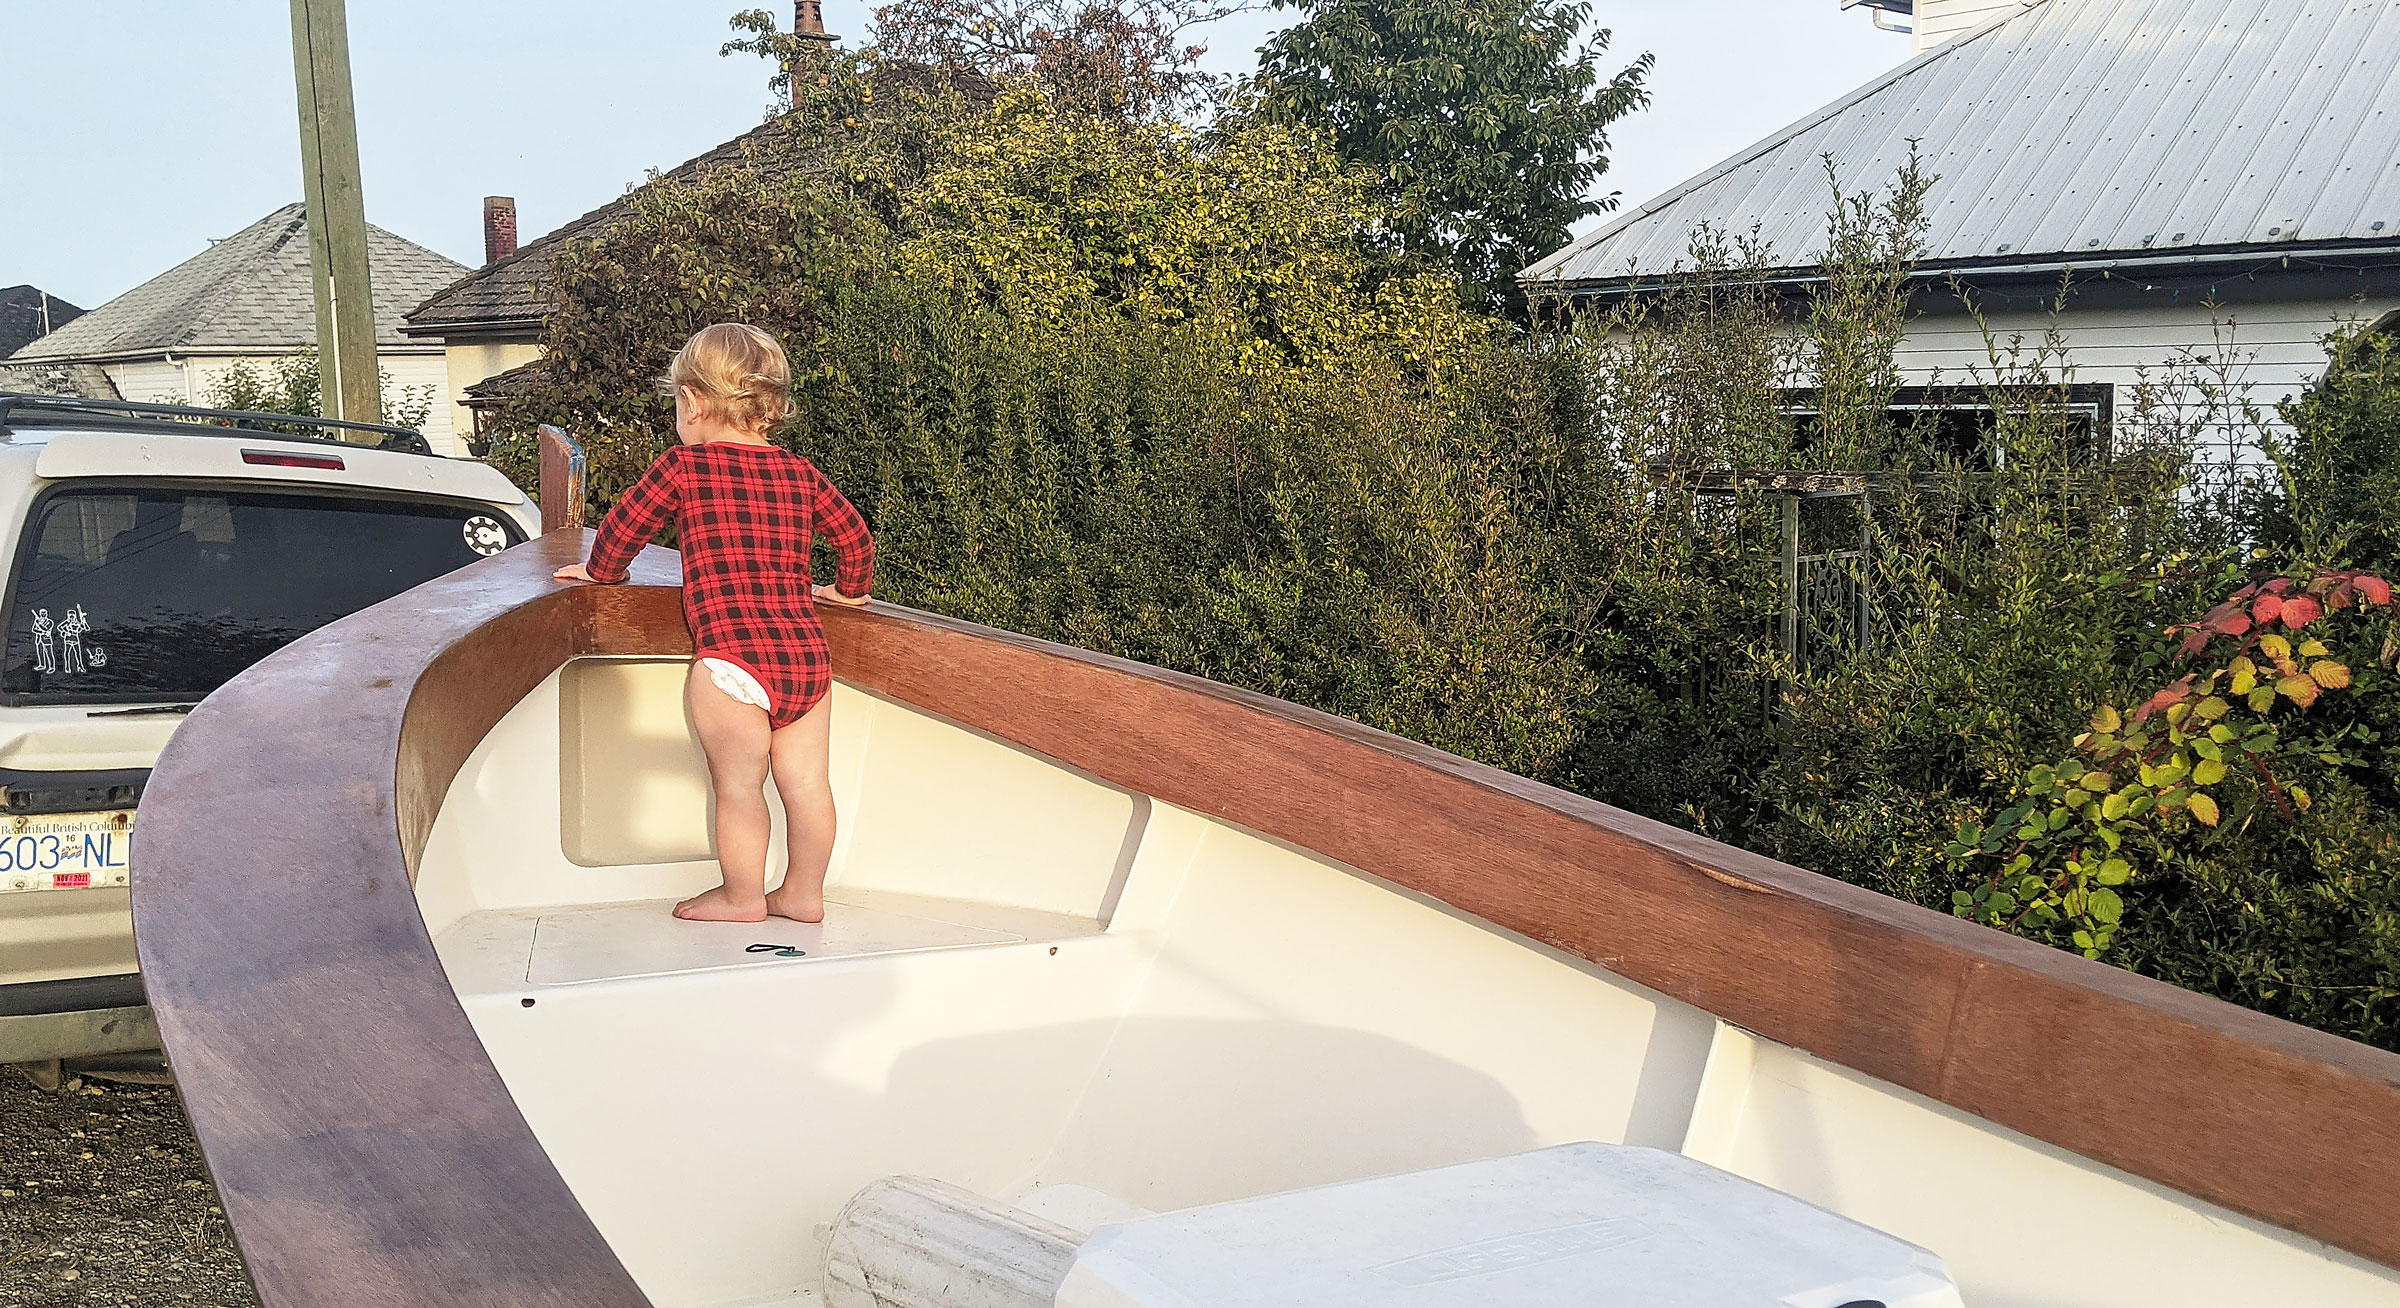
Alaric and YEAH BUOY grew together. The built-in seat in the bow provides not only a great place to sit, but also buoyancy and storage. In front of it, tucked under the foredeck, is the anchor locker.
It took Geordie a year from initial sketch to “laying down the nonskid.” He wanted to get it done quickly so it wouldn’t “take time away from my kid once he was old enough to care.” By the time launching day came around Alaric was about 18 months old and “now we get to play with it together. Erin was really supportive. We have the cabin, and she likes to fish as well, so she’s pretty tolerant of my boat obsessions. I cut the long panels in our bedroom because it has the largest floor area. And I could test the scarfs by laying the panels on the deck railing outside and letting them bounce on the joint. It was a great way to test them, but more importantly, I have a wife who thinks cutting wood for a boat in our bedroom is reasonable, and more of a priority than replacing the ugly deck railing.”
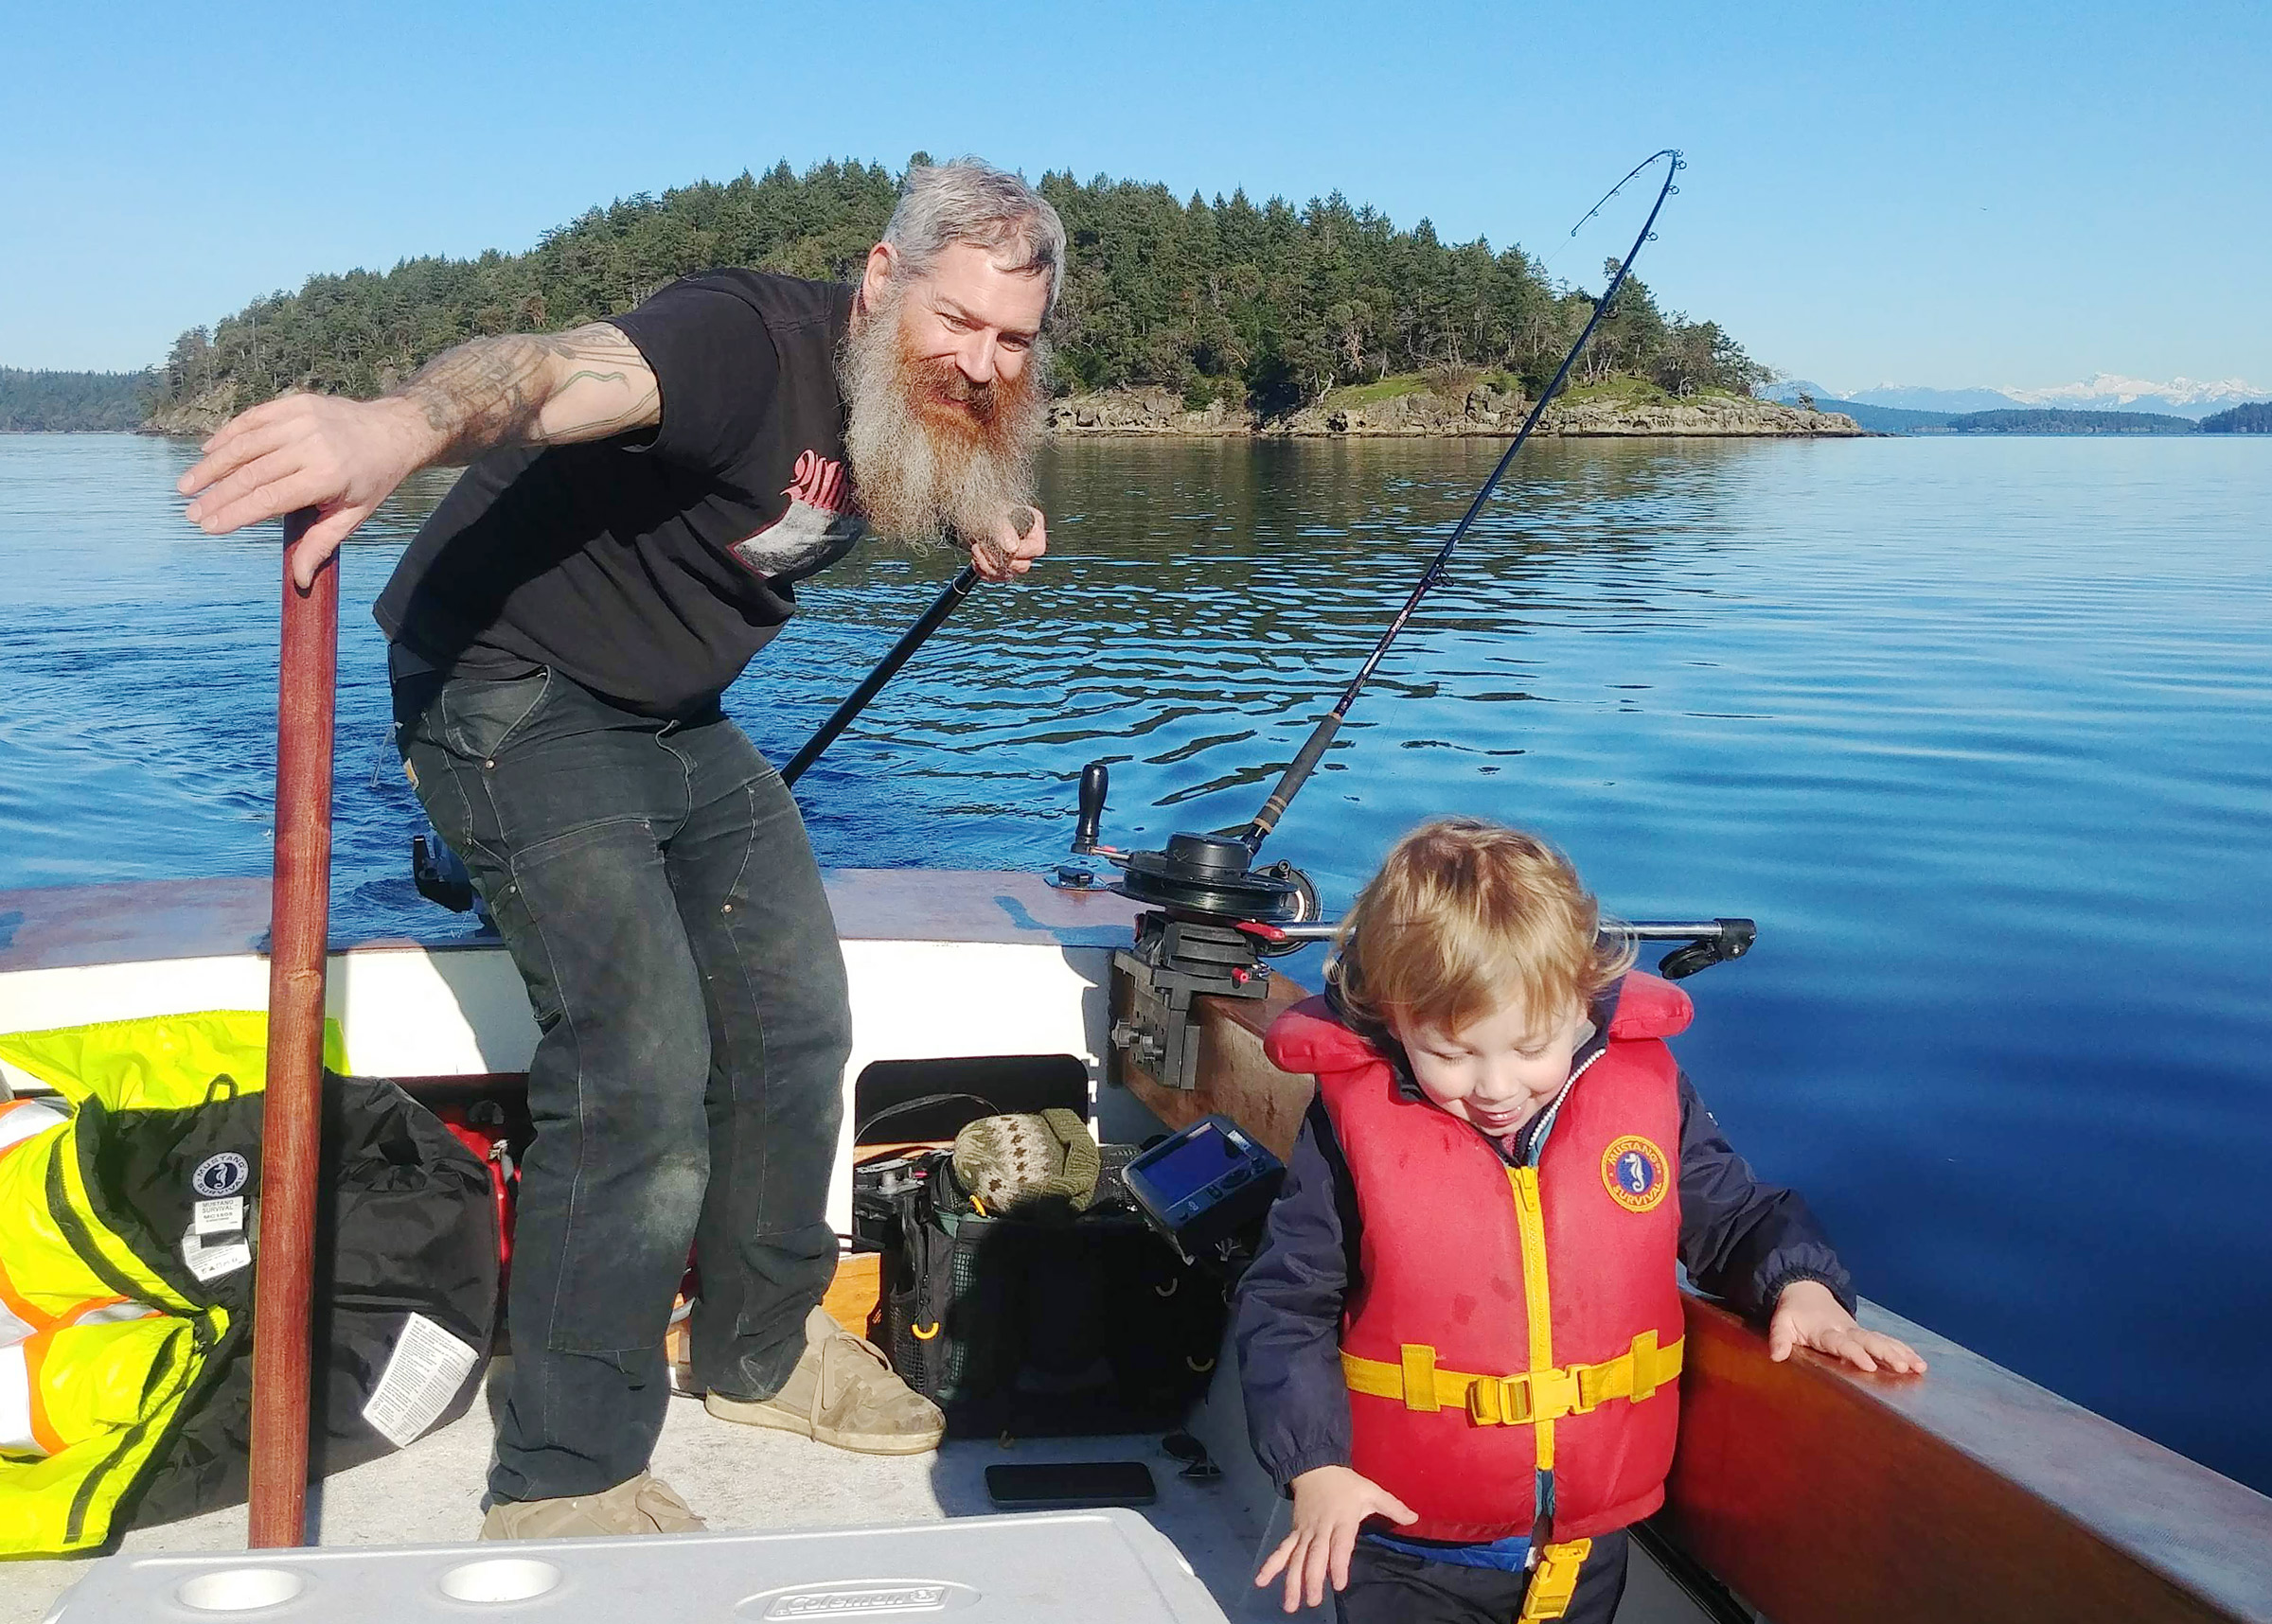
Father and son fishing. The boat’s inherent stability makes for a safe platform and Geordie often steers standing up, holding the outboard’s tiller extension in one hand and the “console“ post in the other. The post is stepped through a threaded fuel fill in the cockpit sole so that it can be easily removed if uninterrupted space is needed in the cockpit when transporting bulky cargo to the island.
YEAH BUOY was launched in June 2021 (although Geordie would continue working on her for another four or five months). Her finished weight came in at a little under 700 lbs including the outboard motor. She will “just kiss 25 knots if lightly loaded and will cruise at around 18 knots with all of us on board.”
Having grown up drift-fishing with his father, Geordie knew he wanted a stable boat with a wide open cockpit. The gunwales became side decks—wide enough to provide a good leaning stage when landing a catch, and also to provide extra safety for the youngest crew member.
In the first year, Geordie says, he’s put about 200 hours on her. “Well, more really, because I drift-fish, so I shut the engine off a lot of the time, but there are about 200 hours on the motor.”
The seat in the bow has become a favorite spot for Erin and Alaric. The cockpit coaming is perfectly angled for use as a backrest and the frames provide some short-term storage for those all-important boat snacks and drinks.
The high bow, he says, makes for “a pretty dry boat, even in rough weather. I’ve had her out in sustained 15- to 20-knot winds, and it’s not bad. You can’t rip through the waves like you could on a big heavy boat with a deep V, but you can plane easily at low speeds and stay in contact with the water. So, it’s a better ride in lots of conditions because we’re not stuck choosing between the lolling 8 knots or brutal pounding at 20 that we faced with the old boat. Now, I can run at 12 or 14 knots in 2′ to 3′ seas and never drop off a wave. We just glide along.”
Geordie, Erin, and Alaric in the bow of YEAH BUOY.
In the works is a design for a removable pilothouse for rainy weather. It will, says Geordie, pop on and off with a “few of those whale-tail closures, like they put on expensive coolers these days.” But for their first two summers, the Pickard family had fun, fishing, drifting, and flying across the Sound, using YEAH BUOY as a tiller-steered open boat with a “cockpit sole the size of a dance floor.”
Jenny Bennett is the managing editor of Small Boats Magazine.
Do you have a boat with an interesting story? Please email us. We’d like to hear about it and share it with other Small Boats Magazine readers.
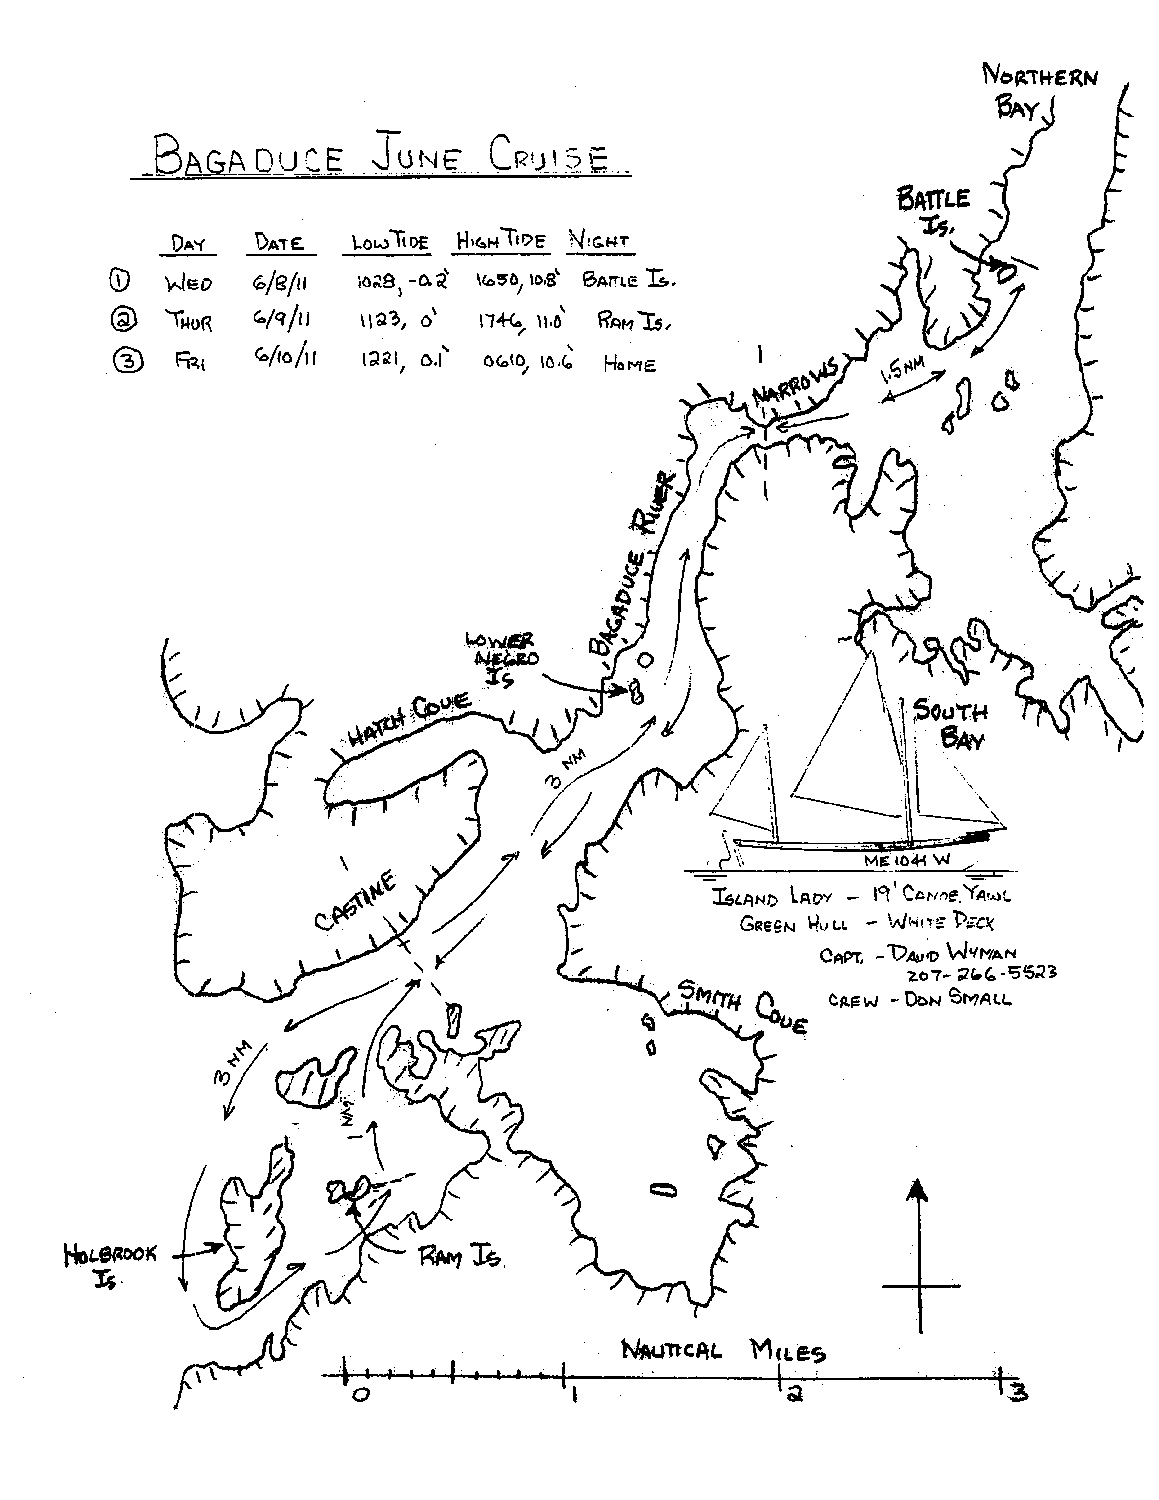
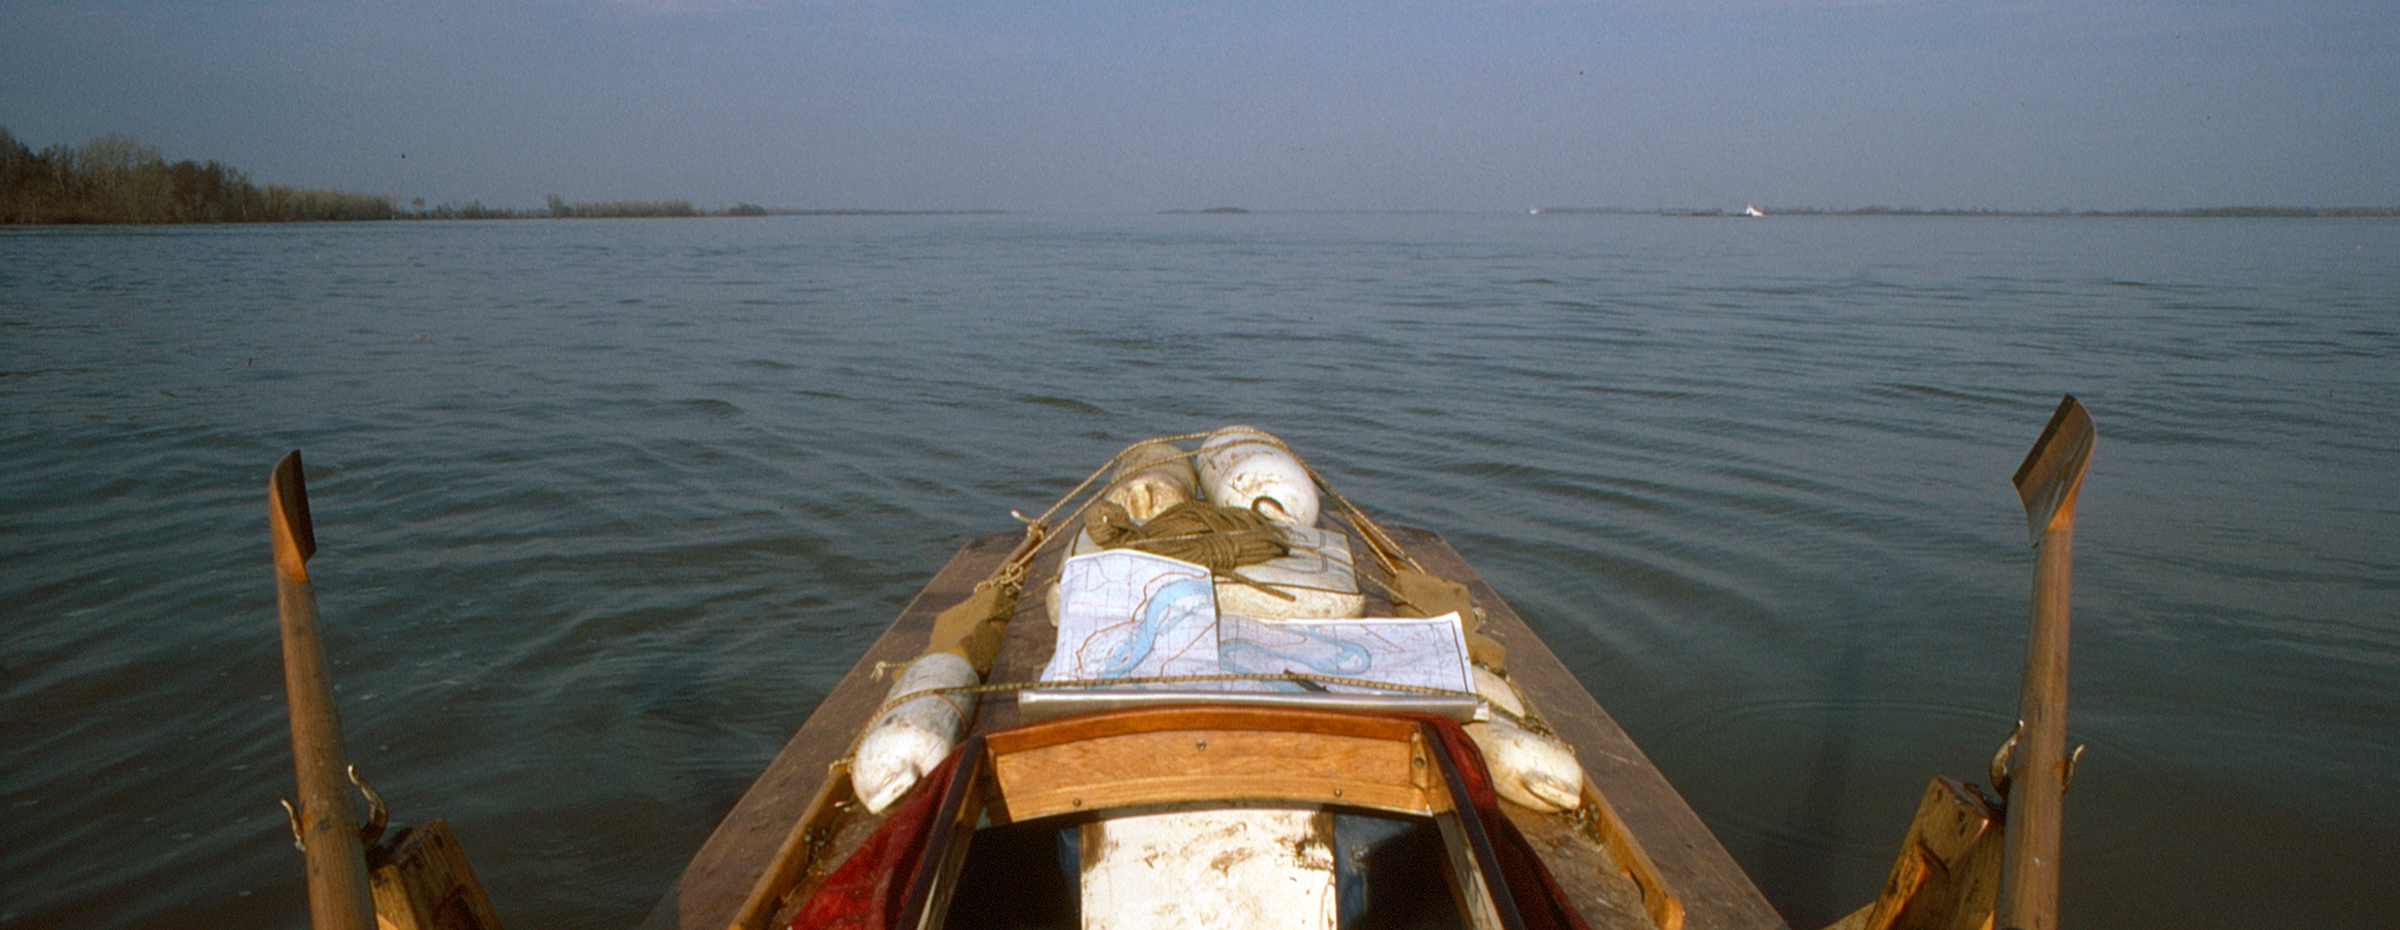
Drawing up a float plan showing the projected route can help a rescuer know where to look for an overdue boat. The author includes a sketch of the boat, with a brief description, together with a list of people on board.
Small boats are certainly less demanding to navigate than large ones. However, navigation skills are still important to understand. All navigation starts with a suitable chart, whether it is a full-sized NOAA chart or a good-quality commercial chartbook. Situational awareness is important. You should always know where you are and be able to plot your position. You must be able to determine the boat’s speed under various rowing and sailing conditions. Over time, you can gain experience in estimating speed by using a GPS or by calculating speed between known locations under given conditions. Two other essential tools, especially for navigating in reduced visibility, are a magnetic compass and a timepiece, which can be as simple as a wristwatch. The compass should be calibrated so you are aware of its deviation. Using a compass, you can steer toward a landmark that is beyond your range of visibility. You can also take compass bearings of known objects so you can plot your position on the chart. The watch is important for predicting your arrival time at specific points. First, plot a course on the chart and measure the distance, for example, to the next navigation mark, then use the distance and approximate speed to predict an arrival time. Practice these skills in good weather so that you have confidence when you need it.
A GPS chart plotter is a magnificent invention, but like any other electronic device it can still fail at the least opportune moment, whether by dead batteries, submersion, and being dropped overboard. Therefore, you should always use a chart plotter as a supplement to a paper chart and a compass. I still remember my old bosun at school saying, “Boys, all these new electronic gadgets are aids to navigation, not substitutes for it!”
For short trips, I fold up a chart so it will show my intended cruising area, and put it in a large ziplock bag, along with tide and current information. I use dividers to measure distances. For measuring course direction, I prefer a pair of plastic triangles because they store flat, but parallel rules work as well.
Learn how to use these basic navigation tools and plan your trip before you get out on the water. I always plot courses ahead of time as much as possible on my chart, and I also write out a “float plan” for easy reference. Notations of courses and distances between landmarks are helpful for quick reference when you’re underway, especially in blustery weather. I usually don’t use the dividers and triangles when I’m under way unless I need to double-check something or deviate from my plan. I often use a simple “navigation stick” ruler that I have marked with nautical miles. (One minute of latitude, which you can pick up from the side of the chart, equals one nautical mile.) This allows me to quickly measure a distance on the chart, plot a position from the GPS, or estimate a heading by keeping the stick at a constant angle to the chart while sliding it over to the compass rose.
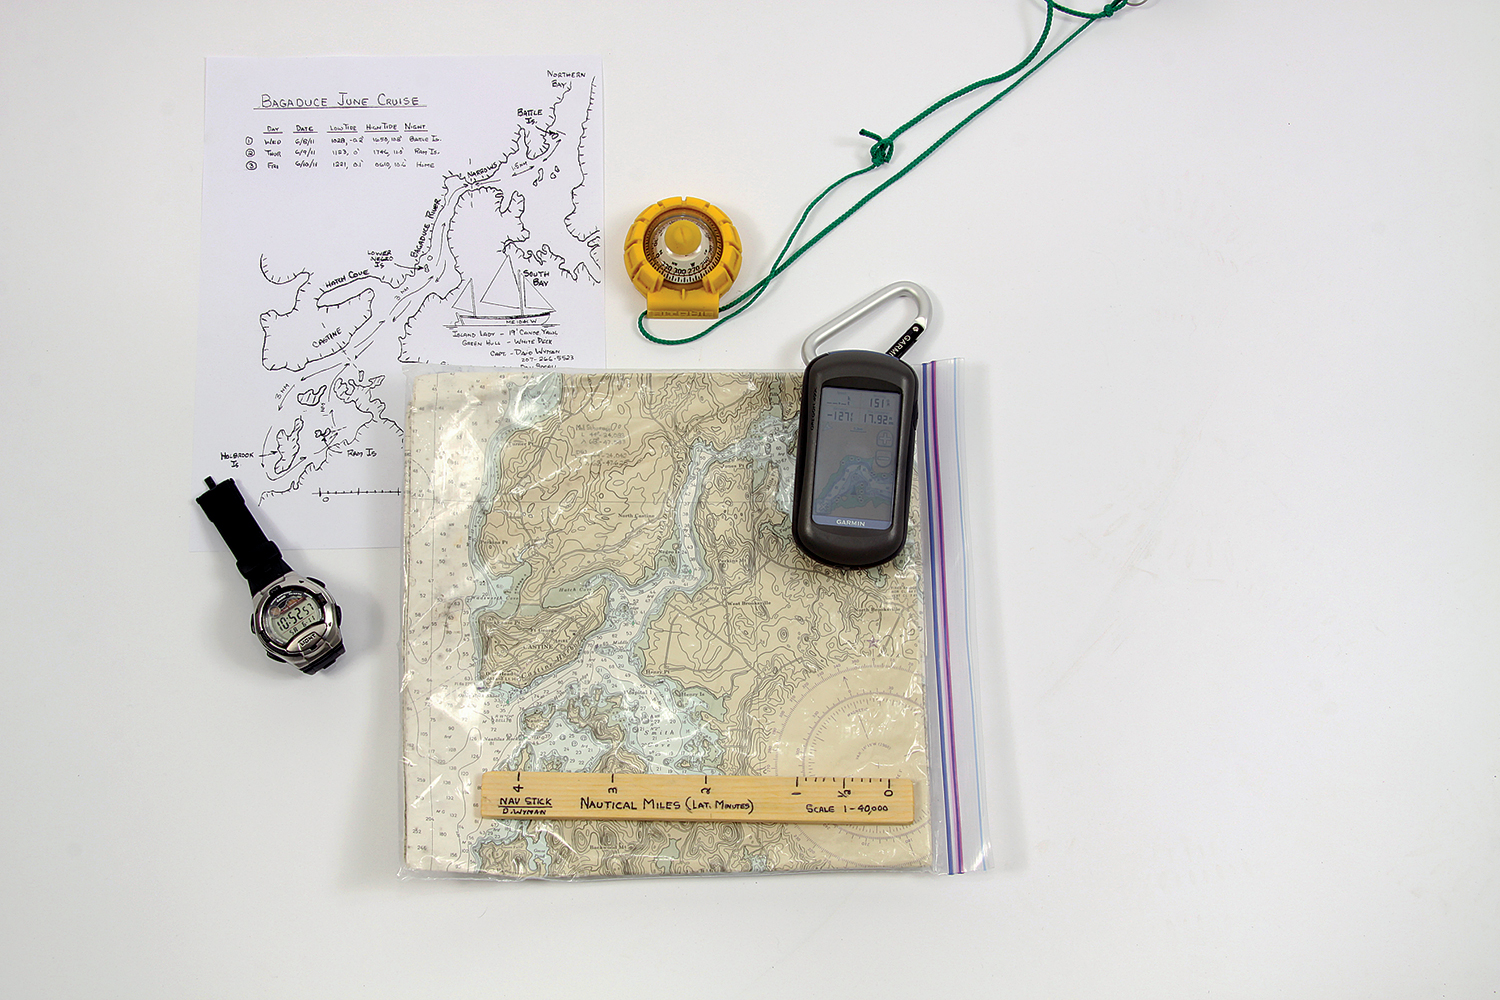
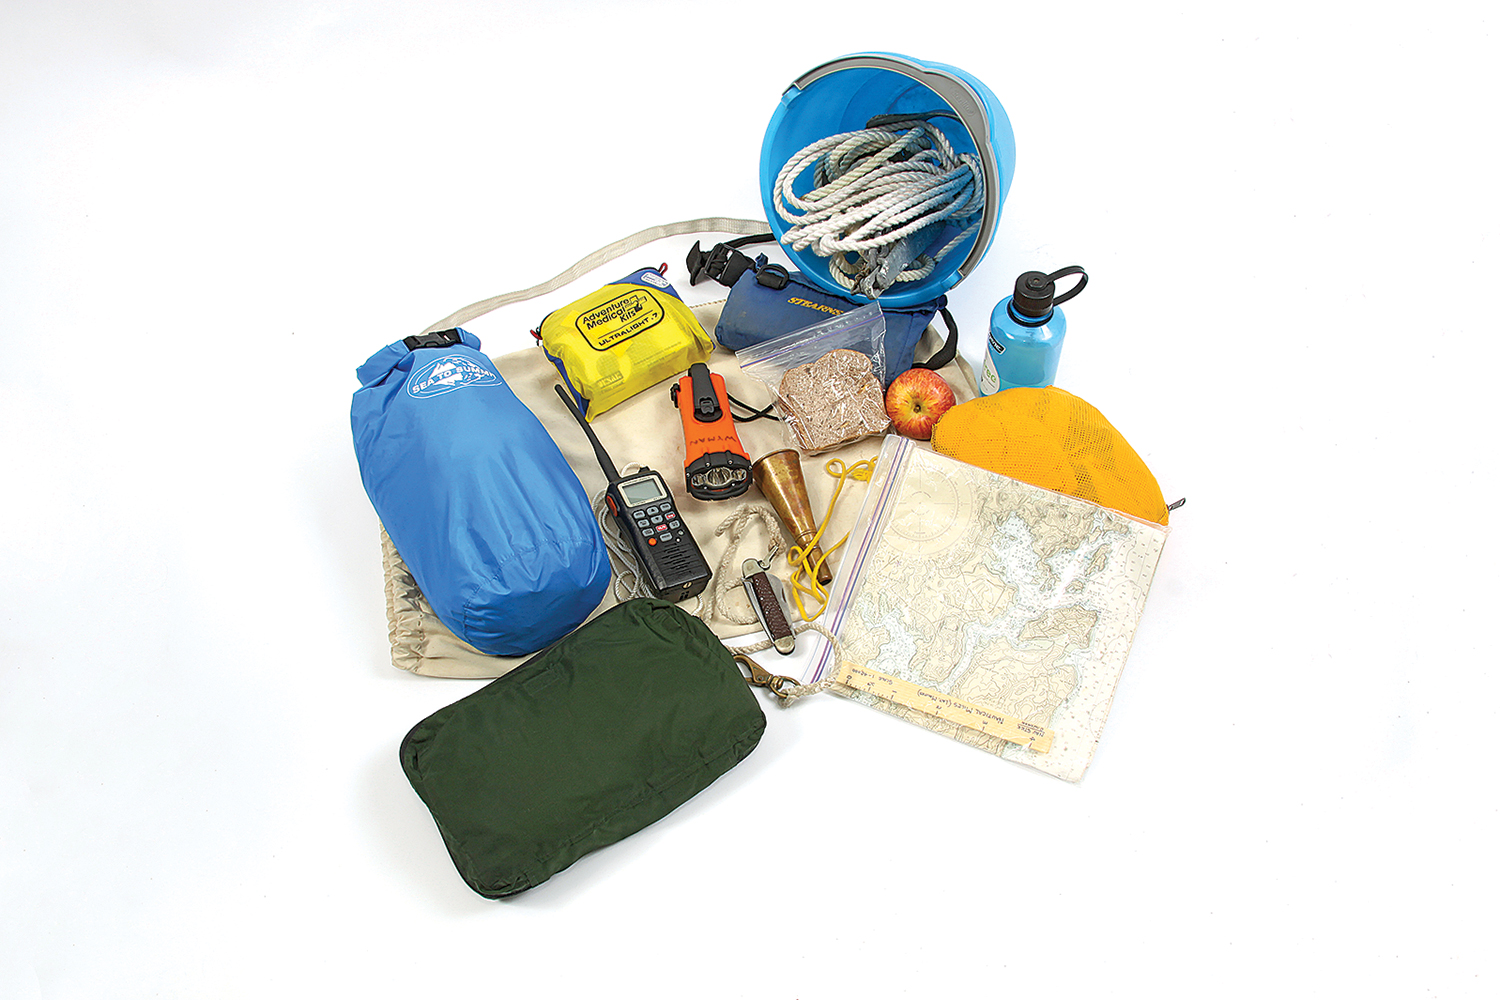
Rosemary Wyman
A chart, compass, and watch are vital for navigation. A simple navigation stick (shown in the chart bag) marked with distances from the chart’s scale can be slid across to the compass rose to find bearings. A handheld GPS is wonderful but not a substitute for basic gear. A copy of the float plan (upper left) with tides and headings noted can also be very useful aboard.
When I’m going out for a few days or exploring an unfamiliar area, I prepare a written float plan showing where I plan to go, along with tidal information and my tentative schedule. A firm schedule is the most dangerous thing you can have on a small boat, because adhering to a schedule without due regard for weather or fatigue can easily get you into trouble. It is always best to have a “Plan B” and even a “Plan C.” Your float plan should include a description of the boat, who is aboard, where you plan to go, and when you plan to leave and return. Leave a copy with someone ashore so that if you fail to return, or to check in as planned, searchers will have critically important information. I check in at pre-arranged times, and I usually instruct the holder of my float plan not to be concerned until a full day after my planned return, but after that to call the Coast Guard and provide them with a copy of the float plan.
Seamanship
All boats need to be able to communicate. I carry a waterproof, handheld VHF radio with a lanyard. I attach it to my clothing, so I can find it in an emergency and it stays with me in the event of a capsize. But be aware of the limitations of handheld radios. They usually transmit at 5 or 6 watts, and a rule of thumb is that for each watt you can transmit one mile. You can hear a more powerful radio from a long distance, but they may not be able to hear you. Someone with an installed radio, usually transmitting at 25 watts, may be able to help you or relay your transmission. Always carry extra batteries or fully charge your radio before setting out, and conserve power if you’ll be out for a time.
Radio is useful for getting updates from NOAA weather radio, for communicating with other boats in your group, and for listening to boat traffic. Commercial vessels often broadcast their intentions, such as, “Sécurité, sécurité, sécurité, this is the tanker SS FLYING ENTERPRISE getting underway from the anchor-age and heading out the channel to sea.” This lets every boat in the area know what she is doing, and the word sécurité alerts listeners that important safety information—not an emergency broadcast—will follow. Remember the unofficial “rule of tonnage”: if she’s bigger than you, stay out of her way.
Cell phones, which are becoming increasingly reliable, supplement VHF radios. A cell phone is a good way to communicate a change of plan to the person ashore who has your float plan. It can be useful for calling someone to ask for assistance, or, in a real emergency, calling 911 for help. But cell phones, too, have limits. Most are not waterproof, so I keep mine in a ziplock bag.
Sailing without an anchor is like driving without brakes. An anchor will allow you to hold your position when afloat, keep your boat from floating away when going ashore, and keep you off the beach and headed into the wind during a squall. Many small-boat sailors choose small, lightweight Danforth-type anchors, which are inexpensive and hold well under the right conditions. Unfortunately, if they are not set properly, or if the direction of the wind or current changes, the anchor may not hold or reset. I favor a heavier and more expensive claw- or plow-type anchor. These have always held for me, which I cannot say for lightweight Danforths. I use a 4.4-lb claw anchor for small boats and an 11-lb claw anchor for my 19′ canoe yawl. For both, I use a rode made up of 6′ of ¼” chain and at least 150′ of 3⁄8″ nylon line, made up of two shorter lengths tied together (see also Getting Started in Boats, WoodenBoat No. 217).
Rosemary Wyman
A suitable anchor and rode can be conveniently stored in a bucket that doubles as a bailer in case of capsize.
Anchors are useful in other ways, as well. Setting an anchor can also allow you to simply take a rest, for example when rowing against a current. Lowering the anchor can help estimate water depth. You can drop sail, set the anchor, and control your drift down to a leeward beach and then use the anchor to haul the boat off when getting under way again. I also often set the anchor when I’m making ready to set sail or when reefing so that I can work without hurrying and get the job done properly.
For any sailboat, being able to reduce sail by reefing or striking sail is critical. My canoe yawl has three sails, with two reefpoints in the mainsail, permitting many sail combinations. Every small boat should have some means of reefing as quickly and simply as possible, and the crew should practice regularly. Reefing in the middle of a squall, like putting on a life jacket after a capsize, is no time to learn. Reefing before setting out may be wise, since it’s much easier to take out a reef in light winds than to put one in amid strong winds.
A bucket or bailer is essential. Water in the bilge, whether from spray or after a knockdown, reduces a boat’s stability due to the free-surface effect, meaning the water’s ability to slosh about. It also reduces free-board, so even more water may come aboard. It is imperative to get water overboard quickly. A sponge or small bilge pump may be useful at the mooring, but when your boat is taking on water, the old adage that “the best bailer is a bucket and a scared person” is still true. Carry the largest bucket practical for your boat.
On a sailboat, water can also flood in through the centerboard trunk, especially if the boat is awash. You should have an easy and effective way to plug the slot or the hole where the pennant comes through. Otherwise, water may come in faster than you can bail it out.
If someone offers a tow when the winds have failed or the current is against you, it is always nice to have a towline ready. The towline should be long enough so that you can be clear of exhaust fumes and ride in a comfortable part of the towing boat’s wake. I carry two 50′ pieces of 3⁄8″ line that can be tied together with a double sheet bend. (For this knot and others, see The Ashley Book of Knots, or check www.animatedknots.com or other online resources.) This line can also be useful if you need to lengthen your rode. Cleat the towline to your boat in such a way that it can be let go if things start to go wrong.
To cut the towline in a hurry, or to cut lines that get tangled in an emergency, Every sailor should have a good, sharp knife. It should have a lanyard tied to your belt. Many sailors now carry belt-sheathed multi-tools that have a knife, pliers, and screwdrivers. I usually carry a fixed-blade rigging knife with a marlinespike and pliers in a leather sheath that fits on my belt. With these, I have reassembled or jury-rigged many boat components that got me home.
Rosemary Wyman
Always carry a sharp knife, fitted with a lanyard so that it can be secured to your belt.
Fortunately, on small rowboats or sailboats most things that break can be fixed without requiring outside help. My repair kit consists of heavy-duty duct tape, some small line, a few self-tapping wood screws, and a sail needle and thread. All this fits in a small ditty bag. It’s also worth carrying a few small pieces of wood that can be used to splint a broken spar or patch a hull leak. With these, I have repaired a broken oar, patched leaks in the hull, and stitched up a torn sail.
If you plan to tie up alongside a float or another boat, bring an inflatable fender. Fenders can double as rollers for moving a boat up or down the beach. If you are alone, rolling the boat may be the only way to get off a beach if the tide has gone out more than you expected (see also “Beach Cruising,” in WoodenBoat magazine’s Small Boats 2009).
Bring enough water and food for your intended voyage plus an emergency supply in case you get delayed. A high-energy snack will help keep you warm and better able to handle any situation. For a day trip, I usually take a snack and enough water to last overnight. When camp-cruising, I always take at least one extra day of food and a couple of extra days’ worth of drinking water, so I can comfortably stay at anchor or ashore until the weather cooperates. You don’t want to be hungry or thirsty enough to be tempted to venture forth despite bad weather. Potable water, especially when boating on salt water, is more important than food, doubly so in hot weather.
The right preparation and equipment should get you through most emergencies. Often, it’s best simply to avoid situations that could turn ugly. In a squall or thunderstorm, for example, go ashore. If you can’t, get your sailing rig down, put out an anchor (or possibly a bucket on a long line as storm anchor), and sit in the bottom of the boat.
Someone who has gone overboard may need help getting back aboard. This is especially true if that person is you and you are sailing alone. In very small boats with low freeboard, you can usually climb over the gun-wale. But with a larger boat with more freeboard, this becomes increasingly difficult. On my 19′ canoe yawl, I shaped the rudder so that I can use it as a step. A boarding ladder would also work. Whatever method you choose, practice using it in calm waters before you need to do it for real.
Rosemary Wyman
Food, water, and foul-weather gear are important for comfort and safety.
If someone does go overboard, be prepared to prevent hypothermia (more on this below). Except in hot weather, anyone who has been in the water should get into dry clothes, which should be stored in a dry bag for the purpose. I also carry a lightweight space blanket that can help keep a person warm.
If I had a serious emergency that required assistance—whether a dangerous injury onboard or an unrecoverable capsize, I would first call “Mayday” on Channel 16 of my VHF. If potential help was nearby, I would use a strobe light or orange flag to show my location, and flares or orange smoke. If no adequate response materialized, I would call 911 on my cell phone. When you’re out on the water, however, there is no rapid 911 response. Help may take an hour or two to arrive. Or, you may have to get yourself ashore and wait for an ambulance. So you should always carry a first-aid kit equipped to deal with major medical issues as well as minor ones. Even more important than your kit is your knowledge of first aid. I recommend taking a first-aid course that includes cardiopulmonary resuscitation (CPR). In addition to that, always carry a small first-aid kit with bandages and over-the-counter medications, along with a stretch bandage, which is useful for sprains or tightly wrapping a bleeding wound.
Major medical emergencies can include cessation of breathing, a bleeding wound, or heart attack symptoms. These can be life threatening and need to be handled quickly. Call for help as soon as you can. If someone has stopped breathing, attempt to get breathing started with CPR. Unfortunately, in most circumstances the success rate is not good, but there may be no better choice, and it may buy time until help arrives. If someone is cut and bleeding, stop the bleeding with bandages, keep pressure on the wound, and in extreme cases apply a tourniquet. In the case of a heart attack, you may be able to keep the person alive long enough for help to arrive with a defibrillator. Giving an aspirin can sometimes save a life in the case of a heart attack. In all these cases, you need to get medical help as soon as possible.
Rosemary Wyman
A compact first-aid kit handles most medical emergencies likely to occur on small boats. It’s a good idea to take a first-aid course, as well.
For minor aches, pains, and injuries the typical small first-aid kit suffices to ease discomfort and prevent infection. Most kits contain a first-aid booklet, which you should consult so that you use the supplies effectively. Again, knowledge of first aid is most important.
Hypothermia
Of all the harms that may come in small boats, hypothermia, or the cooling of the body core, is perhaps the most dangerous. In a small boat, all it takes to get wet is for the wind and waves to pick up. Keeping dry is the key to keeping warm and preventing hypothermia. As it sets in, you gradually lose mental and physical capabilities. It can be fatal. (Study the many online resources that provide opportunities to learn more about hypothermia, for example, the “Cold Water Survival” section of www.uscgboating.org/fedreqs/default/html.) The body core cools fastest by getting wet, even from sweating or from spray, but most especially from immersion in water.
If you do go into the water, keep as much of your body out of the water as possible, get out as fast as you can, and change into dry clothing right away. Keep warm clothing in a dry bag lashed aboard, so that in the event of a capsize you can change into warm clothing after righting the boat and stabilizing the situation.
Rosemary Wyman
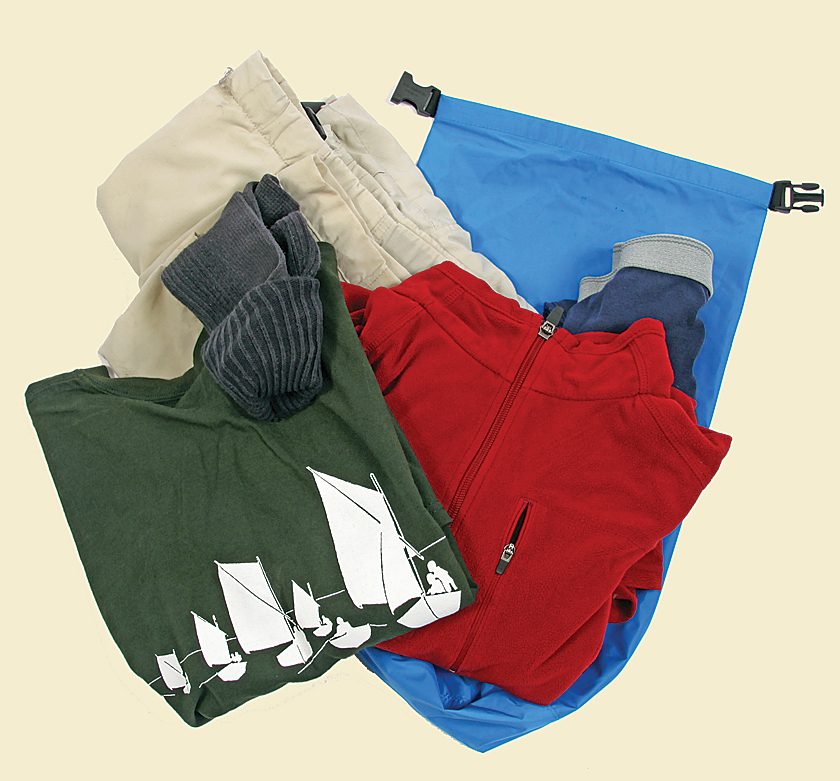
To prevent hypothermia, carry extra clothes in a dry bag so they stay dry in case of a capsize. The pants and pullover shown are synthetics, which dry quickly and still insulate even if wet.
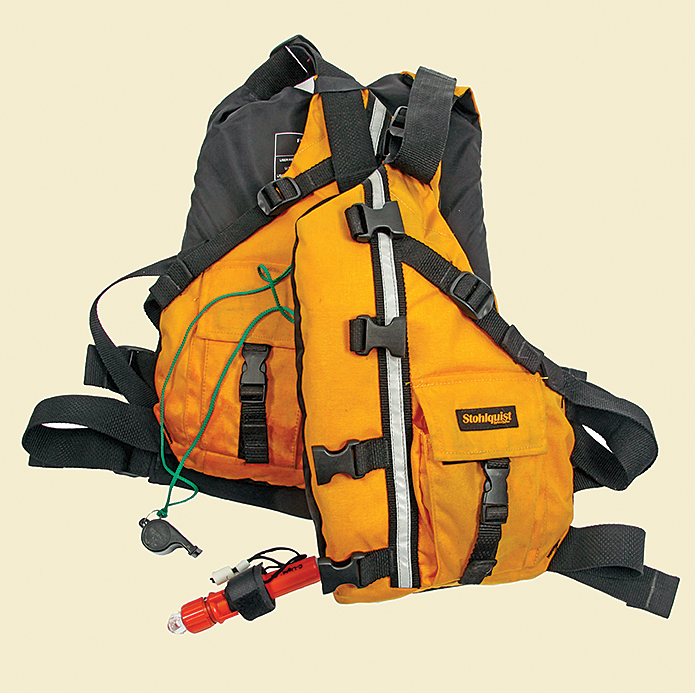
Guard against spray and rain by bringing foul-weather gear and extra dry clothes for each person. Provided the weather is reasonably settled and warm, I carry a lightweight long parka that easily fits in my bag. In cooler weather, I carry a full set of foulweather gear or a Type III flotation vest jacket, which in addition to providing flotation also provides some hypothermia protection both in and out of the water. I also carry my flotation jacket in cool weather just in case I need to provide hypothermia protection for someone I’ve pulled out of the water. For camp-cruising, I take gear suitable for any turn of weather.
Wear clothes that wick water away from the skin. Polar fleece synthetics are good, and many consider wool the best. Always avoid cotton, which wicks moisture very effectively and provides almost no thermal protection when wet; many consider it a killer. Wear clothing in layers so you can adapt to the conditions. Even on a warm day, being wet in a breeze can be chilling.
If you get stuck out unexpectedly overnight, you can be reasonably comfortable sleeping in your extra dry clothes and foul-weather gear, and you can wrap yourself in a sail. In a small boat, being adequately equipped and keeping aware of your options is not only the key to a safe and fun trip, but it may also be the key to survival.
Flotation
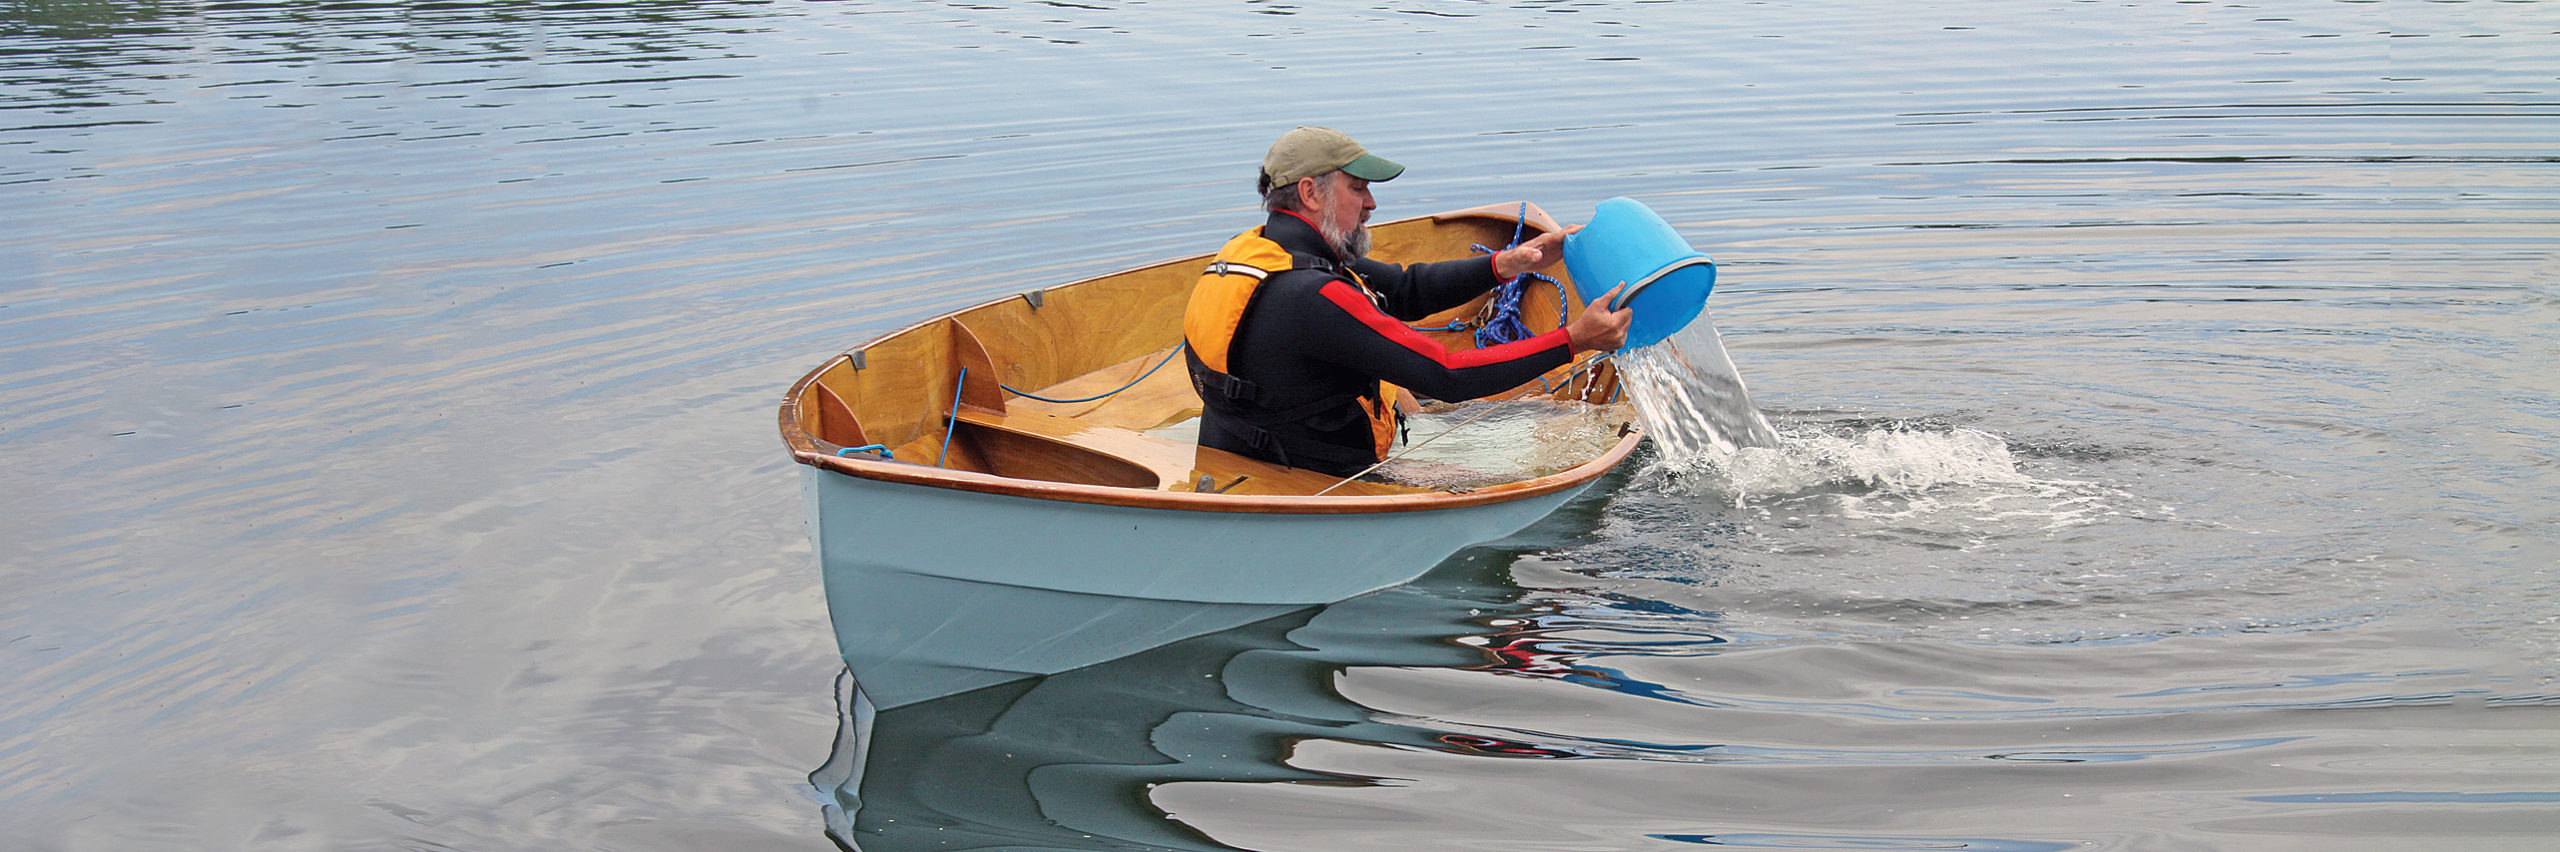
Rosemary Wyman
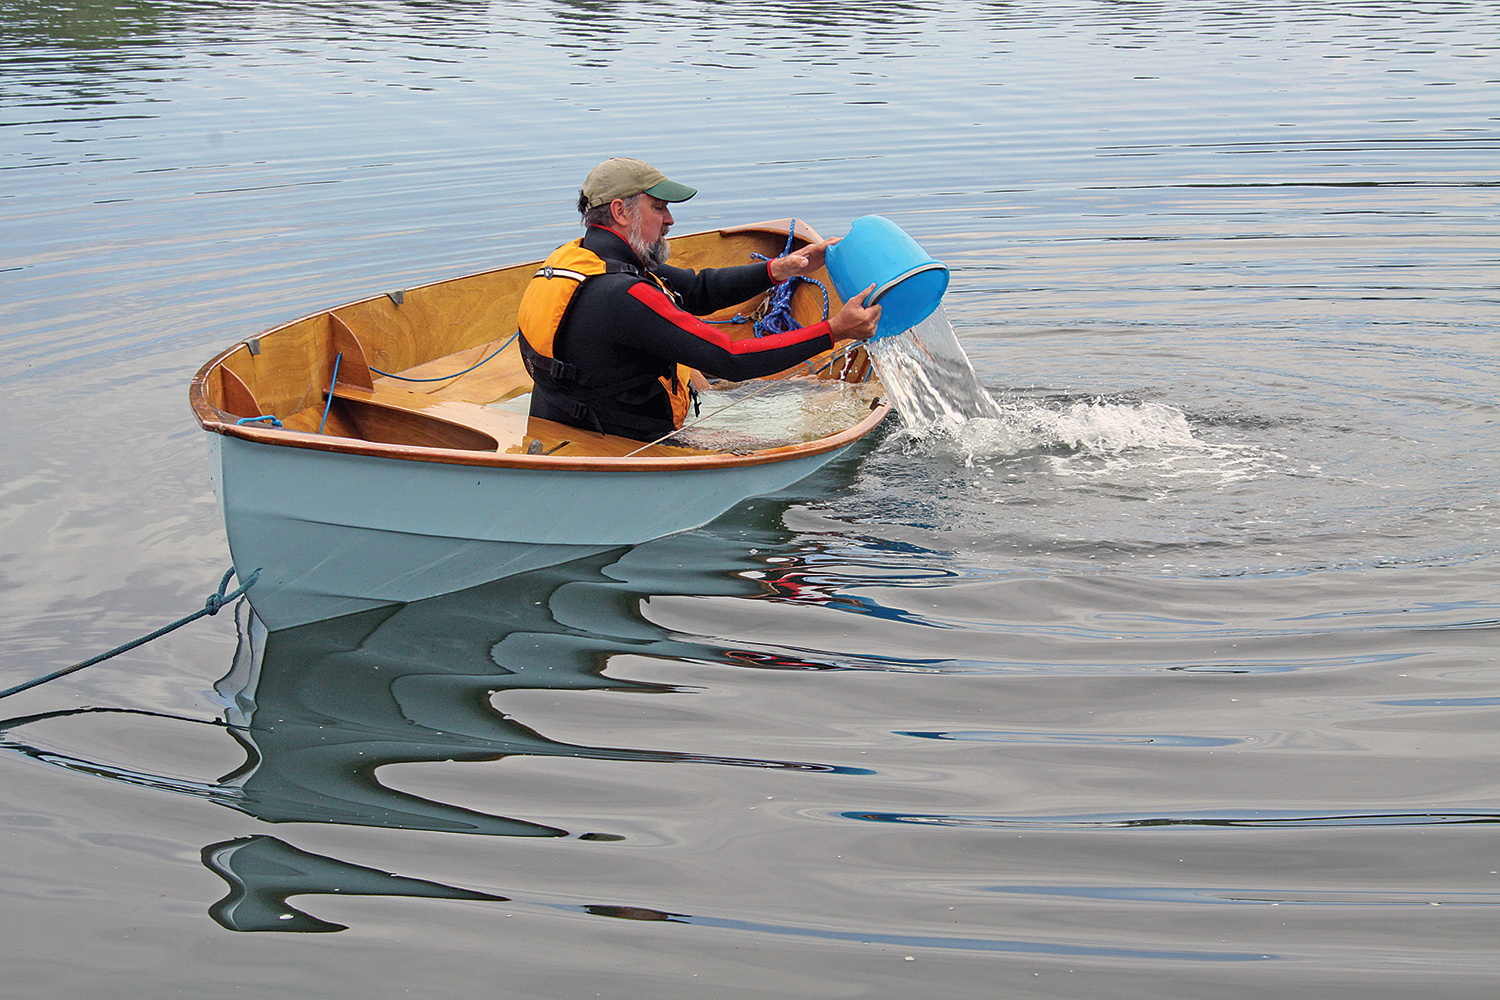
After deliberately capsizing his Chesapeake Light Craft Skerry skiff, which has built-in flotation, owner Bill Corbett uses a bucket to bail. When a boat swamps, a lot of water has to be moved quickly.
A boat should have enough flotation to not only stay afloat in a capsize but allow self-rescue. Over years of studying traditional boats, I have developed a simplified formula (see sidebar) to estimate additional buoyancy needed to keep the gunwale a few inches above the flooded waterline, and therefore possible to bail. In general, in traditionally constructed boats—without ballast—the cedar planking and other solid woods usually provide adequate flotation. But plywood’s flotation properties are much less, so many of today’s lightweight plywood boats need built-in or added flotation. Many professionally designed or kit boats have watertight chambers for flotation, but sometimes home-built boats do not.
Alternatives to built-in chambers include inflatable buoyancy bags and foam blocks, well secured inside the boat. The instability of a swamped boat can be improved by placing flotation outboard along the sides and by providing enough so that part of the flotation stays above the swamped waterline.
All of the above assumes that the boat has no ballast. If there is ballast, include its weight in the calculations. If you need to carry ballast, I recommend using water ballast, which is neutrally buoyant in a capsize.
With a new boat, it’s always a good idea to take a sunny day on a warm pond to practice swamping, self-righting, and bailing. Playing at self-rescue may well save your life in a more serious situation.
Rosemary Wyman
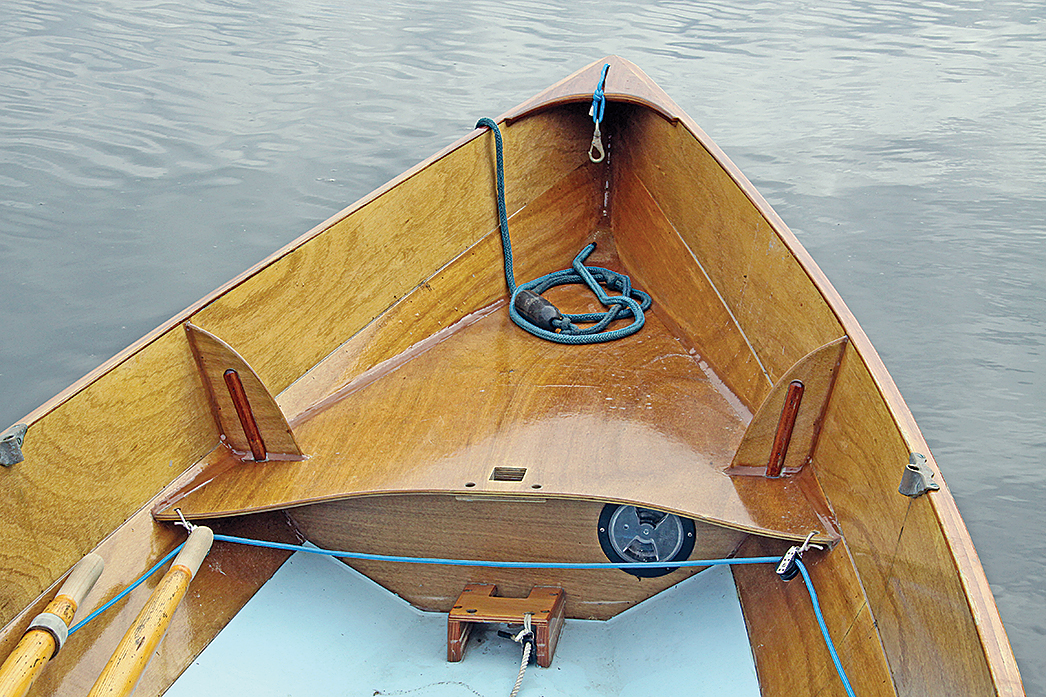
Like many modern boats, the CLC Skerry’s built-in air chambers forward and aft keep the boat high enough in the water so that one person aboard can bail with a bucket.
Rosemary Wyman
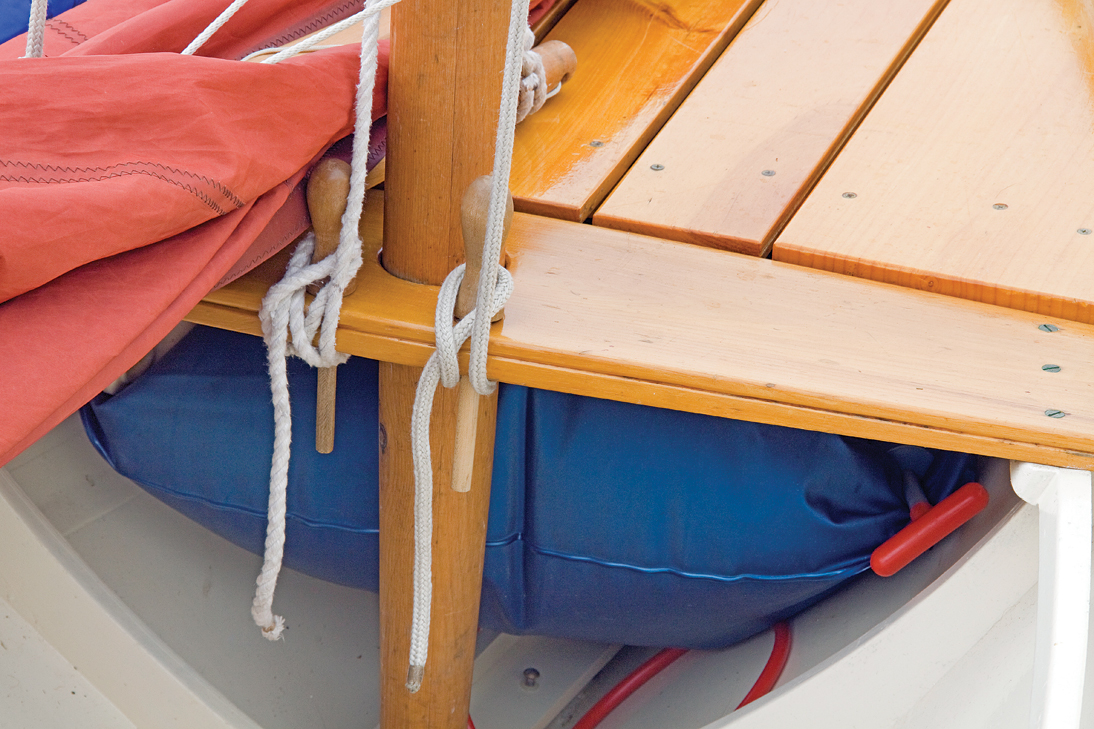
A Joel White–designed stretched Shearwater has no built-in flotation, so instead inflatable bags are secured under the foredeck, shown here, and also under the thwarts.
Conclusion
As you head out in your small boat, remember to take your sea sense and a good dose of common sense along with your gear. Be willing to stay put in a quiet anchorage if the weather turns nasty. In the end, the most important things for a safe voyage—once your boat is adequately equipped—are to listen to the wind, watch the weather, and enjoy the day.
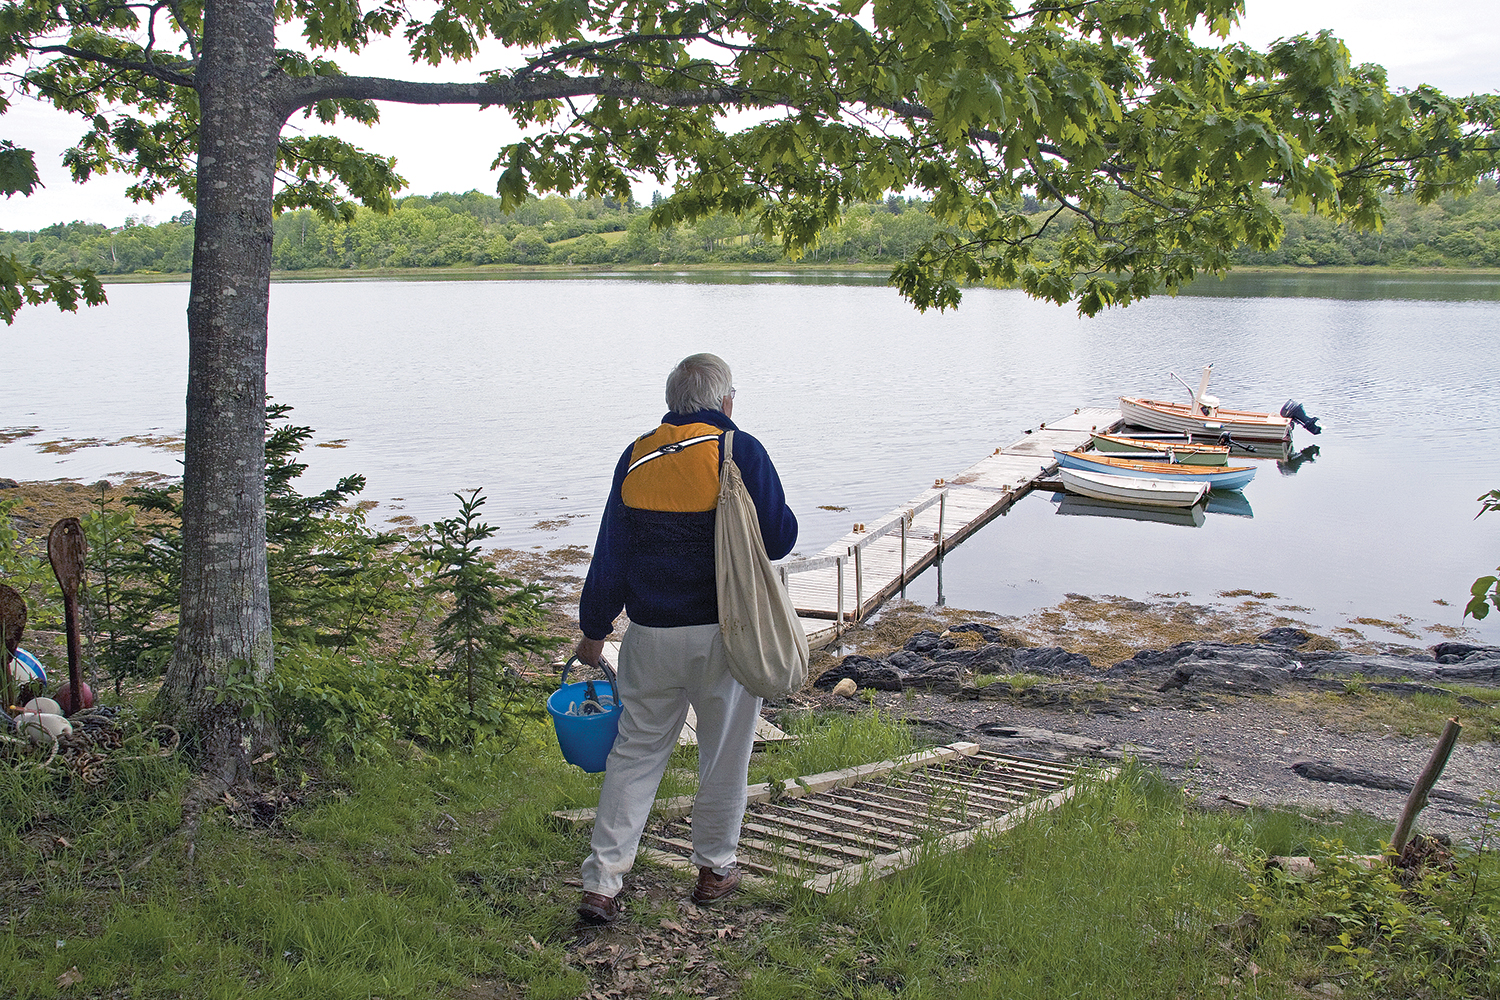
When setting out in a small rowboat or sailboat, whether for a few hours or an adventure of several days, it is important to equip your boat for safety. Though there are few legal requirements for non-motorized boats 23′ and under, the common-sense skipper will view these as minimal and take further appropriate equipment, and he’ll know how and when to use it. The idea is to be self-sufficient, so that regardless of what happens you can take care of yourself.
I like to keep everything compact, ready to go, and easily portable. Most of my gear fits in a canvas bag that I can put over my shoulder and carry with me to whichever boat I’ve chosen to take out. I also grab the plastic pail that holds my anchor and rode. I secure both the canvas bag and the pail to the boat with lanyards, because none of this gear will do any good if it floats away or sinks after a capsize.
Seasonal maintenance is also important. Each spring, in addition to getting my boats ready for the season, I check all my safety equipment to make sure everything is functioning properly and also to reacquaint myself with it. I blow the whistle, turn on the light, inflate my PFD, change batteries, and so on.
Not only do you yourself need to know your equipment, but you must inform your crew, especially if they are new to the boat, what to do in an emergency, where to find emergency devices, and how to use them.
Small Boat Safety Equipment Checklist:
Personal Flotation Devices (PFDs)*
Visual Distress Signals*
Navigation Light*
Sound-producing device*
Hull identification number (HIN)*
Charts suitable for navigation
Float plan
Timepiece
VHF radio
Cell phone
Anchor and rode
Line suitable for towing
First-aid kit
Water and food
Foul-weather gear
Sail reefing gear
Fenders
Flotation
Knife
Repair kit
Spare batteries
Bucket or bailer
A way to assist boarding from the water
Dry clothes in a waterproof bag
*Required by the U.S. Coast Guard
Minimum Legal Requirements
Rosemary Wyman
For small boats, safety gear should be light weight and compact so it fits easily in a sea bag.
Although this discussion is limited to small rowboats and sailboats, much of the equipment discussed here carries over as well to small motorboats, which have specific additional requirements for things like flotation, ventilation, and fire safety. For small nonmotorized boats of any kind, the U.S. Coast Guard and state marine patrol officers enforce minimum equipment requirements:
Personal Flotation Devices (also called life jackets or life preservers). A PFD is required for every person aboard. Boats 16′ and over must also have a throwable device. Children under 13 are generally required to wear life jackets whenever a boat is moving, but this rule may vary from state to state. Although adults are not required to wear PFDs at all times, it often makes sense to put them on. It’s much easier and safer to don life jackets when you see a squall on the horizon than when the squall is upon you. If you prefer not to wear a life jacket, at least make sure each person is assigned one that fits properly and is stowed where it is easy to reach even in a capsize. Of the PFD options (see below), many people like the Type V suspender-style inflatable life jackets, but personally I prefer an inflatable PFD in a belt pouch, which is the least obtrusive kind. Its drawback is that in order to use it you must remove it from the pouch, put it over your head, and inflate it, potentially while reading water. But its benefit is that you always have it with you, even if you fall overboard and your boat sails on without you. Whatever type of PFD you choose, it is important to practice with it in the water to be sure it does what you need and that you know how to use it. Even for good swimmers using boats in warm-water areas, PFDs are important. There is a limit to how long anyone can swim. Also, a PFD will float you higher in the water, making it easier for a rescuer to find you, since a head bobbing barely above water is difficult to see.
Life Preserver Types
Type I: For offshore use, where rescue may be slow in coming. Abandon-ship life jackets for commercial vessels and all vessels carrying passengers for hire. Considered bulky and uncomfortable.
Type II: Buoyant vests for near-shore use in relatively calm waters, where quick rescue response is likely. Considered bulky and uncomfortable.
Type III: Specialized-use vests for specific activities, such as water skiing or kayaking. Reasonably comfortable, but can still be awkward to wear at all times.
Type IV: Throwable devices, such as boat cushions.
Type V: For specialized uses or conditions, including canoe or kayak use, commercial whitewater, man-overboard devices, and others. The inflatable type are considered the least bulky and least awkward to wear, making them a popular choice these days.
Rosemary Wyman
A flare gun with three flares and a flashlight with a strobe can signal your position to a rescuer, especially in darkness. In daylight, an orange flag (shown folded at left) may be most practical.
Visual Distress Signals. The Coast Guard requires small unpowered boats to carry distress signals that are visible at night. Most small-craft skippers carry three flares to comply with the regulation. To me, however, flares are not very effective, because they burn relatively quickly, giving a potential rescuer only a limited number of seconds to notice them. Flares approved under SOLAS (Safety of Life at Sea) conventions are significantly better than recreational flares because they burn much brighter and longer, but they are also bulkier and more expensive. Flares also must be replaced 42 months after manufacture, and there is no good way to dispose of expired ones. Most small boats are unlikely to be at sea overnight, but night signals, in addition to being required, are still important to have if your return is delayed beyond nightfall or your emergency occurs in dense fog. The Coast Guard allows an electric light that flashes “SOS” as a night signal, but unfortunately there are none on the market that are practical for small craft. A strobe light is also effective, even though it does not meet the legal requirement. My handheld VHF radio has an “SOS” strobe, but unfortunately it is not Coast Guard approved. If you were to get into serious trouble, you would want as many options available as possible. Even though they’re not required, signals that show up in daylight are the type most likely to be needed by a small craft in distress. A 3′ × 3′ flag with a black ball and black square on an orange field may suffice, but an orange smoke signal will draw much more attention. A signal mirror to reflect the sun’s rays at a potential rescuer is also good to have. Another reasonable daytime signal for small boats is to stand up and raise and lower your arms repeatedly.
Navigation Light. A single white light, or flashlight, to shine toward an approaching vessel during limited visibility meets the requirement for boats under 23′ traveling less than 7 knots. A light helps others to see and avoid you, just as driving with your headlights on helps other cars to see you on the road, night or day. You should always have a light of some sort aboard, in case your return is delayed until after dusk when the wind fails, the current is against you, or you have a gear failure. It’s also a good idea to have a strobe light attached to your life jacket.
Rosemary Wyman
A PFD should have a strobe light and whistle attached.
Sound Producing Device. A whistle or horn must be audible for a distance of one-half mile. A whistle attached to your life jacket can be effective in signaling a rescuer. Whistles alone will meet the legal requirement, but the operator of an oncoming powerboat would probably never hear it, which is the best argument for also carrying a loud horn. In fog or poor visibility, a sound signal is required, consisting of one prolonged blast lasting four to six seconds followed by two short blasts of one second each, with the sequence repeated at two-minute intervals. Horns are still critical in fog, but these days most skippers rely on VHF radio for boat-to-boat communication, so even if you know your horn signals thoroughly, don’t rely on another boat to understand them.
Rosemary Wyman
For communications, a handheld VHF radio is crucial, but a cell phone in a plastic bag can also be invaluable. The horn is needed for fog signals and attracting attention in an emergency.
Hull Identification Number. All boats, including owner-built boats constructed after 1972, must have a HIN, which identifies the boat, its builder or manufacturer, and the year it was launched. This number should appear on the starboard side of the transom, or on the starboard side near the stern on a double-ender, and in some other inconspicuous location inside the boat, allowing the boat to be identified if lost or stolen. It is also advisable to put the owner’s name and contact information aboard the boat somewhere to allow authorities to contact someone to determine whether a found boat has simply slipped its mooring or whether people may be missing, too. If the Coast Guard can confirm that you are safe and sound, they can simply return the boat and avoid the risks and expense of instituting a search-and-rescue operation. Beyond these few important requirements, safe boating is left to the judgment and experience of individual skippers. The regulations don’t require such simple things as a chart, a compass, or an anchor, yet few seasoned skippers—or none, I would hope—would ever set out without them. These regulations are an absolute minimum, but most skippers of experience establish their own personal equipment standards for navigation, safety, and good seamanship.
The XLNC utility skiff, William and John Atkin’s design No. 681 of June 1951, was drawn up for a “How to Build” article in Motor Boating, part of a monthly series the magazine ran for several years. My boat, RAVENSTRIKE, is true to the plans as to the LOA of 19′ 2″, LWL of 18′, maximum beam of 4′ 4″ and maximum draft at the rudder (which we protected by a stainless-steel bracket) of 14″ including the bracket.
From the basic plans, however, I departed somewhat and installed fore, side, and aft decks with fore and side coamings, which added some weight. I also installed a side steering wheel in lieu of a tiller. Given that I grew up with fast outboards and racing sailboats, I long ago gave up on the quest for speed, so with the extra weight, instead of the designed 13½ mph, I reach somewhere, with the boat’s present engine, around 10 mph with one person aboard, but I usually run at a pleasant cruising speed of 6 or 7 mph.
What I seem to have created is a rather elegantly disguised flat-bottomed skiff, although on a trip to a giant cypress swamp in the Atchafalaya Basin in Louisiana, we set catfish trot lines and generally made a mess of the boat while we were there. It served its purpose well, however, in addition to attracting a lot of attention.
The plans specified a 6-hp Baby Palmer Husky, which was not readily available at the time I built the boat in 2000. I originally installed an air-cooled Honda V-Twin, coupled to a spare Hurth transmission I had on hand. For someone using this boat as a true utility skiff and living in a cool climate, I believe the Honda would be an excellent choice for power, being inexpensive, lightweight, and very reliable. However, I couldn’t handle the heat it generated here in Florida, so I replaced it with a three-cylinder Yanmar diesel with keel cooling and water-cooled exhaust, pretty much the way Robb White did with his RESCUE MINOR (see WoodenBoat No. 189).
Courtesy Bill Oakes
Bill Oakes, a summer resident of Harpswell, Maine, built his AURELIA B to be faithful to the Atkin XLNC open-boat design in every detail but one: he installed a “side stick” steering system, visible at left, instead of using a long tiller.
Before we took the Honda out of the boat, we did take off the governor for a high-speed trial and achieved 91⁄2 knots, close to the designed speed. In my opinion, to reach the designed speed the most important issues are meticulous fairing of the skeg and the installation of the proper propeller for the installed engine.
It is difficult to follow an older designer’s advice not to overpower, which is clearly set forth in the Atkins’ comments. The engines available today are quite different from those of the early 1950s in terms of real horsepower, torque, and, obviously, availability. The Yanmar, while much more than necessary in the power department, is, however, quite reliable and very economical to operate.
RAVENSTRIKE was lofted and built from the plans and table of offsets. She is planked with cypress, built clinker (also called lapstrake) style, with plank laps fastened with copper rivets. Her frames, stem, chines, and transom are mahogany. The bottom is cross-planked, fastened with silicon-bronze screws. Other than the laid decks and coaming, the construction is straightforward and simple. A word of caution, however: If you cross-plank the bottom, as it should be done, be sure to use narrow planks to prevent cupping if you plan to keep your boat in the water; and by all means, if you keep your boat on a trailer, do not forget to wet the bottom so it can swell up before launching. You will be amazed at how much water can come into a dried-out cross-planked boat when launched, and how long it will take to swell up to stop an inflow of water.
When reading the designers’ comments, it seemed appropriate to quote them as to the intended purposes of the design before making my own observations. Quoting from the “How to Build” Motor Boating article:
As time unfolds, motor boats of much less breadth in proportion to length than those now in the mode will become common. Among the reasons for this switch from broad beam to narrow beam will be: with equal displacement and power the narrow beam boat will be the faster of the two; for equal displacement the slim-lined hull will be the easiest of the two models to build, and therefore the cheapest; in general use, providing the design is properly made, the easy-lined narrow boat will behave best in rough water, it will throw far less spray and water, handle better in a following sea, and when slowed down, will not pound, and therefore be more comfortable than any of its two and a half to three beam sisters…. Yes, shipmates, there is a great deal to be said for the performance of reasonably narrow round bottoms, V bottoms, and flat bottom boats; slim ladies that go about their work without fuss and bother; neat sisters that deserve the name of excellency.
D. Turner Matthews
The author also went with a side-steering system for his decked-over XLNC, using a wheel instead of a vertical tiller.
XLNC certainly meets the criterion of narrow. The widest part of the bottom is 3′ 6″ ; at the stern it is slightly more than 2′ ; and at station No. 2, the breadth of the bottom is but 18″.
As for my own observations, I would have no argument with any of the Atkins’ comments. Over the years since her launching, I have operated RAVENSTRIKE in a variety of locations in varying degrees of weather. In the Louisiana swamps, the water—as you would imagine—was very calm, the only concern being not with the boat but the possibility of getting lost. As to its behavior in following seas, my best experience occurred coming into the Caravel River from Apalachicola Bay with a fol-lowing sea breeze. The boat tracked straight and true despite the following waves meeting up with the outflow of the river. My home waters are the Manatee River and Tampa Bay, which frequently have a moderate chop, which is handled with ease. While I do use the boat in those waters, I much prefer to sneak away to some inland river, such as the St. Johns or the Ocklawaha, and cruise around slowly with only the slightest of disturbance to my surroundings. RAVENSTRIKE’s ability to be easily trailered to distant places is one of her real attributes.
In summation, RAVENSTRIKE has given many joyous hours on the water in a variety of places we couldn’t or wouldn’t go in a larger boat. In addition to this, she has performed as the designer predicted. I will be the first to admit that I made her more complicated than necessary, but that only proves the design, as she still performs as intended. I have also been guilty of trading off utility for aesthetics on more than one occasion. For this I make no apologies, because to the degree possible, boats are, or should be, an extension of ourselves as well as sometimes being a useful and creative form of self indulgence.
What should be most important, however, is the joy that is created by the use and sharing of these graceful symbols, regardless of their shape, size, propulsion, or use.
Plans for XLNC, Design No. 681 from William and John Atkin, are not currently available through Atkin Boat Plans, due to the death of Pat Atkin in 2022. Plans will be offered in the future from Mystic Seaport.
Atkin Boat Plans
The Atkins designed a long, lean hull to be easily and efficiently driven by low power, characteristics that make the boat not only comparatively easy to build but also inexpensive to build and use and well-behaved on the water. Particulars: LOA 19′ 2″, LWL 18′, Beam 4′ 4″, Draft 1′, Designed power 6 hp
Here we have an 18′ Hampton sloop, an evolution of a coastal workboat that developed for fishing in and around Hampton, New Hampshire, and spread far afield. The boatbuilding duo O’Donovan & Dole of Searsport, Maine, built the boat in these photos, modeling it on an original one built in the early 1900s.
Early Hampton boats were double-enders, and were common in New England beginning in the early 19th century. By the end of that century, transom sterns were more popular on this type, and motors eventually came to dominate them; the iconic Maine lobsterboat is likely an evolution of the type, as its bow profile and forward sections will attest. Hampton boats were carried on schooners and sold to ports as far away as Newfoundland and Labrador, where they were further developed as local types. The boats ranged in length from 16′ to 26′, and had a distinctive profile shape: a straight stem, a deep forefoot, a long, straight keel, and a generous sheerline. The boats were shapely in plan view, too, with hollow waterlines forward and aft.
Benjamin Mendlowitz
John O’Donovan and Patrick Dole, doing business as O’Donovan & Dole in Searsport, Maine, chose this handsome Hampton sloop as their shop’s inaugural construction project. The daysailer is based on a century-old original in the collections of Mystic Seaport in Connecticut.
John O’Donovan and Patrick Dole opened their business in 2008. After an earlier career as a New York City stagehand, John had attended the Northwest School of Wooden Boat Building, and then moved back East to work for some of the finest shops on the coast: Ballentine’s Boat Shop in Cataumet, Massachusetts; Beetle Cat in Wareham, Massachusetts; and French & Webb in Belfast, Maine. At French & Webb, he met Patrick Dole, who had sailed tall ships as a young man, and had then attended The Landing School of Kenebunkport, Maine, studying small-craft construction and systems engineering, before moving on to jobs at Rockport Marine and French & Webb. The two builders had impressive résumés by the time they struck out on their own, and they were looking for a boat that would showcase this experience, to be built on speculation. Their requirements boiled down to these three points:
1) The construction had to be within the shop’s budget; as much wood as possible would be sourced locally, and as much hardware as possible would be shopbuilt.
2) They sought a workboat with Maine ties. “A Herreshoff design might have been a wise financial plan,” John acknowledges, but they wanted something even more traditional—more rooted in working craft.
3) Finally, the boat had to be adaptable as a recreational daysailer.
Seeking perspective, the pair sought the counsel of several designers. “One of the designers we talked to said ‘this Hampton boat [CUSPIDOR] would be your best bet,’” said John.
CUSPIDOR had been launched in 1902 on Bailey Island, Maine. Despite being named for a New Hampshire town, the Hampton boats were well rooted in that state’s neighbor to the northeast. CUSPIDOR had been designed as a pure daysailer, and as such it was finer lined than its working cousins. Forward, the boat is narrow and deep, but it swells out to firm-bilged ’midship sections, and then narrows up again in the stern. The layout and rigging were meant for recreation, rather than for fishing. O’Donovan and Dole had found their boat.
Benjamin Mendlowitz
The Hampton sloop is built traditionally, which is to say that it’s carvel planked on steam-bent frames. O’Donovan & Dole brought a diverse resume of boatbuilding experience to this project, and are quite capable in a range of boatbuilding styles.
The new Hampton boat is an “interpretation” of CUSPIDOR. The hulls are identical, but the new boat’s layout has been modified for family sailing, and the rig is a sloop, rather than the more typical ketch. “We didn’t want a mast right there,” John said, gesturing to where I was sitting as I steered the boat. “We weren’t trying to build a replica of the boat; we were trying to build a boat for young families,” he continued as we set out from the docks at Stockton Springs on a drizzly early September morning. “We pulled a lot of details from other boats.” They were particularly inspired by the sheet leads of the Herreshoff 12½, and the seating arrangement of the Matinicus Island boat. The simple bronze hook-and-eye gooseneck also came from a Matinicus Island boat at Maine Maritime Museum in Bath, two hours south of the O’Donovan & Dole shop on Route One. “We went down there looking for details,” said John. “We tried to make as much of the hardware as we could.”
Some other shop-made items on this boat include the jib-sheet leads, which are fabricated from bronze bar, bent and fixed to the coaming; the bronze-rod center board pennant; a simple bronze mast gate that can be unscrewed from the partners for unstepping; black locust bow chocks; and a rack of belaying pins for the halyards. Subcontractor Tom Ward made the blocks, strops, and shroud-tensioning deadeyes.
I’d brought my 22-month-old son along for the trip, and it was immediately apparent to me that this was, indeed, a family boat. A boy that age requires constant vigil onboard. The Hampton’s cockpit is divided into forward and after sections by a thwart, and the after section has side benches for the helmsman. Forward of the thwart the space is wide open, and it’s a deep, safe place for young kids to play. They can watch for birds and buoys over the side of the boat, but it would take some effort to climb those sides and get to the water. While I wouldn’t underestimate my son’s ability to do this, there’s a security to this arrangement that’s absent from many shallower-bodied daysailers.
You’d think that so deep a cockpit would indicate a deep-draft boat, but that’s not the case here. The O’Donovan & Dole Hampton draws just 1′ 9″ with the centerboard raised. “That’s what I love about the centerboard,” said John. “We can go over to the beach on Sears Island and step ashore.”
This shoal draft, however, does not indicate easy trailerability, for there are other factors that affect this. This boat is carvel planked, which means that “she really just needs to go in and stay in,” said John. “I guess if you wanted to build a strip-planked version or a cold-molded version, she could live on a trailer.”
The skies brightened, the rain stopped, and the wind freshened during our September outing. The boat tracked well, with its long, straight keel. But it turns well, too; even in the light breeze, I felt no threat of being caught in stays. Of course, it doesn’t spin on a dime—you sail it through a tack—but this is a surpris-ingly maneuverable boat, given the depth and length of its keel.
Because we had wind, we didn’t bother with the oars. John told me, though, that he’s still working out the best, most comfortable way of rowing the boat. Initially, he’d tried sitting in the center of the thwart and rowing with a pair of oars, but that put him right on top of the centerboard trunk—an okay position for brief stints, but certainly not for a marathon. Sam Martinelli of Shaw & Tenney, during the cover shoot for this magazine (yes, that’s the Hampton boat nosed into the beach on this issue’s cover), suggested that John try sitting off to one side of the thwart, rowing with one oar, and adjusting the rudder to compensate for the single oar. That worked, and it seems the best way to propel the boat in a calm, when alone. When crew is available, one member should be assigned to the other oar.
The O’Donovan & Dole Hampton has a white oak keel and stem, white oak steam-bent frames, and Atlantic white cedar planking. The shape of the boat is such that John and Patrick could gang-cut three planks at a time, to the same pattern, and just tweak the ends a bit to get them all to fit well. The planking is fastened with bronze screws. As John suggested, the boat’s construction could be modified for wood-epoxy, though an element of her heritage would certainly be lost in doing so. The boat’s spars are Sitka spruce. While that choice might seem a violation of the economical, local-sourcing mandate, it isn’t. A local yard had some beautiful offcuts from a large project, and so the option was just too good to pass up. The boat’s materials list is adaptable to what’s available locally.
I was impressed with a detail back aft at the helm station: the cockpit sole’s carefully fitted and bent red-oak margin boards. While a more usual approach here might have been to build a wide elevated platform, the fitting of these boards to the inner hull, and the associated deep narrow sole in this area, provided a delightfully ergonomic footrest when sailing.
In fact, ergonomics are a hallmark of this boat’s layout. While it may seem a simple matter to rig such a boat, the careful location of sheet cleats, the tiller’s long length, and the mainsheet lead make the difference between an effortless outing and a frustrating one. I’ve sailed a Mackinaw boat of similar size and shape as this Hampton boat. That boat was ketch rigged, with foresail sheets out of reach of the helmsman, and tacking while alone was a project. The O’Donovan & Dole Hampton’s jibsheets are led practically to the helmsman’s hand, with cleats right there for easy belaying. John noted that he’s found these cleats to be a handy place to tie off the tiller when he needs to slide forward to tend something. One must simply lean forward from the helm to trim the mainsail. An added benefit of leading lines to a single station in a family boat is the comfort of knowing that sheet tails aren’t living with kids; I’m ever aware, when sailing with my son and his friends, of the perils of a line wrapped around an ankle—or worse.
We often hear the phrase “family boat,” but without a lot of description of what, exactly, that means. My short trip in this Hampton boat last summer really helped me to refine my understanding of the label, and this simple, beautiful, and functional boat fits the bill.
Plans for CUSPIDOR are available from Mystic Seaport. Contact Ships Plans.
Finished boats no longer available from O’Donovan & Dole.
The O’Donovan & Dole Hampton boat is built faithfully to CUSPIDOR’s lines, which are shown here. The new boat’s ergonomic layout is the product of much research and thought by O’Donovan & Dole.
Peter Lamoureaux, a strong oarsman, commissioned his friend John Brooks to create a pulling boat that he might race and then, after the competition, row out to an island with his wife for a picnic. The resulting Peregrine 18 has proven fast, easy to row, and handsome.
Preliminary sketches indicate that this design began, more or less, as a Whitehall boat; but the finished drawings reveal something quite different. The designer’s friend and client needed a boat that could average about 6 knots around a 3-mile racecourse, which included tight turns, in sometimes choppy water. He started by drawing a nearly semicircular mid section for low wetted surface. Highly flared sides would increase secondary stability, and they would provide a spread of nearly 4′ at the rails for the oarlocks. Brooks reckoned that a working waterline of about 18′ would offer the optimum length for an athletic one-person-power engine. A shorter waterline would waste energy through excessive wave generation. A longer boat might suffer from too much wetted surface and hull weight.
In order to reduce wetted surface yet more, and to allow for quick turns at the marks, he introduced a little rocker (convex longitudinal curvature) into the keel. For the same reasons, he drew a short skeg with an end plate running along its lower edge. This arrangement provides adequate directional stability at speed, yet it stalls readily during tight turns. In this circumstance, stalling is a good thing.
Peregrine shows a wider, flatter run than many pulling boats. Brooks wanted to provide adequate bearing to support the strength of the oarsman and the added weight of a passenger and picnic basket. That is, he ensured that this boat will not go down by the stern while being rowed at maximum speed or when loaded with wine, cheese, and cookies for an afternoon on the islands. He concluded the hull with a heart-shaped transom—no less elegant for its greater-than-usual breadth.
Robin Jettinghoff
With an installed, adjustable sliding-seat outrigger unit, Peregrine can meet the demands of an athletic oarsman seeking the sporting challenge of open-water rowing.
As for hull construction, the designer suggests that we plank the glued-lapstrake hull with 4mm-thick plywood if we intend to race, or 6mm-thick plywood if we seek more casual recreation. Perhaps contrary to our first thoughts, heavy pulling boats might hold some advantages. Any waterman will tell you that a heavier skiff provides a steadier platform for fishing and hauling traps. Inertia can prove helpful, and a good robust skiff will take little notice of small waves and can carry (glide) impressively between rowing strokes. L. Francis Herreshoff argued persuasively on the pages of The Rudder and in his books on behalf of heavily built human-powered boats. Yet, all else equal, the light boat usually will win the race.
The glued-lapstrake construction makes good use of epoxy and high-quality plywood, and it results in a light and elegant hull. Despite the thin planking and paucity of transverse framing, Peregrine feels strong. There is some flexibility, but it’s a lively elastic flexibility rather than the wet-noodle limpness of a plastic kayak. Full-sized patterns come with the plans package (no true lofting needed), but we’ll still want to take great care with lining off the strakes. The shadows cast at the laps should accentuate the sweet lines of this hull. If even one plank droops or is pinched, that flaw will catch our eye now and forever.
Robin Jettinghoff
Light glued-lap plywood construction makes Peregrine’s interior very clean, with only enough framing to support her seat risers.
Thanks to the strong gap-filling nature of epoxies, the building of glued-lapstrake hulls rests well within a neophyte’s capabilities. Yet those builders not brought up with the technique will benefit from a careful read of How to Build Glued-Lapstrake Wooden Boats (WoodenBoat Books 2004), which Brooks wrote with his wife Ruth Ann Hill. Some of us will want to build Peregrine in traditional lapstrake fashion and plank the hull with cedar. That’s fine, but we’ll need to add sufficient transverse framing to keep the pleasantly aromatic wood from splitting at the laps.
On the water, Peregrine behaves as promised. I rowed the boat along the Maine coast on a clear sunny day with just enough breeze to raise a slight chop. She pulls easily up to a comfortable cruising speed. The winged skeg keeps her rock-solid on the desired course. Yet, for an 18′ 2″ boat, she can change direction quickly at low speeds. Wheeling around racecourse marks or working into a crowded float should pose no undue problems.
Joe Thompson
Her waterline length makes Peregrine a stable rowing platform, creating little wake and avoiding any “hobbyhorse” motion as the rower’s weight moves forward and aft.
After I exceeded cruising speed, perhaps 3½ knots, the hull absorbed all the strength I could muster. The harder I pulled, the faster Peregrine went. Unlike shorter and deeper boats, she didn’t squat or dig herself a hole in the water. King Kong himself likely could not overpower this hull. The boat’s owner tells of having rowed a 3-mile triangular course in a 15-knot breeze. Although not racing, he covered the distance easily at an average speed of more than 5 knots.
Peregrine seems to meet her design criteria in crisp and handsome fashion. Lightly loaded in a reasonable breeze, she travels fast when propelled by a strong rower. After the race, she’ll idle comfortably out to the islands while carrying two people and a picnic basket.
Robin Jettinghoff
Careful attention to lining off Peregrine’s overlapping planks will enhance the hull’s lovely form. This boat was built by Joe Thompson of Brooklin, Maine, shown here at the oars.
For those of us who can’t take advantage of the 18-footer’s speed potential, or who simply prefer a smaller boat, Brooks has come up a shorter sister, the 16′ Merlin. As you read these words, he’s working on finished drawings for this design. At present he can supply a materials list, full-sized patterns for many parts, and a set of Peregrine plans (construction details for both boats are essentially identical). Although some “figuring out and reworking” are involved, several Merlins have been built using this mix of information.
John Brooks specializes in the design of glued-lapstrake boats. He does business as Brooks Boats Designs. Plans for the Peregrine 18 are available for $75.
John Brooks / Brooks Boat Designs
John Brooks, a Brooklin, Maine, boat builder and designer, drew the plans for the Peregrine 18 to emphasize solo rowing, with an option for two rowing stations. For racing, light 4mm plywood planking would be best; for cruising, 6mm will prove more durable. Particulars: LOA 18′ 2″, LWL 16′ 3″, Beam 3′ 10″, Draft not much, Racing weight 110 lbs, Cruising weight 133 lbs
This is a gentleman’s Whitehall.” That’s how Steve Holt describes the Shaw & Tenney Whitehall, a 17′ 9″ recreational rowboat based on a legendary 19th-century working type. Holt is proprietor of Shaw & Tenney, the 150-year-old, Orono, Maine–based maker of wooden oars and paddles. The company itself is something of a commercial legend for its longstanding success in its small niche, and this Whitehall, a modern wooden version, is Shaw & Tenney’s first boat offering in all of those years.
The Whitehall pulling boat is widely believed to have originated in New York and been named for Whitehall Street in that city, though the great small-craft historian John Gardner cast some doubt on that supposition in his book, Building Classic Small Craft, Volume 1. He said the boat’s origins were “vague and shadowy,” and suggested that it might even have been imported from England. Regardless of the type’s roots, it was in active service in New York by the 1820s, and it spread to Boston, where it developed distinctive regional traits.
“The Whitehall was not a ship’s boat, but a vehicle of harbor and coastwise transportation,” writes Gardner. “Not only were these boats the choice of crimps and boarding-house runners, but of nearly everyone else as well who required reliable and expeditious transportation about the waterfront or from one part of the harbor to another—ship chandlers, brokers, newspaper reporters, insurance agents, doctors, pilots, ships officers, port officials, and many others.
“Gentlemen of that day,” continues Gardner, “seeking a pleasure boat, frequently adopted modifications of the Whitehall workboat.” The impulse to adopt these boats for recreation has not diminished after nearly 200 years. With its purposeful plumb stem and seductive wineglass transom—and good rowing characteristics—the Whitehall still often makes the short list of boats for a recreational rower with a penchant for classical good looks. But refinements are, indeed, in order to bring this type into the realm of pleasure rowing, for a commercial Whitehall, while easy on the eyes and oars, could be relatively heavy and hard to turn. Which brings us back to the Shaw & Tenney Whitehall.
N. Forster-Holt / Shaw&Tenney
The new Whitehall’s construction is strong and does not require frames. Some rowers, however, will take comfort in their presence, and so Shaw & Tenney offers the option. The boat we see here is framed in sassafras.
Shaw & Tenney developed its Whitehall because “we have a market that appreciates fine rowing,” said Steve Holt. But the boat is not simply a business venture for Holt; it’s also the fulfillment of a “desire to build something that hadn’t been built before.” That “something” that hadn’t been built before is a glued-lapstrake-plywood Whitehall pulling boat, with proportions refined for recreational rowing.
“Glued lapstrake plywood” means that the boat’s planks are cut from sheet plywood, bent around a building jig as they would be in traditional construction, but glued together with epoxy rather than being fastened with rivets or nails. This popular construction technique yields a hull of traditional lapstrake appearance, but without the traditional worries of leaking and drying out. The boat can therefore live on a trailer between outings, with no need to soak up in order to be watertight. A glued-lapstrake hull should simply not leak, ever. If it does, then something is wrong.
Benjamin Mendlowitz
The Whitehall’s forward rowing station is used when two rowers are pulling, or when a passenger is seated in the stern sheets.
The Shaw & Tenney Whitehall is planked in 6mm sapele marine plywood. While a glued-lapstrake hull does not require frames, this boat has them. A frameless hull is a bonus in regard to cleanliness and refinishing, for it allows unfettered scrubbing or sanding of the inner planking, and there are no frames to trap dirt. But the absence of frames also reveals the boat’s modern glued construction; and a belly full of frames just makes a boat appear so classical, so sculptural. The Shaw & Tenney Whitehall has bright-finished sassafras frames contrasting with its painted inner planking. Although widely spaced, they certainly add some strength to the hull. They also provide some visual relief to that expanse of white inner planking. And, finally, they provide blocking for the inwales, creating an open gunwale structure that allows water to drain out entirely when the boat is inverted. Of course, this open gunwale arrangement could be accomplished with simple blocking, too. The optional vestigial frames, in short, are a personal preference—though not a necessity.
The boat’s transom and bright-finished accents are of sipo mahogany, prized for its so-called “ribbon-stripe” grain. The keel is of white oak—heavy, but heavy in the right place.
The development of this boat began as a conversation with Ben Fuller, curator of the Penobscot Marine Museum in Searsport, Maine. Fuller is also a former curator at Mystic Seaport Museum, where that conversation took place at the 2008 WoodenBoat Show. The mandate was for a tandem, fixed-seat classical rowboat that could also be rowed by a single person—and could be adapted for a sliding seat, if one were desired. “We looked at hundreds of different designs,” said Holt.
N. Forster-Holt / Shaw&Tenney
The Shaw & Tenney Whitehall comes equipped with outrigger oarlocks at the primary rowing station. These oarlocks flip out for use, and are folded inboard for stowage. They allow for oars 1′ longer than would standard, gunwale-mounted hardware, and are also available separately from Shaw & Tenney.
The resulting boat is an original design, but it most closely resembles a recreational model, the Bailey Whitehall, on display at Mystic Seaport—“a fancy pleasure Whitehall,” as described by John Gardner in Building Classic Small Craft. The Bailey boat measures 16′ 9″, and carries a beam of 3′ 7″. The boat’s scantlings are minimal, to save weight, and the lines are “drawn extra lean and fine,” according to Gardner.
The Shaw & Tenney boat is also extra lean and fine. It resembles the Bailey Whitehall, but the newer boat is 17′ 9″ long and 3′ 7½” on the beam—proportionally narrower than even the fine-lined Bailey boat. “Our boat,” says Holt, “is not meant to carry four men and 600 lbs of supplies out to a ship.” But at the launching festivities at Pushaw Lake near Orono, the boat did carry 600 lbs of people through a 2½’ chop. “No trouble at all,” Holt reported of that outing.
I too had no trouble at all when I tested the boat in a 1 2–15-knot northerly at Pushaw Lake on a sparkling afternoon last August. I’d had a brief spin in the boat a few weeks before, when we were shooting this magazine’s cover, so I knew that it tracked very well in a straight line, and that it turned slowly. So I was impressed in August, when leaving the dock in tight quarters and a breeze, that I could practically pivot the boat in its own length with short bursts of opposing oar strokes. Once aimed where I wanted to go, the boat tracked dead straight, despite the breeze being on the forward quarter.
Benjamin Mendlowitz
Because of its long, straight keel, the Shaw & Tenney Whitehall is not nimble in sharp turns, but it’s fast and it tracks straight for long distances.
Steve told me as I left the dock that the boat responds well to a modest pace at the oars—that a fast clip would wear me out sooner, but not necessarily make the boat go faster. This turned out to be true, and it was an especially useful observation when I was rowing the boat upwind. I’d take a firm stroke, and then wait and watch the shore. One one thousand…two one thousand…three one thousand…four one thousand…. The boat continued to carry its way forward, despite the headwind. Then I’d take another stroke.
The night before my Pushaw Lake test, I’d been rowing a popular small dinghy at the WoodenBoat waterfront, in a similar breeze. This smaller boat is famous for its good rowing qualities, but I was struck that evening by how the headwind stopped it in its tracks between strokes. A staccato rhythm was required to maintain headway. I don’t mean this observation as a criticism of that dinghy, for I certainly would not want a tender of the size and weight of the Whitehall. But the role of a little weight and waterline length in keeping a boat gently moving forward in difficult conditions was illuminating.
After rowing a suitable distance upwind, I rested for a moment to recover and make a few notes. Driven by the wind, the boat headed for the barn. It was a great ride back, with my strokes as much for steering as for drive. I tried the boat on different points of “sail.” Dead downwind, broad reach, beam reach…she tracked straight no matter what the relative wind. I rested one oar and pulled with the other, watching the shore astern as I did. The boat’s stern would steer slowly across the backdrop of trees. As the breeze came on to the stern quarter, I’d need to drag the lazy oar briefly to get through the broad reach—a particularly stable wind angle, it seems.
As noted above, I had a brief outing in the boat in calm conditions, and she’s a joy to row in a flat sea and no wind. While not a nimble boat, it’s fast. And it’s beautiful. I can imagine having one for morning rows on the Penobscot River, and I’d feel confident making the two-mile crossing of that river’s lower portions—even in its frequent short, steep chop.
Steve’s 11-year-old son Sam asked me what I thought of the boat when I returned from my breezy trip on Pushaw Lake. I told him some of the things that I’ve just told you—that the boat carries beautifully between strokes, but that it didn’t take excessive power to get it going in the first place, and that it tracked so well. Sam thought for a moment, and then replied with what I think is a more succinct description of the boat’s handling qualities than I’ve been able to muster: “It doesn’t smash up and down because it’s too light, but it isn’t too heavy, either.”
Modeled on a recreational Whitehall conserved at Mystic Seaport in Connecticut, the Shaw & Tenney model is narrower than its working forebears. Particulars: LOA 17′ 9″, Beam 3′ 8″, Weight 145 lbs
When I realized the car that had turned right at me was not slowing down, I tried to speed up, but the camping gear I carried on my 10-speed weighed it down and I was unable to get out of the way. The car hit me broadside and the impact launched me over the handlebars: I did a somersault in mid-flight, the top of my head just glanced the pavement, and I landed on both feet in a deep crouch. I stood up, stunned that I wasn’t injured aside from a road rash on my left elbow. My bicycle didn’t fare as well. The rear wheel was badly bent, and the left crank arm was pushed to the opposite side of the frame so that both pedals were on its right side. Somehow my left foot had come free of the toe clip and strap and my leg wasn’t broken. I ran after the car, which had stopped a few dozen yards away.
Photographs by the author
On the approach to Salt Lake City, Jim (seen here) and I had to endure a hot, 40-mile stretch of road across the Great Salt Lake Desert.
On August 1, 1977, my best friend Jim and I started riding from our hometown, Edmonds, Washington, headed for the Grand Canyon. We rode 800 miles to Salt Lake City and Jim was missing his new girlfriend, Jane. He decided to take a bus home, and I couldn’t blame him. On August 10, I continued south on my own. I’d gone just a few miles and was still within the city limits when the elderly driver with impaired vision ran into me. After my brief suborbital flight over Utah asphalt, I had no idea that the collision would (eventually) lead to my dream job—which I couldn’t even have imagined at that point: working as an editor for WoodenBoat. At the time, I was just happy to be uninjured. The driver paid for a replacement bicycle and, two days later, I was back on the road and pedaled another 1,400 miles before arriving back home. That was my last bicycle tour.
At the same time that I was finishing the dory skiff, I sewed its sails from cotton boat drill, as recommended by Pete Culler in Skiffs and Schooners. The structure behind the boat is the shop in which I built the skiff. My father had the garage occupied with his racing-shell repair work, so he let me build an extension on the back of the house over the concrete pad I’d used for basketball.
Before that ride in the summer of 1977, I had done a lot of backpacking, but I had hit the limit of what I could carry and how long I could stay out. Eventually, the pressure of a 70-lb load on my pack’s hip belt had caused nerve damage that left my right thigh numb for decades. I shifted to bicycle touring, but after getting hit I was no longer at ease sharing the road with cars and gave that up, too. I still wanted to pursue traveling under my own steam, and small-boat cruising seemed the best way forward. A boat could carry more gear than I could haul on my back, and waterways had room for me to stay well clear of motor-driven traffic.
After I finished the skiff, I dismantled my boatshop and left one corner of it around the garage door at the back of the house for Dad to use as an extension when he was working on 40′-long four-oared racing shells. The workbench beyond the bow of the skiff, with the red chair on it, was roughly built and meant to be temporary, but I’m still using it 45 years later.
I studied maps of Puget Sound and British Columbia and was taken by Knight Inlet, which follows a crooked 78 miles from the B.C. coast to some of the 7,000′ summits of the Coast Range. I needed a boat but I couldn’t afford to buy one, so I decided to build one. After reading a handful of boatbuilding books, I settled on the 14′ Marblehead dory skiff. I started building it in the fall of 1978 and launched it on a rainy spring day in 1979.
Our neighbor across the street gave Dad an old trailer for a V-bottom boat and the rollers weren’t at all suited to the skiff. I set a piece of 1/4″ plywood over the rollers to protect the hull. Dad’s 1965 Chevy Sportvan was the tow vehicle.
While my plan had been to row and sail to Knight Inlet that summer, I had grown uneasy about my lack of experience. I had also discovered that building the skiff was a challenging endeavor, and far more satisfying than the means to an end that I’d thought it would be. I put aside my vision of cruising and talked my father into letting me build a boat for him. I spent the next year building a Chamberlain gunning dory.
There was a boat ramp on the Edmonds waterfront, but I wanted to launch the boat at Skinny Beach where I had spent my summer vacation days all through secondary school. I also preferred having the dory carried bow-first to the water by my family and friends rather than backing it in on a trailer.
After launching Dad’s boat in the summer of 1980, I felt obligated to finish what I’d started with the dory skiff before I let another year slip by. I launched from Mukilteo, Washington, and headed north. After a week of rowing, Knight Inlet was coming up just as I’d settled into the rhythm of rowing day after day and enjoying the wilderness as it unfolded around me. The rowing was tiring but didn’t leave me aching at the end of the day as backpacking had, and not a single boat had run over me. I wanted to keep going and opted to follow the Inside Passage northward. I managed to row and sail 700 miles to Prince Rupert, just shy of the Alaskan border, and stopped the day after the mild summer weather had given way to dangerously strong winds.
Inspired by the orphan girl played by Paulette Goddard in Charlie Chaplin’s movie, Modern Times, I christened the dory GAMINE. It was a rainy windless day, so I left the sails at home, but brought the mast for the Cunningham house flag I’d made as a copy of the flags flown by five generations of my family before me.
When I got back home, my parents showed me a copy of Nor’westing, a local boating magazine, which had been published while I was away. In it, presented as the first article of a series, was a letter that I’d written to friends of my parents who had been eager to hear about my trip. They were also the owners of the magazine. I was shocked that my casually written letter had made its way into print and, worse yet, that a few thousand readers were expecting the rest of the story from me. To spare myself further embarrassment, I had to become a writer.
After my first row aboard GAMINE, I took my parents out. The sou’wester Mom is wearing is one I made of canvas coated with GacoFlex, a rubbery paint Dad had used when he reskinned a wood-and-canvas canoe.
I didn’t do any more writing for publication until 1987 when I sent Sea Kayaker magazine an article about building a paper canoe and paddling it 2,500 miles from Québec to Florida. Still wary after my first experience with publication, I fussed over the writing endlessly until I was sure it was squeaky clean. It was squeaky clean, apparently, and was published verbatim. Two years later, I got a phone call from the founding editor, who was planning to retire. He had remembered my clean copy and invited me to succeed him. I knew nothing about magazine production, but I took the chance. It turned out well and I held that job for 25 years.
Two years after launching GAMINE, I set out from this stretch of Puget Sound on a course that took me 700 miles north along the Inside Passage and beyond that to a career devoted to boats and their stories.
In the last few of those years, sea kayaking had passed the peak of its popularity and in 2014 the magazine had to close. Shortly after the last issue went out, I got an email from Matt Murphy, the editor of WoodenBoat, with the offer to edit Small Boats, a new online magazine that WoodenBoat Publications had in the works. The path that began with getting hit by a car in Salt Lake City had finally delivered me to my dream job.
Many of my classmates in high school and college seemed to know from an early age where their life trajectories would take them, but I didn’t have that gift of foresight. Perhaps being raised as a rower by a father who was himself a rower got me used to not seeing where I was headed, and the notion that the path would only make itself clear while I was looking back. As it turned out, I didn’t need to know where I was going to arrive where I wanted to be. Sometimes we have the good fortune to be guided by happy accidents.
As the wakes of passing powerboats slapped SOUL CAT’s port side, she rocked gently. I was in a secluded part of Georgian Bay; the nearby island’s black and red granite outcrops had been smoothed and rounded by ice-age polishing. White pines and brush partially concealed a pair of plain, two-story cottages. These were new to me, but otherwise the low 1⁄5-mile-long island, unnamed on the charts, was much as I remembered from a 1960 camping trip with my dad, brother, and cousin. On this day, August 13, 2022, I had reached the turnaround point in a voyage from my home in Napanee, Ontario, up the Trent-Severn Waterway—a 240-mile chain of rivers, lakes, locks, and canals from Lake Ontario to Lake Huron— and back again. I was 290 miles and 11-1⁄2 days from home.
Photographs by the author
This island at the entrance to the Main Channel from Georgian Bay marked the beginning of SOUL CAT’s homeward-bound journey.
Four solely solar-powered electric boats had previously made the east-to-west journey along the Trent-Severn: in 2017 the American boat, RA, was the first, coming this way during its Great Loop adventure; in 2018 I followed in SOL CANADA; in 2021 a catamaran yacht named THE HARVEST followed the waterway from Trenton, Ontario, to Georgian Bay but then looped back to Lake Ontario via Lake Huron and Lake Erie. Now, in SOUL CAT, I had become the fourth to make the trip and I hoped to become the first to make the 580-mile round trip on the Trent-Severn under solar power.
Inspired by a Small Boatsreview of Bernd Kohler’s gas-outboard-powered Eco Cat, I built SOUL CAT, a modified version of Kohler’s 18′ x 8′ plywood-on-frame catamaran. I had been using her for a year and thus far she had met my expectations. I had a Torqeedo electric motor, the equivalent of a 5-hp gas-fueled outboard, that pushed the boat up to a top speed of 6 knots.
SOUL CAT is propelled by a Torqeedo Cruise 2.0 electric outboard set in a well and powered by a bank of batteries housed beneath the forward bench. The sixteen 3.5-volt lithium-ion phosphate batteries are configured to provide 24 volts with a capacity of 10kW. The boat is capable of a top speed of 11 mph but cruises at an average speed of 5.3 mph. The batteries are charged by eight flexible solar panels in two arrays on the canopy. They have a rated output of 660 watts for the first string of three and 900 watts for the second string of five, giving a total theoretical capacity of 1,560 watts, which is rarely, if ever, achieved because of adverse conditions: the angle of the sun, the hour of the day, cloud cover, etc. The canopy is supported by four motorized struts that can lower the canopy 30″ to rest on the bulwarks for trailering and control the port-to-starboard tilt of the canopy to maximize solar performance.
I turned SOUL CAT from the unnamed island and retraced my route along the crooked 4 miles of the Main Channel toward my overnight destination, Port Severn, 15 miles to the southeast and the site of Lock 45, the most north-westerly lock of the Trent-Severn Waterway’s 45 locks. I cruised in the shadow of high pine-topped granite cliffs along a channel well-marked with buoys as well as day markers on posts and low rock prominences. This midsummer Saturday, boats were flying back and forth, heedless of the speed limit and oblivious to the cresting wakes they dragged behind them. As slow and as light as SOUL CAT was, I felt like I was riding a scooter on the freeway and motored cautiously through the the chaotic intersecting wakes. After a few hours I reached Port Severn and settled in for the evening at the public dock just around the corner of the upstream end of the lock.
SOUL CAT settled in for the night with the side tarps rolled down for shelter and privacy. The cockpit has an aft bench seat and two forward bench seats that fold down for sleeping. A small sink, countertop with hinged table leaf, and a double-burner propane stove serve as the galley. There are two coolers, one for refrigerated food and one for fresh produce. Up forward beneath the ’midship benches, there is plenty of storage space for clothes and tools. The canopy is canvas over an aluminum frame, while the roll-down sides are made from an inexpensive tarp attached, fore and aft, to large bug screens.
The next day dawned shrouded in cool mist so thick that I could not see across the harbor. I took my time over a cup of coffee and tidied the boat while the sun slowly burned off the mist until there were only smoke-like wisps above the barely rippled water. I cast off and ventured into Little Lake with its dark clear water and banks of granite, peppered with maple, birch, and pine that veiled the dozens of cottages crowded along its shore.
Most of the lakes along the waterway are natural, although a few were created as the canal was built and surrounding land was flooded. Construction of the Trent-Severn began in 1833. Linking natural lakes, rivers, and streams across 240 miles, it was hoped that the waterway would open Ontario’s interior and promote agriculture, the lumber industry, and general commerce. It was almost 100 years in the making, and by the time the waterway was completed it was no longer viable—cargo ships on the Great Lakes had grown too large for the canal, and the railways had expanded and were now taking freight overland. From the day the waterway was opened it became a route for pleasure craft, now operated by Parks Canada and open to navigation from May to October.
At the far end of Little Lake, the channel wove through a maze of tree-crowned islands. The channel markers guided me around a northward bend to Gloucester Pool, a 3-1⁄2-mile-long lake where cottages perched on the steep sides of the lakeshore and on the offshore islands were often obscured from view by the trees; long docks extended from the wooded slopes out into the lake.
At the eastern end of the lake is Gloucester Passage, a zigzagging channel that narrows to 25 yards where the swirling Severn River current flowed so fast that I worried my motor, capable of only 6 mph on still water, wouldn’t have enough power to maintain steerage. I made it through, slowly, and without having to contend with any fast-moving boats squeezing through the narrows. Less than a mile farther upstream I reached the Big Chute Marine Railway.
Roger Siebert
.
As early as 1914 there were plans to build a lock to bypass the Big Chute rapids, but construction was interrupted by the World War. The first railway, intended as temporary, was built in 1917 and has been replaced twice. Today, there is a flat-bed carriage 100′ long and 24′ wide. It is the only railway of its type still in regular use in North America. The carriage descends into the water so that a boat can be driven on over its submerged platform. Once the boats are secured, cables pull the carriage up the 60′-high granite slope and down the other side back into the water. The front and rear wheels of the car ride on separate tracks set at different levels so the carriage stays level as it traverses the hill.
As I approached the railway, a single boat was departing, and I motored straight on and had the carriage to myself. In barely 10 minutes SOUL CAT was floating off and I head for Swift Rapids, Lock 43, just 8 miles upstream.
There was a light headwind and the sun shone down from a clear sky, ideal for solar-powered travel the panels generated almost as much energy as the motor was drawing. I arrived at the Swift Rapids Lock along with about a dozen boats ranging from cutters to personal watercraft and we all crowded into the 120′-long lock. There once was a marine railway like the one at Big Chute, but it was replaced in 1964 by what became known as the Giant Lock, the deepest single-chamber lock on the Trent-Severn, which carries boats through an average lift of 47′. When the lock gates opened at the top of the ascent, the other boats all took off and I was soon left behind, once more in peace and quiet.
On SOUL CAT’s port side, is the pop-up cabinet that encloses the head. When the head is in use the upper section of the cabinet is raised; at all other times it is lowered to this height and provides a useful work surface.
The landscape was now flatter, and the channel wound maze-like through inlets and outcroppings. For the first 1-1⁄2 miles there was only a single cottage, snug on an island scarcely larger than it was. Traveling upstream into a headwind and plowing through mats of weeds made for slow going. After a 2-mile crossing of Sparrow Lake, I entered a narrow stretch of river where the flat banks on either side were again crowded with cottages. The powerboats here traveled slowly, providing welcome relief from their wakes. At points along this 4-mile run, the river was so narrow, and the buildings so tightly spaced that neighbors on either side of the waterway could converse with one another while standing on their docks.
I arrived at Couchiching, Lock 42, made the 20′ lift, and moored for the night on the upstream side at the last vacant spot on the low wooden dock. The tall pines on the high banks blocked any wind there might have been. Next to the ash-gray cement wall, a faded-green picket fence lined the gravel trail that led into the woods.
I was awake and up by 6:15 the next morning and rolled up the side tarps. The morning mist was thick and hung over mirror-still water that reflected the surrounding pine, balsam, blue-beech, and maple trees. There was not a whisper of sound.
An hour later, I headed upstream on what seemed to be the river’s natural course with both sides thick in forest right to the edge of the low-lying shore but was a 1.6-mile-long canal that had been cut by hand a century ago to bypass the last stretch of the Severn River en route to Lake Couchiching. The lake is 10 miles long and up to 3 miles wide with a well-marked channel to keep clear of its shoals. I was pleased with the gentle following breeze and the bright sunlight shining on the solar panels. When I first attempted this round trip four years ago, the end of sunny weather had forced me to stop at Lake Couchiching after 377 miles in 16 days. Now, four years later, I was breaking my distance record and was two days ahead of the 2018 schedule.
There is typically little solar benefit to be gained when cruising in the early morning and at 8:15 a.m. the panel was producing only 250 watts while the motor was drawing 800 watts to maintain 5 mph. My battery budget was to draw no more than 600 watt hours from the 10-kilowatt battery bank so I could travel all day and finish the day on a full charge. As the day lengthened, the solar energy increased and the panels produced more and more so that, at times, I could be traveling at 5 mph and yet have a trickle charge into the battery. The power management game was to balance speed and draw—on an overcast day, I would drop the speed and exponentially drop the draw.
At its southern end, Lake Couchiching leads to the city of Orillia and Atherley Narrows, a 50-yard-wide marina-flanked passage that flows beneath a busy highway bridge and on to Lake Simcoe. At 15 miles wide and about 22 miles long, it’s largest lake on the Trent-Severn Waterway. Like Lake Couchiching, its waters are shallow, and a strong wind can swiftly build rollers into large breakingwaves . During the crossing from the east side of the lake in 2018, I had had to slow to 3-3⁄4 mph to keep whitecaps from washing over the bow of SOL CANADA. This time I was in luck, the day was calm and sunny and as I crossed the northeast section of the lake from Orillia to the canal, I was struck by the vast expanse of the blue-green water. I could see no land on the horizon, and seagulls and cormorants flying over were the only signs of life. The marked channel never more than 3 miles from shore, the wind remained light and at my back, and I made good progress.
At the top of Couchiching, Lock 42, SOUL CAT is nestled between two yachts. In the center of the cabin space, the portable toilet enclosure is in its raised position, which provides plenty of seated headroom.
Exactly 5-1⁄4 hours after leaving the dock at Lock 42, I rounded Mara Point, a blunt headland on the eastern shore, and approached the two limestone-rock breakwaters that jutted 250 yards into the lake to protect the canal’s 45′-wide entrance. I looped SOUL CAT around to steer north into the entrance then northeast along the still waters flanked by 6′-high concrete walls that were equipped with mooring bits and iron ladders. On the landward end of the breakwaters, I passed through a blue-painted steel swing bridge and waved at the lone Parks Canada operator. Steering clear of the weeds in the shallows close to the banks, I headed northeast along a narrow 1-1/8-mile straight stretch of canal up to Gamebridge, Lock 41. Instead of the granite rock formations and tall pines of the Severn River and its lakes, layers of limestone, overgrown with scrub brush, cedar, and small white pines, lined the banks, making it impossible to pull into shore. The weeds were thick, and the propeller snagged some that grew from the canal bottom as well as those ripped up by passing boats that gathered into floating islands.
When storms kick up swells on Lake Simcoe, the breakwaters at the narrow dogleg entrance to the Trent Canal give shelter to boats waiting to head out.
On both sides of Gamebridge Lock the walls were painted with a blue stripe, which is standard for all manned locks on the waterway: a boat moored in the blue area waits to pass through. A boat in an area not painted blue is there for a short stop or overnight. The walls leading to and from the lock were again 6′ high— a protective measure in case of a storm surge from Lake Simcoe—so I had to climb a ladder to reach the bollard at the top. I was alone passing through the lock and glad I chose to travel in late August when there is a lot less boat traffic than in July.
Beyond Gamebridge, a series of four locks is separated by as little as 1⁄2- to 1-1⁄2 miles. The shortest stretch, 2⁄3 mile, from Gamebridge to Thorah, Lock 40, was little more than a straight ditch, bordered by flat fields and banks devoid of vegetation, shored up by large limestone rocks. The canal was almost choked by weeds in some sections, and I was forced to stop and clear them from the motor’s shaft. As I got underway again, I saw two cabin cruisers waiting to enter Lock 39 and hurried to catch up to them. The lock tenders contact one another about how many boats are coming their way so that they can lock a group of boats through together. I didn’t want to be the slow poke holding all the others up, so I throttled SOUL CAT up to a blazing 6 mph. SOUL CAT and the other two boats passed together through Locks 39, 38, and 37—Portage, Talbot, and Bolsover.
Leaving Bolsover, I let the cabin cruisers pull ahead of SOUL CAT—Lock 36 was 7-1/2 miles away and she wouldn’t be able to keep up. The canal widened, and the shoreline became a series of small irregular inlets and bends crowded with cottages. I had to wait only a minute for a swing bridge to open before entering the 5-mile-long Canal Lake. I was pleased to have come this far, but the weather was no longer in my favor: a 4-mph headwind was slowing me down and the sky had become overcast, making it difficult to get a good charge.
Canal Lake was manmade after the canal was built and the area flooded. A wide, grassy body of water, the lake is at the western end of the Kawartha Lakes, chain that forms the upper watershed of the Trent River. The channel was well-marked but narrow between shoals and areas of dense weed. I worked my way along the well-marked channel between shoals and areas of dense weed, into the building headwind. The lake was divided by three islands connected to one another and to the lake shores by highway bridges. The channel took me to the concrete arch bridge on the south side of the lake: its 60′-wide semicircular arch, mirrored in the breeze-rippled water, looked like a hole in the wall leading to the second half of the lake. I passed through with fanciful expectations, but it was more of the same: a 3⁄4-mile-wide, grassy lake with weeds that stopped me several times to clear the motor.
At the northeast end of the lake, I entered a narrow channel that led to Kirkfield, Lock 36, one of two hydraulic-ram lift locks on the Trent-Severn Waterway. It raises eastbound boats 49’ to the highest point on the waterway—840′ above sea level. I motored into what looked like a big bathtub, the sides and overhead a web of white-painted steel. The gate closed behind me, and up SOUL CAT and I went. The counter-balancing tub to my right was descending without carrying any boats, but the weight of the water in it was creating the hydraulic pressure that was raising me. Since there was no water flowing in or out of either tub as in a lock chamber, there was no turbulence. It was just a quick elevator ride up. At the top, I left the lift and decided to call it a day. It was 5:30, the lock was closed for the day, I had traveled more than 40 miles in just under 10 hours since leaving Couchiching, and I had the entire upstream half of the lock site to myself. The mooring wall extended along the channel for 1,200 feet on both sides and I stopped about a third of the way along—if anyone else showed up they would have plenty of room to tie up in seclusion. The only downside to my chosen spot was the long walk back to the lift lock, down the multiple flights of stairs and across the road to get to the washroom. Even so, I was content and after some supper and a quick swim in the cool water, I rolled the tarps down for the night.
Kirkfield, Lock 36, is the larger of the two counterbalanced hydraulic lift locks on the Trent-Severn Waterway. Its caissons are each 140′ long and 33′ wide. The rising caisson stops when its water level is about 1’ below that of the canal on the upstream side of the lock. When the lock gate opens, water flows into the caisson, increasing its weight by many tons. Simultaneously, the lower caisson stops when its water level is about 1′ above that of the canal on the downstream side. When its gate is opened, water flows out of the caisson, reducing its weight by several tons. Finally, when the valve between the cylinders of the pistons that support the locks is opened, the heavier upper caisson descends, forcing the lighter one to rise. Just 18 days after SOUL CAT passed through the lock on the homeward-bound leg, one of the gates at the top of the lock failed and the lock was closed. Kirkfield is expected to reopen in time for the 2023 boating season.
It was 7:20 a.m. when I left Kirkfield and puttered up the straight canal between the cement walls and walkway. About 1⁄4 mile from the lock I entered an equally narrow canal that took a sharp curve to the southeast for an arrow-straight 2 miles. Walls of intertwined cedars leaned out from both banks, their lowest boughs just inches above the water. In places, loose layers of limestone rose 10′ to 15′ above me and shrubs had grown in the fissured banks. Glass-smooth water reflected the trees and limestone making the canal appear even narrower and SOUL CAT seemed to be floating on a pathway of sky and clouds. It was a stark contrast to the granite landscape from just the day before.
I motored the canal slowly. The battery bank was still low and overcast skies and thunderstorms were forecast for the afternoon. The only sound was the gentle turbulence trailing each hull. The canal led into manmade Mitchell Lake. On one shore I could see wetlands with green weed beds and cattails. It was still early morning and there was not a soul to be seen except a leggy great blue heron perched motionless on a “No Wake” sign. Another straight and narrow 2-1/4-mile-long canal led to the 19 square miles of Balsam Lake, the top of the watershed. From here on I would be traveling downstream, the channel buoys switched from reds to my left to reds to my right, and all the locks—draining instead of filling—would be less turbulent.
The northeast breeze in the late morning was still light as I headed due east and then dipped south to round Grand Island’s rocky shores and sand beaches surrounded by yet more weed beds. It was a 5-mile crossing to the inlet at Rosedale that would lead to Lock 35. From the lock I continued through a marshy channel into and across Cameron Lake, and within less than 3 miles reached the village of Fenelon Falls at the mouth of the Fenelon River. There is wall space for mooring above Lock 34 and when I arrived, the upper mooring area was taken up by motoryachts, so I locked through and tied up at the concrete downstream wharf.
It was only 11:30 in the morning but since sun was scarce and storms were forecast, I decided to stop here for a rest day to allow the batteries to charge. From my tie-up I could see the long spillway where the river tumbled in an endless rumble of falling water which I hoped would lull me to sleep when I turned in. Downstream, the low concrete canal sides gave way to higher rocky banks of sediment limestone topped by pine, fir, cherry, and maple trees obscuring the view of simple cottages and two-story condos.
I wandered past the yachts, stopped to chat with one or two boaters, and strolled into town where the streets of Fenelon were bustling with traffic and shoppers. The sky soon turned dark, so I circled back to the boat and as I rolled down SOUL CAT’s nighttime tarps the skies opened and a torrent of rain came pouring down. I had made the right decision to stay in Fenelon. Within an hour, the rain stopped and my boat, once all alone in a quiet spot on the pier, had been joined by several other craft; the noise of the rain was replaced by the sounds of chattering neighbors.
Evening came and I went ashore for dinner at an eatery just a block away. Returning to the boat, the roar of the falls was drowned out by the sound of portable gas-powered generators as the yachts charged up their battery banks. The light breeze blew the exhaust fumes from one generator about 10′ away, straight at me and, rather than sit and choke on the fumes, I left to spend the evening at a pub. When I returned, as I had hoped, all was quiet.
I was up and gone before 7:30. The sky was overcast but there was no wind as I journeyed down the Fenelon River, which ranged in width but was generally about 150′ wide with high banks of many-layered limestone. After just 1 mile, the river opened into Sturgeon Lake and I headed south down the western arm of the Y-shaped lake with a light breeze behind me. It was a quiet morning, and I had the lake to myself. After 4 gentle miles, I took a sharp turn around the bottom of Sturgeon Point and headed northeast into the light wind that had previously been in my favor. Ten miles later I was at Lock 32 and the small town of Bobcaygeon that nestles between the north ends of Sturgeon and Pigeon lakes. Even this late in the season, the lock walls were lined with boats.
My route took me south through Pigeon Lake before winding east along Gannon Narrows into Buckhorn Lake. SOUL CAT had covered 30 miles upon arrival at Lock 31 at the lake’s north end. Boats staying the night filled the walls on both sides of the lock, but I managed to squeeze in before walking to the nearby grocery store to restock. I settled in early and after a peaceful night got off to a lazy start as I had to wait until 9 a.m. for the first lock-through of the day. By 9:15 SOUL CAT and I were through and cruising east under a hazy sky with a light following breeze. I had gone through the lock in a swarm of boats, but they were now spread out along Lower Buckhorn Lake well out in front heading to Lock 30, a 3⁄4-mile passage. I followed them through from Lower Buckhorn into Lovesick Lake. My route passed between rocky granite islands with jagged inlets and mature-growth trees hiding concealing small cottages and the mainland shore, where large summer homes stood before a backdrop of high rocky hills covered in maples, oaks, and balsam firs.
I left Lovesick Lake at Burleigh Falls, Lock 28. The channel downstream from the lock opened to an arm of Stoney Lake and 1⁄3 mile to the southeast along the shore the rushing water and spray of Burleigh Falls divided around a small island topped with a thicket of pines.
Beyond the falls was a cluster of islands that required close attention to avoid boulders, shallows, and other hazards. Stoney Lake has its name for good reason. I arrived in Clear Lake, a 4-mile-long body of water that stretches from northeast to southwest uninterrupted by a single island. Clear Lake also appears to have earned its name. Now I could head south in a straight shot to Youngs Point, Lock 27, at the head of the Otonabee River, which meanders southwest to Rice Lake some 33 miles away.
Otonabee, Lock 23, is one of 11 locks closely grouped together over a distance of 26 miles. The long cement walls are typical of all the lock stations on the waterway.
I still had many miles and several days ahead of me, but it was beginning to feel like the homestretch, and I was determined to push on as far as I could. My goal for the day, if all went well, was to make it through another eight locks to end just below Ashburnham, Lock 20, in the heart of Peterborough, 15 miles away. On the downstream side of Youngs Point the Otonabee began as the 5-mile long, 1⁄2-mile wide Katchewanooka Lake and its waters reflected the overcast sky and surrounding evergreens. The rocky shores were giving way to flatter, lower-lying land with the occasional wetland. At the south end of the lake, in the town of Lakefield, I passed through the first of five locks, 26 through 22—Lakefield, Sawer Creek, Douro, Otanabee, and Nassau Mills—all with little to distinguish them, and all within about a mile of one another. A drizzle of rain started and stopped and started again. Moments after I left Nassau Mills, a peal of thunder rattled overhead. If it continued or lightning appeared, the locks would close. It was getting late in the day and I had 4 miles to go to reach the next lock so I poured on the power—1,400 watts—and sped along at 6.4 mph. At 5:15, just 15 minutes before closing, I arrived at Peterborough Lift, Lock 21. The second of the waterway’s two lift locks, Peterborough differs from the Kirkfield Lock only in its greater drop—66′ instead of 49′. SOUL CAT was gently lowered in a matter of minutes. I had planned to spend the night upstream of Ashburnham, Lock 20, but boats aren’t allowed to spend the night between Locks 21 and 20, so I made the ¼-mile sprint to Ashburnham, locked through and was done for the day. I was pleased with the day—eight locks and 31 miles despite the clouds and rain.
While SOUL CAT waited for Lock 19 to open at Scotts Mills on a sunny Saturday, her canopy is tilted 5 degrees, which doubles the solar performance in the early-morning light.
Saturday morning dawned bright and sunny, not a cloud in sight and not a whisper of wind. I was up early and had to time to bide until the 9 a.m. opening of Scotts Mills, Lock 19, just 3⁄4 mile down the Otonabee. In the Ojibwe language, the river is called Odoonabii-ziibi, while the word Otonabee comes from the Ojibwe ode, meaning “heart” and odemgat, meaning “boiling water.” In essence the name translates to “the river that beats like a heart and passes through the boiling water of the rapids.”
At 12 percent, my batteries were dangerously low, but I could get a trickle charge going by motoring slowly and taking advantage of the almost-2 mph downstream current. I arrived with an hour to spare. Scotts Mills was bathed in sunlight but there was a constant clatter echoing in the still morning air from the construction work on the dam. I tied up and tilted the canopy to a 5-degree angle to make the most of the sunlight. I was surprised to see the power production surge from 200 watts to 435 watts even at 8 a.m. and decided to lock the canopy in this position for the upcoming run south. When the lock crew came on duty and opened the gates I silently slipped into the lock as the sole occupant and within a few minutes SOUL CAT was heading downstream at 4 mph drawing 480 watts but generating 550 watts—very good for 9:20 in the morning with the sun low in the sky—leaving 70 watts to trickle charge the battery bank. Later in the morning that rose to 150 watts.
The 18-mile stretch of river wove its way through lowlands with marshy pockets, and between banks crowded with overhanging trees or whose bottom branches skimmed the water’s surface. There were only three bridges, a few cottages, and clearings around beaches. As the morning advanced and the charge going into the batteries rose, I upped the speed to 4.5 mph and was still generating a charge of 200 watts.
The river at last opened into a shallow delta and flowed into Rice Lake, a 20-mile-long, 2-mile-wide, northeast-southwest, shallow lake. It can be rough on windy days, but this day it was calm and I headed northeast toward Hastings with a gentle wind pushing SOUL CAT from astern. As I neared the top end of the lake quickly moving black clouds were coming at me and there my luck ran out: the rain came in a downpour and the wind whipped the canopy so hard it snapped like a flag. I worried that the solar panels might fly off completely. The wind spun SOUL CAT around and I fought to get her back on course. Then, the squall moved on just as suddenly as it had arrived. I was soaked, the boat was soaked, but we were in one piece. I pulled into the Trent River and on to Hastings, Lock 18.
The drizzle thinned, and as I arrived at the lock’s cement wall, the sun was peeking out. Despite the quick summer storm, it had been a good day’s travel—39 miles. I moored just upstream of the lock in the very heart of Hastings, a small Ontario town with a year-round population of about 1,300, and popular with summer tourists. I was moored next to a quiet park land with picnic tables, and just a short stroll from a few restaurants, a grocery store, and an ice-cream shop—Hastings had everything I needed.
A sunny day had been forecast for the following day but at 8 a.m. there was a thick fog. My plan was to start slow, as I had done the day before, with the hope of trickle charging the battery bank and to get as far as I could while the weather held—the forecast for the next few days called for rain. At 9 a.m. the lock opened. The fog had all but burned off and I entered with one other boat to lock through.
Crowe Bay, Lock 14, seen here as water was being released from the chamber, was where Phil installed a spare propeller to replace the motor’s original prop after it struck a submerged rock shortly after leaving the lock.
The banks of the Trent River were thick with cottages and homes on one side and low, grassy wetlands on the other, while between them the river itself was translucent blue. It was 50 miles to the Bay of Quinte on Lake Ontario, but there were 17 locks to go through. I made my way through flat countryside as the river opened into Burnt Point Bay and the adjoining Seymour Lake before narrowing down again. There was little traffic, and I was alone in the three locks—17, 16, and 15—that parallel the last mile of the Trent River before it empties into Crowe Bay, the reservoir created by the dam at Lock 14. To the west of the lock, long gentle falls and small rapids flowed from the dam spillway over 150-yard-wide ledges before slipping back into the channel, which was rocky and, in places, shallow.
Perhaps I was tired, perhaps I didn’t see that the marker buoy had moved out of its location, but the prop hit a rock. The impact jarred the boat, and I knew that all was not well. One of the propeller’s three blades had broken off, but I had enough propulsion to hobble back to the lock entry wall at Crowe Bay. Fortunately, I had brought two older props as spares. The water was too deep to stand in to change the prop, so I tilted the motor up as high as I could, tied a rope around my waist, and, with socket wrench carefully in hand, leaned far out from the wall to get over the motor. I managed to remove the prop nut, replace the propeller, thread the nut back on and tighten it up without dropping anything. Everything worked as it should and I was once more on my way, but I hadn’t gone far when someone at the end of a dock was waving frantically at me. It was my buddy Phil from Belleville, who had been following my voyage with a tracking app. We talked briefly and agreed to meet up after the Ranney Falls locks, just beyond the town of Campbellford.
After an uneventful downriver through Lock 13 and past Campbellford, I arrived at the entrance to the flight of Ranney Falls, Locks 12 and 11, and set up for the night. Phil paid a visit for a couple of hours and after he departed, I hunkered down for the night only to be woken in the early morning by the pounding of a heavy rain. By 9:30 a.m. it had eased to a light drizzle, so I packed up, headed into the back-to-back locks, and then went on my way, once more the only boat heading downstream.
The day was warm, the rain had stopped, there were breaks of blue in the overcast sky, and no wind to speak of. The river passed through a protected wetland area, the acres stretching away through maple, oak and cedar, mixed in with areas of grass, shrubs, cattails, and weeds. The water was now a murky green, a far cry from the clear blue upstream.
By the time I had navigated 5 miles and descended Locks 10 and 9, the rain had started again. It seemed that this would be the theme of the day and I decided to make Glenn Ross, Lock 7, about 12 miles ahead, my destination for the day. The river was narrow, and the low land continued along both sides, but the water was obstructed by a weed growth that looked like floating palm trees. It was a species I had never seen before and later learned that it is an invasive called water soldier. Before it was prohibited, it was sold as an ornamental plant for water gardens. It escaped into a few areas of Southern Ontario and efforts are underway to contain it before it crowds out native species and clogs the waterways. I dodged my way through the spiky leaves, passed through Percy Reach, Lock 8, and made the final 11 miles to Glen Ross, where I pulled in at the top of the lock for the night. An isolated spot, it had just one variety store where I picked up a jar of coffee and later went back for a dish of ice cream.
In this early-evening view looking downstream from the top of the lock at Glen Ross, the section of blue-painted wall is reserved for those boats waiting to lock through. Boats tying up and not wishing to lock through must avoid this area.
The next day was again overcast but I motored the last 14 miles and through six locks to arrive, at last, downstream from Lock 1 and just a mile from the Bay of Quinte. I moored up to the lower wall of the lock, and spent a restless night disturbed by trains crossing the nearby bridge and the rain hammering on SOUL CAT’s canopy.
In the morning I tilted the canopy all the way to port to clear the pool of water that had accumulated in the canvas awning beneath the solar panels. The final stretch of canal was contained between cement walls for 1⁄4 mile. To starboard, the land rose in a 20′ barrier mound topped by a scattered border of sumac trees and separating the canal from the streets of Trenton. To port, beyond the cement, were low scrub trees and brush on a strip of land that separated the canal from the fast-flowing, unnavigable Trent River.
I motored the final 2-mile stretch of canal and beneath the last bridge before turning to look back at the “Gateway to the Trent Severn Waterway” sign that spanned the bridge. I had become the first person to have completed the Trent-Severn Waterway in both directions, solo, using only 100 percent solar electric power.
Making my way east on the Bay of Quinte, a 30-mile-long east-west inland bay that runs parallel to Lake Ontario, my destination for the day was the city of Belleville where I would meet with friends at a small restaurant tucked away near the harbor. I was not to be given an easy ride, however. A head wind and cloudy sky made for slow going and it would be a few hours before I arrived. Then, just as the downtown restaurant came into view, the sky opened and pelted me with rain. It was an unpleasant arrival, but I tied up, mopped up, and joined friends Dave and Phil for lunch. As I sat there, my granddaughter, Taylor, sneaked up behind me bearing a large sign saying, “Congratulations Papa!”
While I had done what I had set out to do, I was not home yet and still had to figure out the next 24 hours. Dave made a quick call and said I could use the mooring space of some friends at the local yacht club for the night and so off I went just as another downpour started. After I’d moored for the night, I had visits from several friends—Belleville is where I worked for 37 years before my retirement.
The morning of August 24 broke to sunshine and a light westerly breeze. I set off on the final leg of my journey to my home dock on the Napanee River about five hours away. The Bay of Quinte was quiet, and as I turned into the Napanee River it felt good to be back in my home waters. I was welcomed at the dock by my son and wife with a bottle of sparkling wine for a celebratory toast. The 23 days and 580 miles had not been without their challenges, but the experience had been unquestionably an extraordinary adventure.
Phil Boyer retired in 2017 after working 38 years in R&D in the telecommunications industry. He now keeps busy building boats and teaching karate at two local clubs. Phil has been around boats his whole life, starting with paddling as a kid. At age 11 he built a sailing pram with a bit of help from his father. In 2006 he began building solo canoes and now has four of them, featured in the August 2019 issue. Phil’s interest turned to building his first solar-electric boat, SOL CANADA, in 2015.
If you have an interesting story to tell about your adventures with a small boat, please email us a brief outline and a few photos.
The Fine is a cedar-strip sliding-seat pulling boat designed and built by Rick Crook of Madeira Park, British Columbia. He describes it as “a full-body workout machine. The Fine is wider than a rowing scull, thus more stable, and is suitable for ocean rowing, in reasonable conditions.”
Rick does business as Oyster Bay Boats, specializes in cedar-strip construction, and builds double-paddle canoes and rowboats. He finishes many of his boats bright and takes care to ensure the wood beneath the varnish looks good.
Photographs by the author
Both the outriggers and sliding seat unit can be easily removed to lighten the Fine for cartopping and carrying across the beach to and from the water.
During the Fine’s construction, as with all Oyster Bay boats, its red and yellow cedar strips are glued to one another and held in place with stretchy nylon monofilament rather than staples so there are no rows of dark spots that staples leave behind. The hull is sheathed inside and out with 4-oz ’glass cloth and biobased epoxy. The gunwales are big-leaf maple. The foredeck and recessed aft deck are supported by bulkheads, and access to the resulting enclosed flotation chambers is through deck plates.
A keel runs almost the full length of the hull and provides tracking as well as protection for the hull when it’s hauled on the beach. It ends in a skeg at the stern and is topped by a transom that sits well above the waterline. The weight of the hull, without the rowing rig, is around 65 lbs (not much more than a sea kayak) and is well suited to roof-rack transport.
The Fine’s outriggers and sliding seat can be moved forward from the standard rowing position to accommodate a passenger sitting in the aft end of the cockpit.
The sliding-seat arrangement is a wooden drop-in unit with weight-reducing cutouts. Aluminum tracks support a sliding seat with ball-bearing-equipped nylon wheels. Two 1⁄4″ machine screws secure the seat unit to cleats built into the hull and it can be moved forward from its normal position to accommodate the weight of a passenger carried in the stern. At the aft end of the unit, wooden clogs with heel cups and Velcro straps provide solid bracing for the feet. The outriggers are made of aluminum and held in place on the gunwale by quick-release clamps that engage aluminum plates slipped in place under the gunwale. The outriggers support gated racing-shell oarlocks.
The Fine’s stability makes it easy for the rower to launch from almost anywhere and get aboard once it’s afloat rather than having to find a floating dock low enough to clear the outriggers.
While the Fine was already at the beach when I arrived for sea trials, the bare hull, at 65 lbs, would be a heavy shoulder carry but manageable for short distances. A cart would be the most practical way to get the boat and the rowing rig in one haul from a parking lot to the water’s edge.
As I stepped aboard the Fine, afloat in the shallow water, it had more than enough stability to support me and stay upright as I brought my weight over the gunwale. Once I was seated, the initial stability was very good and didn’t require the help of the oars to put me at ease. I leaned on the gunwale and the secondary stiffened up reassuringly, even as the sheerline dipped within 1″ of the water.
With designer and builder Rick Crook at the oars, the Fine slips along at a good clip, leaving nearly smooth water in its wake.
The clogs are set at a comfortable angle, and I could keep my heels planted in them when I moved to the aft end of the slide for the catch. I’m 6′ tall, and the tracks extended 10″ farther aft than I needed; shorter rowers will have plenty of room on the slide. At the finish of the stroke, I had just enough room at the forward end of the tracks to avoid hitting the stops; taller rowers may need a longer sliding-seat frame.
I got underway with the carbon hatchet sculls provided by Oyster Bay Boats. The height of the seat and the riggers was right on the mark for me: at the finish of the stroke, the handles were even with the bottom of my sternum. In the middle of the recovery, the handles had a 4″ overlap, which gave me the hand-over-hand position I’m used to. The Fine has excellent tracking, and I didn’t need to keep my gaze over the transom to make adjustments to keep on course. Turning is a little stiff—it took 12 1⁄2 strokes to spin through 360 degrees—but appropriate for a boat meant for aerobic exercise and passagemaking.
The Fine’s full-length keel and deep skeg give it excellent tracking.
Measuring speed with a GPS while I was rowing in water protected from wind and current, I could maintain 4 knots with ease and an exercise pace brought the Fine up to 5 1⁄2 knots. It was hard to get a good reading on the GPS in a short all-out sprint as the numbers on the display fluctuated when the boat accelerated as I moved aft at the recovery and then slowed as I moved toward the bow, pushing the boat back, at the drive. The readings averaged out at about 7 knots—the Fine is a fast boat for its size. During the sprints, when I was pulling hard, I didn’t feel any flexing of the outrigger.
Many fast sliding-seat boats with outriggers rely on their oars for stability. The Fine’s 34″-wide hull has enough inherent stability to allow the rower to take a break from holding the oars.
When I finished my rowing trials, I stopped in about 6′ of water to do a capsize drill. I pivoted the port oar parallel to the Fine and leaned over the gunwale. It took a lot of effort to get the boat up on edge, and I fell out before it turned turtle. The boat flopped back on an even keel, and I was able to crawl back on board over the side without any concern that the Fine would roll over on top of me. It stayed upright, and once I was back aboard I could move about in the swamped cockpit without feeling unstable and make my way back to the rowing station.
The seat had floated off the tracks, and it was difficult to get it back in place and then sit on it to keep it from floating off again. Sitting on the tracks was painful and put me too low to row effectively, so I had to get the seat back where it belonged, in its tracks. The tracks have flanges that are meant to engage retaining clips on the sliding seat to avoid this situation. The seat should be outfitted with those clips.
Rick Crook
Even when fully swamped after an intentional capsize, the author could still easily row the Fine, albeit slowly.
Once I got the seat on the tracks and pinned it there by sitting on it, I was able to row. The Fine floated with the gunwales just awash amidships, so bailing would have been futile, but I was mobile. After I rowed around just to see how the boat moved and maneuvered when full of water, I returned to the beach, where I had some help getting the water out. It was discovered that the stern compartment had a lot of water in it. The deck plate may have been loose. If the Fine had had the full benefit of its buoyancy compartments, there may have been a better chance of bailing it out after I’d climbed back aboard.
Rick has built Fines for several customers, and photographs of those boats show decks of different lengths to suit the needs of their owners. Opting for sealed-end compartments with more volume would be prudent for rowers intending to take on challenging conditions. A smaller stern compartment with a longer open cockpit would provide room for taking a passenger out in pleasant conditions. With large access ports on top of the compartments, gear could be safely stowed. The open gunwales provide convenient places to secure any gear stowed in the open cockpit. I didn’t row the Fine with cargo aboard, but a photo of one being rowed with a passenger seated in the stern shows that the boat can take the additional weight of a companion or cruising cargo without giving up too much freeboard or dragging its transom through the water.
Sliding seats and outriggers are often associated with slender hulls designed for speed at the expense of stability, but the Fine combines that rowing rig with a hull that can take care of itself and allow the rower to enjoy full-body exercise and still take in the scenery whether it’s drifting by at a snail’s pace or zipping past at 7 knots.
Christopher Cunningham is the editor of Small Boats Magazine.
Fine Particulars
Length: 18′
Beam: 34″
Weight, without riggers and sliding seat: 65 lbs
The Fine is available from Oyster Bay Boats as a finished boat, built to order, for $6,800 CAD. Carbon-composite oars are included.
Is there a boat you’d like to know more about? Have you built one that you think other Small Boats Magazine readers would enjoy? Please email us!
Beyond Cairo Point, the eastward-turned tip at the bottom of Illinois, the Ohio River poured into the Mississippi, but the collision of the two great rivers only crumpled the surface of the water and spread ripples across the mile-wide confluence between Missouri and Kentucky. It was December 7, 1985. The cold front that had surrounded LUNA with ice that morning had cleared the sky and the sun had raised the temperature a few degrees above freezing. The Lower Mississippi, easily twice the breadth of the Ohio, pulled me toward a breach in the horizon where the umber-hued woodlands hung cantilevered over the river’s reflection of clouds.
Photographs by the author
Above the toe of my left boot is a bridge over the Upper Mississippi River; above the right boot is a bridge over the Ohio River. The low land between the bridges is Cairo, Illinois.
I rowed in midstream where the current was the swiftest and to give a wide berth to what was the first of a series of seven dikes, or wing dams, that the chart showed would be coming up on the Kentucky side, the longest reaching two-thirds of a mile from the shore. There were no wing dams on the Ohio, but the Mississippi has thousands of them. The rows of piled boulders set straight out from shore force the current into the navigable channel, speeding it up so that sediment doesn’t settle. I didn’t know what to expect, and before I saw any sign of the first wing dam, I heard a sound like wind rushing through a thicket of aspen. Carried on a breeze blowing upriver, it was clear and crisp, making the dam seem both close and dangerous, but when I passed it, the dam was covered by water so deep that there were no standing waves trailing it, just a patch of sharp-cusped ripples spilling across one another.
In the vaulted sky was a miscellany of clouds, some like rippled sand or fish scales, others billowed, flat-bottomed, or bearded with virga. As the sun angled toward the horizon, the colors illuminating the clouds changed as rapidly as their shapes and patterns did.
I’d rowed 23 miles from my last camp on the Ohio River to get to the confluence and after rowing another 10 miles it was getting late in the day, so I pulled ashore and made camp on a 3⁄4-mile-long sliver of an island near Millers Landing on the Missouri side of the river.
Roger Siebert
.
In the morning I was fogged in and everything but the sand and brush within 20 yards of my campsite had disappeared. It was too risky to row—the swift current would push me too quickly toward hazards to avoid them. I’d also be invisible to vessel traffic—sitting so low in the water and having very little metal aboard, LUNA wouldn’t show up on radar.
I spent part of the morning writing letters and did some work on LUNA’s oarlocks. While they were as good as new when I left Pittsburgh, the month of rowing down the Ohio River had enlarged the holes in the oarlock sockets and made them egg-shaped while the shafts of the oarlocks were no longer straight but tapered from the middle toward both ends, the metal polished to a bright shine by the wear. I had been applying grease to the locks several times a day, but the horn and the sockets had worn through almost 1⁄8″ of bronze between the two bearing surfaces. I unbolted the sockets from the oak stanchions and rotated them, as one would the tires on a car, to have their unworn sides take the burden of rowing.
When the fog lifted, I headed downriver and made good progress—easily 6 mph with the help of the current. For 5 miles the right bank was lined with riprap, the rocky upper fringe of a revetment almost fully concealed by the high water. Most of the revetments were along the banks on the outside perimeter of the bends in the river, and the wing dams were on the opposite banks. The Army Corps of Engineers had been charged with installing and maintaining all this stonework in 1928 after a prolonged heavy rainfall in 1927 flooded much of the river plain. The Mississippi now caroms off the rockworks of this man-made corridor. The fastest water was on the revetment side of the river, so that’s where I could make the best speed. The wing dams had slow-moving water and collected sand, which made good beaches for landing and camping.
The Lower Mississippi’s many islands and sand bars provided easy places to come ashore for a midday break or to camp.
At dusk I coasted along a bend that led the river northward, and looked for a campsite. The left bank was lined with revetment. Where it ended, I pulled ashore on a gentle slope of tawny sand and made my camp at the edges of a cornstalk-littered field on Kentucky Point. The point is a lightbulb-shaped lobe of land wrapped by a great loop in the river. To the south, the Mississippi comes within 3⁄4 mile of folding back on itself. At the apex of the 19-mile loop is the city of New Madrid, Missouri, which relies on the levees to prevent the river from straightening itself, leaving the town stranded on the banks of an oxbow lake.
I often passed the time between dinner and bedtime watching the tows go by. Tow tugs operating after dark swept their spotlights along the shore to negotiate the bends in the river and sometimes illuminated my campsite.
To the north of my camp a tow’s bright spotlight glowed through a lattice of leafless trees like the rising of a full moon. Its beam slipped off the smooth surface of the river, leaving no mark other than the firefly glints of bubbles and flotsam.
In the morning the air was still as I rowed to the outside of the bend where the rush of water over the bottom made the sneakbox’s resonant hull hiss like a punctured tire. In the still air the only marks upon the water were patches of froth marbled white and tan and the dimples of tiny whirlpools that spun like ball bearings between opposing flows of water. I secured LUNA in the brush at the New Madrid riverfront and walked to the top of the levee. A man in a pickup truck driving along the crest of the levee had seen me come ashore and pulled up alongside me. “Boy, don’t I know how it is when your motor breaks down,” he said. I asked if there was a grocery store nearby, and he gave me a ride into town to the local market. Two young women working there found me interesting, probably because I was the scruffiest customer to walk through the doors. When I got to the register, one said, “Did you just get off a boat?” I answered, “Yes, I must look awful.” She replied quietly, “Yes, you do.”
When I had finished shopping, the man with the pickup truck was back in the parking lot waiting for me. He had driven to the levee to take a closer look at LUNA and then come back to take a second look at me and give me the return ride. There were some advantages to not blending in.
By the time I rowed past Kentucky Point’s slender waist, I was 2 miles along the Tennessee shore on the left bank and the warm midday air was filled with gossamer, some so fine that I saw only briefly a bright iridescent thread as it refracted the sun’s light before vanishing. The more substantial strands drifted with the wind like strings trailing errant kites.
I didn’t see as many towns as I had along the Ohio, and the land hemmed in by the levees, broad expanses of leafless trees and pale sand, gave the Lower Mississippi the appearance of a remote wilderness. I stopped at the site of the old Tiptonville ferry landing on the Tennessee side where the levee rose directly above the riverbank. From the top I could see the land on the other side. Close by it was flooded, but beyond that, stretching uninterrupted to the horizon, were fields radiant with still-green crops, laced with windbreaks of poplars and a web of roads, and dotted white and red with houses and barns, steepled churches and clustered grain silos, as different a world from the river as Oz from Kansas.
After rowing 42 miles downriver from New Madrid, I stopped for water at Caruthersville, and parked LUNA on the town’s concrete boat ramp. Two blocks into town I passed a wedding reception—the matching bridesmaids taking a stroll in the sunshine were the giveaway—in full swing at the local bank and on the sidewalk around it. I stopped at a women’s clothing boutique across the street. At the register there were three women working, and it seemed I had caught one of them off guard. She looked at my hair (which I knew had some interesting angles to it from the glimpse I had caught of my reflection in the shop’s window) and made a slow scan of the grime from there down to my boot. When I said, “Hi!” she snapped her gaze to meet mine and looked a bit embarrassed that she had forgotten her manners. “Well,” I said, “am I the best-dressed man in town?” and got a smile in reply. I asked if I might fill my water jug, and she led me to a sink in a back room. I thanked them as I left and, after I’d walked out the door, I heard them all giggling.
While much of what I’d read about the Lower Mississippi described it as a dangerous river, I found it mostly tranquil and well suited to traveling in my very small boat.
I spent the night camped a few miles downriver from Caruthersville, and the following day I arrived at Chickasaw Bluff No. 1, the first of four. The tawny cliff of ancient, compacted sediment towered 300′ over the river and shunted the course of the river from southeast to southwest. Ten miles farther downriver I approached Bluff No. 2 and stopped rowing to study what lay ahead. The Mississippi takes a sharp westward bend from south-southeast, tighter than a right angle, and squeezes its width from 1 1⁄4 miles to 1⁄2 mile. It was not an easy turn for the tows—towboats pushing as many of 42 barges, each measuring 195′ by 35′, all rafted together.
The Chickasaw Bluffs on the Tennessee side were imposing features and Chickasaw Bluff #2 required downriver tows to make a surprising maneuver to negotiate the river’s sharp turn at its base.
A tow coming downriver passed me, veered perpendicular to the current to drift toward the bluff. When the tow was just shy of impact, the towboat accelerated straight into the westward leg. I followed well behind the tow, taking roughly the same line. The river bunched up and flipped wave crests into the air, but at the base of the bluff was a smooth upwelling. Water from the bottom of the river apparently curled up at the submerged base of the cliff and created a countercurrent cushion that pushed LUNA safely away. The high banks streaked by too fast to focus upon them as I bounced through standing waves and dipped into the edges of the whirlpools that trailed from the downriver edge of the bluff. On the downstream side of the bottleneck, I darted over a mound of water between two whirlpools and pulled into the back eddy. In its quiet eye I waited for the tow that had been gaining ground on me in the previous reach of the river. The rusty bow of its lead barge clipped by the edge of the bluff and squeezed through the narrows. After the throbbing tow tug had passed, I drove the bow of the sneakbox back through the eddy and into the turbulence and raced downstream with the full force of the current behind me.
The couple who took this photo of me arriving in Memphis introduced themselves at the marina and took good care of me during my stay in town.
Chickasaw Bluffs Nos. 3 and 4 were not nearly as dramatic: No. 3 was an unremarkable hill hidden by a forest, and downtown Memphis concealed No. 4. At Memphis, I rounded Mud Island and rowed into Wolf River Harbor. A local couple, Lauren and Gayle, had seen me coming in and met me after I landed. They saw to it that the harbormaster provided me with a slip where LUNA would be safe and took me (by way of Elvis’s Graceland estate) to their home where I ate well, did my laundry, and slept in a comfortable bed.
I usually passed the big cities by, making only brief stops for supplies. In Memphis, two strangers welcomed me into their home. Here LUNA is at rest in the middle of the far pier at the bottom of the launch ramp.
Before I left Memphis, I’d met a man who had taken an interest in the sneakbox and what I was doing and offered to put me up for the night. We’d rendezvous 28 miles downriver from Memphis at Star Landing, just the other side of the Tennessee-Mississippi border.
As I rowed downriver, I passed a beach on the left bank that would have made a good campsite but I gambled on the promise of a hot shower, a home-cooked meal, and a warm bed. I was still 2 miles from Star Landing when the sun set, and it was nearly dark when I reached the location marked on the chart. It was a landing in name only; the bank was covered with a revetment of broken boulders. I kept moving with the river; the sharp-edged revetment continued for as long as there was light to see it by.
With the dark came cold: 15 degrees below freezing. Spray blown by an upriver breeze came over the bow and gelled in a lumpy sheet of ice on the foredeck and glazed the canvas dodger. Beads of ice stuck to the back and arms of my jacket and blunt icicles sprouted from the oar looms. A waning moon rose over the bank as I searched for a landing of sand, but in the shadow of its glow, the shore and river merged in black. Tugs working their way upriver swept mile-long blue-white searchlight beams along the shore. I hoped that they would not see me; if they focused their lights upon me, I would be blinded by the glare. As the current carried me over submerged islands of brush, leafless stalks came out of the dark and whipped against the hull and oars. My face was raw with the ice-edged wind and my feet had been numb since sunset.
Nearly three hours into the night, the silhouette of trees along the bank thinned and lowered. I crept in close where the beam of my flashlight could distinguish between the river’s rim of ice and any patches of sand. Behind an inundated row of grass tufts, I spotted a 6′-wide pocket of sand. The grass, frozen solid, did not give way when I plowed the bow into it. I backed and rammed it a second and third time before I scraped through and beached. I tied the painter to a branch and immediately gathered wood for a fire. I needed warmth and couldn’t waste time setting up the tent. My teeth were chattering so violently that I kept my mouth open to keep from chipping them. After the cold moved in from my arms and legs and reached my core, spasms gripped my midsection, making me grunt as if I’d been punched in the stomach. I got the fire going, fed it with twigs and driftwood until the heat seeped through my jacket and into my chest and arms.
In the middle of the night, long after my stomach had lost the warmth of dinner and the bottle of hot water in the foot of my sleeping bag had chilled, I lay awake and waited for morning.
In the morning, the ice that had coated the boat had not yet melted. Note the pool of solid ice at the base of the oarlock stanchion.
I didn’t get up at first light but waited for the sun to rise above the levee to the east and illuminate the tent. I stepped outside and got my first good look at the frost-dappled shore where I had landed. The patch of sand that I’d camped on was backed by a field of cobblestones, dark and wet with melted frost. In the middle of it, a dozen yards from the tent, stood a single leafless tree less than twice my height. Its shadow had kept the frost from melting, and the silhouette cast over the stones was a filigree of glistening white frost.
At Helena, Arkansas, I stopped to pick up mail. As with most stops in towns, I ran to minimize the time the boat was untended. The sidewalks of Helena were cracked and uneven; a protruding lip of concrete caught the toe of my rubber boot, and I was suddenly horizontal and airborne a good 3′ above the sidewalk with time enough to think about my landing. Pancaking on the concrete would spread the skin of my palms across the sidewalk like cold butter on lukewarm toast. That would put an end to rowing for a while. The previous summer I had learned how to fall and roll in an Aikido class and decided to use that approach for my landing. I curled one arm down from my Superman stretch and hooked it under my chest. When the outside edge of my hand made contact with the pavement, the rest of my body curled downward onto the concrete and rolled without skidding. (That evening I wrote a letter to my Aikido instructor thanking him for a self-defense technique that defended me from myself.)
At the post office I picked up two packages and several letters. My mother had sent a wool shirt long enough to tuck into my pants. My sister had sent a red polypropylene balaclava that made me look like a cloth doll with a ceramic face, but it was warm. I now had protection in the two spots that had always been vulnerable to the cold.
I camped at the Sunflower Cutoff, one of many places where the Mississippi had once served as an established border between states before its course was altered by flooding or by the U.S. Army Corps of Engineers. The border didn’t move and often left bits of one state on the “wrong” side of the river. At mile 625 (measured from the Head of Passes on the Mississippi River Delta) there used to be two great loops, the upriver one curving out and back 11 miles to the west and the downriver one 13 miles to the east. The Jackson Cutoff and the Sunflower Cutoff were dug by the Corps across the loops in 1942. The river began to flow through the new channels, but vessels still had to navigate the old route around Jackson Point (which became Island 65) and Island 66 until the cutoff was deep enough. In the years that followed, the old channel accumulated sediment and both of the islands joined the land that surrounded them, and neither is an island now. They are still marked on the charts as islands, 65 as Mississippi land in Arkansas and 66 as Arkansas land in Mississippi. All of the cutoffs combined have shortened the Lower Mississippi considerably since Bishop rowed it in the winter of 1874: it was 1,150 miles then; 953 miles now.
On December 17 I rowed 50 miles. The Mississippi River runs faster than the Ohio, but it’s more difficult to take advantage of the current. Sometimes the fastest flow wasn’t where I thought it would be, and I often wound up in slack water or back eddies. The wind had also been contrary most of the time, and I expended a lot of extra effort dodging tows.
The confluence with the diminutive Arkansas River was much choppier than the merging of the Ohio River at Cairo.
I made a short stop at Terrene Landing, an unpaved boat ramp in the middle of the woods on the Mississippi side, then on the right bank rowed by the mouth of the Arkansas River where its current crumpled the Mississippi up against the left bank. Chaotic waves popped up so steep that froth slipped hissing down the upriver faces. LUNA surged through the buckskin-brown chop, dropping off the crests and hammering her bow in the troughs but carrying me through dry.
At the end of the day, I pulled LUNA out at the Caulk Neck Cutoff. A truck driving on a road at the crest of the bank stopped. I walked up and met a man named Fred, who explained that the land here was the property of a private hunting club. I could see that it was a fancy one with an airfield across the road, two private planes, and a large lodge, which Fred said was “four or five hundred thousand dollars’ worth.” I told him I was hoping to get off the water for the day. “We’ve got some cabins a ways up the road you could use.” I didn’t want to get far from the sneakbox, and thanked him for the offer.
I shoved off and passed beneath the lodge on its perch at the edge of the bluff. A woman on the porch waved at me and went inside; a crowd of people at the window turned to watch me. I crossed to the river’s opposite shore and landed on one of the sandy beaches on an island called The Bar. As I gathered driftwood for a fire, I could see the lodge all lit up and filled with people who I imagined were sitting down to an elegant dinner of venison, duck à l’orange, and focaccia. I was content to heat a can of beef stew, spread peanut butter on a squished slice of bread, and dine next to a warming fire under a half moon and a star-strewn sky.
Most of the Lower Mississippi was far from any towns that would keep the sky lit all night long. The half moon and campfire kept the darkness at bay.
While I was setting the tent, still icy from last night’s frost, I listened to the weather radio. Another “mass of Arctic air” had crept across Canada and was headed my way. For the moment, the air was only cool, and I was warm; my shirt and jacket smelled like they had just come hot out of a dryer. I had burned most of a whole driftwood tree during the evening, and I let the flames retreat into the circle of embers before turning in.
There had been no frost in the morning and the tent fly wasn’t even damp so my hands wouldn’t get so cold breaking camp. I made good speed toward Greenville, Mississippi. In the last bend before reaching the town’s waterfront, I was taking advantage of the swift midriver current, making good progress, though it was always hard to know how much of that speed the river was adding. I looked over my left shoulder to check my course, and in the moment that I had my head turned, a red nun buoy, which had been pulled under by the current, erupted from the water just two boats’ lengths away. Its top rose 6′ above the water and the buoy came to rest, angled sharply upriver, and passed by me as if under power, with froth wrapping around it.
It was a red nun buoy like this one that shot up out of the river close to LUNA on the run into Greenville.
Greenville was once on the left bank of the Mississippi River on the downstream end of Bachelor Bend, but in 1933 the river cut across a narrow neck of land and bypassed the town. What is left of Bachelor Bend is now Lake Ferguson, which opens onto the river. It would have been a 4-mile row for me to get to the center of town, a chore I wanted to avoid. I pulled LUNA into the brush by a grain elevator, walked to the road, and put out my thumb. My appearance may have put off the first several drivers. It was cold and windy, and I walked about a mile before a man in a truck picked me up. He asked what I needed and bypassed his usual route to drop me off in front of the post office. After mailing the letters I’d written, I walked to a grocery store, hurried through the aisles dropping the usual staples into the cart—Fig Newtons, bread, cheese, apples, Grape-Nuts, crackers, V-8, beef stew—and a new item, canned barbecued chicken.
I hadn’t approached a local newspaper to offer my story for a while, and called the Delta Democrat-Times. A reporter named Alice met me in town. She got her story and photos, and I got a ride back to the boat.
I didn’t have to spend nights on board the sneakbox as I had on the Ohio River. Instead, I had plenty of space in my three-man dome tent to relax during the long evenings.
I rowed out the channel to get back on the river, where the wind had dropped a bit but was still good for a shove, and 10 miles downstream I arrived at a nameless island at sunset. Its upstream end was a long, low point of white sand. As I stood on the beach looking for a good place for the night, windblown sand whirled around my boots and made small dunes in their lee. Farther downstream I came ashore again near a small cluster of trees that would provide the tent protection from the wind. I set up camp as the last crimson light of the day bled into night. In a fire made of driftwood from the beach and dried limbs from the woods I cooked a can of beef stew. After dinner I was ready for sleep and filled the cookpot with river water to soak. I’d wash it in the morning. It was a cold night, but in the tent’s bubble of still air I slept well.
Retrieving my spoon from the solid block of ice in my cookpot would take a bit of effort. Melting the ice on the stove would consume a lot of fuel, so I had to chip it free.
When I emerged from the tent in the morning, I saw that the water in the pot had frozen solid. Through the lens of ice, I could see the silvery shimmer of my spoon against the carbon-crust remnants of last night’s dinner. As I dismantled the tent, I shook the ice from it. Flakes of ice fell from the inside walls, and the frost on the outside rose in a cloud of white powder. I stuffed the tent in its bag with bare hands to keep my gloves dry. The painter, strung taut between LUNA’s bow and a tree, was rigid with ice. I bent it into a coil of irregular triangles and set it on the afterdeck with the cookpot to thaw during the day’s rowing. Out on the river there were small patches of ice that were invisible until the waves in my wake lifted their edges. Clumps of brown river foam, as stiff as baked meringue, fractured when I hit them with the blades of my oars.
On a day that was so cold that my boots didn’t keep my feet warm, I put on extra socks and grocery bags.
I usually warmed up after rowing for a while, but as I traveled south from Greenville, my hands and feet stayed cold. I couldn’t do much about my feet with my rubber boots on. I took them off, put on another pair of wool socks, and put grocery bags on over them. I had brought pogies to keep my hands warm, but they were cumbersome when I had to switch from rowing to the many other tasks on board, so I wore my gloves.
North of Vicksburg, an olive-drab aluminum jonboat skimmed across the river to LUNA. The skipper, Dan, had been hunting ducks, and the limp bodies of a dozen ducks were lined up on the thwart ahead of him. For 4 miles we drifted together holding onto one another’s boats. The conversation turned to the history of the area. The Civil War had ended only a decade before Bishop rowed the Mississippi, but Dan talked about it as if it had ended last week. His face flushed red with anger about the calumny of the Yankees as we passed the wooded point where Union troops had come to do battle. He pointed across the river to the woods on the left bank. “Over there, Grant, the plodder, tried bringing his gunboats down the bayous. Course we was ready for him with guns around every bend. BOOM!” He motioned downstream where Grant tried to reroute the river around the Confederate stronghold at Vicksburg. He pointed to the opposite bank where Confederate guns fired upon Union soldiers as they labored in vain over their diversion canal. “BOOM, BOOM!” Dan’s cannon shots echoed in the woods along the shore.
Within a year of Bishop’s rowing by Vicksburg, a flood did in hours what General Grant’s troops could not accomplish in three months, and the Mississippi cut a new course. Vicksburg was left on a stagnant reach of the old riverbed. Soon afterward the Yazoo River was diverted to keep Vicksburg’s harbor open to the Mississippi.
The gloves I’d lent to a volunteer on the Ohio River came back to me with an invisible coating of poison ivy oil.
During the cold spell, something was going wrong with my left eye. It was very itchy, and my eyelid had swelled up so much that it was in a permanent squint. I stopped at a fuel dock on the right bank and explained my problem to the woman working there and asked if I could use the restroom mirror to take a look at myself. I looked a bit like I’d been in a fight, but I only had the swelling, not the bruising of a black eye. When I got back on the river it occurred to me that my gloves were likely the cause of the problem. At Payne Hollow on the Ohio River, I had lent them to a young woman who had been part of a crew cutting firewood for Harlan and Anna Hubbard. She must have pulled poison ivy off the logs. I had evidently been rubbing my eye with my gloves on and had gotten the poison ivy oil on my eyelids. I hadn’t been taking my gloves off when I had to take a leak either, so my eye wasn’t my only problem.
Christmas Day called for dressing in red—balaclava, pogies (rowing mitts), and spray skirt—and hanging a red wool stocking.
On Christmas Day, I stopped early to give myself time to set up a comfortable camp and relax for an afternoon. I found an island of sand and willows with a high perch for my tent with a clear view across the river. The sky was cloudless and the air still, and there wasn’t another person or a sign of civilization in any direction. And I was, as the Germans put it, wunschlos glücklich, wishlessly happy.
Fourteen years earlier, I had done my first solo backpacking trip at the age of 18. Since then, I had increased the challenges of my wilderness adventures, hiking farther, staying out longer, and graduating from summer to winter travel. I was driven to see not only what I was capable of but also if I enjoyed my own company. I continued on that same path with boating, and my cruise with LUNA was the culmination of 14 years of making my way under my own steam. None of the challenges I’d faced on the Ohio and the Lower Mississippi had ever made me wish I were anywhere else. On the bad days I had persevered, on the good days I sang.
As I drew near to Natchez, I had another jonboat encounter. Two of them buzzed up to LUNA; the first skimmed by, the second slowed down and passed alongside. There were three camouflage-clad men aboard about my age. I said, “Hi.” The helmsman replied, “You’re the craziest thing I’ve seen so far.” With a smile I countered, “I haven’t said two words and you’ve already decided that I’m crazy. It’s hardly fair.” That got him laughing. He promised to meet me at Natchez and buy me a drink before he zipped away. I stopped in Natchez for supplies and mail but never saw my jonboat acquaintances. On my way downstream, just past the Natchez-Vidalia Bridge, I rowed past a barge that was sticking up in the middle of the river: 175′ of it underwater, resting on the bottom, and 20′ angled up over the water.
The Lower Mississippi has no locks to restrict the number of barges in a tow. There can be as many as 42 rafted together—seven rows of six barges side by side—covering an area of nearly seven acres. Occasionally one gets loose, like this one just downstream from Natchez, and is lost.
For the next 26 miles there was nothing more to see than winding riverbanks blanketed with trees, a landscape I imagined was unchanged from what Bishop had seen 110 years earlier. I stopped for the night on the left bank of Dead Man’s Bend. Before I set up camp, I walked through the woods at the water’s edge to see what was in my new neighborhood. I found a shack high overhead, perched on 20′ stilts. It was built on the outside of the bend where tapered ridges of sand, left by rushing high water on the downstream side of every tree, looked like drifted snow.
I set my tent on a spot of high ground where a knot of trees held the soil together with the mesh of their intertwined roots. In the logjam heaped against the trees there was plenty of bone-white driftwood for my campfire. A white plastic bleach jug was lodged in the pile, and I brought it back to camp. I cut slits arranged like a capital H in its side, bent back the two flaps, and set a candle in the jug held to the bottom by a drop of hot wax. With the candle lit, the jug glowed like a fluorescent light bulb and, with the luxury of bright light, I spent the evening answering the mail I had picked up at Natchez.
The winter days were short but having fewer hours of daylight kept me from expending too much energy rowing and gave me time to enjoy sunsets over the river.
There was a thick cloud cover in the morning, and after I rowed 2 miles from camp I was in the fog. I kept going, but when I strayed too far from shore the banks disappeared, and without that reference it was as if the river had stopped moving and LUNA had been brought to a crawl. When I heard the throb of twin diesels of commercial traffic in the channel, I hurried back to shore. If the tows were moving, the fog was close to the ground and the skippers had a clear view from their wheelhouses, three stories above the river. I rowed the inside of Graham Bend, which wasn’t as slow as it could have been because an island hooked a lot of current to the inside.
Below the bend it was quiet, and I headed across the river into the fog. I thought that I’d be able to see the opposite bank as the one I left behind disappeared, but I soon reached a point where I could see nothing. I kept the wake trailing behind me as straight as I could, but I was still anxious. I scrambled for the compass in the seat box and pulled due west; I came up to the right bank quickly. After 27 miles I put in at the Fort Adams Landing, at the foot of a bluff, and discovered that many deer carcasses had been dumped over the bank. There were hooves and heads poking out of the sand, ballooned entrails, and white sheets of waterlogged hide. A fresh carcass in the water was wreathed in red. It had been raining most of the morning and my clothes were soaked, but this wasn’t a place where I wanted to stay to get warm.
I crossed the Mississippi state line into Louisiana and rounded the 9-mile bend that curves around Angola, the Louisiana State Penitentiary. I kept to the far bank. At the next meander, Tunica Bend, I heard an upbound tow through the fog. I stayed close to the right bank, and after it had passed and was so far away and so quiet that I would be able to hear any other traffic, I headed across. In midstream, I emerged from the fog bank and saw a church and a few buildings on the left bank, an unusual sight because, aside from the bluff cities and settlements, so much was hidden behind the levees.
The Como Plantation was a ghost town. But, while it seemed abandoned, there were no signs of vandalism so someone must have been taking care of it.
I pulled LUNA out on a sandbar downstream from Como Bayou, which was a creek I could almost jump over, and walked through the woods toward the church. A hard-packed dirt road led across a wooden bridge spanning the bayou to a gate where a sign said that this was the former Como Plantation, adjacent to what was once the river port of Brandon. The white clapboard church had a belfry capped by a small cross. Inside, it was gutted and empty except for a pile of large cardboard tubes for molding concrete piers.
The uninhabited Como mansion was an elegant building influenced by ancient Greek architecture.
Across the road were a general store and a brick-fronted Bank of Pointe Coupee, both empty. A few dozen yards from the church was the mansion of the one-time plantation. It had a clapboard piedmont supported by four slender fluted columns, two stories high, with Corinthian capitals that each had three tiers of curved leaves.
On the Ohio River, I didn’t have a single campfire. The Mississippi, with its sandy beaches and abundance of driftwood, offered the luxury of warmth at the end of a cold day.
The rain had eased to a drizzle but was still falling, so when I returned to the river’s shore, I stretched my tarp between two trees above the beach, set the tent under it, and got a small fire going to dry out my pants and other wet clothes. As a treat, for dinner I had two cans of beef stew.
I was up early and underway quickly—it was a Saturday and I wanted to get to the St. Francisville post office, 26 miles downriver, in time to pick up my general-delivery mail. There were a few cars and trucks, some occupied, in the landing’s parking area at the end of the road that led to town, and I wanted to leave LUNA in a less public place. I rowed up Bayou Sara, past a few derelict tugs and wrecks that were hauled half up on the banks, and came to a launch ramp that looked like a safe place. A mint-green pickup that I had seen near the ferry landing drove up and stopped at the top of the ramp. After I had tied LUNA to a tree trunk, I walked to the truck and the driver rolled down his window. “Didn’t I see you back at the landing?” I asked. He nodded, and we introduced ourselves. Johnson was waiting for a friend to come back in from duck hunting, but he had some free time and offered to take me to the post office. The post office, as I’d feared, had closed at 10 a.m., but Johnson’s mom had worked for the postmaster, Miss Clara. We drove to Miss Clara’s house on the edge of town, but she was out. Johnson then took me to a grocery store and parked to wait for me. As I entered the store, I realized that I’d left my wallet in the boat. Annoyed with myself, I returned to the truck, ready to give up. “How much are you going to need?” Johnson asked. I said about $15. He gave me $20.
Near the grocery store was a billboard featuring Rosedown Plantation where tourists could see 120-year-old azaleas. Johnson saw me staring at the sign and said his ancestors had lived there. Johnson was Black.
On the way back through St. Francisville, a well-groomed town graced with well-preserved Antebellum architecture and broad live-oak trees draped with Spanish moss, I asked Johnson if things had changed much in the town over his lifetime. “No,” he said, “it’s just the same. Place is run by Jim Crows. Jim Crows don’t want it to change, so they keep it the way it is. I’m heavy into politics, you know. It’s time for some changes.” He didn’t say what kind of changes, but it was easy enough to guess. His bitterness was well-restrained but evident in what he repeated several times as he drove me back to the boat: “It’s time for some changes.”
When we got back to the ramp, I asked Johnson to wait a moment while I retrieved my wallet to repay him. I appreciated the loan and valued even more his kindness and his willingness to share a glimpse of what life had been like for him in the South.
Eleven miles downstream from Bayou Sara, I climbed to the top of the bluff to a plow-corrugated field. Near a lone pecan tree in the middle of the field, cradled in the soil, I found a lead Minié ball, speckled white with oxides, that may have been fired during the Civil War. Bishop wrote that the bullets gathered in Vicksburg after the war amounted to 300 tons of lead. One-hundred twenty years after the war the harvest of lead still continues and for some in the South, the war has not yet been put to rest.
From Bayou Sara I rowed 24 miles to Solitude Point and set up my tent among trees that leaned precariously over the river. After the sun had set, the glow of Baton Rouge lit up the night sky to the southeast.
Solitude Point was the last quiet camp I had on the Mississippi River. At Baton Rouge the banks were a tangle of steel pipelines, storage tanks, and refining towers hissing plumes of steam. The river strained through the pilings beneath the long loading docks. The depth of the channel increased from 12′ to 40′, to accommodate the oceangoing tankers and freighters that steam 230 miles up the Mississippi from the Gulf of Mexico to Baton Rouge. For a small rowing boat, Baton Rouge was a 5-mile-long gauntlet of wharves, ships, tugs, and barges.
Baton Rouge is 230 miles upriver from the Gulf of Mexico, but it is a deep-water port crowded with ships from around the world, many at anchor, like this ship from Bombay, awaiting their turn at the docks to load or unload cargo.
The air that hung over the river was thick with the smell of diesel exhaust, and there was a constant drone of immensely powerful engines. Tugs backed and filled, their superstructures swaying heavily as they bullied barges into position. The froth of prop wash swirled out white around their sterns. Several of their captains, hard-edged men in visored caps, opened the doors of their wheelhouses to stare at me, and some even pointed cameras my way. One traced spirals in the air at the side of his head with one hand and pointed at me with the other. Another was more direct.
“Are you crazy?” he shouted.
“I must be,” I hollered back.
“Awright!” He jammed a fist into the air.
I rowed a strong, steady pace, churning a wave at the bow that hissed like frozen French fries plunged into hot oil. On the stern of a tug headed upstream, a roustabout with sledgehammer pounded out my cadence on the steel deck.
After I cleared Baton Rouge, there was still wilderness between the levees east and west where I could camp.
The following day I rowed by Plaquemine too early for any stores to be open. I made a stop mid-morning at Bayou Goula, where a church steeple and plantation-house chimney peeked over the levee. I walked 1⁄2 mile along the levee from where I left LUNA. In a neighborhood separated from the plantation manor by vine-choked woods raucous with birds, the houses were in sad shape. Clapboards that had rotted away revealed the backsides of interior walls. Some houses showed traces of paint, but most of the wood siding was bare, gray, and fissured. And yet there were brightly colored curtains in the windows, and the sound of music seeped through the walls. I flagged down a car and asked the driver, a young man, about stores. Without hesitating he told me to hop in and took me to the grocery store and then back to the levee.
About 15 miles downriver from Bayou Goula, I looked over the bow and saw twin flashes of reflected sunlight about a mile away. It had to be another rower, the only one I’d seen since I set out from Pittsburgh. I pulled hard to catch up and closed the distance quickly. The boat was an outboard skiff with a windshield, not much longer than my sneakbox, with gear heaped all over the boat. The oars had scraps of plywood added to extend the blades, and the nails were bent over and hammered flat against the plywood. I pulled alongside and said, “They tell me only a fool would row down this river.” This didn’t evoke a smile, even from one fool to another. The boat was, somewhere under all the junk, aluminum, painted white and red. I pulled my oars in and grabbed the gunwale. “Where are you from?” I asked. “Seattle,” he said. I introduced myself and shook hands with James.
He was middle-aged and had lived in Woodinville, Washington, a half-hour drive from my hometown. He’d been married and had a welding business. “My wife went kapooey, my business went kapooey, and I went kapooey. I made a contract with God then.” He sold his truck to a man in Idaho, and made arrangements with the buyer to send payments to James as he traveled. James bought a bicycle (which was now lashed on the skiff’s foredeck) and pedaled east. A few weeks out he called the man in Idaho; there had been a forest fire in his area, and things looked pretty grim. James told him not to worry about the money he owed, James didn’t want it. The next time James talked to him, the man in Idaho said, “You won’t believe what happened.” “Oh, yes I will,” James replied, “I’ve been praying for you.” James told me, “The fire came up to that man’s property and went around it; his place was untouched in one of the biggest forest fires Idaho’s ever had.”
James had been traveling since September and looked haggard. His eyes were bloodshot and thickly wet. The Coast Guard in St. Louis had noticed him and asked to see his life jacket. “I don’t need one,” he told them, “I’ve got this,” and showed them his Bible. When they pressed him, James showed them the PFD he carried. “They wanted to stop me being dangerous to my own safety.”
On the gunwale was a square of rusty steel that used to be a paddlewheel that James turned by bicycle cranks and a chainring amidships, but he’d given up on that and had started rowing. Behind the windshield was a pile of orange sleeping bags set out to dry after the morning’s dew. He slept aboard the boat under a canopy that pulled back from the windshield. In the bottom of the boat was a matted coil of multicolored braided 1 1⁄2″ line too large to be of any use on a small boat; it appeared to me that he slept on it. Trailing from the stern at the end of a short line was a huge white plastic bottle, empty now, but James said it would hold 25 gallons of fresh water when he reached the Gulf. At first, he had been called to go to New Orleans, now it was to the Gulf of Mexico or the Bermuda Triangle: “I don’t know what I’ll find when I get there or if I’ll die on the way. It’s whatever the Lord wants.”
The current carried us into Smoke Bend and through a line of eddies that set us spinning like dancers. As the sun circled around our heads the bill of his baseball cap cast a shadow that licked across his face. James said he had talked to grizzly bears and a moose during 40 days in the wilderness. “You know how dangerous a moose is,” and he spread out his hands to indicate a huge rack of antlers. “He stuck his huge head in my tent smelling me. Animals aren’t afraid of me. People are.” James told me that he had studied under a Japanese samurai and after eight years of study he was able to defeat his master and to tell who was coming up behind him and what good or evil they intended.
In the midst of our conversation, we both looked upriver at the same instant. There was nothing on the river and there was only silence. Then I could hear a low thrumming. We both had spent enough time on the river to sense tows before we were aware of hearing them. Despite our obvious differences, the Mississippi had given us something in common that few people share. I wanted a picture of James and his fantastical boat, but I could not bring myself to put a camera between as. We shook hands and pushed off. “Remember me” was the last thing he said before turning his bow downstream. I was close to tears as I watched him fade into the distance over LUNA’s stern. We had traveled the same river, but it had brought me joy and James pain. I didn’t take my eyes off his boat until that last flash of his oars was erased from the horizon by the shimmering heat in the air.
At Donaldsonville, I was taken to the store and back by a man named Tal, who worked at a barge fleeting operation. He told me of the recent grounding of the stern-wheeler MISSISSIPPI QUEEN. Striking a barge, she had a 25′ hole torn in her hull but that wasn’t enough to sink her. The captain had run her onto a bar around the bend and she was taken off and down to New Orleans for repair.
I made camp on the downstream side of Point Houma with my tent set on a narrow perch above the river. At the door of the tent, I cooked my dinner, a two-can mix of beef stew and barbecued chicken. When it was hot, I brought the pot inside and zipped up. Before settling down to eat I smeared my company of mosquitoes against the walls. Only one had already had its fill of my blood and left a 2″-long black streak on the blue nylon wall.
Later in the evening, I heard a noise like an avalanche of empty oil drums. I unzipped the door and peeked out over the river. A few dozen yards away a ship was sliding downriver but all I could see was its superstructure, like an office building on the move. The ship was moving stern-first with three tugs rumbling at its port flank. There was little to see of the tanker, only the lights above the sheer. The hull was invisible, just a long hole in what had been an illuminated skyline. The tugs spun the tanker end for end in the middle of the river and then pinned it against a dock on the far shore. I crawled back into the tent, smeared a new batch of mosquitoes on the walls, and snuffed out the candles for the night.
At the town of New Sarpy, 25 miles upstream from New Orleans, there were several boats tethered to the banks, and the men aboard them were making long sweeps in the river with nets on hoops at the ends of long poles. When I pulled ashore next to one of the boats, the fisherman in it kept his rhythm while watching me come ashore. He had a full dark brown beard, and his hair was bound by a red bandanna. He was bringing up five or six quivering silver fish with almost every sweep. “Where you come from?” he asked. “Pittsburgh,” I said. He introduced himself as Tom and nodded to Joey, his 11-year-old cousin, who was seated by a fire of broken wooden crates. Tom had already filled five of the bentwood bushel baskets in his boat. When he asked if I’d seen a lot of dip nets upstream and I’d said I hadn’t, he was pleased. He would get a better price for the shad. When I headed out again on LUNA and drifted past Tom, still intent on his fishing, he asked, “Where you come from again? Pigsburg?”
Jane Cunningham
I arrived in New Orleans in the rain and was taken home, with LUNA, by my father’s cousin and his daughter.
In the last 20 miles to New Orleans, I wove in and out of anchored freighters from Hong Kong, Singapore, Bergen, and Tokyo, but most of them were from Monrovia. I arrived in New Orleans in the early afternoon of a bright New Year’s Day. I brought LUNA ashore for a break at the home of my father’s cousin, Joe, and his daughter Jane. They took me and LUNA home with them so I could rest up, spend some time with them, and see a bit of the town.
The Cunningham household in New Orleans made for a very pleasant stay for both me and LUNA.
Jane Cunningham
After my break with relatives in New Orleans, I resumed rowing in a drizzle.
Jane Cunningham
In a goodbye salute to my New Orleans family, I stood up in LUNA , making my boat look even smaller.
It was raining when I set out again three days later. In less than a mile I had rowed from a drizzly overcast into a dense fog that blanketed the New Orleans waterfront. Rowing against the current to hold my ground ahead of a tethered barge, I peeked around it to see if the river was clear alongside of it. There was only fog. I let the river carry me into the ash-gray murk.
“You wanna die you just keep doin’ what you’re doin’,” came an amplified voice from a shadow above the decks of the barge. Suddenly I could see a tug bringing another barge in against the wharf. The tug’s skipper spoke again over the loudhailer. “Why don’t y’all set a spell until you can see where you’re goin’.”
I retreated upstream and threaded my way through the pilings to a debris-littered slope of sand between wharves. An hour later the fog appeared to have thinned, and I crept back out to the river. I drifted, listening to the noises around me. I slipped by the stern-wheeler DELTA QUEEN and along the gray-green flanks of a freighter. The intensity of the noise ahead increased. Above the fog I could see three lights on a vertical staff, the mark of a dredge. I pulled quickly against the current to keep from being drawn into the web of cables and pipelines that usually surrounded a dredge.
I called out to a crewman aboard a tug that was made fast to the pilings of a high wharf and asked if I could wait out the fog with them. I spent the rest of the day with him and his crewmates aboard SANDRA KAY watching TV and snacking in the galley.
After being squeezed between a tugboat and a row of pilings, LUNA survived with only a bent brace for the oarlock stanchion; it was easily straightened.
I felt the tug shudder, and one of the crewmen bolted out the door as the rest of us followed. A tug had come alongside SANDRA KAY and pushed her stern into the pilings, closing the gap where we had tied LUNA. The sneakbox was pinned and it took three of us to dislodge her. A brace for the starboard oarlock stanchion was bent, but there was no other structural damage. With LUNA secured across the tug’s stern, we returned to the galley.
After LUNA was nearly crushed between SANDRA KAY’s starboard side and the wharf pilings, the crew and I moved her to the tug’s stern.
The fog lifted at 11 that night and the navigation lights across the river streaked the full width of the black water with red, white, and green. After SANDRA KAY got a call to escort a tanker up from the Mississippi Delta, I cast off from the tug and paddled into the forest of steel pilings beneath the Canal Street Wharf. With loops of line from bow and stern, I tethered LUNA in a space between four pilings. I cleared a space in the cockpit and spread my pads and sleeping bag in the bottom of the boat. Though I had rowed fewer than 7 miles since morning, the day had left me in a condition to sleep through anything. I crawled into bed wearing my life jacket and fell asleep jostled by the syncopated rhythm of the waves beneath the wharf.
In downtown New Orleans, the pilings under the Canal Street Wharf made a refuge comfortable enough to get a good night’s sleep.
At dawn, amber sunlight slanted under the wharf and woke me. After I had stowed my bedding and gathered the four mooring lines, I slipped out from the thicket of pilings to the river. Drifting with the current past the three tall black-slate-shingled spires of the St. Louis Cathedral opposite Jackson Square, I set the oars in the locks and pulled the last mile to a canal that would take me beyond the banks of the Mississippi River and out into the wide waters of the Gulf of Mexico.
Christopher Cunningham is the editor of Small Boats. Some of the passages here were taken from stories I wrote for Nor’westing and Small Boat Journal in the late 1980s.
If you have an interesting story to tell about your adventures with a small boat, please email us a brief outline and a few photos.
Last year, I moved to a new home where, for the first time, I have a garage. The extra sheltered space got me thinking about buying a small skiff for rowing and sailing, but my new one-and-a-half-car garage posed some storage limitations. The overhead door would prevent me from hanging a boat directly above the car. There is floor space off to the side of the parking area, but my family needs that for bicycles and storage. I began to scheme about a way to lift the boat off the car and slide it sideways to hang over the storage area. What came to mind was a scaled-down version of the overhead bridge cranes used in factories to move heavy materials around.
Photographs by the author
The lifting mechanism is attached to a beam that has a pair of ball-bearing trolleys attached on top. The trolleys run within the slot of the Unistrut channel fixed to the ceiling joists. Once the boat is raised to the desired height, the ball-bearing wheels allow it to be manually pushed sideways along the channel.
Having purchased a 14′ wherry that would fit the overhead space, I looked for lift hardware. There are several boat lifts designed for garage storage, but nothing that could move a boat both up and over. I considered barn-door hardware and stumbled across similar rolling hardware made by Unistrut for its slotted-steel channels, which are commonly used in construction projects for structural supports. The company offers ball-bearing trolleys that run inside the strut.
The trolleys are fastened to the ends of the upper beam . The black and orange lifting line runs across the top of the beam and down around 1″ sheaves. On this end, the working end of the line is led through a cam cleat.
The channel comes in 10′ lengths, which is long enough to move the lifted boat from the car off to the side of the garage door. I installed two channels about 5′ apart. Fastening the channels directly to the overhead framing required a low-profile fastener that won’t block the trolleys. SPAX ¼″ washer-head Powerlag screws span the slot well and have plenty of strength. The four-wheel trolleys I bought have a load rating of between 300 and 600 lbs, and each of the Powerlag screws has a tensile strength of 1,600 lbs, so my lift system would easily support my 100-lb boat.
I positioned each lag screw at the end of the oval fastener openings in the channel to maximize contact between the screw head and the strut. After I inserted the trolleys into the channel, I fastened a block of wood in each open end of the channel to prevent them from falling out.
The lifting line is set up in a loop. At the standing end, it is fastened to an eyebolt below the trolley. From there it leads down to the lower beam, around a sheave, along the lower beam to a second sheave, back up to the first of two sheaves in the upper beam, along the center channel, and finally back out to the cam cleat.
The trolleys have flanges that are fastened to glued-up plywood beams constructed to create a center channel for two 1″-diameter sheaves for ¼″ line and the line that runs horizontally between them. For each of the two lifts, the line is anchored to an eyebolt fixed to the bottom of a trolley on one end of the upper beam, then led down and around the two pulleys in the lower beam, and then back to the upper beam and around its two pulleys, creating a loop. The loop, with its four sheaves, provides the same mechanical advantage as a block-and-tackle with two sheaves. A cam cleat mounted on the end of the upper beam provides control of the line for raising and lowering while a horn cleat on the lower beam provides a secure belay for the line.
The beams are constructed of glued-up plywood, leaving a center channel for the pulleys and line. Seen here is (left) the line as it comes down from the eyebolt and passes around the sheave on its way to the far end of the beam and (right) the end of the line as it is led back down from the cam cleat on the upper beam to be secured—for safety—to the horn cleat on the lower beam.
I raise or lower one end of the boat at a time and find it best to work in 12″ increments, alternating between the bow and the stern. For safety’s sake, I tie off to the horn cleat after each move as a backup to the cam cleats. The boat usually remains level while being lifted but when I lower it, one side tends to descend faster than the other so I re-level the boat after I cleat the line. Once the boat is at the right height, I can slide it laterally with a shove or two and, while the motion of the trolleys is not silky smooth, the ball-bearing wheels roll easily in the channels.
Raised and moved to the side, out of the way of the overhead door, the 14′ wherry is safely stored overhead, leaving floor space for family bikes and other gear.
The boat is stored at the back of the garage where it is off to the side of the overhead door’s tracks. Before I can lower it onto the car’s roof racks, it needs to be moved sideways along the channels, and then shifted forward on the lift’s beams. Once the weight of the boat is held by the roof racks, I loosen the lift lines completely so that the lower beams can be slipped aft and off the stern of the boat. Moving the car forward a few feet helps get the forward beam under the stern. If my boat is on a trailer, most of this maneuvering is unnecessary.
The lift allows me to store my boat where it doesn’t occupy space needed for other things and to load and unload the boat by myself. As with moving any heavy object, the key is to move slowly and methodically. I’m always happy to have help whenever it is offered and with an extra pair of hands, using the lift is a breeze.
Paul West lives in a townhouse in Seattle, Washington, and manages capital projects for parks and recreation facilities. He rediscovered rowing a few years back and now rows every week at The Center for Wooden Boats. Paul hopes to camp-cruise with his wherry next summer.
You can share your tips and tricks of the trade with other Small Boats Magazine readers by sending us an email.
When it comes to contemporary wooden boat construction and repair, epoxy is essential. As versatile as good marine epoxies may be, no single formula is best suited for every job. We are big fans of Thixo Flex, a flexible variant of TotalBoat’s Thixo, a thickened epoxy.
Thixo Flex has several favorable attributes: it can be used on oily woods, dry, damp, or wet surfaces, and a wide array of materials including (according to the Total Boat website): “fiberglass, aluminum and other metals, glass and ceramics, and most plastics, including ABS, PVC, HDPE, LDPE, and polycarbonate.” It can be sanded, drilled, primed, painted, and is resistant to vibration and shock.
A flexible epoxy becomes especially useful when joining dissimilar materials. Dissimilar wood species, for example, will expand and contract at different rates when affected by moisture or temperature changes. An epoxy that cannot move with such variations may lead to failed bonds. Thixo Flex—fully cured—creates a bond very nearly as strong as regular Thixo while offering 15 percent more elongation.
Photographs by the authors
A high-thrust caulk gun makes it easier to push the thickened epoxy components through the mixing tip.
We have used Thixo Flex with excellent results on almost all elements of boat construction and repair, from trunk bedding mahogany to oak, attaching teak knees to sapele plywood, fir frames to mahogany plywood, and solid mahogany rubrails to sapele plywood. It can also be used to make fillets and to wet-out epoxy-compatible fiberglass cloth or woven roving. It takes a little longer for the thickened epoxy to soak into the cloth, but it has better gap-filling qualities than does thin epoxy. At 72°F, Thixo Flex has a working time of 75 minutes, can be sanded in 7 to 10 hours, and is ready to take a strain in 24 hours.
Inside the static mixing tip, a series of baffles fold the white and brown components back on themselves until they emerge tan and fully blended.
Thixo Flex’s resin and hardener are contained in a single cartridge and dispensed simultaneously with a high-thrust caulk gun. The components are blended as they flow through a mixing tip, so there is no need to measure resin, hardener, and fillers. The tip of the cartridge can be cut to several diameters to allow for precise applications on small components to larger amounts in laminations that require a lot of epoxy in short order. The cartridge system does come at a higher price than an epoxy with resin, hardener, and filler in separate containers, but that cost is offset by being able to dispense only the required amount needed on each small project—there is no guessing on how much epoxy will be needed, and thus no wasted product. The amount of epoxy remaining in the mixing tip is usually significantly less than would be left over from conventional mixing and stirring in a cup. When we are done with a task, we store the cartridge with the old tip left in place; when we come to the next project, we simply replace the old tip with a new one. Thixo Flex has a shelf life of one to two years.
With its easy dispensing and ability to bond such a wide range of materials and to create lasting bonds between dissimilar materials, TotalBoat’s Thixo Flex now occupies a permanent space on the shelf of our little workshop.
Audrey, aka Skipper, and Kent mess about with their 15 boats in the Tidewater area of Virginia. Their adventures are logged at www.smallboatrestoration.blogspot.com
Thixo Flex is available from TotalBoat in a 250ml cartridge with two mixing tips for $33.99.
Is there a product that might be useful for boatbuilding, cruising, or shore-side camping that you’d like us to review? Please email your suggestions.
Brothers Ian and Justin Martin, the owners of Adirondack Guideboat since 2012, build elegant wooden and composite guideboats. They also make cherrywood oars for the guideboats, in the traditional style, which calls for pinned oarlocks that secure the oars and prevent feathering. They recently applied their skills to making spruce oars for boats that use conventional horned locks. These are offered in three lengths: 7′, 7′ 6″, and 7′ 10″. Justin recently shipped a pair of the 7′ 6″ oars for me to try.
Photographs by the author
Begging to be used: The new spruce oars from Adirondack Guideboat are designed for horned oarlocks—instead of pinned guideboat oarlocks—and accommodate rowers who prefer to feather their oars.
Each oar’s loom is made of two pieces of 1-1⁄4″-thick Maine-grown spruce that run the full length of the oar from grip to blade tip. Two laminates on either side of the loom together form a blade that measures 24″ long and 6-3⁄8″ across at the widest part. The glue lines are tight and straight and the shaping smooth, fair, and symmetrical. It took me a while to notice that care was taken to match the laminates—the patterns of the grain in one oar are mirrored in its mate, a pleasing indication of the level of attention to detail. The face of the blade is shaped with the obvious curve along its length and a subtle curve across its width that’s about 1⁄8″ deep.
The blade’s slender profile is well suited to getting into the water cleanly at the catch. Despite their delicate appearance, the blades are strong enough for hard rowing and large enough for good power.
The center of the blade is just 9⁄16″ thick, providing a thin profile for minimal fuss getting into and out of the water. The throat is 15⁄16″ wide, which gives the oar a delicate appearance, but the 1-1⁄2″ depth has the strength required for hard rowing. Each oar weighs close to 3 lbs, and the difference between them is only a little over one ounce. The oars are finished with four coats of brushed-on spar varnish.
At the leathers, the oars are a perfect fit for standard #1 horned oarlocks—loose enough for easy feathering while still being contained within the lock’s opening; slide the oars inboard, and as soon as the leathers are clear of the lock, the oars can be lifted up and out.
The handles are simply tapered out from the looms and left unvarnished for a comfortable, sure grip, even when wet .
The 7′ 6″ oars were well matched to my 14′ Whitehall and a pleasure to row with. The 10″ leathers offered a wide range of gearing to meet different conditions. Close to the buttons is the spot for speed on a downwind run, the middle is suited for calm to moderate conditions, and close to the outboard edge lowers the gearing for working to windward. With the Whitehall’s 4′ 3″ beam at the center rowing station, the grips have about 12″ between them when the buttons are next to the locks, and a 3″ overlap when the outboard ends of the leathers are in the locks. For most of my rowing, done mid-leather, there was a comfortable 2″ space between the grips.
The 10″ sewn-on leathers allow the oars to be moved in and out in the locks to change the gearing to match the rowing conditions. The glued-on buttons keep the oars from sliding out through the oarlocks.
The glued-on leather buttons kept the oars from slipping out through the locks and, with a good rowing technique, don’t need to ride against the locks. To get the best out of the oars, the leathers should be well lubricated (I used tallow) to eliminate friction in the locks that would interfere with effortless feathering.
The blades, with their slender profile, slipped neatly into the water at the catch and came free at the finish just as effortlessly. A hard pull during the drive didn’t make the blades flutter; they stayed where I planted them. The looms had enough flex to soften a strong, quick catch and kept a slight bend through the drive, as they should, and then released that stored energy at the finish. I never felt that I was applying more power than the oars could manage.
The looms will bend during a fast catch and a hard drive, a feature that eases the strain on the rower and gives the oars a lively feel.
My backing stroke can be a little less graceful than my forward stroke because I don’t use it as often, but the blade profile made me look good by being so easily moved in and out of the water. And I could effectively move the Whitehall sideways by sculling one blade well below the surface, where the thrust generated is close to horizontal rather than downward. The blade was well behaved, and I didn’t have to keep a tight grip to control it.
The Martin brothers have taken a welcome step by expanding their focus beyond guideboats and guideboat oars. For those of us who enjoy oars that feather, their new spruce oars are pretty to the eye, light in the hand, well behaved in the water, and inspire good rowing.
Christopher Cunningham is the editor of Small Boats Magazine.
The Spruce Oars are available from Adirondack Guideboat for $399 (7′), $439 (7′ 6″), and $479 (7′ 10″). Options include traditional leathers, plastic Douglas-style collars, and cherry blade tips.
Is there a product that might be useful for boatbuilding, cruising, or shore-side camping that you’d like us to review? Please email your suggestions.
I was raised in the tropical paradise of Jamaica and was just a child the first time my father took me sailing on a Hobie 16. There was something magical about the way it glided through the water while I relaxed on the trampoline, joyful under the summer sun. My favorite part was being refreshed by the cool ocean spray when my dad steered into the waves.
Jan Anderson, Jan’s Marine Photography
Rules established by the International Hobie Class Association keep all Hobie 16s equal, so sailing skills alone determine which crews are the fastest.
In the 1950s, Hobie Alter, designer of the Hobie 16, made a name for himself in surfboards and was the first to make them with fiberglass over foam cores. When he turned his attention to sailing, the results were no less revolutionary. He introduced his 14′ sailing catamaran, the Hobie 14, in 1967. Created as a fun, affordable, and lightweight boat, it was dubbed “the people’s boat.” Within a few short years of development, the Hobie 14 was quickly adopted into the racing scene around the world and became the largest class of catamaran. The Hobie 16 was introduced in 1971, and now, over a half-century later, it is the most popular of all the Hobies. More than 135,000 Hobie 16s have been sold, the design was enshrined in the now defunct American Sailboat Hall of Fame, and it thrives as a world-renowned racing class.
Almost identical to the original 14, the Hobie 16 is built for two people and is equipped with a second sail and dual trapezes so both crew members can hang their weight well outboard. It is easy to rig, launch, and sail. With its 148.2-sq-ft main and 55.1-sq-ft jib (both fully battened), and its lightweight construction coming in at 320 lbs, the Hobie 16 can reach speeds approaching 24 knots in ideal conditions. Cutting neatly through waves upwind and surfing them downwind, it thrives in breezy and wavy conditions.
Jan Anderson, Jan’s Marine Photography
The asymmetrical hulls—straight and vertical on the outboard side and curved inboard—create lift, and as the windward hull rises, the lift generated by the leeward hull diminishes the leeway made by the catamaran.
The Hobie 16 has asymmetrical hulls that are nearly straight on the outside and curved on the inside so that the downwind hull, the one most deeply immersed, provides lift to windward. The shape of the hulls eliminates the need for daggerboards and meets one of the designer’s primary requirements: the ability to sail directly off and onto the beach. It’s one of the many reasons the boat is loved by so many.
Jan Anderson, Jan’s Marine Photography
The anodized aluminum mast rotates and has a teardrop cross section, features that improve the airflow across the mainsail.
When setting up the Hobie 16, the most difficult task is raising the mast. While this can be done singlehandedly, I have never been successful. A crewmate, and even a third pair of hands, makes it easy. Once the mast is up, it is stabilized laterally by the shrouds while the forestay is connected to the bow bridle. Fortunately, after doing this process once, it is easy to master.
When rigging the sails, I usually start with the jib, attaching the tack to the chainplate connected to the bridle between the bows of the boat. I then attach the jibhead to the halyard with a bowline, clip the five hanks to the forestay, and thread the jibsheets through the travelers and cam cleats. After attaching the halyard shackle to the mainsail, hoisting the main is fairly straightforward but does benefit from a second set of hands to feed the luff into the mast track. Each rudder connects to the stern with a pin and a split ring.
Courtesy of Hobie
The Hobie 16’s ability to be sailed off the beach was a major factor in its rise of popularity.
The light weight of the Hobie 16 means that I can singlehandedly push and pull it across a beach. I will typically hoist the sails on land, push the boat into the water, jump on, and as soon as I’m aboard, I’m sailing. Returning, I drop the sails while in the surf and then pull the boat onto the beach. Hobie hulls can handle rough landings, and many people sail their boats directly onto the beach—even while sheeted in and driving hard. The 16 can also easily be launched from a trailer at a ramp.
Underway, the Hobie 16 is very sensitive to tiller movement, and oversteering may often lead to an accidental tack or jibe, or send you straight into irons. However, it’s easy to get out of irons, even when singlehanded, by backing the sail and directing the tiller to the same side as the sail until the bow turns away. The boat is then quick to pick up speed again.
For recreational sailors, the trampoline provides comfort and relaxation, and for advanced sailors it prevents bruises during high-speed tacks and jibes. While spray rarely comes over the bows because of the way they cut through the water, do not expect to stay dry because the trampoline does not offer protection from spray coming directly from underneath.
Jan Anderson, Jan’s Marine Photography
The Hobie 16 is designed for a crew of two. Even with both crew members on the trapezes, it’s possible to fly a hull. Sailing with one hull out of the water eliminates the drag created by the wetted surface and increases the potential for speed.
Going fast and flying a hull, as you might expect, can lead to a capsize. I’ve never capsized a Hobie without getting dropped into the water, so be prepared to go for a swim. But righting a Hobie 16 is easier than it might seem, indeed, the boat will frequently right itself because the trampoline acts like a sail when the wind blows under it, allowing a crew and skipper to just climb back aboard. On the rare occasion a Hobie 16 does not right itself, I first loop the righting line (which is attached to the base of the mast) around the windward hull. Then my crew and I stand on the leeward hull, lean back, and pull the boat upright. Because the Hobie 16 is designed to be crewed by two people, when sailed solo on breezy days it is quick to capsize and difficult to right alone. Regardless of the occasional dip in the ocean, every Hobie 16 sailor, from beginner to racer, exhilarates in the rush of excitement that comes from sailing this fun-packed multihull.
Because the Hobie 16 can reach very high speeds, especially on windy days, the boat can be overpowered and reefing the sail is important. Reefing the mainsail is easiest when done on the beach. Five reefing lines are required: a tack downhaul leads from the lowest eye on the luff to the eye at the base of the mast, a clew outhaul leads from an eye on the leech down to the boom, and three reefpoints secure the excess sail around the boom.
Jan Anderson, Jan’s Marine Photography
When the wind speed reaches about 12 knots, both crew members often take to the trapezes.
While the Hobie 16 is popular with thrill-seekers, it is mainly used as a summer recreational boat. Even on quiet days, the Hobie sails smoothly, especially when using light-wind techniques such as shifting crew weight forward to reduce drag or to leeward to heel the boat and angle the mast so gravity can give the sails their airfoil shapes.
Ultimately the Hobie 16 is a versatile boat that can be easily rigged for brief outings, day trips, or multiday adventures loaded up with camping gear and food. Despite being only 16′ 7″ in length, it is surprisingly spacious and, although designed for a crew of two, can comfortably accommodate three adults or a family of four. It is a great boat for family outings with kids; on glassy days the trampoline is a very comfortable place to take a nap or gaze into the water at the marine life. Indeed, if you’re not into racing, bring plenty of sunscreen, water, and snacks and just enjoy cruising under the summer sun.
For me, the joy of Hobie 16 sailing comes with breezy days: when I’m hiked out on a trapeze, I feel like I’m flying.
Zoe Knowles is a lifelong sailor and a published author. She was raised in Montego Bay, Jamaica, where she was first introduced to dinghy sailing through local youth sailing camps and went on to become the youth sailing instructor at the Montego Bay Yacht Club. At the age of 16, she was the youngest sailor to race in the 2015 Pineapple Cup, an 811-nautical-mile race from Fort Lauderdale, Florida, to Montego Bay. Now 24, Zoe is an academic working in higher education in Florida but often returns home where she still cherishes sailing with her dad.
In 1901, Thomas Fleming Day, who founded The Rudder a decade earlier, conceived a boat that would bring ocean voyaging to the common man. Simple enough to be built by amateurs, small enough to be singlehanded, and big enough for long passages, the Sea Bird yawl still beckons those with a sense of adventure.
She was originally a centerboarder, but Day soon added a deep keel for ocean passages, including an Atlantic crossing he made in 1911. With The Rudder’s publicity, plans, and instructions, the design soon caught hold. Hundreds have been built. Day’s vision turned out to be unusually lovely for a hard-chined hull, in plans formalized by C.D. Mower and Larry Huntington. Boats of this type have cross-sectional shape consisting of nearly straight lines rather than the svelte curves of racing craft. Sea Bird’s sweeping chine curve rises high forward and aft and just kisses the waterline amidships. The shape is complemented by her gaff-headed yawl rig. In 1981 WoodenBoat, working with Mystic Seaport, had the plans redrawn by Dave Dillion (see WB No. 43), and the seven-sheet set of plans, which includes the deep-keel option, is still available through The WoodenBoat Store.
Joel Page
At 25’ 7 1⁄2” overall, the centerboard version of the Sea Bird can—with effort—take to the water each spring from a launching ramp, with her 1,300 lbs of ballast added later.
I first saw a Sea Bird in a photograph published in a book I’ve long forgotten. Taken from astern in a calm harbor, the picture captured the distinctive transom, which was intriguing to draw and immediately made me imagine building the boat. Some years ago, sailing into Robinhood Cove, Maine, I saw a boat that instantly brought me right back to that photo. She had a rightness about her. This particularly fine Sea Bird, I learned, was built by Alex Hadden in nearby Georgetown.
Hadden launched his centerboarder in 1988. He had come by a marconi rig complete with masts, sails, rigging, and hardware, from a Sea Bird that had been cut up, and he planned to build the boat for sale. The project launched Hadden’s business, but not the way he intended: somebody with an aged Sea Bird hired him for a reconstruction instead. It was his first commission, but he ended up keeping the boat he hoped would be his first sale.
After sailing the boat for years, Hadden has concluded that his 361-sq-ft marconi rig (which is not included in the plans set) would be best suited to the deep-keel version, and the original gaff rig, with its 383 sq ft of area but a lower heeling moment, would be a better fit for the original centerboard version. He compensated for the marconi-centerboard combination by using 1,300 lbs instead of 1,000 lbs of internal lead ballast to keep her on her feet. He has considered changing to gaff rig but loves the simplicity of the triangular sails.
Joel Page
Hadden has devised A-frame sheer legs for stepping his masts before launching.
There’s that word again: simplicity. If Hadden has learned one thing about the Sea Bird in more than two decades, it is to make things ever simpler. During a recent deck replacement, he eliminated both a large bridge-deck hatch and a foredeck hatch. He removed his built-in VHF radio, together with its masthead antenna and wires, in favor of a handheld model. His red and green side lights are fitted into shroud-mounted blinds that take a little time to reinstall every year, but “It’s less obtrusive than pretty much anywhere else I can think to put them. And they work better up there, if you’re actually out sailing at night.
“The whole effort was to make it as simple and easy to paint as possible, because that’s all I do is paint,” Hadden said. He has strived to remove deck fittings. “If it’s not absolutely necessary, I don’t want to even look at it. You’re either sanding or you’re reminded of when you were sanding.”
The Sea Bird seems to scream it like a gull’s cry: Simplify, simplify. It’s a good antidote to life’s increasing complications.
Hadden launches his boat each year from a trailer, which is very unusual for a 25′ 7 1⁄2″ LOA boat that displaces some 6,000 lbs. It takes some effort. For example, he raises the rig while still ashore, and his bread-pan-sized lead ballast castings have to be transferred to the boat by skiff, one at a time, in what has become an annual ritual. But he pays nothing for haulage. He has the vast satisfaction of independence.
Having a deep keel would free up cabin space, true, but at a price: “There goes your hauling out on the trailer. There goes going happily wherever you want without navigating, which I enjoy. I can explore, and you really don’t have to worry, you’re just going to hit the centerboard.” He once poled the boat up a creek too narrow to turn around in, and next morning poled her out stern-first. He tells me this as we sail within what seems an arm’s reach of the cove’s rocky shore. “You wouldn’t be doing this if you converted this to a keel boat.”
Jonathan Taggart
With low freeboard, a proportional low-profile cabin trunk has everything to do with the Sea Bird’s appearance and also its function, giving the helmsman a clear view forward.
In the light and fluky breeze, she responded well to occasional puffs. She answered the tiller easily, with the feel of a larger boat. She tacks easily. Hadden has made only one change to the rigging: he brought the jibsheets inboard of the cockpit coaming instead of making them off to cleats on their outboard faces. “I brazenly cut holes in the coaming, just so when you are heeled over you can control that from the inside.” She ghosted along, only surrendering when the ebb made it clear that the current, and not the wind, was in control that afternoon. The Yanmar diesel carried us the last few hundred yards to the mooring.
“My favorite times are when it’s kind of dreary out, windy, and you’re going through the chop and the waves are hitting the bottom of the jib and streaming down,” Hadden says. “That’s when I’m saying to myself, ‘Okay, this is like the paintings.’” She handles best in about 15 knots of wind. Her mizzen is fairly large for a yawl, so it gets reefed first. In high winds, Hadden douses the jib and mizzen and sails on a reefed main alone.
Tom Jackson
Spartan accommodations encourage a simplicity of lifestyle that matches the boat’s overall theme.
The boat doesn’t pound in waves, and Hadden has actually found advantages in the hard chines. “People say, ‘Oh, it’s a hard chine,’ and that’s one of the reasons I think people don’t bother with it. But this particular boat, if you got rid of the chines, you’d lose it. That’s the best thing about it, is the chine line, the shape it makes. If you rounded that, it’d be fine, probably, but you’d lose a lot of the look. But when it gets rough out, t’s throwing the waves and all the water off to leeward. It’s a great thing.”
Hadden used 1″ Atlantic white cedar planking over oak backbone timbers and frames. “Structurally, these sawn frames are great. They’ve got big screws in them, they’re really deep, there’s a lot of them. I can’t imagine anything falling apart.” After it takes up, the hull does not leak. His original deck did, though, because the tongue-and-groove pine moved a lot and cracked the paint of the canvas. He replaced it with plywood sheathed in Dynel set in epoxy to better keep the water out. He couldn’t bear, however, to part with the traditional canvas sheathing over his coach roof, which fared much better because it was planked in fine cedar.
Jonathan Taggart
The bridge deck provides comfortable seating and makes the cockpit a sociable size.
Some Sea Bird builders made unfortunate design changes, especially involving the trunk cabin. For Hadden, even his new deck altered the purity of the boat’s profile perceptibly. “This is only a quarter of an inch lower, but I can tell the difference when I sit there in the window and look out at it. It’s not much. I got over it. But people who haven’t done it much, they’re always going, ‘Oh, who’s going to see an inch, inch and a half, two inches.’ So in the Sea Birds, a lot of them, the cabins were inches higher and wider.” Some extended the cabin aft, eliminating the bridge deck and with it the most comfortable place to sit topsides. Some clumsily squared off the cabin and used oversized portlights. Some changes were more drastic: “In the one we rebuilt, the stem was plumb, and had a big knuckle. The boat’s not drawn anything like that.”
The cabin, dominated by the centerboard trunk, provides rudimentary shelter, not comfort. In reality, it isn’t any smaller than those of many other small cruisers, a type that invites clever and inventive tinkering.
For example, because the chine knees intrude into the bench seats, Hadden fitted removable boards between the seat edges and trunk sides to make more comfortable sleeping platforms. Like many builders, Hadden is rife with ideas for greater interior comfort and practicality. But he mostly takes short trips these days, so those cruising solutions can wait. For now, he’s content to simply sail, just the way Thomas Fleming Day imagined it all.
Thomas Fleming Day had ease of construction and limited expense in mind when he conceived the hard-chined Sea Bird yawl, yet the centerboarder proved herself in 1,000 miles of cruising in her first season in 1902. Redrawn by Dave Dillion for WoodenBoat in 1981 to rejuvenate interest in the type, the plans include the original gaff-rigged mainsail and ample detail for amateur construction.
Sea Bird Particulars: LOA 25′ 7 ½”, LWL 20′, Beam 8′ 1 ½”, Draft, board up 4′, Draft, board down 1′ 11″, Sail area (original gaff rig) 383 sq ft, Ballast (internal) 1000+ lbs, Displacement ~6000 lbs
Harry Bryan’s Rambler 18 is a handsome lap-strake runabout designed to carry the whole family for a daylong outing —exploring the coast or perhaps visiting friends on an offshore island. Though just 18′ in length, she’s big enough to take everything a couple would need for a week’s camp-cruise. Weighing 900 lbs, it should trailer easily behind the family car and launch without causing undue strain on the engine.
Bryan specifies a 9.9-hp, high-thrust Yamaha outboard motor, which gives better fuel economy than a larger engine. The boat’s hull design trades speed over the water for a gentle ride through the water. While the large-diameter propeller will push Rambler at speeds up to 8 knots, the optimum speed for cruising is about 6 knots—fast enough to reach your destination, but slow enough to enjoy the scenery.
The bow’s narrow entry slices through the water so the boat doesn’t pound—softening the ride through the chop. There are no white knuckles and no hanging on for dear life that one might have experienced in the past with the slapping of a planing hull. The hull’s after sections have no deadrise, providing some lift. The hard chine aft adds stability, both at the dock and at speed. The keel has significant rocker; it rises to the waterline at the transom, reducing the wake and making the hull more fuel-efficient than heavier boats at slightly over hull speed.
Typically an 18-footer, powered by a 90-hp outboard, carving circles in a lake at full throttle, will use up to 8 gallons per hour, burning through roughly $32 in one hour at today’s price of nearly $4 a gallon. The Rambler 18 will carry you to new waters and back, running all day at 6 knots, burning about half a gallon per hour, or just $16 for an eight-hour day.
Robin Jettinghoff
A spacious cockpit will seat six and accommodate all their gear for a day on the water.
The Rambler’s hull has a sweet sheerline accentuated by a softly sweeping coaming that curves aft from a raked windshield. Bryan built the boat upside down starting with an oak keel fastened to a stem and forefoot of black locust. The frames are attached to the keel next. No molds are needed as the ½” copper-riveted lapstrake planking can be fastened to the 7 ⁄8″ × 2″ sawn oak frames. All other fastenings are bronze. The hull has a spray rail at the stem just above the waterline to help keep the cockpit dry. This rail extends aft about 6′ to where the chine becomes visible. The hull sections change from a smooth curve at the bow to a near right angle at the transom.
Bryan says this boat could be built using glued-lap plywood. Another option would be to use sheet plywood for the topsides; however, the bottom would have to be built of two layers of laminated plywood strips in order to achieve the correct shape. While underwater the bow’s entry angle is fine to cut through the chop, above the chine it flares outward, to deflect spray. To add comfort for the crew, the windshield has large windows to port and starboard for protection from spray. The cockpit has two spacious seats forward for the driver and a passenger. Benches running fore-and-aft behind these seats will comfortably hold four adults facing each other thwartships. This arrangement allows the crew to walk down the hull centerline, unobstructed by seats, without disrupting the boat’s trim. An accessible cuddy under the foredeck will hold all the gear they’ll need for the day or a weekend. The transom is high, and forward of it is a splash well. Both of these features help prevent the boat from being swamped by a following sea. The motor tilts into the splash well when it’s not in use. The transom’s sweet tumblehome section echoes the equally sweet curve of the sheer.
John Marples
The Rambler 18 has a splash well in front of the motor to help prevent the boat from being swamped by a following sea. The motor tilts into the well when not in use.
Like many of Bryan’s boats, the Rambler 18 just invites you to touch her, to rub your hand along her, to climb aboard. As you sit in the driver’s seat and grab the wheel, everything about her is effortless. As you pull away from the dock and throttle up to speed, everyone aboard can anticipate a comfortable ride. Passengers will be able to talk easily to each other over the relatively quiet engine. If your destination is a beach, Rambler’s shallow aft sections allow her stern to be brought right to the water’s edge, once the outboard is kicked up, for unloading of passengers and their picnic and swimming gear.
Bryan has designed three other Ramblers—at 16½’, 20′, and 23′ long. All three of them carry inboards, and the larger models have covered wheelhouses. His Handy Billy, available in 18′ and 21′ lengths, is another outboard launch design that is seaworthy, comfortable, and fuel-efficient. The Handy Billys are built with batten-seam construction and carry their outboards in a well. The Handy Billy was conceived to offer a low-powered alternative to the average 68 hp of North American boats. The Rambler 18 continues this theme, but with the dramatically lower power needs of a displacement hull.
Martha Bryan
Bryan chose a 9.9-hp high-thrust outboard motor, which has a larger propeller than a standard motor. It will move the Rambler 18 at 8 knots.
Bryan conducted his sea trials for the Rambler 18 in Buzzards Bay, Massachusetts, in May 2012. He reports that she easily ran against a 4 knot current in the famously swift waters of Woods Hole, and out into the choppy bay beyond. The four adults aboard that day reported a safe, dry, and comfortable ride.
Later in the season, I joined Harry for a ride in the Westport River in Massachusetts. The wind was light but there was a strong current. Rambler was easy to maneuver, turning smoothly in tight circles, accelerating and decelerating without significant changes in trim. Our top speed was about 8.5 knots, but most of the time we easily cruised at an economical 6 knots with two adults aboard. There were five of us aboard for a short run, and her performance did not change noticeably with the added weight.
Martha Bryan
Rambler’s maple windscreen sweeps aft on both sides of the cockpit, protecting passengers from spray.
Racing around at top speed is not the only way to travel in small powerboats. The Rambler 18 is for people seeking comfortable cruising, not the exhilaration of speed. Riding in this boat is a pleasant and relaxing experience. But the boat is also large enough and powerful enough to handle modest currents and choppy seas while keeping everyone aboard dry.
On his website, Bryan has a quote from boat designer Andre Mele, whose book Polluting for Pleasure caused quite a stir in the recreational powerboat world almost 20 years ago. Mele said the recreational boating industry has been selling adrenaline and glory to the males, and white knuckles to the wives and children, for years. The Rambler 18 is a stable, comfortable, and economical alternative to this mass-market phenomenon.
Plans and completed boats are available from Harry Bryan, Bryan Boatbuilding, 329 Mascarene Rd., Letete, NB, E5C 2P6, Canada; 506–755–2486; www.harrybryan.com.
Subscribe For Full Access
Flipbooks are available to paid subscribers only. Subscribe now or log in for access.
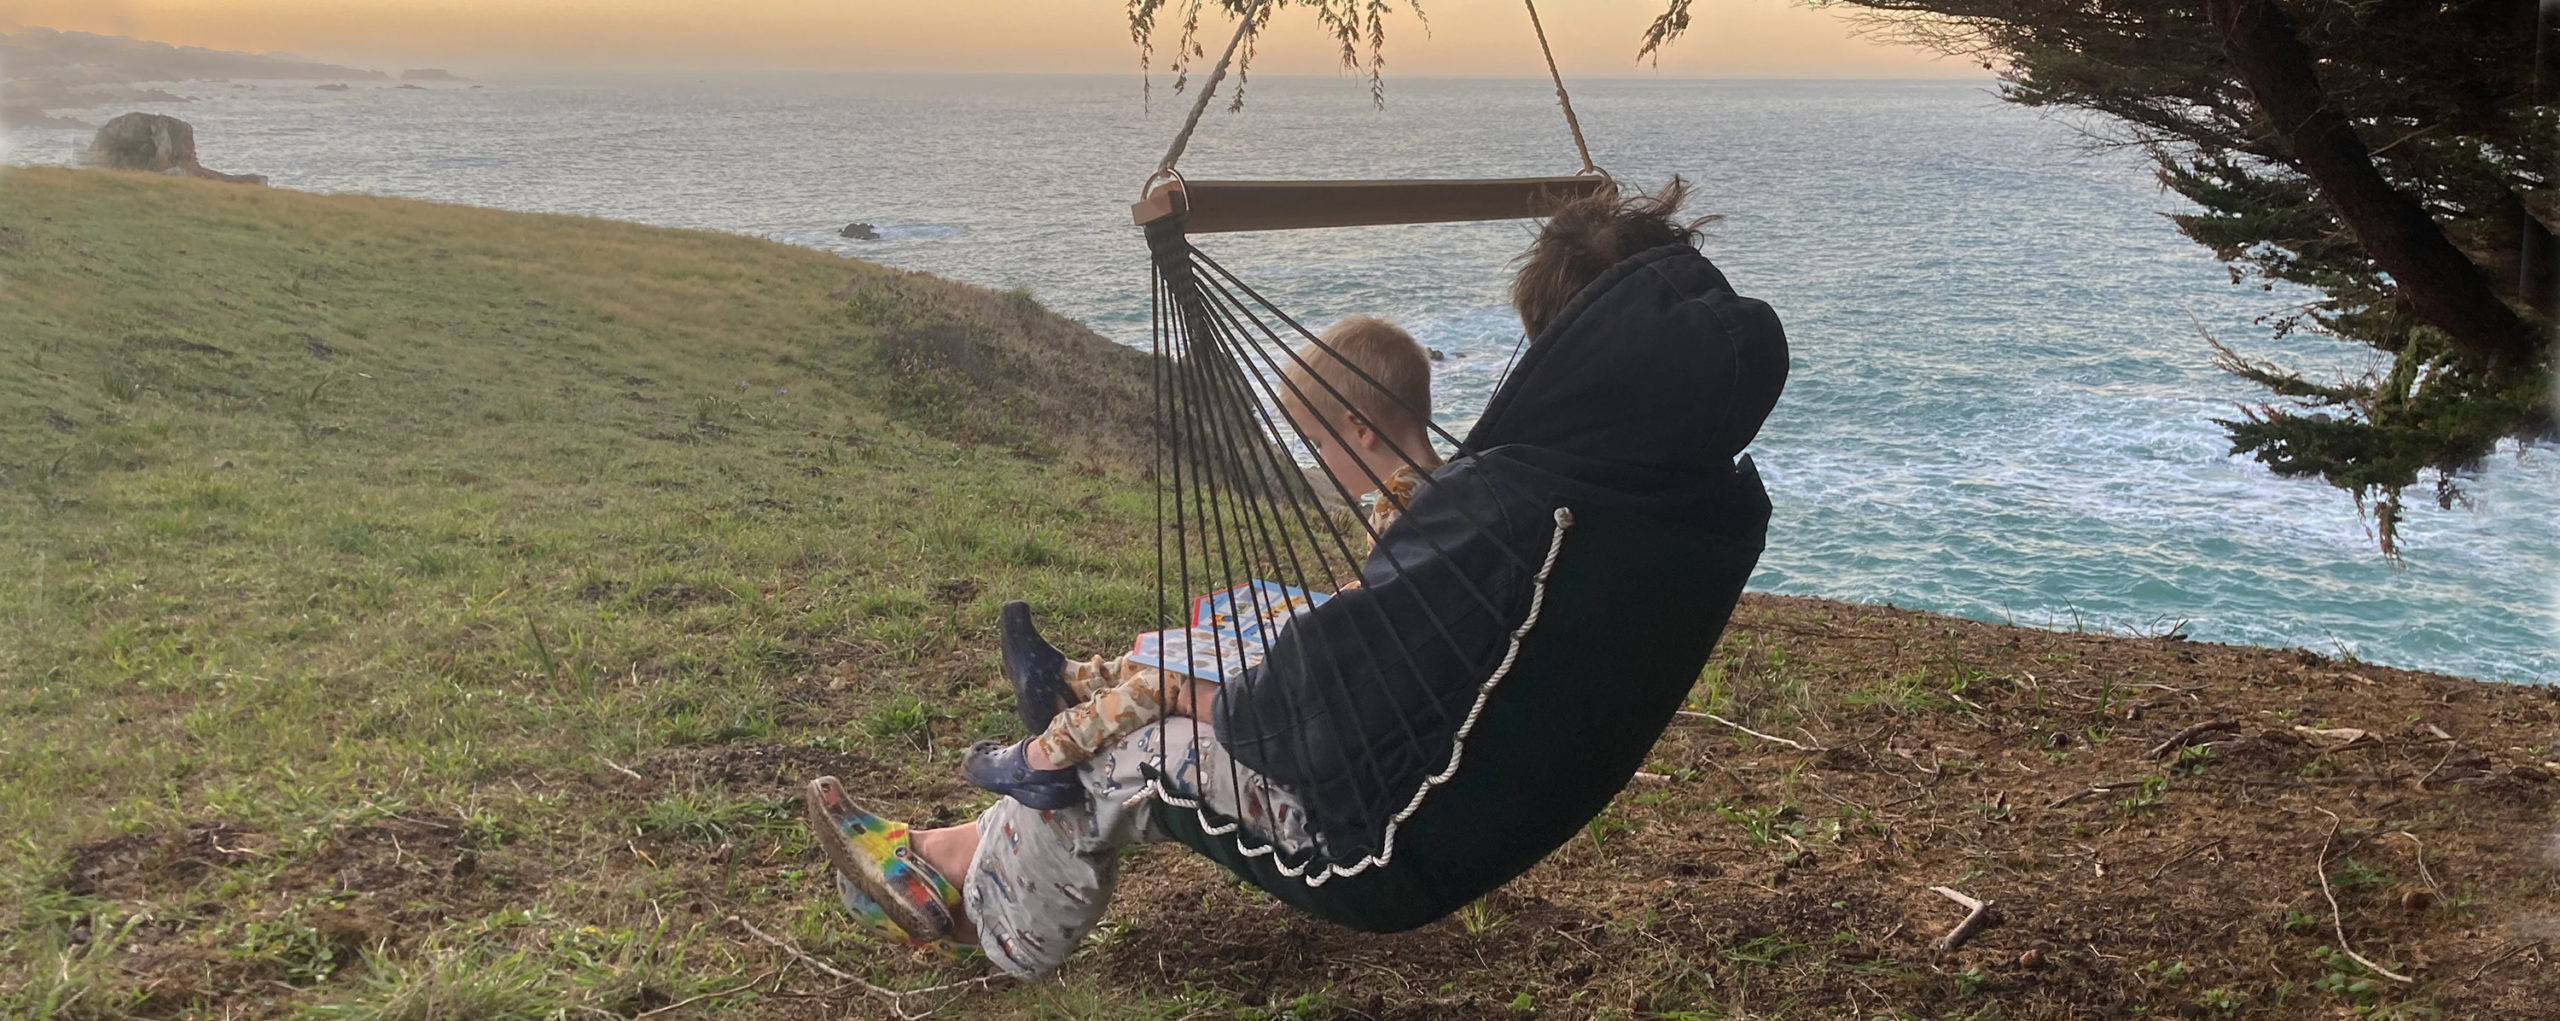
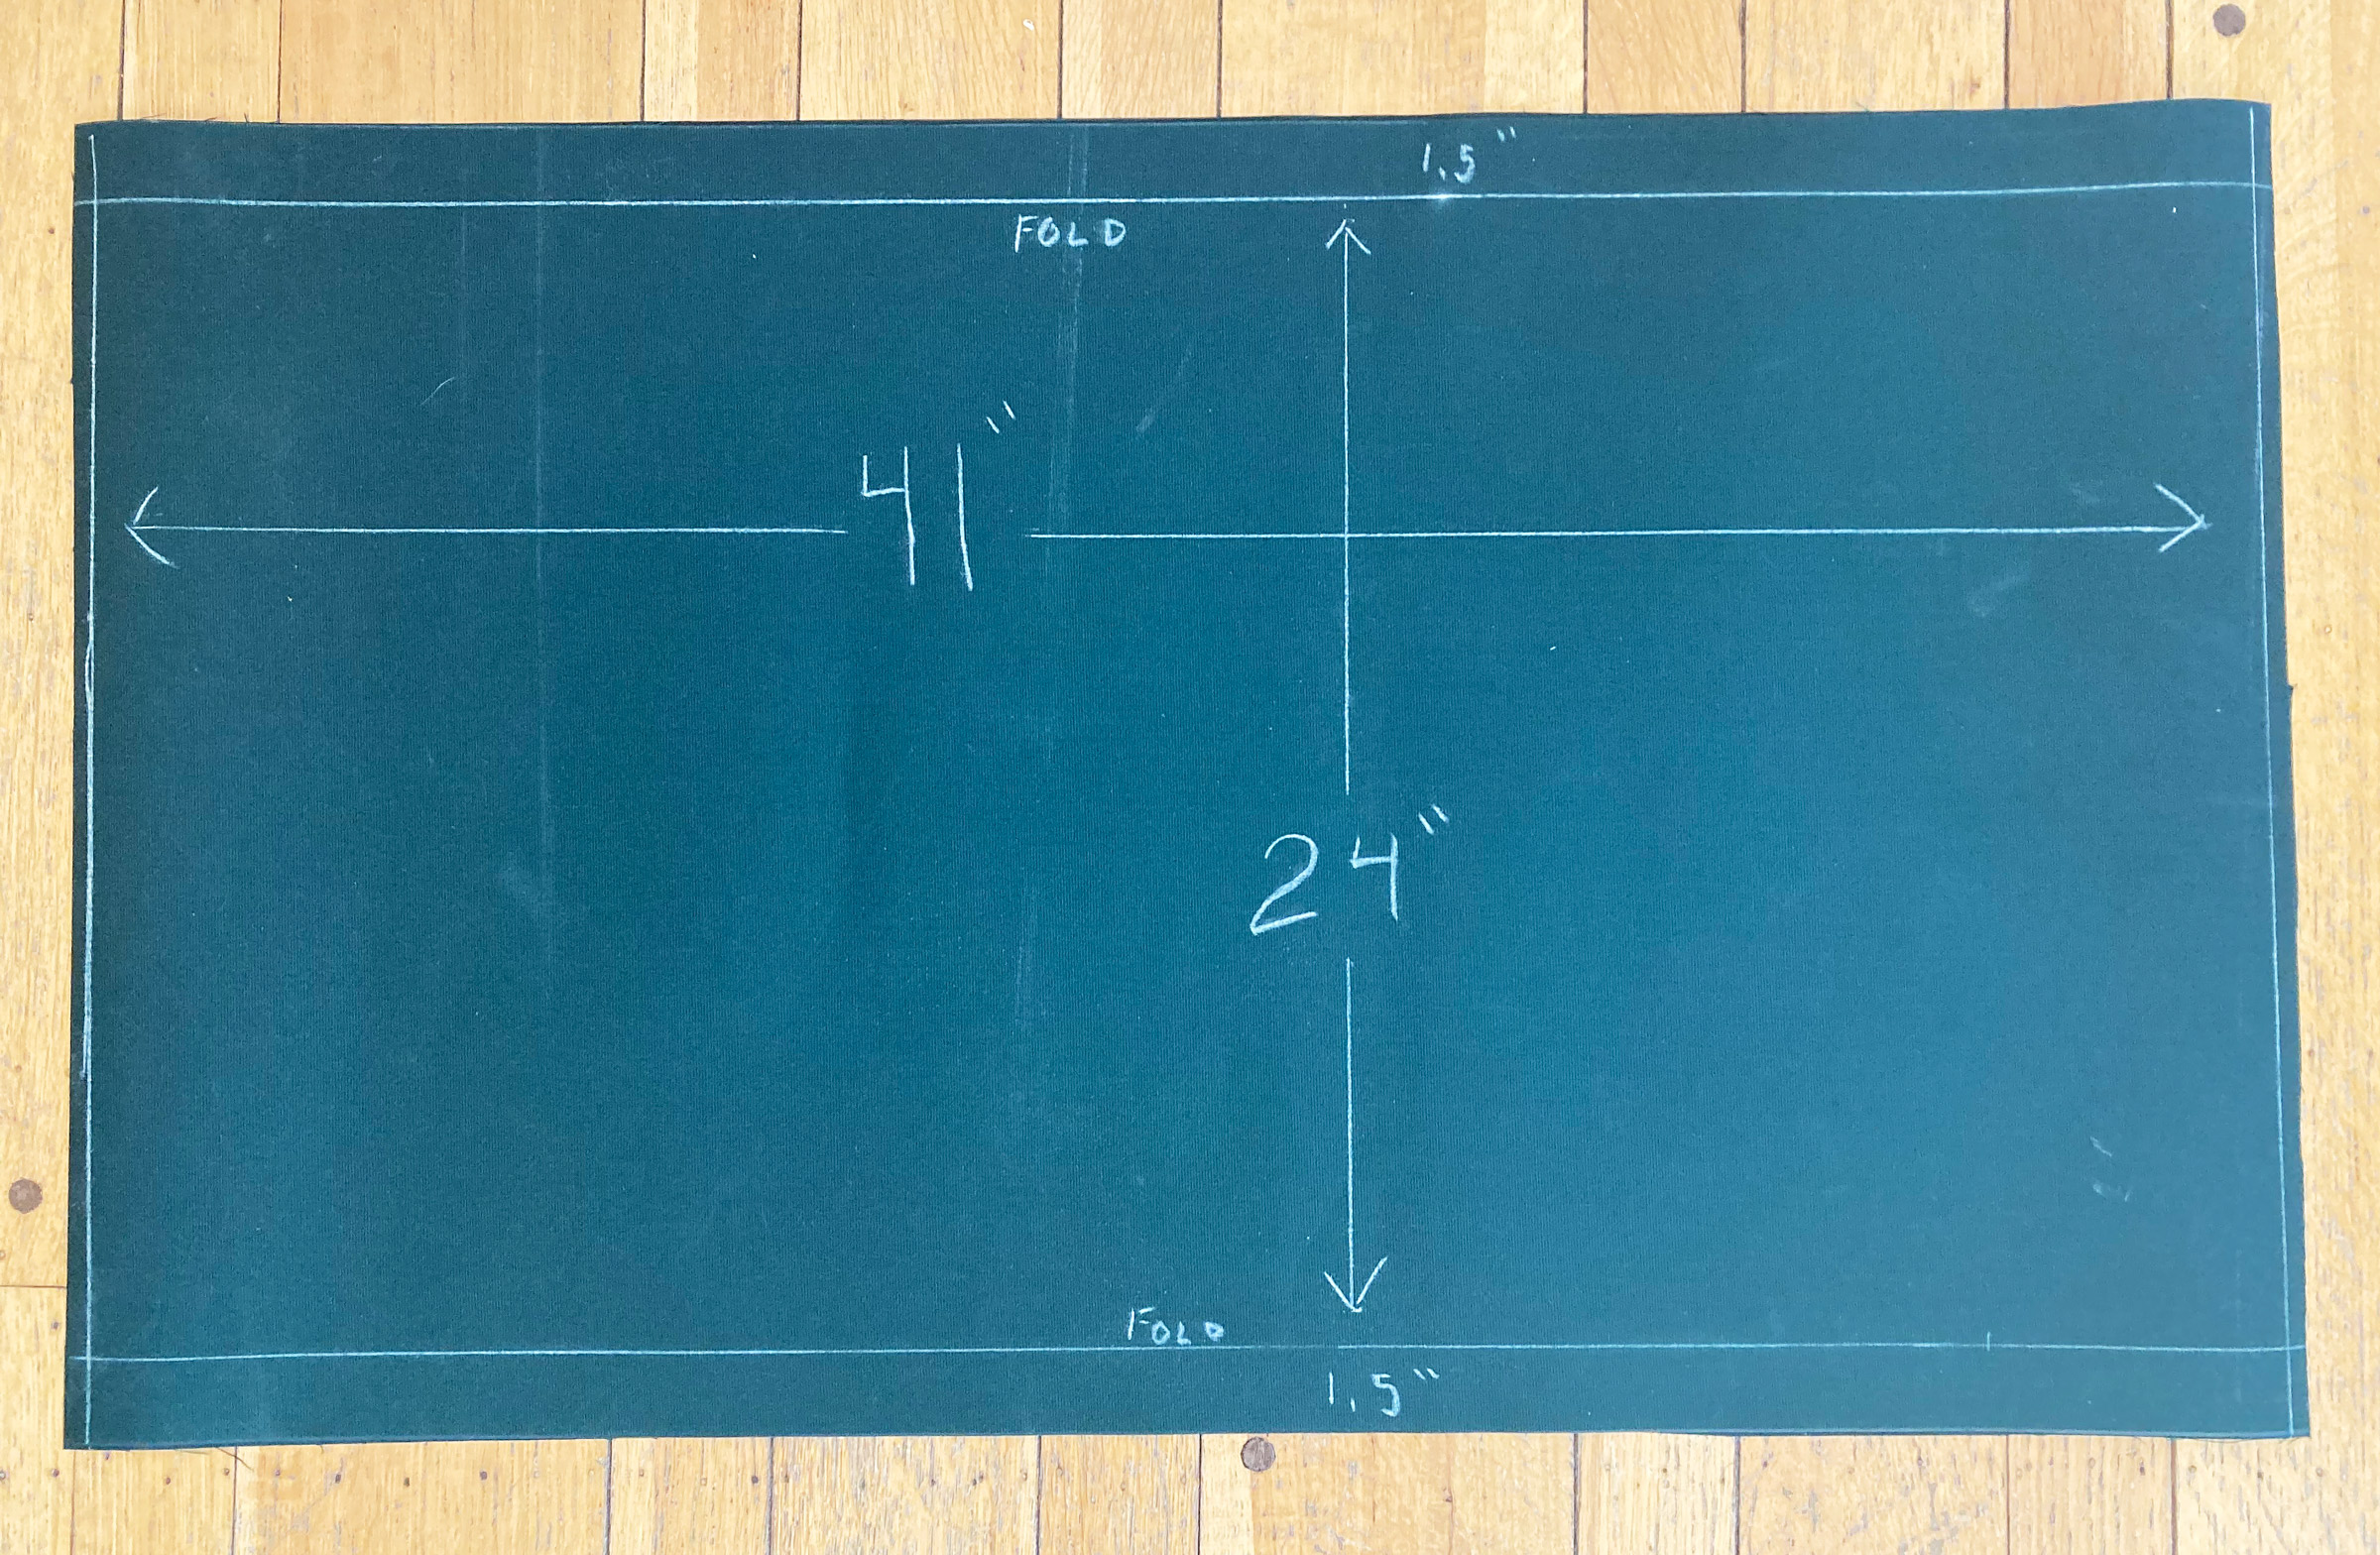 Photographs by the author