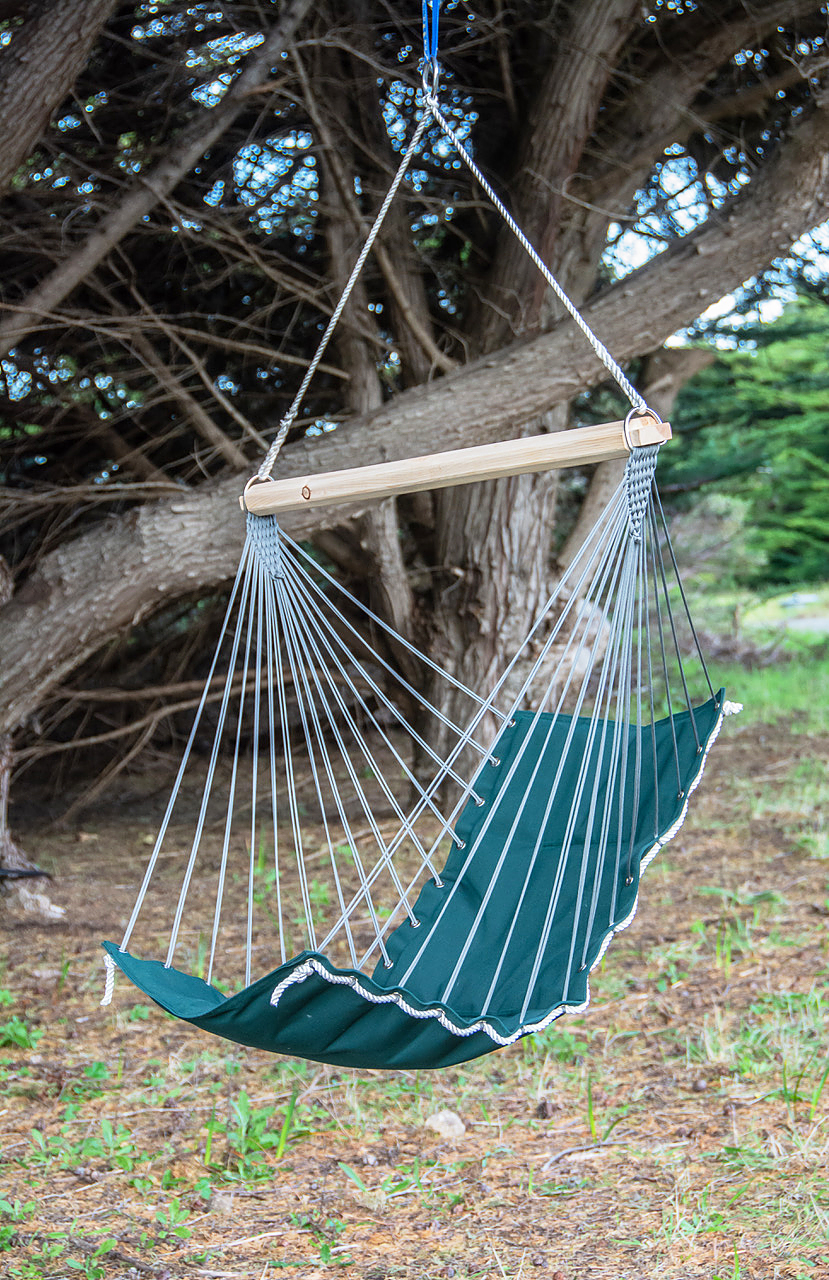
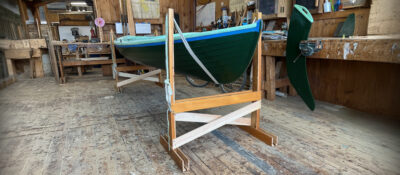
Here’s a luxurious recliner you can take on your next camping trip. It is wonderfully supportive, perfectly comfortable, small to stow, relatively easy to make, and looks more polished than just about anything you can buy. The canvas and cordage skills you’ll use making it can extend to other kinds of hammocks and small-boat accessories. Your biggest challenge will be clearing your companions out of the chair when you want to sit in it.
Materials:
1-1⁄4 yards of roughly 60″-wide canvas. (For chairs that will stay outdoors at home year-round I use Sunbrella.)
28 #0 spur grommets
About 200′ of paracord
16′ of 3⁄8″ three-strand nylon line
Two 2″ D-rings
One 2″ round ring
A stick of wood roughly 2″ × 4″ × 38″
Heavy-duty sewing-machine thread
High-loft polyester batting 23″ × 40″
Tools:
Sewing machine
Scissors or rotary cutter
Grommet hole punch and setting die
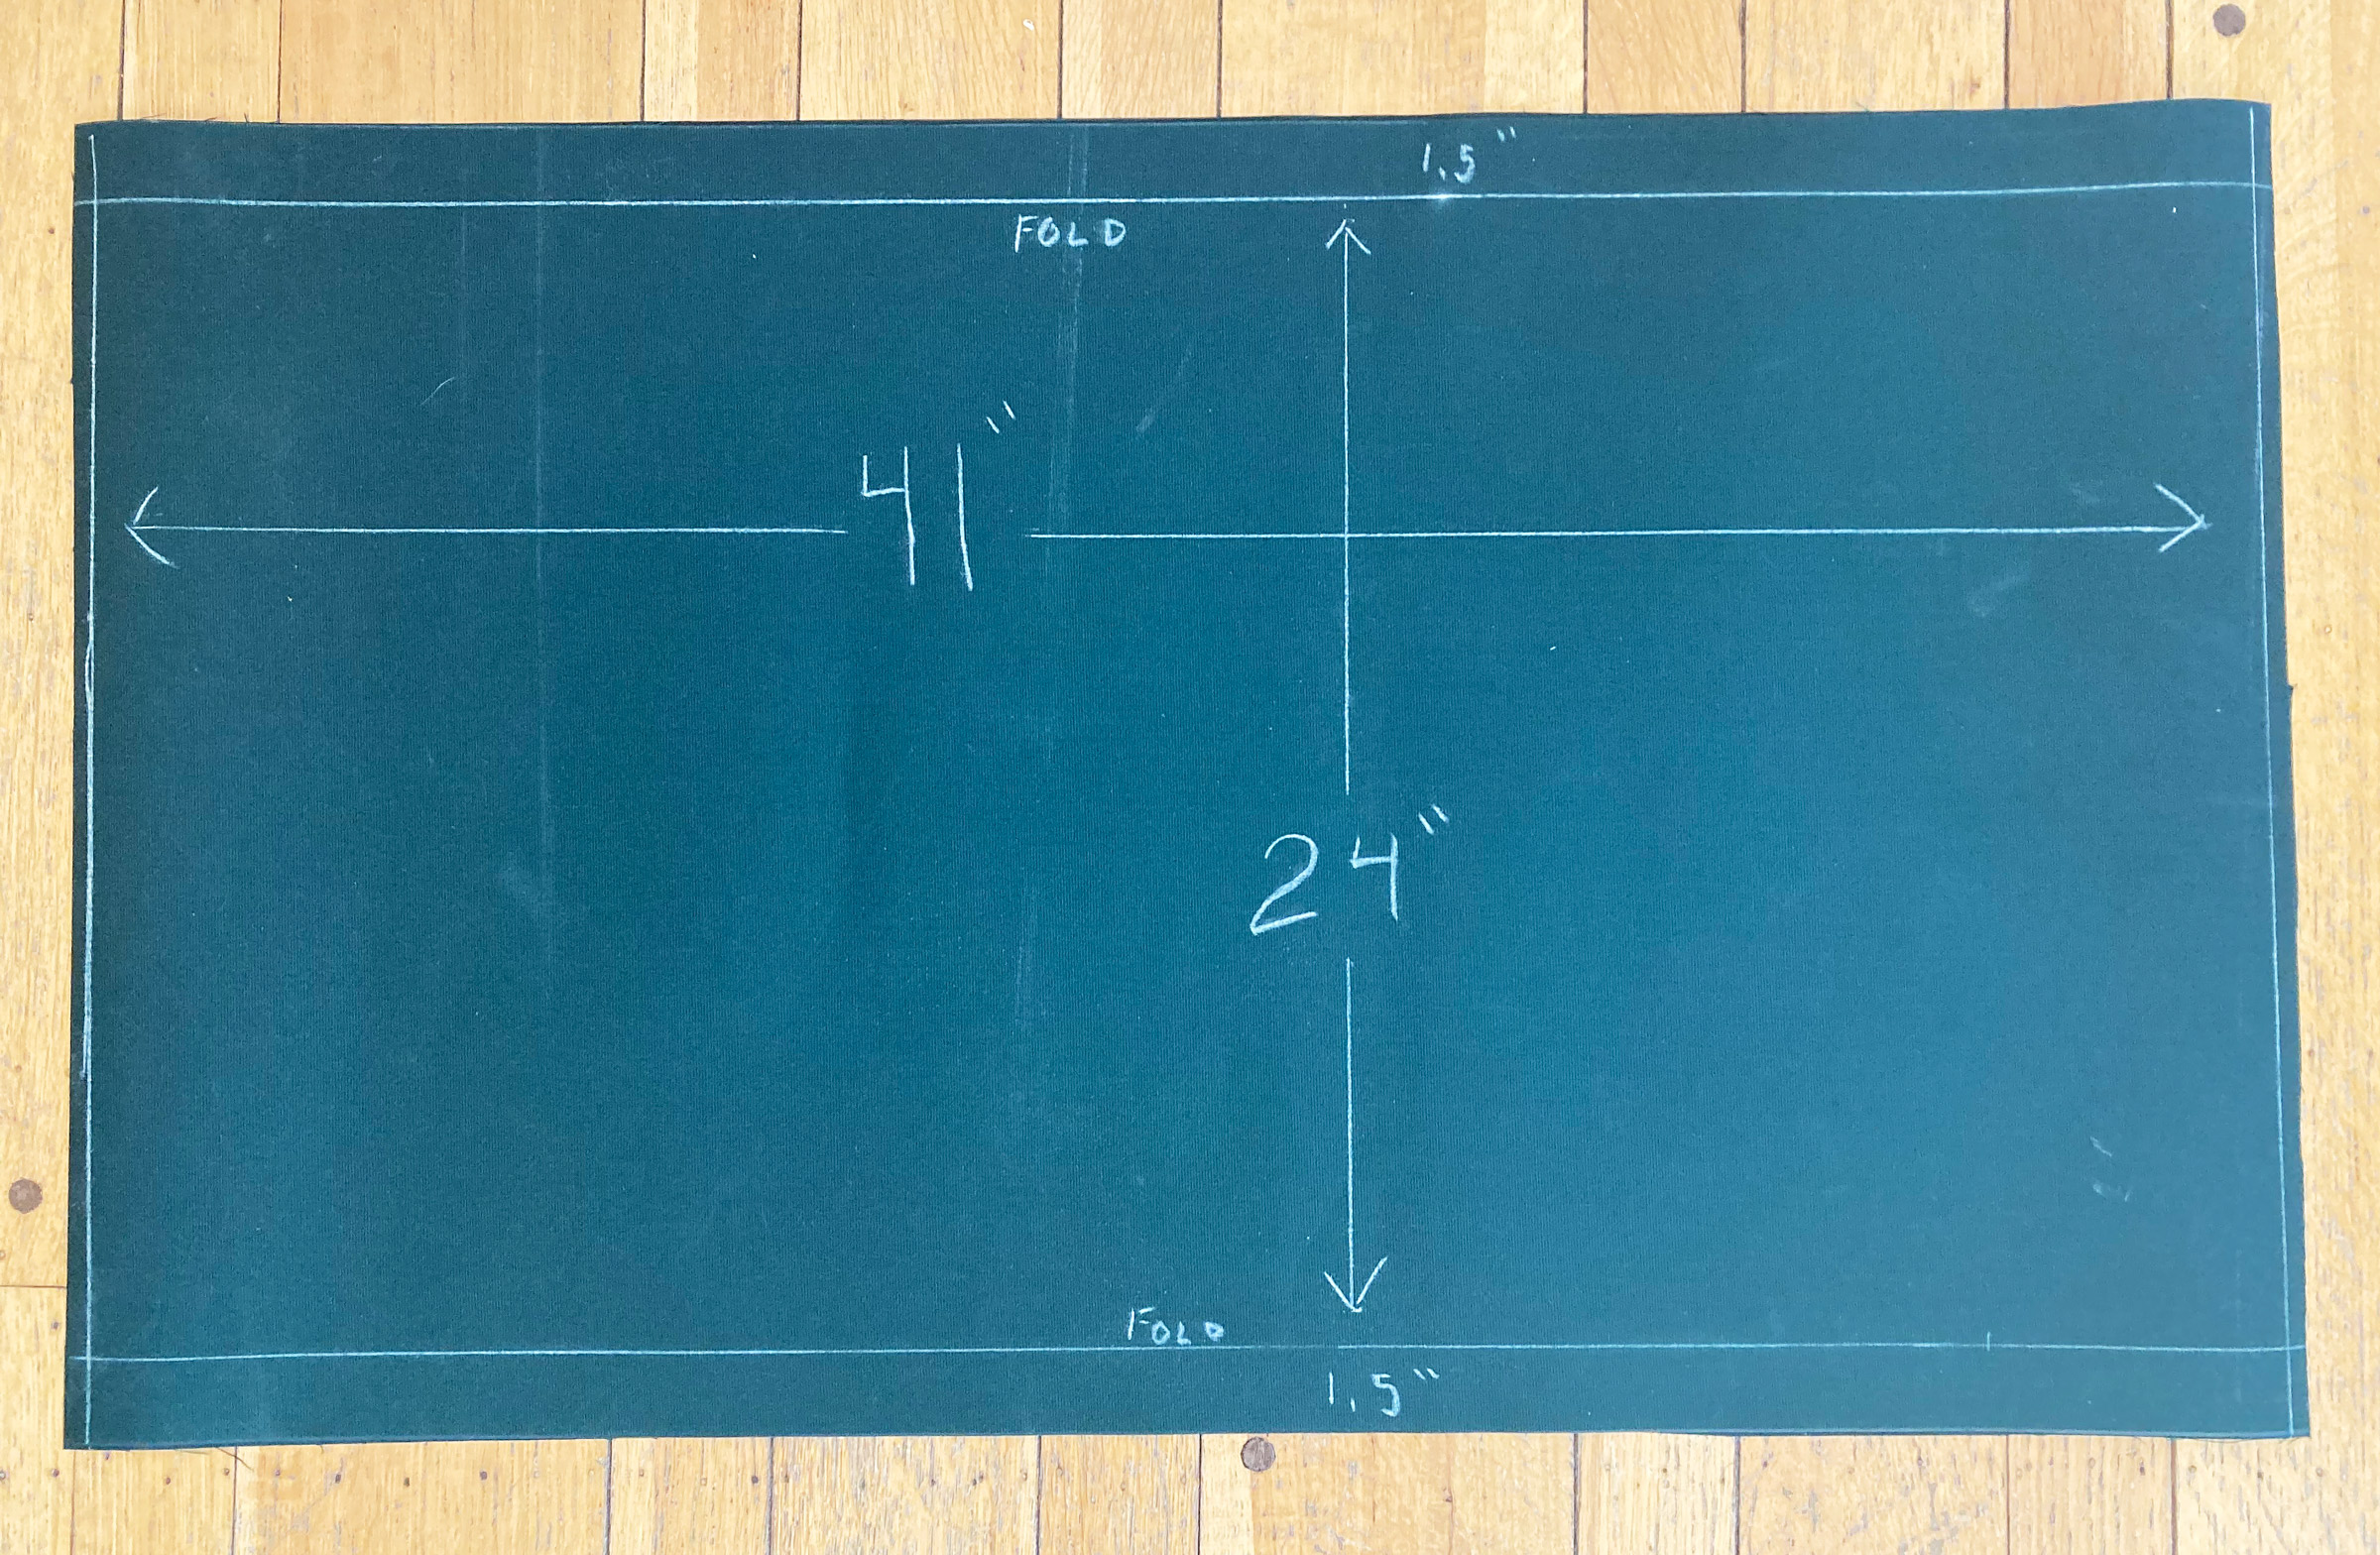
Start with the body of the chair. The finished article is 41″ x 24″ with 14 evenly spaced grommets on each long side. The body can be as simple as a single layer of canvas cut to 43″ x 30″. The double-fold hems on the long sides must be 1-1⁄2″ wide. The resulting three layers work best with the grommets. Fold 1-1⁄2″ in on each long side, then fold this over again. For the short sides make a 1⁄2″ double-folded hem. For the simple version, skip the next two paragraphs and resume with the one that follows them.
 Photographs by the author
The “Cadillac” version, which is made of two layers of fabric with batting in between, starts with two pieces of fabric cut to an overall dimension of 27″ x 42″. With single-fold hems—½″ on the ends and 1-1/2″ on the sides—the finished size will be 24″ x 41″.
For the “Cadillac” option, two layers of canvas with soft polyester batting in between them, cut two pieces of canvas at 42″ x 27″. On each piece, fold a 1-1⁄2″ single-fold hem on the long sides and a 1⁄2″ single-fold hem on the short sides. Hold the hems with double-sided seam-stick tape or sewing clips.
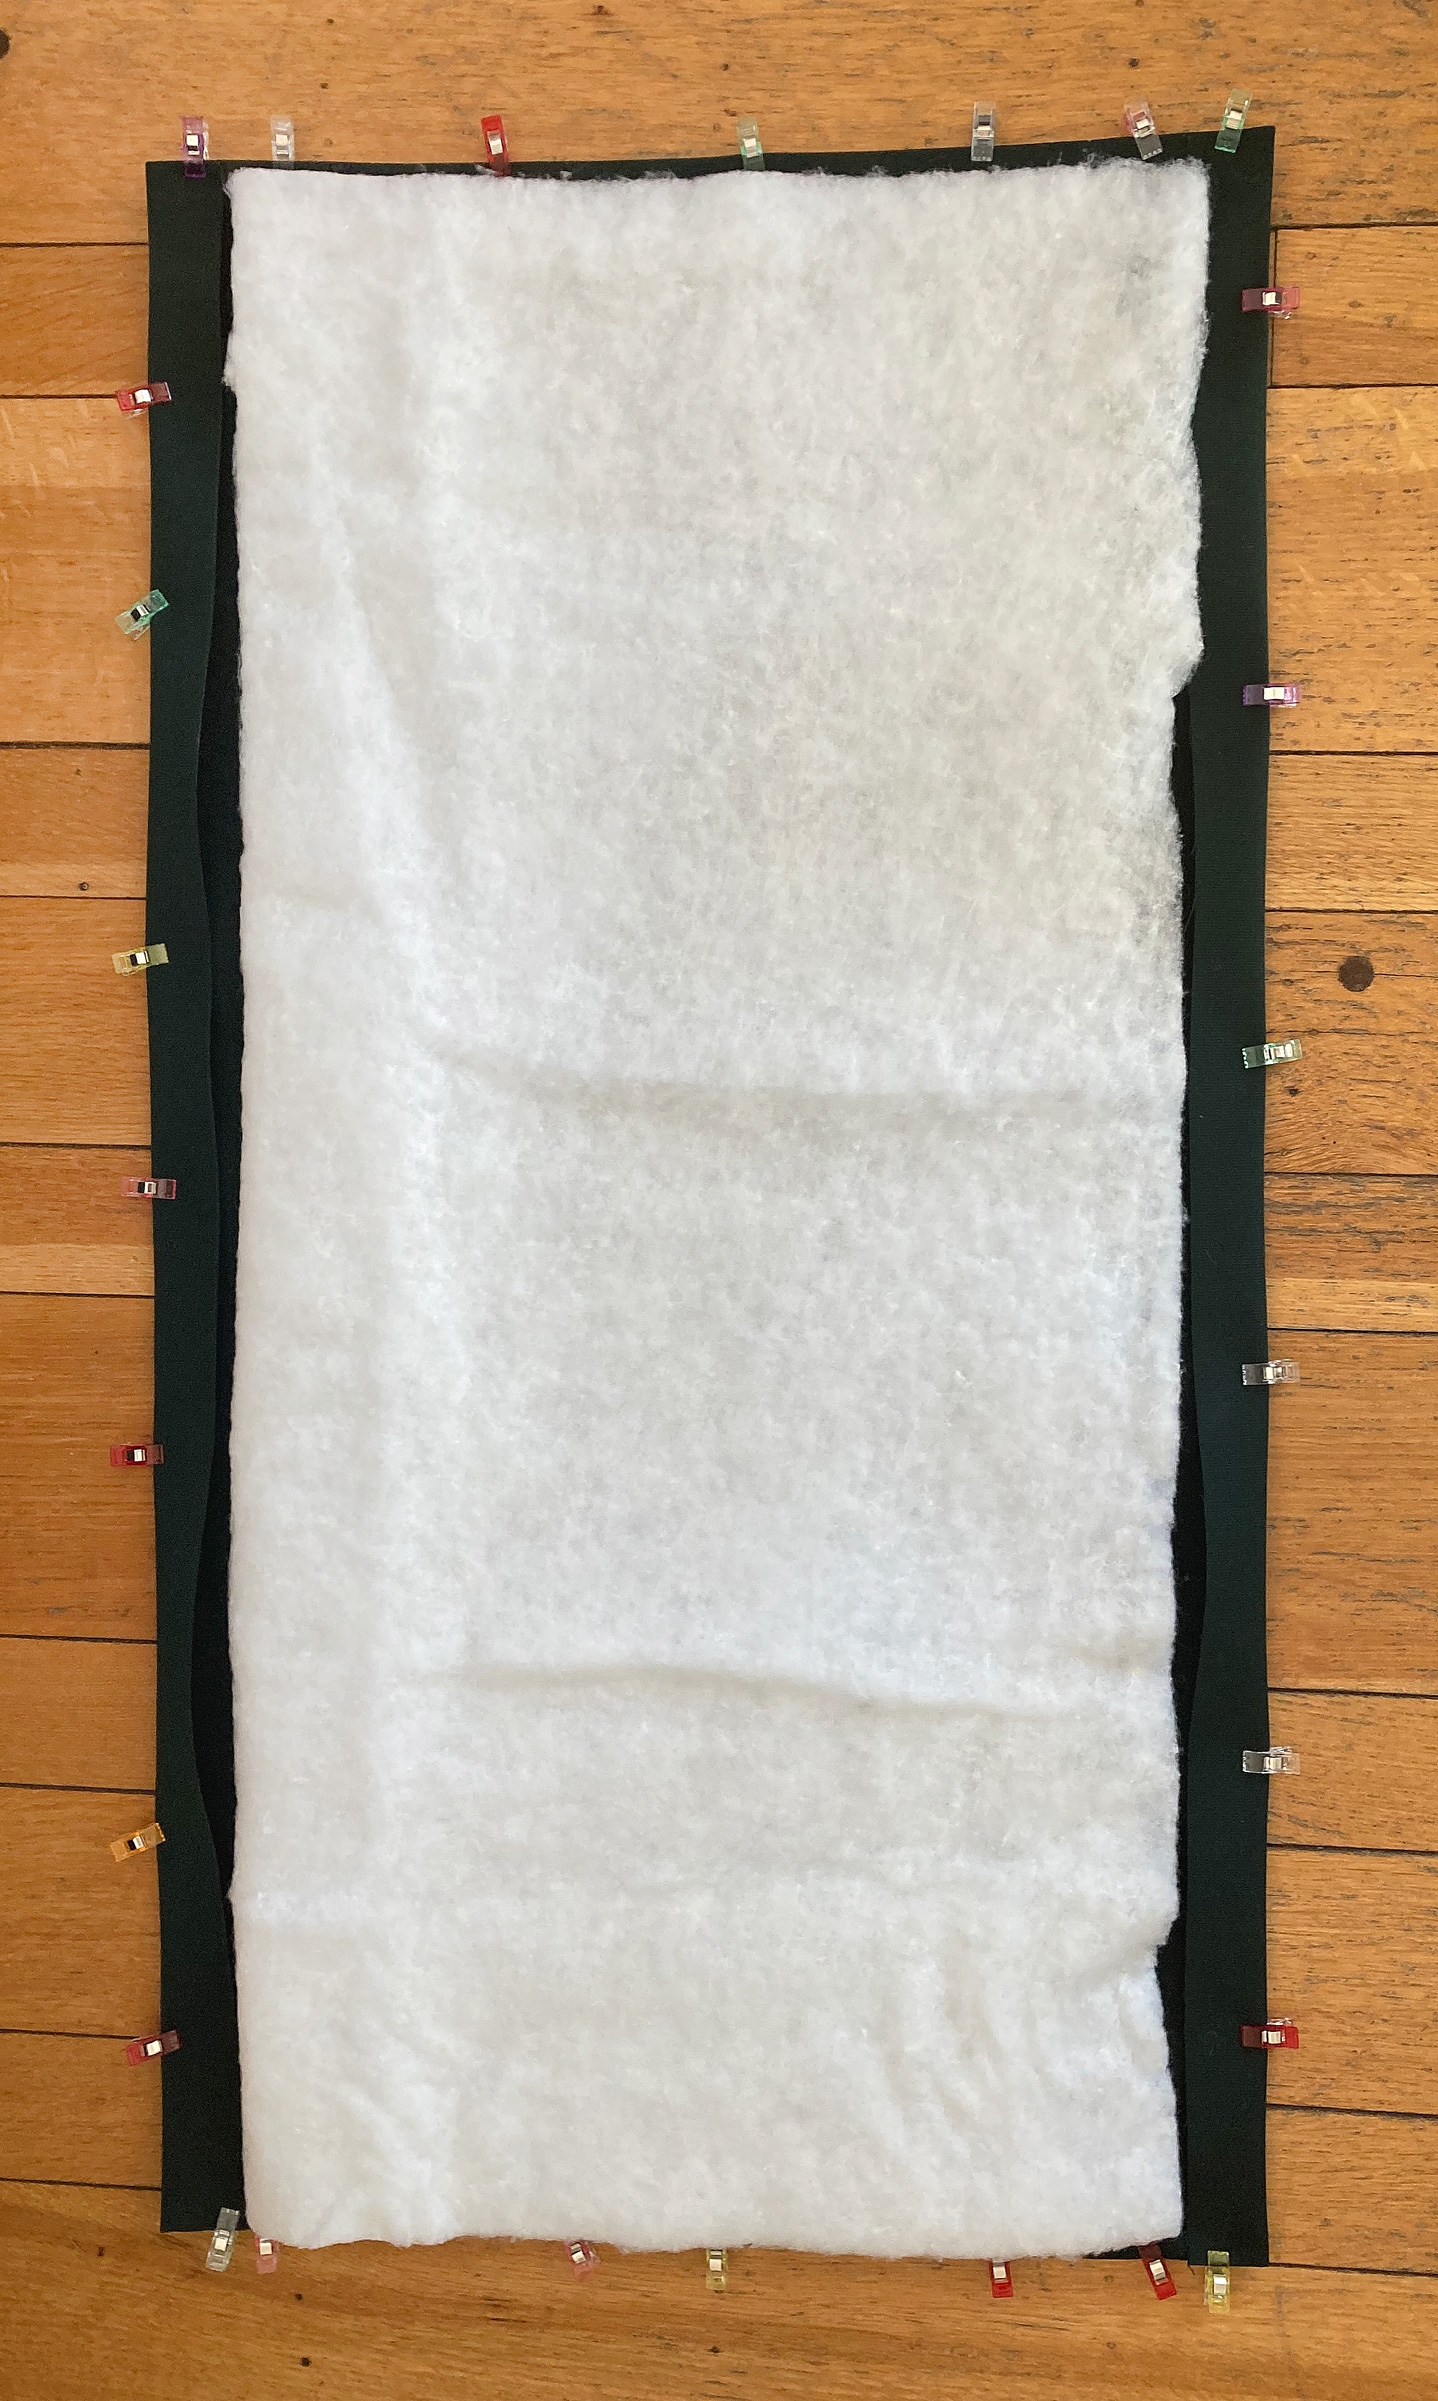
The batting is cut to fit within the hems.
A 40″ x 23″ piece of batting should fit 1⁄2″ from the outside perimeter of the hemmed fabric. Sandwich this batting between the two canvas pieces with the hems facing inward; be sure no batting overlaps the hems. Secure the edges with tape or clips, then sew around the perimeter of the rectangle using the longest straight stitch your machine can make. Sew additional lines 1-1⁄4″ in from the long sides to capture the 1-1⁄2″ hems inside. The body of the chair should be quilted to hold the batting in place. For the chair pictured here, I did just three horizontal lines of stitching, but you can decorate your chair with quilting in a pattern of your choice.
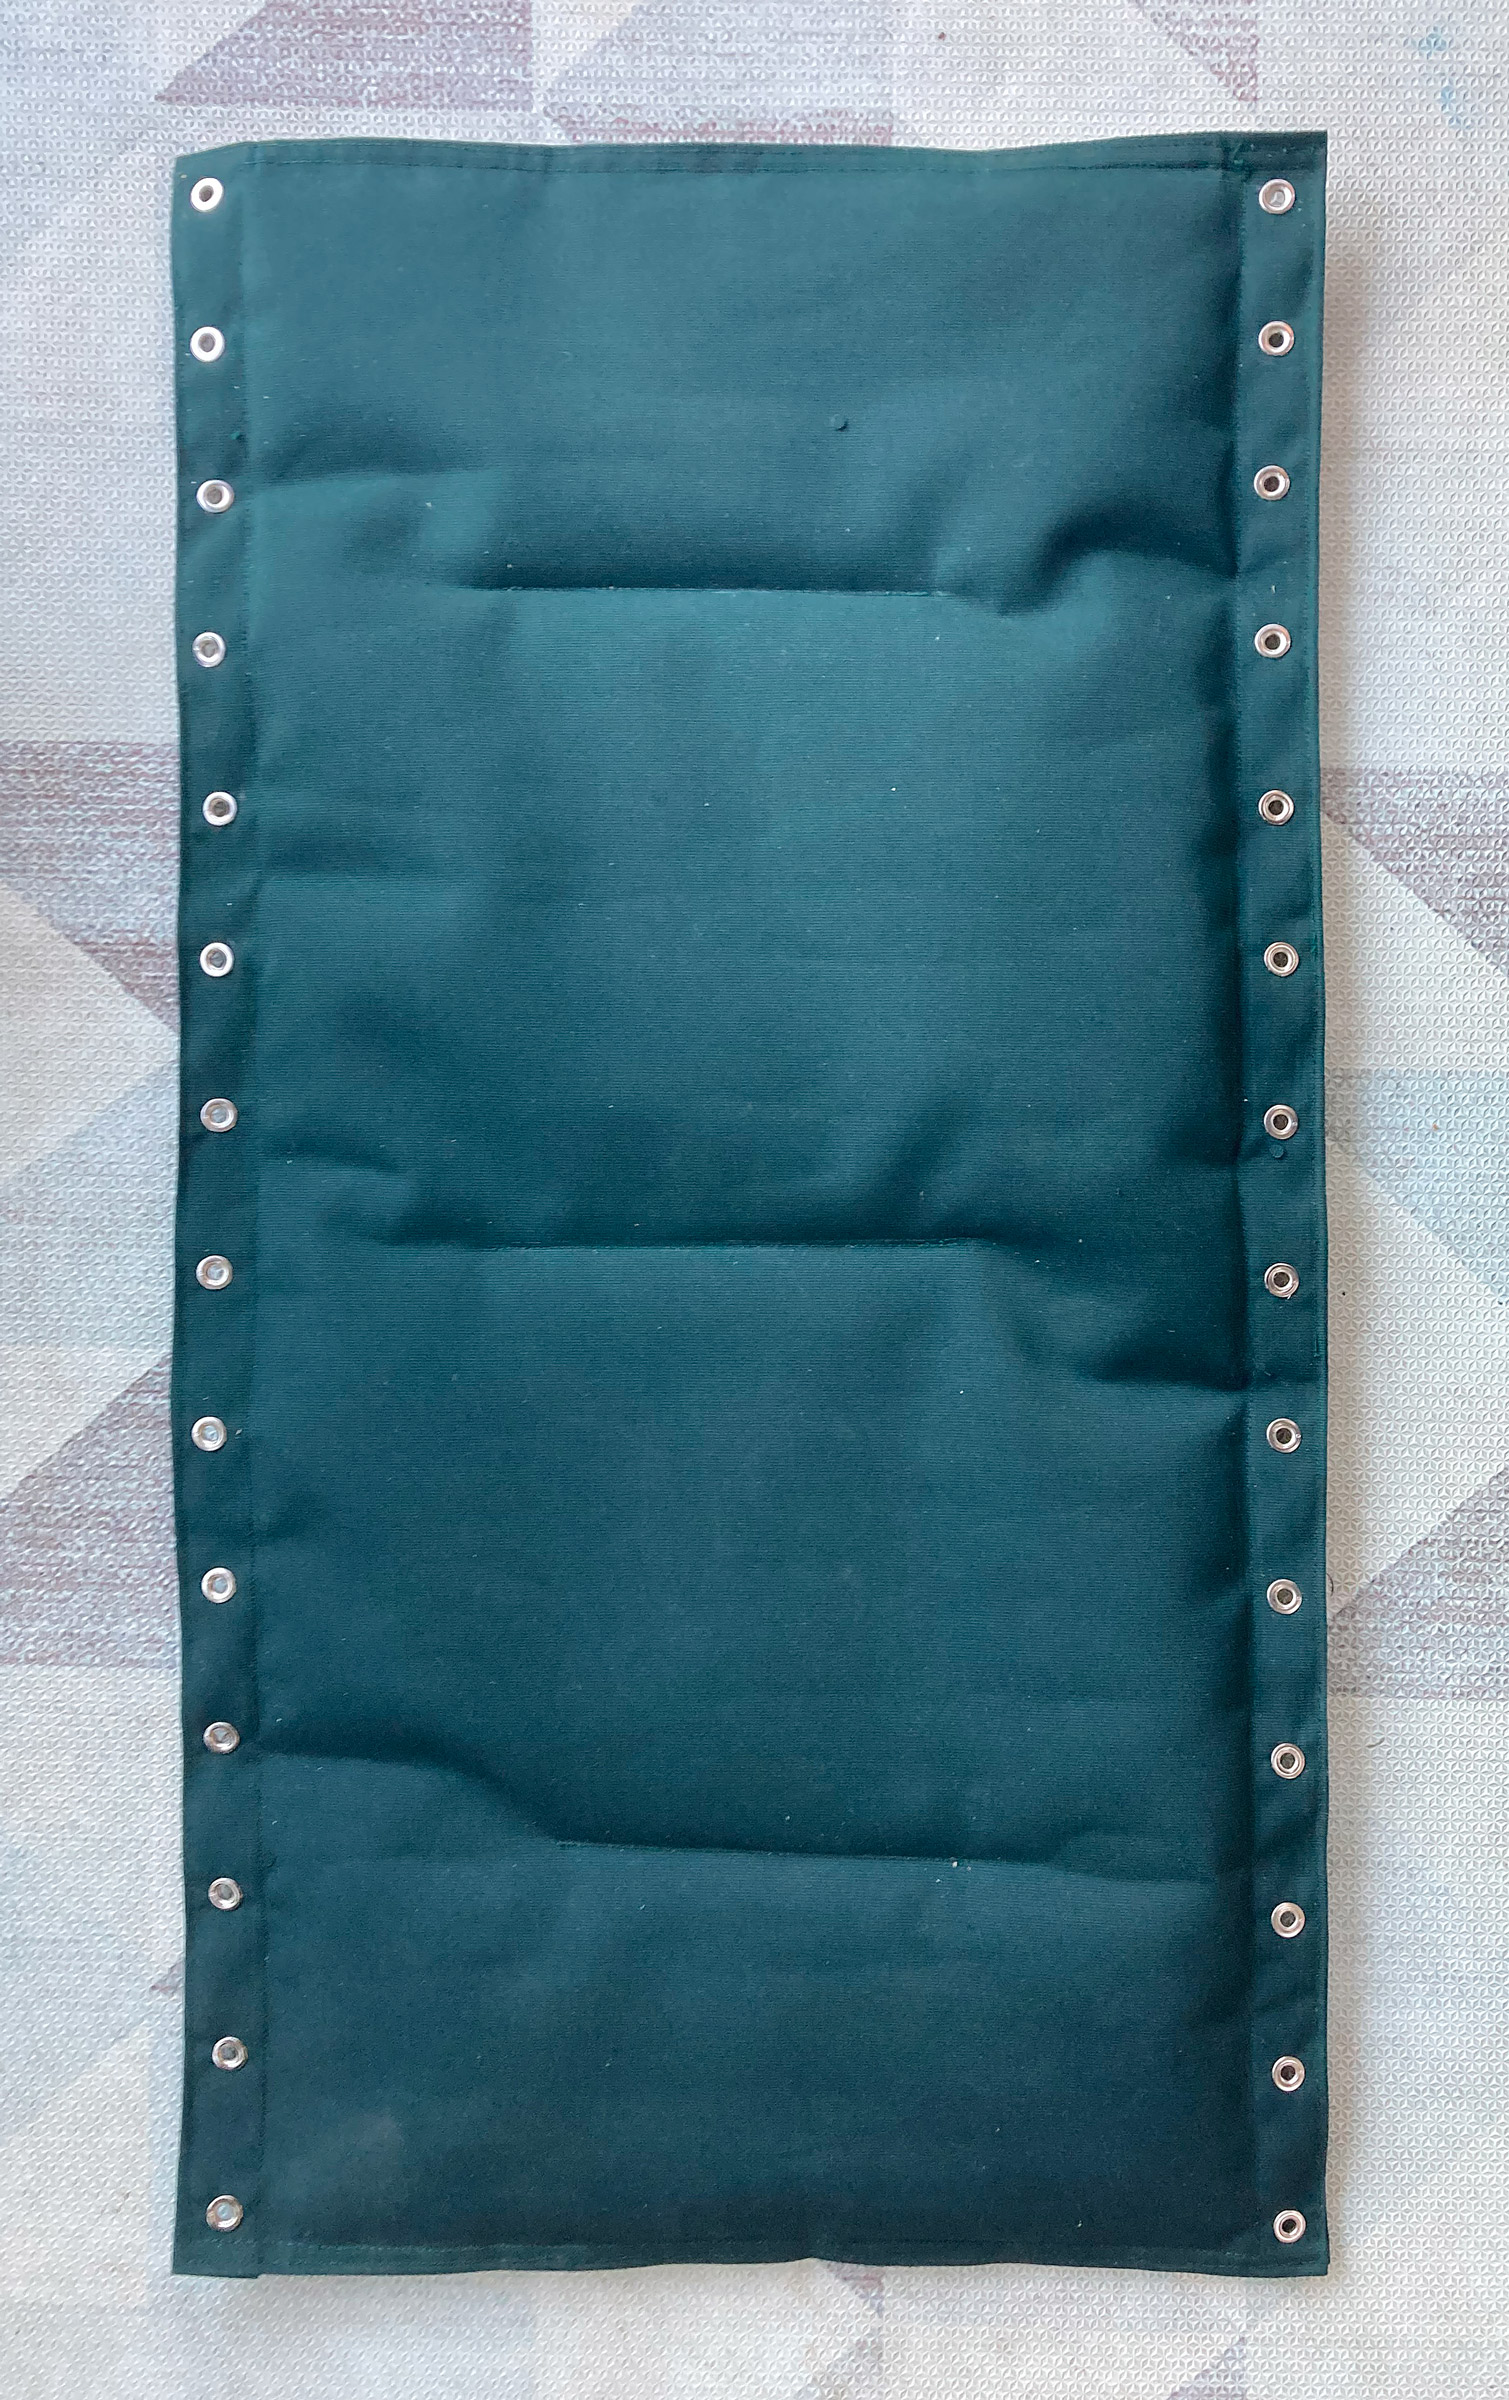
After the two layers of fabric are sewn together, grommets are installed. The three lines of stitching in the middle hold the batting in place.
Layout for grommets: Make a mark in the center of the long-side hem 1″ in from the end of the chair. Continue to mark every 3″ until you have 14 evenly spaced marks along each long side. Punch holes and set grommets. The chair body is complete.
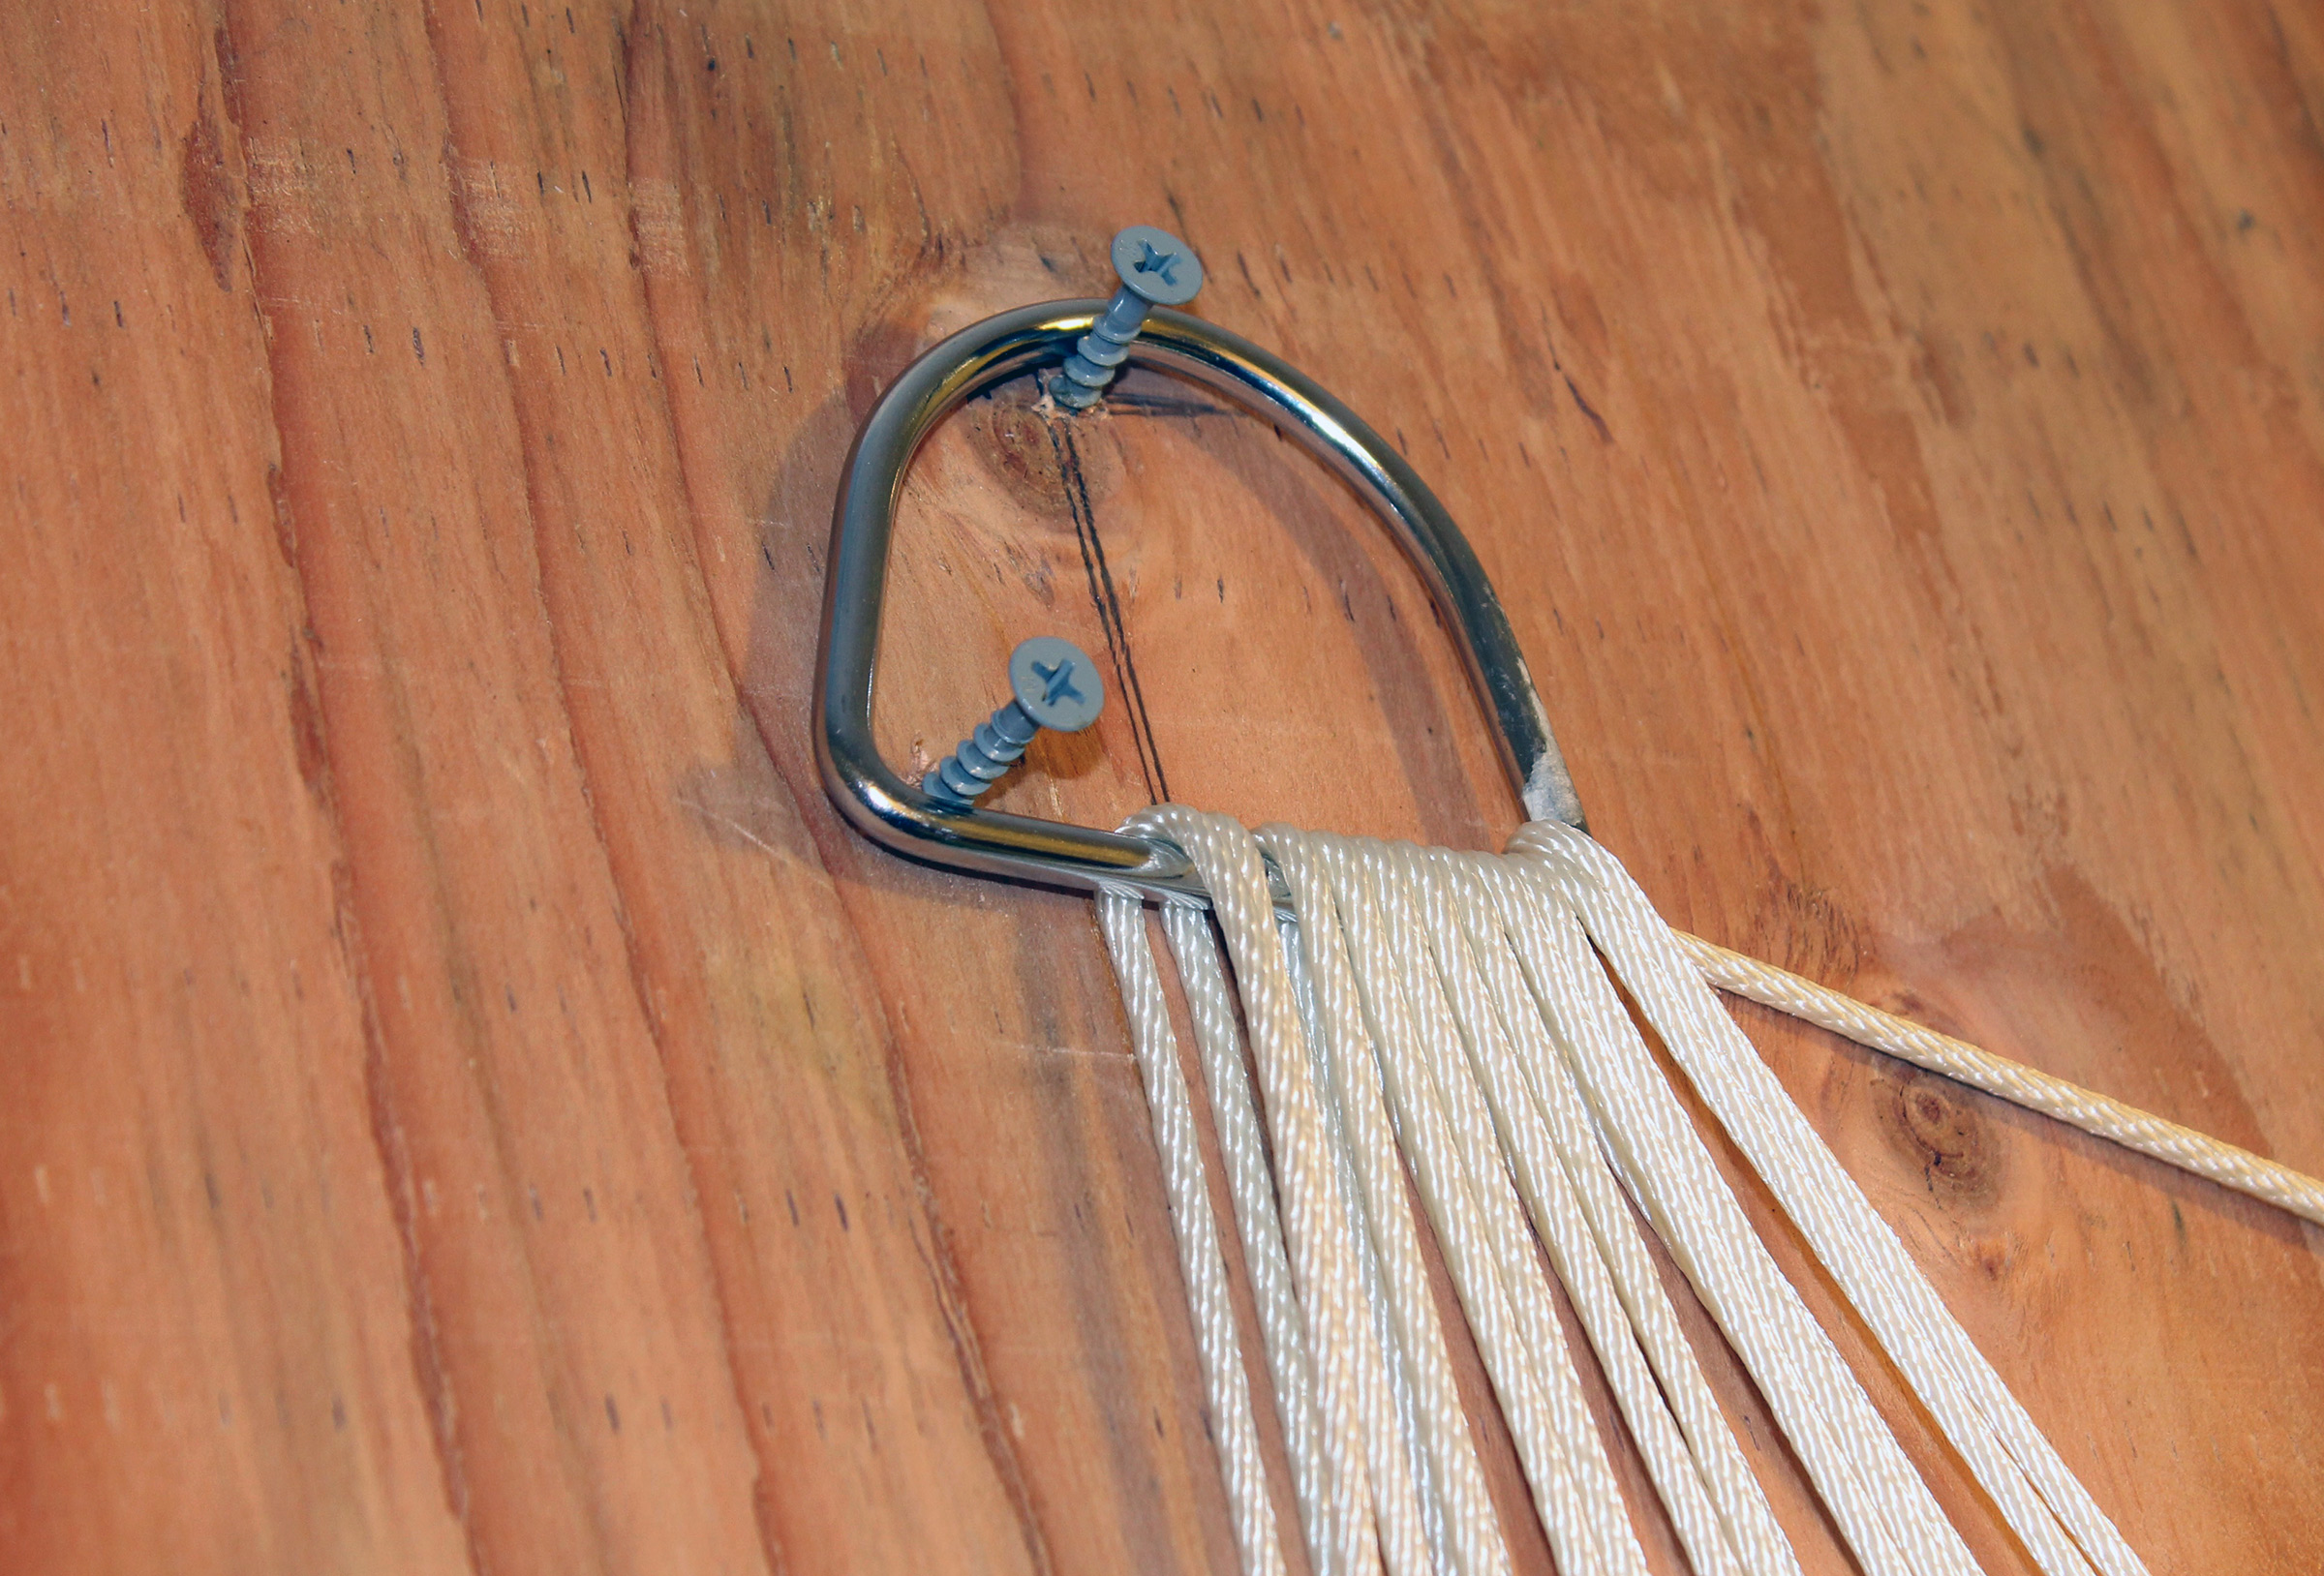
Each grommet will anchor a loop of line called a nettle, and all of the nettles hang from a D-ring on each side and are woven into sword-mat clew knots. It may look far more complicated than it is; with the jig (described below) I can weave one in 10 minutes.
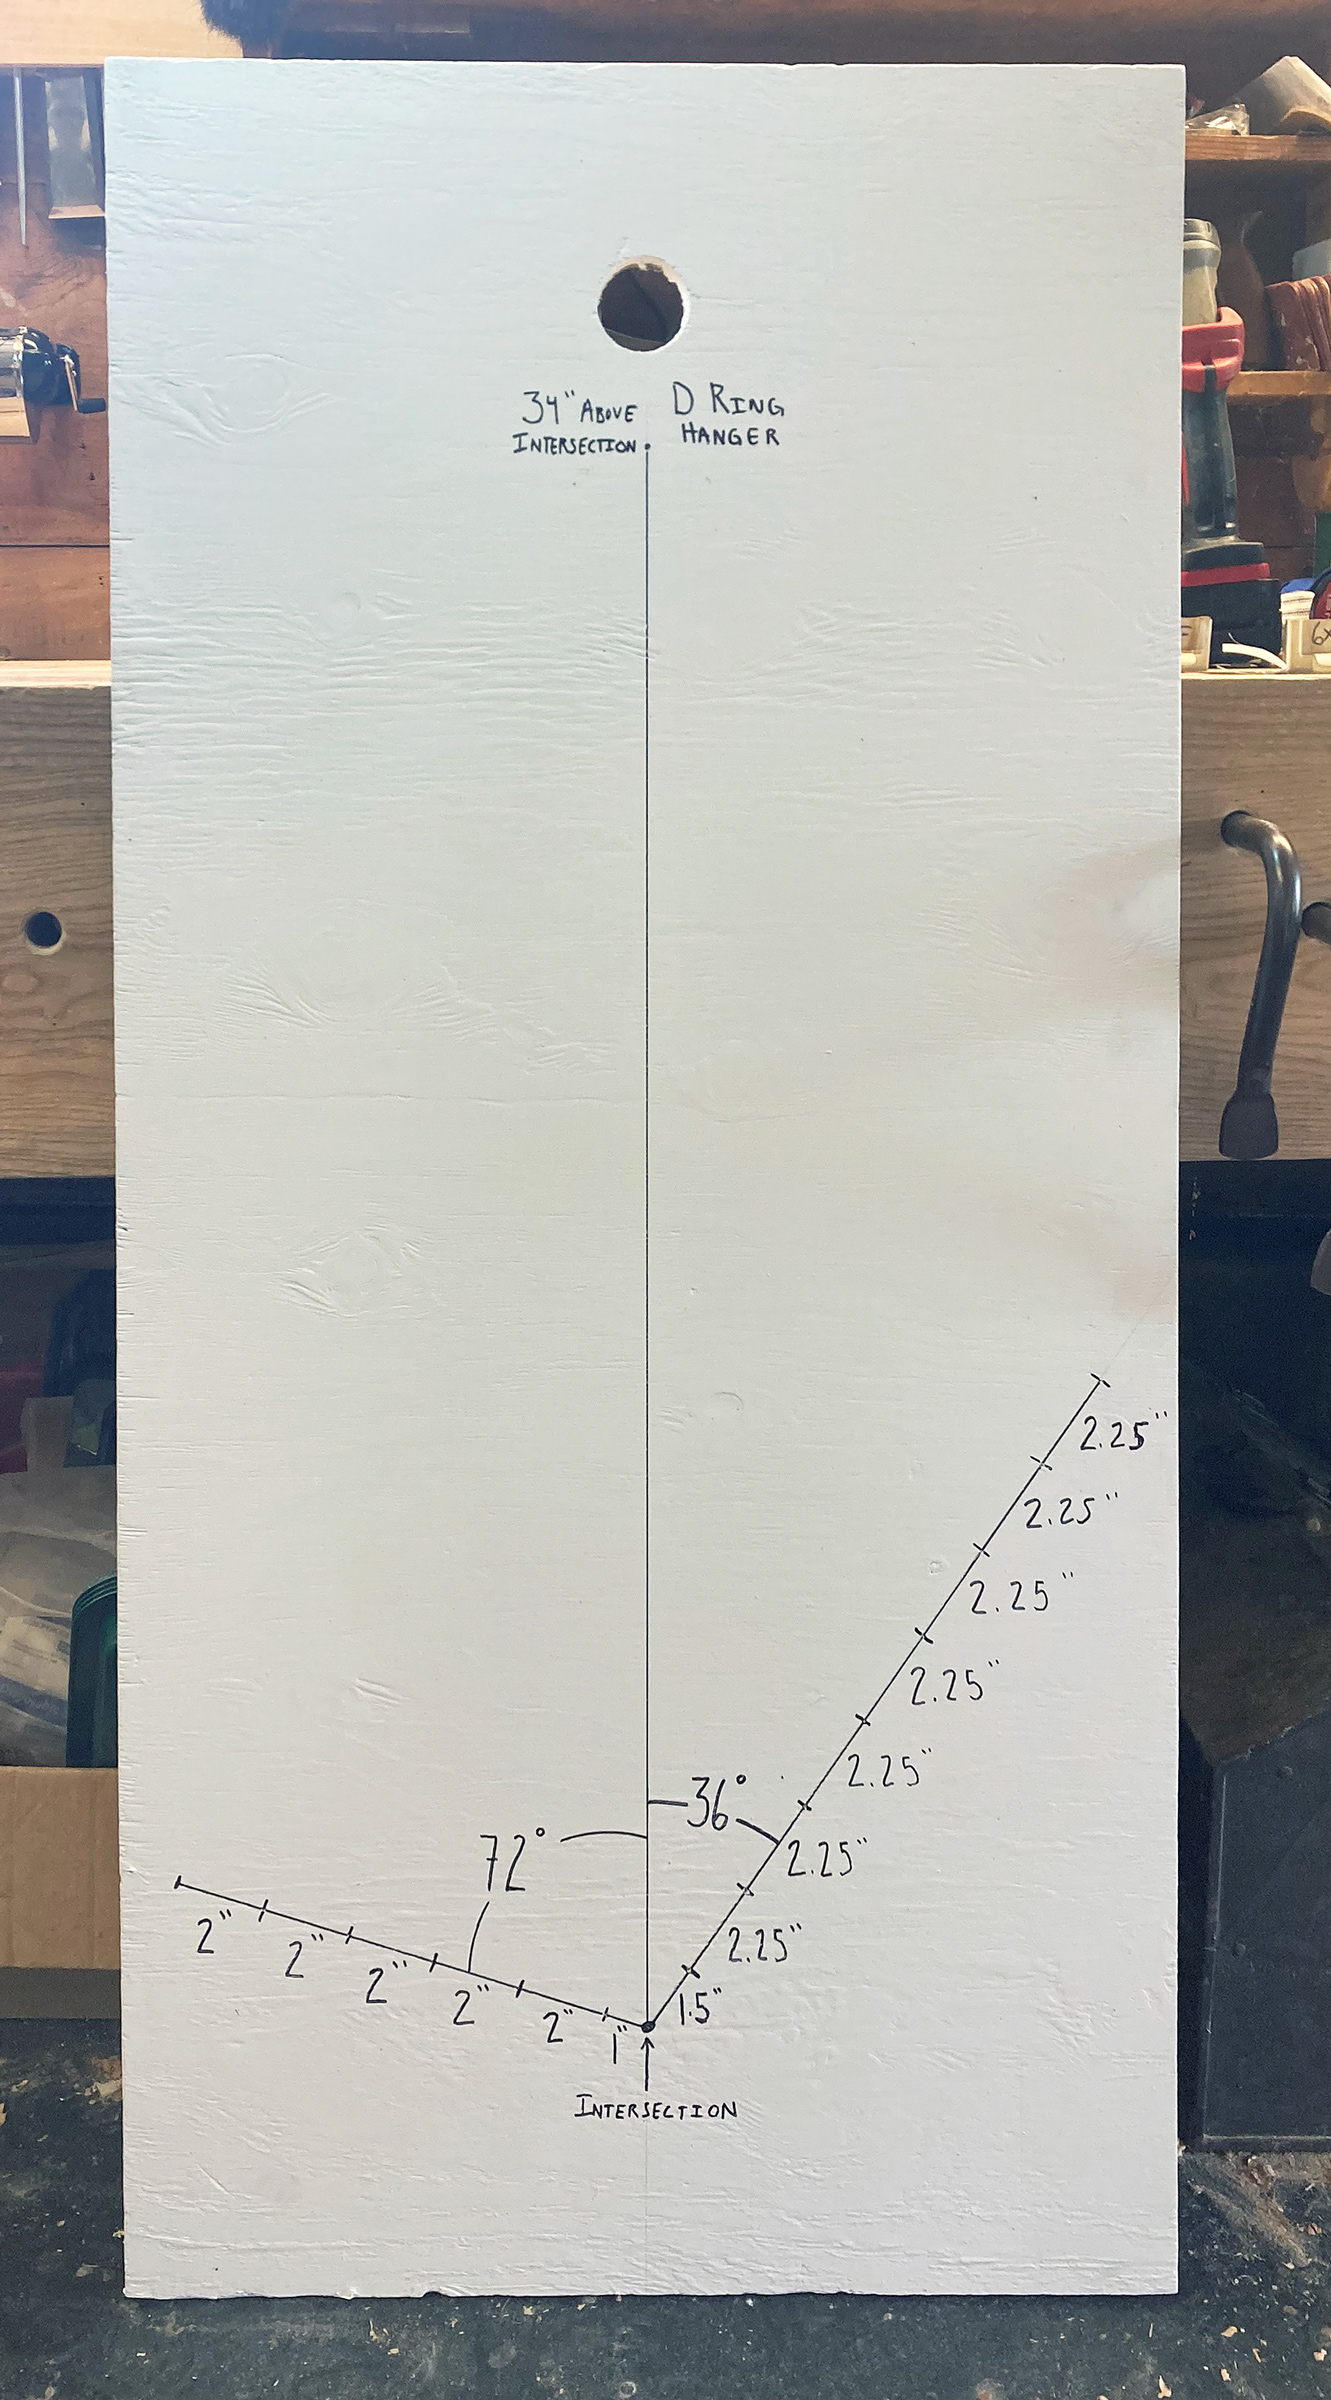
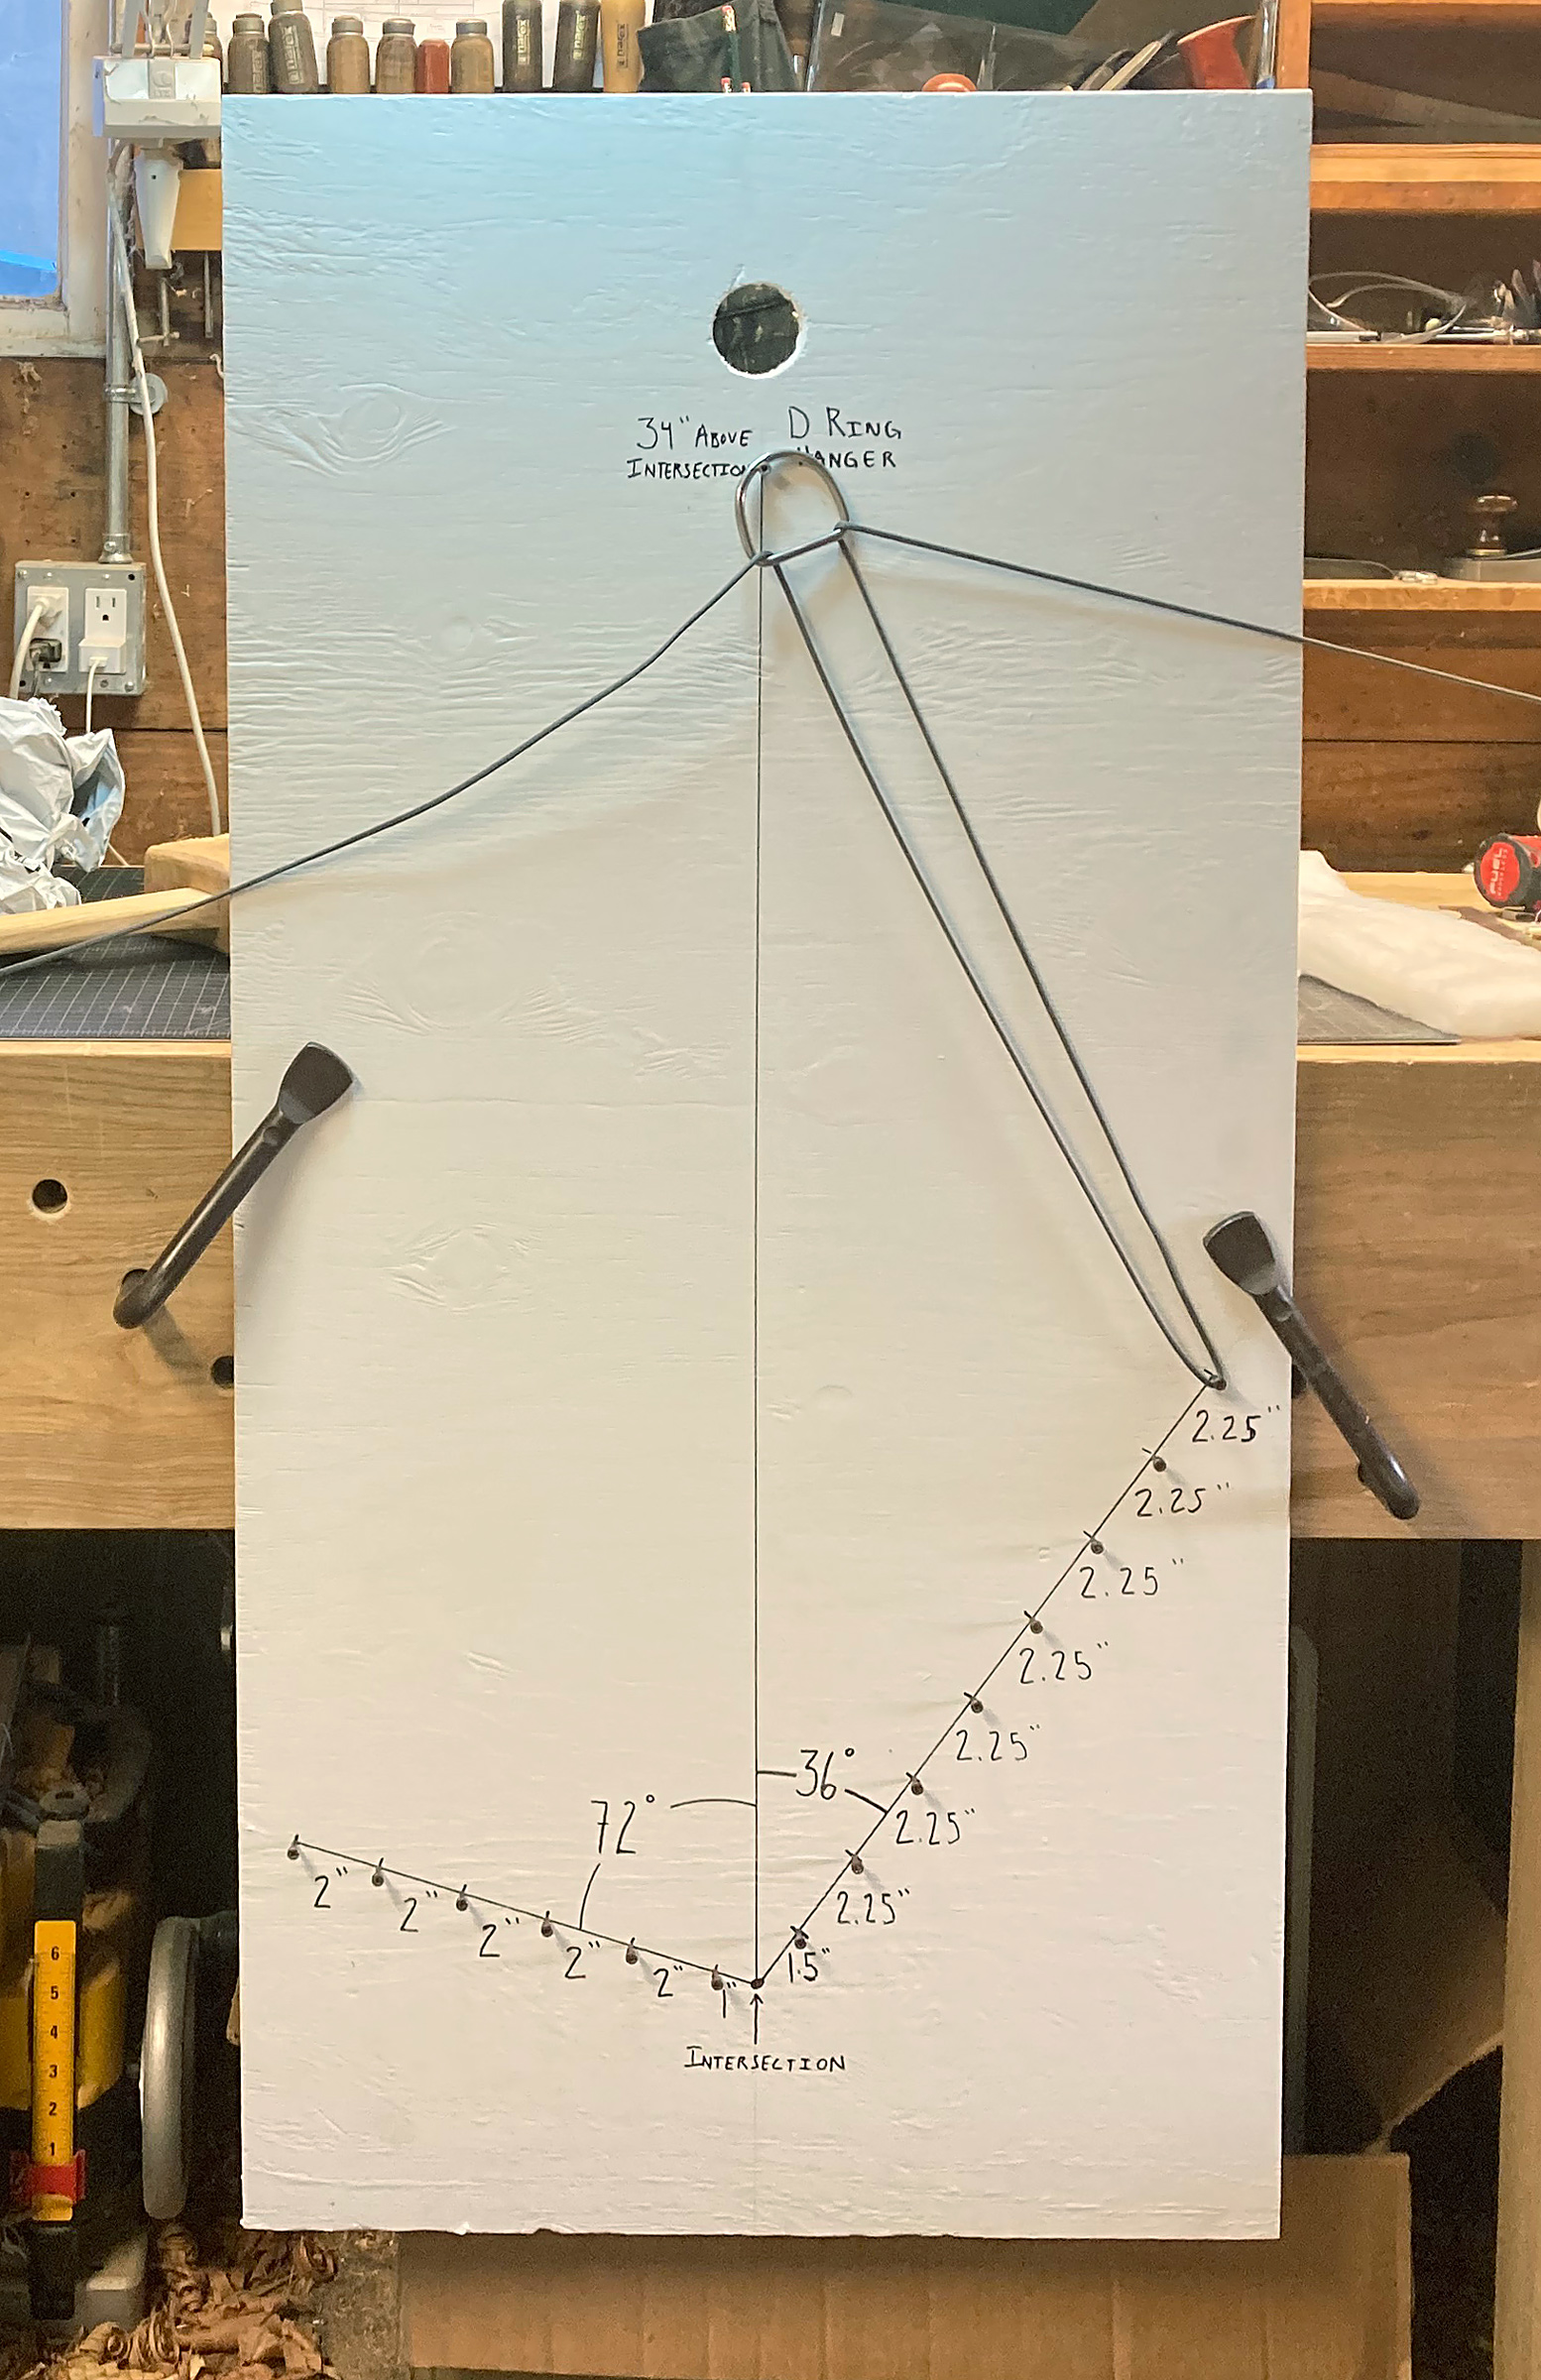
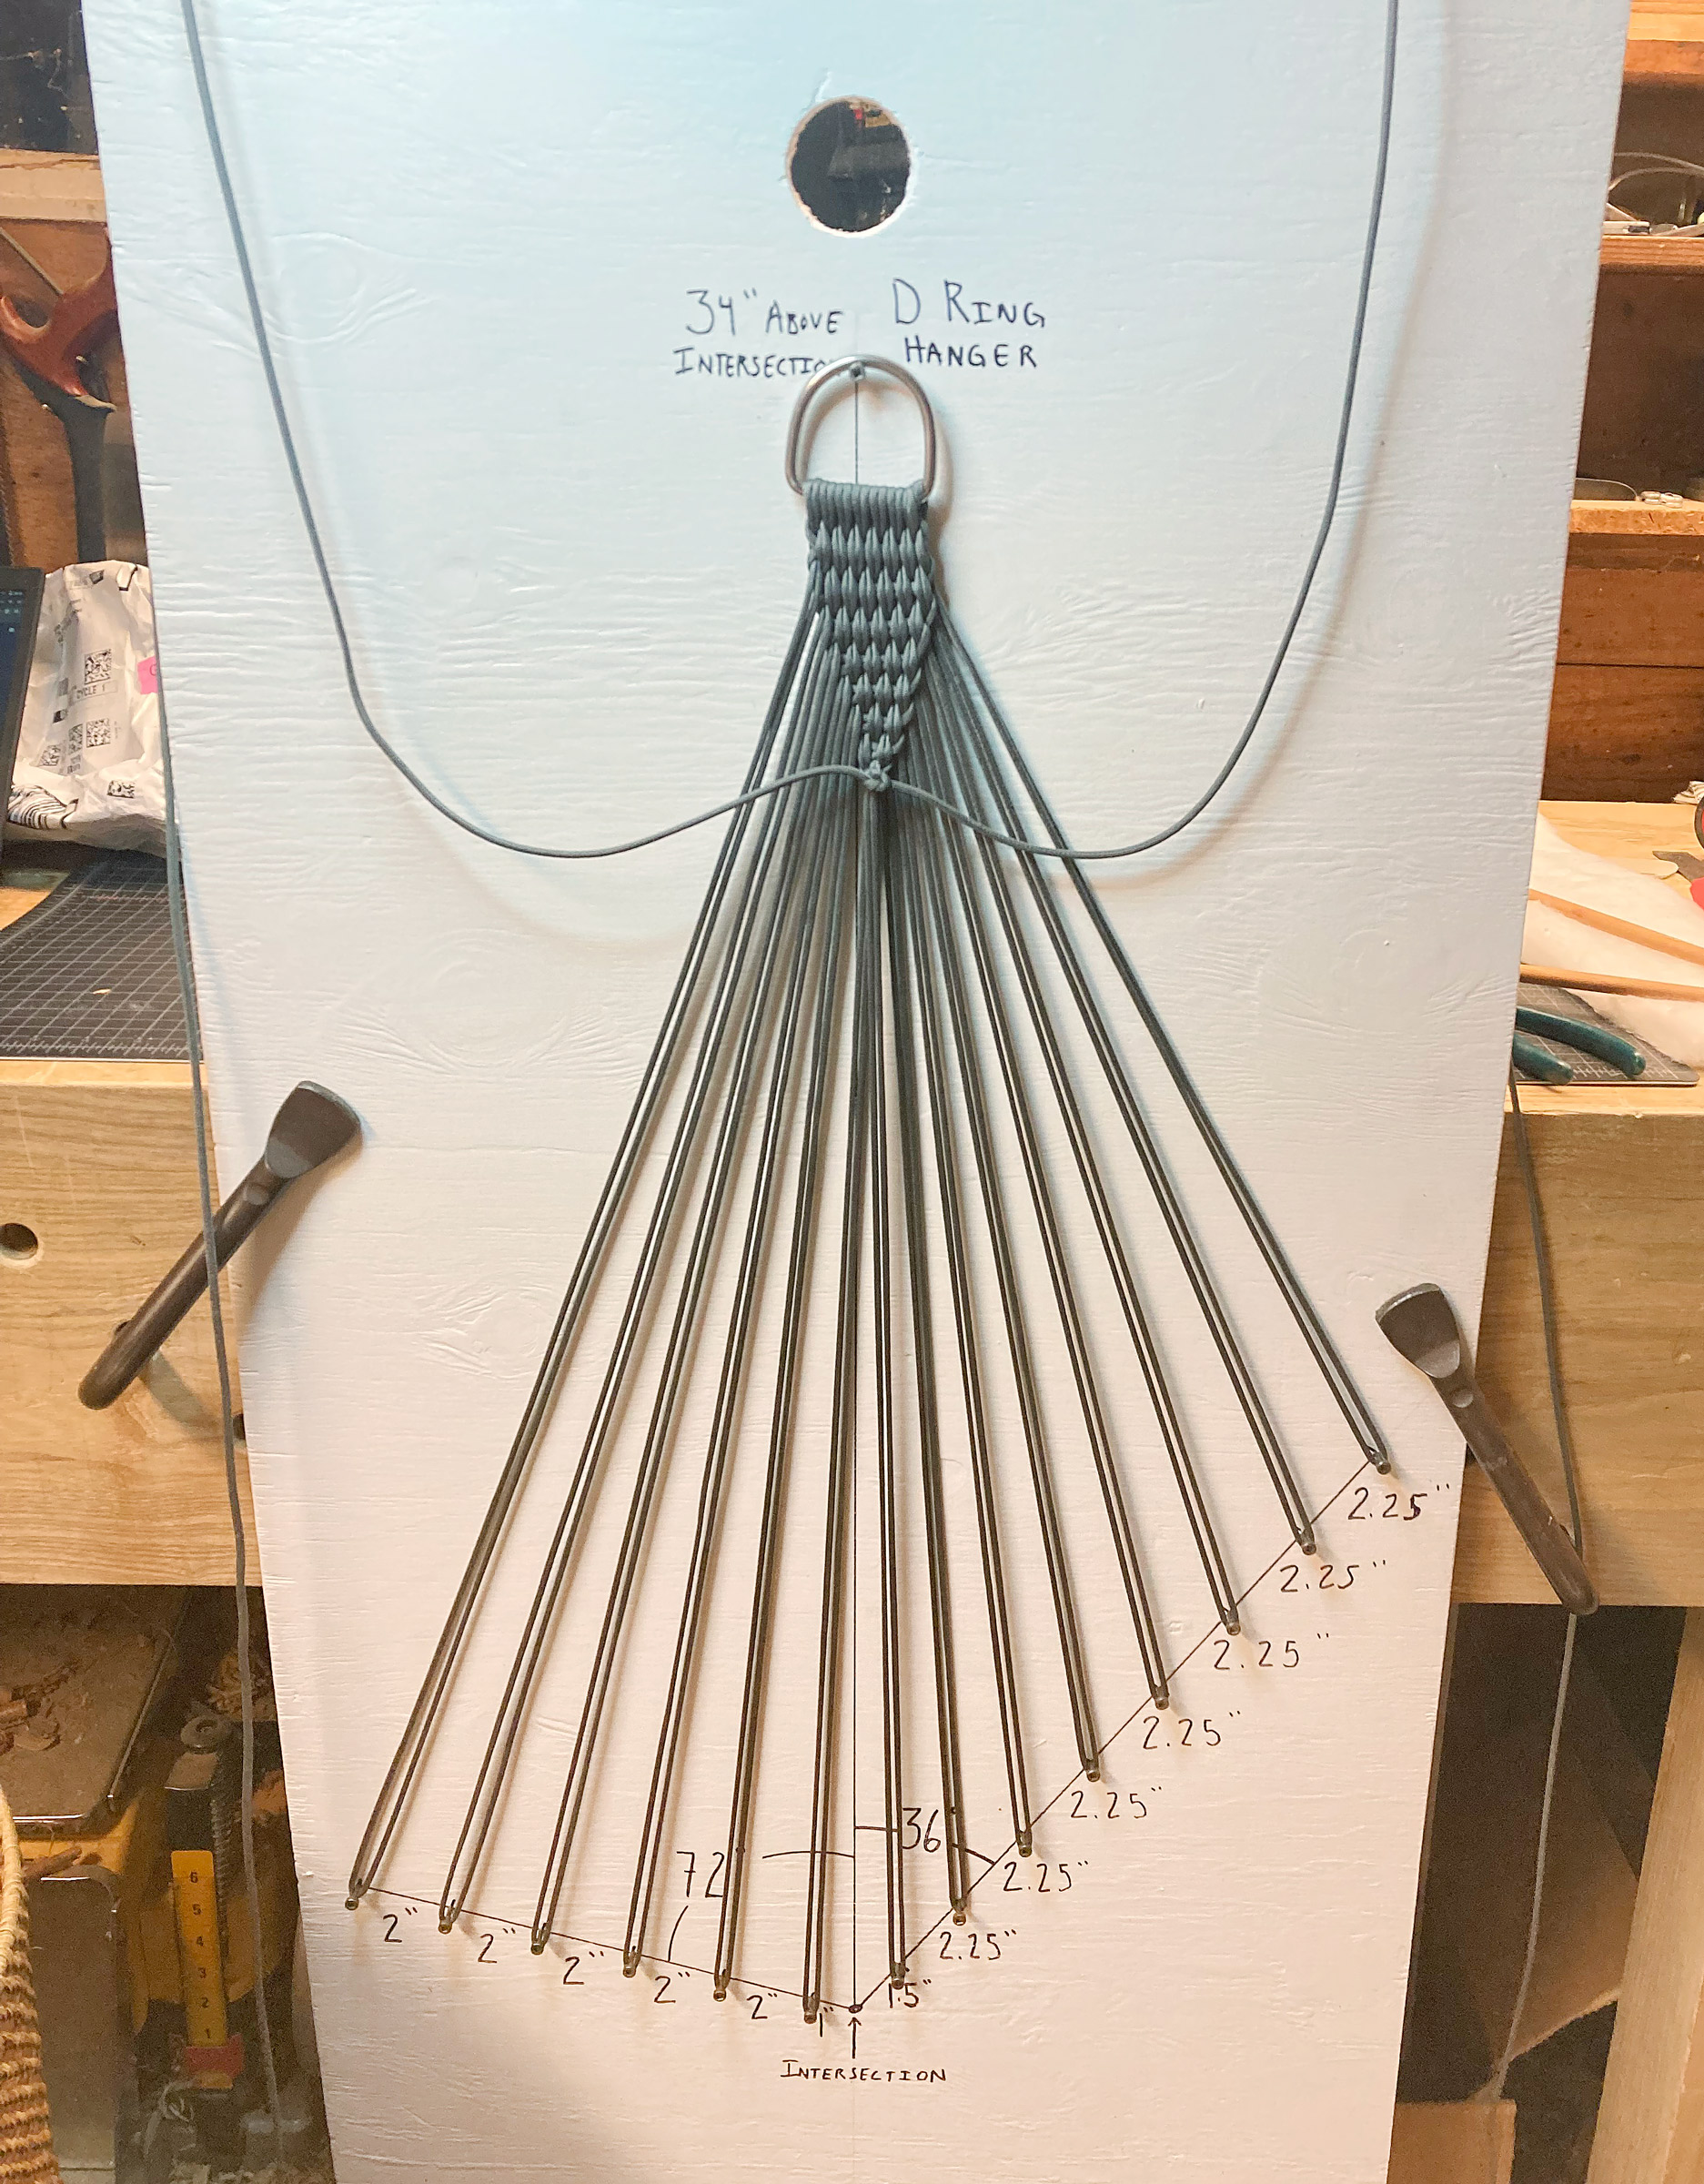
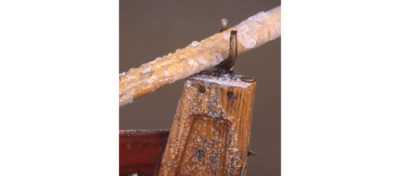
Screws driven into a wood panel create the jig for making the suspension system for the hammock chair.
The jig is made from a piece of plywood, particle board, or other sheet material roughly 40″ x 24″ and thick enough to hold screws. Draw a vertical line down the center of the sheet. Make a mark about 6″ above the bottom of the board to locate the intersection of the back and the seat. Subsequent measurements will be made from this point. Mark 34″ up from the intersection for the screw that will hold the D-ring.
Draw a line to the left of the intersection at 72 degrees from the vertical. Measure 1″ along this line from the intersection and mark for the first screw. Proceed outward along the line, placing marks at 2″ intervals for five more screws. Draw a line to the right of the intersection at 36 degrees from the vertical. Measure 1-1⁄2″ along this line from the intersection and mark the location of the lowest screw for the backrest. Proceed along the line, marking 2-1⁄4″ intervals for seven more screws. Drive screws on all of the marks, leaving enough of the screw proud to catch a bight of paracord. Your jig is complete.
Begin the clew by hanging a D-ring flat-side down on the uppermost screw of your jig. Place the paracord coil or spool to the left side of the jig, then pull the line to the right to a point about 5′ past the D-ring. Make this line fast. Now, pull a bight of line through the D-ring—in the front and out the back—and loop it over the rightmost screw.
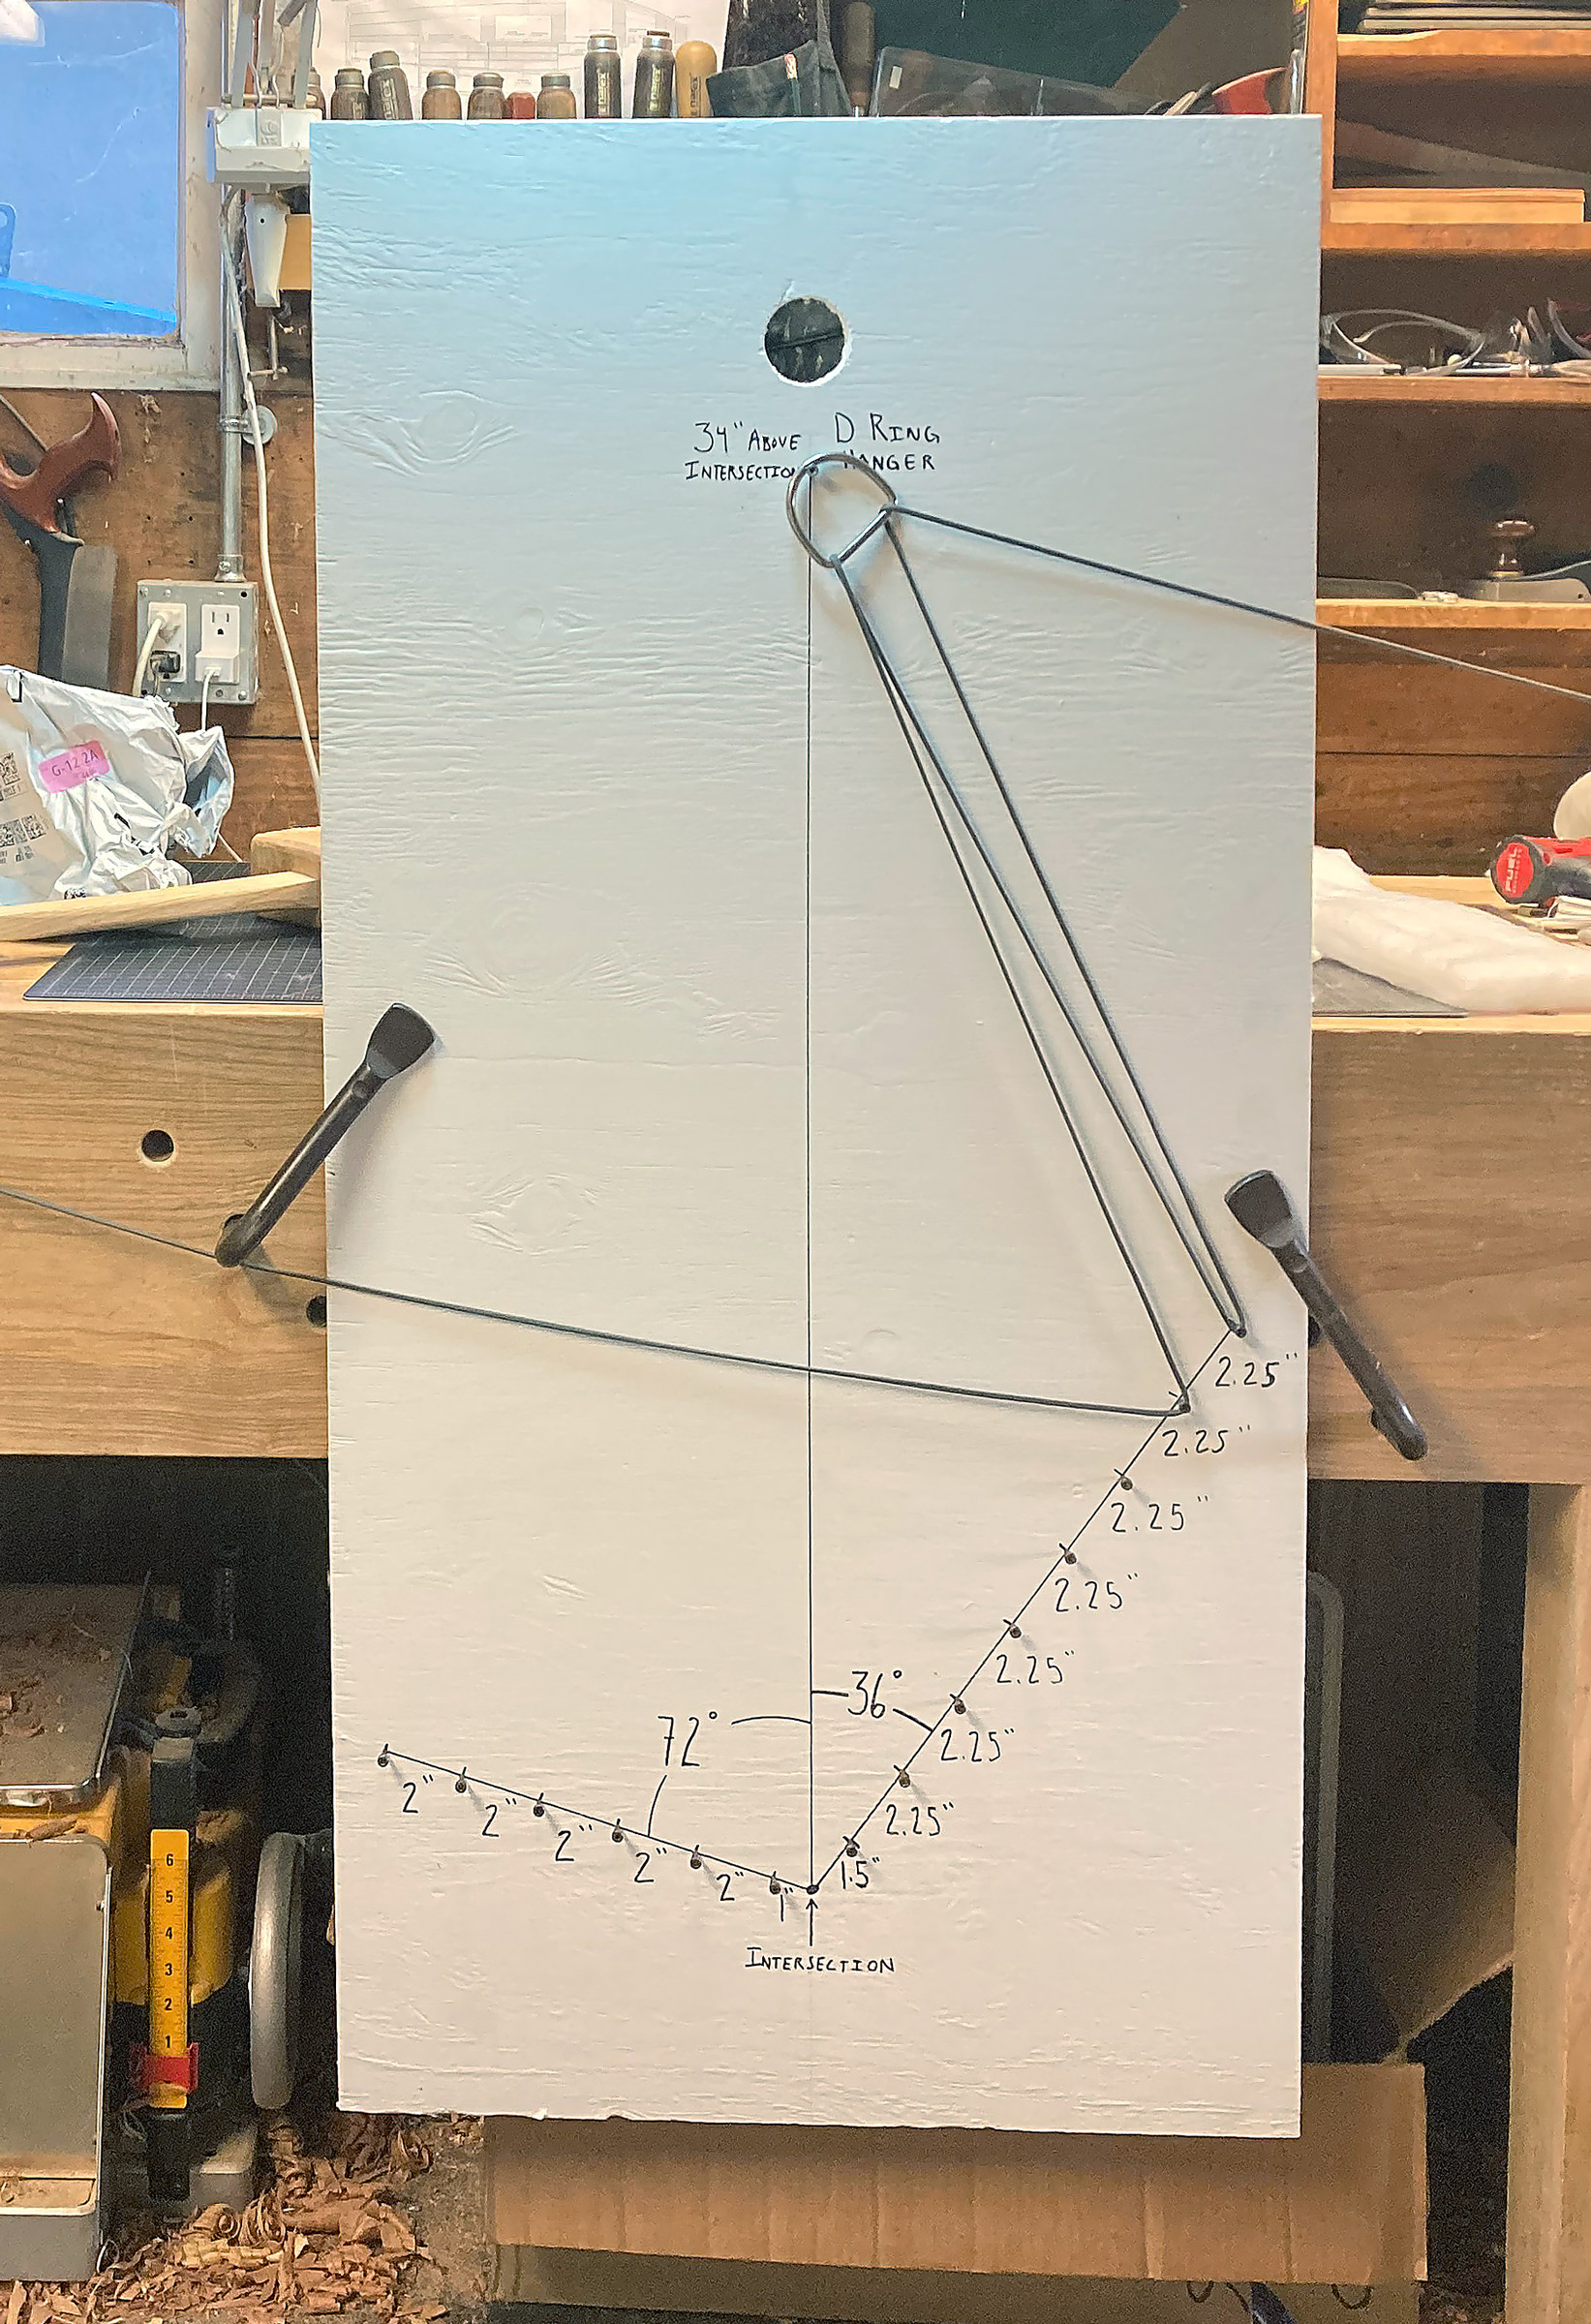
The cord coming off the spool is looped around the second screw. A bight is then made in the cord between the screw and the spool and inserted through the D-ring, as before, from front to back.
Take the line running from the D-ring to the coil and loop that over the next screw. Pull a new bight of line through the D-ring, again from front to back, and loop it over the next screw.
The process is repeated until all the screws have been looped by the cord. The line at the left, coming off the spool, will be inserted through the D-ring and cut to have an end 5′ from the D-ring.
Repeat until all screws have a bight of line on them. Cut the cord off the coil, leaving 5′ beyond the D-ring.

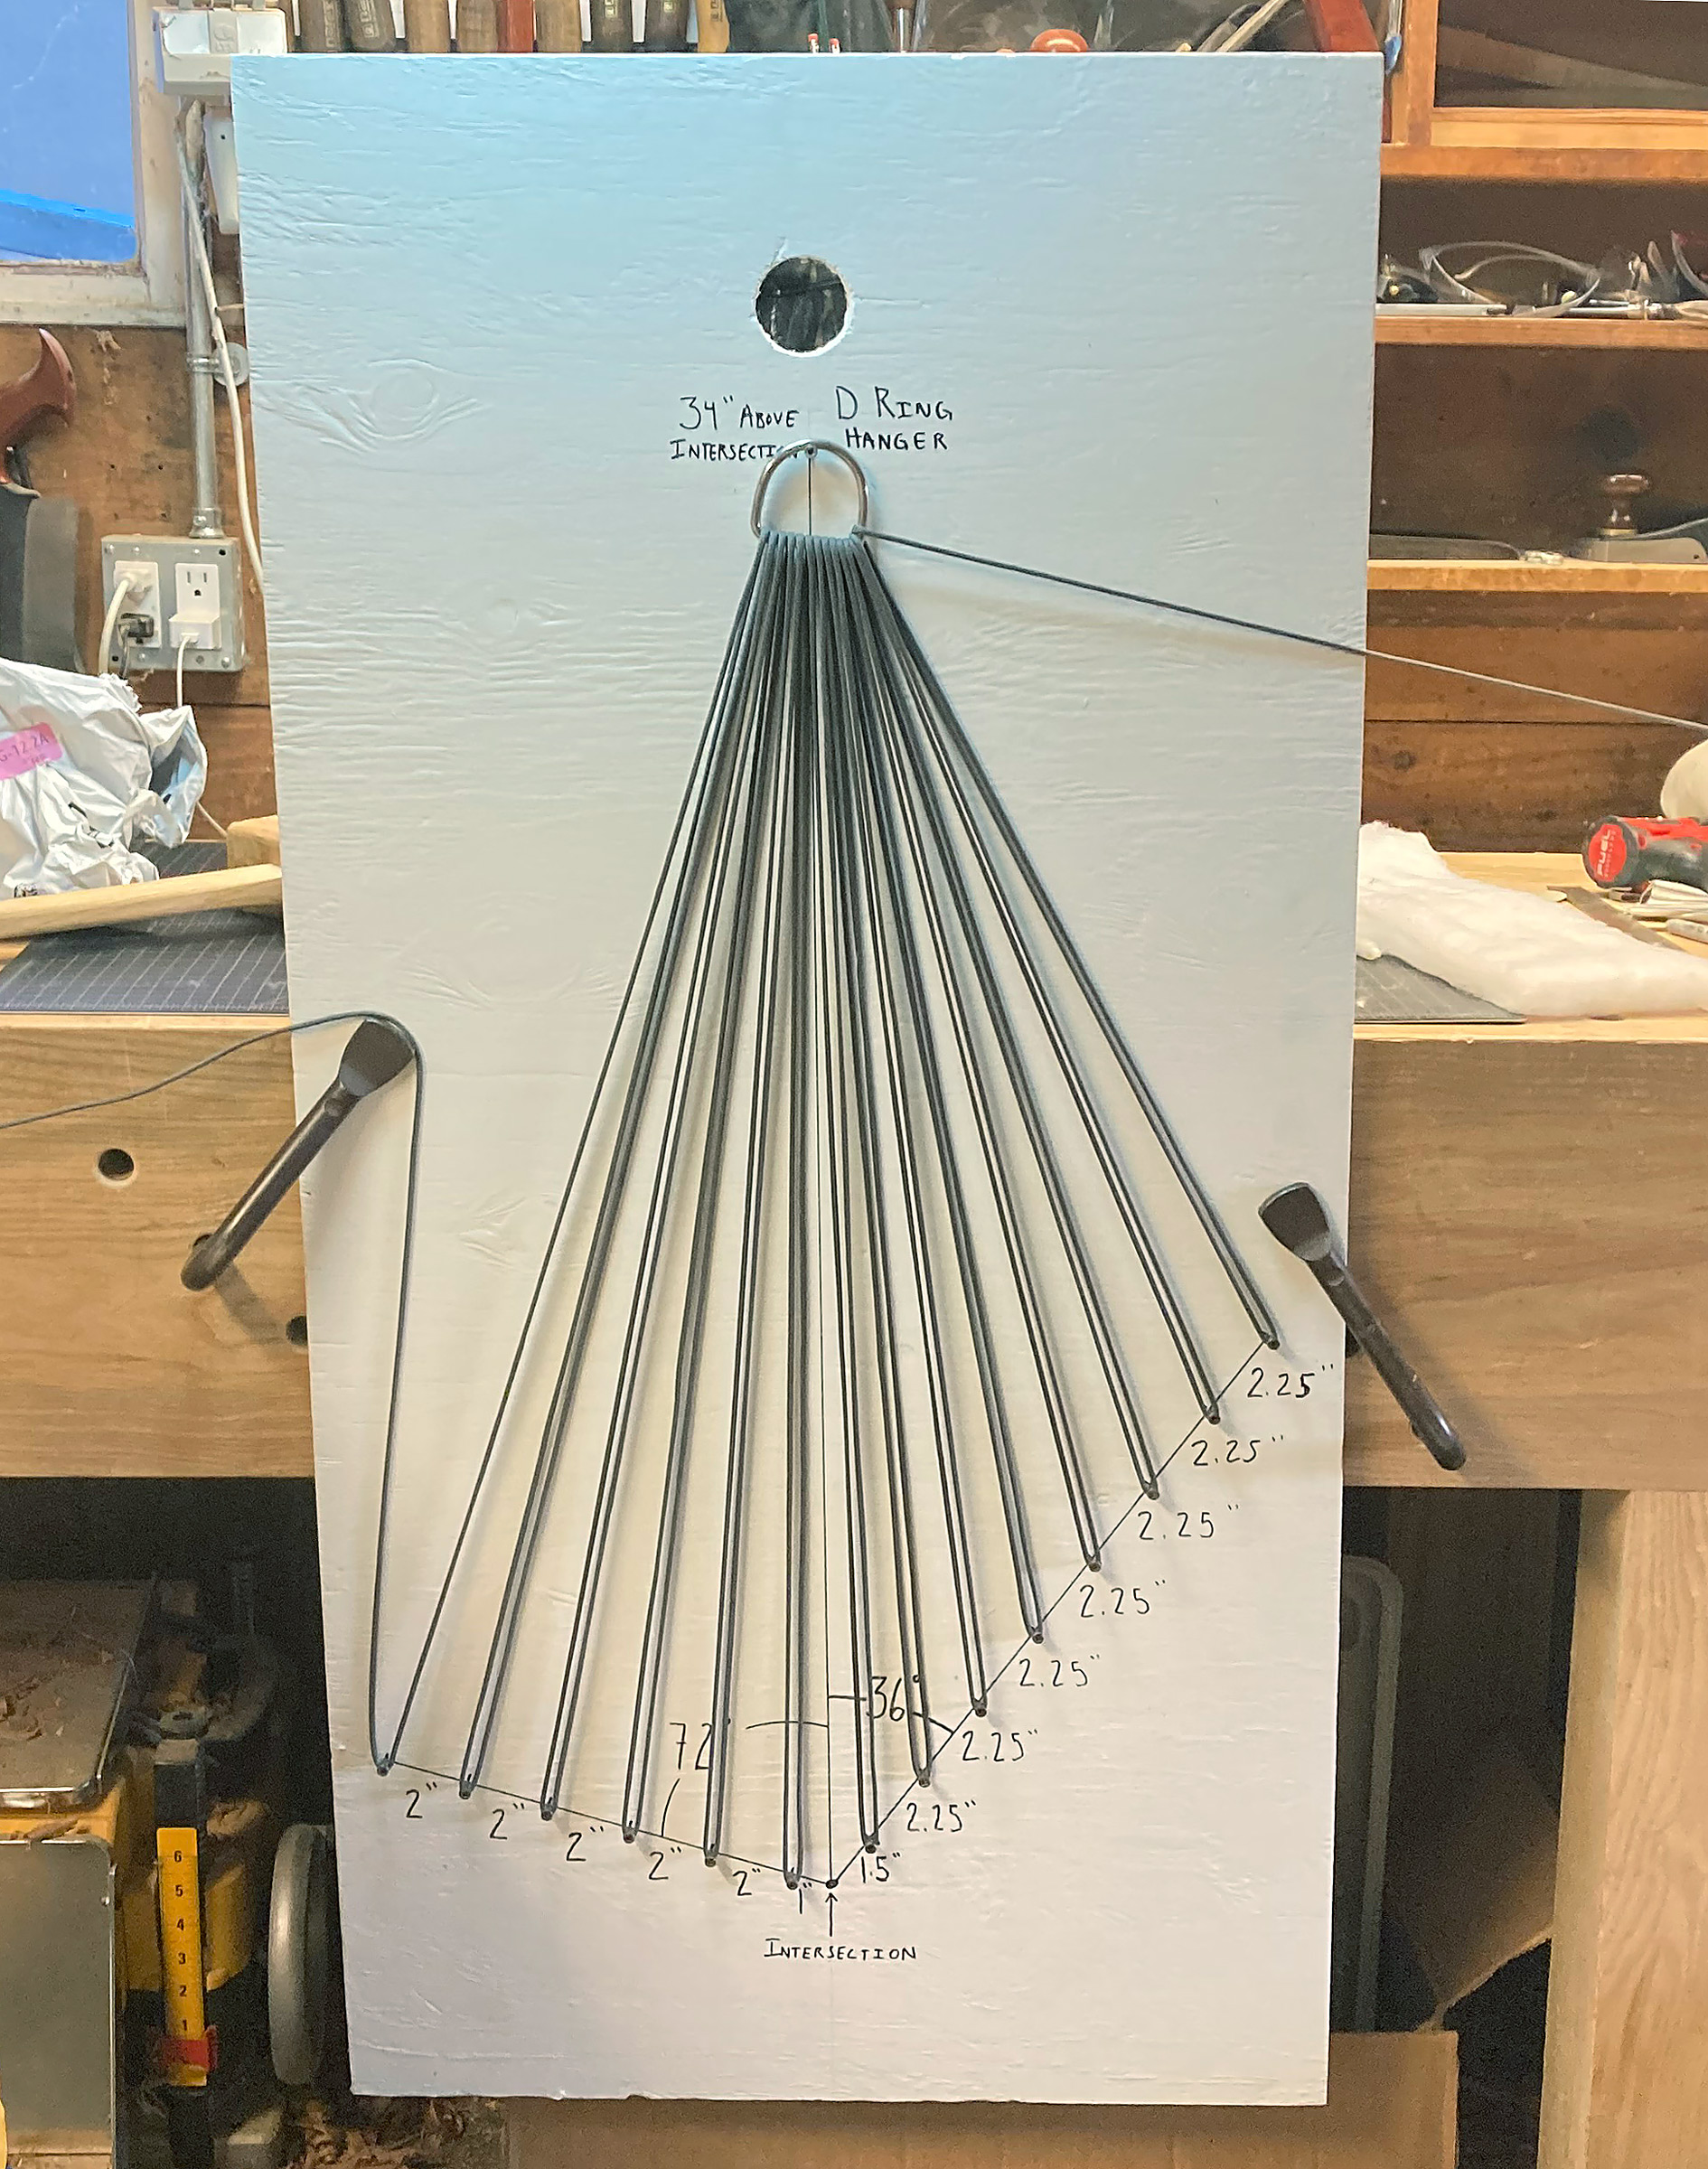
The two 5′ ends of the cord are inserted through the space created by the nettles under the D-ring.
Pass each bitter end under the D-ring through the space between the lines in the front and the lines in the back. There is no need to haul the lines tight at this point, just keep things snug.

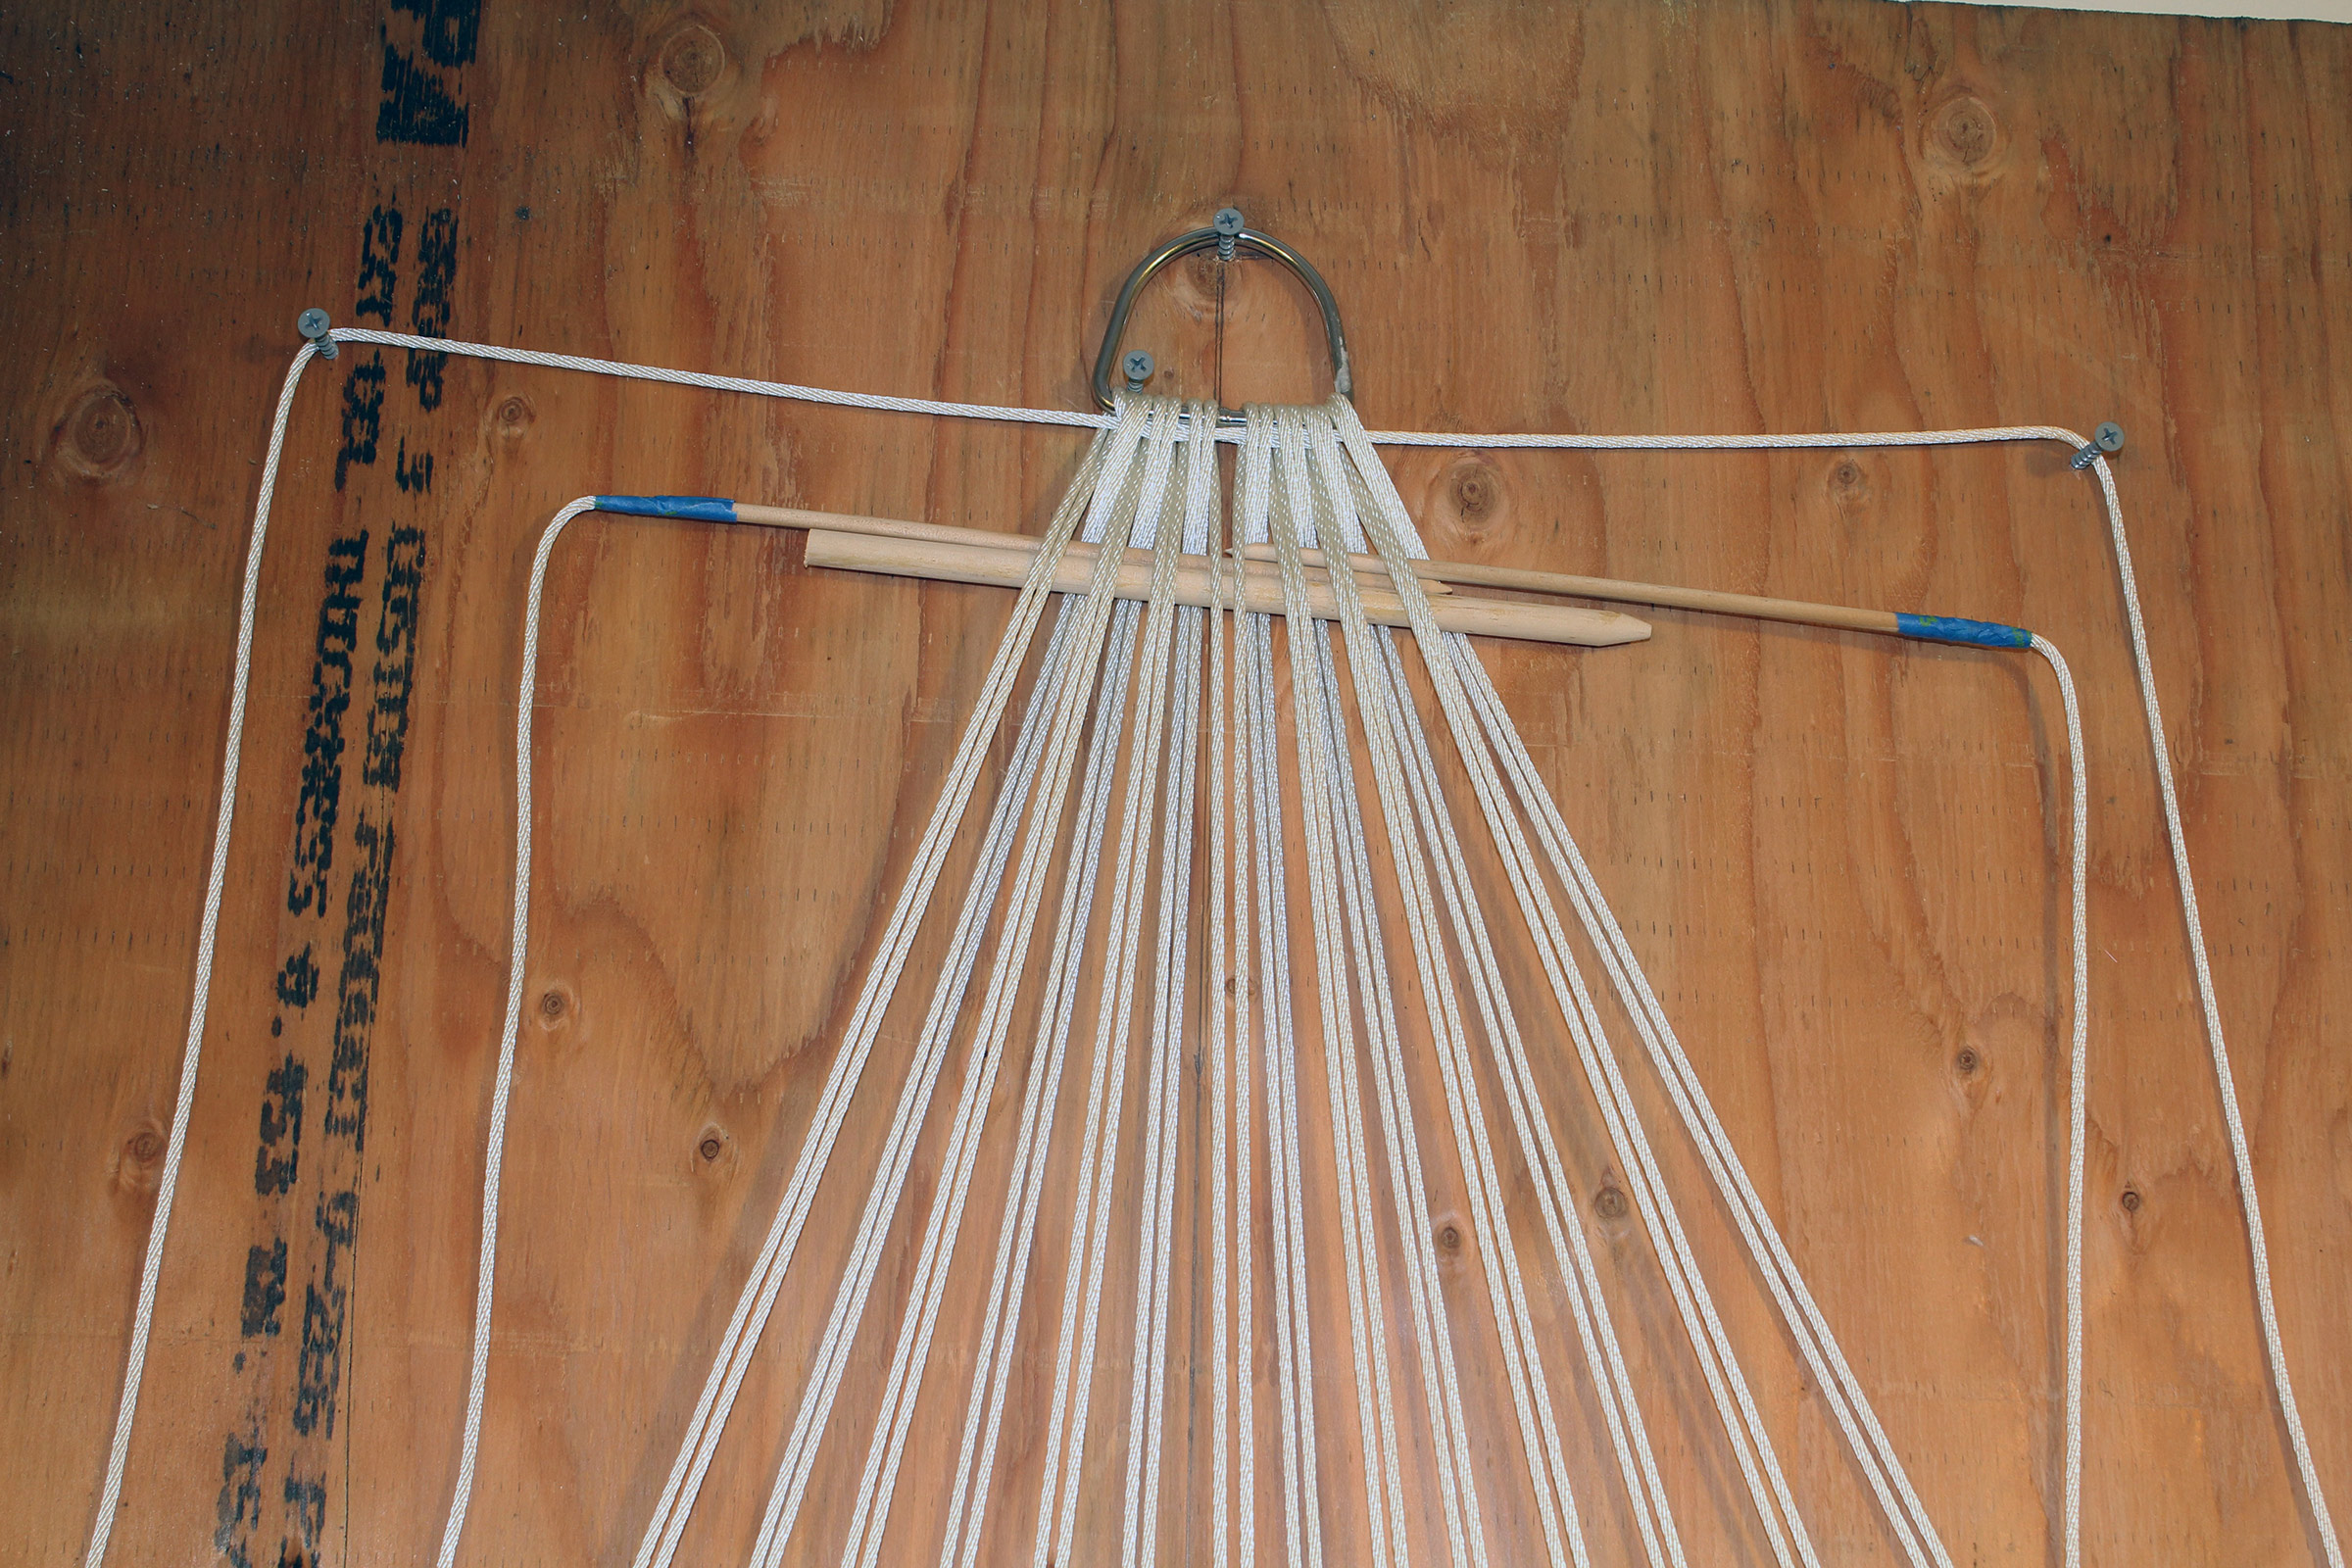
A dowel is woven through the nettles pulling the nettles at the back forward while pressing the nettles at the front to the back.
Cut a dowel about as wide as the jig and put a smooth point on one end. Starting at one side of the nettles, pick up the nettles that are at the back and push down the bights that are at the front. It’s easier to sort the nettles out low on the jig where the nettles are apart from each other, then slide the dowel up to the D-ring for weaving the clew. Pass the bitter ends through the space under the dowel.
The cords are slipped through the space above the dowel.
Slide the dowel out, then re-thread it across the nettles to pick up those that are now at the back and push back those that are now at the front. Skip the nettle at each end this time and pass the bitter ends along the stick in the space beneath it.

The process is repeated, skipping the outermost pair of nettles with each weaving of the dowel.
Repeat this process, dropping the outer nettle with each course. When you are down to the last bight, go back through your work tightening each line to harden up the weave.

A pair of needle-nose pliers helps tighten the woven cords.
I find smooth-jawed needle-nose pliers helpful here.

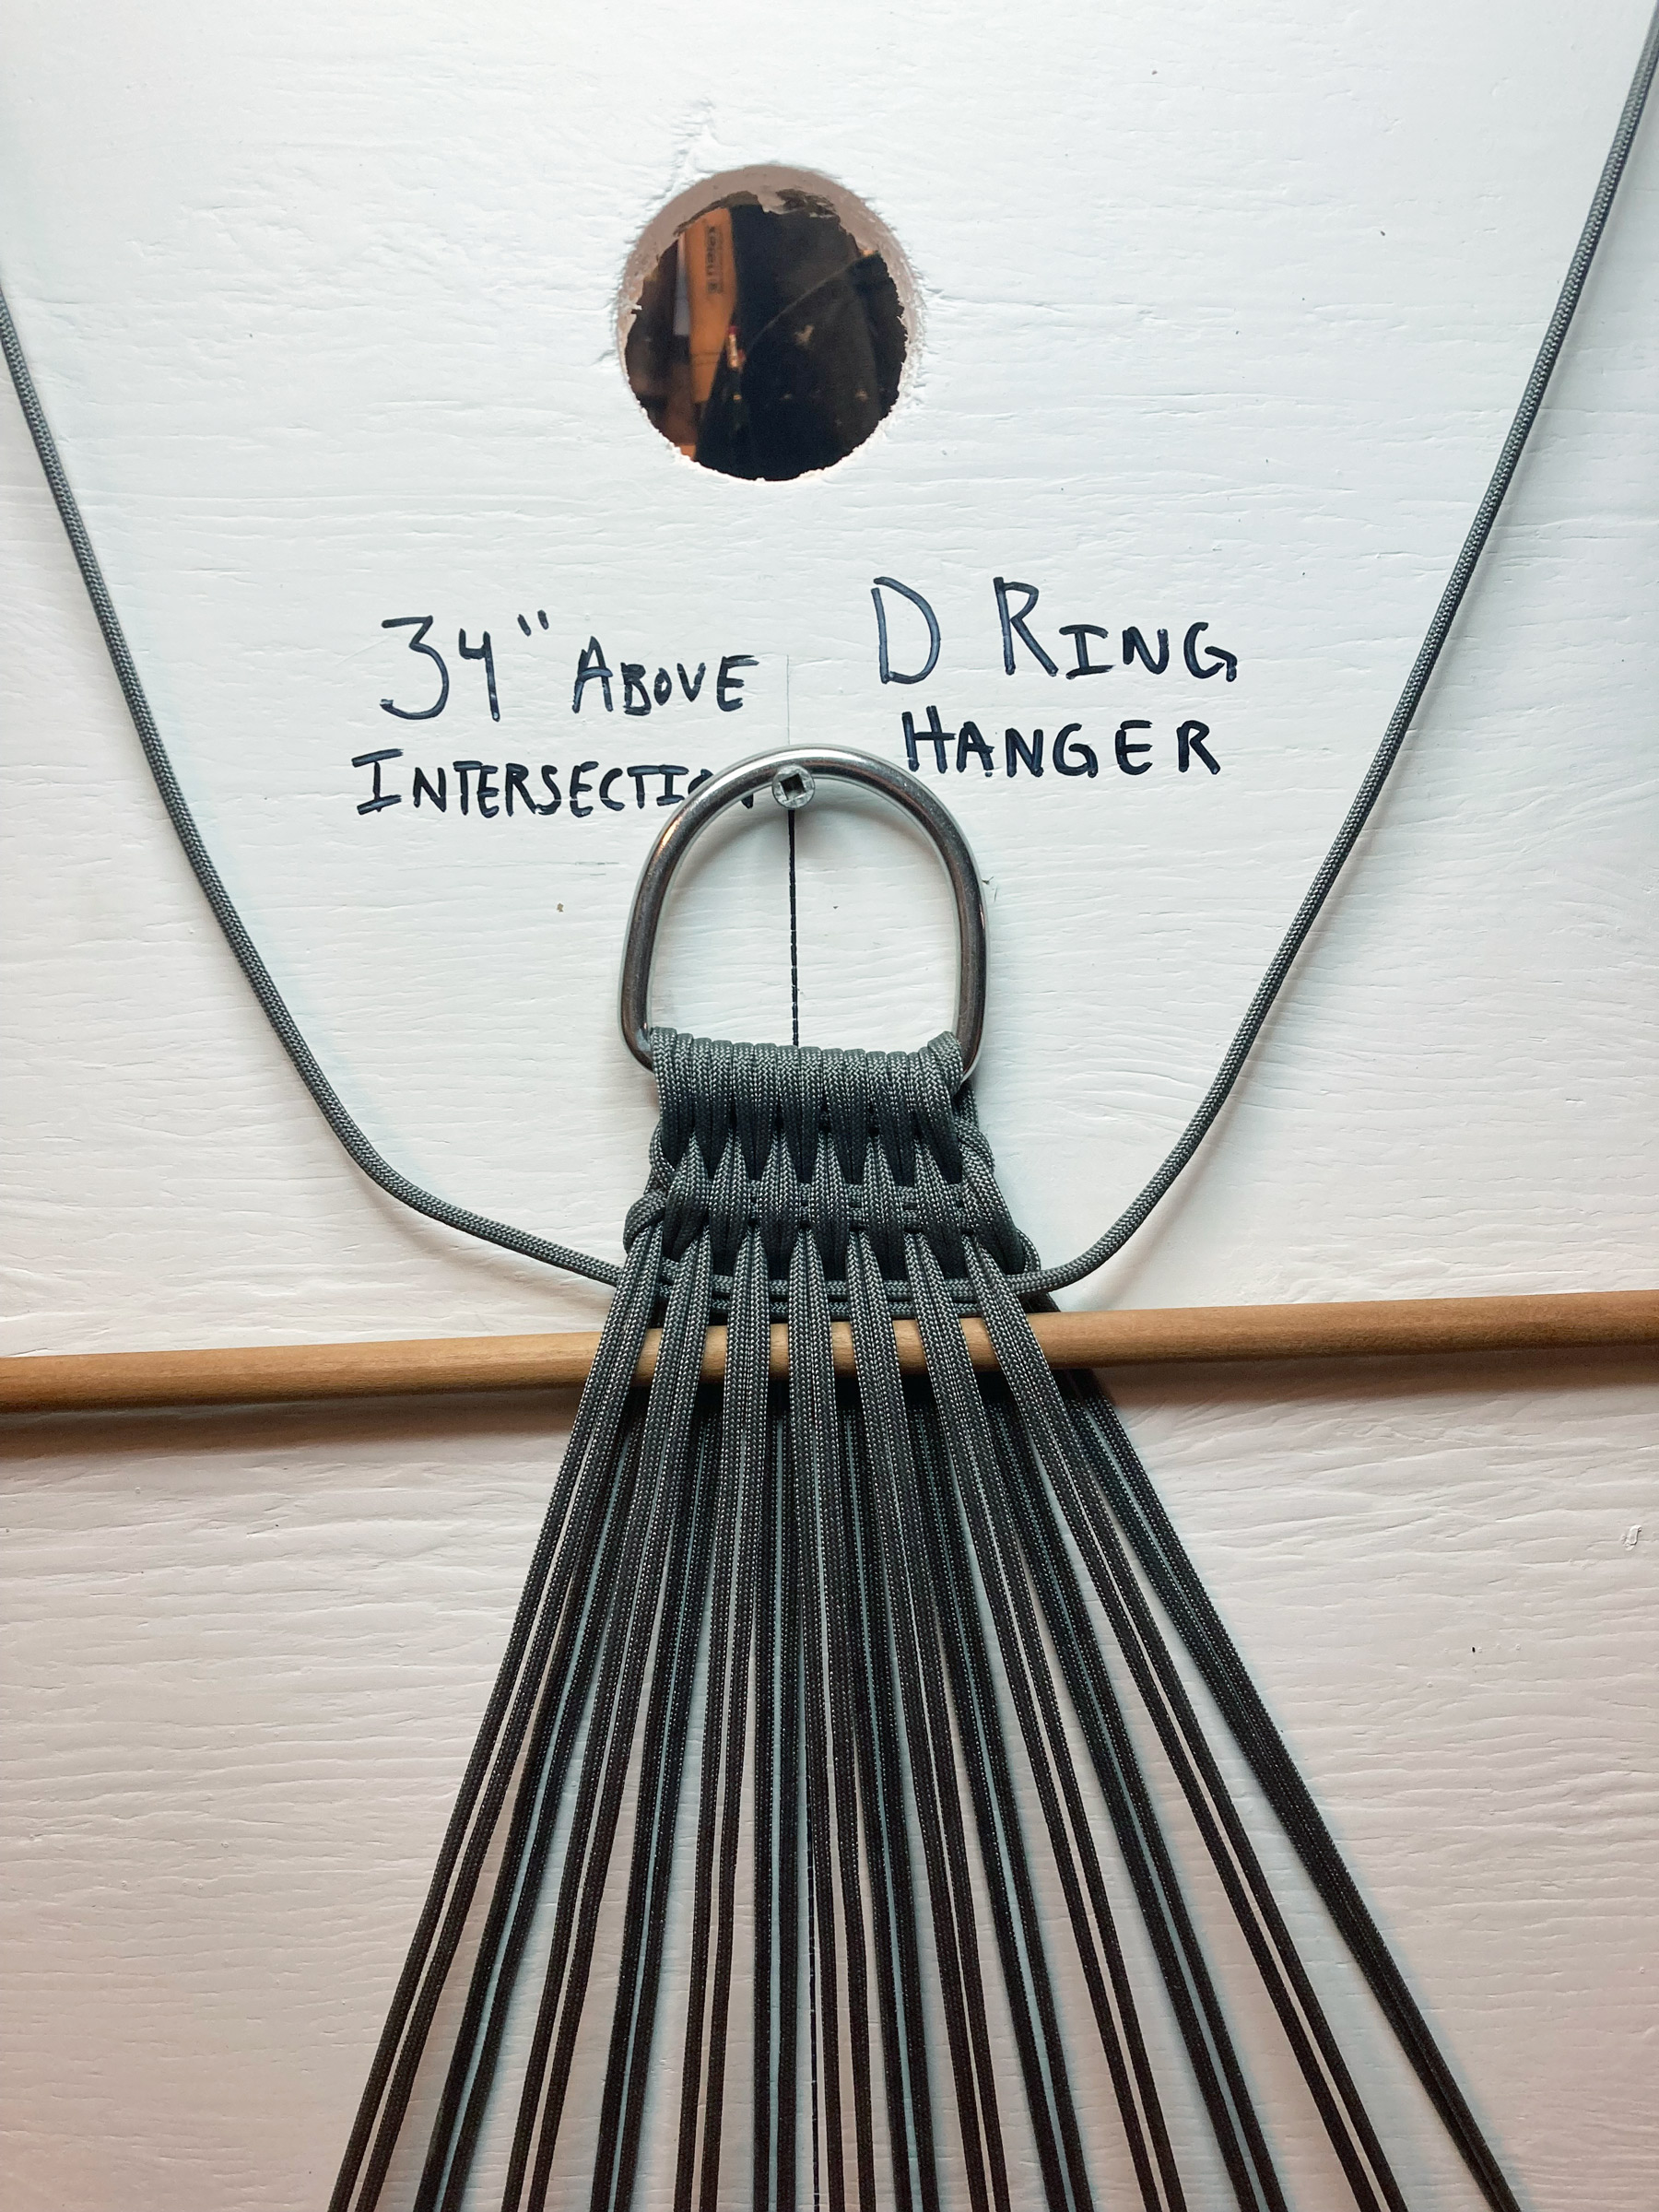
Tying the cords in a square knot finishes the weave.
Once the weaving is tight, tie a tight square knot, cut the lines, and melt the ends to prevent fraying and keep the knot tied.
The ends of the cords are cut close to the square knot and then melted against the knot to prevent fraying and keep the knot from untying itself.
Your first clew is complete; repeat the process to weave the second clew.
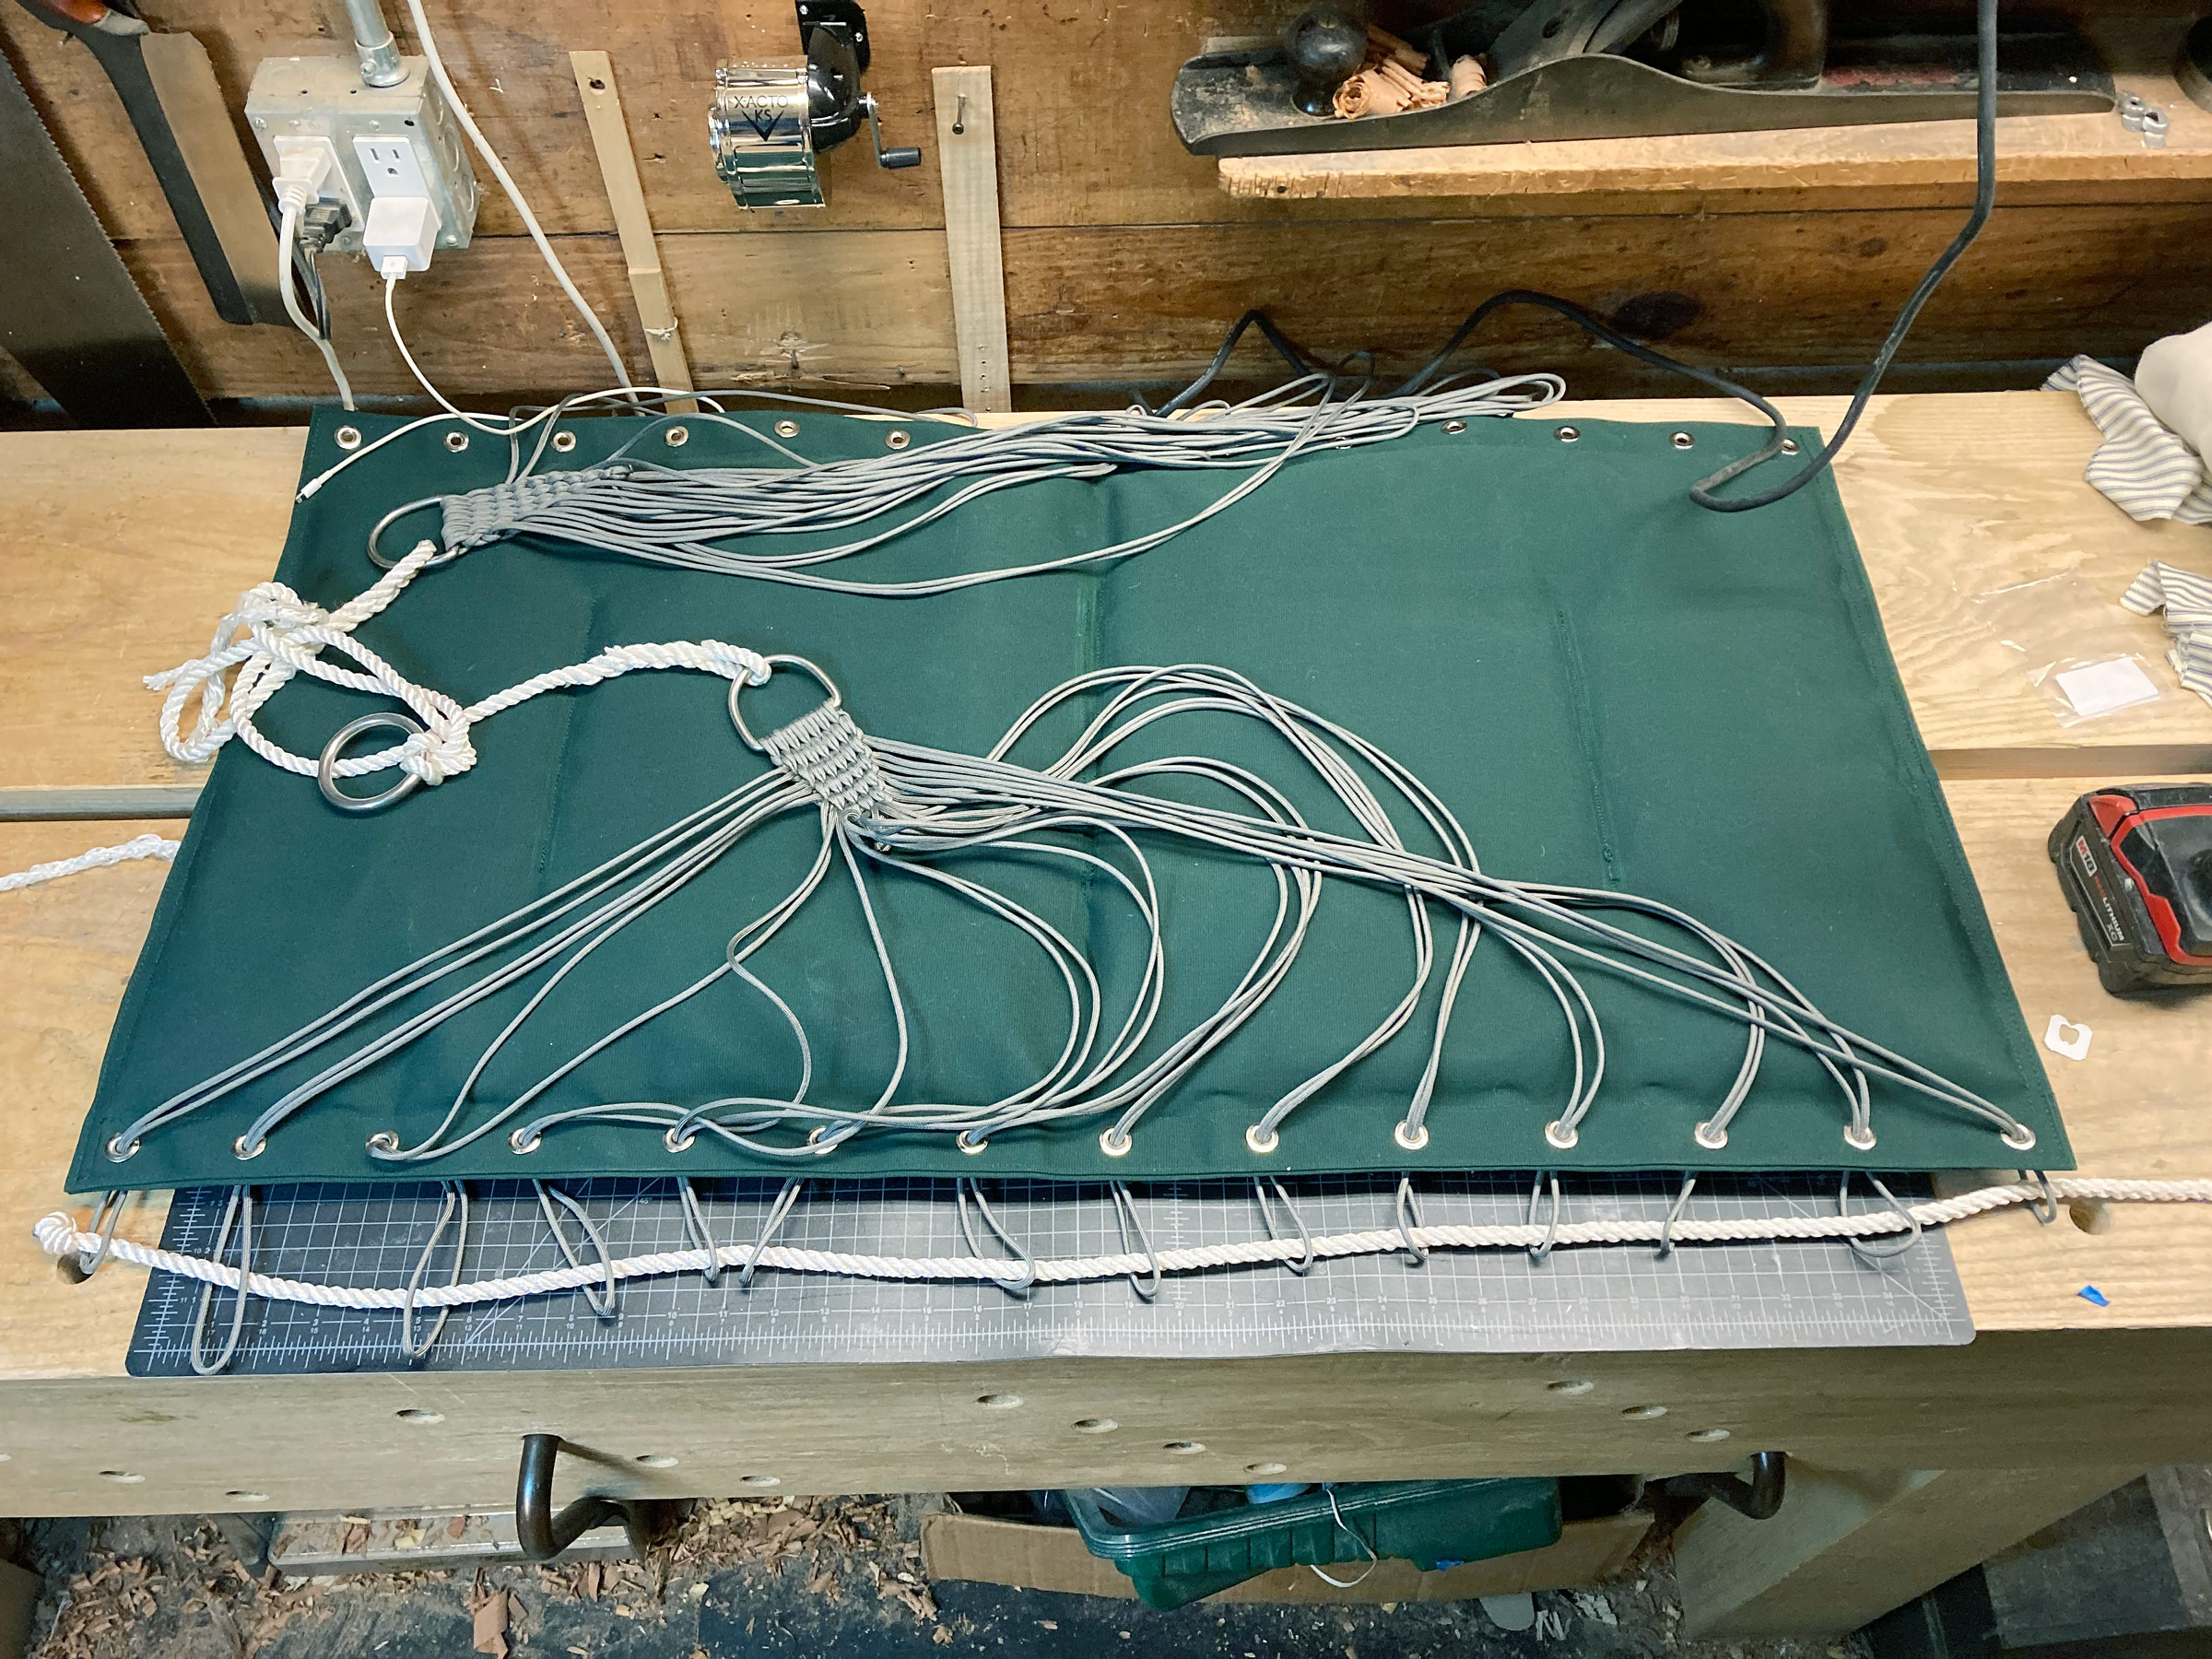
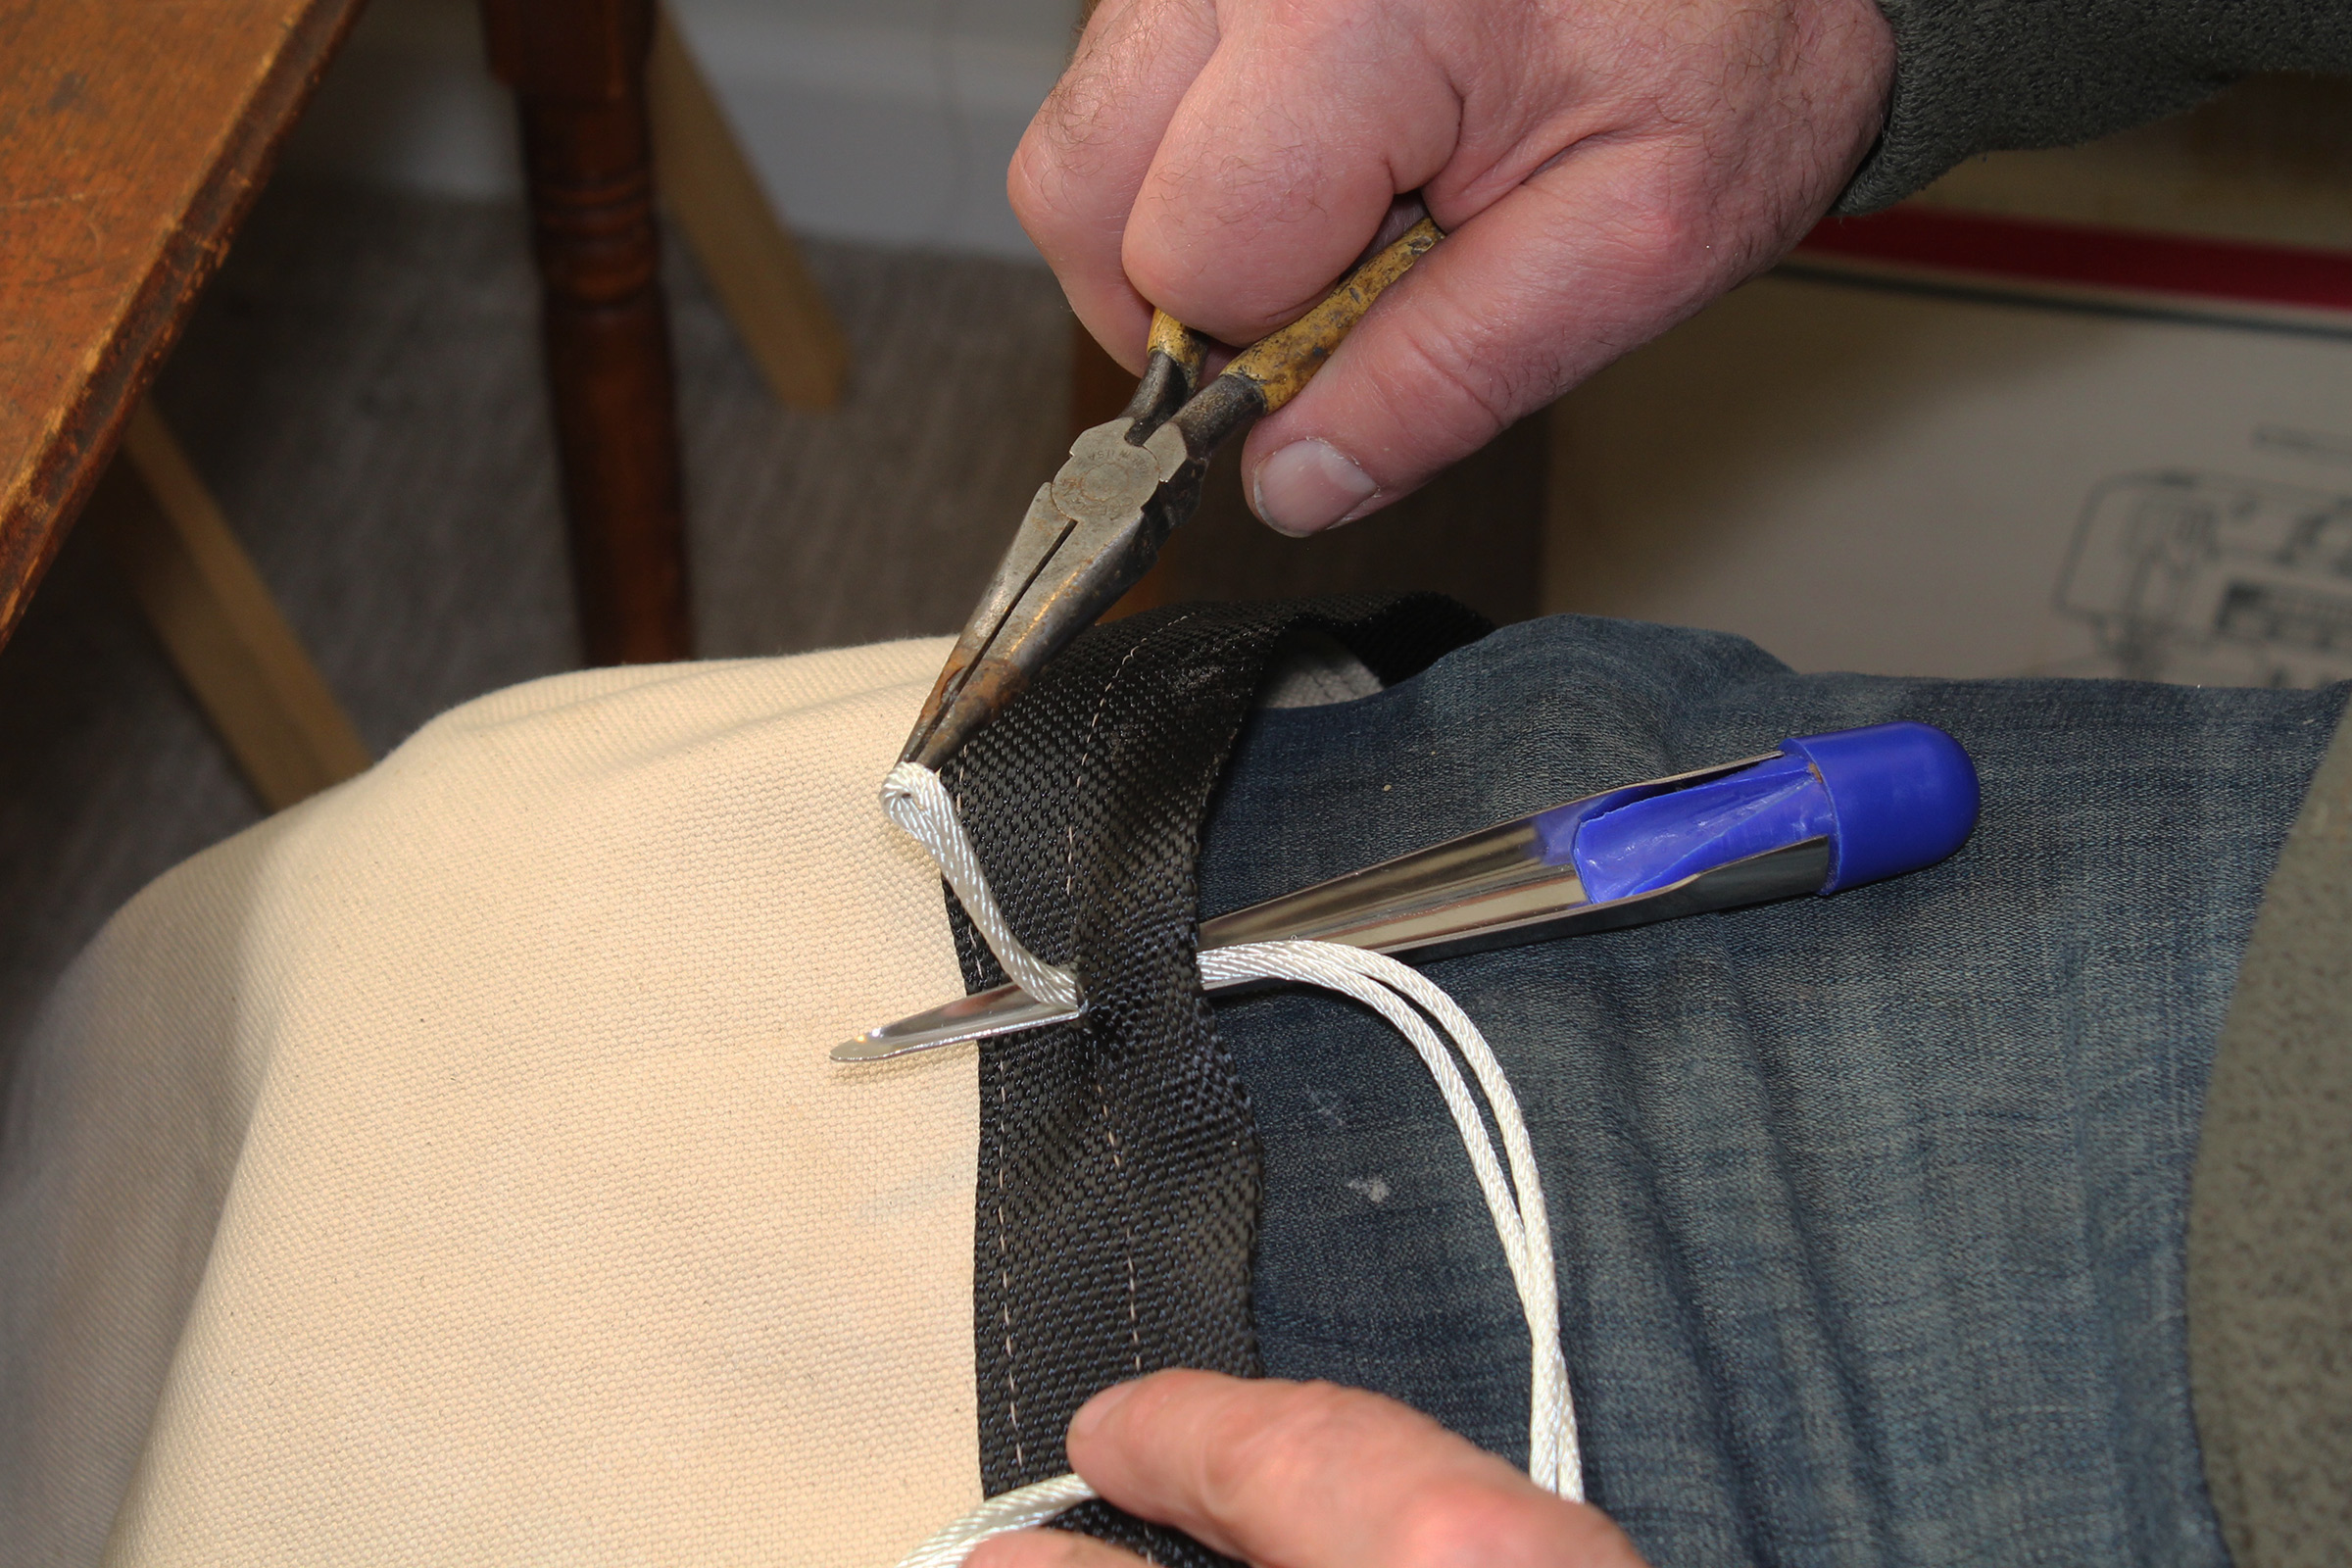
The nettles are slipped through the grommets and a thicker line is slipped through the bights.
To connect each clew to the chair body, pass the nettles, in order, through the grommets on one side of the chair, then a length of 3⁄8″ line through all the loops at the ends of the nettles. Tie a stopper knot in each end of the 3⁄8″ line, cut it short, and melt the ends. Repeat for the other side. The 3⁄8″ lines will be on the outside of the chair when you sit in it.
A spreader holds the D-rings apart.
To hold the D-rings apart, I make a 40″ stretcher from whatever wood is lying around the shop, and shape 1″-long shouldered tenons on the ends to slide into the D-rings.
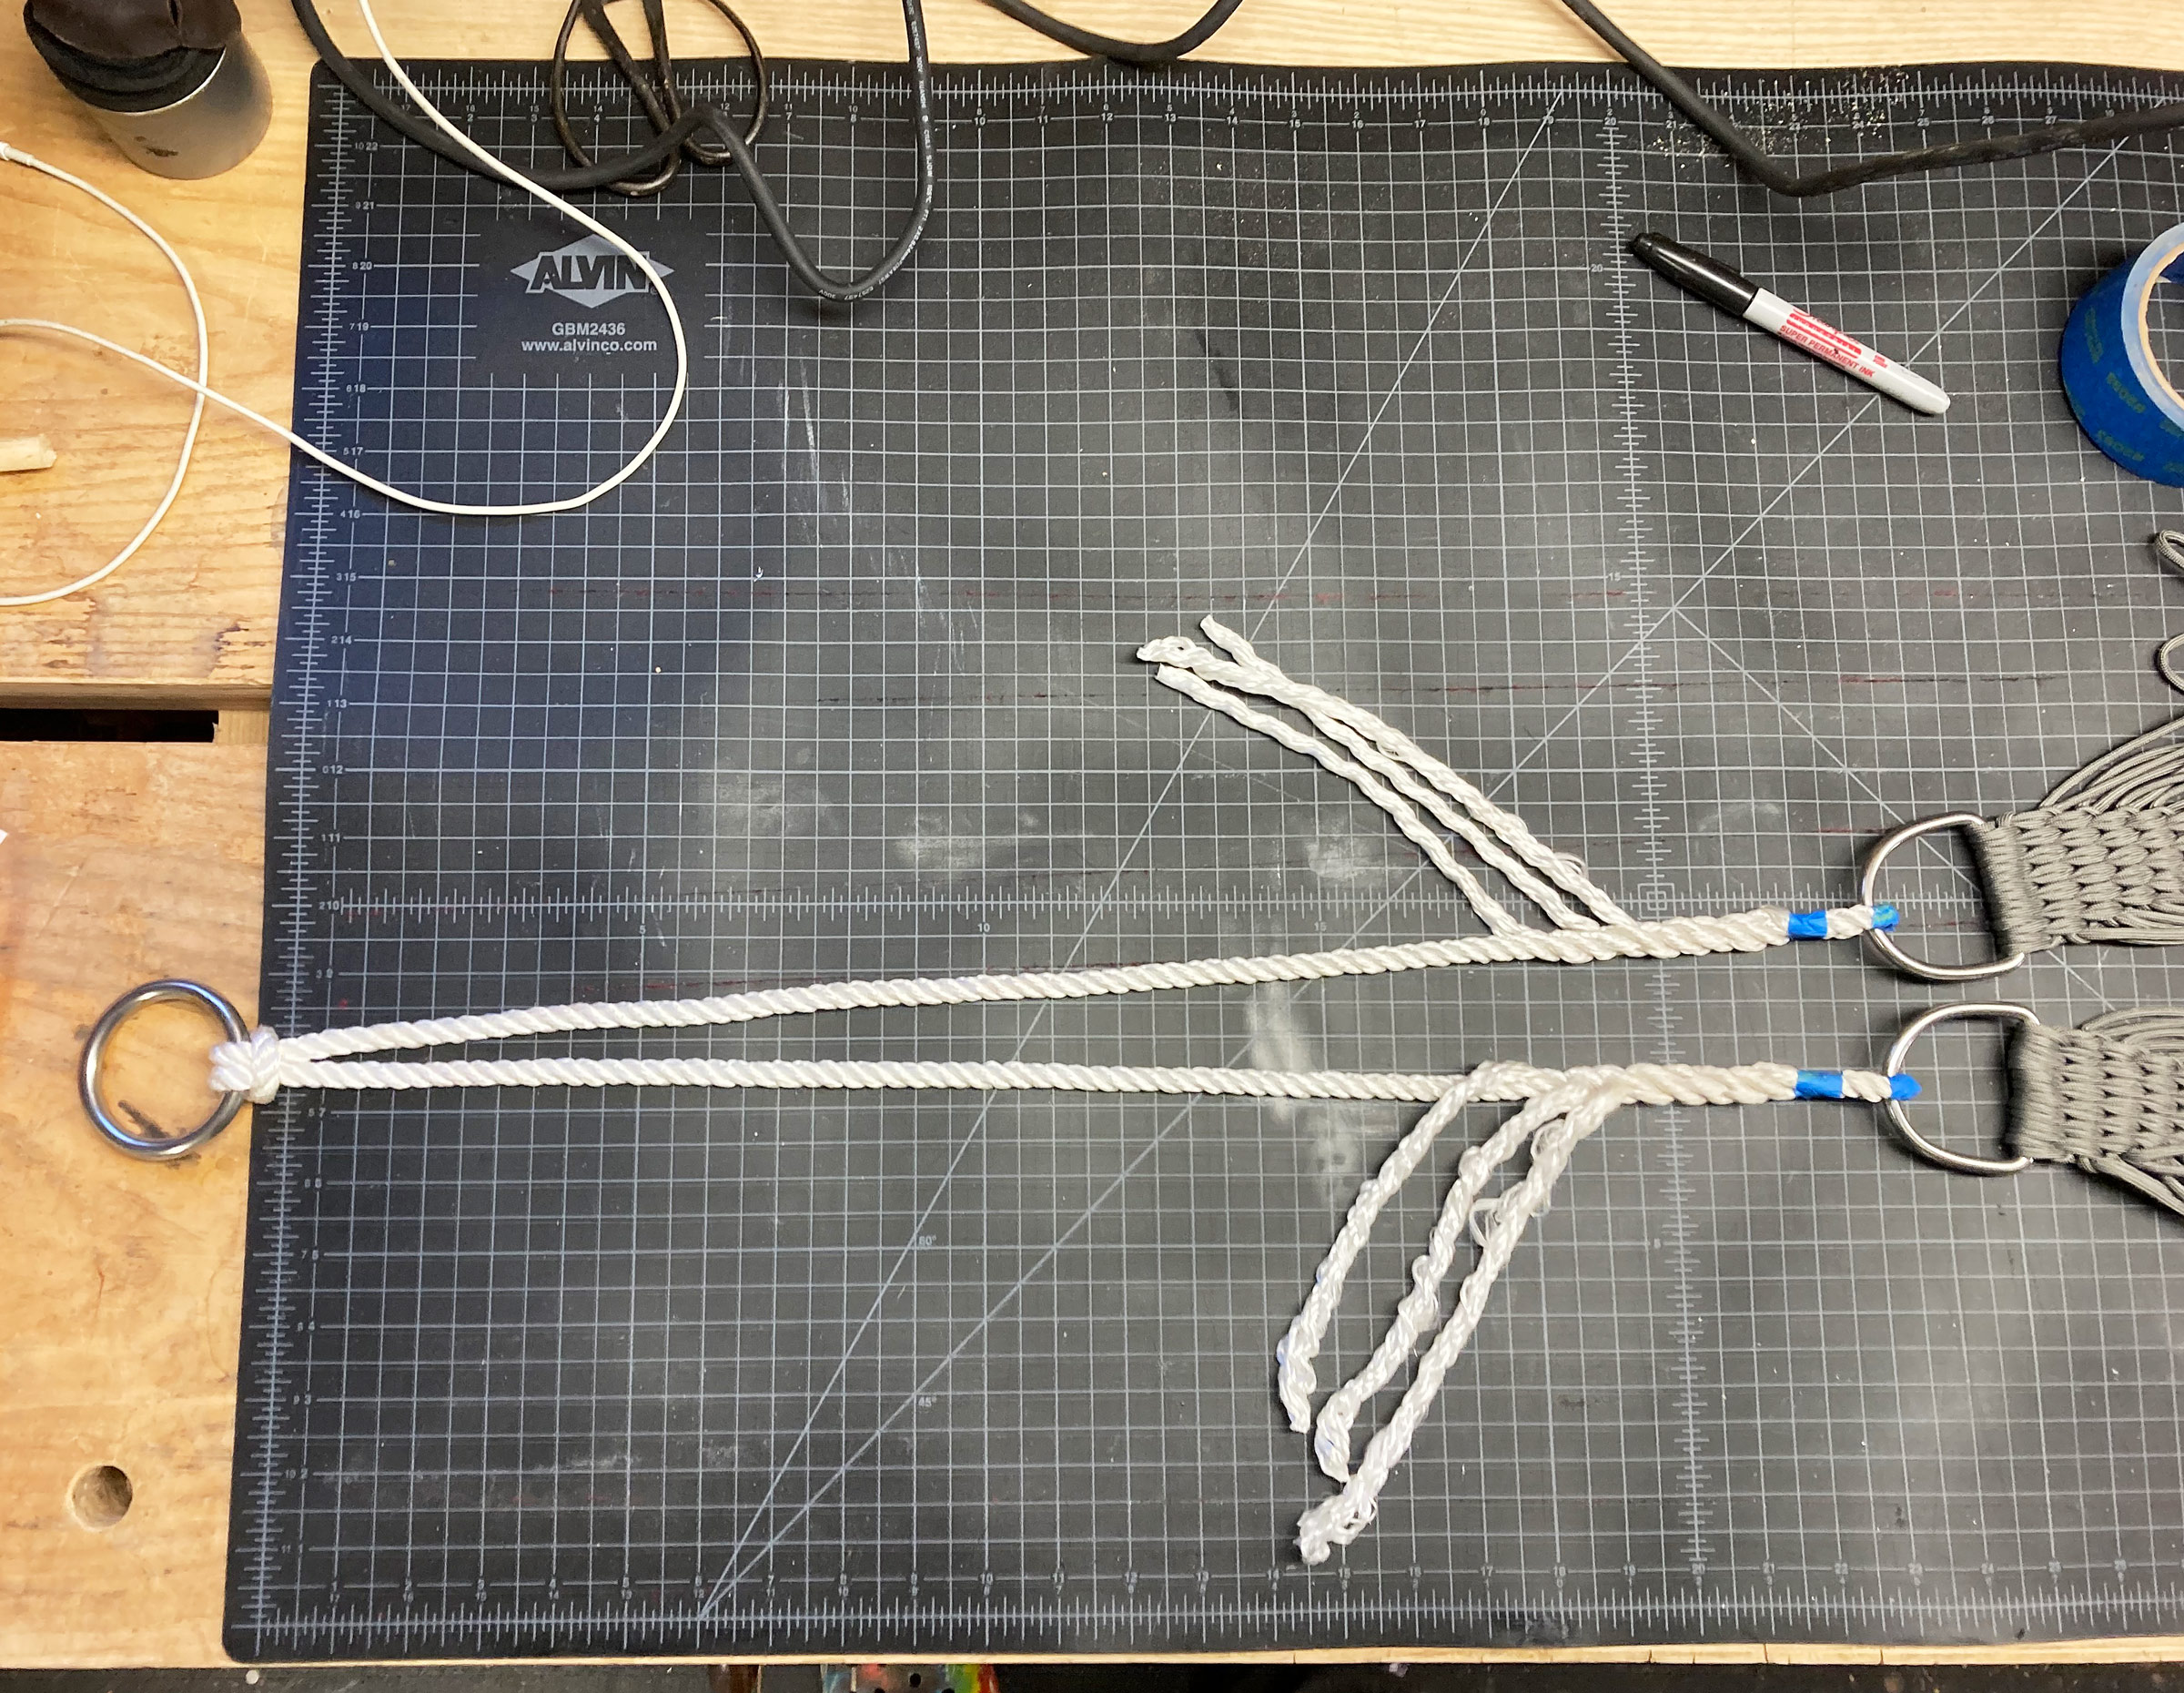
A 6′ length of line connects the D-rings with a circular ring at the top. Here the ends are spliced. They may also be tied with bowlines for a quicker though not-so-elegant finish.
To connect the D-rings to the round ring, fold a 6′ length of 3⁄8″ line in half, then cow-hitch this midpoint to the round ring. Splice or tie each end to a D-ring so that each leg of the line is 24″ long.

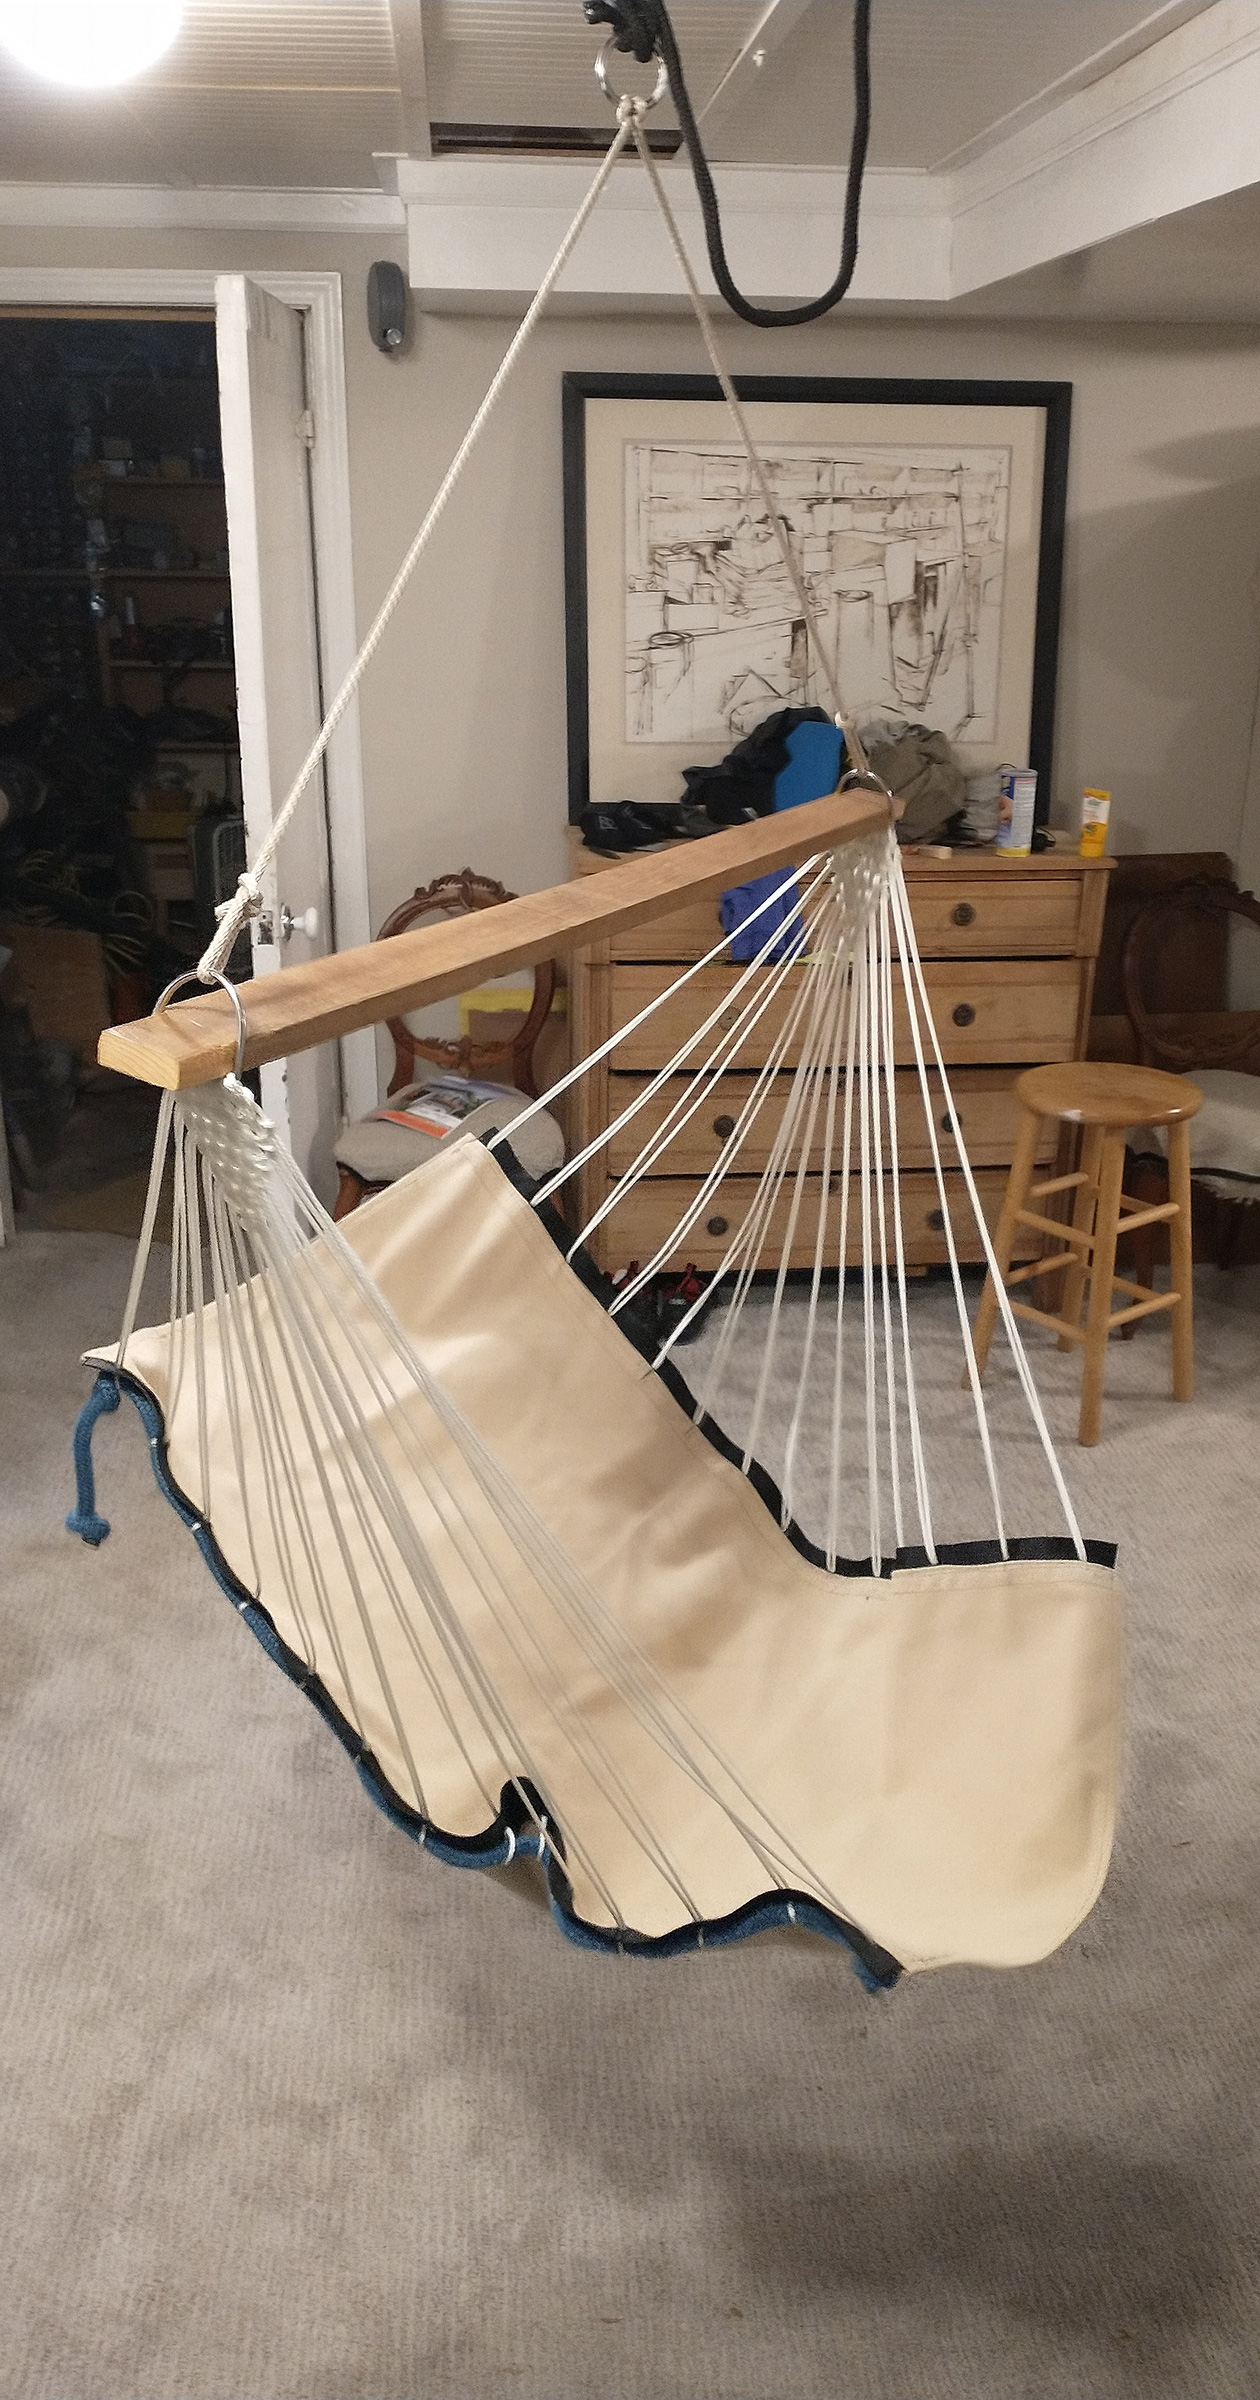
The chair is quite strong and can hold an adult, a child, and a storybook.
Your chair is complete! Good luck keeping everyone out of it.![]()
James Kealey lives and teaches in Richmond, California. When he’s not chasing his two young sons, he can usually be found banging away on some project in his garage workshop. In high school, he rowed in racing shells. He still gets away most summers for sail-camping trips on mountain lakes.
Editor’s Notes:

While my small-boat cruises have taken me to a lot of interesting out-of-the-way places, only one of them has had a place to sit that was as comfortable as my living-room sofa: a recliner someone had left on the Kentucky side of the Ohio River. I hadn’t imagined that there could be a chair that I might carry aboard a boat as small as my sneakbox that would be every bit as luxurious.
James’s hammock chair looked like it would offer a way to relax and take in the scenery, so I set out to make one for myself. I had a piece of heavy canvas, just enough for a single-layer chair without batting, and plenty of rope and wood for the bridle and spreader. I didn’t have enough paracord or the small spur grommets and the tools to install them. I found online a 500′ spool of 1⁄8″ solid braid nylon cord at a good price. It was more than enough for one or even two chairs, but I always have a use for that cord for boats, camps, and around the house. I bought stainless-steel 2-3⁄8″ D-rings and a stainless 1-1⁄2″ round ring for a few bucks, but nickel-plated steel rings are cheaper. To avoid the cost of the grommets and the tools they require, I used strips of 2″ nylon webbing. (I also tested the webbing of an old ratchet strap and it would have worked, too.) A Swedish fid can open holes for the nettles without significantly damaging the webbing. After the fid is removed, the webbing will close around the nettle and won’t open up or distort when a load is put on it.
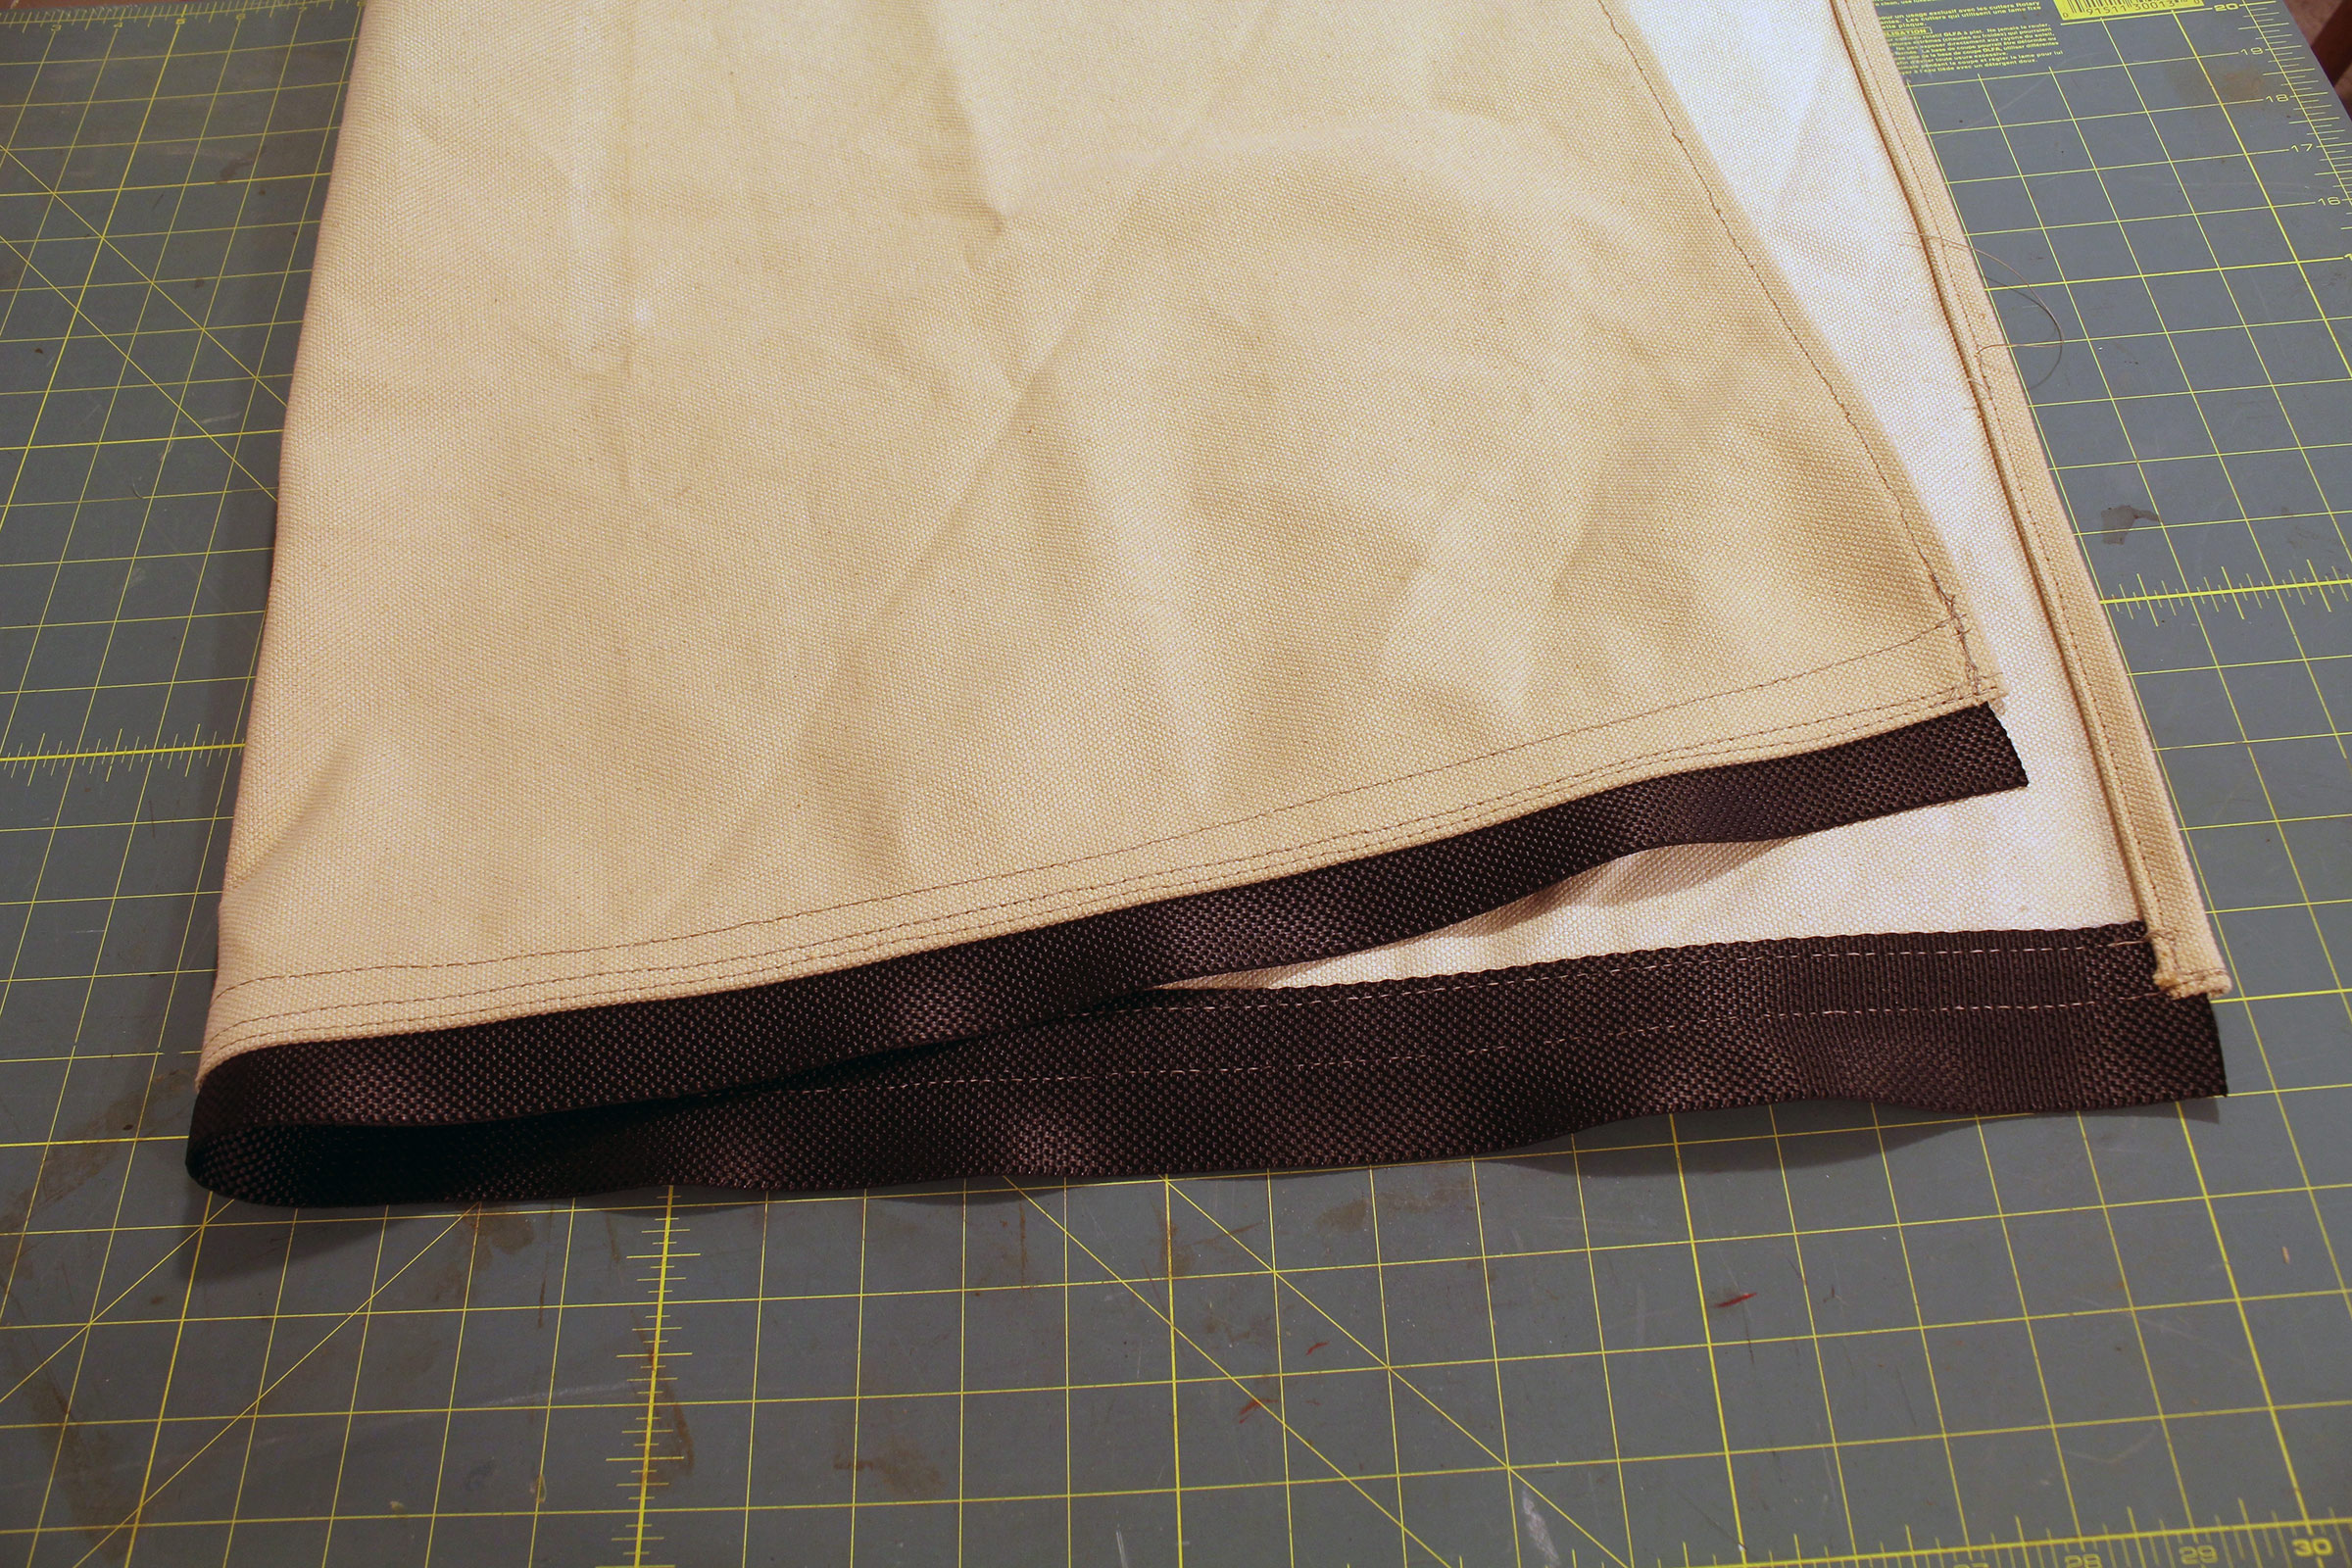
Strips of 2″ webbing are sewn overlapping the single-fold hem on the long sides of the chair body. The webbing ends, cut with a hot knife to prevent fraying, are tucked in the second fold of the double-fold hems of the ends of the chair body.
A second screw keeps the D-ring from being pulled to the side by the nettles as they are looped through it.
A pair of 1⁄8″ dowels help thread the ends of the cord along the dowel that holds the nettles. The two screws to the side of the D-ring keep the cord from getting mixed up with the nettles.

As the weaving progresses, an outside pair of nettles gets skipped for the next weave. Taping those pairs away from the rest of the nettles helps keep track of which nettles go where.
Be sure to ensure the square knot won’t untie itself. Either melt the cut ends to the body of the knot or leave the tail ends of the cord long and whip the ends together, perhaps to the center nettle. I had only melted the ends and the square knot shook itself out and the weave came undone. To reweave it, I’ll hang the chair and put some weight in it to tension the nettles. That will save having to rebuild the board with the screws.

The hole for each nettle is opened gently with a Swedish fid, right next to the canvas. Pencil marks on the canvas indicate where each hole goes.

Needle-nose pliers poke the bight of the nettle along the hollow in the fid and through the hole in the webbing.
The pliers pull the nettle through.
The chair, like a hammock, feels cool on my back, so the batting in James’s double-layer Cadillac version is a good idea for cool weather. I can use a blanket or a foam pad on top of my single-layer chair if I need some insulation.
The comfort of the chair and its swinging are very conducive to relaxing, even napping, but having some head support would be a welcome addition. I can tuck a throw pillow between the chair and my back to serve as a headrest or put it against the nettles on one side, but if I make a second chair (and I very well might) I’d make the back 9″ taller with the addition of three more nettles at the same 3″ spacing. That would require another 20′ of cord, 85′ on each side instead of 75′.
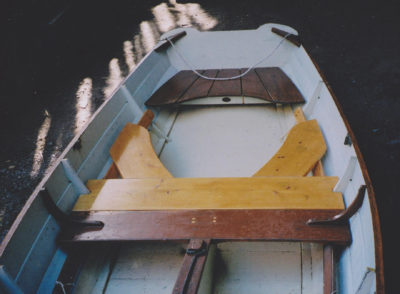
The hammock chair is so pleasant to sit in that it now spends its non-cruising time in the rec room.
The chair exceeded my expectations for comfort and made the project well worth doing.![]()
You can share your tips and tricks of the trade with other Small Boats Magazine readers by sending us an email.


Nice plan. I could see hanging it from the boom on a bigger boat. (No, not while under way!)
Thanks David! I think I’ll bring one along next time I’m out in my buddy’s keelboat.
To keep some knots in small cords from coming undone, I use a drop of super glue to “freeze” them in place. Of course, you have to untie them with a knife or pair of scissors.
I have three string hammock chairs hanging from the roof of my patio. They are very popular. My grandchildren love to play in them. I just recently purchased one that claims to be 7′ long. I haven’t tested it yet, but I am hoping it will be comfortable enough to sleep in. I have been looking for a hammock for a l-o-n-g time that van be hung from single support. I am a hammock camper. Have been for over 50-years. I even made a stand that I could erect in a canoe to hold my hammock, but PVC pipe will change shape under stress and slowly let you down.