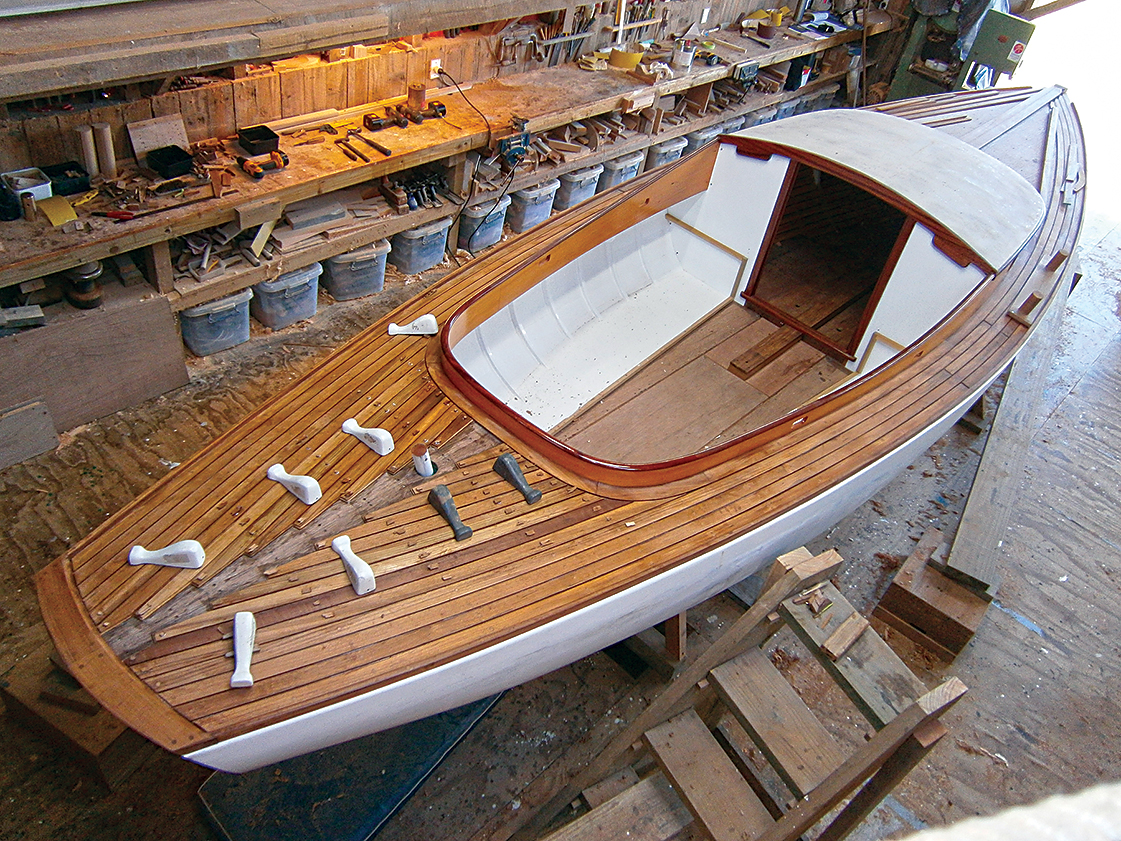
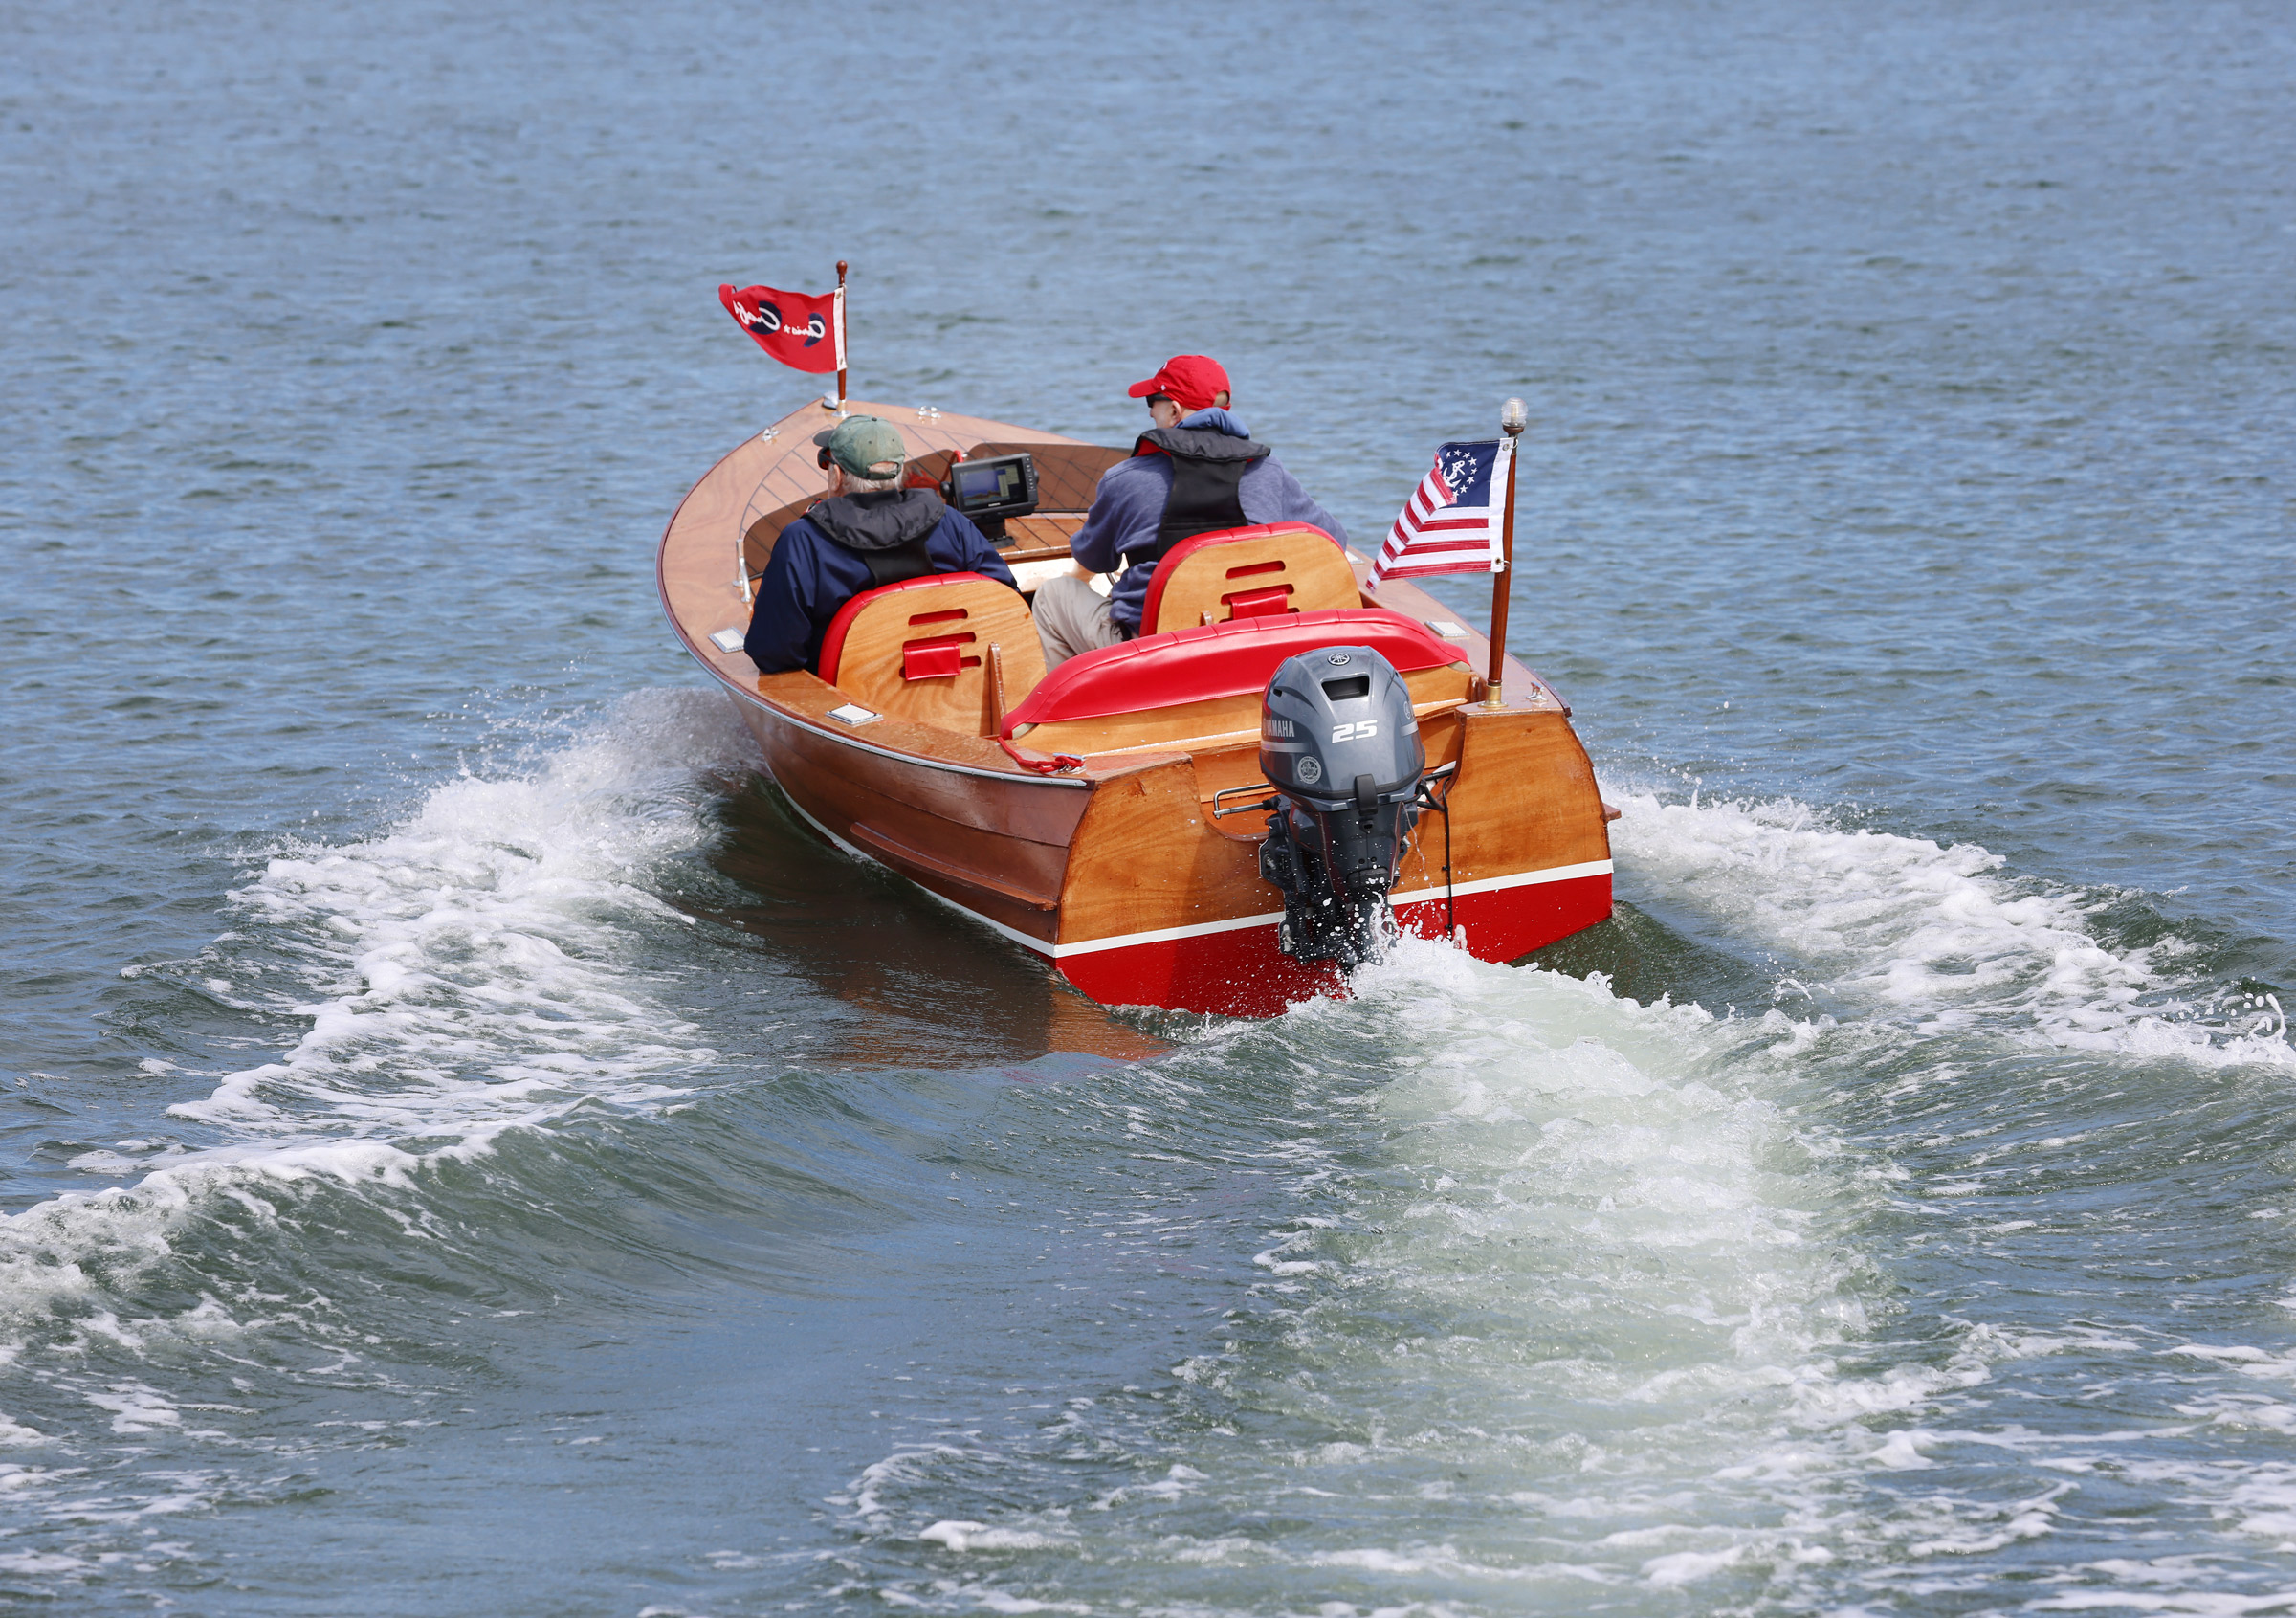
I’ll put a case to you, as lawyer Jaggers did hypothetically to young Pip in Great Expectations. Put the case that a boat should be designed, and that this boat should be handy under oars. Put the case that this boat should also sail well, and further that it should accommodate a small outboard motor off the transom, should some unknown person desire to do so. Put the case, as well, that this boat must be detachable into two halves that may “nest” one inside the other so as to be hauled aboard and lashed down in the smallest possible space on the crowded deck of a long-distance cruiser, and therefore must be very light yet equally very strong. Put the case that this boat must also be attractive, and put that last case to yourself very carefully. These expectations are great, indeed.
Compromising to resolve such thorny conflicts is the intellectual challenge that Russell Brown, a designer and boatbuilder of Port Townsend, Washington, took on in working up a nesting dinghy that has one further twist: he wanted his company, PT Watercraft, to be able to market the boat as a kit that could be built by amateurs.
The result is impressive. Brown has been working a long time in lightweight boat construction, with an eye toward engineered solutions tending toward minimalism. Using thin plywood and powerful epoxy to best advantage, he strives for construction that is light in weight yet very strong, as many others have in using these techniques. He also spent a good part of his youth cruising the world’s oceans, first with his parents and later on his own, so he has direct practical experience of what works and what does not.
Tom Jackson
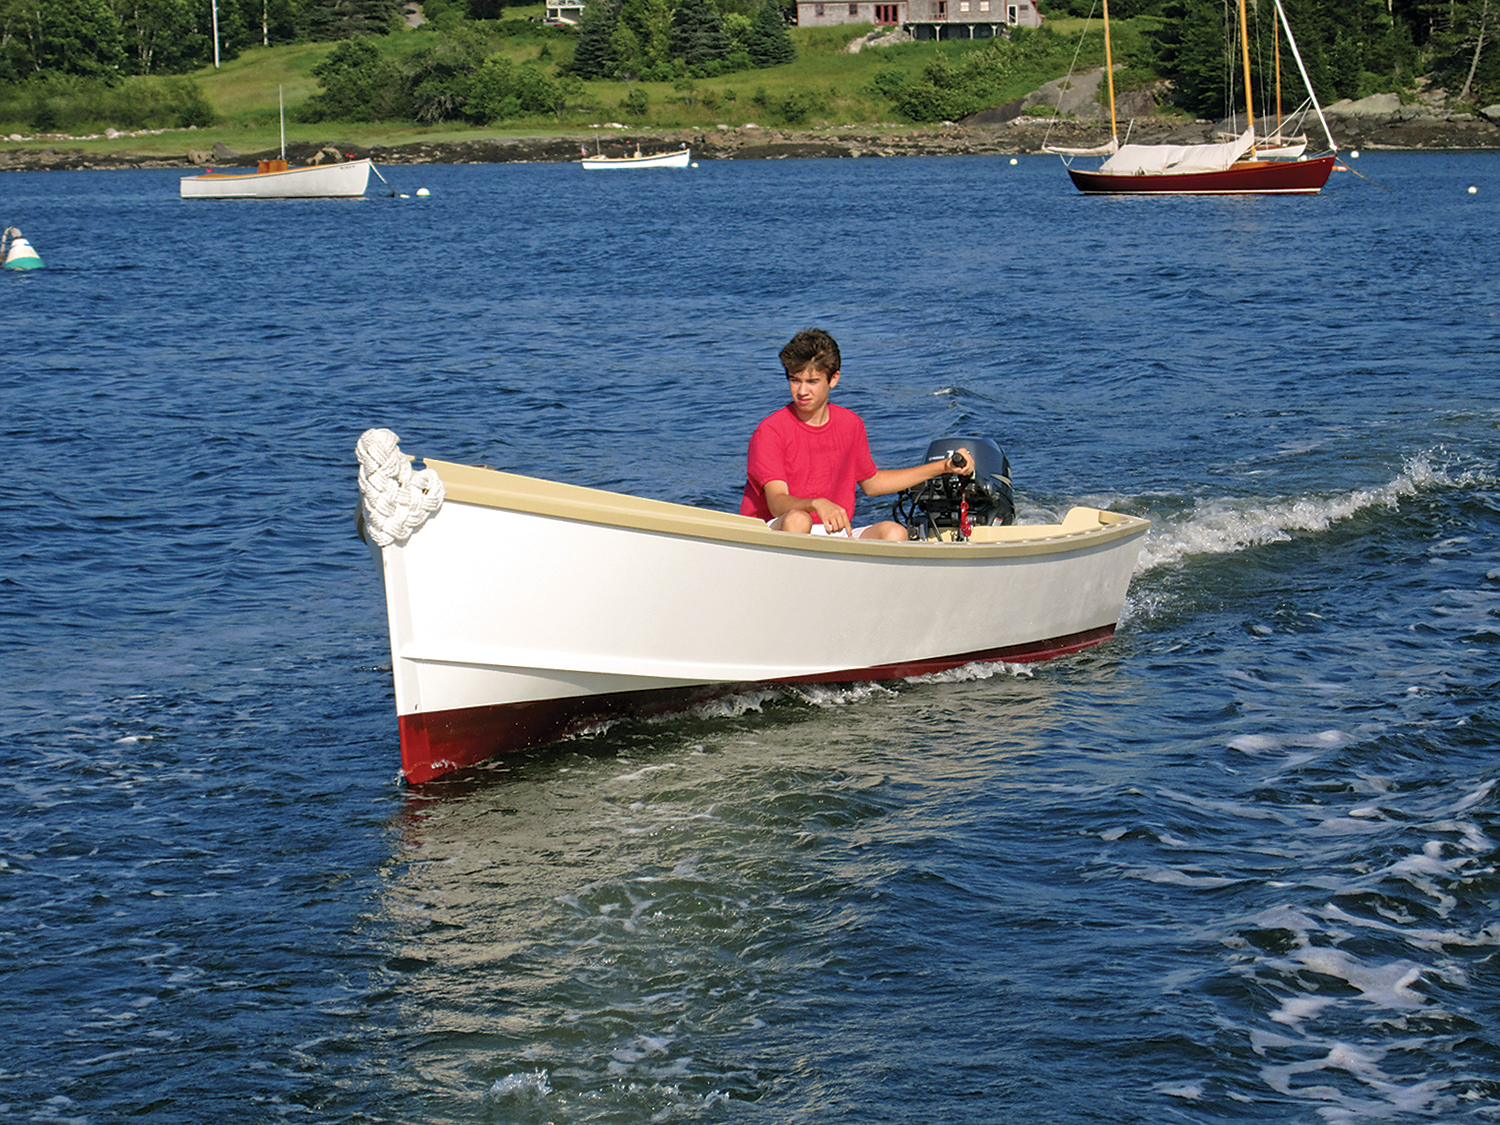
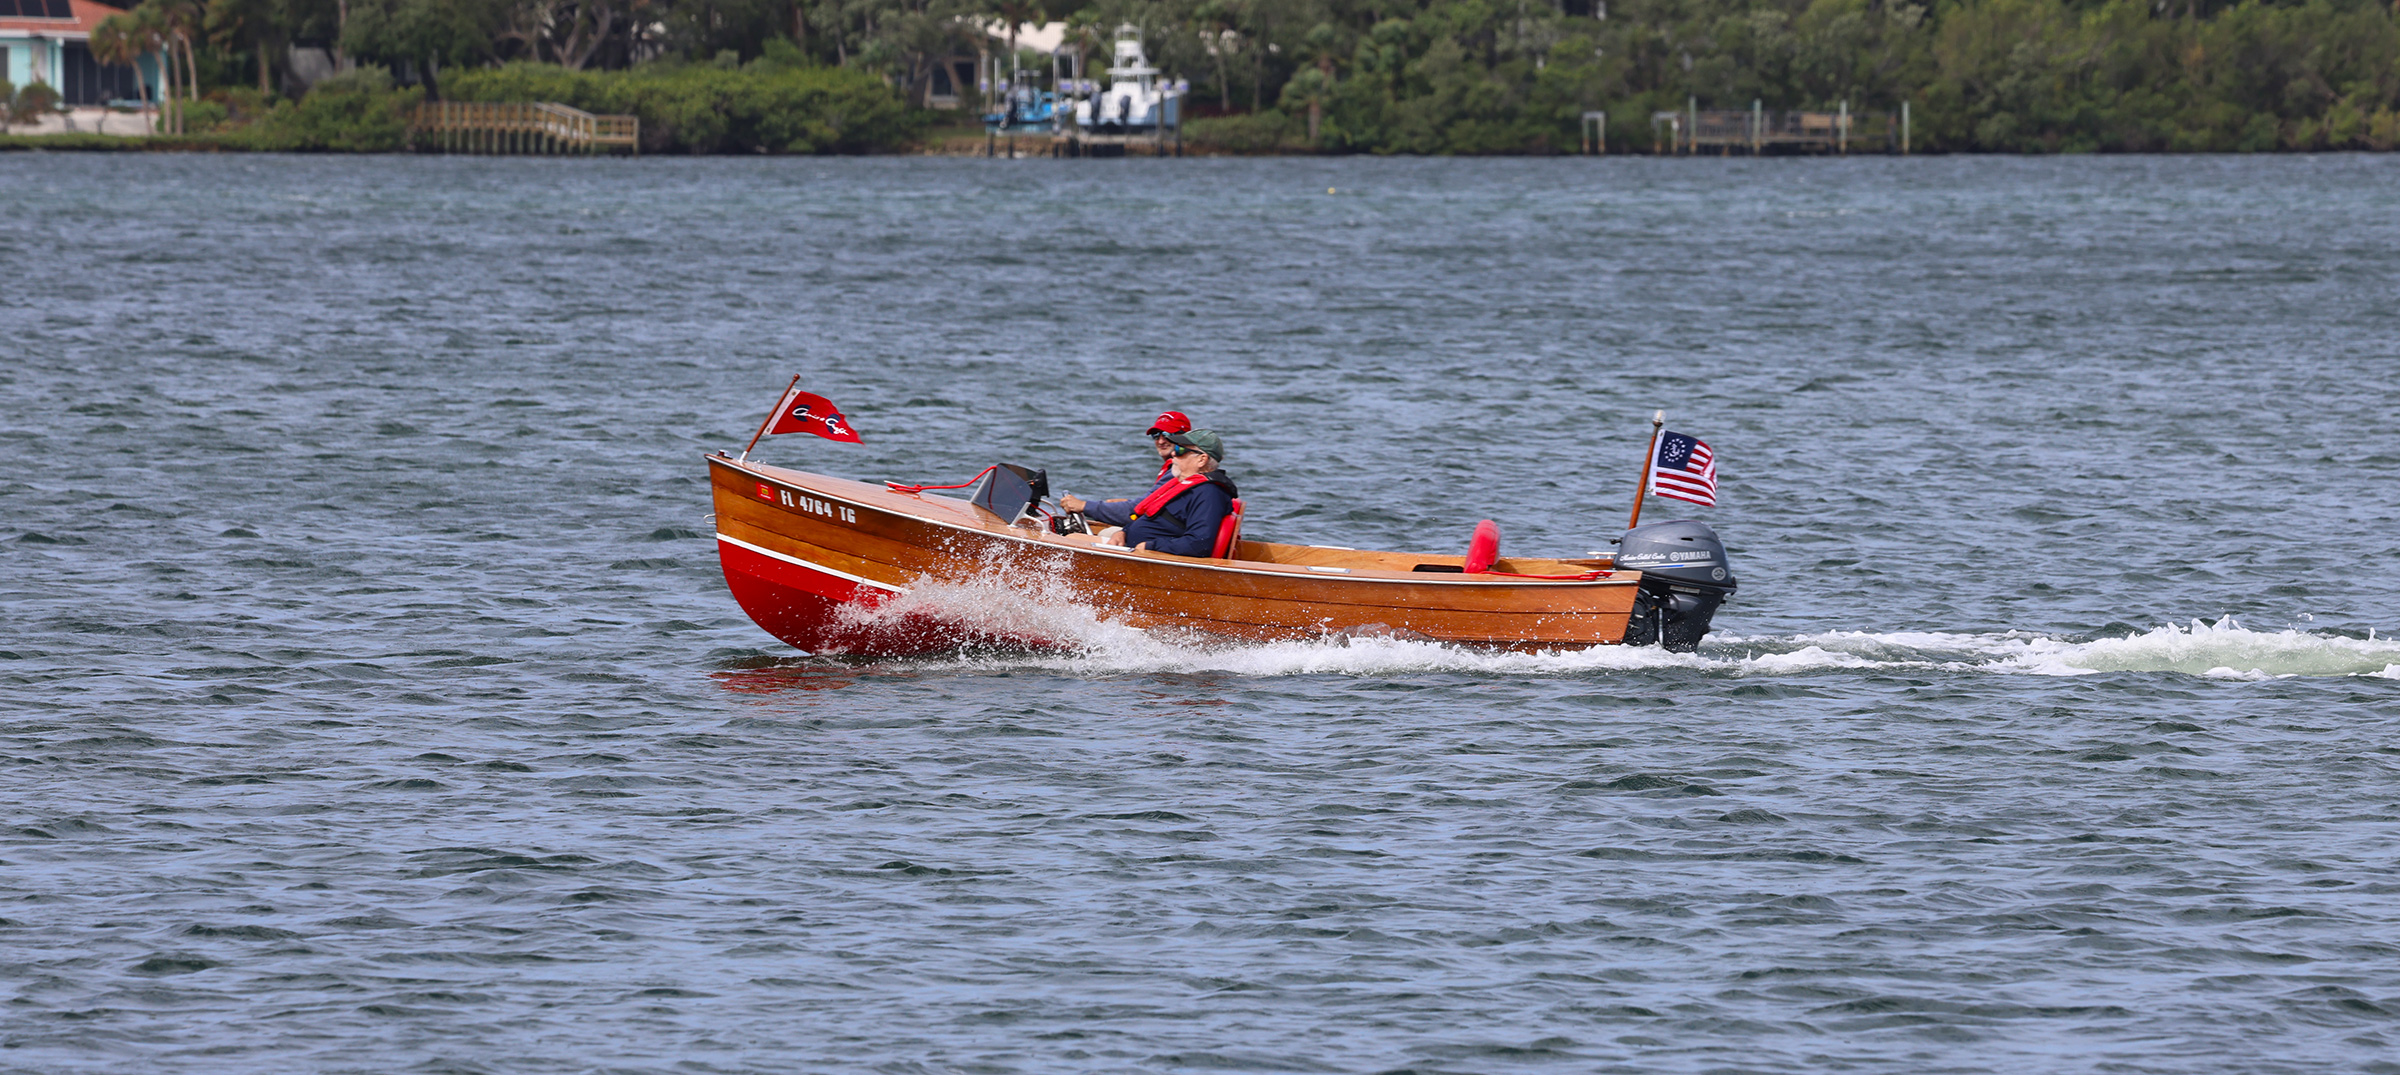
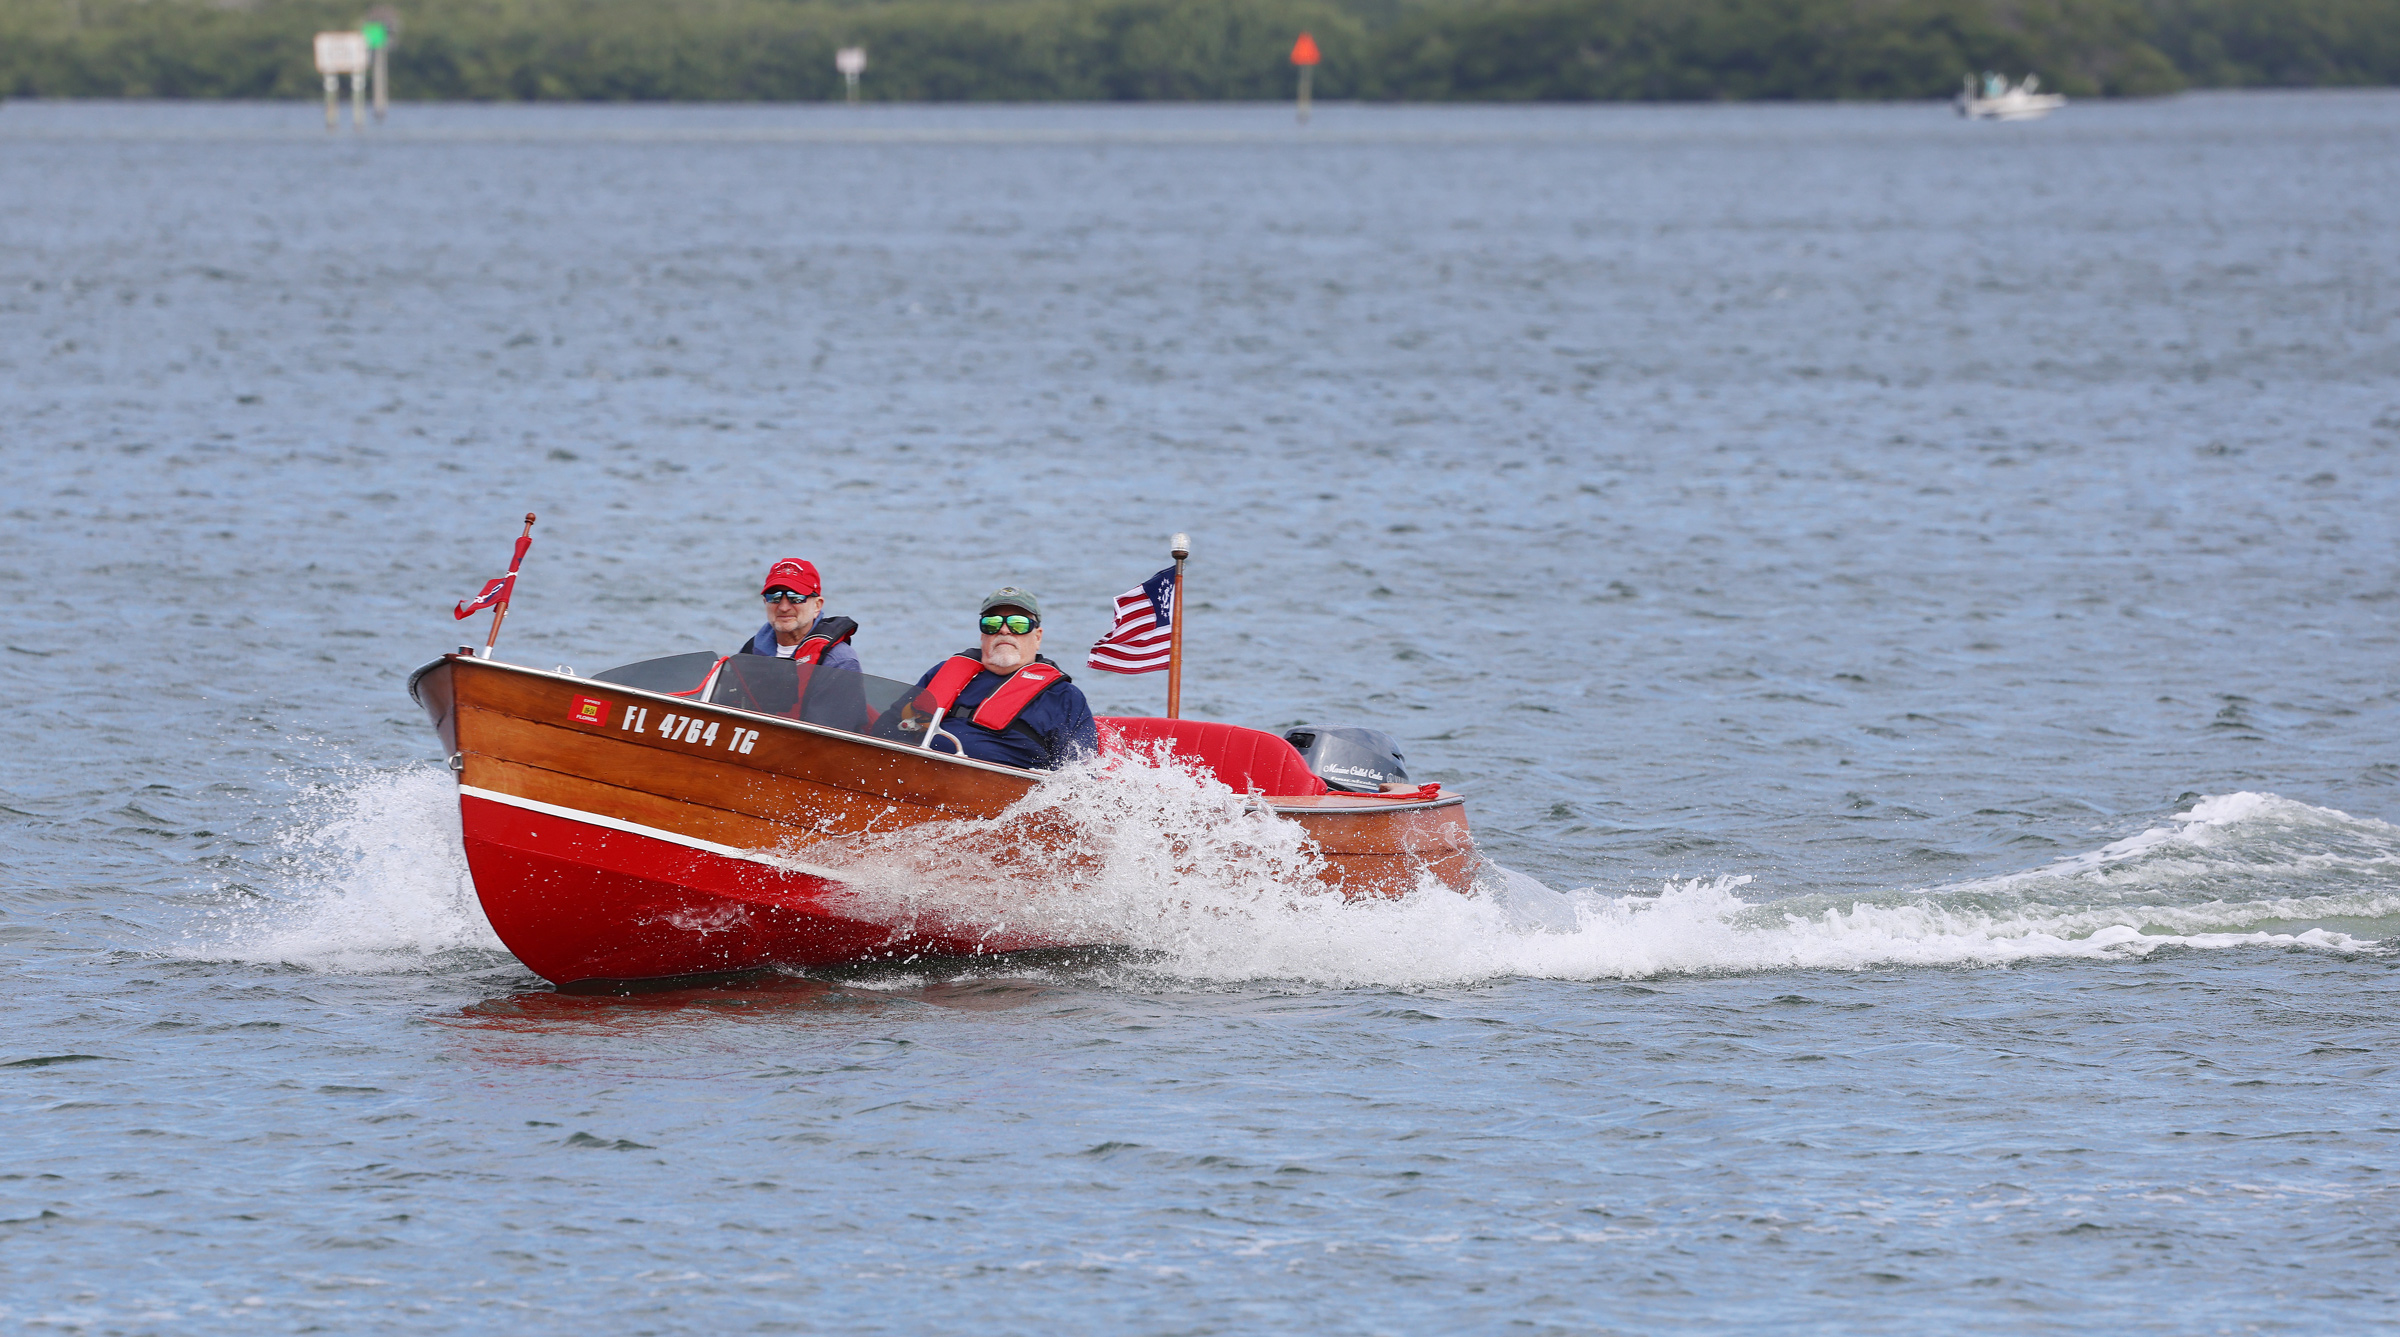
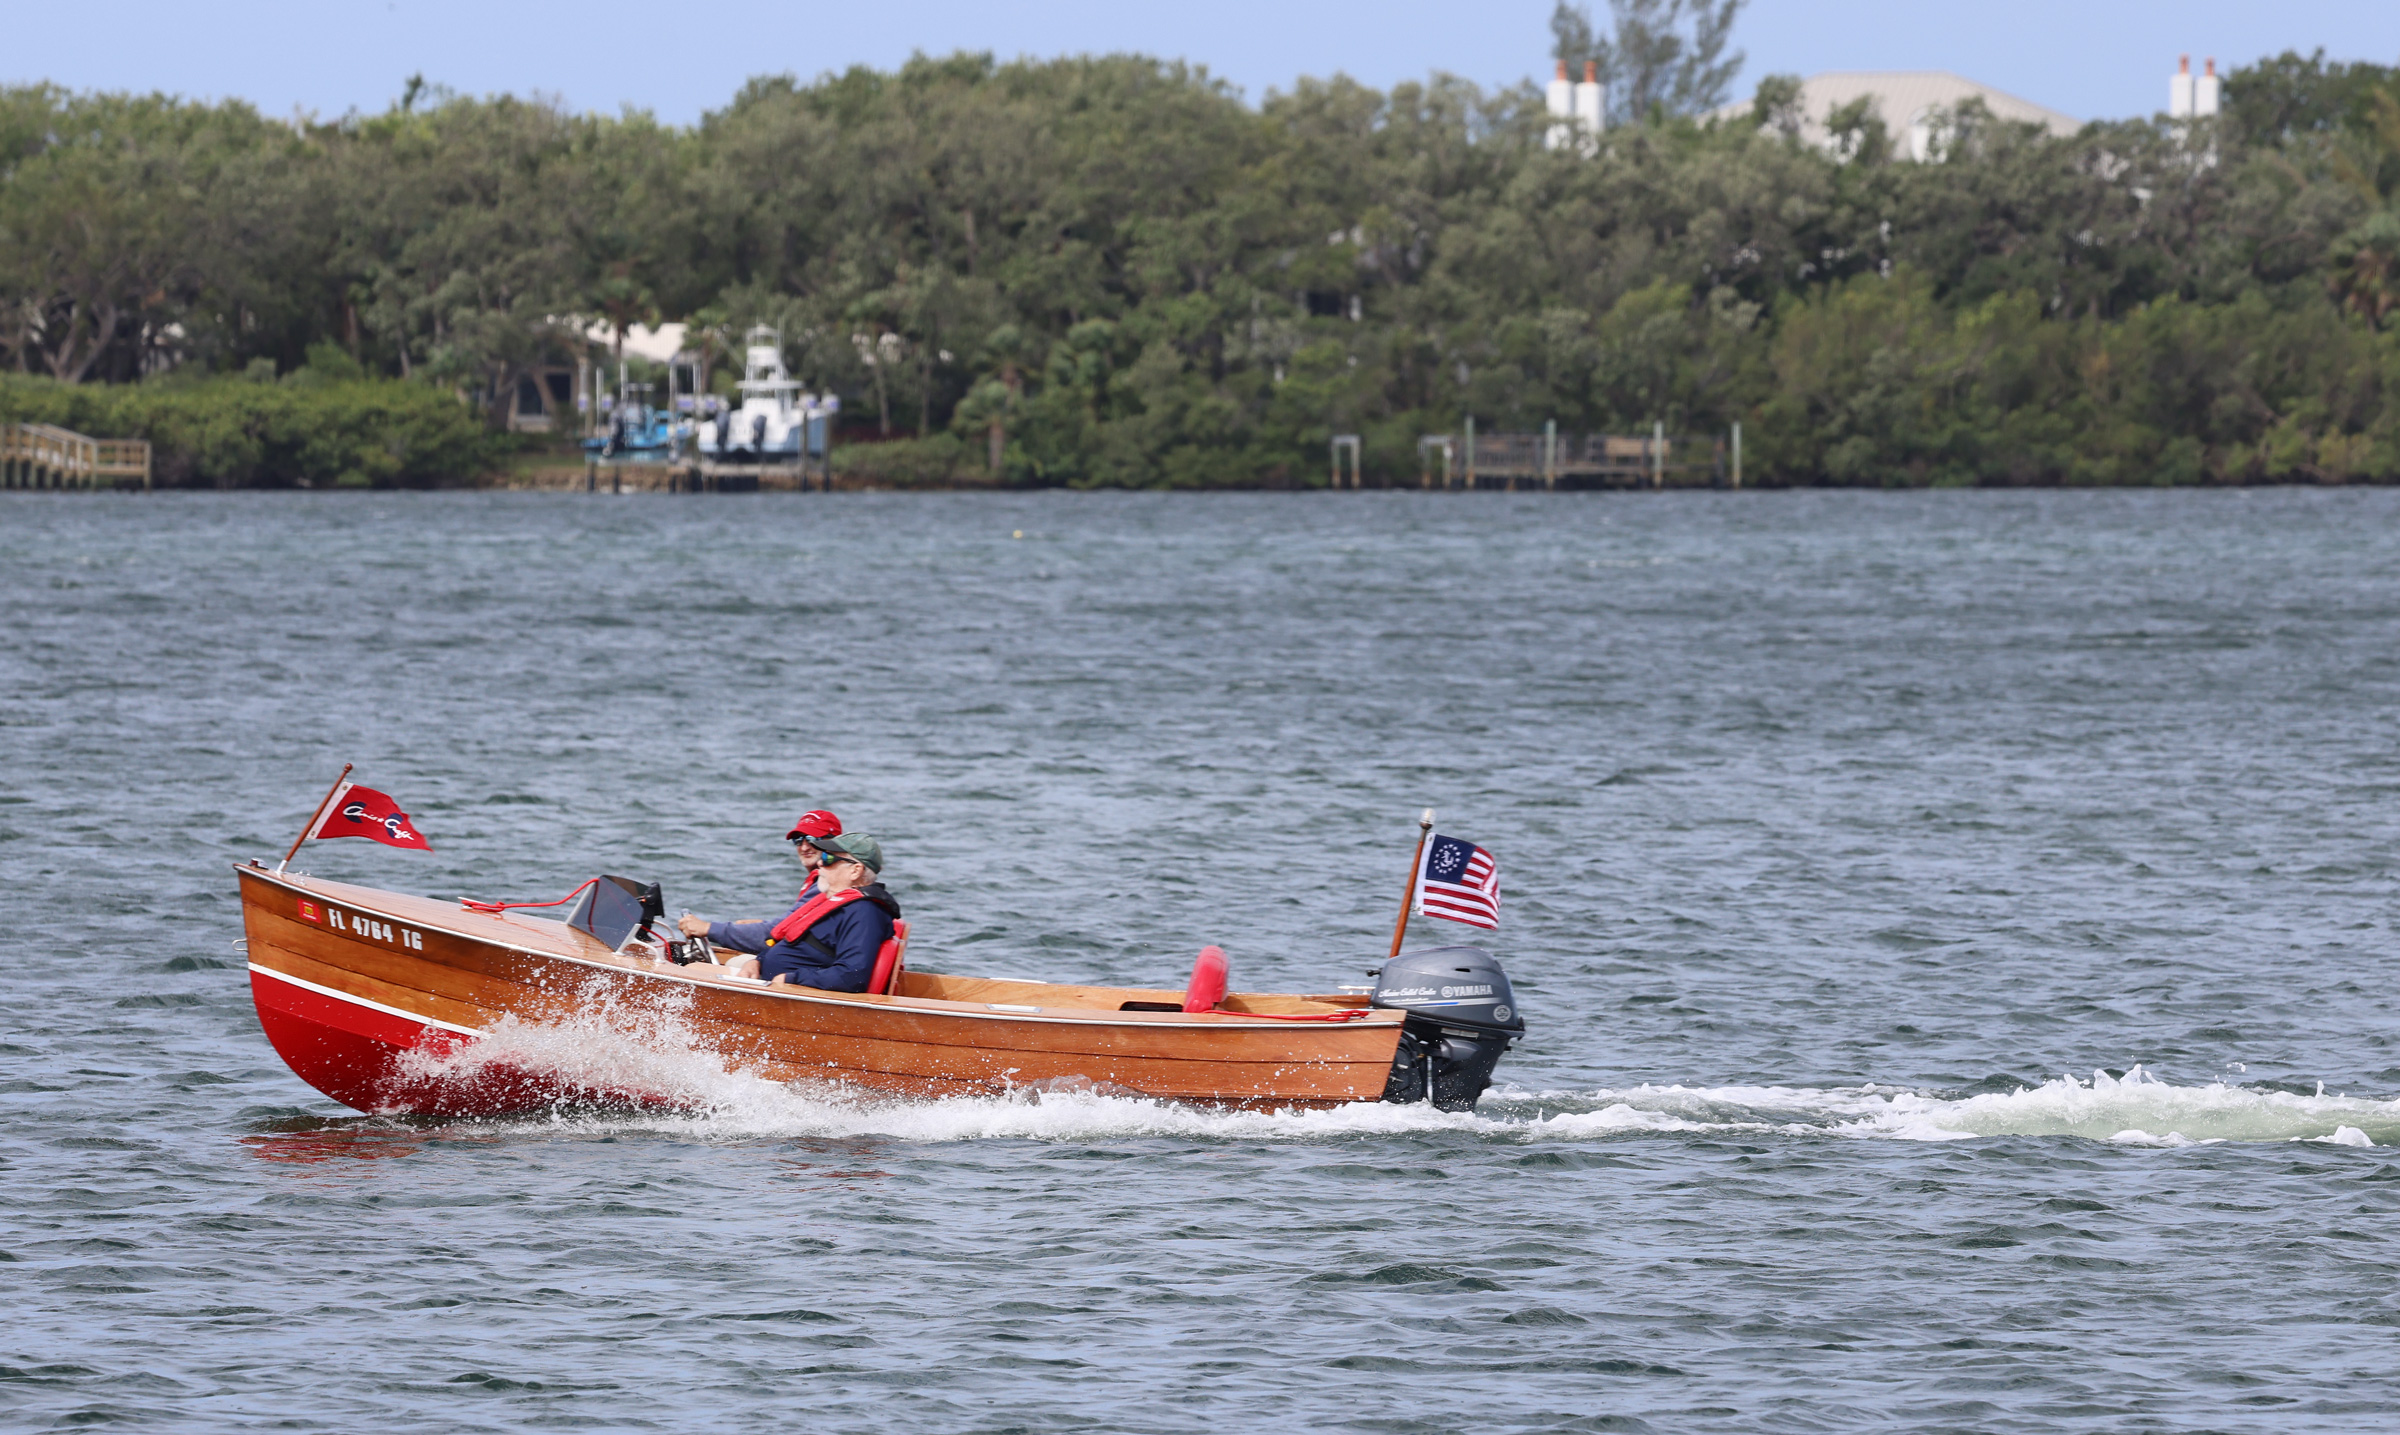
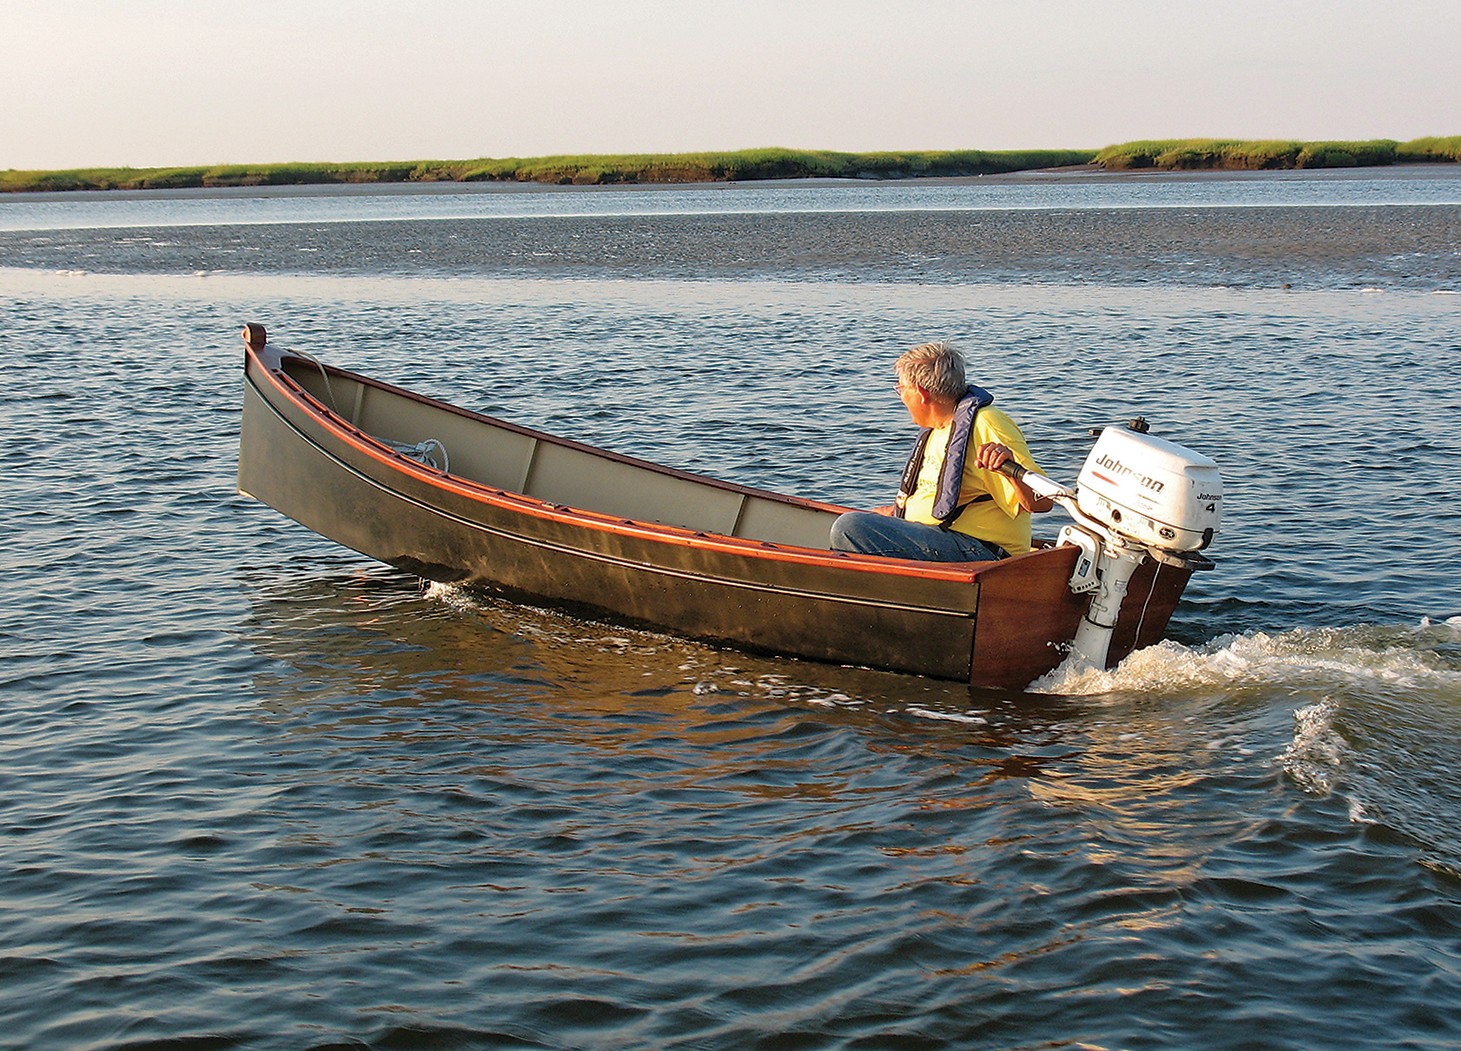
By extensive ocean cruising, Russell Brown came to know what he valued in a nesting dinghy, and his PT 11, which weighs just 85 lbs, balances conflicting purposes of sailing, rowing, light weight, and compact stowage while still remaining a handsome boat.
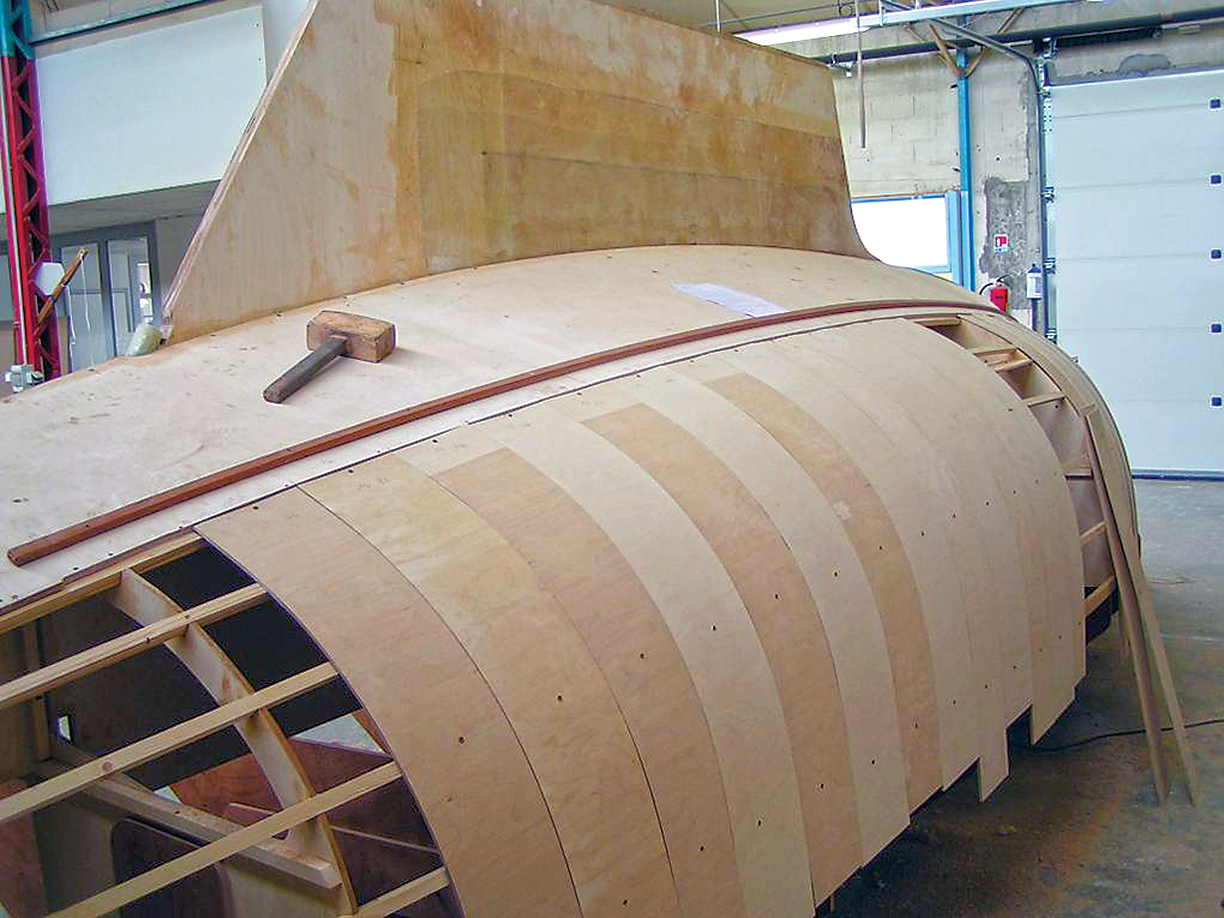
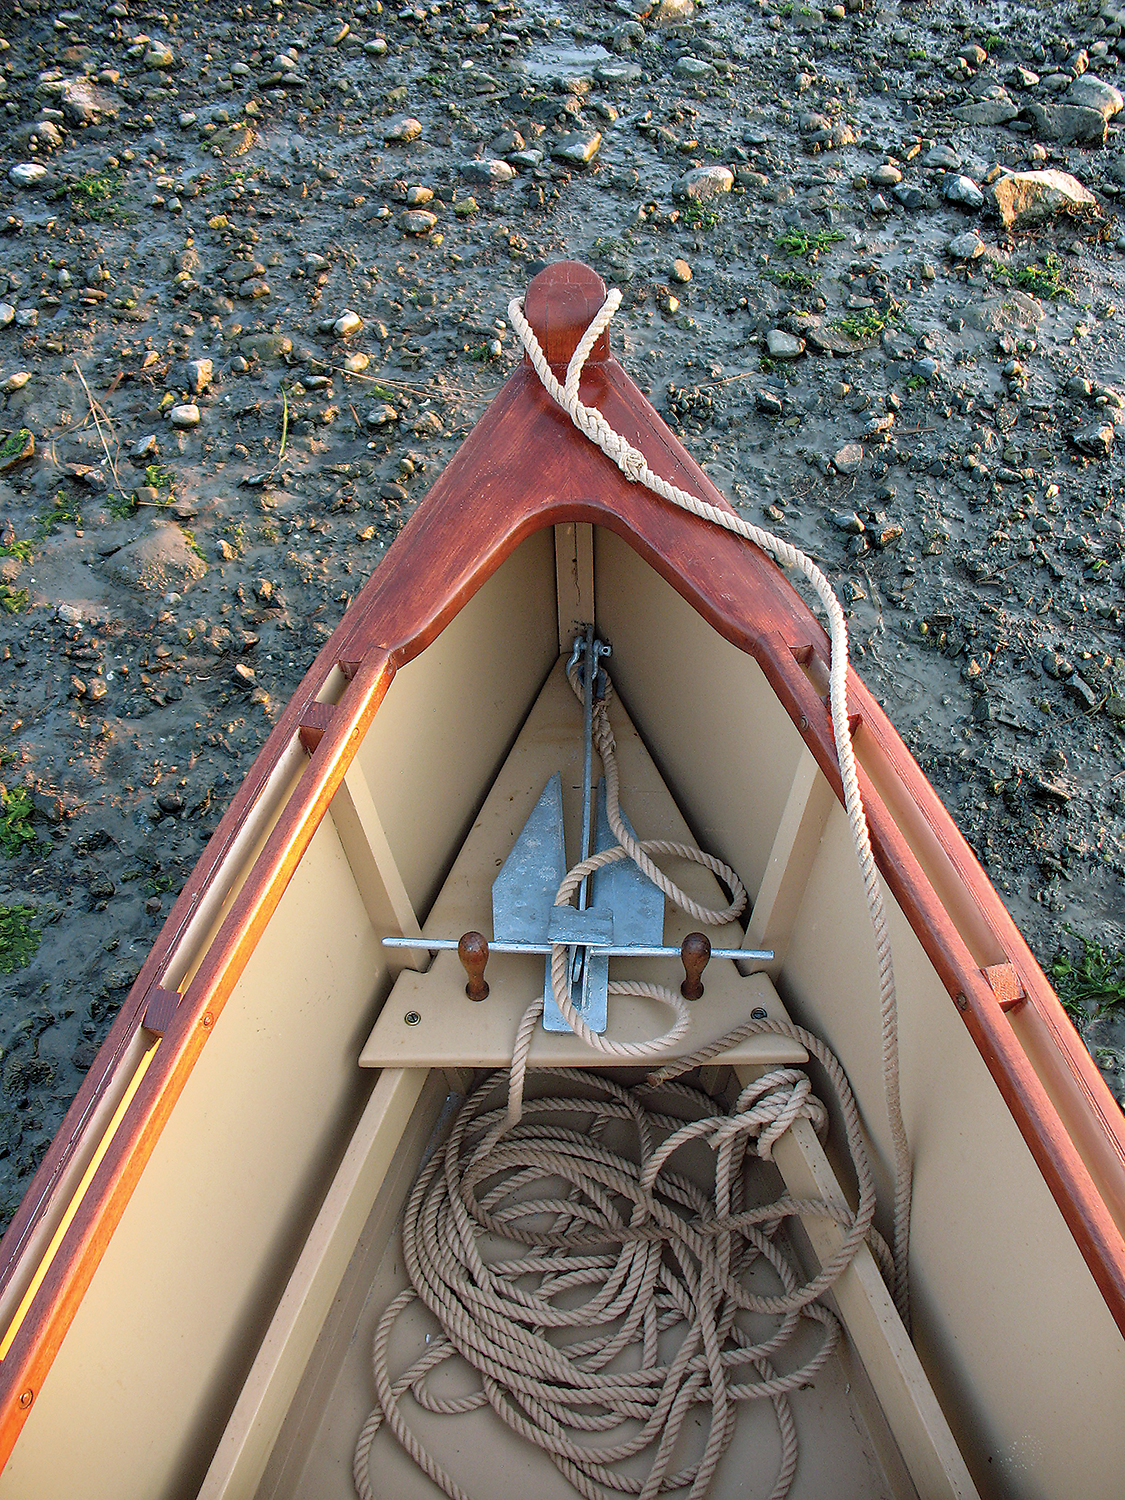
For light weight, Brown chose 6mm okoume plywood for the topsides and the bottom panel. Almost every part of the boat is made of plywood, sheathed in fiberglass cloth set in epoxy. Though 11′ long when joined, the hull weighs only 85 lbs. With its low weight, this boat’s halves can be manhandled ridiculously easily by two people, and probably very easily by a fit person working alone. To keep the dinghy to a minimum size for hauling aboard, Brown chose to make the hull flat-bottomed, with but slight rocker and a skeg of minimal depth. Plus, he made the boat’s profile very flat at the sheerline, that critically important curve formed by the top edge of the uppermost plank. Giving a boat a flat sheerline risks ungainly appearance, but to Brown it was imperative to do so to allow the boat to stay compact when nested on board: the bundle is only 5′ 10″ long and 1′ 8″ high at one end and 1′ 5″ high at the other, and more sheer would have made for a taller nested stack. Brown anticipates that most cruising sailors will lash down the boat under the swinging mainsail boom, so height is critical.
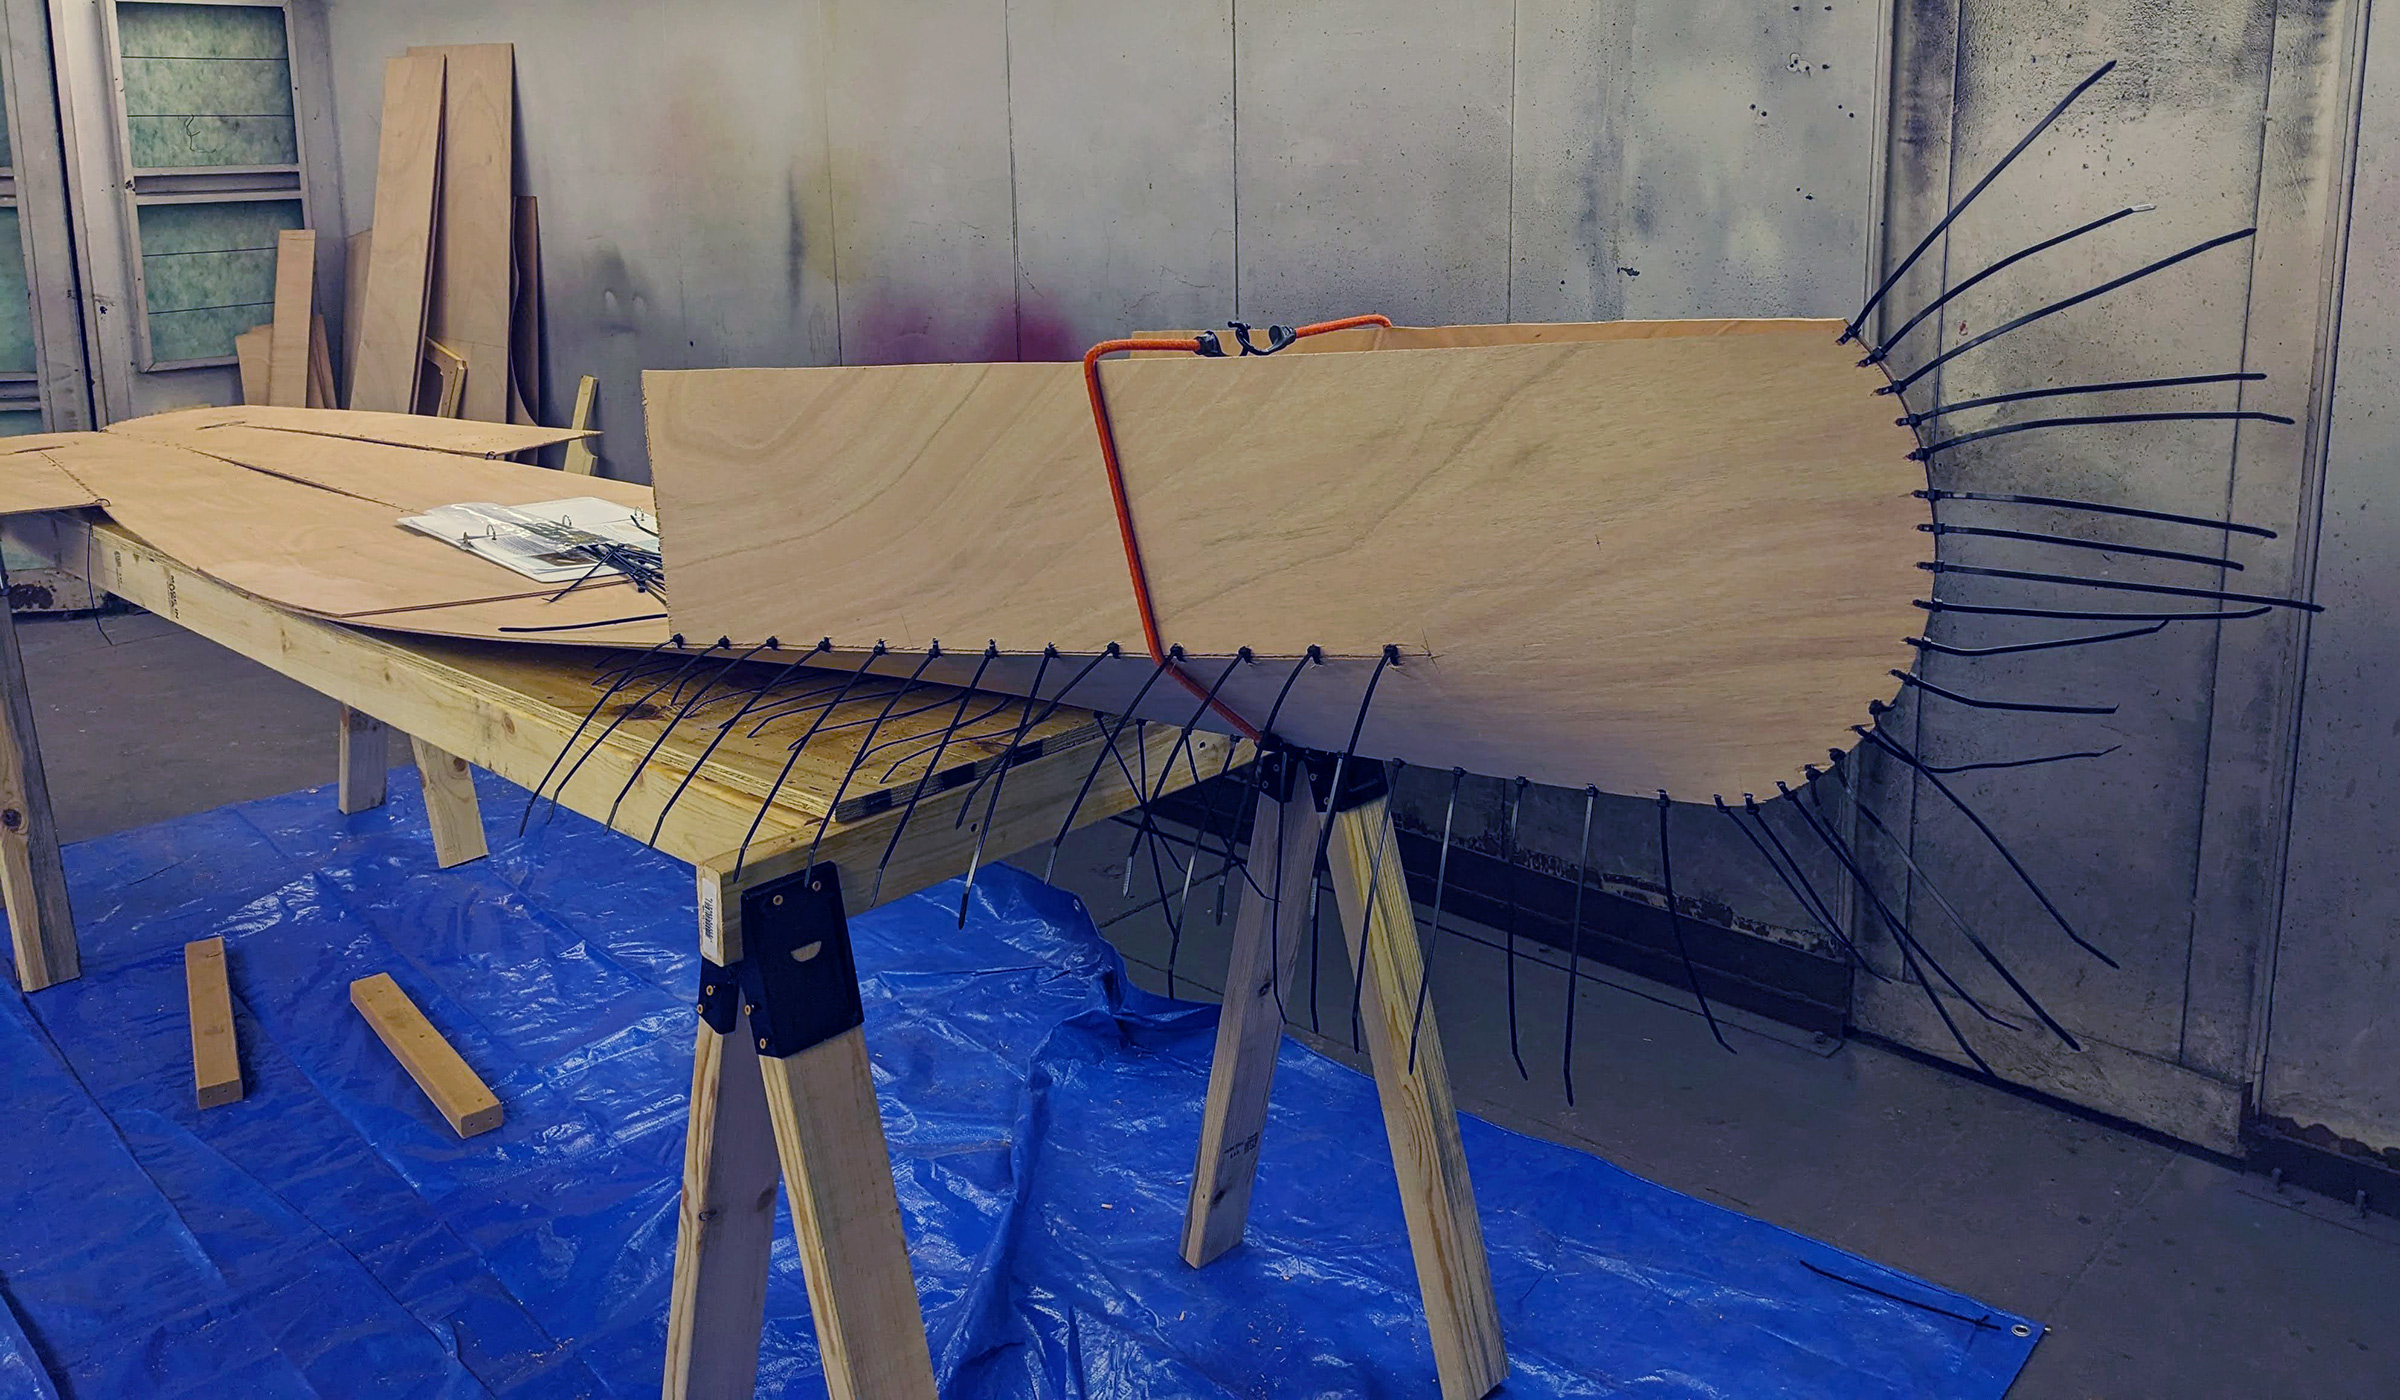
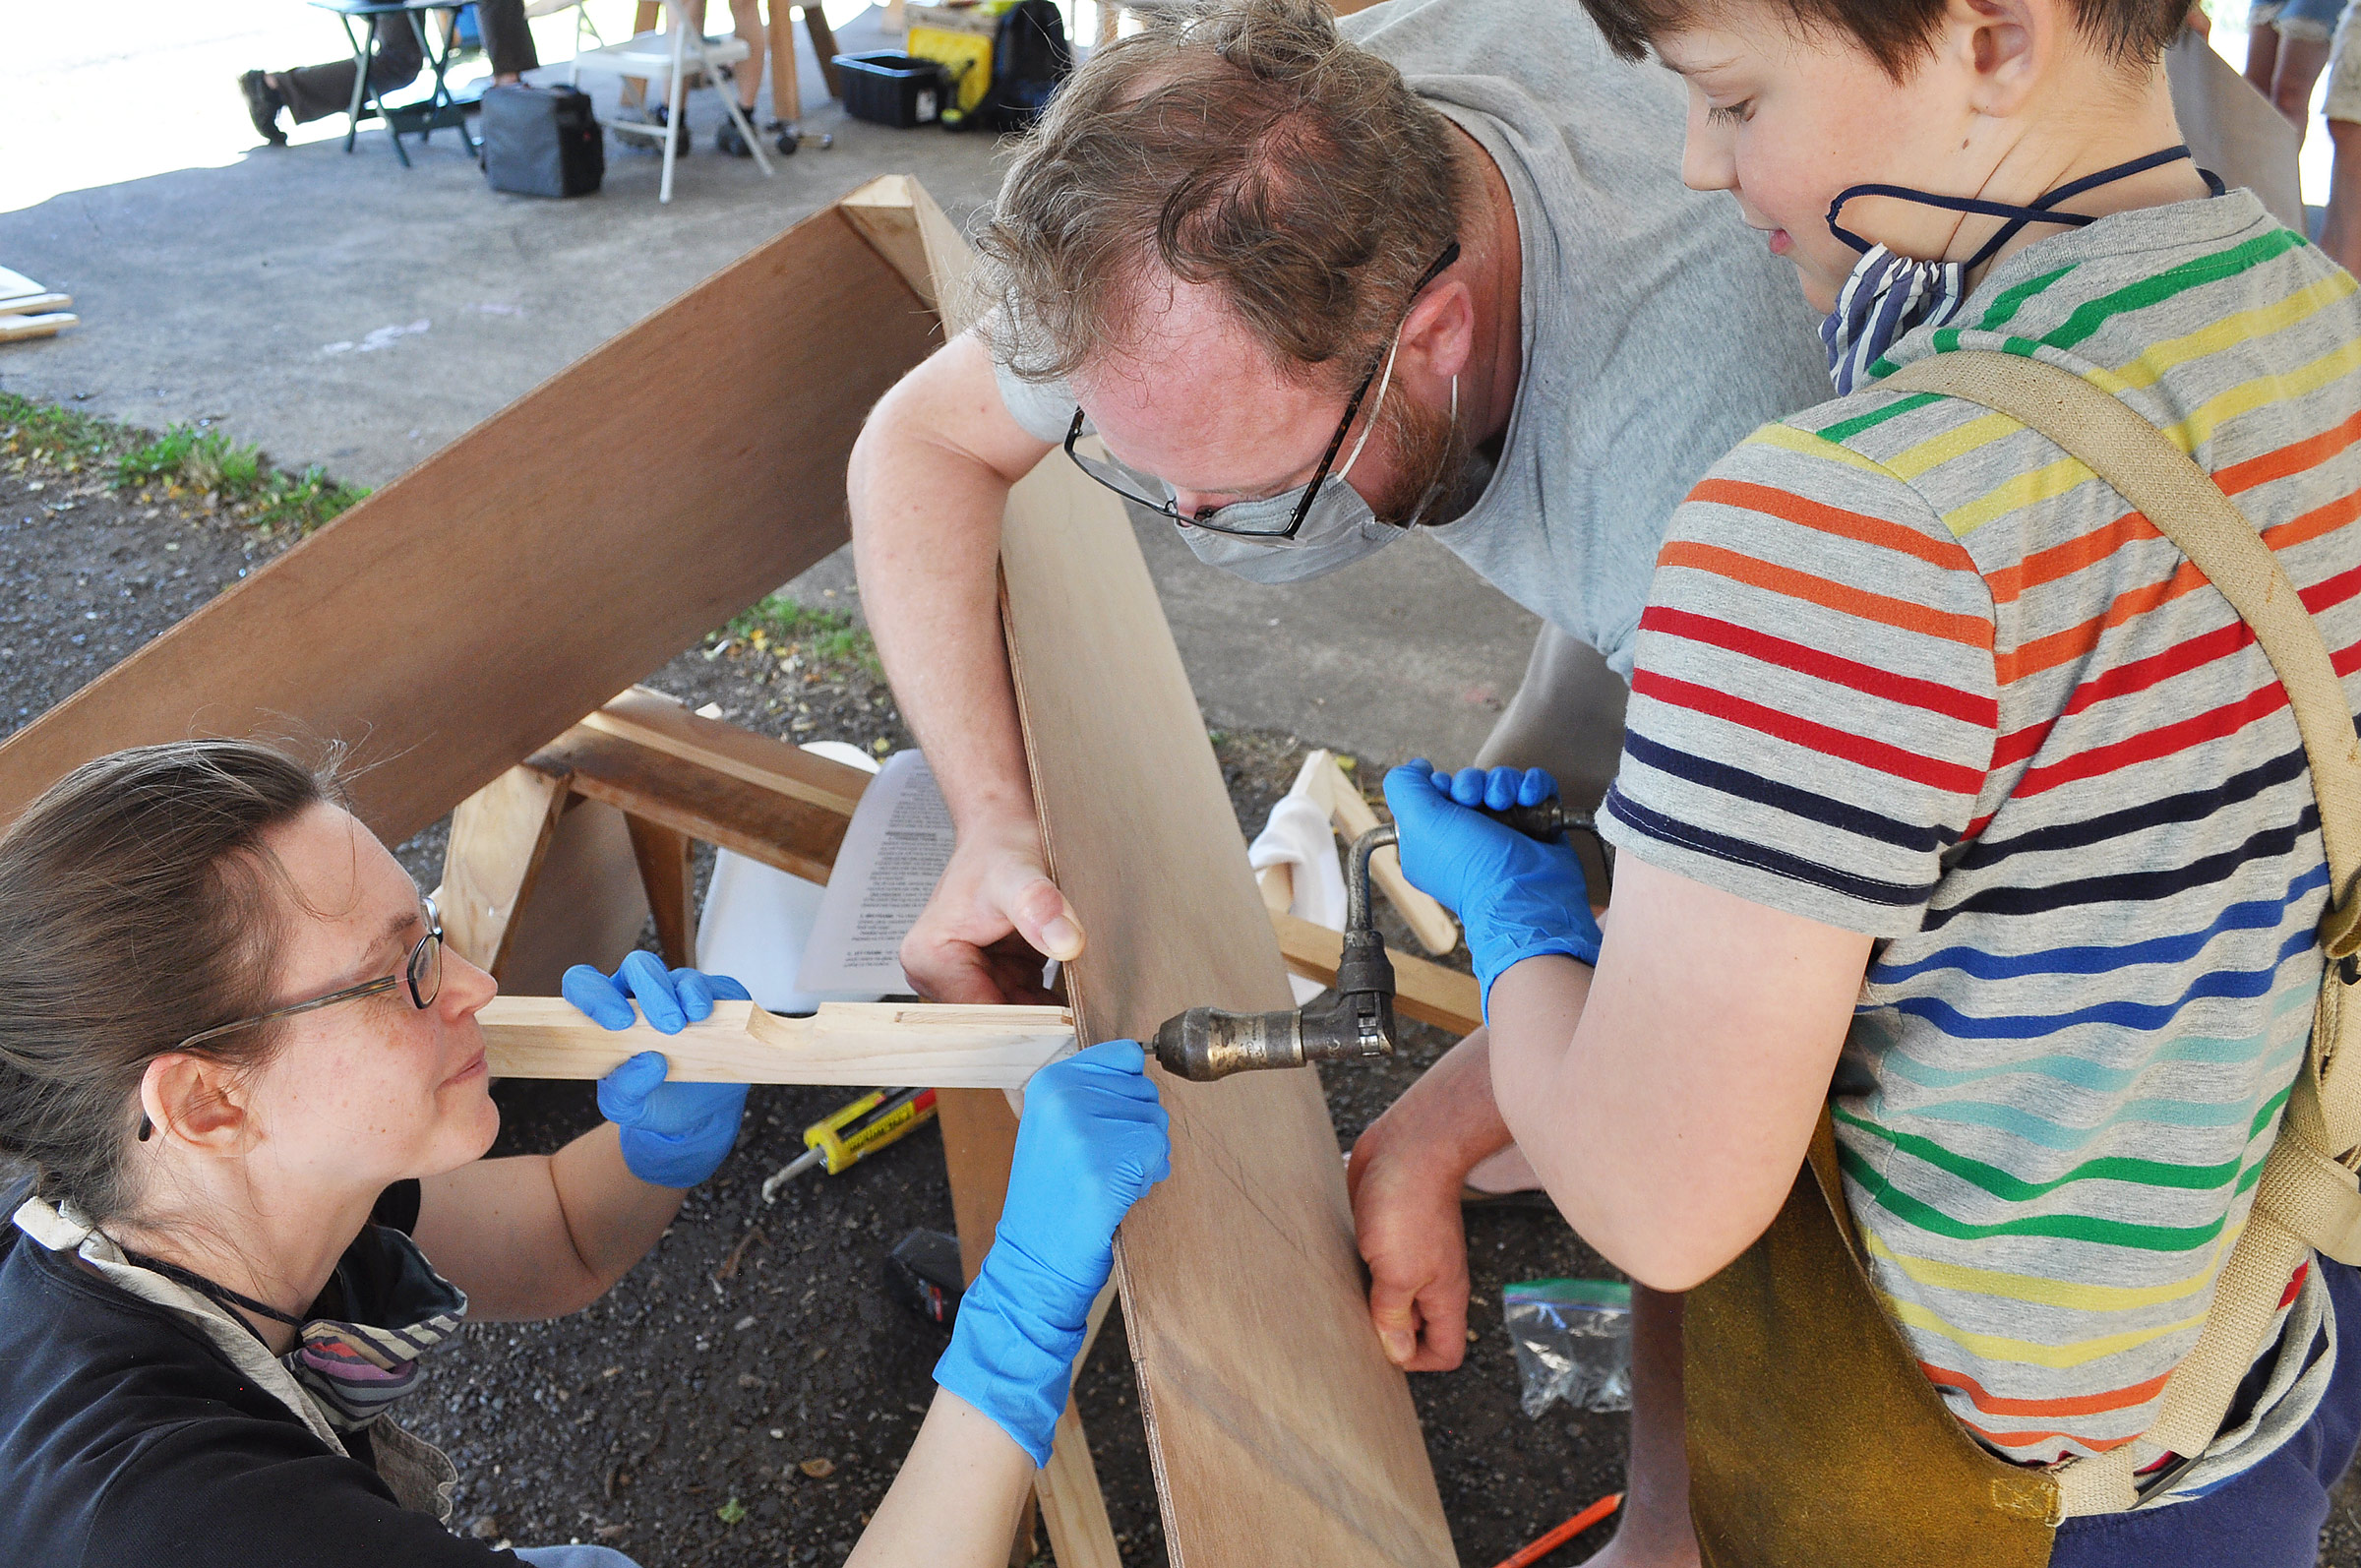
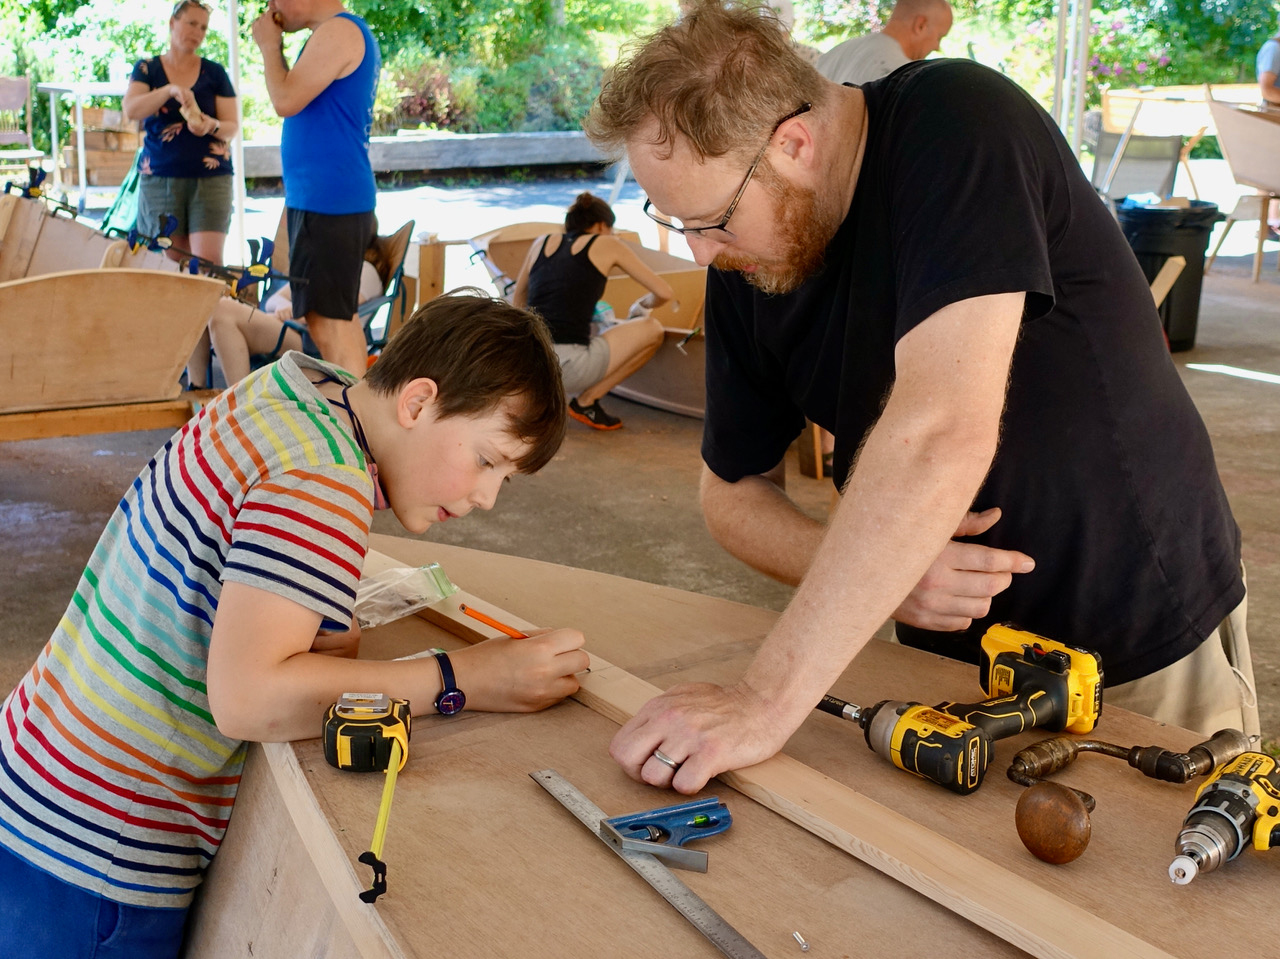
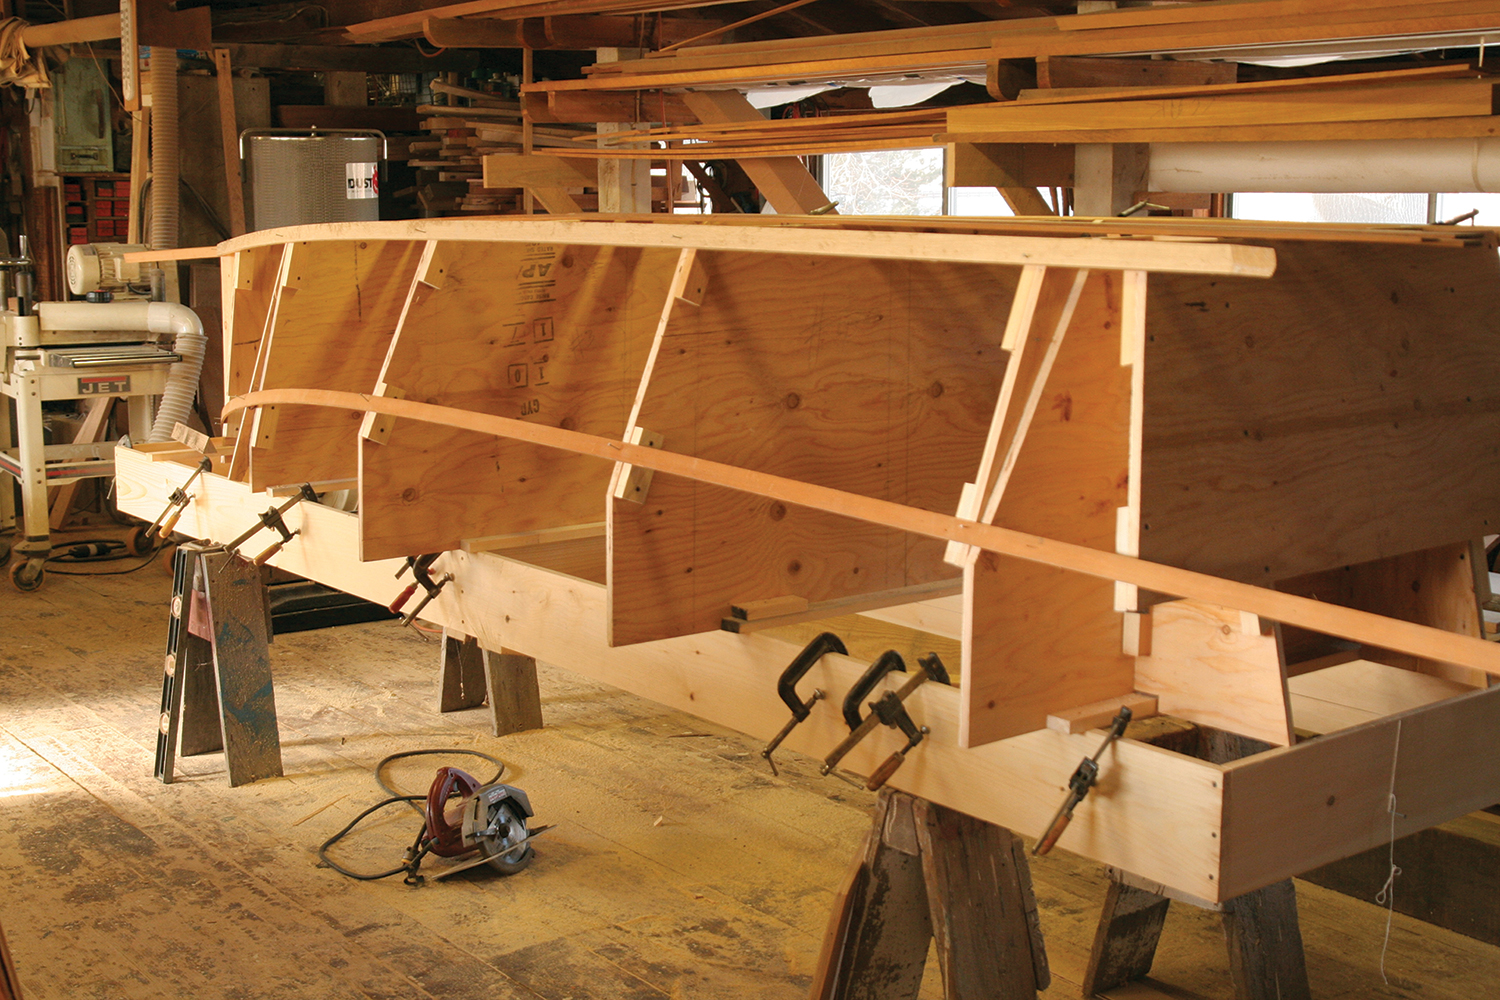
Brown developed custom stainless-steel hardware to join the two halves together, and the system seems to work well in the water or on land. In this type of boat, the hull is usually constructed in full, then two bulkheads are installed at or near amidships, and then the builder—no doubt after taking a deep breath—cuts his hull in half, a process fully described in the kit’s extensive instructions.
Tom Jackson
The 11’ hull divides to form a bundle only 5’10” long, 4′ 2″ wide, and a maximum of 1′ 8″ high, and the flat bottom makes nesting them easy.
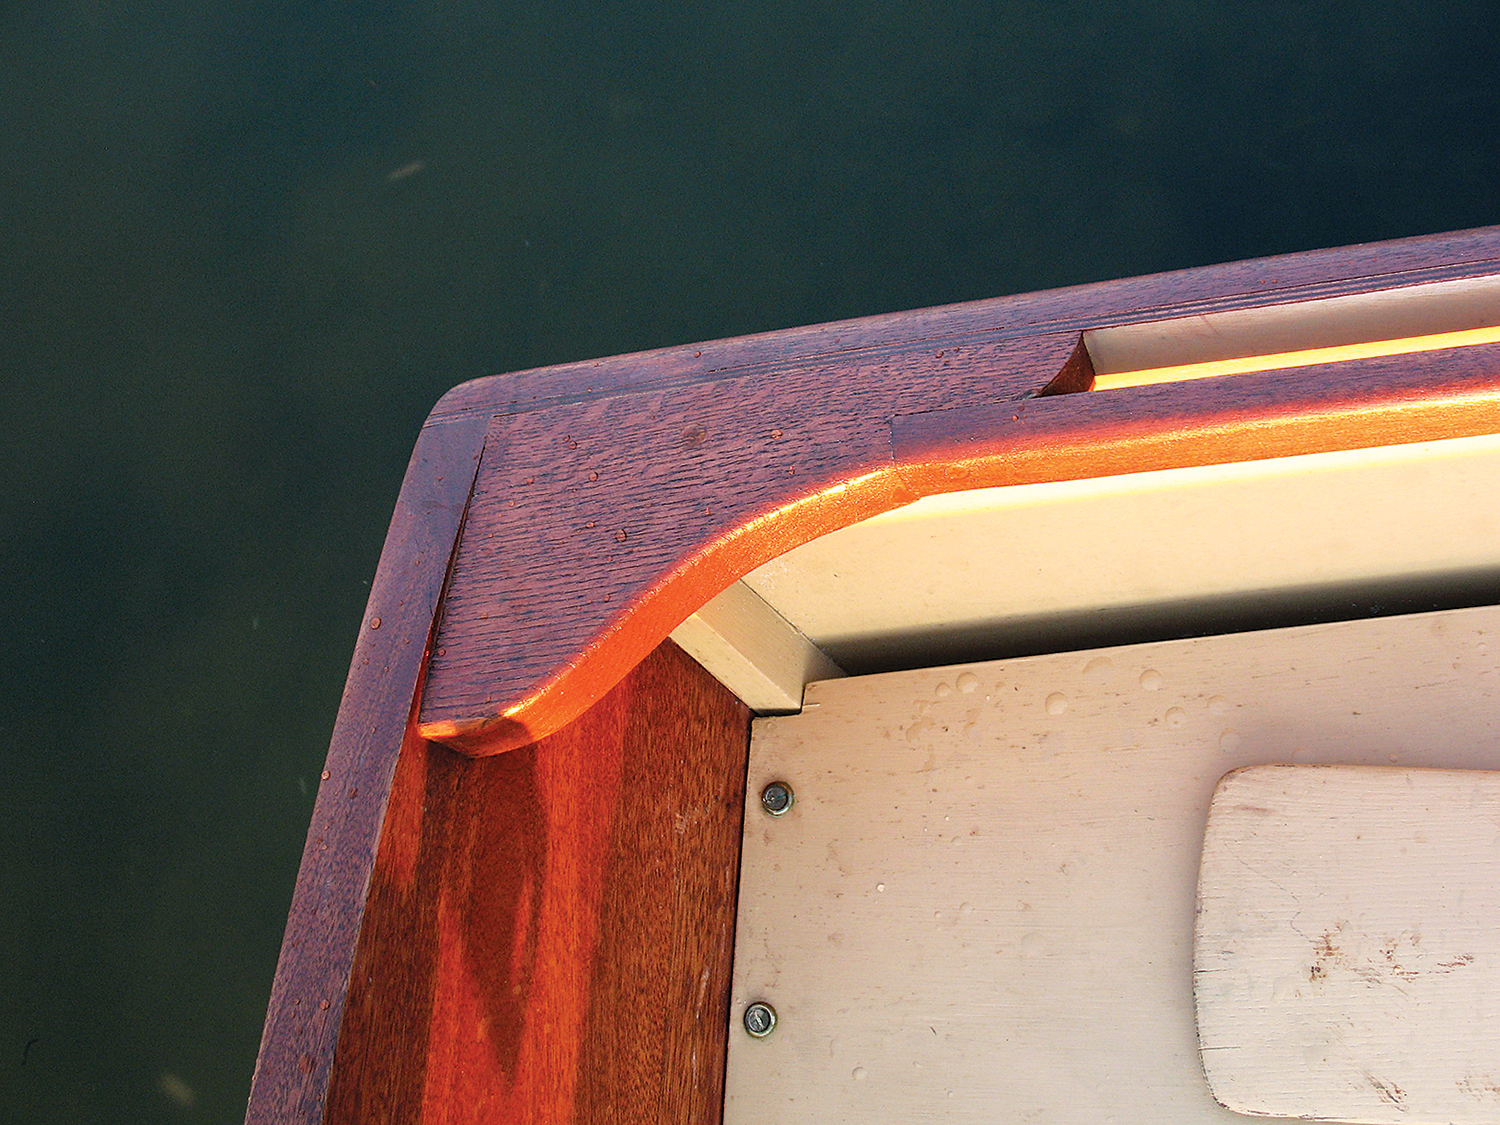
The forward of the two sections is completely decked over at thwart height, which provides necessary hull stiffness and also sees to it that any water coming aboard is directed to the after section for easy bailing. At the top of the sheerstrakes, plywood pieces scarfed together and set perpendicular to the sheer planks make L-shaped gunwales that stiffen the topsides, deflect spray, and provide a flat surface to receive a glued-on continuous, low-profile rubber fender that actually accentuates the boat’s appearance. Brown kept his ’midships bulkheads low, so that the foredeck extends aft of the joined bulkheads when the hulls are assembled. This provides a comfortable rowing position, with no need for a thwart.
The joining hardware, meanwhile, consists of four knobs that screw through bushings in the after bulkhead and into threaded receivers in the forward one, with O-rings making the fittings waterproof. The sequence for attaching the hulls together is well thought out. The forward hull has two custom carbon-fiber brackets mounted on the deck and tight against the bulkhead sides. These brackets extend aft just far enough to have the after bulkhead slip behind them, which is easily managed. They hold the hulls together and in the right alignment while tightening first the lower knobs and then the upper ones. The hull halves join together surprisingly tightly, and in rowing and sailing (admittedly in light conditions) I never saw any water come through.
Tom Jackson
The two hull halves assemble easily while afloat.
Technology and innovations seem to have come together to make nesting dinghies more viable than ever. Lightweight plywood-epoxy construction makes a stiff hull, which is especially important when introducing the added complexity of cutting it in half. The challenge of lightweight structural design is what got Brown thinking about nesting dinghies in the first place. “A dinghy is really a tool, it’s not a pleasure boat. If you’re talking about a dinghy being a tender for a cruising boat, it has to be light, it has to be really tough, it has to be abrasion resistant, and it has to perform all the other functions it has to perform.
“The intent was to make a dinghy for serious cruisers,” Brown said. “I have a nesting dinghy that I built in ’85 that I took on most of the cruising I’ve ever done. It didn’t have the kind of sophisticated attachment hardware that this one does, but it’s what really got me into the whole idea of nesting dinghies. And cruising really led me to see the interest and need for a serious nesting dinghy. There’s more nesting dinghies out there than you can shake a stick at, but none of them that were ever really highly developed, as far as easy assembly in the water, light weight, complete kit package, good sailing characteristics, and really good rowng characteristics.”
Tom Jackson
Two carbon-fiber brackets (visible at the edge of the foredeck near the bulkheads) hold the hulls in alignment while knobs are tightened to hold them firmly together.
Brown started with pleasurable rowing in mind. He noticed other cruisers needlessly struggling with dinghies mainly because they were miserable to row, while his was comparatively easy. “That’s what I ended up doing with my nesting dinghy. I loved it. Other people had these god-awful inflatables, they were hoisting these 18-hp engines on and off, and going for gas all the time. It was my experience that got me going in this direction. This boat’s not a sprinter of a rowboat, but it really has very good cruising speed capabilities.” Brown earlier considered all-carbon-fiber construction for even lighter weight, but actually building a prototype gave him experience that came to the rescue: “I actually didn’t like it because it’s too loud. I don’t like rowing it, I don’t like using it. If you dropped the bow painter snaphook into the boat, the whole anchorage woke up.”
Tom Jackson
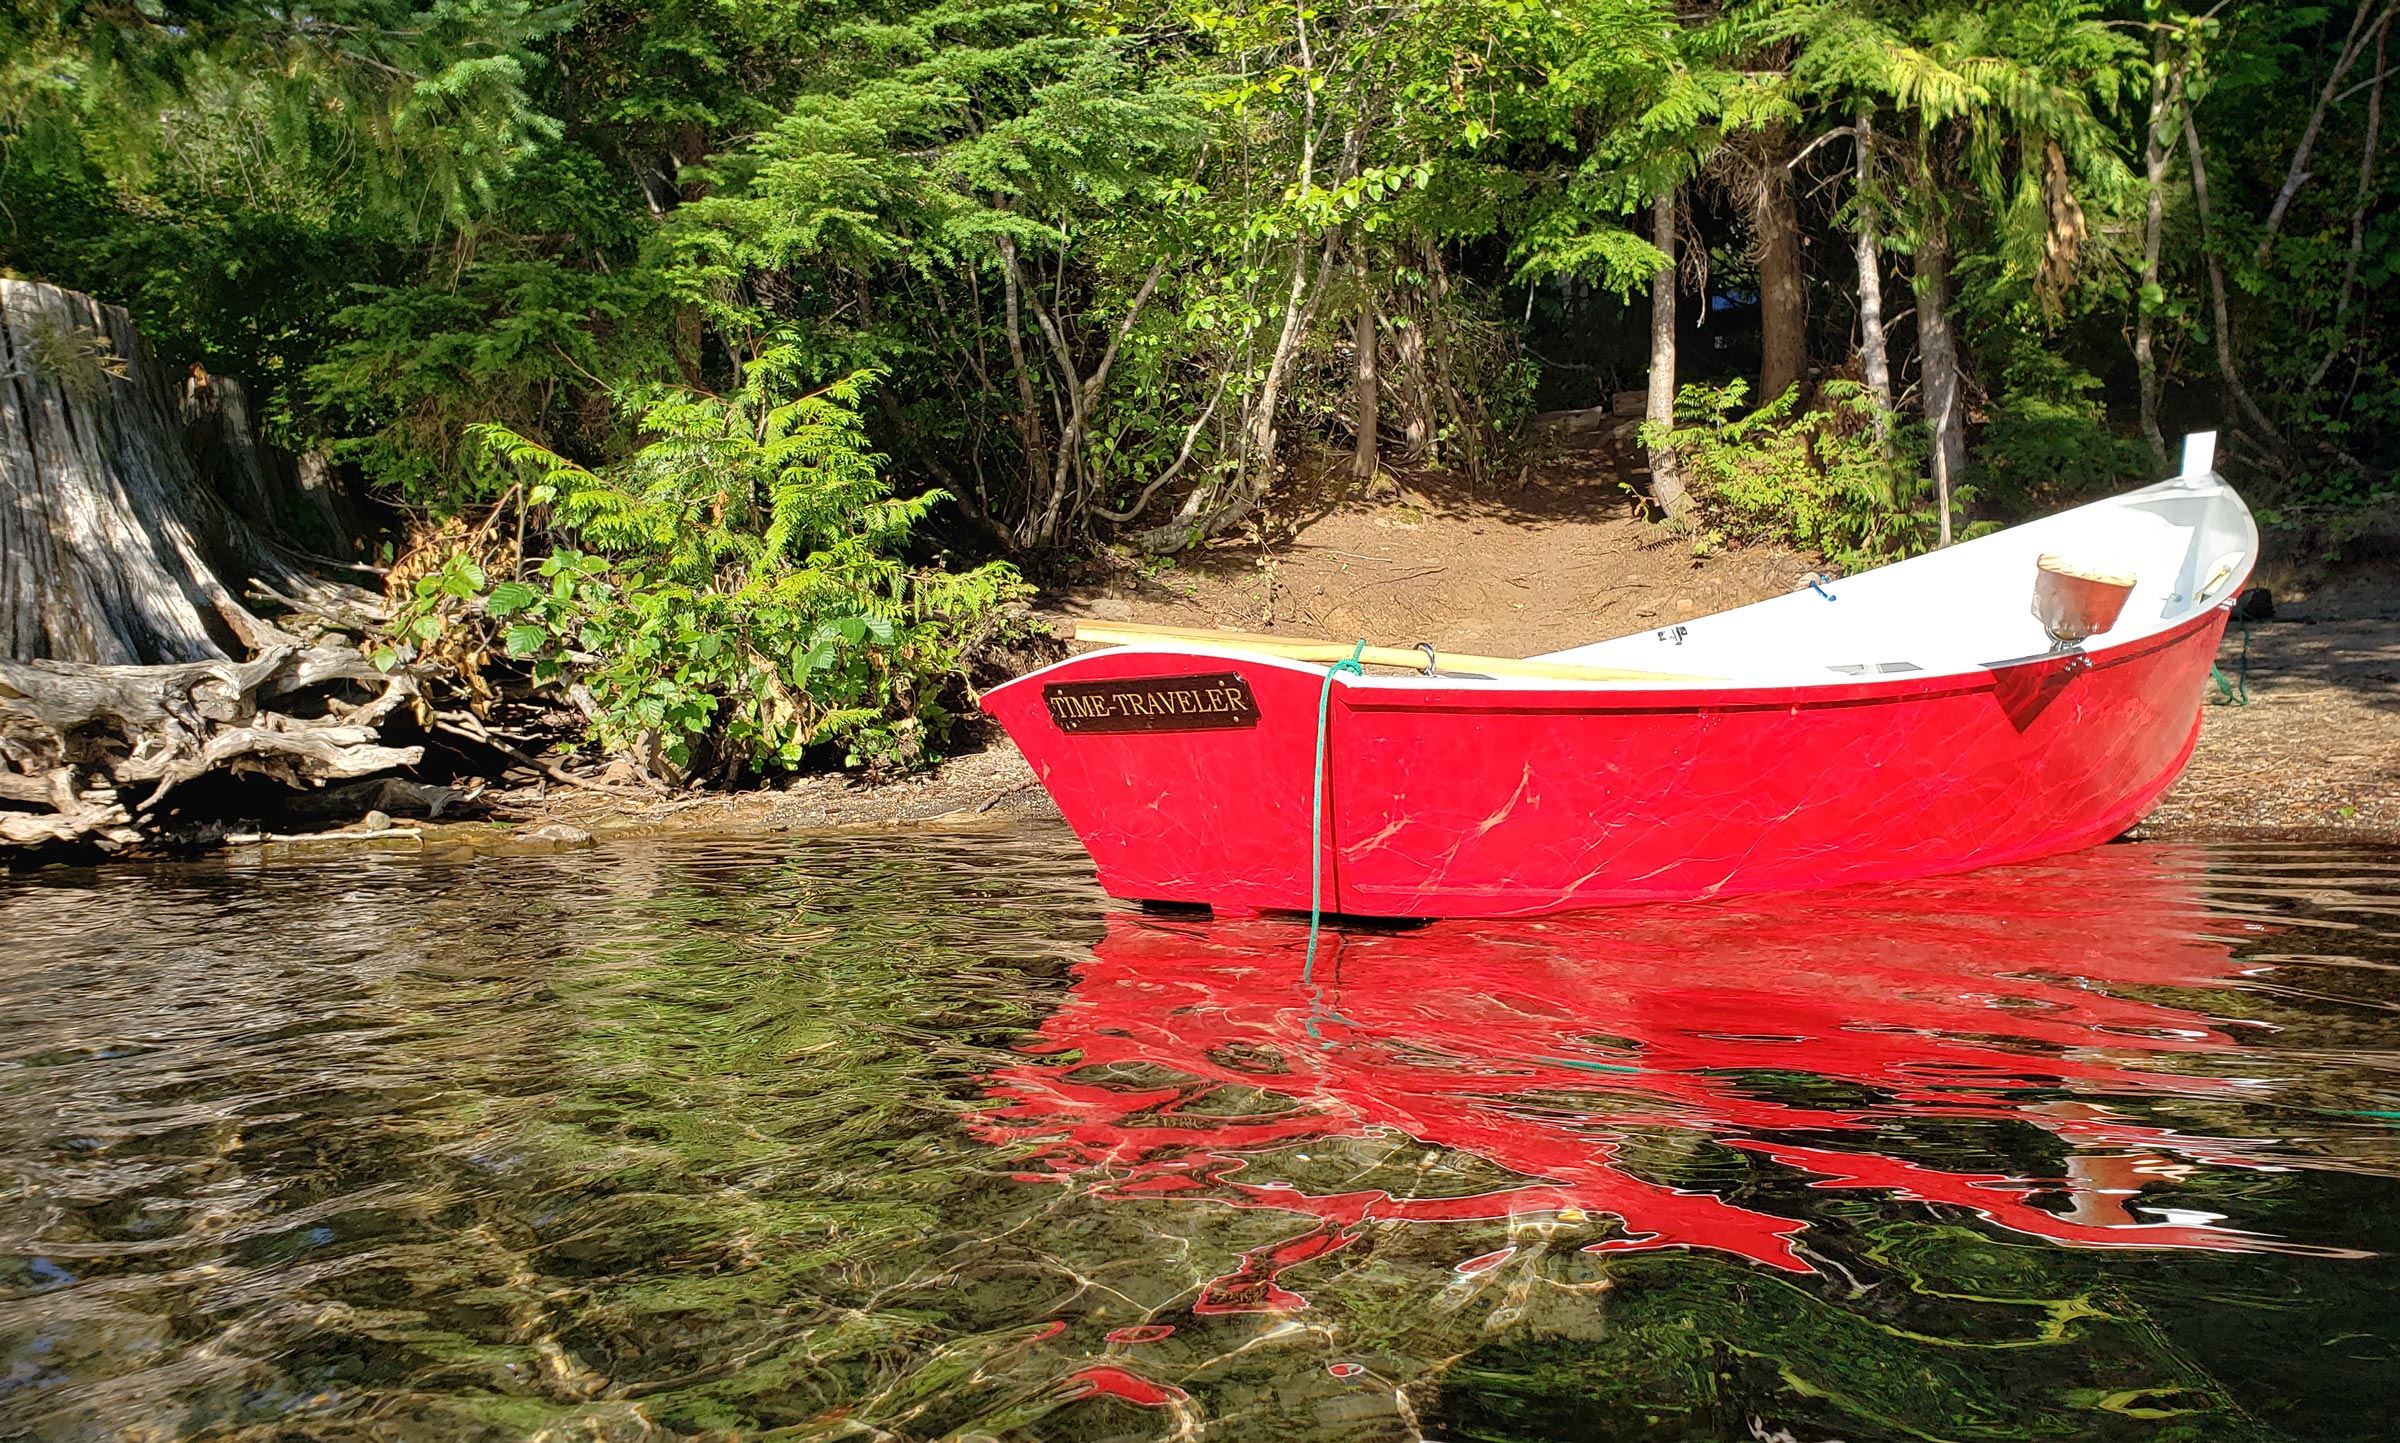
Coming onto a beach, the boat’s flat bottom, which is well sheathed in fiberglass cloth set in epoxy to resist abrasion, allows her to stand upright, and the long foredeck makes it easy to step ashore.
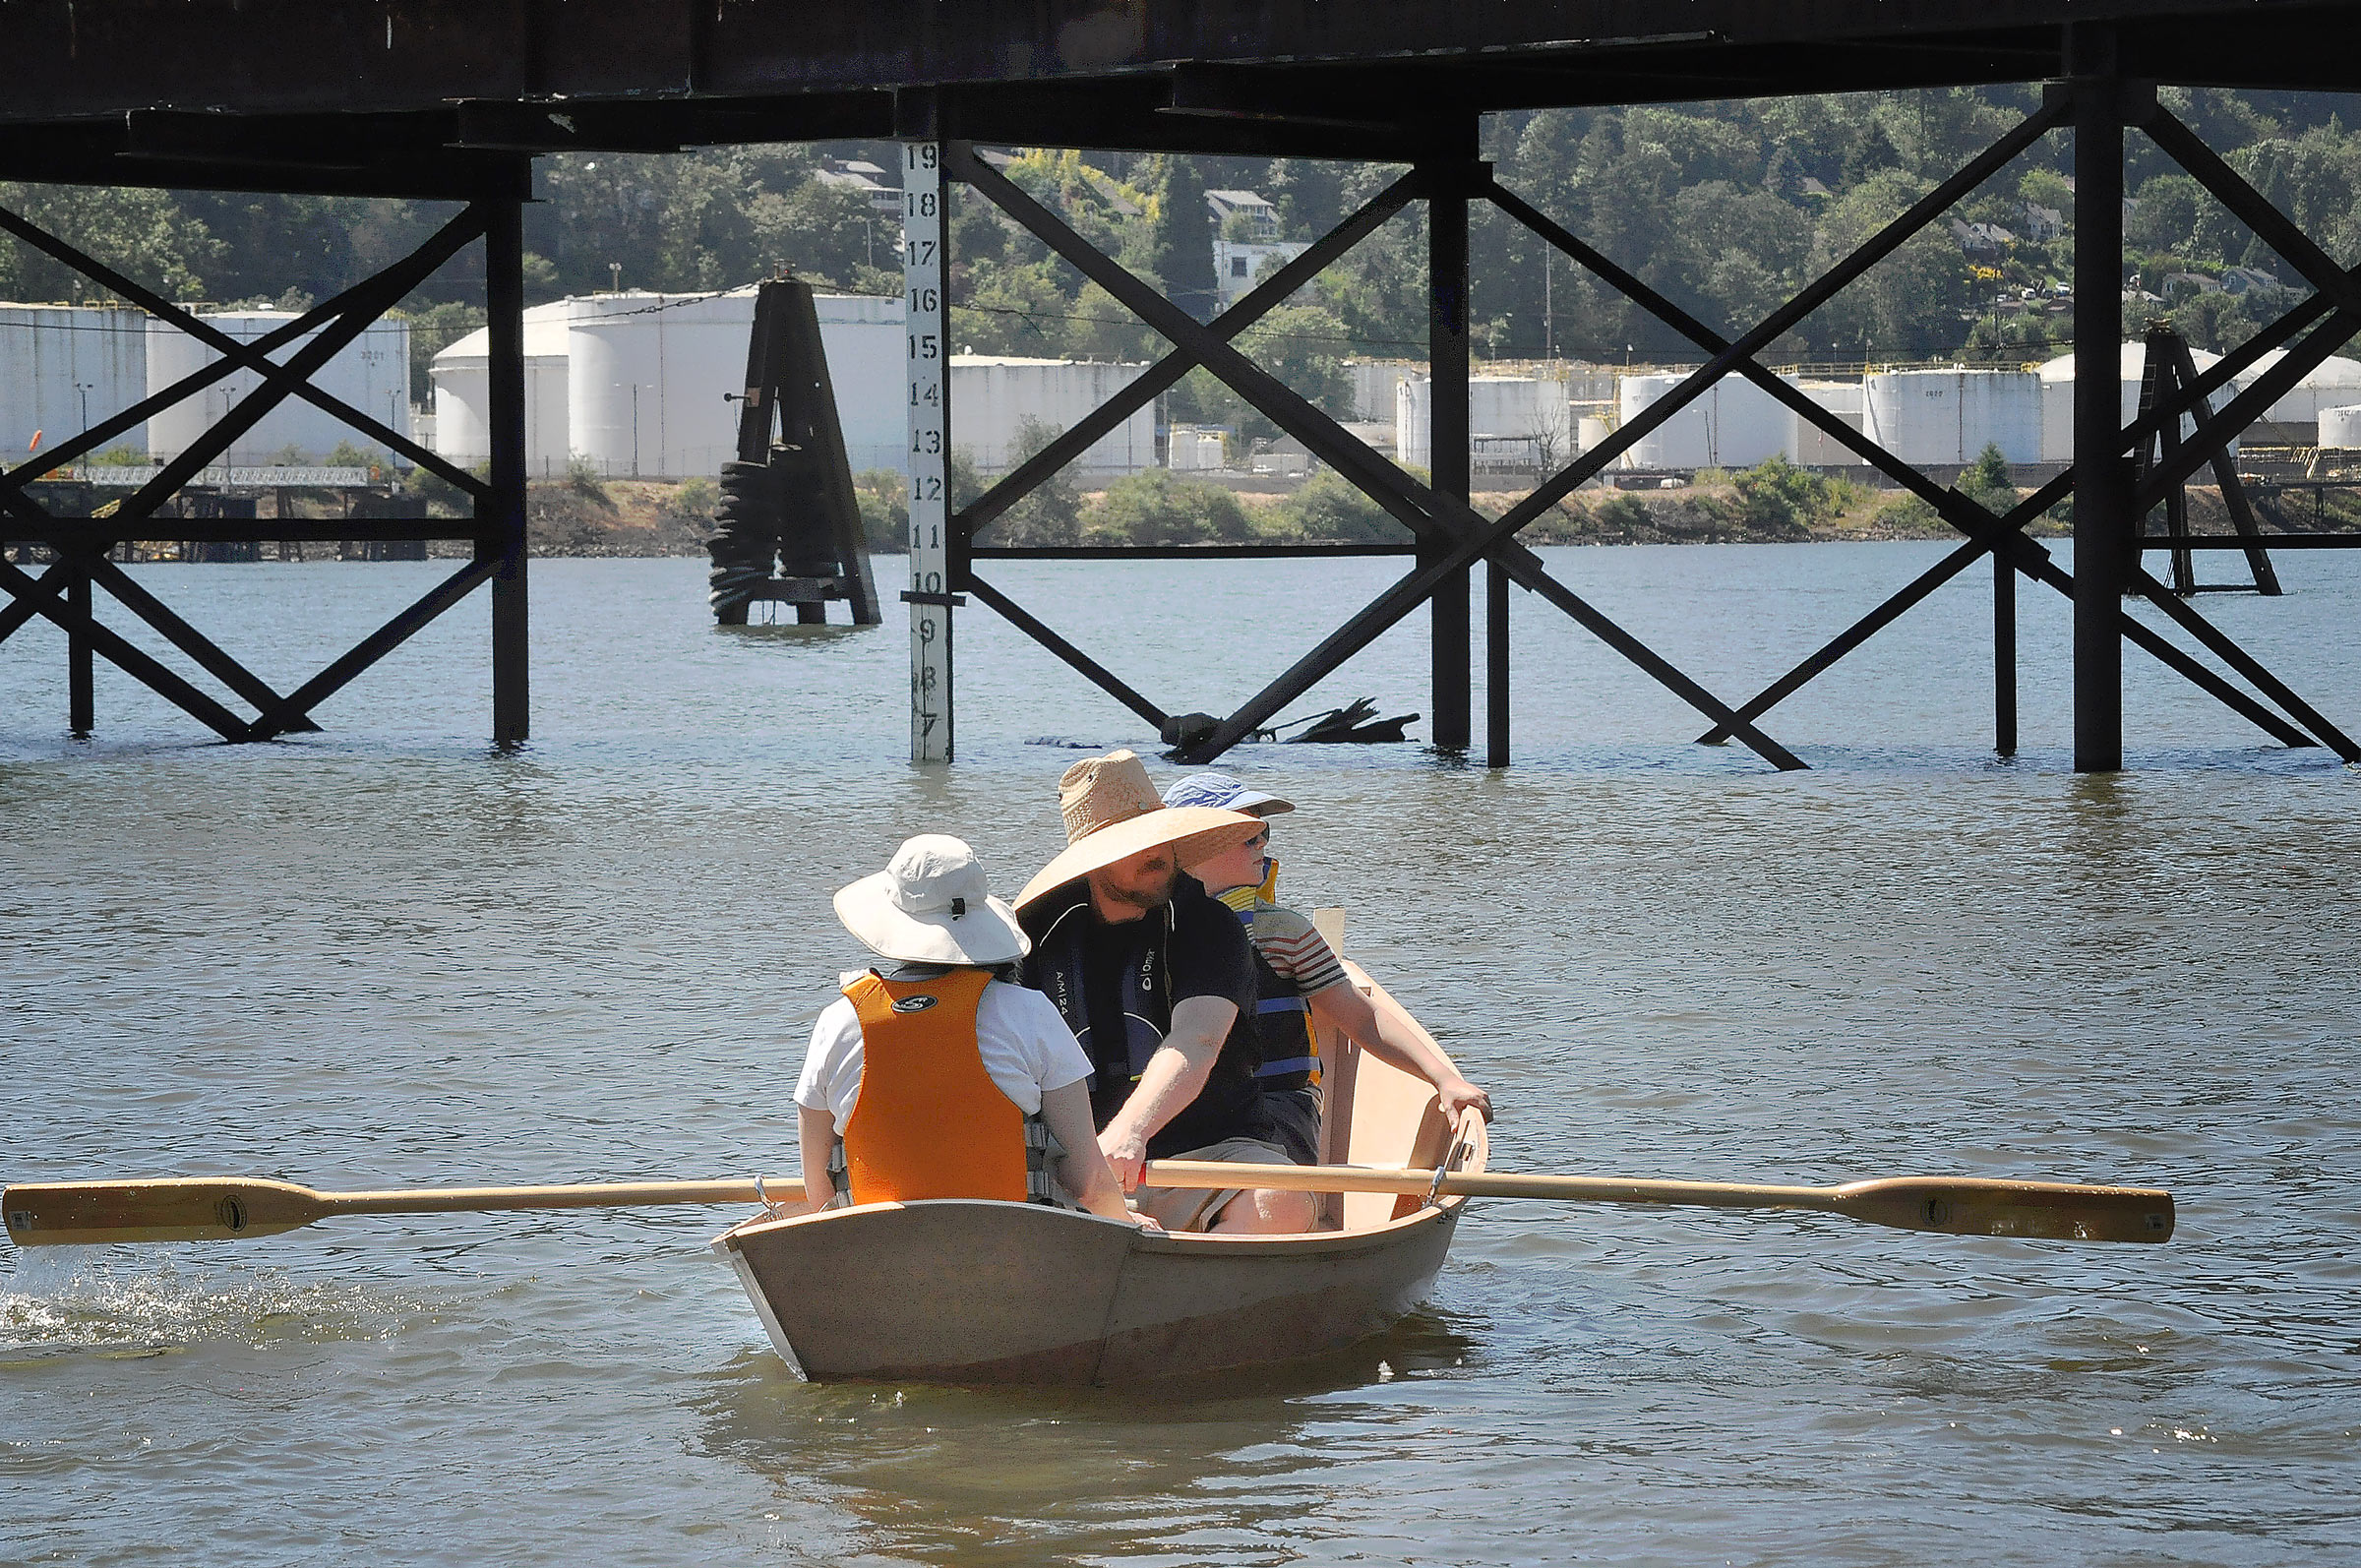
During my row, I found that the new boat, largely because of its light weight, feels a bit squirrelly at first, but in short order it’s very simple to find her sweet spot. The boat tracks well enough. The combination of light weight and slight rocker, or longitudinal curvature, to her flat-athwartships bottom, meanwhile, make her extremely maneuverable. She’ll turn with just a flick of the oar. That’s an excellent characteristic in a crowded harbor, where responsive turning and quick stops are often necessary. However, in my judgment she would be plenty able for gunkholing expeditions and amply commodious for ferrying supplies from shore. “We’ve rowed the boat with four 200-lb guys, and it still goes right along,” Brown said. I found her quite a pleasure to row; I could see Canada over my shoulder, and Brown coaxed me back to shore only with some difficulty.
Nosing into shore, the flat bottom proved its worth once more. The boat comes easily to the beach, and it stands upright prettily. The foredeck makes it exceptionally easy to step forward and out of the boat, dry-footed.
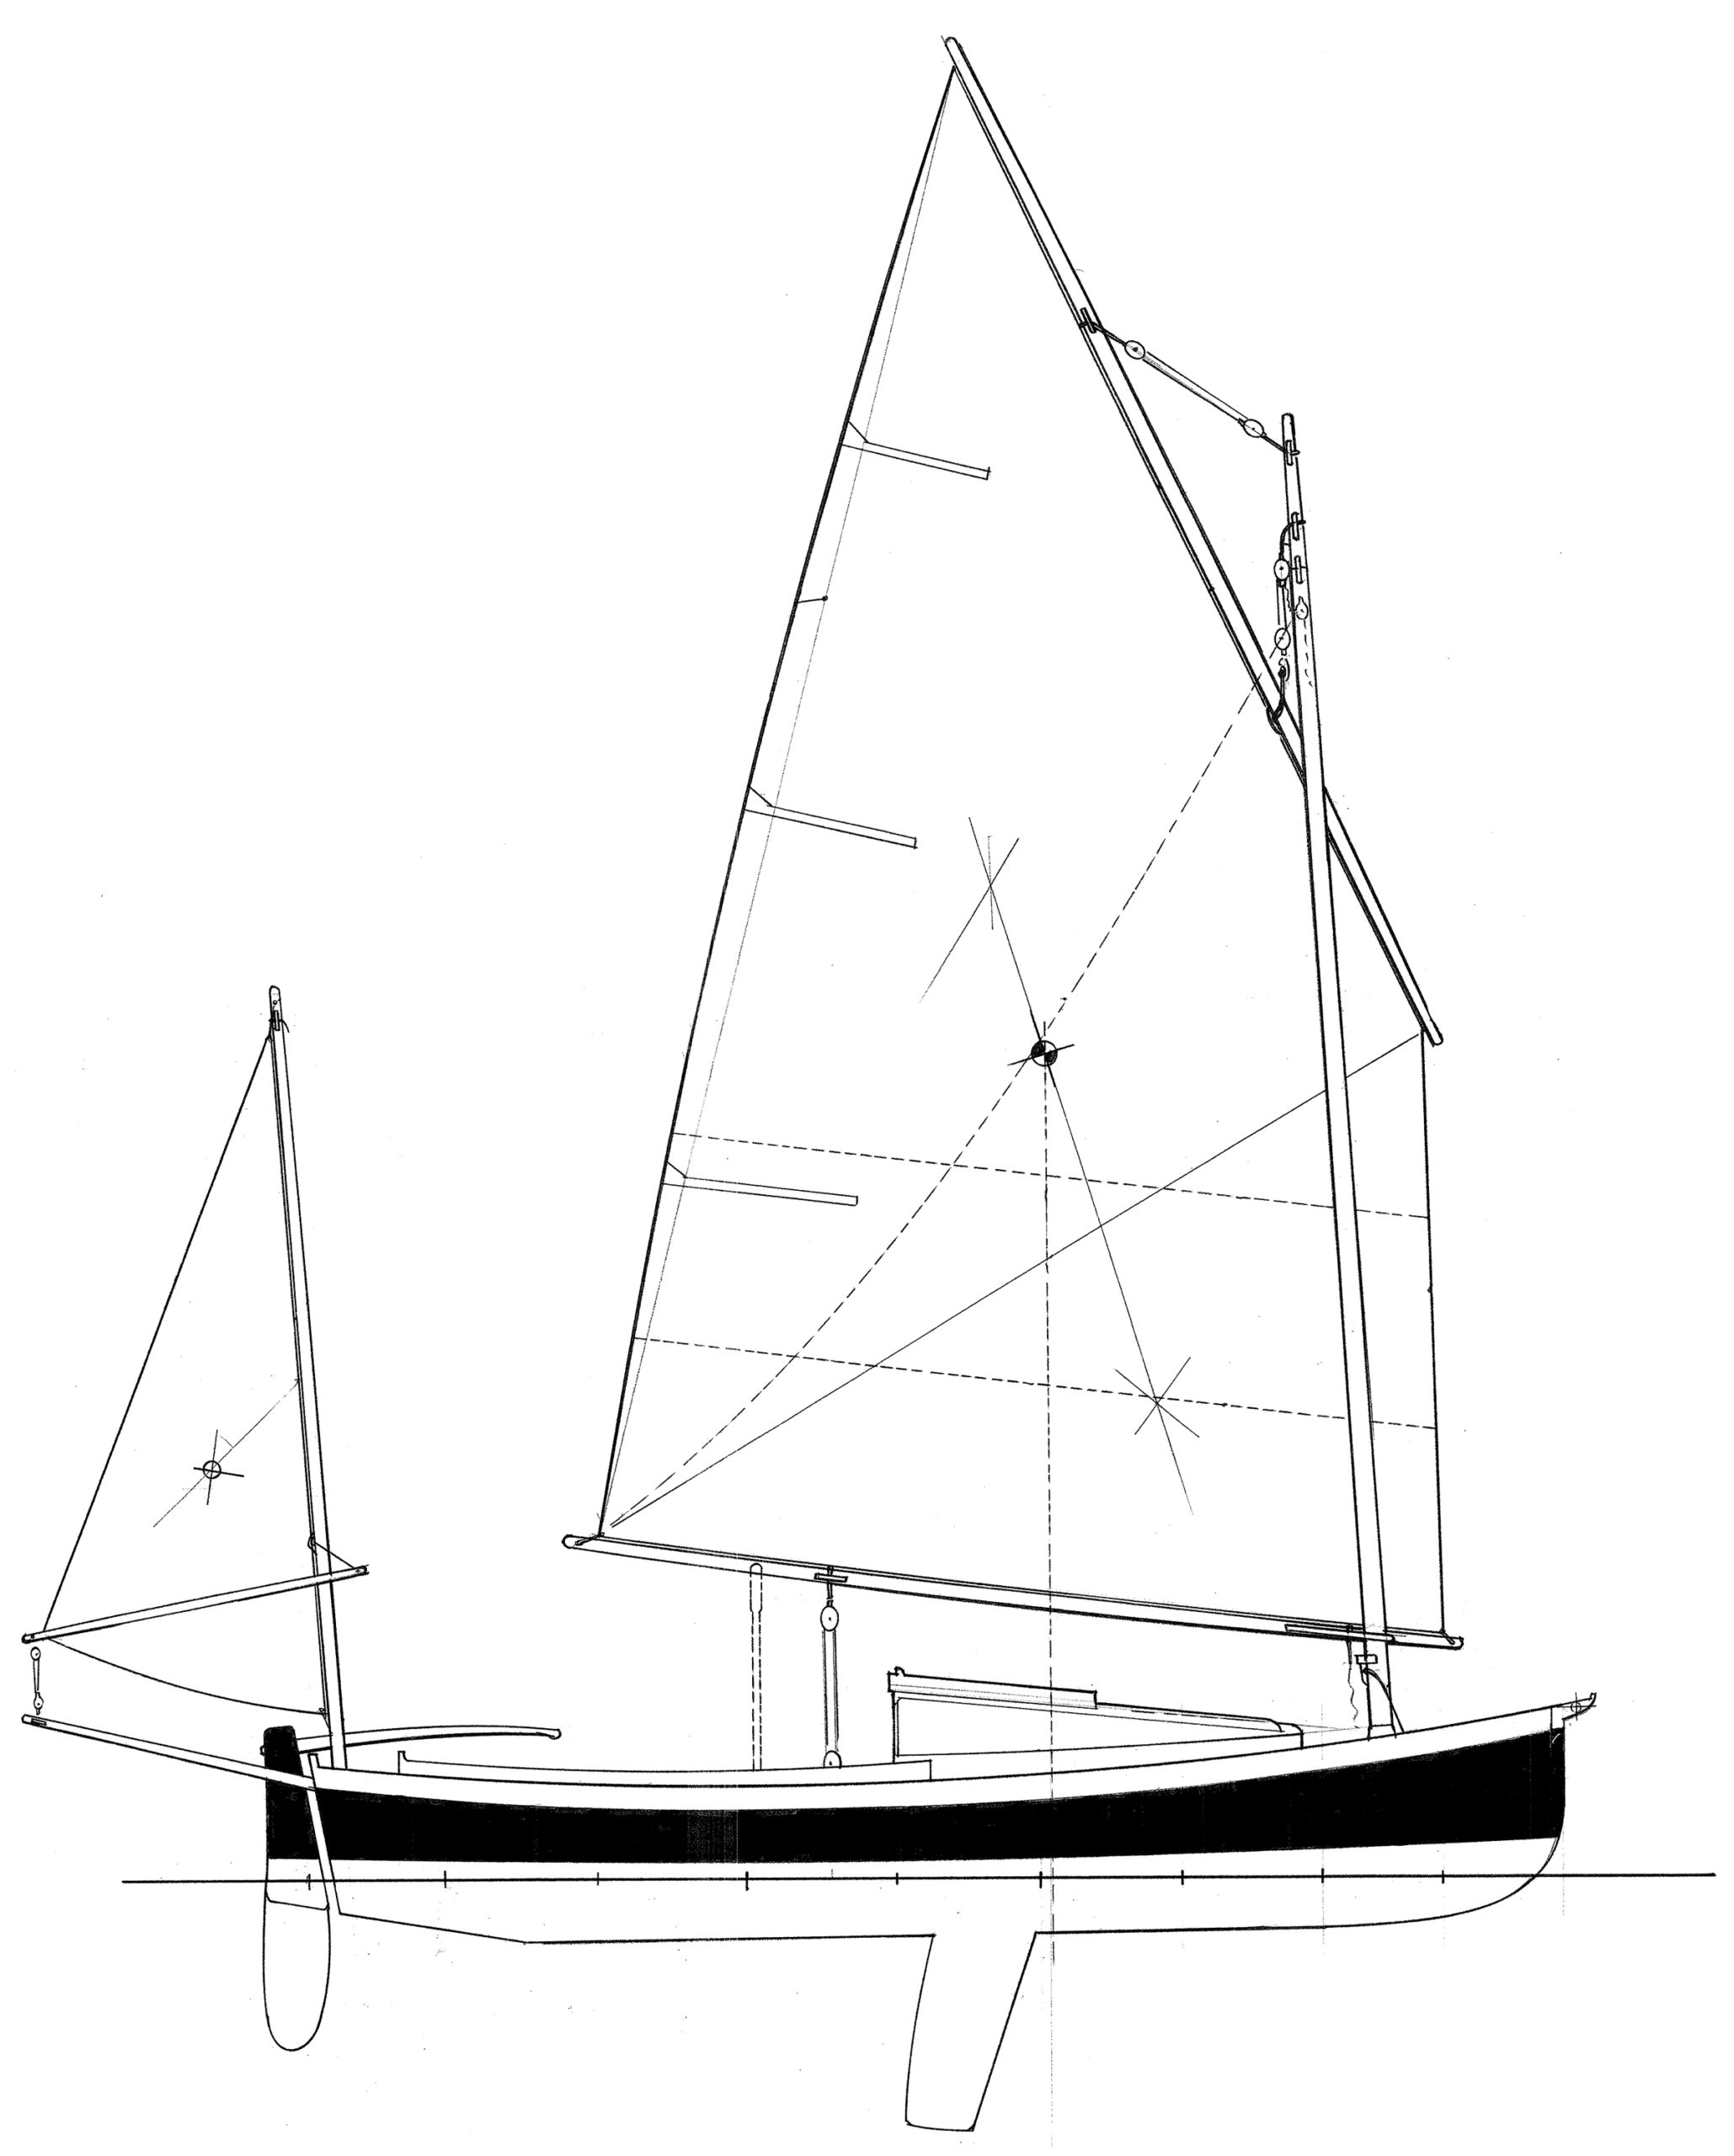
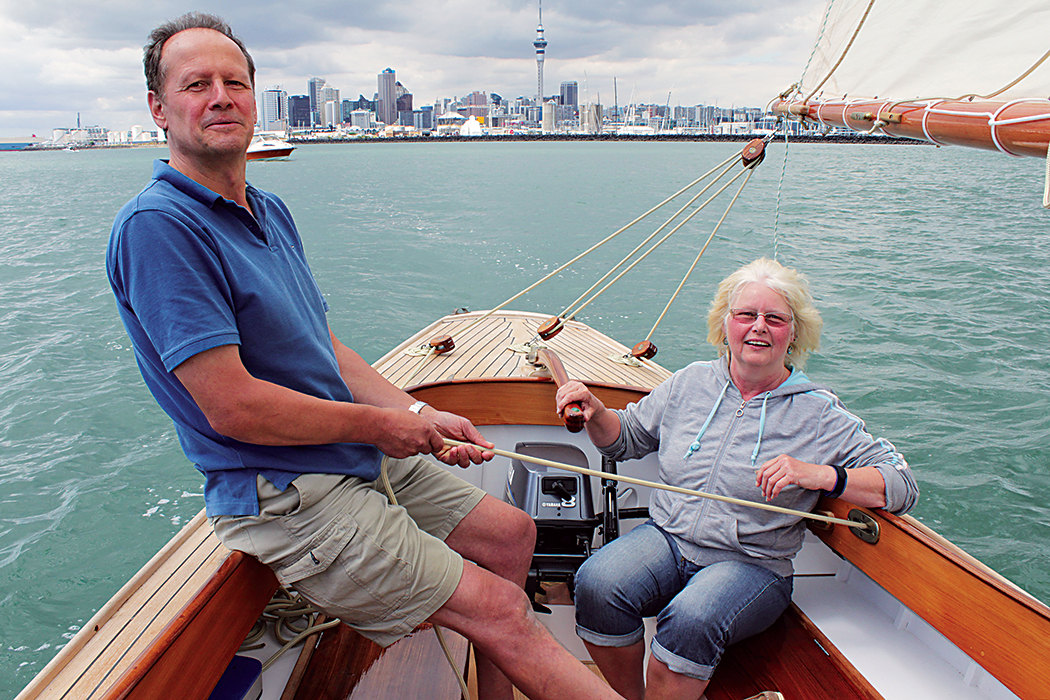
The sailing rig is deliberately simple, a modified windsurfer rig with the sail’s sleeve slipping over a two-part carbon-fiber mast, which needs no standing rigging. The mast itself fits easily into a tube mounted between the foredeck and the bottom. The entire rig weighs but a few pounds. Brown, who has long experience in developing foil sections in plywood, has also designed a daggerboard and a kick-up rudder, both of which would be very familiar to any dinghy racer. The designer likes to sit right on the boat’s bottom while sailing; in light air, I found kneeling amidships to work all right for me. It was a light-air day during our rendezvous, so I can’t say much about the boat’s sailing characteristics, though I found her quick for what little breeze we had. Heeling to the few puffs that materialized, she held out the promise of surprisingly good performance. Later, when Brown found a bit more breeze during his time at the helm, I observed that she accelerated quickly and tacked easily. Like any lightweight dinghy, she is very responsive to crew weight, yet she feels stable. An old dinghy racer would be at home here and would not be displeased by her sailing qualities.
Tom Jackson
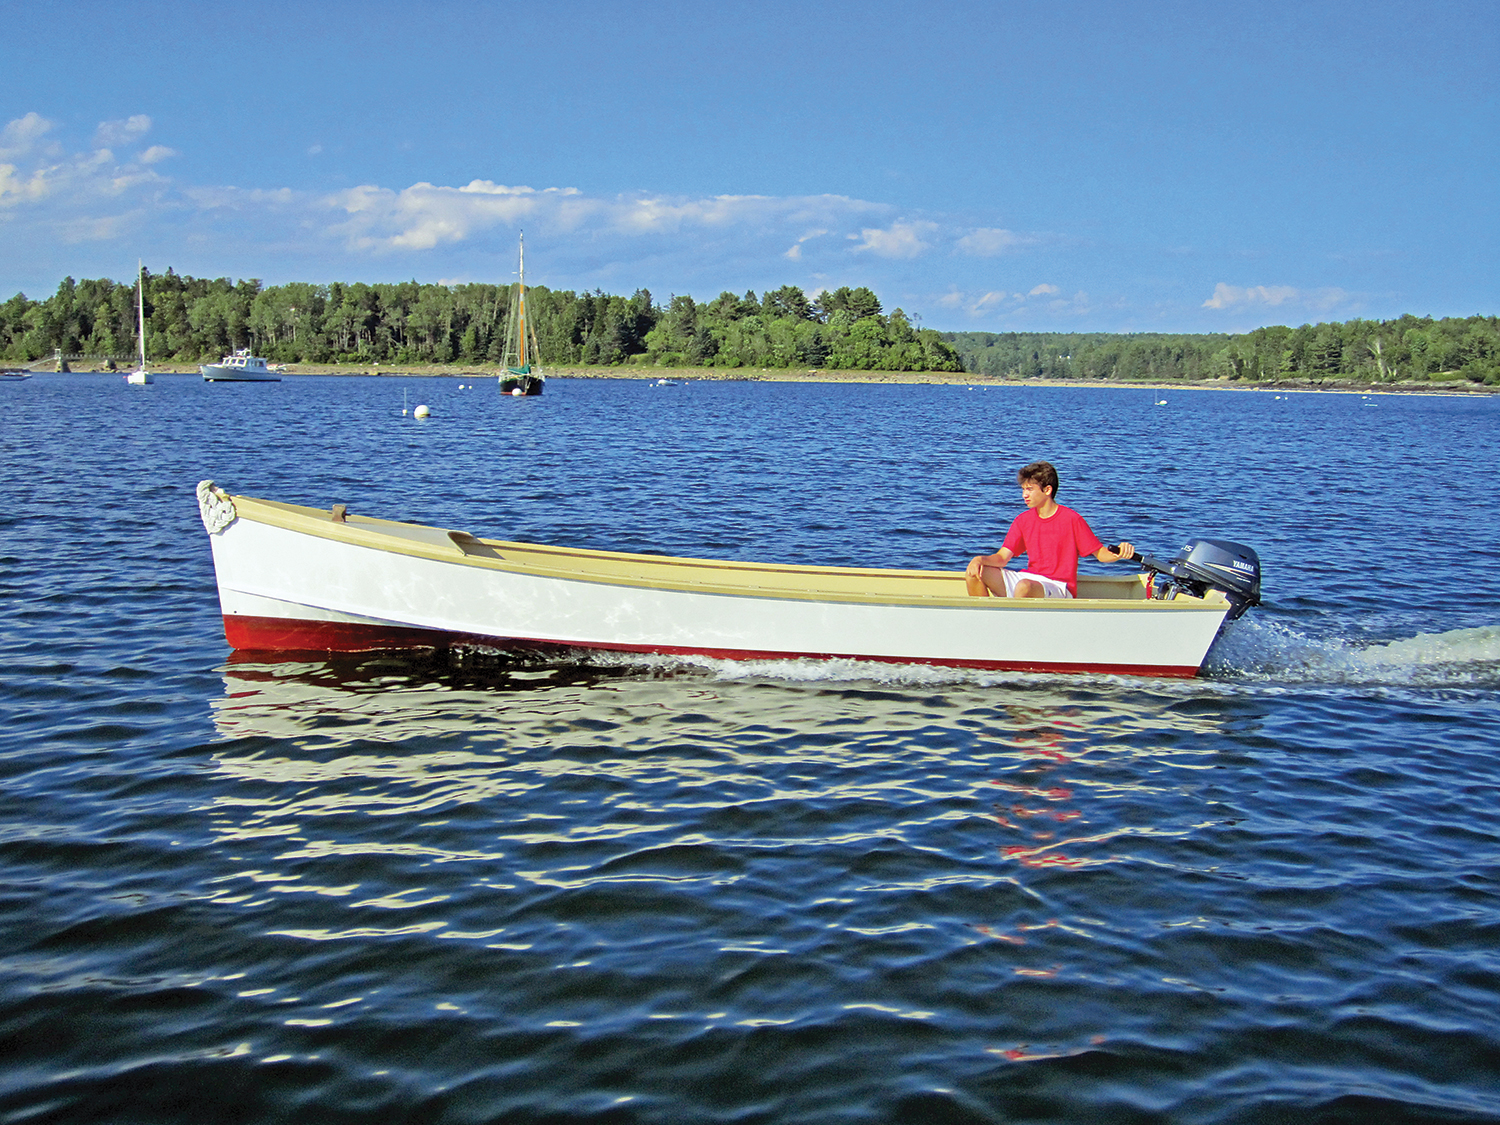
The dinghy attains good speed quickly, tracks reasonably well, and rows very comfortably. Unlike many dinghies, she’ll make rowing ashore from an anchorage a pleasure.
As I sailed, in my imagination, I thought of anchoring down in some pretty harbor somewhere and spending the few minutes necessary to get the boat launched, rigged, and ready to sail into the golden light of evening. I put the case, further, that doing so would allow anyone so fortunate to enjoy such a harbor in a boat that is fine-looking beyond all expectations.
Russell Brown
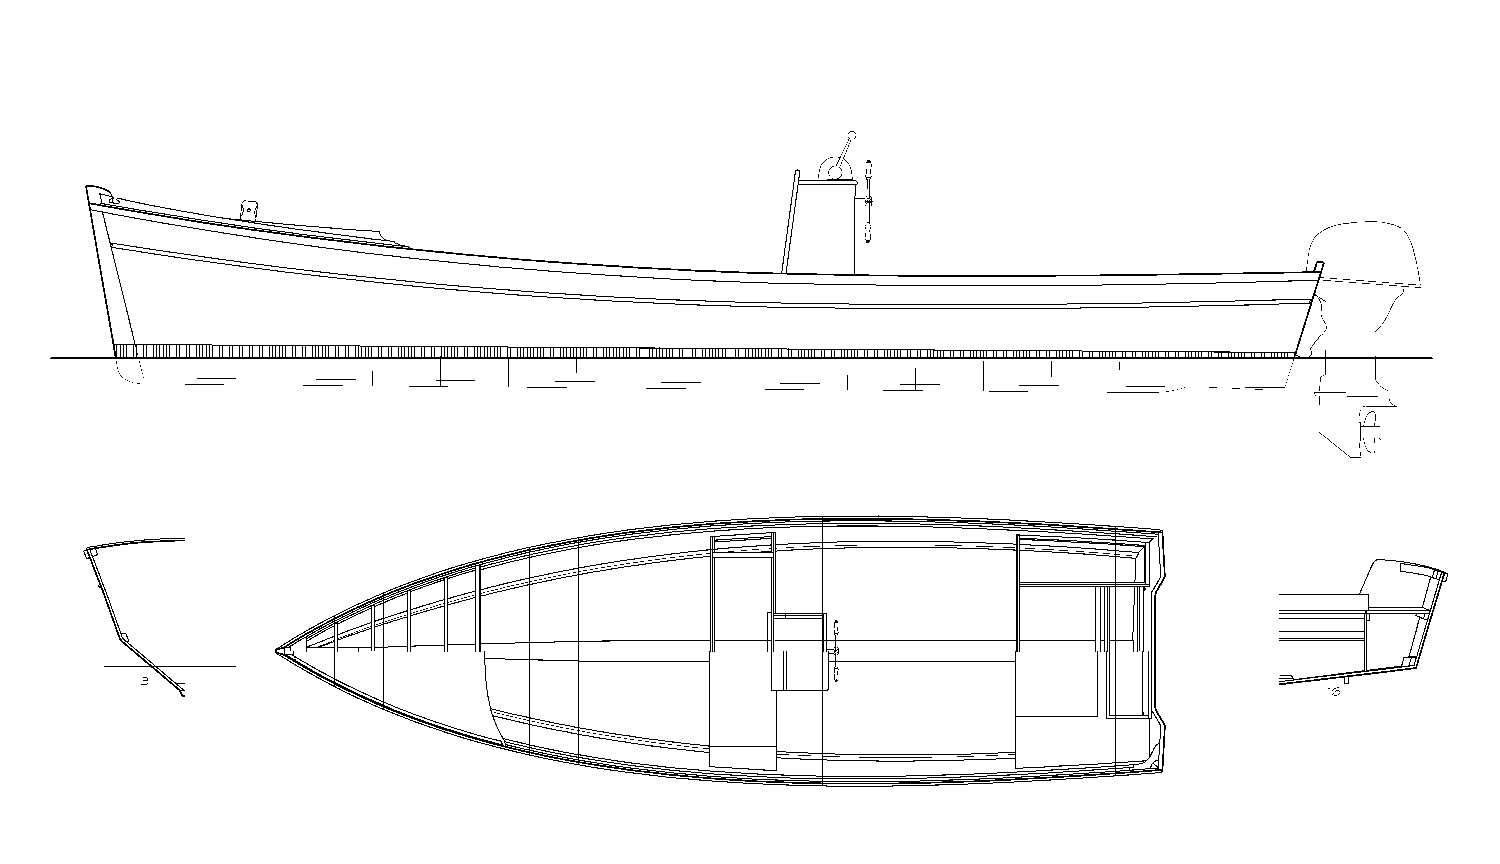
To keep the PT 11’s nested dimensions to a minimum, Brown made the boat flat-bottomed with only slight rocker and also quite flat-sheered. Nevertheless, the boat is handsome and sails smartly with her modified windsurfer rig. The boat is available in kit form only, and the designer has developed an extensive instruction manual for builders.
The PT 11 nesting dinghy is available as a kit from PT Watercraft.
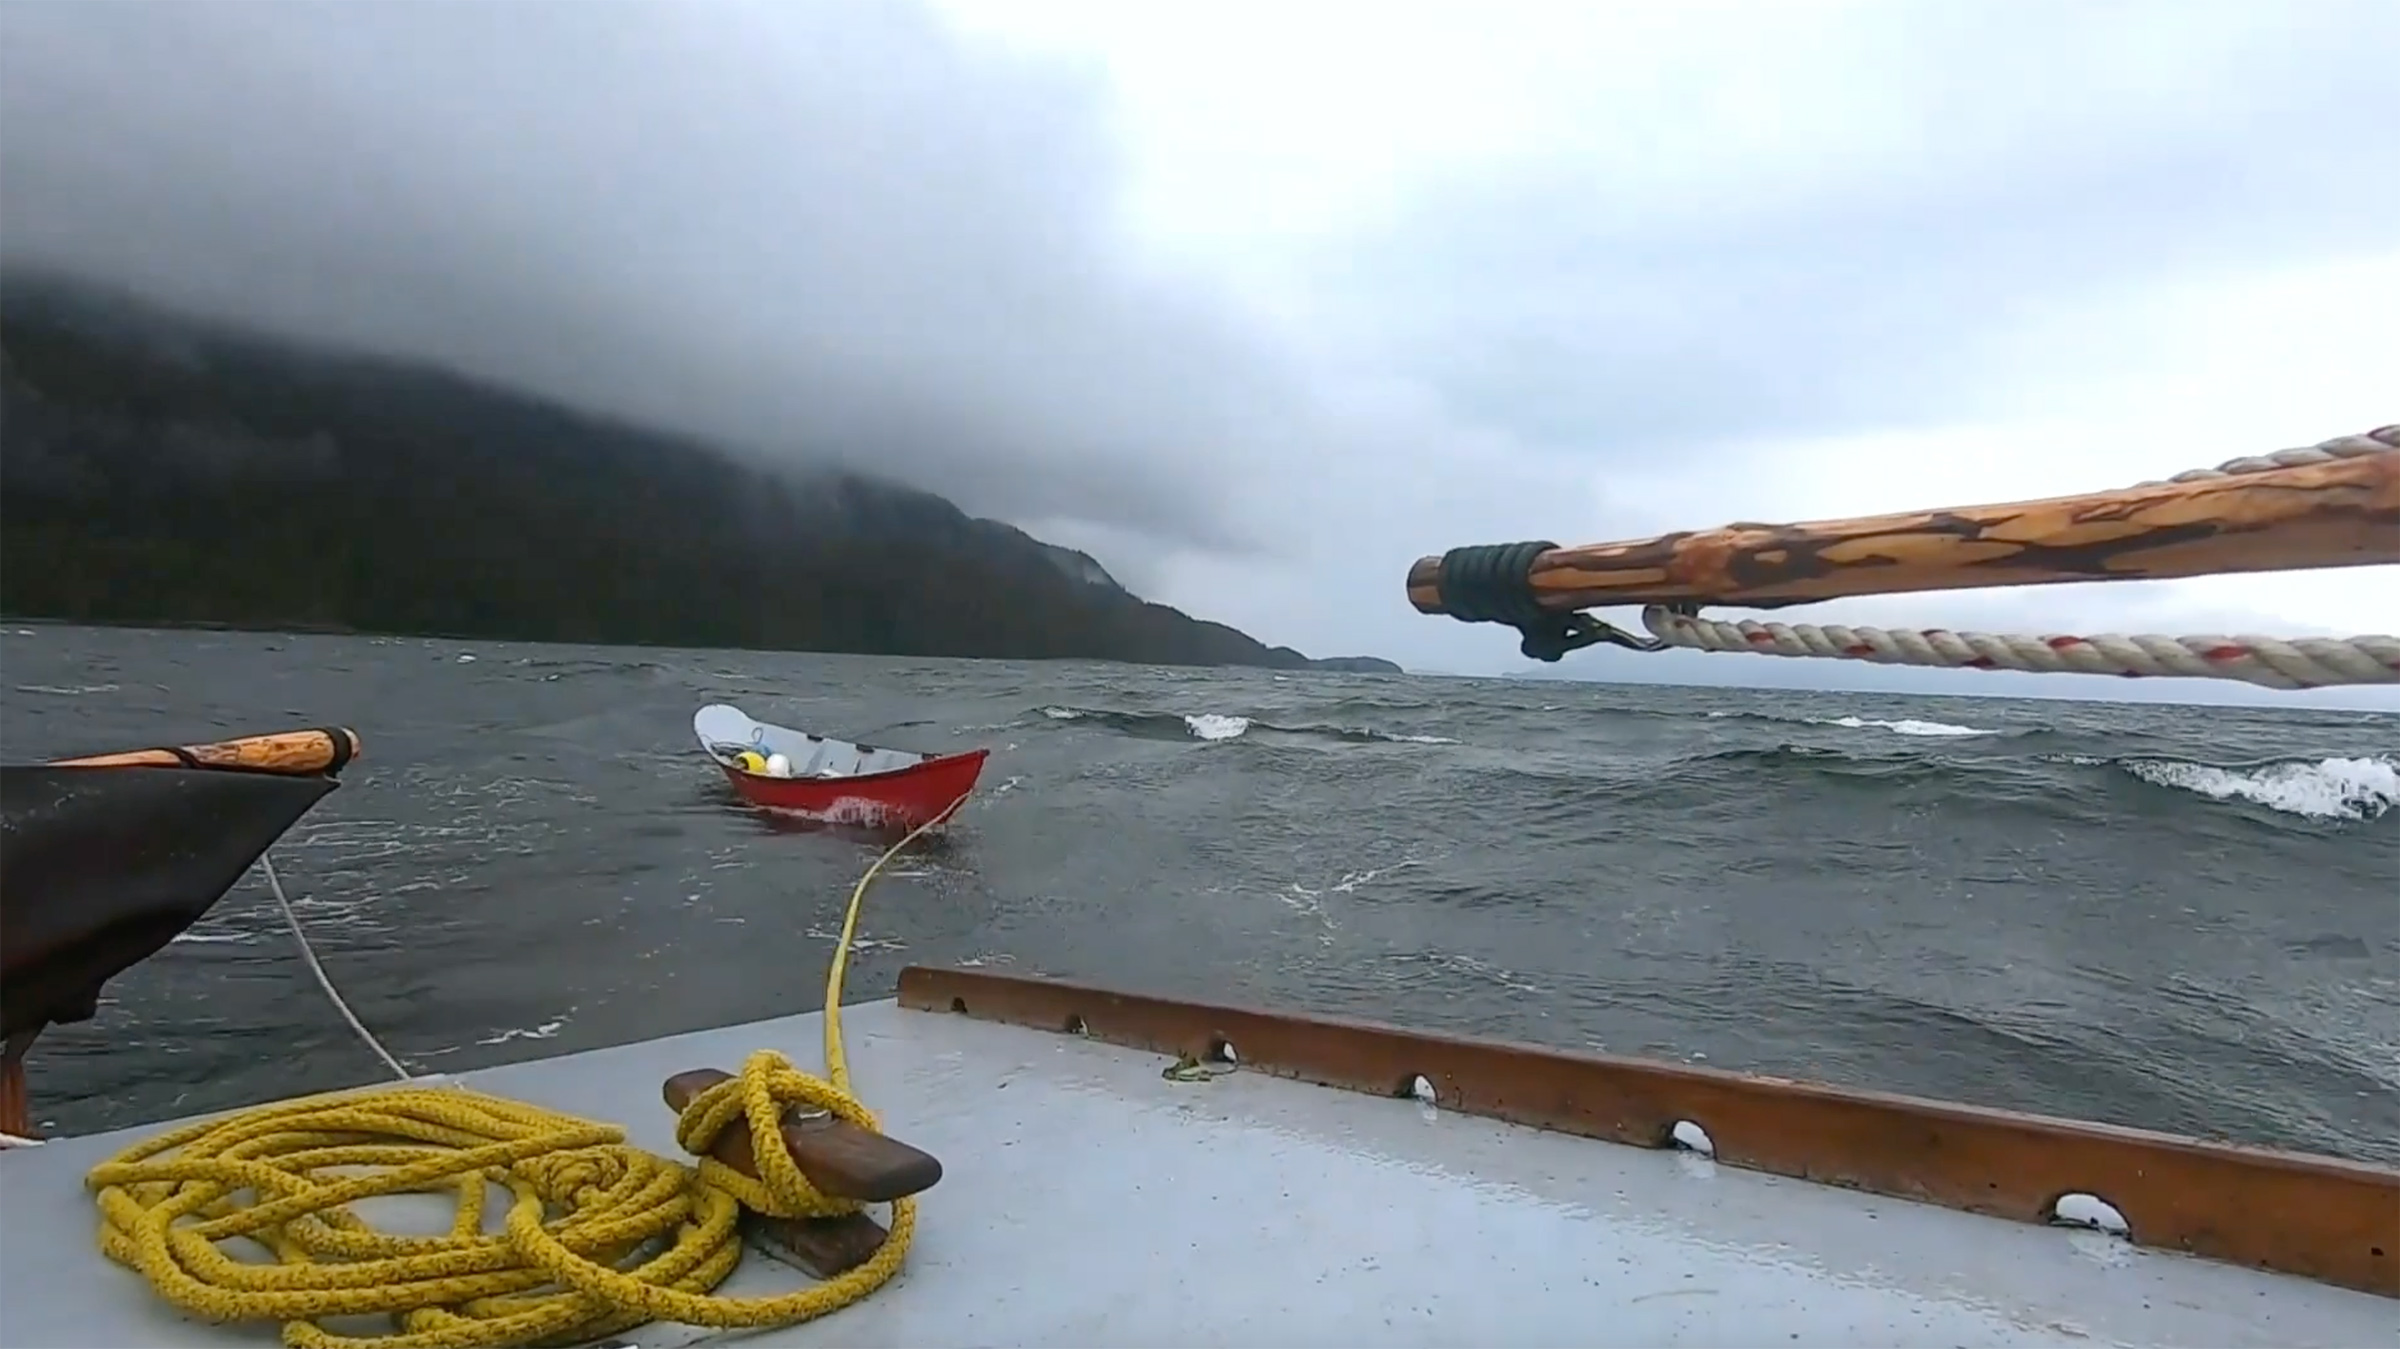
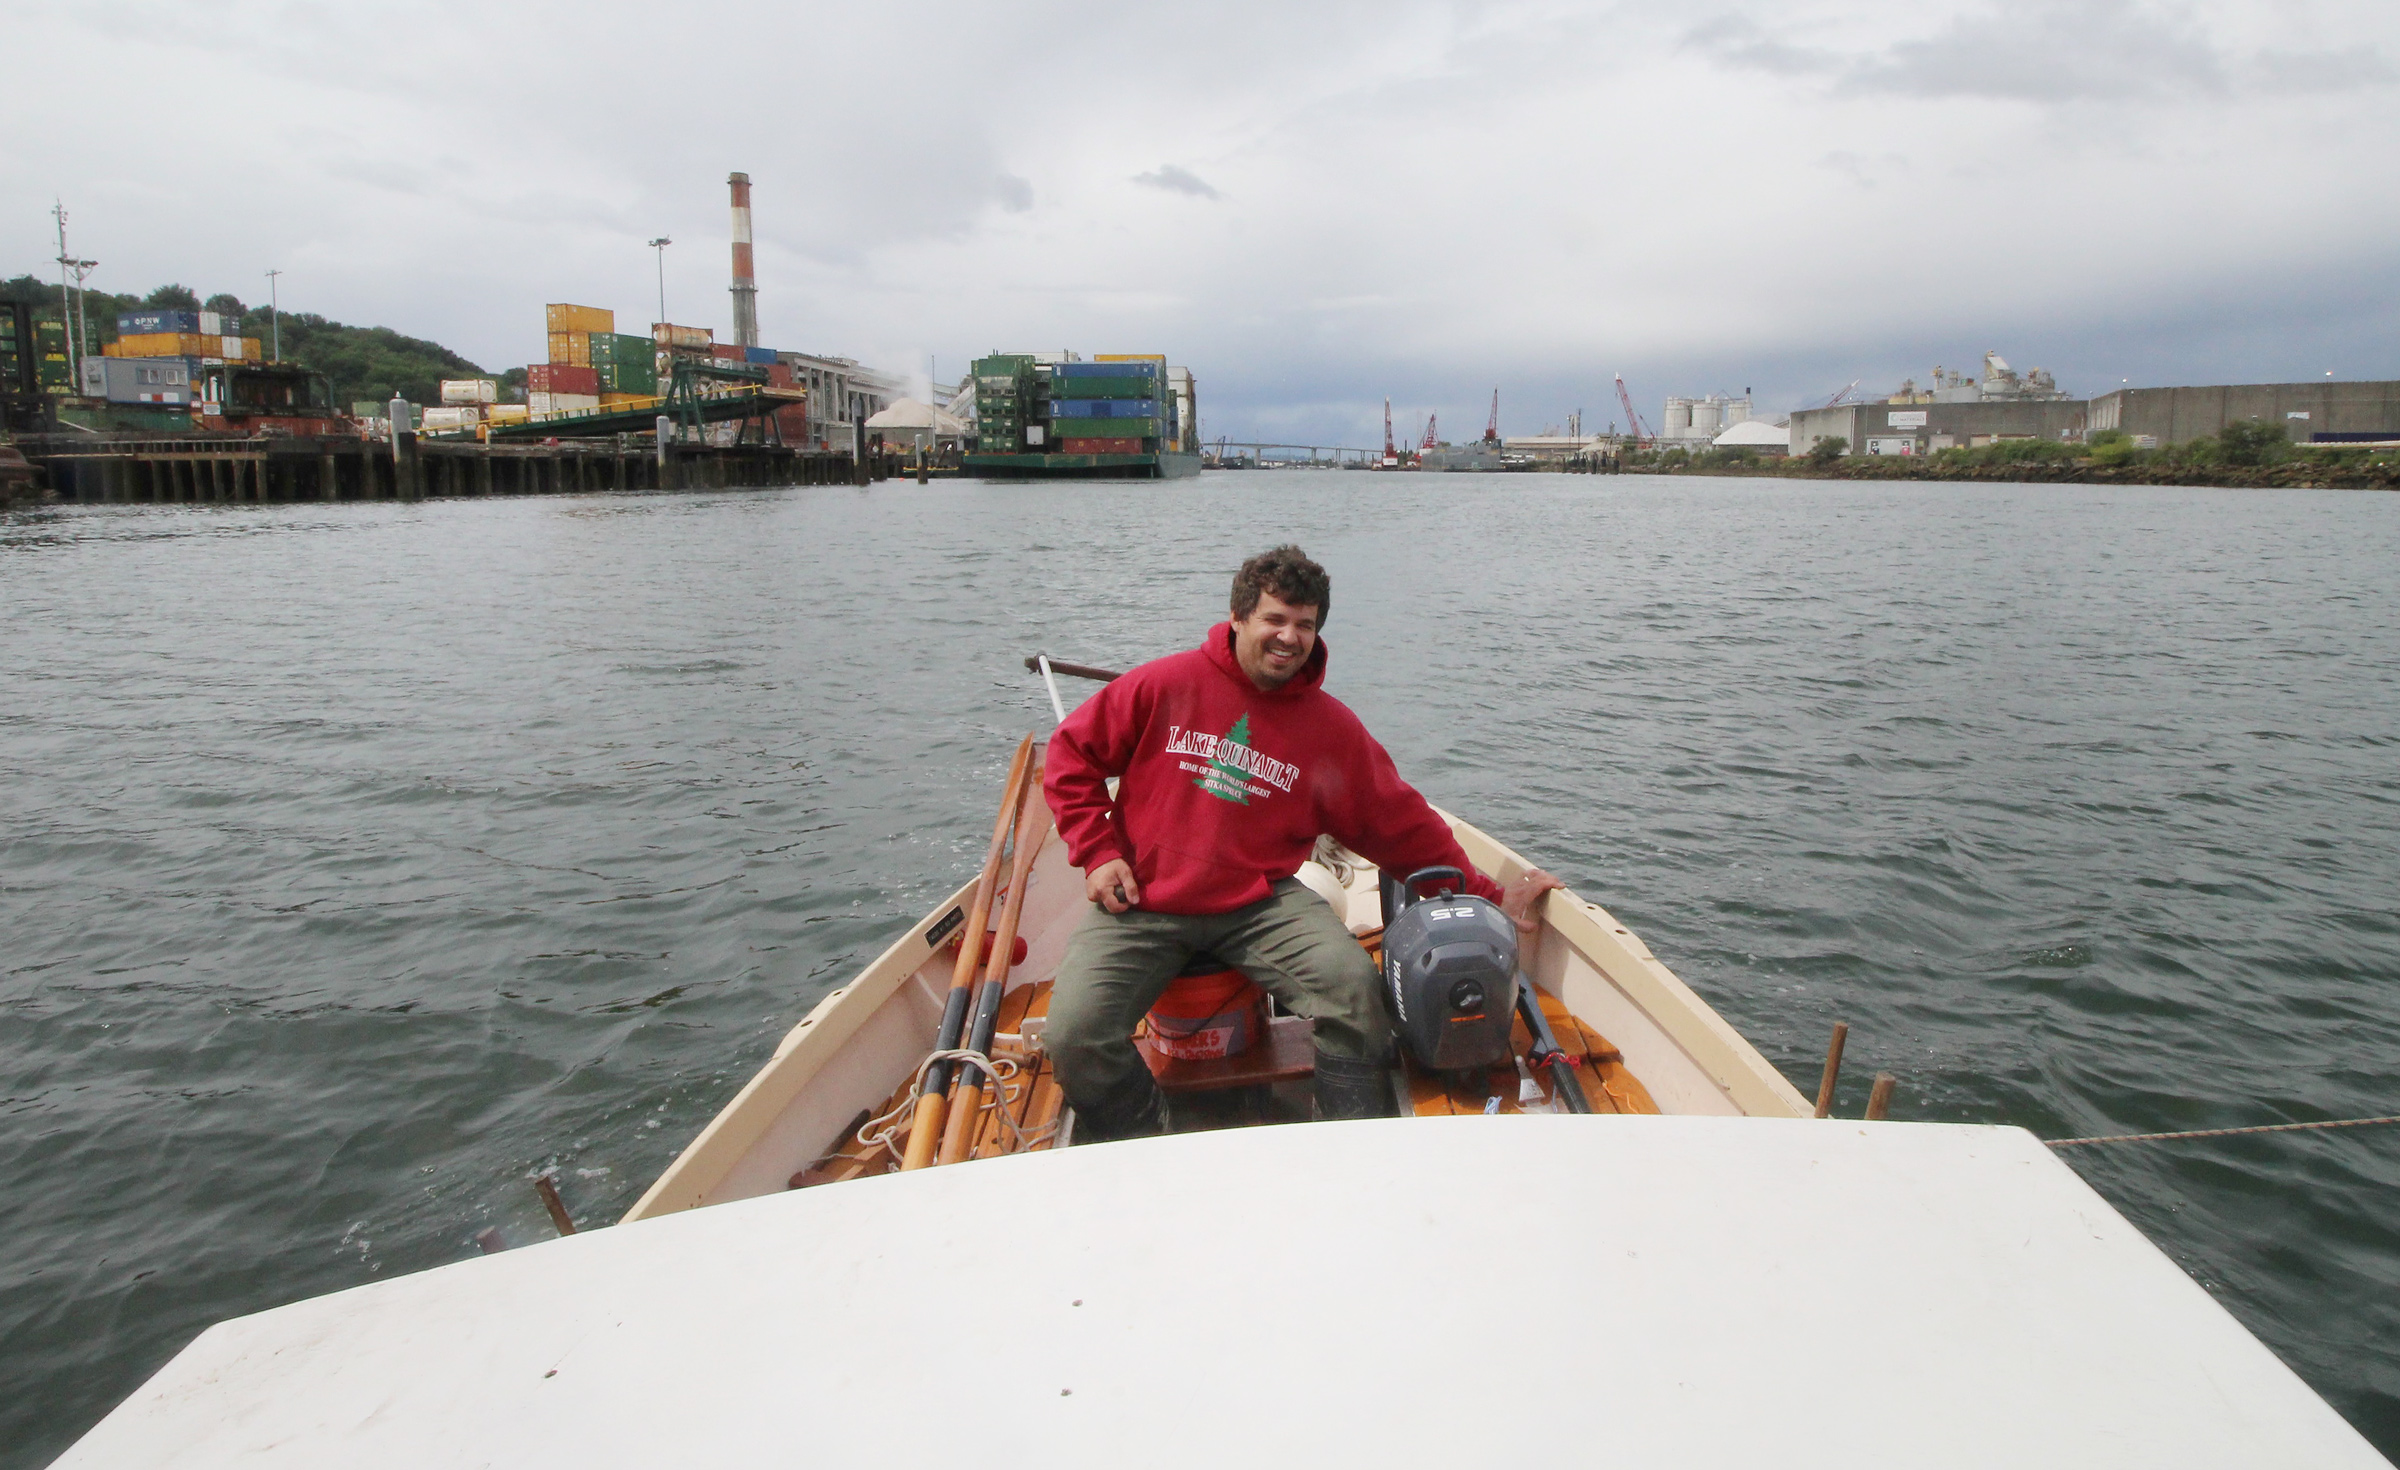
We won’t see the wilderness wedding we set out for that never materialized. We won’t see Dave forget the durn camera at home and row back a mile for it. We won’t see the whale that almost T-boned us. Those are tales for another time.
We will see our first big wind. Our first narrows to negotiate. A spooky and exhausting coastal passage with no safe anchorage in the exposed surf, breakers, rocks, and foul bottom. And our first glimpse of the outer coast.
Through all our years of venturing, we’ve been sailing “inside” waters—sounds that are occasionally open to the Pacific. Things can and do get rough at times, and there’s plenty of opportunity for trouble. But there’s always a fallbacks to more sheltered waters.
We are sailing a new vessel, untried in every direction. This stretch stretches us!
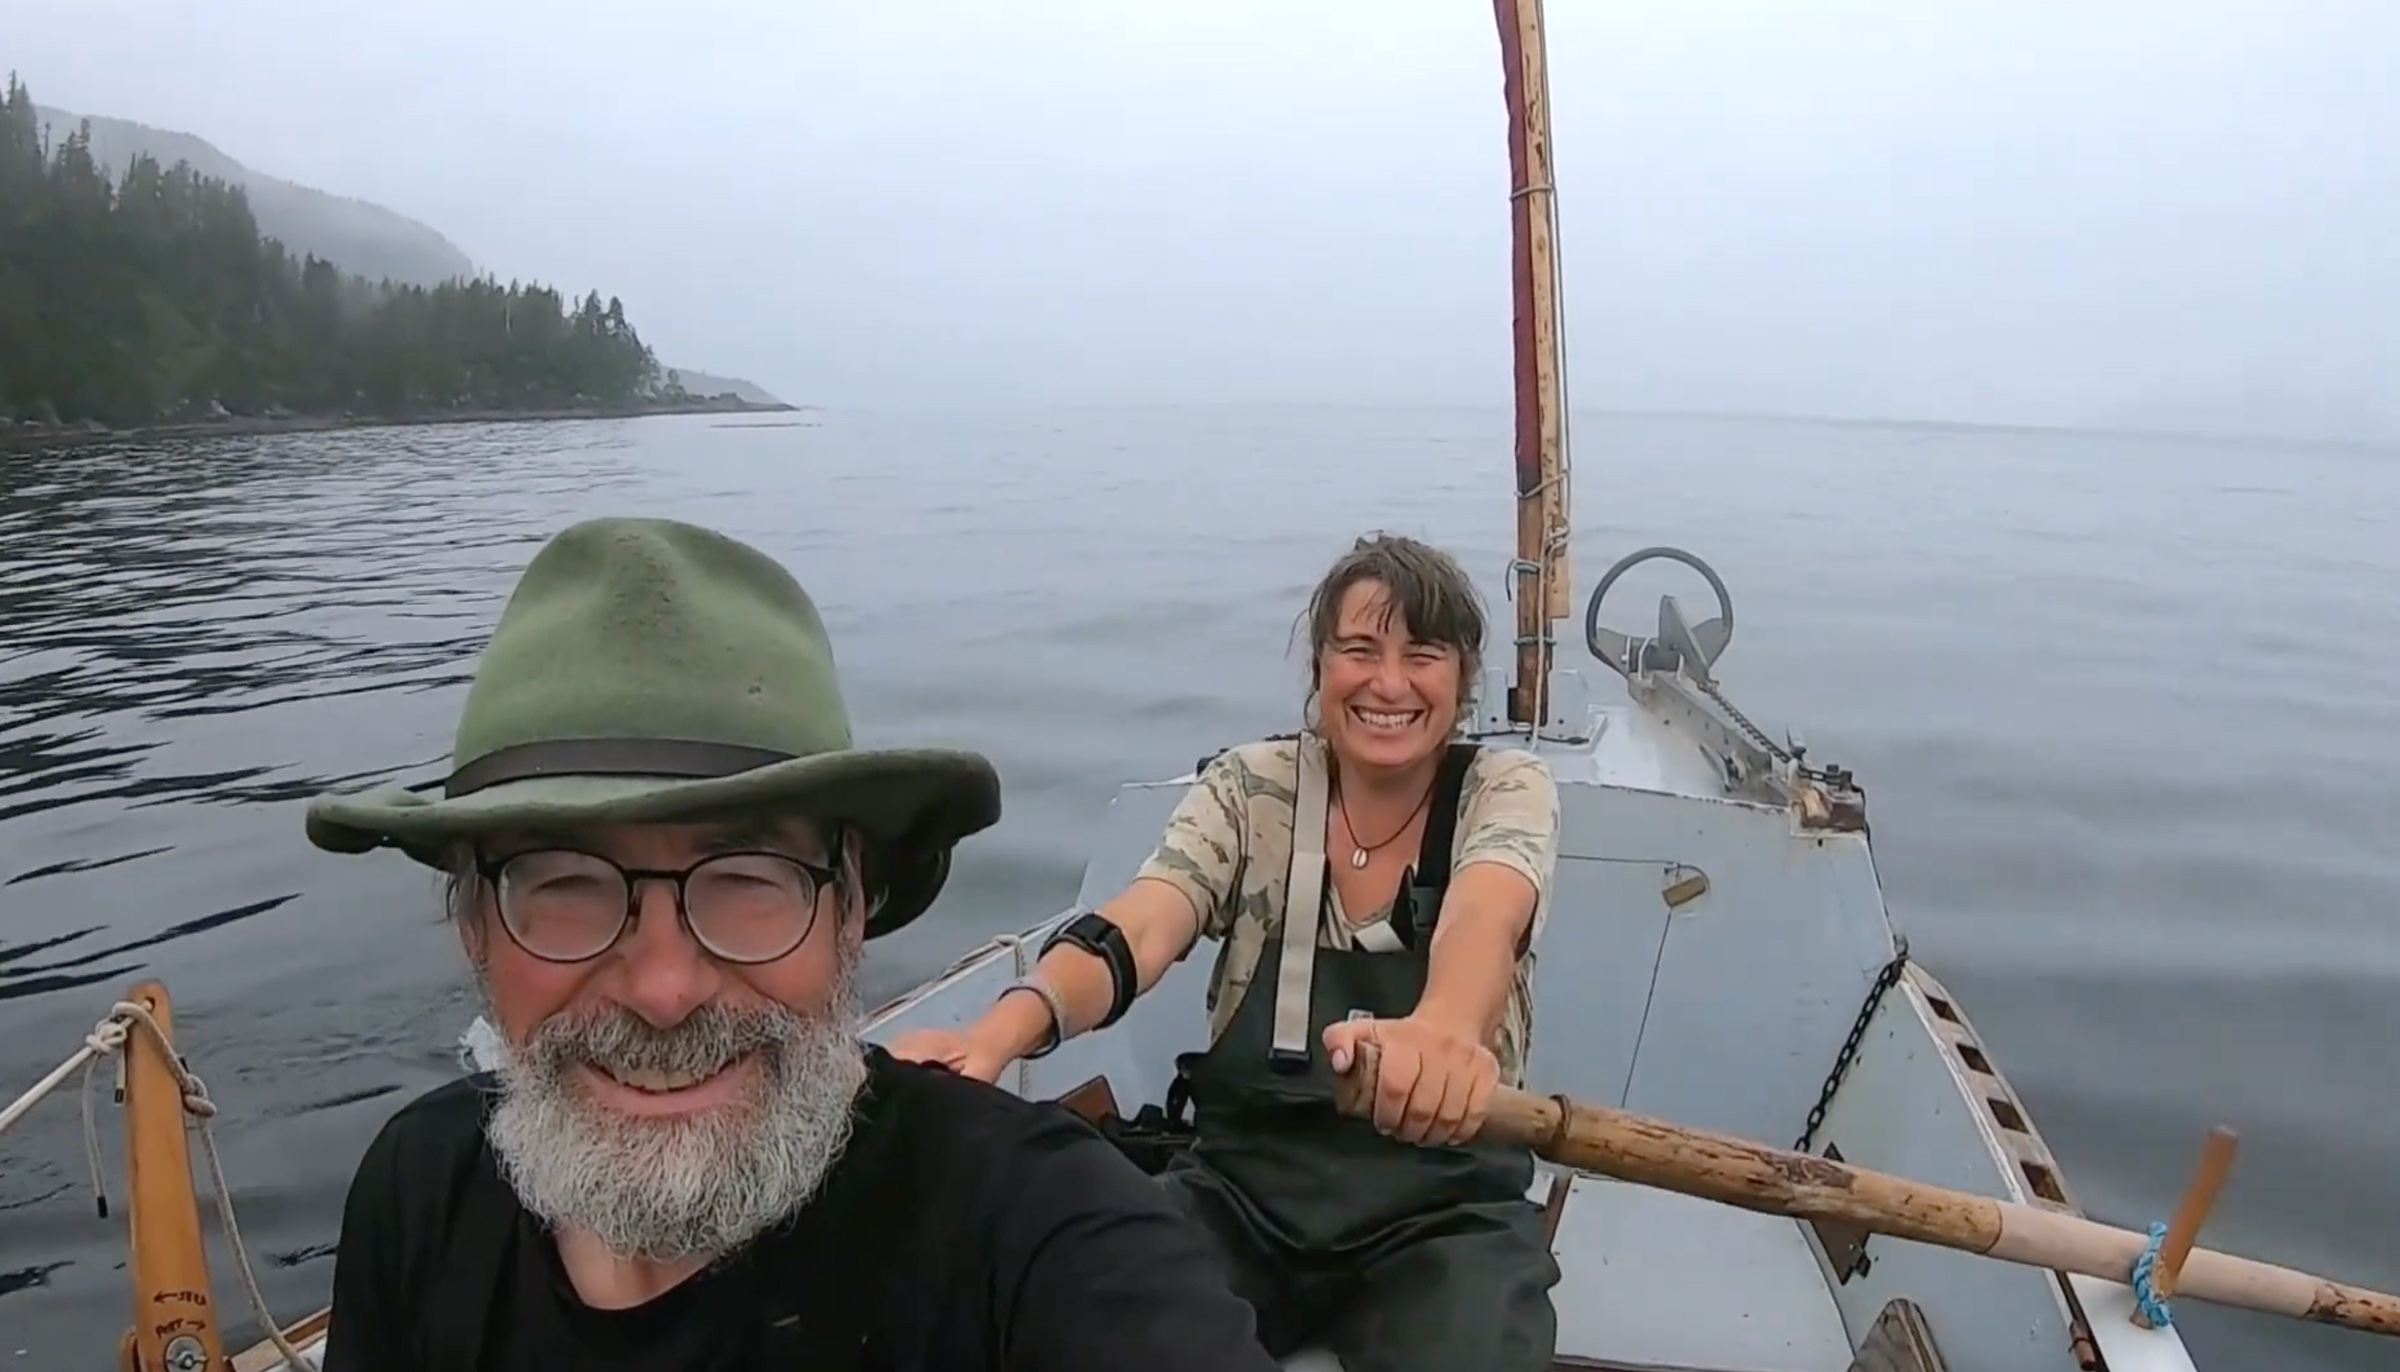
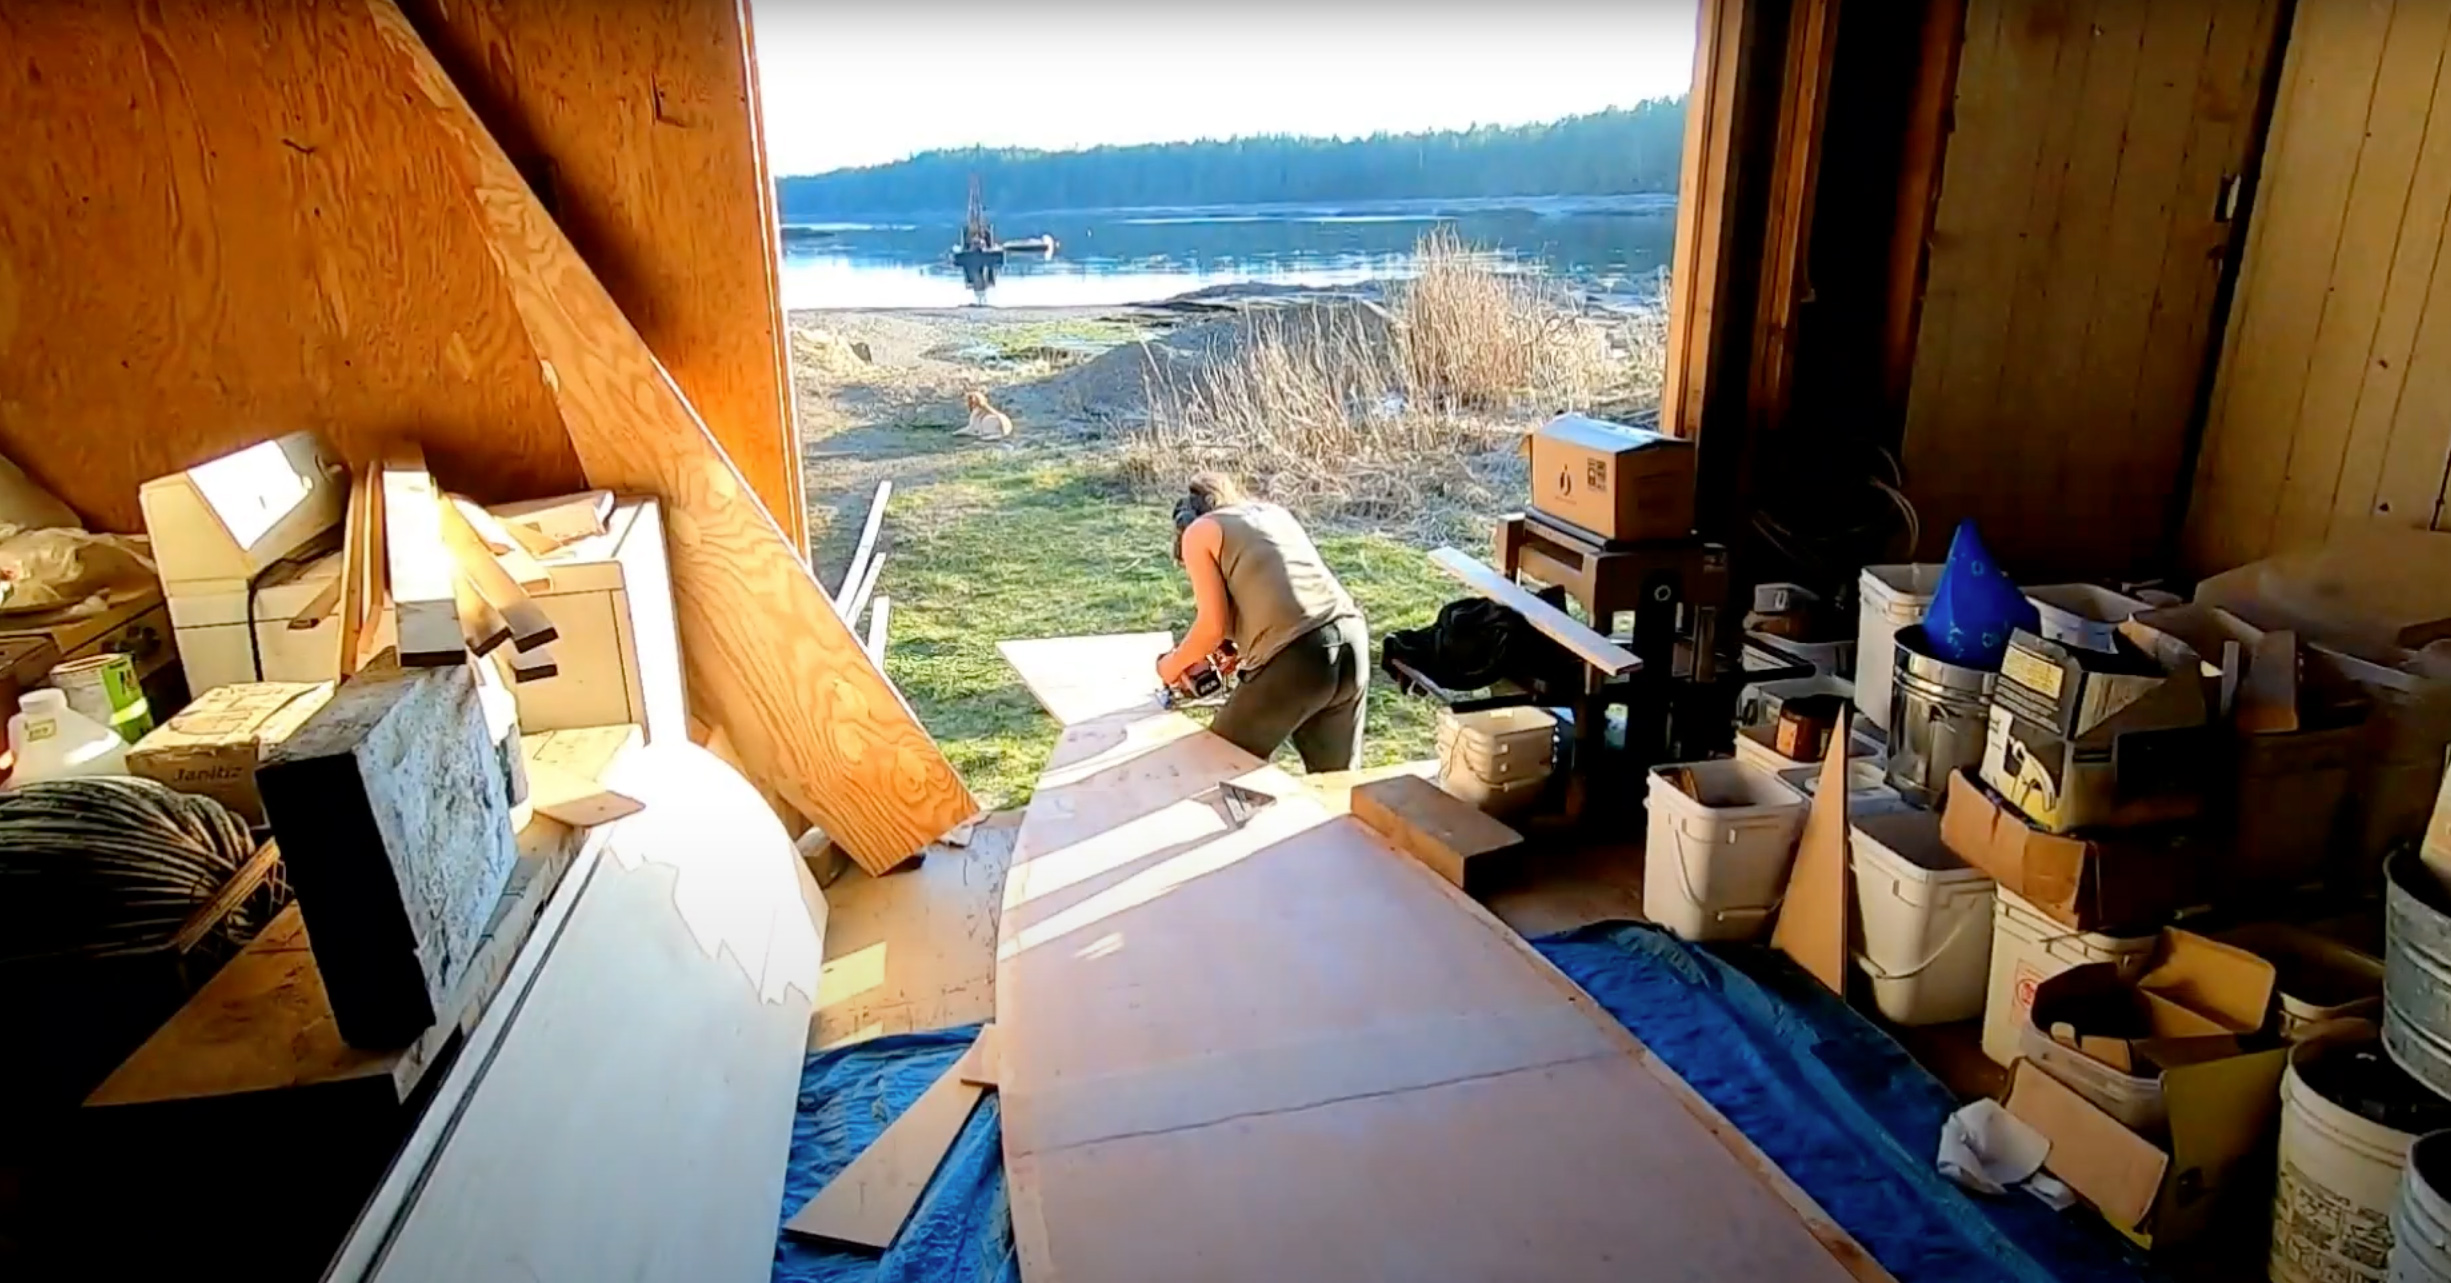
In this installment, we are getting ready to cruise, intending to row and sail around Chichagof Island, a distance of about 450 nautical miles—if we were to limit ourselves to the straight and narrow. But first we recap a change of venue, from the Southern Admiralty Wilderness site where we built MUSTELID to our home port of Tenakee Springs, Alaska, our jump off point for the voyage.
This trip will touch on each of the ABC’s: Admiralty, Baranof, and Chichagof Islands, which are the 7th, 10th, and 5th largest in the U.S., respectively. All are known for their abundance of brown bear (aka grizzlies), and our Chichagof has the highest known density of them on earth; there are 1,600, outnumbering the roughly 1,350 humans huddled in four communities.
Our trip will take us via “Outer Chich,” a raw and remote maze of rock and islands off the open Gulf of Alaska. We’ve dreamed of this place!
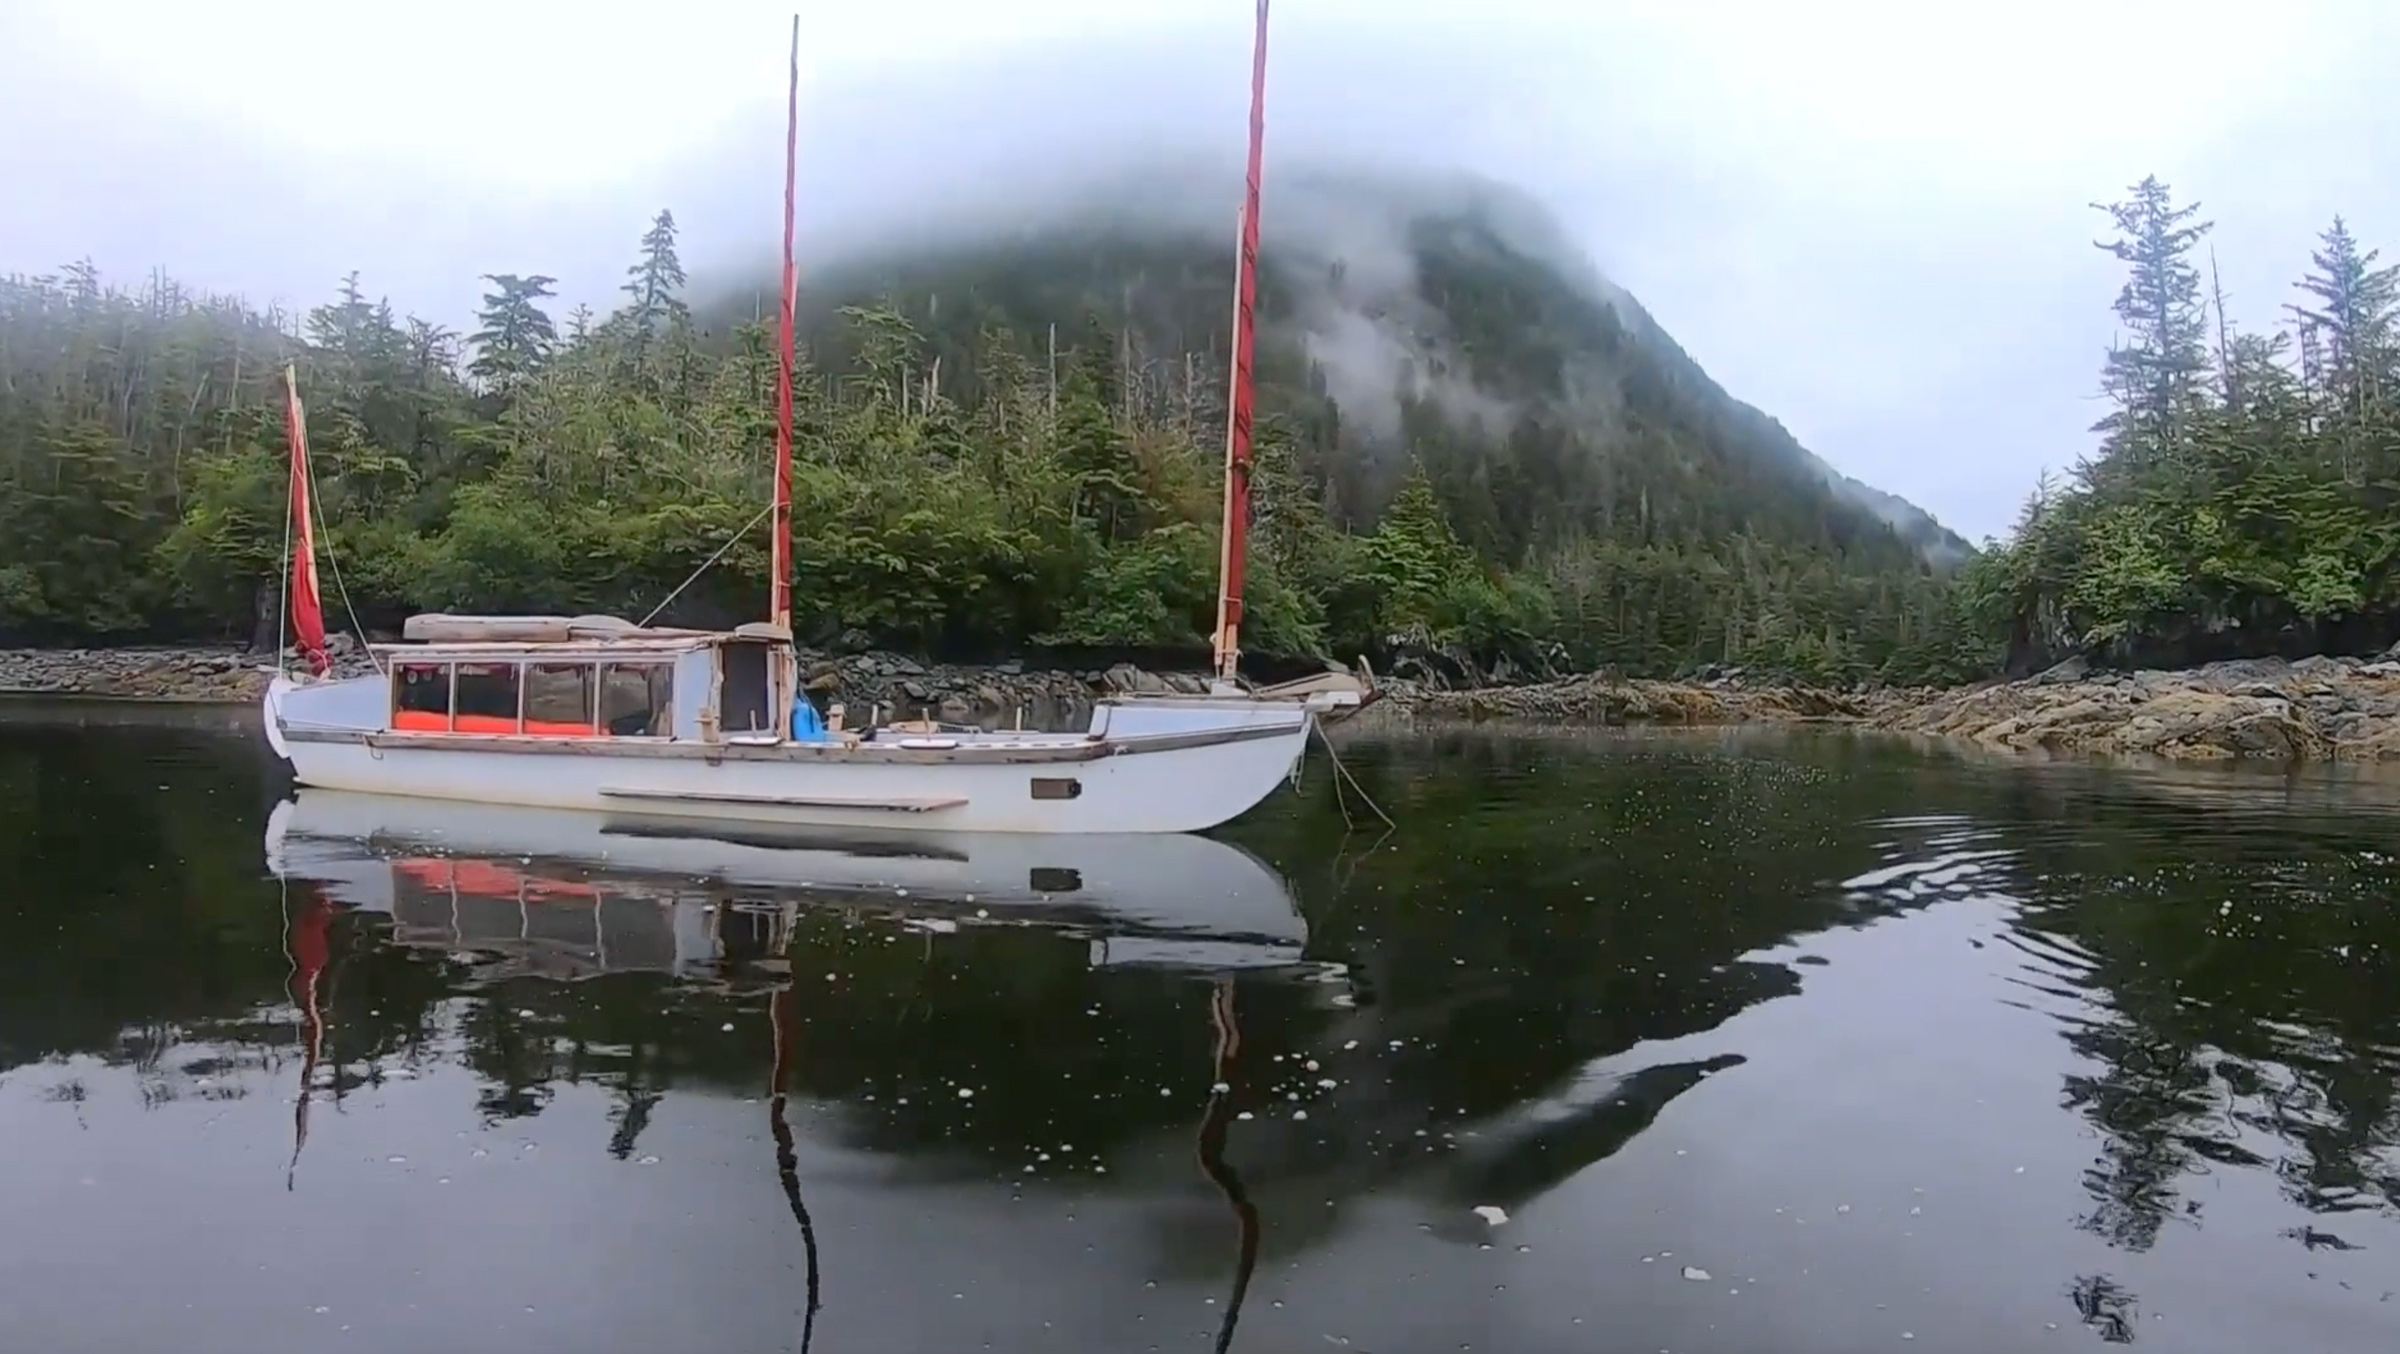
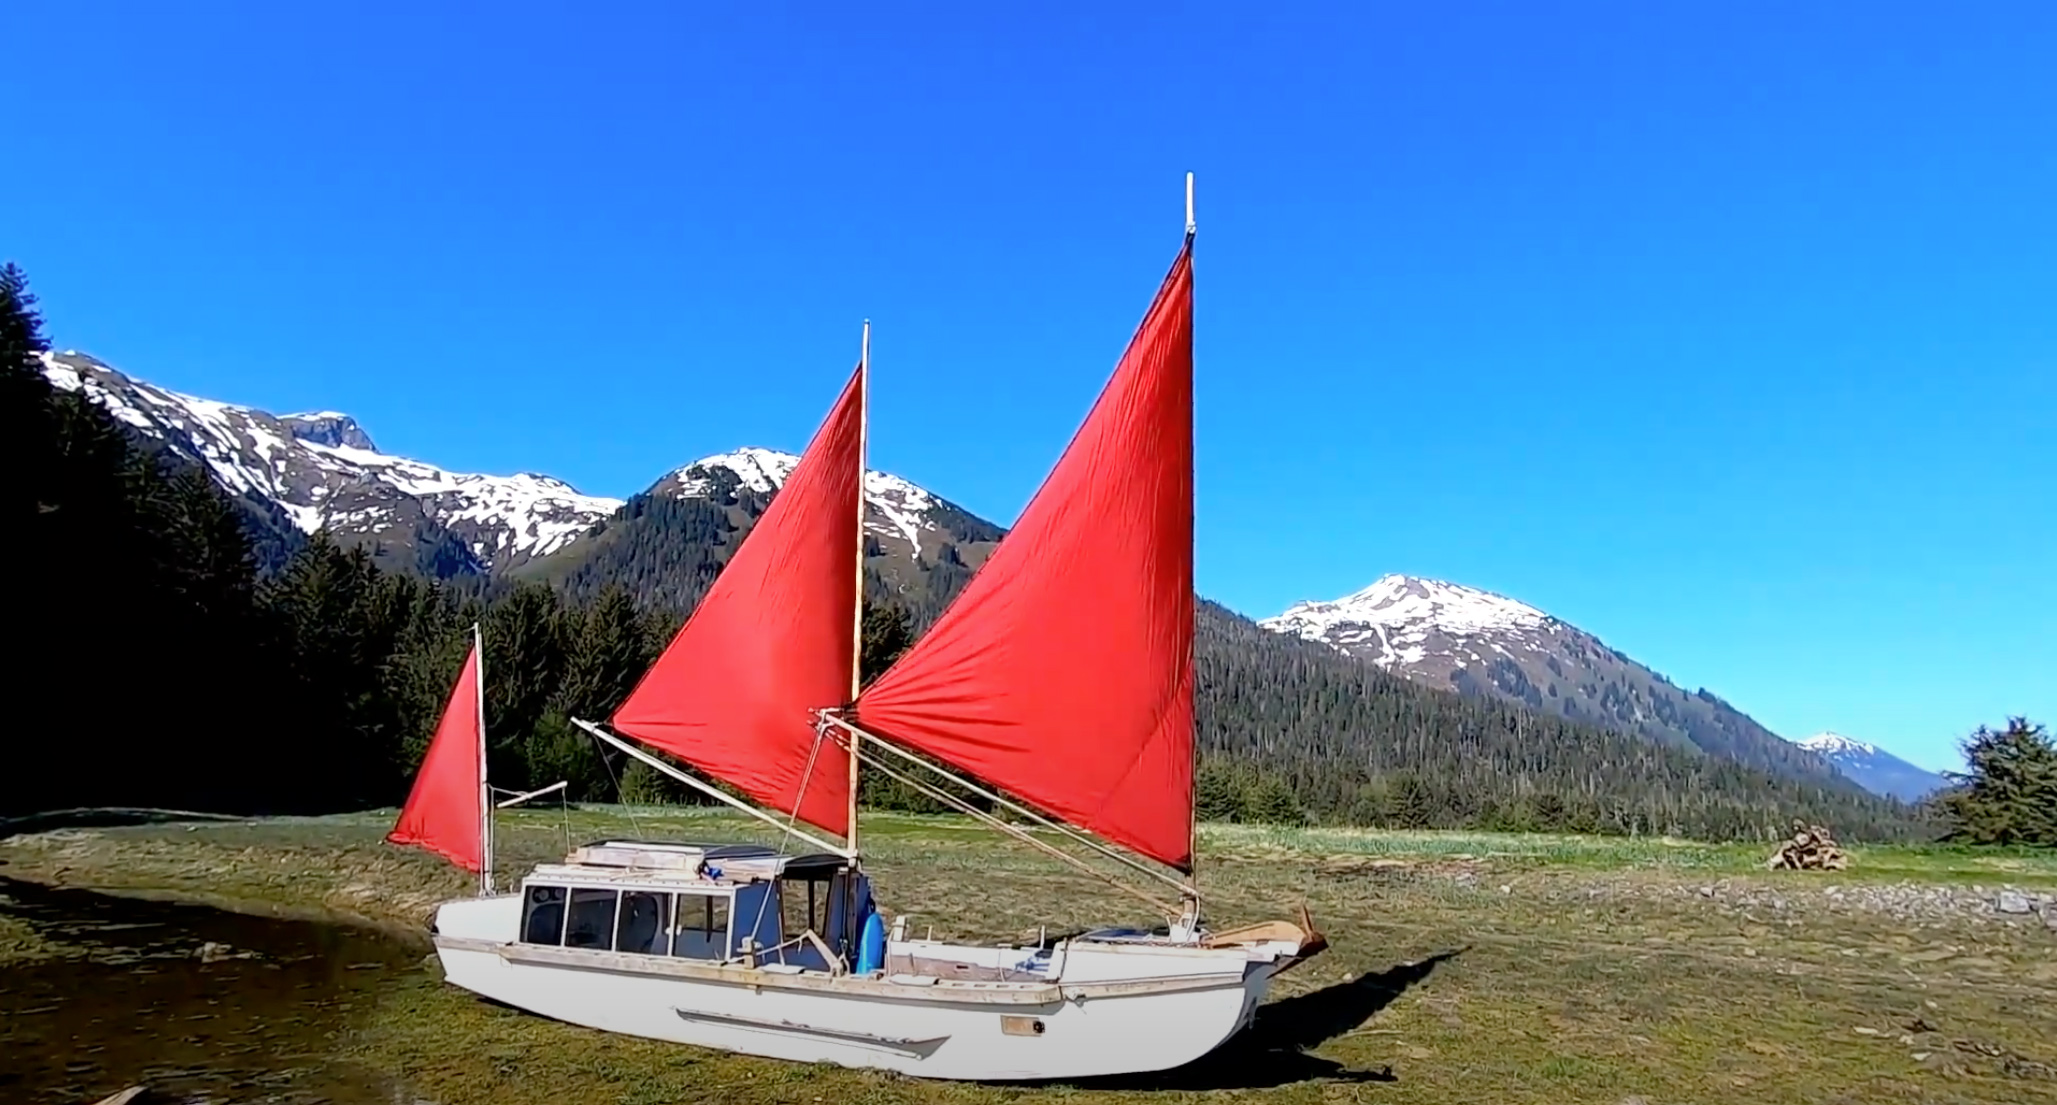
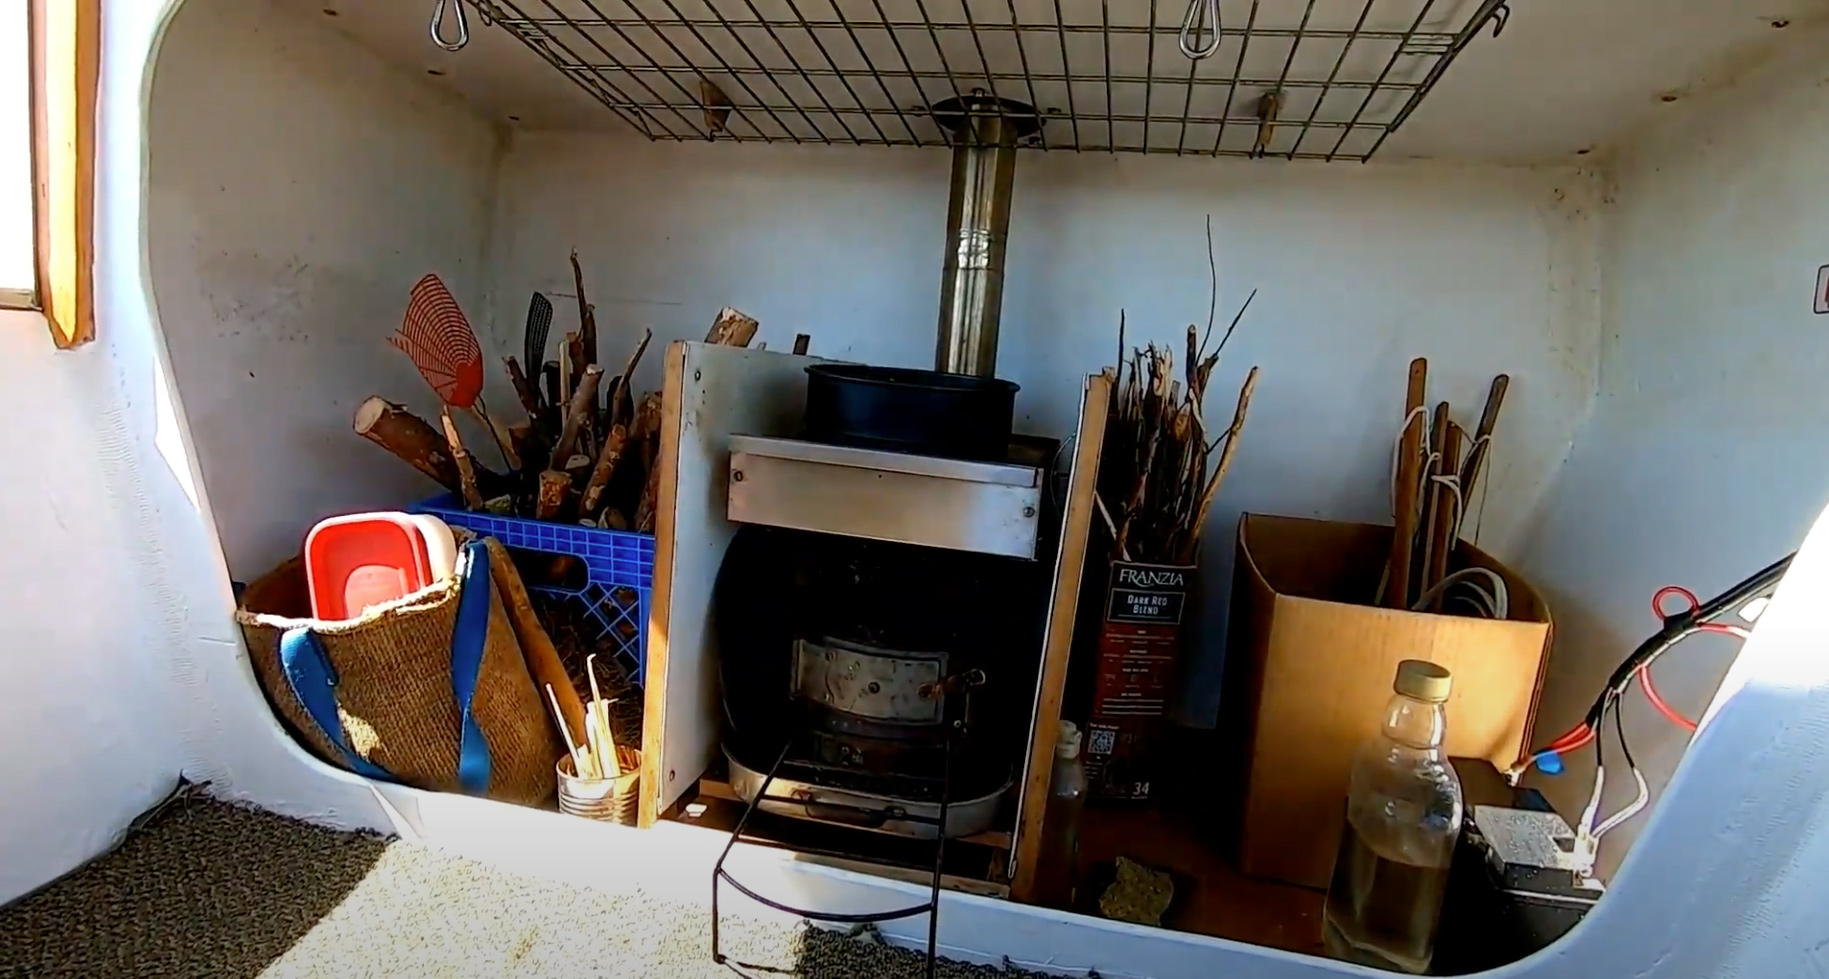
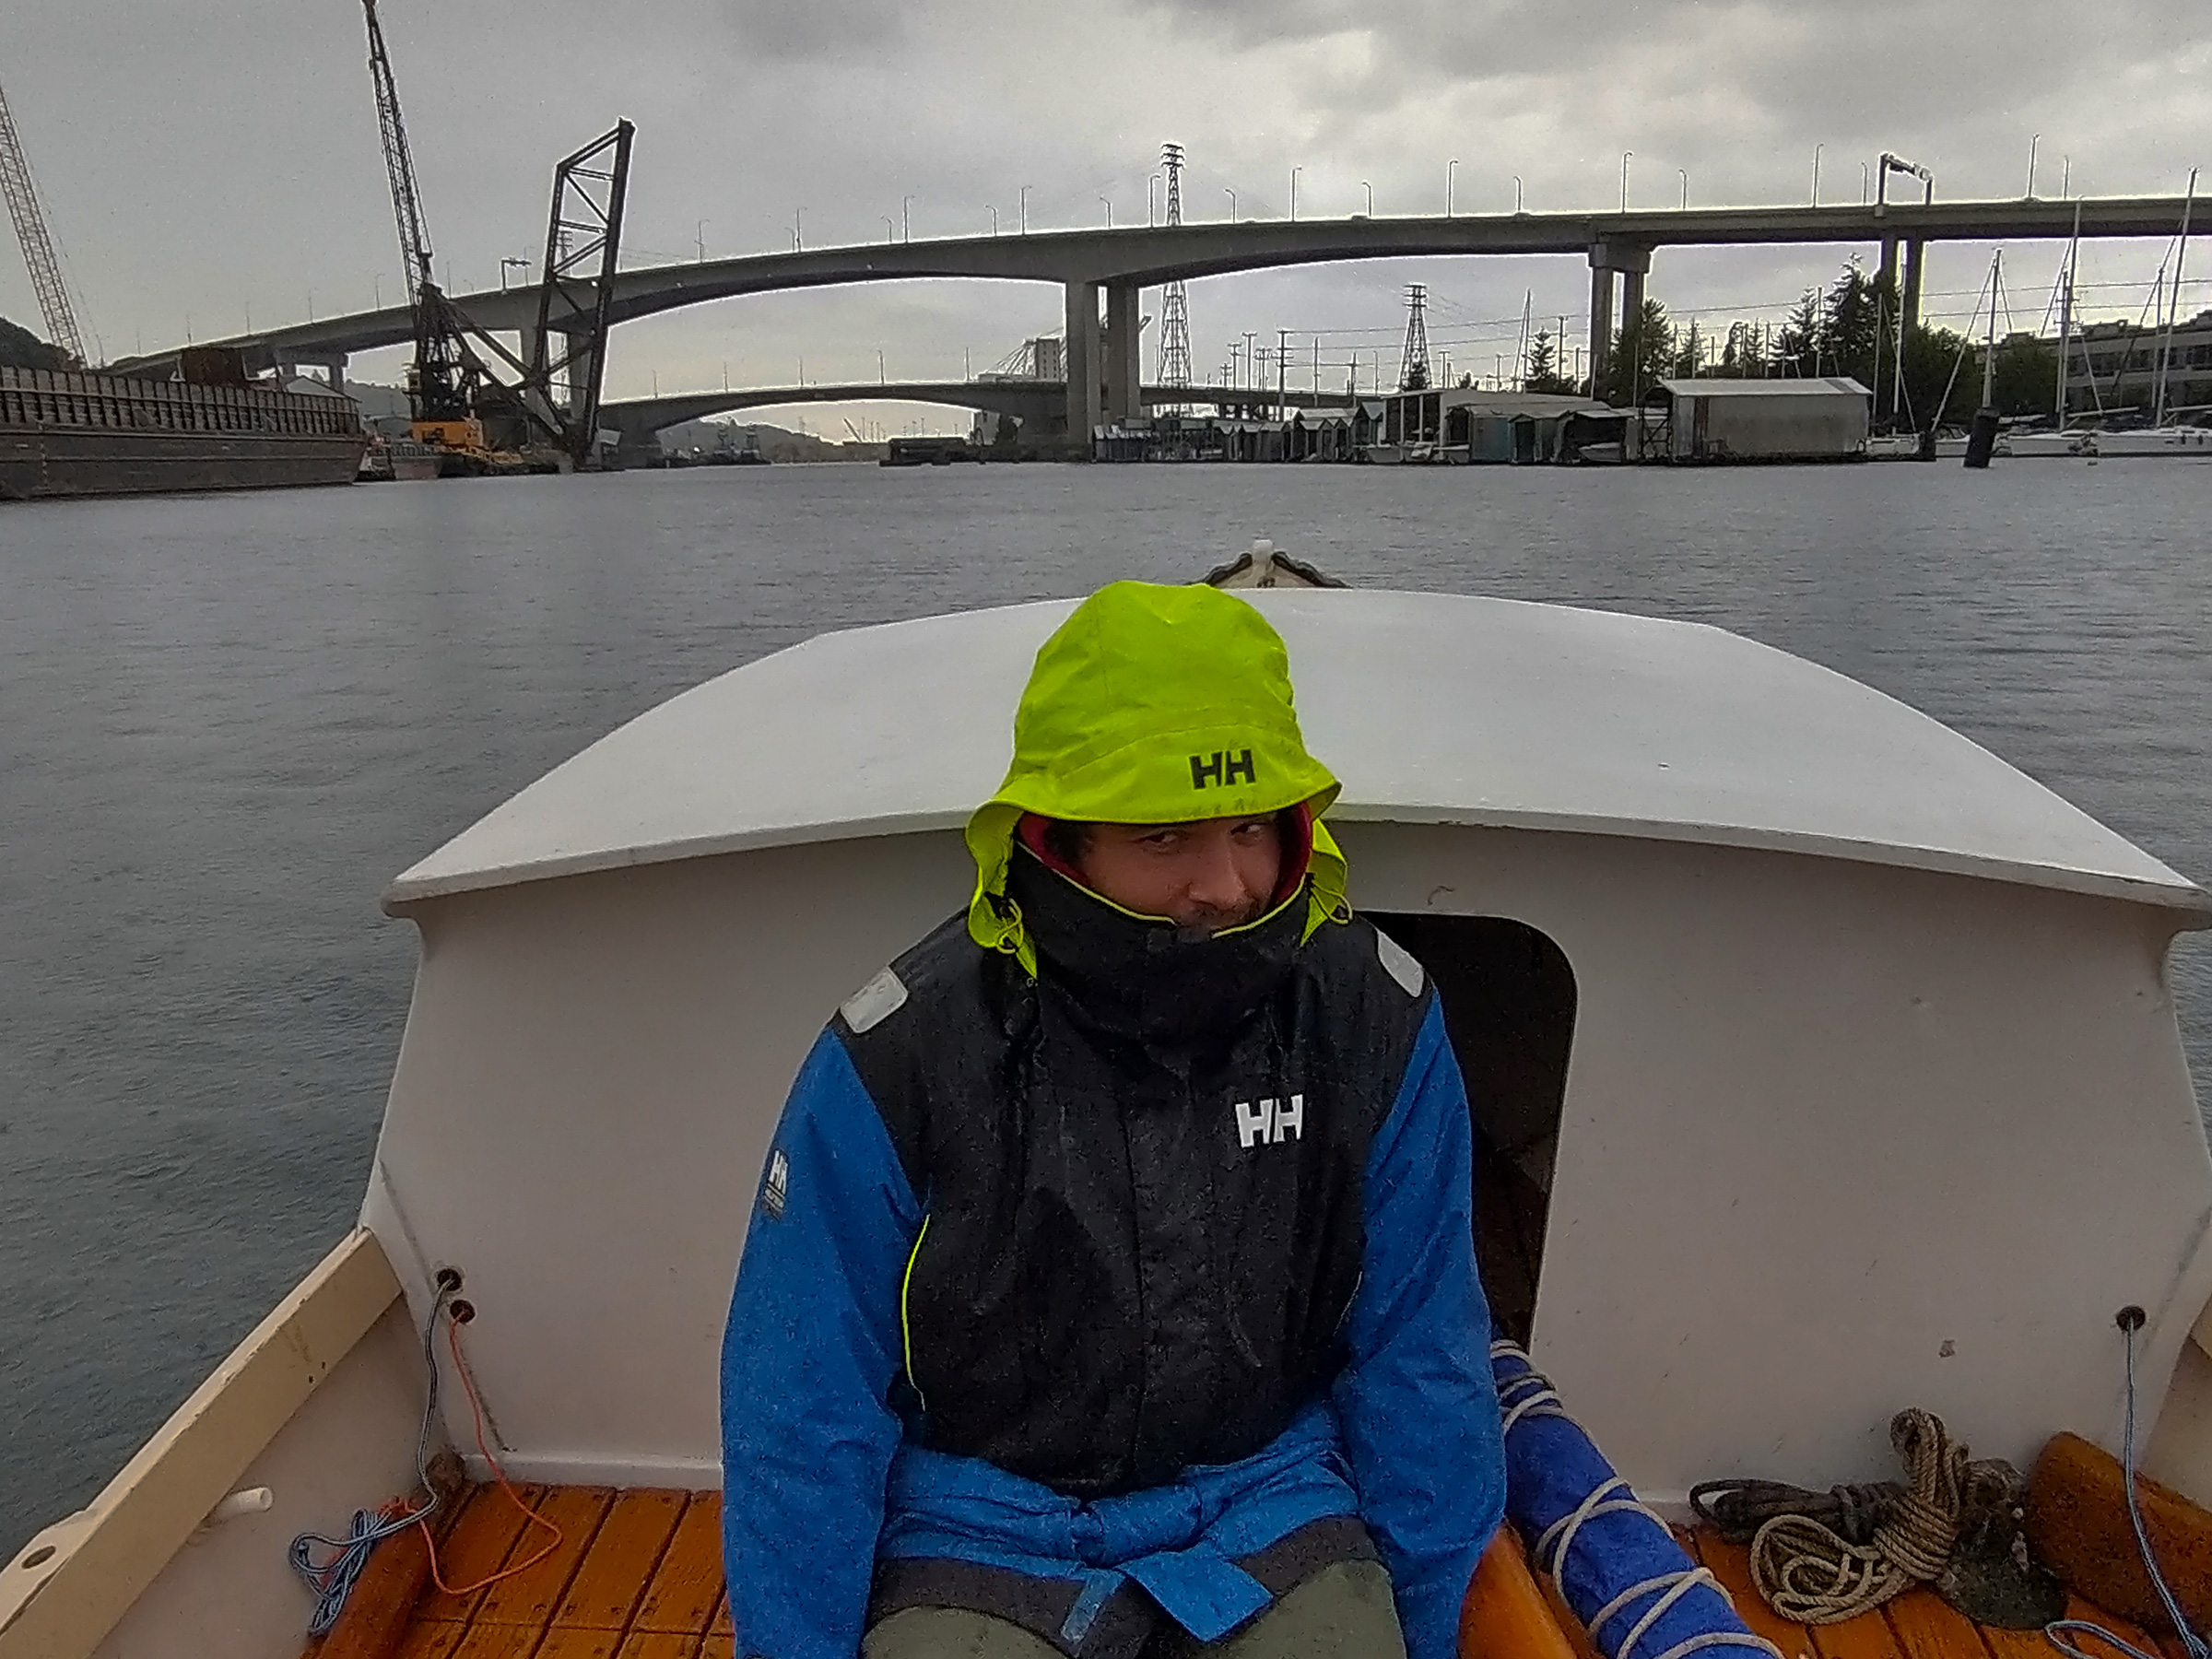
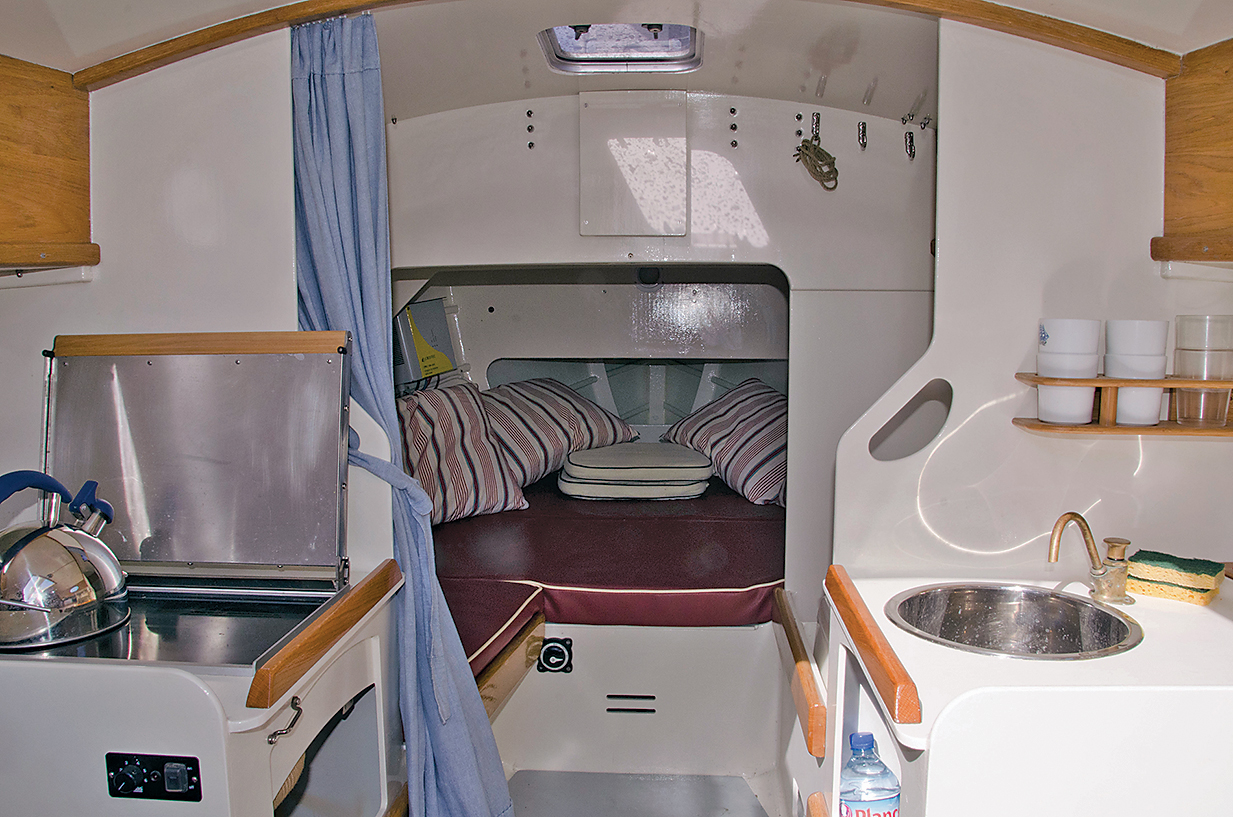
Here’s a look at our living arrangements when we’re aboard for extended periods. The cabin accommodations include heating, sleeping, food preparation, lounging, work, and play—and for foraging for the food, fuel, and materials that extend our provisions.
One thing that turned out hard to show, even in video, is the amazing feel of a cabin of this sort. Picture sitting at ease on a cushioned sheet of plywood. Add backrests below, and full-length windows on either side. Roof it over with pleasant clearance, and even more along the hatched-over, midship gangway. You are warm. You are dry. A meal’s savory fragrance suffuses the cabin. Cue your favorite music. Look about at the lovely vista opening around you from kayaker vantage.
Wait. Aren’t we supposed to be roughing it?
This Part wraps up our focus on the boat. Next we go venturing!
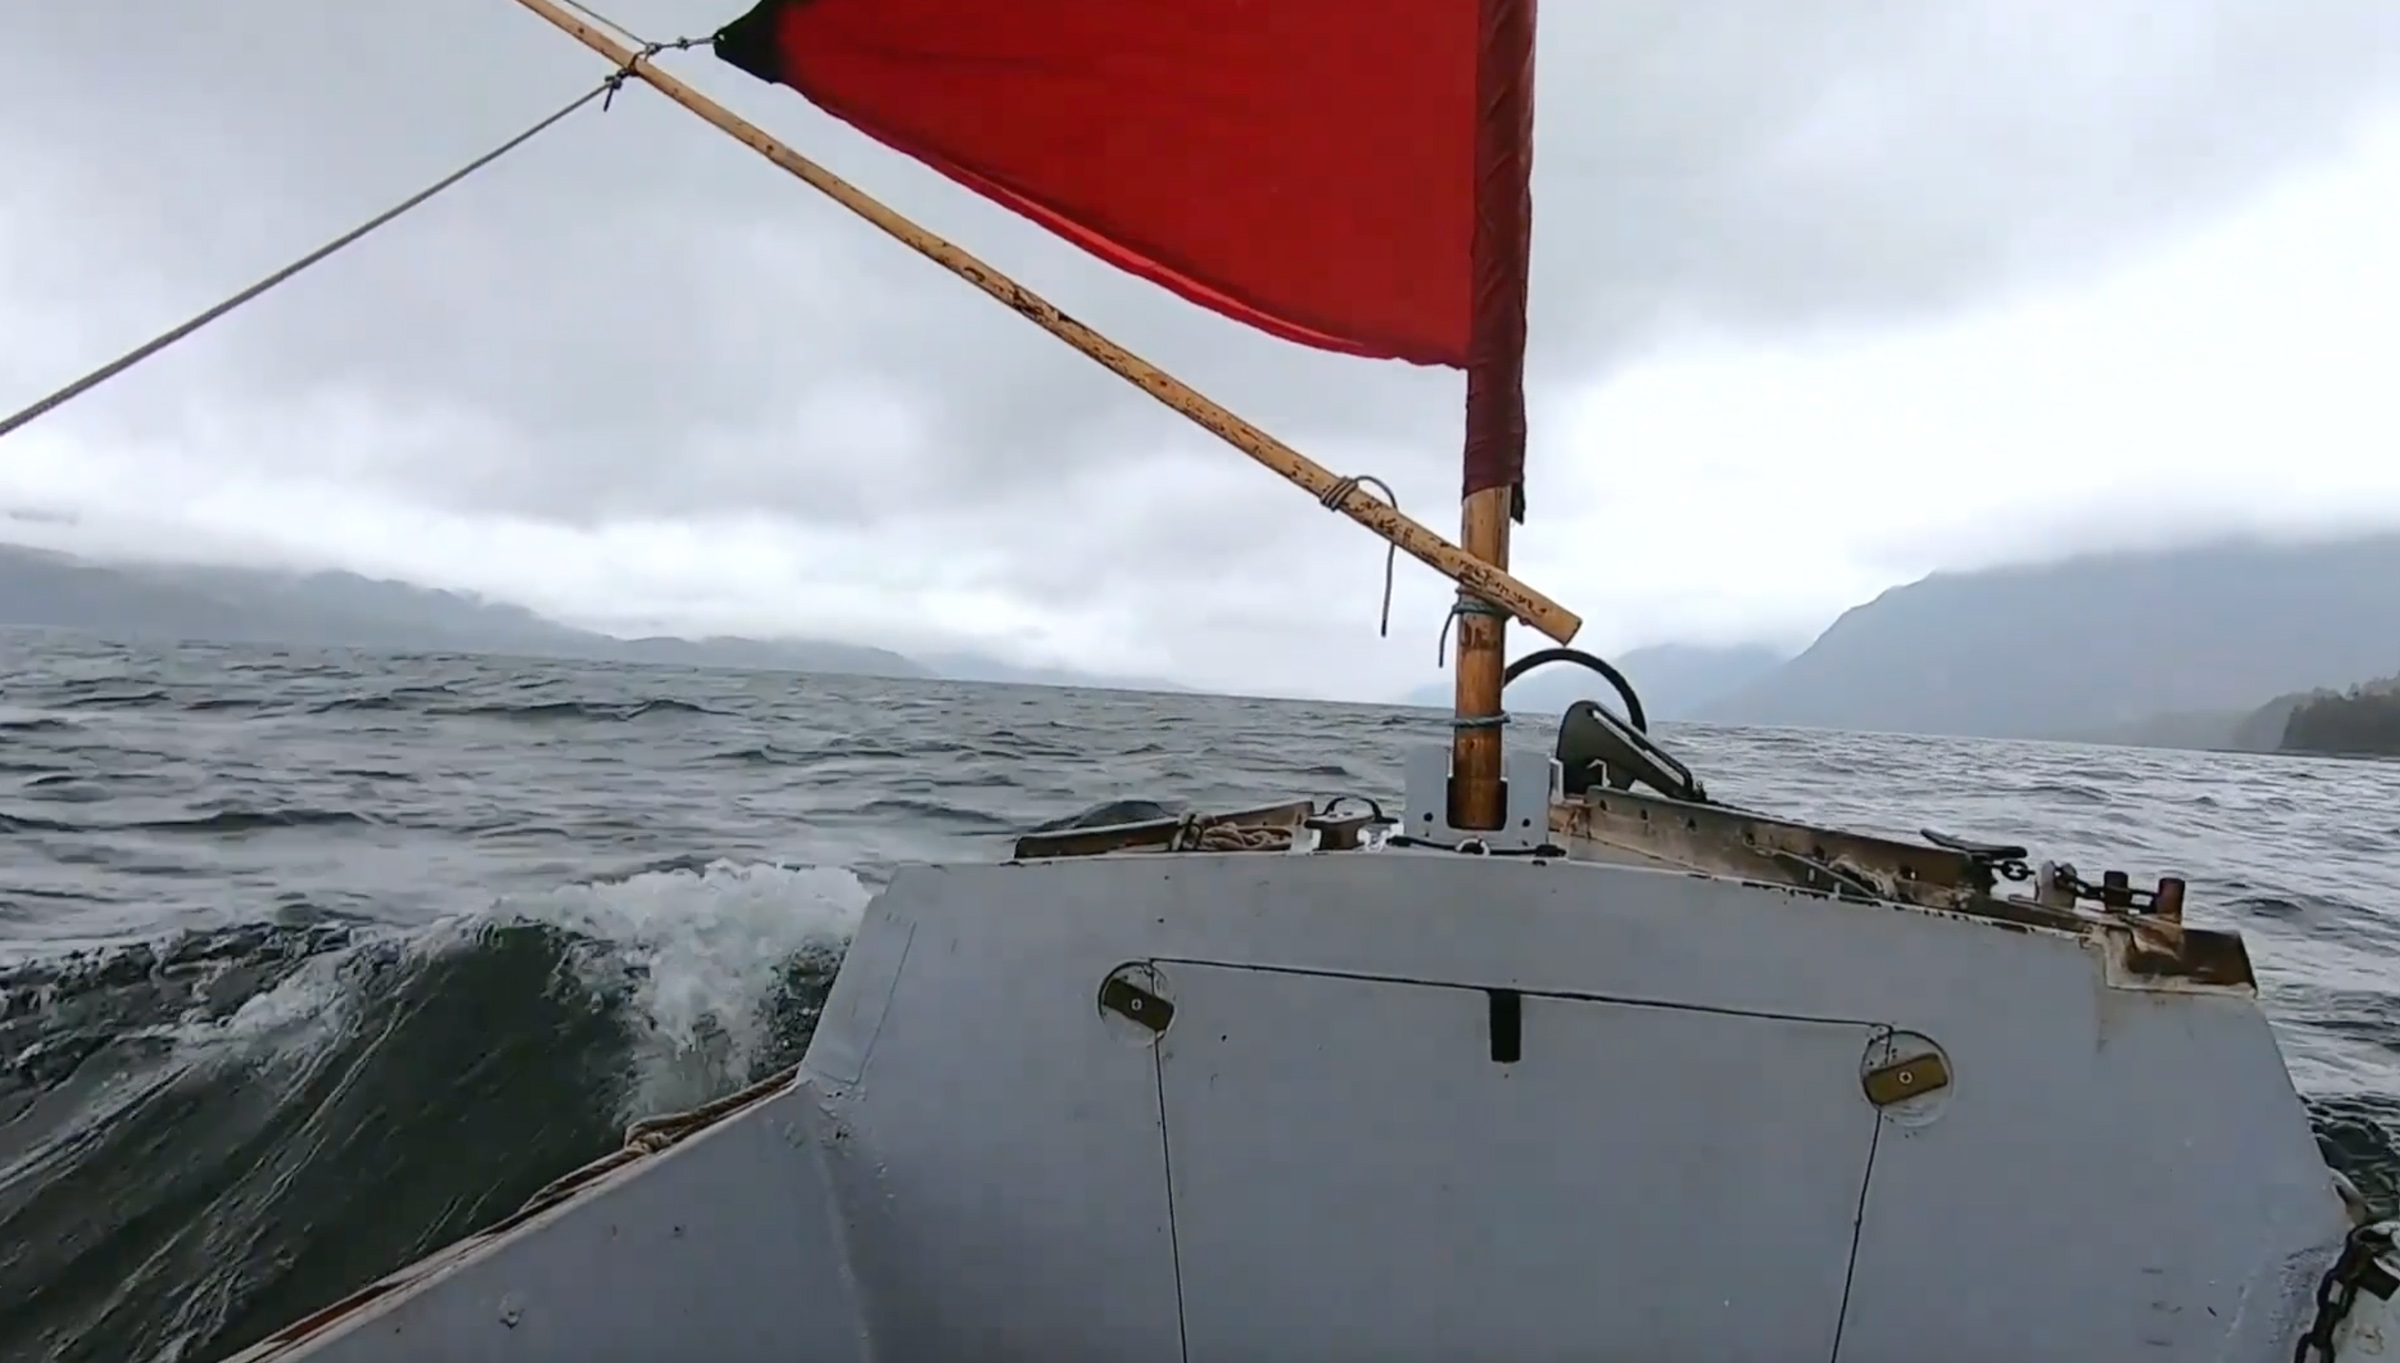
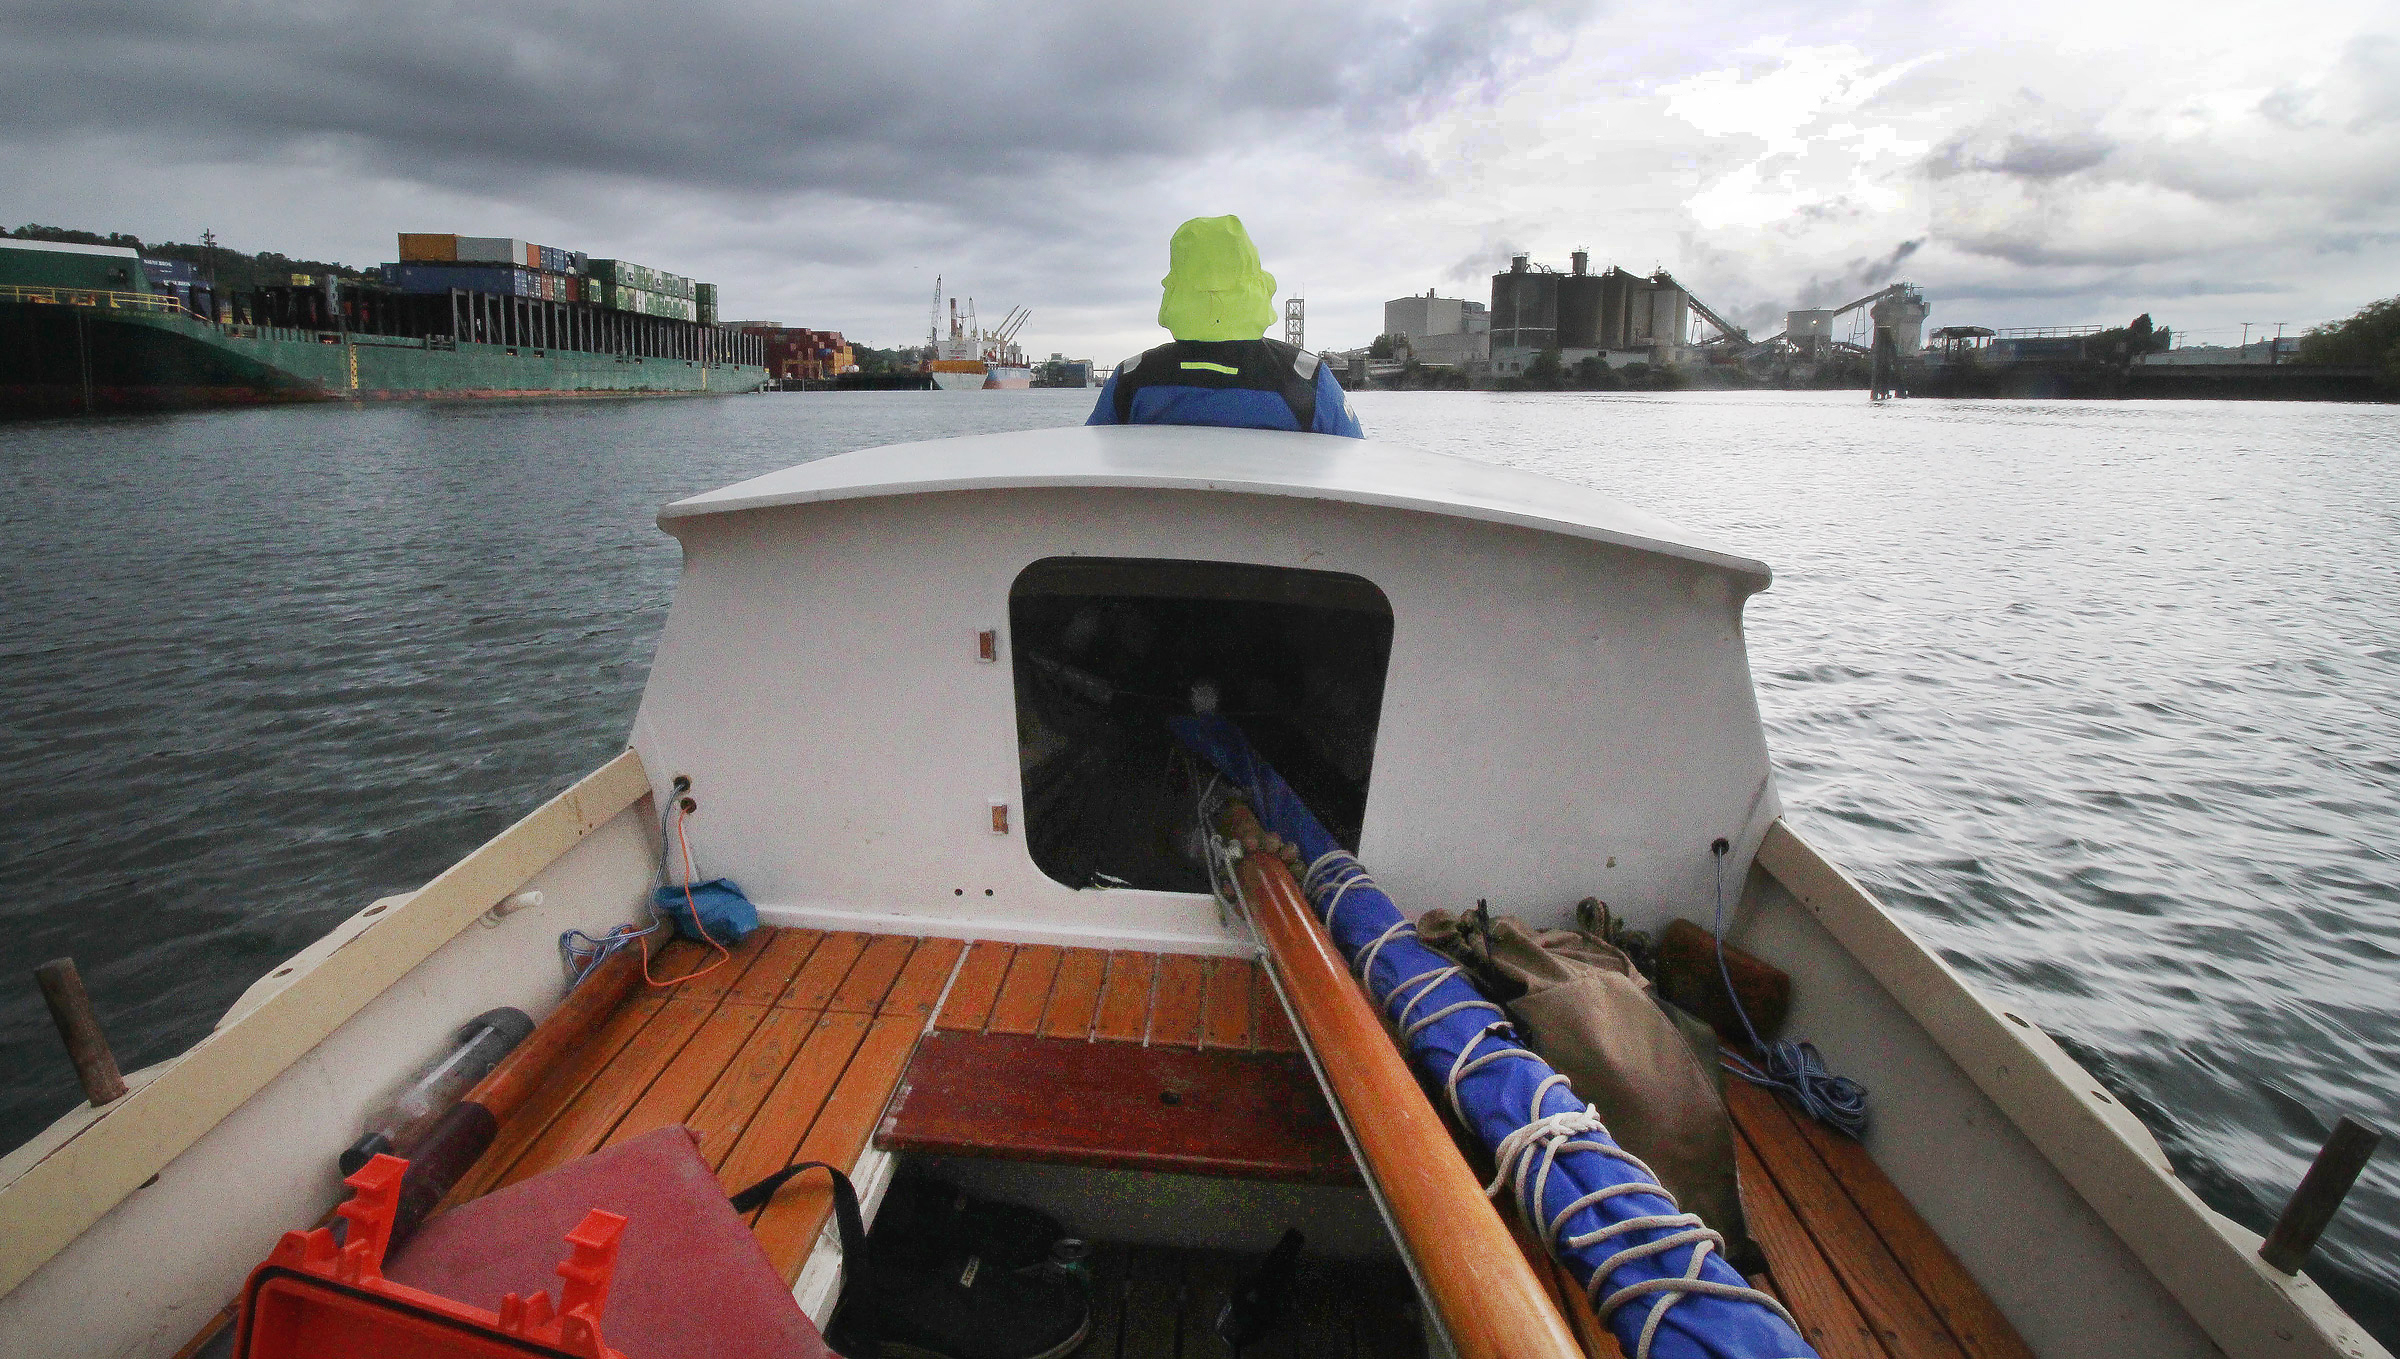
MUSTELID’s rig and rigging are original. They should work, but might not work.
Southeast Alaska is criss-crossed by long runs of water between shorelines of varying height. Winds tend to blow mostly up or down them. Mostly.
Our intent is to sail from a beam reach to a run, and row the rest. Any slight windward ability in this rig is for the sometimes miles-long transits from one side to another. Any small lift can save miles of rowing, with wind on the nose. But, should things get contrary, we can always hunker down until conditions favor us.
For remote cruising, we built the rig of found materials–conifer saplings. The six identical sails are interchangeable and redundant. We led our lines aft then forward again to the cockpit. The masts should come down and stow easily and out of the way for rowing.
Sometimes it’s hard to know if we’re inventing or re-inventing the wheel. Or, before we try what we’ve built, whether we’re even holding a wheel in our hands.
In this episode we take a tour of MUSTELID’s outfit. Much of this has never been tried, to our knowledge. Some has, at least in principle, but we’ve “dumbed it down.” Some is tried-and-true but not in our context or in conjunction with other items. But it must work, or be culled. There’s no space for laggards!
We’re aiming for a handful of qualities in construction, stowage, and use:
Simplicity: It must be clever, but not too clever.
Flexibility: The more roles it can fill, the merrier.
Modularity: Interchangeable, reconfigurable, and redundant.
Synergy: Parts that work together.
And the further challenge of sea-trials lie yet ahead.
Phil Bolger once commented that he had abandoned a design due to the sheer number of untried features it involved. We’re not that wise.
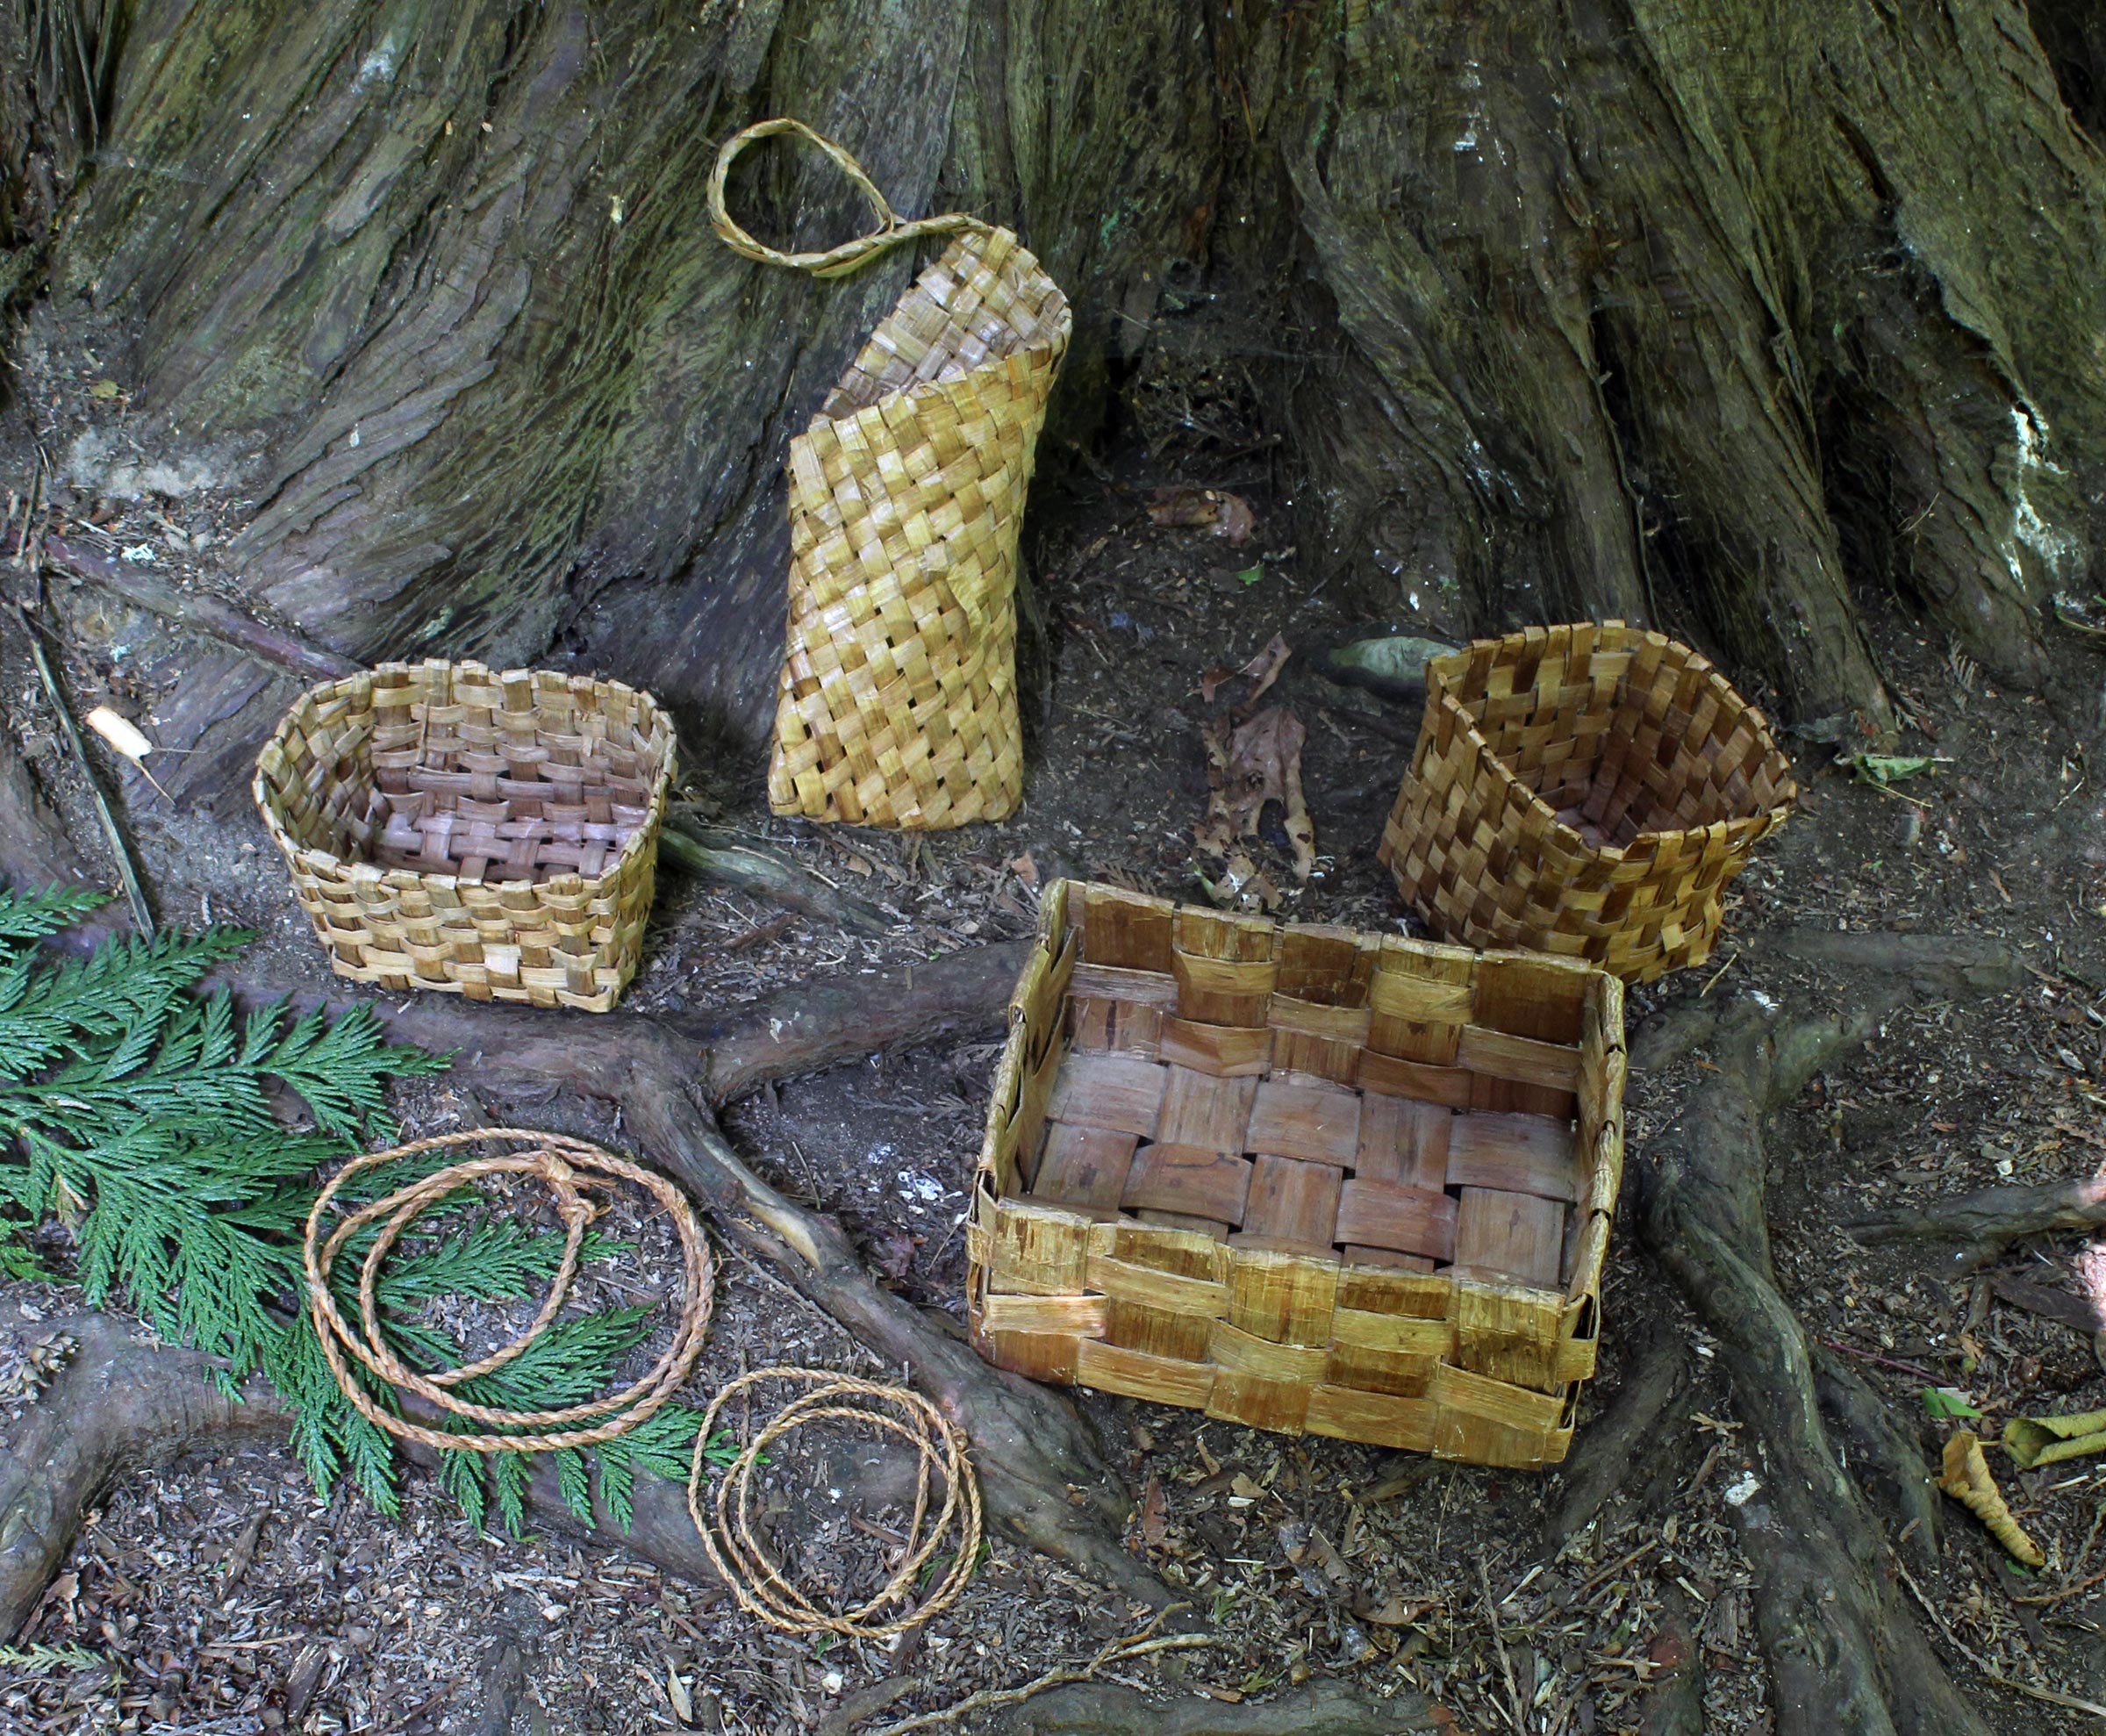
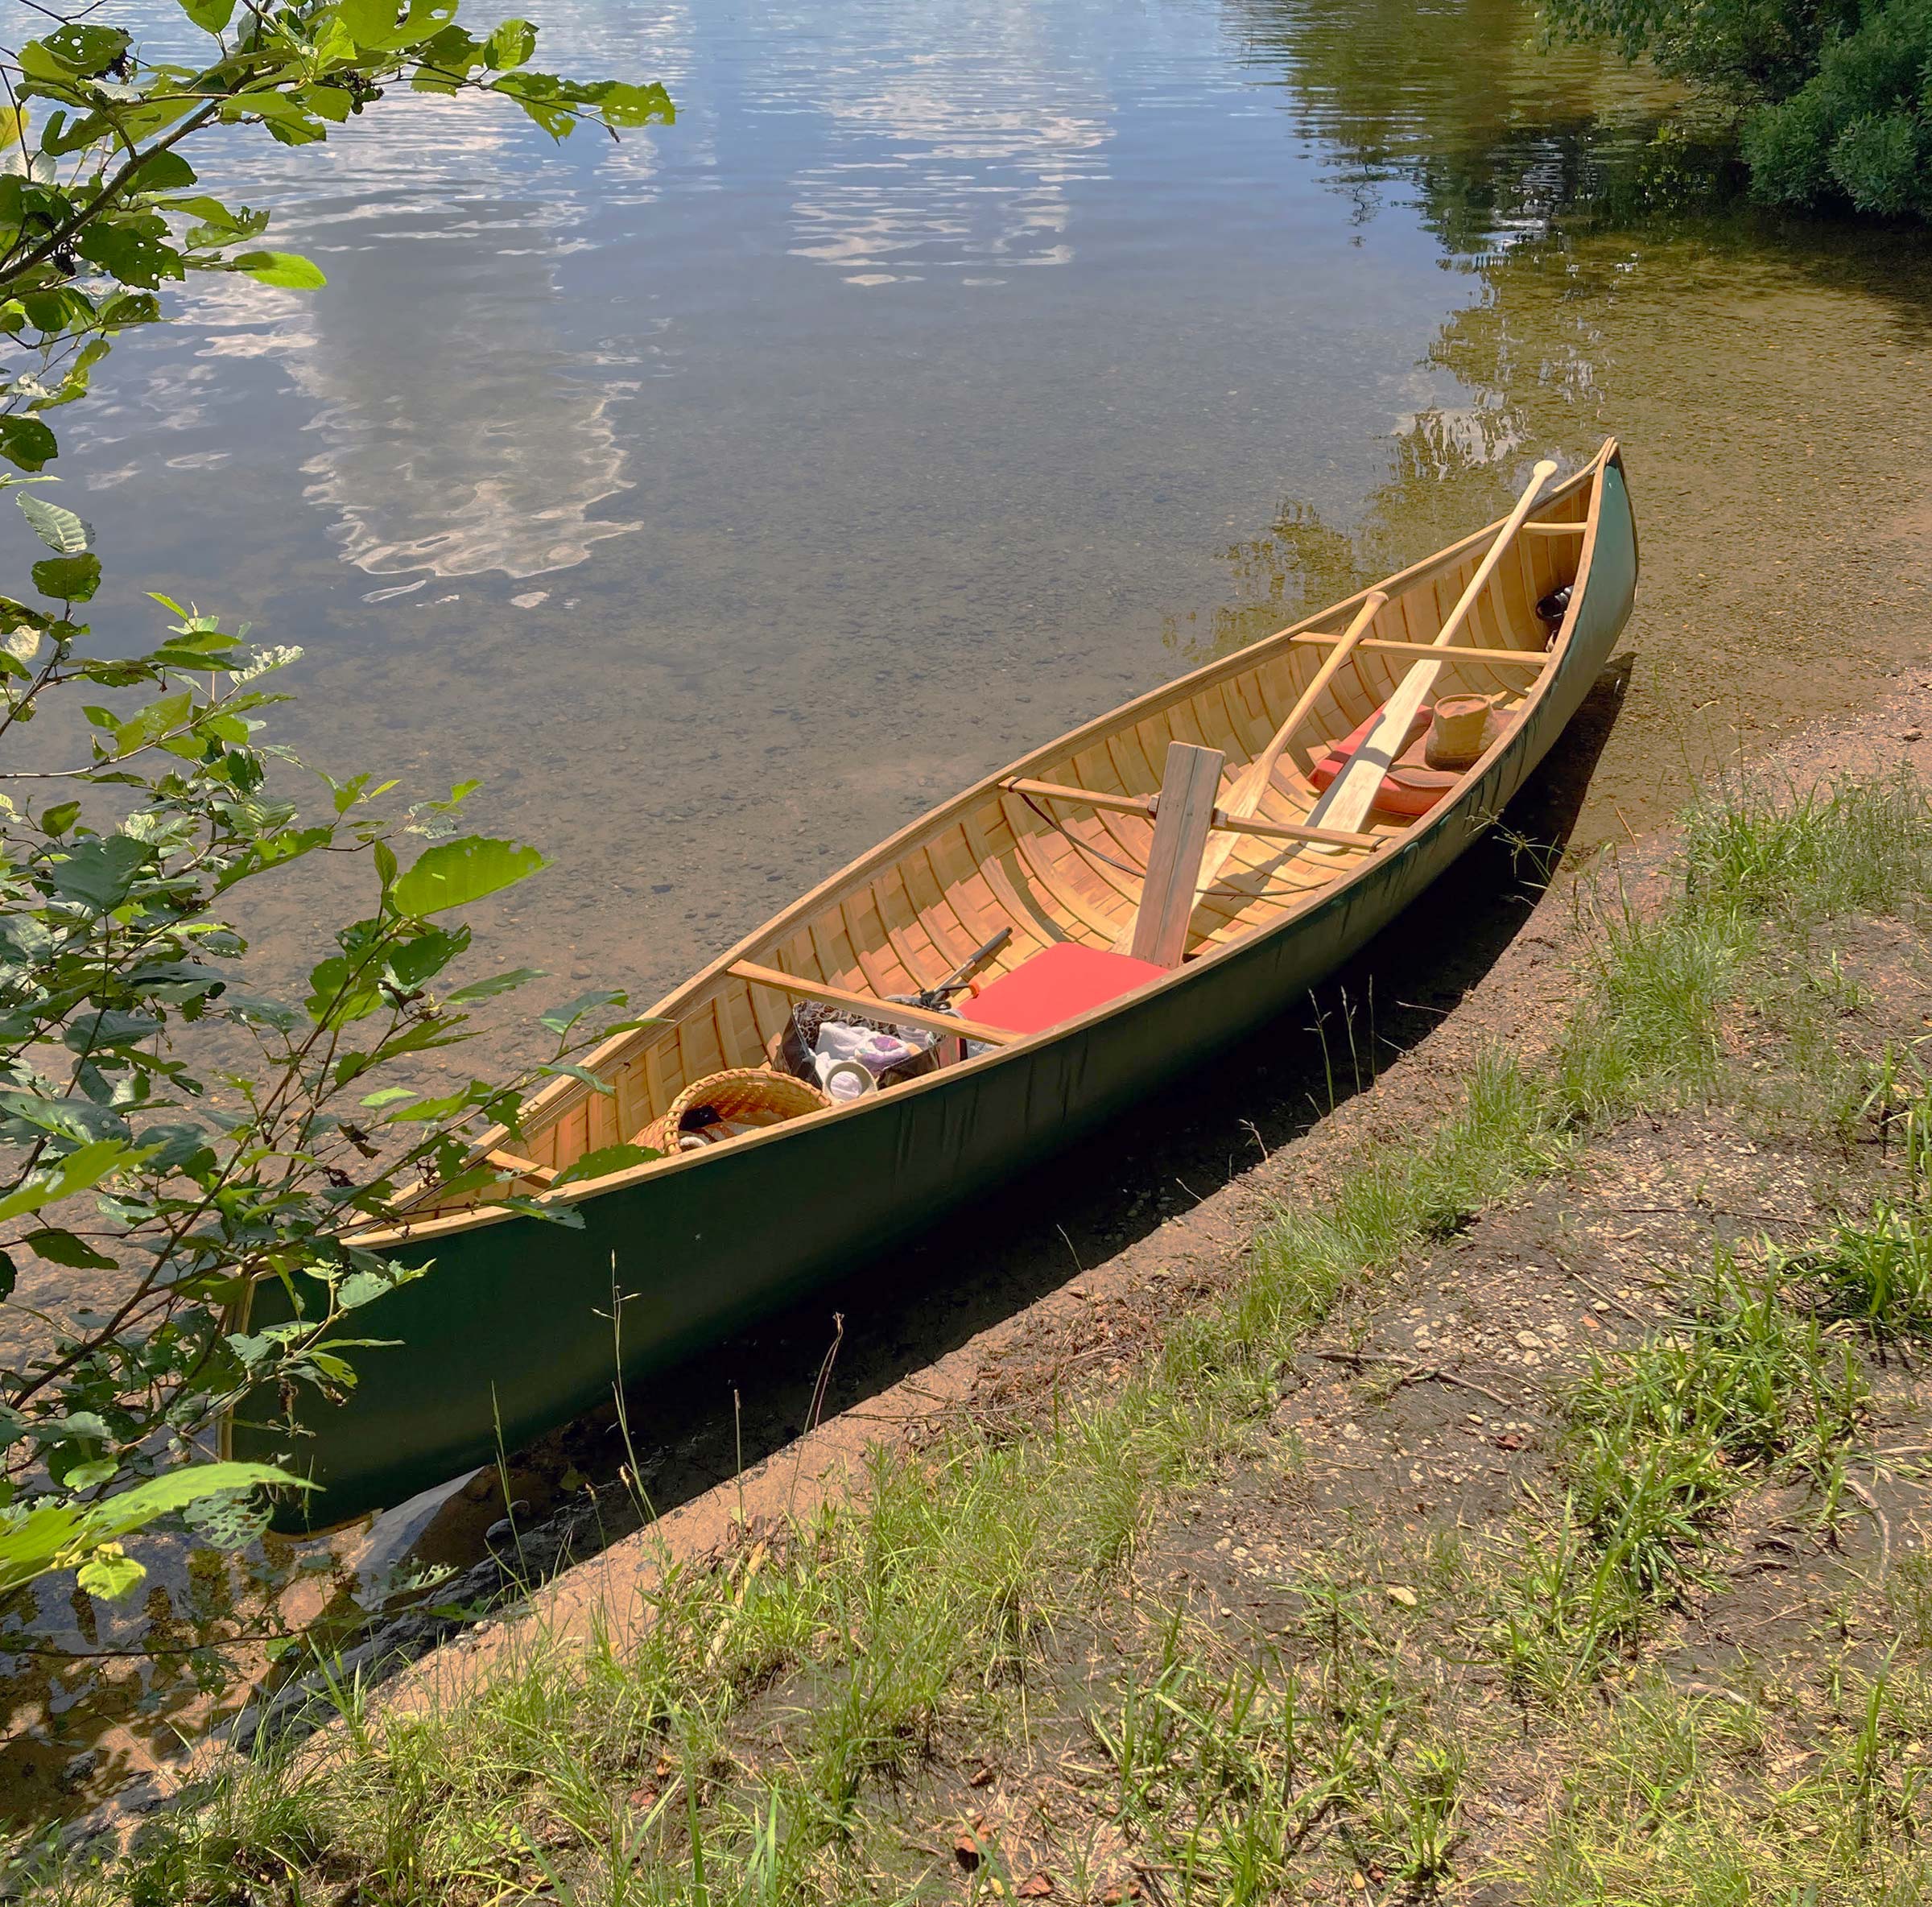
When I read this issue’s story about Reid Schwartz, I knew how he could have fallen into the thrall of birchbark canoes. It happened to me in the early 1990s when I was a speaker at a sea-kayak symposium on the northwest coast of Lake Superior in Grand Marais, Minnesota. One of the other presenters was a birchbark canoe builder. I don’t now recall his name, but my research suggests that it was quite likely the late Walter Caribou, an Ojibwe who had lived in Grand Portage, just up the lake from Grand Marais. He invited attendees to visit his shop and there I was quickly fascinated by the process of building a strikingly beautiful vessel from sheets of birchbark and other materials harvested from the surrounding forests. Walter explained how the bark can be harvested from a standing tree without fatally girdling it and how roots are gathered, scraped clean, and split in two for lashings.
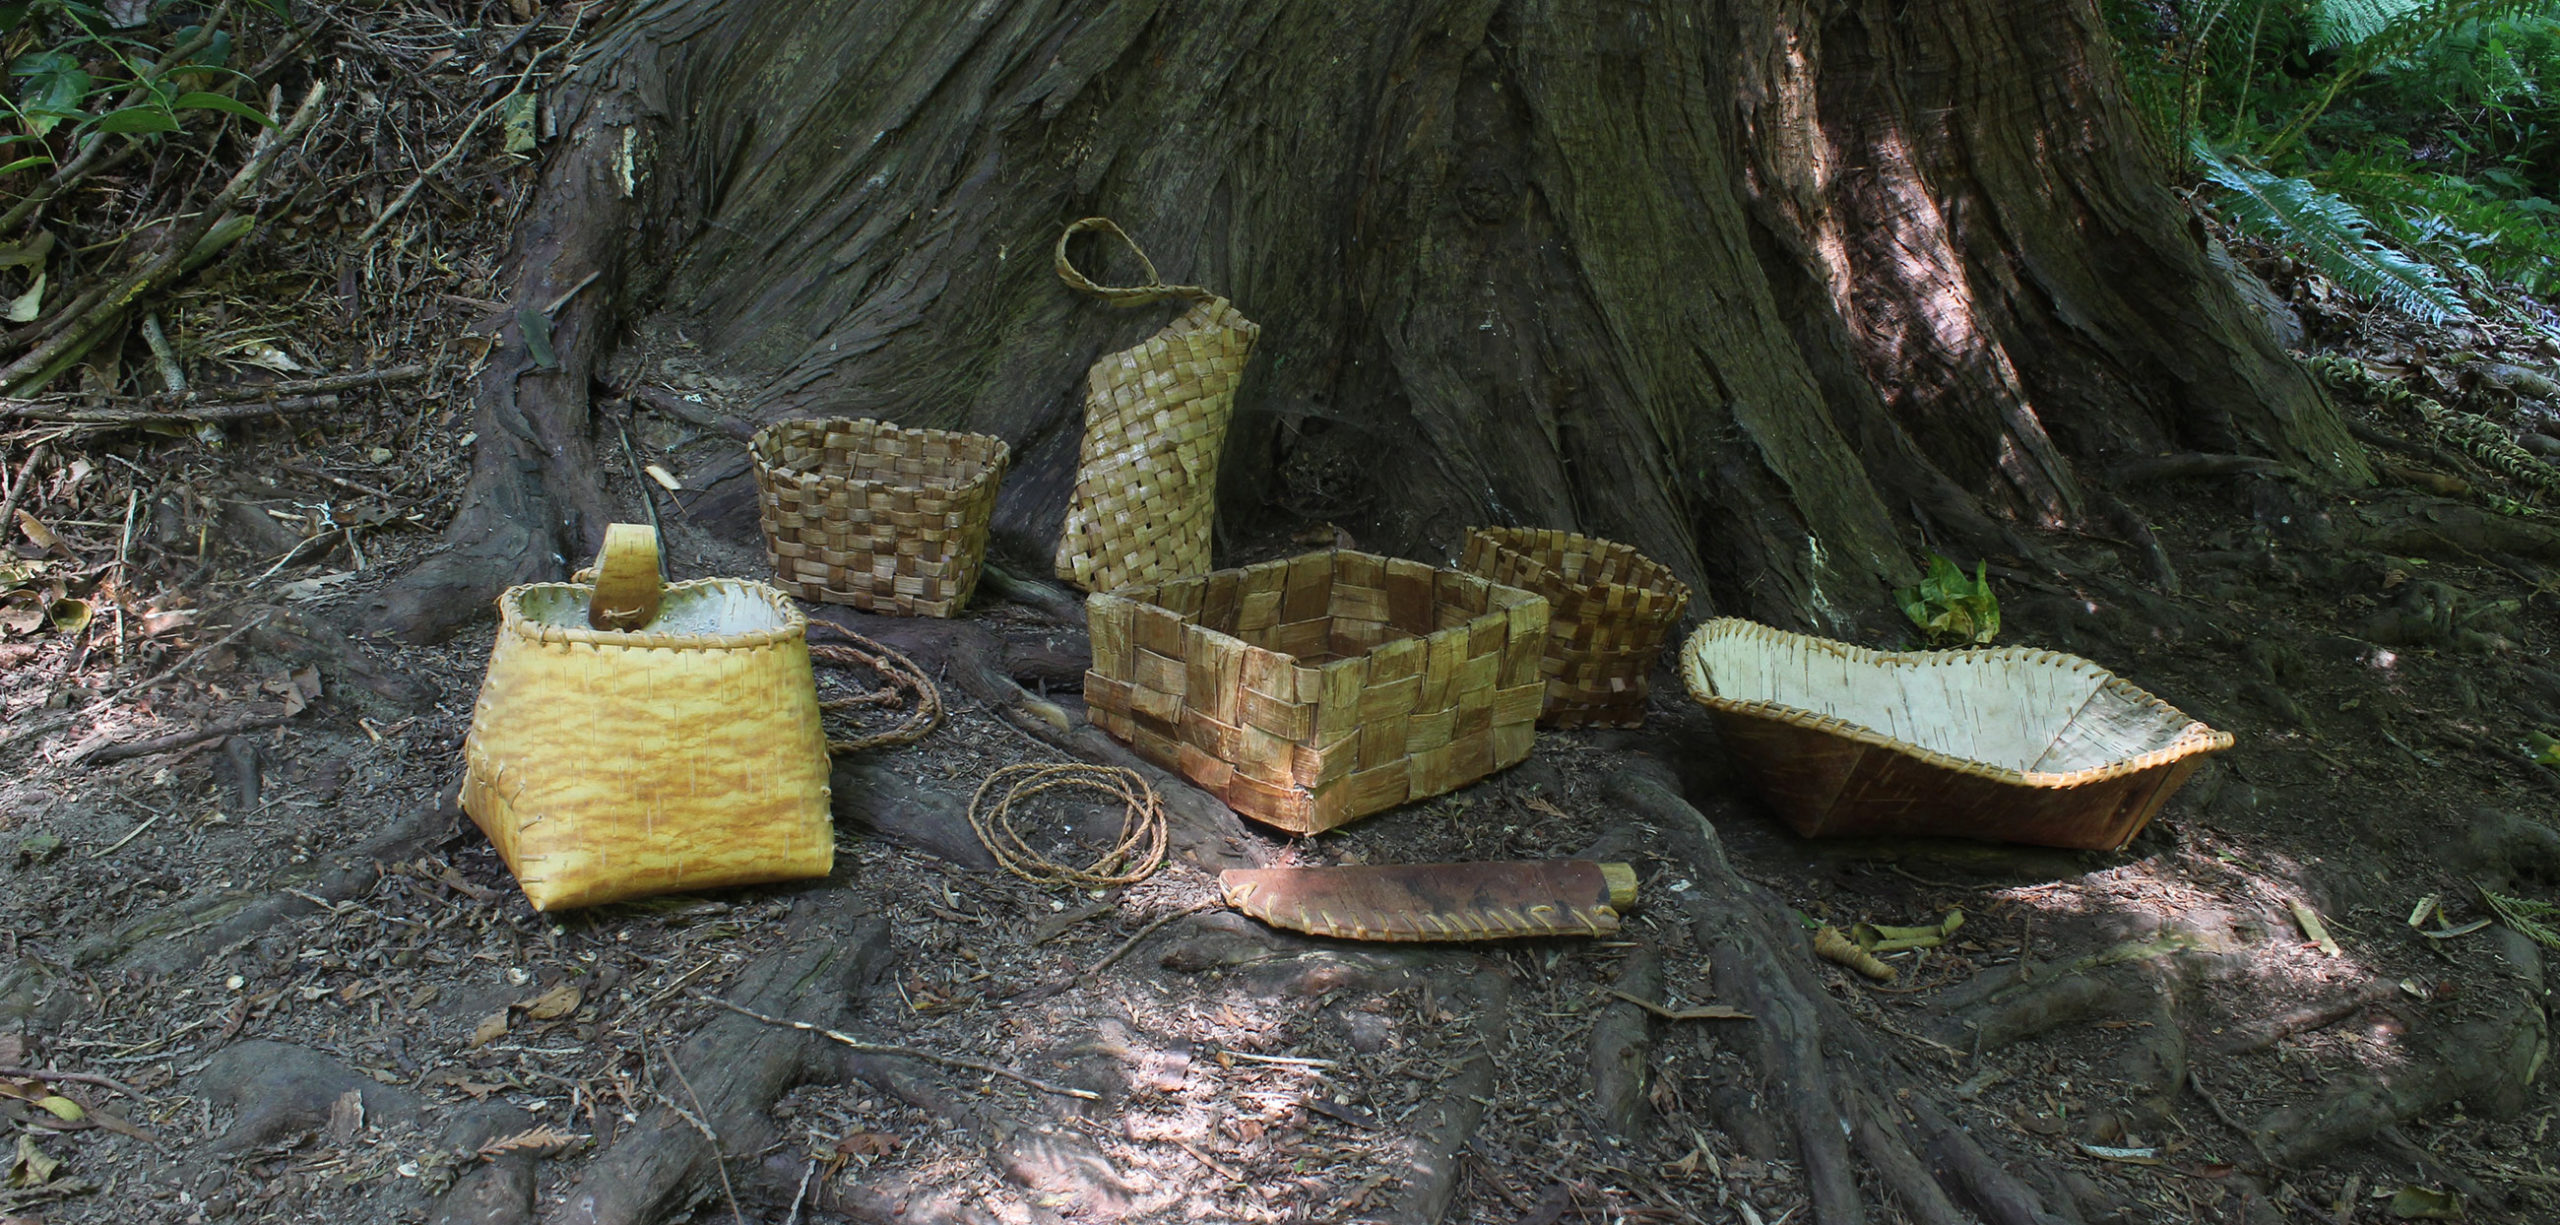
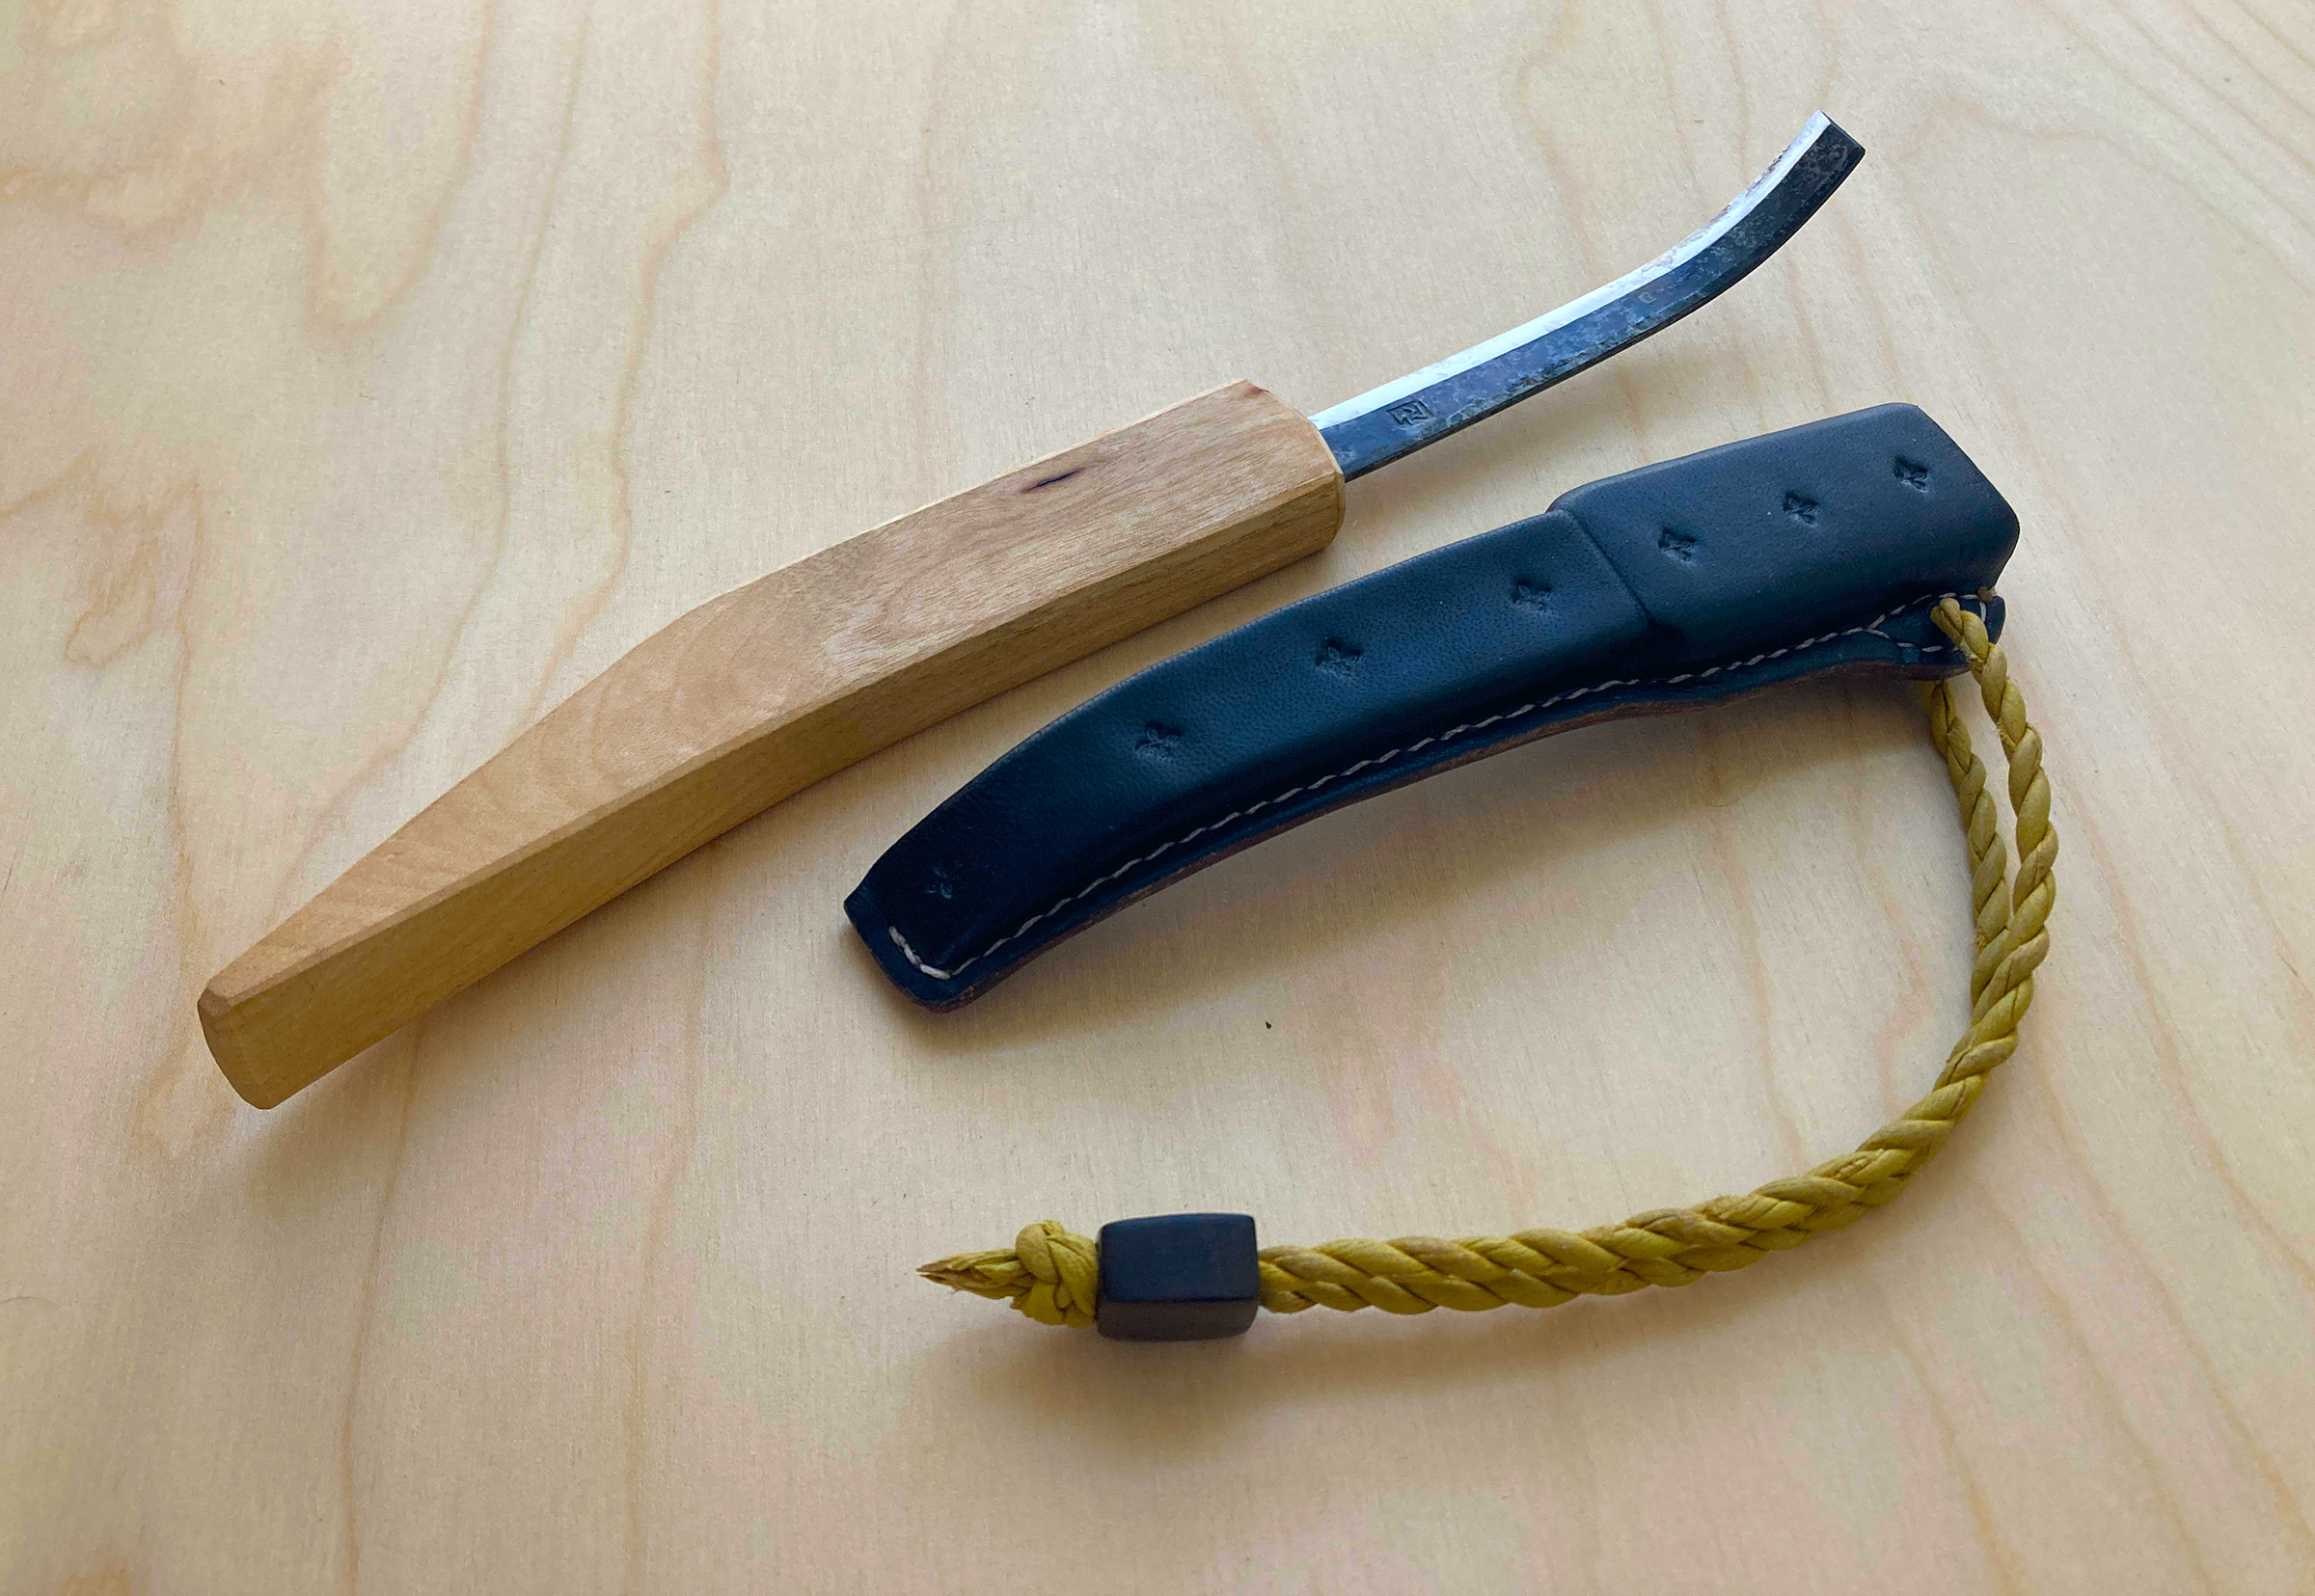
The large basket is in the style of a wild-rice winnowing basket; the smaller one was made to a pattern given to me by an Ojibwe bark-canoe maker. For the sheath, I just folded a piece of bark around the knife, cut away the excess, and laced it with split root.
But the canoe in the shop was overwhelmingly complex and I found myself drawn instead to his birchbark baskets. Many had been decorated by scraping away the bark’s dark inner layer, and some of the small ones were made from a single piece of bark scarcely larger than a sheet of paper.
While the scarcity of suitable birch trees inspired Reid to build a traditional canoe without bark, I was inspired to make things with whatever small pieces of bark could be found. With a Chippewa basket pattern from Walter and some scraps of bark and a few roots, I made my first basket before the symposium ended.
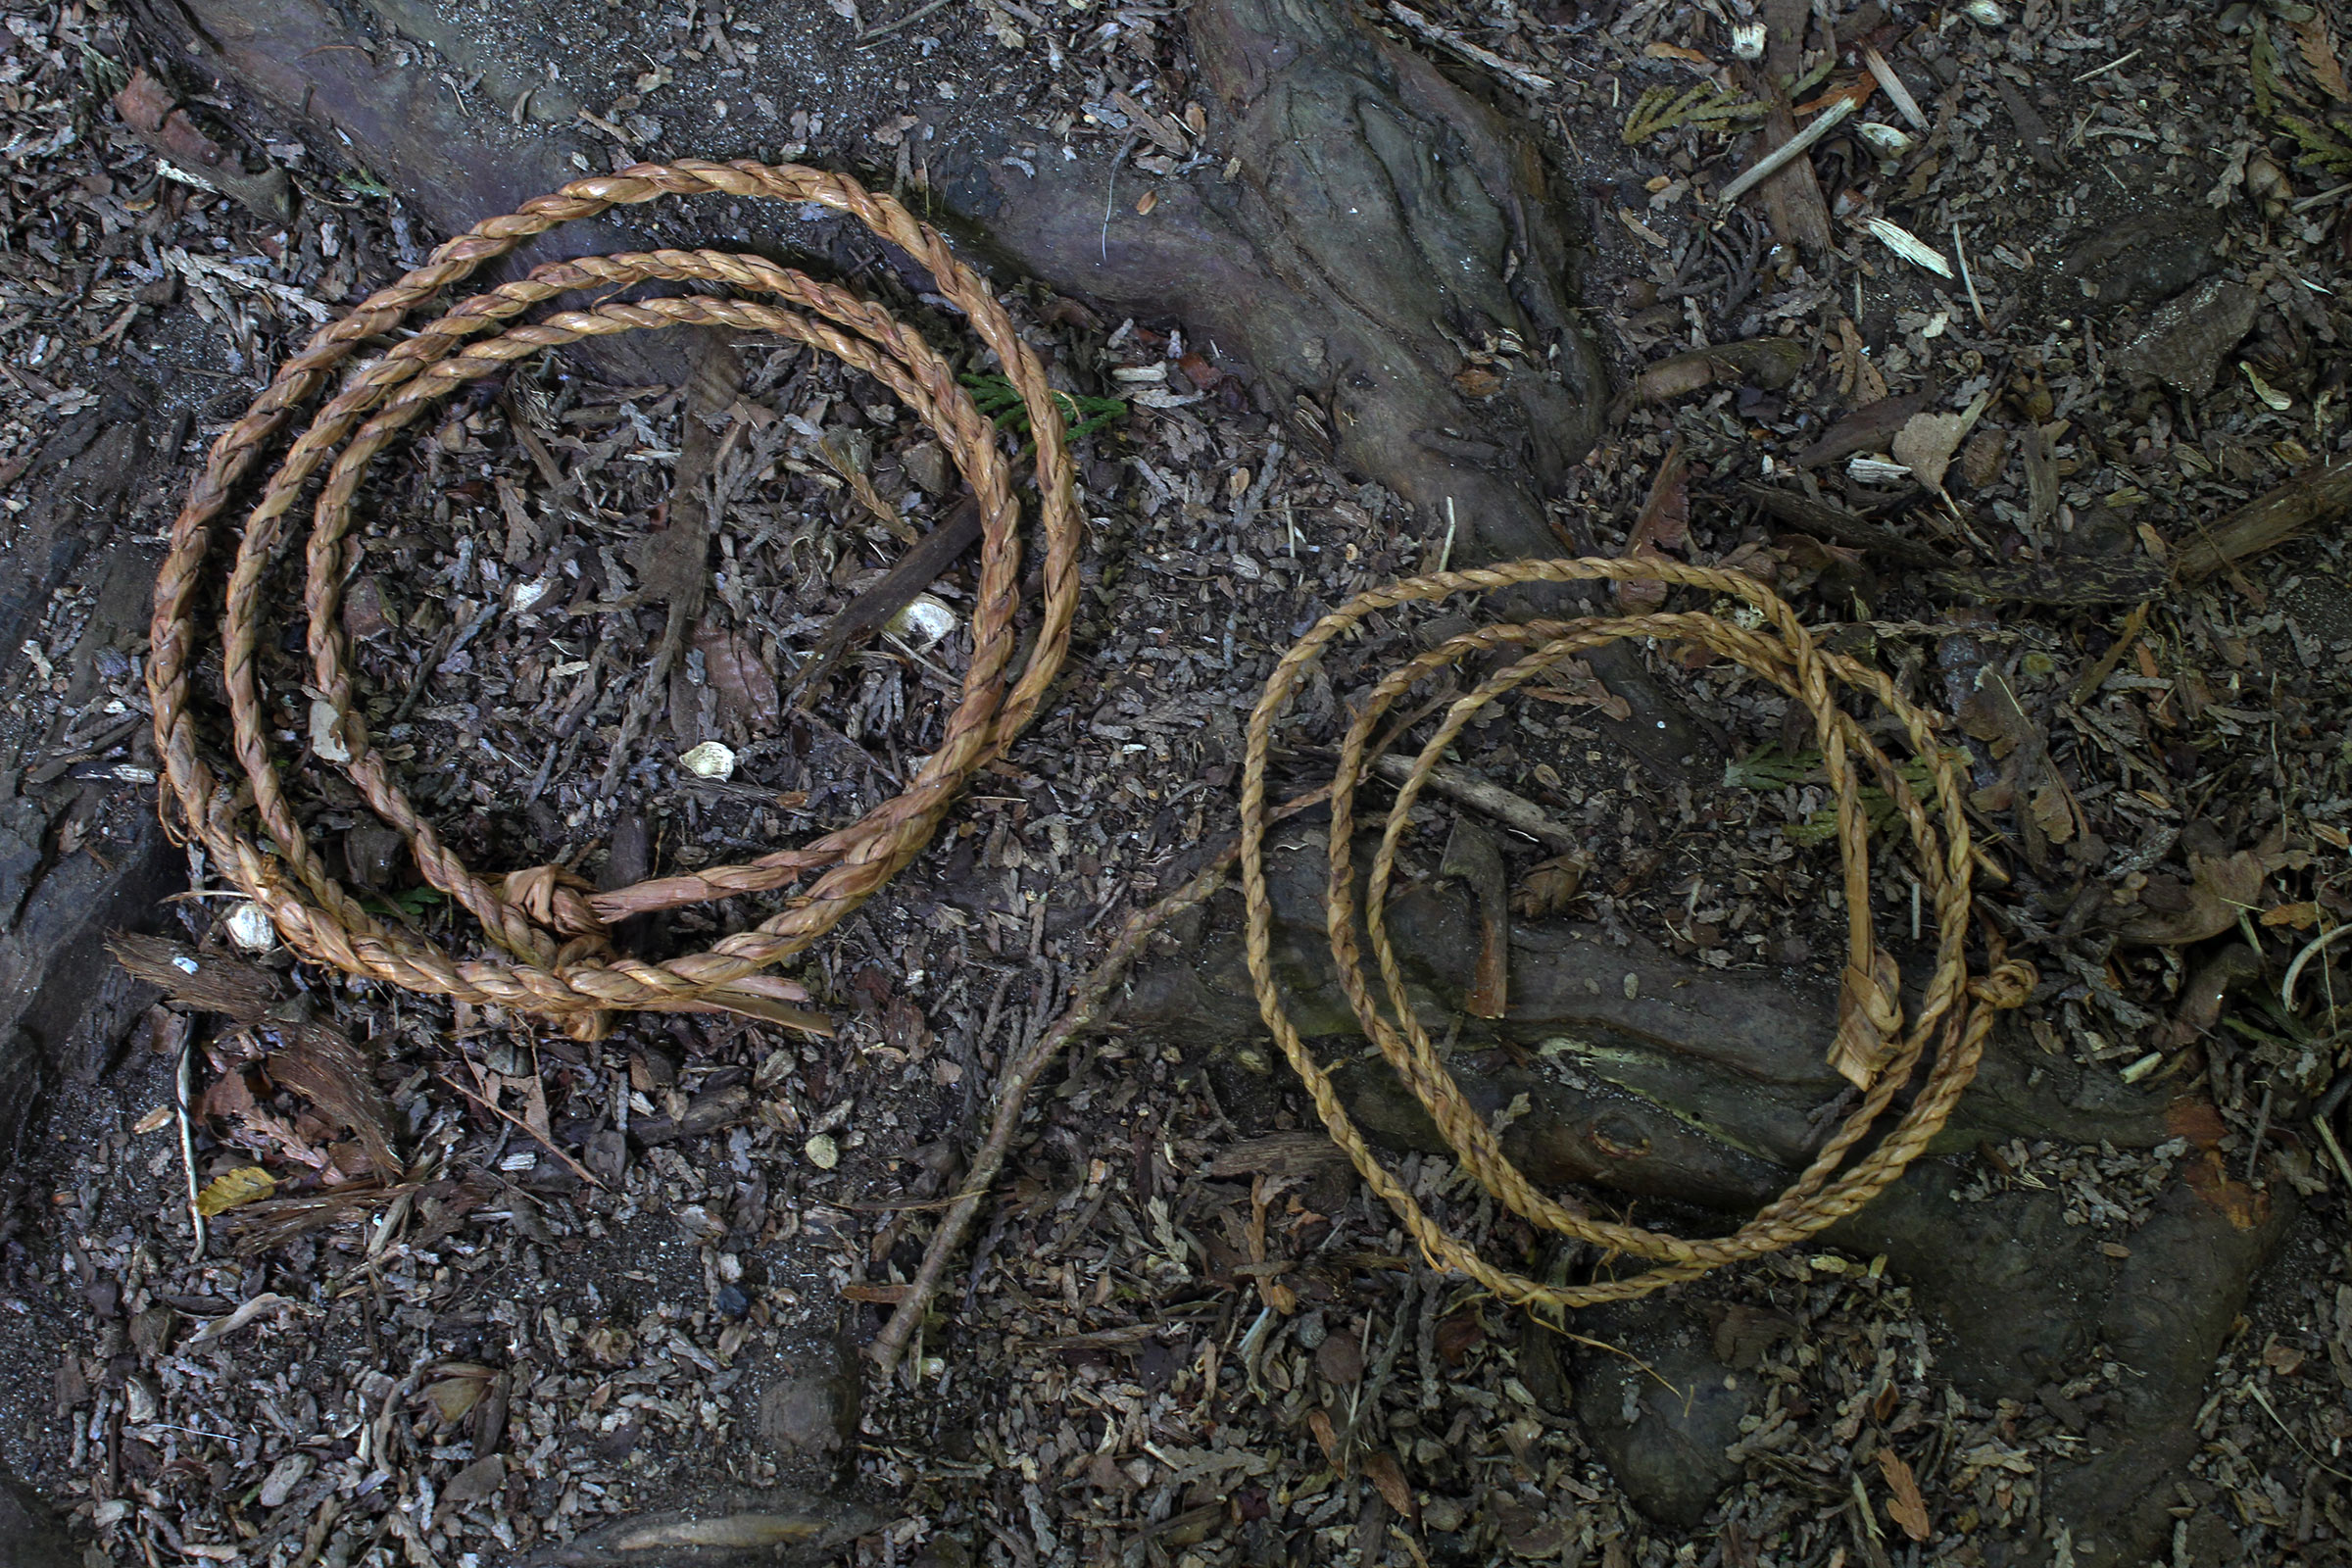
Root lashings are integral to making things with birchbark. When I made tools for working bark, I wrapped them with split roots and coated them with melted pitch. The bone knife is for cutting bark, the antler wedge for peeling it, and the bone awl for piercing holes for lashings.
A few years later, while I was teaching a workshop in Greenland kayak construction at WoodenBoat School, I took a break to explore the surrounding woods and, in my wanderings, found a clearing where a house was going to be built. Some birch trees on the land had been taken down and bucked into 4′ lengths. I made lengthwise cuts on one piece. I didn’t know what time of year the trees had been felled, but the bark peeled off easily and cleanly and was still very flexible. I dug up a few chopstick-thick roots in the area. In the soft duff it was easy to push my fingers through to the underlying soil to find roots almost everywhere.
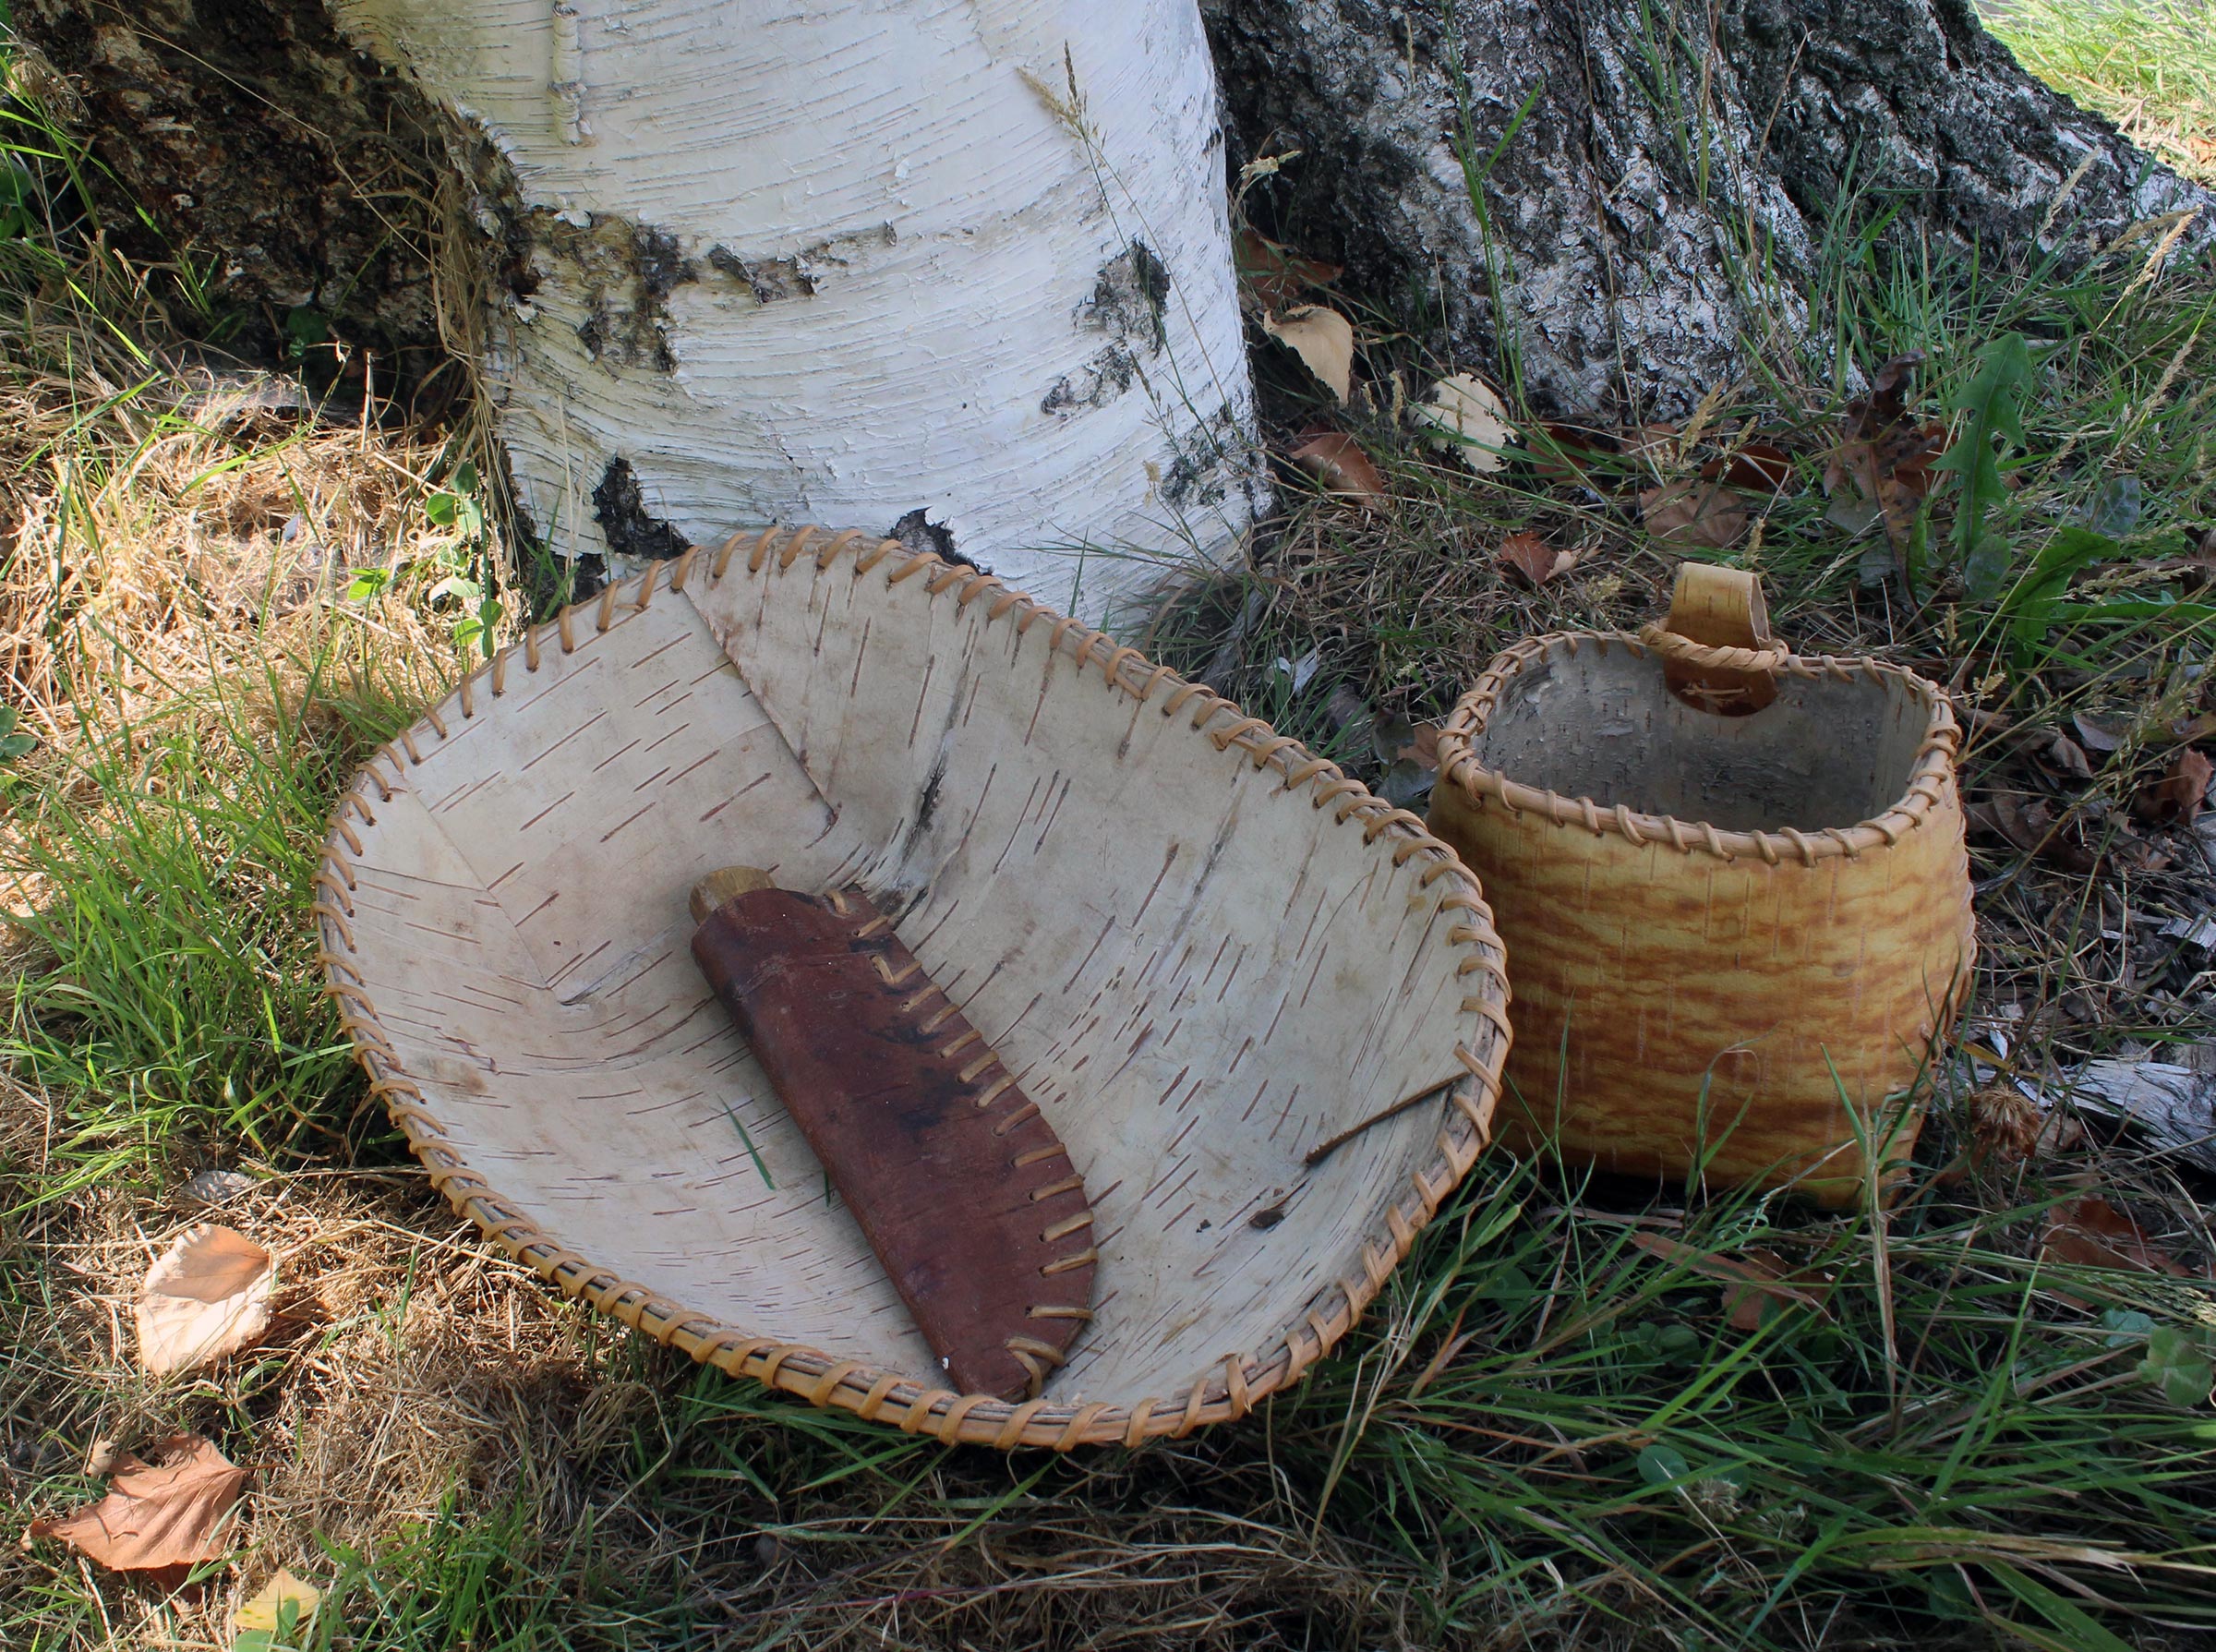
For the past 20 years, I’ve been using the birchbark sheath I made for one of my most-used carving knives.
When I had some free time back at the school, I scraped the bark off the roots and split them in half, working the thickest end. An inch-deep cut with a knife was enough to get the split started and then it just had to be steered down the middle. If the split began to stray, bending the thicker side more brought it back in line. I cut a piece of bark and wrapped it around the knife I was using during the workshop, trimmed the bark to make a sheath, and laced it with the split root. Some 20 years later I’m still using that sheath.
In the Pacific Northwest, Western red cedar is plentiful and it is not uncommon to find downed trees for harvesting bark.
Canoe-bark birch trees grow in the Pacific Northwest but their natural range ends about 25 miles north of my home in Seattle. Western red cedar, on the other hand, is everywhere. In Hilary Stewart’s book, Cedar, I read about the many ways in which First Nations people who have lived on this land for thousands of years used cedar bark. While it wasn’t used to make canoes here—the trunks of large cedar trees provided the wood for carving them—the inner layer of bark was used to make, among other things, baskets, rope, clothing, blankets, and hats. I’d known how the bark was used for some time, but I had never gathered any to see what I could do with it.
When I make a cedar-bark basket in the field, I work with bark that hasn’t had a chance to dry, so it shrinks after I’ve made the basket and the weave isn’t as tight as it should be.
One spring day, on a path through the foothills of the Cascade Range, I found some recently wind-downed cedars still green with their flat, scale-like needles. It was the time of year when the sap would have been running before the trees fell, and after I made cuts through the bark it peeled off easily. As I ran my fingers between the bark and the slick sapwood it felt as if cold creek water had just been poured through the widening space. The soft bubble-gum pink inner bark of the cedar, the cambium, has to be separated from the craggy umber outer bark before being cut into strips for weaving. I made a few small baskets with 1⁄2″-wide strips and a larger basket with thicker 1 1⁄2″ strips.
Twisting three strands of cedar bark together makes surprisingly strong and flexible cordage.
Later, on a car-camping weekend when my kids were six and nine years old, a downed cedar supplied bark that I used just as it came off the tree with the inner and outer bark still together. With a long rectangle divided roughly into thirds, I folded the ends up, cambium to the outside, and pleated and gathered the ends. That curved the center into a small semicircular trough. With the ends of a twig handle lashed with strips of cambium to each upturned end, the bark was quickly turned into a blackberry-picking basket for the kids. The same form had been used by Nootka mariners as canoe bailers.
In all the years I’ve been building boats, I’ve developed a fondness for a few types of wood, cedars mostly, for their color and warmth, the fragrance they bring to the shop, and for the many things they can do and become. For much of that time, the wood came from lumberyards and beach driftwood, stripped bare, but when I began harvesting birch and cedar bark from windfalls, I found a closer connection with the trees and a better appreciation of the reverence native people had for them. Walter said that before bark is taken from a tree, it is given thanks. I suspect that the gratitude runs deep and is not just for the bark but also for air to breathe and life itself.
After years spent exploring Baja California’s Bahía Magdalena in MADRINA, my 19′ 6″ Iain Oughtred Sooty Tern—an ideal boat for the job—I was beginning to feel my advancing age. It wasn’t only the sore muscles and creaking joints as I settled onto the floorboards, squeezed in next to the centerboard trunk for another long night of intermittent sleep; nor the dampness inside my cockpit tent, nor another meal cooked on a stove set on those same floorboards between my upraised knees. No, the larger question that returned whenever I thought about replacing MADRINA with something a wee bit more comfortable, and thus more substantial, was simply: If I’m ever going to tackle a bigger boat project, hadn’t I better begin now rather than later?
From the moment I opened my copy of Plans & Dreams Vol. 1, Paul Gartside’s first collection of plans and invaluable essays originally published in Water Craft magazine, I was taken by the 19′ 9 3⁄4″ centerboard lugger, his Design #166. I was particularly drawn to the simple standing lug, a rig with which I was already familiar, and imagined the design approaching that sweet spot between size, seaworthiness, and ease of handling. Also, having already built Gartside’s Design #130, a 12′ dinghy, I remembered the wealth of detail included in his plans, the breadth of classic, old-school building techniques they revealed, and that Gartside himself had been always quick to respond to questions.
Scott Sadil
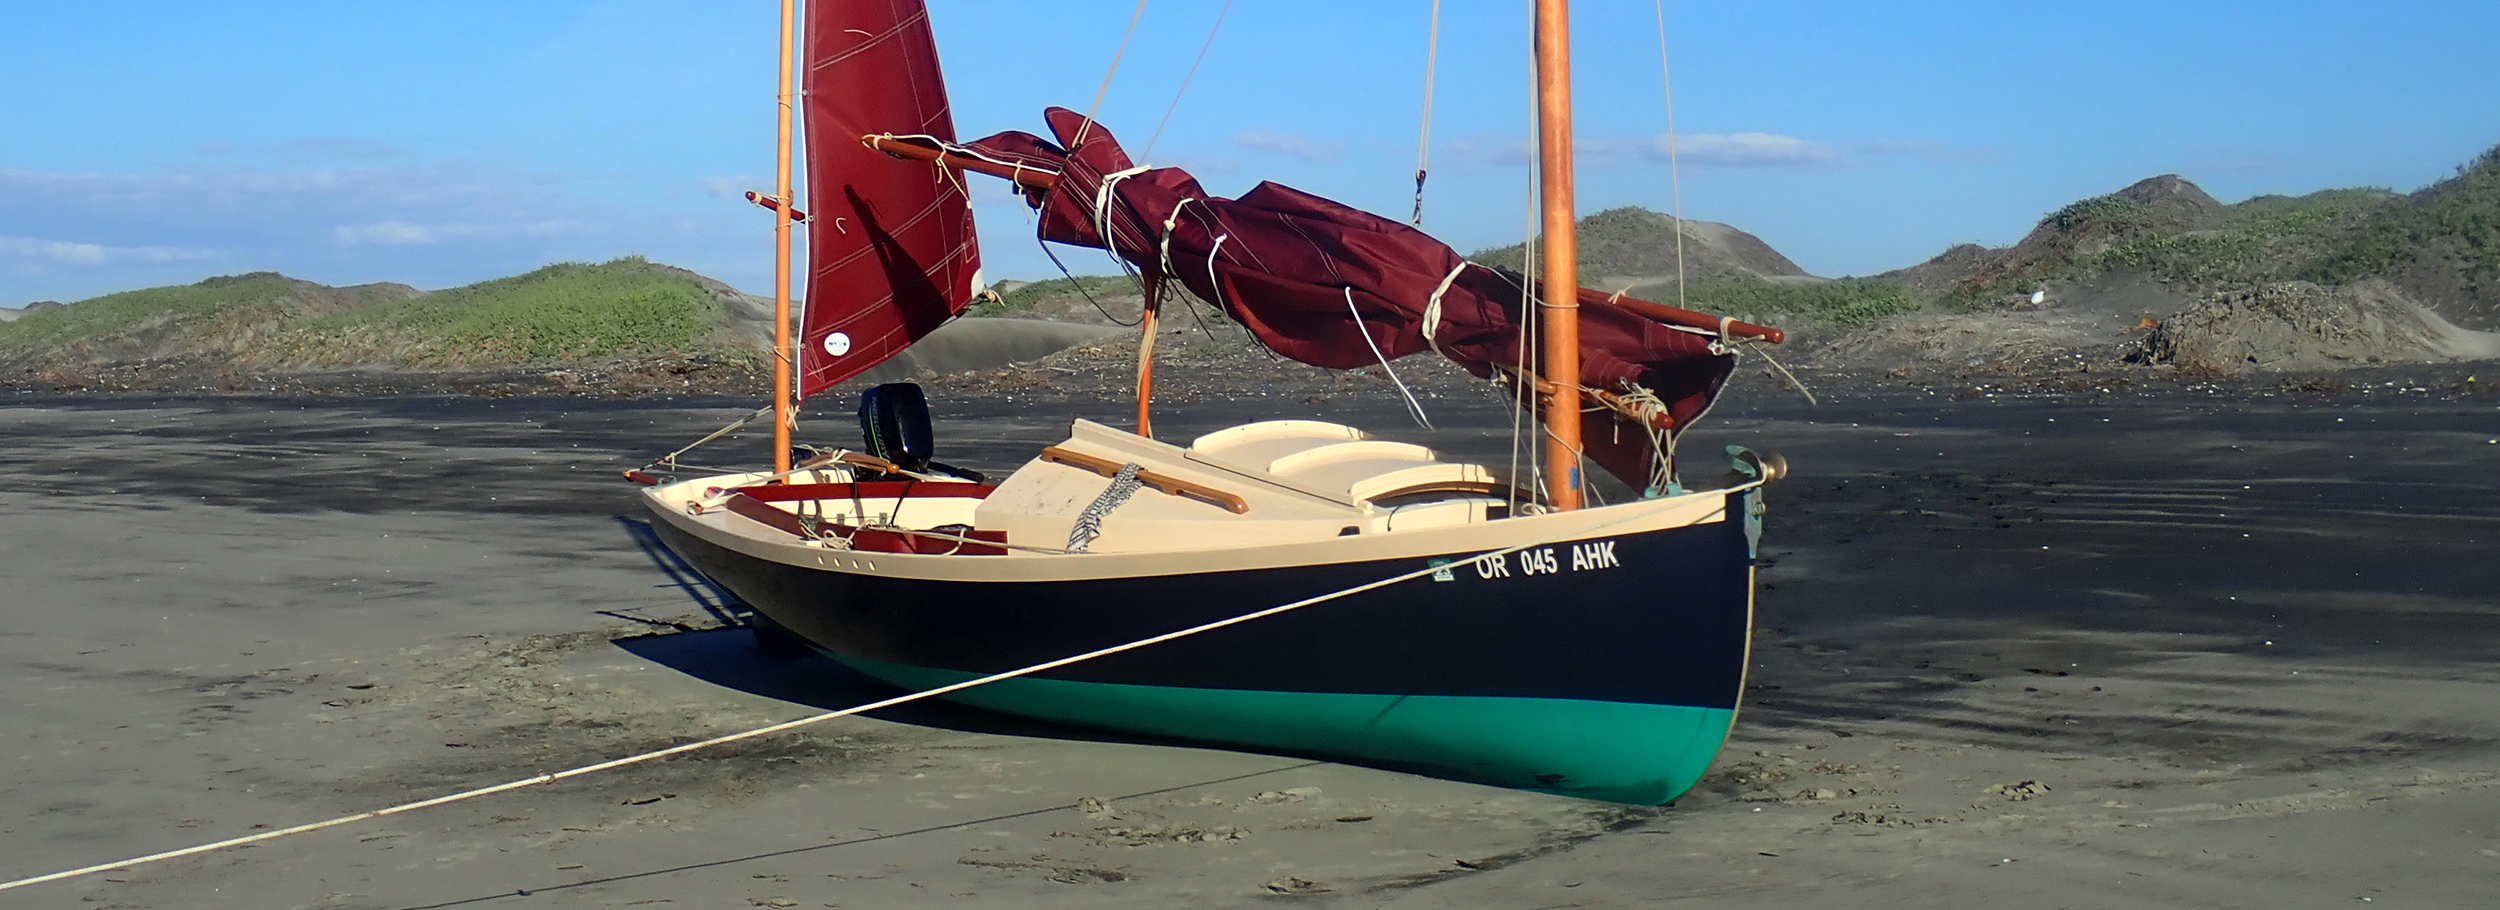
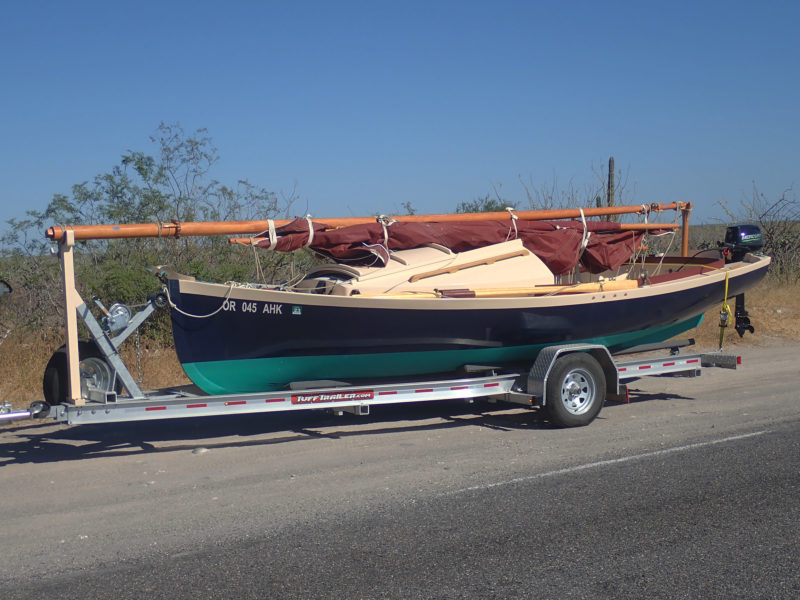
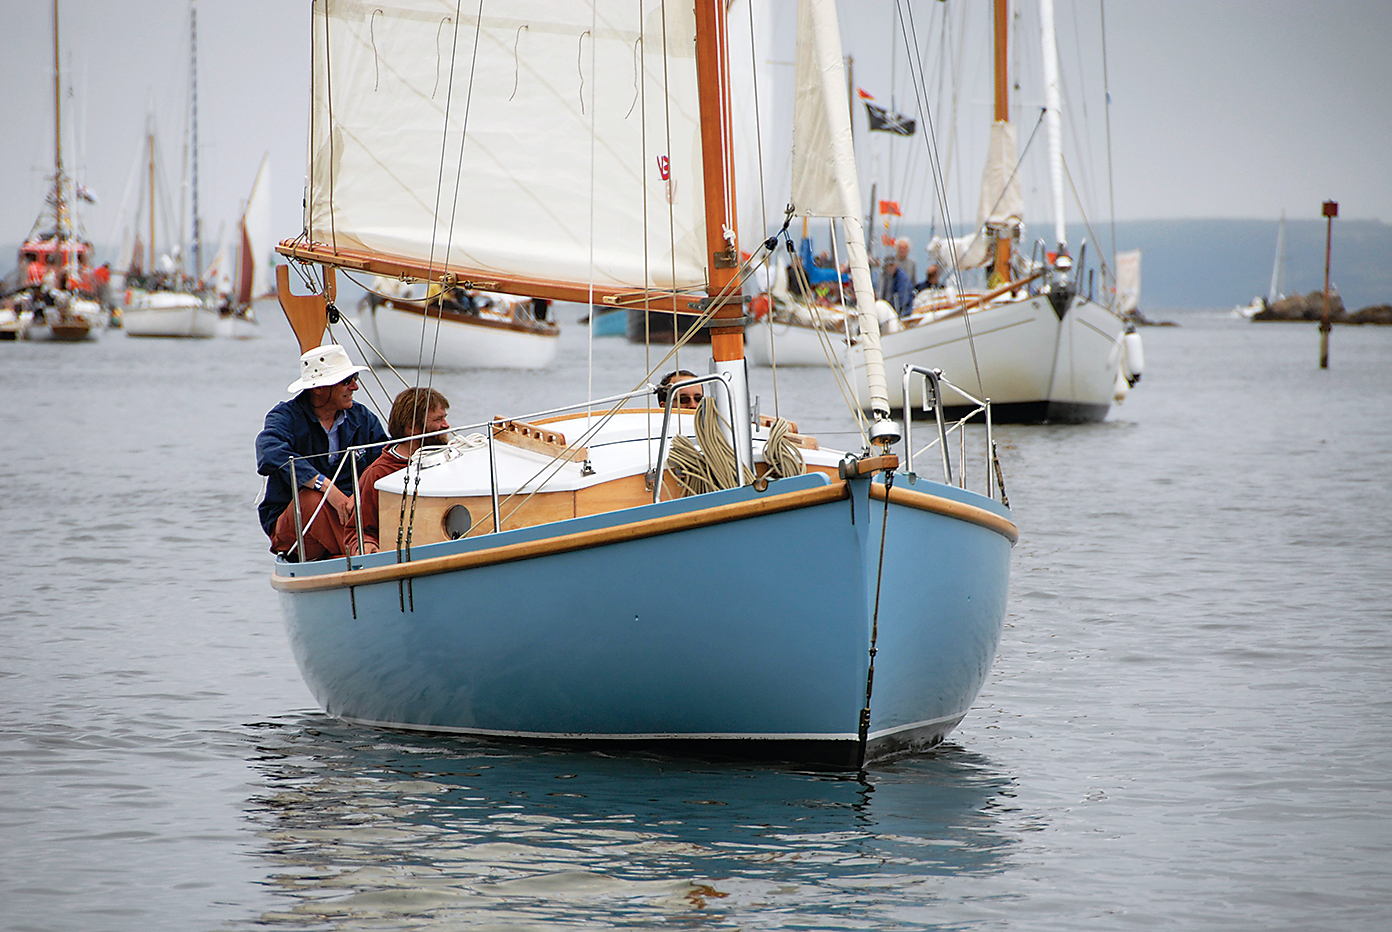
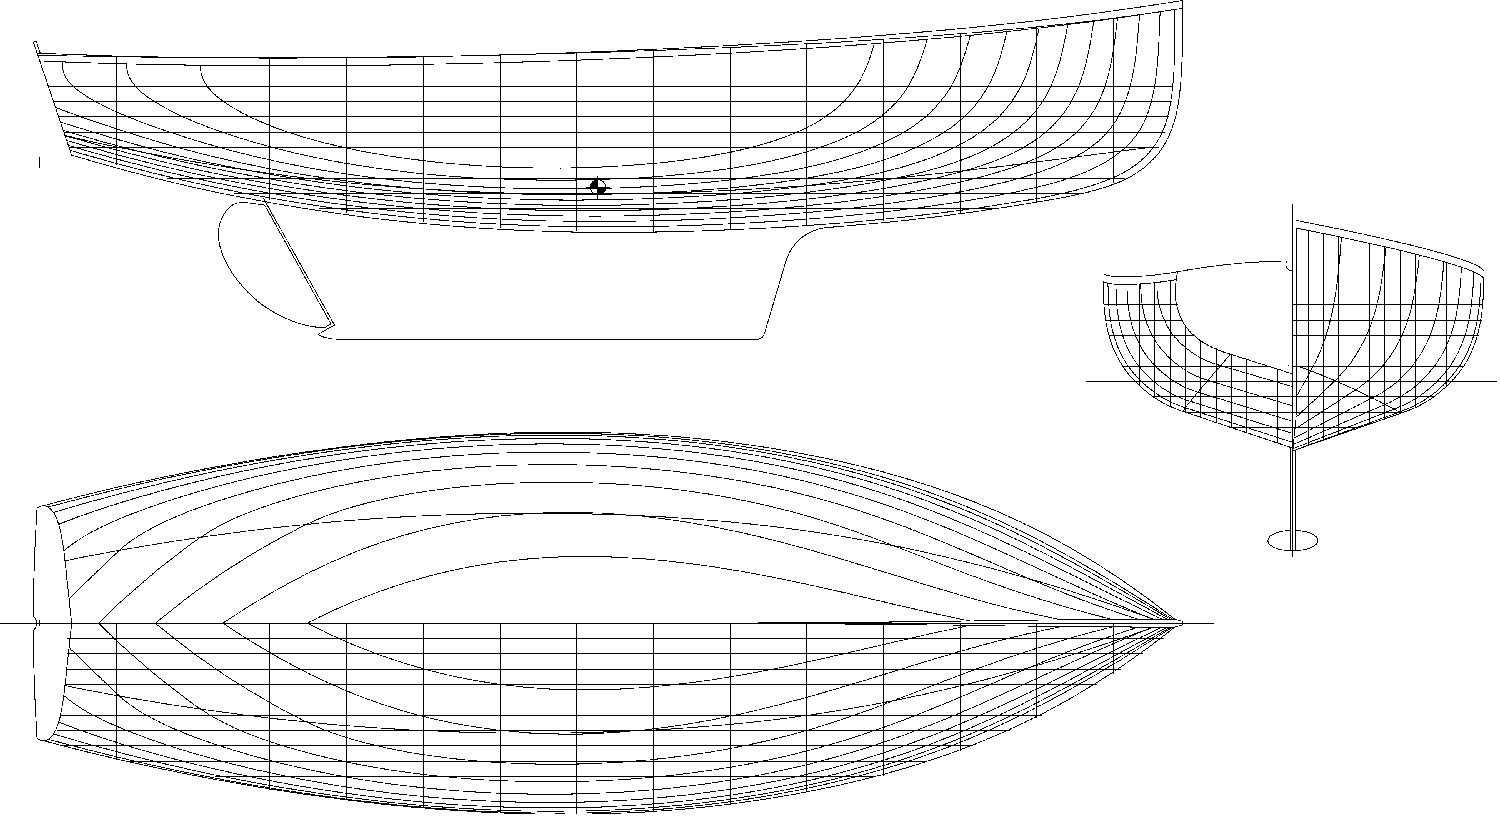
Out of the water the sweet lines of Gartside’s design are clearly visible: the fine entry and aft skeg enhance performance both under sail and when rowed; the gently curved sheerline complements the sloping cabintop. For trailering, the boom crutch—used to support the main boom when at anchor—is moved aft to stand in the mizzen maststep to support the head of the mast.
Still, for months I hemmed and hawed. No question, Design #166 was a lot of boat: decks, cabin, exterior ballast, a tricky forward maststep, an impressive freestanding mainmast. Did I really want to commit to the time and expense of a job this size? Eventually, I realized there was only one answer: If not now, when?
Although the plans for #166 show two construction choices—strip-planked and ’glass, or glued-clinker plywood—Gartside states, in his essay that accompanies the plans, that his own first choice for the hull would be “cold molding: a triple-skin layup of two diagonal and one fore and aft to finish about 12mm thick would be perfect and require little in the way of framing.” I was sold. I contacted Gartside and he drew up another page of construction details for cold-molding, bringing my set of plans to eight pages in all: lines plan, table of offsets, construction details, stem and maststep details, layout, sail plan, and the original setup detail for strip-plank or glued-plywood construction. There were no patterns. Throughout his writing Gartside advocates strongly for lofting: “Avoid the temptation,” he argues, “to shortcut the process.”
I did my lofting on plywood sheets spread out across my living-room floor, built my molds, and ordered up a load of western red cedar “shingle stock”—wide, uneven material (minimum thickness 4mm)—that I ran through a thickness planer to 4mm and then ripped into 4″-wide planking stock—narrow enough to fit the shape of the hull but not so narrow that I ended up with an unmanageable number of pieces. Gartside leaves the plank width to the builder’s discretion. The plans detail eight molds, and 13 battens measuring 3⁄4″ × 1 1⁄4″.
I applied the two opposing diagonal layers of planks and the final fore-and-aft layer and, after fairing the hull one last time, I sheathed it with a layer of 6-oz fiberglass saturated with epoxy. I used a two-part epoxy paint for the hull—further protection for the cedar hull. When a group of friends helped me to lift the hull from the molds, carry it outside and turn it over, I was surprised by its light weight even though the #166 hull is 1′ 7 3⁄4″ longer and 2′ 1 3⁄4″ wider than the Sooty Tern. Then, I was struck by the boat’s dimensions: mid-flip, when standing on its side, the hull stood far taller than my helpers—I was dealing with a boat of much greater size.
Kim Boehler
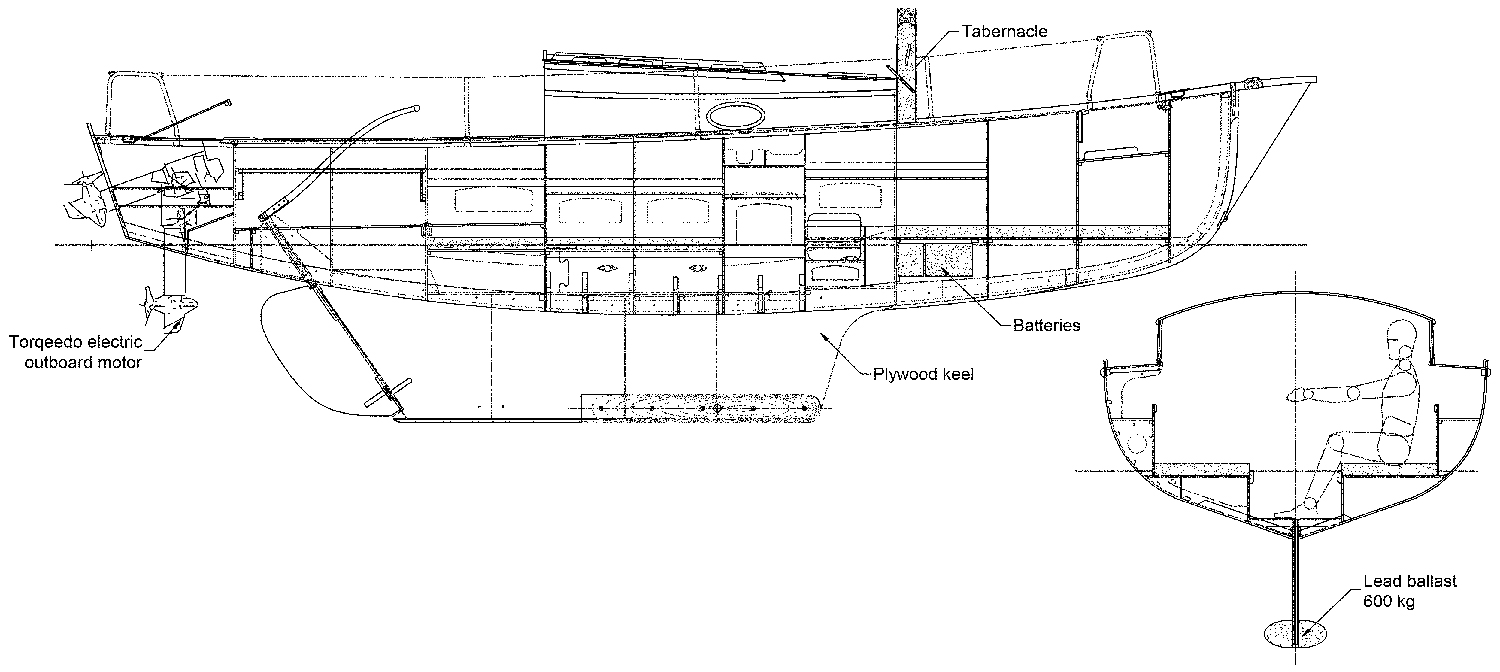
The pivoting rudder blade doesn’t rely on weight to submerge it from its retracted position it. Its haul-up and haul-down lines are secured by a jam cleat on the tiller. The motor mount, mizzen mast, and boomkin are all offset so a standard tiller can occupy the centerline.
The lugger was also more complex. Among other testing elements in the build, it has a keel with 305 lbs of recessed external lead ballast—a great comfort when the 191-sq-ft mainsail fills with wind, but a construction challenge to be approached with care and consideration. The forward mast tube is also challenging. It is an aluminum sleeve that houses the maststep and runs from the deck, down through the forward flotation chamber, and drains downward through the keel itself. Its construction and installation involve some low-tolerance engineering that demands competency with this sort of metalwork. The plan details are explicit: the tube is fashioned in three parts that must be welded together and the heel plug, also clearly shown, is best machined out of high-density plastic.
The final challenges were in finding all of the hardware for the finished boat. I wanted to stick with silicon-bronze fittings as an appropriate match for a boat with such handsome, traditional lines, but could find nothing suitable at any chandlery. In the end I went with bronze fittings cast at Port Townsend Foundry, Tufnol blocks, and three-strand lines.
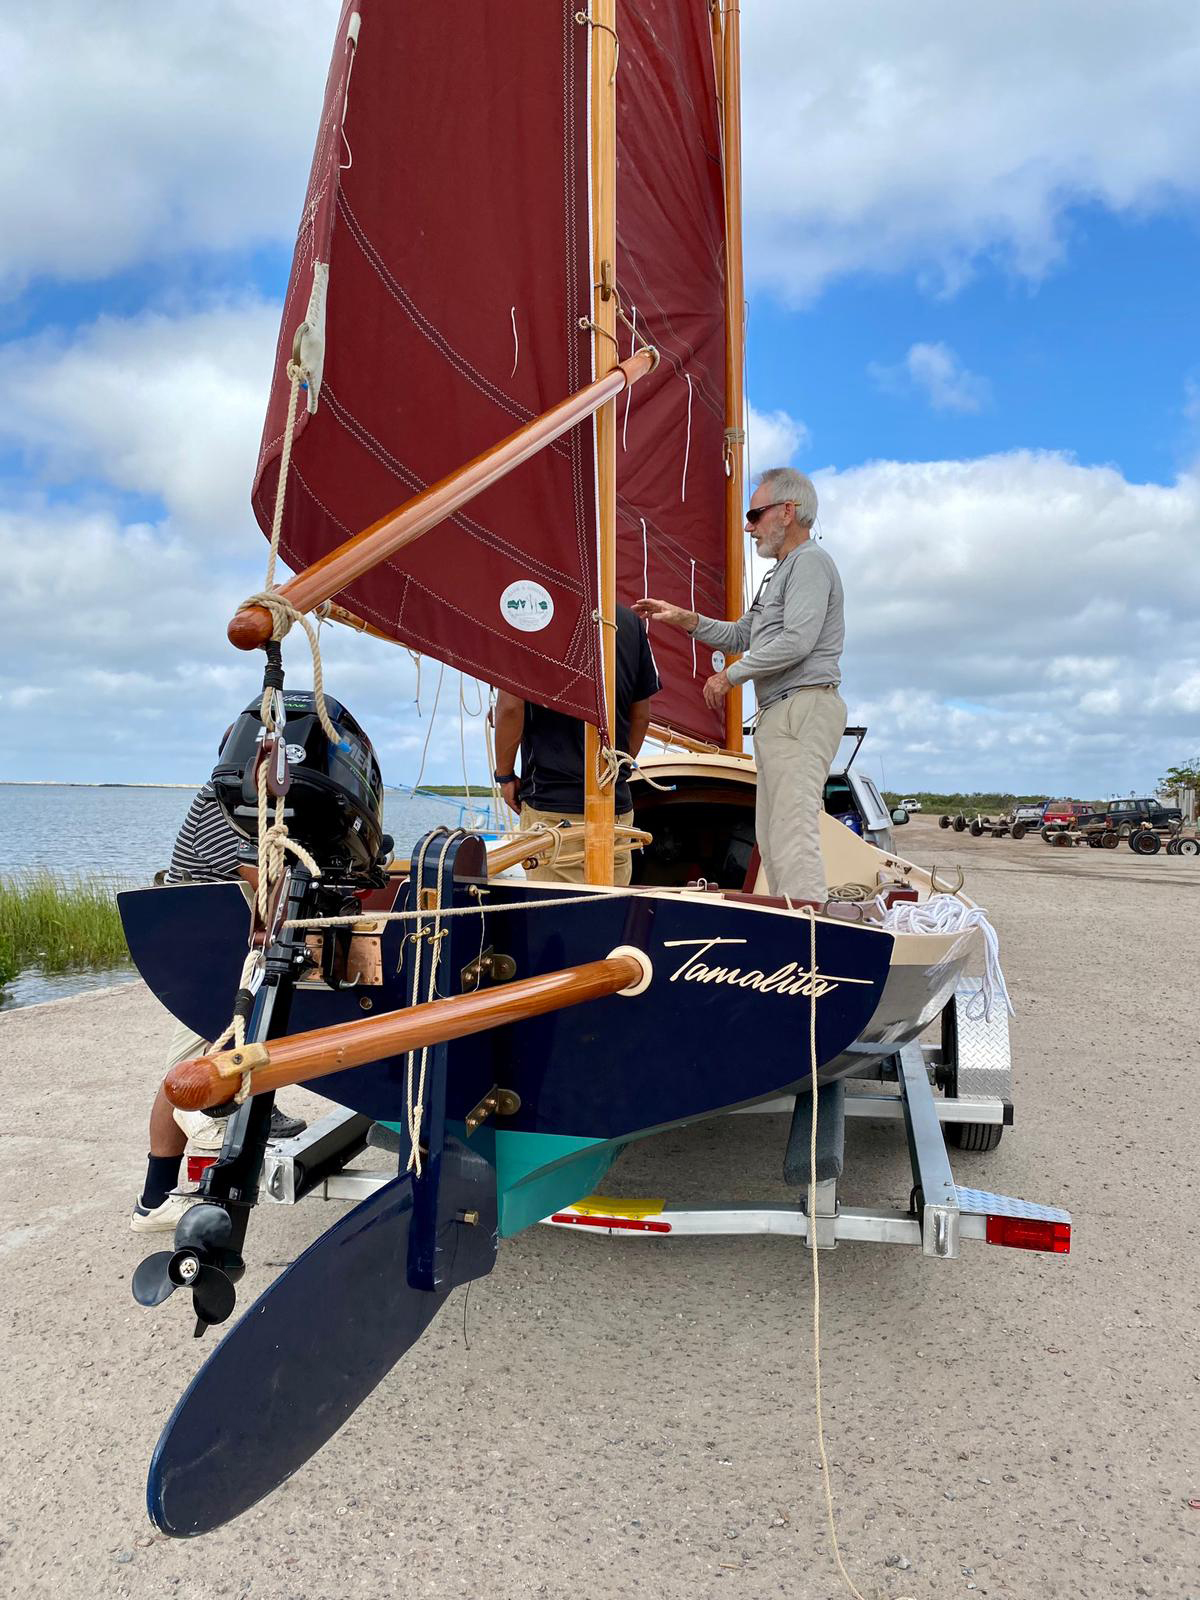
The free-standing mast is 22′ long and a full 4 1⁄4″ in diameter at deck level. I built it out of a single piece of Douglas fir, 10″ x 2 1⁄3″ × 26′, ripped down the center, ends swapped, the two halves hollowed out—as per the plans—starting 1,200mm up from the bottom and ending 600mm from the top. I kept the wall thickness to no less than the specified 25% of the outside diameter and epoxied the two halves together to complete the blank.
From start to finish, building TAMALITA took just under three years. Of course, the challenges would fade quickly from memory if I ended up with a boat that lived up to my expectations.
My goal was to replicate the shoal-water attributes of my Sooty Tern: easy singlehandling, good speed under sail, maneuverability under oars. I also hoped to enjoy the added comfort of a small cuddy as well as the security of side decks, coaming, and external ballast when I ventured out onto California’s open Pacific Coast.
The cockpit is expansive. In the text that accompanies the plans, Gartside calls his lugger “a daysailer first and foremost.” Indeed, for an outing with friends it would be ideal—you could distribute six adults along the two side benches. The cuddy is small but still usable: large enough for a single wide berth, lots of floor space, a tiny galley, and what Gartside refers to as “the illusion of privacy for the head.”
This shallow-draft, flat-floored boat will also please sailors who have trailered any boat near this size in the past. It’s easy to launch and retrieve at any typical launch ramp. It’s also light for a boat of its length. My trailer is a standard model although the axle position was adjusted to suit a sailboat rather than a sportfisherman with a heavy motor hanging from the stern.
Kathleen Wilder
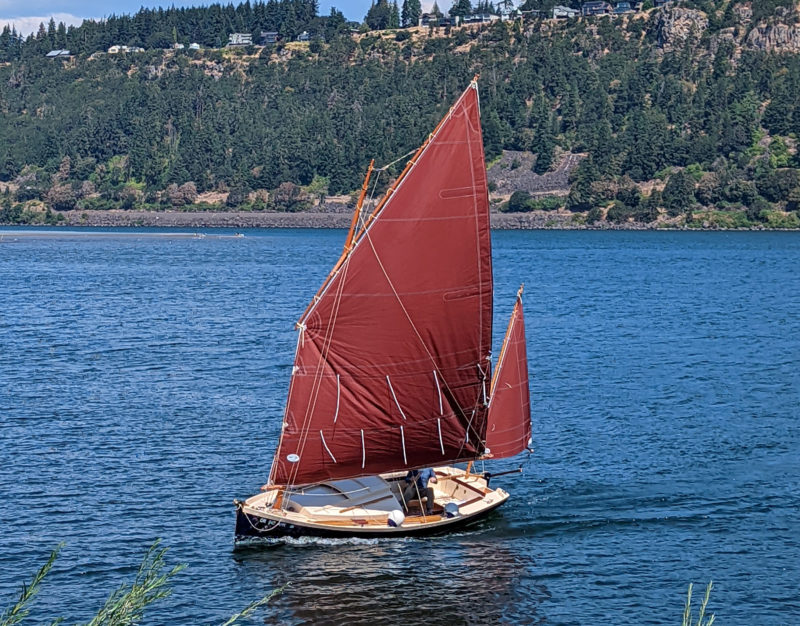
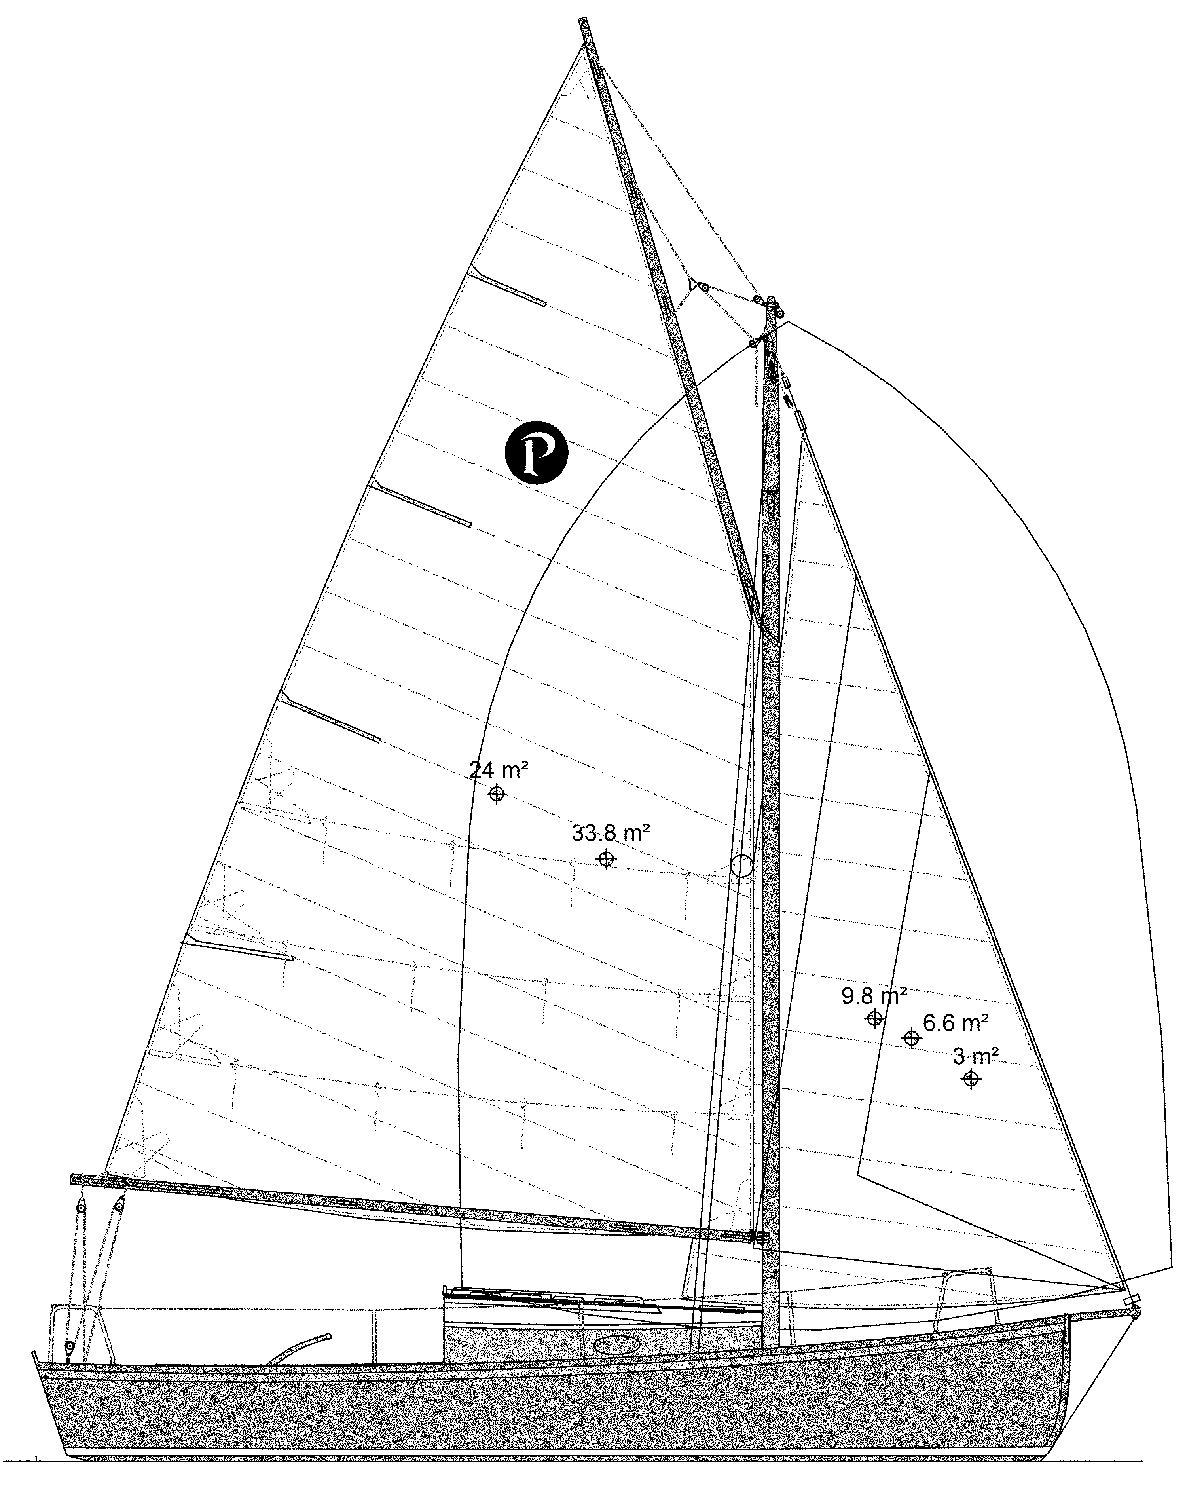
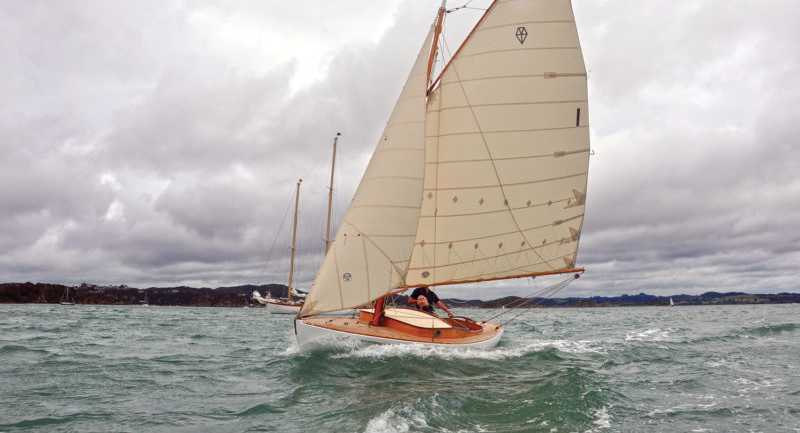
For its size the lugger has a generous sail area. Most of the power comes from the 191 sq ft balance lug mainsail but the off-center leg o’ mutton mizzen sail can provide a bit of a boost and be tuned to achieve a neutral helm.
Setting up before launching offers some challenges. Anticipating what it takes to step the free-standing mast, Gartside added a second step 15″ aft of the main step. “The mizzen,” he writes, “is dropped in here first and used as a crane to lift the mainmast.” It takes some time to tweak and adjust the rigging, and the first time you raise the mainmast overhead, expect to feel your heart flutter. As a newcomer to the boat, I got some extra practice stepping and unstepping the mainmast while working through the mainsail rigging. Four lines lead back to the cockpit—throat halyard, peak halyard, parrel line for snugging the yard to the mast, and topping lift—the easy-to-handle setup is perfect for the singlehander once everything is sorted and in place. Once the lines are all rigged, they can be left in place. After gaining experience, I can step the masts, hang the rudder, go through my checklists, fuss with this and that, launch, and be sailing easily within an hour.
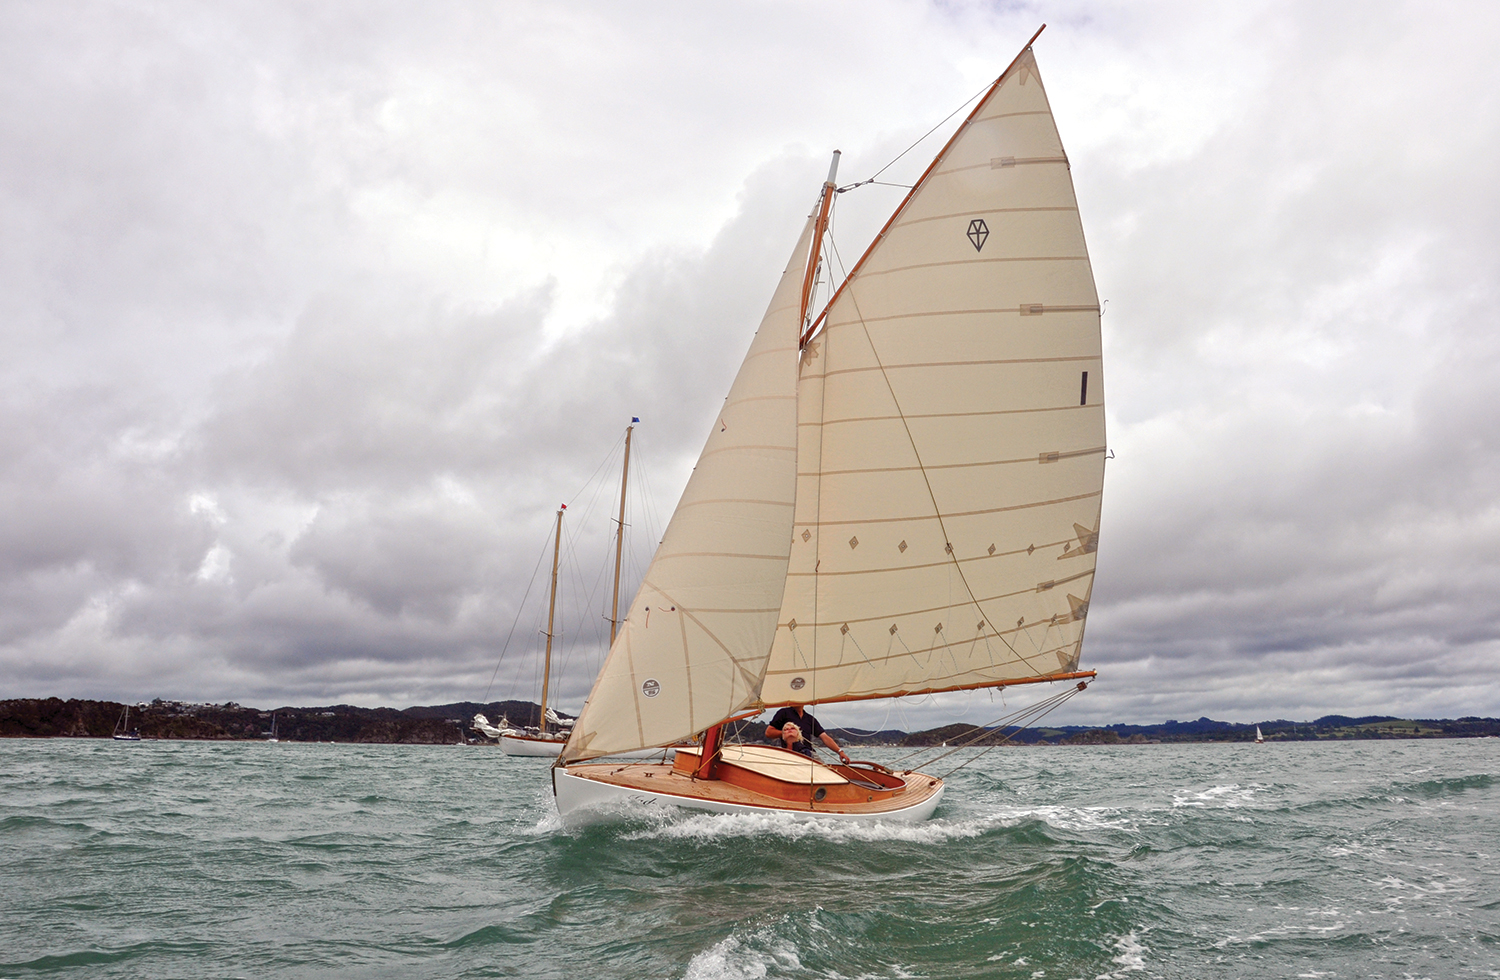
For a relative novice like myself, the boat is a delight to sail. With the substantial ballast built into the keel, its shapely hull carries the big mainsail well. The off-center mizzen will also make a lot of sailors happy, as it allows for the swing of a conventional tiller rather than the push-pull steerage seen on many small boats with two-masted rigs. I have sailed luggers most of my brief sailing career and find that Gartside’s points at least as high as I’m used to. Its peak halyard helps to keep the mainsail from twisting. The boat comes about easily, and if you do need a little extra turning momentum in light air, you can snug the mizzen in tight and hold the boom for a moment to backwind the mainsail. Adjusting the mizzen also takes care of any weather helm.
With the side decks and cockpit coaming, even in a stiff blow if the hull does dip a rail, the water stays out of the cockpit. Given a tough chance, however, there are three large watertight flotation compartments, one forward, and one on either side beneath the side decks aft of the cabin bulkhead. According to Gartside, the lugger will float upright if swamped.
Kim Boehler
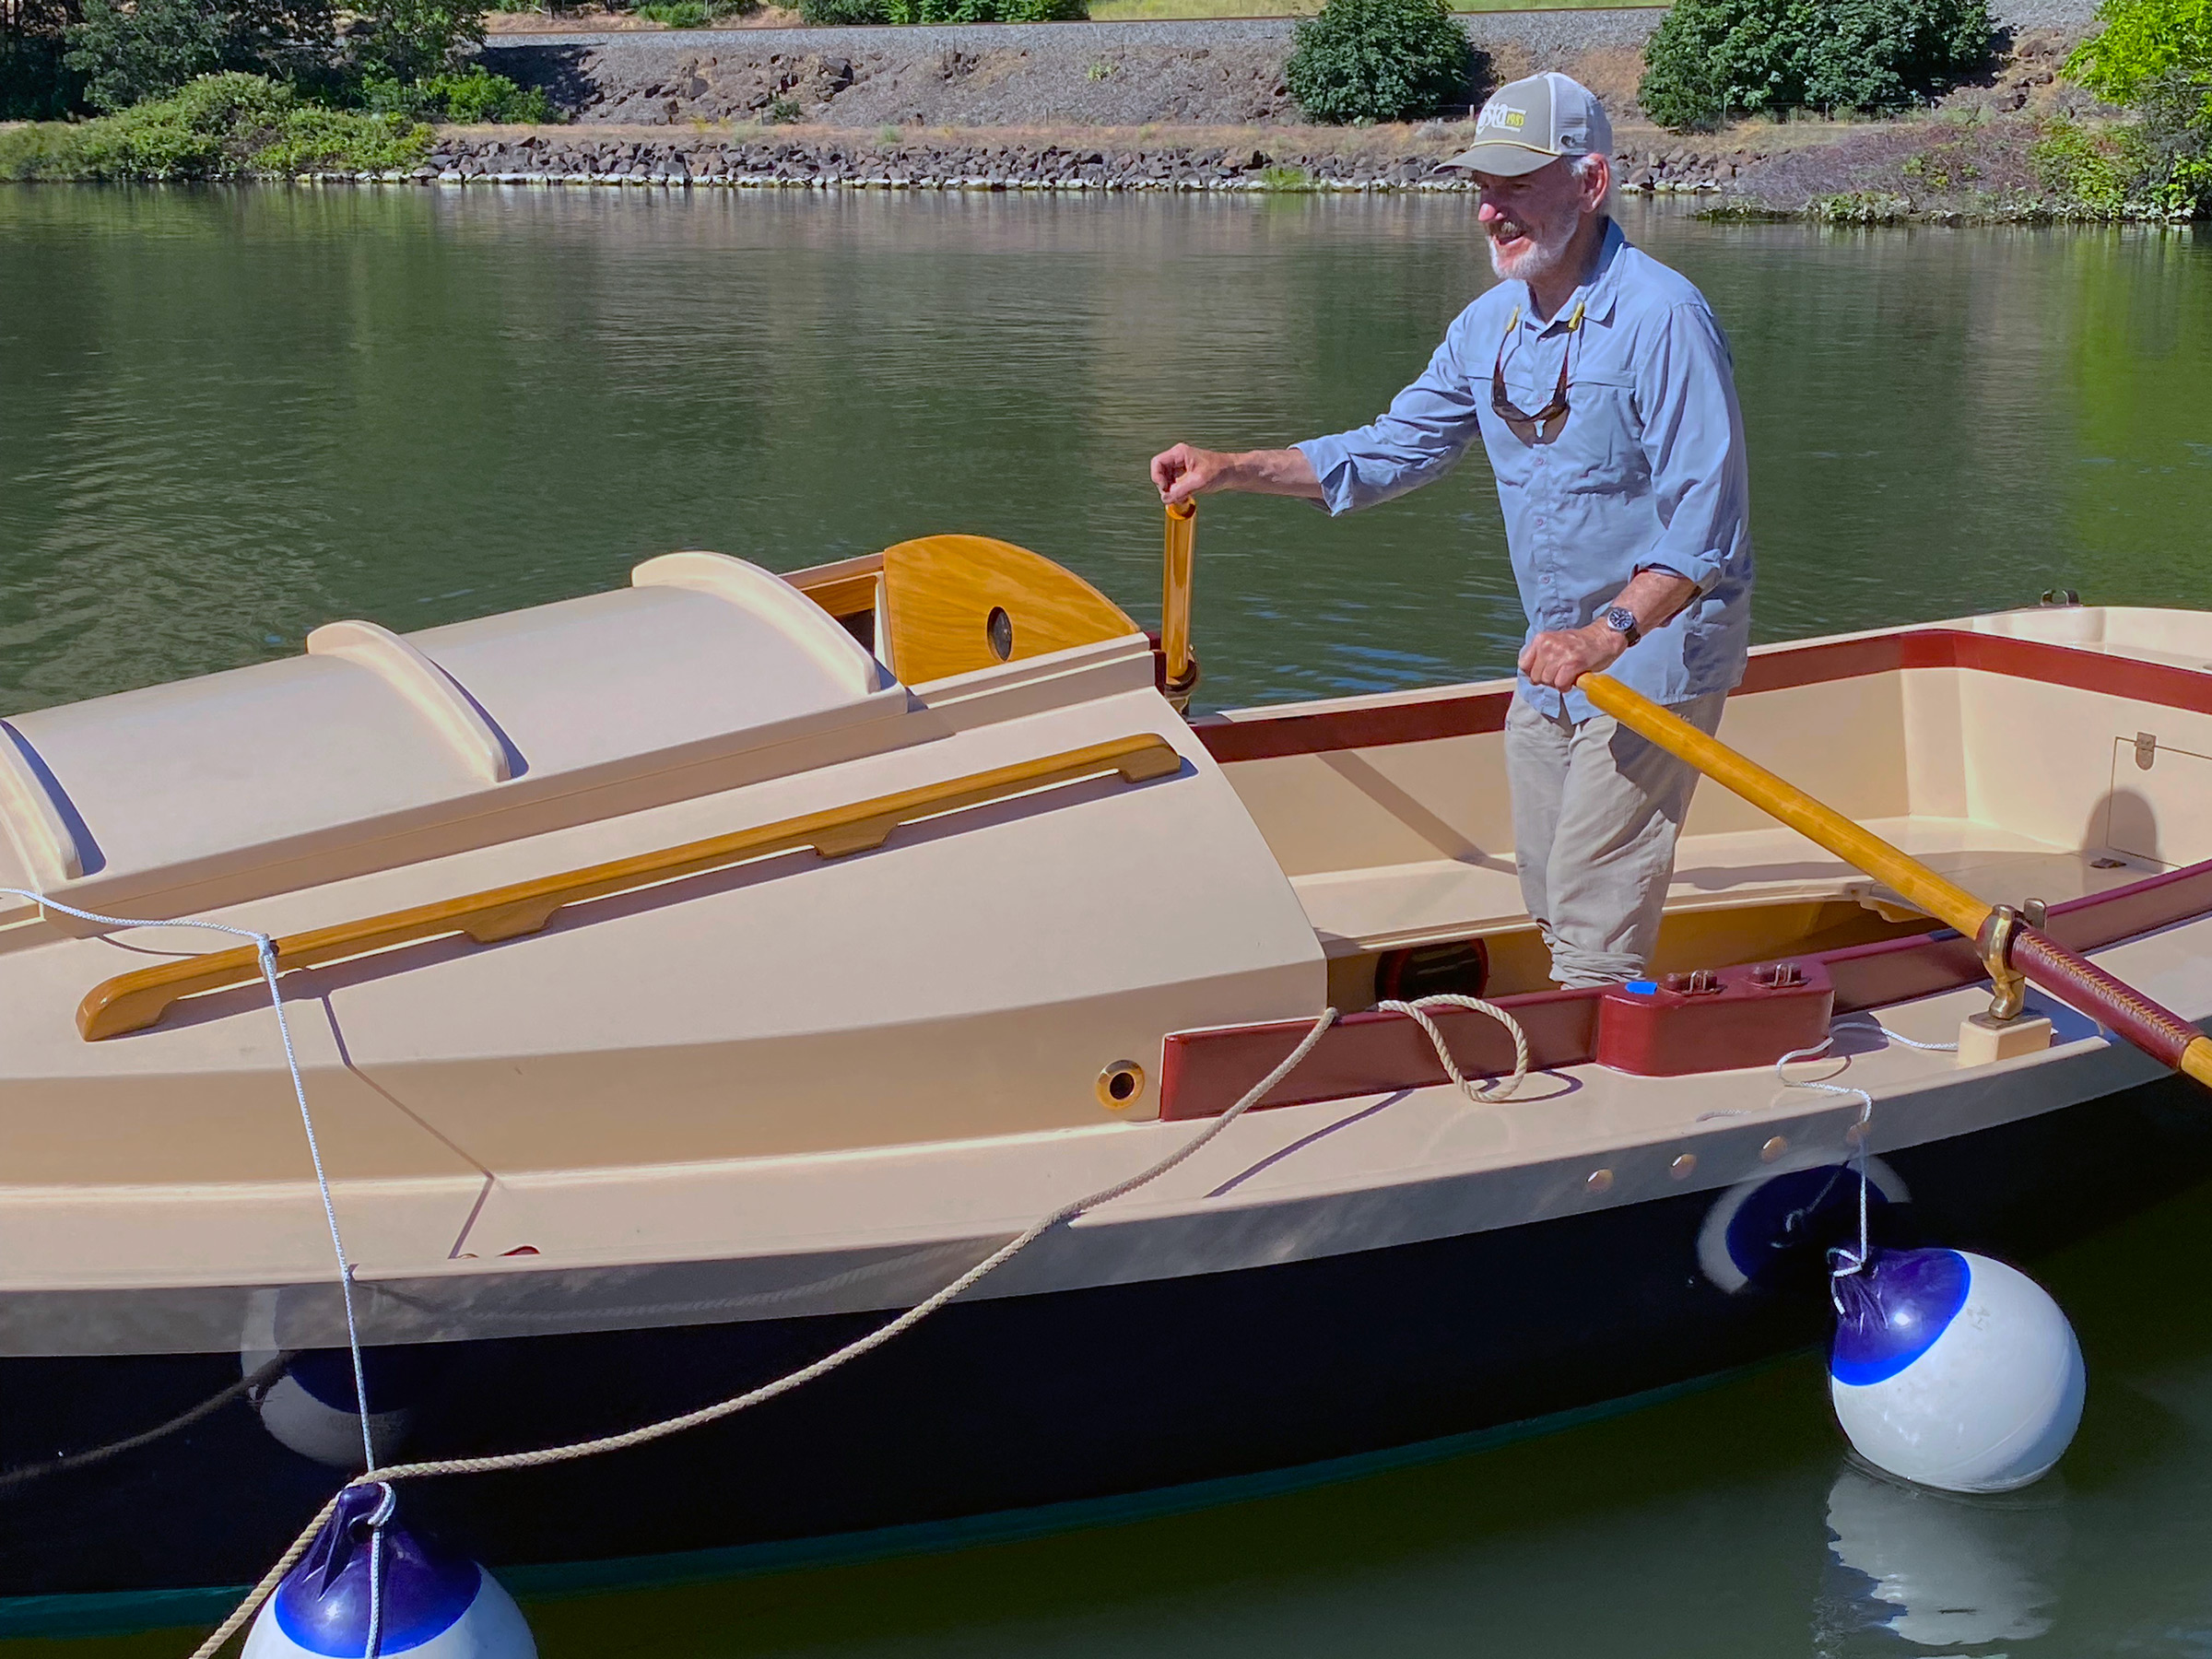
The author prefers to row standing up and facing forward—a position that offers excellent visibility ahead. Although the mainmast was not stepped in this picture, even when it is in place, the boom and yard can be raised above the rower’s head with the topping lift.
The boat moves smartly under 9′ oars, which are the longest that can be stored on deck. I row from a standing position in the cockpit so wouldn’t want to have to fight much of a wind, but if there’s a breeze, I could sail instead of row.
Finally, although I was initially reluctant to have a small outboard dangling from the transom, Gartside had included the arrangement in his plans, and I went with it. The first time I found myself in Baja’s Magdalena Bay in the face of a stiff wind and a foul tide, I felt lucky to have followed the designer’s lead. Aside from that episode, I’ve never felt the need to use my 5-hp Mercury propane motor for more than a few minutes at a time.
Scott Sadil
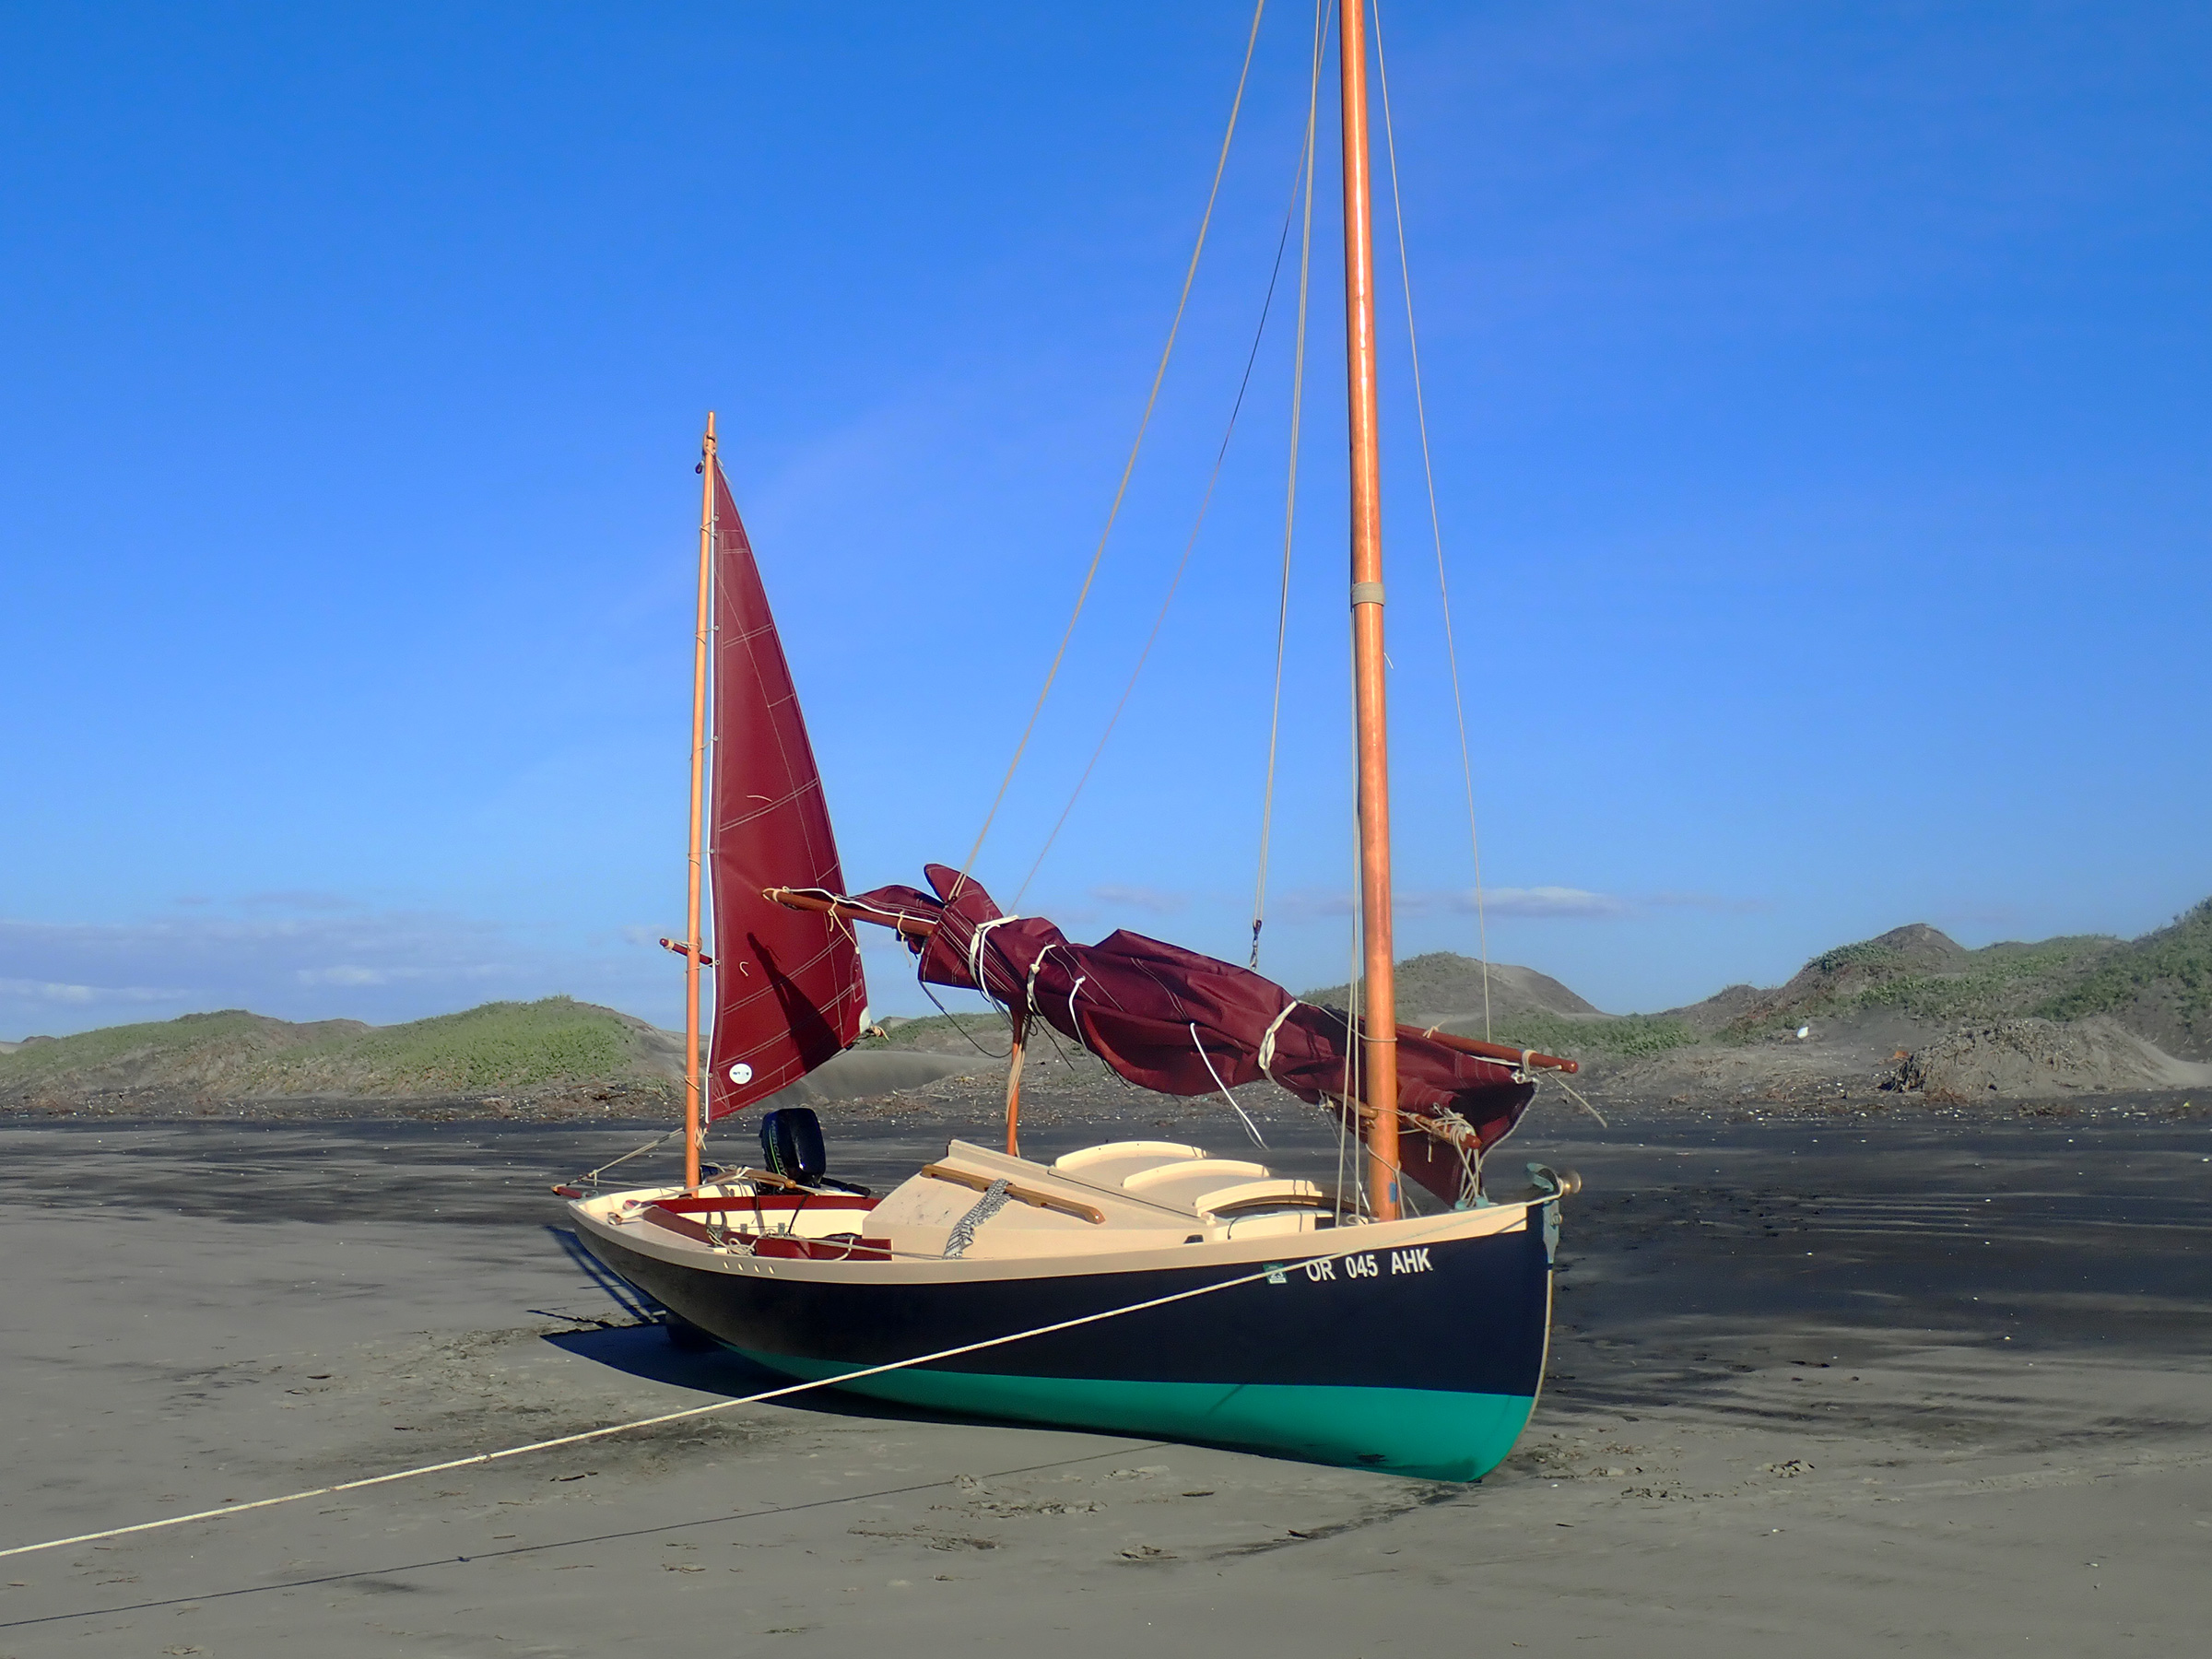
For singlehanded cruising the lugger has much to offer: its flat ’midships sections allow it to sit upright when beached; the small cabin proves comfortable shelter for overnights; and the uncluttered spacious cockpit with angled coamings is a relaxing place in which to sail or just sit and enjoy the view.
With the retractable rudder blade, the lugger can be beached and will sit level and upright on a flat bottom. I prefer not to beach if there is any surf and on extended voyages I tow an inflatable stand-up paddleboard, which I use as a tender.
Headroom is limited, and at anchor I spend much of my domestic time seated atop the cabinet between the galley and the centerboard trunk, my head poking through the companionway. With the hatch closed, however, and vented washboards in place, the cabin is dry, quiet, and cozy. A small fan forward adds to the luxury as I stretch out on the spacious berth.
Paul Gartside’s Design #166 has many of the attributes and even comforts not often associated with small boats. He calls it a small boat and “a very simple boat.” Both descriptions have much to do with point of view. Gartside is surely a master of boat design and building. For mere commonfolk like myself, his Design #166 is neither small nor simple; rather, it is a big boat for big adventure, and an elegant piece of his legacy.
Scott Sadil decided he needed to learn how to sail while he was building his first boat, TÍA, a Chesapeake Light Craft Northeaster Dory, a dozen years ago. He is currently the angling editor at Gray’s Sporting Journal and the author of six books, both fiction and nonfiction, that weave essays and stories into the sport of fly-fishing.
Centerboard Lugger Design #166 Particulars
[table]
LOD/19′ 10″
LWL/18′ 11″
Beam/7′ 6″
Draft/1′–4′
Displacement/1,405 lbs
Ballast/304 lbs
Sail area/214 sq ft
Mizzen/23 sq ft
Main/191 sq ft
[/table]
Plans for Paul Gartside’s Design #166 are available from gartsideboats.com, $360. Study plans are also available: $20 for electronic delivery, $40 for printed.
Is there a boat you’d like to know more about? Have you built one that you think other Small Boats readers would enjoy? Please email us!
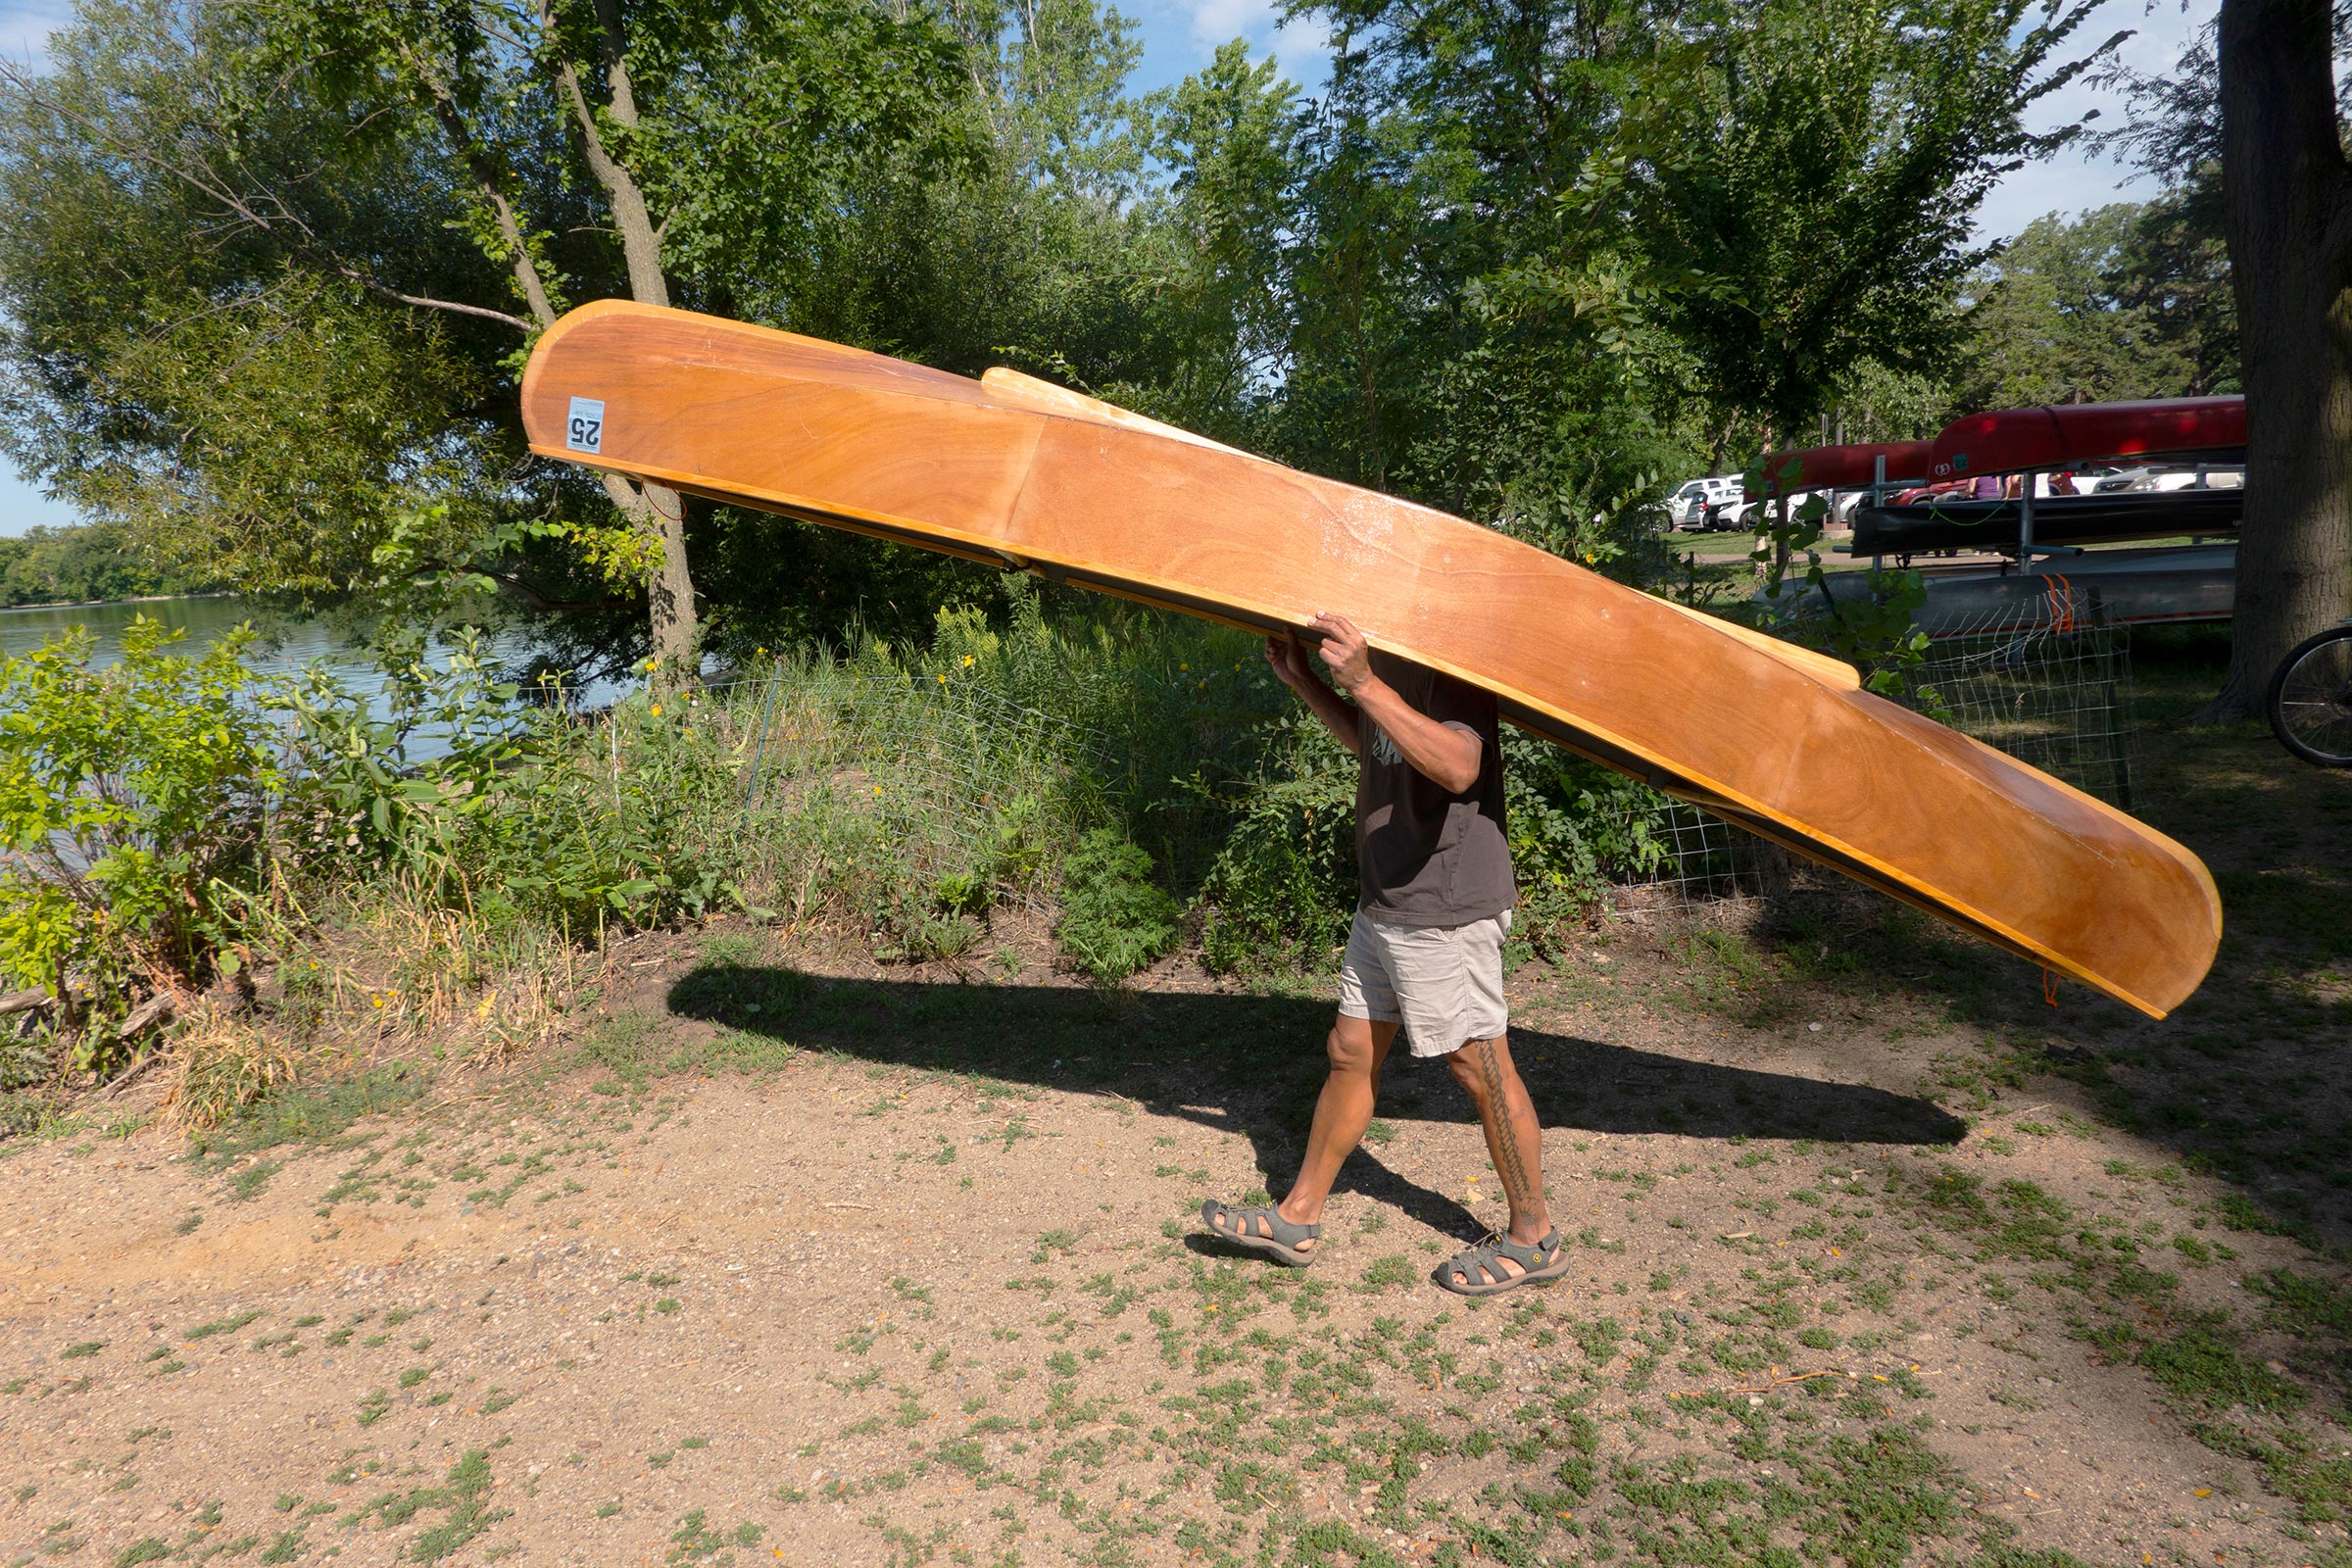
For more than a half-century I have explored many of the Minnesota waterways from a canoe and although I have enjoyed much of that time fishing from it, the idea of trolling or casting for hours on end is not, to my bewilderment, met with as much enthusiasm by my wife and two kids. Our 17′ canoe is more boat than I needed for what has become an individual activity, and I wanted something much more portable and nimble—a solo canoe. Purchasing a new canoe was never going to be an option due to limited resources, and reasonably priced used solo canoes don’t become available often. So, I decided I’d attempt to build one as a winter project.
My criteria for choosing a design revolved around the following: stable enough for trolling or casting, ease of transport on and off my car roof rack, light enough to portage, uncomplicated construction for a first-time boatbuilder, and affordability.
Mike Hoyt
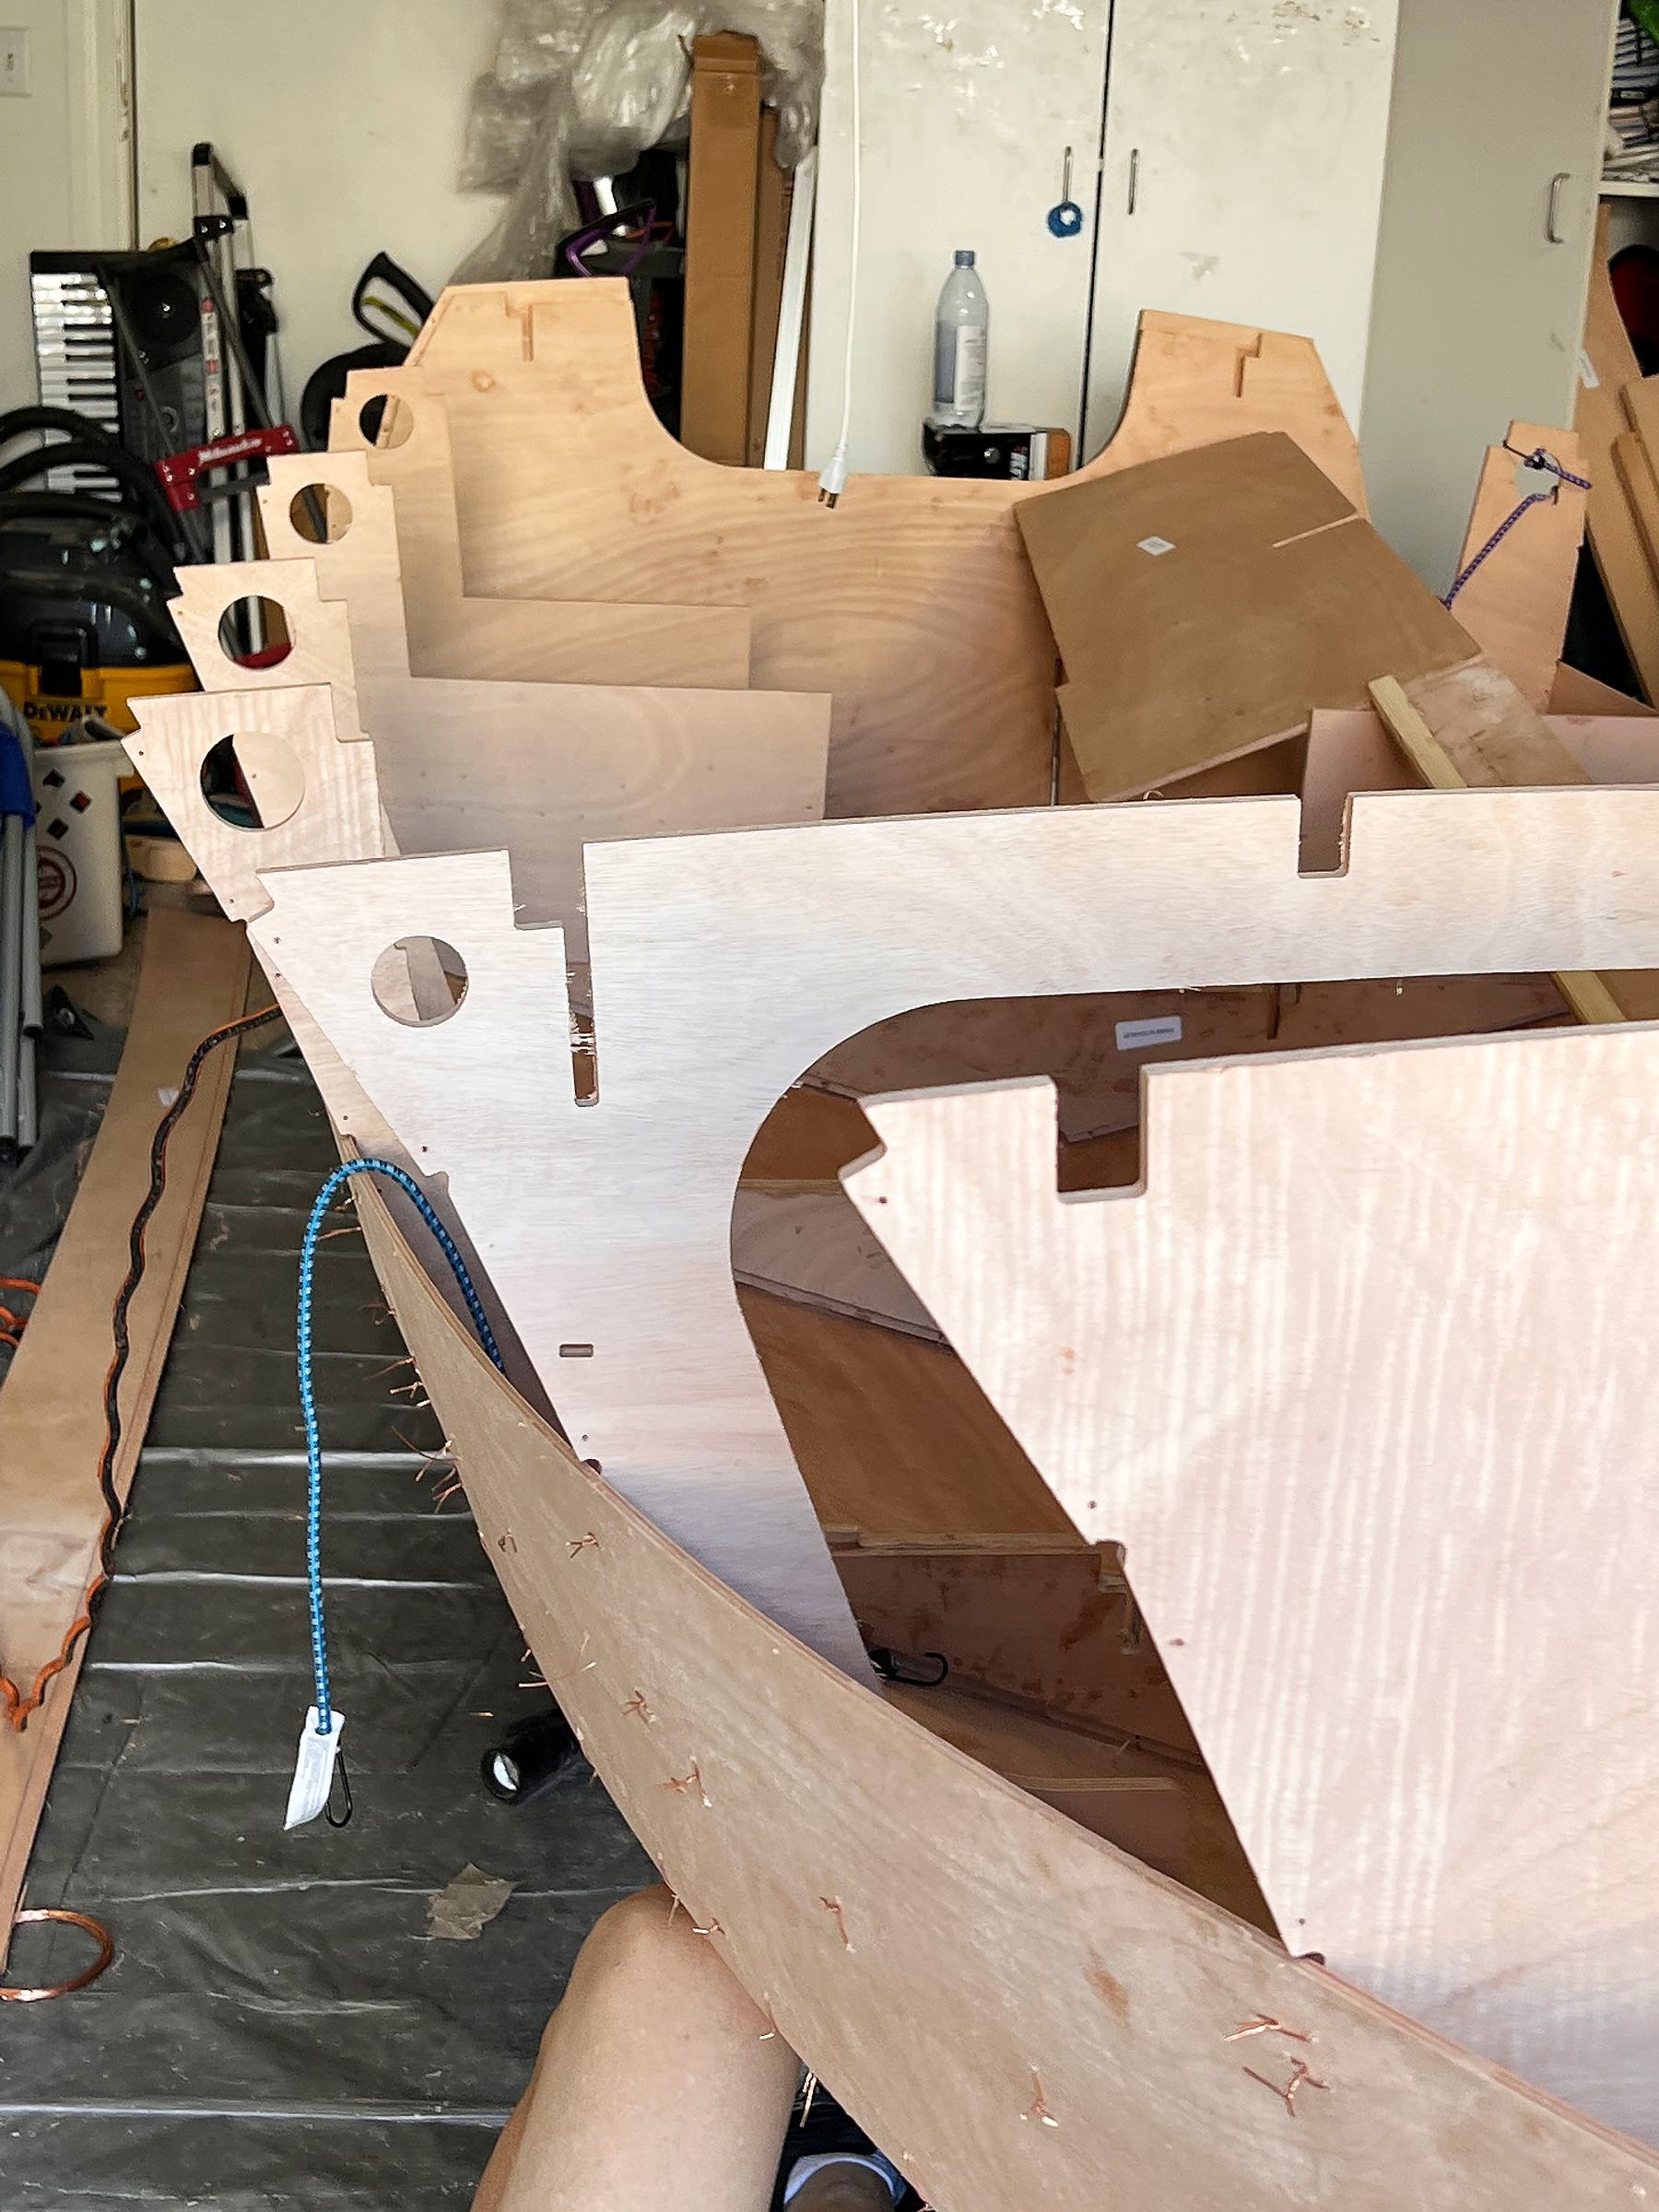
With the two end pieces joined together, the canoe takes shape as the sides are curled up. The seams that will become the chines end short of the stems and are reinforced with small plywood patches, epoxied in place, to ease the transition there from angled chine to curved bow.
I found many resources on the web for one-sheet, lapstrake, and tortured-plywood designs. After finding and browsing Michael Maddox’s site, I settled on his Hiwassee Wanderer design because I felt like it fit well with my key criteria. As Michael wrote, the “canoe is designed to combine classic aesthetics with simplicity of construction. It features a traditional recurved bow and is well within the abilities of a first-time amateur builder.”
I purchased the plan set online and promptly received PDF files for the two sheets of 1:5-scale measured drawings, one with the patterns for the five plywood hull components and the other detailing the single frame and its gussets, the breasthooks, thwarts, and seat supports. The 12 pages of instructions included informative drawings and color photographs detailing every step in the construction process. Michael’s clearly written instructions walked me through each step of construction in a sequence that was easy to follow. The construction doesn’t require any special tools—most people probably own (or are able to borrow) the necessary tools and equipment for the project.
Mike Hoyt
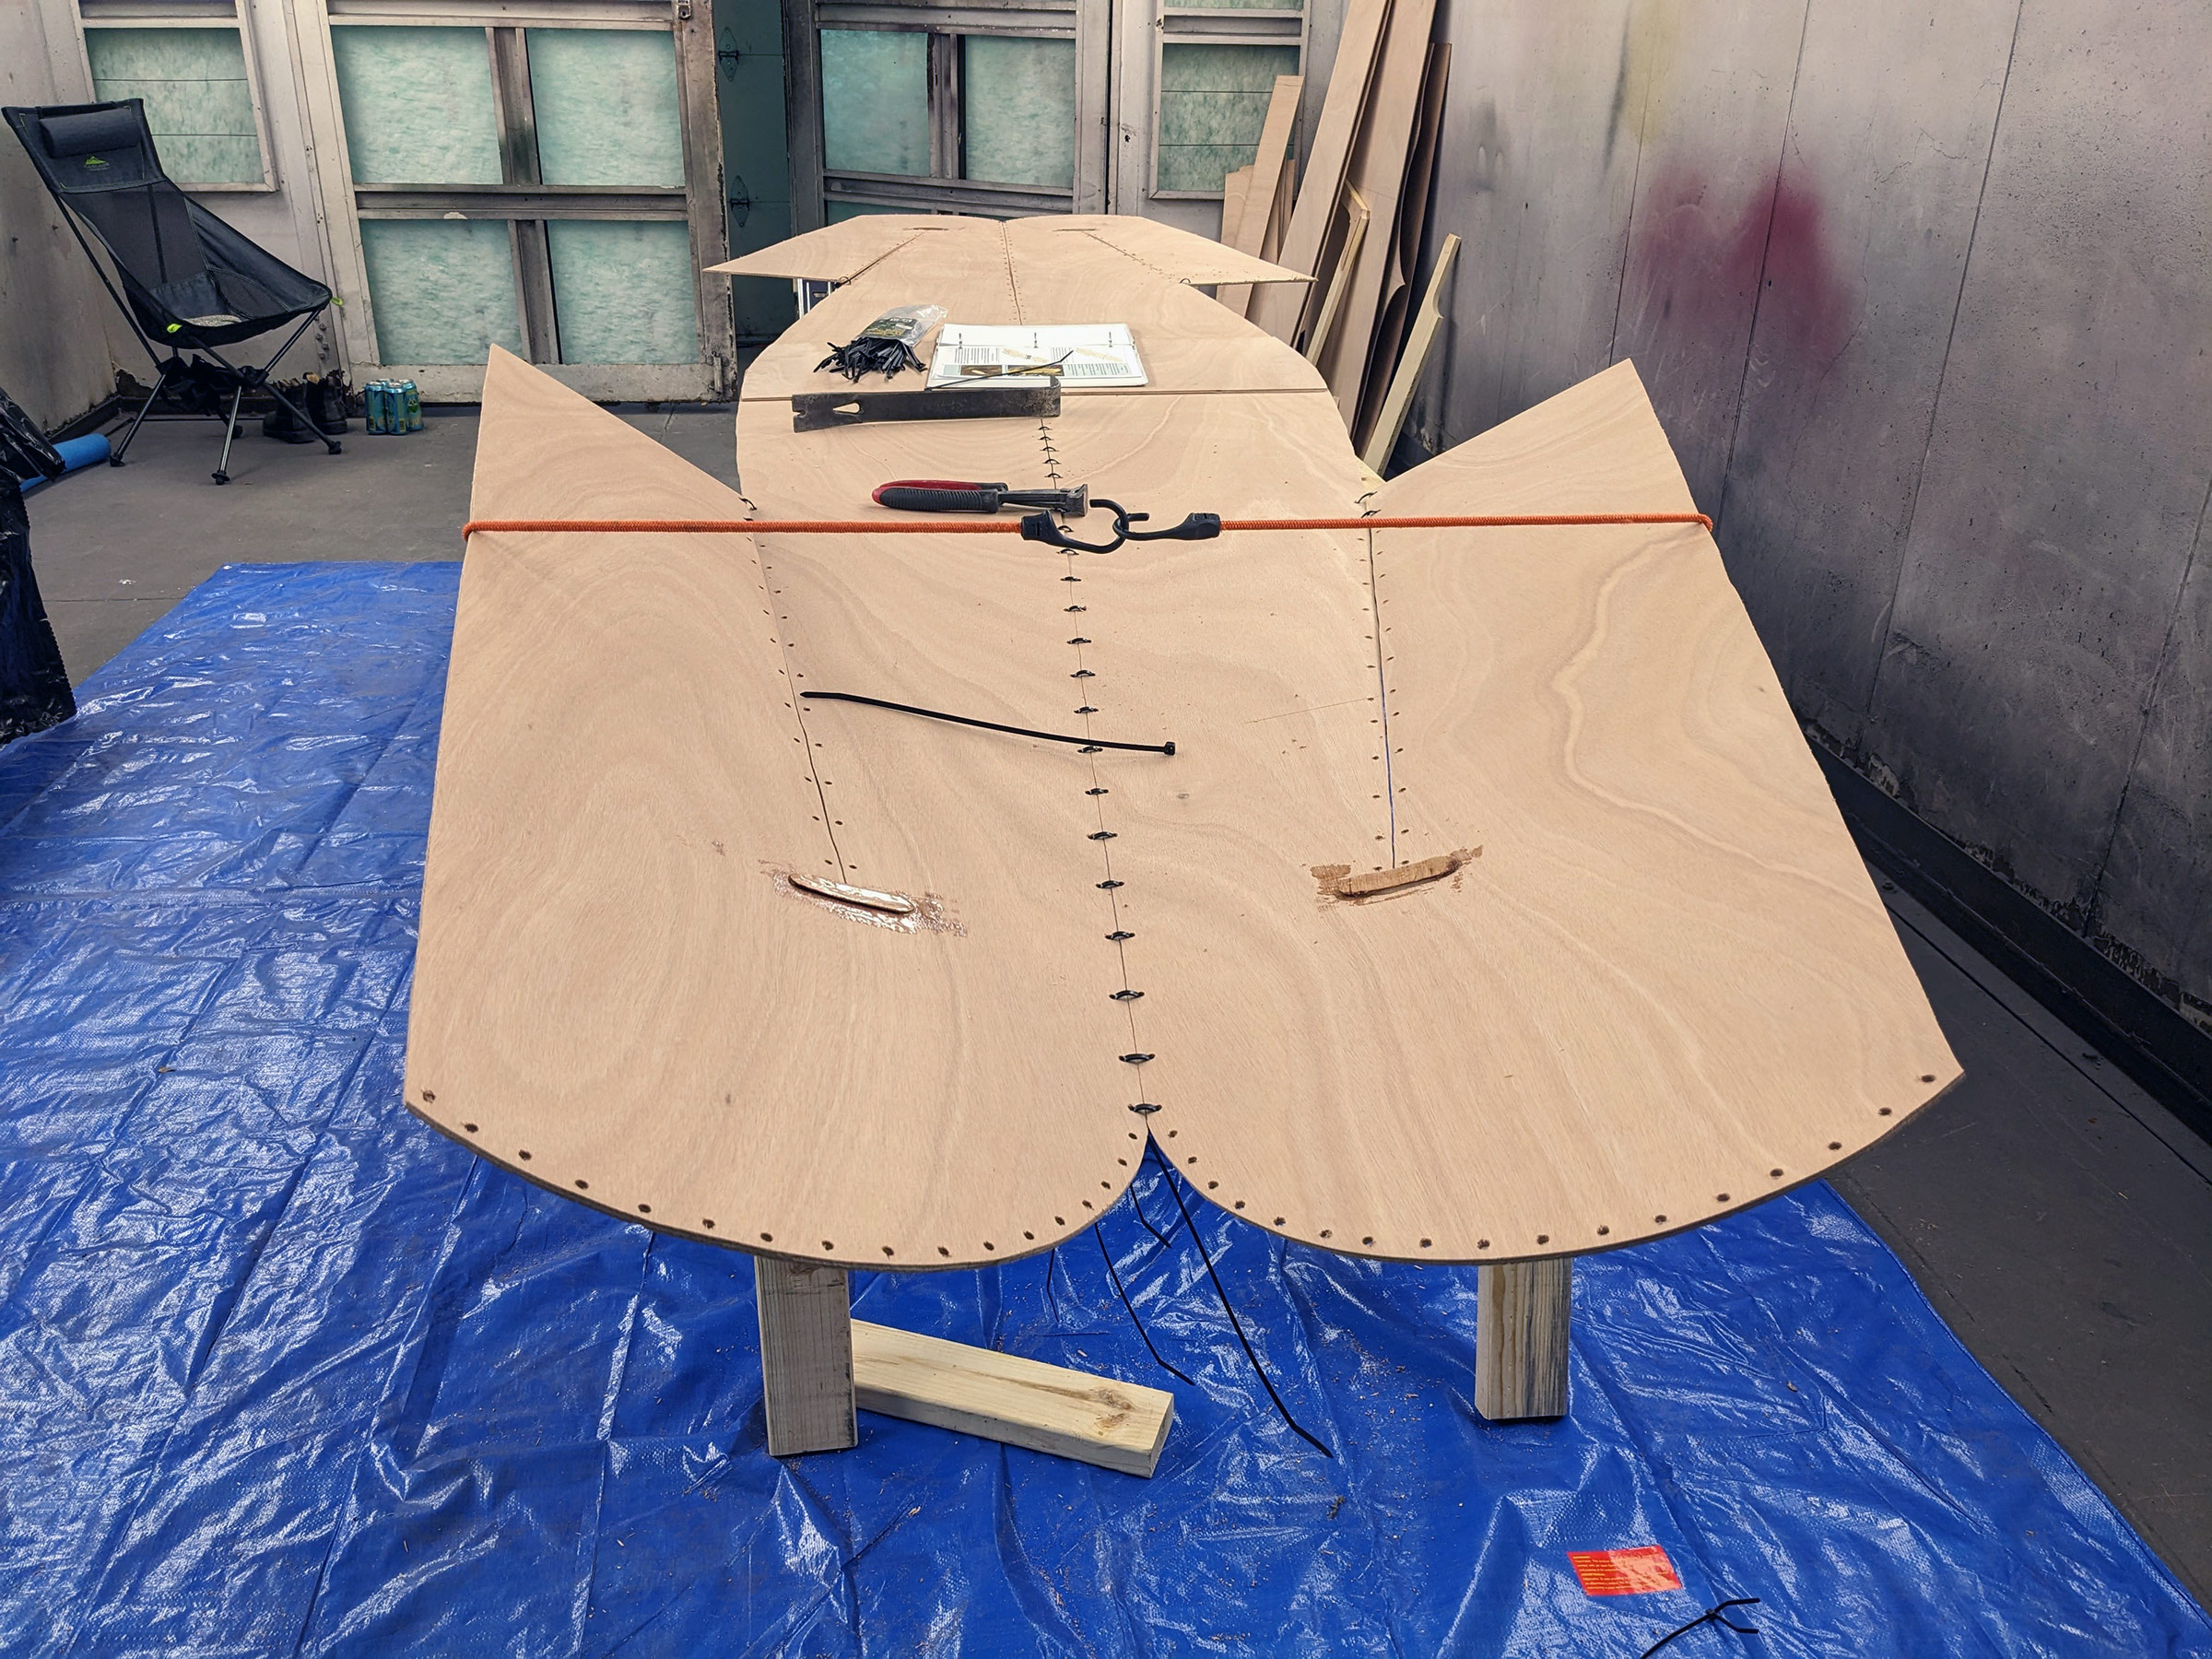
Stitch-and-glue construction often uses wire to close the seams, but zip ties make it easier to align the joined plywood edges.
The hull of the Hiwassee Wanderer requires three sheets of marine-grade 1⁄4″ plywood—fir, judging by the looks of the plywood in the photographs—but I opted to use 4mm okoume instead. I built the rest of the components from scrap materials I had on hand or wood purchased from a big-box lumberyard. When I had all my tools and materials gathered, I was ready to begin the build. I consider myself a competent woodworker but would never claim to be a master carpenter. I was familiar and comfortable with the tools required for this project and found it easy to construct the canoe without assistance.
The plans provide thorough instructions for drawing the hull shapes on the plywood. After the two end pieces are cut out they are butted together and the “floor block” is epoxied in place over the joint.
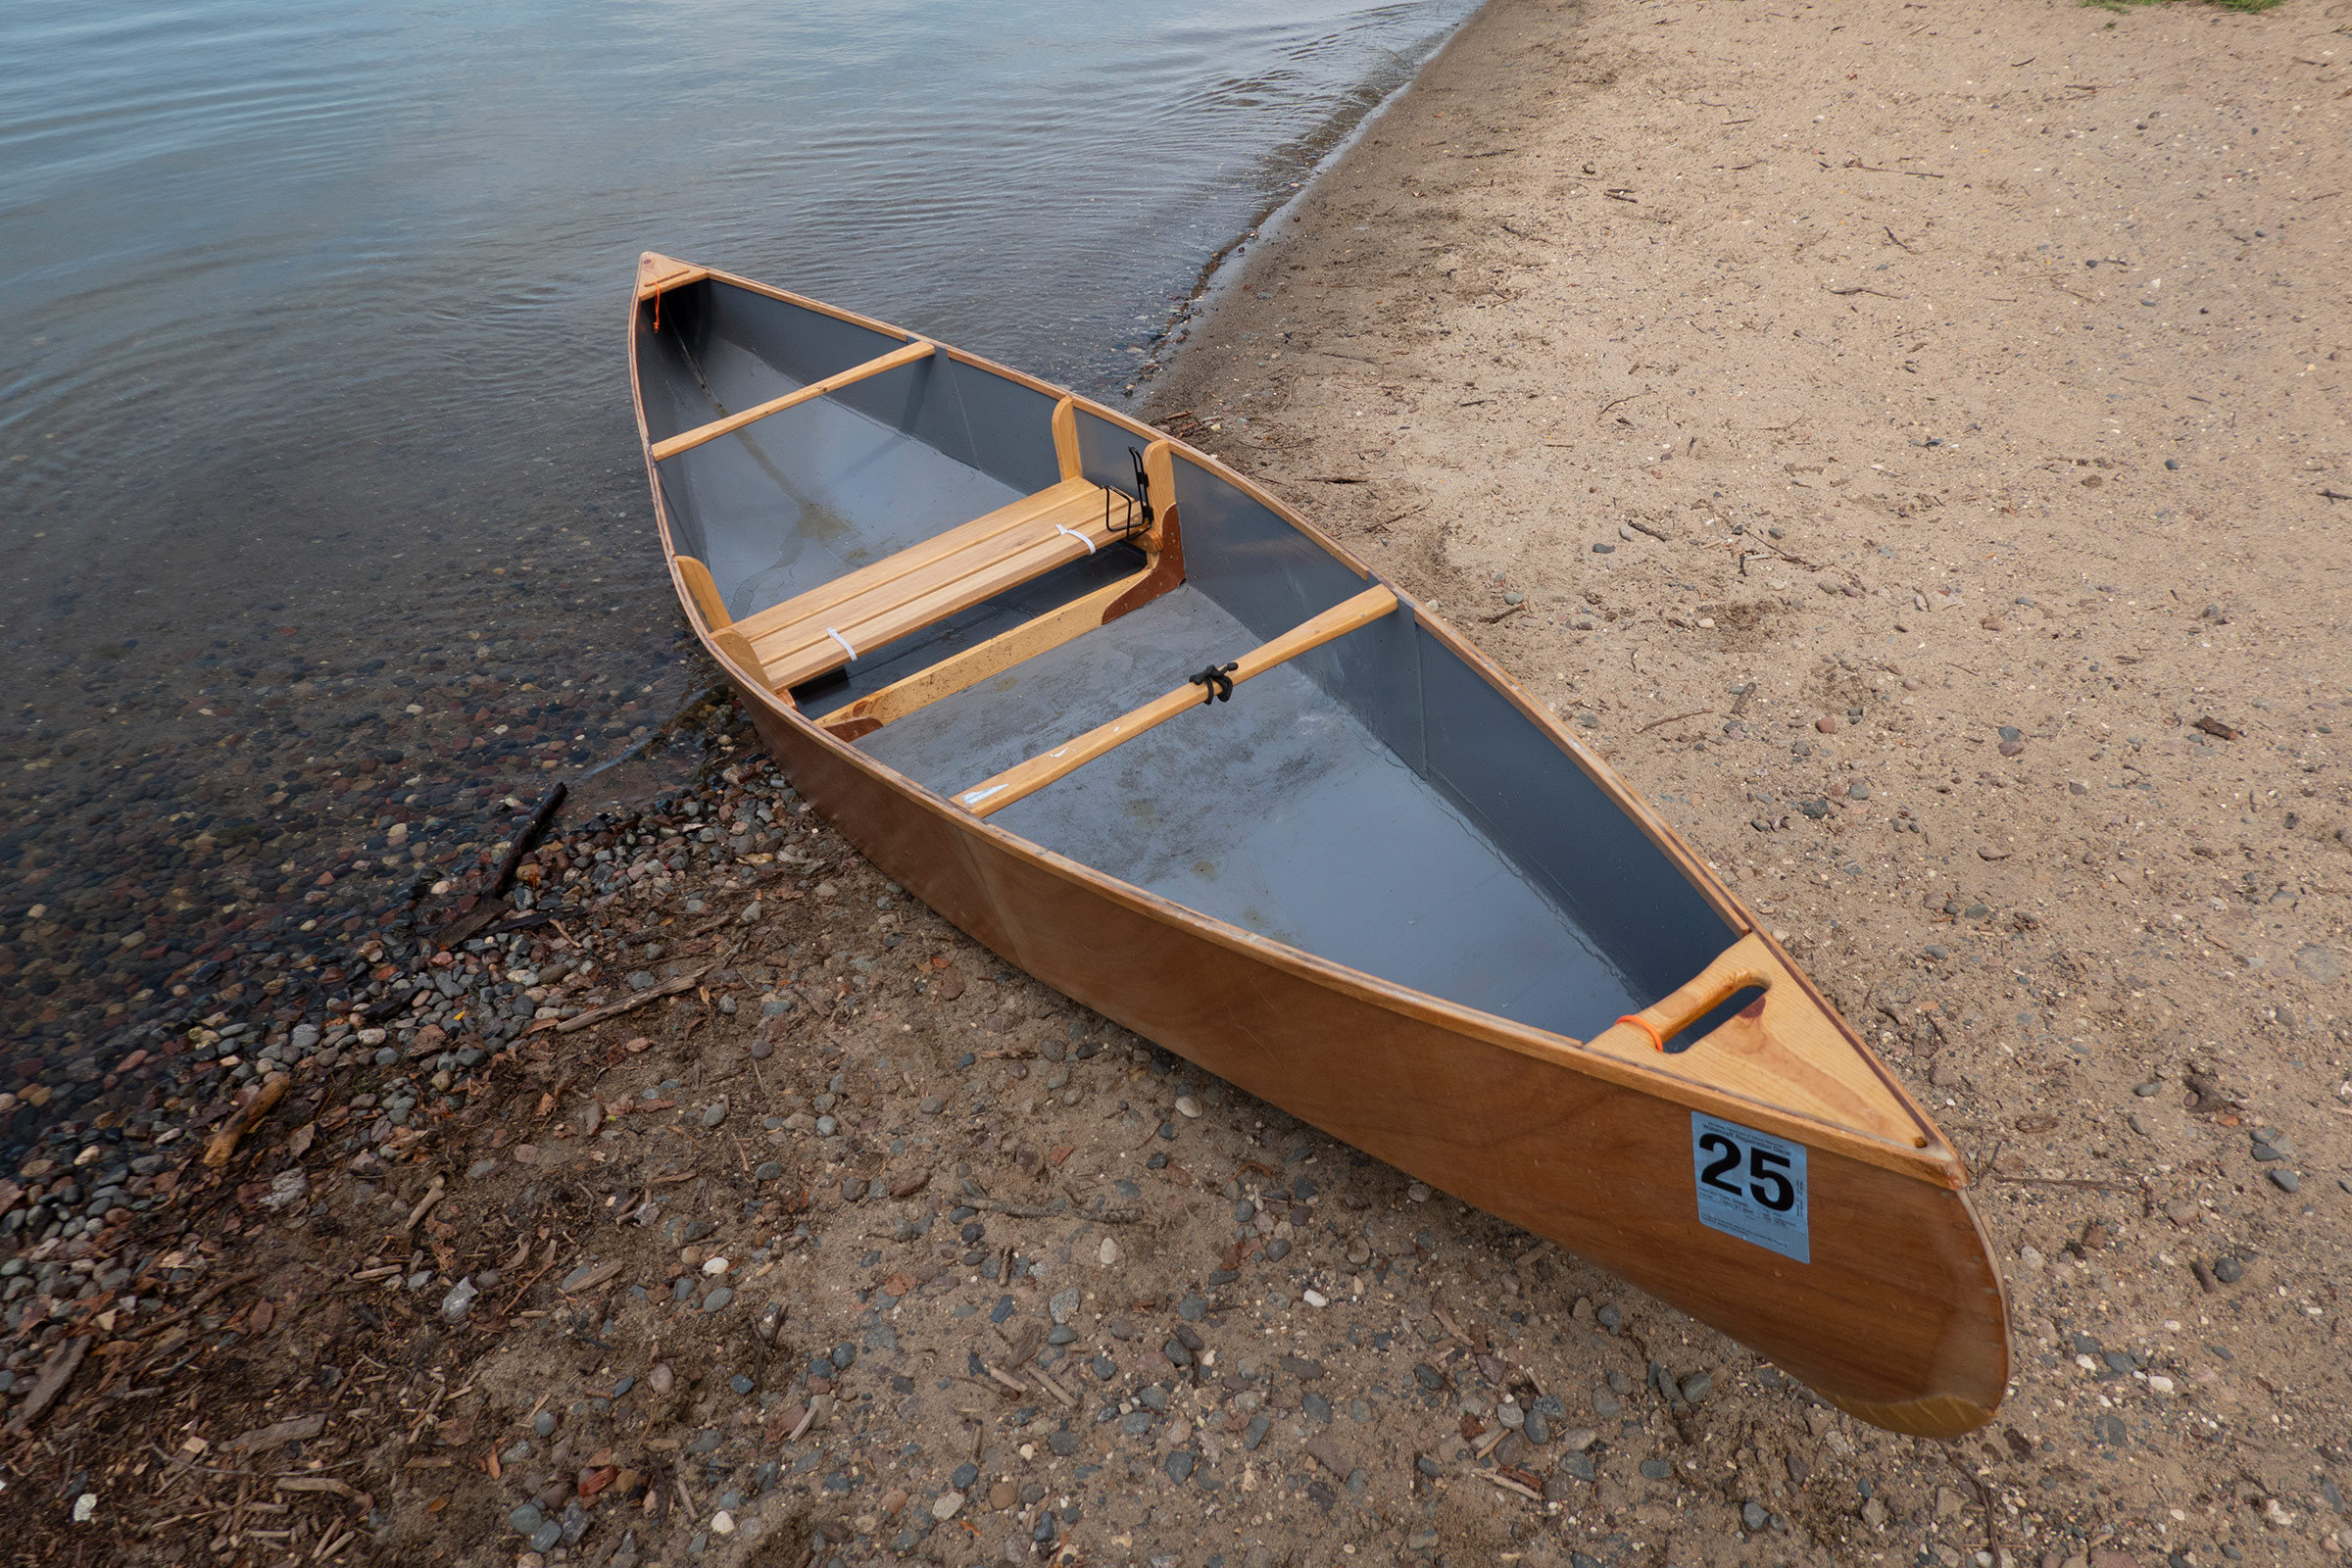
Peter H. Thompson, www.phtpht.com
The outwales and the inwales (which are installed here in sections between thwarts and frames) were not indicated in the plans but reinforce the sheer and make the canoe easier to grip from anywhere along its length.
Shaping the hull with the stitch-and-glue process was new to me, and as I slowly ratchet-strapped the flat assembled panels I was surprised at how they curled up to take the shape of the canoe. As the seams between the bottom and sides closed, they formed the hard chines amidships and forced curves into the ends. Working slowly while tightening the zip ties that close the seams helps ensure even alignment of the joined edges. Using zip ties was easy and much more efficient than twisting copper wire. A friend who had built her first dinghy told me that using copper wire to stitch the seams together was the hardest part of the process.
Two slightly curved rectangular plywood panels measuring 63 1⁄2″ × 11″ fill the gaps on the sides of the hull. They’re zip-tied to the bottom panel at the chine and butt-blocked on their ends.
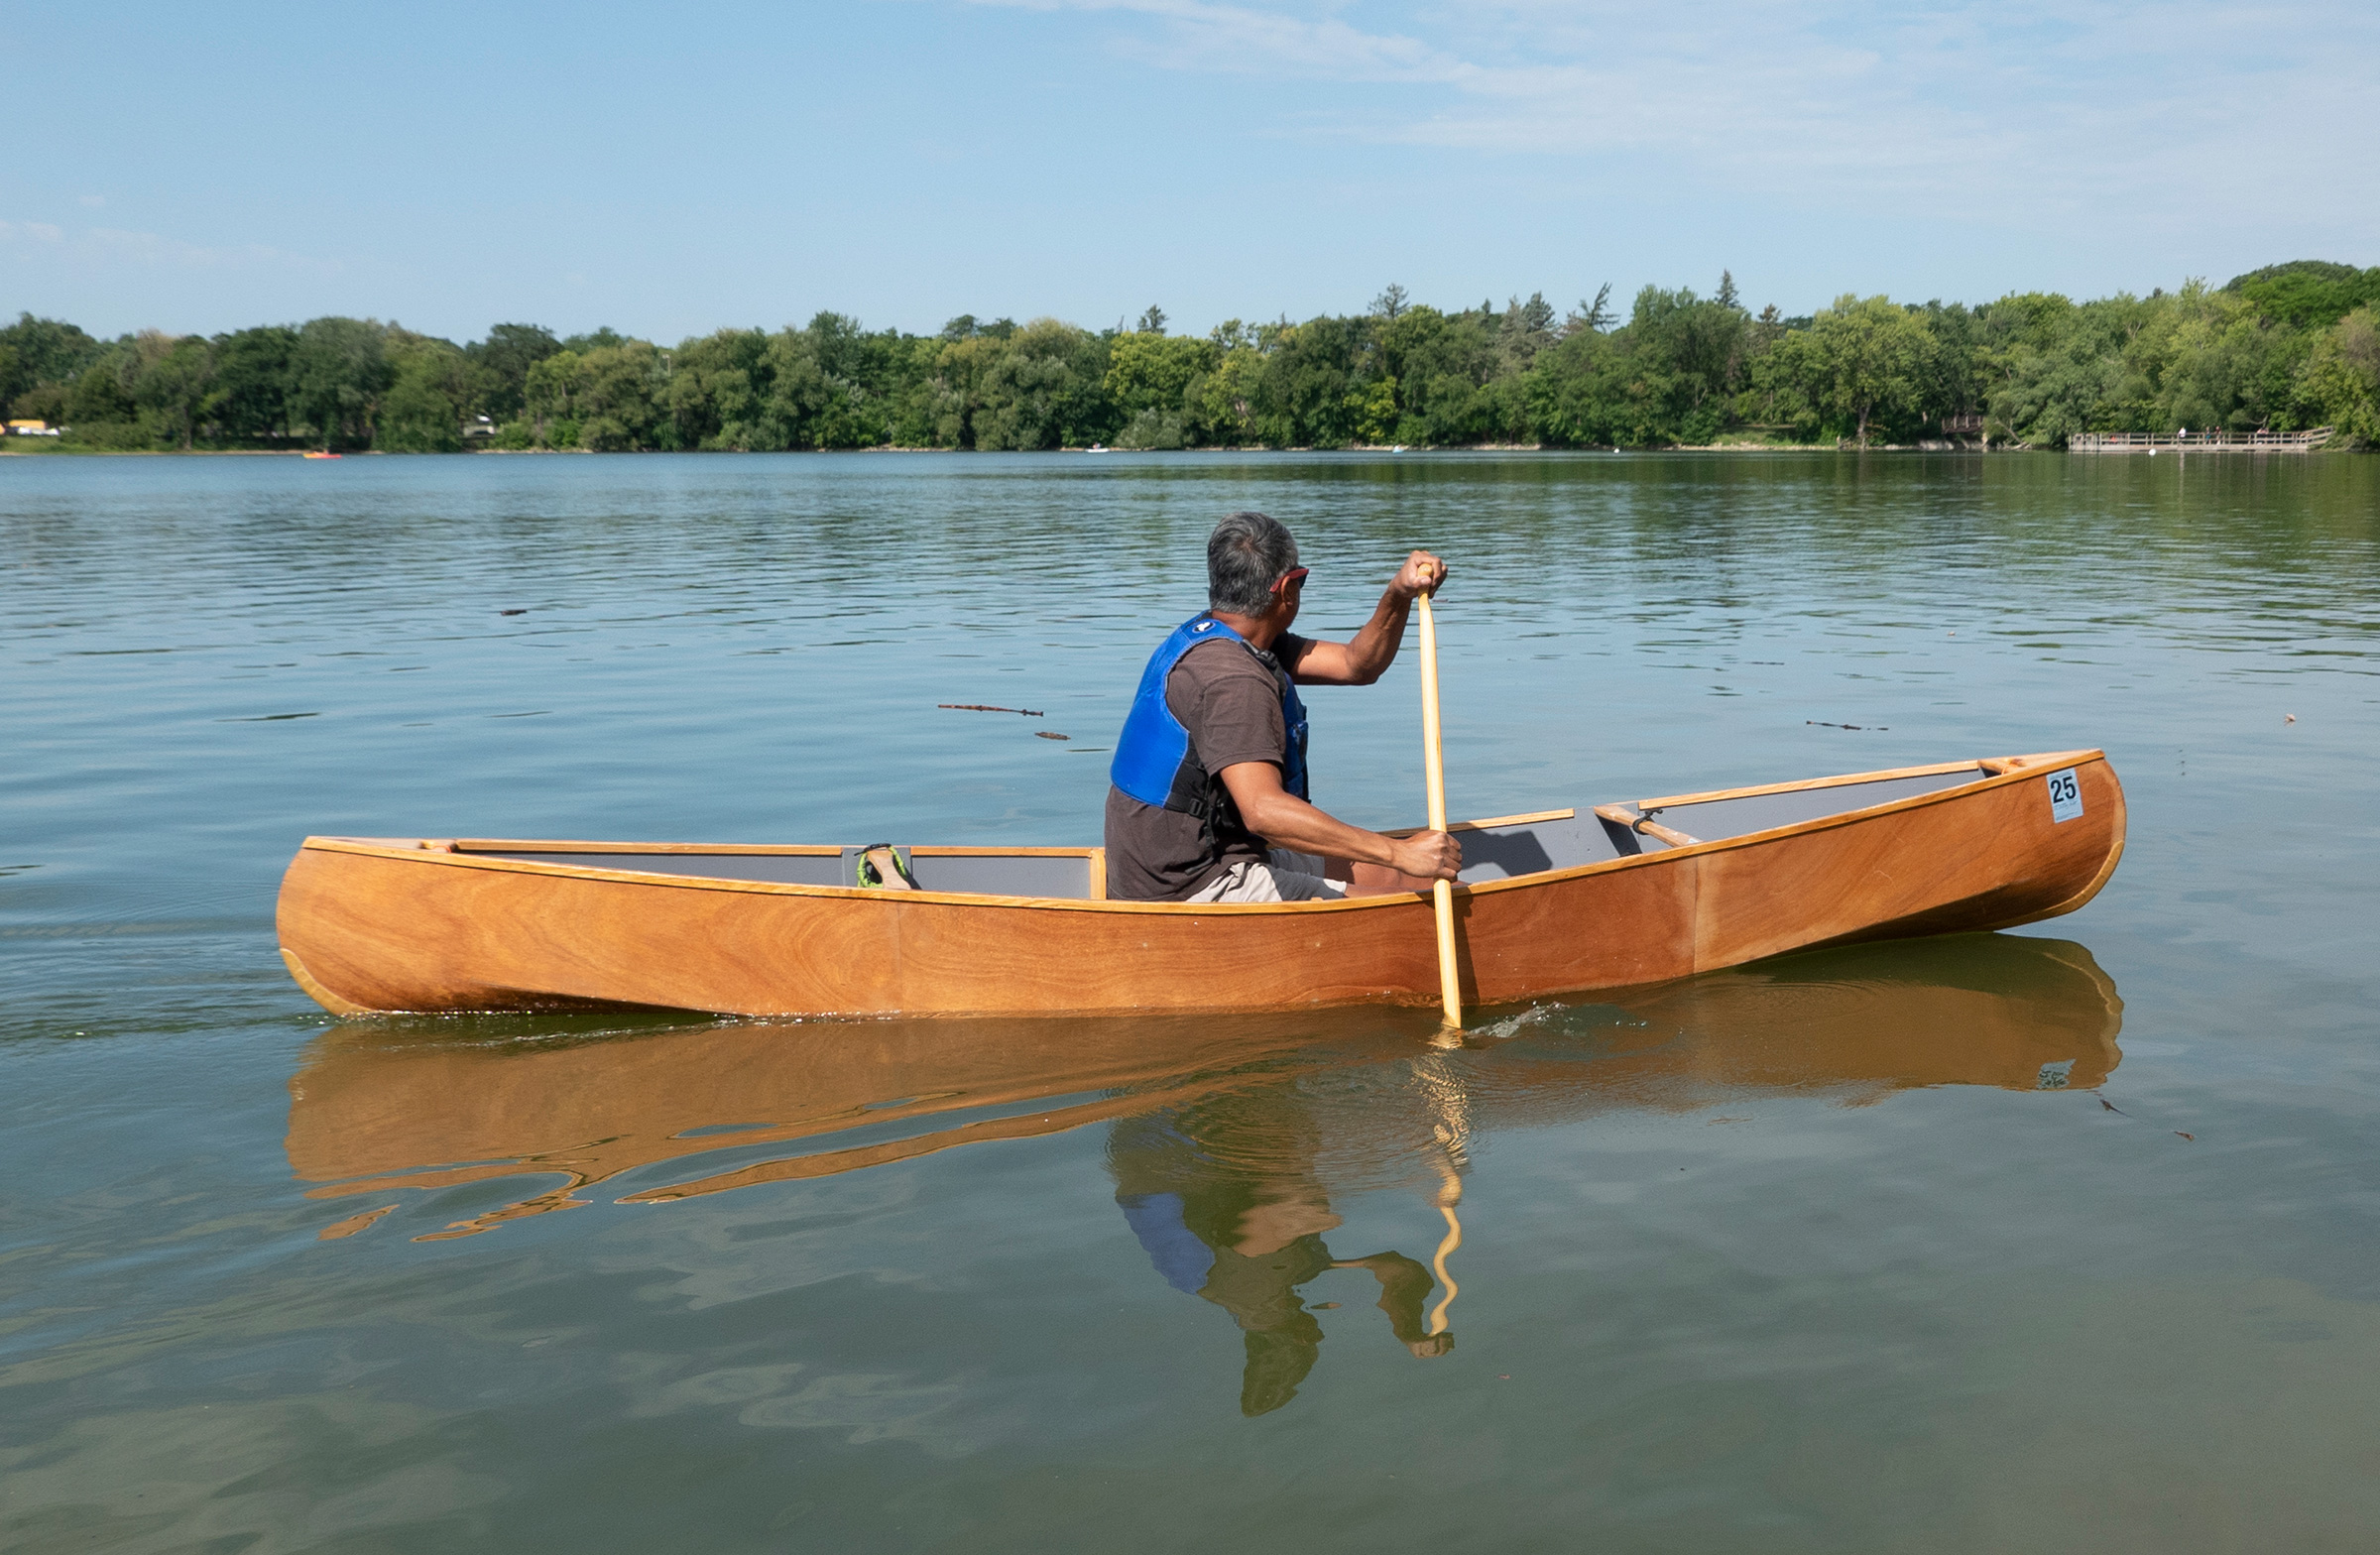
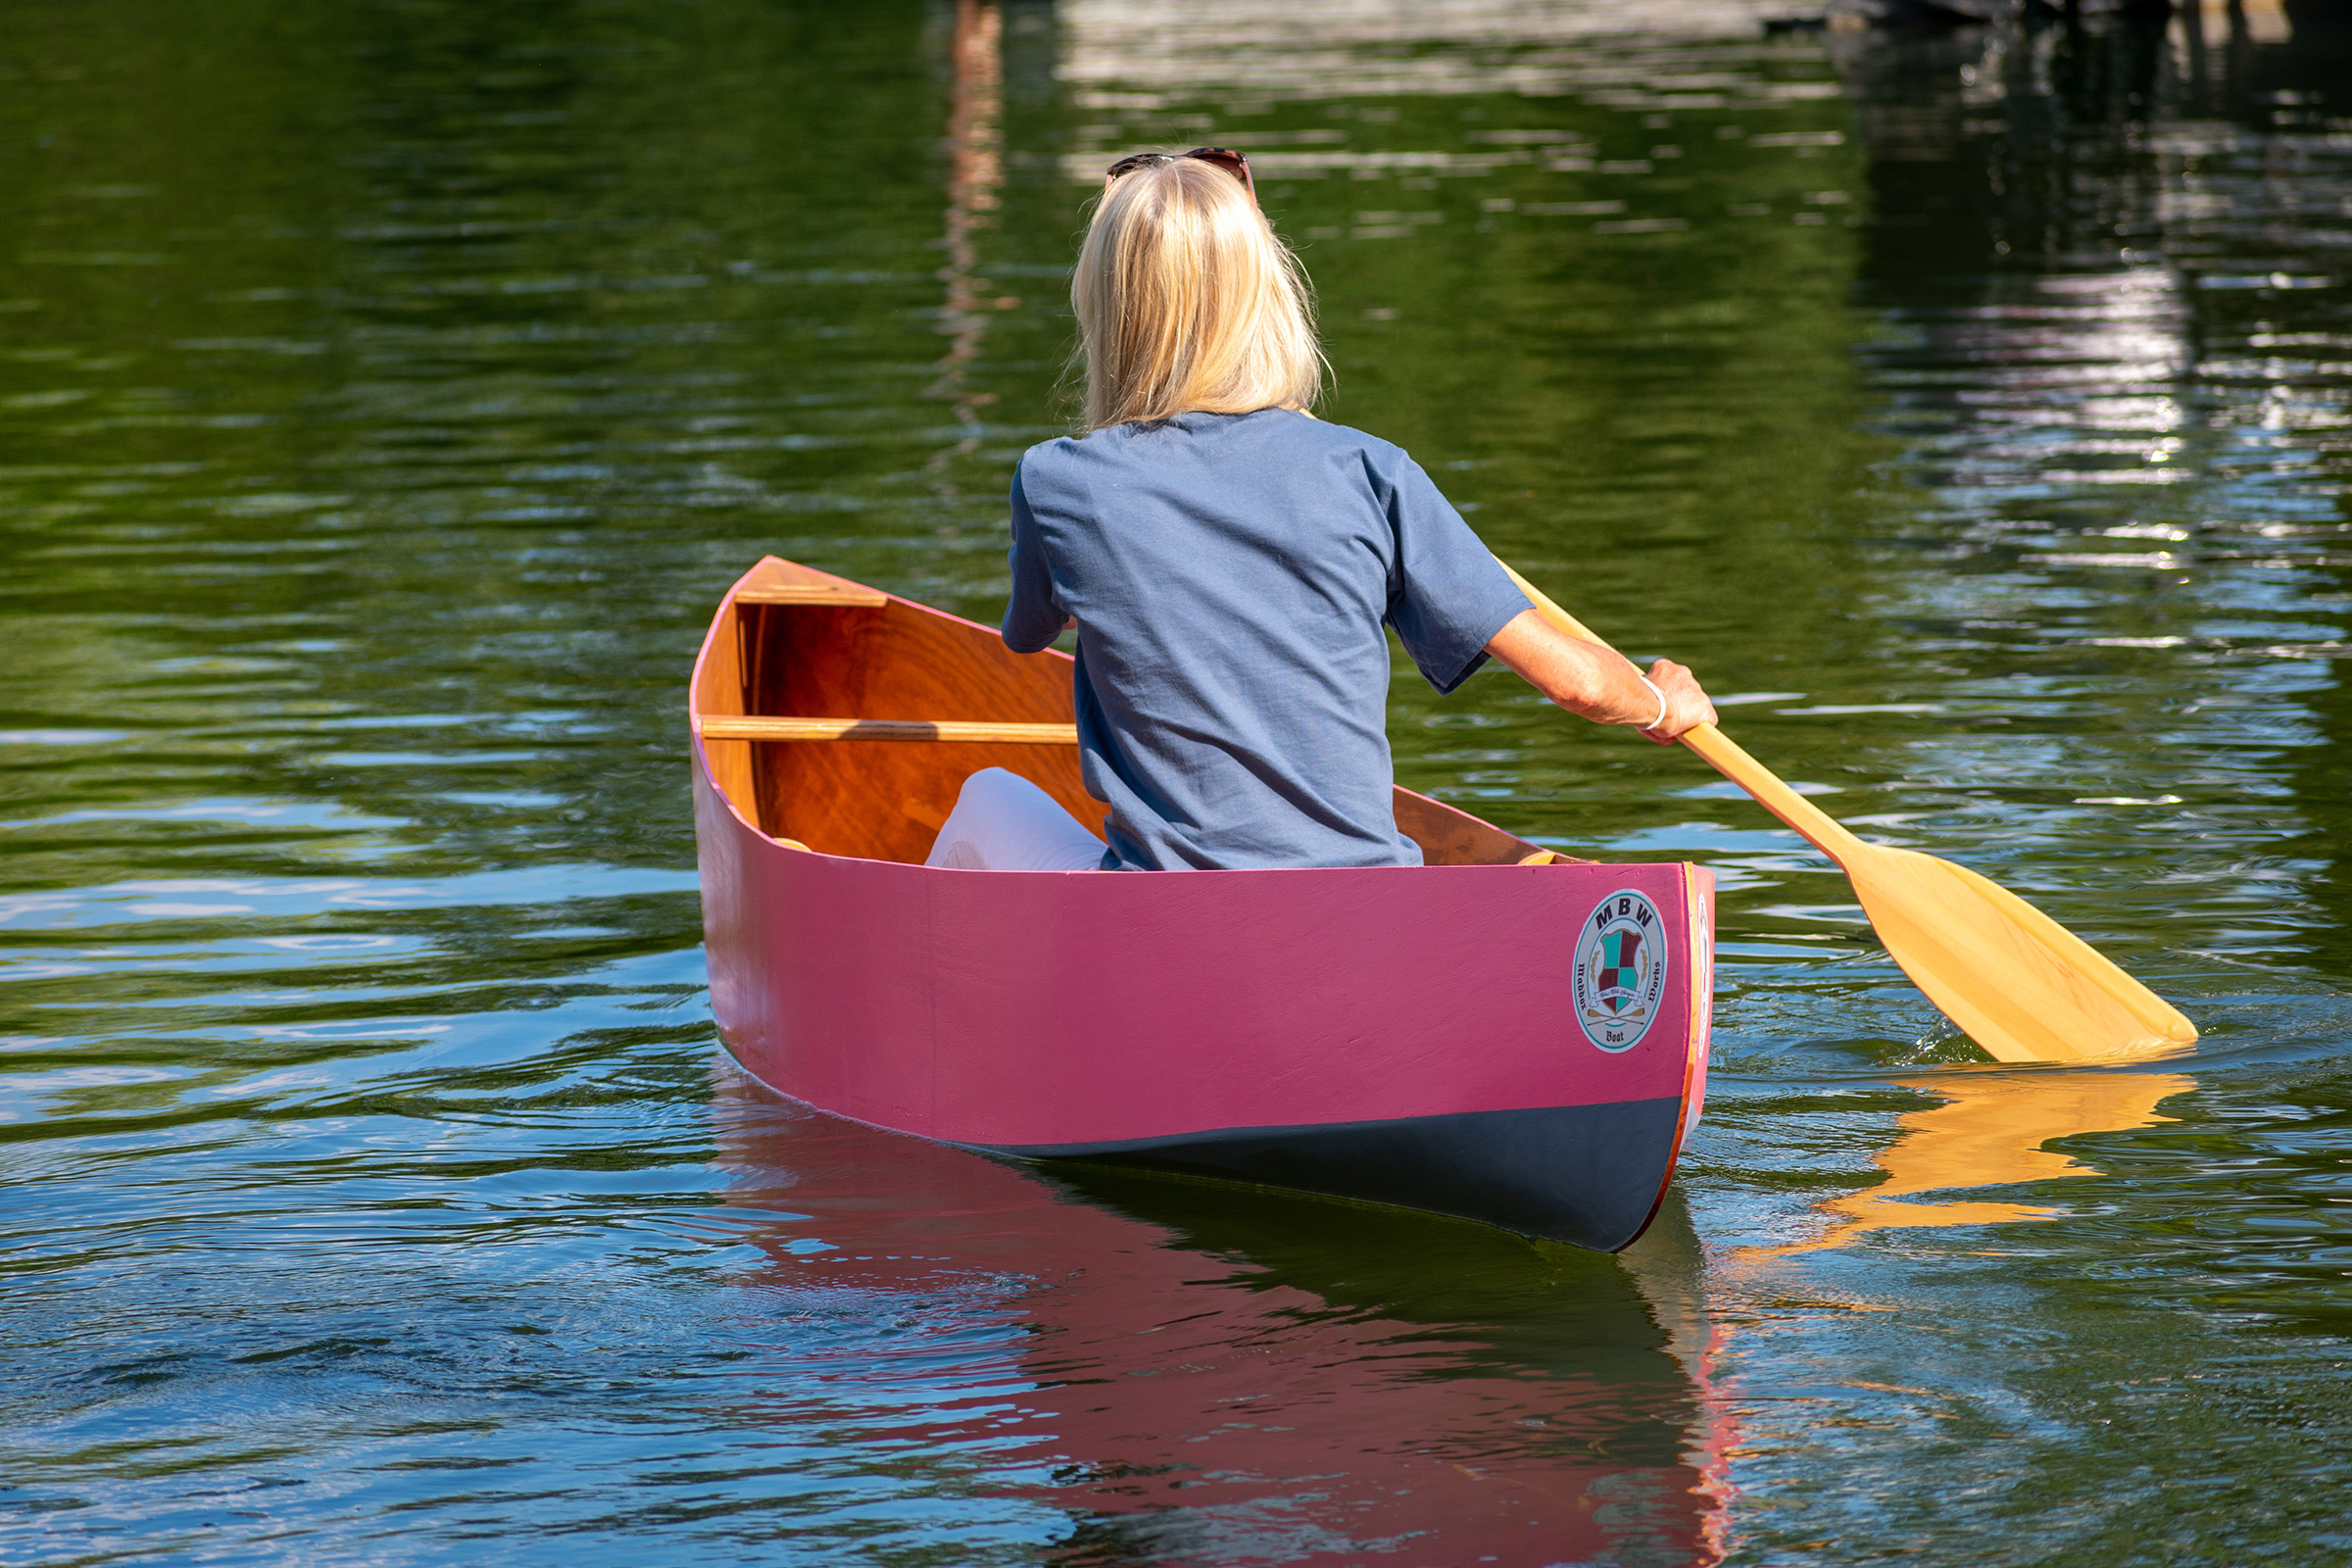
Peter H. Thompson, www.phtpht.com
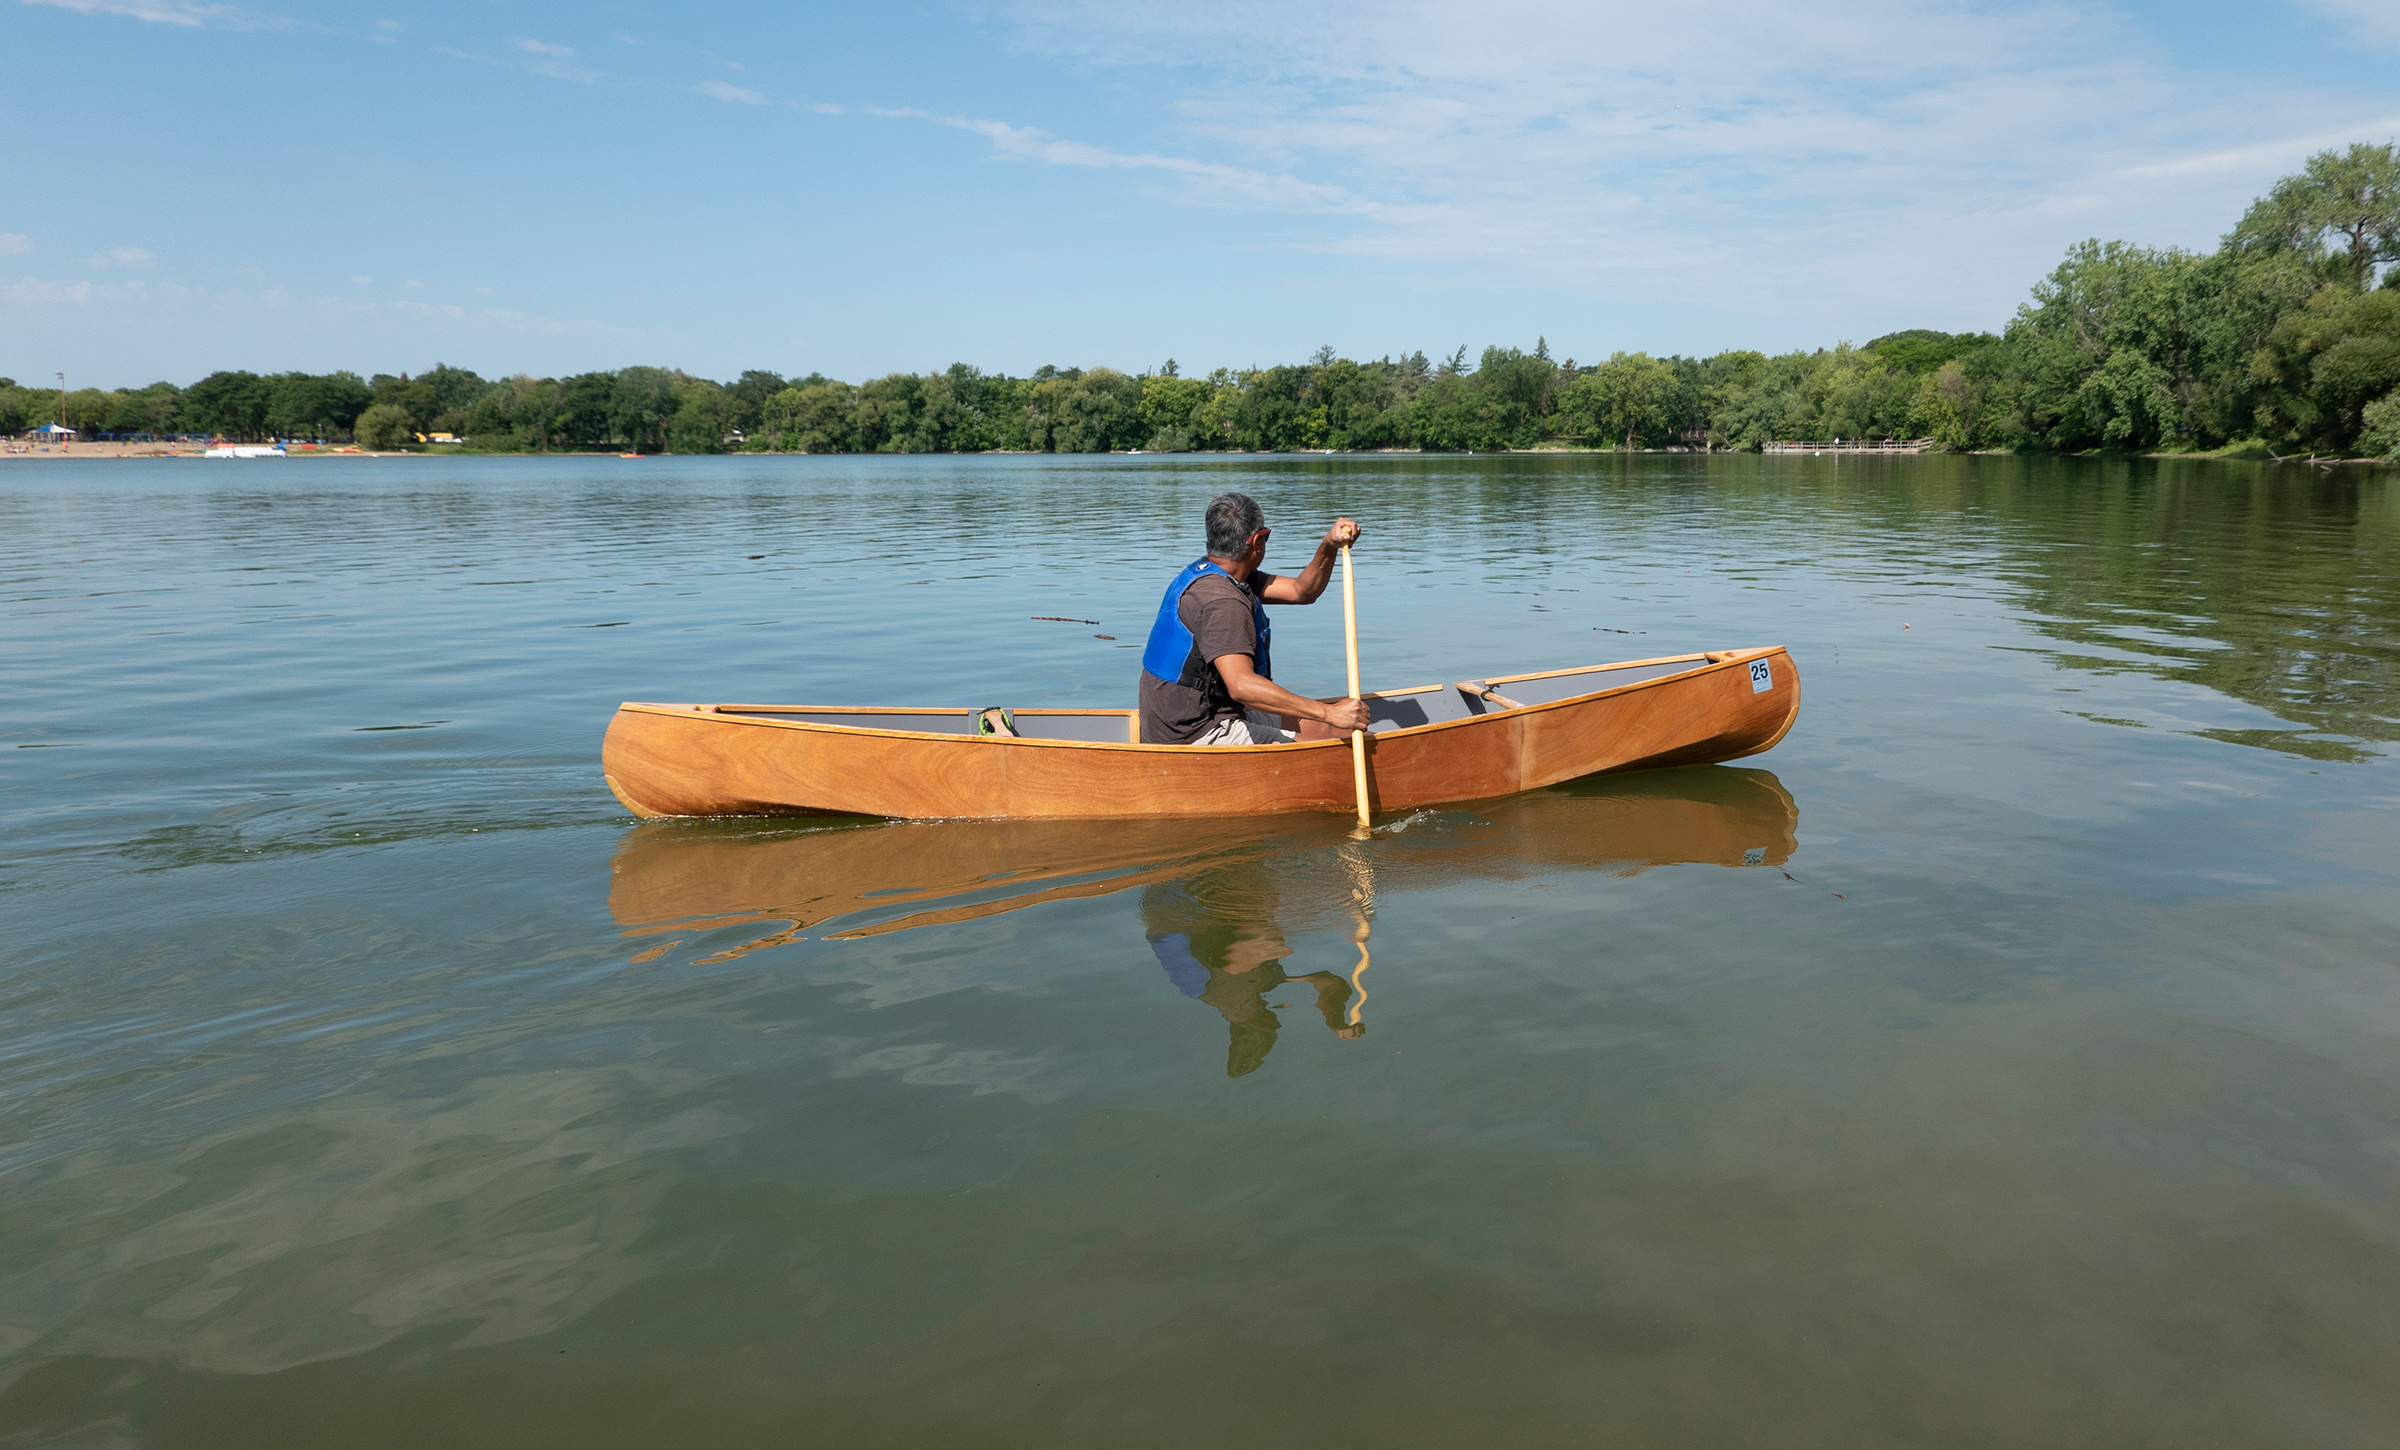
With the author aboard, the Wanderer sits lightly on the water and its wide bottom provides good stability.
After the hull had taken shape and all the zip ties were in place I tacked the seams with epoxy thickened with fumed silica. It took some trial and error to get the ratio to achieve the right viscosity, and my skills improved as the project progressed. After the epoxy had cured, I cut and removed the zip ties, applied fillets of thickened epoxy to the chines inside the hull, and filled the gaps outside. Finally, after sanding them smooth, I applied fiberglass tape to the chines, inside and out.
The instructions suggest “the builder may choose to fiberglass the entire hull and/or encapsulate it in 2 or 3 coats of marine epoxy for increased water resistance and added durability.” I sheathed the exterior with fiberglass and epoxy. I installed the breasthooks, thwarts, frame, and the wood-slat seat (woven webbing is an option) as directed by the instructions but held off on installing the keel to see how the canoe would handle without it.
Peter H. Thompson, www.phtpht.com
The raised seat makes for a comfortable paddling position and facilitates getting in and out of the canoe.
I finished the canoe in roughly 100 hours over three weeks and I think most builders, even novices, should be able to take on this project without too much difficulty. If you want to varnish the plywood, slow down, as all the imperfections caused by hastily done work will show. You can prolong the enjoyment of the process by reducing the urge to cut corners.
Mike Hoyt
The Wanderer can be easily lifted on and off roof racks. The Kevlar skid plates applied to the ends are not in the plans but offer strength and protection.
I took the canoe out on a local lake for my first test paddle. It was very easy to transport on my car’s roof rack and was light enough to portage, without a yoke, from the parking lot to shore without difficulty. The conditions were mild to moderate winds. Once afloat for the first time, I was impressed with the initial stability, an important characteristic in a solo canoe that I’d use for fishing. With no keel the canoe did not track as well as the tandem canoes with which I was familiar, but I attributed some of this to the canoe’s shorter length and ample rocker.
Peter H. Thompson, www.phtpht.com
The light weight of the Wanderer makes it an easy carry. Here its partial-length keel is visible.
After about five days on the water and a few email exchanges with Michael about how the canoe was performing, I decided to add the keel. It was, after all, part of his original design and I figured it would help. After installing the keel, I took the canoe on a multi-day fishing trip on a small trout lake in northern Minnesota. For most of the time the conditions were mild, and I explored a body of water new to me at a casual pace. I was out of cellular service and there hadn’t been any bad weather forecast for the area, so I was caught off guard when a storm moved in. As the sky darkened and the winds picked up, I did my best to get off the water, but did not make it before being challenged by horizontal gusts of hail and whitecaps. It was not an ideal position to be in, but it did give me some assurance that the canoe had good stability. I got safely back to shore.
The addition of the keel did improve tracking, but not dramatically given the short waterline. I found that using a slightly longer paddle made my J-stroke more effective for course corrections by giving me more reach over the wide beam. I paddled for a day with a double-bladed kayak paddle, and it was easier to maintain a straight course with that than it was with the canoe paddle. Although I found the kayak paddle too cumbersome for use while fishing and trolling, if fishing is not a priority, I recommend using one with the Wanderer. The canoe maneuvers easily and can be rotated in place and repositioned quickly. When trolling I found it helpful to set the canoe across the wind so that its ample freeboard caught the gusts for a slow sideways drift.
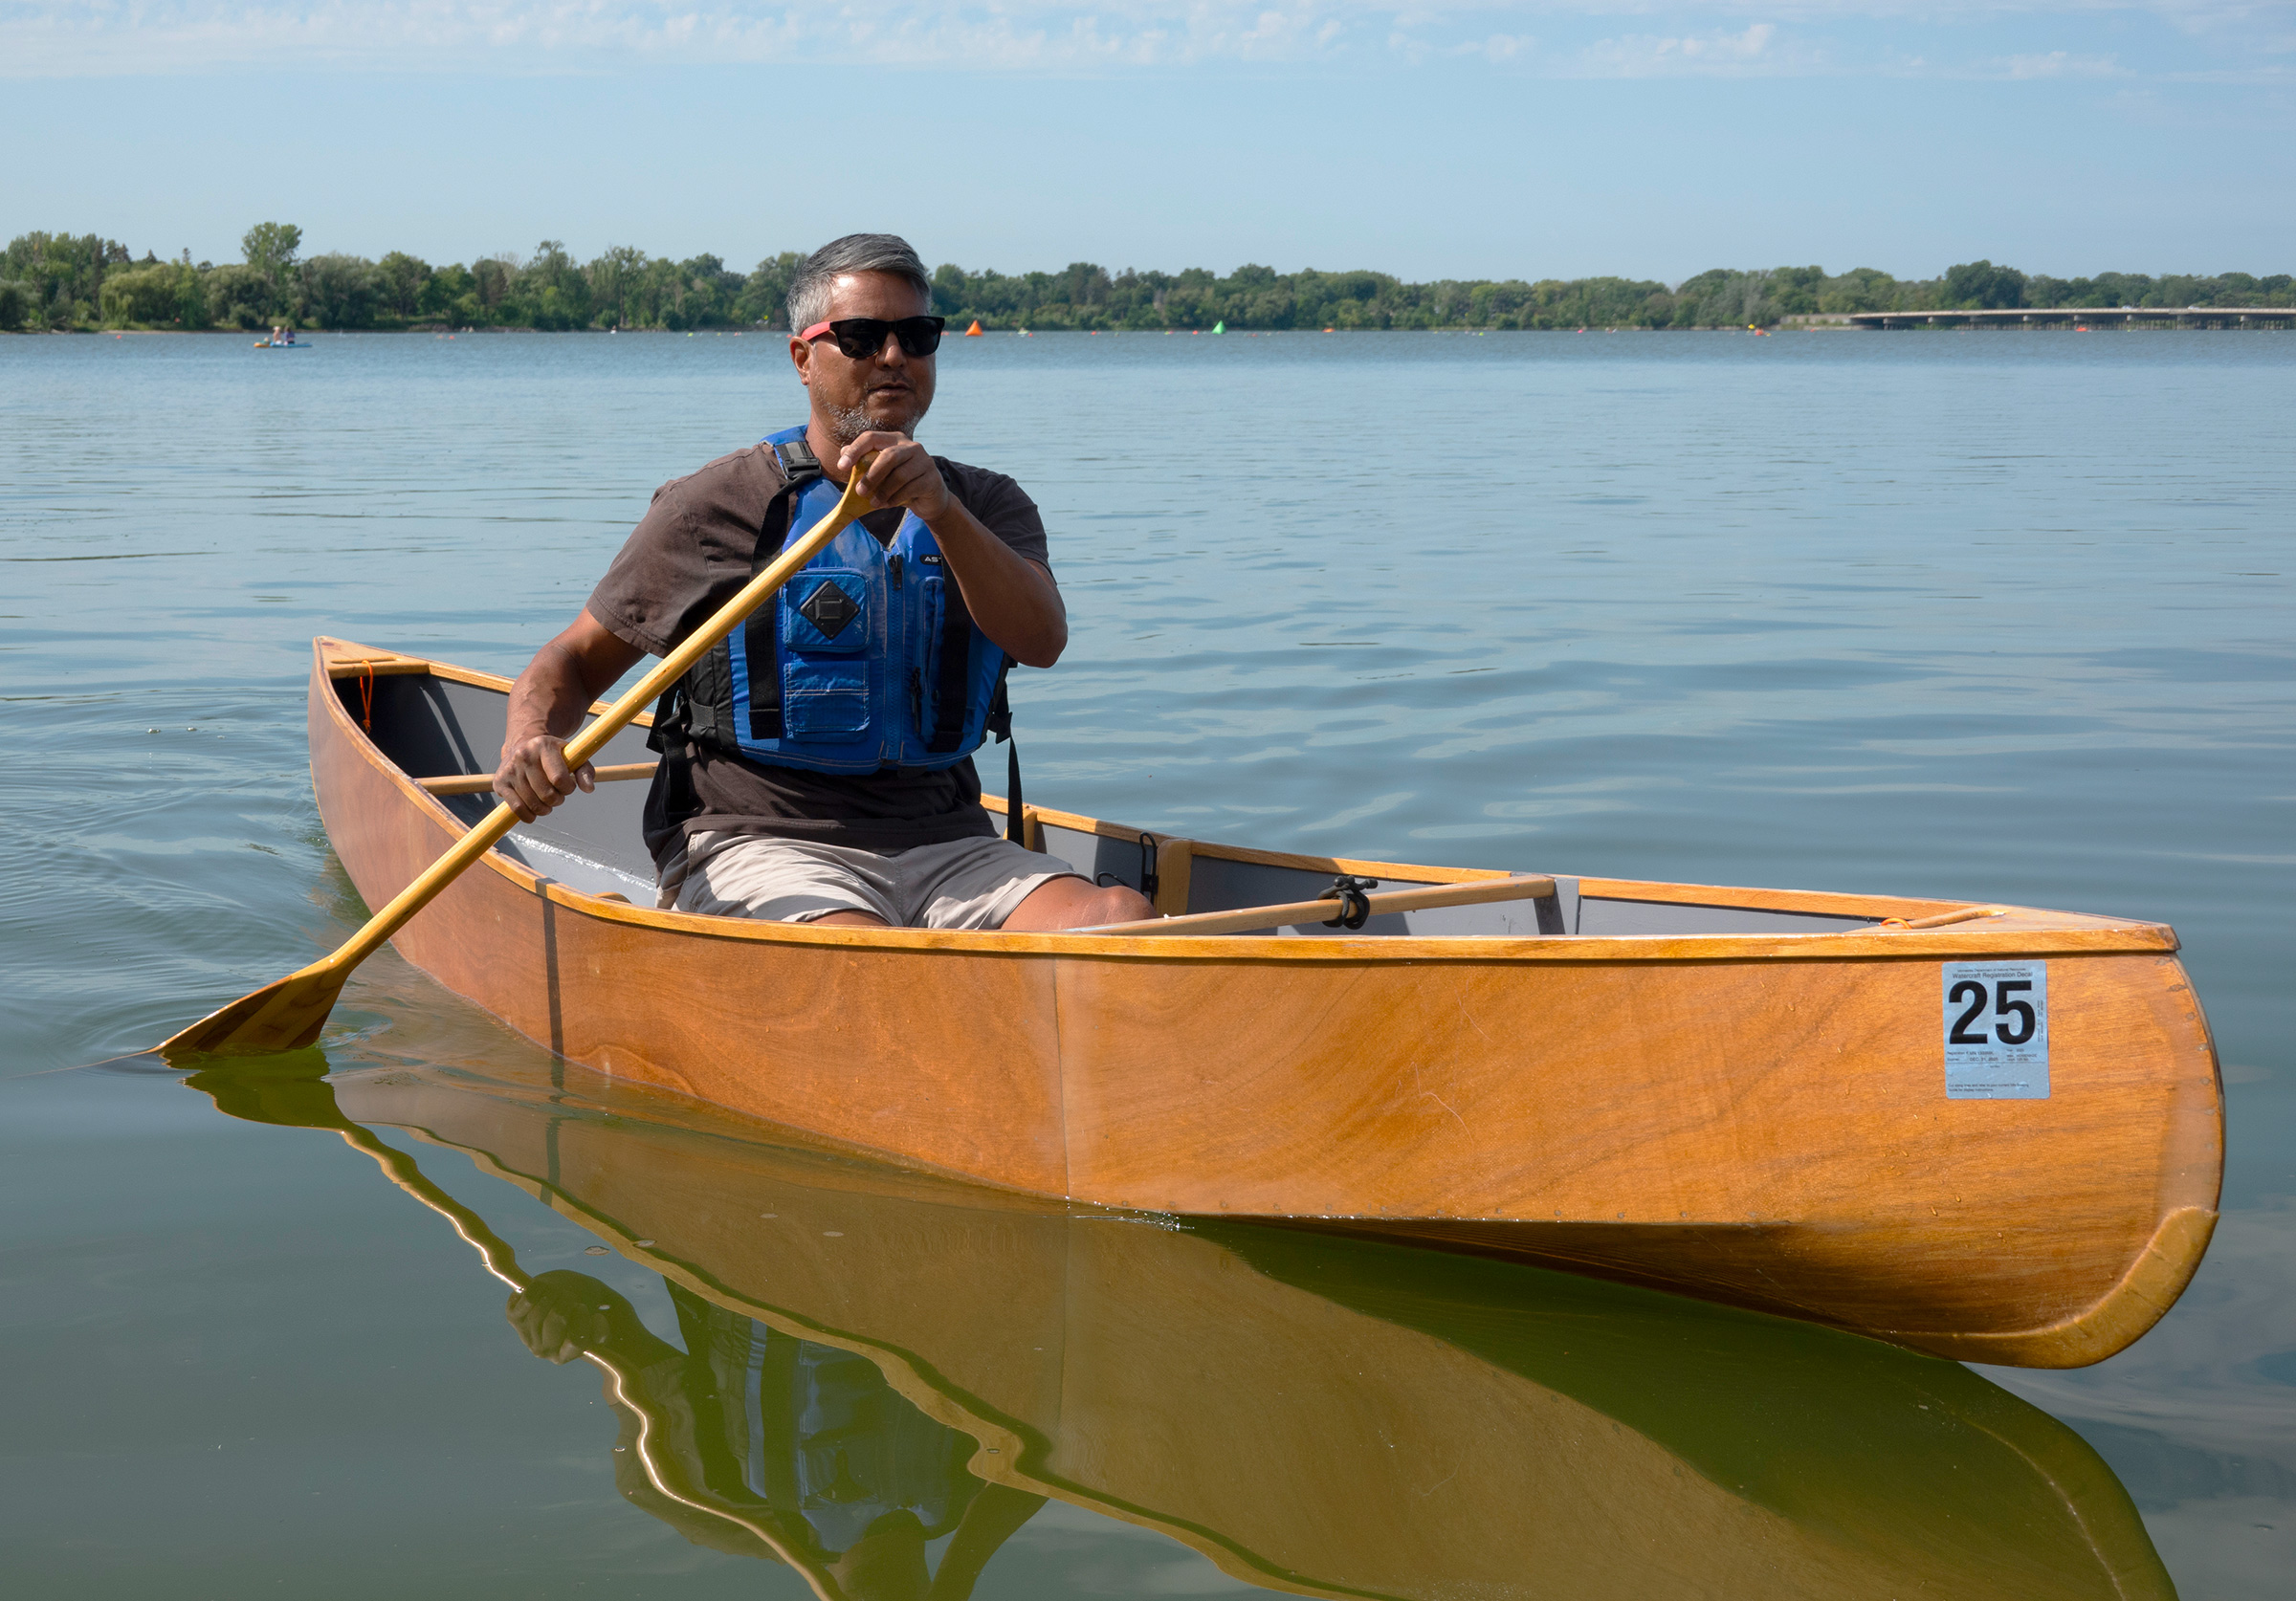
Michael Maddox
As designed, the sheer is unreinforced by inwales or outwales, keeping weight to a minimum.
The raised seat was among the reasons I chose the Wanderer. At my age, I don’t want to sit or kneel on the bottom of a canoe. The seat height is quite comfortable and affords a good upright paddling position, even after five hours on the water, and it helps with entry and exit at the shore. There is plenty of leg room and enough space between the seat and the forward thwart for my fishing gear.
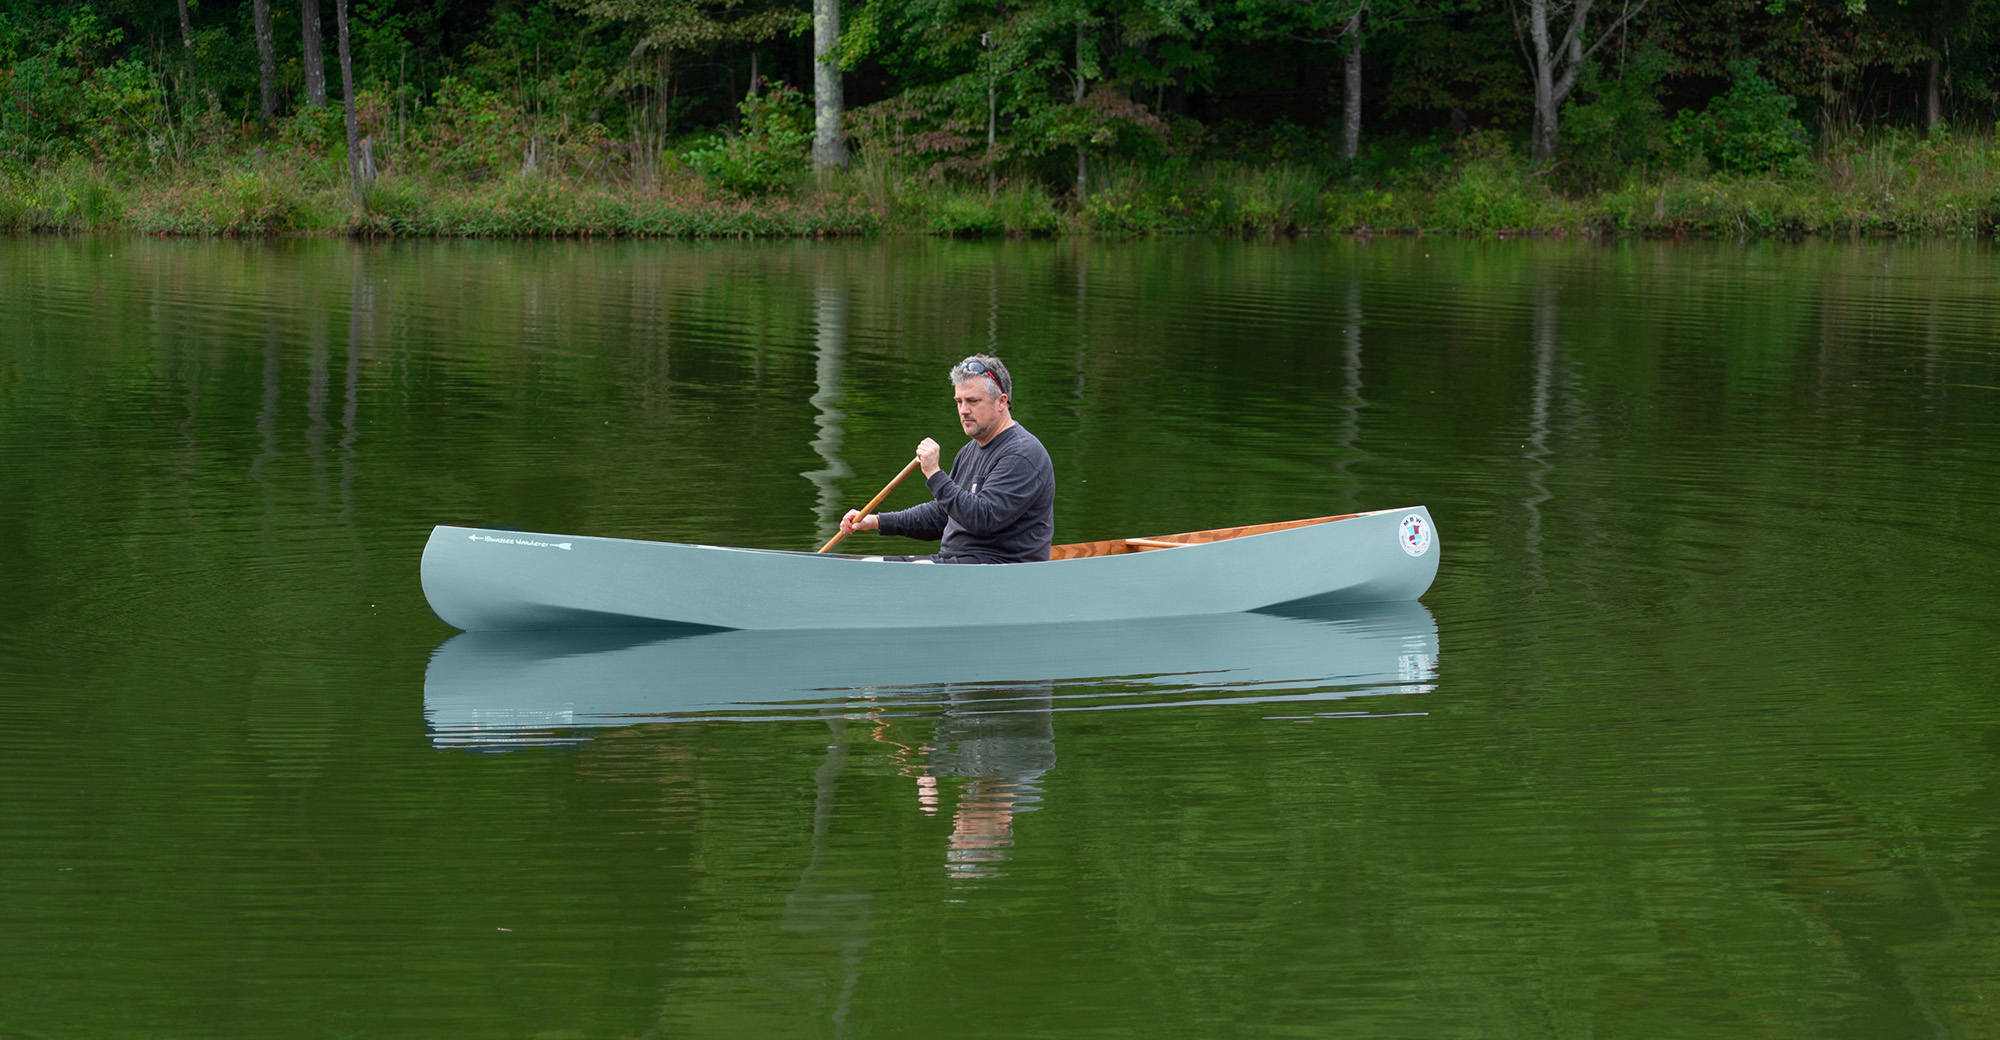
DeAnna Oliver Maddox
With designer Michael Maddox aboard, the Wanderer sits right on its lines with the stems touching the water.
After logging 30 to 40 hours in the Hiwassee Wanderer, I could happily confirm that it met all my initial criteria. It is extremely stable for solo fishing and provides ample room for gear. Compared to a tandem canoe it is much easier to throw onto the roof of my car for transport, which means I will get on the water more frequently and for more hours at a time. And it is certainly a more cost-effective option than purchasing a new or used solo canoe. Perhaps even more important, building it was a very enjoyable project.
Mike Hoyt is a Kanaka Maoli currently living on Dakota homeland, Bde Ota Othunwe, Mni Sota Makoce, Minneapolis, Minnesota. He is an independent professional artist and the Creative Community Director at the Pillsbury House Theatre.
The path to a first boatbuilding adventure is not always straight, nor even obvious. For some, boats have been a lifelong passion, stemming from childhood when school notes were embellished with doodled sailboats, or scrap-wood vessels were towed on the end of a string across driveways and puddles. For others, like Reid Schwartz, the journey was more oblique.
Reid Schwartz grew up in the Lake Sunapee region of New Hampshire, and while his family didn’t have boats of their own, he often went paddling with neighborhood friends whose family owned two canoes. But Reid was drawn more to arts and crafts than boats, and after high school he went to the Massachusetts College of Art to study sculpture and printmaking. It was there that he discovered a love of tools. “While trying to learn blacksmithing,” he recalls, “I made blades and hatchets…my professors were not amused.”
Reid Schwartz
In the course of researching indigenous crafts and canoes, Reid learned that when suitable birch for canoe building was hard to find, Native Americans improvised, initially trading for bark from other regions, or, by the late 1800s, for manmade materials such as canvas. By the late 20th century, the preferred fabric in parts of Canada was waterproofed tarpaulin. When Reid built his own canoe in this more recent tradition, he used a PVC-coated truck tarp for the skin.
After graduating in 2006, Reid took an apprenticeship with a cabinetmaker and learned skills that would allow him to make a modest income by taking odd jobs. He moved to New York City to work in commercial illustrating, but it was in making things in his spare time that he found his true calling; after the crash of 2008 he rented a studio in which to start “making for work. I built furniture, cabinets, outfitted galleries with displays, took repair jobs on old windows, and dabbled in restoration carpentry.” He also carried on with his blacksmithing and taught himself how to make woodcarving knives.
In 2016, he took a very part-time gig in a boatyard in Westport, Massachusetts, restoring the interior of a fiberglass sailboat built in the 1970s. And, around the same time, he brought into his own shop a late-1800s Rushton wood-and-canvas canoe for restoration. During the weekdays he was tearing the sailboat back to rough, splintered fiberglass, and in the evenings and weekends he was falling in love with the canoe. “Something about the mass and complexity of the sailboat left me craving boats I could actually pick up and carry. But it was also the lines of the canoe. It was very much an interpretation of Abenaki birchbark canoes, which were still being traditionally made in the late 1800s and were considered some of the most desirable canoes of their day.”
The canoe restoration led Reid to look into the history and origins of the Abenaki type. As he delved ever deeper into native canoe-building he came across César’s Bark Canoe, an hour-long documentary by Bernard Gosselin that follows César Newashish, a 67-year-old Atikamekw of the Manawan Reserve north of Montréal, as he builds a birchbark canoe, from felling the tree in the forest to paddling the finished boat on the reserve’s lake. Watching the “sublimely skilled and deft-handed craftsman build his boat with the materials at hand in the boreal forest, was absolutely jaw-dropping,” Reid says. “Virtually all the timber he worked was split, hewn, and shaved to outrageously fine proportions using the most wondrous indigenous tool—the crooked knife.”
For Reid, seeing “such critical and intuitive understanding of material” had the effect of “grabbing a thick bundle of loose strings in my head—toolmaking, woodworking, art, history, my love of nature and interest in trees and their growth, the desire to work from the log and to choose my own tree—and tying them together in my mind.”
Cody Nowell
Created in the Cree tradition, Reid’s crooked knives have yellow-birch handles carved by axe and knife, finished with tung oil, and hand-forged steel blades. Unlike the scooping cut of a spoon knife, the crooked knife carves out a gentle hollowing cut.
But Reid was still far from building a bark canoe. He set out to make a crooked knife and learn how to use it. “It is a notoriously difficult tool to use when you first pick it up,” he says. There is no standard one-size-fits-all crooked knife. This Native American multipurpose tool is designed to be used, most often, gripped palm up and drawn toward the user to shave and carve wood. It is particularly adapted to carving long, flat objects like the frames and ribs of a birchbark canoe. The shape of the crooked knife varies from tribe to tribe and from craftsman to craftsman. There are, says Reid, not many native-made crooked knives around, and those that do exist “represent the quirks of the maker. The tool is very particular—different users and cultural groups prefer different functional details. They are tools that can be broadly similar but individually distinctive.”
Over time, Reid studied and tried many knives until he found some shapes that worked for him. Eventually he started making knives for himself and then making them to sell.
His knives don’t suit everyone, he says, nor do they suit every task, and “you only really know if a knife is right for you if you’re using it on the right material—wood split from a round.” This led Reid to another step on his path to boatbuilding: green woodworking. “I had to learn how to use wood that’s fresh cut. It was exciting but challenging. I started to see firsthand how variable wood growth is and that if I wanted to have a decent time splitting, hewing, and shaving, I had to be more careful about my choices in the field.” Reid began to see not only the tree but also how the ecology and landscape affects the tree and its wood. As he explored his family’s property looking for suitable woods on which to practice the carving skills for building a traditional canoe, he started thinking about bark.
Reid Schwartz
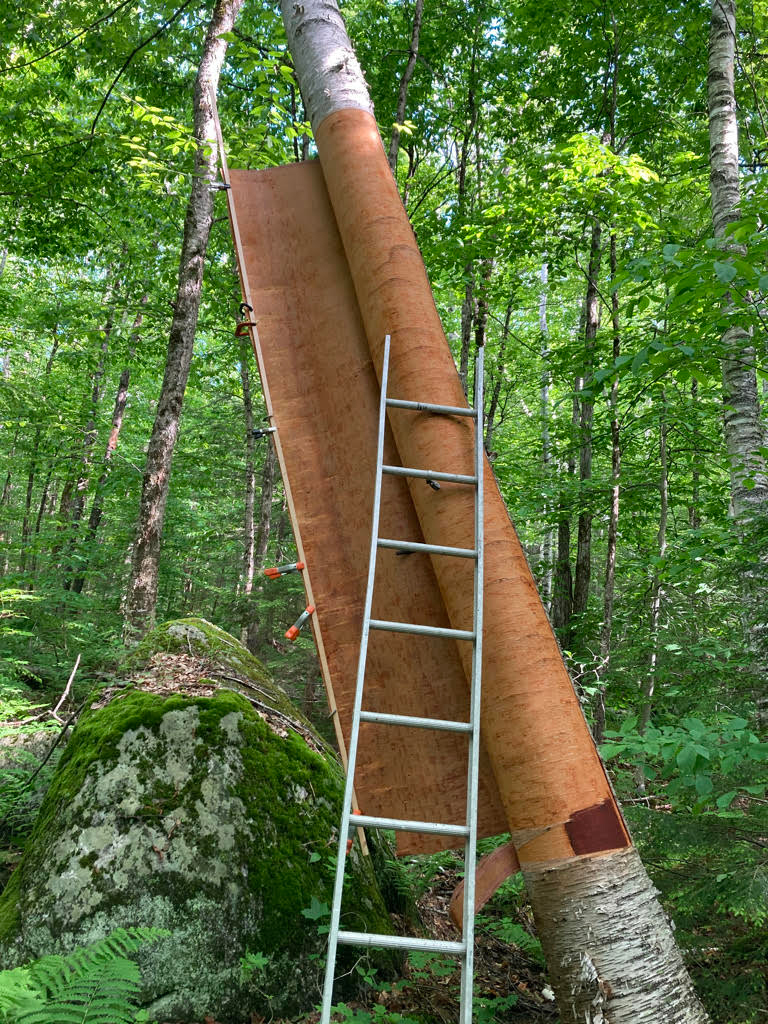
When harvesting summer bark, a vertical cut is made according to the length of bark required. Because the cut is made vertically very few of the capillaries working sap and nutrients up and down the trunk are disturbed, and since the bark fibers run in circumference it will tear off cleanly at the top and bottom of the harvest site, with no horizontal cuts needed. If harvested in the late spring, when new bark is being first formed, the bark almost pops off the tree and is at its most smooth. A healthy tree will survive losing as much as 20′ of bark if harvested correctly.
“Suitable canoe bark,” Reid says, “is very hard to find; it’s not as simple as finding a birch tree with white bark. A usable canoe birch tree, Betula papyrifera, needs a lot of girth without flare—it needs to hold its girth all the way up, staying nice and straight. It can’t have bumps or scars, and, even then, the bark has to be the right thickness and when you bend it through 90° in either direction, the layers must stay firm, without delaminating or splitting. It’s a really tall order. You have to cover a lot of ground and look at a lot of trees.” Reid became a forager, hunting through the woods near his home for the right canoe birch tree.
He snapped up every book on bark canoes that he could find. He discovered the writings and drawings of Edwin Tappan Adney, who is famed for his documentation of the history and different styles of indigenous bark canoes. Reid read and learned; he practiced splitting and shaving with his crooked knife, but still he wasn’t ready to build his own bark canoe.
In 2015, Reid went to the Peabody Essex Museum in Massachusetts to hear Passamaquoddy birchbark artist David Moses Bridges talk about canoe building. “He was very gracious about my overbrimming interest,” says Reid. “And we got talking about tools and bark and digging roots. He encouraged me to get my hands on the materials, and the very next day I peeled some bark to make my first model.”
Two years later, Reid and his wife moved back to New Hampshire, to settle near his parents on a piece of family-owned land. There, he met Bill Gould, an Abenaki basket maker, snowshoe maker, sawyer, and member of the Nulhegan Band of the Coosuk Abenaki Nation. Bill invited Reid to help him build two bark canoes—a 10-footer and a 12-footer—with materials they harvested. “Before we knew it, we had a 10′ canoe, a 12′ canoe, and a 14′ canoe in the works. From one to the next, our technique improved, and we learned a tremendous amount. Perhaps the greatest learning curve came when we were working with roots to make gunwale lashings. Roots have a few challenges. You have to be choosy about where you dig. The trees have to be spread out enough that their roots aren’t just tangled together in massive mats—plus if the ground’s too rocky the roots grow kinky. Then, once you’ve found them, peeling the roots is tricky. At first, we tried whittling the bark off, but it took hours and hours, and you need 600′ or more for a canoe. But, after a while, we learned that if you boil the roots, the bark and pitch just slide off, and once the root is soft, splitting it down the center is very easy.”
Reid Schwartz
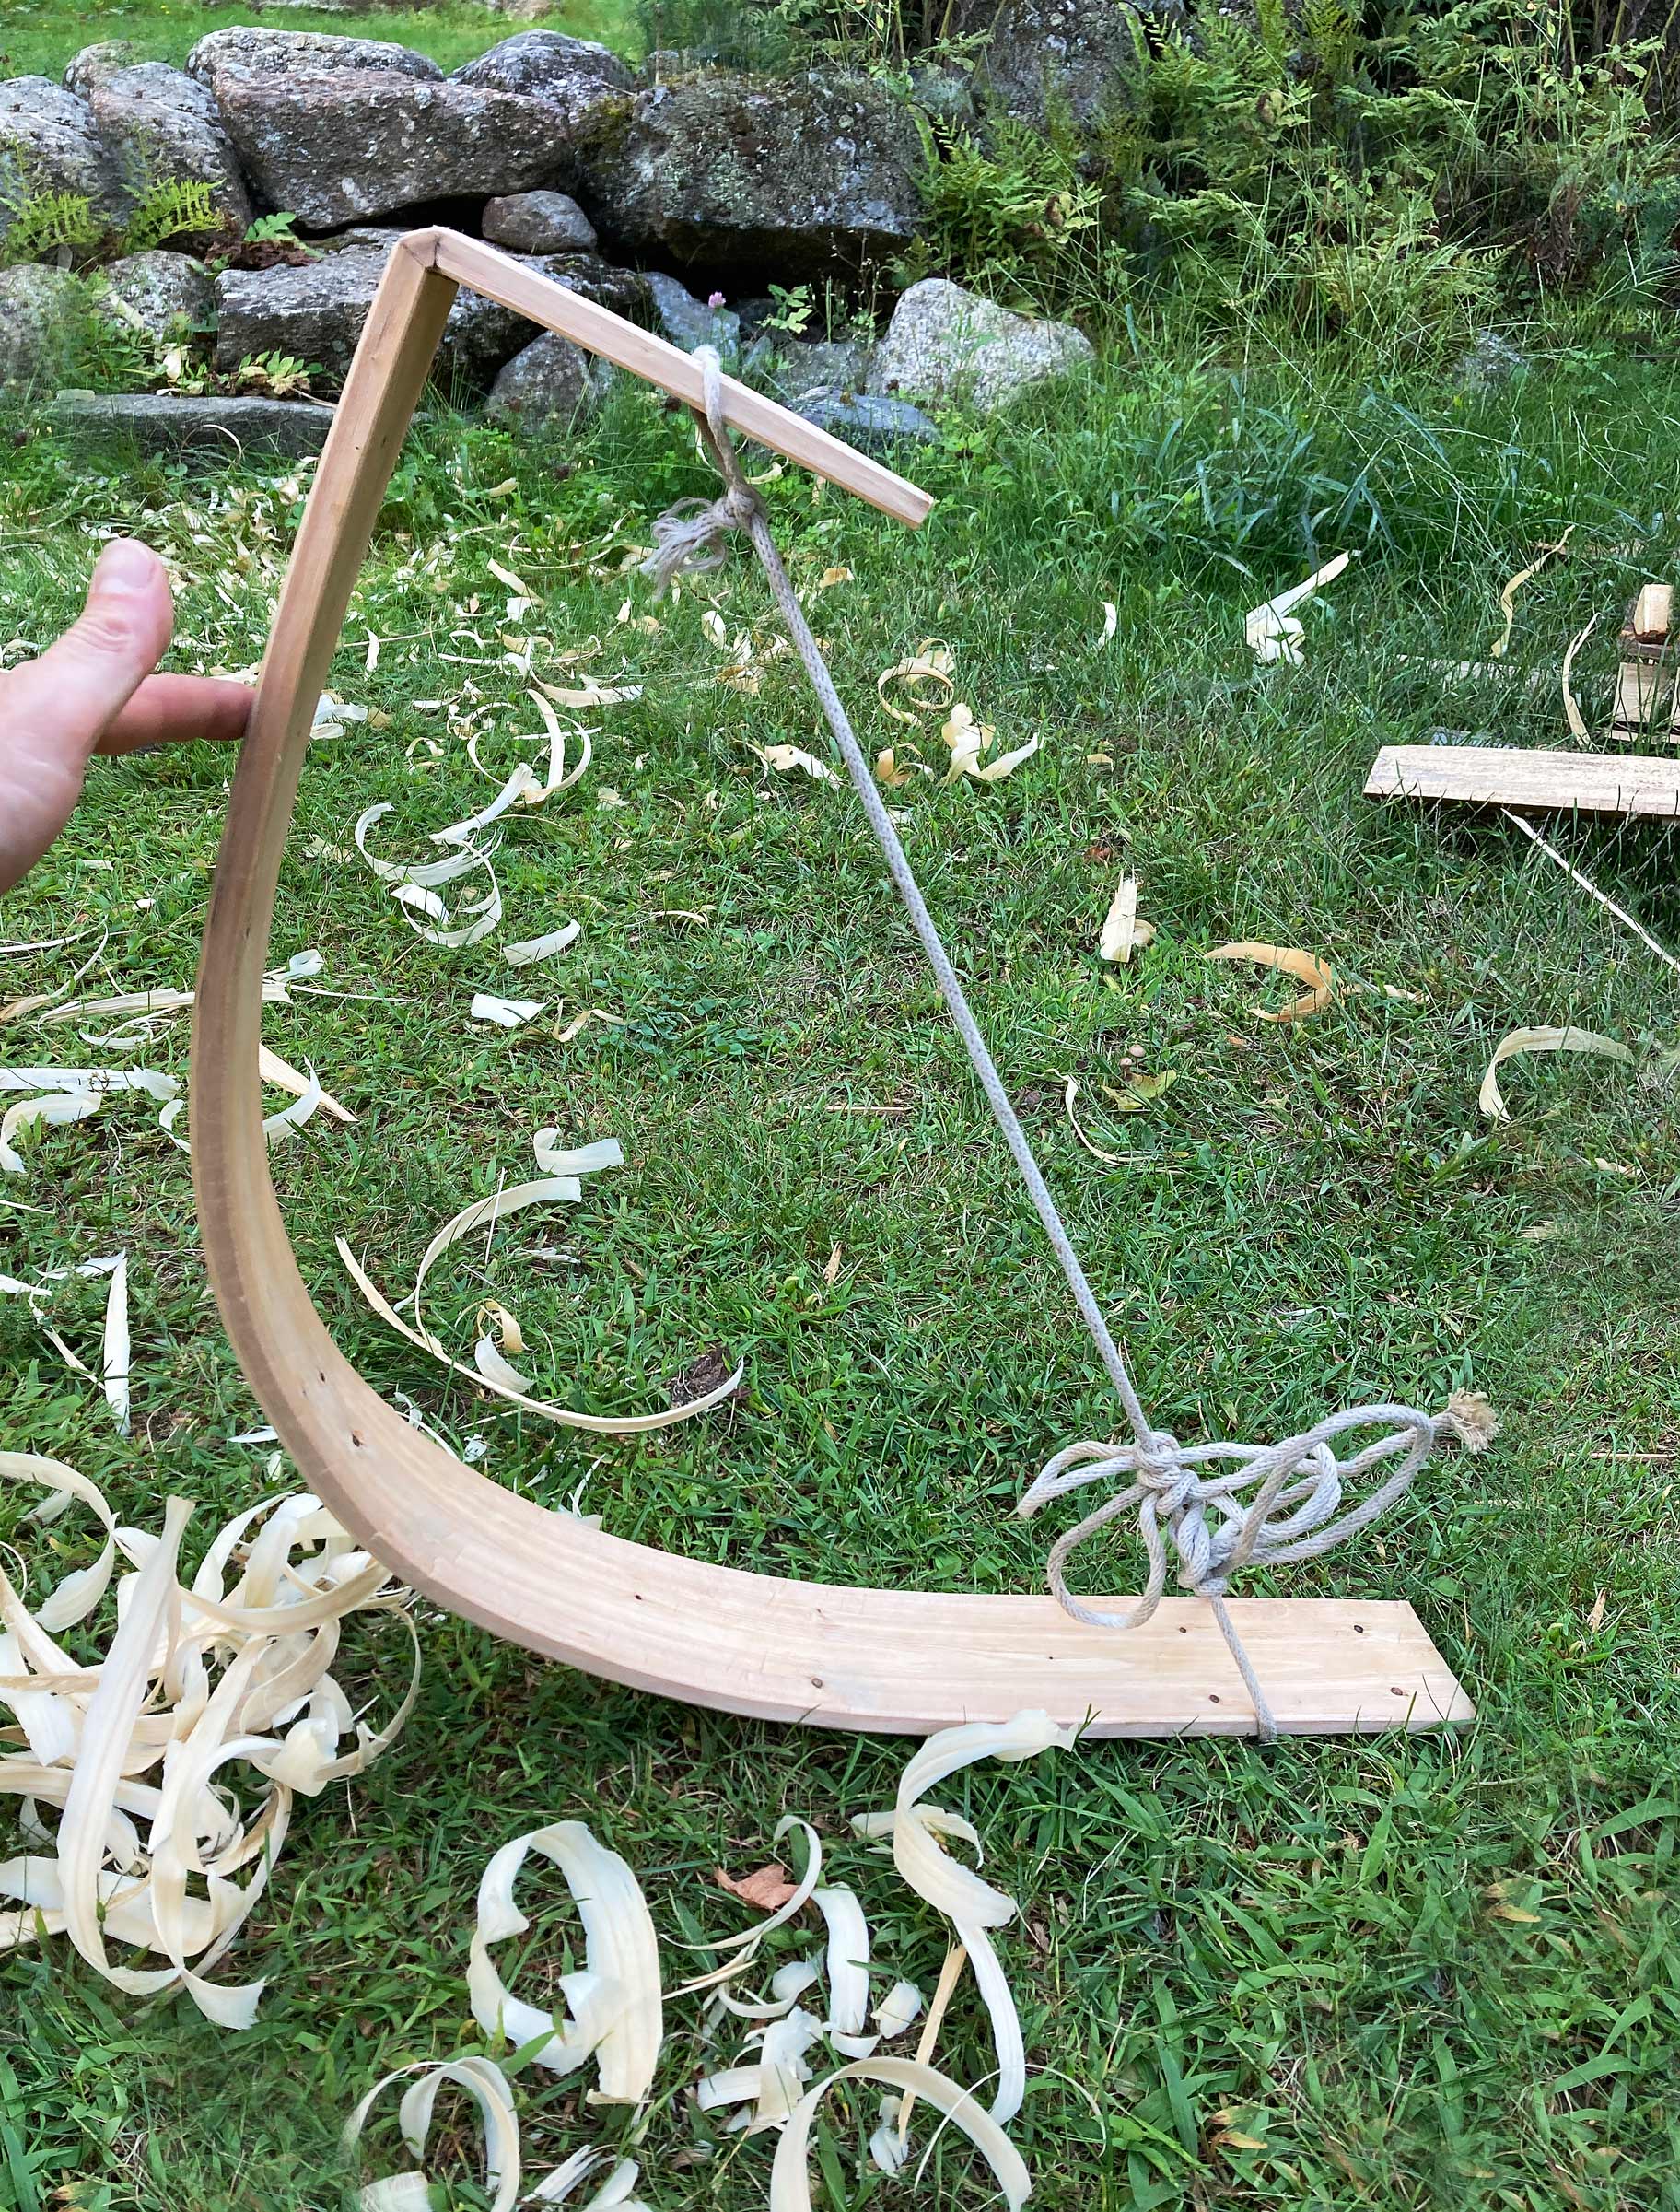
The gunwales, pre-soaked for a week, are shaped at temporary cross spalls at the thwart stations. Sheer is introduced by weighting the gunwale and raising the ends up onto blocks. The gunwales are left to take shape for a week.
Building a birchbark canoe starts with the skin of the boat. The bark is laid out, with its exterior facing upward so that the smooth inner layer of the bark becomes the outside of the canoe, and a temporary bottom frame is set on top of it, weighted down with rocks. The sides are folded up into a flat-bottomed, vertical-sided trough in the rough shape of a canoe. The gunwales—typically northern white cedar, but spruce and pine are also used—are fitted along the top of the bark, inside and out, and pegged through before being lashed around and through with split and shaved spruce roots woven tightly to bind the gunwales and form the sheer. The temporary frame is removed, and the final curved shape of the canoe is then created with the placement of tight-fitting pre-bent ribs, which are tapped under the gunwales bringing the bark into tension. As the ribs are set in place, planking, fashioned from finely shaved staves, is fed between them and the bark skin to produce a strong, watertight hull. The ribs force the hull into the desired shape, whether flare-sided, high or low tumblehome, narrow and round-bottomed, wide and flat-bottomed; it can also have as much rocker as the builder desires, from flat to heavily raised. The only restriction on shape is the bark itself. “The challenge,” says Reid, “is to tailor the shape in the very first step, when the bark is laid out.”
That summer, Reid and Bill built several canoes with varying success. “It took me several full-sized boats to figure out what was going on,” Reid says. “My first had way too much rocker; it was like a banana. It was solid and watertight but hard to paddle because it was so tender. The next was flat-bottomed, but the ribs were not tight enough and needed shimming, and once I’d done that, there were a lot of leaks.”
Reid Schwartz
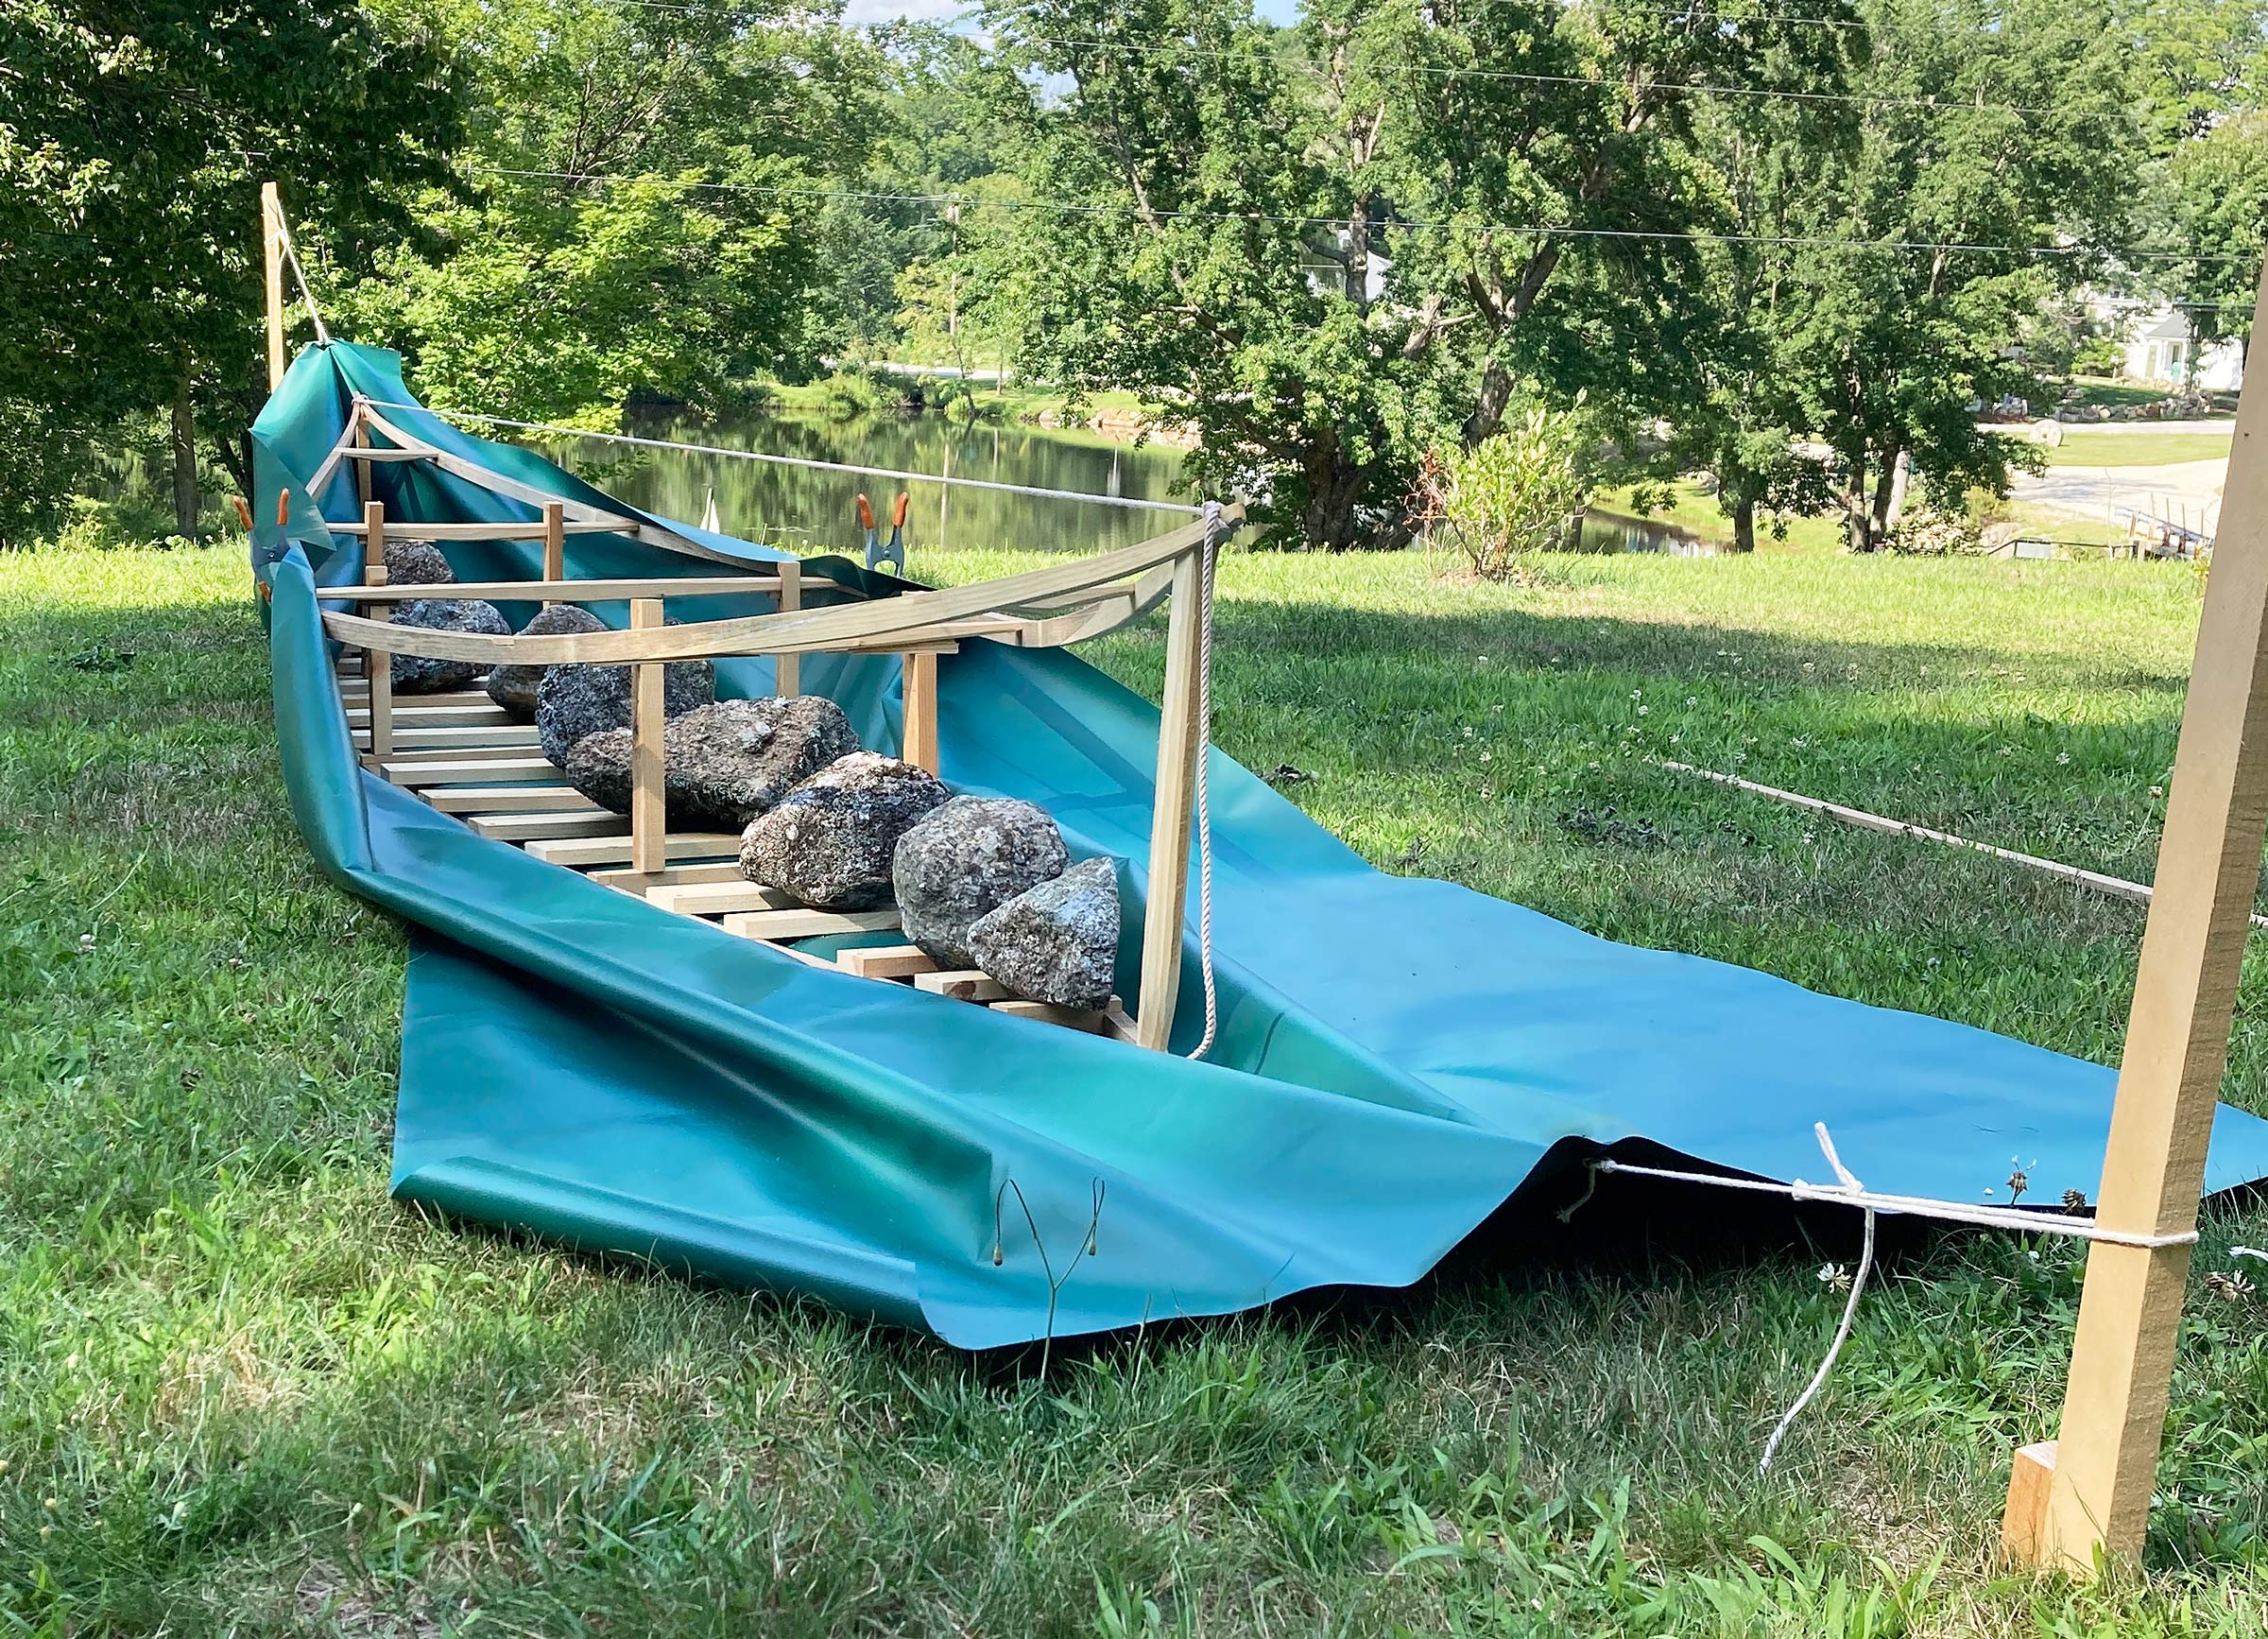
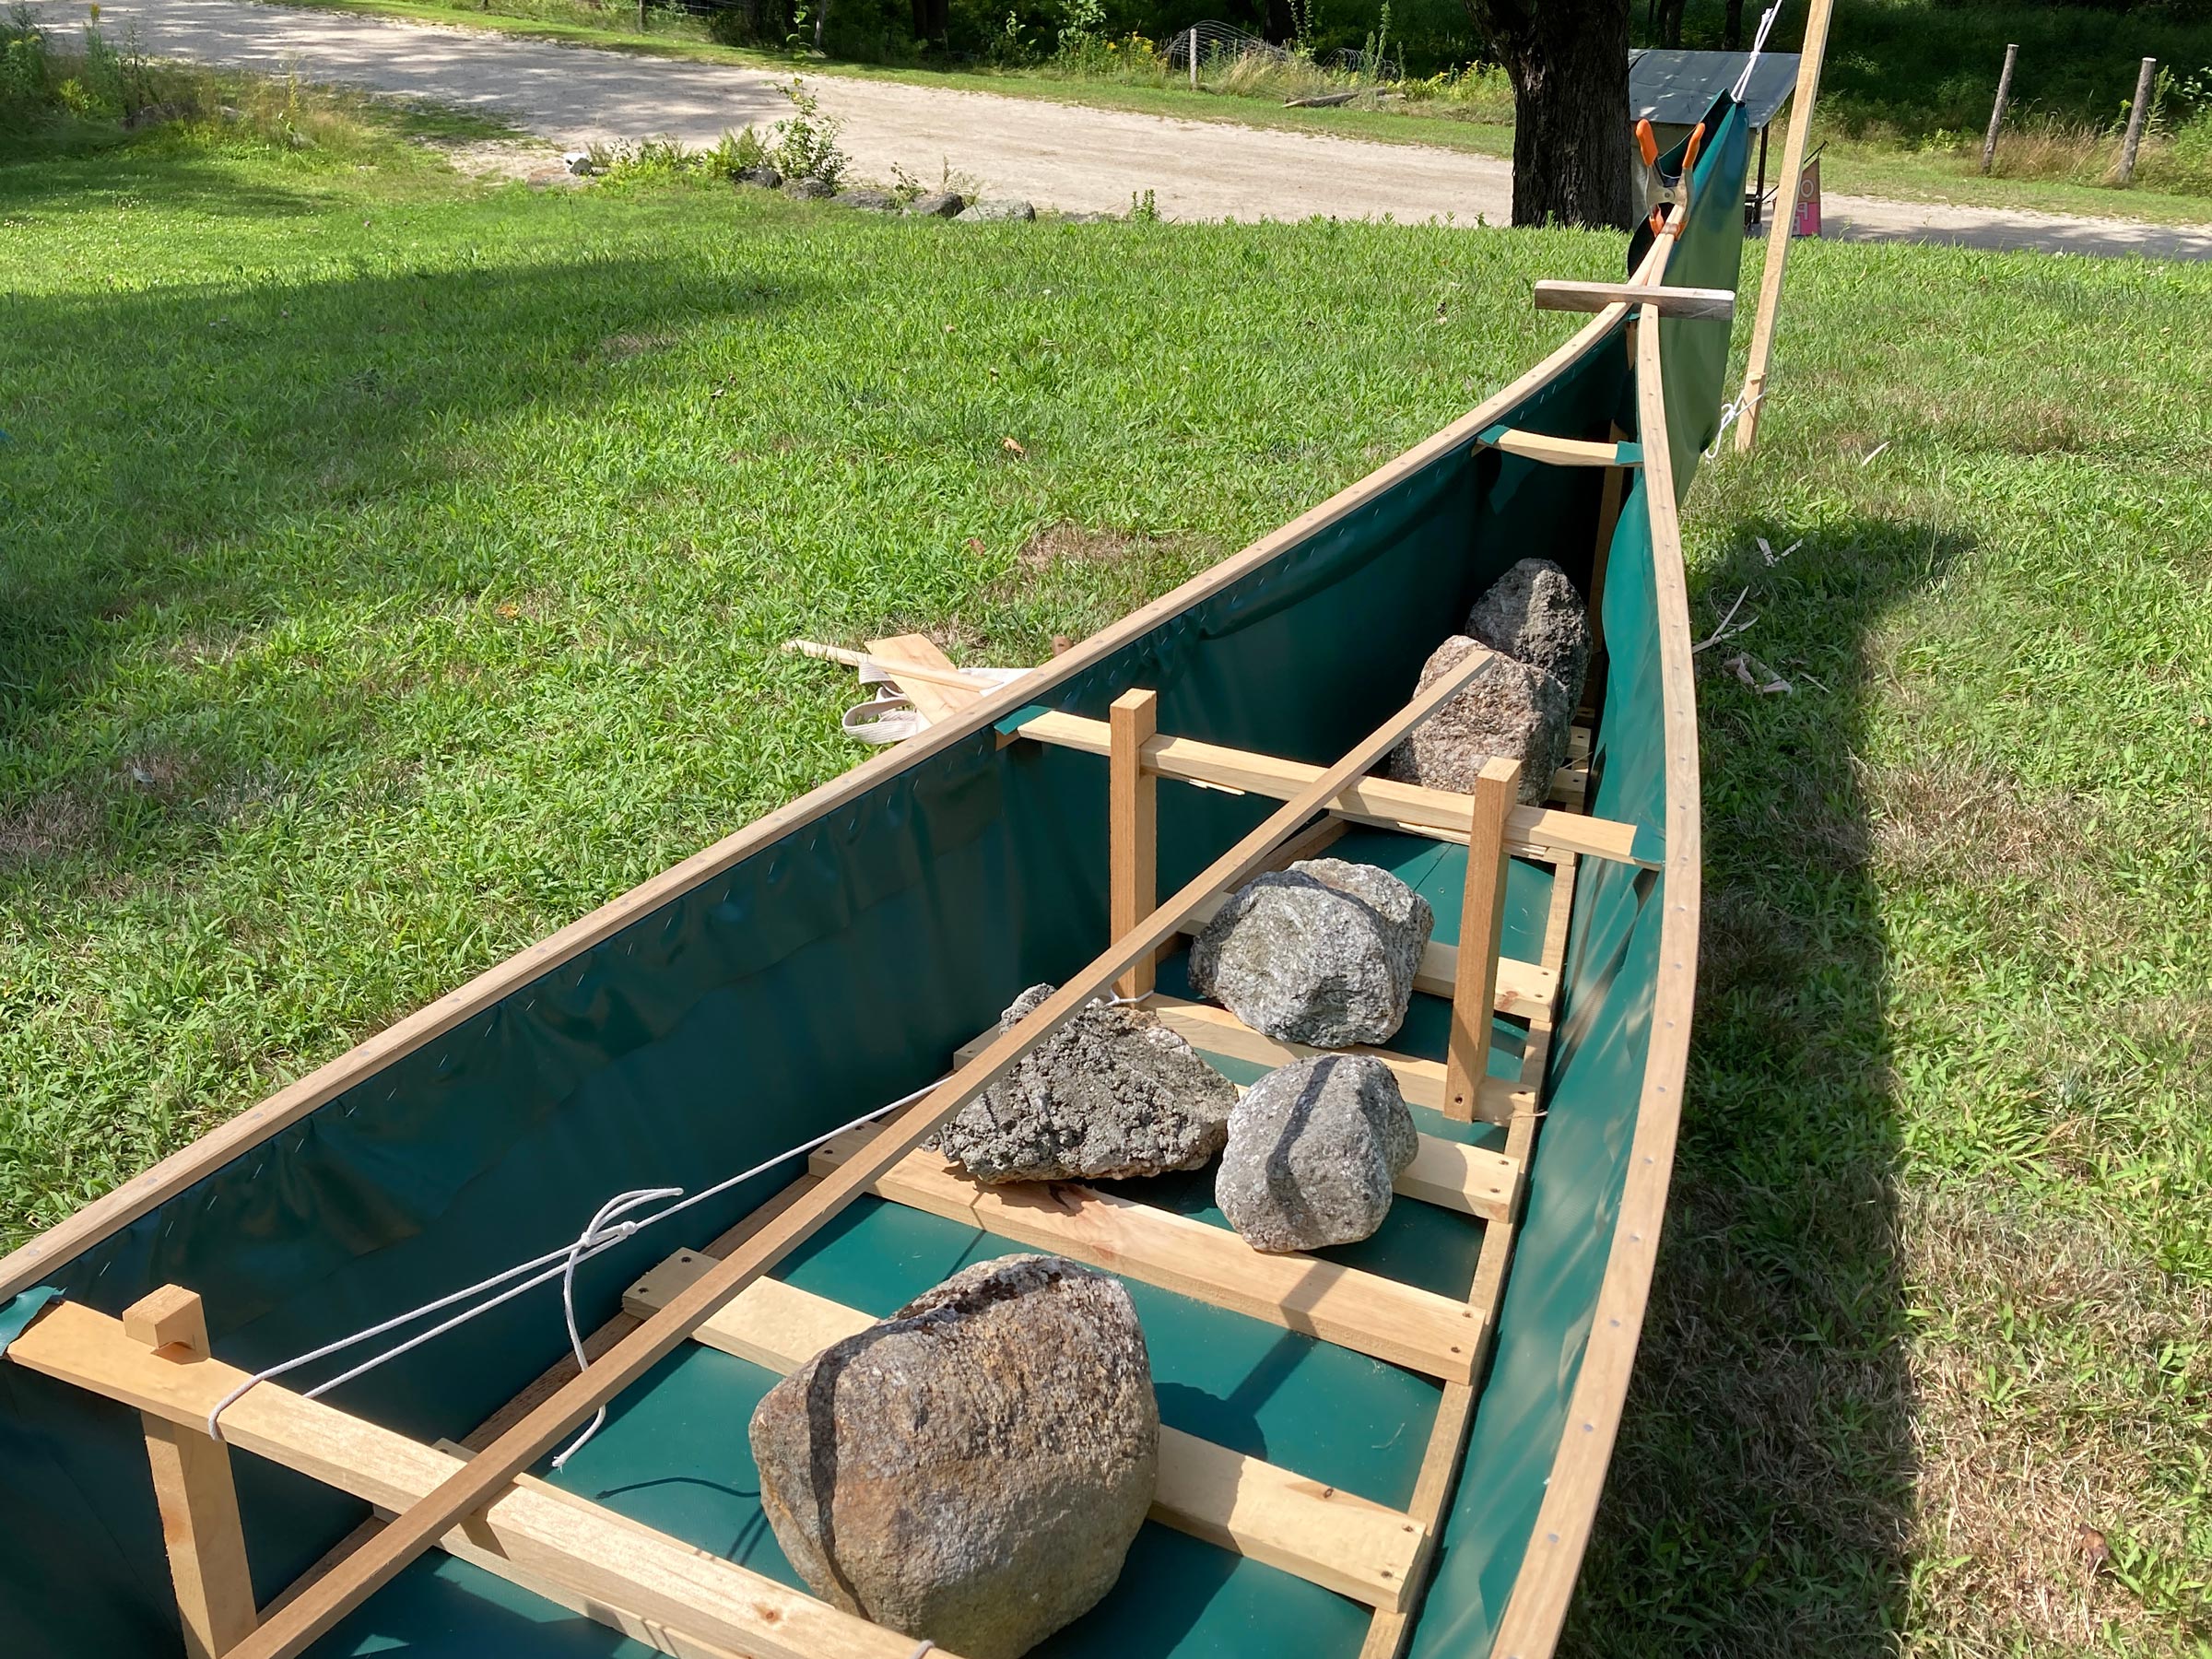
The tarp (as it would be with a birchbark skin) is laid out on the ground, and the temporary frame, weighted down with rocks, is laid out on top of it. The gunwales, with thwarts in place, are supported by struts anchored to the temporary frame.
By fall, Reid was more experienced but broke. He went back to making tools for sale and thinking about his next steps. In the course of their harvesting, Reid and Bill had realized that there were very few suitable birch trees for canoe building. If Reid built another canoe, finding bark to harvest was clearly going to be an issue. He began researching indigenous canoes built in regions where birchbark is scarce.
He learned that the Cree, one of the largest tribes in Canada, from the late 1800s had adapted their canoes to be built with canvas skins. “Indigenous builders,” says Reid, “are, without fail, ingenious and practical, combining their labor with an intimate understanding of natural materials. The Cree of the Ungava peninsula in Québec, used many of the same techniques as the Abenaki, but the native birches in their area are so small that to build a canoe you have to sew a quilt of small squares. So, they began trading for larger sheets of bark from other regions or even other materials. By 1908, canvas had become the dominant material and produced a canoe that was considered superior for its smoothness and light weight, but was less durable than the birchbark canoes.” In more recent times, “probably in the second half of the 20th century,” says Reid, “the Innu, in the eastern portion of the Québec-Labrador Peninsula, took this one step further and used a pre-coated tarpaulin, the kind used to cover goods on trucks. The great advantage of the tarpaulin over canvas,” he says, “is that it’s already waterproof.”
Reid Schwartz
The tarp is pulled up around the temporary bottom frame weighted down with rocks. The temporary thwarts have introduced flare to the canoe’s sides, and the gunwales further define the sheer.
Reid ordered some 18-oz PVC-coated truck tarps to have on hand for a canoe skin when he turned up the wood he’d need for the project.
Shortly after the tarps arrived, in April 2022, some large white pines on the family property were felled and sawn by a portable bandsaw mill to make boards for a barn his parents were building. “I crawled over the slash and pulled out the waste created by squaring off the round logs. I set about splitting some, and the wood was of much better quality than I’d expected. If it weren’t for the pitch all over my hands and clothes, it would be rather pleasurable to work pine this way.”
As with a native canoe, every part of Reid’s boat is based on measurements of the body: “from fingertip to fingertip on outstretched arms, single arm length, handspan, all the way down to finger widths—it’s very handy, especially when working with rough balks of wood that aren’t easy to measure with a tape.”
Each piece for the rib blanks and the gunwale was hewn out by axe to close proportion and then shaved by crooked knife. He shaped all the pieces and left them to soak in the old industrial-site millpond across the street from his house. Over the course of the summer, he would grab a handful of blanks each weekend, split them as close as possible to the finished dimension, and then fine-tune the edges and faces with a crooked knife. After the ribs soaked for a week, he bent them into their final shape, and set them to dry. “I bent them by eye,” says Reid, “in bundles of eight to ten ribs. The bundle is lashed tight in the center and then the rope is tied around the ends to draw the whole into a U, which is checked for shape against the gunwales. By nesting the ribs in bundles, you get graduation in the bends, which you need to form the shape of the canoe. Of the 50 ribs I made, I used about 40 in the finished boat.”
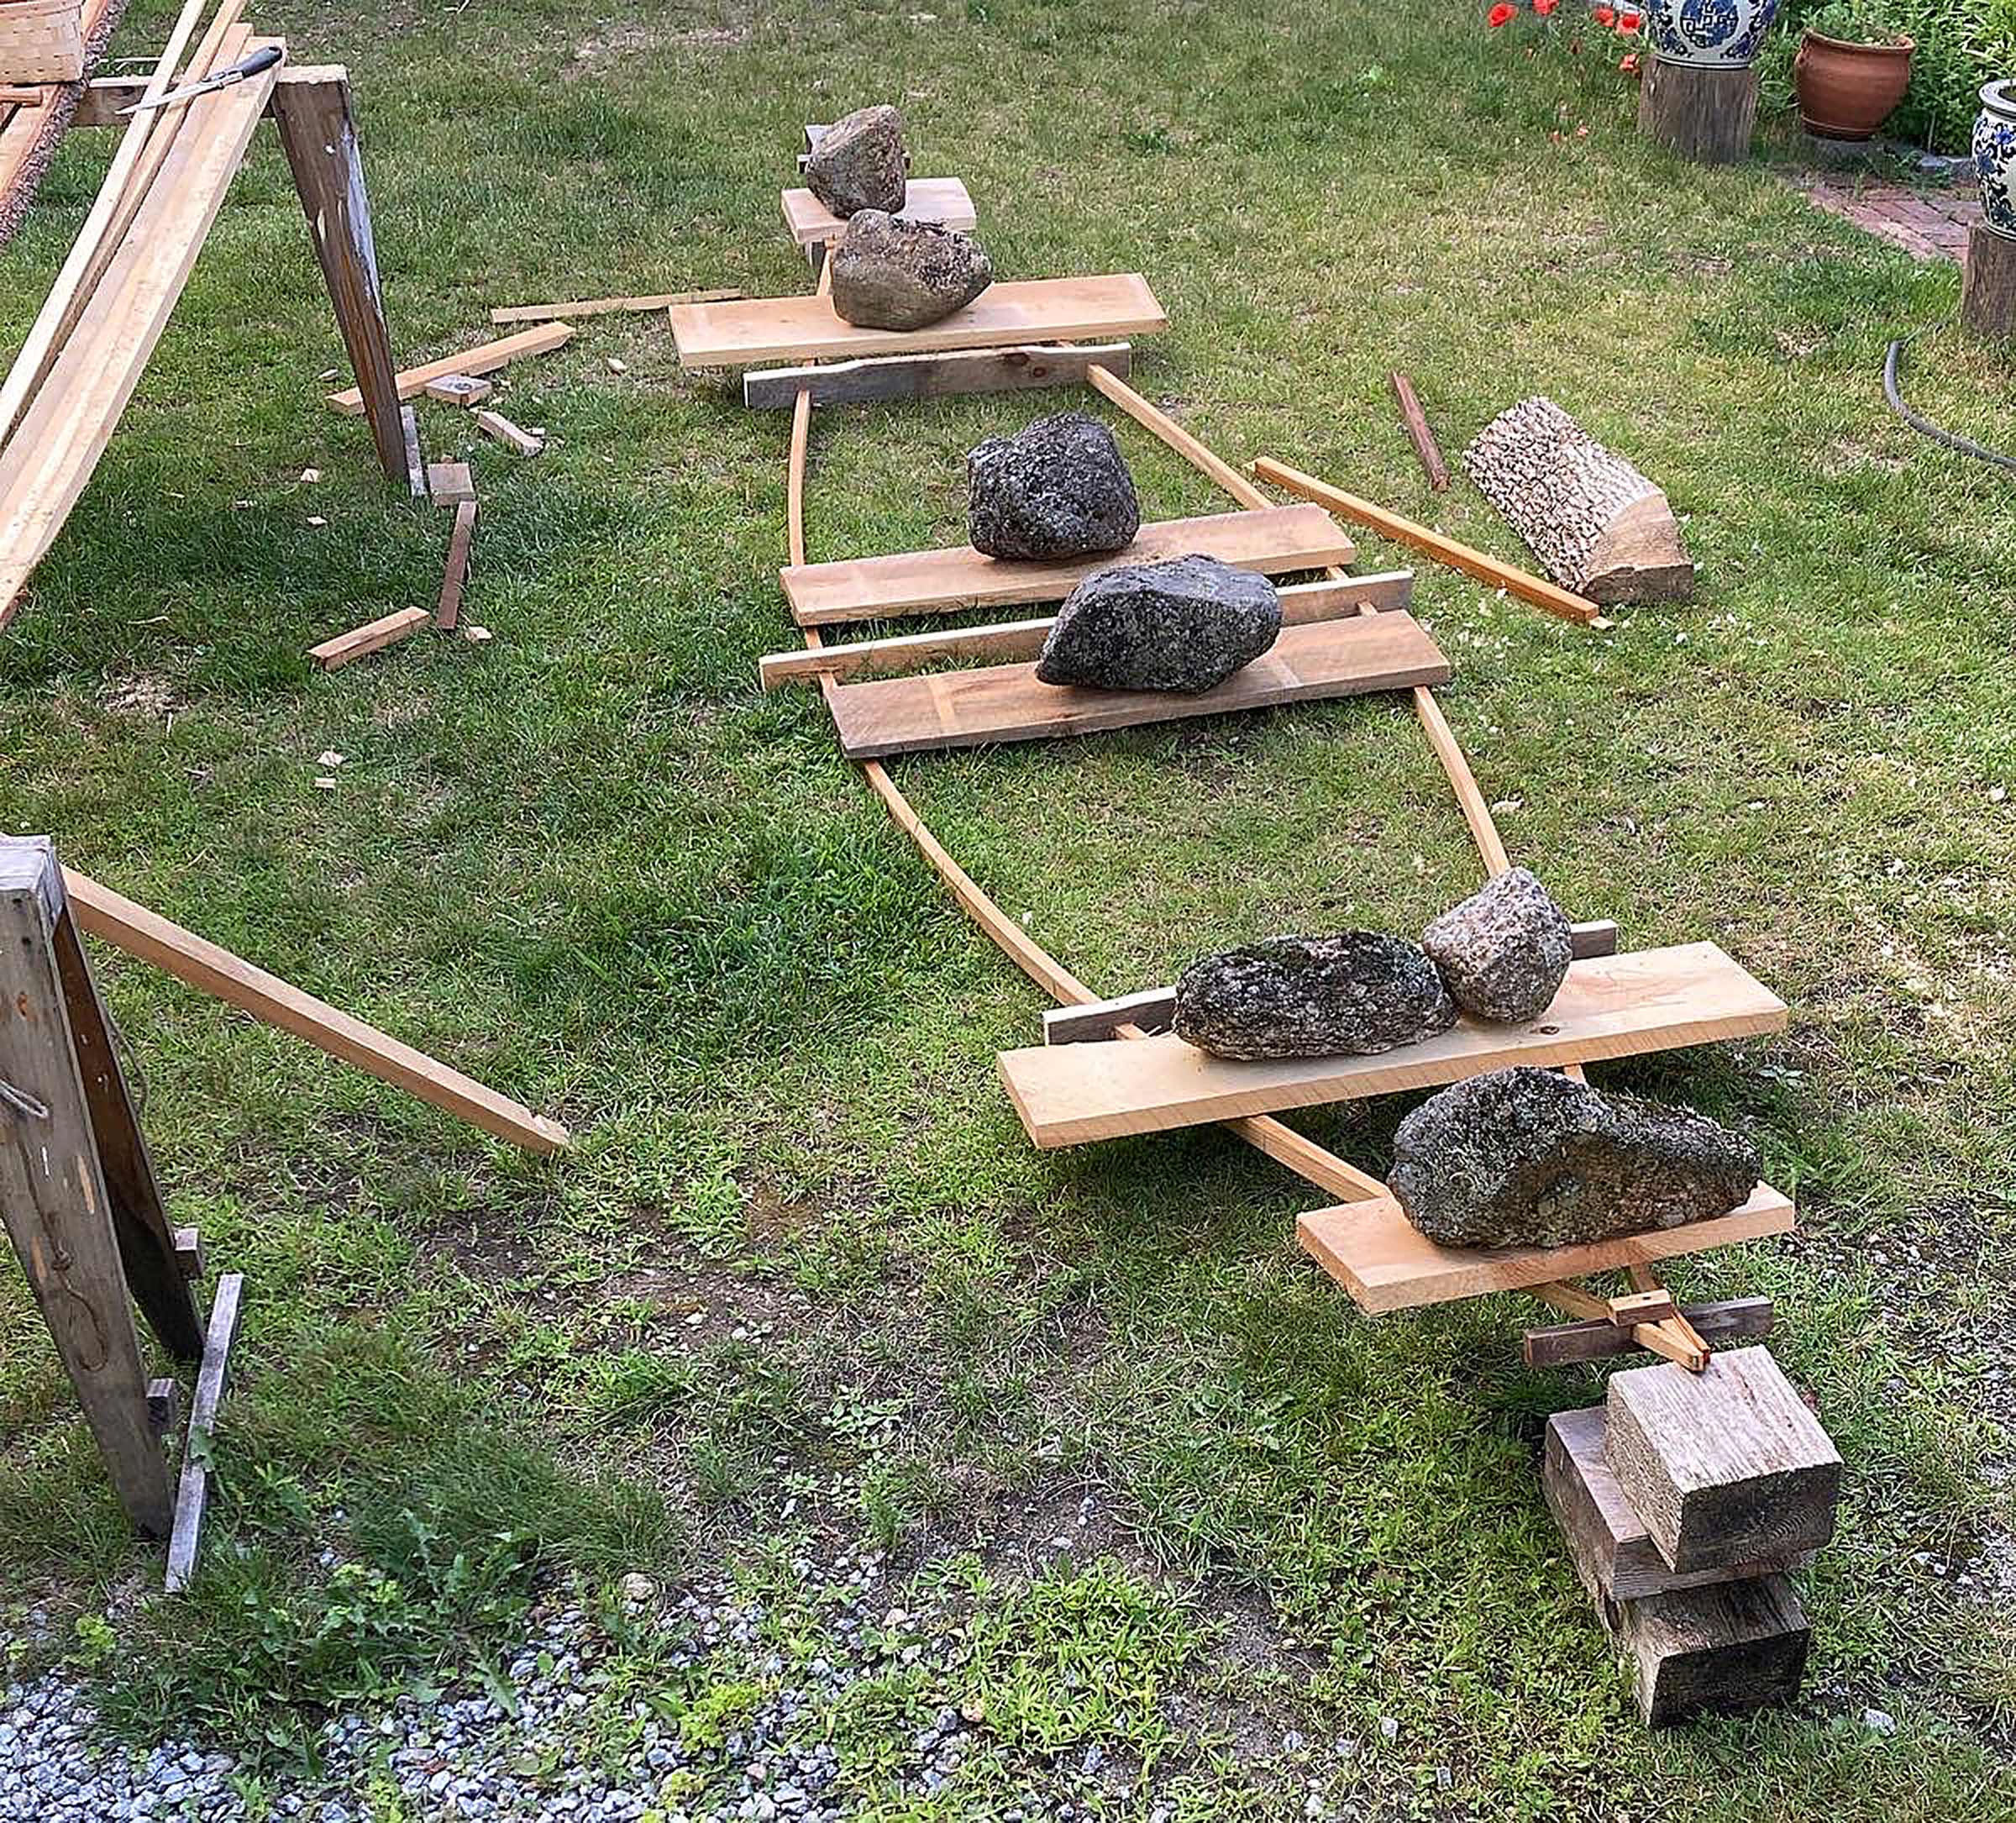
For gunwales, Reid used more of the pine again roughed-out with an axe and trimmed with a crooked knife. After the pieces soaked for a week, the gunwales were set up around temporary cross spalls at the thwart locations. The ends were held together with notched sticks. “Once the gunwales’ form is set up end-to-end,” Reid explains, “it gets bent into its sheer profile. It’s laid out on the ground with heavy rocks on boards pressing the middle down, while the ends are lifted up and held on blocks. After a week, the temporary spreaders can all be removed, mortises are cut in, and the thwarts are fit in their places. The temporary building frame on the bottom is made the same way, except that it has transverse crosspieces screwed along the lengths of its ‘chines’ to carry the rocks that weigh the frame down.”
Reid Schwartz
Creating the stems was probably the hardest part of the construction. The tight bend at the top is created by cutting two V-shaped grooves into the inside face of the board and then bending the board across them under tension. If the grooves are too deep, the board will snap; too shallow and the extreme bend will be unattainable.
The trickiest part of the build was producing the stems. It took Reid five attempts to get them to bend to shape without breaking. “To produce symmetrical ends,” he explains, “both stems are bent as a single wide board. The board is bent to the arc of the stem profile” which is carved in the ends of the planking and then split into two matching pieces. Each of those is then split down the middle to sandwich the edges of the fabric at each end of the canoe. The upper end of the stem must be hard bent to about 90 degrees to lie parallel with the gunwale and form the peak at the bow. To achieve this bend, two V-shaped grooves are cut across the inside face, leaving a few growth rings intact to form the outside of the bend. Finding good grain and figuring out the right depth for the grooves was the key to getting a bend instead of a break.”
By late fall, Reid had all the parts shaped and ready. For his building bed, he used a flat patch of the lawn outside his house and laid out his tarp. Using tarp for his canoe’s skin also introduced new challenges, he says. “Instead of folding it or cutting gores to take up the extra skin as it comes to the gunwales, I subtly puckered it between temporary staples. Until I added the planking between the skin and the ribs it looked very ripply, but once the planking was in place, even though some puckering remains along the gunwales, overall, it’s very smooth. For the permanent attachment to the gunwales and stems, I used clench nails.”
Throughout the process—splitting and hewing a log to a rough balk, and then carefully shaving it to an even board—Reid used hand tools. “It goes from coarse to fine,” he says. “I start with a wedge or froe, then an axe, and finally, to the crooked knife,” the tool that started the whole adventure.
Reid Schwartz
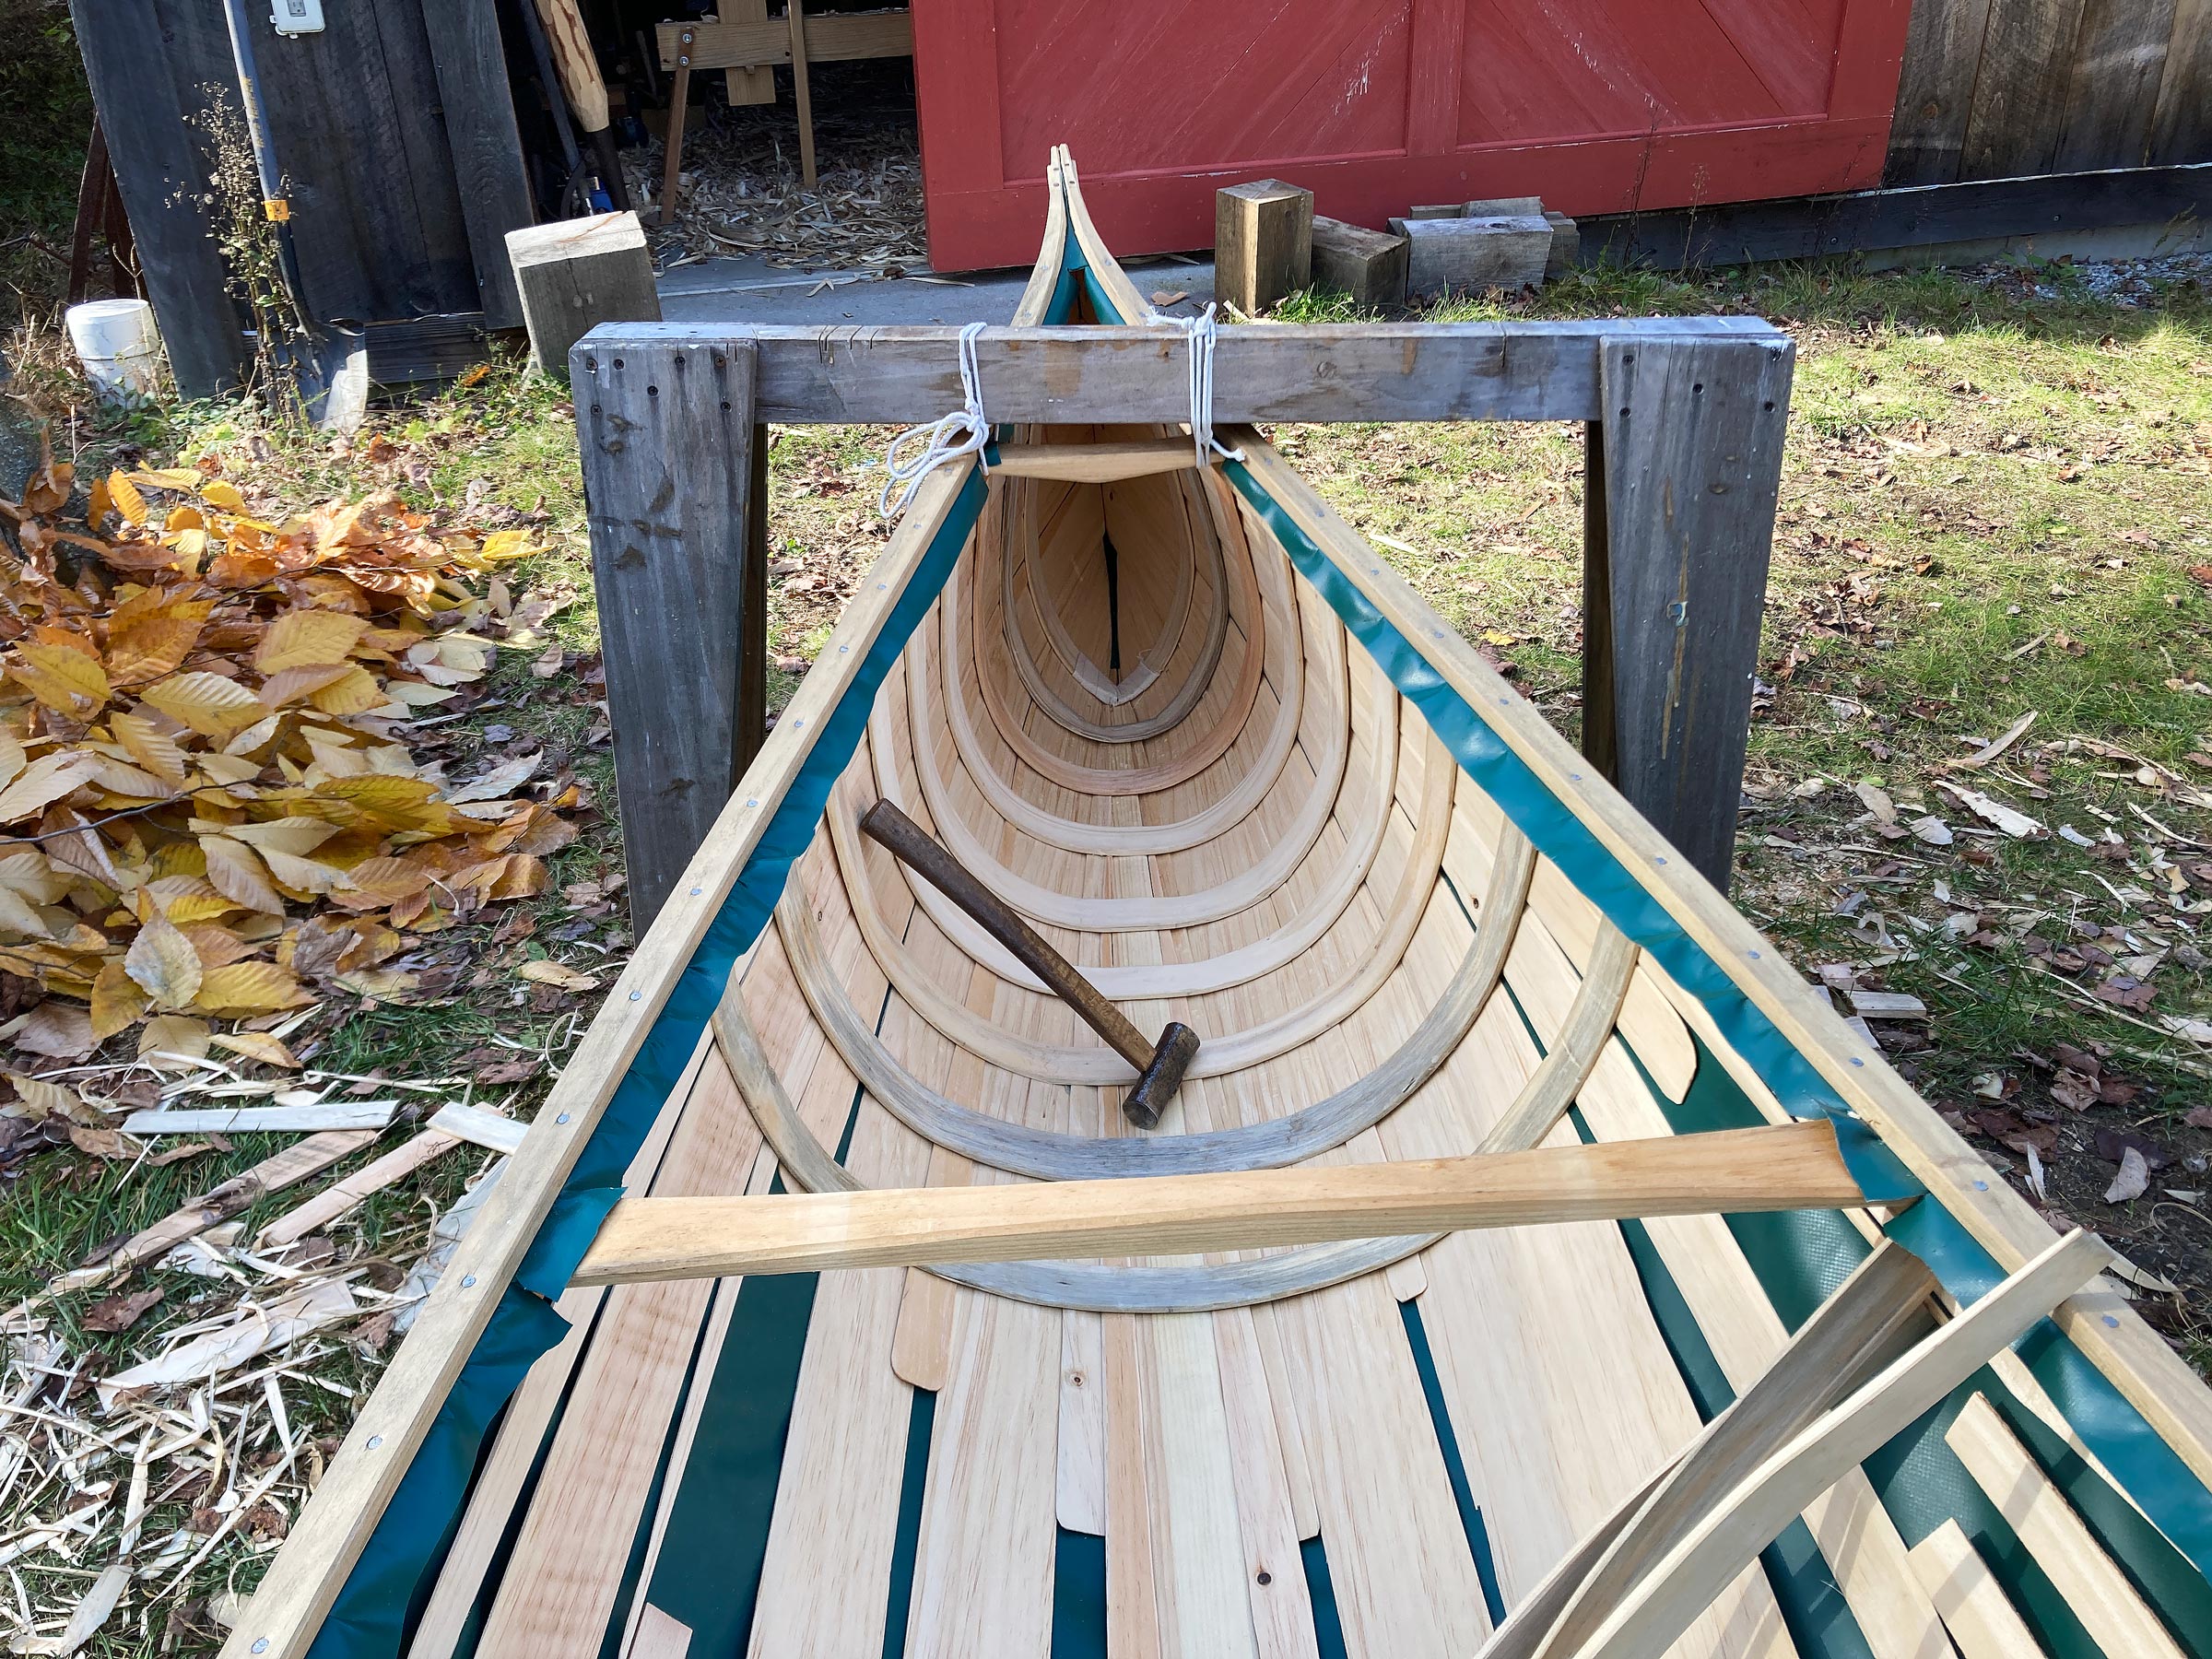
Framing out the canoe. The pre-formed ribs are set in place, tapped up under the gunwales. As the builder works from stem to stem, finely-shaved staves are slid in between the ribs and the skin to create a strong, watertight boat.
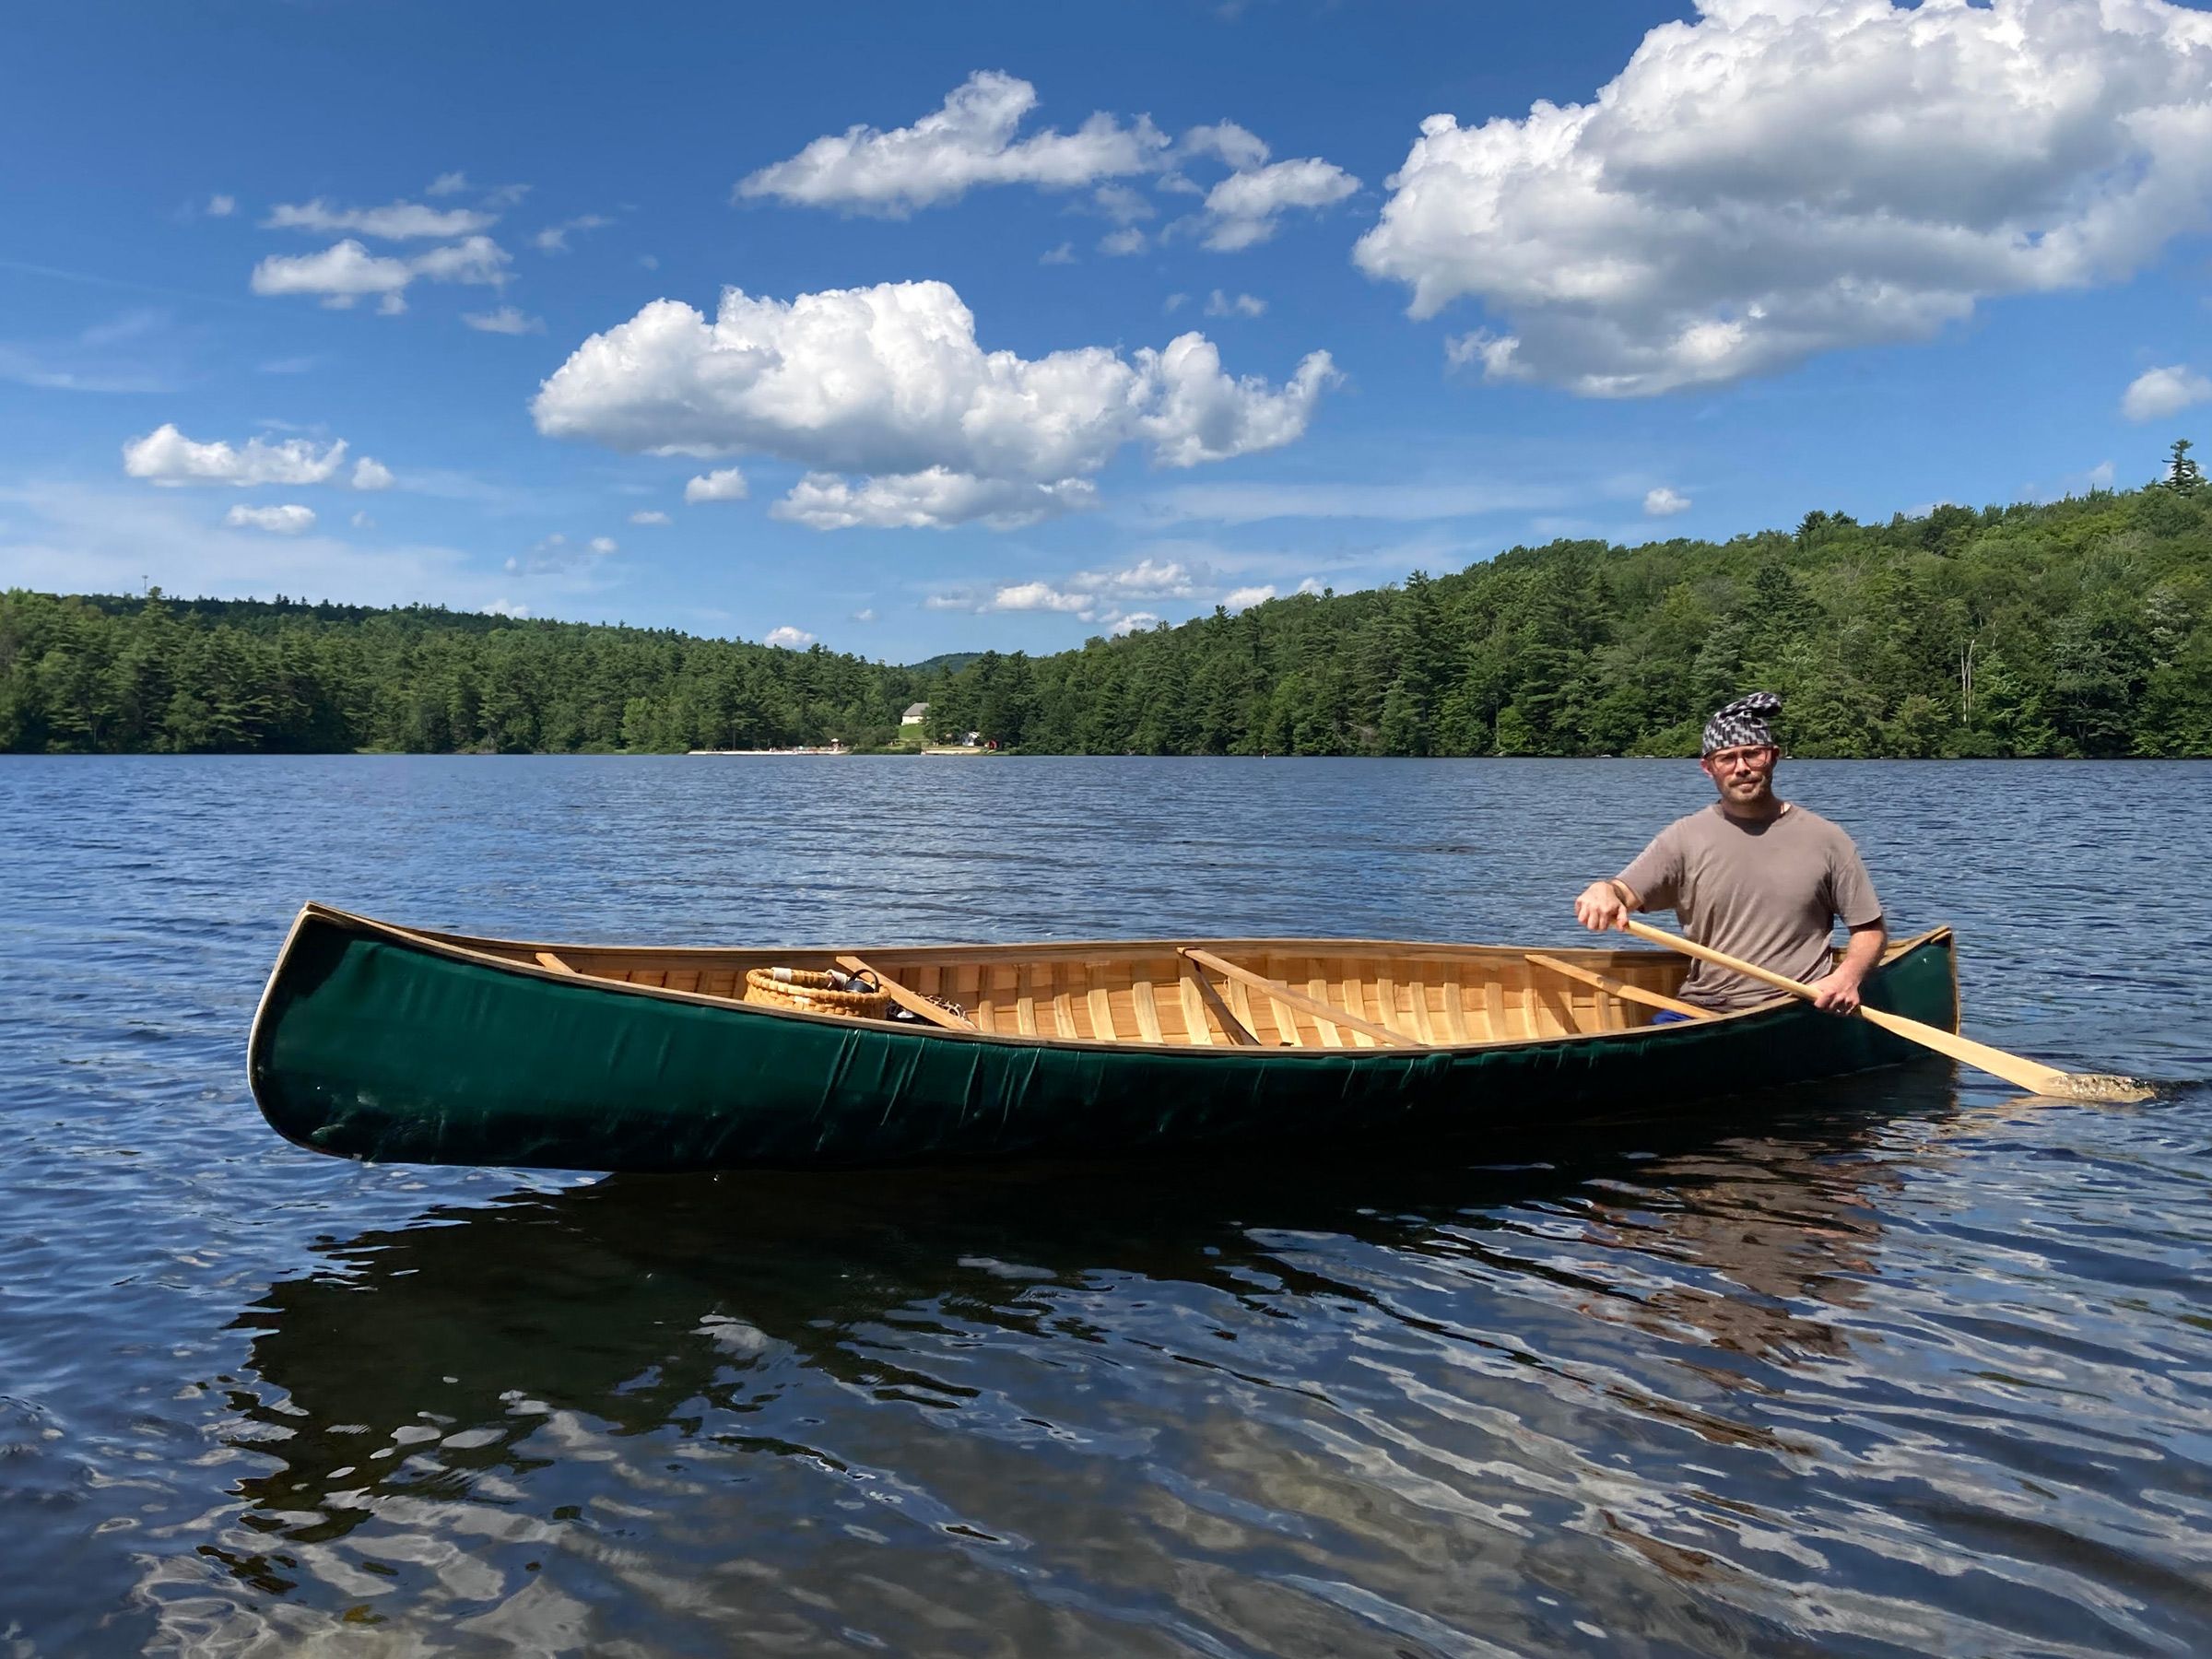
Reid ribbed out the canoe on his 39th birthday at the end of October. Working alone, he would complete the entire build two weeks later. On November 5, 2022, he launched his tarp-skinned canoe. It is 15′ 6″ long, has a beam of 37 1⁄4″ and a depth amidships of 14 1⁄4″; it weighs just 48 lbs. Built of white pine, red spruce, balsam fir, and PVC tarpaulin, it was the culmination of an eight-year-long odyssey.
As canoes go, Reid’s is relatively narrow. “We are more accustomed to wide-bottomed canoes today, with nearly upright or tumblehomed sides and a very broad bottom that nearly matches the beam. But in native canoe building there are both wide- and narrow-bottomed canoes. Narrow canoes have more flare to the sides with the broadest part of the bottom being only two-thirds or less of the beam. They can have a hard or soft chine with a round, flat, or even shallow-V bottom. Mine is narrow with a soft chine and round bottom, which should be the most tender combination. But as I’ve used the canoe, I’ve discovered that it feels at its least stable when it’s upright, and as it leans to either side the stability quickly firms up against the flared sides.”
Cody Nowell
Normally, when paddling alone, Reid shifts his weight forward to just aft of the center thwart. That prevents the bow from lifting out of the water (as seen here) which reduces the waterline length and impacts the directional stability of the canoe.
It was not until spring, some months after the build, that Reid was able to use the canoe on a regular basis, but then he went out on the millpond nearly every day. With only his own weight in the canoe, he says, “I paddle from a kneeling position to keep gravity low and settle my weight off center to the port side just aft of the center thwart. That keeps the waterline as long as possible and gets me close to the gunwale for comfortable paddling. As the canoe tips it becomes more stable, feeling firmer as the gunwales lean harder toward the water. When I’m seated low and well aft, even the initial tenderness is pretty mellow, but shifting back to lean against the second thwart sacrifices some speed—with so much rocker, it’s easy to have the bow pop up out of the water and thereby lose some waterline length and speed. It’s still responsive to a J stroke, but it does have a slight propensity to oversteer when the bow is out of the water. That issue disappears completely with more weight aboard.”
Reid Schwartz
Despite being narrow, Reid’s canoe is flat-bottomed enough that it will sit upright when beached, making it easy to load. The backrest is simply lashed to the center thwart so that it is easily removed and adjusted.
Before embarking on longer outings, Reid tested the canoe under load. “I added sandbags to the bow and forward middle sections, 25 lbs at a time. Any weight added to the bow greatly increased stability. With all my sandbags loaded plus the folding cart that I had used to bring them to the canoe, I had about 120 lbs on board with me. It brought the canoe to its waterline and made it feel extremely stable. Now I could move back to the most comfortable paddling position all the way aft, perched on the stern thwart. Sitting there is as comfortable as sitting in a chair, and the canoe is very narrow at that point, so I’m paddling as close to my body as possible with the paddle strokes working not far from the centerline. Tracking was very good. I was simply at ease and hugely impressed by the canoe’s stability.” It was, says Reid, a day of confidence boosting, and demonstrated that the canoe performed best when loaded. “It made perfect sense for a working boat,” he says. “Canoes were built to be picked up and carried, but they also needed to be load carriers. It was exciting to prove that in practice.”
As spring turned to summer, the rains came to New England and as the millpond dam burst twice within a month, Reid scaled back his boating, but he’d had enough time on the water to test the durability of the canoe’s tarp skin. “By June there were lots of scrapes and several gouges in it, but it seems they’re only superficial. The coating scuffs back to the woven-fiber core, but that stays intact. The millpond has quite a few sharp granite boulders lurking just beneath the surface. I’ve hung up, scraped, and crashed hard onto them. The flexibility of the tensioned ribs and floating planks seems to be very robust, and the canoe stayed as dry as can be.”
Cody Nowell
After rough-shaping the paddle with an axe, Reid fine-tunes with a crooked knife, holding the tool palm up and drawing it towards his body.
In the course of all his trials, Reid decided the thing he was not completely happy with, was the paddle. He had carved it to use on his 12′ birchbark canoe, which has less freeboard, and it was too short for the new boat. He decided to make a new one. Working in white pine, he hewed it to the outline and established the tapers and volumes with an axe before carving it to the finished dimensions with his crooked knife. He prefers a long, narrow paddle blade and says that he finds it appealing that “indigenous paddle design is rooted in the same anthropometric measurements as the canoe—everything is made to one’s own personal scale. The paddle’s blade width is limited to the span that can be comfortably gripped between the curled tips of the thumb and middle finger. This keeps the paddle from being so broad that the user pushes too much water and tires quickly. The long, narrow blade sacrifices power, but is conducive to the J stroke and the box stroke. The trade-off is worth it. I’ve even used it for sculling when I’ve needed to be completely silent on the water.”
Reid Schwartz
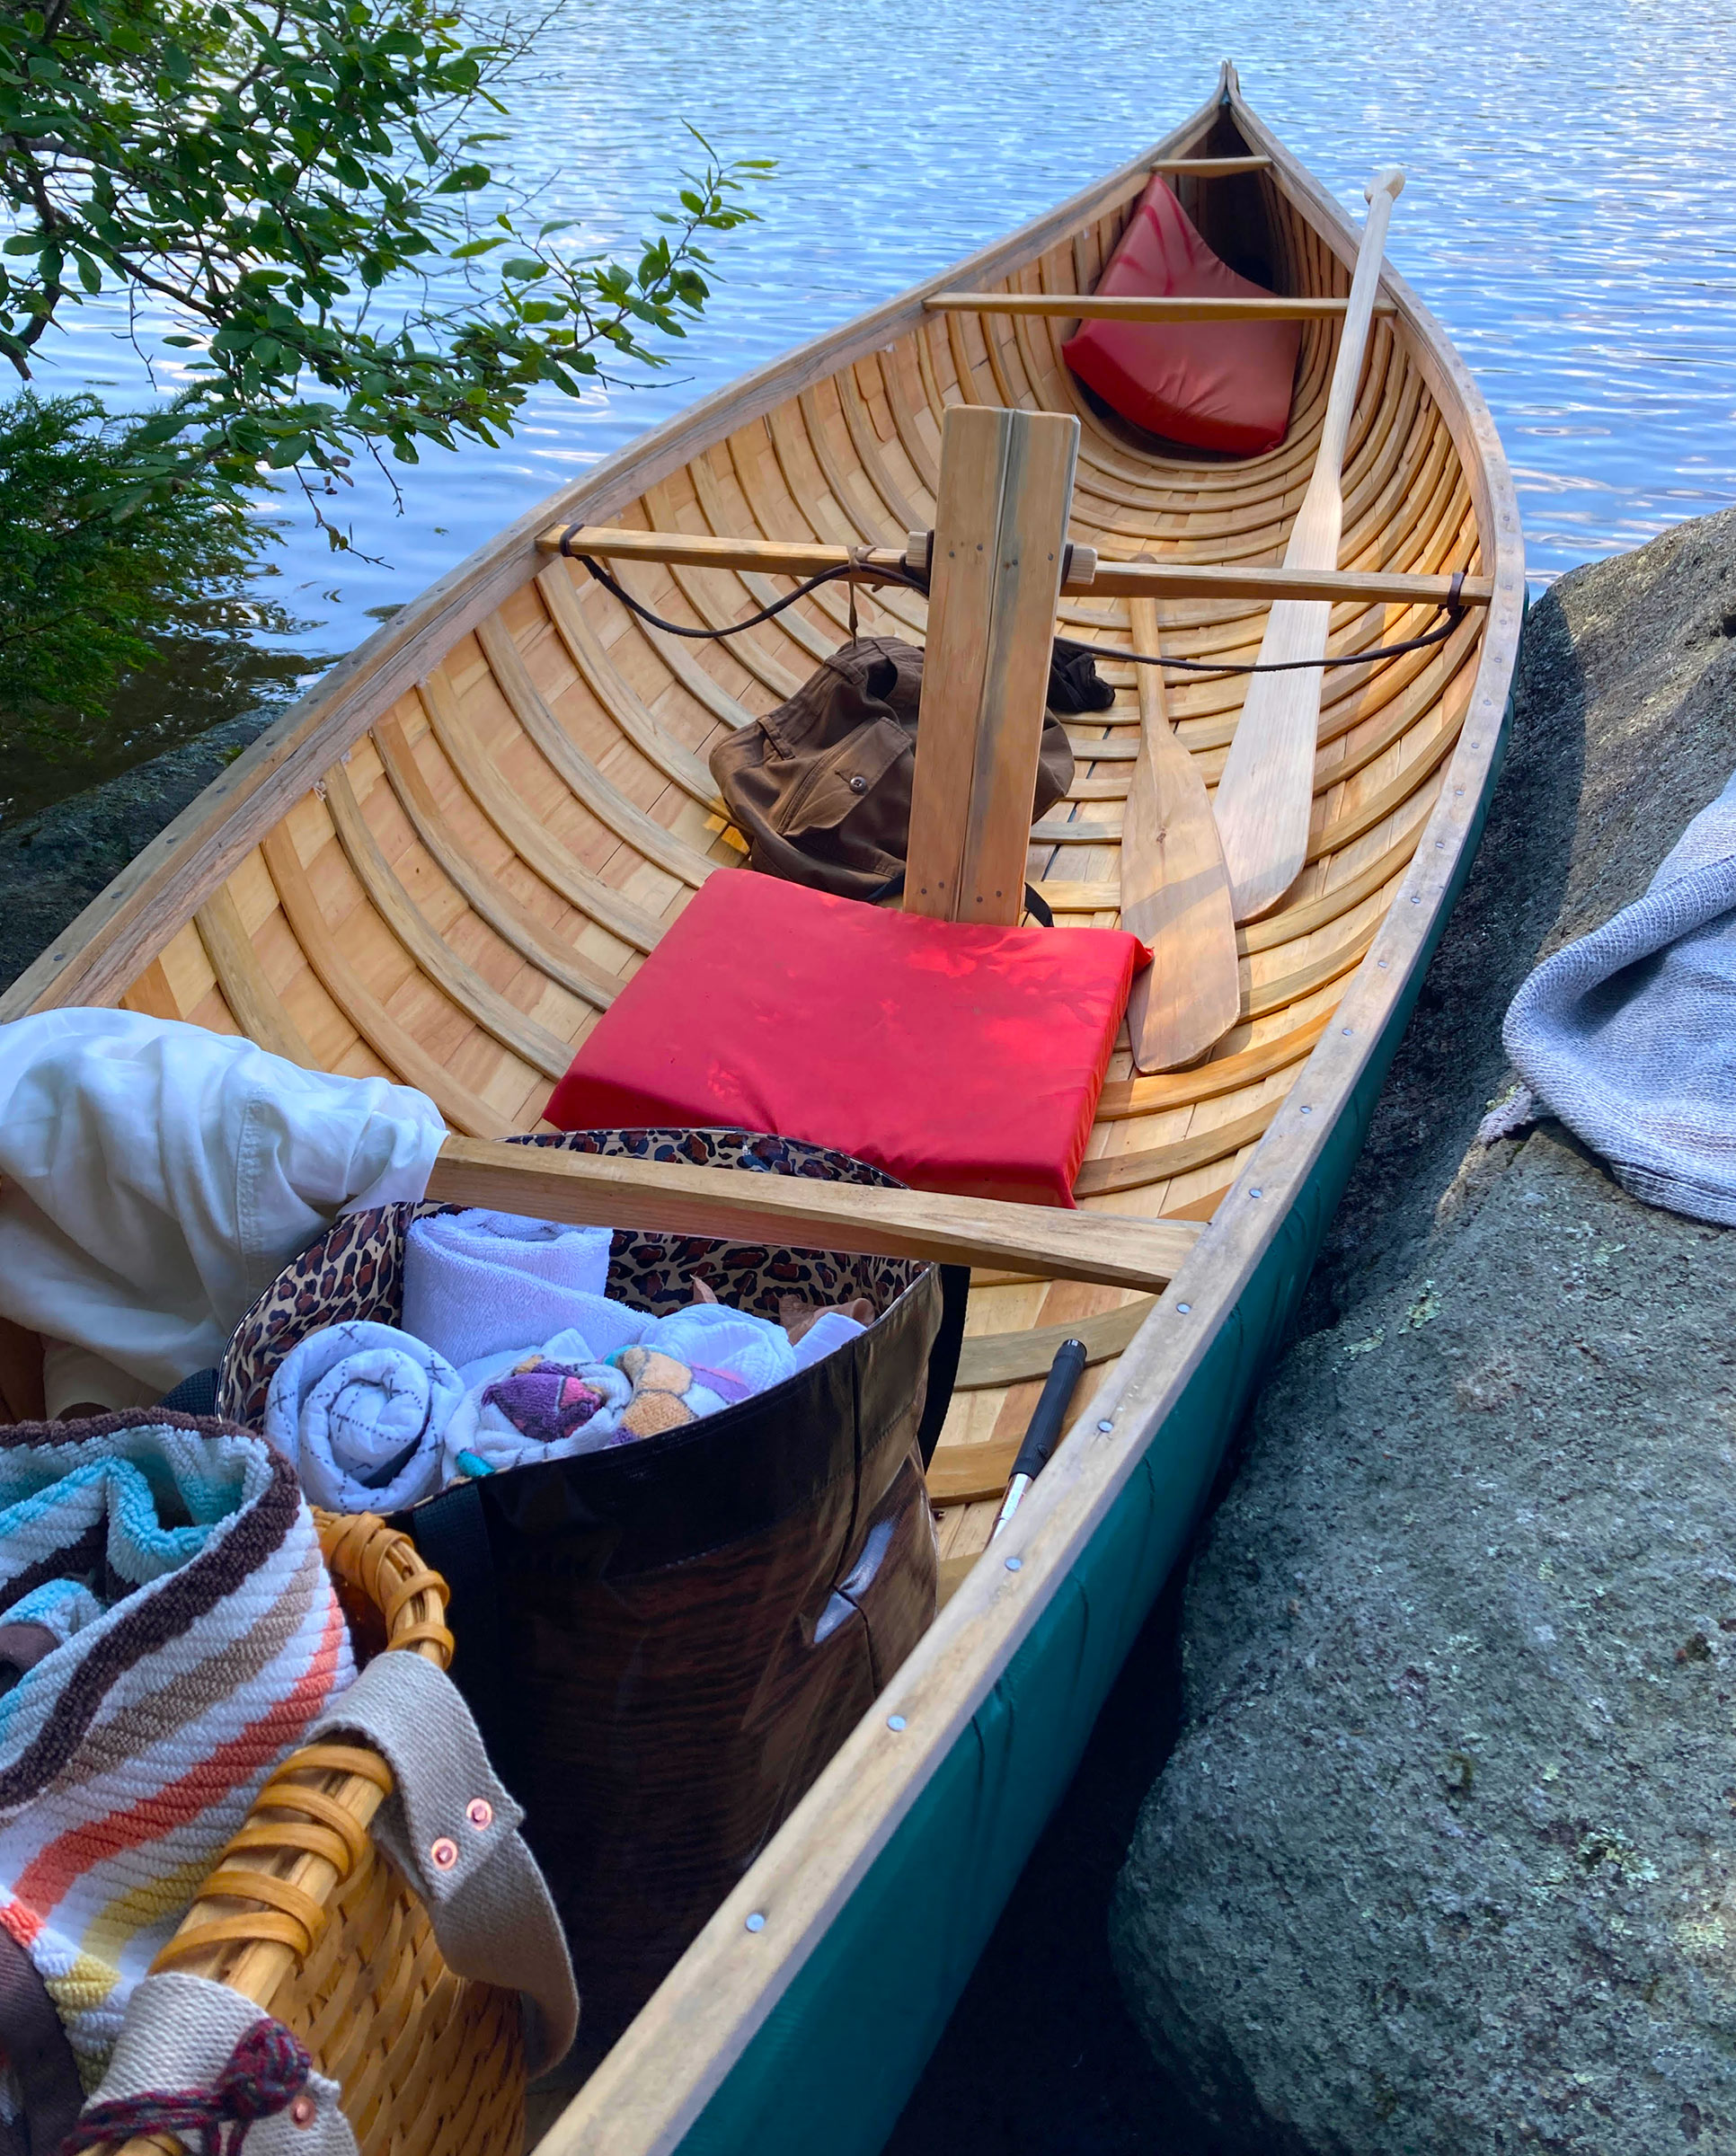
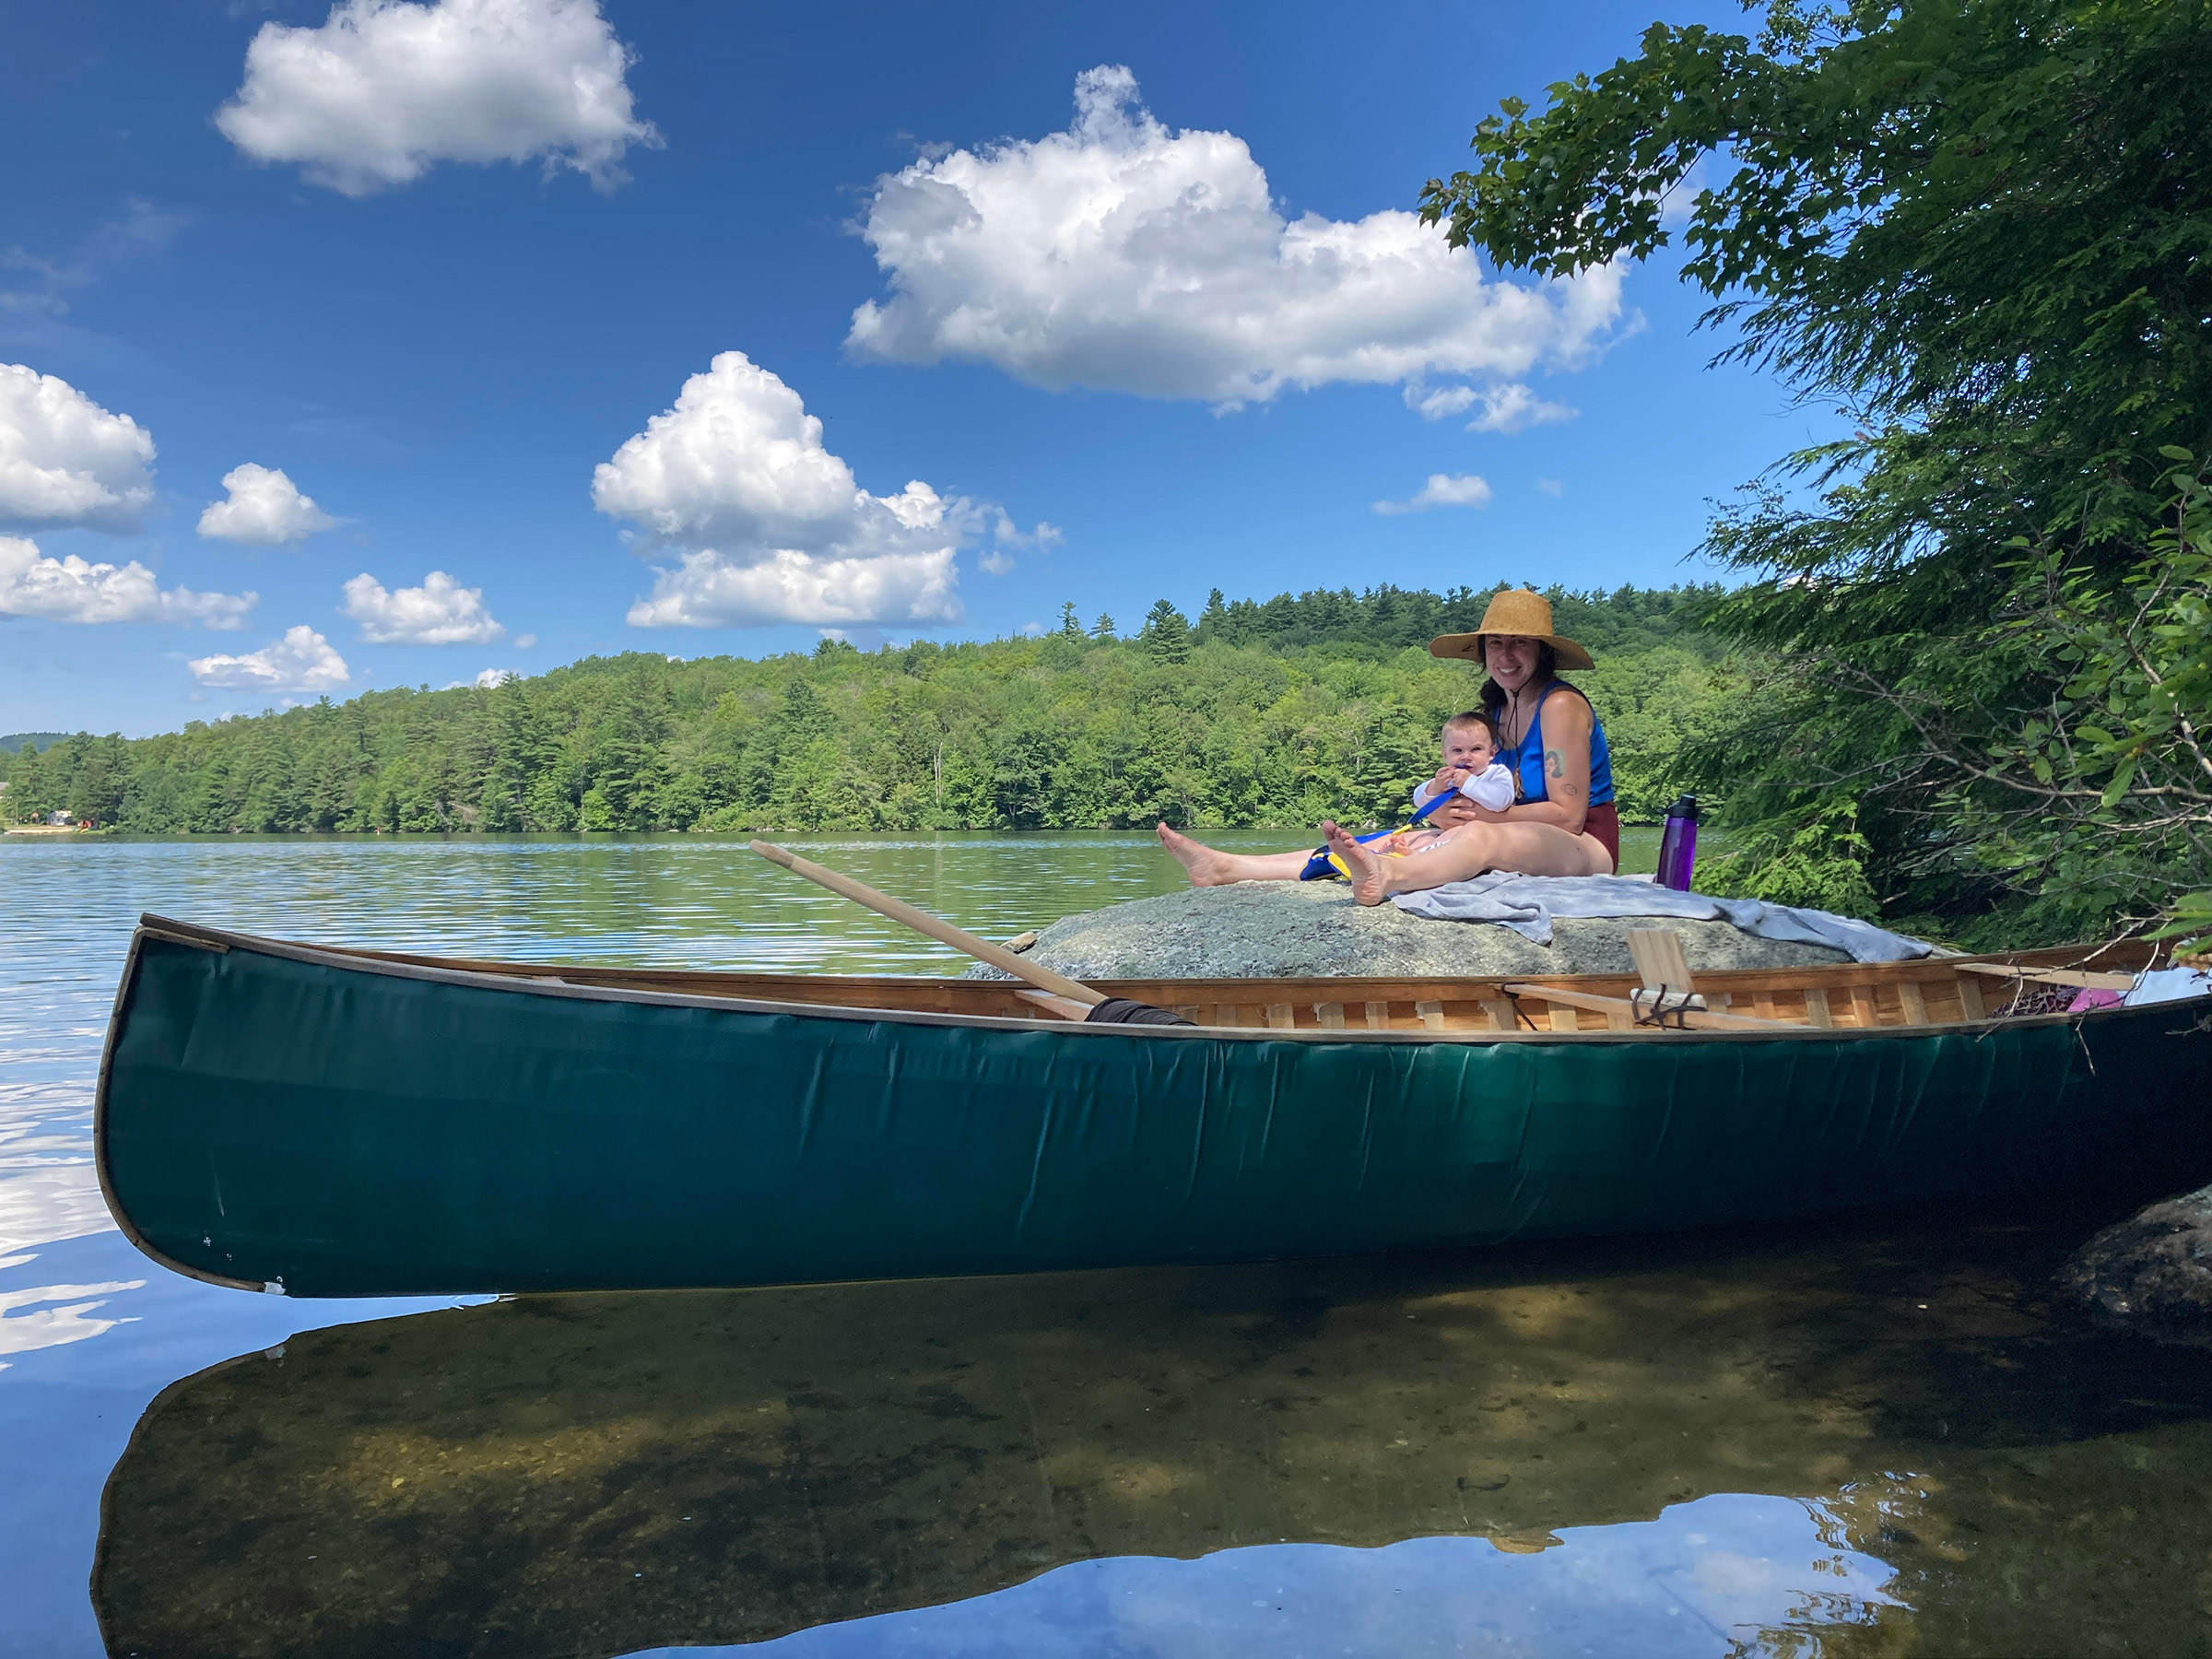
While the canoe is relatively narrow, at 15′6″ long there is ample room for two passengers (plus toddler) and all their gear. By stowing the cargo in the bow, the weight is well distributed and the canoe is at its most stable.
With the paddle finished and the summer bark-harvesting season upon him, Reid set off through his family property in search of bark with which to make birchbark canisters that he plans to sell at a local craft event in the fall. With his tarp-skinned canoe he had a stable mode of transport with excellent load-carrying capability.
Reid Schwartz
For a young family living in an area with many easily accessed freshwater lakes, the canoe is proving to be the ideal boat: light enough to get up onto the car roof rack without too much effort, stable enough to protect the passengers, and large enough to carry all the gear for a long day’s outing. The tarp skin has withstood bumping over rocks in the shallows and even coming in hard and getting stuck fast on a sharp-angled rock. The outer layer scuffs, but the weaving beneath remains intact.
He continued to use the boat almost every day, weather permitting, and in mid-July, finally took the family—himself, wife Cody, and toddler son—for a picnic outing. “We car-topped to a favorite lake,” Reid says, “packed a lunch, swimming gear, and all the baby stuff. We traversed the lake and cruised the shady side of a few coves before settling on a protruding rock for lunch. The canoe turns out to be the perfect family boat—it was a relaxed, happy day…the first of many.”
Jenny Bennett is managing editor of Small Boats. When he’s not out on the water with his family, Reid Schwartz continues to make knives by hand and eye. He sells them via his website.
If you have an interesting story to tell about your adventures with a small boat, please email us a brief outline and a few photos.
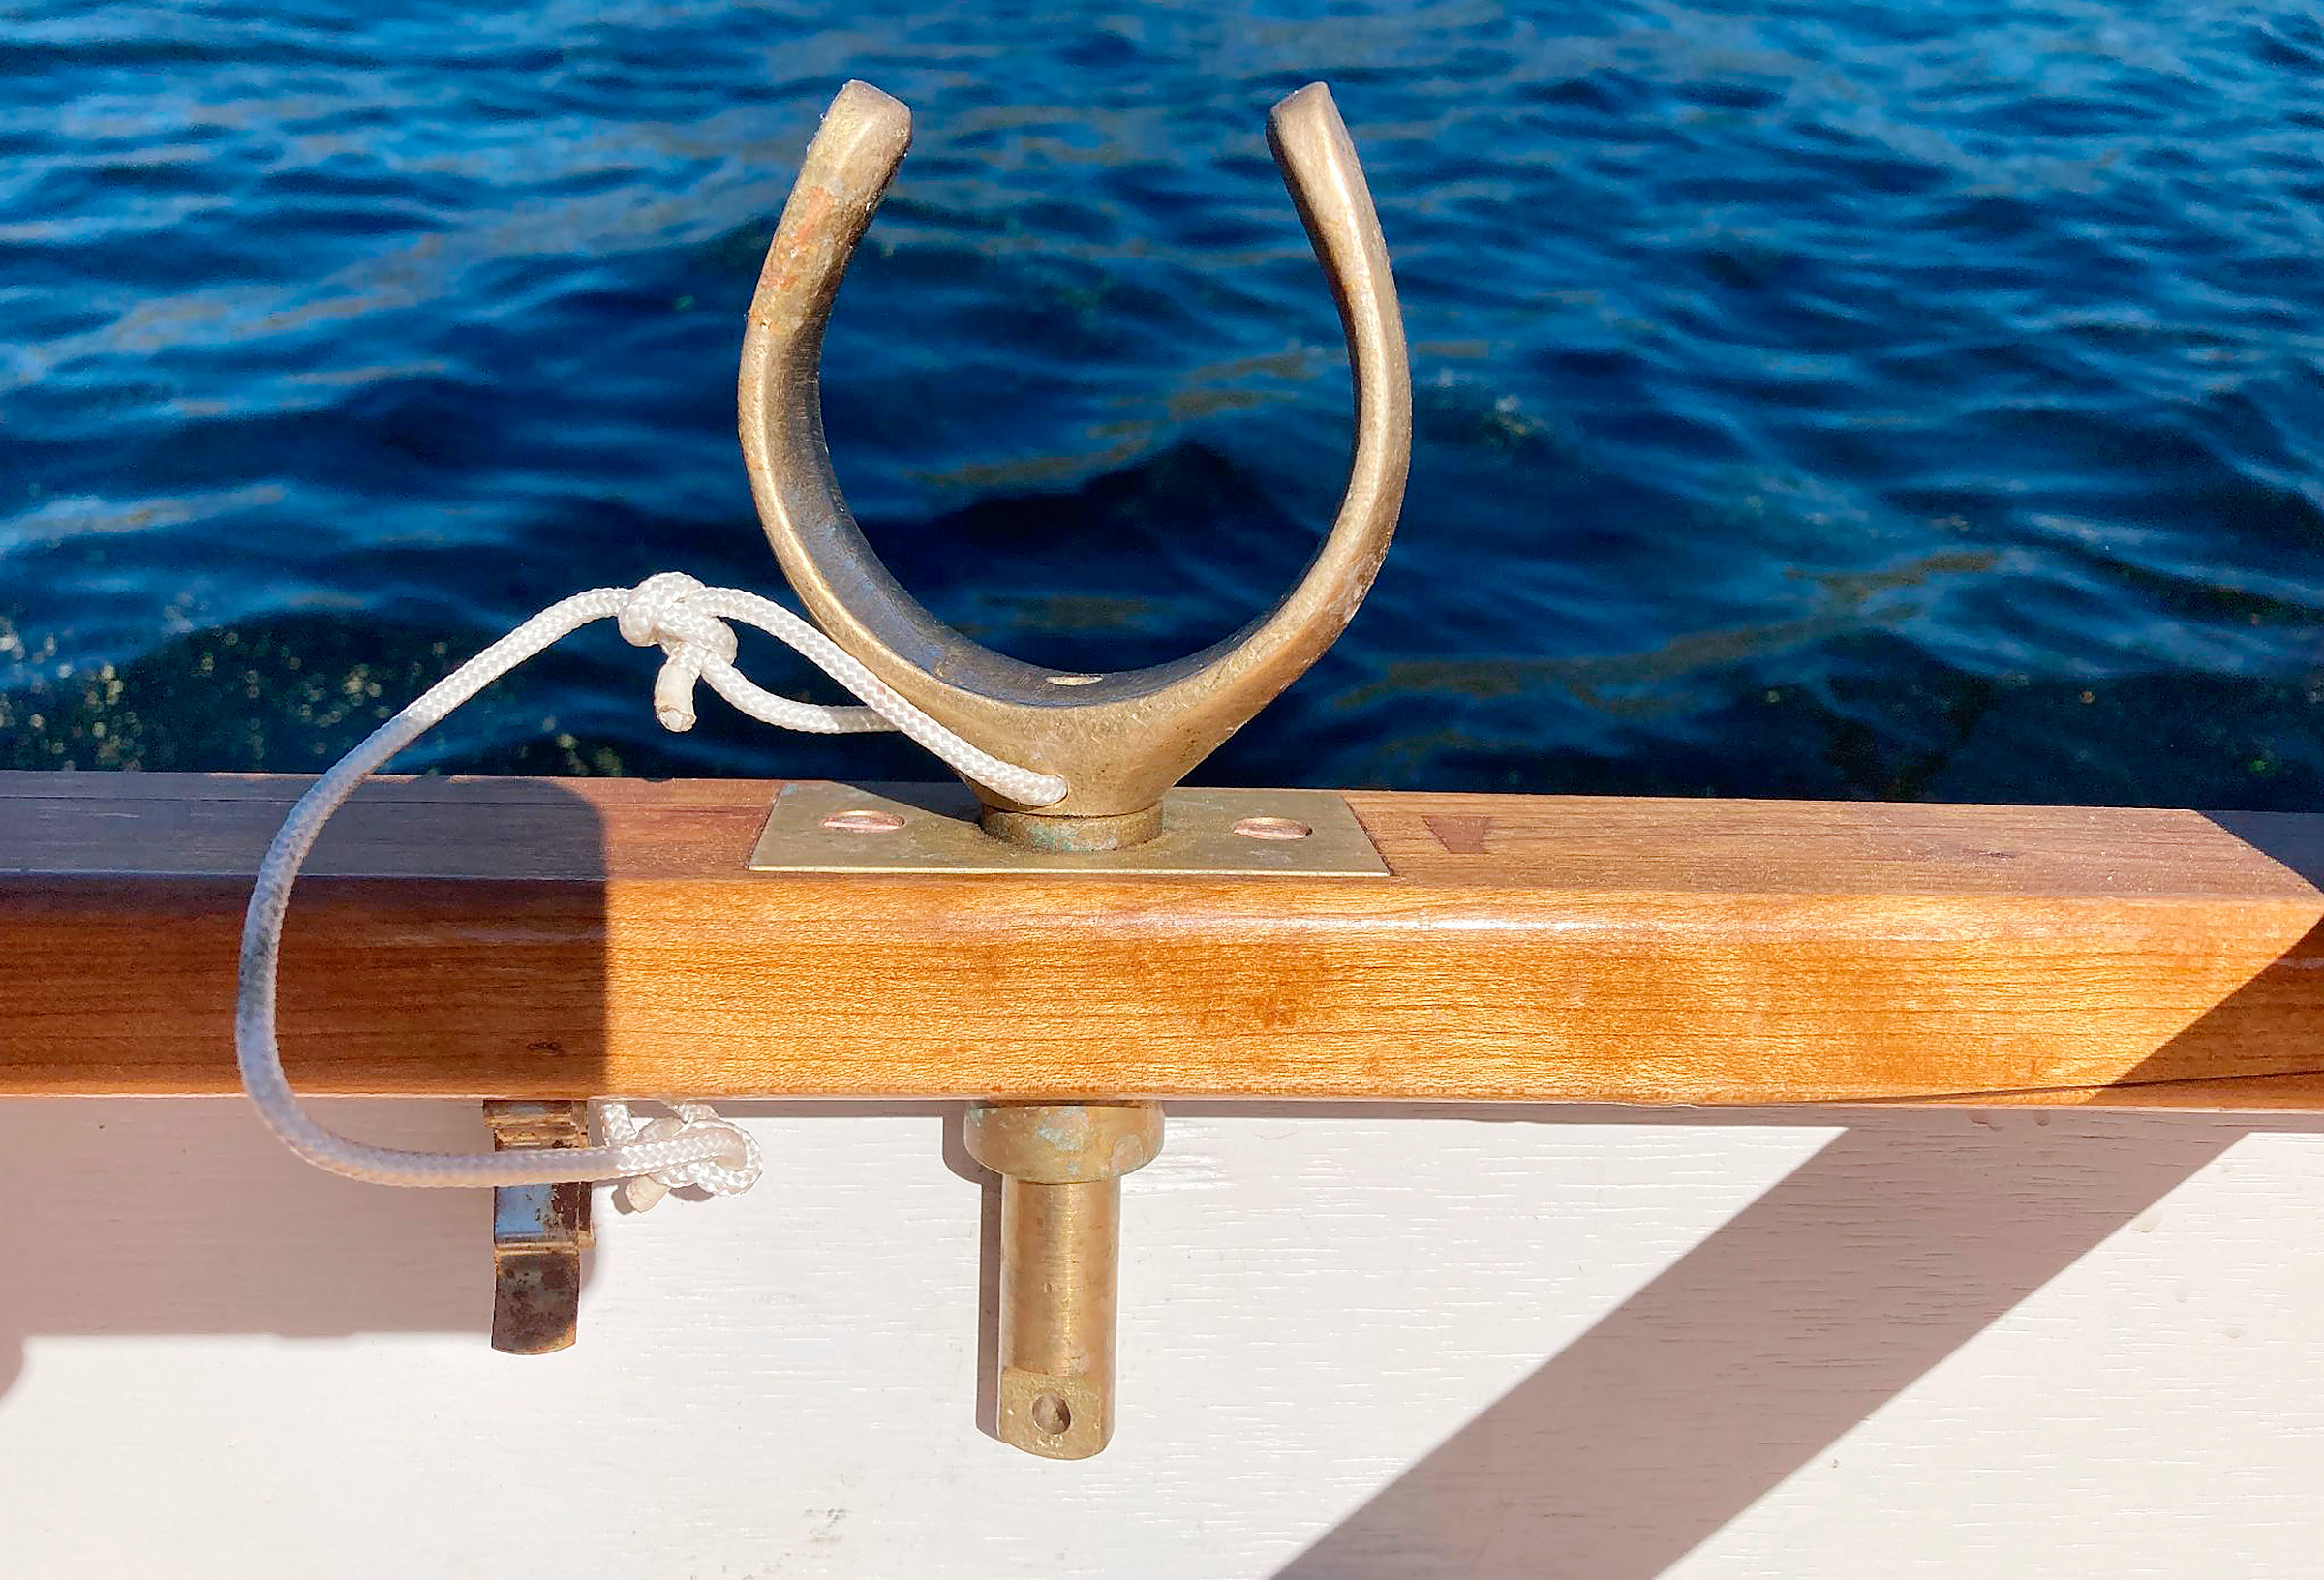
The perfect oarlock socket exists, and you can make it in a modestly equipped home workshop. These sockets are very strong, precisely machined, and will never corrode or need lubrication. I got this design from avid rower Rick Thompson. Installed in 2010, his original pair are still going strong and they have never squeaked!
The secret ingredient is a $6 Oilite bushing. Oilite is sintered oil-impregnated bronze: powdered metal coalesced into a porous solid, permanently holding lubricant in its interstices. In use, oil travels through the pores of the material to lubricate the bearing surface. Commonly used in motors and machines, Oilite bushings are available in a huge range of sizes including the 1⁄2″ and 5⁄8″ inside diameters that perfectly match commercially available oarlocks.
To make these sockets, you will need:
Oilite sleeve bearings about 2″ long with an inside diameter equal to the diameter of your oarlock shafts. I made the sockets in these photos to fit Sawyer Super Strong oarlocks with a 5⁄8″ shaft. It is wise to purchase your oarlocks first to confirm that the shafts have been precisely turned; the sockets and oarlocks form a system and will work best if they match closely.
Plain bronze sleeve bearings. You will press the Oilite bearings into these to create a larger non-porous outer layer. This will stop the oil from leaching out of the bearing into the gunwales. Choose a size with an inside diameter equal to the outside diameter of your Oilite bearings and with a length 1⁄2″ less than the bearings. Brass bar stock 1⁄8″ thick and about 1 1⁄2″ wide; 3″ of length per oarlock socket is about right. Links to the pieces I purchased are listed below.
Photographs by the author
Within the plain bronze bearing there is an Oilite sleeve bearing. It is this extra element that makes the socket a superior product and cuts down on the squeaking so often heard when oarlocks rub within their sockets.
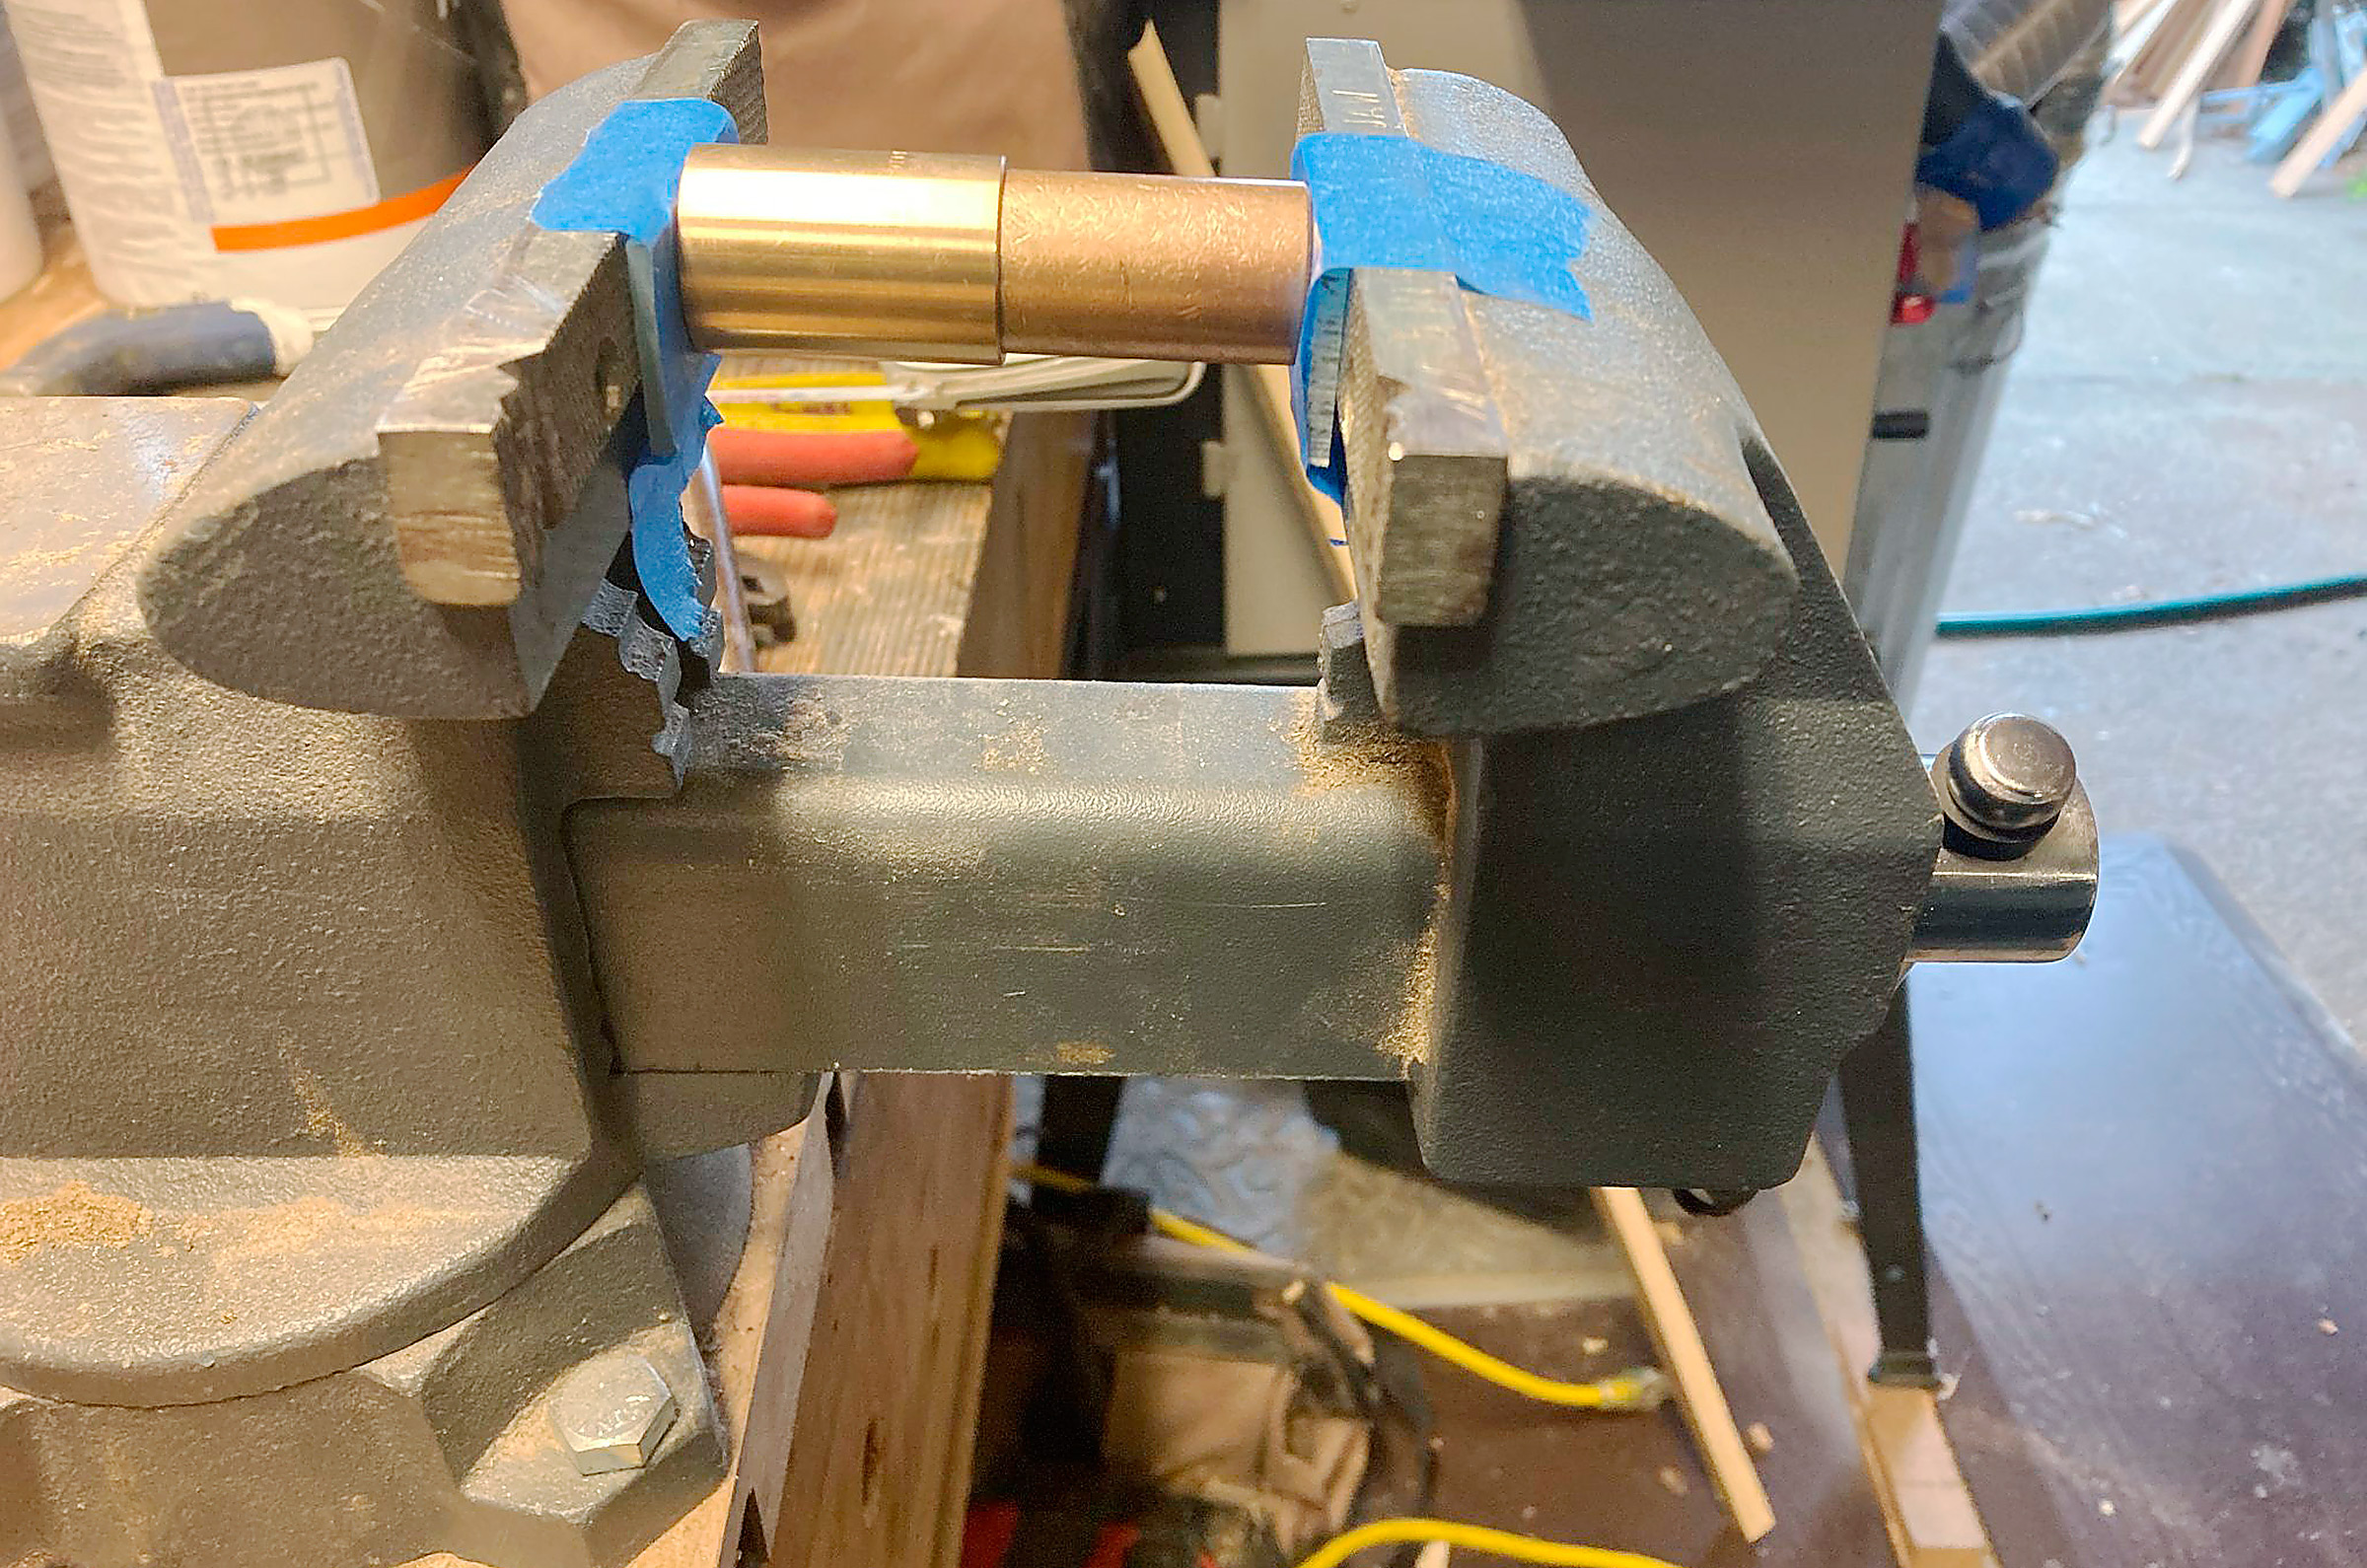
To assemble your sockets, first push each Oilite bearing into a bronze sleeve bearing until it bottoms out. While an arbor press would probably be ideal for this, I had no trouble using a low-quality 5″ bench vise.
Now, make mounting plates from the brass bar. First, make a jig. Route a 1⁄8″ recess the width of the bar and 3″ long into a scrap board. Bore three holes to clear the bits you will later use to drill the brass: a central hole larger than the outside diameter of your plain bronze bearing, and two peripheral holes larger than the holes you will drill for mounting screws. (When you lay out for these holes, extend the layout lines beyond the routed recess to the surrounding surface. You’ll later use these lines to transfer the location of the holes on your brass bar).
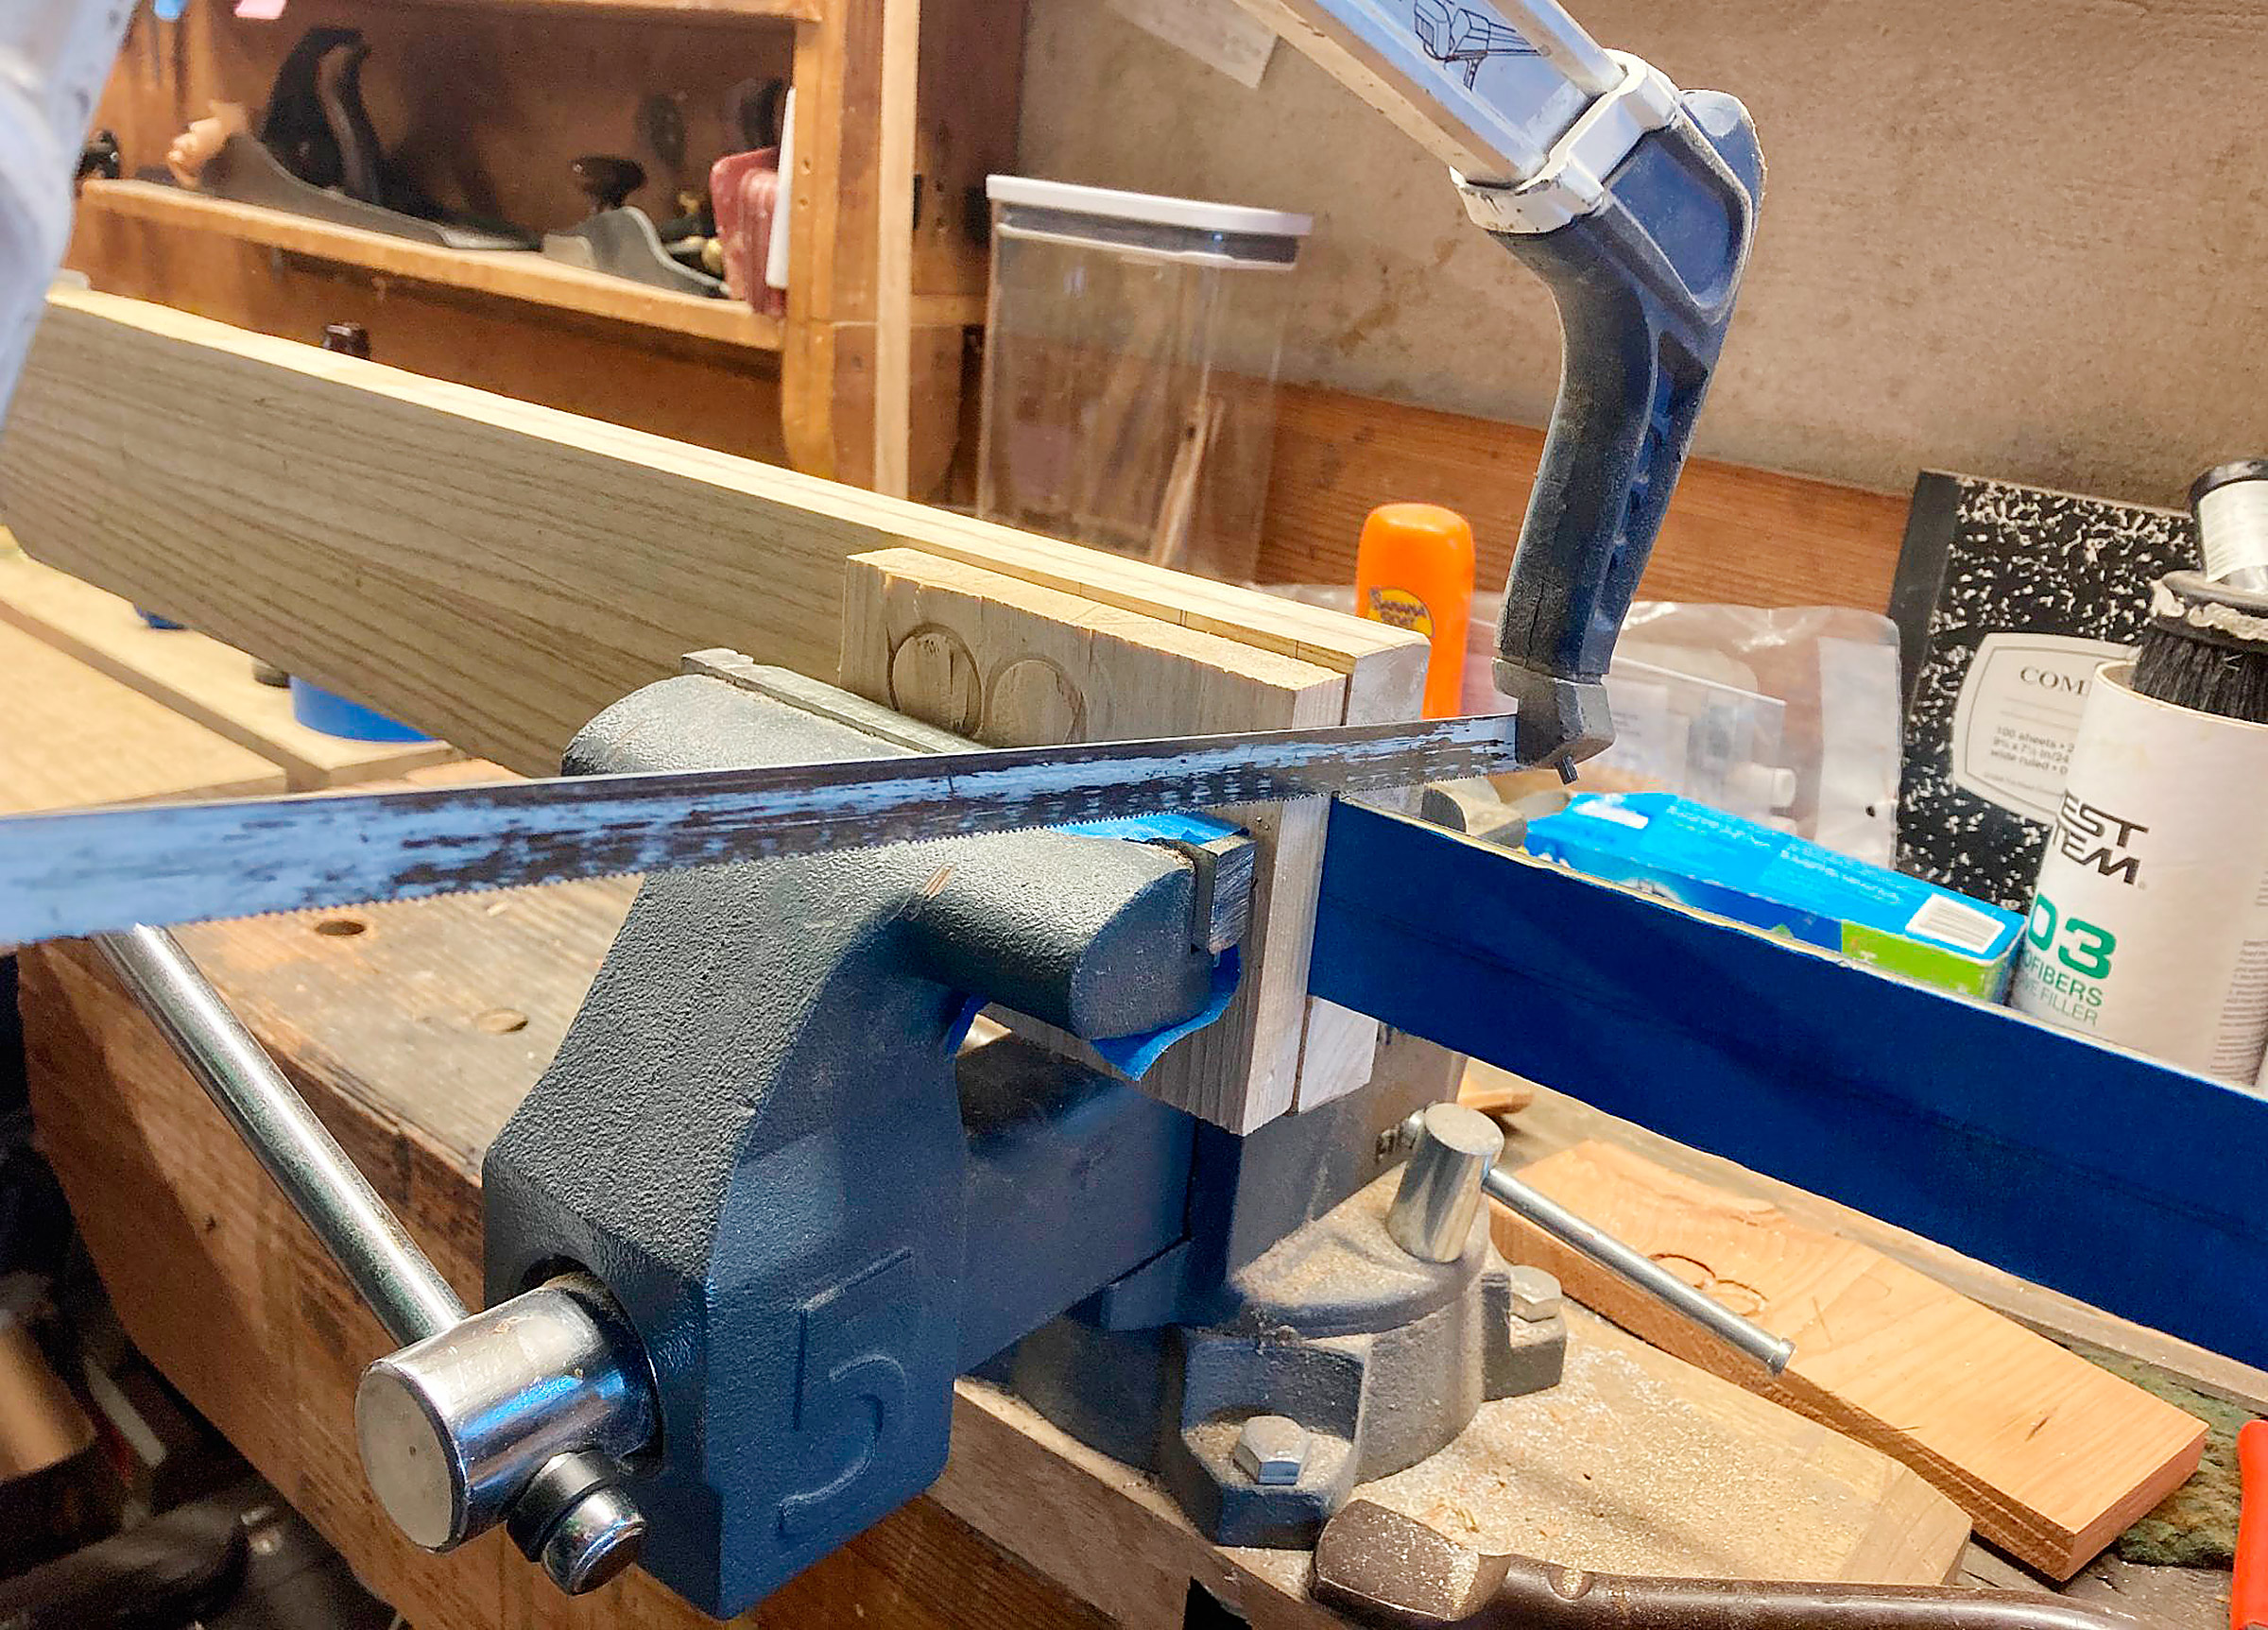
Before cutting the brass plate to size, it is covered in masking tape—to avoid scratching the surface—and held between two pieces of wood within the vice to further protect it and provide a guiding edge for the saw.
Before working the brass bar, protect it with a layer of masking tape. Insert the brass bar into the jig. Cover it with a scrap piece of wood, clamp the resulting sandwich in the vise, and cut along the edge of the jig with a hacksaw. Use a file to clean this cut down to the surface of the jig.
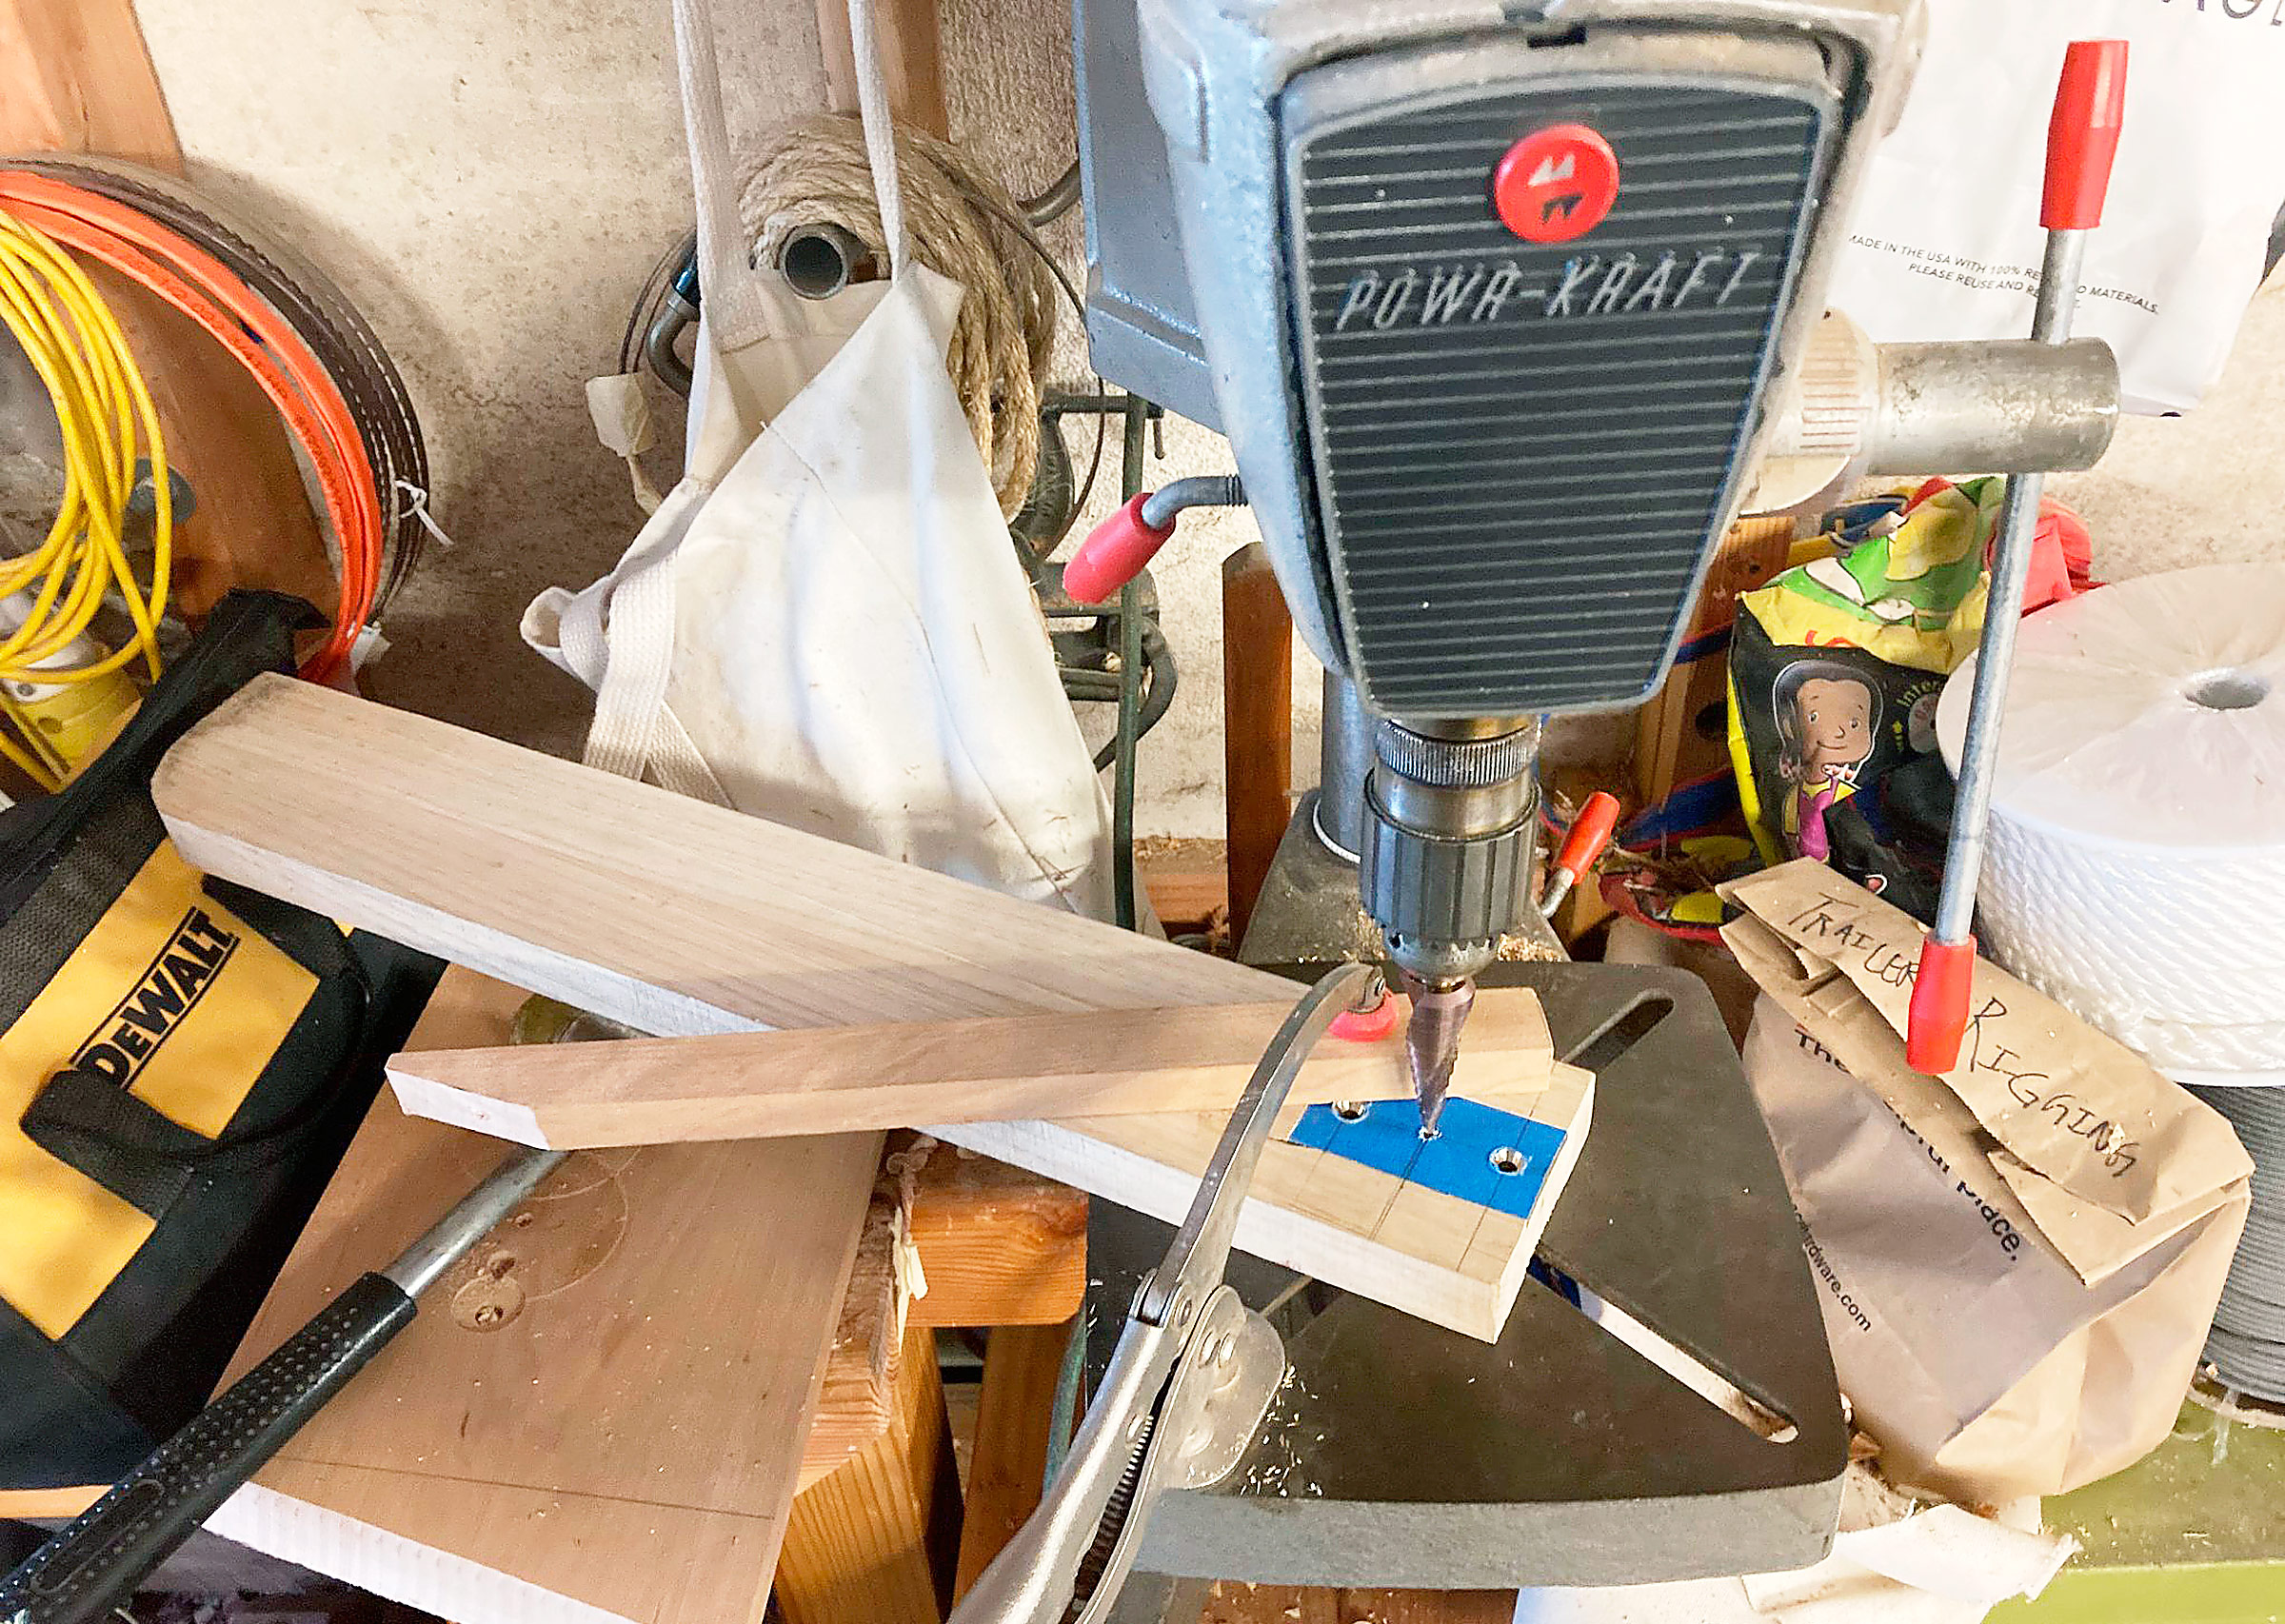
When drilling the holes into the jig it is important to make them just slightly oversized—the central hole is sized just larger than the outside diameter of the bronze bearing, the two side holes just larger than the screw holes in the socket plate.
Keep the bar in the jig for drilling. (The increased holding power provided by the jig makes drilling much safer, particularly as brass stock tends to catch on conventional drill bits and the brass can then spin.) Carry your layout lines onto the bar, then drill and countersink for the fastenings. Standard woodworking countersink bits should work well. Drill the smaller holes for the fastenings after the countersinks. Use a step drill to make a hole the size of your Oilite bushing’s outside diameter. As with the plain bronze sleeve bearing, the precision and standard sizing of these parts will allow for a tight press fit.
Take the sockets and plate to the vise and press the Oilite bushing into the large hole in the center of the plate; a hardwood block with a clearance hole drilled in will allow the bushing to extend past the top of the plate. When the plain bronze sleeve presses against the brass plate, your sockets are complete.
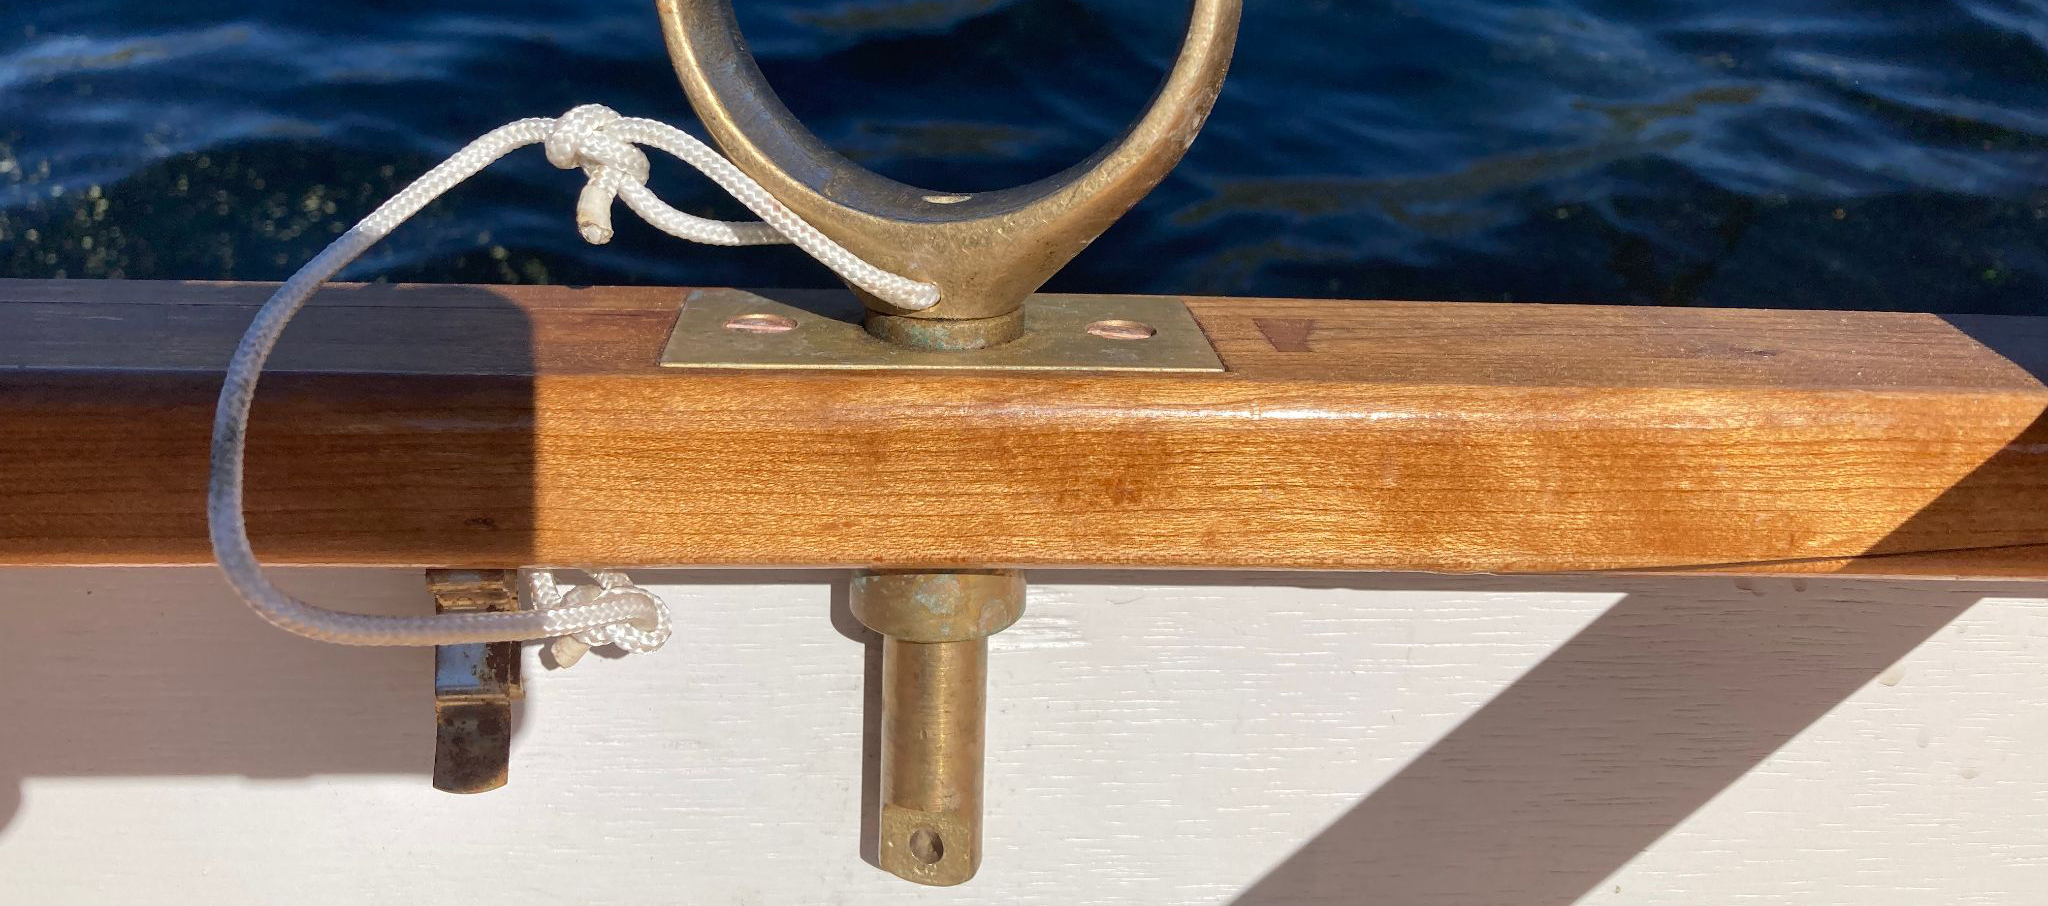
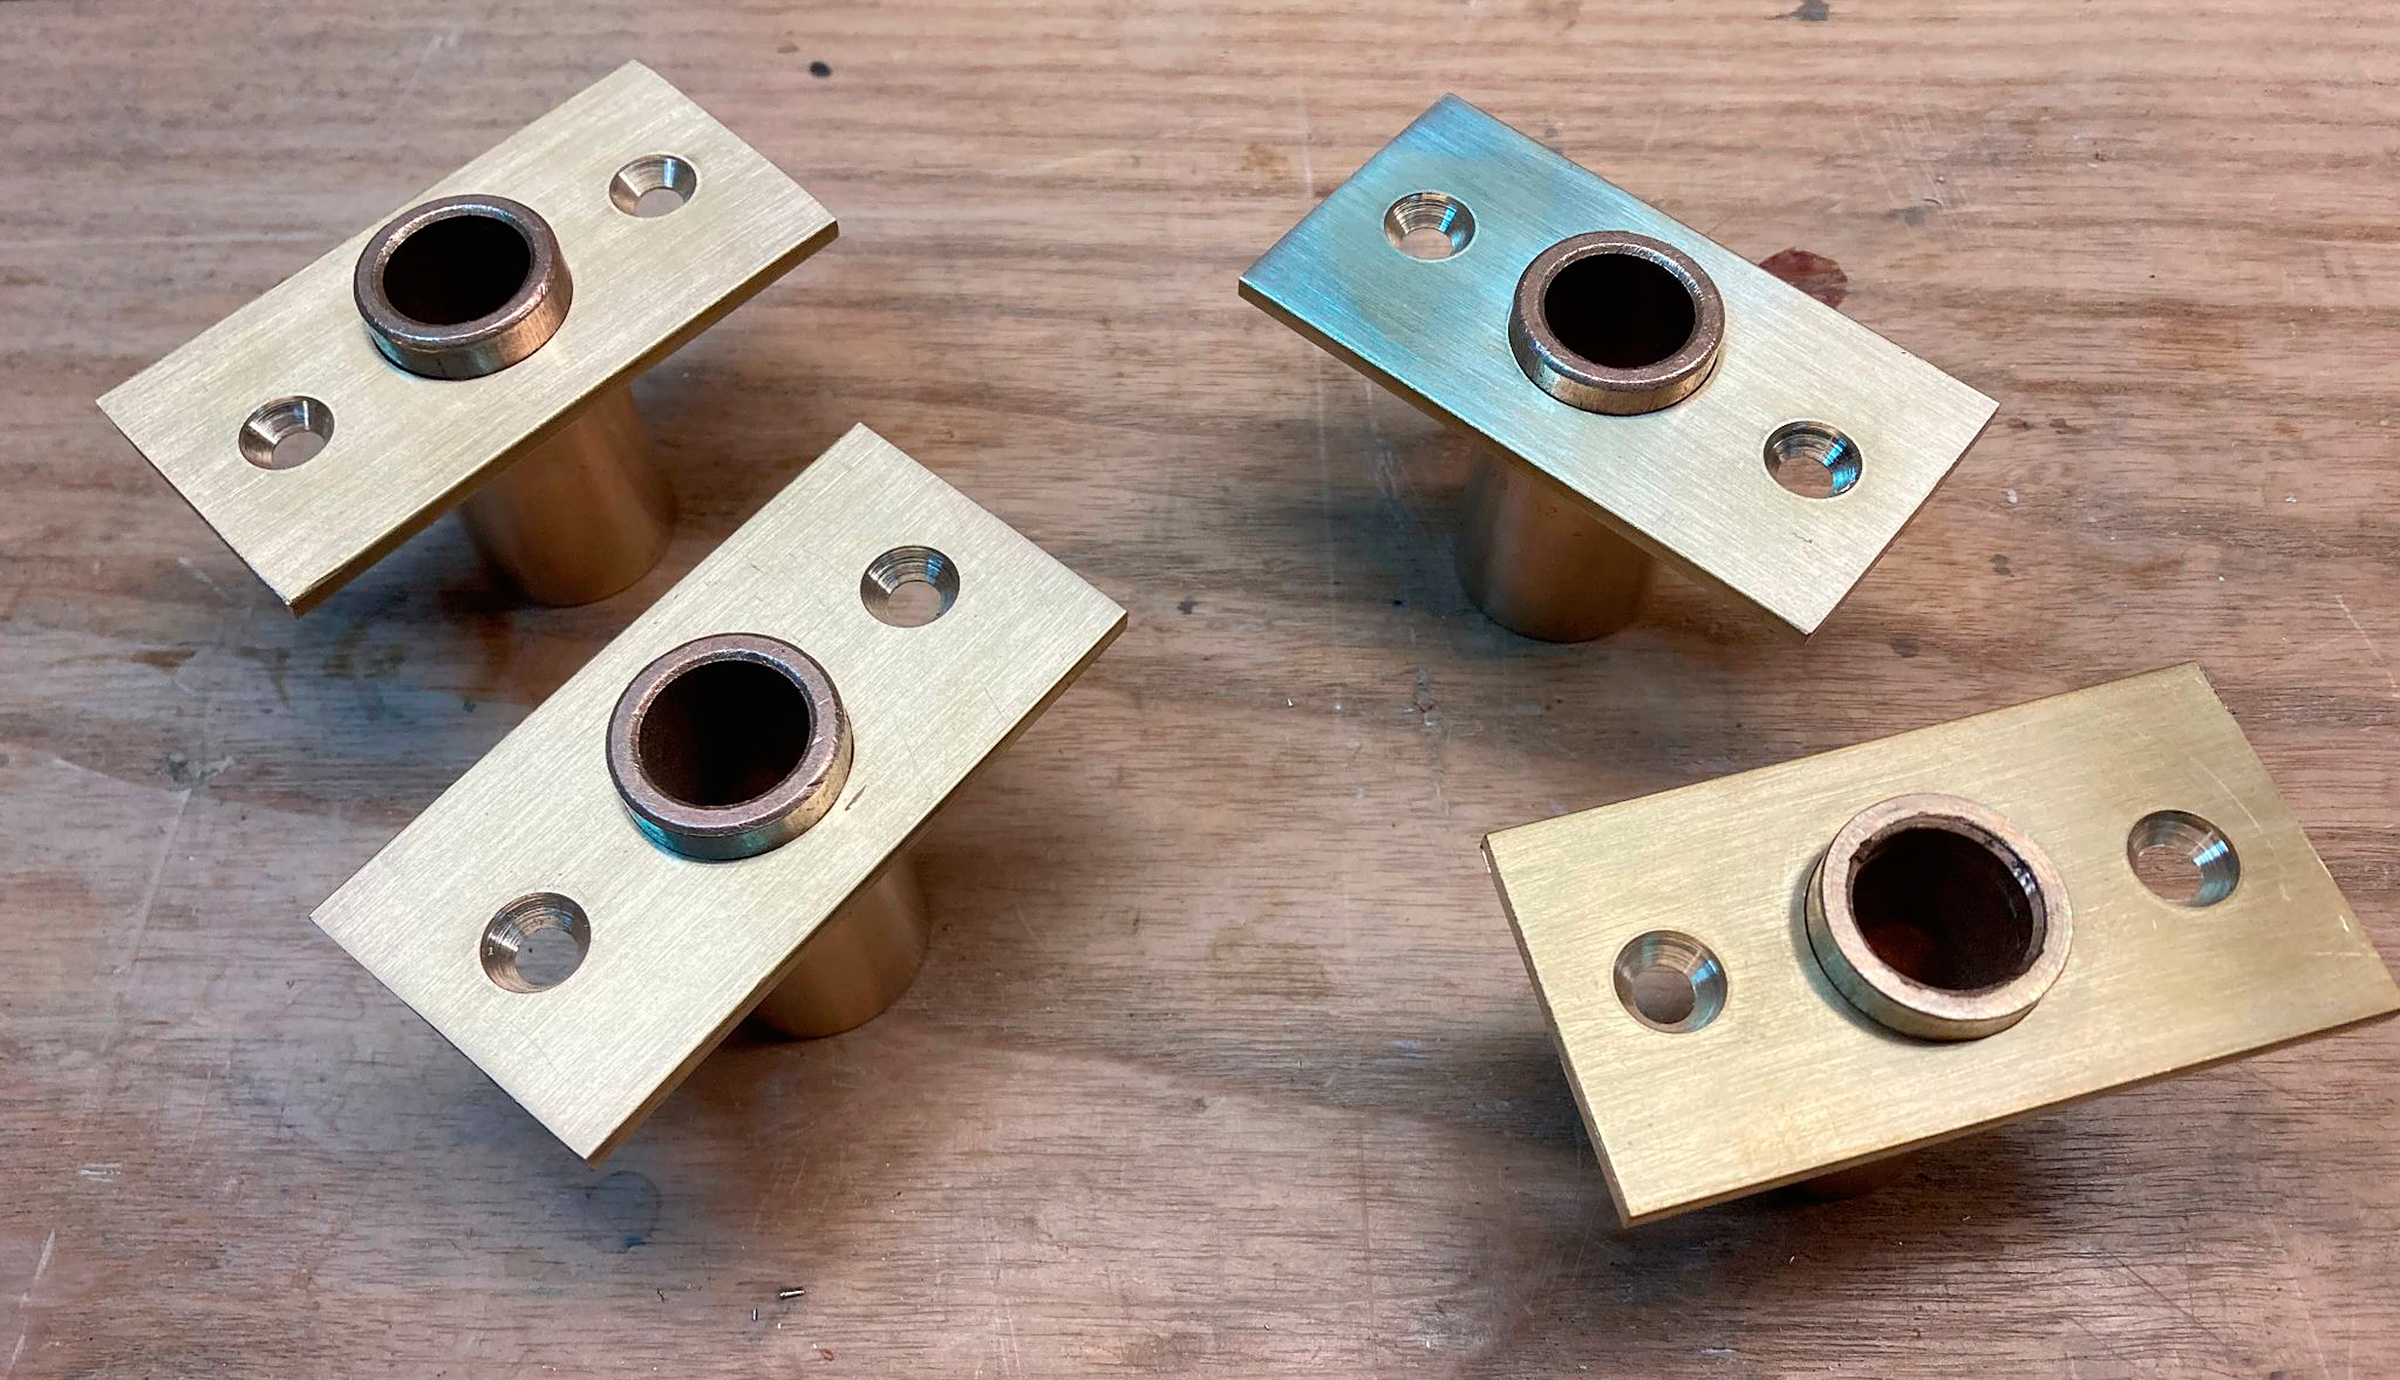
The finished sockets ready to be mounted on the boat. They make look identical, but the alignment of the screwholes is just slightly different on each. The author labeled the undersides so that if he ever needs to remove them he will be able to see easily which goes where.
I installed my 1″ outside diameter oarlock sockets into 1″ holes in the gunwale. Here’s how: first, drill a hole through the gunwale (or oarlock pad and gunwale) for the bearing. After pressing the socket assembly into place and carefully aligning it with the gunwale, temporarily install fastenings (I recommend brass bolts and nuts) then mark along the outside of the plate with a sharp knife. Remove the socket assembly, mortise inside your line to the depth of the plate, and complete the installation by bedding the hardware in compound, paint, or old varnish.
The four sockets I made all appear identical when installed on the boat. However, if you tried to swap them, you’d find that the location of the holes for the fastenings is not perfectly aligned. I was sure to scratch a label on the underside of each socket’s plate so that I can match them with the appropriate mortise on the gunwale in their proper orientation should they ever be removed for varnishing.
The perfect socket, made to measure for both oarlock and boat.
I have been exceedingly pleased with the quality of these home-brewed sockets and would put them up against anything on the market for quality. Try a set for yourself!
James Kealey lives and teaches in Richmond, California. When he’s not chasing his two young sons, he can usually be found banging away on some project in his garage workshop. In high school, he rowed in racing shells. He still gets away most summers for sail-camping trips on mountain lakes.
The materials James used were sourced from McMaster-Carr.
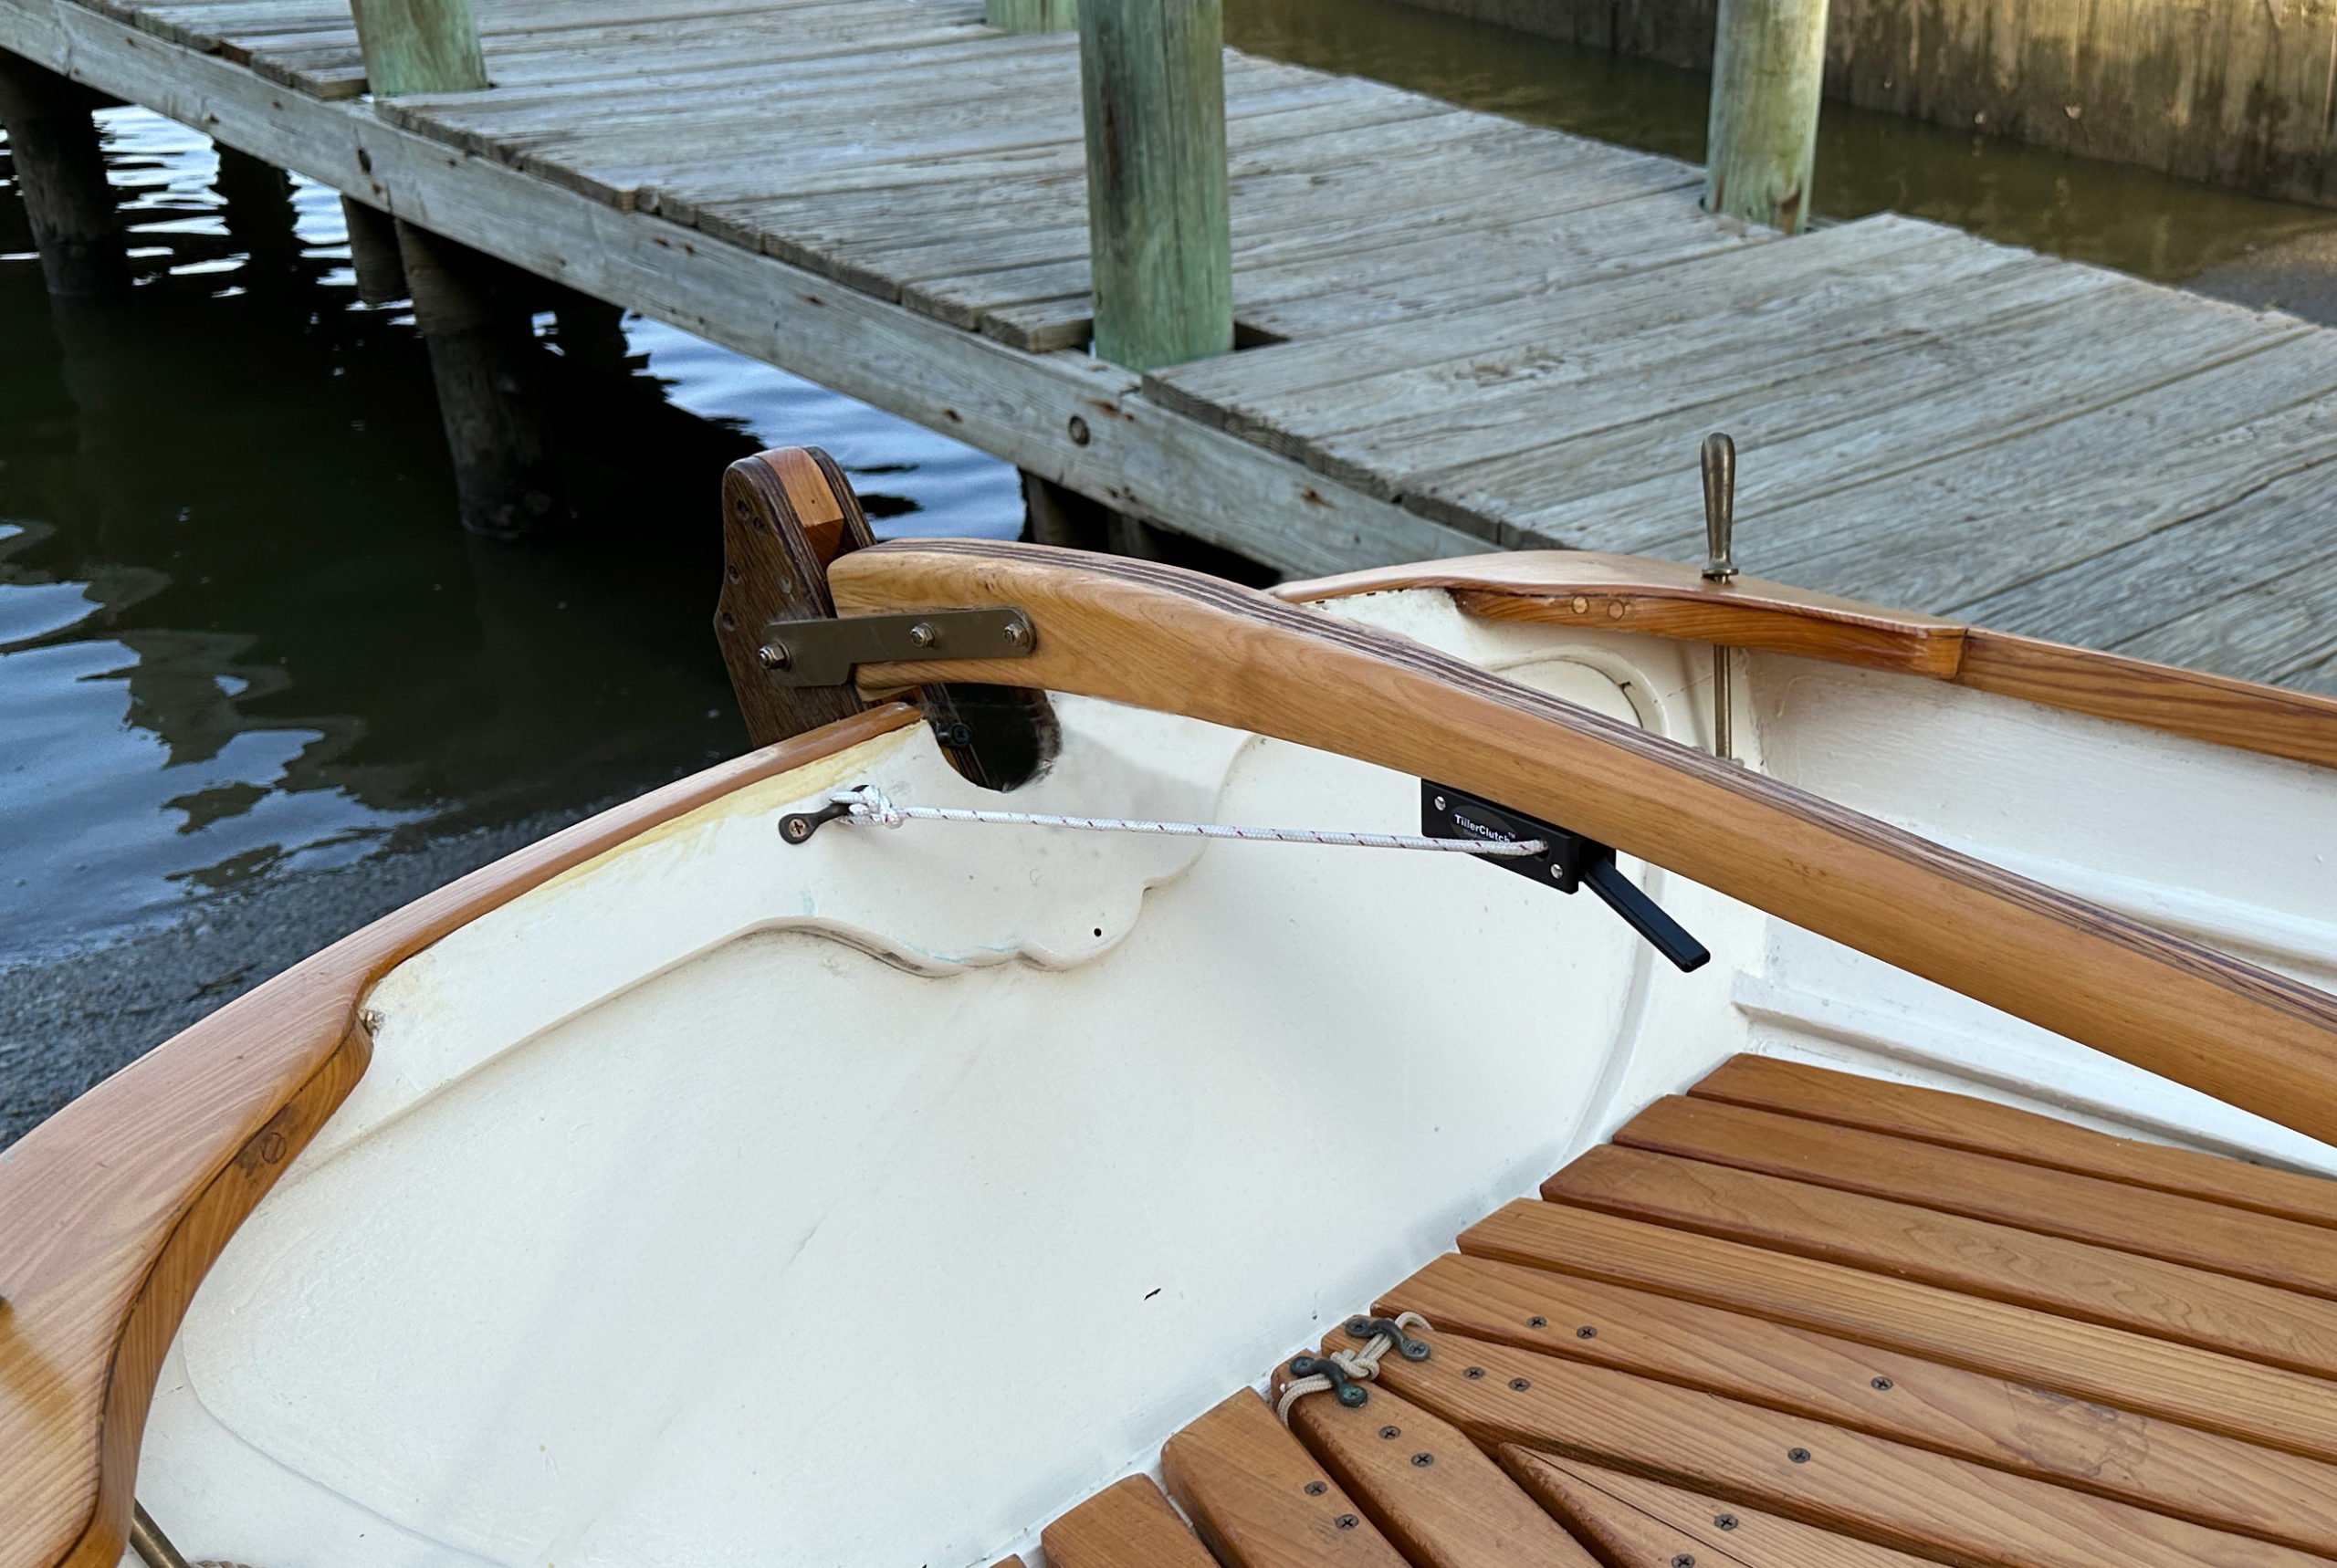
Audrey, aka Skipper, and I built ST. JACQUES, our little Penobscot 14, to row out on a nice day and ride back with the wind and tide to our launch spot. While I row, Skipper takes the helm and steers. She occasionally nods off, and we may veer off course. We recently added a nice piece of gear, the WaveFront TillerClutch, which can keep us on track while Skipper snoozes. And when I take ST. JACQUES out for a singlehanded row and sail, I can now have the TillerClutch mind the tiller while I attend to the many other nautical bits that often keep me pretty busy.
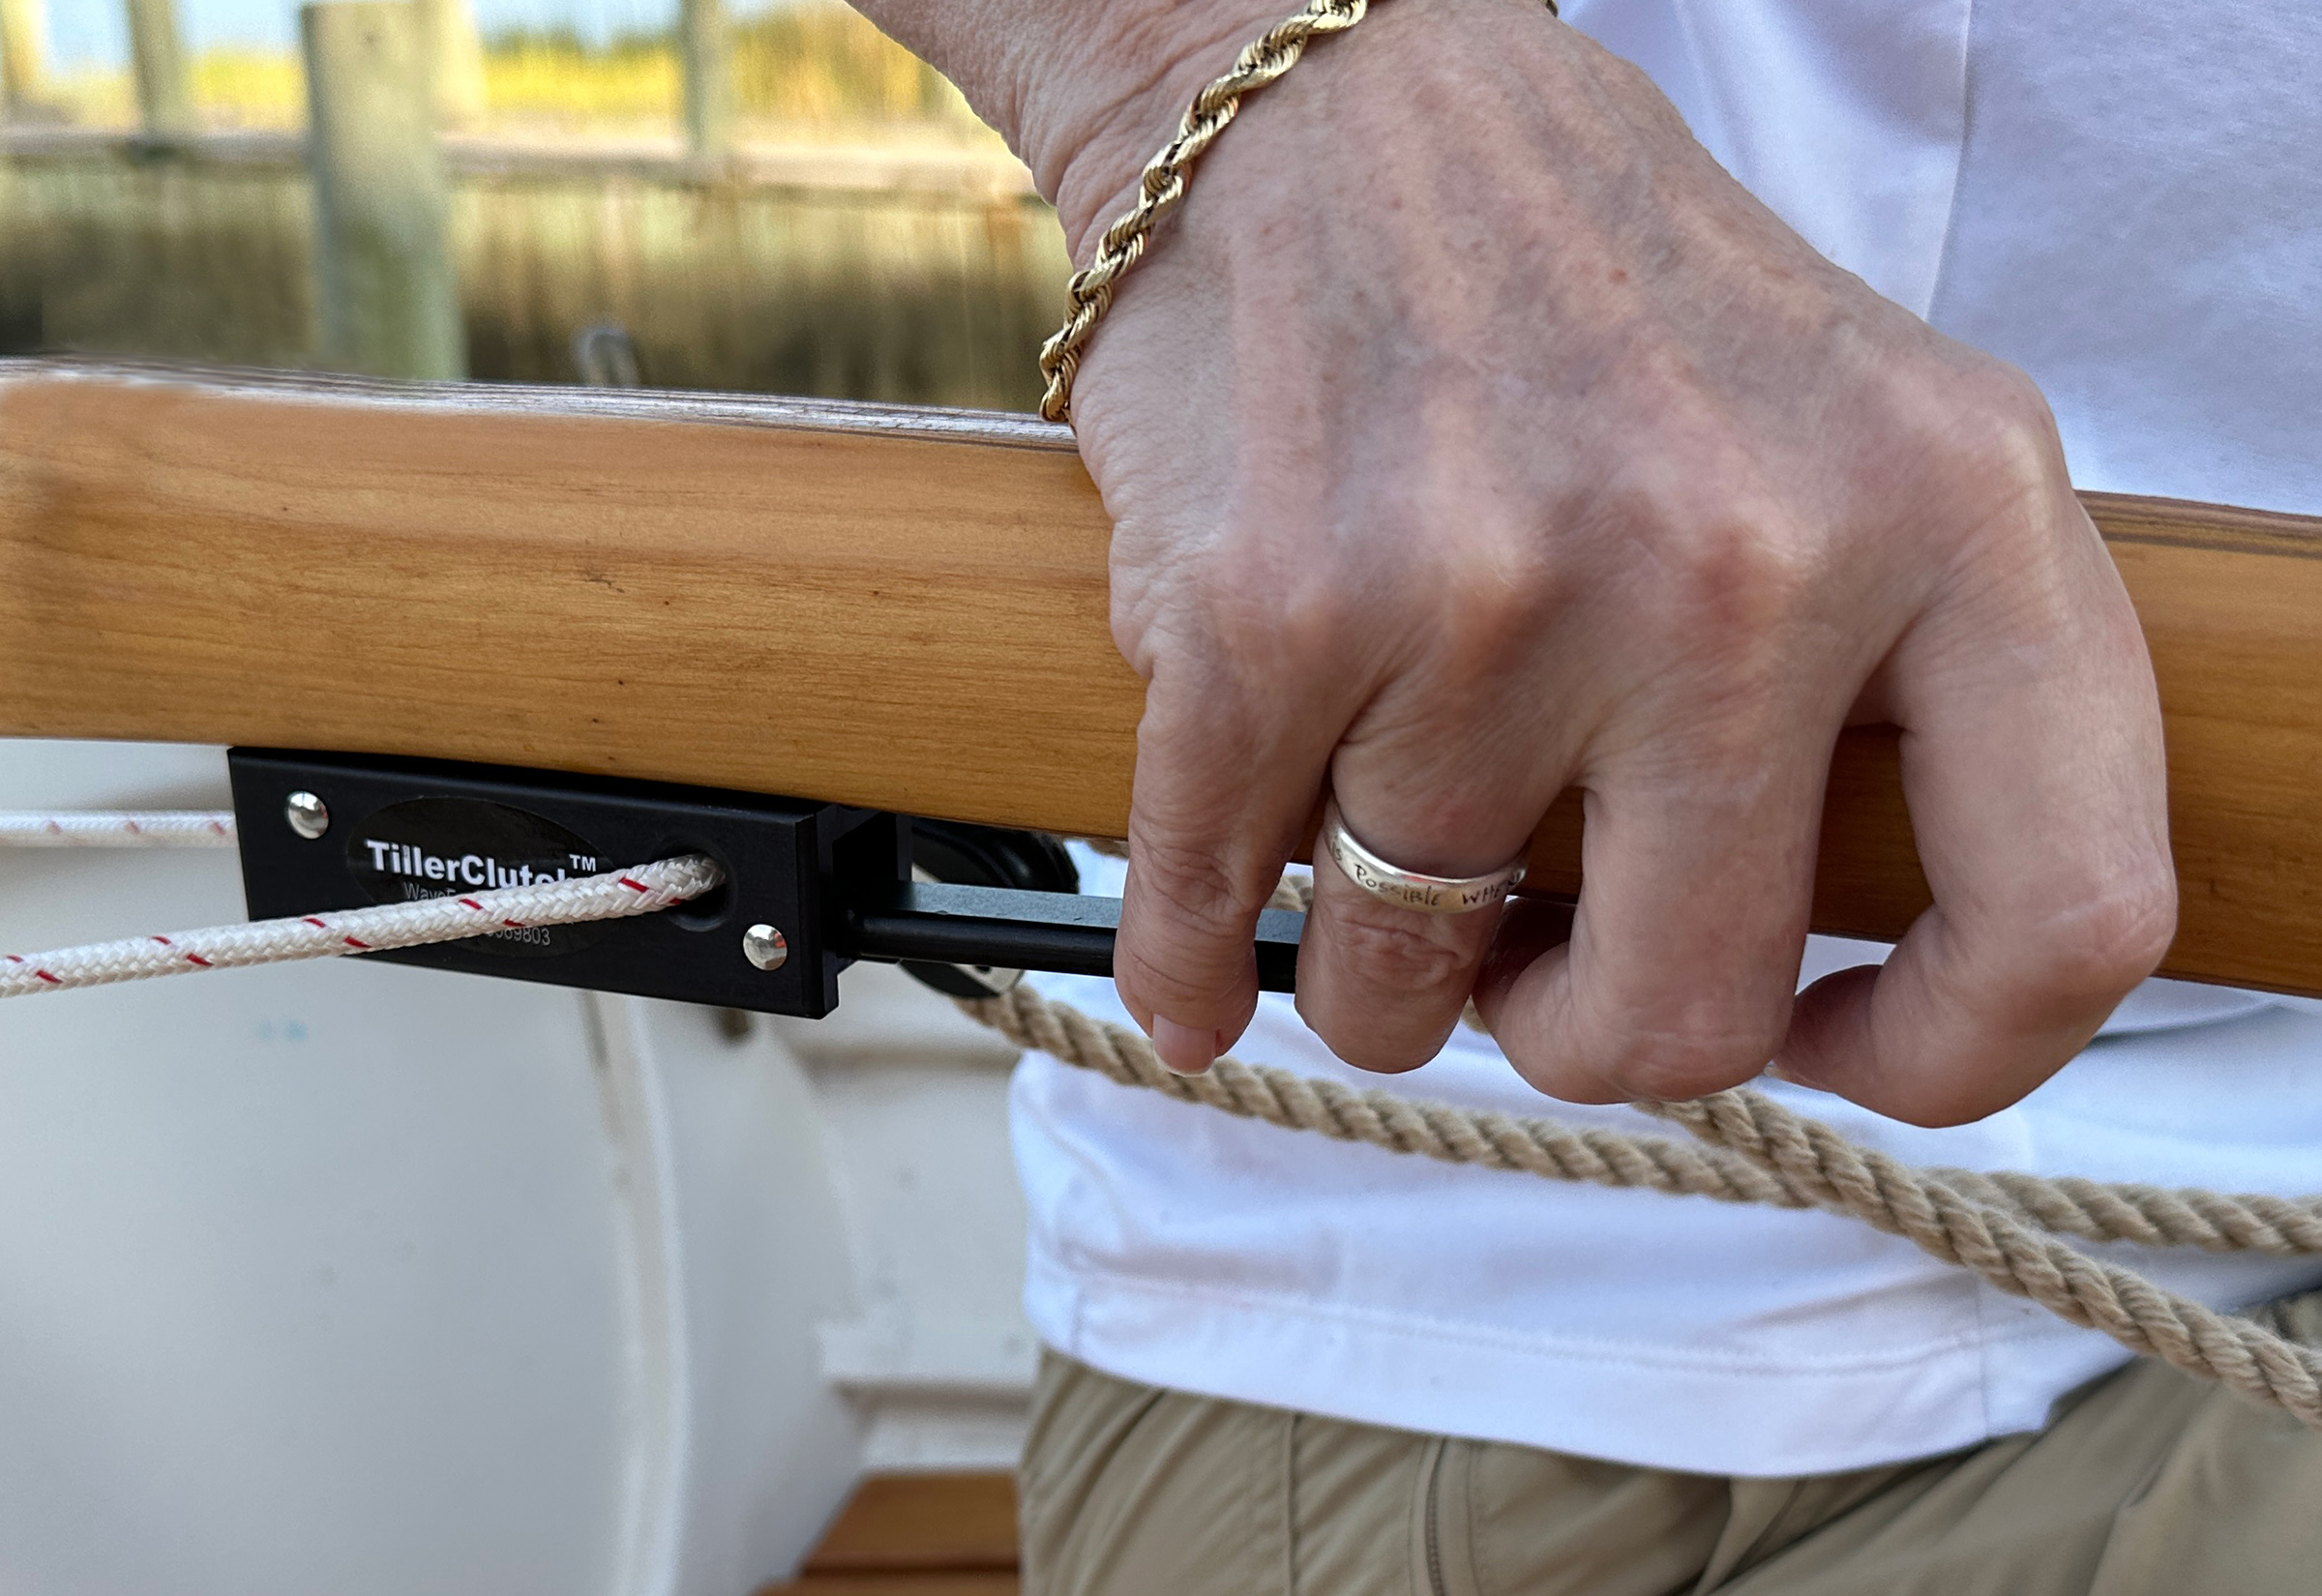
The TillerClutch works by locking on a control line that is run under the tiller and anchored port and starboard. When the device is activated by flipping the control lever down, it holds the tiller in the set position. Squeezing the lever partially upward momentarily releases the hold on the control line for quick adjustments. For an unrestricted tiller, the control lever is set in the full up position to allow the tiller to swing freely. In this position, there is enough clearance between the lever and the tiller to prevent finger pinching.
The body and handle are machined from marine-grade aluminum alloy, and the clutch spring and rivets are made from Type 316 marine-grade stainless steel, which has been passivated (treated with acid to create a protective oxide coating). The internal lever bushing is made from a self-lubricating synthetic material that requires no maintenance beyond a periodic freshwater rinse. The bushing also acts as an insulator to prevent dissimilar-metal galvanic corrosion. The body measures 3 1⁄8″ × 1″ × 1 1⁄8″, and the control lever toggle is 2 1⁄4″ long. The finish is superb, and the rounded edges of the control box feel smooth and safe to the touch. The clutch body can be mounted to tiller surfaces that are flat, rounded, or circular, with the recommended mounting location being on the underside of the tiller.
Photographs by the author
The TillerClutch offers three positions: fully engaged the clutch holds the tiller in a set position; partially engaged allows the helmsperson to move the tiller for course adjustments; fully released disenages the clutch so that the tiller can be used without restriction. The clutch is operated with a gentle squeeze of the hand.
The TillerClutch kit comes with an owner’s guide, detailed installation instructions, 12′ of 3⁄16″ braided control line, and two 1 3⁄4″ stainless-steel screws. WaveFront also sells additional hardware to facilitate installation, including V-cleats, cam cleats, pad-eyes, and even tillers. While the instructions call for installing the clutch 6″ to 7″ from the forward end of tiller, we installed it within Skipper’s easy reach from her accustomed perch well aft in the port quarter. She can still lean back against the transom, rest her arm on the tiller, and click the clutch on and off with the flick of a finger. This sternward clutch position lessens the mechanical advantage the clutch has to resist slipping, but our helm is very well balanced. Boats that have a heavier helm may need to have the clutch farther forward on the tiller.
The manufacturer recommends mounting the tiller 6″ or 7″ from the forward end of the tiller to keep it close to hand and also to maximize the mechanical advantage. They also recommend temporarily strapping the clutch to the tiller in order to find the optimum position before final fitting. The authors decided to mount their clutch farther aft so that it is within easy reach when leaning back on the transom.
We took the option provided in the instructions for small boats and attached the control line to pad-eyes fastened to the transom. With the lines back to the transom and close to the tiller’s rudderhead pivot point, we are still able to raise our tiller to its maximum limit. For larger boats, the control line is led through fairleads on the transom, then forward to jam cleats so the line can be released for unimpeded access to the stern or raising the tiller. For our boat, we only need to be able to remove the rudder for trailering, so one end of the line is secured with a bowline and on the other end we use several half hitches, so that we can slip the control line out of the clutch body.
The control lever is easy to operate and has a positive feel when shifted between the locked and unlocked positions. Under normal sailing and rowing conditions, the TillerClutch handles the rudder loads without slipping, and the tiller can also be repositioned in an emergency by pushing or pulling the tiller with more than 15 lbs of force to override the friction created by the clutch when it is engaged. When Skipper steers and I row, she usually unlocks the TillerClutch, but she has the option of locking it when she’s fixing to doze off. When I’m singlehanding the boat, I am very happy with the assistance provided by the clutch. It keeps the tiller straight while I’m rowing and when I’m sailing and need to move forward to tend the sail or centerboard. The TillerClutch is also very handy when transitioning between rowing and sailing.
The TillerClutch is working great and is allowing us more freedom on ST. JACQUES. It’s like having someone else aboard to mind the tiller. Made in the USA, it comes with a lifetime warranty, and the company has been very responsive to emails.
Audrey (Skipper) and Kent sail and row around the Tidewater region of Virginia when not restoring boats. They blog their mess-about adventures at Small Boat Restoration.
This past Father’s Day, my son Nate suggested we sail across Puget Sound to the village of Indianola for our annual outing. We had sailed there on a summer day 19 years ago when he was 14, and apparently he remembered that outing as fondly as I did. His sister Alison, then 11, was also with us, along with her friend Sarah. The two of them spent much of the time lying bellies down on the foredeck singing Girl Scout camp songs. There was a reaching breeze out of the north, enough to move my Caledonia yawl ALISON at a good clip while only rippling the Puget Sound waters. We made the 7-mile crossing under a broad clear sky in good time and made our landfall on Indianola’s broad sand flats, which stretched 250 yards out from the silvered driftwood above the high tide line to the retreat of the water at a minus tide. We left the boat at the water’s edge with the anchor set as far as the rode would reach shoreward. As we walked ashore, Ali and Sarah tiptoed through shallow tidepools, sending 1′-long flounders fluttering away leaving gray contrail clouds of sand behind them. Indianola’s general store was just above the beach. We went straight to the freezer for ice cream. We bought ice-cream sandwiches and Drumsticks, those vanilla-ice-cream sugar cones, topped with chocolate and crushed peanuts.
The forecast for this year’s Father’s Day outing with Nate was for weather less pleasant than we’d had for that sail to Indianola in 2004. A south wind to 20 knots and waves to 2′ with thundershowers predicted for the afternoon made it unwise for us to cross the Sound. We hadn’t been to the Duwamish River in at least a decade, and, while it offered well protected waters on the South end of downtown Seattle, it flowed through the city’s industrial district and was flanked for miles by docks and windowless warehouses. We decided to give the river a try and pulled ALISON out of the back yard and headed to the launch ramp on Alki Point, a little over a mile to the northwest of the mouth of the Duwamish.
We set out under a cloudy sky, but patches of blue had opened to the south and the air was warm. We motored from the ramp across Elliott Bay and into the mouth of the Duwamish River. We passed one of the three Port of Seattle container terminals where four spidery cranes were perched side by side on a ¼-mile long dock. Beyond them were two highway bridges and an open bascule railroad bridge.
South of the bridges we approached the intertidal sandspit on the downstream end of Kellogg Island. Nate scrambled over the cabin top and watched the shoaling water from the foredeck and at his command, I cut the motor. ALISON quietly hissed to a stop on the sand. We ate lunch—deli sandwiches—standing in shin-deep water alongside the boat, then walked about 100 yards toward the island and its brush-crowned high ground. On a downhill slope in the middle of the spit I slipped where the sand turned to mud but managed to stay on my feet. Rather than struggle with the mud there, we turned around and walked back to the boat.
I rowed ALISON along the river bend that arcs around Kellogg Island’s west side. The bend is the only one remaining after 15 others were bypassed in 1916 by a 3-1/2-mile dredged channel known now as the Duwamish Waterway. In 2017, I’d stopped along the west bank to test the pattens I’d made and written about for the October issue.
We landed and Nate and I strapped pattens on to walk along the tide-exposed mudflats. The mud wasn’t deep, but it was very sticky. Like kids in new rubber boots looking for puddles we clomped around to walk on the deepest, stickiest mud we could find.
This ½-mile-long remnant of the river’s original course remains undeveloped. It had been home to the Duwamish First Nations people for thousands of years, but the only signs of habitation Nate and I saw were red bricks strewn everywhere we walked.
Before we arrived and left our H-shaped patten prints in the mud, the only tracks were those left by great blue herons. We returned to ALISON, and, still wearing the pattens, used the oars to paddle across the river back to Kellogg Island. A century ago, it was known as Muddy Island, and while the low tide had left the island surrounded by an undulating skirt of raw-umber mud, it wasn’t deep but it was slippery. We kept the pattens on for the grip the cleats on their bottoms provided and walked as far as we could around the south end of the island before backtracking to the boat.
When we rowed out from Kellogg Island we saw that there was a northerly, upriver breeze on the Duwamish Waterway. We stowed the oars and raised the squaresail. This dredged channel has provided a place for ships and industry but the new enterprises that inhabited the banks created for them so abused the river that it became one of the most polluted rivers in the country and was declared a Superfund Site by the EPA in 2001; efforts to restore the river’s health are ongoing.
When the breeze began to fail us and even backed the squaresail a few times, I suggested we put the outboard, here alongside Nate, back in the well and motor upriver. He insisted we do without the noise and continue under sail, no matter how light the wind. Even in the lulls, we made progress upriver with the flood tide carrying us at almost 2 knots. We eventually had to drop the sail and the mast to pass under two roadway bridges 6 miles from the river mouth. We carried on another mile, came to a bend in the river that was shallow and rocky, and turned around.
On the homebound stretch, against the wind and tide, the storm clouds we’d seen to the north had drifted over us bringing rain and a sudden drop in temperature. We bundled up in our raingear. Nate climbed over the cabin and tidied up the foredeck in anticipation of a rough crossing of Elliott Bay. When he returned to the cockpit, he stood in front of me looking over the bow. I watched rainwater dripping from his jacket onto the backs of his pantlegs and into the open tops of his boots. I was faring a bit better in my cagoule, but a seam I hadn’t sealed was seeping water on my shoulders.
We were both getting cold as we approached the last mile of the river. ALISON can be operated from inside the cabin (visible on the port side of the cabin wall are the lines for a rudder yoke and the kill switch). I suggested we retreat to it, but Nate preferred the rain to the noise in the cabin. We toughed it out for the remaining 2-1/2 miles to the launch site.
Nate and I were both thoroughly wet and chilled by the time we reached the ramp, but within minutes the sky to the west cleared and the rain stopped where we were. (It continued to fall on Seattle’s city center.) By the time ALISON was out of the water, we were both warmed up.
Our afternoon on the Duwamish was not at all like the crossing to Indianola 19 years earlier. Instead of a clear sky and warm sunlight we had ashy clouds and chilling rain. Instead of the broad unfettered expanse of Puget Sound, we had a polluted canal hemmed in by ships and cargo terminals. Instead of running barefoot on sand flats and through tide pools, we plodded in boots on slimy toxic mud. I expect that 19 years from now I will remember this time with Nate as fondly as I do our summer sail to Indianola. Sometimes what matters most is not where you are but who you’re with.
The presence of ships rarely goes unnoticed. Aside from their sheer size, they show up on radar and AIS (Automatic Identification System) and are in regular contact with each other by radio. Those of us in small boats often go unseen and literally under the radar. While there are advantages to being so unobtrusive, there are times when it is necessary to make our presence known, if only to convey a very simple message: I’m here. Having a good whistle or horn aboard makes that possible when there is an inattentive boater or fog about.
Among the loudest I’ve used are two foghorns made by Plastimo: the Trump and the Mini-Trump. I don’t know exactly when the horns were first released, but they were listed in Plastimo’s 2014 catalog, a few years before the name became intertwined with American politics. My guess is that the name was a play on the word “trumpet.”
Photographs by the author
The larger horn comes with a wrist lanyard, a case, and two replacement membranes (not shown).
The horns are of the diaphragm type and produce sound by vibrating a membrane that intermittently interrupts the flow of air passing through the horn. I’ve made a few of this type with plastic plumbing parts and in several different pitches. I thought they were loud, but the Plastimo horns are at another level: painfully loud. It takes very little air pressure to make them sound, and an easy puff produces almost full volume.
To get a measure of the volume, I bought a sound-level meter and took readings with the meter set 24″ from the horns. My home-made horns reached 90 decibels (dB), and my classic Perko fog horn hit 106 dB. The Plastimo horns are claimed to exceed 100 dB, though I wasn’t able to find at what distance that reading was taken. At 24″, the large one registered 119 dB on the meter, and the small one, with its tube extended, registered 108 dB. I used a digital tuner to identify the pitches: E-flat for the large and E for the small.
Cupping hands around the ends of either horn protects the ears when hearing protectors aren’t used.
The sound from the Plastimo horns is projected from the ends, which puts it closer to the ears than does a forward-facing horn. To measure that effect on the user, I took readings at 6″. The large horn hit 124 dB and the small hit 121 dB. Many websites with information about sound levels set the threshold for pain and damage to hearing at 120 dB.
I did all my testing with ear-muff hearing protectors, but they don’t seem like a practical addition to my boat’s safety gear. I found I could hold either Plastimo horn in one hand with a finger in one ear and plug the other ear with the free hand. That made a significant difference, and I could use the horns comfortably. It was also effective to cup a hand around each end of the horn to direct the sound forward and away from my ears. That brought the sound down to a level below the pain threshold and had the added benefit of projecting more of the sound forward. At 24″, the large horn hit 124 dB and the small hit 121 dB, the same levels I’d measured at 6″.
The smaller horn has an extension tube, here retracted. The black cap protects the plastic membrane and stretches it tight when installed in the horn.
The horns have no parts that will suffer from exposure to salt water. If the membrane fails, it can be replaced in seconds with a piece of plastic film (grocery-store produce bags and zip-close bags also work well). When dropped overboard, the yellow plastic horns float, are easy to spot, and will quickly drain of water when recovered, ready for use. The smaller of the two horns, with its extension tube retracted, fits easily in a coat or PFD pocket. With either Plastimo foghorn you can effectively make yourself heard and your presence known.
Christopher Cunningham is the editor of Small Boats
François Vivier designed the handsome pocket cruiser Pen-Hir for his own use. He cruises the boat for up to two weeks at a time, often singlehanded, along the Brittany coast.
Pen-Hir is a very pretty little 24′ 7″ pocket cruiser designed by naval architect Vivier Vivier. Some of my favorite moments at the big French traditional boat festivals have been watching her sail purposefully through strong tides and sometimes strong winds in the company of schooners, pilot cutters, and fishing boats. There’s always a large sail-and-oar contingent too, numbered in the hundreds, and there we are among friends, because Vivier has designed a large proportion of them, as well as quite a few of the larger boats. There are sleek double-enders, plumb bows and transoms, raid boats like his sprightly Stir Ven design, and a proliferation of rigs from gaff and lug to gunter and marconi.
Vivier spent four years considering the design for a small, fast, good-looking cabin sailboat for himself that he could cruise for two weeks in the summer along the coast of Brittany, often singlehanded or in shallow waters. He wanted to keep it simple, without the need or expense of winches and windlasses, little to go wrong. His inspirations were the small boats of Alden and Crowninshield, the purity of Herreshoff, but updated for modern use with more beam and a larger cabin. He also added to the mix the traditional look of workboats from western Brittany that were sailing at the same time in the early 20th century, with a plumb stem and short counter, but adding the lower freeboard and elegant sheer of classic yachts.
If the boat was to be trailered to different cruising areas as well as sailed locally, Vivier wanted to keep that process simple as well. A gaff rig, when peaked high enough, can point to windward like a marconi sail, but has the added advantage that the mast is in two parts so the spars can be designed the right length to fit inside the boat for trailing. The mast can also can be raised without assistance with a counterweight and tabernacle, with dedicated pole and purchase. This was his rig of choice, though he has designed a marconi option as well.
Vivier came to the project with an enormous amount of experience and a wish to try out new ideas with his own boat. A naval architect for many years designing large ships, later working as director of the French Shipbuilding Research Institute and co-founder of the French traditional boat magazine Le Chasse Marée, he has designed an impressive range of boats. He’d already designed a 27′ 10″ (8.5m) cruising boat, the Toulinguet, and a smaller weekend centerboard cruiser, the Méaban. But with the aim of simplicity, he considered a shallow, long keel and rudder, instead of a steel centerboard and hydraulic lifting gear. Weight could then be better distributed, but would the extra wetted surface slow down the boat? Here Vivier comes into his own, for careful research and analysis that might be shared with the boatbuilding community is something that comes naturally to him. Drag calculations showed that it is the number of appendages that is the critical factor rather than the wetted surface area. A shortish classic keel and integral rudder with sufficient sail area can give better lateral resistance at slow speeds than a centerboard or fin keel plus one or two rudders.
For anchoring in shallow or drying areas, Vivier then added detachable legs that would store under the cockpit side decking, to be mounted on the hull sides to keep the boat balanced on the ground. “For my father, the length of the cockpit is now determined by the boat’s draft so the legs will fit,” his son, Nicholas, said. A 13″ sculling oar also fits neatly, partly under the cockpit. It must be one of the pleasures of designing a boat.
Kathy Mansfield
In the interest of conservation, Vivier used birch plywood from Finland for the prototype Pen-Hir’s hull. He also conducted a longevity study on this wood and his method of using it, with promising results.
For his own boat, but not necessarily in future builds, Vivier looked at environmental considerations. Instead of using marine plywood manufactured from tropical hardwoods, he found a sustainable birch plywood made in Finland, and as a side project managed to get funding to study the durability of different types of marine plywood. Plywood samples without any protective coatings were half plunged into seawater for two years. All were damaged by the end of that time, showing that protection is essential, though mahogany survived best. The tests show too that current durability classes are not relevant to boatbuilding. Mechanical tests including density pointed to birch ply as being preferable. Despite a high density, birch was used in early airplanes. There has been no problem in the five years since the boat was built, and two others using birch plywood have been built since. Okoume plywood would need an increase in thickness, particularly in the keel area.
Pen-Hir, named after an attractive peninsula near Camaret in Brittany, was built by Nicolas at Icarai Boats near Cherbourg. Once the plywood pieces are computer-cut to shape, the boat can be ready for planking and much of the accommodation built within two weeks at the yard with two or three people working. The bottom planking is a single sheet of plywood and the sides are planked vertically, a method that Vivier has used extensively and thinks can be more accurate than using long horizontal planks. It also makes a strong, nicely rounded hull, avoiding the hard chines that often identify a plywood boat. The bulkheads and keel are made of strong, criss-crossed layers of birch plywood, the latter with 1,323 lbs (600 kg) of lead at the bottom. The bilge area and side planking are composed of two layers of 6mm ply, and the single bottom section is 12mm. The entire hull is epoxy-sheathed, and any exposed plywood edges are protected by a hardwood batten, epoxy glued and nailed in position. The curved coach roof top is laminated over a mold and glued to the oak sides. Sustainable woods are used throughout the boat: oak for floor timbers and coach roof coamings, northern pine for accommodation below, Douglas-fir for beam clamps and spars. The mast is hollow and mounted on deck, saving room down below. The bottom is coated with a long-term antifouling mix of copper and epoxy.
Kathy Mansfield
Pen-Hir sleeps two in a forepeak double. A curtain separates the sleeping space from the saloon and galley, which are airy and welllighted.
My first view of Pen-Hir on the water was of a classically low, light aqua hull and nicely proportioned oak–sided coach roof with white-painted decks, her sheer echoed in a solid oak rubrail. Her plumb bow under a short bowsprit is curved at the forefoot; she has a very ample cockpit with a short transom.
The boat coasted along in very little wind, her high-peaked gaff rig, almost gunter, set off by classic stitched sails and Douglas-fir spars. A short transom holds a mainsheet horse, keeping the cockpit free, and a well holds a Torqeedo electric engine, equivalent to about 6 hp, which can be tilted out of the water, giving a range of about 20 miles at 4 knots on a quiet sea. Oars plus a sculling notch at the stern gave extra options for harbor work. The tiller is convenient for the helmsman in any position and easily lifted out of the way. The side decks were clear, not a winch to be seen, with the mainsheet on a block and tackle and secured with a cam cleat. The jib, about 108 sq ft, is small enough to sheet in to cam cleats as well, as are the halyards. I liked the small anchor well and cover, everything neatly to hand, and the stainless-steel pulpit and guardrails were unobtrusive. The oak grabrails on the coach roof and the bronze cleats give a traditional touch.
The saloon feels spacious and bright with no centerboard trunk or mast to get in the way, with white bulkheads, oval portholes, and shelves above the two full-length berths, plus easily accessible and ample stowage and plenty of wood trim. There is a 60-liter water tank under the starboard berth, a small sink and galley stowage at the forward end, and a sliding chart table at the aft end near the cockpit hatch. At the forward end of the port berth there is a combined stove and heater. A table slides out from under the cockpit, and it can be positioned below or in the cockpit. A curved opening to the forepeak with a full double bed and more stowage plus batteries underneath is lightened by a hatch above. A curtain separates this area from the saloon, and a chemical toilet means no plumbing or through-hull fittings.
Kathy Mansfield
Pen-Hir has proven herself in winds over 22 knots, and she also ghosts well in light air—often passing much larger boats.
I’ve sailed now in a wide range of wind strengths in Pen-Hir, notching up a Force 6 last May in the Gulf of Morbihan when we sailed outside the protective gulf, Vivier sailing singlehanded so I could take photographs of the start of a parade of sail. The commentators later mentioned our presence there—no other light plywood craft under 30′ were to be seen, nor much else besides traditionally built workboats. With a couple of reefs, a sense of adventure, and a fine skipper we were in good control. At the other extreme, in light winds, and in moderate winds as well for that matter, we have slipped past boats much longer than us with great ease, our keel keeping us from slipping sideways as we work upwind. She tacks firmly and easily despite the keel, and does not feel tender. We have not been in waters shallow enough to have the keel impede our progress, with the exception of one lunch spent at a slight angle while the tide came in. The hundreds of festival boats that we have encountered at times make for a short, steep chop that Pen-Hir hardly notices, and the thought of cruising away toward the nearby beaches, the islands farther away, the coastal towns, was a very enticing thought indeed. I can envisage her far from the Brittany shores, exploring Penobscot Bay in Maine, and I think Alden and Crowninshield would have nodded approvingly.
LOA 26′ 1″
LWL 23′ 8″
Beam 9′ 2″
Draft 3′ 10″
Sail area 364 sq ft
In Pen-Hir, Vivier was inspired by the good sailing qualities of the knockabout sloops designed by B.B. Crowninshield in the early 20th century, as well as by the pure simplicity of Herreshoff boats. But he also sought a larger cabin and a wider hull than those boats carry. The plumb stem and short counter are typical of Vivier’s home waters.
To develop his trailerable daysailer, Herbert Krumm-Gartner started by carving a half model, inspired by the boatbuilding methods and design aesthetics of Nathanael Greene Herreshoff.
JADE took shape the old-fashioned way: a spokeshave and a piece of golden New Zealand kauri timber. Boat designer and builder Herbert Krumm-Gartner is German by birth and has lived in New Zealand for 26 years, but as the half model gradually emerged from the kauri, it reflected the lines of a classic American daysailer.
A year later, in September 2012, the full-sized, 23′ version was afloat—the first boat of Krumm-Gartner’s Gem-class design with a piece of New Zealand jade or greenstone, pounamu in Maori, on her tiller. Krumm-Gartner named the class Gem because his wife, Romy Gartner, has a past life as a jeweler and because, he says, all classic boats are like gems.
She sparkles with beauty from her spoon bow in a gentle sweep through her low profile to the counter stern that finishes in a gleaming mahogany transom, topped by the glossy Douglas-fir spars of her gaff rig. From the beginning, Krumm-Gartner says, “It was the aesthetics that drove the design.”
Like many before him, Krumm-Gartner is inspired by Nat Herreshoff’s designs—a connection that began in the 1980s when Krumm-Gartner was an apprentice boatbuilder in southern Germany. He was frustrated at the lack of interest in building wooden boats. For his apprenticeship project, he wanted to build a round-bilged clinker boat (also known as lapstrake), but his boss insisted he build a boat with a flat bottom. “But I had to build it his way, the right way up,” Krumm-Gartner says. “I now mostly build upside-down, but you couldn’t argue with your boss.”
He found salvation in a local bookshop, which stocked books on boatbuilding—nearly all of them in English. Today, Krumm-Gartner’s German accent has disappeared, but in the 1980s his English was schoolboy standard. He bought Building the Herreshoff Dinghy, published by Mystic Seaport, and translated key phrases into German so he could understand the building process. He still has the book, including his penciled notes in German. In the same shop he saw his first WoodenBoat magazine. “I’ve been a subscriber ever since,” he says.
The more Krumm-Gartner talked about wooden boats, the more he heard about New Zealand. He knew a tradesman in Germany who knew someone in New Zealand who knew boatbuilder John Gladden. Many international phone calls later, Krumm-Gartner moved to New Zealand with Romy to work for Gladden. “He was great,” Krumm-Gartner says. “He took a lot of time to explain something and drew diagrams of what he wanted. I did some quite complex stuff, like building a gamefish launch. It was like a second apprenticeship.”
Krumm-Gartner later set up Classic Boats Ltd. He has built new boats and has restored many classic yachts, but he held a dream to build a boat to his own design.
In 1999 he designed a Herreshoff-inspired 16-footer, but he and Romy felt it would be too small. “I didn’t want to get wet,” Romy says. Instead, they bought a small classic yacht, which they kept on a mooring, but were disappointed by her obvious need of care when they returned from a three-month trip to Germany.
“It made me realize I wanted a trailer boat at home to minimize pre-Christmas maintenance,” Krumm-Gartner says. “In the United States, daysailers are making a comeback, and they are in New Zealand too. They have lots of varnished wood, but you don’t have to be afraid of it because you can protect it at home under cover.”
“Looking for a challenge,” he revisited the 16-footer, stretched it to 23′, and added more freeboard. “I designed it the Herreshoff way,” Krumm-Gartner says. “I did a half model and shaped it until I liked what I saw.” His book about the Herreshoff dinghy was a close companion.
HERBERT KRUMM-GARTNER
Like Herreshoff yachts, JADE, the first of the Gem class boats, was built upside-down with one mold per laminated frame. For watertight integrity and structural strength, the laid deck’s sprung planks were installed over a plywood substrate.
The aesthetics brought the challenge. “It’s difficult to build a counter stern and a curved transom. It was also very difficult to plank, and I didn’t know how difficult when I designed it. The stern has a lot of tumblehome and the bow has a lot of flare, so they are very complex curves and a plank needs some convincing to take that shape.”
The construction wood was mostly kahikatea, known as New Zealand white pine, which had been salvaged from submerged logs. The key in bending the planking was to use narrow widths. “I put a straight edge on one side of the plank and then I put a fair curve into the other one, so that amidships the planks could be 70 to 90 mm [23⁄4″ to 31⁄2″] wide, tapering out to about 40 mm [about 11⁄2″] at the ends; then I stuck them in the steambox. We wrapped them around and bent them around the building mold.
“Usually when you steam planks you’re bending them one way, but we bent these around the boat and edge-set them up or down, so we had to keep them narrow. This method wastes less timber than if cutting carvel planks the conventional way from wide boards,” he says.
Krumm-Gartner’s favorite tools were planking clamps that he had first seen in WoodenBoat magazine and ordered from the United States. “They attach to the rib,” he says. “You can then wind down the plank so you get this super-tight fit. Normally you’d have to do with a normal clamp and wedges. Every rib was laminated over a frame so the building jig could be re-used, as Herreshoff used to do.”
The edge-glued planks are covered in one layer of 6-oz fiberglass cloth set in epoxy. It’s a good method for a trailering boat that will be out of the water most of the time.
Krumm-Gartner says JADE is helping to preserve traditional boatbuilding methods. “Building is the only way you can acquire a skill properly,” he says. “If you repair a boat and you replace a plank, you’re not a proficient planker. But if you build 40 planks, select the planks, steam them, you really learn the process. The first plank took me most of the day to get it on. Later, we did a pair a day.”
Krumm-Gartner and Romy built JADE together; for Romy it was an unofficial apprenticeship, albeit without plans. “Herbert would say, ‘We’re doing this.’ And I’d say, ‘Show me,’” Romy says. “It was all in his head, so I couldn’t picture it.”
“Plans can be limiting,” her husband says.
They recorded every part of the construction, from lofting through to final fittings, in a diary, including photographs, with suggestions for improvements and a record of the hours for each job.
Krumm-Gartner selected 23′ as the length so the boat would be easy to trailer, store, sail, and maintain yet still achieve a reasonable turn of speed. The cabin sleeps two comfortably and the cockpit seats four people. Facilities include a chemical toilet under the cabin sole, an icebox under the port cockpit seat, and a stove to starboard. There are watertight bulkheads in the bow and lazarette. Four sockets around the cockpit accept stanchions to support a sun tent.
When it came to motive power, Krumm-Gartner didn’t want an outboard on a bracket. “They are ugly, unwieldy to use, and ineffective in a choppy sea,” he says. But he didn’t want an inboard engine either: “It would have dominated the cockpit, cost more, and weighed more.”
After playing around with an outboard-shaped piece of plywood in the workshop, he permanently installed an 8-hp Yamaha outboard in a well in the aft cockpit. It pushes the boat at 6 knots and is angled at 12 degrees so that the propeller wash streams over the rudder. A pipe in the outboard’s idling outlet takes exhaust fumes away from the outboard well. Two fairing pieces around the outboard leg also help to keep the fumes out of the cockpit.
HERBERT KRUMM-GARTNER
JADE’s commodious cockpit, with macrocarpa coamings at a comfortable height for seating, has room for four and an outboard set in a well.
JADE may have been complicated to build, but as a baby classic she is easy to sail. One person hoists gaff mainsail by pulling simultaneously on the peak and throat halyards, which are led to the starboard side of the forward end of the cockpit. The 5-square-meter [54 sq ft] jib hoists on a halyard to port. The jib’s boom makes it self-tacking, and to save crew having to lean out into the spray to trim, the jibsheets lead inside the cockpit via bronze sheave boxes let into the macrocarpa coamings.
The mainsail hoists on mast hoops made of stainless steel sheathed in leather, and thanks to an endless mainsheet it can be trimmed from either side of the cockpit. Because the boat has no bowsprit, sail handling is easy, but with no winches for trimming or hoisting sail, the crew needs to practice belaying skills.
Her stiff manner under sail befits her gentle, classic temperament. Krumm-Gartner and Romy enjoyed many sails on JADE before finally dipping the rail under, in a wind of more than 20 knots. The 15-square-meter [161 sq ft] gaff mainsail provides most of the power, unlike a modern marconi rig, for which a large genoa is usually the driving force. When working to weather, Krumm-Gartner reefs the mainsail at 15 to 18 knots. The main and jib are made of cream-colored sailcloth as a nod to the classic sailing of yesteryear.
The helm has a feel of yesteryear too, being placid but firm. It’s easy for one person to manage the tiller and sheets. Going forward on the narrow coach roof without lifelines feels strange to sailors more used to modern designs, but there’s something wonderfully snug about the varnished cockpit surrounded in sweeping coamings. The water is just inches away, and Krumm-Gartner has certainly created the feel of old-style sailing.
HERBERT KRUMM-GARTNER
Showing her early-20thcentury American influence, the gaff-headed sloop has a self-tending jib that makes sail handling simple. Low draft enabled by her centerboard makes her readily trailerable, and with her planking sheathed in fiberglass cloth set in epoxy she can be launched dry without needing time for the planking to swell.
JADE has just under 300 kg (661 lbs) of ballast for her 1.1 tons (2,425 lbs) weight, including 135 kg (298 lbs) of lead either side of the keelson and 30 kg (66 lbs) of lead in the centerboard. The centerboard brings the draft to 5′. By use of the only winch on board, the centerboard swings up into a low-profile trunk in the cockpit for trailering or creeping into shallow water when gunkholing. The centerboard winch is bronze, as are other metal fittings on board JADE, for which Krumm-Gartner made wooden molds, accounting for shrinkage.
It takes one person 30 minutes to rig or derig JADE. The mainmast, being a gaff rig, is only 6m [about 20′] and light enough for one person to manage. To lower the mast for trailering, Krumm-Gartner releases the forestay; the mast stays in its tabernacle and the shrouds stay connected. The lowered mast rests in crutches on the deck. The 4.2m [13’9″] Douglas-fir boom, gaff, and mainsail stow in the saloon. Krumm-Gartner launches JADE using an extension bar on the trailer.
JADE already has a sistership, commissioned as an open daysailer without a cabin and resplendent in varnished mahogany topsides for which Krumm-Gartner meticulously selected every plank. He and Romy built the boat for an American superyacht on which it resides in a special cradle alongside a classic runabout—a stable-mate that Nat Herreshoff would surely appreciate.
HERBERT KRUMM-GARTNER
JADE Particulars LOA 23′ Beam 6′ 6″ Draft, centerboard up 2′ 2″ centerboard down 5′ Weight 2,425 lbs
For information about completed boats, contact Herbert Krumm-Gartner, Classic Boats Ltd.
With an open-cockpit layout, relatively high boom, and lots of seating, the Mirror is ideal for taking kids out.
If you’ve spent any time at all in sailing clubs in North America or Europe, chances are you’ve seen at least a few of the many dinghies drawn by the English designer and boatbuilder Jack Holt (1912–1995), who drew more than 40 boats during his long career, including the Cadet, the GP 14, the Hornet, an International 10-Square-Meter Canoe, an International 14, and the Rocket, which later merged with another design to become the Merlin Rocket. He was noted for his early adoption of marine plywood with a particular focus on dinghies that could be home-built by amateurs. Two of his more distinctive designs are the Enterprise (1956), with its baby blue sails, and the Mirror (1962), with deep red sailcloth derived from the newspaper’s signature color. Interestingly, the Enterprise (The News Chronicle) and the Mirror (The Daily Mirror) are, along with the DN Iceboat (The Detroit News), three small craft designs sponsored by newspapers that have gone on to great success.
To create the Mirror, Holt refined and improved two prototypes created by British do-it-yourself television personality Barry Bucknell. According to the international class association, more than 70,000 of these small dinghies have been built worldwide, and the Mirror is now an international one-design class overseen by the International Sailing Federation (ISAF). Mirror hull No. 1, EILEEN, was constructed in 1963 and is now in the collection of the National Maritime Museum Cornwall in Falmouth, England. Originally gunter-rigged, the class now also permits a Bermudan mainsail. The Mirror was an early design to employ stitch-and-glue construction. Home-built boats still use this method, but some professionally built hulls are also available in foam-sandwich fiberglass in the United Kingdom. The first generation of spars was all wood, but masts are now commonly aluminum.
John Summers
The interior layout is simple and uncluttered. Auxiliary power can be provided by paddles or oars.
The dinghy measures 10’11” LOA × 4’7″ beam, with a board-down draft of 28″. Sail area is 49 sq ft in the main, 20 sq ft in the jib, and the spinnaker adds 47 sq ft. Complete and ready to sail, the boat weighs approximately 150 lbs, and capacity is 600 lbs. The racing crew is two, but the boat can easily accommodate three adults or an adult and several children for daysailing. Plans for this strict one-design are not commercially available, and Mirrors are sold either as complete kits, hull kits, bare hulls, or sail-away boats. The kits include everything except paint, varnish, and epoxy resin. Within the one-design specifications, the interior layouts have evolved in the years since the boat was first designed, and builders have some options in cockpit layout and the scantlings of individual components such as the yard of the sliding-gunter mainsail.
The conventional stitch-and-glue construction requires only basic hand and power tools. Work begins with clear-coating the hull panels with epoxy, especially where they will form the inside of buoyancy tanks. The builder next joins the fore-and-aft sections of the hull panels with butt straps, and then marks and drills them for wiring together. Small gluing blocks are attached to the bottom panels to aid in positioning and attaching the sides of the buoyancy tanks and the bulkheads later in the construction sequence.
John Summers
When racing, or looking for a little extra speed downwind, the Mirror can fly a spinnaker. Hull No.43756 has seen long service, so her deep red sails have faded a little.
The bottom panels are wired together first, followed by the aft transom, the bow transom, and the side panels. As always with a stitch-and-glue hull, it is crucial to align it with winding sticks and diagonal measurements before finishing the seams to ensure it is not wracked. The bulkheads and side tanks are fitted before the seams are filleted and taped, followed by the centerboard trunk and center thwart. The decks rails, and quarter and bow knees complete the basic hull. The rudder, daggerboard, and spars finish the build and are followed by hardware installation and rigging. The manufacturer of the kits suggests that boats can be constructed by builders with moderate skills and a reasonable assortment of tools in 150–200 hours. The U.K. Mirror Class Association website at www.ukmirrorsailing.com includes links to sites documenting particular Mirror constructions, and a YouTube search will quickly reveal posted videos of various build and restoration projects. The kits come with a comprehensive 50-page building manual.
The boat’s spars all fit inside the hull (at least with the gunter rig), and that, combined with a relatively light hull weight, means that Mirrors can easily be trailered or cartopped. They are readily carried or moved on a dolly for launching and retrieving from a beach or ramp. Rigging is quickly done, and boats can go from trailer to sailing in well under 30 minutes. A kick-up rudder means that it’s easy to sail off a beach.
John Summers
The Mirror is an easy boat to singlehand, and some have made long cruises. Modest sail area and plenty of buoyancy allow Mirrors to go out in winds that would keep other dinghies on shore.
On the day I met with some members of the Ontario Mirror Dinghy Association to go sailing, the winds varied from very light to moderate, with perhaps a maximum of 8–9 knots for a time. Beautiful summer weather, to be sure, but it wasn’t a day to test the seamanship of the skipper or the mettle of the boat. I was assured by some sailors of the boat’s seaworthiness, though, as they shared stories of heading out on blustery days on Lake Huron or Lake Ontario long after other small boats had retired for the day. With 69 sq ft of working canvas, the Mirror is certainly not overpowered, but there are lots of other dinghies out there if you really want to go fast.
Under sail, the helm is light and the boat is well balanced. Like many small dinghies of traditional rig, the Mirror sails best a little eased and no higher than a close reach. The hull has an easy motion, but the pram bow means that she will tend to slap into a chop. We sailed with two average-sized adults for a time, and in the light air the boat balanced best with both of us on either side of ’midships, one to windward and one to leeward. Hiking straps are fitted for heavier weather, but we didn’t need to use them that day. Nothing is too far away in a boat only 11′ long, but those who habitually sail singlehanded might want to bring the control lines back to cleats on the center thwart for easy access. Serious racers will also want to double them up so that they can be reached from either side of the boat.
Basic sail controls include main and jib sheets, vang, and mainsheet outhaul. The wire shrouds are made off to chainplates, but the forestay is secured with a lashing to a pad-eye at the bow. Class rules permit it to be adjusted underway. The built-in buoyancy tanks go up either side and across the bow, offering a choice of seating positions. The gunwales are narrow, so serious racers or those planning on hiking out a lot might want to invest in padded shorts.
John Summers
Mirrors are easily handled on beaching dollies, and can also be cartopped.
Class equipment includes both a whisker pole for booming out the jib clew downwind and a spinnaker, which is set and retrieved from a tapered mesh bag via a center retrieval line. Race upgrades include a multi-part block system for adjusting the forestay and up to an 8:1 purchase on the boom vang. As is often the case in one-design classes, racing competition can be fierce, and as one of the sailors I met when testing the boat said, “If you can make a Mirror go fast, you can make anything go fast.” Especially in the U.K., the boat has often served as a development platform for future Olympians and professional sailors.
John Summers
With its light draft and kick-up rudder, the Mirror is easily launched and retrieved in shallow water.
The Mirror Dinghy is very popular in Europe and in Canada, but not as well known in the United States. This is a pity, because it is a durable and practical boat whose small size and easy handling make it perfect for those with young children and limited storage space at home. As a trailer boat or cartopper, the Mirror can easily be brought on vacation, and can also be rowed or, with minor modifications to the transom, fitted for use with a small outboard. In the right hands, Mirrors can also be capable small boats for cruising, and they have made some long passages under sail. The fact that all this can be had in an easily assembled kit that is available for less than the price of many other less-capable production dinghies is an added bonus. The experience of building and then using a boat together is one that can stay with parents and children for a very long time indeed. The distinctive red sails of the Mirror certainly deserve to be seen more often in North American, and especially in American, waters.
Mirror Dinghy Particulars
LOA: 10′ 11″
Beam: 4′ 7″
Draft: 28″/4″
Sail area: main and jib 69 sq.ft, spinnaker 47 sq.ft
Mirror dinghies can often be found on the used-boat market in central and eastern Canada, particularly through the website of the Ontario Mirror Dinghy Association.
Mirror dinghy kits are available in North America from Mirror Sailing Development, [email protected].
General information about the class is available from the International Mirror Class Association www.mirrorsailing.org, where you will find links to national associations in Australia, Canada, Ireland, Japan, The Netherlands, South Africa, Sweden, and the United Kingdom.
Senate Hills, of Hillsboro, Oregon, has been making things for as long as he can remember. His current project is a framed wooden shed with cedar-shake siding for his six trucks. Before this, he built two other sheds, one of which has a ramp and accommodates the wagon he uses for light hauling. For loading logs, he built a boom derrick operated by a steam donkey.
Senate is 11 years old. His trucks and heavy equipment are all toys, most of which he has made. He started building things in cardboard, but when he was six or seven, he turned his hand to working more substantial materials. He and his dad, Jeff, were fixing a table when Senate spied a piece of plywood about 18″ long by 7″ wide, pointed at one end. He thought, “I could build a boat out of this. I screwed some boards to the sides, added a keel, which increased the draft from about 3⁄4″ to about 4″, attached a rudder, which I’d made out of a small hinge and a wooden board, and screwed a tiller to the top. I kept the boat from leaking by driving hemp twine into the cracks using a flat-head screwdriver and a hammer.”
Melissa Hills
A young Senate tested his first wooden boat, DRIFTWOOD, on the Tualatin River.
The family took the new boat to the beach on the Oregon coast where Senate christened her DRIFTWOOD before launching her. As she bobbed in the shallows of the Pacific Ocean, Senate imagined her as an inboard fishing boat.
That summer Senate built all manner of experimental boats. Almost every week the family went to nearby Tualatin River and almost every week there was a new boat to christen and launch. They were, he says, “weird little things, just experiments really, but they almost all worked.”
Senate Hills
Senate’s interpretation of a harbor tug is MILKMAID, named after “The Milkmaid,“ a song by his favorite band, The Longest Johns, a folk and shanty group from Bristol, England. Senate was inspired when reading On The Hawser: A Tugboat Album by Steven Lang and Peter H. Spectre, and Tugboats Illustrated by Paul Farrell. MILKMAID is 3′ LOA by 8″ beam.
There is no boating in Senate’s background, but when the pandemic hit and the Hills family went into lockdown, Senate’s mom, Melissa, decided to subscribe to a couple of magazines they could all enjoy. One was National Geographic, the other was WoodenBoat. Senate read the latter from cover to cover and was hooked. He continued to create the cardboard and plywood vessels of his imagination but also started building small, simple, model boats from kits. His favorite model boat, he says, is PADDY, a radio-controlled Beaver Tug that he built with Jeff fromplans and templates they found on the internet.
“We built her of balsa,” says Senate, “and installed a radio-controlled motor. We sheathed her in cotton fabric soaked in epoxy to make her stronger and watertight. And we painted her to look like a real working tugboat; she even has miniature tires for fenders.”
As the pandemic restrictions slowly eased, Melissa began looking for family outings. First came a tour on ARROW Nº2, a retired and restored Columbia River pilot launch based in Astoria (which Senate got to drive during the family’s visit) and then, in the summer of 2022, Senate, Melissa, and Jeff joined seven other families on the banks of the Willamette River for the annual Family Boat Build put on by the RiversWest Small Craft Center.
Ralph Cohen
With the side panels in place the family worked together to frame the skiff. Jeff held the panel, while Melissa held the forward frame steady for Senate to drill into using the bit and brace.
Over this two-day weekend workshop in Portland, Oregon, the goal was for each family to build a Salt Bay Skiff—complete but unfinished. The Hills family worked as a team, but they agreed that it was Senate’s project. “RiversWest had set up stations with all the parts and the instructions, like a kit,” says Senate. “RiversWest members helped by demonstrating and explaining how to do things if we weren’t sure, but we did all the work ourselves. I was the senior shipwright, my dad was the tool specialist, and my mom made sure we followed all the instructions.”
The Salt Bay Skiff, designed by Chris Franklin, is a simple 12′ stitch-and-glue skiff that can be built from two sheets of plywood. It is an ideal project for beginning boatbuilders. It has a deep skeg, outside chine logs, and can carry a load of up to 300 lbs. While it can be built and rigged for sail, the Hills family chose to build their boat for rowing. Senate had no previous experience with small boats and wanted to take things one step at a time.
Meg McGill
With Jeff looking on, Senate marks the keel for a screw placement. Fixing the keel and chine logs would be the final steps before turning the boat over.
The weekend was hot but despite numerous breaks to cool down and rehydrate, Senate and his parents stayed on schedule. Apart from the heat, Senate says, the hardest part was “attaching the side panels to the stem. At that point there’s nothing holding the plywood panels in place, and they flopped around a lot. But it got easier as we attached the stem, then the forward frame, the midships frame, and the transom. After we attached the bottom sheet and the chine logs, it felt really stable. Then we turned it over and it already looked like a boat!”
Ralph Cohen
“We built that!” The Hills family take their skiff for its first outing. By the end of the Family Boat Build weekend, the boat was structurally complete but there was still a lot of finishing work to do.
By the end of the weekend, they had fitted all the pine thwarts, quarter knees, and breasthook, and the skiff, while not yet painted, could be taken out for a test row on the Willamette River. “It was exciting,” says Senate, “There was the ‘We built that!’ moment. All three of us went out. For the sake of balance, my dad rowed, sitting on the middle thwart. I’m glad we did it, but we quickly knew that having all three of us on board was too much. There was very little freeboard and in the wrong conditions the boat would be easy to swamp.”
Jeff Hills
After filling, sanding, and many coats of paint, TIME–TRAVELER’s topsides shine. Protecting the finish is important to Senate, so he and Jeff added a brass shoe to the skeg and are working on fenders for the topsides when alongside the dock.
After the weekend, Senate went straight to work finishing the skiff at home. “We had to make sure all the screwheads were countersunk, and then we filled and sanded and painted.” Indeed, Melissa and Senate would spend weeks painting. “We sealed everything with primer,” says Melissa, “and then painted many coats of bright red and gloss white. We added a nonskid to the bottom inside. We taped off where we didn’t want texture, painted a coat of white, sprinkled sand over the wet paint and then covered it with a final coat on top of the sand.” Jeff and Senate shoed the skeg with a brass half-oval strip because, Melissa says, “Senate was very concerned after the first few times using the boat that the skeg was getting chewed up.”
Jeff Hills
As well as rowing, Senate uses TIME–TRAVELER to survey the lake. His sounding line is 200′ long with knots every 1′ for the first 10 and then every 10′ up to 200′.
Senate named his skiff TIME–TRAVELER because “when kids go out in boats,” he says, “we lose track of time.” In the year since the Family Boat Build, Senate has taken TIME–TRAVELER out “so many times I’ve lost count. She’s really nice to row and I’ve noticed that even when going into waves she still performs well. If you really lean into the oars, she’ll go fast. Sometimes I give my parents rides, but I’d say the optimum is just me or me and one other person. With a passenger you just have to get the weight distribution right, but otherwise, the only downside is less freeboard.”
Meg McGill
In 2023 Senate volunteered to bring TIME–TRAVELER back to the RiversWest Family Boat Build weekend to help families who might be unfamiliar with the building process and with the terminology.
Senate and TIME–TRAVELER returned to Family Boat Build in 2023, not to build another boat, but to help. Senate had made display cards identifying all the boat parts. He answered many questions—especially at the beginning of the weekend—and helped to fetch tools and parts, held things in place when an extra pair of hands was needed, and offered advice and encouragement to the new builders. He also brought some of his favorite books about boats to share.
Jeff Hills
Senate and TIME–TRAVELER on a visit to Lost Lake in the Mount Hood National Forest, Oregon. The rope fender, made by Jeff, is the first of a set that Senate will be making.
While he’s busy getting on the water as much as possible in TIME–TRAVELER, Senate continues to draw, build, and dream. He hopes, in a few years, to build a sailboat, something he can construct himself and learn to sail in. “I don’t know how to sail,” Senate says. “I’ve never even been on a sailboat. So that would be an ambition.” In the end though, he says, he just wants to go on learning new things. “I think that’s what life is about…learning…you’re never really finished.”
Jenny Bennett is managing editor of Small Boats.
Do you have a boat with an interesting story? Please email us. We’d like to hear about it and share it with other Small Boats readers.
Doug Hylan’s Point Comfort 18 offers the seaworthiness and lineage of a Chesapeake deadrise skiff, with the light weight and ease of construction a plywood hull provides.
One of the enduring pleasures of traditional wooden boats is how each boat conveys a sense of place. Every region has its distinct type, evolved to best suit that locale’s topography, weather, water conditions, and the use to which the boat is put. Available building materials can play a large role in shaping the boat, as can the need for economy in construction and in use. The interaction of cultures often has a powerful effect, as indigenous peoples pass on their building techniques to a newly arrived group who come with their own technologies. By studying the shape and construction of a traditional boat, we can peer back through the years for a snapshot of what the world was like for those who developed the type, and by looking at the evolution of the style we can follow broader trends in society. Who knew wooden boats were a solid form of anthropology?
Doug Hylan has given us plenty to study with his Point Comfort 18. At first glance, we see a simple, basic skiff—prettier than most, but a plain open skiff, nonetheless. But as we begin to take stock, we realize she is a modern distillation of the fine qualities of a Chesapeake deadrise skiff, one of the most distinctive of traditional American workboat types. Developed to take advantage of local materials and to handle the particular challenges of the shallow waters of Chesapeake Bay, the deadrise skiff is seen in all sizes up to the sail-powered skipjack sloops, as large as some 60′ overall and still dragging for oysters today (see WoodenBoat No. 233).
The watermen of the bay have long respected the deadrise skiff for its ability to keep them safe and comfortable on the changeable waters where they ply their trade. Located between the tropics and the north, the Middle Atlantic states are subject to fast swings in weather conditions. Thunderstorms and tornadoes can spring up with little warning, and strong northers can sweep across the bay, bringing Arctic cold and steep seas. Shallow harbors, creeks, and swamps demand boats of equally skinny draft, but the wider expanses can kick up to a short dangerous chop in no time. Simple construction has always been valued to reduce the investment of time and money in building these essential tools of the Chesapeake watermen, but seaworthiness is the first concern.
Robert W. Stephens
Hylan built ample storage into this design yet kept her interior uncluttered. The design has storage compartments in the bow, stern, and inside the ’midship thwart.
The deadrise skiff provides both seaworthiness and value. Its unique construction springs from local materials and local culture. Where a dead-flat bottom was acceptable in the oyster fleet to the north—the large and impressive sharpies of Long Island Sound—even greater economy of construction was permissible, but in the more challenging Chesapeake, a softer ride was required. The bow, instead of being flat like a cross-planked skiff or sharpie, incorporates a distinctive and effective twisting vee, the “deadrise” for which the type is named. In early boats, heavy timbers were used for keel and chine log—most likely hold-overs from the earliest types of bay working craft, dugout log canoes, made from single trees. As boats became bigger, these hulls were made from multiple logs pegged together—techniques adopted from the Native American peoples of the bay’s shores. To form the shapely bow sections, thick timbers were fitted between keel and chine and hewn to shape, as the twist was too severe to allow solid timber to be forced to conform. From amidships to stern, planks were arrayed in herringbone fashion to allow a continuously changing deadrise angle through the midsection and the run.
The great advantages of the traditional deadrise skiff and her larger cousins are seaworthiness, simplicity of construction, and economy of operation. The early boats sailed or rowed easily, and later on, powered boats showed good speed with small engines. But, for today’s recreational watermen, the boats come with some downsides, too: weight and maintenance.
Robert W. Stephens
The Point Comfort is an economical boat to operate. With a 10-hp to 25-hp outboard, she’ll do 12 to 20 knots.
With their thick, hewn bottoms and massive timbers, traditional skiffs would be a challenge to consider trailering. To make things worse, they rely, like most traditionally planked boats, on staying “soaked up” to remain tight. Life on a trailer would be travail for a classic deadrise skiff, and even the smallest would be a big grunt for most family vehicles. Good news for us, though—as with many traditional craft, modern materials and clever designers have permitted us to enjoy the virtues of these remarkable boats without suffering the downsides.
Doug Hylan’s interpretation features the simple and elegant shape in a finer, lighter-weight version. One of the challenges with reinterpreting traditional designs is how to remove the displacement required by heavier construction without changing the handling characteristics of the boat. Hylan has made the whole boat a bit more svelte than might be seen tonging for oysters: with a beam of 5’5″, she’s slim, and the hull depth is less than an old working boat might have—6″ instead of, say, 10″. Total hull weight is a featherweight 350 lbs, making towing behind even a compact car a possibility. But the look and the ride is pure Chesapeake.
Robert W. Stephens
The Point Comfort’s light weight and efficient underbody make her a joy to drive. She rises to a plane smoothly without jerking.
Hylan has shifted from solid lumber to thin, stable plywood for the hull planking—high-quality, easily attainable, and dimensionally stable on a trailer. He’s been able to employ full sheets of 1⁄2″ ply for the topsides panels and the aft half of the bottom, but in the shapely forefoot the compound curvature (twist) is too great for sheet plywood, no matter how thin. Hylan solves this problem by adopting the traditional method: he employs narrow strips of 1⁄4″ plywood, laid approximately perpendicular to the keel (as would be the solid, hewn planks), and uses two layers, with seams staggered. The “planks” can get progressively wider as you move aft and the twist reduces, until amidships the thinner skins fit to the 1⁄2″ sheet in a ship-lap rabbet. The result is authentically shapely and equally effective as the original in softening a tough chop.
With her light weight and efficient bottom shape, the Point Comfort 18 is a delight to drive. We tested Hylan’s prototype with a new 15-hp four-stroke outboard with tiller steering. Hylan pointed out the only trick about the boat: a great ride is dependent on getting her to trim just right. To reap the benefits of the fine forefoot, she wants to run with the knuckle of the stem just kissing the water. Tuning by adjusting motor tilt and perhaps positioning passengers carefully is well rewarded. Hylan had clearly done his homework: with my 15-year-old son Matthew alone in the boat, the prototype looked perfect. At idle, she slid along effortlessly, cutting cleanly through the water and leaving an invisible wake. As Matt twisted the throttle, she slid ever faster along, rising bodily but never sticking her bow up. The transition to a full plane was seamless. Hylan reports speeds of about 18 knots with this power—and I would not want to go any faster than that in a tiller-steered boat. Her long, straight keel gives her the feeling of being on rails—until you turn, when she feels like the rails continue through the turn. She inspires complete confidence.
Robert W. Stephens
The aft compartment is large enough to hold the fuel tank, a battery, and a bilge pump.
Her arrangement is simplicity itself. Our prototype featured the standard layout: a small foredeck covers a cuddy, providing spray protection and a dry place to store essentials. A platform inside the cuddy at chine level covers a flotation compartment; with additional compartments specified aft, Hylan calculates she’ll comply with USCG flotation and stability requirements. Amidships is a thwart with bulkheads creating more covered storage (a spare fuel tank and extra life jackets resided there during our test) as well as necessary structural elements. Another bulkhead forms a “mechanical area” aft, where the active fuel tank, a battery, and bilge pump were concealed in our boat. A small but ample self-bailing well around the motor adds safety and structural stiffness to the transom. The inside of the hull is smooth and uncluttered by frames or other structure. She is easy to move around aboard, and will be easy to keep clean and well maintained.
An alternative arrangement eliminates the central thwart and bulkheads, trading them for long seat boxes each side of the boat. I think I’d favor that arrangement—more options for seating and tremendous structural stiffness, if less traditional in appearance. Perhaps that’s the reason Hylan reports the thwart version is more popular by far.
Hylan also shows a center-console version that would shift the weight of the skipper out of the stern—but it’s an encumbrance in the middle of the boat, and she seems a bit too small to my mind for standing at a console.
Plans for the Point Comfort 18 are thorough and simple. Eight sheets show lines, construction plans for both versions, a construction jig setup, layouts for the topsides planks, and full-sized frame patterns. A thorough specification spells out materials and offers useful tips and hints. Hylan offers good advice couched in encouraging language. A CD includes an electronic version of the specification as well as photos of the construction and more helpful hints on scarfing and supplies.
For quick and simple building, easy trailering, a ride that’s kind to the kidneys and easy on fuel, and as a way to get your daughter out fishing or your family to that picnic spot on a distant island, it’s hard to find fault with the Point Comfort 18. And with her knockout good looks and traditional heritage, she is a true deadrise skiff for today’s water men and women.
Plans, kits, and new boats are available from Hylan & Brown Boatbuilders in Brooklin, ME. Hylan has a link on his website to many pictures of the prototype boat under construction.
D.N. Hylan and Associates
The underwater sections are nearly vertical at the stem and twist as they move aft to become nearly flat at the transom. This results in a seaworthy but shallow-draft hull that can cut through a chop without pounding. Particulars: LOA 18′ 3″ LWL 17′ 4″ Beam 5′ 5″ Draft 6″ Weight without motor 350 lbs Propulsion 10-hp to 25-hp outboard Speed 12–20 knots
In this episode, take a look over our shoulders at the building and launching of MUSTELID. Each boatbuilding project has its own challenges of time, space, contextual, and financial constraints. Paper is cheap, but it can sail us no farther than can our armchair. To get on the water, we must build.
We are “low-road” builders. We meet challenges armed with a small box of mostly hand-tools. We’re handy, but not masters of craft. We’re shoe-string operators and scavengers but debt-free and able to budget. We benefit from modern, gap-filling adhesives but favor lower-tech and common materials. We build simple and robust structures, but let handsome be as handsome does.
Who builds their own vessel must be able to persist. Heads down, put-in-the-time persistence that plods on and around every obstacle. As you’ll see, we are living proof that success is in reach of those who persist.
At this point, Dave and Anke have an inkling of what they want in their new boat. “Over the years,” says Dave, “we’ve collected quite a number of quirky ideas… the kind that could be great, or might crack the pot. Each one requires a real-life platform for testing and tinkering. So many ideas; so little time.
“These ideas have gone into the mental stew-pot and…well… stewed. Other ideas have mellowed and blended and complemented one another. But years have thundered by, and it’s time to serve up the stew or abstain from it.”
In this episode, Dave and Anke serve up the stew. They present their influences on the design of their new hull. From these influences, they draw ideas and innovations, run them through a filter of perceived wishes, needs, and constraints, then simmer it all down to a design plan. Likewise, they look at the concepts behind their outfit and rigging choices.
I wanted to build an outboard boat that would be fun to use in Florida, something eye-catching and different. I had always been drawn to classic runabouts, particularly the Chris-Crafts I see in more northern waters. While they are mostly inboard-powered, outboard motors are easier to maintain in Florida’s exceptionally saline waters. The Chesapeake Light Craft (CLC) Rhode Runner was just what I was hoping to find. It’s a kit-built outboard runabout in the classic Chris-Craft style of the 1950s. With bright-finished mahogany and faux planked foredeck, it exudes elegance and prestige and would stand out among the fiberglass boats on my Sarasota waterways.
Rob Wucki
With its bright-finished mahogany and faux-planked foredeck, the Rhode Runner is a modern take on a vintage Chris-Craft runabout. There is plenty of storage space under the recessed deck between the transom and the rear seat, which is hinged to provide access.
As one of CLC’s ProKits, the Rhode Runner requires prior experience with stitch-and-glue construction. While I had previously built three stitch-and-glue plywood kayaks and one hybrid using cedar strips, as well as CLC’s Jimmy Skiff, I was unsure that I could take on this challenge; but after I spoke with John Harris, the company’s president, his confidence in my abilities inspired me to purchase the ProKit, which I completed six months later.
The builder’s guide for the Rhode Runner consists of 35 pages of computer-rendered drawings, and the construction steps are noted in a bullet list of two to six instructions, presuming the builder understands the standard boatbuilding processes. By comparison, the manual for the Jimmy Skiff II, one of CLC’s standard kits, has 160 pages, with each operation explained by one or more sentences and illustrated with a photo or drawing.
Even though the Rhode Runner guide was greatly abbreviated, it was well suited to my previous experience, and the boatbuilding I’d done previously made it easy to follow the instructions.
Bob Silverman
The Rhode Runner, one of CLC’s ProKits for stitch-and-glue construction, is assembled with neither temporary molds nor strongback. Here the starboard planking panels are being wired to the frames. Note that the frames are notched to ensure the planks’ proper alignment.
The quality of the okoume plywood in the kit was exceptional, and the milling of the CNC-cut pieces very precise. Each of the two interior stringers, two deck panels, two bottom panels, and four strakes is supplied in two pieces with interlocking puzzle joints. The mating pairs are self-aligning when epoxied together. The 3⁄8″ frames are strengthened with plywood doublers, and the aft ends of the bottom panels are sheathed with fiberglass and epoxy.
The Rhode Runner does not require temporary molds or a strongback. Assembly of the hull begins with stitching the 1⁄4″ bottom panels together along the centerline. The installation of the seven 3⁄8″ frames follows, aided by tabs that fit into slots milled in the bottom panels. Copper-wire stitches temporarily hold the pieces together. The 1⁄4″ planks in the four strakes have pre-milled rabbets that align the planks at the laps in CLC’s LapStitch method. The hull bottom gets ’glassed inside and out before the interior and the decks are installed.
The two 1⁄4″ deck pieces are tacked together along the centerline with cyanoacrylate glue, avoiding the holes required for copper-wire stitches. The top surfaces have been milled with grooves to accept contrasting strips of wood to create the appearance of a planked-and-caulked foredeck typical of vintage Chris-Craft runabouts.
Rob Wucki
Stylish and fast when carrying one, two, or three passengers, with just the skipper aboard, the runabout can achieve a top speed of 27 mph with the 25-hp outboard.
The cockpit is all plywood sealed with epoxy. There are two storage compartments along the sides in the stern. They have access openings on their forward ends and are sealed by adhesive rubber-foam gaskets on the underside of a hinged stern bench. Between the compartments, in the center of the stern, there is room for a fuel tank. A seat backrest slides into slots provided by a pair of brackets. At the forward end of the cockpit there are seats for the helmsperson and a passenger, made of 18mm plywood. I bought the kit that included the two forward seats. They add flair to the look of the boat, and have narrow fiddled shelves on the aft side of the backrests that can hold beverages and other small gear.
I installed several optional features, including a period-looking windshield, running lights, stainless-steel rubrails, upgraded seats, and a complete electric package. Hardware for a windshield and for the motor’s throttle and gear shift is available from CLC. I added switches for the navigation lights and bilge pump and installed a Garmin navigation screen with depthfinder.
Rob Wucki
With a 25-hp four-stroke outboard the Rhode Runner gets on plane easily. When at speed, the boat carves around turns rather than skidding through them.
To achieve the appearance of an original Chris-Craft, I went the extra mile and customized the upholstery with a local shop and located period-accurate flags, pennants, deck pads, and an original gas tank.
I purchased a single-axle, aluminum-frame trailer with a 1,600-lb load capacity, which supports the runabout’s weight—including motor and fuel tank—with ease. The boat behaves well on the road. It isn’t a heavy boat, so a pair of ratchet straps can keep it secure and centered on the trailer bunks. At the ramp, the Rhode Runner glides off and back onto the trailer very well.
I equipped the Rhode Runner with a 25-hp Yamaha four-stroke outboard. Its 126 lbs is ideal for fore-and-aft trim, and it is smooth and quiet from idle to top speed. The boat went on plane with ease and remained perfectly trimmed with uninterrupted visibility over the bow. When underway, the Rhode Runner is incredibly stable, and you can feel the smoothness when accelerating. The boat rides exceptionally dry thanks to the slight flare of the foredeck that deflects the spray. I was pleasantly surprised by how well it cut through the waves when crossing the Intracoastal Waterway, even in choppy conditions. When cornering, the boat dug in and stayed the course, rather than swerving out of its direction. I was able to reach speeds of up to 27 mph motoring solo, and the boat slowed down comfortably without having the stern wave pile up against the transom. The ride is incredibly smooth and stable, making it a joy to operate. I’ve only run my Rhode Runner with two people aboard, and it balances very well. I don’t doubt that having two more passengers would be just fine and it would still get on plane.
Rob Wucki
The Rhode Runner provides a smooth, stable, swift ride, and has ample space for four.
I’ve owned many boats, including Boston Whalers, flats boats, fishing cruisers, and pontoons, but if you’re after a fast, fun, and stable runabout, this is it. My Rhode Runner is an undeniable head-turner wherever I take it—both on land and in the water—with people constantly asking me how they can get one. With the quality of the kit and the easy-to-follow plans, I felt confident, after I got started, that I’d be able to complete a very solid, well-thought-out boat. Building this boat was one of the most rewarding experiences of my life. If you’d like a runabout with the look of a classic and you’ve already built a kit and are ready to take the next step as a boatbuilder, the Rhode Runner provides good value and will reward your efforts.
Bob Silverman is a business-administration graduate from the University of South Florida and now a licensed real estate-broker specializing in developing mobile-home parks in Florida. Married with two grown children, he has lived in Sarasota for over 66 years. He has lived by the water most of his life and enjoys building wooden boats, kayaks, canoes, and even teardrop campers. He’s also a vintage Ford Mustang enthusiast, with ten restorations and showings under his belt. He’s currently building a hybrid stand-up paddle board with a trolling motor.
Rhode Runner Particulars
[table]
Length/14′9″
Beam/5′5″
Dry Weight (hull only)/350 lbs
Max Power/25 hp (200 lbs max outboard weight)
Min Power/15 hp
Motor Shaft Length/20″
Fuel Capacity/6 gallons (tank not included)
Passenger Capacity/4 adults
Max Payload without motor/1,000 lbs
[/table]
The Rhode Runner is available from Chesapeake Light Craft as a complete kit, with optional seats, for $4,998. Wooden parts only ($3,639), PDF plans with guide ($199), and many other options are available.
Is there a boat you’d like to know more about? Have you built one that you think other Small Boats Magazine readers would enjoy? Please email us!
Many years ago, I took an adult-education entry-to-woodworking course. The once-a-week evening classes were held at a local high school over 10 weeks. I made a mahogany hinged-lid box with dovetailed corners. It took me the whole 30 hours of the course to make. When it was finished, I was ridiculously proud of it until a friend said, “Nice! What else did you make?”
I still have and use my adult-ed box, but I’ve made nothing since. I’m handy with a paint-stripper, power sander, sanding block, paintbrush, varnish brush, even occasionally a palette knife and wood filler, but I am not a maker of wooden objects. So, when another friend recently suggested I make a wooden toolbox, I laughed. Then I found the CLC Tool Box. While Chesapeake Light Craft is well known for its kits for kayaks, canoes, and boats, the company also offers some “small projects,” among them the Tool Box.
The finished box measures approximately 25″ × 10″ and, with its gently arched carrying handle, stands about 9″ high. It’s made entirely out of 9mm marine plywood. On their website Chesapeake Light Craft says the toolbox is an “interpretation of the ‘classic tab-and-slot’ type favored by woodworkers for its ease of assembly.”
When the kit arrived, I was skeptical: I opened the box to reveal nothing more than a pile of machine-cut plywood pieces taped together. There were no fancy wrappings, not even any tools, but there was an illustrated instruction manual. I quickly scanned the 11 pages and was pleased to see large full-color photographs accompanied by one- or two-sentence directions showing the toolbox assembly, step by step. I read that I would need a file or rasp, some sandpaper, and some wood glue.
Photographs by the author
The 9mm plywood kit pieces are all accurately machine cut for snug fits. The small tabs seen at the bottom edges of many pieces are leftovers from the router-cutting process and need to be removed before assembly.
The tools are used at the beginning of assembly. Nearly all the pieces have small tabs left over from the cutting process and these must be removed prior to building the box. The manual recommends a rasp, file, or sanding block. I started with a file, but the process was frustratingly slow. I persevered with half-a-dozen of the tabs but with many still to do I decided to try a sharp-bladed knife. I carefully cut away the bulk of each tab and then sanded the edge smooth. In very short order all the tabs were gone, and I was ready to start assembling.
The parts are assembled in a particular order so that the finished tool box doesn’t need glue to hold it together.
Apart from one false turn at the very beginning when I failed to spot that the two side panels were not identical and that I had, by chance, started with the wrong one, the assembling process was quick and simple: the tenons and slots lined up perfectly and to my delight, in less than an hour, I was ready to install the carrying handle and locking keys. This was the only moment during the construction when I doubted the process. It is a tight fit to get the handle (two 9mm-plywood pieces glued together along their length) into the holes in the end panels. I had to use some gentle persuasion with a rubber mallet to get the two pieces to accept one another. Once the handle was through, the locking key slipped into place in its slot without complaint. I repeated the process at the other end and there it was: a completed plywood toolbox.
A few taps with a rubber mallet helped get the end pieces set.
During and after construction I smoothed most of the edges with 120-grit paper to remove splinters and round-off the hard cut of the plywood, but I was impressed by the ease of assembly and the look of the finished product. While the instructions indicate the marine-grade plywood doesn’t need to have a finish, I applied several coats of spray shellac, which I rubbed down between coats with a 3M scuff pad.
The handle is made of two pieces glued together to make it stronger and provide a more comfortable hand grip. The keys tapped into the ends of the handle hold it in place and lock the entire assembly together. The dividers in the center can be removed.
At the end of the construction, there were two extra pieces still on the bench, so I called Chesapeake Light Craft. They apologized that the pieces are not mentioned in the text but explained that I could glue them to either side of the top arc of the handle to increase the thickness, if desired, for carrying comfort. It might, indeed, improve the feel when the box is heavy with tools, but for my smaller hands I think I will just do a bit more smoothing of the edges and call it good.
A shellac finish brought out the color of the plywood. The middle divider has been removed to create a space for larger items.
After the shellac dried, all that was left to do was load up some tools. In each end, a shelf with holes can hold five screwdrivers and the two layers assure that the tools remain upright, handle at the ready. The wider ovals are useful for pliers, files and rasps, slender-handled paintbrushes and scrapers, and spokeshaves. In the main body of the box the partitions create spaces for palm planes, glue bottles, and tool rolls. Dividers can be removed for wider bays as needed.
Along the front, a 24-1⁄4″ full-length compartment will hold a framing square, hammer, larger brushes, and a short saw. Everything is kept in place and easily visible. Perhaps, when I go to work on one of the boats next spring, I’ll be able to spend time actually working instead of rummaging in my canvas bucket for the next elusive tool.
Jenny Bennett is the managing editor of Small Boats.
The Pert Lowell Co. in Amesbury, Massachusetts, designed the Ipswich Bay Skiff for a customer who wanted a lightweight but rugged skiff that he could launch from the beach on a dolly.
Avid readers of Small Boats and WoodenBoat are accustomed to finding articles about flat-bottomed skiffs. There’s a good reason for this: While such boats are sometimes referred to as “humble,” the fact is that once they progress beyond the “flat-iron skiff” of yore—a primitive boat with a totally flat bottom lacking fore-aft upsweep, or “rocker—a skiff can become an elegant solution to all manner of waterborne needs. The more specialized those requirements become, the more the inherent adaptability of such comparatively simple boats tends to shine. The Ipswich Bay Skiff is a case in point.
“One day,” remembered Pert Lowell proprietor Ralph Johnson of how the new skiff came to be, “a customer walked in with WoodenBoat’s article about the Babson Island 14. But he didn’t want as much rocker, and he wanted more sheer [the curve described by the top of hull’s sides]. He had lots of other thoughts as well.”
The prospective buyer, who brought with him two manila folders full of ideas, had very specific criteria in mind. He planned to use a dolly to launch the boat from a sand beach bordering Ipswich Bay and then run it about a mile to his mooring in the Essex River. This meant the skiff would need to be sturdy yet reasonably light and seaworthy, and perform well under outboard power. What’s more, there was a desire for the vintage look of a straight, plumb stem and for some method of stowing a small anchor and rode that would be both neat and secure.
This is a boat that was designed initially not on paper but in three dimensions. “We set up temporary plywood molds,” said Ralph Johnson, a one-time banker who chucked that career to learn boatbuilding from his accomplished father-in-law, Pert Lowell, in Newbury, Massachusetts. “Once we had established where the stem, stern, and midpoint would be, we used a pair of flexible 18‘ battens to try out different curves. We’d nail the battens onto the molds, stand back and judge how things looked, and make adjustments.”
Stan Grayson
Solid mahogany rails and knees mask the boat’s sheetplywood construction, and several frames add stiffness to the topsides. The anchor stows neatly in the bow, while the rode lives in a 5-gallon bucket.
Gradually, after 10 or 12 tries, the new skiff’s shape was literally nailed down. A graceful sheer was established that swept down from the bow to provide 15¾” freeboard at its lowest point, making for easy entry and egress, and back up to the 20“ high transom. “There was a lot of talk,” said Ralph, “about how high the sides should be. It’s always a balance of aesthetics and function—keeping people relatively dry, including someone seated on the bow thwart.”
Because the stem is straight and the transom is angled just 13 degrees from vertical, the boat’s waterline is almost as long as possible, contributing to overall speed and performance. The shallow arc of the transom’s top was patterned after that of the Town Class sailboat, the venerable one-design developed at Pert Lowell’s in 1932.
A batten was also used to shape the bottom’s rocker. Aft, the bottom is totally flat to best support the weight of the outboard and deliver solid performance. The hull’s forward sections, however, have significant rocker. “We started out with 5“ and lowered it to 3“, said Johnson. “That proved to be enough.” The rocker provides buoyancy as weight is added, and contributes to a dry ride. The rocker also makes it easy to run the boat onto a beach for a sojourn ashore. A 3“ oak keelson and a sturdy skeg contribute to directional stability.
Sheet plywood was selected as the primary building material because of its strength-to-weight ratio and cost-effectiveness. While opinion varies, Johnson prefers okoume to meranti and especially to today’s fir plywood, which tends to check badly. The bottom is constructed of two standard 8‘-long ½“ okoume sheets scarfed together. The hull sides are scarfed ¼“ okoume. “For structural reasons, I didn’t want all the scarfs to be in the same place,” Johnson said. “The bottom scarf is 8‘ from the stern while the hull sides are scarfed two-thirds of the way forward. It took us about two hours to scarf the panels together.” A sheathing of 10-oz fiberglass cloth set in epoxy covers the bottom and extends 2“ up the hull sides ensuring a leak-free bottom that will withstand a lot of abuse.
The boat was built upside down over the final set of molds. To minimize weight, fir was used rather than oak for frames and chines. All these solid-wood components were sealed with epoxy and received a coat of red lead on their mating surfaces. At the bow, the hull sides are glued and screwed to the tough locust stem. A decorative yet functional “false stem” made of several white oak pieces epoxied together is a visual focal point that also serves as the attachment point for the neatly spliced painter. The bow is reinforced by a precisely fitted fir breasthook. A bronze strip protects the stem against impacts.
The top portion of the stem is stained to match the Philippine mahogany gunwale and inwale, which are secured with copper rivets. “Some small boats,” said Johnson, “are built without inwales, but I don’t think those hulls are stiff enough.” Stiffness and overall strength do not appear to be matters this boat’s owner will ever need to worry about, and Johnson admits that he expects his boats to last a lifetime.
Built into the bow section is a small shelf. A Danforth anchor is stowed here, secured in place to a pair of belaying pins. The latter are among the many wooden hardware offerings—mast hoops, cleats, and so forth—that are a production staple at Pert Lowell, Inc. They’re a nice touch.
At the stern, silicon-bronze screws join the 1¼“-thick mahogany transom to nicely proportioned mahogany knees. The stern thwart, like the others, is built of pine screwed to the thwart risers. Closed-cell Styrofoam flotation is mounted beneath the thwart. The rear thwart is composed of five individual pieces, resulting in a visually interesting seat whose components can be individually removed for refinishing.
My first, and most lasting, visual impression of this boat was that it’s decidedly graceful, but it took me a few minutes to zero in on a subtle detail that helps make it so. Any boat with sheet plywood sides runs the risk of looking slab-sided, no matter how nice its proportions. The Ipswich Bay Skiff, however, has a decorative molding that runs from stem to stern. Echoing the boat’s sheerline, the molding at once contributes to an impression of flowing lines while reinforcing the 19th-century look suggested by the plumb stem.
Stan Grayson
Here, the boat is driven by a 4-hp Johnson four-stroke motor, which is 21 lbs heavier than a comparable out-of-production two-stroke model. There is a price to be paid in boat trim.
These days, anyone buying a boat intended for propulsion by a small outboard confronts the fact that new, small, two-stroke motors have been regulated out of existence. The 4-hp, four-stroke Johnson used for our photo session is quiet and clean, but at 57 lbs it’s a whopping 21 lbs heavier than one of OMC’s comparable, out-of-production, two-stroke models. Because of the negative impact on boat trim and performance, and awkward stresses on one’s wrists and back, it’s unlikely that anything heavier than the already discouraging 55–57 lbs of a new Johnson/Evinrude 4- to 5-hp motor would be acceptable. Manufacturers are making efforts to reduce the weights of their four-stroke outboards, but until the small ones become appreciably lighter, my local outboard mechanic would, I am certain, recommend scouring Craigslist and local outboard shops for a lightly used or reconditioned, long-shaft Johnson/Evinrude 5-hp two-stroke, or something similar.
With Ralph aboard, the 4-hp Johnson made reasonably easy work of tidal current in the picturesque Parker River, and the skiff coped well with a few overly large wakes that rolled beneath her and onto the sand flats and mud banks exposed by an ebbing tide. The boat seems well adapted for two adults, a child, and a dog on a day’s outing, and acceptable for three adults. It’s officially rated to carry 600 lbs, but one would need to give careful thought to packing four adults and their boat bags aboard for anything more than a short trip in protected water.
Stan Grayson
The Pert Lowell Co. developed the shape of the Ipswich Bay Skiff by first establishing the stem, stern, and ’midship dimensions. The shape was then refined on the building jig, with judgments made by eyeballing battens. The drawings shown here were developed after construction of the prototype, which has a transom inspired by the Town Class sloop (which Pert Lowell builds).
Costing around $4,200 including a careful paint job using marine enamels, this skiff is competitively priced. The Ipswich Bay Skiff is a deceptively simple boat whose several thoughtful details—the stem, the sheer molding, the anchor stowage, the graceful transom, and the multi-part stern thwart—make it an elegant little craft. It’s easily launched and retrieved from a trailer by one person, enhancing its usability—just what’s needed in a small boat. Intelligently handled and maintained, the Ipswich Bay Skiff should give a lot of pleasure.
Oddly enough, given the skiff’s absence of rocker aft, Johnson has found it to be surprisingly pleasant to row. “With one person, it really glides along,” he said. “It would be okay with two or three for shorter distances.” That said, someone looking for a pure rowing skiff would want one designed with that in mind. Altering the bottom configuration would be easy. Boatbuilder Johnson has his battens ready and waiting.
The Pert Lowell website no longer lists the Ipswich Bay Skiff as one of it regular offerings. This Boat Profile was published in Small Boats 2014 and appears here as archival material.
Abundant cargo-carrying capacity was uppermost in Francis “Mick” Fahey’s mind when he designed a wood-and-canvas freight canoe for his own use in the 1960s. The canoe’s versatility has made its successors, including this Jerry Stelmok–built Moosehead Laker named FIELD OF STREAMS, popular among camp owners and fishing guides in the Maine lakes.
Maine is big. The last time my wife and I returned from an Allagash River trip, it took us more than five hours to drive from Fort Kent to Camden. Fort Kent is within sight of New Brunswick, and Camden is about halfway up the coast. Either a northern paddle trip or the long drive home would acquaint one with two of the state’s best features: its extensive forest and its phenomenal supply of fresh water.
It’s easy to forget that 150 years ago, travel in northern Maine was chiefly accomplished by small watercraft. As a result, interior Maine has a rich history of regional small craft. Recently, we set off in search of one of these old-time boats, to the fabled Kennebago Lake region in western Maine to experience firsthand a scarcely known regional craft, and the guide who is happy to sing its praises.
Bill Stevens first visited Kennebago Lake in 1958, when he was 12, on a fly-fishing trip with his father. Watching the grace of his father’s cast made a lasting impression, and thus began a lifelong love for the Maine outdoors shared between father and son, a connection that evolved to include the co-ownership of a camp on Kennebago since 1984, where Stevens (now retired) and his wife, Jan, spend their summers.
Stevens’s boat,FIELD OF STREAMS, is a 20‘ wood-and-canvas canoe, a model called the Moosehead Laker built by the expert hands of Jerry Stelmok and designed by legendary Maine woodsman and guide Francis “Mick” Fahey. In the 1960s, Fahey designed the boat in the spirit of North Woods freight canoes as a one-off, which he called VOYAGER. Fahey first carved a half model, which he then used to produce offsets to build a construction jig.
Donnie Mullen
The 4’-wide Moosehead Laker has generous tumblehome, affording great bearing surface, especially aft where the shape supports the weight of the outboard motor. A spray rail extends almost full length .
Specifically, VOYAGER was built to haul building supplies to his retirement home at Chesuncook Village, which at the time was accessible only by crossing Chesuncook Lake’s notoriously choppy 20-mile length. VOYAGER’s hull, which has a 4‘ beam and is 20“ deep amidships, can carry 1,500 lbs of cargo and still hold a few passengers. Though VOYAGER was intended to handle a small outboard, Fahey built substantial rocker into the aft 3‘ of the keel, which left the narrow, 26” transom high enough to allow for efficient paddling and poling.
In 1982, a fire destroyed Fahey’s home along with his cherished VOYAGER. The form, however, was spared. Fahey was nearly 80 at the time and saw no reason to rebuild, so he handed his form on to a young Stelmok, his colleague Rollin Thurlow, and their nascent canoe-building business (see WB No. 67). (Although they are no longer business partners, Stelmok and Thurlow continue to share Fahey’s original form.) The young builders added stations to the inside of the form to strengthen it, increased the ribbands to assure a fair hull in repeated constructions, and installed steel bands to turn the points of clench nails.
Donnie Mullen
Fly casting is something of a “zen” experience, which can only be aided by being surrounded by the beauty of a wood-and-canvas canoe’s interior. On the practical side, the fisherman has a stable platform and ample working room forward.
Although the Moosehead Laker is an elegant and supremely capable freight canoe, most of the customers who came to Stelmok and Thurlow with an interest in the model—Stevens among them—were most attracted by the design’s promise for fishing or guiding, taking note of its comfort, space, and stability. Another draw for these clients was the boat’s square-sterned design, which allows the boat to carry an outboard motor. Also, its draft when empty was only about 4“, which meant that it could cover miles easily yet sneak into the shallowest of inlets. The canoe is known for its stability, and substantial tumblehome makes the hull strong. Such tumblehome, however, can allow water to sneak in at the gunwales, so Fahey placed spray rails 6“ to 8” below the sheer.
While Fahey limited his interior fitout to single seats at the stern and bow, Stelmok and Thurlow today can include an assortment of enhancements: mahogany bench seats, a deck with coamings, folding seats, a floor rack, storage drawers, and rowing stations, to name a few. When paddled, the Moosehead Laker benefits from having three or four people take to the paddles.
Fahey’s VOYAGER had significant sweep to the sheer at the bow, a purely romantic quality that helped distinguish his design from its more utilitarian brethren. Stelmok and Thurlow chose to decrease this sweep by a few inches.
Donnie Mullen
With a beam of 4’, the canoe has enough width to be rowed by two people, but it can also be paddled.
In 2010, after several years of ownership, Stevens made a rare trip outside the Kennebago watershed with FIELD OF STREAMS, launching it instead in Chesuncook Lake. With a mischievous grin, he pulled out his phone to capture an image of a sizable wave crashing over a darkly clad bow paddler. “That’s my wife,” he smirked. “She’s a good sport.” Clients have used Stelmok’s Moosehead Laker (and Thurlow’s version, called the Voyager model) in diverse waters ranging from Lake Erie to the Maine coast. Stelmok even outfitted one for sailing.
Early one August morning, while I waited at the dock below Grant’s Kennebago Camps, Stevens emerged silently from the edges of the mist-cloaked lake paddling FIELD OF STREAMS. No sooner had he welcomed me aboard than the fog swallowed us. As we bonded over a shared fondness for Stelmok’s work, I felt as though I had stepped back in time, to a simpler world of jovial guides, glistening wood canoes, and giant trout rising toward a well-placed fly.
Later, when the mist cleared, we headed toward Stevens’s beloved Upper River. The rounded, conifer-clad top of West Kennebago Mountain welcomed us to The Logan, a reedy wetland that separates the Upper Kennebago River from its lower half. Open water led to a narrow, graveled channel. I was happily overwhelmed, both by the beauty of the area and what I hoped to accomplish in the boat: paddle, row, motor, fly-fish.
In short, the Moosehead Laker is a versatile boat.
Donnie Mullen
The Moosehead Laker can take gear and passengers for extended fishing journeys, her quiet four-stroke outboard hardly breaking the tranquility of the day. The anchor forward can be set from the cockpit to hold her quietly steady while casting.
As we ascended the stream, Stevens stuck his paddle overboard to illustrate the limited depth required to float FIELD OF STREAMS, a mere half a paddle blade. I was reminded of Fahey, who once observed, “I fear the short canoe is made for an unknowing and gullible public,” after his 20-footer passed unscathed over a shallows that wreaked havoc on a fleet of 16‘ canoes.
When Stevens and I reached a high-banked pool, he turned us around and handed me the paddle. I was giddy, and a tad anxious, to take command of the girth and length of the mesmerizing hull. While I eased us downstream, Stevens stood in the bow and cast. When a family of kayakers passed us, Stevens announced, “This is a real treat. I’ve never fished from up here.”
Donnie Mullen
For Maine Guide Bill Stevens, a wood-and-canvas canoe is part of the experience of Kennebago Lake, where he first visited with family in 1958. He has summered at his camp on the lake since 1984, and he has been a registered Maine Guide since 2001.
For my part, I found the Moosehead Laker easier to singlehand than I had expected, though I did have blisters by day’s end. During a moment of drift, I exclaimed, “This is a big boat, but it still acts like a canoe.” Stevens concurred. He said that he prefers the paddle to the motor or oars. He uses the motor to cross the lake or head upstream and then pulls out the paddle for the fine maneuvering. When it comes to stability and tracking, the Moosehead Laker takes care of itself, according to Stevens. He generally doesn’t even have to counterbalance while a client fishes. As I navigated a tight bend in the river, Stevens said, “See now, it even turns on a dime.” When I swung wide and ducked under some brush, he added, “Well, maybe a quarter.” I did find the bow a bit unwieldy when a straightaway coincided with some wind. In these circumstances, Stevens doesn’t hesitate to drop the paddle and go for the motor. Easy for us paddle geeks to forget, but the Moosehead Laker is a motorboat first.
When we returned to the lake, I got a crack at the motor. Stevens uses a 5-hp outboard, favoring its lightness, although Fahey used a 7.5-hp. As we sped off, Stevens leaned back comfortably against the deck. Not surprisingly, the Moosehead Laker tracked like a bullet and carved gracefully while the interior remained dry. When we reached the middle of the lake, I cut the motor and rowed us back to shore. I found the Moosehead Laker a delight to row, though not as nimble as the local 17‘ Rangeley boat type. Before we parted, Stevens insisted I try a few casts. The hull felt so solid beneath me, I might as well have been standing on land.
Earlier in the day, as we hung below West Kennebago, surrounded by the moose-friendly Logan, I had said to Stevens, “I understand why you don’t tire of this place.” Later, it occurred to me that Stelmok had once said as much about building his boats: the process had held his interest all these years because he never tired of gazing at the interior of a freshly varnished wood-and-canvas canoe.
As I stepped back onto the dock at Grant’s, FIELD OF STREAMS’s mahogany and cedar were ablaze in the midday sun. While Stevens motored toward his century-old camp, my mind wandered back over the foggy morning, to the era when wood and canvas reigned.
Jerry Stelmok, Island Falls Canoe, www.islandfallscanoe.com.
Rollin Thurlow, Northwoods Canoe Company, www.wooden-canoes.com.
Bill Stevens, Kennebago Fly Fishing, [email protected]
Subscribe For Full Access
Flipbooks are available to paid subscribers only. Subscribe now or log in for access.
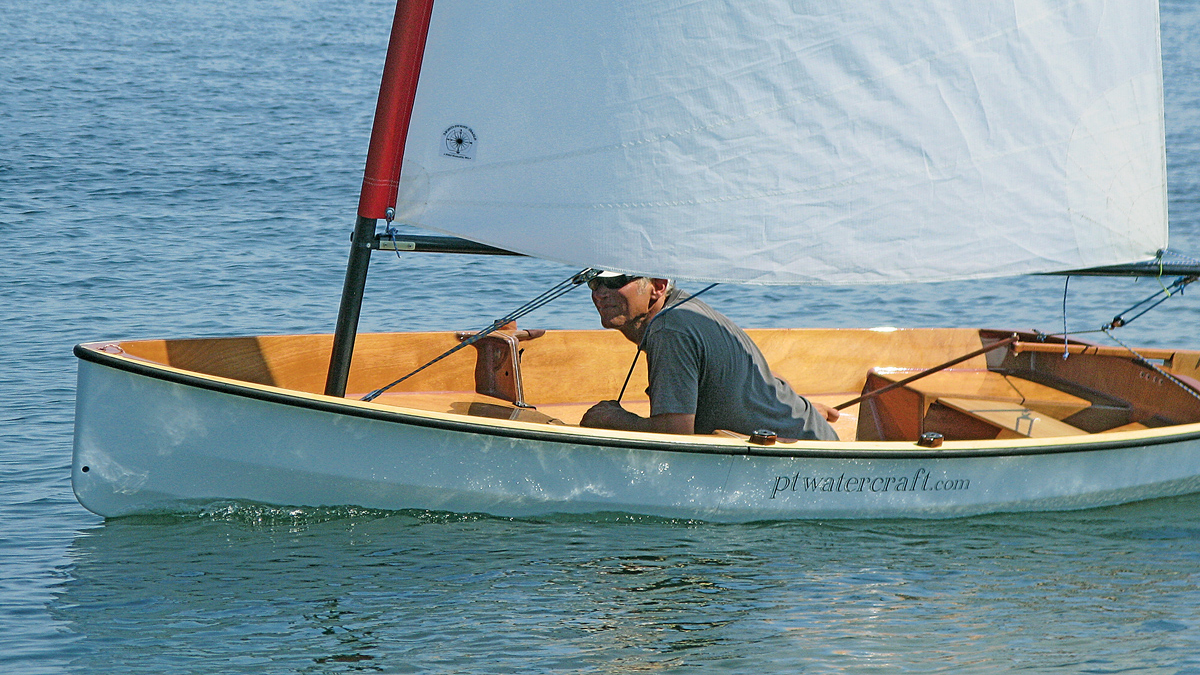

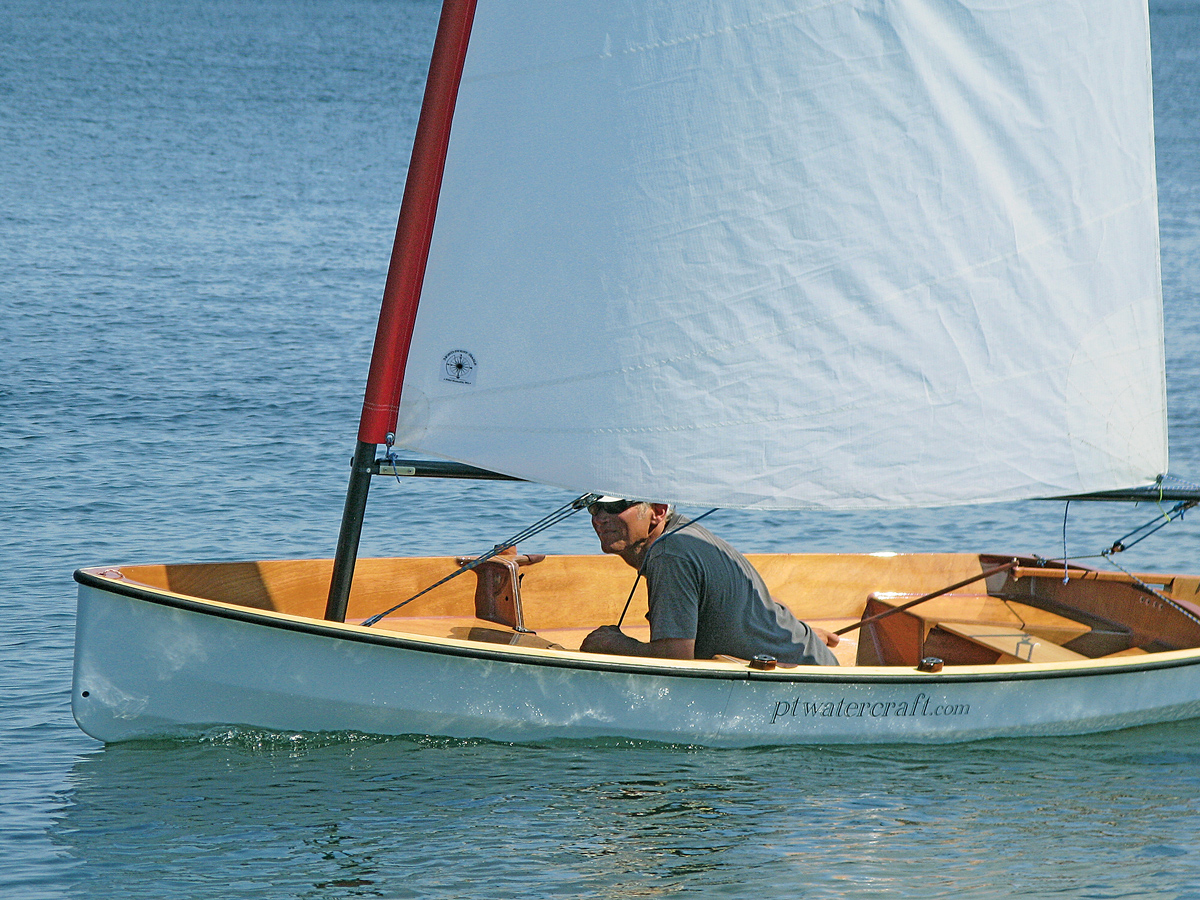 Tom Jackson
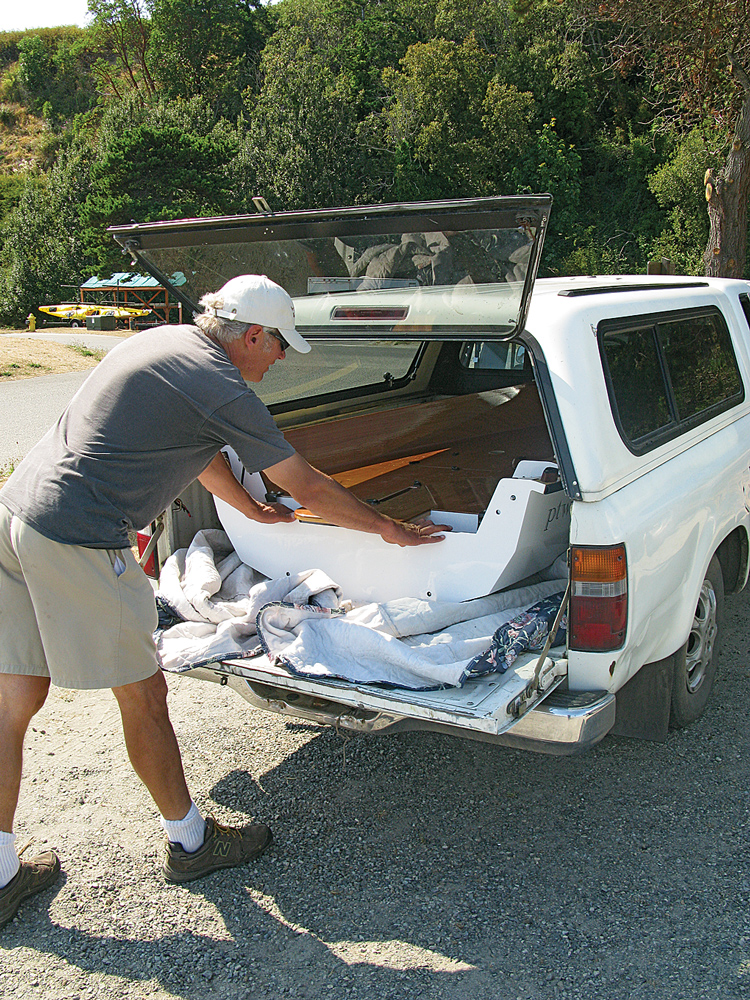 Tom Jackson
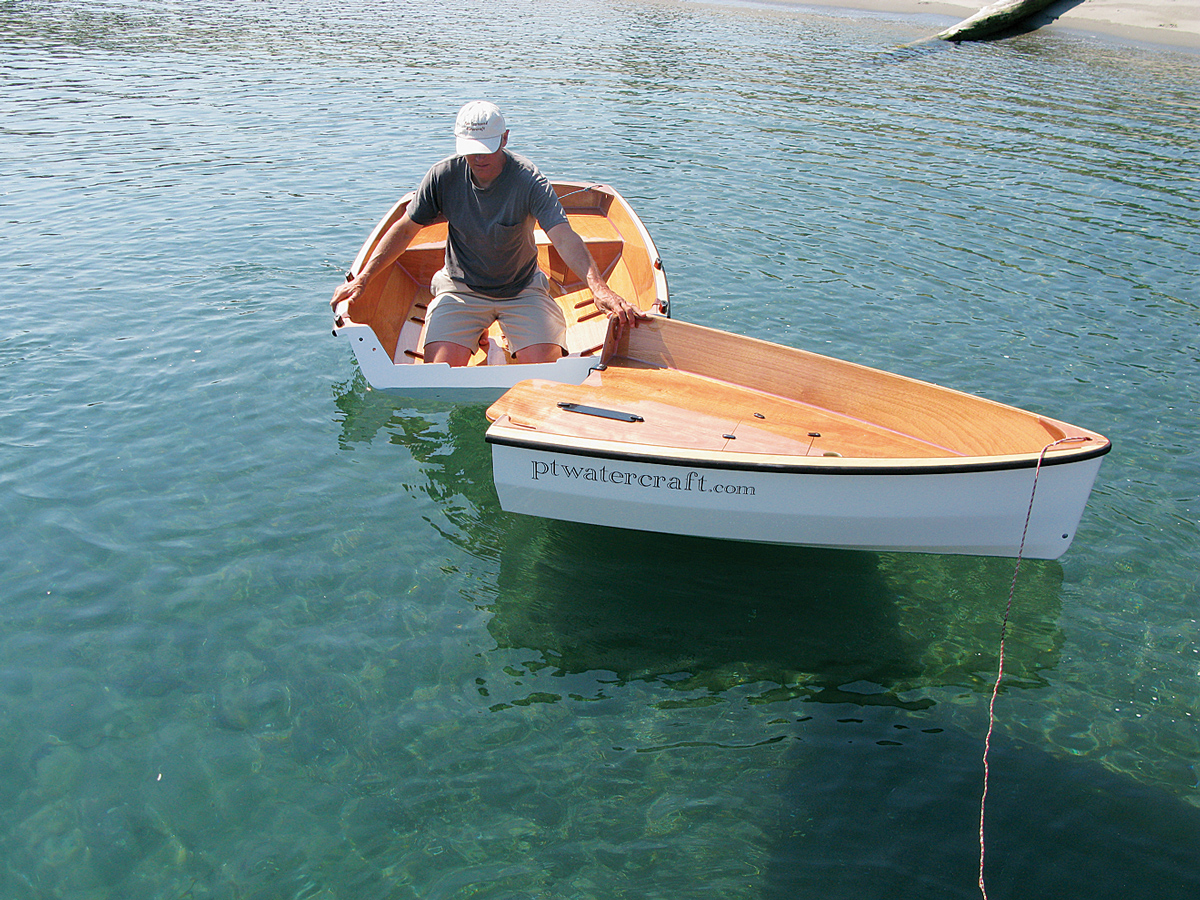 Tom Jackson
 Tom Jackson
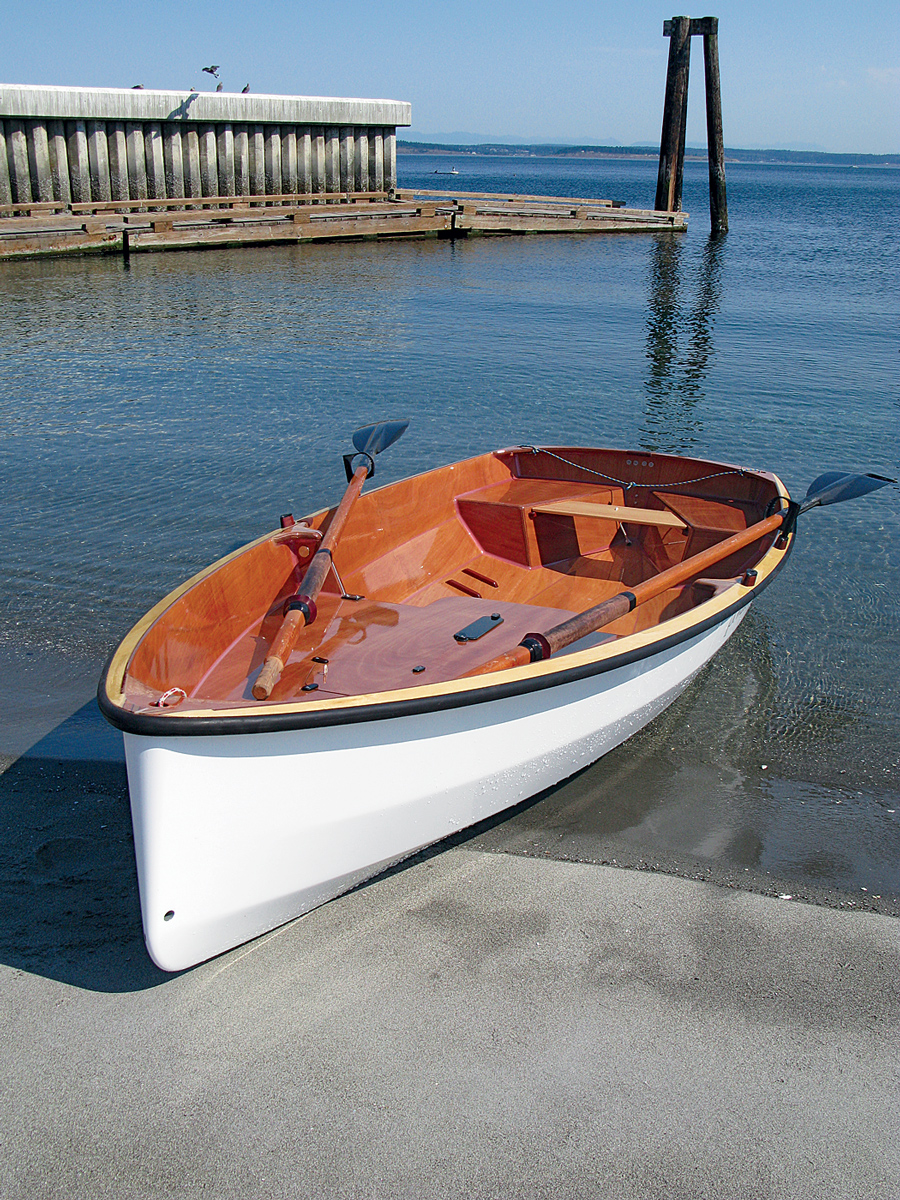 Tom Jackson
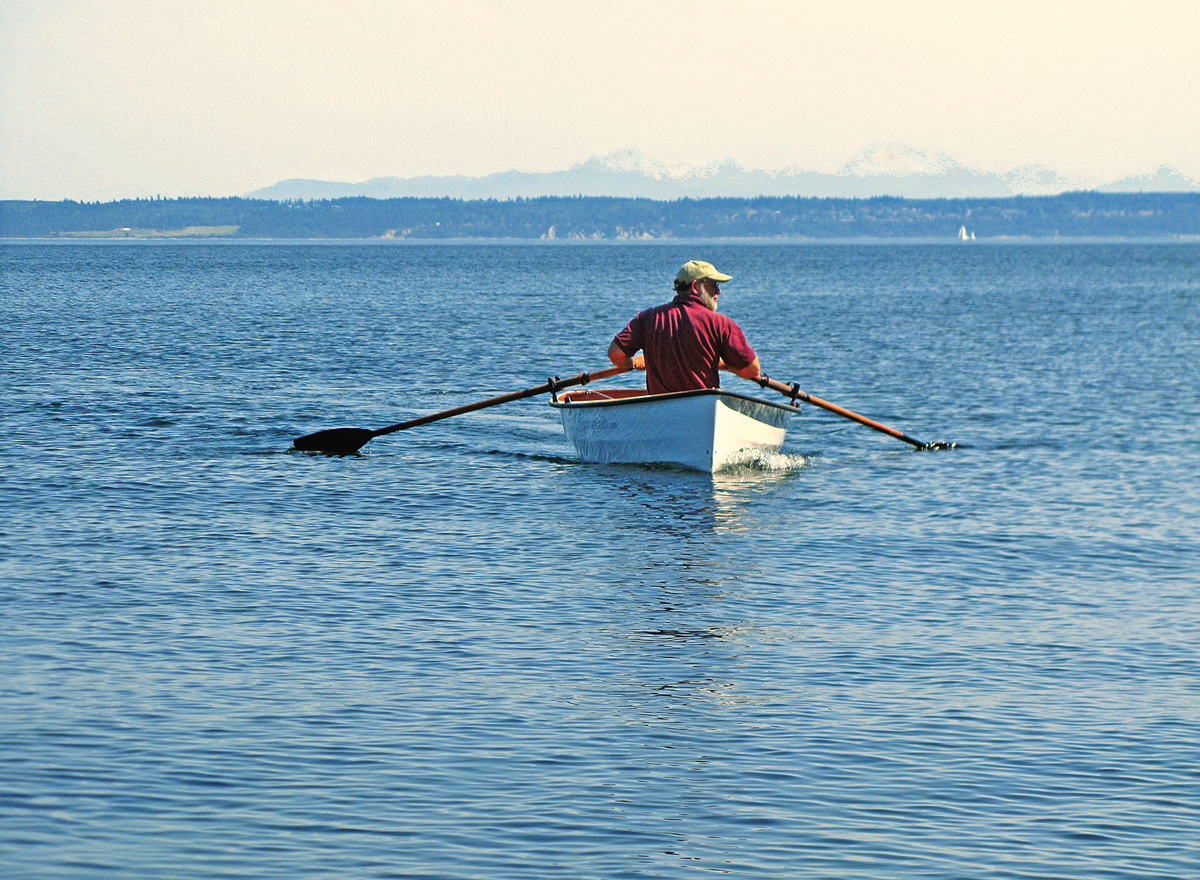 Tom Jackson
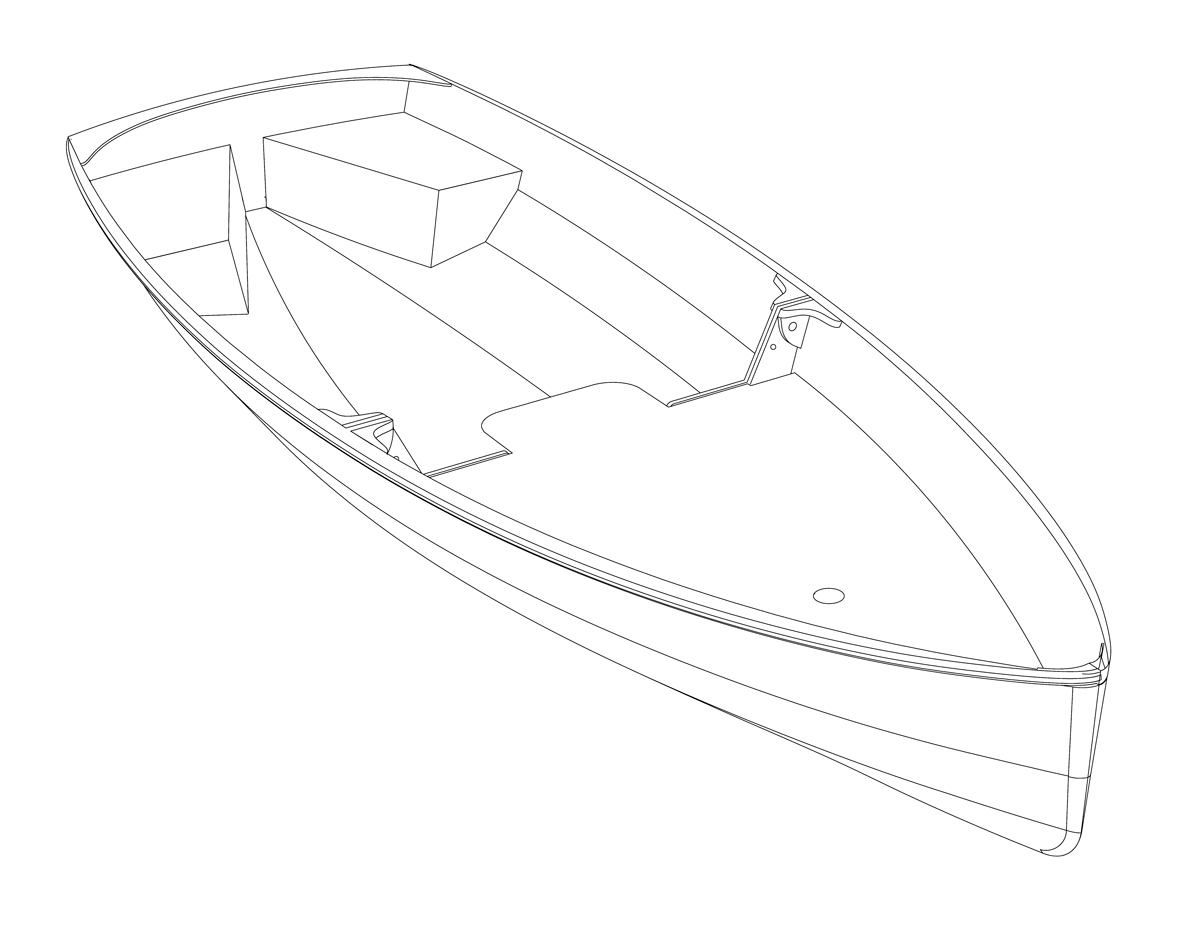 Russell Brown