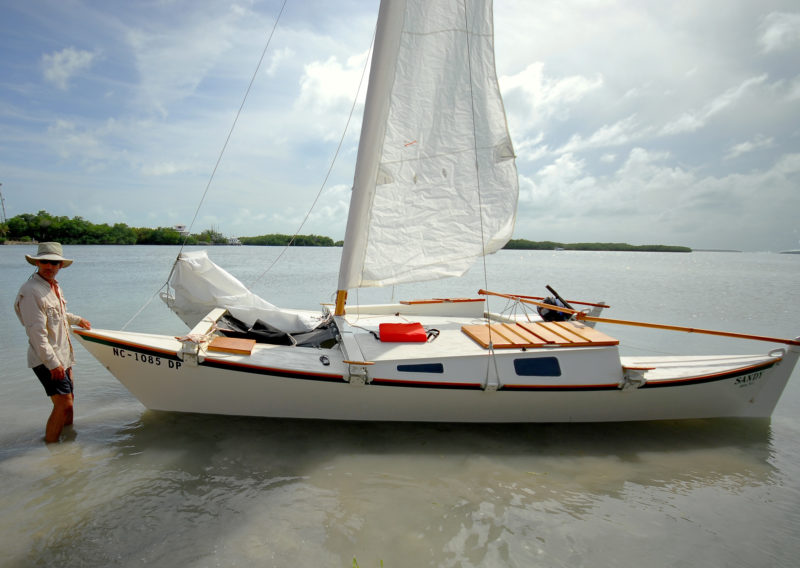
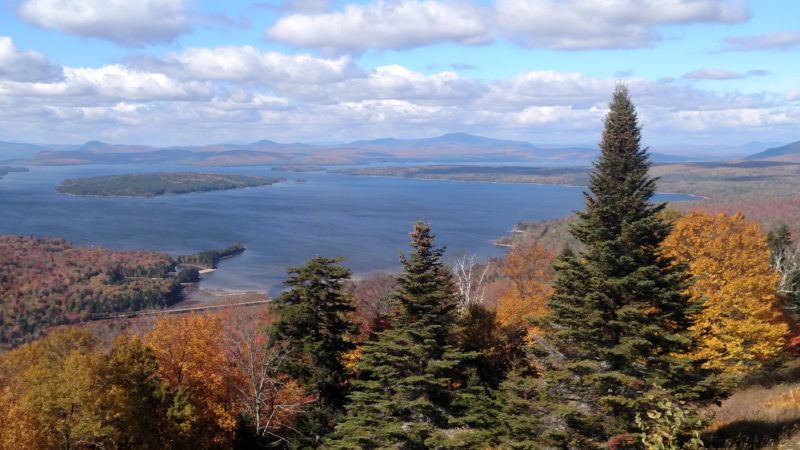
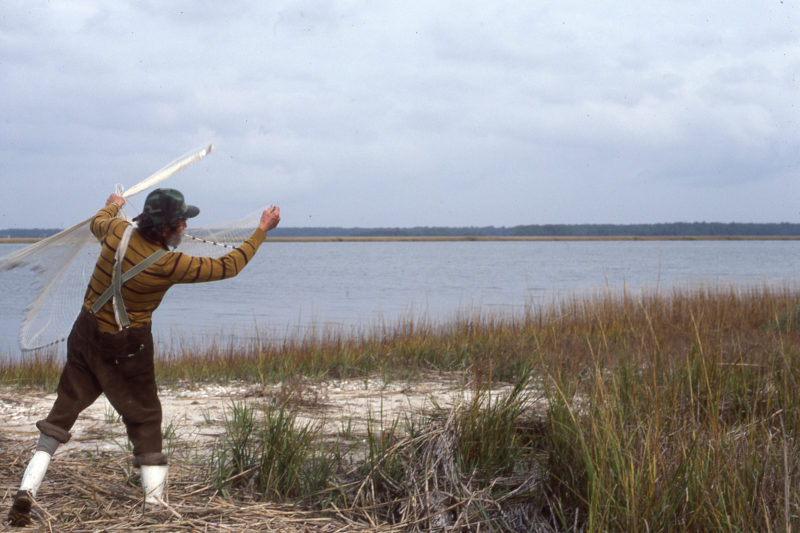
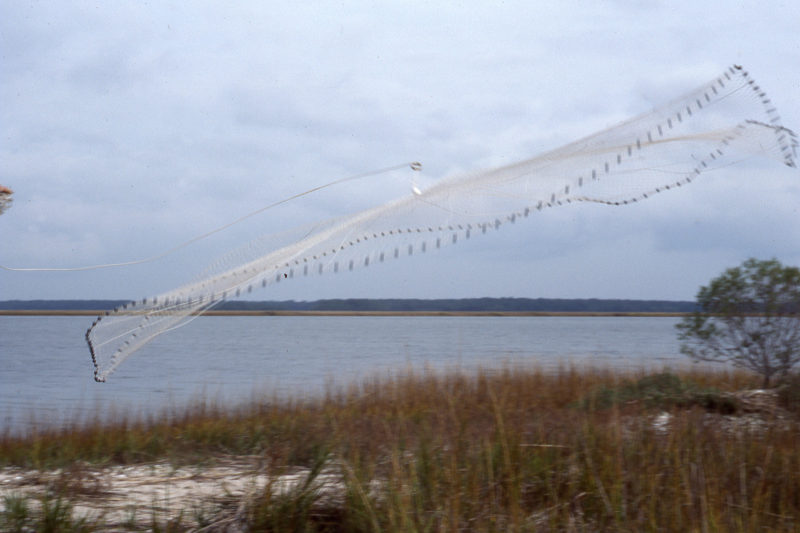
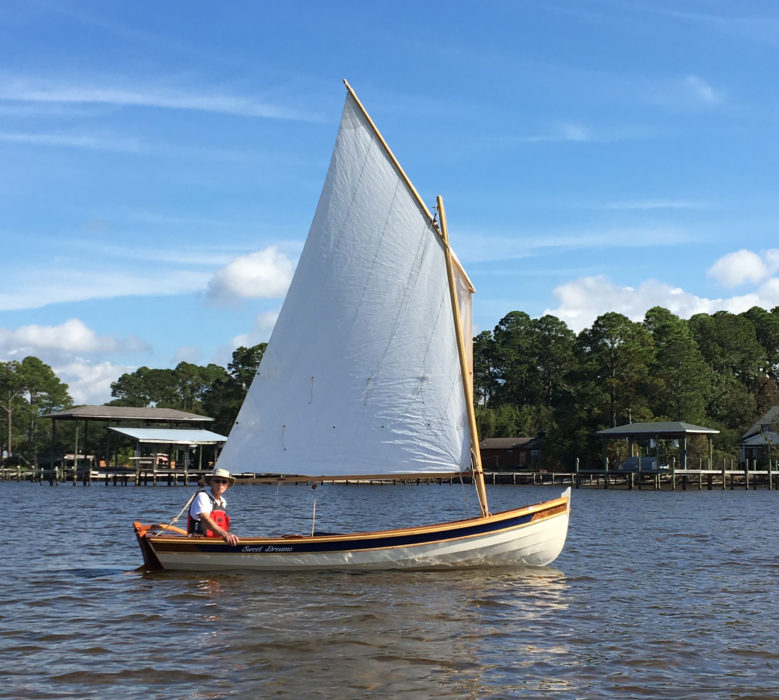
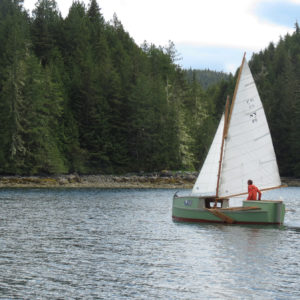
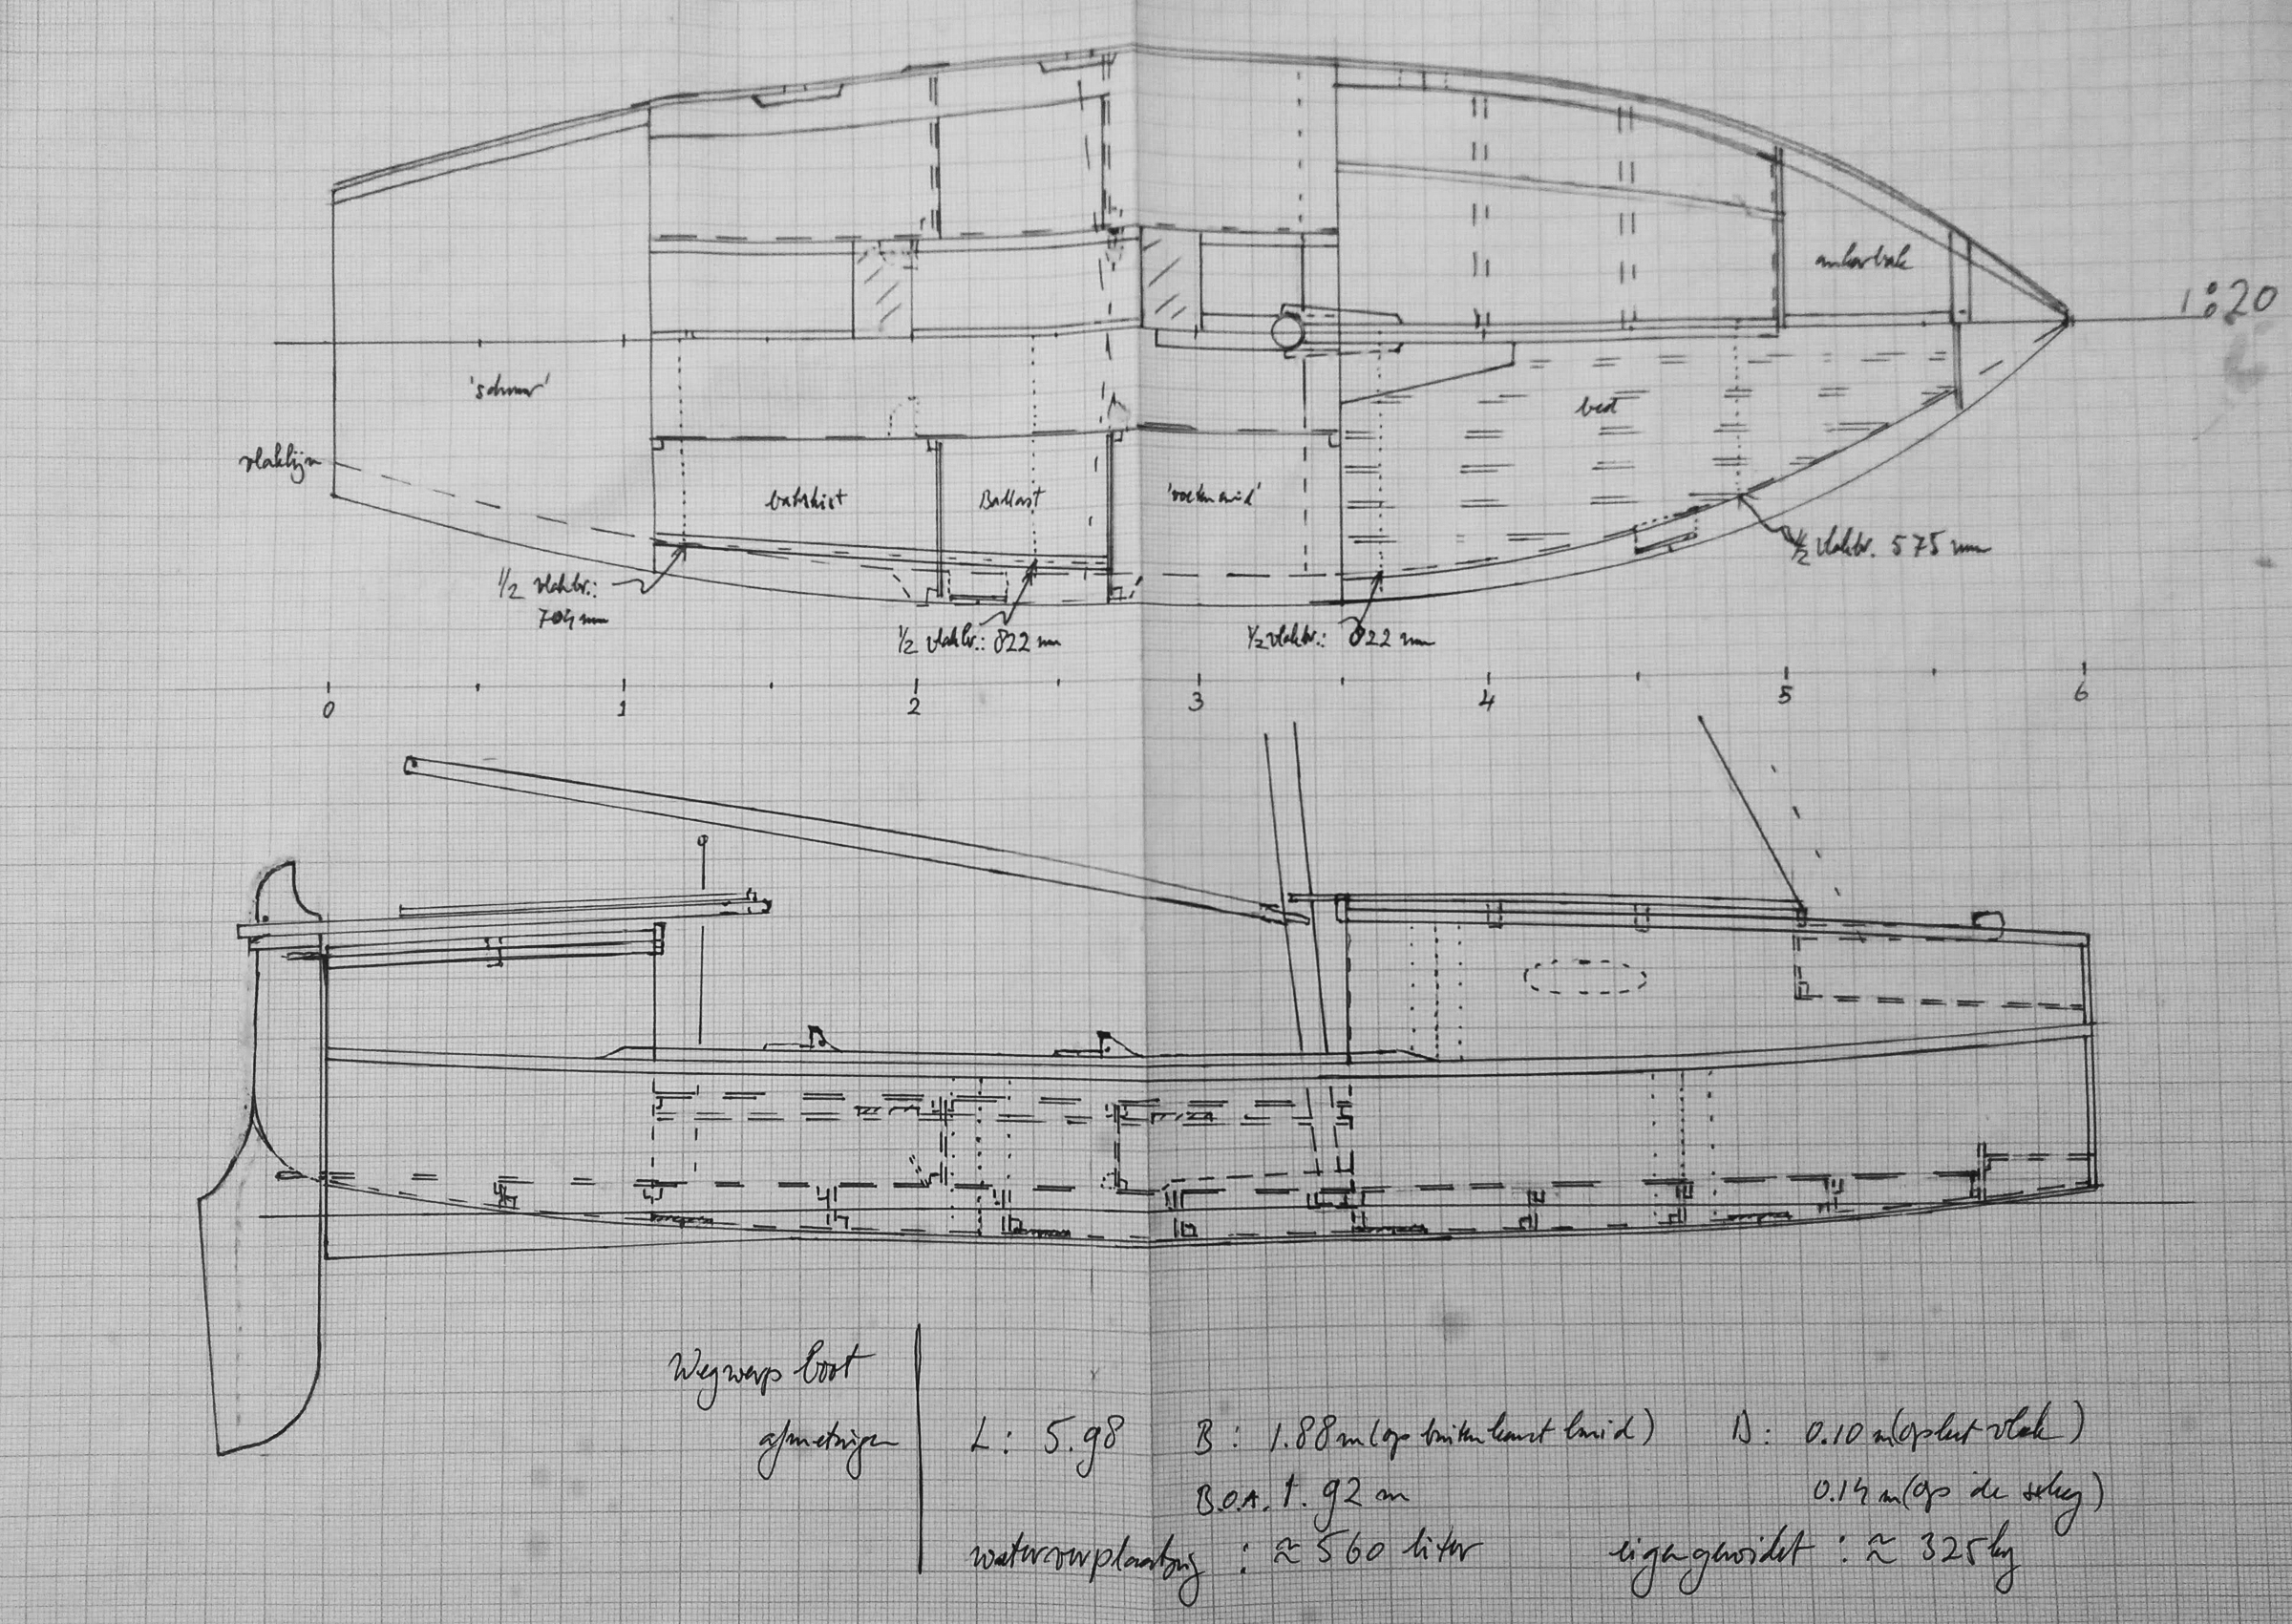
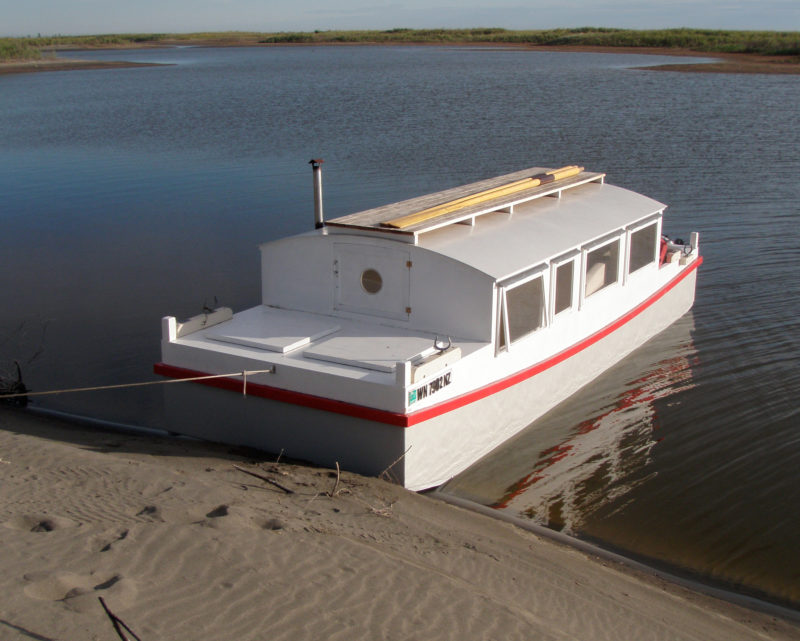
The best-known boats of the Adirondack region of northern New York are, of course, the Adirondack guideboats—sleek, lightly built double-enders with tumblehome stems. Designed to reach some of the smaller, less accessible lakes, they were developed to be carried as much as they were to be rowed.
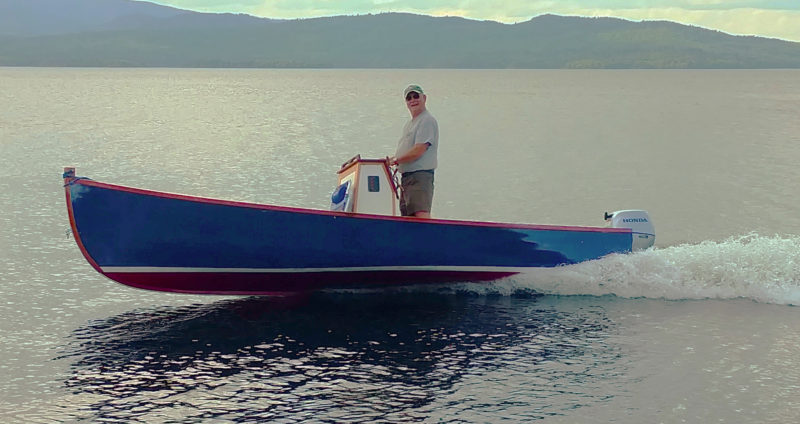
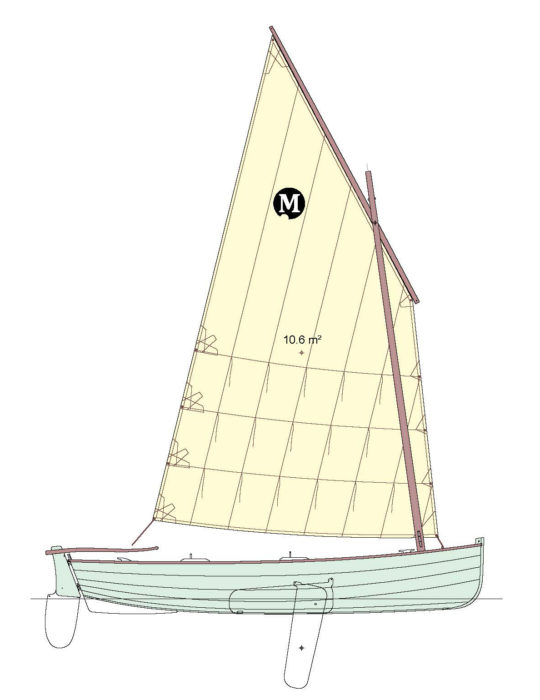
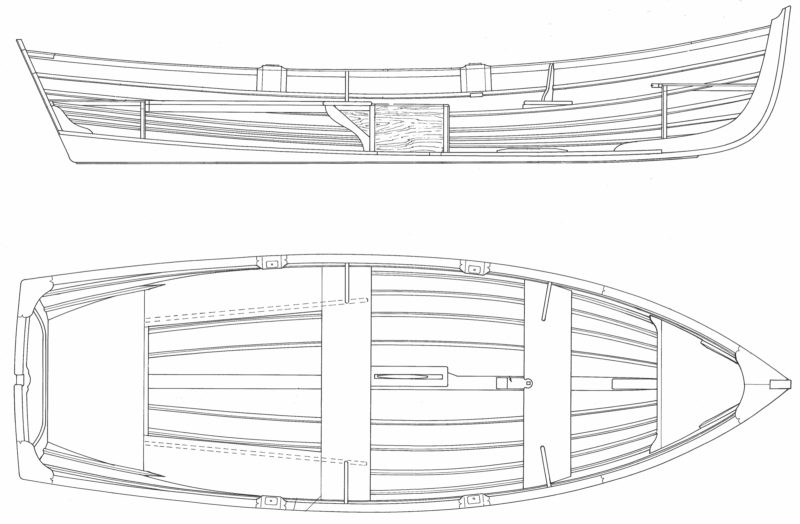
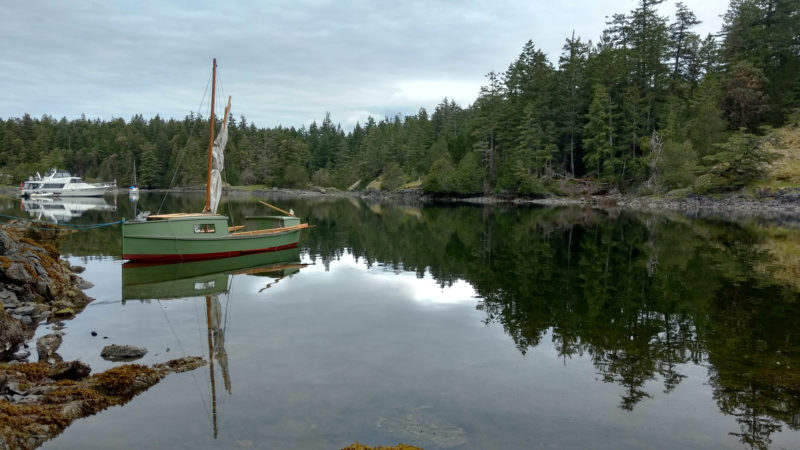
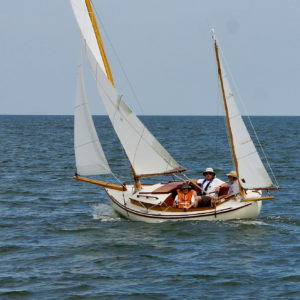
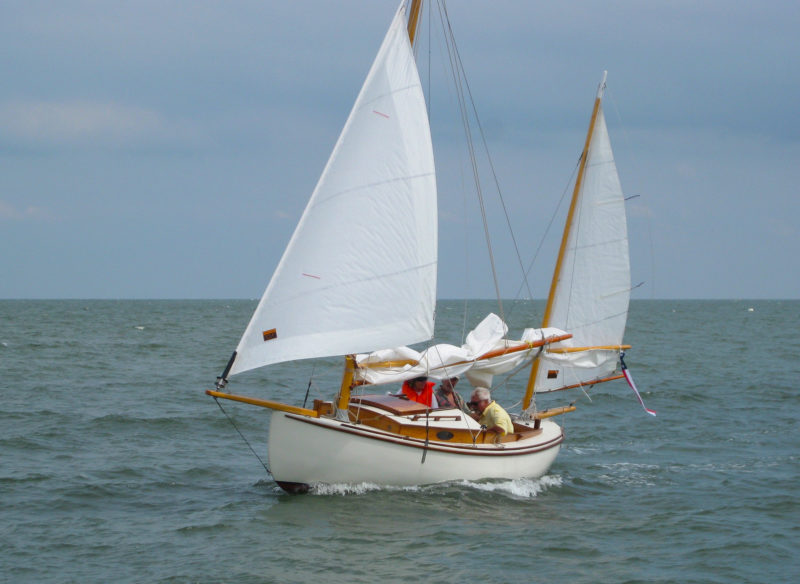
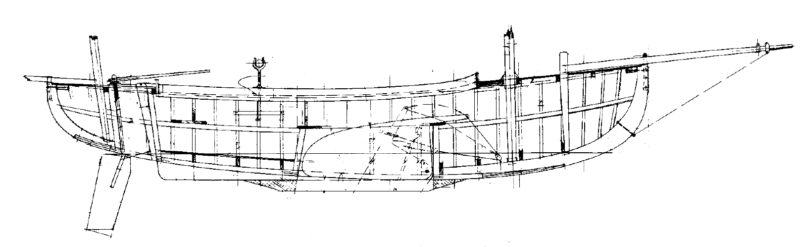
Not everyone drawn to the Adirondacks needed a boat that was easily portaged. Lake George, second only in size to Lake Champlain, is 32 miles long and up to 3 miles wide. Set apart from the network of lakes that gave rise to the guideboat, it produced another type of boat, called, naturally, a Lake George boat. This is a lapstrake pulling boat, very much like a Whitehall, but lacks the wineglass transom. Light construction and a trace of tumblehome in the stem hint at the influence of the Adirondack guideboat. WINONA, a Lake George boat built around 1911 by Jared Bartlett of Sabbath Bay Point on the western shore of the lake, is now in the Mystic Seaport collection. Her lines were taken off in 1983.
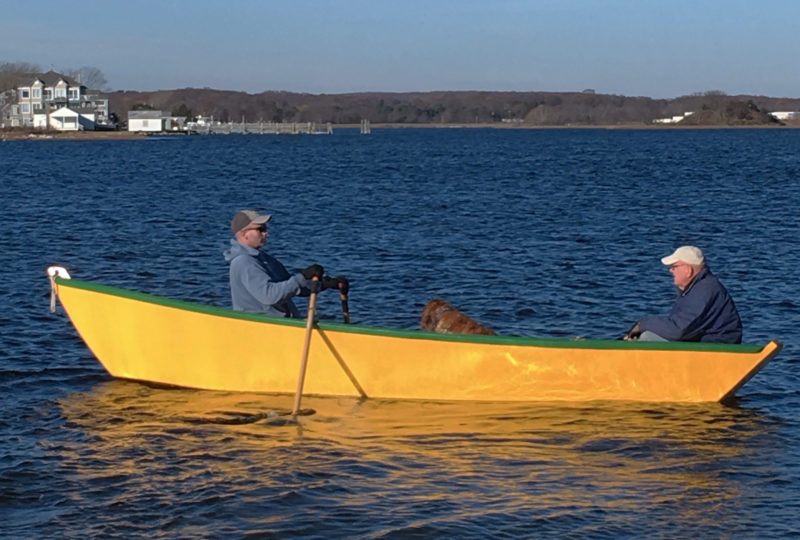
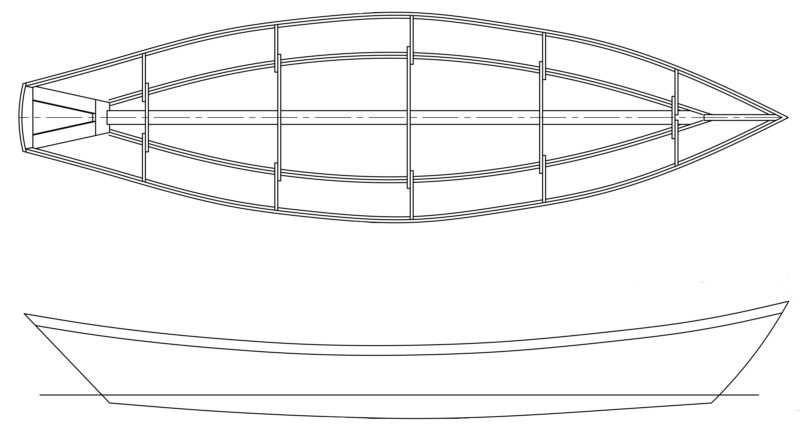
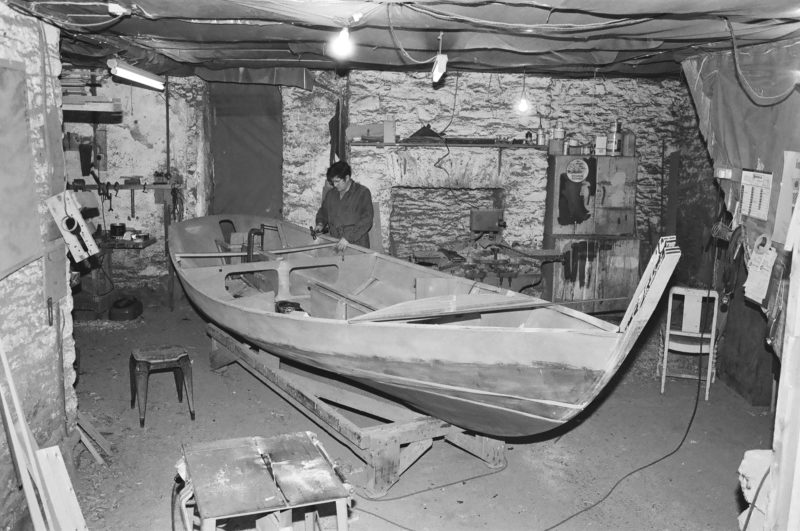
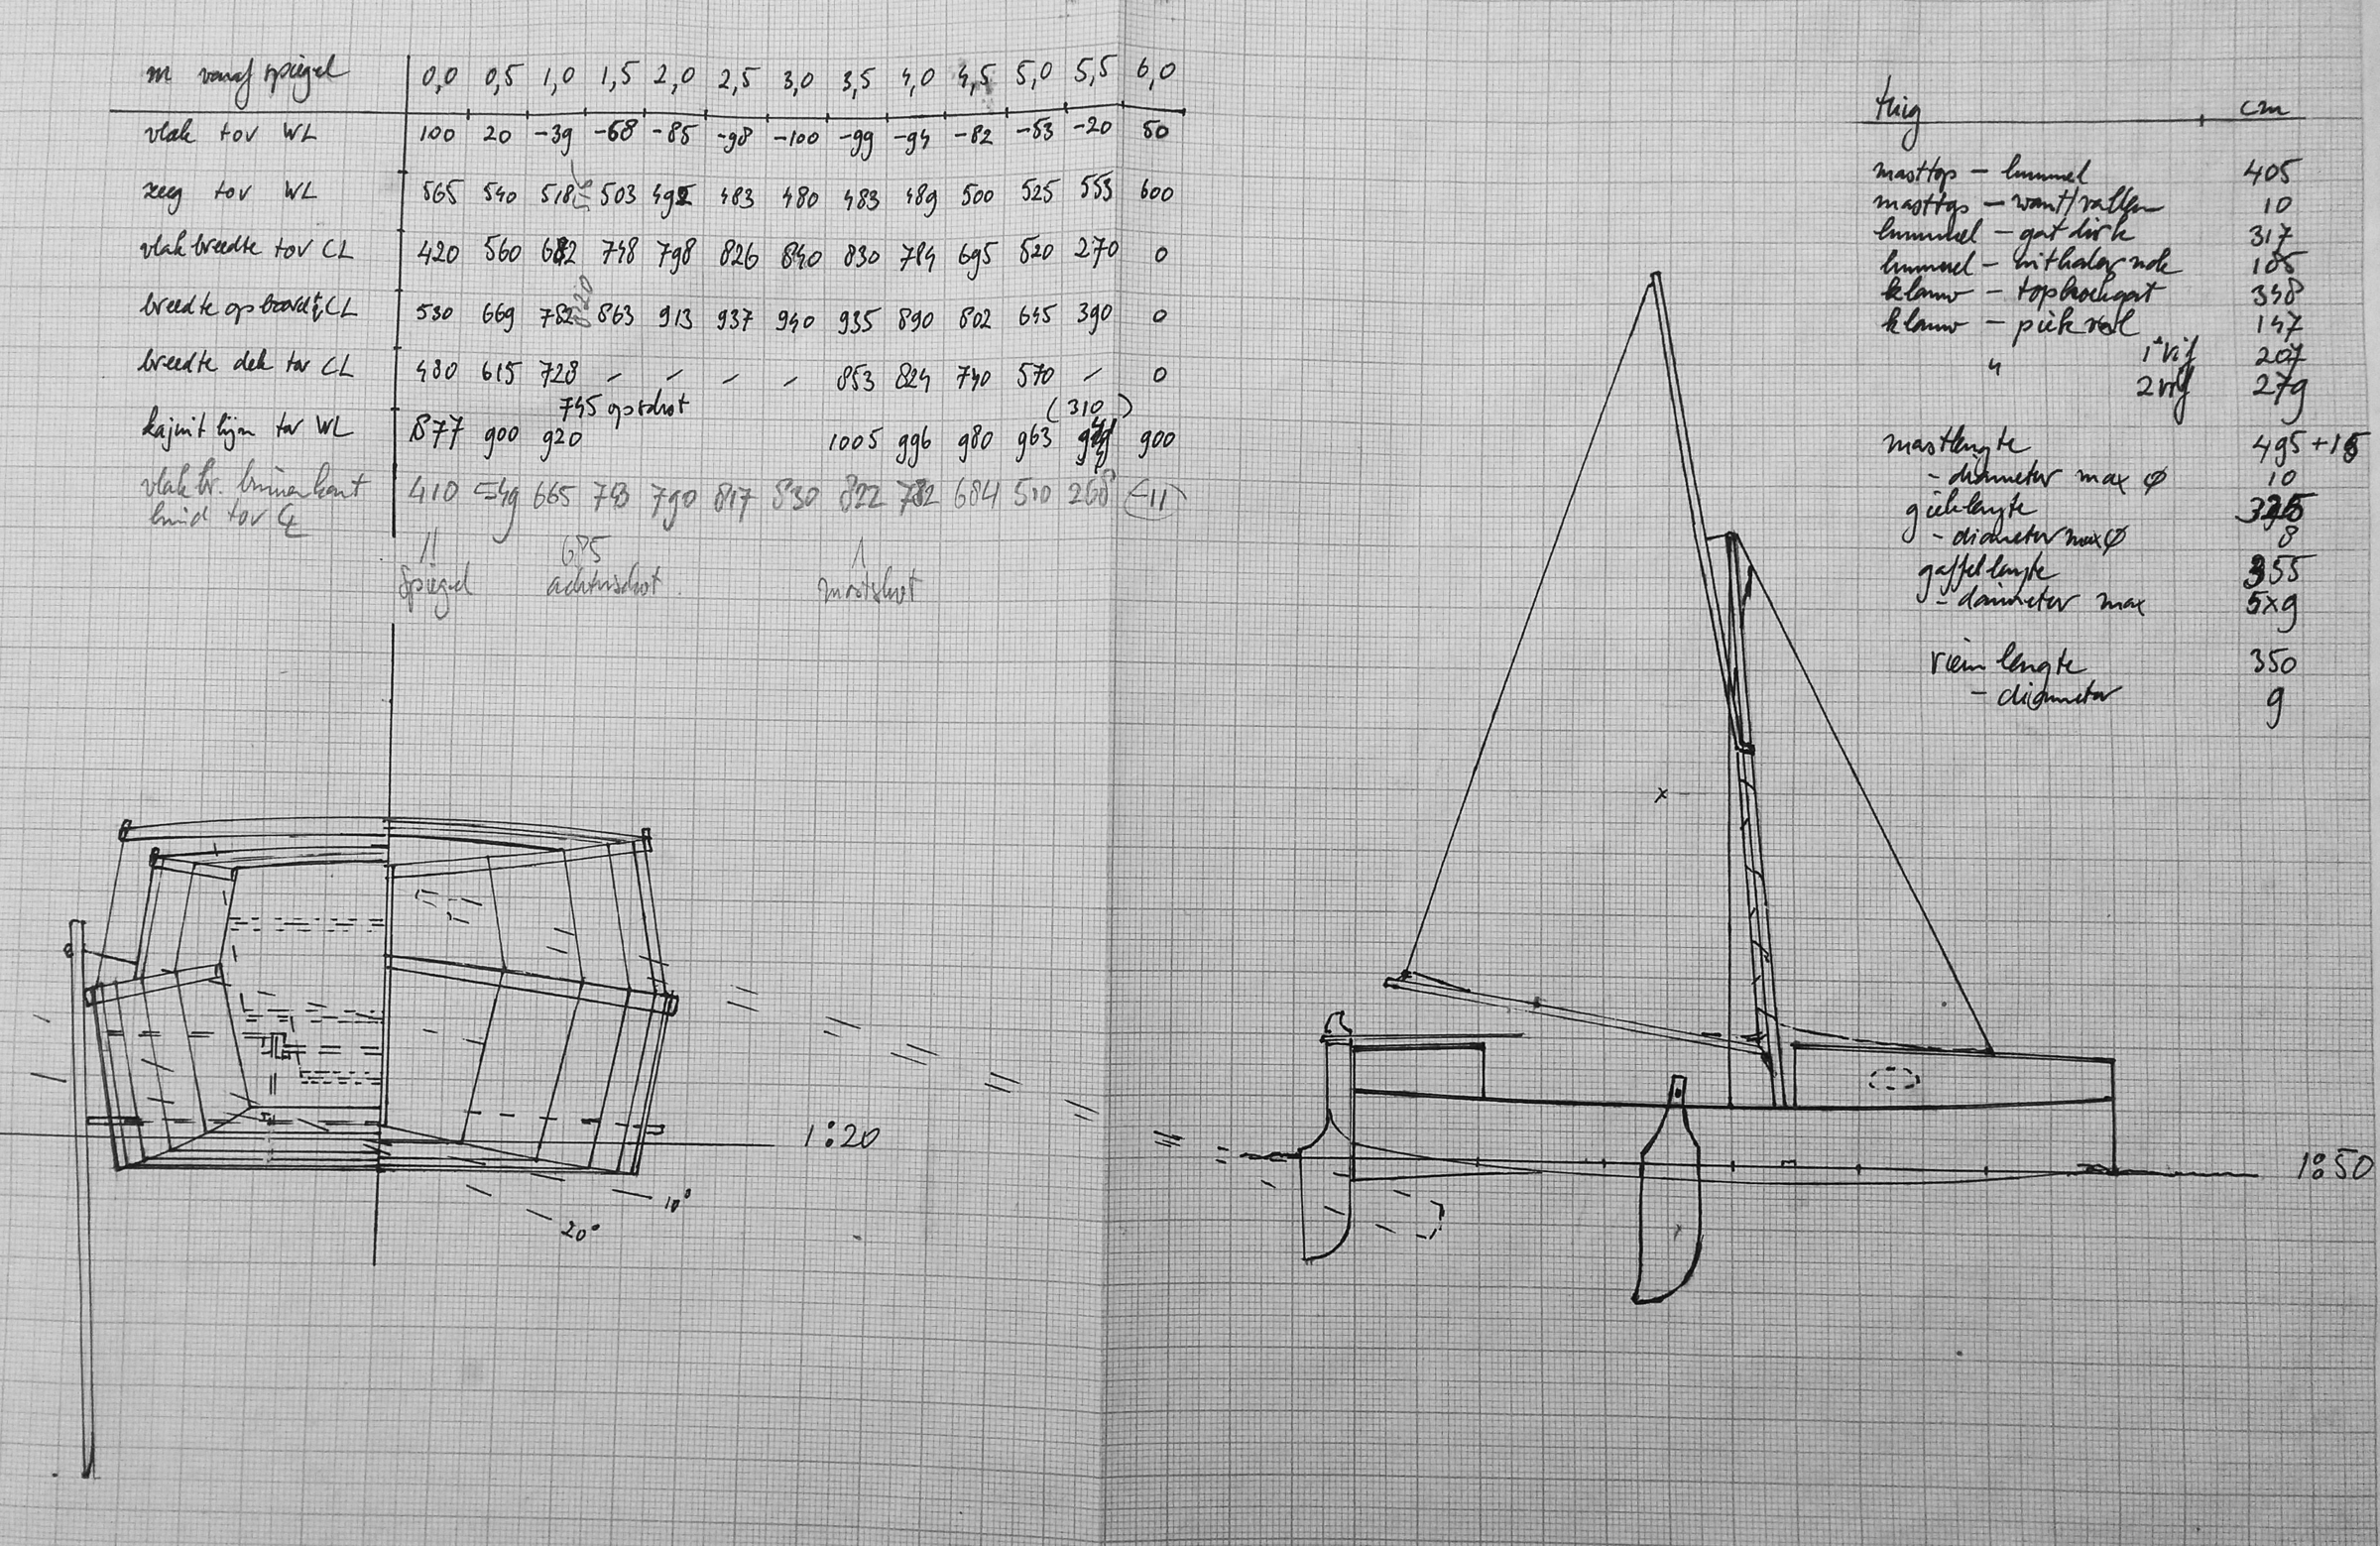
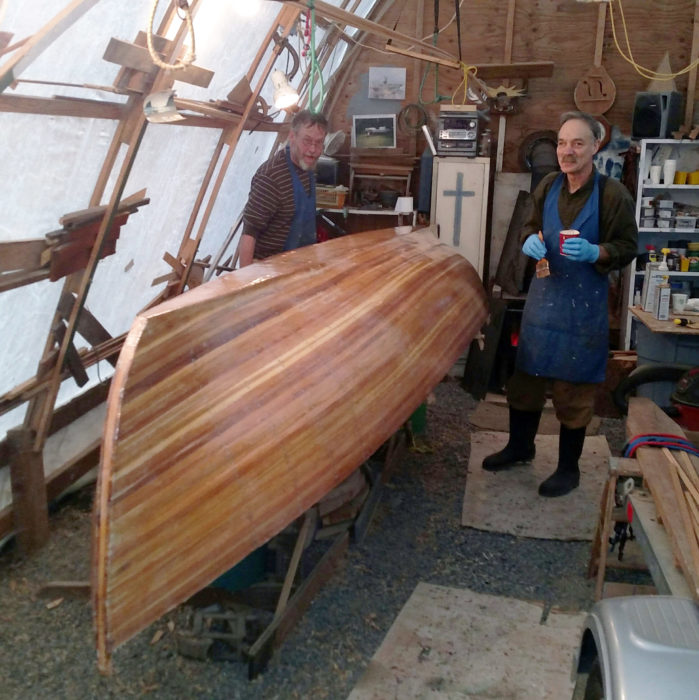
Tom Regan of Grapeview Point Boat Works wanted to build a fast rowing boat and took an interest in WINONA; he decided to make a version of the boat for his home waters on the tidal fringes of Washington’s Puget Sound. He began the process by making a 1:8-scale half model to get the shape of the boat he wanted. He would narrow the beam from 50″ to 45″, diminish the width of the transom, and forgo the tumblehome stem for one with a bit of rake to keep the boat a bit drier in a chop.
Photographs by the author
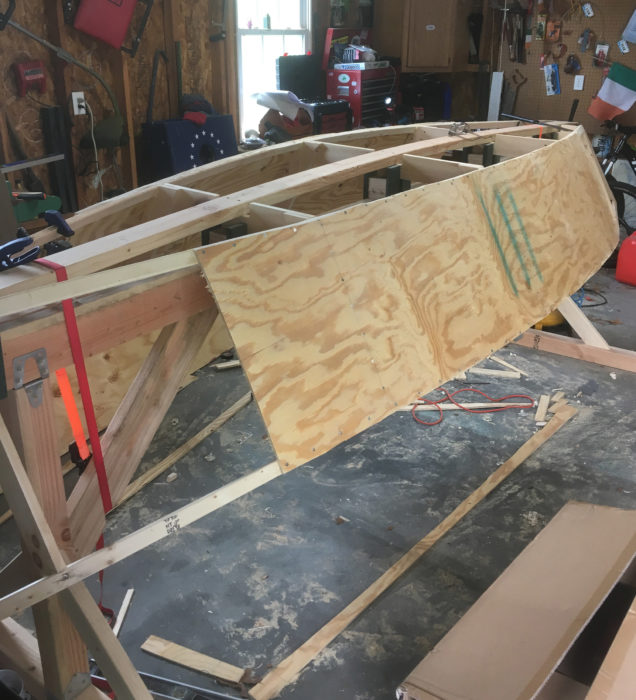
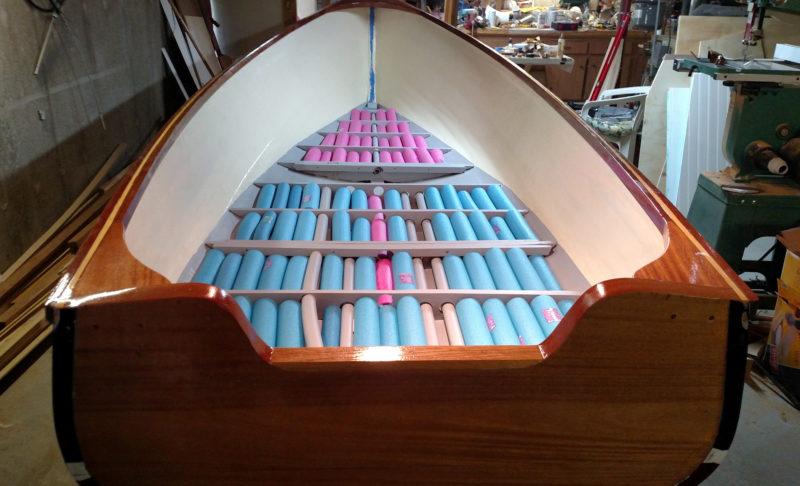
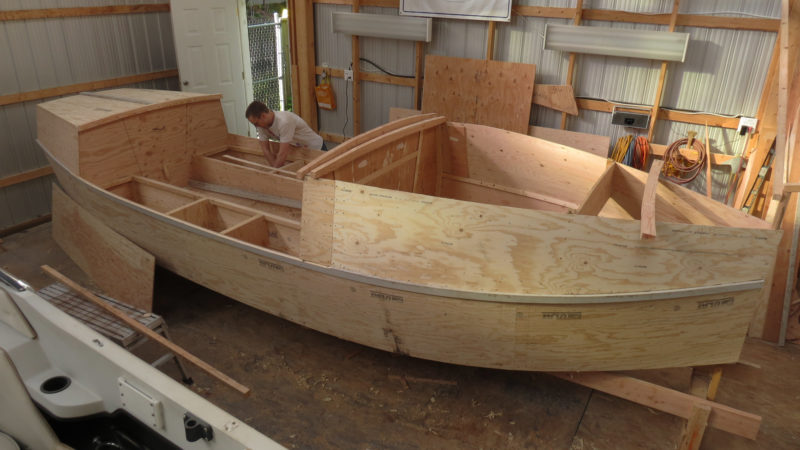
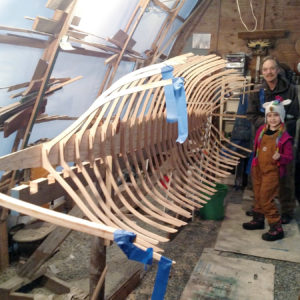
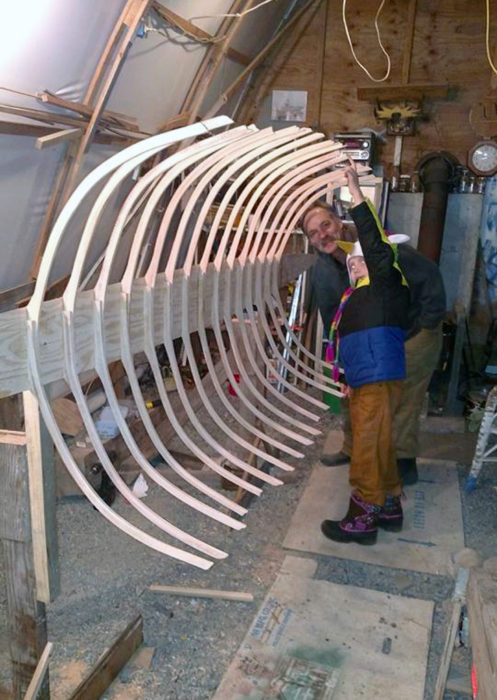
The Ebb first took shape as a half model. Wires were bent around it to transfer the sections to drawings for further development.
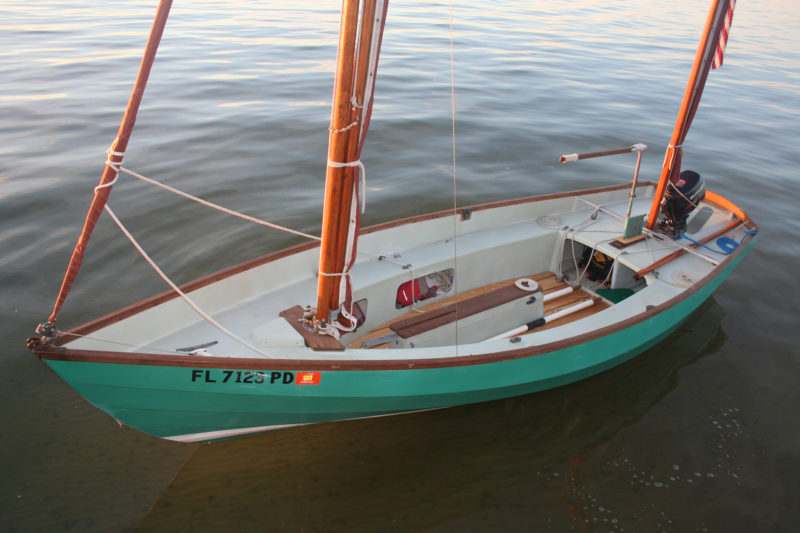
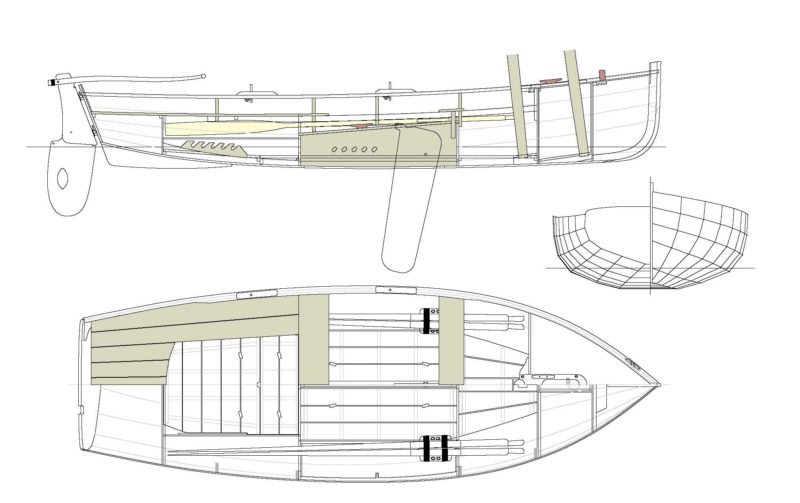
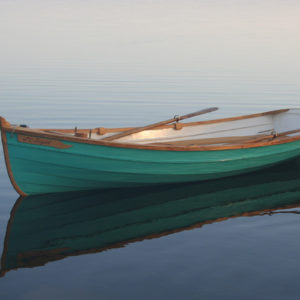
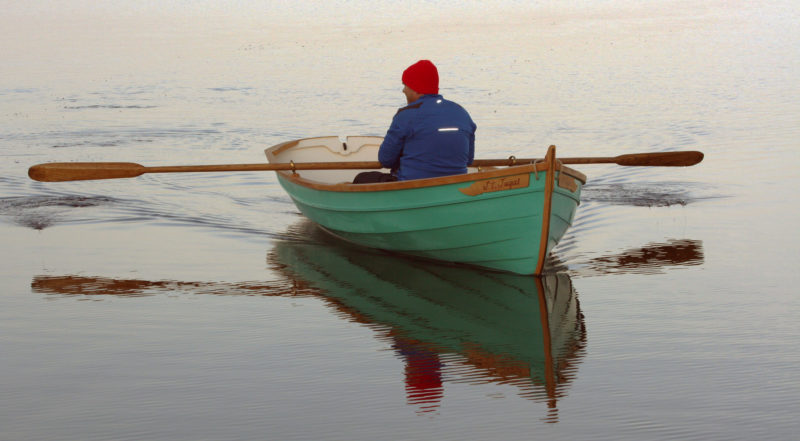
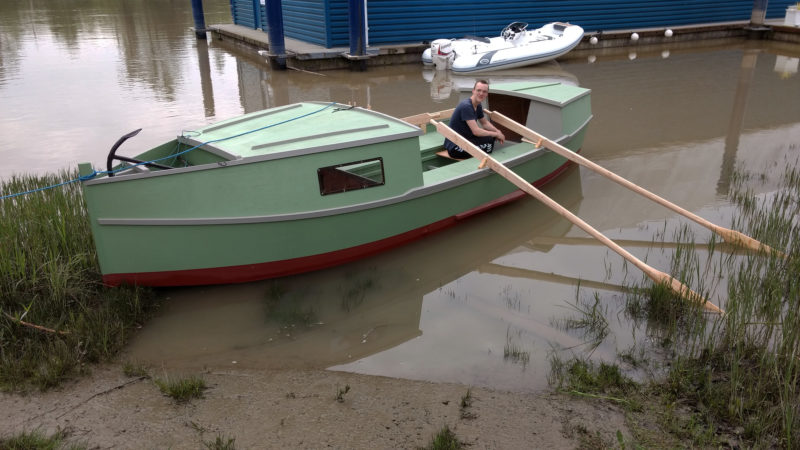
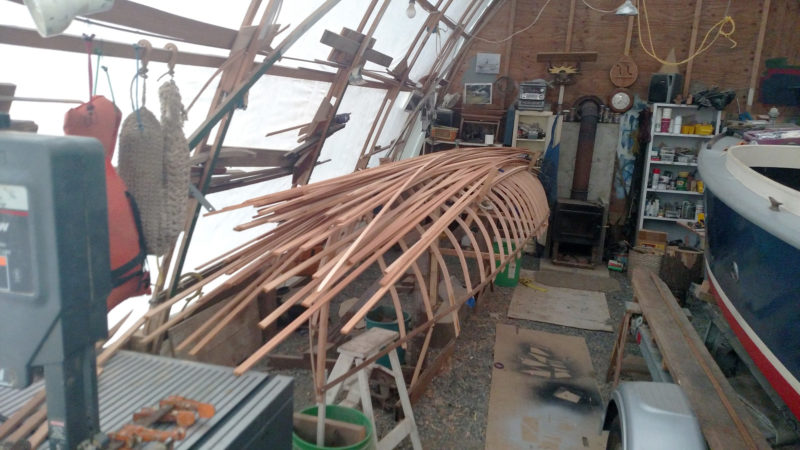
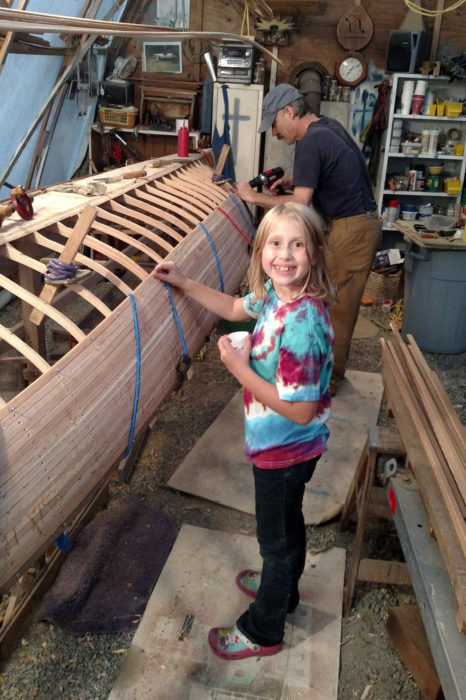
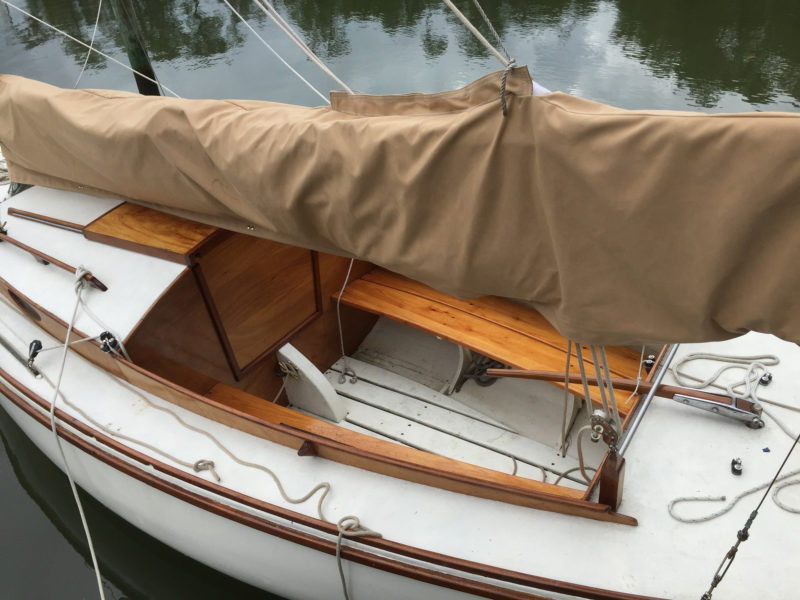
In 2015, Tom built the first, and as yet only, Ebb for his own use. Like WINONA, it is lightly built and weighed just 85 lbs before the paint went on. The paints and hardware contribute about 15 lbs to the finished boat. WINONA was planked with 1/4″ white cedar and framed with 3/8″ x 5/8″ oak on 5″ centers. The Ebb’s planks are 4mm okoume marine plywood from Joubert, and the steam-bent frames are 5/16″ x 5/8″ Alaska yellow cedar on 6″ centers.
No hardwoods were used in the Ebb: Alaska yellow cedar served for everything but the thwarts and floorboards, which are of Western red cedar. The departures from WINONA’s composition helped Tom meet his target for the Ebb’s weight—light enough to load singlehanded on his truck’s rack. A replica of WINONA built under Regan’s guidance at the Gig Harbor BoatShop, a nonprofit dedicated to preserving working-waterfront traditions, incorporated hardwoods that WINONA had, and finished up at 165 lbs.
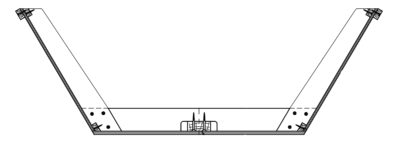
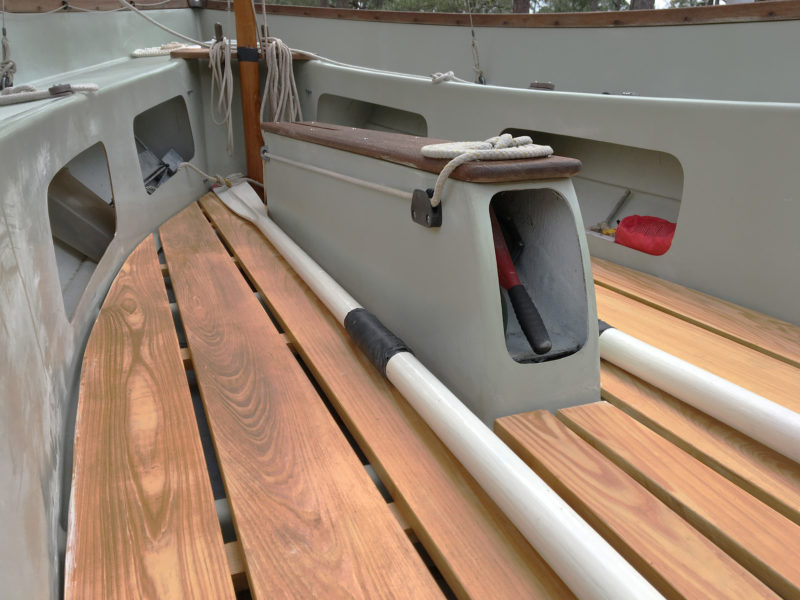
The steam-bent knees are light in weight and adequate for a boat that is meant for rowing and not subject to the racking forces of sailing.
I’m used to seeing a lot of fastenings punctuating the frames and laps—which tears up both sandpaper and knuckles during finishing and refinishing—but there are just a few rows of roves visible on the frames at the sheerstrake and just above the floorboards. Ebb’s construction is glued-lap plywood with steam-bent frames, and rivets were used only where required to hold the hull’s shape. The smooth surfaces will make refinishing a much more pleasant task.
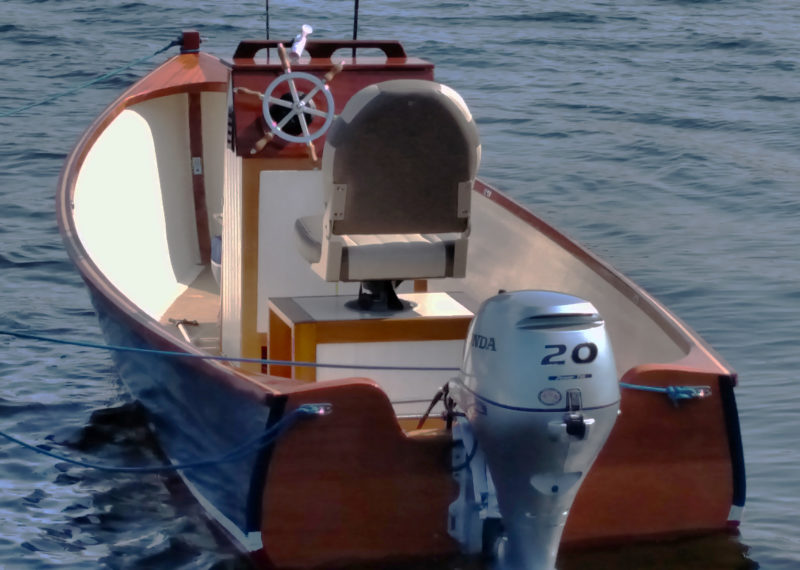
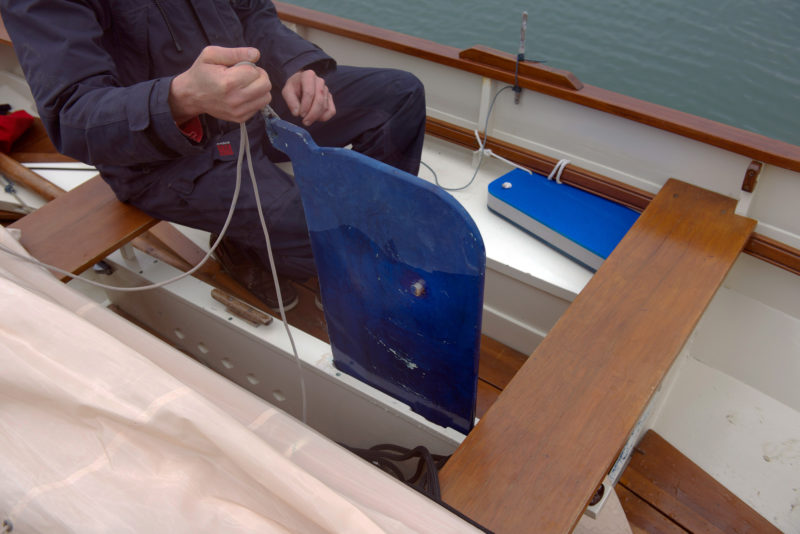
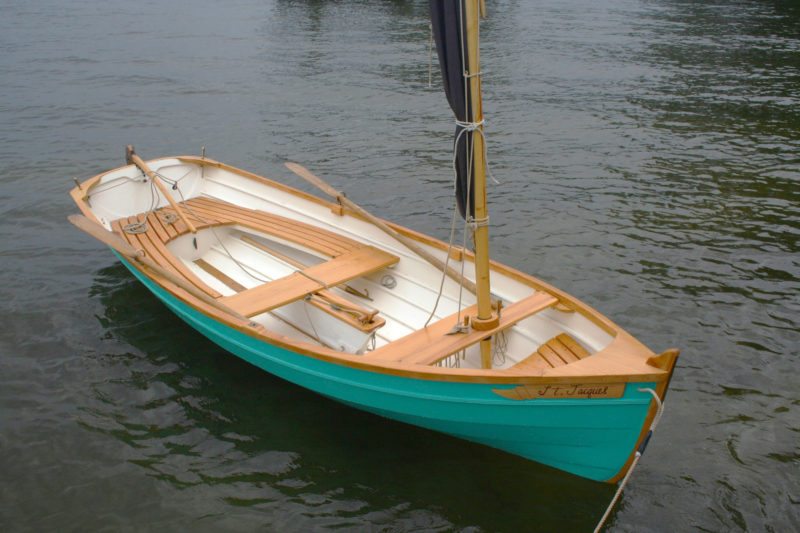
The tall back rest slips in place and has a cleat that bears on the inner face of the transom.
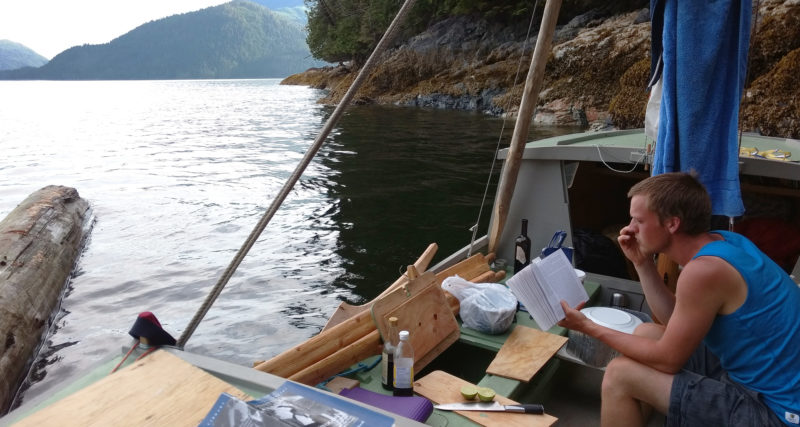
I rowed the Ebb on two separate occasions. The first was at Port Townsend and required carrying the boat across a rough shore with large rocks to avoid and orange-sized rocks that made for unsteady footing. Tom and I were able to carry the Ebb to the water to launch it but we had a third person help carry the boat back ashore when I returned and it was much easier. The second outing was on the little inlet by Tom’s boatshop. The two of us could easily lift the boat onto a dolly; it’s wheelable solo, so one could do a dolly launch singlehanded.
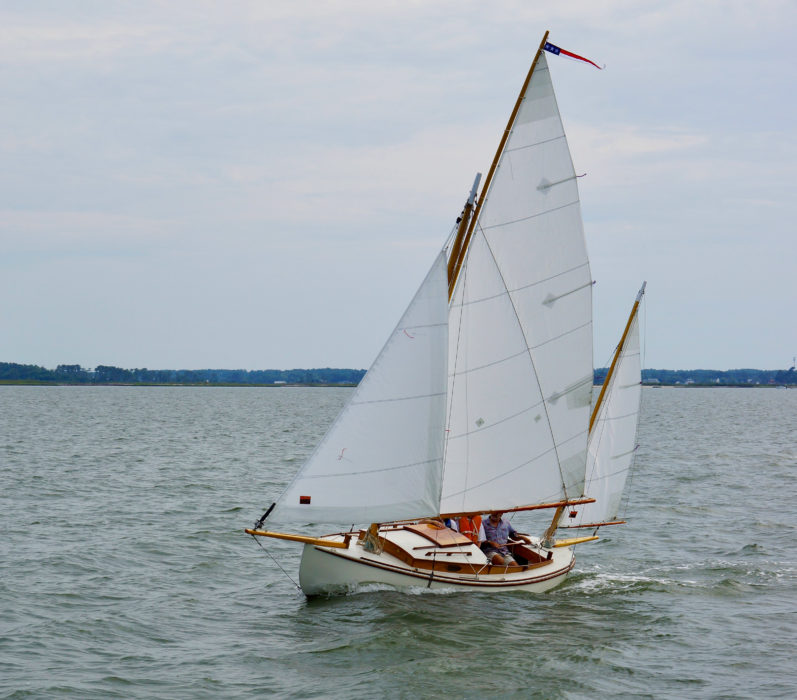
While WINONA had a touch of tumblehome in its stem, a common feature of Adirondack guideboats, Ebb’s stem is angled forward.
The soft bilges made the Ebb feel just a little bit wobbly when I stepped aboard, but the boat steadied itself when I got myself seated. I could lean over the gunwale and look straight down past it to the water without any fretting that the boat was going to roll out from under me. With a passenger in the stern setting the hull deeper in the water, the Ebb was quite steady.
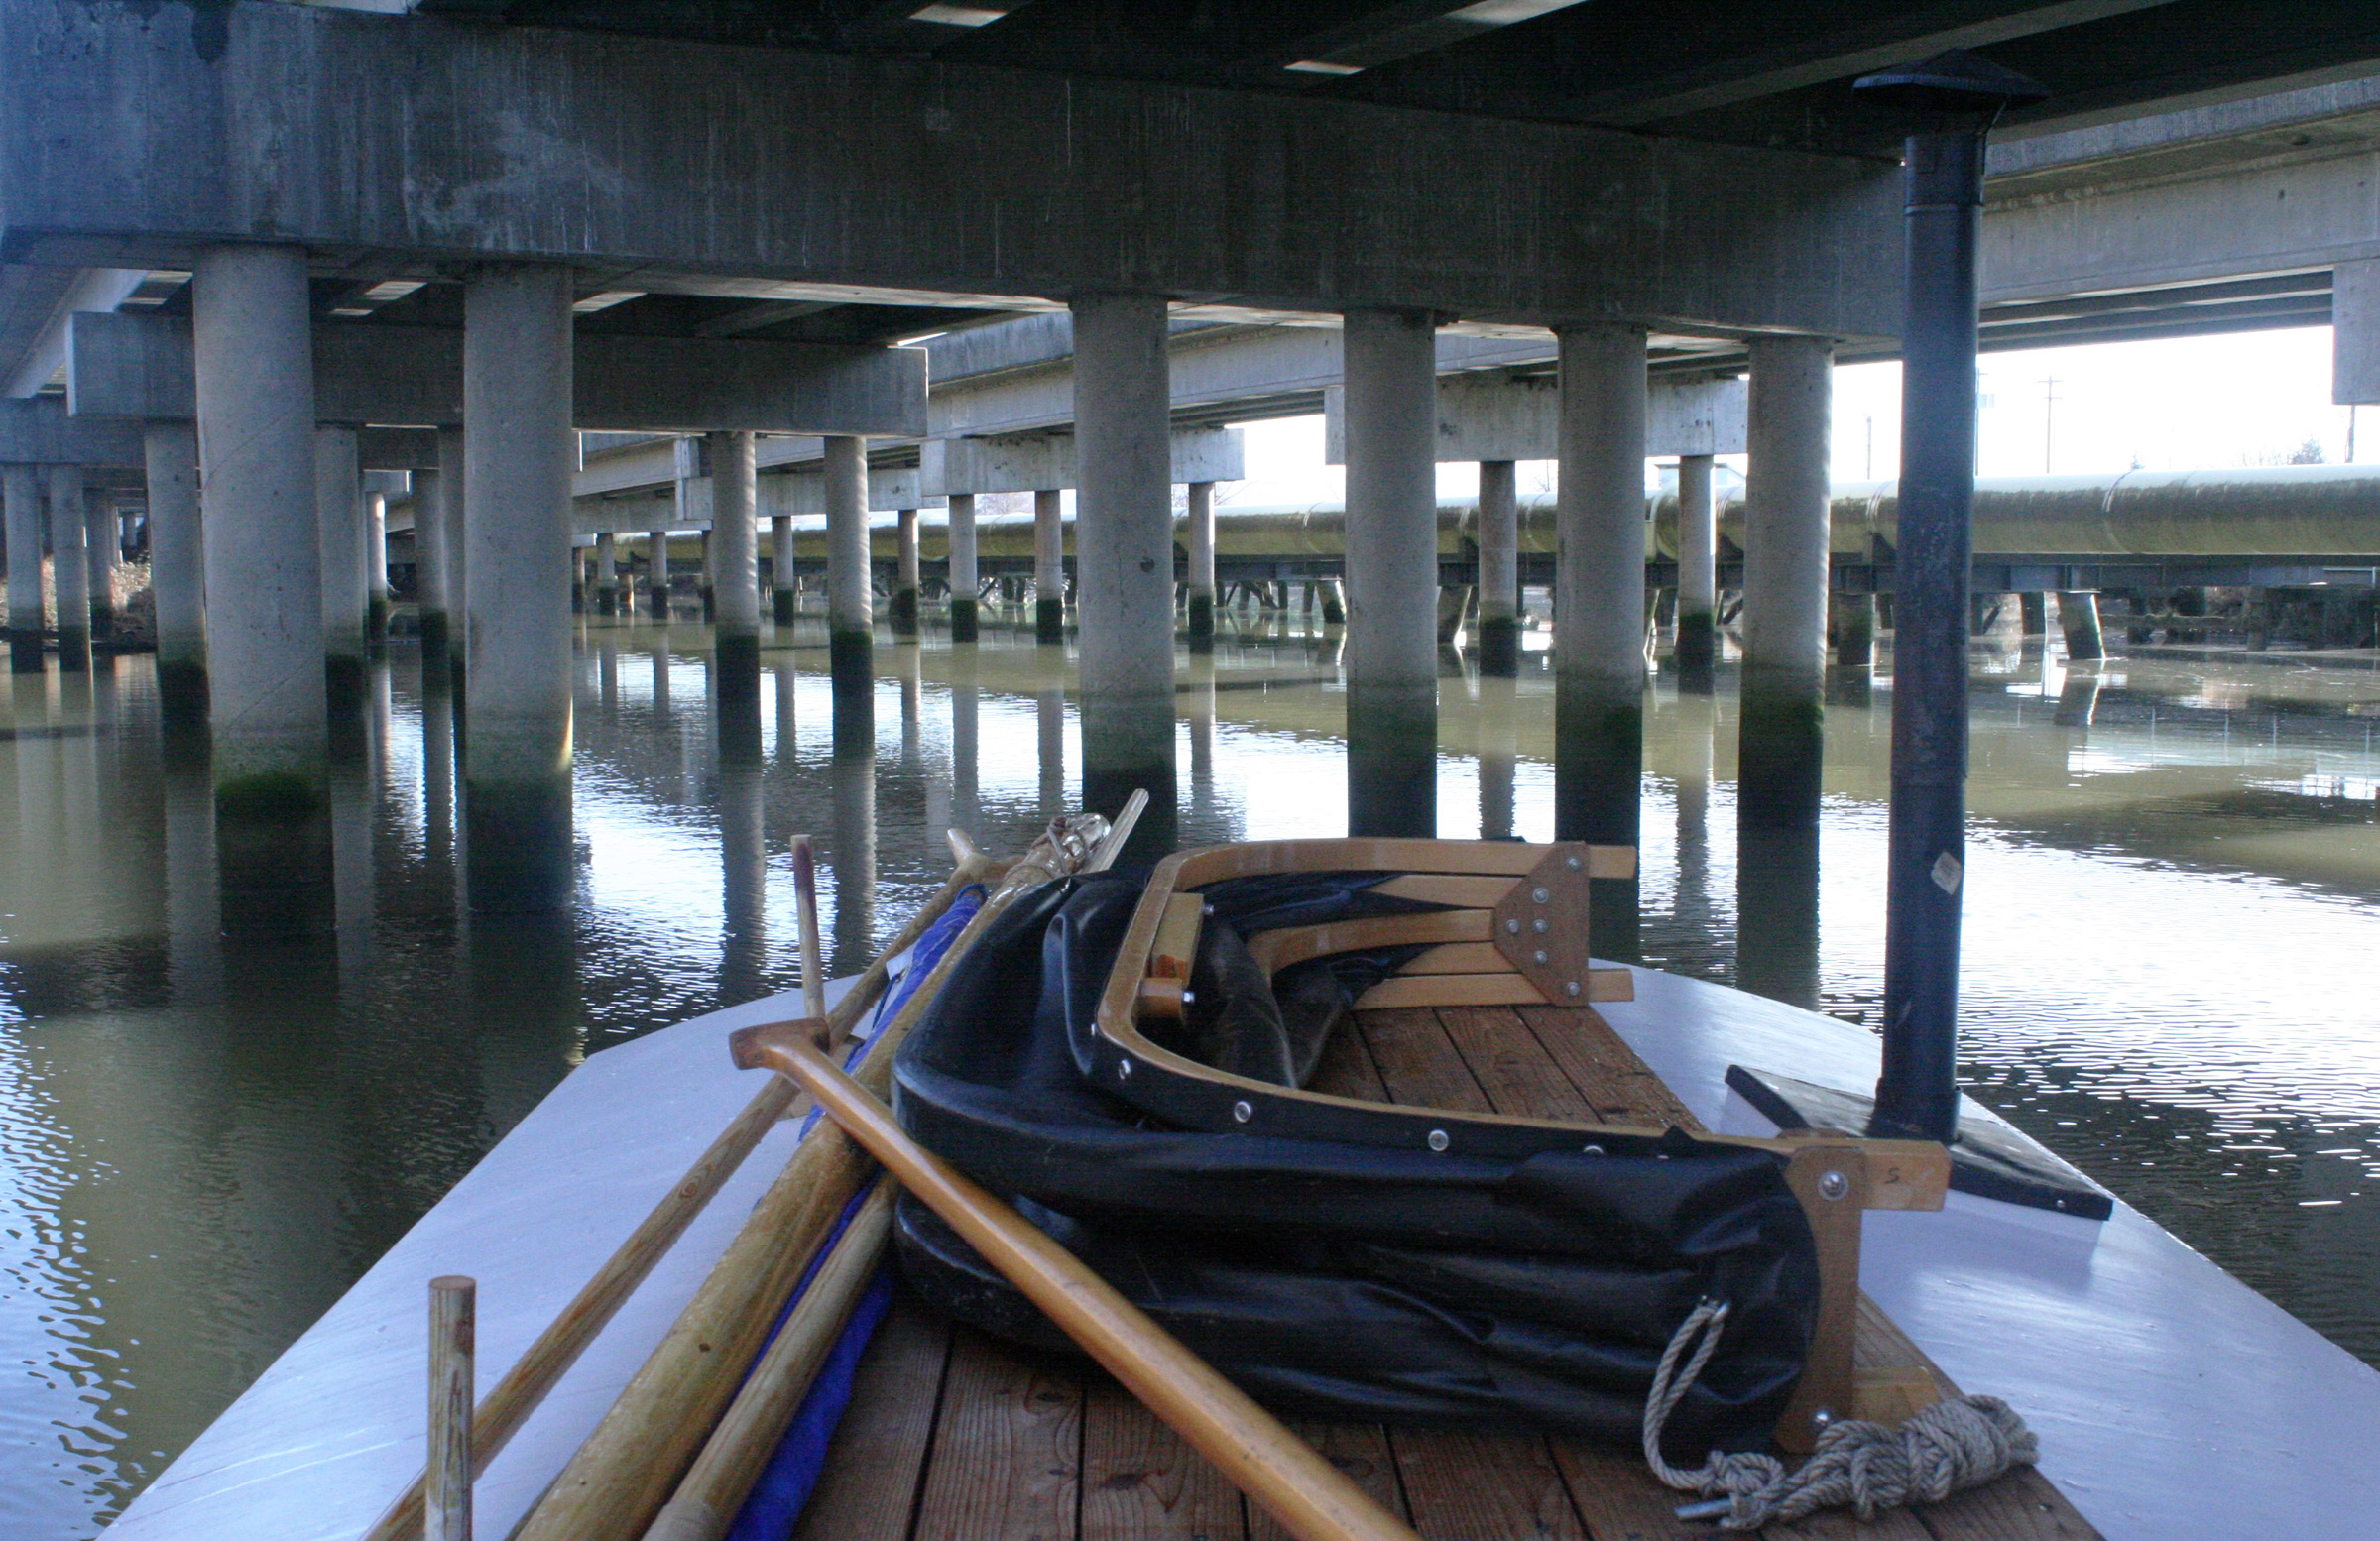
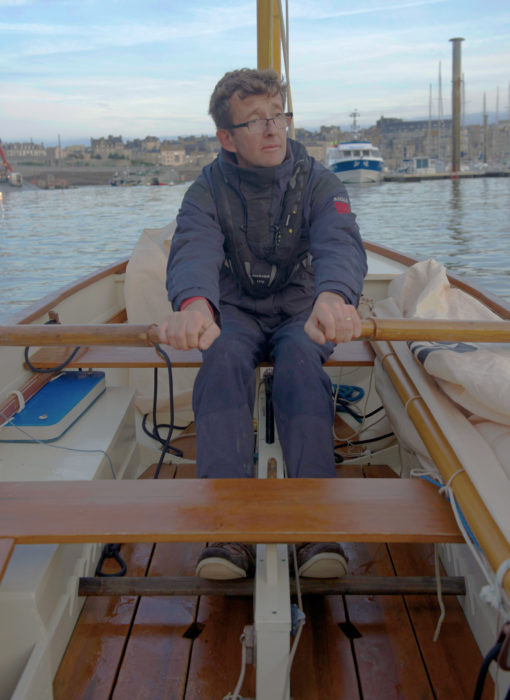
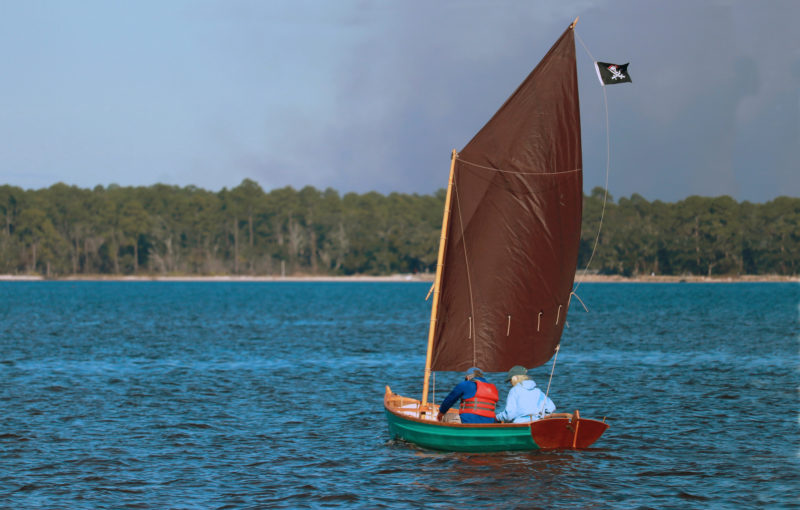
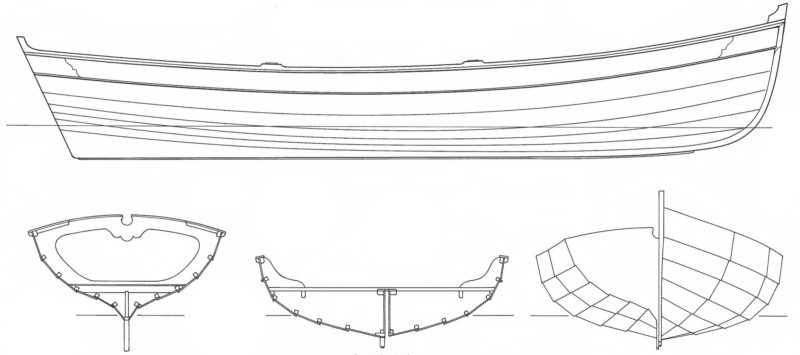
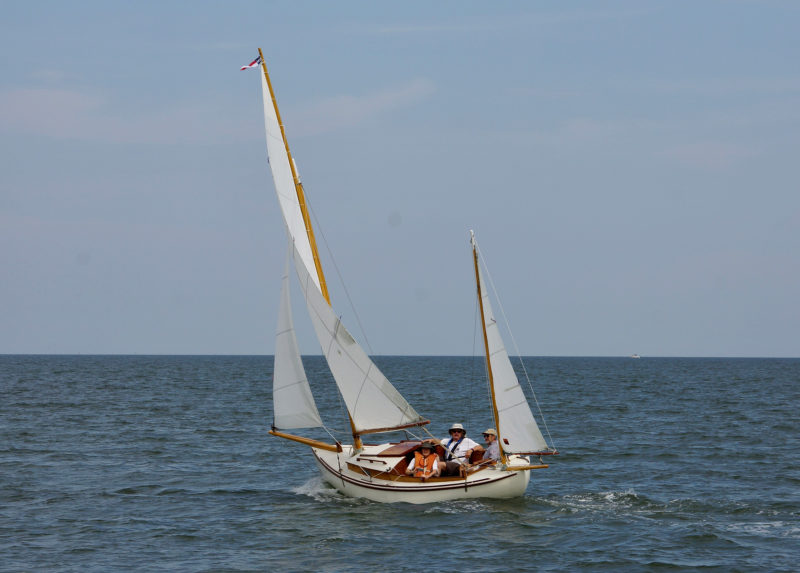
The Ebb has three rowing stations. The placement of the forward and aft stations favors generous spacing between rowers rather than keeping the ends light.
WINONA had two thwarts and seating in the bow and stern. With two rowing stations, she could be rowed solo from the amidships thwart, or rowed from the forward thwart with a passenger in the stern. Tom added a third thwart; the Ebb can be rowed solo from the middle thwart and tandem from the other two thwarts. The thwarts are 32″ apart, plenty of room to allow a pair of rowers, one on the aft thwart and the other on the forward thwart, to get out of synch without clashing oar blades. Tom suggests three kids might enjoy rowing the Ebb as a triple without overburdening it. The spacing of the thwarts also provided excellent foot bracing (at least for me, at 6′ tall, with size-13 feet) at the middle and forward stations.
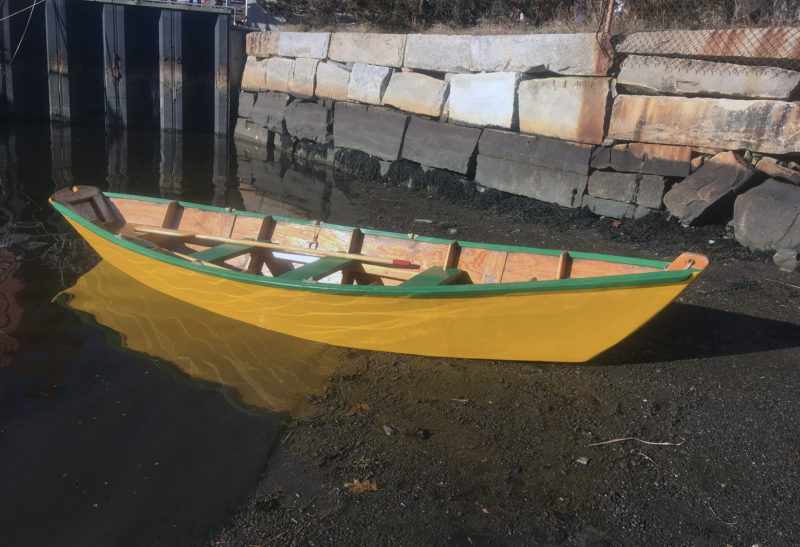
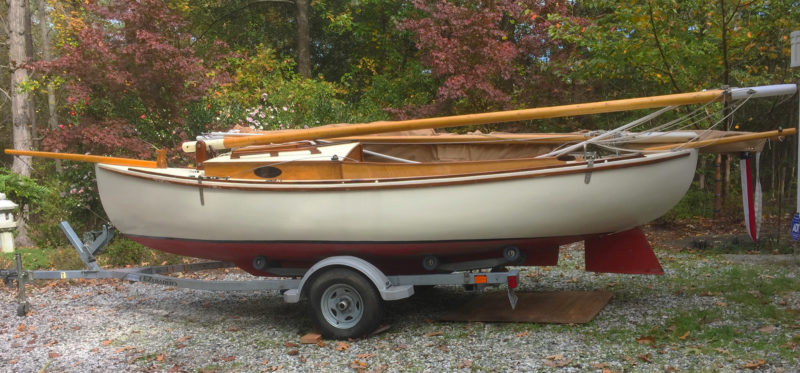
The Ebb’s planks are evenly and beautifully lined off. The sheer strake caries its guards and the outwales without looking pinched at the stem.
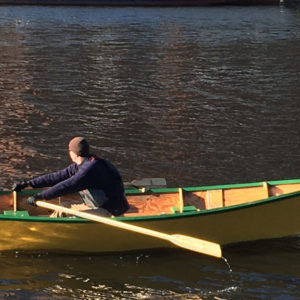
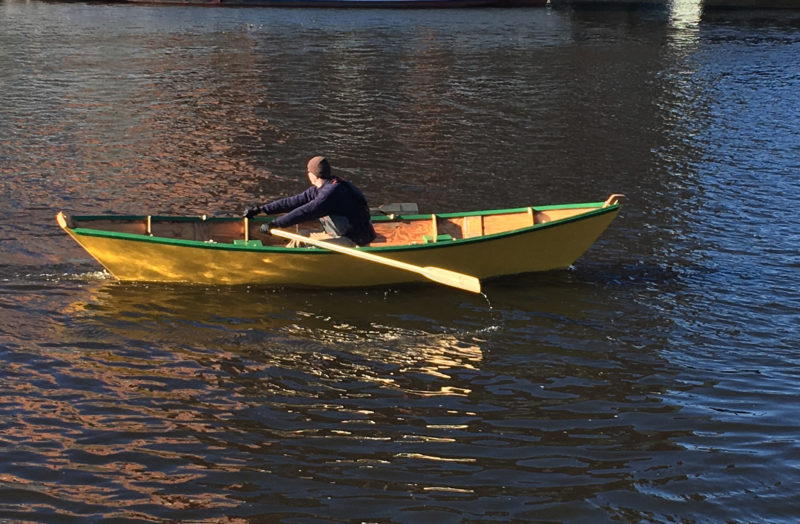
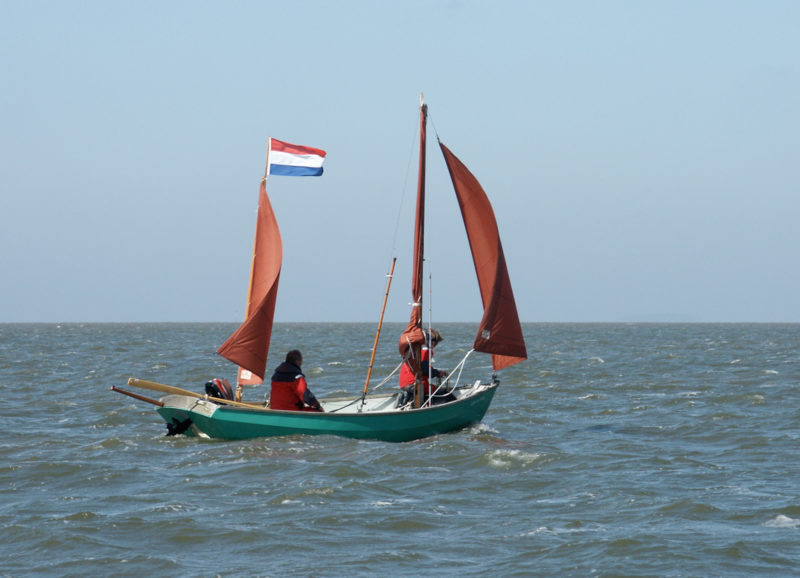
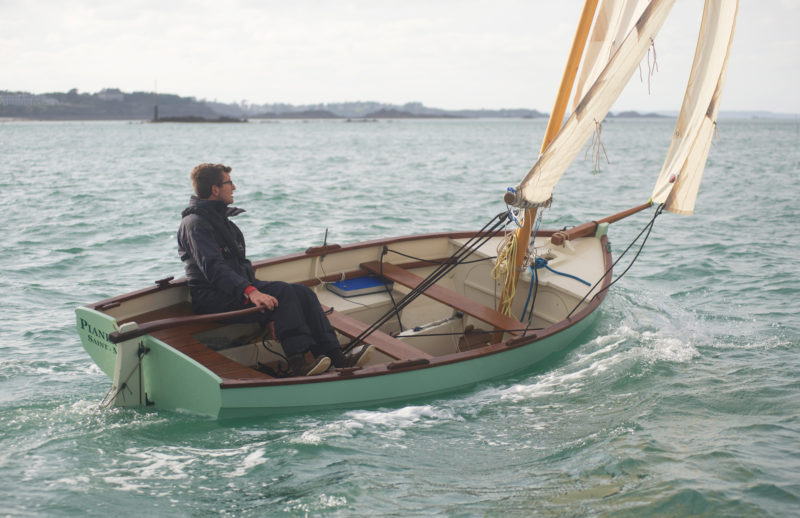
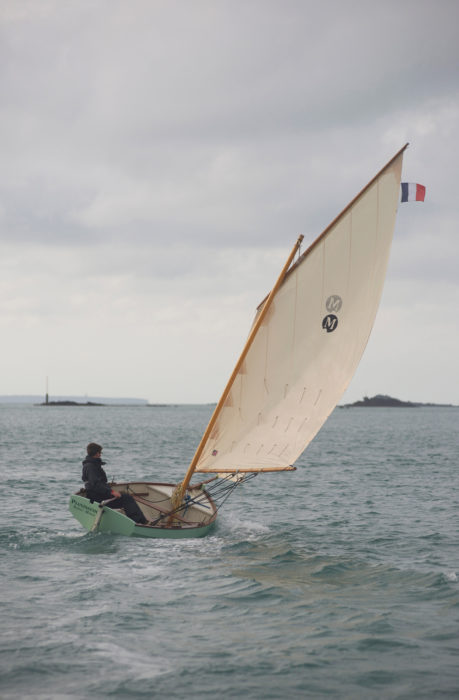
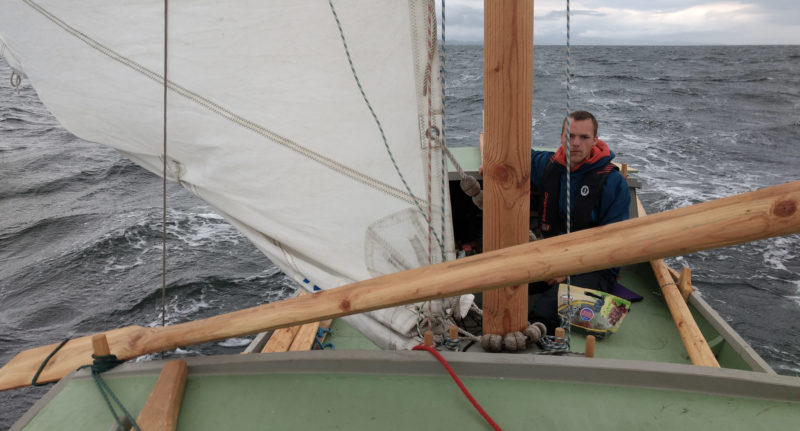
A pull or two on the oars, and the Ebb was quickly moving at a good clip. The long, ample skeg kept the boat from wandering so I didn’t have to keep watch over the stern to keep my course. There was a light breeze, about 8 knots, and it had no detectable effect on the Ebb’s ability to stay on track across the wind, even when I let the boat coast. The Ebb, consequently, isn’t a quick turner. It took 14 strokes, pulling one oar, backing the other, to do a 360, a few more than other pulling boats.
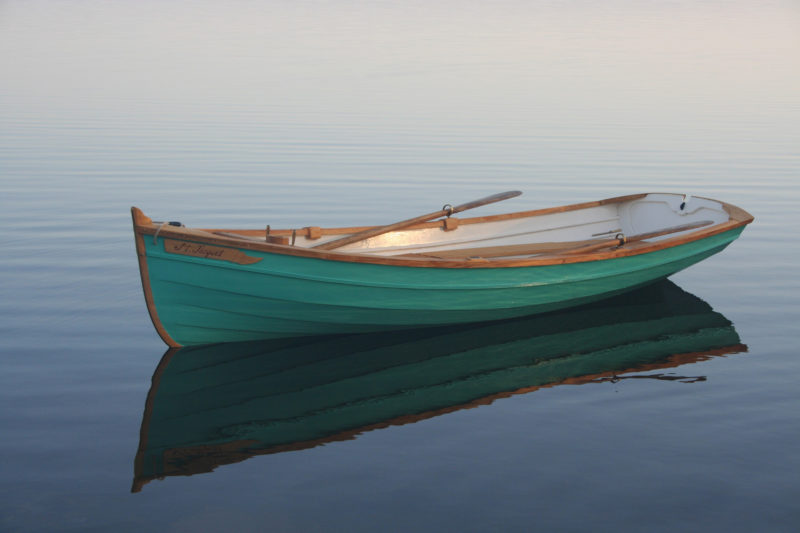
An ample skeg keeps the Ebb in line.
While the Ebb is easily moved under oars, its light weight made measuring its speed difficult. Weighing well under half my weight, the Ebb followed Newton’s Third Law of Motion with élan. It had an equal and opposite reaction to the swing of my torso back and forth, speeding up as I swung aft during the recovery and slowing down as I heaved toward the bow during the drive. You might not feel the effect while rowing unless you paid close attention to the water curdling astern, but a GPS certainly notices it. The numbers to the right of the decimal point never settled down.
It takes very little effort to get keep Ebb moving in excess of 4 knots.
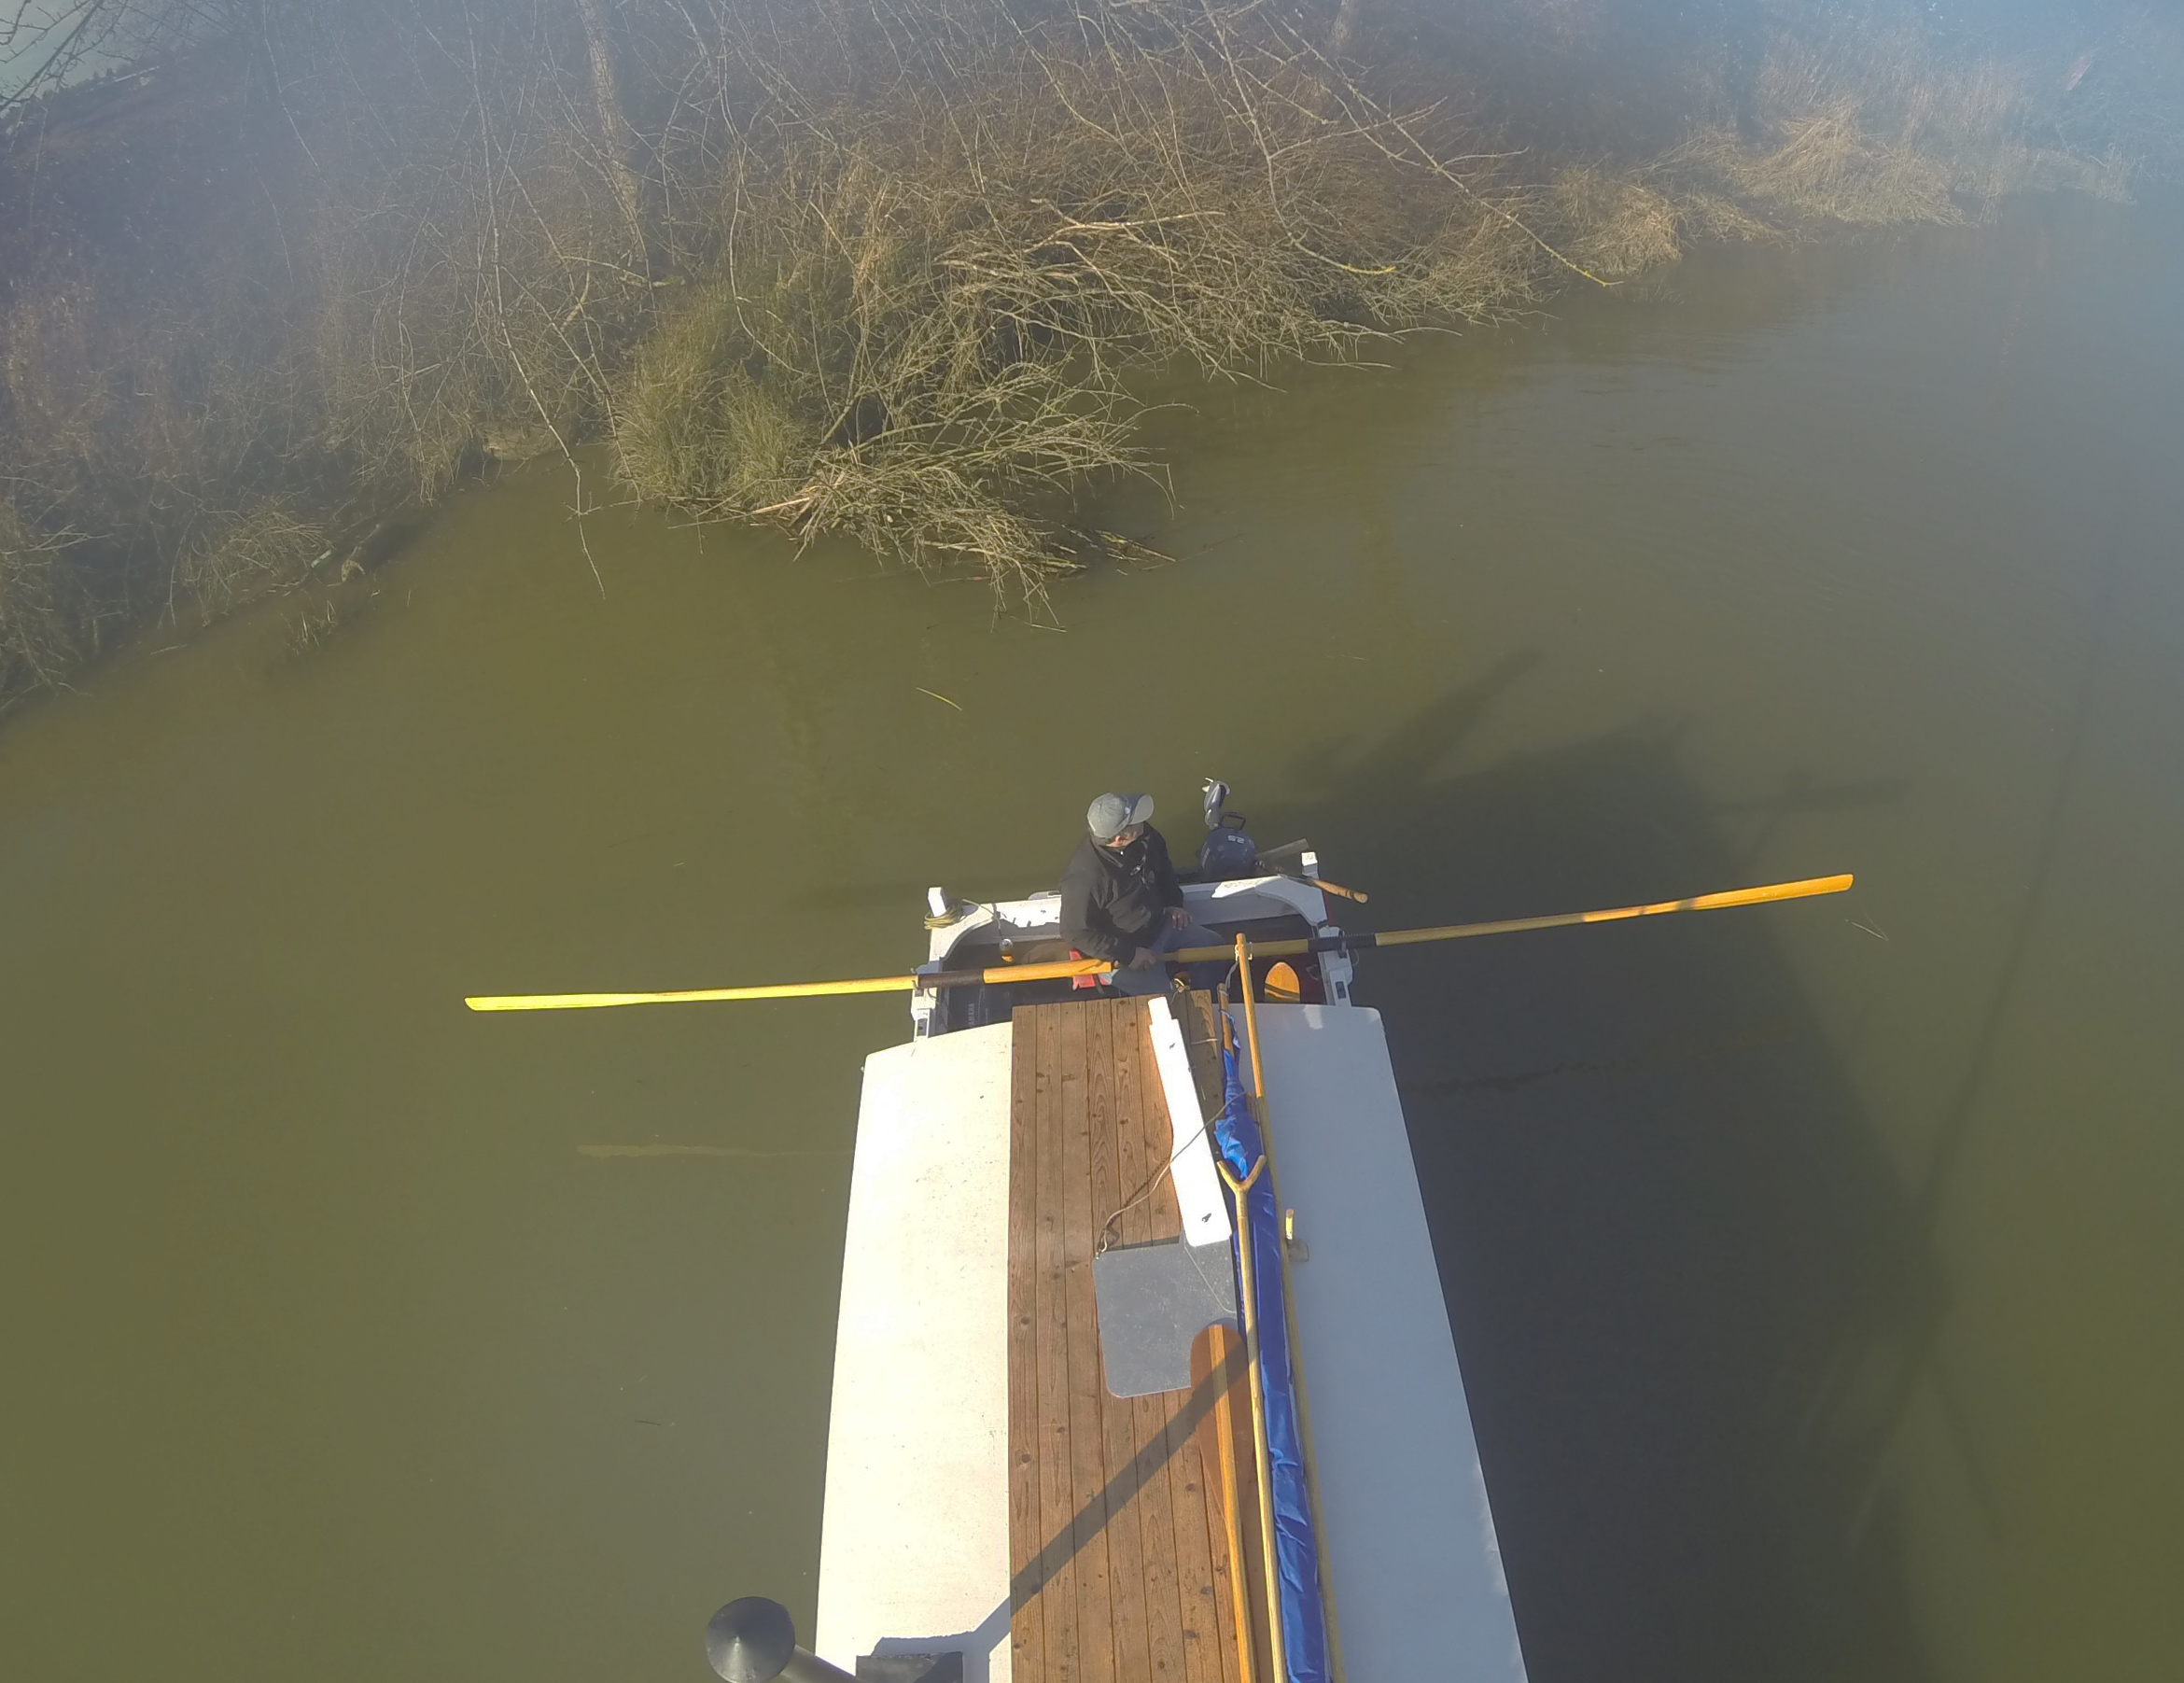
Rowing solo and averaging the speeds of several runs in opposite directions in a current-free cove, I easily made 4-1/2 knots with lazy pace. I could back the Ebb at 3-1/2 knots, not bad considering I didn’t have my feet locked down. Ramping up to a sustainable aerobic effort rowing forward, I held 4-3/4 knots; in short sprints I made an average top speed of 5 knots. Tom hopped aboard and sat in the stern; I shifted to the forward rowing station. He could make a better reading of the GPS than I could rowing solo, and surprisingly he came up with an averaged top speed of 5 knots.
Susanne Regan
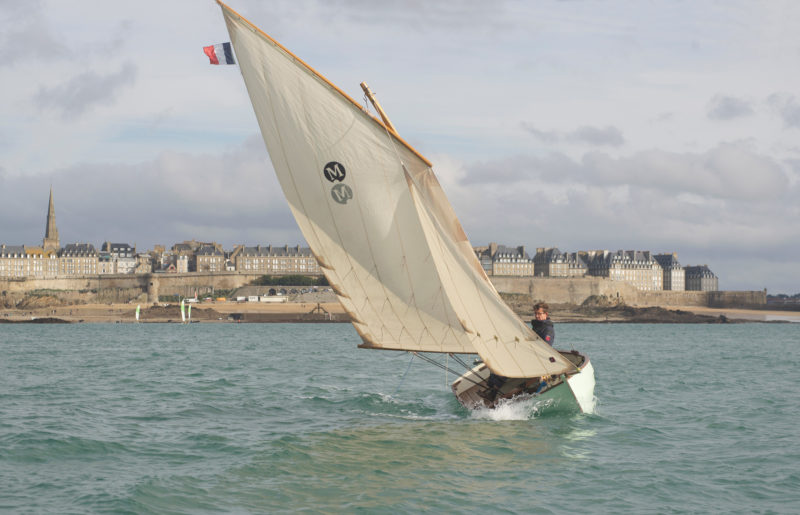
With two aboard, the Ebb maintains its proper trim and keeps its transom above the waterline.
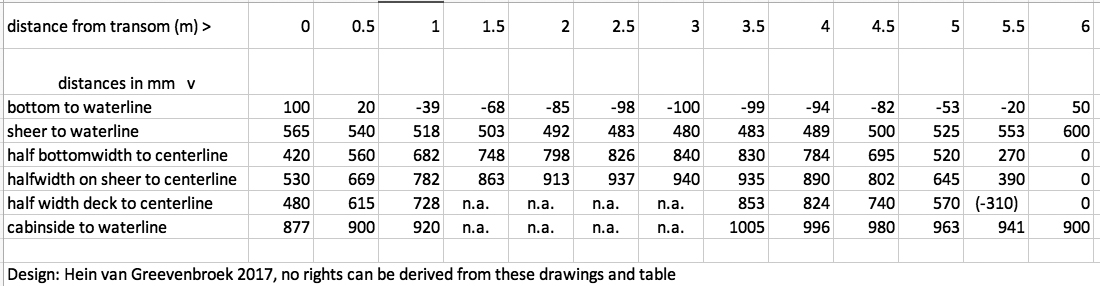
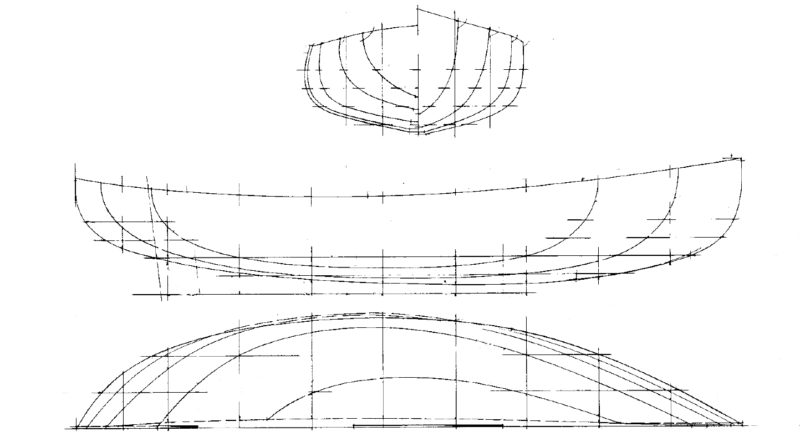
To see how fast the Ebb should be by the numbers, I started by taking measurements on Tom’s drawing. The waterline length from cutwater to the trailing edge of the skeg was 15′ at a 7″ draft. The theoretical hull speed (√WL x 1.34) based on that length is just under 5.2 knots, a bit more than my sea trials demonstrated. But that waterline length includes 11″ of skeg, which is just an appendage and doesn’t contribute to the length of the hull form. Taking the measurement to the rabbet gave a waterline length of 14′1″ and a theoretical hull speed just a tick over 5 knots. That was a good match for my speed trials.
There wasn’t anything unusual about pushing the Ebb up to its top speed; what I found interesting was the 1/2-knot difference between speed at a relaxed pace and the speed at full effort. I’m used to seeing a span about three times that. In another lightweight pulling boat I rowed recently, the Drake Race Boat, the speeds I recorded were, respectively, 3-3/4, 5, and 6 knots. As the name of that boat suggests, the top speeds were the ones that mattered to the designer. The bottom number is more pertinent to a wider range of rowers. I suspect Tom minimized the surface area of the hull to give it better speed at the low end. If you’re out for a relaxing day’s row, wouldn’t it be appropriate to have a hull that is efficient at slow speeds and gives you the best return on your investment of effort?
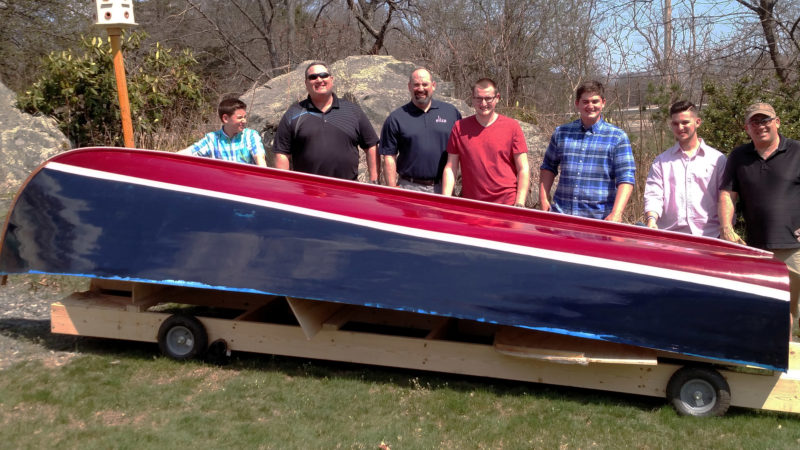
Tom would make a few tweaks to the Ebb for any subsequent builds. A smaller skeg, for instance, would improve maneuverability without giving up much tracking ability. The only change I’d request would be to make the floorboards a bit sturdier—I weigh enough more than Tom to put him on the high side of a playground teeter-totter, so I’d hate to come down hard with a heel on a floorboard between frames and spoil a day’s outing. Everything else suited me just fine. The Ebb was a treat for the eyes and a pleasure to row, meeting Tom‘s goal to design “a fast pulling boat with a traditional appearance, but built as lightly as reasonable without sacrificing aesthetics.”
Christopher Cunningham is the editor of Small Boats Monthly.
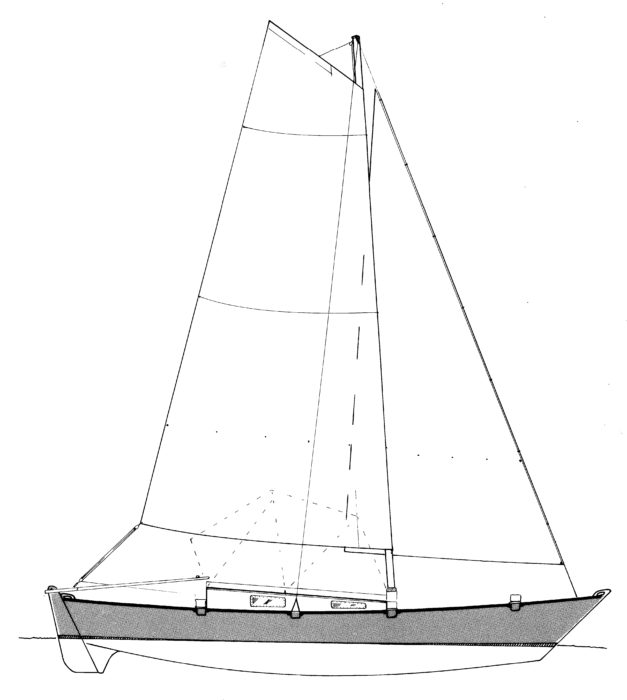
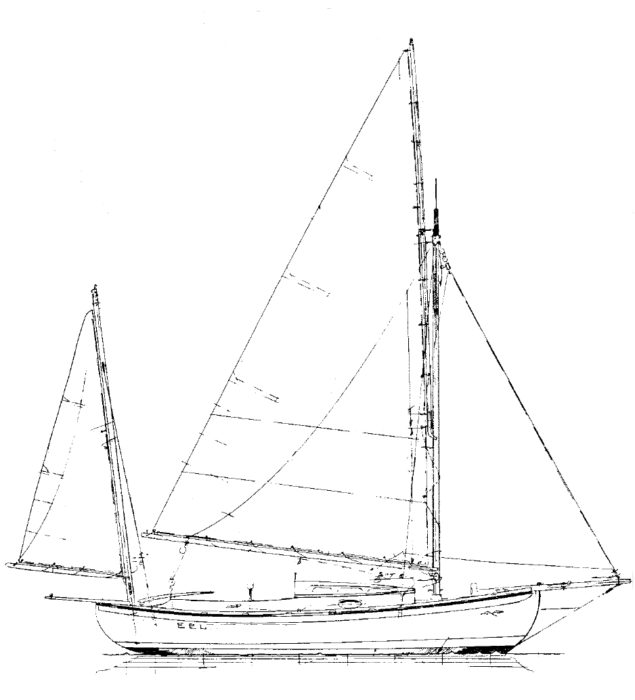
Ebb Particulars
[table]
Length/15′9″
Beam/45″
Draft/7″
Weight/approx.100 lbs
Capacity/3 adults
[/table]
Update, November 2022: The Ebb is no longer available as a finished boat from Grapeview Point Boat Works. No plans are available.
Is there a boat you’d like to know more about? Have you built one that you think other Small Boats Monthly readers would enjoy? Please email us!
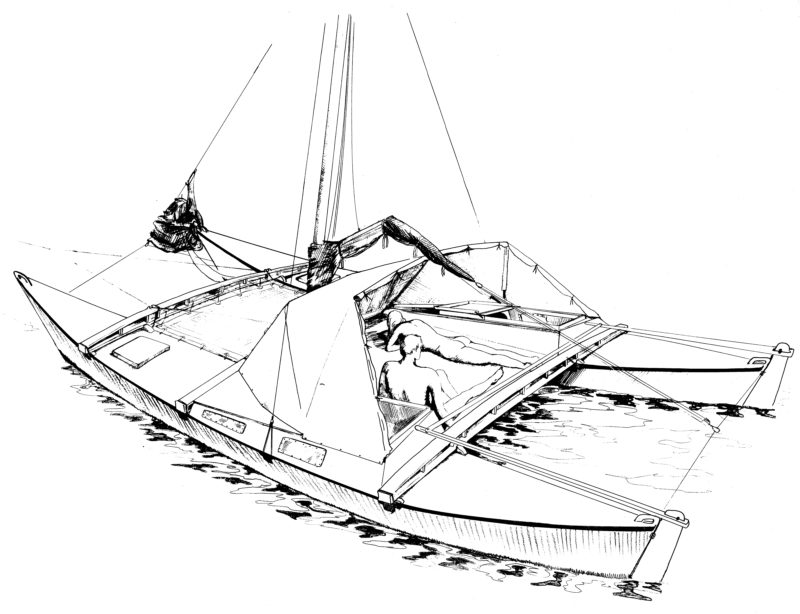
James Wharram is a multihull pioneer who has been sailing and designing exceptionally seaworthy catamarans since the 1950s. For his first voyage, he built, TANGAROA, a 23’ catamaran and sailed her from the U.K. to the Caribbean with Jutta Schulze-Rhonhof and Ruth Merseburger, both from Germany. While in the Caribbean he became a father, and the boat mothered a growing colony of teredo worms. With a strong desire to sail home, Wharram built a 40-footer and did the first North Atlantic crossing by catamaran. His designs are based on firsthand experience, regularly updated and improved, and have a safety record that is hard to beat.
I built his Tiki 21, which is designed as an easily built, trailerable coastal cruiser for adventurous folks who don’t mind bearing a small amount of discomfort to be rewarded with a boat which is in harmony with the sea. The plans are highly detailed and provide illustrations for almost every step of the process. The plans include a materials list, down to the last fitting, and an epoxy technique manual depicting everything from laminating to fairing. The plans call for 18 sheets of 1/4″ marine plywood and one sheet of 3/4″. My Tiki 21, BETO, took around 10 or 12 gallons of epoxy and a good helping of mahogany and Douglas-fir.
Dale Duke
While the Tiki’s main is designed to be sailed with a loose foot, the author finds an easily mounted, aluminum sprit boom provides improved performance in light air.
The hulls are built using the stitch-and-glue method, making it a fairly quick build, even for the first-time builder, though practicing with some scraps of plywood and epoxy is recommended for beginners.
Construction starts with forming the hull panels and stitching them together, then moves on to installing bulkheads and bunks and fitting the decks and cabintops. After the hulls are complete, just three beams, two tillers and rudders, and a wooden mast remain as the last major projects. For BETO, I chose an aluminum mast—a 22′ length of 4″ aluminum tubing with a 1/8″ wall thickness, as recommended in the plans. I chose aluminum over wood in hopes of a lighter mast that would require less maintenance and be easier to raise when rigging.
The Tiki 21’s most controversial feature is, perhaps, the use of lashings, rather than conventional marine hardware, to hold the amas and akas (hulls and cross beams) together. Wharram believes that the lashings allow for shock absorption and decrease shock loads at the joints. Each wrap of the five loops has a 2,800-lb breaking strength. The lashings are frapped so tightly that small movements between structural members are unnoticeable. The lashing system is proven by both Wharram cats and the well-traveled Polynesian voyaging canoes of the Pacific.
Scott Williams
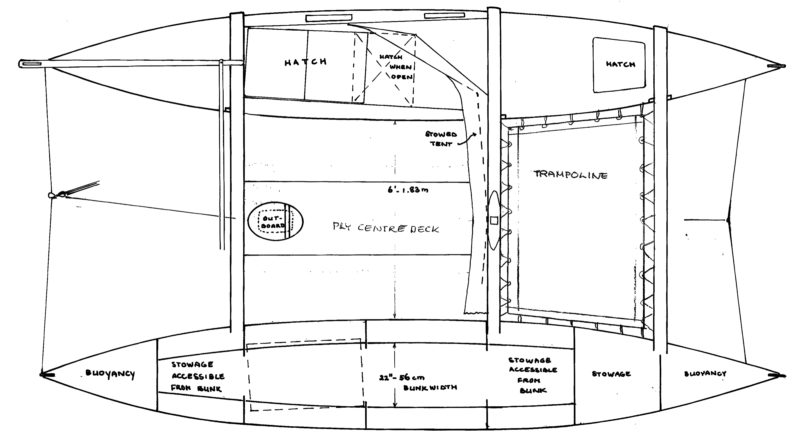
The Tiki 21 plans include a motor mount set within the perimeter of the deck. The pod added to this boat frees up deck space and includes a place for the gas tank. The cross beams, or akas, are stitch-and-glue I-beams.
The Tiki 21 was designed to be assembled on a beach at low tide and to float away when the sea returns. It has a 14″ draft, and each hull weighs in right under 200 lbs when completed. For our negligible tidal range and for freshwater sailing, I chose to build a trailer with telescoping sides that allow the hulls to be expanded outward for boat assembly before being backed down the ramp. We currently sail BETO on a small lake, so it rests on the trailer between outings.
When we want a taste of salt water, we unlash the beams and slide the hulls together for a package that is a little wider than my small Toyota truck. I can assemble the boat by myself in two hours and disassemble it in an hour. This is pretty fast to be on the water, and a helper could easily bring this time down as the lashings and frappings are the most time-consuming tasks. Some Tiki sailors have had good luck with ratchet straps and nylon webbing when trailering to daysail. I wouldn’t recommend ratchets in lieu of lashings for venturing offshore, however.
Scott Williams
The Tiki 21 was designed with cruising accommodations for two, but there is room for more on deck. The catamaran has a carrying capacity of a half ton.
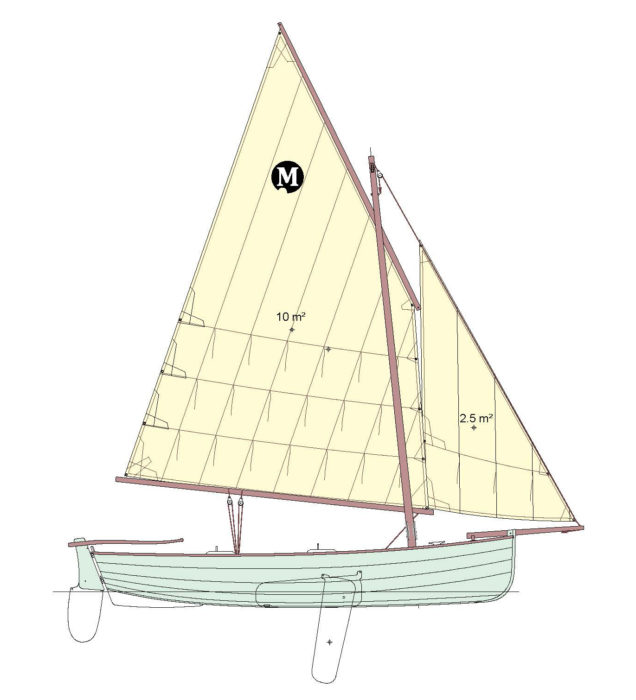
So how does the Tiki 21 sail? I’m a former racing catamaran sailor whose friends all sail go-fast boats, and I think it sails like a dream! The rig is a Wharram “Wing” sail that keeps the center of gravity low and the power high. The sail is modeled after a high-aspect Dutch gaff rig, using a short gaff at the peak and an elongated luff pocket that envelops the mast and minimizes turbulent airflow. This unique arrangement offers performance similar to modern rotating masts and square-top mainsails without all of the moving parts.
Scott Williams
The mainsail is sewn with a luff sleeve for a smother flow of air around the mast. The jib and main halyards run along the mast inside the sleeve. This Tiki 21 was built by Rick Hueschen of North Carolina.
Unlike older Wharram designs, the Tiki 21 has a power-to-weight ratio that can get one in trouble if the wind pipes up. In light air, however, it is slightly undercanvased, and a drifter works wonders. The deep-V hulls have hardly any noticeable leeway if sails are trimmed correctly, and can tack in light and heavy air even sailing just the main.
The rudders are lashed to the sternposts and skegs and do not extend below beneath them, so the Tiki can’t turn on a dime in tight quarters. However, when sailing, it tracks like it is on rails. I sail upwind all the time in up to 20 knots with just a bungee crossed over the tiller. The Tiki is superbly well balanced and will sail along happily with proper trim. To windward we have seen 7 knots with the wind at 50 degrees true, falling down to around 5 knots at 40 degrees true. Off the wind, BETO has clocked 15 knots while power-reaching with no noticeable lifting of the windward hull (check my video). For normal cruising, we reef the main and jib in 15 knots to keep dry on deck and fully in control while still making 8 to 10 knots on a reach. For sails, we carry a main with three reefs, a jib with one reef, a nylon drifter, an asymmetric spinnaker, and a storm jib. I have an outboard, but I learned to sail on a 22’ engineless racing sloop, so I have plenty of patience when the wind dies, preferring not to deal with a nasty outboard and volatile gasoline. Using a stand-up paddle, I can move the Tiki all day at 3 knots in flat water, and with a second paddler it’s even faster.
Dale Duke
While each hull provides room for a narrow berth, the deck provides more spacious accommodations when equipped with a canopy or a free-standing tent.
For coastal cruising on a small catamaran, one can really not find a better-suited vessel than the Tiki 21. The accommodations inside each hull provide a 12′-long bunk that is 2′ wide; the hulls span 3-1/2′ at the sheer. Our sleeping accommodations are often a two-person tent set on deck, or my girlfriend and I can get cuddly and sleep in one hull if needed. All of the bunks are above the waterline, and under them are the bilges, which provide loads of storage. The load capacity is listed as 1,000 lbs. The bows and sterns all have watertight flotation chambers. The anchor locker doubles as another flotation chamber. The Tiki 21 has six bulkheads in each small hull, making it a strong little boat. Resting between the akas is a plywood deck measuring 6′ x 7′ that never moves far from level when under sail. For my own preference I built a slatted cedar deck instead of a solid plywood one, and it has since been approved by the Wharram Design team.
Rory McDougall sailed his modified Tiki 21, COOKING FAT, around the world in the early 1990s, and until just recently he held the record for sailing the smallest catamaran in a circumnavigation. He experienced gales pushing waves up to 30′, and his boat suffered little damage. In 2010, McDougall sailed in the Jester Challenge, a single-handed transatlantic race for boats between 20′ and 30′, and came in second after 34 days under way, just a few hours after a larger monohull. When in storms, McDougall goes on his sea anchor and reports that the Tiki rides very happily and calmly. In his first gale on sea anchor, he even felt so relaxed that he tied a jibsheet around himself and jumped overboard to swim the swells!
The stories of COOKING FAT’s performance convinced me that a Tiki 21 would easily manage any conditions I’d be likely to encounter. If you’re looking for a small and easily managed coastal cruising catamaran to build, then I couldn’t recommend the Tiki 21 highly enough. In fact, it is my favorite boat I have ever sailed. For an adventurous couple with goals of gunkholing and cruising the coast, this vessel is simply what dreams are made of. The estimated building time is around 400 hours. I spread my time over about a year and a half and spent roughly $10,000. For my time and effort I got an outrageously capable, fast, safe, and well-mannered cruiser and daysailer.
Brad Ingram lives in Birmingham, Alabama, and enjoys sailing, running ultramarathons, and climbing. He spent eight years in 20th Special Forces Group on a small Intelligence team, and he’s now going to nursing school as a civilian. He plans to travel while working as a nurse, making it easy to spend a significant amount of the year traveling in the mountains or at sea. Among all of his recreational pursuits, sailing occupies the lion’s share of his enthusiasm and interest. He mostly enjoys small boat cruises and small, raid-type multihulls. He has a passion for simple, traditional vessels and enjoys sailing sport boats as well.
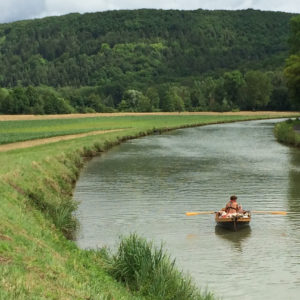
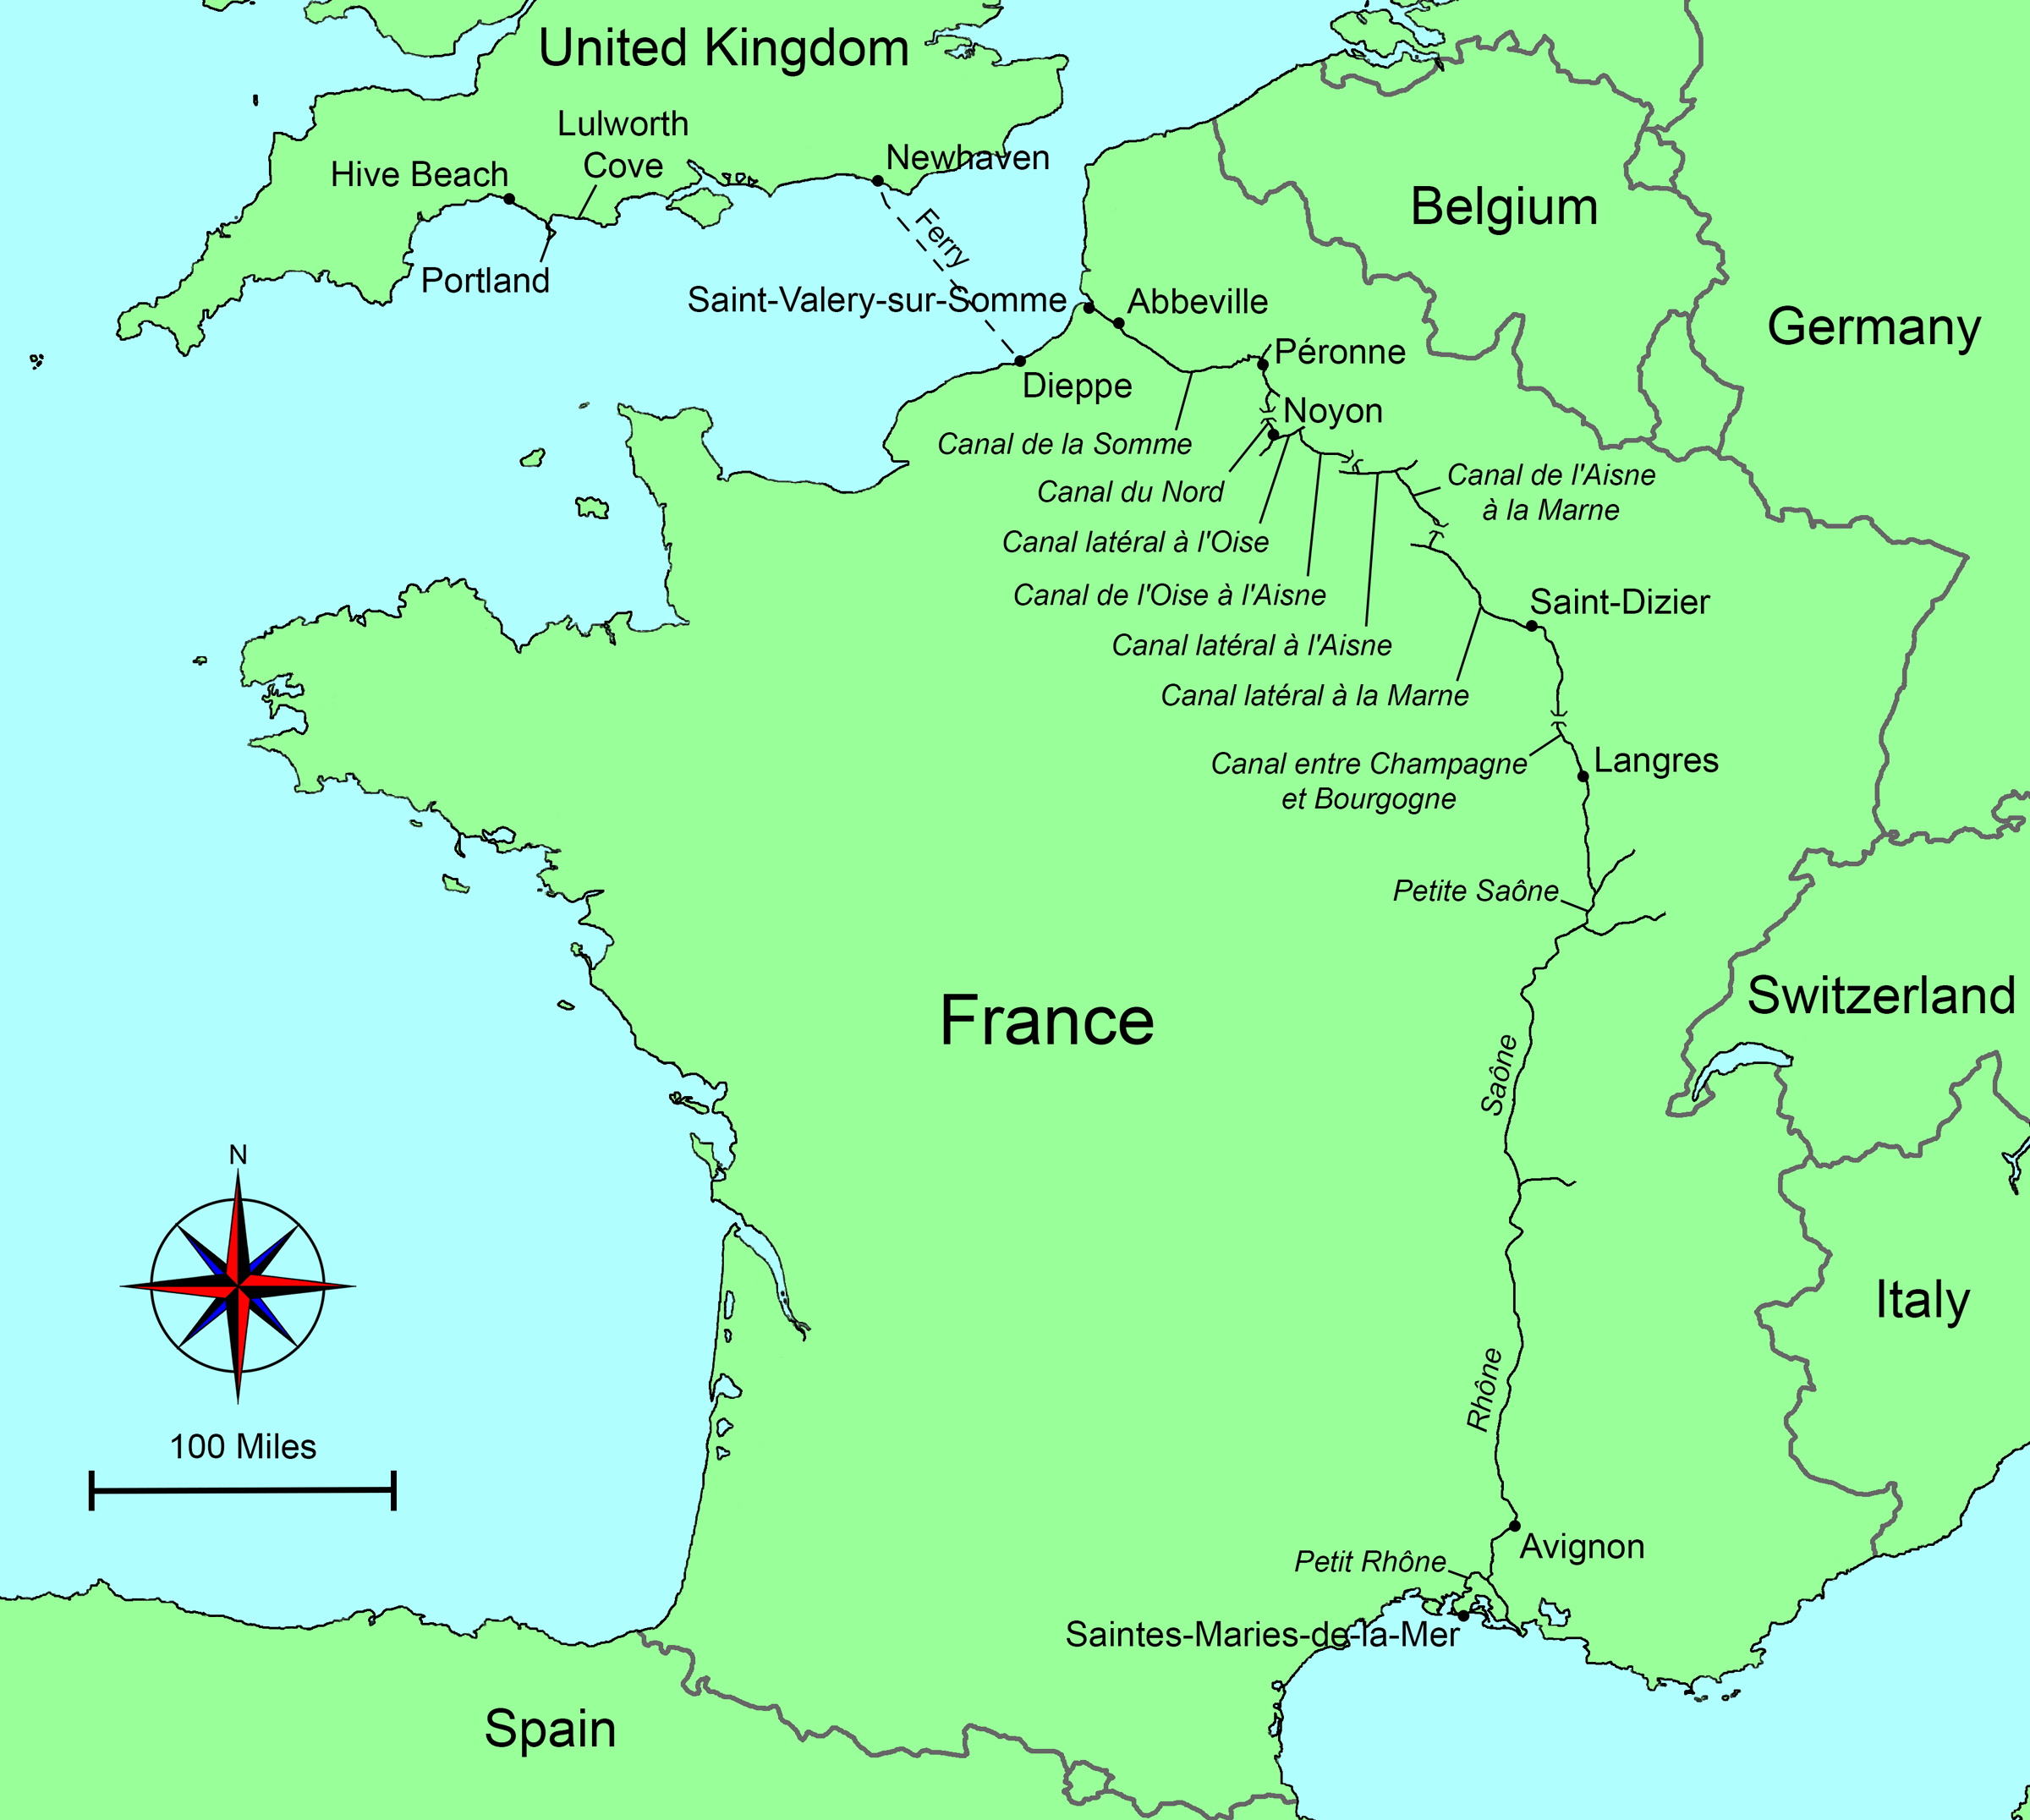
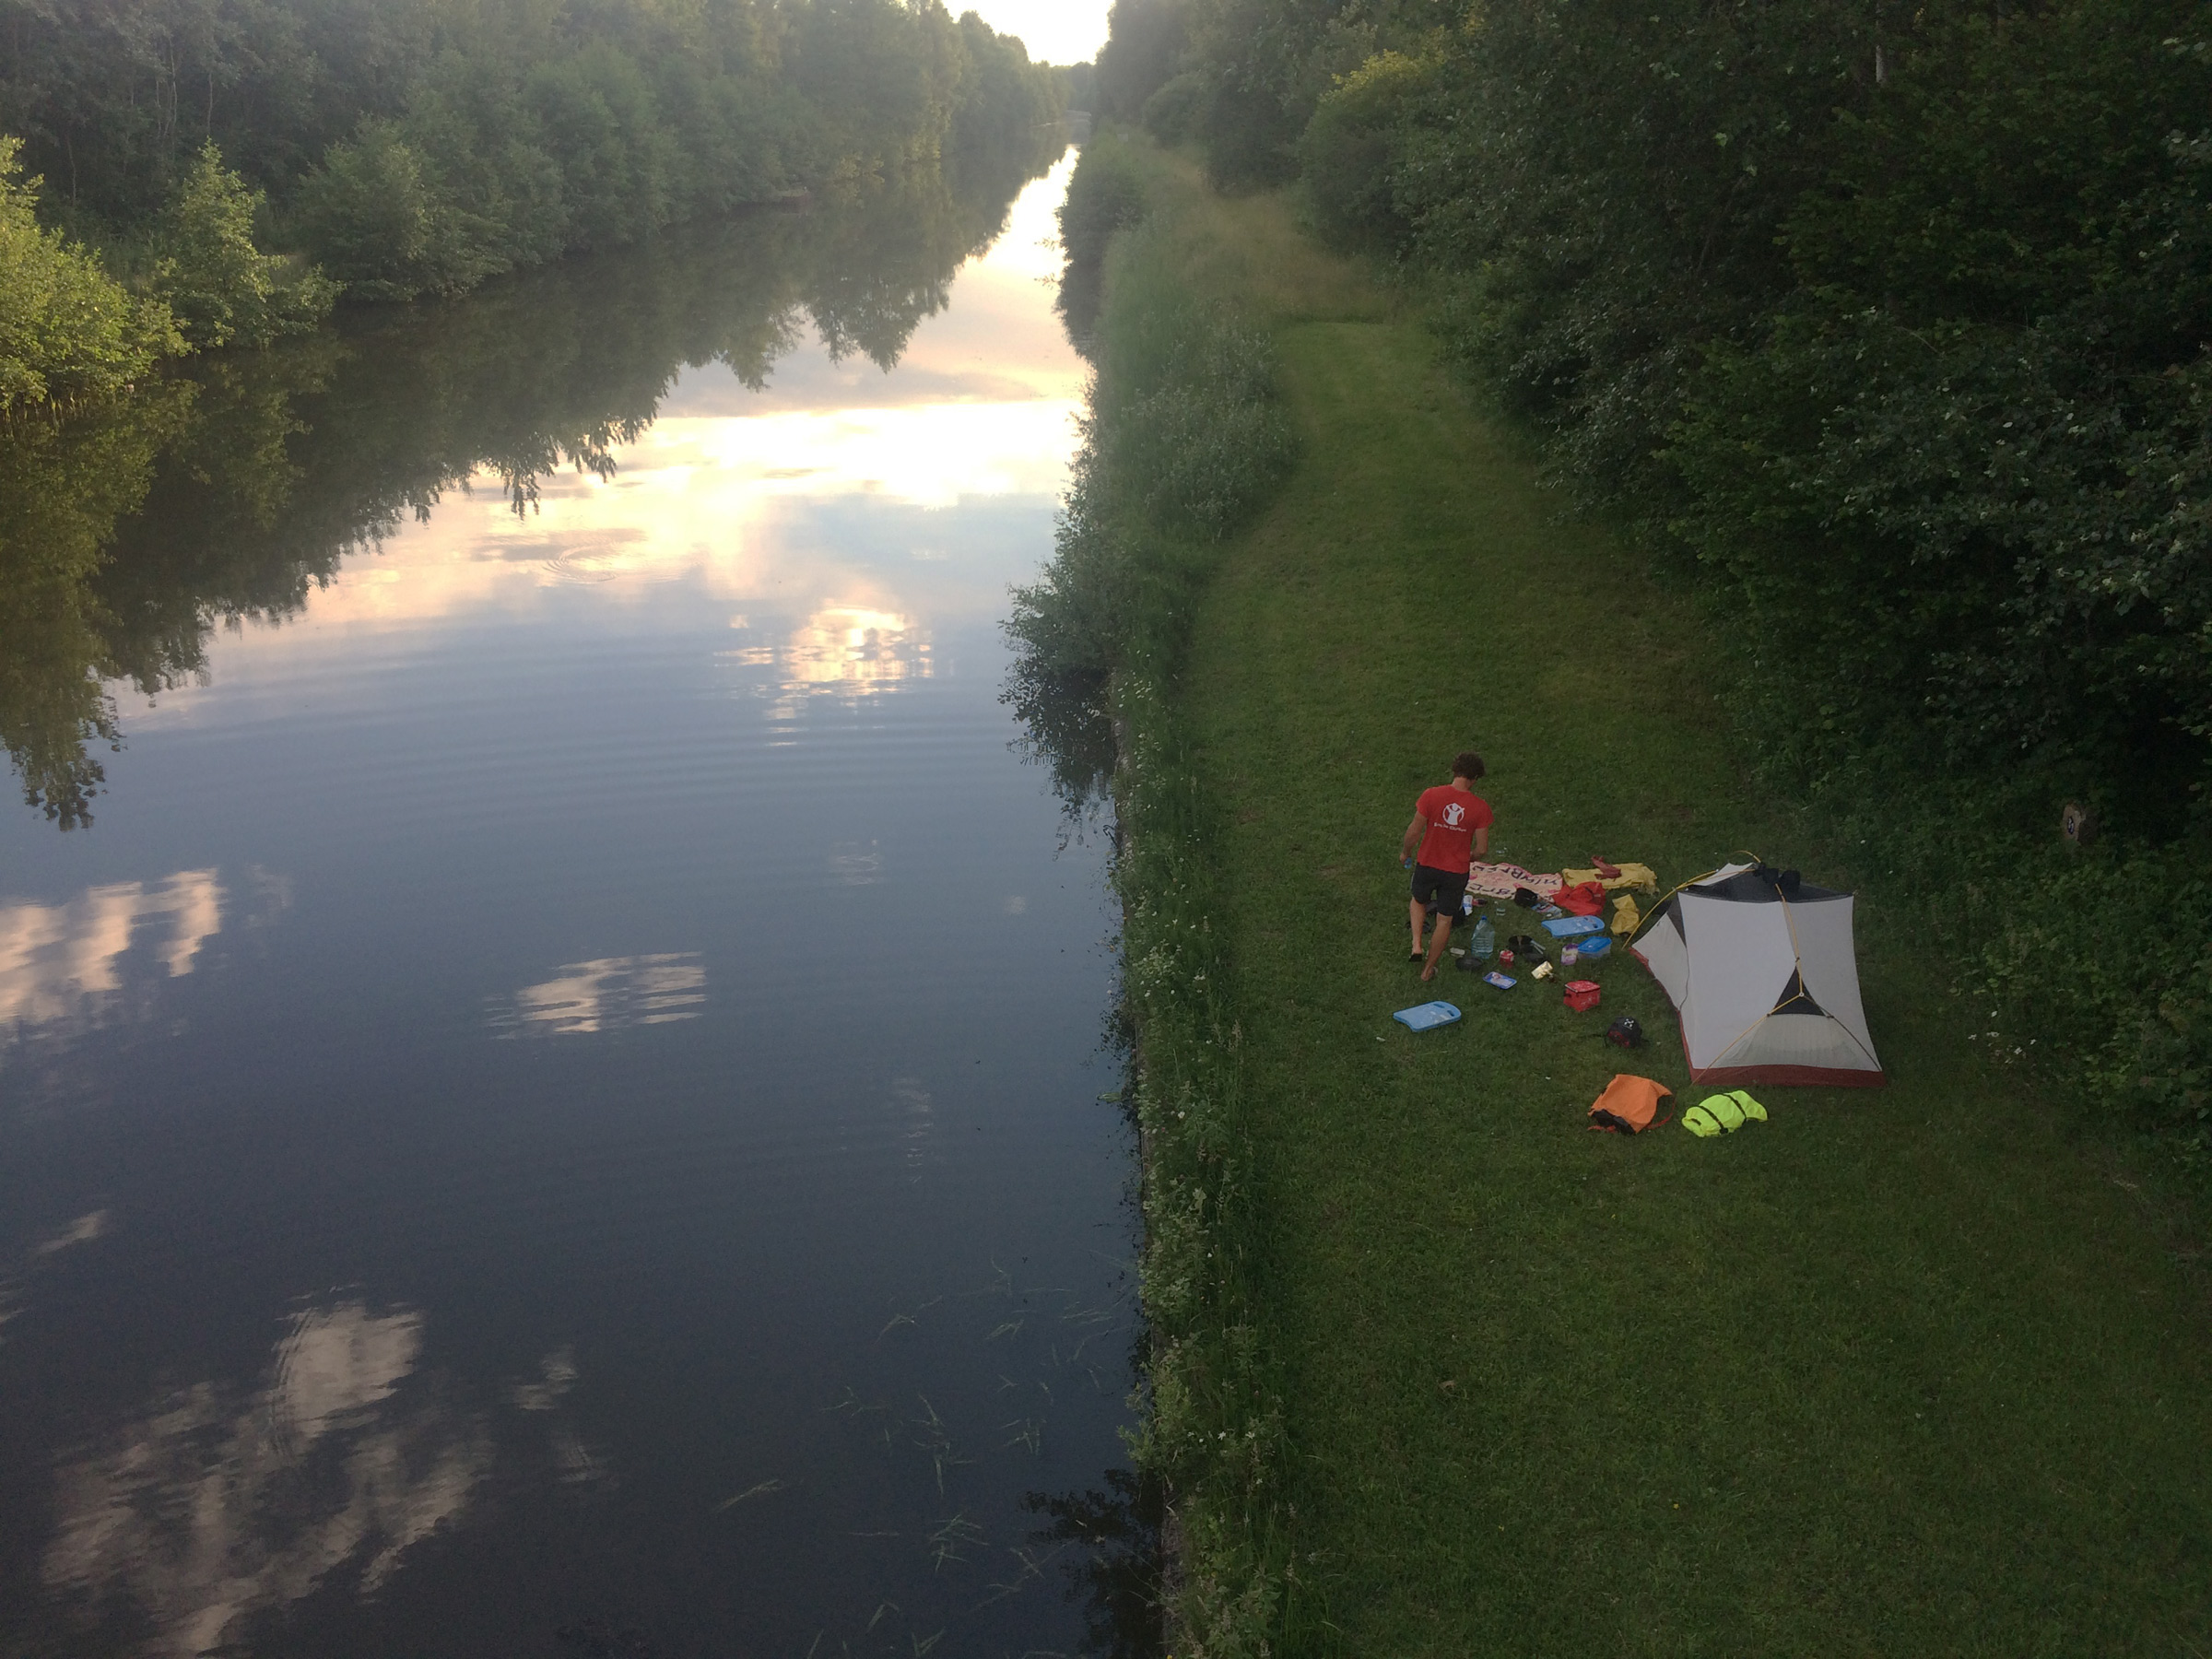
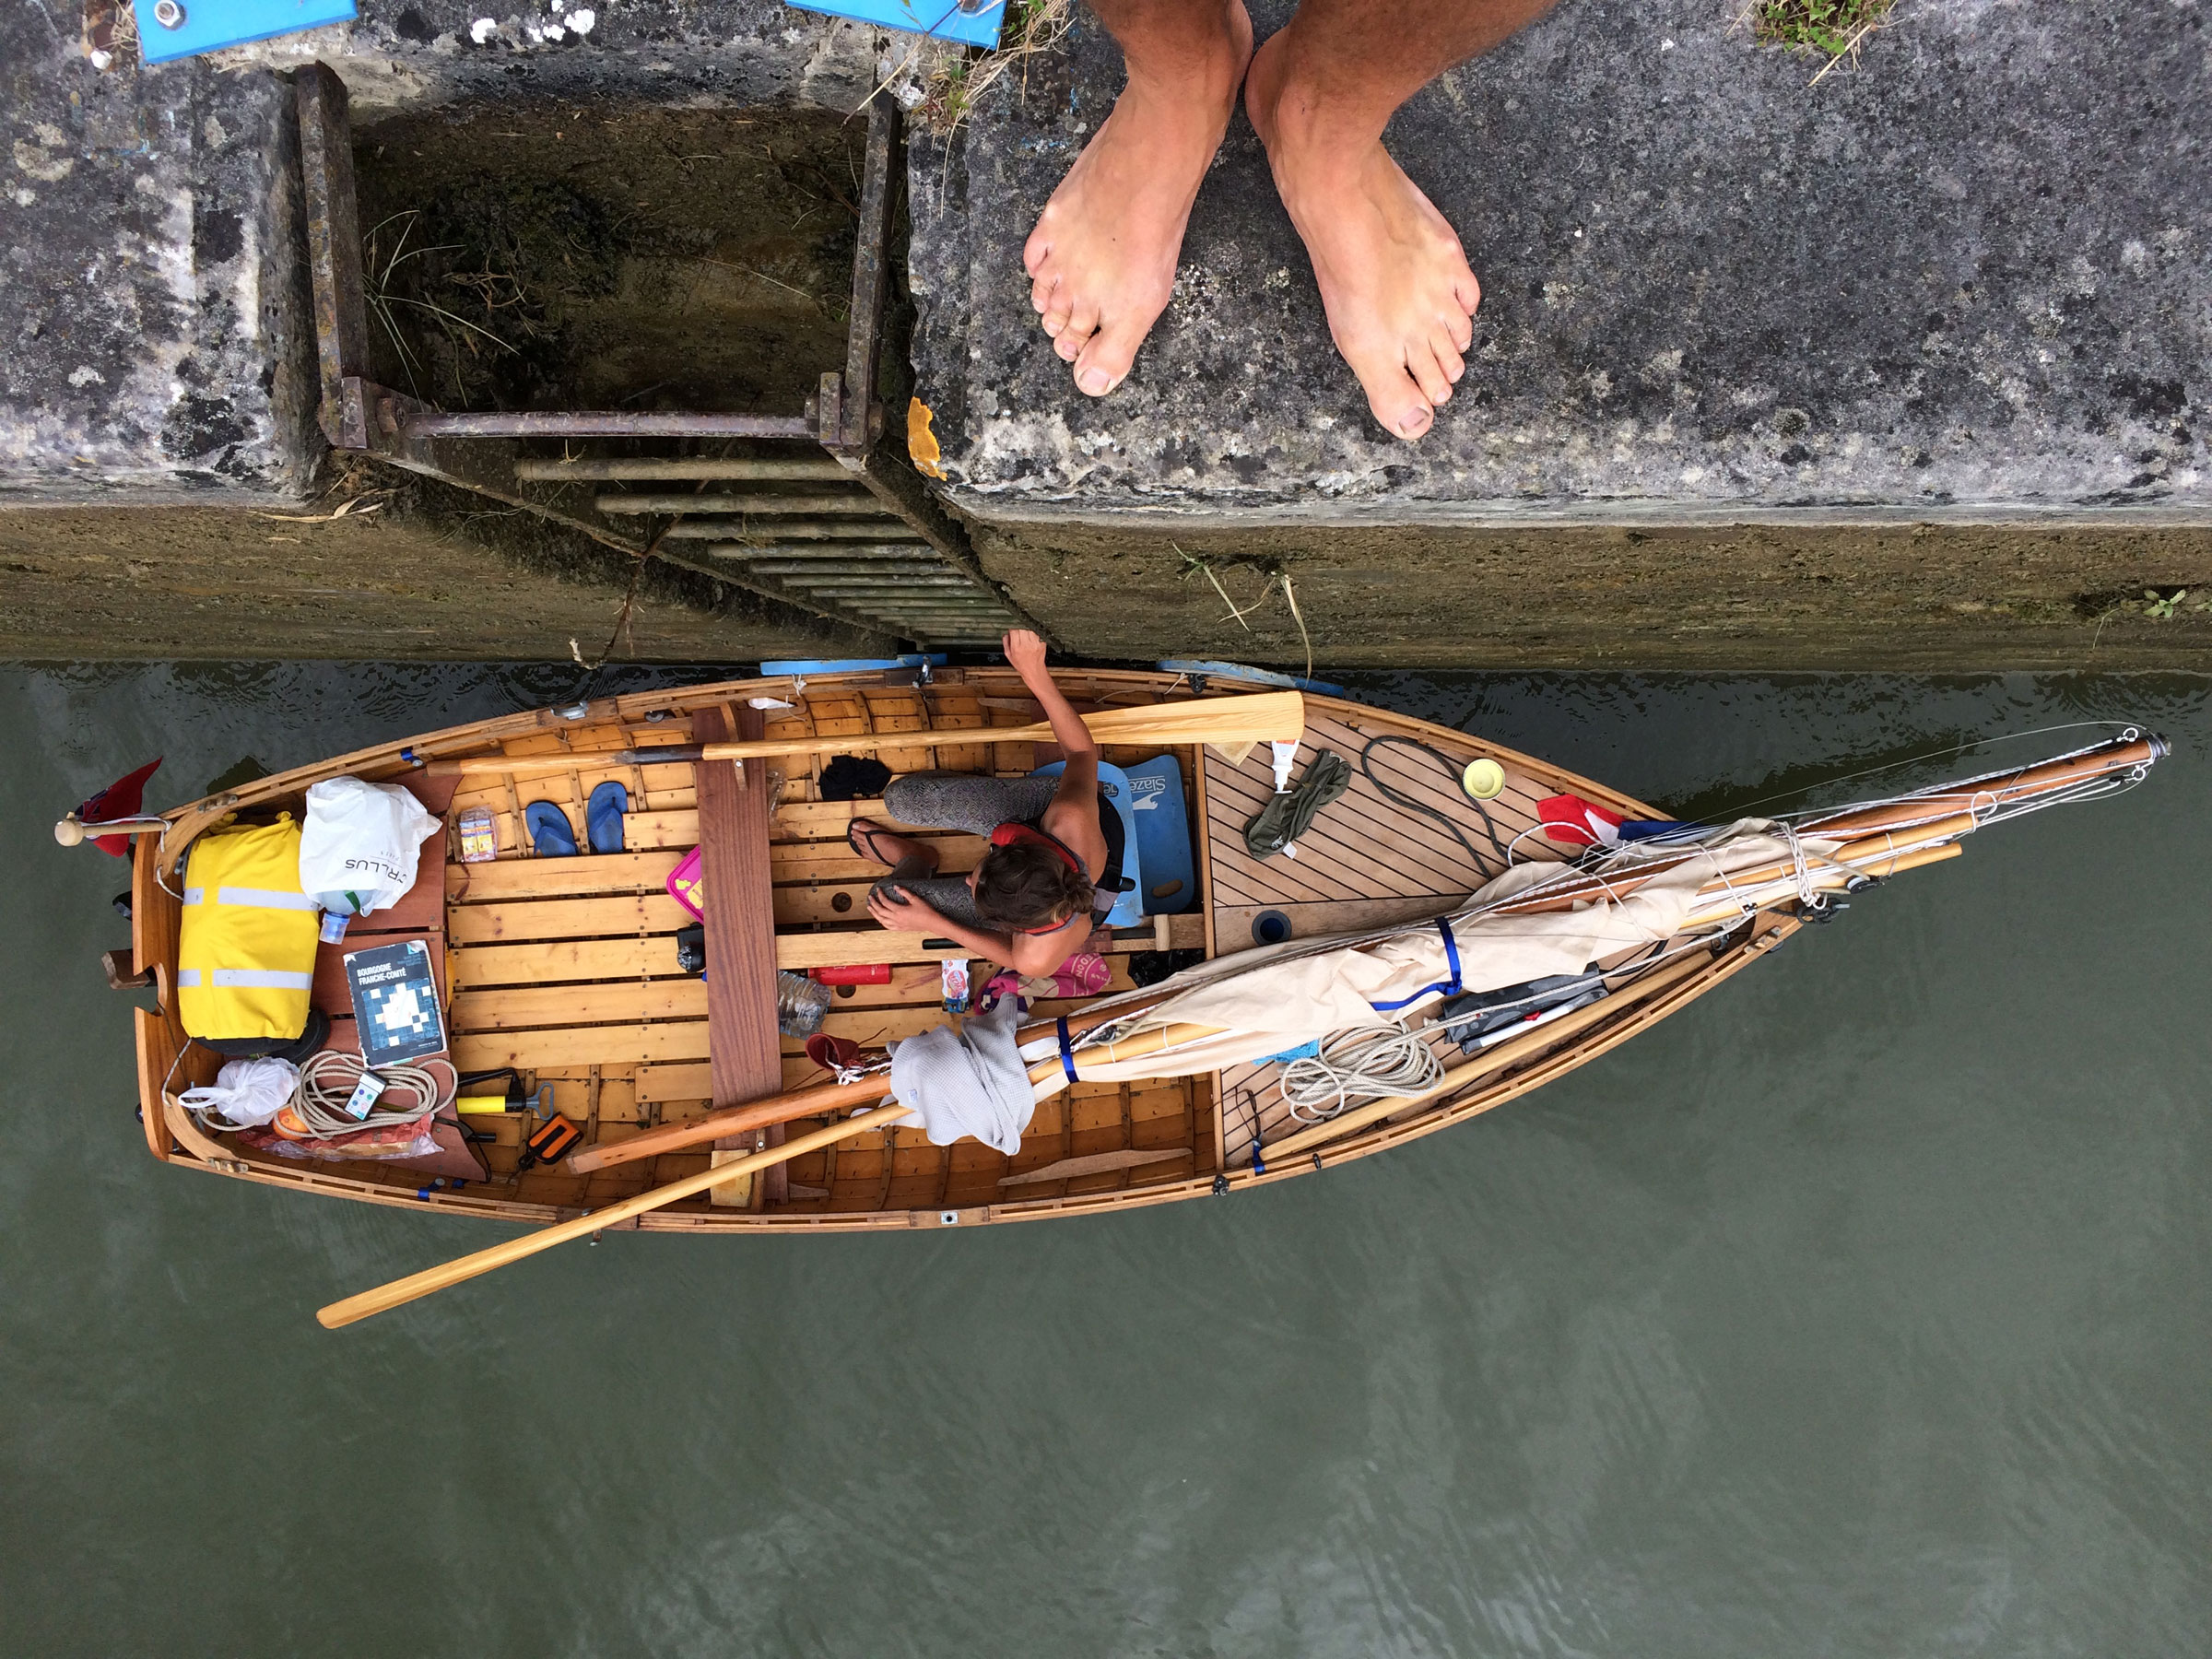
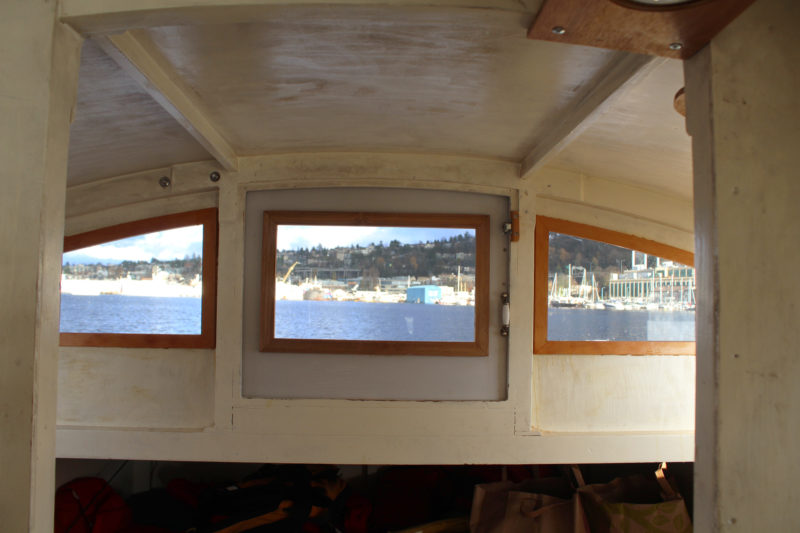
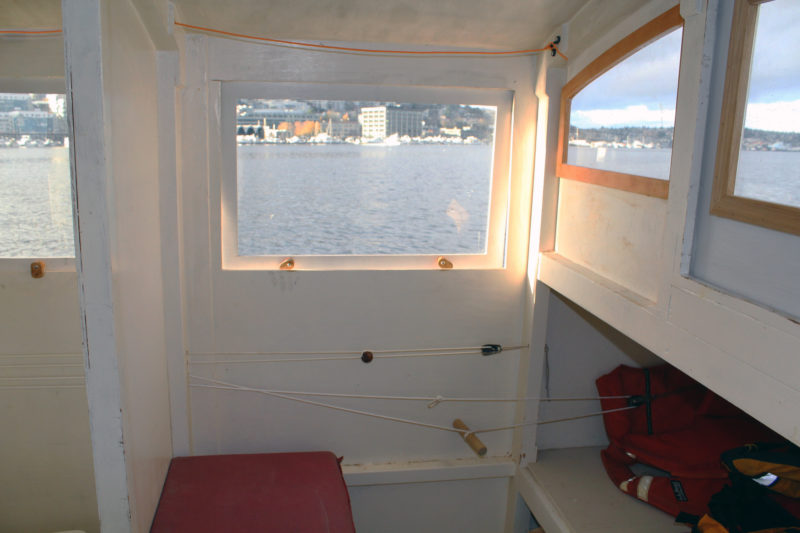
When my husband Mat and I set off from Sidmouth, England, our destination was the Mediterranean, roughly 870 miles (1,400km) south. We planned to reach it through the inland waterways of France. We had two months off work and arranged for friends to meet us with the boat trailer in the port of Sète on August 5, 2017, to bring us home. We estimated we’d need to row at least six hours every day to make it. With just weeks to go before we planned to depart, Mat finished our boat, DUNLIN. The lapstrake dinghy, 13′ 7″ long with a 4′ 6″ beam, was the first boat he’d built and is based on a traditional workboat designed for both rowing and sailing with a gaff sloop rig.
As our families waved goodbye from Sidmouth beach, we clumsily zigzagged east along the English Channel coast, unable to row in a straight line. We had only rowed DUNLIN together for the first time a few days previously and we weren’t helped by a poor distribution of gear that had disrupted the proper trim. That morning we’d stuffed the tiny lockers with camping gear, a gas stove, a solar panel, some clothes, and emergency canned food, all inside waterproof bags. Stowed under our seats were water bottles, inflatable rollers, and swimming floats, which made cheap, compact fenders.
Roger Siebert
.
With one oar each, we kept practicing in different positions until we settled on Mat to starboard on the aft thwart and me to port on the forward thwart. We eventually learned to keep our strokes rhythmically consistent to row in a straight line. With Mat setting the pace, I had to ensure the blade of my oar would catch the water to start the stroke at exactly the right moment. We counted aloud together, aiming for a long reach and fluid movement. We kept the retractable rudder out of the water while we rowed.
We planned to row as far east as possible before having to put DUNLIN on a ferry for crossing the Channel to France. We had wanted to make it to France ourselves by oar or sail, but found out this would be illegal since the French classified DUNLIN as an “unorthodox vessel” and not permitted to make the crossing
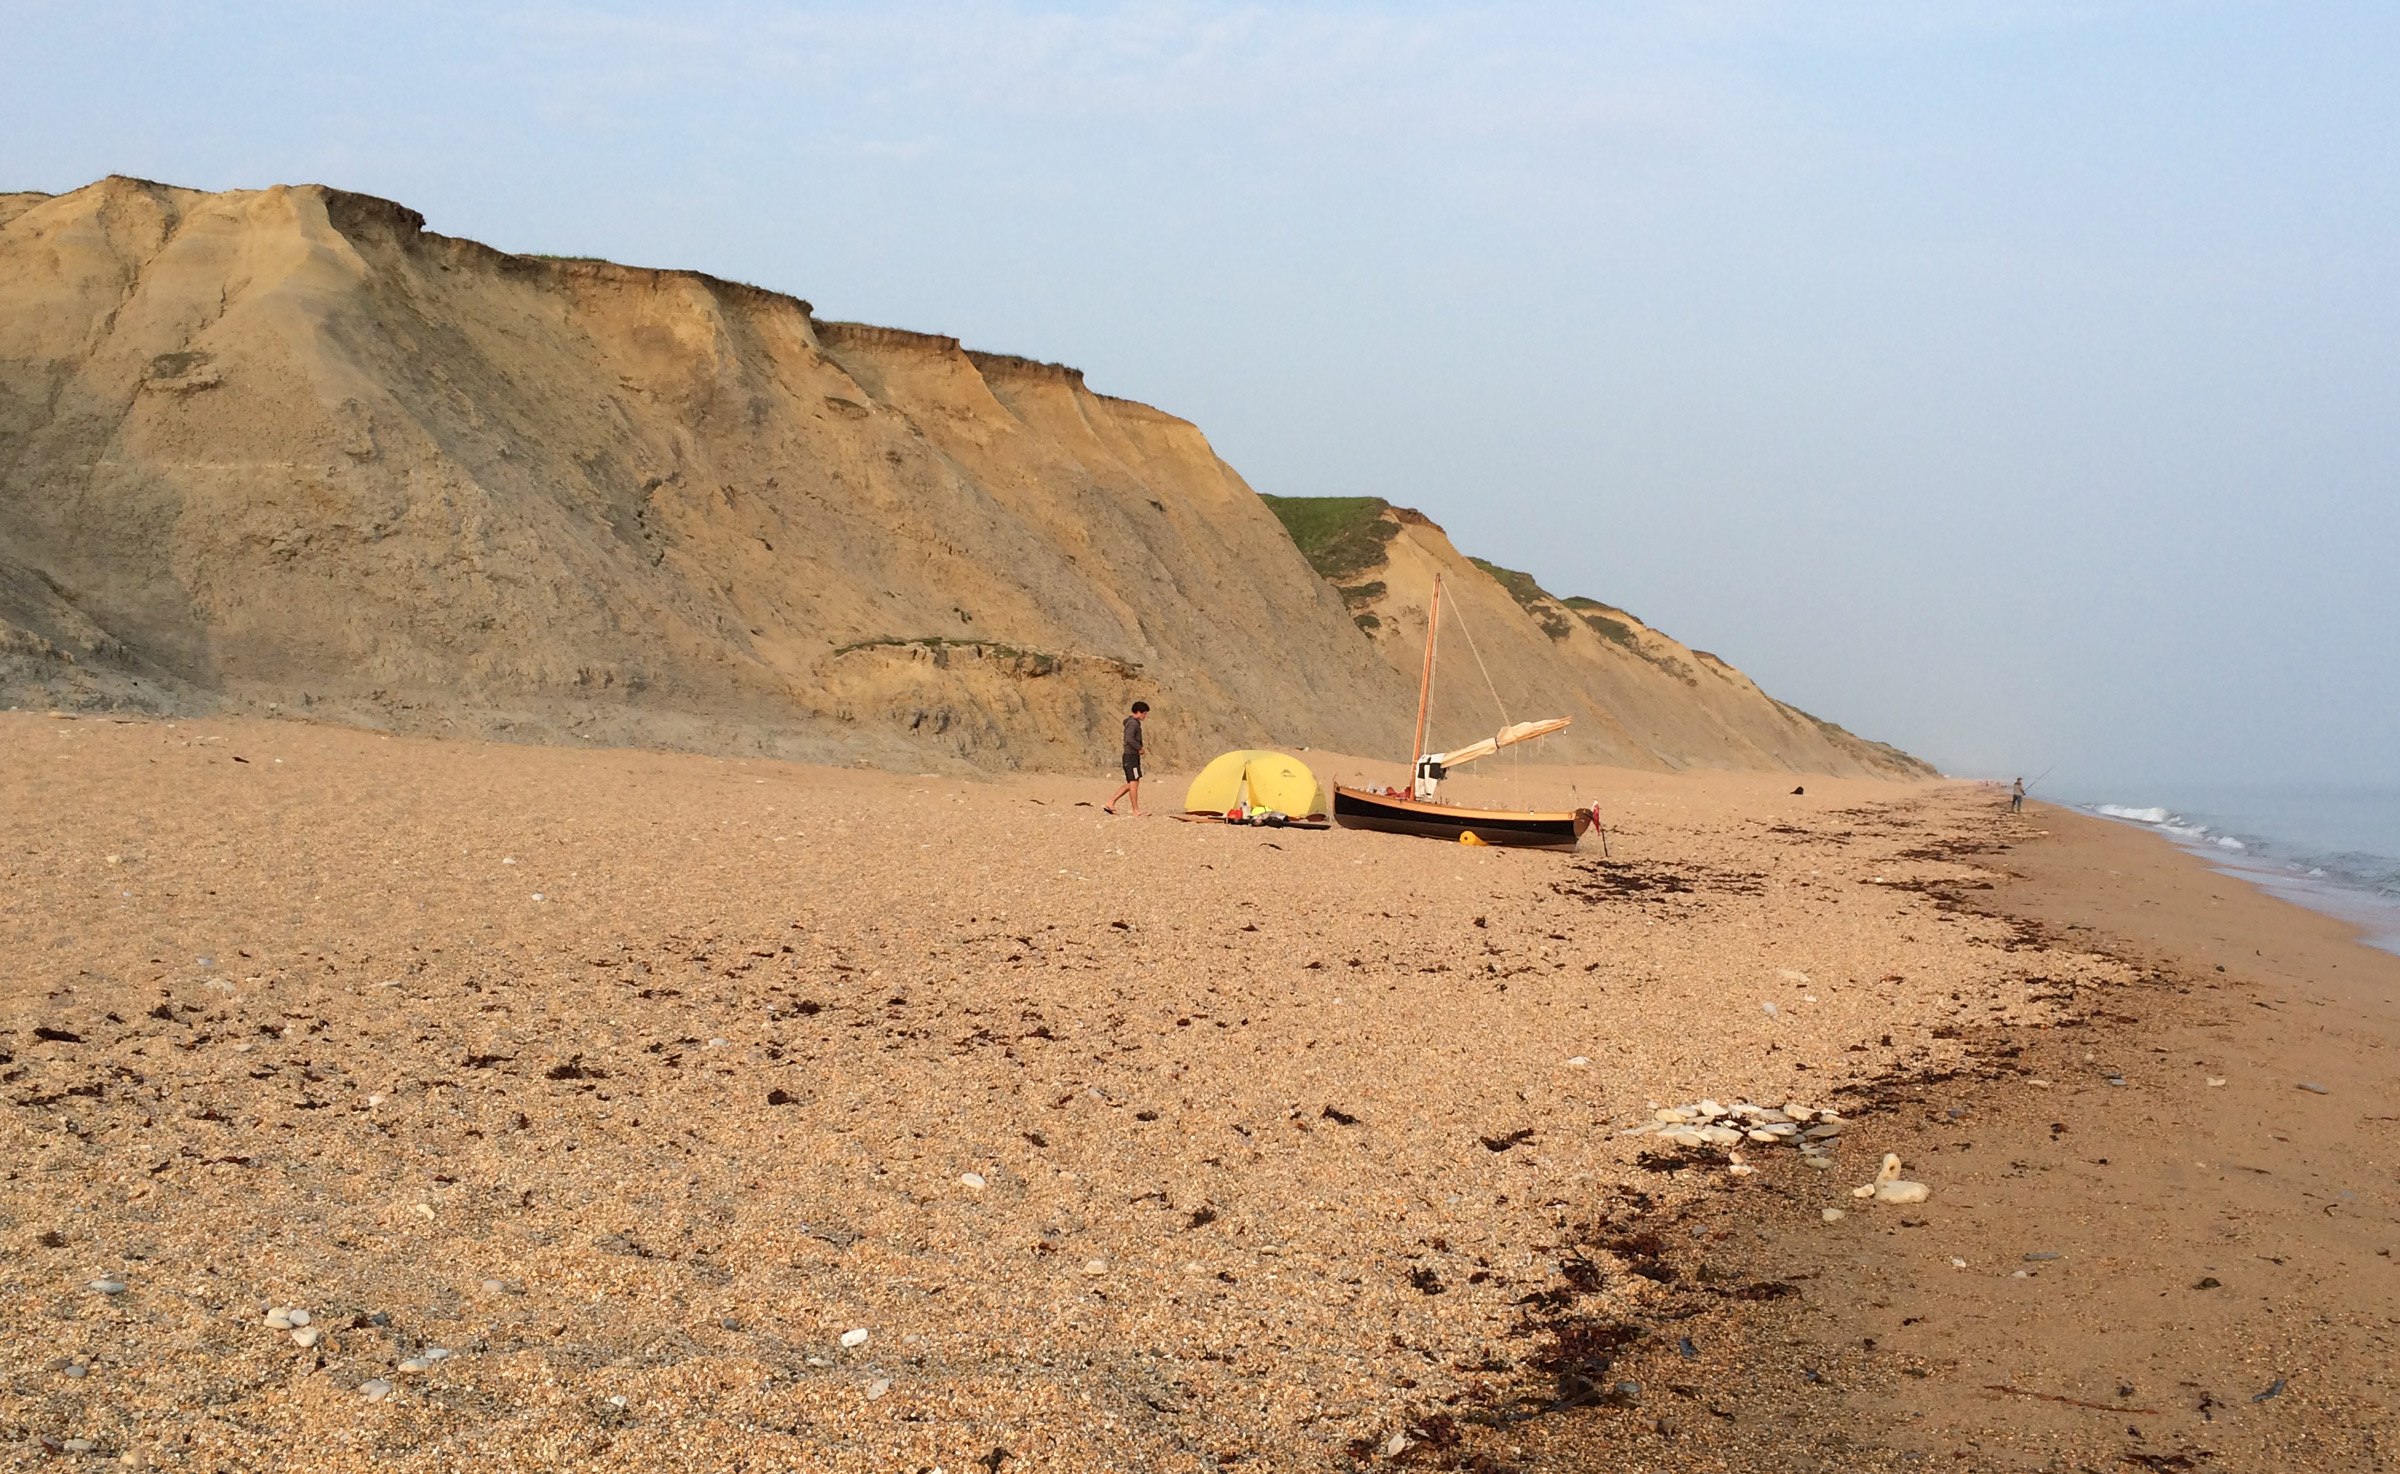
For the first few days along the south coast of Devon and Dorset there was not a breath of wind, so we rowed until we saw somewhere to stop then set up camp on the beach.
photographs by Polly and Mat Hilton
At Hive Beach, near Burton Bradstock, Dorset, we used our inflatable boat rollers to push DUNLIN up the beach. We pitched the tent and cooked canned macaroni and cheese on our multi-fuel stove. There weren’t many people on the beach, just us and a few fishermen.
We slept well on Hive Beach, Dorset, and awoke at 6:30 a.m. to a perfectly still day. The sun was warm; there was no chill in the air despite the early hour. We launched DUNLIN and rowed more harmoniously than before as we gained practice, gliding through the glassy sea. We had soon shed layers and felt warm in T-shirts.
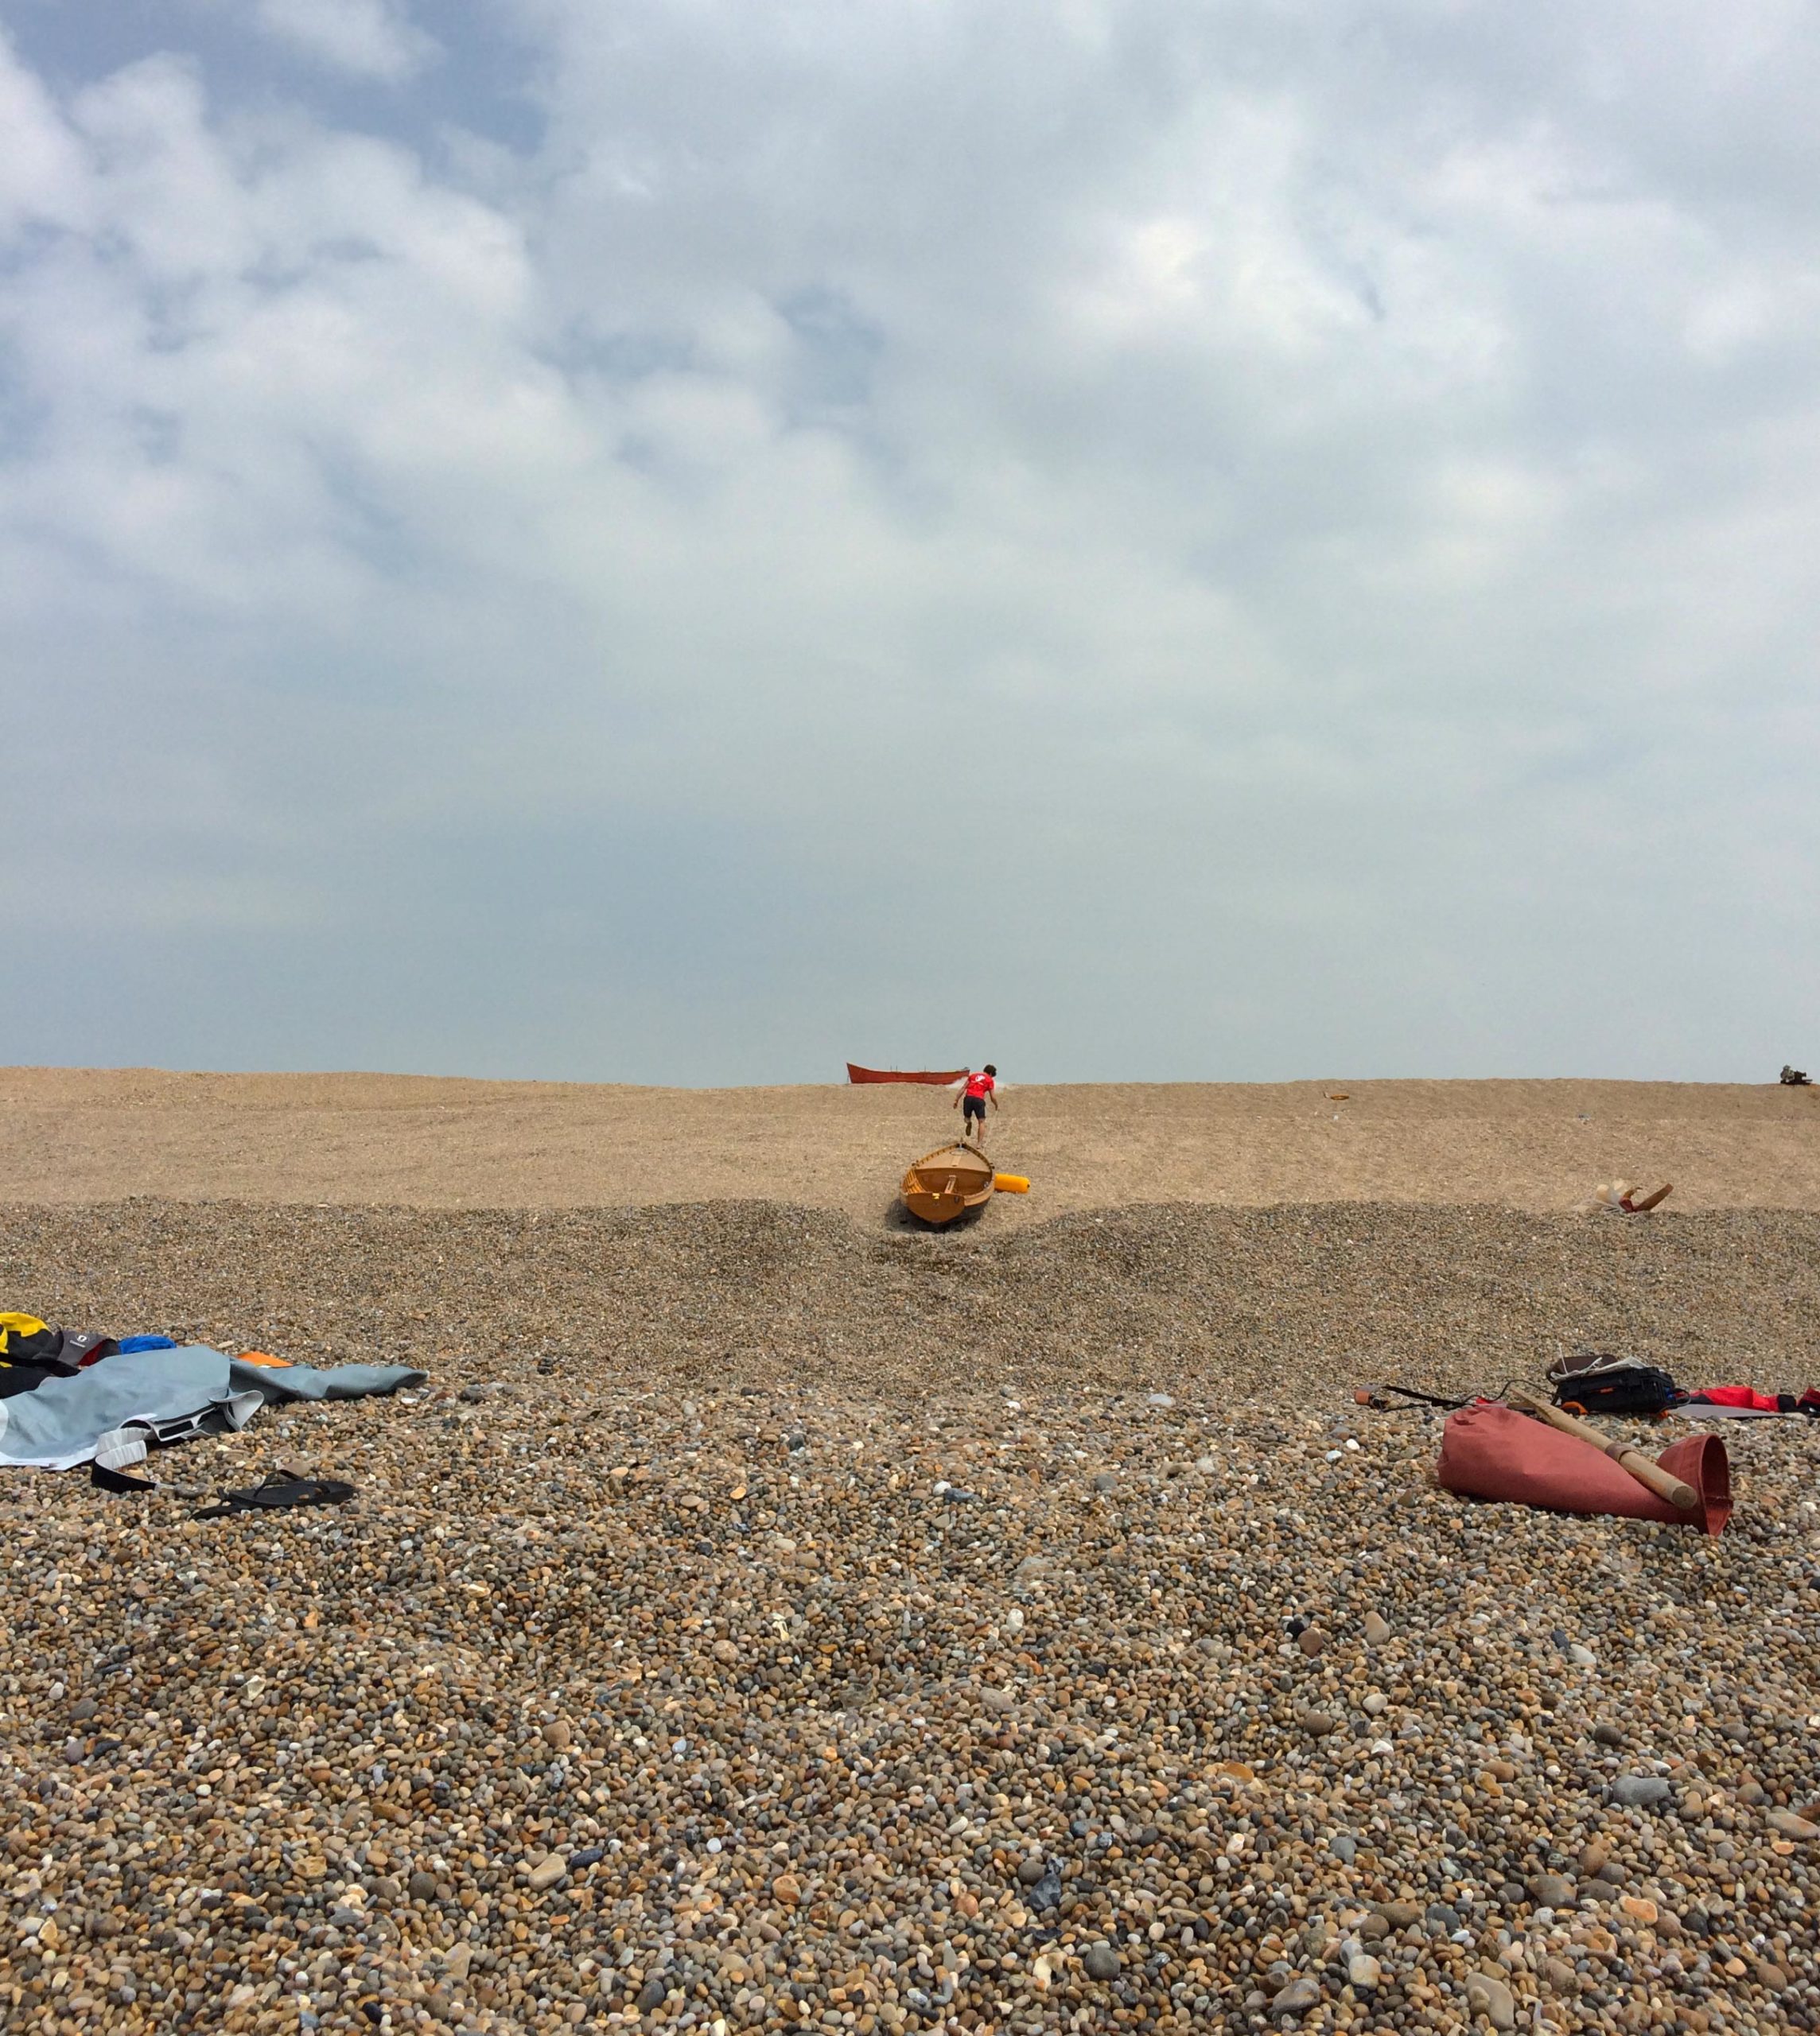
We were heading east along the south coast approaching Chesil Beach, an 18-mile-long pebble ridge reaching 40’ high and 175 yards wide. By 7:30 a.m. a Force-3 wind had picked up, rain fell, and we threw on waterproofs and we beat up wind, bashing through gray waves, searching for a spot to land on Chesil beach. Mat had decided we would drag up over the bar of the mountainous shingle beach, sail up through the shallow fleet lagoon behind it, then sneak under the low bridge into Portland Harbour to ensure we could reach a safe place to sleep for the night, instead of wasting hours waiting for the right conditions to go around Portland Bill, a rocky point notorious for its ferocious tidal race.
We emptied DUNLIN to reduce the weight before we started heaving her up over Chesil Beach, a pebble and shingle tombolo that connects the Isle of Portland to the mainland. We did the portage to avoid having to face the turbulent waters at Portland Bill at the isle’s southern extremity. We found a shovel to dig holes in the pebbles to bury the anchor and used a makeshift block-and-tackle pulley system to ease the load as we dragged the boat up the beach.
From our position on the water, the landing on Chesil Beach appeared as a vertical, rock solid wall, a few feet high, that we would collide with head-on—not a soft landing. As we sailed closer, it became no less intimidating, so just before we reached it I clumsily hauled myself over the side to avoid collision while Mat landed on the not-quite-vertical ledge.
We spent the next three hours dragging and pushing our quarter-of-a-ton, solid wood boat up and over the steep pebble ridge. We blew up our inflatable boat rollers, and Mat rigged up a block-and-tackle system using the sheets, pulleys, and the anchor. We even found a shovel on the beach, which helped us bury the anchor. The clouds and wind had disappeared and the sun beat down on us again while we slowly, with exhausting effort, pushed DUNLIN 40’ up the steep mound of pebbles. By the time we reached the top we had run out of water to drink and were parched.
Sliding the boat down to the lagoon was easy, and we were soon sailing through the shallows toward what we prayed would be somewhere we could get some water. We landed on a little muddy beach and walked up to a stately Georgian Manor Hotel, where we filled our bottles and gorged on afternoon tea under the shade of a calico umbrella.
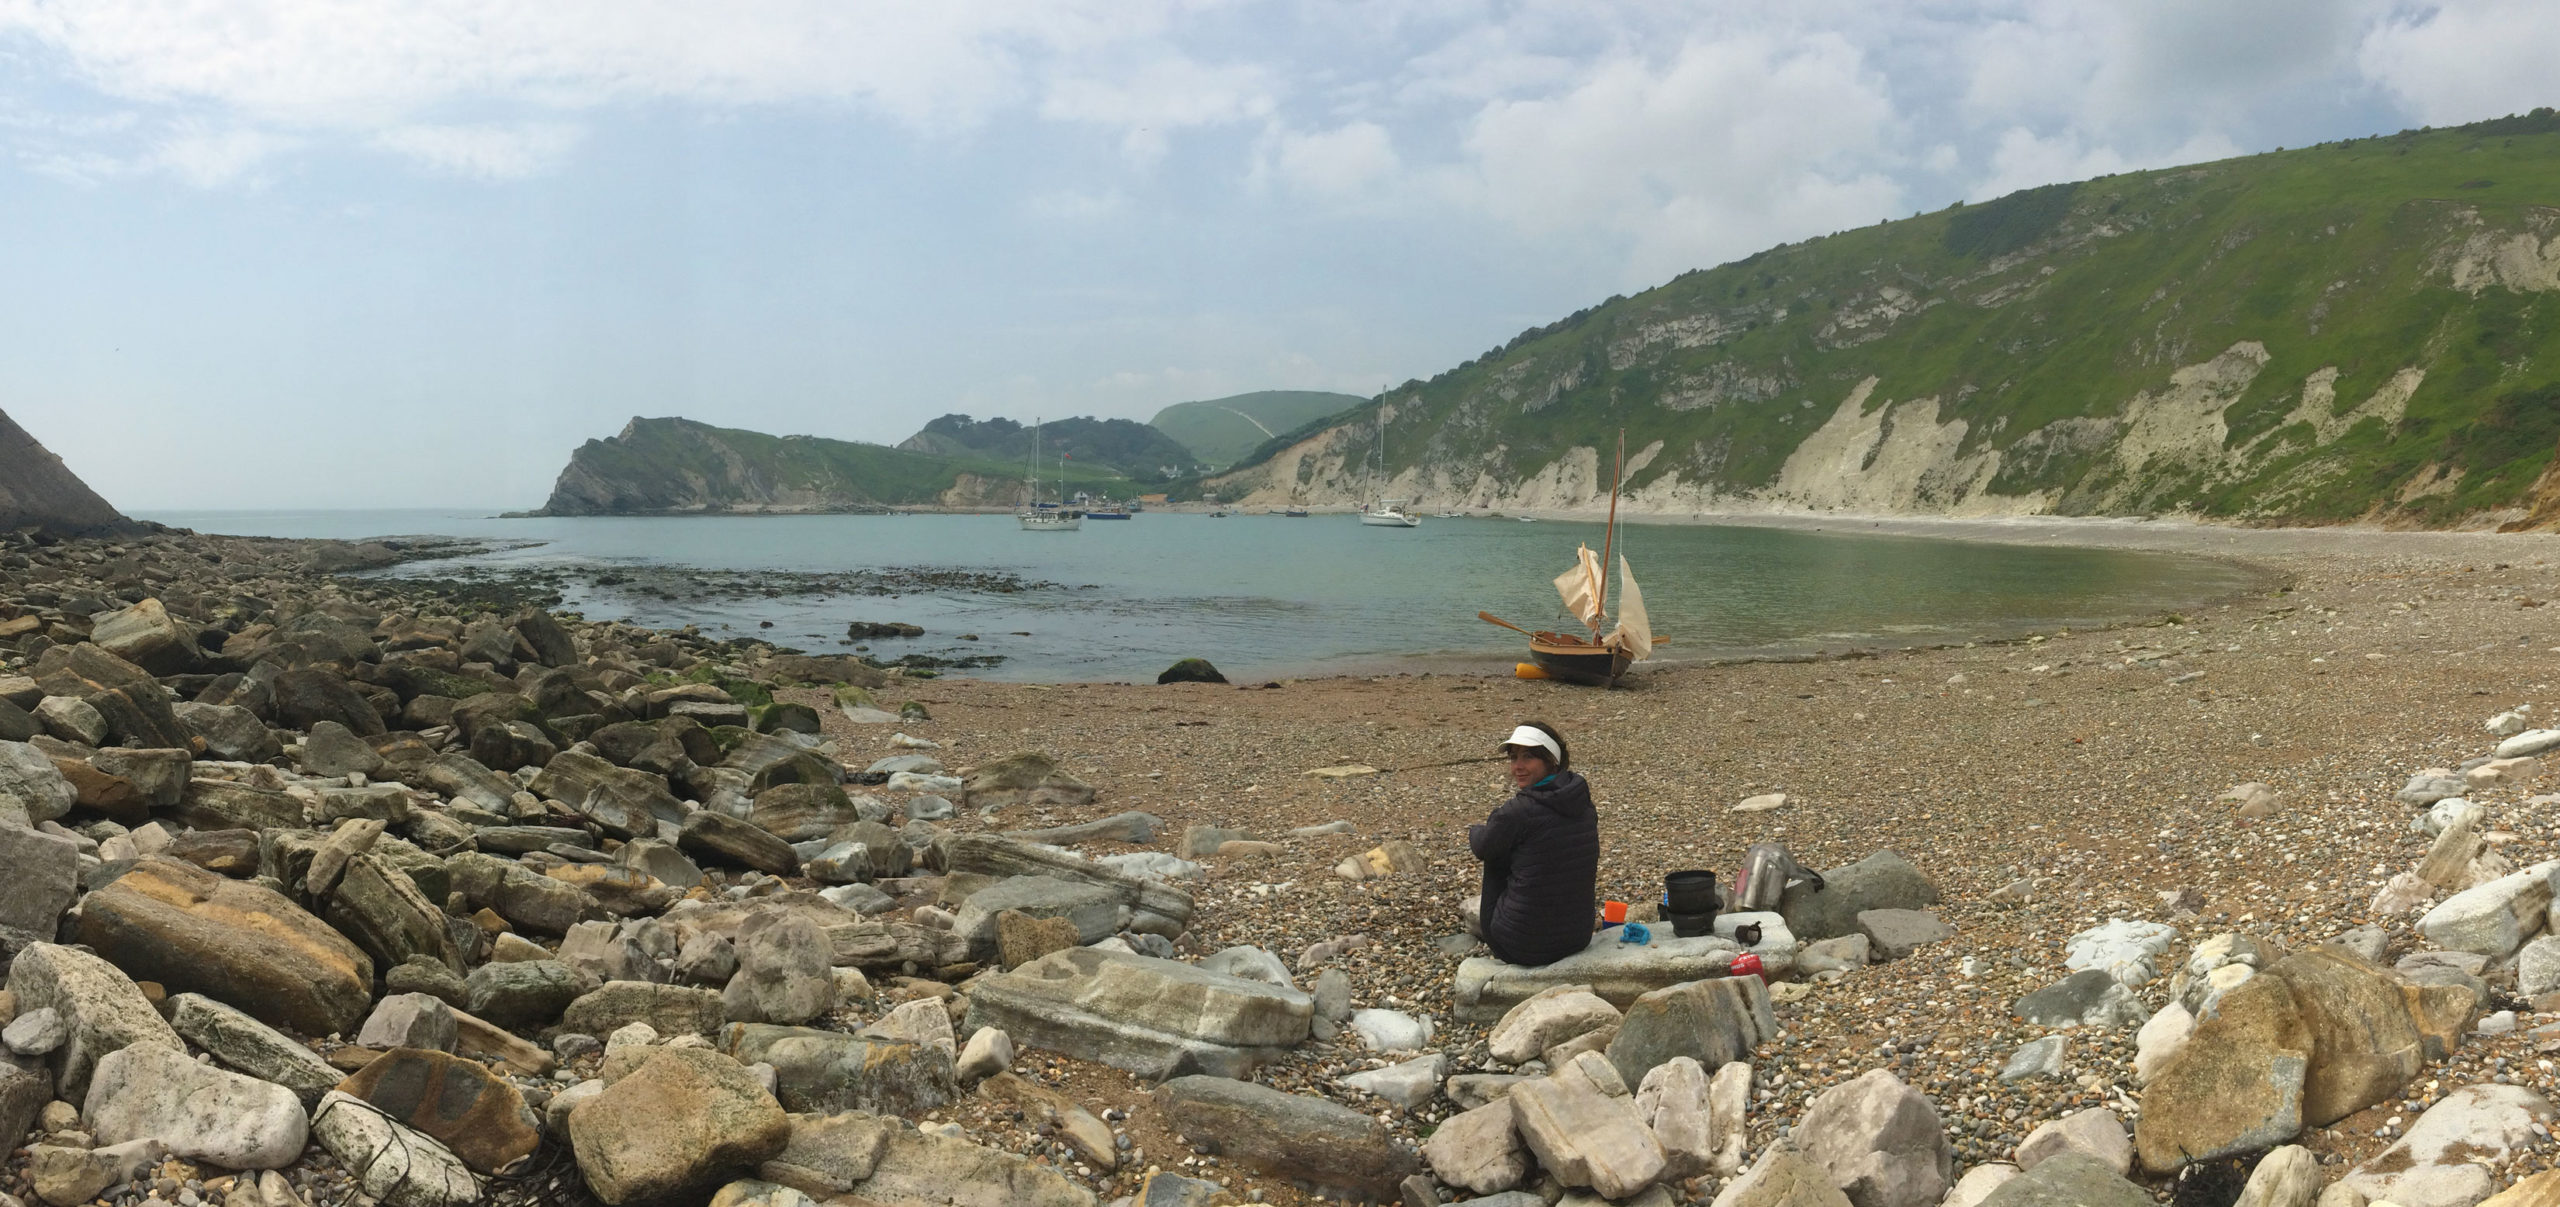
We had a lovely sail around Durdle Door, a hammerhead peninsula on the Dorset coast, and arrived here at Lulworth Cove. Mat’s parents would arrive the following day with DUNLIN’s trailer and drive us to the ferry that would take us across the English Channel. We camped on the beach opposite the village of West Lulworth, expecting to have a quiet stay, but an Army firing range was active through much of the night and made too much noise for us to sleep.
The next day we rowed and sailed to Lulworth Cove, a quarter-mile wide natural harbor, where we rendezvoused with Mat’s parents, Gill and Dave, who drove us, with DUNLIN on the trailer, to the ferry landing at Newhaven.
After the four-hour crossing of the English Channel, the ferry dropped us in France at Dieppe. Gill and Dave drove us to Saint-Valery-sur-Somme, a village at the head of the Baie de la Somme where we found the first spot we could launch into the canalized river. It was flooded and fast-flowing. We had to fight against the current and made painfully slow progress rowing as hard as we could.
After a few hours’ rowing we made it to Abbeville, made a right turn, and headed to our first lock. Floodwater spilled violently over the gates. There was no lock keeper around. A local explained in broken English that the locks were closed because of flooding. We rowed back to the river up a dead-end toward the town center and docked against a towering old ship’s wall. A rusty ladder gave access to the street. It was getting dark, and this was no place for putting up the little tent we’d slept in on the beaches, so we pulled out the boat tent.
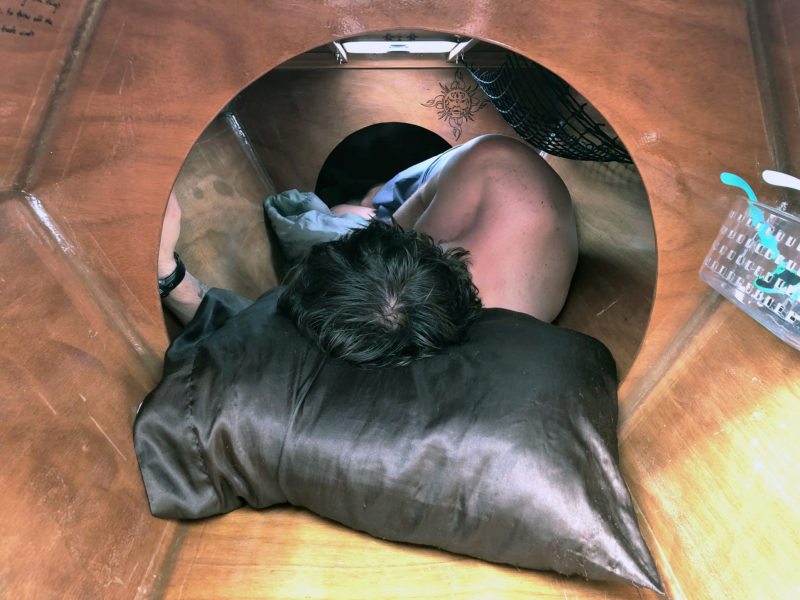
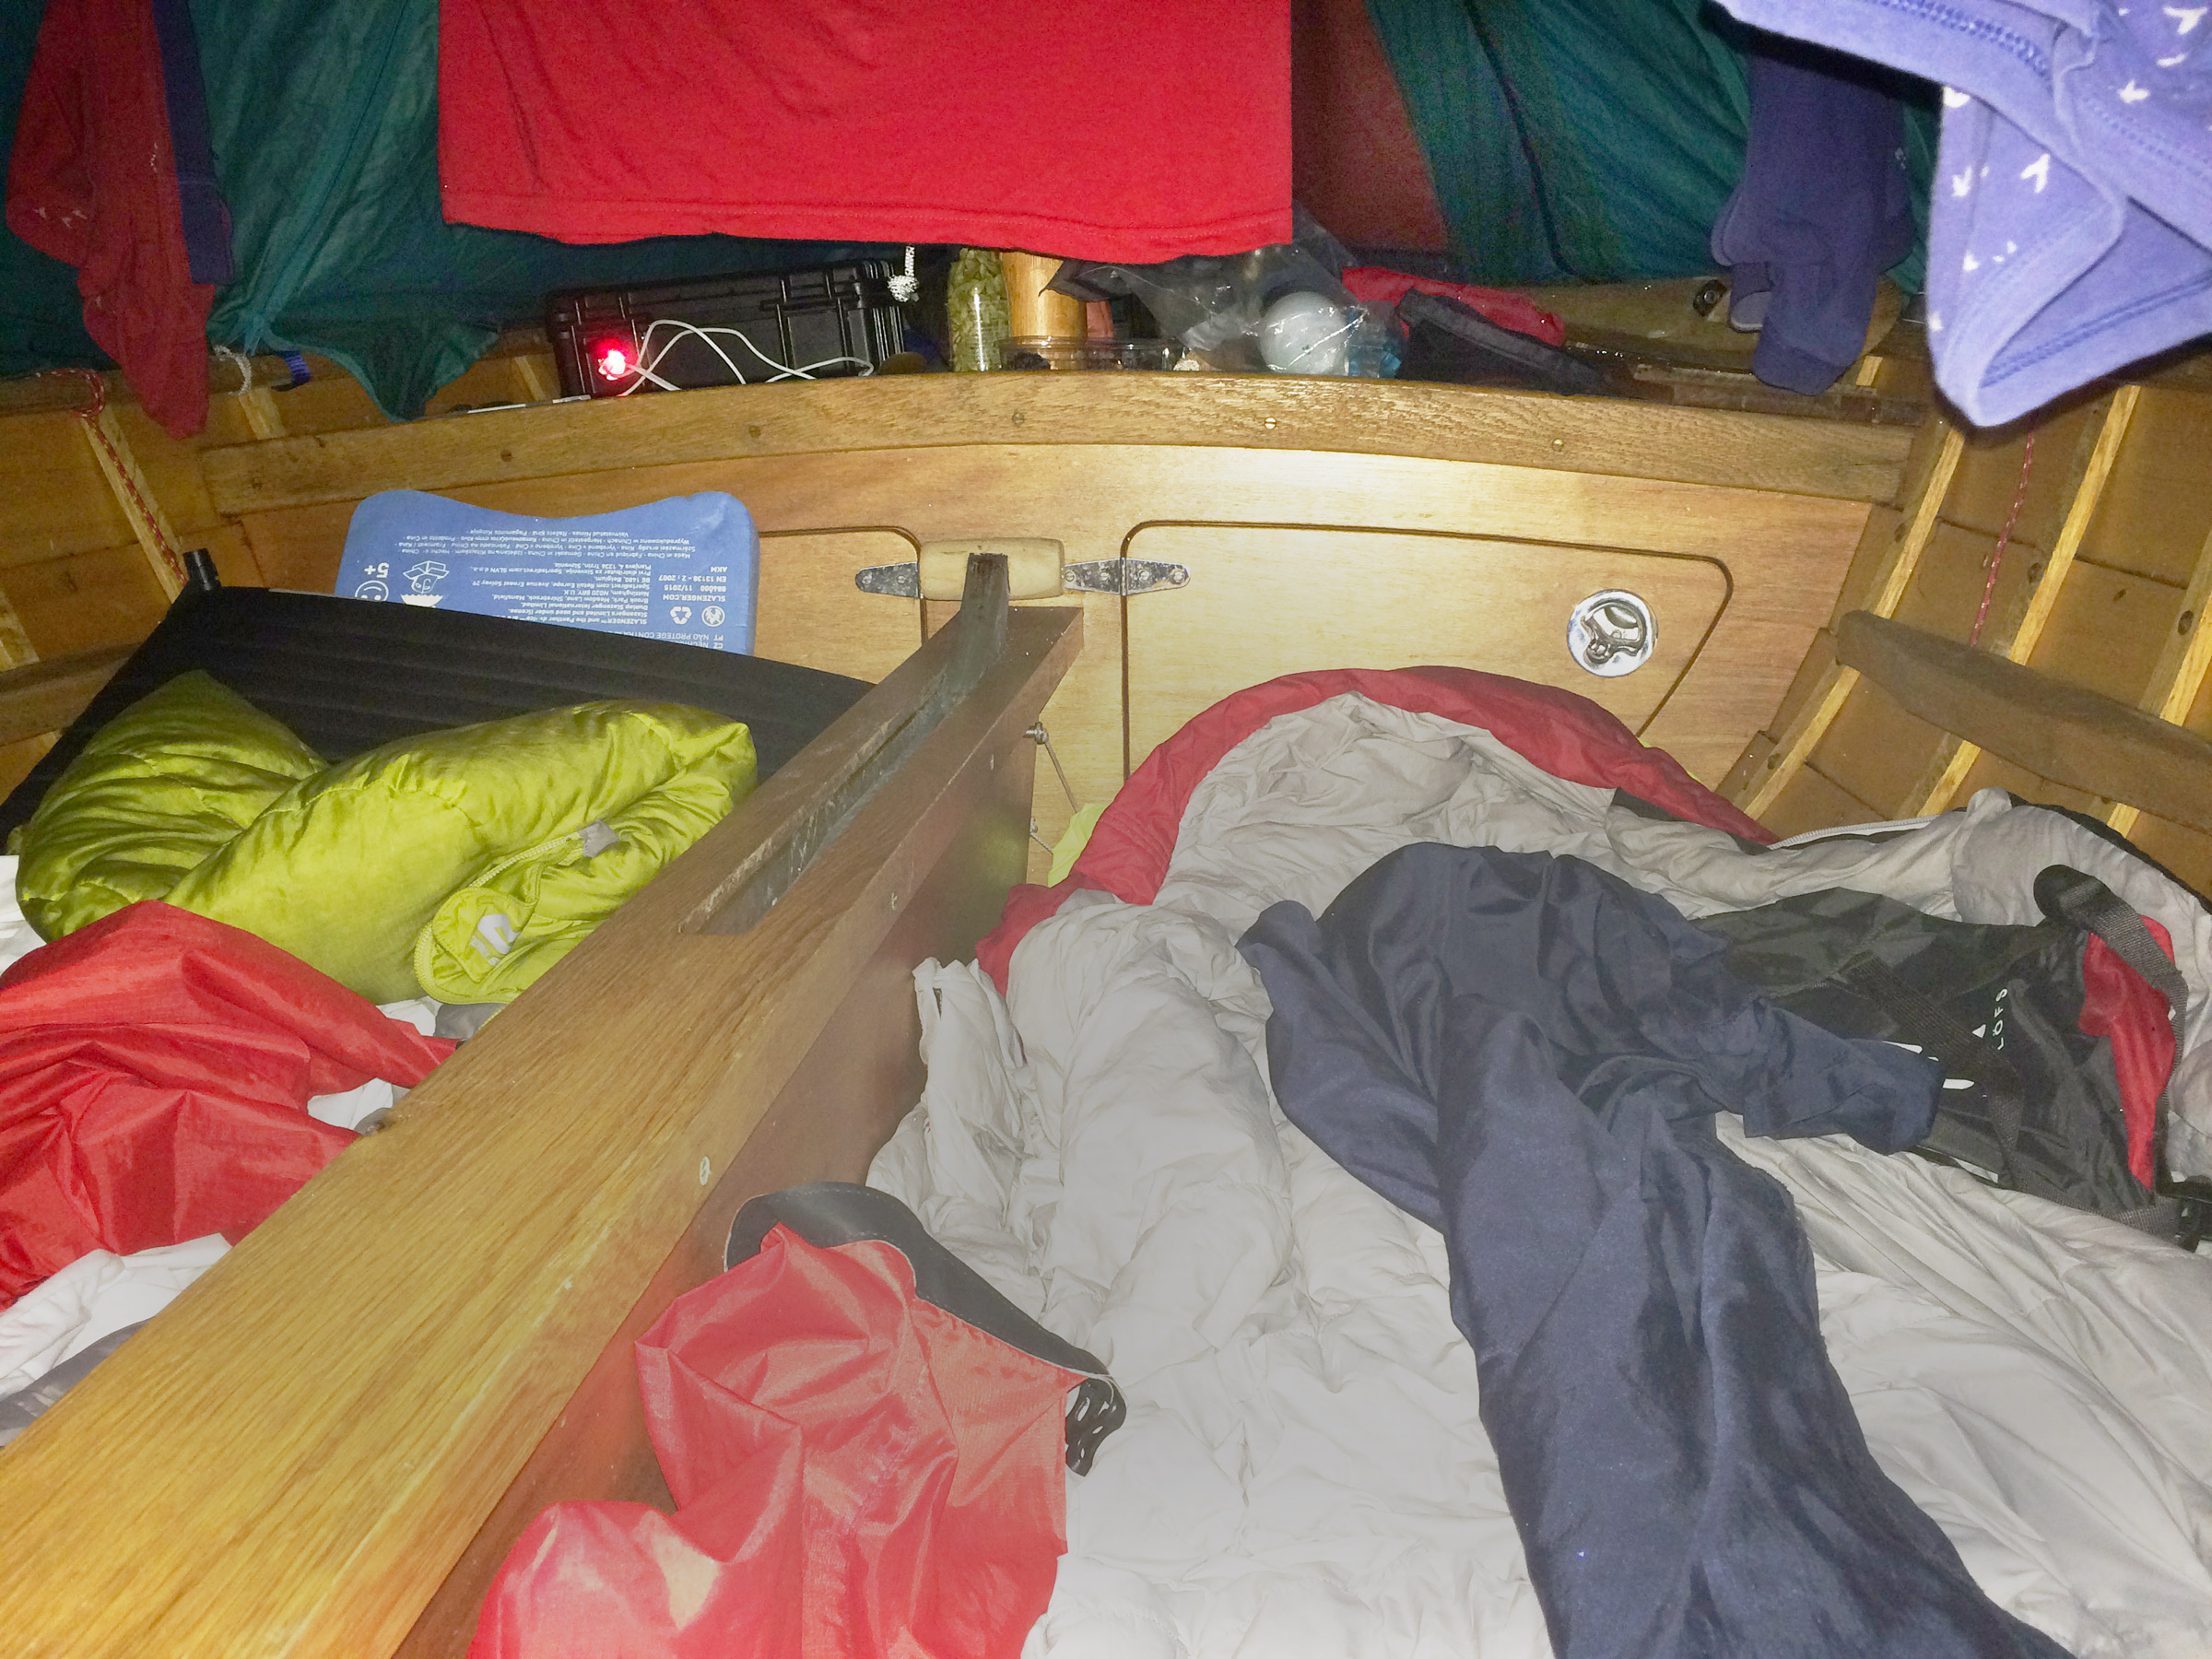
Our sleeping arrangements aboard DUNLIN under the boat tent were quite snug but we usually slept well. Mat made all of the thwarts removable so that we could take them out at night and lie on either side of the centerboard. We both had inflatable sleeping pads and good sleeping bags, which we stored in waterproof bags in the lockers during the day. There was no space for pillows. Clothes that got wet in the rain would hang overnight above us.
In the days before our departure Mat had raided his parent’s attic, where he found an ancient tent and set to it with scissors and a sewing machine. He reshaped it to fit snugly over the top of DUNLIN, with the poles hooking into clips he attached to the gunwales, and with Velcro doors at both ends. The mast had to be in place to put it up, so Mat would balance precariously on the tiny foredeck while I directed the foot of the mast into the step. With the cockpit covered, we settled into our coffin-like beds in the bilges, which were surprisingly comfortable once inside a sleeping bag on a pad.
When we woke from the first sleep aboard DUNLIN we heard the hiss of rain outside. We headed to Abbeville tourist office with Mat’s parents, who had slept in their campervan, knowing they would need to help us get past the flooded locks.
We were told we’d have to row back to Saint-Valery-sur-Somme where we had launched DUNLIN the previous day. Though it was disheartening to go back over previously covered ground, it was a rapid passage aided by the flow of floodwater. The four of us hauled DUNLIN out on to the trailer, drove upstream past the closed locks to the village of Long, 11 miles to the southeast, and launched where the canal was open.
Gill and Dave headed home with the trailer.
Mat and I spent the next week rowing 80 miles against the strong current of the Somme. I slathered my hands in Gurney Goo—a parting gift from my mum—which helped keep blisters away.
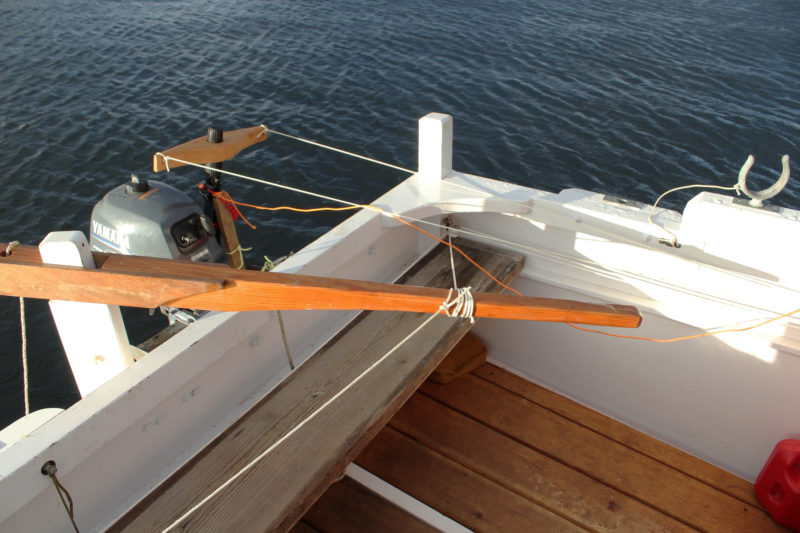
At the slightest hint of wind, Mat would hustle to put down his oars, grab the mast (which lay between us while we rowed), and teeter on the foredeck trying to put it in place, then unpack the sails and rigging from the lockers, and get everything ready to sail, while I took both oars and rowed alone against the current.
The wind was always too short-lived to make any progress under sail. The waterway was lined with trees, which allowed the occasional gust but sheltered us from most wind. We would pick up our oars again and row with the sails up and I’d bang the back of my head on the mast at the end of every stroke until we took it all down again.
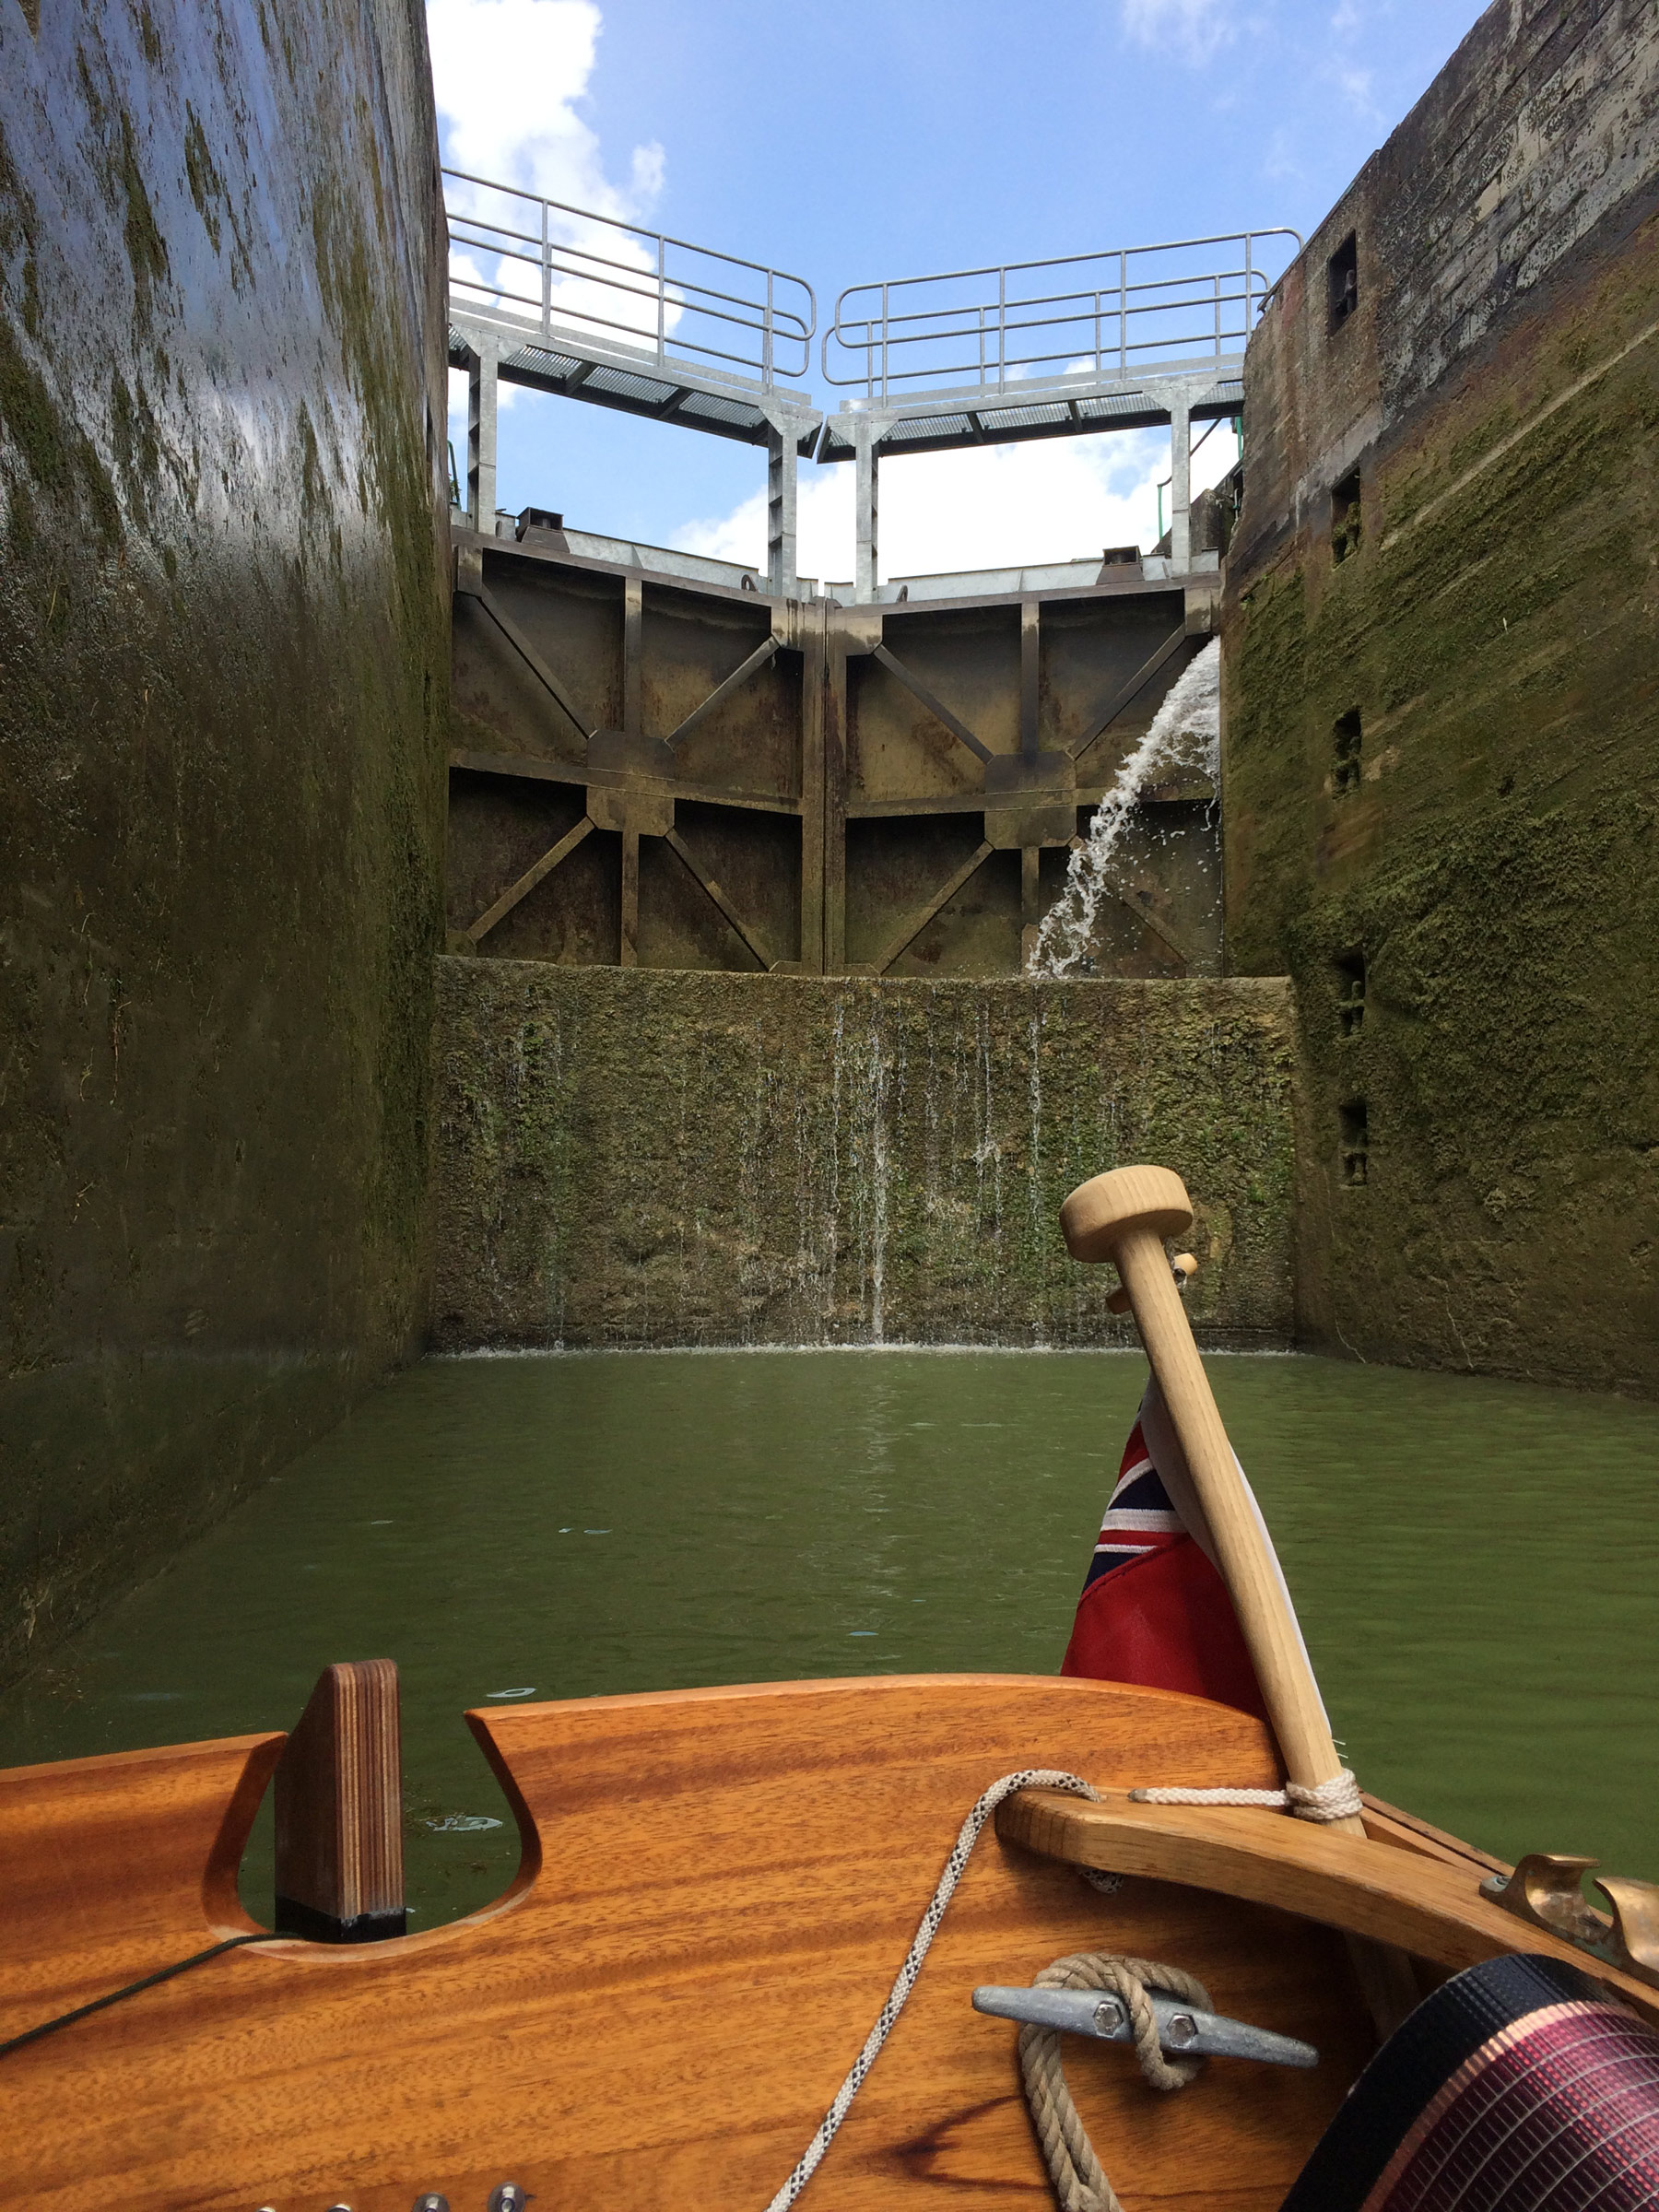
When we reached Péronne, the pastoral, serpentine Somme joined the canal du Nord, a busy, often arrow-straight, 59-mile-long commercial waterway carrying hundreds of péniches—huge commercial barges, some weighing thousands of tons. It was our only route to the Med; the way to the alternative route via the Canal de Saint Quentin was closed, and in need of restoration.
Each new canal had a new type of lock to get used to. This is one of the smaller locks on the waterways in the north. On one series of locks you’re accompanied by a youngster on a moped, usually a female student, who rides along the towpath and works the locks ahead of you. This was a luxury.
Violent thunderstorms and heavy rain began to arrive daily. On a supply run to a grocery store in Noyon we saw newspaper headlines: “Storms & heavy rain batter continent,” “More than 330,000 lightning strikes hit Europe in just eight hours,” “Extreme lightning strikes, killing and seriously injuring dozens of people.”
We spent the next 12 days dodging thunderstorms, rowing 120 miles southward on a network of canals: Canal du Nord, Canal de l’Oise à l’Aisne, Canal lateral l’Oise a l’Aisne, Canal de l’Aisne à la Marne, and Canal lateral à la Marne.
Near Saint-Christ-Briost, on the Canal du Nord, we spotted a place we could moor just as tar-black storm clouds darkened the sky. We hastily erected our little yellow tent under a tree on sharp gravel, dotted with dog crap and brown puddles. We dived into the tent as sheets of heavy rain hit the canvas; the noise was so intense we were shouting to hear one another despite being huddled like two Antarctic penguins trying to keep warm. A violent crack of thunder pierced the air around us at the same time that lightning flashed, so intense it burned your eyes before they clamped shut. I flinched every time, certain that lightning so close couldn’t miss us. We huddled for an hour while fierce thunder clapped every few minutes. When the rain eased, we carried on.
We were careful not to get in the way of barges. When big ones overtook us, we could surf the bow waves which sped us forward. On narrow straits, barges approaching from the opposite way pulled the water ahead of them and dragged us toward the wake coming off the bow. We had to row hard to avoid collision.
At the 1200-yard-long Panneterie Tunnel on the Canal du Nord, we had to wait our turn while a commercial barge emerged heading in the opposite direction. Many of the tunnels in France are too narrow to allow boats traveling in opposite directions to pass by each other; lock keepers who control a traffic-light system at both ends of the tunnel. It was always a little nerve wracking waiting for a green light to give us the go ahead, since our guide book told us that boats without engines would not be allowed through. But, as we’d hoped, we were given the green light to pass through all four of the tunnels along our route.
The Canal du Nord has no accommodations for pleasure boats, so finding a suitable camp for the night wasn’t easy. The first night we rowed until it was too dark to continue, searching for a suitable place to stop. Sleeping in the boat wouldn’t be safe, as the wake from any passing barge could capsize us while we slept. At about 9 p.m. we had put on headlamps, devised a way to secure the boat to the canal bank using an anchor attached to the bow line, and then tried to decide where to put the tent. The bank sloped toward the canal, then dropped 2′ straight down to the water. Between the canal and a stagnant swamp, humming with insects, on the opposite side, there was even ground about 6′ wide, just enough space to pitch our tent, but tire tracks running along it suggested it was occasionally used as a road. It was dark and drizzling and we were hungry. We put up the tent on the slope, on the edge of the canal, overlapping the tire tracks as little as possible.
We warmed canned dauphinoise potatoes on the camp stove, then turned in and fidgeted on the sloping ground in our sleeping bags until exhaustion forced us to sleep. A few hours later I was awakened abruptly staring straight into the glow of two headlights that illuminated the yellow canvas of our tent as they sped toward us. I thought we were about to be run over, trapped inside the two zipped doors of our tent with no time to escape. I let out a terrified scream that tore through Mat. Still half asleep, he leapt up out of his sleeping bag, wildly thrashing about as if trying to tear his way out of the tent. We were inches from the water’s edge, on the brink of toppling in. My fear of falling into the canal while zipped inside the tent surpassed that of being run over. I yelled at Mat, “Wake up! Wake up!”
The car inched past us just as Mat awoke from his sleepwalking state. He had snapped a tent pole and now the canvas was sagging. The sound of drizzle pattered on the tent and at 3 a.m. we quietly packed up our things and re-pitched our tent on a hummock in the swamp in a dense cloud of insects that swarmed and glowed in the light of our headlamps.
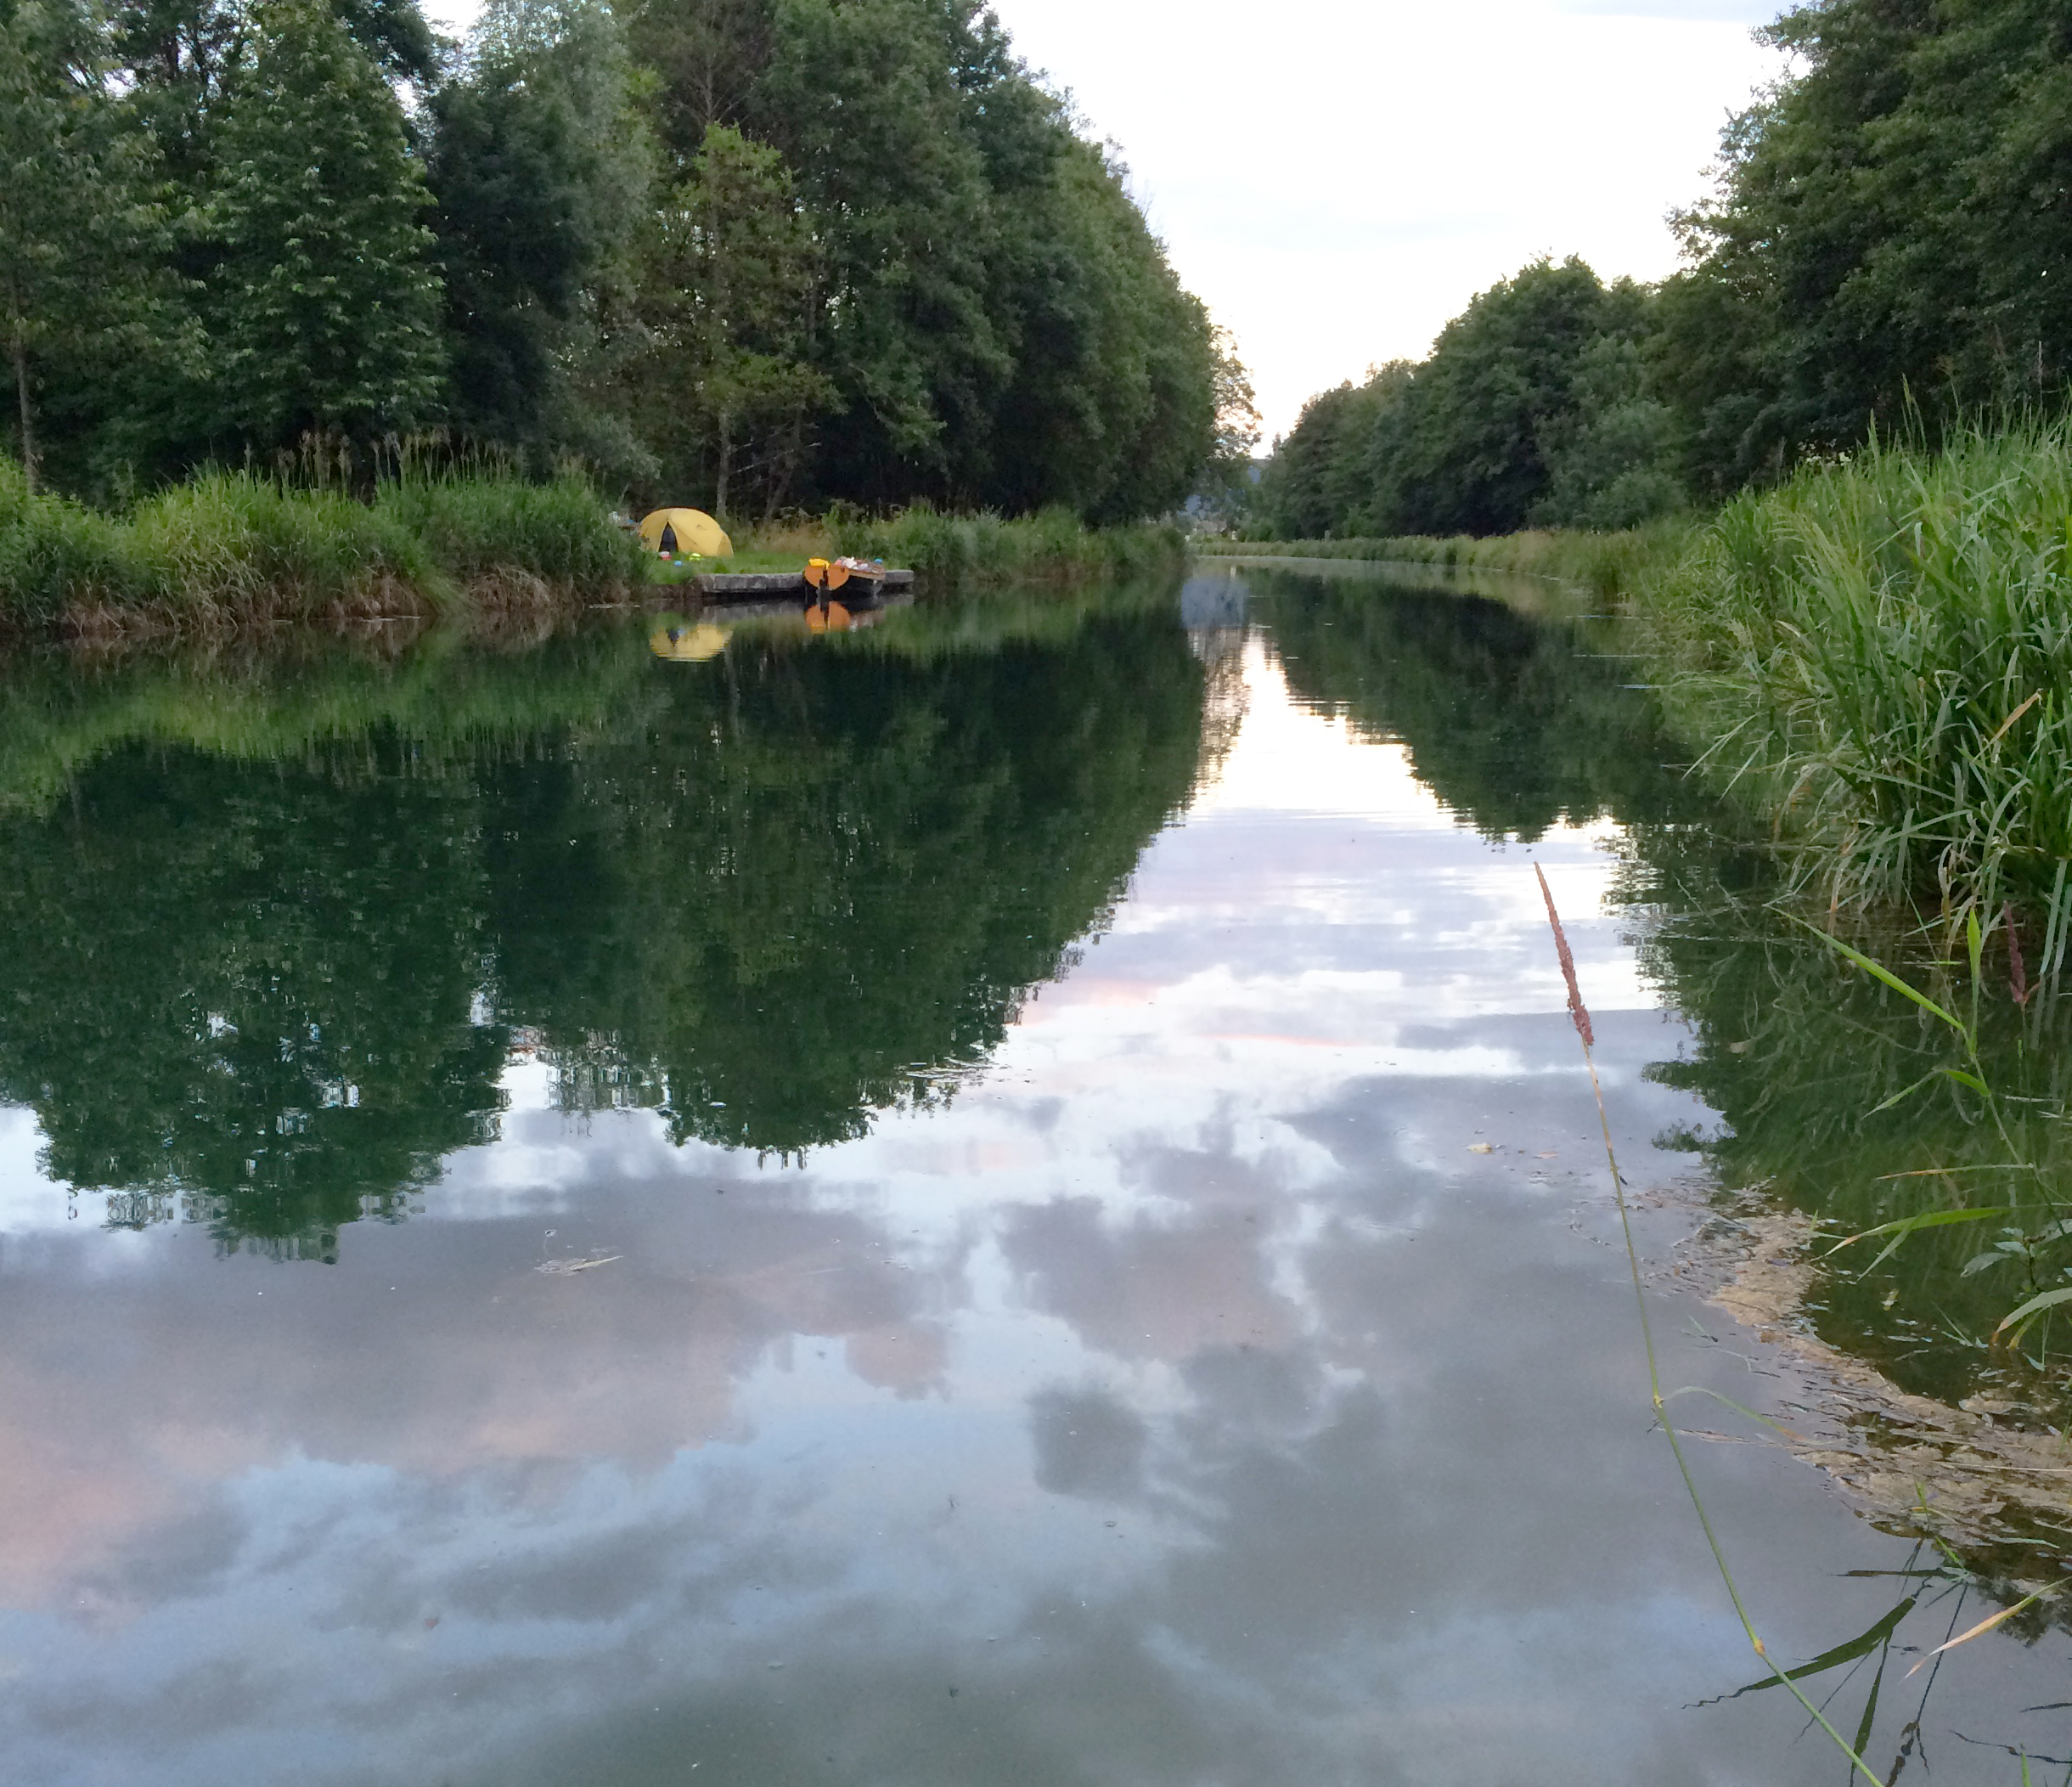
We had not intended to camp here on the Canal de l’Oise à l’Aisne, but its locks are remote-controlled and won’t allow pleasure boats through after 6 pm. We missed getting through the lock (where I was standing to take this photo) by seconds after rowing as hard and fast as we possibly could for the previous hour. We didn’t reach the place with showers or toilets we were aiming for, but this spot was beautiful.
We rowed as fast and long as we could on the Canal du Nord and covered the roughly 27 miles to the Canal de l’Oise à l’Aisne in under three days. After that we usually found places to moor at night. Occasionally we made it to towns on the river with toilets, showers, and Wi-Fi.
We rowed into the Champagne region of northern France, where the murky green-brown water we’d become accustomed to became a translucent, chalky blue. We could see shoals of fish dart and dive to avoid our oars. So far we had passed through over 30 locks, all lifting us higher into the French countryside. We began to see the surrounding hills; a neat patchwork of vineyards, dotted with chateaux.
The Canal de L’Aisne à la Marne carried us up 24 more locks on its 36-mile (58km) length from Berry-au-Bac to Condé-sur-Marne and through the centers of beautiful old cities like Reims and Chalons-en-Champagne. We bought fresh food from bustling markets piled high with brightly colored fruit and vegetables. We explored narrow streets and ate lunch in shaded parks. But sleeping aboard the boat near a city center had its drawbacks. In St-Dizier we were awakened repeatedly by drunks. At around 2 a.m. someone cast off our bowline while we were asleep and we were awakened only when DUNLIN crashed into the quay, tearing a fender. The following morning the lack of sleep didn’t help as we tried to row through thick weeds in the canal. The plants clung to the bow with an enormous dead weight that dragged us to a near halt; it hung in long strands over our oars as we tried to heave them out of the water.
We docked DUNLIN in Châlons-en-Champagne, a city 90 miles due east of Paris. We were able to pass under several low bridges and get right to the city center. It had been raining, so we got the boat tent up as soon as we arrived to give the sleeping area a chance to dry.
We climbed through 71 locks to the summit of the 140-mile-long Canal entre Champagne et Bourgogne. Every day we’d row for nine hours, three of which were spent sitting in locks. They lifted us to an elevation of 1,115’ above sea level, where we arrived at the 134-year-old, 3-mile-long Balesmes Tunnel, near the town of Langres.
We had read that only motor-driven vessels were allowed to pass through tunnels, which were controlled by a traffic-light system. To our relief, we had already been allowed to pass through one such tunnel, so with fingers crossed again we put on our life jackets, switched on our tiny navigation lights, and waited for the red light ahead to turn green…and waited some more. There was no alternative to the tunnel.
Twenty minutes later as we began to lose hope, a double-length péniche came squeezing out of the tunnel, like toothpaste from a tube. We watched as it glided slowly past us. When we looked at the traffic light again we had a green!
The shade of the tunnel was a relief from the heat outside, cold slimy drips fell on us from the ceiling, it was pitch black— no light at the end. When we entered, our boat should have triggered a sensor that turned the lights along the ceiling on, but being so small we’d failed to trigger them. We rummaged around for our headlamps.
About halfway through the tunnel we began to hear the low rumble of a distant engine and smell faint diesel fumes. We were counting aloud to keep our rowing strokes in time, after a month rowing all day, every day we could row in a perfectly straight line. We were both reluctant to disrupt our smooth progress by acknowledging that it smelled and sounded like a péniche was coming toward us. The rumble of the engine grew louder. Just as we thought we would choke on the fumes, we could make out a pale glow at the end of the tunnel. As we rowed closer we could see a maintenance barge but it was only partially obstructing the view out and we’d have room to row around it. We burst past into the hot, bright day and breathed a simultaneous breath of fresh air and sigh of relief. The barge had not been about to motor into the tunnel; it was parked at the entrance, working on reconstructing the façade.
Mat stood on the wall of one of the many small locks we transited while I descended aboard DUNLIN. Dealing with the locks in such a small boat was very easy compared to being in a big, heavy barge, as we could easily hold ourselves in position holding on to the ladders built in to the walls.
With the tunnel behind us we began the downhill leg of the journey. Just 43 more locks until we reached the river flowing to the sea. The remainder of this canal was a series of automated locks. I ran along the bank while Mat rowed so I could manually trigger the sensors that opened and closed the locks because DUNLIN wasn’t substantial enough to trigger them. It was a great relief to be running instead of rowing through the French countryside, passing golden fields dotted with straw bales and white Charolais cows, and picking sweet wild cherries along the way to feast on while we were waiting at the locks.
At the end of the canal we reached the Petite Saone, then the Saone, a wide, open river bustling with rental boats. After weeks of traveling straight, narrow, stagnant canals the feeling of space and fresh water was extremely refreshing. The wind could reach the water, and for the first time since we’d arrived in France, we could sail! We zoomed with ease at twice the speed we had been rowing. It was glorious, but we had to keep an eye out for giant river cruise ships, 360’ long and three stories high, charging up and down the river with their onboard swimming pools and cinemas.
We found this bucolic camping spot on the banks of the Canal Latéral à la Marne, which we joined at Condé-sur-Marne and left at Vitry-le-François, where it joins the Canal entre Champagne et Borgogne. This canal featured very long, straight, relatively uninteresting sections. We passed many péniches that use this route to transport goods from Vitry-le-François to Paris.
We sailed more than we rowed on the 130-mile length of the Saone, sometimes covering over 25 miles a day. The next river, the Rhône, wouldn’t be so accommodating; we had been warned and read that DUNLIN would not be permitted in the locks and on much of the river’s length because we didn’t have an engine. It wasn’t possible to lift DUNLIN past the locks, but we could still make it to the Petite Rhône where we would row out to the sea, if we could find a boat with an engine that was willing to raft DUNLIN alongside to get us past both the locks and through long sections designated as dérivations, on which we were not permitted alone.
A couple of days previously, ashore in Lyon, we had a met Malté and Aladino, two friendly Swiss guys, who were motoring their 30’ sailboat, JULIETTE, to the Med as quickly so they could to sail in Sardinia for the summer. We pulled up onto a slipway at the edge of the Rhône just upriver from the first lock and kept watch over the wide stretch of water. We knew they would pass eventually, and just a couple of hours later we caught sight of JULIETTE. We waved and shouted, leaping about madly to get their attention from 200′ away. Aladino and Malté steered over to us and said they were happy to have us aboard with DUNLIN rafted through the locks and in tow along the dérivations.
Rowing through the French countryside, we were aiming for the village of Froncles, and a halte fluviale (river stop) that accommodates boaters. Our waterway map indicated it had hot showers. It was just under 20 miles away along the river but we were making slow progress fighting with weeds that tangle our oars for much of that distance. I hopped out on to the bank for a moment to stretch my legs while Mat continued rowing.
Being aboard JULIETTE was good fun but after three long days motoring 150 miles we couldn’t wait to be back aboard DUNLIN, sailing and rowing as we’d planned. Motoring felt like cheating.
With just one more lock on the Rhône separating us from the wild, shallow Petit Rhône, the western arm of the Rhône Delta, Aladino and Malté cast us off. All the motoring put us ahead of schedule, so we decided to row up the arm of the Rhône that leads to the center of the historic city of Avignon. The current was flowing fast, so we tucked into an eddy that helped us make our way upstream. We rowed under the world-famous bridge, the Pont d’Avignon, then spent a day wandering within the city walls and doing chores. The next day, we sailed downstream from Avignon with just the jib on a strong mistral wind for over 10 miles, steering well clear of an 850’ cargo ship and carefully navigating its bow wave.
Just downriver from the bustling medieval town of Verdun-sur-le-Doubs, we took shelter under a tree to wait for a storm to pass. DUNLIN sat tied to the bank of the Petite Saone at the edge of a cow pasture. A strong wind was blowing directly against us but the river here was too narrow and too shallow at the edges to tack to weather. We could have taken to the oars, but in the muggy heat we’d get wetter rowing in rain gear than sitting in a thunderstorm, so waiting for the rain to blow over was the best option.
We stopped at a little river port run by a memorable ex–fighter pilot named Olivér. We also met Roger and Mary, a retired Australian couple, who were heading south the following day on their barge. A plan was formed. The next morning, we set sail toward the lock where Roger and Mary caught up with us just before we reached it. They threw us a line. We rafted alongside their 50′ barge without stopping, then climbed aboard. They let Mat take the helm for a while, while I kept an eye on DUNLIN, then reclined on their sofa reading the paper. Mary prepared lunch which we enjoyed while waiting for the lock to open. We passed through smoothly, said thanks and farewell, and jumped back aboard DUNLIN. We had passed through the 202nd and final lock of our journey.
We kept to the right bank and entered the distributary of Petit Rhône. It felt wild and secluded and it was good to be rowing again. It was much narrower than the Rhône and flowing slowly, just a third the speed of the Rhône. We found an idyllic little sandbank to set up camp and lit a fire for cooking and keeping mosquitoes away.
We awoke full of excitement, knowing that roughly less than 30 miles downstream the river spilled into the Mediterranean Sea. Mat relit our campfire and cooked omelets for breakfast while I packed away the camping equipment. After wolfing down omelets, which tasted a lot like wood smoke, we pushed DUNLIN off the sand, jumped in, and continued rowing downstream. There was not a single cloud in the radiant blue sky and the riverbanks, dense with trees, were alive with birdsong.
We rowed hard for 18 miles, with the heat of the Mediterranean sun building. By 1 p.m. we were desperate to find shade and replenish our energy stores. There were no convenient places to stop along the banks, so we grabbed an overhanging branch and tied our bowline to it, then dropped a stern anchor to keep us from swinging under low branches. We refueled on stale baguette and bottled water that had become hot in the sun and tasted strongly of plastic.
When we were ready to get under way again and tried pulling up the anchor, it was stuck. Mat dove in and I watched him swim down until his feet disappeared in to the murky water. He untangled the anchor from roots on the riverbed and we set off toward the Camargue, a marshy lowland island separated from the mainland only by the two slender branches of the Rhône. The river began to widen and groups of tourists paddled past in brightly colored kayaks.
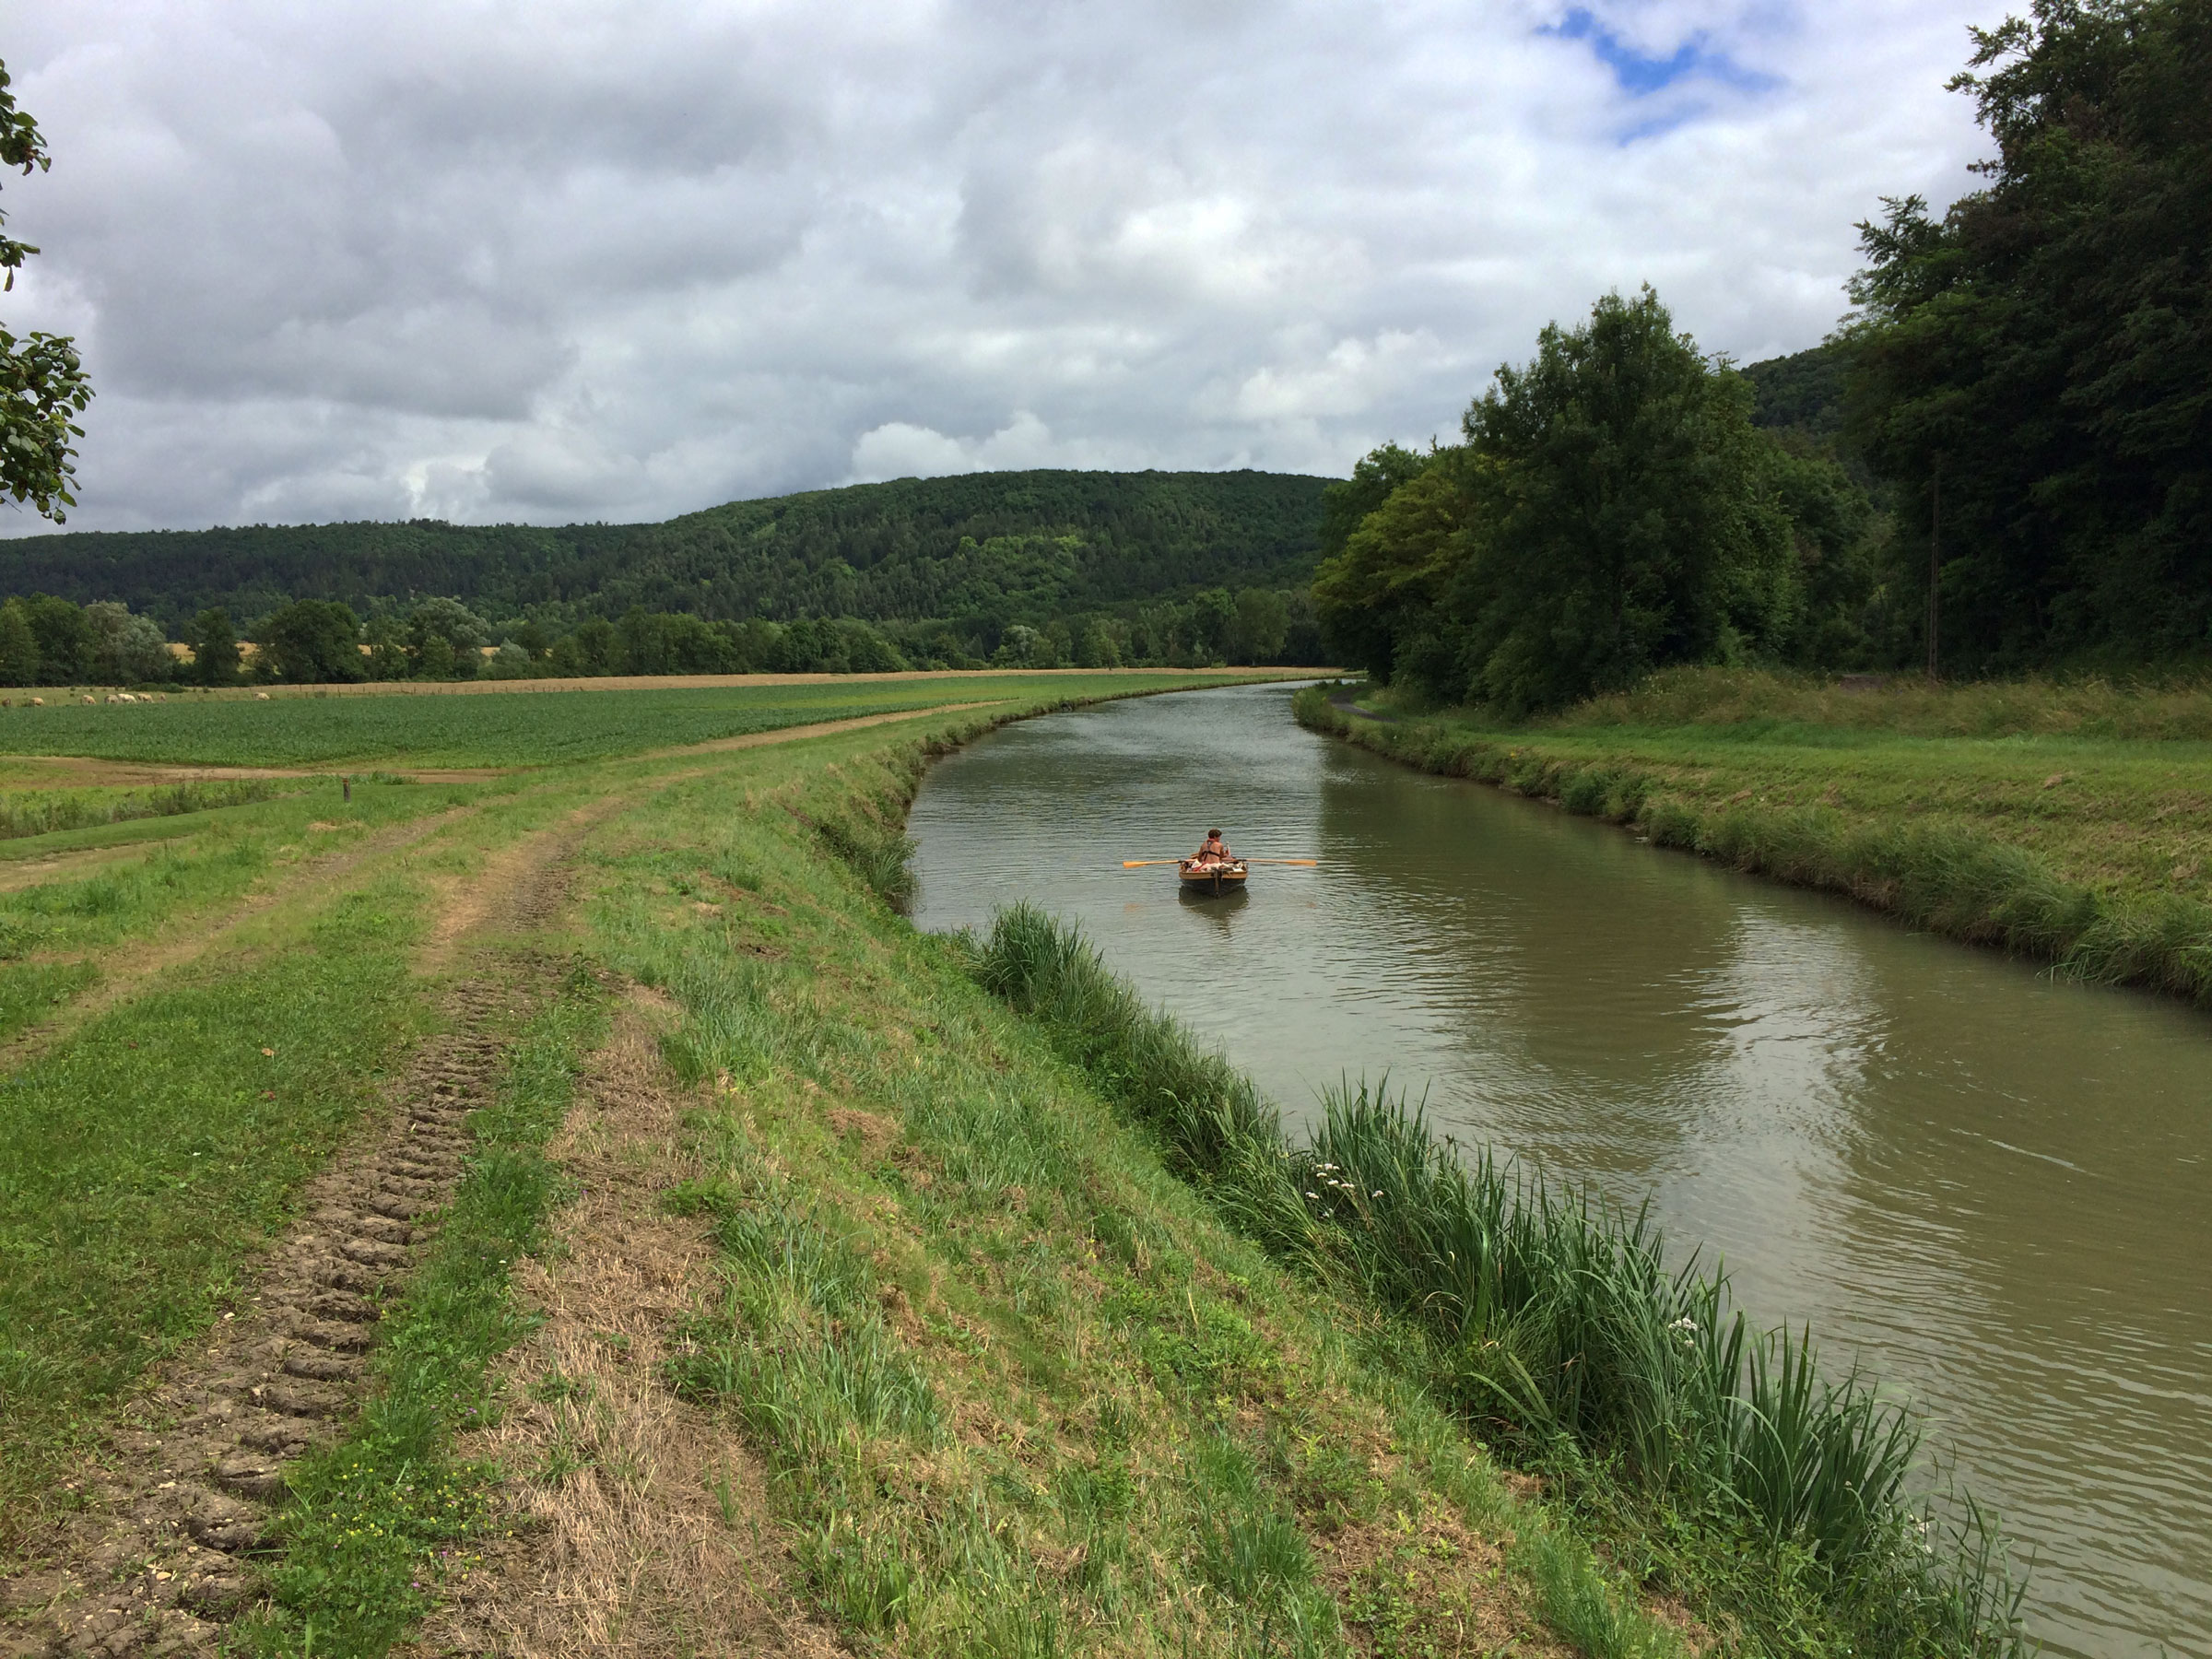
We found perfect sailing conditions on the south-flowing Saone River in east-central France. With the oars are stowed we sailled goose-winged downstream.
Soon after we’d had lunch, a strong breeze picked up, causing a loud rustling in the trees and carrying the smells of hot sand and seawater. Instead of continuing to row directly in to it, we hurriedly stowed the oars, hoisted the sails, and began tacking into the sea breeze. The Mediterranean felt close. DUNLIN was heeling at an unnerving angle, so we leaned out over the windward gunwale as we pushed our way onward. The outhaul block on the boom suddenly came loose and the main flapped wildly. We quickly took down both sails, grabbed the oars, and resumed rowing. After another hour of rowing against the wind, we arrived at vast open plains where wild, white horses and black bulls wandered among grasses, and pink flamingoes on stilt-like legs waded in shallow ponds. Reaching the wetlands of the Camargue felt like rowing into a new continent and promised we were close to the sea.
We rowed around a couple of big meanders, past a charging 60′ paddle cruiser, with a foaming white wake spreading out from its bow, and all of a sudden we could see the sea. The prospect of rowing out into saltwater swell and open sea now seemed a little daunting. For me, a slight panic crept in, but we rowed on, pausing to take in that surreal moment when we were out in the sea looking back up the river. We’d come out at the other end of France! We made it to the Med! The sun was just beginning to sink from view and a pink hue lay along the horizon. We took turns to dive off the boat. The seawater was shockingly cold compared to the warmth of the river we’d become accustomed to bathing and swimming in. When we got back aboard we could feel the salt clinging to our skin.
We had been underway for 52 days since leaving Sidmouth—I had not dared to believe we would actually make it to the Mediterranean. We looked in both directions along the coastline for sign of ports, rechecked our chart, then rowed a mile east through the small, rolling swell to Saintes-Maries-De-La-Mer for the night. We rowed in to Port Gardian, a marina on the west side of the town, and looked for an open spot along the docks among the huge white yachts. The staff didn’t know what to do with us and our tiny wooden boat, they had us move three times before deciding on a place we could stay. Mat rummaged in the locker and pulled out the bottle of champagne we’d bought a month earlier, which we had stowed away for this very moment.
Polly Hilton lives in Devon and founded Find & Foster, a small fine cider company. She has always loved being in and on the water and she kayaked growing up, but was not interested in boats before Mat built DUNLIN and had never sailed before meeting Mat. She has become a keen rower since the trip through France.
If you have an interesting story to tell about your adventures with a small boat, please email us a brief outline and a few photos.
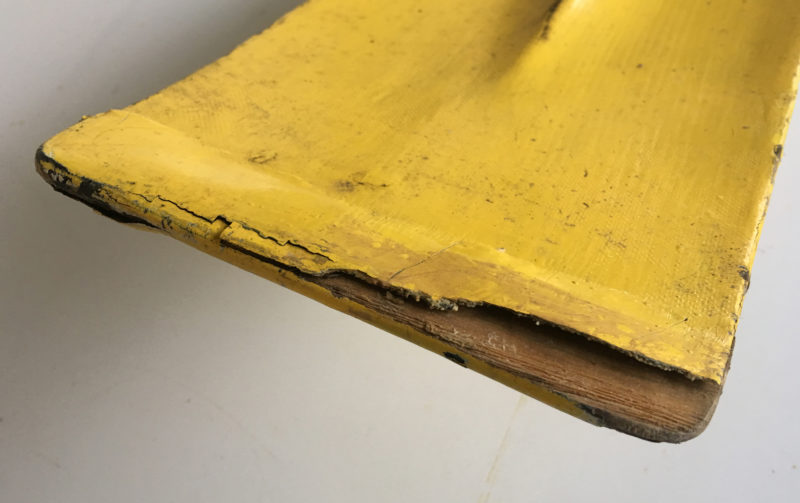
Although this blade was protected by a strip of hardwood that was glued in place and covered with fiberglass, the wear and tear of cruising still took its toll.
Oars do their work in water, and if that were all they came in contact with, they’d get by with a few coats of varnish. But they get beat up when pushing off docks, clipping pilings, and scraping across rocky shallows. The tips of the blades get the worst of it, and you can reinforce them with hardwood, epoxy, fiberglass, or a combination of the three, but those materials will eventually show the wear and tear they’re subjected to.
Photographs by the author
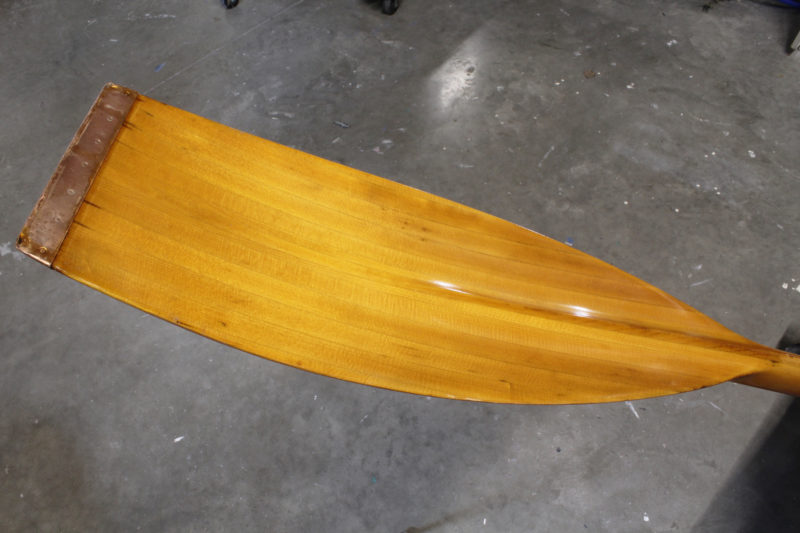
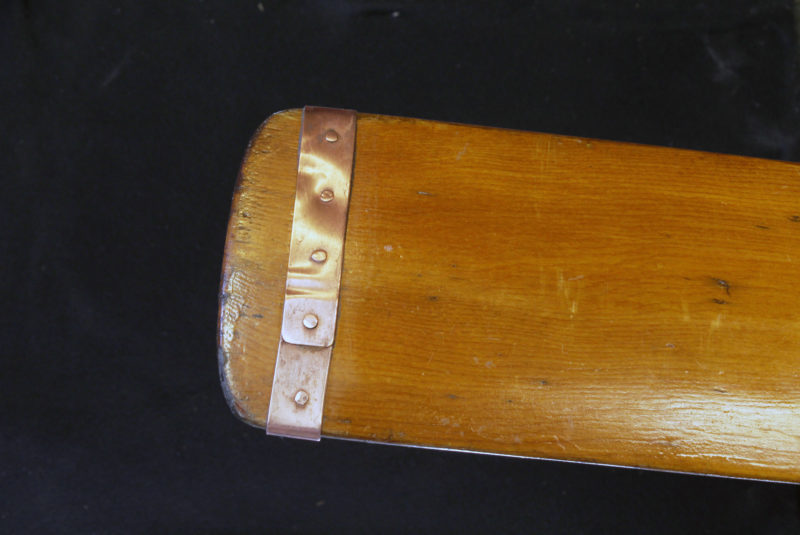
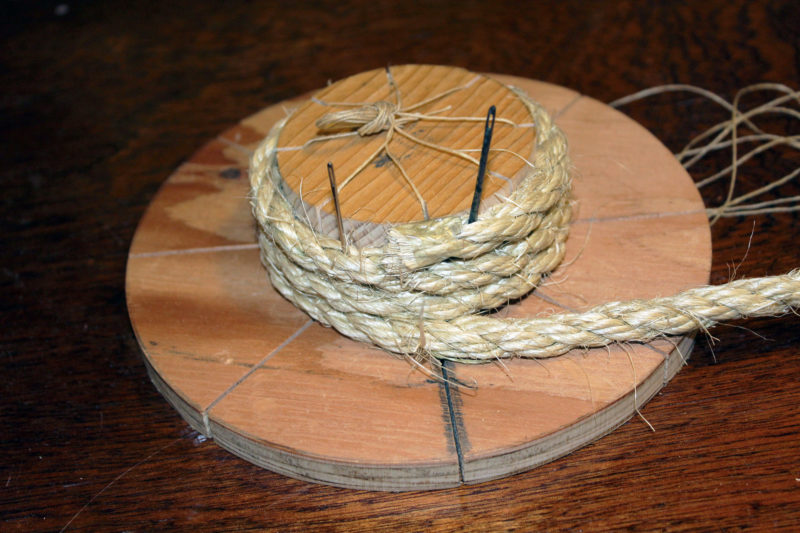
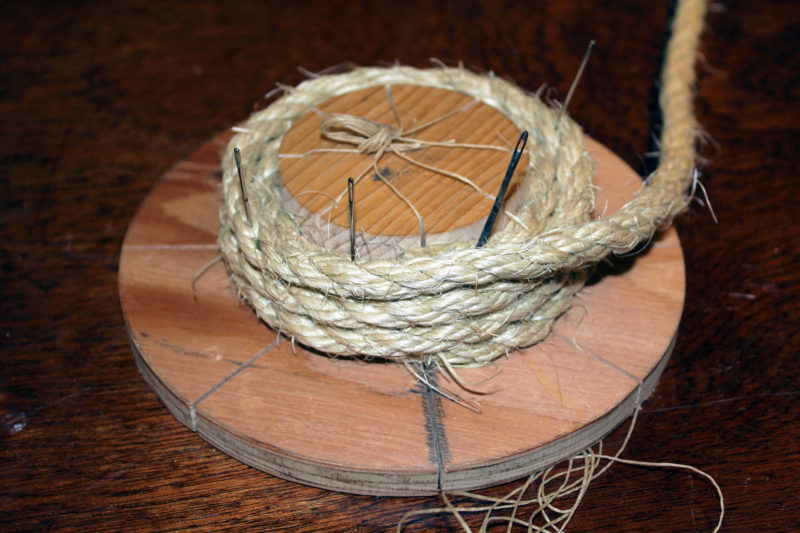
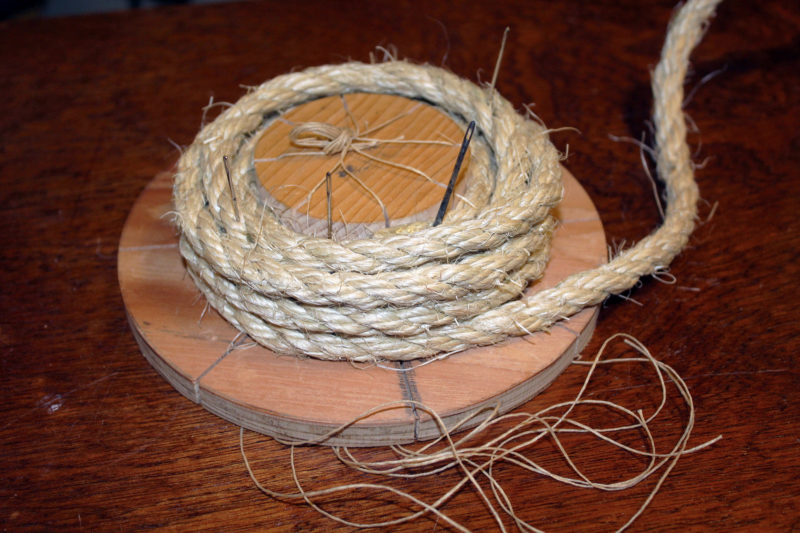
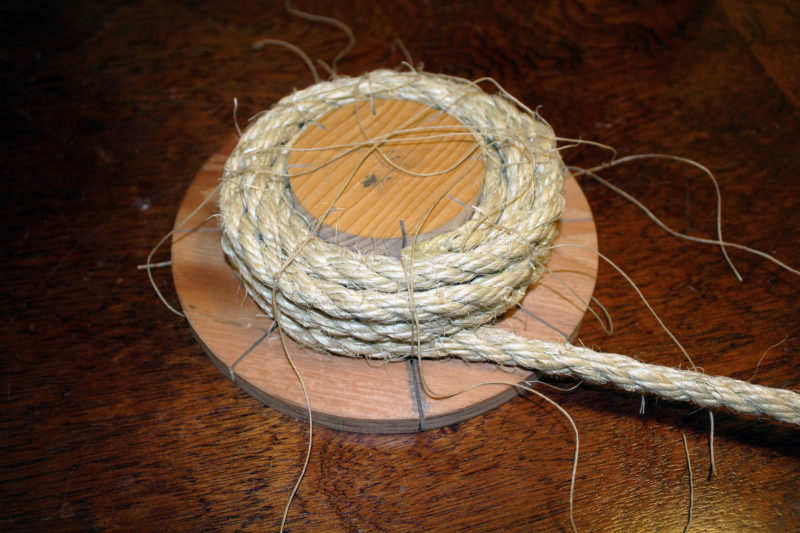
This is one of a pair of oars that I built and equipped with copper tips in 1985. That winter, they survived my 2,400-mile, 2-1/2 month sneakbox row from Pittsburgh to Cedar Key, Florida. They’ve been in use on and off since then.
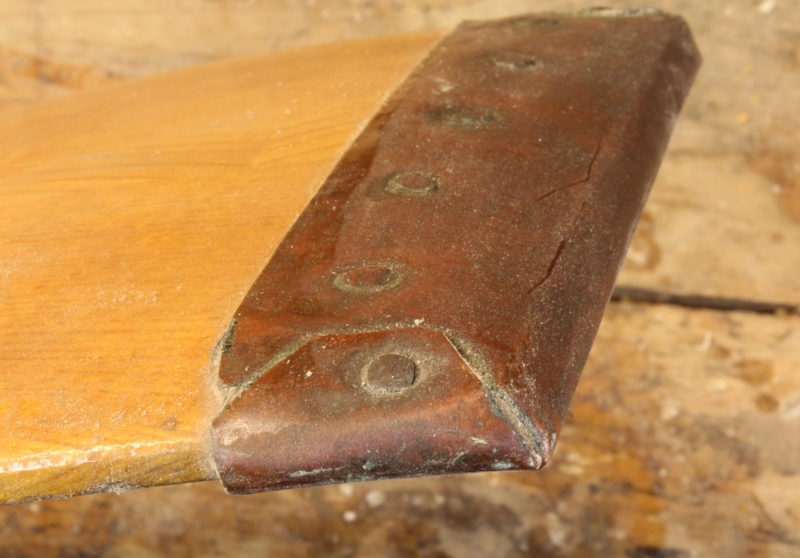
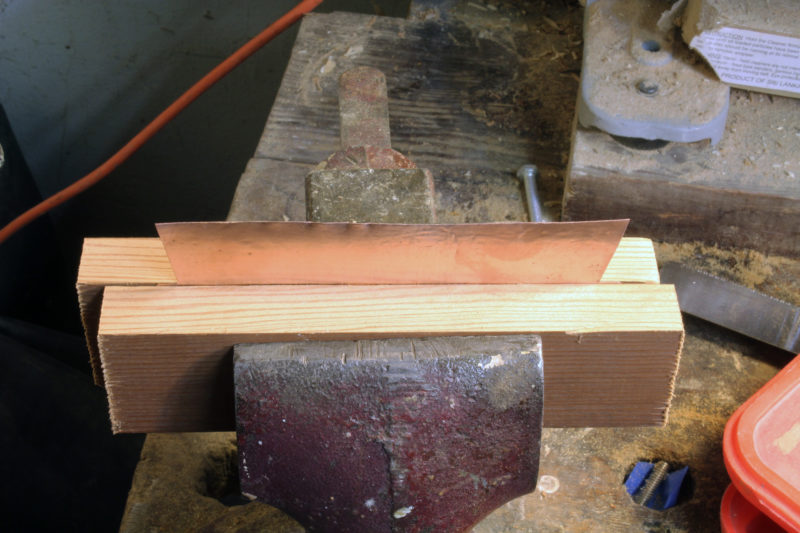
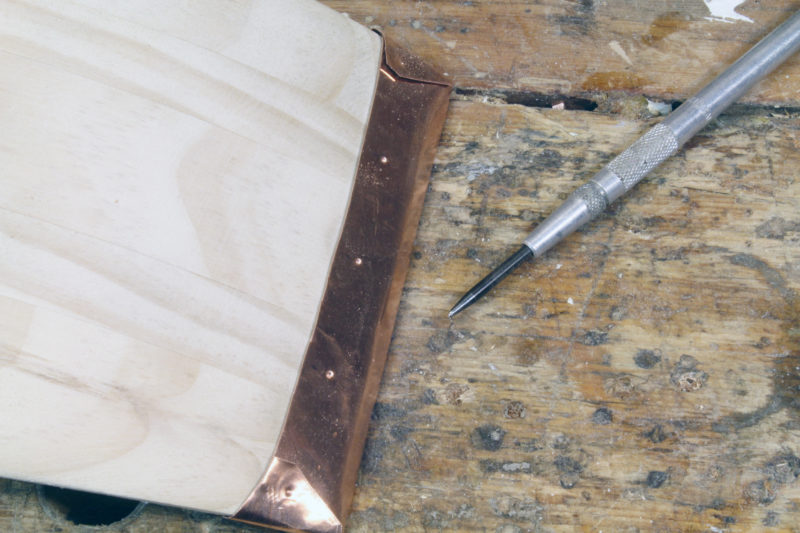
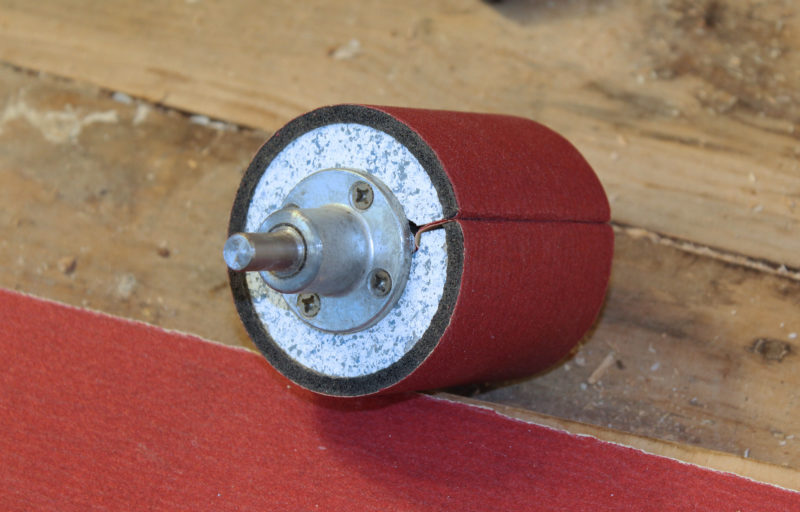
The traditional approach has been to cover the blade tips with sheet copper. The copper guards look good, take wear well, and make a good do-it-yourself project. I always put copper guards on my spoon-bladed oars. The tips are thin and have cross grain that makes them more fragile than straight-bladed oars; fortunately, the tips are straight across and easy to wrap with copper.
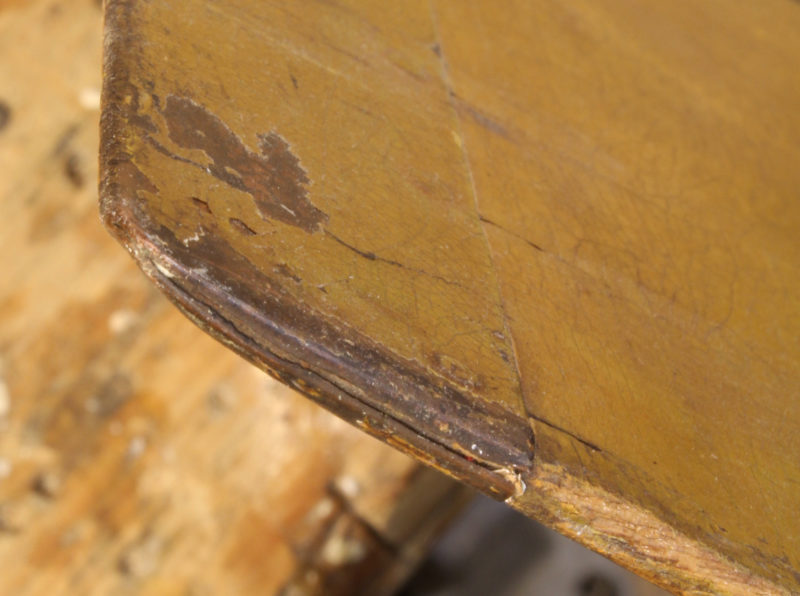
While the oar once used by my great grand uncle for class races at Harvard developed some spits where the nails are, the copper tip made it possible to make the blade very thin and light. The splits may have developed long after the oar was in use.
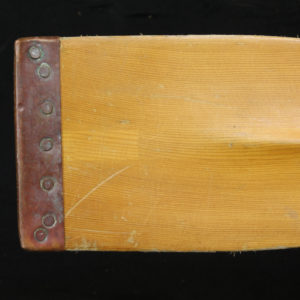
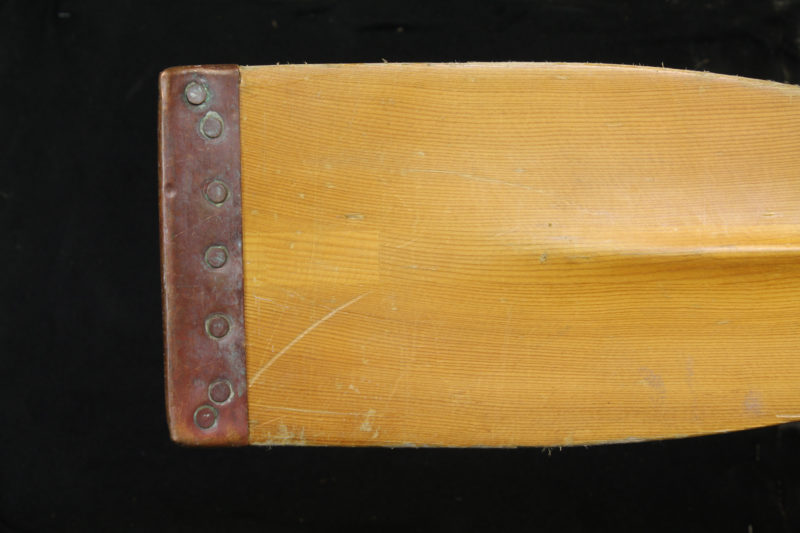
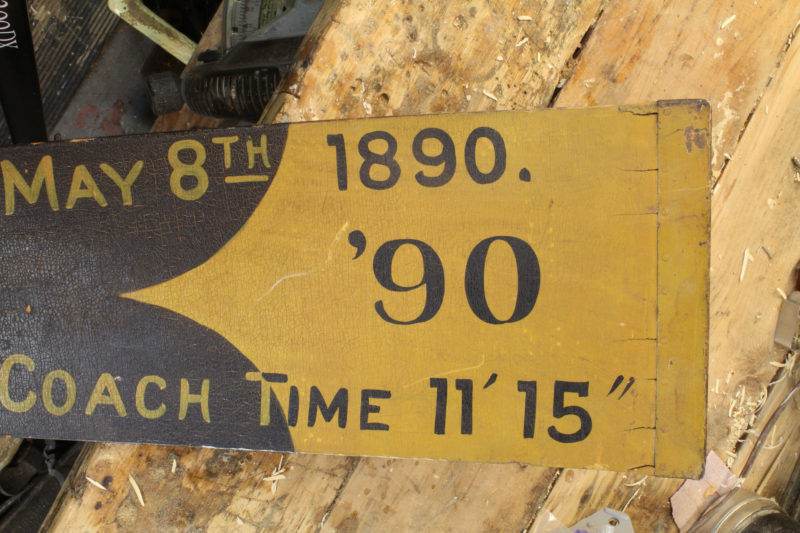
There are two styles of copper guards that I know of. The simplest covers the blade faces, and the edges, trimmed short, come close to butting together at the sides. That’s how the coppers were applied to the racing oars handed down to me from my great grand-uncle, Charles L. Crehore, who rowed with the class of 1890 crew at Harvard. Those oars were used only on racing shells and treated well, so the guards offered enough protection.
The edges of the Harvard oar’s coppers had been carefully trimmed and tapped around the edges of the blades. The hammering work-hardens the copper, which helps it hold its shape.
For the rigors of cruising, I prefer guards with tabs that wrap around the blade edges to better protect them. It’s the style that was used on the oars made by the racing shell company founded by George Pocock in 1911.
Pocock’s wooden oars and sculls were all fitted with copper tips.
I used a version of the Pocock style for my sneakbox oars. The wrap-around edges make a very durable guard. The nails were inserted from the opposite side; the peened ends are seen here.
I’ve used sheet copper of varying thicknesses for guards. I measured the Pocock guards at about 0.016″ thick (0.477mm). That’s 27-gauge or 12-ounce copper, a good thickness for durability and ease of applying. I make templates from the stiff paper hanging file folders are made of. Copper nails hold the guards in place. Depending on the length of nail that I need, I use either copper tacks or clench nails. If those aren’t readily available, you can use copper wire, the kind that’s used to wire your house. Home improvement stores sell it by the foot, and a foot is more than enough for many pairs of oars.
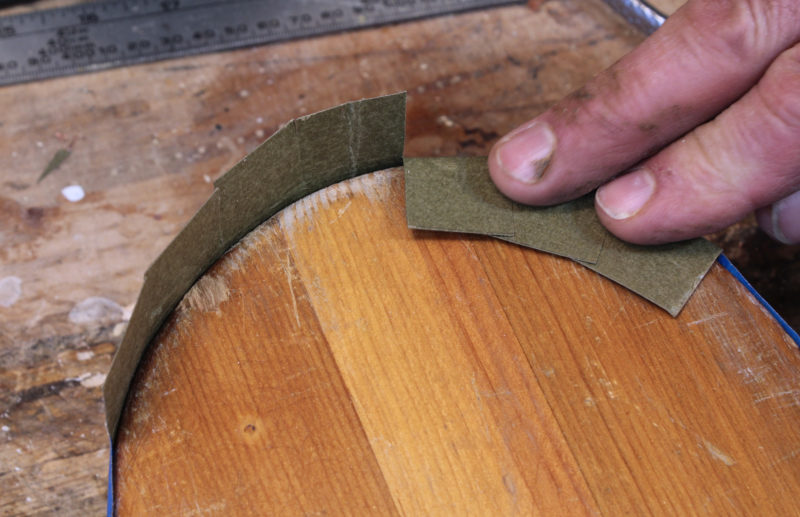
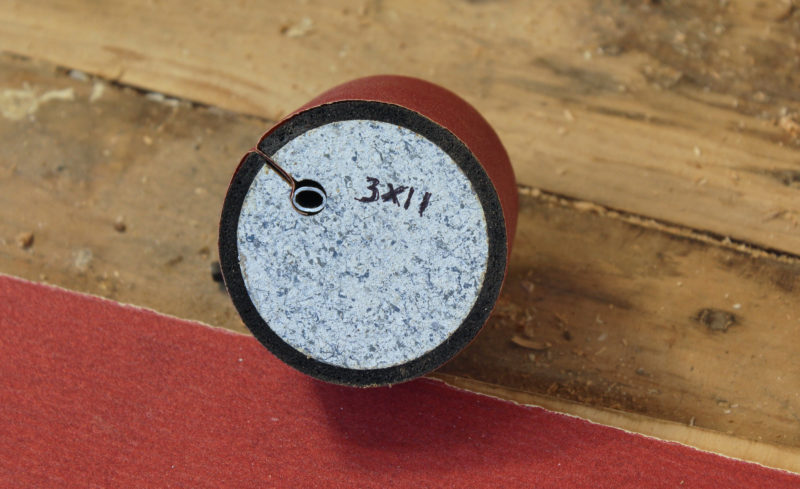
The outline of the blade is traced onto stiff paper—here a hanging file folder—with fold set along the blade’s tip.
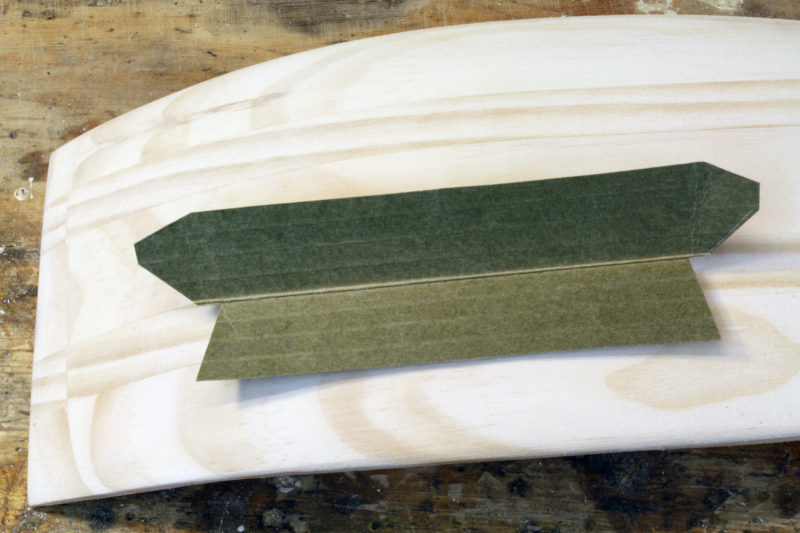
The bottom of the pattern here is cut along the traced lines. The upper half has tabs that project straight out for about 1/4″, long enough to wrap around the edges of the blade. Each tab is tapered to a truncated point that will be held in place by a copper nail.
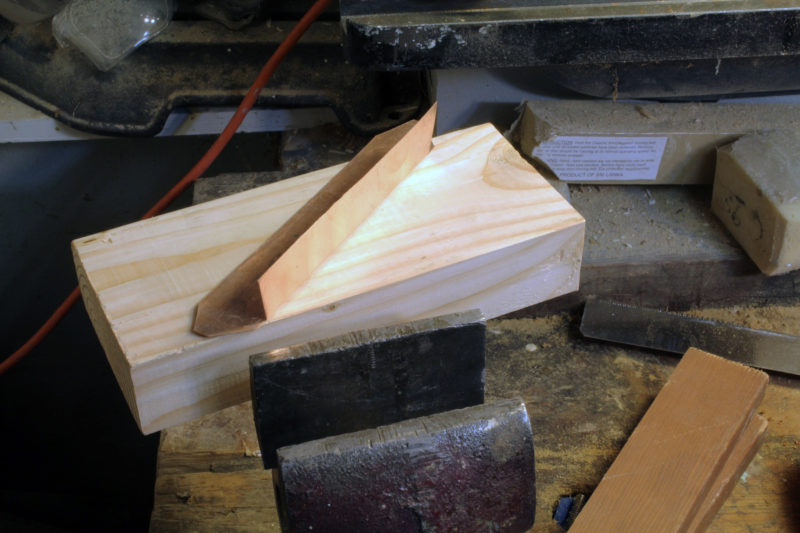
The copper needs to get a straight bend before being fitted to the oar blade.
Two blocks of wood clamped by a vise around the copper serves as a sheet-metal brake to make a straight fold.
The block at the back pushed the copper over and kept it flat.
The copper comes out of the makeshift brake with a right-angle bend.
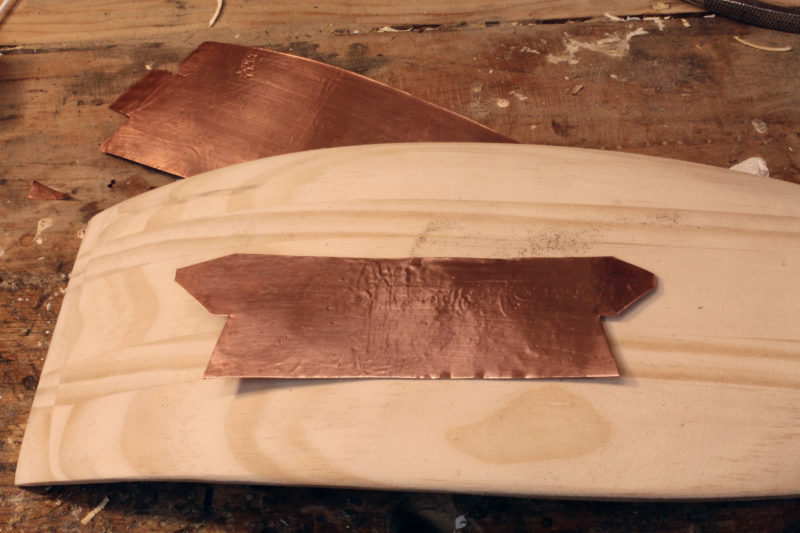
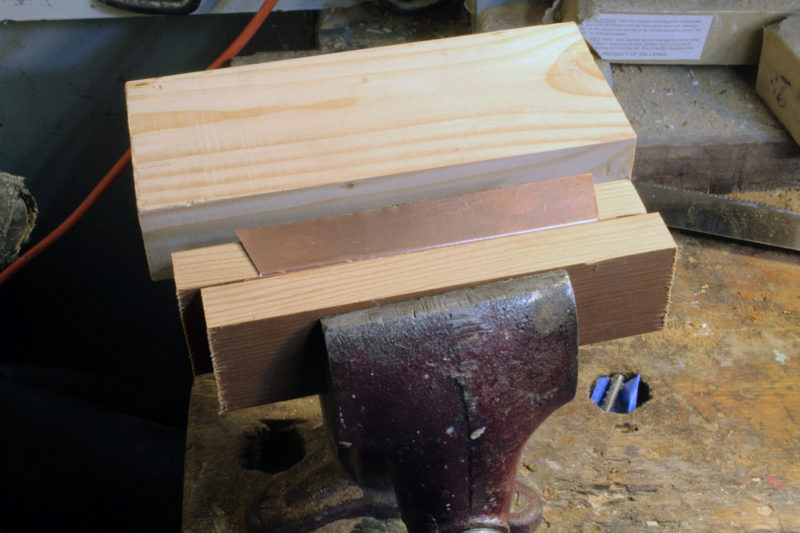
The copper, with the table on the concave side of the blade, is formed around the tip.
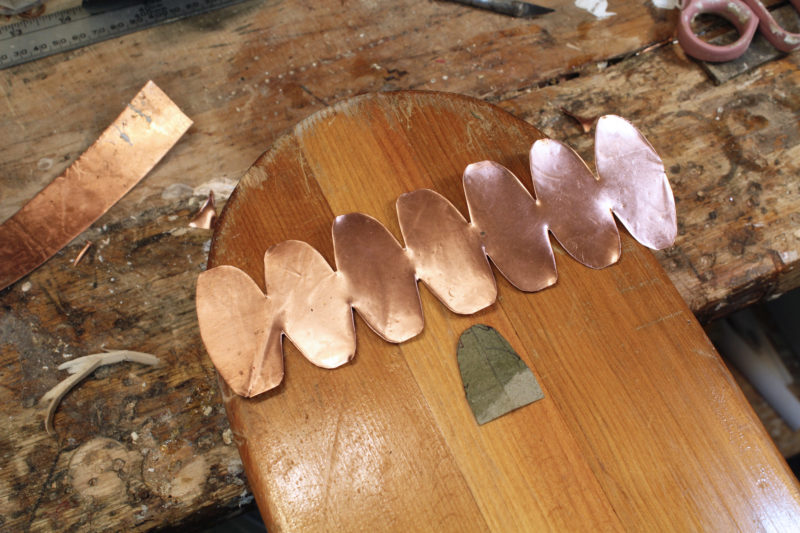
The edges of the tabs should be cut to flow into the long, straight edge. With a spring-loaded automatic center punch you can hold the copper tight with one hand, and punch the dimples with the other.
I put the guards on after I varnish the oars. Then, after I’ve shaped the guards around the blade tips, I apply Dolphinite bedding compound to both the oar and the inside of the copper, enough to make sure that I’ll get some squeezing out as the guard goes on. It’s easiest to drill the holes for the nails after the guard is pushed on over the Dolphinite. If I predrill the holes and then remove the guard for the Dolpinite, it’s hard to get the holes realigned for the nails.
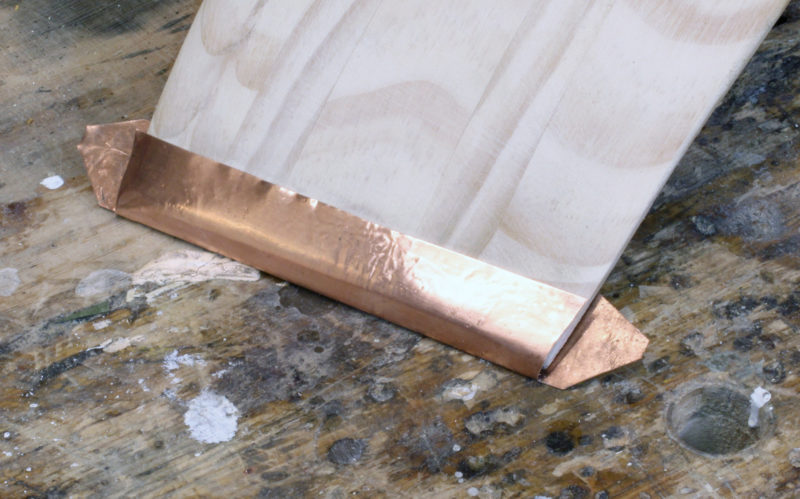
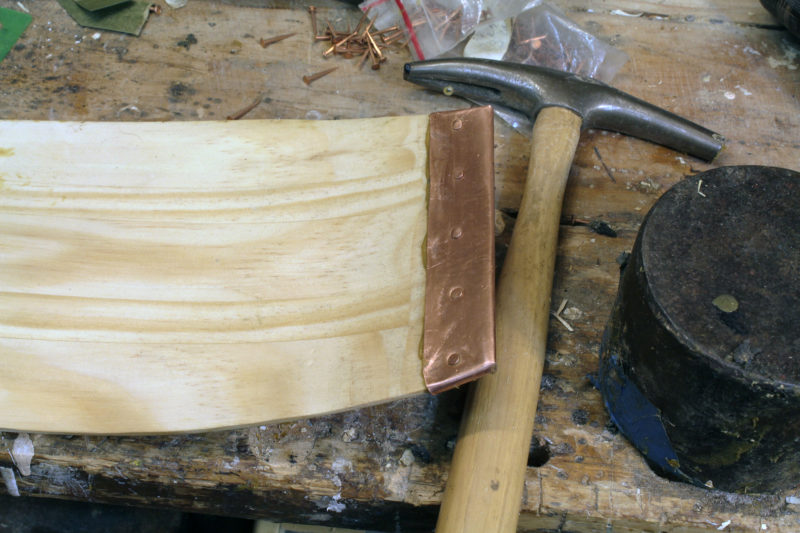
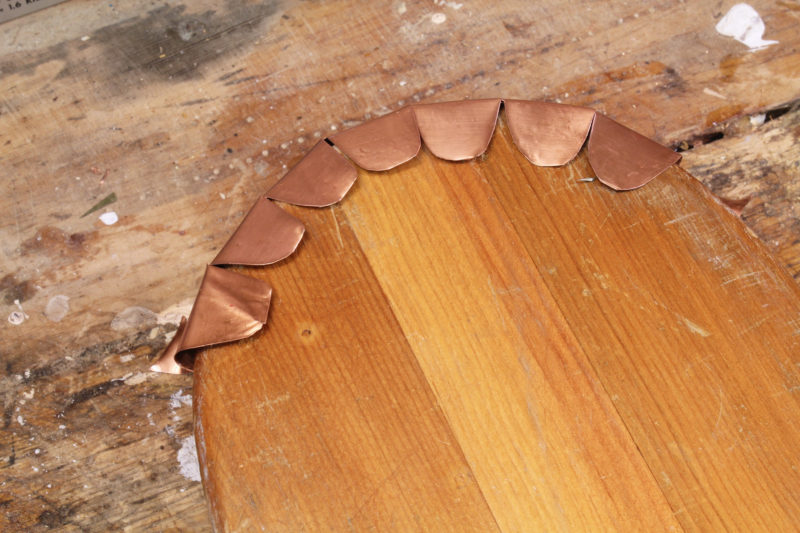
The copper nails are pressed or tapped into the predrilled holes from the concave side of the blade.
The protruding points of the nails are clipped short and tapped to flare at the ends. Note the bedding compound squeezed out as the nails tightened the fit of the guard.
The nails are inserted into the holes on the concave side of the blade; after trimming the excess length on the back side, I use a small hammer and tap lightly, to flare the cut ends. Whether I can peen the ends nicely or not depends on the copper in the nail. Some nails will mushroom; others will fold over no matter how carefully I tap. Both results will do the job.
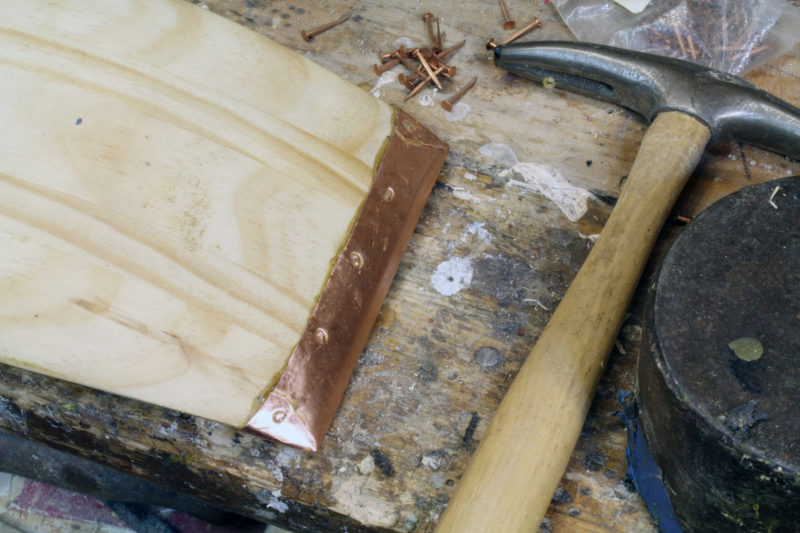
After the guard has been fastened, I’ll tap it home with small rubber mallet until the bedding compound stops coming out from under the copper. The corners of the guard may have a sharp edge which is easily rounded with a few tap with a small hammer.
Oars and paddles with rounded blade tips call for other treatments. I put a copper tip on a paddle that I use for maneuvering my boats in tight quarters.
The flaps will overlap and the apex of the obtuse angle where the inside edges intersect gets marked. Then, I cut the sides of the tabs from those marks to the base of the tab. The taper of each flap will eliminate the overlap.
A single tab cut from the pattern and rounded serves as the template for all of the tabs on the copper.
Folding the tabs around the blade begins to put the copper into shape.
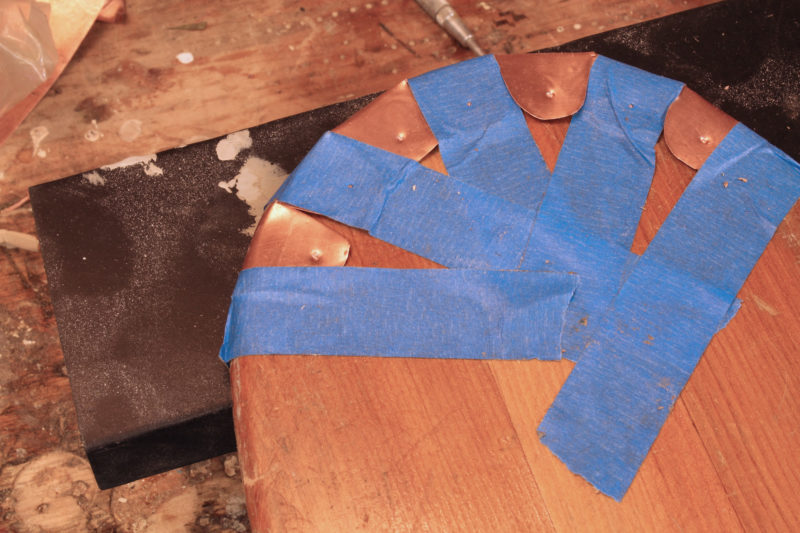
With tape holding the copper bent around the blade tip, the holes for the nails are marked with a center punch and drilled through the blade and the tabs on both sides. I have a block of rubber here backing up the copper on the back side of the blade. A block of softwood will do as well.
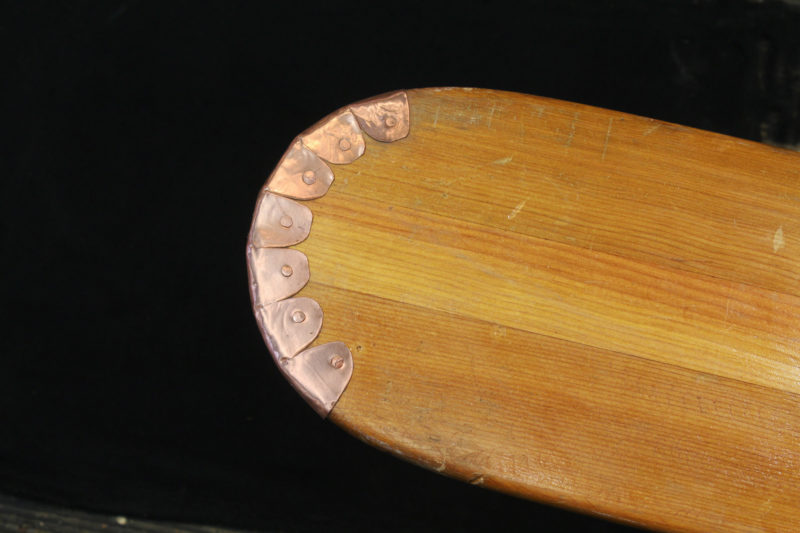
After the guard has been attached with nails, a gentle tapping with a small hammer will bring the copper in close contact with the blade.
A simple flat band around a straight-bladed oar is a tradition method for preventing a blade from splitting. It doesn’t protect the tip from wear.
A band of copper is easy to apply to a blade with a rounded tip. The blade may be scarred by use and abuse, but the band should prevent more serious damage that would render the oar useless.
The copper guards I put on my sneakbox oars 43 years ago have held up well. They survived a 2,400-mile cruise, mostly rowing, from Pittsburgh, Pennsylvania, to Cedar Key, Florida, and many years of use after that. The oars could use a little sanding and some varnish, but they’ve never needed repair.
Christopher Cunningham is the editor of Small Boats Monthly.
You can share your tricks of the trade with other Small Boats Monthly readers by sending us an email.
Audrey and I repair and restore a lot of boats, both wood and fiberglass, and in 2016 we restored an 1880s Mississippi River rowboat. The old boat was made of cypress and we needed a thickened adhesive/sealant product to bond on new pieces, fill some holes, and seal up areas where we had cleaned out rot. It had to be flexible to move with the wood’s movement through moisture changes, and it also had to have structural strength and to hold fastenings. It had to be easily faired, sanded, or shaped, and take to stains and oil-based or polyurethane paints. And just for grins, it needed to be rated for use below the waterline.
photographs by the author
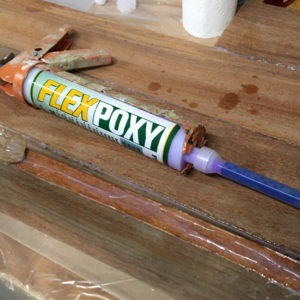
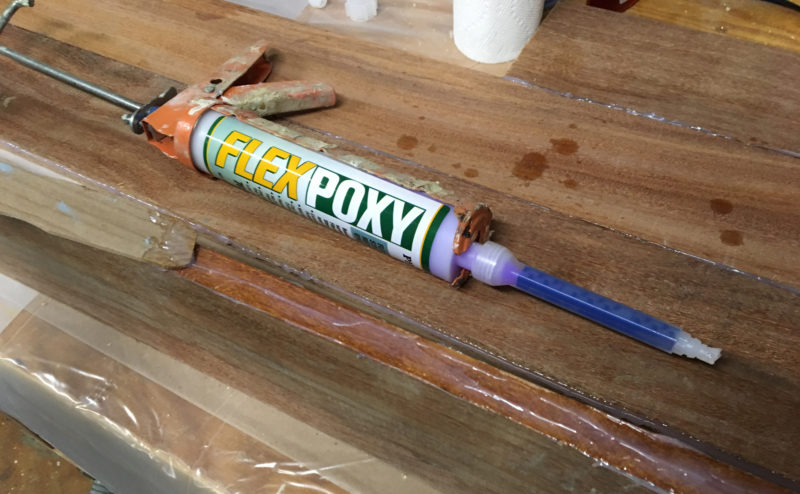
The Flexpoxy cartridge fits a standard caulking gun and can be dispensed through a static mixer tip, emerging ready-to-use. The tip can’t sit idle for long: Mixed epoxy will begin to cure, becoming too thick to flow. At the end of the job, the tip has to be discarded and along with a bit of waste epoxy is lost with it.
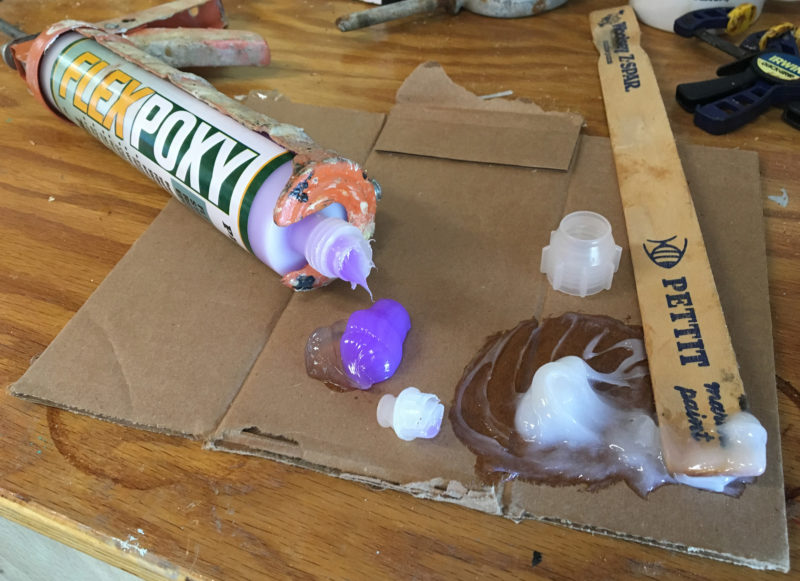
With these requirements in mind we found our way to Flexpoxy, a thickened epoxy that comes in a 250mL, two-part cartridge that fits a standard caulk gun. Flexpoxy comes out clear on one side of the nozzle and a light purple color on the other, then turns a translucent white when it is thoroughly mixed. It is very convenient to have the cartridge dispense the proper amounts without having to measure the two components to get the right ratio. The resin and hardener can be dispensed through a static mixing tip and applied directly to the work surface, but what we like to do is dispense larger amounts onto a palette without the tip, stir it up, and apply it to large surfaces that needed to be bonded. To fill small checks in planks, we’ll trowel mixed Flexpoxy into a small syringe. Flexpoxy is highly viscous and doesn’t run, so there is no need to mix in fillers to keep it from sagging. We’ve used it without any additives for filets. The resin/hardener mix has a pot life of 20-25 minutes, sets in 3 hours, cures in 16 hours, and dries clear.
When mixing Flexpoxy by hand, the two components come out clear and purple. They turn white when properly mixed.
To use Flexpoxy, the wood’s moisture content needs to be under 18 percent, not a problem on a 130-year-old river boat. We used it to shape several small, worn-away areas. Its gap-filling quality was great for scarfs and dutchmen where the fits were less than perfect.
A small amount can be dispensed for each job and the caps can be replaced to save what remains in the tube for future projects. Wiping the nozzle clean before putting the cap on helps keep the two components from mixing and curing. Over the last two years we have not run across any dried-up tubes.
We have also used Flexpoxy on many fiberglass projects; it is great for small jobs. We have used it to wet out fiberglass cloth by forcing it into the weave; it works in a pinch, but is not ideal. One other drawback is that it will not take polyester gelcoat applied over it. Another good use is to make bushings for fastenings by drilling out an oversize hole, filling the hole with Flexpoxy, and then drilling a new hole for the screw. The Flexpoxy then works as a barrier to keep water from seeping in around fastenings and intruding into the wood or fiberglass.
We have used Flexpoxy on many different fiberglass and wood boats for two years, and it is an invaluable part of our restoration arsenal.
Audrey and Kent Lewis live on Florida’s Emerald Coast and enjoy small-boat sailing, restoration, and boatbuilding when she’s not designing costumes or when he’s not flying. The 1880s Mississippi River Skiff they repaired is in the collection of the Beauvoir Museum in Biloxi, Mississippi. Their personal fleet includes several fiberglass Sunfish, a wooden Sailfish, wooden Sunfish, a Catfish catamaran, an O’Day Daysailer, a Drascombe Lugger, and a Drascombe Dabber. They have also rescued and fostered over 30 boats since 2011. Some people describe them as “boat-struck.” They document their boating pursuits in their blog.
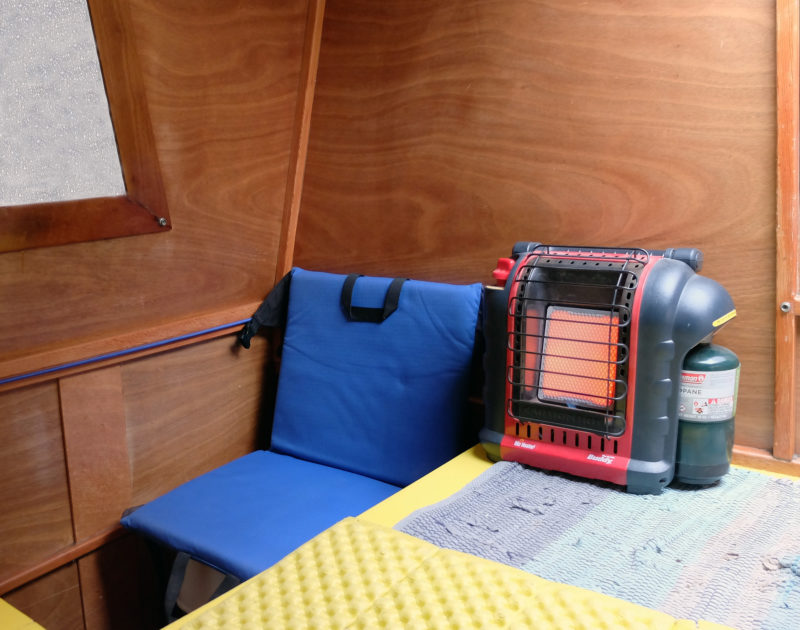
Brrr, it’s a chilly morning and there’s frost in the cabin. Do I really want that early start? I reach out of my sleeping bag to start the Portable Buddy heater and snuggle back in the sack for another 10 minutes. It’s soon a lot warmer and a pleasure to get out of bed to get dressed. Time for breakfast—when it gets too warm, I’ll turn the heater off.
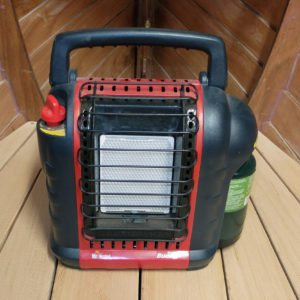
The Portable Buddy, a radiant infrared propane heater from Mr. Heater, is a practical way to extend the boating season. It’s not a 24/7 solution that will take you to Alaska, but I’ve used it for winter weekend outings aboard JUST ENUF, my Kohler-designed catamaran outboard cruiser, to warm the cabin, especially just before turning in. I usually turn the heater to the middle setting for 10 minutes, then turn it off another 10 minutes—it doesn’t take much to warm the cabin.
Photographs by the author
The Portable Buddy will shut itself off if it tips over or if its sensor detects a drop in oxygen levels.
The Buddy puts out 4,000 Btu with a six-hour burn time on its low setting, and 9,000 Btu with a three-hour burn time on the high setting. I rarely use the high setting; a 1-lb propane cylinder lasts about three days of 30- to 40-degree mornings and evenings. The Buddy can be operated with an accessory hose, sold separately, that you can connect to larger refillable tanks, but storing those bulky cylinders isn’t practical for most small boats.
The Buddy has a stable base with a 14.5″ x 9″ footprint and keyhole slots in the back for wall mounting. It must have 6″ clearance to the sides and 30″ above. When I use the heater in the enclosed space of a cabin, I feel most of the warmth as radiant heat focused at me. But when I use the Buddy in a cold garage where I’m building a lapstrake sail-and-oar boat, I felt a little heat focused on my legs but a tremendous amount of heat rising from the top of the heater. I’ve not had problems using the heater in a boat cabin, but I’d advise respecting the 30″ overhead clearance recommendation.
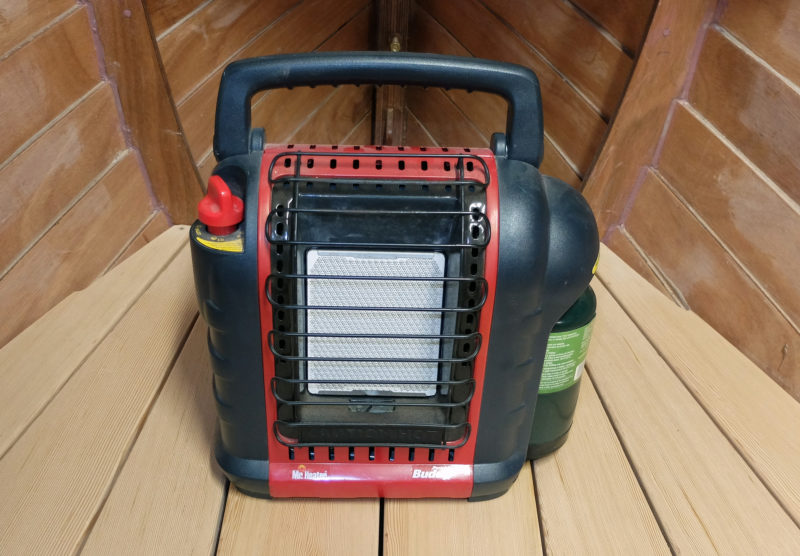
Heat is projected outward through radiation and carried upward by convection, so the Buddy requires adequate clearance as well as ventilation.
Is using a propane-burning heater in an enclosed space safe? Mr. Heater writes “The Portable Buddy incorporates an Oxygen Depletion Sensor (ODS), which shuts off the heater if the oxygen in the room gets below a certain point. This allows for the heater to be safely used while camping, ice fishing, working in a garage or workshop, or for emergency home use in the event of a power outage.” It is important to read the instructions about providing adequate ventilation: a minimum vent of 9 sq in is required. For most boats, sliding a hatch back or cracking a window about 1″ will suffice. The oxygen sensor does work, both shutting down the heater if triggered while running or preventing it from being lighted if the sensor detects the ambient oxygen to be low before starting. The heater is very stable, but needs to be moved carefully when it is burning, or the tip-over sensor will turn it off; that’s good. The Buddy has a certification from CSA (formerly Canadian Standards Association) an international organization that sets safety standards.
What’s not to like? Well, burning propane creates moisture and the Portable Buddy doesn’t vent to the outside, so it releases that moisture into the cabin where it can condense on cold walls and windows. It’s just part of the package and not any more of a problem than we already deal with by cracking hatches and using vent fans to keep the interior free of the condensation created by breathing.
With lovely spring days coming, now’s the time to get out and enjoy the boat more. The Portable Buddy will make you look forward to waking up to a warm cabin.
Ron Mueller recently sold JUST ENUF and is now building a François Vivier-designed Ilur that he will sail in the 2018 Barefoot Raid. He continues to design and build small boats and still rows most days in Bellingham, Washington. He started whitewater kayaking in the late ’60s, sailing in mid-’80s, and rowing in the ’90s when he founded Wayland Marine. Ron designed the Merry Wherry, for which he also built kits, and he was the Northwest dealer for Alden Ocean Shells and Echo Rowing until retiring in 2010.
Debby White pressed husband Curt to provide some relief from an all-white interior. Investing the time in the brightwork was well worth the extra effort.
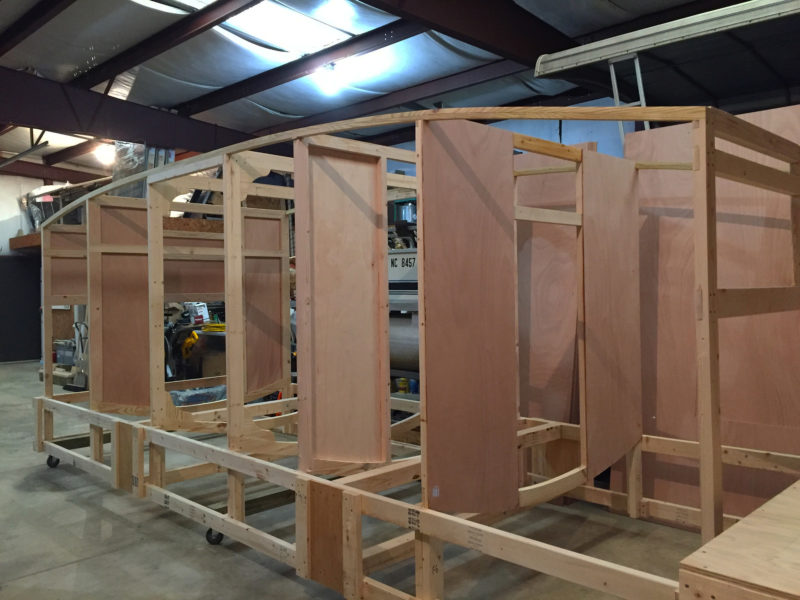
When Phil Thiel designed his Escargot canal boat, he had two things in mind: It had to be easily built from readily available materials and it had to offer its occupants comfortable travel at a relaxed pace so they might more fully take in the world around them. He took great pride in his boat designs and his exceptionally well-detailed plans, so he occasionally bristled at the liberties builders with them, but the simplicity of the Escargot’s structure makes it very easy, even for novice boatbuilders, to make modifications to suit personal visions. That’s part of its appeal, albeit unintentional on Thiel’s part.
Nate Cunningham and his friend Bobby Calnan, both new to boatbuilding, built their Escargot, BONZO, with more headroom by making the cabin sides 6″ higher than the 48” specified in the plans, and lengthened the cockpit by 12”. The changes added complexity but paid off with more room to move about.
The build of an Escargot starts with the frames and bulkheads upside down. They all had oversize verticals to a common baseline (here, roughly, the floor) beyond what will become the cabin roof. The scheme makes for easy alignment; the extensions are sawn off later.
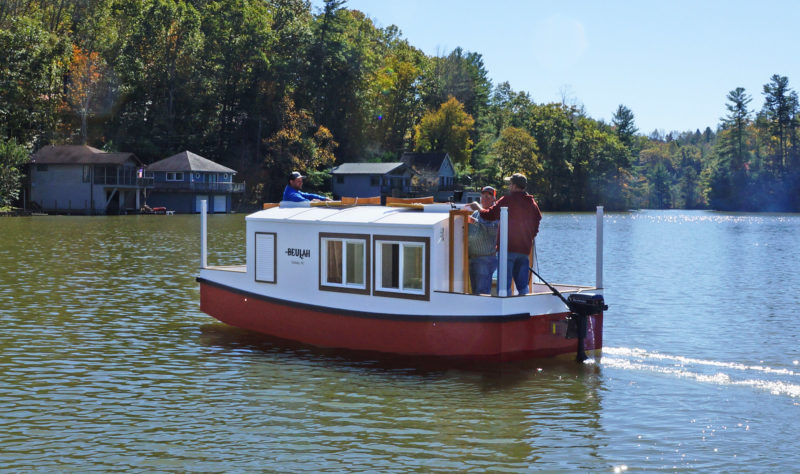
Last year, Curt White of Saluda, North Carolina, made some even more dramatic modifications to his Escargot, BEULAH, creating a well-appointed living room afloat. He and his wife Debby had lived in Charleston, South Carolina, for 30 years and to take advantage of the rivers and backwaters that surround the city, they had five boats ranging from a 10′ sailing pram to a 25′ outboard cruiser. When the two retired, they moved inland, trading the coast for the mountains surrounding Saluda, North Carolina. Building a boat was on Curt’s “bucket list,” so he and Debby kept an eye out for designs that would be well suited to the mountain lakes near their new home. The review of Escargot in the April 2015 issue of Small Boats Monthly provided just the inspiration they were looking for.
Curt equipped the building frame with casters to keep his project from getting in the way of the other work going on in the shop.
Curt had done a fair bit of woodworking—fences, sheds, tables, and cabinets—but had never taken on a task as complex as building a boat. The Escargot, with its simple construction—just two curves, the cabin roof and the bottom of the hull—gave him the confidence that he’d stay with the project until its completion. And the lumberyard materials would keep the cost within his budget.
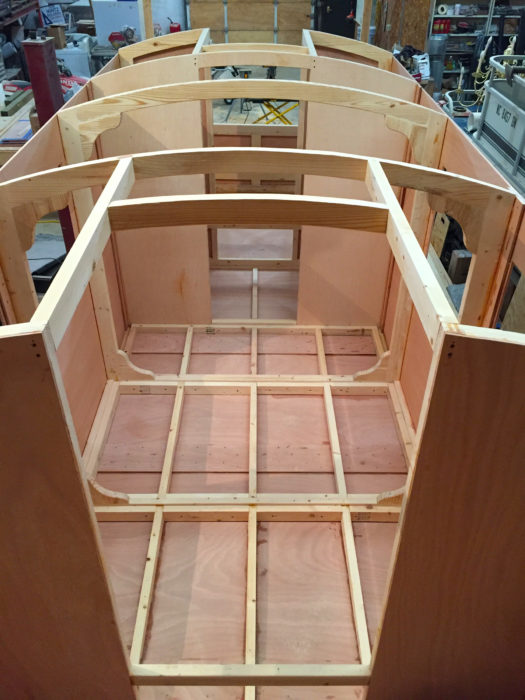
The view forward from the cockpit shows the extended main salon. The design normally calls for partial walls where the farther set of knees has been installed. Curt also altered the framing to support an unobstructed floor.
Curt bought the plans and studied them, occasionally going to the web to look up any boatbuilding terms that were new to him. He and Debby intended to use the boat only for day trips, so they didn’t need the sleeping quarters forward. They planned to move the head and the stove into that space, allowing them to eliminate a bulkhead and extend the main cabin by 2′. They liked the idea of raising the cabin roof: “We can’t crawl around as well as we used to,” Curt noted. They stretched the frames and bulkheads to span 6′ from bottom to rooftop to create better headroom. Debby designed the interior, which included a floor built over the framework backing up the bottom of the hull. The uninterrupted floor made it possible to forgo the built-in seating, instead opting for living-room furniture.
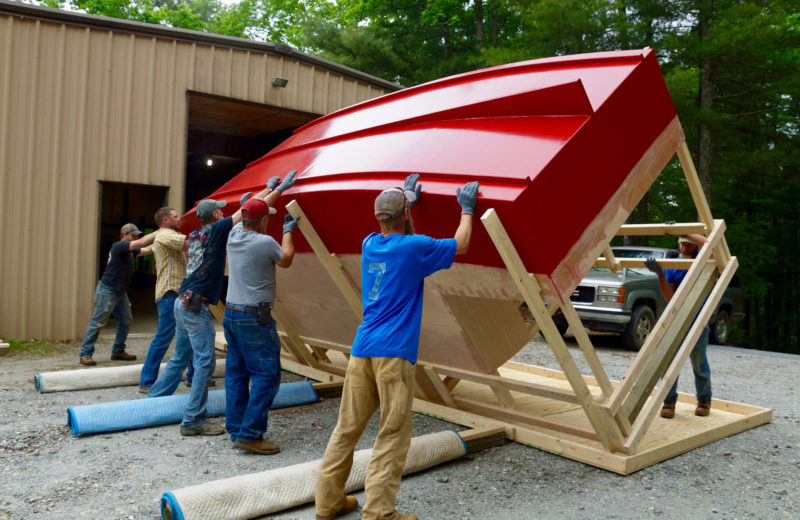
The home-construction crew pitched in when it was time to flip the Escargot upright.
Curt started construction in January 2017. He didn’t have space at home for the project, but his friends Don and Sean Mintz had a warehouse for their homebuilding business and made space for him. The warehouse is a busy place and sharing it required that Curt’s worktable and the strongback supporting the boat be mobile, so he set them both on wheels.
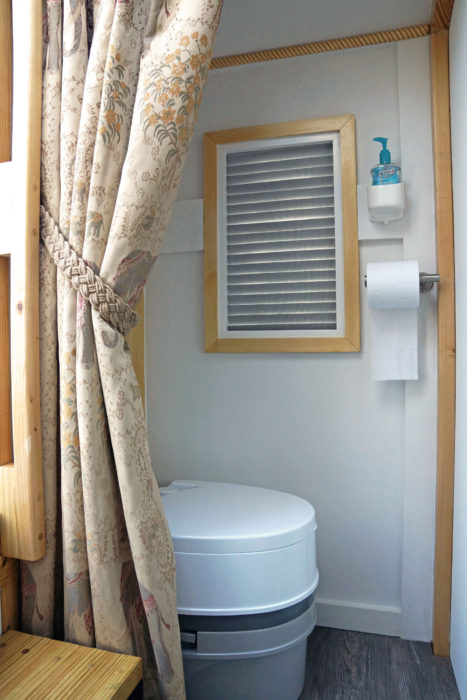
BEULAH is intended for day use, so one side of the forward compartment, designated in the plans as sleeping quarters, was equipped with a portable toilet instead.
Curt had to make a drive to Charleston to get the 20-plus sheets of okoume plywood he needed, but got the rest of the materials from local home-improvement stores and online hardware retailers. The plans include detailed drawings for shop-made windows, but he simplified the work by installing vinyl-framed double-glazed windows.
A stove designed for hot-tent camping keeps the cabin warm. The floor of an Escargot is normally obstructed by the framing that supports the hull; Curt’s addition of a floor over the timbers makes for a cleaner look and allows the use of living-room furniture.
When Curt suggested painting the entire interior white, Debby insisted that it would look better with a touch of brightwork. The two-tone scheme would add weeks to the project and he wasn’t convinced that varnish on ordinary white pine would be worth the effort. “In the end,” Curt wrote, “she convinced me to do it her way, and I’m very thankful I’ve learned to listen to my wife because more often than not, she’s right.”
The main cabin in the Escargot is designed to be 6’6″ long, but, by eliminating the bulkhead that normally separates the cabin from compartments for a head and storage, Curt created a roomy cabin 2′ longer.
A crew of warehouse workers helped wheel the finished hull outside and roll it upright. With the boat sitting on its bottom it was possible to step into the cockpit for the first time. It was evident that the extra cabin height obscured the view forward from the cockpit, a problem solved when he installed an automotive back-up camera on the bow and attached its monitor alongside the aft companionway hatch.
The boatbuilding took over 10 months and about 1,000 hours from start to finish. To get the Escargot out of the warehouse and on the road, the Whites bought a custom-built trailer: “It was more than I had budgeted, but it has made getting the boat in and out of the water very easy.”
The Escargot plans include drawings and dimensions for a rudder, but BEULAH manages well enough steered with the outboard.
They mounted a used 4-hp outboard on the transom and were ready to launch. On October 26, 2017, BEULAH was backed into Lake Summit, just 3 miles west of Saluda. “The moment she slid into the water and floated,” wrote Curt, “will never be forgotten.”
Have you recently launched a boat? Please email us. We’d like to hear about it and share your story with other Small Boats Monthly readers.
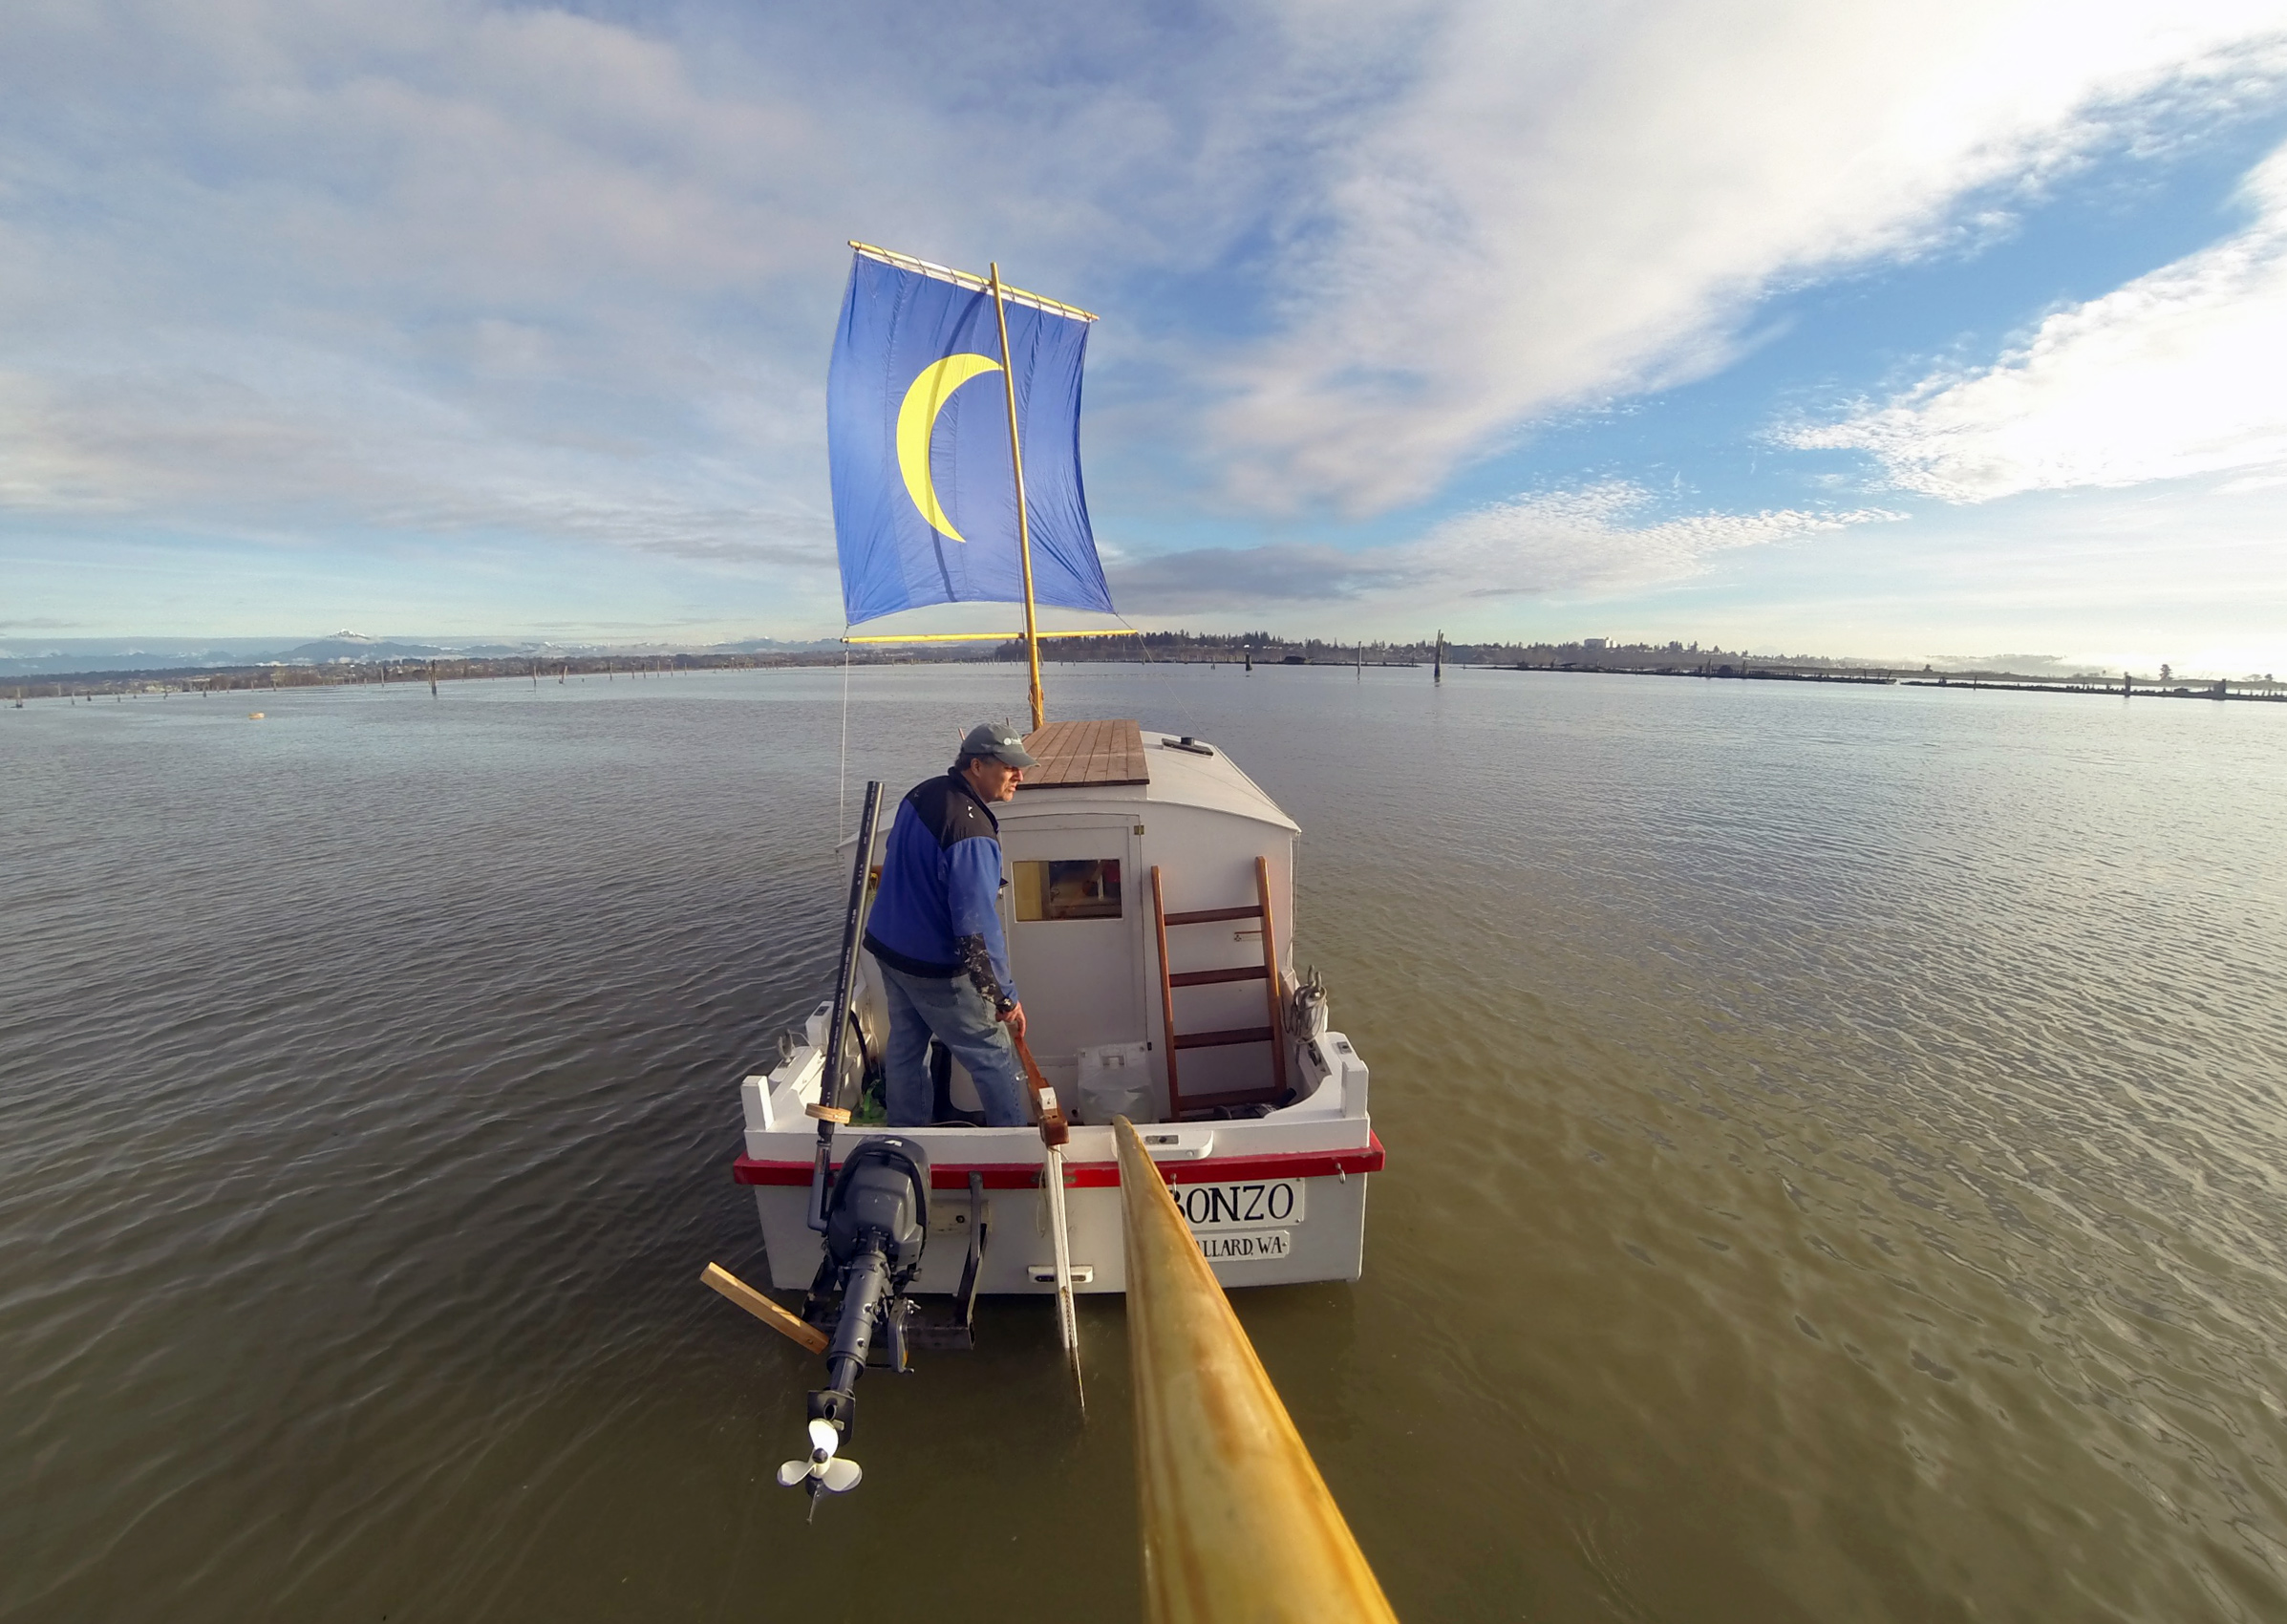
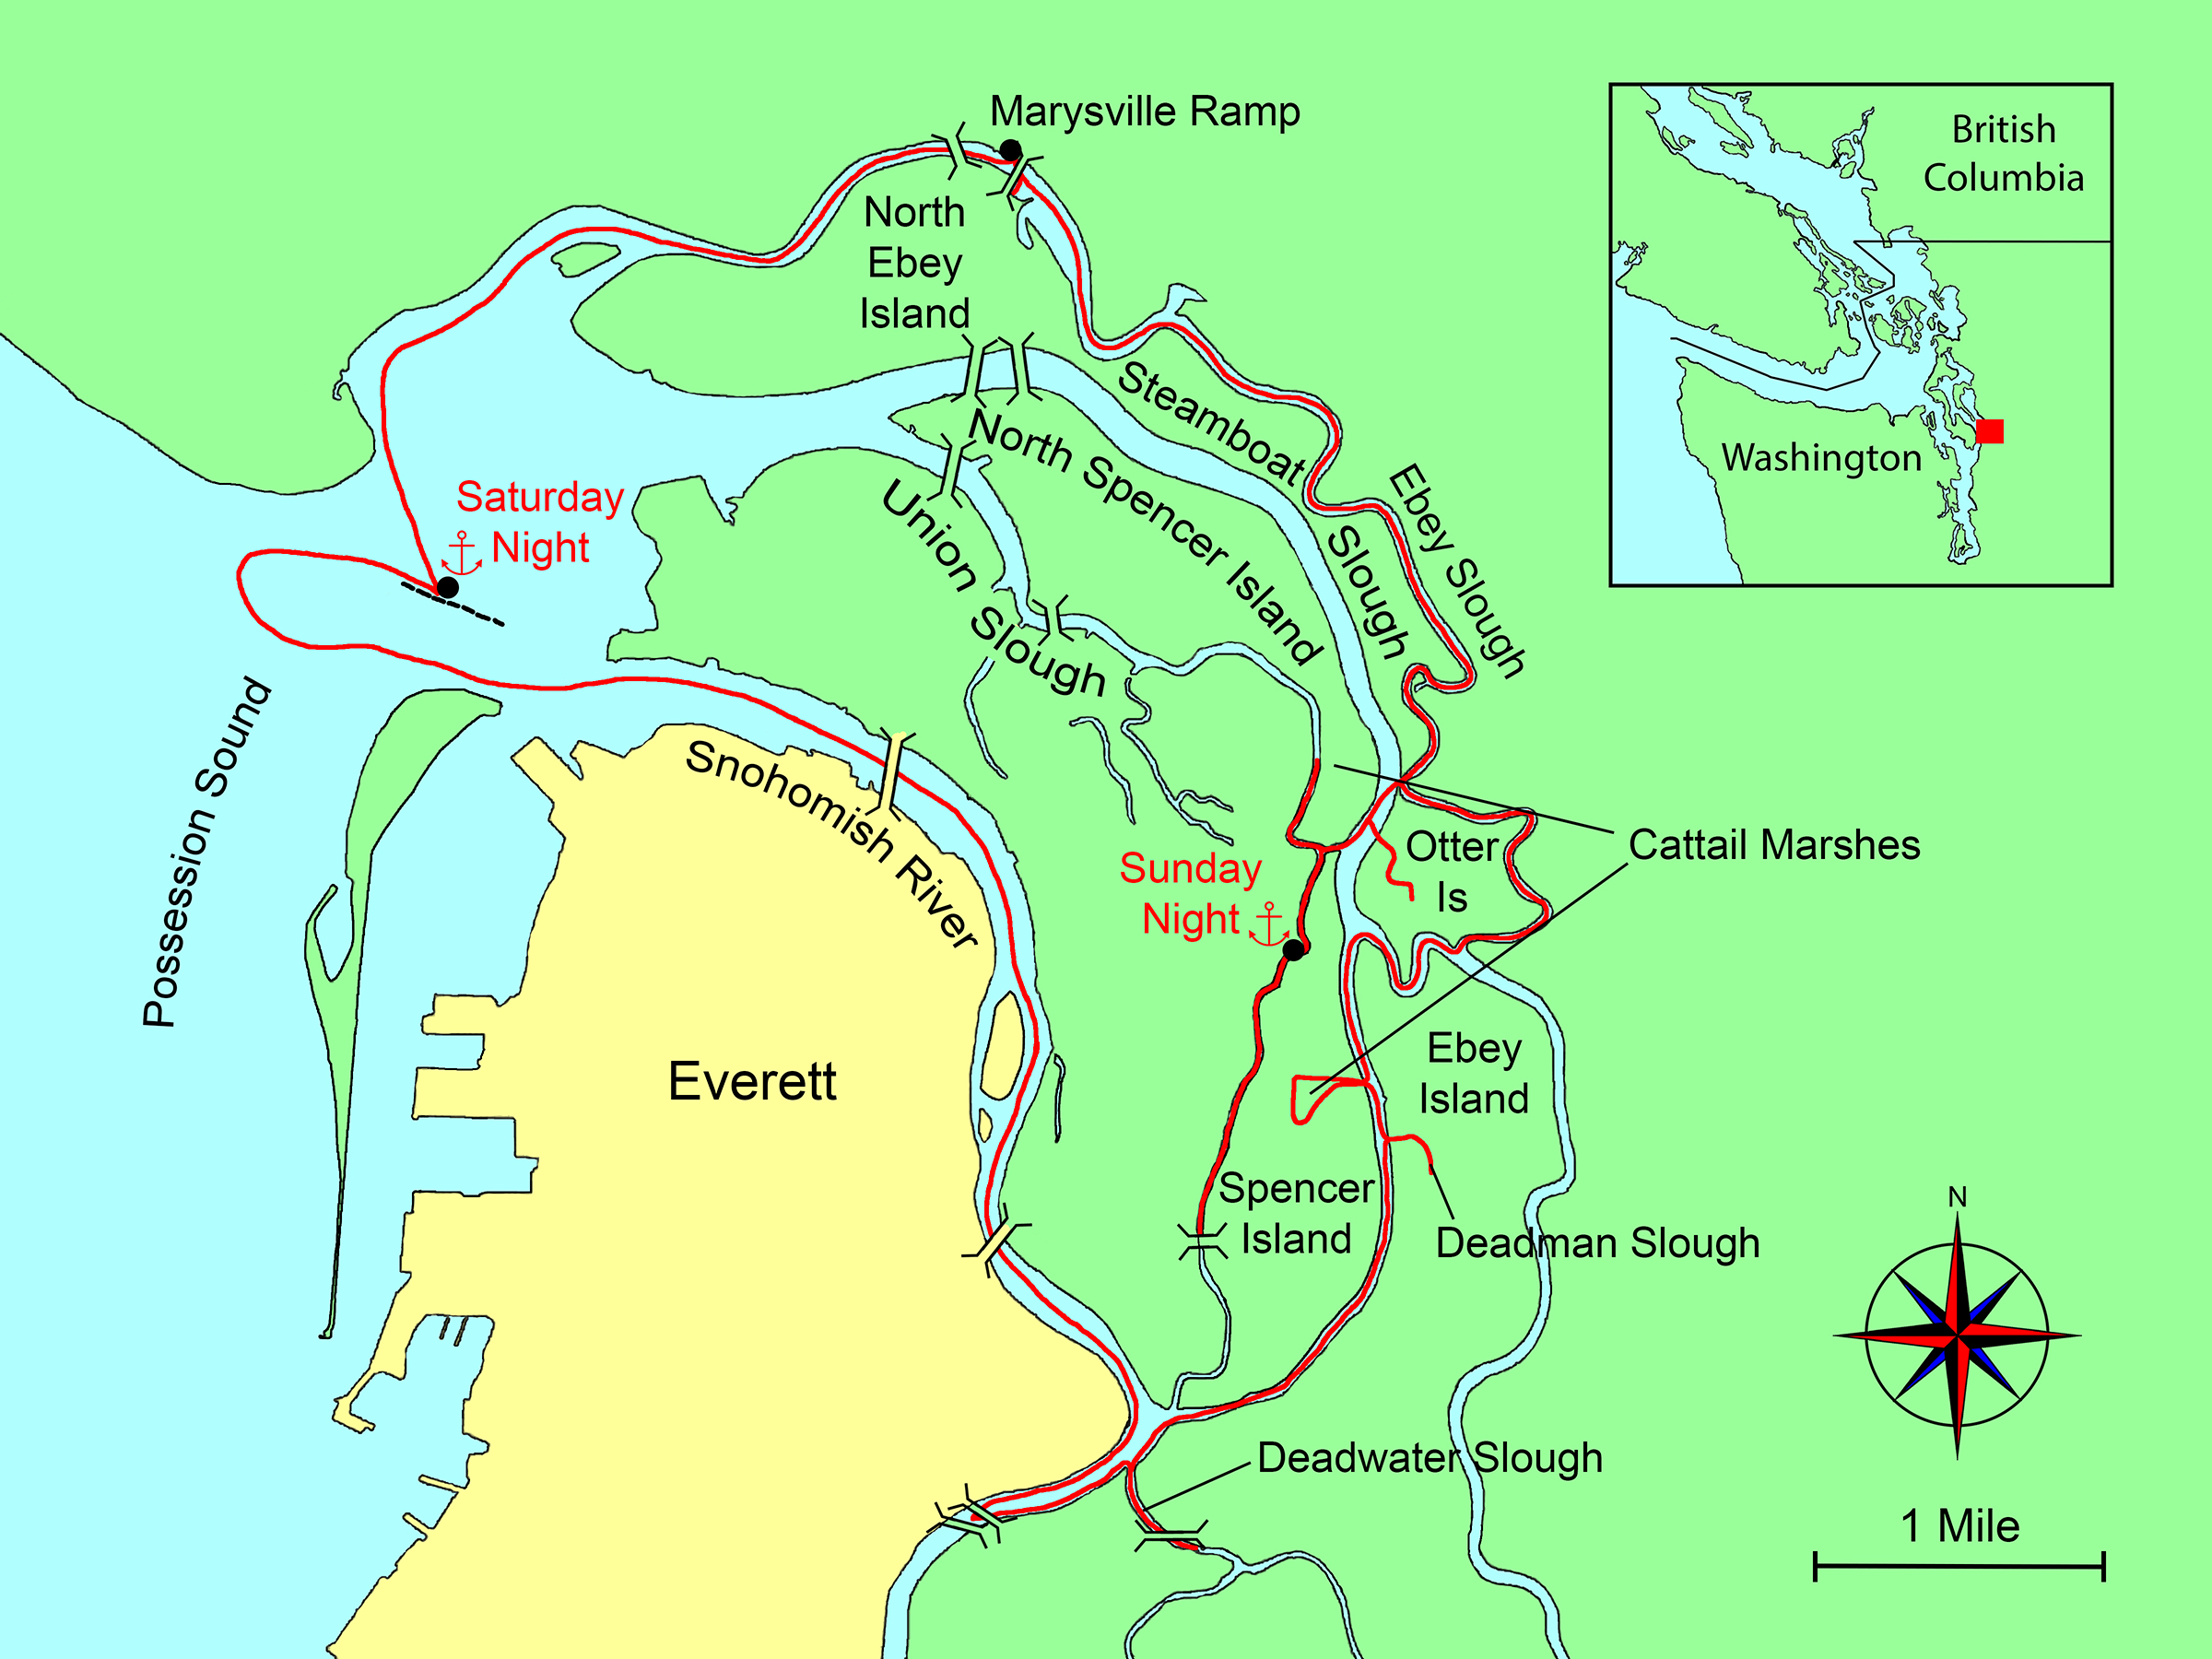
I often get an almost irresistible lure to spend a night in a tranquil, protected anchorage under a starry sky, but sometimes, when I get the feeling that something’s not quite right as I’m getting ready to head out, I’ve learned the hard way to take heed. I didn’t get out on the weekend cruise of the Everett sloughs that I write about in this issue on my first try. I had launched at Marysville ramp two weeks earlier. I had packed for a three-day outing, but I hadn’t been able to leave home as early as I had planned and got underway on the slough late in the day. I had about three hours of daylight left, enough time to make my way upstream to one of the anchorages I had picked out after poring over satellite photos of the area. I had packed the boat in a hurry and was tidying the cockpit even as I was negotiating the bends in the slough. I had my head down for a few seconds too many, and when I looked up I saw the boat was fast approaching the muddy bank to starboard. I yanked hard on the tiller and it split where it wrapped around the rudder head. I brought the rudder aboard and kept going, steering with the outboard.
I had with me all I needed to make a solid repair to the rudder, and normally the incident would just make for a good story. But while I usually relax after I get afloat and take mishaps like that in good spirits, that wasn’t happening this time. I was uneasy about the falling tide, and after breaking the tiller, I was not in the mood for any more of the unexpected. A mere 2-1/2 miles from the ramp I turned around and headed home.
The feeling that led to me to turn tail was not new to me; I had just learned to give it the attention it deserved. Many years ago, I had set out to go kayaking, alone, on Puget Sound while there was a strong southwesterly blowing. The conditions were perfect for some exciting paddling and downwind surfing. I’d gone out many times in the same conditions, always thoroughly enjoyed them, and came back elated. This one time I was feeling a bit off as I paddled the mile and a half in the lee of West Point, just north of downtown Seattle. As I drew near the end of the point I could see the waves tumbling by just beyond the lighthouse. The conditions were perfect.
I paddled close to shore to get ready. I was in a kayak that I was paddling for the first time and taking notes about it in a waterproof notebook that I kept tucked inside my PFD. The pencil I’d tucked under the bungees on the foredeck had disappeared, but I had a spare stashed behind my seat. I opened the spray skirt and fished around for it but couldn’t find it. I scooted out of the cockpit, to sit on the aft deck to get a clear shot at the cockpit. I was quite accustomed to doing that while afloat, but I was feeling impatient and annoyed. I know now to regard that as a red flag, especially when I’m embarking on a solo outing.
When I shifted my weight aft, the stern went under. This kayak had exceptionally fine ends and could only adequately support me when I was in the seat. I grabbed the pencil as water began to pour into the cockpit. That was just another nuisance. I was wearing my dry suit and it wasn’t a problem getting wet, so I slipped into the water, made my way to the bow and flipped the kayak, pouring the water out. It was only I after I returned to the cockpit to get back aboard that I took notice of where I was. The mood I was in had put blinders on me and I hadn’t noticed that I was drifting rapidly away from shore. I’d soon lose the protection of the lee and have to work against wind and waves to get back aboard.
There was a mooring buoy with a workboat a few boat lengths off the bow and slightly downwind. I took hold of the kayak’s bow toggle and swam toward the buoy, which I drifted past but was just able to reach the boat’s bowline. If I’d missed that, there wasn’t anything else I could grab onto keep from drifting out into open water. I stayed in the water with one hand on the line, the other on the toggle, and, for the first time that afternoon, shook off the myopia and took stock of my situation. With my head cleared, I got aboard the kayak, paddled back into the lee, and went home.
Since then, I have paid more attention to my inchoate misgivings. There have been times that I’ve suited up, packed up, driven to the ramp, and even launched the boat, but turned around without leaving the dock. If I’m feeling something is not right, I’d rather deal with that on the way home from an outing cut short than on the way out where turning around is not so easy.
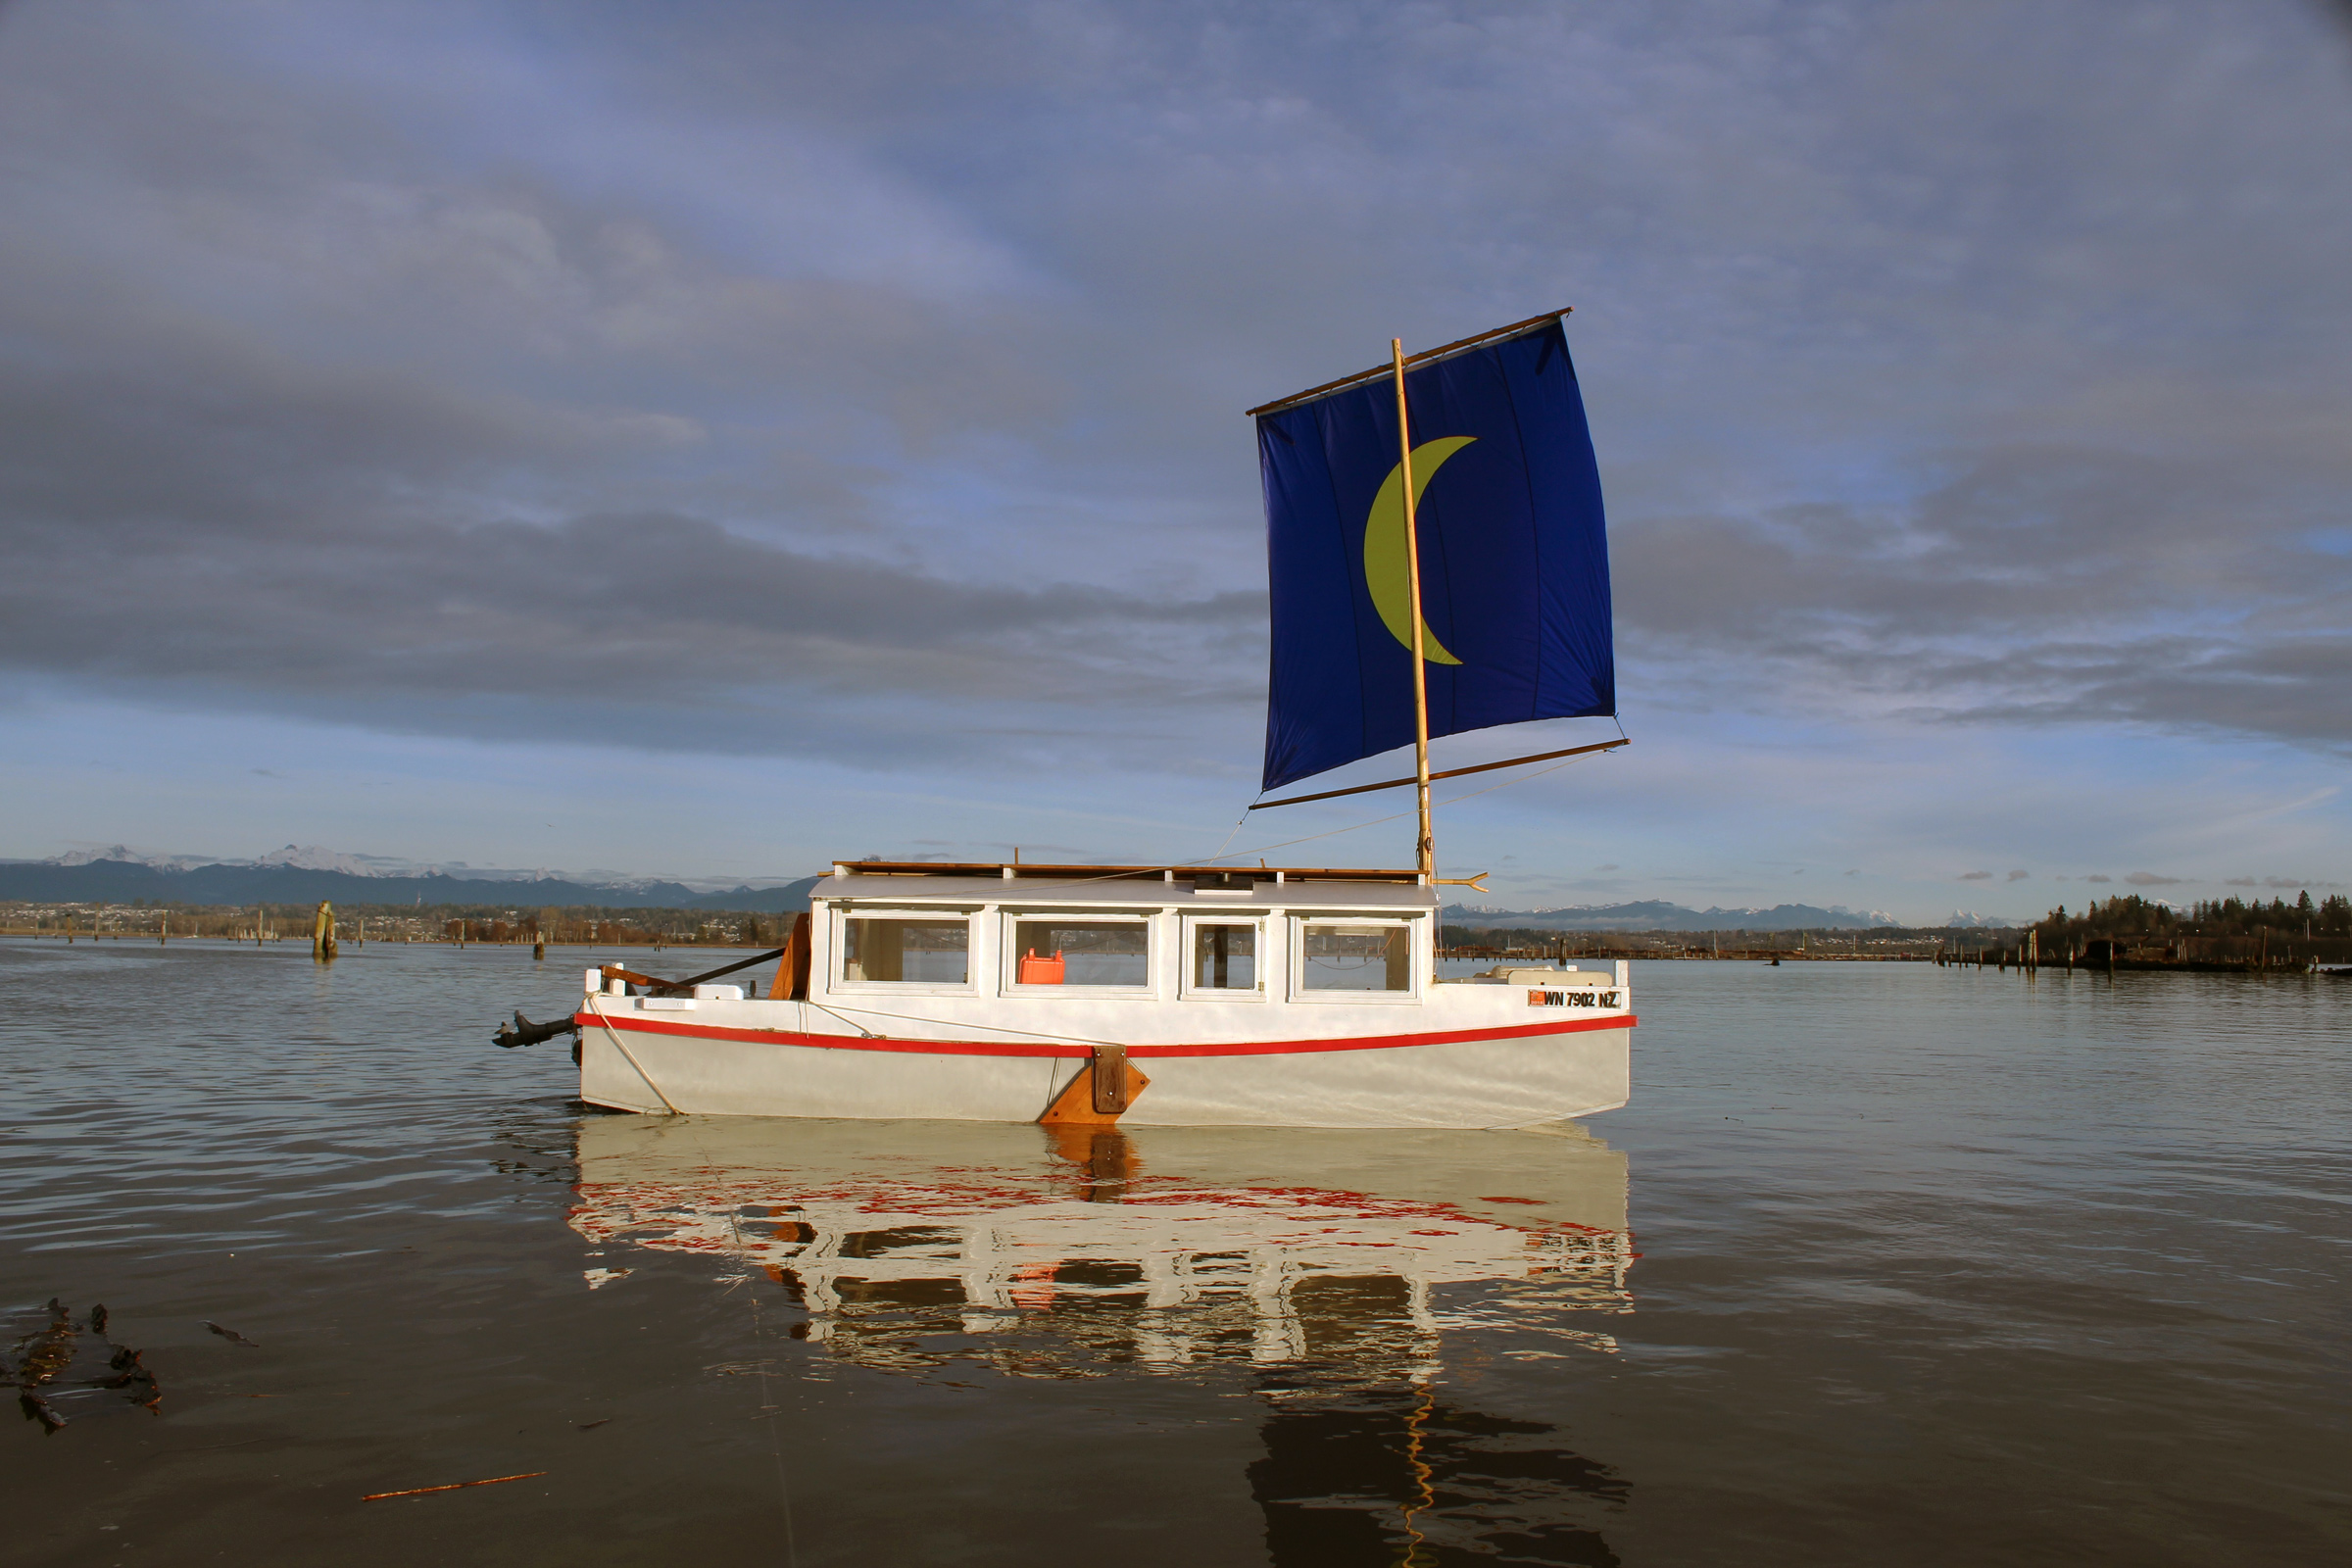
When I launched the boat the second time, for the trip you can read about in this issue, I knew that there could well be gear I’d left behind and some things might not go as I had planned, but I was in the right state of mind and up to working through whatever problems I would encounter.
My father’s father was born on Cape Breton Island, Nova Scotia. Though he emigrated to New York before my father was born, he took his family on summer trips back to visit his family in Louisbourg. My father has fond memories of these trips, but most of them revolve around adventures in dories. Slab-sided with tombstone transoms, these stalwart workhorses of the Canadian Maritimes have a well-deserved international reputation for being easy to build, easy to row, exceptionally stable, and capable of carrying heavy loads.
My father has owned a couple of small, traditionally built dories, and when I was in my early twenties he bought a 15′ Gloucester Gull based on the famous Philip Bolger design. A few years later, Roger Crawford of Marshfield, Massachusetts, built a 16′ Swampscott dory for him. My father has had this boat for 20 years, and still enjoys it.
Kevin Power
The manual includes a section on types of wood and notes that some types of common construction can be used for Spira’s ply-on-frame method for the dory.
Naturally, when I decided to get a boat, I started looking for a dory. It didn’t take much searching on the web to realize that there weren’t many available, and with my limited boat funds I couldn’t afford to hire someone to build one for me, so I started looking at plans. Jeff Spira and his business, Spira International, were among the top hits on Google for “dory boat plans.” Jeff’s site is mesmerizing. There are pictures of boats, videos of builds, a blog with builder contributions, and over 100 plans to choose from. I knew I wanted a Grand Banks–style dory about 16’ long, and Jeff’s Nova Scotian fit the bill perfectly.
Jeff goes to great lengths to promote the ease with which his boats can be built, even for those with no boatbuilding experience. He goes so far as to say you can complete the project with no prior woodworking experience, although he suggests building a couple of sawhorses first to get acquainted with some of the tools required for boatbuilding.
The beauty of Jeff’s designs is their simplicity and accessibility. The wood is all readily available at the big-box stores and is relatively inexpensive—about $250 for lumber and plywood. The epoxy and fiberglass cloth totaled about $400, and I found all the stainless fastenings on eBay for another $150.
Kevin Power
The plywood panels take their shapes from the chine logs and inwales. The butt joints will be backed with plywood plates.
The construction begins with the assembly of the five frames and the transom. In his plywood-on-frame construction manual, Jeff recommends using a framing square on a large surface (a sheet of plywood, for example) to draw up the five frames according to the measurements provided, then to assemble each frame piece over its drawing. The framing members are joined with simple lap joints, screwed and glued. The transom frame pieces are assembled with butt joints. Here I used pocket-hole joinery, which I favor for a tight attachment.
The hull build takes place on a strongback. The assembled frame members are spaced along it according to the measurements in the plans, with the bottom crosspieces of frames one and five placed directly on the jig and frames two, three, and four raised up on blocks cut to give the bottom its rocker. The ends of the strongback are cut at angles to fit the stem and the transom, which get temporarily secured in place. Once the frames are in position, the 2×4 keelson is set in notches previously cut in the five frames. After I applied epoxy at the intersections, I used ratchet straps to bend the keelson over the frames and hold it while I screwed them all together.
Kevin Power
Plans from Spira typically don’t include the arrangements for the interior but outfitting the dory with risers and thwarts requires little guidance.
The chines and sheer clamps follow. I wasn’t able to find 1x2s in the proper length, but Spira provides instructions for scarfing pieces together by cutting the ends at a 1:8 ratio. I built a jig to make consistent angles in the ends of my 1x2s, then simply glued pieces together. The full-length longitudinals are then glued and screwed in notches in the frames. Then I did a bit of fairing to bevel the bottoms of the chines and to present a smooth surface for the plywood sides.
The plywood sides and bottom are then screwed to the framework and cut to fit while in place. This is the part of the process that makes Spira boats particularly easy to build: there is no precise precutting and fitting prior to attaching the sides. I clamped the oversize plywood panels to the sheer clamp and the chine log and screwed them in place. I needed three pieces of plywood to get from the transom to the stem. The two seams created are butt-blocked with a 6”-wide piece of the same plywood spanning 3″ to each side of the joint on the inside of the hull. Once the sides and transom are skinned with plywood and the excess material is removed, the bottom is put on in the same manner. I was able to get from stem to stern on the bottom, creating only one seam.
Sean Power
The plans leave the outfitting of the interior up to the builder. Installing a rowing station at each of the three central frame was an easy task and in keeping with traditional Banks dories.
The screw holes and seams get filled with epoxy mixed with wood flour. I had never worked with fiberglass before, but there are tips in the Spira book and in the blogs on his site. The plans recommend two layers of glass on a smaller boat like this one. In the guide included with the plans, Spira notes that some people opt to use fiberglass tape on all the seams before applying the sheets of cloth. Just the suggestion of it was good enough for me. I’d be using the boat at times on rocky shores, so I added extra ’glass tape and strips of cloth along chines, and particularly, over the stem.
To finish the exterior of the hull I found paint of excellent quality in a nice selection of colors from George Kirby Jr. Paint Company in New Bedford, Massachusetts. One gallon of yellow for the hull exterior and a quart of green for the trim (a common color scheme for Nova Scotia dories) were more than enough.
When the dory comes off the strongback and sits upright for the first time, you’ll have an empty hull. Jeff Spira does not give any direction for the interior of the boats, leaving that up to the builder. That was fine for my boat, because I was never planning on any decks, consoles, or cabins. I did fancy a place to sit, though. I used frames one and five to create compartments in the bow and stern, and filled them with foam for flotation. I used 1x3s as risers to support 2×10 thwarts at the second, third, and fourth frames. Banks fishing dories had removable thwarts so they could be compactly nested on the decks of fishing schooners. My dory’s thwarts are not permanently attached but slotted to slip around the frames. I installed three pairs of bronze oarlocks so there would be a place to row from each thwart.
There are few things in life more satisfying than launching a boat you built. I was so pleased with the way the boat rowed and tracked, that I had to remind myself to be critical of the build. At first I could not tell if I was just riding on the excitement of the accomplishment. But many hours and many nautical miles later, I still love rowing this boat.
My original intention was to have the dory join the family kayak fleet and become a part of our adventures in the rivers and bays of southeastern Connecticut, and it exceeded my expectations. It easily handles the loads of coolers, beach chairs, blankets, towels, two big dogs, and anyone who gets too tired to paddle their own kayak. It does this with ease.
Courtesy of the author
With two passengers and a dog aboard, the dory still has plenty of freeboard and the capacity to carry even more weight.
The middle rowing station is the most preferable for a single rower, and the forward and aft rowing stations are ideal when one of the kids wants to lend a hand with rowing. Once you get the Nova Scotian moving, it tracks beautifully and glides effortlessly. Typical of dories of its type, it is a bit tender at first, but the secondary stability is reassuringly solid. You can lean it over to one side, but it’ll stop there. I’ve hauled my 110-lb golden retriever over the side more than once without feeling I was risking putting the rail under. I also intended to use the dory to extend the boating season. I now enjoy getting on the water year-round and row through the winter when the Mystic River isn’t iced over. My dory doesn’t go into storage; it is always ready to go.
Kevin Power is a home inspector who lives with his wife and three teenage kids in Mystic, Connecticut. He has been boating for 44 of his 47 years and his fleet includes the dory, two kayaks, a rowing dinghy, a sailing dinghy, a Sunfish, a sloop-rigged centerboard dinghy, and a 20′ outboard fishing boat. He has always enjoyed simple woodworking projects such as rolling cooler carts, beer-growler caddies, and Adirondack chairs. As a beer-fueled joke, he started the Mystic Cornhole Company. The dory is the first boat he has built. His wife works at Electric Boat Division of General Dynamics in Groton, Connecticut, where the U.S. Navy gets its nuclear submarines. Kevin notes she doesn’t find it as amusing as he does when he says they are both boatbuilders.
Nova Scotian Particulars
[table]
Length/16′
Beam/4’10”
Height of stem above bottom/2’6″
[/table]
Update: Jeff Spira passed away unexpectedly in the spring of 2022. His website is no longer operating and it is presumed that his boat plans are no longer available.
Is there a boat you’d like to know more about? Have you built one that you think other Small Boats Monthly readers would enjoy? Please email us!
We think the Drascombe Lugger is one the most versatile small boats ever built. Its designer, John Watkinson, sailed alone often but wanted a boat that his family “could enjoy, and to do this, the first requirement was that they should have complete confidence in the craft.” He set four criteria for the boat he would design: It had to be easy “for the family to handle on and off the trailer,” have “first-rate seakeeping qualities,” be a “good motorboat for fishing and pottering under power,” and be “lively enough for me to enjoy a good hard sail once I had put the family on the beach.”
Douglas Elliott
John Elliott and his brother Doug built this wooden Drascombe Lugger in their boatshop in 1978. The building at Yealmbridge in Devon, England, was 300-year-old flocking mill and furniture factory that was cold and drafty in the winter. The boat was built for the Rees family and named REESKIP (Rees’ ship) has spent all her life in Holland. A later owner renamed the boat ELLIOTT in honor of the builders after John passed away. The boat was built from BS1088 mahogany marine plywood and iroko hardwood with an all glued construction using phenolic resin adhesives. In the photo, John is fitting the deck beams prior to the decks, sheer strake, and transom return being added. The hulls were built upside down on a jig on the floor above, then removed from the jig, turned right side up and the build continued on the ground floor. Every Lugger the Elliotts built was custom, so no two were identical.
These design criteria can be elusive when combined, but he hit the mark when he launched the first Lugger in 1965. He went into business making wooden Luggers in 1967. Fiberglass Luggers went into production in 1969 and are still being built today.
He based his Lugger design on fishing vessels that worked the choppy water of the English Channel. The sheer leading to a high freeboard forward keeps the crew dry and a broad beam makes it seakindly. The first Luggers carried a lug rig but switched early in production to a high-peaked sliding-gunter yawl rig. The boomless main allows the sail to be stowed out of the way and creates working space for in the middle of the boat.
The design met the requirements set by his wife, Kate, that the Lugger be “a day boat, so I could get home to a comfortable bed, have no boom to bang heads and have any engine fumes well out of the way.” Watkinson created a boat that his wife would enjoy and it drew the interest of others, and at the 1968 Earls Court Boat Show the first production boat sold within 20 minutes of the doors being opened.
Kent Lewis
To keep the rudder at the ready, the authors’ Lugger, ONKAHYE, uses a piece of wood with a thin slot to keep the blade pulled up into its trunk.
Luggers are seaworthy boats in which many notable voyages have been taken. Ken and B Duxbury cruised from England to the Aegean and back in LUGWORM. Webb Chiles sailed his two Luggers, CHIDIOCK TICHBORNE I and II, 20,000 miles, which included a crossing of the Pacific and Indian oceans. Seakeeping qualities indeed.
Audrey’s family has owned Lugger ONKAHYE since 1982, and we have sailed her in lakes, reservoirs, bays, and harbors and even poked her bow into the Pacific Ocean on a day sail. The Lugger is 18′9″ in length and 6′3″ on the beam. She will float in 8″ with the galvanized centerboard up, and draws 4′ with the board down. The hull weighs 800 lbs. All of this adds up to a boat and trailer that can fit in most garages, is easily towed by a minivan or SUV, and is easy to launch.
Kent Lewis
A compartment in the aft end of the centerboard trunk houses a bilge pump. The trunk houses a galvanized steel centerboard and is wide and strong enough to stand unsupported by thwarts.
At the ramp, we can rig our Lugger in under 30 minutes, with one person rigging the boat and the other loading float kits, food, water, and spare PFDs under the seats. The second person’s primary job is to serve as the public information officer, as the Lugger always draws a crowd eager to ask questions. We usually step the unstayed mizzen first to get it out of the way, then step the 16′ mast and attach the jib stay to the roller-furling drum. The mast is easy for one person to step and all of the spars fit inside the boat for transport; it is easily lowered for going under low bridges. The main halyard and downhaul belay to pins on the mast thwart. Next, we tie down mainmast’s stays and run jibsheets through the fairleads to their cam cleats. We set the rudder in its case, employing a wooden chock we made to slip under the rudder cheek that holds it clear of the keel for launching. Moving aft, we rig the boomkin, attaching the mizzen sheet to the sail and bending the ensign onto a line flown off of the mizzenmast.
We keep the boomkin stowed during launching, lest it snag on something or someone. When the wind is light, Audrey pivots the boat 180 degrees while I park the trailer; it helps to have the boomkin stowed during that maneuver as well. On most days we sail off the dock, and in that case we’ll extend the boomkin, drop the rudder, put about centerboard half down and unfurl the jib. Once we are off the dock, we raise the sliding gunter gaff for a full main. I tidy up lines, drop a little more centerboard, and move aft to loose the mizzen. If we use the motor at all we usually shut off at this point and tilt it clear of the water in the neat transom cutout.
The Lugger has a great motorwell just behind the tiller and mizzenmast, so there’s no need to hang over the transom to work with the motor. A Minn Kota trolling motor performed well for protected areas but not extended cruises; a four-stroke Suzuki 6-hp outboard will take us up to hull speed at one-third throttle and handle any current or wind that we have encountered.
The jib is 30 sq ft, the main has options from 70 to 115 sq ft, and the mizzen carries 23 sq ft of canvas. The Lugger performs well under all points of sail but really enjoys reaching. She is not at her best pointing high, but can work to windward at a slow pace. With higher winds, it is best to release the mizzen during tacks. On a nice day we have run wing-and-wing, and on the bad days we have a multitude of options to set, reef, or furl the jib, main, and mizzen.
Drascombe Nederland - Michel Maartens
CASTOR & POLLUX takes it easy flying only the jib and mizzen. The Dutch owner installed a tabernacle on the main mast to make it easier to lower. One of the oars is set in a transom-mounted oarlock in anticipation of shallow water ahead. The oar can be used for steering when the rudder needs to be retracted in thin water.
We almost never reef and we usually stow the mizzen first, but many folks prefer to drop the main and sail on the jib and mizzen. The boat is very stable and never feels like it is exceeding sensible limits. The wide beam is kind to beginner sailors, and there is plenty of room for four to move around the cockpit, tending to boat and sail trim without bumping into each other. Six adults is the maximum load.
With an experienced crew aboard, the Lugger is happy to take a lively sail; a hint of spray will come over the rail. The ride is comfortable with high bulwarks to lean against, and the boat feels sturdy. If water comes over the rail, ONKAHYE has a bilge pump built into the centerboard case. Heading back to the ramp the sails can be stowed and furled in a snap, giving us the opportunity to row a bit with the 8 1/2′ oars; the centerboard case provides a rowing seat for one set of oarlocks, and there’s a transom sculling socket to scull right up onto the beach.
Audrey Lewis
The authors’ Lugger, ONKAHYE (Seminole for Dancing Feather), was built in 1980 by Honnor Marine in Devon, England, and imported to Texas in 1982.
Our Lugger has required minimal maintenance over the years—the big jobs involved a touch of bottom paint, replacing the floor, and varnishing spars. That adds up to economy of ownership. We recently spent a day buffing the gelcoat, touching up the boomkin, replacing parrel beads, and whipping ends of a few lines. The teak gunwale, thwart, centerboard case cap, rudder case trim, and gunwale look phenomenal with just the right amount of patina.
Drascombe Nederland - Michel Maartens
CASTOR & POLLUX was built in 1982. With main, mizzen, and jib set, Luggers carry 132 sq ft of sail.
The Lugger has a global owner footprint with the Drascombe Association, which produces a newsletter and hosts an online support forum. The Lugger started off with over 100 wooden hulls and is one of just a few boats make the transition to fiberglass while wooden hulls continue to be in production now. Drascombe just celebrated its 50th anniversary, and the Lugger is currently built by Churchouse Boats in England. Through the years over 2,000 fiberglass Luggers have been built, and the high quality has been maintained.
Gunter yawl, tanbark sails, belaying pins and a boomkin…how can we top that? As Webb Chiles put it, “the boat is built for performer and spectator.” For a half century the Lugger has kindled the spirit of adventure.
Audrey Lewis has sailed her Lugger ONKAHYE for 35 years and pressed her husband Kent into service as movable ballast 24 years ago. The 1980 Lugger ONKAHYE is the flagship of their small-boat armada; her adventures can be followed on the blog Small Boat Restoration. Their review of Muck Boots is also in this issue.
Lugger Particulars
[table]
Length/18′9″
Beam/6′3″
Draft, board up/10″
Draft, Board down/4′
Weight/850 lbs
Sail area/132 sq ft
[/table]
Drascombe Luggers are available from Churchouse in the United Kingdom. They are priced at £18,250 (around $25,900 USD) and have been exported worldwide.
Is there a boat design you’d like to know more about? Have you built, bought, or adventured in one that you think other Small Boats Monthly readers would enjoy? Please email us!
I left the launch ramp at Marysville at the peak of a midwinter high tide when flood had slowed the downstream current in Ebey Slough to a crawl. I put the outboard in neutral and eyed the swing bridge that spanned the slough a few dozen yards downstream. From my eye level, all I could see of the bottom of the bridge was a thin dark line, but that was enough. The high water left me just enough room to motor BONZO, a 19′6″ Escargot canal boat that my son had built, under the railroad’s 111-year-old swing bridge. I didn’t have to crouch to keep from hitting my head on the black, rivet-blistered steel plates, but it was good that I hadn’t put the stovepipe in place; it would have been knocked off.
The parallel concrete bridges another 100 yards downstream stood high above the slough, carrying the north- and southbound lanes of an interstate highway. The guardrails masked the cars from view, and I could see only an intermittent stream of boxy trailers hauled by semis, but the hum of engines and hiss of tires on pavement was constant. As I left the bridges behind, distance muffled the rush of traffic until it began to sound like wind-driven rain.
Photographs and video by the author
At the mouth of Ebey Slough I took advantage of a light breeze to sail the last 1-1/2 miles to the line of wrecks where I’d spend the night.
I kept to what I knew from the chart to be the main channel of the slough, but it was evident only by the absence of pilings. The separate streams of Ebey Slough, Steamboat Slough, and the Snohomish River were united by the apex of the tide. A following breeze came up, only enough to dimple the water, but I was in no rush and welcomed the chance to silence the outboard and set sail. I stepped the mast, an irregular 14′ spar I’d made from a spindly sapling by doing little more than removing the bark and drilling a couple of holes at the top for halyards, and raised the square sail. BONZO ghosted along leaving a softly pleated wake. When the wind shifted to the northwest I angled the sail and lowered the leeboard, putting BONZO’s course on a broad reach. The leeboard wasn’t meant to turn a boxy boat into an able sailer, but it does keep the bow from falling off when motoring in a crosswind.
I sailed along the edge of Possession Sound toward a breakwater made of six wrecked ships set bow-to-stern in an orderly line one-third of a mile long. With the tide up, only the ragged ends of frames and some of the diagonal planking were visible, blackened with age and bristled with the iron rods that once held the ships together. About 50′ from the line of wrecks I dropped the anchor, dragging it along under sail until the flukes set and brought BONZO to a stop.
I dropped the anchor near the line of wrecks, just visible to the right, that were scuttled to form a breakwater to protect rafts of logs tied to the pilings that surrounded the mouth of the Snohomish River. Phil Thiel, the designer of the Escargot, never intended it to be sailed, but any boat can be sailed downwind. I installed the leeboard to make BONZO more maneuverable when under power, but it also allowed her to do a bit of broad reaching. Sailing is slower than motoring, but it is quieter, so I raise the sail whenever I have a chance.
It was 3:30 p.m. and I had an hour to go before sunset—time enough to get ready to spend the night. The tide had dropped only 2’ since I’d launched and would drop another 8’ to the low at 9:00 p.m.
I tidied up, rolling the sails up on the spars, coiling line, and setting FAERIE, my folding coracle tender, on the cabin catwalk. The boat settled near the outer end of the line of wrecks, which didn’t offer as much protection as a position farther upstream. I pulled the rode and got the boat moving forward, coiling it around the port post. The anchor came up with sticky, fine black silt. I set it on deck and used my 14′ push-pole to gain a bit more ground. The depth stayed a steady 6′ until I strayed close to the wrecks and found water too deep for the pole. I’d seen photos of the wrecks during a low tide and knew there were pools of water; the current running between the ships scoured a trough. I used the pole as a paddle, moving a couple of boat-lengths away until I could push off the bottom again. I dropped the anchor again well into an area of flat sand.
Roger Siebert
.
The air chilled when the sun slipped behind the sooty streaks of clouds above the Olympic mountains to the west, so I put the chimney in place and got a fire going in the woodstove with a pot of water on top for tea.
At dusk I put on a jacket and stepped out into the cockpit to check the depth. The ebb-drawn current was no longer trailing straight back from the transom, but veered in lazy swirls as the water around the boat grew shallow. The push-pole hit bottom 2’ down. The tide chart on my phone indicated that the water level would fall another 5′, hitting low at 9:30 a.m.
After having dinner, I raised one of the windows and aimed my spotlight at the water. It was no longer green, as it had been during the day, but tan. I must have been only about 1′ deep, but I couldn’t make the bottom. I rocked in my seat…and the boat rocked with me. I was not yet aground.
At 6:30 I stepped out into the cockpit again; it was dark enough for me to see the faint cluster of the Pleiades almost directly overhead. I checked the depth with my paddle, illuminating it with my spotlight. The blade showed less than a foot of water left, though I could see only 3″ of the paddle beneath the surface, even with my spotlight. Three boat-lengths astern of BONZO a sandbar had broken the surface. I’d be aground soon.
I went back into the cabin, chilled, and opened the stove door, pulled the coals forward with a stick, and placed some cedar kindling on top. When I opened the damper, the air rushed in and a flicker of orange light glowed through the mica window.
At low tide, BONZO came to rest on the sand close to the line of shipwrecks. I didn’t get to do as much exploring as I’d hoped—the mud surrounding the sand bars was far too sticky.
A few minutes later, I noticed the boat wasn’t responding to my movement and assumed BONZO was aground. I held a 2′ length of dowel at one end and let it hang vertically while eyeing the cabin door beyond it. The boat was listing only a couple of degrees to starboard—enough that I could feel it in my lower back when seated facing aft, but not so much that it would make for an uncomfortable night’s sleep.
I checked the tide chart. The curve of the graph would reach its nadir at 8:55 p.m. The point on the chart directly across from where I was now would be at 11:00 p.m. I’d be aground for four-and-a-half hours.
I heard a rattle on the cabintop that suggested the boat hadn’t stopped moving. I used my dowel as a plumb bob again. The list had doubled. With the bottom of the door lined up with the dowel, the top of the door was 2″ from its top, a list of about 5 degrees [delete: to starboard].
By the time BONZO came to rest, the top of the door was now 3″ from the dowel, a 7-degree list. While there were patches of flatter ground all around, the hull had settled in a bit of a gully in the sand. It may have been that the last of the current, seeking out the lowest ground, took BONZO with it.
I didn’t get far from the boat before I had to turn back to get my pattens to keep from getting stuck in the mud.
I put my boots on and stepped out over the port side. The sand was firm and could easily support my weight, so I walked around on the bar that led toward the wrecks. They were, as I had seen in photos, surrounded by water that didn’t drain on the low tide. I headed the other direction, north toward the Steamboat Slough channel, though I could not see it within the 70-yard beam of my searchlight. A few yards from the boat, the sand turned to mud and I couldn’t walk without having to pull my boots up behind me. I turned back, got my 14″-square pattens out of the cockpit, and tied them on. I clomped back across the sand to the mud and tried again to walk to the river channel. The mud was extremely sticky and the rope bindings tied tight over my boots pressed painfully across my instep. The mud stuck to the bottoms of the pattens, making them quite heavy; each step became increasingly difficult.
Turning around without falling was a bit of a chore, and getting back across the mud I had just walked over was harder than it was the first time. I was relieved to get back to the sand. I took the pattens off, swished the mud off in the pool of water astern of BONZO, and put them back in the cockpit. I retreated to the cabin, got the fire going again, and boiled up more water for tea.
I went out again at about 9:15 when the tide had just turned. The sandbar to the south led right up to one of the wrecks and I easily could walk there without the pattens. The sand was soft and spongy, but my boots didn’t stick as long as I kept moving. The hull was pinned against a tall piling, and wedged in between the two, 10′ above the sand, was the barnacle-encrusted trunk of a tree with a tangle of roots on the upstream side, looking like the carcass of a giant squid.
Above the reach of the high tide there was little left of the six nearly identical sailing ships that formed the breakwater. Where the hulls were submerged daily in salt water the planking was largely intact, and still held water. All through the night’s low tide I could hear trickles of water slowly dripping from the seams.
With my spotlight pointing to the west, I could see the bow of the next ship in the line of wrecks. From the side, the hulls are just a jumble of century-old timbers rotting away, but bow-on, the ship’s full curves and sweetly lined strakes were clearly visible; the beauty that was built into the hull by long-forgotten shipwrights hadn’t been diminished by tides or time.
A fog slinked in from the north, wrapping haloes around the lights of houses lining the banks of Ebey Slough. When it reached BONZO and drifted through the beam of my flashlight, it was not a gauzy haze, but a swirling sea of luminous plankton. I put one last load of wood into the stove and slipped into my bed in the forward compartment.
I woke to the sound of something knocking against the hull. BONZO was afloat and rocking, and I thought that a stick coming from upriver might have drifted under the bow. I got up and followed the sound to the cockpit where one of the oarlocks was hanging loose on its tether, rapping the hull with each swing. I set the lock in its socket. The beam of my searchlight could reach only 30 yards in the fog that had come over the tide flats. The only feature of the landscape that I could see was the single piling that stood between BONZO and the shipwrecks when I was aground.
I was awakened again at 1:15 a.m. This time I knew what the sound was: the mast rattling in the partners. I got up, crawled out onto the foredeck, pulled the mast out, and set it with the sail and oars side of the catwalk. The fog had grown thicker and I couldn’t see anything when I turned the spotlight on. All of the light bounced back as if I’d pointed it at myself. When I turned it off there was a faint, dark streak that I took to be the line of ships, but I couldn’t be sure. I tugged on the rode and found that it was quite slack. Eventually I felt some resistance and it seemed that the anchor was still holding. I crawled back in bed and turned the GPS on. It showed my speed was zero. I wasn’t drifting.
When I woke at 3:30 a.m. BONZO was still and quiet. Outside the window, what little water I could see beneath the press of the fog was glassy and calm. The tide would peak in an hour and the currents had come to a standstill. I could take advantage of the stillness and get some sleep.
The chill was getting through to me. I pulled a third sleeping bag over the others. With the additional bedding pulled up around my head I soon warmed up, and the only cold I felt was on my teeth when I breathed in.
I woke at 6:30 a.m. to the slap of wavelets under the bow that sounded like a gallon-jug of water upended, but never emptying. The fog masked the horizon; pilings 30 yards away floated in an ill-defined, colorless space. BONZO yawed gently at the end of the anchor rode, and the piling that had been several boat-lengths to the south while I was grounded drifted past. I rolled over and watched the silhouette slip by the main cabin windows. Worried that the kicked-up outboard would hit the piling, I quickly got up and moved to the cockpit. The lower unit made it past the piling with 2′ to spare.
The wind dropped as I was having breakfast, and the water soon smoothed itself like a bedsheet pulled tight. The water was not perfectly still; the ripples were just large enough to turn the soot-black reflections of the shipwrecks into sharp, horizontal shards. The biggest waves around the boat were those that radiated out from BONZO’s hull when I shifted my weight.
The high tide had passed while I was asleep, and the morning low would be an hour on the other side of sunrise. Between them the water would drop just 3’, so the currents coming out of the sloughs and river would be gentle. There was no need to get underway quickly. As the fire in the stove had gone out and the cabin was getting the edge of a chill, I loaded the stove with a few pages torn from a Harbor Freight catalog, some cedar kindling, and fir shop scraps to get another fire going.
In the first light of the morning, the wrecks were all but submerged.
A single feathery cloud in the clear sky above the fog was the first to catch the morning’s rose-pink sunlight. The eastern horizon whitened and the fog lifted, revealing to the north the wooded shore I had sailed along yesterday and the industrial fringe of the city of Everett to the south. The sun’s first rays swept away the last of the enthralling uncertainties of night and fog.
The fog had covered everything with ladybug-sized beads of water. I poured a pint out of FAERIE after I had folded it up to get ready to get underway. Although the sun was shining, it was still cold, so I rigged the outboard with the yoke on the throttle and clipped the steering lines to the tiller. I started the motor, put it in gear, and took my place in the fo’c’s’le next to the control lines. I headed downstream and out into Possession Sound before turning east again for the Snohomish River.
As I approached the channel on the south side of the wrecks, I passed into an area where the waves bunched up. The chart showed an area of shallow water. I returned to the cockpit and sounded with a push-pole. Motoring along, I had a good 5’ or 6’ under BONZO but stayed in the cockpit, sounding as I went. I made a beeline for the wrecks, expecting to find the channel there. Soon the bottom was beyond the reach of my pole, and I turned upstream again.
Everett has its back to the Snohomish River, and where its banks are not covered with brush and riprap they are lined with logs piled high for sawmills, boats in bad repair, and shacks with broken windows.
There were two high concrete bridges ahead, each with mid-river piers. On a previous trip up the Snohomish, 8 miles farther upstream, my kids and I were motoring and had just passed a railroad bridge when the outboard run out of fuel. Dead in the water, BONZO was carried downstream directly at one of the bridge piers. Without time to refuel and start the motor again before an impact, my son and I paddled feverishly to keep the boat from getting wrapped around the stone bridge support. Ever since then, I’ve refueled before going under a bridge if it has been a while since I’d filled the gas tank.
I paused just shy of the bridge, stopped the motor, and fueled it. With a full tank, I started the motor and carried on. Seconds after passing under the bridge, the motor sputtered and threatened to quit. I pulled the choke and brought it back to life, steering for the bank to avoid the bridge piers. The motor didn’t sort itself out, so I brought it aboard and put my backup 2½-horse in its place.
The maze of pilings supporting Highway 2 over Deadwater Slough made for an interesting slalom, but eventually led to a dead end.
I motored a few hundred yards into Deadwater Slough and cocked the motor up when I reached a maze of concrete columns that supported two roadways and a pipeline. Standing on the foredeck, I pushed off columns and paddled between them until I discovered I’d reached a dead end. With the air filled with roaring traffic overhead and the double thump of tires crossing expansion joints, I shoved my way back out, and headed for the river.
While BONZO drifted sideways with the current on Steamboat Slough, I used the oars to follow the contours of the bank.
Just a quarter mile downstream is the river’s intersection with Union Slough and Steamboat Slough. I had marked my chart with a promising place less than a half mile along Union where I could spend the night—a sandbar off to the side of the slough where BONZO could dry out again on the falling tide—but its 25-yard-wide entrance was blocked by a logjam. It was still midday, so I kicked the motor up and let the current take me sideways down Steamboat Slough, using the oars to keep away from the banks.
This stretch of Steamboat Slough is known as a boat graveyard, and while it is a place where many boats come to grief, this lonely stretch of the slough seems to be a place where hopes and dreams die first, and the boats waste away for years afterward.
On the right bank of the slough, stretching out for a third of a mile along the outside of the first bend, is a row of boats, many of them in bad shape. Some were wrapped in blue plastic tarps to buy time, and one lay on its side, surrounded by oil-containment boom with only its port rail and a davit above water. An old commercial fishing boat listed to starboard, its windows gone and its paint peeling away in sheets the size of letter paper. Her name, painted below the pilothouse window, was missing most of its letters, but I could read it spelled out on the bow: ELUSIVE DREAM.
This old commercial fishing boat anchored in the middle of the slough appeared to be abandoned, but as I passed by I heard a generator throbbing deep within the hull and saw a lightbulb glowing in a window. Bearing the name MIDAS on its bow, it seems to have lost its golden touch.
I poked into Deadman Slough on the right bank, a passage a few boat-lengths wide, but there wasn’t much to see, beyond a string of surplus docks and the shell of what was once a floating office, because the levee had been built right over the slough, blocking access to the greater part of it.
To explore a tide-flooded marsh I kicked the outboard up and used a push pole to get across the lagoon.
Another 150 yards downstream on Steamboat Slough, I motored into another opening in the bank. Water was flowing slowly out of the gap, a sign that the tide had turned, and over the next five hours it would fall a total of 11′. The passage opened onto a mile-wide cattail marsh that was almost entirely inundated except for some patches of dried reeds. I tested the depth with a push-pole at the opening, and it was about 8’ but soon became much shallower when I coasted near the brown stalks of last summer’s cattails. With the motor cocked up, I pushed BONZO through the stalks to the middle of the lagoon.
I didn’t stay long because it was drawing near 3:00 p.m., and I needed to figure out where I was going to spend the night. I wouldn’t be able to get to my first choice, the sandbar in Union Slough, because it was blocked by the logjam on one side and a footbridge on the other.
I had hoped to find a safe to anchor among the cattails, but a log blocked the channel to the patch of water I had my eye on.
I circumnavigated Otter Island on my way to an 80-yard-long passage connecting Steamboat and Union sloughs. A half mile down Union there was another potential overnight spot I had marked on my chart. I found the opening, only 10′ wide, to a channel that paralleled the slough on the other side of a narrow strip of land covered in brush. Beyond the channel was a cattail marsh a half-mile wide. Here, the marsh wasn’t flooded and the cattails stood shoulder high, topped with their corn-dog-like seed heads. The channel eventually opened up into a clear patch of water I thought might be suitable for an anchorage, but access to it was blocked by a log. I poked around under the boat with a push-pole; the channel was about 8′ deep and the bottom seemed quite irregular. I feared BONZO might end up resting at a bad angle when the tide drained the channel.
Once, a friend of mine who had cruised the sloughs in his Escargot canal boat had tried to spend a night at anchor when his bow got hung up on something. The stern went down, putting the boat at such a precarious angle that he feared the boat would swamp. He called the county sheriff in the middle of the night, and the boat that was sent out for him was able to get his boat back on an even keel.
The footbridge over Union Slough limited my options for an overnight stay. On a previous trip BONZO had passed under it on a high tide with only a couple of inches to spare.
I started checking the wider parts of Union Slough itself with my handheld depth finder. Just inside of the passage to Steamboat Slough there was about 16′ of water, more than enough to float through the 10′ drop to the 9:30 p.m. low tide. I took soundings as I made my way along Union Slough, all the way to the footbridge that would block my passage. The depths varied, some offering only a few feet of water left at low, others a greater margin of safety.
I wanted to pole across the flooded lowlands to the west of Union Slough, but I needed to pass them by to find a place to anchor and settle in for the night.
I returned to the middle of a set of four meanders where I’d found depths of 16′ and 17′ and took more soundings across the slough. The deep water seemed to span most of the channel; I’d have plenty of water under the boat at low tide.
The tide had accelerated, and the current was about 2 knots, so I motored a few dozen yards upstream, dropped the anchor, and let BONZO drift with the current set it. I watched the trees on the bank against the hills in the distance, and when the anchor buried itself it was quite clear that the downstream drift had come to a quick end. I took the 14’ push-pole and swept the area under and around the boat looking for anything projecting upward from the bottom.
When BONZO was first launched we had 13 people aboard and everyone had a place to sit. With the cabin to myself, I had room to spread out. My bed is in the bow, just beyond the wood stove behind me
It was 4:30 p.m. and the sun was setting over Everett. Throughout the evening I kept watch on the banks as they were exposed by the falling tide. They were muddy but steep, as I had guessed and hoped. I’d have plenty of room in the middle of the slough to keep afloat at low water. At 8:30 p.m., with an hour to go and only inches left to drop, I still had 9.2’ beneath the hull.
As the tide dropped, and the ebb pulled the water from the slough, there was a steady parade of driftwood marching downstream. Broken branches scratched along the bottom and low-floating logs knocked on the hull from bow to stern.
At 8:30 p.m. I looked around with my searchlight and could see only the banks to either side, but nothing up- or downstream, because a fog had filled the little canyon of the now half-empty slough. I checked the depth and still had 9′ beneath the boat with only 6″ left to go until low. As I was reaching over the transom I was startled by a splash sounding equal to a concrete block being dropped overboard. I could make out the silhouette of a beaver upstream, his head at the apex of an arrowhead wake. I aimed my light at him and he slapped his tail again and disappeared.
I turned in, feeling I could sleep through the night without having to check on the water level. The tide would be rising, and even if BONZO kited over to one of the banks, the tide would lift the boat free.
With a clear view of the Cascade Mountains, even Mt. Rainier far to the south (behind the two bare trees above the stovepipe), the morning was off to a good start until I tried weighing anchor.
I got through the night without waking up every couple of hours to check on the boat. It was a bit after 6:00 a.m. and still dark, but BONZO was afloat in midstream and the slough was filled back up to the brim.
On this cold morning, sitting by the wood stove cooking breakfast was the place to be.
I got a fire going in the stove and set on a pan of water for poached eggs and bread for toast. After putting the cabin in order, I went to the cockpit and got the outboard ready to start. I moved across the cabin roof to the foredeck and hauled the anchor rode in, coiling it on the starboard corner post as I brought it in. BONZO moved forward, against the current, and soon the rode was nearly vertical. I pulled, but the anchor didn’t break free. I hauled as hard as I could, but it only pushed the bow deeper into the water.
My anchor was stuck under a log submerged in mid channel just beyond BONZO. Pulling from this bank and the far bank didn’t budge it.
I spent the next hour and a half doing everything I could think of to recover my trusted stainless-steel anchor. I brought the rode aft, hitched it to a post, and motored at full speed upstream. I tied the end of the rode to a fender and cobbled together an anchor retrieval device with things I had on board. I made a ring of stiff, vinyl-coated chain that I hoped would slide down the rode, anchor chain, and the anchor’s shank. I tied a spare rode to the chain, and sent it down to get the loop over the anchor shank to pull its fluke free. That didn’t work—the chain never got a purchase on the anchor. I put BONZO ashore on the right bank, the left bank, upstream, and down, dug my heels in, and pulled in every direction. It was clear that I had hooked a heavy log.
I tried everything I could think of to get my anchor back, but I had to give up and hope “REWARD $50” drilled into a piece of hardwood that I tied to the anchor chain would someday get my anchor back to me.
After spending the best part of the morning trying to retrieve my anchor, I gave up, but rather than let it be lost for good, I tied the chain to a fender and a piece of wood with my phone number on it.
The best I was able to do was to get the end of the chain to break the surface. The anchor was a good one, and I was reluctant to give up on it, but I had run out of ideas. I decided I’d write my phone number on one of my older fenders, then leave it tied to the chain. I didn’t have a permanent marker on board, but I did have a cordless drill and bits. In the firewood was a scrap of ipe decking with a 3/4″ hole through it. With a small bit chucked in the drill I made a series of holes spelling out “REWARD $50” on one side, and my phone number on the other side. I tied the fender and the wood to the last two links in the chain, then cut the rode. The fender drifted a few feet aft with only one end breaking the surface of the water and then the current pulled it down and out of sight.
BONZO drifted downstream, and since she stayed in the middle of the slough through the meanders, I just let her drift.
Mt. Baker loomed over the sloughs. In my 20s I had twice climbed the left flank and looked out over the Everett waterways from the summit. A bald eagle took to the air when BONZO motored beneath his perch.
When I reached the junction with Steamboat Slough, I motored over to Otter Island where I found a narrow opening in the west side of the island. I poked BONZO’s bow in and cut the engine. I poled around the first bend, thinking the water would be shallow in a passage barely wide enough to turn the boat around, but the bottom was at an awkward depth for using the pole, so I switched to sculling with an oar set in a lock mounted on the transom.
The narrow waterway in Otter Island was an enchanting place to explore, but I didn’t stay long, worried I’d get trapped by a falling tide.
I sculled the bends in this little slough for about 300 yards, never able to see more than a few boat-lengths ahead or behind. The banks were overhung with grass, and the trees closest to the water were leaning over it. The blade of the oar struck submerged roots reaching out from the mud beneath the grass. I was halfway through a hairpin turn to port before I saw a log bridging the banks, a foot above the water. I grabbed a paddle and dug in over the port quarter to bring the boat to a stop.
As I sat on the cabin top I watched the ripples spread out across the slough when I rocked the boat. I could still see them when they reached the lower trunk of the tree leaning over the far bank to the left.
I got BONZO turned around and sculled back to Steamboat Slough. There wasn’t a breath of wind on the water, and barely any current, so the sky, clouds, and trees were mirrored in the water. I ate lunch sitting on the catwalk as the shore 15’ off the stern inched by. I rocked the boat and watched the ripples radiate from the hull. They warped the reflections of the clouds, and then turned the images of the treetops ragged. I could still see the effects of the ripples 200 yards away when they reached the reflection of a lone fir tree leaning the over the opposite bank of the slough. In the moment before they disappeared, the image of the trunk had the look of a finely threaded machine screw.
On the afternoon of my last day, I had Steamboat Slough to myself. The water had been so still that I regretted making a mess of it by getting underway.
I climbed down into the cockpit, started the motor, and steered for an opening in the bank to starboard where the Steamboat Slough made a tangential touch to a sharp bend in the Ebey Slough. The Ebey Slough, at 50 yards wide—half the width of Steamboat—curled around North Ebey Island in jigsaw-puzzle curves.
In a little over an hour, BONZO was back on the trailer, doing 50 miles an hour over the bridges we’d passed under at less than a tenth of that speed. The noise of engines and tires on pavement was constant; I missed the distance that made it sound like wind-driven rain.
Christopher Cunningham is the editor of Small Boats Monthly.
If you have an interesting story to tell about your adventures with a small boat, please email us a brief outline and a few photos.
Angle grinders are designed for working metal; equipped with sanders and blades designed for wood, they have plenty of power to do quick work.
Some of the woodworking tasks we take on in boatbuilding have a lot in common with sculpture, as we carve our way from a block to a purposeful shape. When I started making spoon-bladed oars I used gouges, curved spokeshaves, and my father’s Stanley 100-1/2, a small spoon bottom plane. I later turned to a Makita 125mm disc sander as a quicker way to work concave shapes. It spun at a screaming 4,500 rpm and used stiff resin-fiber discs that cut aggressively. It could shape the power face of a spoon blade when the edge of the disc was set at an appropriate angle to the wood. It made for quick work, albeit dusty and noisy, but the discs didn’t last long and tended to scorch the wood when their grit dulled.
While I was looking through tool catalogs, I found woodworking discs made for angle grinders. I had a few projects on my to-do list that might be made easier by putting my grinder to work, so I bought a carving disc, a 24-grit carbide cup wheel, and 60-grit and 120-grit flap discs.
The carving disc is a 22-tooth loop of chainsaw chain that is clamped between two pressed-steel discs. The angle grinder spins it at 11,000 rpm—three times as fast as my tablesaw—which is scary enough when turning a toothless, , metal-cutting disc, but more so when spinning chainsaw teeth into an invisible blur.
The Carving Disc made quick work of cutting the hollow of a traditional wooden bailer.
The carving disc removes and throws wood particles that are heavier and that travel faster and farther than wood dust. A full-face shield and a protective glove for the hand holding the grinder are useful accompaniments to the standard safety gear of safety glasses, hearing protection, and dust mask. The carving disc is very much like the round tip of a chainsaw, and if you’ve ever gotten sloppy with a chainsaw, you know that the blade will buck up toward your head if you inadvertently catch the tip on something. The carving disc didn’t exhibit that tendency in the work I’ve done with it; it cut so fast that the wood would go flying before the teeth could get enough of a hold on it to send the tool flying. The chain is held only by pressure between the two steel discs, so it could slip if it hits something unyielding. That’s the manufacturer’s caveat; I decided against putting it to the test.
The carving disc can make plunge cuts and kerfs up to 1″ deep and, with repeated passes, is able to dig deeper and wider hollows. Using the grinder with it requires a firm grip and a steady hand because mistakes happen quickly. The disc worked well for the initial rough-shaping of a Viking-style bailer, but it cuts so quickly and coarsely that finish work requires a tool with a slower cut and finer control. [Update, April 2021: I just watched a video describing some serious accidents that happened using a chainsaw disc. I took the advice offered and put my disc in the trash. Using it isn’t worth the risk. CC]
Cutting the shallow contours of a rowing seat was a task well suited to the Carbide Cup Wheel.
The carbide cup wheel is made of steel with coarse carbide grit fused to its perimeter. Only a couple of grades of the abrasive element are available; mine has #24 carbide. For an abrasive tool it cuts quickly, and the carbide will outlast any sandpaper. The edge of the wheel doesn’t have grit in it, so it won’t cut, making it safer to use than the carving disc. For making gentle concave cuts for oar blades and rowing seats, it’s an ideal tool for shaping. It’s faster than my Makita disc sander, and it won’t wear out. The carbide cup wheel comes in handy for other jobs that require quick removal of wood; I could rough-in the bevels on a piece of white oak to use for a stem, saving my elbow grease for planing the last bit smooth and up to the lines.
After using the Carbide Cup Wheel to do the initial shaping of spoon blade, I used the flap sanders to do the more subtle work of refining the shape.
The flap sanders for angle grinders are designed for finishing metal but work just as well on wood. The perimeter has over 70 overlapping 5/8″ x 7/8″ resin-coated fabric flaps glued to a fiberglass disc. The flaps are set at a slight angle to the plane of the disc so they get better contact with the work. The 120-grit flap sander is the finest I have (some sources offer 180) and while it leaves a smooth surface, it still cuts so quickly that changes in the pressure applied results in uneven work. To finish up, I put the grinder away and use a random-orbit sander and hand-sanding to finish the job.
If you don’t have an angle grinder, there are some inexpensive options for under $20. You may find they open up some possibilities for working with both metal and wood. Just be sure to handle them carefully and use good protection for your eyes, lungs, and ears.
Christopher Cunningham is the editor of Small Boats Monthly.
You can share your tricks of the trade with other Small Boats Monthly readers by sending us an email.
I have fond childhood memories of car-camping with my family, especially of sitting around the campfire roasting marshmallows. I usually sat in a faded blue camp chair, one of the chairs my parents would also bring to watch my soccer games. When I was old enough to strike out on my own and began taking backpacking and boat trips, I had to leave bulky 5-lb camp chairs behind, instead using a foam gardening pad cut in half as a seat.
photographs by the author
Four tennis balls slit to fit over the chair’s feet keep them from sinking into sand.
When my life partner Kyle Hawkins and I were planning our Mississippi River trip, I went on a search for something that would offer better comfort and back support and found the Helinox Chair One. Weighing 2.1 lbs and measuring only 4″ x 13-3/4″ x 4-3/4″ when packed, this compact chair is made from especially strong TH72M aluminum alloy tubes, Nylon 66 junctions, and lightweight nylon fabric and mesh.
All of the aluminum tubes and junctions are linked with bungees, so there are no pieces to lose and the frame nearly assembles itself. The zippered carrying bag, also made of durable fabric, has two large loops that can be used to hang the bag from the chair for a handy storage space; it also has a webbing ladder that makes it easy to lash down or attach to a backpack. The compact package easily fits into our small hatch openings, reducing clutter in the cockpit.
When sitting in the Helinox Chair One, I am approximately 10″ above the ground—high enough to be comfortable, but low enough to easily tend to a campfire or cook on the ground. The molded feet endured over three months of daily use without cracking or breaking lose, and while they do help keep the chair from sinking fully into the ground, Helinox also offers a ground sheet, sold separately, to prevent the legs from sinking into sand or soft soil. We recently found that we could prevent the legs from sinking by putting tennis balls with slits in them to fit over the feet of the chair, distributing the weight. The tennis balls easily fit with the folded chair in the zipped carrying bag. On our three-month Mississippi River trip, we just pre-set the chairs by hand before sitting in them and they would usually stay level and support our weight just fine.
The Chair One weighs just 2.1 lbs and will support 320 lbs.
The first thing I would do when setting up camp was set up our Helinox chairs. The back support after a long day of rowing was a great relief, and I found myself sitting in mine while unpacking cooking supplies and digging a hole for the fire. Our chairs and carrying bags are a bit dirty but are as good as new. They are pricey compared to others on the market, but it’s true that you get what you pay for. Our Helinox Chair Ones have given us exactly what we expected and required: light, durable, compact, and comfortable seating.
Danielle Kreusch grew up in Salt Lake City, Utah and spent a lot of time hiking and camping in the mountains. After moving to Florida to finish her BA in Psychology and Child Development, Danielle met Kyle Hawkins, who took her sailing on their third date. For the last few years they’ve been living aboard their 35’ Ben Bow cutter and cruise with it whenever possible. Their Mississippi River trip was their first small-boat excursion, and they have both fallen in love with the idea of continuing to travel in small boats.
—My wife Audrey—aka “the Skipper”—and I spend a lot of time moving our small boats to and from the shore and hand loading them at boat ramps. We have tried a lot of different footwear for water but none of them kept our feet dry or warm, and as this winter approached, the Skipper complained that her feet were beginning to get cold. We decided it was time to look for boots that would work year-round, and as luck would have it, I spotted a gentleman wearing some nice-looking outdoor boots at our local grocery store. He was happy to answer questions about his Muck Boots and he said they were comfortable, warm, and waterproof.
Kent Lewis
The Women’s Hale is a multi-season boot with a wrap-around ridged sole.
We bought a pair of the women’s Hale model Muck Boots. She has found that they are easy to put on—she can step into and out of them, hands free, if needed—and the fit is comfortable. The company’s sizing runs true to her shoe size when she is wearing a normal-weight sock. The inner boot is a soft 4mm “CR Flex Foam”-brand neoprene that extends from toe to top inside of a rubber overlay lower and a self-cleaning ribbed outsole.
The fashionable black and hot-pink boots have been 100 percent waterproof. Audrey is able to get in and out of our dinghies and keep grit out of the boat with a just swish of water on the soles to clean them off. What she likes best about them is that her feet stay warm because of the neoprene and the breathable mesh lining. She had a severe ankle injury a few years ago and appreciates the stable walking platform that the outsoles provide. The insoles offer good arch support, and the material around her ankles and calves is flexible for unrestricted mobility. The outsoles are flared so her feet do not sink into the sand as far as her water shoes did, and the boots are buoyant, helping float her feet up as she steps off the bottom.
Audrey Lewis
The Men’s Edgewater II is rated for use in temperatures from below freezing to 65 degrees and has a deeply contoured sole for good traction.
The Skipper was so enthusiastic about her boots that I decided I needed a pair. The Muck Boot Edgewater II offers features similar to those of the Hale, but with a higher rubber upper and outsole. The boots are comfortable, warm, and 100 percent waterproof as well. The tops of the boots are soft and stretchy—they can accommodate different calf sizes, I can wear my pant legs inside or outside the boots, and the upper is flexible enough to be folded down to improve air circulation in warm weather or to be folded for compact storage. The sizing ran the same as my shoe size and while there is room for a thick sock, the fit of the stretch neoprene around the ankle keeps the boots from slipping off in mud. The waffle outsole gave the Edgewater II excellent traction.
We are both very happy with our Muck Boots. They are awesome on the beach and the slippery launch ramp; we can focus on the boat and count on having good footing and warm feet.
Kent and Audrey Lewis can be found on Florida’s Emerald Coast, messing about in their flotilla of small boats. Their review of the Drascombe Lugger appears in this issue.
The women’s Hale ($109.95) and the men’s Edgewater II ($129.95) are available online direct from the Muck Boot Company. There a many other styles available for women, men, and children.
Is there a product that might be useful for boatbuilding, cruising or shore-side camping that you’d like us to review? Please email your suggestions.
On its inaugural outing, LIZZY B performed up to her builder’s expectations.
Bob Burns, as a novice boatbuilder, once paid a visit to Joel White to get some advice on what boat to build. He had a cedar-strip canoe to his credit, had brought the bare hull of a bass boat to completion, and was ready for a new project. Joel suggested that Catspaw, a 12′ 8″ dinghy he had designed as a carvel-planked version of Capt. Nat Herreshoff’s lapstrake Columbia dinghy, would be well suited for Bob’s growing set of skills. Armed with a set of plans, Bob was soon at work in his cellar. The boat is still there, unfinished, 20 years later.
Before turning his attention to the construction of the interior, Bob filled the space under the cockpit sole with foam pool noodles for flotation. Each noodle provides 30 to 40 pounds of buoyancy.
In 2016, at 72 years old and with retirement from a career in IT management in the offing, Bob was seeing an opportunity to finish the project. That worried his wife, Beth. She imagined the dinghy setting sail from their vacation home on the shore of Lake Mooselookmeguntic, a sprawling wilderness lake in Rangeley Lakes region of western Maine. The lake is subject to sudden storms that can bring high winds and waves over 3′ high. Beth noticed Bob poring over a pair of WoodenBoatarticles about the Jericho Bay Lobster skiff, another one of White’s designs. The 15′6″ outboard skiff seemed to be a better choice for the lake—she saw her opportunity and surprised Bob with a set of plans as a Christmas gift the year before his planned retirement.
The 20-hp outboard will drive the skiff at speeds up to 24.5 mph.
Beyond being a better boat for their lakeside summer home, Beth thought building a Jericho skiff, given Bob’s record with the Catspaw dinghy, would keep him busy for at least a couple of years and stave off the ennui that often settles in with retirement. She was wrong on that count. Bob started work on the day after New Year’s last year, and six months later, launched LIZZY B, named after her.
When Bob set up the molds, he stretched the length by 1′ to make more room for a center console. The new length of 16′6″ also would also meet a rule of thumb used by early boatbuilders in the Rangeley Lakes region. They believed that a boat needed to bridge the two troughs between three wave crests. Their assumption that the wave lengths rarely exceeded 8′ set the minimum boat length at 16′. The Jericho skiff’s beam could remain at 62 1/2″ because Bob would have 1/2″ to spare when it came time to move the boat out through the cellar door.
Bob made steady progress on the project this time, even though he worked on the boat only in the mornings and spent his afternoons with Beth so she wouldn’t feel widowed by the boat. On Easter Sunday, he invited his sons and grandsons to the house to take part in moving the boat and the building jig, sporting a new set of wheels for the occasion, out of the cellar. In the back yard, the crew lifted the hull off the strongback, rolled it upright on the lawn, and set it back on the wheeled frame.
The Burns sons and grandsons gathered for moving the hull out of the cellar on its wheeled building frame.
As they were rolling the boat back into the cellar, a 250-lb boulder tumbled off the stone wall adjacent to the door and hit the side of the hull. It scratched the paint, but the Alaska cedar strips, protected by 24-oz woven biaxial fiberglass on the outside and 12-oz cloth on the inside, took the blow without damage. The unintended test proved the skiff would be able to take a beating on the Maine lakes.
Lake Mooselookmeguntic rests in a bucolic Maine countryside but can get quite rough quite suddenly. When the colors of autumn come to the woods, it’s time for LIZZY B to retreat to the garage.
LIZZY B was launched on Lake Mooselookmeguntic, and Bob and Beth spent the summer of 2017 exploring and fishing on lakes Aziscohos, Umbagog, Richardson, Kennebago, Rangeley, and Cupsuptic and on many of the rivers connected to them. October brought cold and wind, and LIZZY B was pulled out of the water and put away in the garage for the winter. The boat, Bob, and Beth eagerly await this coming summer.
Have you recently launched a boat? Please email us. We’d like to hear about it and share your story with other Small Boats Monthly readers.
In Hein van Greevenbroek’s cruising story this month, he makes a reference to Roger Miller’s lyric, “I’m a man of means by no means, King of the Road.” I met such a man of means by no means in a marsh just outside Savannah, Georgia, while I was canoeing the Intracoastal Waterway in the winter of 1983. My paddling partner and I were making our way south along the Georgia coast and following the meanders of the Skidaway River as it looped in and around Savannah suburbs. At the intersection with the Vernon River we turned south into a brisk headwind, and rather than fight it we pulled ashore on a small hammock—a sliver of high ground with a ragged crown of stunted trees.
A whisp of smoke rose above the brush, and nestled in the trees we found a smoldering campfire next to an upturned aluminum johnboat. Its bow was propped up and the openings around the boat were walled in with weathered plywood. Plastic buckets were scattered around the campsite. There was no one there.
Upside down, Arthur’s johnboat was his shelter; right-side up he’d row it to Savannah, carrying a bicycle to get around town. The kayak belonged to my paddling partner.
To the west, 50 yards away across a flat plain of tawny salt-marsh grass, we spotted a man in a plaid shirt and a green baseball cap walking toward us. His conversation with us had apparently started well before we could hear his voice, and by the time we shook hands with him and introduced ourselves he was well into the story of his life and how he came to be here in the middle of a coastal marsh. This was Arthur Dennan. He was 61, but his weather-creased face and silvery beard made him look a decade older.
Arthur’s “kingdom” of marshland stretched for a mile or more in every direction.
He was indeed “a man of means by no means,” and although he was not “King of the Road” as the song goes, he was, at least by his own account, King of Lafayette Square. The square is an old park in the heart of Savannah where he would play harmonica with a hat out to collect pocket change from passersby. He had taught himself to play harmonica without even knowing how to hold it—“Most plays with the low notes on the left, but I play with the high notes on the left. Ain’t that a wonder?”
Arthur nimbly climbed the trunk of a pine to show us a tree stand hunters had built in the woods of Petit Gauke Island.
It was not yet midday and Arthur offered to show us around the marsh. We walked a few hundred yards through the shin-high grass to Petit Gauke Island, a half-mile-long forest of longleaf pines and palmettos. In the woods, he showed us a tree stand used by hunters and a pile of rusted steel drums that were all that was left of a moonshine still, all the while keeping up a steady line of tour-guide patter about the history of the place.
Back at his camp, he insisted we stay for lunch. From one of his five-gallon buckets he produced 10 sea trout he had caught that morning. He cleaned them, splayed them out with driftwood sticks, and set them around the fire to cook.
Arthur cooked fish around the campfire and we at them right off the sticks. There was no dishwashing to do after dinner.
After lunch, Arthur showed us one of the cast nets he had made. Spread out, it was a 12′ circle of white mesh with a perimeter of a lead-weighted cord. The netting was quite fine to keep baitfish from escaping, and Arthur’s handwork was as uniform as any machine might produce. He had another net that he was still working on and showed us the netting needle and the gauge stick he used to tie the thousands upon thousands of knots that went into each of his nets. Selling his cast nets was another source of income for him; I doubted any fisherman, regarding the nets as utilitarian, paid him anywhere near what his craftsmanship was worth.
With a gauge stick, netting needle, and quick and nimble fingers, Arthur turned spools of twine into beautiful cast nets.
Arthur was as adept at throwing the nets as he was making them. He showed us the technique in the clearing between the river and his camp. With the middle of the net gathered up in his left hand and the perimeter line in his teeth and in his right hand, he threw it like an oversized Frisbee and the net fanned out into a full circle. It dropped wide and flat upon the grass. I tried several times to throw the net, but I could never get it to open up and fly like Arthur could.
We spent the rest of the day with Arthur. He started playing a song on his harmonica but stopped abruptly and put it away, saying he wasn’t in the mood. There was sadness in his sapphire-blue eyes as he told spoke about the disappointments in his life. He had been a radio operator in the Marines during World War II and had grand aspirations for his return to civilian life. He wanted to be “a movie star or maybe the world’s greatest comedian,” but that wasn’t to be. “I ain’t a has-been,” he said, “I’m a never-was.”
We shared a dinner of soup and campfire-popped popcorn with him before turning in. Arthur disappeared under his boat where he had his bed, and we retired to our tent.
In the morning Arthur got the fire going again and began fixing oatmeal for breakfast. As he cooked he talked almost nonstop in a way that made me think he hadn’t had any company for quite some time. “Got the water boilin’ here. Ya’ll like raisins?” The raisins were somewhere in one of his buckets, so he up-ended two of them and spilled their contents across the ground. “Ain’t no use diggin’ down in the bucket when you can spread everything out like that an’ git right to what ya want.” He found the bag of raisins and dropped three handfuls into the cookpot. As he stirred them in he said, “I’ll just make believe you’re not here so’s you can see how I do it,” yet still kept up his narration. “A pinch of sugar. Some powdered milk; just stirring that up till it gets all milkified.”
After breakfast, we packed up and got ready to resume paddling south. We gave Arthur a Polaroid someone had taken of us in Thunderbolt, just outside of Savannah, and a plastic bear squeeze bottle of honey we’d been given on Daufuskie Island on the South Carolina side of the Savannah River. As we paddled away, I kept looking back at Arthur, alone again now in his tide-marsh kingdom, with his fishing rod for a scepter. “Take the shortcut,” he shouted out to us, “not Hell Gate. Cross the Little Ogeechee River, this here next river.” He was still calling out advice and pointing directions for us to turn even after the breeze had swept his voice away.
Arthur would be in his mid nineties if he were alive today. I don’t know what became of him.
Arthur’s camp was within sight of mansions on the Vernon River, but I felt it was a good stroke of luck to take refuge from the wind with him rather than at an estate where the residents have something fancier than a johnboat as the roof over their heads. Arthur owned little, but he didn’t hesitate to share what he had with strangers.
One of the perks of my admittedly cushy job as a freelance writer is that I get to try out a lot of different boats—everything from small rowing dinghies to large sailing yachts. Inevitably, some are more appealing than others, and I have to admit François Vivier’s 15′ 3-1/2″ Minahouët wasn’t one I was particularly excited about sailing. It looked nice enough in the pictures, but my heart wasn’t exactly pounding to get out on it. All that was to change during a two-hour sail on a gusty day off St-Malo on the north coast of Brittany.
My acquaintance with the Minahouët started on the slipway at the Anse des Sablons marina near the historic old town. That’s where I met the boat’s builder Pierre-Yves de la Rivière, founder of the Grand-Largue boatyard at nearby St-Briac. The bespectacled Frenchman had brought PIANISSIMO, a Minahouët he had built for a client. The boat was rather understated, with a good deal of paint and the boat’s brightwork finished with oil stain rather than varnish. It all looked very workmanlike, if rather plain.
François Vivier
The forward watertight compartment is accessed through two hatches because it is partially divided by a box for the forward mast partner and step. The aft mast partner—installed only for the sloop rig —is open; the mast will be lashed to eyelets yet to be installed.
Things got more interesting once Pierre-Yves had launched the boat and was setting it up to sail. The centerboard arrangement is ingenious. The board is fitted with a pin that slides down slots inside the case so that, once lowered, it can pivot like a conventional centerboard, and yet still be raised and removed like a daggerboard. You get the accessibility of a daggerboard with a centerboard’s convenience.
Nic Compton
The centerboard drops into the trunk like a daggerboard, but once it is in place it pivots on a short pin that’s embedded in the board.
The Minahouët has two maststeps, so it can be rigged either as a sloop, with the mast set in the aft position, or cat-rigged, with the mast in the forward position. With two or more people in the boat, the sloop option is probably more efficient, while the cat arrangement is easier for singlehanded sailing. Either way, the boat is lug-rigged and there’s no need for stays, so rigging is simple and fast.
François Vivier
Both rowing stations have removable and adjustable foot braces.
There are some interesting details. The bowsprit slips through a bronze hoop fastened to the port side of the stem head and is held in place in a chock on the foredeck, with a lashing to hold it in place. The tiller has a pin inside the slot that slips over the rudderhead. The pin engages a notch on the rudderhead, locking the tiller in place as it is pivoted into position. It may seem pretty basic stuff, but there is a purpose to the nearly fetishistic attention to detail: getting people on the water as quickly and easily as possible.
“The great advantage of the Minahouët is the ease of launching,” says Pierre-Yves. “You can do it on your own, so if it’s a nice day and you’ve got a couple of hours to spare, you can put the boat in the water on your own, and ‘baff,’ as we say in France, off you go, because it’s really very easy.”
Nic Compton
Vivier traces the development of the 15′ 3.5″ Minahouet to his 14′ 4″ Ilur and its predecessor, his 14′ 1″ Aber. All three have the option to rig with for a lugsail alone or as a lug sloop with the bowsprit and foresail.
Pierre-Yves and François had been collaborating for a number of years to develop new boats—mainly a 22′ dayboat and an 11′ 10″ pram—when they decided their next project should be a sail-and-oar boat. François had already designed several boats of this type, such as the Aber and the Ilur, and knew what the challenge was: “I tried to make a design that was as balanced as possible,” he says, “stable enough for family sailing, but also light and narrow enough to be enjoyable to row.”
To make the boat accessible to as many amateur builders as possible, the components were designed to be cut out by a CNC router. The approach marked a significant shift from the more traditional boatbuilding methods the pair had been using.
“It was first time we really explored potential of CNC cutting and of modern plywood construction,” says Pierre-Yves. “All the parts lock together. The longitudinal pieces lock into the transverse parts; you simply click them into place and everything falls into place naturally. When you build a boat manually, there’s always the risk of making mistakes when you line up the planks and the bulkheads can move. But with a computer design, there’s no possibility of error.” The plan seems to have worked and, since the Minahouët was launched in 2002, about 30 of the 40 boats launched were built by amateurs, mostly from kits, while the rest were built at the Grand-Largue boatyard.
Out on the bay off St-Malo, a brisk offshore wind was ruffling the surface of the sea, and ominous black clouds were piled up on the horizon. Alone aboard the Minahouët, Pierre-Yves shot across the bay, the very picture of insouciance. The wind continued to build, and after a couple of near-capsizes, Pierre-Yves lowered the mainsail and put a reef in. With the sail area reduced, the boat settled down and became more easily managed.
Nic Compton
With 135 sq ft of sail flying and the wind building, Pierre-Yves de la Rivière, the builder of this Minahouët, soon tucked a reef in.
After a little while, I traded places with Pierre-Yves and tried rowing the boat with the sails lowered. The owner he had built the Minahouët for had opted for single thole pins and grommets instead of rowlocks, which took a bit of getting used to. I’m not convinced there’s any real advantage to this setup, though it does look good and, providing you row against the grommet rather than the pin, the oars will rest alongside the boat if you let the handles go. More to my liking were the adjustable and removable footbraces fitted on either side of the centerboard case to give you something to push against while rowing.
Nic Compton
The side benches are below the thwarts and provide a shelf for storing the oars out of the way when they’re not in use. The centerboard trunk is also well below the thwart level to make it less of an obstruction when moving about the boat. The foot bracing for the forward station is split into two halves, one one each side of the trunk.
Once under way, I made good progress rowing against wind and tide and managed to row a fair distance back up the bay toward St-Malo. I’ve been spoiled by having my Western Skiff to row, which is considerably lighter than the Minahouët and therefore easier to row, but I had to admit that, in the windy conditions off St-Malo that day, the Minahouët carried its way better than my skiff would have. I could quite imagine rowing it several miles up an estuary or into harbor, although sailing probably is her best mode of propulsion.
Eventually, Pierre-Yves joined me on board and we shook the reef out of the main and raised the sails again. With the wind abating slightly, we eased onto a reach and sailed toward the off-lying islands of Le Petit Bé and Le Grand Bé. I felt immediately at ease with the boat, as if I’d been sailing it all my life. There was nothing unexpected, nothing to worry about; everything was where it should be.
Nic Compton
The unstayed mast of the sloop rig carries the 108-sq-ft main and 27-sq-ft foresail.
The Minahouët’s performance under sail was better than I expected. It was faster and pointed higher than I’d anticipated, and perhaps that was why I felt so relaxed on board. From the moment we set off, it performed impeccably and made me feel I was doing a good job; I didn’t need to squeeze that bit of extra speed, worry about the set of the sail, or try to point that little bit higher. The boat performed without being coaxed. It helped that we were going nowhere in particular and that it was a perfect autumn day and the coast was aglow with late afternoon sun. What was not to like?
I came ashore feeling rather pleased with myself. The boat had handled well, under both sail and oar, and I felt I’d got its number. It was only later I realized this feeling of satisfaction was what François and Pierre-Yves had aimed to achieve all along. It was thanks to their unassuming and deceptively simple design and its whole host of clever little details—an out-of-the-way place under the thwarts to stow the oars and a low centerboard trunk that’s easy to step over, among others, including many I probably didn’t even notice—that I was able to jump in the boat and sail it with such ease. My feeling of well-being was a direct result of their hard work.
There was one feature that looked like it might cause a minor problem while we were taking the boat out of the water. Unlike several other Vivier designs with well-rounded bows that lift themselves onto the trailer as they move forward, the Minahouët has a plumb stem, and may need to be lifted it to get it onto a normal trailer. The solution for PIANISSIMO was to ride a break-back trailer, which hinges in the middle until the roller is under the stem and then is straightened and locked into position before winching the boat the rest of the way up. Once on the trailer, there’s an elongated hole in the stem for a line to hold the boat in place.
Even though I had started out feeling decidedly skeptical about the Minahouët, at the end of two hours’ sailing I was completely converted to this deceptively simple little boat. Not only that, but I was pretty well convinced this was a boat a lot of people would find well worth owning. Park it in your drive, and the next sunny day, “baff, off you go!” Well, they do say it’s the quiet ones you have to watch.
Nic Compton is a freelance writer and photographer who grew up sailing dinghies in Greece. He has written about boats and the sea for more than 20 years and has published 12 nautical books, including a biography of the designer Iain Oughtred, available at The WoodenBoat Store. He currently lives on the River Dart in Devon, U.K. He previously wrote about his adventures in his Western Skiff.
Minahouët Particulars
[table]
Length/15′ 3.5″
Beam/5′ 1.4″
Draft, board up/6.3″
Draft, board down/3′ 3.3″
Weight/551 lbs
Sail area/Loose-foot lug, 114 sq ft; Sloop, 135 sq ft
The Penobscot 14 is a versatile sail, oar, and motor boat designed by Arch Davis in the early ’90s. His goal was to design a boat that was easy to build, had pleasing lines, and offered excellent sailing and rowing performance. He did not take inspiration from any particular existing design, and says his design was “based on many years of looking at boats and trying to figure out what makes a good one.”
He was influenced a bit by the Whitehall-type boats, but most have a narrow beam in proportion to their length and rarely a sailing rig, so Davis gave the hull more bearing to enable it carry sail and drew three sail plans—gunter sloop, lug cat, and sprit cat—to meet a variety of needs. Arch built the first Penobscot 14 in 1992, and the result was a seakindly hull with striking lines. Hull No. 1 sits in his garage, not taking up much space, and he still takes it out to row. He published plans in 1993 and since then has sold over 1,500 sets of them.
Kent Lewis
The stringers that back up the laps strengthen the hull without the need for frames.
The glued-lapstrake 14′ plywood hull has an innovative structure with wider, and therefore fewer, planks, simplifying construction. The internal framework of longitudinal stringers is anchored to the stem, two bulkheads, and the transom. Two temporary molds help fair the stringers while the six strakes are applied. These stringers provide exceptional strength along the plank laps. The planks are attached to the stringers with glue and stainless-steel screws, and so fewer clamps are required.
Woodworkers with some experience can turn themselves into boatbuilders by following Davis’s excellent study package and watching the companion DVD. There are several helpful offerings to choose from: a 14-page set of plans; an illustrated 74-page builder’s guide; full-sized Mylar patterns for bulkheads, stem, transom and molds; and a frame kit, which includes bulkheads, temporary building frames, and transom frame. Kits for the sails, spars, and rigging are also available. If a builder needs help along the way, Davis responds to phone calls and emails; he was a big help to us during the construction of our P14.
Kaitlynn Lewis
The authors, here aboard their Penobscot 14, ST. JACQUES, opted for the sprit rig. The brail, clearly visible here against the tanbark cloth, makes quick work of gathering up the loose-footed sail.
Construction begins with the assembly of a jig built of common lumber. Davis emphasizes that a variety of materials may be used during all phases of construction, and recommends taking advantage of locally available materials. The boat is built upside down both on the temporary molds and what will become the bulkheads, stem, and transom. We chose okoume plywood planking, cypress stringers, and a white oak keel.
The keel can be built with a slot for a daggerboard or a centerboard, or left solid if the boat is intended solely for rowing. After the stringers and sheer clamp are added, planking begins from the garboard. When the deadwood is attached and the planking is complete, the boat is flipped right-side up, and it’s time to add the centerboard or daggerboard trunk. The bulkheads are meant to enclose watertight flotation compartments in each end, but we varied from plan and opted for readily compartments under the bow and stern seats and use spare PFDs as flotation in them. The breasthook, quarter knees, gunwale, and railcap complete construction of the hull.
In the three rigs Davis provides in the plans, the lug rig carries 77 sq ft of sail, the sprit rig 73, and gunter rig 95. The spars for all of the rigs will fit inside the hull when not in use. We chose the small sprit rig for ease of rigging and handling on our gusty bay.
Audrey Lewis
John Stevenson’s SWEET DREAMS carries the boomed standing lug.
The boat is lightweight, easy to trailer, and getting underway is simple: Step the mast, bend on sail, and ship the rudder. At our beachfront home we launch with a dolly and further afield the boat is light enough to launch easily via trailer on a ramp. We can be underway in about 20 minutes. We wade the boat out a few feet and climb aboard over the side. Davis says that he boards over the transom, then pushes the rudder down with the trailing foot as he gets underway.
Once onboard we drop the centerboard a bit, row a few feet to get deep enough to drop the rudder blade, and look for the wind. When we find it, we loosen the brail and the sprit sets nicely. The sprit’s snotter runs down to the mast thwart and is tied off to a belaying pin. We use another pin for the brail. The sheets are easy to reach and to route aft for singlehanding.
The Penobscot 14 is a stable sailer, well suited for skinny water, and very comfortable for the crew with plenty of room for camp-cruising gear. With the sprit rig, heeling is minimal, and the boat exceeds 3 knots with little effort when we are out messing about. It will not point especially high; its favorite point of sail is a beam reach. The hull has just the right enough of keel and deadwood to sail in shallow water with the rudder retracted and the centerboard up.
The arrangement of the sides and seat offer many convenient places to sit with comfortable back support. The skipper’s favorite position is reclined against the transom with her foot up on a side seat. The stringers act as “mini shelves” that can hold gear such as a boathook, a paddle, or coffee cups. A small section of floorboards may be added, but we left the bilge open so we can see where all the spilled coffee went.
Audrey Lewis
The Penobscot 14 rows with ease, carries well, and tracks straight. Davis recommends 8′ oars. With the two rowing stations the boat can be rowed tandem.
When we can’t find the wind, there are rowing stations forward and amidships. There is plenty of room to row from either station, and the boat is well balanced with our crew of two—skipper on the aft seat and the first mate taking his place amidships or forward. The Penobscot 14 rows with ease, carries well, and tracks well. The oars may be left in the oarlocks when not in use, with the blades tucked neatly under the breasthook. There is also sufficient room to lay them on the side seats. Our neighbor has built two Penobscot 14s and has rowed them over 1,200 miles, so it is safe to say that it is good rowboat.
There’s a notch in the transom for those who have a knack for sculling, and, if motoring appeals, the plans included instructions for equipping the boat with a small outboard of 2 to 3 hp.
The plans for the Penobscot 14 have provisions for mounting a small outboard. In this case, the transom is made thicker and a small, removable section is cut to accommodate a short-shaft motor. If the motor is not permanently mounted, the section that has been cut out is designed to be dropped back into place to restore the appearance of the transom.
The Penobscot 14 is easy to care for and store. After a day on the water, it is a simple task to wipe down the hull and cockpit by sponging the water (and coffee) out from easy-to-reach low points. The spars, sail, and rudder stow in the hull, then we throw on a custom-made Sunbrella cover.
The Penobscot 14 performs well as-designed and is delightful. We highly recommend it to anyone looking to build a boat with a few attractive curves and a versatile rig for messing about. There is great support community for owners of Penobscot 14s as well. We can confirm what Davis has to say about the boat: “The attention she draws wherever you take her, and her excellent performance under sail or oars, will give you great enjoyment for years to come.”
Audrey and Kent Lewis live in Florida and enjoy small-boat sailing, restoration and boatbuilding when she’s not designing costumes or he’s flying. They launched their Penobscot 14 in 2017, and in 2016 they restored an 1880s Mississippi River Skiff for the Beauvoir Museum in Biloxi, Mississippi. Their personal fleet includes several Sunfish, a wooden Sailfish, wooden Sunfish, Catfish catamaran, O’Day Daysailer, Drascombe Lugger, and Drascombe Dabber. They have also rescued and fostered over 30 boats since 2011. Some people describe them as “boat-struck.” They document their boating pursuits in their blog.
Penobscot 14 Particulars
[table]
Length/14′
Waterline length/12′ 8″
Beam/ 4′ 6.5″
Draft, board up/ 7″
Draft, down/ 2′ 6″
Weight/155–175 lbs
[/table]
Plans for the Penobscot 14 are available from Arch Davis Designs: Study Package (covers Penobscot 13, 14, and 17), $15; Boat Plans, $125; Frame Kit, $850. Inquire for details on other kits. WoodenBoat chronicled the construction of the Penobscot 14 in Nos. 138, 139, and 140.
Is there a boat you’d like to know more about? Have you built one that you think other Small Boats Monthly readers would enjoy? Please email us!
Back in the ’60s, Roger Miller sang, “I’m a man of means by no means, king of the road.” My son Koen and I are men of means by no means, but we had an ambition to make the coast of British Columbia our road.
I had read and heard about the wondrous waters of British Columbia and long ago had my heart set on sailing them, so I proposed to Koen that we take a cruise. He studies math at the university in Vancouver and was doing quite well in his courses, so he could afford to take a semester off to join me. We looked into renting a boat or buying something cheap, but couldn’t find anything that would fit the bill. We shifted gears and decided we could build a simple boat in a month and still have enough of the summer left to head north along the mainland coast.
We let the idea ripen for a few weeks. It still felt good, so during lunch one day I grabbed a pencil and in a burst of inspiration sketched the simplest form I could think of. Most boats are designed to last for decades, but there was a time when people just hollowed out a log if they wanted to cross the swamps. On Lake Titicaca, people would bundle reeds and have a boat in short order. In other parts of the world people made birchbark canoes, coracles, or balsa rafts using the materials available to them. We’d do the same; in our case we had access to cheap plywood and construction lumber. And to outfit the boat for our voyage, the Vancouver area has no shortage of boatyards and chandlers, supermarkets, and secondhand stores.
We needed a place to build the boat, but Koen suggested that there were some things that didn’t lend themselves to preparation and we shouldn’t spoil the sense of adventure by having every last item planned in advance. I made my travel plans, and we would thereafter trust in chance. That became the beauty of building the boat as well as exploring the coast.
Photographs by the author
Koen here is working on the storage compartments in the cockpit. The bottom, bulkheads, transom and foredeck were made with 5/8″ fir plywood and 3/8″ plywood used for the rest. The lumber for the building jig was later transformed into four oars.
I arrived in Vancouver early in April 2017, while Koen was still finishing his spring semester, and we made his room at the university our base camp. After I unpacked my drawing, the sails from my Ness Yawl, and some blocks, cleats, and ropes, I began the search for a place to build the boat. I walked the banks of Fraser River under a gray sky and peeked around big sheds, small shops, and seemingly deserted mini-marinas. I wasn’t finding many people around, but then someone yelled at me. A man alarmed by my snooping around by his trailer stopped me. I explained my intentions to him; he warmed up to me, introduced himself as Ken, and we shook hands. We parted and I continued strolling the waterfront. I hadn’t gone far when a car pulled to a stop next to me. It was Ken and he had chased me down to say his friend Alan could offer us his shop for a month. It was just the stroke of luck that our plan not to plan had allowed to happen.
With a building site secured, we ordered materials at a nearby lumberyard, and bought a saw, a square, and a small plane. The owner of the shop was so enthused by our project that he loaned us a circular saw, a jigsaw, and a straightedge.
We surprised ourselves by working seven days a week, finding it difficult to stop. We enjoyed taking bevels, chopping away at an oar or leeboard with an axe, or bending a rubbing strake, but we didn’t linger on the tasks or strive for a fine finish. The goal was to get the boat launched and use it. In four weeks, it was afloat, ready to sail, and fully loaded with provisions.
The boat was launched without ceremony or christening in the backwaters of the Fraser River. It floated high and had no leaks. The fisherman’s anchor had its place in a recessed part of the foredeck.
On Sunday, May 14, the forecast called for stable, sunny weather and light winds. We cast off and took to the oars. A yell came from the muddy banks—Alan was waving a last farewell. The ebb flowing down the Fraser River was in our favor, but the oars, each coarsely shaped out of 2×6, proved too long for good balance—so when a southwesterly breeze piped up, we tried sailing. We tacked slowly downriver. The tiller interfered with the mainsheet, so Koen pulled out a saw and cut the tiller to suitable length, all while keeping a steady course. Our pointed box, as rough as it was, was rising to meet our expectations.
The deep buzz of the city dwindled until there was little more than the occasional cry of a gull to be heard and we grew more aware of the murmur of waves and our own wake. Koen and I were quickly at ease with the boat and we adjusted sheets, shifted leeboards, and steered to the wind almost without thinking. Now and then we burst out in wild laughter—an indication, we realized, that we were tired and a bit nervous, but deeply satisfied with what we had accomplished so far.
Roger Siebert
.
While the tide nudged us slowly past Steveston at the mouth of the Fraser, a fisherman aboard an aluminum skiff came by and hailed us. In our conversation, we told him about our adventure and learned he was heading out to tend some nets, a method of fishing allowed for First Nations people. He was taken aback by the boat’s diminutive size and the magnitude of our voyage, and surprised us by asking, “Have you obtained permission of the tribal elders to pass into our territory?” Without waiting for answer he laughed loud, opened the throttle, and sped away. The thought hadn’t occurred to us, and although the native fisherman was just giving us a good ribbing, it made us aware of another aspect of our whereabouts. Suddenly we felt a bit arrogant, as though we were trespassing like early explorers Cook, Vancouver, and Bodega y Quadra before us.
Later that day, with the city of Vancouver abeam as we headed north, a 4′ slab of styrofoam, carrying two masts and sails, crossed our track. This unassuming, unmanned craft had survived freighters, passenger ferries, and the shifting weather, keeping a steady northwesterly course. The little ketch was a reassuring sight and boosted our confidence.
The fo’c’s’le offered a comfortable refuge in the evenings. It was equipped with a bookshelf, a table, a wine and beer cellar, and two bunks.
The wind died slowly, and we rowed several hours in the darkening evening, growing ever more tired after a day at the heavy oars. With the help of a flashlight we found a mooring buoy in a small cove on the southeasterly tip of Bowen Island and tied our painter to it. We could hear the shore close by, but it was hard to see in the feeble light of our modest flashlight. An easterly breeze came straight into the cove and stirred the rig. I would have gone straight to bed, but Koen always has a healthy appetite, so he put a late dinner together. We finally crouched through the narrow opening to the “fo’c’s’le” and laid our tired bodies to rest. Koen was off to sleep in a minute, but for me it was an uneasy night worrying about the wind and waves.
On waking early I found the boat swaying and slamming in the waves in an uncomfortable way—the southeasterly had piped up considerably. I looked outside and in the morning light I could see the steep, rocky, wave-lashed shore just 100′ away. The marine forecast promised more wind from the southeast and a lot of rain, so we were eager to get away. Taking to the oars, we took up the fight against the wind and chop. The bow slammed back and forth; the rocks to leeward terrified us and made us row like madmen. We eventually managed to get far enough from the shore to stow the oars and hoist the sails.
We sailed closehauled along Bowen Island’s steep, wooded shore heading for Snug Cove, hoping it would live up to its name. We were over-canvassed, but reefing down wasn’t an option; any leeward drift while putting the reef in would push us dangerously close to the rugged coast. After 4 miles of anxious sailing we rounded the entrance to Snug Cove and found the marina inside so well protected that we had to row the last yards in the still air. We tied up to a floating dock, rigged a tarp, and let the rain come.
Soon after we had ducked out of the weather, a man approached in a boat and asked from under his dripping southwester what he could do for us. The nerve-wracking experience was probably showing on our faces; I blurted out, “A shower!” An hour later, after this kind man drove us across the island to home, Koen and I were washing away the sweat and grime. He and his wife also offered a beer, advice on not-to-be-missed spots, and some old charts as well. The tension in our shoulders slowly slipped away in the warmth of their hospitality.
When we rowed into Smuggler Cove, we heard the occupants a 21′ sloop anchored there say, “Well, here we have an even smaller boat!” As small as our boat might have appeared, it was big and heavy enough to make it unwieldy on shore. We had often wished we’d had a dinghy, something foldable, for more convenient access to land.
The following week, we crept along the Sunshine Coast and got acquainted with the scale of the British Columbia landscape, a tidal range approaching 16’, and an abundance of drifting logs and deadheads. We made an overnight stop at Wilson Creek and raided the town’s supermarket the next morning, stocking up on flour, oats, nuts, raisins, and powdered milk. Although our supplies were as simple as the boat itself, Koen saw to it that we would have a culinary high point every day. He had brought his sourdough starter; it was so dear to him that it even had a name: Jesaja. In the morning, the sweet smell of fresh bread filled the air; Koen was beaming at what he had created in our two frying pans.
I had been wondering why almost all of the boats in the area had dodgers and awnings, and got my answer on our 9-mile crossing from Secret Cove on the mainland to Squitty Bay on the southern tip of Lasqueti Island. The air was cool so we sat in the blazing sun to keep warm. By the time we reached Lasqueti we were well cooked.
We dropped the sails and rowed into a 30-yard-wide natural harbor under the watchful eye of a perched bald eagle. We tied up at the government dock, and when the harbormaster came down, we paid her the fee for us to stay the night. We asked her about drinking water, and she told us that people on Lasqueti live off the grid and provide their own power and water. She directed us to a man living nearby who would be able to fill our 15-liter canister. We met him standing on the float beside a beautiful 23′ sloop, and found out he had built this gem of a boat of mostly driftwood from that very beach. He had milled it with a chainsaw and worked it with hand tools. The water running from his tap at his house was like tea, colored by cedar trees, but he declared it was good drinking water.
After a few days of exploring Lasqueti and nearby Jedediah Island, we recrossed Malaspina Strait back to the mainland, rowing in a dead calm a dozen miles eastward to spend the night at Madeira Park. We were used to sailing Europe’s coastal waters around the North Sea, where the tidal range is around 8’, and were eager to see what tides twice that do in the many rapids of the B.C. coast. What we’d heard about Sechelt Rapids sounded like something almost from a different planet. We sailed and rowed north then east along the half-mile-wide Agamemnon Channel into the mountain-fringed waters of Jervis Inlet and moored at the small town of Egmont.
The next day we hiked to the Sechelt Rapids along a footpath through a lush cedar forest. We’d had several warm, sunny days and it was nice to stretch our legs in the cool shadows of the woods. Beyond the trees that surrounded us, we heard a muted rumble that grew louder as we got closer. Quite suddenly we were at a barren rocky patch just a few feet from the rapids. From the southeast, millions of gallons swept across our overwhelming panoramic view racing to the northwest at bewildering speed. The ebb-powered current piled standing waves up against small islets as if trying to push them out of the way. At the tip of one, water cascaded down 6′ into a chain of deep, ever-widening whirlpools.
We sat there in amazement for almost an hour, as the hissing and roaring rapids accelerated to 17 knots on the spring tide. If this was what the British Columbia rapids looked like, how could we even consider taking our boat through those that lay ahead of us? From far upstream, an aluminum crab boat was bearing down on the rapid. Weaving and swaying, it skirted the worst turbulence as it sped downstream. The skipper leaned half out of his window and waved to us. That broke the spell, and we came to our senses again. Koen and I started walking back along the trail, discussing our possibilities. The current in each rapid changes direction four times a day, and we’d have windows with little or no current. We ended up with the feeling that we stood a good chance getting through any of the rapids that lay ahead.
Koen was a picture of concentration as we raced wing on wing with a reefed main along Malaspina Strait. We initially used an oar as a whisker pole to hold the jib out for downwind runs, but later found a piece of driftwood to do the job.
Two days later we were again on our way back to Malaspina Strait. The weather had changed; during the night a southeasterly had swept through, bringing wind and rain squalls. We set out from an anchorage in Ballet Bay on the south shore of Blind Bay, and the water grew more exposed. We needed to reduce sail. Tucked in the lee behind a small island, we put two reefs in the main and struck the jib. Koen and I decided to head back out into the Strait and test the boat and ourselves. If something didn’t feel right we would turn around, seek shelter, and wait for better weather.
We got hit by a few gusts, but everything seemed under control. Out in the Strait we jibed and set a course back into the protection of Blind Bay. I asked Koen what his gut feelings were, and he thought we just could continue sailing north along the Strait. I was a bit more hesitant, but there were many places where we could take refuge. Koen steered out of the bay again. It was our first sail in more than a gentle breeze, and we felt comfortable on a downwind run. We raised the jib opposite the main and used an oar as a whisker pole to spread the jib out to better balance the main and ease the pressure on the helm.
We were making good speed when suddenly a scraping and rumbling resonated in the hull, and then there was a strong jerk at the tiller. At first we were worried that the boat was breaking up, but it soon dawned on us that we had run over one of those logs that float so low in the water that they are almost impossible to see in the waves. It slipped astern; the boat was intact. The collision and the day’s gray skies didn’t keep us from enjoying the sailing. The boat really moved well. By the time we sailed into Lund we had covered 30 sea-miles in 6 hours, not bad for an ugly duckling.
After an overnight stay in Lund we sailed to Desolation Sound. Our plan to proceed without a fixed plan left me and Koen to decide on our strategy for the coming days and weeks. To the north, two deep inlets—Bute Inlet, 43 miles long, and Knight Inlet, 67 miles—promised hidden jewels of nature well inland, but we didn’t like the prospect of long days of rowing the steep and likely windless fjords. To the west, the route through the islands clustered between the mainland and Vancouver Island would lead us through several rapids. The neap tides were upon us, so we would traverse the rapids at their least dangerous and could safely make our way to the Broughton Archipelago. Cruising in the rather gloomy Desolation Sound left us wanting to see the horizon again, and the prospect of sailing along the islands on edge of Queen Charlotte Strait appealed to us.
We anchored in the still waters of Roscoe Bay on West Redonda Island. We were lured by the promise of a short walk along a trial to Black Lake where we could bathe in fresh water. The walk turned out to be 20 minutes of bushwhacking.
From our anchorage in the still waters of Roscoe Bay on West Redonda Island, we had a magical tailwind following us north along Waddington Channel, west along Pryce Channel, through a U-turn to the south in Raza Passage, and giving as a final push northward on Calm Channel.
We spent a short and uneasy night anchored by the spooky, and apparently deserted, village of Church House.
Underway again, we steered for the gap between Sonora Island and Stuart Island, where Yuculta Rapids was hiding just around the corner, followed close behind by Gillard Passage and Dent Rapids. We had left in good time and were carried by a fresh southeasterly under sunny skies, putting us two hours ahead of the slack water. We had studied the charts together and decided we would hug the shore to starboard first, then cross and hug the shore on the other side, to avoid the worst and possibly even get some back-eddies to help us through. We entered sailing the jib only, and yet had just enough speed against the 2- to 3-knot south-going current.
We had to wait for the tide to rise for us to cross a shallow spot in Cramer Passage at Broughton Island, so Koen passed the time doing some solo sailing.
Just as we proceeded to cross to the port shore, two bald eagles gave alarming shrieks and flew over us, startling us. There were some tide rips, but they were easily managed and our transit of the rapids worked out much better than we had feared. In less than half an hour we had passed Yuculta and were still hugging the shore to port.
To avoid the rapids in Gillard Passage, we tried the narrow opening south of Inner Passage. While a few dozen sea lions watched us from barren Sea Lion Rock, we hoisted the mainsail to power up. We had to perform a tight turn to port against 3 or 4 knots of current working against us in a channel less than 30’ wide. We succeeded in the turning but failed to make progress: we had to slip out the main’s reefs while being set back in the direction of Sea Lion Rock. We did it in record time, and began to make progress against the current again. Keeping close to the lee shore gave us the most wind and the least current. Carefully, we steered just clear of the boulders underwater and tree branches overhead; a fortunate gust or two helped us inch to wider waters.
By the time we arrived at Dent Rapids a mile and a half farther along, the turning of the tide was near. We sailed close to Dent and Little Dent islands against the last bit of flood entering the wide Cordero Channel. Koen and I felt victorious, and to celebrate we decided to put in for a break at Shoal Bay, just 7 miles from Dent .
The 600′-long wooden pier loomed 20′ above us while we tied up at the floating dock. We strolled down the pier, which connected to a wide valley. Six cottages and a vegetable garden occupied the land where there had once been a thriving town with 5,000 inhabitants.
A driftwood log (at the left) crept by very slowly and paid us a visit behind Gilford Island near Thompson Sound. We were moored in a tiny shallow cove, with lines to shore off the bow and stern holding us just off a tiny beach.
The next afternoon, we rowed and sailed in light air north from Shoal Bay into Phillips Arm. Five miles in, the wooded hillside was fronted by a grassy foreshore. From a distance, we could see a brown spot slowly working along the shore. We hesitated on how close to get. Can grizzlies swim fast enough to get to us? We kept a good 70 yards away and soon saw a second, lighter-colored bear. They were both eating grass and sounded just like grazing cows. We rowed to a pair of anchored logs, tied the boat alongside, and continued to watched the sow and her large cub grazing while we prepared dinner The two bears finally meet in a mock battle, towering high on their hind legs. The cold air dropping down from the snowy slopes far above made us seek refuge in the fo’c’s’le when the light faded. The bears disappeared in the woods. We closed the hatches in case they changed their minds and wanted dessert.
We let the boat dry out in Potts Lagoon and were surprised to see the receding water reveal a bear’s paw print just beside the boat. The boat’s flat bottom made it easy to wait aboard the boat for the next tide.
We easily negotiated the last two rapids, Green Point and Whirlpool, thanks to the neap tides of the quarter moon. The moderate southeasterly breezes of these days suited us well, and before long we arrived at Port McNeill on the Vancouver Island shore. It was a dull place, but had a convenient harbor and shops. From there we went on to the island towns of Alert Bay and Sointula.
From the outset, I had been dreaming of sailing farther north, but we decided not to. Instead we chose to explore the close-by islands during the remaining three weeks. The Broughton Archipelago offered a myriad of islands and islets, and the open waters of Queen Charlotte Strait were never far off. Leaving Sointula, we rounded the red-topped lighthouse at Pulteney Point on Malcolm Island, and half sailed, half rowed in a dwindling westerly breeze. Looking north across Queen Charlotte we saw the snow-capped mountains of the Coast Range. Would we tempt fate and row across the 11 miles to the mainland shore in the sunny calm? It was early enough in the day to say yes, so we set to work. But after a quarter of an hour, a light breeze brushed our cheeks, and with relief we laid the oars aside and set sail.
A First Nations woman had recommended we keep an eye out for trade beads, the trading currency that dated back to the voyages of Cook and Vancouver. I found one on the beach here near the site of Mamalilaculla on Village Island.
Within 20 minutes the northwesterly became a fresh breeze. The mirror-like water was soon fractured and began to build up in small seas, each with a glassy green crest. The waves threatened to board us, but our rough-and-tough plywood box answered by dancing elegantly from one peak to the next. Just over halfway across the Strait, the Numas Islands offered shelter to put in a reef and continue north across the open water to the north being a bit more relaxed. As we approached the mainland, we could shake out the reef and carry on under full sail. Soon we glided into Wells Passage. The low sun gave the shoreline a tranquilizing golden glow, and we coasted into a bay on the north side of Dickson Island to drop the anchor for the night.
The diversity of Broughton’s islands made for interesting adventures. Sometimes we would hide from high winds in a small cove or deep in a fjord, then in lighter conditions we would venture out into the Strait. We squeaked through the narrow entrance of a lagoon, and a small family of curious Pacific white-sided dolphins appeared under the bow. In another lagoon we let the boat dry out on an ebb, only to find bear prints just beside the boat when the falling tide revealed them. We anchored off a deserted First Nations village where a frame made of three immense logs was all that remained of what must have been an immense longhouse. Crossing the entrance to Knight Inlet, we heard a loud hmpfffff as a fin whale rose less than 100’ away to take a breath.
The boat had served us well in the two months we’d been sailing. It would have deserved to have a name painted on the transom, but we never did a proper christening. The boat was as unfinished as the trip was unplanned, and both had their practicality and their charm. It was not a disaster for the rough plywood hull to bounce over a half-submerged log any more than it was a loss of progress to wander aimlessly from our northern course.
The boat was a temporary vehicle meant to satisfy our urge for a summer’s travel. At the beginning, we thought we might leave the boat on a beach or set it on fire when we were done with it, but we began to wonder if it could brighten someone’s life when it was time for us to return home. At Port McNeill, we met a fishing guide who lived with his wife and two small kids, working their float-house fishing lodge in Cramer Passage in the summer. We offered the boat to them, thinking it could be a nice distraction for the kids since they had no nearby neighbors to play with. We were as happy as they were that our boxy boat would have a new home after having served us so loyally, and were met with grateful tears when we delivered it.
Koen and I returned to Vancouver by bus and ferry. Back home, in the midst of telling my daughter about the adventures I’d had with her brother, she grabbed me and insisted that she and I have a new experience for the two of us sometime in the future. I replied with a smile, “How could I say no to that?”
Hein van Greevenbroek is a carpenter and a builder of furniture boats who is currently living in the Hardanger region on the west coast of Norway. He emigrated from The Netherlands 12 years ago on a 49′ catamaran he designed and built. He has done most of his sailing on traditional boats in Holland’s inland waters, but has done some seafaring as a mate on schooners and smacks. He once owned a 66’ tjalk (a type of Dutch sailing barge) which he operated as charter vessel, has worked at several boatyards in Holland and Norway, and sailed his Åfjord square-rigged halvfjerrømming from Trondheim to Amsterdam. He hates engine noise.
In response to a reader’s request for plans for the boat, QUICK AND DIRTY, Hein provided these drawings and offsets:
If you have an interesting story to tell about your adventures with a small boat, please email us a brief outline and a few photos.
A set of doughnut fenders provide distinctive protection to the hull of the author’s tender. Note the tails of the fenders on the port side tied to thwart knees.
In the eyes of our traditionally minded peers on Maryland’s Eastern Shore, my wife Jenny and I tread dangerously close to the gates of hell by sailing a fiberglass boat. Our redemption comes by way of the plywood lapstrake dinghy we built as a tender to it. I had installed a robust length of line along the sheer to provide a nice cushion to protect the mothership, but we needed something more to protect the tender from the dinghy dock and the loitering tenders-of-others.
My Internet search for rope fenders led to a lot of cylindrical versions similar in shape to their modern air-filled cousins. Scrolling down a little further in the search results, I eventually found doughnut-shaped fenders that I discovered were not difficult to make.
The basic principle of most rope fenders is to create a core and then wrap it prettily. My process may be different from others, but once one method is understood, variations come easily. The core of the doughnut fender is a coil; I use a darker line for it, which has the pleasing effect of contrasting with the lighter-colored line I use on the outside. I wrap the core using a type of loop hitching. To see other ways on how to wrap the core, you’ll find examples of ringbolt hitching and buttonholing in The Ashley Book of Knots, pages 569 to 571. (The book is also available in digital format for free online.)
To create a core, coil a single length of line, making sure that each loop lies close to the previous one. To keep each loop from drifting away or crossing over the others, stitch marline through the loops to hold them together as you lay them down and to keep the core a consistent diameter. I sequentially increase and then decrease the number of loops. The first row—the innermost one—has one loop; the second row has two loops; the middle row three; the fourth two again; and the last row one loop. Larger fenders will require more loops for the core.
To begin the decorative wrap, I stitch a lighter-colored line to the core loops for a few inches to fix it in place. I begin hitching with a loop on the outside, tucking the working end under the standing part. Drawing the line around the core, I pull the end up through the just-made loop, snug it up, and continue with another loop. I keep each turn tight against its neighbor, and take up any slack before moving too far ahead. When the core is covered and I can make no more turns, I lock the hitching with a simple overhand knot after drawing the line up through the last loop. I leave a generous amount of line to secure the fender to the dinghy and whip the tail end.
The core starts with a single loop with an inside diameter of about 3″. The 9 loops of 3/8″ Spunflex 3-strand polypropylene the author uses for the core take up around 9′ of line. Stitches of marline hold the coil together.
The lighter colored line used for the wrap provides contrast for a decorative effect. A 16′ length of 3/8″ polyester New England Vintage 3-strand covers the core and leaves a tail to secure the fender on the dinghy’s rail.
The loop hitching for the wrap begins with a twisted loop.
The tail end of the line passes around the coil and through the loop.
The wrap is drawn up tight.
The next loop is made, a repeat of the first.
The loop hitching continues around the coil and back to the beginning.
A half hitch in the tail end, pulled up tight against the last wrap, keeps the fender from getting looser with use and age.
Andy and his wife Jenny have been messing about in small wooden boats since they met in 2005. They have built and restored a number of boats that they use for canoe-camping in the Adirondacks and sailing in company with their fellow Delaware Valley TSCA members. When their daughter Ella came along eight years ago, they needed a larger vessel and bought the aforementioned fiberglass boat for weekend outings on the water. They cruise the upper Chesapeake Bay and explore its shallow creeks and byways in their homebuilt tender.
Editor’s notes:
SBM photographs
I found that I could make the core coils faster and more uniformly by using a jig. I cut a 3” disk cut from 1 ½” stock and fastened it to a 7” plywood disk. Eight bandsawn kerfs accept lengths of marline that will later hold the wraps of the coil together.
The jig is designed for 3/8″ line and requires about 25′ to make a fender with a continuous core and wrap. The first wrap starts at the top and winds down around the core three times. Needles temporarily hold the coils together and tight. The pencil-marked kerf indicates where the transition to the next wrap starts.
The second set of three coils goes from the bottom up.
The last wrap adds three coils, wound from top to bottom. This core, like Andy’s, has 9 wraps, but they’re arranged in a cross section that is a square (3-3-3) rather than his diamond (1-2-3-2-1). When the wraps are applied, the cross sections of both become nearly circular.
Once the eight lengths of marline are tied around the core, the needles can be removed.
The entire fender can be made of a single length of line. Here the first hitch of the wrap has been made directly from the coil. The remainder of the process follows Andy’s instructions.
The fender on the left was wrapped with Andy’s form of loop-hitching. The two fenders on the right are wrapped with kackling, hitches that alternate left and right. The loop hitching I used for my first fender took up 27′ of line; the kackling took 25′ and I could get two fenders from a prepackaged 50′ length of 3/8″ sisal.
You can share your tricks of the trade with other Small Boats Monthly readers by sending us an email.
A full charge on the battery is rated for 6 hours with the white light on high, 20 hours on low, 60 hours for the red light, and 48 hours for the SOS.
I have had all sorts of headlamps over the years, but none have impressed me as much as the Mantus Headlamp from Mantus Marine. It’s built around a rugged, watertight, aluminum-alloy case that houses a rechargeable and replaceable battery. The included 2600 mAh, 3.7-volt lithium-ion battery takes a full charge in about 3 hours. The single LED light, mounted in the middle of the housing, has a high output of 770 lumens, a low output of 150 lumens, an SOS beacon light, and a red light setting for preserving night vision.
The head strap can be switched out for a smaller strap to attach the lamp to a wrist or a PFD.
To test the manufacturer’s claims, I ran the battery at the high-beam setting at a full charge to see how much juice it had. The light started to get slightly dimmer after about 5.5 hours, but did not go off. If I plan to use the headlamp for periods longer than the battery can hold a charge, additional batteries are available online and at electronics outlets.
The light is seated in a soft, curved rubber fixture, and the easily adjusted head straps are comfortable. The head straps can be removed and the light can be mounted on an included wrist strap. With the shorter strap, the light can also be mounted on a PFD as an emergency light. To adjust the angle of the beam, the whole light rotates inside the soft rubber mount. There’s no rigid, breakable pivot mechanism to worry about.
Mantus built the headlamp with SCUBA diving in mind, and carries an IPX8 standard that indicates that you can trust the light to work down to depths of 10 meters (33′). The manufacturer has tested it to a depth of 100′ and didn’t see any water intrusion. The deepest water my light has been in so far was some dinghy bilge-wash after it fell out of my bag as I was loading the boat. I have also been able to test its performance in some wet and windy weather conditions.
The rubber end cap incorporates the switch and a cover for the USB charging port.
The single large button switch is easy to operate, even with gloved hands. It has an advantage over my former favorite head lamp, which has two separate buttons for red and white lights, both small and hard to press separately one from another. When the button on the Mantus headlamp is pressed, the light cycles through all of the various modes in order: first red, then white low, high, and SOS. It’s the way the red light works that makes it a gem. When navigating at night, you’ll want a red light to preserve your night vision while reading charts, so the red light is always the first to turn on. After the red light has been on for more than 4 seconds, pushing the button again will turn the red light off, instead of cycle through the white lights spoiling your night vision with bursts of white light. When you turn it on again, you get the red light again
At 6.4 oz, the Mantus Headlamp is heavy, more than twice the weight of other headlamps I’ve used, but its durability and features make it worthwhile for me to get used to the weight. I like the ability to recharge—sparing the expense and waste of single-use batteries and the easy operation when I’m wearing gloves during the bitterly cold Maine winter. I feel like I’ve finally moved up to a headlamp that I can count on when I need it most.
Anne Bryant is the associate editor of WoodenBoat.
Is there a product that might be useful for boatbuilding, cruising or shore-side camping that you’d like us to review? Please email your suggestions.
I most often use my decades-old 2″ drum chucked in my drill press and wrapped in fine-grit sandpaper.
My main drum sander is a simple shop-made affair: a plywood box containing a salvaged motor fitted with a chuck to hold a 3″ sanding drum. With a 60-grit sanding sleeve on the drum, it’s a real workhorse when it comes to smoothing curves, but I don’t use it for finish work. Sleeves with finer grits are available, but they’re $4 apiece, hard to get on and off the rubber drum, and too stiff to smooth radiused edges. For finer work, I’ve been using sleeveless sanding drums. They are built around rigid foam cylinders and hold strips of common sandpaper. The exterior of the cylinder is padded with a layer of 1/8″ neoprene, and one end of the cylinder is fitted with a cast-aluminum flange and a steel axle. The ends of the sandpaper strip are tucked into a slot in the drum and led to a long, round hole where a length of steel oval tubing rotates to secure them. A lever is inserted into the tubing to rotate it, but a straight-bladed screwdriver will do the job just as well when that little lever included with the drum goes astray.
The the drive shaft has a diameter of 1/2″ where it joins the fitting on the drum, but is reduced to 3/8″ to fit most drills.
The literature describes the drum’s core as foam, but it is quite hard and very durable. I’ve had my 2″ drum for close to 30 years and it is still going strong. The system for holding the sandpaper was getting a bit loose, but a wrap of making tape around the oval tube cured that. I recently bought a 3″ drum; it appears to be made of the same materials, and I expect it will hold up just as well.
A keyhole slot traps the ends of the strip of sandpaper and an oval steel tube locks them in place. I’ve marked the drum with the size of the sandpaper strip the drum uses.
I made a plywood jig to tear 3″-wide strips of sandpaper to fit the drums. It has an alignment fence along one edge and a hacksaw blade at a right angle and loosely anchored with two screws.The toothed side of the blade does the tearing. I’ve made markings on the plywood indicate where I need to align the paper to tear off the strip I need.
I can quickly tear strips of sandpaper using a jig that has a fence and a hacksaw blade loosely screwed to a piece of plywood.This side of the board works for the 3″ x 7-3/4″ strips I need for the 2″ drum.
For the 3″ x 11″ strips I need for the 3″ drum, I have a metal strip screwed to the board 3″ from one edge
The sheet sandpaper isn’t as durable as sanding sleeves and requires a lighter touch, but the flexibility of the paper and the cushioning of the rubber behind it allow the sandpaper to mold to the contours of the workpiece. I can sand rounded edges without making unsightly, unwanted facets. I spin the drums on my drill press when working small pieces; when I need to bring the drum to the work—e.g., for smoothing oar blades and stem heads, or sanding frame ends sandwiched between inwales and outwales—I chuck the 2″ sanding drum into an electric drill.
It is important to secure the sandpaper tightly on the drum. If it is loose, it will begin to pucker, the puckers will turn to creases, and eventually those will wear through. The damage occurs on the trailing end of the sandpaper, so even when it begins to wear out and tear, the drum will still pull it and do useful work. I can get a couple of strips for the drums out of a single sheet of sandpaper, so the cost is pennies per strip, far cheaper than the cost of sanding sleeves.
My oldest sleeveless sanding drum has been among the most-used and longest-lasting tools in my shop and does finish sanding on many projects much faster than I can do by hand.
Christopher Cunningham is the editor of Small Boats Monthly.
Sleeveless sanding drums are available in a number of sizes from several sources. I bought my 3″ x 3″ drum from Lee Valley for $23.50 plus shipping.
Is there a product that might be useful for boatbuilding, cruising or shore-side camping that you’d like us to review? Please email your suggestions.
Gary Strombo of Everett, Washington, told his friend John Leyde that he wanted to build a boat. As often happens, the moment you speak of your wishes to someone else, the momentum to carry them out begins to build. Gary had had no experience building boats, but John got his start decades ago and had several boats to his credit, including two electric launches and a diesel launch that he later converted to steam power. Gary had taken an interest in Adirondack guideboats and found plans and instructions for a strip-built version in Building an Adirondack Guideboat by Michale Olivette and John Michne.
photographs courtesy of Gary Strombo
With John looking on, Sigrid takes the measure of the first 15 of 29 frames.
John volunteered the use of his shop and tools for the project, and for about 16 months the two friends got together for a few hours every Tuesday to work on the boat. For jobs that were easier and faster with more than two pairs of hands, like milling the cedar strips, they had friends pitch in on occasional Saturdays.
With all of the frames in place, planking with the red-cedar strips could begin.The guideboat project was squeezed in John’s boat shed alongside his steam launch, GALILEE.
The most frequent helper was Gary’s 10-year-old daughter Sigrid, who rarely missed a Tuesday or a Saturday session. Gary had grown up with a father who was a hardworking logger: “There were four of us kids, two boys and two girls, and I am not 100-percent sure Dad could tell us apart. He expected the same hard work, craftsmanship, and attention to detail from all of us.”
Gary has included Sigrid in all of his projects to give her the same kind of experience he had while growing up with the hope that she will become a competent, confident, and capable adult.
With thousands of screws holding the planks to the frames, Sigrid kept busy placing them in predrilled holes so John could maintain a steady rhythm with the drill/driver.
The guideboat described in the Olivette/Michne book is 16′ long, a bit too long for strips cut from their readily available 16’ stock to wrap around the molds, so John and Gary decided to shorten the guideboat to 14′8″. John was not timid about modifying desigsn, having departed from the plans for a few of the boats he’d built— changing sizes and even converting a transomed design into a double-ender.
They milled western red cedar 1x4s into cove-and-bead strips for the planking and Douglas fir for laminating stock for the frames. Strip-built boats can be built with fiberglass inside and out strengthening the hull, but Gary and John—and Sigrid—invested the time and effort to make the 50 half frames and lap them in 25 pairs on a ¼” plywood plank bottom. “Cutting, bending, laminating, and then cutting individual ribs from the shaped blanks and attaching them to the bottom board,” John noted, “proved to be a laborious process and probably where most of the building time was spent.”
Gary and John step back from their work after saturating a layer of ‘glass with epoxy.
The delicate frames add considerably to the beauty of the boat, and echo the construction of the original guideboats, without taking on the extraordinary challenges of the traditional beveled, smooth-skin planking. In another nod to traditional construction, each strip was screwed to each frame. Sigrid was charged with placing a good portion of the more than 2,000 3/4″ flathead wood screws.
With the planking and sheathing complete, the hull was taken outside to be admired. Sigrid celebrated the occasion with a lollipop.
The hull was sheathed in fiberglass and epoxy, then outfitted with an inwale, which was a departure from tradition but serves as a useful handhold for carrying the boat and as good place for tying docking lines.
On launch day, the guideboat, sporting a Norwegian flag, was christened ATNA with a bottle of water from Norway’s Atna River.
The finished guideboat was launched on Lake Ki, a stone’s throw from John’s shop, and christened ATNA, after a river that passes the Strombo ancestral farm nestled among the inland mountains of southern Norway. Gary’s wife, Kristina, surprised him by providing a bottle for the christening; it was filled with Atna River water that had been sent by his Norwegian cousin for the event.
In 2017 the guideboat was put to good use doing a little fishing and cruising in the lakes and rivers in the Everett area. Among the plans for the coming summer is a 60-mile cruise down the Clark Fork of the Columbia River and past the farm in Montana where Gary was raised.
Have you recently launched a boat? Please email us. We’d like to hear about it and share your story with other Small Boats Monthly readers.
The cabin of our Escargot canal boat, BONZO, is quite cozy. The woodstove keeps it warm and cushions on the seats make it comfortable. While we’re at anchor or having dinner drifting across the lake everybody is content, but at some point, someone has to step out into the not-so-cozy cockpit to start the motor and steer the canal boat back to the launch ramp. That task usually falls to me or to my son, Nate.
Aboard BONZO, my sister Laurie serves up our favorite family dinner—a chicken, rice, and broccoli casserole—during one of many meals afloat. The little round window (to right) over the berths was our only view forward.
There’s a bit of shelter in the cockpit behind the cabin’s aft wall, but that only blocks a bit of the wind and rain. Nate and I usually keep each other company and keep our collars zipped up and our hands stuffed in jacket pockets while one of us steers straddling the tiller. When someone opens the cabin door to offer us something to eat, some of the warm air in the cabin escapes and wafts around us.
The forward end of the cabin was designed as sleeping quarters, with windows only on the sides of the cabin. After we added a round window on the door, we could get a peek over the bow, but the view was too restricted for navigating.
A few years ago, for a cruise up the Snohomish River with Nate and my daughter Ali, I had installed a round 4″ plexiglass window in the door to the foredeck and installed a loop of line from the rudder and single line from the outboard’s kill switch. We could get out of the weather to steer, but the view forward was limited and the seating was uncomfortable, so we resigned ourselves to taking the helm in the cockpit.
The view forward was greatly improved by the addition of three large windows.
This year I revived the idea of a sheltered helm. I put three large forward-facing windows in the front of the cabin, reinstalled the rudder and kill-switch lines, and added a pair of lines to control the throttle. A stick clamped to the outboard’s bracket holds the tiller upright, and a yoke pressed on the throttle provides some leverage and finer control. Taking out two of the sleeping platform panels and replacing them with short seats provides a footwell for comfortable upright seating.
What was originally the boat’s sleeping quarters now also serves as the pilothouse when we’re underway in foul weather. The orange cord at the top is connected to the kill switch, the line just below the window with the wooden bead controls the throttle, and the line at the bottom with the dowel attached operates the tiller. The plywood panel that is usually part of the sleeping platform has been temporarily replaced by a smaller piece that leaves an opening for a foot well.
We took BONZO out for an early family Thanksgiving dinner on a clear cool November evening. There were six of us aboard, and we ate our fill while taking in the night skyline of downtown Seattle and its glittering reflection on the inky black water of Lake Union. When it was time to head back to the ramp, Nate took the helm in our fo’c’s’le-turned-pilothouse and I slipped out to the cockpit to start the outboard before taking a seat alongside Nate. I had the advantage of having a bulkhead backrest that was warmed by the wood stove on its other side.
There are a few lines taking up some space in the cockpit, but they don’t get in the way of starting the motor and I can still operate everything if I need to move to the cockpit to maneuver through traffic or approach a dock.
Nate must have appreciated the comfort more than I did. He has done several weekend trips from Lake Union to Lake Washington’s Andrews Bay, the only place within the city limits where boats are permitted to anchor. It’s a four-hour passage each way, and on at least one trip BONZO was fighting a stiff headwind and a chop that sent blasts spray across the cabin roof.
There are, of course, lots of factory-made systems that bring all of the controls of an outboard forward, but our sticks-and-string system cost next to nothing, and there’s the pleasure of seeing that our Rube Goldberg version actually works.
When I sail WINKLE, my William Garden–designed Eel, people almost always take out their cameras. The 18′6″ canoe yawl was designed as a slightly shorter and much lighter version of the original Eel designed by George Holmes in 1895. Holmes was one of the pioneers of the canoe yawls that became popular in England at the end of the 1800s. Recreational boating was then in its early stages, and canoe yawls, derived from canoes and other small boats meant for work and pleasure, appealed to sailors drawn to longer cruises in more open waters. They were perhaps the first “pocket cruisers,” a category of small boats that have recently become popular once again.
Those 19th-century canoe yawls were often sailed on the rivers and estuaries of England and so were typically of shallow draft. The Garden-designed Eel draws only about 11″ with the board up. It can be nosed up to a beach, but its 330-lb external lead keel, about 4″ square and about 4′ long, makes it impossible to drag the boat up on a beach. You can omit the lead keel and use bags of lead shot as internal ballast instead if your sailing regularly brings you ashore.
Plans for the Eel consist of five sheets of drawings and a table of offsets that detail how to build the boat using carvel, strip, and cold-molded construction methods. I chose strip-building, as I had previously built a Wee Lassie cedar-strip canoe. My hope that the Eel would just be a bigger version of that project was not off the mark. Its hull is like that of a canoe, the lack of reverse curves simplifies the planking, and it’s built upside down, with the strips glued together over lofted station molds.
The strips were 3/4″ thick and 1-1/4″ wide—harder to bend than the strips I used for the Wee Lassie—and it was necessary to kerf some of them to take the tight curve around the canoe stern. I made a thin, 2′ cut down the middle from the end of the strip so I could more easily bend what had become, in essence, a pair of flexible 3/8″ strips instead of a stiff, single 3/4″ one. And yet, while strip-building is probably the simplest way to build the hull, the Eel is not a beginner’s building project. Doing the lofting, making the lead keel, building a cabin, and making spars call for some advanced skills and patience.
The Eel has a gunter rig with a vertical gaff that is an extension of the mast. I have come to really appreciate the rig; the shorter spar lengths are much easier to manage. I have built a tabernacle for the mainmast, and now I can quickly raise and lower it by myself. Another advantage of the gunter rig is that when you reef, you are lowering the gaff along with the sail, decreasing the weight aloft.
Apparently, some owners have complained that the gaff needs to be lowered all the way to the cockpit to change the attachment of its halyard for reefing. I added a second halyard that goes from a block higher up on the mast to a point higher up on the gunter. To reef, I slack the primary halyard and pull this one in. It works very well and makes for rapid reefing, shaking, and resetting. It does complicate the rig a little more with the addition of another line; however, this boat is light, and it is important to have the correct amount of sail up, so I think that it’s worth it.
I built the main mast and gaff hollow using the bird’s-mouth method, and the weight savings is significant. It does take some intricate work to mill the eight strips, tapered on one side and notched on the other. It is really fun and exciting when you put them together, and they create a long, faceted cylinder. The mizzen mast and booms are solid.
The centerboard has an arm going forward out of the top of the trunk. A line from the tip of the arm goes forward through blocks and then aft to a cleat in the cockpit. The board can be raised and lowered from the cockpit and works well. The plans call for the centerboard to be made of 5/16″ steel plate, which would weigh about 100 pounds. I made mine of 3/4″ marine plywood enclosed in fiberglass to save money and get a little bit of a foil shape. I added two lead inserts, but it still doesn’t weigh that much. I have thought about adding additional weight to the keel. My boat does seem a little tender as it heels quickly in puffs; it may a little underweight. Other Eel builders who kept to the plans report their boats are stiffer under sail.
The only other major modification I made to my Eel, beyond the tabernacle, was to the shape of the rudder. Garden’s plans call for a deep, removable spade rudder that can be pulled out through a trunk when encountering shallow water; then a paddle or an oar serves as a rudder. There are many bars and shallows where I sail, and I worried about snagging the rudder, or even bending the rudder shaft and then not being able to pull the blade up into the trunk. I had seen a picture of an Eel in WoodenBoat (Launchings, Sept/Oct 2001) mentioning a “winged” rudder. I was able to chase down the owner and creator, Roger Dahlberg in Tasmania, Australia, who graciously shared his plans with me. His rudder doesn’t extend below the keel and has a horizontal plate along the bottom to improve performance. It has worked well for me.
Randy Colker
The centerboard trunk divides the cabin’s sleeping quarters, but barely intrudes into the cockpit.
The cockpit of the Eel is very comfortable. After consulting a furniture-making manual, I made some alterations to improve the seating. I slanted the coamings outward about 10 degrees and the seat bottoms at about a 6-degree angle. This was extra work, but really added to the comfort. While the coamings offer good back support, but angled or not, they rise high enough above the deck to make hiking out impractical and uncomfortable.
The Eel is a very dry boat, and handles chop well. The cockpit is not self-bailing, which is not unusual for a boat this size; I don’t have a cover for the boat and I have to bail water after a rainfall.
I did not build cruising accommodations in the cabin, as I expected I would only use the boat only for daysailing. Other Eels have been equipped with two comfortable 6′-plus berths in the cabin and a good bit of storage, making them better suited for cruising. In 1983, Bruce Baker sailed his newly purchased Eel from Schooner Bay Boat Works (where about a dozen Eels were built in the 1970s and ’80s) in Anacortes, Washington, to his home near Juneau, Alaska, a trip up the inland passage of about 900 miles.
Tom Wessels
With 201 sq ft of sail, the Eel makes good speed. The design calls for 300 lbs of lead in the keel and a steel-plate centerboard to stiffen the hull for windward work.
Space in the cabin is tight and it takes a bit of flexibility to move around in it. There is about 38″ of headroom under the forward part of the cabin top, and 43″ aft. If you are sitting on the sole, without anything built in, you can sit upright. The plans call for hinging the cabintop at the front so that it could be raised for more headroom in the back. I did do this in case I ever decided to use the boat for cruising, but haven’t yet added the canvas panels to cover the openings at the sides.
While I was building my Eel, I read about the perils of sailing a boat without built-in flotation and so, despite the extra shop time it added, I put a watertight compartment in the bow and foam flotation under the deck, seats, and floorboards. I wanted to buy a flotation bladder to go under the aft deck, but couldn’t find one in the shape I needed, and the bladders I did see were prohibitively expensive. I settled on two heavy plastic bags filled with empty 2-liter soda bottles and gallon milk jugs.
Originally, I had intended to use a Seagull outboard for auxiliary power. The classic motors are light and in keeping with the character of the boat. Unfortunately, the Seagull I had was not cooperative when it came to starting and idling. I then tried a Torqeedo 1003 electric outboard. It comes apart in three pieces, which makes it easier to put the engine on and take it off. The Eel has a canoe stern, so the outboard needs to be mounted on a bracket hung over the side, and my preference would be to take it off while sailing for appearance’s sake as much as to keep it from dragging while heeling. Taking the three pieces apart and putting them back together wasn’t as easy as I’d hoped, so I settled for tilting the engine up, and swinging it over on the deck on its side when it is not in use. This has proved satisfactory, though the motor goes through one charge of the battery fairly quickly. Rowing is another option for auxiliary power. The Eel can be outfitted with elevated locks for stand-up, forward-facing rowing, but I have not yet invested in the locks and oars.
The Eel is very easy to trailer and launch. I have done it comfortably with my mid-size, six-cylinder Toyota sedan. With three sails, five spars (seven including the bowsprit and boomkin), roller-furling jib, and my reefing system, there is a lot to be assembled. It takes an hour to an hour and a half to set up at the launch ramp.
Randy Colker
Instead of incorporating the rudder specified in the original design—a vertical blade that retracts into a trunk—the author’s Eel has a rudder that is even with the keel and extends aft rather than down, allowing it to be used to sail in shallow water.
My mainsail cover fits around the gaff, sail, and boom. This creates a nice package that can be taken off the mast in one piece and tied down for transport. The bowsprit and boomkin can stay in place while the boat sits on the trailer, though I wouldn’t want to tow it any distance with the boomkin on, as it would be too vulnerable sticking out the back. The mast can stay folded down in the tabernacle for both storage and transport, which is very convenient.
Leigh Fenigsohn
Dropping the main and leaving the jib and mizzen flying reduces the sail area while keeping the helm well balanced.
Once the Eel is in the water, getting under way is rapid and easy. The jib’s roller-furling is a joy to have. The Eel is great fun to sail. It is fast, very responsive, and with 201 sq ft in the jib, main, and mizzen, it sails surprisingly well in very light winds. With a mizzen staysail rigged, I have sailed at 2 to 3 knots in 5-knot winds. I don’t think you could use the staysail in winds any higher than this without being overpowered. The fastest speed I have measured was 6.1 knots in about 10 knots of wind without really trying. I was happy with this as the theoretical hull speed for a boat this length is 5.7 knots. Maximum speed for just the jib and mizzen in higher winds has been 5.2 knots. It points very well with the full suit of sails, though not quite as well closehauled with just the jib and mizzen. Having the three sails makes for a very balanced boat with little weather helm. It also provides many sail combinations for different wind conditions, which is important for a light boat with this much sail area.
Tom Wessels
The author reports that his Eel, WINKLE, is “a joy to sail, fast and responsive. Immensely satisfying.”
My Eel took over five years—and an enormous amount of patience from my wife for a project that took over half of our garage—for me to build, but it was well worth the effort. It has been a pleasure to own and sail, and generates many compliments. WINKLE sails the Poquoson River which feeds into the Chesapeake Bay just below the York River. My wife often joins me, and many of the folks who helped build the boat volunteer to serve as crew. Whoever comes aboard is soon smiling.
Randy Colker is a retired psychologist living in Yorktown, Virginia. He started building boats after attending a class at The WoodenBoat School in Brooklin, Maine, and built several working his way up to the Eel. He loves beautiful wood and working with it.

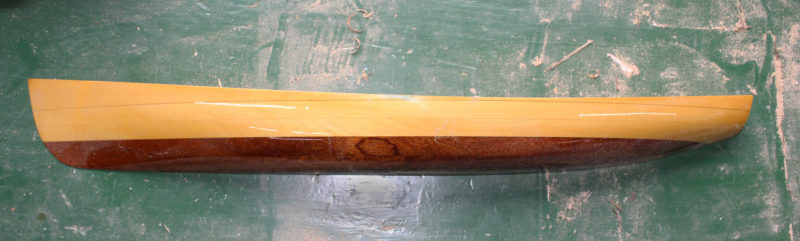 Photographs by the author
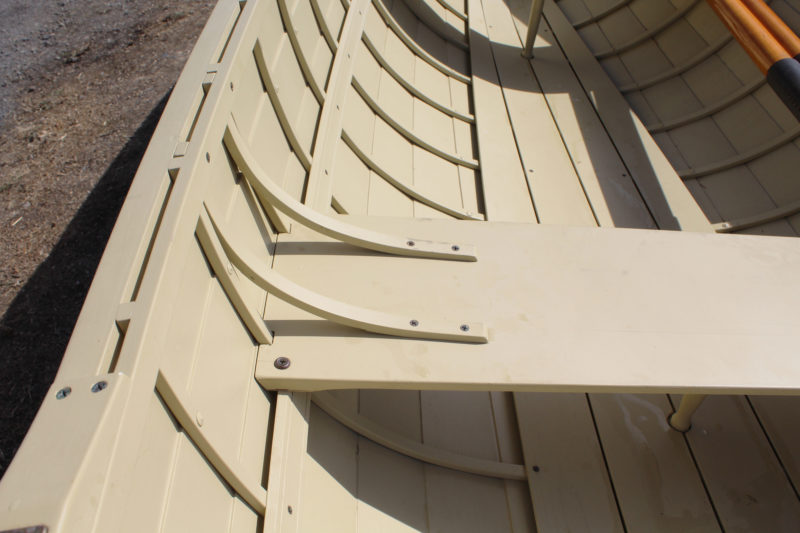
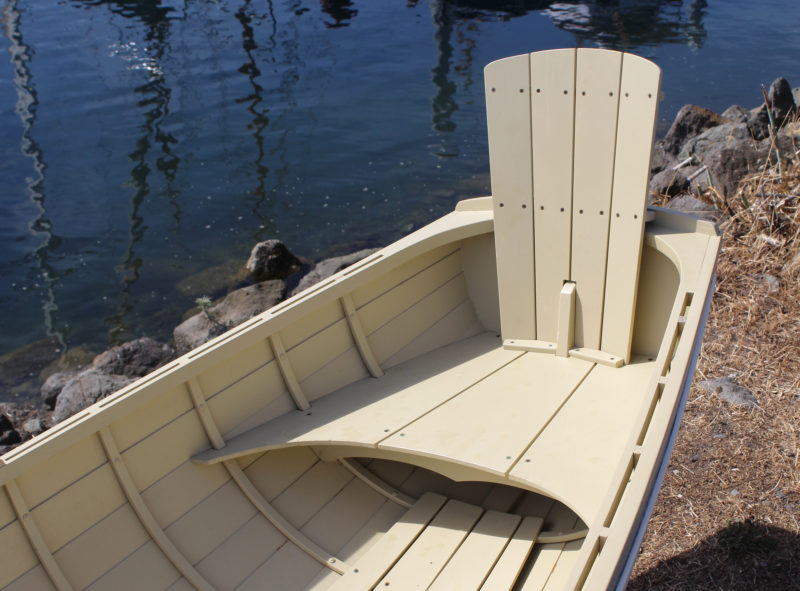
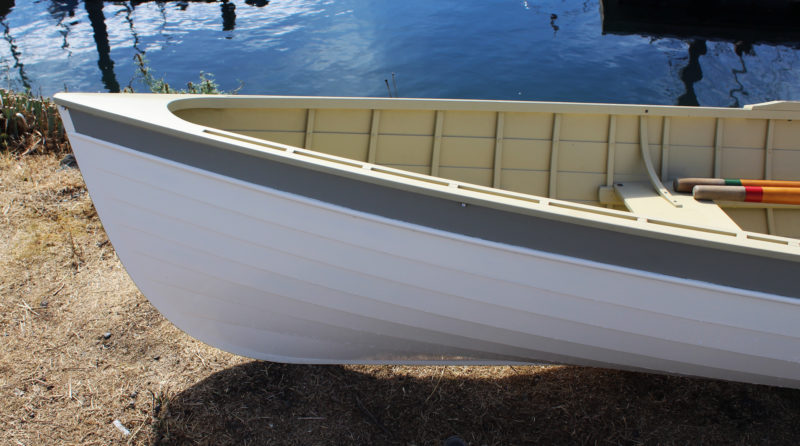
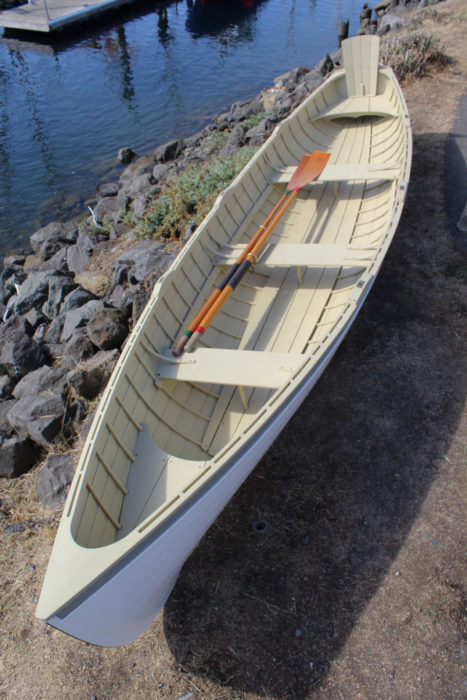
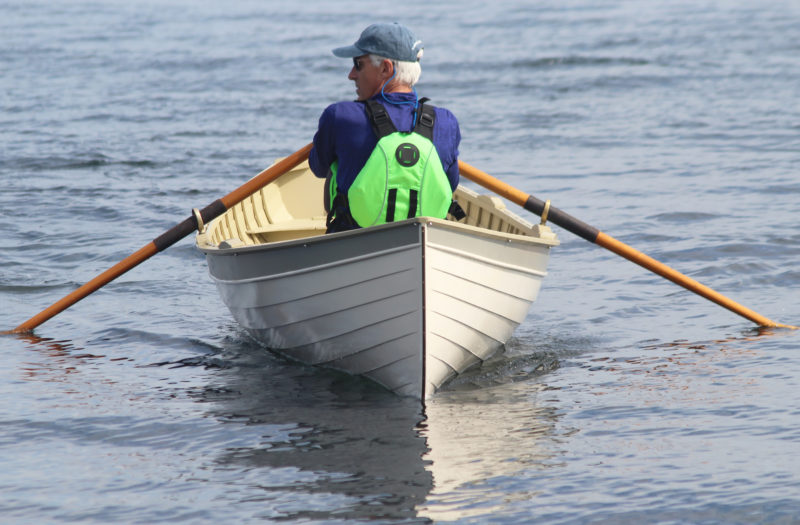
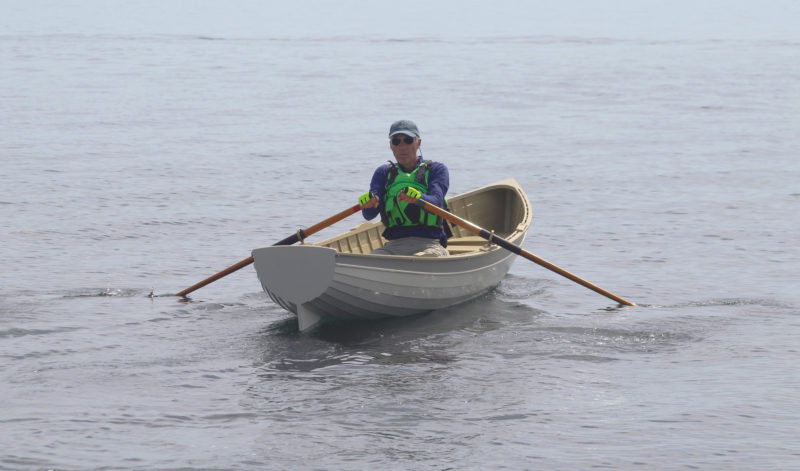
 Susanne Regan