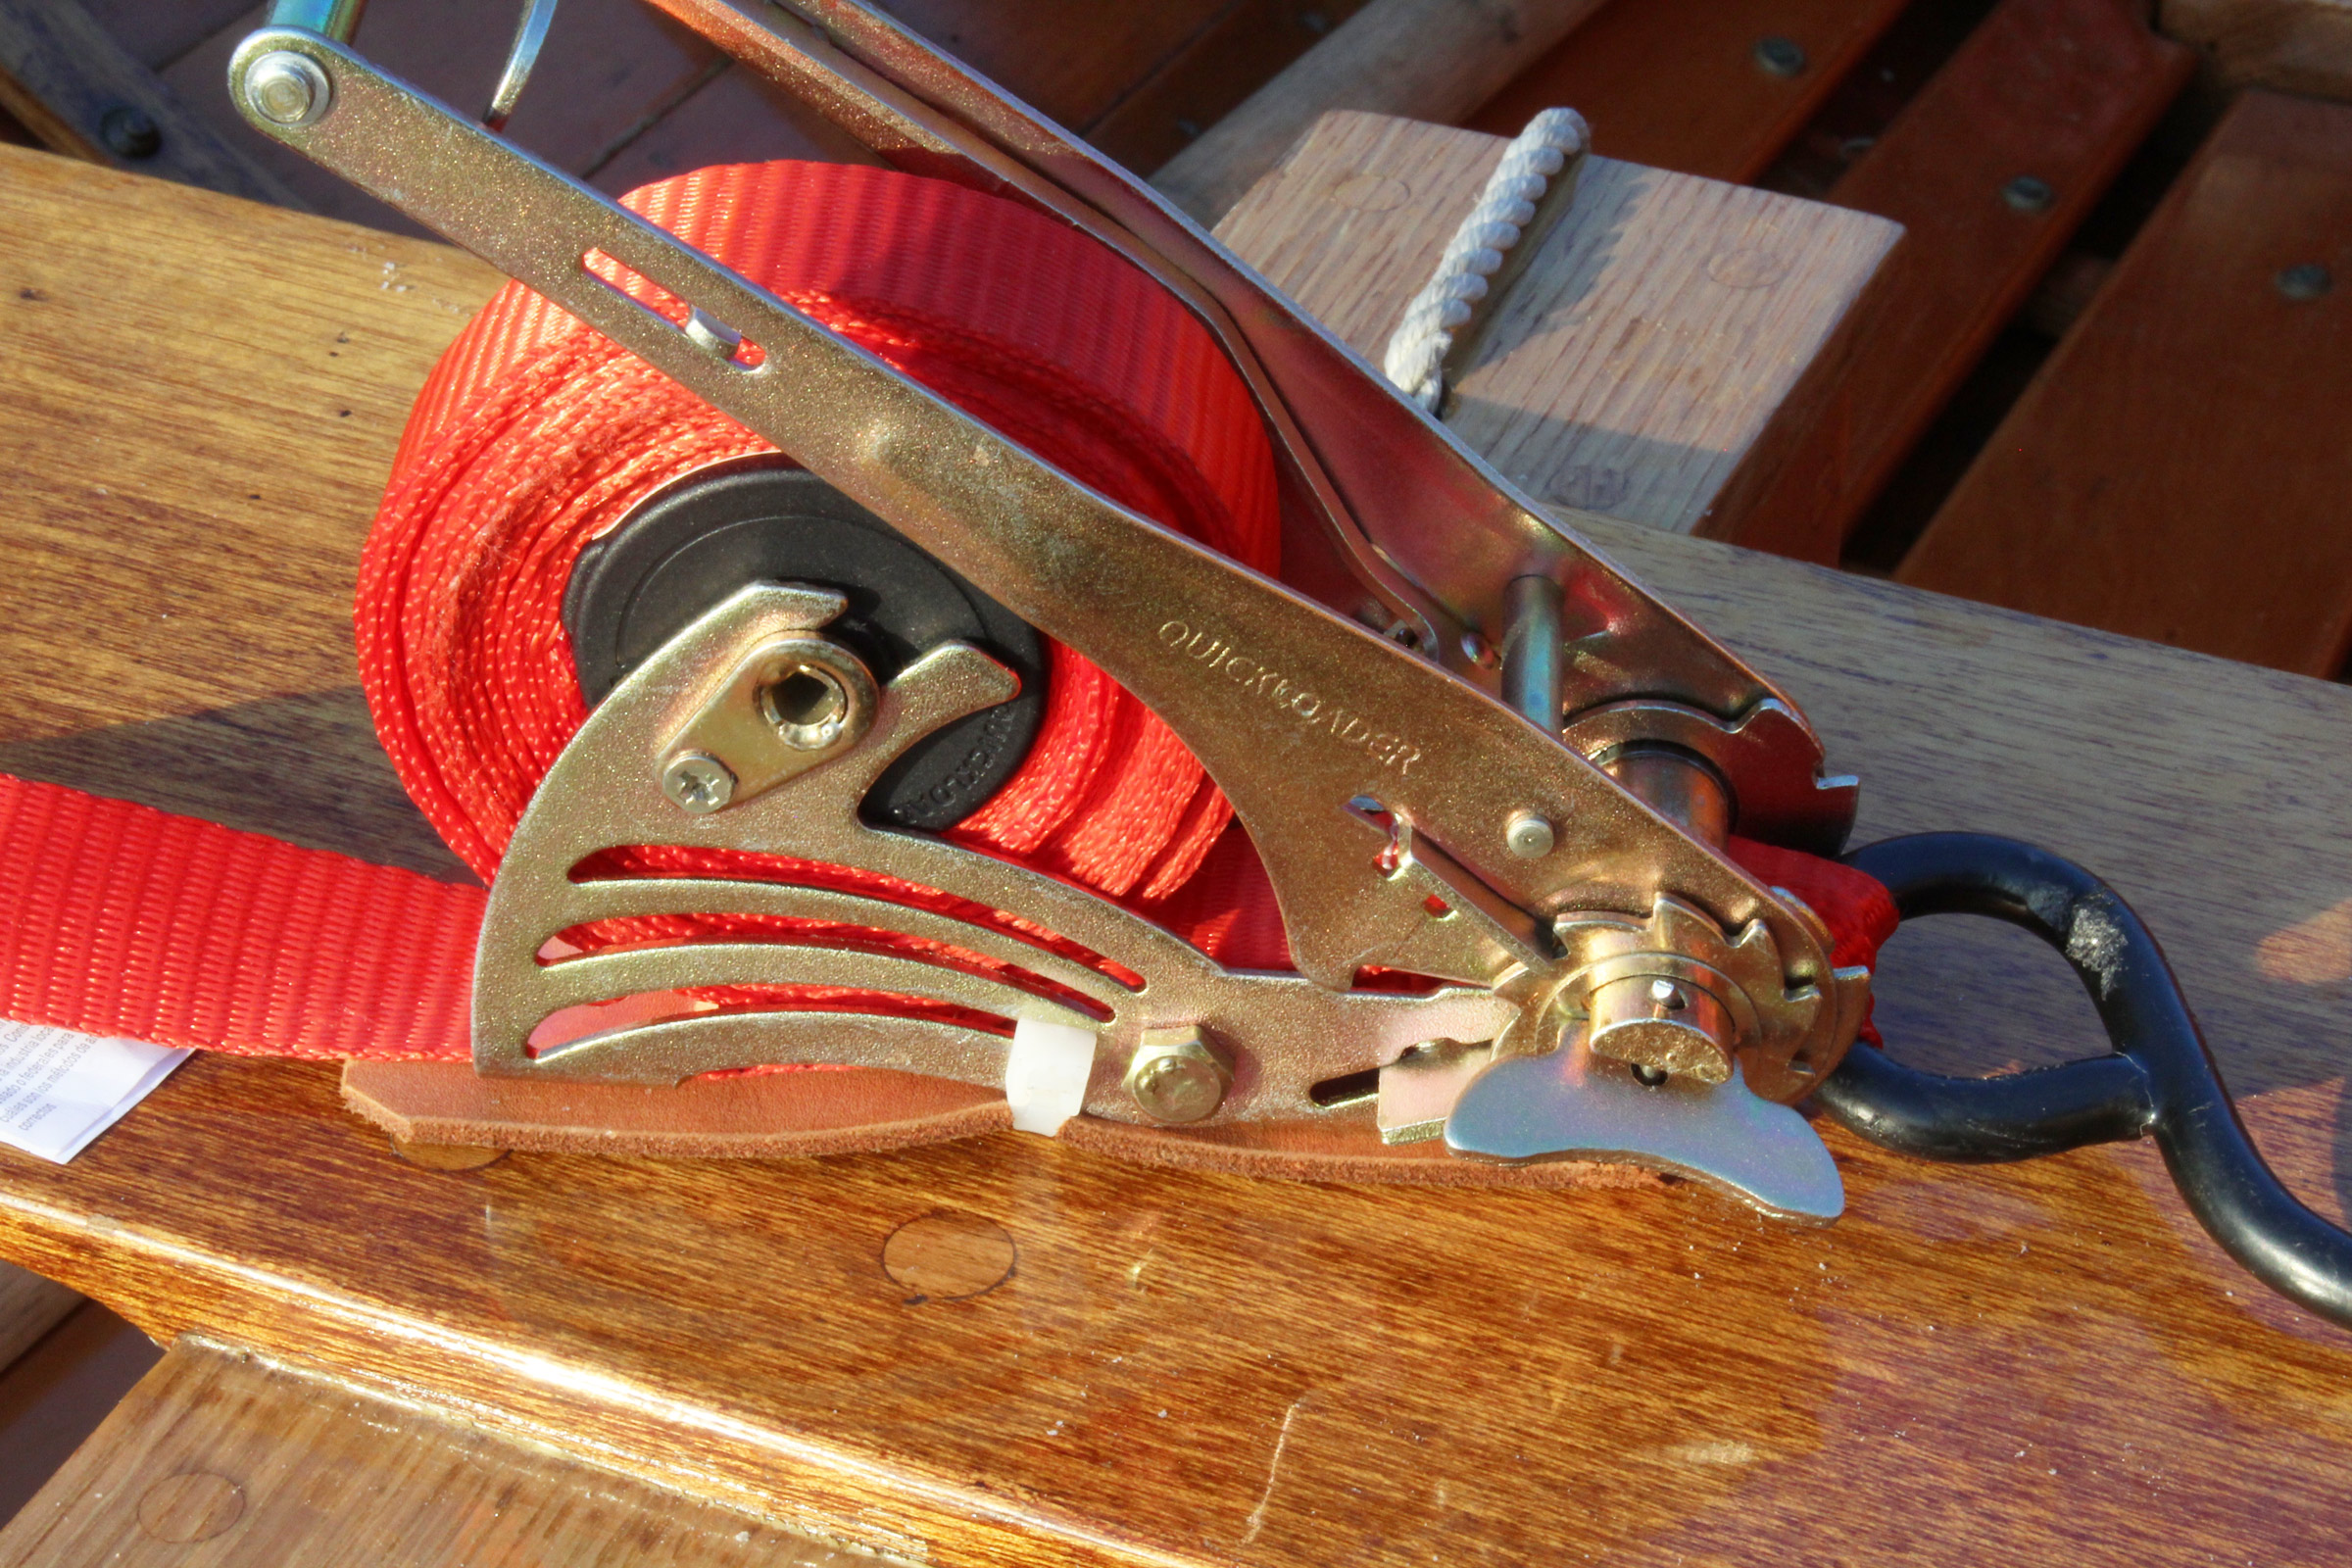
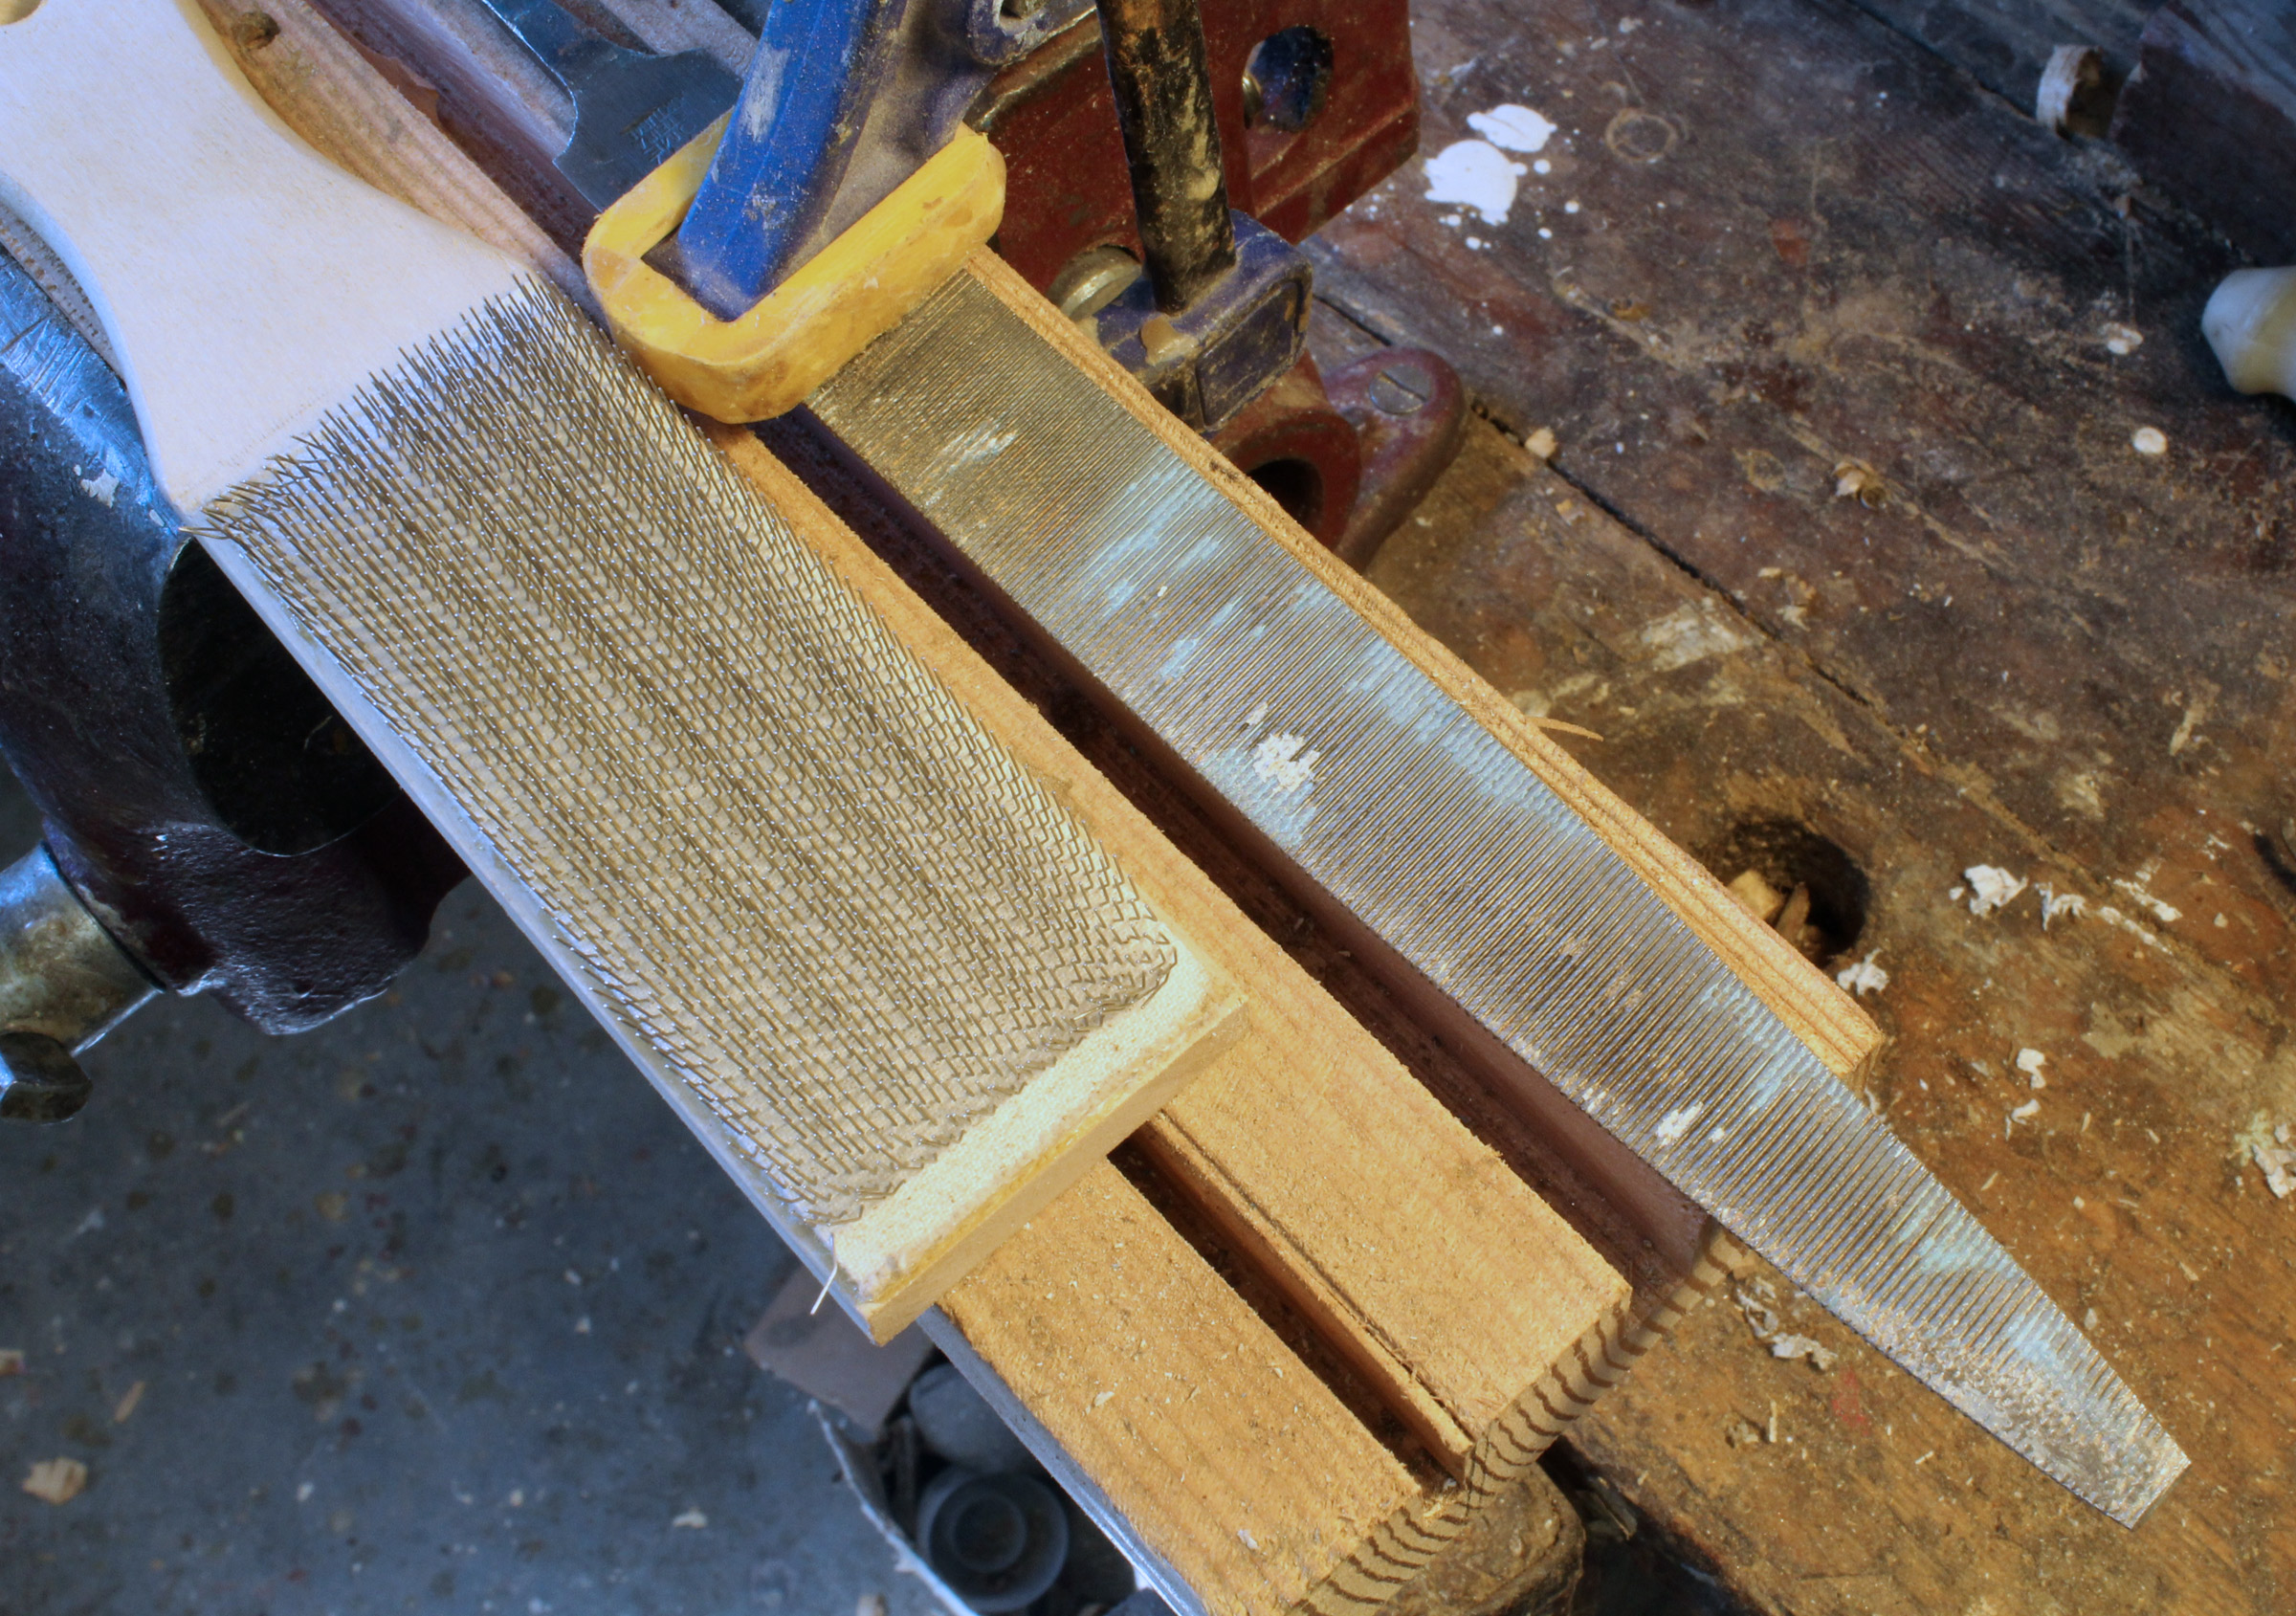
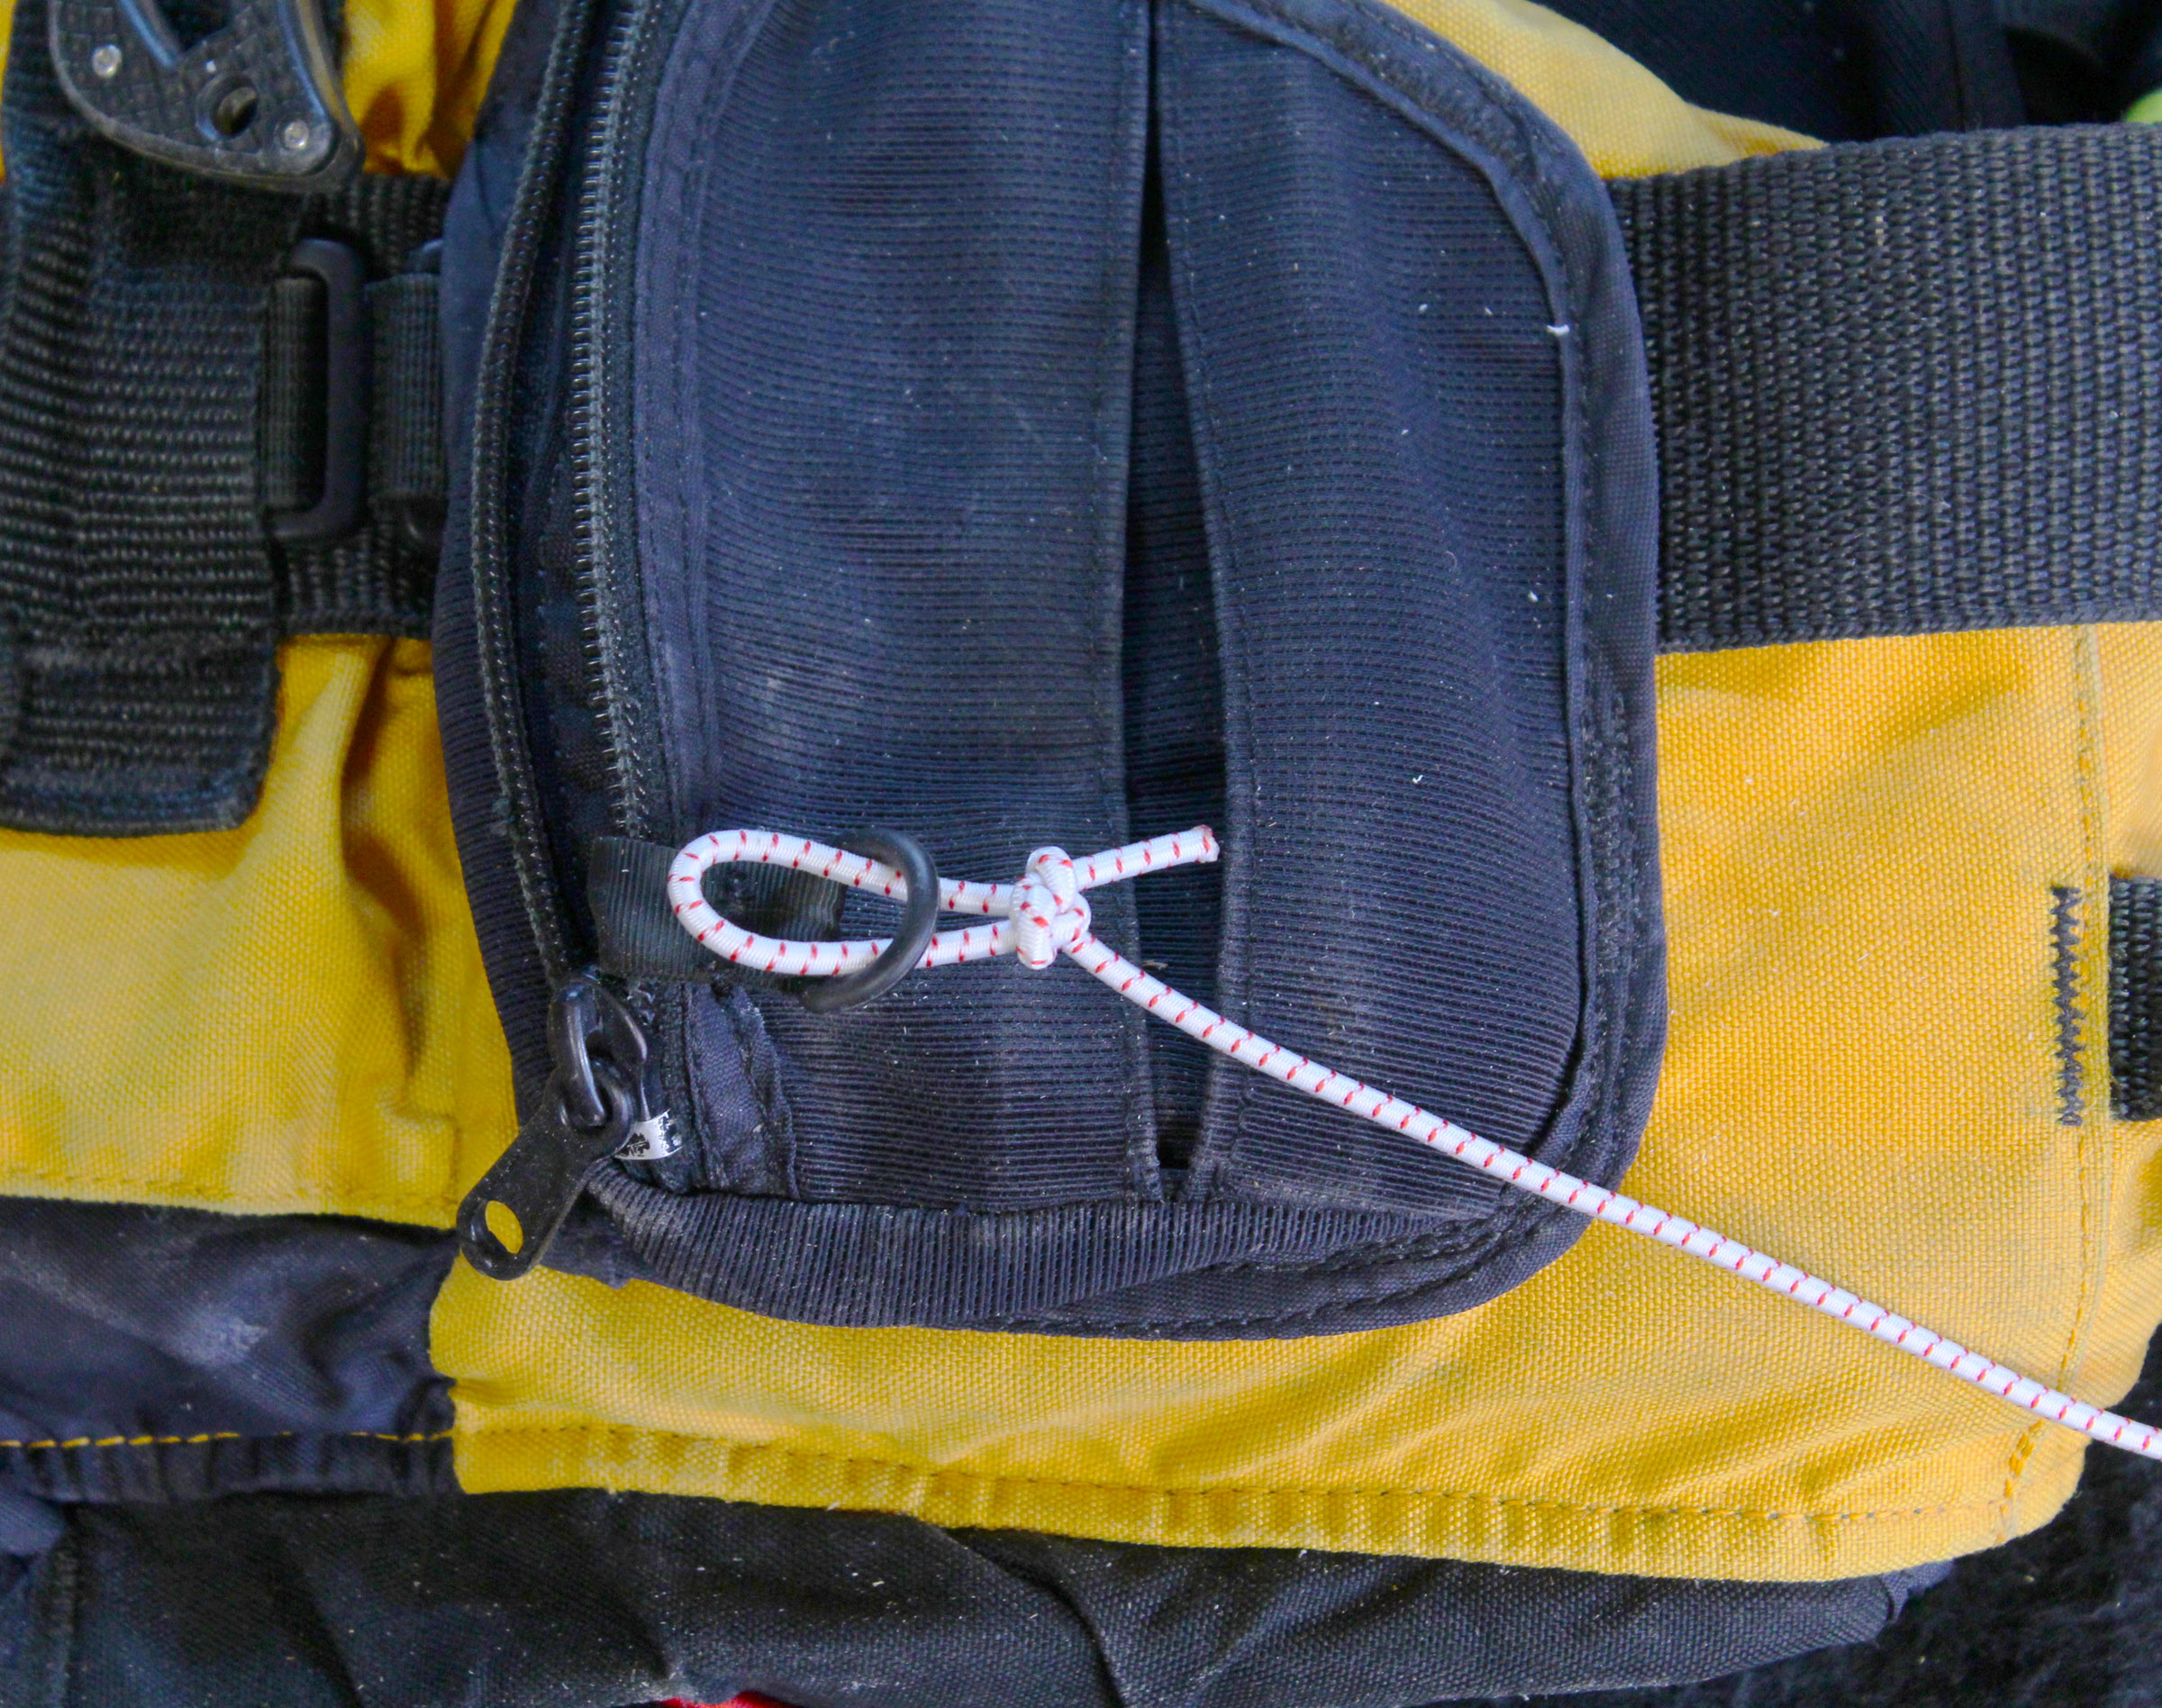
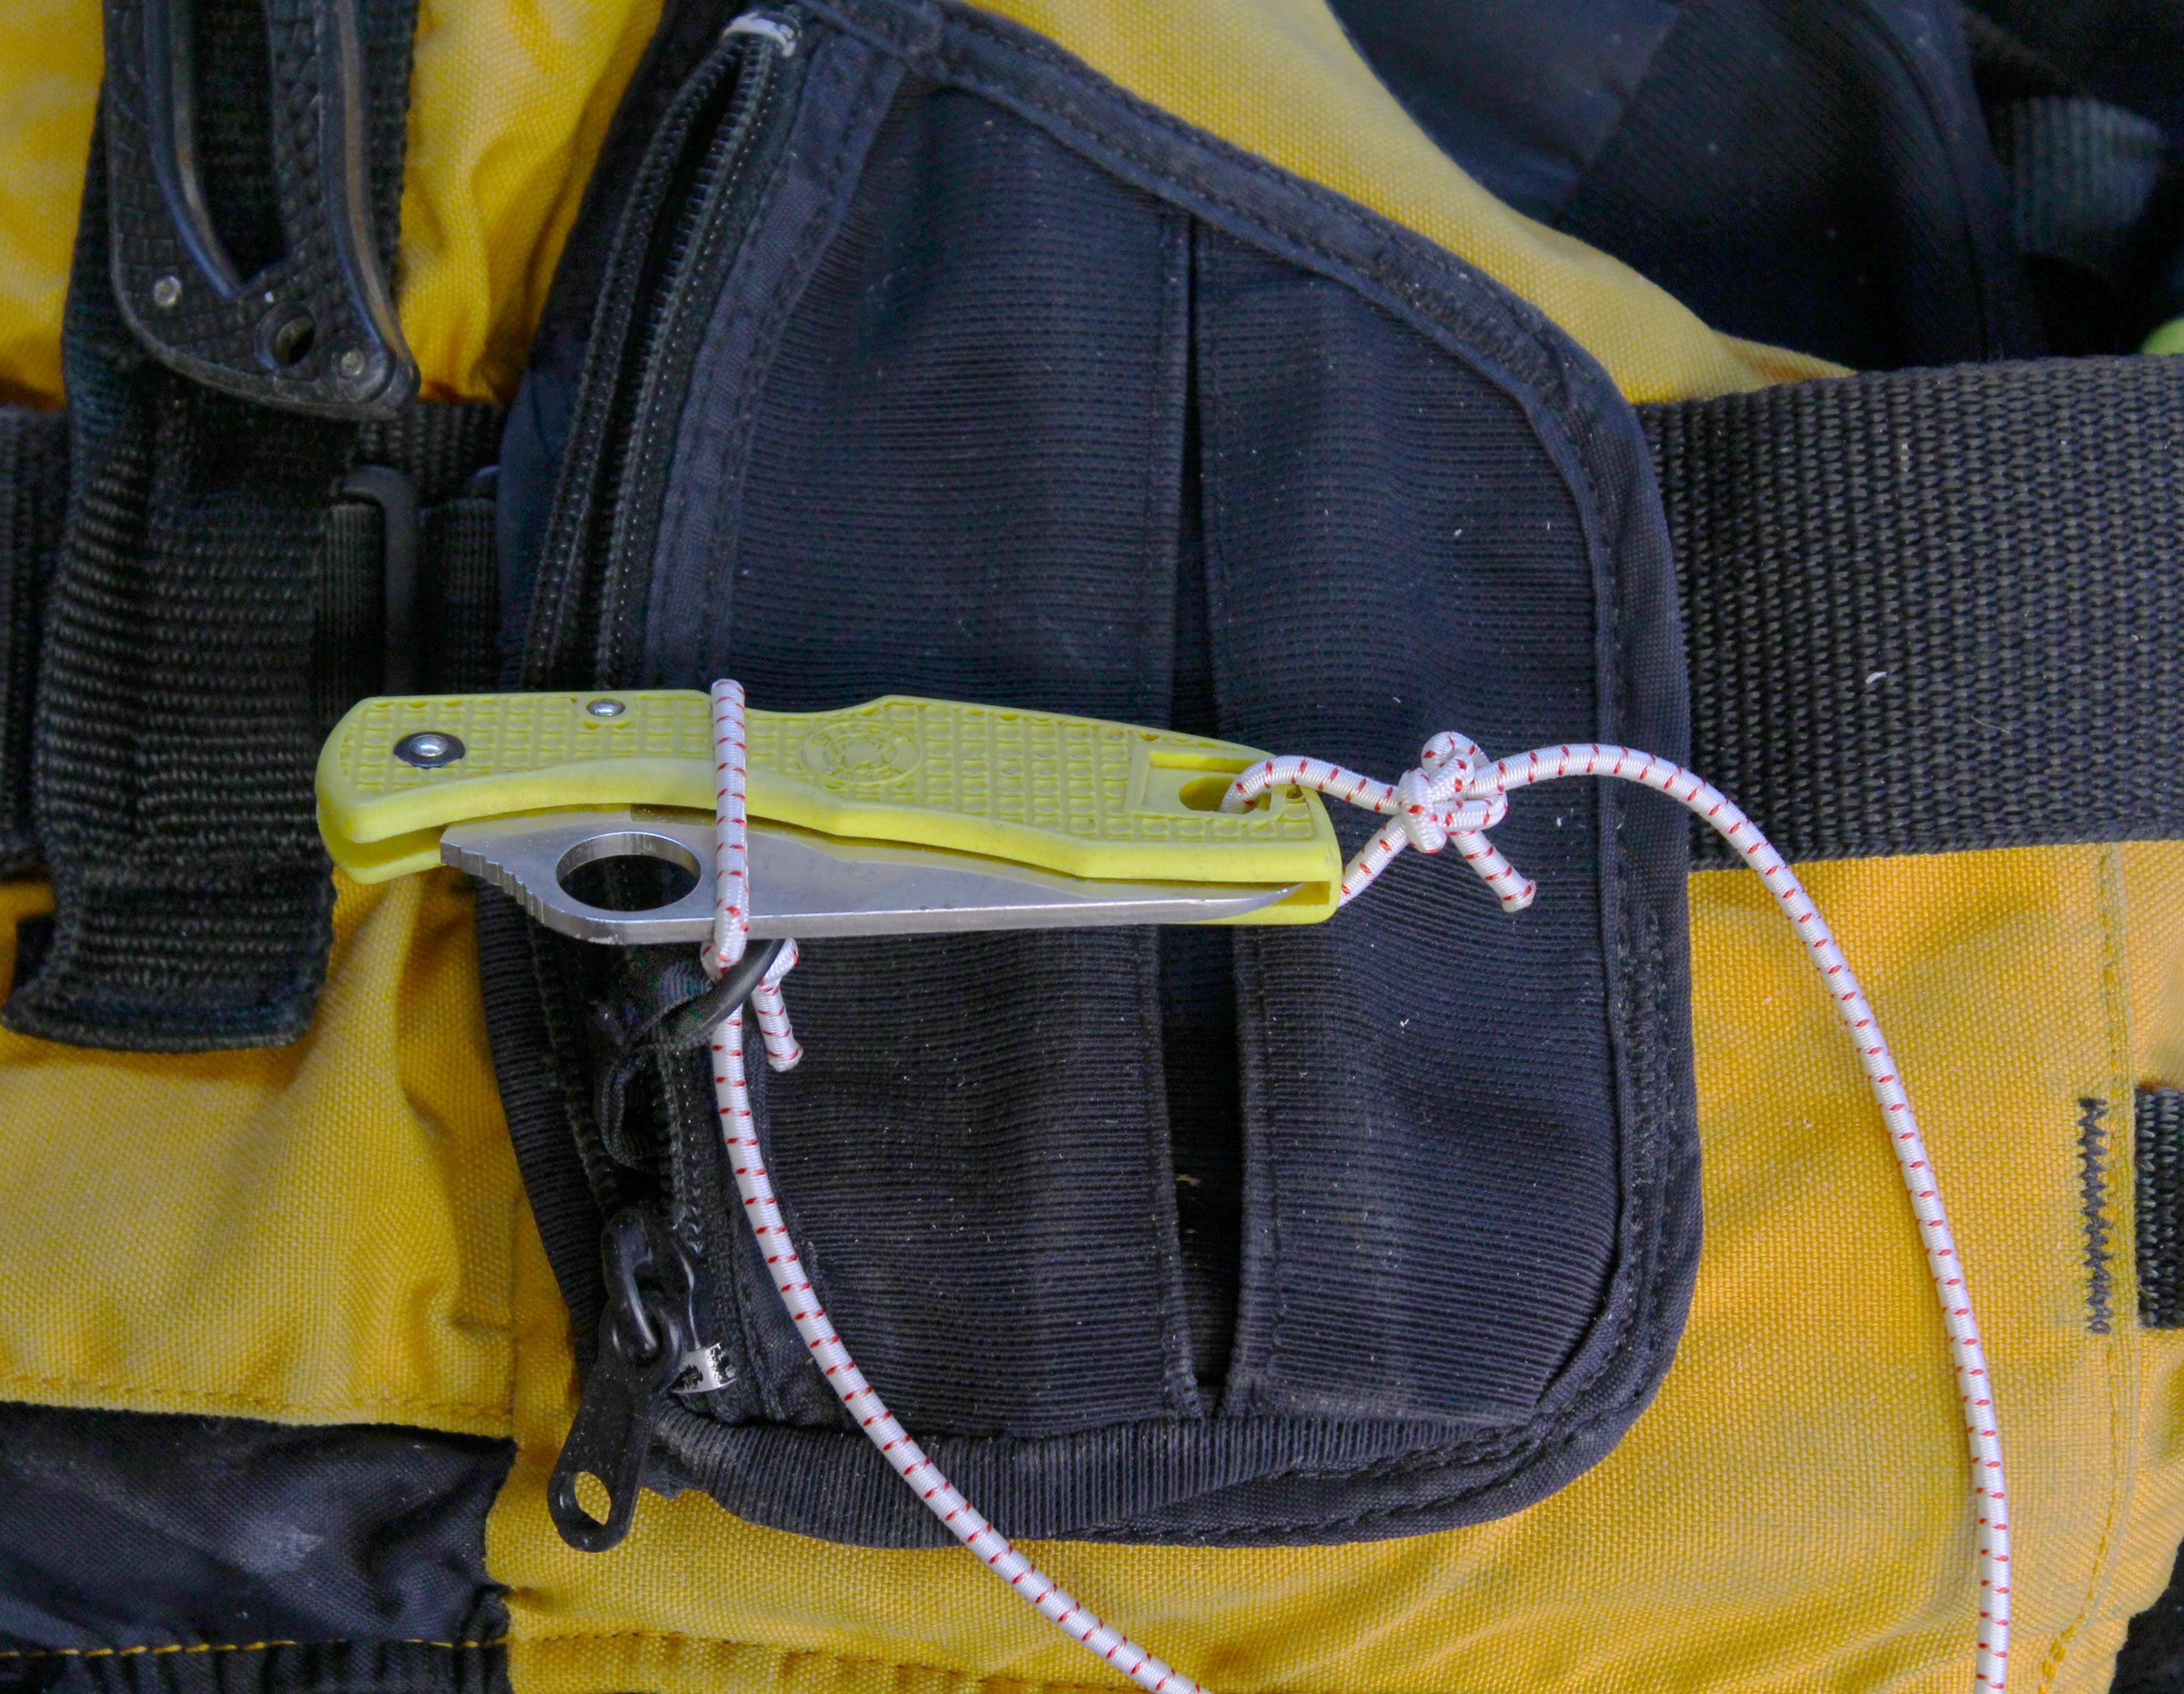
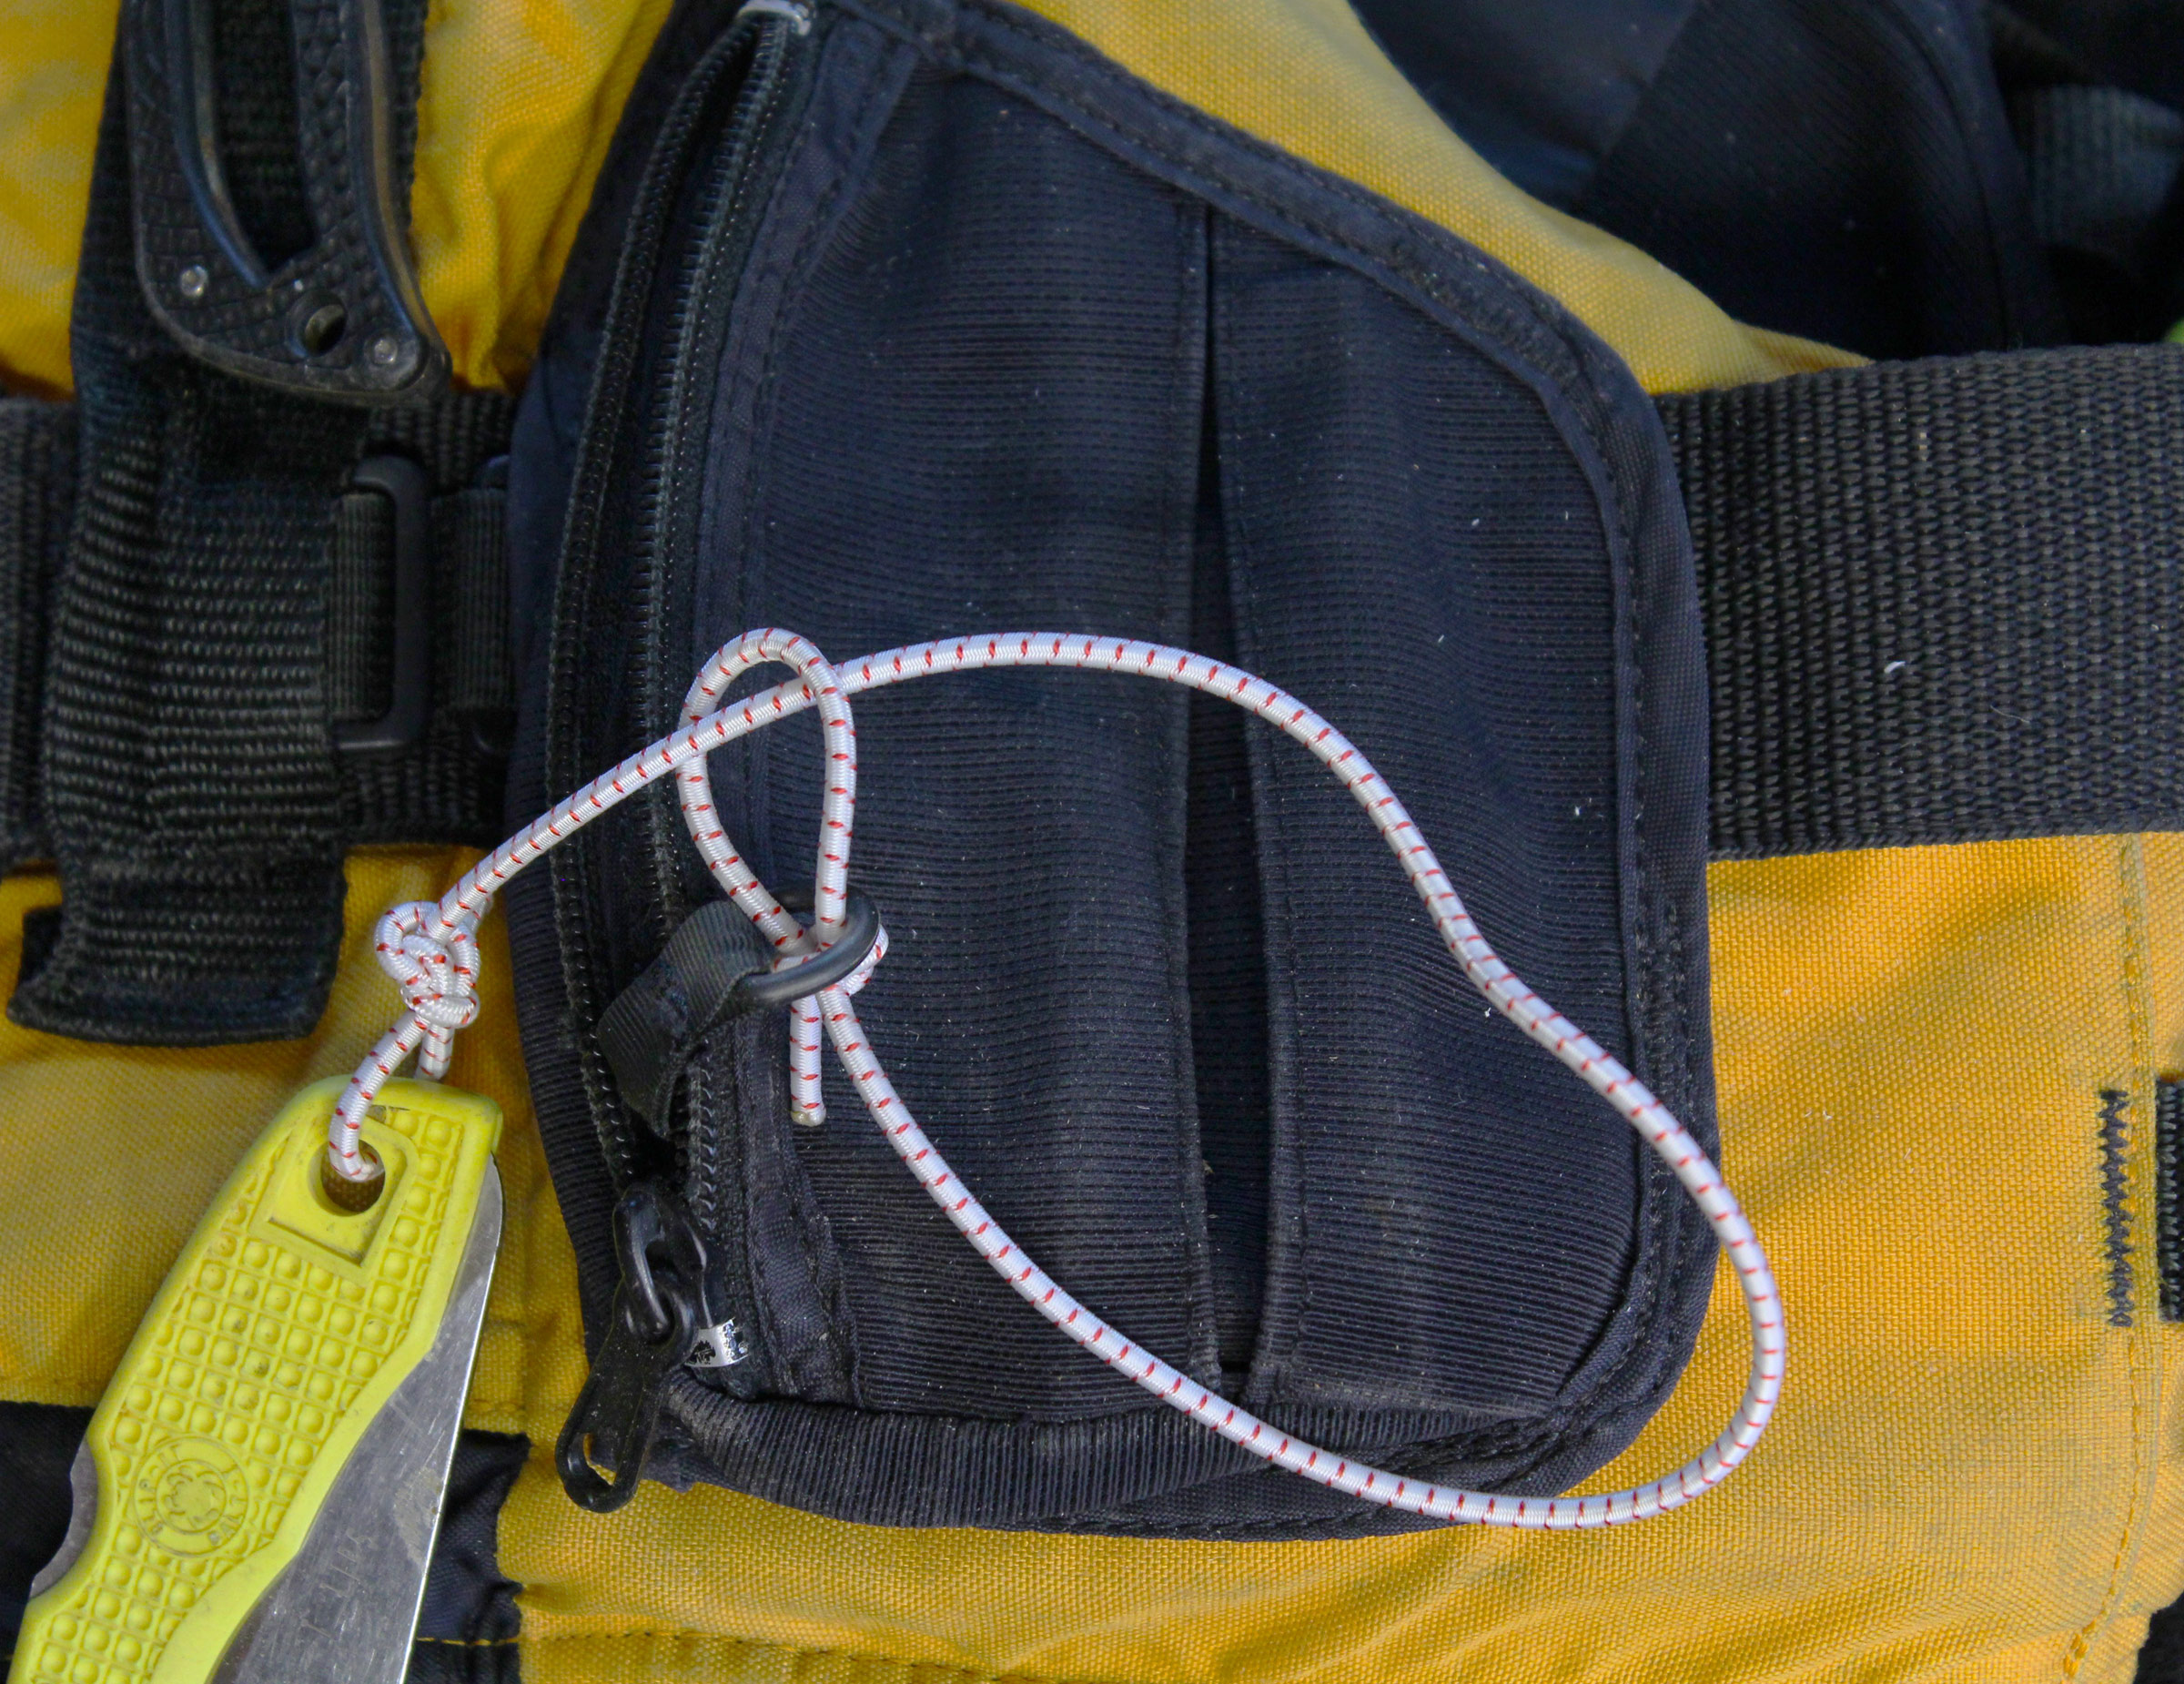
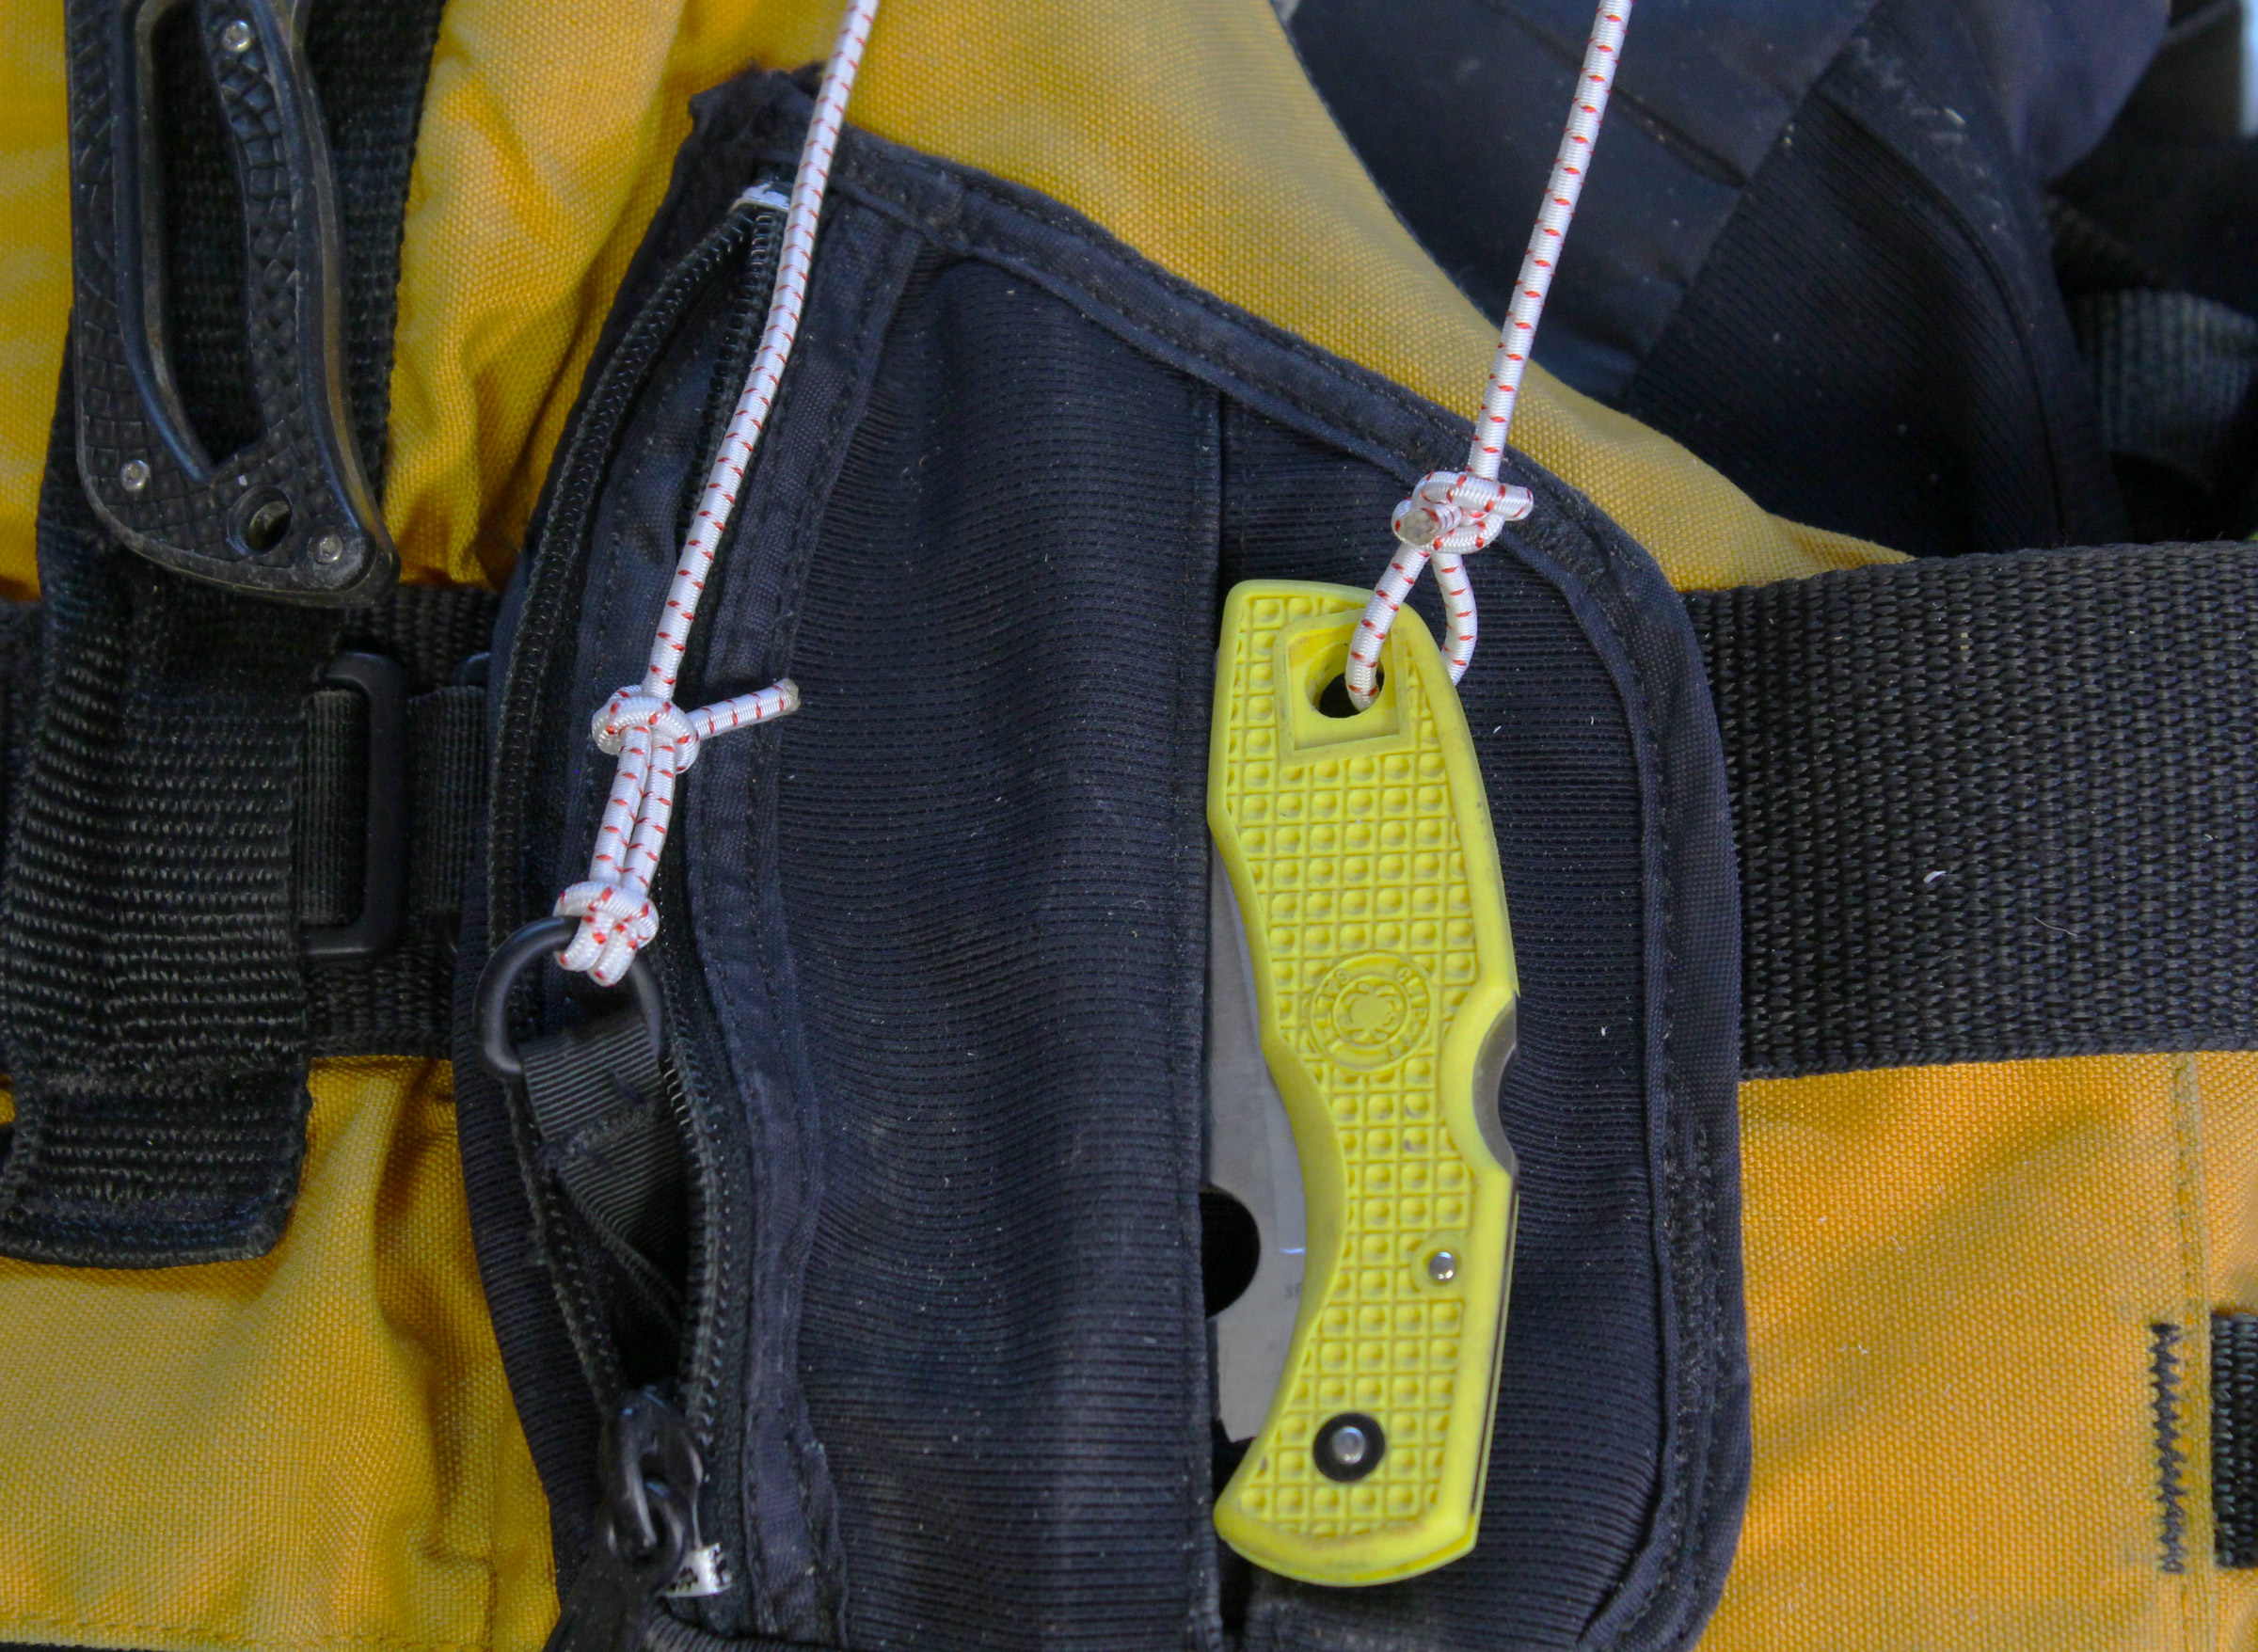
With its webbing coiled around a spring-loaded drum, the Quickloader makes a tidy package when not in use.
A friend of mine demystified ratchet straps for me last summer. I had given her a dinghy, and when she came to pick it up, she walked me through using the straps she’d brought. I know and trust knots so I’d always preferred to keep a length of line in my trunk for tie-downs, but I liked how the flat straps can be cranked down so quickly and snugly. Keeping the strap from getting twisted was annoying; the tail end had to be tucked away to keep it from flapping in the wind, and, when not in use, the straps didn’t coil as tidily as rope. It wasn’t until I tried Quickloader ratchet straps that I was convinced to make the switch from rope and knots for securing cartop loads.
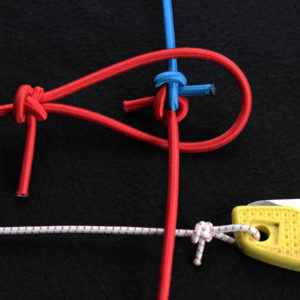
When the ratchet release (just to the right of the handle) is pulled, the handle can be fully extended, letting the drum unwind and the webbing run free.
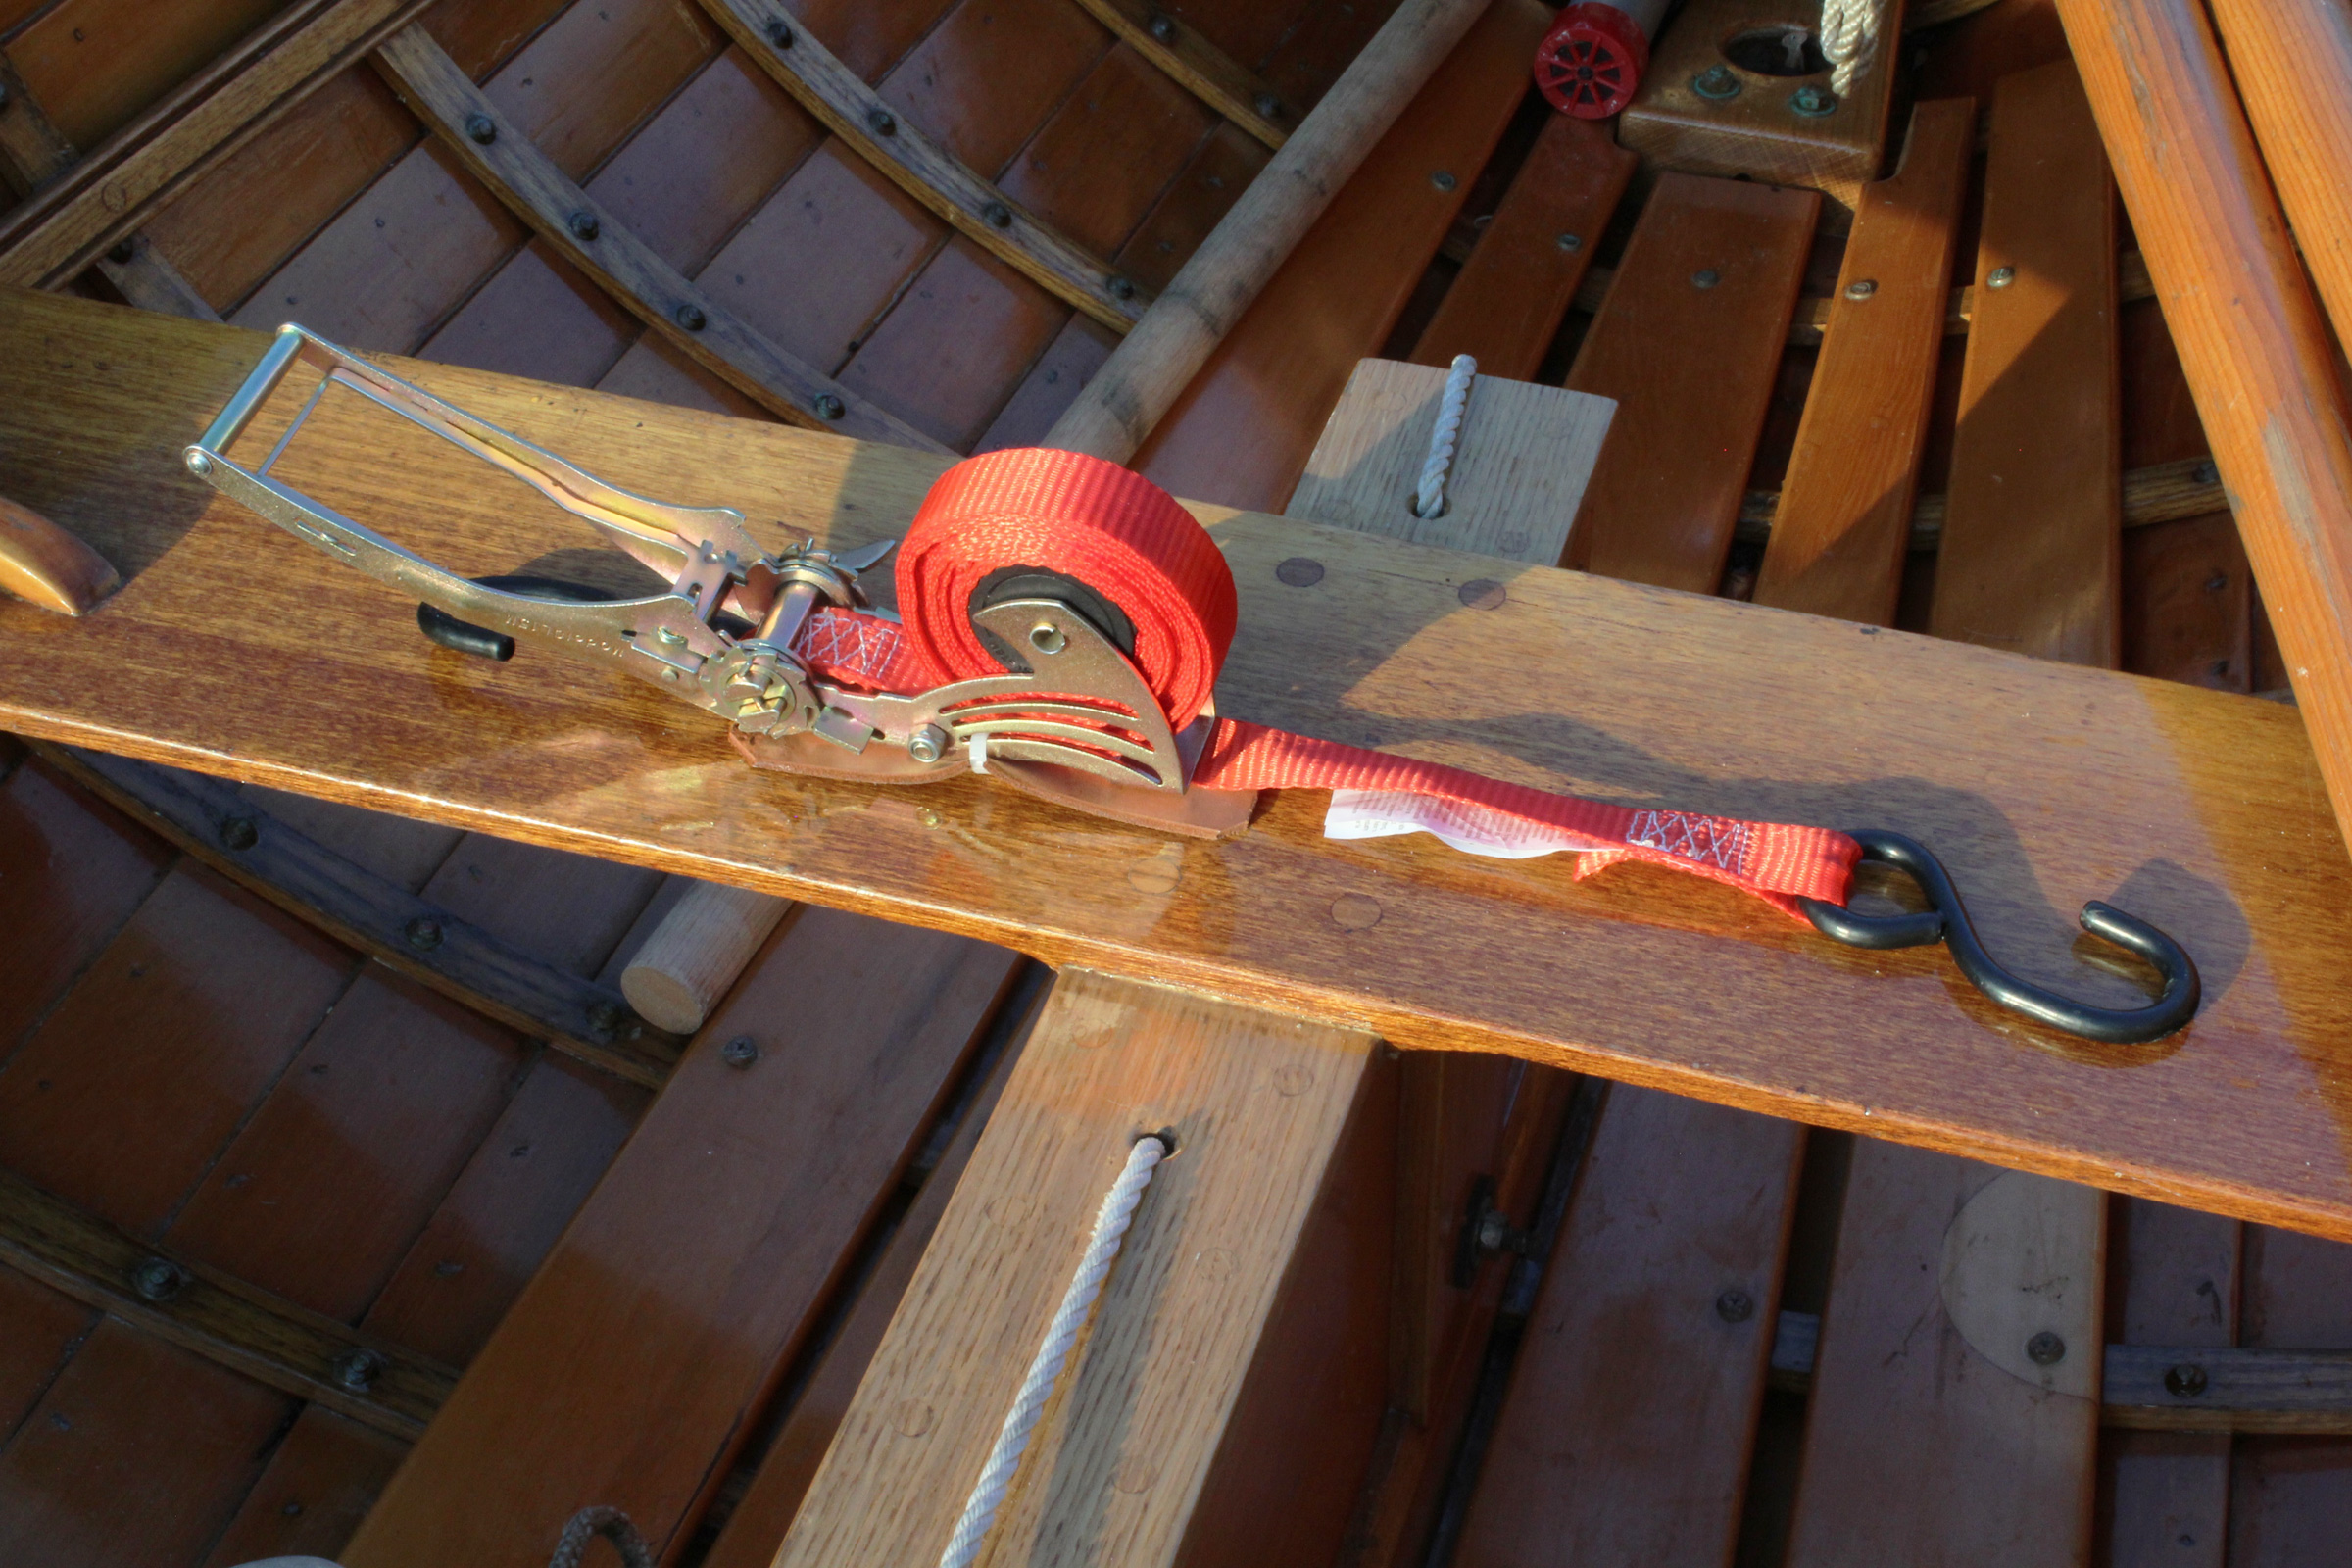
Quickloader Retractable ratchet straps are thoughtfully engineered and simple. The QL15 model has two black, rubber-coated metal S-hooks, one of which is on a 9-1/2″ piece of 1″ polyester webbing, and the other is at the end is a neatly coiled 1″ polyester webbing stored around a spring-loaded core. Fully extended, the Quickloader has a reach of 12′. The strap feeds out and retracts like a tape measure so there’s never any slack to get knotted, tangled, or twisted. A loop sewn into the webbing limits the extension so the spring-loaded coiler isn’t damaged. The self-coiling tail end is a great advantage over common ratchet straps; I don’t have to worry about extra strap material getting loose, potentially dragging under a trailer tire or flapping in the wind. The QL115M has a 500-lb working load and a 1,500-lb breaking strength.
The ratcheting mechanism is of high-quality steel with a slightly iridescent finish and a powder-coated texture. The Quickloader’s action instills confidence; the ratchet’s clicks are distinct and reassuring. The handle is 6-1/8″ out from the center of the barrel and with a few wraps of webbing around the barrel, the handle has a 16:1 advantage. A video on the Quickloader YouTube channel shows a Quickloader used as a come-along to drag a boat, and while the device has plenty of power, the distance you can drag anything is limited to about 14″ by the number of wraps the barrel can take before the webbing binds against the frame.
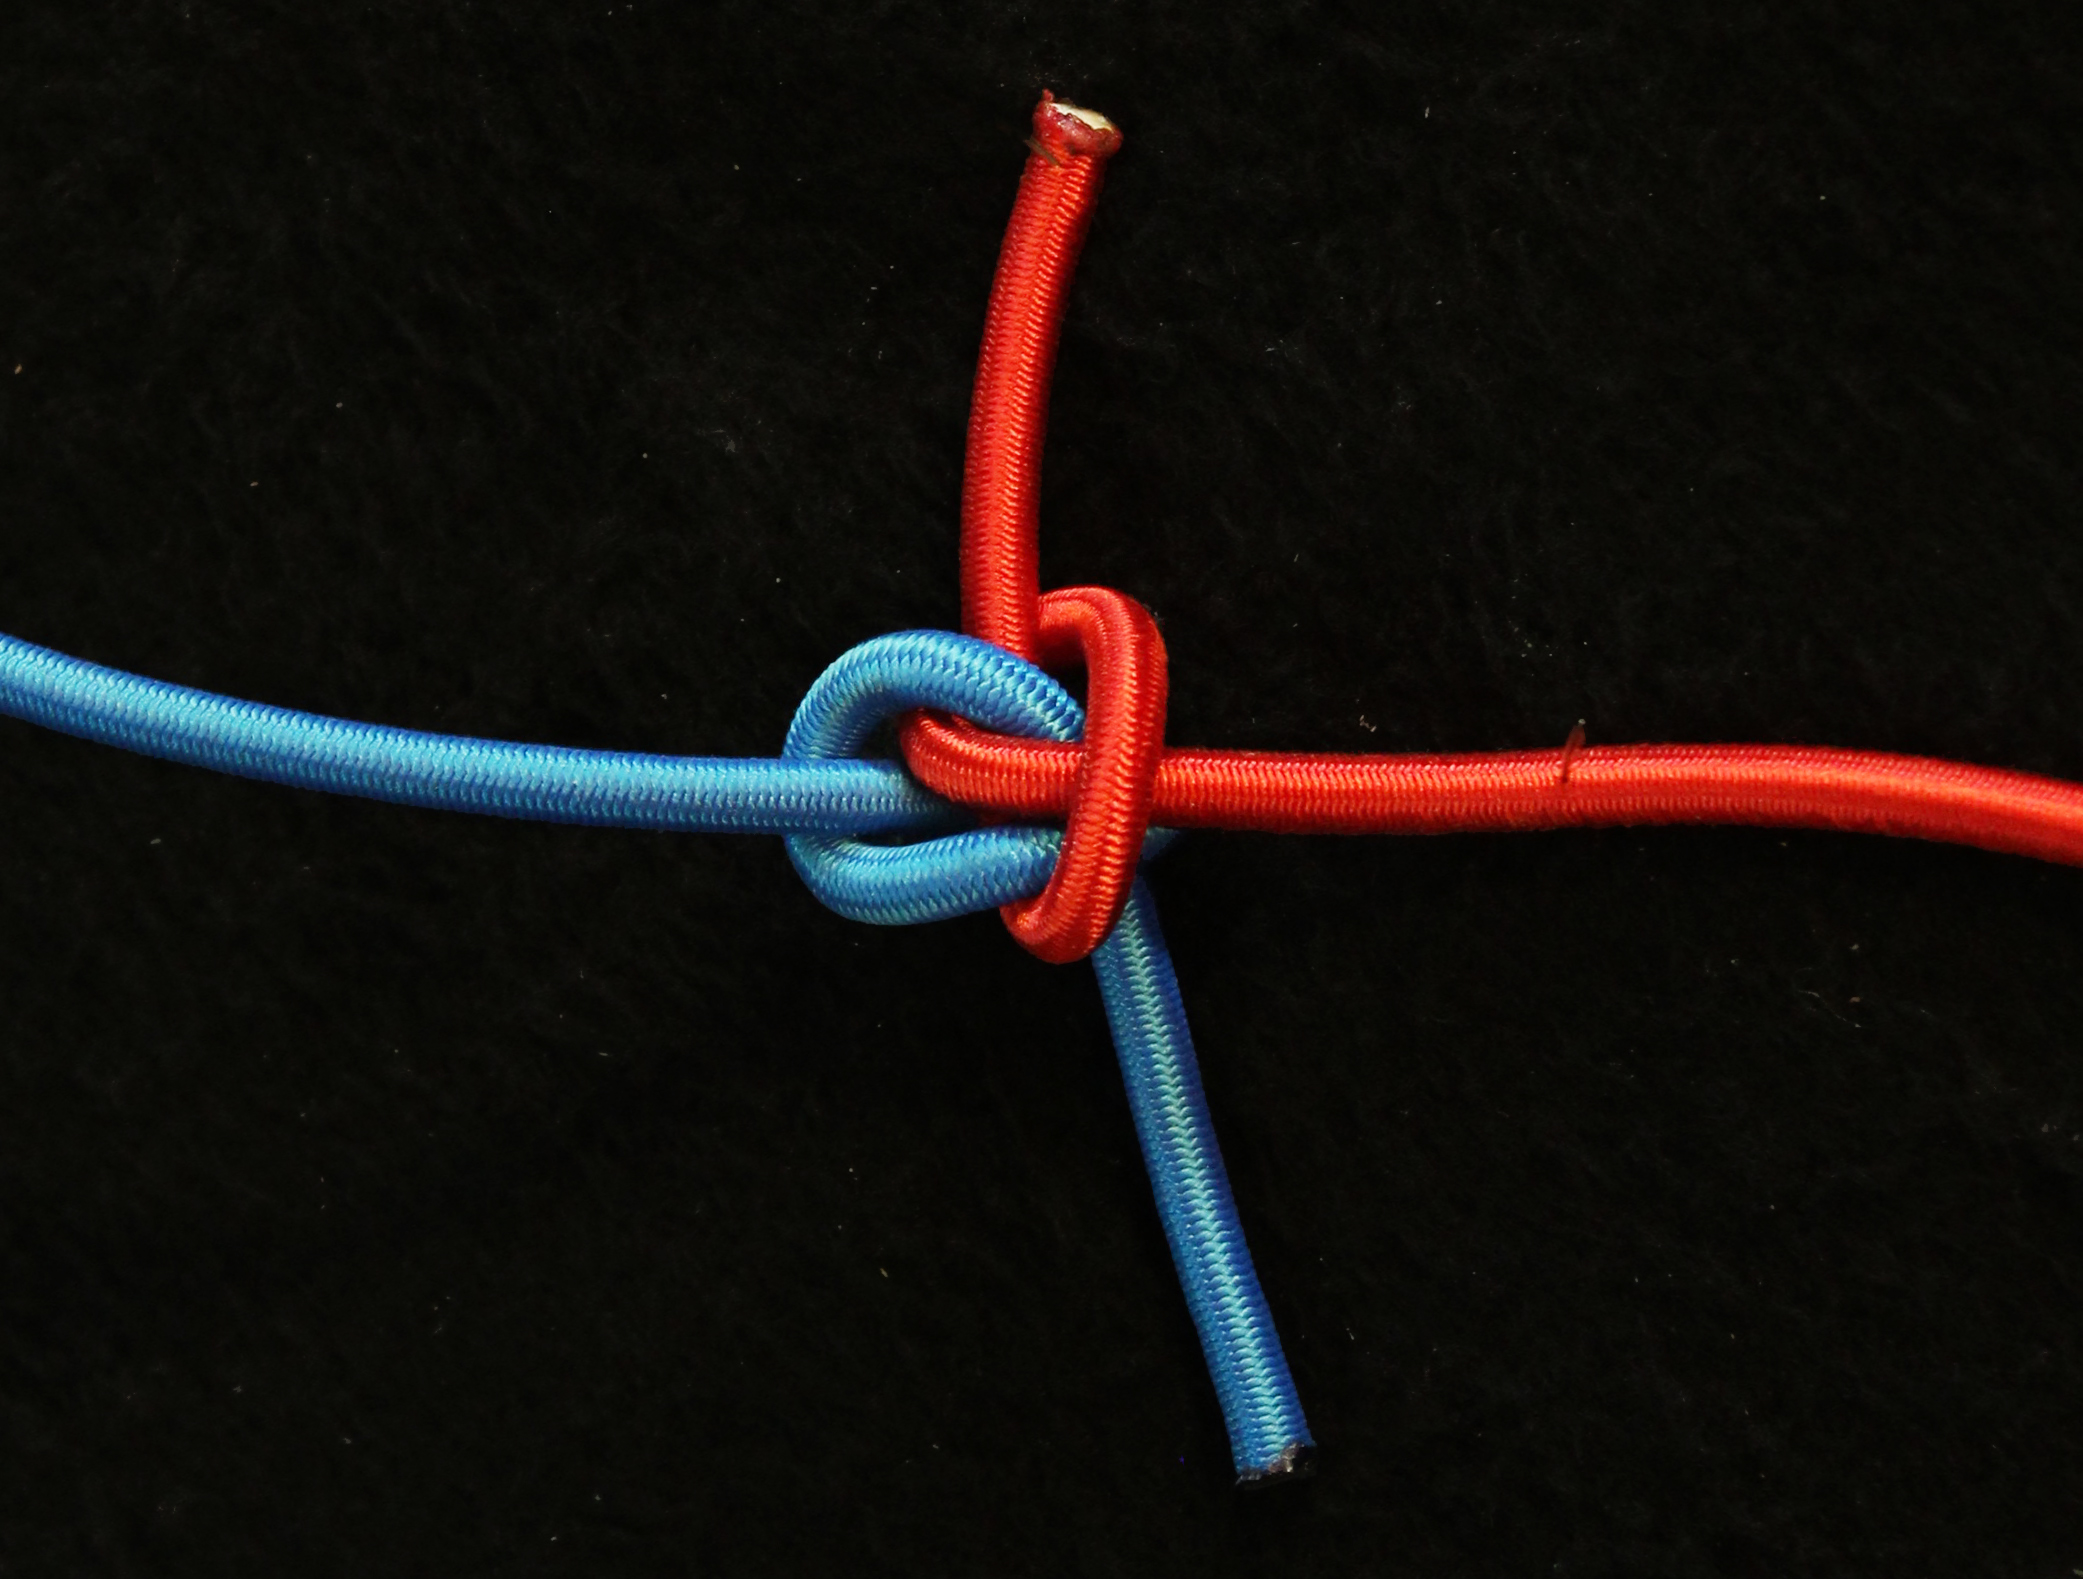
When the two S-hooks are attached, the drum takes up the slack with a single turn. The webbing is then locked on the drum and ready to be tensioned.
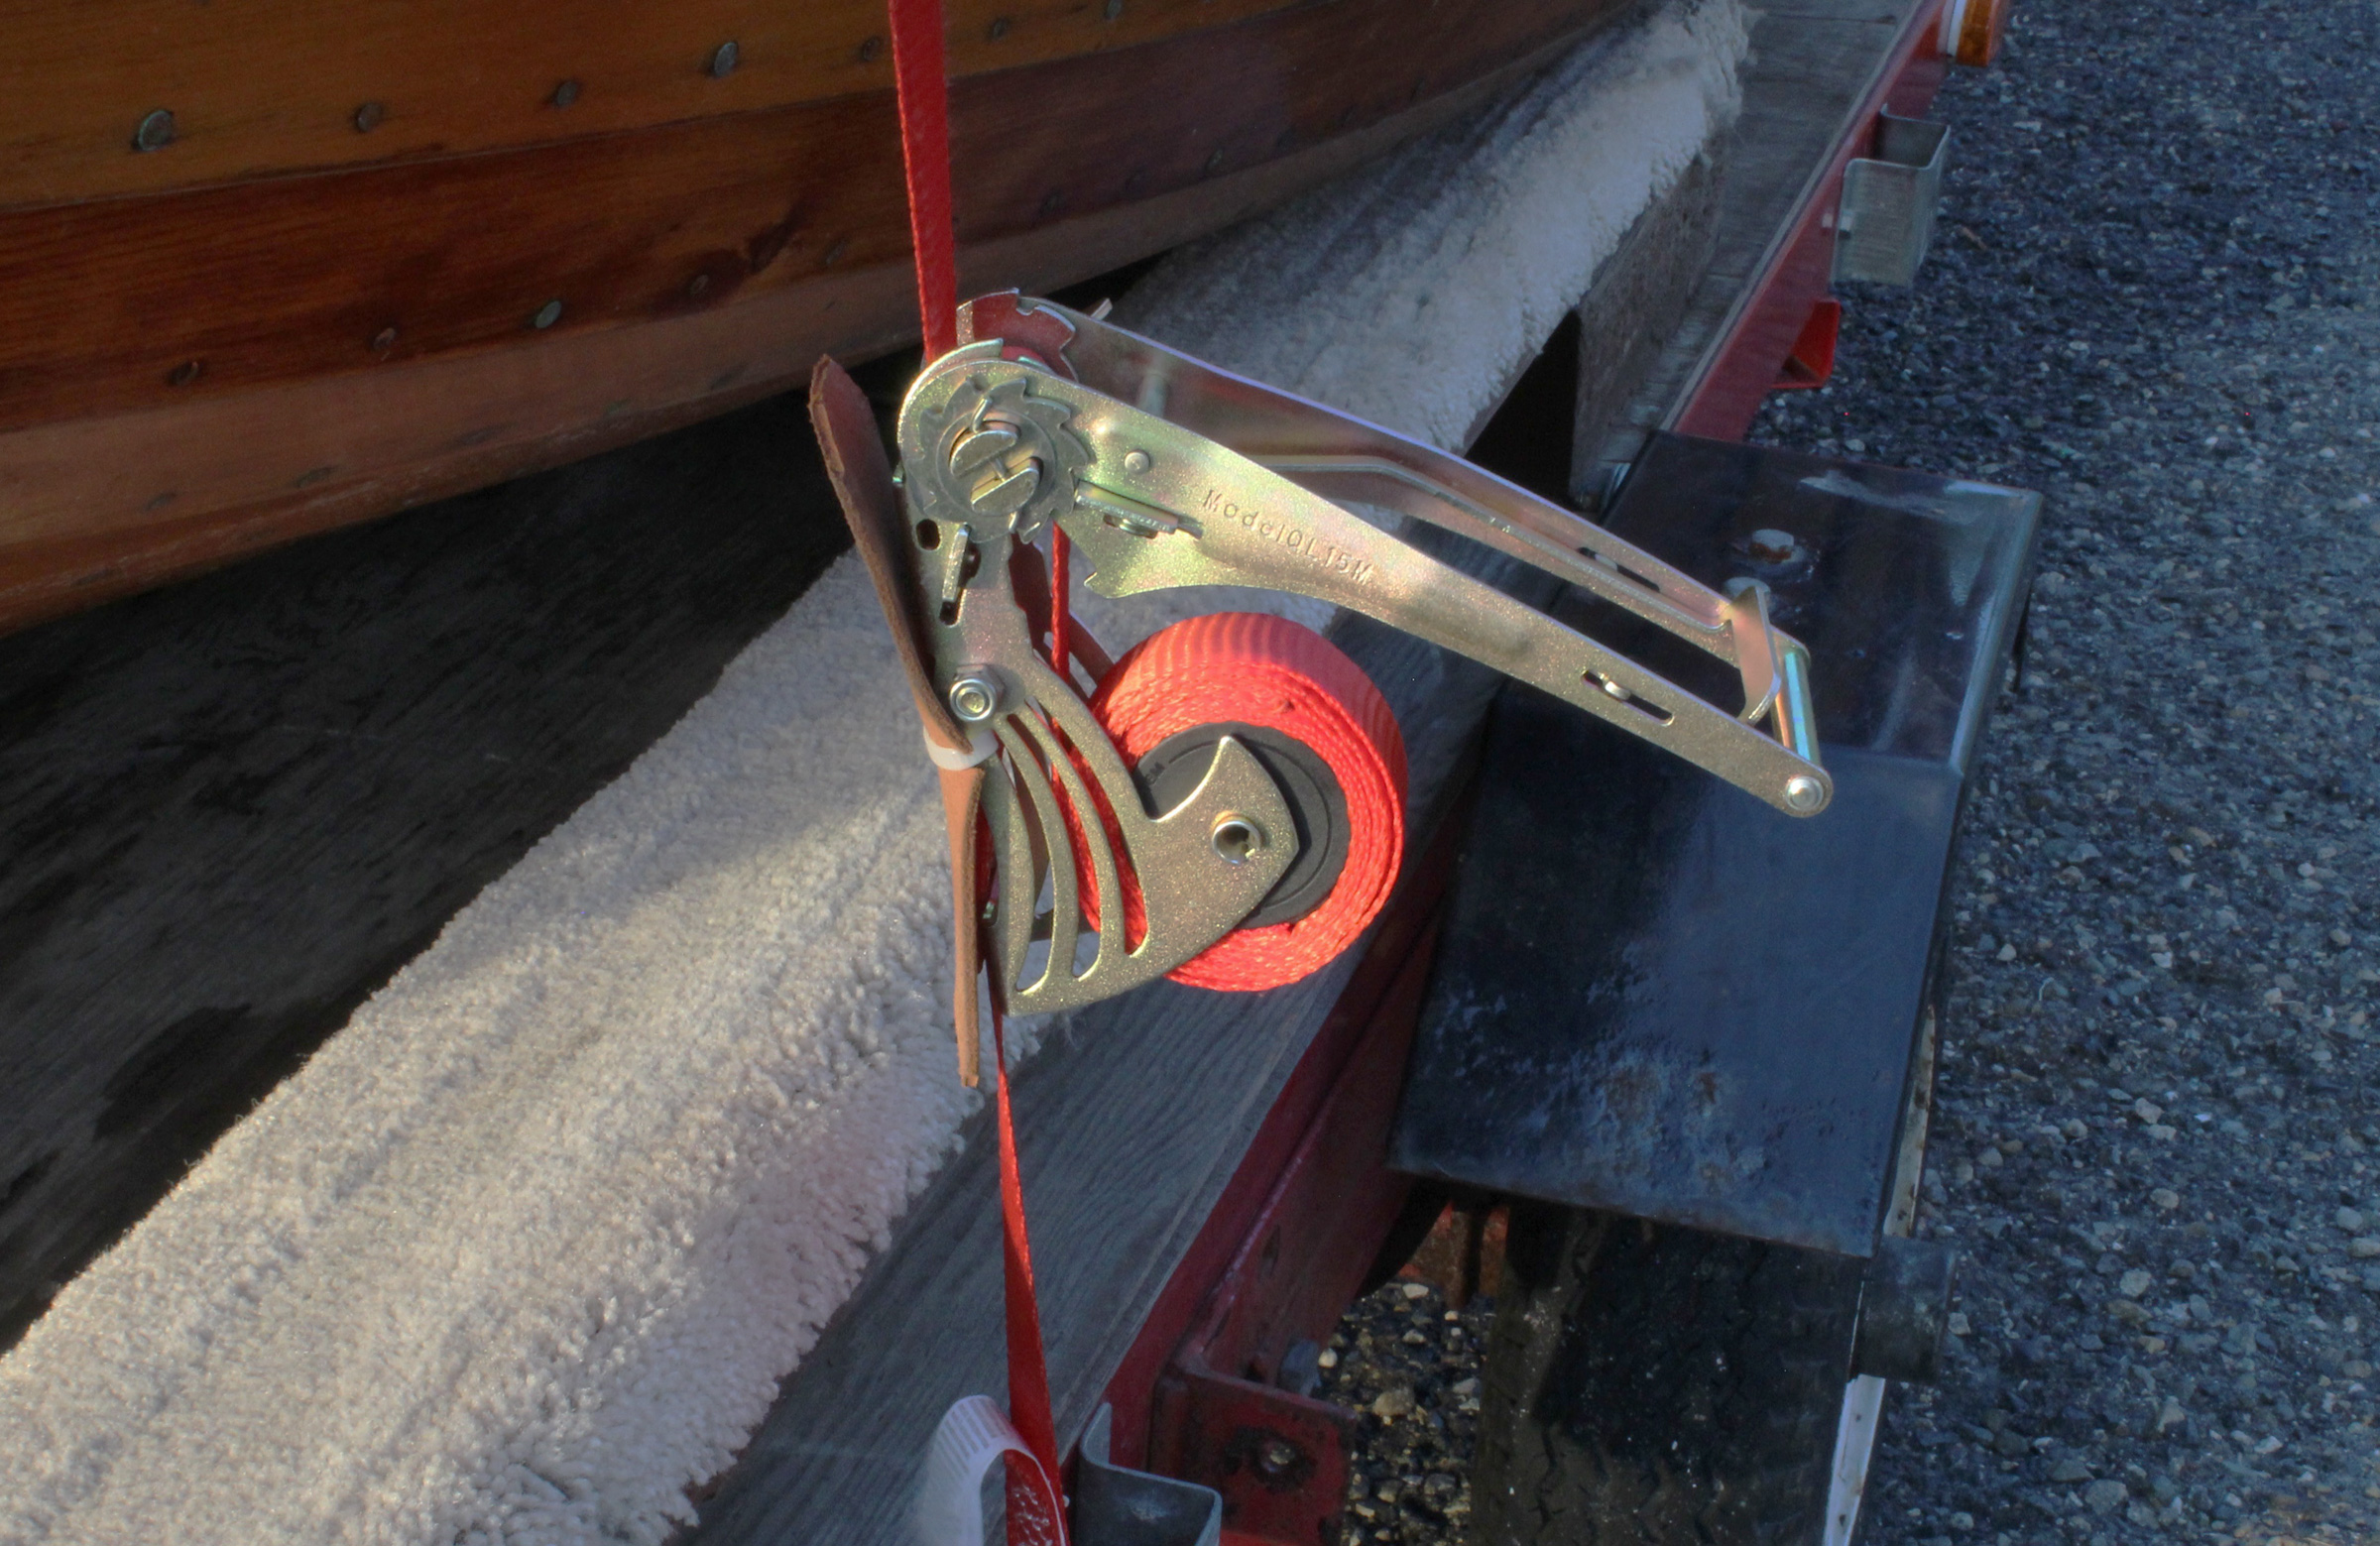
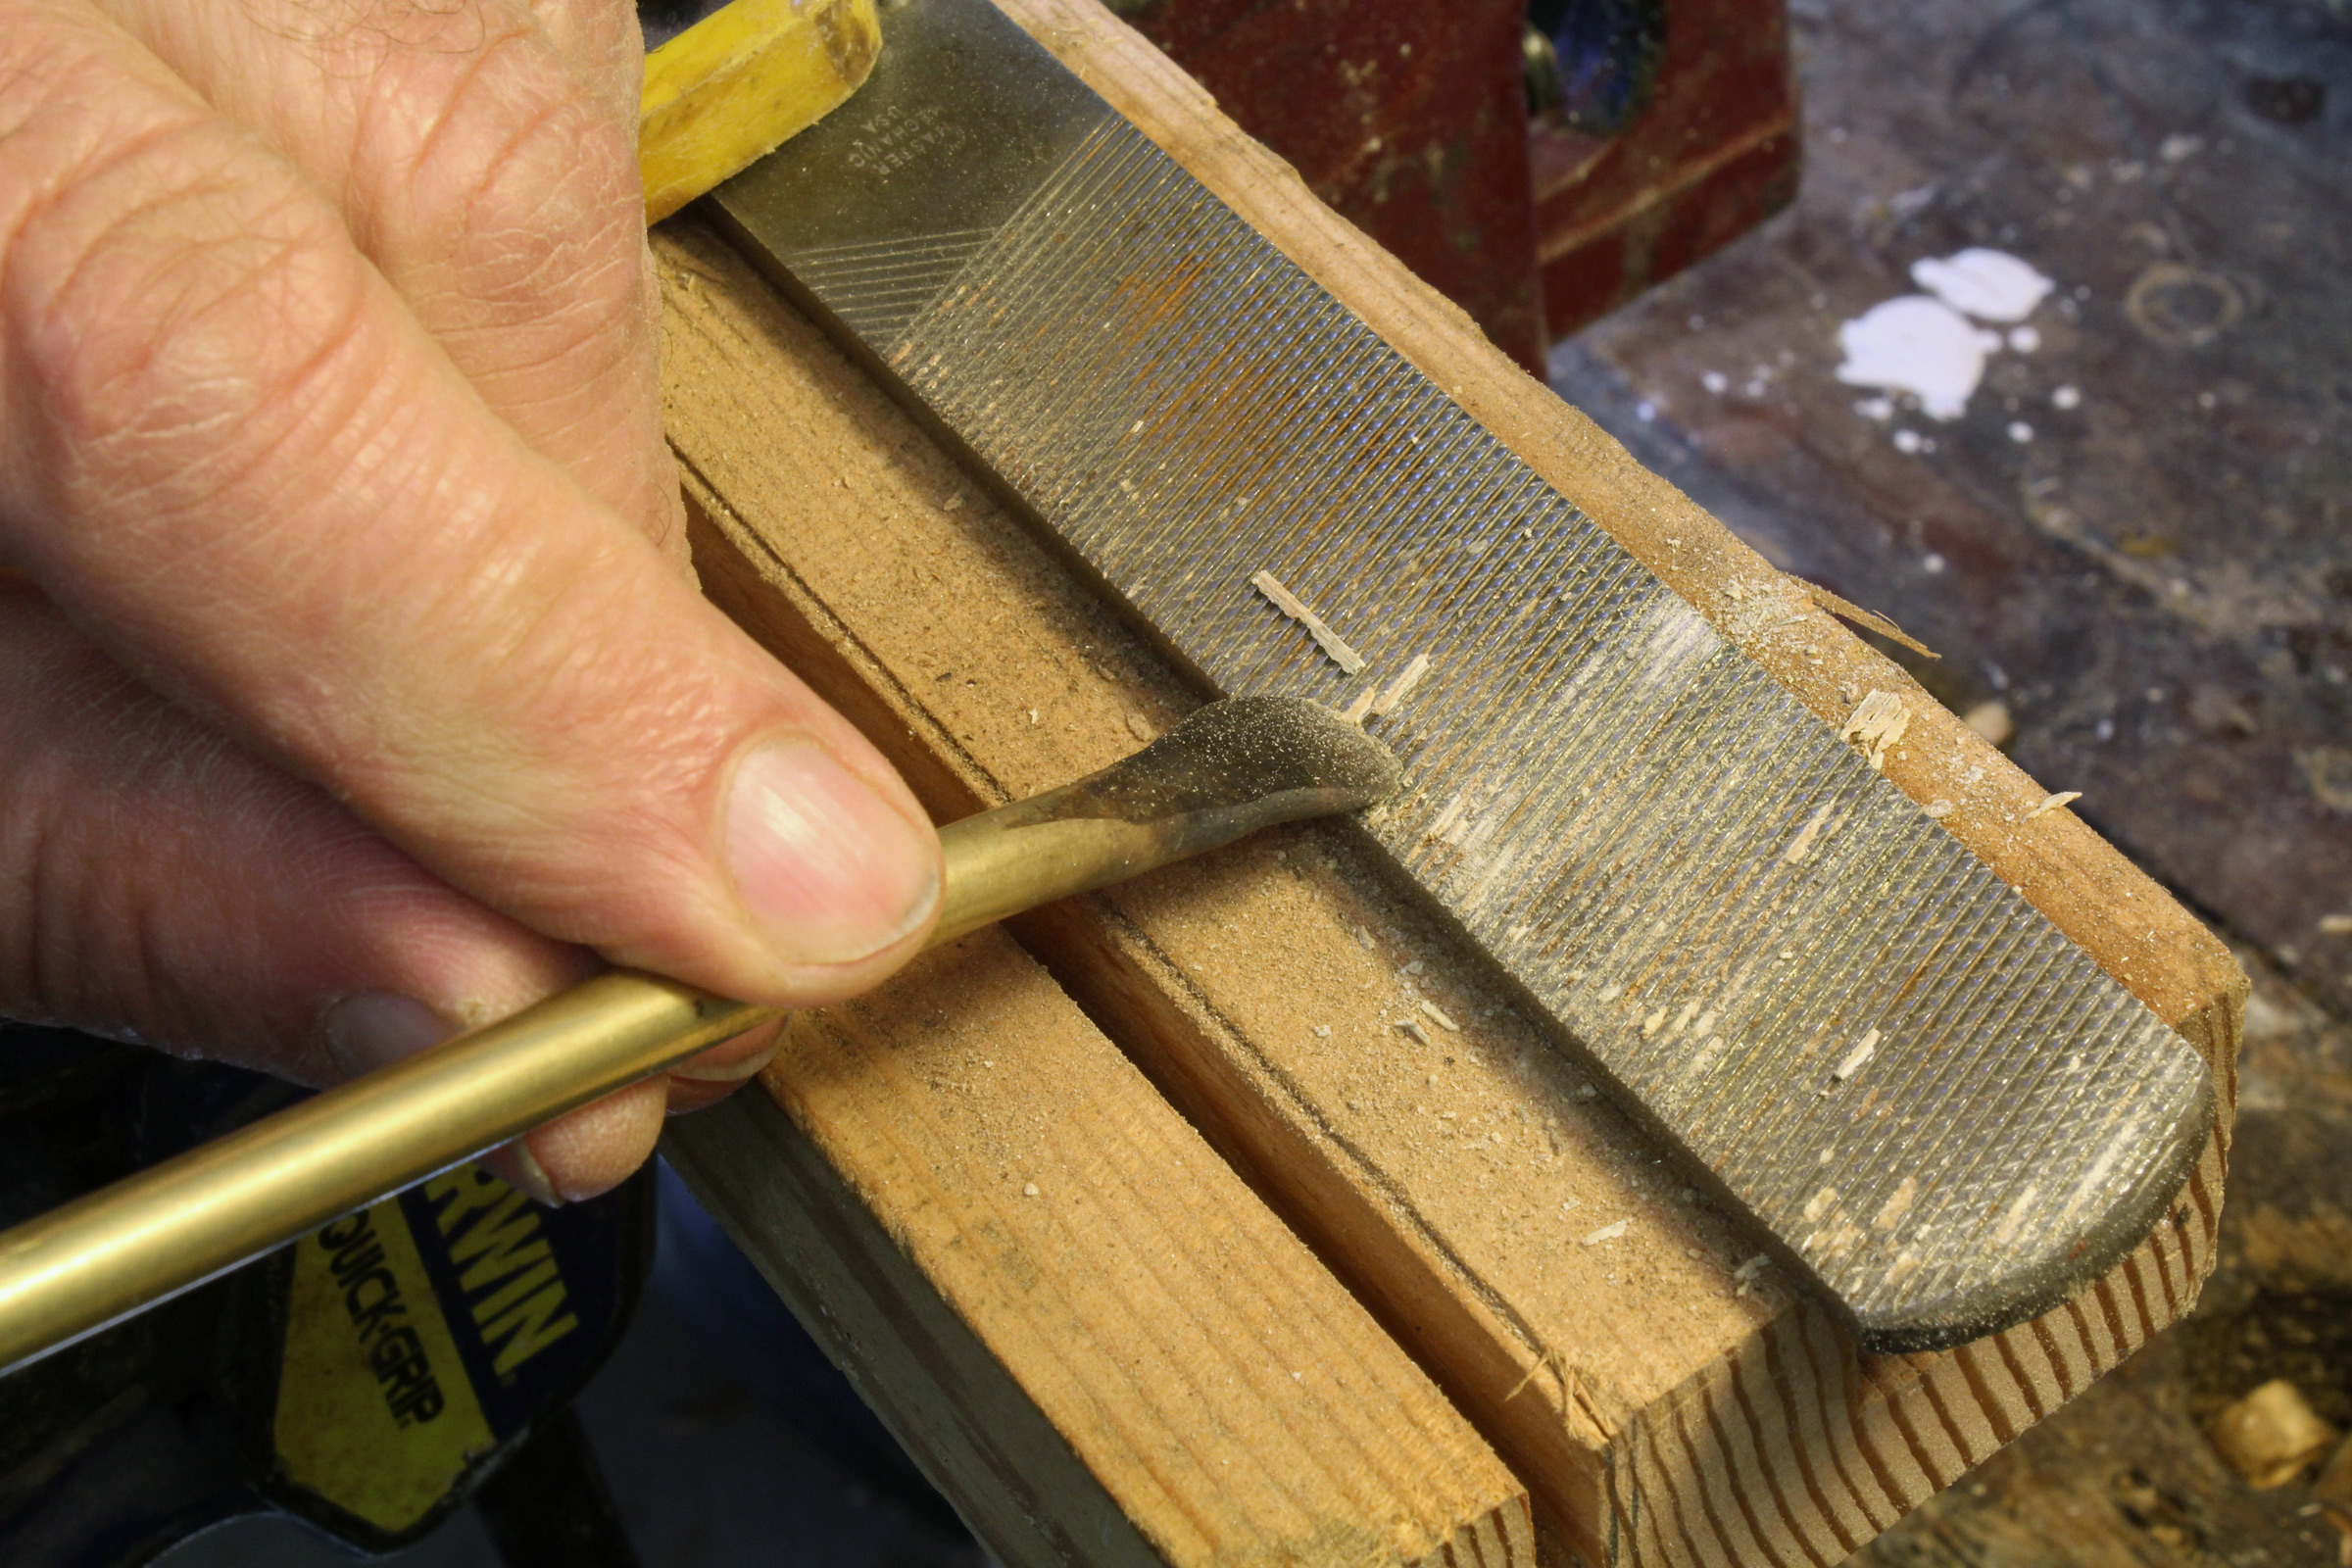
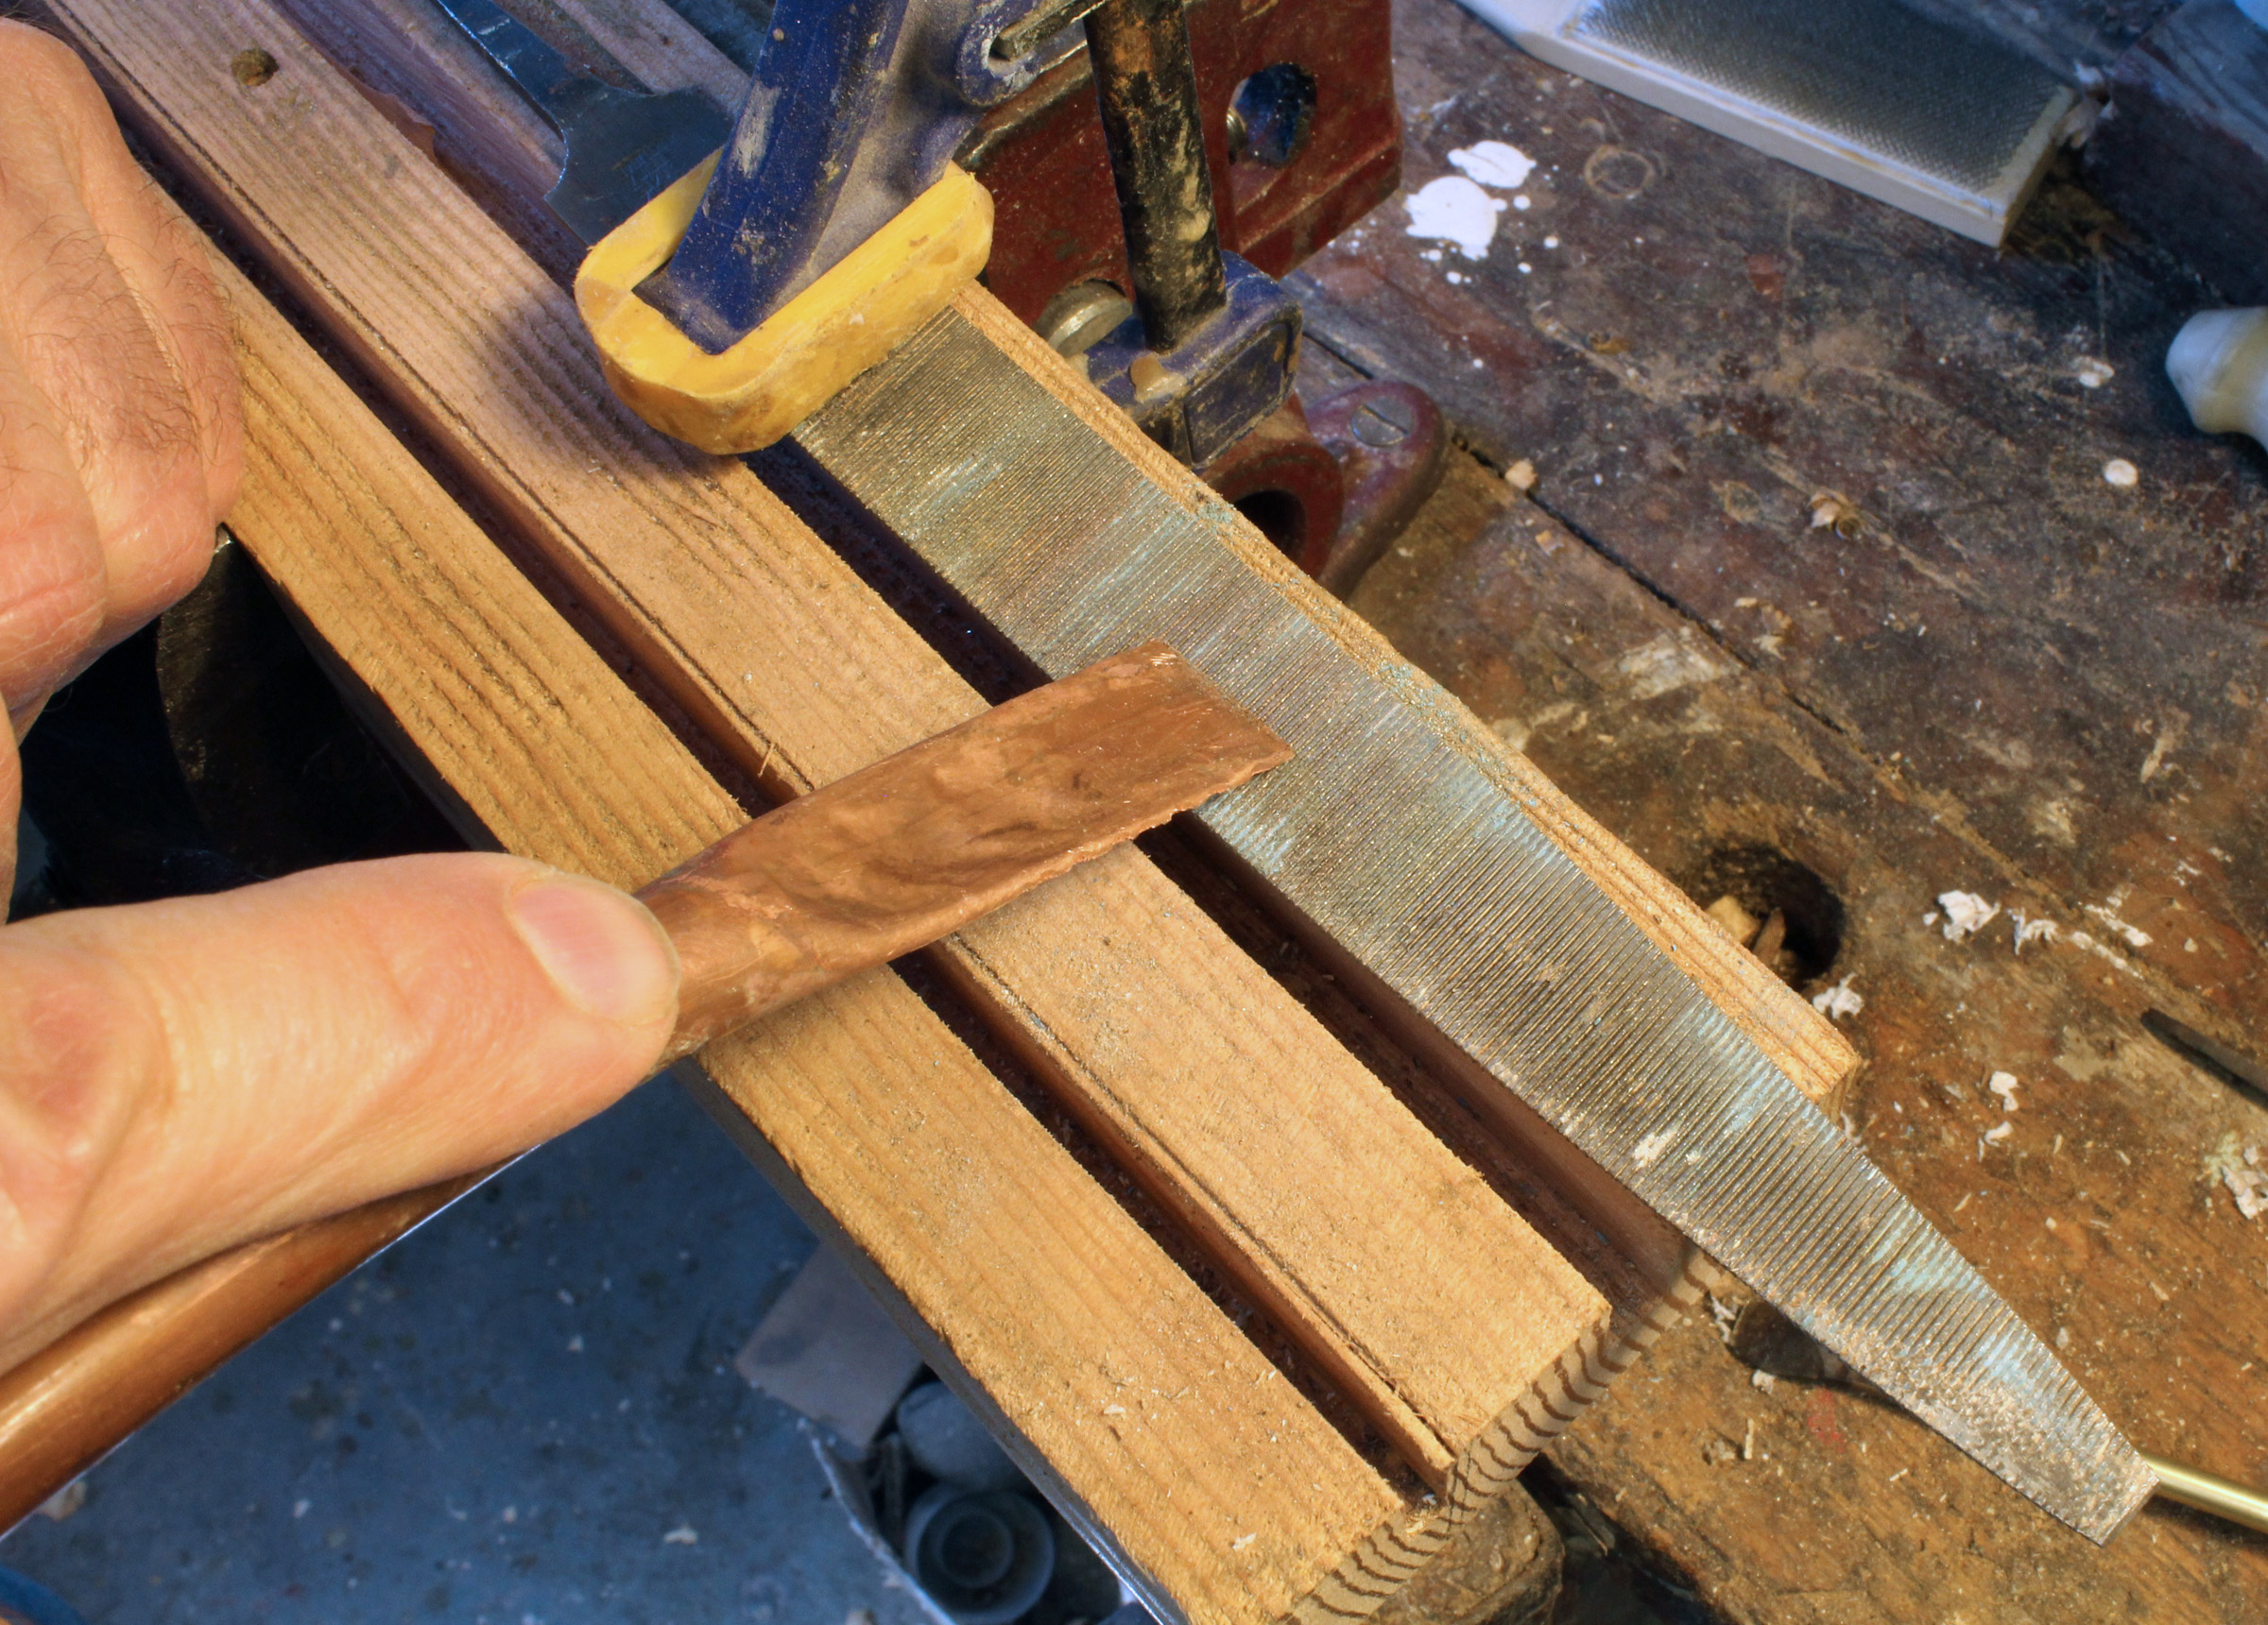
The ratchet release located at the end of the handle and is easy to operate. Pulling the ratchet release and fully opening the handle unlocks the ratchet so the barrel can spin to let the strap run free. If the webbing gets bound up between the barrel and the frame, there’s a wing on one end of the barrel you can easily twist to free the strap.
The wing just outside of the ratchet makes it easy to unwind the drum if there is too much webbing on it. This Quickloader has a piece of leather, attached with a cable tie, to keep the metal frame from damaging whatever is being strapped down.
If the Quickloader is pressed up against the hull of a boat, the metal could scratch the finish or gouge the wood, a problem with any ratchet, so I may attach a bit of soft foam or fabric to the device’s back side. For now, I carry a pad of soft material to tuck between the Quickloader and an easily marred surface.
After tying a dinghy down on my roof rack, I pushed and pulled on the boat in all directions and it was solid as heck, ready for a 65-mph trip down the interstate. I totally dig my Quickloader Retractable ratchet straps. They’re easy to use, hold tight, and stow neatly.
Anne Bryant is associate editor of Small Boats Magazine.
The QL115M goes for about $23 and Quickloader’s array of retractable ratchet straps is available from various online retailers.
Is there a product that might be useful for boatbuilding, cruising, or shore-side camping that you’d like us to review? Please email your suggestions.
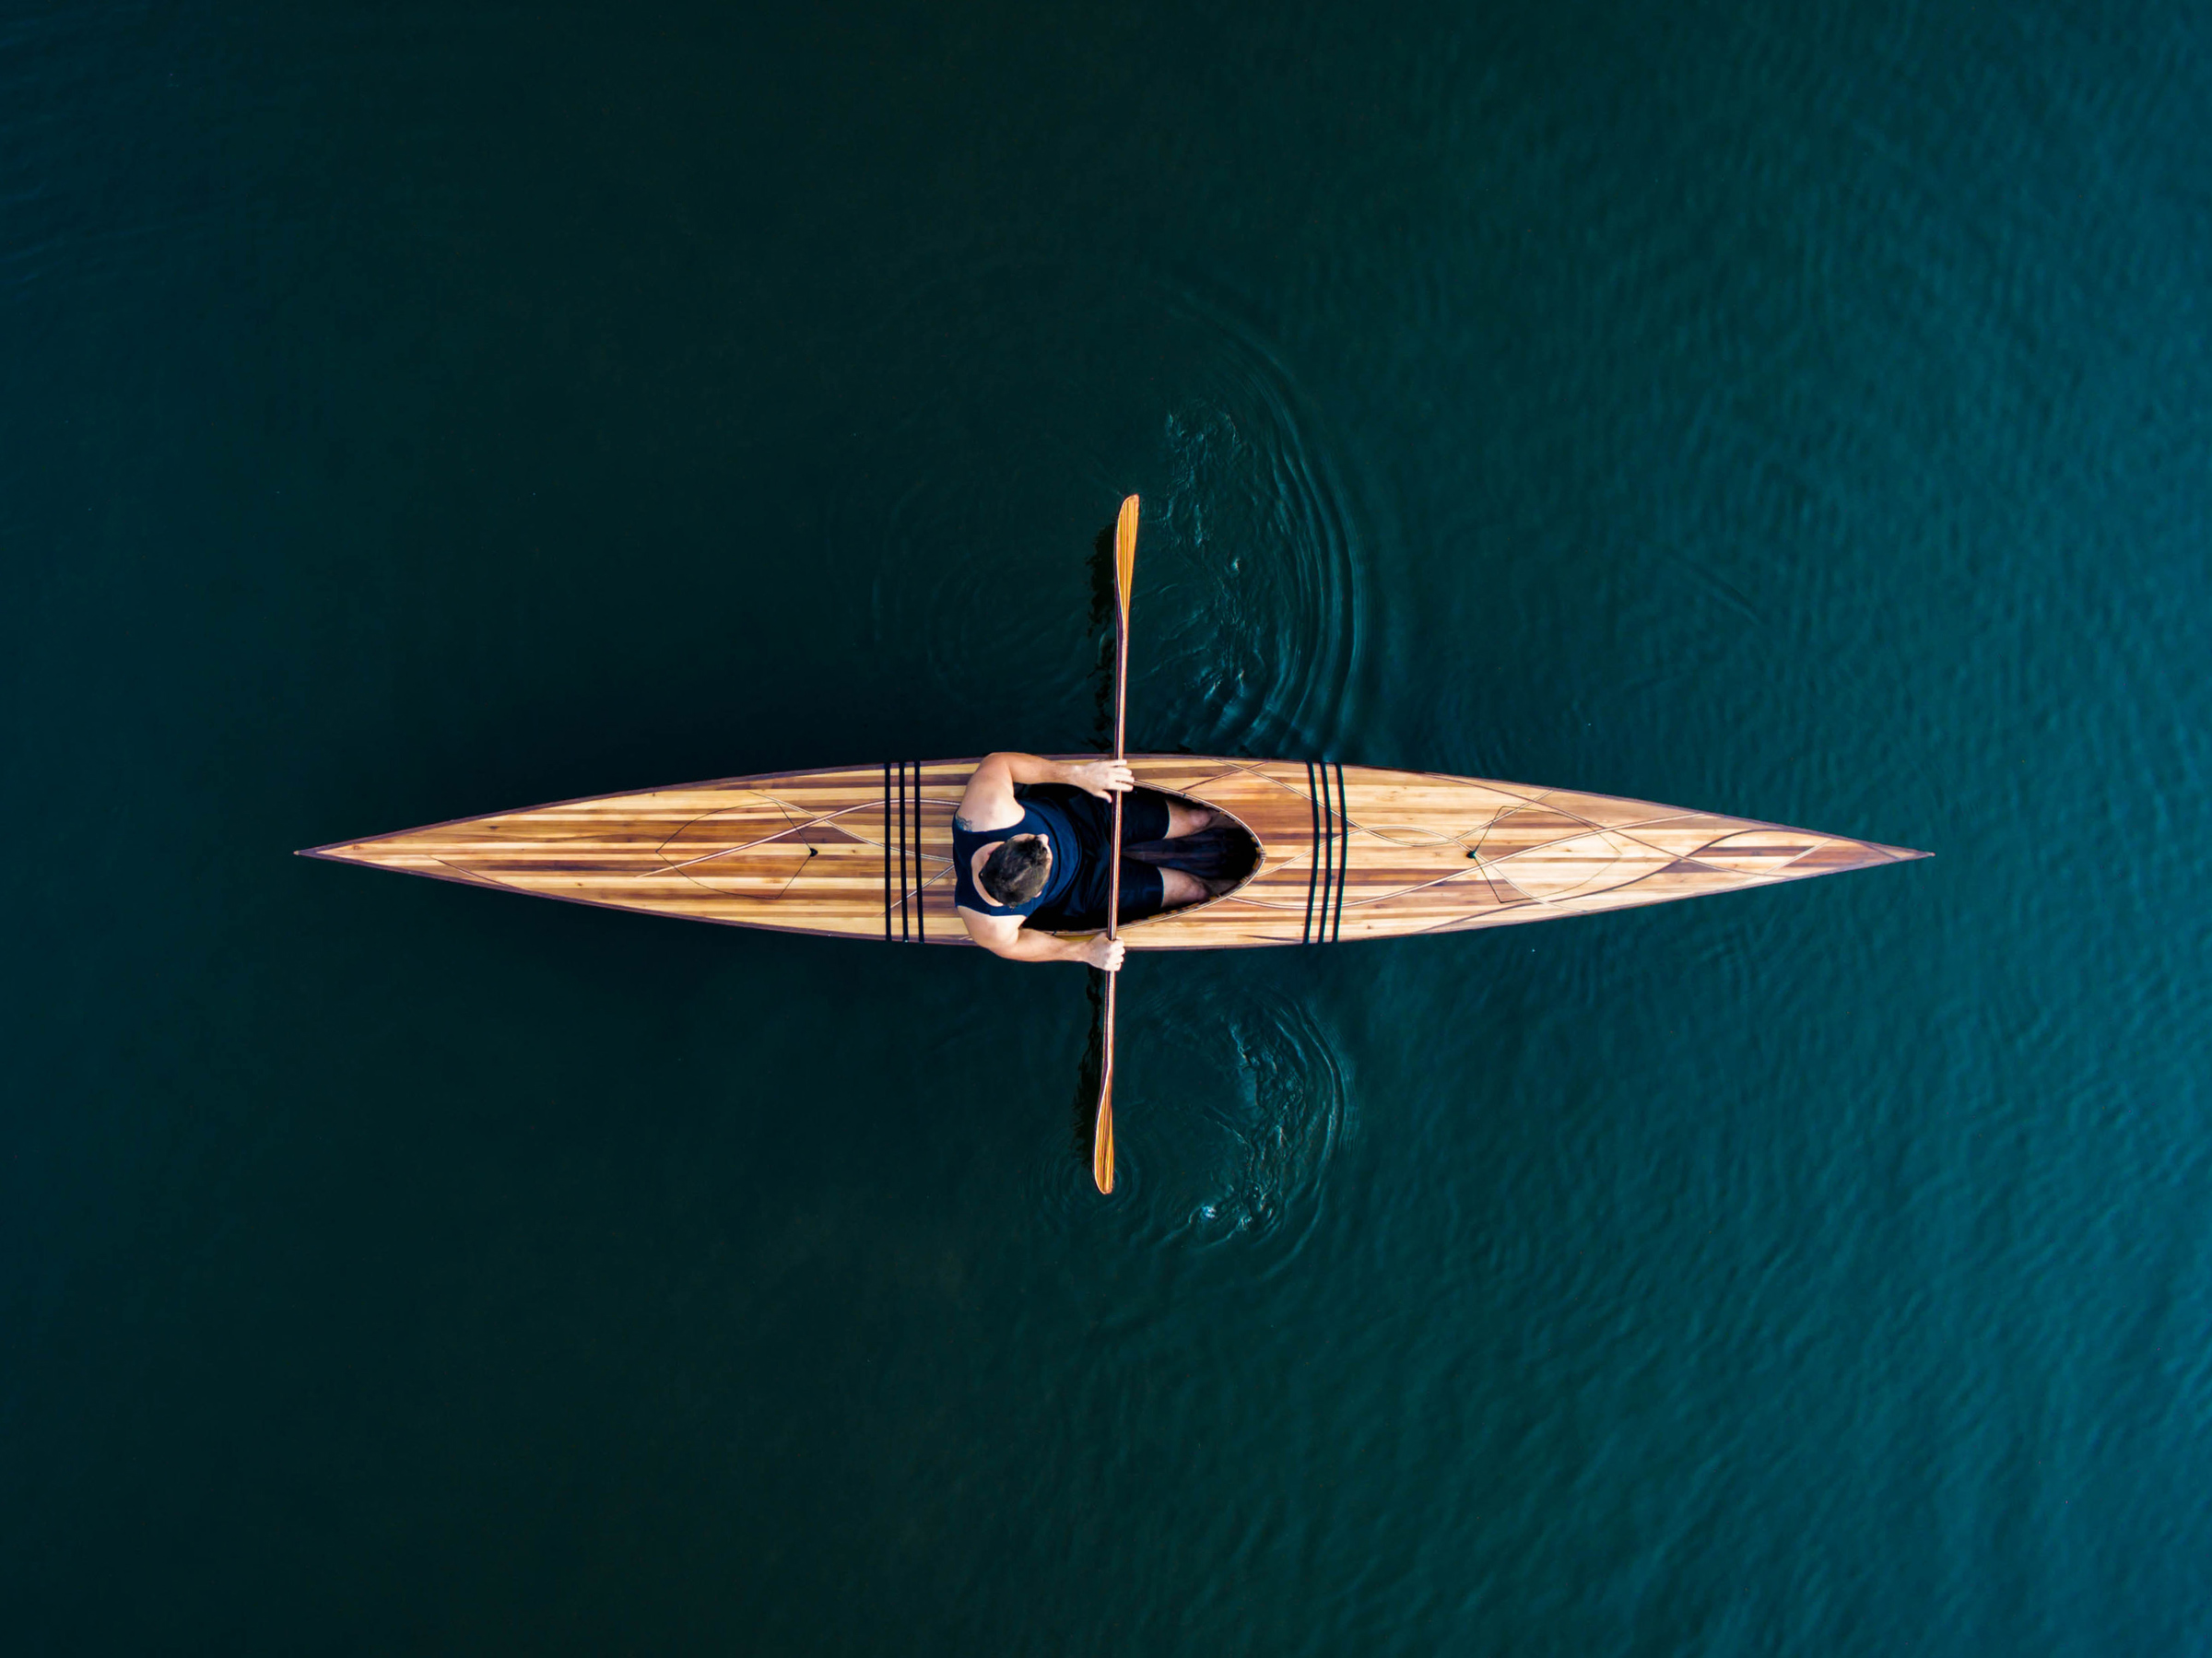
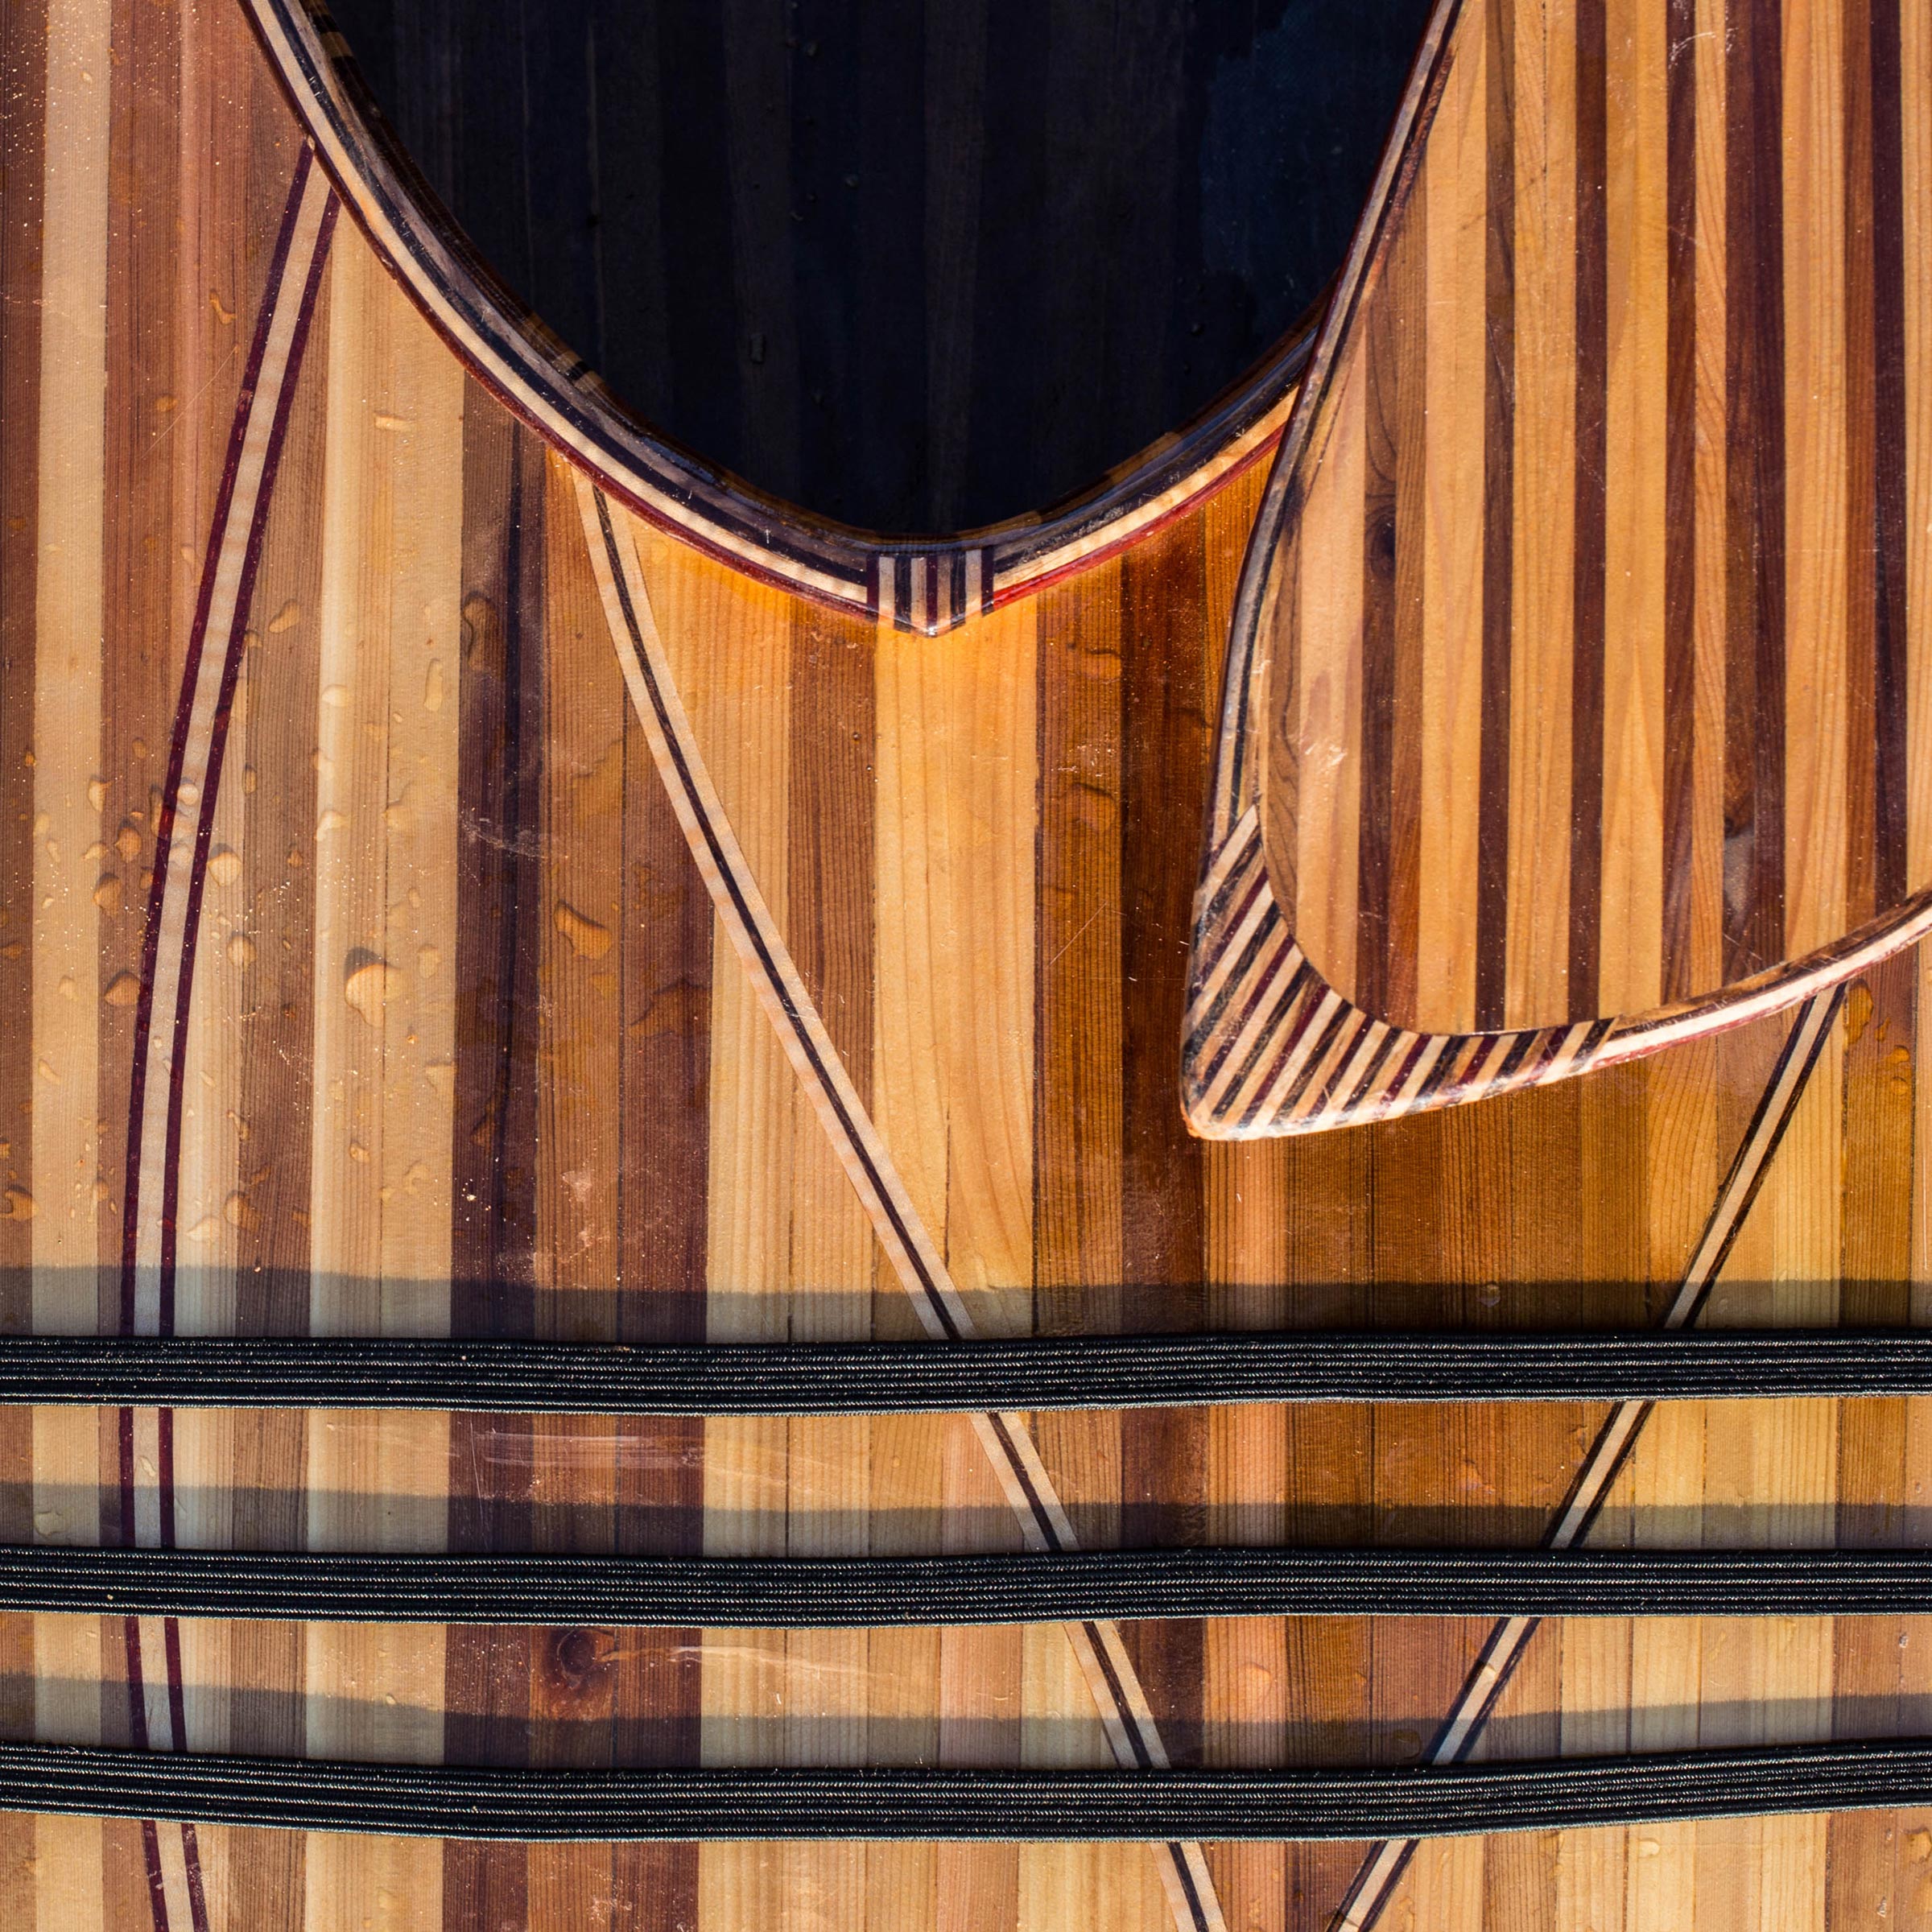
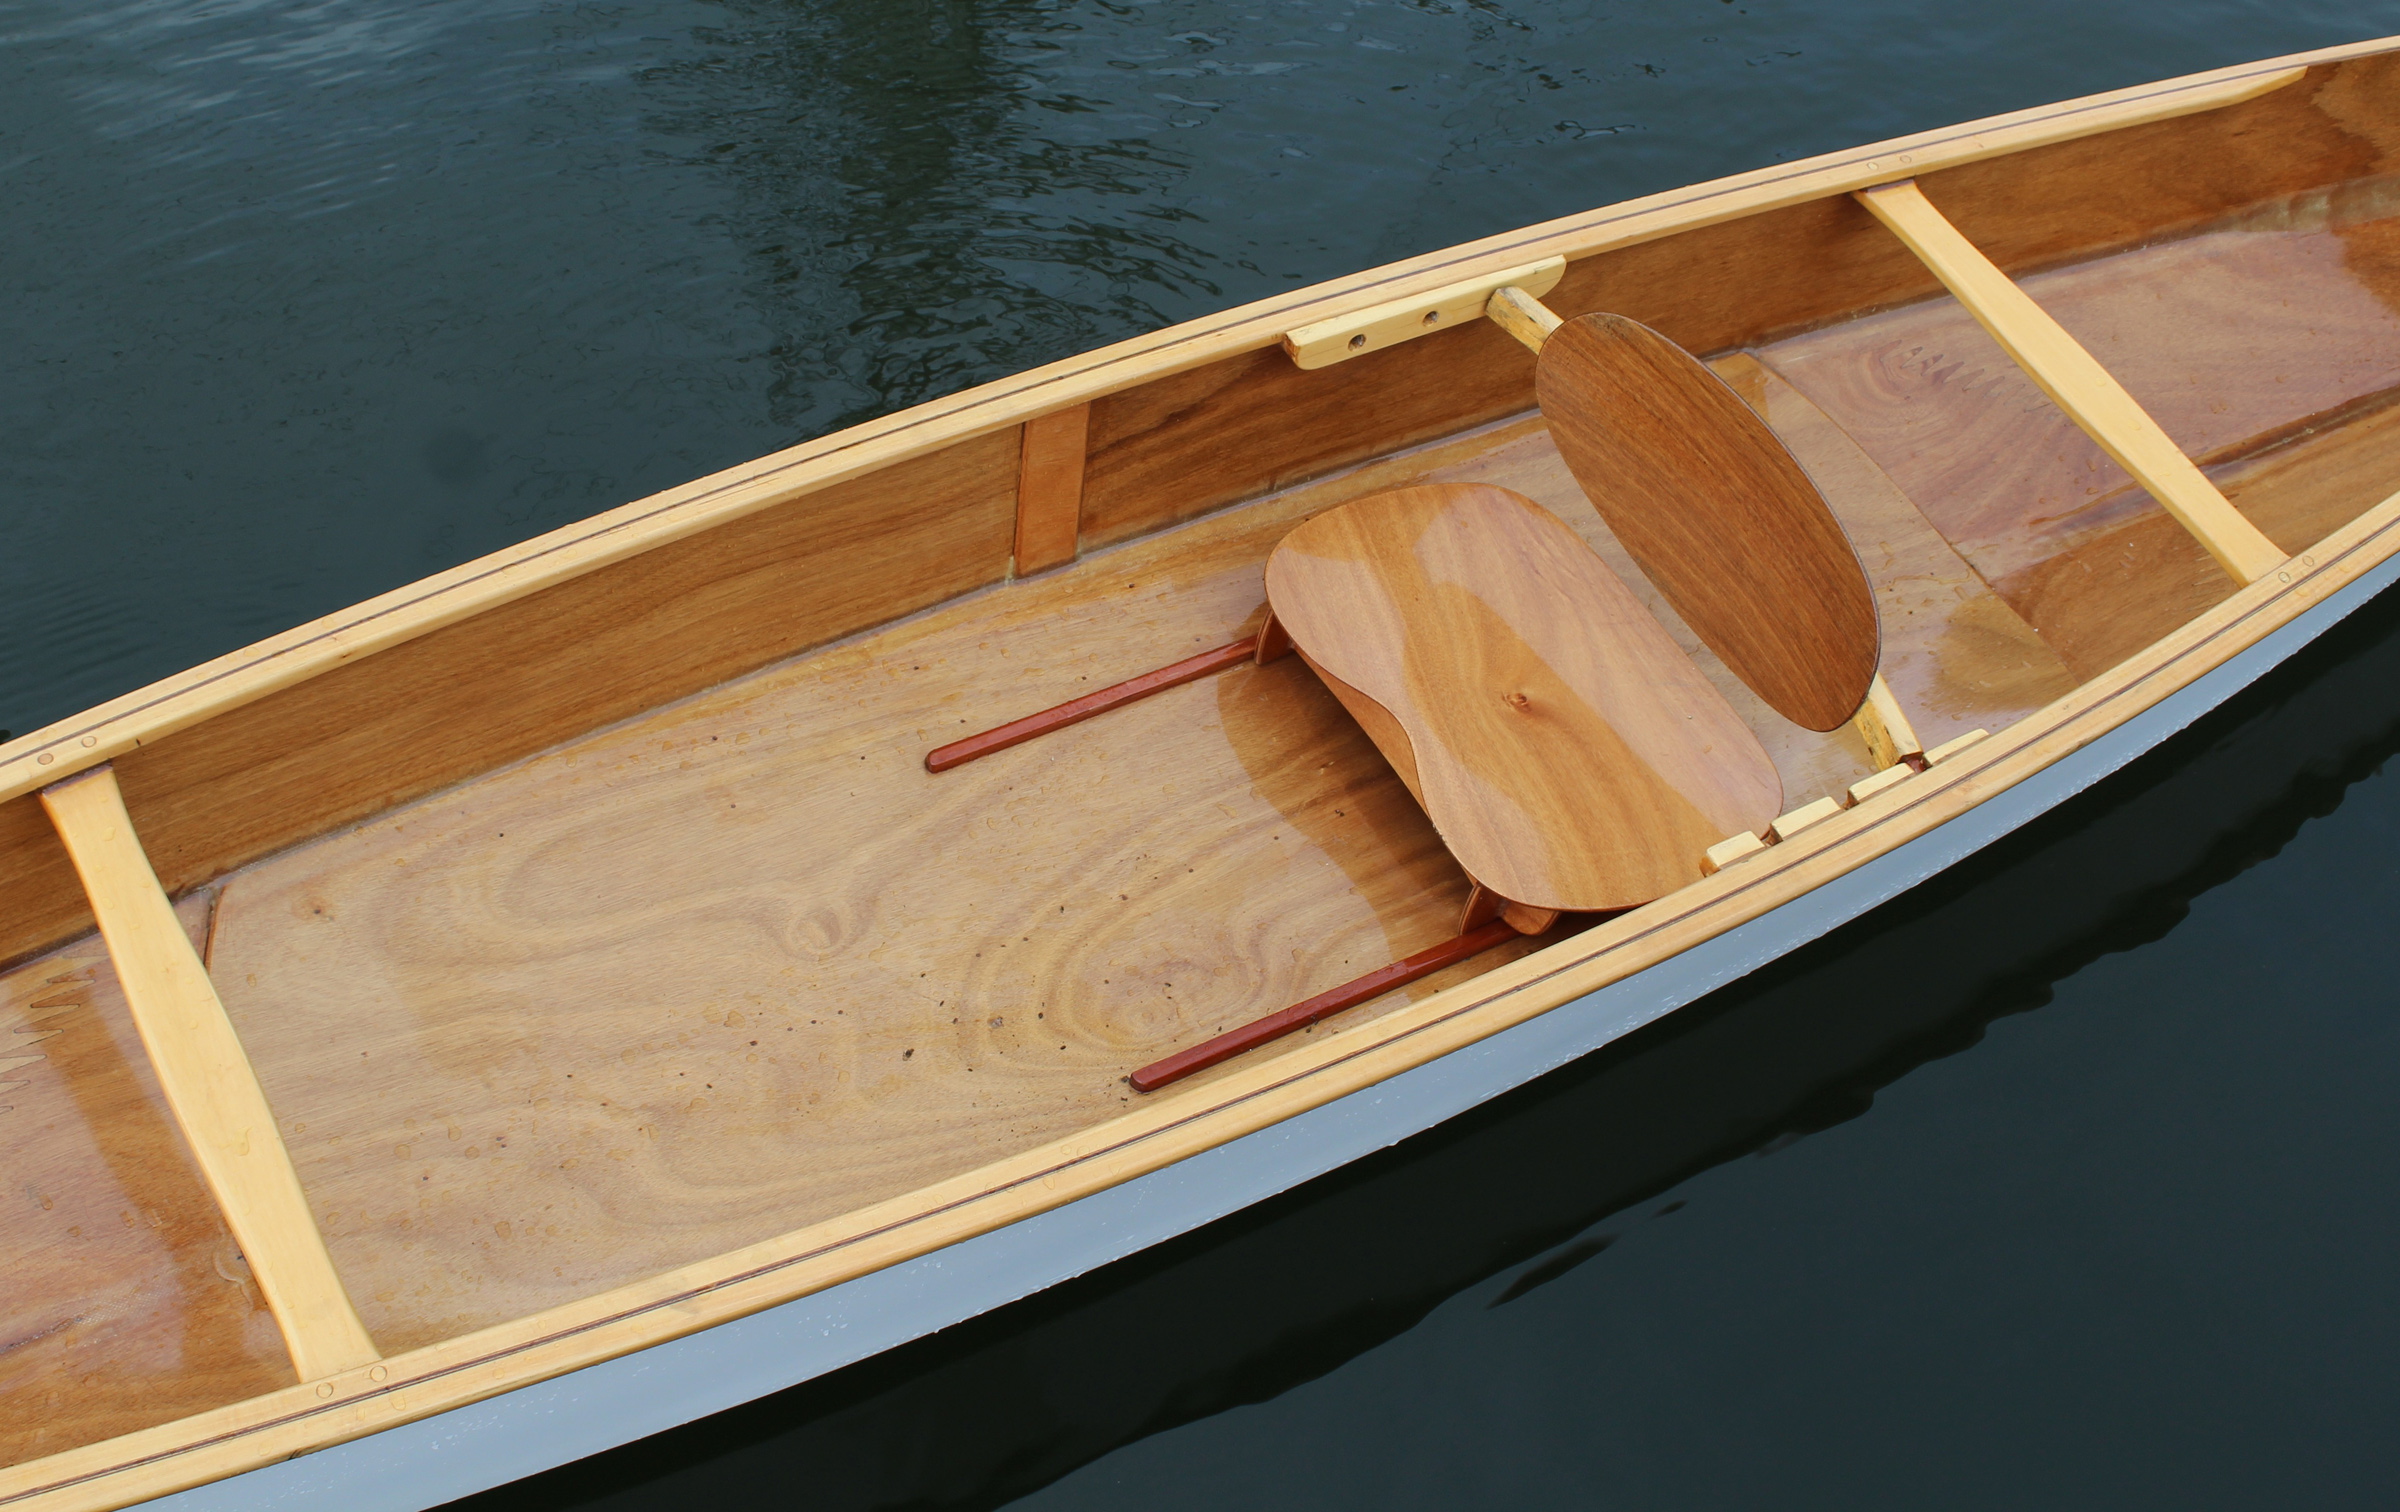
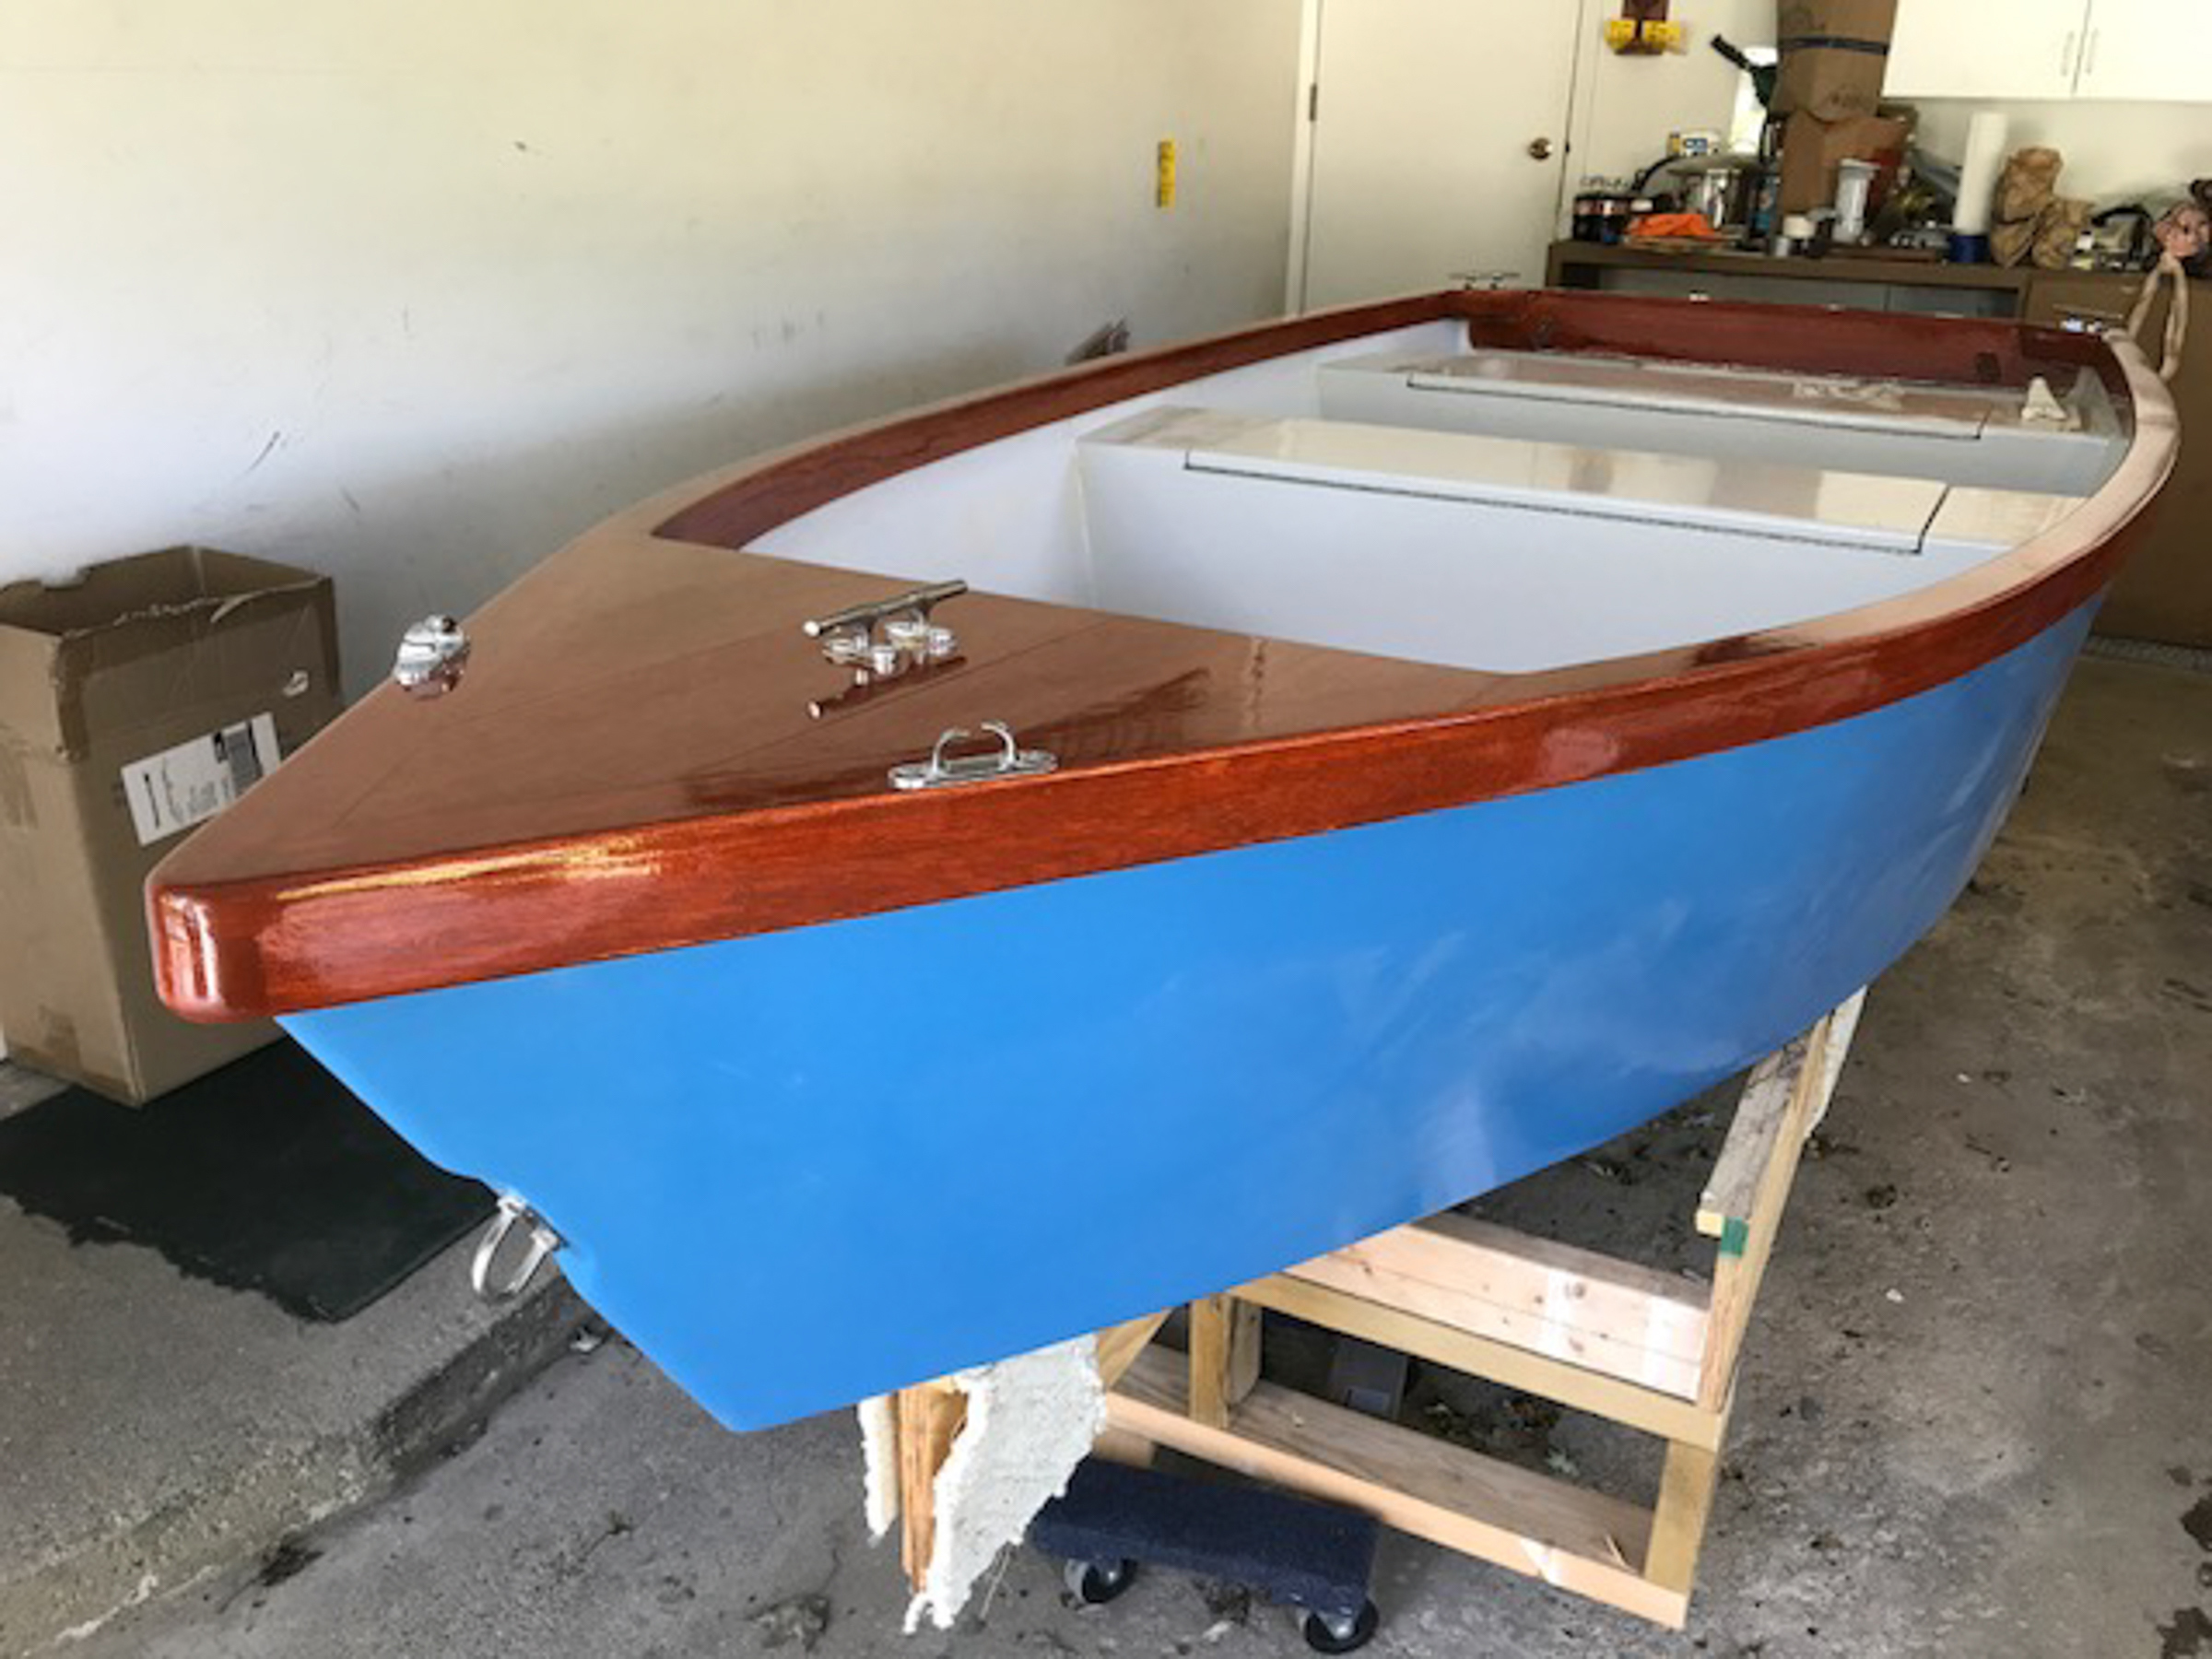
Even when DREAM WEAVER is at rest, her deck conveys fluid motion.
Claudia Miranda Monteleagre was born in Caracas, Venezuela, and, like all kids, liked toys, but in her case, so much so that she decided that when she grew up she was going to be a toy designer. When Claudia was older, she relocated to Europe and while there continued moving from country to country. By the time Claudia graduated from high school, she spoke five languages and could continue her education almost anywhere in the world. In 2013, she enrolled in the Savannah College of Art and Design (SCAD) in Savannah, Georgia, a college with one of the best industrial design programs in America.
Claudia Miranda Monteleagre
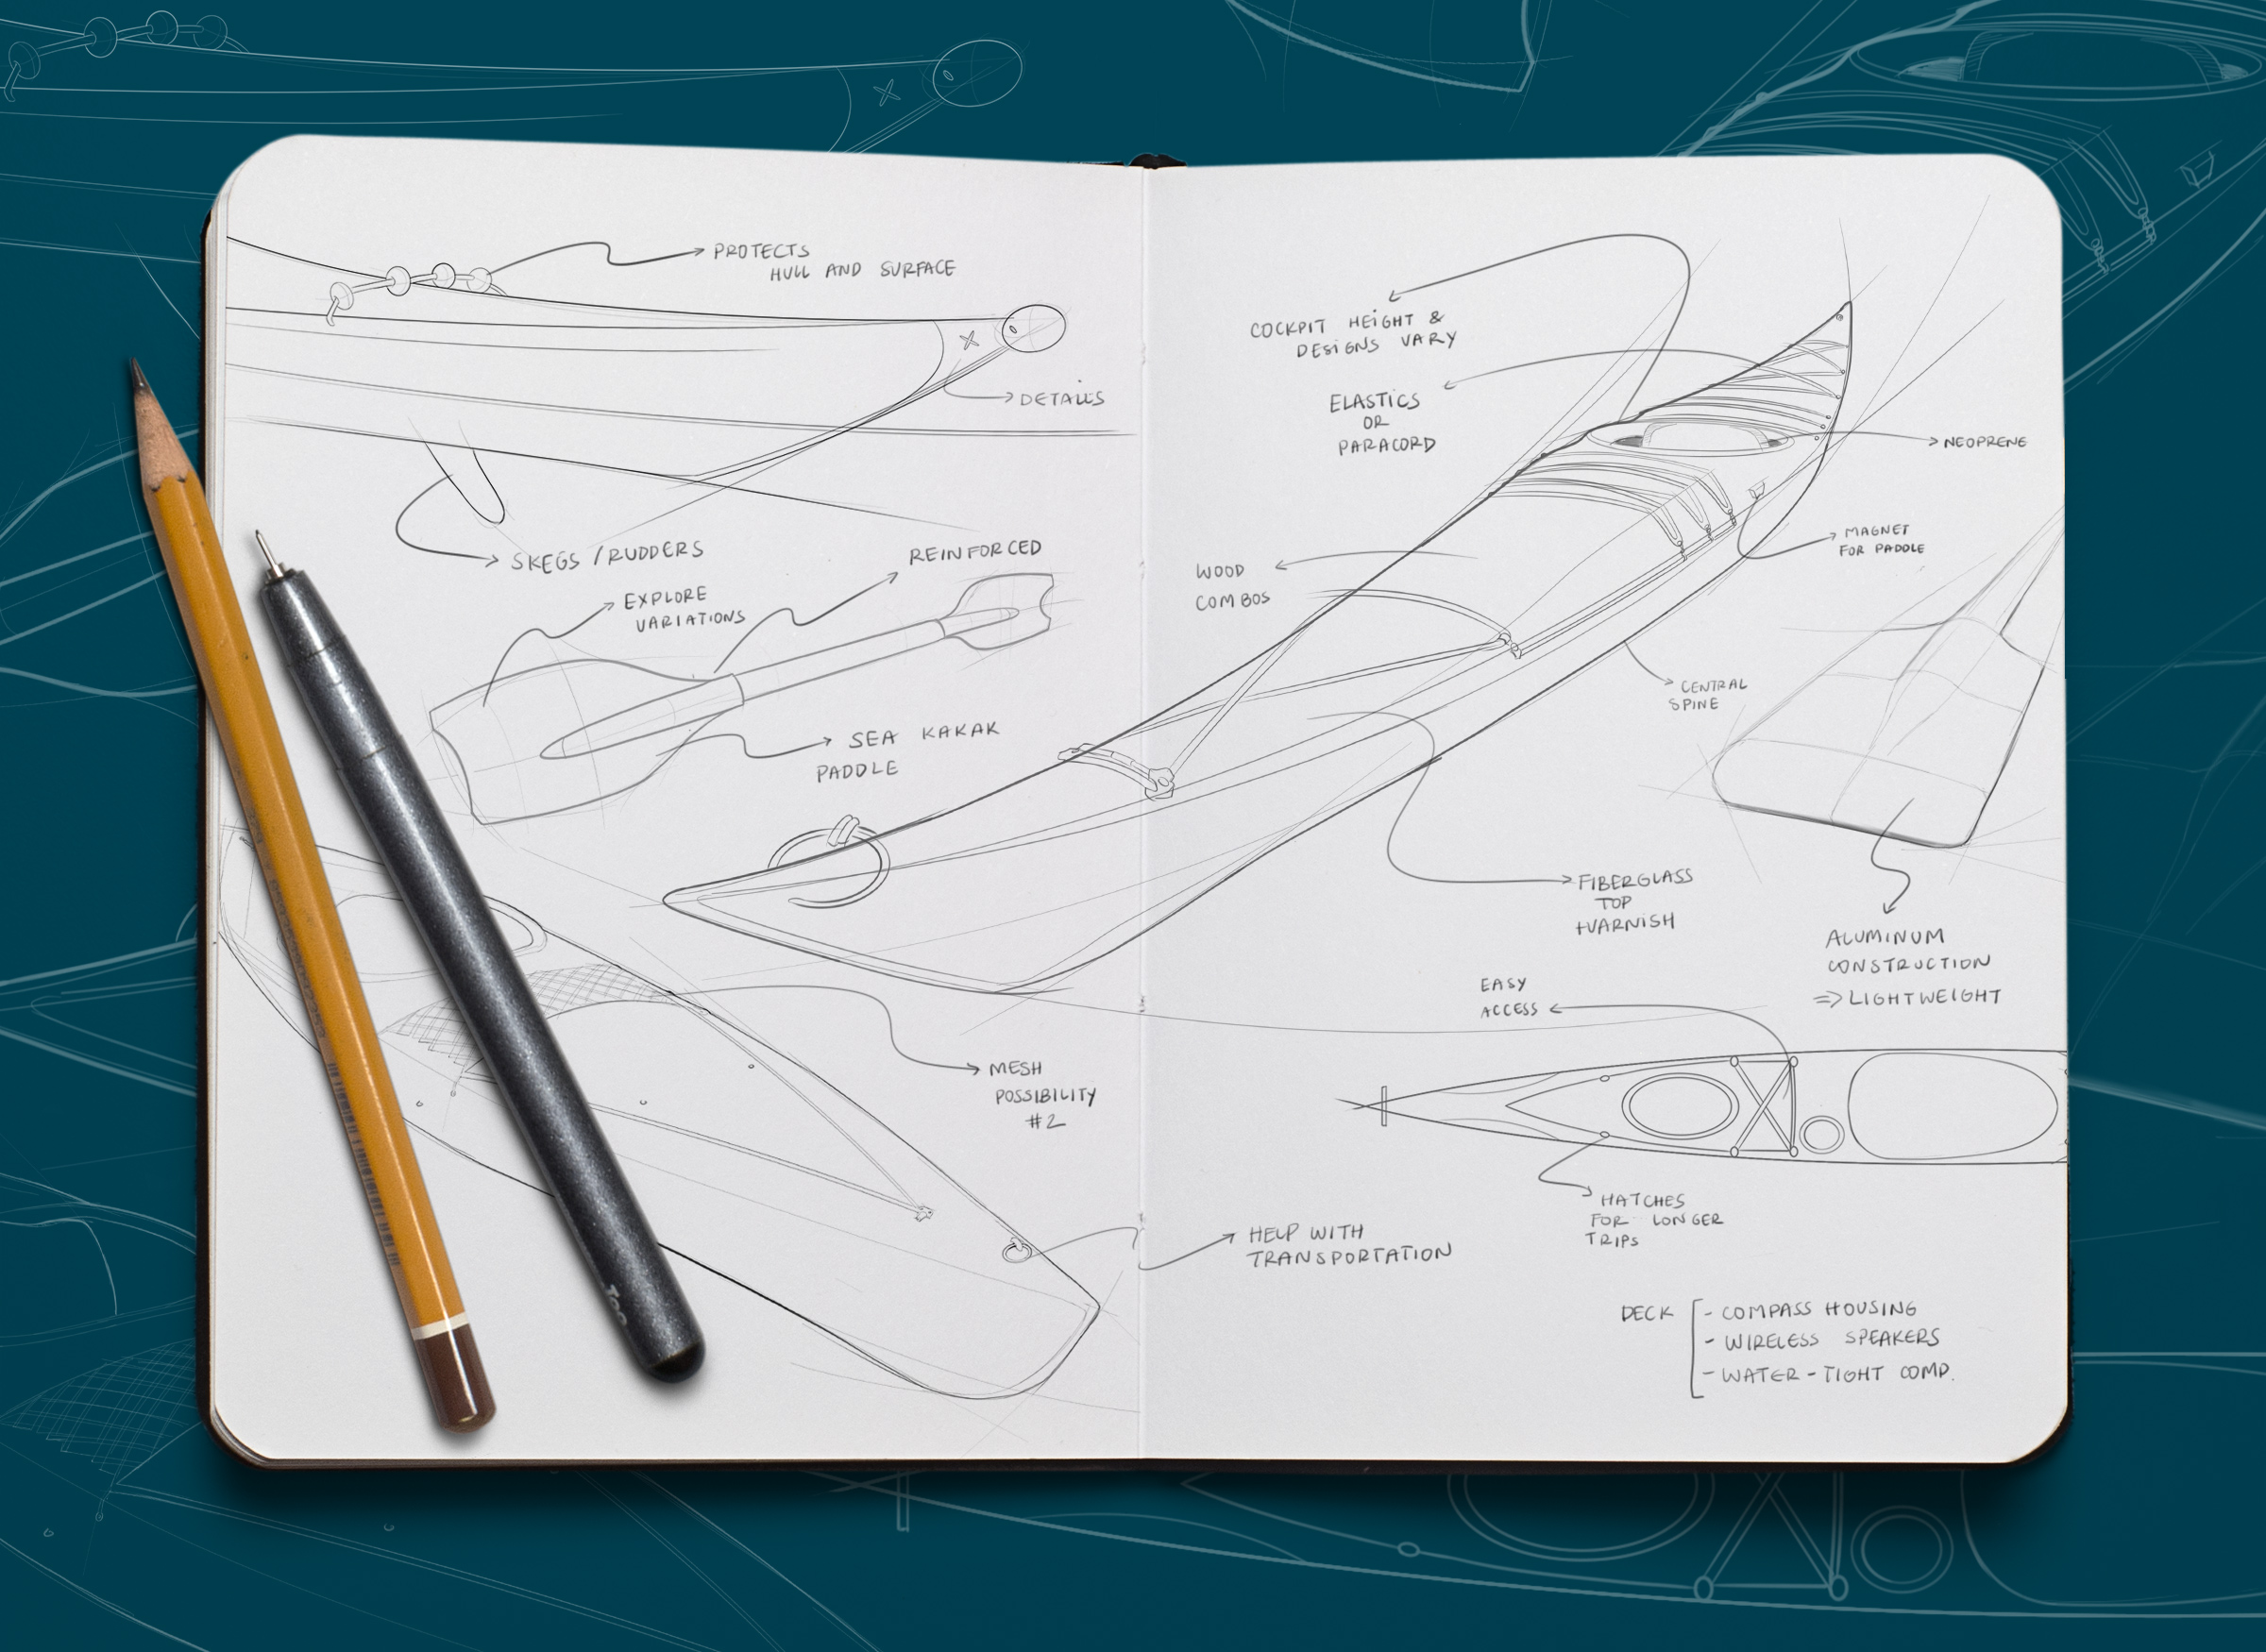
Claudia’s presentation of her digital sketches for the project includes ideas for paddles, a skeg, and even deck-mounted wireless speakers.
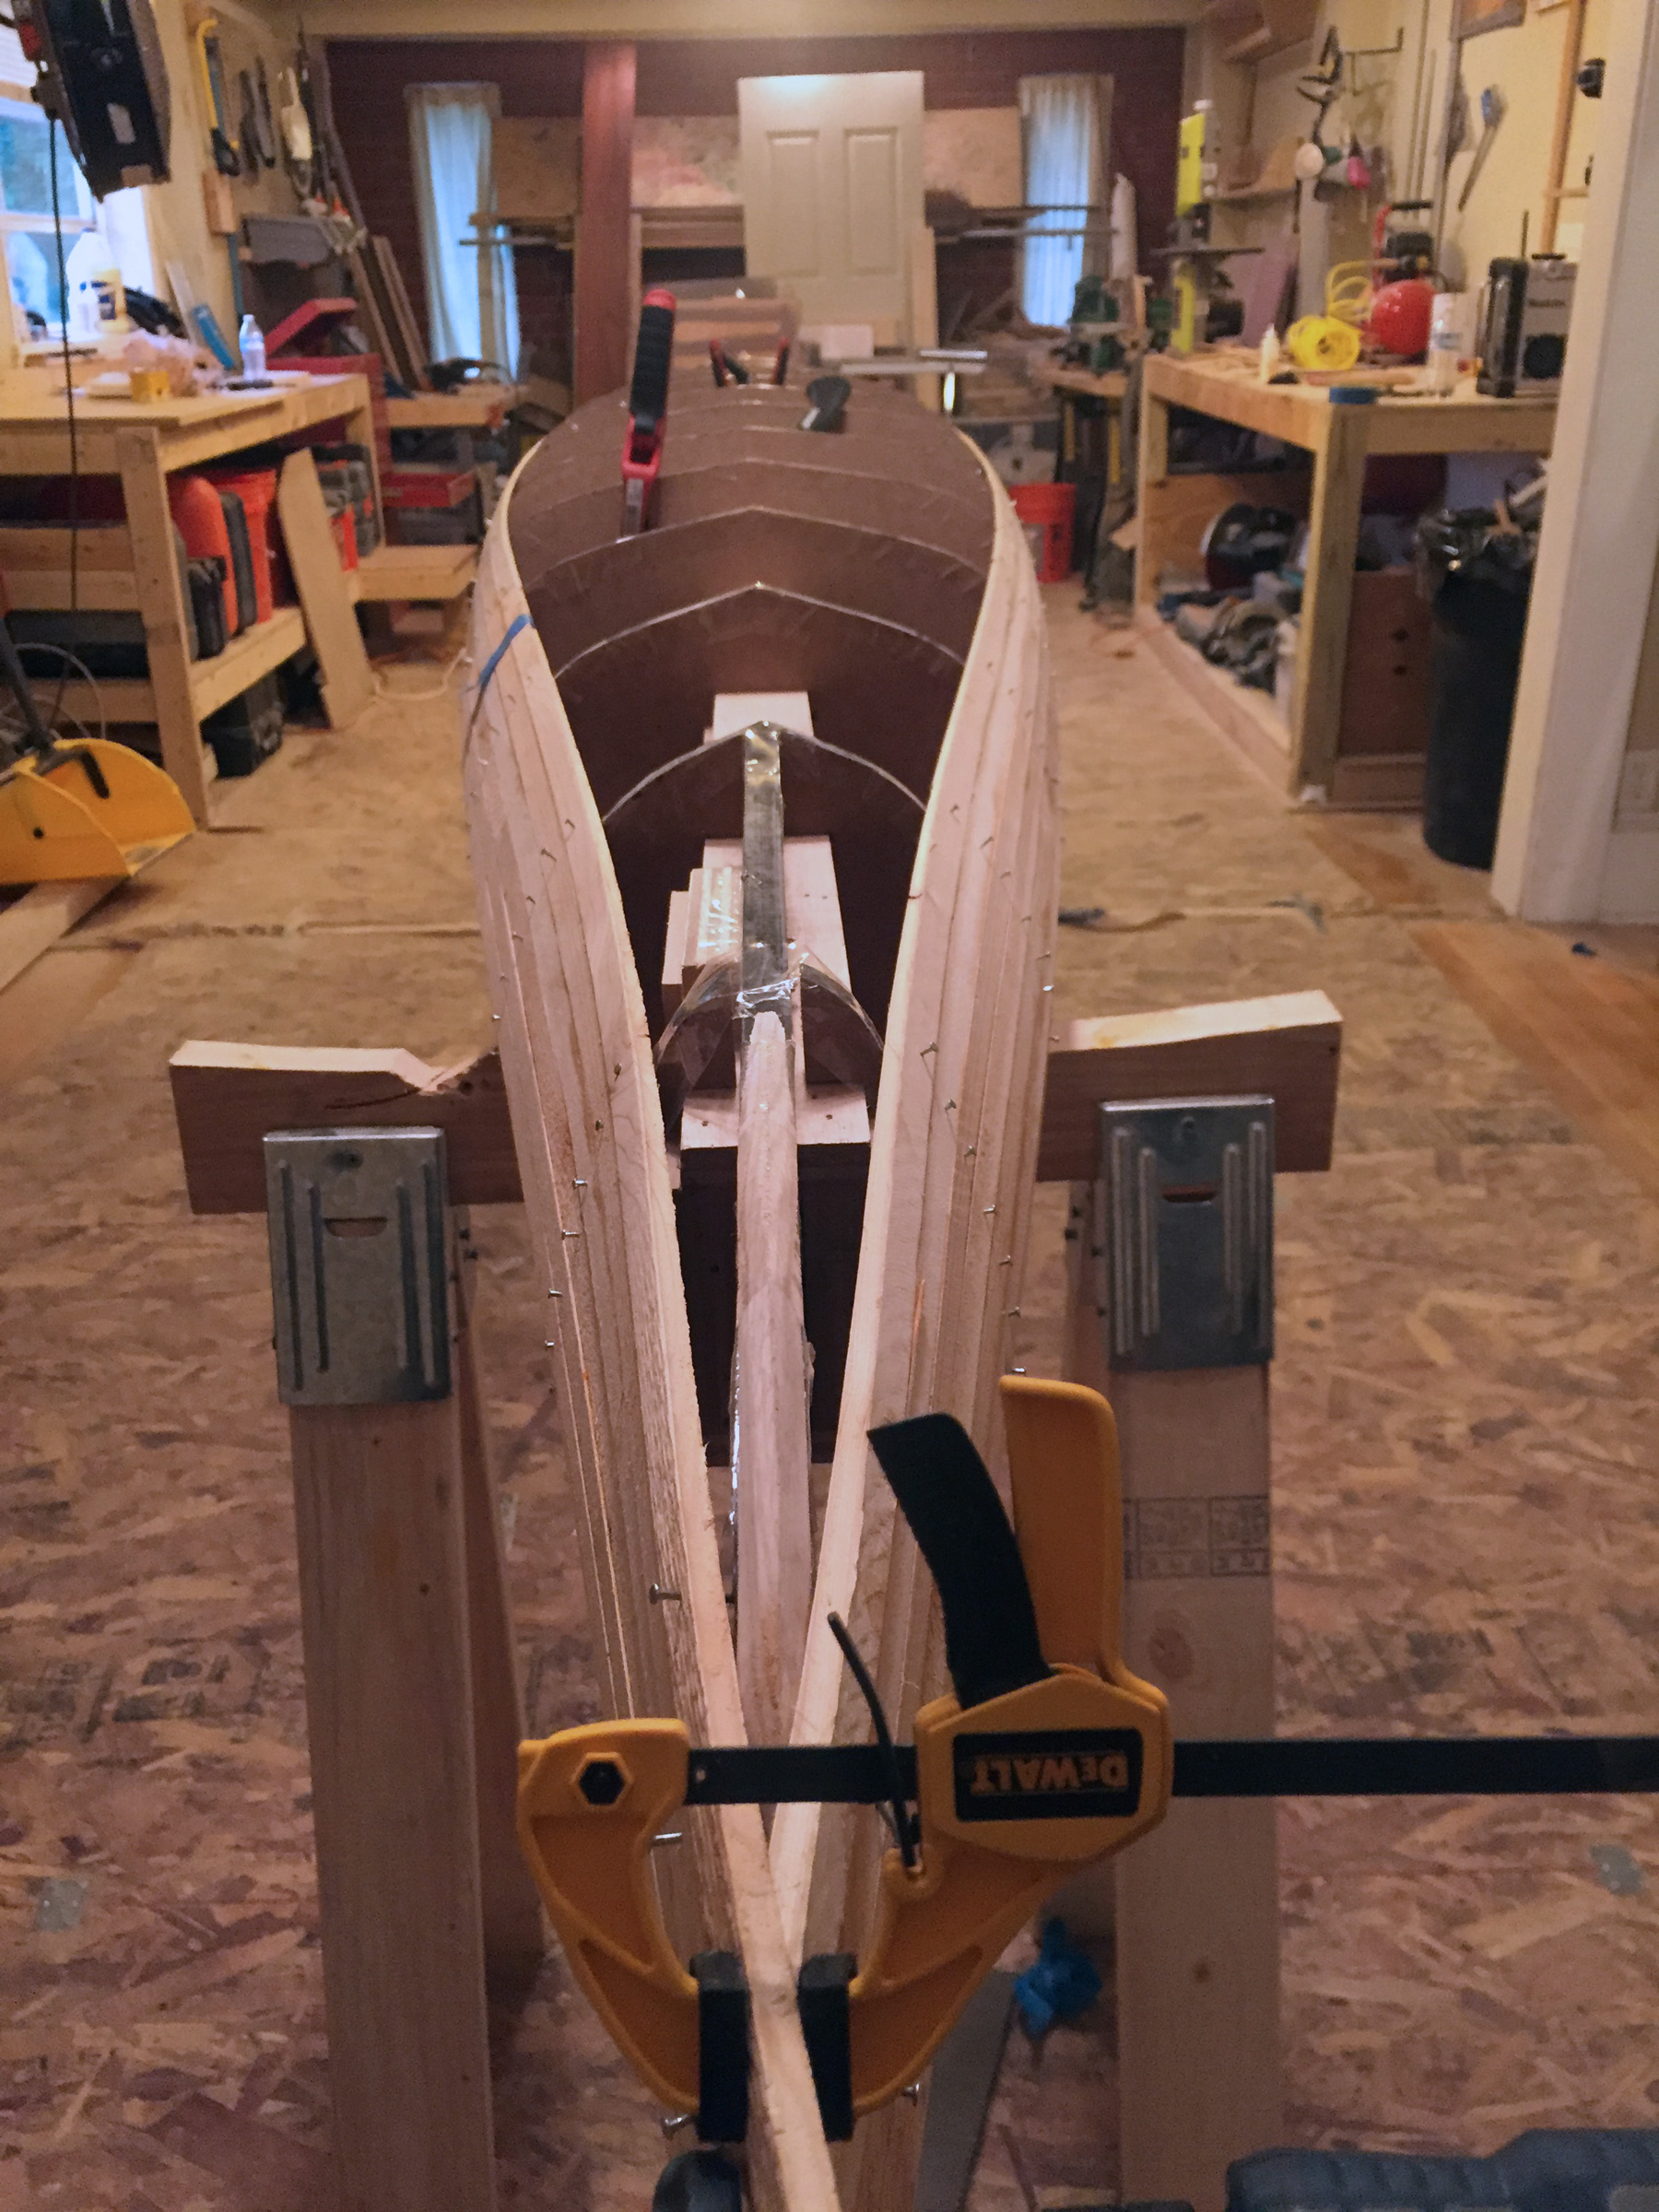
In one of her first classes, “Introduction to Industrial Design,” Claudia met Jacob Phillips, and the two became good friends with a shared interest in design concepts and ideas. In 2016, they both took a class that involved building a kayak. It started with the whole class working on a strip-built kit kayak from Guillemot Kayaks as an introduction to boat design and construction. The class then split up to design and build their own kayaks using the experience they’d gained. Claudia and Jacob teamed up and began their design process by studying existing kayaks and making sketches, CAD drawings, and scale-model prototypes with 3D printers and CNC routers.
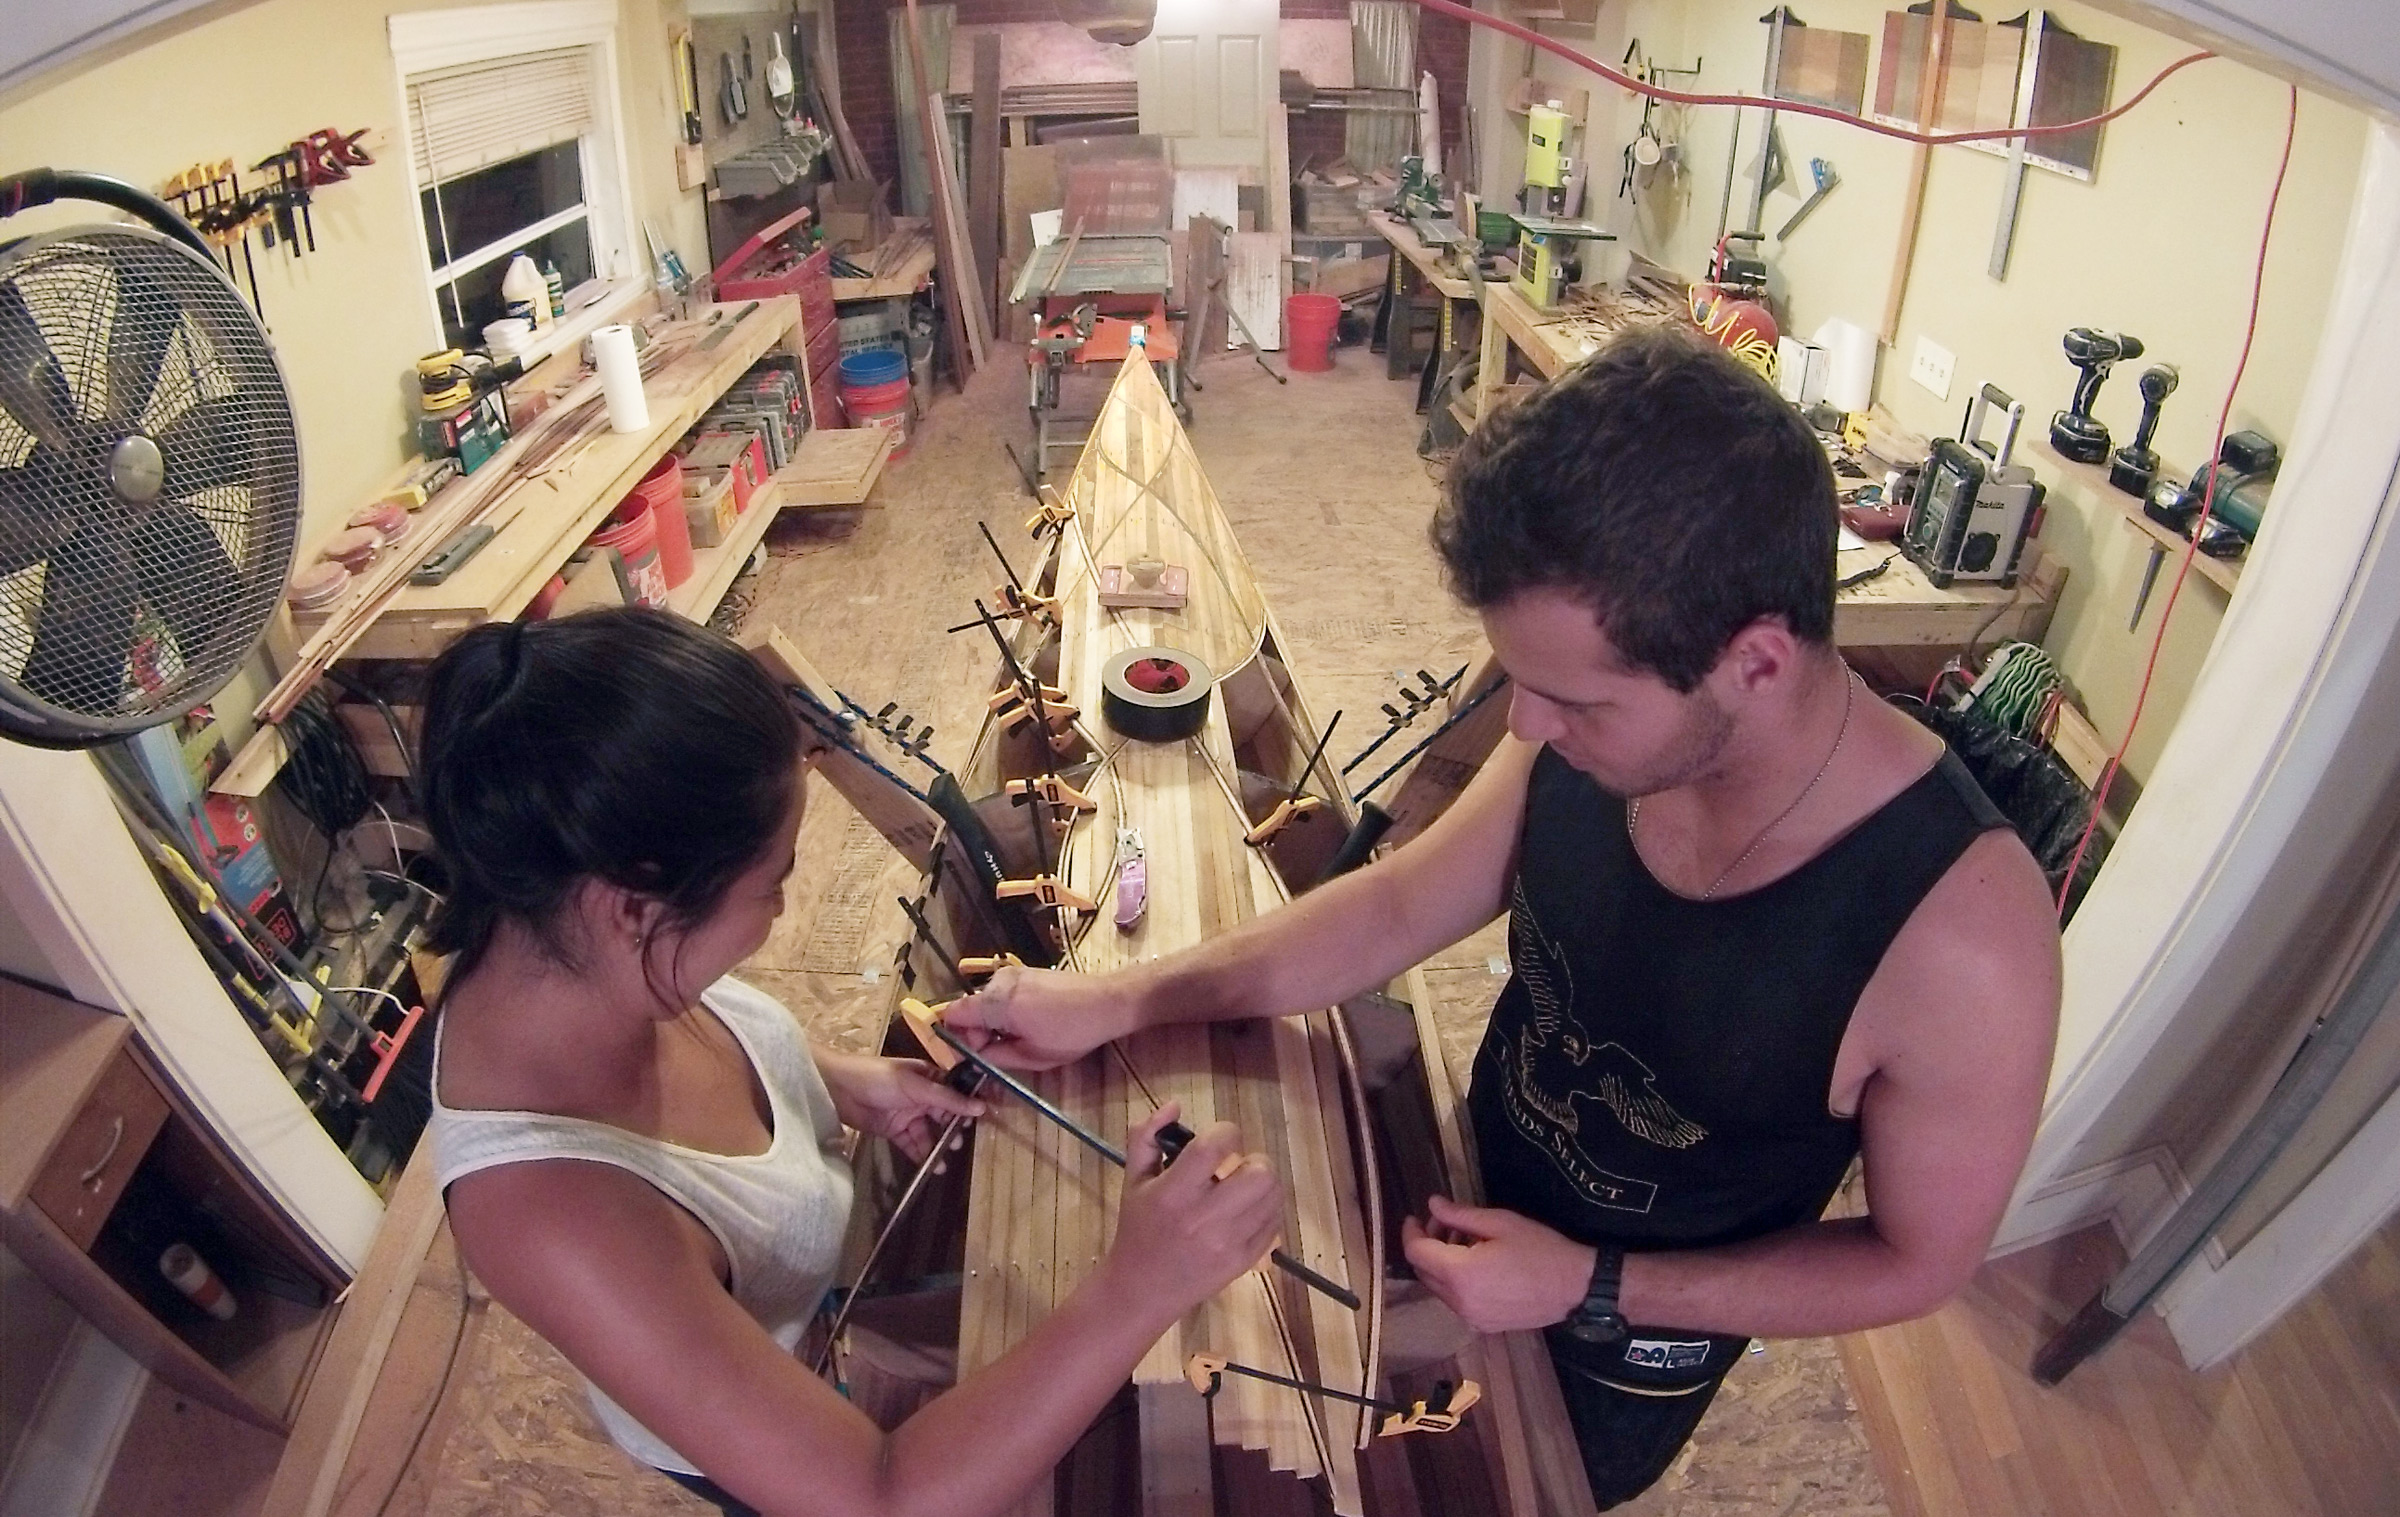
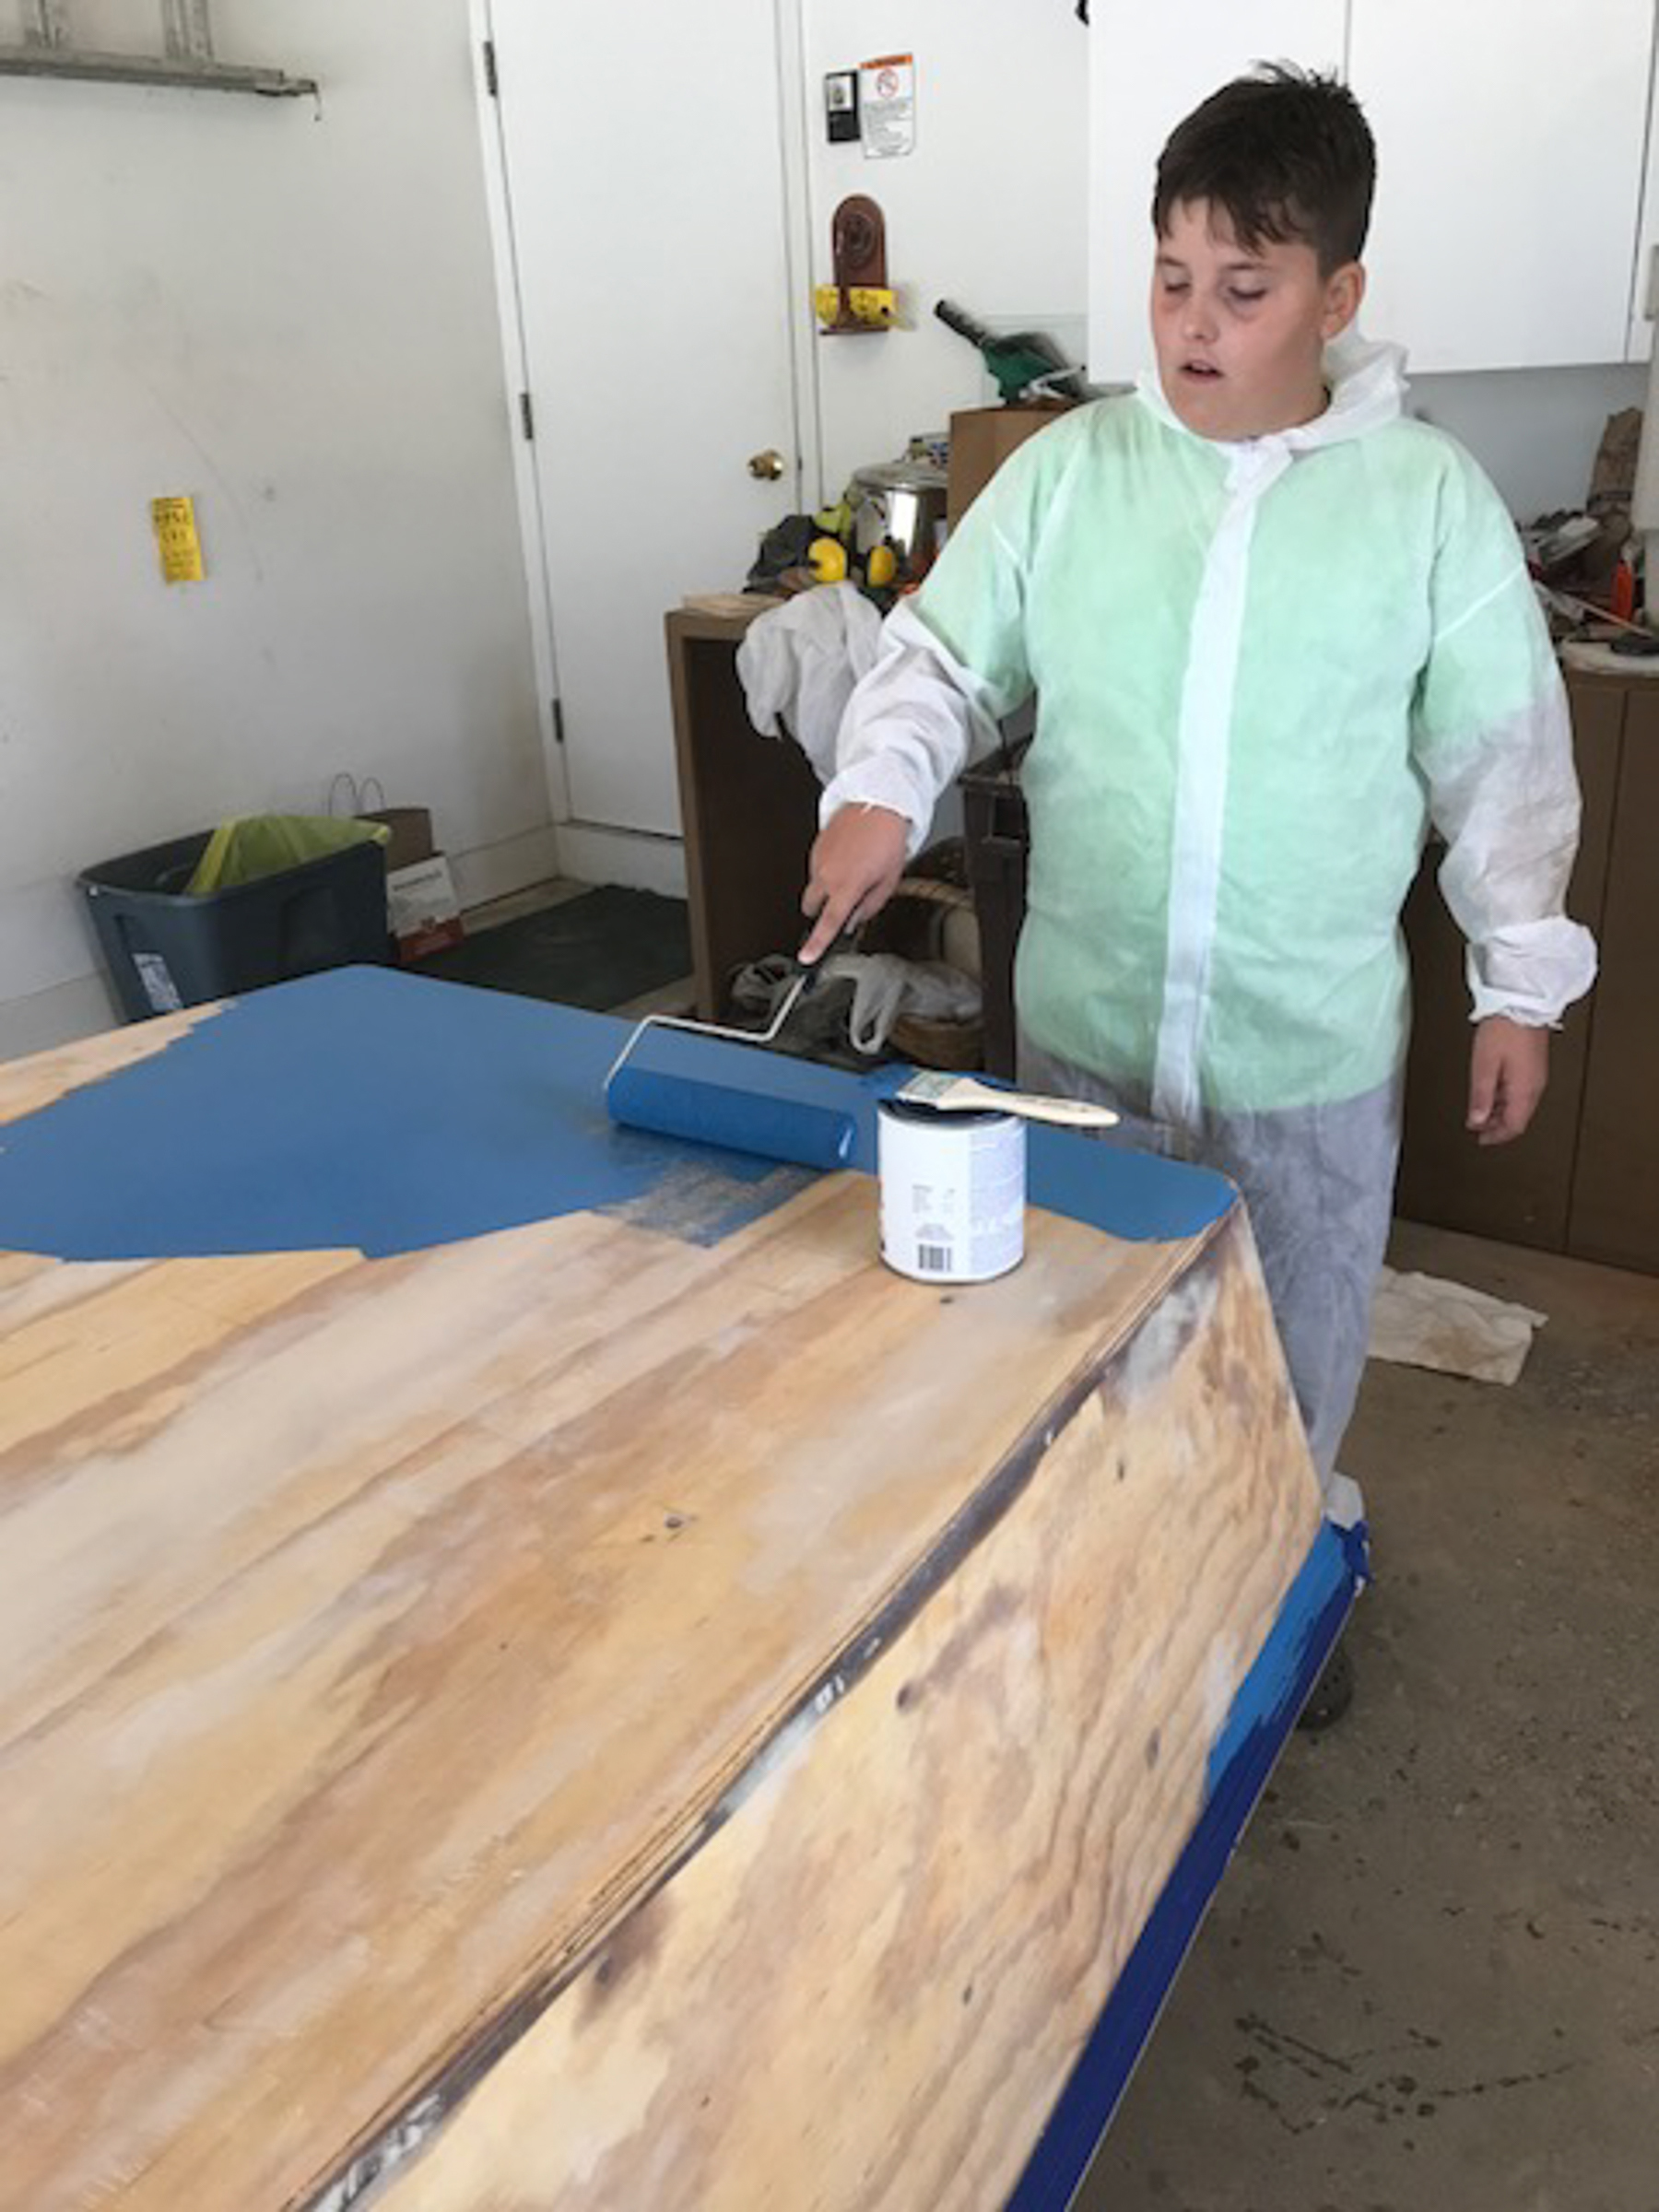
Claudia and Jacob didn’t have a garage for the build and set up shop in the living room of the house they were staying in. They protected the floor with several sheets of oriented-strand board. The Georgia summer temperatures, rising to 100 degrees, forced them to work indoors with air conditioning and fans.
Collaboration was a big part of the building process; Claudia and Jacob worked on the kayak day and night to complete the project in 10 weeks.
Neither Claudia nor Jacob came into that class with much experience in marine design beyond scanning online videos and blogs. For guidance on construction, they studied Nick Schade’s The Strip-Built Sea Kayak. While pondering the practical elements of kayak construction, they also considered the artistic possibilities offered by wood strips. For the deck, they sought to bend accent strips of exotic hardwoods to mimic the rhythm of waves and ripples and “guide the eyes of the viewer through a vibrant path of beautiful colors and intricate forms.” Western red cedar would be the canvas on which they painted with padouk, wenge, curly maple, and zebra wood.
Emily Galvin and Natalia Serrano
The foredeck, coaming, and paddle have delicate details that unify the decorative design.
Jacob Phillips
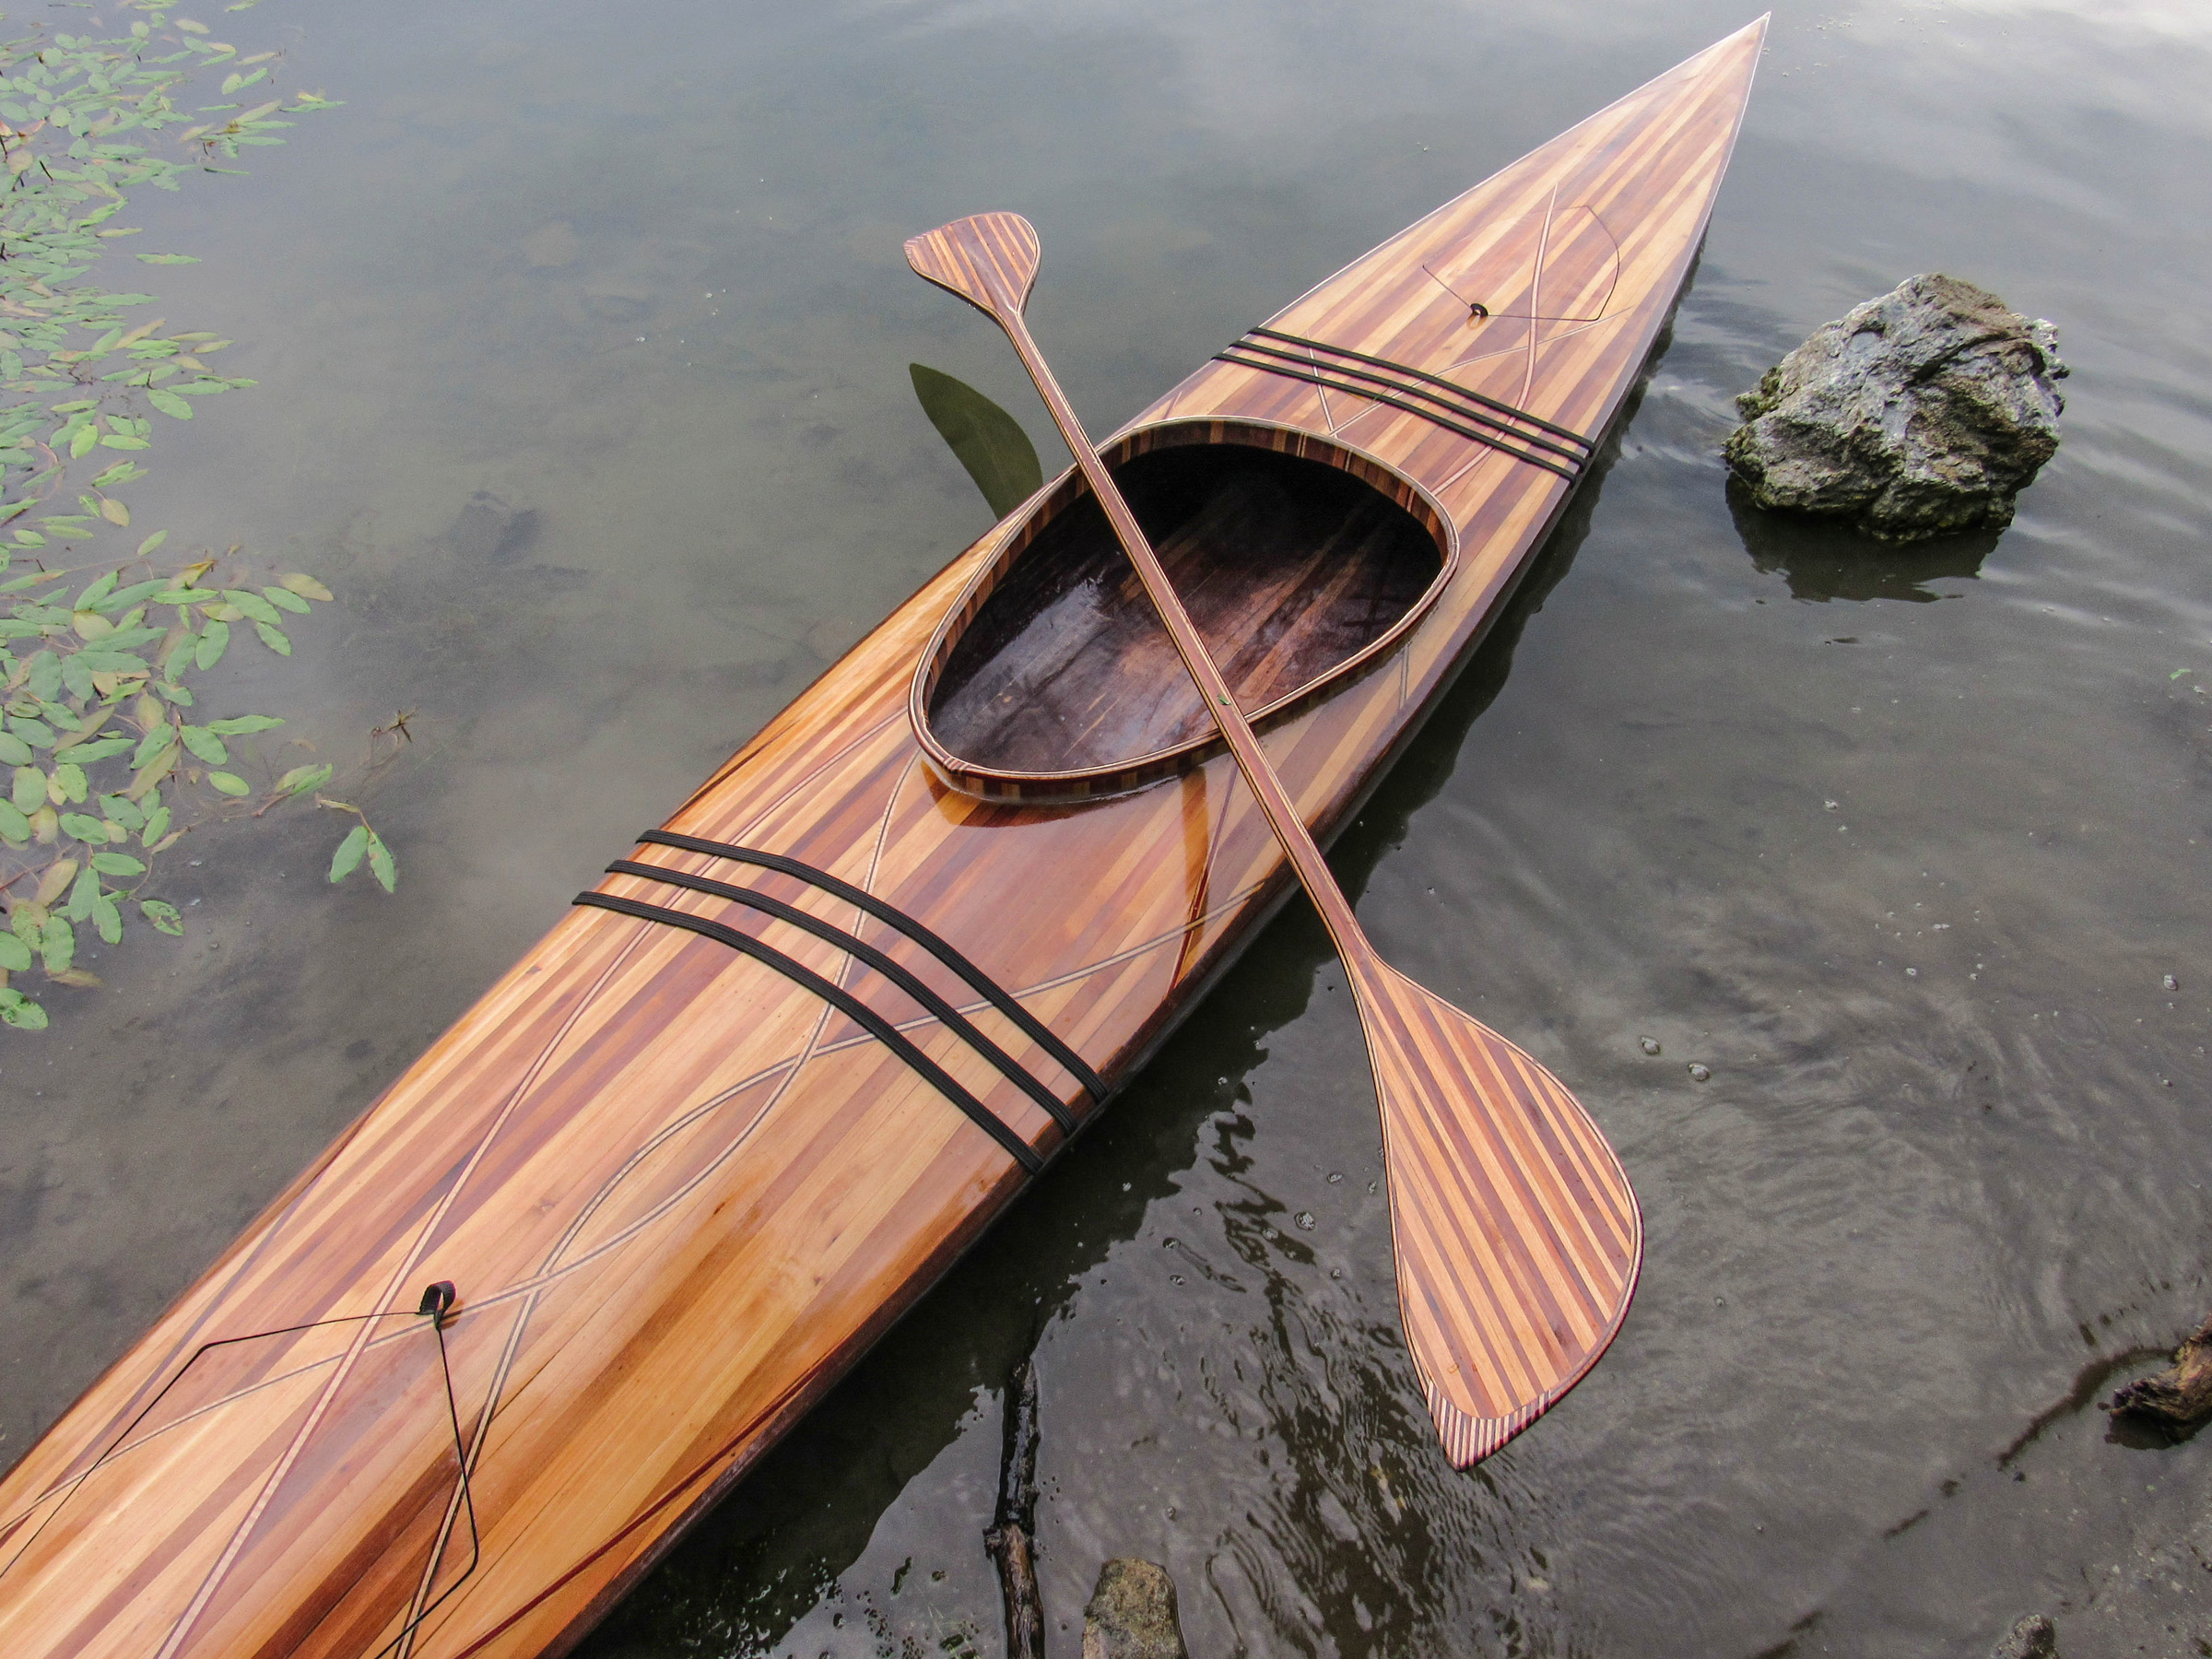
The strips left over after the construction of the kayak went into a distinctive, complementary double-bladed paddle.
When the kayak was finished, there was a lot of wood left over, so Claudia and Jacob designed and built a striking double-bladed paddle with edge banding that flowed around the blades and across the loom.
Cody Moore
DREAM WEAVER’s first touch in the water was in Ocean City, Maryland. Claudia takes the first strokes while a foredeck-mounted GoPro records the moment.
Emily Galvin and Natalia Serrano
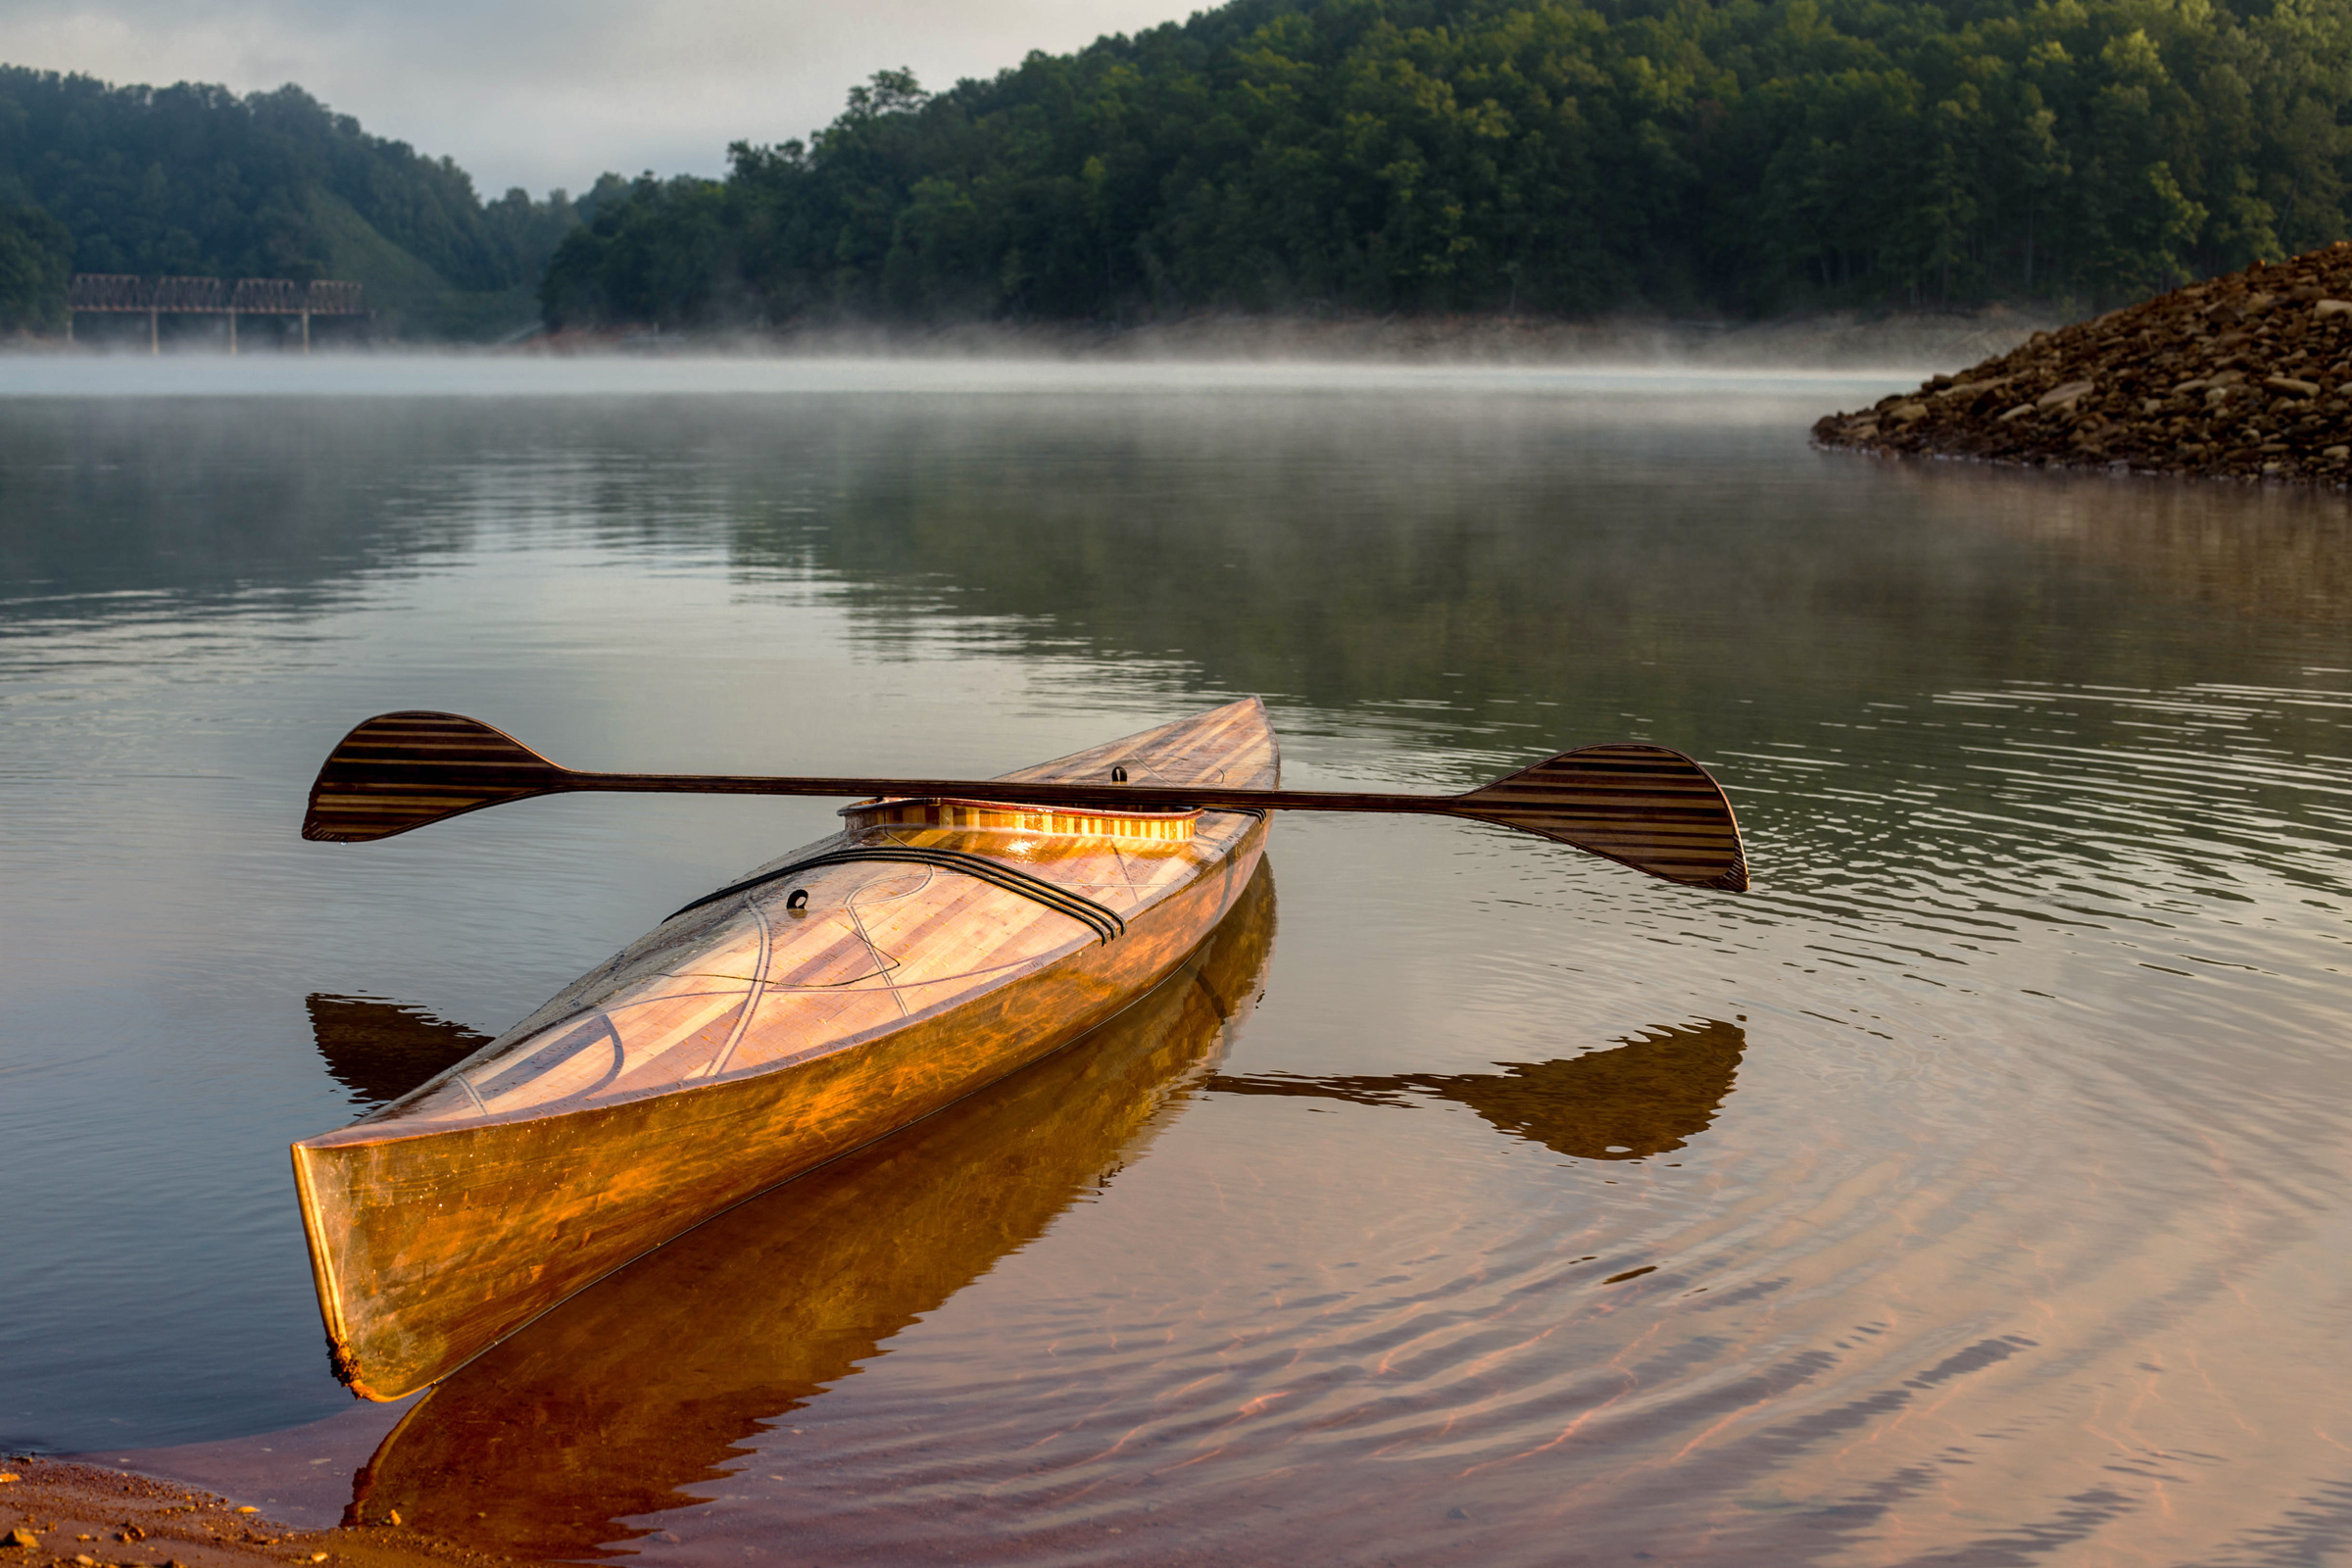
The hull is made of cedar strips all of the same color and gets its variations from the play of sunlight reflected by the ripples on the water.
The kayak was named DREAMWEAVER and the project was a success. Claudia and Jacob both earned an A for the class. After graduating from SCAD, neither, sadly, continued with boatbuilding. Jacob now teaches design tech at a high school. Claudia became an industrial designer, but never lost sight of what she wanted to be when she grew up. She has worked with toy giants Fisher-Price and Mattel and had a hand in creating The Scooby-Doo Haunted Ghost Town Playset. You can see more of her work at her website.
Do you have a boat with an interesting story? Please email us. We’d like to hear about it and share it with other Small Boats Magazine readers.
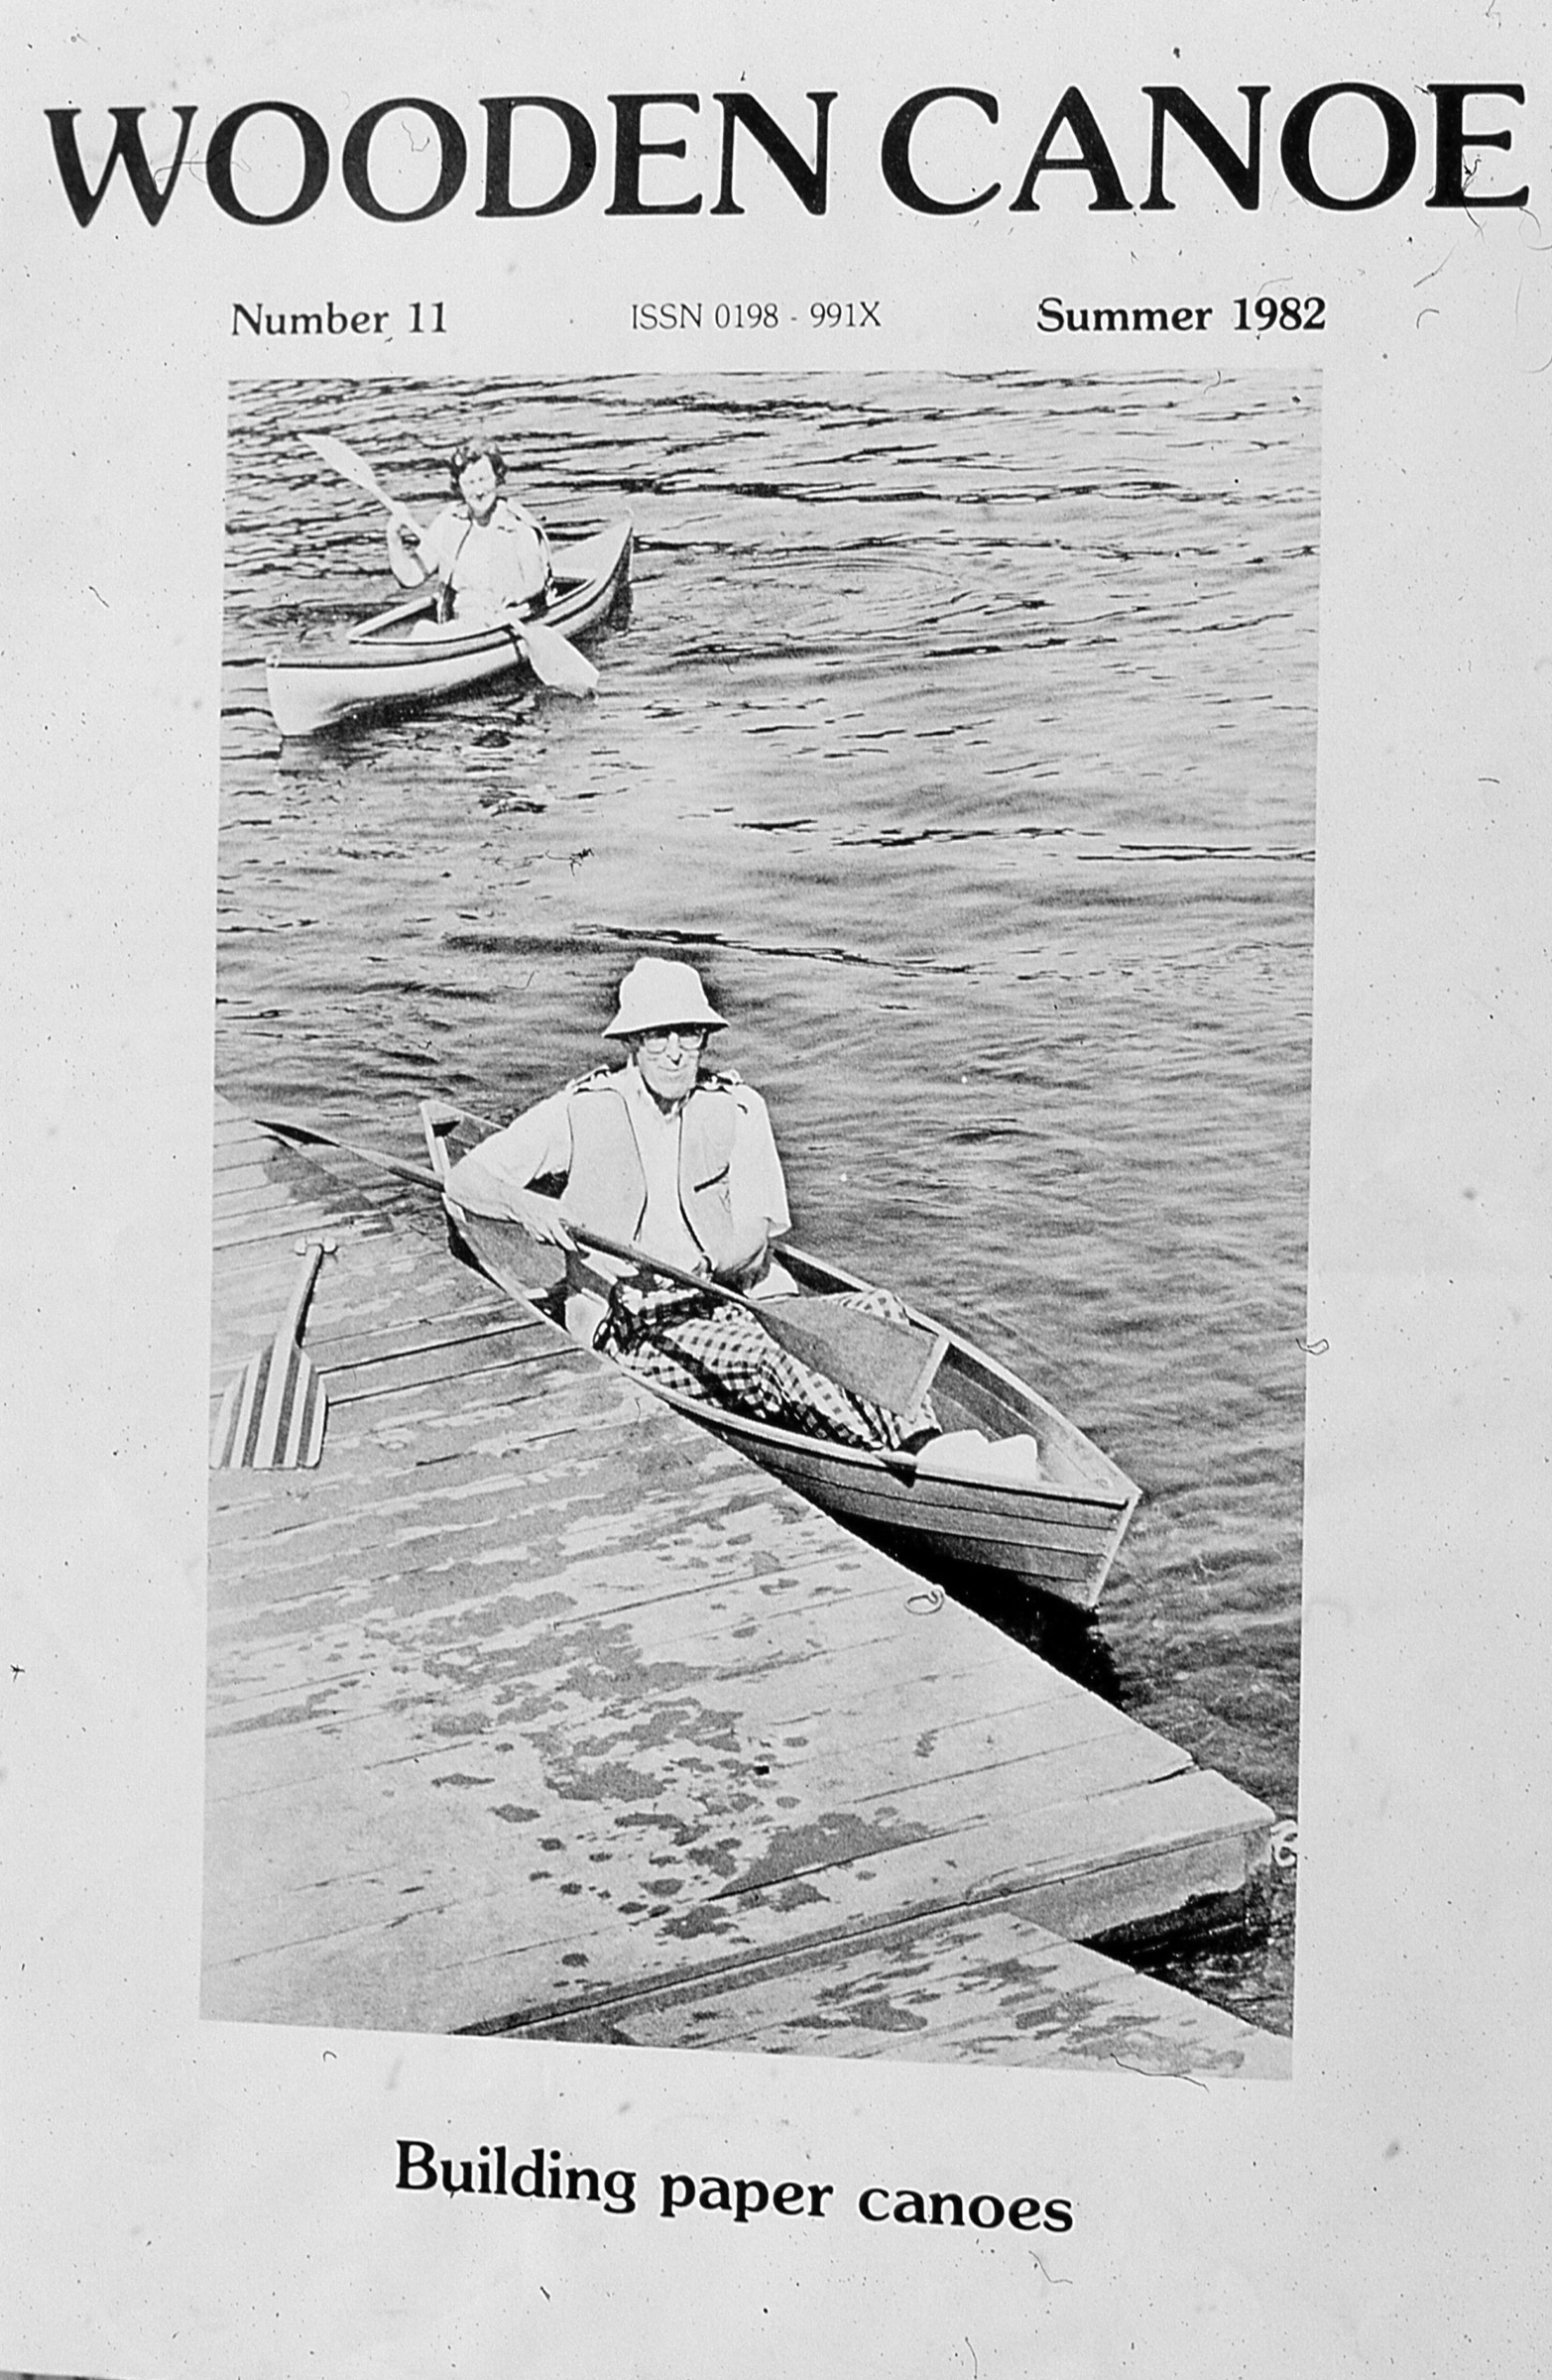
Nathaniel Holmes Bishop III was born in Medford, Massachusetts, on March 23, 1827, and died in Glens Falls New York, July 2, 1902. In his time, he was quite well known for books he had written about his travels in small boats. I first heard about him, quite by accident, in the spring of 1982. I was working part-time at the Wooden Boat Shop, located, appropriately, on Boat Street in Seattle. On a sunny summer morning, I was manning the front counter when the mail came in and among that day’s mail was the latest issue of Wooden Canoe, Volume 11 of the Wooden Canoe Heritage Association’s magazine. The store was empty so I had some free time to browse through it.
This issue of Wooden Canoe introduced Nathaniel Holmes Bishop to me. Eight years later my son would be named Nathan in his honor.
I skimmed over an article written by Walter Fullam of Princeton, New Jersey about building canoes by laminating kraft paper with glue. That was mildly interesting, but what captivated me was an excerpt from Bishop’s Voyage of the Paper Canoe: A geographical journey of 2500 miles from Quebec to the Gulf of Mexico, during the years 1874—5. Hungry for the rest of Bishop’s story, I found an old copy in the University of Washington’s library and read it from cover to cover. His writing was certainly a product of the 19th century, but charming and evocative:
Finding that the wind usually rose and fell with the sun, we now made it a rule to anchor our boat during most of the day and pull against the current at night. The moon and the bright auroral lights made this task an agreeable one. Then, too, we had Coggia’s comet speeding through the northern heavens…. In this high latitude day dawned before three o’clock, and the twilight lingered so long that we could read the fine print of a newspaper without effort at a quarter to nine o’clock P. M.
And he did not lack a good sense of humor. About his parting with David Bodfish, his traveling companion, briefly, from Quebec City to Troy, New York, he writes:
I had unfortunately contributed to Mr. Bodfish’s thirst for the marvellous by reading to him at night, in our lonely camp, Jules Verne’s imaginative Journey to the Centre of the Earth. David was in ecstasies over this wonderful contribution to fiction. He preferred fiction to truth at any time. Once, while reading to him a chapter of the above work, his credulity was so challenged that he became excited, and broke forth with, “Say, boss, how do these big book-men larn to lie so well? does it come nat’ral to them, or is it got by edication?
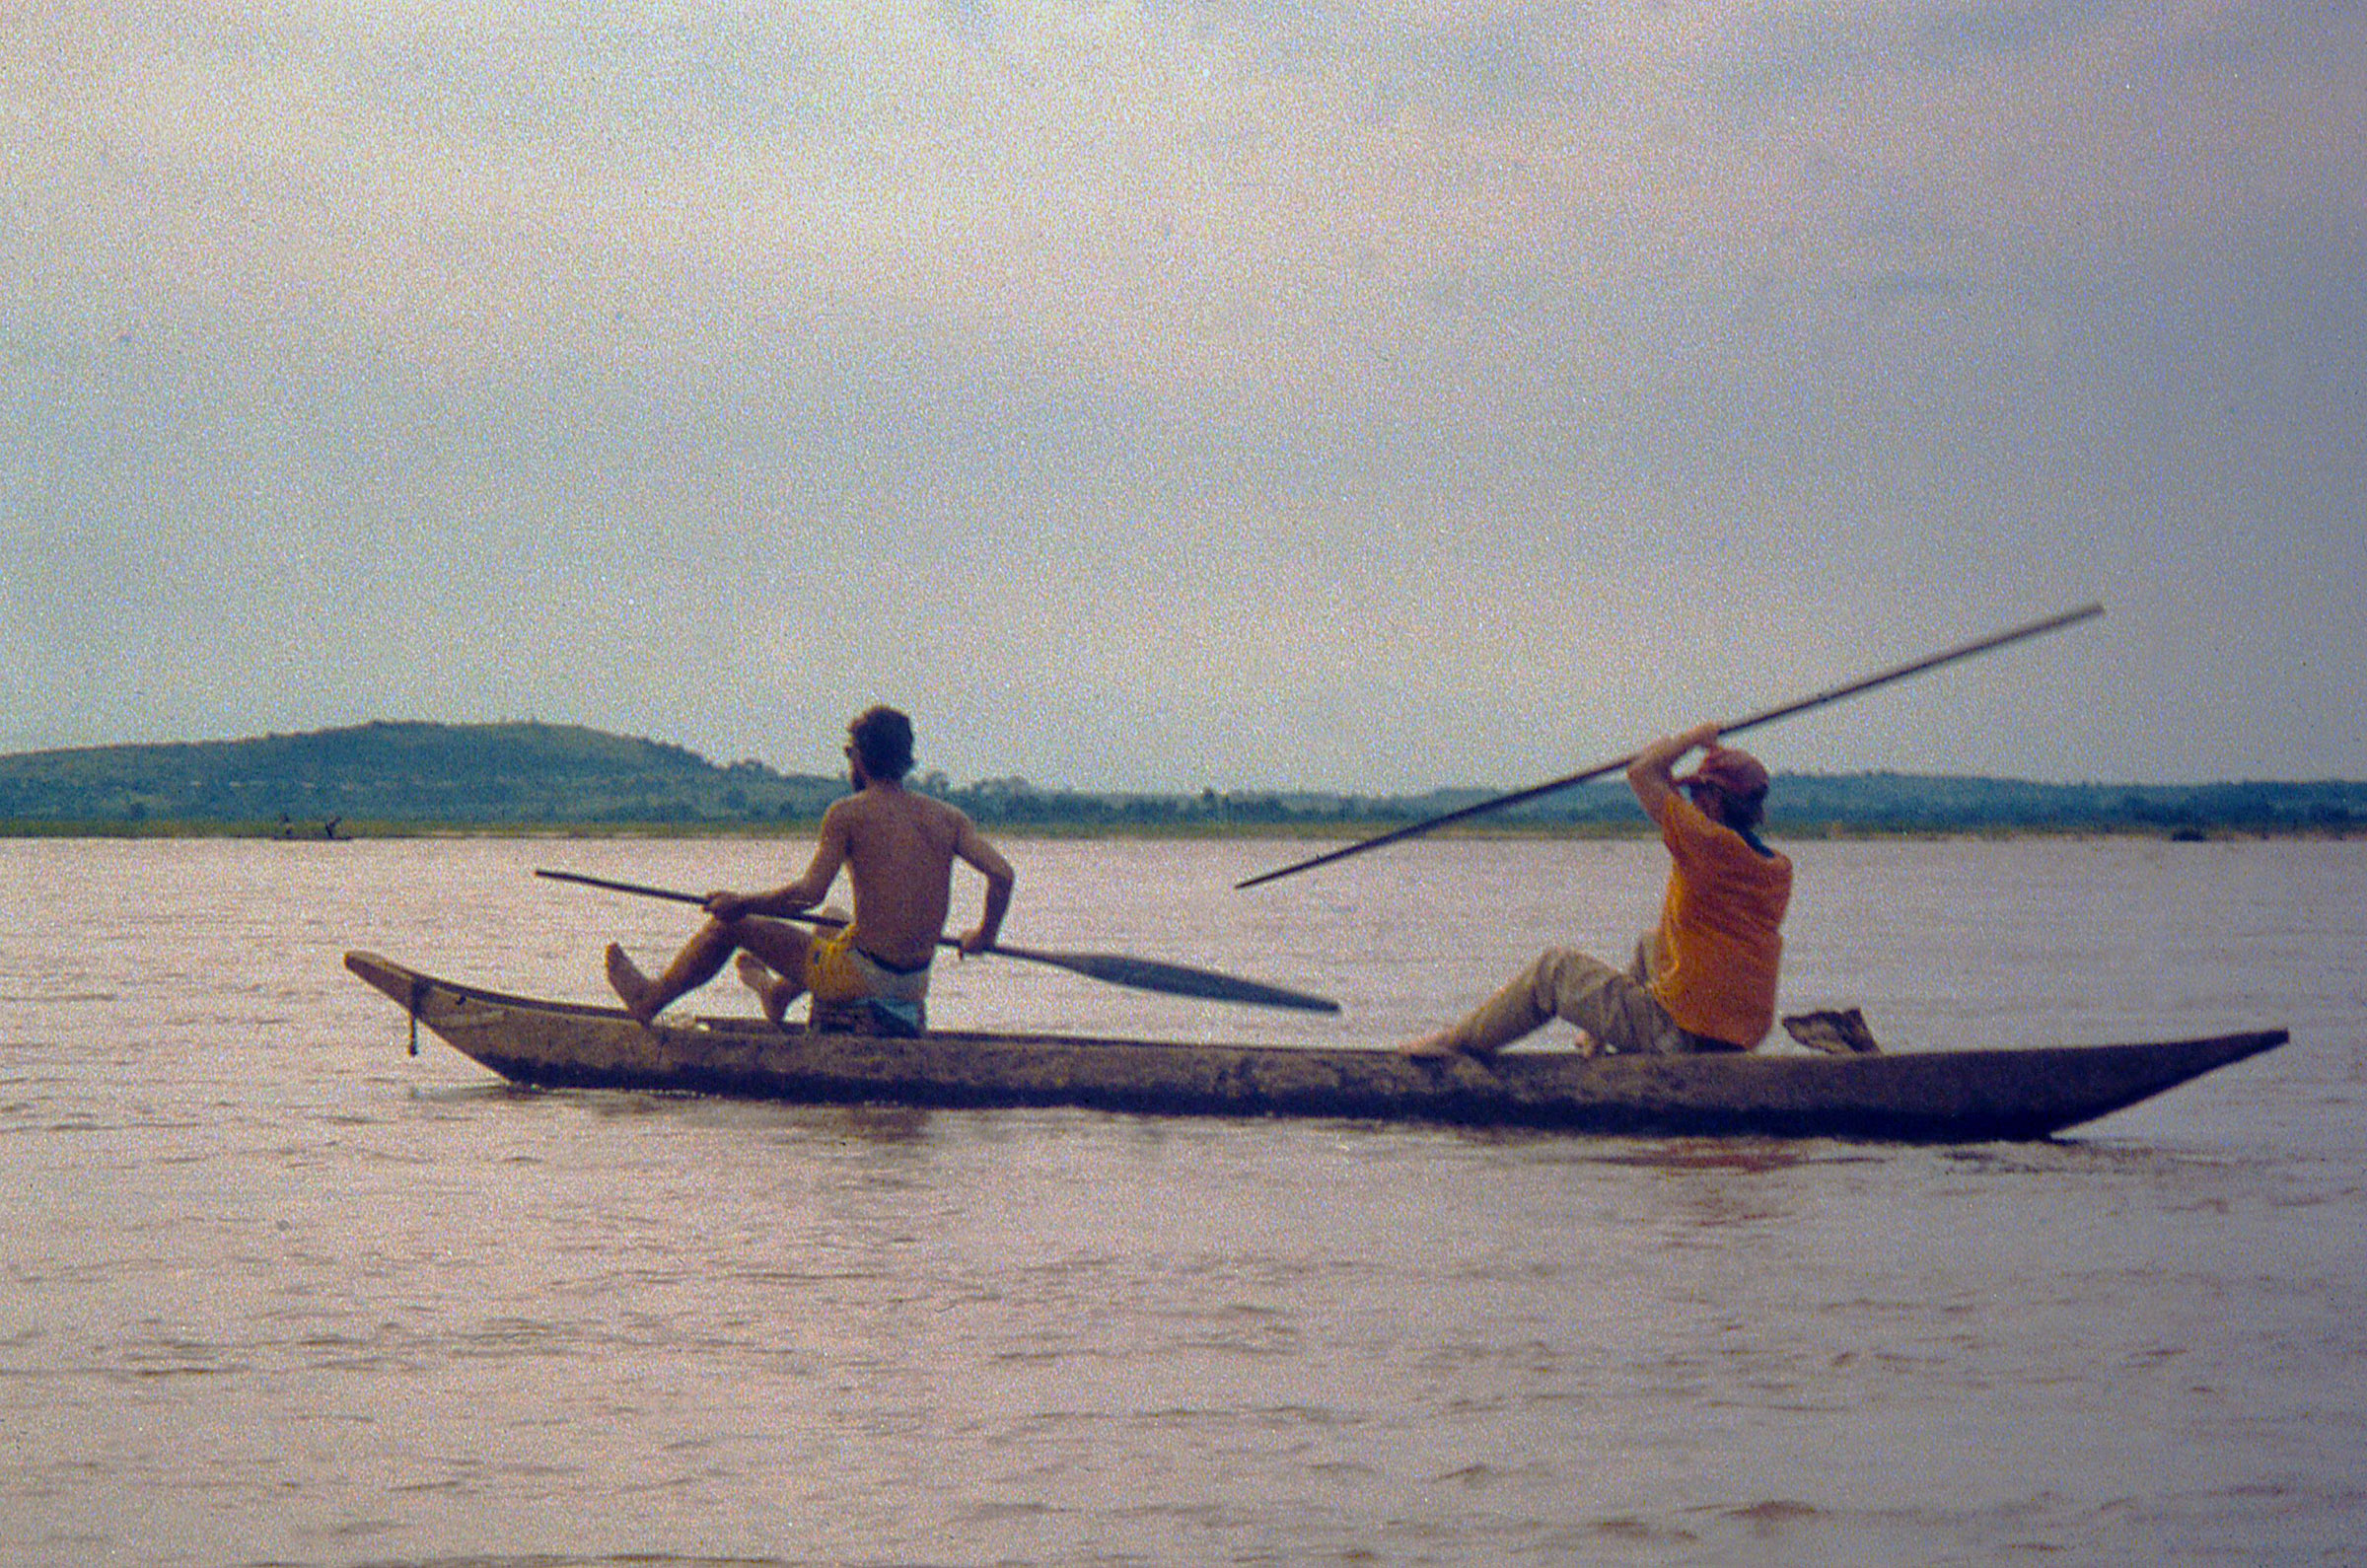
Having grown up on the West Coast, I knew about the Inside Passage woven into the coasts of British Columbia and Alaska, but I had no idea that there was an even longer and better protected thread of waterways that connected Canada to Florida. After I returned Voyage of the Paper Canoe to the library, I paid regular visits to the book with a weighty pocketful of nickels and carefully photocopied every page of it. I needed to have a copy because I’d decided, even before I’d finished reading the book, that I would build a paper canoe and retrace Bishop’s route. He would be my guide. I was approaching 30, not quite sure what I was going to do with my life, and had no obligations to prevent me from embarking on a voyage that would take several months. I spent the next year trying to figure out how to laminate a paper hull, and in the late fall of 1983, with a craft-paper canoe of questionable durability on my Volkswagen bug’s roof racks, I headed to Quebec City. Four months later I had reached Cedar Key on Florida’s Gulf Coast. The voyage had only whetted my appetite.
I kept my copy of Four Months in the chart case and kept up with Bishop day by day as I descended the Ohio River and then the Mississippi with him. Not all of the landscape had been changed by the 110 years between us. Cave-in-Rock, a 30′ wide cavern on the Illinois side of the Ohio is still there, as is the burial mound in Moundsville, West Virginia. And most of the Mississippi is isolated from civilization by levees so it’s the same wilderness the Bishop rowed through and the people who live along the river were every bit as interesting and generous as they had been in Bishop’s account.
I made good time, especially along the Gulf Coast where I had some good sailing, and reached Cedar Key in 2-1/2 months. Although my pursuit of Bishop was suddenly over, he had given my life a new and clear trajectory, one that eventually lead me here, to Small Boats Monthly.
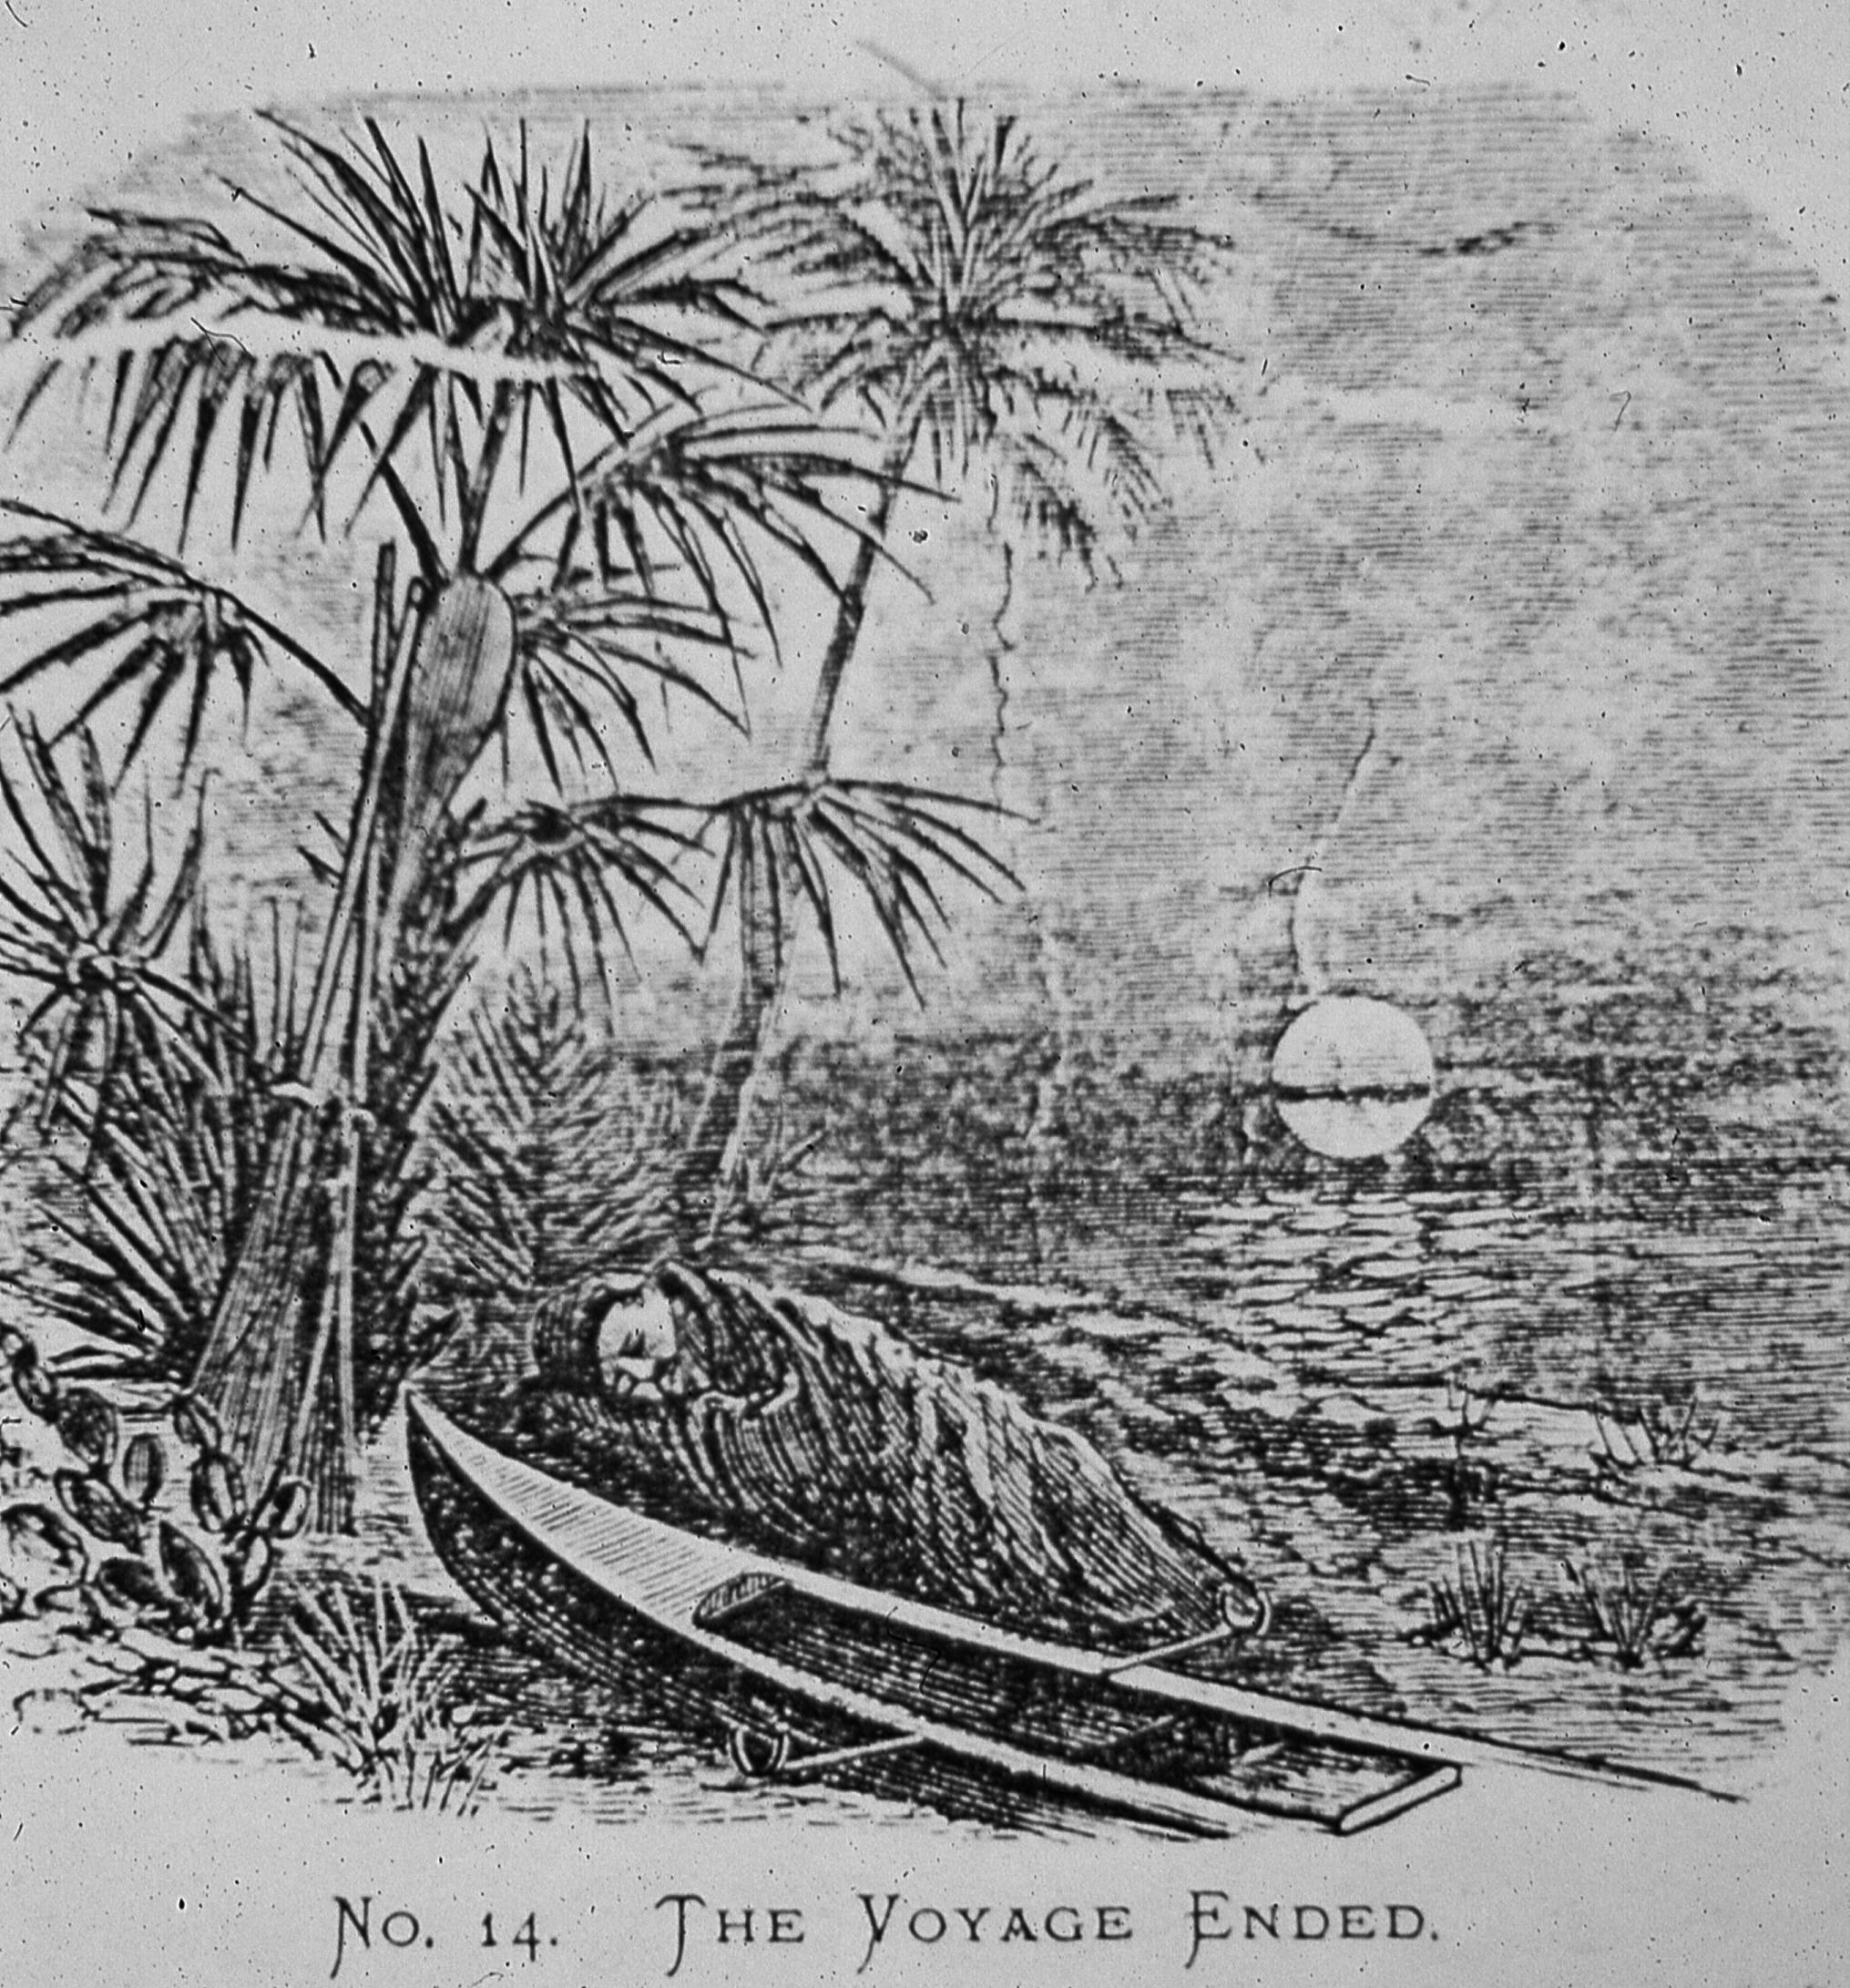
Of the last night of his voyage, Bishop writes:
Lying there under the tender sky, lighted with myriads of glittering stars, a soft gleam of light stretched like a golden band along the water…. It seemed to be the path I had taken, the course of my faithful boat. All I could see was the band of shining light, the bright end of the voyage.
What he had seen behind him, that bright path, was what I had seen stretching out ahead of me.
Bishop was traveling and writing long before his well-known voyages. This journal, dated 1852 and written when he was 15, is titled “Nathaniel Bishop’s Journal of a Pedestrian Tour from the Town of Medford, Mass, to the White Mountains, N.H., Embracing nearly 300 Miles Travel on Foot.” He also kept a journal later in his life called “Log of the Lorna,” an account of travels by boat with his wife, Mary Ball. I saw this journal, and other Bishop memorabilia, in the archives of the Ocean County Library, in Toms River, New Jersey.
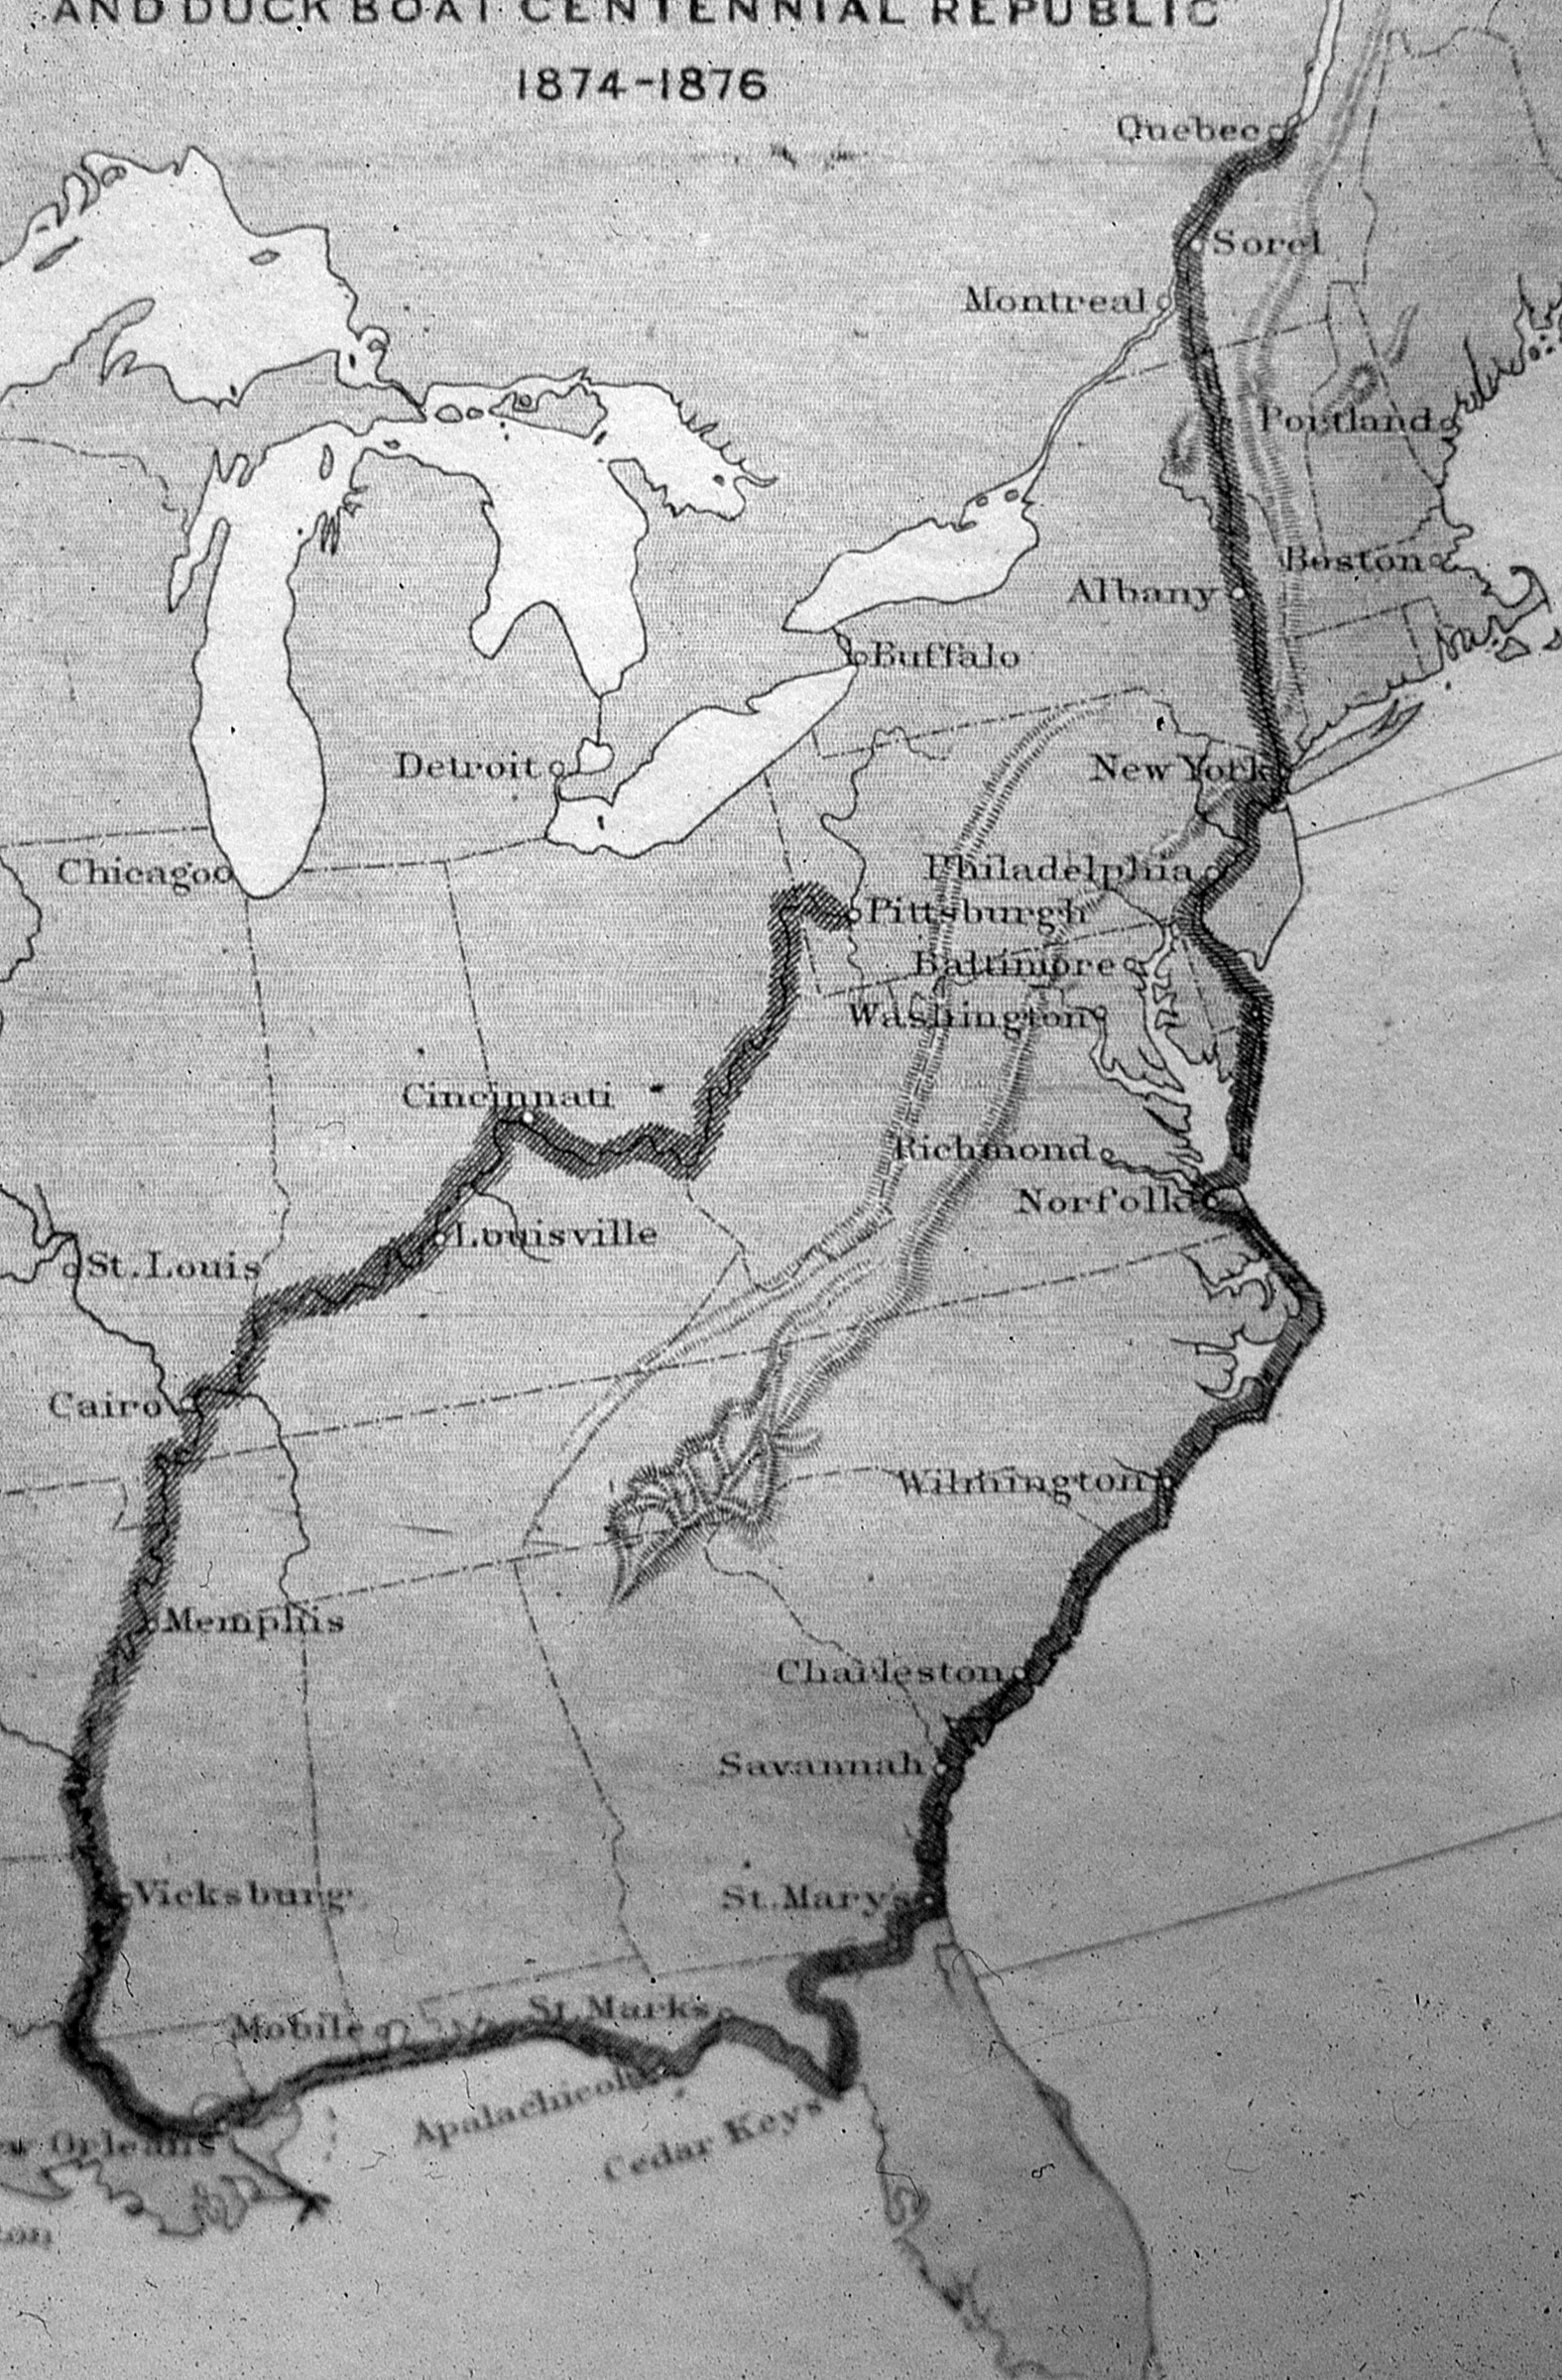
The two routes, paper canoe on the right and sneak box on the left, both end at the Cedar Keys on the Gulf Coast of Florida. Together they add up to more than 5,000 miles.
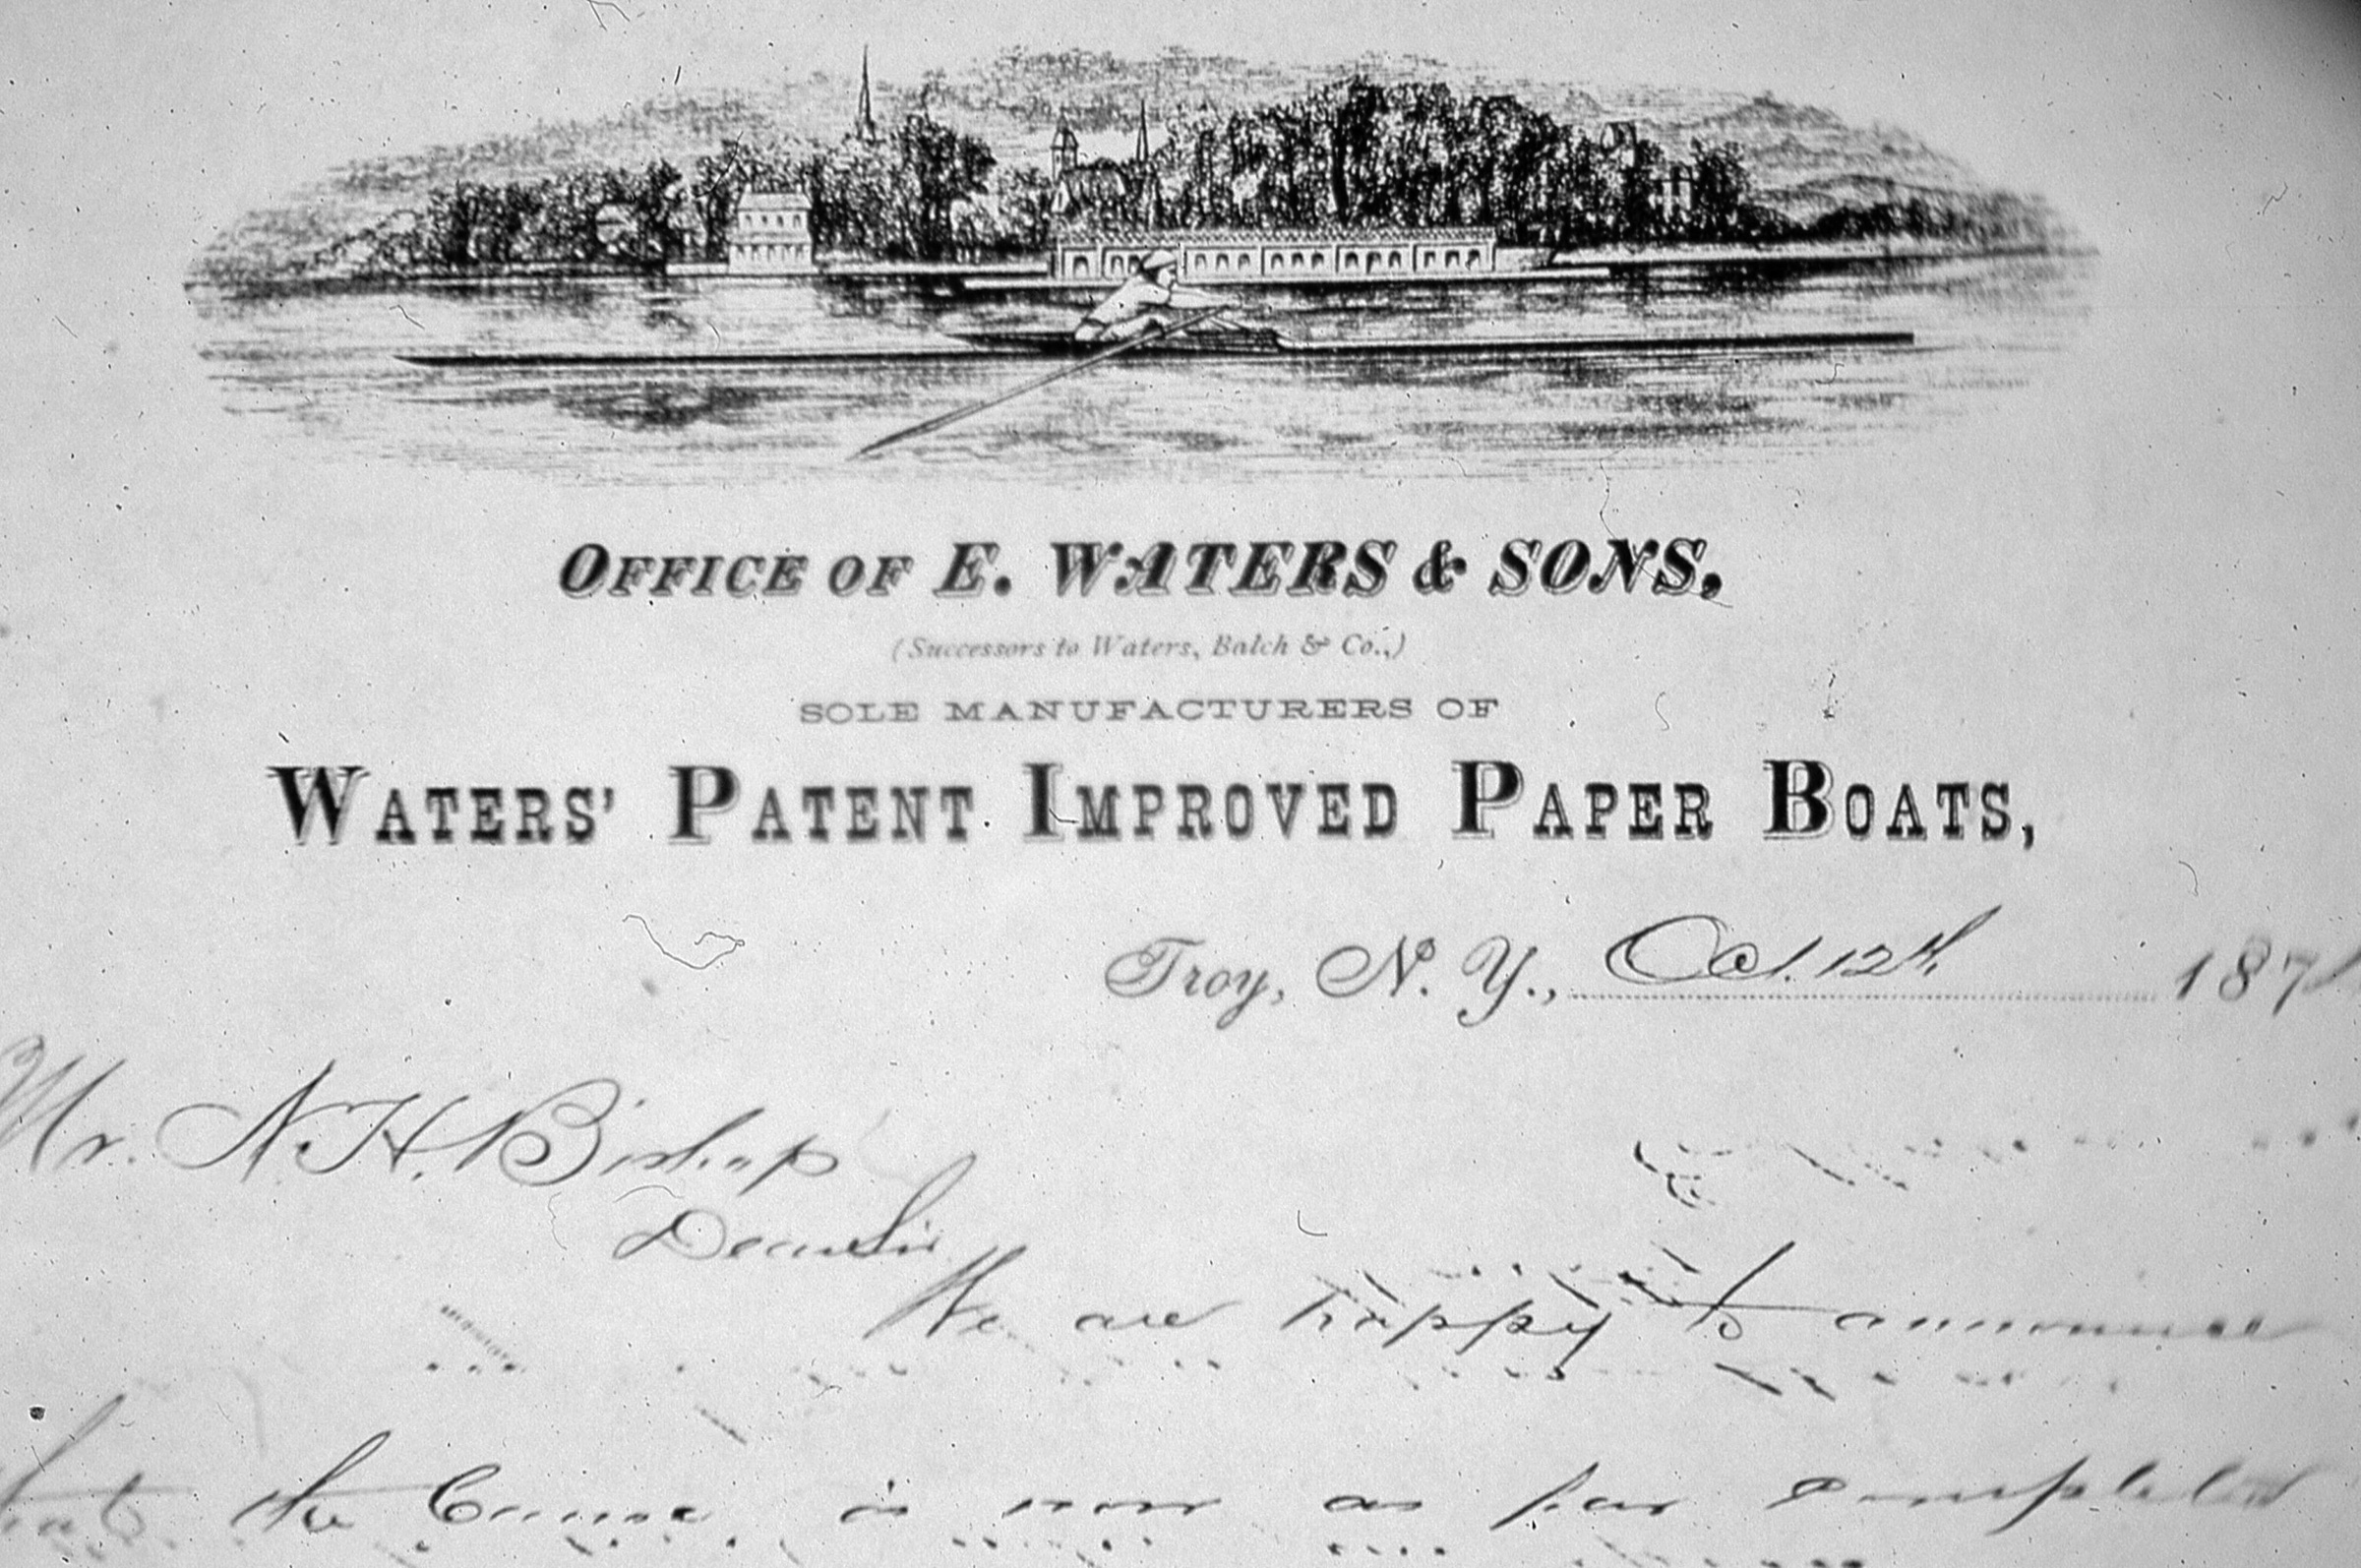
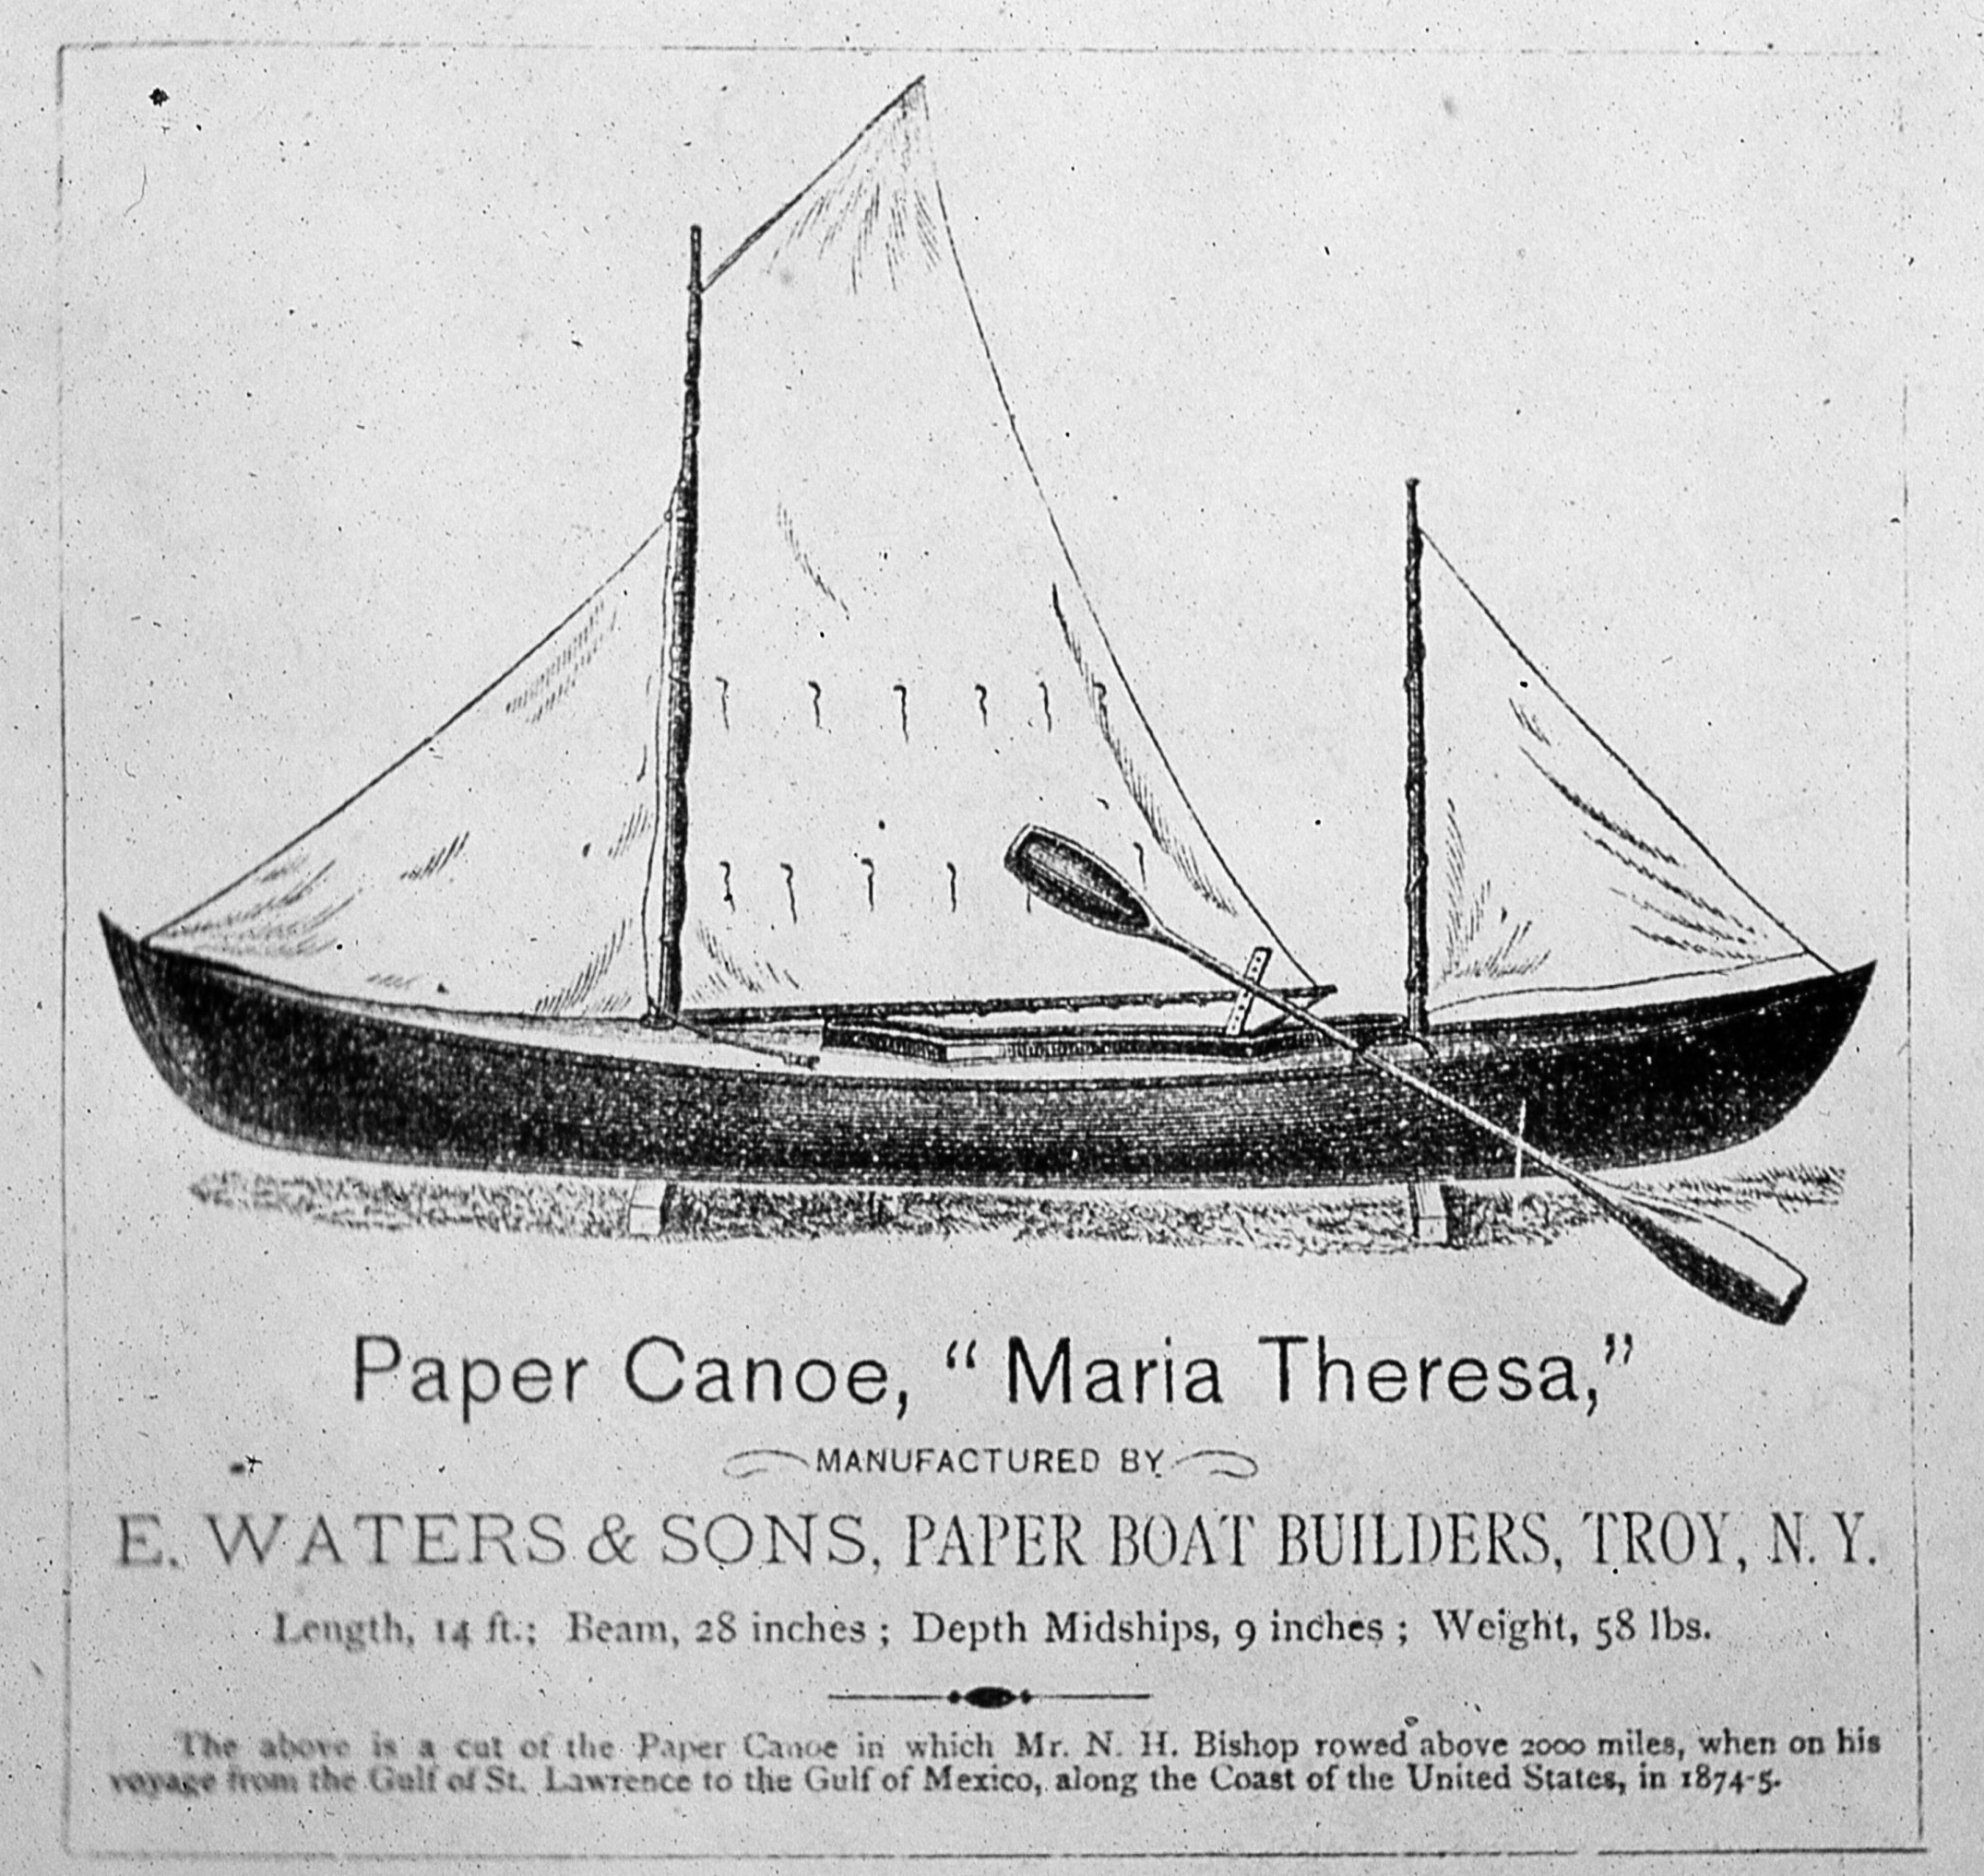
Bishop travelled from Quebec City to Troy, NY, in a lapstrake double-ender, MAYETA, an 18′ lapstrake canoe, which proved too heavy and unwieldy. Bishop had heard about the tough, lightweight boats being made of paper by Waters & Sons, the only company making paper boats, as well as observatory domes and racing shells. The company was in Troy, so he ordered a paper canoe. This letter, dated October 12, 1874, seems to be an announcement of the completion of the canoe. Nine days later, having christened the 58-lb canoe MARIA THERESA, Bishop resumed his trip southward on the Hudson River. George Waters, paddling his own paper canoe, accompanied him for a few miles.
Bishop’s paper canoe became a selling point for the Waters company. His books were quite popular and often given out a prizes to school children.
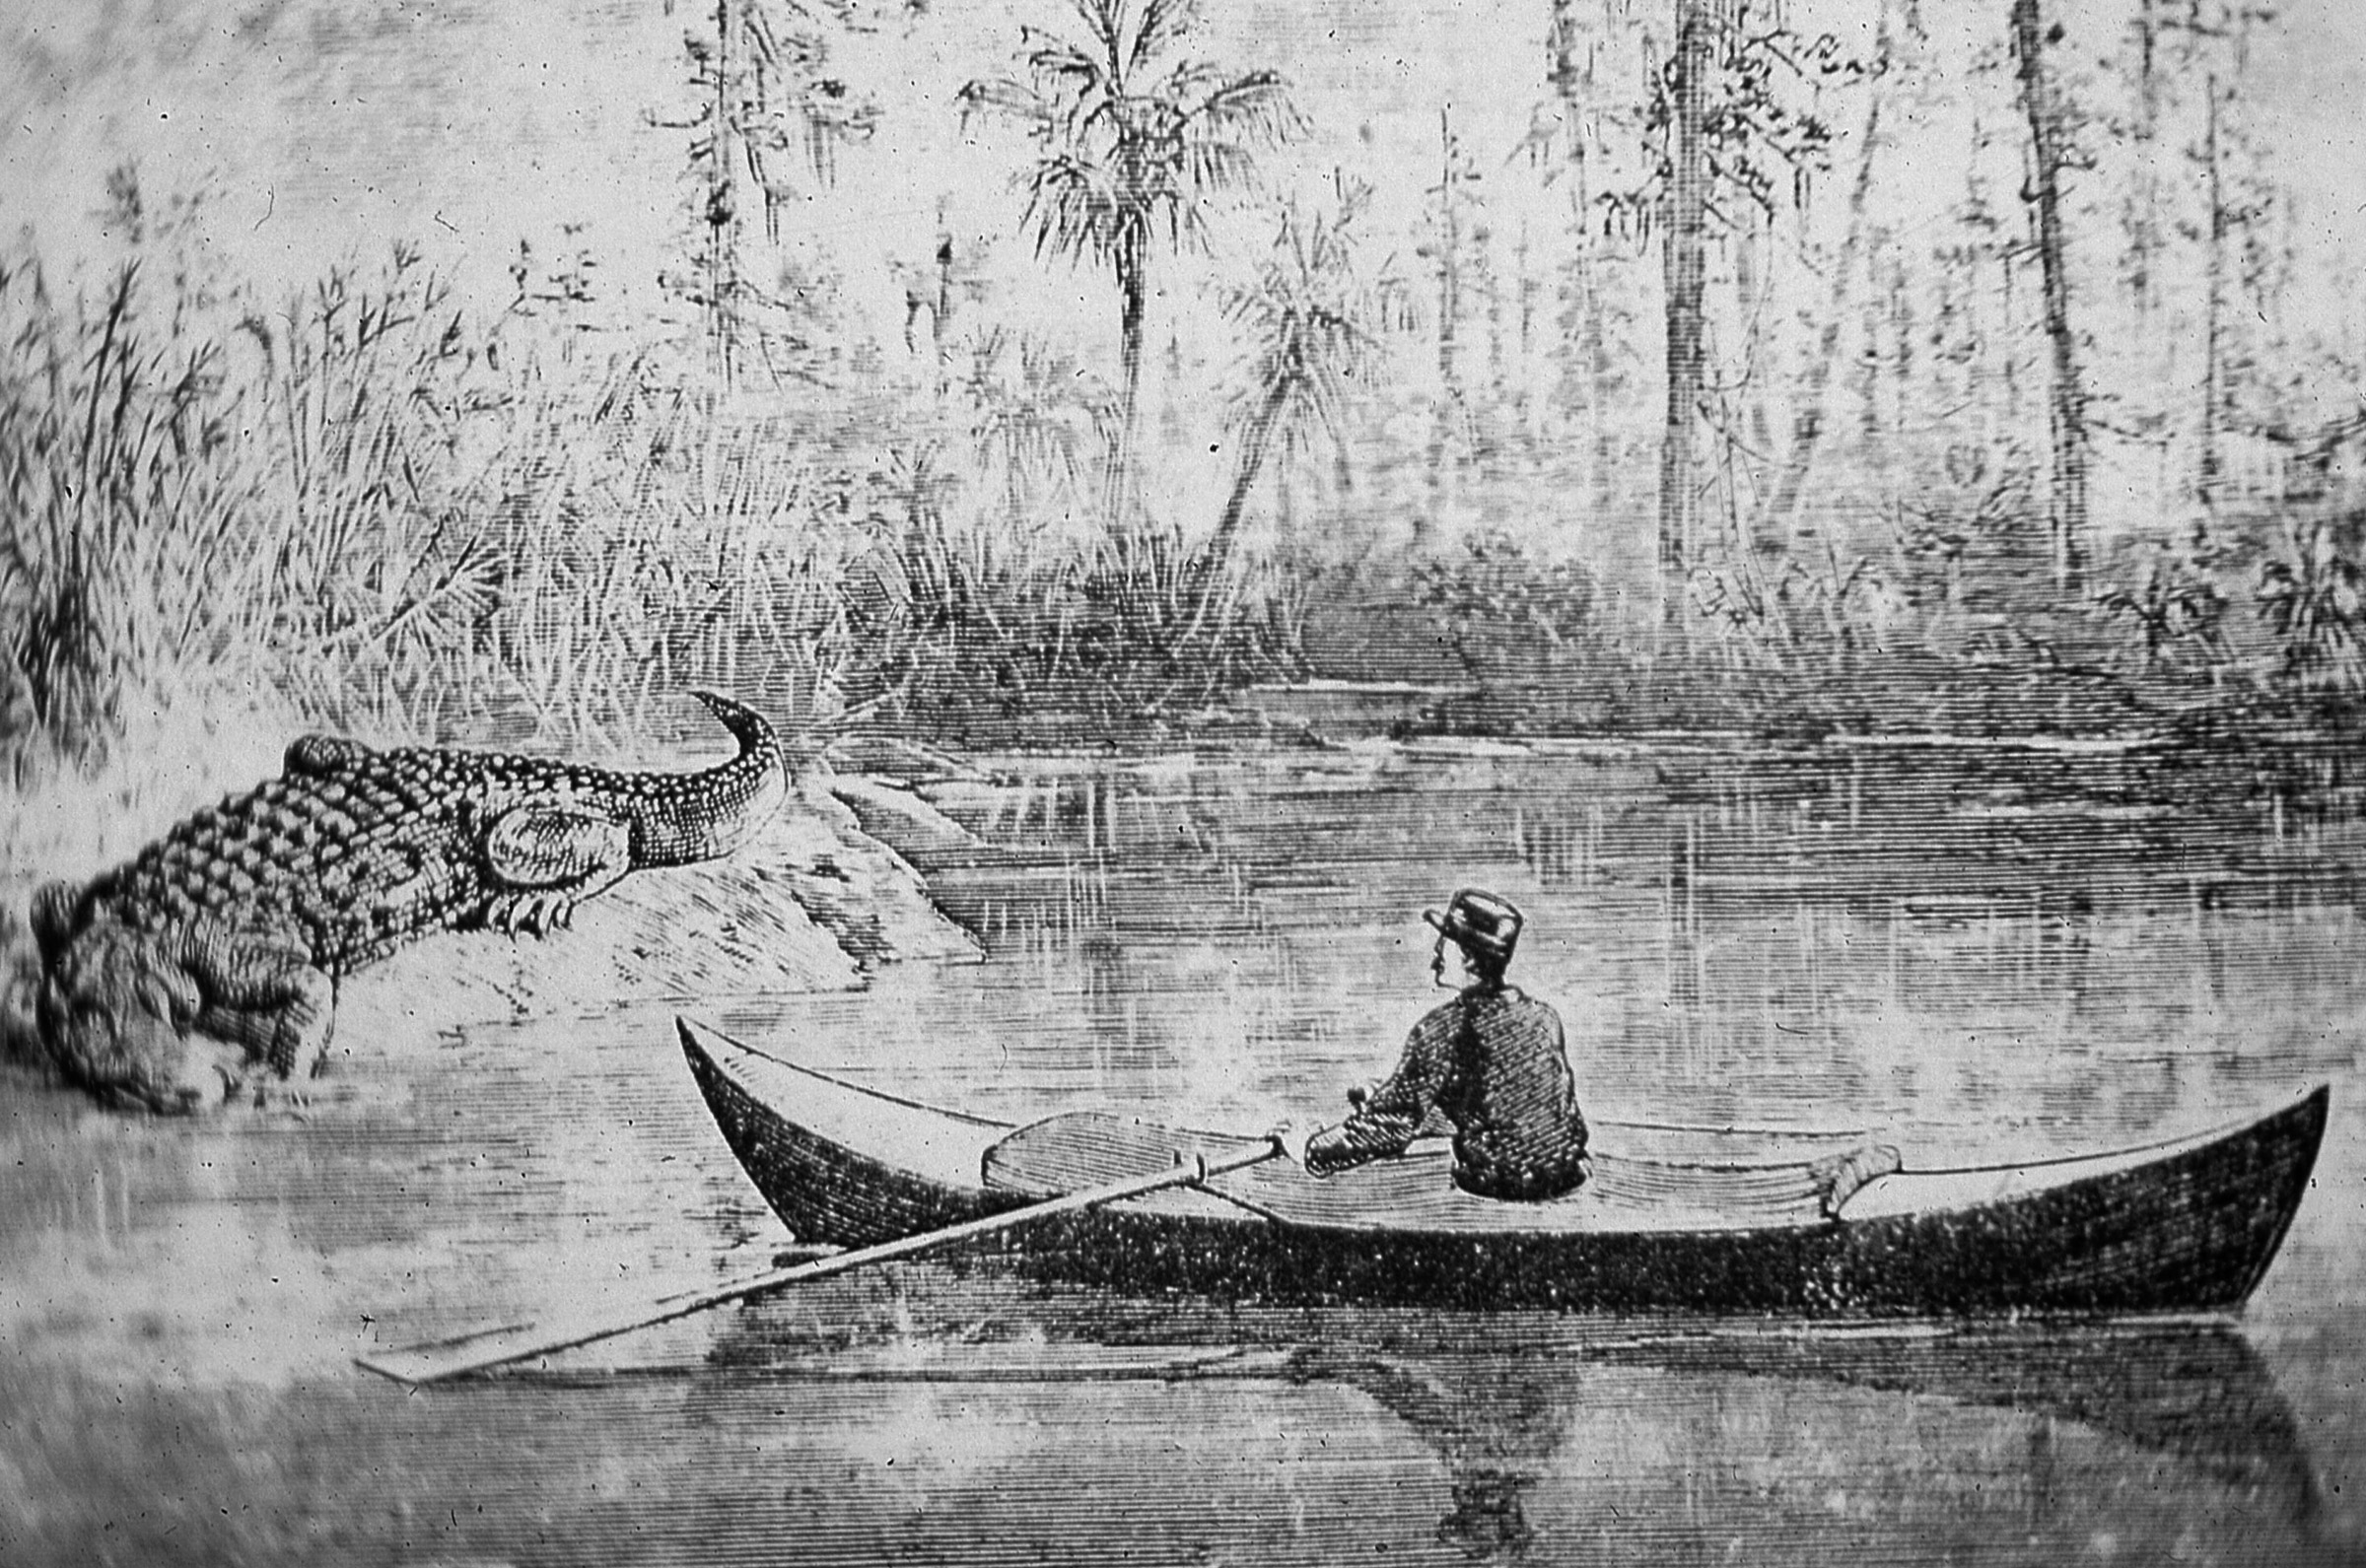
Bishop rowed MARIA THERESA through southern waters in February of 1875, and the cool weather would have kept the insects at bay and made the alligators sluggish.
News of the Voyage of the Paper Canoe raced down the East Coast ahead of Bishop. The town of St. Marys, Georgia, awaited him with this elaborate document, “An Address of Congratulation and Welcome from the Inhabitants of St. Mary’s” that was presented by the city’s mayor.
This undated photograph of Bishop paddling MARIA THERESA is the only photograph I’ve seen of that famous paper canoe. Bishop spent most of his time rowing instead of paddling; the outriggers are here folded back to rest on the deck. [Update: Ken Cupery, who once published The Paper Boater (no longer being issued but selected articles appear in Ken’s website, www.cupery.net), notes that the boat pictured here is not MARIA THERESA, which had a much longer cockpit. The photo has no notations and the boat’s identity is unknown.]
After I’d paddled MARIA THERESA’s route from Quebec to the Gulf of Mexico, I caught up with Mr. Bishop at the Riverside Cemetery in Toms River. That was in January of 1984. Two years later I’d be back on his trail, close to finishing my retracing of his sneak-box voyage.
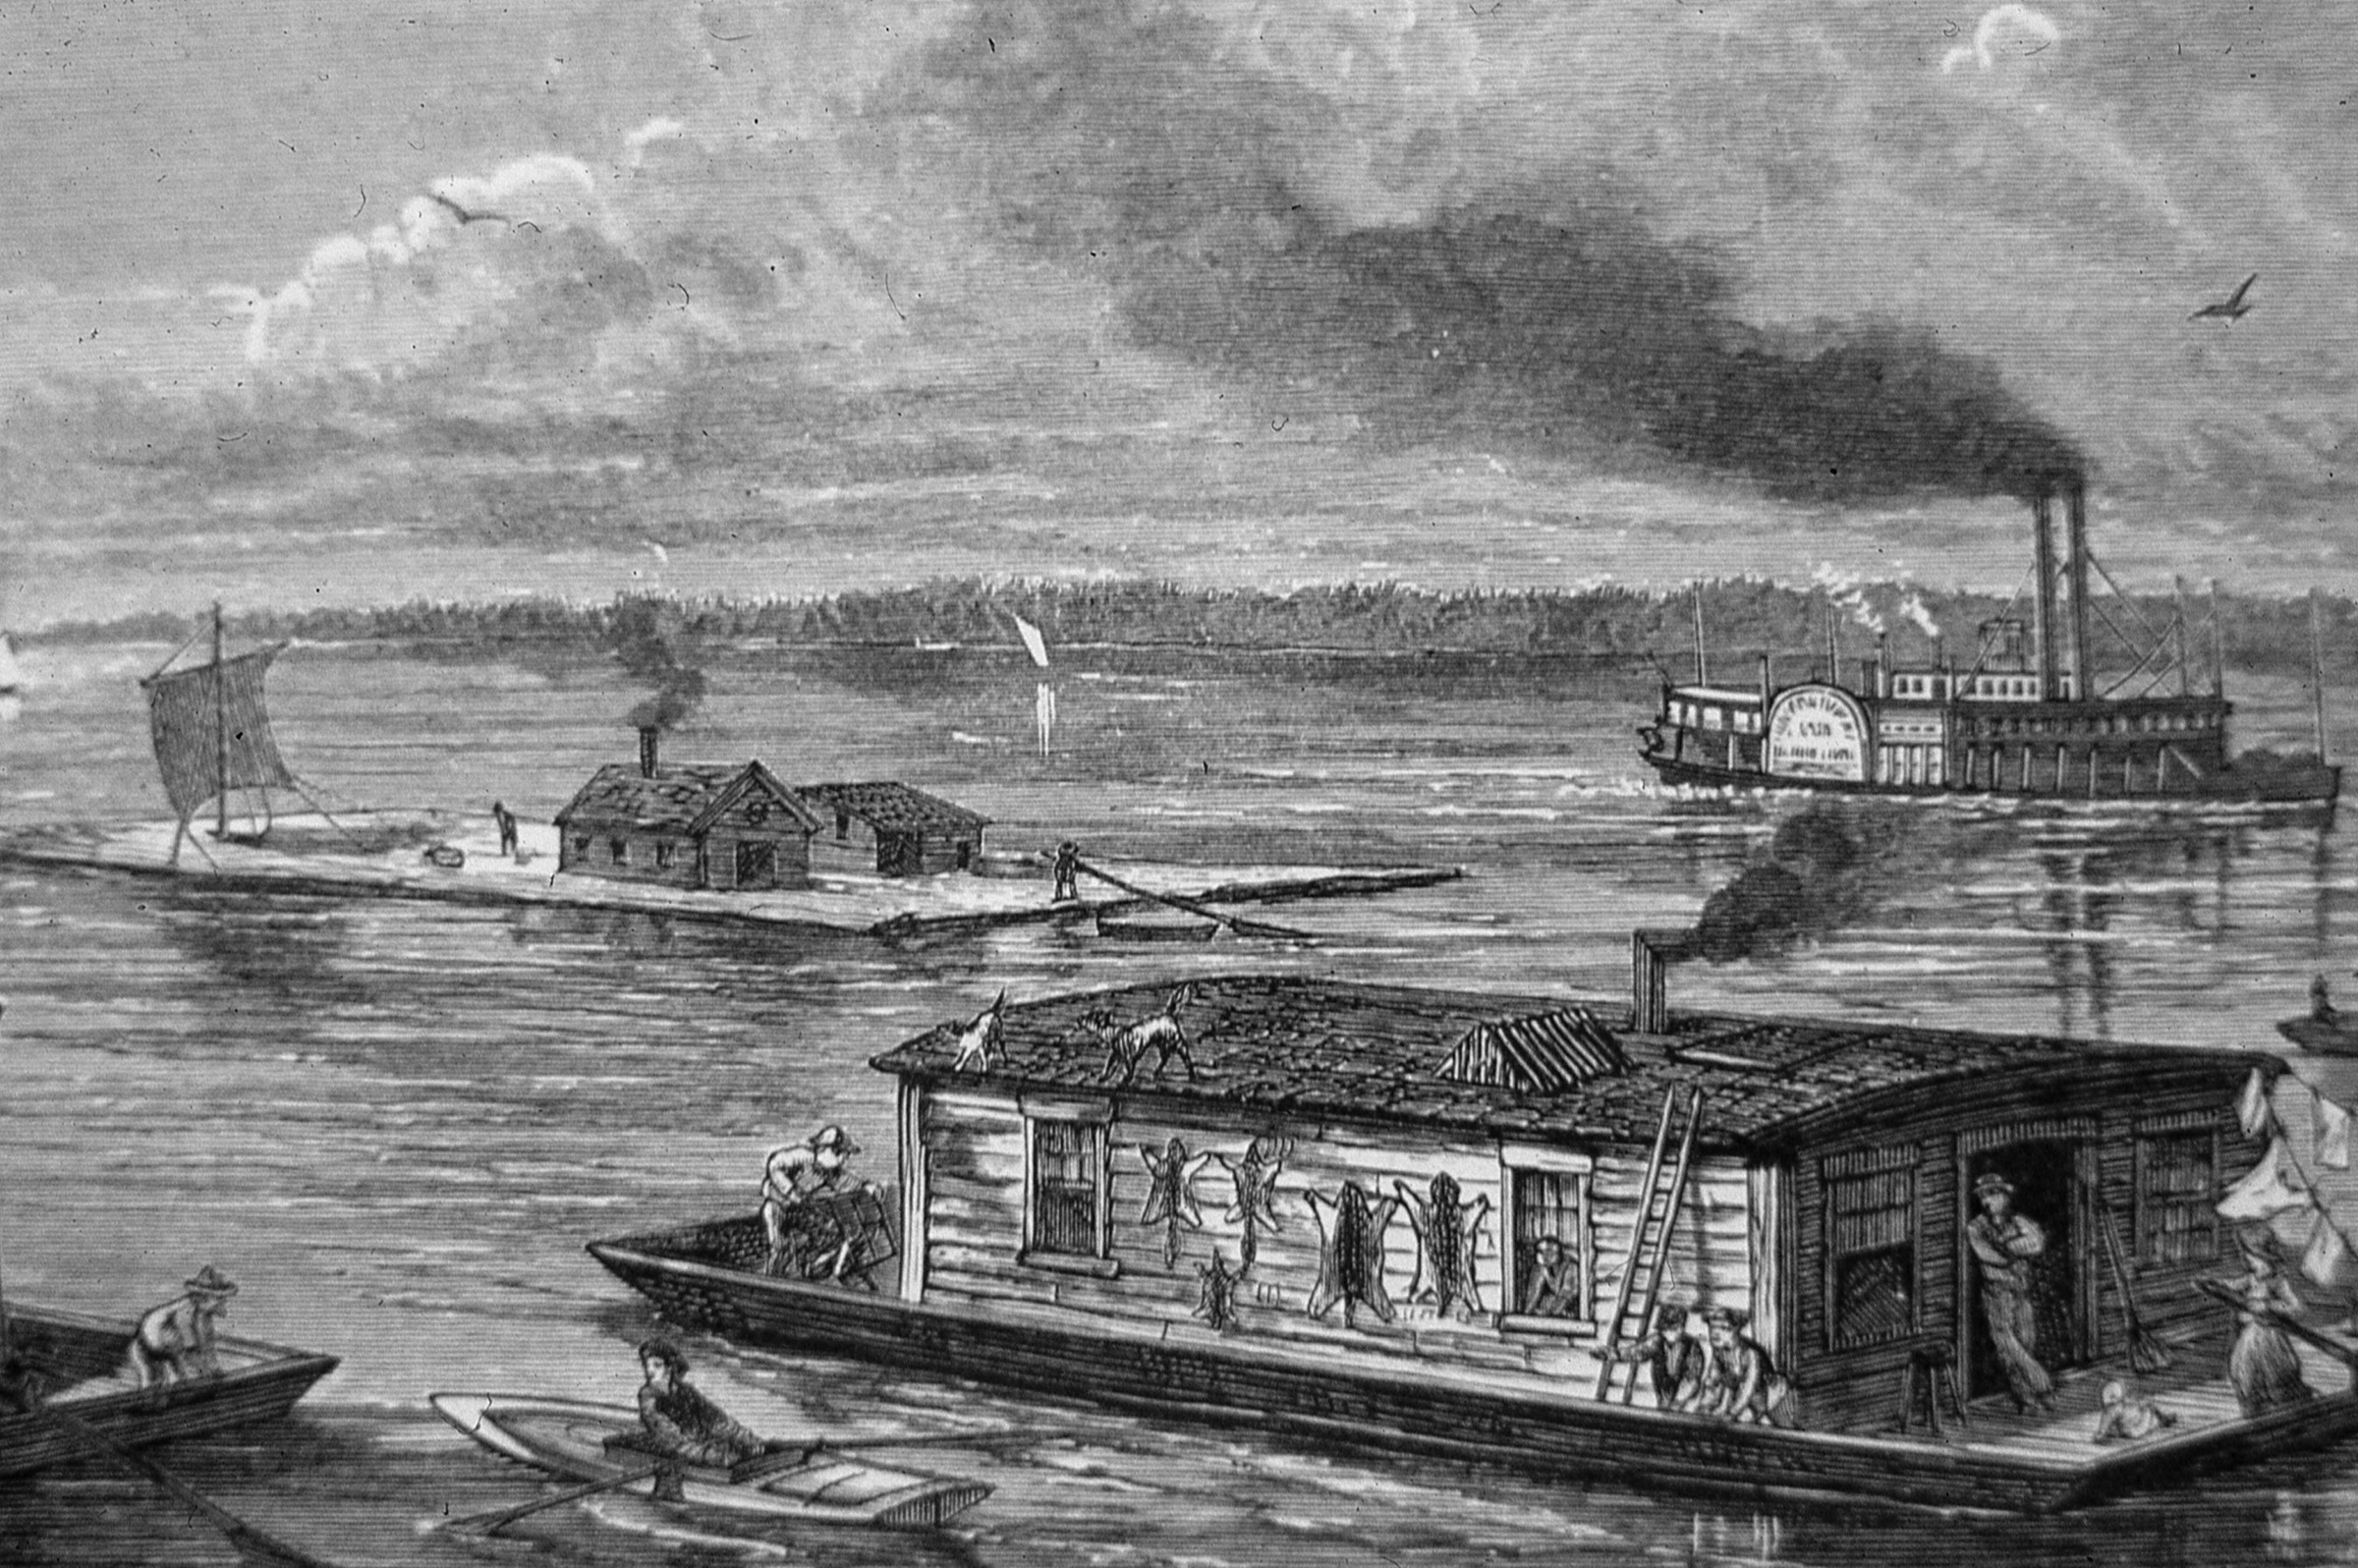
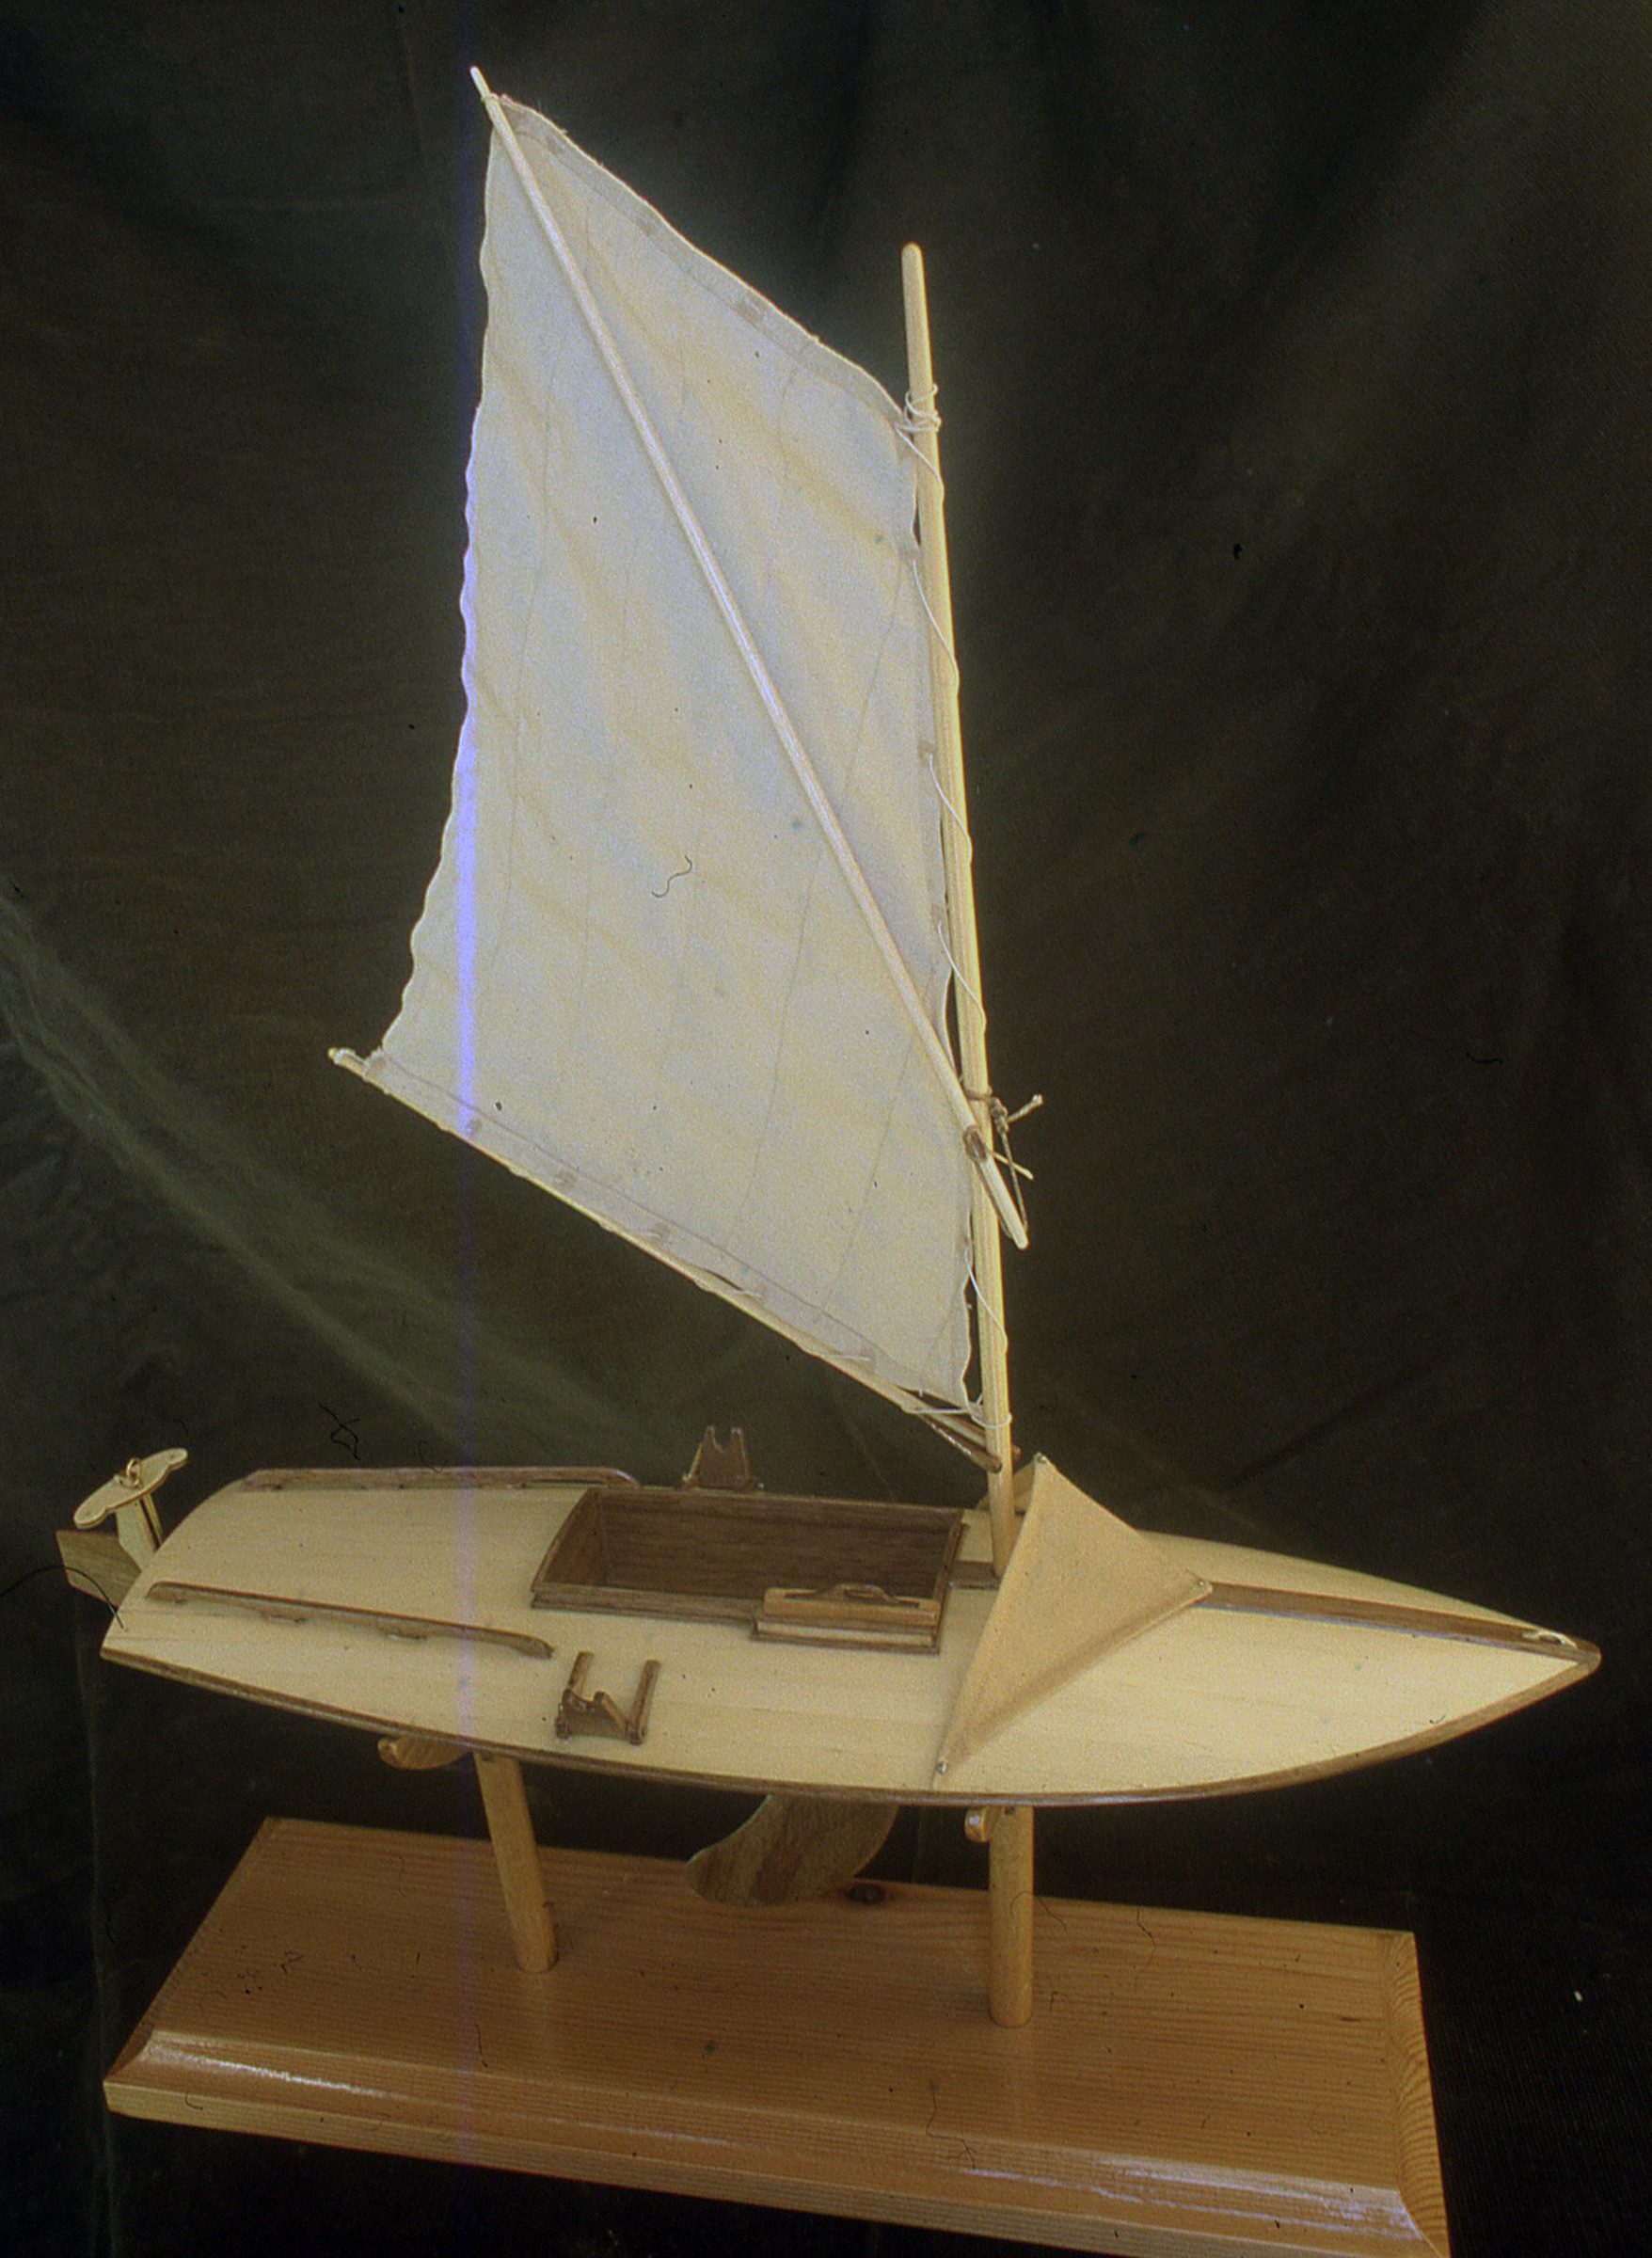
Traffic on the Mississippi River has changed over the last 143 years. In 1876, Bishop’s sneak box, CENTENNIAL REPUBLIC, may have been among the smallest boats on the river, but she was certainly not the slowest.
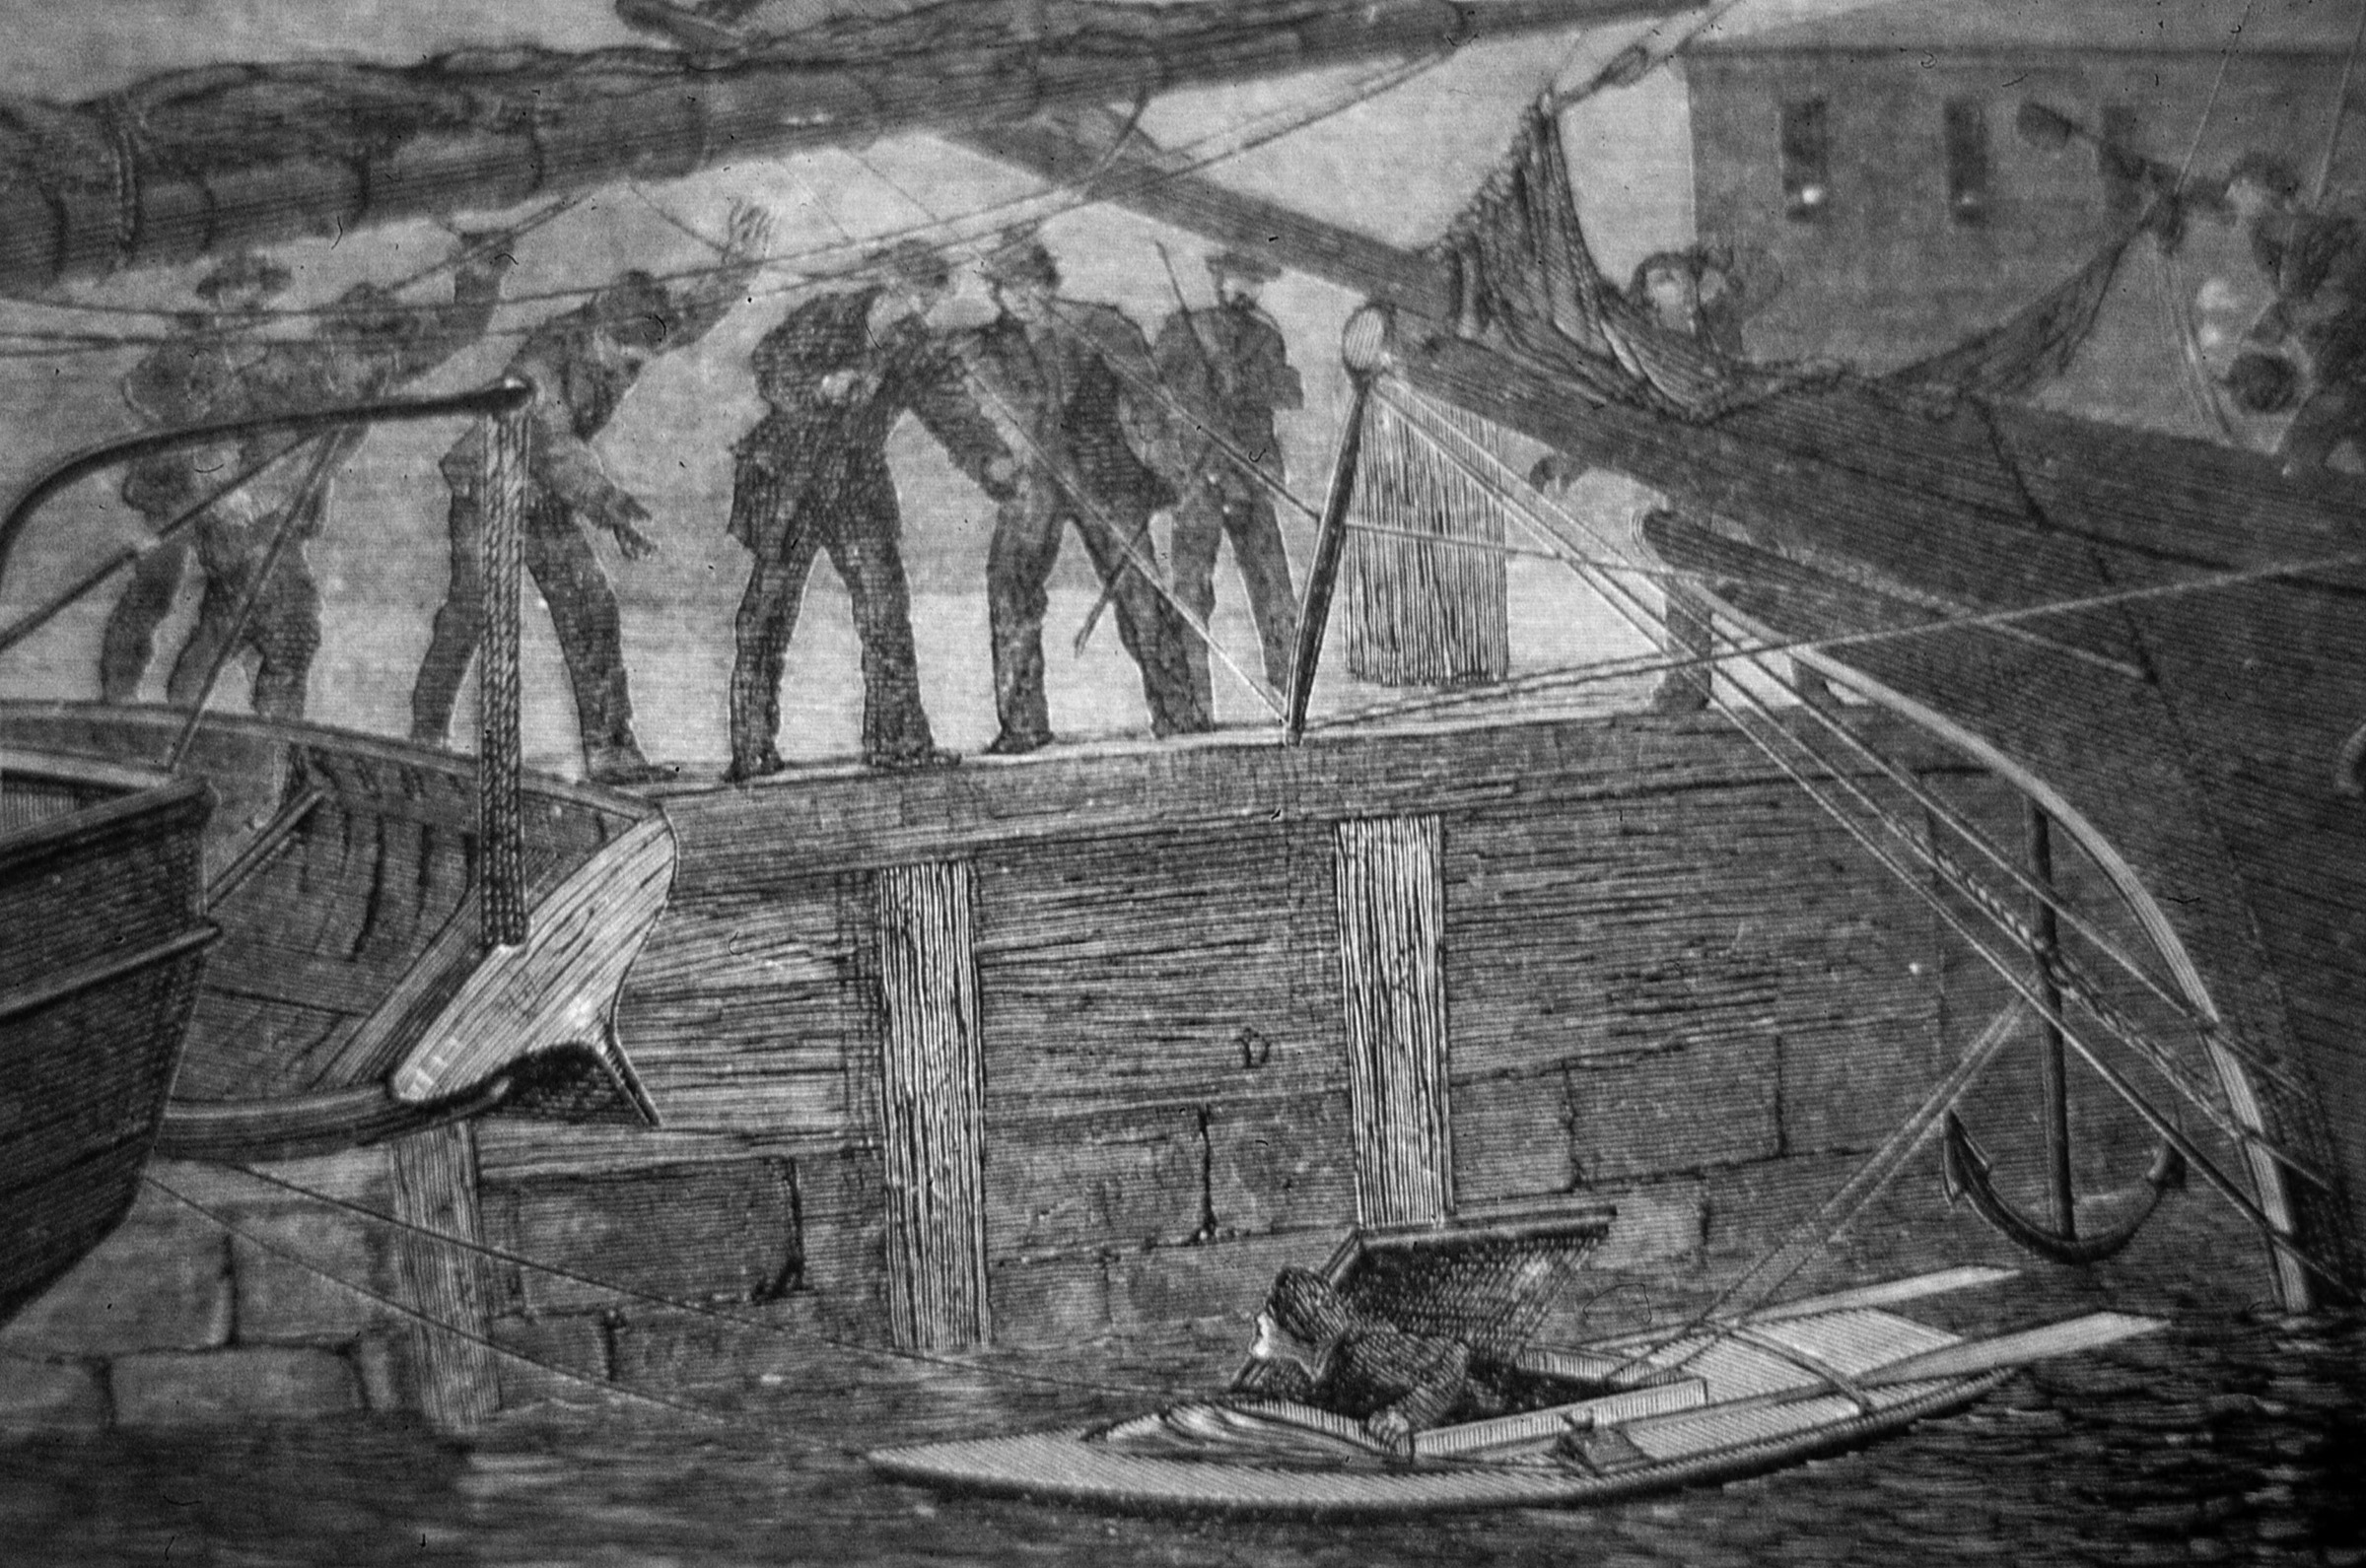
While Bishop was spending the night in New Orleans, he was discovered by “roughs” and taunted while he was trying to sleep. Having the benefit of his experience, I spent my night in New Orleans tucked deep under a large pier where no one could see me.
The Gulf Intracoastal Waterway wasn’t fully developed in Bishop’s day. Where he had to travel overland, there are now canals.
Bishop traveled 2,600 miles aboard CENTENNIAL REPUBLIC. The route from Pittsburgh to Cedar Key is now almost 200 miles shorter.
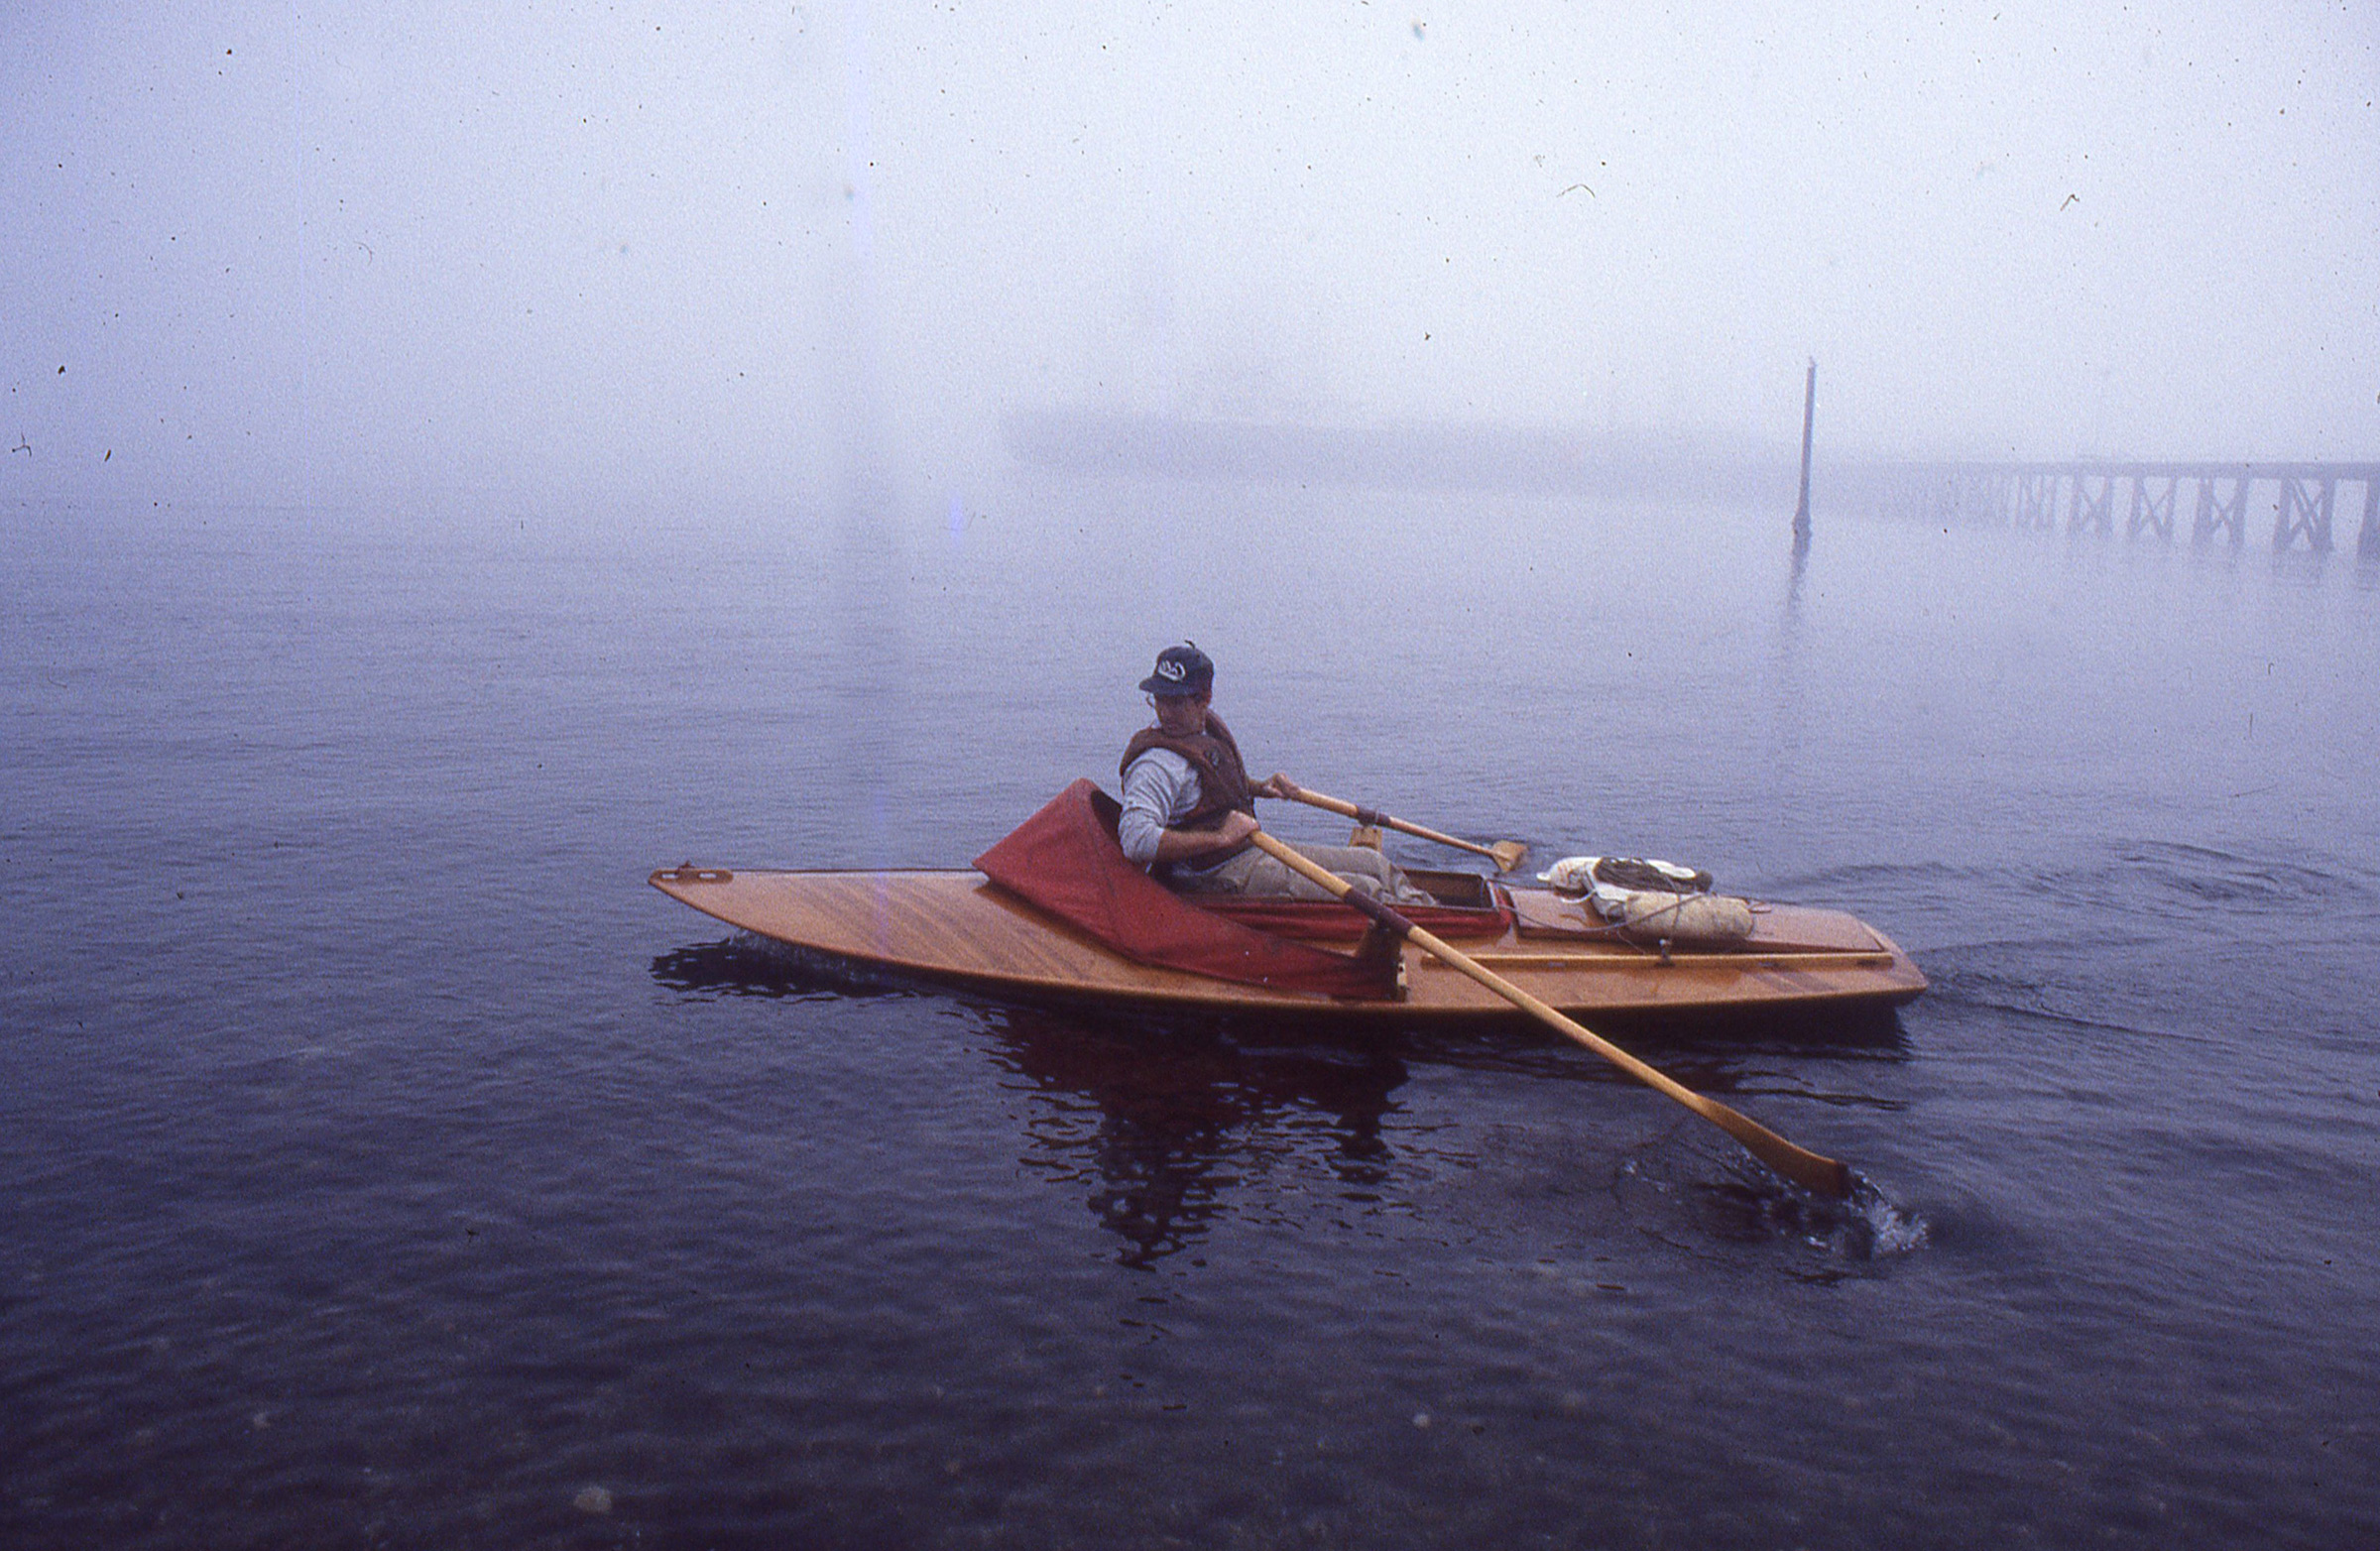
When I left New Orleans on a foggy Mississippi River, I had followed Bishop’s two long voyages for 4,500 miles and had another 400 miles ahead to get to the finish at Cedar Key, Florida. In the end, it was over all too soon.
Walter Fullam, whose article on paper canoes helped me build mine, shared with me an abiding interest in Bishop. After I finished my sneak-box journey, I built this model of Bishop’s CENTENNIAL REPUBLIC for him. We remained friends until his death in 2000 and his wife Dorothy and I sent each other Christmas cards for many years afterward.
Bishop did quite well for himself in his later years. He was a successful cranberry farmer and owned over 60 plots of land as well as homes in New Jersey, New York, Florida, and California. In 1880 he was among the two dozen paddling enthusiasts who founded the American Canoe Association. I found this portrait of him in Toms’ River, in the library he funded in his will.
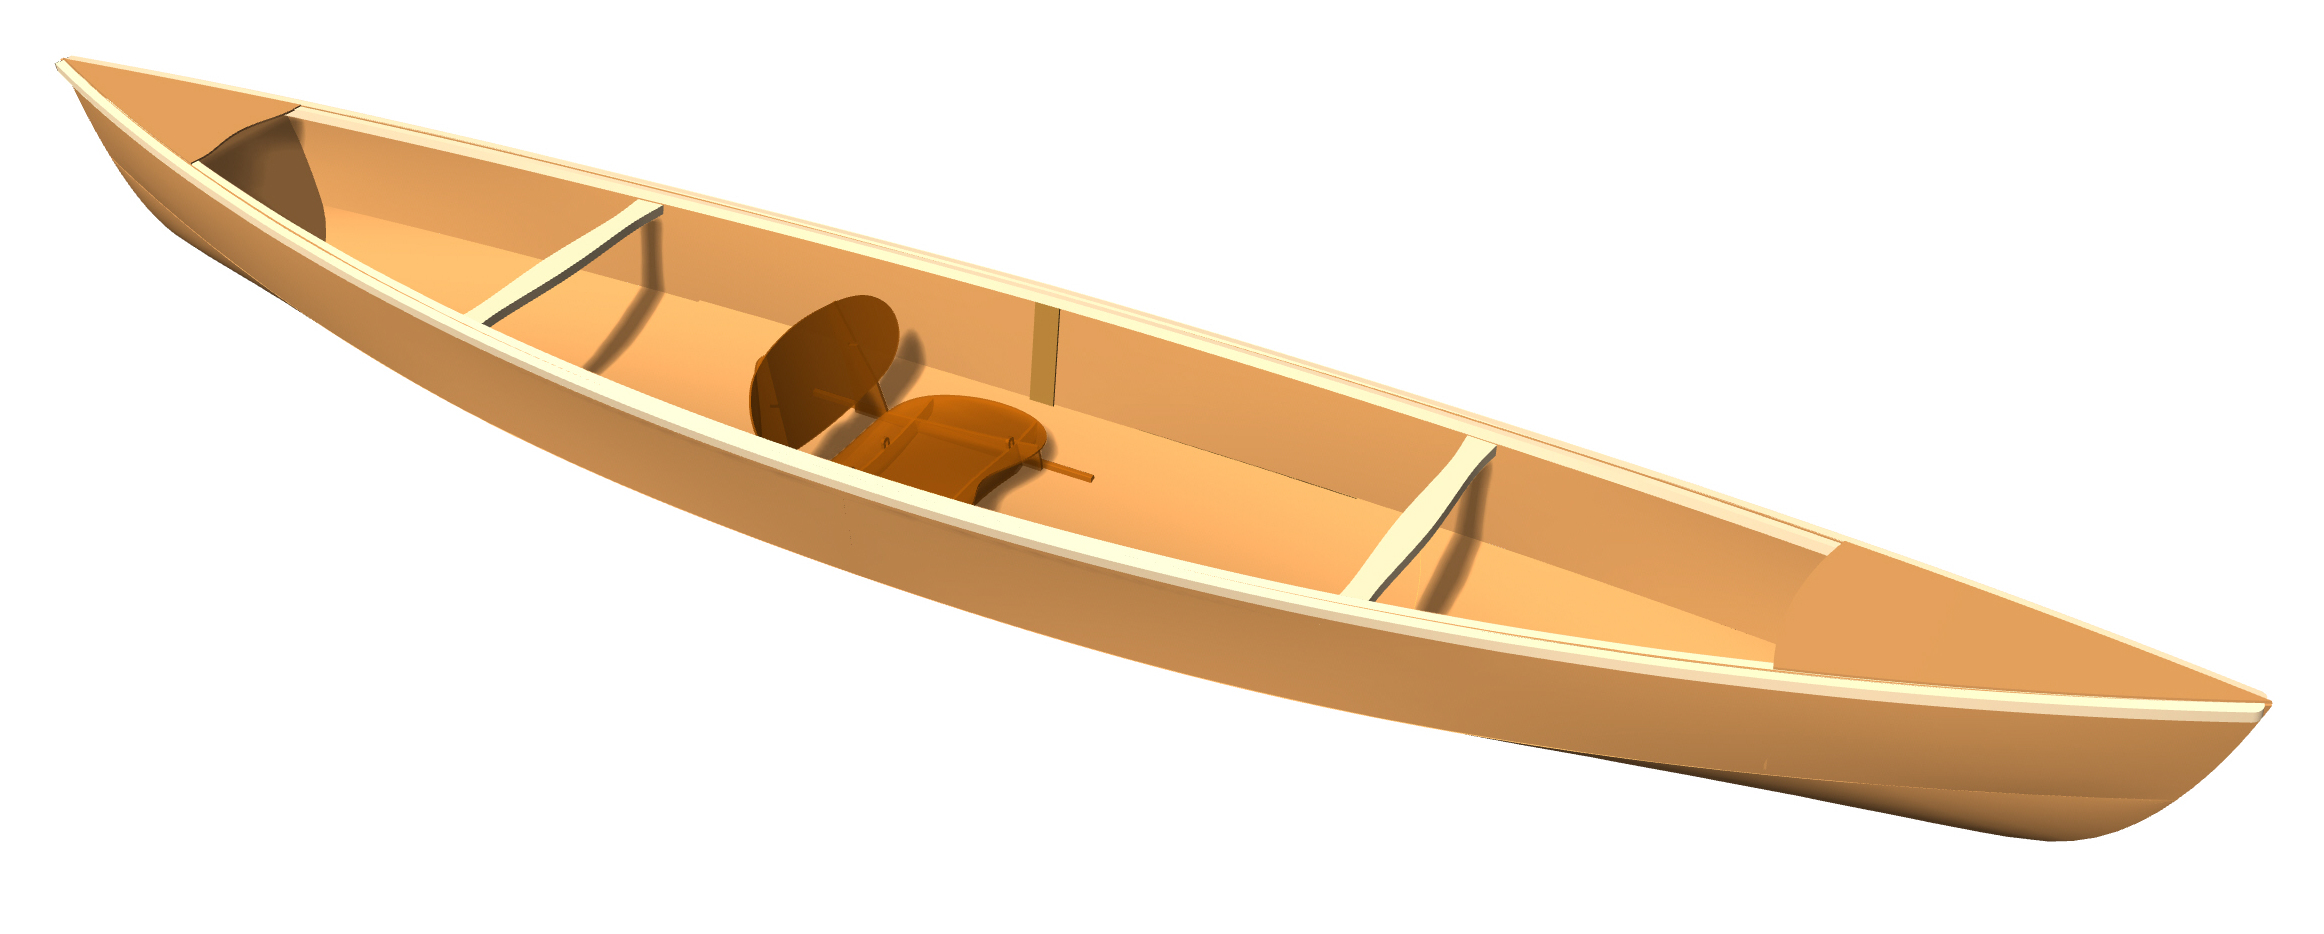
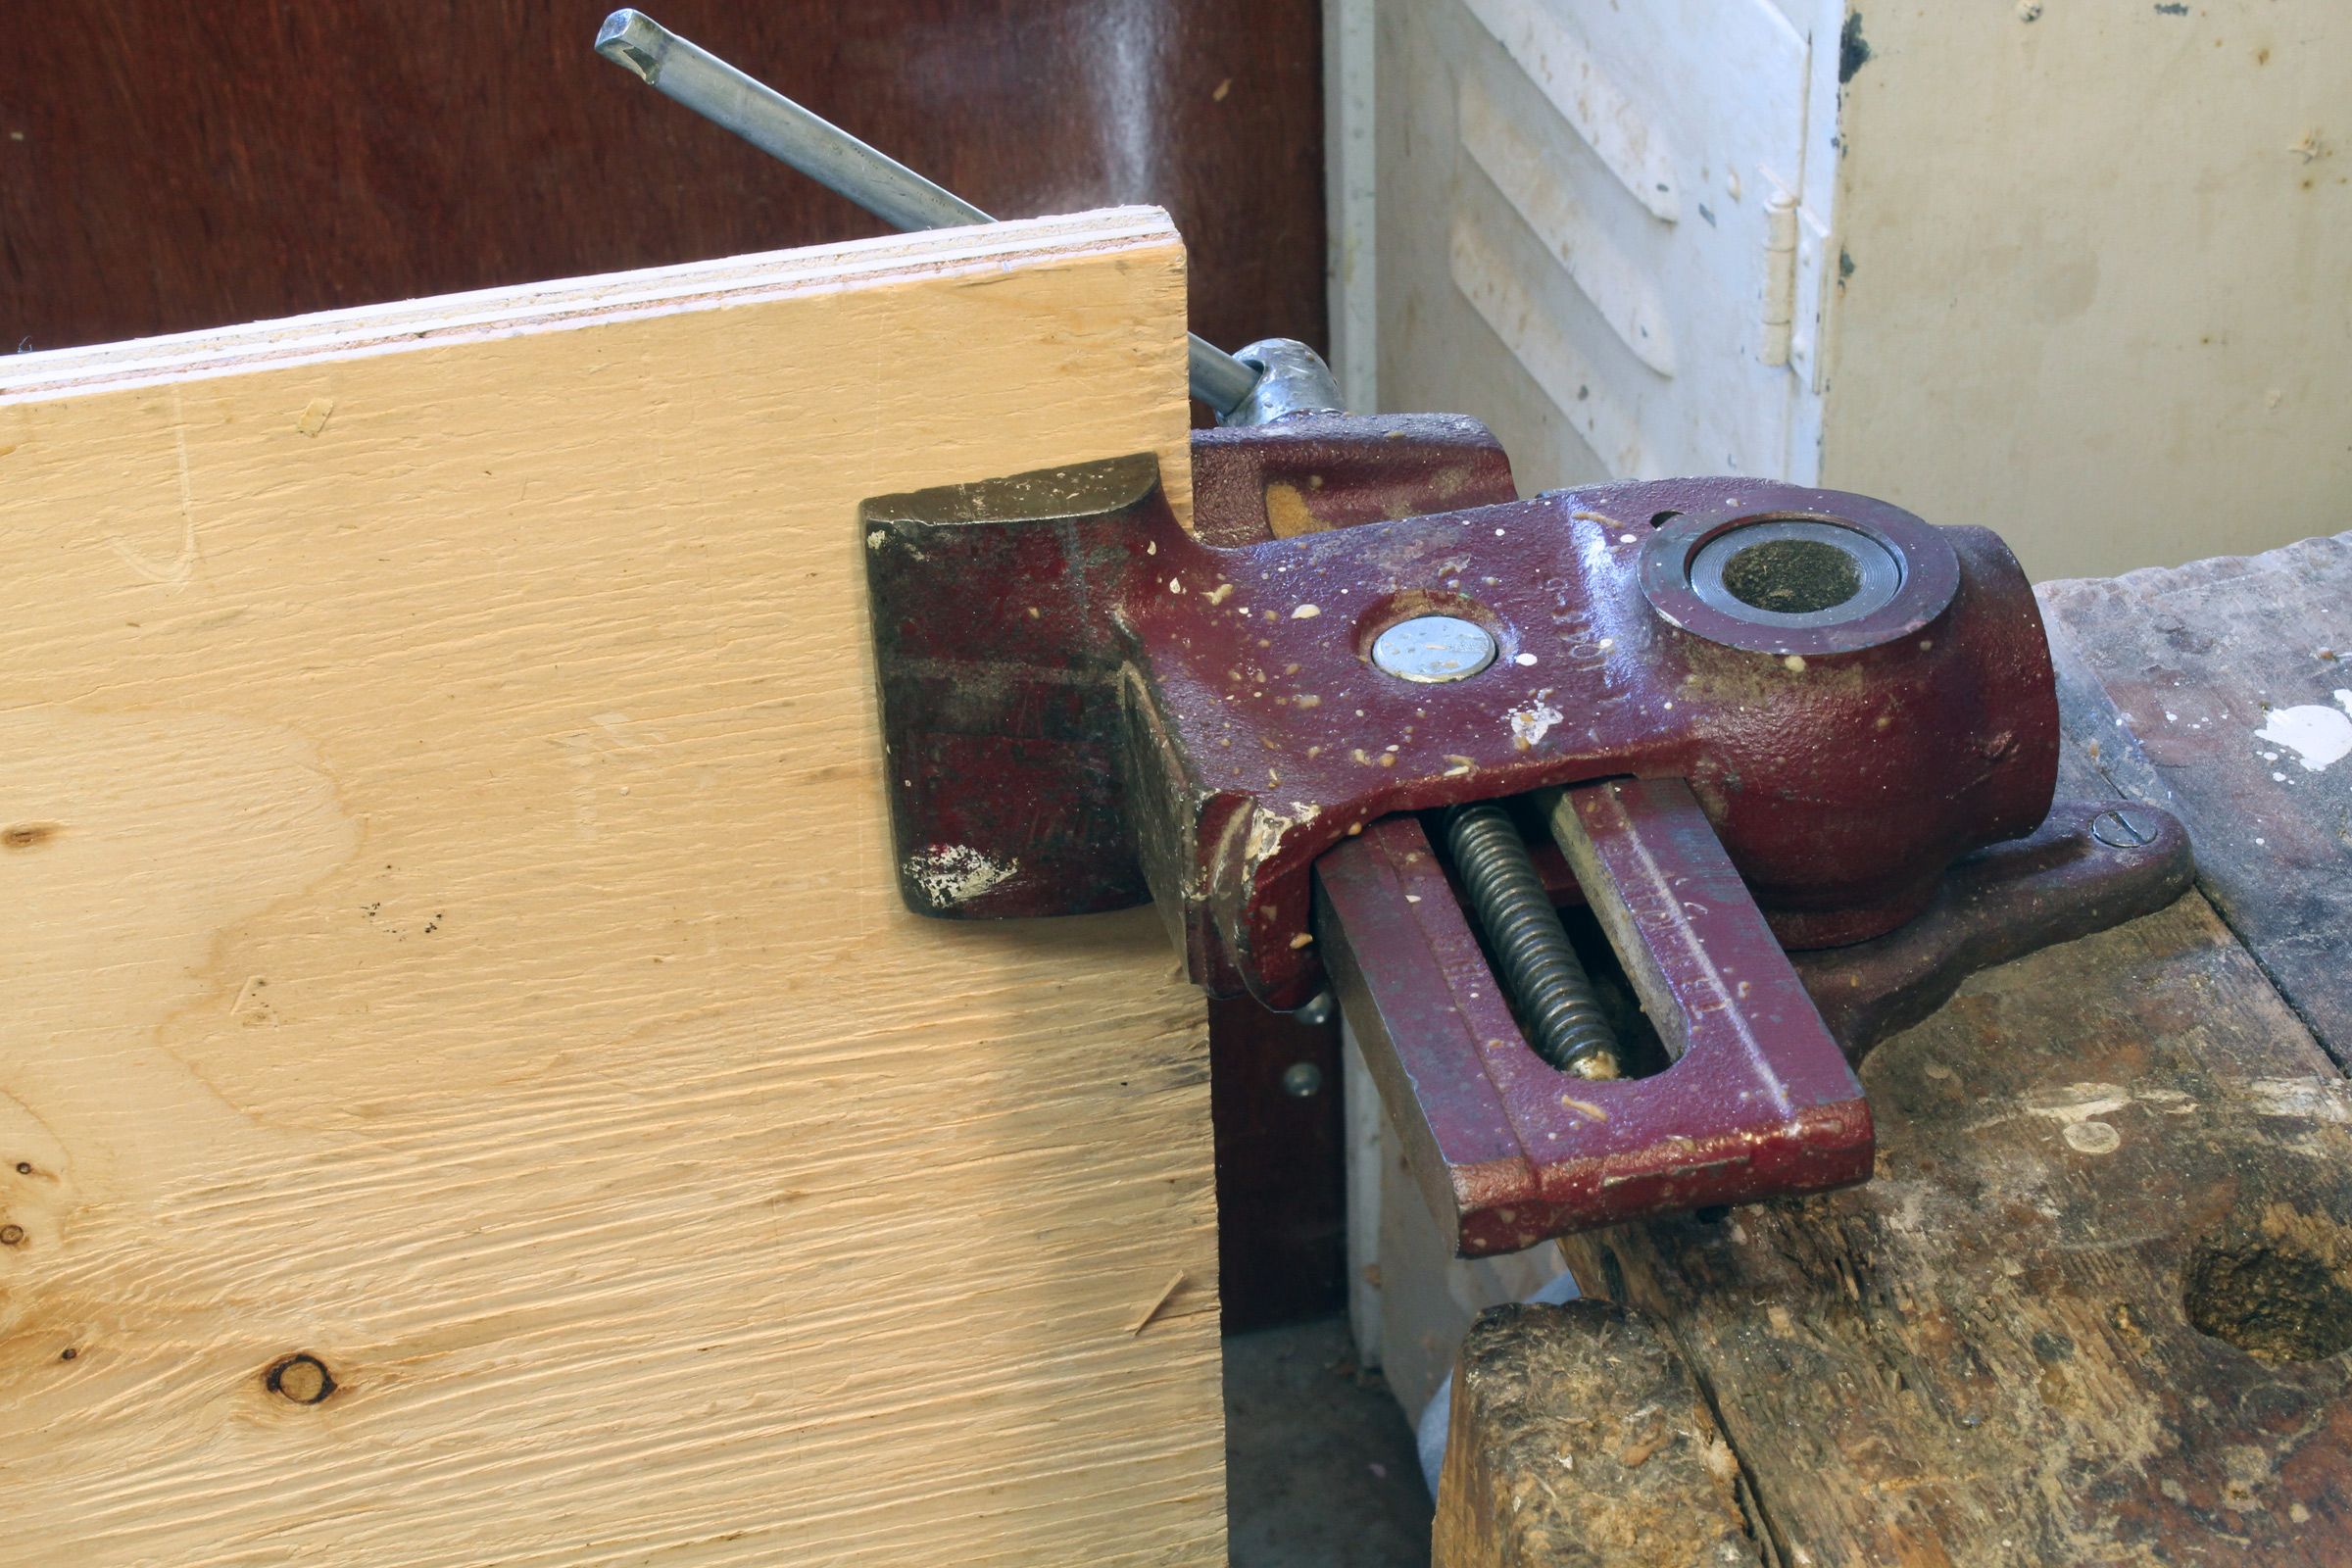
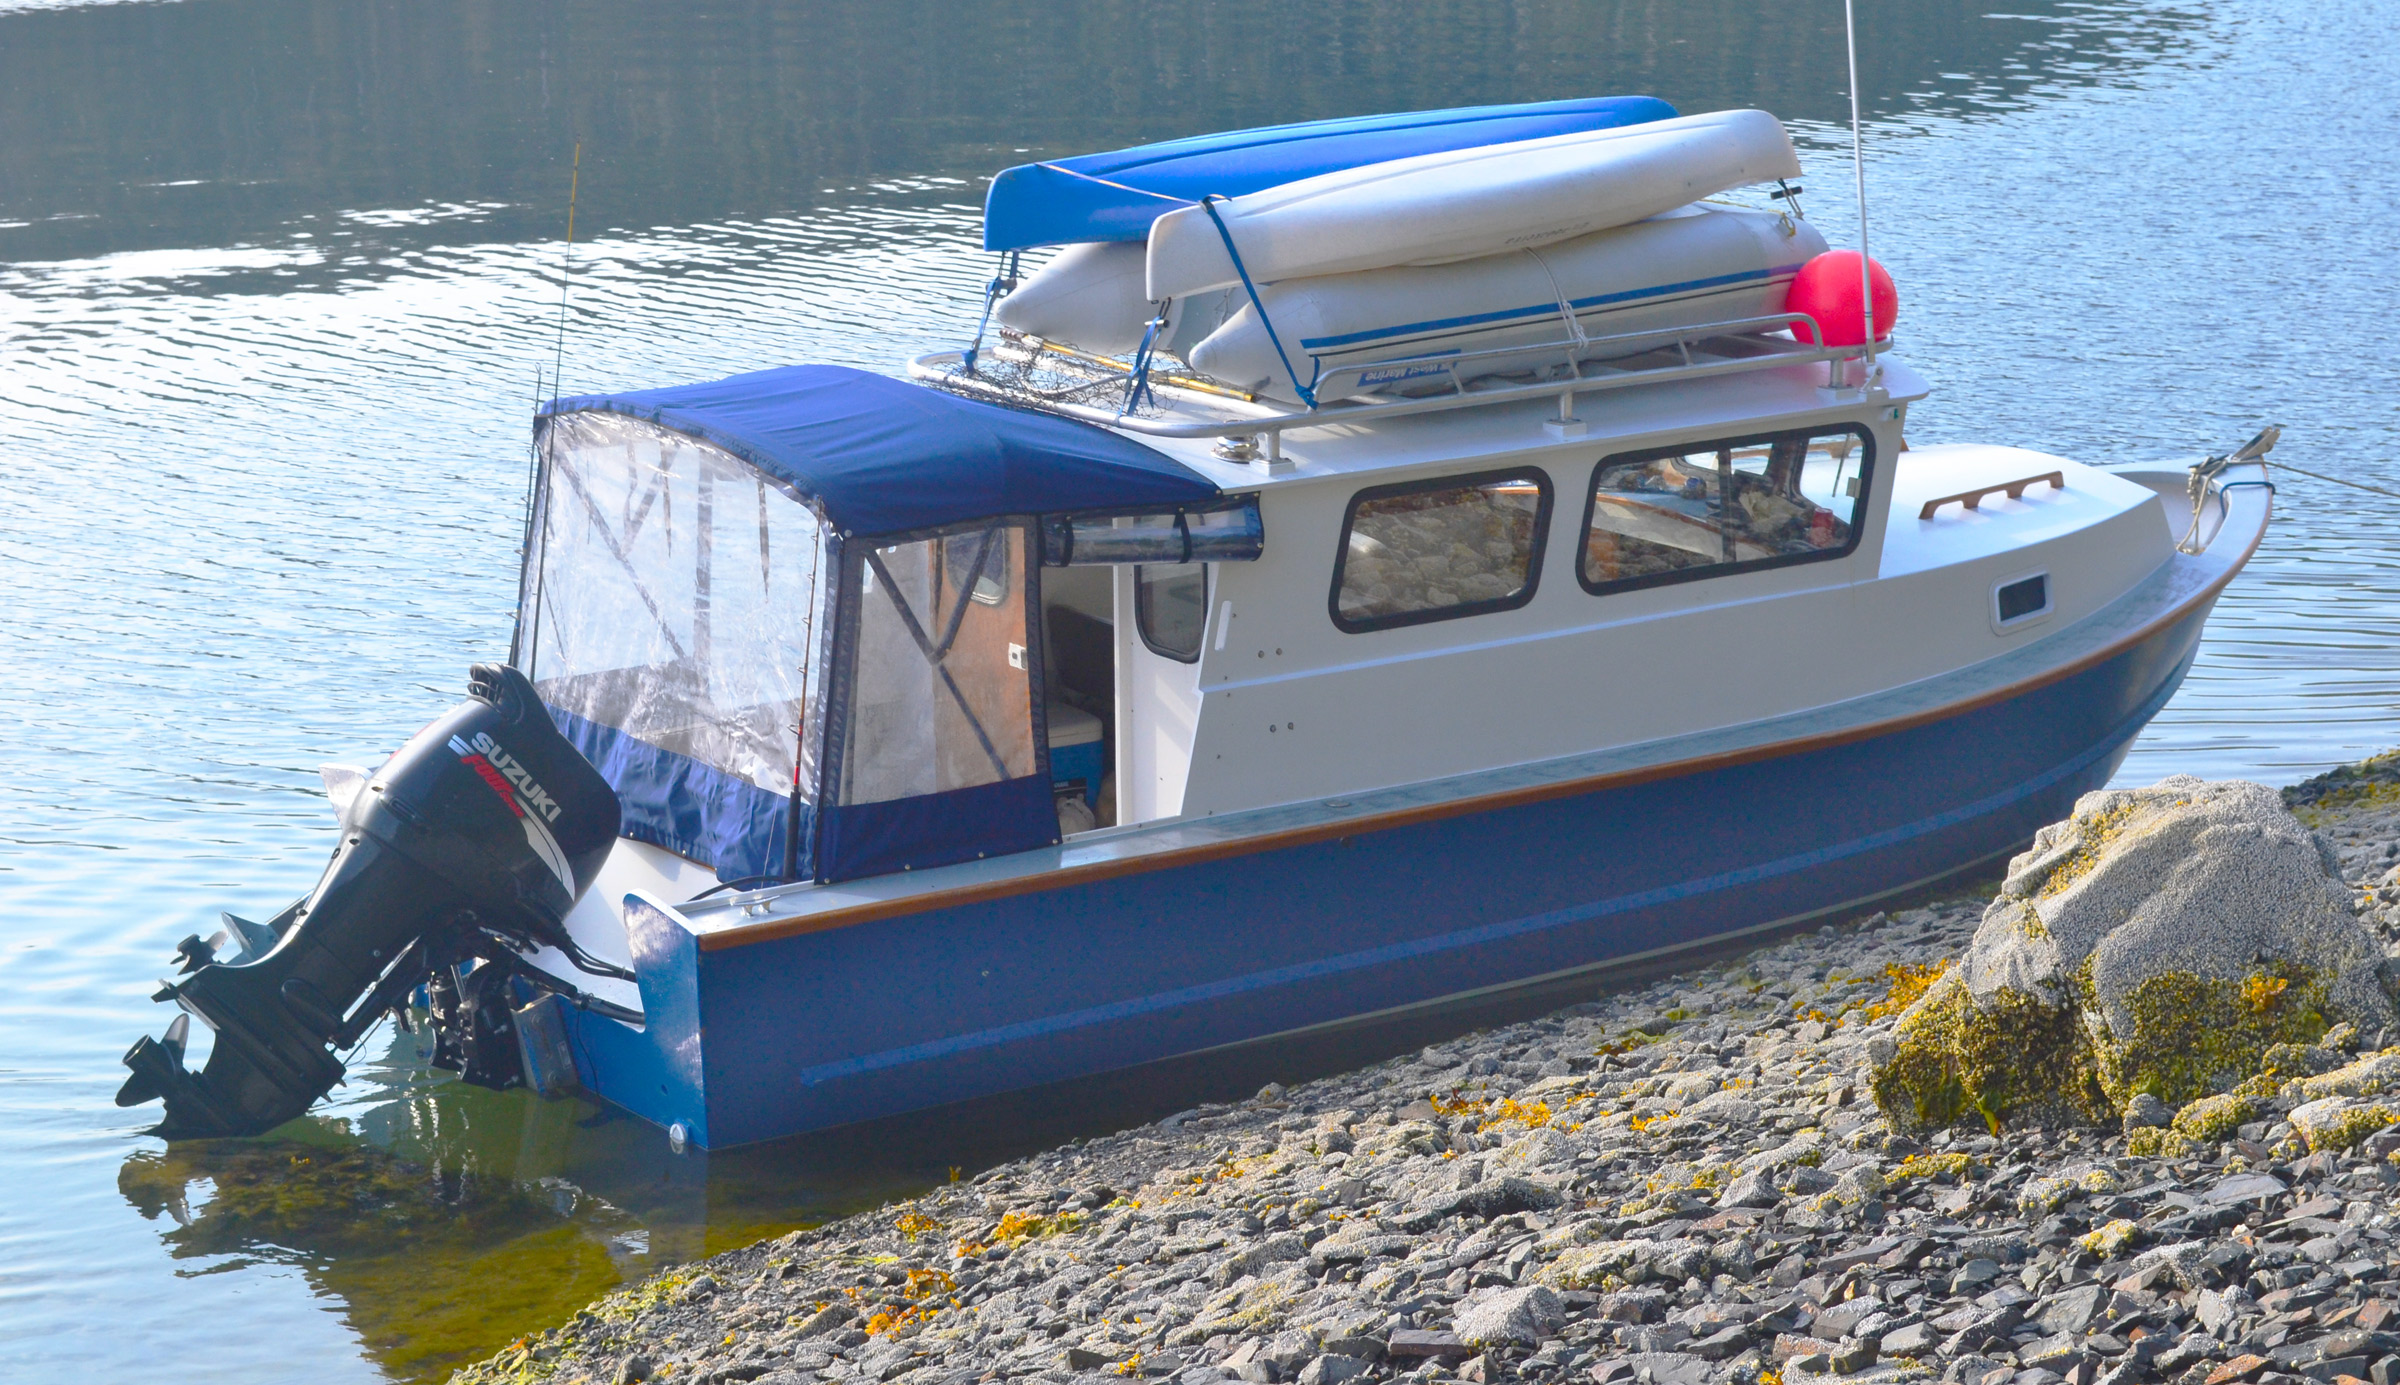
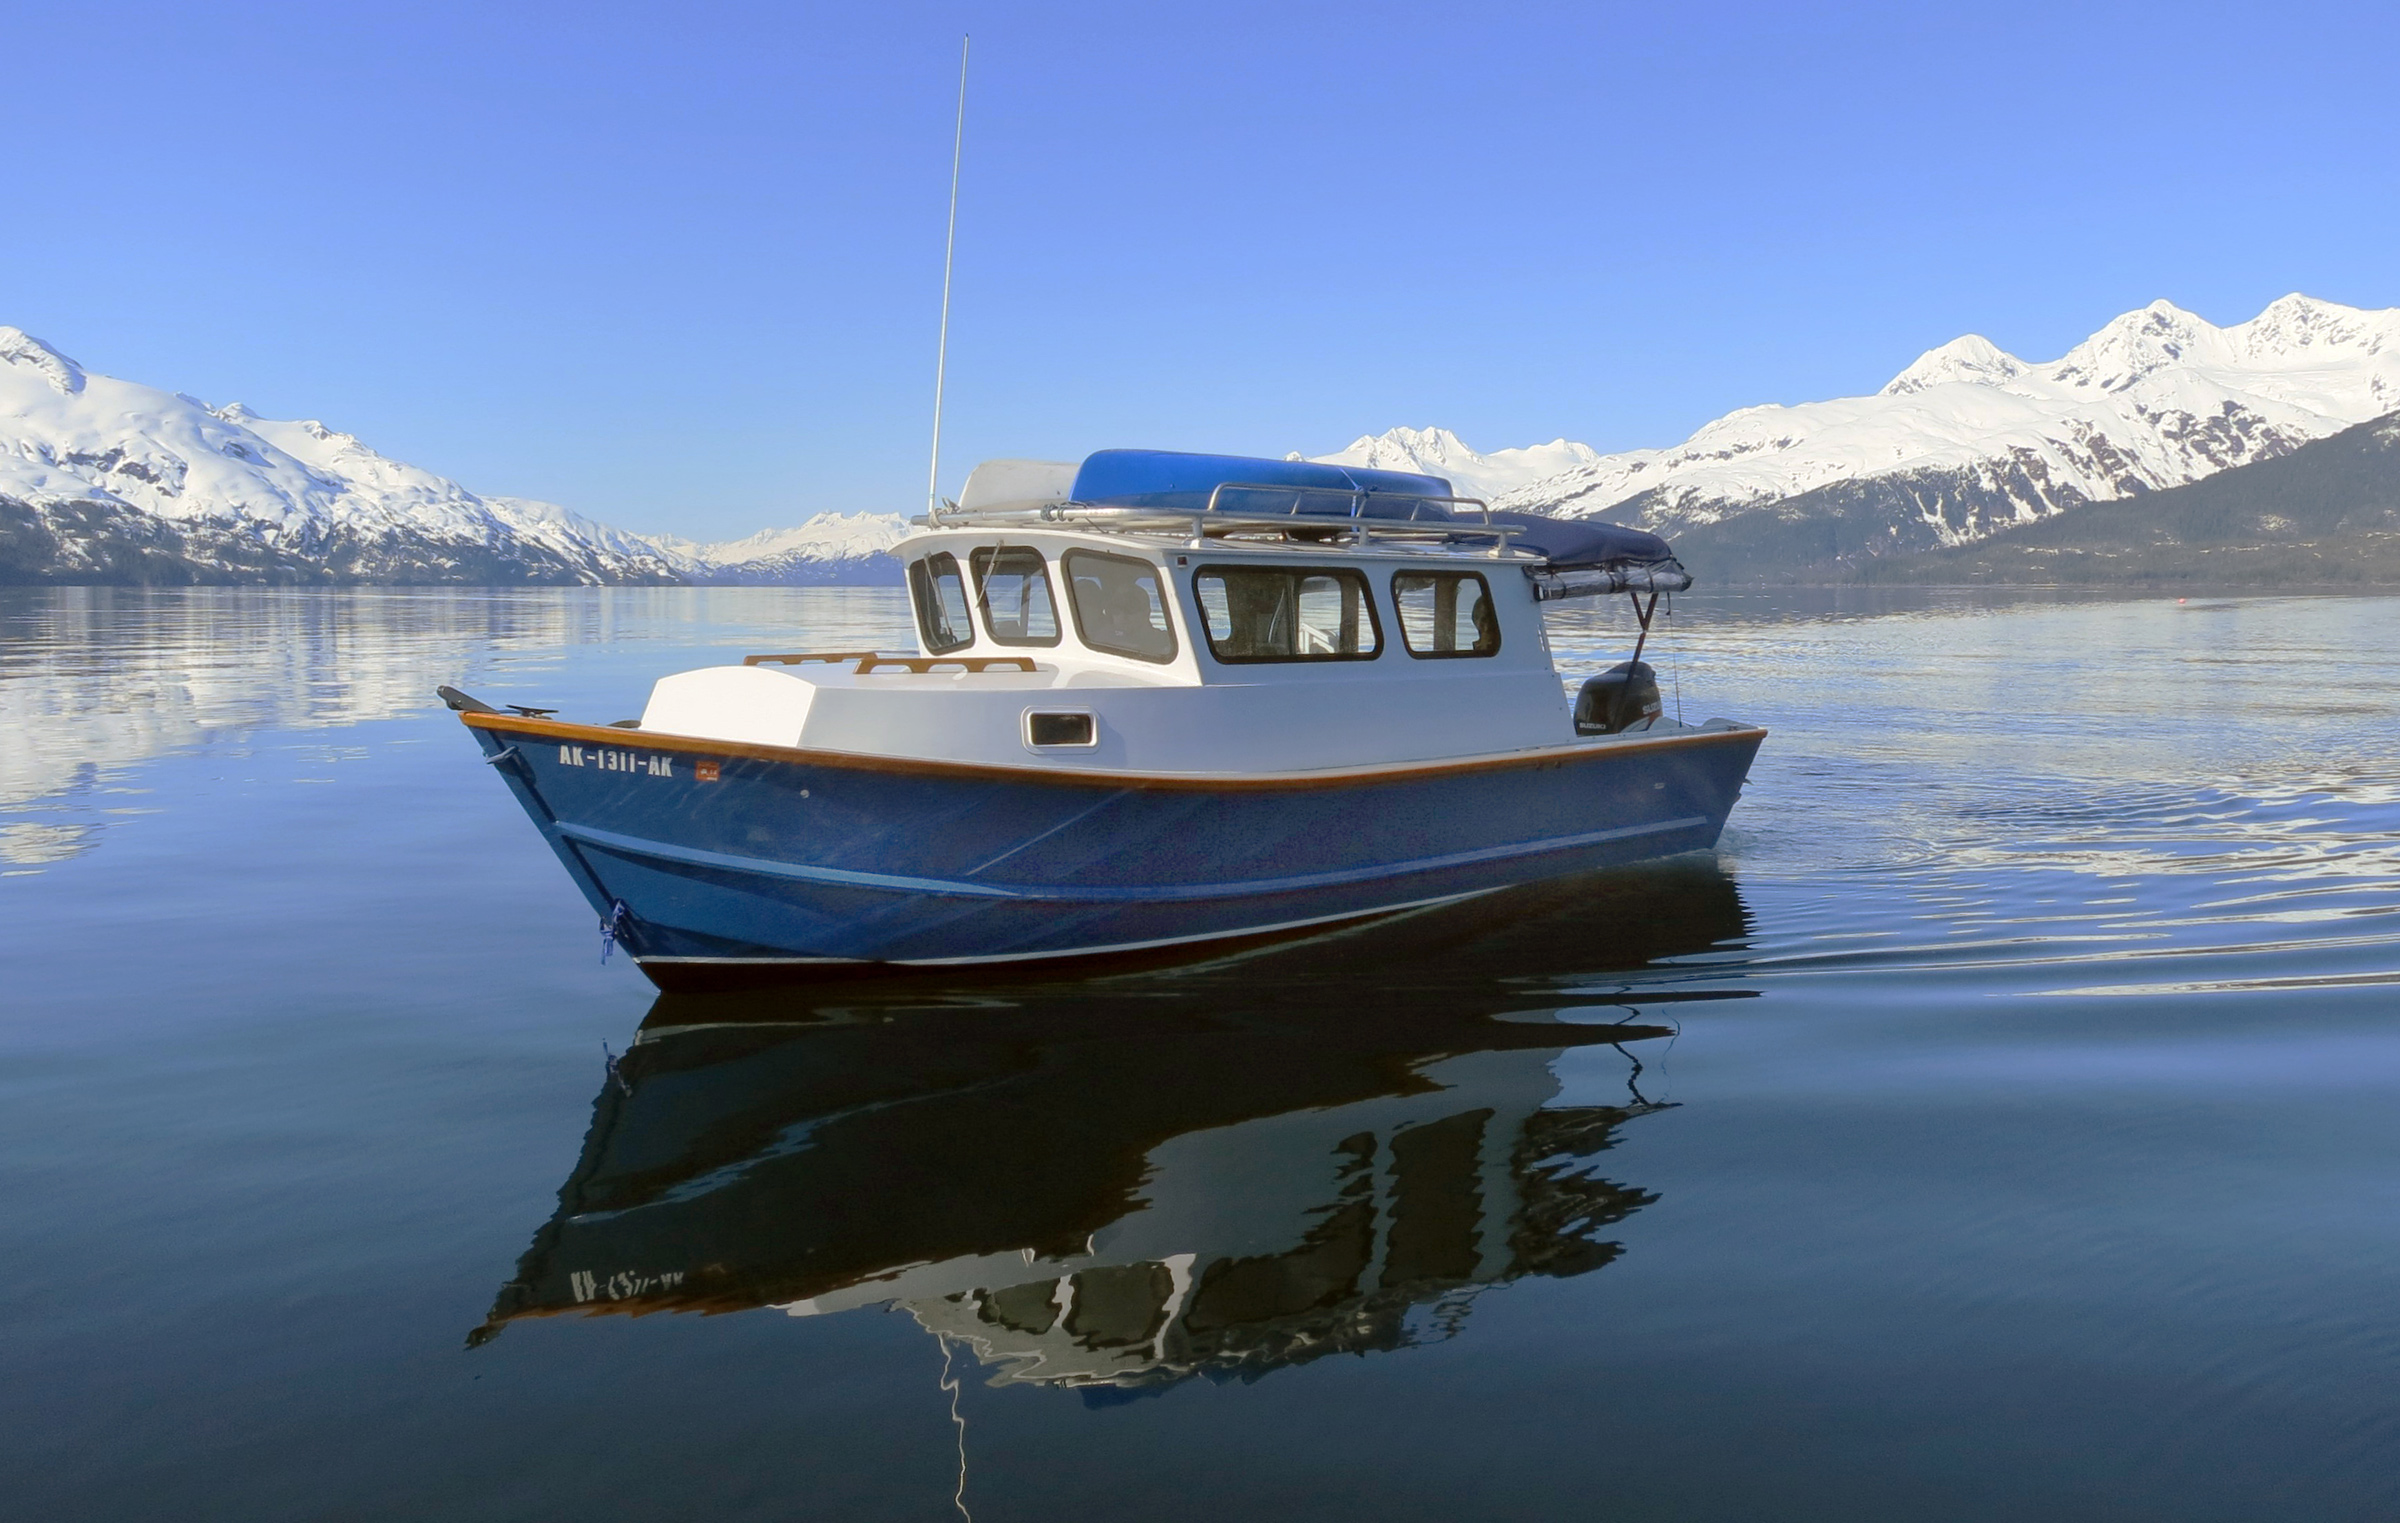
I set out to build a boat to commute the two miles between the boat I was living aboard and my job at The Center for Wooden Boats (CWB) on the shore of Seattle’s Lake Union. I wanted something that would be inexpensive to build, big enough to carry a group of four friends, easy to row, and able to carry an outboard. I also wanted to build something with ties to the history of the local waters. I perused over 100 small-boat plans of many of Seattle’s famed yacht designers that have been cataloged and digitized by Paul Marlow of Puget Sound Maritime. The boat that caught my eye was a flat-bottom skiff designed by Edwin Monk in 1943 for Bryant’s Marina.
Ed Monk was a famous Seattle-based naval architect renowned for designing attractive motor-yachts; Bryant’s was a local yard that outfitted fishing vessels. This 13′6″ skiff was likely a meant to be a working tender for fishermen, one that could be quickly built by the yard. The stem and frames are all straight, so I thought the build would be a pretty straightforward, given that there would be so few curves to cut.
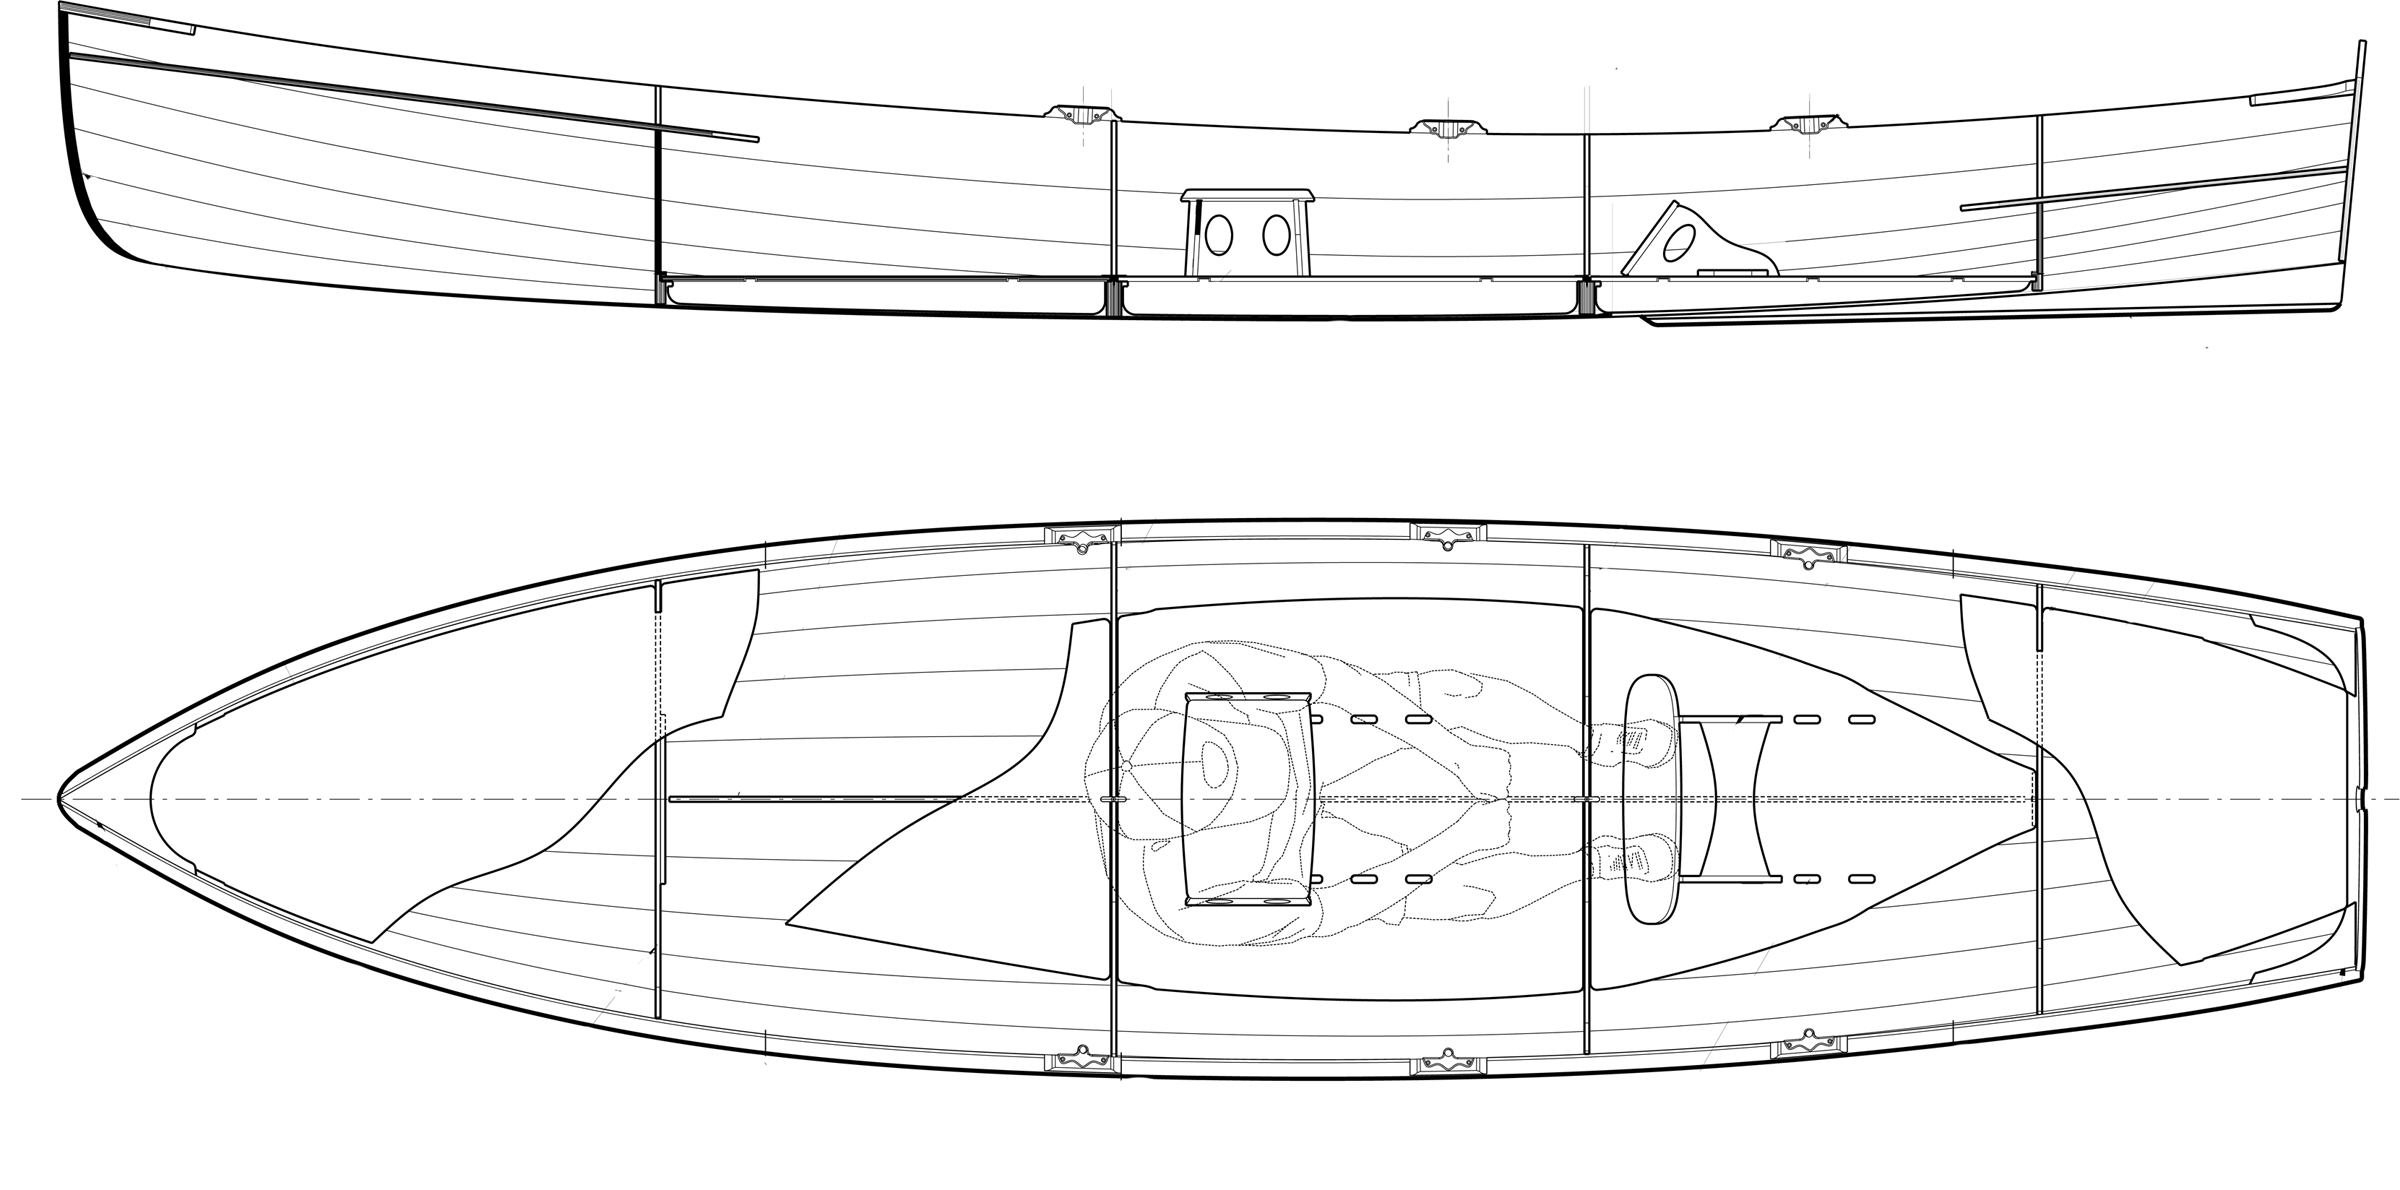
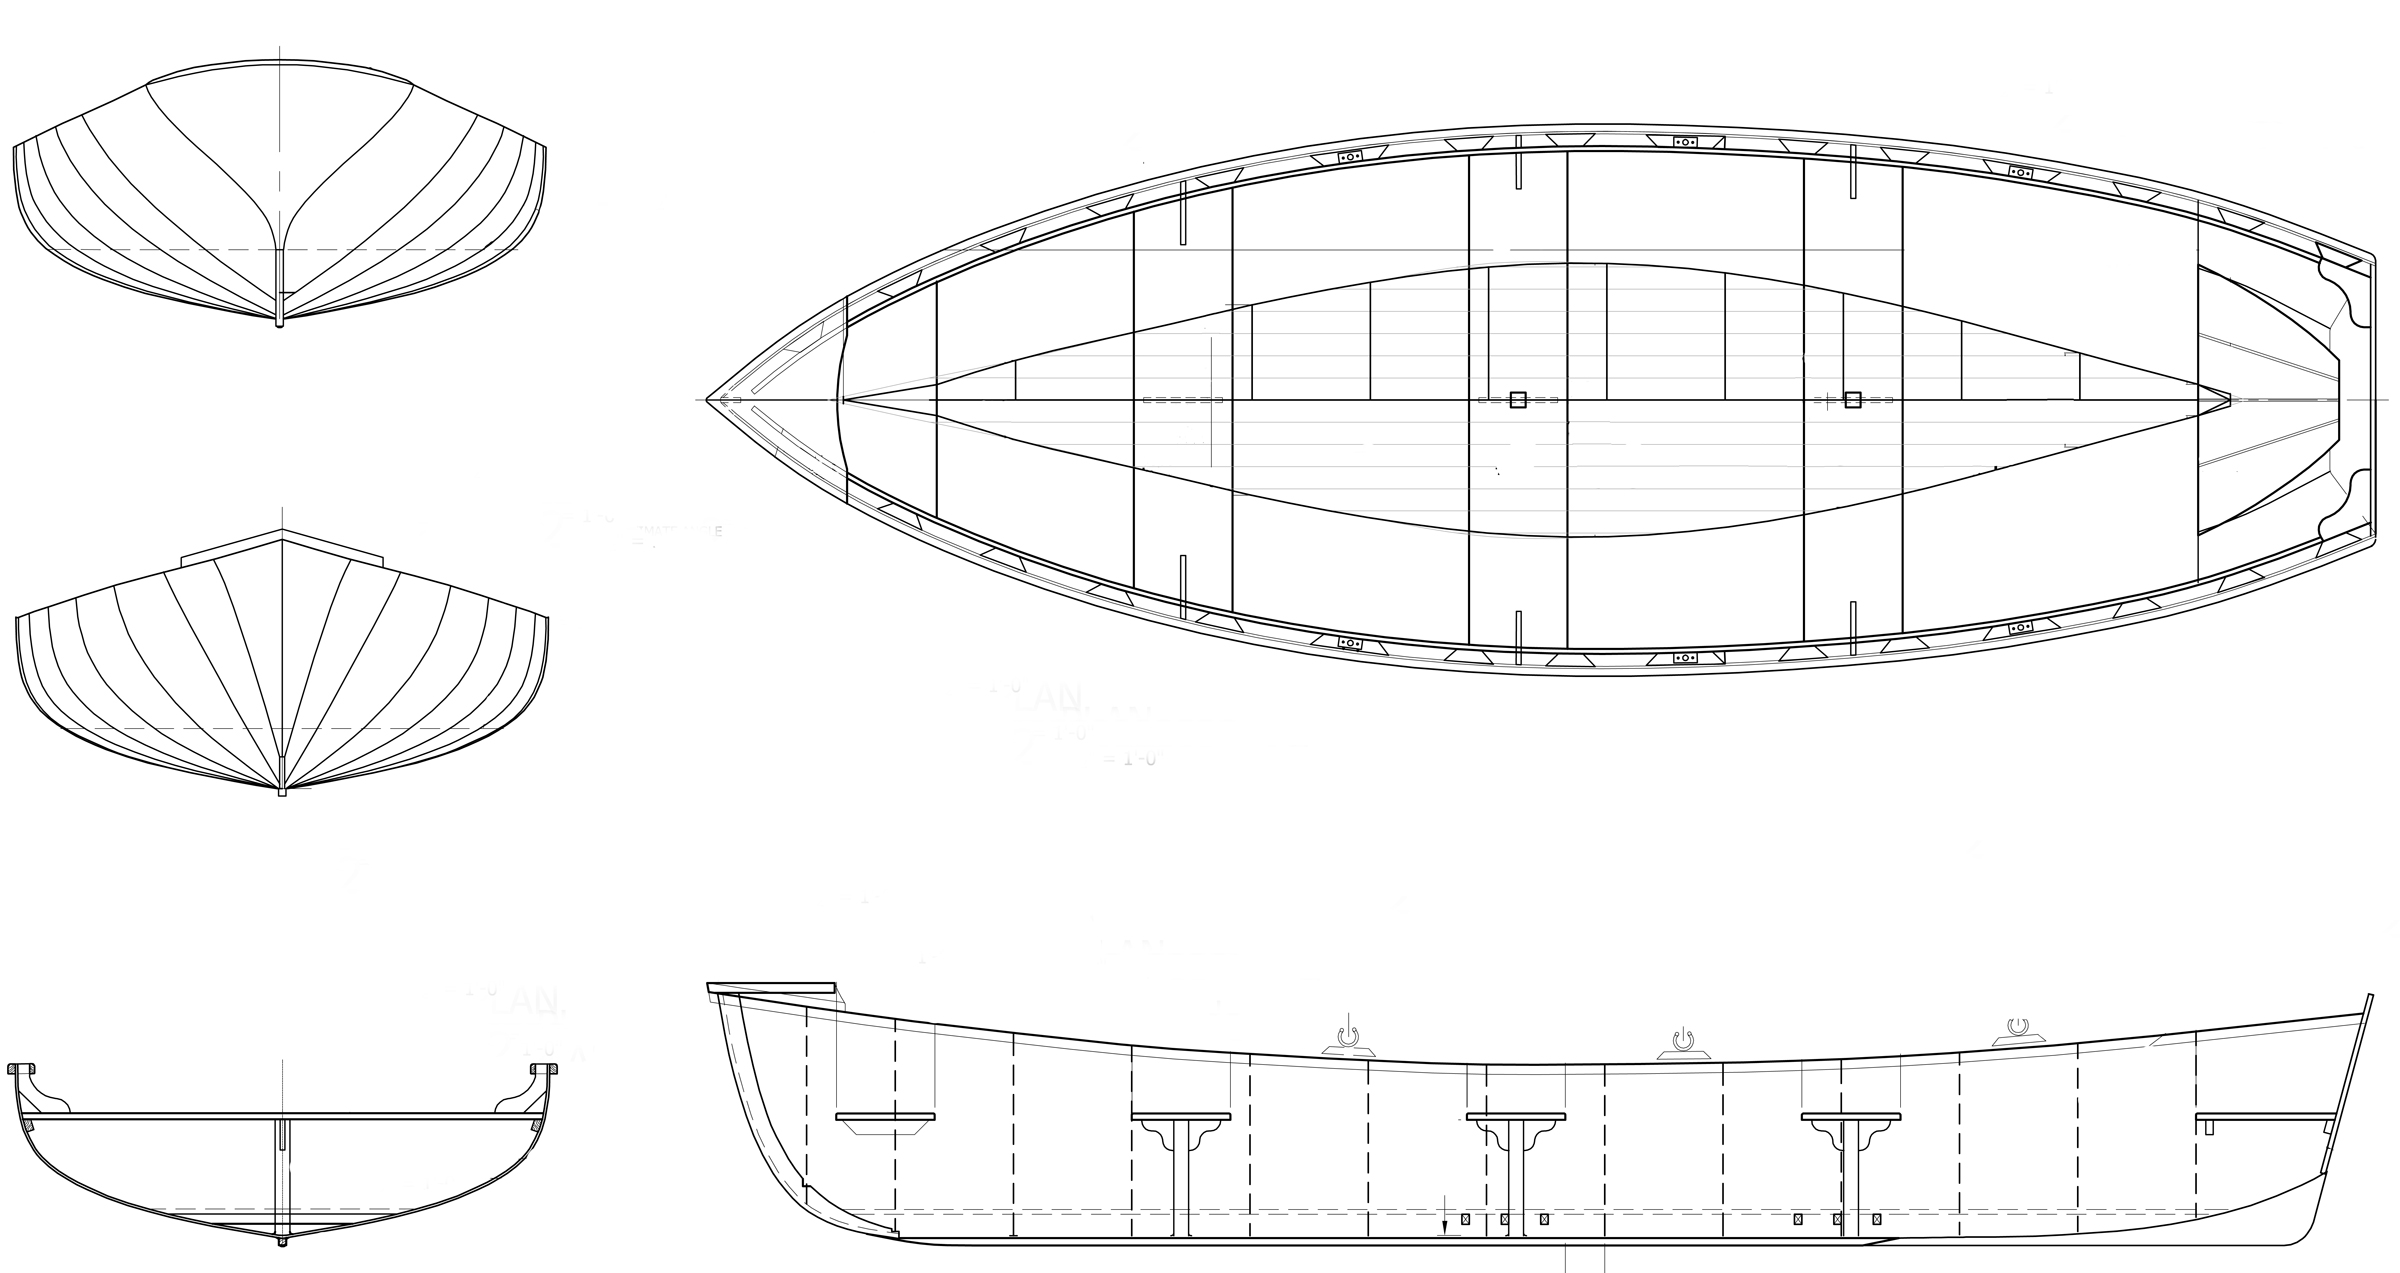
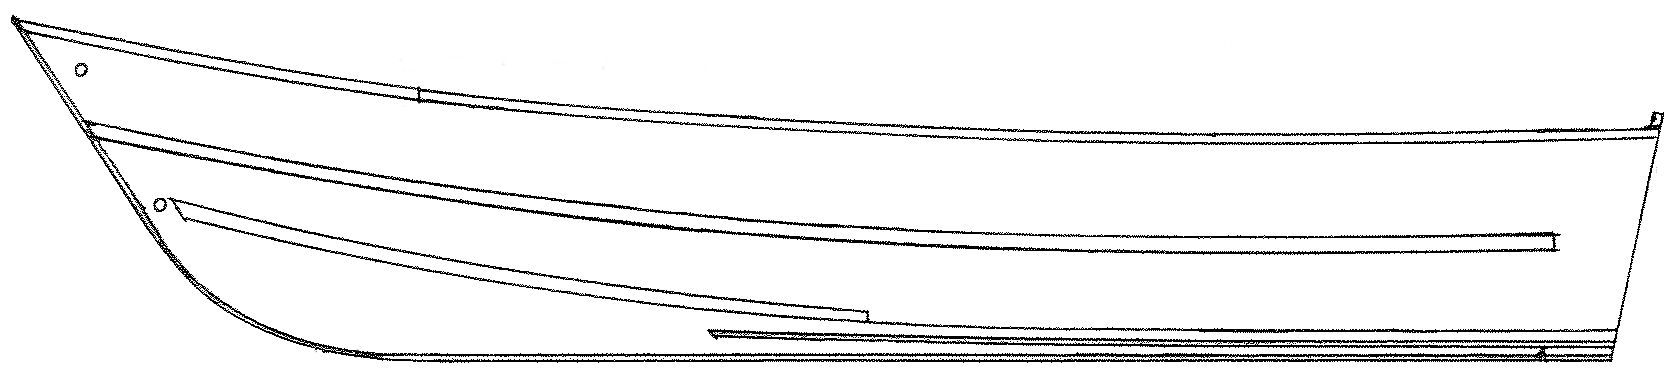
Monk’s plans consist of two sheets of drawings. The first has construction drawings with scantlings and materials. The second has simple lines drawings in plan and profile with the offsets on each station. The plan view depicts two hull options on the same centerline: one with a 4’6” beam on one side of the centerline, and one with a 5’ beam on the other. While there’s enough information provided to build the boat, to get a better feel for Monk’s building style, I read his book, How to Build Wooden Boats with 16 Small Boat Designs, published in 1934. Monk’s earlier boats utilized wide, old-growth red cedar that was readily available on the West Coast at that time. Most of his small-boat designs feature wide, flat sides and bottoms, with hard chines, shapes that readily lend themselves to substituting marine plywood for planking.
In the 1940s, waterproof glues improved and boatbuilders started to embrace the use of plywood, and Monk’s drawings for the Bryant’s skiff highlight that transition—a traditional lapstrake with 5/8″ red-cedar planks and a 11/16″ cedar bottom is detailed alongside a hull of 3/8″ waterproof plywood. For the latter, fewer frames are needed. The construction drawing indicates that they can be on 24″ centers rather than on 16″ specified for cedar planking.
Josh Anderson
The plywood version includes chine logs to provide gluing surface at the edges. The cedar-planked version can use bronze or galvanized fastenings between the bottom and the side planks.
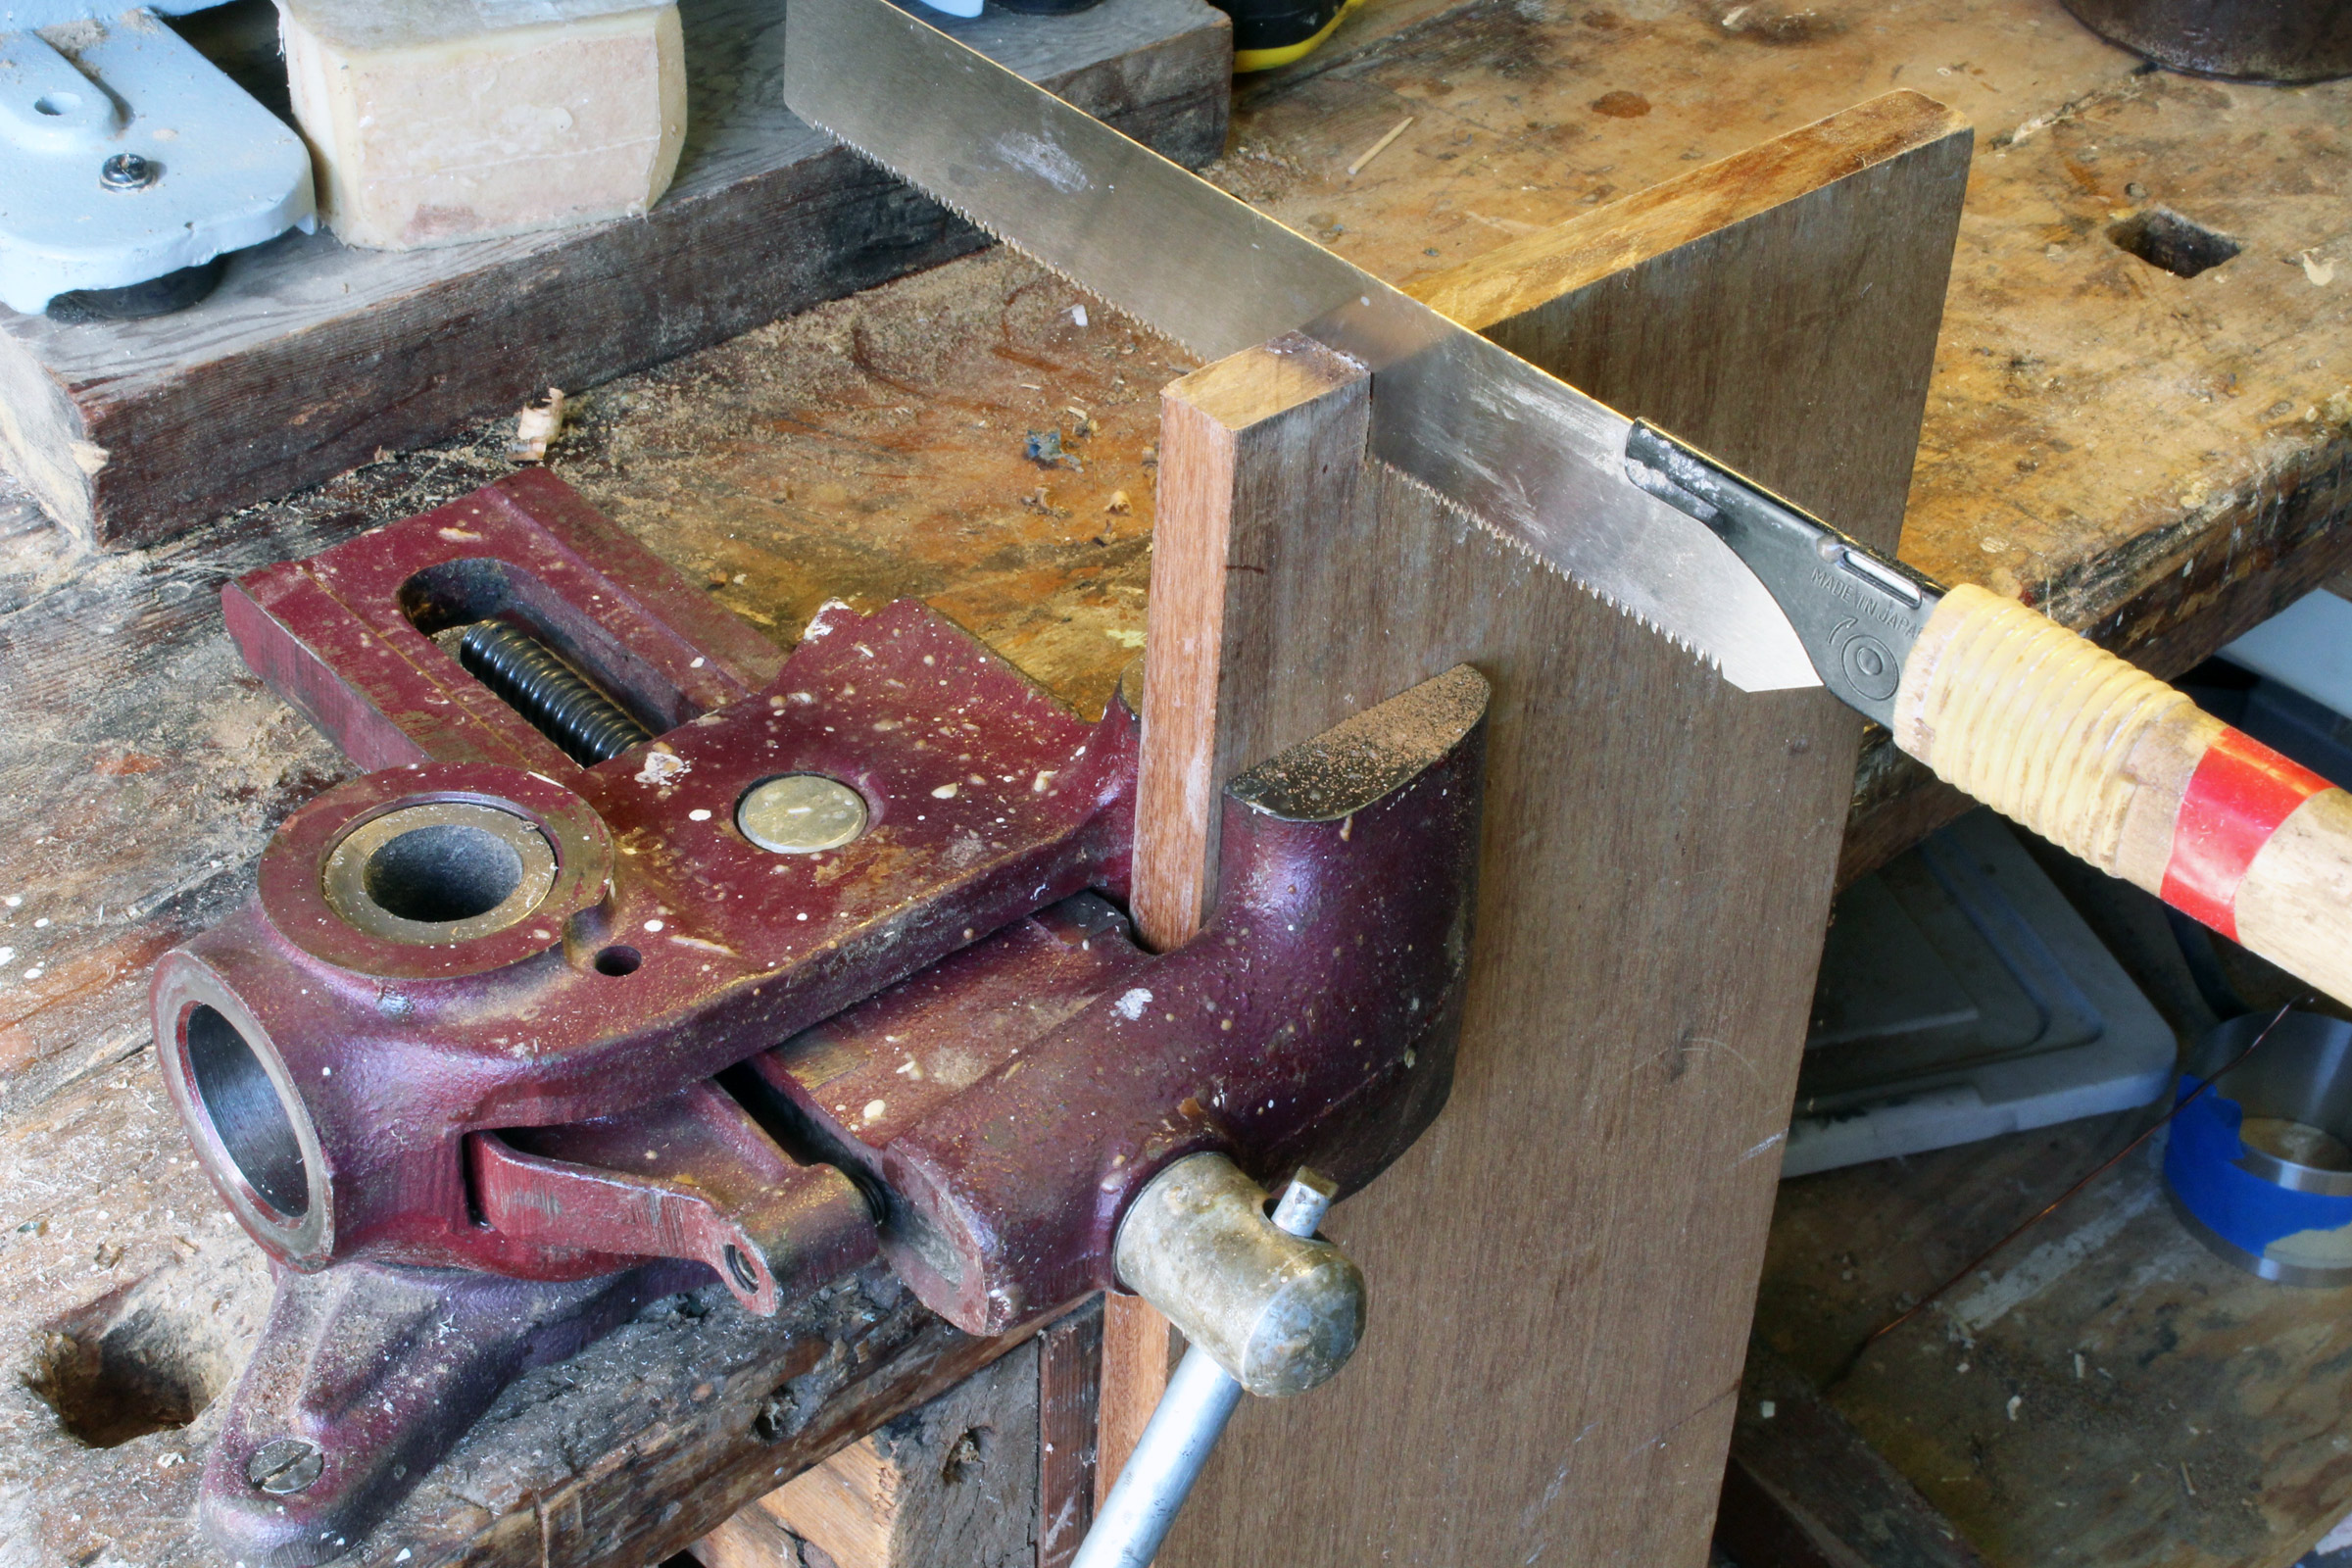
I constructed a 16′ x 4′ strong back on which to build the boat that would double as a lofting platform. Just four lines—the sheer and chine, each in profile and plan view—require drawing with flexible battens, making the skiff a great first boat for people to learn lofting. The plans show the heights and half breadths—to the nearest 1/8″—on the drawing rather than a table of offsets. I carefully lofted the lines for the skiff with the 4 6″ beam.
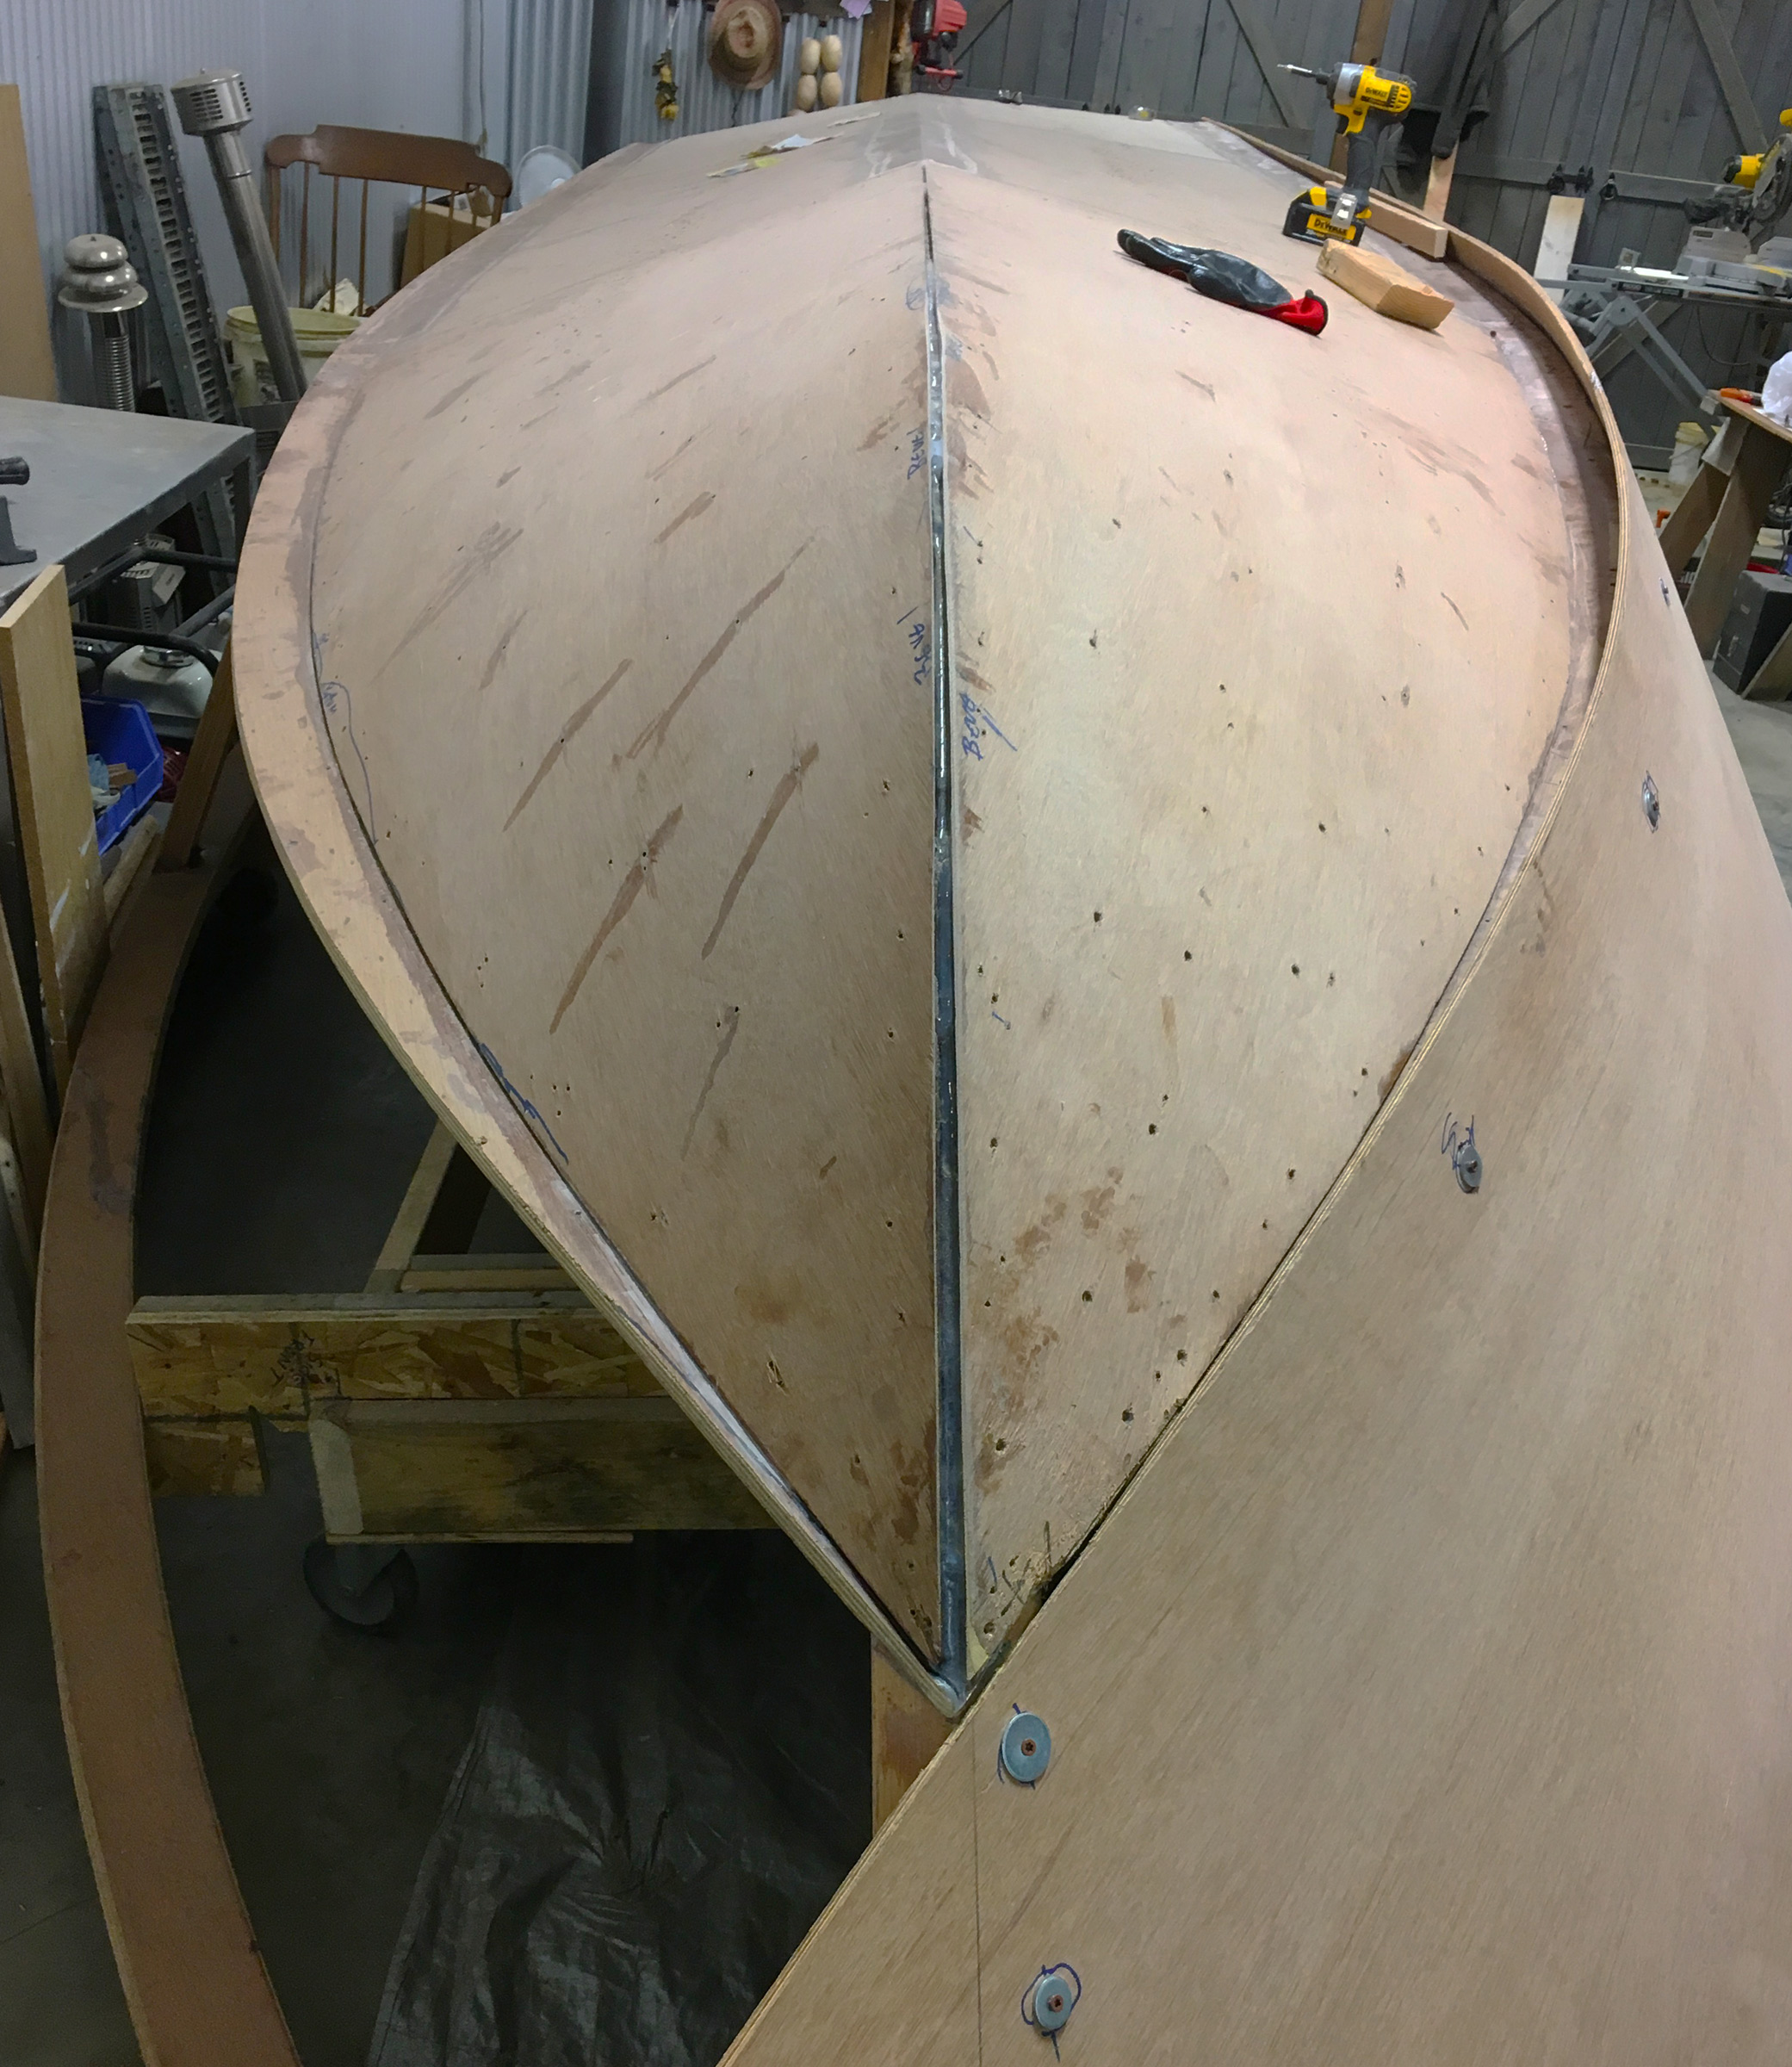
At each of the six stations I made a plywood pattern upon which I would construct the frames. The plywood patterns will quicken building more skiffs in the future; for a one-off build, the frames could also be assembled over drawings on the lofting. I marked the bevel for the planking on the patterns, as each frame is different, then started constructing the frames. Each consists of two sides joined to a bottom piece. A temporary cross spall, set to a baseline representing the strongback, helps keep each frame’s proper shape.
With the three frame pieces and cross spall on the pattern I joined the frame’s laps with three screws, securing the bottom frame to each side frame. A notch cut in the outer corner will accept a chine log. (The cedar-planked version is built without them.)
With the frames set up on 24″ centers on the strongback, the transom and stem are also put in place. The plans call for a transom of 1 1/8” yellow cedar. I used white oak instead, edge-glued with epoxy and biscuits. The inner part of the two-part stem—2-1/2″ oak on plans—gets a consistent bevel to receive the plank ends.
The chine logs were let in and secured with epoxy (though galvanized bolts are specified) tying the whole structure together
Josh Anderson
The optional plywood construction required fewer frames—6 instead of the 9 required for cedar planking—but a lot more clamps for the epoxy bonding.
The bottom consists of two pieces of 3/8″ plywood scarfed together, glued and fastened with screws into the bottoms of the frames. Gluing the bottom down took every clamp and heavy object I had in the shop.
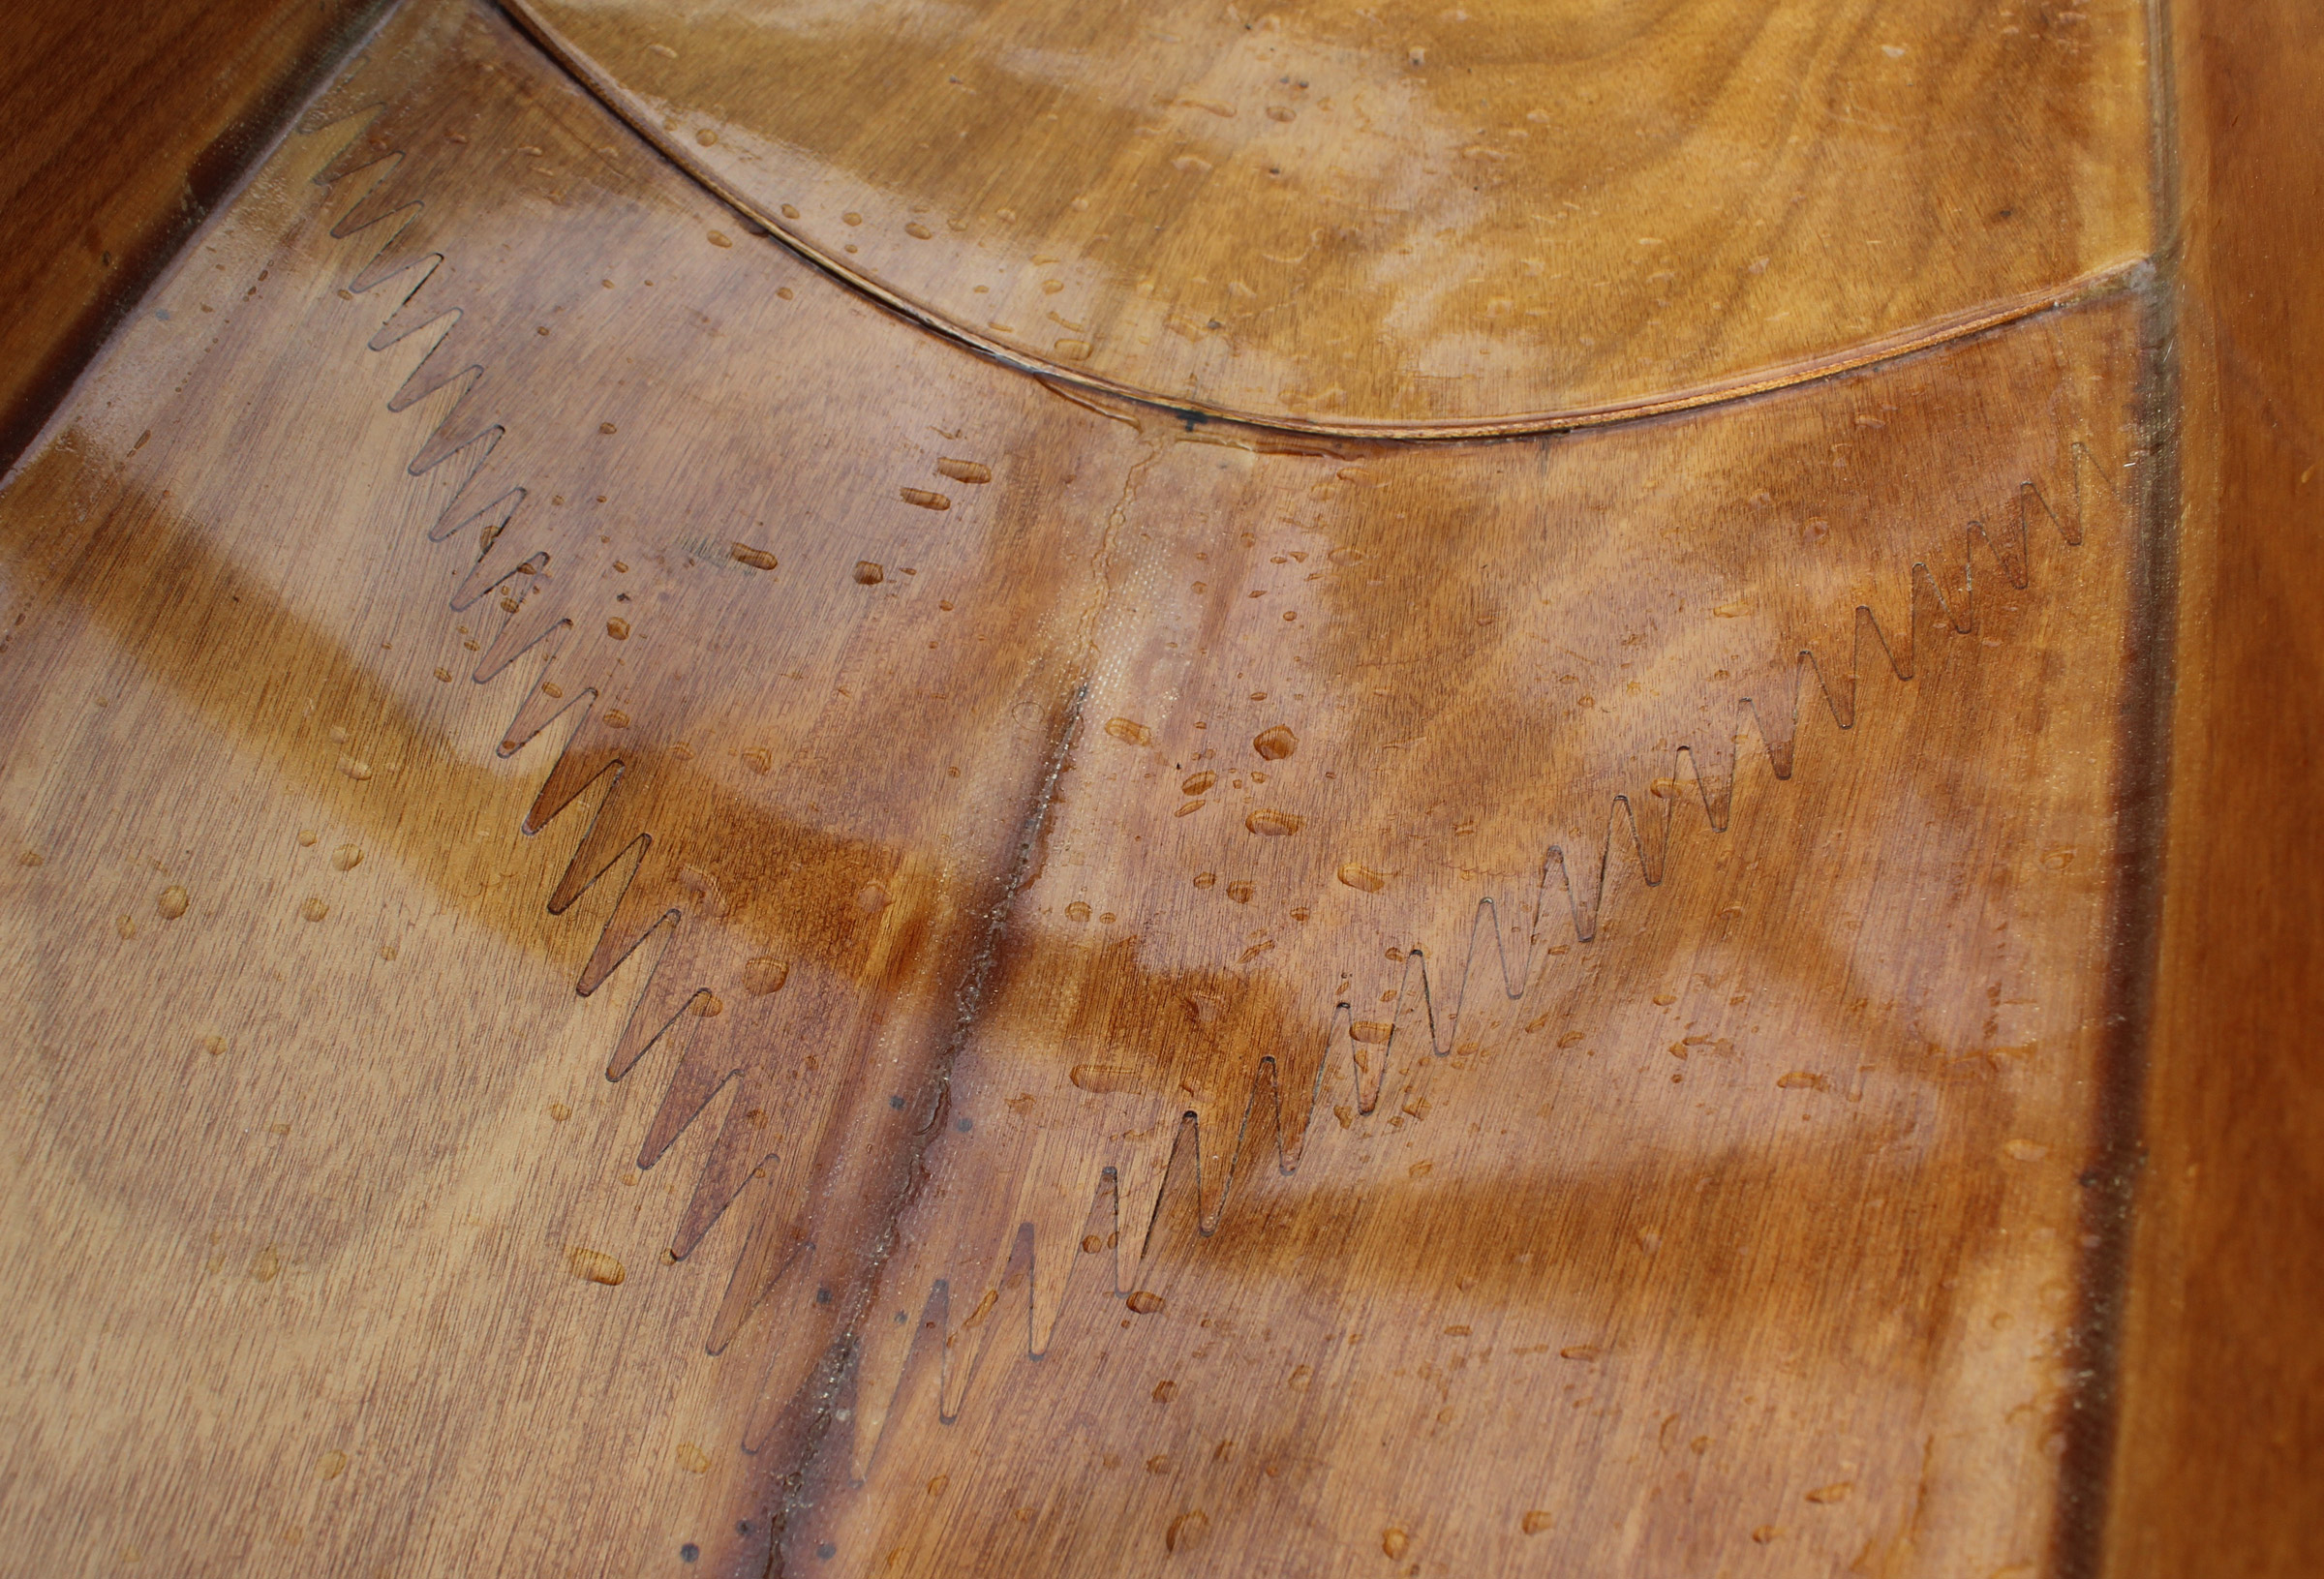
For plywood construction, Monk specified a single broad sheet of plywood for each side. The cedar-planked version has three lapped strakes; I thought that lapstrake would look a little nicer, so I chose to do a glued-lap version with plywood planks. To squeeze the laps during gluing I used waxed sheetrock screws with washers under the heads.
Josh Anderson
The plans call for a plain thwart in the stern and a sculling notch in the transom. The author built the skiff for motoring and installed stern sheets for more comfortable seating at the helm.
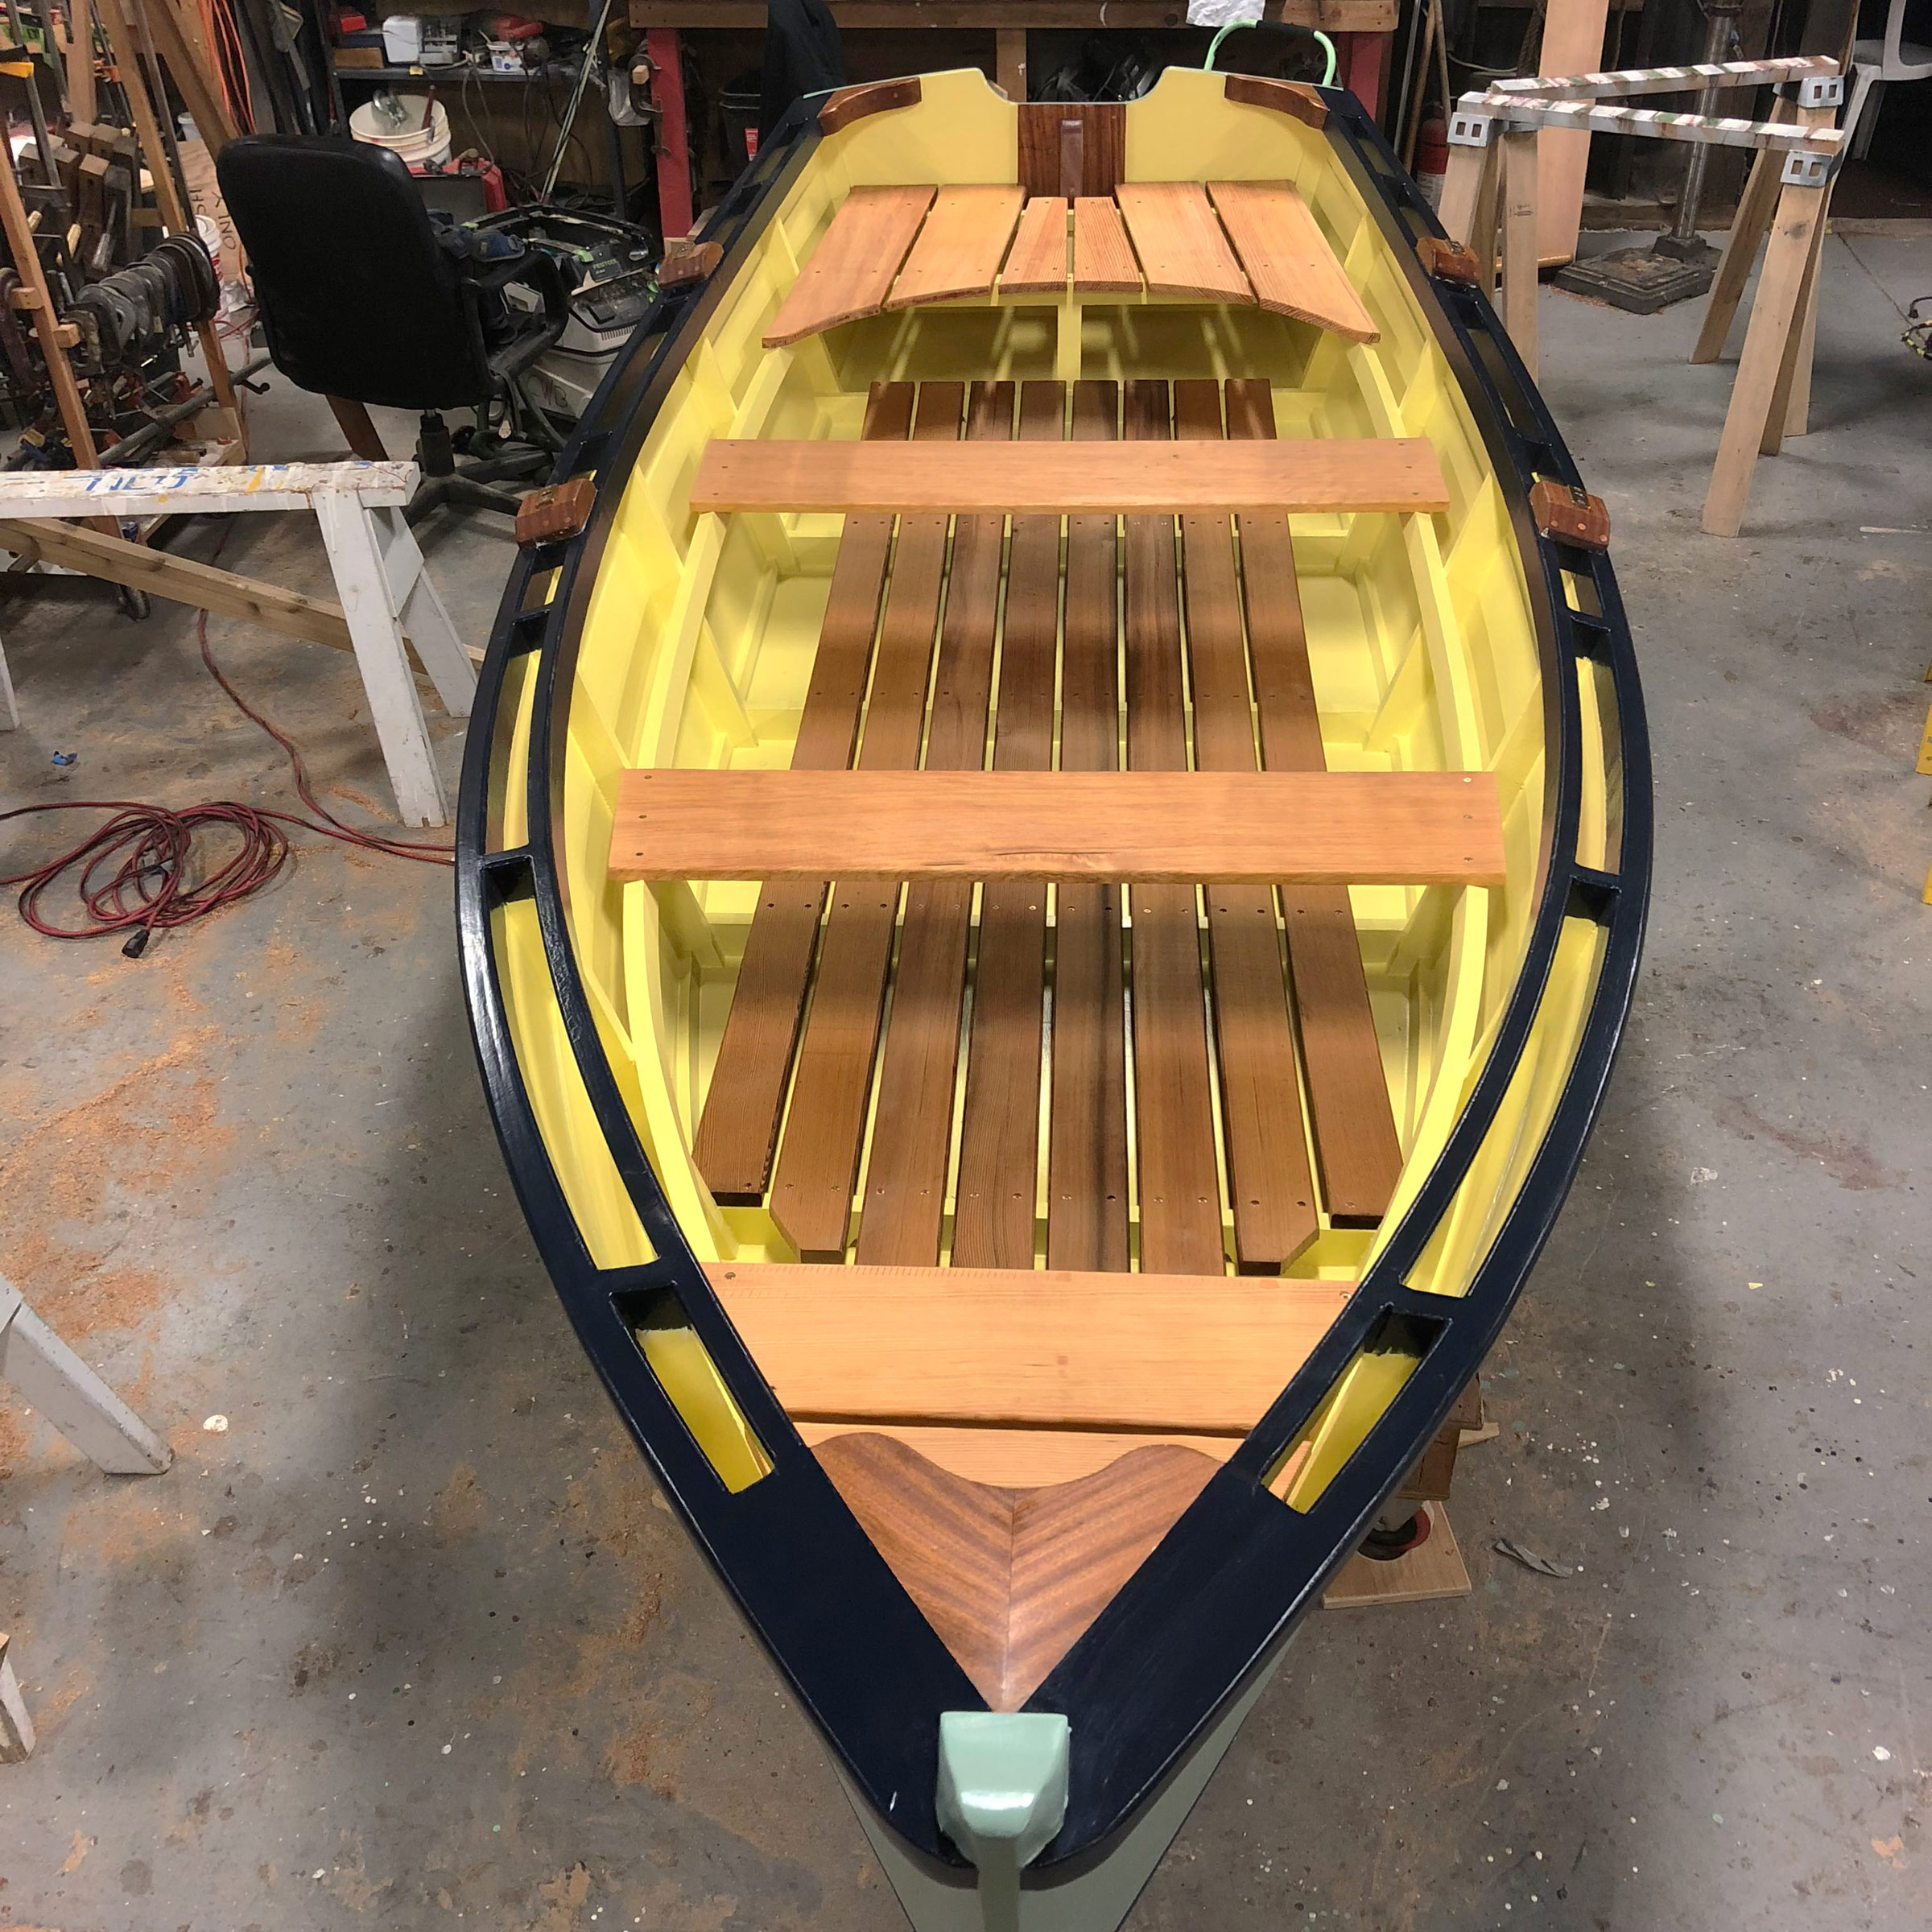
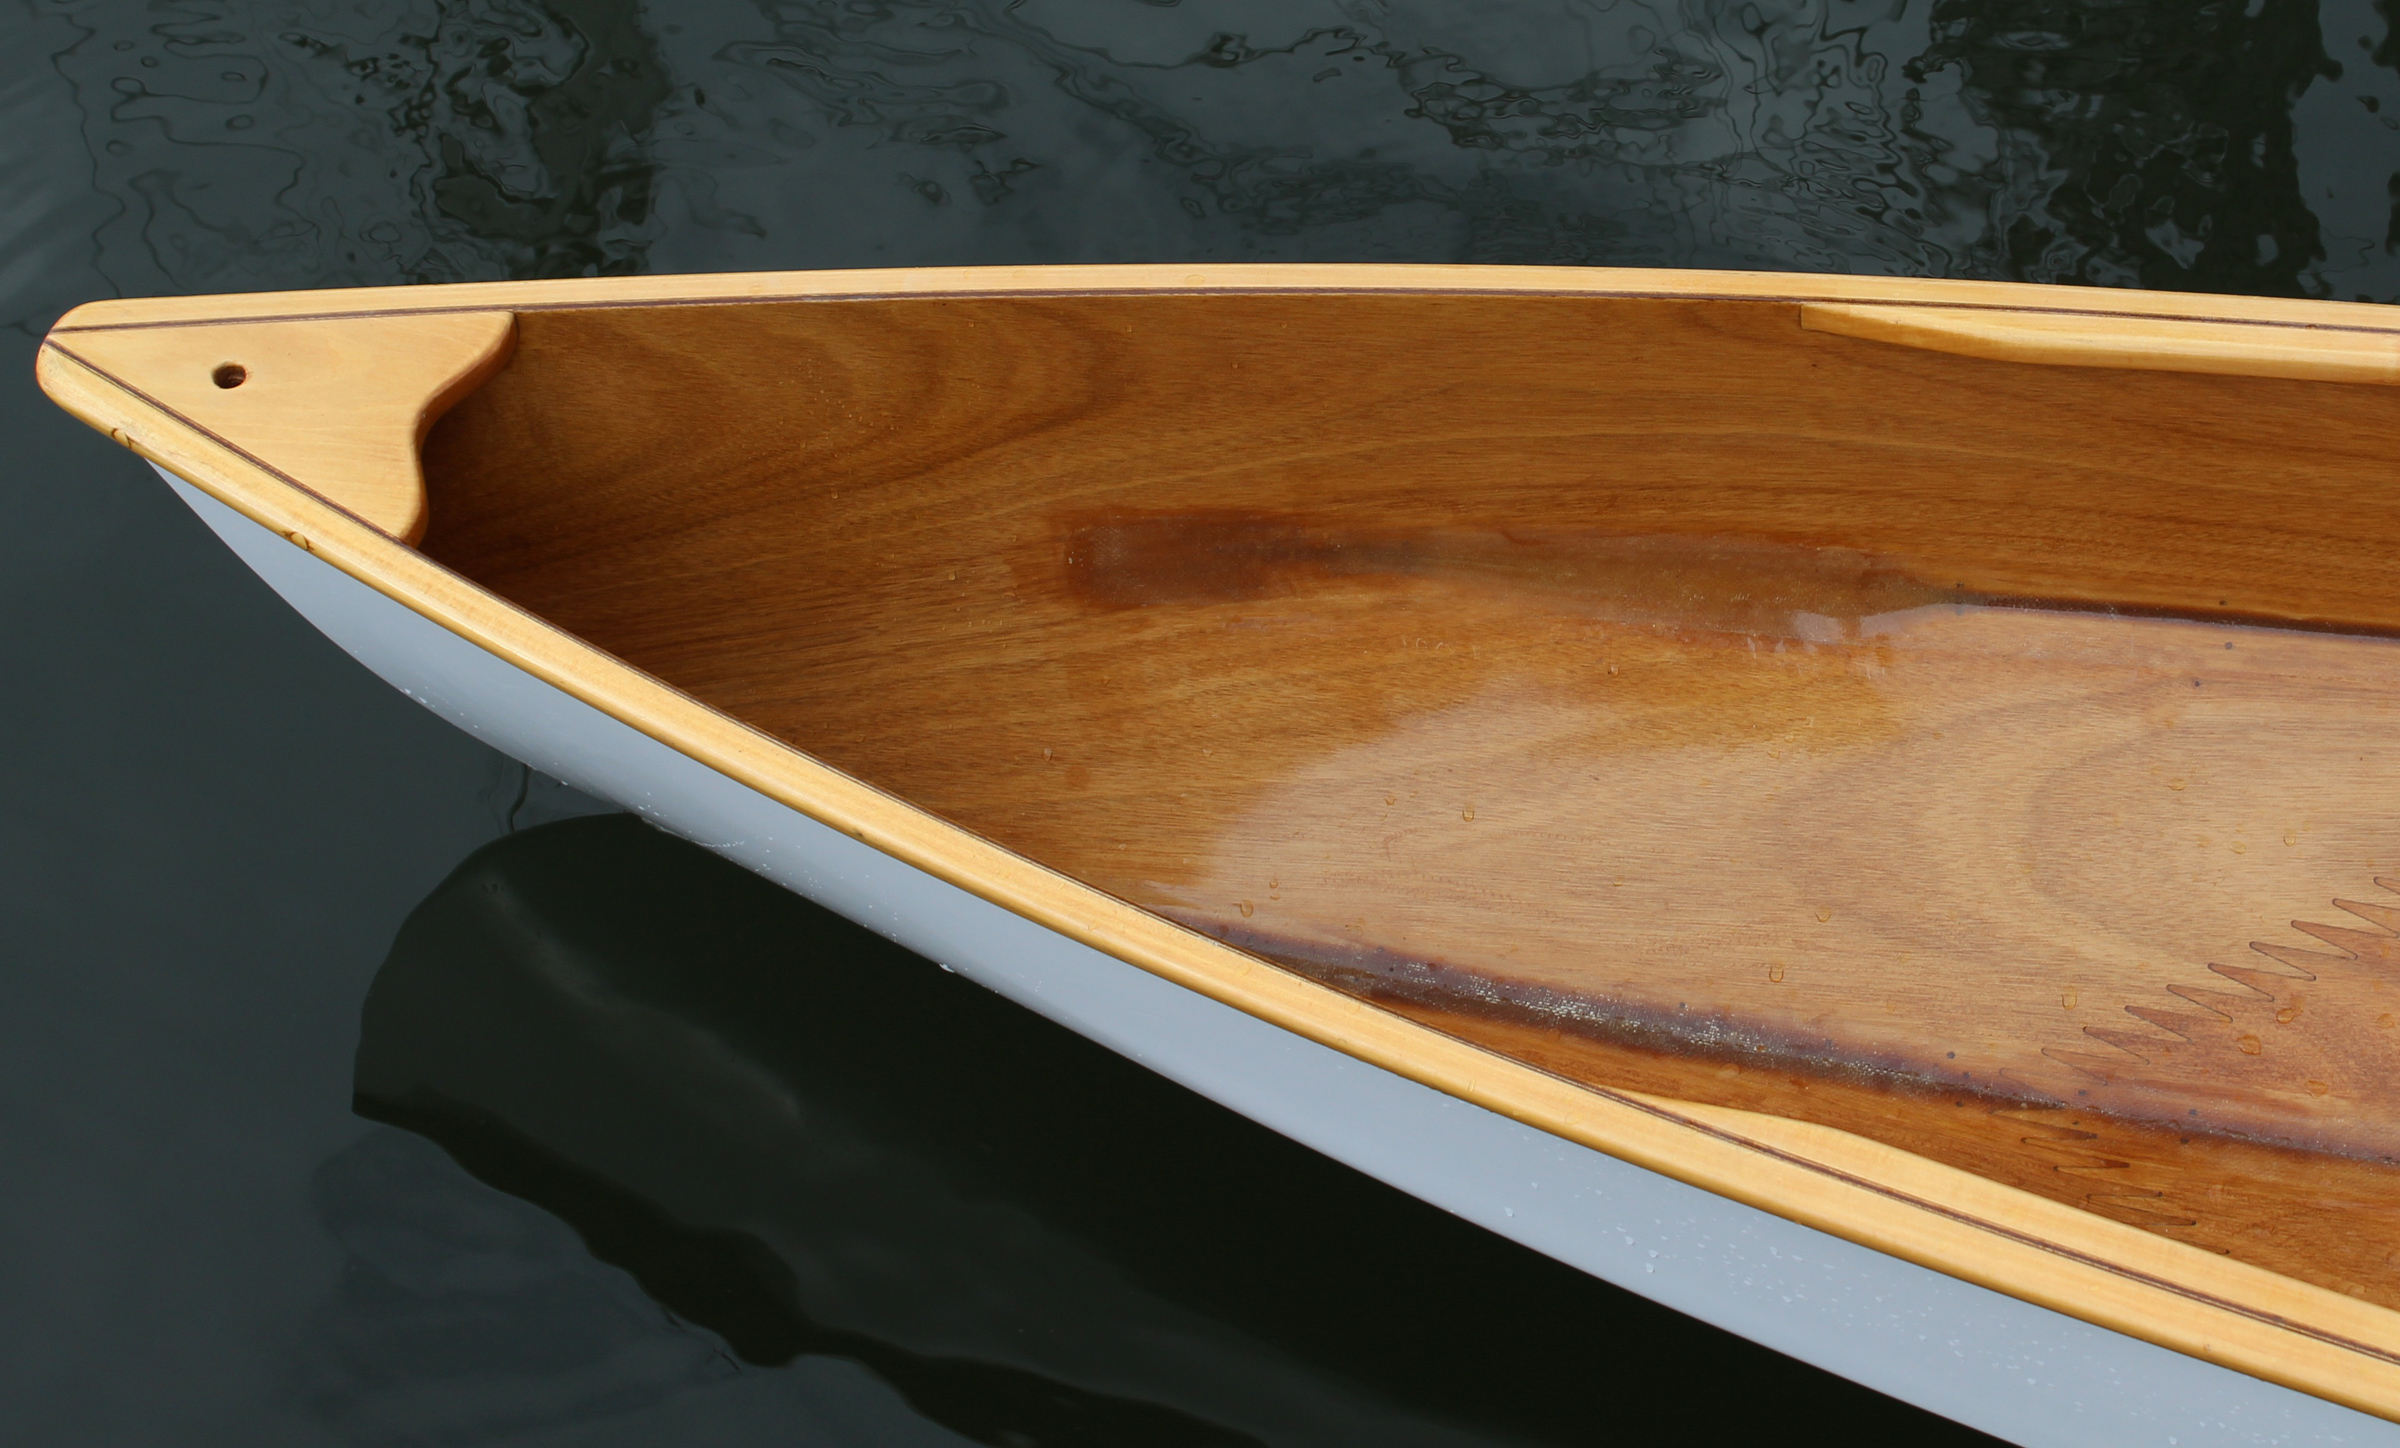
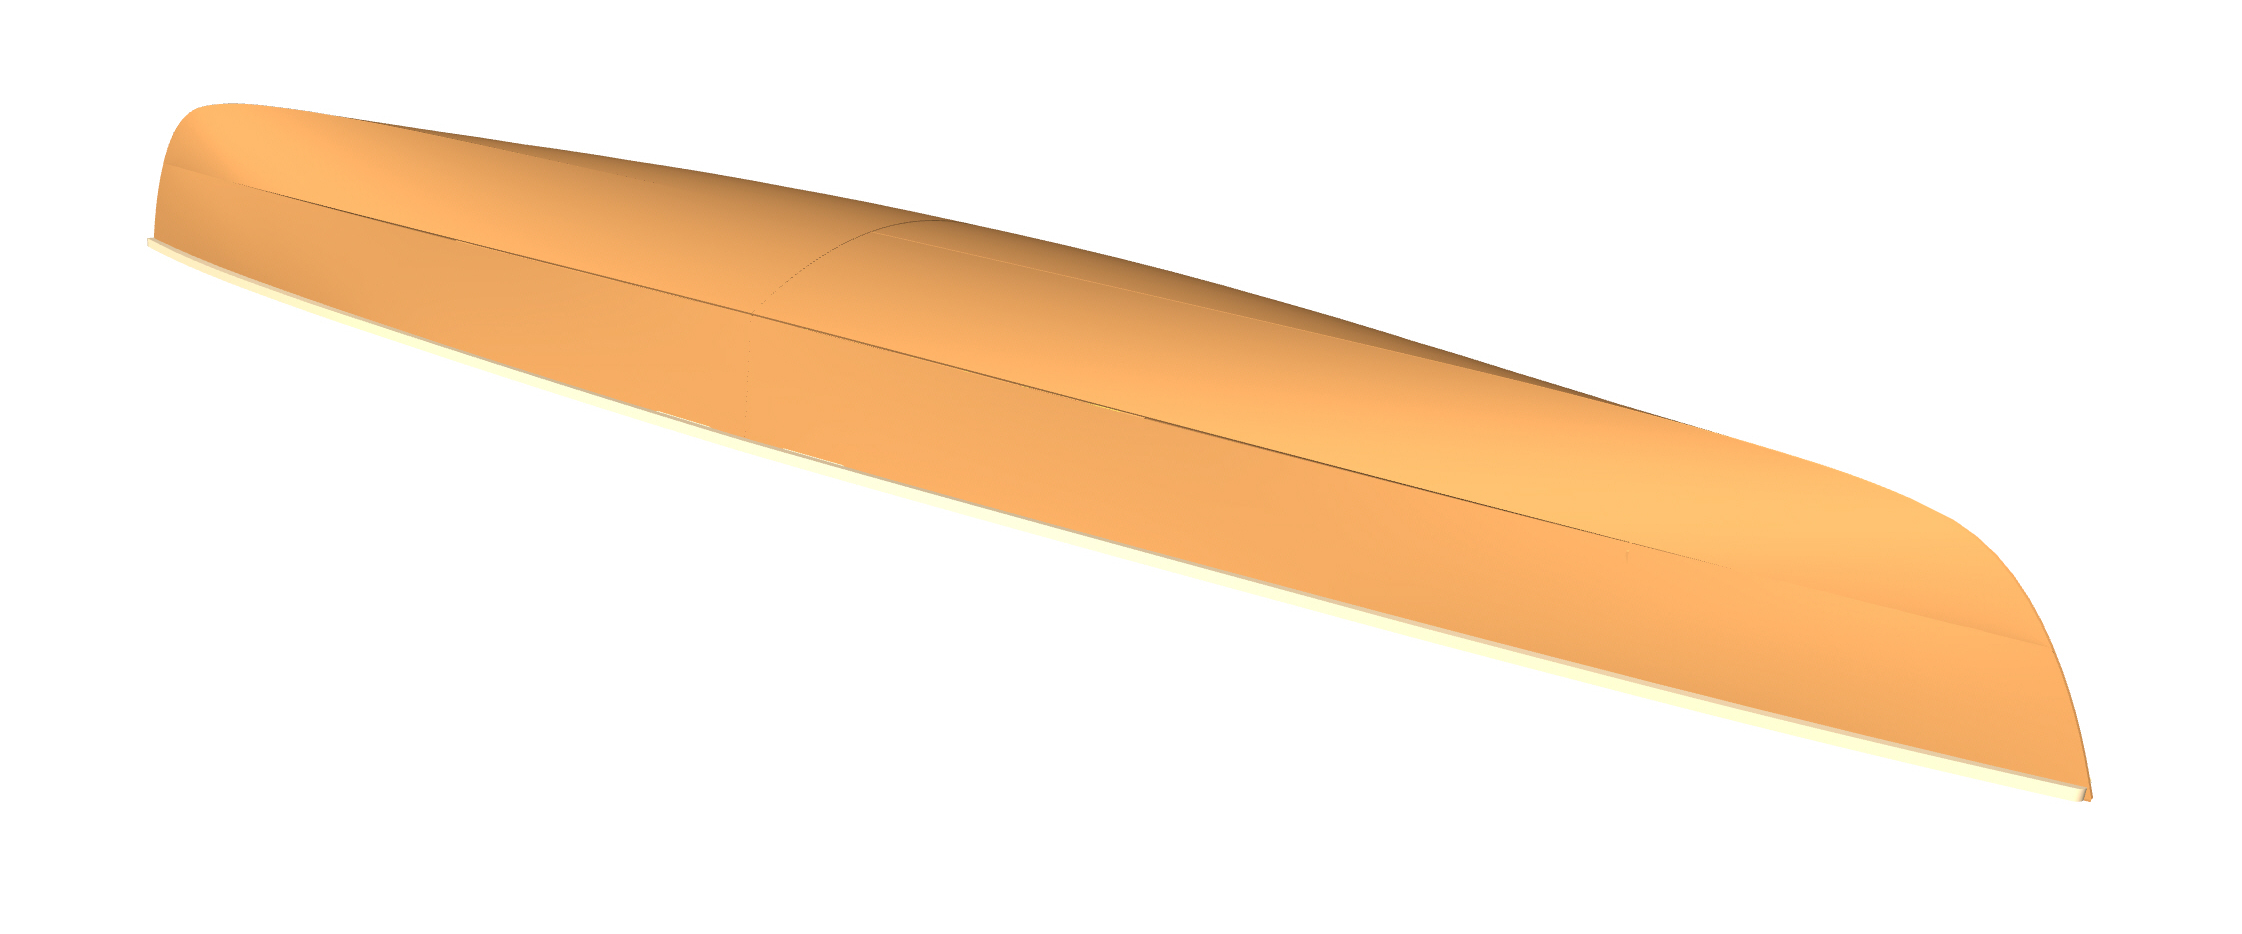
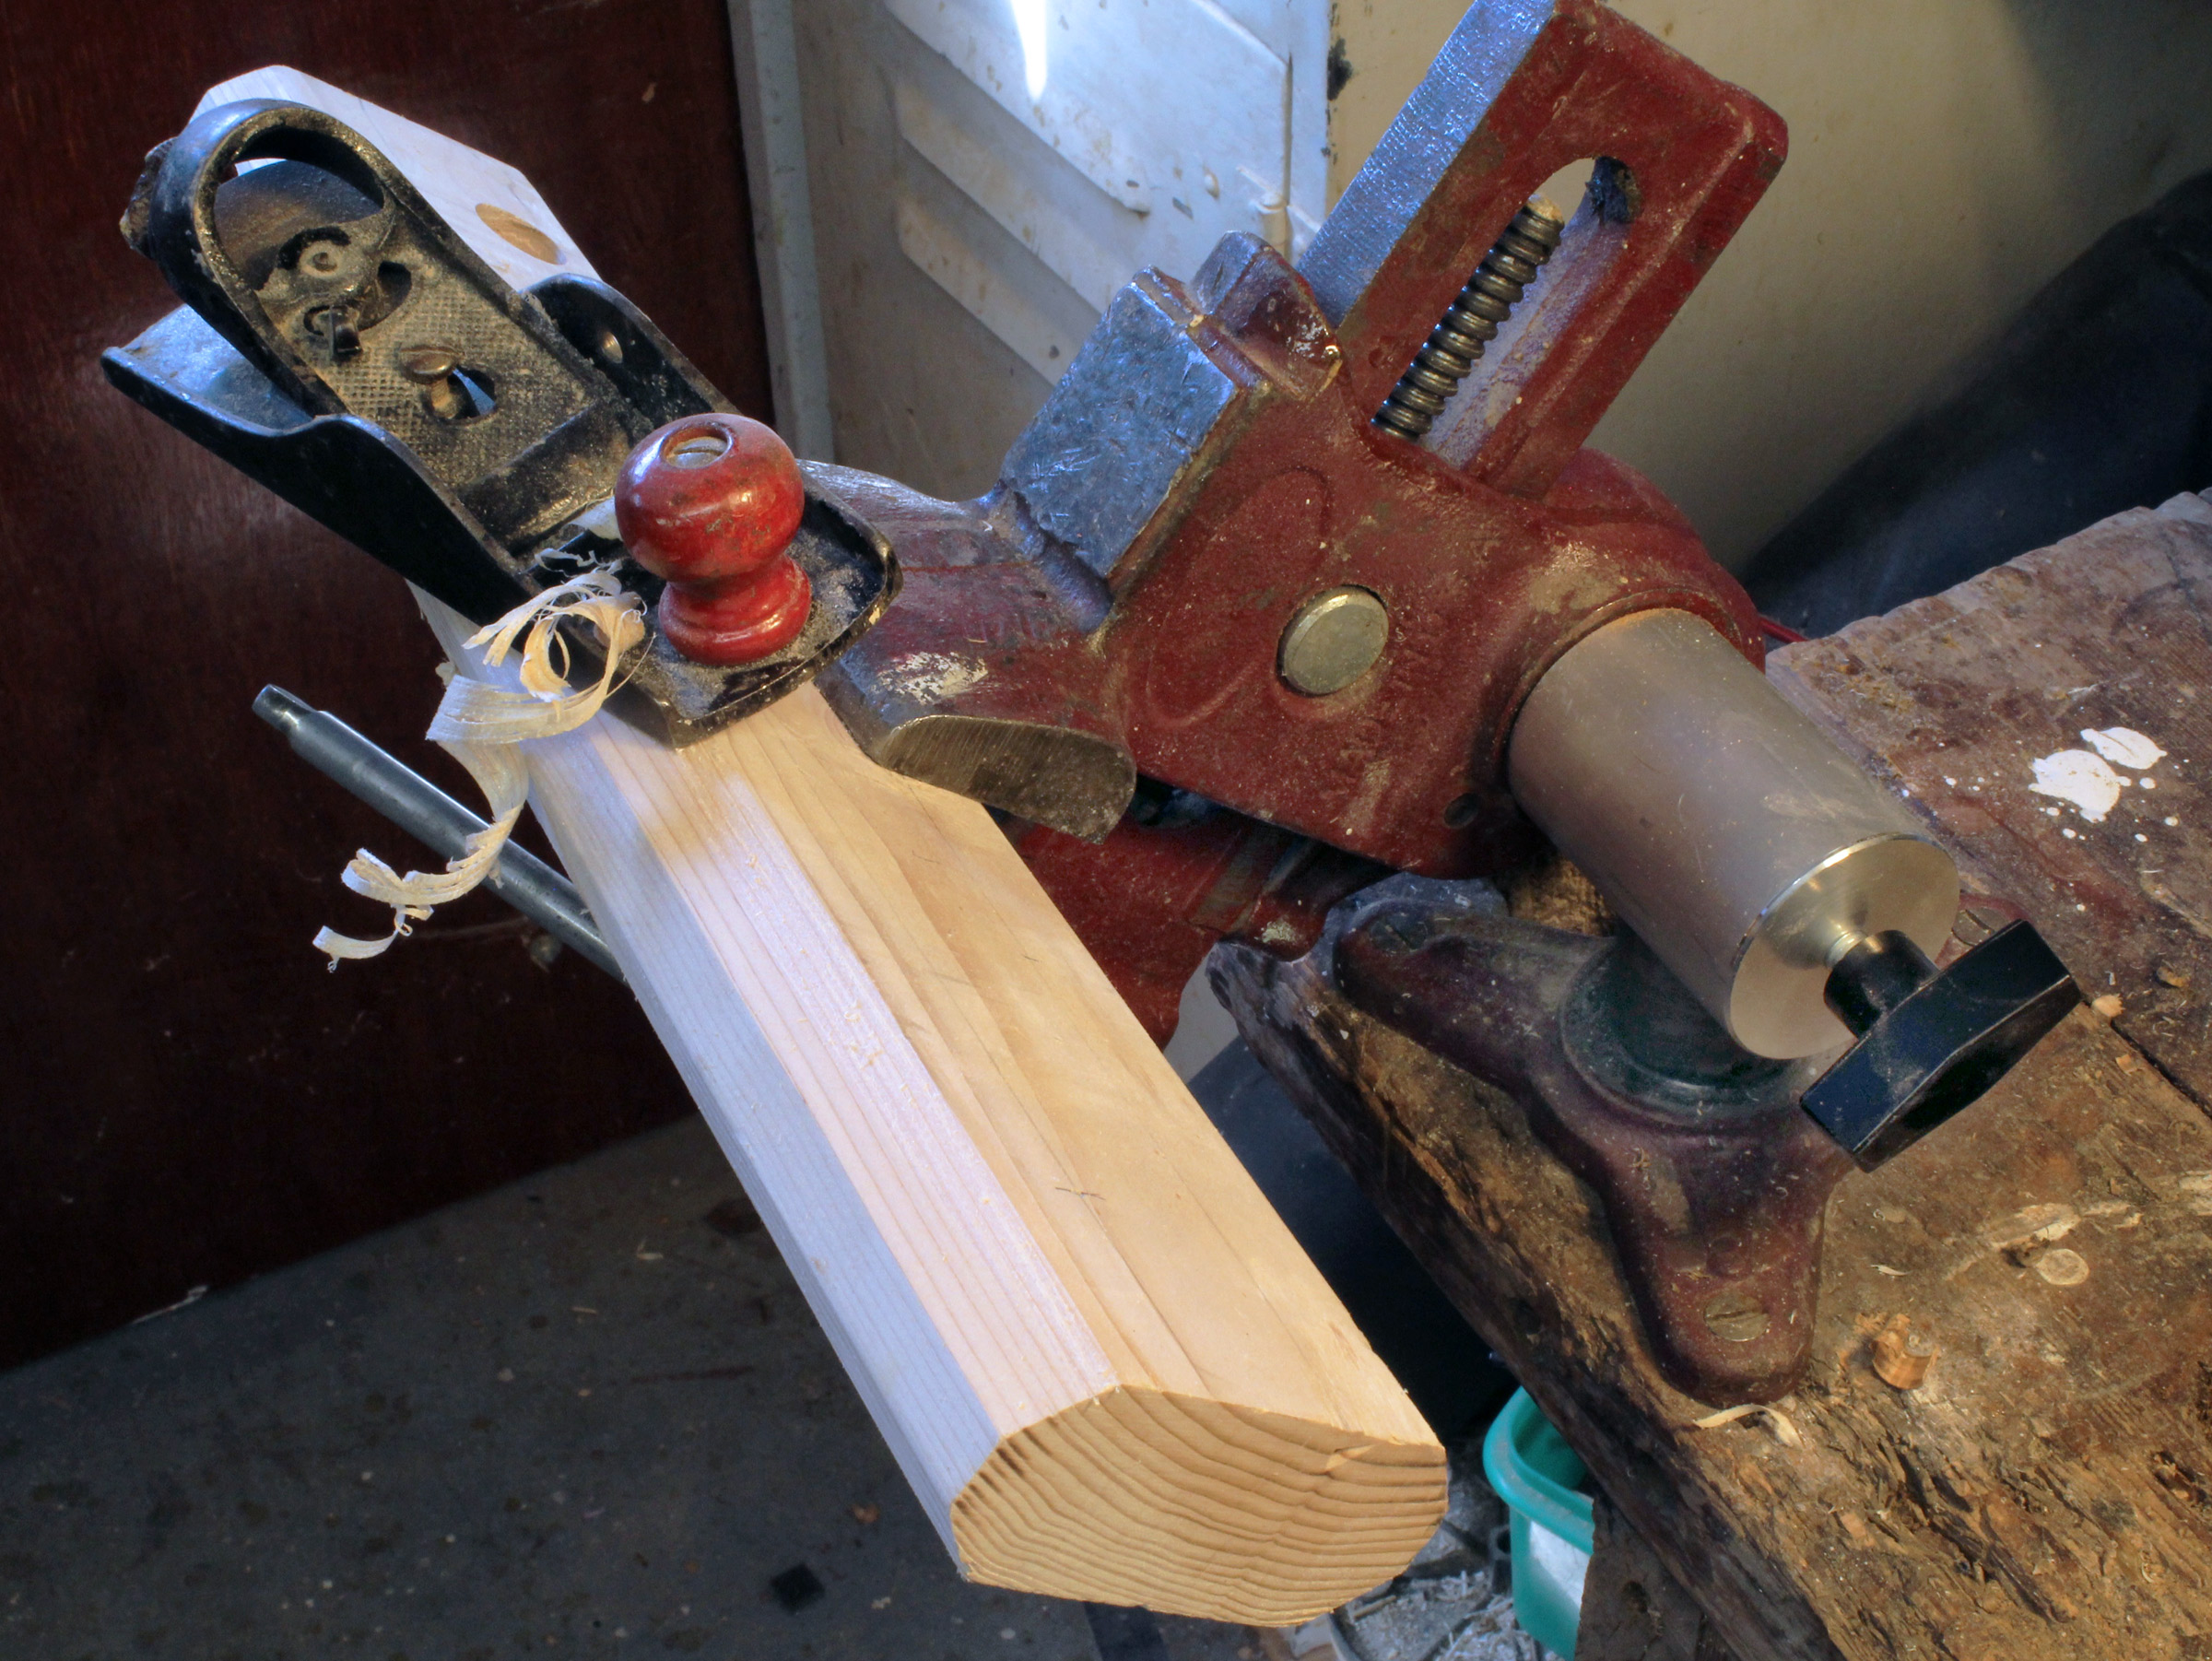
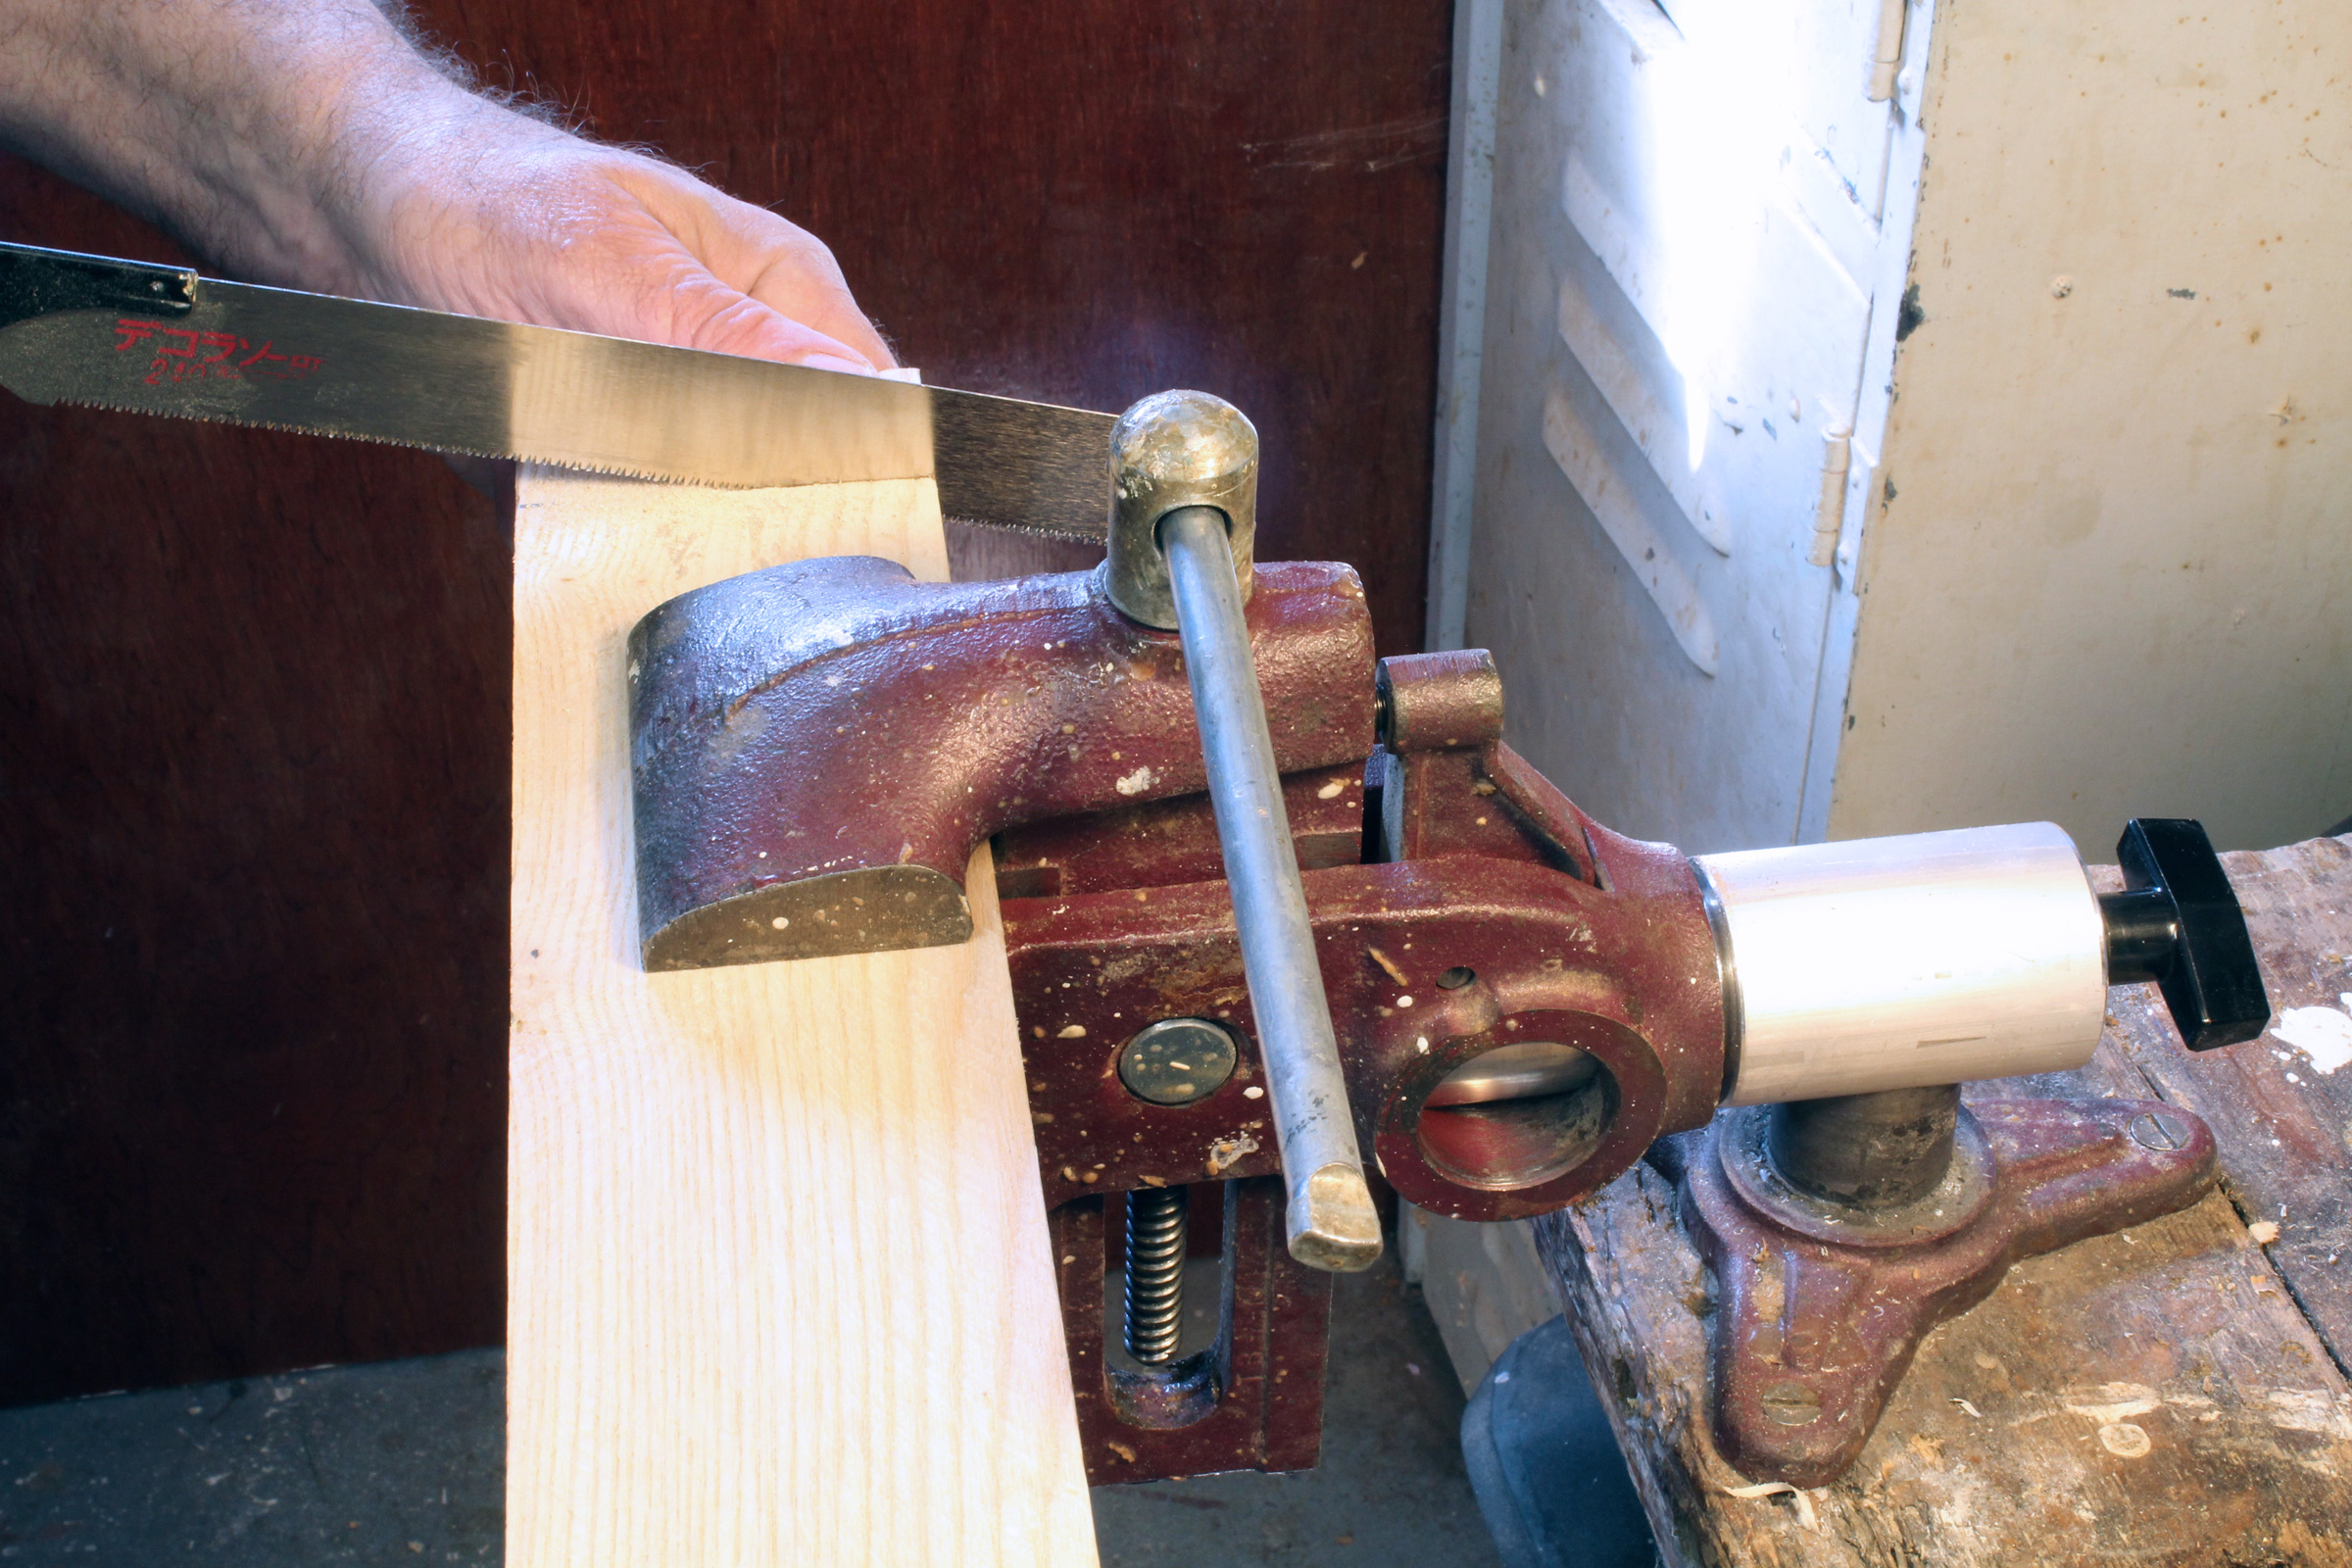
Once the planking was finished and the cutwater attached over the trimmed forward ends of the planks, I sanded and faired the hull. The plans call for paint at this point, but since this boat would live most of its life on the lake as a rental boat at CWB, I wanted it to be fairly indestructible. The bottom was fiberglassed and the rest of the plywood was epoxy coated three times. After the epoxy cured, the skeg and bottom runners were attached. The boat was then flipped upright, the frame ends were cut, and the sipo mahogany rub rail, inwale, breast hook, and knees were all installed with epoxy. I then cut out a notch in the transom so that a standard shaft outboard could be mounted. I also installed a beefy 2″-thick sipo transom knee and 1” pad to support the outboard. After the interior was epoxy coated, everything was primed and painted, expect the breasthook, knees, oar lock pads, and transom knee, which were oiled. I made the thwarts of vertical grain Douglas fir, and the sole of vertical grain red cedar, all of which was also oiled.
As I was building this boat, I realized this design would lend itself well to boatbuilding classes at CWB, and I made patterns of all the molds and parts so that they could be duplicated for future skiffs. Monk’s design would be easy for novices to understand and his plans could easily be used to teach either modern or traditional building techniques.
SBM
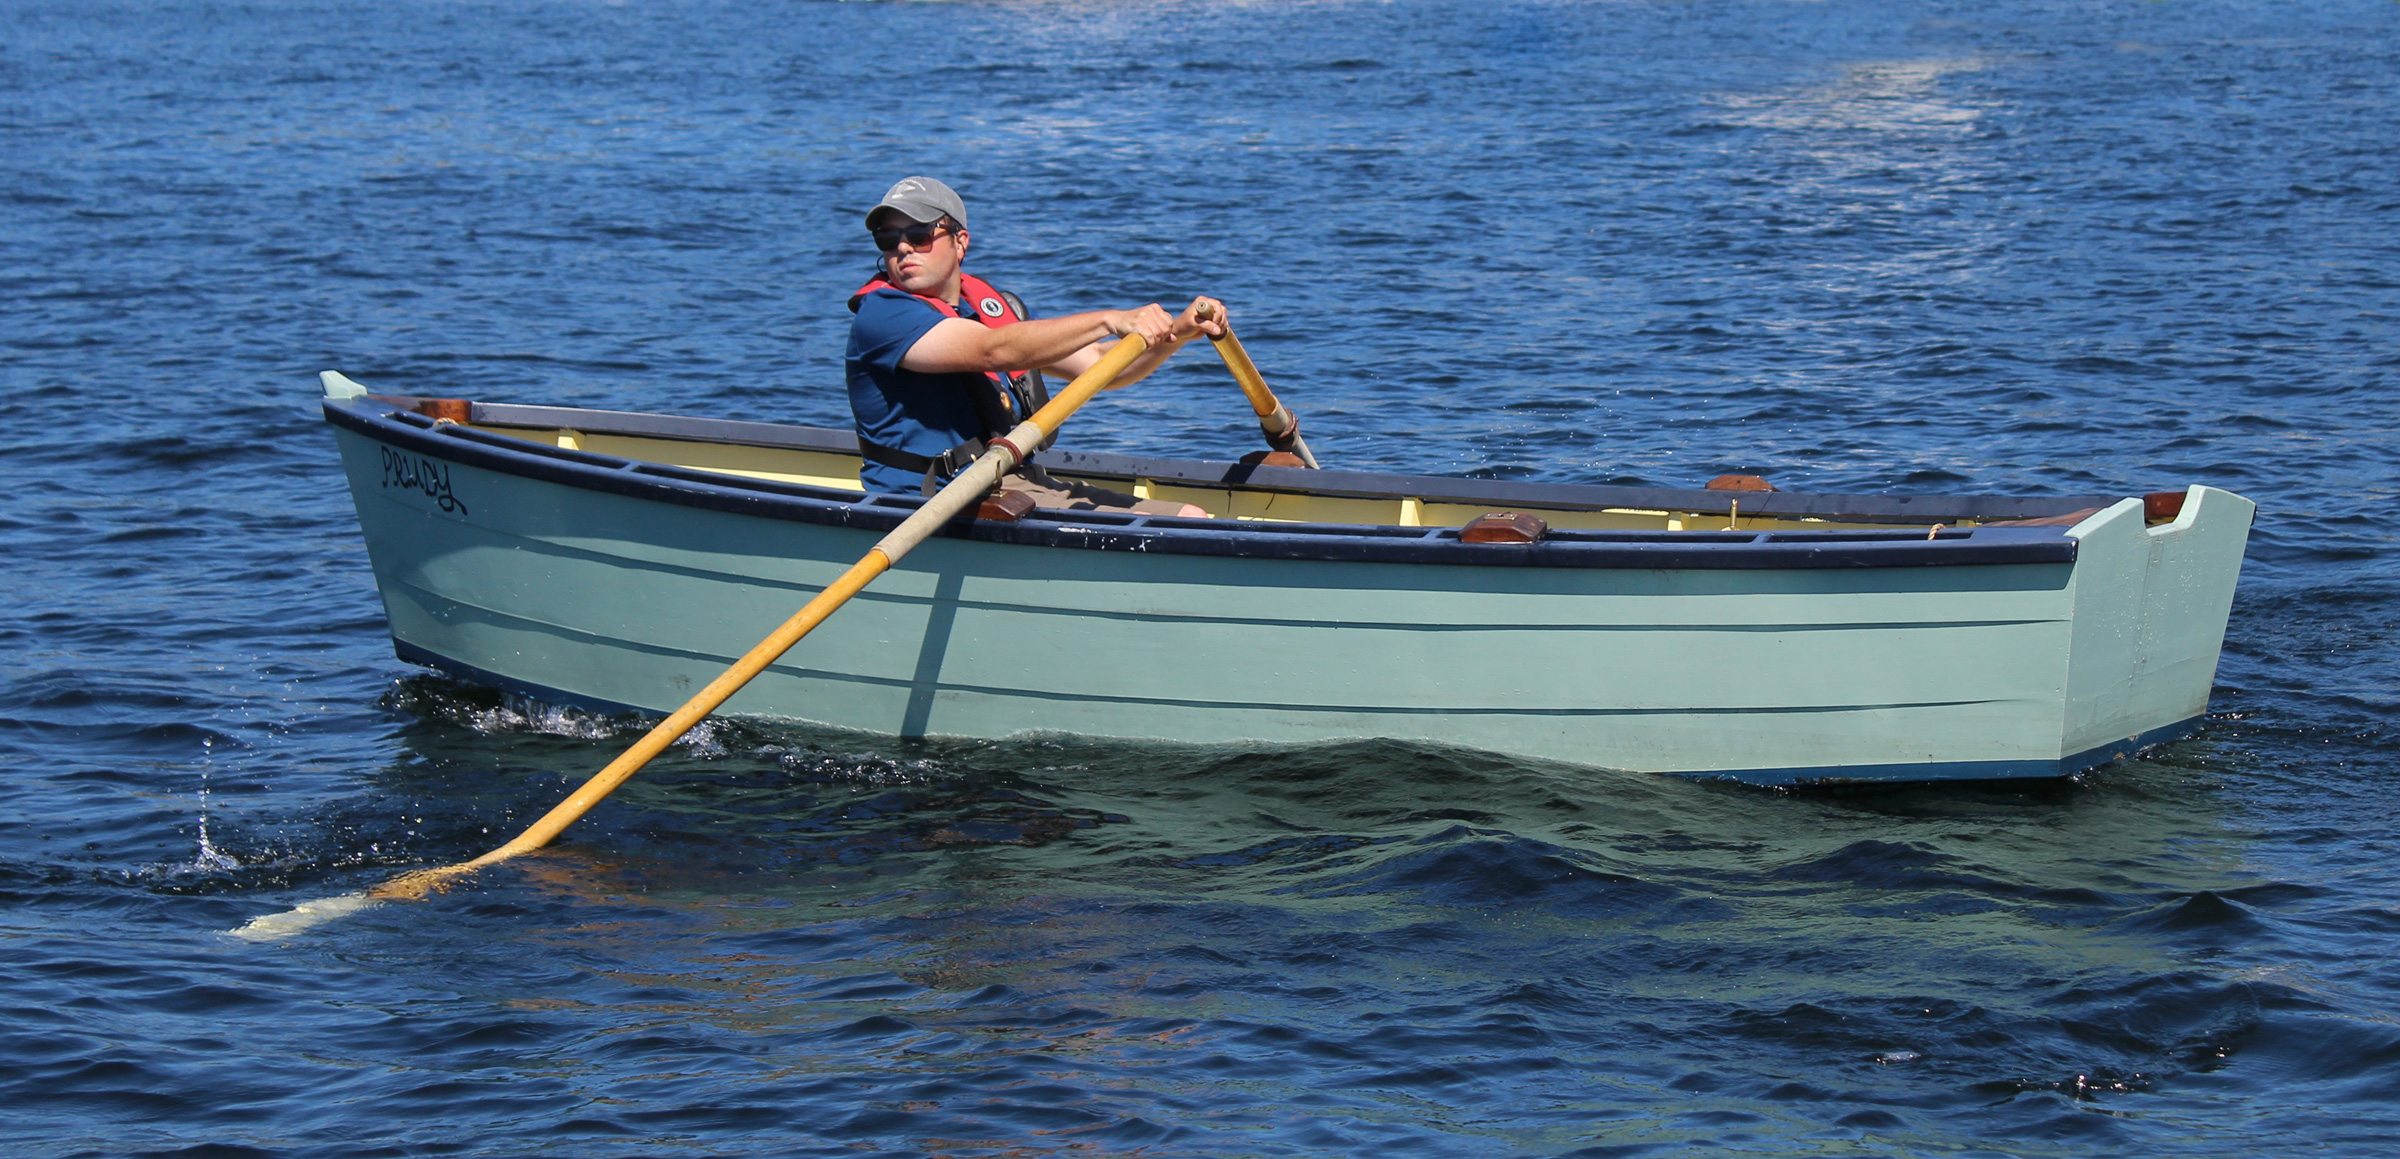
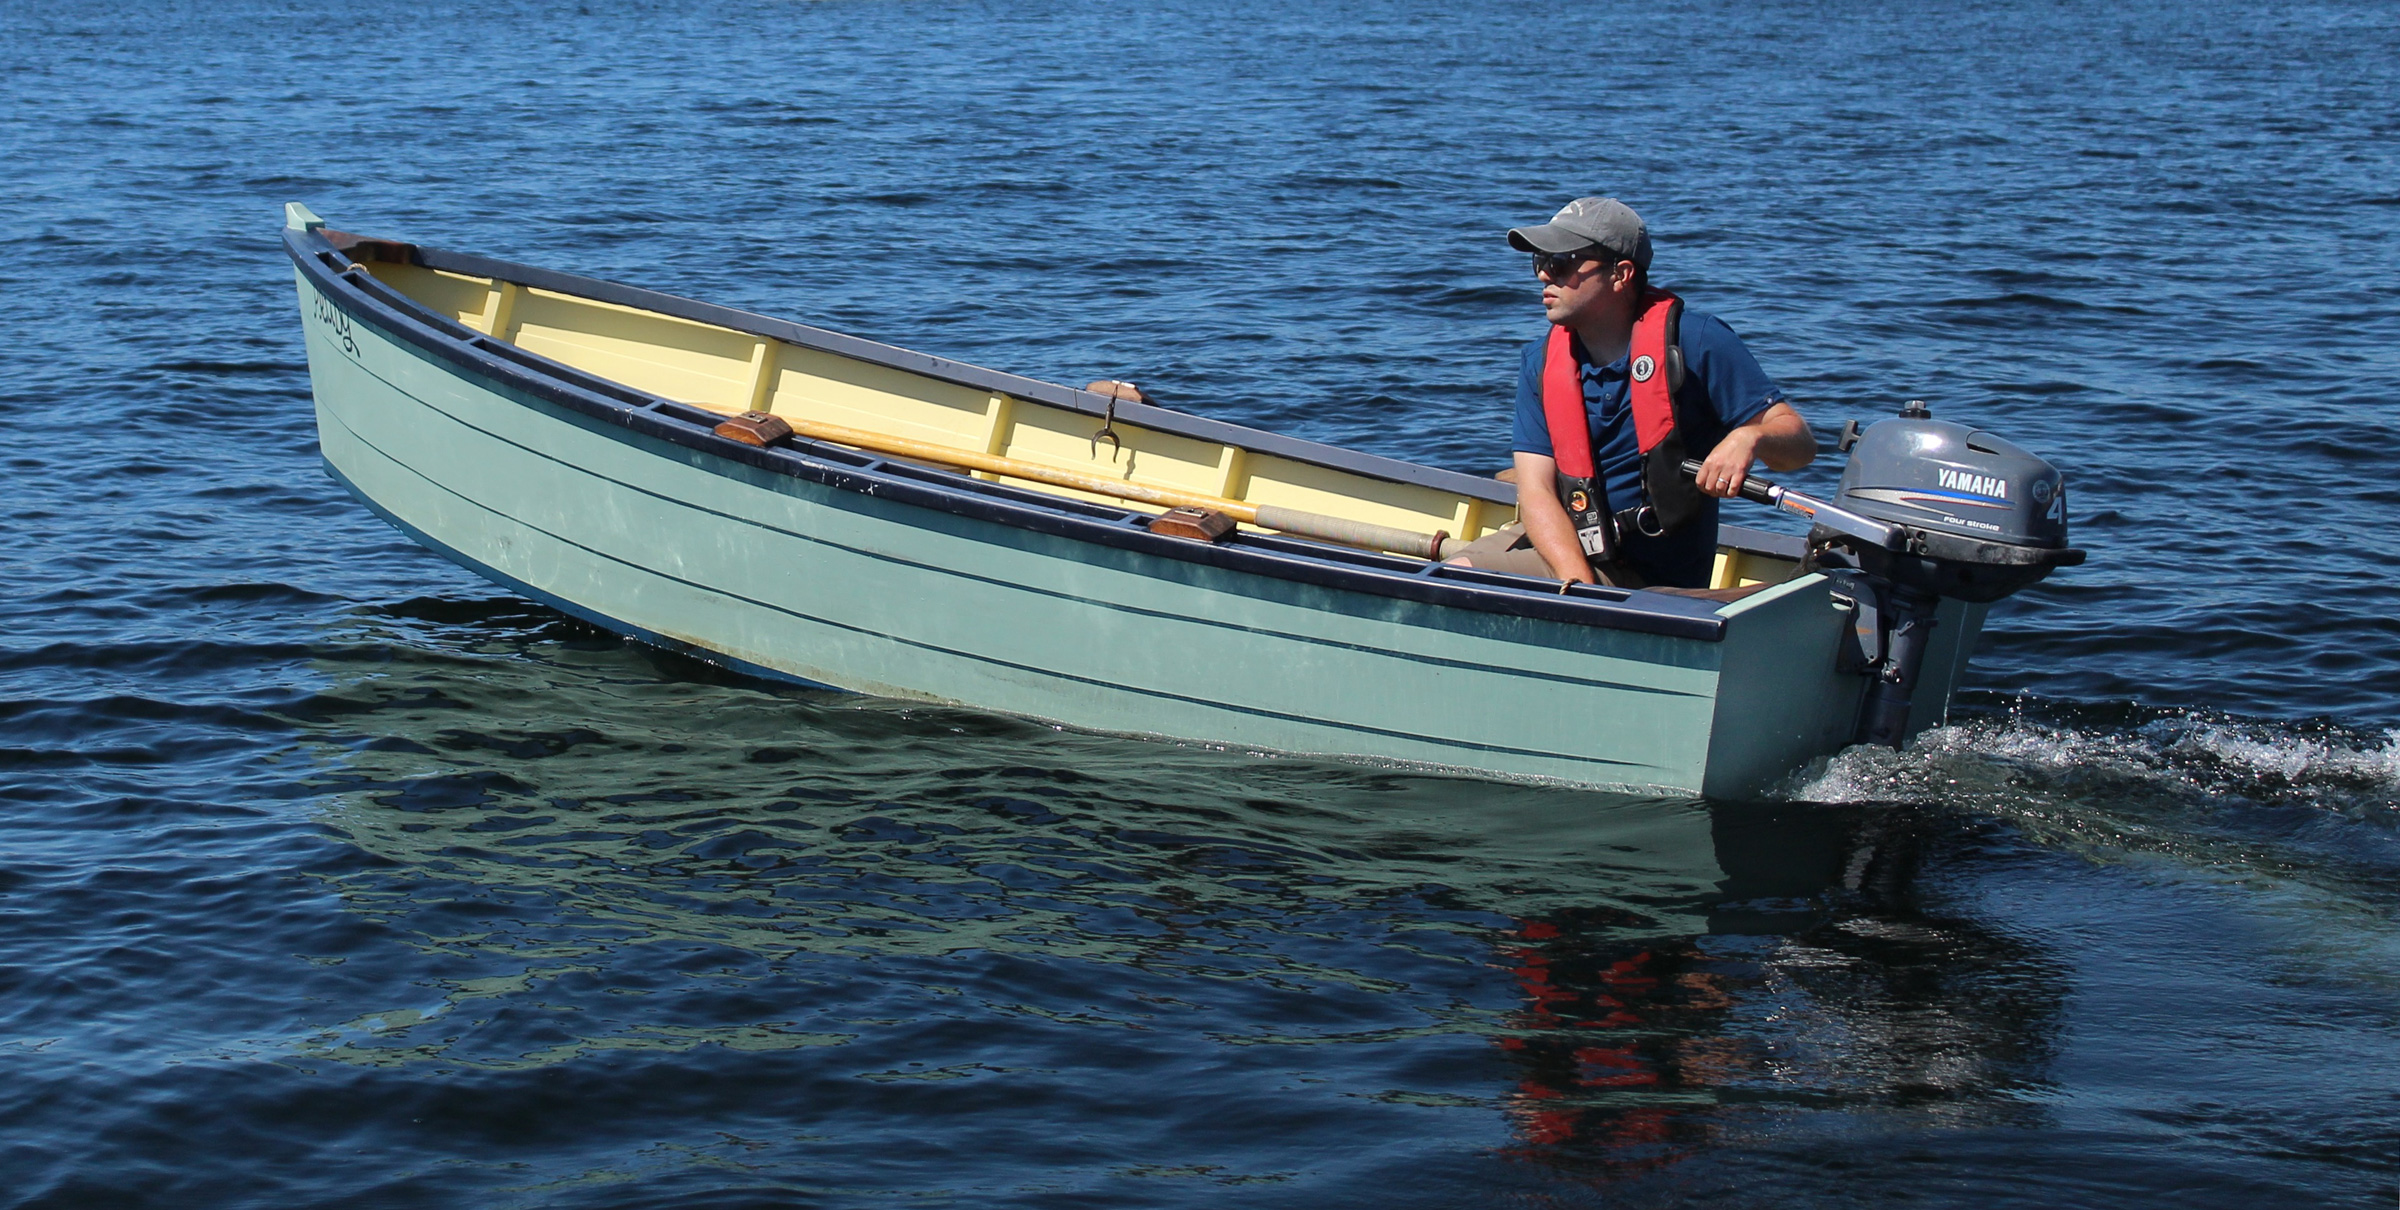
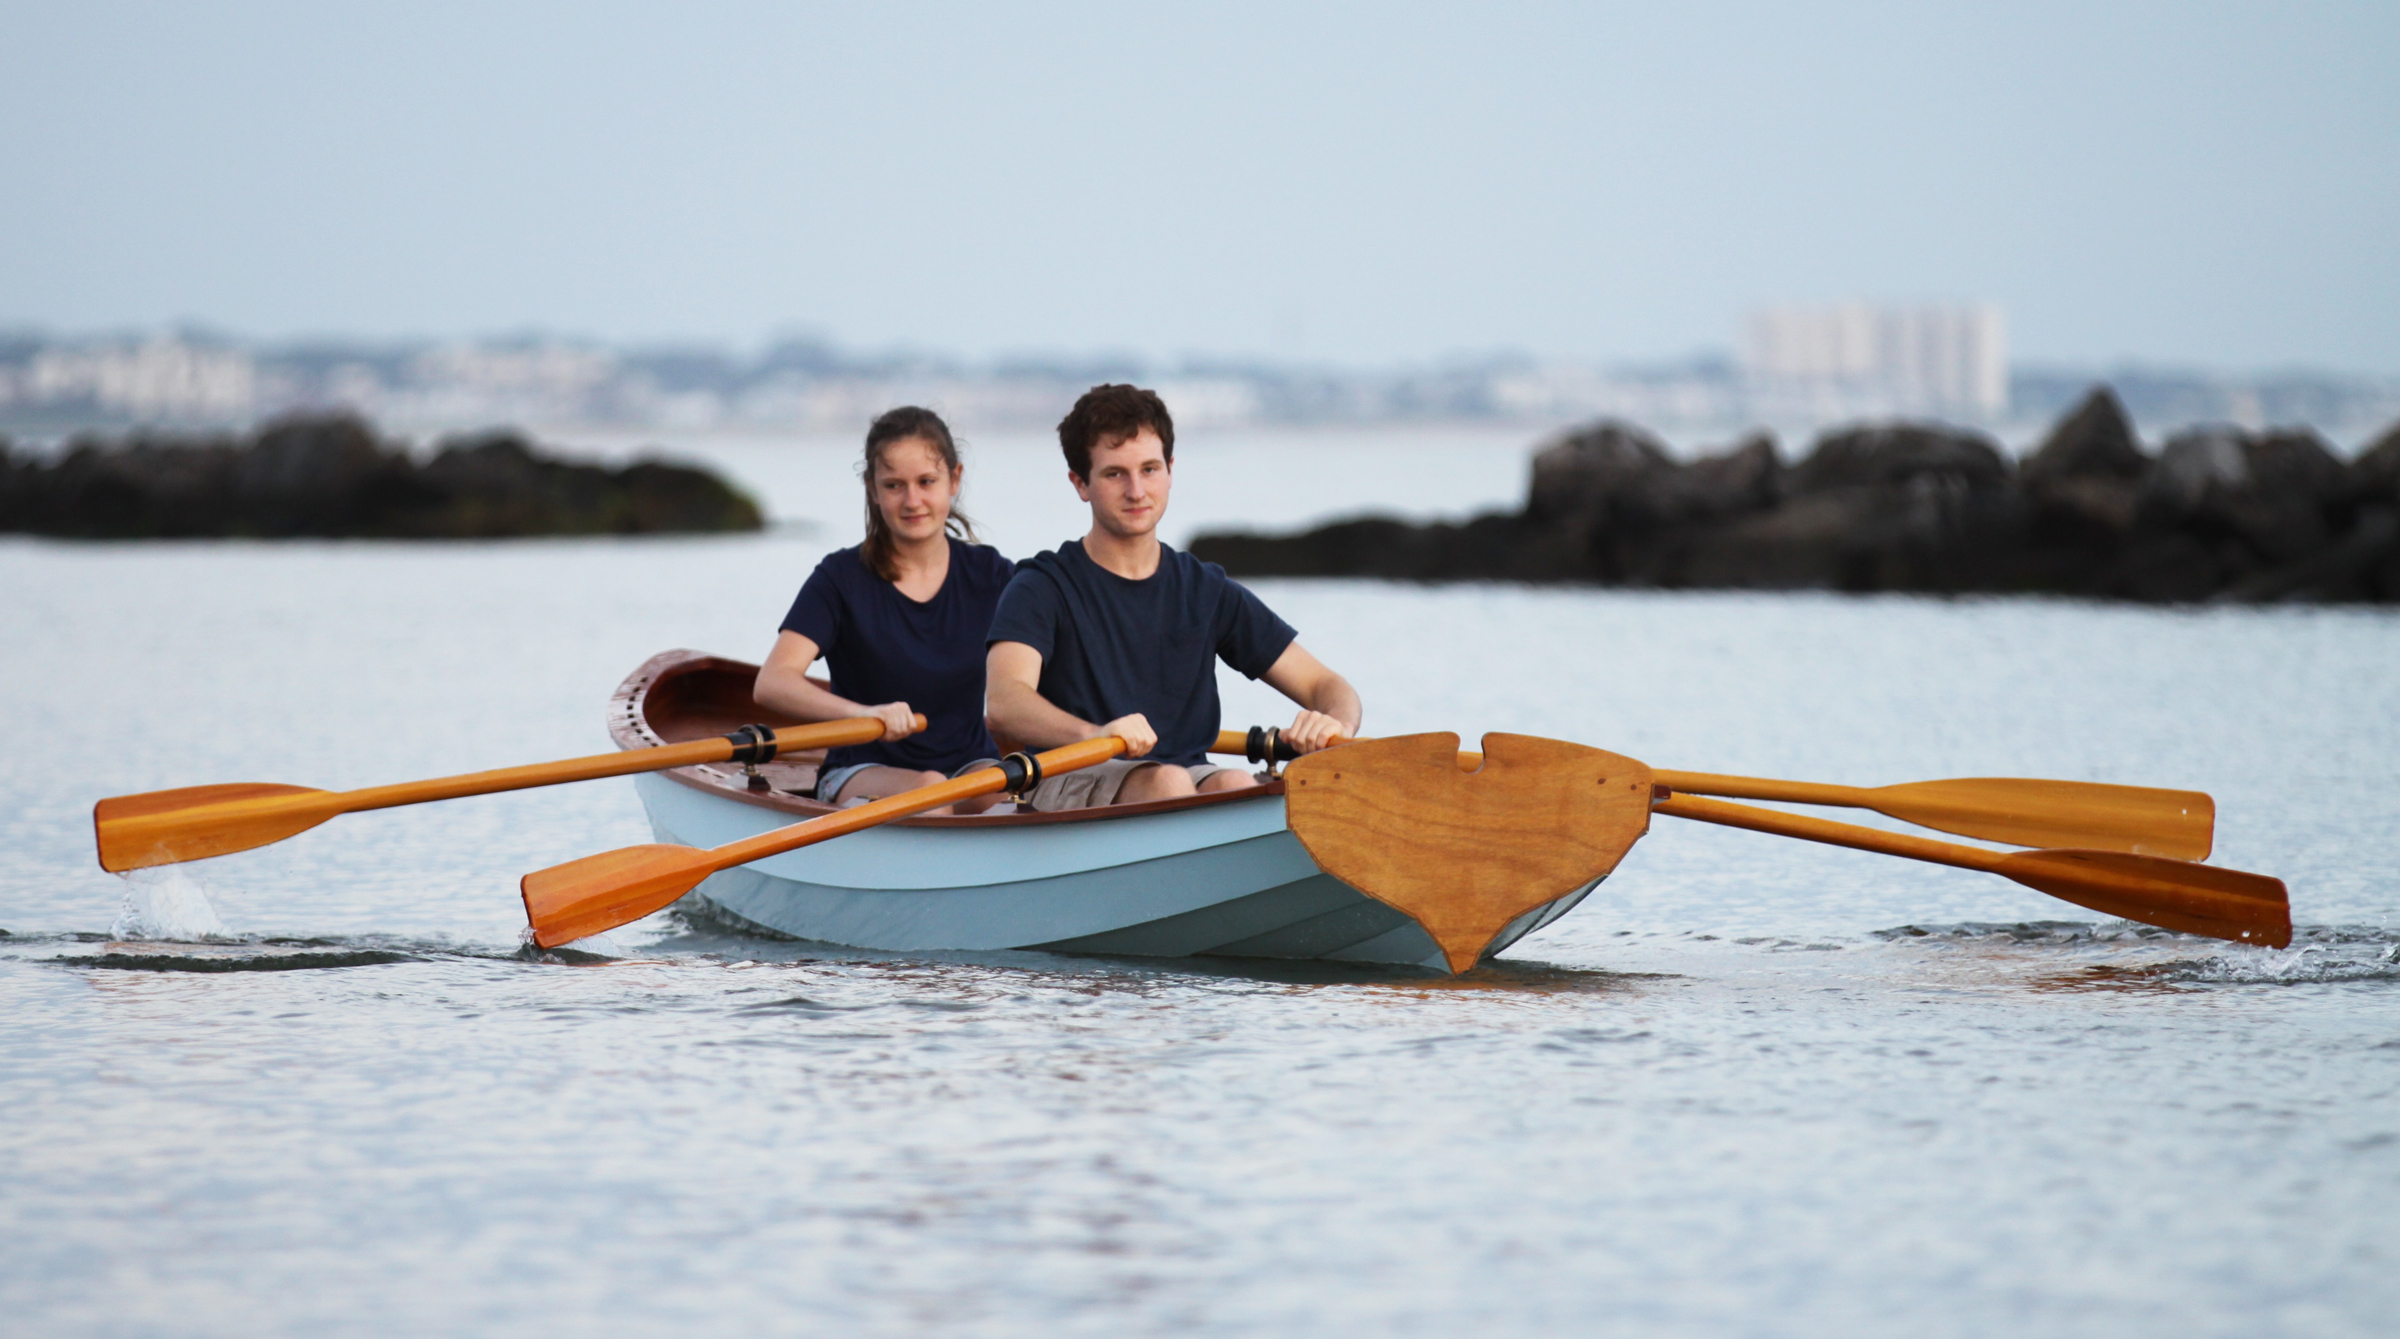
The forward station puts the boat in good trim with a solo rower.
On the water the skiff is quite stable—you can stand up and do jumping jacks in this boat and it will not toss you overboard. With its high freeboard, it can hold a lot of weight and accommodate up to five adults comfortably, with enough stability to switch seats in the middle of the lake.
The two rowing stations are for either single or tandem rowing. For going solo, it rows really well from the forward station. The skiff’s flat bottom and low draft make it very maneuverable and responsive. Without a lot of weight aboard, it glides through the water easily. The high freeboard results in a fair amount of windage and in strong winds the boat gets pushed around a bit when under oars.
SBM
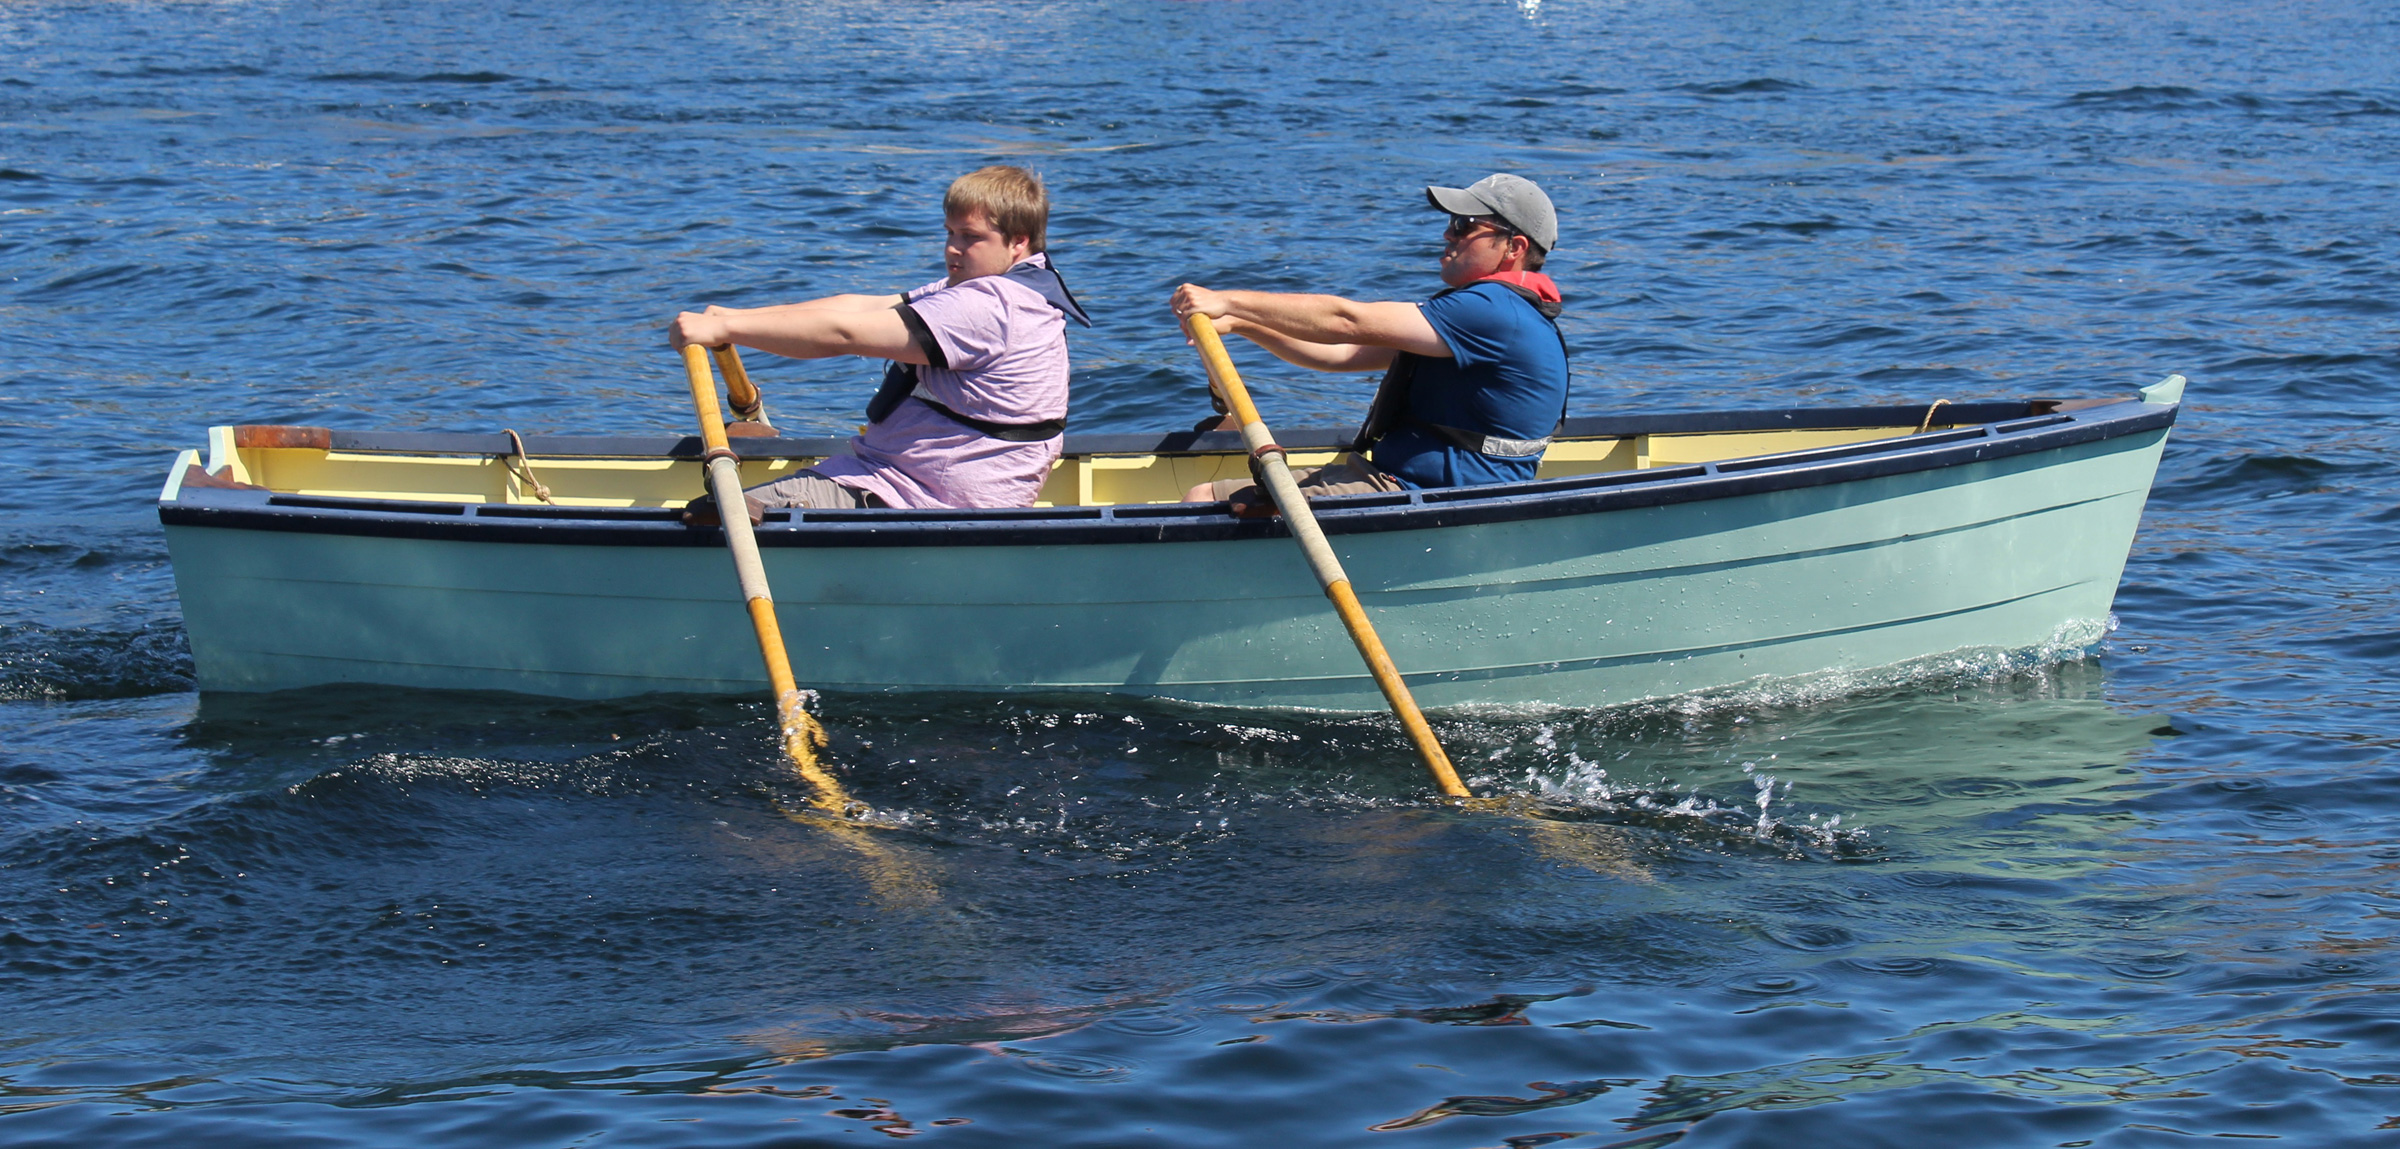
The 4′ space between rowing stations gives a synchronized pair of rowers enough room to keep out of each other’s way.
Rowing in tandem significantly eases the work of getting the boat moving, especially with added weight aboard. The two rowing stations are 4’ apart, providing plenty of space for comfortable tandem rowing without clashing oar blades.
SBM
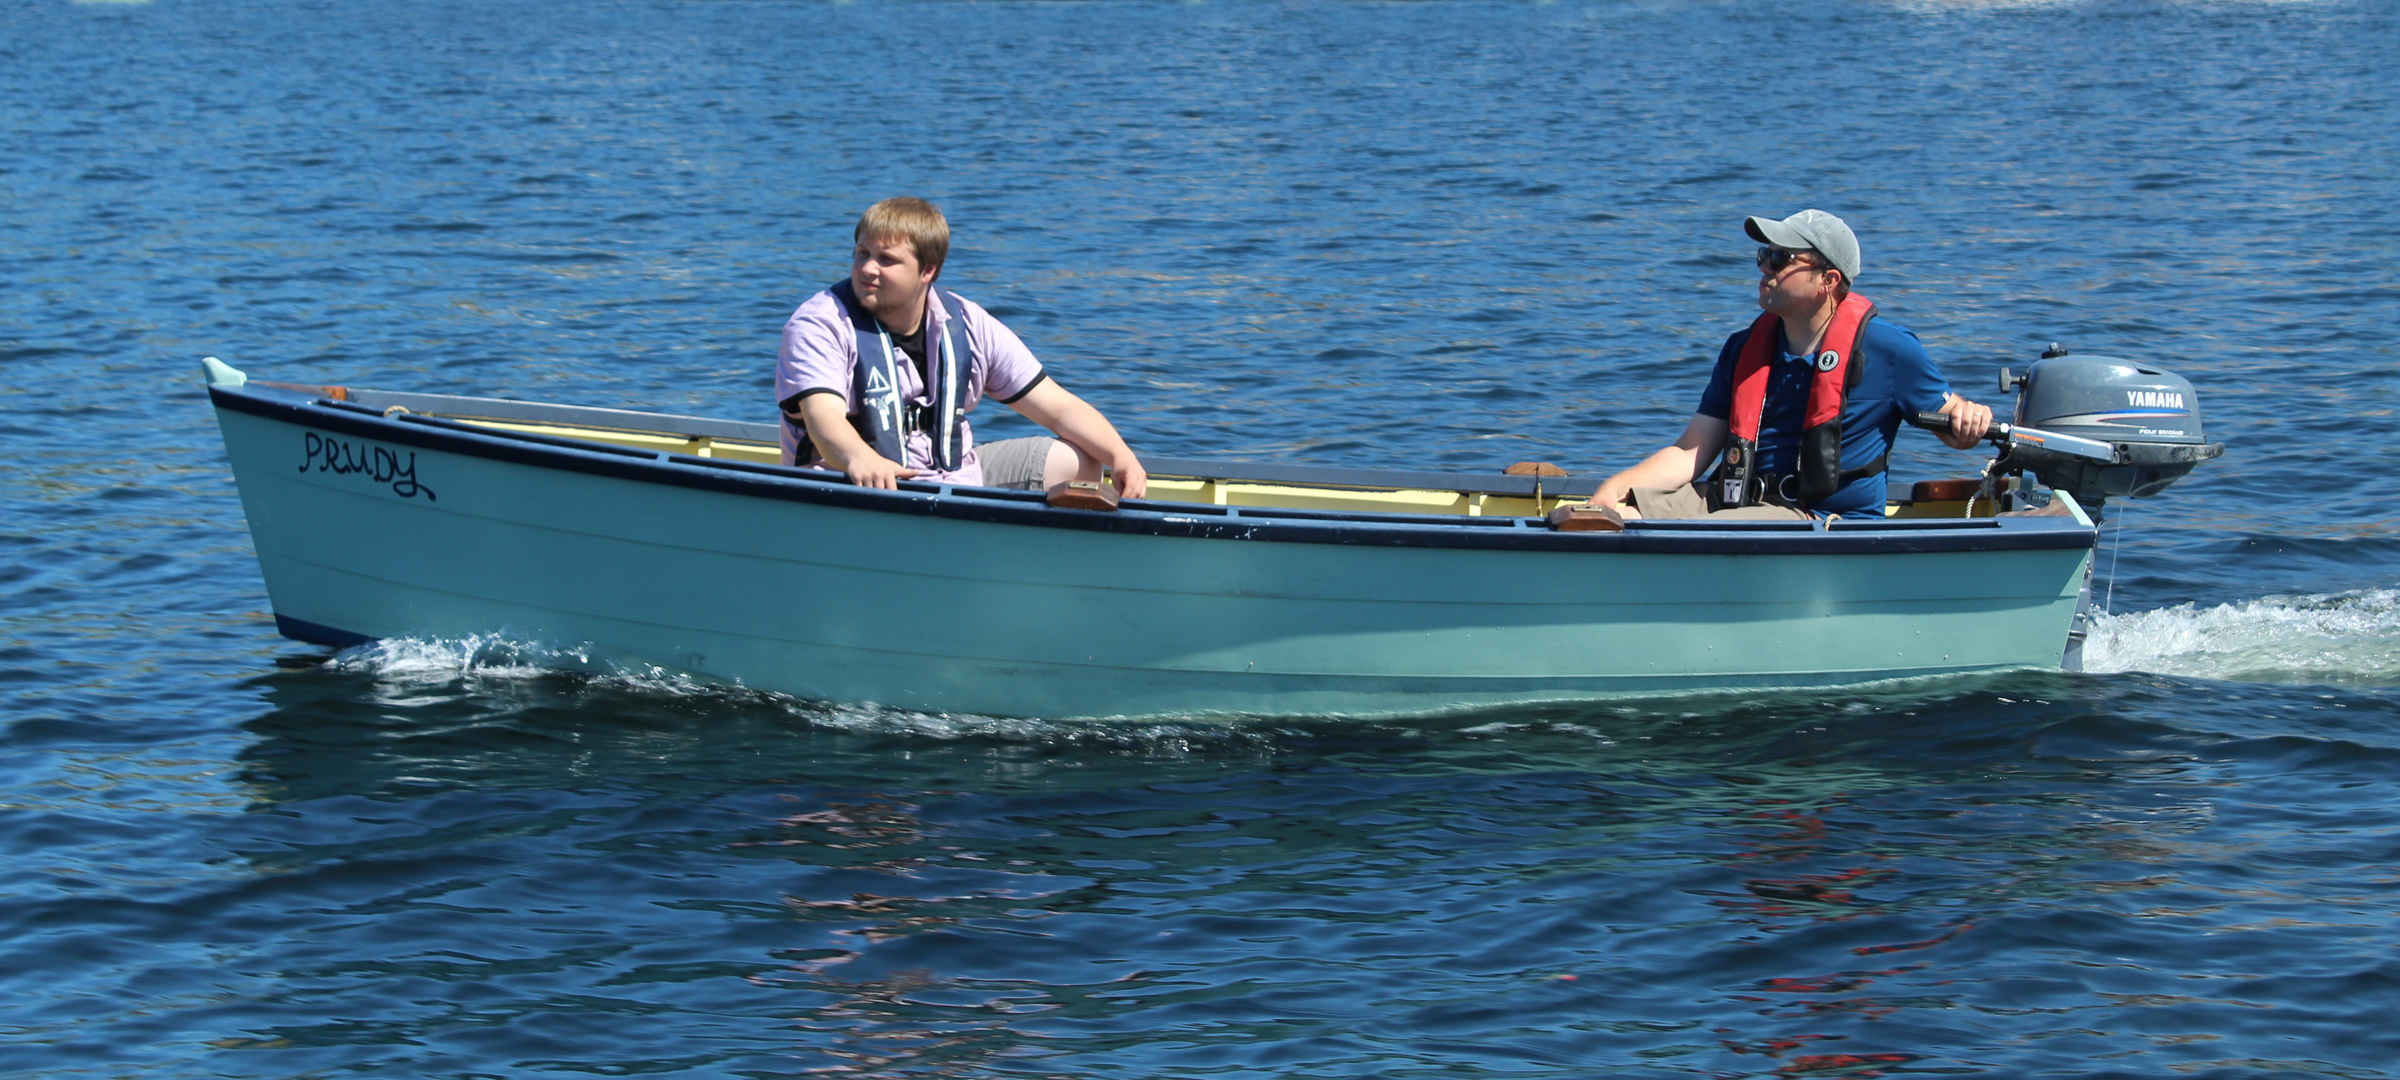
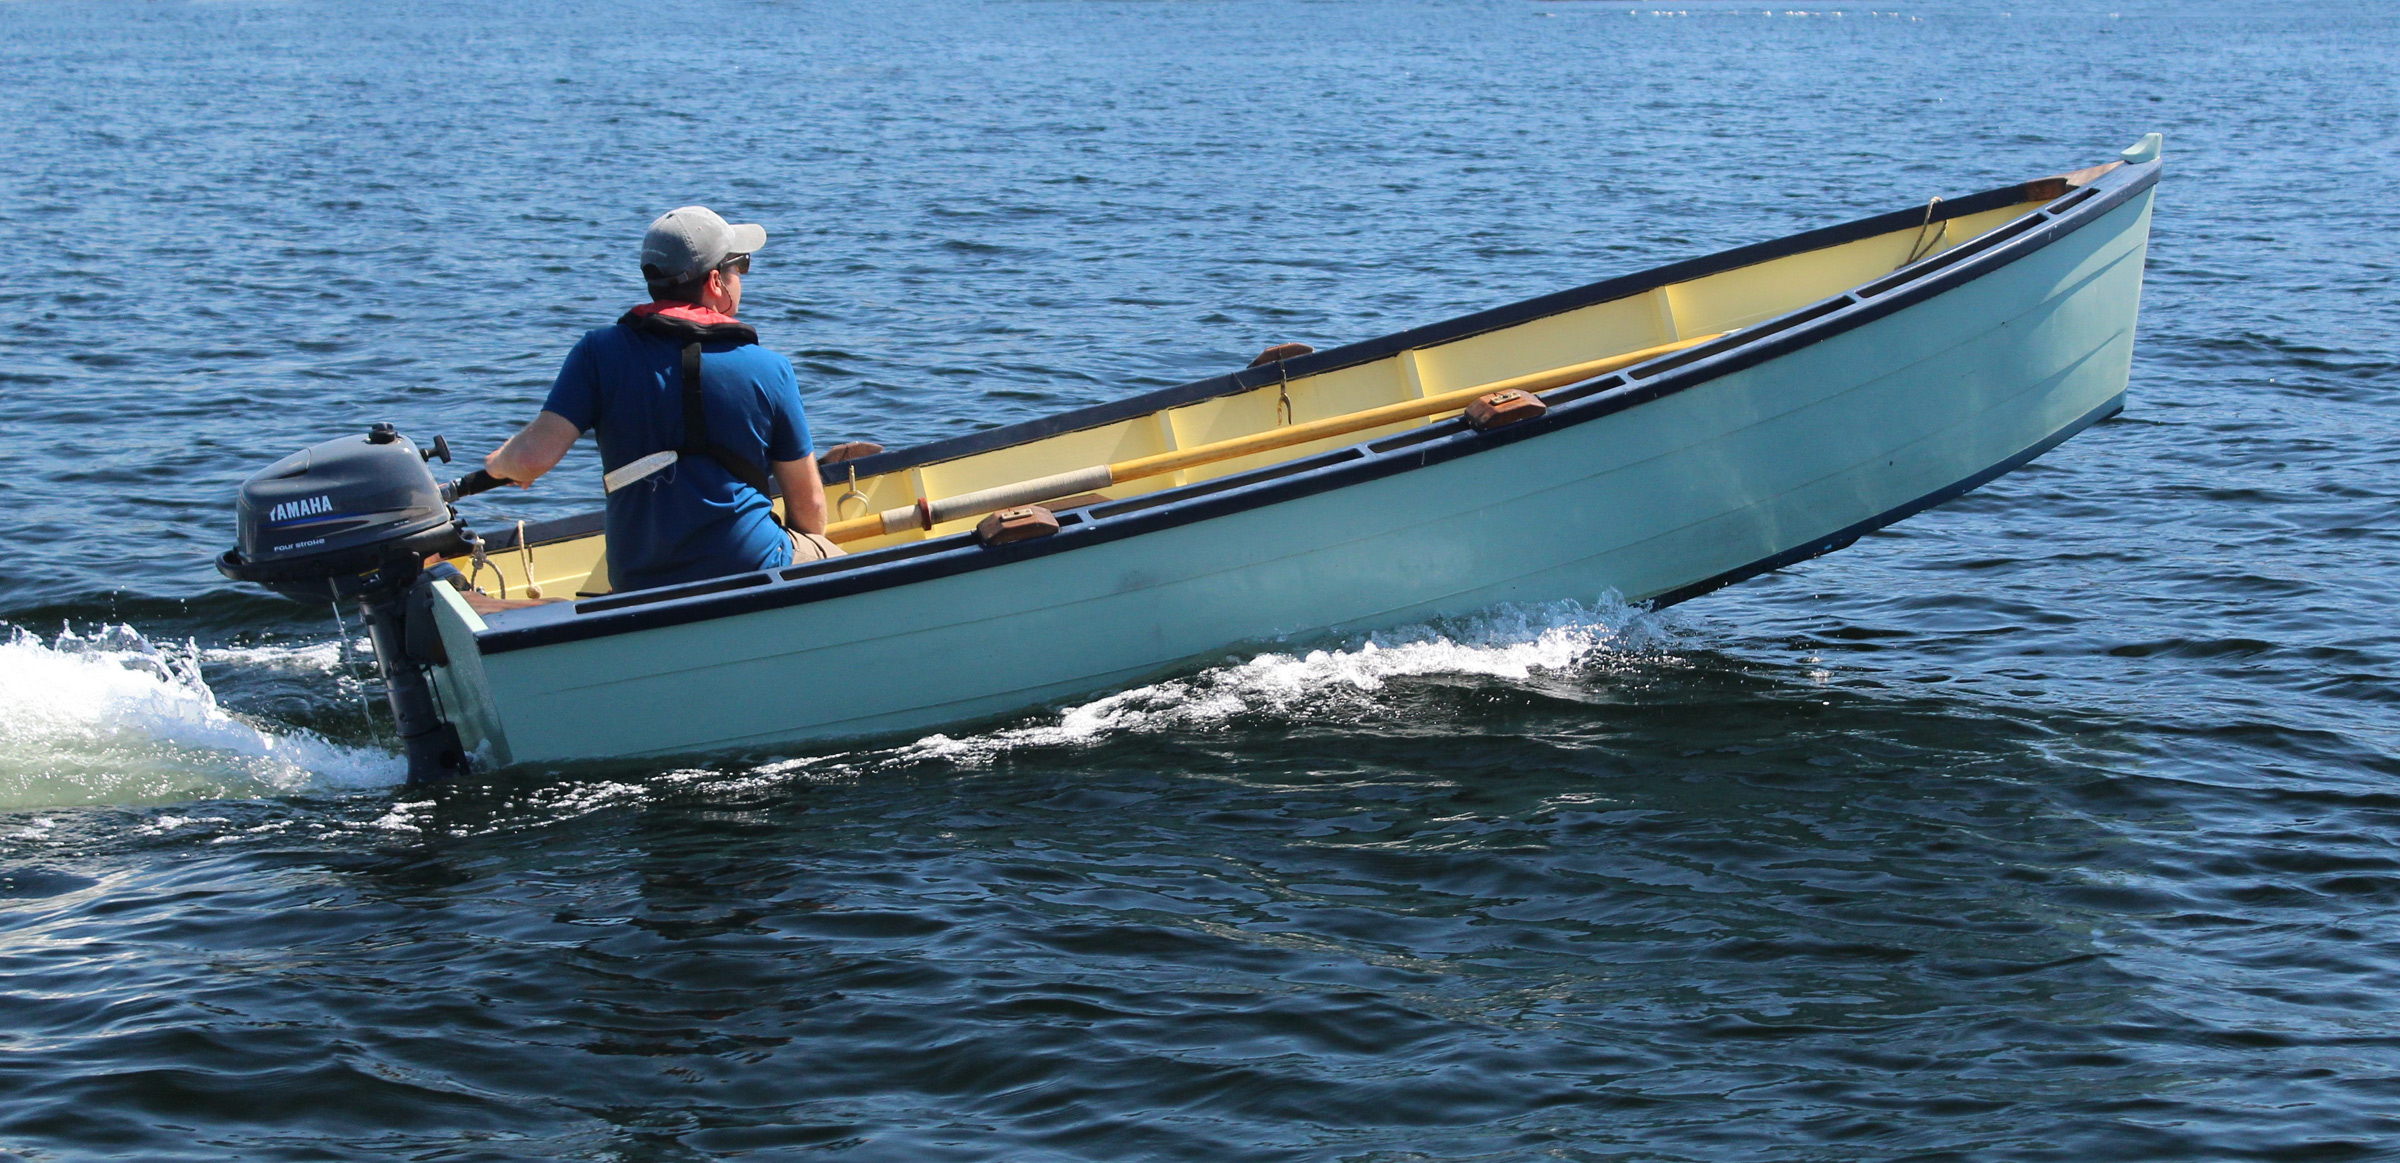
The skiff is at its fastest when there is some weight forward to keep the bow down.
The skiff is very responsive and stable when powered by an outboard. It even handles very well in reverse. I’ve gotten the boat up to 5 knots with a Seagull outboard and up to 4 knots with an electric EP Carry outboard. With a 4-hp four-stroke outboard on the transom and two people on board, the top speed at full throttle was 6.5 knots.
A passenger seated forward helps keep the boat trimmed along the water line. With the skipper motoring alone, the bow comes out of the water making it a little difficult to see, not surprising given the bottom’s rocker. The beamier version of the boat is 5” wider across the bottom of the transom and might be better able to support the weight of the motor and solo skipper. Nonetheless, the boat still handles well. With the outboard at full throttle, the speed for solo motoring was reduced a little bit, down to 5.5 knots.
SBM
With the motor at half throttle, the skiff keeps in reasonably good trim with a lone occupant at the helm.
SBM
With the motor at full throttle, the bow rises well out of the water.
To reflect the no-nonsense hardworking purpose of Monk’s skiff, I named it PRUDY, after my hard-nosed great-grandmother. By the time it was completed, I was no longer a liveaboard and no longer needed a boat for commuting, so PRUDY is now part of CWB’s fleet.
Josh Anderson
The ample stability and carrying capacity has made the skiff a favorite among the rental fleet at CWB.
Equipped with an outboard, she has served as a safety boat for our youth camps, and as a rowboat, she keeps busy as a rental in the livery. Renters at CWB often have never been in a boat before and Monk’s skiff, with its remarkable stability and carrying capacity, quickly puts them at ease. It has quickly become the most popular rental in the fleet.
Josh Anderson attended the Maine Maritime Academy in Castine, Maine. With his wife, Sarah McLean, he restored a 25′ Friendship sloop, operated a charter business with it, and spent several years sailing the Maine coast. Josh also attended the Apprenticeshop boatbuilding program in Rockland, Maine, and built boats for Artisan Boatworks in Rockport Maine. He is now the Maritime Operations Manager at the Center for Wooden Boats in Seattle, Washington.
Thanks to Dustin Espey for his service as passenger and rower and to Shelby Allman for piloting the chase boat for the SBM photos.
Monk Skiff Particulars
[table]
Length/13′6”
Beam/4′6” (reviewed here) or 5′
Depth amidships/20.5”
[/table]
Digital files for the two sheets of drawings for Monk’s skiff are available from Puget Sound Maritime. The charge is $50 for the first page, $10 for the second page. Orders are made as “Research Inquiries.” Specify Monk drawings 710-1 and 710-2 for the 13’6” x 4’6” skiff for Bryant’s Marina.
Is there a boat you’d like to know more about? Have you built one that you think other Small Boats Monthly readers would enjoy? Please email us!
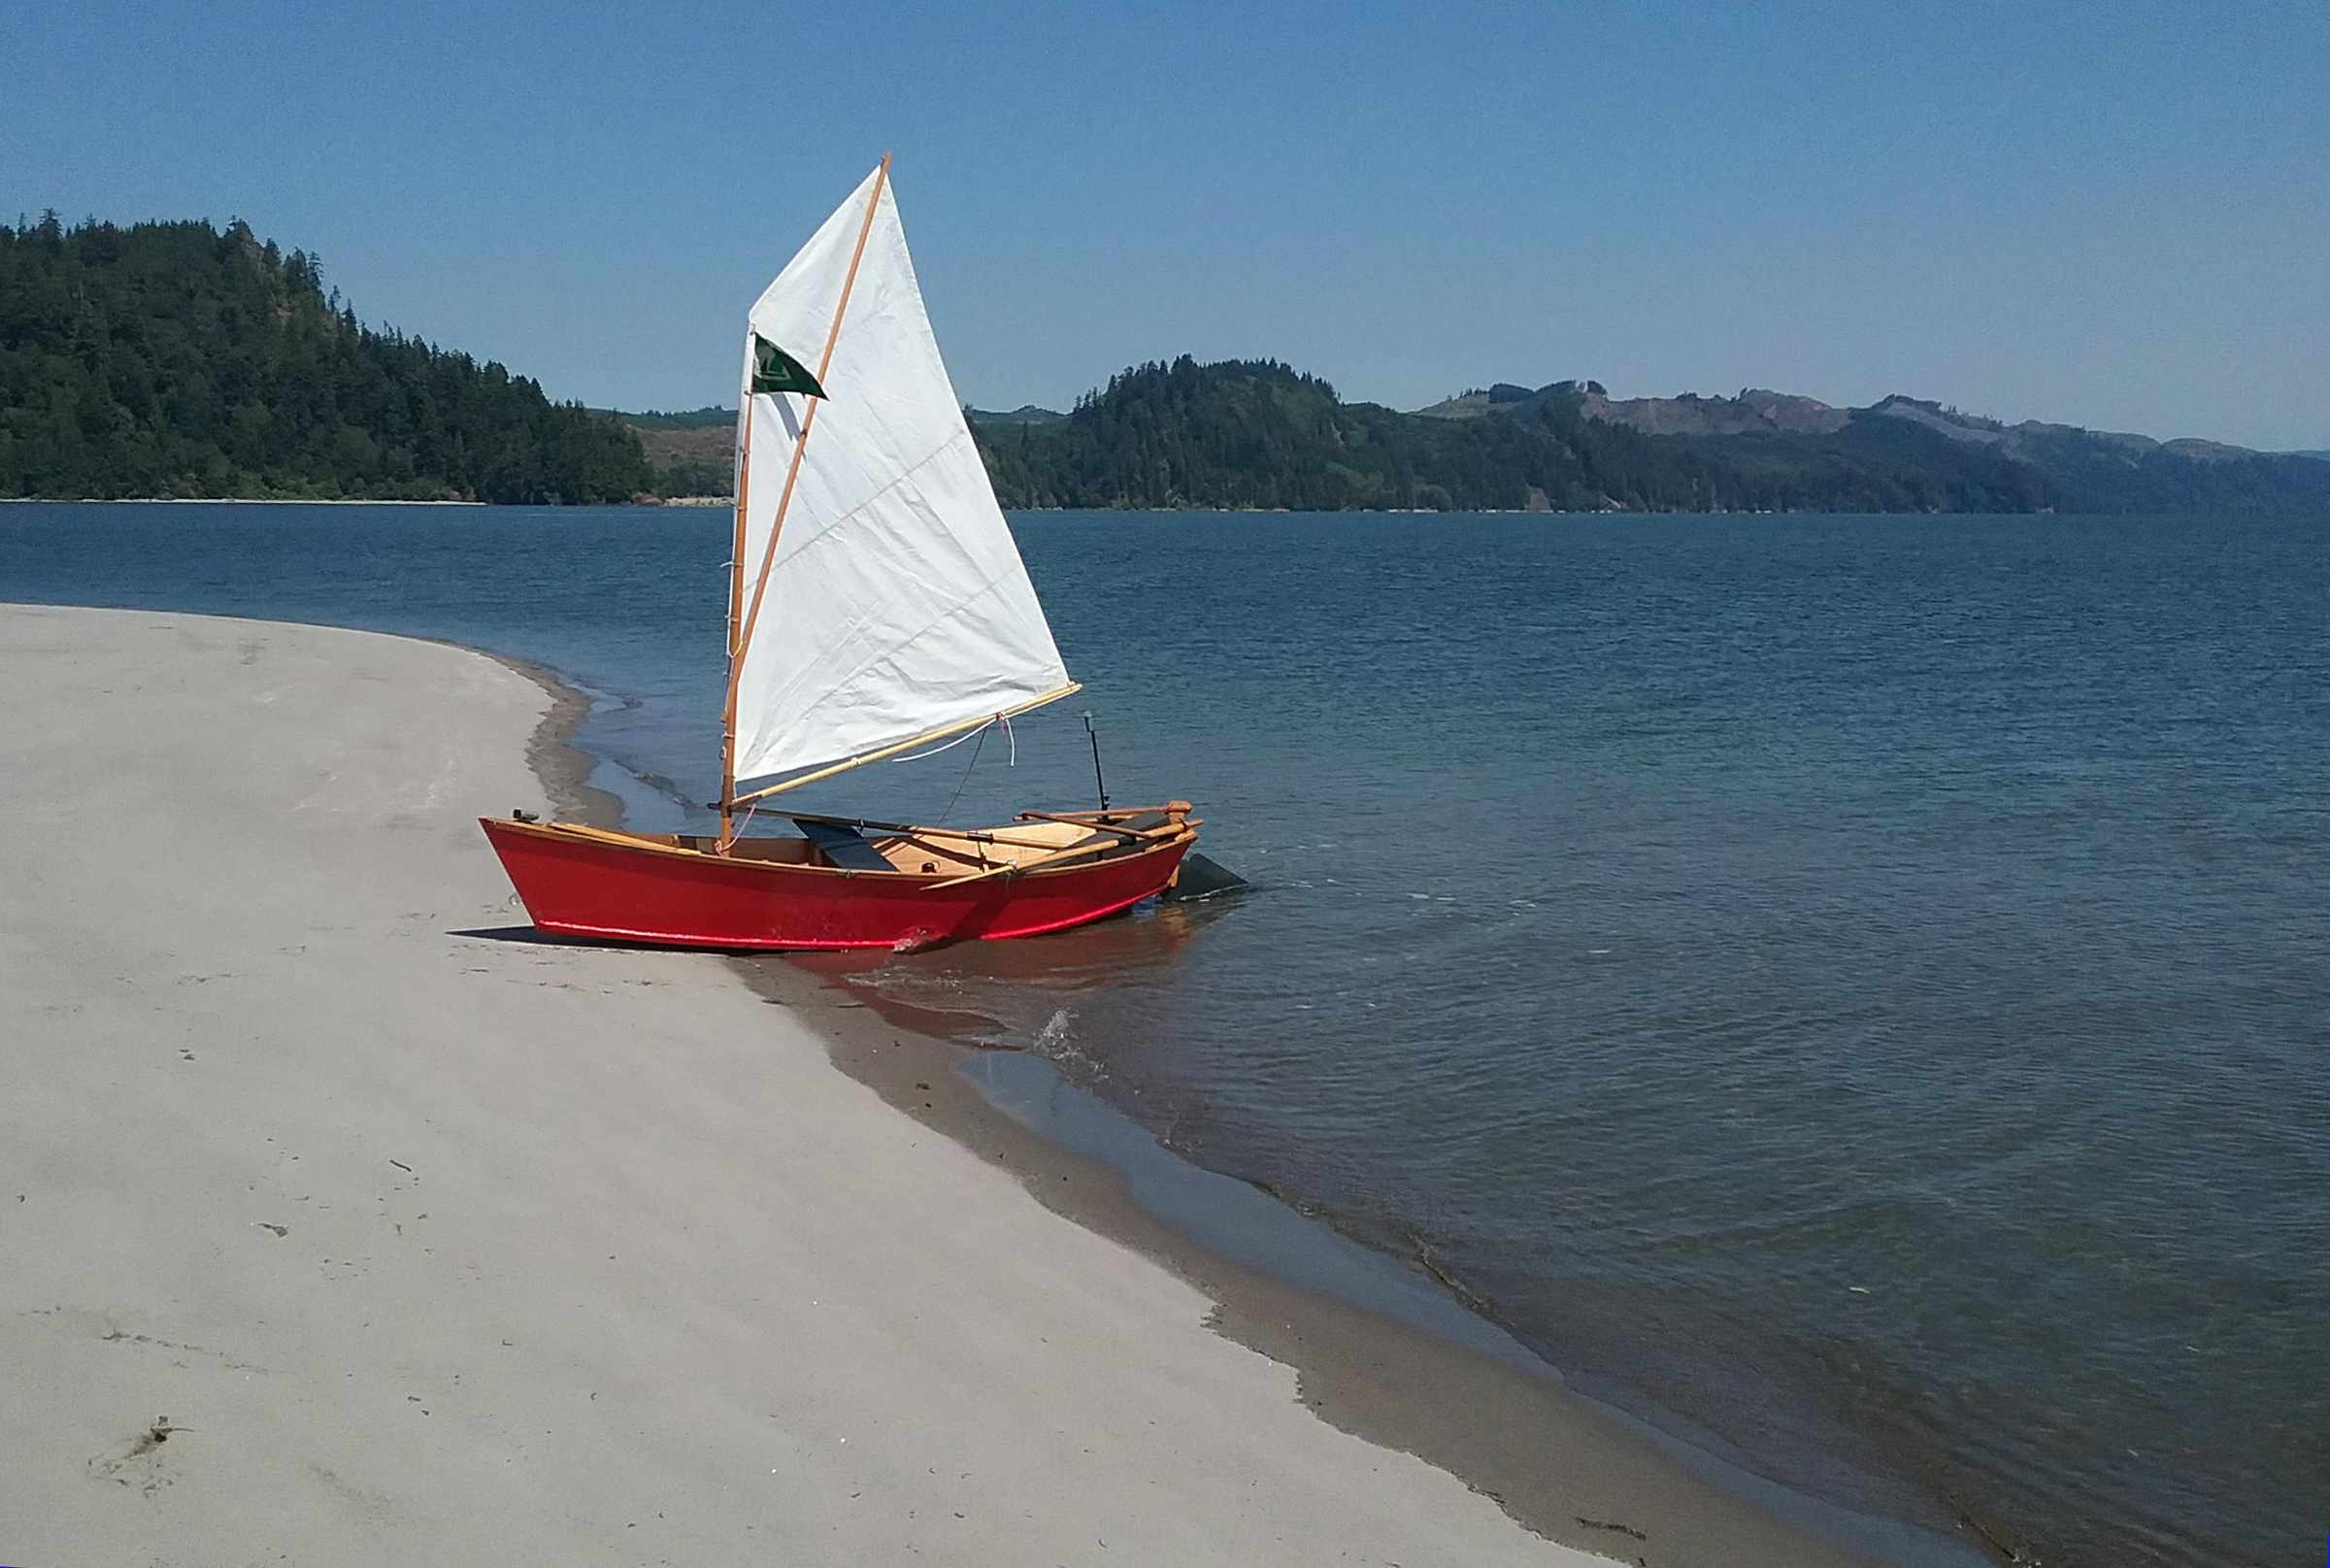
You wouldn’t know from its good looks, but the Salt Bay Skiff is a quick-and-dirty boat to build. I discovered the skiff through the Willamette Sailing Club (WSC) in Portland, Oregon, where RiversWest Small Craft Center hosts an annual family boat-build on a summer weekend. For the past ten years, each participating family builds their own Salt Bay Skiff. Chuck Stuckey, one of the founding members of event, said, “We picked it because we believe it to be a real boat, not a 12′ toy.”
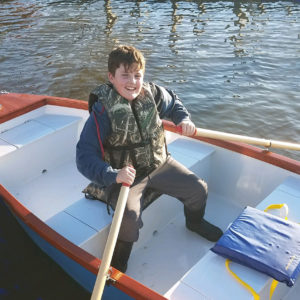
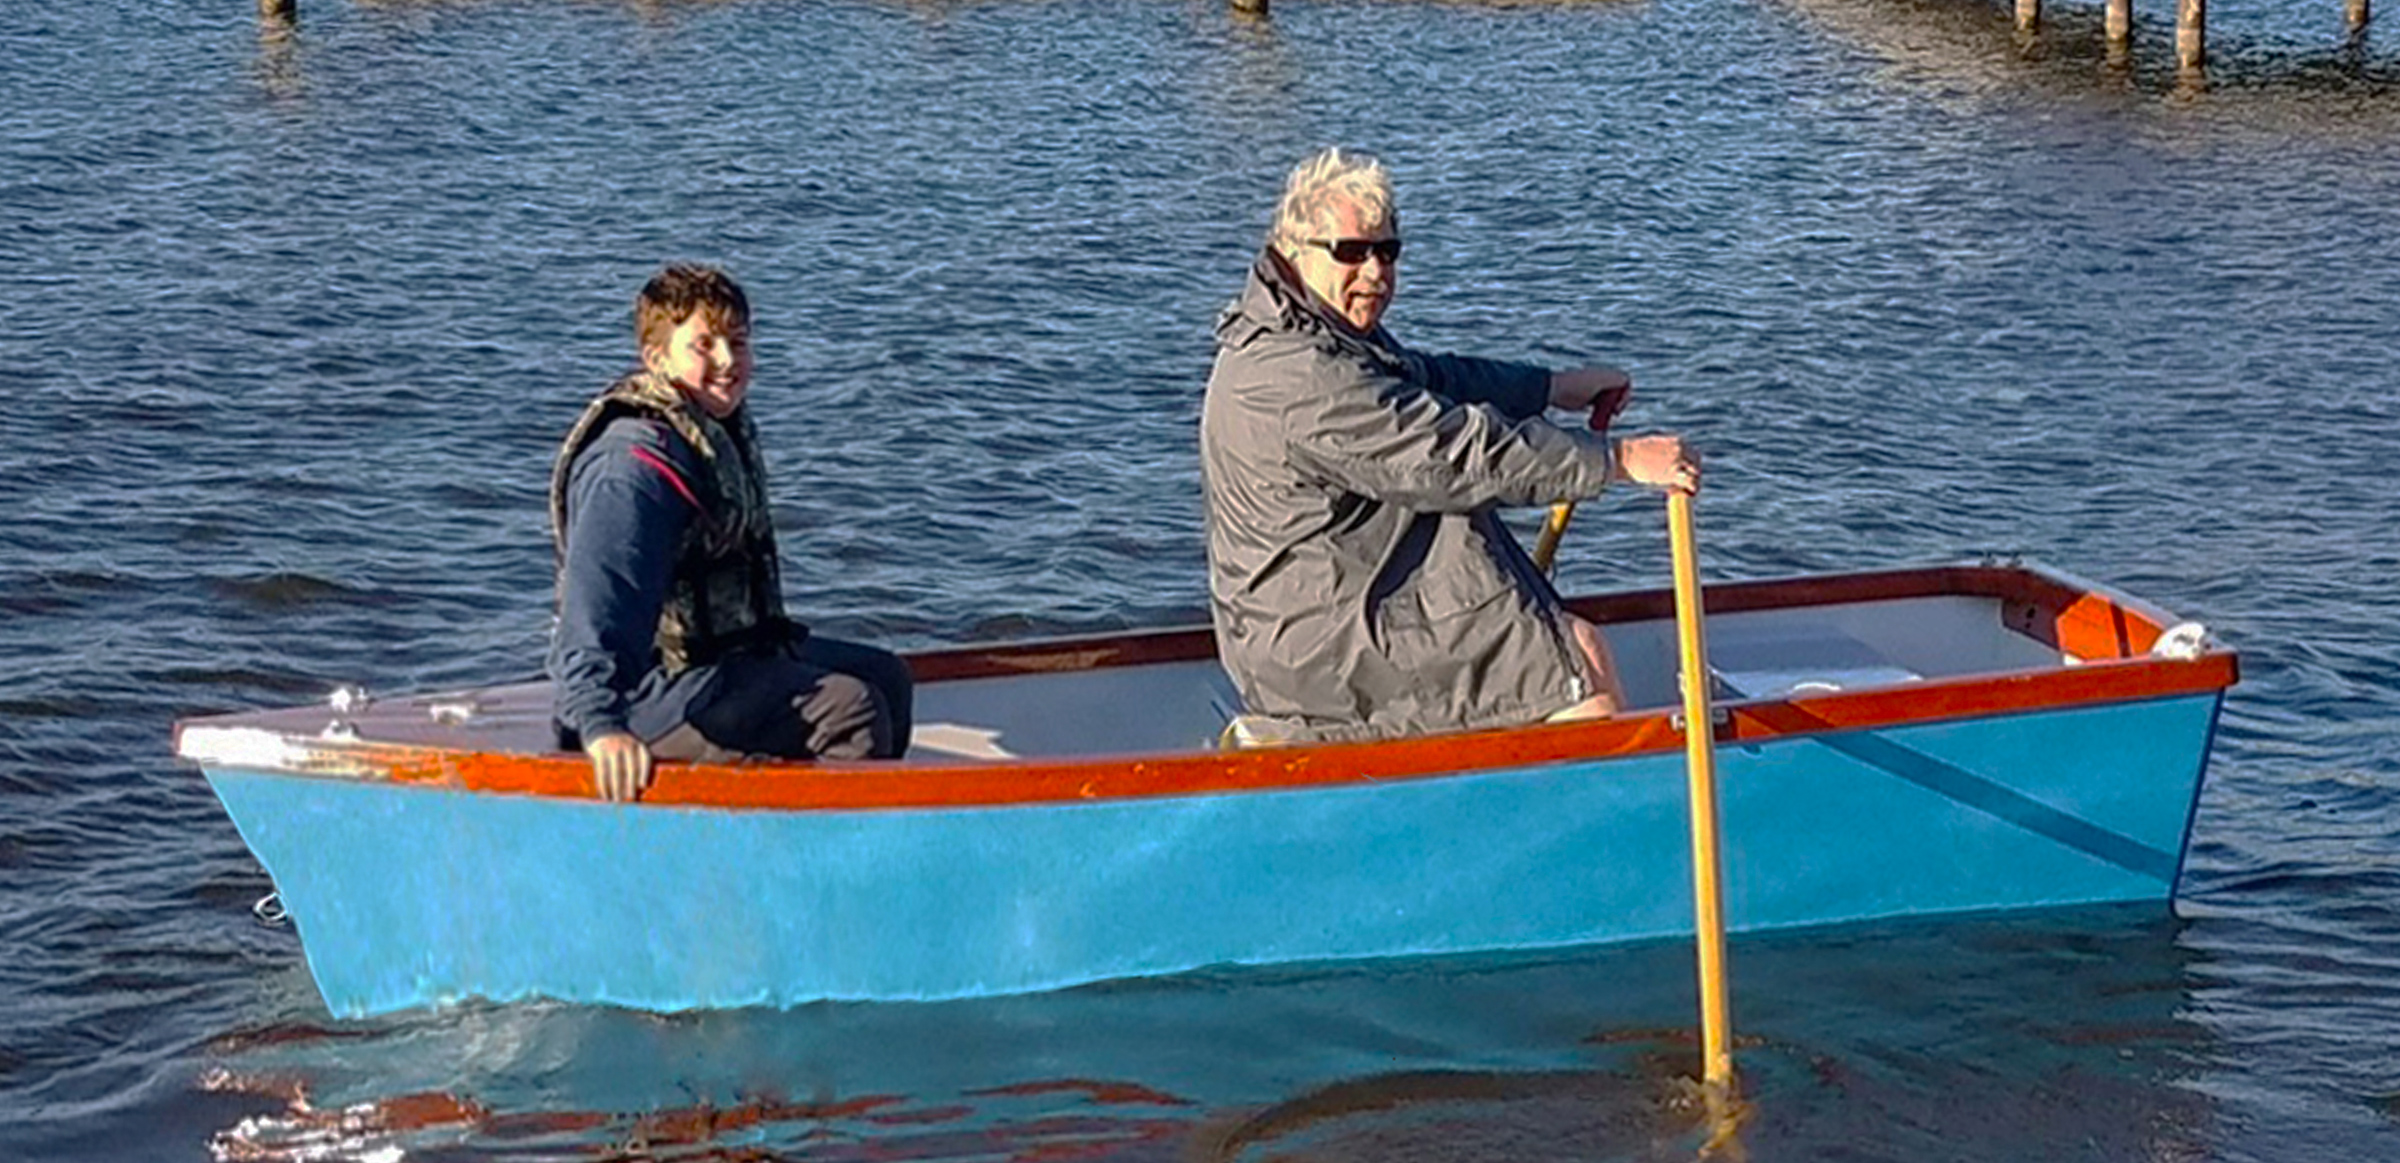
In 2017, my brother and I, with two of our friends, joined in the largest group to date, with 16 families packed into the club’s modest boat-parking lot. We started on a Saturday morning and the next afternoon rowed the unpainted hull across the Willamette River. With four adults aboard, it rode pretty low in the water but it did not swamp. With a rated capacity of 300 lbs for passengers and gear, the 500-or-so lbs we had aboard was, admittedly, pushing it.
Photographs and video by Jay Hideki Horita of Outdoor Asian
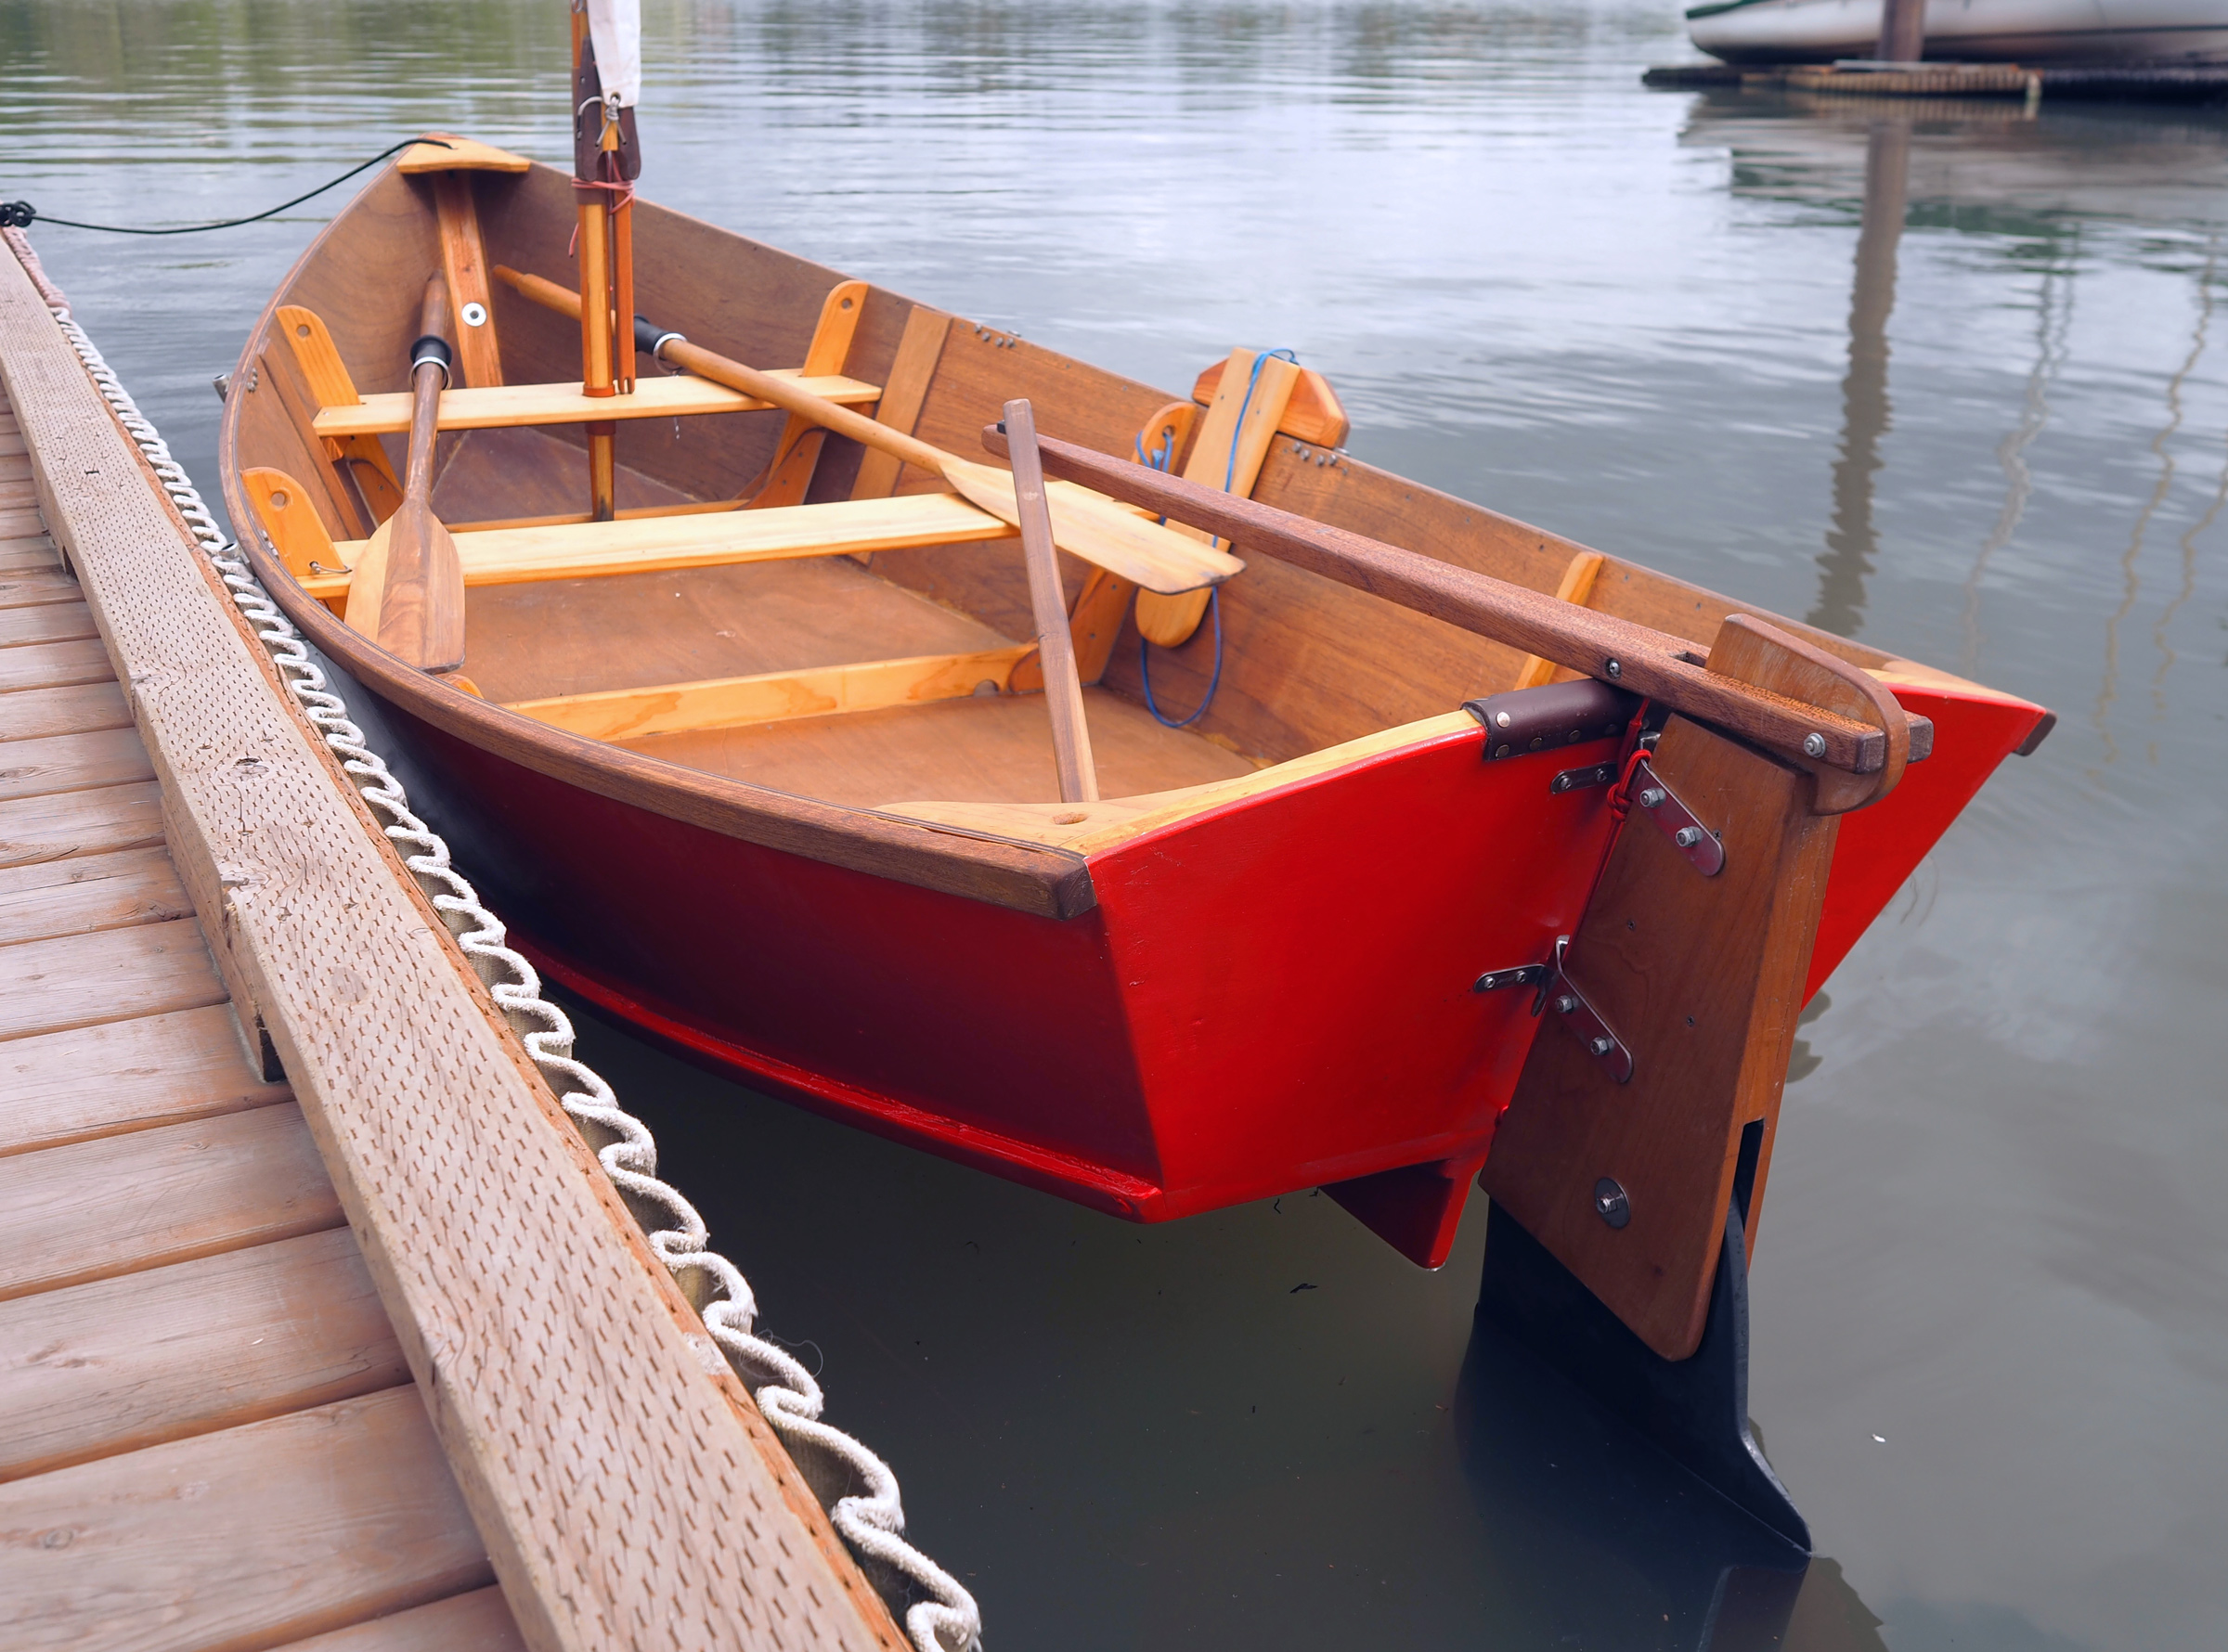
On the starboard side, amidships, you can see the tongue that holds the leeboard in place. The chine logs, on the outside of the hull, simplify and speed construction.
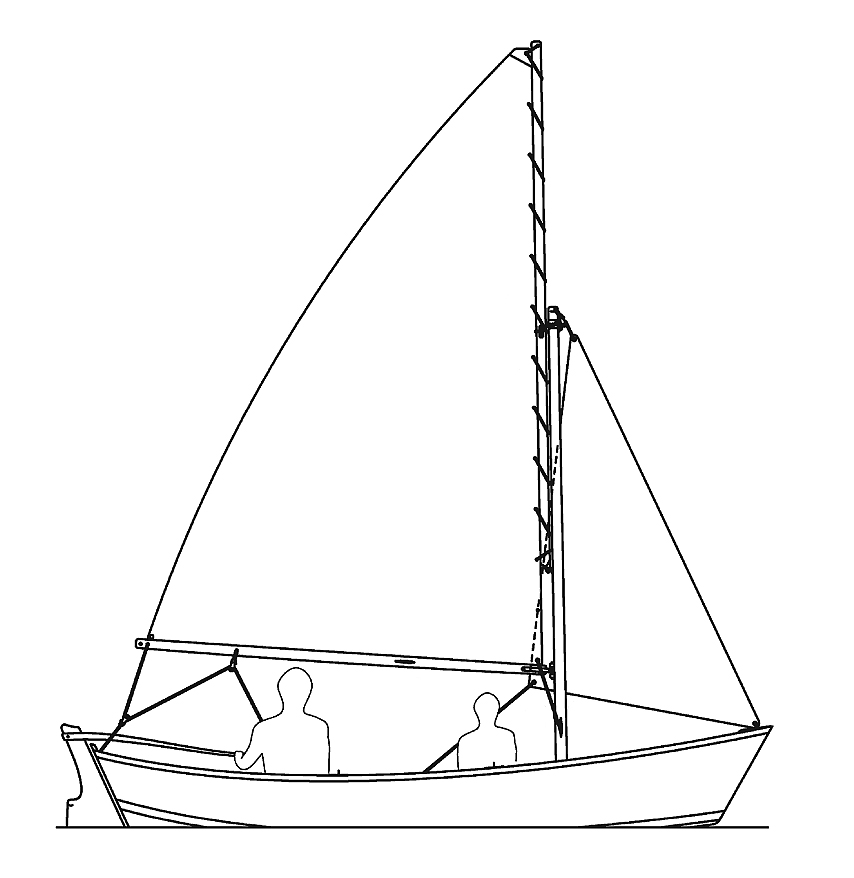
Designer Chris Franklin set out with the intention to create a simple, sturdy boat. It was introduced in Getting Started in Boats, Volumes 7 and 8, supplements to issues of WoodenBoat in the winter of 2007-08. These issues were specifically geared toward building boats with kids. Thanks to the simple design and ease of construction, there is plenty of flexibility for personal modifications. Most Salt Bay skiffs are built as rowboats, but some build them as driftboats by omitting the keel and skeg. The skiffs can be sailed, and the plans include dimensions and drawings for adding a leeboard, a rudder, a gunter rig with boom, and jib. Some builders have rigged the boat with the gunter without the boom, or without the jib, or with a lug sail instead of a gunter.
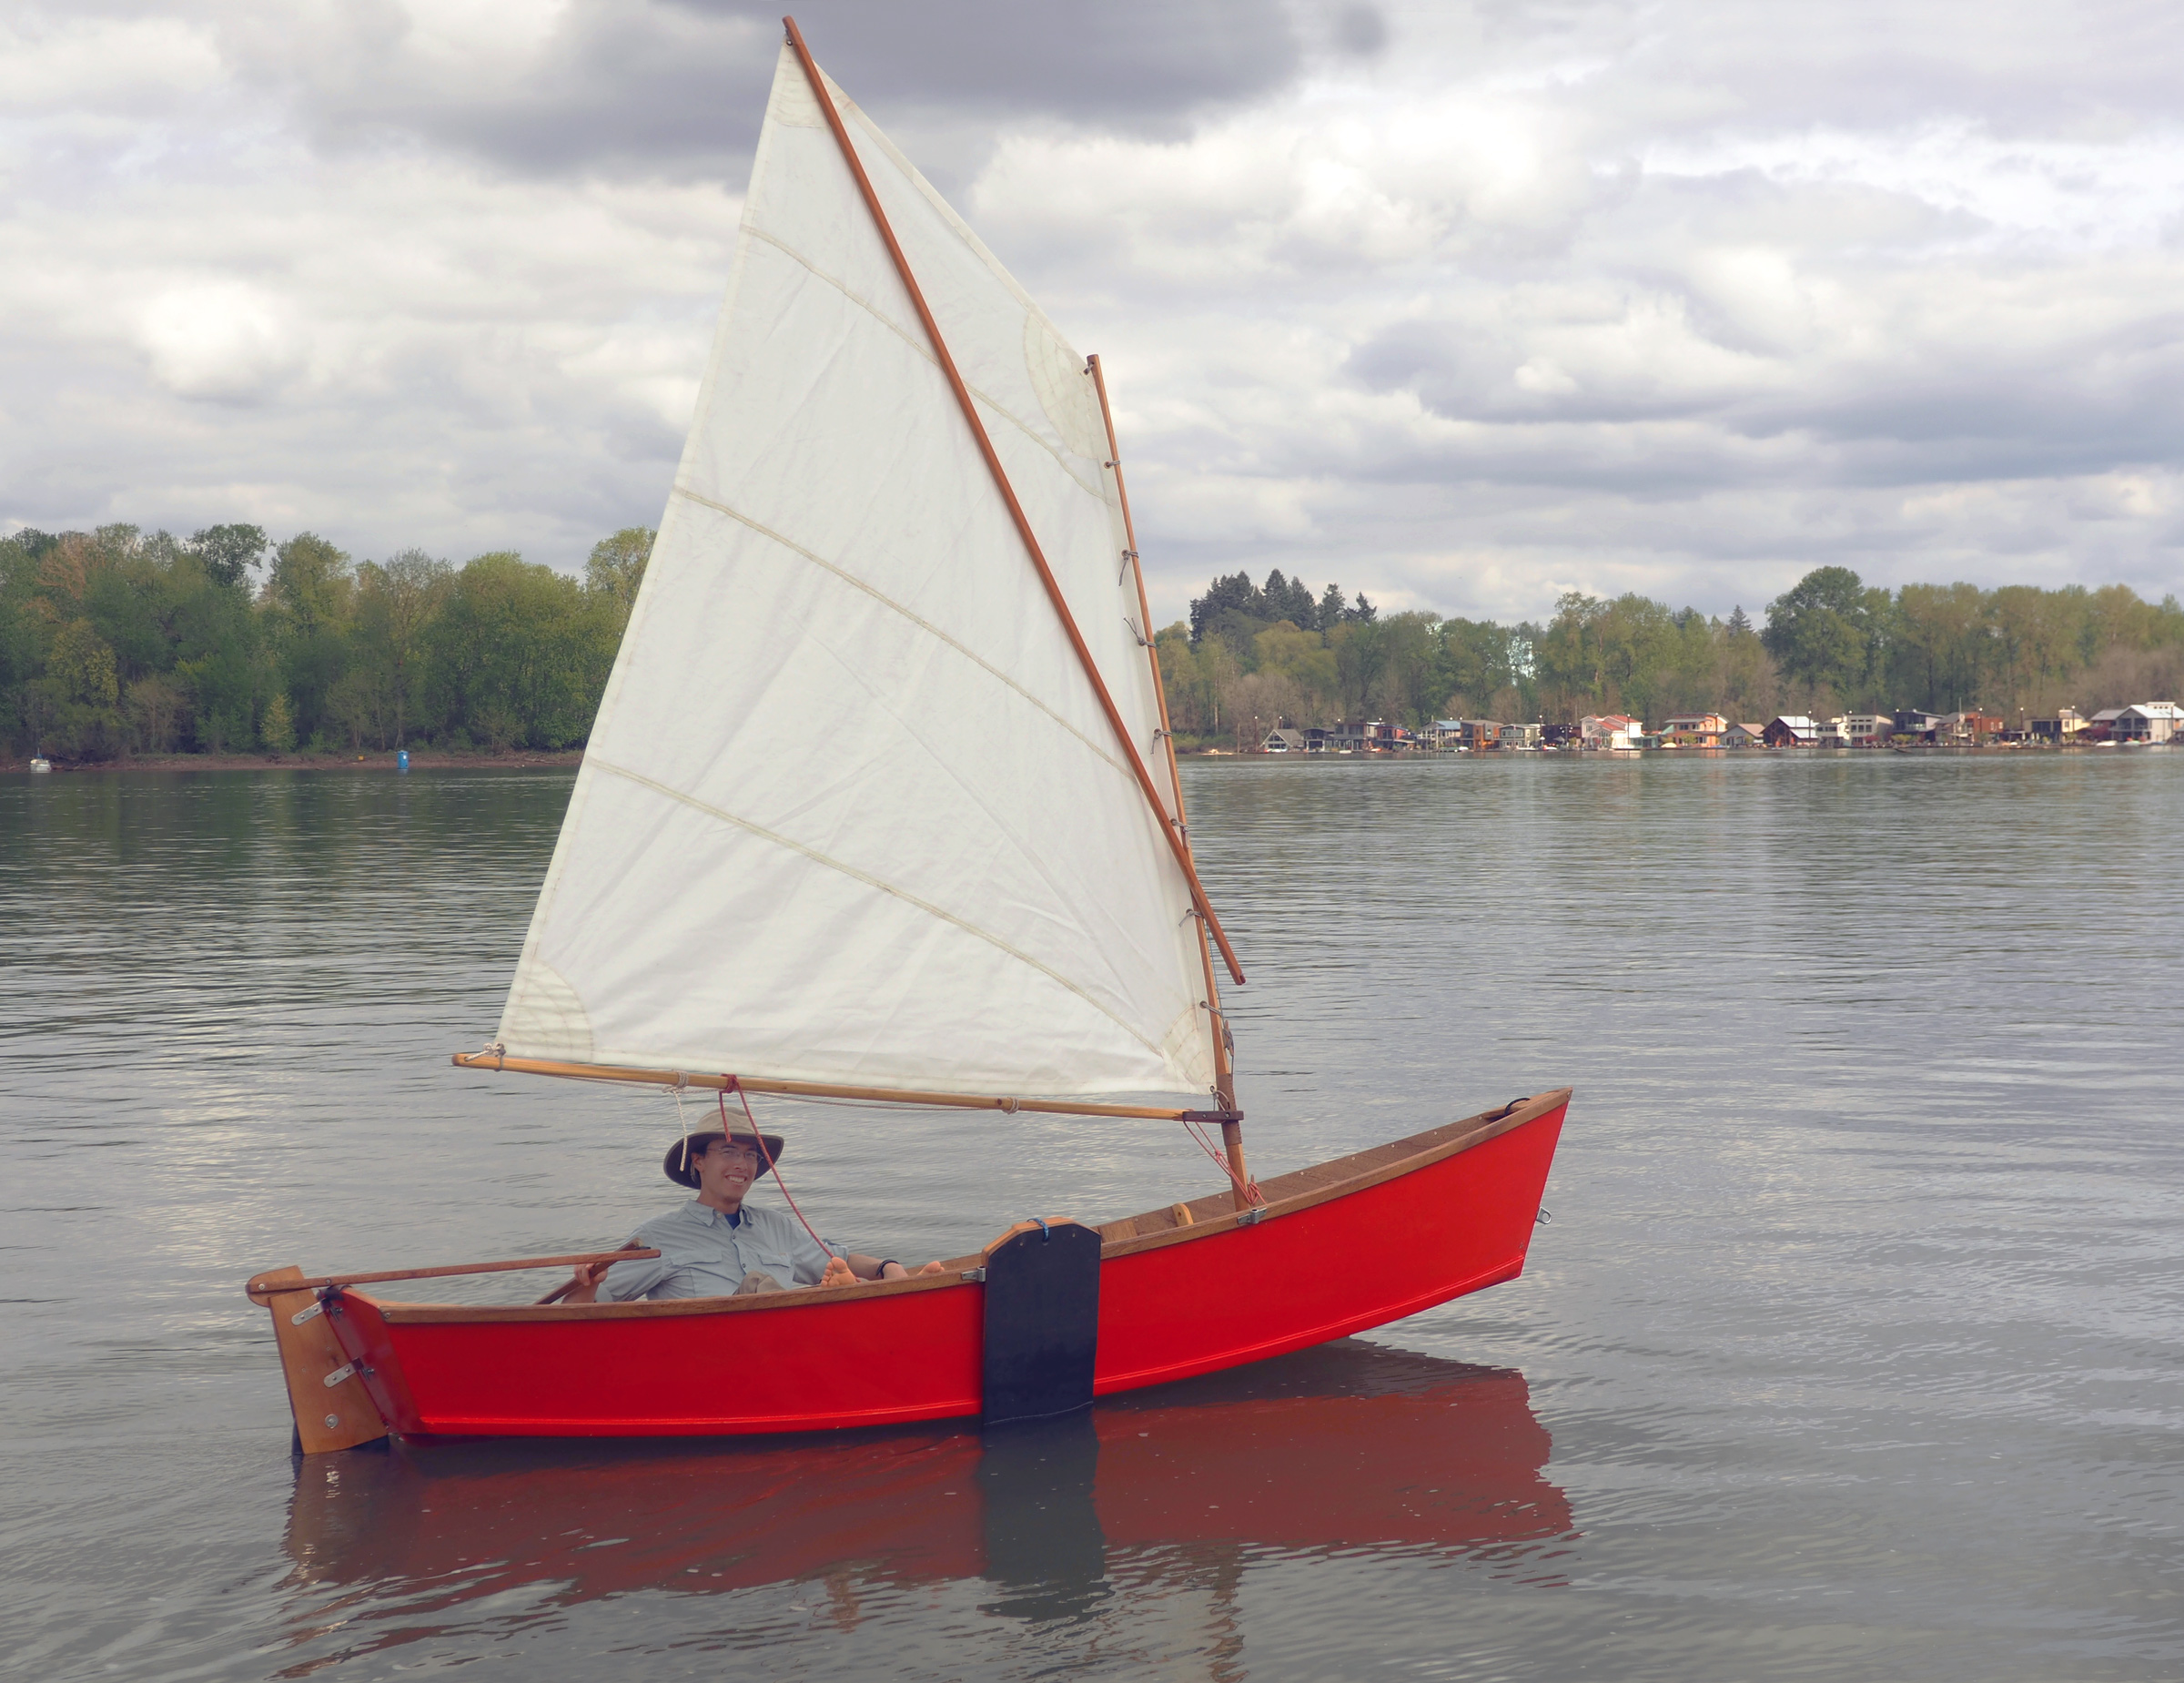
I decided on a sprit rig, for greater sail area aloft for the 9′4″ mast height, and included a boom for better downwind performance. I wanted a camp cruiser that I could sleep in, so I stayed with the leeboard to preserve cockpit space that would be taken up if I opted to install a daggerboard trunk. With a 12′ overall length and a 4′ beam, there’s not much extra room. A sprit rig and a leeboard may not be best for sailing upwind, but if I ever needed to travel against the breeze I figured I would simply strike sail, pull the board, and row.
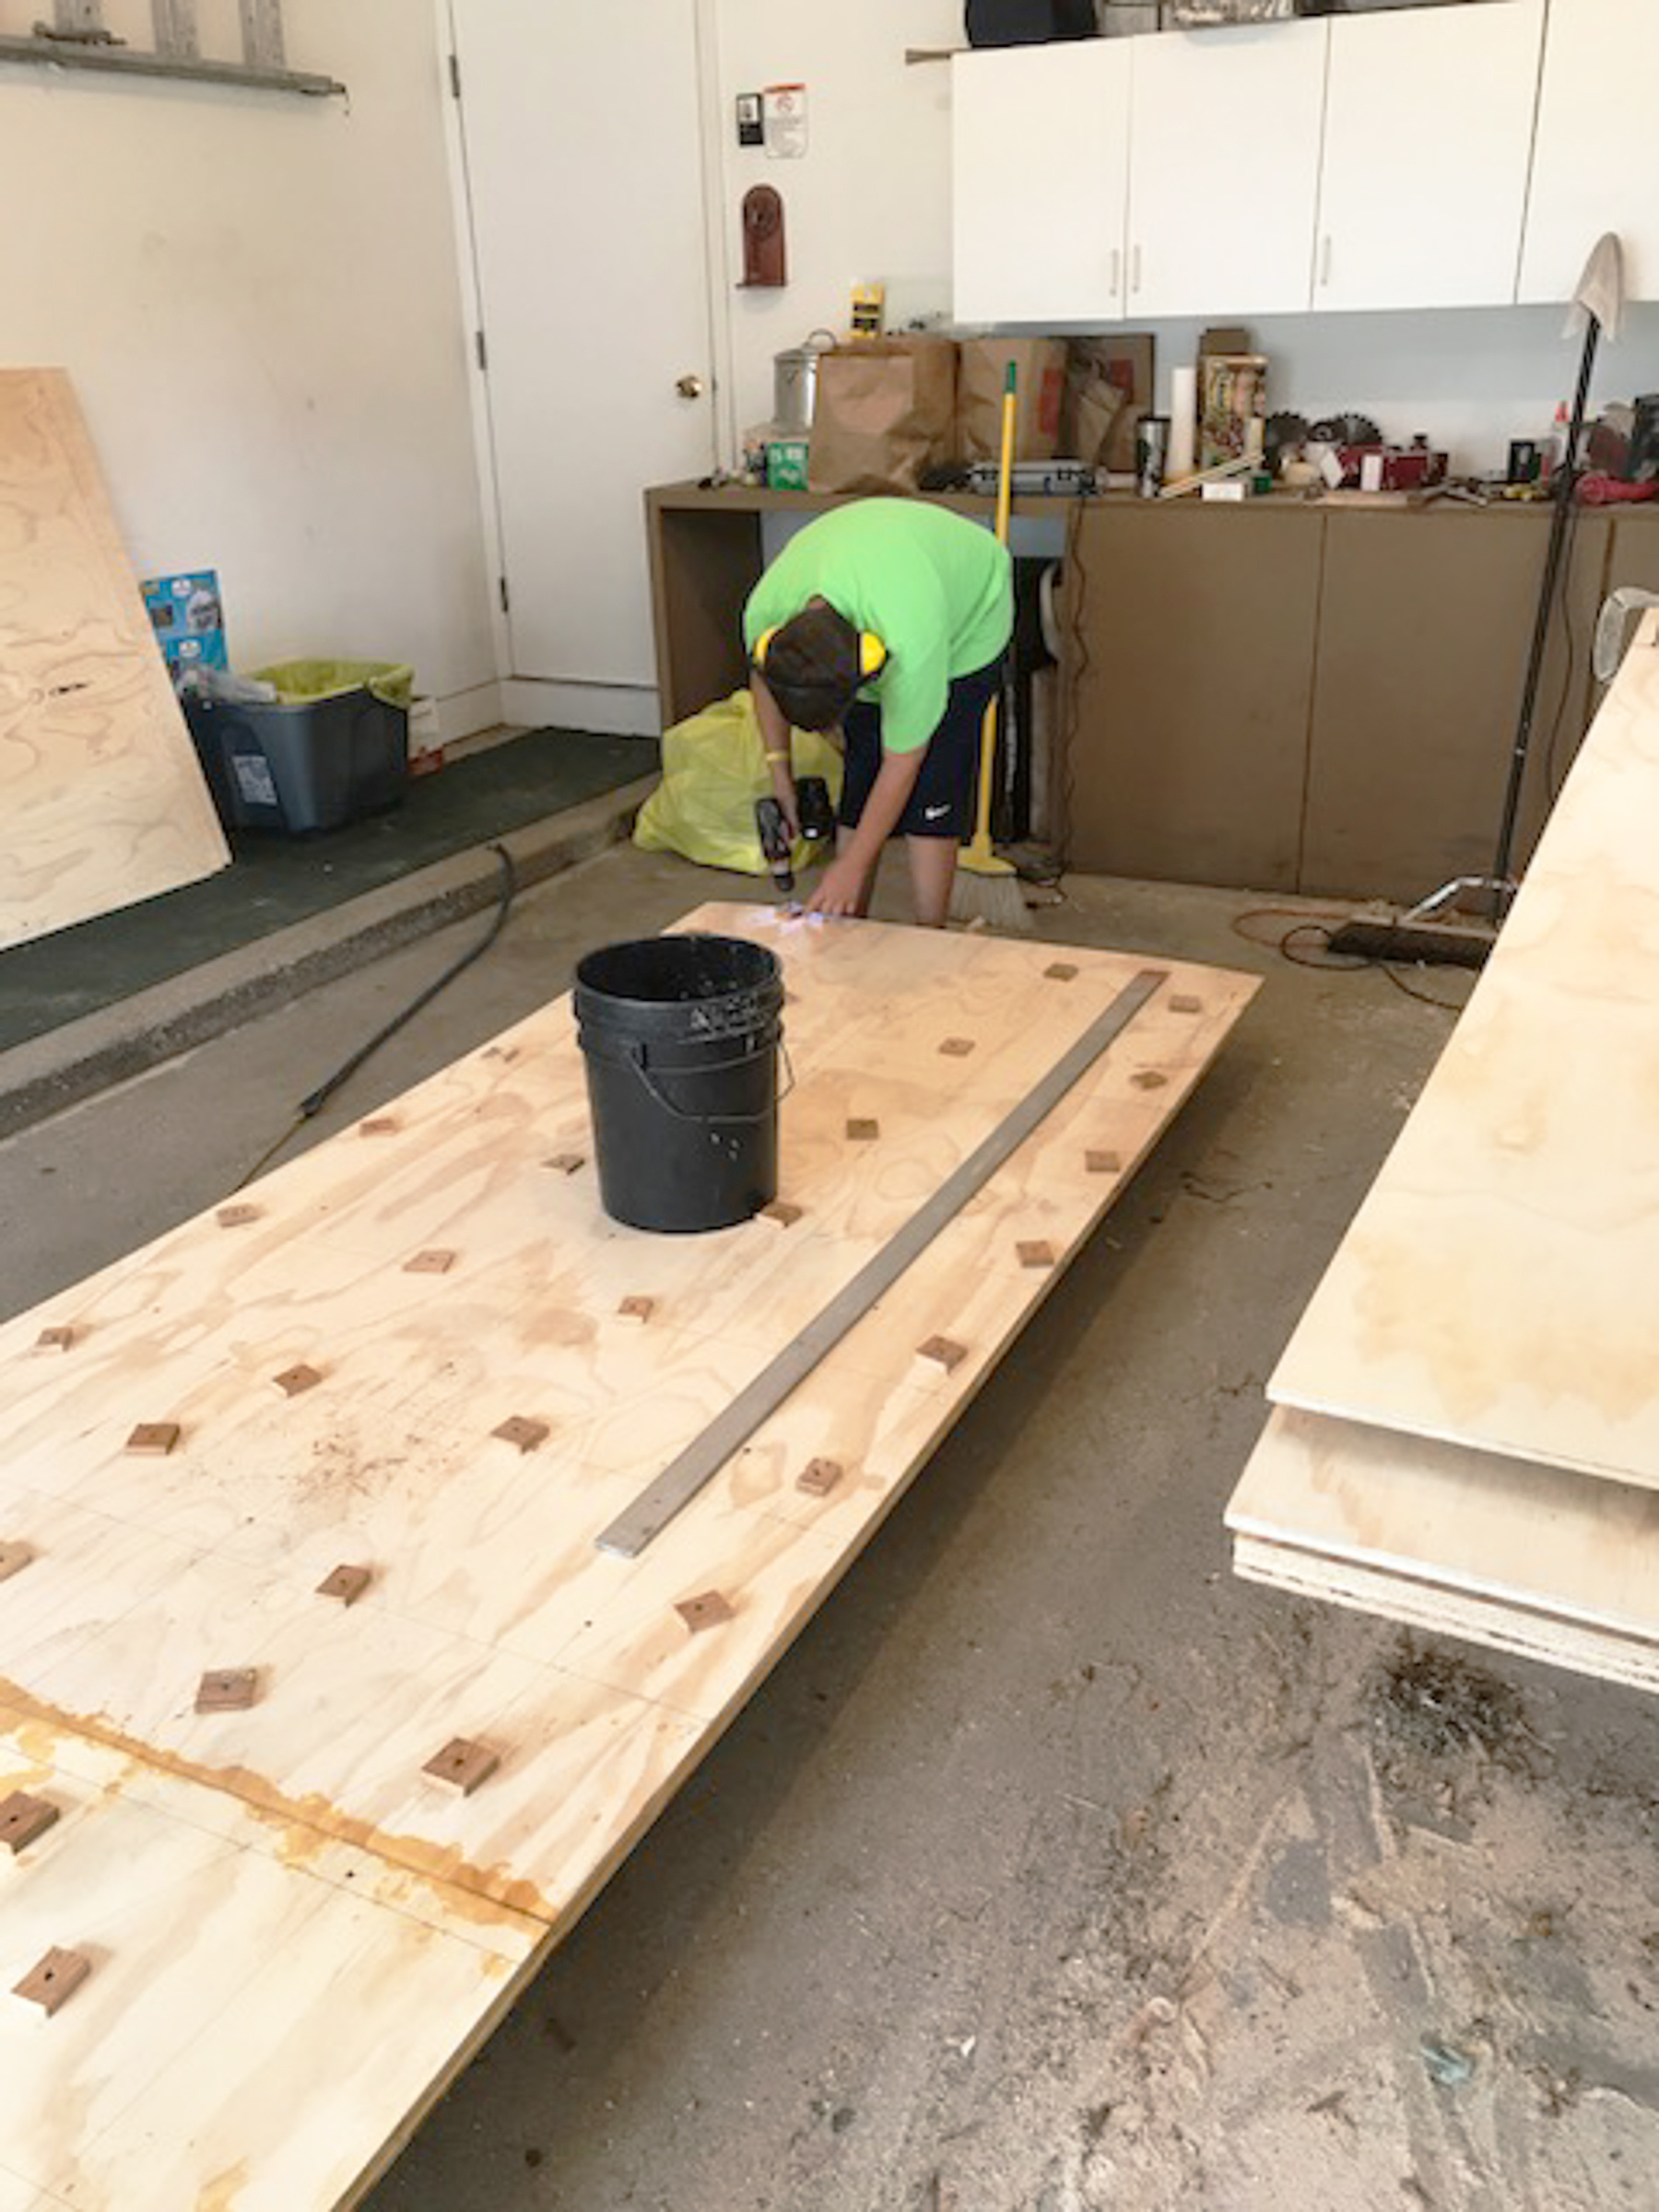
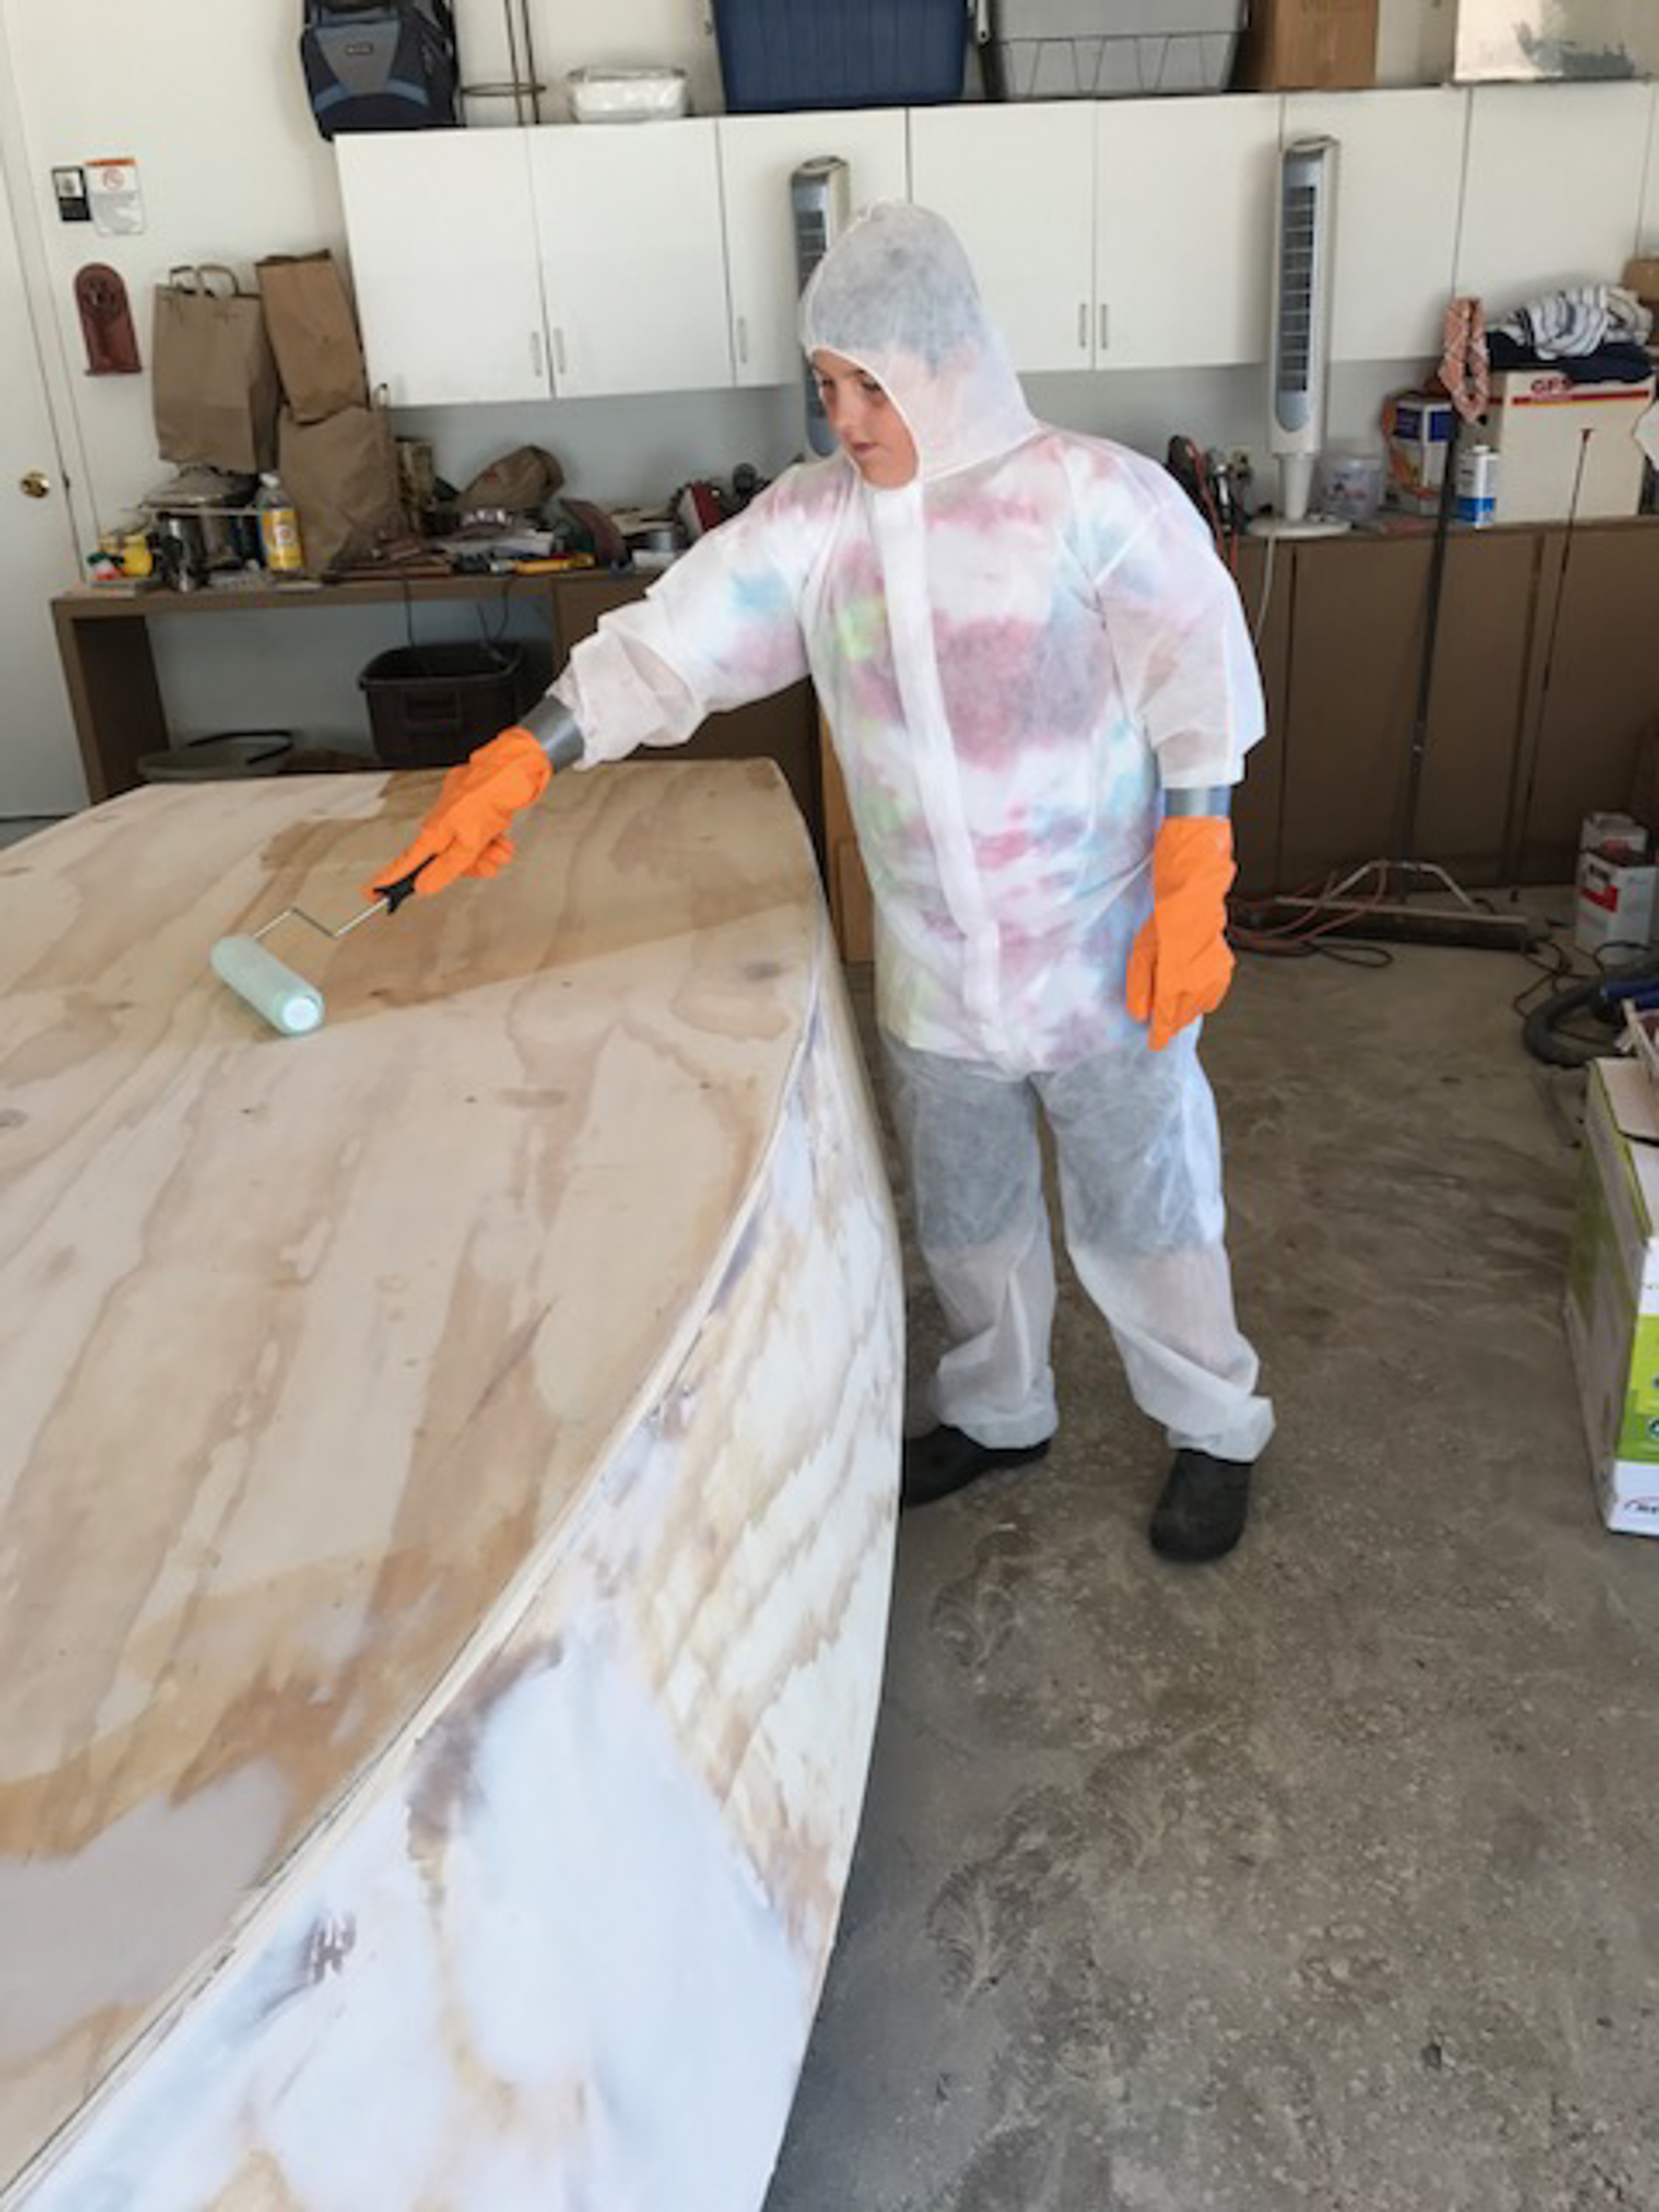
The boat requires two 4′ by 8′ sheets of marine plywood: one 1/4″ sheet for the sides, and one 3/8” sheet for the bottom. A half sheet of 3/4″ plywood provides the transom, rudder and leeboard. Add to that a few boards of pine for the seats, quarter knees, breasthook, keel, and frames, and some strips for the gunnels, chine, and stem, and all that’s left to buy are glue, screws, and paint. At the family boatbuilding event, we used marine-grade polyurethane glue in place of the epoxy recommended in the instructions, as the two-day event couldn’t afford the time it takes epoxy to cure.
The volunteers who prepare the kits each year spend about two months of weekends and evenings for 12 to 16 boats, giving builders at the weekend event a head start. If you begin with nothing but a pile of wood and a bucket of screws, getting to a finished, painted boat rigged for sail can easily be done in the span of a summer.
The author’s sprit rig is a departure from the gunter rig in the plans.
The sail is where I diverged most from the original Salt Bay plans. Drawing upon the information in David Nichols’ book, The Working Guide to Traditional Small-Boat Sails, I determined the dimensions of the spritsail that would best fit my boat and my weight: 6′8″ luff, 7′7″ foot, 9′5″ leech, and 4′2″ head. I aimed to keep the mast height low to preserve stability by reducing weight aloft, and that led to the short luff. The boom could also only be so long before it extended beyond the transom, resulting in a shorter foot. Even with these limitations, the spritsail carried more area than the gunter main, while still meeting the constraints of the spars. The longer leech and head make up for the shorter luff and foot. The Salt Bay Skiff works with a variety of sails in the range of 30 to 50 square feet. My sail is 44 square feet.
I made the spars from spare lumber I scavenged from the RiversWest shop—primarily cedar, Douglas fir, and white oak. Though I made the spars lighter than the ones in the plans, they have held up to 15-knot breezes well enough in my opinion, and suggest the originals are more than stout enough.
The instructions don’t mention what material to use for the sails. The low-budget option is to make one from polytarp or Tyvek house wrap, and I considered this at first, but decided against it because the sails I had seen made with these materials appeared to stretch too easily. Luckily, another builder in the shared RiversWest workshop had an old genoa, and I reused its fabric for my own sail. The Dacron sailcloth was a little wrinkled, but to me looked much nicer than tarp or Tyvek.
The plans specify an one-piece plywood rudder. The author made his rudder with a kick-up blade for sailing shallow waters.
The only changes I made to the leeboard were for aesthetics rather than improved performance. I made the rudder with a pivoting blade, rather than fixed, to make for easier beaching, and added an extension to the tiller. The rudder is a bit large for this size of boat, but that is useful when navigating at low speeds, not to mention sculling through lulls by wigwagging the tiller. A leather guard across the transom is important to protect both the tiller and the transom from abrading each other. The leeboard is symmetrical around its vertical axis and can be mounted on either side of the boat, and switched at any time. The tongue that slips inside of the gunwale fits nicely between the mid-frame and aft oarlock mounts.
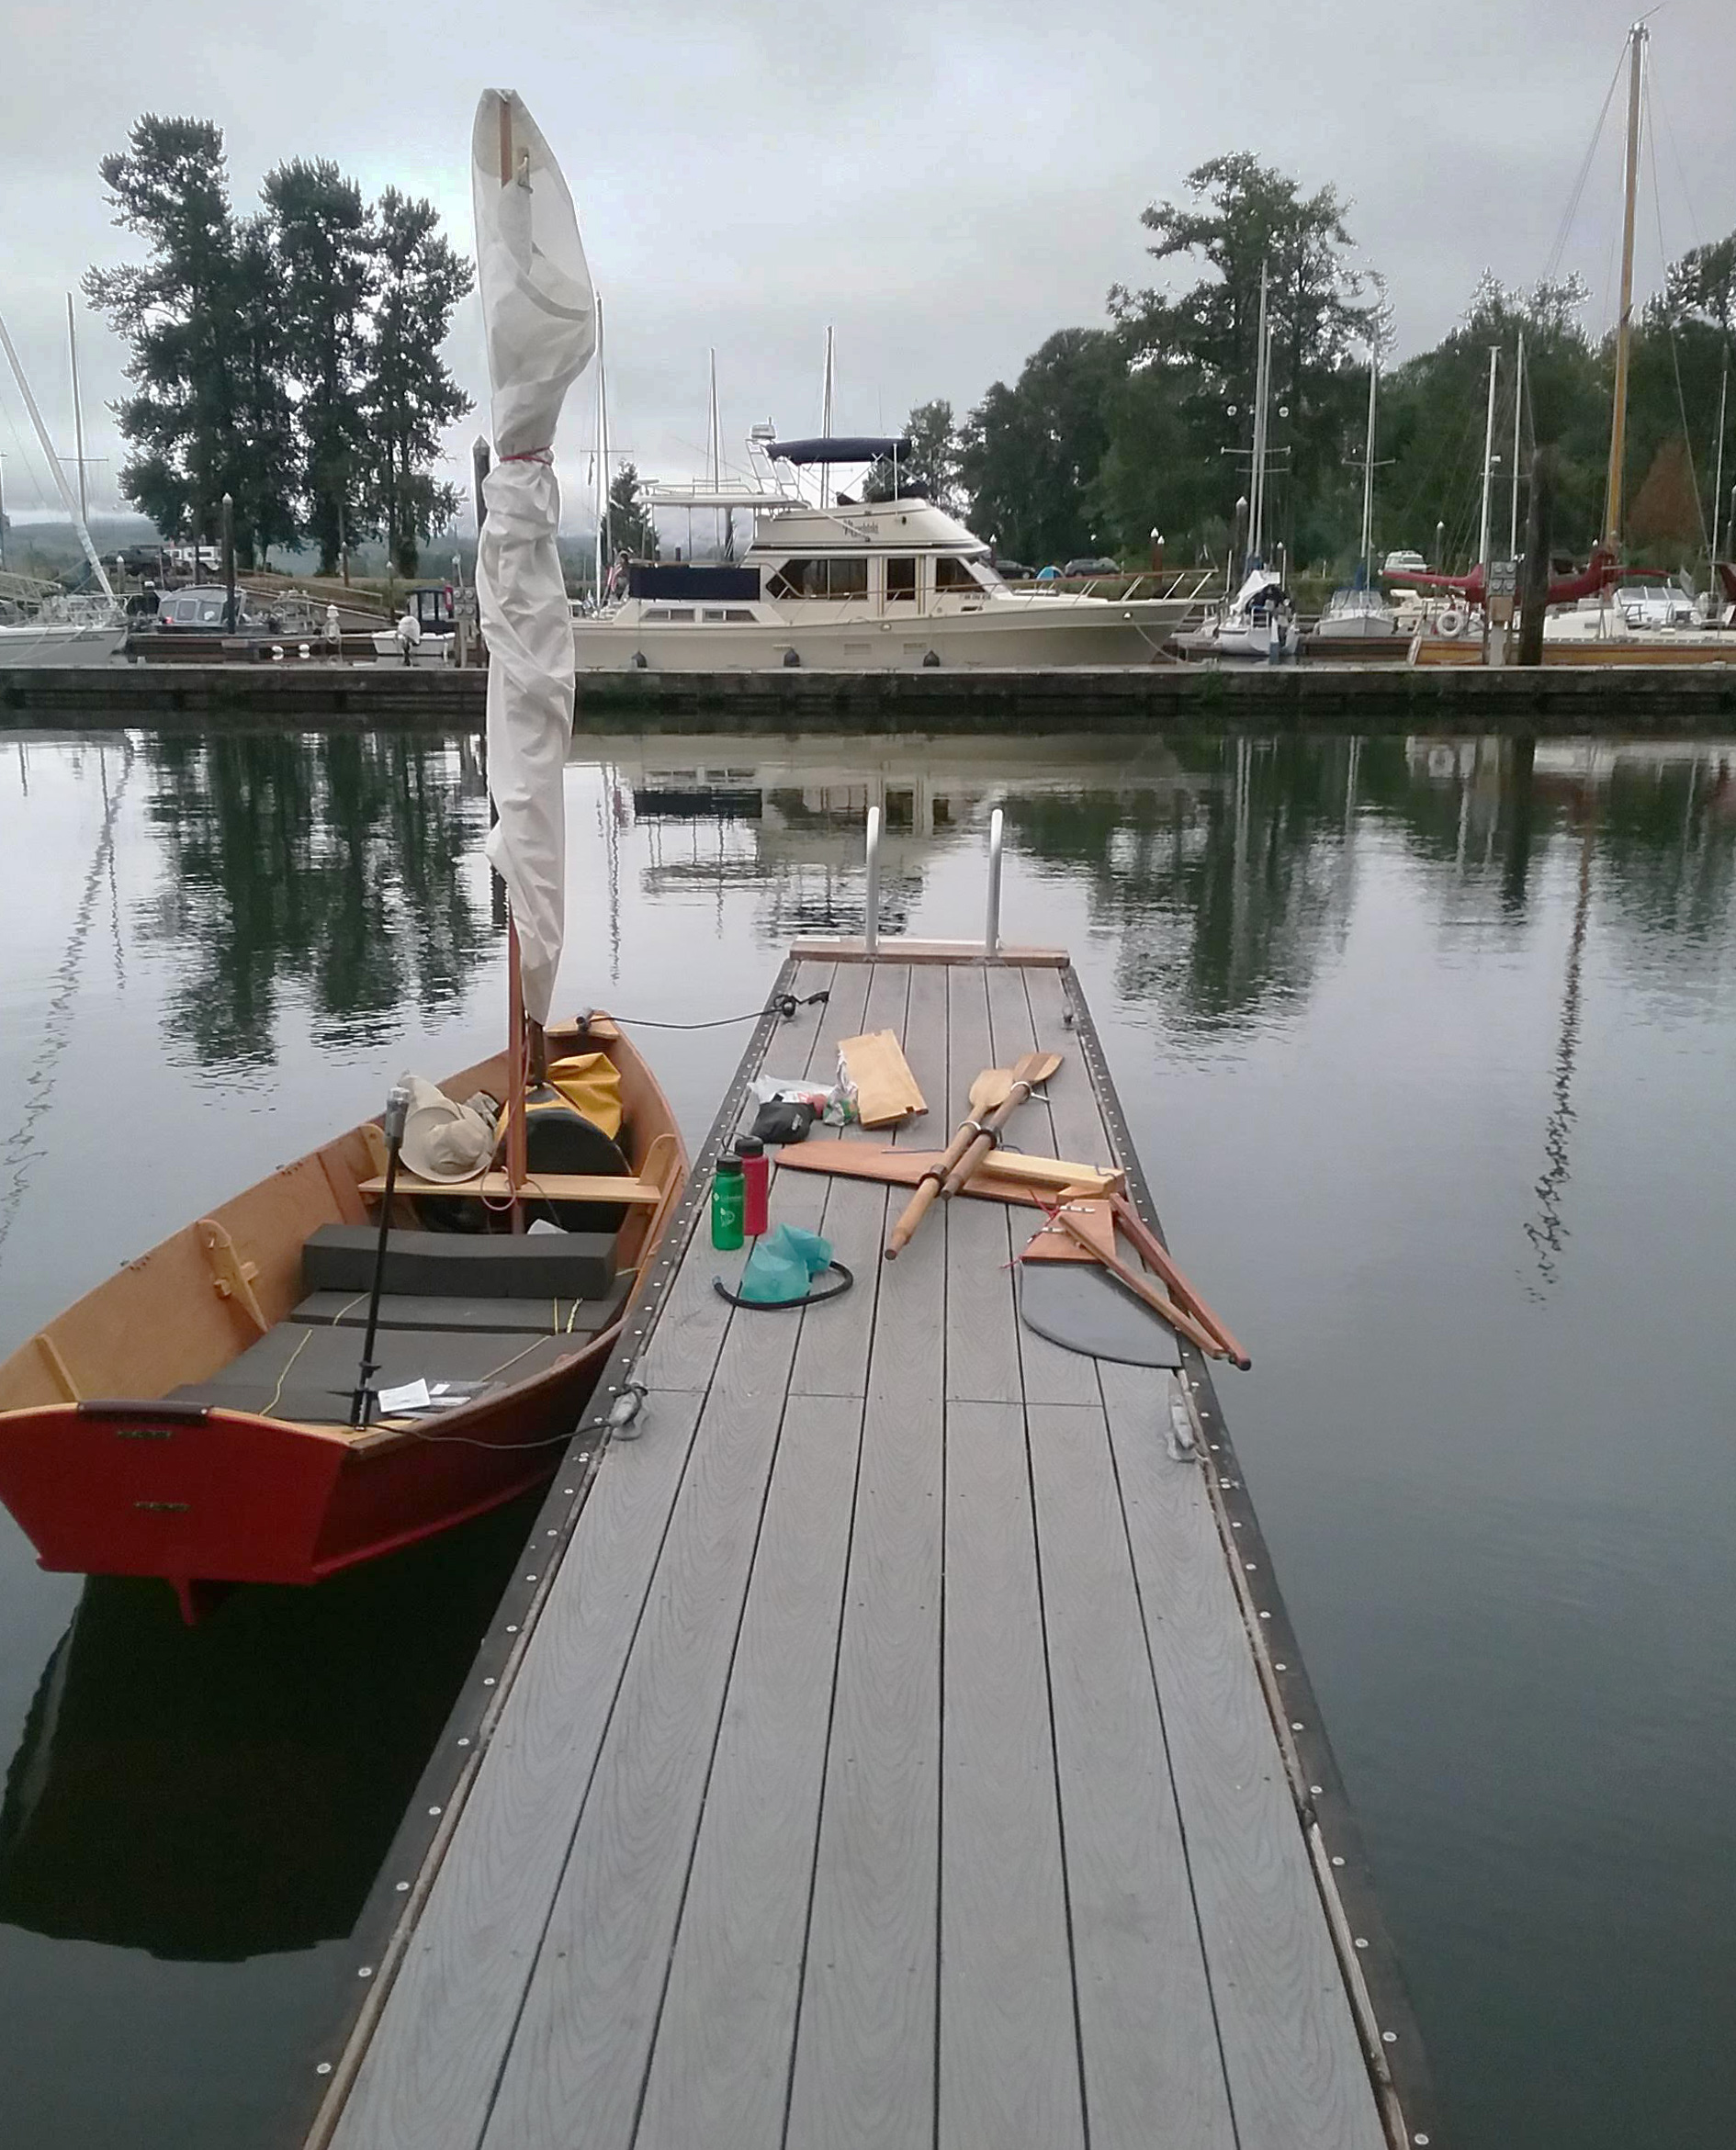
The designer recommends 7′ spruce oars for rowing and a pair of 5′ oars as auxiliary power when sailing. The shorter oars will take up less room in the cockpit when under sail.
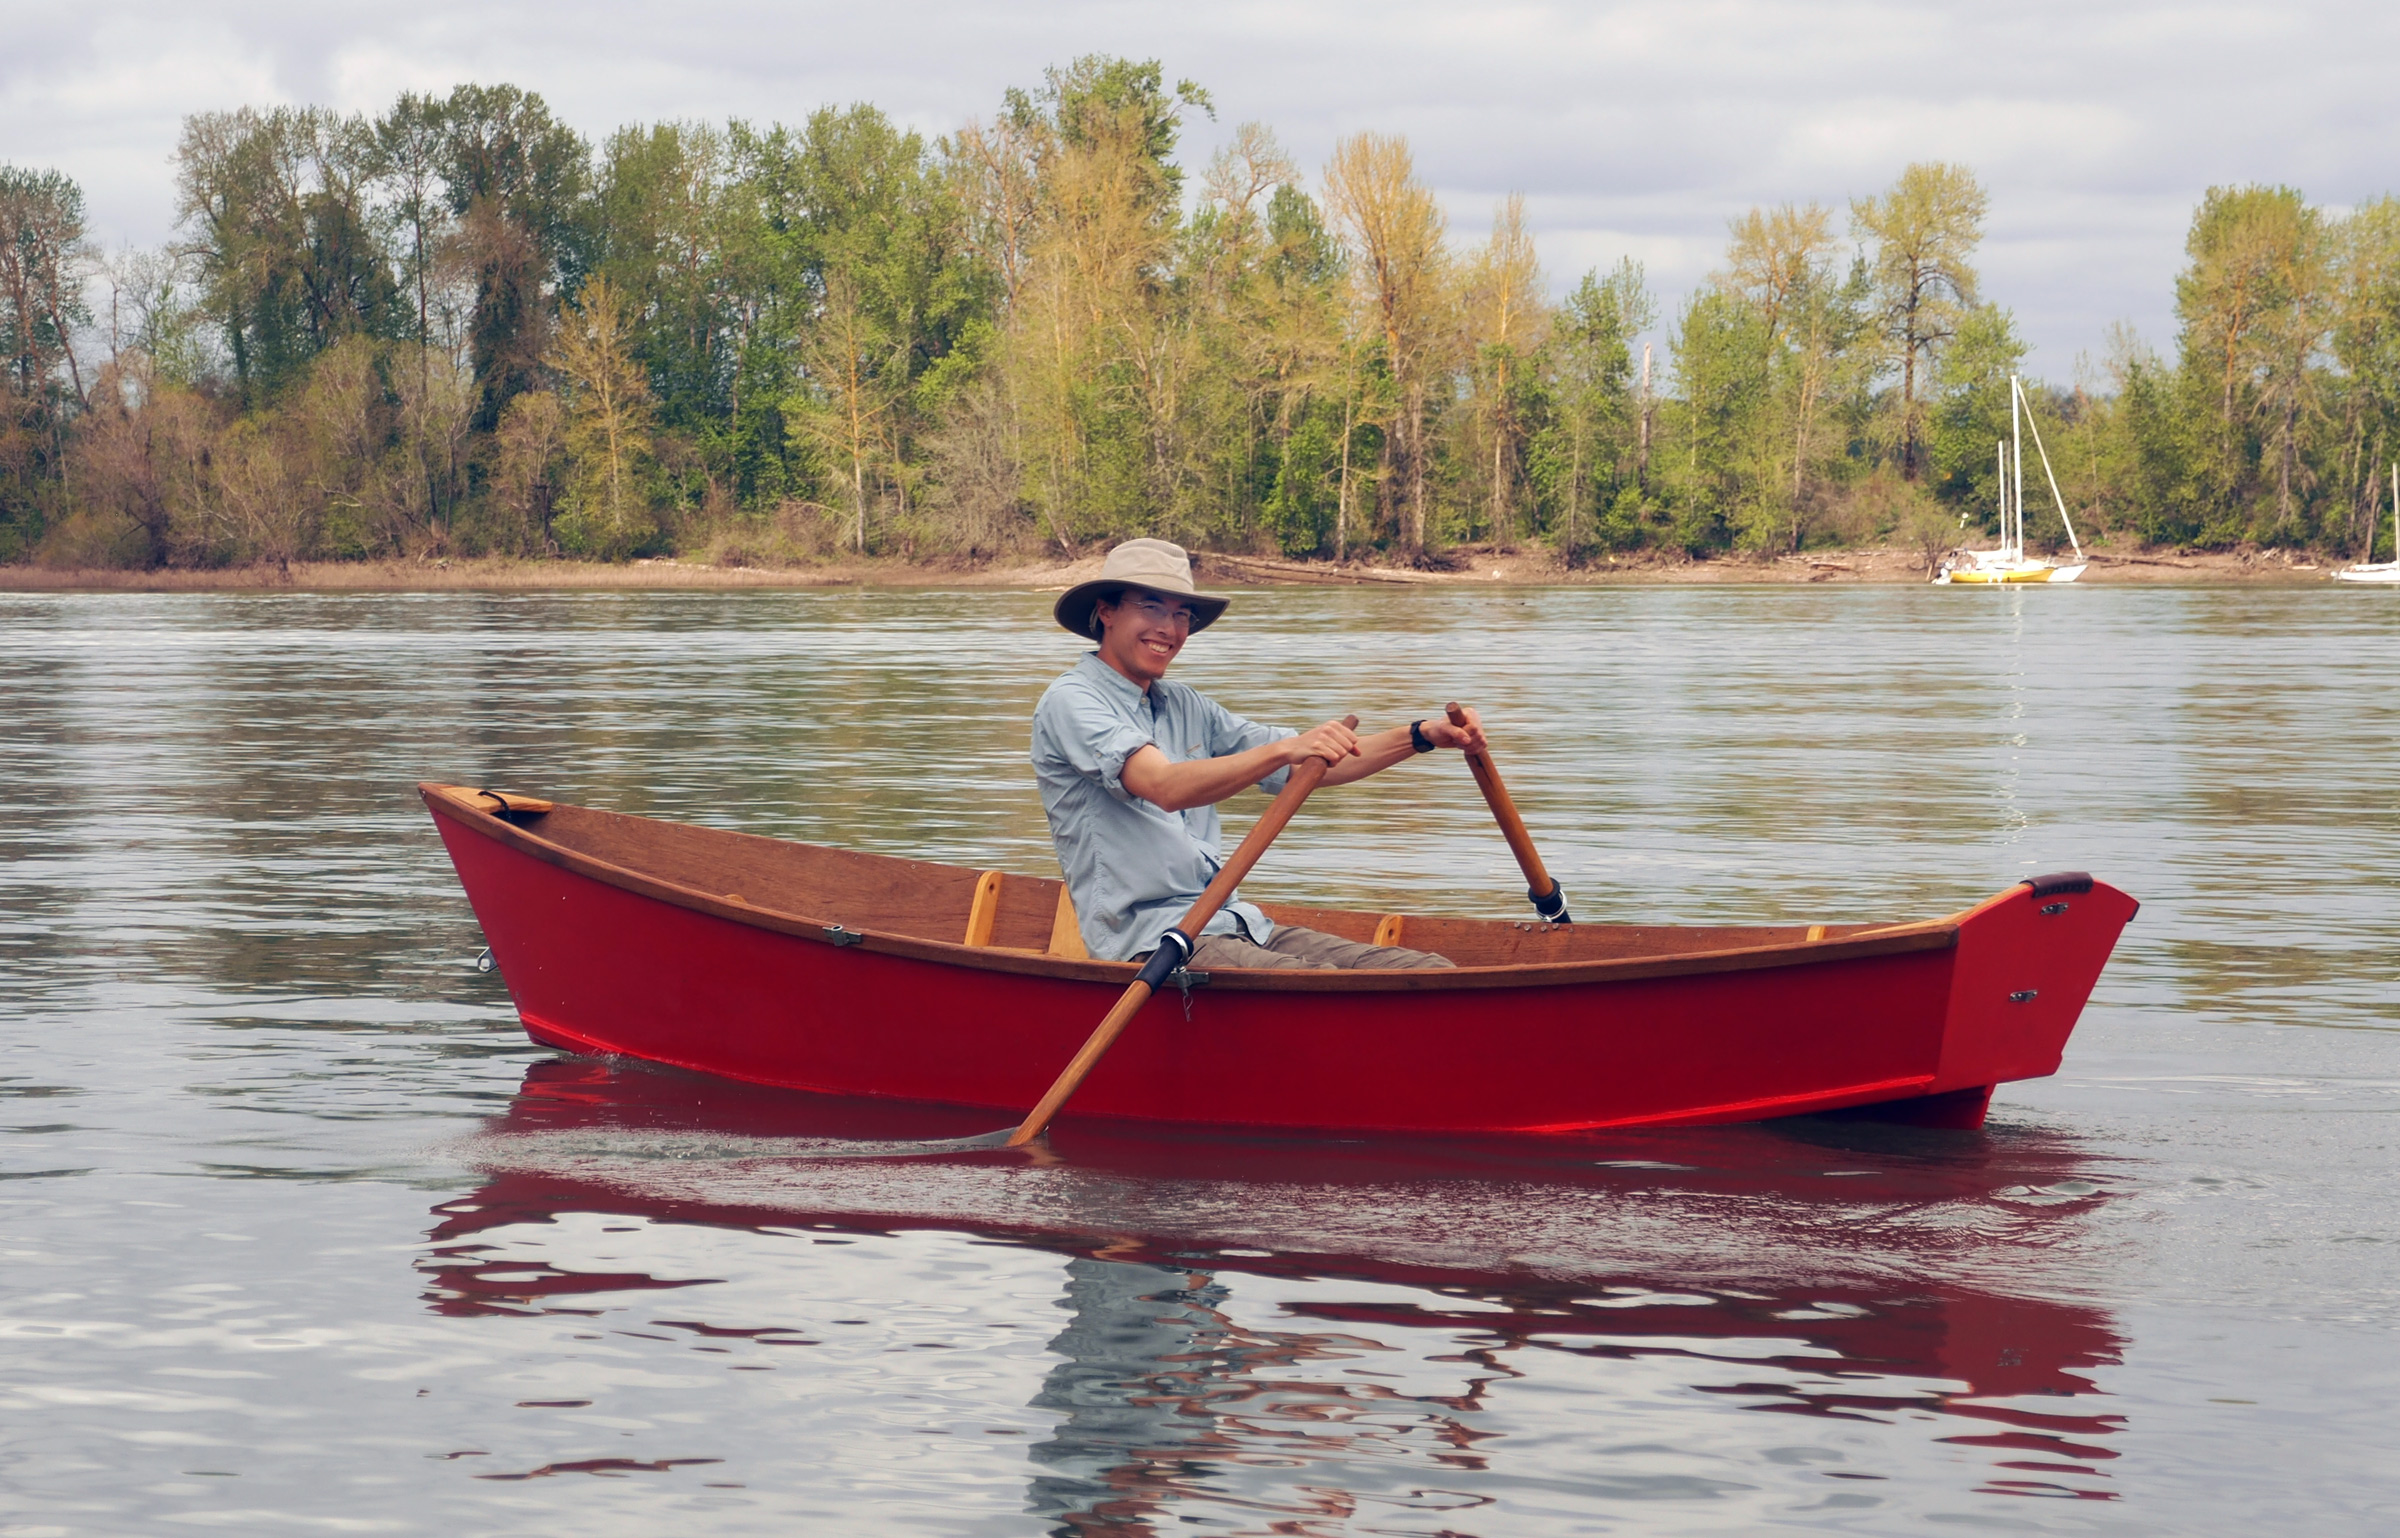
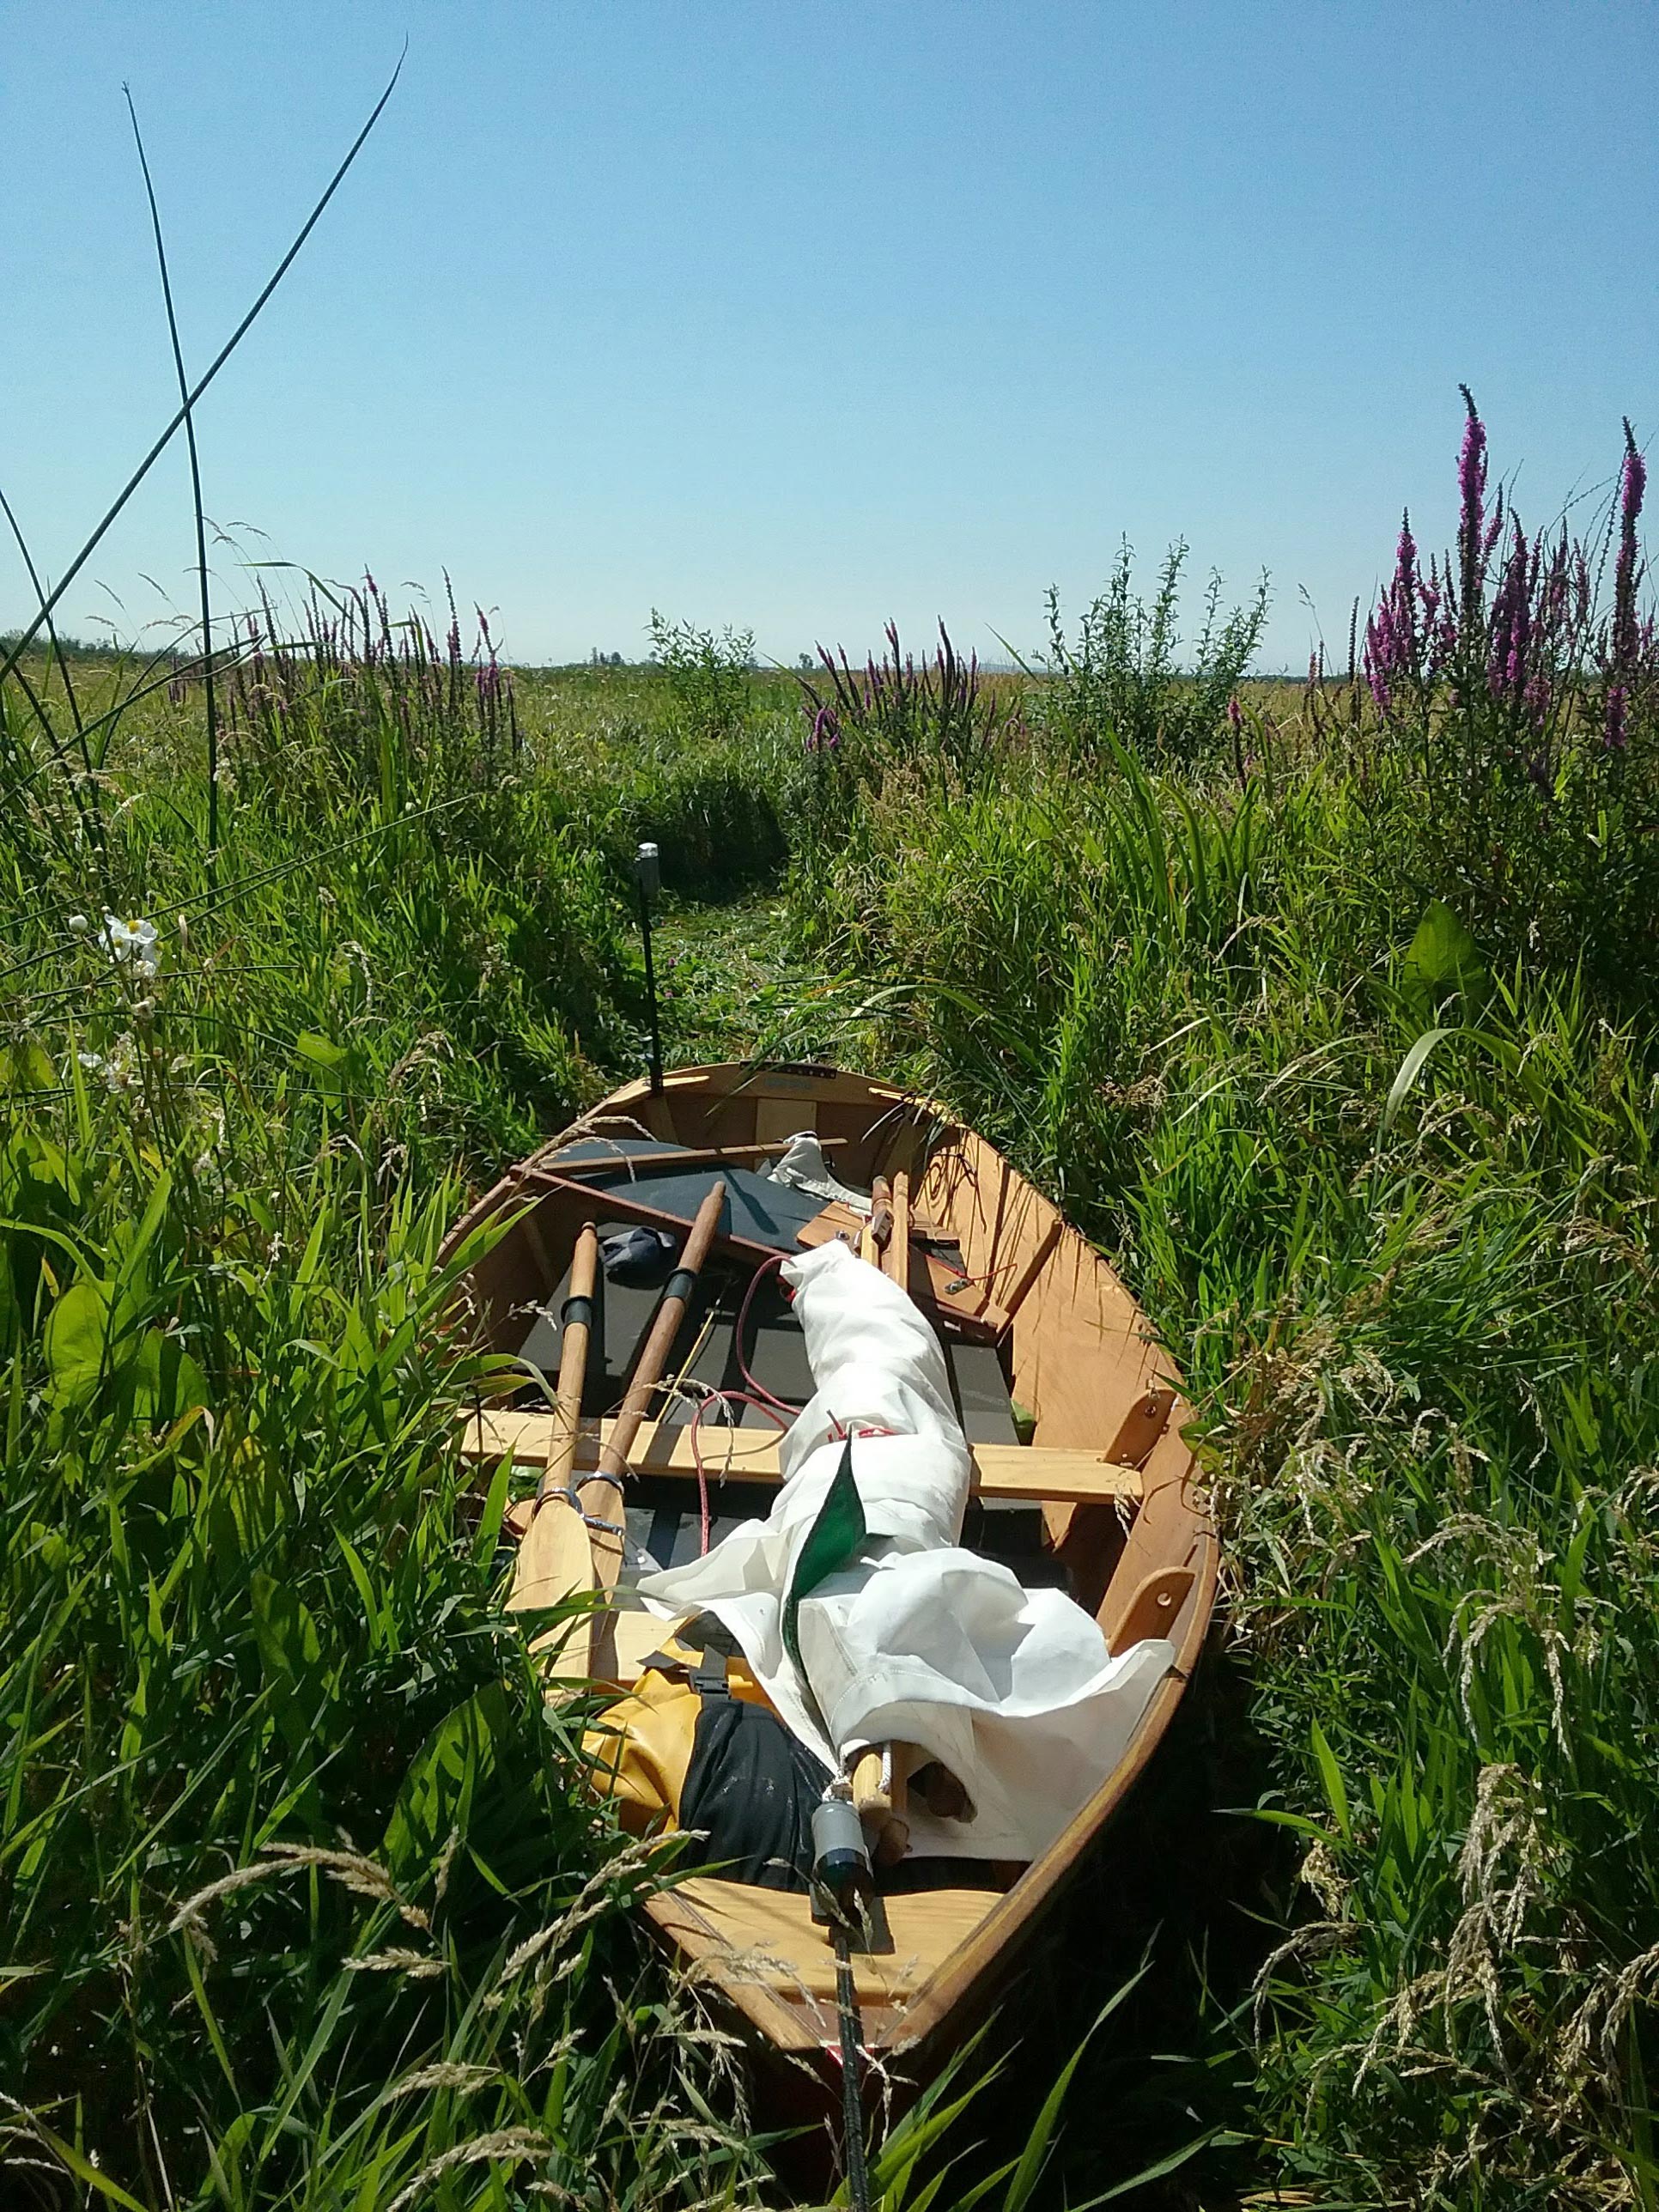
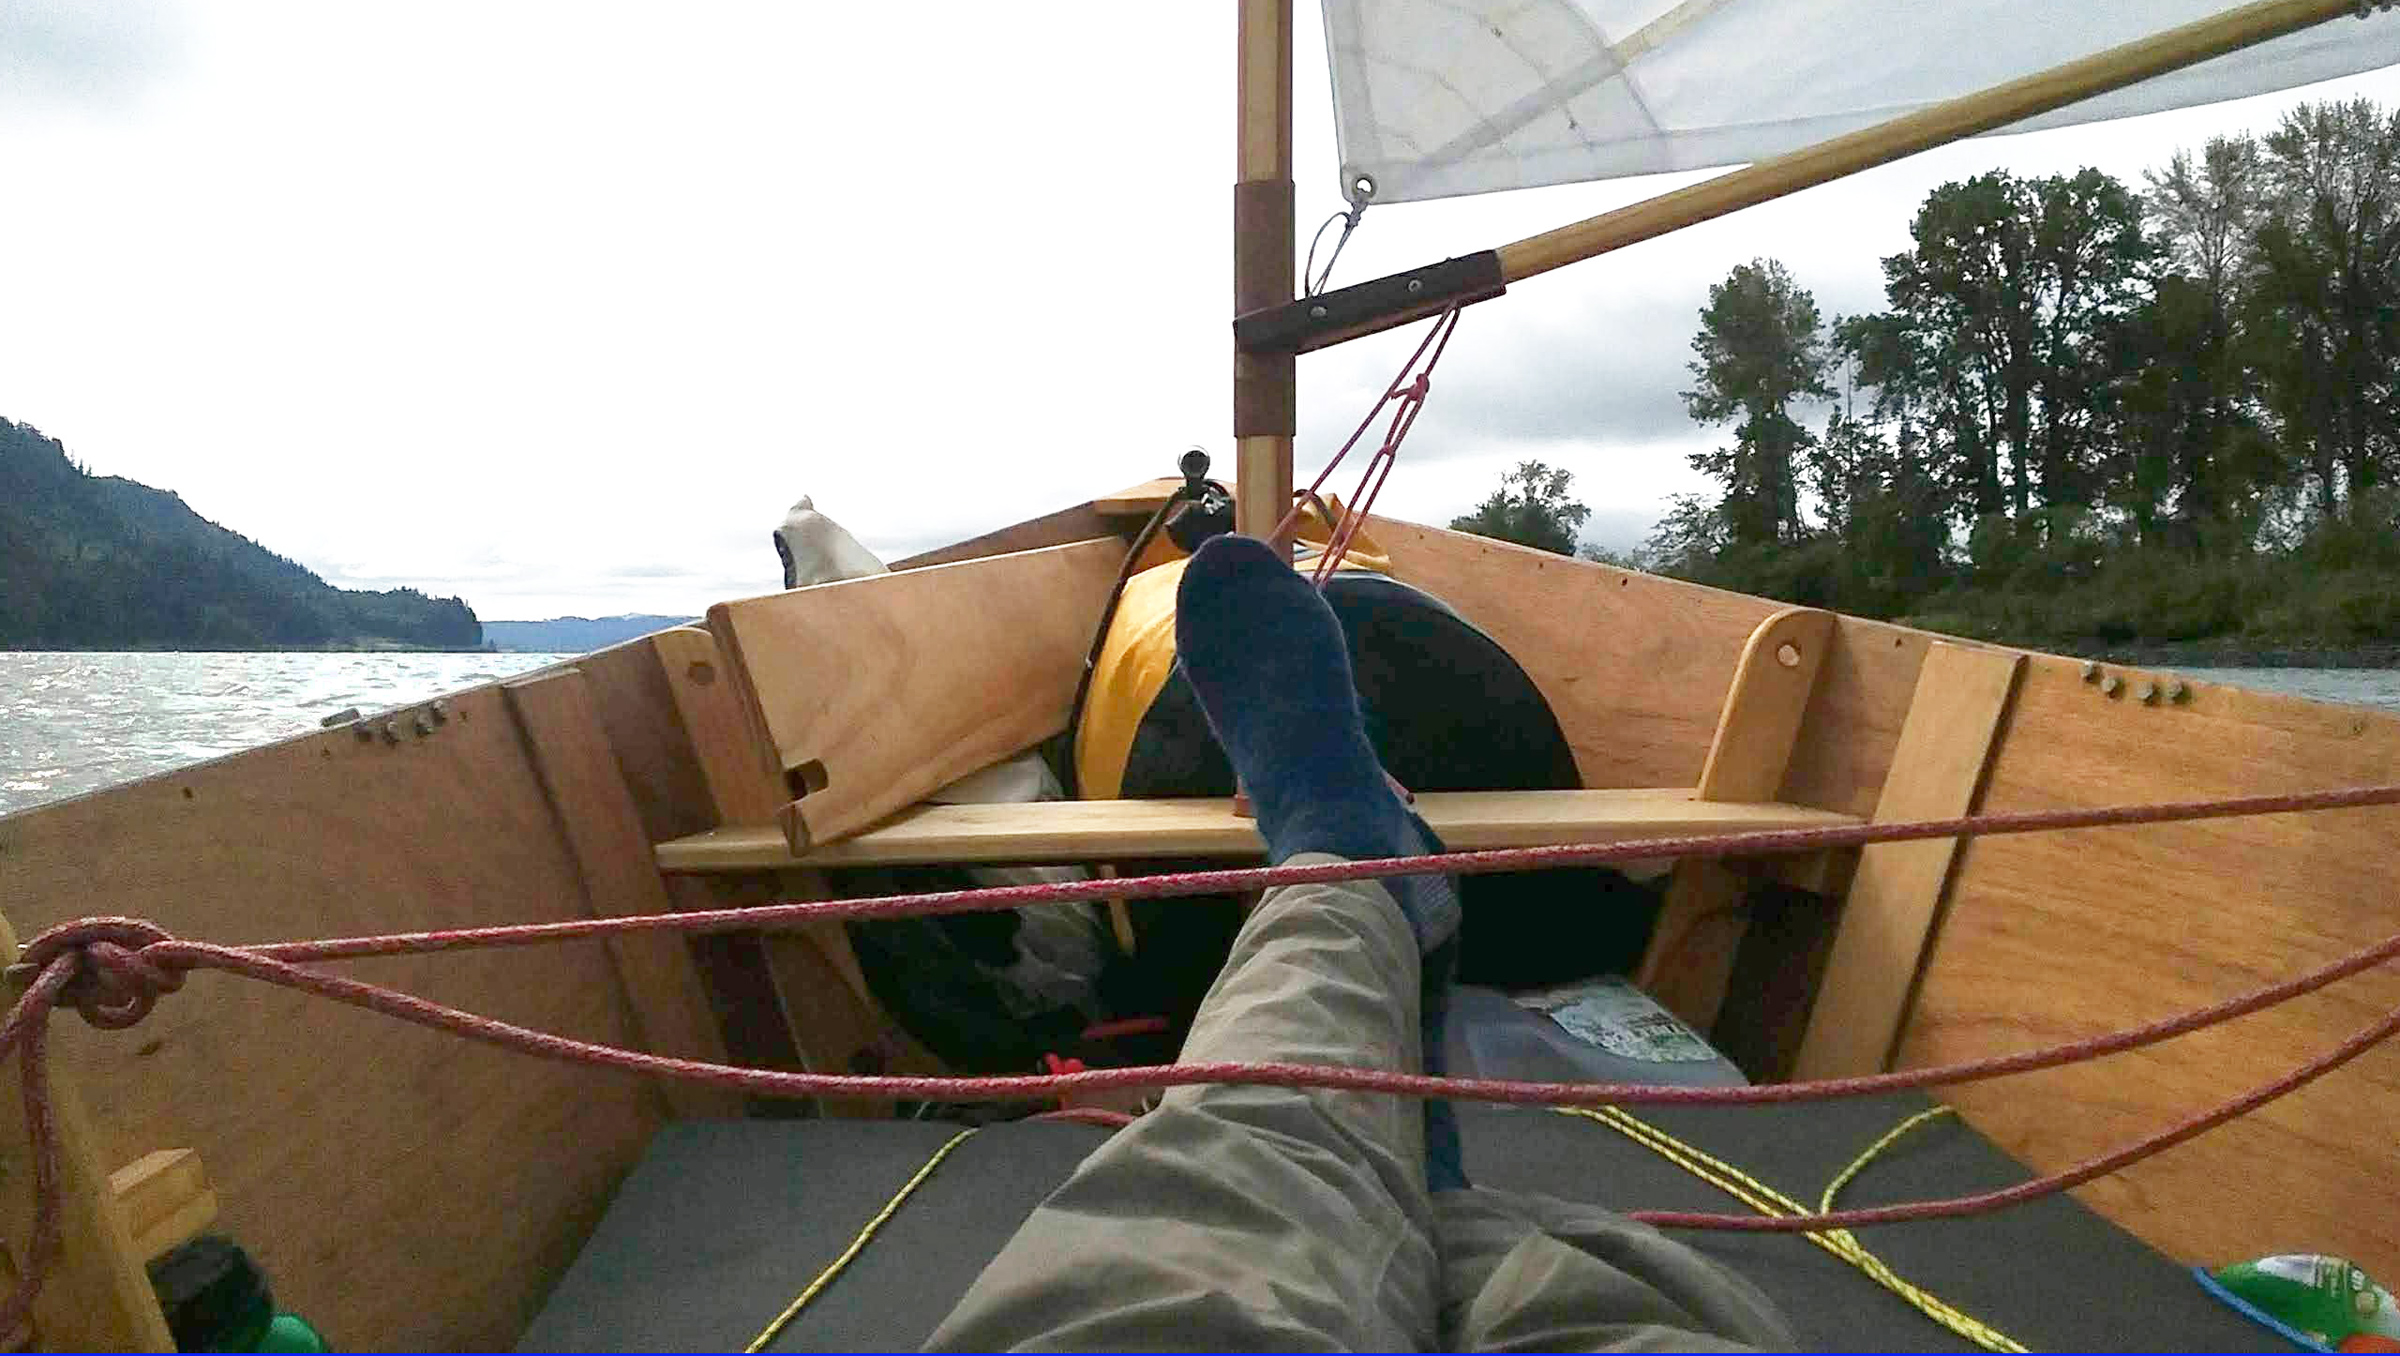
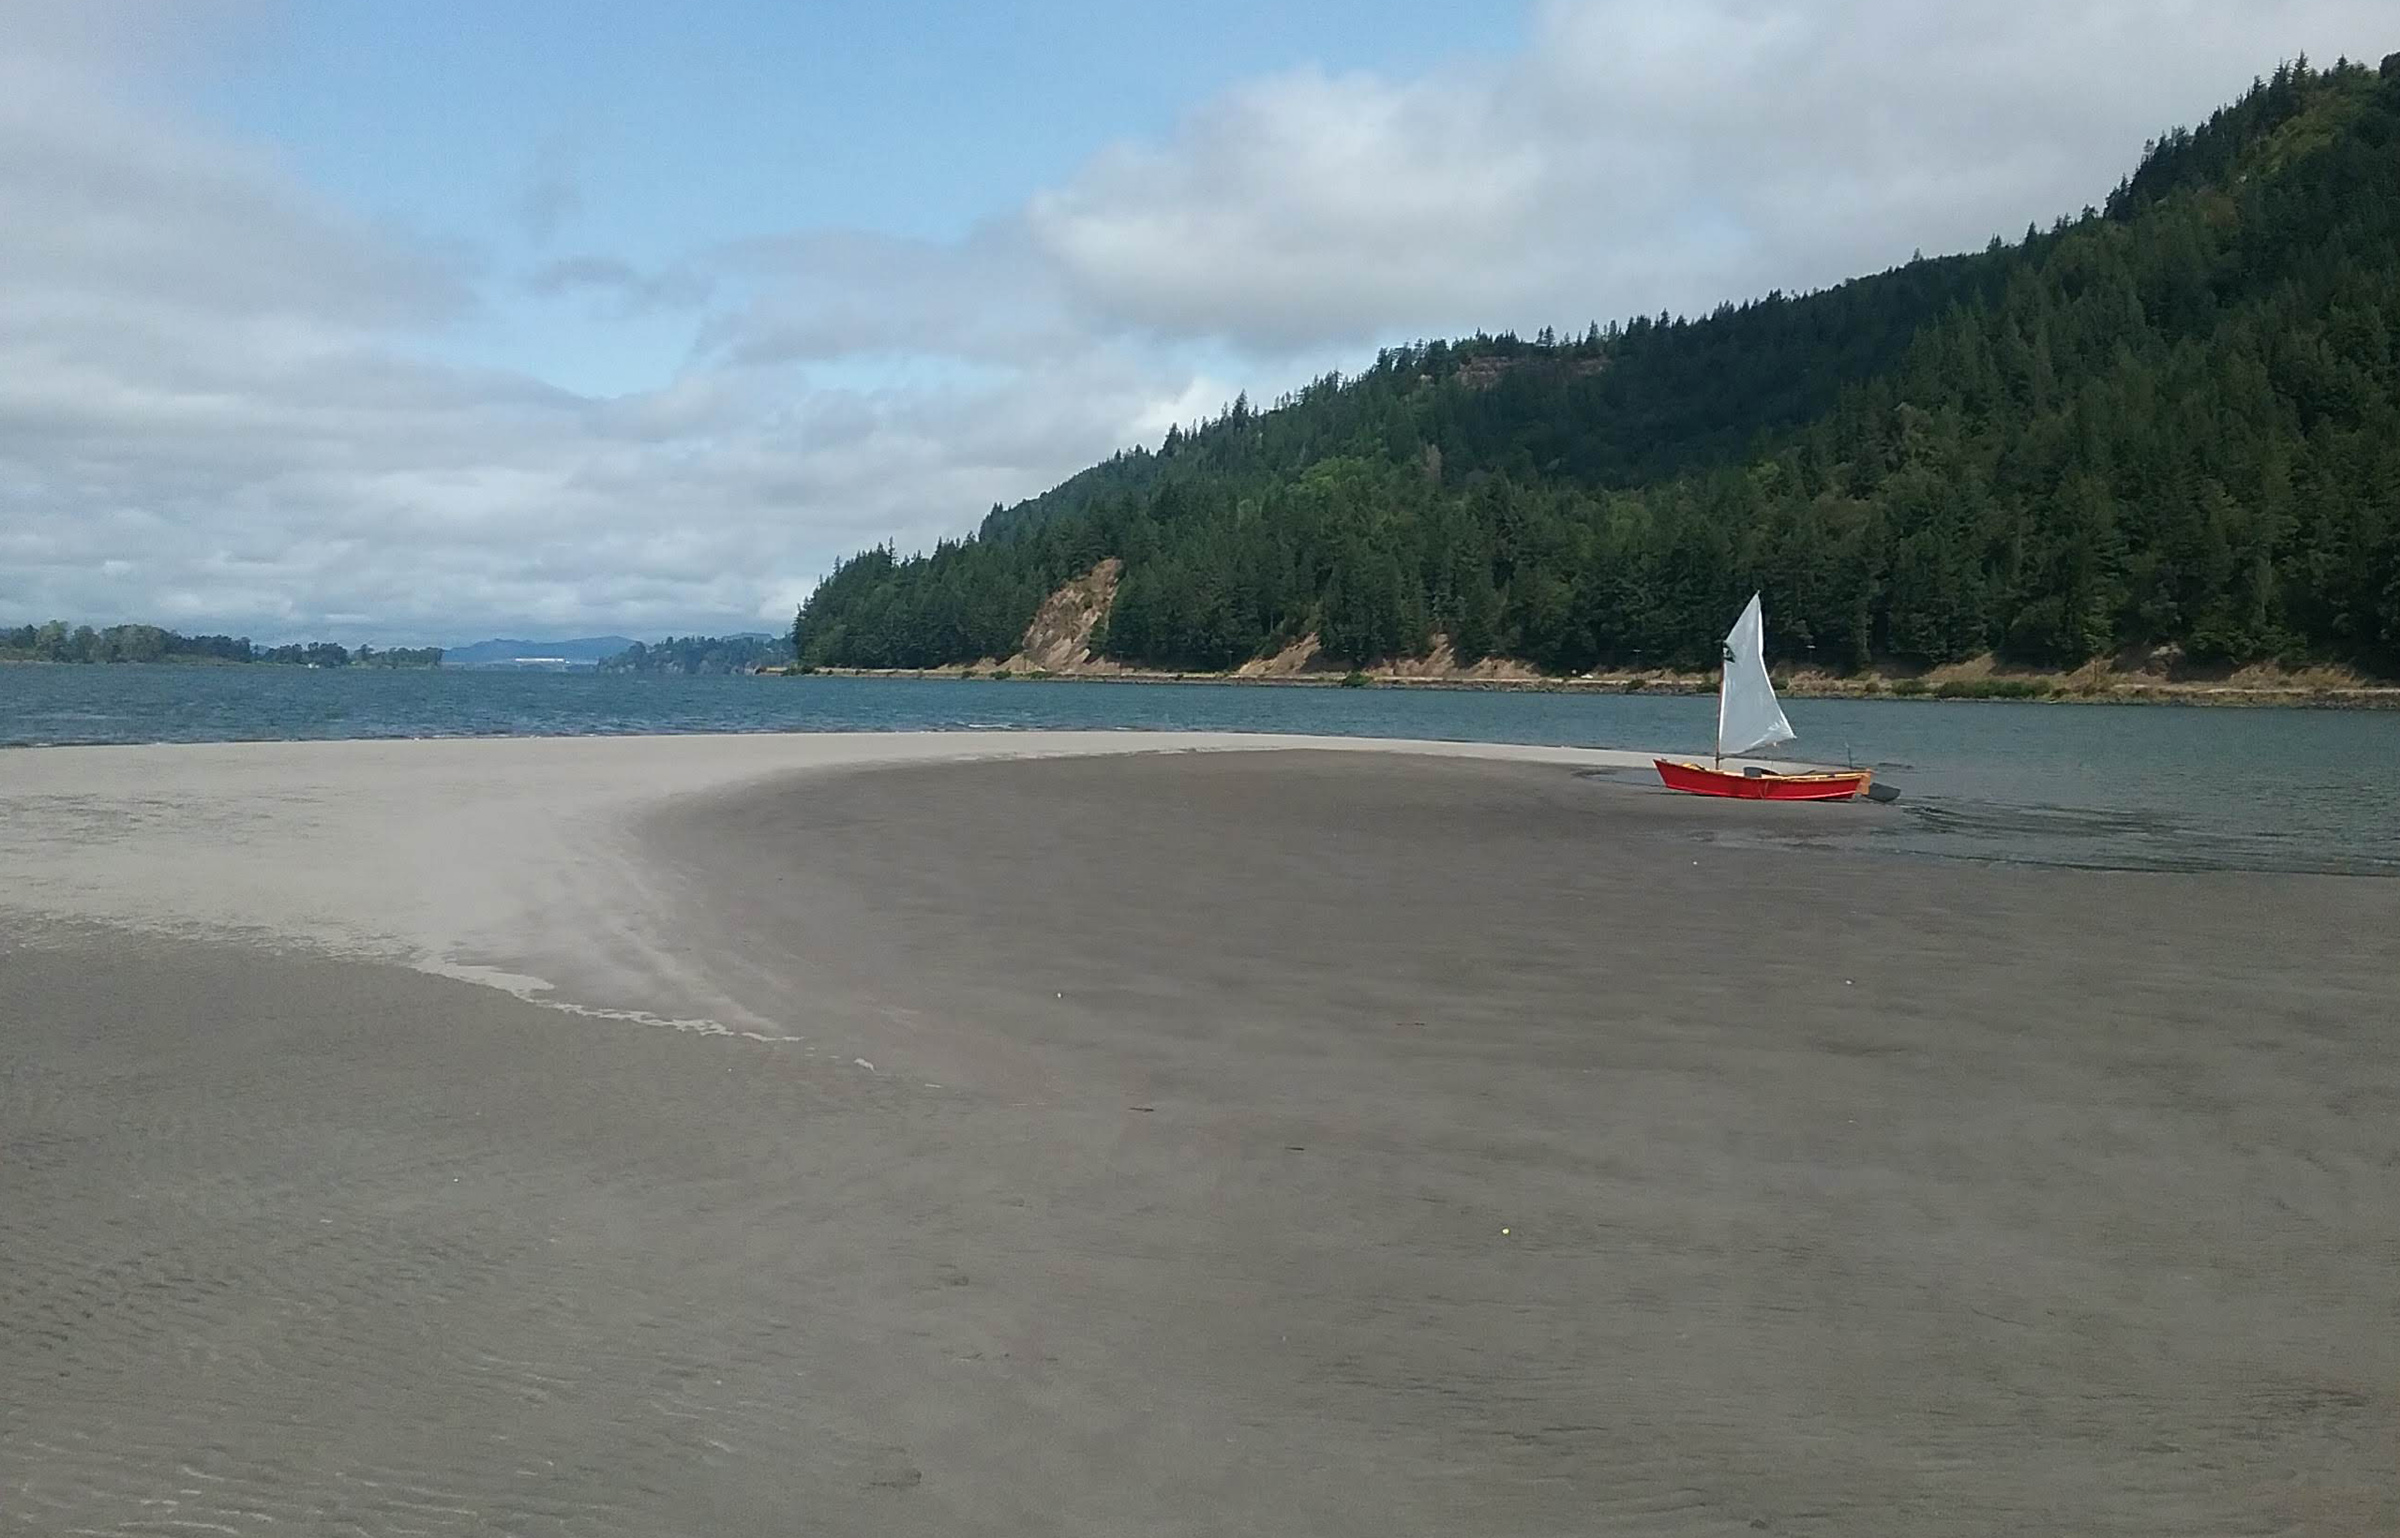
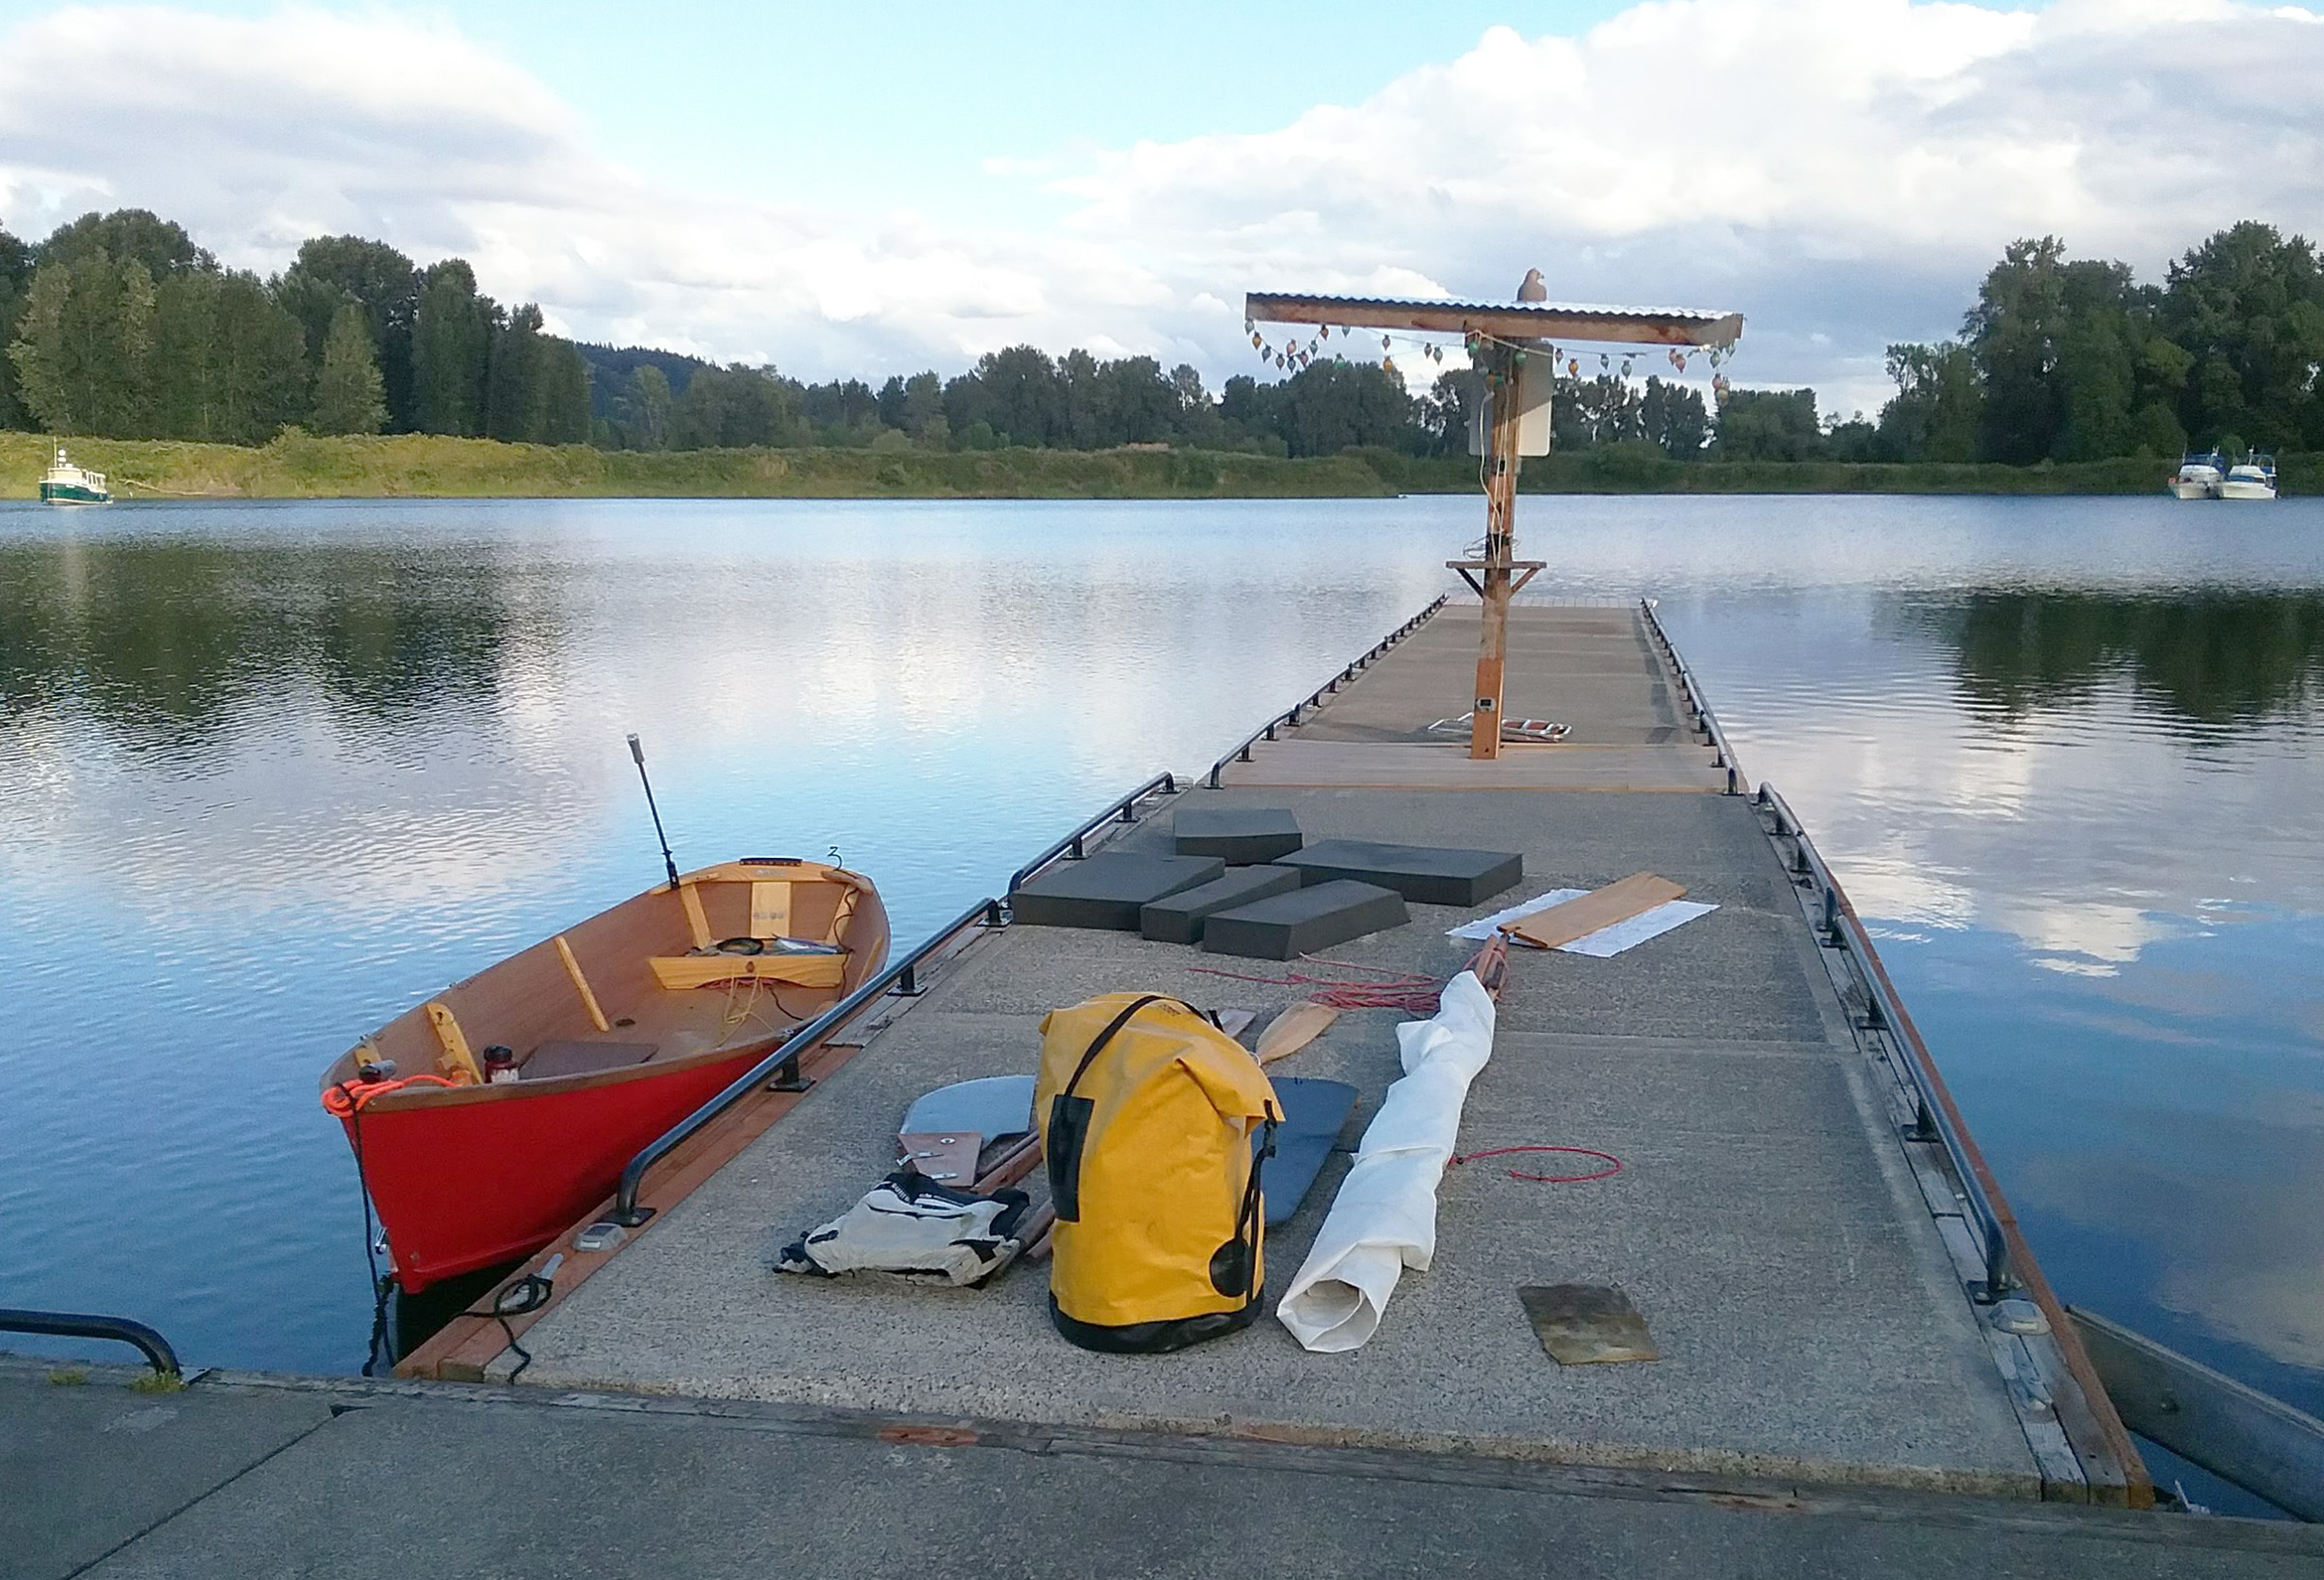
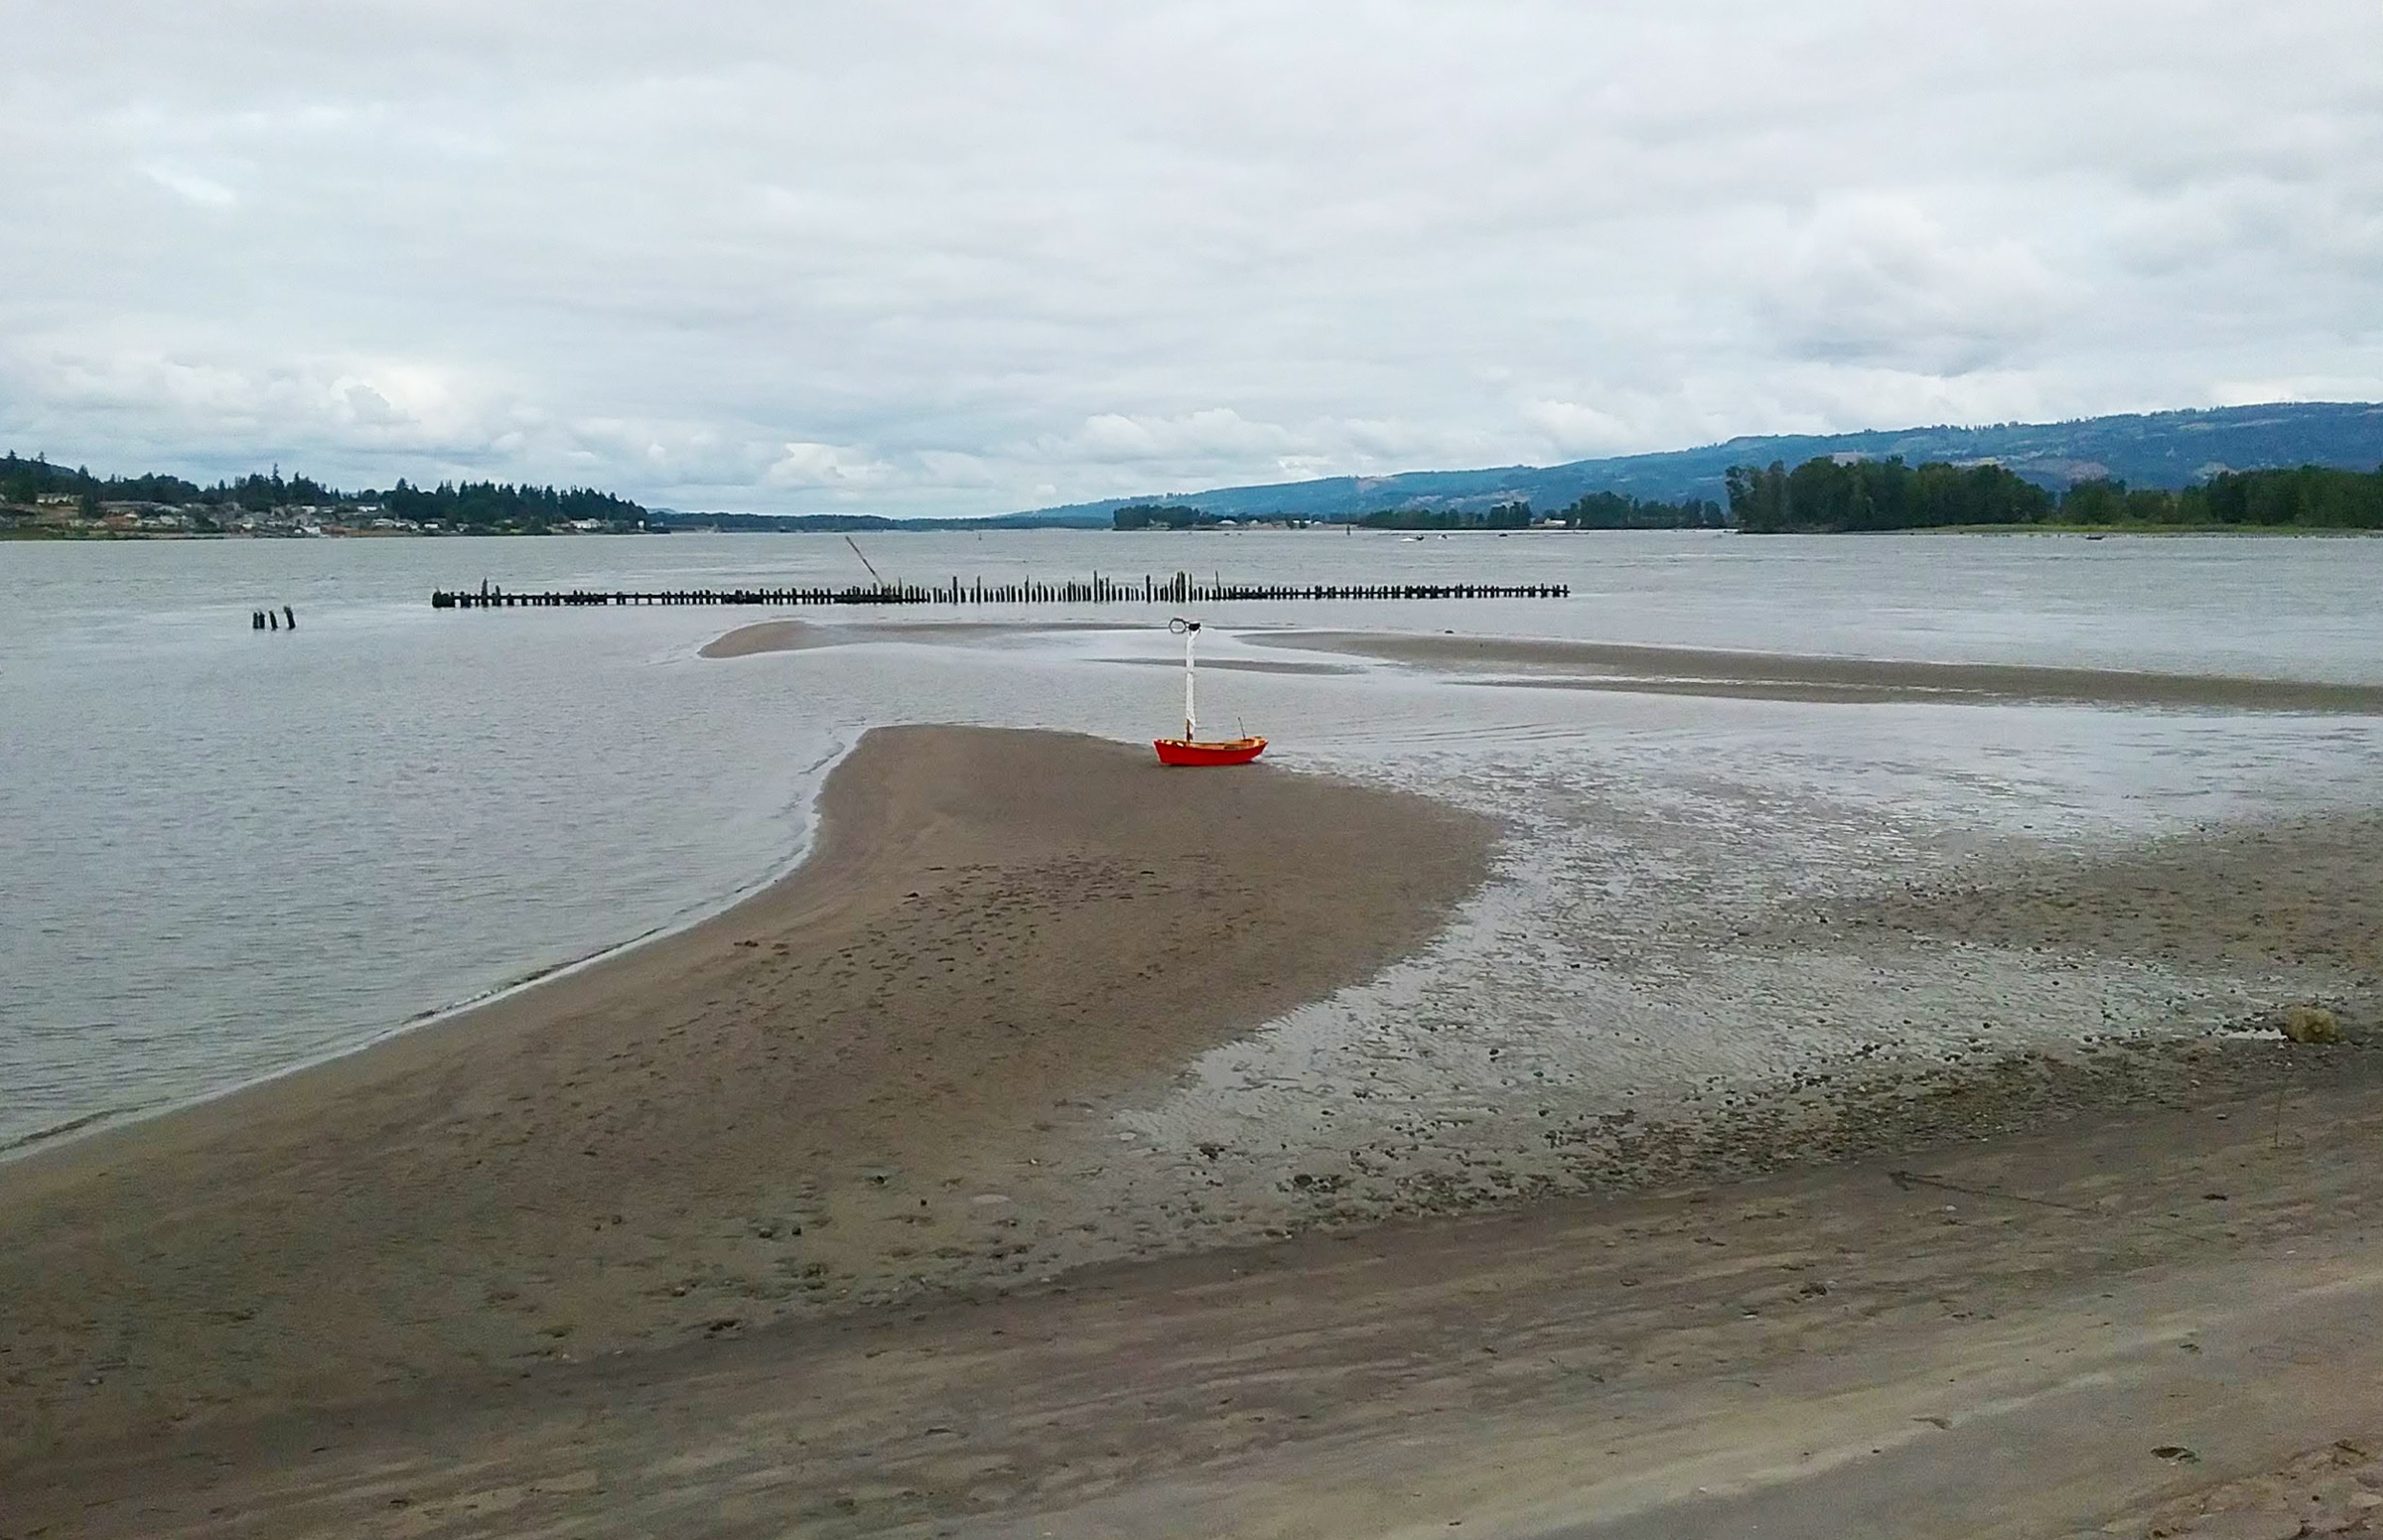
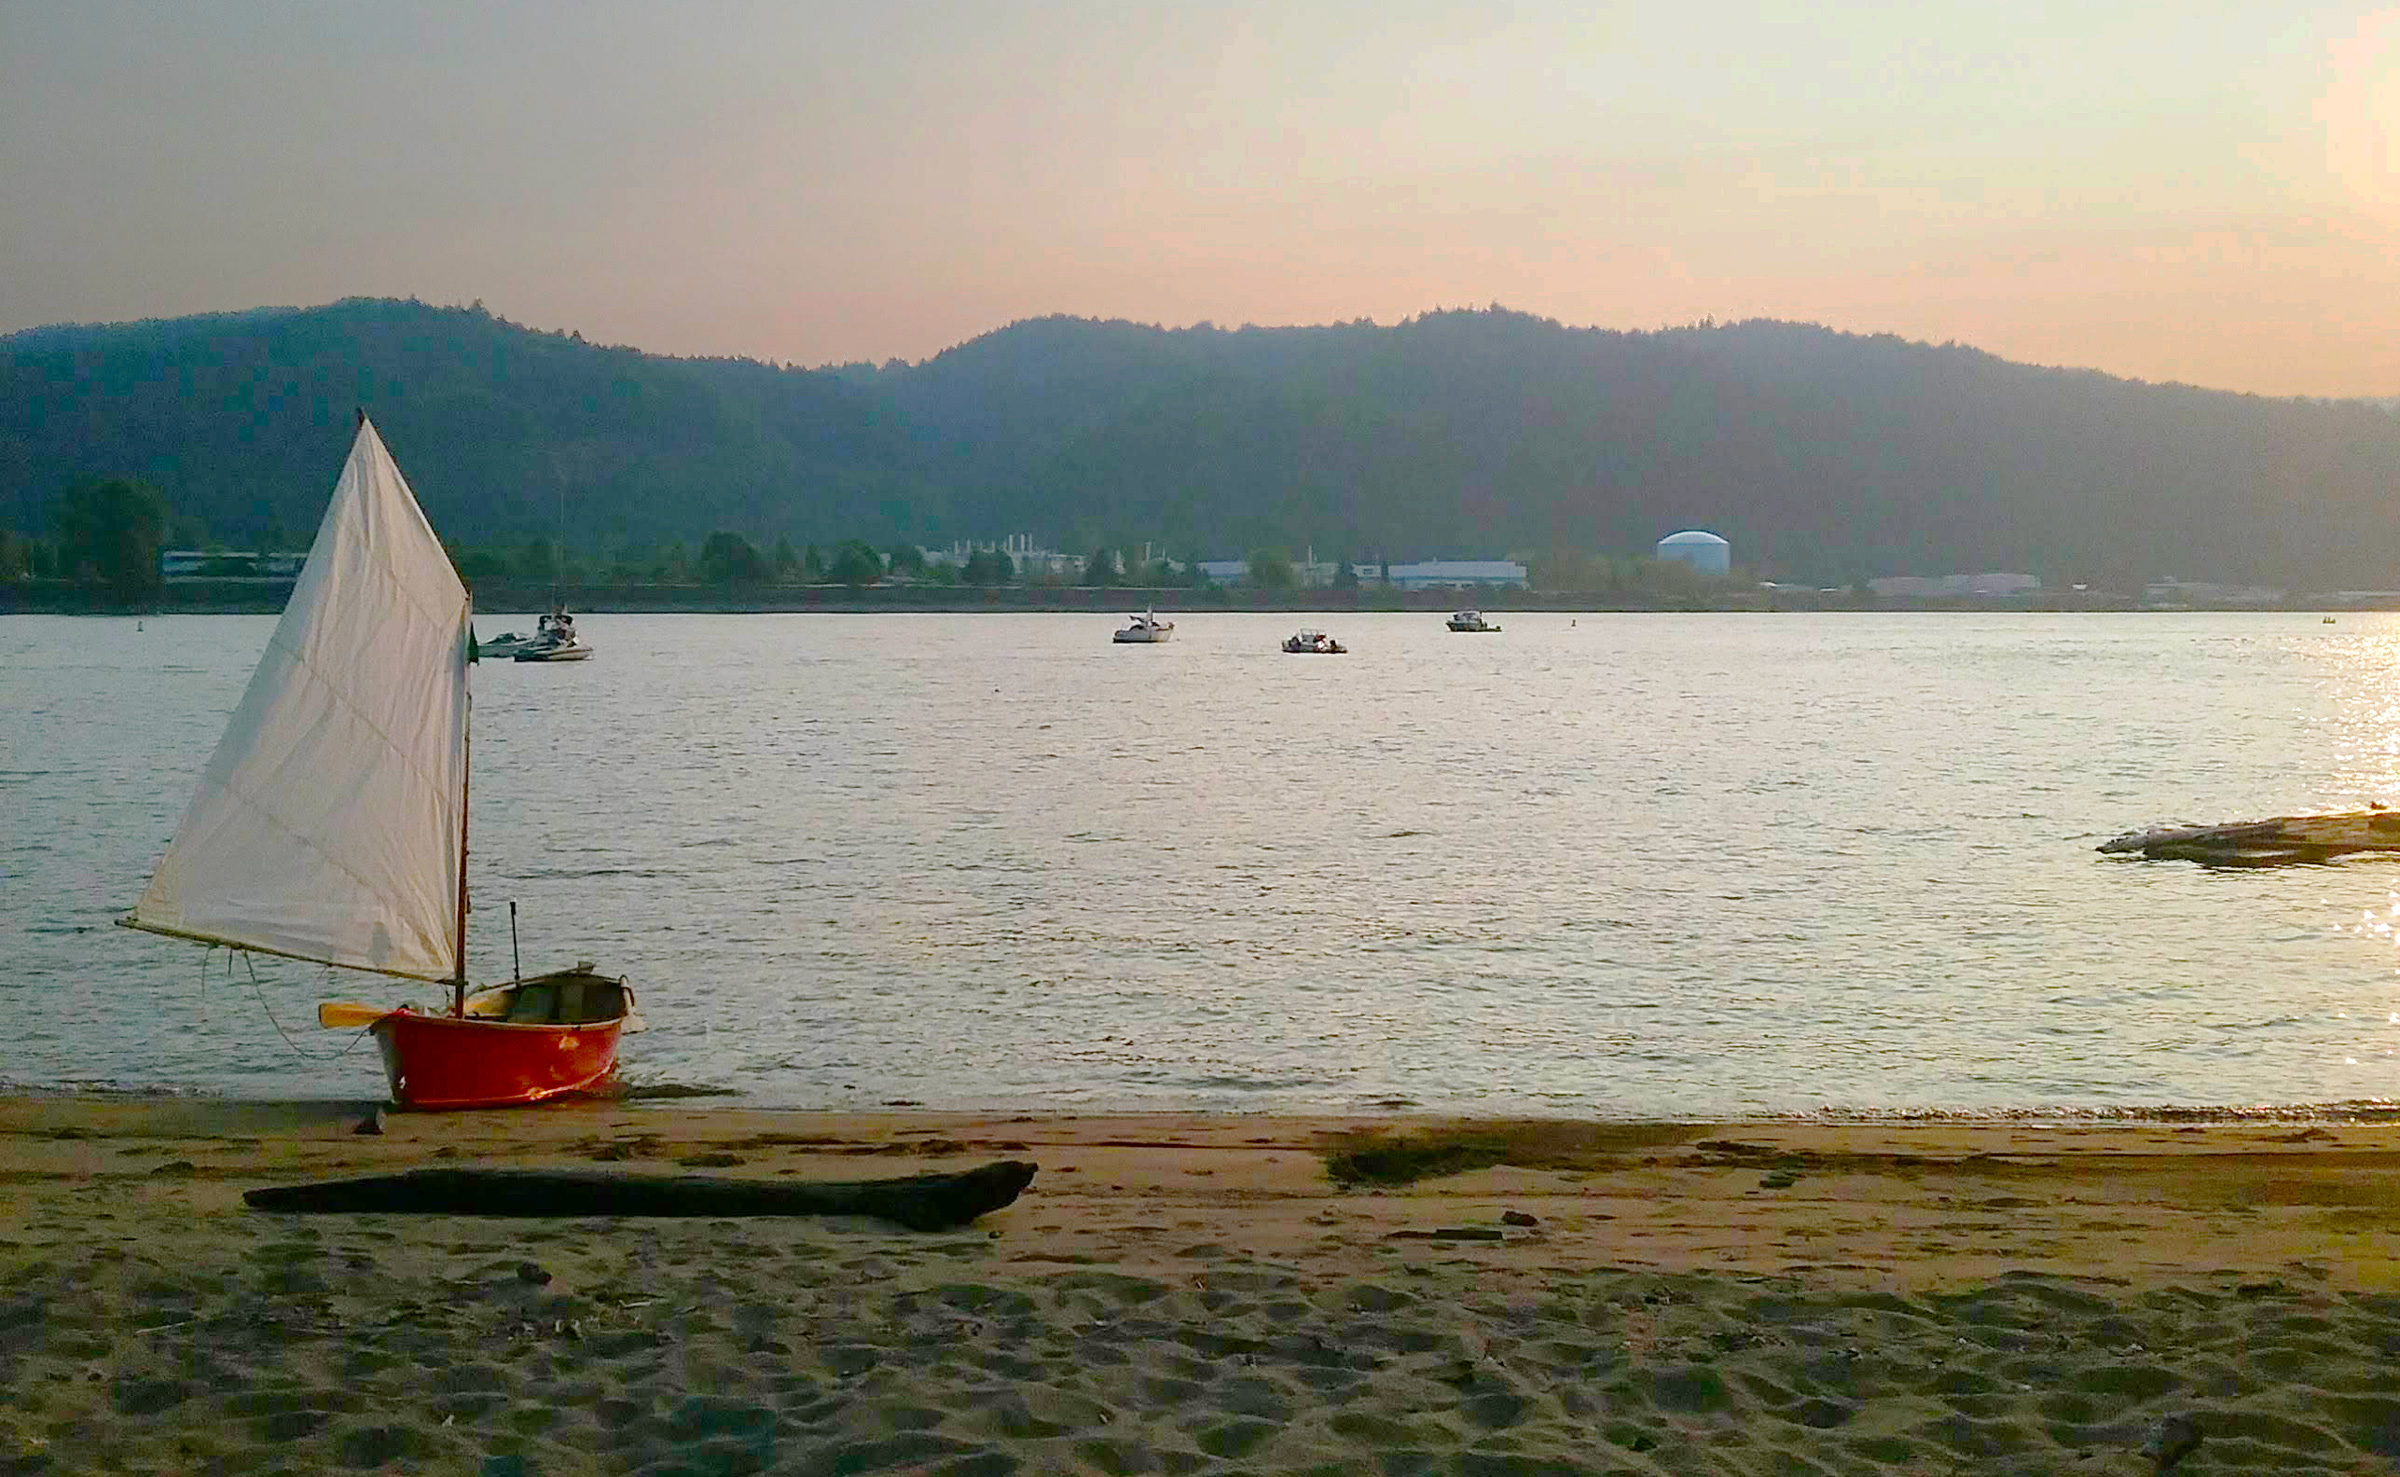
For a boat that you can practically make with spare change and scrap lumber, the Salt Bay holds its own on the water. No one would expect it to break speed records, or to endure the ravages of estuary bars and whitewater rapids, but for having fun with friends or kids on a calm summer’s afternoon it does quite nicely. I found on my 100-mile voyage on the Columbia River that it can also serve as a cozy camp cruiser for protected waters.
For voyaging, the boat is really best suited for one adult. When messing about and traveling short distances, two adults or an adult and two kids is a comfortable occupancy.
The skiff has great secondary stability. When sailing, I have sometimes heeled the boat until the gunwale is inches from the water. This has also proved useful when I want to pool water along the chine for bailing. My friend John modified a Salt Bay by installing airtight tanks along the sides to provide flotation in the event of a capsize or swamping. Closed-cell foam blocks, tied down between the frames or under the thwarts would also keep the boat afloat.
Chances are, if someone is in a Salt Bay, it’s not going to be for clocking speed. Indeed, I haven’t myself. I’d estimate I row it at a steady 2-knot pace, with sprints just over 3 knots. Sailing downwind in a good breeze is the fastest way to go, topping out between 4 and 5 knots. What really matters is that it moves fast enough to feel like I can get somewhere.
The cost for my boat, including the sail, rigging, trailer, and cover, came in at just over $1,000. Keep in mind that much of it was bought secondhand or salvaged. For one who wants only to build the boat and has no need for a trailer or cover, the cost would certainly come in under $500.
The Salt Bay Skiff was easy to build, inexpensive, and car-toppable, but is also pleasing to the eye, and impressively functional. Taken in the context of the boating world at large, it’s a humble boat. But for those who own one, it often represents a first step into boatbuilding and boating. I could not think of a better companion for such a milestone.
Torin Lee lives in Portland, Oregon, and wears a few hats at a local solar installation company. On summer weekends he teaches at the Willamette Sailing Club. He learned to sail in college, racing Flying Junior dinghies. He still enjoys racing with the club fleets, and got the boatbuilding bug from the folks at Portland’s RiversWest Small Craft Center.
Salt Bay Skiff Particulars
[table]
Length/12′1″
Beam/4′4″
Sail area, main/38 sq ft
Sail area, jib/13 sq ft
Weight/ under 100 lbs
[/table]
The full-sized printed plans mentioned in the articles are available for $50 from designer Chris Franklin at [email protected]. Plans and instructions for the Salt Bay Skiff are available as digital downloads of Getting Started #7 and Getting Started #8, available from The WoodenBoat Store for $1.95 each.
Is there a boat you’d like to know more about? Have you built one that you think other Small Boats Magazine readers would enjoy? Please email us!
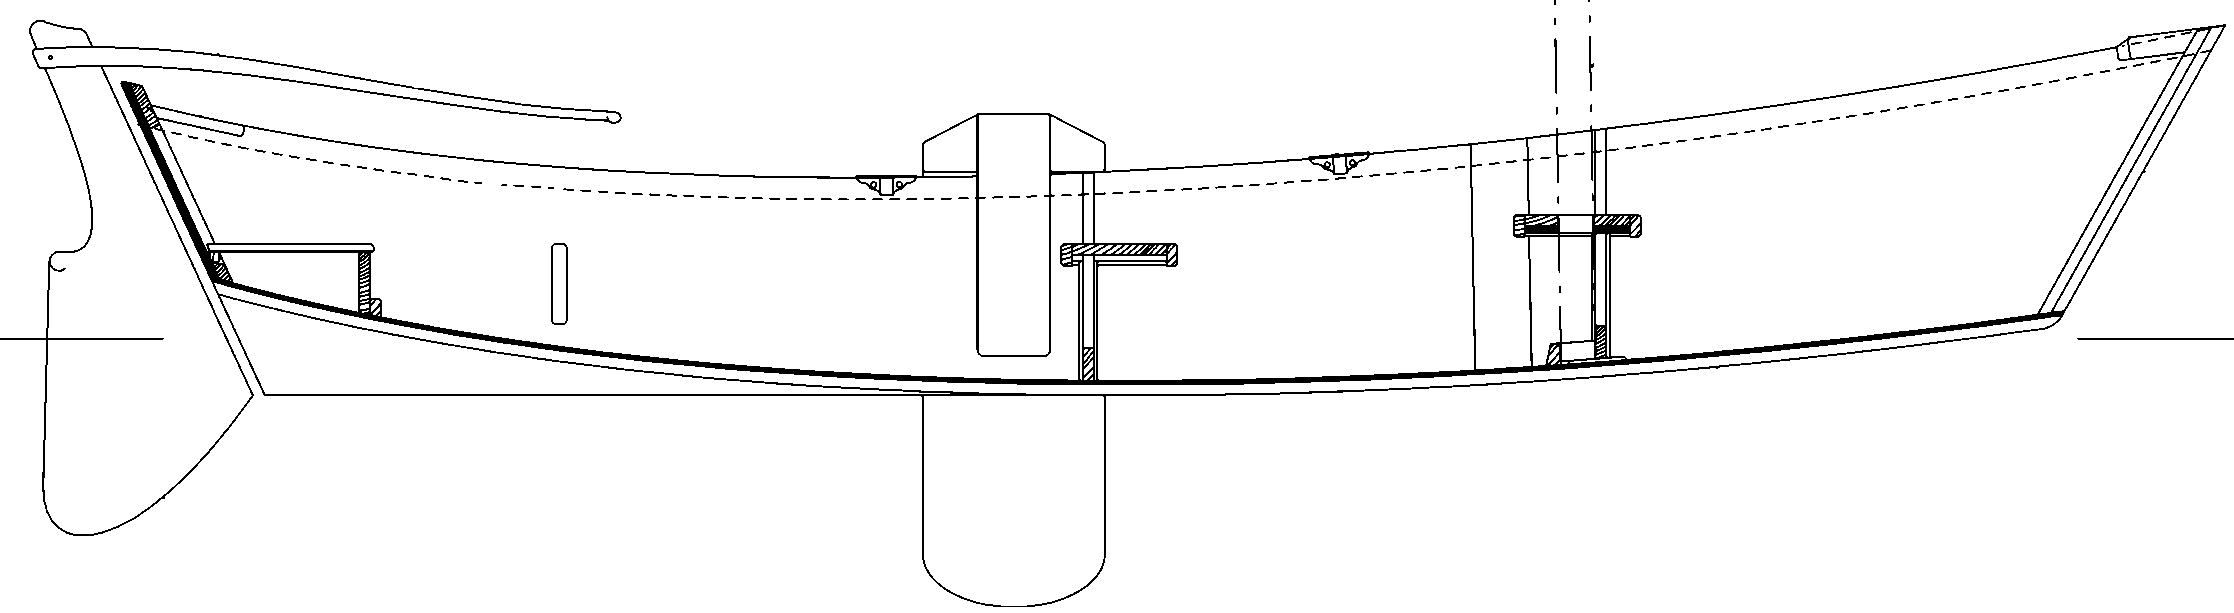
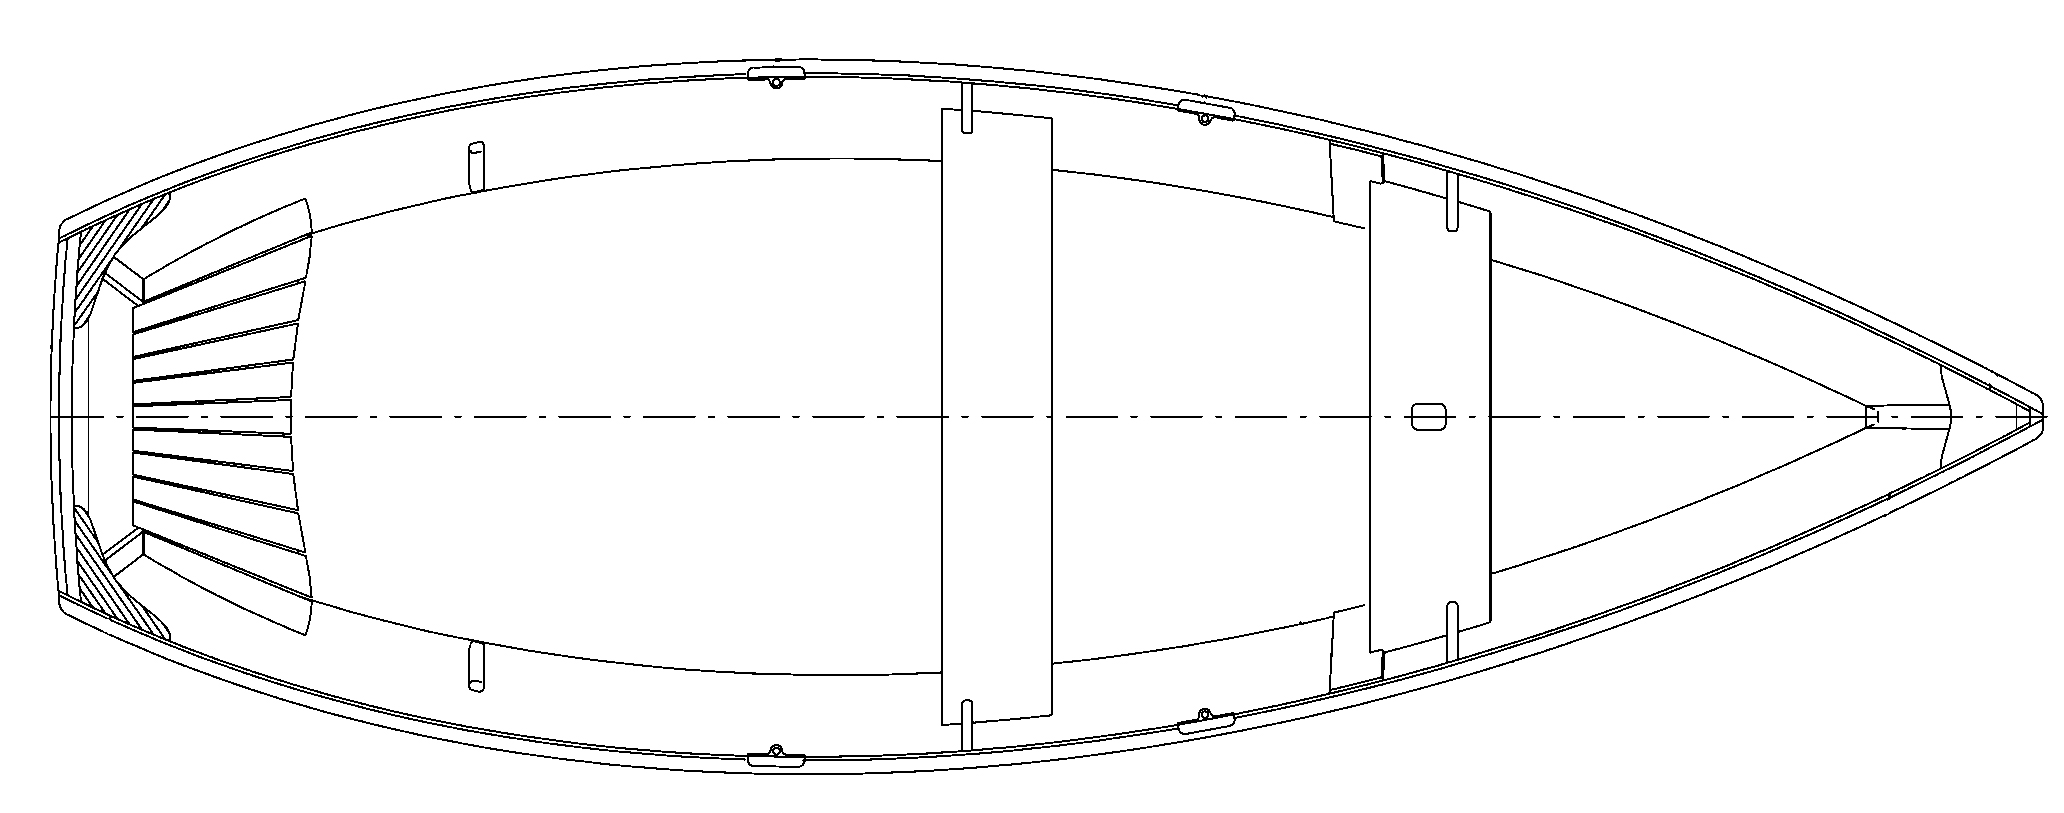
When I moved to the Belfast area of Maine in 1989, I brought with me ACE, a 14′ sailboat that I had built in North Carolina. She had a light, planing hull, and with a crew of two or three she was fast in a good breeze. I had had a lot of fun with her. Getting very wet in the process was no imposition in warm Southern waters.
The water in Maine’s Penobscot Bay is not warm, but after the sultry calms of the Carolinas, the brisk summer winds promised good sailing. My wife is a somewhat reluctant sailor, so I had rigged my boat with a trapeze and long tiller extensions for solo sailing. While I was on the trapeze, with two sheets in one hand and a tiller extension in the other, ACE was something of a handful, but in the right breeze she would take off like a scalded cat. Sometimes I would out-pace powerboats across the upper reach of the bay in the triangle of water north of Isleboro, between Belfast, Castine, and Searsport.
The wind had to be just right, though, for those exhilarating rides. Too little wind and the boat might zip along with a humming daggerboard and a flat, fizzy wake, but wouldn’t quite reach the frantic pace that, once experienced, made anything pale in comparison. About 15 knots of wind was ideal. Much more than that—well, that is what this story is about.
I had taken to sailing out of Searsport to avoid the beat up or down Belfast Harbor. One late spring morning, with a brisk northwesterly promising a thrilling sail, I hitched the boat trailer to my old Plymouth, and headed north along Route 1. On the drive to the launching ramp I passed flags crackling in the breeze and looking out over the bay I saw a carpet of whitecaps. Maybe I should tuck in a reef before heading out, I thought.
I’d had the good sense to invest in a wet suit soon after discovering just how cold the bay could be. Icy spray on a warm day was one thing, but the uncontrollable shivering that followed full immersion for more than a few minutes provided a salutary warning of the dangers of hypothermia. I rigged the boat, pulled the wetsuit on, and looked out from the launching ramp. The wind was blowing directly offshore, and the water’s edge was calm, only ruffled by the wind, but the whitecaps farther out were plain to see. I should reef, I thought again, but what if I could handle a full mainsail? If I could keep the boat on her feet, she might take off as never before. The temptation was too much, and with my mouth somewhat dry, I pushed off, and hopped aboard.
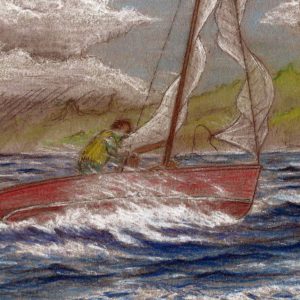
Arch Davis
“Gust after gust found her heeled way too far with me hanging on by the skin of my teeth.”
It was hairy, right from the start. Close to shore the breeze was gusty; its direction inconsistent. An accidental jibe would have meant instant capsize, so I tacked downwind, letting the boat round up and spilling the wind in the gusts, and jibing in the lulls. As I moved further out into Searsport Harbor the wind steadied, but it was strong, and the boat felt twitchy, darting ahead, then rounding up and heeling hard, with too much weather helm for comfort or good speed. Obviously, I needed to get out on the trapeze if I were to keep ACE on her feet, which she needed to be if I was to make the best of her planing bottom.
This wasn’t easy. There was that dodgy moment as I crouched on the deck and clipped the harness to the wire—I hadn’t got my weight out yet, the sails weren’t sheeted properly, and I needed to change my grip on the tiller extension. The wrong gust just then, and I’d have been over. I swallowed my apprehension, and managed it without fumbling; now the boat moved faster and toward more open water.
It was clear, though, that ACE was still not happy. The wind continued to increase farther offshore, and gust after gust found her heeled way too far with me hanging on by the skin of my teeth, sheets eased and sails flogging, the tiller hard to windward, and the rudder dragging. Then I would get her back on her feet, struggle with the sheets, only to be knocked down again.
I needed to come up into the wind just a bit, I thought. If I could trim the sails just right and get her properly up on plane, she’d outrun those gusts, and I’d have better control. I had more sea room now, and I set about trying to find that magic combination of sail trim and course that would set ACE free.
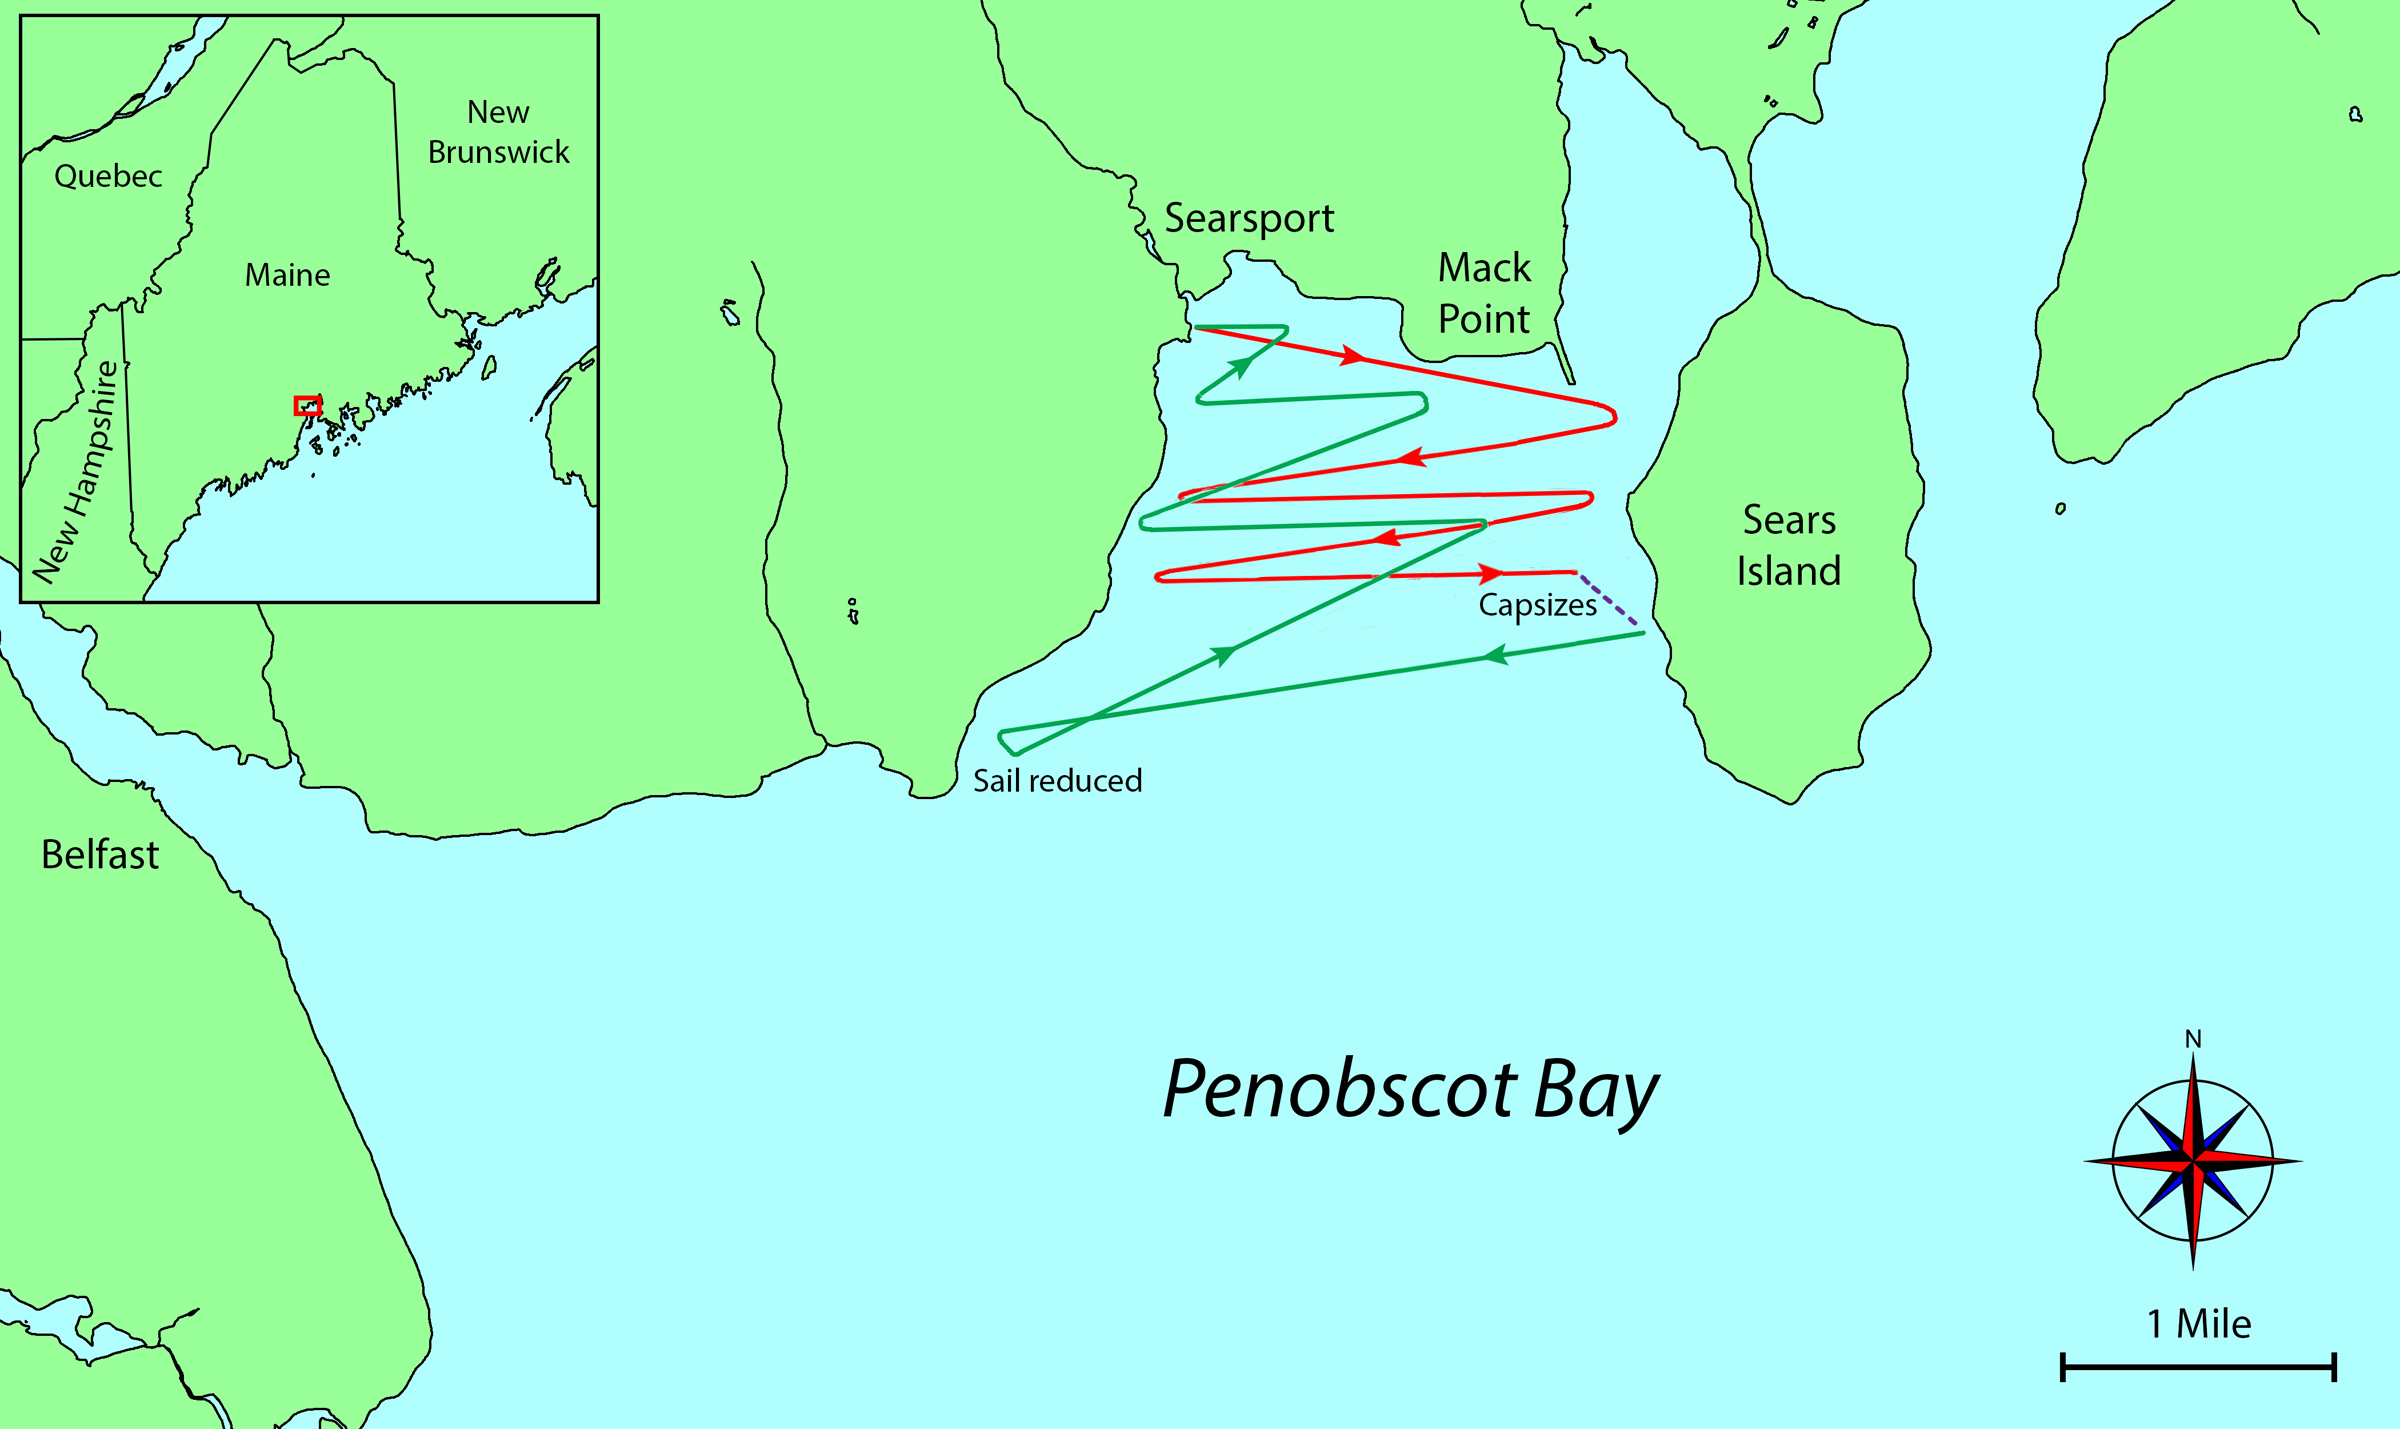
Of course, I should have seen that it was impossible. What followed were two broad reaches, from Sears Island to the Searsport shore, and back to the island, in a series of swoops as each attempt to find the sweet spot led to a knockdown. A tugboat near Sears Island on its way to Belfast would cross my course, and caused me to come up into the wind, and tack to head back the other way. By the time I reached the Searsport shore, the tug had moved out into the Bay; now, I thought, with the harbor to myself, I’ll make ACE fly.
Roger Siebert
.
But conditions were worse than ever. The wind had continued to increase, and again and again I was knocked down, releasing the sheets and regaining control only with the utmost effort. Closing in on Sears Island, the inevitable happened. I could no longer risk a jibe, and as I hardened the sheets and came up into the wind to tack, a gust hit, and we were over.
Now, I had capsized this boat may times in pursuit of thrills, and normally I could get her right back up. As ACE went down, I would climb over the windward gunwale, stand on the daggerboard, haul her back, scramble aboard, and be off again. This routine depended, of course, on the daggerboard being there. This time, it wasn’t. In my haste and trepidation on the launching ramp, I had neglected to secure it with its bungee cord. Now the daggerboard had slipped out of the trunk, and began to float away as the boat continued to roll until she had completely turned turtle.
For a moment I stood on the bottom of the hull, my eyes fixed on the drifting daggerboard. Without it, I was completely helpless, but could I haul myself back onto that slippery bottom if I swam after it? Well, nothing for it but to try, I decided, so in I dived. I retrieved the board, swam back, and found that by hooking my fingers into the daggerboard slot I could just wriggle my way aboard the capsized hull again. I fished under the boat, found a jib sheet, stood back on the chine, and hauled. Slowly the boat came up, and flopped back onto her feet again.
I tumbled aboard and lunged with the daggerboard to shove it back into its trunk, but before I could do that, the wind caught the flogging sails, the bow swung to leeward, the sails filled, and over she went again.
This time, at least, I didn’t have to swim for the daggerboard, but when I got ACE upright once more, the sails filled, and over she went again.
I don’t know how many times the same exact thing happened. In that wind, I just couldn’t get the daggerboard down quickly enough. Without it, there was nothing to stop the bow from being blowing downwind, the sails filling, and the boat capsizing. It seemed futile, but there was nothing I could do but keep trying. At some point I noticed that the tugboat was no longer heading for Belfast, but was sitting motionless a half-mile or so down the Bay. If I hadn’t been so busy, I might have paused to imagine the comments on my idiocy passing between the occupants of her bridge.
My life was not in danger. I was drifting toward the rocky Sears Island shore. At worst I would have swum ashore and made a long, uncomfortable walk back to the launching ramp. The prospects for the boat were more dire. Soon, her mast would touch bottom and probably break. There would be no hope of keeping her off the rocks. I carried a paddle, but there was not the smallest chance that I could use it to work along the shore to a safe landing. The fetch from Searsport to Sears Island is about a mile and a half, but although the waves were not big, they were angry enough to make short work of a light plywood hull on those sullen rocks. Thanks to my wet suit, and my exertions, I was not cold, but I was getting tired. Soon, I knew, I would not have the strength for another effort.
Then, I had an undeserved stroke of good fortune. As the boat came back up one more time there was the merest lull; I managed to ram the daggerboard home and slam the helm down, and the boat rounded up, sails spilling the wind. For a moment I could rest. I bailed ACE out and sorted out the tangle of sheets and halyards in the cockpit.
Arch Davis
“The tugboat was now steaming southward; perhaps I thought that I could show her crew that I knew what I was about after all.”
Now, I should be able to report that at this point I dropped the jib, reefed the main, and headed for home. I did not. The tugboat was now steaming southward; perhaps I thought that I could show her crew that I knew what I was about after all. I got out on the trapeze, and headed back for the Searsport shore, in one more wild pursuit of glory.
I was no more successful than before. The wind was now, if anything, even stronger, and the struggle harder; I did not even come close to getting ACE up on plane. I wrestled with the tiller, eased the main to its fullest, and laid back hard in the trapeze; at every second another capsize threatened.
Then, when I reached the Searsport shore, I could not get the boat to come about. I could not come up into the wind, so I had to try to tack from a reach. The boat was not going fast enough to carry her way through the eye of the wind; she would falter, and fall off on the same tack, heading for the rocks. I tried again, and then again.
Clearly, I had to do something. A jibe was out of the question, and the rocks were getting uncomfortably close. Now, at long last, I came to my senses. I let the sheets run free, scrambled onto the little foredeck, pulled down the jib, unhanked it, stuffed it under the foredeck, and reefed the main.
The boat was still over-canvased, but at least under control. I was able to tack away from disaster on the rocks, and belatedly admitted to myself that there could be too much of a good thing; another attempt at glory would be unwise, I headed back for the launching ramp. I still needed to put my weight out on the trapeze even with the reduced sail, but at least I could work to windward, and pretty soon I was back at the ramp and loading the boat on the trailer.
On another occasion soon after this episode, I was broad reaching well out into upper Penobscot Bay in far too much wind, again chasing thrills, only to find that I had taken on more than I could handle. I didn’t capsize this time, but when I realized that I was really being pretty stupid, and headed back to Searsport, close hauled under just a reefed mainsail, I still needed the trapeze. It was rough out there, with short, steep, tumbling seas. I was well offshore this time, with not another vessel in sight, and I would much rather have just hiked out just on the side decks, but there was no making headway like that, so heart in mouth, I beat back hanging on that slender wire, wishing I’d stayed ashore.
That was about the last of that foolishness. Not long after, I became a father and found that having a small child at home quickly knocks some common sense into your head. I still sailed ACE, often singlehanded on the trapeze, but I gave up the pretense that I could make a 14’ daggerboarder fly in a gale of wind. I have to say that, being more prudent, I had a lot more fun.
Arch Davis grew up in New Zealand, where he learned the elements of boatbuilding and design, and sailed out of Auckland on the Hauraki Gulf and beyond. He moved to Maine in 1988, where he builds and designs boats for the backyard boatbuilder. In 2012, with his daughter Grace, he launched the GRACE EILEEN, a 30’ light displacement cruising sailboat, which they sail on Penobscot Bay and the coast of Maine. He no longer has an ACE 14, but he still takes the original Penobscot 14 out for an occasional row on Belfast Harbor. Plans and kits for his designs are available at Arch Davis Designs.
If you have an interesting story to tell about your adventures with a small boat, please email us a brief outline and a few photos.
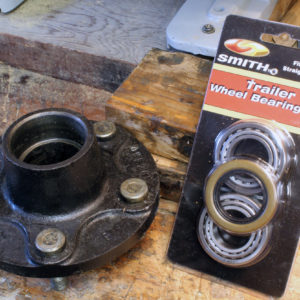
This $17 bearing replacement kit includes bearings, rear seal, and cotter pin.
Spring is our time to recommission our fleet of four trailers, so I recently made the rounds to check the condition of lights, tires, axles, and bearings. I found that the grease in the bearings of one of our trailers had a milky brown appearance, rather than the clear, thick motor-oil appearance that it normally has. The change in color was an indication that water had found its way into the grease. Grease that has been overheated by friction-generated heat will be darker than new grease. With this trailer, it’s likely that the seals had failed and the bearing needed to be removed, cleaned, and inspected. The cleaned bearings or their replacements then get repacked with grease and reinstalled with new seals.
Repacking a bearing with grease is a messy job, but relatively easy and even somewhat fun. Round up a couple of rolls of paper towels, protective gloves, and a piece of cardboard for a clean, disposable work surface. You’ll need bearing grease; boat trailer bearings require marine-grade grease, which has more hydrophobic qualities than regular trailer bearing grease.
Ensure that the trailer tongue is well supported, either blocked up or hitched to a car with the parking brake on, and chock the far wheel. Jack the trailer up until the wheel is free to spin, and support the trailer with blocks or a jack stand, just in case the jack fails. Hold the tire on both sides and twist it back and forth. There should only be a little play. Then spin the wheel and listen to it. If it’s making any noise, it’s likely there is damage to the bearings and/or races. Lower the trailer until the tire makes contact with the ground, then loosen the lug nuts, jack the trailer up again and remove the wheel and tire. Any grease on the inside of the wheel’s inner rim is an indication of a failed seal.
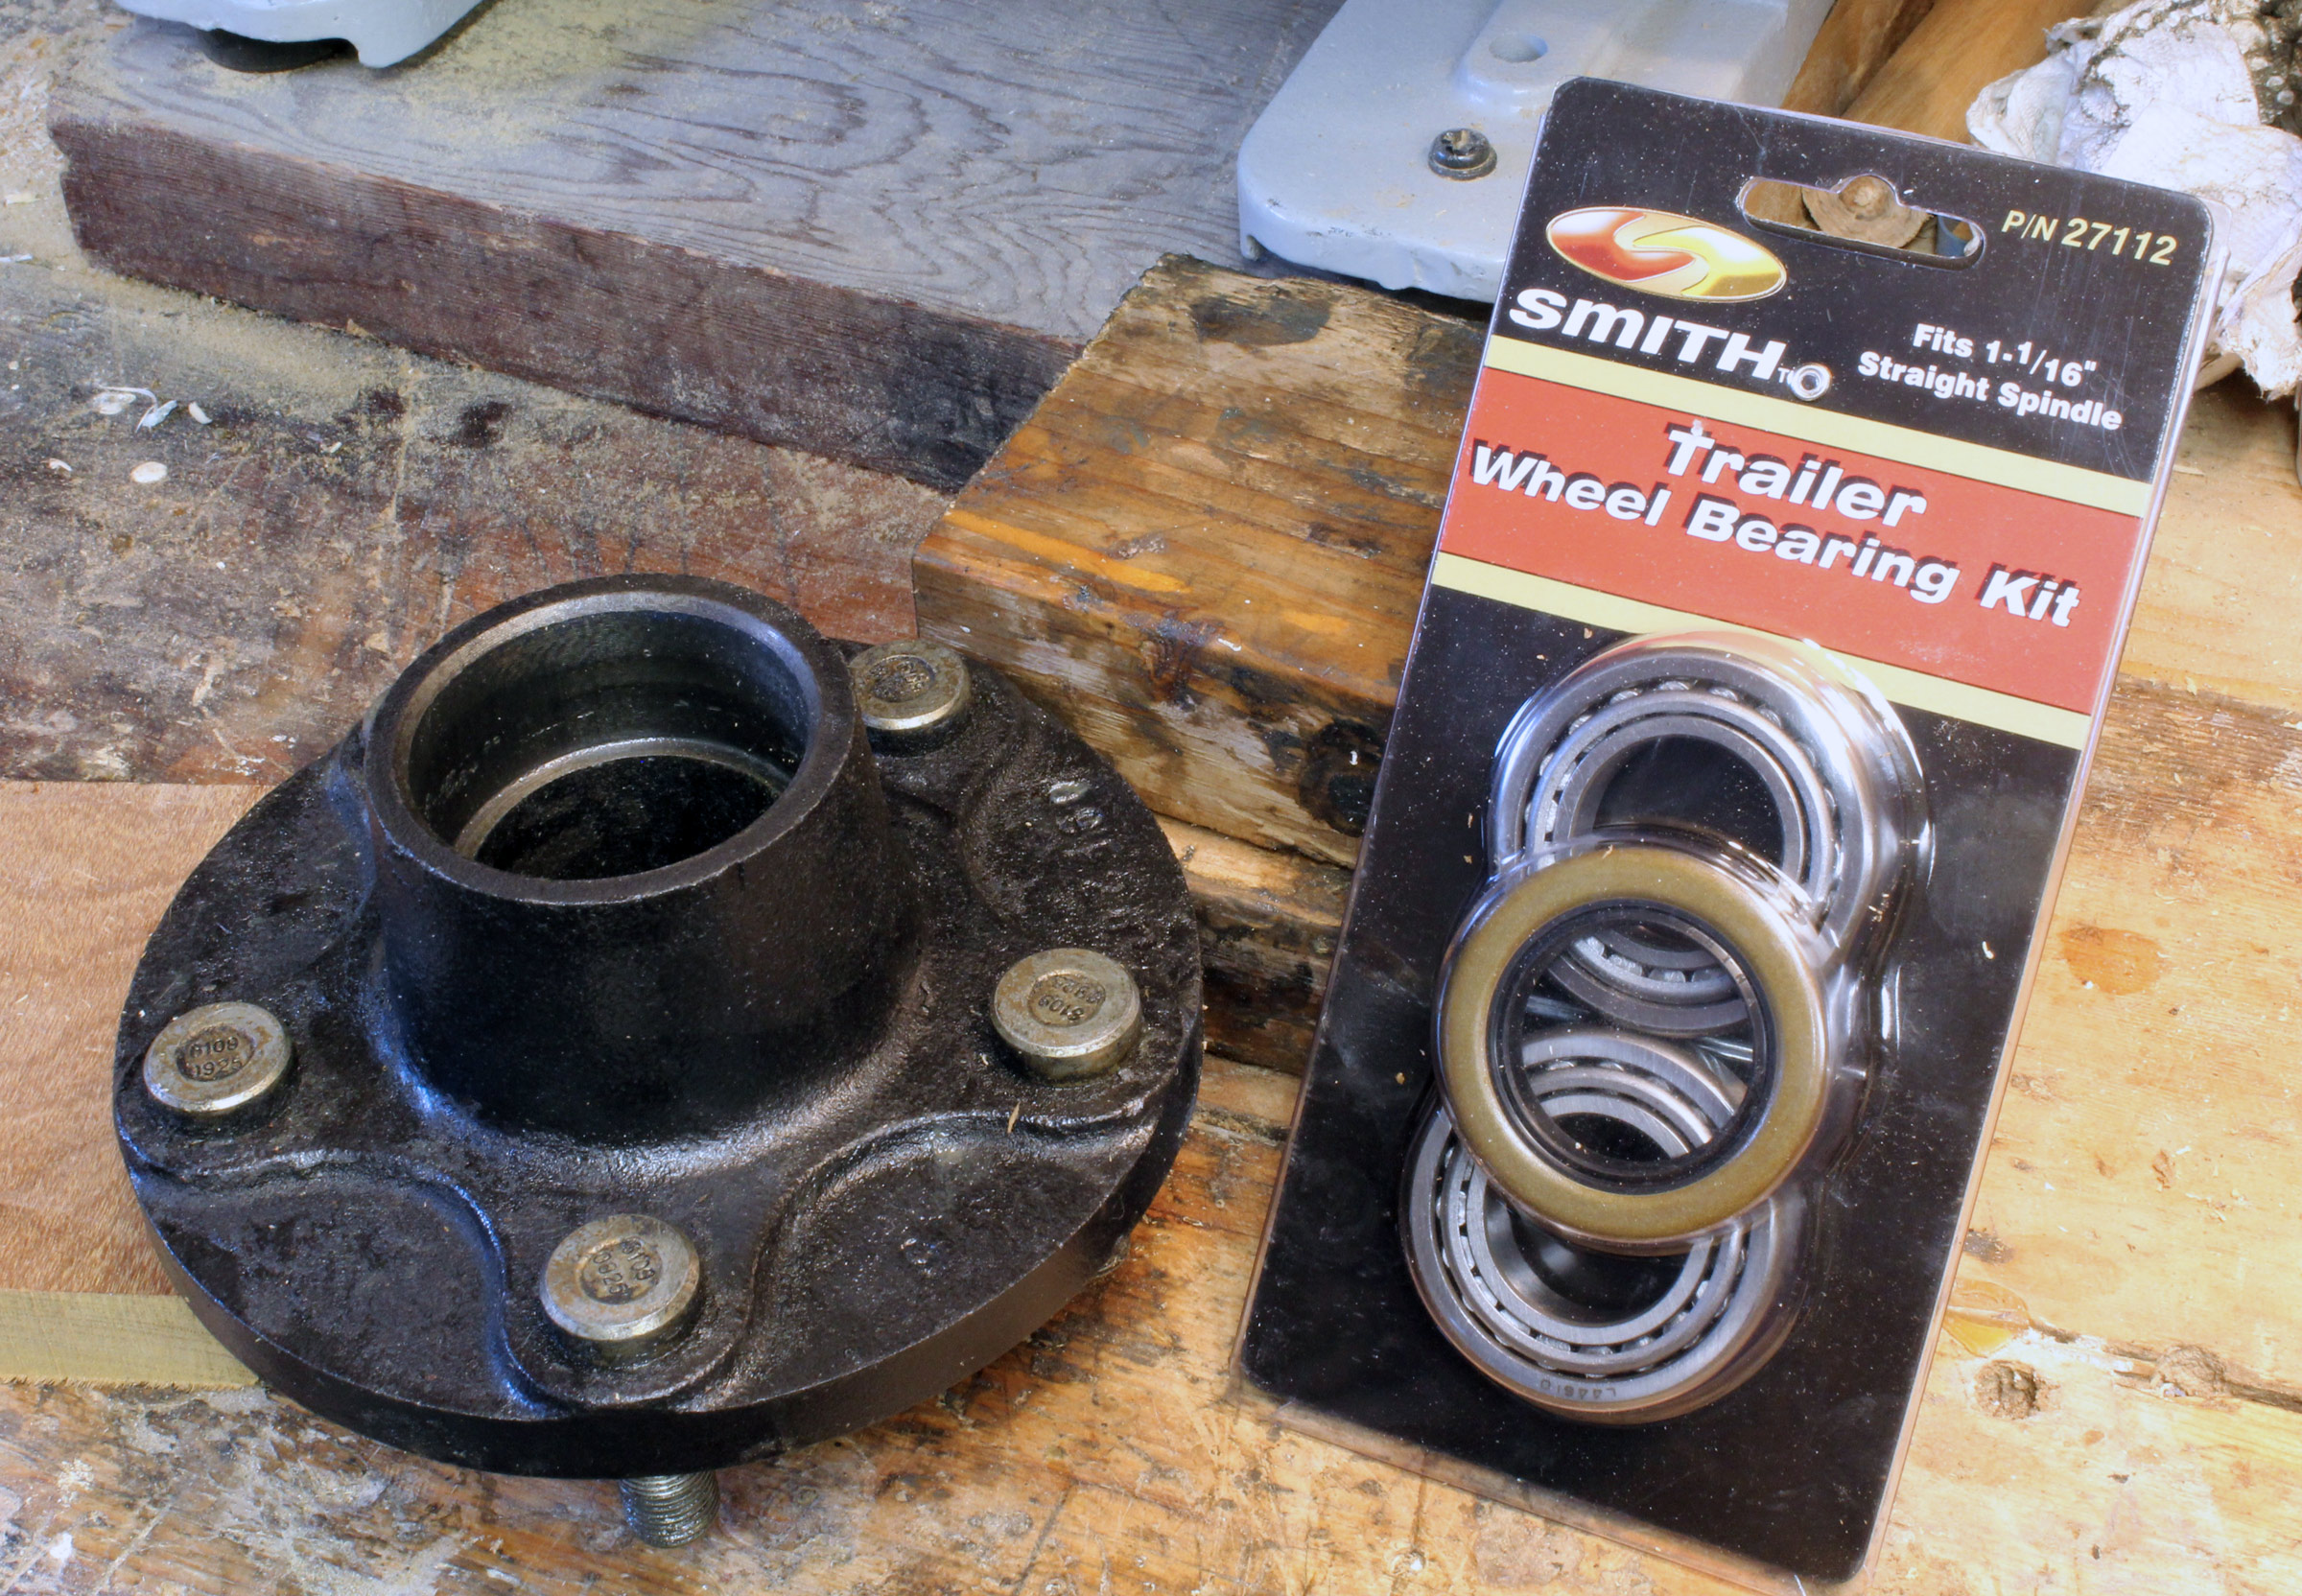
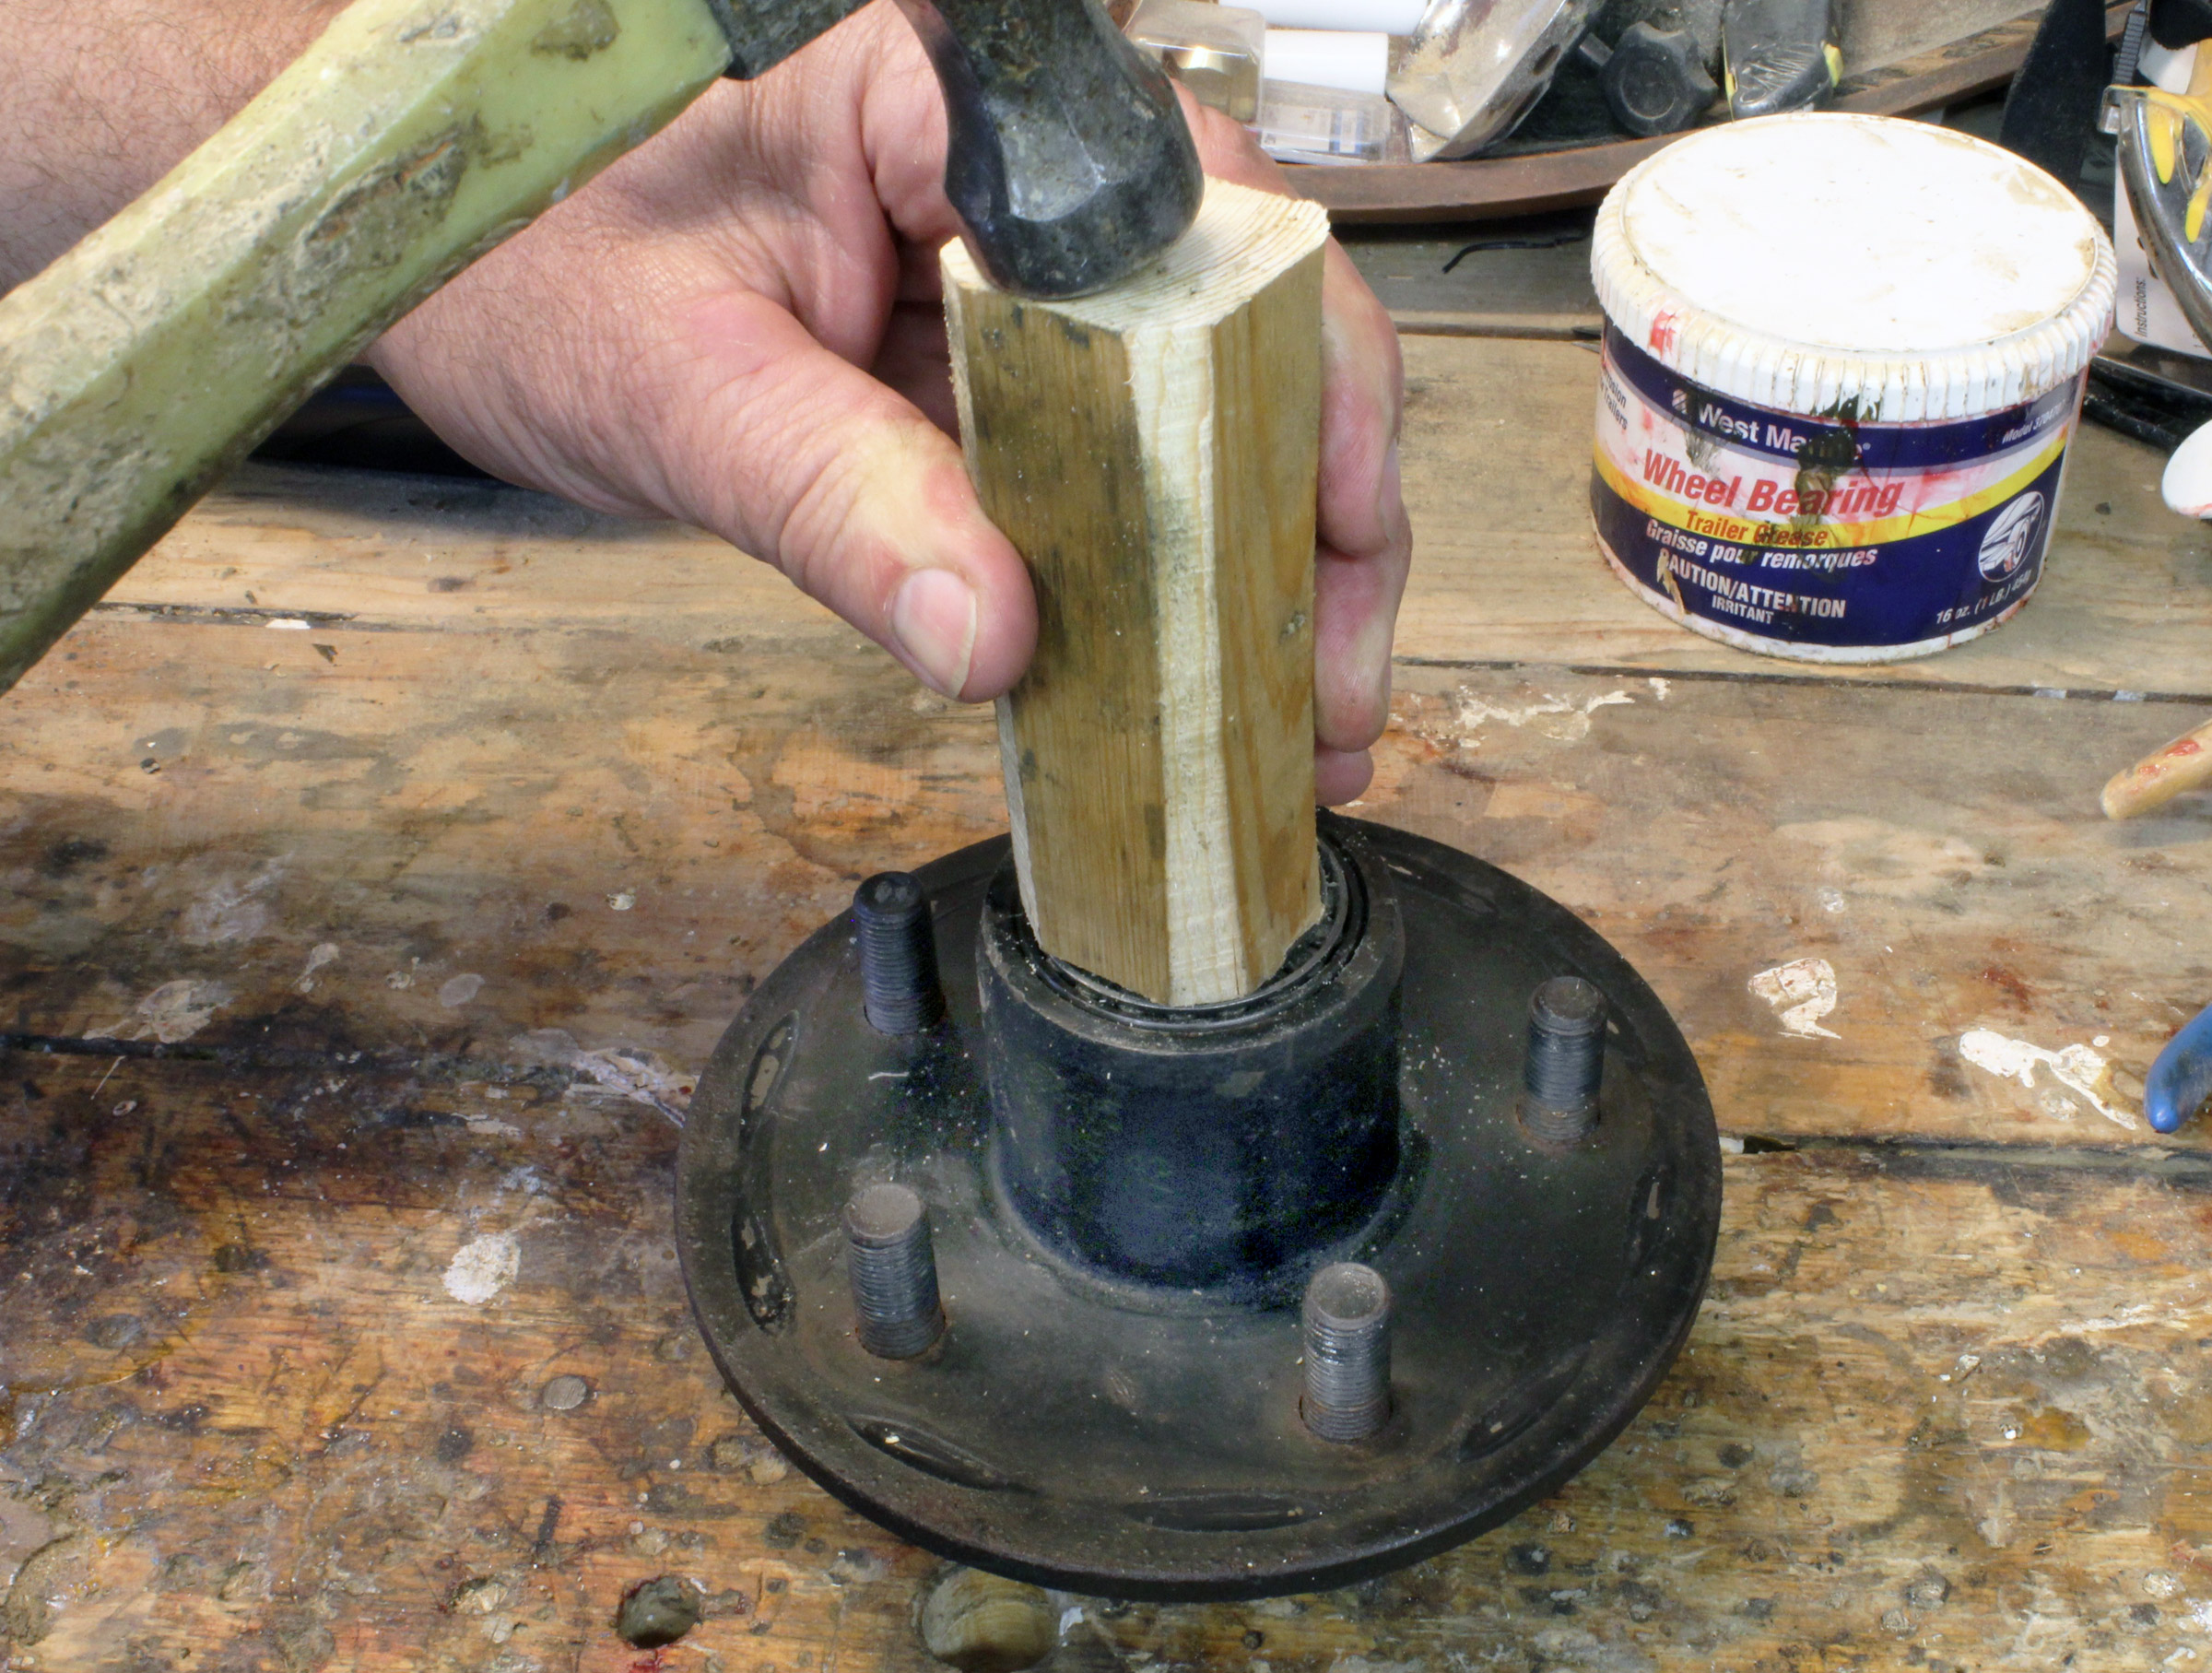
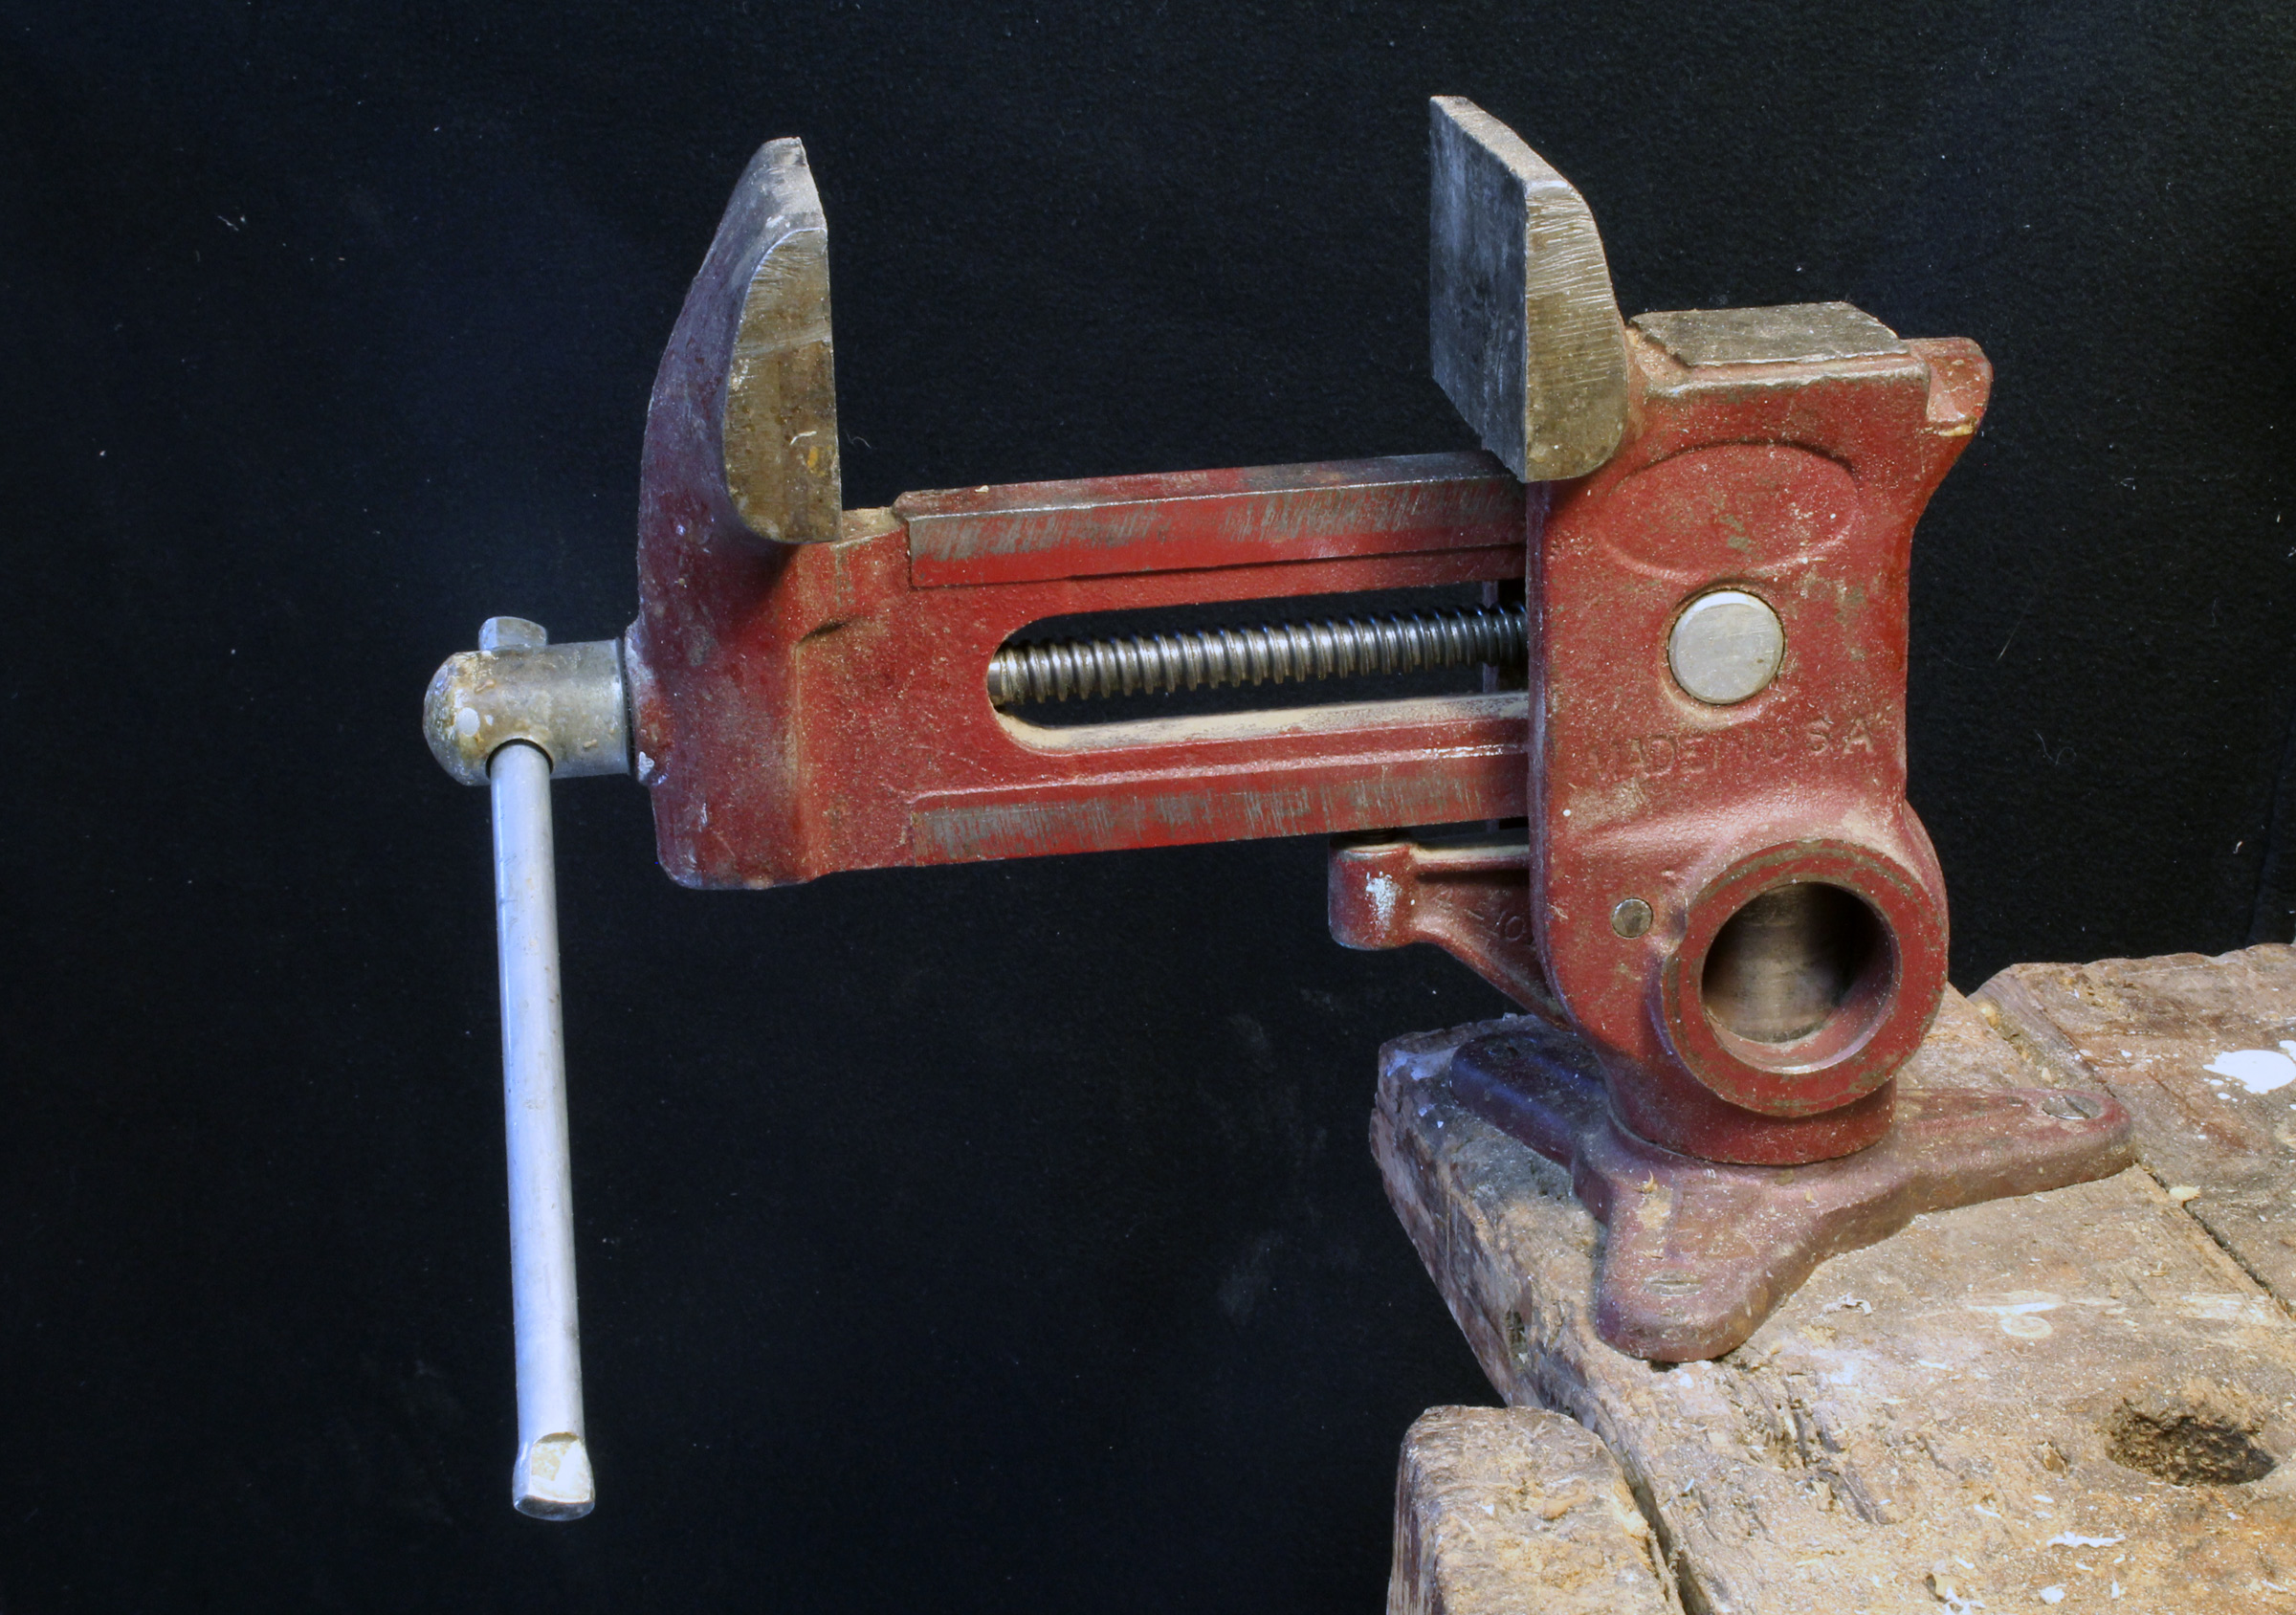
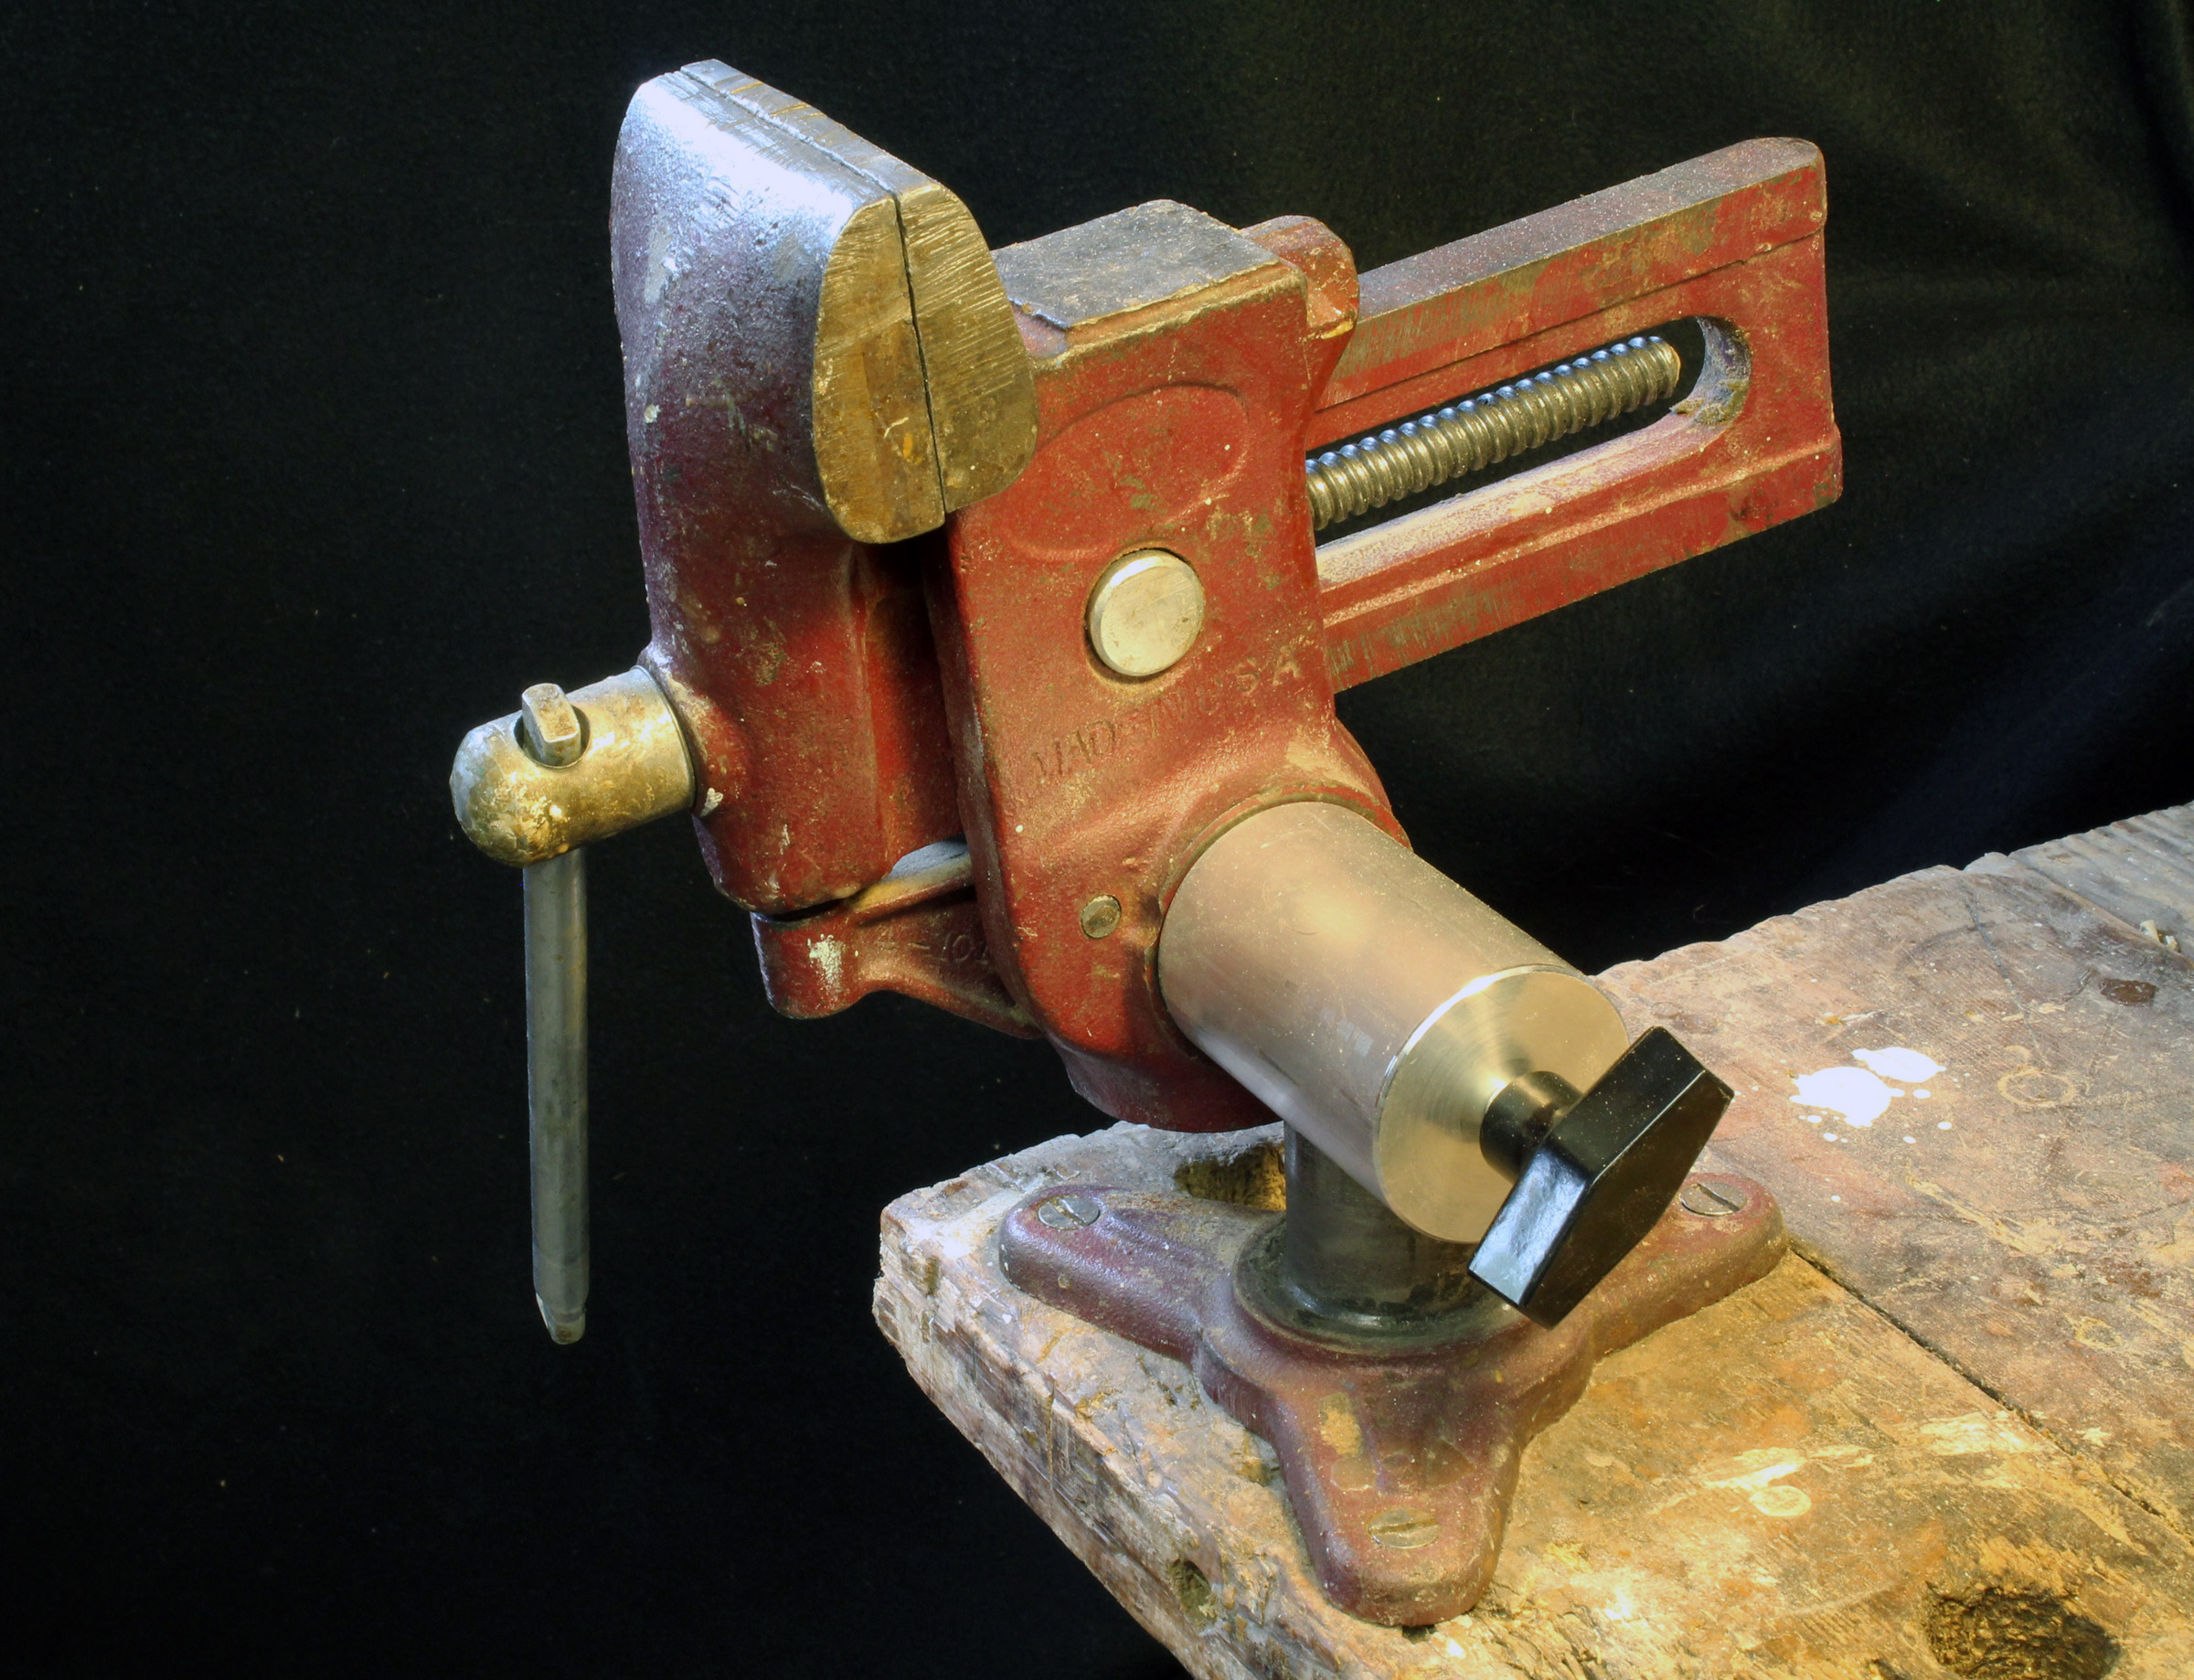
Bearing Buddies are removed by gently tapping them off with a rubber mallet or hammer. If you use a steel hammer, hold a piece of wood against the Bearing Buddy and tap it to prevent damage. Protective grease caps with a flange resting against the hub can be removed with a screwdriver. Clean the Bearing Buddies or caps and set them aside.
Bearing Buddies are not difficult to take apart for cleaning. Inside the shell of the Buddy, there’s an O-ring set in a groove, and the sliding “piston” seals against the O-ring. As you fill the Buddy with grease through the fitting on the piston, use a light touch and let the piston move outward as the grease fills the space behind it. As the Buddy reaches it’s maximum capacity for grease, the piston will slip past the O-ring and excess grease will slip leak to the outside. If you push against the piston as you pump, the piston will remain sealed by the O-ring and excess grease will be forced past the seal over the inner bearing. That might not damage or dislodge the seal, but the escaped grease will make a mess of the inside of the wheel.
Once the cap or Bearing Buddy is off, clean up the old excess grease from the hub and remove the cotter pin that keeps the castle nut from rotating on the spindle. After your remove the castle nut and washer, you can slide the hub off the spindle. Keep track of the castle nut, washer, and cotter pin; they can be used or replaced as needed.
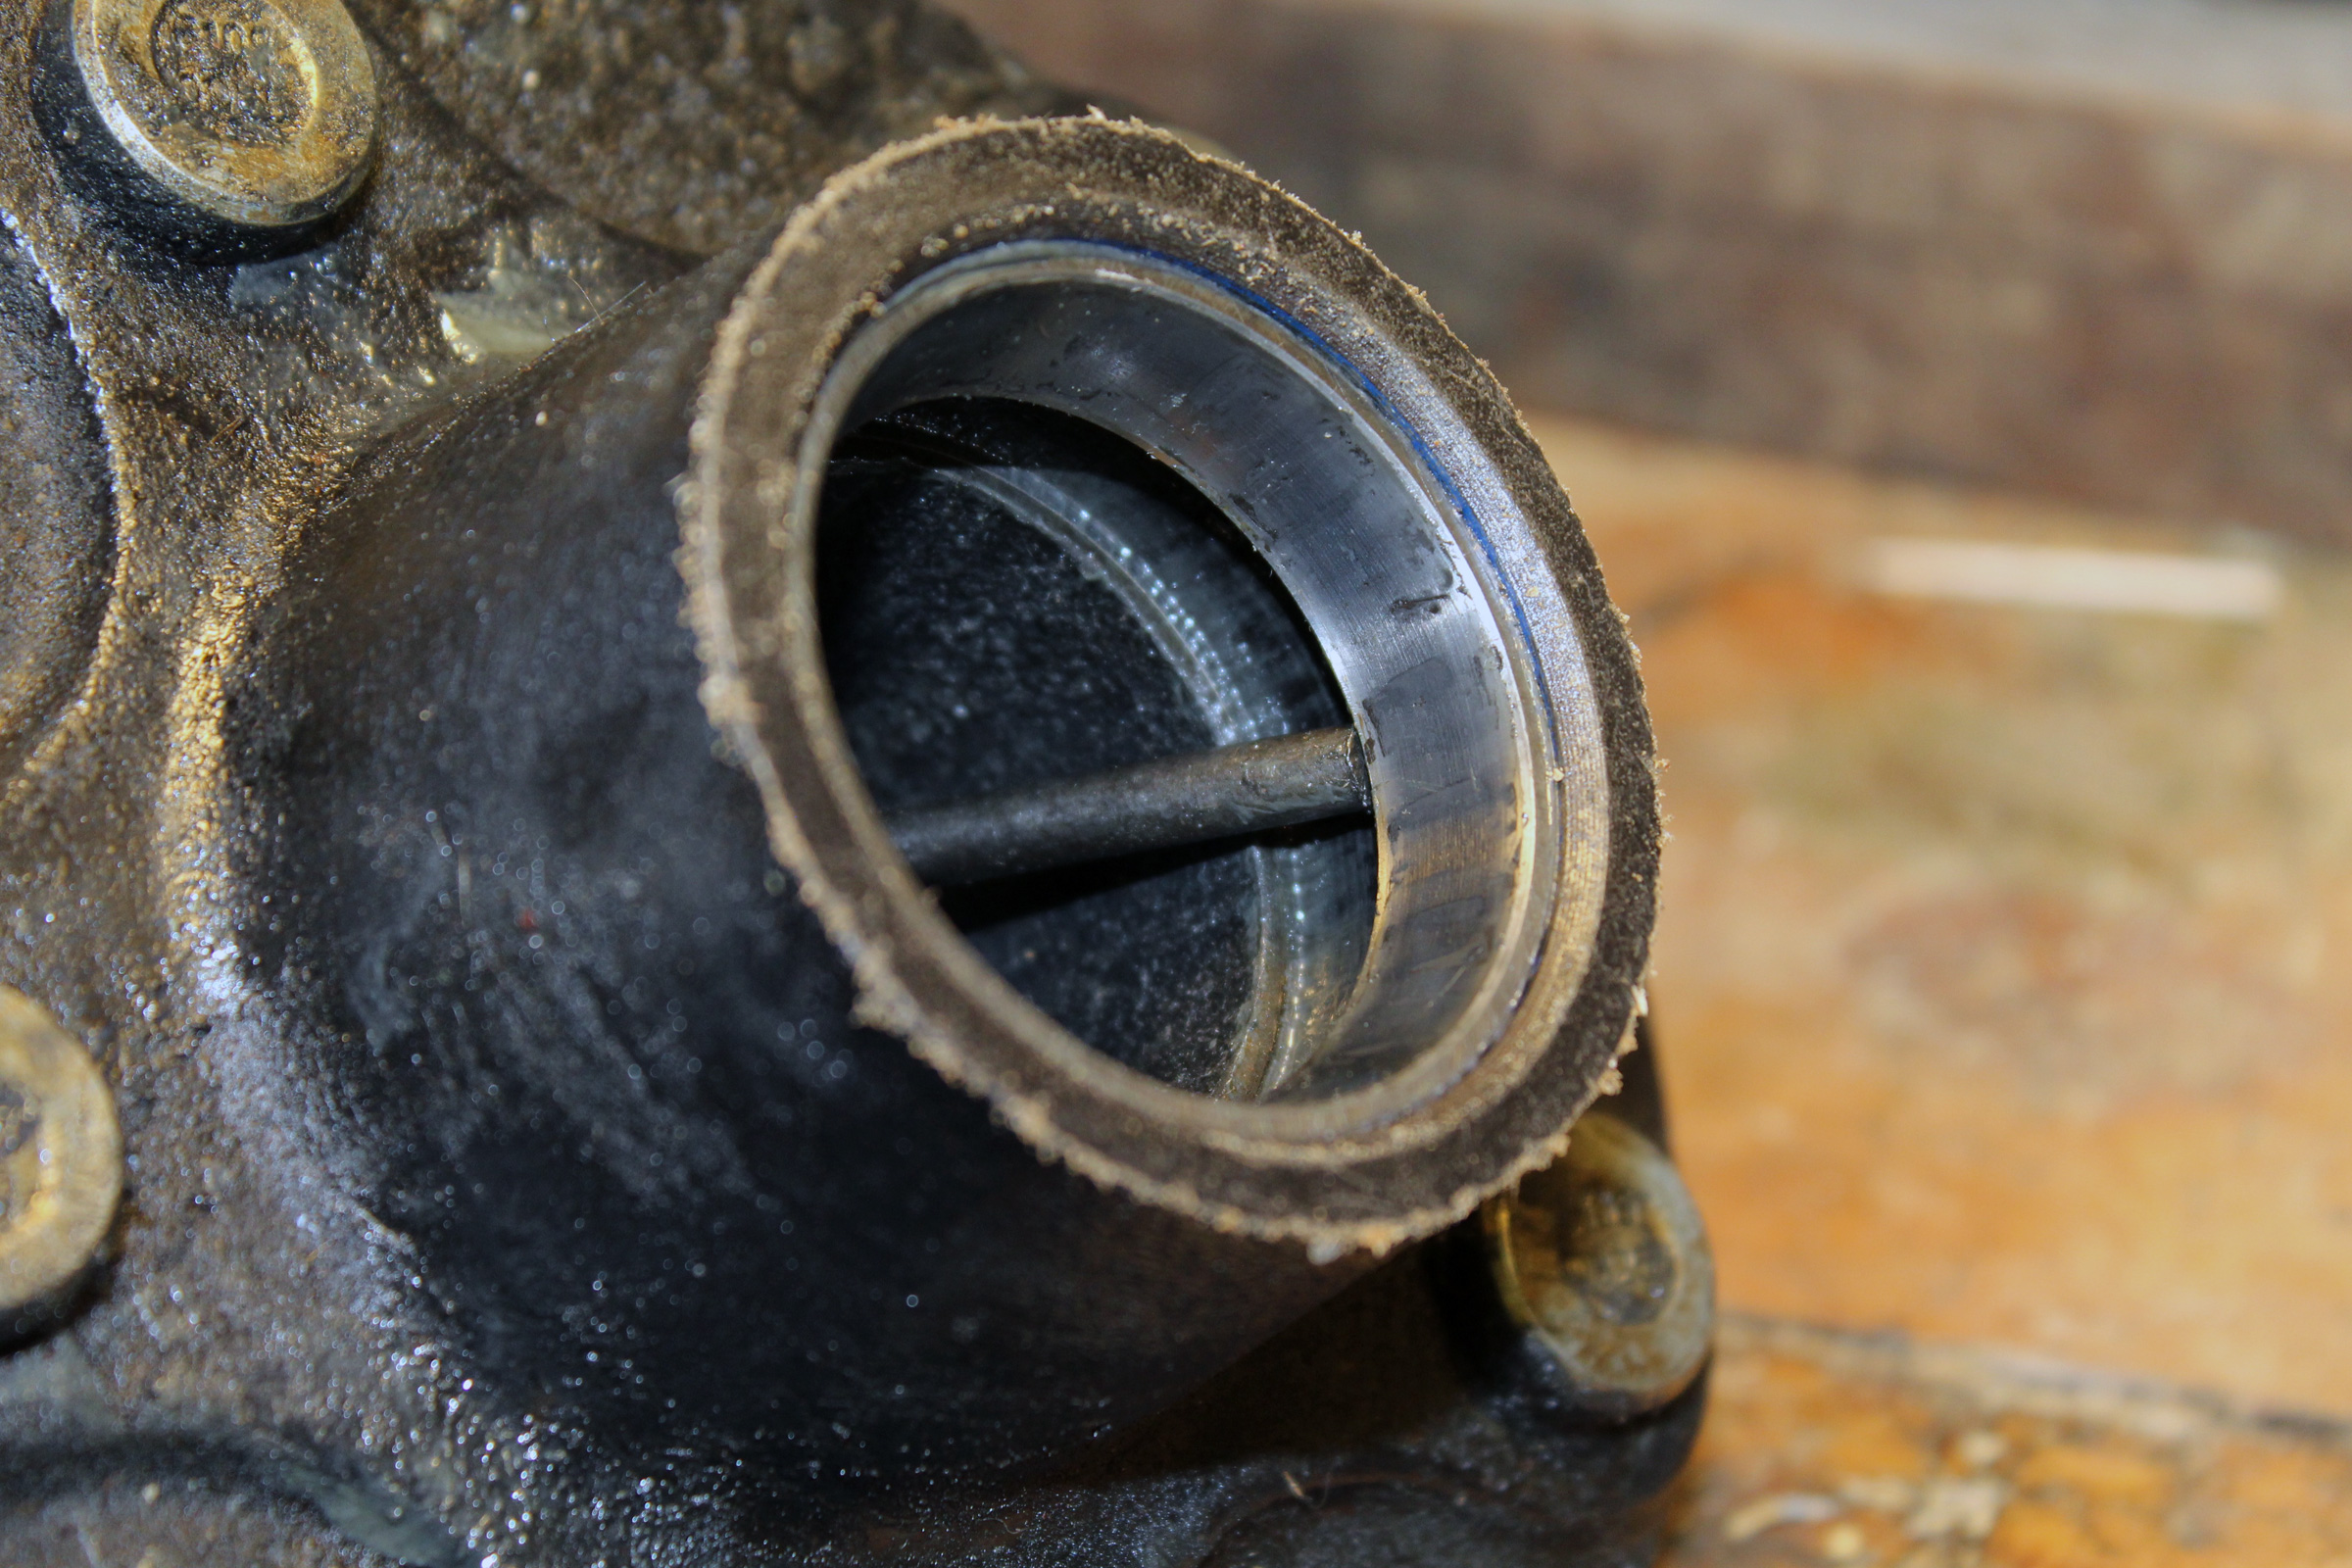
The hub has an outer bearing and an inner bearing, along with the inner and outer races that they ride against. Pull the hub off; the outer bearing will come with it and you’ll be able to remove it. Pry the seal off the back of the hub. The seals are inexpensive and it’s prudent to replace them whenever servicing the bearings.
Prying the old seals out may damage them, but they should be replaced whenever you work on the bearings.
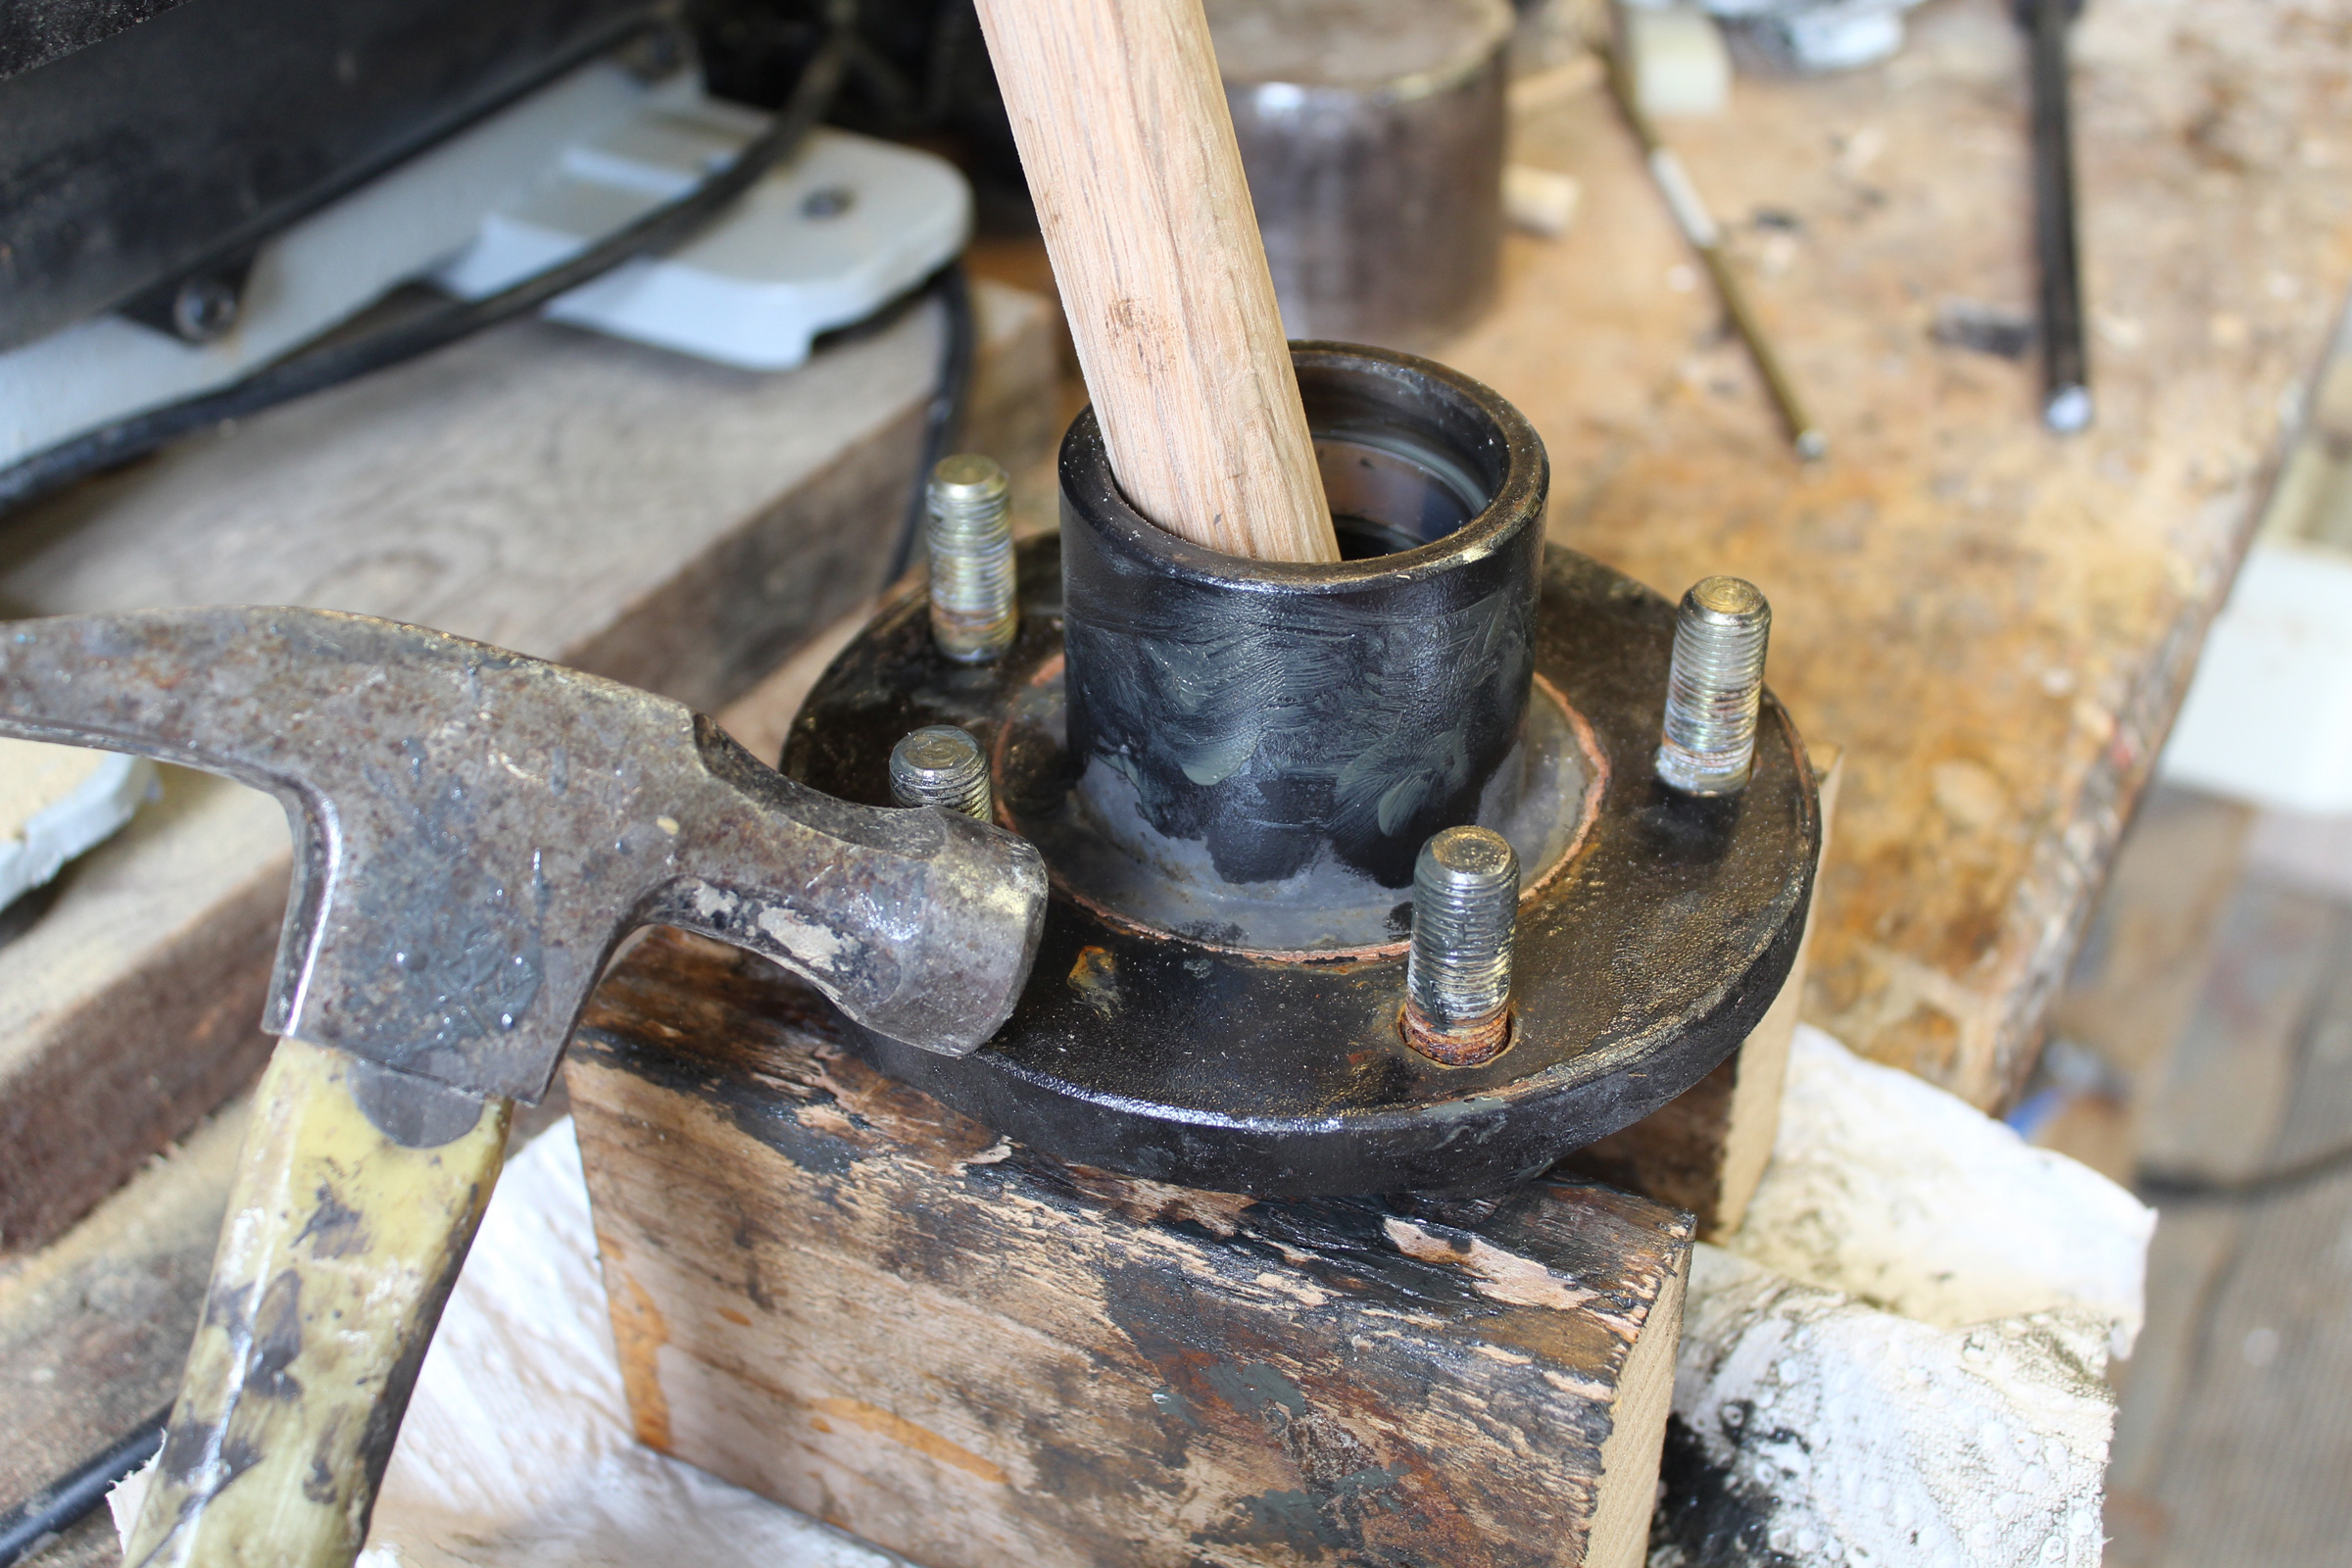
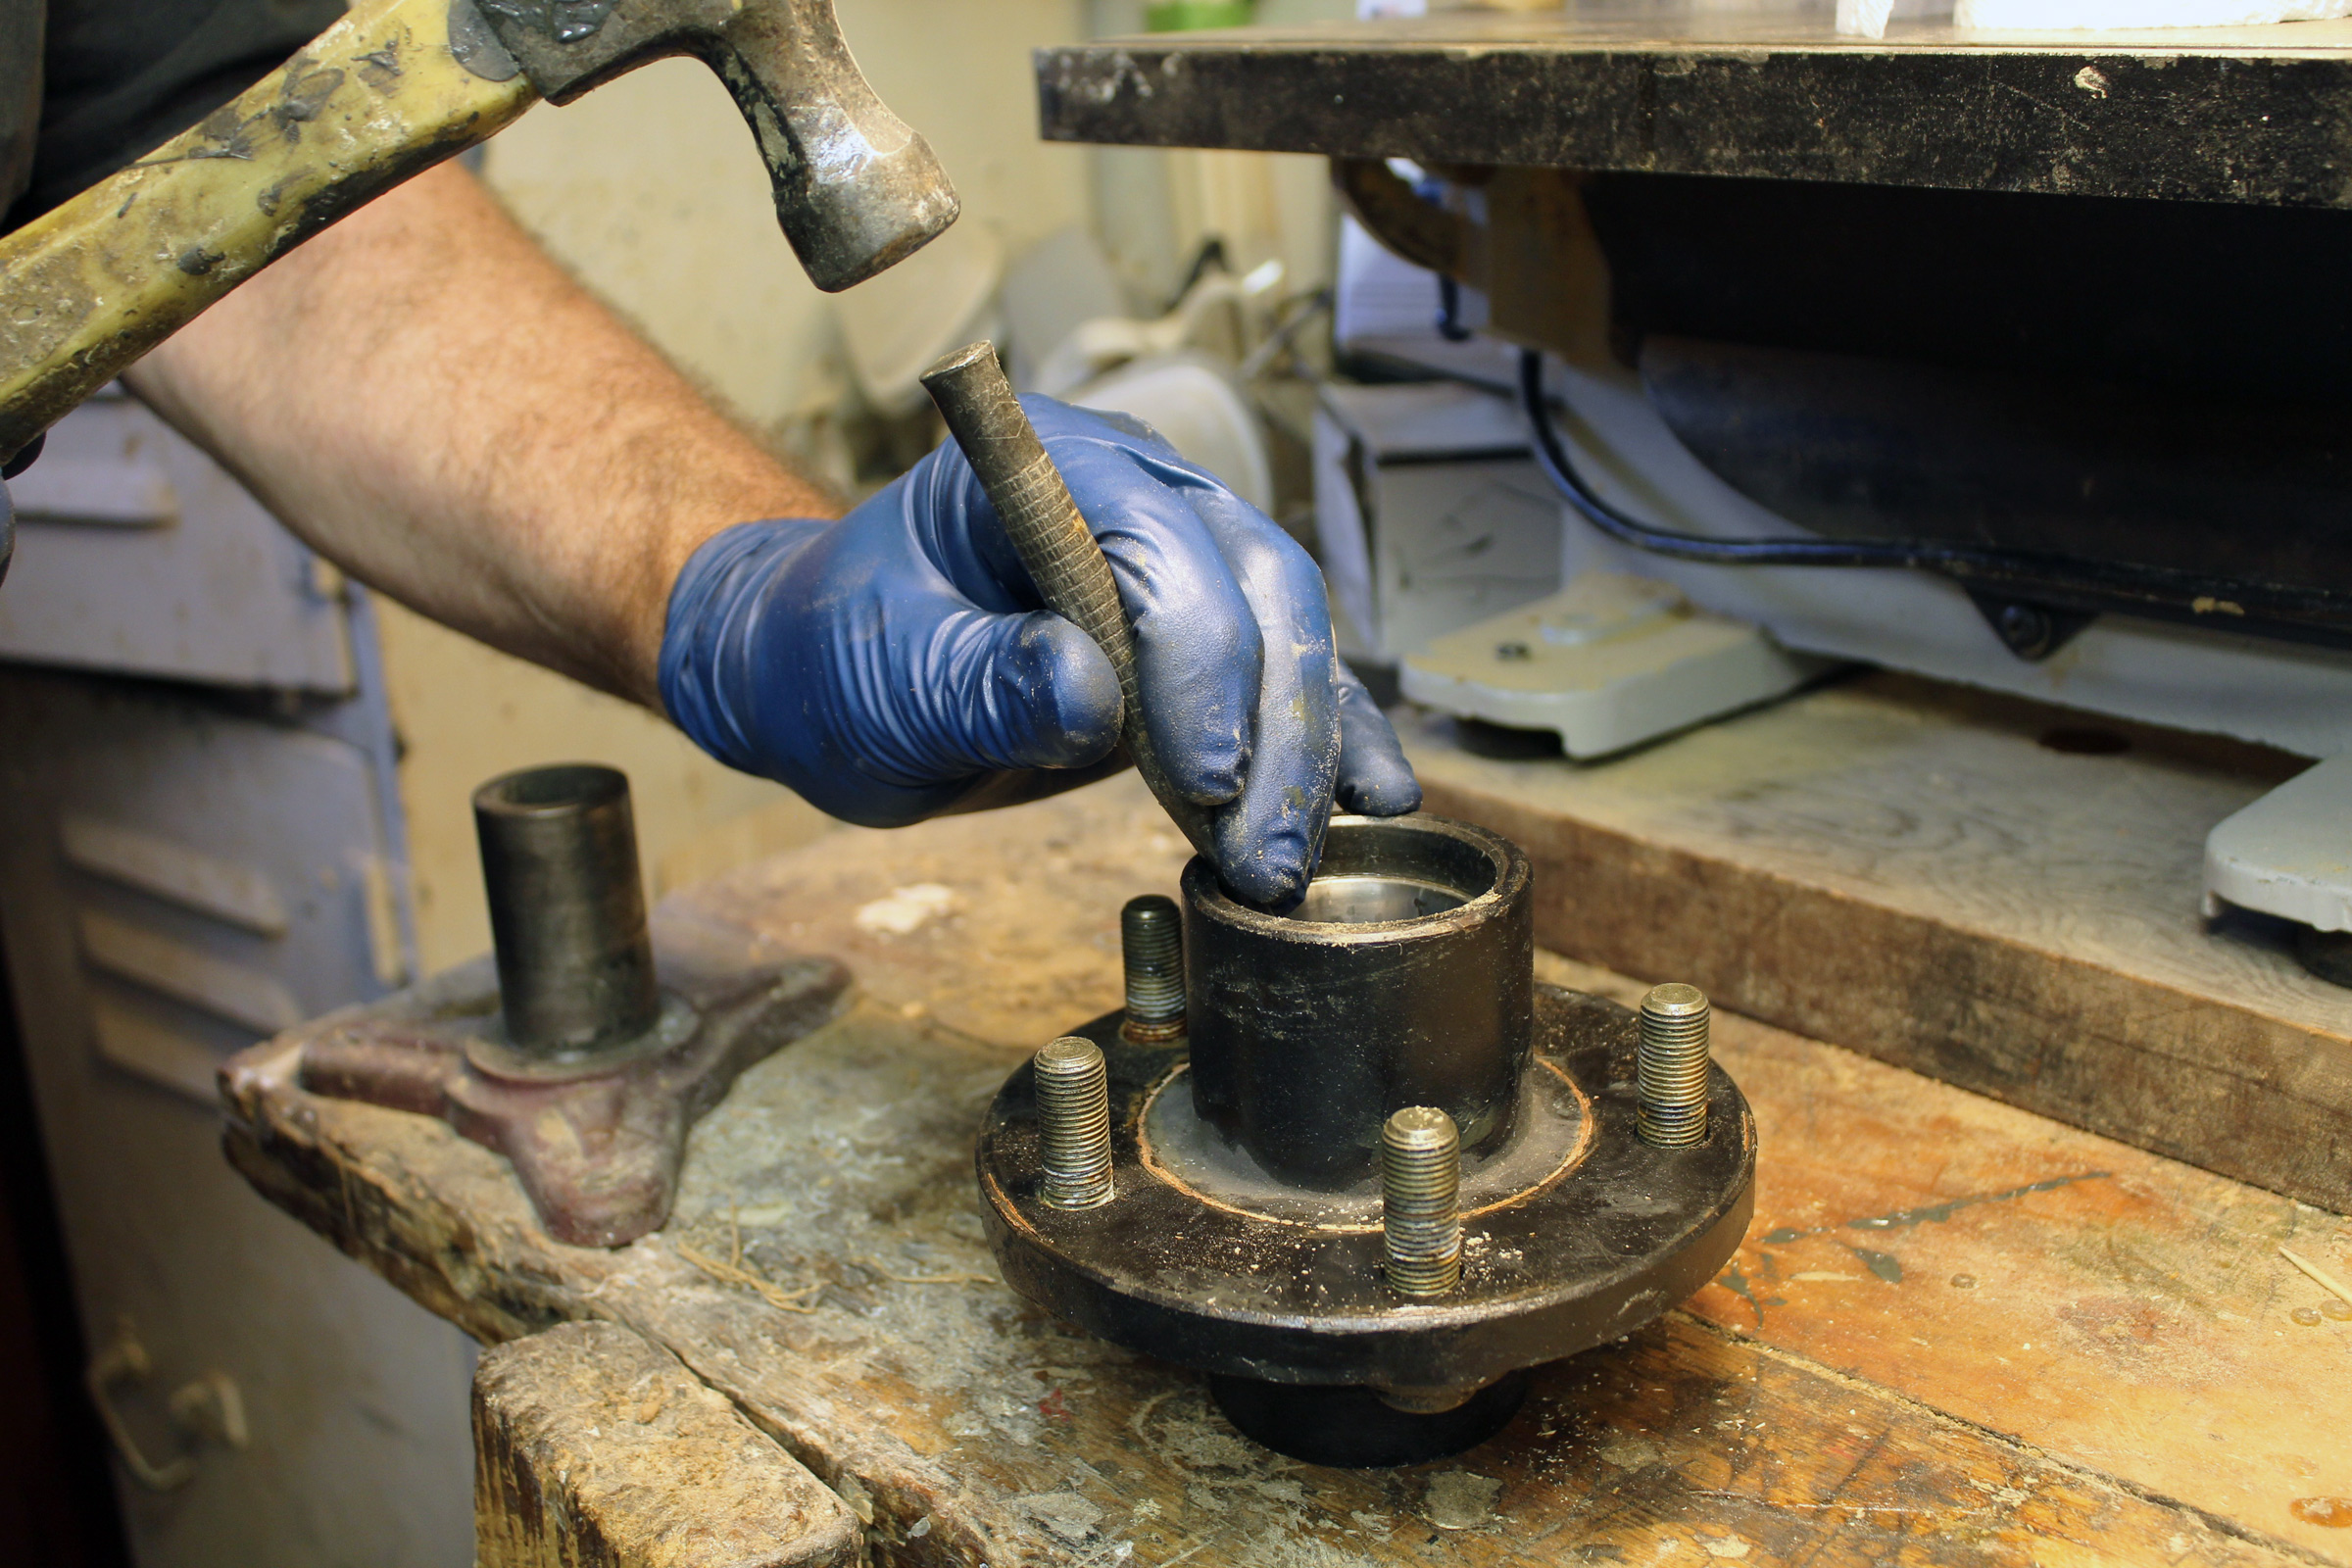
Another way to remove the seal is to tap a large dowel against the inner bearing . It will push the seal out ahead of it. The hub is elevated to give the pieces room to fall out.
Remove the inner bearing. Take the old grease out of the hub and clean its interior. Wipe the old grease off the spindle, hub, bearings, races, and cap, keeping any eye out for metal shavings that would indicate bearing failure. Then clean any remaining old grease off with parts cleaner. Because grease comes in many different compositions and not all are compatible, all of the old grease must be removed before applying the new.
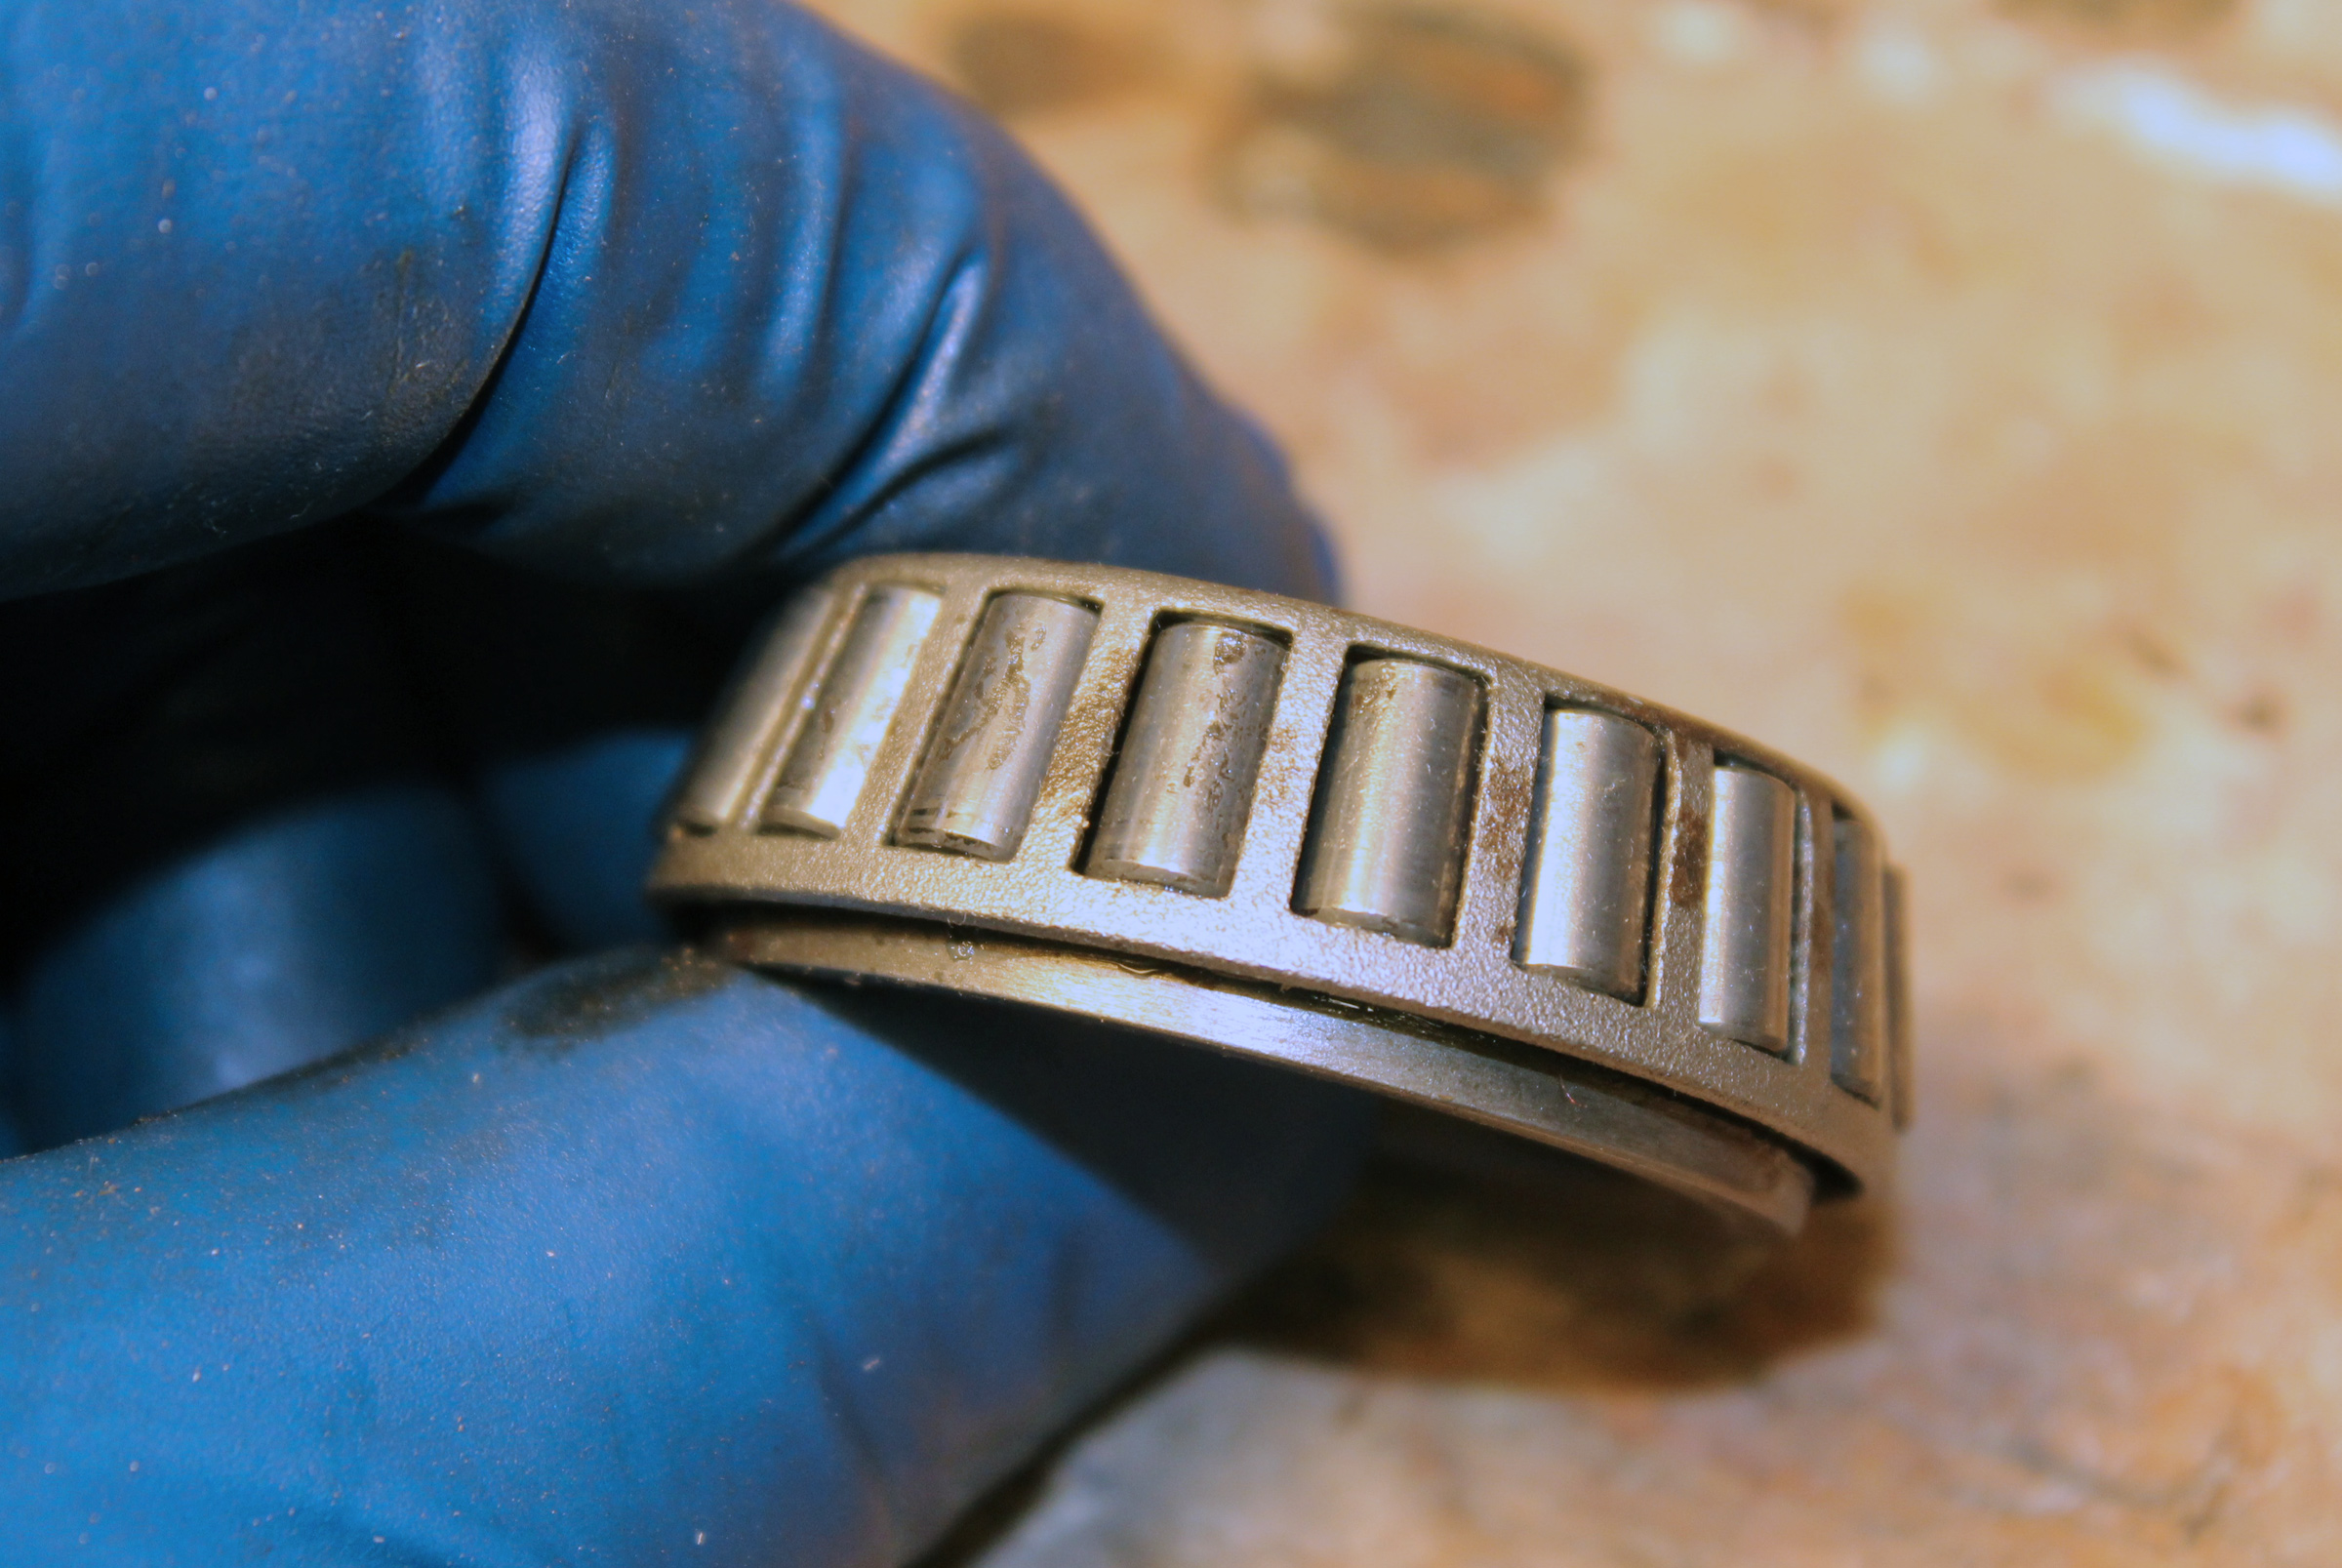
Discoloration on the rollers and the retaining ring are signs of corrosion and pitting. This bearing needs to be replaced.
Take a look at the condition of the bearings and the races inside the hub. They all should be bright and shiny with no rust, pitting, or discoloration. If they are not shiny, they’ll need replacing. Check the spindle for wear by sliding the inner bearing over the spindle. It should be snug with no play.
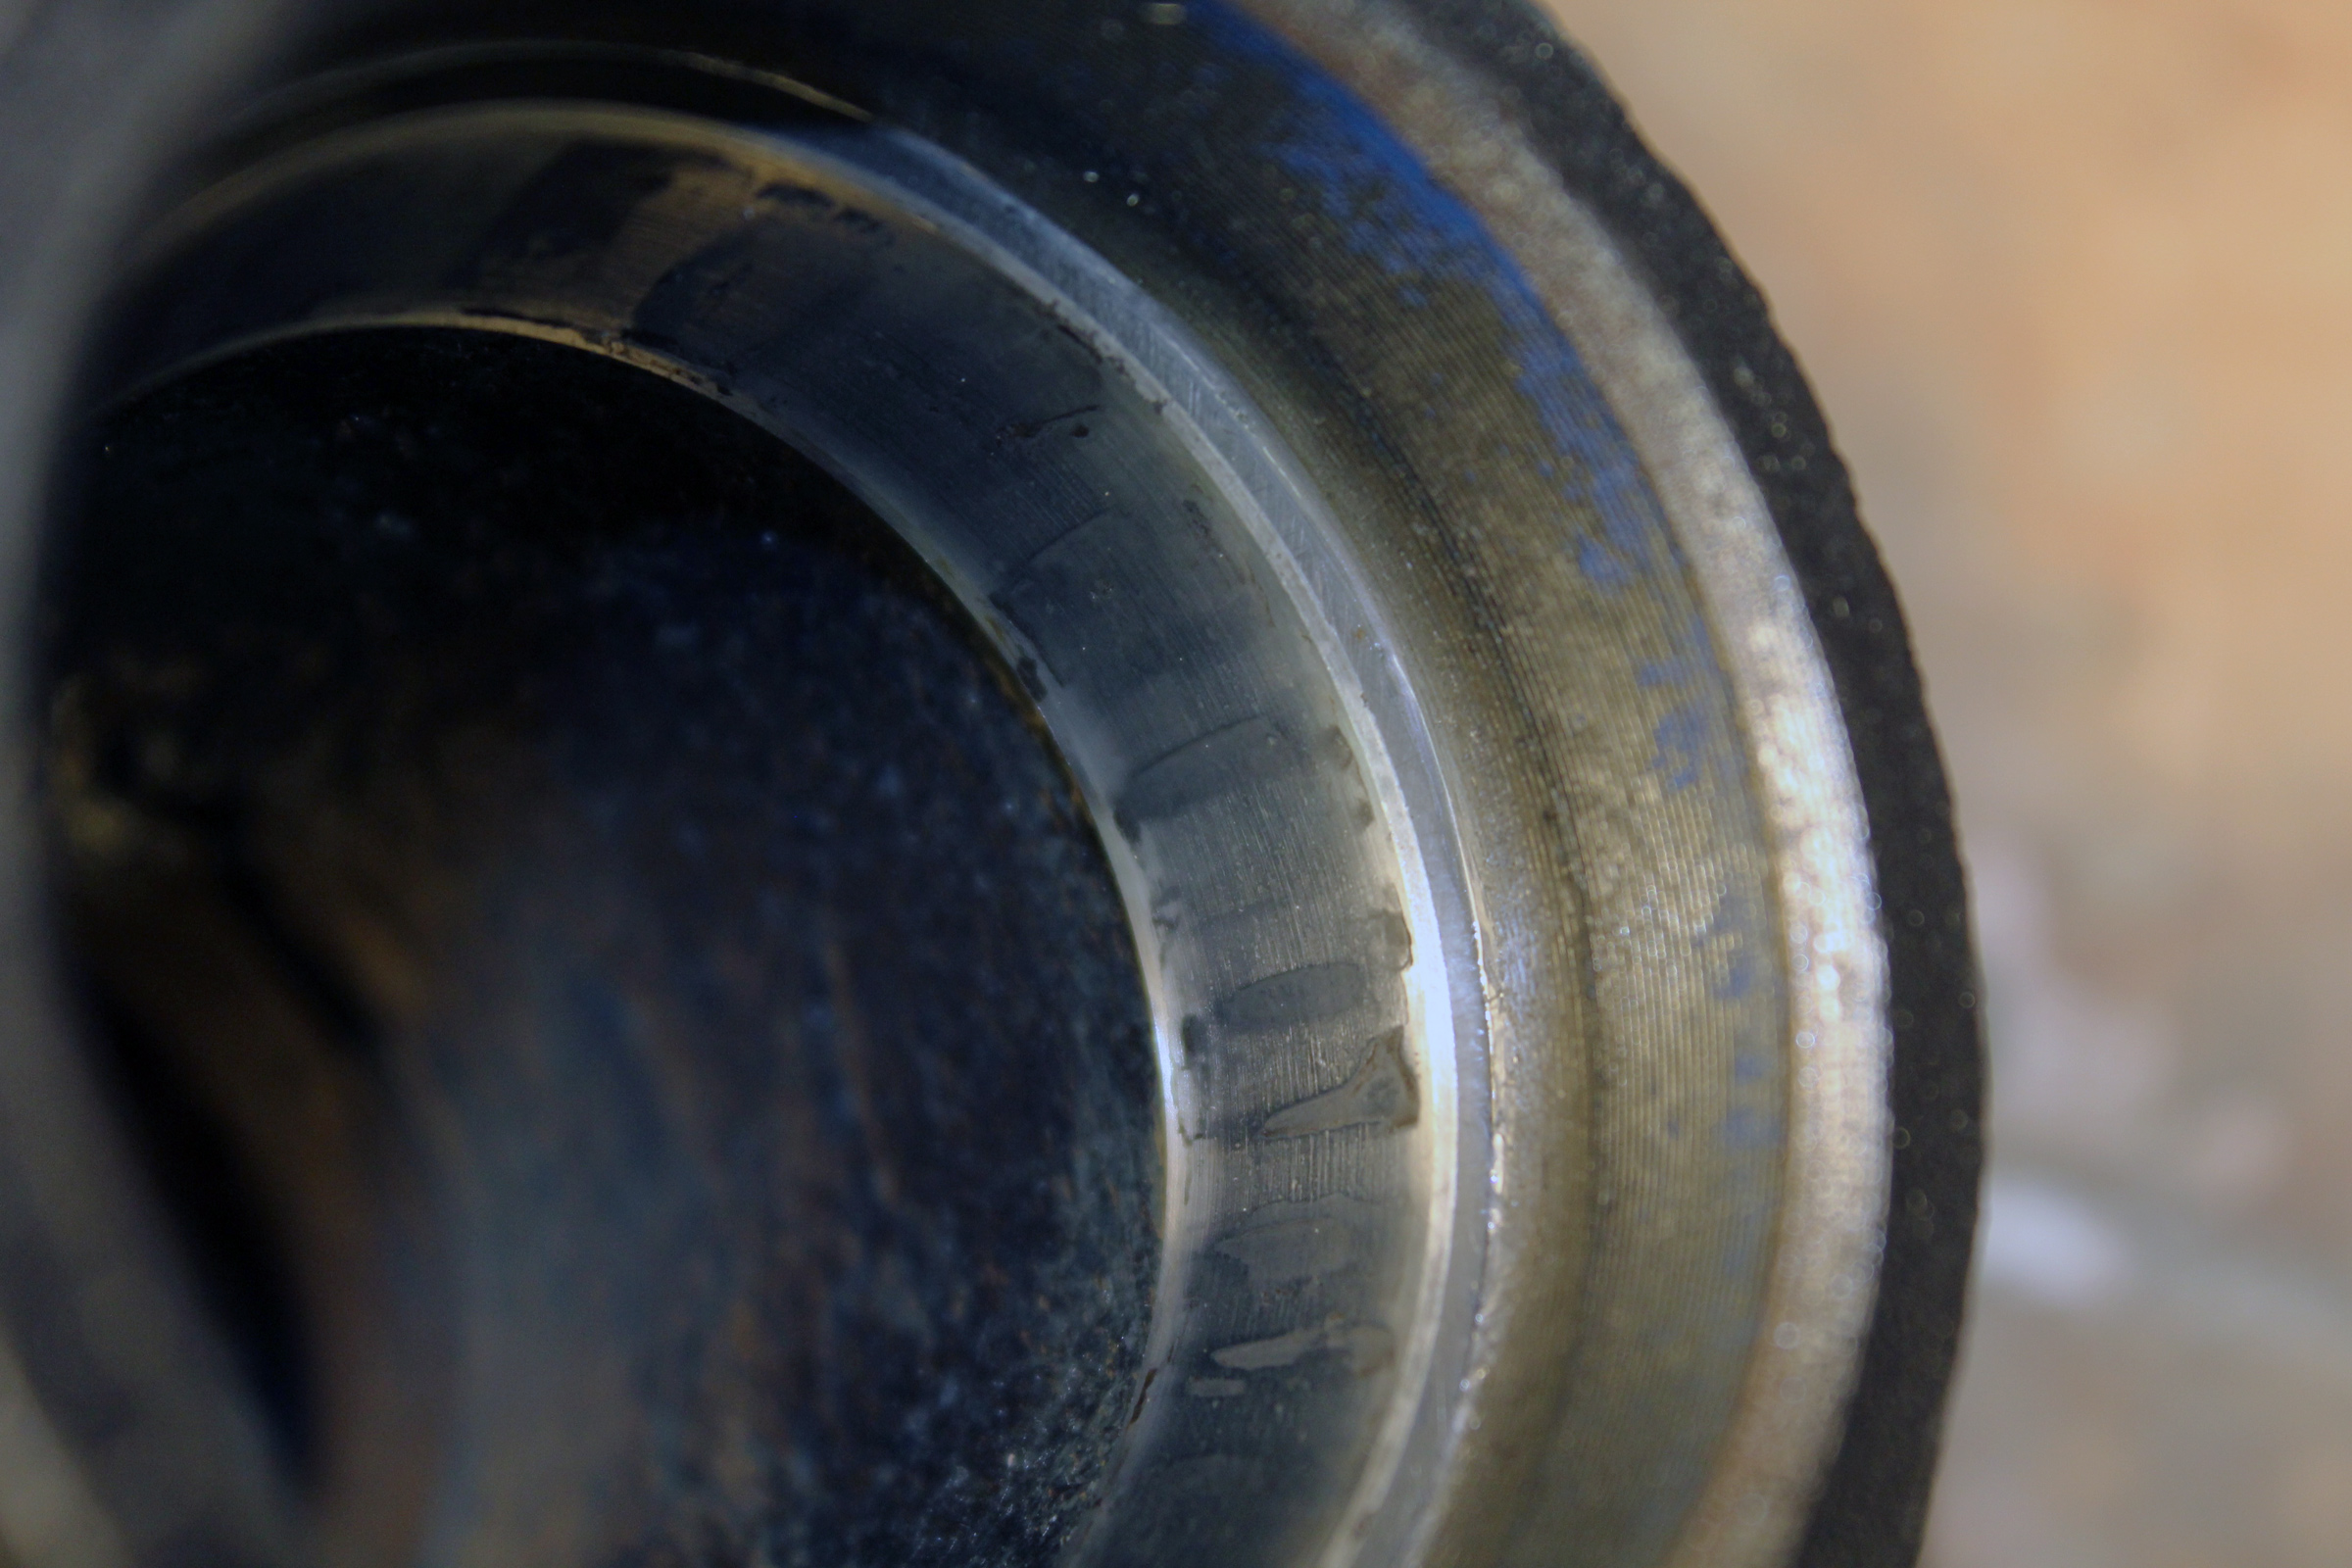
This race, still in the hub, has stripes indicating wear.
The race on the left is badly pitted, and done for. The race on the right is still smooth, but the blackened edge is a sign of heat damage. It too needs to be replaced.
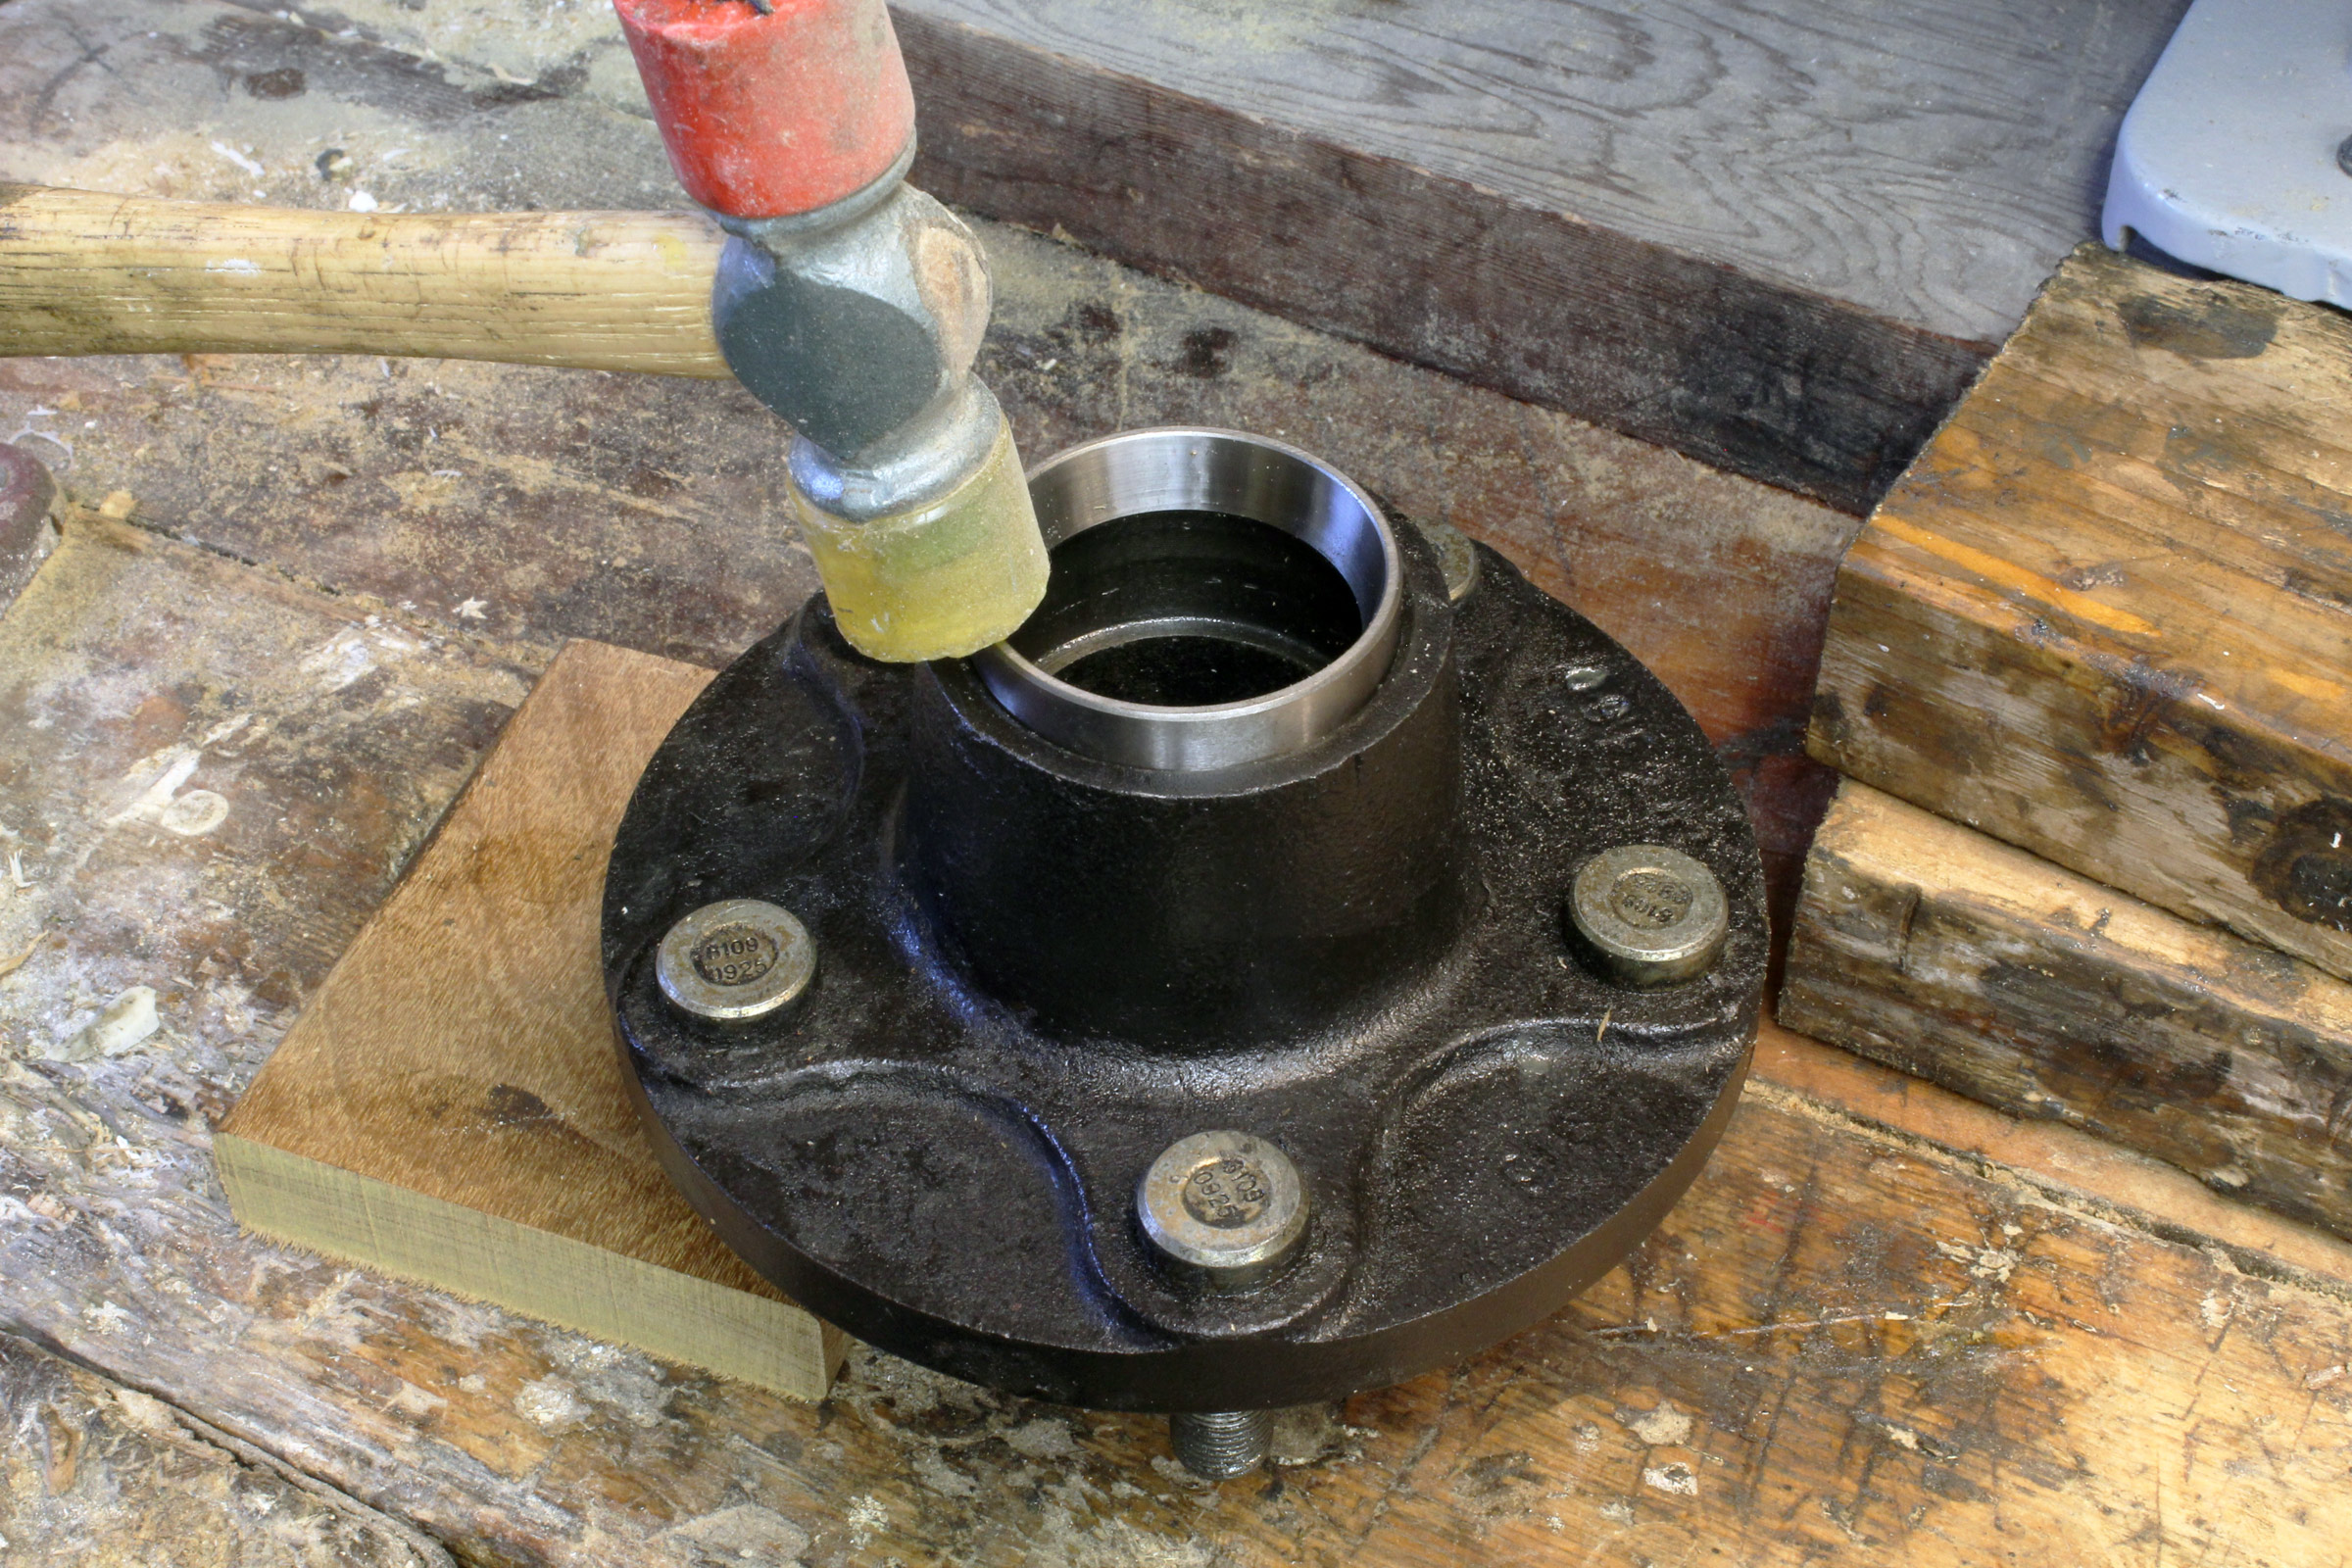
If you need to replace the races, set the hub flat and tap the old races out with a punch or a stout screwdriver, working one side then the other to keep the race fairly flat as it moves.
With the tip of the punch set on the protruding edge of the race, hold the punch tight against rim of the hub on the opposite side. The exposed part of the race may be very narrow, so make sure the tip of the punch has a crisp edge—a rounded edge will slip off the race. Tap on alternate sides to coax the race out. The race is made of very tough steel and not easily damaged, so don’t be timid with the hammer.
This race is halfway out, showing the ledge it rests on when in use and the punch pushing it out.
Getting the race all the way out will require elevating the hub.
To insert a new race, gently tap it in until it is flush with the hub, then insert one of the cleaned bearings. Center a large socket or dowel over the bearing and hit that with a hammer to drive the race in until it is fully seated.
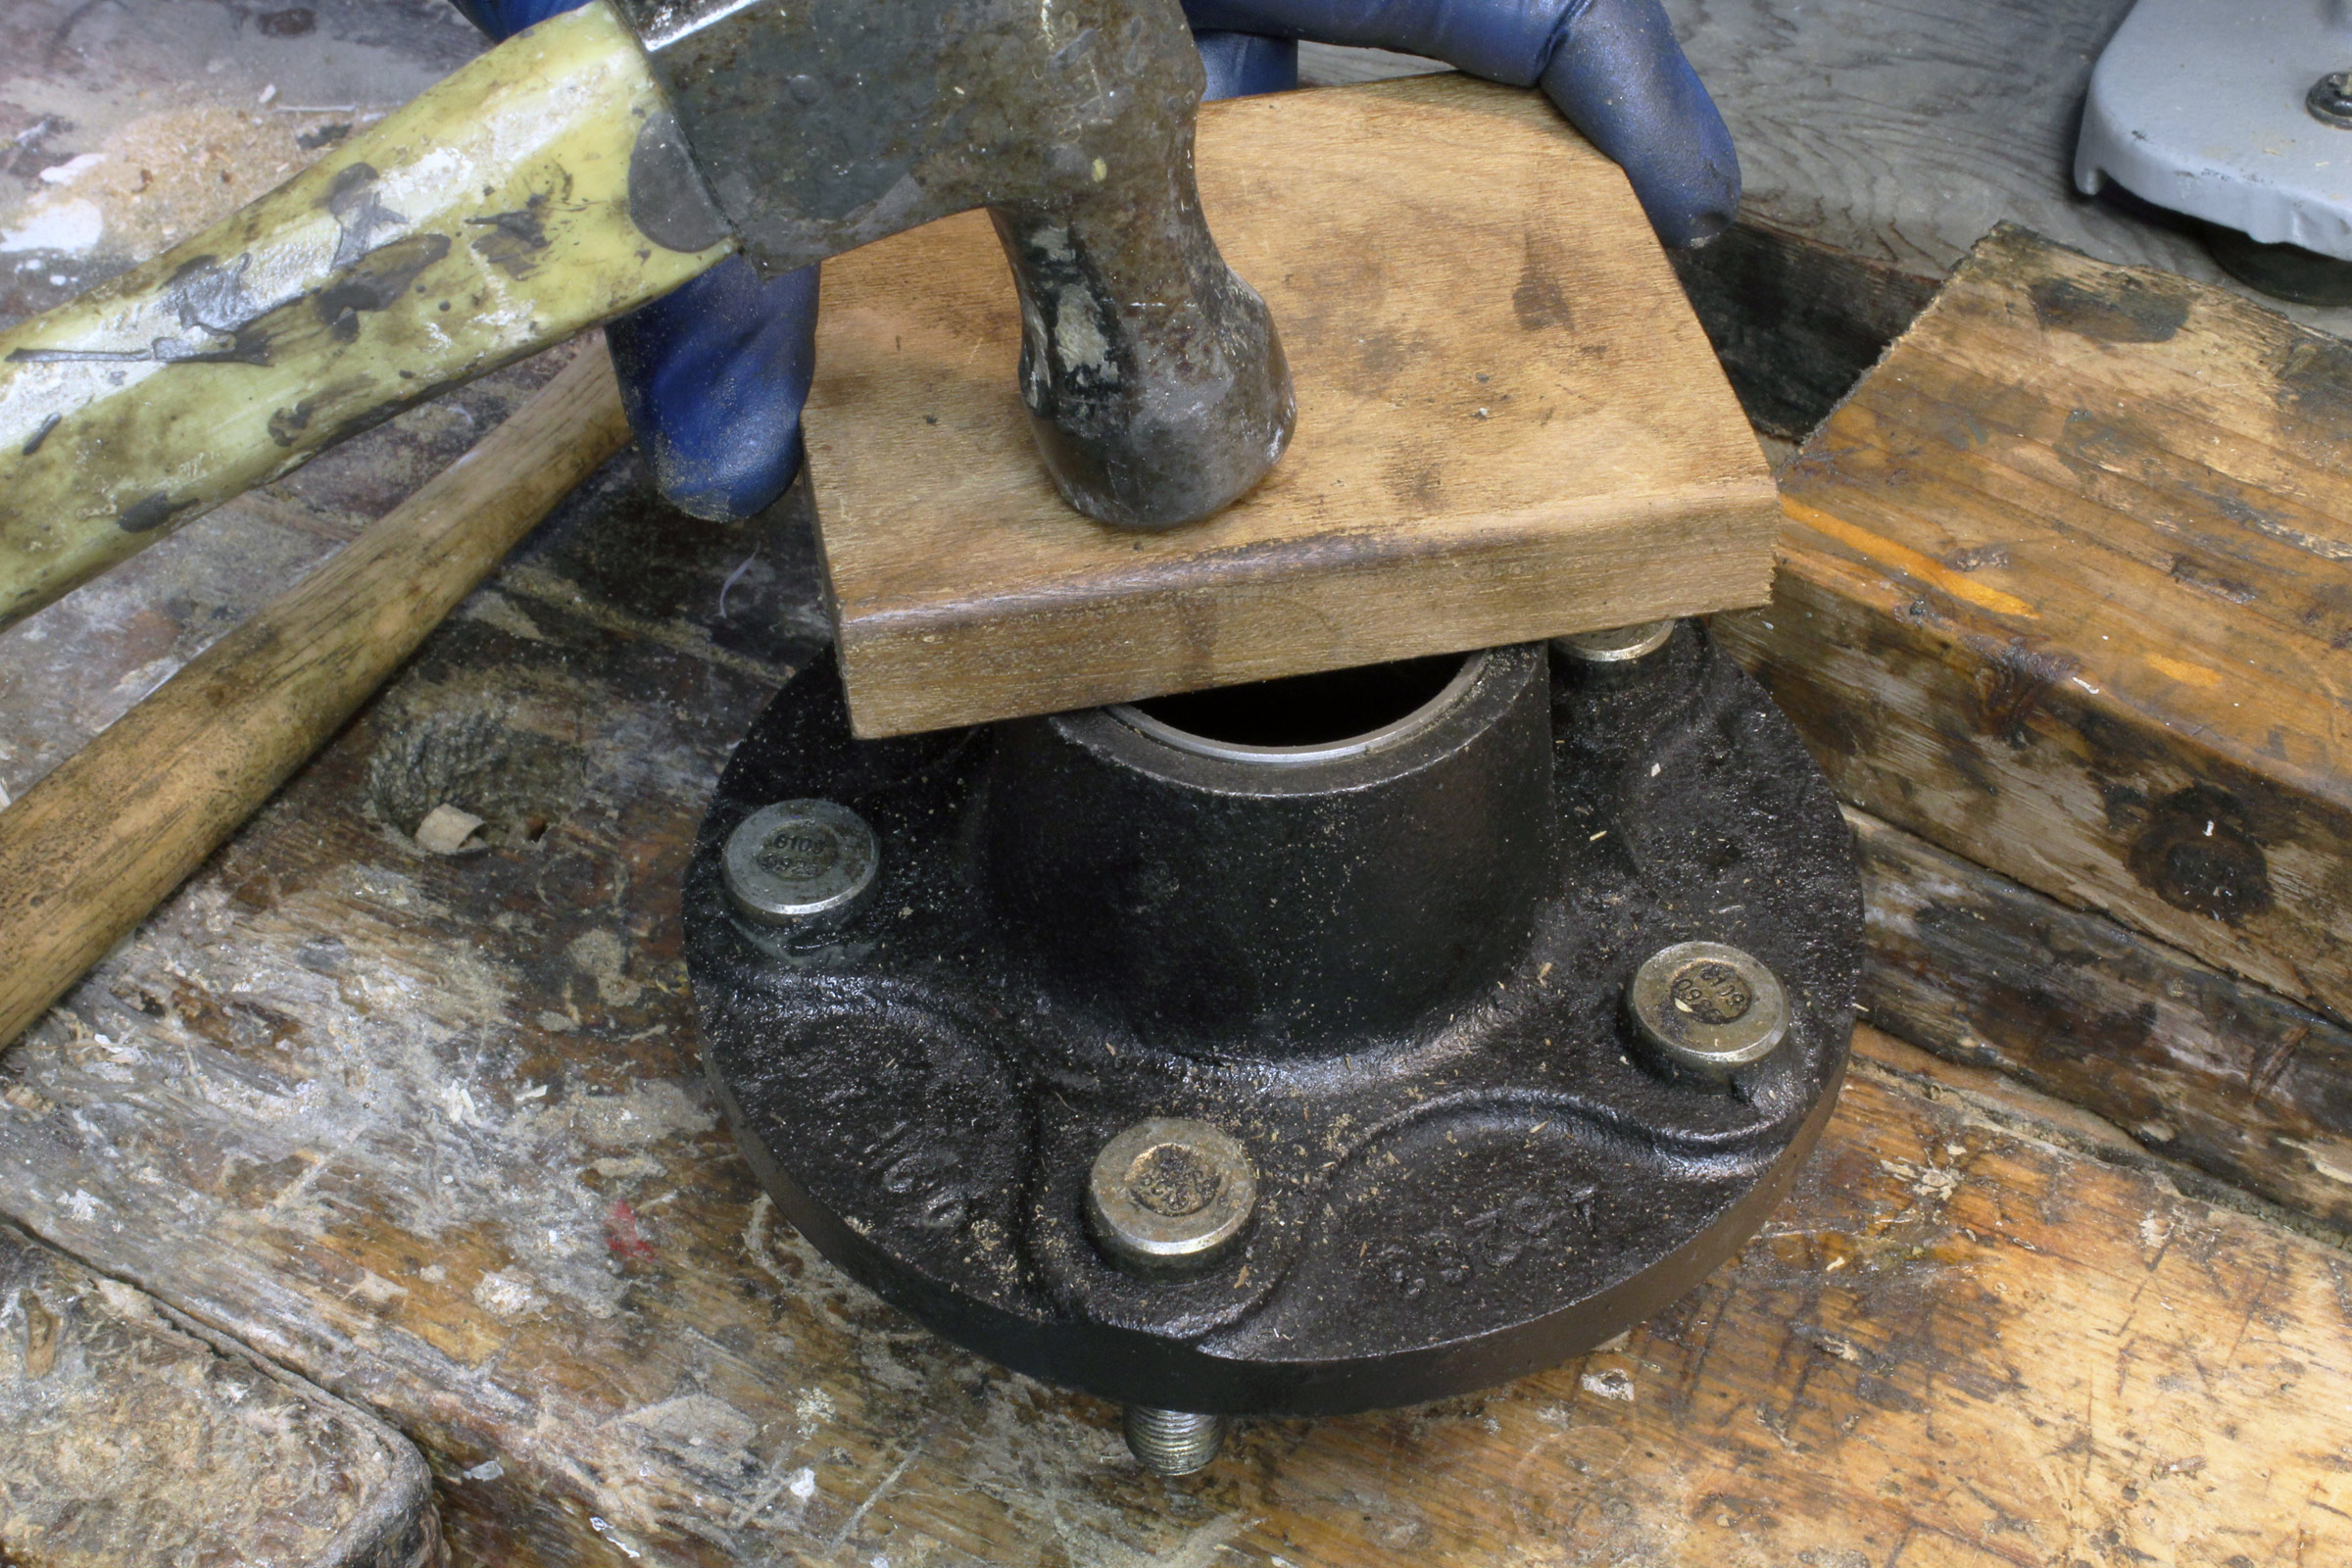
The thick side of the race goes into the hub. A few taps will get it started.
After the race is started, a block of wood makes a good driver. You can hit it in the middle and get the race to go down flat, rather than one side, then the other. When the race is flush with the hub it’s time to switch to another device to drive it home.
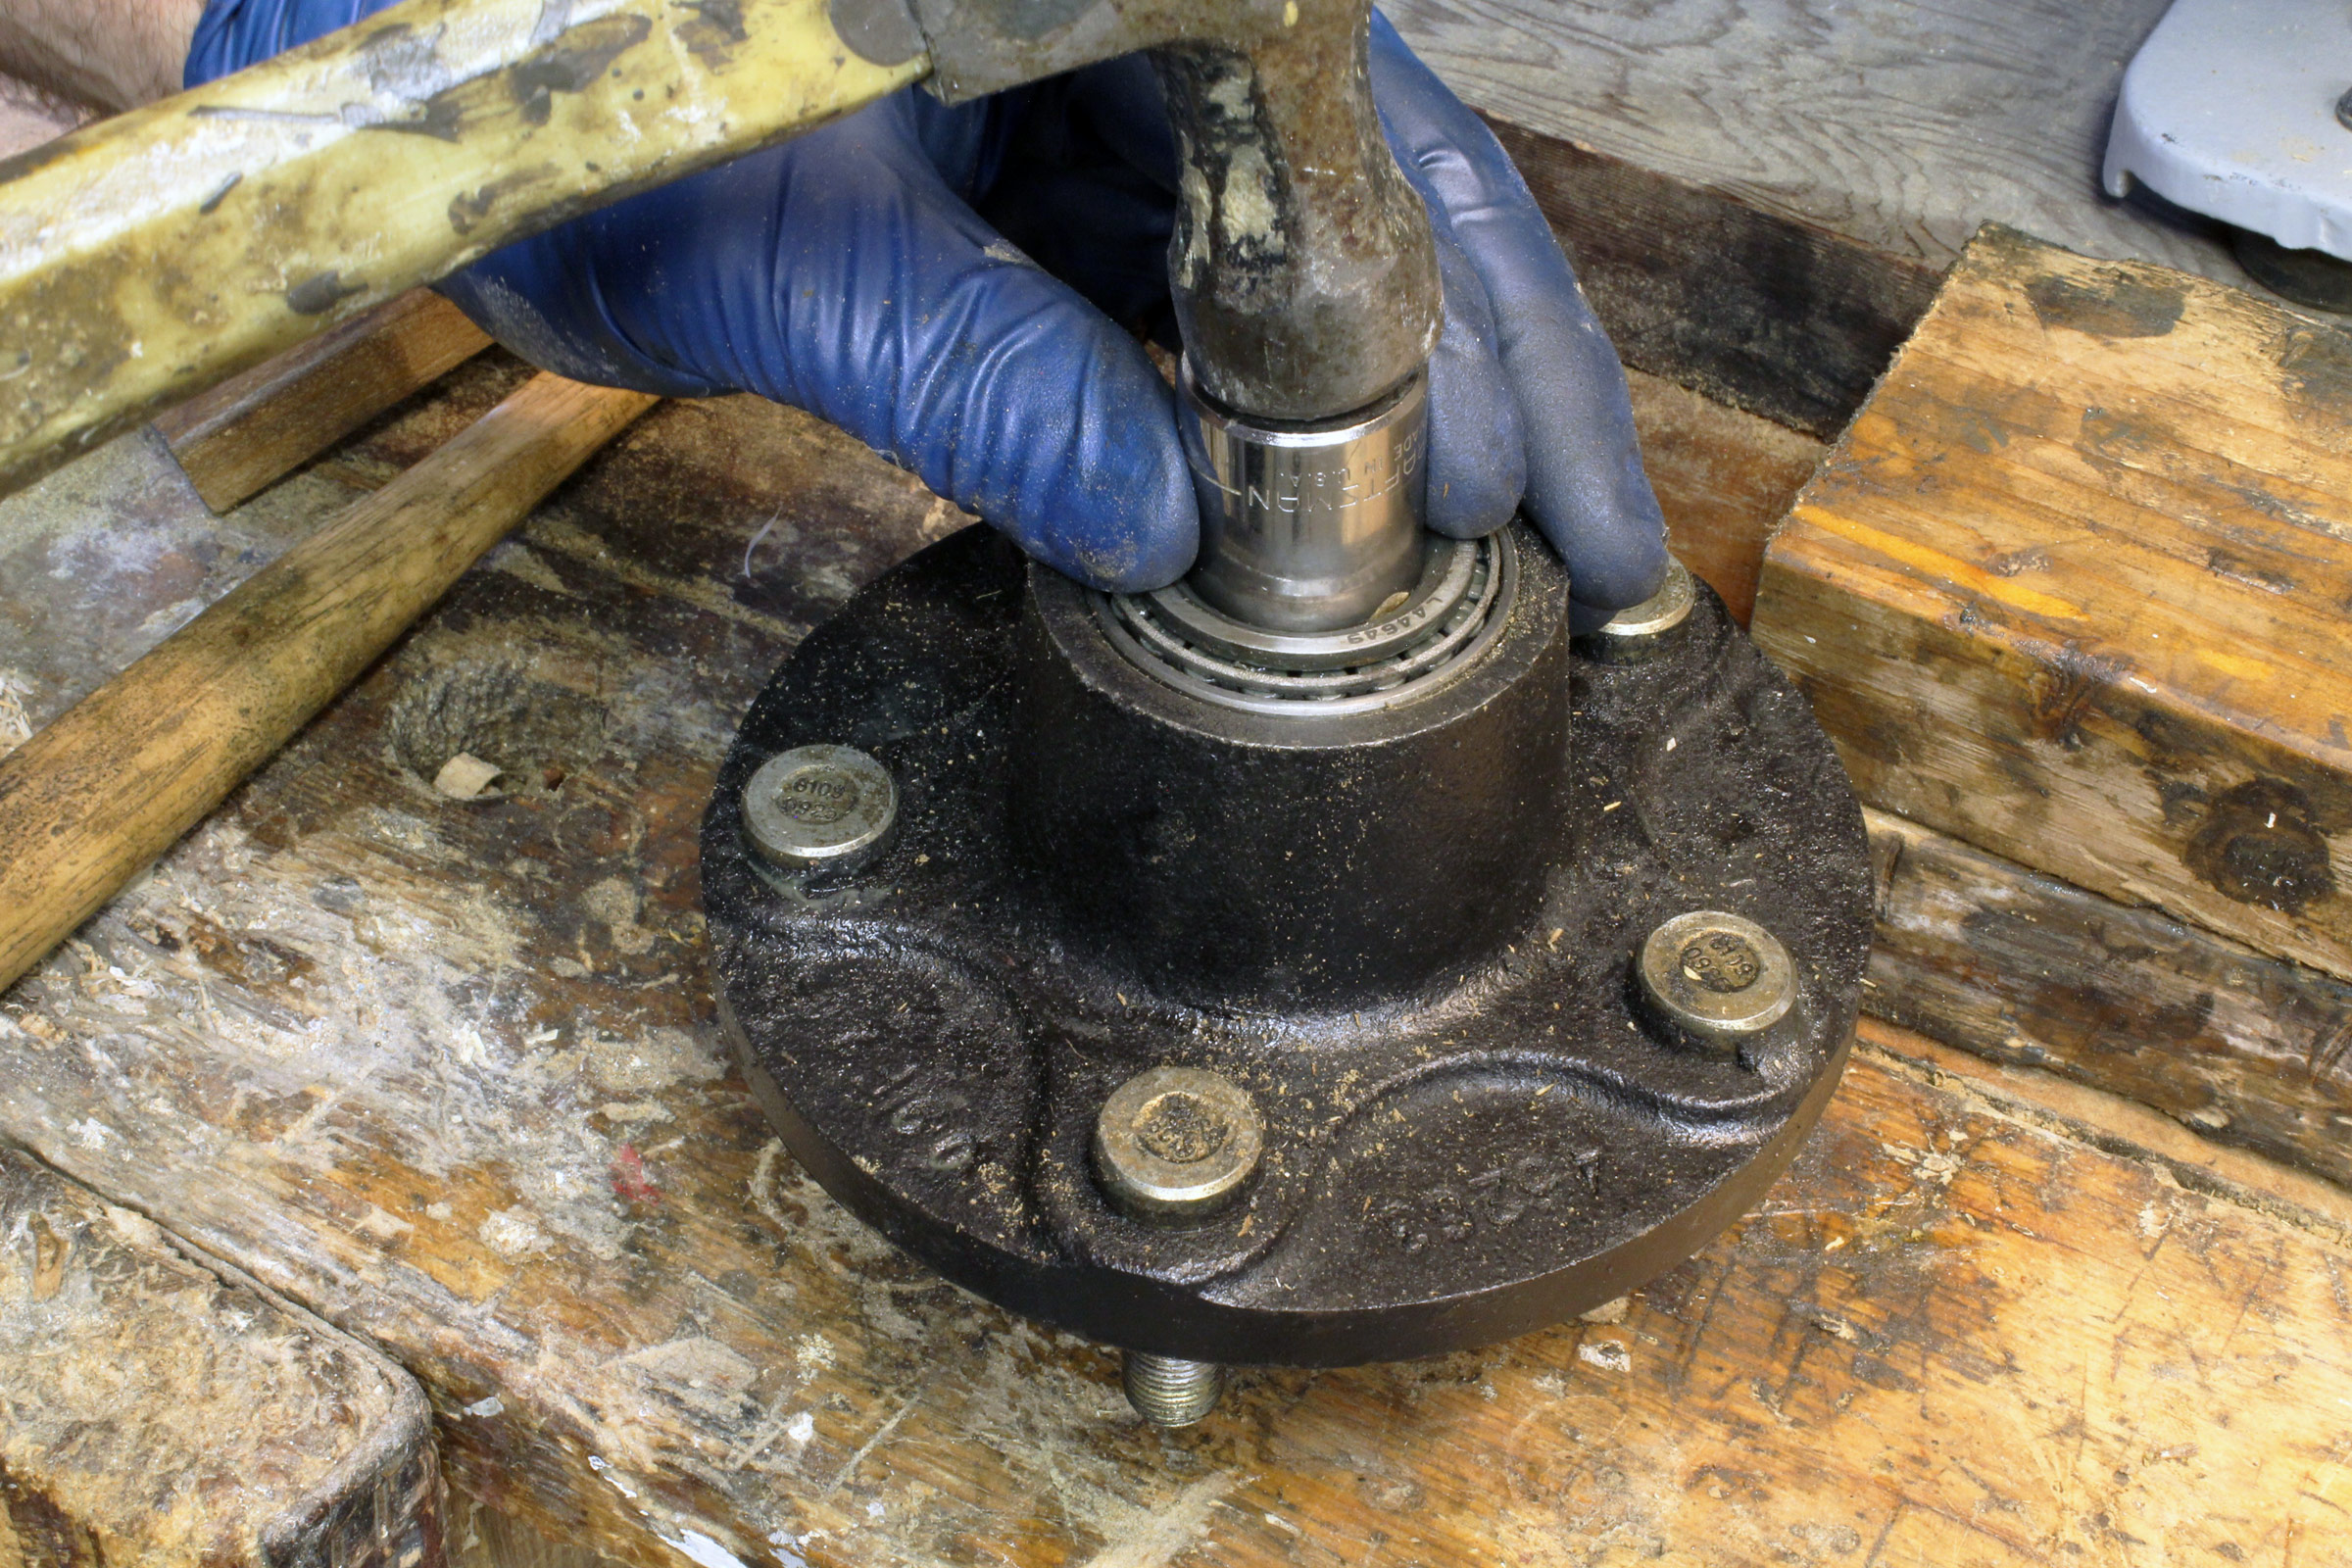
You can use an old bearing to drive a new race in place. A wrench socket, set in the recess around the bearing’s bore, can transmit the hammer blows. See the video and the comment below for alternate methods for driving races.
If using a wrench socket isn’t effective, use a large dowel or chamfered block of wood to drive the bearing and the race.
To pack a new or a reusable bearing, squeeze out a palmful of new grease and scrape the bearing across the grease to force it into the edge of the bearing from the large end until it emerges from the small end, making sure the grease works its way all the way through the bearing assembly, rollers, and cage. Rotate the bearing to help distribute the grease. A bearing packer, available from auto parts stores or online retailers, will do most of the job, but the fine tuning of grease distribution on the outside face of the rollers will need to be done by hand.
This plastic universal bearing packer cost just $7.50. With a grease gun connected to its fitting, grease is pumped through the bearing from top to bottom, assuring its interior is properly filled. The exterior will need a coating applied by hand.
Now everything can go back together. Grease the inner race, then put the grease-loaded inner bearing into the hub. Grease the inside of the seal and gently tap it into position. Place a wood block over the seal to hammer it home. Preload the hub with fresh grease and grease the spindle. Slide the hub carefully over the spindle to avoid damage to the seal as you slide it in place over its matching surface on the spindle. Grease the outer race and install the greased outer bearing. Next, install the washer and castle nut. Reinstall the wheel and lightly tighten the lugs. Spin the wheel and tighten the castle nut with a wrench or channel locks until the wheel starts to drag when spun. Pull on the wheel, one side then the other, to make sure there is no side to side movement, then back the castle nut off to the first spot where the cotter pin can be inserted. There should be a very slight motion when you tug on the sides of the wheel/tire.
To finish up, reinstall the Bearing Buddy or protective cap, then get the tire safely back onto the ground and fully tighten the lugs. Recheck the lugs after 1, 10, and 100 miles to make sure they’re still tight after driving. While you’re at it check for wobbles indicating the bearings are loose. With a lightly loaded trailer you may not need to jack, but on heavily loaded trailers you’ll need to take a bit of weight off the wheel to be able to wiggle it.
A spare bearing replacement kit with bearings, races, a seal, and a cotter are handy things to have in the road-trip kit, in case the loose bits go missing on a dusty roadside bearing job. Better yet is to purchase a spare hub, and build it up with races and bearings, all packed with grease. At this point you could simply install the new hub, secure it, replace the tire, and be on your way (versus swapping bearings and races in the auto parts store parking lot).
If your hubs have caps, you should consider replacing them with Bearing Buddies. Bearing Buddies use a spring to provide a slight pressure to the grease in the hub to keep water out. We have used Bearing Buddies in the past, now all of our trailers are equipped with PosiLube spindles. The spindles have a hole through the spindle so grease pumped through the fitting goes to the inner opening of the hub and flows through the inner bearing, the hub, and the outer bearing. The old grease is pushed out by new without having to remove the hub or bearings.
After driving the trailer to the ramp, it is a good plan to find a few things to do to give the hubs have time to cool, as immersing a hot hub in cold water can cause water to be drawn in. So, rather than load your boat when it’s at the dock, put gear aboard before backing it down the ramp and into the water. Rigging our sailboats takes care of this cool-down step.
Check those bearings, take care of them, and they will take care of your boat and trailer.
Kent Lewis sails, rows, paddles, and motors a fleet of small boats in the Florida Panhandle. Through the years he and his wife Audrey have owned over 20 trailers and have fond memories of changing trailer bearings in Pecos, Texas, during the heat of summertime with two toddlers supervising.
You can share your tips and tricks of the trade with other Small Boats Monthly readers by sending us an email.
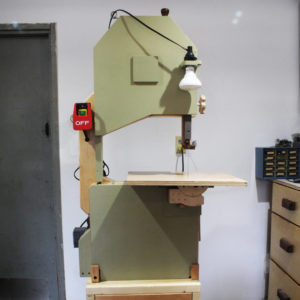
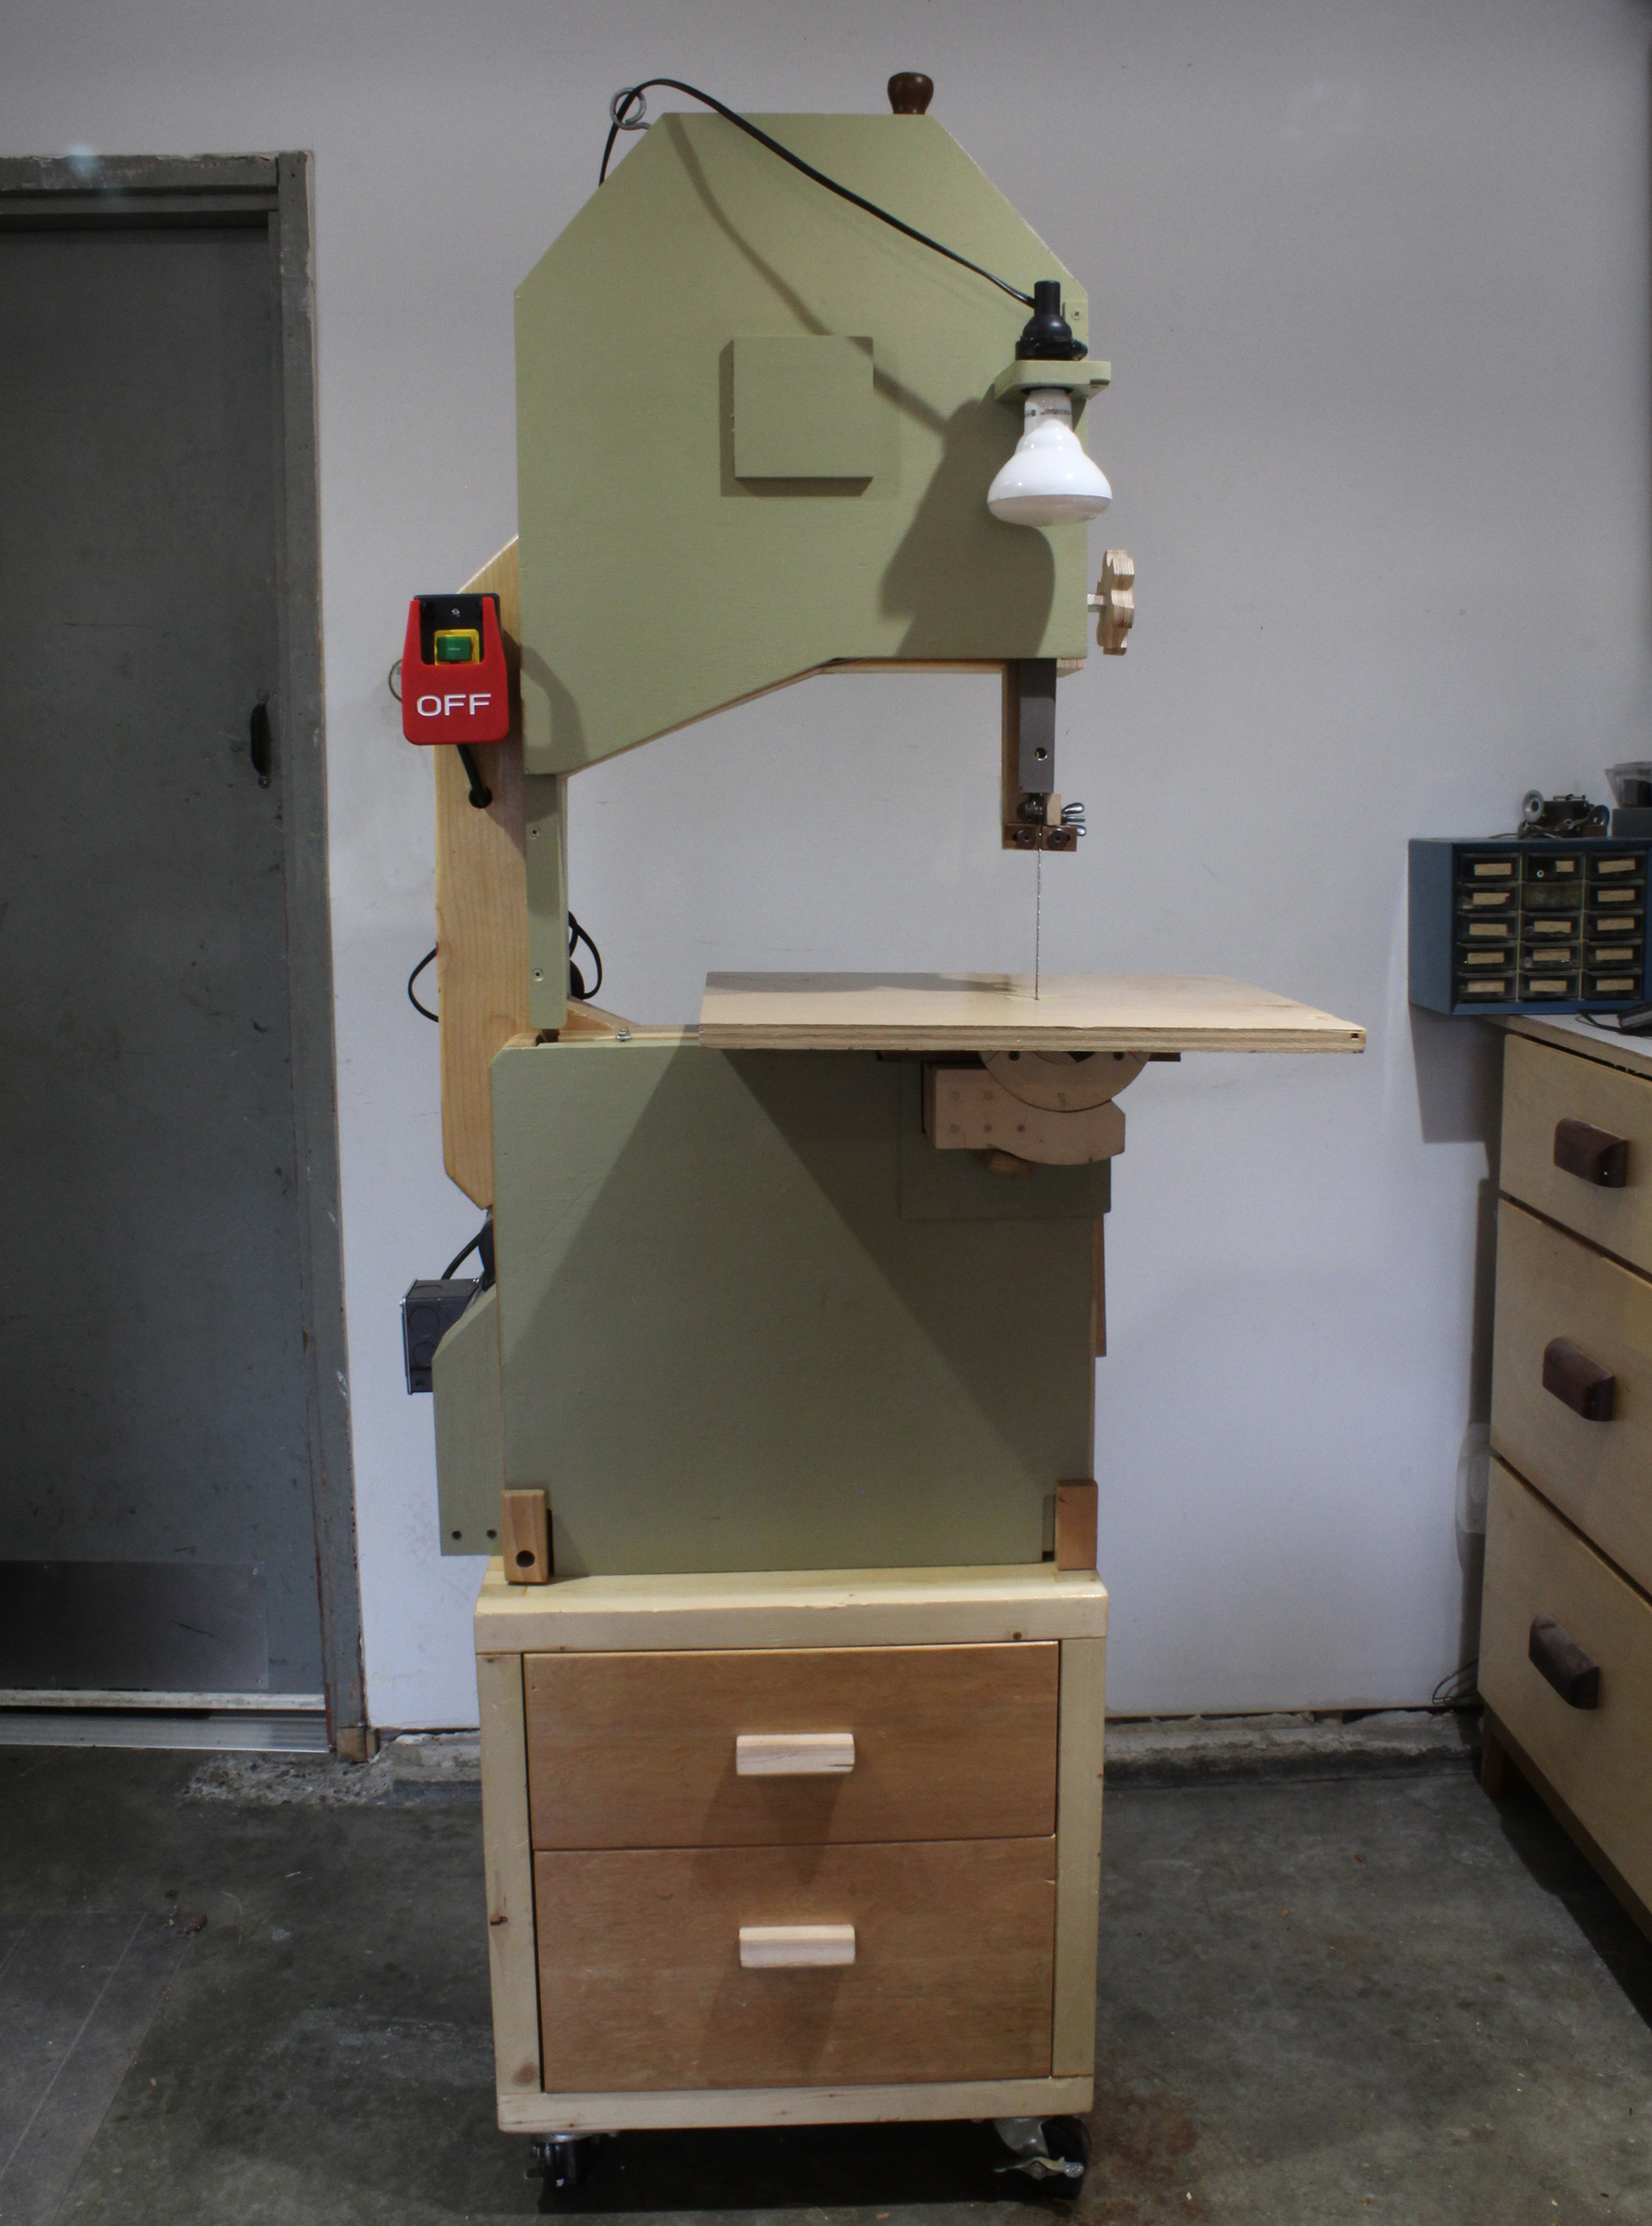
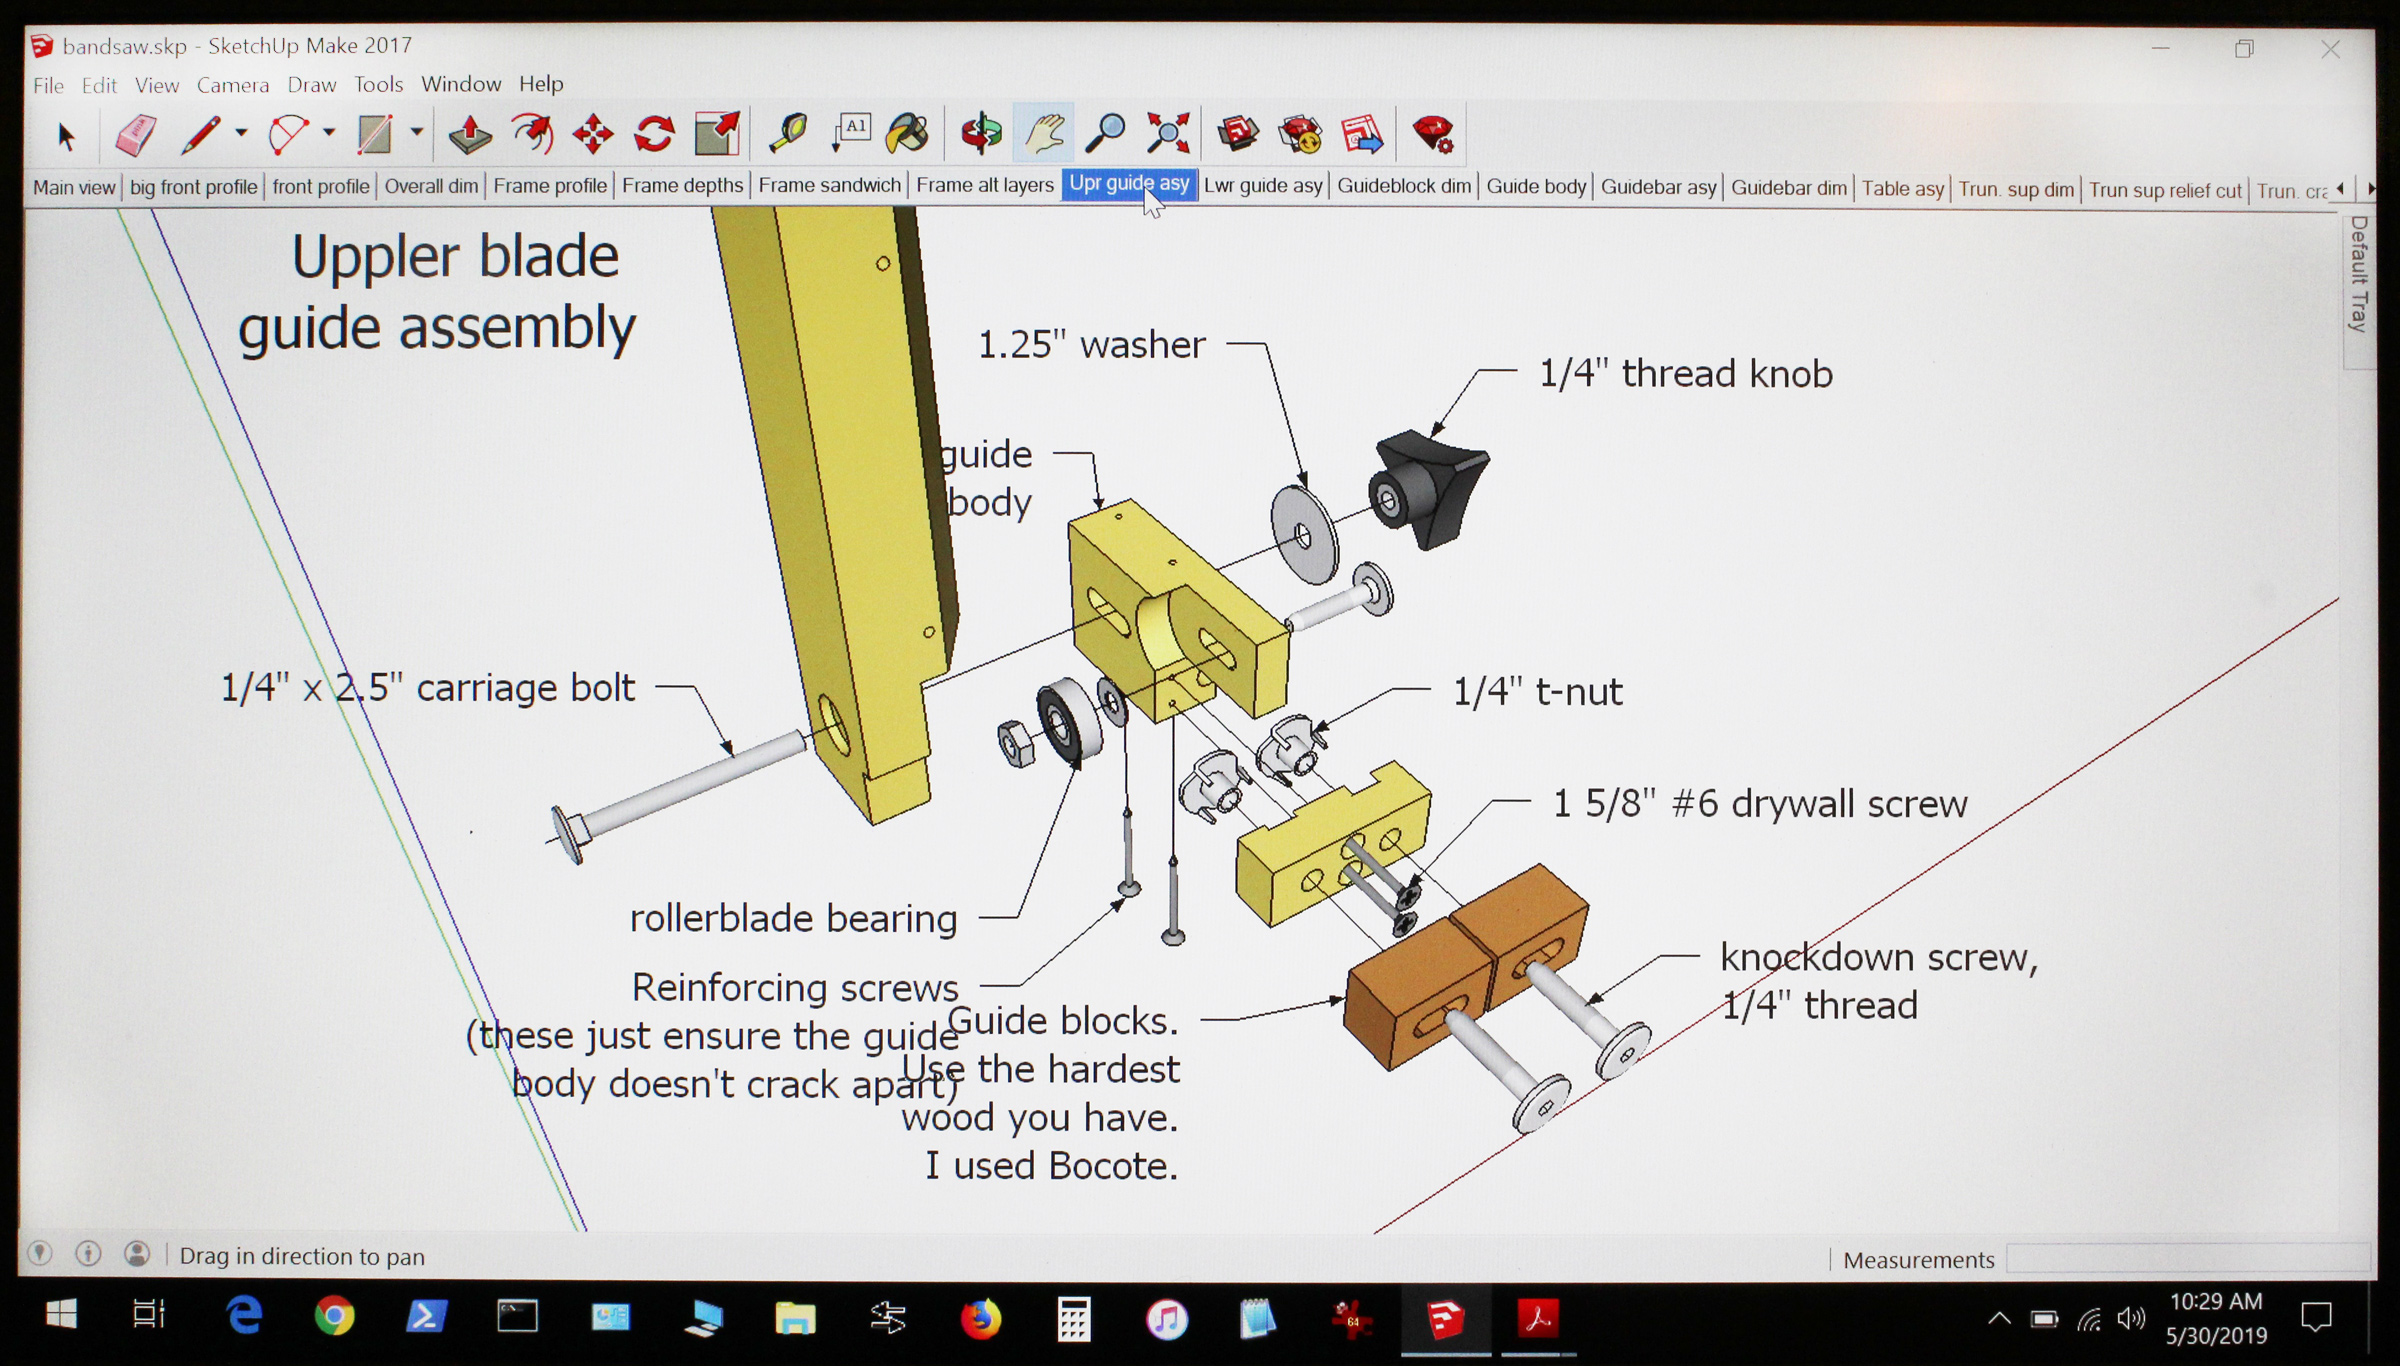
The plans include a dust-collecting cabinet that supports the bandsaw at a working height.
My woodworking began with house repairs with one project leading to another, and one required that I cut box joints. My research on the web led me to a gear-driven box-joint jig created by Matthias Wandel, a Canadian engineer, woodworker, and YouTuber. If you somehow haven’t stumbled onto his videos yet, you’ll want to pack for a long visit. The jig uses three wood gears, which require a bandsaw to cut them; I didn’t have a bandsaw, so I decided to build Wandel’s 16″ bandsaw. It’s up and running and someday, I suppose, I’ll get to the box joints.
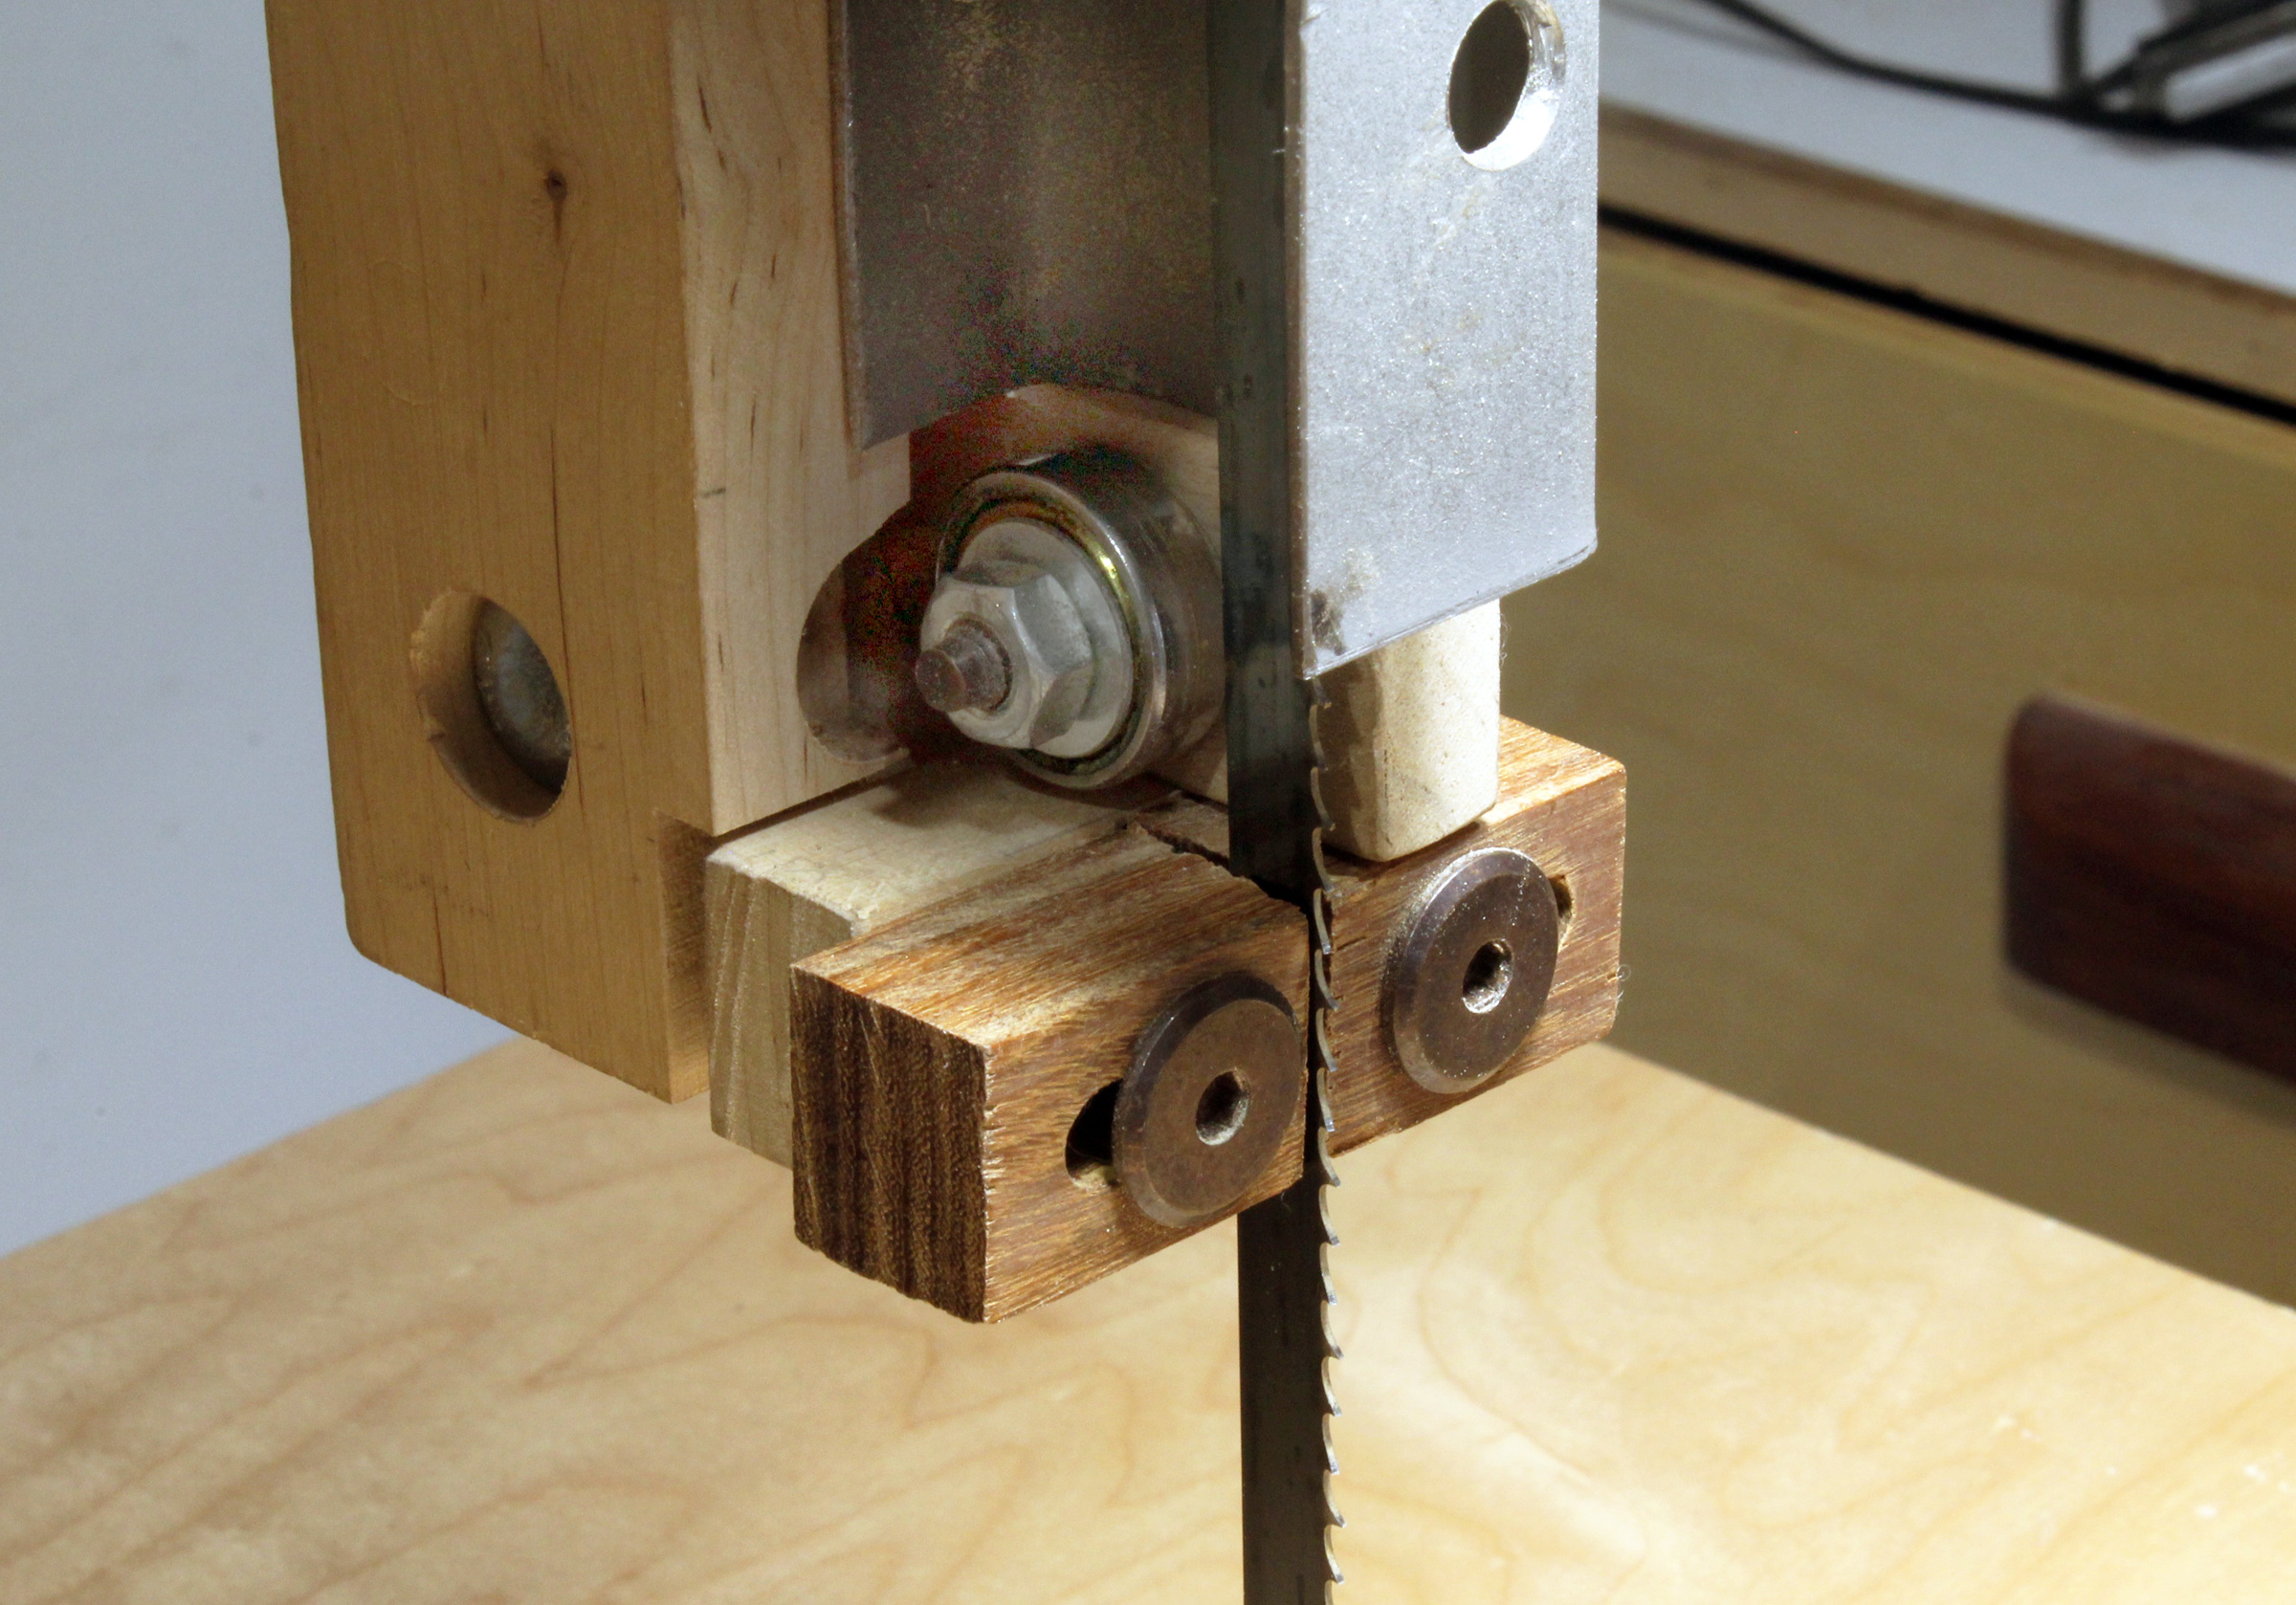
The blade guides are hardwood and have the advantage that they’ll never dull the blade teeth. The thrust bearing meets the blade with it edge, rather than its face, as typical in commercial bandsaws.
The digital plans for the bandsaw include thorough instructions with over 120 photographs, complete materials and cut lists, PDF print-ready full-sized templates of key parts, and Sketchup 3D digital models. Sketchup is a free CAD program that allows you to see the complete bandsaw and every part from any angle. I highly recommended using it. The plans also refer the reader to Wandel’s website with exhaustive articles and photos about this project, and to 19 bandsaw-related videos on his YouTube channel.
With SketchUp, all of the assemblies can be exploded and each part can be viewed from any angle.
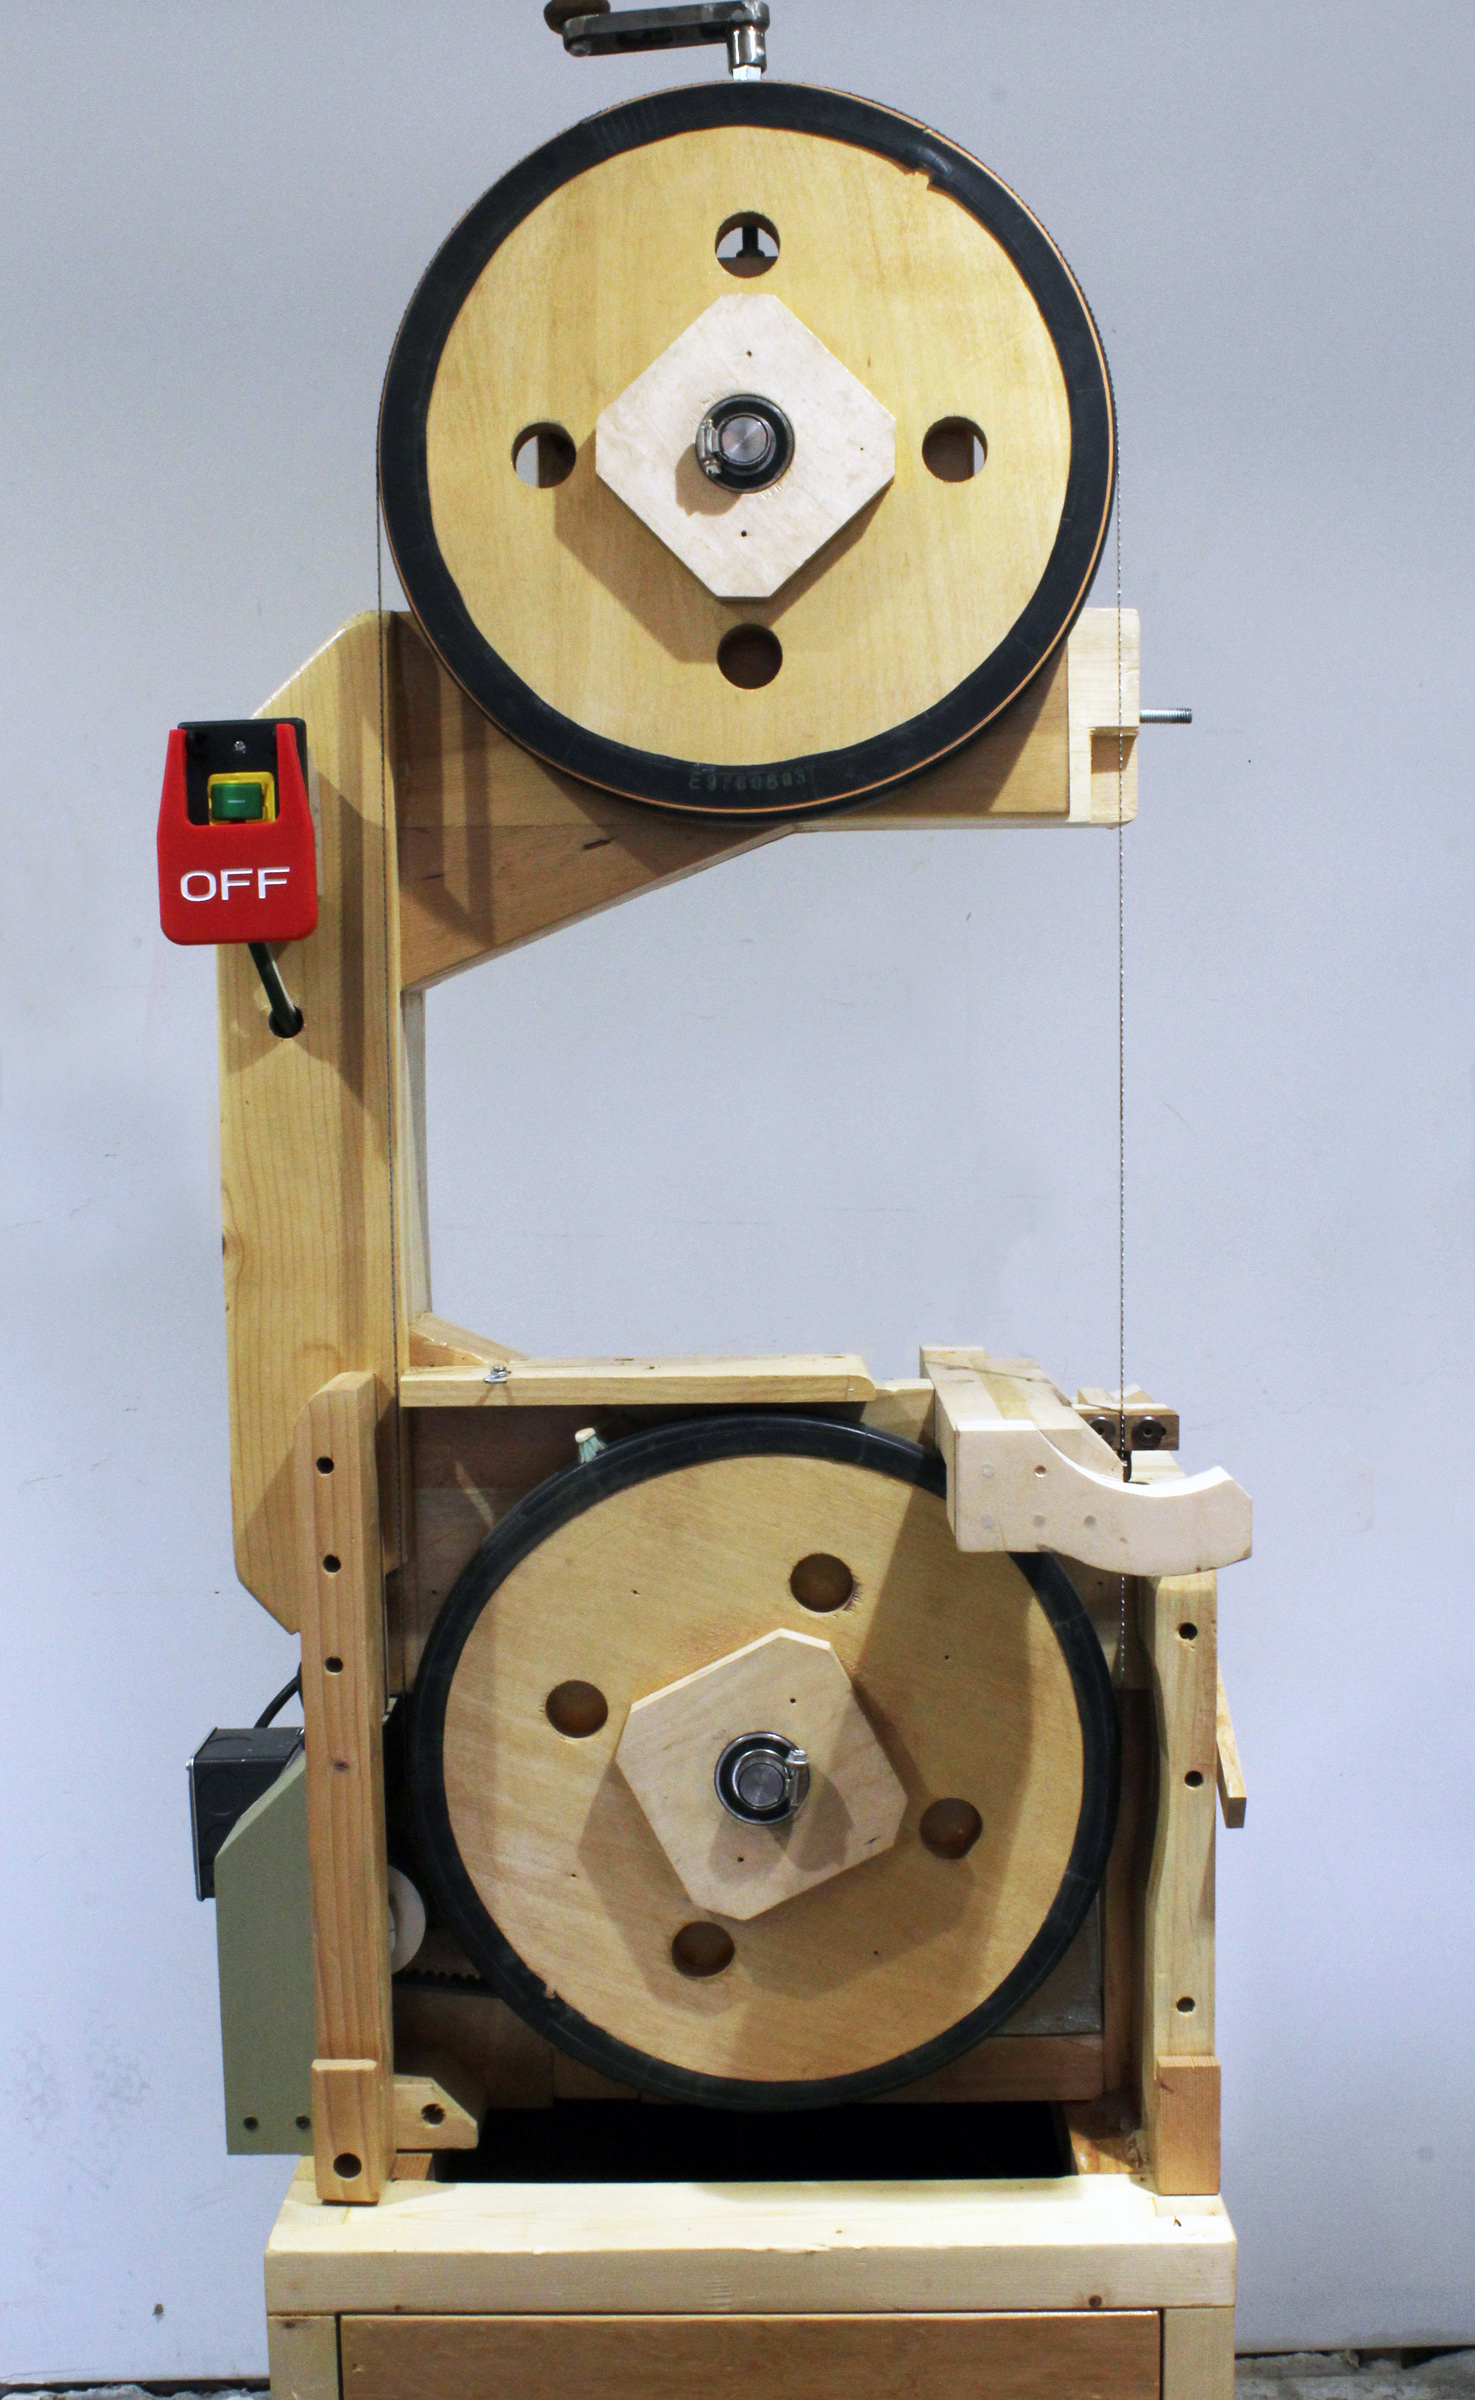
The most elegant aspects of Wandel’s bandsaw design are the frame and wheels. The laminated softwood frame is very stiff, lightweight, easy to build, and cheap—I built mine largely with scrap lumber. Turning, truing, and balancing the plywood wheels and the pulley, with their own bearings on stationary axles, allows for reliable precision with no special tools.
The bulk of the material needed is wood, and Wandel encourages using shop scraps and reclaimed lumber, so builders will probably find the only significant costs to be bearings, shafts, blade, drive belt, bolts/screws, and a motor. The tires are made from bicycle inner tubes! The average cost for everything, including the motor, is between $200 and $500. Wandel, in a video about the cost of his tools, noted that salvaging a motor—his 1⁄2-hp motor was from a furnace—is what makes the homebuilt bandsaw a good bargain. The 16″ saw uses 105″ blades—the same as used by commercial 14” bandsaws with risers—available at most woodworking outlets.
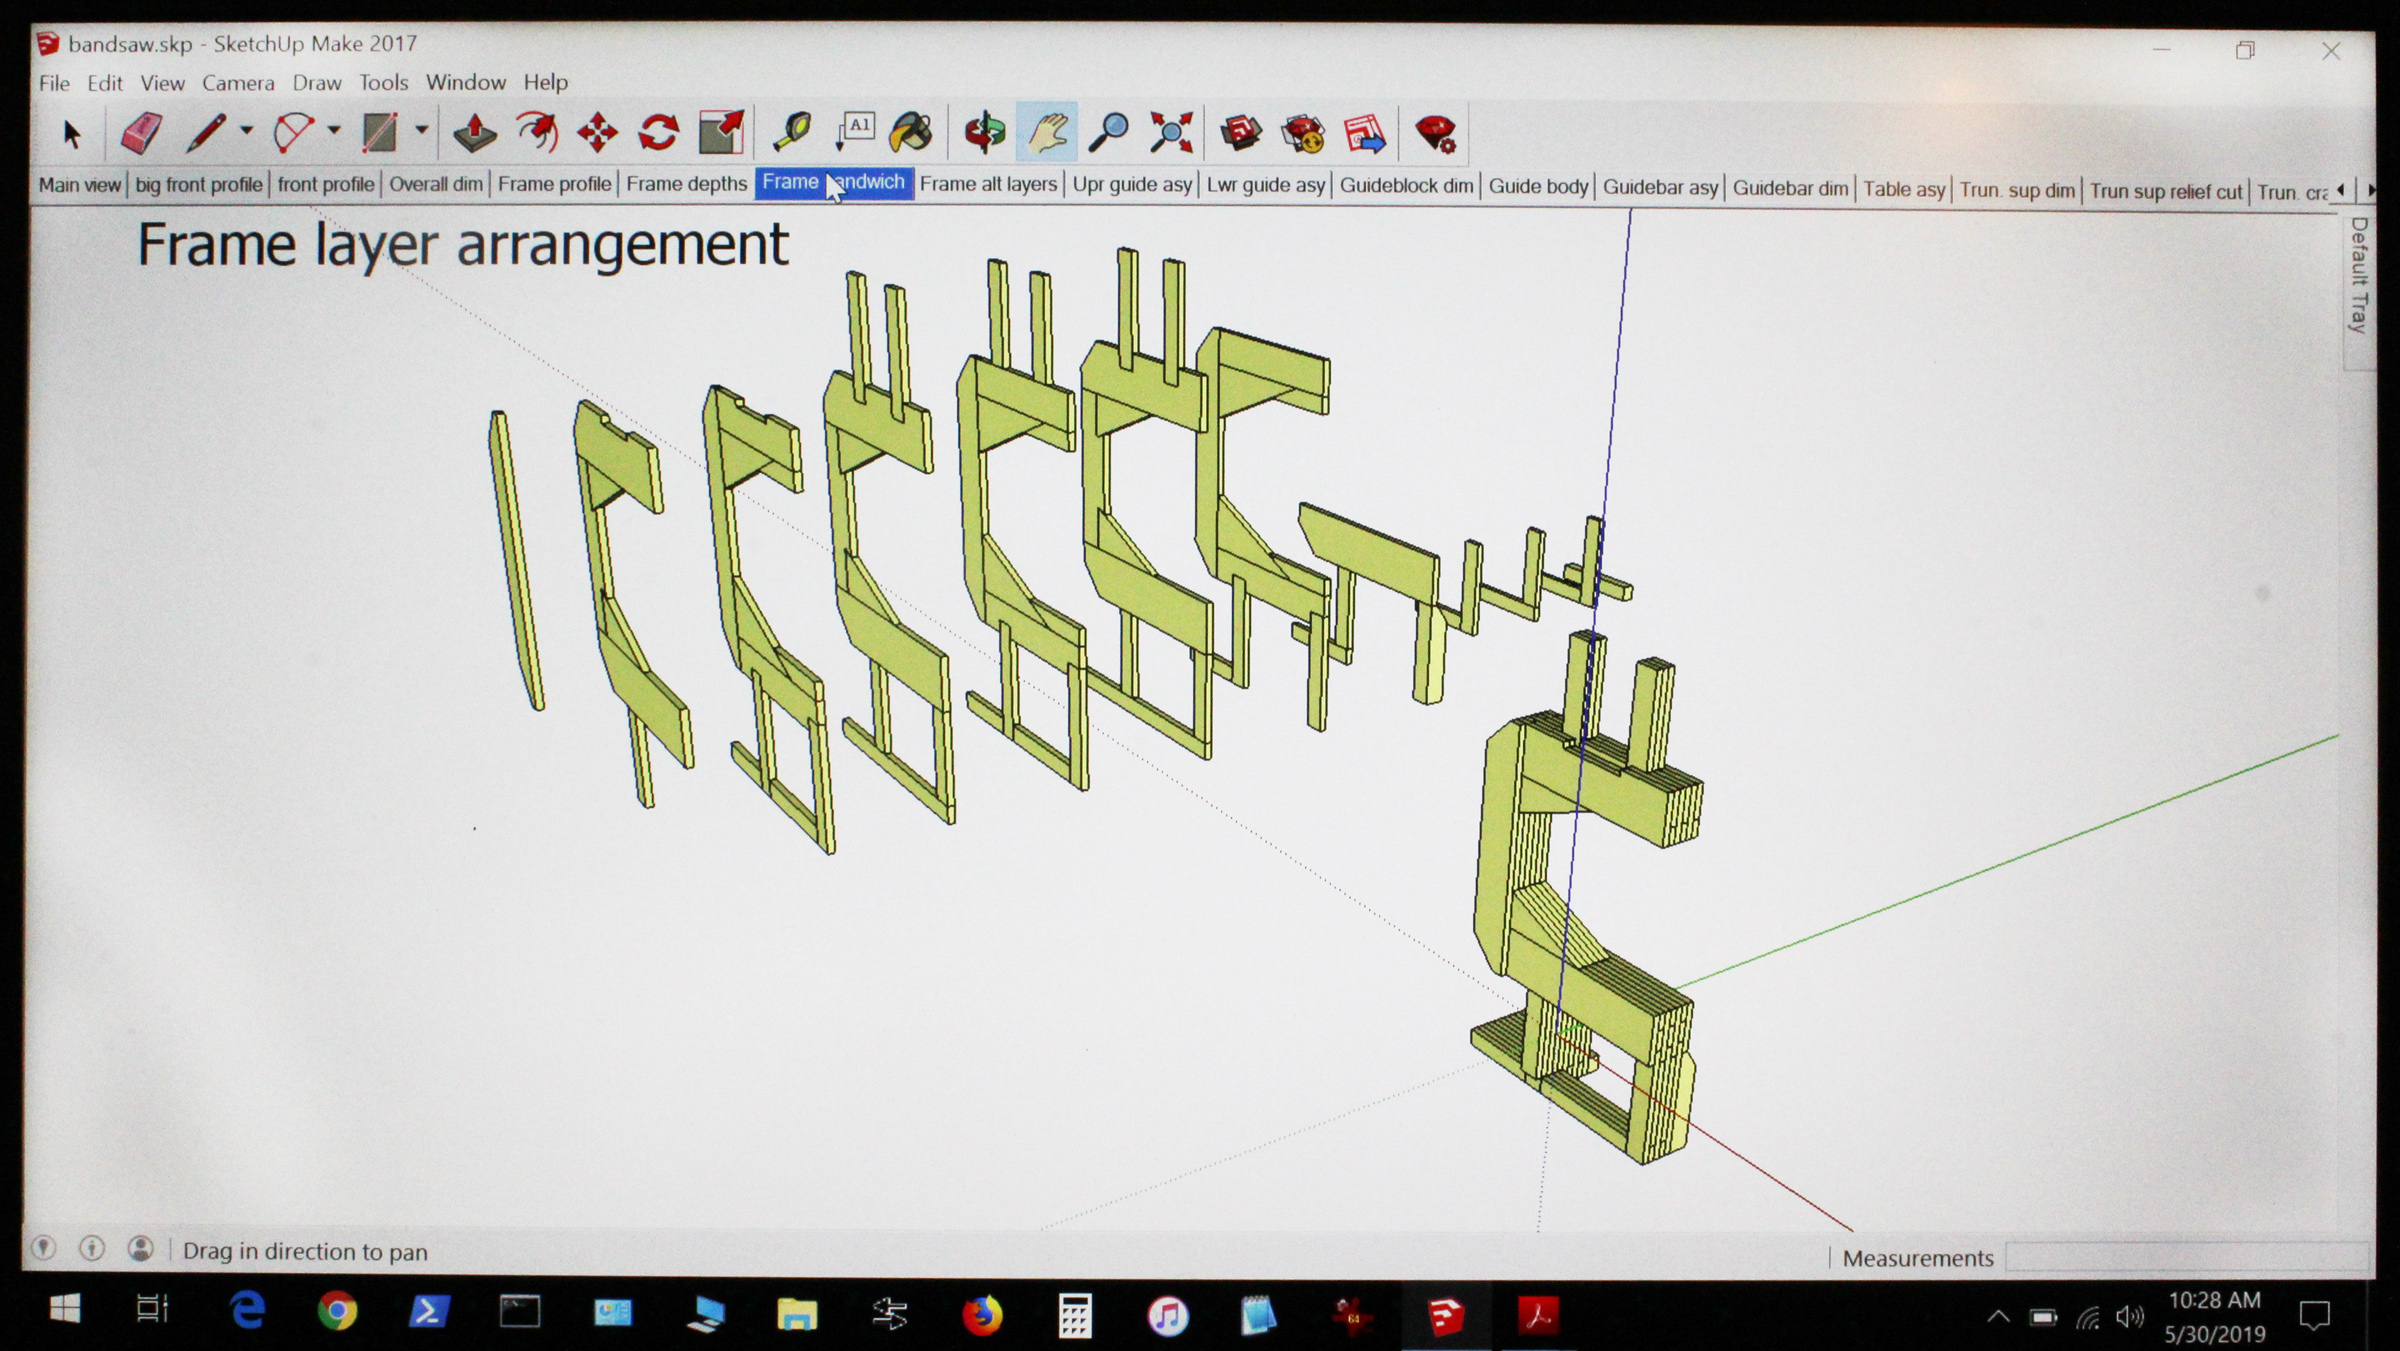
A SketchUp view of the frame shows the laminates that go into it.
The frame is made of eight laminations of interlocking 3⁄4″ softwood boards. After the first layer is carefully made flat and square, with all parts edge glued on a dead-flat surface, all the subsequent layers easily fall into line on top. The multiple glue-ups will require some creative clamping, weights, and occasional screws, which must be removed to avoid accidentally drilling or cutting into them later.
The wheels are made of plywood and have inner-tube tires. The four holes in each wheel are finger holds for turning the wheels when installing a blade.
The wheels are made of two layers of 3⁄4″ fir plywood. Flanges made of 3⁄4″ Baltic-birch plywood glued on either side of the wheels capture the bearings. The higher quality plywood is required to provide a tight and long-lasting connection to the bearings. The holes for the bearings are drilled slightly undersized, and big C-clamps and sacrificial blocks, along with a bench vise, press the bearings into the very tight holes. The instructions suggest using a mallet to drive the bearings in place; on one of Wandel’s videos he uses a vise as a press. With each wheel slipped in turn over a stationary axle, a temporary pulley from junk plywood is used to spin it for shaping and truing. The lower wheel includes a drive pulley made of 3⁄4″ birch plywood. It is trued and gets its V-belt groove cut while the temporary pulley turns the wheel.
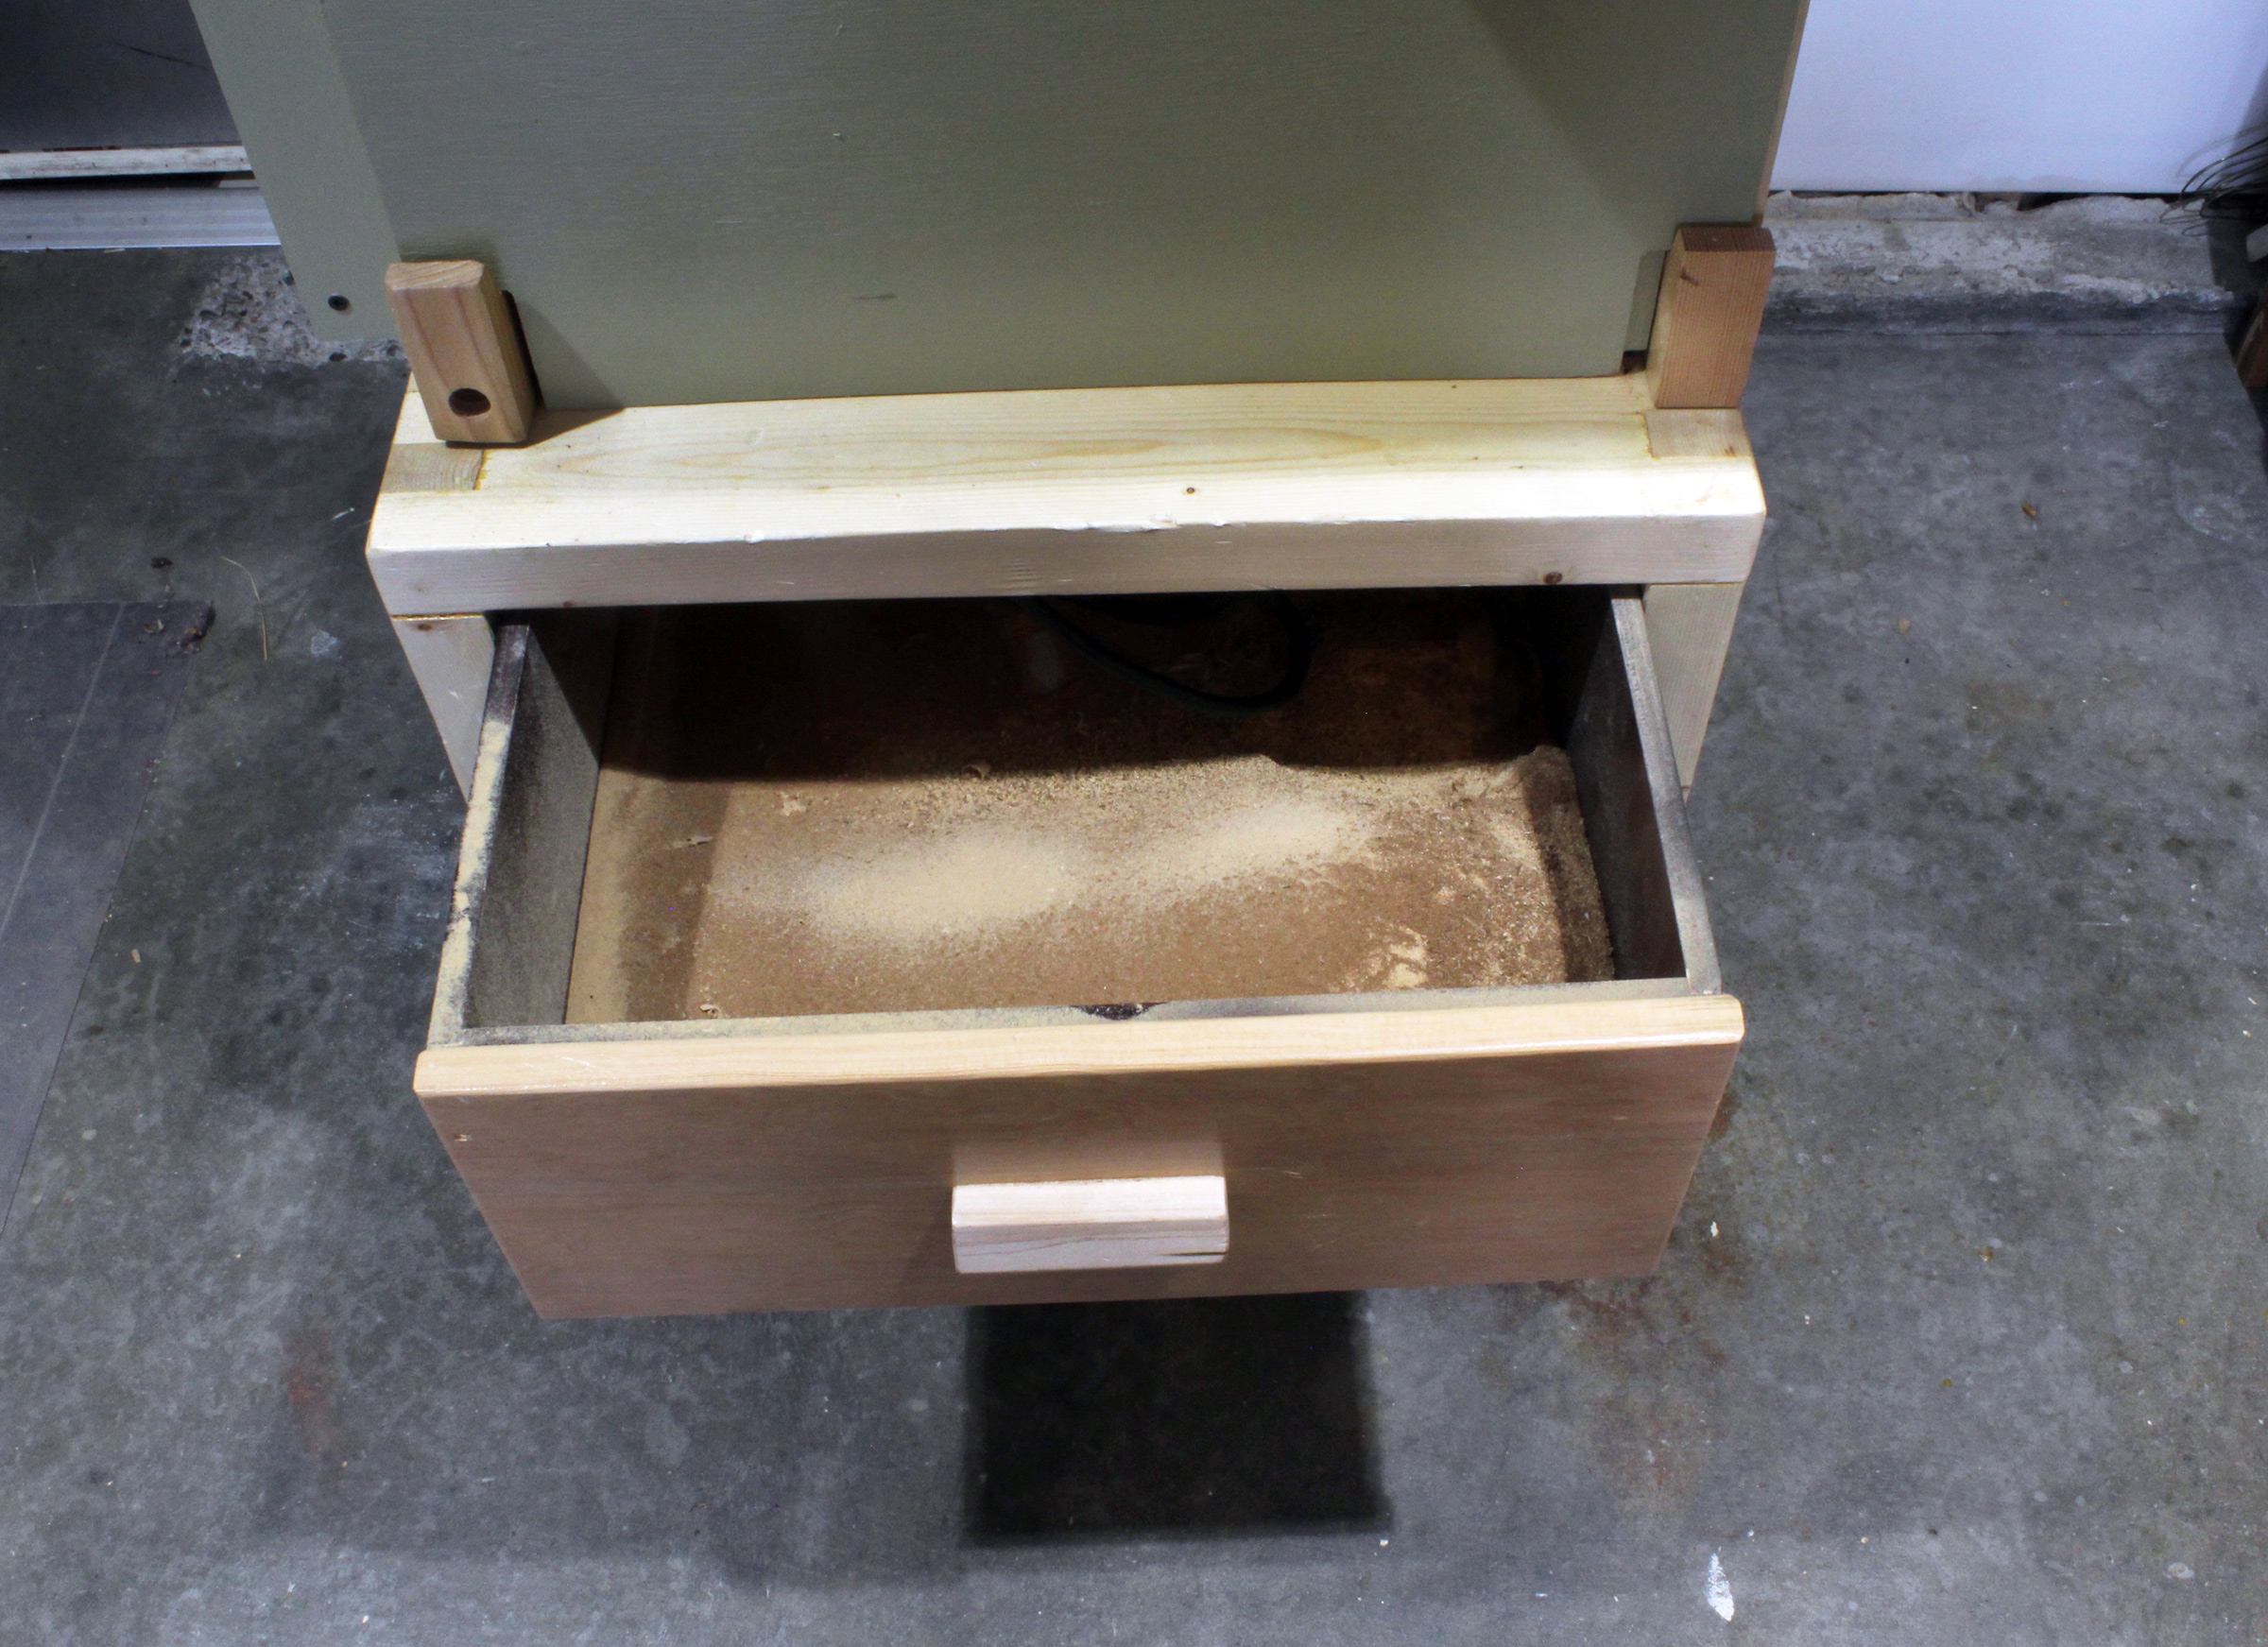
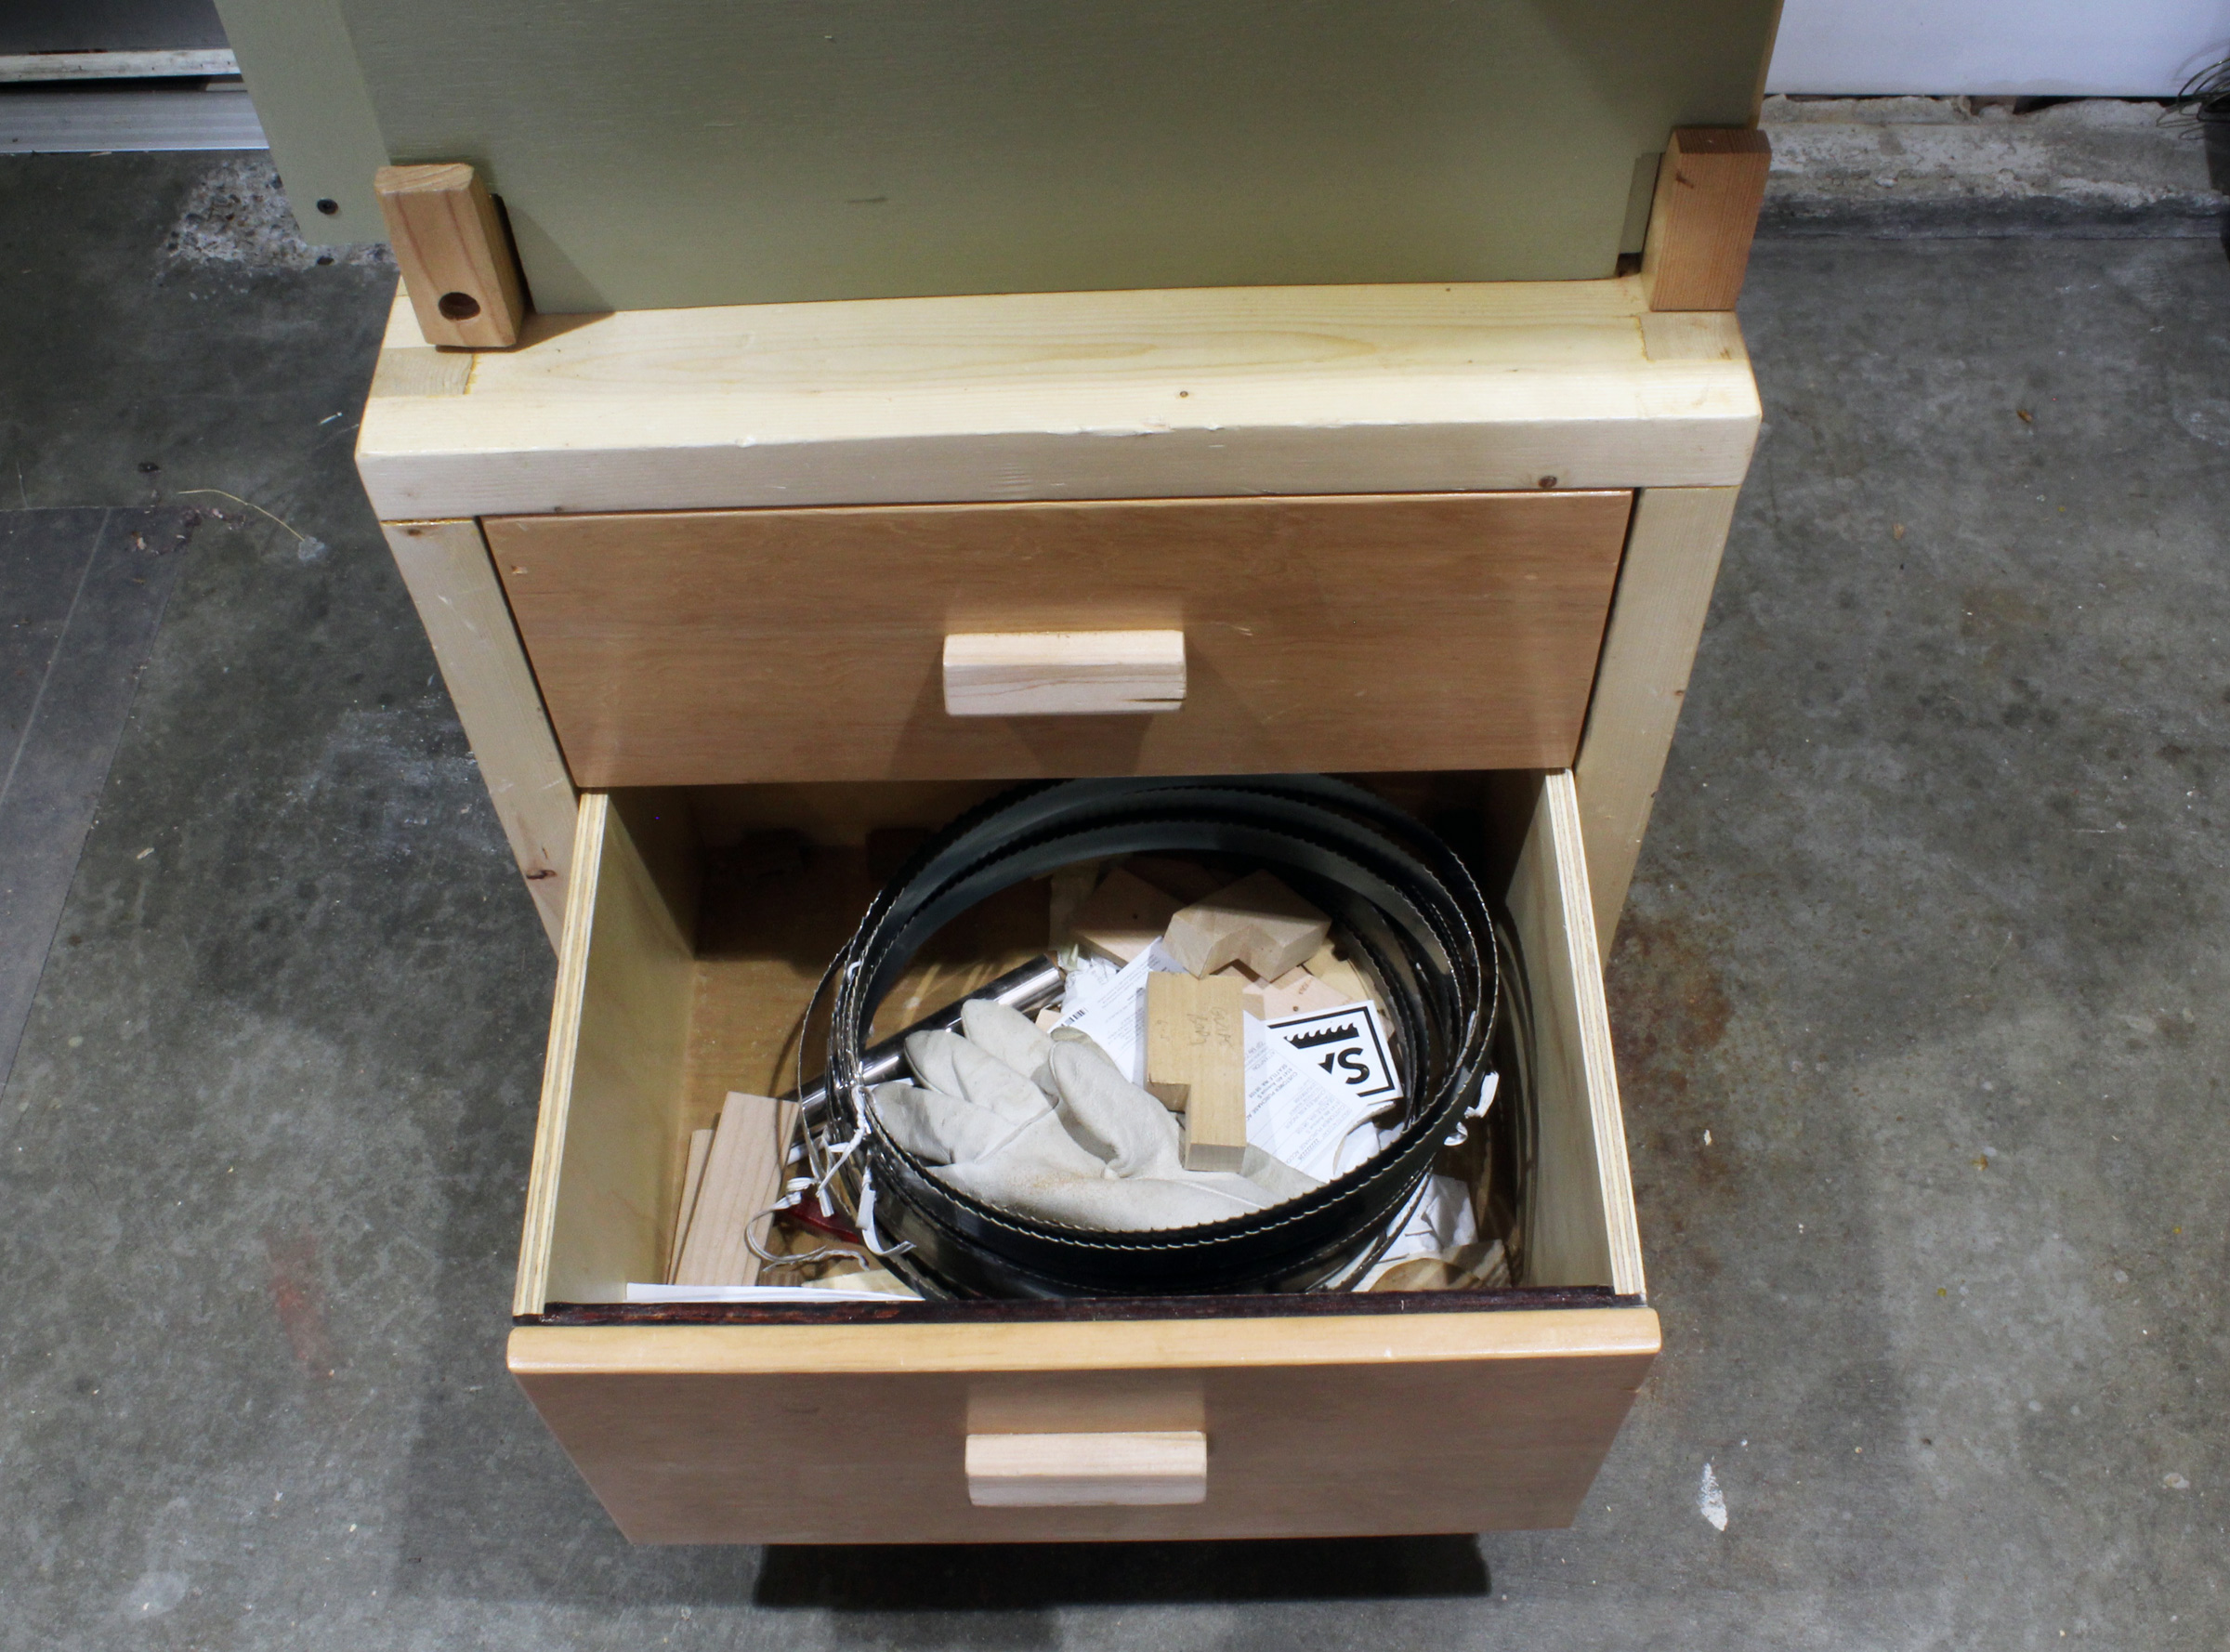
The top drawer built into the base catches sawdust.
After the motor is installed and the wheels on the frame are running true with a blade in place, now comes perhaps the most satisfying part of the whole project: turning the saw on and using it to cut the curved parts for the saw’s own tilting table’s trunnions. A delightful experience.
The bottom drawer holds blades and accessories.
I initially installed a salvaged 1⁄4-hp motor, less power than the 1⁄3-hp to 2-hp range Wandel recommends, and it stalled sometimes, so I shopped around online and found a 1 1⁄2-hp motor on sale. It was a tight squeeze getting the slightly larger motor on the mount. You might consider making the motor tray area a little long to more easily accommodate whatever motor you install.
With the more powerful motor, my finished bandsaw made quick work of 4″ thick, well dried cherry wood, and I’ve made a sled so I can mill up small logs of salvaged wood. The saw has the capacity for cutting wood up to 10 1⁄2″ thick, though I haven’t yet fully tested its limits. The saw runs with only minimal vibration—I’ve been able to balance a coin on edge on the table while the saw is running.
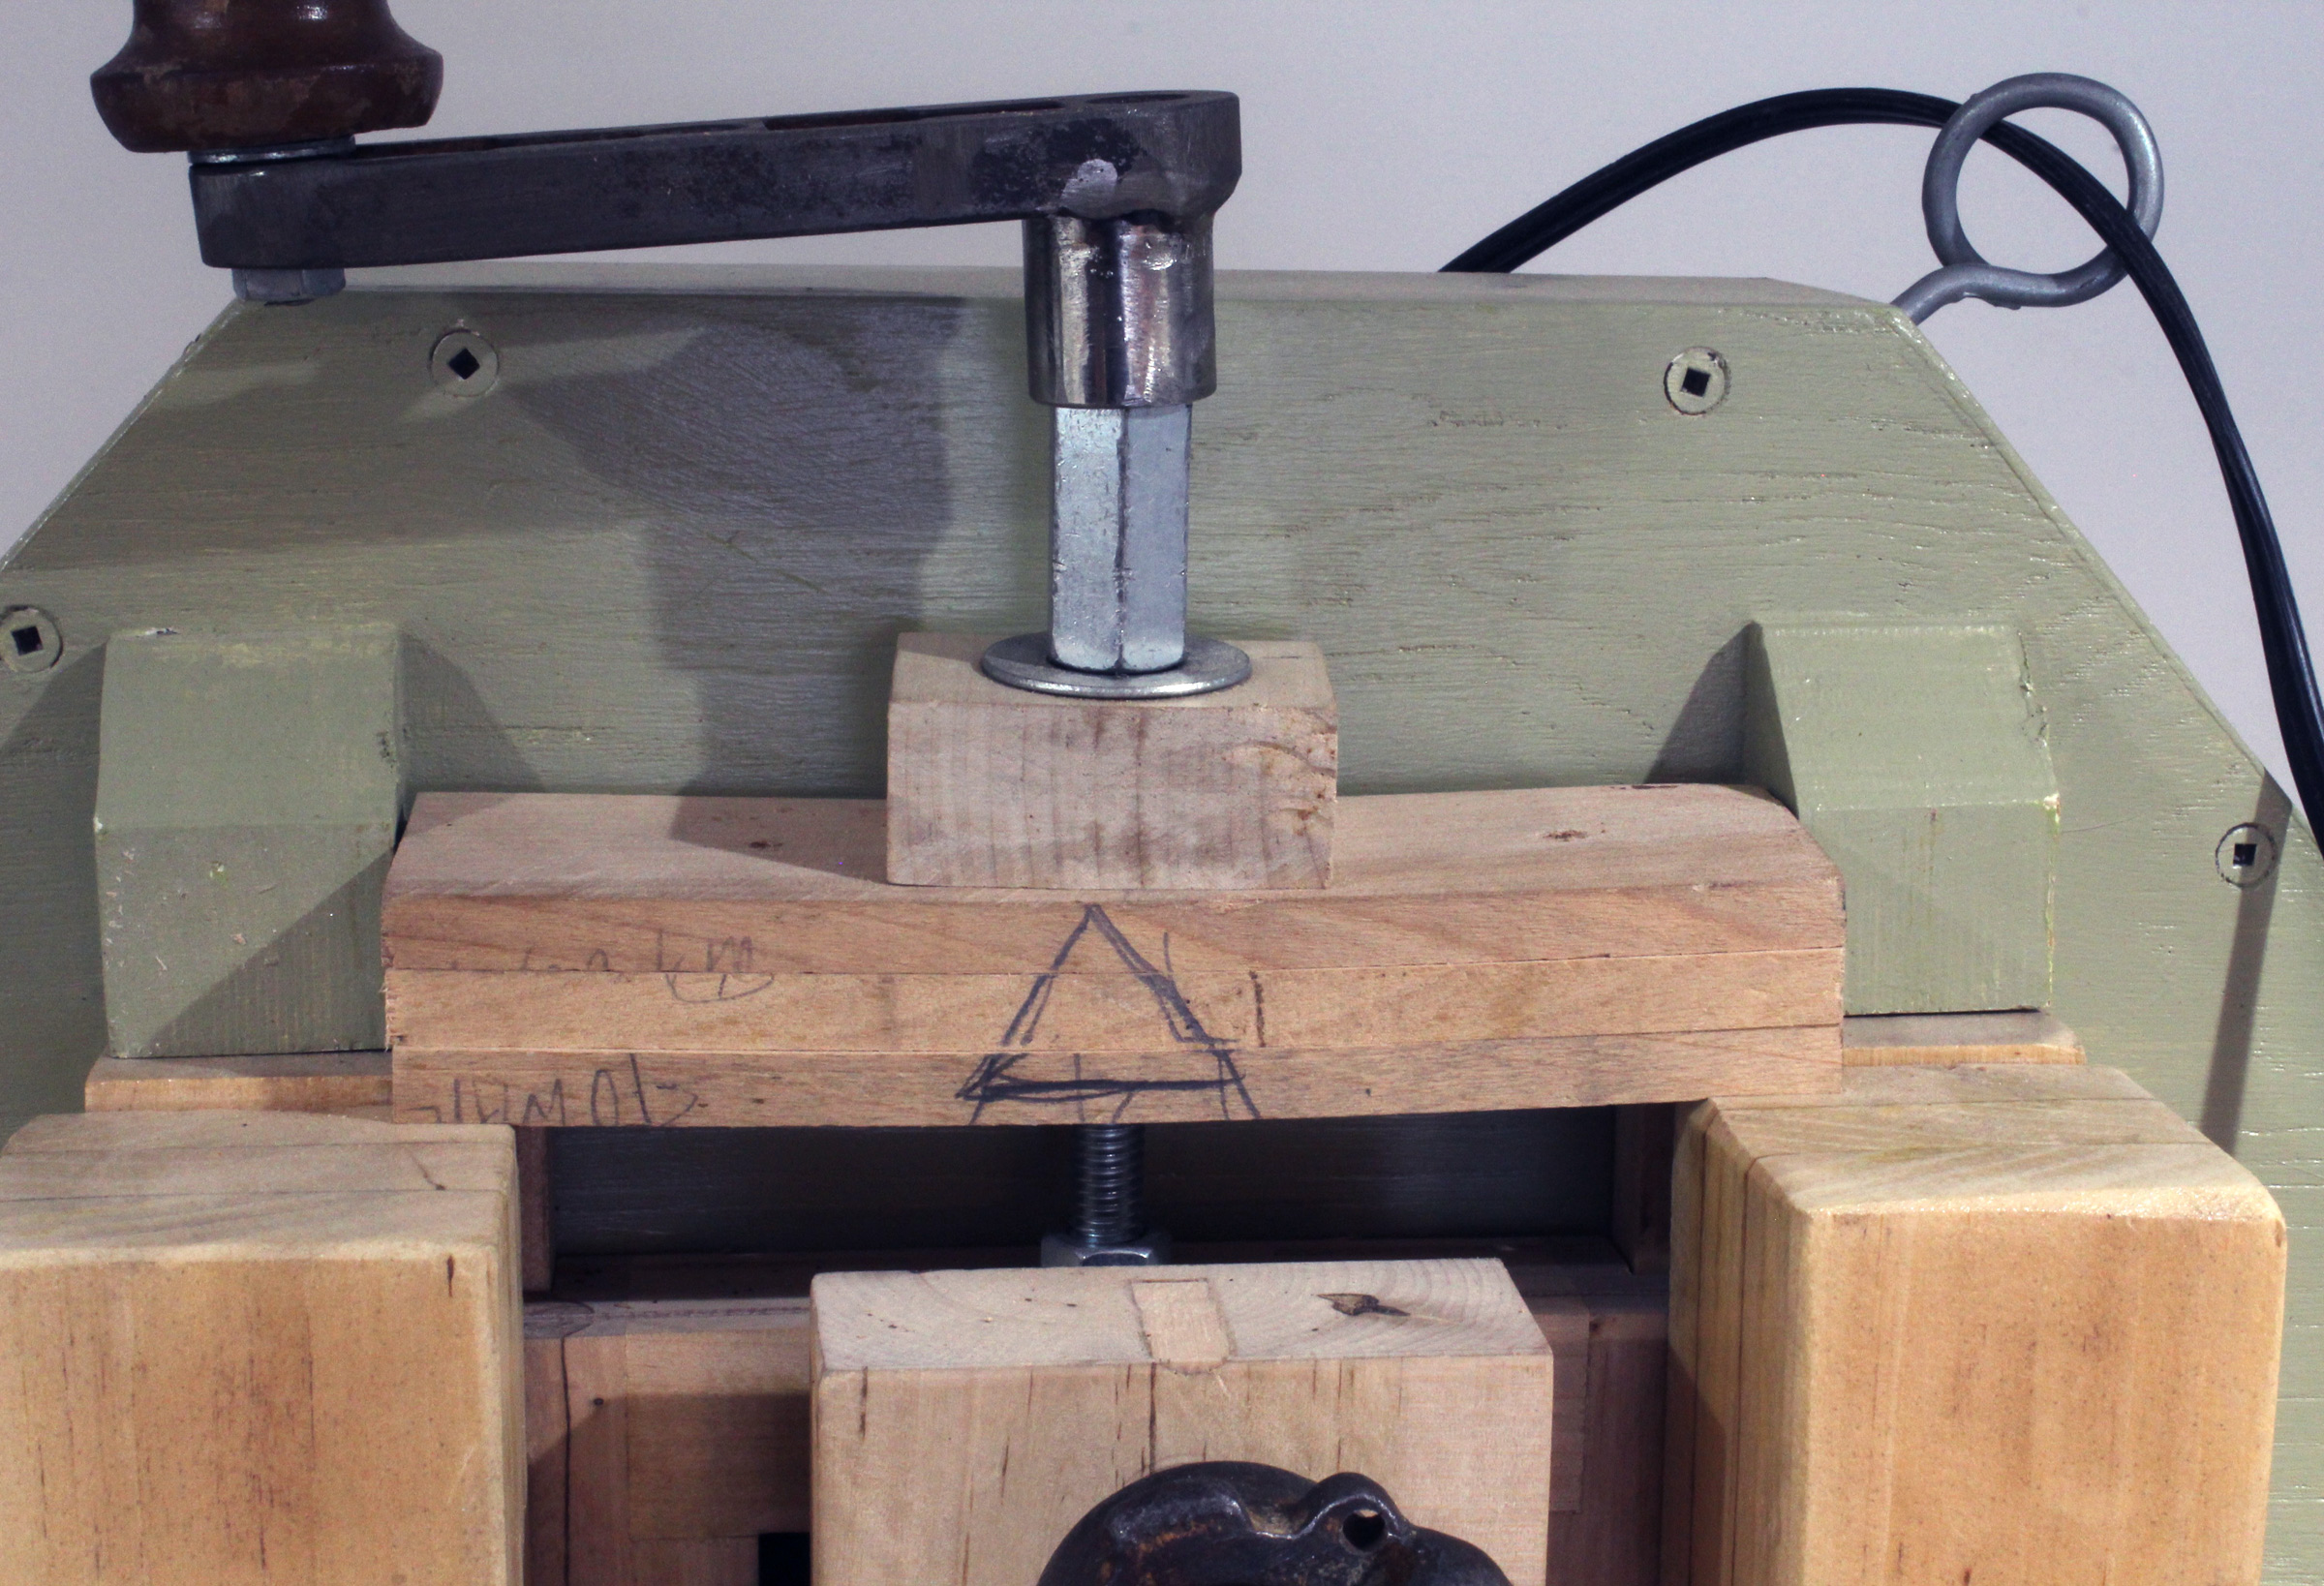
Blade tension is provided by three wooden leaf springs.
Building the bandsaw stretched out over months as I was working in spare time squeezed between family duties and a full-time job—but someone who could devote more time could surely run through the whole project in a week or two.
I added old toothbrushes to scrub the tires and keep them cleaner; Wandel favors letting a layer of sawdust build up on the tires as a way of preventing wear to the rubber and increasing the life of the inner-tubes. I’ve thought that a plexiglass window in the cover to observe blade tracking might be nice. I have also wondered if I could have installed some sort of simple belt-tensioning system other than the slightly elongated motor-mount bolt holes. The saw captures its own sawdust passively in a drawer built into the base. A bit of fine dust leaks out, but one could tweak the enclosures to plug leaks. A dust port for a vacuum would be easy to add.
Wandel’s plans are thorough and easy to follow, and the saw I ended up with is powerful and accurate. I enjoyed the build so much I may not be able to resist giving it away so I can build another one. I’m tempted to build Wandel’s larger 20″ saw next.
Charles Kiblinger is an environmental consultant taking a sabbatical to pursue tinkering, woodworking, and making things in a one-car garage. His boating experiences have mostly been in canoes and kayaks. He lives in Seattle with his wife and son.
The air-cooled tool guide angles upward underneath the wheel. The top face of the wheel can be used, with the help of the tool support at left, for large or curved blades. In the box at right there is a slotted disk that provides a view of the blade being sharpened on the tool guide.
I spent a few years looking at some pretty crusty plane irons and chisels, tried sharpening them with conventional stones and old-school methods, but I was not satisfied with the dubious results that I was getting. So, I did some research on sharpening systems and came across Work Sharp’s WS-3000 Woodworking Tool Sharpener. It promised consistent and accurate sharpening of the tools that I use in boat building and restoration, so I bought it to give it a trial run.
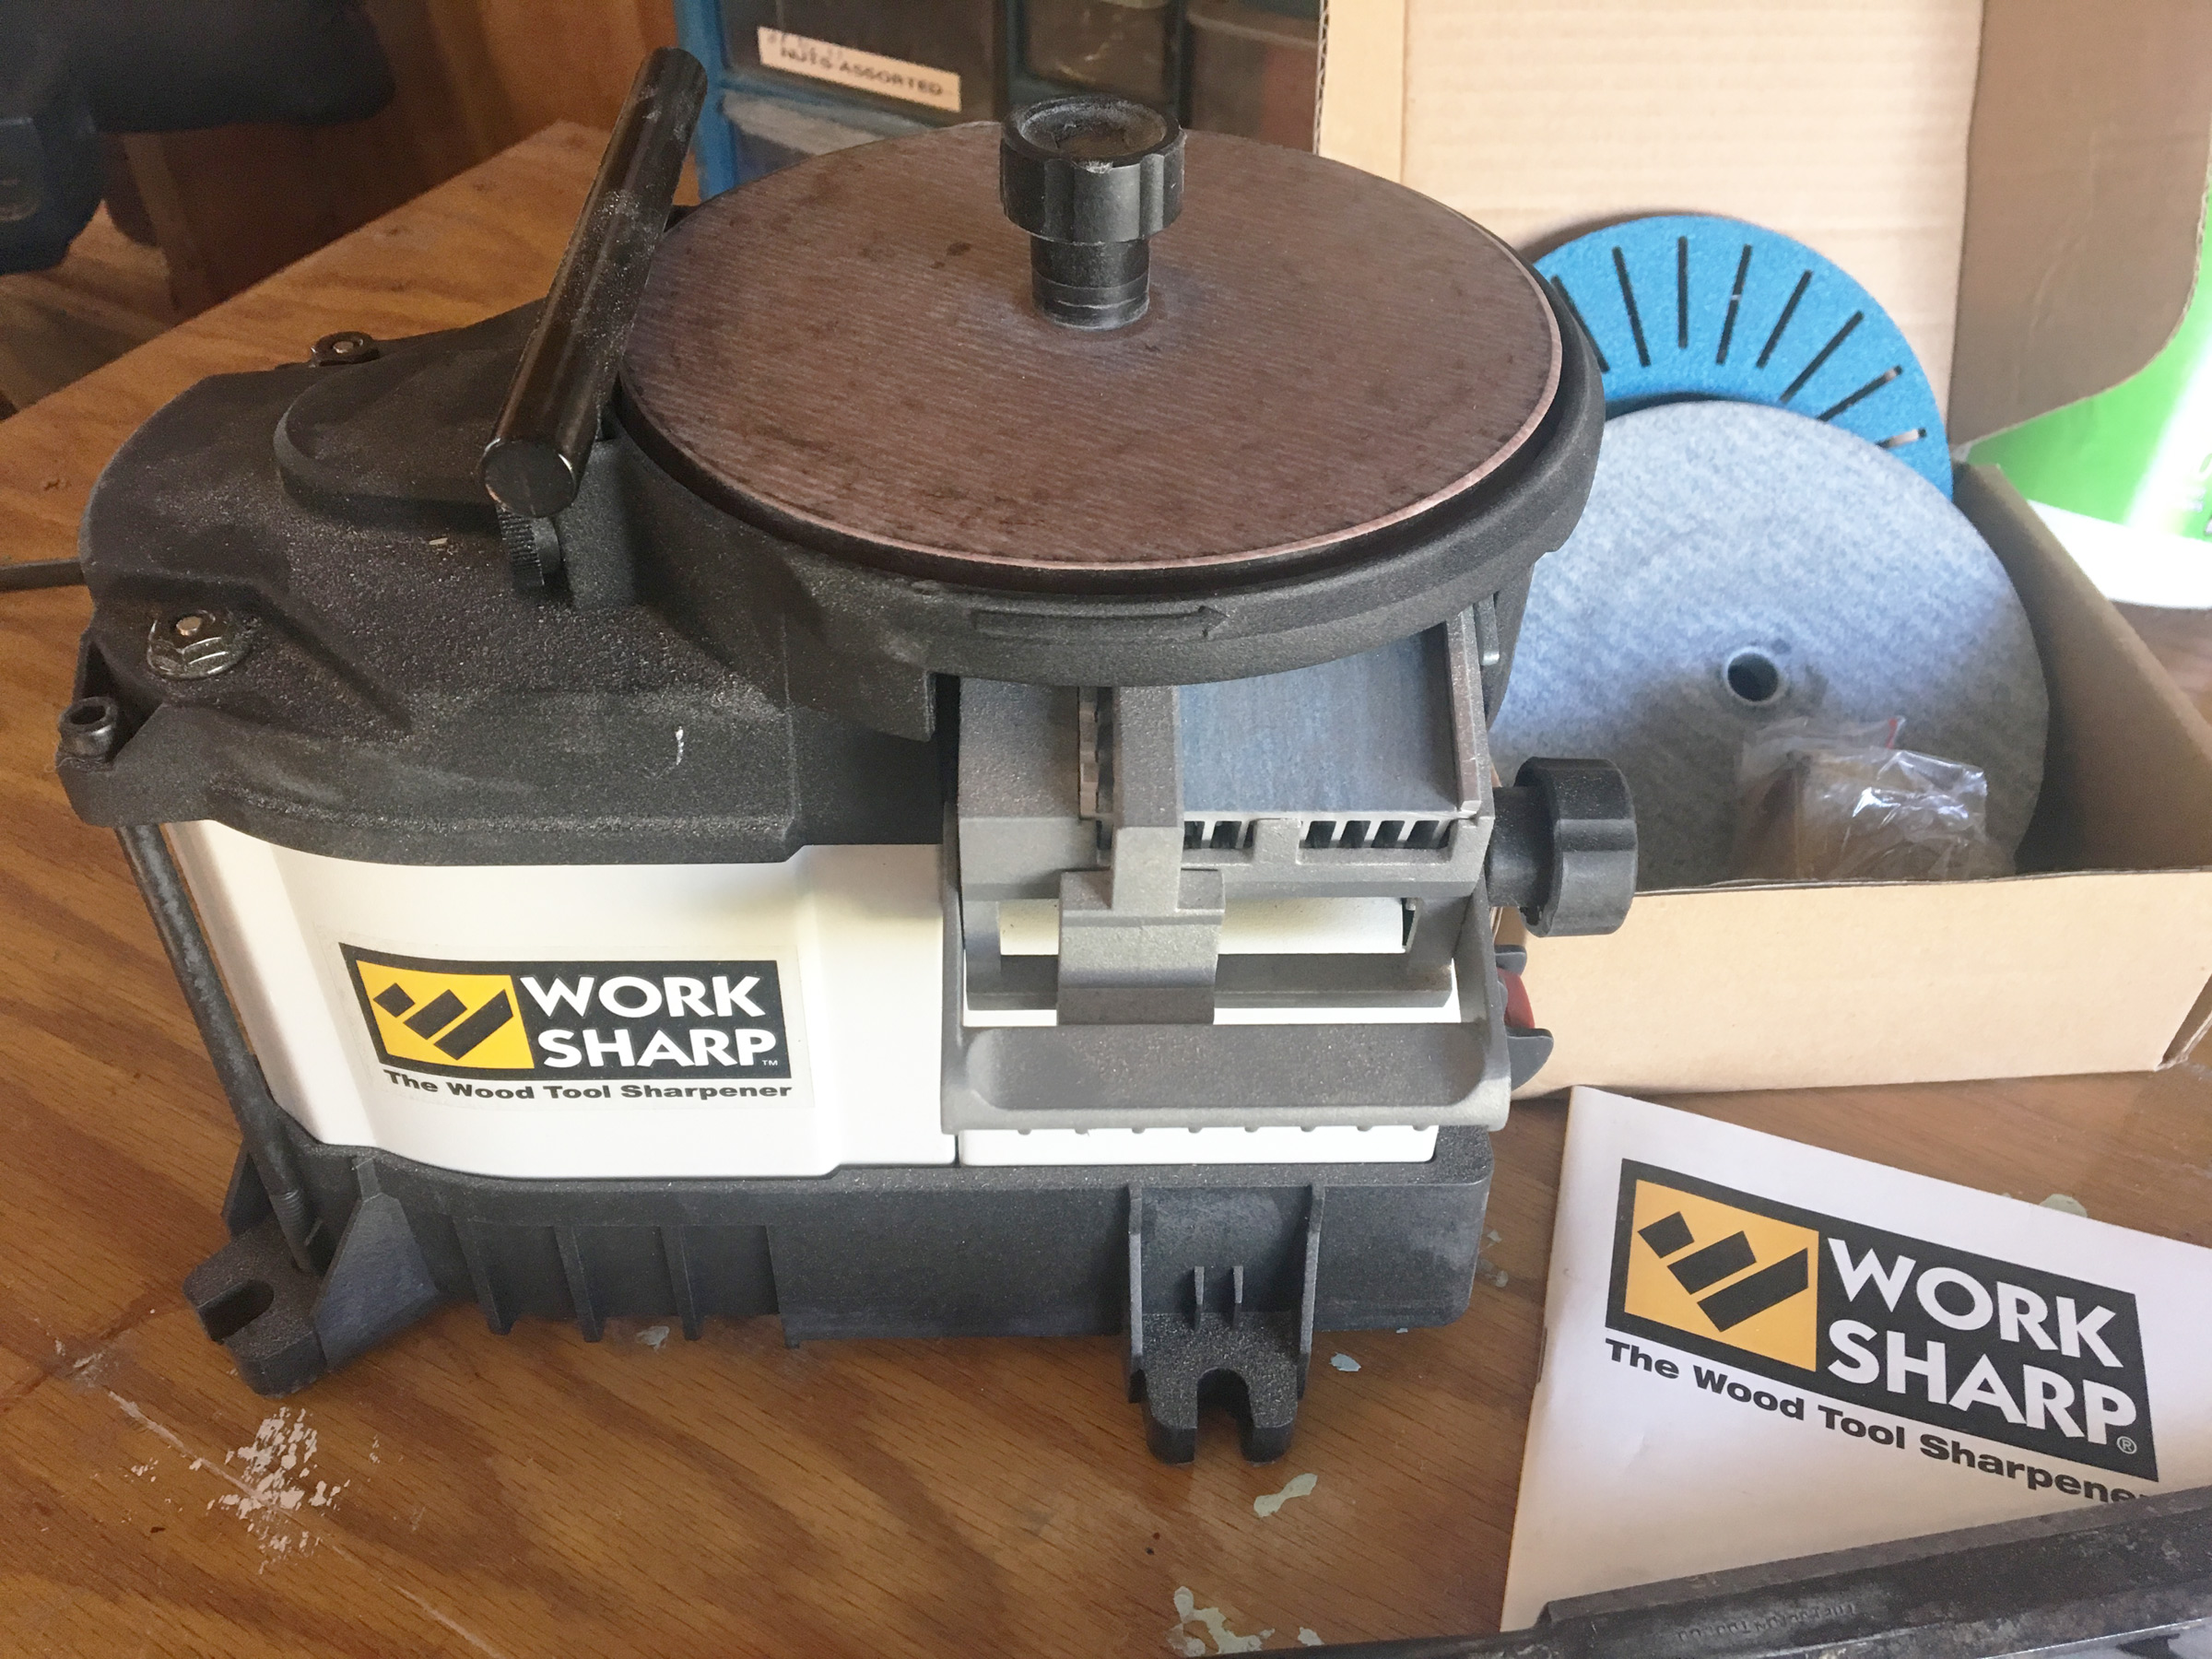
The Work Sharp WS-3000 is a dry sharpening system that uses air cooling while sharpening, avoiding the mess of a wet system. The high-torque 1/5-hp motor turns the wheel at just 580 rpm, which keeps tool heat down during sharpening. The WS-3000 has a cast-aluminum top and a sheet-metal housing, yet it has substantial weight to minimize vibration. It has four tabs for mounting the machine on a benchtop, but the machine doesn’t vibrate enough to walk across the bench, so it’s not necessary to bolt it down.
Chisels and plane irons up to 2″ wide rest beneath the wheel on an adjustable guide that incorporates fan-forced airflow to take heat away from the tool being sharpened. This sharpening rest allows precise, repeatable bevel selections of 20, 25, 30, and 35 degrees for chisels and plane irons up to 2″ wide. Another feature of this “plunge-pull” sharpening port is a 2″-square pressure-sensitive-adhesive (PSA) P400 ceramic oxide abrasive patch on the port’s tool rest that removes the burr that curls away from the tool’s bevel. It hones both sides of the tool in a single operation, speeding up the process.
The WS-3000 works quickly and is easy to use. The face of the horizontal sharpening wheel provides more sharpening surface than that of a vertical wheel system. The kit comes with two tempered glass wheels with flat and true surfaces on which to attach various PSA abrasive discs. Different grits of PSA abrasive discs are included; we set our wheels up with 120, 400, 1,000, and micro-mesh 3,600. Finer grits and a leather strop wheel are also available. A crepe-rubber stick is included to clean the abrasive discs. The glass wheels are changed out with the twist of one knob, which makes it easy to start with a coarse grit to remove nicks in a blade and then put a fine edge on it.
The kit also comes with an “Edge-Vision See-Through Slotted Wheel”. The slots, when matched with the same pattern of slots on the abrasive disks, allow observation while sharpening so I don’t have to remove the tool repeatedly to check progress. That makes the job not only faster and easier but lets you know when to stop.
On top of the WS-3000 there is an adjustable tool rest for sharpening blades wider than 2″ and the curved blades of gouges.
I like using hand planes and chisels, but I’ve never acquired the skill and patience required to get good results with sharpening stones. The WS-3000 helps me keep my woodworking tools at a respectable level of sharpness with minimum effort.
Kent Lewis and his wife Audrey have a small fleet of boats in Florida, having built a Penobscot 14 and restored many other wooden boats. They blog about their adventures in their blog.
The W-3000 is available from Work Sharp for $249.95 and comes with a 2-year warranty. Prices listed by online retailers are as low as $190.
Is there a product that might be useful for boatbuilding, cruising, or shore-side camping that you’d like us to review? Please email your suggestions.
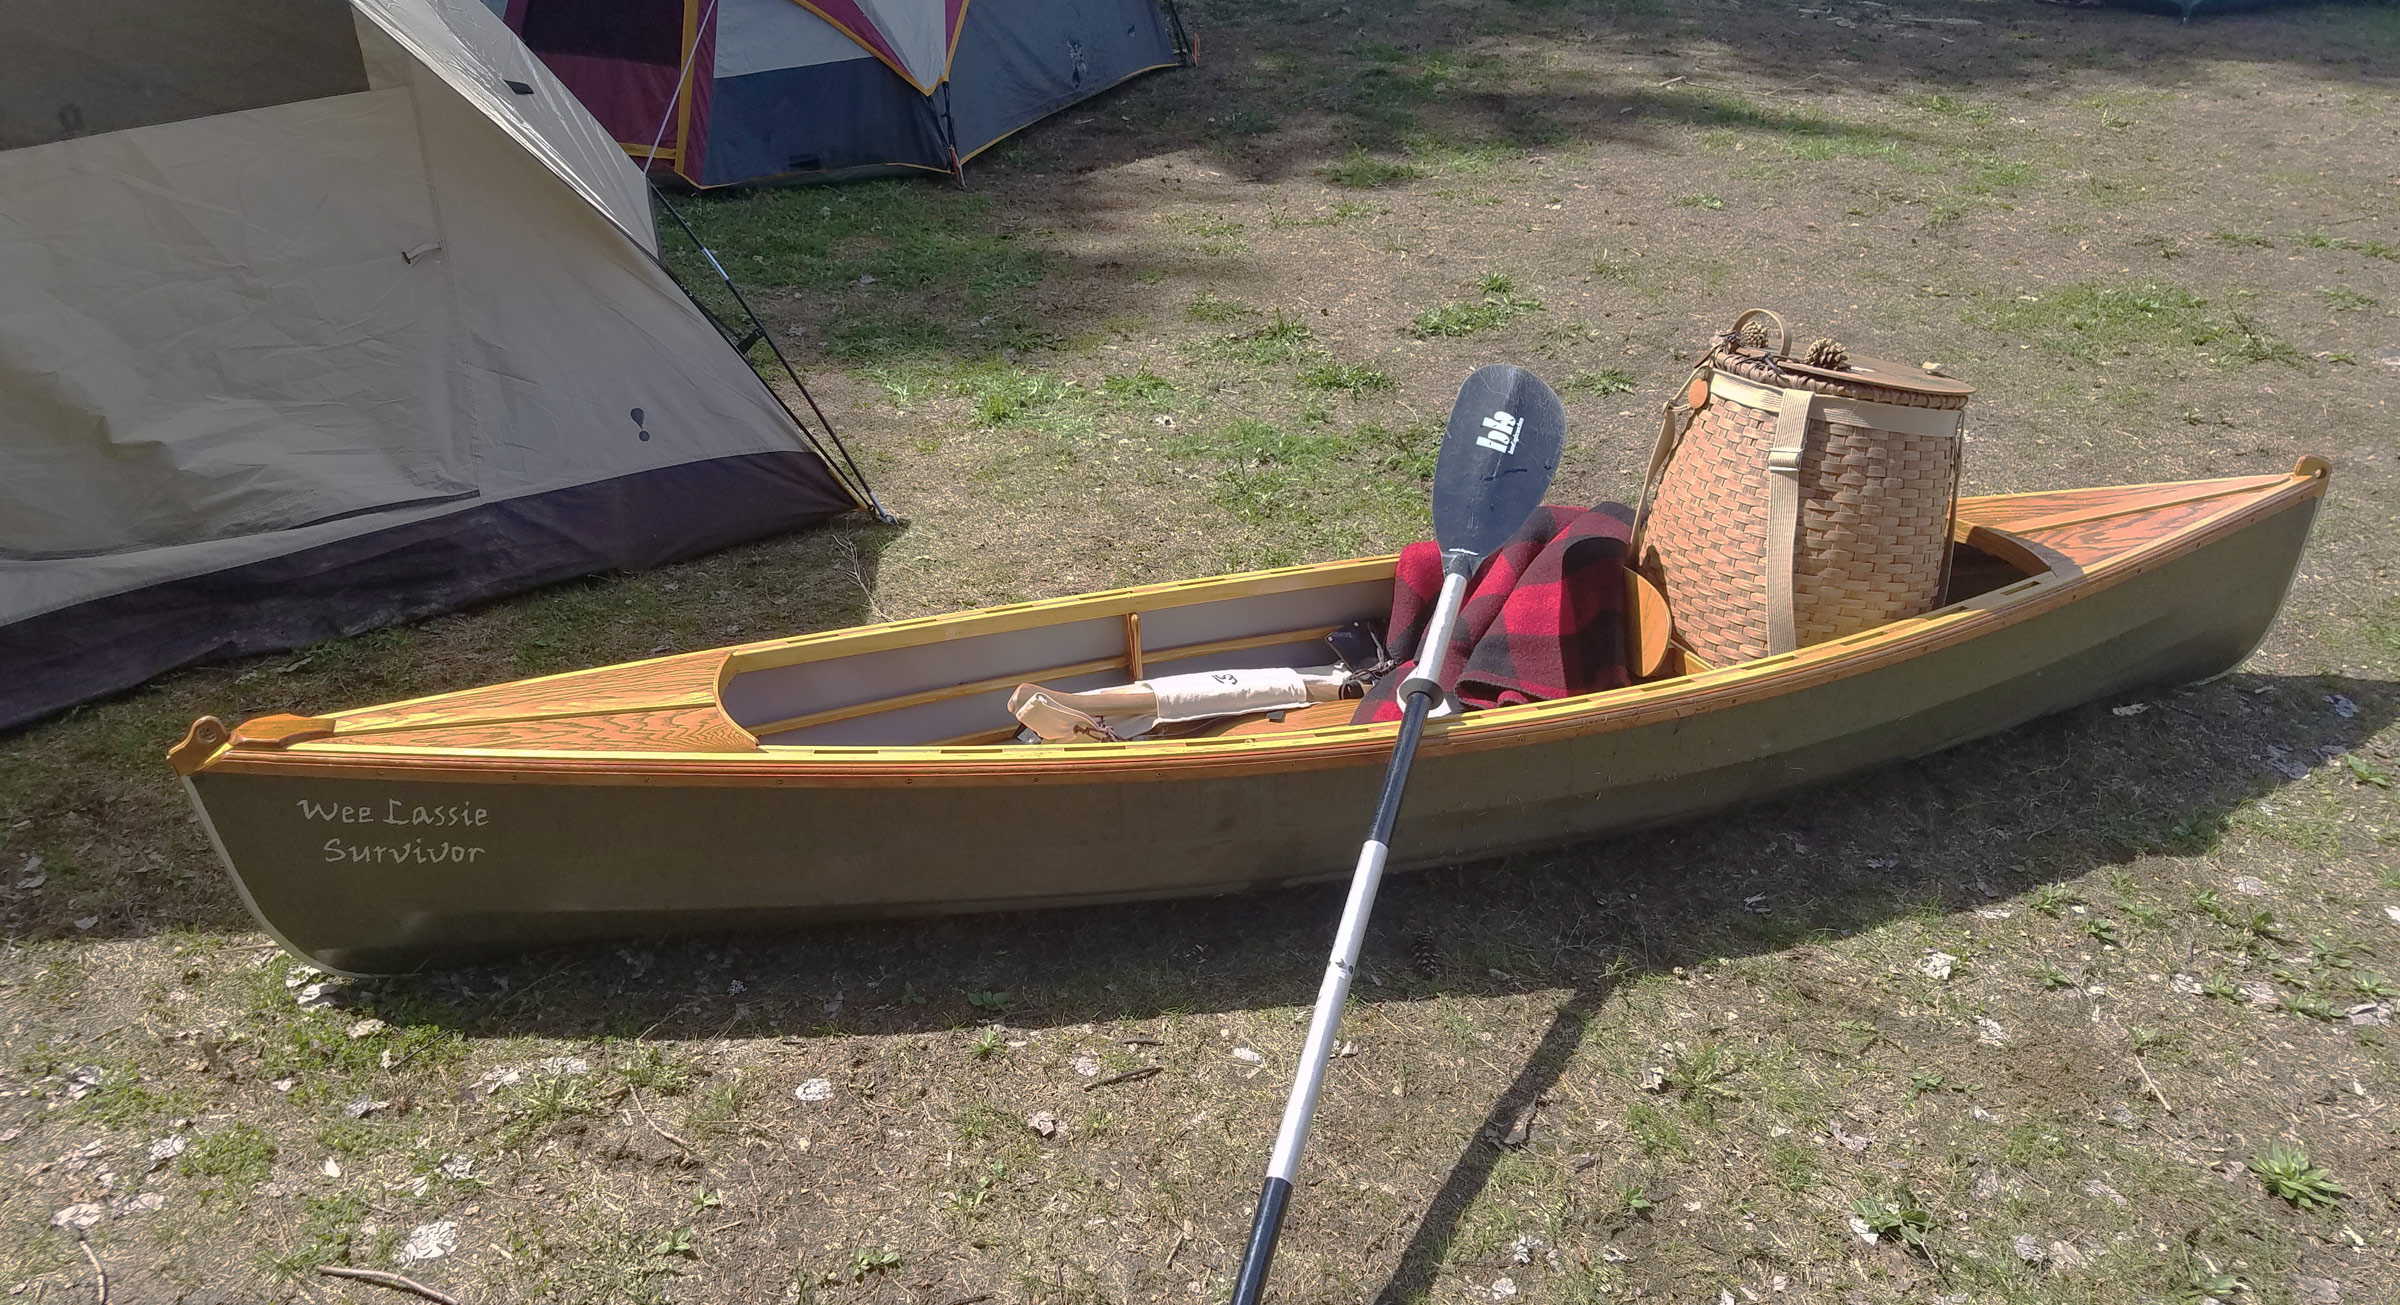
James made his Wee Lassie frame from oak, cedar, spruce, cherry, and marine plywood. The hull is a vinyl-backed polyester covered with marine varnish.
James Shamis grew up in the Adirondacks, where traveling among the lakes and ponds required boats that were lightly built and easily portaged. In his late teen years, he spent his summers working for Milo Williams restoring antique Adirondack guideboats. While working in Milo’s shop on the north shore of Little Moose Lake, he grew to appreciate the beauty of the guideboats and the pleasure of working with wood.
Among all of the boats Milo had under his care was a Wee Lassie, an undecked canoe designed by Henry Rushton. “I had never seen such a small boat before,” James said. “I thought it was a child’s boat the first time I saw it, and, after many days of prodding on my part, Milo finally let me bring it down and take it for a paddle. I was in love!” James had enjoyed rowing the guideboats, but the Wee Lassie, powered by a double-bladed paddle, was light and quick. And he was on his own. “No room for a guest, just me and the water.”
James made up his mind that he’d someday have a Wee Lassie, but the years slipped by and he never found one he could buy and restore. Still, his fondness for the canoe endured for decades.
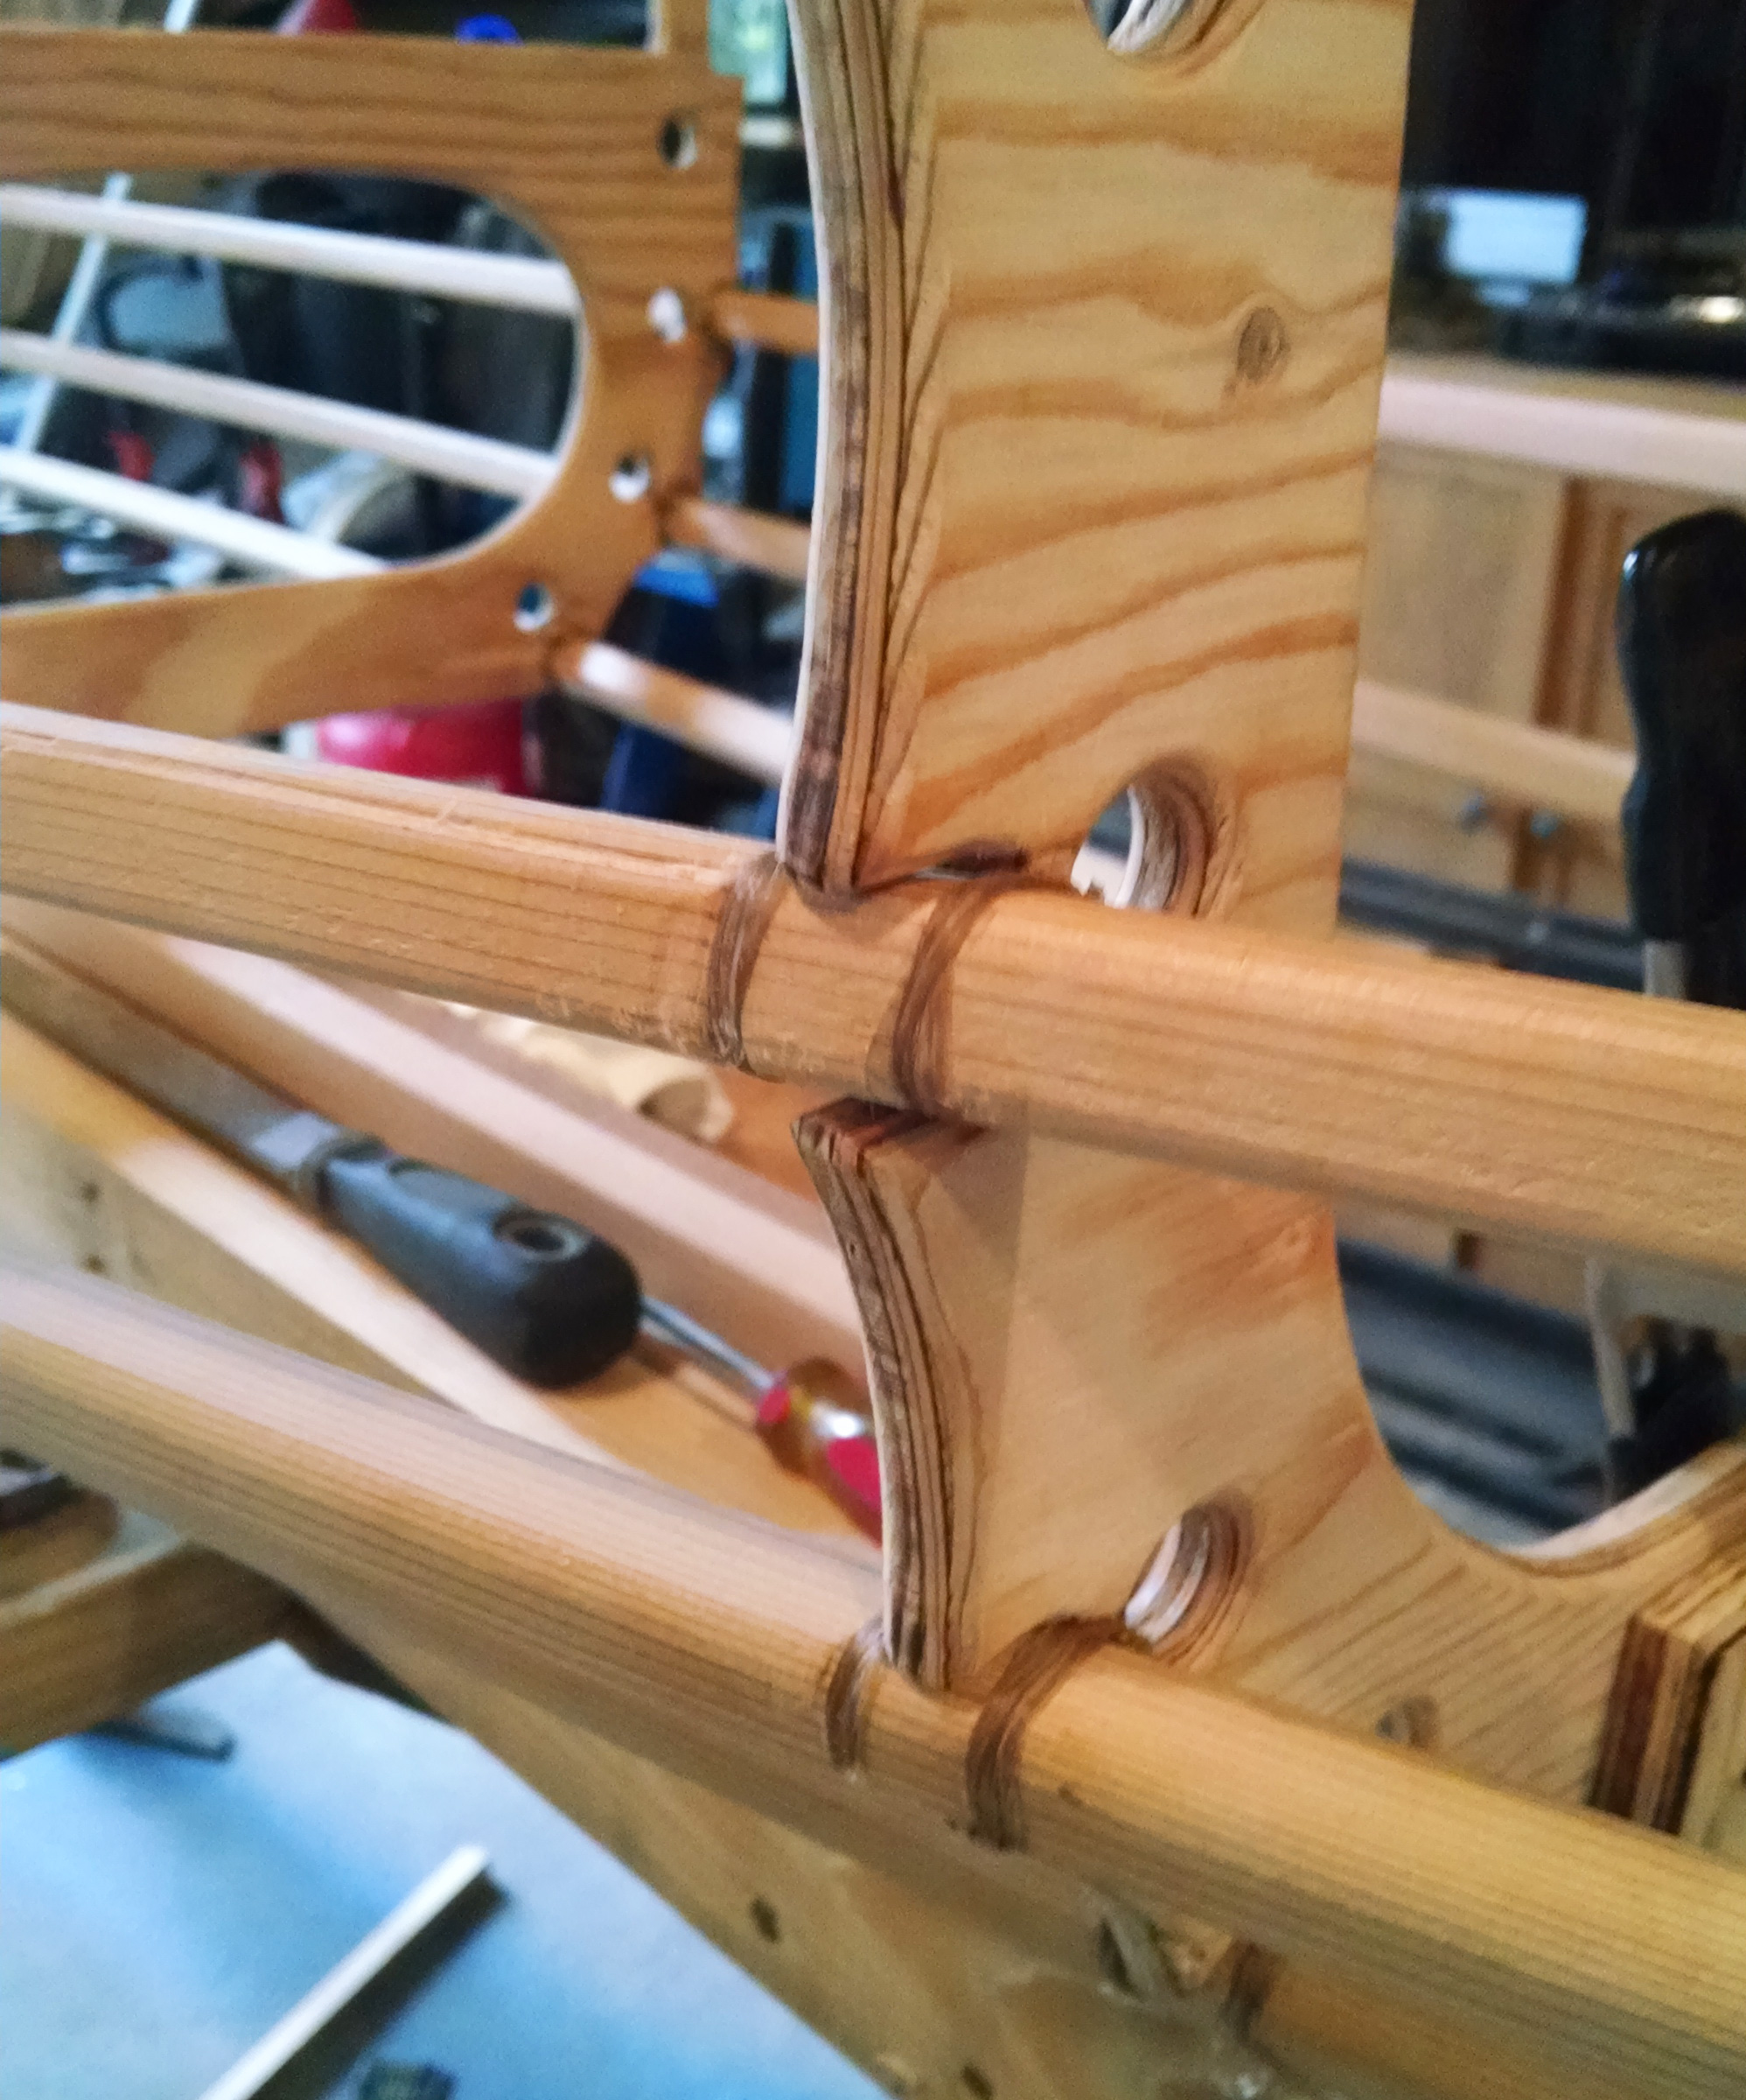
James preferred lashing the frame together over the messier work of using screws and epoxy.
In 2015, doctors discovered James had a vocal-cord cancer. Glottic cancers respond well to radiation treatment and are almost always curable, but the health scare was a wake-up call for James. During his radiation treatments, his thoughts were drawn to his teenage years and the time he spent paddling the Wee Lassie on Little Moose Lake. The memories were his refuge during a difficult time, and after a few rounds of radiation he decided to bring a Wee Lassie back into his life—he’d build his own.
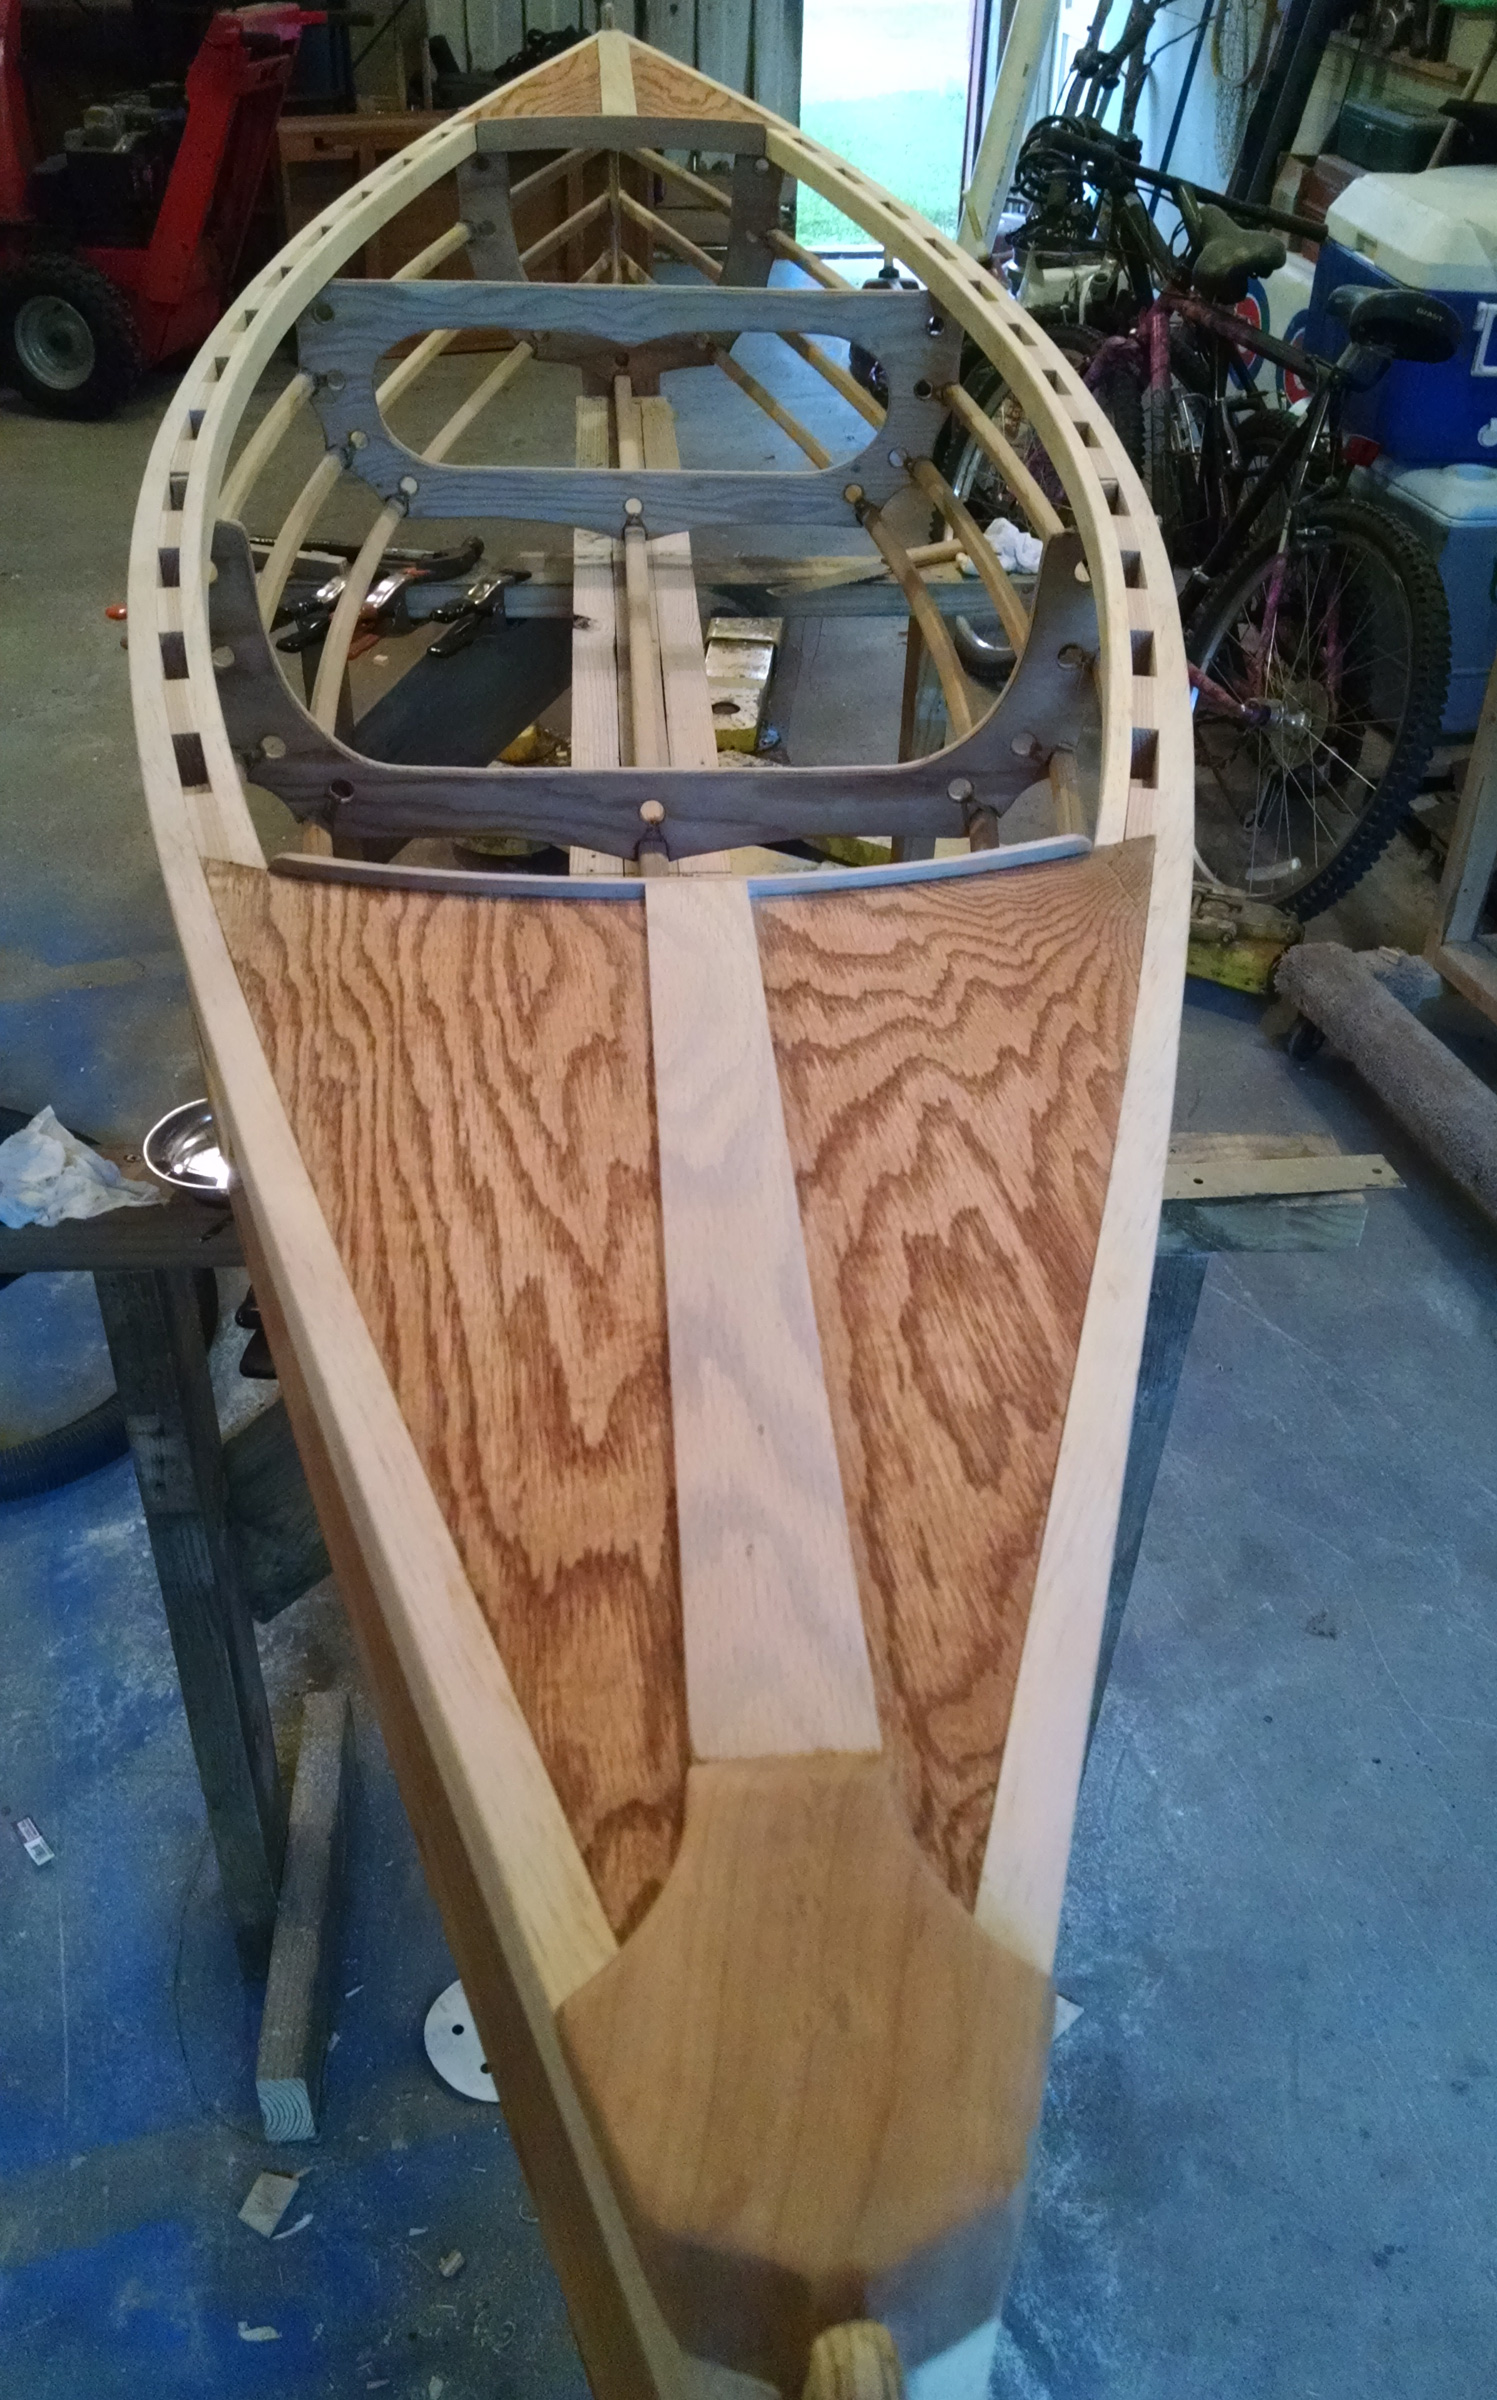
James added decks as reminders of the Adirondack guide boats he used to work on as a teenager.
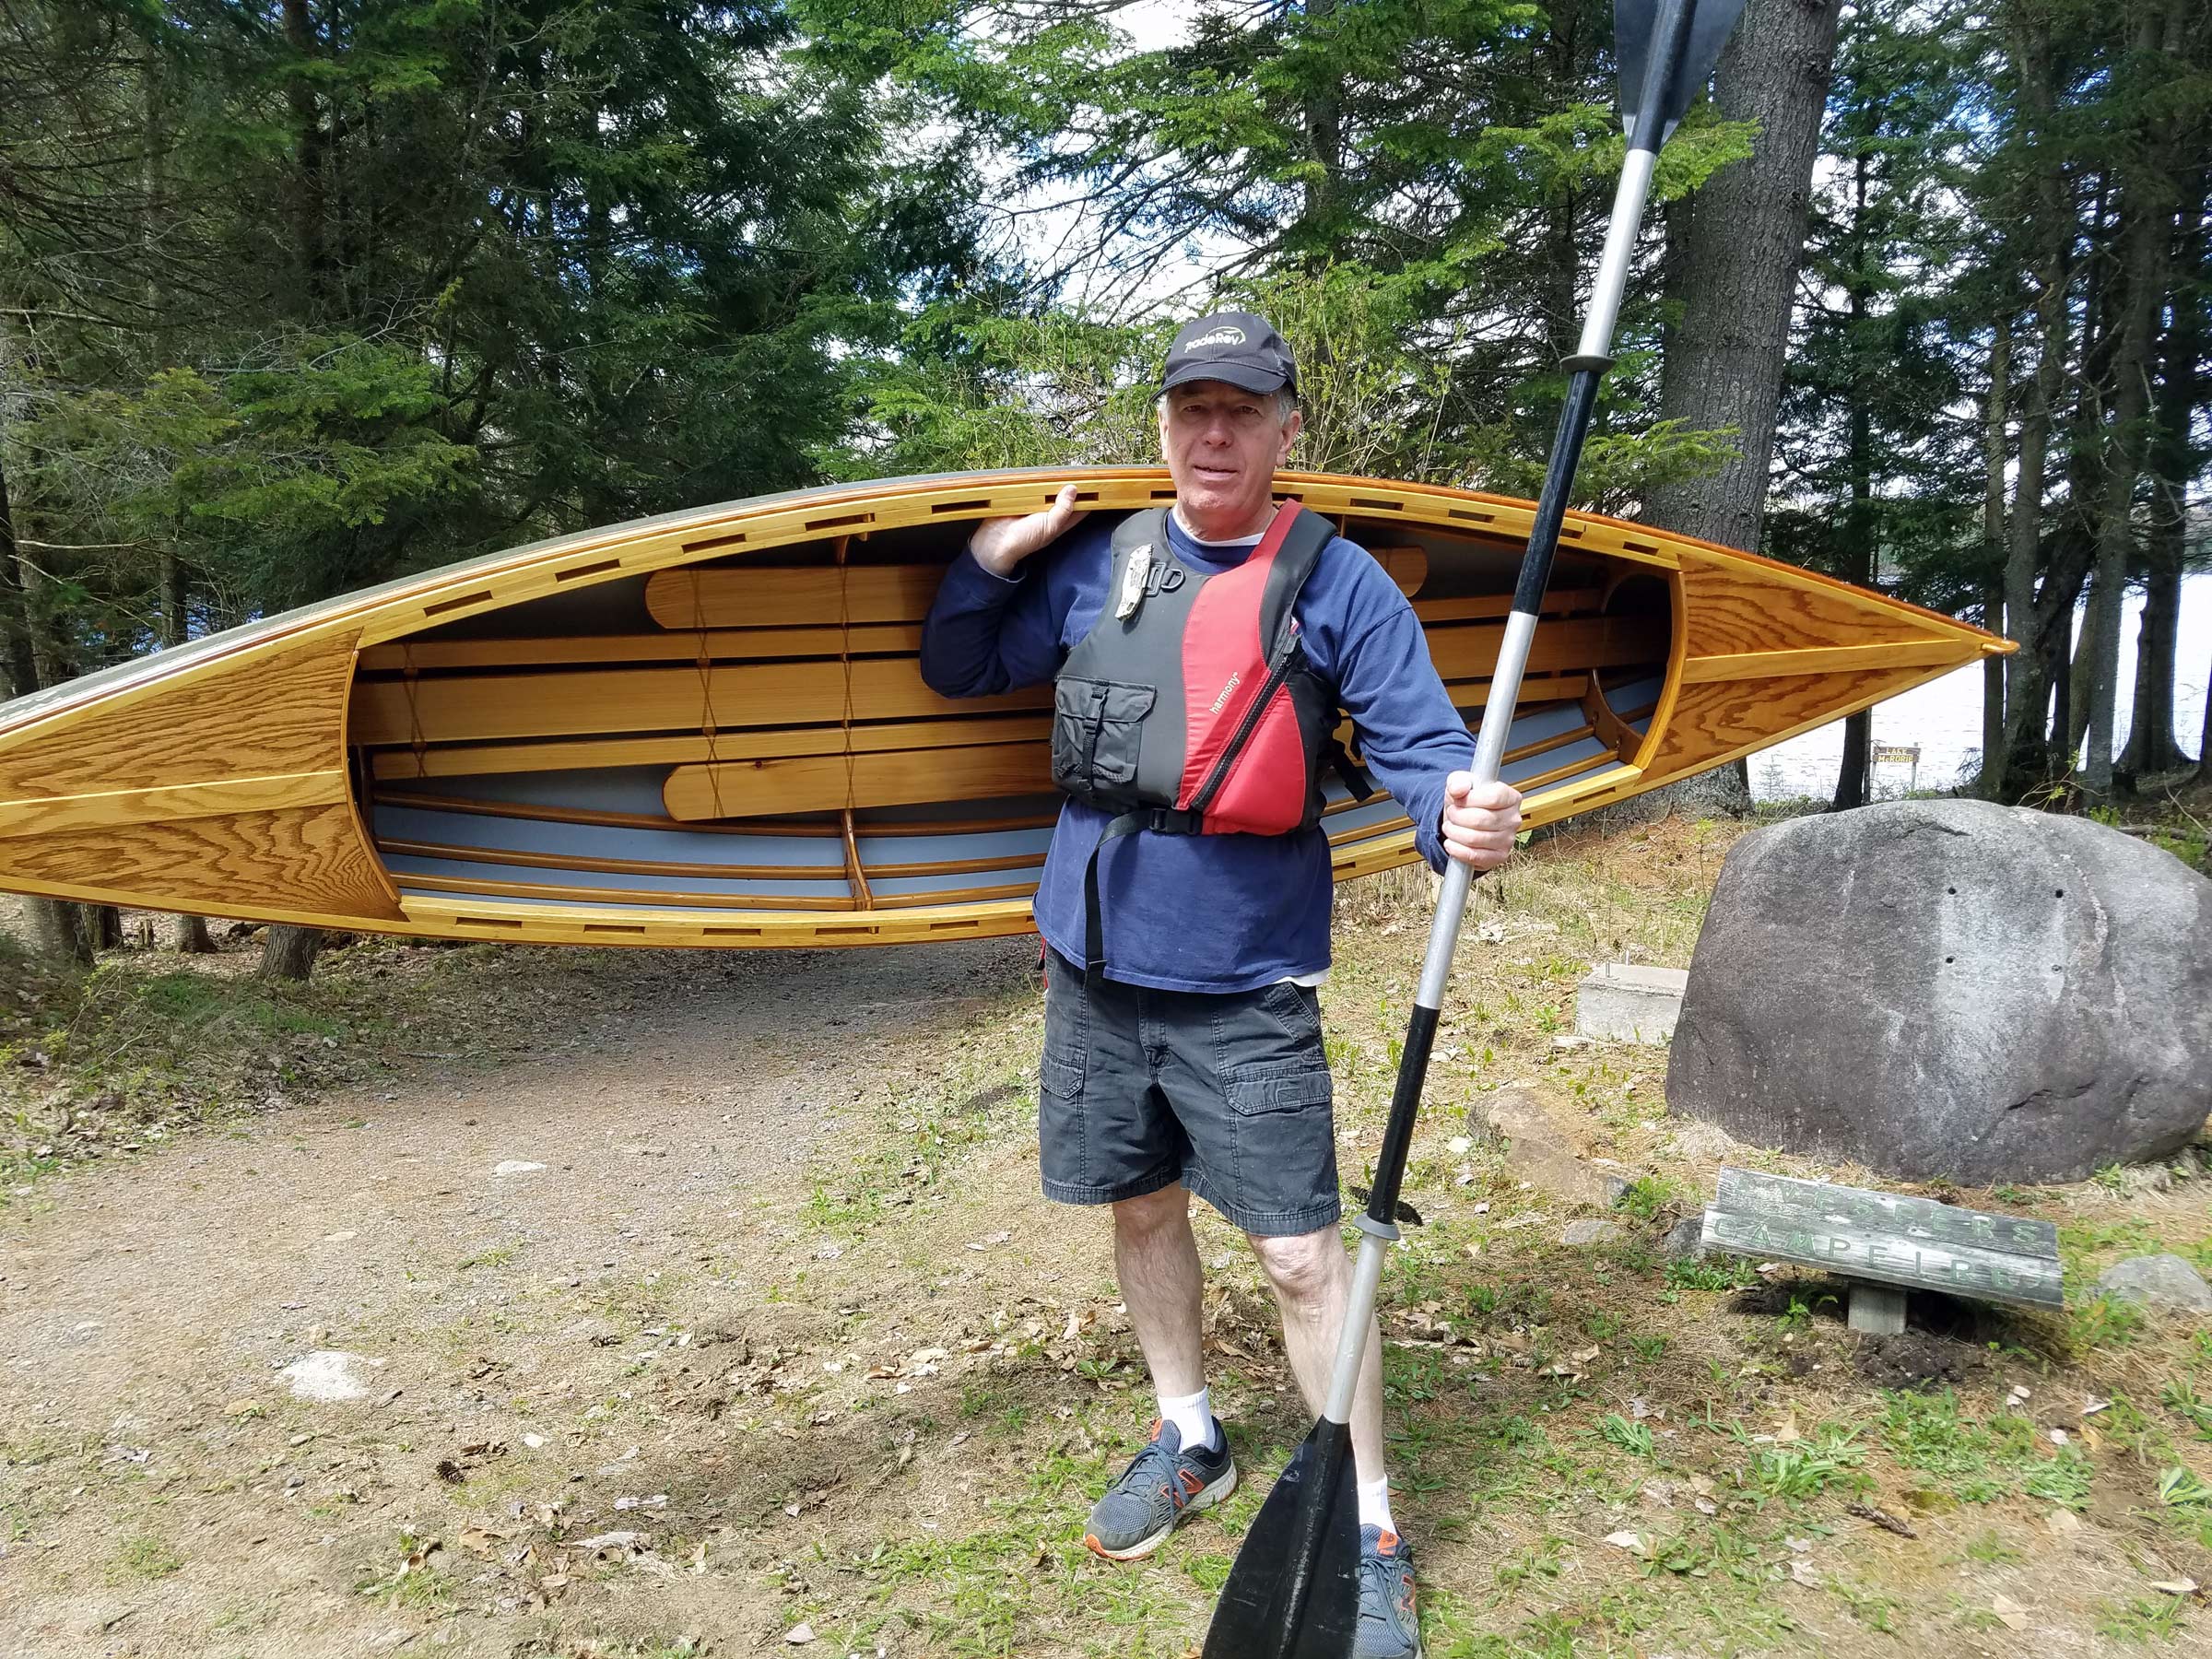
Rushton’s original Wee Lassie, built in 1893, was 10′6″ long, weighed just 20 lbs, and was a delicate lapstrake construction of cedar planks, just 3/16″ thick, on closely spaced steam-bent oak frames. Building a replica true to the original would require the skills of an experienced craftsman. For a first boatbuilding project, James was drawn to Dave Gentry’s version of the Wee Lassie, an adaptation for skin-on-frame construction that would be quick to build, require nominal skills, and yet be as light as the original.
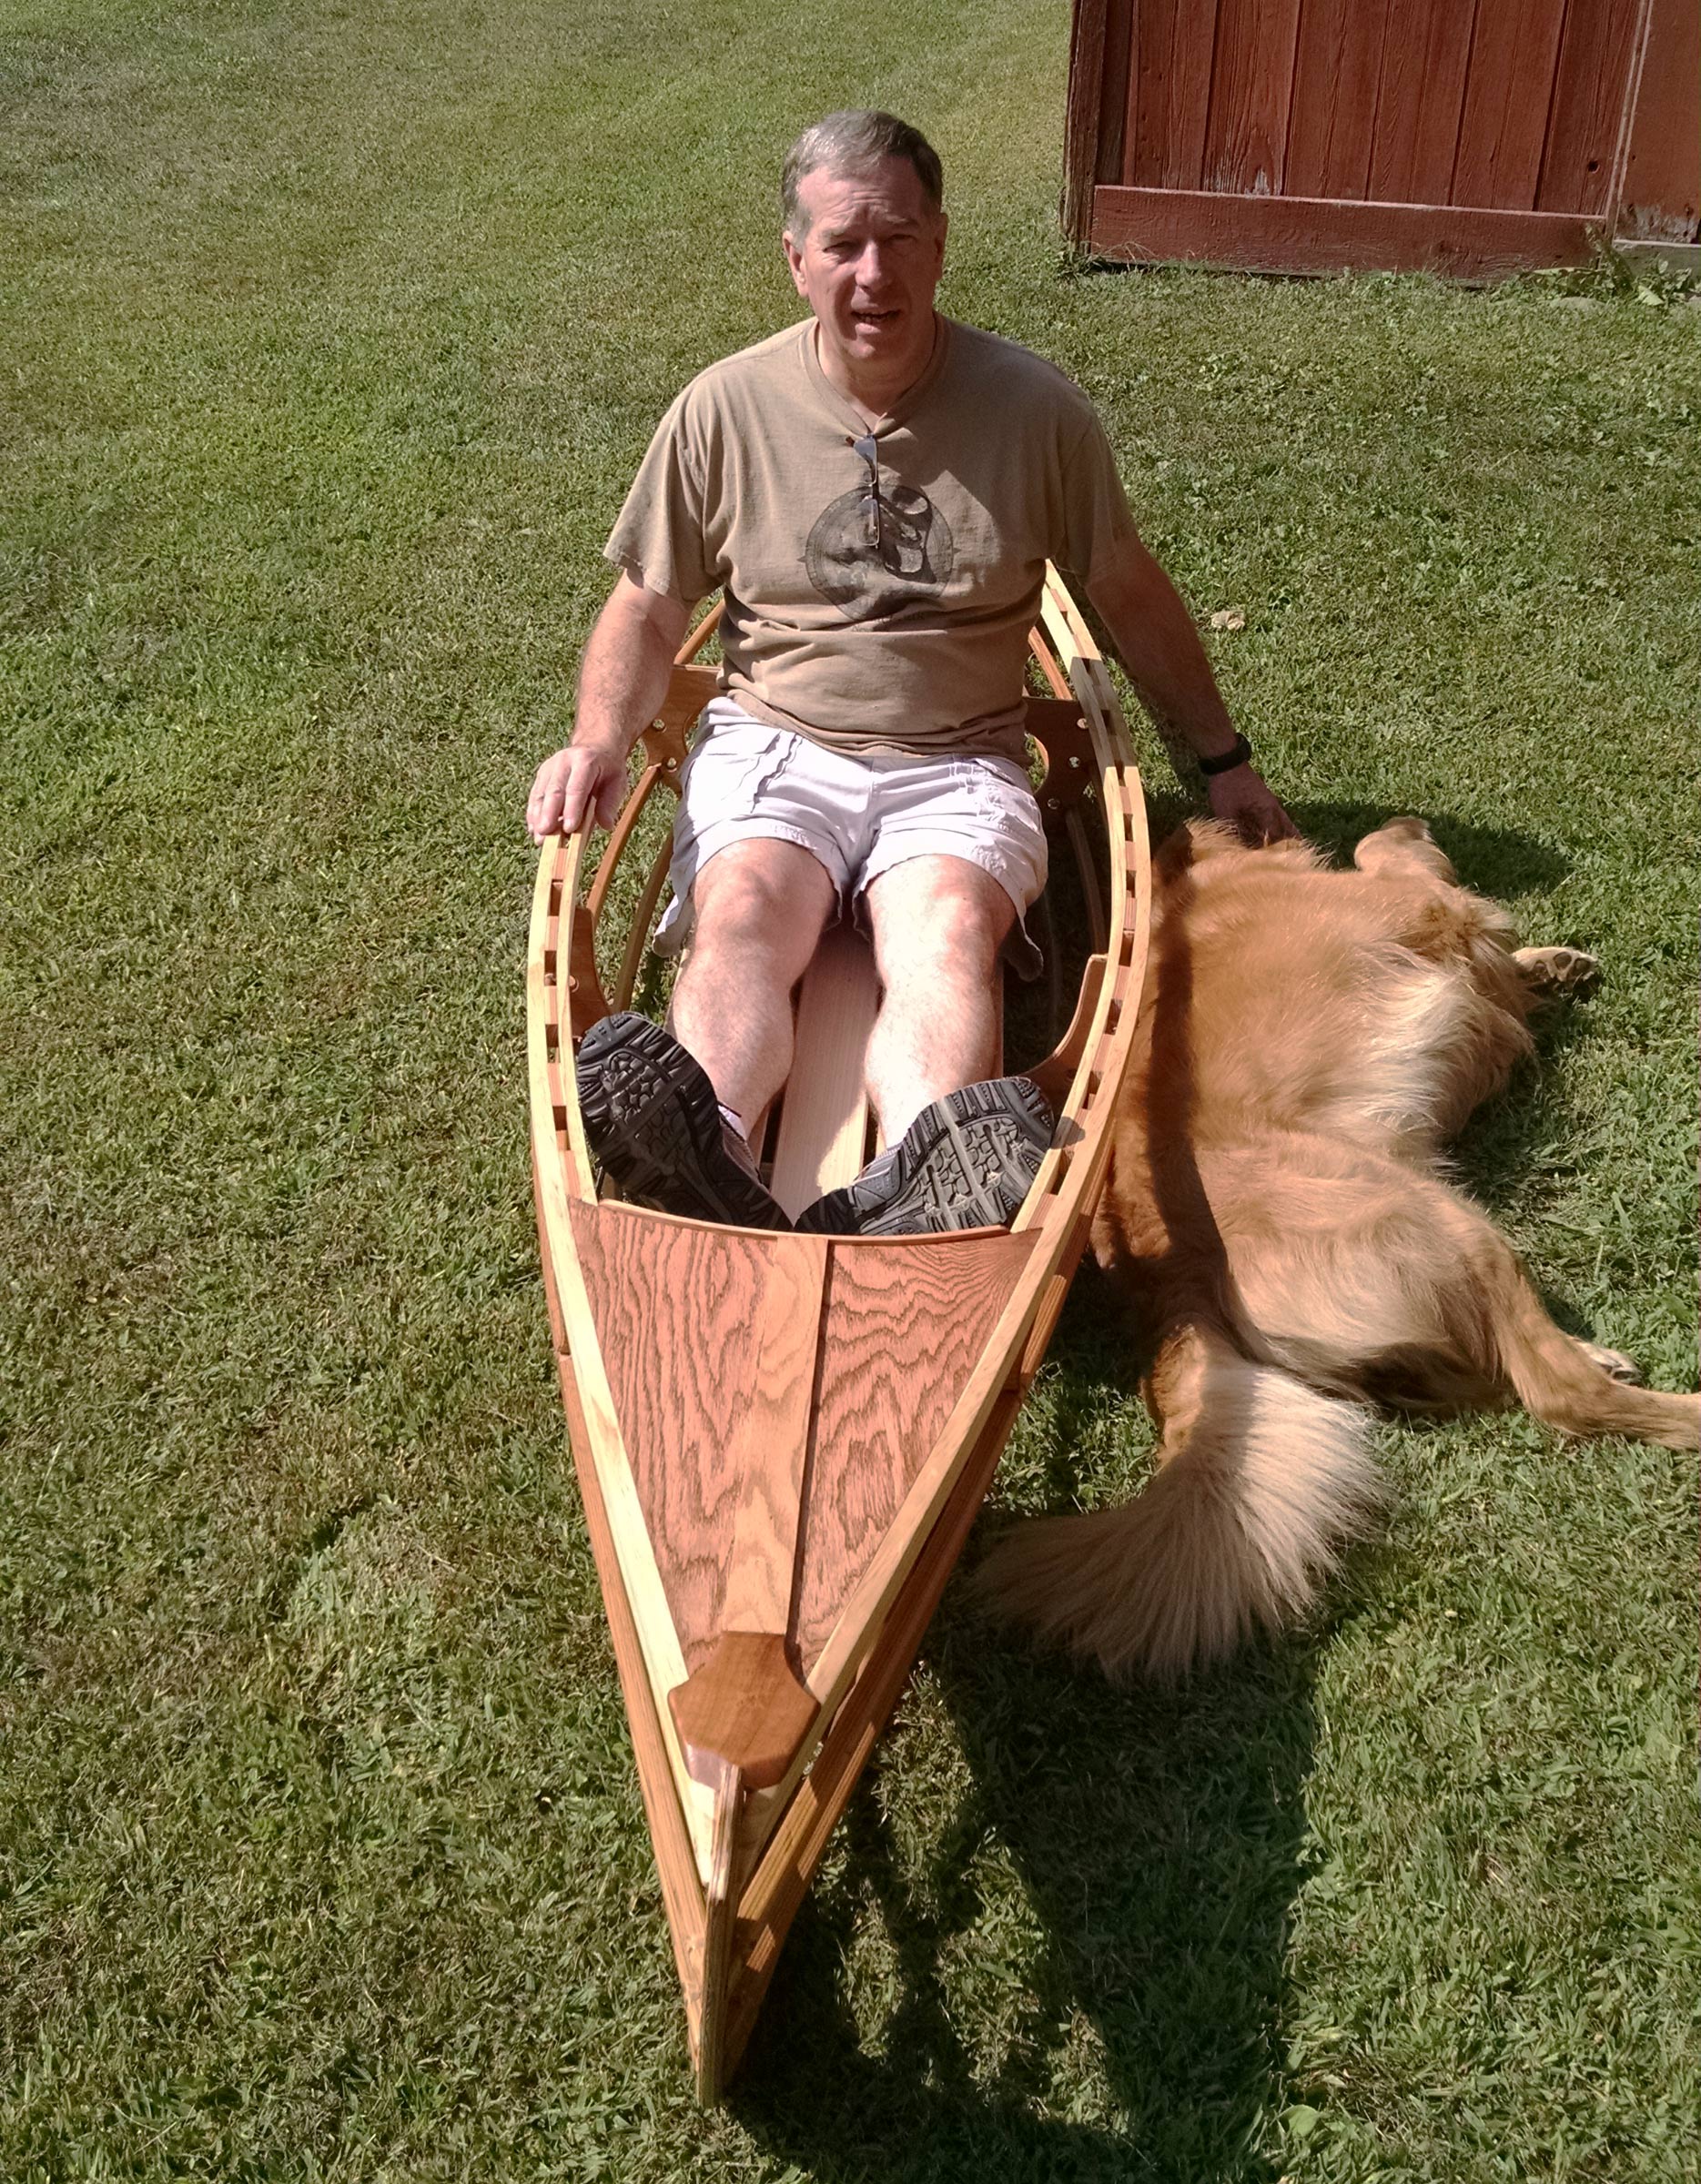
James tries the frame on for size before skinning the canoe. Cody imagines swimming alongside.
In July 2015, James had his last radiation treatment and rested for just two days before beginning building his Wee Lassie. Working in his barn, he got off to a slow start as he gradually regained his strength. When he would return to the house after working for a spell on the canoe, his wife would ask, “What are you doing out there in the barn?” “Building a boat,” he’d reply. She would laugh and say, “Oh, okay….” Weeks went by before she came out to the barn and, to her surprise, there was indeed a boat taking shape there.
James made a woven Adirondack pack basket as a fitting accompaniment to his canoe.
In the Gentry plans, there are two options for fastening the longitudinals to the plywood frames: lashings or screws and epoxy. James opted for lashings. The nylon artificial sinew gave the connections flexibility in addition to great strength. He departed from the plans to add decks fore and aft to give his Wee Lassie a touch of Adirondack-guideboat class. This decorative touch brought the weight to 25 lbs, a bit over the 19 lbs specified in the plans, but still an easy carry.
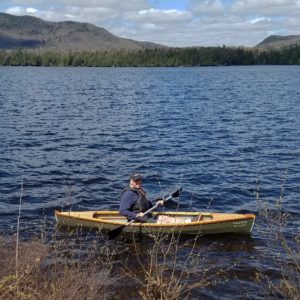
James’s version of the Gentry Wee Lassie came in at 24 lbs, an easy carry in the backcountry.
James finished the canoe in three months, christened it WEE LASSIE SURVIVOR, and took his first outing on the waters of Lake Delta, not far from his home in Rome, New York. The moment she was afloat transported him back to his summers paddling Milo’s Wee Lassie on Little Moose Lake.
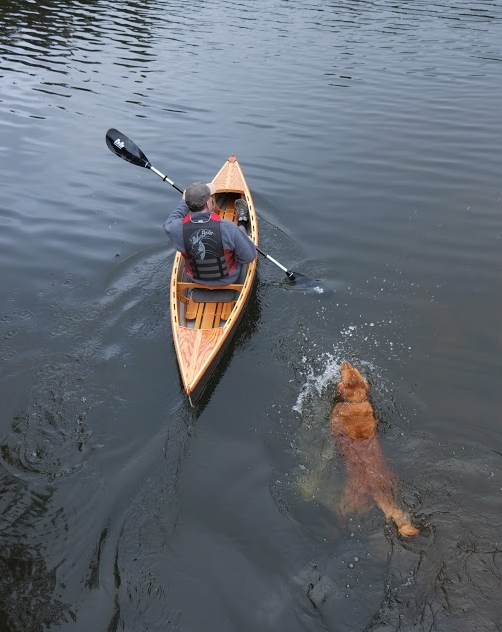
Cody heels dutifully by land and by lake.
Winter descended not long after that first October outing and WEE LASSIE SURVIVOR went back into the barn. The following spring, James joined a Boy Scout canoe-camping trip. He had brought his dog, a golden retriever named Cody, but expected him stay ashore. James was well on his way when he discovered Cody was swimming in SURVIVOR’s wake. The two of them have since enjoyed many small ponds together, one paddling and the other dog-paddling.
Have you recently launched a boat? Please email us. We’d like to hear about it and share your story with other Small Boats Monthly readers.
History has been shaped by crossings. Traveling by boat along the shore can be paralleled overland on foot, but for most of human history, reaching distant, even unseen lands has required boats and navigators willing to set a perpendicular course that leaves familiar land behind. Erik the Red in the 10th century and Columbus in the 15th sailed west into the unknown Atlantic to discover the New World. Australia and the Pacific islands were settled in vessels launched from Asia. In recent times, crossings in small boats have been personal challenges. Frank Samuelsen and George Harbo were, in 1896, the first to cross the Atlantic under oar power. Ed Gillet paddled a kayak across the Pacific from California to Hawaii in 1987.
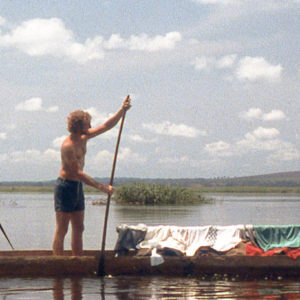
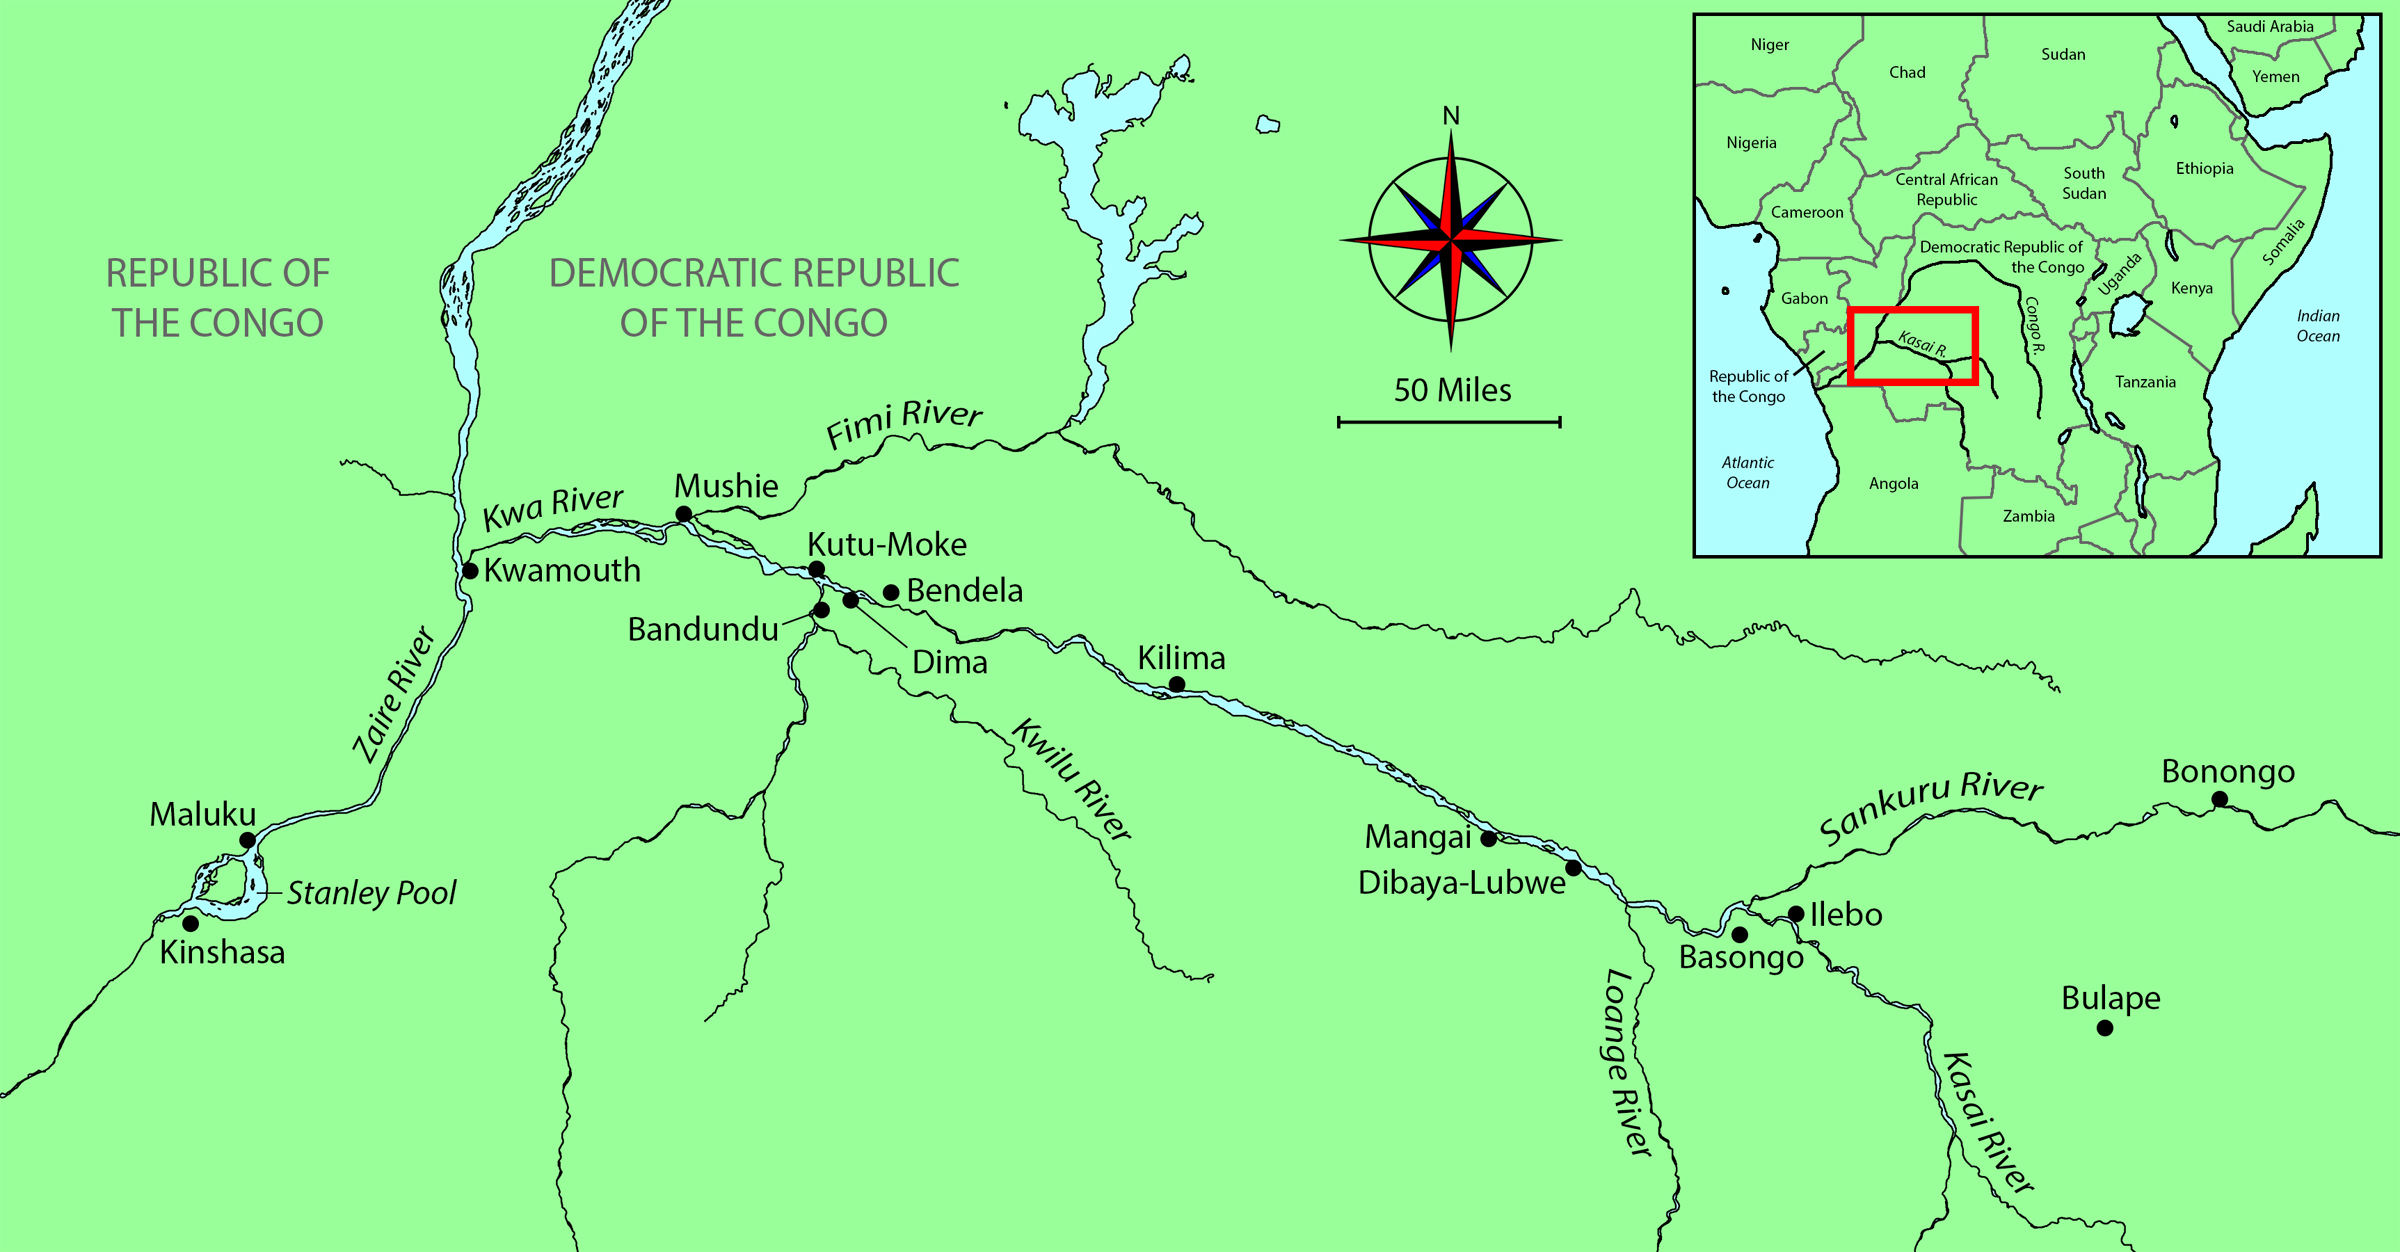
I made my first crossing in 1965, when I was 12 years old, and while it didn’t shape history, it shaped me. I had bought a flat-bottomed skiff from a kid who lived a block away from the home in Edmonds, Washington, where I grew up. I paid $15 for it, a few weeks’ worth of my allowance. I don’t know who built the boat, probably some penny-pinching amateur, because the plywood that made up the hull was textured and meant for house siding. The boat was too heavy for me to cart the half mile from home to the shore of Puget Sound, let alone drag over busy railroad tracks to get to the beach, so Dad let me keep the boat at the Edmonds marina alongside his 27’ Tumlaren sloop. He also let me use his 5-1/2 hp Johnson SeaHorse outboard on one condition: I had to stay close to shore.
The marina was a 2-mile bike ride from home, and during the summer I often went out boating, by myself, along the Edmonds shore. I’d leave my bike on the dock, get the gas tank, oars, life vest, and throw-cushion out of the cabin, and load up the skiff. I had rigged the motor to be steered by means of a plastic-covered wire clothesline that I’d looped through pulleys around the perimeter of the cockpit so I could sit forward to bring the bow down.
Rick Myers/rickmyersart.com
.
One bright sunny day, when Puget Sound was drowsing in a silvery calm, I biked to the marina, fired up the outboard, and motored out from behind the boulder breakwater. In the cool air, the Kingston shore, 5 miles to the west, was sharply defined and seemed much closer than it usually did through a scrim of midsummer haze. I turned west and aimed the bow at the Kingston ferry dock. After I set the throttle at a comfortable cruising speed, I stepped forward and sat in the bottom of the boat with my legs tucked under the foredeck and my back resting against the thwart. The steering line, running along the beam supporting the deck, was at shoulder level and only occasionally needed tending. The air coming over the bow cooled my face, but the still air in the cockpit let the warmth of the sun come through. In the middle of the Sound, a ferry on its way from Edmonds passed me, and passengers lining the railing on the upper deck waved and I waved back. In 1965, apparently, seeing a recently graduated sixth-grader alone in a small boat in the middle of Puget Sound wasn’t cause for alarm, and there were neither cell phones nor 911 anyway.
As I neared Kingston I steered for a narrow sandy beach just yards to the north of the ferry dock. I killed the motor, kicked it up, and used an oar to pole across the shallows to the beach. With my weight in the stern and the bow lifted above the water, the boat skidded ashore. I crawled over the foredeck and set foot on dry land.
I didn’t stay—touching that far shore was all I’d set out to do—and shoved off straightaway to head back home. At the halfway point, the sky had pushed the land around me tight against the horizon. I could barely make out individual buildings on either shore, so certainly no one could see me. I was miles from anything and anyone and on my own in a way that I had never been before.
I didn’t tell my father about that crossing until I was in my mid-40s. He wasn’t at all surprised that I had broken our agreement and ventured far from Edmonds; he had expected it. He’d been a boater his whole life and he knew the lure of a distant shore, and, as a father, he knew that one day I would have to sail away from the security of my home shore and the timidity of always doing as I was told.
I work as a naval architect designing high-speed naval craft in an office where the engineers and the most senior naval architect all have the same credo: Never own a boat you can’t carry. Given my career, I felt it was my duty to build a boat with my son and daughter. I considered designing the boat—I certainly have the technical skills—but thinking I could get the design spot-on on the first try seemed hubristic, so it just made sense to go with a proven design. The Chester Yawl fulfilled many prerequisites and needs.
My home in Norfolk, Virginia, is just 250 yards from the shore of the Chesapeake Bay, so I usually hand-launch my boats from the beach. I also have two teenagers, so I need boats big enough to include them on my outings; my rule is to own only boats that I can launch with a dolly, so we needed a boat in the 150-lb range.
Length would be limited to 15′—my garage is 19′ x 19′, and we’d need room to walk around the boat while building it—and a rowing boat would be the best addition to the fleet. I already have two small sailboats and didn’t need a third; and I didn’t want a canoe because its paddlers are facing the same direction, not ideal for conversation. With a rowboat, I could take to the oars and chat with a passenger sitting in the stern. The boat had to be able to handle some waves—the southern end of Chesapeake Bay can quickly turn into a mess of 1′ to 2′ waves when the wind picks up. I wanted an aesthetically pleasing boat with some built-in flotation and the ability to self-rescue if needed. I also wanted an interesting project, not, for example, a single-chine hull we could throw together in a single weekend. And finally, it had to have an aesthetically pleasing, classic shape—I wanted an heirloom, not a workboat.
Robert Bice
The plank pieces are joined with precise finger joints for proper alignment.
My search led me to Chesapeake Light Craft’s (CLC) Chester Yawl, a 15′ Whitehall-type rowboat. It has beautiful lines, and the complexity of the project seemed just right: enough to feel like an accomplishment without being daunting. The Complete Rowing Kit I ordered from CLC included CNC-cut parts of marine okoume plywood, epoxy, fiberglass, oarlocks, and a 68-page manual. I also ordered the optional second seat. To create full-length pieces, the rubrails have precut scarf joints and the plank pieces have tight puzzle joints that assure that the mating pieces are properly aligned and the curves of the planks will be fair.
I ordered the kit in June 2015 and scheduled a week off from work for the build. I told my wife and kids we would be halfway done by the end of that week and finished by August. I got the month correct but not the year. We launched the boat in August 2016.
Robert Bice
While the kit outfits the Chester Yawl for fixed-seat rowing, the open cockpit and the easily driven hull are also well suited for a sliding-seat rig. CLC offers instructions for installing a Piantedosi rowing rig.
The Chester Yawl build uses CLC’s LapStitch construction, with precut rabbets in the planks’ lower edges to make the laps of adjoining planks self-aligning and create the appearance of traditional lapstrake construction. The gains that taper the laps and bring the forward ends of the planks have to be cut using a guide and a small rabbet plane. The hull consists of 12 strakes. For strength and abrasion resistance fiberglass cloth and epoxy were applied below the waterline and along the stem.
Building the yawl was just challenging enough without getting frustrating, and the assembly turned out to be easier than the sanding and finishing. We used the tricks outlined on the CLC website for smoothing the fillets with denatured alcohol. After the epoxy has cured enough to stiffen, you can put on a glove, dip a finger in denatured alcohol, and quickly smooth the fillet without the hard work and dust of doing the job with sandpaper after the epoxy has fully cured.
After we had started construction of our Chester Yawl, CLC came up with an option for a spacered inwale, which would provide additional stiffness in the gunwales, add easy attachment points for fenders and lines, and create a look that was too tempting to pass up. To accommodate the addition of the new inwales, I had to cut the breasthook and quarter knees out, and notch the frames and bulkheads.
Buying a kit was the best decision I made, as it is unlikely that I would have been able to cut the planks correctly. The most thoughtful part of the kit was that the holes for the stitching wires were predrilled. That made the construction much easier and made for a neater-looking finished product—it’s not easy to eyeball and space hundreds of wire holes. All of our labor—mine and the kids’—was a bit over 400 hours, and it was wonderful family experience.
SBM
The slots in the center and aft floorboards are for the foot braces, not for the seats, which are held in place by the weight of the rower. The frames are flush with the floorboards in the middle of the boat, providing a place to stretch out. (This is a very early version of the Chester Yawl and some of its details aren’t representative of CLC’s current version.)
The boat has three removable plywood floorboards that fit between the frames. The center and aft floorboards each have rows of notches to anchor footboards. The five notches in each row are 2” long—to fit the tabs on the bottom of the footboard frames—and spaced on 4″ centers, so the footboards offer a 16″ range of adjustment in 4” increments.
SBM
The support frames for the foot braces have tabs to fit in the floorboards slots.
The foot braces are solidly anchored, and the footboards are set at a comfortable angle. At 5′ 10″ tall and 180 lbs, I have no issues with the width of the floorboards. They appear to me to be wide enough for someone larger as well. I often row barefooted and enjoy the feel of the varnished wood under my feet.
The seats don’t have tabs to fit in the floorboard slots and are held in place by the weight of the rower. Surprisingly, they don’t move while rowing, and I can only adjust the seat by taking most of my weight off it. There is a trick to get the seat in just the right position, because inevitably the seat moves a wee bit as I sit down. After a few tries I was able figure out how to place the seat so that it is perfectly positioned when I do sit down. I like the flexibility of adjustable seats compared to a fixed thwart. The curve of the plywood top takes a bit of pressure off the tailbone at the finish of the stroke.
There are flotation compartments at the bow and stern. The stern compartment is enclosed and has a 1″ drain plug; the forward compartment has a 6″ deck plate in its bulkhead for access and ventilation.
Robert Bice
The Chester Yawl’s Whitehall ancestry is made clearly evident by the wineglass transom. The partially closed notch captures a sculling oar and keeps it from lifting away.
The sculling notch in the transom is partially closed to help keep the oar in place. I don’t yet have an oar well suited for sculling the yawl, so I have sculled just once with one of the oars we use for rowing. I was barefoot on a wet and slippery floorboard, but even then, the boat was stable and it was somewhat like a stand-up paddle board. I am looking forward to installing some nonskid on the floorboards this spring.
Robert Bice
Propelled by two rowers, the yawl can easily reach 5 knots.
We have been using our Chester Yawl for two full years now, and it rows wonderfully. When I’m alone on the boat with just a small ice chest aboard, I can row all day at 3 to 4 mph. It rows well with two people at the oars and easily reaches a top speed of around 5 knots without much effort. My favorite way to row is to use the forward rowing station while having a conversation with someone sitting on the aft seat. My kids like the boat for fishing and messing about.
While it’s a pleasure to row the Chester Yawl, one of the things I really like about it is that the floorboards cover up its shallow frames, and with the seats and foot braces moved out of the way, it creates an open space perfectly suited for an afternoon nap.
If you’re looking for an attractive lightweight rowboat, I don’t know that you could find a better design. I couldn’t ask for more—the build experience was fantastic, and we love the boat.
Robert Bice, P.E., grew up in southeastern Texas and spent his childhood exploring and camping on the banks of Village Creek, a tributary to the lower Neches River. He graduated from Texas A&M in 1995 and has been a practicing naval architect for 24 years, primarily focusing on hull structure and stability. He lives in Norfolk, Virginia, with his two teenaged kids. In his free time he likes to explore the endless backwaters of the Chesapeake Bay or use Google Earth to plan his next adventure.
Canoeist Bill Burk, in an article linked to the Moccasin 14 page of the B&B Yacht Designs website, writes that he had built a Moccasin 12 and enjoyed it for day use and fishing but needed something larger to take canoe-camping at lakes in the Pacific Northwest. Regulations at the Bowron Lakes in British Columbia required at least 16″ of freeboard, Ross Lake in Washington State limited length to 14′, and Bill anticipated carrying up to 120 lbs of gear, setting the displacement at 350 lbs. That established the design criteria for Graham Byrnes, and he drew up what would become the Moccasin 14.
Opening photo Graham Byrnes, this photo Christopher Cunningham
The five pieces of CNC-cut plywood for the hull are joined with these sawtooth finger joints.
B&B’s Basic Kit for the Moccasin 14 includes a 24-page manual, illustrated with drawings and photographs, and the plywood parts for the hull and paddle blades, all CNC-cut from 4mm plywood. The hull is made from five precut pieces: a center panel and four identical end panels. Each end panel incorporates half of a side panel, one side of the bow or stern, and the end of one side of the bottom. Finger joints, slathered with epoxy, hold all five pieces together. After the epoxy has cured, the joined pieces lie in a flat plane, ready to fold into shape.
Christopher Cunningham
The forward end of the chine transforms from a pronounced angle to a smooth curve.
The center seam at the ends is stitched together with cable ties, bringing the ends from flat to vertical. The sides, now splayed out, get stitched next. The chines have interlocking tabs that assure exact alignment, so there’s no fussing with an edge-to-edge contact and poking at wired ties. Pulling the chine joints tight forces shapely compound curves in the ends of the hull, and the side panels eventually meet amidships to get connected with plywood butt blocks.
Christopher Cunningham
The plywood doubler that spans the area between the two thwarts reinforces the seating area.
At this point the hull is hogged, and that’s where a building a cradle comes in. It’s one of the many add-ons to the basic kit and will assure the hull takes its proper shape. The center of the cockpit gets a second layer of plywood, and as that doubler is glued in place, screws driven along the centerline pull the hull down to the cradle’s long wooden I-beam. When removed from the cradle, the hull has a straight keel.
From this point on, the canoe’s completion is standard boatbuilding. Breasthooks, inwales, outwales, and thwarts can be cut to patterns in the basic kit or purchased as an add-on, ready for installation. A keel, epoxied to the bottom, protects the hull from gritty shores and gives the hull better tracking. The plywood paddle blades, supplied with the basic kit, take on a curve when glued to the paddle shaft, also supplied as a pattern or as a factory-shaped piece.
Christopher Cunningham
The seat, provided as an add-on kit, is a worthwhile addition for the comfort and paddling efficiency it provides.
The seat is sold as an optional kit, and I’d recommend adding it to your order. Sitting on the hull puts you too low for comfort or power, and cushions make a sloppy connection to the boat. The B&B plywood seat is set at a comfortable angle and high enough to put your hips higher than your heels—much better than sitting with your legs straight out—without compromising stability. The seat’s frame is contoured to pull the seat top into a single broad curve at the back, providing relief for the tailbone, and a double curve at the front to cradle the legs.
Christopher Cunningham
The broad pivoting backrest offers comfortable support.
While the kit doesn’t include a foot brace, you could, and should, take a cue from the backrest mounts and set a stretcher from side to side, high enough to meet the balls of your feet. With a foot brace, you can press yourself into the backrest, stay locked in the seat, and paddle with more power.
The canoe is light—it should come in at 38 lbs—so it’s easy to carry. The inwale provides a good grip for a solo carry with the canoe hung over a shoulder. The seat isn’t secured in place, but it will rest against inside the canoe, kept from sliding out by the inwale. Adding a yoke to put the weight on both shoulders with the canoe overhead would be a good shop project if you have in mind to do canoe tripping with long trail portages. For a tandem carry, the breasthooks offer good handholds.
Christopher Cunningham
The inboard ends of the paddle blades are shaped with a small lobe that sheds water before it can run along the shaft and get the paddler’s hands and lap wet.
When the canoe is sitting in the water, the seat is set between to two long cleats that center it and allow fore-and-aft adjustments. With a paddler’s weight on the seat, it stays put. I could make adjustments by pushing down against the hull with my knuckles to unweight the seat and scooting it where I wanted it.
The backrest has three positions to get the paddler in the right place for proper trim. The aft setting was appropriate for my 6’ frame. The backrest’s curved plywood panel was comfortable and provides good support down low where it doesn’t interfere with torso rotation during a full, powerful stroke. The seat was comfortable too, and if I’d had a foot brace I could have added a bit of leg drive to the stroke, pivoting my hips slightly in the seat.
The Moccasin 14 is rated to carry an adult and one or two kids. With my 200+ lbs aboard, the canoe had about 8” of freeboard, and with a beam of 28″ the gunwales weren’t so high that I had to reach over them. I could paddle with a low, relaxed stroke. The initial stability was a little soft, but very good given the 28″ beam. I was quite comfortable taking my hands off the paddle to take notes. The secondary stability kicked in quickly and reassuringly when I edged the canoe.
Underway, the Moccasin tracked well and didn’t yaw excessively between strokes. Turning in place through 360 degrees took 14 strokes—seven forward on one side, seven backing on the other. The keel makes the canoe favor tracking over quick maneuverability, appropriate for a canoe designed for tripping, traveling lakes and slow-moving rivers. The Moccasin took well to being sculled sideways; it was a fun way to maneuver.
Graham Byrnes
Putting the power on, the author was able to push the Moccasin at 5-1/3 knots. It maintains good trim even at speed.
Equipped with a GPS, I did some speed trials. I could easily sustain 3-1/2 knots at a relaxed cruising pace. Working up to an aerobic exercise pace brought the Moccasin to an average of 4-1/3 knots. Paddling all-out for a few dozen yards, I did 5-1/3 knots. At top speed, the canoe stayed in good trim and its stern didn’t squat.
I didn’t have much wind during my two trails, just 8 knots. Paddling across the wind, I didn’t detect any weathercocking. I’d take a course across the wind, stop paddling, and watch the bow; it didn’t veer to windward. There were no waves or wakes, so I could do any rough-water testing, but, as an open canoe, the Moccasin 14 would have limits to the amount of chop it could handle. For lake tripping where adverse weather could make the going sloppy, spray decks and flotation, either as built-in airtight compartments or float bags lashed in place, would be in order.
The Moccasin 14 has an unusual construction that makes for a quick build and a shapely hull. And while it was designed for cruising with a big load of camping gear, unburdened it’s quite playful. It could make use of those brief windows of time when there’s a break in your schedule and the weather, and just as ably turn a vacation into a memorable adventure.
Christopher Cunningham is editor of Small Boats Monthly.
Moccasin Particulars
[table]
Length/14′
Beam/28″
Height/11.5″
Weight/38 lbs
[/table]
The Moccasin 14 kits are available from B&B Yacht Designs. Prices range from $415 for the Basic Kit, with just the plywood pieces, to $1,025 for The Works, with everything you need to complete the build, ready for paint or varnish.
Is there a boat you’d like to know more about? Have you built one that you think other Small Boats Monthly readers would enjoy? Please email us!
After seven days in equatorial Africa I was still acclimating—the hazy air had weight. Ten days earlier I was at home chopping firewood in the snow in New York; now I was walking a dusty road and drained by the sweltering sun. Ted Cooney, Brent Simpson, and I made up a three-man caravan. Ted and Brent had just finished their two-year stints as Peace Corps volunteers in the Republic of Zaire, now known as the Democratic Republic of the Congo, and were more at home in the unrelenting heat. The three of us had spent the last two days in the mission town of Bulape, Zaire, making preparations for the march overland to the Sankuru River, where we would find the pirogue that we’d paddle downriver to the Kasai and Congo rivers.
As college roommates in Maine, Ted and I had canoed and camped together and following his Peace Corps posting to the Kasai province of south-central Zaire, we corresponded often by mail. In August 1985, Ted wrote a letter from his mud hut in the town of Demba saying he had ridden his motorcycle “to a village 150 km from here to the north on a big river called the Sankuru. The last 20 km I had to have a guide to show me the way and to help pull and heave the moto over fallen trees on the forest path. The village is Bongongo, about 30 km upriver from Kilendjale, if you can find that on your map. They have the rep of being the best pirogue makers in the area. In short, I put in my request for a large boat and three paddles, delivery to be taken on or about January 20, ’86. The trip downriver is all flat water for approx. 600 miles (three to four weeks max). However, one must bear in mind that the trip will involve the navigation of the confluence of some of the world’s largest rivers—Sankuru and Kasai, Kasai and Zaire. The section spent on the Zaire is but a few days at best….”
Ted was recruiting Peace Corps pals to join in and hoped I could make the trip too. So, in February 1986, Brent, Ted, and I were retracing Ted’s route from Bulape to Bongongo.
Tom DeVries
Brent Simpson, Ted Cooney, and Tom DeVries, (left to right) out in the noonday sun, were eager to find some shade on the two-day overland hike to Bongongo.
Heading out at 5 a.m. gave us a few hours’ refuge from the sun. We’d walked for an hour by flashlight, passing a village singing and drumming in mourning for a recent death, exchanging moyos—greetings—with hunters heading for the Bulape meat market with bloody monkey haunches, and passing a group of uniformed children making their way in the dawn light to the mission school. Two hours later, we climbed up into the bed of a big truck heading 45 miles along our way on the rutted, sandy road. At a fork in the road, we parted company, payed the driver, and continued by foot to the Lubudi River. There, a ferryman got us and our packs settled low in his pirogue and paddled us, herky-jerky, across the racing current. That wobbly ride left us a bit apprehensive about what lay ahead. Brent and I both groused to Ted, “Man, I hope our boat’s a hell of a lot more stable than that!”
Back on the trail, we trudged along, pack straps wearing grooves in our shoulders. The sun bore down relentlessly. That night, completely burned out, we threw down camp on the top of a sweeping savanna that commanded the green and brown hills of Kasai. By seven o’clock we were under mosquito nets on the hard ground listening to the bugs click and buzz and gazing at the dazzling diamonds in the African night sky. At 4 degrees south latitude, a 12-hour night follows a 12-hour day year-round, so we got a long night’s rest following our hard day laboring under the sun.
Roger Siebert
.
The next morning, we followed the single-track trail off the grassy highland, across plains and through forest, occasionally passing a lone walker or a few grass huts. In one parched village there was a single tree centered in a bleak, boulevard-wide dirt plaza. Under the shade of the tree lay a bony, frothing dog. We beelined for the shade, dog be darned, and guzzled our water jugs. No one else stirred in this high-noon ghost town. Farther on there was cool water at a tree-lined stream swarming with thousands of blue and green butterflies. There were also nipping bees that found Brent and Ted, so we scrambled out of there. We guessed that the bees were attracted by the salt in the sweat on their shirts. The bees didn’t sting me. I hadn’t sweated all day. I was bone-dry dehydrated.
My mates were a bit concerned about me and tried refreshing me with mental popsicles by reciting, among other gems, “The Cremation of Sam McGee”:
There are strange things done in the midnight sun by the men who moil for gold; The Arctic trails have their secret tales that would make your blood run cold.
I was more apt to conjure dismal images from Heart of Darkness, Joseph Conrad’s novel about a brutal voyage up the Congo River, than from Robert Service’s story of sourdoughs freezing on the Klondike, but it was good diversion just the same. My shirt was finally as soaked as theirs after a most welcome afternoon storm that drenched us sideways and pelted us with hail.
As we neared Bongongo, we started seeing more people on the path. Passersby greeted us with grins. It seemed to me they were whispering, “It’s them.” Someone passed around some palm wine. Someone else ran ahead to announce our arrival. We crossed a final bridge and entered the village as night fell. We had made it to the Sankuru! We were greeted as welcome guests. I drank water like a draft horse, met our hosts, and faded off to sleep.
Tom DeVries
It was wonderful to watch ALICE MAY get a final fairing. A few of the boys made a little money selling us their slingshots.
In the morning we got our first look at the pirogue Ted had commissioned. The barefoot, barrel-chested boatbuilder was still whacking out chips with his adze. The boat, a six-man canoe, measured some 33′ long, 3′ in the beam, and less than 20″ deep amidships. The sides at the sheer were 1” thick and thicker a bit closer to the bottom. There was no flare to the sides. The bow and stern each angled up from the flat bottom for 3′ or 4′ and tapered stylishly. Inside the hull were wedged three hardwood sticks used as thwarts. We christened the canoe ALICE MAY, after the derelict Yukon stern-wheeler used to thaw Sam McGee. Ted paid the builder with a shotgun forged near Bulape and shells for it.
We were eager to get on the water. Though we had little more of a plan than “let’s follow the rivers,” we had plenty of work to do before we launched. We bought three paddles and a bailer for the boat. The used wooden paddles, nearly 9’ long, were intended for paddling while standing. We were more familiar with Old Town canoes and thought we might be more successful paddling sitting down, so we bought stools. As word spread that the mundele—white guys—were shopping, young and old brought wares and it suddenly became market day. ALICE MAY was the main attraction, and we were the side-show curiosity. We made bargains for bags of rice, bananas, and hard candies; machetes, spears, arrows and slingshots; decorative fabrics, necklaces, and other local crafts. That evening there was palm wine and a pleasant feast.
Tom DeVries
Among older dugouts at this most pleasant cove in the jungle, ALICE MAY looks bright! We were more likely thinking about dinner food (maybe duck?) than the poetry of the place.
The whole village was out the next morning to drag, shove, and tug the new canoe to the river. The big dugout had dried some and a little water bubbled through some cracks as she was set afloat. Undaunted, our builder caulked them with burlap using a machete to drive it in tightly, and assured us everything would swell up soon enough. We had lashed together a cargo rack of bamboo and vine, and Ted had packed a tarp for rain cover. After we had loaded up, we bid farewell, and paddled off downriver—standing—a green pirogue carrying green piroguers. Around the first bend, and out of sight of the village, we sat down on our stools.
There was no guidebook for the Sankuru, Kasai, or Zaire rivers, and what information we had was just hearsay. No one we talked to knew of anyone who had made this trip by pirogue. Our Bongongo host, a retired riverboat pilot, guessed we’d be all right. We had a 1:3,000,000-scale map of Zaire which showed cities, towns, and larger villages, as well as missions along our route. We could make estimates of distance but at first had no good idea of how fast the muddy current carried us. We paddled mostly to keep in the main channel, and let the river do the work. While scouting for boats, Ted had been warned that he should watch out for crocodiles, hippos, and whirlpools. So we did.
Brent Simpson
Tom DeVries (left) and Ted Cooney enjoy paddling in the cool morning drizzle on the Sankuru River. ALICE MAY had plenty of room for the three us and our gear.
It sure felt good to be on the water. No more trudging under heavy packs. We sat, drifting. There were screeching monkeys and red-tailed parrots and fish eagles in the trees. Brilliant blue and orange kingfishers darted along tan sandy banks. The sun was blazing, so we often dipped into the river to cool off. ALICE MAY’s husky hull barely heeled when we climbed back aboard. We paddled standing. We paddled seated. We drifted. We were three boys on a lark—Huck Finns on a raft—adrift in the Congo Basin.
The wind picked up that afternoon and storm clouds threatened. Standing up, we paddled through the chop as rain started to fall, and with some effort reached a sand bar where three men had brought their pirogues ashore; two were butchering monkeys and one had a couple of fish. We brought a large catfish to cook for lunch and were invited to wait out the downpour in their riverside shelter. The boiled fish tasted like it had been slathered in butter and there was a lemon to drizzle on top—restaurant quality—but the monkey meat they were eating was unappealing. These Sankuru River natives had leathery faces, gnarled hands, and mashed feet with toenails missing. They were rugged, ragged, and gracious.
Tom DeVries
We tried avoiding any place with an official look to it. A Zairean flag flies over this Sankuru River compound.
That evening we stayed in a village on the south side of the river. As was the custom, someone gave us the use of their dirt-floored, thatch-roofed, stick-and-mud hut. For dinner, a woman cooked the remaining catfish with rice for us and later we enjoyed a conversation with some of the local folks about the existence of God. French is the language of Zaire and Tshiluba the local tongue of the Kasai region. I understood a little in French and could greet passersby in Tshiluba. Of course, facial expressions mean a lot, but my participation in any meaningful local exchange relied on the well-versed Peace Corps fellows interpreting.
The mosquitoes that night were fierce. We had lit coils and hid in our nets, but the three of us only escaped the whining torment by wandering in circles outside until dawn.
For breakfast we kindled a small fire and boiled water for oatmeal and tea. The Quaker Instant oatmeal that I’d brought from the States wasn’t normal fare in Zaire and was a small pleasure from home for Ted and Brent. Bidia was the staple of the Zaïrois cuisine and we ate it often during our time in the country. It’s a manioc and cornmeal mush that resembles Play-Doh in texture and taste. Bidia is best served with matamba—greens—or a little chili pepper sauce, but sometimes we’d have it plain. We could often find citrus fruit as well as bananas for sale at villages along the river. We carried our large bag of rice and tins of pilchards and a few candies, although the M&Ms were long gone. Drinking water was plentiful; we always treated it with iodine.
We carried our paddles, stools, and bags down to the boat and got back on the water early. Feeling rushed, Brent quipped, “It’s not a race, it’s a river trip,” but I was driven to make progress. My visa was only valid for a month, and I didn’t want a hassle if I overstayed. We rotated paddling positions throughout the trip. This morning I was the stern man with Ted ahead of me and Brent in the bow. We paddled for a few hours and then sat for a break and drifted. We picked a village on the map for our next layover. The haze on the brown river gave everything the look of a sepia-toned photo. The rainforest dripped with heavy dew. Sometimes we heard talking or drums echoing. Paddling, we were mostly silent, lost in the wonder of the place. Fishermen and local travelers glided past in pirogues. They all asked where we were going and when we answered Kinshasa, they’d say “Ah, ah, ah!” with eyebrows raised in disbelief.
Keith Peterson
ALICE MAY was a “six-man” pirogue. We—(from left) Ted Cooney, Tom DeVries, and Brent Simpson—are putting our backs into it as the laundry dries. The hardwood paddles are flexible and strong.
Our third night on the Sankuru we stayed in the big village of Butala. We guessed we’d traveled 85 miles or so from Bongongo. ALICE MAY had tightened up and was no longer leaking, and the three of us felt like seasoned watermen. A barefoot crowd welcomed us to Butala and helped carry our gear up the muddy bank at water’s edge. Though we were strangers, we were treated as special guests. Butala was accessible by road but quite some distance from any pavement. Most huts were mud with thatched roofs, but the relative wealth of a few residents was evidenced by their metal roofs. At a roadside market stand we found some cigarettes, matches, canned tomato paste, chicken-fat soap, and local bread for sale. We bought a chicken for dinner to go along with some bidia and good palm wine. With machetes, we gathered some firewood, thinking the next night we could camp out on an island or find a fisherman’s hut on a sand bar. The map showed we’d be on the bigger, busier Kasai soon.
Sooner than expected, we reached the Sankuru’s confluence with the Kasai. There’d be no camp-out on the Sankuru. With two hours of daylight left we crossed, a hard 45-minute ferry against the merging currents. We paddled until shortly before sunset to make it to the town of Basongo on the southern shore of the Kasai. After a cooling bath in the river we secured our boat with cable and lock and hiked up the bank into town. On the trail we were met by Peace Corps crony Greg Mock, grinning ear to ear. He had been scanning the river, hoping to see three white guys paddling by.
Tom DeVries
Keith Peterson (left) and Greg Mock worked their stroke on a calm Kasai afternoon. Their pirogue, FIFTY GOOD ONES, had wired and stapled tin strapping holding the bow together.
I had met Mock in Bulape where he was enjoying the company of a wayfaring Swiss gal while he was recovering from a bout of malaria. He had committed to Ted’s river adventure early on but wasn’t in shape to make the overland trek. Mock and our fifth compatriot, Keith Peterson, had traveled by train to the port city of Ilebo to find and join us on the Kasai River. Ilebo marks the end of navigable water on the Kasai and the terminus of a railroad that leads southeast to the mining city of Lubumbashi. Big river barges move fuel, equipment, goods, and people from Kinshasa to the railhead and return loaded with the production of the country’s mines, forests, and fields. After arriving in Ilebo, Keith had the equivalent of $250 stolen from his room while he was out having a beer, and in the dust-up that followed, passports were taken and threats were made by the local authorities. Mock made his way to Basongo, while Keith stayed behind, trying to get both the money and passports back.
In Basongo, green-uniformed gendarmes checked our papers. The Peace Corps boys had special passes permitting their passage down the Kasai and Congo. Their years in the country had taught them how to deal with Zairean officials, but bribery and theft were familiar here. My passport had a full-page visa stamped and signed at the consulate in New York, and Ted and crew kept me safely in their care. We were set up in what was once a fine colonial-era Belgian home, now empty, dingy, and derelict. The place was fair shelter, with a commanding view of the river, but we felt a bit unsettled under the watchful eye of the dictator Mobutu’s police.
Tom DeVries
These guys at a hunting and fishing camp on the Kasai River looked tough. None of them waved.
Two days passed before we got back on the Kasai. The first morning, Brent and Mock headed for Ilebo to reinforce Keith. Ted and I repaired and reorganized our gear, re-provisioned at ramshackle market stalls, and rested travel-weary muscles. Keith and his mates returned, having recovered only 2,000 Z ($50), about enough money to buy a second pirogue—three Americans and their kit seemed to crowd ALICE MAY. The second day in Basongo, while Keith and Ted were bargaining for a two-seater, the rest of us each enjoyed a dix-huit (French for 18)—a roasted guinea pig costing 18 Z—for lunch. For dinner, celebrating the new boat and new crew, we feasted on wild boar that we boiled and fried over an open fire. Fearing another hot, sticky night, we looked forward to an early start.
We were refueled and refreshed after the two-day layover. The five of us now floated on the waters of the Kasai River. Mock and Keith settled into our paddling and drifting routine. Their boat was christened FIFTY GOOD ONES, a tongue-in-cheek reference to a drill-sergeant of a supervisor the Peace Corps boys had all endured. It was shorter, narrower, and had less freeboard than the ALICE MAY. They paddled sitting on stools as we had first done on the Sankuru but were soon on their feet with their long paddles pulling. Keith was in his element on the water (he’d captained his university swim team) but Mock became somewhat withdrawn as the river widened and we ventured away from shore. We would drift apart or raft up as we explored or shared food and mapped out our overnight destinations. Everyone’s baggage was stowed onboard the bigger ALICE MAY.
Tom DeVries
Greg Mock (left) and Keith Peterson often paddled FIFTY GOOD ONES canoe-style. Only in overloaded pirogues did we see Zaireans seated.
On setting out together that first morning there was smoke far off in the distance. Black belches clouded the sky. As we got nearer, we saw the hillsides all around were planted in neat rows of nut palm trees. We could smell the diesel smoke and hear the pounding and rumbling of the palm oil factory sprawling along the southern shore. A river barge as long as a train thundered along the far shore. Pirogues, large and small, plied the river. People were fishing, traveling, and ferrying goods. The mystery and tranquility of our magical days on the Sankuru had given way to a busy, boisterous, commercial waterway.
By midday we passed the Loange River, which formed the boundary between Kasai Occidental and Bandundu provinces. We were surprised at how fast we were traveling. Our navigation and dead-reckoning skills were not keeping pace with the flow of the river. Some passing piroguers said we could get to a mission in Dibaya-Lubwe by nightfall so, with the sun setting fast, we pushed ourselves hard.
Tom DeVries
As we were cruising across the Kasai River at dusk, these guys paddling made us think they were dancing on water.
We hadn’t had lunch, only oranges and a few hard candies, so the promise of a meal at the mission was good motivation. A fisherman hailed us in French as the sky darkened. He cheerfully guided us across the river under moonlight to the town’s landing. After unloading, we doused ourselves in mosquito repellent and, with many helpful local hands, carried our gear the mile from the river, through the village to the mission. We were welcomed by a kindly Belgian nun who passed around cold, fresh water, offered showers for all, and fed us well. Dinner was a light green soup, bread and margarine, fish, instant potatoes, and a fresh lettuce salad, and vanilla pudding for dessert. We left no crumbs. After a fine night’s sleep on mattresses with cool, white sheets, we were treated to a first-rate Belgian breakfast with European coffee. As we said our good byes, the sister snuck two tins of hot dogs in our bags.
For days, the weather had been calm, sunny and hot, with no rain. This morning big thunderheads brewed overhead. We got off the river at a plant that processed sisal for burlap near the town of Mangai. For 20 minutes we weathered the storm on shore, hosted by the Greek fellow in charge. Back on the river in the drizzle we noticed little whirlpools in the gurgling brown flow. Many locals we passed said we wouldn’t make it in our pirogues farther down the Kasai because of big waves ahead.
Dugouts and barges, large and small, negotiated the currents of the Kasai. It widened and formed channels around low islands and sand bars as it flowed toward the Zaire River (now called the Congo River) and the sea. One afternoon we were paddling toward a southerly runoff when two pirogues raced upriver to intercept us. The fishermen warned that there were hippos down that way. In the dry season the sand bars are where the hippos hang out, but at high water they move into the bush along the tributaries. We made our way upriver, not wanting a confrontation, though disappointed to miss a photo opportunity. Ferrying back across the river, here nearly 2 miles wide, we arrived at the village of Kilima.
Tom DeVries
This entire Kasai River village came out when we landed to wait out an afternoon blow. Here Ted Cooney, Greg Mock, Bent Simpson, and Keith Peterson (left to right) are surrounded by a sea of curiosity.
Our reward for another hard day’s paddle was an overnight at a riverside hotel consisting of a few bare rooms in a musty concrete block building. The sound of a running generator promised cold beer for our parched throats. After sundown we were roused by the rumbling of a mighty riverboat slowing its downriver run, making a 180-degree turn to point into the current and easing into shore, cabling off to a tree. In the jungle darkness, this ship looked to be more than 100′ long and 25′ or so wide. I climbed up to join Ted and Brent in the wheelhouse and learned from the bleary-eyed second captain that his tanker was one of three running diesel fuel from Kinshasa to Ilebo for the copper mines at the end of the rail line. This trip took five days upriver, full, and three days back, empty. He and his crew were stopping for much-needed sleep.
We reviewed the kind captain’s charts and recorded distances. Nine miles from the confluence of the Kasai and the Zaire was a perpetual 35′ whirlpool on the southern bank. It was something to avoid, so we would pull out into the middle of the river when we reached the Zaire. Now we had a check on our progress and a fair idea of what lay ahead. We had been on the Kasai for three days and were averaging close to 60 miles per day. With fair weather and steady progress, we could make the 317 miles to Kinshasa in a week.
Fair weather was not to be. Heavy rains kept us in Kilima until late morning. We left in a spattering breeze with hopes of gaining 31 miles and making another mission by nightfall. Ted was stern man in ALICE MAY this day; Keith and Mock in FIFTY GOOD ONES followed us. Cross-winds increased and made steering difficult. We tried the lee of an island but grounded on sand bars. A half hour of hand-hauling the heavy boats got us afloat. Later, Keith drove FIFTY GOOD ONES back down a channel toward the north shore, waves piling on. We followed. Bailers got steady use. Looking ahead, we saw a curious crowd of hundreds running alongshore, watching as we made landfall in the gale. Everyone on shore was giddy. Some of the kids had never seen mundele before! A few tried wiping the white off my face with nervous fingers. We were white dots in a sea of brown. After staying an hour in what we called the “Hurricane Village,” sharing the excitement, we decided to push back out into the obstinate wind. The rest of the day we paddled from our stools, hunched low in the blow, grinding on until we made the mission.
Brent Simpson
A heavy head wind blew and the heat was wearing us down so we hand-hauled the boats. Here, Ted Cooney is happy we didn’t surprise any crocodiles.
The following afternoon we pulled toward a village, hoping to find provisions. Another crowd gathered, but the villagers here were agitated and loud so we backed away. Some local official yelled at us to come back. Brent kept asking “Why?” but got no answer. We carried on downriver. Looking astern, we saw ten men in a big pirogue coming after us. We kept up a slow, steady stroke, keeping our boats close. The chasers eventually overtook us and demanded identification. There were billy clubs and metal rods in the bottom of their boat. After examining our passes (a few of the fellows “reading” paperwork upside down), they permanently “borrowed” our bailer, wished us well, and put their backs into a very long return home, upriver.
For days the surrounding countryside had been sprawling lowland, tree-spotted savanna. Now forested hills were prominent. The Kasai choked down and we were in the Narrows. Channel markers bobbed in the quickening, turbid current and the wind left us alone. Without a breeze, the African sun scorched us, but the paddling was pleasant and we made good time.
On the 13th day since launching ALICE MAY, we stopped midday at the mission in Bendela. We washed clothes in the river. Ted and Keith bought 20 loaves of bread and we enjoyed our last tin of hot dogs in bread-slice buns for lunch. In the afternoon we steered wide of what looked like an abandoned army post in Dima, on the river’s south bank. Past that village, the Kwilu River added its brown water to the Kasai and the valley opened up again. We ended the day’s paddle in Kutu-Moke on the north bank and were once again welcomed by strangers as long-lost friends. Here we were housed in a swampy concrete office building erected in the 1950s during the heyday of Belgian colonial rule. Villagers brought us a basin full of manioc, bananas, tins of sardines, and matches. Some came by to socialize. The village chief shared his knowledge of the river, including what he knew of the whirlpool on the Zaire.
After dinner, while Ted, Brent, Keith, and I played cards, Mock lay low, lost in a book. My innards were unsettled but my card mates were able to enjoy some beer. There was a tap at the door. Keith answered and said there were well-armed military guys outside. An officer looked over our papers and said he wanted us to go to Bandundu to see the colonel. After ten minutes of futile argument, Ted said he’d go. Brent and Keith agreed to go too; Mock wanted nothing to do with the authorities and he stayed with me under house arrest. Our Three Musketeers dressed in their finest clothes that night and Ted and Brent strapped on their Bowie knives, while Keith left his Mom’s phone number in my notebook in case he was detained (he hadn’t yet recovered his passport, lost in Ilebo). Out into the night they went—“up the river.” Finding it hard to sleep, Mock and I listened to what was happening in the rest of the world on his shortwave radio. Later I finished reading The River Congo, by Peter Forbath, which gave me a better understanding of the country I was in. We both hoped for the best.
The next morning, the two of us shared the last of my oatmeal for breakfast. Roosters crowed. The soldiers who had been guarding us were nowhere around when I found my way to an outhouse. Our three bedraggled boys returned around 9 a.m. Nothing came of their all-night shakedown. They never saw the “colonel” and were worn out by the bogus runaround. A benevolent river man had bought them bread and coffee and run them back down river in his 25-hp pirogue. We accepted a tow downriver a ways from Kutu-Moke, for we wanted to get to the mission in Mushie that night. Corruption and kindheartedness were both ingrained in Zairean society. A night at a mission offered respite.
Tom DeVries
Any port in a storm. FIFTY GOOD ONES and ALICE MAY chained and cabled to a driftwood mooring alongside a bulky freight pirogue on the Kasai River. We had a lot of bailing to do.
Getting to Mushie was a push. Our fisherman friend had given us landmarks. This stretch of the Kasai was unsettled country, and he instructed us to look out for three prominent points of land and then a village on the left bank, after which we should be in sight of the mission town across the river. We paddled in the main channel until a fresh wind whipped up with angry, gray sky all around and frothing brown water splashing over the bow. In the ALICE MAY, we did the tarp drill, covering our gear, and snuck in toward a near-shore island. FIFTY GOOD ONES followed. Several 2′ swells rolled over the sides of the big pirogue as we paddled. We pulled into a cove and shared some bread. With three hours of daylight left we decided we could push and pull our craft, walking through the shallows, hand hauling to make some headway. Black clouds rushed overhead and lightning flashed to the north. Rain fell ahead of us and to the south. We crept along the island. The wind let up, the sky cleared, and the rains passed us by. Night fell as we paddled into the mission town.
Everyone was drained. The Musketeers had had no sleep the previous night. The rough water and waves were disquieting to Mock and he was on edge, knowing that only bigger water lay ahead. My bowels were rebelling, and even though I could purge at will while in the water, the bloat left me feeling feeble.
Our spirits were raised once more by the goodness of a stranger. The kind père of the mission in Mushie fed us soup and bread. There was summer sausage with mustard and mayonnaise. He served cold water, peanuts, pastrami, and more bread with butter. Real butter! This man could speak fair English, so even I could enjoy some table conversation. We talked for hours, in spite of our weariness. For dessert there was a beautiful, ripe papaya. The priest’s advice to chew up some papaya seeds helped calm my rumbling gut. He told us there were very few people living along the river where we had recently passed because of the prevalence of the tsetse fly. He called the area “The Sleeping Sickness Capital of the World.”
At Mushie, the tan waters of the Kasai are joined by the black waters of the Fimi River. From Mushie to the Zaire River the waterway is known as the Kwa. Entry to the Zaire River, the Congo, was only a day away. I had read in Peter Forbath’s book that following Portuguese making landfall in the 1400s, the names Congo and Zaire have been used interchangeably to describe the world’s second largest river. The indigenous people of the great river basin were part of the powerful Kingdom of the Kongo. The name Zaire comes from a Portuguese translation of a Kongolese word meaning “the river that swallows all rivers.” In 1971, the land known as the Belgian Congo officially became Zaire, as the newly independent African nation tried to move on from its brutal colonial past. A hot day of paddling on the Kwa, with very little wind, got us to the lumbering port of Makayuba.
Tom DeVries
This was, by far, the biggest dugout we saw on the Sankuru, Kasai, and Congo Rivers.
Up early next morning, we paddled the 9 miles to Kwamouth where we checked in before embarking on the Zaire. It was another hazy, hot morning. The busy port of Kwamouth was bustling with people and pigs boarding the wooden banana barges that moved much of the river’s local commerce. We were told by port officials that we didn’t need guides for the Zaire, “Just pull out into the current and stay toward the middle because of the whirlpools along the bank for about 2 miles or so.” We remembered the tanker captain in Kilima had said to look out for whirlpools 9 miles after the confluence.
After finalizing paperwork and eating a bit, we headed out. The powerful current was palpable and for an hour we zipped along. On our right, on the western shore of the mile-wide Zaire River, was the People’s Republic of the Congo (which existed from 1969 to 1991). As a communist nation, it was not known as a friendly place for Americans. That foreign shore was defined by stony bluffs. Looking back, upriver, we noticed a dark sky threatening rain. We stayed in the middle to avoid whirling waters but started to draw to the left. A roar like a freight train grimly rumbled. “Looks like we’re in deep shit,” Ted mumbled. We doggedly paddled for the far Zairean shore. We hollered at Keith and Mock to do the same. “Holy crap!” they cried.
A fierce wind whipped up the river and rocked us. Rain blasted. Brent struggled steering the ALICE MAY. Keith and Mock fell behind. Brent yelled, “They swamped!” I looked around and they were gone. We were struggling, too. I was pulling furiously in the bow. Ted was frantically bailing. We kneeled, knees wedged against the hull like we were running haystacks in a Class-IV rapid. Brent urged, “Come on boys!” straining to hold us into the wind. We labored. Muscles drained, we eventually gained the sandy shore and poled to a small landing. A crowd of tough Zairean fishermen had gathered. They applauded our efforts, shook our hands. But no one had seen FIFTY GOOD ONES.
Winded and worried, we searched the main current and the far shore through a camera with a telephoto lens. The three of us were racked with anxiety for our mates. The wind abated and the river flattened some. We didn’t spot anybody or anything floating. About a third of a mile downriver we saw a small, steel-hulled riverboat, hove-to in the current. Had it passed us in the storm?
The wind diminished. We headed back onto the river to find out what the boat’s captain had seen. As we took off, the riverboat sounded its horn and moved out into the mainstream too. Closing together, we made out a white man in the wheelhouse. It was Mock! Then we saw Keith on deck, smiling and waving. FIFTY GOOD ONES was in tow.
It was a relief to reunite onboard the riverboat. Mock was tight-lipped but Keith was animated, describing how the waves filled the boat, and with only two aboard bailing proved impossible, and they foundered. They held on and floated about half an hour in the turbulent river. Keith stuck his white T-shirt on the tip of his paddle to flag the riverboat as it passed.
Mock’s days in a pirogue were done. He had fulfilled his promise to accompany Ted. His friendship was sincere, but this upset on the Congo River was enough. He remained in the safety of the wheelhouse while we all caught our breath. Keith was game to carry on. After 20 minutes in tow, four of us climbed into ALICE MAY, handed up Mock’s duffel, and were floating the mighty Congo once more.
Keith, Brent, Ted and I enjoyed each other’s company, and the six-man canoe was a fine vessel for four. Our daily rhythm on the Congo River proved similar to our routine on the Kasai. We got on the water early, we paddled, and we drifted. We ate fish and rice, bidia and chicken, papaya and bananas. We passed riverboats and barges, all manner of pirogues, riverside villages of mud and thatch, river cops, and military outposts. We weathered wind and rain and blisteringly hot sun. We played cards at night and got going at first light. We kept a closer weather eye now and stayed close to the western shore. We respected the power of the “river that swallows all rivers.”
Tom DeVries
We watched this fellow fishing for ten minutes as we drifted past the plantation palms. His cast-net technique was well practiced but we didn’t see him land any fish.
We saw Mock unexpectedly two days later. We had only been paddling a few hours on what turned out to be our last day on the river when a motorized pirogue came alongside. We were told that we needed to check in at the military post in Maluku upriver. So back we went with ALICE MAY in tow behind the pirogue. Mock met us on shore, once again grinning ear to ear. It was evident that with solid ground underfoot he had regained his good humor. His riverboat ride had gotten him to this town, and here he had sold FIFTY GOOD ONES. He was still waiting for final approval of the sale before he could go to Kinshasa. After a quick visit, the army commissioner amicably approved our papers and we shoved off from shore one last time. Stanley Pool, where the river widens to 15 miles and wraps around dozens of islands, gaped ahead with the Crystal Mountains looming beyond. We finished our journey in the company of clumps of flowering water hyacinth—flotsam flushed from some unknown river, hundreds of miles away, swallowed by the Congo.
Keith Peterson
We relished the fantastic weather among the sand bars and islands of the Kasai River. By this time we had found our paddling rhythm. From left: Brent Simpson, Tom DeVries, and Ted Cooney.
For a few days, the five of us got together in Kinshasa and enjoyed the good food and cold drinks the city had to offer. Brent left for unfinished business at his post in the city of Mbudji Mayi. Keith helped me get my visa sorted out. His next stop was an Indian Ocean beach in Mombasa, Kenya. The last time I saw Ted in Africa, he was getting on a ferry to cross over Stanley Pool, making his way to Mount Kilimanjaro. His African adventures weren’t over yet. Mock stayed with me then and helped me get to the airport in Kinshasa that night as I headed back to New York. With my luggage were three 9′ paddles carefully wrapped in a rain tarp.
Tom DeVries and his wife Tina live in New Braintree, Massachusetts. Now that both of their kids are off to college, he spends more time in Beyond Yukon Boat and Oar, his woodworking shop, and imagines that with the kids away he and Tina will be spending more time together fishing, paddling, and sailing in little boats. In years gone by, Tom has also canoed on the Yukon, fished commercially in Alaska, and sailed his skipjack on the Chesapeake. He wrote about DIY riveting hammers in SBM, December 2018.
If you have an interesting story to tell about your adventures with a small boat, please email us a brief outline and a few photos.
My equipment includes three glass flower vases I bought at Goodwill for 69 cents apiece. A thin stick and some small spring clamps hold the tangs out of the acid. Drain cleaner provides sulfuric acid to etch the files and a saturated baking-soda solution neutralizes the acid. The third vase has a fresh-water rinse. The file card (lower left) cleans file teeth and shop-made tools of copper, brass, and steel remove the debris the file card leaves behind.
Files don’t get the attention that planes and chisels receive, but they are cutting tools too work best when they’re sharp. Because files are made of hardened high-carbon steel and their teeth are numerous and small, the easiest way to sharpen them is with an acid. I’ve used vinegar—acetic acid—and drain cleaner—sulfuric acid. The acids react with the iron in steel, removing metal from the surface. A dull cutting edge is rounded over with wear, and as the metal dissolves, the radius of the curve diminishes and the edge gets sharper. Before putting acid to work, the file needs to be cleaned. Anything stuck between the teeth will prevent the acid from getting to the metal. A wire brush will get some of the debris left by the work, but a file card, with its short, stiff wire bristles will do a better job.
I work files with my vise holding a block of wood that I’ve run through the table saw to make a raised lip along to restrain files set on the flat and a couple of grooves to hold files on edge.
A pistol-grip bar clamp with padded jaws holds the file for cleaning. This file is clogged with paint. Its back is rounded so it covers a bit of the lip on the wood block.
The first step is to scrub the file with a file card. If you don’t have a file card, use a stiff steel-wire brush. Even after a thorough scrubbing, some debris remains.
If there is still debris stuck fast in the gullets between teeth—paint, epoxy, and aluminum are my usual culprits—a piece of copper pipe with one end flattened or a piece of brass will dislodge it. Pushed parallel to the file’s teeth, the copper or brass will wear away, creating a saw-tooth-like edge with tips that reach down into the gullets. For very stubborn debris, piece of mild steel, heated and hammered thin and flat, is the most effect cleaning tool I’ve found. I used a piece of 1/4” steel rod; a big ungalvanized nail could work too.
Whatever debris that the file card leaves behind can be forced out by pushing parallel to the grooves with metal softer than the file’s hardened high-carbon steel. Here a flattened brass rod does the work on a 4-in-1 rasp and file.
The flattened end of a piece of copper pipe can also work down into the grooves. For stubborn bits of debris, called “pins,” angle the flat edge of copper to apply pressure with one corner.
I made this file cleaner from a length of mild steel 1/4″ rod that I heated to red-hot with a propane torch and hammered flat. Pushing the tip parallel to the file’s grooves quickly creates an edge of teeth that will chisel out debris. The soft steel won’t damage the file. The same grooves develop when using copper and brass to push the pins out.
White vinegar is often recommended as the acid for sharpening files. The type you’ll find for kitchen use is 4-percent acetic acid. There’s also a 6-percent cleaning version that you’d find at the store among household cleaning products. Even the stronger version is very slow at etching a file. I found that after three days it would begin to make slight progress. The sulfuric acid that is available as drain cleaner is much more aggressive and can do the work in about an hour. The Clean Shot Drain Opener I bought at a home improvement store is 93 percent sulfuric acid. It contains “metal inhibitors,” but they clearly don’t prevent the acid from sharpening files. This high concentration of acid makes the product very harmful if it gets on you or almost anything else, so it requires handling with care. I wear glasses, the full face shield I use for lathe work, rubber gloves, and an apron.
This drain opener with 93 percent sulfuric acid, gets diluted with water to a 10-percent solution that can sharpen a file in about an hour. When the acid is poured into water it generates heat, so I prefer to use glass instead of plastic containers that might get softened when warmed. I bought these three glass flower vases at Goodwill for 69 cents apiece. I prefer the vases over glass baking dishes because I can suspend the files and keep the tangs away from the acid and dry for safe handling. The vases also give the acid less surface area to emit vapors and I can clearly see the acid at work. In a baking dish the bubbles would obscure the view through the surface of the liquid. I marked the acid vase with levels for the water (9) and the acid (10) so I could easily make the solution and require I pour the water in first. The other vase gets filled with water and then baking soda is added until no more can be dissolved. The third vase, to far, right is water for rinsing.
The acid is too strong to use undiluted; 10 percent acid/90 percent water is strong enough. Never pour water into acid. It can splatter and raise a little cloud of vapor because of a quick exothermic reaction. You’ll notice that a bottle of sulfuric acid will feel heavy. It is almost twice as heavy per unit of volume than water. When poured into water, the 10-percent solution will noticeably warm up, which is why I prefer glass containers to plastic. Keep away from the vapor rising from it by working outside or wearing a respirator.
Prepare a baking soda solution to neutralize the acid after the file has been etched. Mix baking soda until the water can dissolve no more and soda begins to accumulate at the bottom.
Before you immerse the file, check how sharp it is by pressing a fingertip against the teeth and slide it toward the tang. With a dull file, you’ll feel some resistance but won’t feel the teeth catching the skin.
Submerge the file in the acid solution and give it a gentle swirl to dislodge any air bubbles. The chemical reaction will quickly produce very small bubbles of hydrogen. The acid does the work in about 60 minutes. To check the progress, I remove the file from the acid and rinse it in water. I do the same fingertip test and when I feel the teeth catching, the sharpening is done.
Dipping the file in the baking-soda solution will neutralize the acid. The residual acid on the file will produce a flurry of carbon-dioxide bubbles. Rinse the file with fresh water and dry it with a heat gun, hair drier, or a blast of air from a compressor.
After dipping in acid, baking-soda solution, and water, the file needs to be thoroughly dried to keep from rusting. When the file is dried, rubbing chalk or soapstone on it will absorb any remaining moisture. I lightly brush the excess off with a brass-wire brush. Soapstone, often carried by art-supply stores for carving, is slippery stuff and leaving a thin film on will, for a while at least, prevent clogging when the file is in use.
Some do-it-yourselfers spray a lubricant such as WD-40 on the file to prevent rust, but I find that gets pretty messy and the lubrication might make the teeth slide across the work rather than cut into it. Rubbing chalk or, my preference, soapstone over the teeth will assure the file is dry and won’t rust, and then help prevent clogging when it’s being used.
After rubbing the newly sharpened rasp with soapstone, I use a brass-wire brush to clean up.
To dispose of the sulfuric acid solution, I fill a 5-gallon bucket half-full of water and pour the solution in. Next, I slowly pour the baking-soda solution into the bucket. It creates a lot of froth as carbon dioxide bubbles up from the reaction. The mix is still likely to be acidic, so I sprinkle in baking soda, straight out of the box, until the frothing stops. It can take a whole 1-lb box. At that point, the mix in the bucket is no longer acidic and the remaining by-product of the reaction is a solution of sodium sulfate, a neutral salt. It is safe to pour down the drain—it won’t harm plumbing—and isn’t an environmental hazard. The sodium and sulfate ions in the solution are, according to the source linked above, “ubiquitous in nature.”
While you’re devoting some attention to sharpening your files, consider grinding the teeth off one side. Some flat files come with toothless safe edges to assure you’re only working one side of an angle. I use square files for cutting through-mortices in the gunwales of Greenland kayaks. With cutting faces on all sides, it’s difficult to tune the corners accurately.
Grinding a safe edge on a file can make it easier to work accurately, working a corner one surface at a time.
By making one face smooth I can concentrate on one mortice surface, knowing the adjoining surface will be unscathed. I remove the teeth with a bench grinder and a 1×30 belt sander/grinder. As an added benefit, the intersection of the safe surface and the cutting surface will cut a sharp, precise corner. The file’s original edge cuts a slightly rounded corner.
All of these files and rasps got a better bite after a dip in the sulfuric acid solution.
After you’ve sharpened your dull files, treat them with the same care you accord your other cutting tools. Keep them separated from each other instead of tossed together in a drawer.
Christopher Cunningham is editor of Small Boats Monthly.
You can share your tips and tricks of the trade with other Small Boats Monthly readers by sending us an email.
The router we’ve used for years was suitable for many tasks, but it was too large and heavy to use on the many small pieces that went into the Penobscot 14 we built. We did some research and were intrigued by the compact routers designed for trim work, so we picked one up and gave it a try. We were very pleased with the range of projects it could do.
Kent Lewis
DeWalt’s DWP611 weighs 4.6 pounds and has a 1-1/4 hp motor.
The tool we chose, the DeWalt DWP611 Compact Trim Router, has a 7-amp, 1-1/4 hp motor with variable speed of 16,000 to 27,000 rpm. The clear plastic base and two built-in LED lights make it easy to see the bit and the edge of the piece being worked. The 4″-wide base provides a stable platform, and 1/4″-shank bits are easy to change with multiple spindle-lock detents and a single wrench. The motor has a soft-start feature and an automatic electronic control to keep bit speed constant. The router has a depth adjustment with a range of 1-1/2″ and a clamping mechanism to lock the vertical position with a quick flick of a lever. The 8’ power cord is long enough to move around our work area. There are standard 1-3/8” template guide inserts and a vacuum-hose attachment available for use with the router.
We have used the compact router on cypress, white oak, mahogany, white pine, yellow pine, and Peruvian teak. It powered through some white pine with a Roman ogee bit with no problem, and eased the edges of the cypress, pine, and teak with round-over bits of different sizes. The variable speed is handy to get the best performance on different materials, the lower speeds especially, to minimize the chance of router burn on hardwoods. The router’s contoured grip is set low and is easy to handle on the smaller pieces, and I do not have to fight the torque that the larger router puts out. With the high horsepower and amp rating, the router runs cool. The aluminum base is textured to provide a secure grip while keeping fingers clear of the bit. Many jobs were simplified by being able to hold the router with one hand and steady the workpiece with the other.
One of our first thoughts when we bought this compact router was to set it up with a dedicated round-over bit and leave it that way, but we quickly found that it can handle a variety of bits on a variety of large and small projects. For one of those projects we set up a scarfing jig and put an 8:1 scarf on several sheets of 6mm plywood, with complete control of the router during the precise cut. We find that the DeWalt DWP611 is a very useful tool for our shop.
Kent and Audrey Lewis paddle, row, and sail a small armada of boats in the skinny waters of Northwest Florida. Their messing-about reports can be found at their small-boat restoration blog.
Soon after Kent sent me the draft of his review of the DeWalt router, I went shopping for a compact router for myself. I’ve had a small Makita router, the now extinct 3608B, for 30 years and it has worked well, but even as small as it is, it is often awkward to handle. Kent convinced me of the advantages of a compact trim router, and I wasted no time shopping for one. I settled on the Ridgid R2401, which is in many ways like Kent’s DeWalt DWP611 with a soft-start motor and very precise depth adjustment. The one-handed operation, the clear base, and the built-in lights would have been enough of a step up from my Makita, but there are several other features I appreciate. The soft-start feature on both the Ridgid and DeWalt routers won’t test your grip. The Ridgid router has a flat, rubber-guarded top so it will sit upside down for changing bits without marring delicate finishes. The on/off switch is on the top of the router, so it will turn itself off when set upside down. It’s a pull-push switch, so a quick slap will also turn the router off—you don’t have to go hunting for it. The Ridgid R2401 is a good value for the $99 price tag.
Christopher Cunningham
The Ridgid R2401 weighs 3.8 lbs and has a 1-1/2 hp motor.
Is there a product that might be useful for boatbuilding, cruising, or shore-side camping that you’d like us to review? Please email your suggestions.
I first used a Versa Vise in 1988 when I was working for the Smithsonian Institution, making mounts for art objects in the National Museum of African Art. Those brass armatures could be very complex with very odd shapes, and the Versa Vise had a nearly unlimited range of motion to accommodate working on them. I liked the vise so much that I soon bought one for my own shop.
The jaws of the vise open to 4-7/8″ and have smooth, flat faces 3-1/2″ wide and 2-1/4″ high. With that wide area of contact and the absence of knurling common to the jaws of other vises, the Versa Vise won’t mar wood or metal. On the body of the vise, behind the fixed jaw, there is a 1-3/4″ square anvil surface. I do light work on it and leave the heavy hitting for some big slabs of steel that can take no end of abuse. The vise sits on a base with three legs and a 1-1/2″-diameter post and can swivel freely around it. There are two matching 1-1/2″ holes in the vise, one on the bottom to hold it in a normal upright position and the other on the side for a horizontal orientation.
The swivel base adapter gives the vise additional ranges of motion.
I recently purchased the Versa Vise swivel adapter. It’s an aluminum cylinder that attaches horizontally to the vise base and locks with a T-handle screw. The Versa Vise then slips over the other end of the adapter for a new range of motion, tilting front to back. Newer models of the vise have a threaded hole in the vise for locking on to the adapter. My vise, without that hole, locks on the adapter when the jaws are tightened. I’ll likely drill and tap the hole so the vise will stay put when I open the jaws. The new models also have a pair of holes in each jaw sized to take screws to hold wood faces in place.
If there is no pressure on the vise jaws, the vise easily slips on and off the post, so it’s easy to change its position or remove it if it’s in the way of a project on the workbench.
The little arm to the left, the “dog,” pivots around the small pin. As the vise grips something, it presses down on the dog’s set screw, and then the dog presses against the base’s post, locking the vise.
When the handle is turned and the jaws are squeezed on something, the movable jaw pivots slightly around the barrel nut for the screw and the bottom of that jaw presses on a “dog,” a little rocker that then presses on the base’s post. That prevents the vise from pivoting. The tolerances are close enough that there is no perceptible shift of the moveable jaw as it presses down against the dog.
I use my Versa Vise for working brass, bronze, steel, and wood. Set horizontally, it will hold a board on edge on the benchtop for planning, a sheet of plywood on edge on the floor. If I need to use my chopsaw on the workbench, I can quickly slip the vise off its post to get it out of the way.
With the vise set on its side over the post, the jaws can hold a board on edge for working with a plane or a router.
With the vise on its side and its jaws facing outward, a sheet of plywood, resting on edge on the floor, can be held upright.
Rotate the vise and it will hold a board vertically for cutting dovetails.
With the adapter connecting the vise to the base, the vice can rotate in a vertical plane.
This arrangement with the vise and adapter will hold a workpiece flat.
In the Versa Vise’s long history, it has been through several different manufacturers and a few changes, some not for the better. Harry Bryan (who wrote about small-boat seating in our January 2015 issue) reviewed the Versa Vise for WoodenBoat in 1996. He had purchased a Versa Vise in 1971 and liked it so much that he bought four more for his kids, and then 10 more that he sold to his friends. Later, he purchased one in 1995 and received one in 1996 for the WoodenBoat review. All of the vises were made by Gaydash Industries of Uniontown, Ohio, but the two newer models didn’t grip the base’s post as firmly and would pivot when they shouldn’t. The older vises had round knobs on the ends of the handle while the newer had the ends pressed flat and flared, and the screw’s barrel nut showed scoring from sawing instead of being tooled smooth. In the review, Harry wasn’t able to recommend the newer Versa Vise as it arrived from the manufacturer, but he offered instructions for tuning it up to work as well as the older model that he liked so well. “You should not have had to do the work,” he noted, “but the result is you have ready for a lifetime of use the best all-around woodworking vise I know of.”
My vise has the pressed ends on the handle and the saw scoring on the screw nut—indications that it was a version that didn’t perform as well as its predecessors—but I haven’t had trouble with the vise pivoting. I haven’t done any measurements, I just tighten the vise until it doesn’t pivot. It’s important to tune the jaws to meet parallel, favoring the first contact at the top of the jaws. The screw in the dog makes that adjustment. The higher up the jaws apply pressure, the tighter the dog presses against the post, eliminating unwanted rotation of the vise.
The Versa Vise is now being manufactured by Jon-Mar Gear and Machine of Canal Fulton, Ohio. It has the rounded knobs on the handle and the smooth tooling. I got a bit of the history behind the vise from Larry Murgatroyd, the company’s owner. For 18 years he had worked for the Wil-Burt Company, where the vises were made prior to manufacturing by Gaydash. While Jerry purchased the equipment that was used to make the vises in the ’30s and ’40s, he uses CNC machinery to make parts faster and more precisely. He has made a number of improvements in the Versa Vise and elevated the level of durability and quality to meet or exceed the standards set by Wil-Burt.
The Versa Vise was invented by John R. Long of Springfield, Ohio, and was granted Patent #667,151 in 1901. While the patent has expired, the name, Versa Vise, is still a protected trademark. There are several knock-offs on the market under other names: caveat emptor.
Now, three decades after I bought my Versa Vise, it is still anchored to the corner of my workbench and I’ve never given a thought to replacing it.
Christopher Cunningham is editor of Small Boats Monthly.
The Versa Vise is manufactured and sold by Jon-Mar Gear and Machine for $79.95. The Swivel Base Adapter sells for $34.95. The company has a 90-day return policy.
Is there a product that might be useful for boatbuilding, cruising, or shore-side camping that you’d like us to review? Please email your suggestions.
BLUE PEARL is a boat that was conceived when grandson Henry said to his grandfather, “Let’s go fishing.”
Young Henry got lucky with his choice of grandparents. Grampy, known to the rest of the world as Mark Bonnette of Holland, Michigan, had a degree in industrial design, taught illustration at a university, worked in the aerospace industry, and was the director of design in the marine industry for 7 years and owner of his own design firm for the past 29 years. Henry liked to build things and Mark knew how to build them.
Whenever Henry came up with an idea for something to build, he’d tell his grandfather about it and at some point announce: “We need a blueprint, Grampy.” He would climb up on Mark’s drafting table and start to draw. Armed with the “blueprint,” grandson and grandfather would head for the shop. They have already built a pirate ship play structure, a Herman Miller slat bench knock-off for Henry’s mom, a toy box, and an assortment of swords, shields, and other weaponry.
One day, Henry decided he’d like to go fishing, and when Mark pointed out they didn’t have a boat, naturally Henry said, “Well, let’s build one.” The conversation led to setting the design criteria. Henry came up with seats for the two of them, an anchor, oars, and a motor. Mark had his own set of criteria. The boat had to be small enough to build in the garage, and the project could not require expensive tools or materials. Plywood would fit the budget and speed the construction, though perhaps not enough to meet Henry’s projection of having the project wrapped up from start to finish in a single weekend.
Mark set the length at 12′. The bottom would span 4′, no wider than of a sheet of plywood, and the sides would be constrained by the 24″ width of a half sheet. He created plans on an AutoCAD program and, after completing the drawings, made a cardboard scale model. The pieces of the model went together well and gave the green light for buying materials for the full-scale boat.
A bill of materials for 10 sheets of 1/4″ plywood and two sheets of 3/4″ plywood (for cradles, seats and bulkheads) plus clear pine lumber came to about $300, doubled to $600 to account for other supplies and incidentals. That was more than Henry’s allowance could cover, so Mark stepped in to be the project’s financier.
Henry favored using the cordless drill, so he was tasked with removing all of the screws and pads that held the three-layer laminated bottom to the curve of the building cradle.
The boat took shape from the bottom up. Three panels of 1/4″ plywood, each scarfed together from a sheet and a half, were epoxied together, one on top of the other, and temporarily screwed to a cradle shaped to give the bottom its stem-to-stern curve. After the epoxy had cured, the screws were removed and the bottom cut to shape with a saber saw. That power tool made Henry a bit anxious; he was more comfortable with the cordless drill and took charge of removing the screws, though he was afraid all of the holes left behind would sink the boat.
The sides were also composed of three layers of 1/4″ plywood. After the first layer was attached to the stem, transom, and bulkheads, Mark mixed a pot of epoxy and from that moment on, the clock was ticking. It took both grandson and grandfather working together to spread the great expanse of epoxy, position the next side panel, and drive the screws to pull the plywood panels together. Henry got his first taste of a job that demands focus, quick action, and working without a break until the task was complete.
Decked out with protective clothing, Henry could roll epoxy on the hull without ruining his tie-dye T-shirt or shorts.
With the all of the pieces assembled, the project looked like a boat, and Henry thought the end was close at hand: Throw on some paint, and it’s fishin’ time. Mark, having designed mahogany runabouts for Grand Craft, had a different view of the work remaining: a stainless cutwater, transom straps, mahogany chine boards, and on and on. One of Mark’s friends offered him some good advice: “What are you thinking? ’Glass it!”
Henry’s first idea for a color scheme involved all the colors of the rainbow, but he changed his mind and chose blue, all the better for sneaking up on fish.
For Mark, fiberglassing meant blowing the materials cost estimate out of the water. For Henry, it meant forced labor dictated by epoxy pot life. After seemingly endless rounds of squeegeeing and sanding, he decided that a career laminating fiberglass or boat finishing wasn’t going to be in his future.
Grandfather Mark decided even a little boat meant for fishing deserved a touch of class and went for some mahogany, finished bright.
When the ’glasswork was done, Mark gave into his runabout inclinations and added mahogany gunwales and foredeck, all finished bright. But he gave his grandson the choice of color for the paint for the rest of the boat. Henry decided that “rainbow” would look good. Mark thought “great, how am I going to pull that off,” but when the two went to the marine-supply store, Henry took a look at the color chart and, much to Mark’s relief, chose “blue, that way the fish won’t see us coming.”
Young Henry saw his grand plan through to a successful completion.
BLUE PEARL was launched late in the fall, more than two months over Henry’s projected timetable and a couple of thousand dollars over Mark’s estimated budget, but the bond between a grandfather and grandson is worth every dollar and every hour spent together.
Have you recently launched a boat? Please email us. We’d like to hear about it and share your story with other Small Boats Monthly readers.
The old personal flotation device (PFD) that I had with me for about 6,000 miles of small-boat cruising between 1980 to 1987 was given to me by my next-door neighbor. He said it was the type used by longshoremen working the docks. Like all PFDs of that time, it had no pockets.
I got a lot of use out of this PFD on my cruises, but all it ever did was keep me a bit warmer and help explain my grubby appearance when I walked into town: “I’m not destitute; I’m boating.” Here, I’m two months into a wintertime river voyage. Behind me is my sneak box, hauled into an abandoned house in Louisiana that had half fallen into the Pearl River and lost its living room’s riverside wall.
My recollection is that the Coast Guard or Underwriters’ Laboratories would not approve pockets because they could be filled with lead shot and sink a PFD. I couldn’t carry anything on my old PFD, and even if I had pockets in a jacket, they’d be covered by the PFD. Sewing pockets on a PFD would void its status as an approved flotation device, so I later sewed up a vest with pockets that I could wear over my PFD. Shortly thereafter, in the ’90s I think, PFDs with pockets were given approval and came on the market.
I met a Coast Guard rescue swimmer, a guy whose job is to jump out of helicopter to rescue boaters in distress. He said something that stuck with me: “If the gear you need is not on you, you don’t have it.” The bulging pockets on his PFD and dry suit proved the point. I was doing a lot of sea kayaking then, and a capsize was something I had to be prepared for. In a worst-case scenario I’d have to contend with losing my kayak, and my survival and rescue would depend on what I had on me.
When I’m wearing my PFD, it appears I have only two items with it, a VHF radio and a rescue knife, but it carries much more.
The PFD I’ve been using for the past several years is the Guide model from Kōkatat. It does much more than keep me afloat. It has a top-loading electronics pocket on the right, a side-loading, stretchy mesh pocket on the left, and small top-loading pocket behind the zipper; all of the pockets have rings sewn-in to anchor tethers. The two lash tabs on the front of the PFD and one on the back provide places to mount gear on the outside of the PFD. There are retroreflective patches on the front and back for night search visibility.
My current PFD, shown above with everything tucked away, has what I need as well as to help someone in need.
The PFD has a belt with the quick-release buckle; it’s part of a towing system for use while kayaking. I don’t need to tow with my PFD when I’m aboard my other boats, so I’ve taken the O-ring, the towline, and the towline’s pouch off. The towing belt, by the way, makes the PFD a rescue vest, classified as a Type-V, special-use life jacket, though all the other features are available on the more common Type III recreational vests.
On the back I have a PFD light and pouch for my Sea Seat.
I added an accessory pocket to the back of my PFD, anchored to the shoulder straps and belt loops. Its Velcro-secured top flap has its own retroreflective patch.
Here’s what I carry aboard my PFD: The electronics pocket holds a handheld 6/2.5/1-watt VHF radio. It’s waterproof (IPX7) and floats. In the mesh pocket are a signal mirror, a flashlight, and a rescue laser light. I used to carry a set of three aerial flares, but switched to the laser because the pyrotechnics burn for just a few seconds and have to be replaced every three years.
I also keep a spare car key and an expired driver’s license in the mesh pocket. The license is laminated plastic and waterproof, and has my name, picture, and address on it. On the back of the license I’ve written my phone number, in case I misplace my PFD and someone finds it, and phone numbers for emergency contacts.
The lash tab above the left pocket has a rescue knife in its sheath. The knife blade is made of rust-proof H-1 steel. It has a blunt combination serrated/plain cutting edge, and a line and bungee cutter on the spine. My whistle is tethered to the shoulder strap above the knife.
The small pocket concealed behind the front zipper carries a rust-proof folding knife with a plain blade. It has a large hole in the blade so I can open the knife with one hand. The PFD has buckles and the belt holding it in place, so it’s safe to open the zipper to get to the knife.
I’ve done a lot of sea-kayak self-rescue practice while wearing my PFD, and when I scramble over the aft deck I haven’t had any trouble with the gear on the vest front snagging deck lines.
The Sea Seat, pulled from the PFD pouch by its tether, takes about 60 breaths to inflate. It’s then big enough to support me, seated upright and mostly out of the water.
The pouch attached to the back holds a Sea-Seat, a 38″ x 40″ inflatable “personal survival raft for cold water.” (The Sea Seat, dating back at least to 1986, has been out of production for decades and as far as I can tell, its Canadian patent—1550108—has expired, just in case someone is thinking of reproducing it.) The raft is orally inflated and has a depression in the middle to provide a stable place to sit. I clip the Sea Seat’s tether to my right shoulder strap, and giving that a hard tug will pull the folded seat past the pouch’s Velcro closure. I’ve practiced with the Sea Seat in breaking waves, and I’ve been able to inflate it easily and get aboard. Sitting in the depression, I’m fairly stable, even in whitecaps, and I’m mostly out of the water and my hands are free to tend to tend to distress calls and signals.
The lash tab on the left side of the back has a small PFD light that I can turn on my reaching back and twisting the top.
I carry my smart phone in a waterproof case that is tethered to the left shoulder strap; the phone gets tucked down inside the front of the PFD where it’s out of the way and well protected. My waterproof (IPX7) GPS is tethered to the right shoulder strap and also tucked inside the PFD.
The XL Guide PFD has almost 17 lbs of buoyancy, and mine keeps me afloat even with all the gear I have attached to it. It not only tips the odds more in my favor but also puts me in a position to help others more effectively. I never regret wearing it.
Designing a small boat that can be rowed easily, is stable in a variety of sea conditions, and is a pleasure to look at has challenged generations of builders and trained marine architects. The most successful results have evolved as one designer has influenced the next until something perfect, or close to perfect, emerges.
John Hartsock grew up rowing a variety of small boats, and his experiences with the best of them led him to regard their designers as being “wonderfully intelligent people with an intuitive feel for hull shape and a willingness to communicate with one another.” As an engineer and computer programmer, he was convinced that a superior rowing boat could also be designed from a set of mathematical equations. His conviction eventually led to the 14′ Cosine Wherry. Its similarity to a Whitehall rowing boat is both a nod to the designers and builders of the 19th century, and confirmation that his mathematical approach to design worked. John’s detailed explanation of his approach can be found in WoodenBoat, May/June 1991, or at Concrete Canoe.
Paul McCuish
The author’s Cosine provides a clear view of the hull’s interior. The strips in the bottom of the hull run parallel to the keel; those forming the topside are parallel to the sheer. The transition is at the turn of the bilge.
The Cosine Wherry is 14′ 2″ long with a beam of 52″ and should weigh about 100 lbs when built to the plans. It is strip-planked with 1⁄4″ × 3⁄4″ red cedar, and sheathed inside and out with fiberglass cloth and epoxy. Building time is at least 200 to 250 hours, though that will vary considerably depending on the builder’s experience, whether or not the strips are purchased or milled from solid planks, and how much detail is put into finishing touches. For my Cosine, I cut my own strips, sawed my own hardwood veneer for the transom, and laminated an outer stem that is not in the plans.
The guide I used for the construction of my boat was Rip, Strip, and Row: A Builder’s Guide to the Cosine Wherry, written in 1985 by J.D. Brown in partnership with John Hartsock, Bob Pickett, and Erica Pickett. The Picketts were highly regarded proprietors of a marine-lumber company in Anacortes, Washington; they sold materials and kits and were a source of help for many builders. Rip, Strip, and Row takes the beginner builder from selection of materials, with a detailed cut list, through construction of the mold, planking and fiberglassing the hull, to finishing the interior. The inexperienced builder will appreciate the attention to detail in constructing the building form. This is the stage where precision is a must: get the form exactly right and laying the strips is a pleasure, like piecing a jigsaw puzzle together, rather than a battle to force pieces into place.
SBM
In this Cosine Wherry, built by Richard Davison of San Diego in 1992, the thwart knees, included in the original design, strengthen the gunwales, reducing flex when the boat is rowed hard.
Rip, Strip, and Row was written almost 35 years ago and is no longer in print. There are a number of online sources for the book, but be sure to ask if both large pages of the patterns are still in the envelope attached to the inside of the back cover. An alternate source for both the plans and a builder’s guide is Ray Klebba’s White Salmon BoatWorks (link below).
Builders will want to use additional sources to take advantage of newer techniques and approaches to construction. I appreciated Susan Van Leuven’s Woodstrip Rowing Craft: How to Build, Step by Step (published in 2006, it’s also out of print but available from many on-line booksellers). She details the project from molds to launch as she builds two cedar-strip rowboats. Her Rangeley Lakes boat is similar to the Cosine Wherry, and following her steps saved me a lot of head scratching, especially during the final stages of piecing together the interior. Rip, Strip, and Row is not big on interior details and leaves much for the builder to decide: whether to add a seat in the bow, how best to build the rubrails, how to fit the stern seat, etc. Woodstrip Rowing Craft provides excellent guidance for these kinds of details.
SBM
At each of its three rowing stations, the Davison-built Cosine has adjustable foot braces described in Rip, Strip, and Row. While the book states they “aren’t necessary, but they are handy,” foot braces are an important addition for rowing with power and control.
When you build a cedar-stripped boat, you’ll need to decide whether you’ll use bead-and-cove strips or square-edged strips, and whether or not you’ll use staples to hold the strips to the molds or go without staples to avoid the rows of small holes that turn into dark specks in a bright-finished boat. Having built a cedar-strip kayak some time ago, I felt confident building the wherry with square-edged strips and without staples. I collected old inner tubes from a friend’s bicycle shop—they’re great for squeezing the strips tight to each other while the glue dries.
Square edges required a lot of crawling under the partly stripped hull to inspect the gaps between strips on the inside. The outside joints are visible and not difficult to make tight, but it’s easy to go too far with the plane and take away too much wood on the inside. It’s worth the time spent checking and fixing these gaps on the hull’s interior, because in a varnished boat that’s what you’ll be looking at once you get rowing. Working with square-edged strips saves time routing the beads and coves and avoids the unpleasant discoveries of gaps that show up between them when you begin fairing the hull.
SBM
The editor, here rowing the Cosine solo, could easily lope along at 3 1⁄3 knots, sustain 4 1⁄2 knots at an exercise pace, and hit 5 knots rowing all-out.
Hartsock designed the Cosine Wherry to be light. At approximately 100 lbs, he could carry it down the beach on his shoulders or hoist it onto a cartop carrier. I had originally planned to flip mine upside down on top of planks laid across my utility trailer. My wife, however, has had enough of wrestling boats around, and insisted that we buy a small boat trailer. That set me free to make changes which would add a few pounds but result in a more solid boat. I changed the transom from 1⁄2″ to 3⁄4″ plywood, and the 1⁄2″ plywood stem to a solid hardwood stem. I increased the width of the fiberglass cloth so that it extends farther toward the rubrails than the plans called for.
I used sapele hardwood for the skeg, the small keel strip, the seats, and the rubrails. The sapele rails required steaming, but once fastened they stiffened up the hull very nicely, and will take a beating that softwood rails would not withstand. Once the breasthook and thwarts were fitted snugly, the hull seemed stiff enough that I chose to not add thwart knees shown in the plans. I may add them later, even if only because they look good, and leaving them out seems a little lazy.
Paul McCuish
The Cosine trims well with a rower at the forward station and a passenger in the stern.
Rails, thwarts, and all the other solid wood pieces were given one or two coats of epoxy before receiving four to six coats of varnish. The sanding alone makes me wonder how anybody could build this boat in 200 hours.
The only oars I had were an old pair I’d bought years ago at a hardware store. A neighbor convinced me that the wherry deserved good oars and urged me to make a pair to Pete Culler’s drawings in Boats, Oars, and Rowing. I found a nice piece of yellow cedar for the project; spruce or pine would have worked as well. The oars were a pleasure to make, and would prove essential in getting the best performance from the wherry.
SBM
The editor, rowing with his son in the stern, brought the Cosine up 2-1/2 knots without much effort, held 3-1/2 knots with an aerobic effort, and peaked at 4-1/3 knots in a short sprint.
On launch day, the Cosine was all I could have wished for. It does not in any way seem heavy with the hardwood bits and pieces I’d chosen to add. It slips through the water with hardly a ripple, tracks beautifully, and maneuvers like a charm. A rower sits on the middle thwart while rowing alone, and on the forward rowing station when a passenger’s in the stern sheets. The drawings include a third station aft so that two could row together, but it’s generally only my wife that I boat with, and we chose to avoid the “marital turbulence” that might result from rowing in tandem. Perhaps I’ll add the third station when I add the thwart knees.
SBM
With two people rowing the Cosine wherry, there is plenty of room between the stations so it’s easy to avoid a clash of blades. The editor and his son held 4 1⁄2 knots with a moderate effort.
The Cosine Wherry is wonderful to row. There is no mention of a sail or a motor in the book, and the builders who have outfitted a Cosine for sail agree that she rows well but are less enthusiastic about how she sails. And clamping an outboard on the transom would be, in my opinion, just rude. Perhaps the most convincing testament to how the wherry handles a variety of sea conditions is the repeated success that a Cosine named MAGGIE has had in the annual Great River Race, a 21.6-mile rowing race on the Thames River in England. MAGGIE has placed near the top of the 300 entrants for several years, and won first in her class and first overall in 2010 and 2013. While I won’t be entering any races with my Wherry, it is nice to feel the water slip away so easily beneath me when I lean hard on the oars.
Paul McCuish’s first boat was a 10′ lapstrake rowboat that he received for his tenth birthday. It was much older than he was, and he spent more time stuffing the holes in it with rags torn from old blue jeans than rowing it. Since then he has always had a boat or two, most of them old enough that he learned a bit about building from having to keep them afloat. He’s a retired teacher, but he has worked as a carpenter and as a cook on a boat out of Haida Gwaii, British Columbia, Canada. The Cosine Wherry is his second cedar-strip vessel. The first was a One Ocean kayak designed by Vaclav Stejskal. He can use them both year-round where he lives on Vancouver Island.
Plans for the Cosine Wherry are available from White Salmon BoatWorks for $135. They include full-sized drawings and an instruction book. White Salmon Boatworks, located in White Salmon, Washington, also offers kits and finished boats. Oyster Bay Boats builds Cosine wherries in Madeira Park, British Columbia.
Is there a boat you’d like to know more about? Have you built one that you think other Small Boats readers would enjoy? Please email us!
One of the better-known trailerable boats in Southcentral Alaska is the Tolman skiff. Designed by the late Renn Tolman of Homer, Alaska, in the early 1990s, the three models of the skiff have become a common sight in Alaskan waters. The beautiful power-dory-inspired lines and stitch-and-glue construction made the design very popular for new builders. Even those with little or no woodworking skills can take on these easy-to-build boats.
Renn’s book, Tolman Alaskan Skiffs, details three models: the Standard, a 20′ open skiff; the Widebody, a 21′ 4″ version of the Standard with a console, a cuddy cabin, or a pilothouse; and the 22′ Jumbo, a cruiser that can support a full cabin with pilothouse. In recent years, the Jumbo, stretched by many builders to 24′, with its comfortable overnight accommodations, has been the most popular of the three Tolmans because of its usefulness in Alaskan coastal waters. Although the skiffs were designed for that area and the Pacific Northwest, they have been built and used from the California coast to the Florida flats and other parts of the world.
The plans for the Jumbo and the two other models are in Tolman Alaskan Skiffs. The book has no shortage of drawings and pictures to build by; it’s also an enjoyable and interesting book for those who have been contemplating building their own boat and need bit of inspiration and encouragement. The author takes the intimidation out of getting started by eliminating the lofting and supplying all of the measured drawings required, including those for the bottom, sides, shelves, and transom with options for the transom depending on the motor chosen.
Photographs by the author
At this stage of the construction, the bottom panels have been assembled, including the second layers of 1/4” plywood at the bow and the chine flats. The 4” chine flat at the left is clearly visible at the edge of the bottom panel. The first side panel has been installed with the help of screws and fender washers.
The hull is built with standard marine or okoume plywood, and the step-by-step instructions make it easy to scarf the plywood sheets together for the bottom and side panels. By stacking the plywood in stair-step fashion, all scarfs are cut at once using a hand planer and a belt sander. Once smoothed, the scarfs joints are aligned and epoxied together to form the long panels. Each bottom panel starts with one length of 1/4″ plywood forward and two lengths of 1/2″ plywood aft. The 1/4″ plywood offers easier bending at the bow. The interior faces are flush with each other; the exterior surface temporarily leaves half of the bevel on the 1/2″ plywood exposed. The two full-length bottom panels are then stitched together and mounted on forms at the proper deadrise.
With an outboard of 115-150 hp for power, a Jumbo can fly along at up to 35 knots.
The bottom has narrow chine flats. One of the well-thought-out features of the Jumbo design, they provide lift at speed and keep the spray down. The flats are stitched and glued in place and then the bottom panels are taped, fiberglassed, and epoxied on the interior side. The bottom assembly is then set aside while the other components are completed. Two 2” x 14” longitudinal stringers are cut from laminated veneer lumber (LVL) beams, the kind used in residential construction; they provide great strength to the hull and support the cockpit sole. LVL beams are easier to cut and stronger than dimensional lumber that was used in earlier Tolmans.
Next, the transom, stringers, shelves, and stem are secured upside down on the building frame, followed by epoxying the previously assembled bottom panels to them. Now is when a second layer of 1/4″ plywood is applied to the bent 1/4″ plywood portions of the bottom panels, bringing the forward end of the hull to a 1/2″ thickness. The entire hull is then covered with fiberglass cloth and epoxied. Spray rails are added to the side panels and a durable UHMW polyethylene shoe is installed to protect the keel . At this point, the hull can be removed from the building frame, turned over, and the installation of the selected cabin option can begin.
The Jumbo can sleep up to three adults comfortably. Many builders depart from the cabin arrangements provided to meet their individual requirements.
While the book includes detailed instructions for building optional accommodations such as a cuddy cabin with bunks, a wheelhouse, steering stations, cabins, and various seating arrangements, many builders design their own. Measurements are given for placement of the bulkheads to obtain the best balance and usefulness depending on cabin and deck configuration. The instructions offer suggestions for the placement of the gas tank, storage lockers, and anchor well.
Everything the novice builder needs to know is in the book. Material lists, tips for working with fiberglass cloth and epoxy, setting up shop, and tool selection are all covered. The hull can be built in about three months, but adding a cabin and other features will make it a longer project.
A Jumbo with the full cabin will sleep two or three adults and makes an excellent craft for weekend or even weeklong adventures. I built my Jumbo ten years ago to take advantage of more deck and living space than the Widebody I’d built a few years earlier could provide. With 8’ between front and rear bulkheads and 6′ of deck space, there is always plenty of room for fishing and room inside when the weather isn’t at its finest.
Most builders power the Jumbo with a single four-stroke outboard in the 115–150-hp range, which allows it obtain speeds up to 35 knots. I chose a Suzuki 140-hp four-stroke, which made for a very well-balanced and quiet ride, and a 9.9-hp high-thrust auxiliary motor. The Suzuki has never left me stranded, but the 9.9, which pushes the boat at about 5 knots in calm water, could get me home if it did.
The Jumbo’s transom is strong enough and wide enough to take two powerful outboards, providing more security, though many have a main outboard and a trolling motor.
The transom is stout enough to handle twin motors for those who want that extra security. Fuel economy is outstanding and ranges from 3 to 5 miles per gallon, depending on load and motor choice. This allows adventurers to reach those places that may be a stretch for a larger boat that consumes much more fuel. Using Renn’s recommended placement of the gas tank under the rear deck, my Jumbo has a range of 250 miles or more.
Driving the Jumbo is always a pleasure. Although this boat feels well balanced and performs well on calm seas, it is also right at home in a 3’ or 4’ chop. There will be little pounding in choppy water, which is to be expected with such a light boat. The hull has a 12-degree deadrise at the transom, increasing toward the bow, which gives it a comfortable ride. The flaring sides, characteristic of a Tolman, contribute to its seaworthiness. The boat comes up on plane very easily, carves turns nicely, and tracks well. It is perfect for sport fishing, exploring, or edging up to a beach for beachcombing or for offloading passengers and camping gear. Jumbos are easily trailered with a heavy-duty pickup, although tandem trailers are needed for the larger stretched versions with heavier cabins.
The Jumbo will get 3 to 5 miles per gallon of fuel, and its range with the recommended fuel tank is over 250 miles.
My Jumbo turns heads when trailering, and I’m often approached with questions about it at fuel stops and in harbors. With its good looks, fuel efficiency, and being fun to build, it’s easy to see why the Tolman designs have become so popular. Online Tolman forums have become quite popular and are helpful for discussing all parts of the building process; long-term friendships have developed through building and using these boats. If you’re looking for a boatbuilding project that will produce a great-looking and good-sized boat in a reasonable time frame, look no further than the Tolman Jumbo.
Neil Andrews is an IT professional who loves adventuring in Alaska and lived there for 30 years, raising his family and building boats in his spare time. Although now residing in Arizona, he continues to explore Alaska and enjoy boating in Prince William Sound in the summer.
Jumbo Particulars
Length: 22′ to 24′
Beam: 8′
Beam at chine: 6′
Weight: less than 2,000 lbs
Recommended power: 115–150 hp
Renn Tolman’s book, Tolman Alaskan Skiffs, is available from the WoodenBoat Store, Duckworks, and from the publisher, Kamishak. West Coast Boat Works of Bend, Oregon, provides kits for the Jumbo and the two other Tolman Skiff models. The Saltwater Workshop of Buxton, of Buxton, Maine, also provides kits for all of the Tolman Skiffs.
Is there a boat you’d like to know more about? Have you built one that you think other Small Boats Monthly readers would enjoy? Please email us!
The Angler’s Loop (horizontal cords) and the Zeppelin Bend (vertical cord) will hold in bungee cord without coming undone or jamming.
Bungee cord is very useful stuff aboard a boat, but the precut bungees, fitted with metal hooks or plastic balls on the ends, are not always well suited to the applications I have in mind. The stretch of the cord itself might accommodate the length required for a particular job, though if the bungee is on the short side, the extra tension makes it hard to work with, and if it’s too long, making extra wraps to take up the slack takes time, often when there’s good reason for haste. I’ve never liked the metal hooks because they often snag things, and the plastic balls sometimes get loose and whip around like a monkey’s fist on a heaving line.
Most of the knots meant for rope don’t work with bungee cord. A sheet bend, even a double sheet bend, will come apart if you push the joined lines together, and a bowline will start to undo itself as quickly as it’s tied.
To make bungee cords for specific uses, I’ve used hog rings to create eyes in bungee cords and covered up the rings and the tail end with heat-shrink tubing. I don’t carry any of the equipment to do this work in the field, so if that were the only way to fabricate custom cord, I’d be stuck with what I’ve had the foresight to make at home. And the hog rings I have are sized for thick bungee cord; I’m not aware of hog rings small enough for 1/8″ bungee.
There are two special knots that do work with bungee cord, and while they are a bit more complex than a sheet bend and a bowline, they hold themselves together and can be easily untied.
Two Useful Bungee Cord Knots
The Zeppelin Bend
The Zeppelin Bend will securely tie two bungee cords together. As its name suggests, the knot was used by the crews of lighter-than-air ships to join together two lines and hold under great strain without breaking or becoming hopelessly jammed. To add a bit of bungee cord to a rope, or to make a ring of bungee cord like an oversized rubber band, the Zeppelin Bend is the one to use.
The Angler’s Loop
The Angler’s Loop is the bungee equivalent of a Bowline. I’ve read that it was used when fishing line was made of gut of some sort, which must have been slippery and stretchy. Learning to tie the Angler’s Loop is the first step, and the next is learning to tie it with the loop the right size and the tail end neither too long nor too short. That just takes a bit more practice. With a Bowline, it is easy to tie the loop to something; after you thread the line through that, you just carry on tying the knot as usual. To tie the Angler’s Loop to anything, the thing gets involved in the tying and has to slip through the first loop you make.
A spritsail, wrapped around its mast, gets bundled with the boom and sprit. The bungee with knobs on the end takes an extra wrap, and then is too tight to connect the ends easily. The bungee with the hooks take an extra wrap too; the hooks engage easily enough but can dent the soft spruce spars and snag things. The homemade toggled loop, cut to fit, is quick and easy to apply, and won’t dent spars or snag.
For a stopper knot, the common Figure-8 works well with bungee cord and is useful for making toggled loops. I like plastic-pipe toggles better than the plastic balls used on commercial products. The pipe toggles are easier to engage with the bungee under tension and less likely to slip free.
With a toggled loop at the throats and an adjustable loop above the leathers, two pairs of oars become an easily carried bundle.
I get long lengths of bungee cord in an assortment of diameters cut from spools at my local marine supply store and stock them my shop. I cut off whatever I need, making allowances for the length taken up by the knot, melt the ends’ woven sheaths to keep them from unraveling, and in a couple of minutes I have just the right bungee for the job.
How to Tie Secure Knots for Bungee Cord
Tying the Zeppelin Bend
The Zeppelin Bend starts with two mirror-image overhand loops. Think a P and a 9.
Flip the right loop vertically.
Slide the flipped loop under the other loop. The working ends are on the outside of the loops, top and bottom.
The top working end goes through both loops from underneath.
The bottom working end goes through the loops from the top. Notice how the bungee cords create two interwoven half-hitches.
With the bend drawn up tight, the working ends will stick straight out.
Tying the Angler’s Loop
The Angler’s Loop starts with an underhand loop. The working end is under the standing part.
The working end then crosses over the standing part…
…and makes an underhand loop under the standing part.
The working part crosses over the intersection and is held there.
The loop at the left is pulled over the top of the working end…
…and passed through the first loop.
As the second loop is pulled through, pulling the standing part will draw the first loop tight and into the knot.
Cinched up, the bungee cord will stay put and the knot will stay tight.
Tying the Angler’s Loop as a Tether
To tie a small bungee tether to an important bit of gear, like the knife here, start with the underhand loop, as usual, and then thread the cord through the item at the start of the second loop.
Make the left underhand loop, with the working end below everything.
The working end then crosses over the top.
The knife gets threaded through the first loop…
…and pulls the second loop through the first loop.
After the Angler’s Loop is tied, you can shorten the working end and tighten the loop through the gear by chasing the slack out from the working end, through the knot, and into to the standing part.
Anchoring a Bungee Tether
To anchor a tether, slip an Angler’s Loop through the ring.
The object to be tethered, here a folding knife, gets slipped through the Angler’s Loop.
With the knife through, the rest of the tether, including the knot at the base of the Angler’s Loop, is pulled through.
Pulled up tight, the Angler’s Loop makes a Lark’s Head Knot around the anchor ring.
Great Uses for Bungee Cord Knots
The Zeppelin Bend will work for tying rope (left) to bungee cord (right).
A length of bungee, with its ends tied together in a Zeppelin Bend, makes an oversized “rubber band.”
To make loops with toggles, drill two holes in one side of short lengths of plastic pipe. The bungee ends, threaded through the holes, can be tied off with a Zeppelin Bend or with Figure-8 stopper knots. The Figure-8s require some extra length in working end to allow for the knot’s travel as it is pulled tight once inside the pipe. The Figure-8s will be very difficult to untie.
For an adjustable cinch, cut a short length of plastic pipe and drill a hole in the back near one end and another on the opposite side near the middle. With a sharp knife, cut an elongated V from the middle toward the end opposite the hole in the back.
Undercut the sides of the V so the outside edges will be tighter than inside edges. Tie a Figure-8 in one end of a bungee cut to length, then slip the other end through the hole with the V and out the end of the pipe. Then thread the end of the bungee through the hole in the back from the outside, tie a Figure-8 in its end, and pull the knot tight inside the pipe.
Christopher Cunningham is the editor of Small Boats Monthly.
Check out these articles for more useful Bungee tips and tricks:
My friends John and Helen and I toasted my departure with wild blackberries. Our farewells said, I climbed aboard KIMCHI, the 12′ Salt Bay skiff I’d built with John’s guidance. I pulled on the oars, slipping away from the dock into the John Day River near Astoria, Oregon. The sky was a gray sheet and the water like glass, murmuring softly as KIMCHI picked up speed.
I’m really a sailor, not a rower. But that morning the weather decided that, like it or not, I was going to be a rower. I didn’t mind, since there was no sun to warm me and I wanted to work up an appetite. It was flood tide, and the John Day River, which feeds into the Columbia just 12 miles before that broad river reaches the Pacific, was flowing in reverse. Once I was on the Columbia itself, the tide would be in my favor as I headed east, but I had a mile to row against a nearly 2-knot current before I reached the John Day’s mouth at Cathlamet Bay. A derelict railroad bridge marked the gateway between the two, and with a final sprint I pushed through the narrow channel between its pylons and onto the edge of the estuary’s 5-mile-wide expanse.
Roger Siebert
.
Leaning on the oars, I drifted with the now favorable current, slowly making my way to Portland, and my home. KIMCHI slid over submerged marshland, as minnows and weeds alike swayed to let her pass. They moved with a sleepy lack of concern, as if they would not have moved at all if the water displaced by the hull didn’t push them aside. I was glad for the stillness, catching my breath while the river itself was inhaling deeply.
After drifting a while, I set to rowing again. As I left the shallows and began traveling the channels between the sandbars and the southern bank of the river, the small black head of a harbor seal popped up from the water a few hundred feet from the boat. The seal followed me most of the morning, resurfacing every few minutes, its head swiveling like a periscope until it caught sight of me again. Each time, its dark, marble eyes held me in an unwavering gaze. Then I would blink and the seal would vanish seamlessly back into the water.
The morning passed with steady rowing on a quiet river. Around noon, the sun came out, burned the fog away, and brought the wind. It happened in a matter of minutes, and the world of gray was suddenly light blue. I stowed the oars, keeping them in the oarlocks and sliding the handles all the way to the stern where I strapped them to the quarter knees. I unfurled the bundled sail and spars, stepped the mast, and set the boom and sprit. A quick haul on the boom vang and the snotter to snug them up and cleat them, and in 60 seconds I had the sail flying. I settled into the stern, took the tiller and the sheet, and KIMCHI scooted along in the building breeze.
Photographs by the author
Her sail set for the midday breeze, KIMCHI rests on the beach at Jim Crow Sands. To the northeast, across the shipping channel, lies the Washington shore. Most of Jim Crow Sands is dredge spoil, pumped up from the bottom of the channel.
Within an hour it was blowing 7 or 8 knots from the northwest. The landscape had a new skip in its step, trotting past me where before it had ambled. As I sailed along, I spotted unusually bright white sand on the bank of an island and turned north toward it, sheeting in from a run to a beam reach. KIMCHI entered the shallows around Jim Crow Sands, a mile-long sandbar that stretches east from Pillar Rock Island. Ten yards offshore I slid forward and pulled the leeboard up from the starboard side. The rudder, rigged with a bungee downhaul that allows it to kick up, could fend for itself.
When the boat eased to a stop, I stepped off into a few inches of water and my right leg suddenly plunged up to the knee in the sand, water erupting around it with the release of trapped air. I nearly fell on my face, my left leg still in the boat at ground level, the right buried in the porous sand. After the initial shock, I rolled up my pants and stepped out of the boat with my left leg. The ground held firm, so I pulled my right leg out of the sand and stepped with it again. Everything seemed fine. I placed my third step with more force and my leg sank to the shin in a flurry of bubbles. When I finally reached solid ground, I set off running down the beach, much to the disapproval of the Canada geese and ducks attempting to enjoy their respite on the shore. They squawked, waddled, and flapped a few disorderly wingbeats to put some distance from me. I thought better of disturbing the birds and returned to the boat. The sun had burned the clouds away entirely, and a fresh northwesterly rattled the sail and spars as the boat rested on the shore.
Departing Jim Crow Sands, I decided to avoid the shipping lanes to the north of the island and take a back route around a cluster of scrub-covered islands to the east. My chart showed that the channels between them would become shallow but clearly passed through to the river. With an 8-knot tailwind pushing KIMCHI, I sailed down the first major artery, whipping past a row of ramshackle houseboats along Woody Island. I followed a narrowing course between Goose and Tronson islands; the tall marsh grass lining it drew closer. The channel was only 20′ wide when my concern grew, but there was still clear water in front of me.
I rounded a bend, and the last stretch of water ended in a wall of marsh grass swaying lazily in the breeze. I steered into the nearest bunch of grass to stop the boat, and soon the drag of the reeds held KIMCHI in place. I used an oar to turn the boat around and bring the bow back into the wind. I tried sailing back out of the channel, but after two tacks, I wound up right where I’d started. Sailing out wasn’t going to work. I struck the sail and set the oars in the locks. Rowing, I covered more ground, but if I stopped for an instant the wind pushed the boat askew and back the way I’d come. I had sailed a full mile down this winding, narrowing pathway and decided if there was some other way out, it would surely be better than backtracking. While I stood up and looked around, the wind pushed KIMCHI against the reeds.
The main flow of the river was only 100 yards away but separated by thigh-high grass and who knew what else. Still, crossing seemed better than backtracking. A little to the northwest was a tiny streamlet that extended partway into the marsh. I crossed and rowed in and the boat filled it entirely. Grass rasped on the hull as I rowed, and the oars found purchase more against the roots of the plants than the water. With each pull I plowed through the water lilies that grew in the center of the stream. This worked for 30 yards, until the thickness of the growth brought KIMCHI to a stop. I stood, pulled the oars out of the locks, and poled the boat forward. I used both oars and stood in the middle of the boat, and applied almost as much downward force as I did upward force, as if I were attempting to pole-vault over the bow. This got me through another 30 yards of marsh.
The trail of water lilies marking deeper water ran out. I had followed them as far as I could because they meant easier passage, growing where it was too deep for the grasses, but I had reached the point where all that stood between me and the rest of the Columbia was just that: grass. So once again, I stowed the oars, pulled on my water shoes, and stepped out into the soup.
Cutting a furrow through the grass, the skiff proves itself an amphibious vessel. For the overland trek, all of the gear was just dumped in the boat.
My foot landed on a cluster of grass and the roots supported my weight—I hardly sank in at all. I tiptoed to the bow from root cluster to root cluster, and grabbed the painter. For the last 40 yards, I towed the boat across the grass.
I had at last reached flowing deep water again. I paused to catch my breath. The swath of crushed greenery behind me looked like a giant snake had slithered through the marshland. I walked around to the back of the boat, pushed it forward until only the stern clung to the grass, and with a final shove, launched into the current and dumped myself on my back into the cockpit. I was exhausted and happy to be on my way once more, under sail and drenching summer sun.
Ready to sail again after our unexpected hike, KIMCHI perches on the edge of the channel to the east of Goose and Tronson islands.
I made 20 miles that first day, marshland detour and all. The wind stayed steady through the evening, and I sailed into the Elochoman Slough Marina in Cathlamet, on the Washington side of the Columbia River. My boat was half the size of the next smallest in the marina, and could have been a tender for many of them. I pulled into an empty slip next to a 35-footer and tied off. It was dusk, and the many campers and locals paid me no mind as I made my way to a picnic bench and fired up my camp stove. One bowl of corn chowder and two instant ramens later, I plodded back down the gangway and fell into the boat, where I pulled on my sleeping bag and quickly fell asleep on the foam pads I had tied into the bottom of the boat.
Before my departure from Elochoman Slough Marina on the second morning, I spread my gear out to get organized for the day. I do a lot backpacking and I never slept better in the woods than I do in the foam cushions in the bottom of the boat.
The morning of the second day was much like the first: calm, gray, and cool. Rather than immediately set out rowing, knowing I would likely spend most of the morning fighting the current, I decided to wander into town, so I went off walking. Twenty minutes later, back at the marina, I decided I could wander the town a second time before the wind picked up.
To my dismay the taco joint and brew pub were still closed, even on my second walkabout, so around 9 a.m. I got to rowing again. Within the first hour the sun was out and the wind was up, almost a perfect mirror of the previous day.
Lying supine in the stern is the most relaxing position for me and the most stable for sailing. Removing the rowing thwart and setting it in the bow gives me more room to stretch out. Cloud cover kept the sun off me while I sailed toward the east end of Puget Island after leaving Cathlamet.
Soon the wind had surpassed the first day’s, blowing close to 15 knots astern as I sailed the last leg of the channel between Puget Island and the Washington bank to reenter the main channel.
At the east end of the island, I let the sail luff and looked both ways before crossing the shipping lanes. Two osprey chicks eyed me from their nest atop a daymark.
Where the channels converge the river is almost a mile wide. There were no obstructions and the wind was over 15 knots. Small whitecaps frothed as I sailed among them. My dinghy-racing blood was up, and I angled KIMCHI to run with the swell. Keeping my weight low and aft, I kept my left hand on the mainsheet ready to pull it from its cleat.
KIMCHI started surfing. She slowed in the troughs as I tweaked the rudder in anticipation of the approaching waves, turning the boat a few degrees off the direct path of the crest. As the wave behind me caught up with the boat, lifting its stern, I lunged forward and the boat raced down the face. The rush of water hissed while KIMCHI surged forward. As the wave finally outpaced me and the bow lifted, I glanced over my shoulder and prepared for the next wave.
The sand bar on the east end of Puget Island is almost 40 miles from the mouth of the river but not beyond the reach of the tides. I had pulled KIMCHI 15’ from the water’s edge, but within just five minutes the incoming tide had nearly floated her off.
The day whipped past in a gusty, blue-sky blur. I stopped for lunch at Cooper Island, on a beach so broad that it must have been made of dredge spoil, much the same as Jim Crow Sands.
Around the next bend, I passed the Beaver Generating Plant, a natural gas–powered facility. Beyond a fence that came almost to the river, the thrum of turbines emanated from the stark, metal-clad buildings.
From the power plant I sailed along the slough between Crims Island and the Oregon bank, emerging upriver on the sandy end of the wooded isle. A dragonfly hitched a ride for the length of the slough, sunning itself like a figurehead on the bow. In the main channel next to the island a cargo ship lay at anchor, splitting the river down the middle. The name DARYA SATI, painted in white letters each as tall as my mast, stood stark against the red-and-black hull. In the lee of Crims the wind had calmed, so I bobbed toward the ship with the remaining few knots of breeze pushing KIMCHI. At the ship’s stern, the gap between the hull and the rudder was large enough for me to sail through. I was tempted to try it, but imagining KIMCHI being churned into kindling brought me to my senses.
I left the shadow of the DARYA SATI behind me and sailed along the south shore of a 4-mile-long finger of land pointing downstream from Longview, Washington, passing Willow Grove Park, a stretch of beach backed by a straw-colored lawn and scattered trees. Sunbathers and power boaters were out in full force.
The wind, unhindered, blew through with the steady 15 knots it had sustained all day. I sailed southeast, upriver, to Barlow Point and entered a straight, wide-open corridor between the industrial riverfronts of Longview on the Washington side and Rainier on the Oregon side. It was a noisy, busy gauntlet to run. On either side, timber yards lined the river with towering stacks of Douglas-fir trunks 60’ long. Docked cargo vessels waited to be loaded with the mountains of logs. A tugboat chugged past, the skipper giving me a nod as he steered around a mooring buoy the size of a city bus.
The late afternoon sun shone with a burnt-orange glow, and I knew I needed to find a spot to camp. After passing the tug, I spotted the landmark on the Oregon bank that I had been looking for, a pink stucco building with a terra-cotta-tile veranda roof. It was my friend’s favorite Mexican restaurant in Rainier.
I had made 25 miles that day and had eaten only two energy bars. I beached beneath the restaurant’s patio and hauled KIMCHI above the high-water mark. I climbed up the embankment, sat down at a table, and ordered a steaming burrito. After dinner, I went for a stroll around Rainier’s waterfront before returning to the beach. I slept in the boat, my gear spread across the sand beside it.
I woke on the third day to an easterly wind and clouds looming in the eastern sky, and knew I would spend most of the day getting wet and getting nowhere. I launched in the chill air and immediately started rowing. In about an hour I made it a mile upriver along the Oregon bank, drifted back half a mile crossing the river, and remade the lost ground along the shore just west of Cottonwood Island. I had aimed for the downriver end of the island because of the narrow, slow-moving channel separating it from the Washington mainland, ideal for making progress upriver with as little resistance as possible.
The Cowlitz River flows into the Columbia at the north end of Cottonwood Island. After the morning’s first fit of rain I was not at all dry but I stayed mostly warm by walking KIMCHI through the shallows between the island and the Washington shore.
As I approached the channel, it began to rain, and all of the weekend fishermen anchored along the Washington bank reeled in their lines and motored off. It was the middle of August, our sunniest month, so I had brought no rain gear. I shoved everything I could into the dry bag—map, snacks, water bottles—and piled my foam pads into a vertical stack in the stern so not all of them would get so wet. I put on my life vest for warmth and to keep some of the rain off me. I continued rowing—against the wind, against the current, and pelted by plump summer raindrops. I would have been miserable if it weren’t for the heat generated by rowing. A harbor seal followed me up the channel along Cottonwood. He appeared to be staying drier than I was.
About halfway down the 4-mile channel, the rain abated and I dried off a bit. My pants, which had been soaked through to the skin, slowly turned splotchy with dry patches. I bailed out the water in the boat and then, just as I was exiting the channel to return to the main body of the river, another bank of clouds reared up to the south. They dragged gossamer sheets of rain from their bellies over the hills on the Oregon shore. From afar, the gray veils were beautiful. As they reached the river the hiss of rain on water filled the air, soft at first, then growing as the clouds continued their northward advance. I resigned myself to another drenching.
Tuning out my surroundings, I set to the task of rowing like a yoked ox. It wasn’t until I was a few yards from an industrial loading dock that I looked over my shoulder to see where I was going. With a 90-degree pivot and two quick strokes I shot between its concrete pylons and into the echo under its deck. I spent an hour under there, tied off to a pylon, wringing the rainwater from my clothes and sponging the last drops from the boat with a small piece of foam that had ripped off one of my pads. A pair of ducks swam around KIMCHI. Calm followed the rain, and as it cleared, the whole width of the river shone like a liquid mirror.
In the early afternoon, the sky cleared and the wind lazily drifted back to the northwest. It had yet to build to more than a few knots, but I sailed south in the desultory breeze up the narrow part of the river south of town of Kalama, just before Martin and Goat islands. A stern-wheeler chugged by downriver, carrying a full load of tourists, cameras and binoculars dangling from their necks.
There was no other traffic upriver or down, so I decided it was safe to sail across the channel to the Washington side. It was slow going, but there was just enough wind that I didn’t think I needed to strike the sail and row. I was halfway across the river when I noticed a red buoy about a half mile upriver of me. It puzzled me because this buoy was right up against the Washington side of the river; the far side of the shipping channel was only 150 yards from the Washington shoreline, and I was smack in the middle of it rather than almost across.
Downriver I heard the unmistakable deep rumble of a cargo ship’s engine and the waterfall rush of the bow pushing through the water. I had been bobbing across the river thinking the path was clear, and now this rusted 750’ red-and-gray behemoth had rounded the corner of Sandy Island and was bearing down on me.
The skies had cleared a bit by the time I reached the anchorage in the middle of Martin Island, but an inch of rain had fallen that morning, so I spent the evening drying my gear.
I jibed as fast as I’ve ever jibed, and aimed straight for the Washington bank. The wind was still light and shifty, but I felt confident I had enough breeze and time to get clear. Whoever was at the ship’s helm must have noticed me too, and steered slightly to the west, away from me and toward the channel’s Oregon side. The ship churned passed with just 100′ between us. I looked up at the bridge, and saw, hazy through the bridge windows, someone in a white shirt and black cap looking down at me with a pair of binoculars. I reached up and waved. The crewman’s arm shot up in response, and we held the gesture for a beat as if saluting. The ship continued on its way, and I on mine as I sailed up the slough between Martin Island and the Washington shore. I entered the island’s small cove, a snug anchorage I had spotted on my map earlier that day. There were already five boats anchored there and among them were two floating docks maintained by local yacht clubs. Thick, tall walls of brambles heavy with blackberries lined the shore. I ate my fill before settling in for the evening.
August is the peak of blackberry season and the brambles are scattered all along the river shore. I made many pitstops to pick them, and some were monstrous and I could easily make a meal of the them.
I made my way to the more welcoming of the two docks, the one with the tiki hut strung with lights. I tied off, set up my kitchen, and cooked instant ramen. As evening set, I ate and watched cows grazing along the shore and lights flickering on in the anchored yachts. Despite the lousy start, I had covered close to 15 miles.
The next morning dawned cloudy, but the air was warm and lacked the cool bite that had heralded the easterly storm the day before. There wasn’t any wind, so I started the morning by rowing. As I left the cove, a faint buzzing noise come from the sky, but with no apparent source. The buzzing grew louder, and from behind the trees of the more southerly Goat Island the pink fabric wing of a paraglider appeared. He was taking advantage of the still morning air, and buzzing about with a caged propeller strapped to his back. The buzzing softened as he cut back on the throttle and spiraled slowly down to the meadow on Martin Island. His feet scraped the grass and I thought he would land, but he revved the motor and swooped back into the sky. I continued rowing and followed the slough along the Washington bank of the river.
It was an uneventful morning, apart from a brief tangle when I rowed KIMCHI’s mast into a fisherman’s line that had been cast from a cliff along the bank. With a dead stop and reverse I extricated myself from the monofilament snare. By noon, the wind still hadn’t turned up, so I continued rowing. I rowed the 5 miles from Martin Island to St. Helens and stopped on the shore of Sand Island, a 2/3-mile-long wooded isle across a narrow channel from St. Helens Marina. It’s a well-appointed city park and I was happy to take advantage of the facilities. But while I was using the restroom, some kids wandering around were drawn to my boat. I was walking back to KIMCHI just as they climbed aboard. When they noticed me approaching, they jumped out but I smiled and asked if they’d like to ride in the boat as I towed them through the shallows. They climbed back in, but before I could get the okay from their parents they were called back to the dock; it was time for them to return to the mainland. The kids leaped out once more, leaving KIMCHI with a wealth of sand.
At low tide, this sand bar stretches downriver from Sand Island. St. Helens, visible on the left, is close by. The island looks quiet here, but on this Sunday afternoon it was teeming with hikers and kayakers.
After crossing to the public dock at St. Helens, I consulted my chart. I had covered a lot of ground and was ahead of schedule, so I had some time to kill and took a break to see the town. Things were off to an exciting start when the river current swept a large powerboat against the walkway that bridged the two floating docks. A half dozen boaters appeared as if from thin air, and with much grunting we shoved the 2-ton boat upstream and hauled it into an empty slip. The boat’s crew gathered their wits and made a second launch, this one successful with the application of more throttle.
At the south end of town, on the edge of a vacant concrete-paved lot, I met a chatty local named Howard. Lugging a massive jug, he paused at the foot of a stairway made of railroad ties set into the hillside, then slowly climbed the steps, watering the plants that grew alongside them. Once he got to talking, he forgot about the plants entirely and told me about the old Boise Cascade veneer plant that used to sit on the lot and had shut down in 2008. He recalled in vivid detail the plant in operation, trucks hauling in the debarked logs, machines peeling them layer by layer like so many onions, and barges swinging wide with their loads of veneer around the point of Sauvie Island, just 1/2 mile upriver where the Multnomah Channel meets the Columbia. The site didn’t look like much now, just a bare fenced-in lot with a rusted dock.
I had my eye on the Multnomah Channel, the narrow, winding 22-mile-long distributary from the Willamette River. The wind had filled in while I was ashore, and so in the late afternoon I set sail from St. Helens and said farewell to the Columbia and entered the 200-yard wide mouth of the channel. A mile in, Scappoose Bay split off from the Multnomah, and I slid along its bifurcated entry, with the dwindling northwesterly nudging KIMCHI along.
When I arrived at the bay’s only marina, 1-1/2 miles in, it was nearly dusk and there was no place to dock, so I rowed farther into the bay. It quickly shallowed, and in about 1′ of water I stopped, pulled my oars from the locks and plunged them blade-first into the mud. With the oars serving as stakes, KIMCHI, snugly tied to the looms, was prevented from swinging in the wind.
After dinner, I settled in for the night. In the dark, I checked the knots around the oars one more time, and laid back in the boat. The light evening breeze flowed over the top of the gunwales, carrying the smells of mud and grass. It was cool, but in my sleeping bag I was comfortable, and soon fell asleep. It had been another day, and another 12 miles.
When I woke on the morning of my last day, I was glad to find KIMCHI had not pulled free from the mud and drifted into the weeds. I backtracked out of Scappoose and rowed into the Multnomah Channel. Judging by the weather, the Columbia likely had plenty of wind. The channel, on the other hand, only received the irregular dregs of the wind, tumbled over obstructions along its narrow and winding path. I made my way in fits of rowing and sailing, and eventually got tired of setting and striking the rig every 30 minutes. I decided that unless the wind rose above 5 knots, I was going to row.
Multnomah Channel felt like a small town’s main street, compared to the highway of the Columbia. The southern half is lined with houseboats and the residents lounged on their porch decks, waving as I passed. A leather-skinned woman in a red bikini riding in an outboard-powered rubber dinghy passed me twice, as if she was out on a trip to the grocery store for milk.
By midafternoon, the wind had withered in the August heat. I took my shirt off to stay cool while rowing, but the air was sticky with heat and humidity. By the time I passed under the Sauvie Island Bridge, I was practically in Portland. The wind picked up above my 5-knot threshold, so I set the sail and donned my shirt.
The St. John’s Bridge, the first on the approach to Portland, was bathed in the afternoon light as I sailed up the Willamette River. It was a downwind run, so I pulled the leeboard up and set it in the boat just forward of my feet.
Just 1-1/2 miles beyond bridge I reached the Willamette, my home river, and the last leg of my journey. I passed under the St. Johns Bridge, the first of 12 that I’d pass under sailing through Portland, and stopped on the left bank at Willamette Cove. A sign on the shore said the site was toxic with industrial waste once dumped there. The woman walking her dog, the man with the camera, and the teenagers ambling across the sand didn’t seem to mind this, but I decided against spending the night there. It was nearly sunset and I still had more than 5 miles to travel up the river.
I took my last rest stop of the voyage at Willamette Cove. The sun was setting and the western bank of the river was already in shadow. I had just a 9 more miles to the voyage’s end at the Willamette Sailing Club.
With my running lights on, I set out from the cove. I was worried about sailing through the industrial part of Portland, which lay ahead, but I didn’t see another boat on the water. It was not until darkness had fallen completely, that I saw anyone else.
The city lights sprang up around me as I left the rougher part of Portland’s riverside behind me and sailed through the downtown district. Pedestrians crossing the Hawthorne Bridge stopped and waved as I passed beneath them. WILLAMETTE STAR, a 100′ dinner-cruise ship, swung wide around me and starburst flashes from the diner’s cameras sparkled beneath the steady glow from the city.
It was nearly 10 p.m. when I reached the Tilikum Crossing Bridge. The reflections of its lights glowed orange and undulated on the slow-moving water. The best wind of the day filled in from the north, bringing KIMCHI alive. I left the city lights behind and sped down the inky waters of the southwest waterfront. At 10:10 p.m., in the pitch dark, I slid into the docks at the Willamette Sailing Club. The day’s 25 miles brought me to the end of a nearly 100-mile voyage. I derigged KIMCHI and stowed her under buzzing fluorescent lights.
Torin Lee lives in Portland, Oregon, and wears a few hats at a local solar installation company. On summer weekends he teaches at the Willamette Sailing Club. He learned to sail in college, racing Flying Junior dinghies. He still enjoys racing with the club fleets, and got the boatbuilding bug from the folks at Portland’s RiversWest Small Craft Center.
If you have an interesting story to tell about your adventures with a small boat, please email us a brief outline and a few photos.
The foil-puncturing tool pivots in and out of a recess in the red frame. The cartridge-tip cutter is the circular hole to the right of the spring.
For years we used the common caulking guns that go for a few bucks at hardware stores; we assumed one caulking gun was like any other and accepted that dispensing thick caulks and adhesives just takes a lot of effort. That was until we starting using the Newborn High-Thrust Model 250 caulk gun.
The 250 has an 18:1 thrust ratio, compared to the 6:1 or 8:1 thrust ratios of the cheap caulk guns from home-improvement stores. The 250 takes standard 10-oz cartridges and has a heavier feel and the construction is higher quality; the powder-coated frame and zinc alloy handle should hold up well. As with most caulk guns, it has a cartridge-seal puncture tool so you don’t have to go looking for a nail long enough to get to do the job, and a built-in tip cutter that will cut a cartridge tip off square or at a slight angle. If you need an angled opening at the tip, a utility knife is the tool for the job. The 250 has a handy ladder hook on the tail end of the plunger, which we use to hang the gun on our tool shelf so it doesn’t go missing during a project. The hand grip has a nice ergonomic design to it, making it easier to hold and squeeze. The 250’s revolving frame allows the cartridge and its tip to rotate as needed for ease of application at different angles to the work.
The tips for mixing two-part epoxy increase resistance to the flow of the material, but the 250’s high thrust ratio makes it easier to dispense.
The high-thrust gun is well suited for use with thick caulks and adhesives and with mixing tips for two-part epoxies. With our previous caulk gun, I could barely force resin and hardener through a mixing tip, and at times I had to use both hands to squeeze the trigger to get a dribble of mixed epoxy to appear—very disheartening when we were looking at dispensing four tubes of epoxy.
Our best test of the Newborn 250 is to load it with a tube of two-part epoxy that is thickened for filling gaps and making fillets. When I squeeze the trigger, even with minimal force, the gelatinous epoxy flows through the mixing tip. The action on the handle is smooth, and the force required easily just half that of a regular gun. The challenge now is to keep from squeezing the trigger with abandon and dispensing the material too quickly.
The 250 has a trigger-release lever at the back to take the pressure off the plunger and stop the flow from the cartridge. For thinner materials that require less thrust than the 250 applies, there are drip-free guns that have a plunger that springs back automatically when you relax your grip on the trigger.
With the Newborn 250 it will be very easy to work through several tubes of thickened epoxy on our current wooden restoration project. We are delighted to have found a tool to make this task much easier.
Kent and Audrey Lewis, aka Skipper and Clark, sail, row, paddle and motor a fleet of small boats, with boat repair and restoration being another necessary hobby, which they document on their blog.
The Newborn High-Thrust Model 250 is available from several online retailers with prices starting around $23.
Is there a product that might be useful for boatbuilding, cruising, or shore-side camping that you’d like us to review? Please email your suggestions.
The LivWild saw has highly visible straps and a cutting tooth on every link.
It’s my father’s fault. For years, during my summer vacations from grade school he’d load our station wagon, a 1956 Ford Ranch Wagon, with a 42″ one-man crosscut saw, a splitting maul, and a half-dozen wedges, and we’d head for the beach. Back then, rafts of logs were towed by tugs up and down Washington State’s Puget Sound, and a lot of logs got loose. The beaches were thick with driftwood that never made it to the sawmill. Dad and I went after the red cedar, sawing it to length and splitting it for fence rails and slats. After a few summers, the whole lot around our home was surrounded by red cedar, over 150 yards of it.
So, I picked up an unshakable habit of combing beaches for useful driftwood. I gather red cedar, yellow cedar, Port Orford cedar, Douglas-fir, and spruce, and use it in my boatbuilding and making everything from musical instruments to Shaker boxes. I have my father’s crosscut saw, but it’s not practical to carry aboard a small boat. That’s when I take a pocket chainsaw. It’s compact enough to carry even when I’m out kayaking—if I find something good, I’ll tow it. I once sawed an 8′ length of yellow cedar from an especially fine-grained log, and towed it 1-1/2 miles by kayak back to the launch site.
Back in the ’60s, I used twisted-wire pocket saws for backpacking and they were fine when I only needed wood for campfires and to do some whittling. They didn’t last long before they broke. I now use chain-style saws, and the latest version, the Camping Pocket Chainsaw from LivWild, works great. It has a 28″ chain with 37 teeth, the same kind used on motor-driven chainsaws. Every link is a cutting tooth, with adjacent teeth facing in opposite directions. The handles are bright orange 1″ webbing, lessening the likelihood that I’d inadvertently leave it behind.
Some versions of the pocket chainsaws, like the Saber-Cut, have teeth facing in both directions, but, like a power chainsaw chain, have gaps between teeth.
I put the LivWild saw up against the two other pocket chainsaws I’ve been using. The Saber-Cut Chainsaw from Ultimate Survival Technologies has a 25″ chain with 11 cutting teeth, one every third link. The backs of the intermediate links have the fin-like extensions meant to engage the drive-sprocket teeth of a power chainsaw. They serve no purpose in a pocket chainsaw.
The Pocket ChainSaw has wire loops that use bits of driftwood for handholds.
The other saw, the Pocket ChainSaw from Supreme Products, is 28″ long and has its own style of links and teeth. Each of the 62 links has two symmetrical teeth, bent to the outside to provide clearance in the kerf. The teeth are stamped but not filed, so they have chisel edges like a ripsaw’s. I took a triangular file to the teeth to give them a sharp-points like the teeth of a crosscut saw. Pocket ChainSaw cuts a kerf that’s 1/8″ wide, half that of the other saws. To make the saw fit into its can, the loops that attach to the end of the chain are removable and require small foraged sticks for handgrips.
In recent beach trials, the LivWild saw got through a 2-1/2″ driftwood limb in 17 seconds and the Pocket ChainSaw took 14 seconds. The Saber-Cut did fine for 8 seconds, but then started to grab. I gave up on it after 37 seconds. That last bit of the limb had a tight radius, about ½”, and the widely spaced teeth got hung up on the sharp turn. The Saber-Cut has fared better on larger logs where the last bit of wood to cut through is small enough to be broken, but doesn’t cut as smoothly as the LivWild.
Having ruled out the Saber-Cut for general use, I compared the LivWild and Pocket ChainSaw on the end of a log about 7″ thick. The LivWild got through in 50 seconds, including a break to get myself positioned more comfortably. It took me 127 seconds to get the job done with the Pocket ChainSaw, including a half dozen breaks to catch my breath. It seemed that the saw couldn’t clear the sawdust quickly and it clogged the kerf, adding a lot of resistance.
Beavers chewed this red cedar down, but the LivWild saw couldn’t take much of a bite out the wet wood.
On a recent rowing outing I found a red cedar that had been felled by beavers. The trunk was about 10” in diameter and the wood was still green and wet. The LivWild easily cut branches about 3″ thick, but on the trunk it only got through the bark and about 1/4″ of sapwood. After the chain was buried in the kerf, the teeth began to grab and it wasn’t worth the effort to continue. I don’t often find freshly fallen trees, so I wasn’t overly disappointed by the LivWild’s limitation. It works well on driftwood large and small and will be my steady beachcombing companion.
Christopher Cunningham is the editor of Small Boats Monthly.
The LivWild pocket chainsaw, with nylon pouch, survival booklet, and mylar blanket, sold through Amazon for $22 was not available at the time of publication. There are a number of nearly identical saws with teeth on every link: a 24″ 33-tooth with pouch and survival bracelet, a 24″ 33-tooth with pouch, and Jusstech’s 24″ 33-tooth with pouch, fire starter and two paracord bracelets. The Pocket ChainSaw with storage can and handgrips is available for $24.
I ordered the Justech kit to confirm that the saw would be a good substitute for the LivWild saw. The chain is 4” shorter—not an issue for any logs up to 8” in diameter—and cuts just as well. The saw comes with a pouch, a 2-3/4” ferro rod with steel scraper, and two 9” paracord survival bracelets, each with a whistle, compass, and fire starter built into the buckle. Both the large and small fire starters ignited dry paper tinder with a few scrapes of the rod. At $17 for the kit it’s a good value.
Is there a product that might be useful for boatbuilding, cruising, or shore-side camping that you’d like us to review? Please email your suggestions.
Continue Reading - Enter your email to log in or subscribe
New to Small Boats? Create a free account to get our weekly emails and two free articles each month.
Time to upgrade!
You've read all of your free content for the month. Upgrade to a paid subscription for unlimited access.
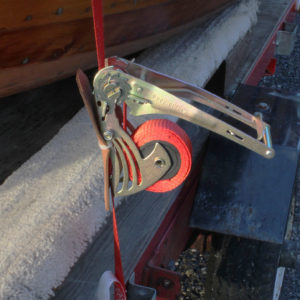
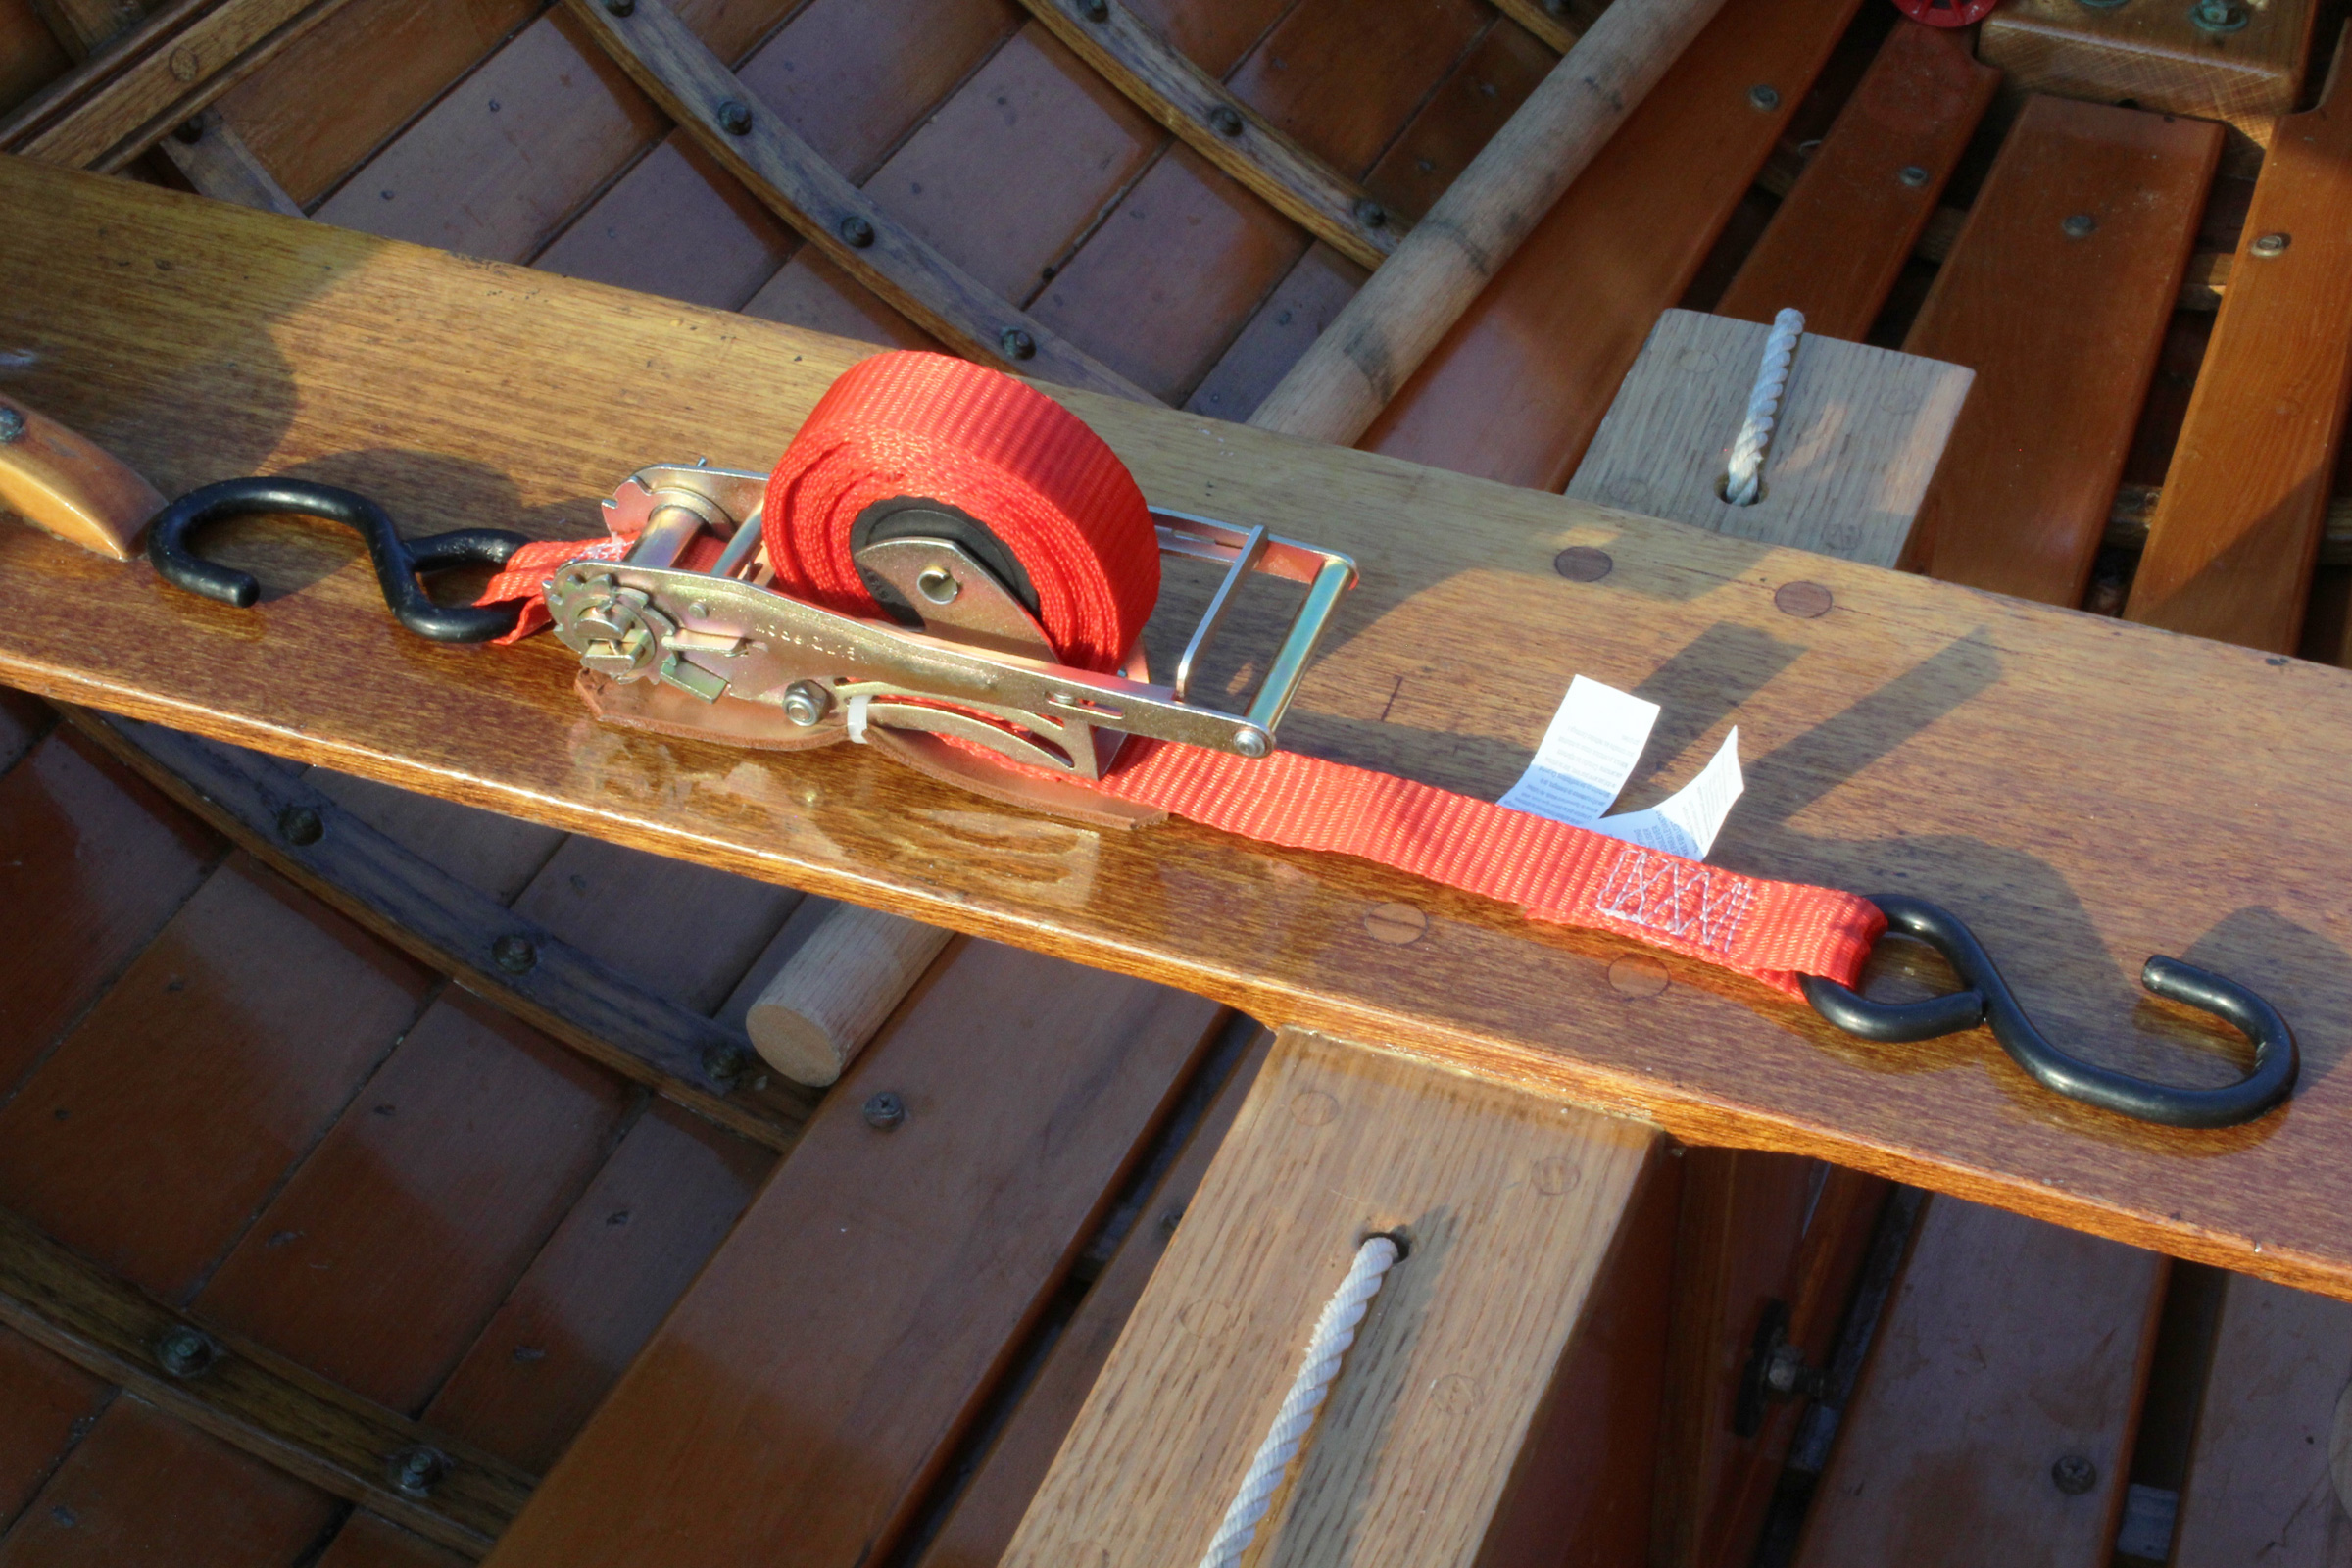 SBM photos and video