Iain Oughtred’s 15′ 11″ Penny Fee is the latest and largest member in his line of classical rowing-sailing dinghies. All of them have roots in 18th-century ship boats and yacht tenders, which were relatively full in shape for good carrying capacity and had wineglass transoms to avoid adding drag when they were fully loaded.
My path to the Penny Fee started at a local boat show in 2020 where I met a couple looking for a sail-and-oar boat and someone to build it. They took me on as their builder, and together we started mapping out suitable candidates that would meet their criteria: modern glued-plywood construction, a relatively light hull, good rowing and sailing properties, and accommodations for occasional fishing. They also had in mind to use a small electric outboard, so a boat with a transom was preferred over a double-ender. The Penny Fee emerged at the top of the list of candidates. It has enough stability for an all-around boat and for fishing. Its longer hull promised more speed under sail and maybe even when rowing.
Mats Vuorenjuuri
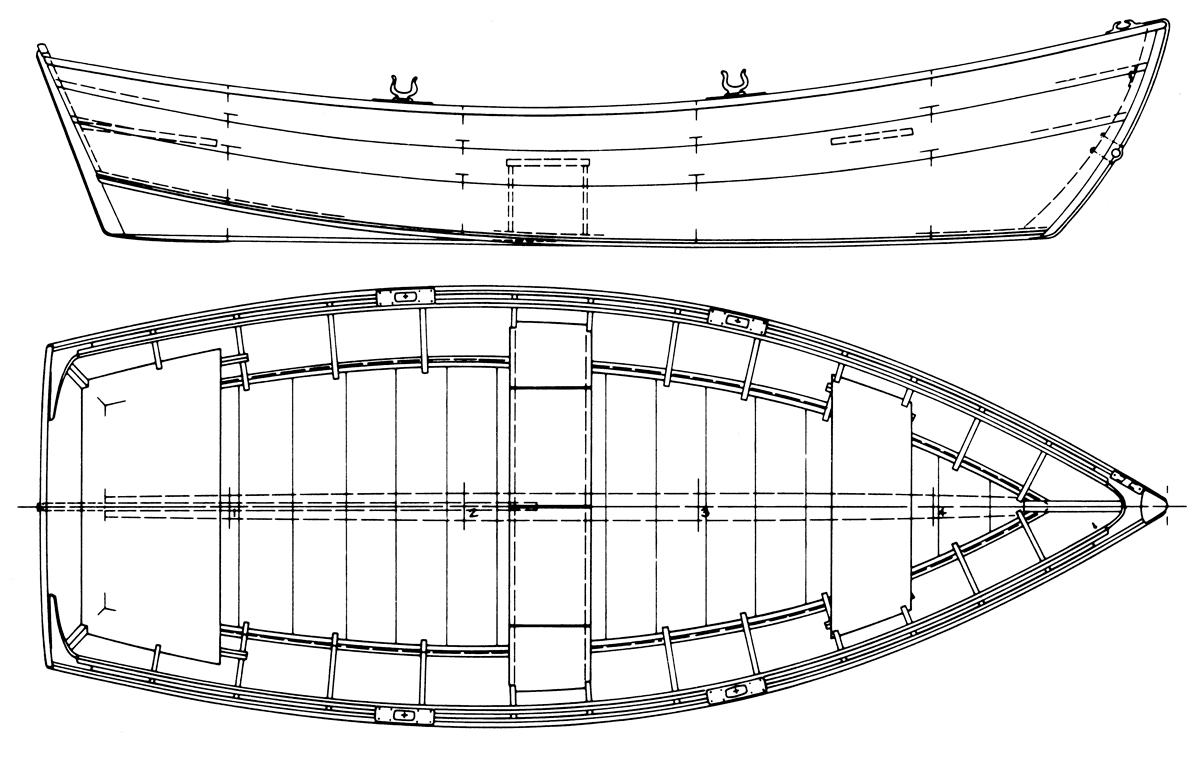
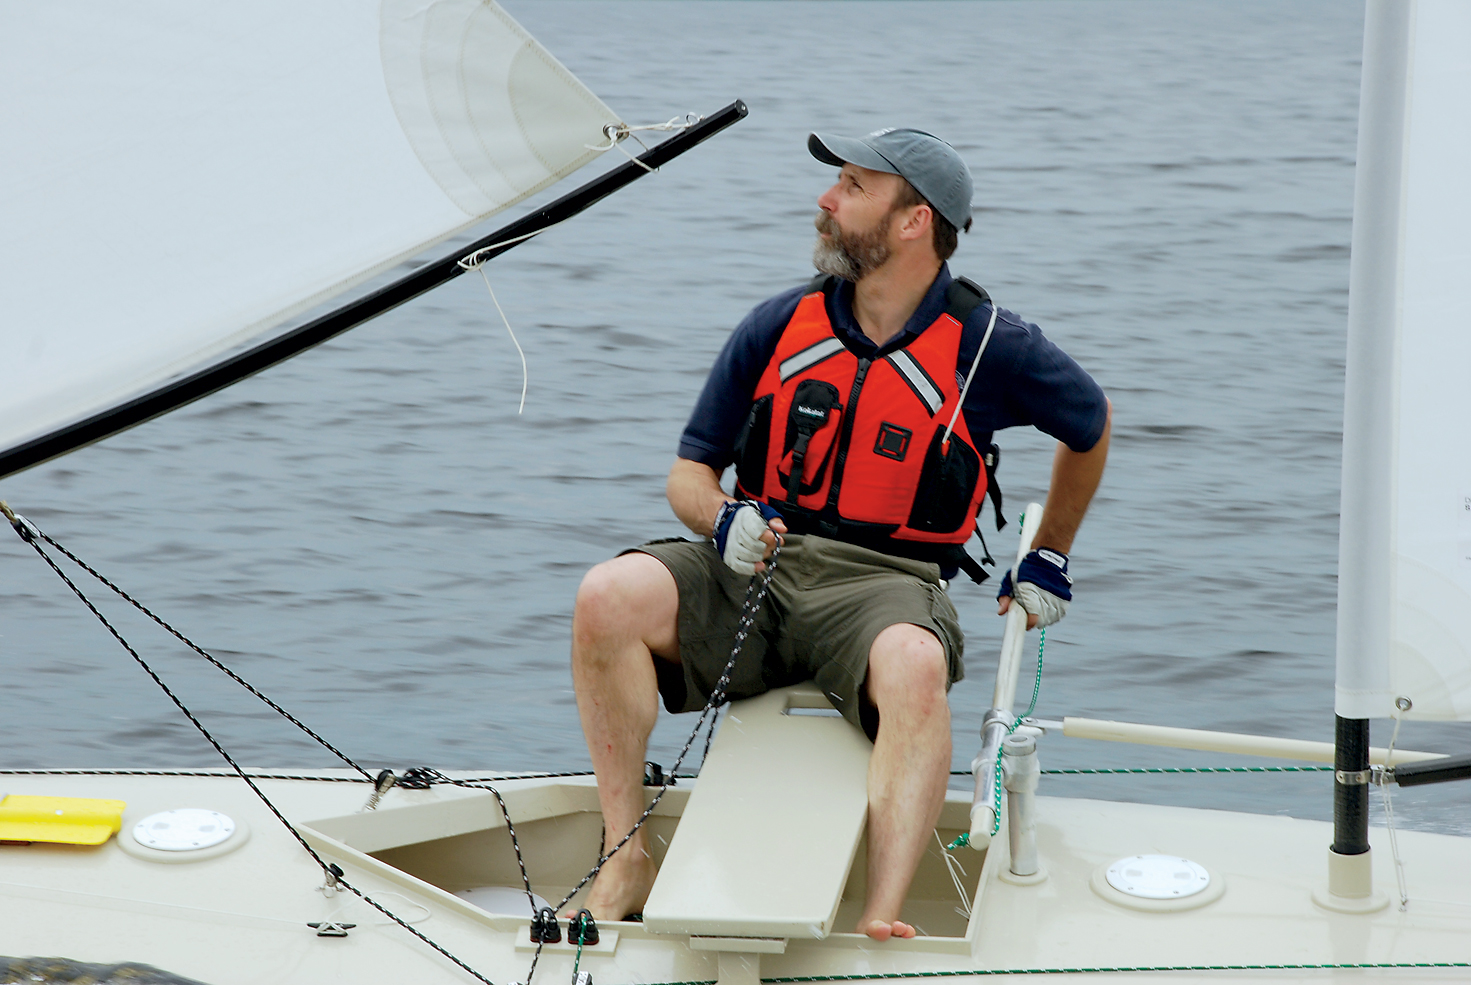
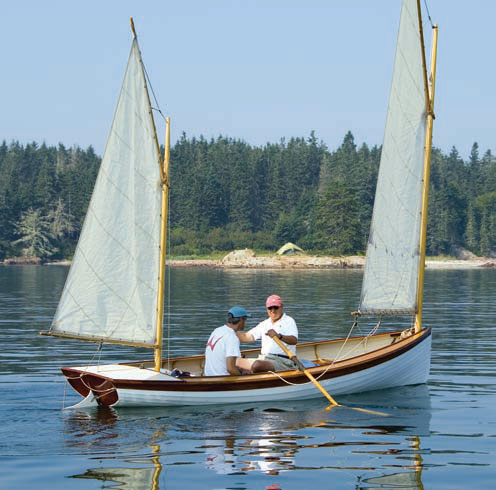
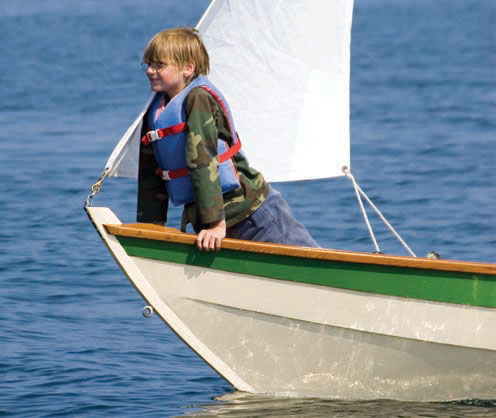
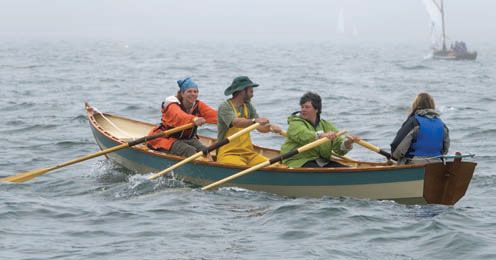
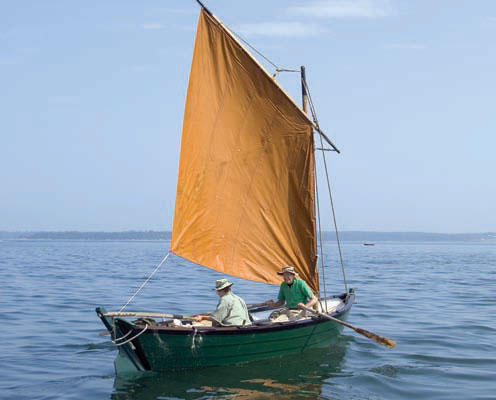
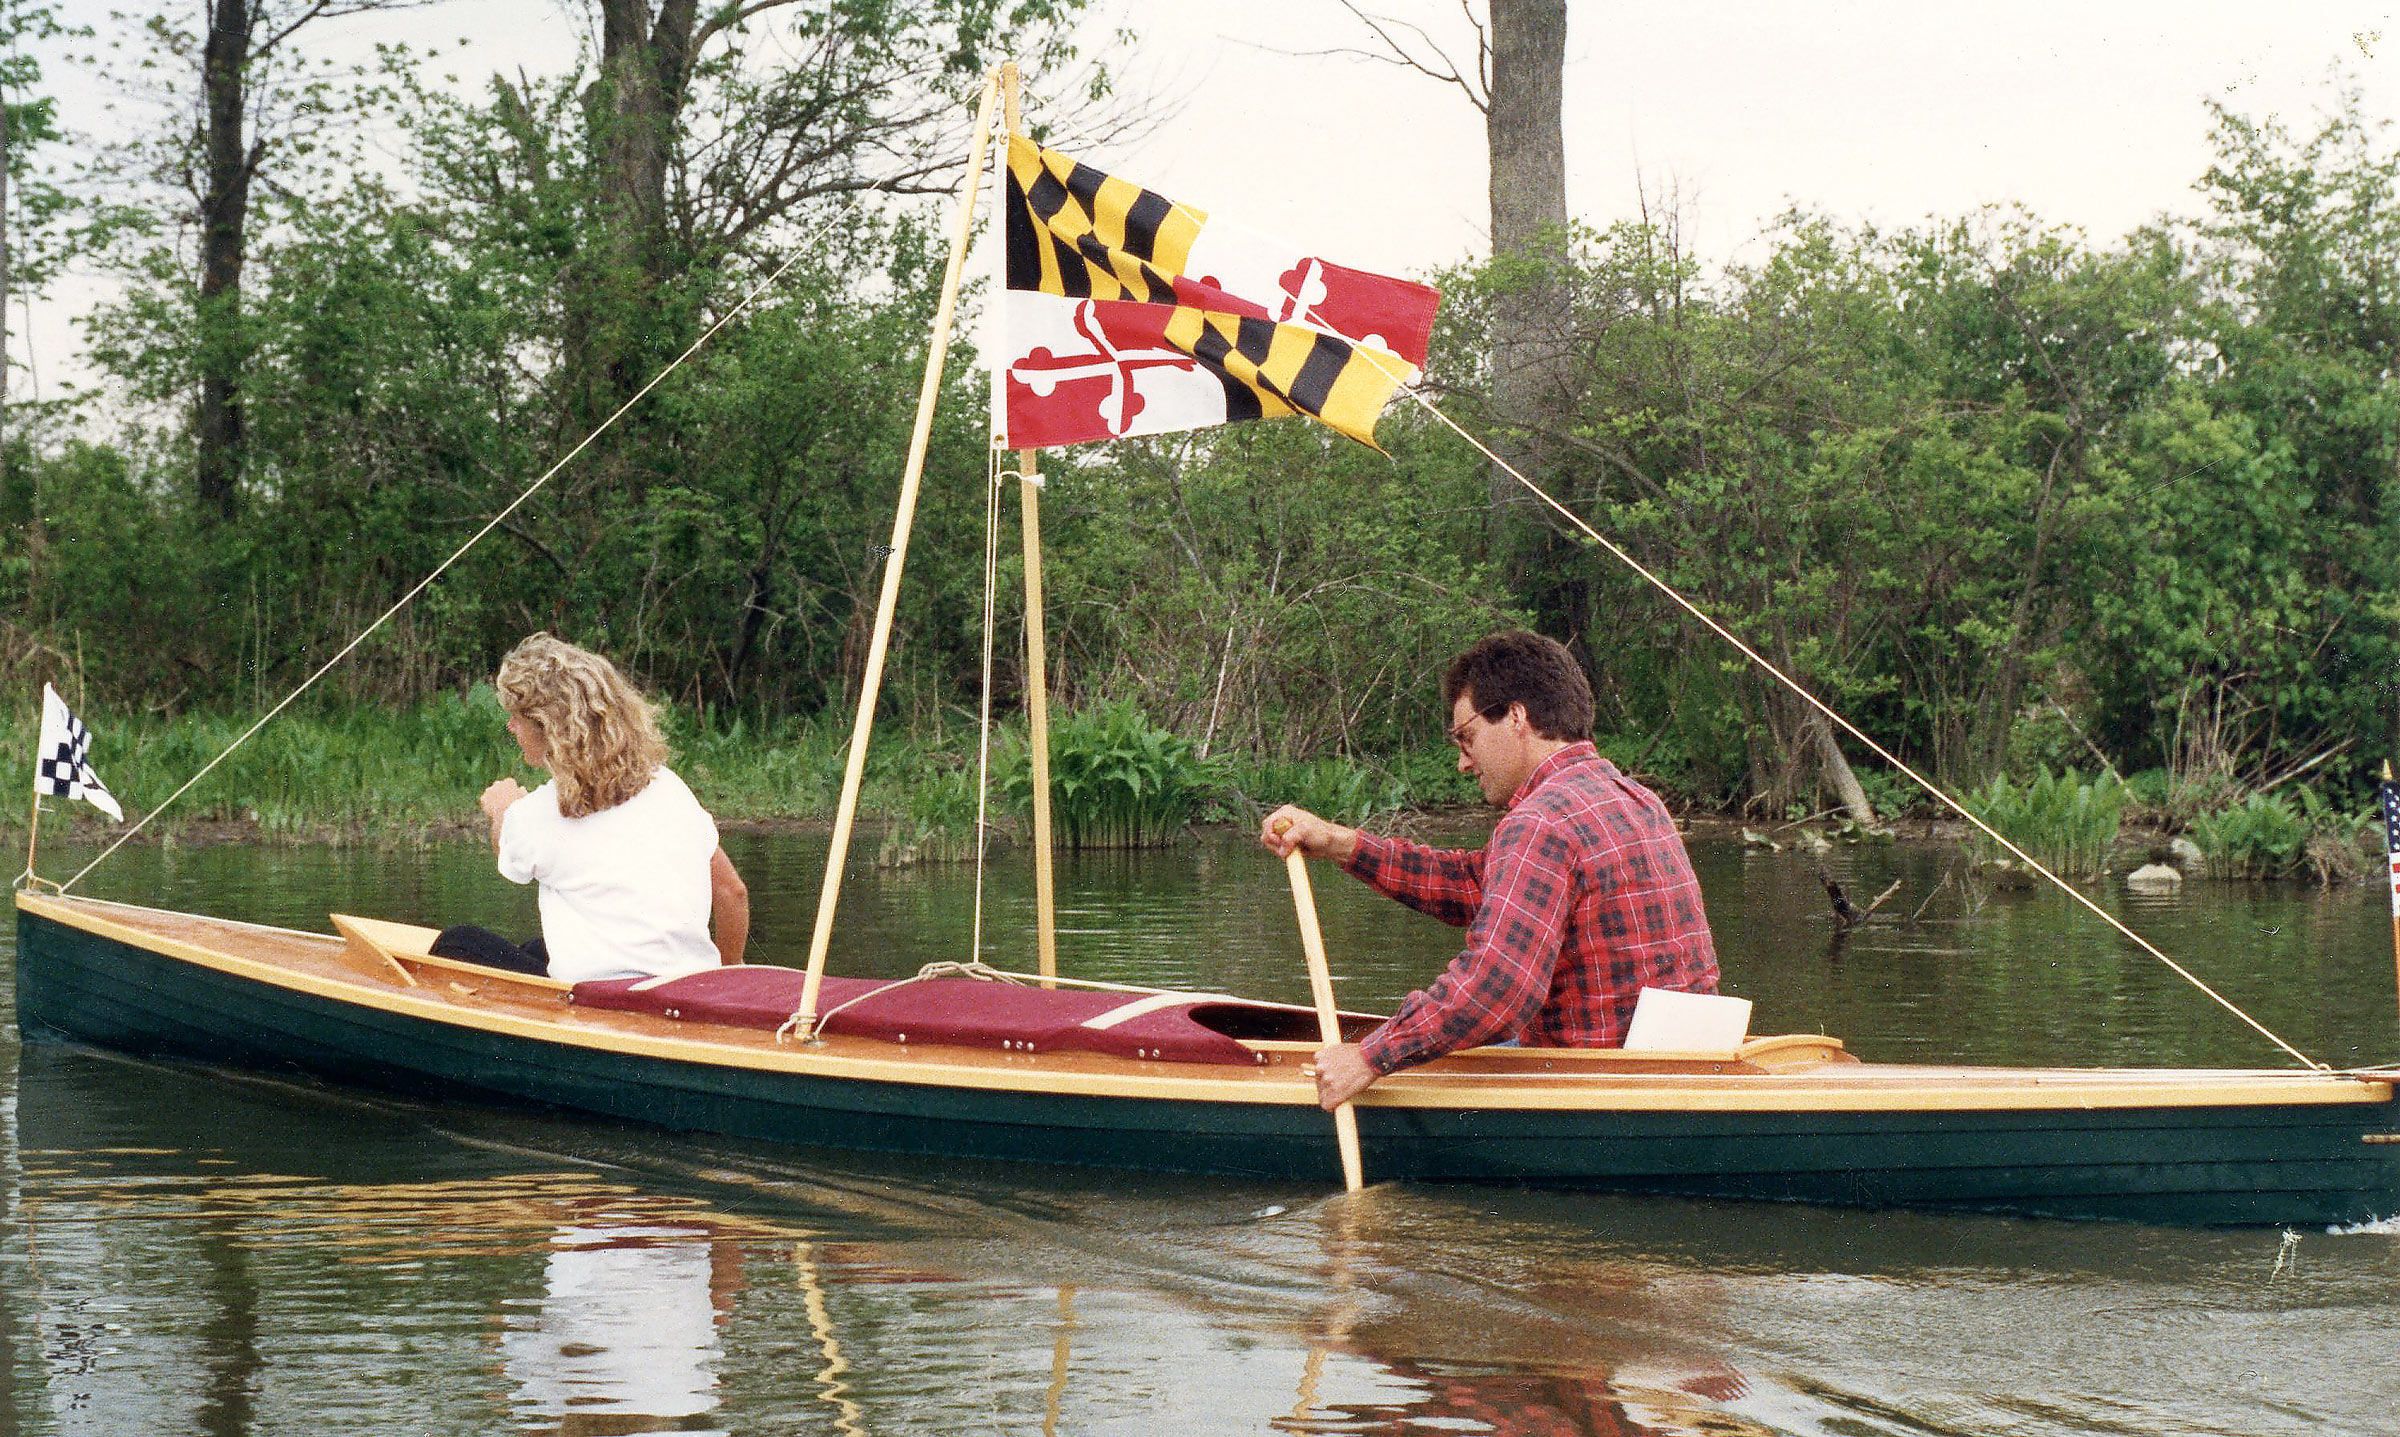
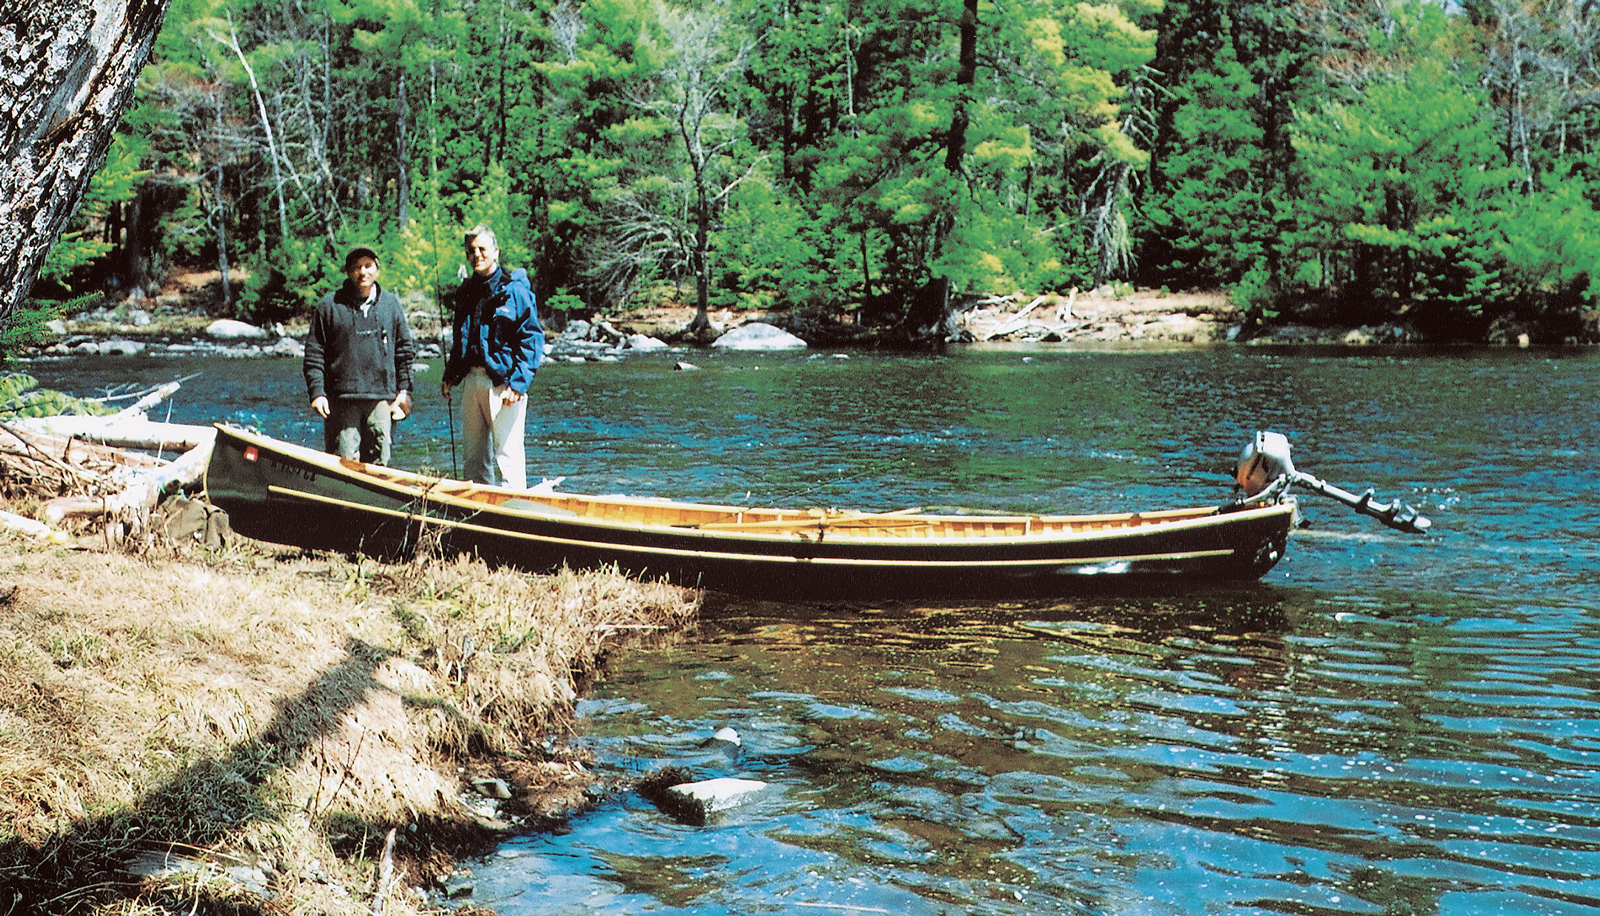
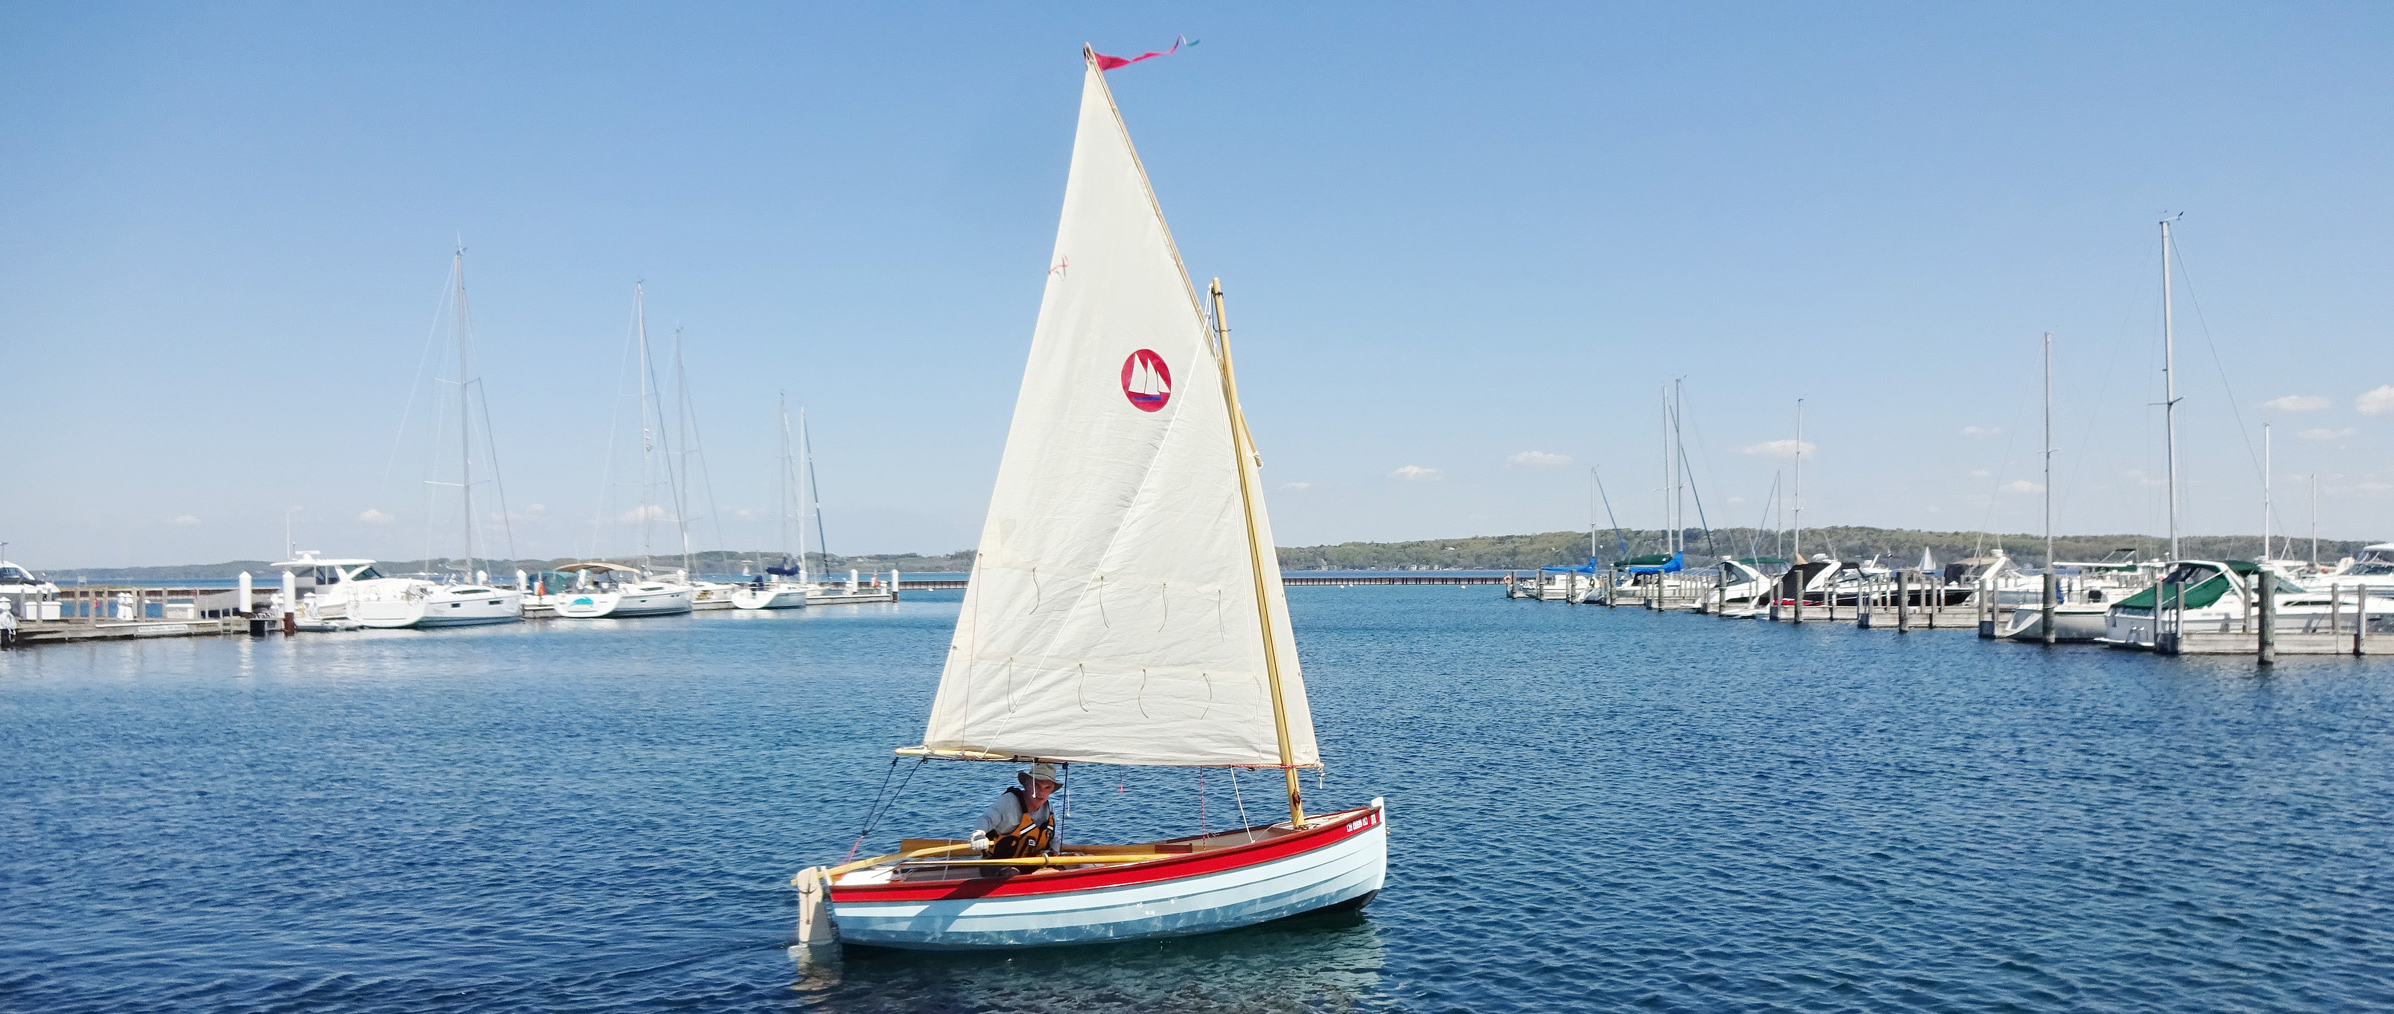
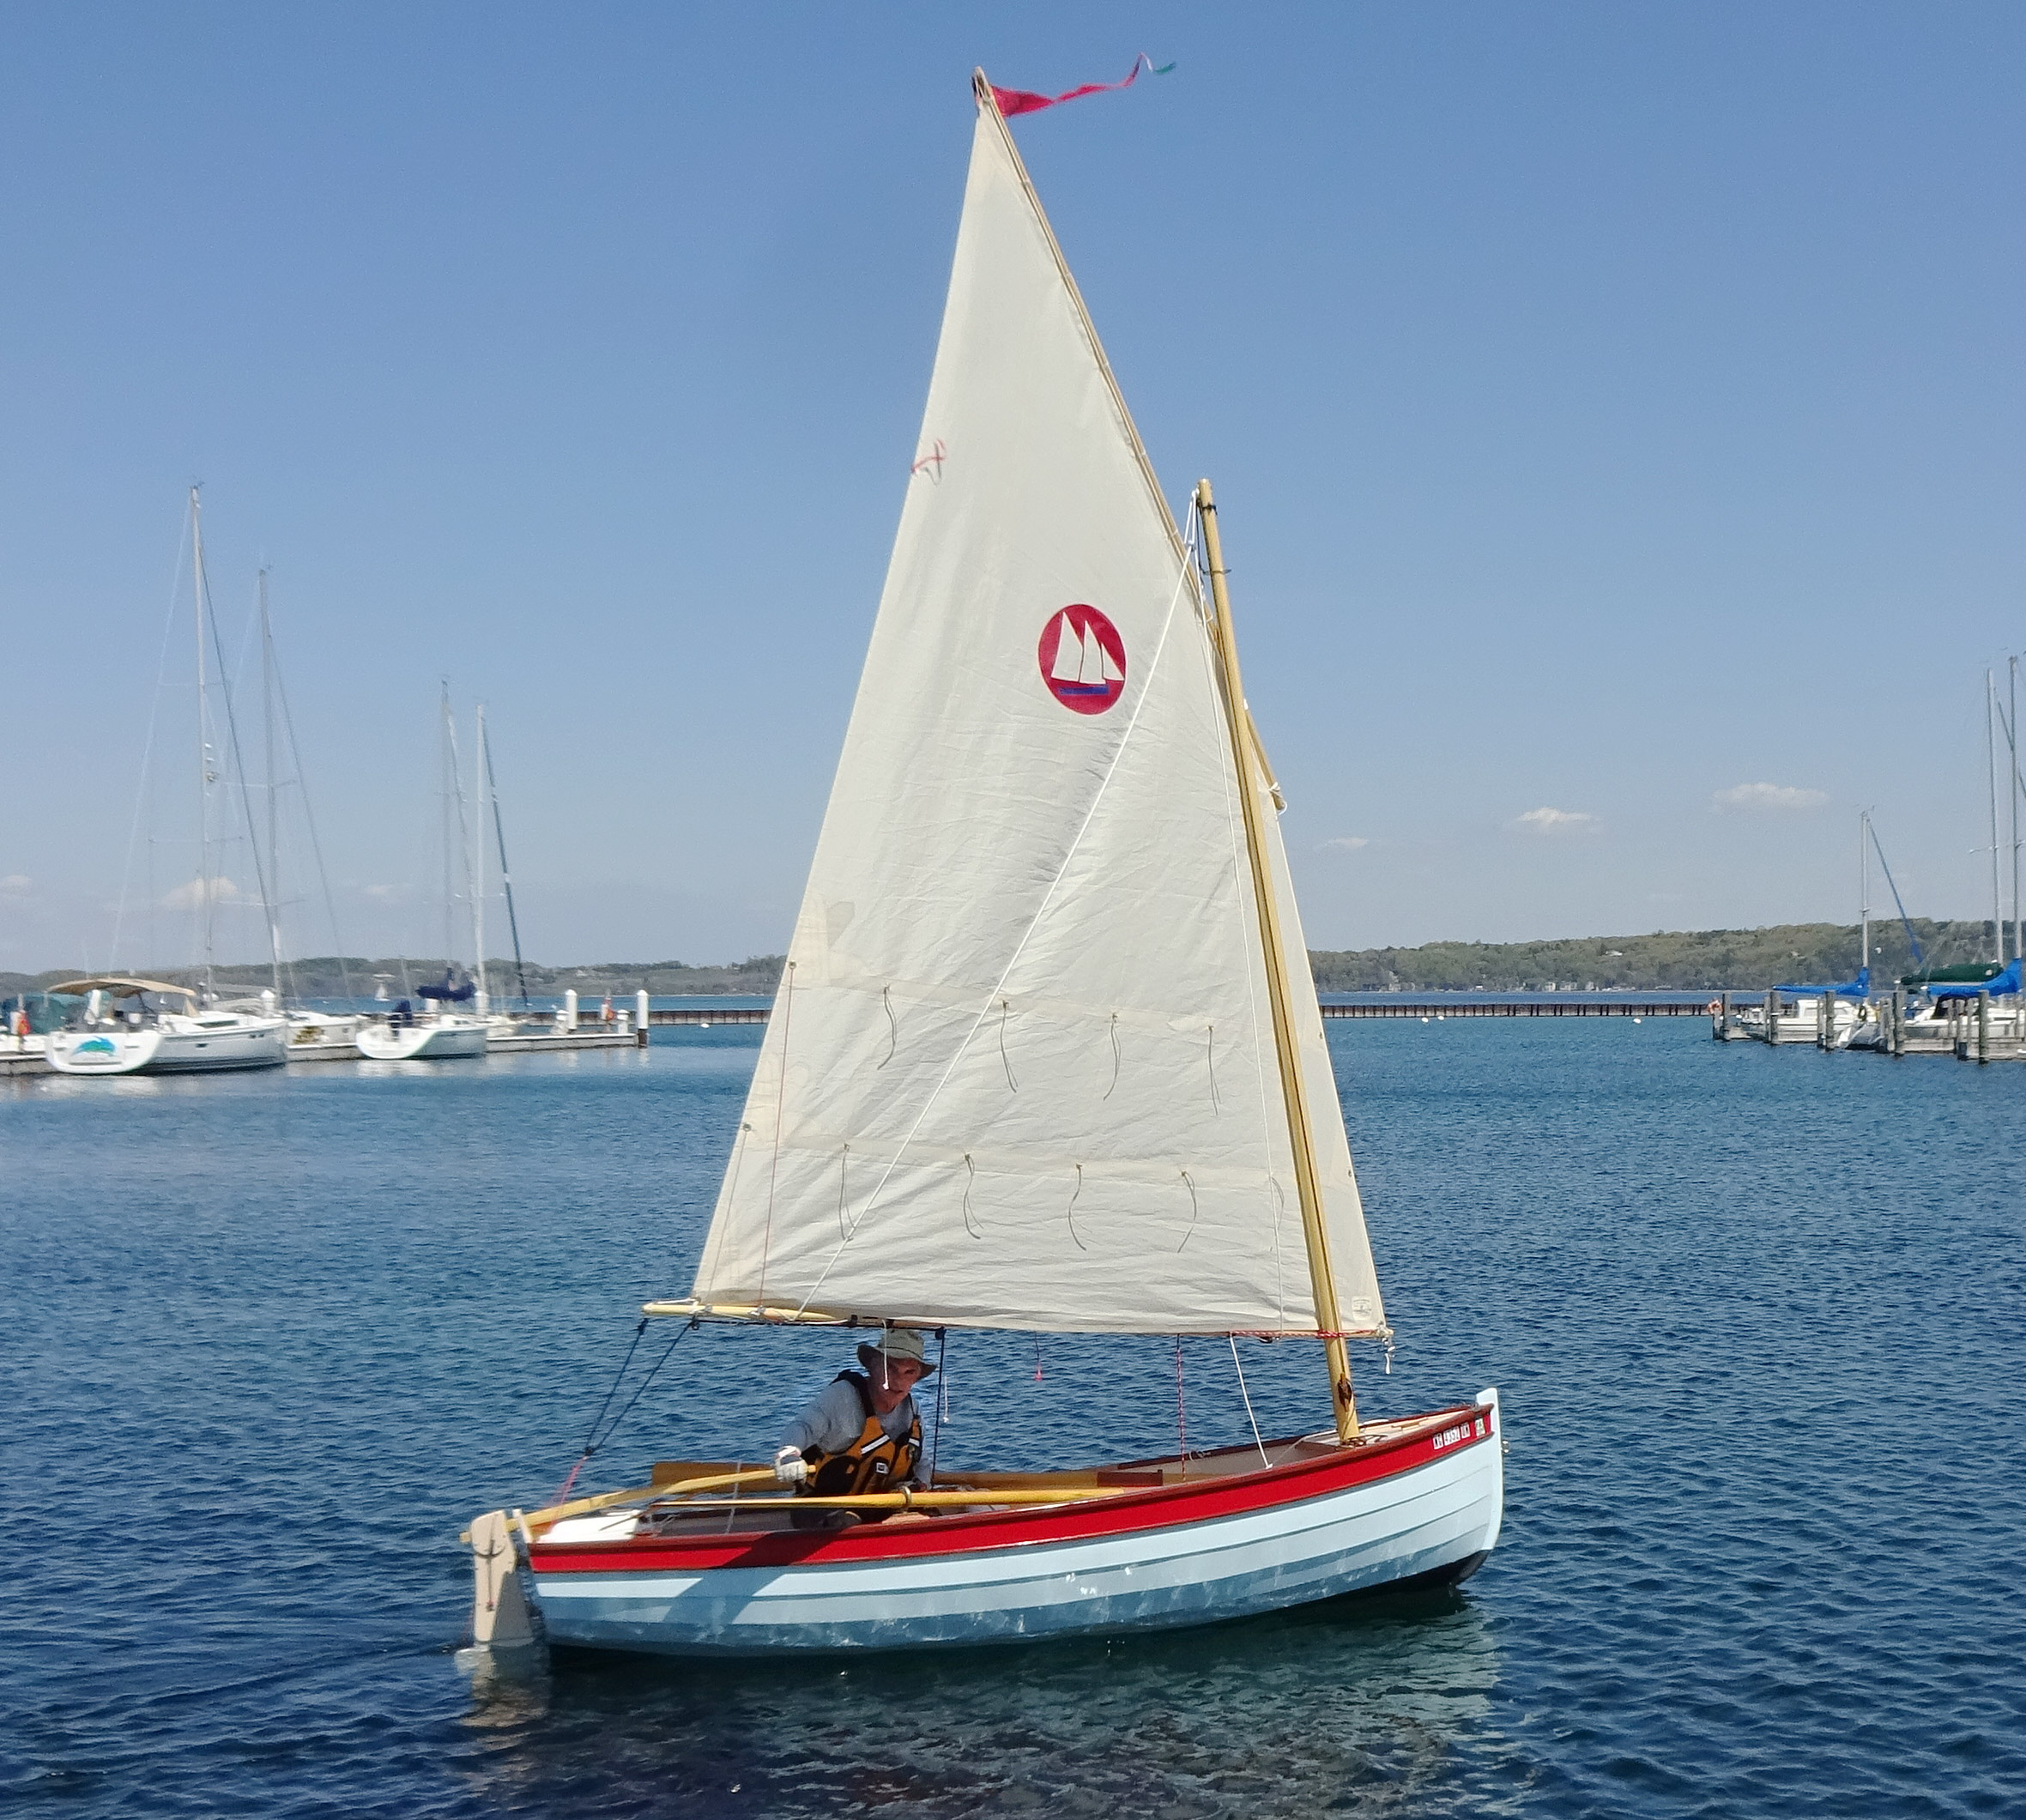
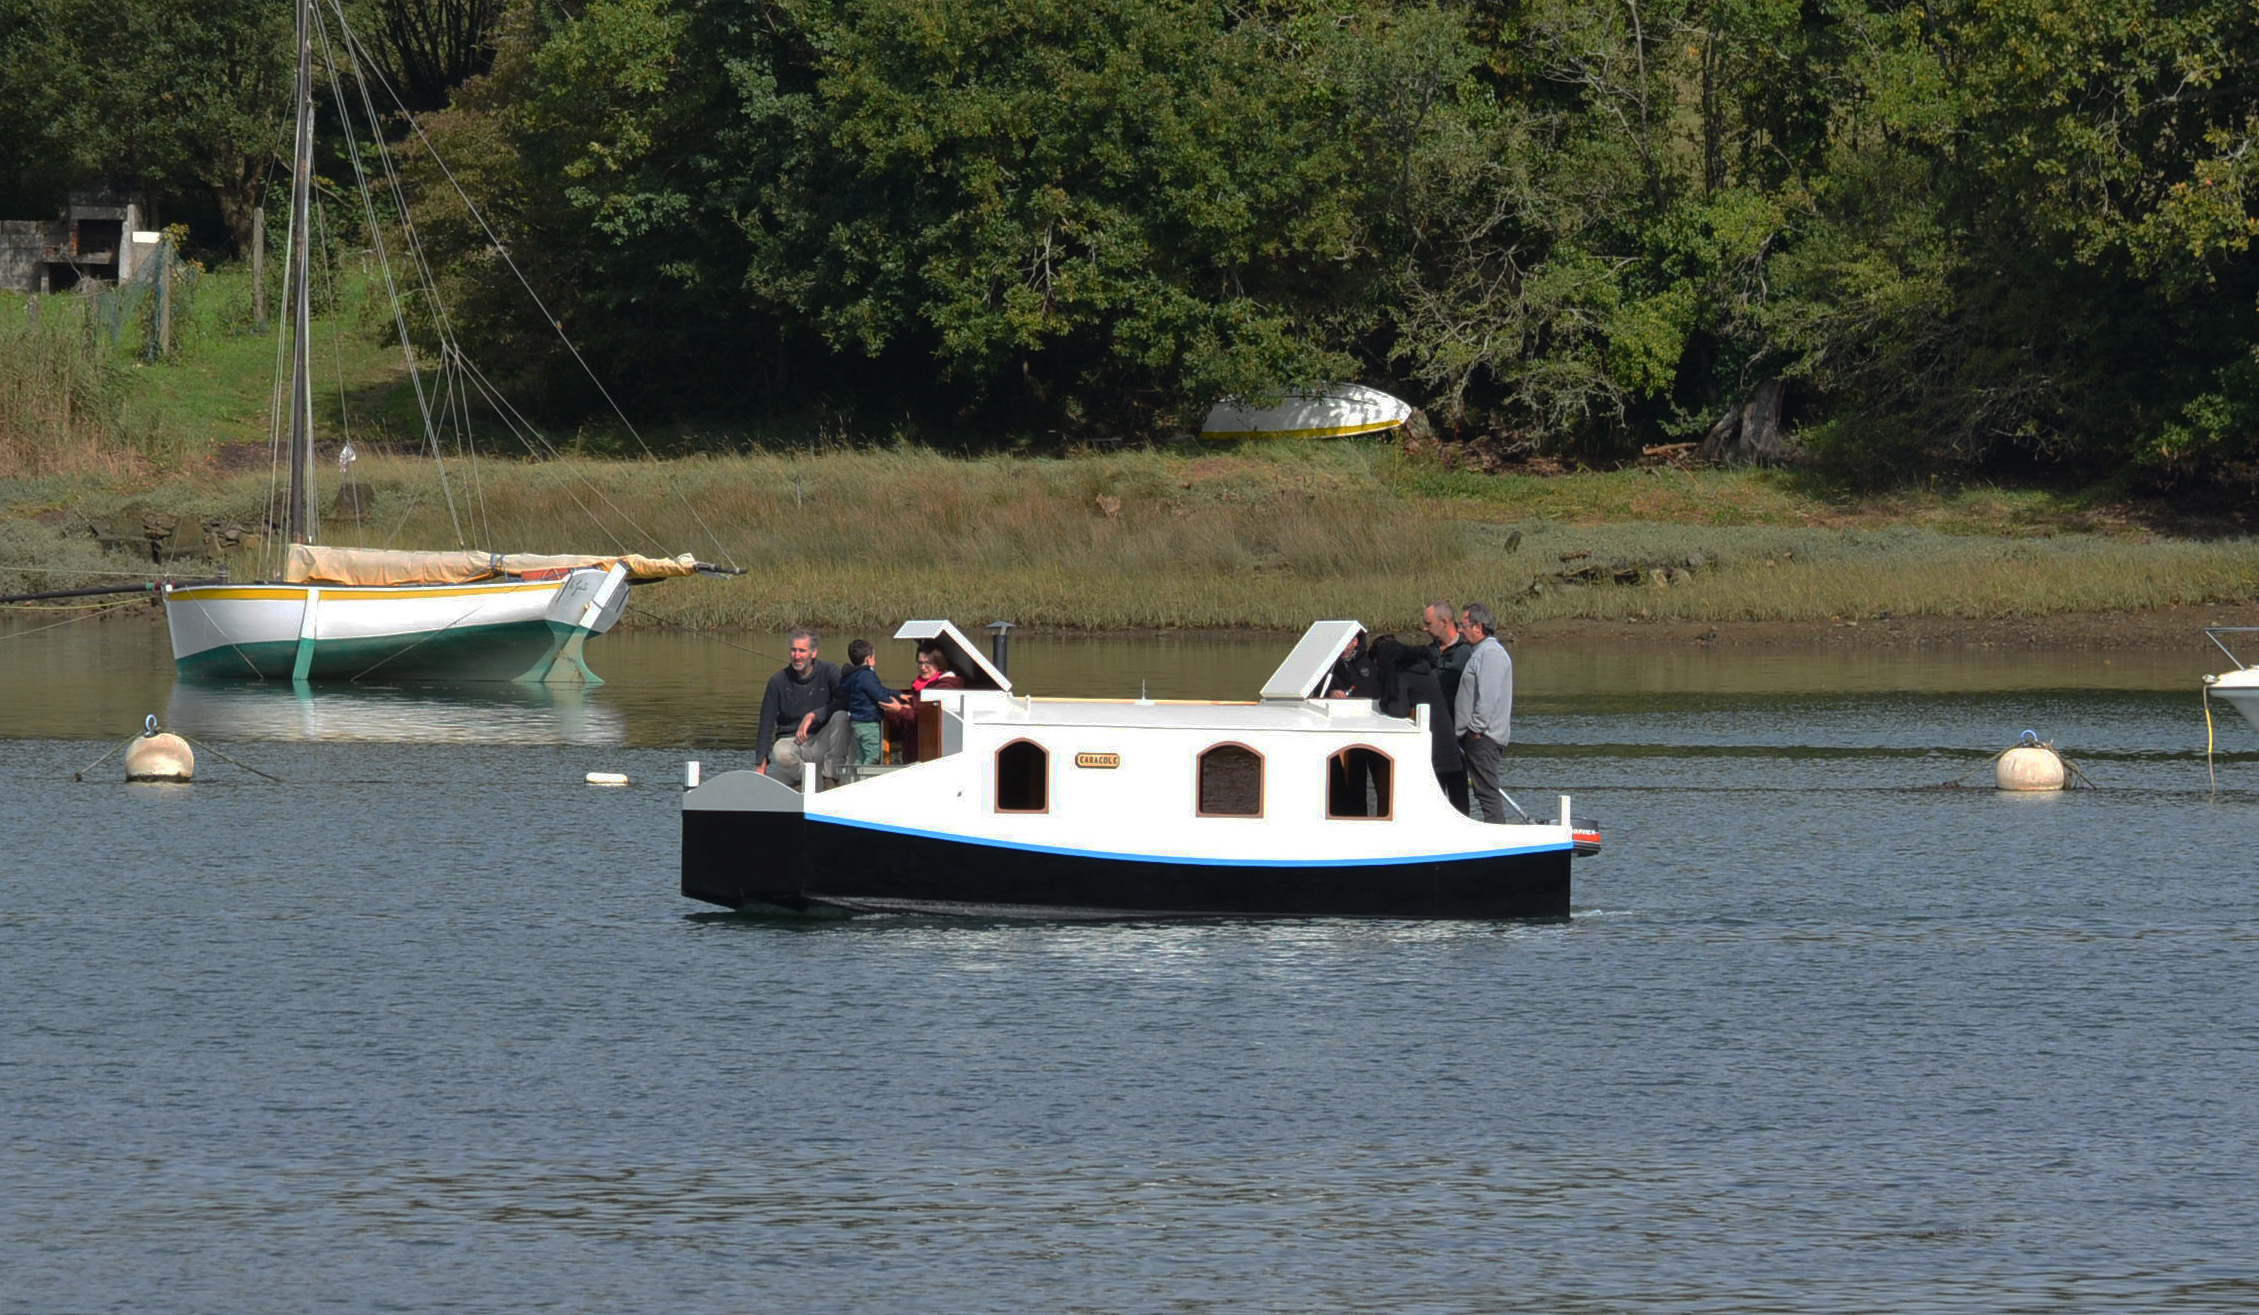
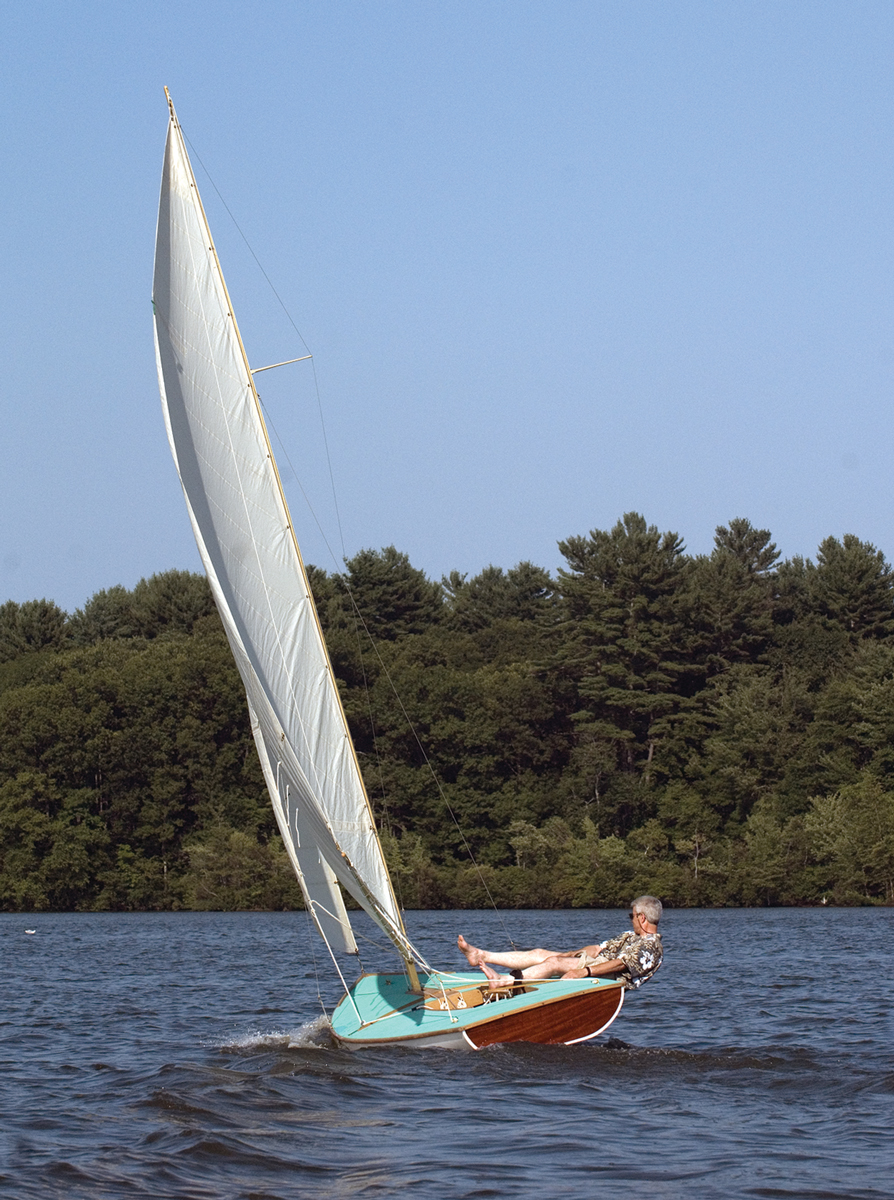
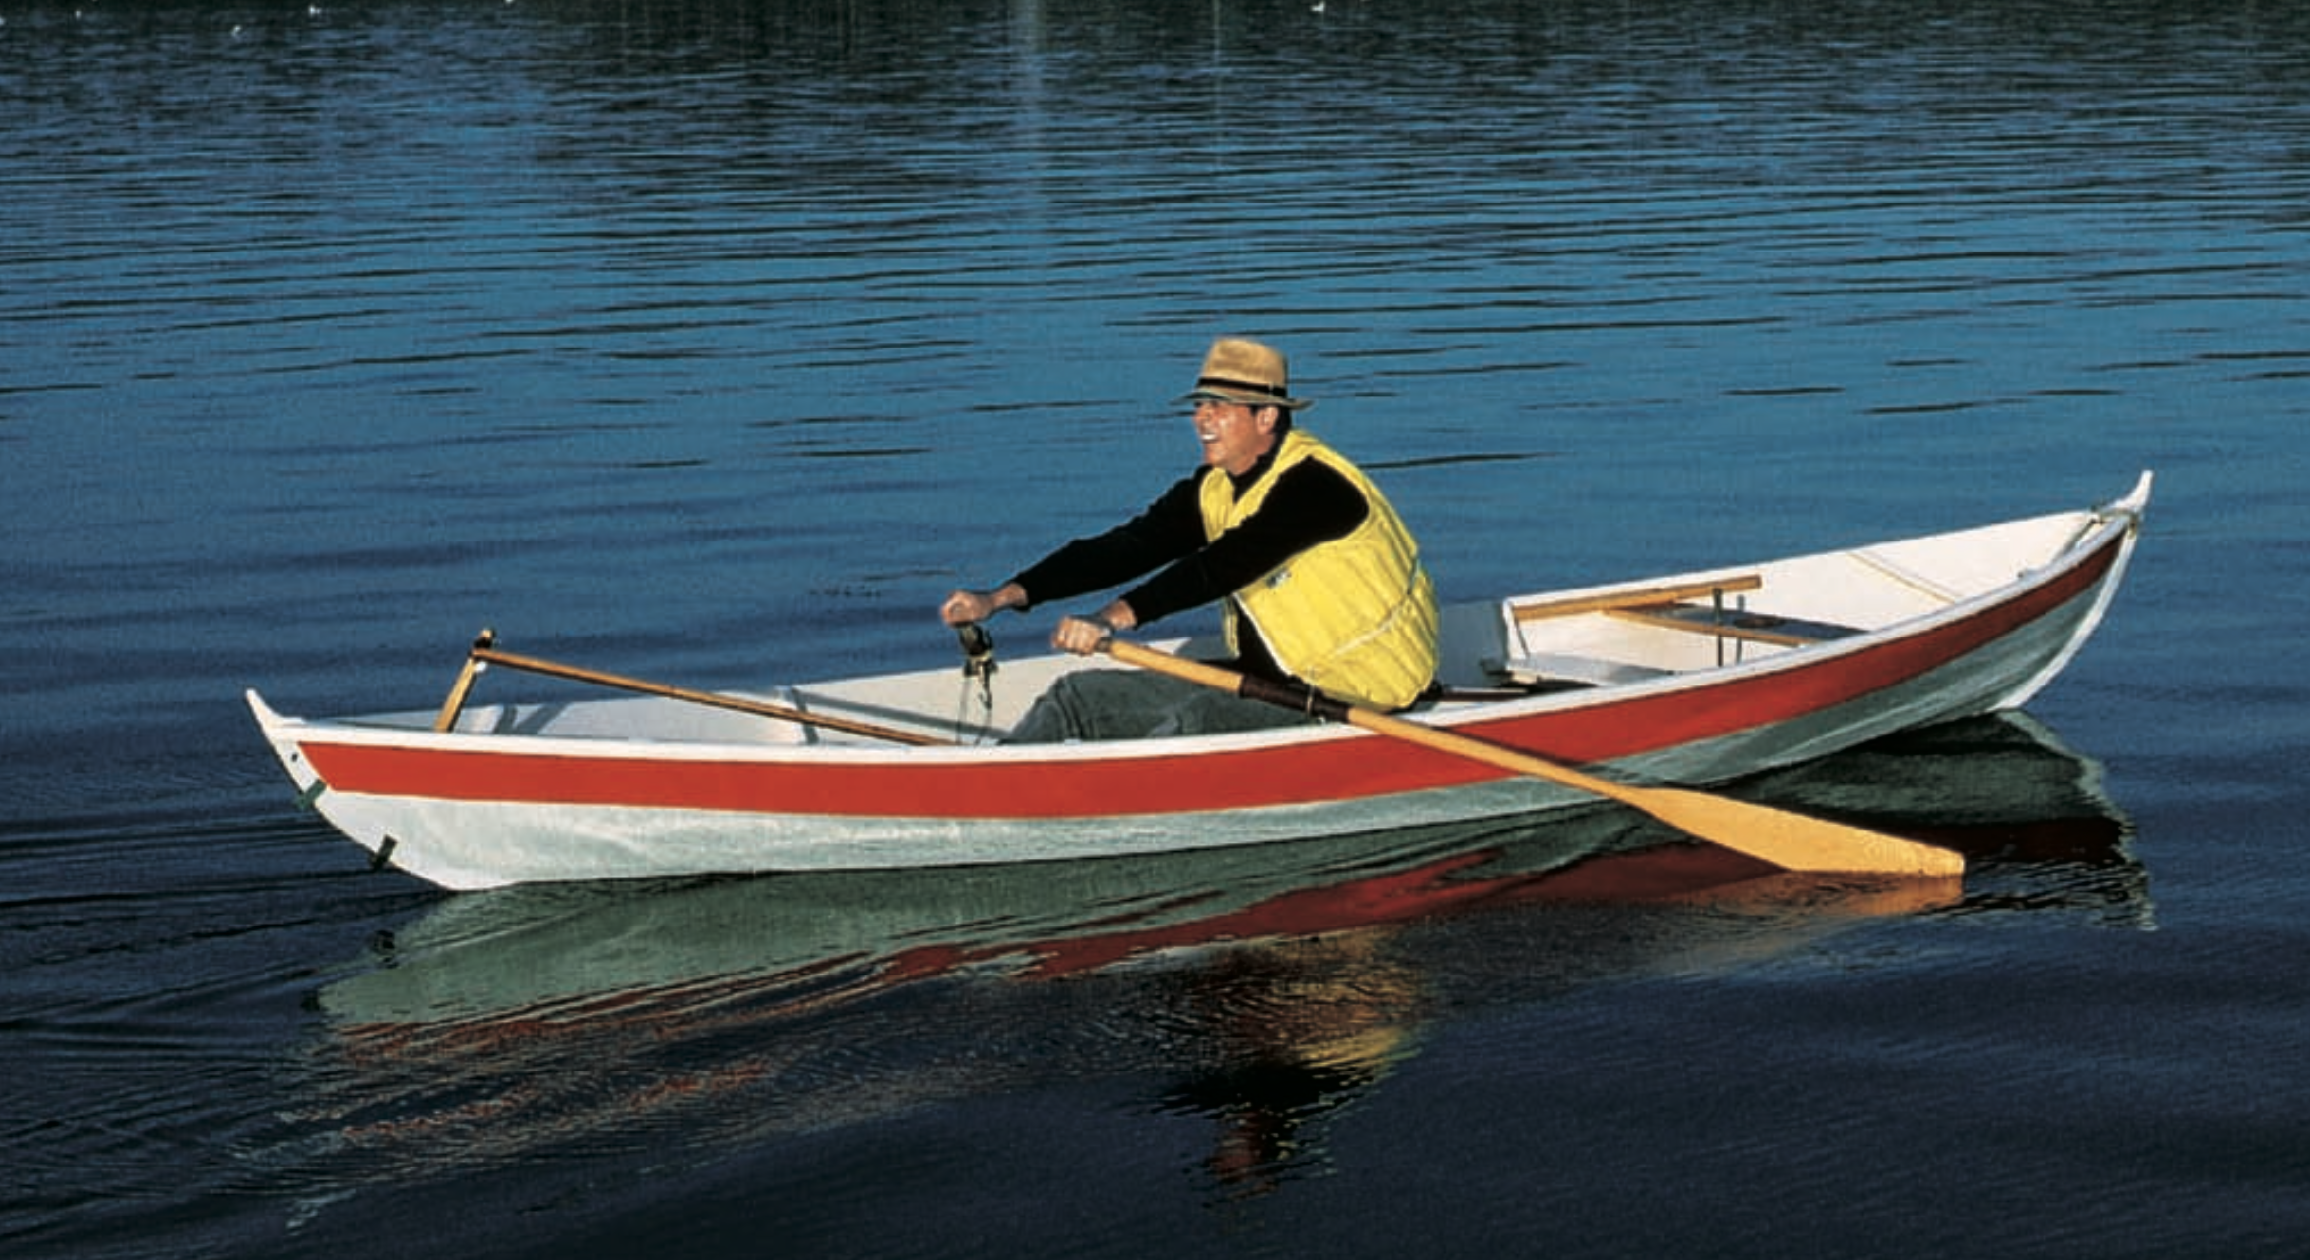
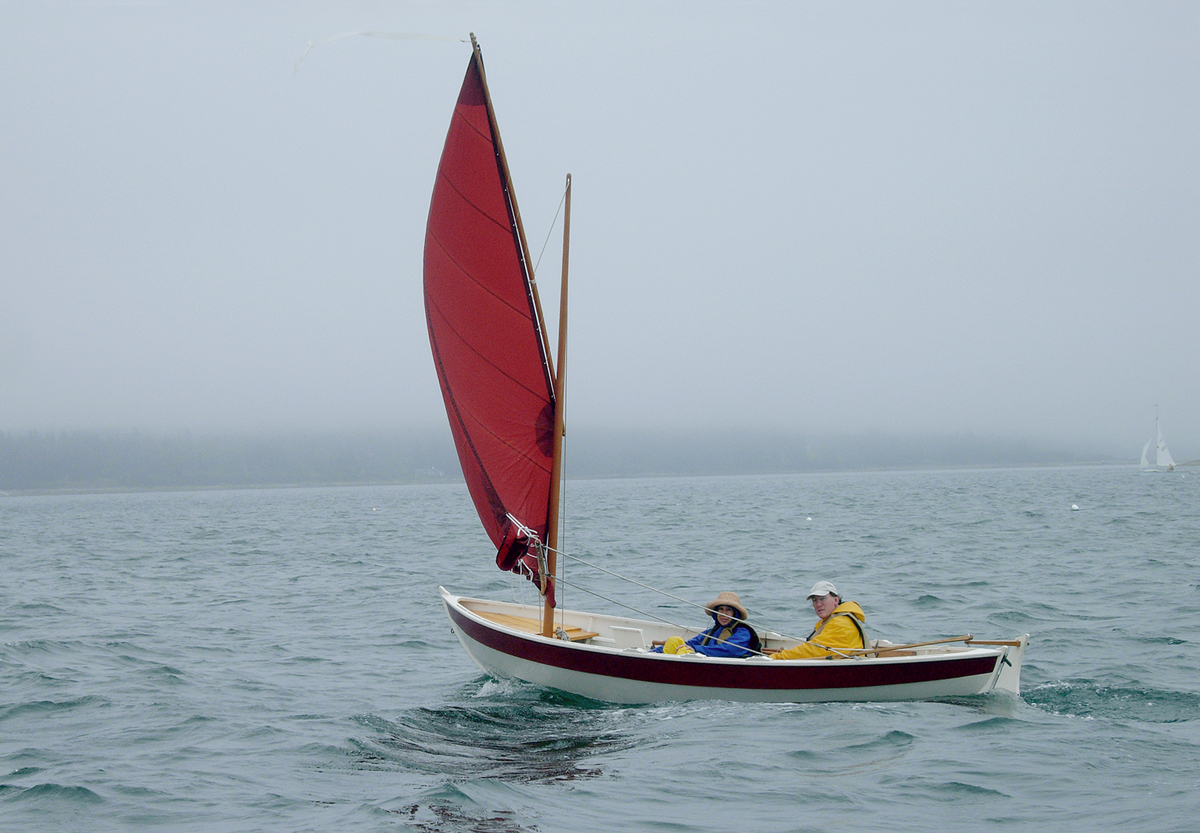
While the Penny Fee is easily sailed singlehanded, there’s room for a complement of four aboard.
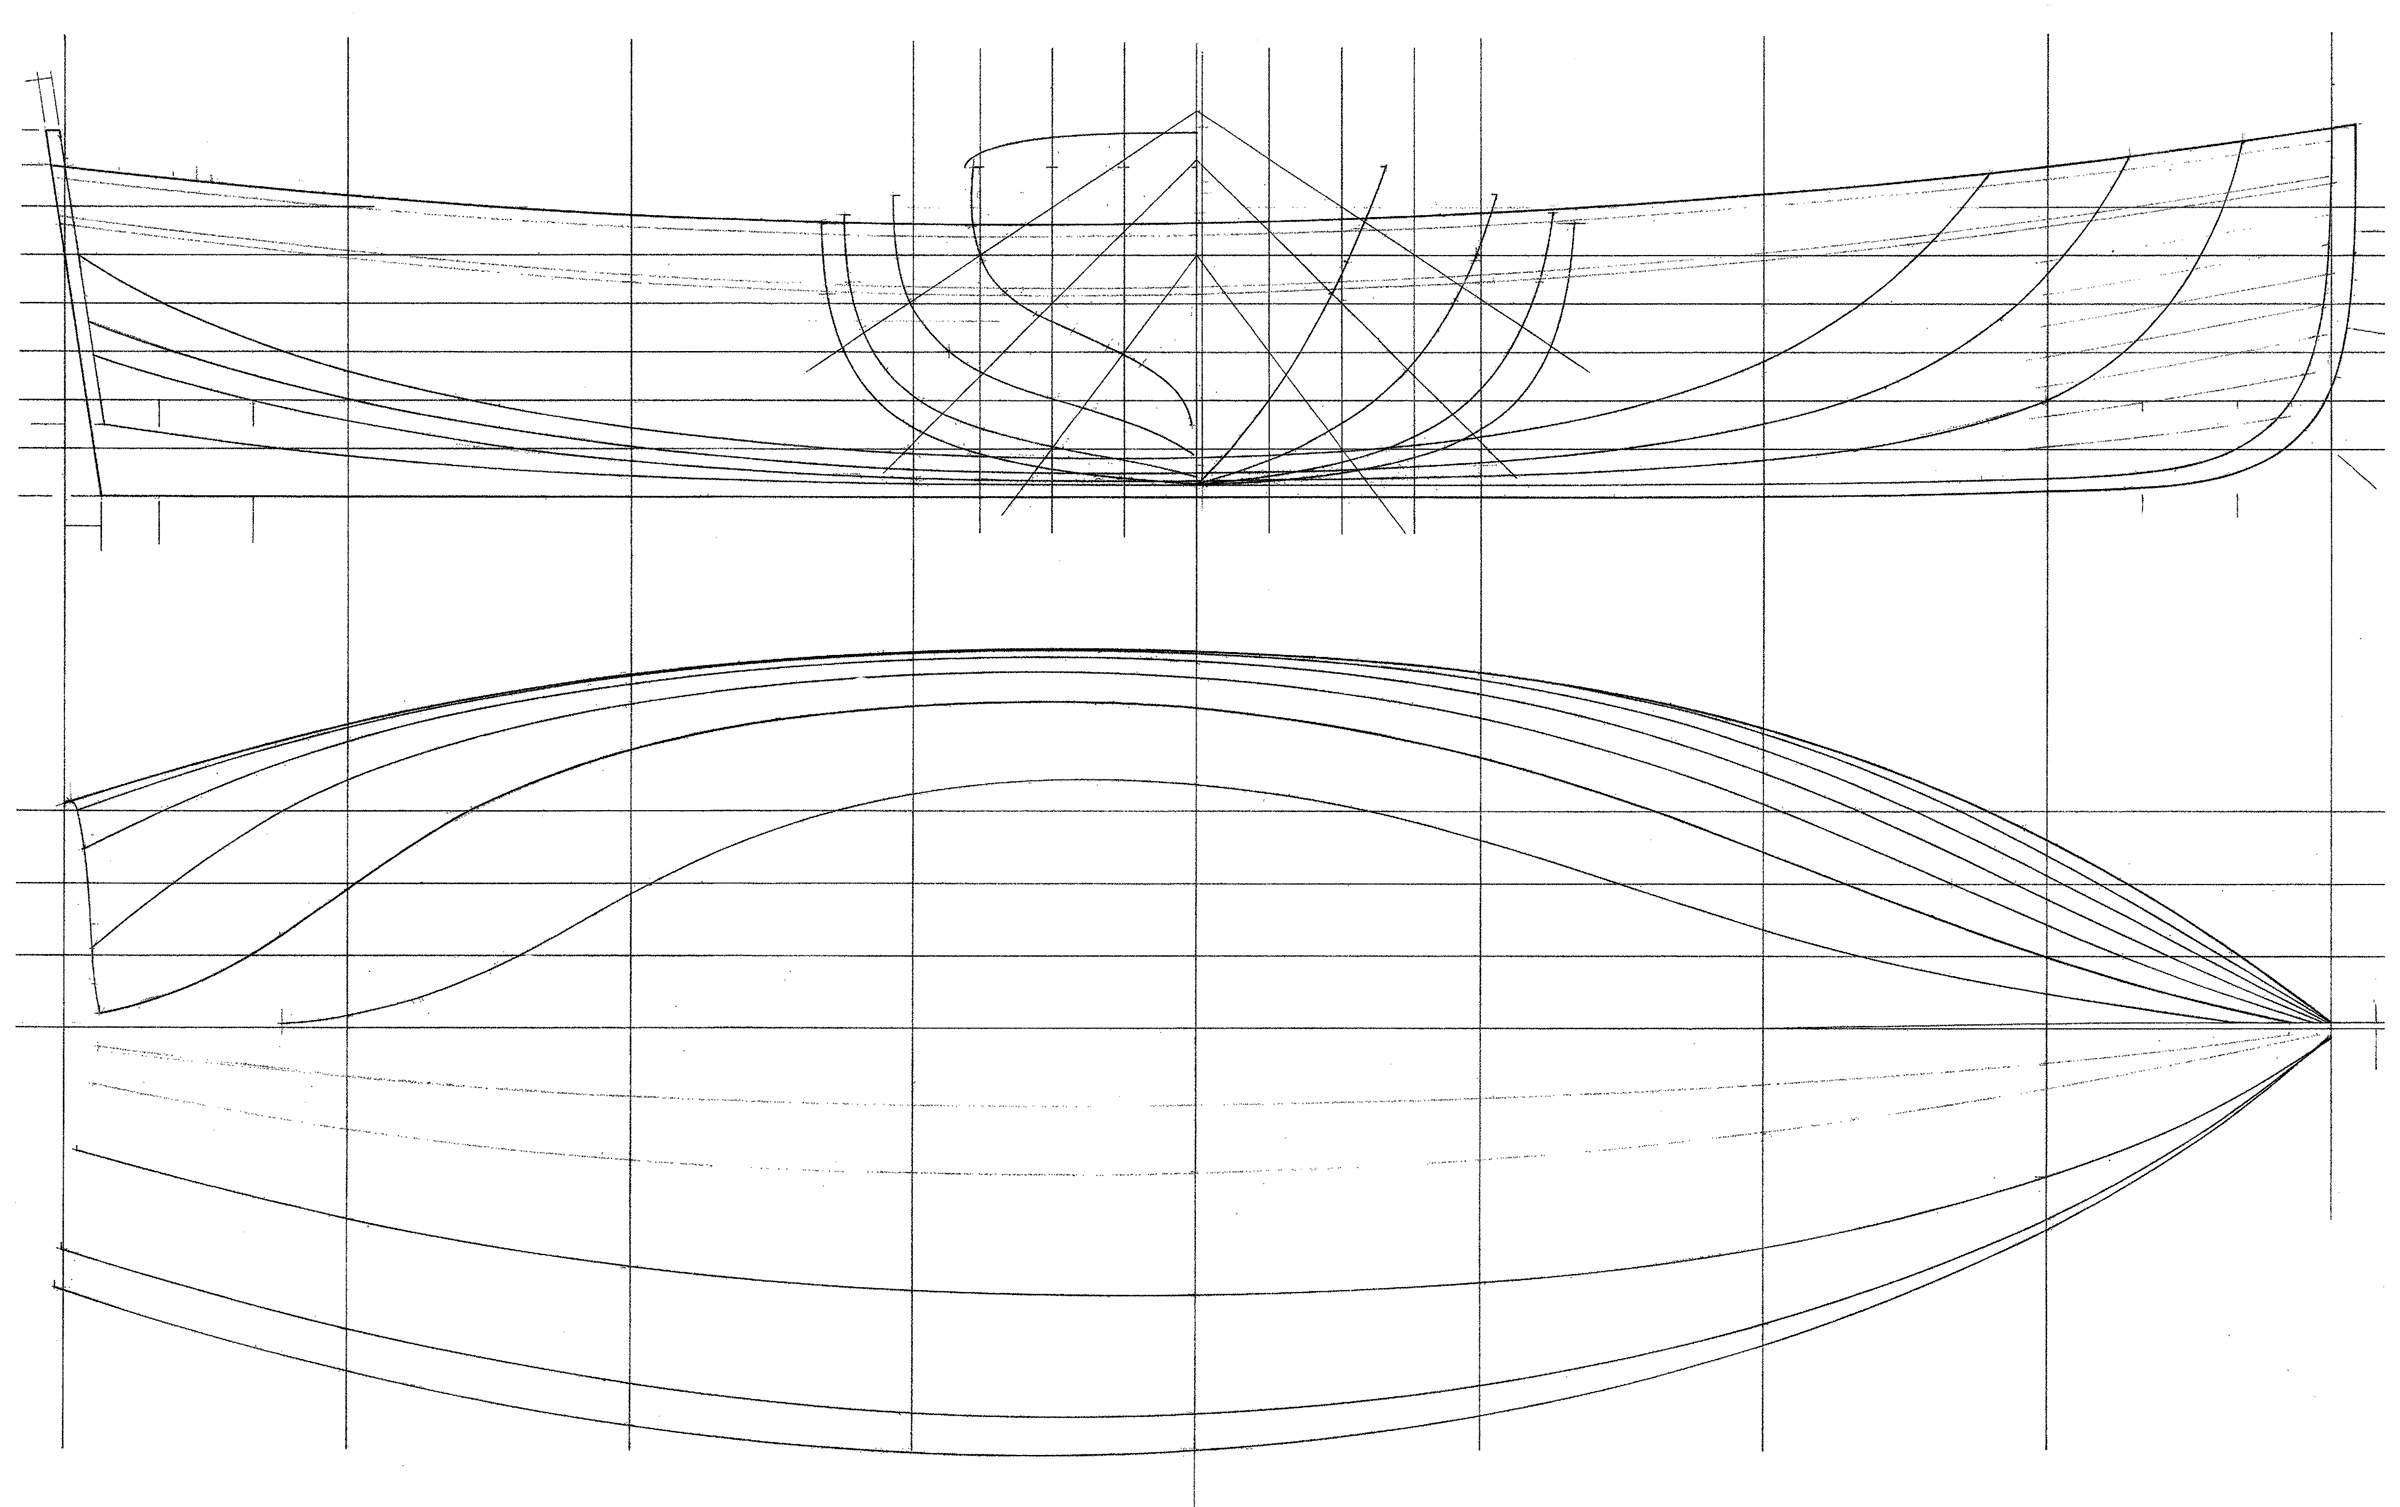
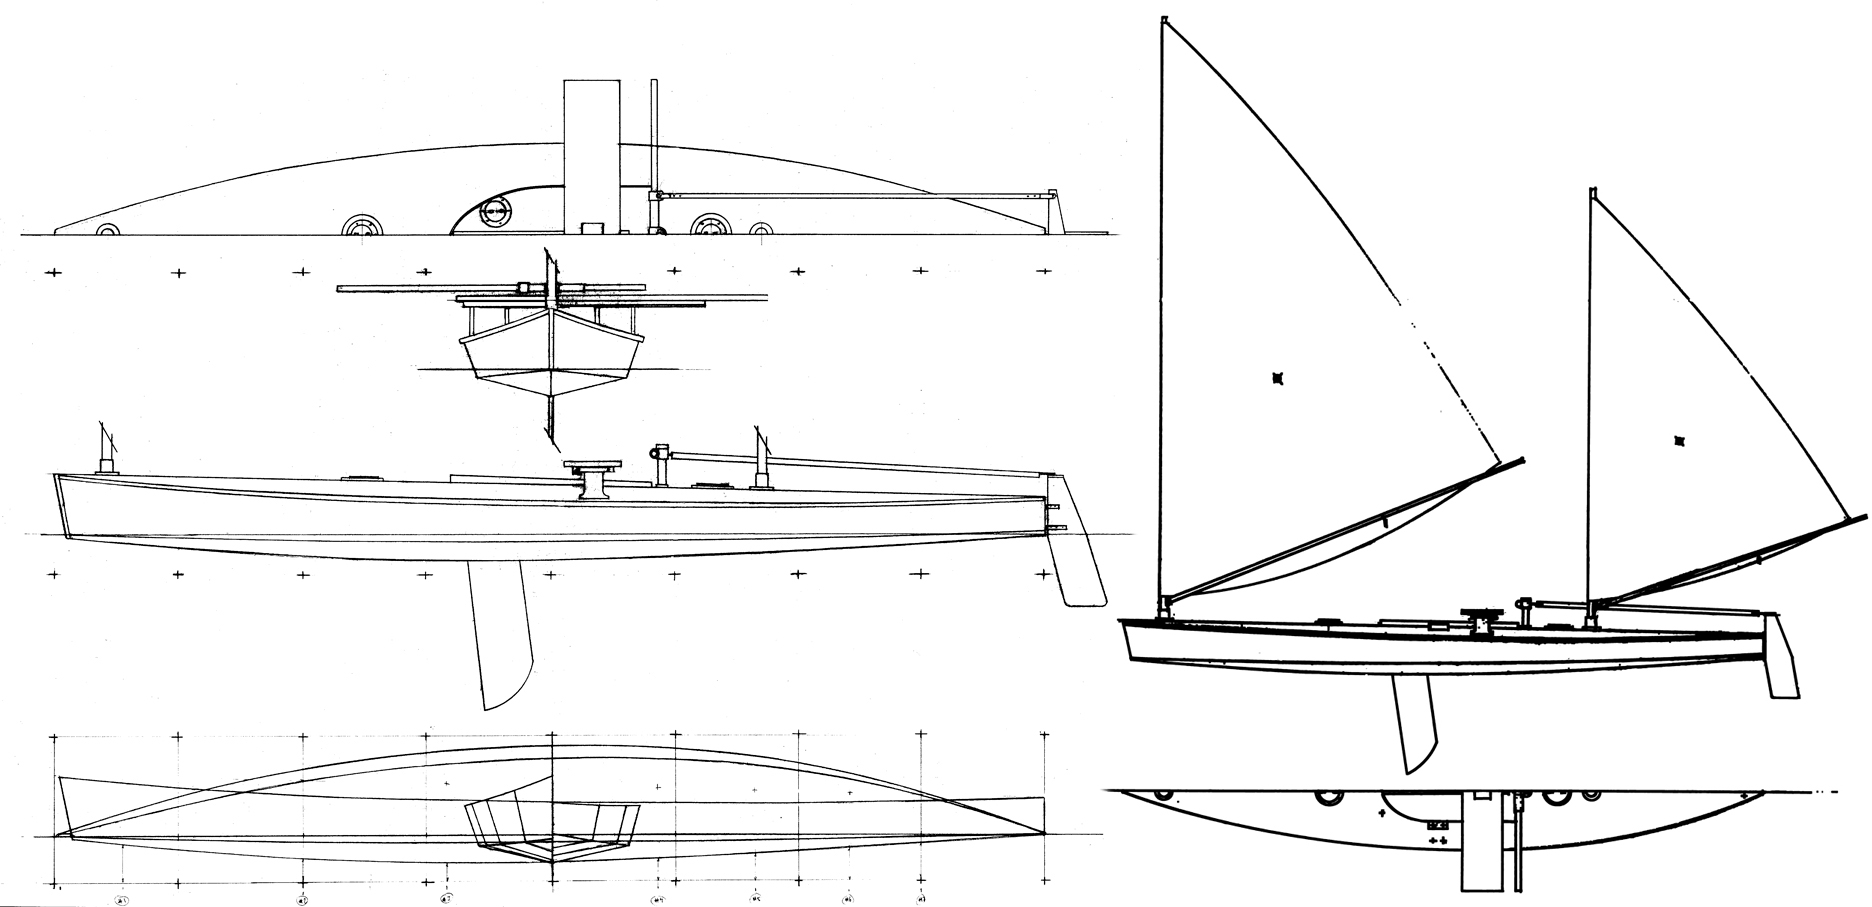
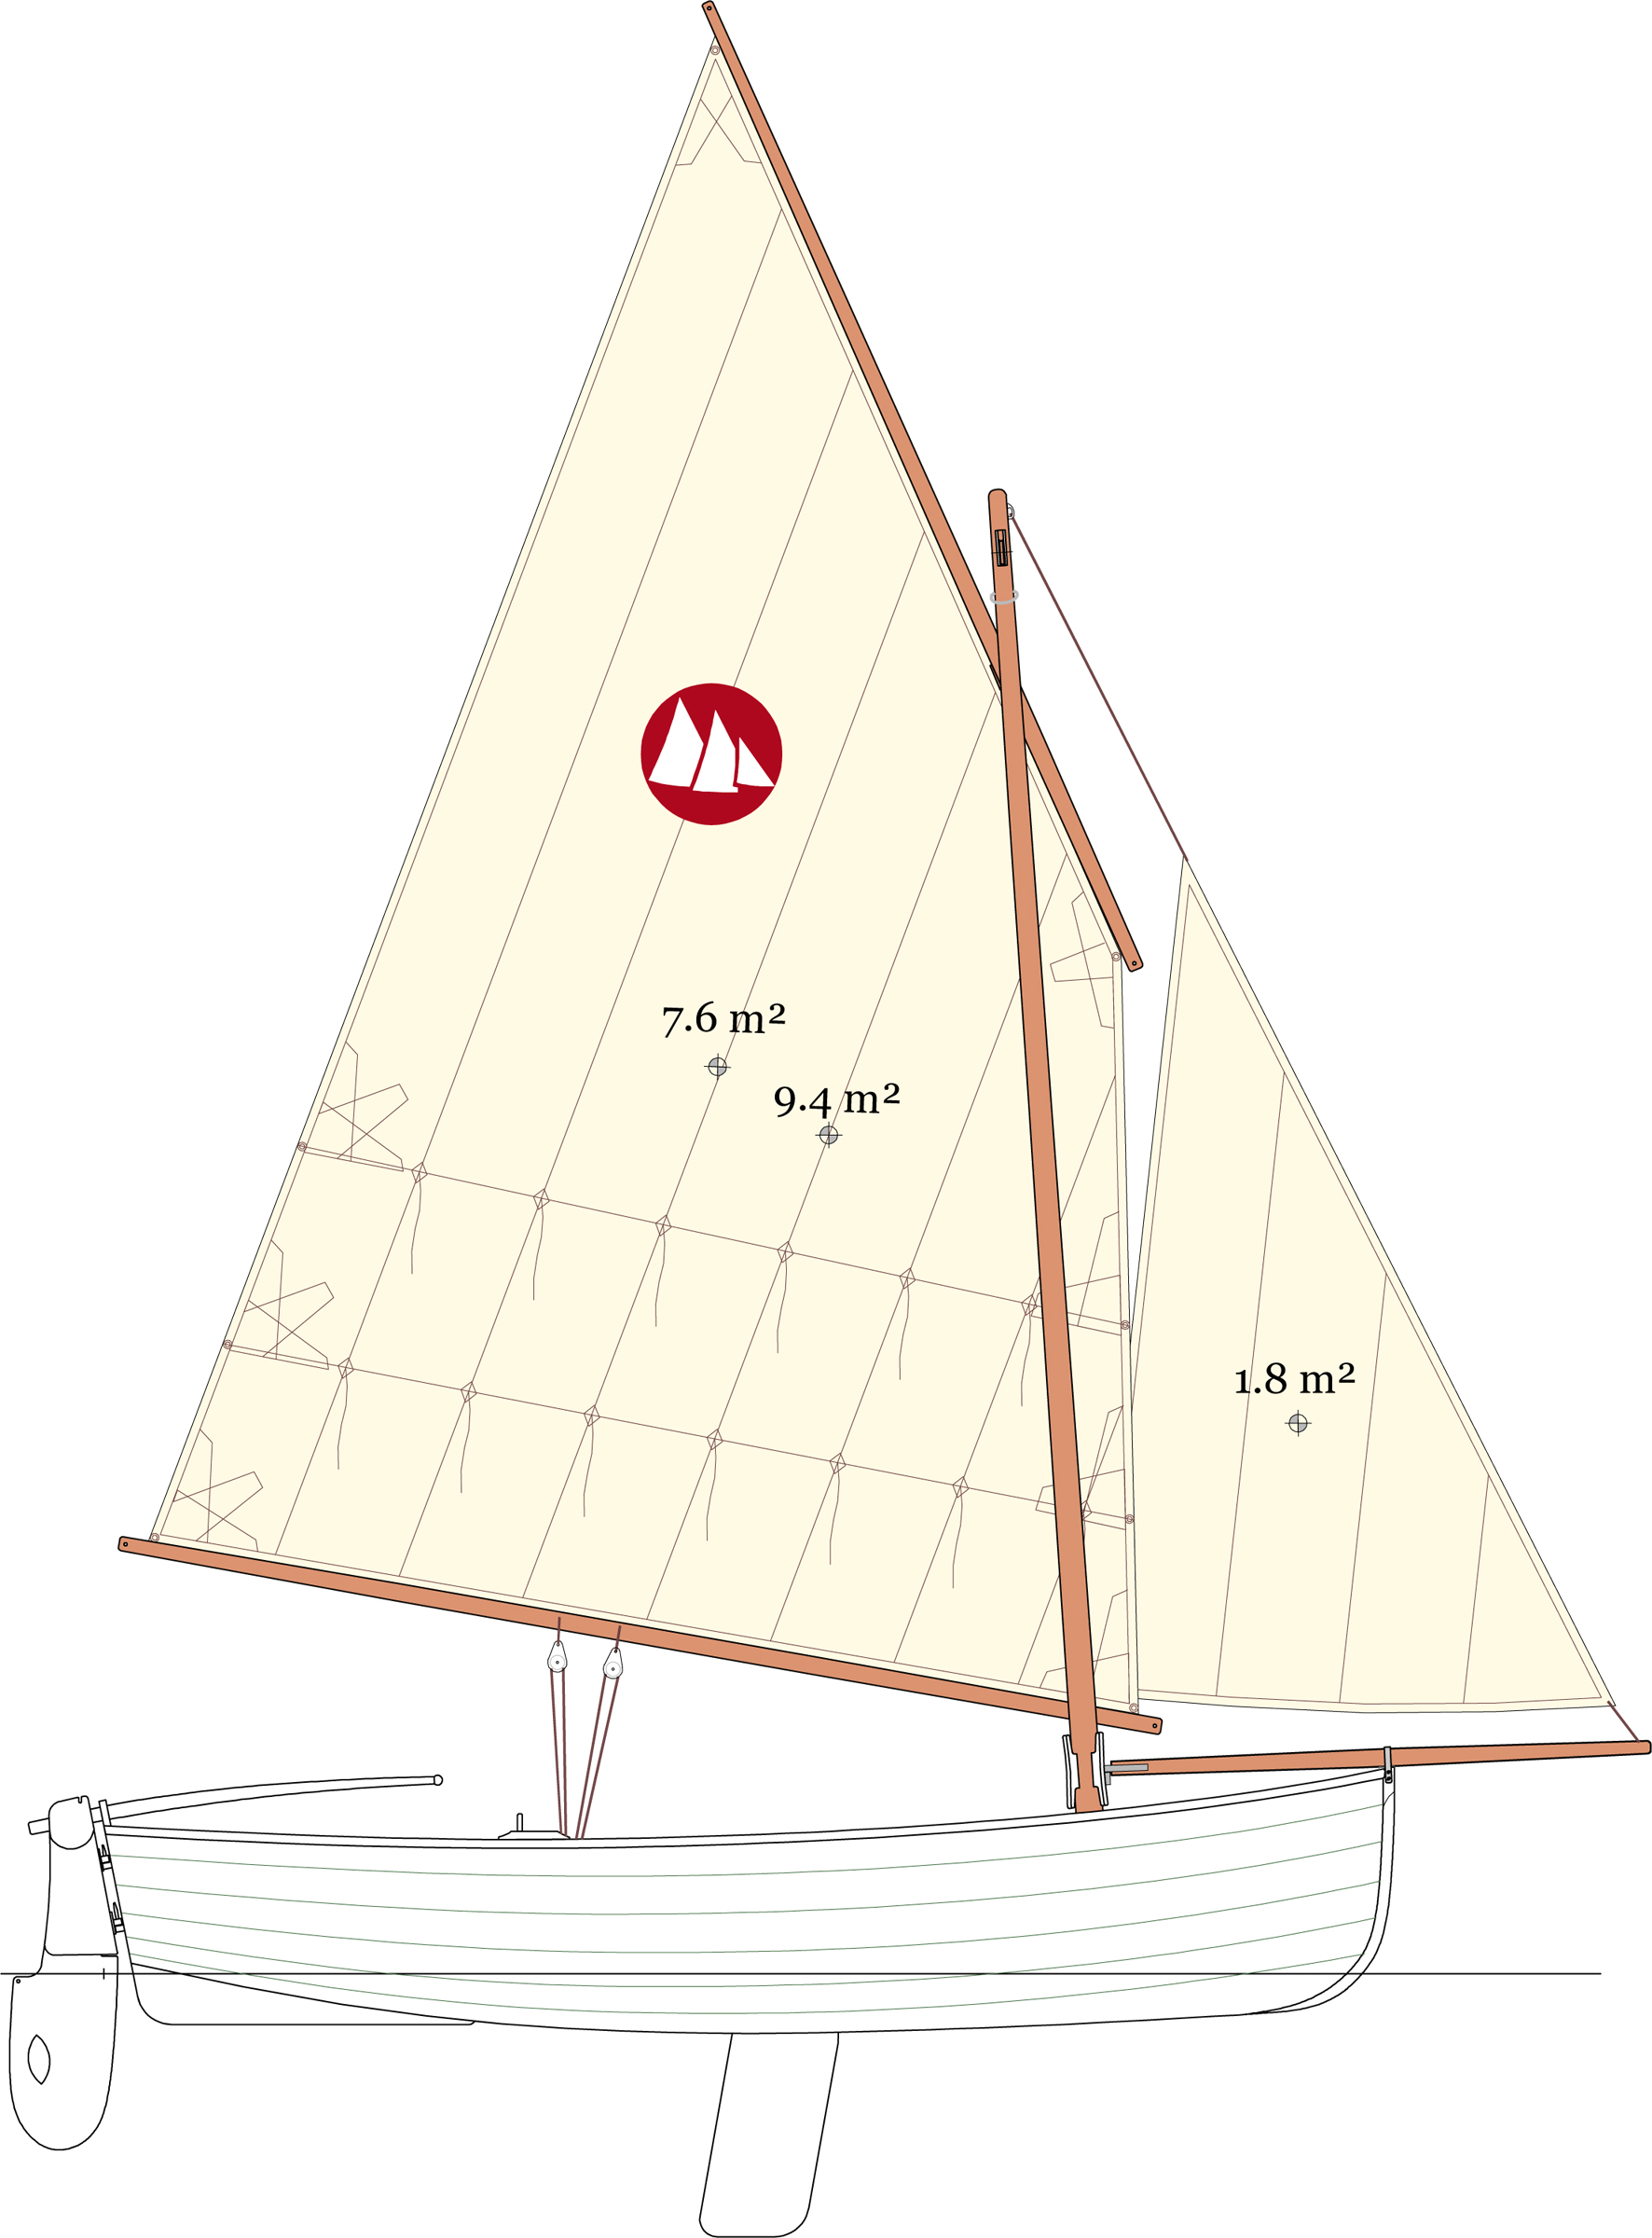
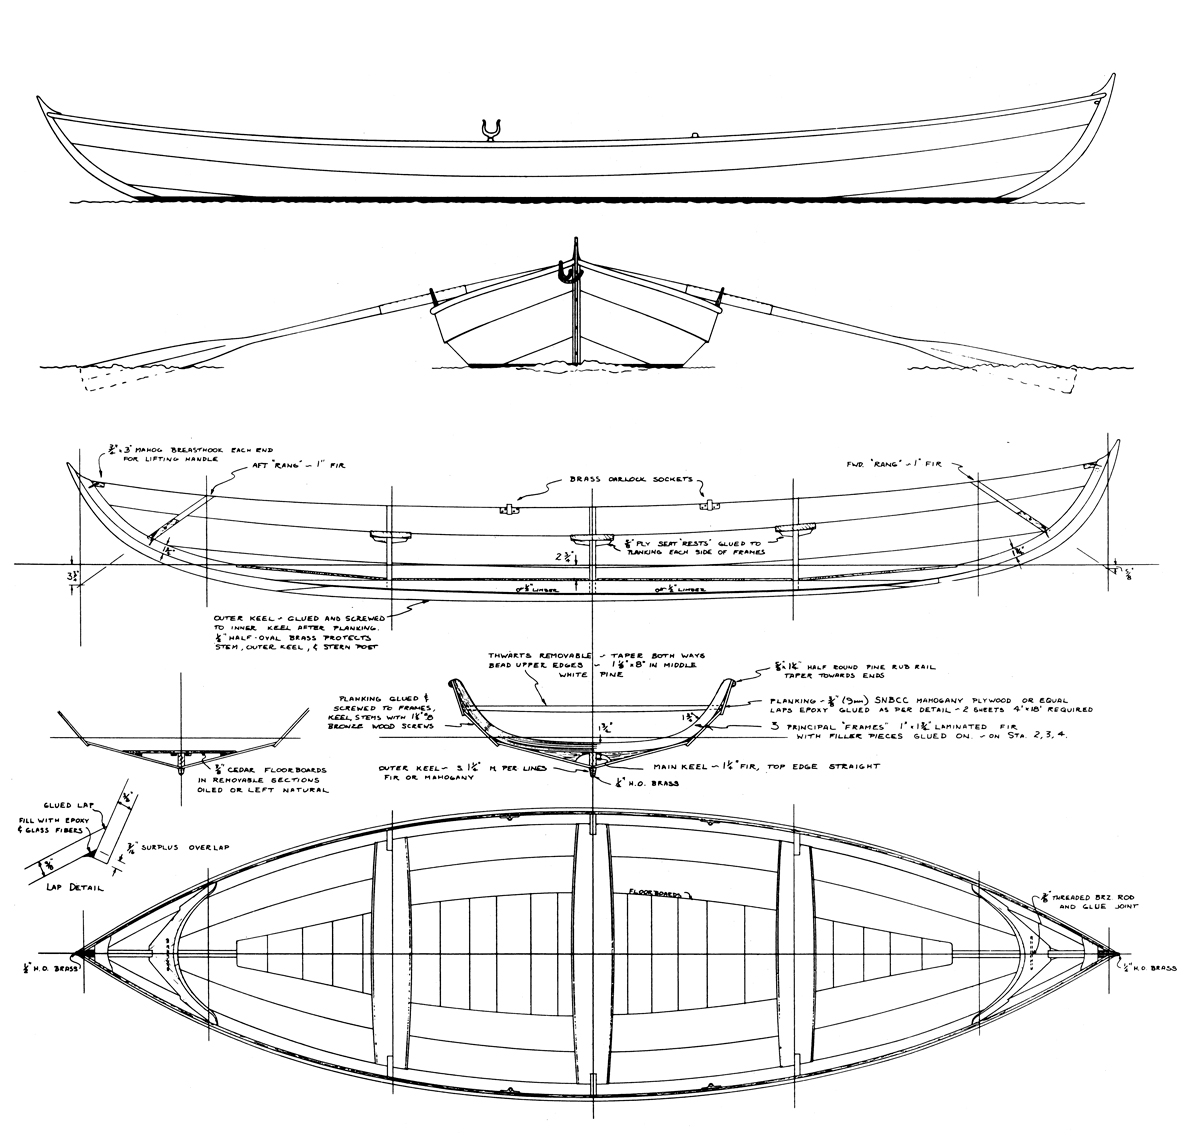
I ordered the plans for the Penny Fee and, as always, Iain’s drawings were a treat for the eye and the soul. The Penny Fee set consists of eight sheets. There are offsets, lines, and a detailed construction plan followed by four options for the sail plan: single lug, lug yawl, gaff sloop, and gaff yawl. A measured drawing defines the centerboard; the shapes for two rudders—fixed and kick-up rudder—are conveyed with superimposed grids. Full-sized patterns are provided for the molds, stem, and transom. The plans do not include drawings for oars, but Iain kindly supplied us with drawings, and recommended an oar length of 9′ 10″.
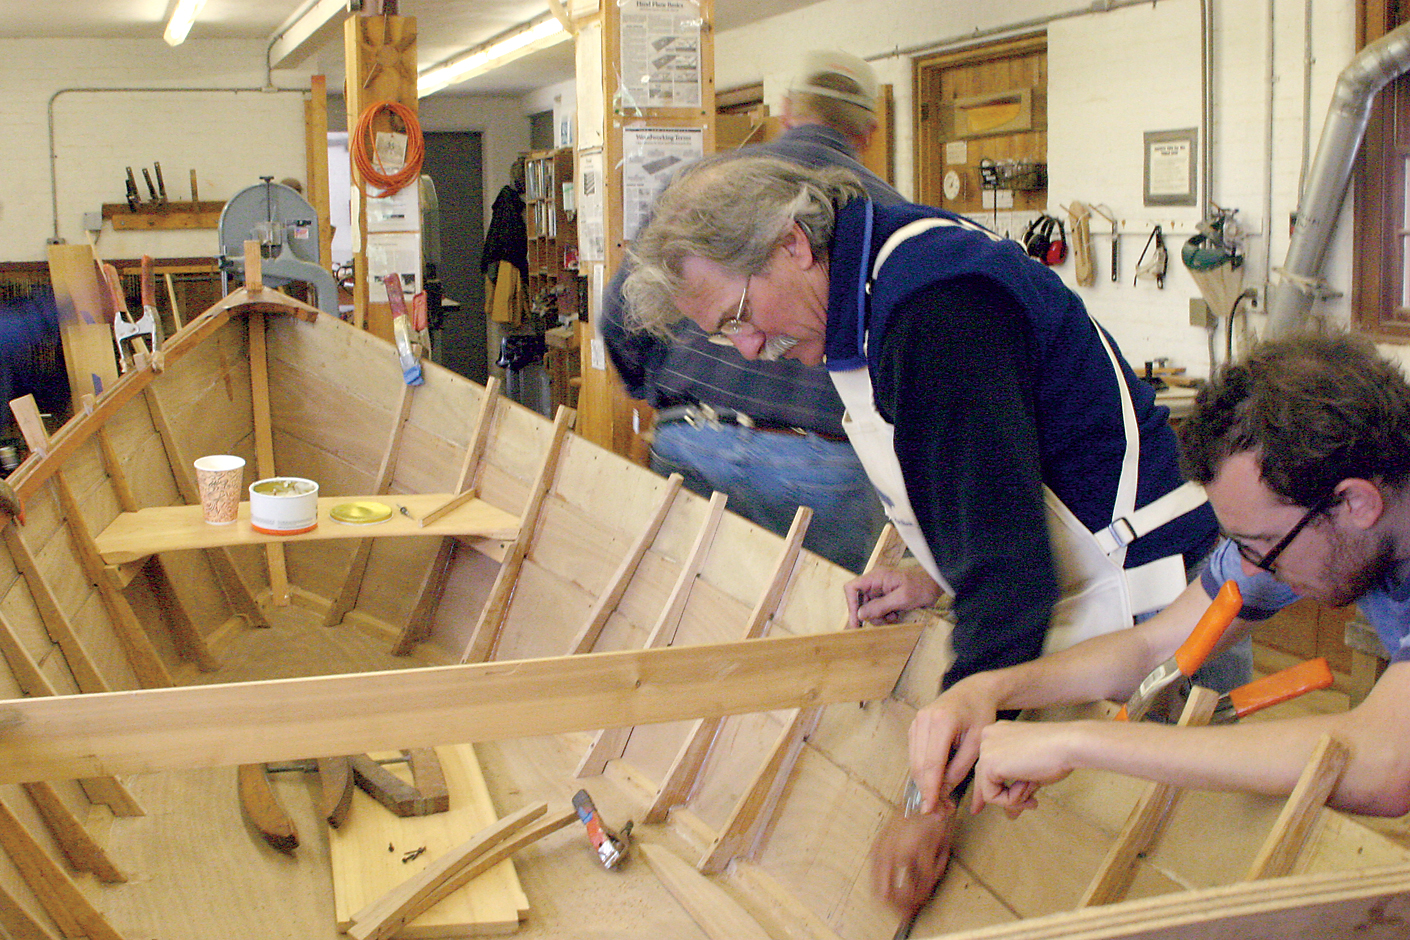
In order to speed up the start of the building project, we decided to build from a CNC-cut kit supplied by Jordan Boats UK. The kit consists of 9mm plywood okoume planks (each in three pieces) and okoume building molds, and 9mm side panels for the centerboard case. The molds have notches on the outer edges for the planks to fit into, so no measuring and marking of strake locations is needed when fitting the planking to them. For scratch builders, the plank locations are all marked on the patterns for the molds, stem, and transom.
Jordan Boats prefers scarf joints to finger joints for appearance, strength, and simplicity of construction. The scarfs are cut by the builder and the kit provides an ingenious system for aligning the plank sections for gluing them. There are predrilled holes in the scarf joints and in the ends of the planks; a nail is driven through the holes, locking the scarfs in place. A string is drawn tight between the nails driven in the predrilled holes in the ends of the plank; once the string touches the nail located in the center of the plank, its sections are aligned properly. This worked well, but we still checked each strake visually for a fair curve, before letting the glue cure. Scratch builders will spile the planks from the molds.
Mats Vuorenjuuri
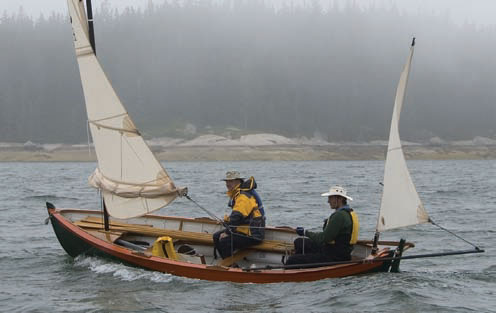
The plans offer drawings for two rudders, one with a fixed blade and the other with a pivoting blade with lines to deploy and retract it.
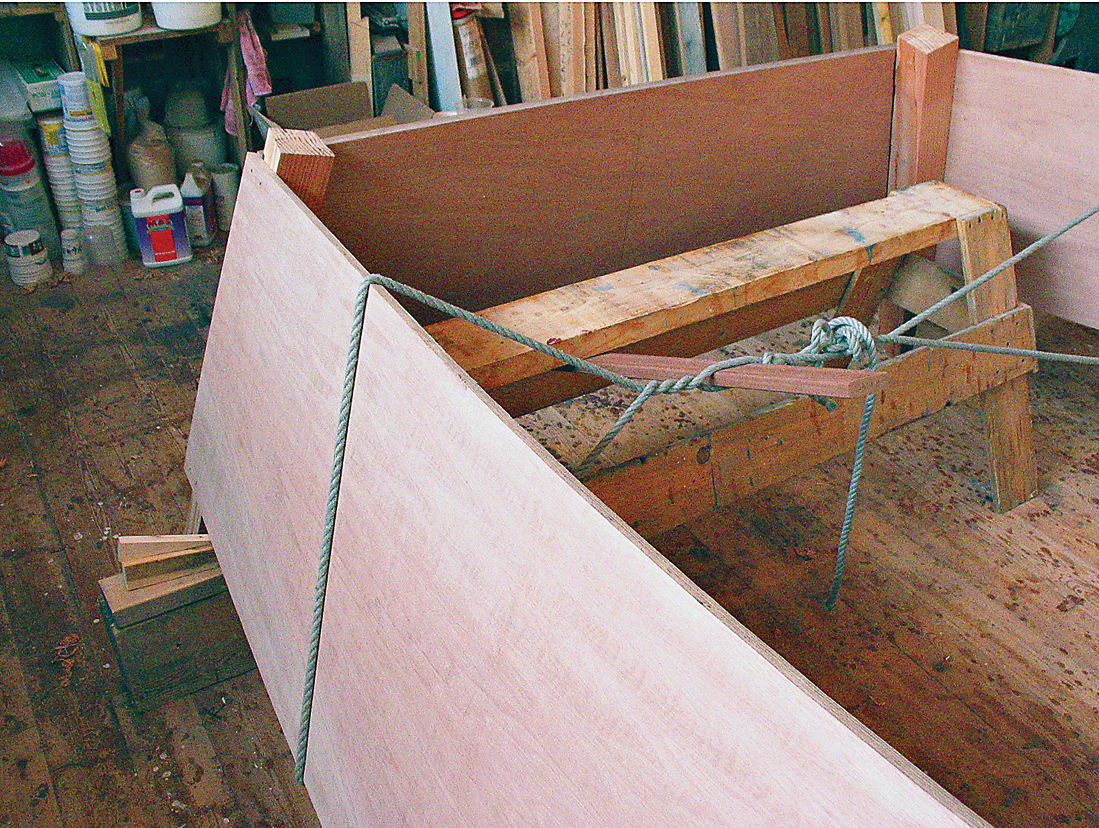
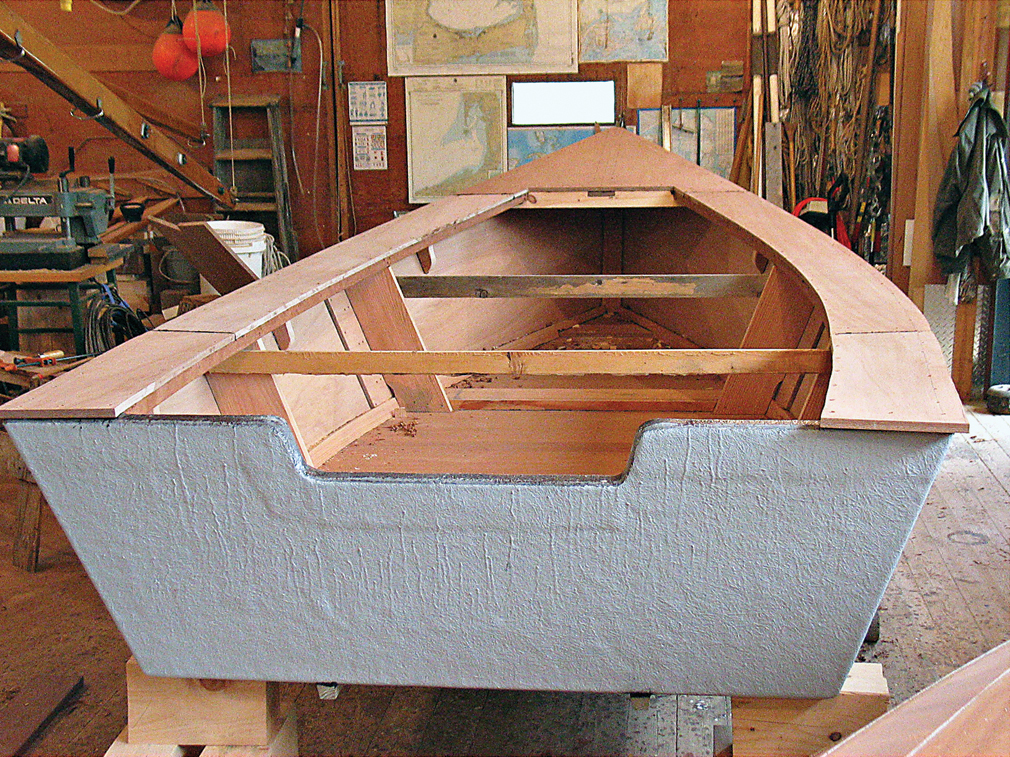
The 1″-thick transom can be built from solid wood or by gluing up two pieces of plywood. We edge-glued three wide planks of khaya mahogany and cut the transom using the CNC-cut hardboard pattern that Jordan Boats supplied. The stem is cut and glued from three pieces of 2″-thick solid wood; for the stem and keel we used khaya mahogany. For accurate placement of the transom, the kit also included plywood brackets which are attached to the building frame and the eighth mold. Once the stem, keelson, and transom are in place and glued together, planking can begin.
The garboards get a fair amount of twist in the stern. By softening the plywood with rags soaked in hot water, the bend is easier to achieve. As mentioned in the instructions provided with the kit, some minor adjustments might be needed with the molds in order to make the strakes run smoothly. For us, this was the case with the first three strakes. After that, the rest of the strakes fitted the precut notches perfectly. Because the sheerstrake was going to be finished bright, it was cut from solid mahogany and we used the kit’s okoume strakes as patterns. Khaya mahogany was also used for the floors, rubbing strakes, inwales, knees, and the transverse and longitudinal thwarts. The bottom boards were cut from knot-free Oregon pine.
Mats Vuorenjuuri
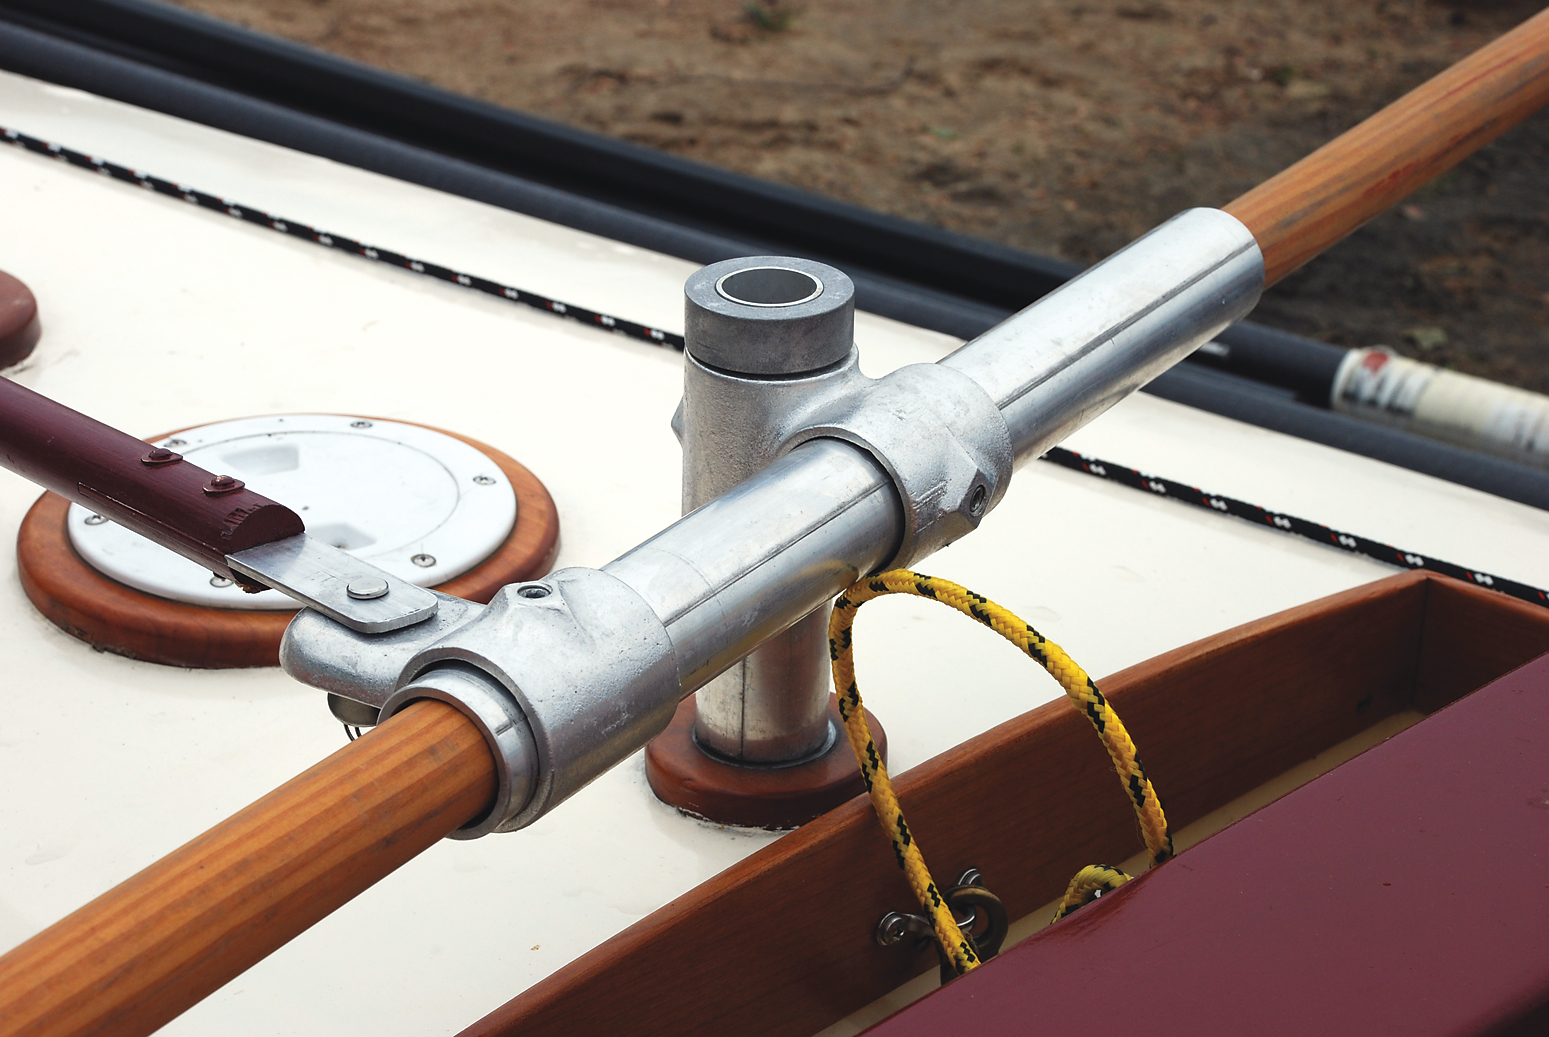
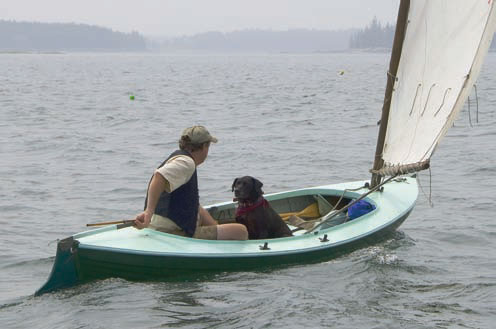
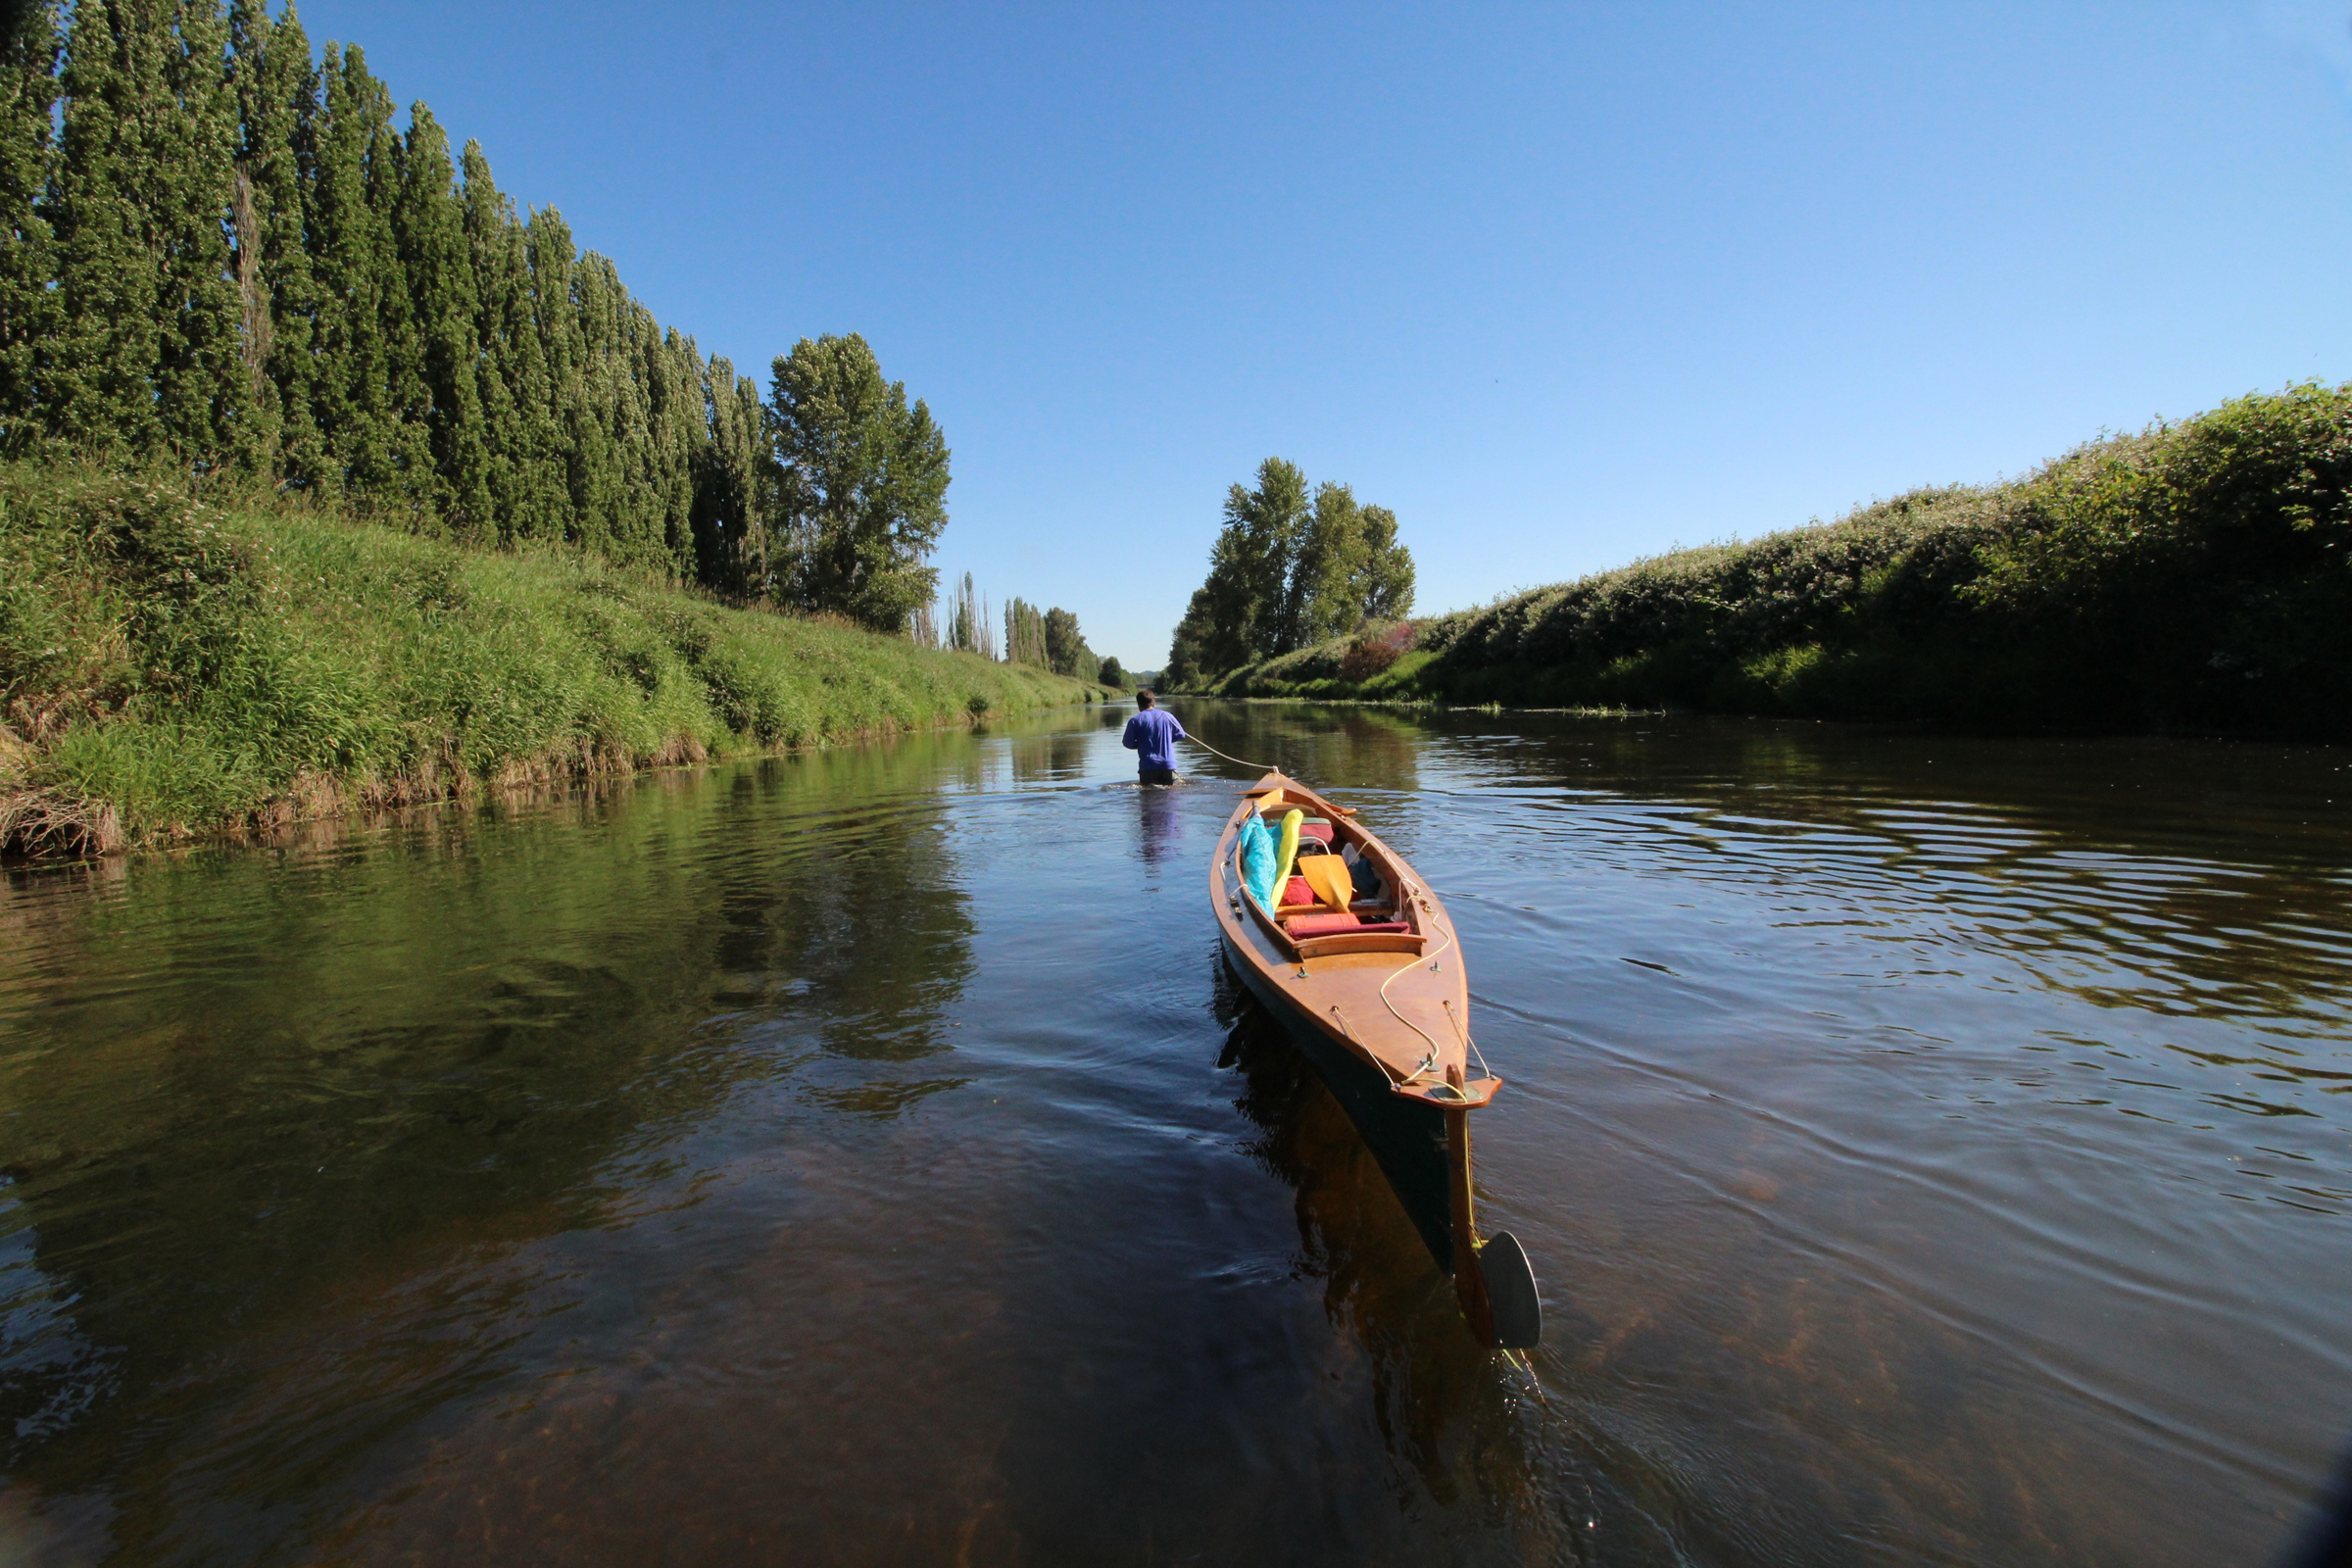
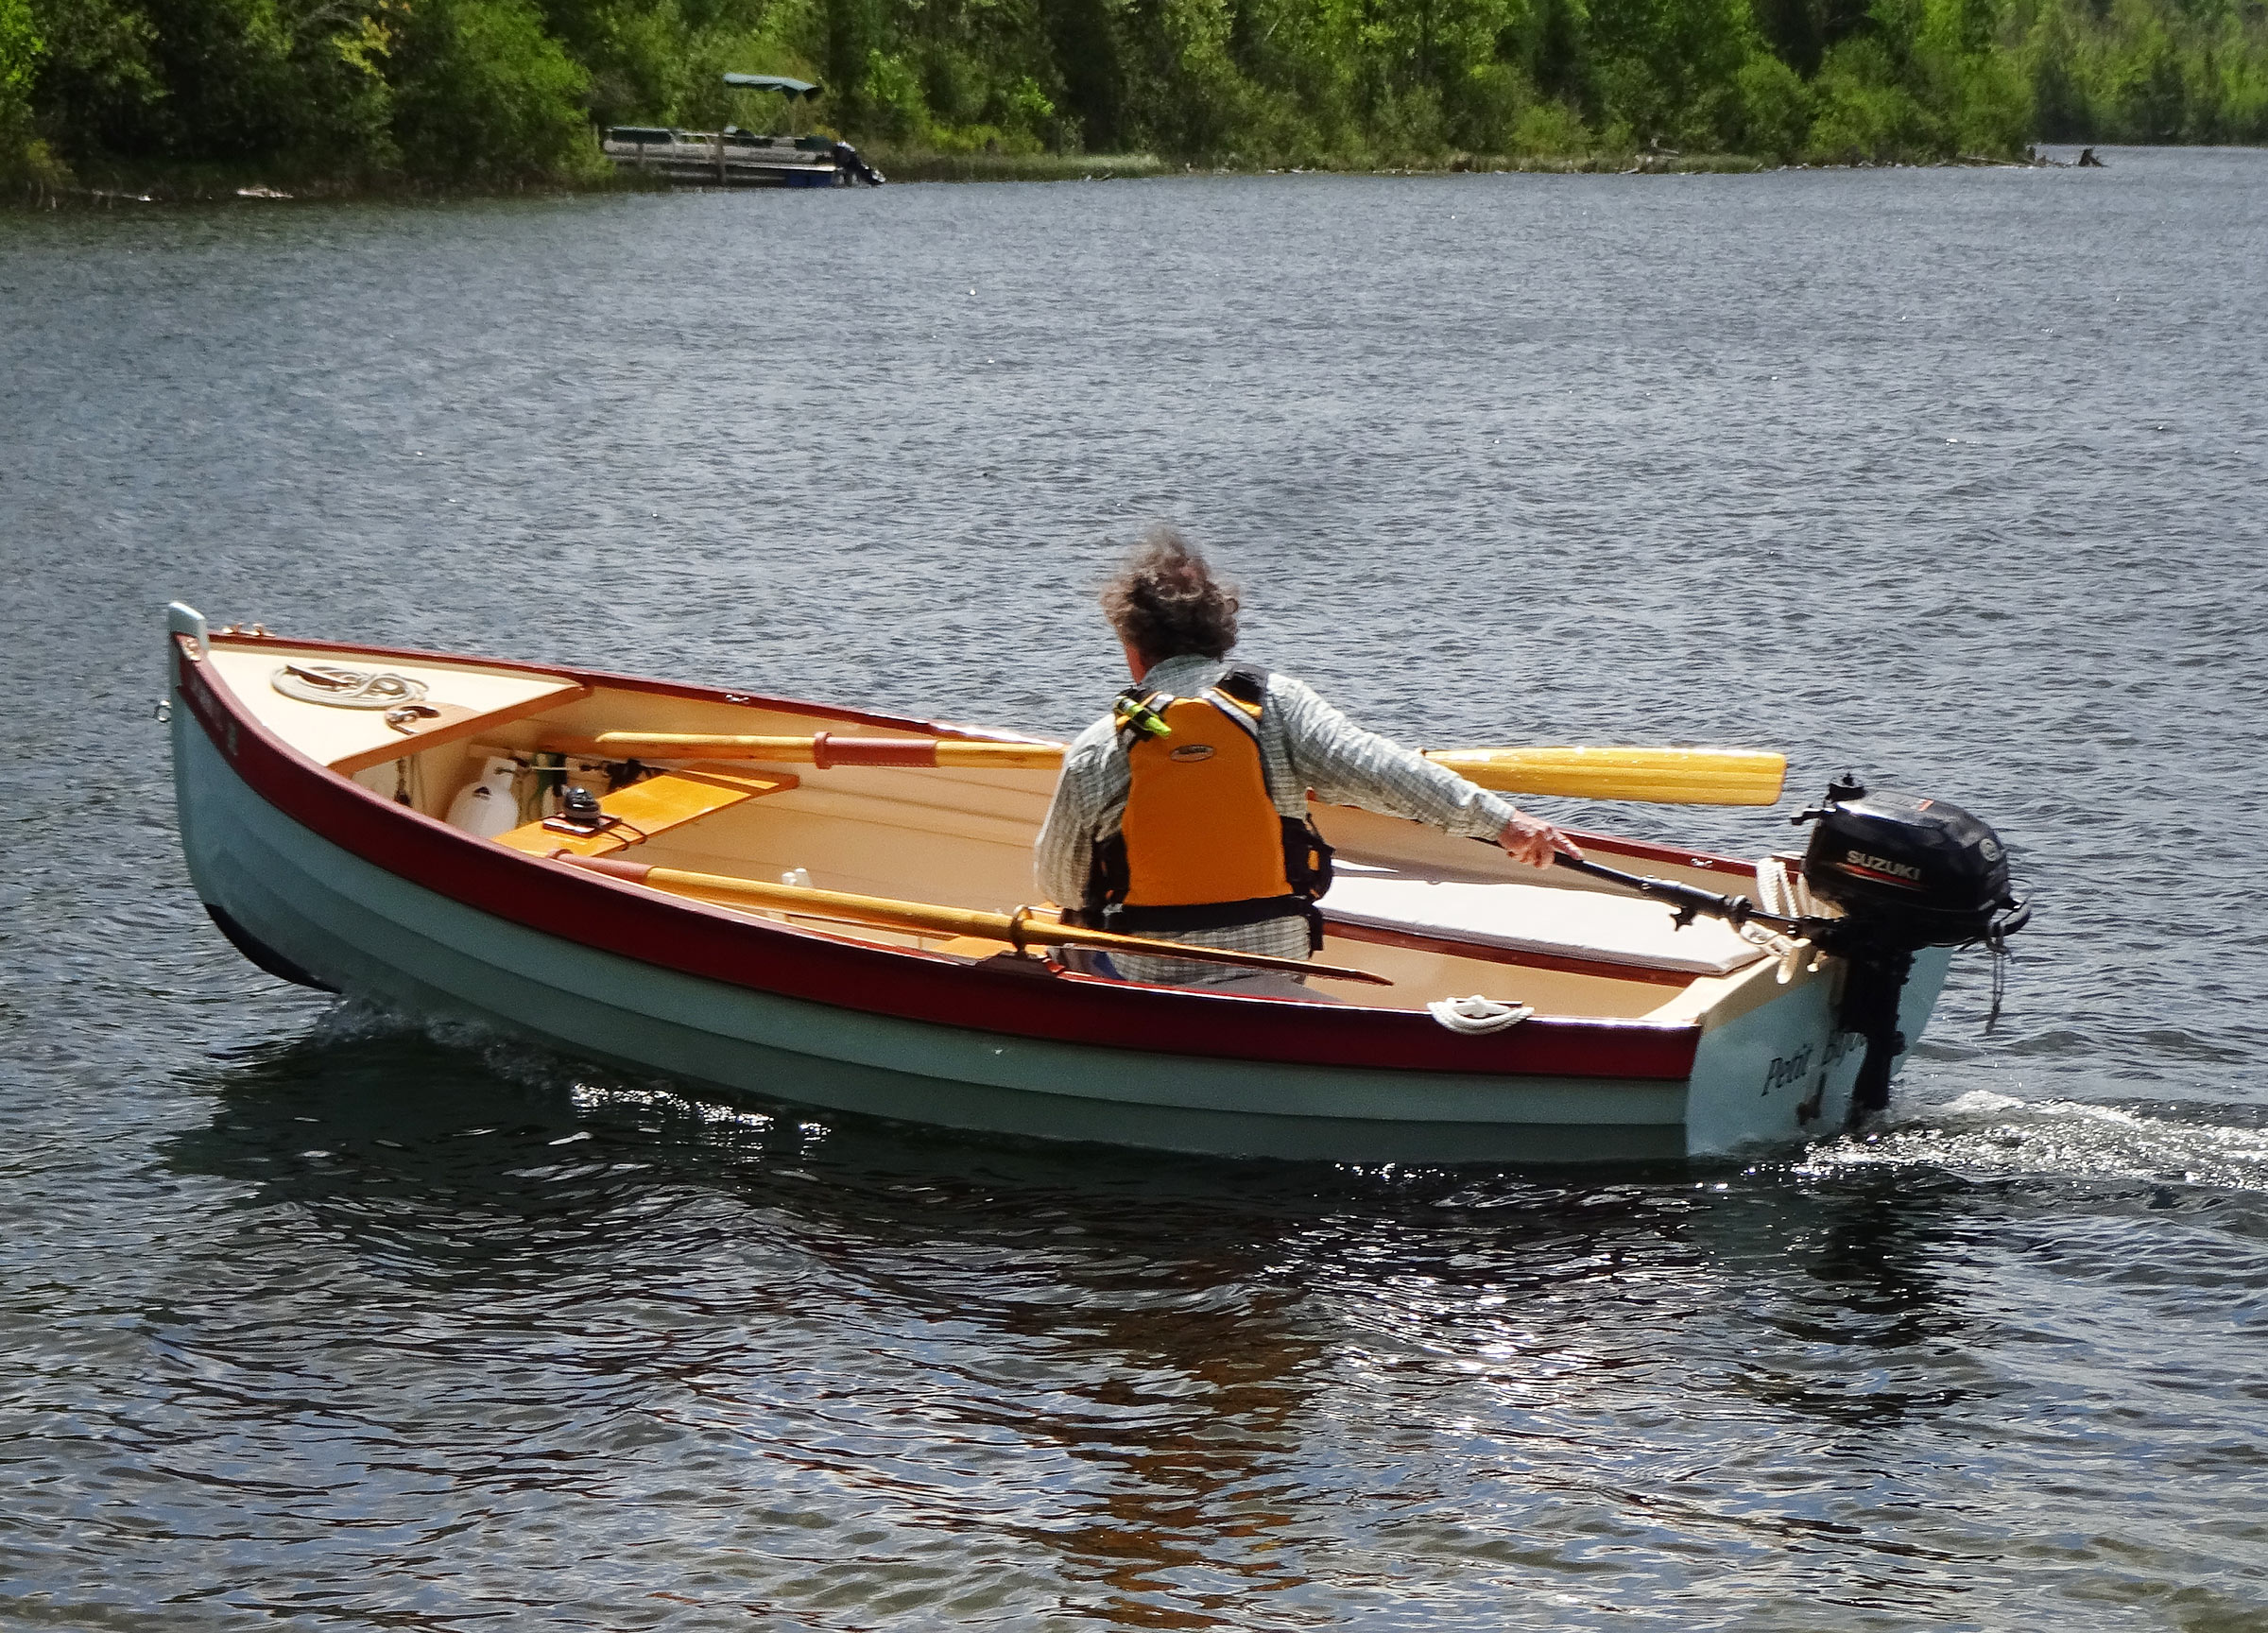
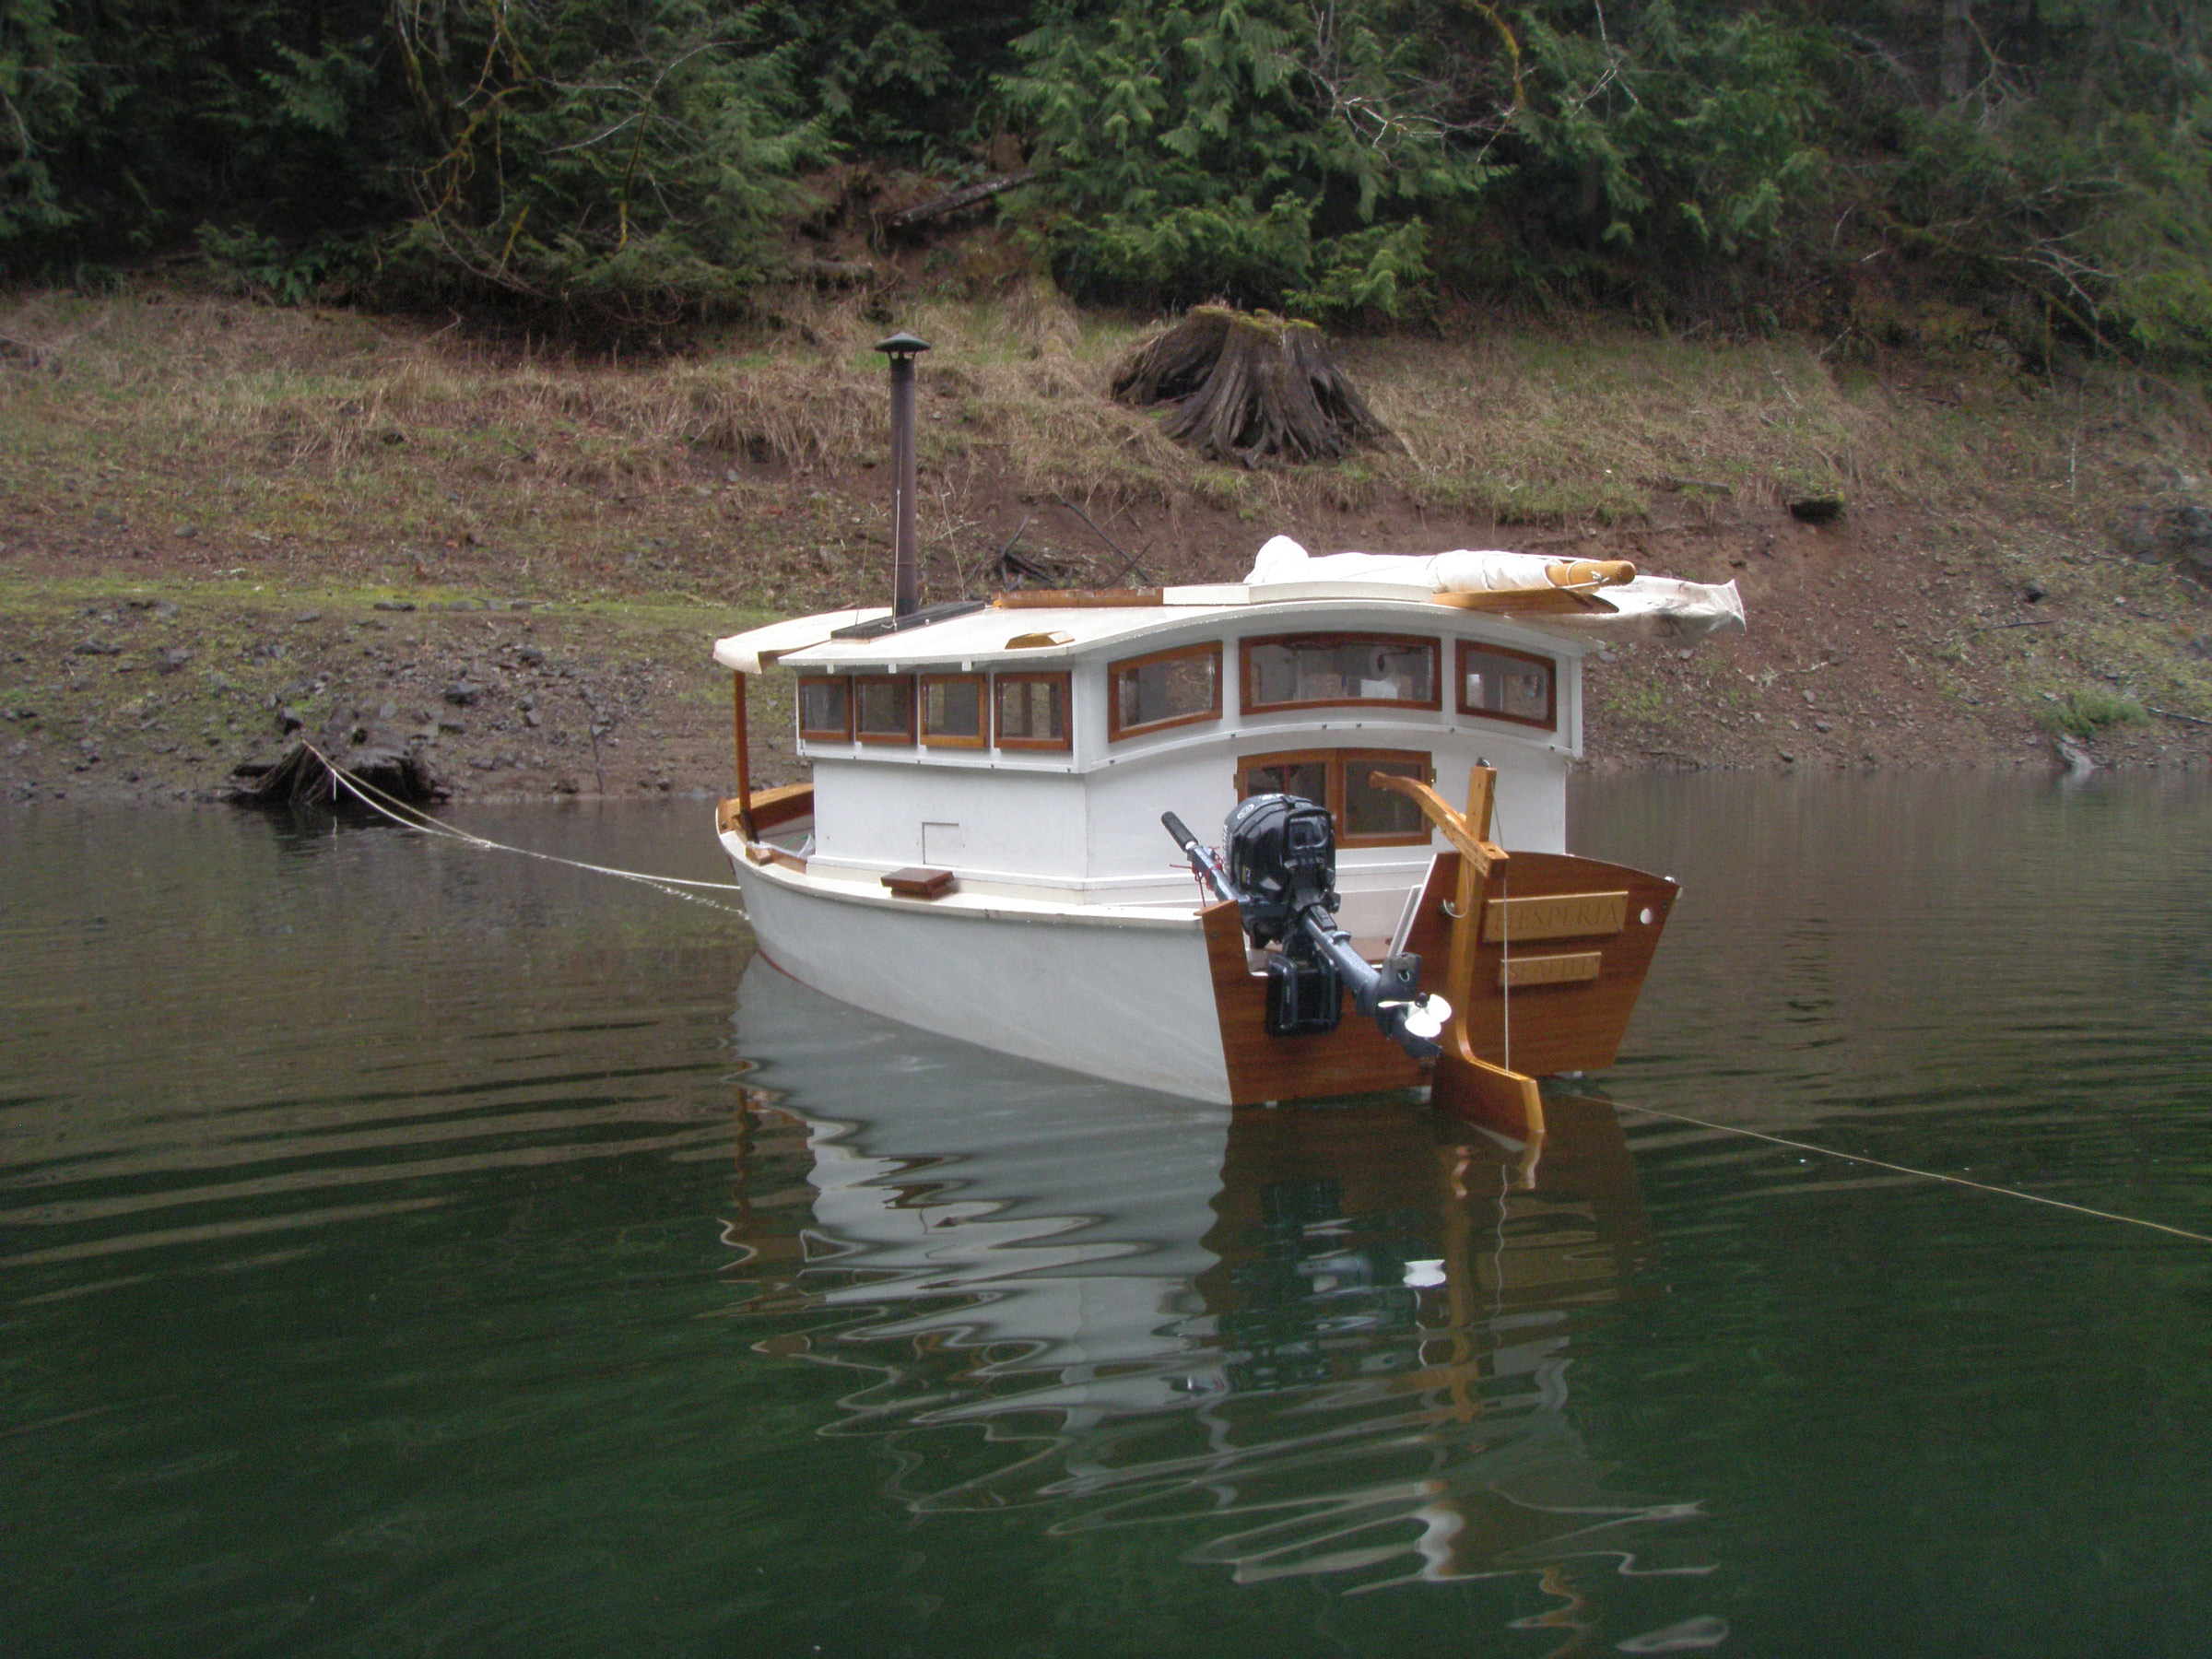
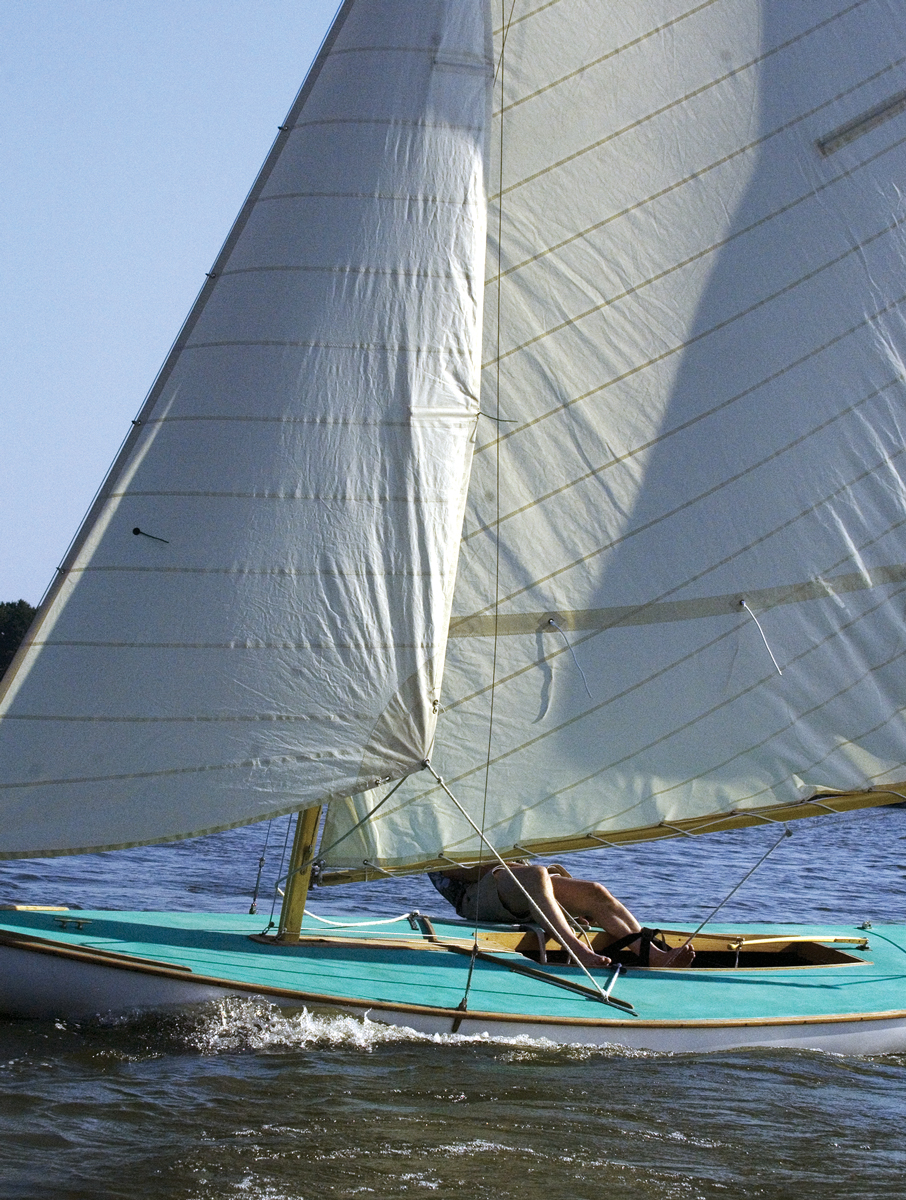
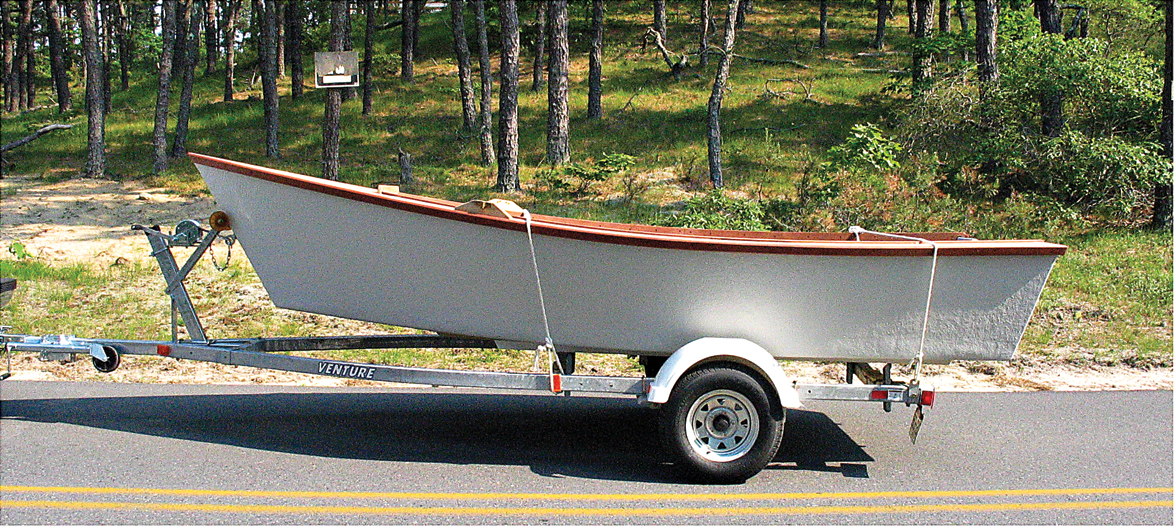
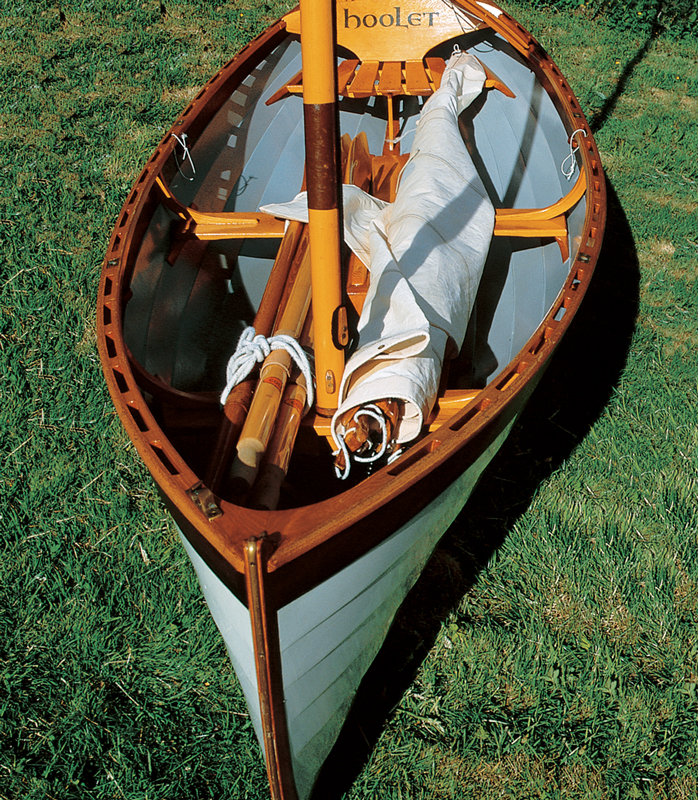
The Penny Fee is ordinarily equipped with a standard tiller, wich leads from the rudder head through a slot in the transom. The Norwegian tiller here was adopted because it provided clearance for an electric outboard set to port.
As the bottom boards are not connected to each other for support, they need to be substantial, 3⁄4″ thick, in order to retain shape when stepped on. The wooden cleats holding them in place may get kicked open from time to time, but our clients wished the floorboards to be easily removable, and we followed the plans.
The okoume hull was sealed with epoxy, painted with two layers of epoxy primer, and finished with two-part polyurethane enamel. For the sheerstrake, we chose a marine two-part saturating wood oil. The floorboards and thwarts were also sealed with epoxy before being finished bright. The Oregon-pine spars and oars were wiped down with linseed oil.
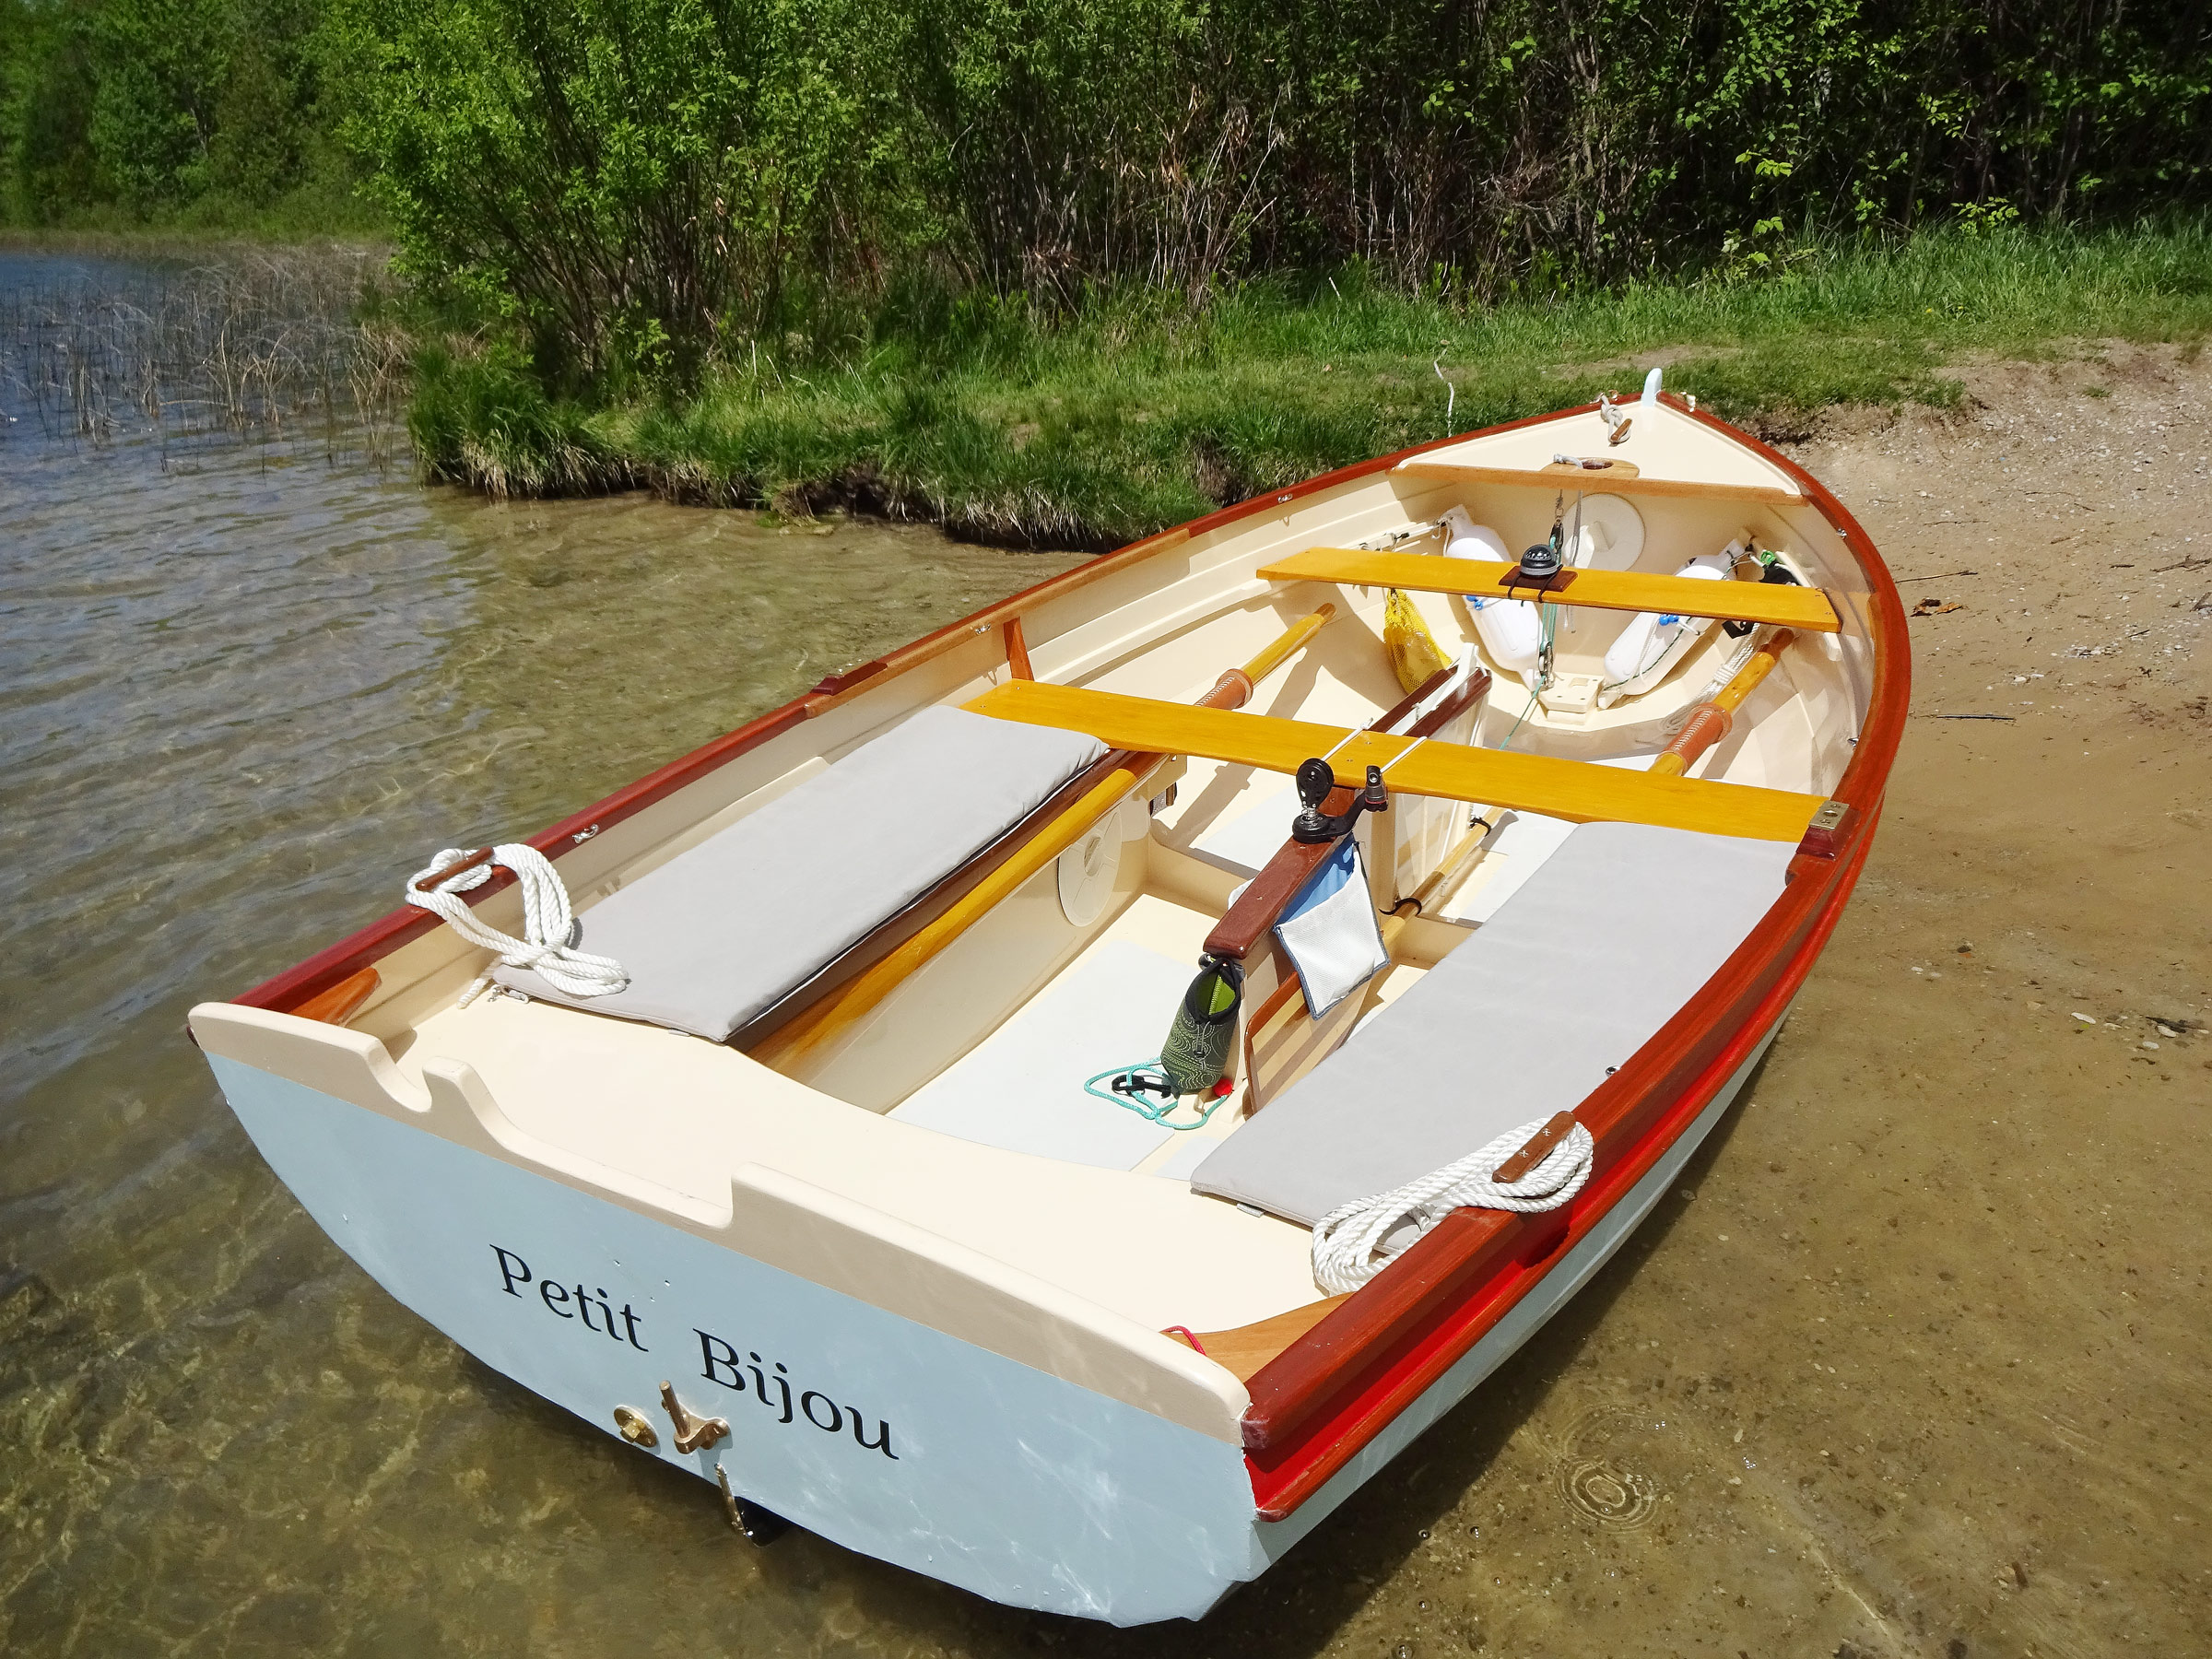
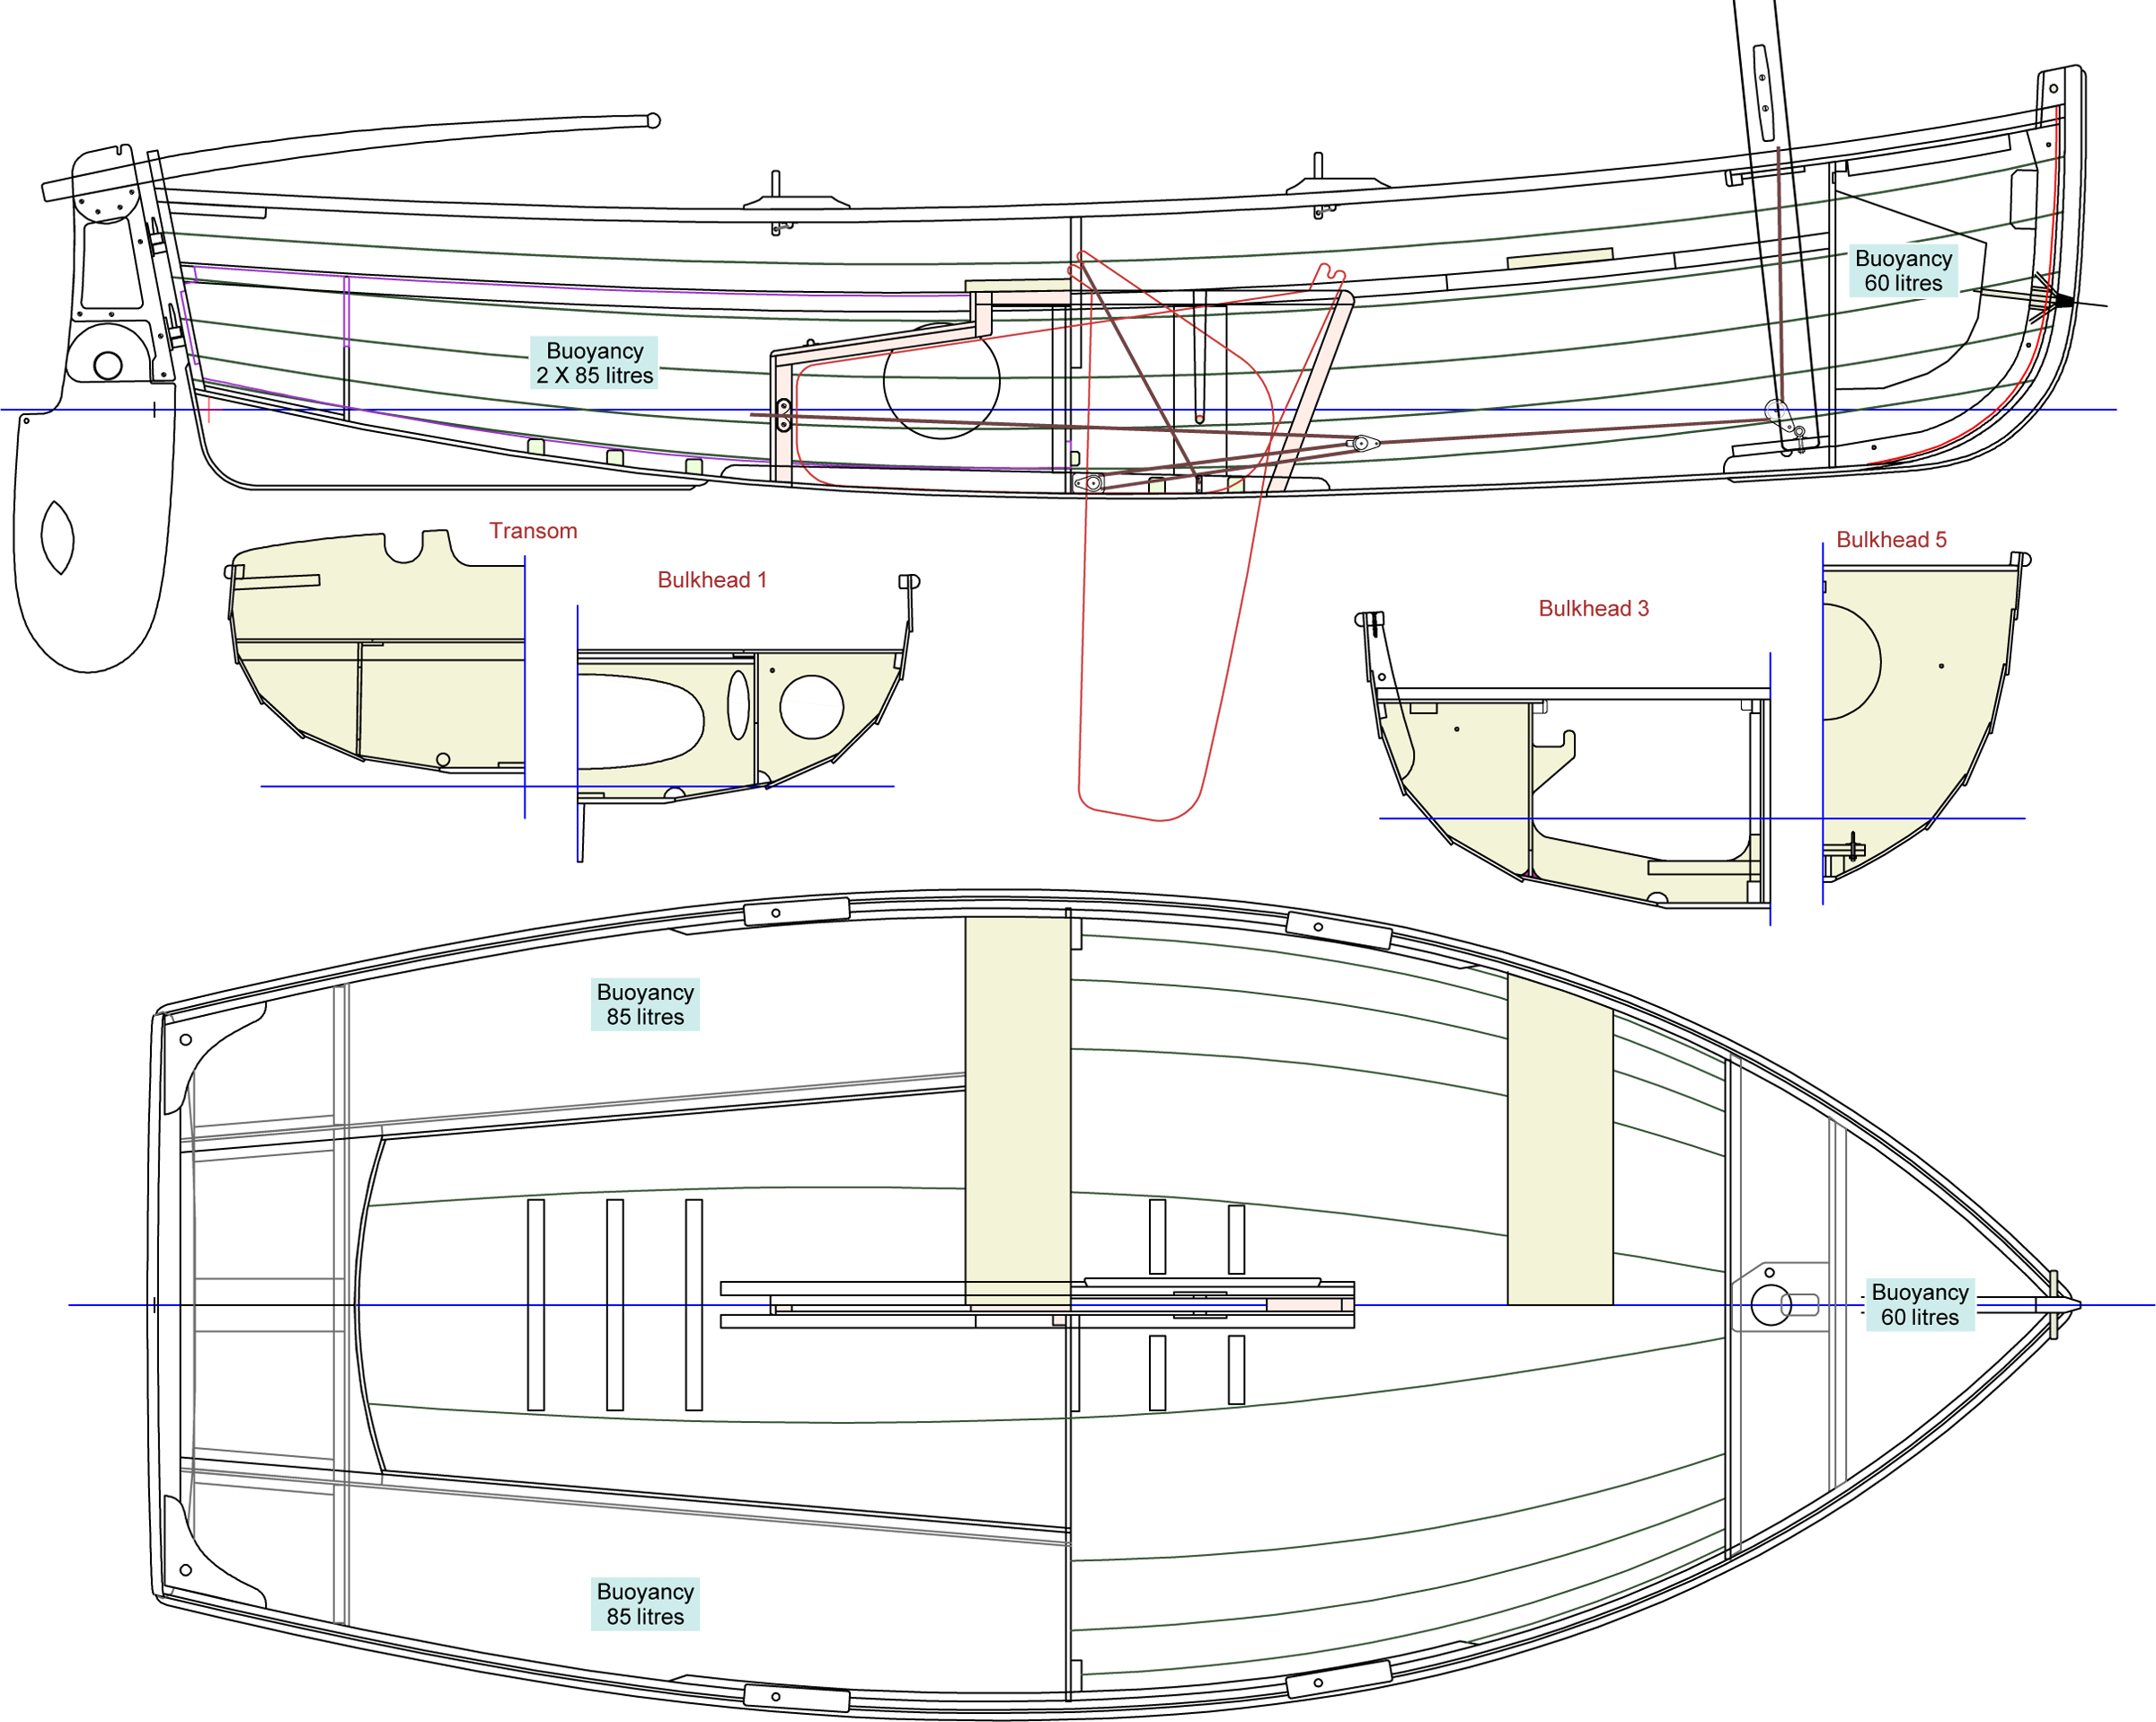
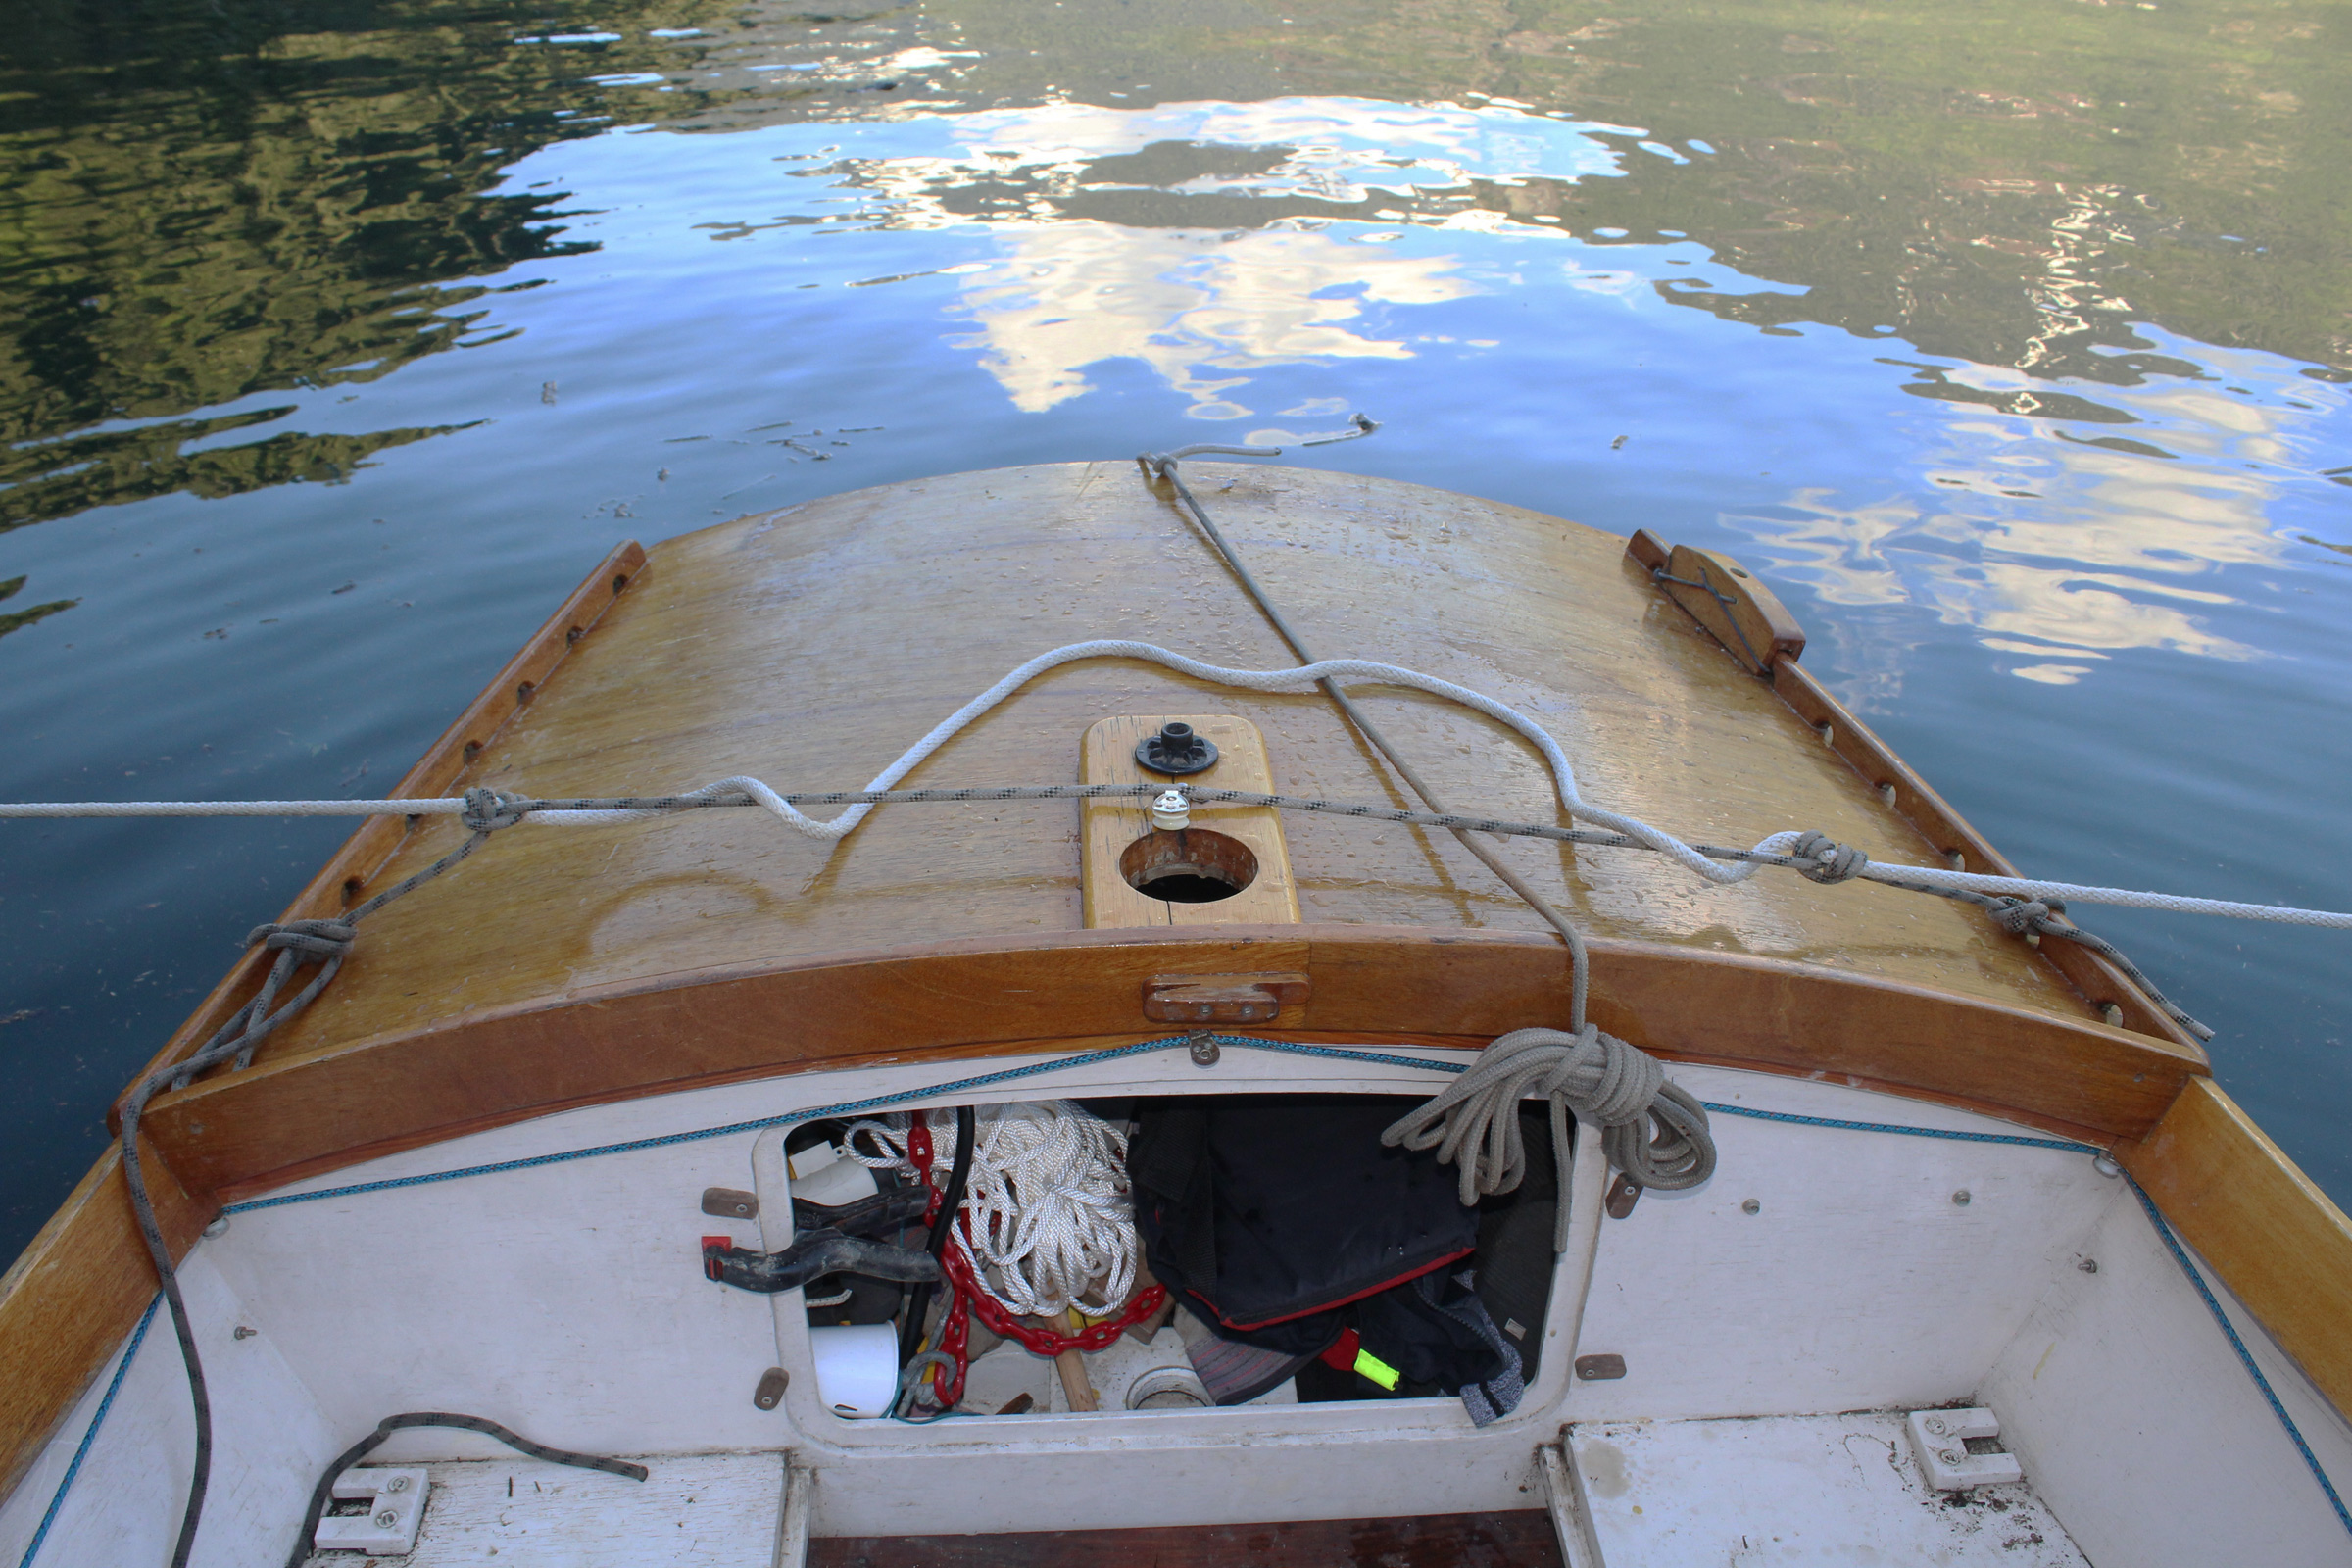
While the plans don’t include built-in flotation, at the clients’ request we added a sealed compartment in the bow, which doubles as a stepping platform and a forward seat. With two inflatable rollers strapped in the middle of the boat under the side seats and one buoyancy bag under the stern thwart there was more than adequate flotation in case of a swamping.
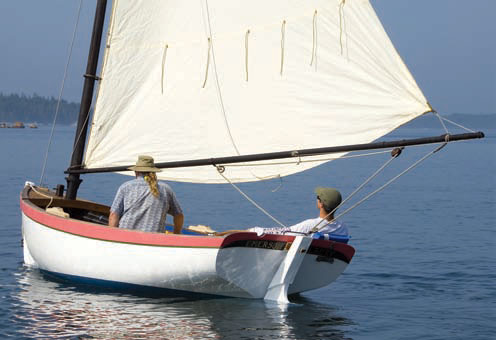
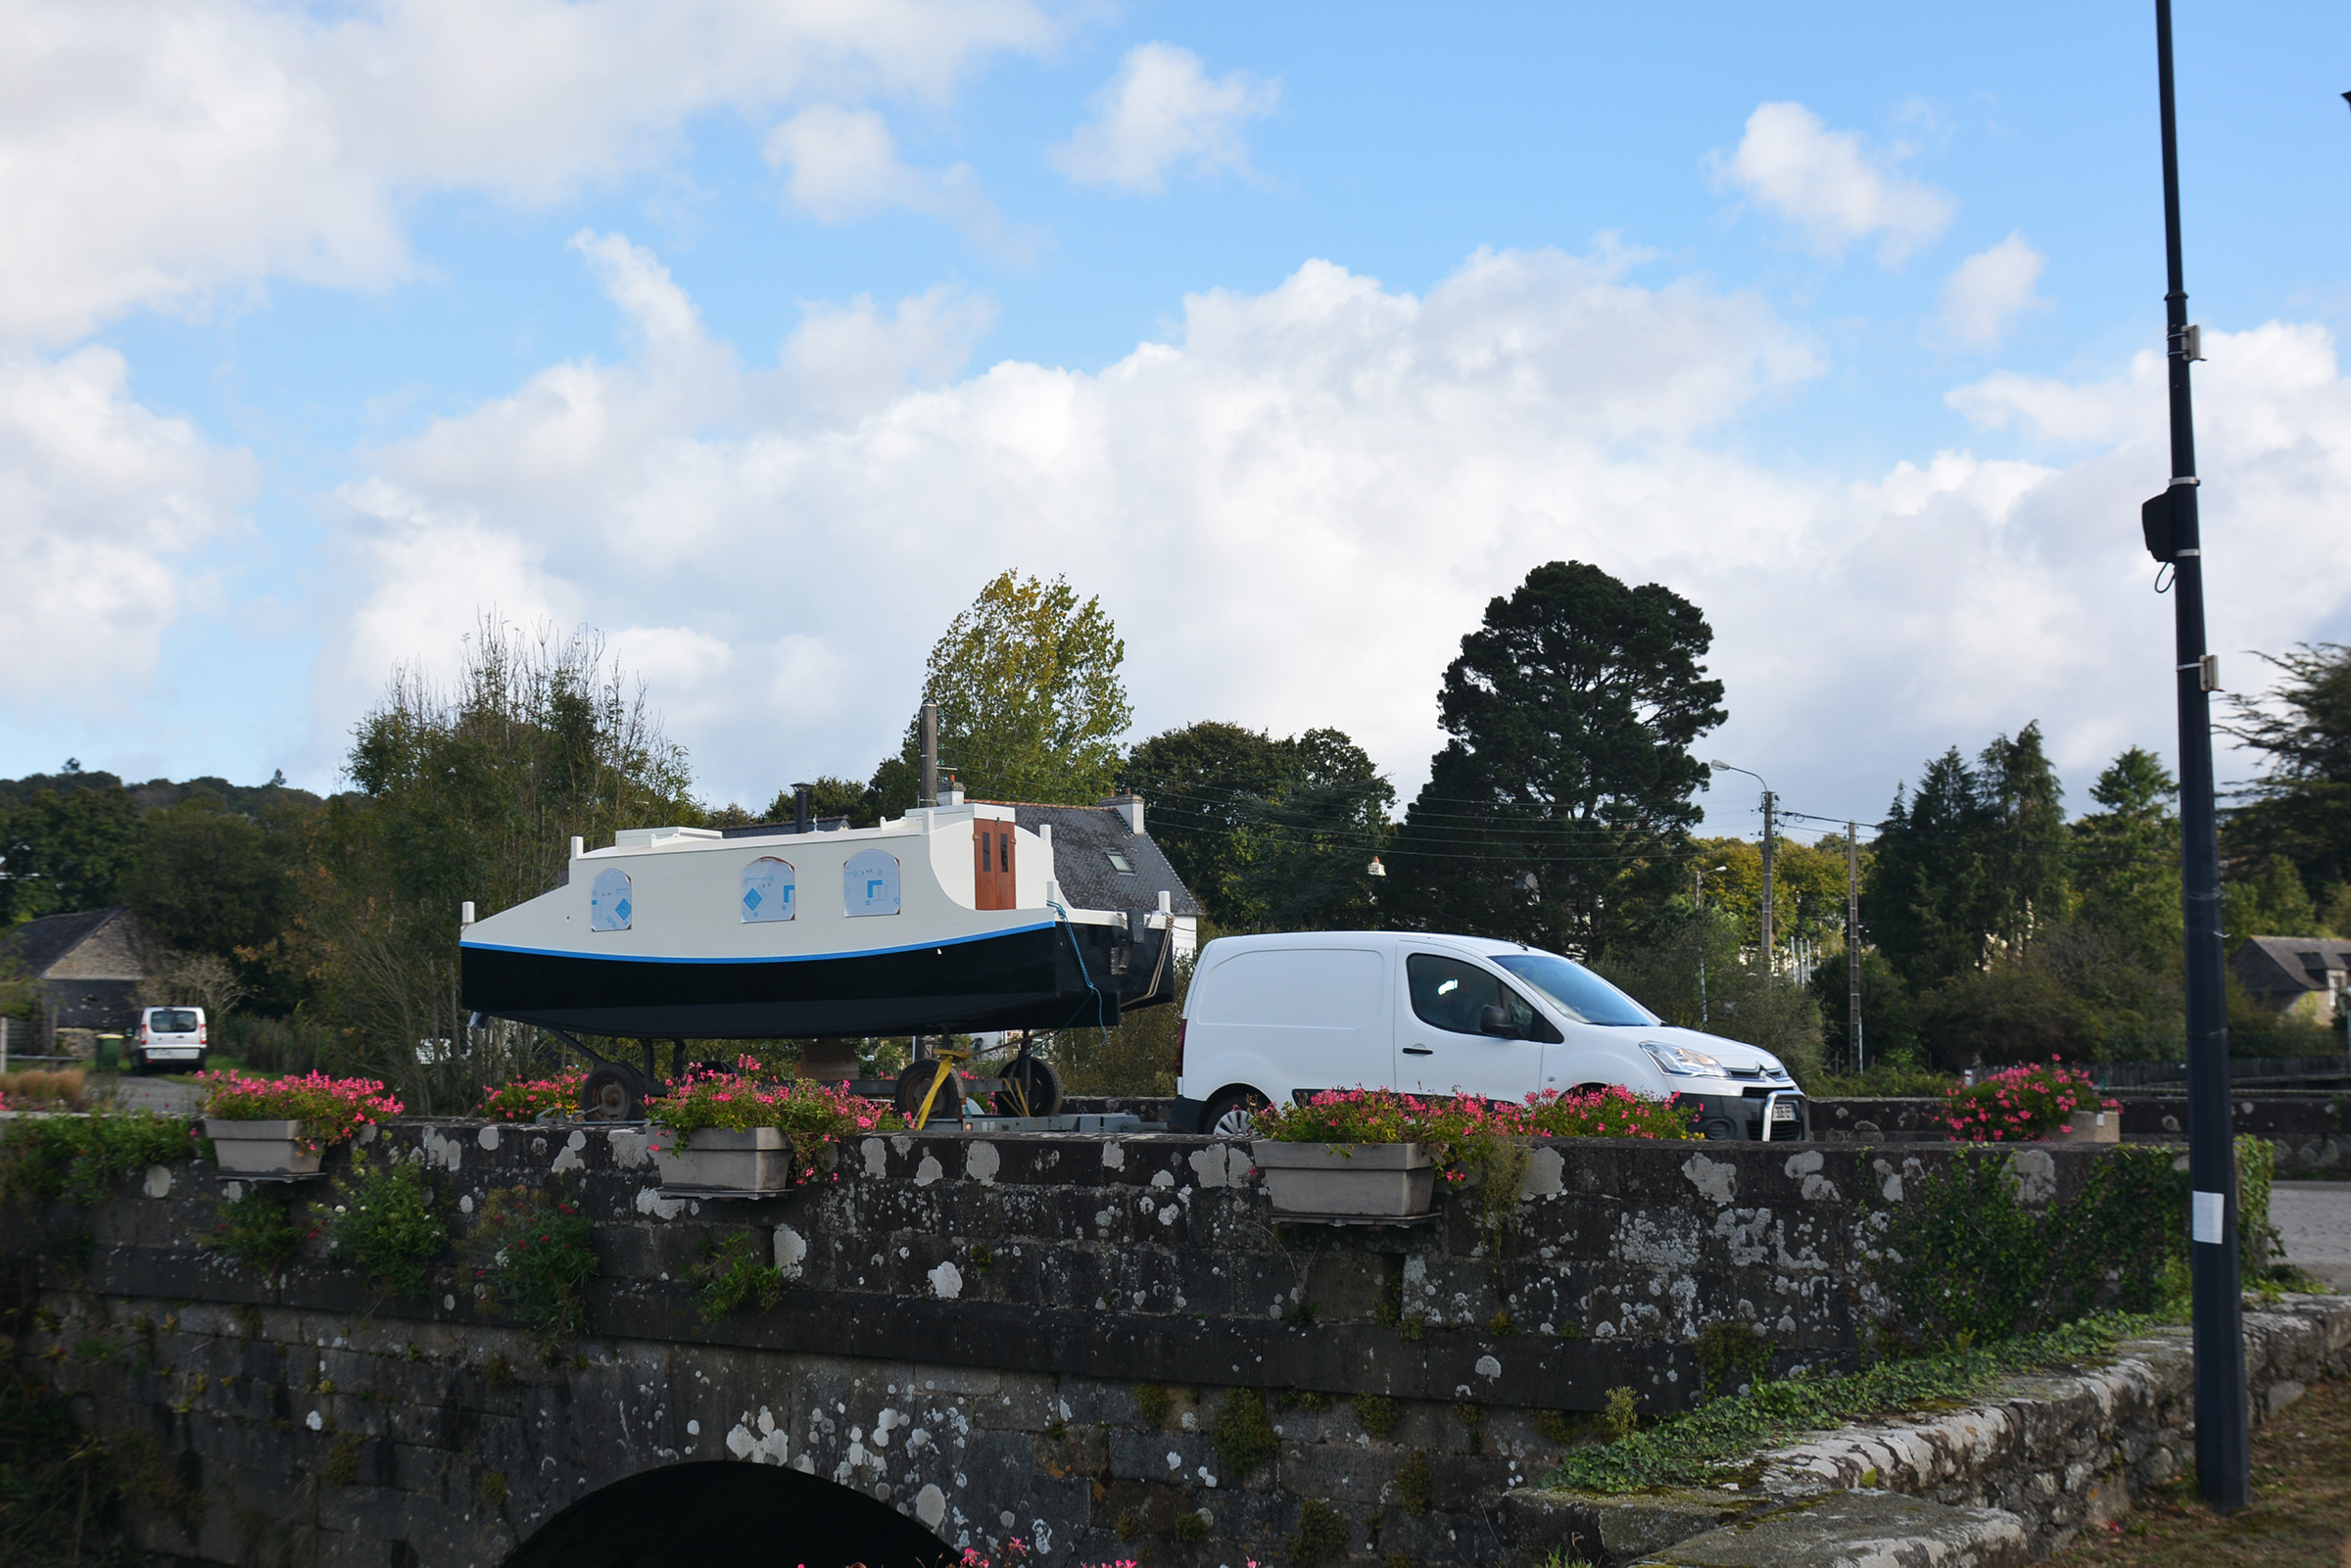
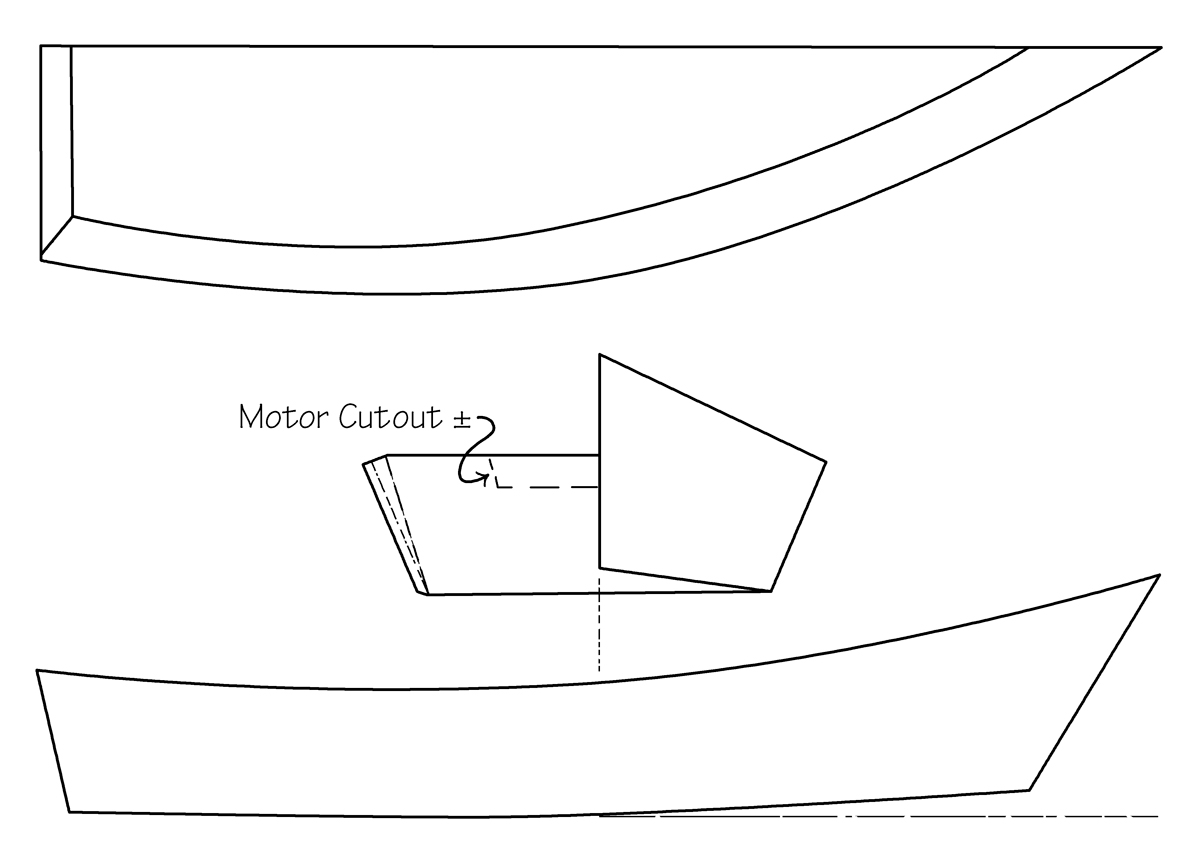
One distinctive feature of Penny Fee’s design is the high, arched transom, which has a hole cut in the center for the tiller. With an electric outboard installed in the transom most of the time, this Penny Fee was equipped with a Norwegian tiller over the transom. When the outboard is kicked up, it would interfere with the tiller.
Mats Vuorenjuuri
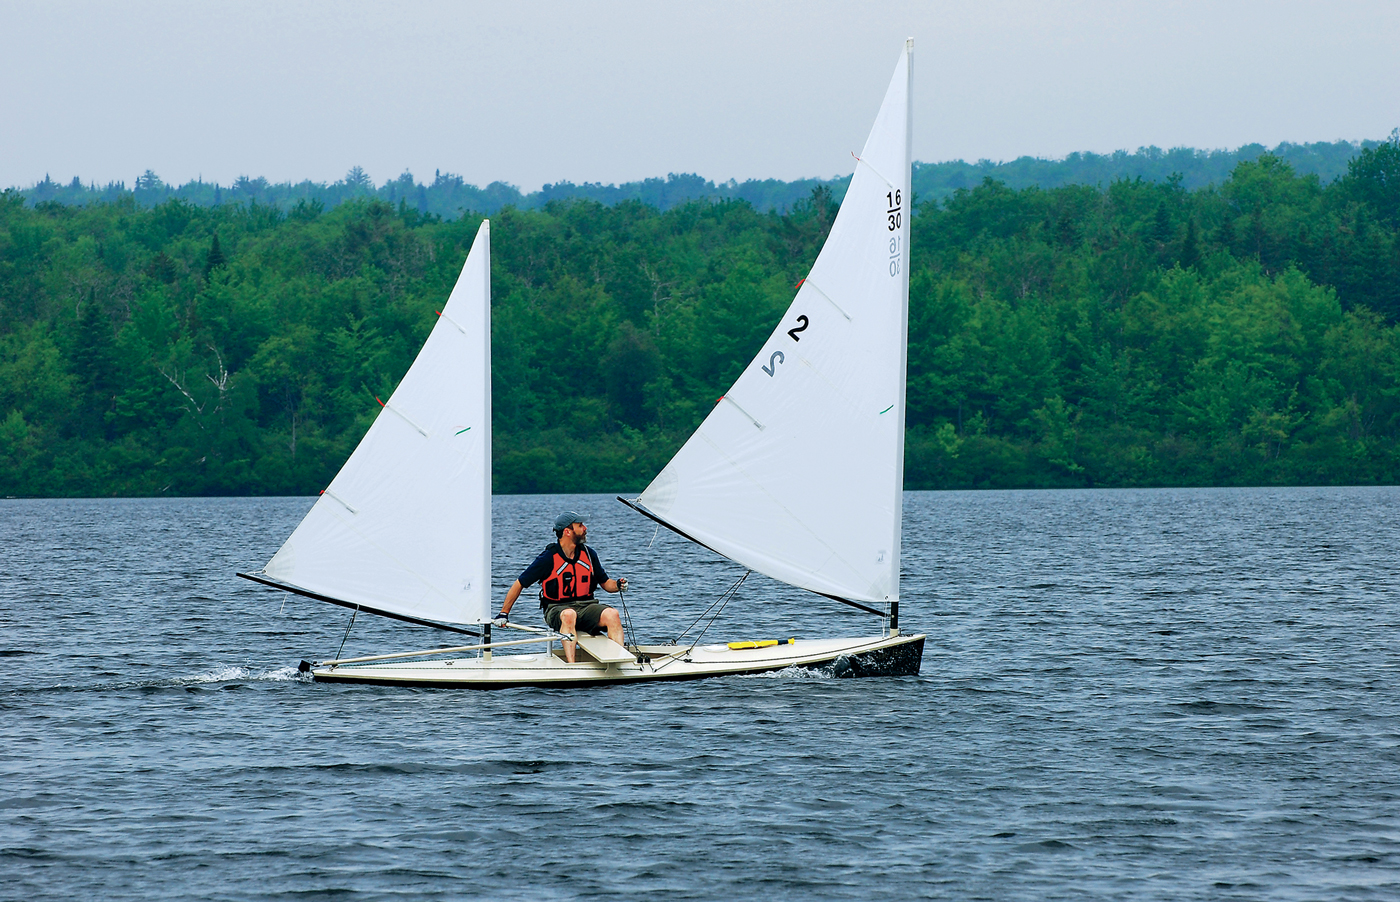
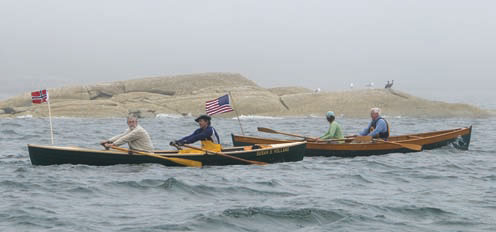
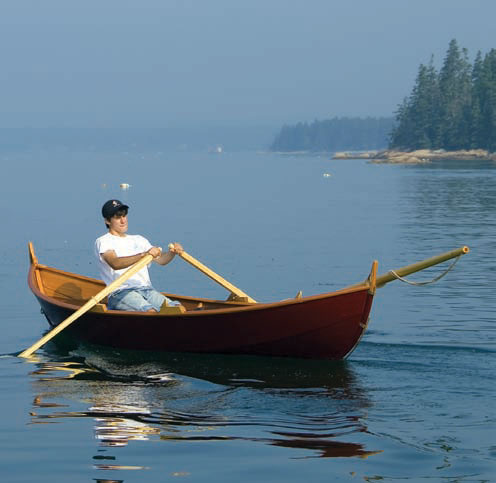
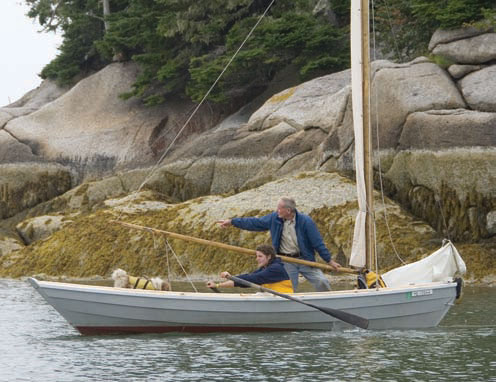
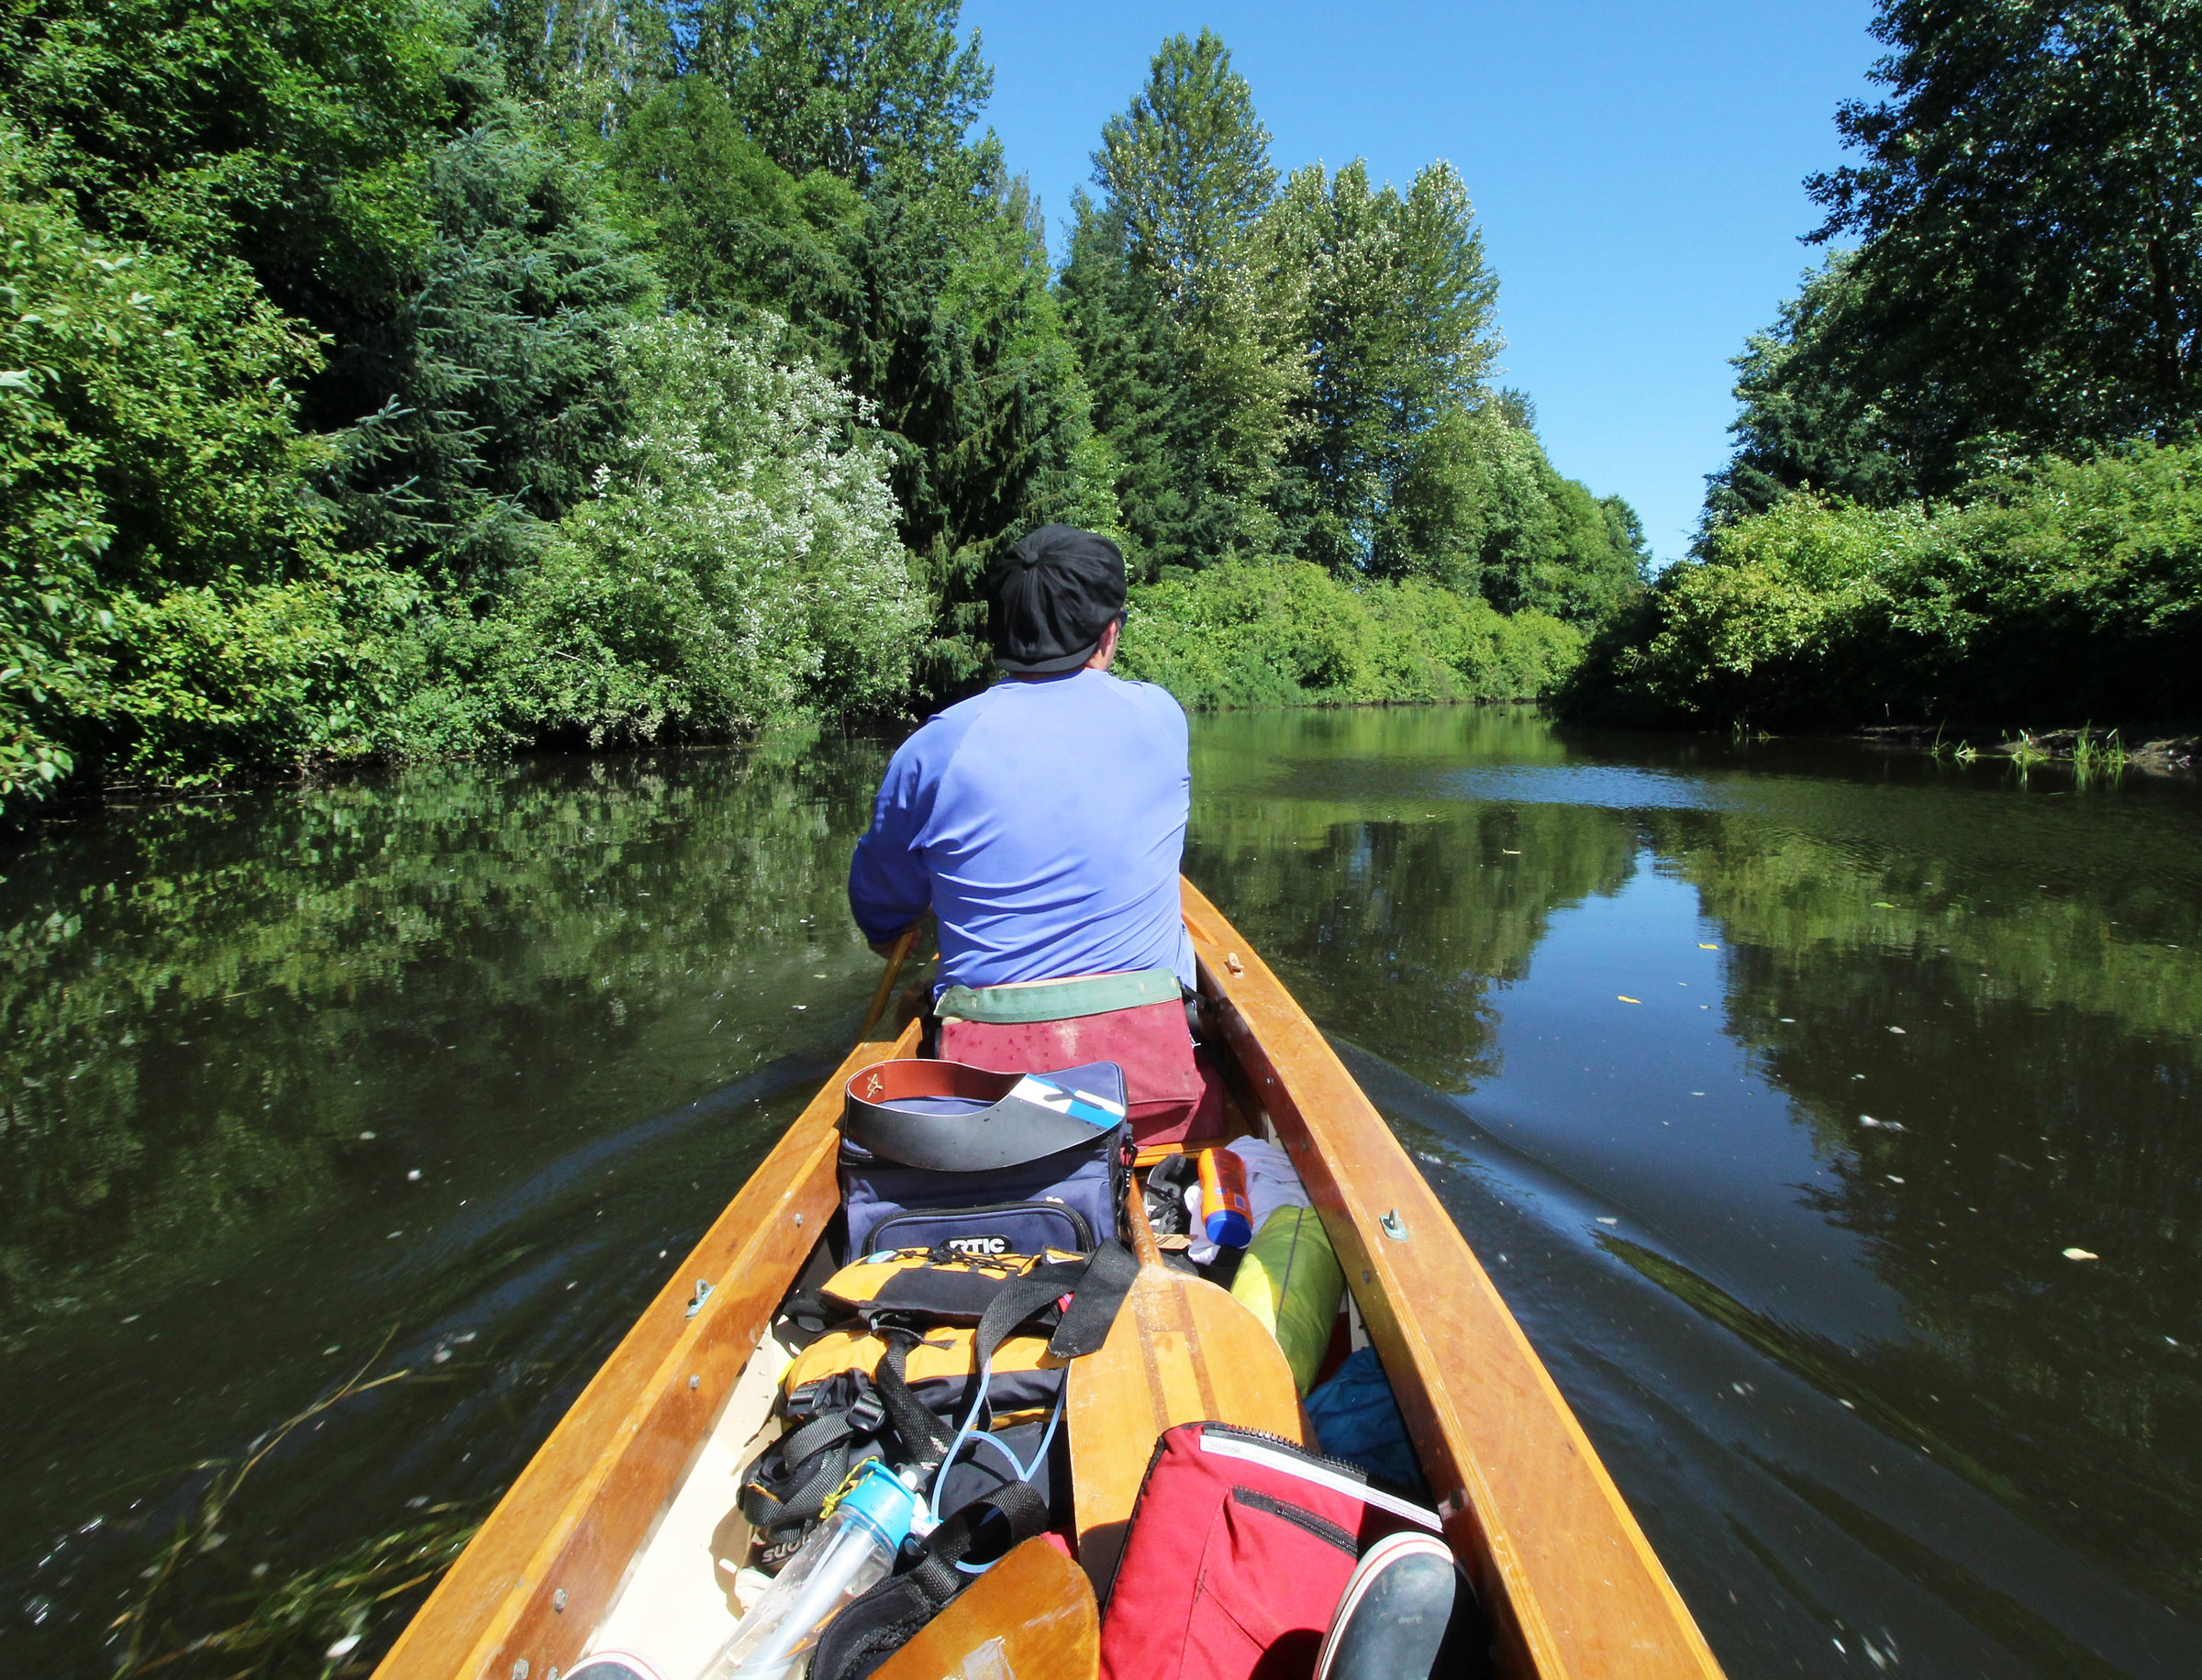
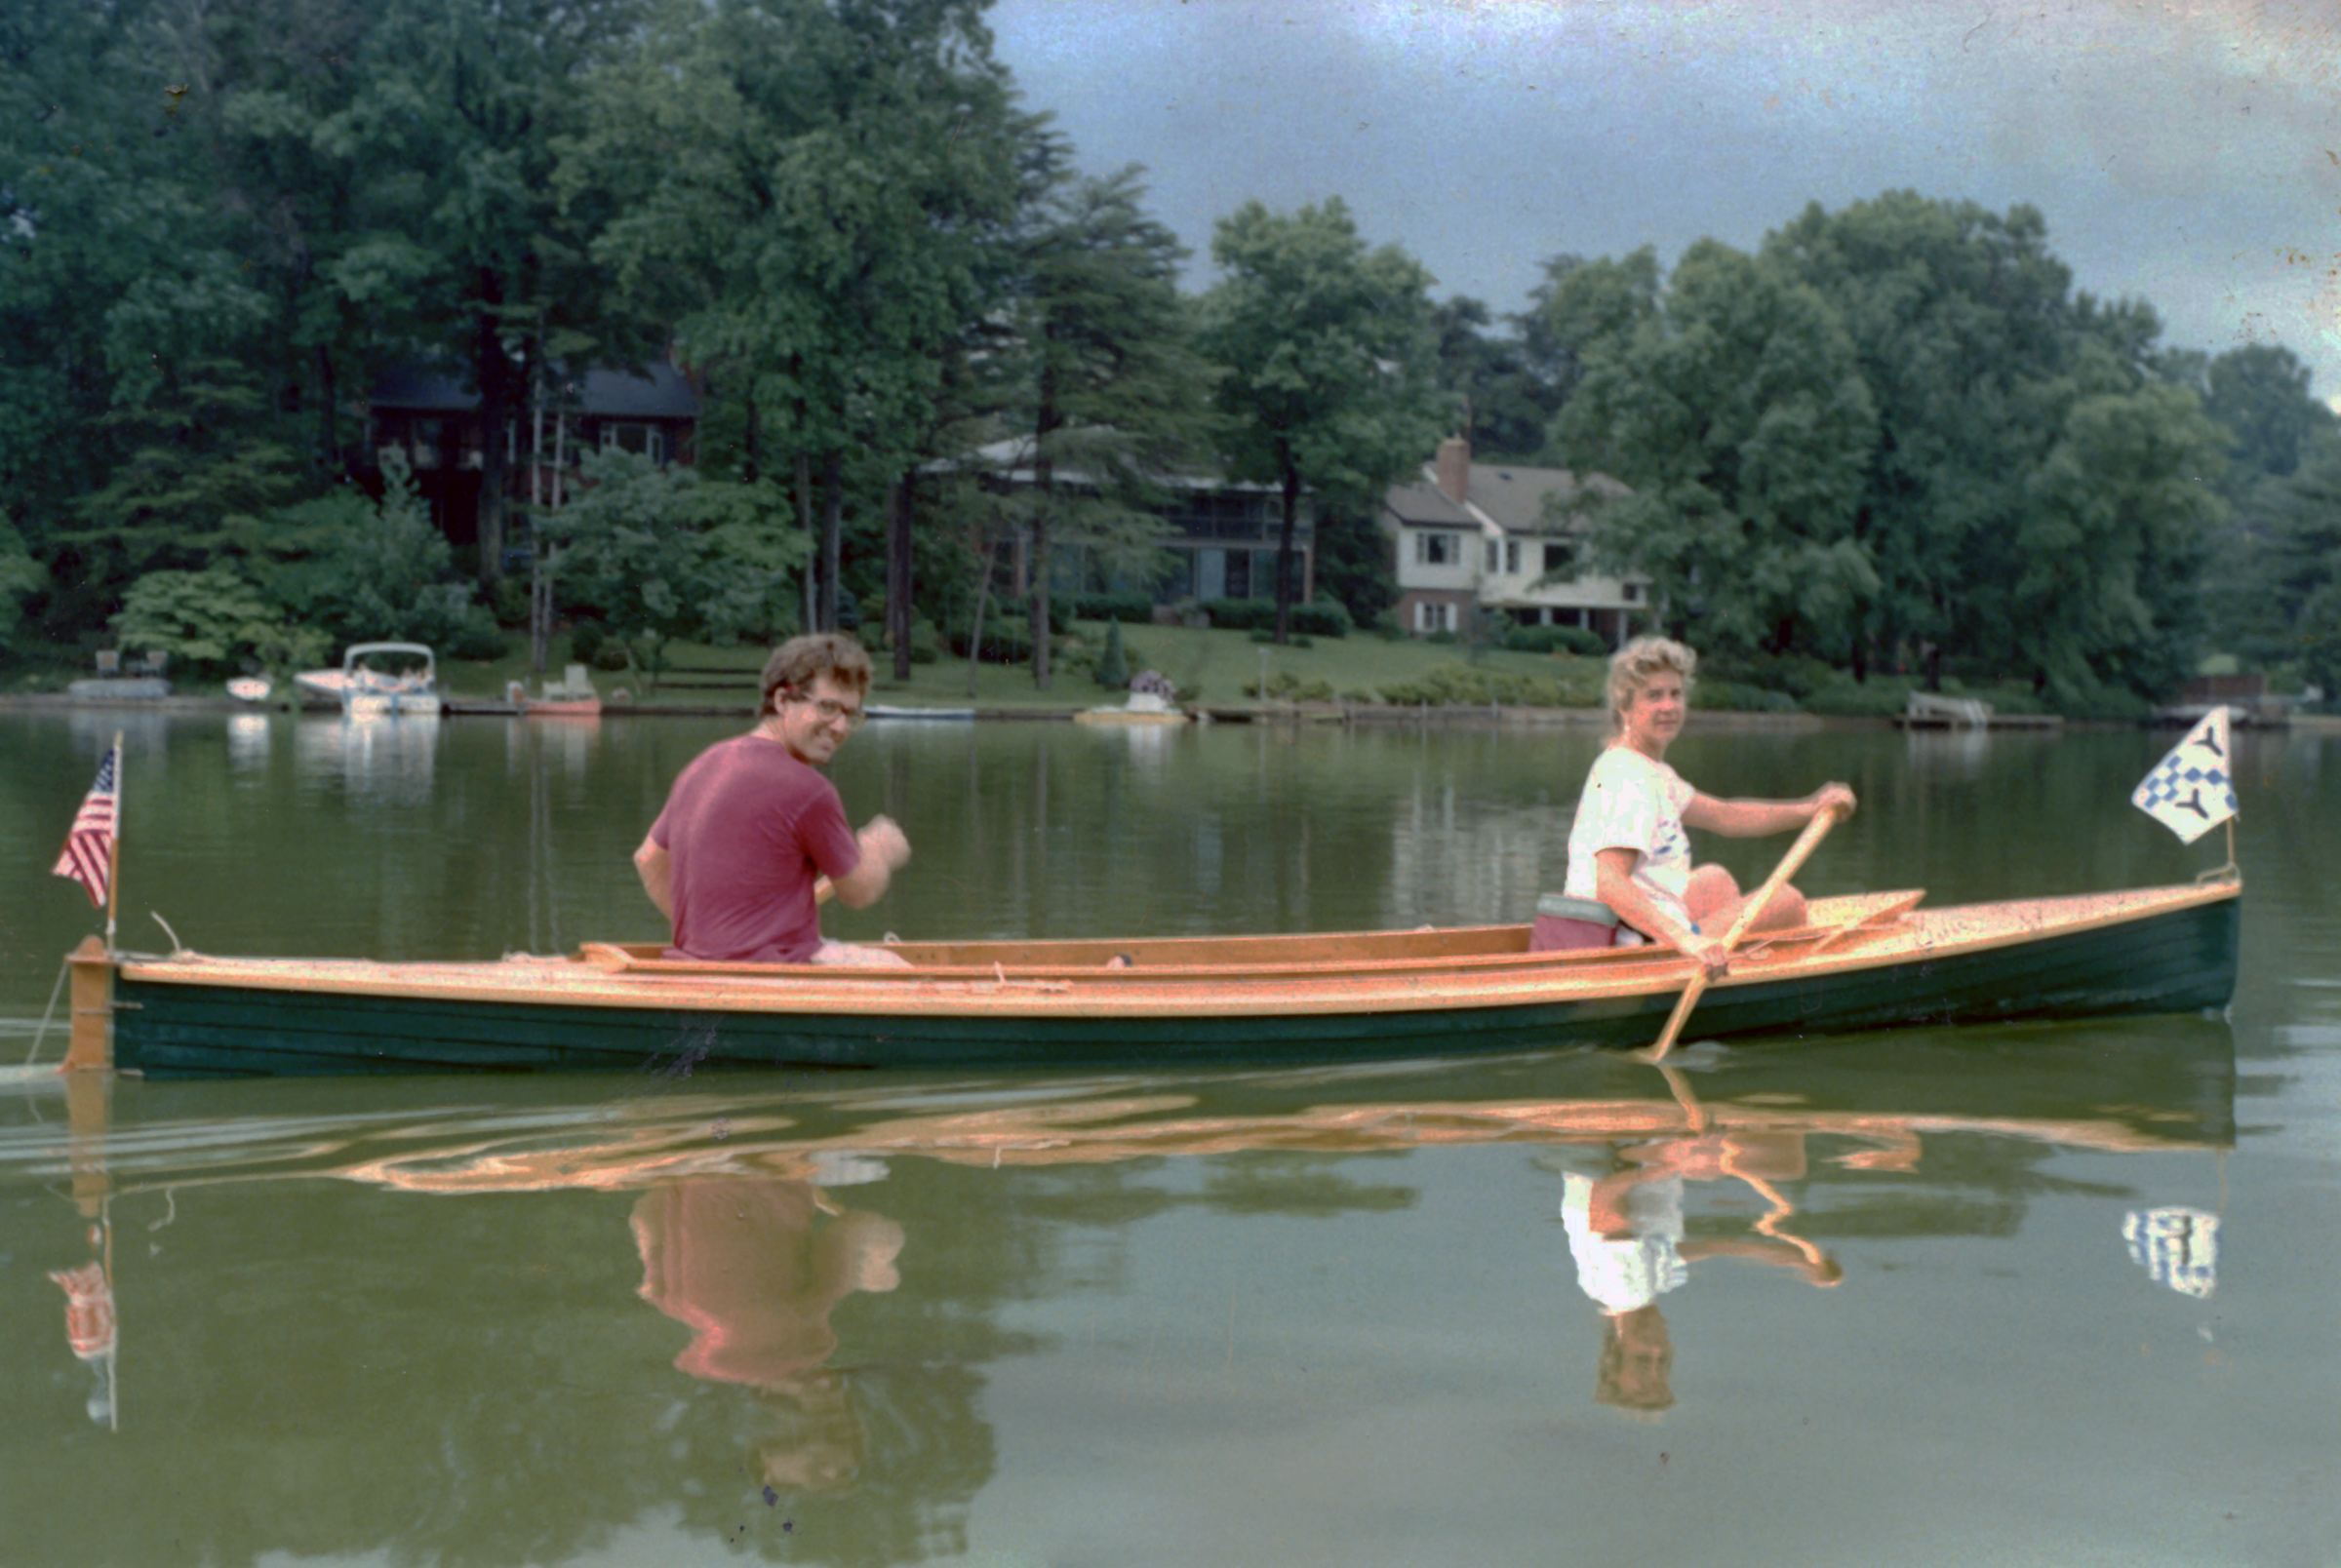
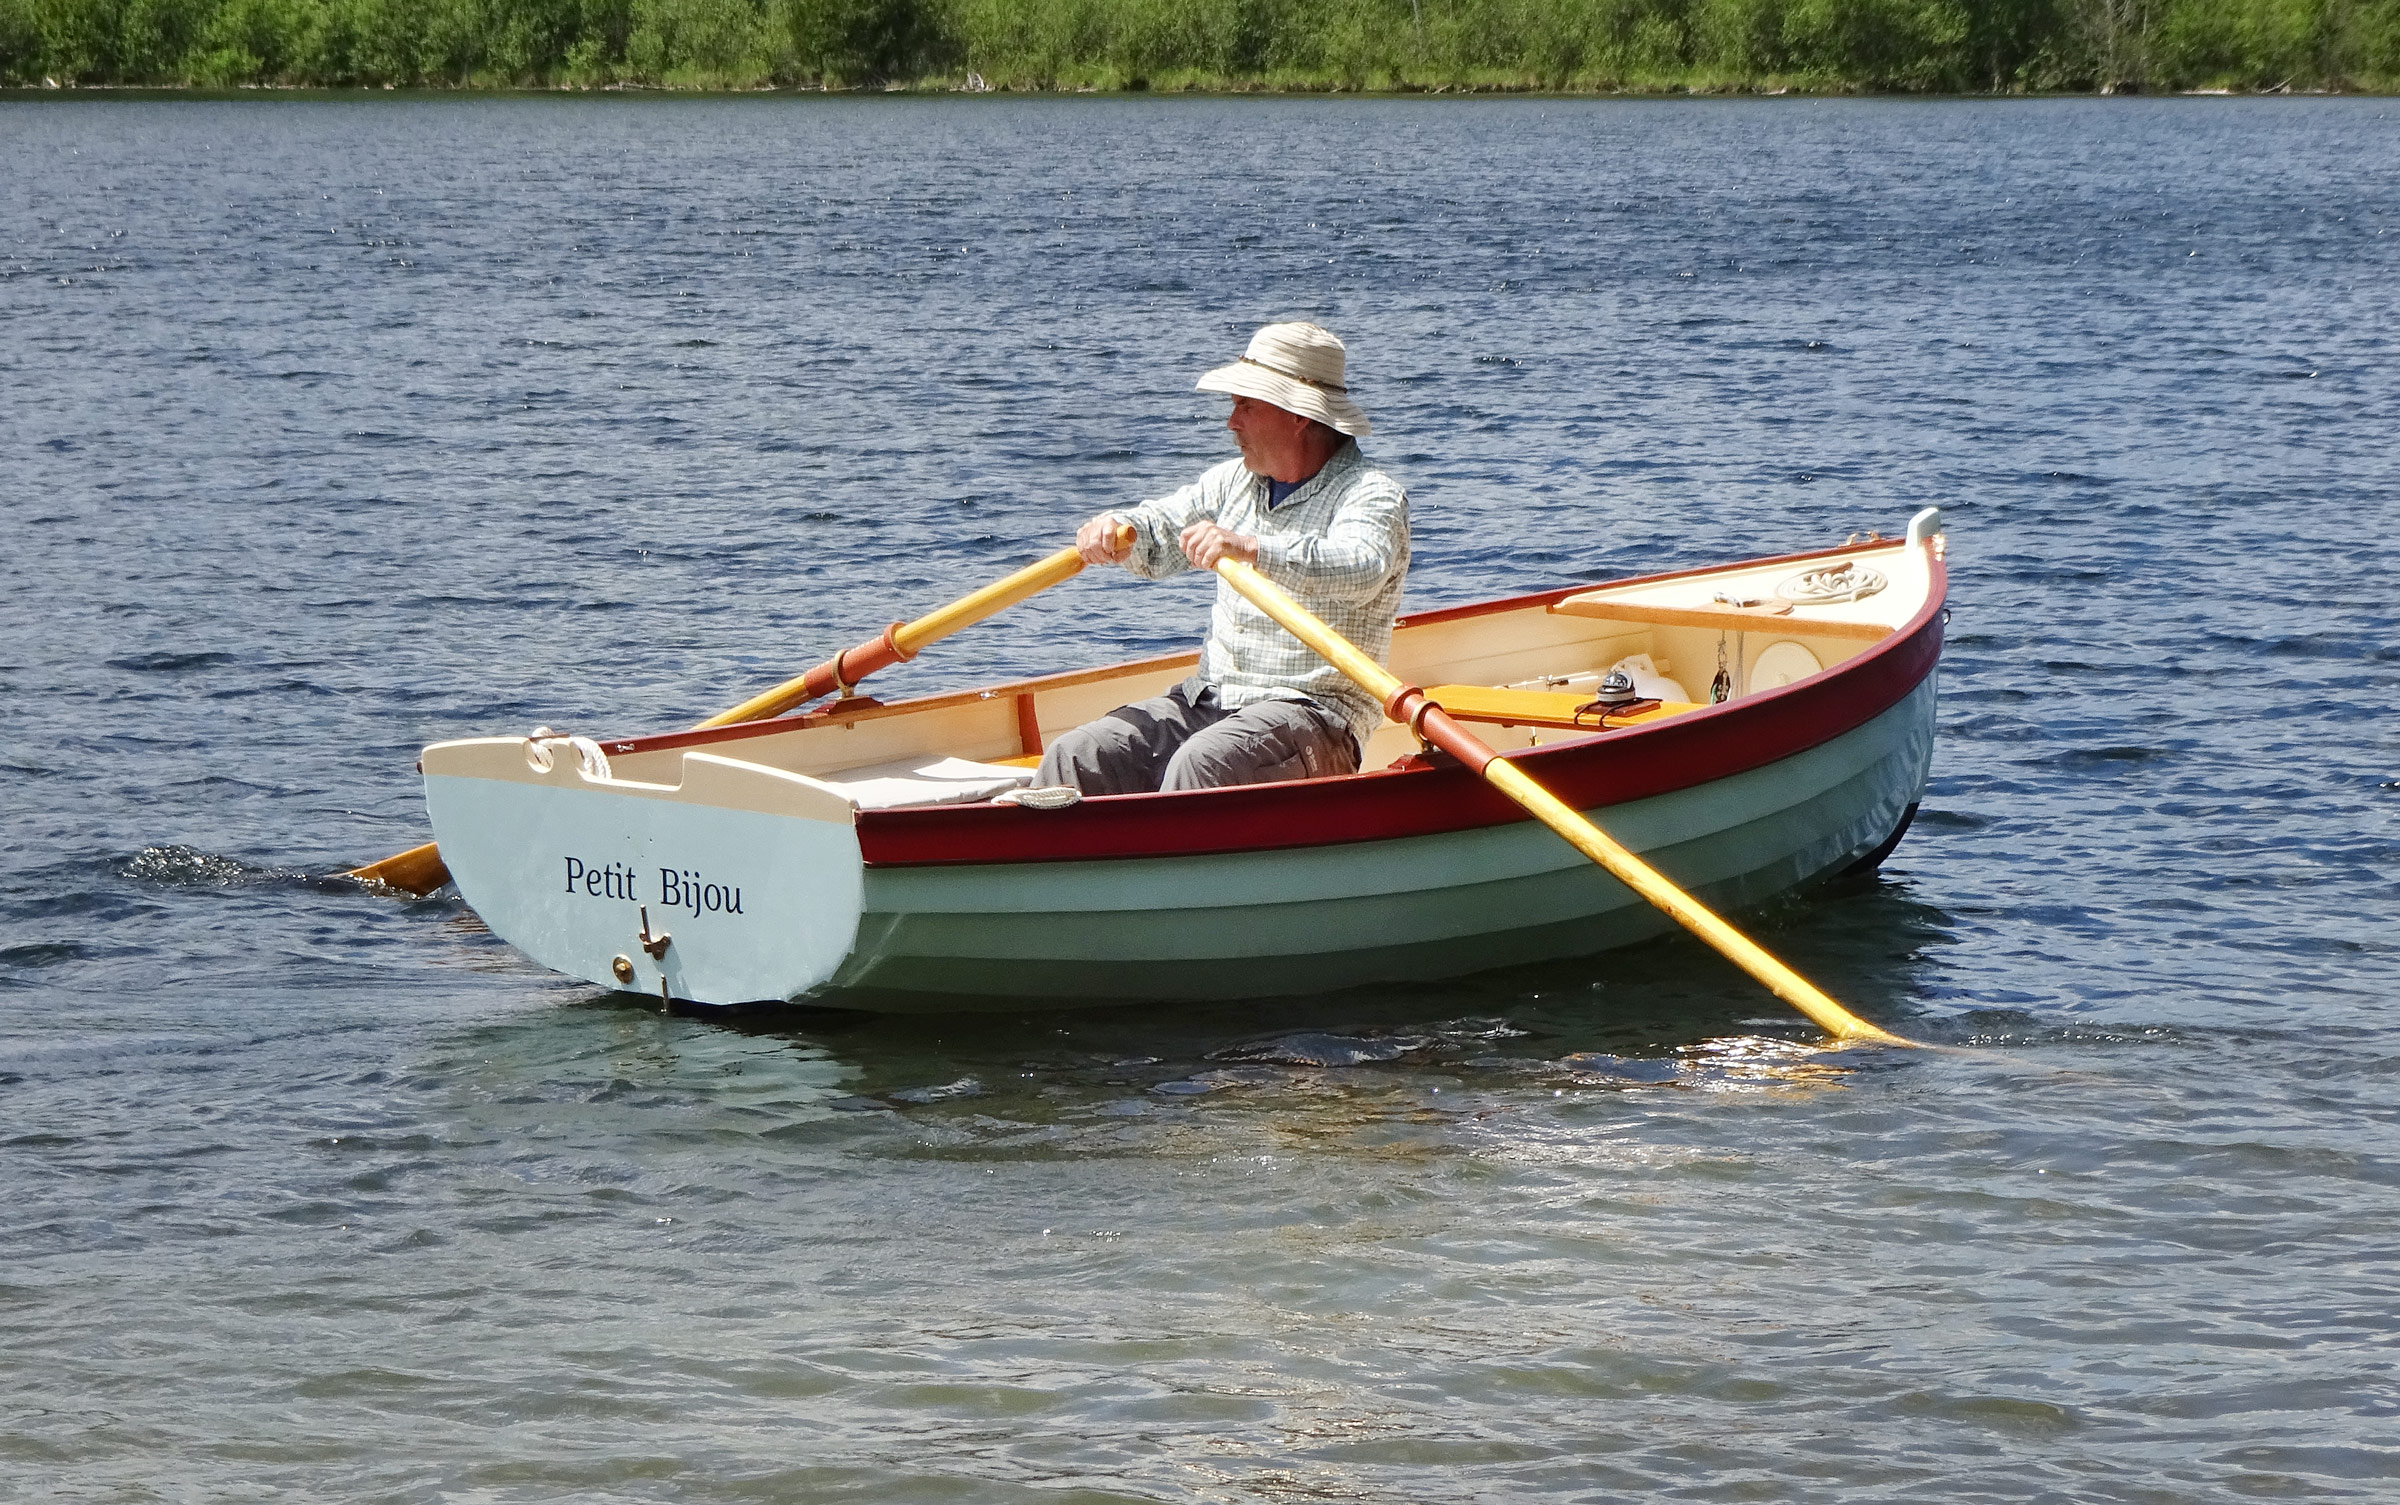
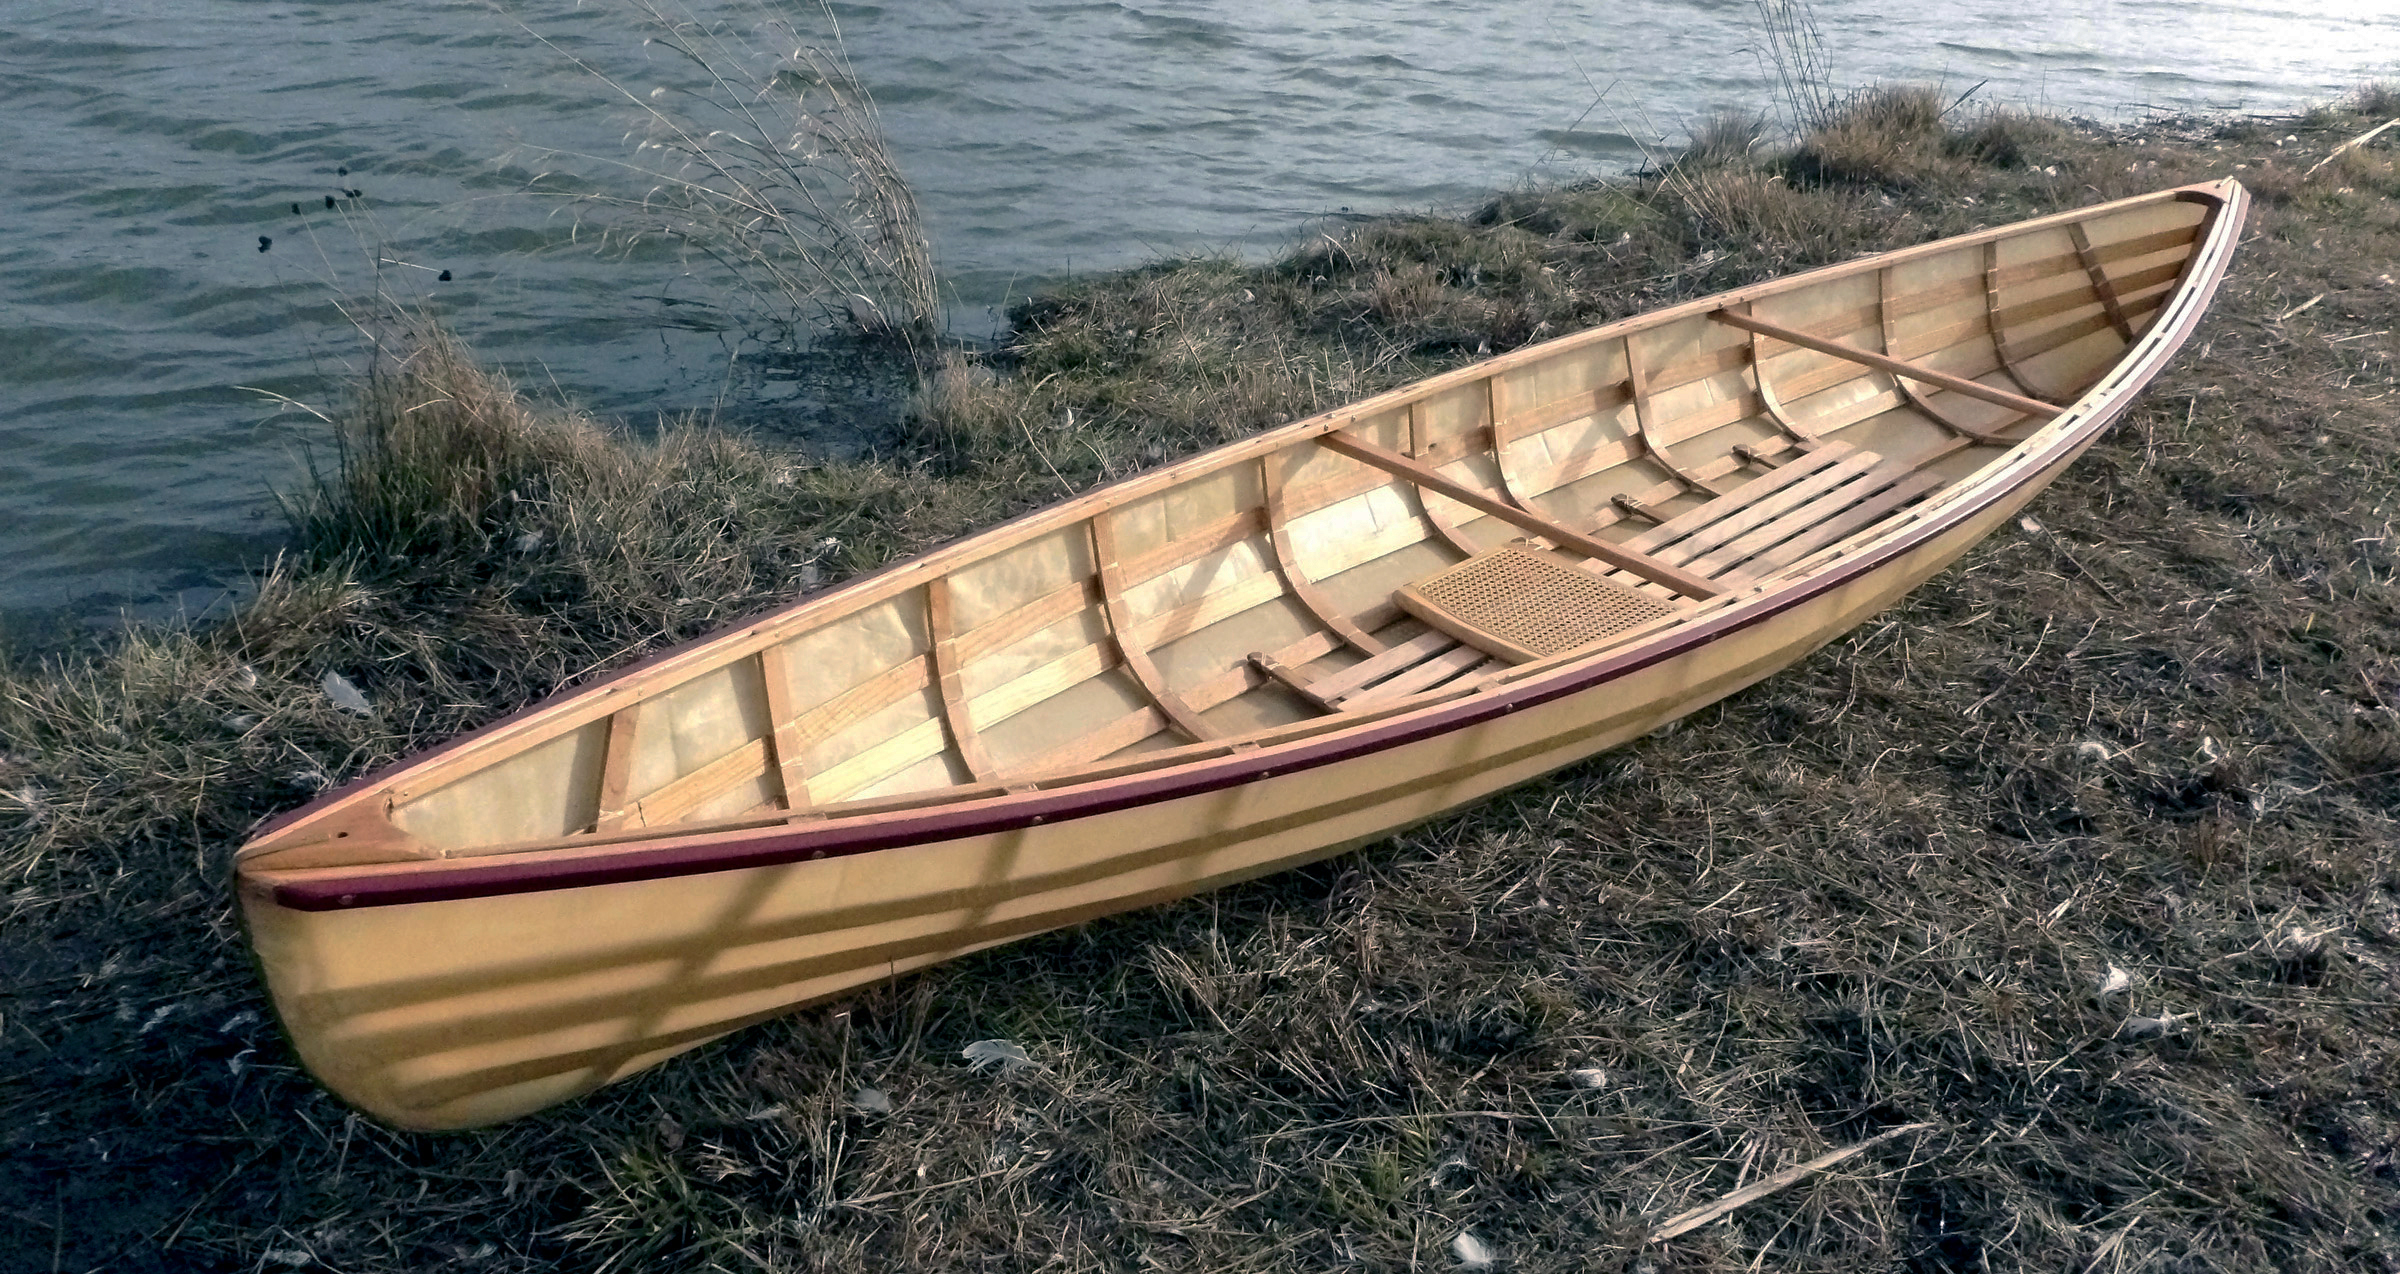
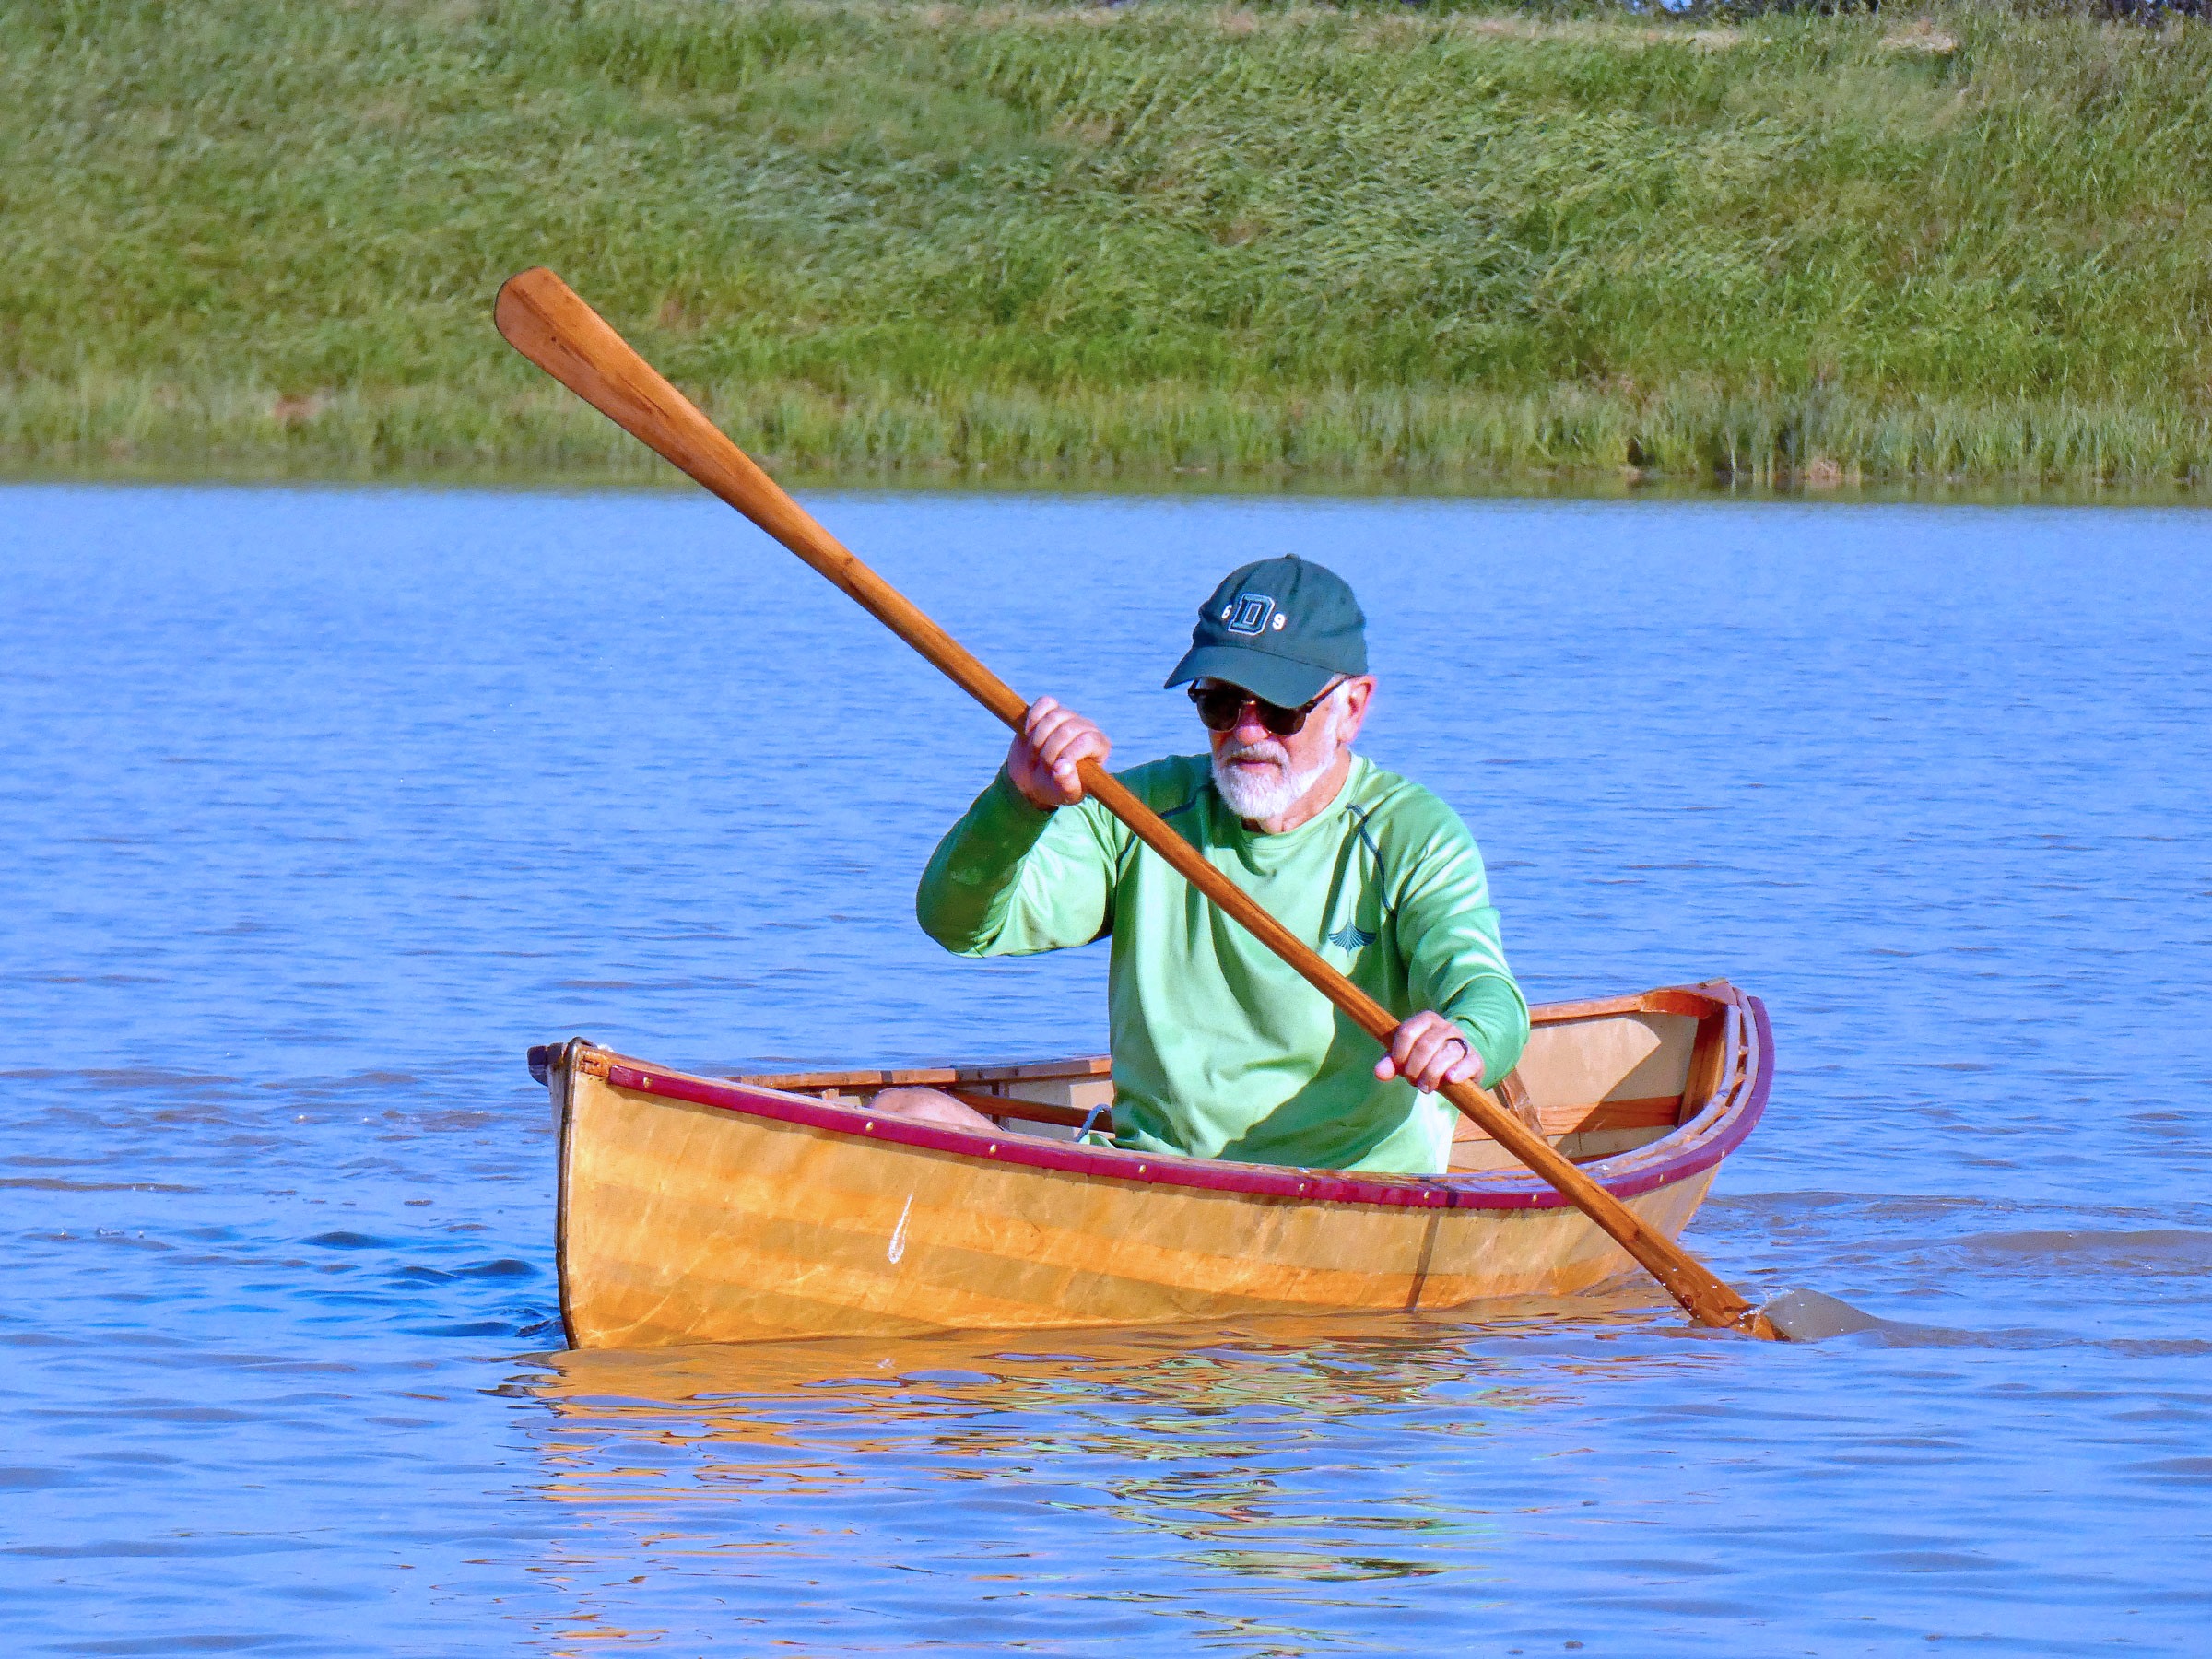
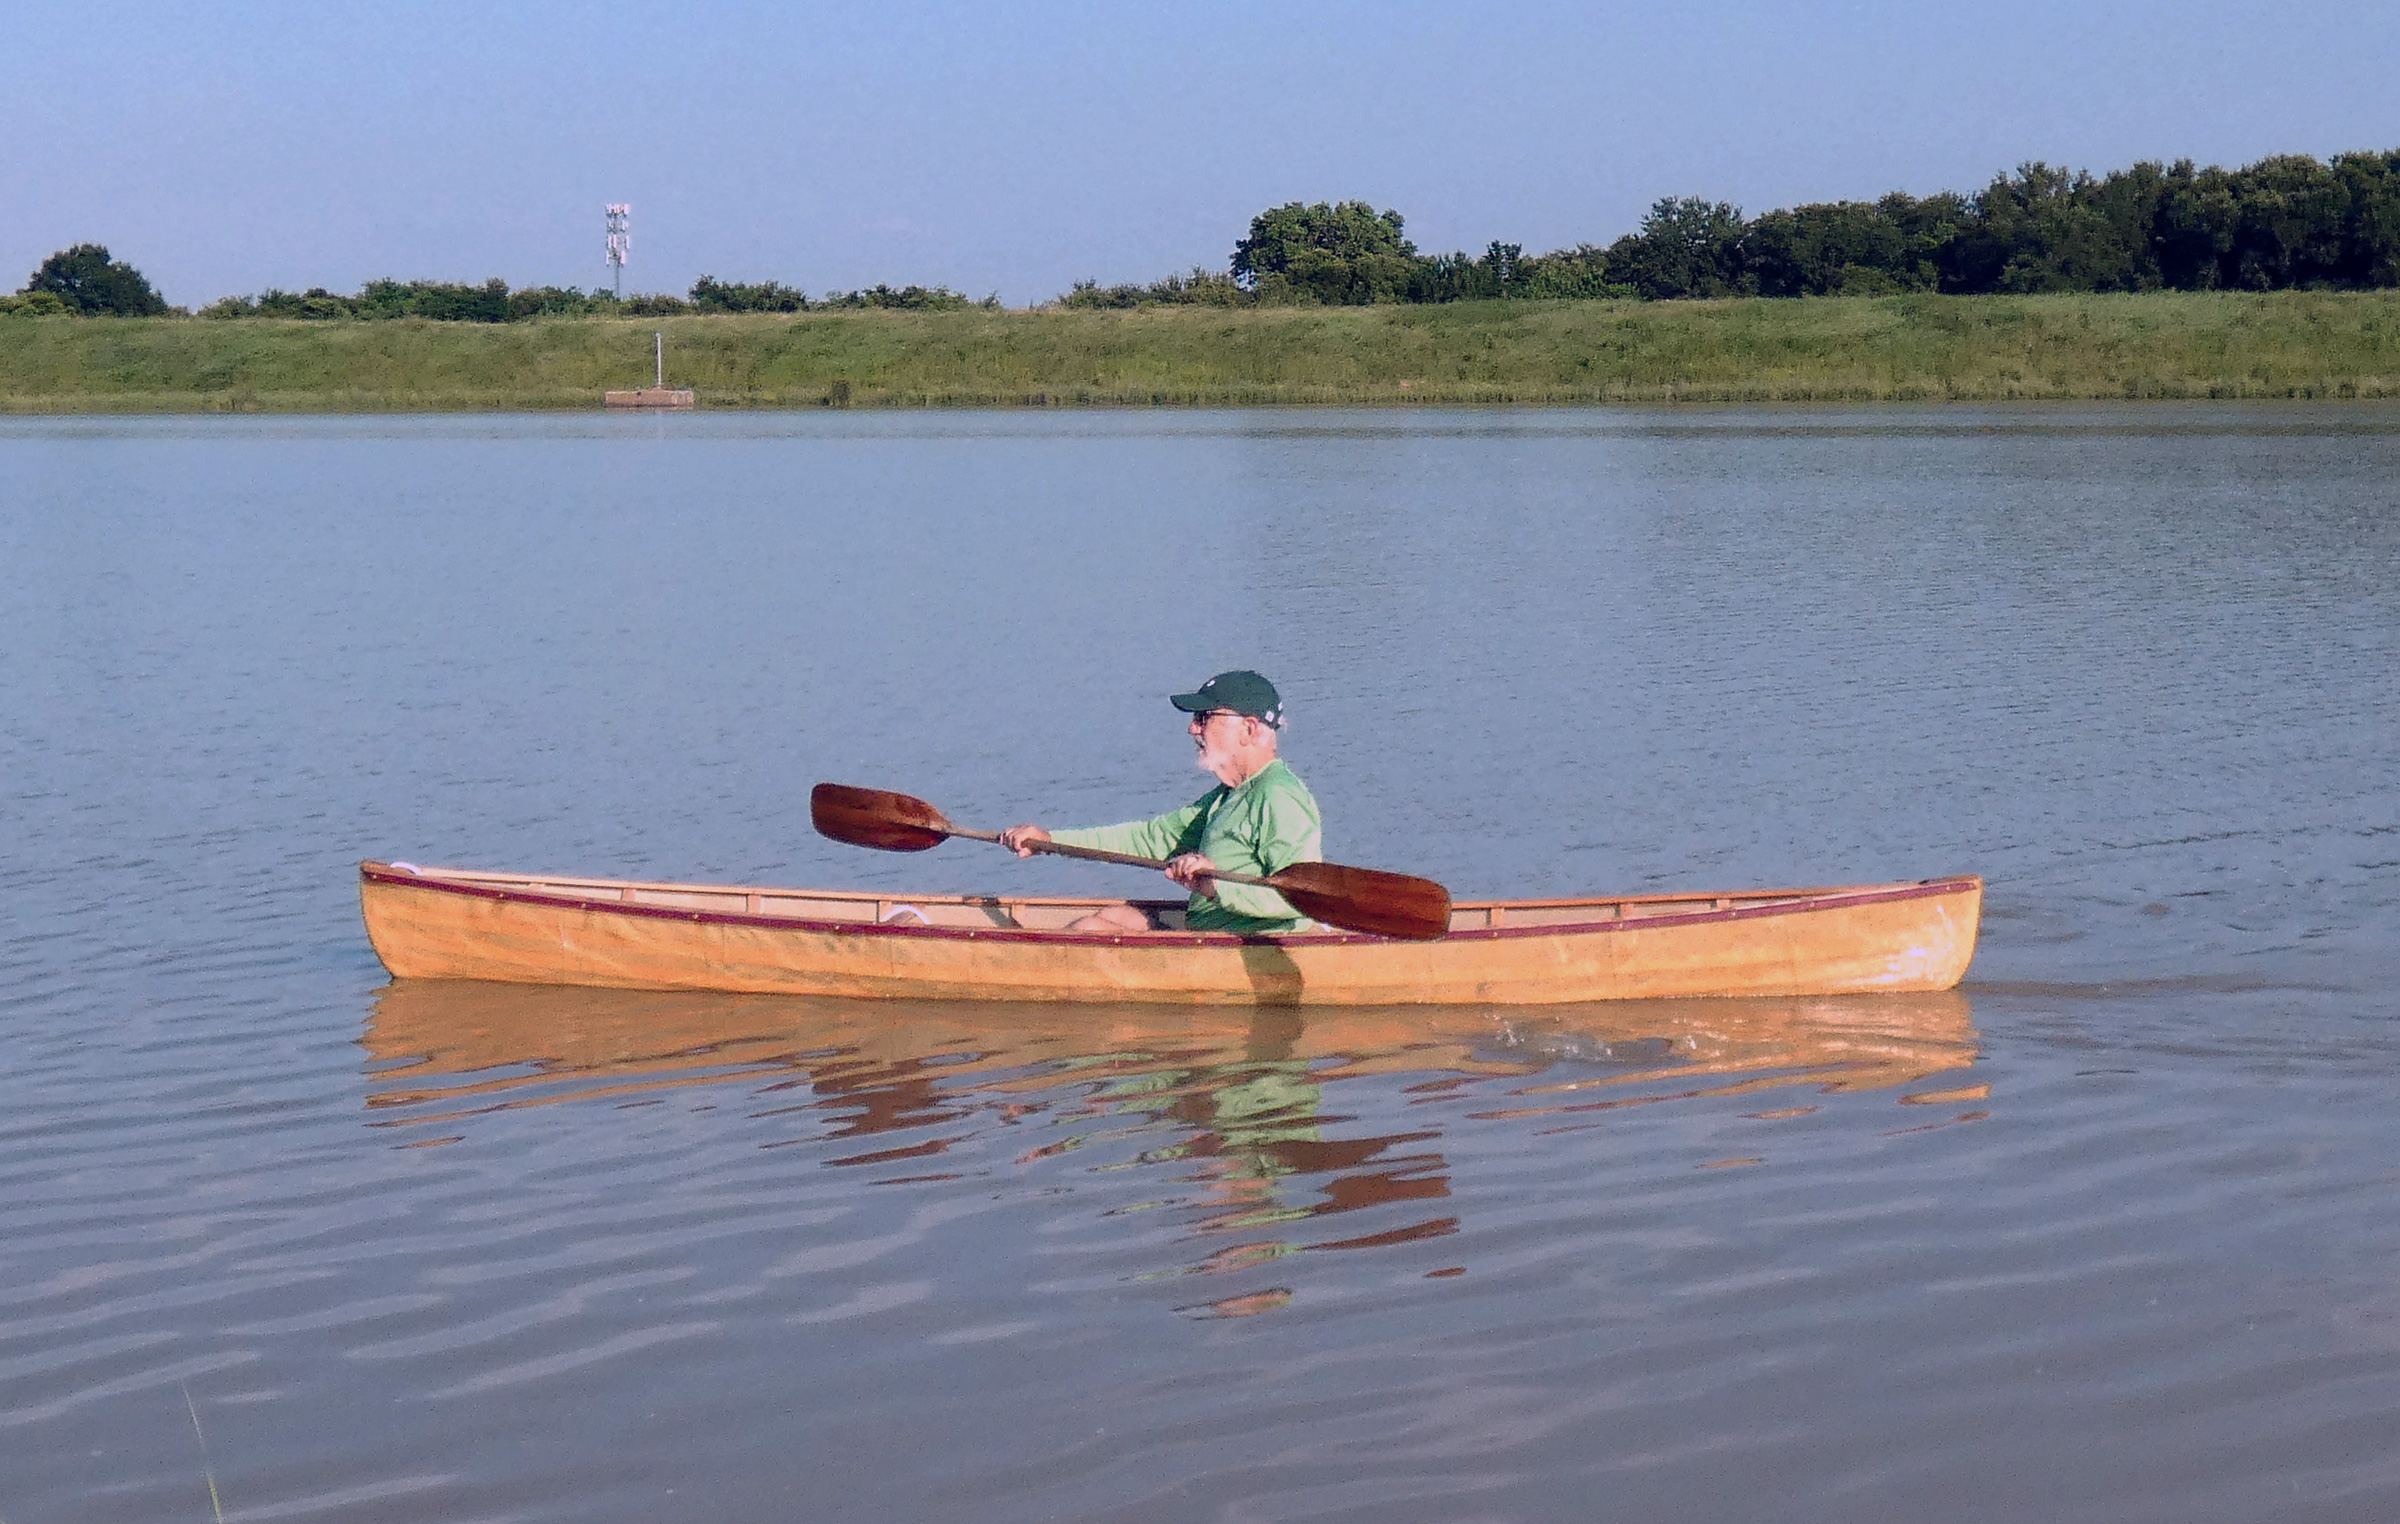
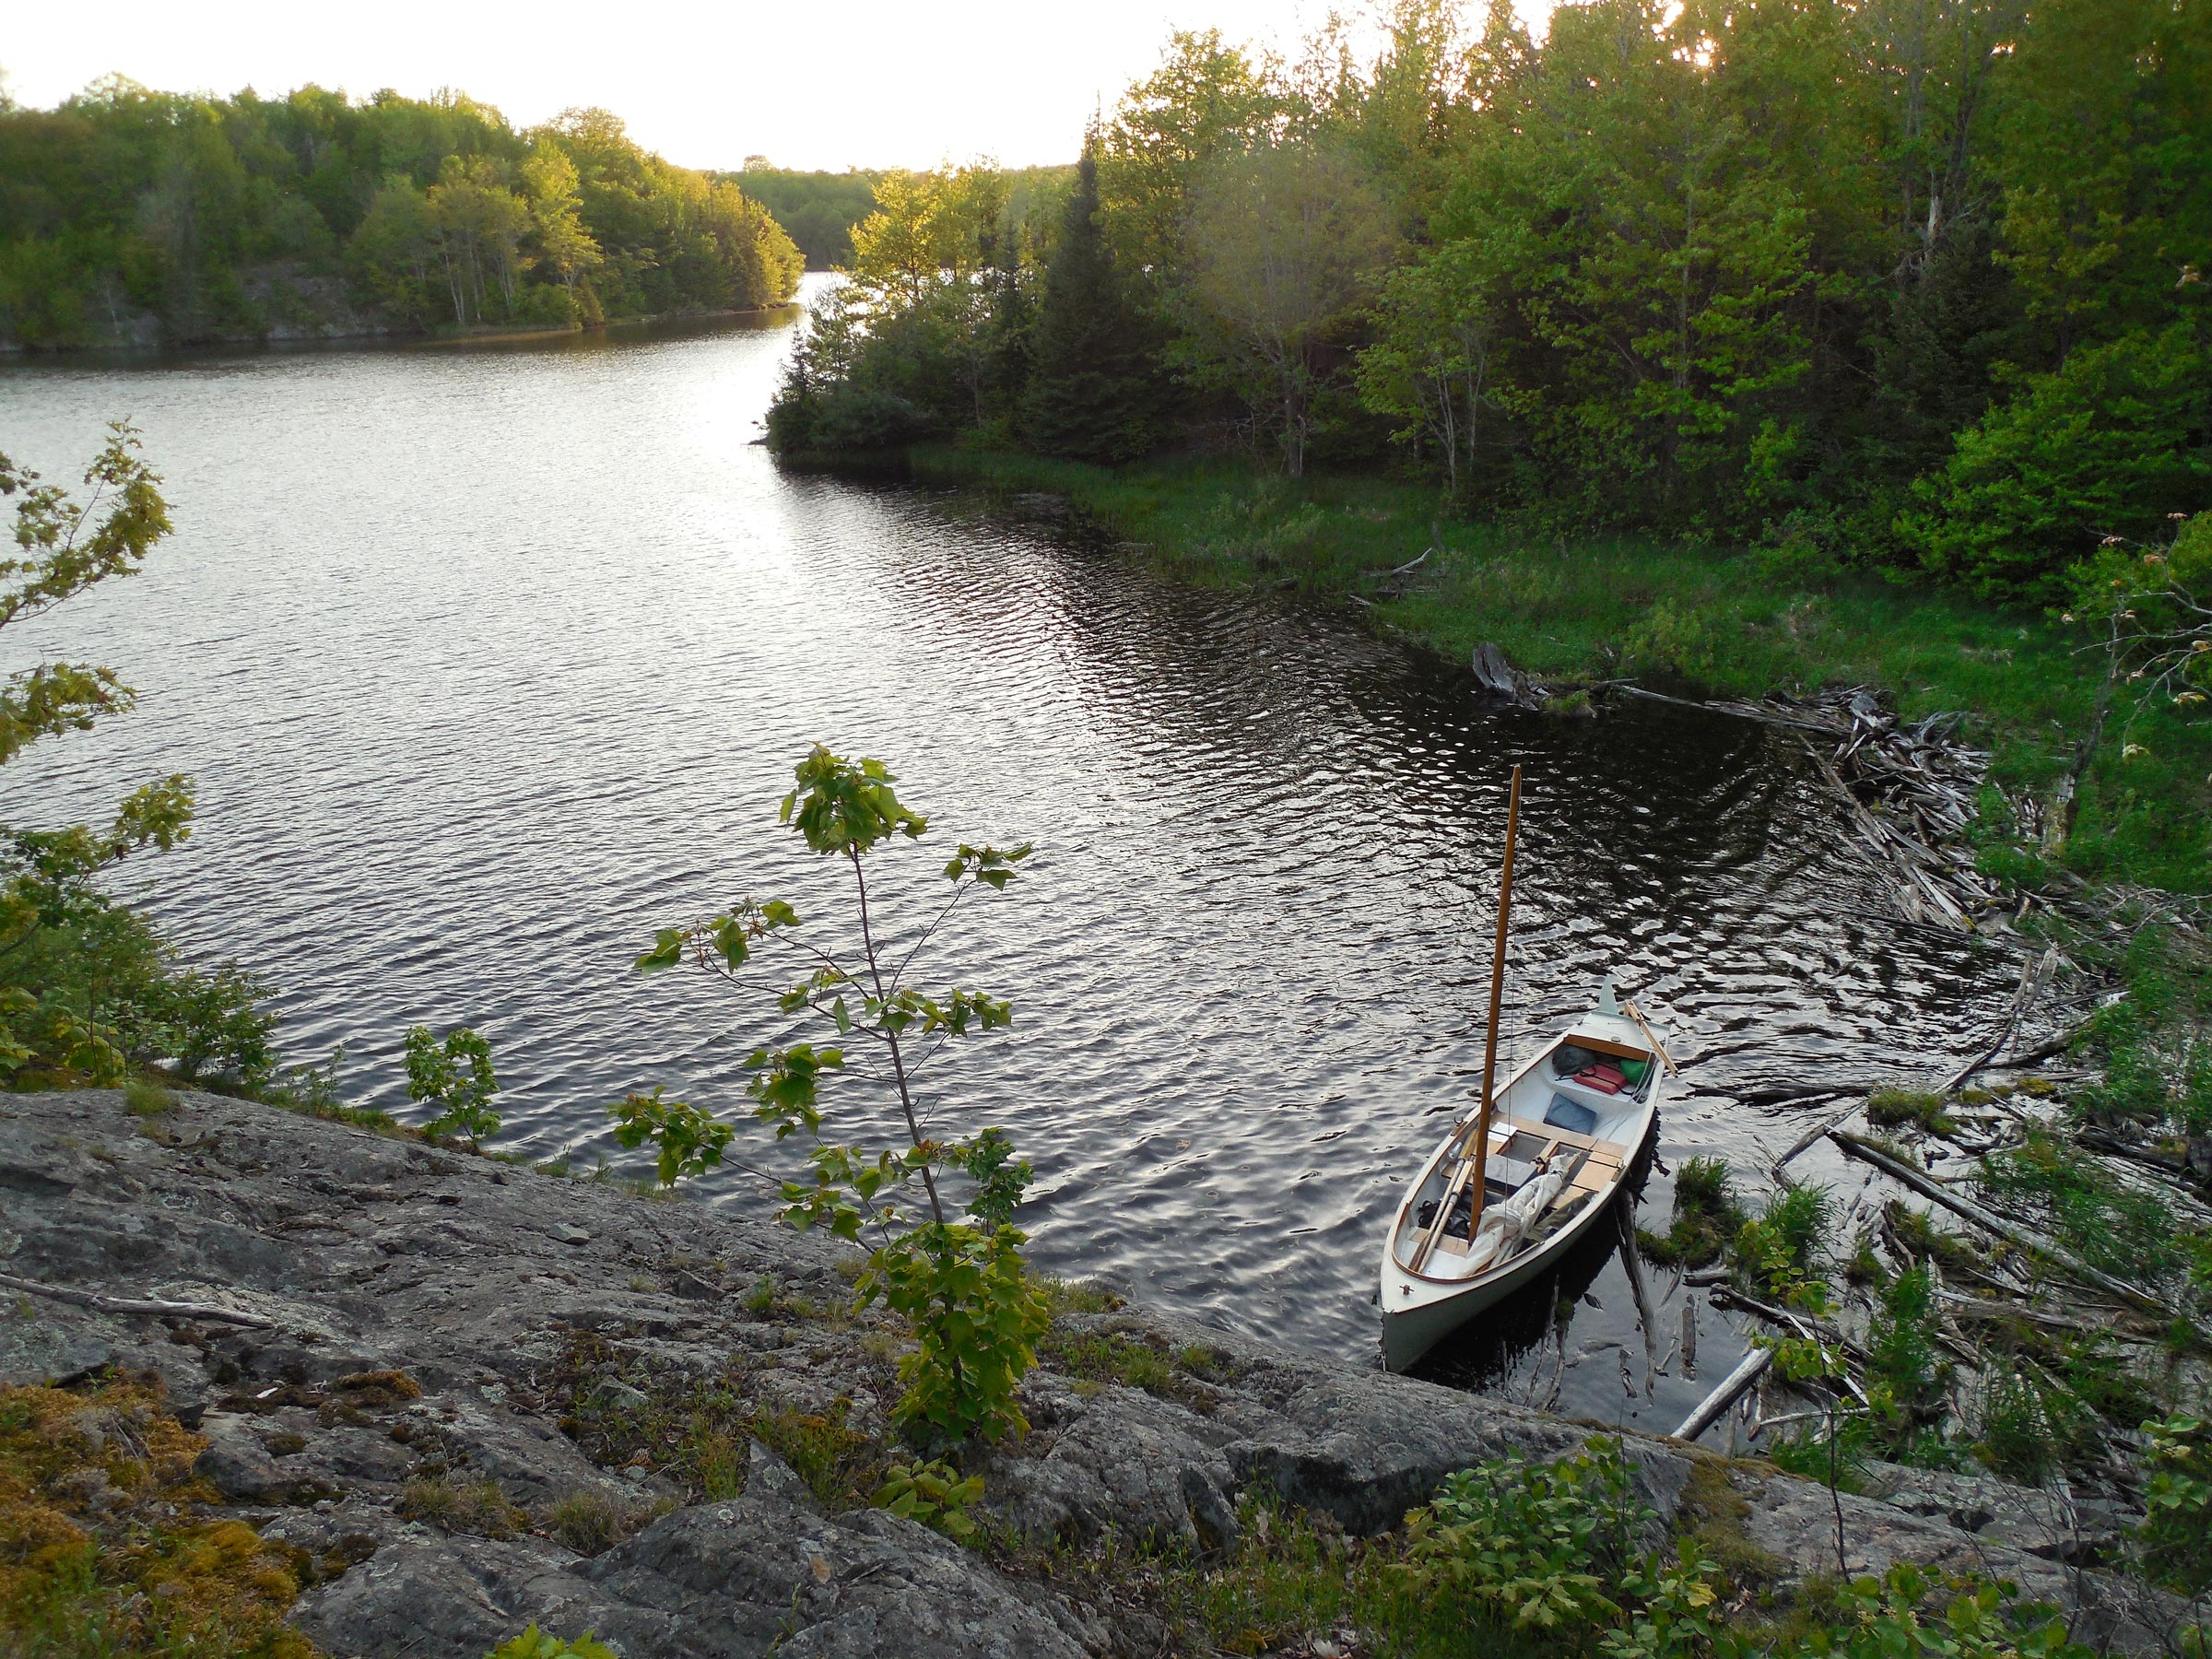
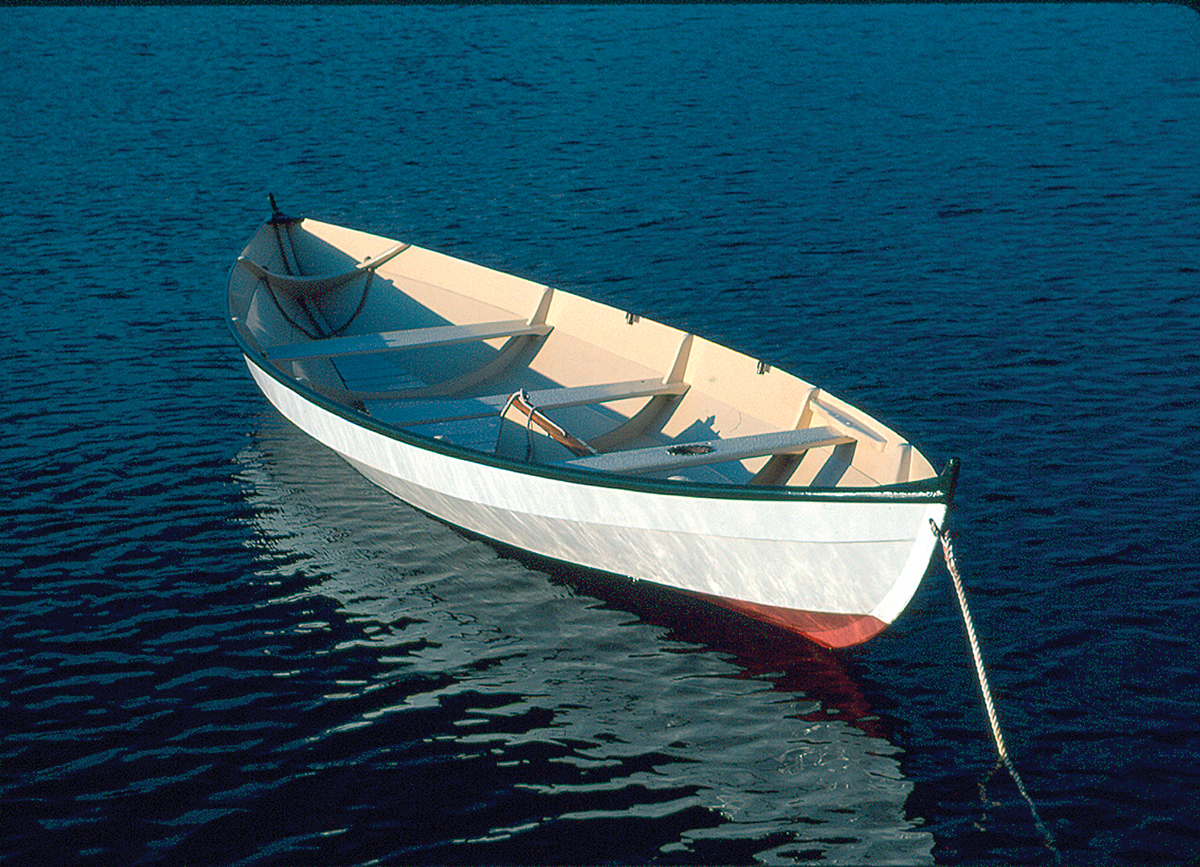
With a beam of 63″, the Penny Fee feels big for a rowboat, but cruises easily at 3 knots.
I have been impressed by the solid feel and stability of Penny Fee. Lightly loaded, the transom is well clear of the water, promising good load-carrying capabilities without added drag. For a rowboat, it is on the larger side, and you can feel the weight and beam, but once you get the hull moving with a good pair of oars, it is easy to maintain 3 knots and, with a little more effort, the GPS can clock a steady 3 1⁄2 knots. Penny Fee has two rowing stations, the middle one being a natural choice if you are rowing on your own. At this station, the beam of the hull is widest, providing a little more leverage. The boat is fairly well balanced longitudinally, whether you use the center or the aft rowing station. As only one pair of oars was made, we did not test rowing with two, but you would certainly get more speed and range with two rowers.
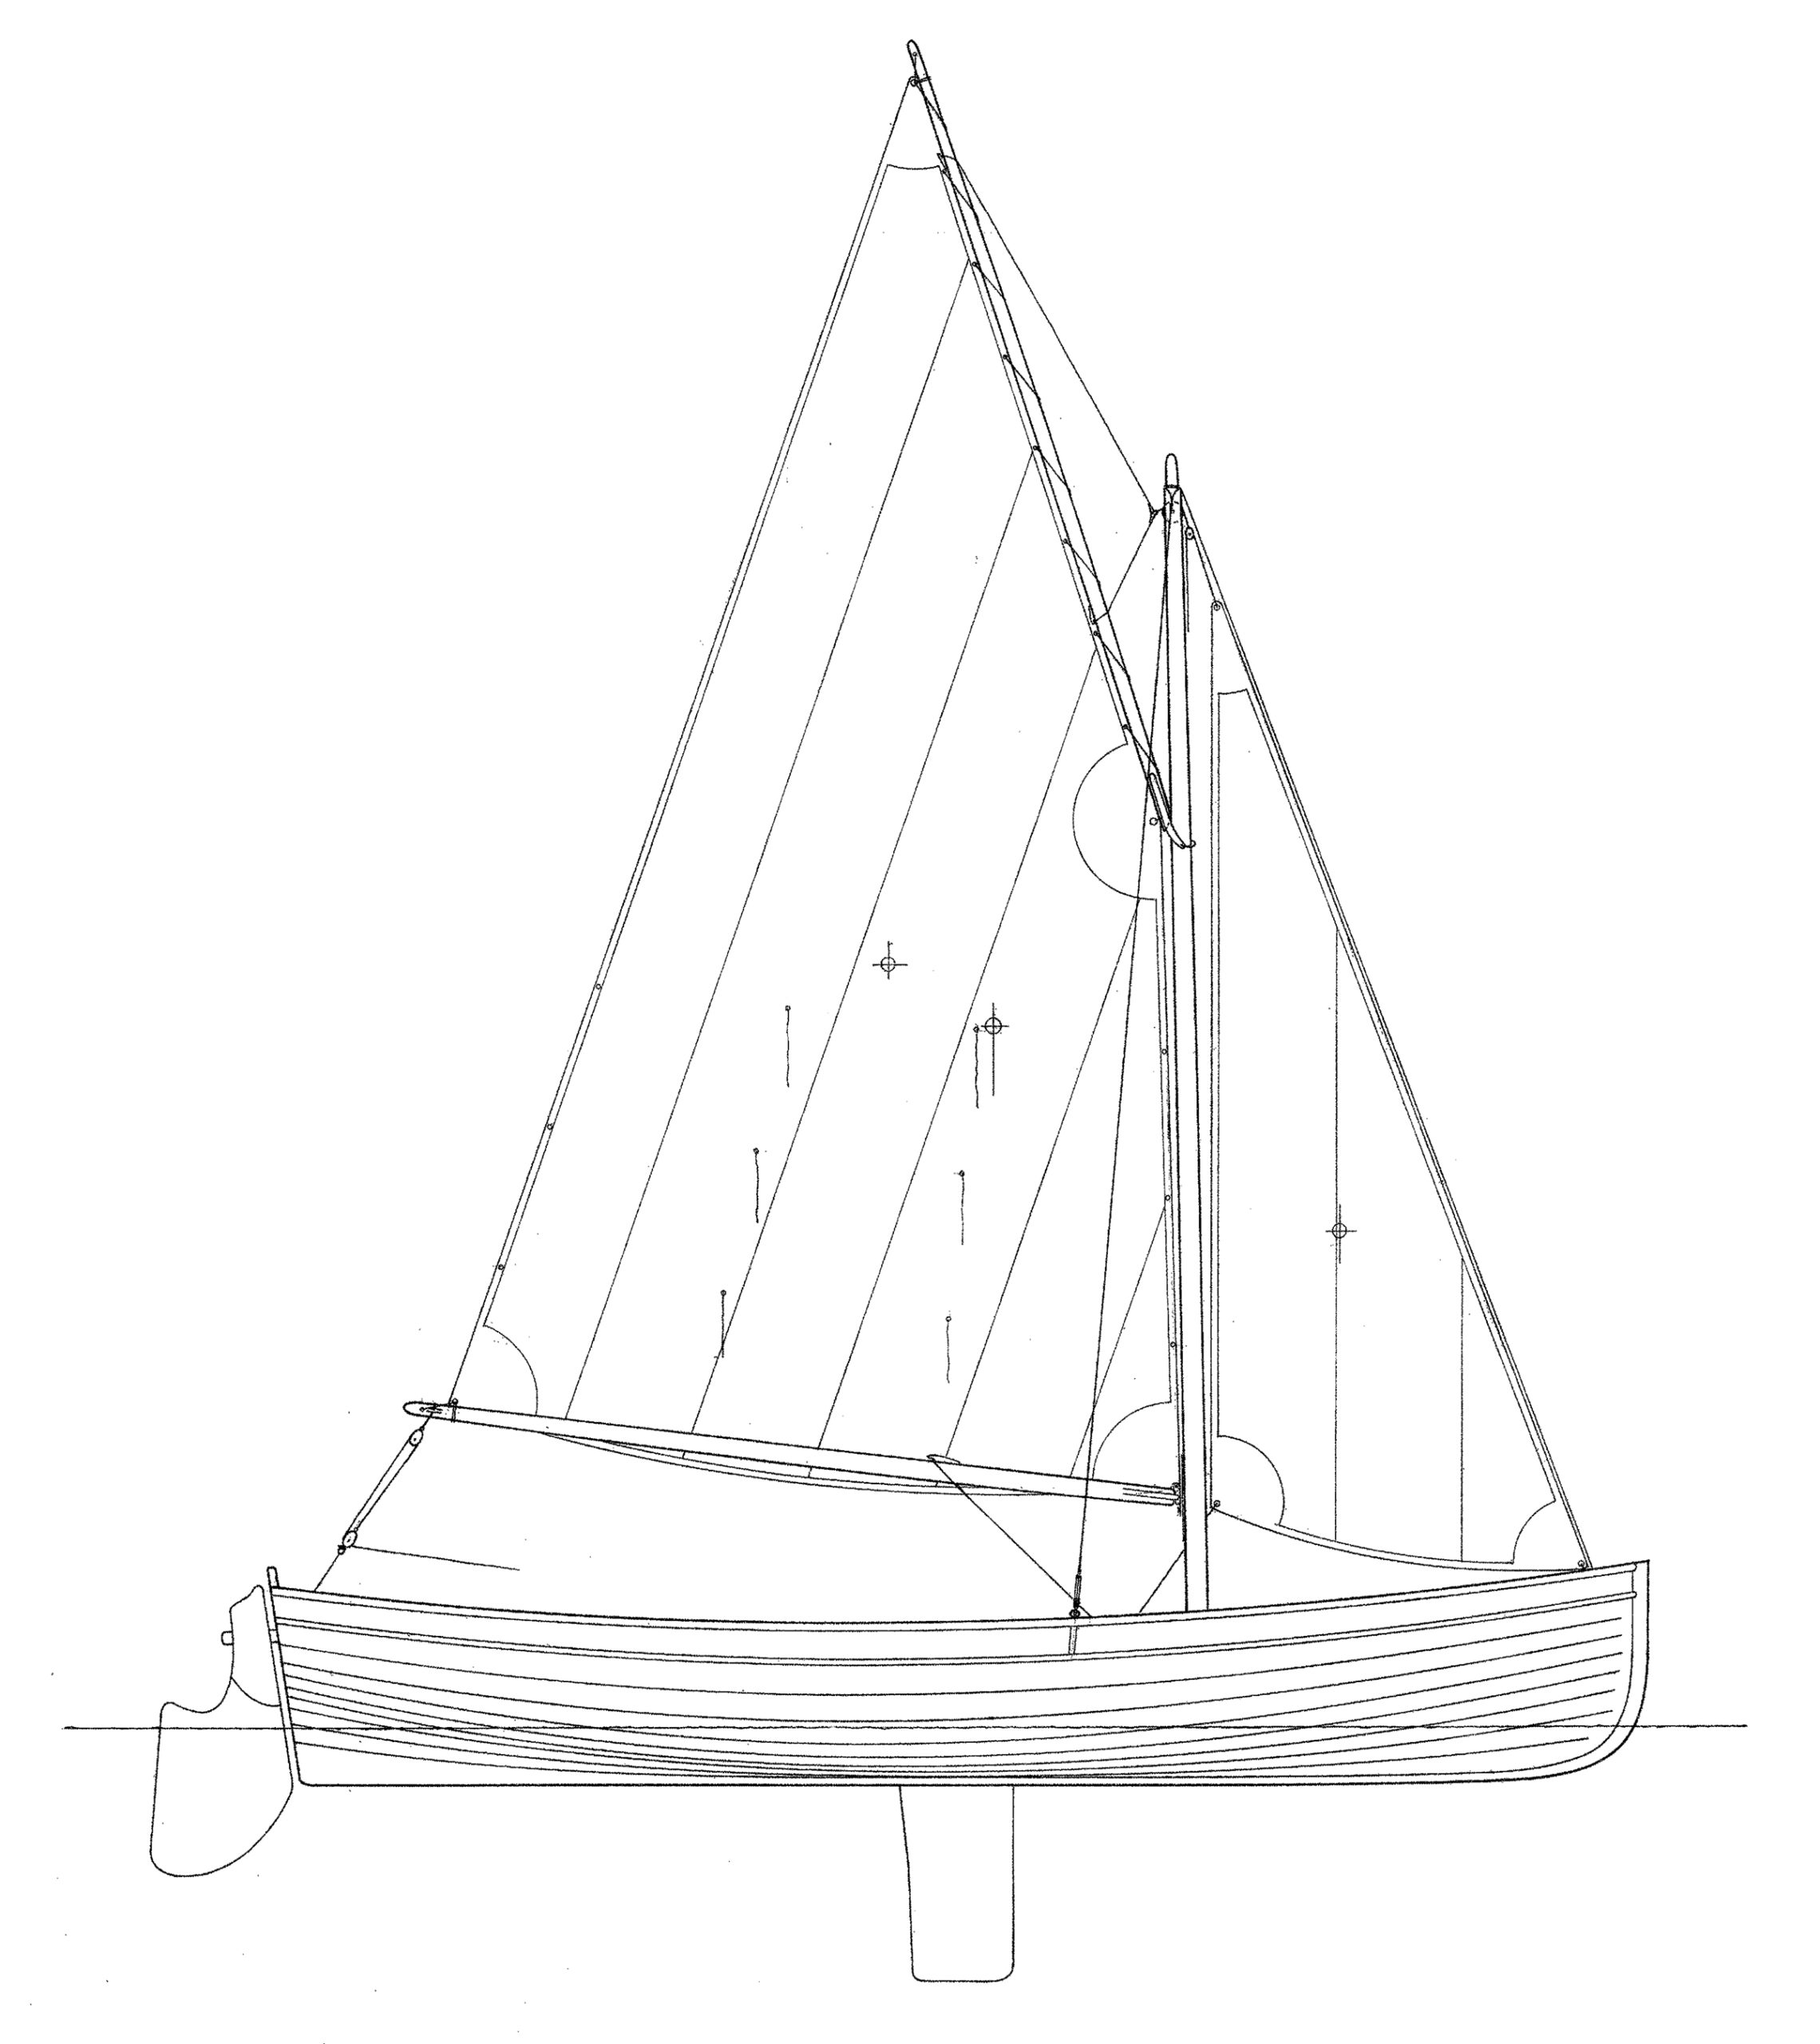
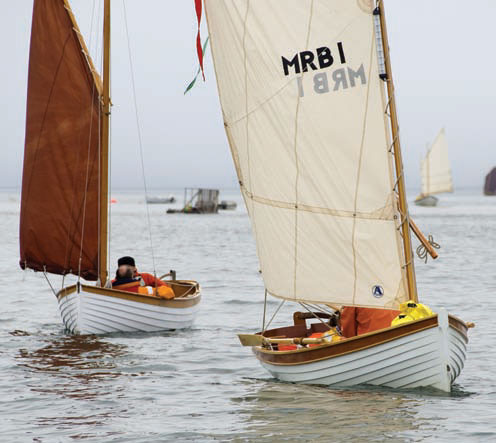
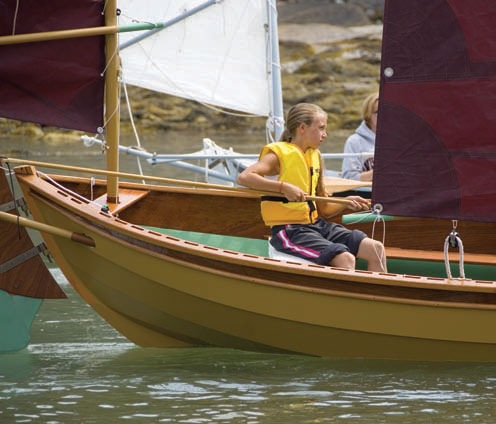
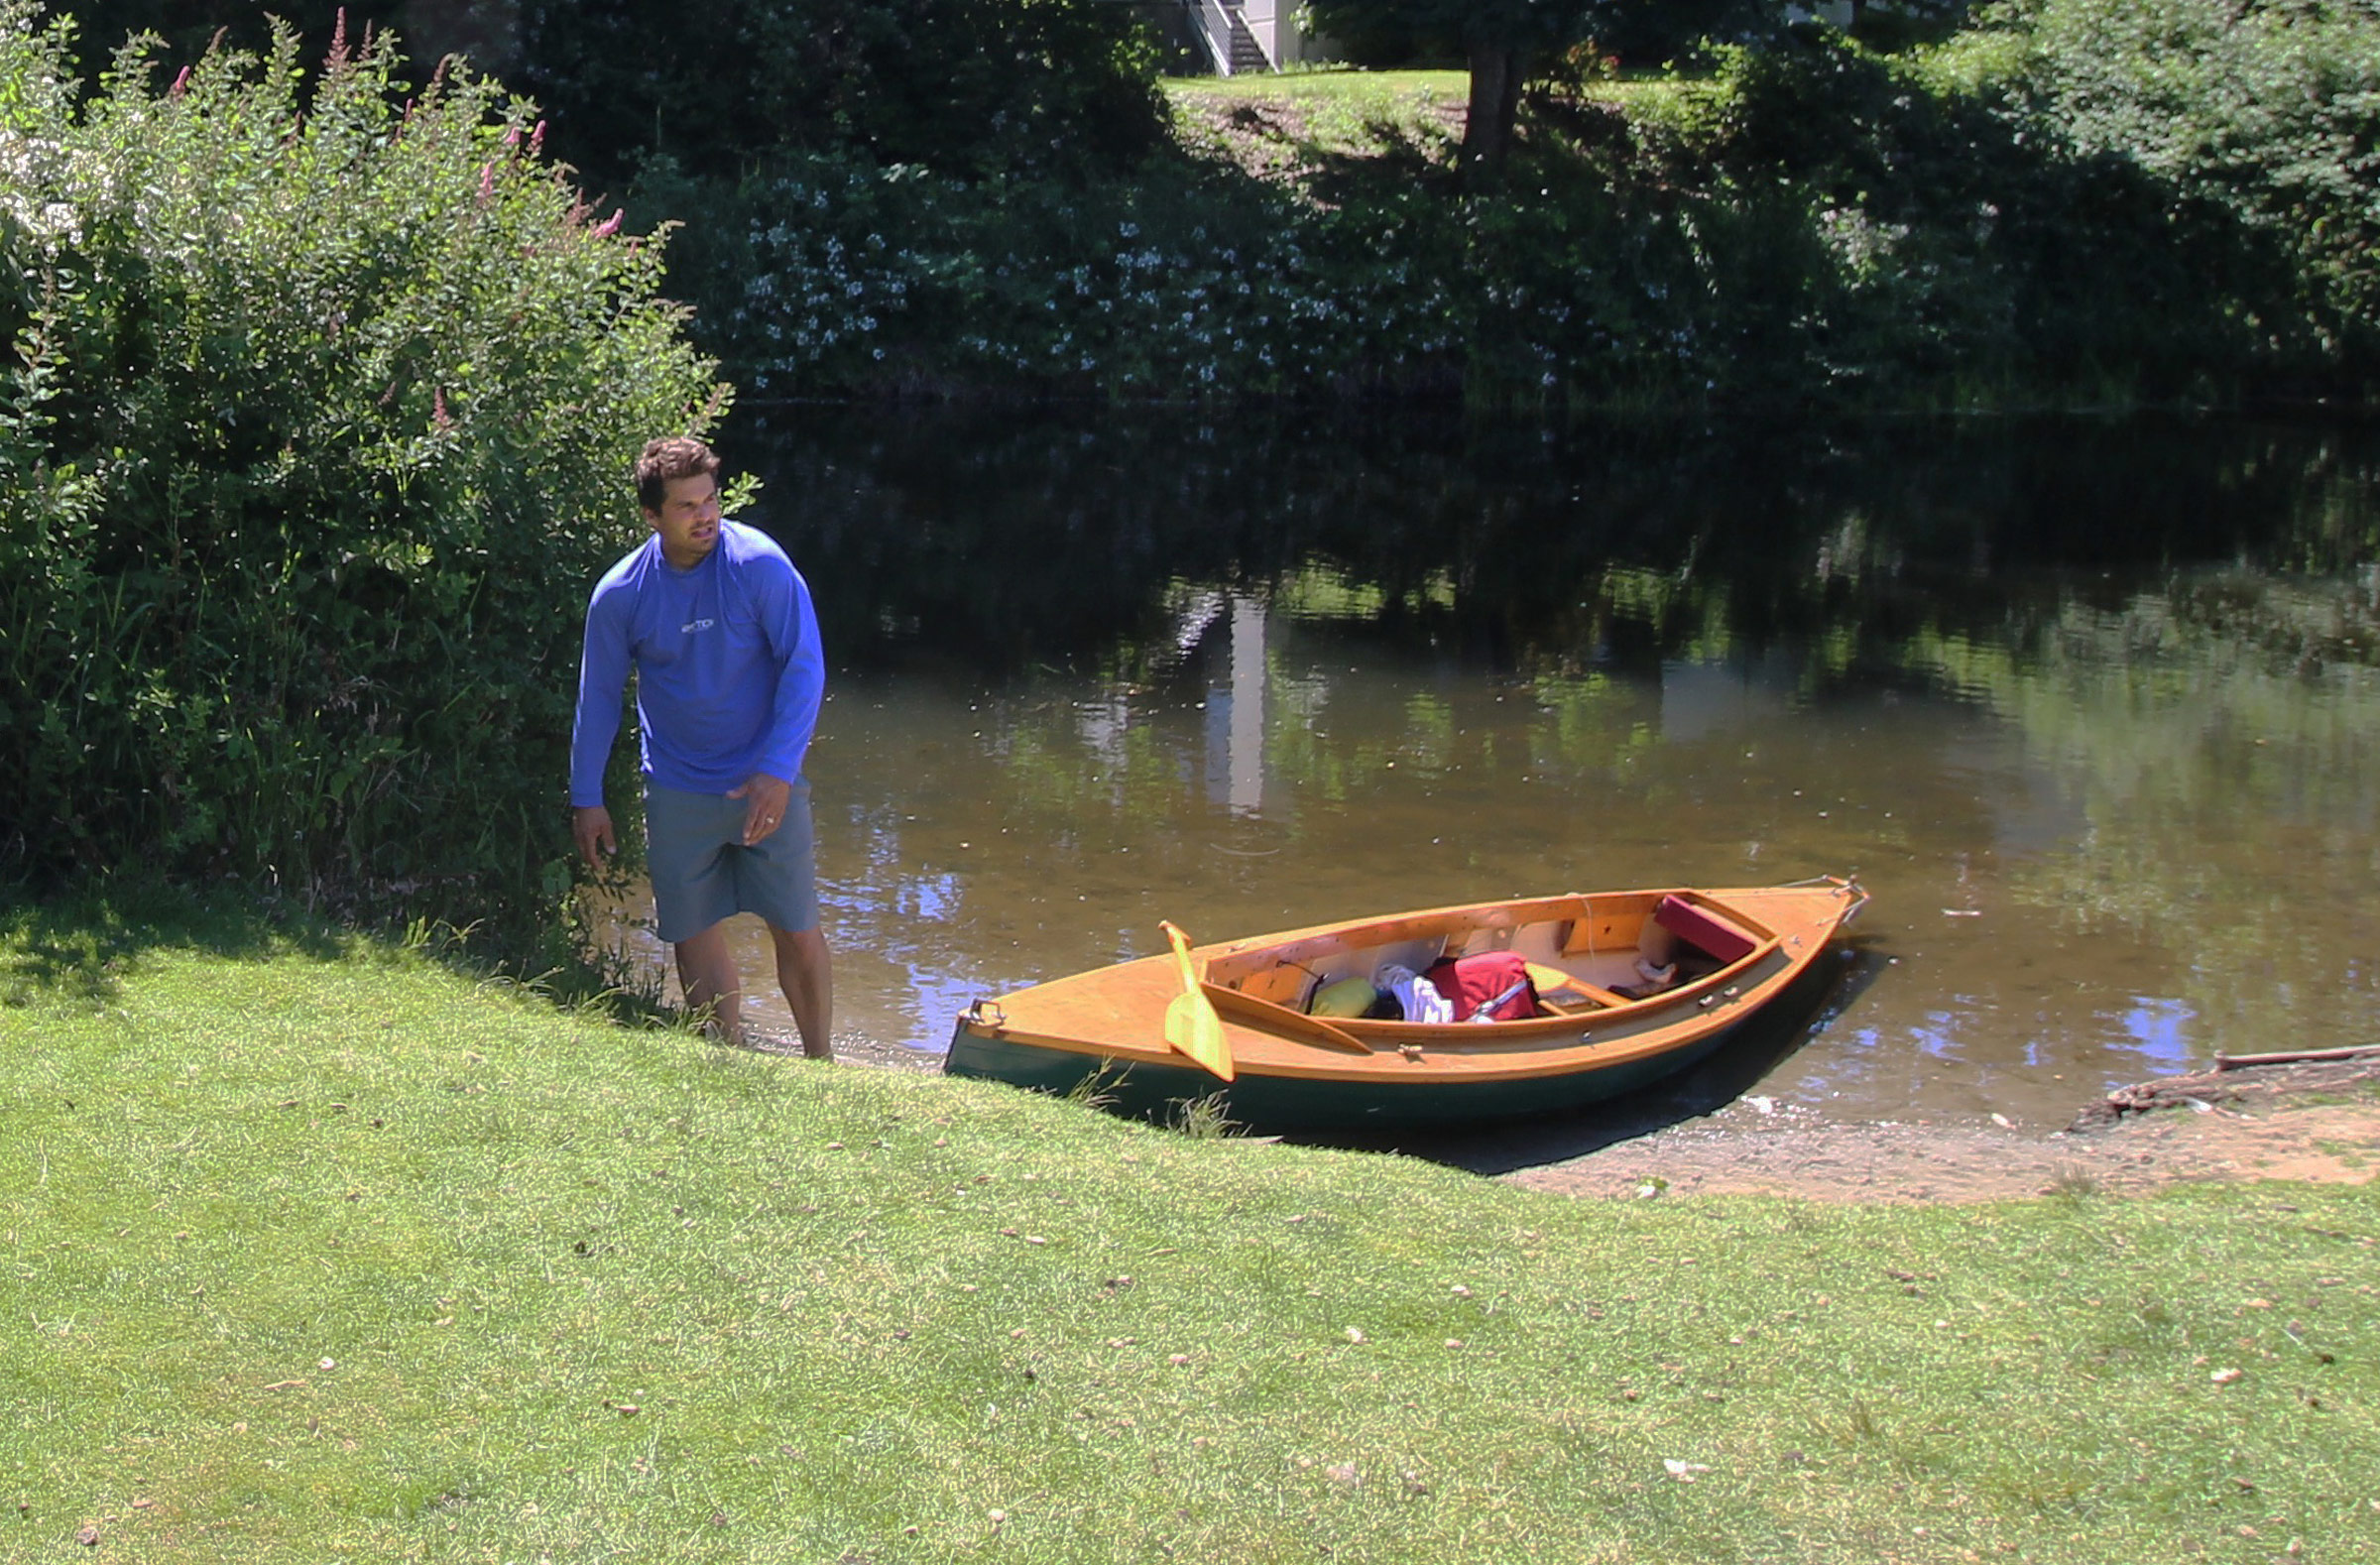
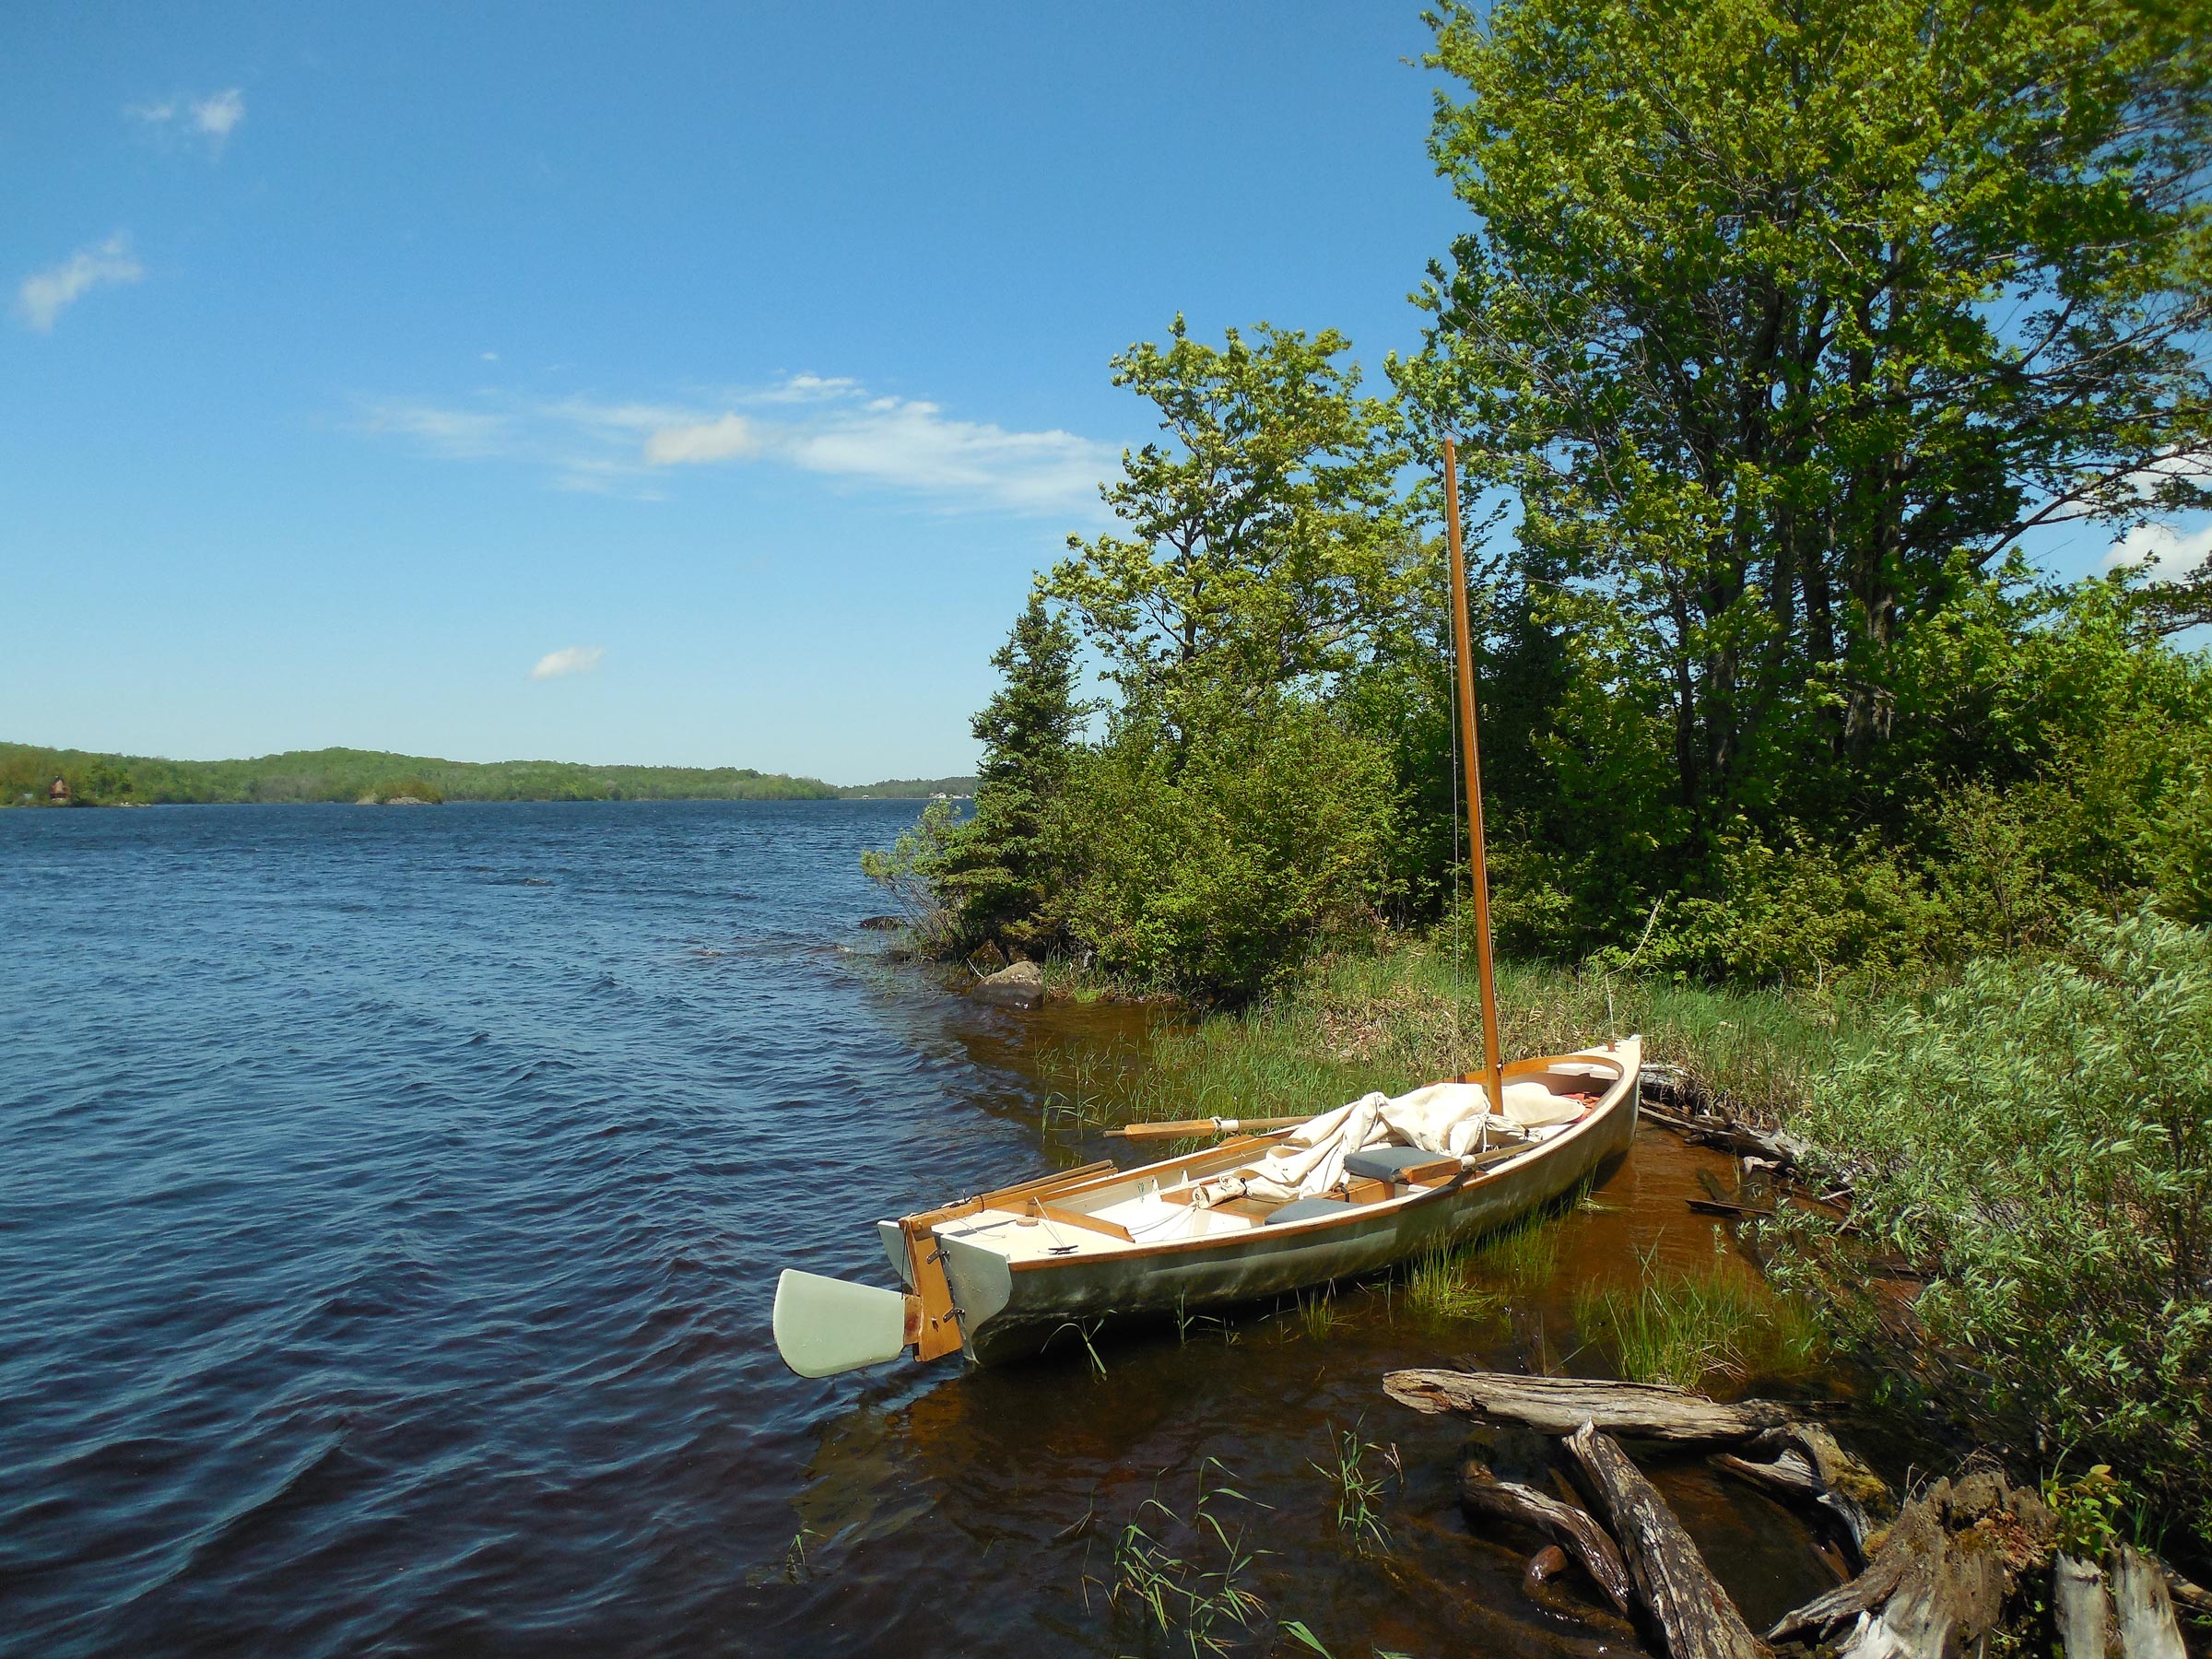
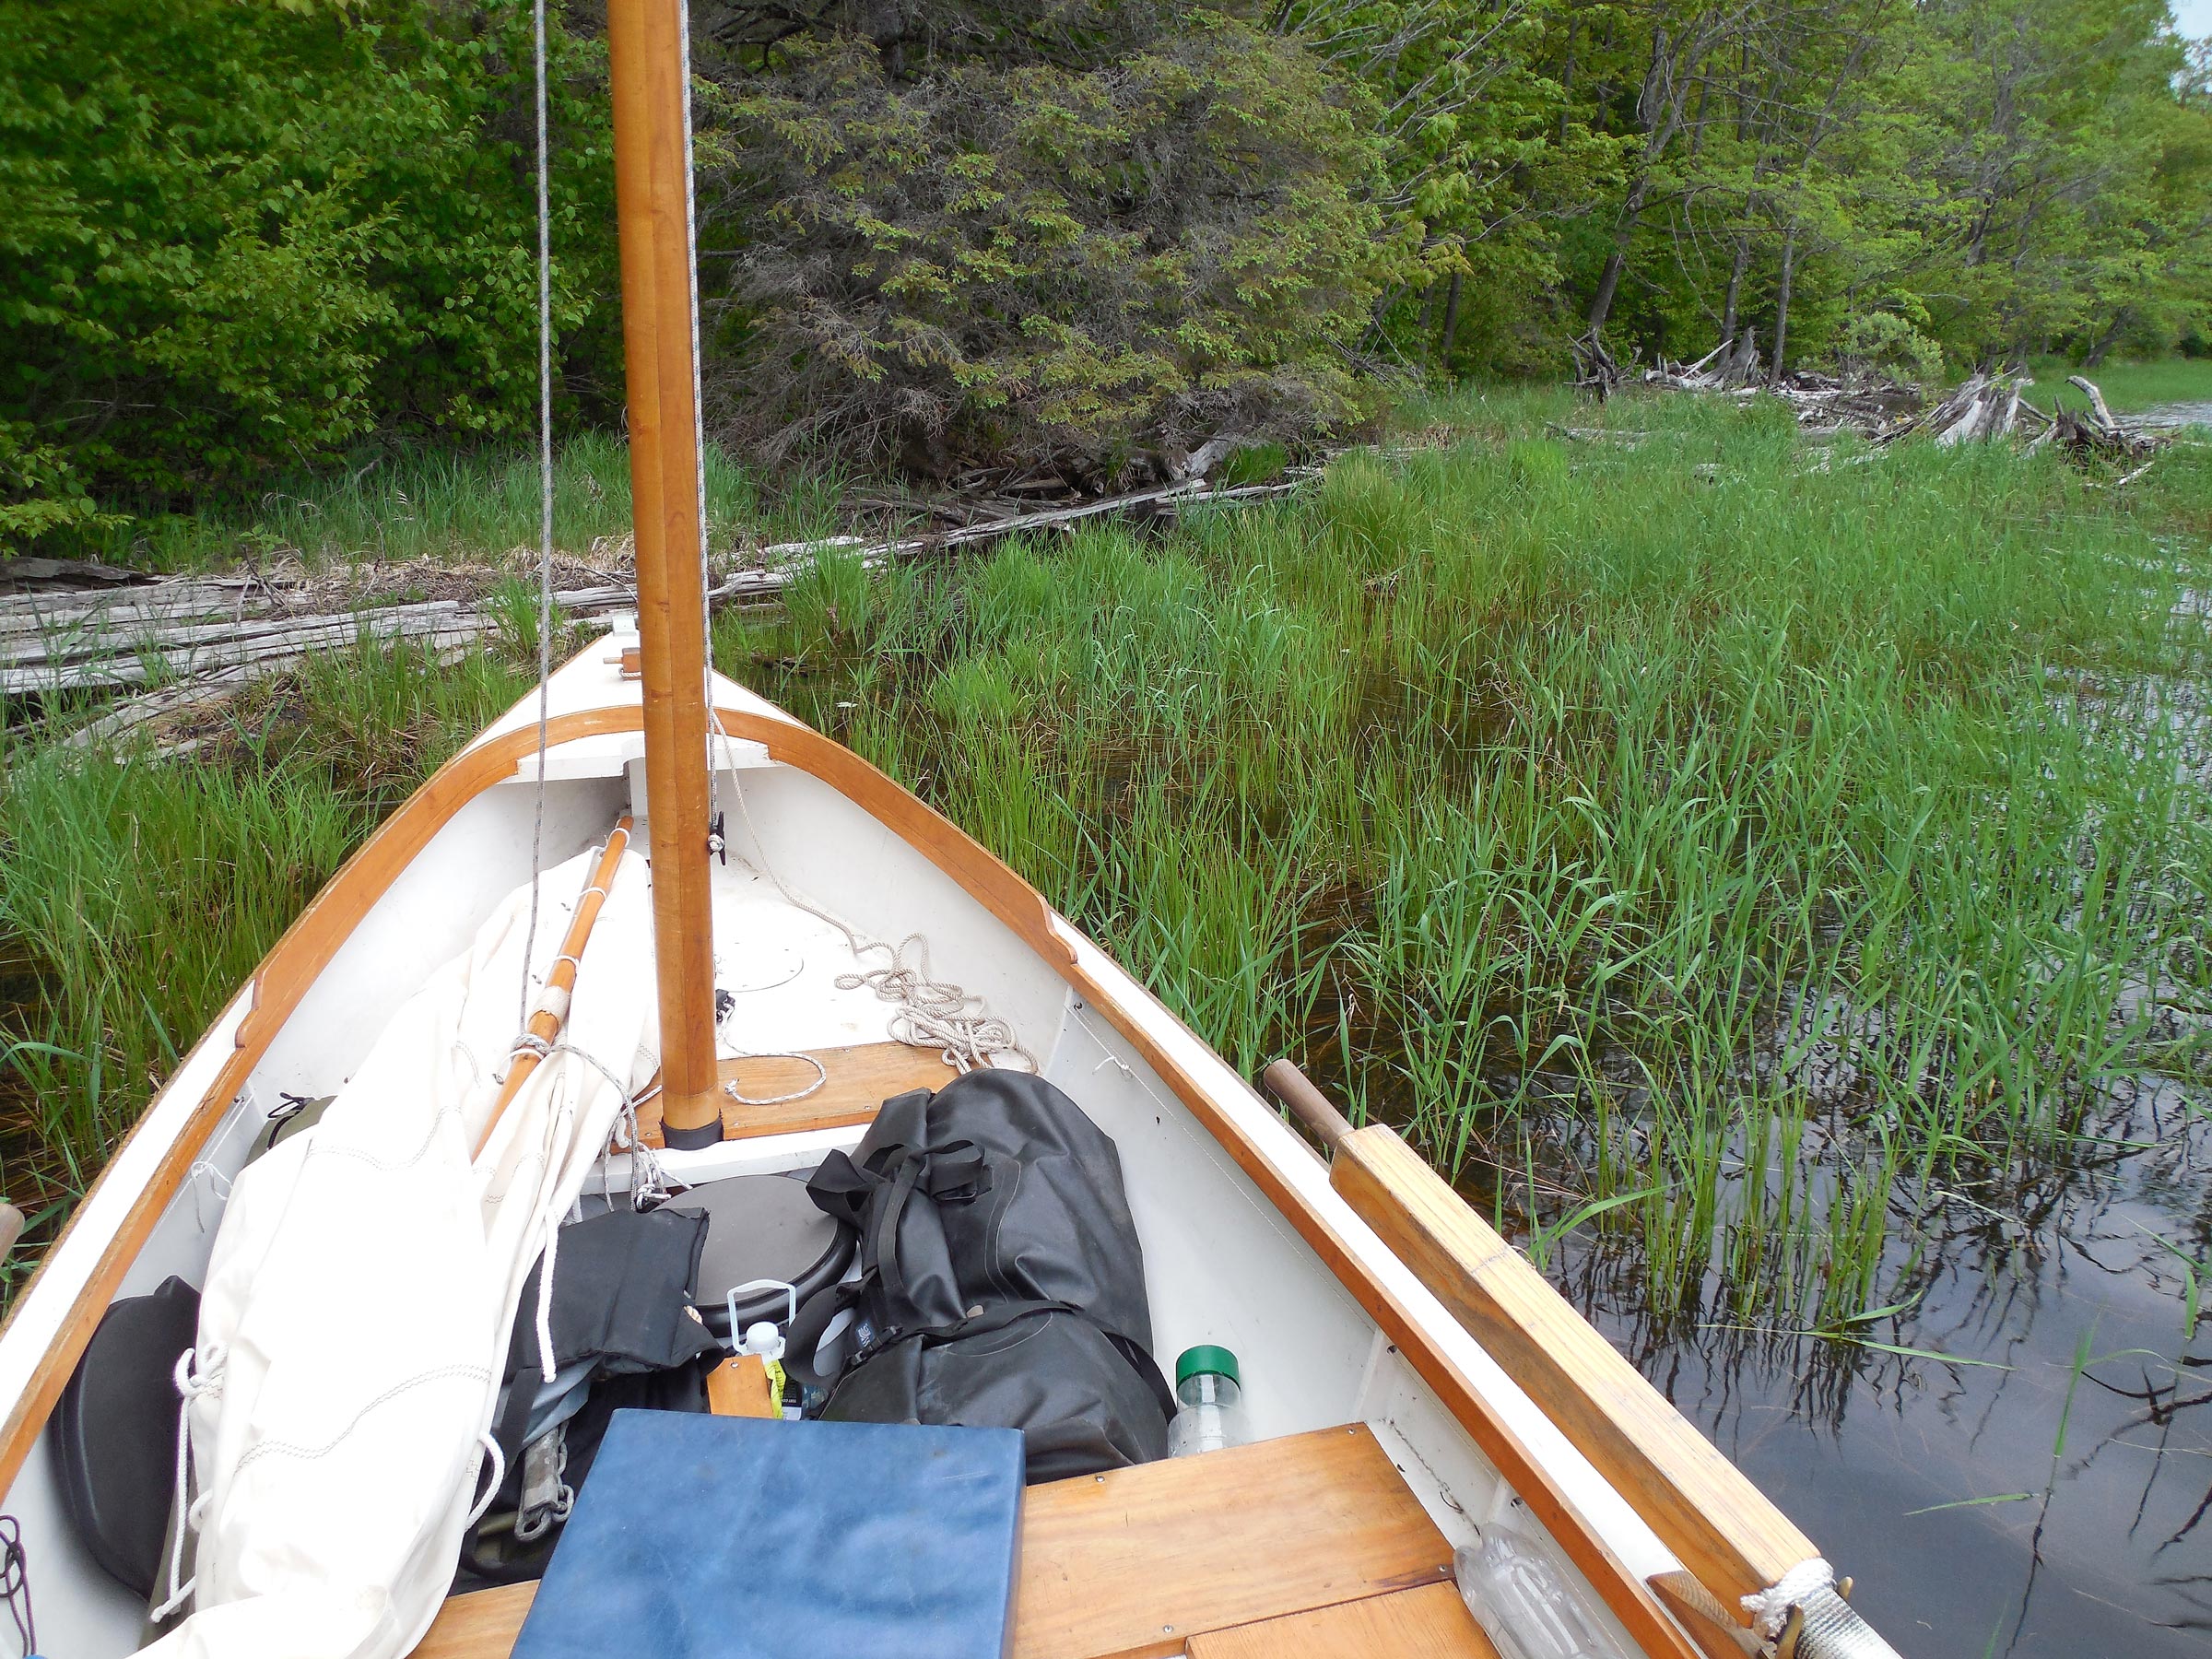
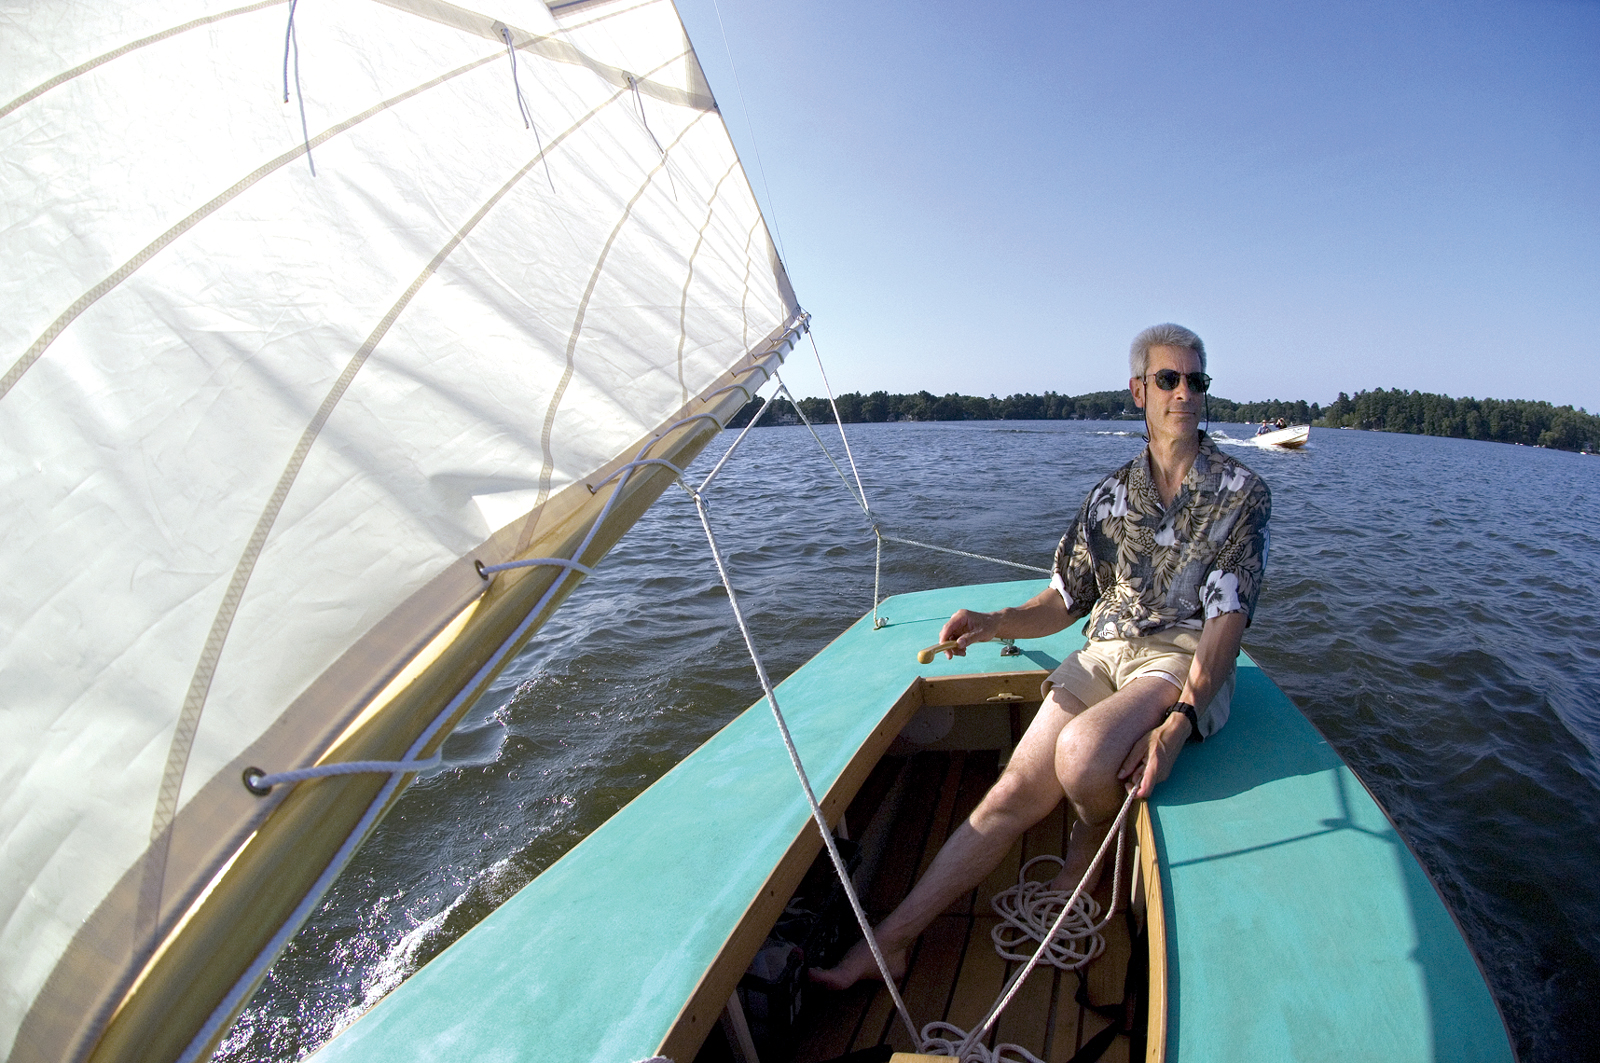
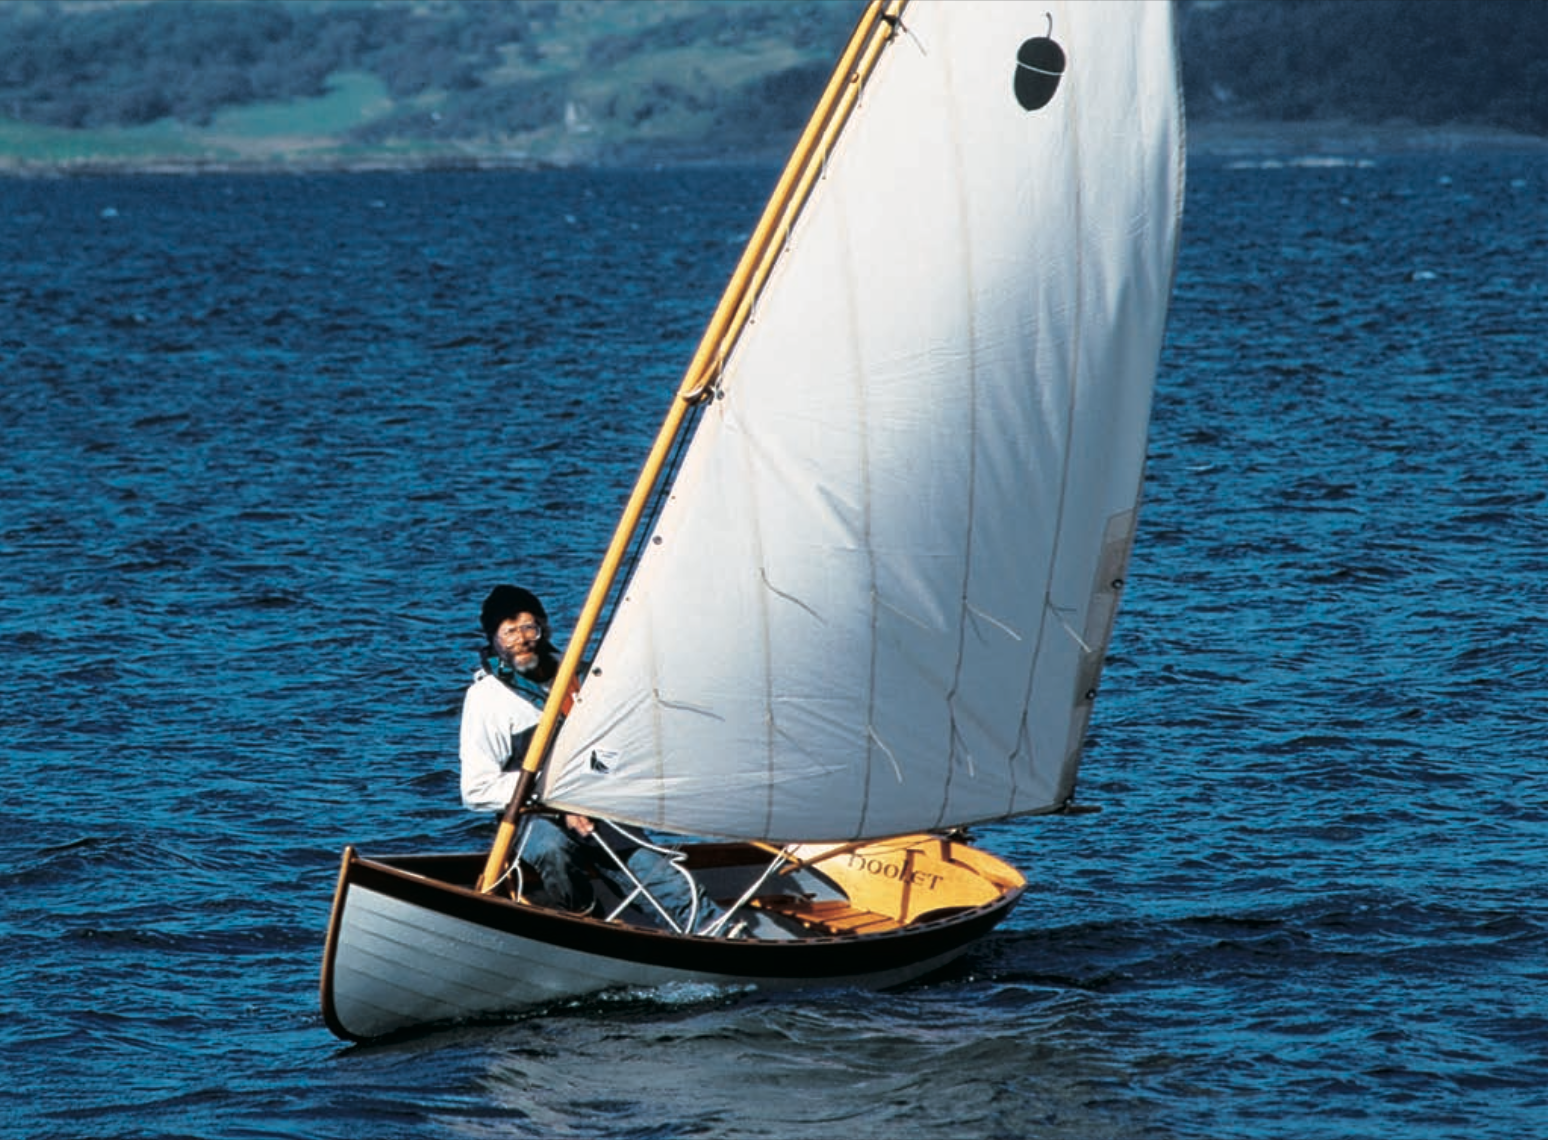
While the lug-yawl rig has the mainmast partner well forward, the plain lug rig option puts the mast partner close to the first thwart, and the forward part of the boat gets a bit busy; when getting aboard, you have to step in carefully. The floorboards do not extend all the way into the bow, and the open area is a good spot for bailing out.
We conducted a capsize test and the Penny Fee, with the flotation installed, floated steadily on her side; righting the boat and getting back on board was a simple matter. Once recovered, the top of the centerboard case was still well clear of the waterline, and the stability was good enough for at least one person to move around in the boat and bail.
Mats Vuorenjuuri
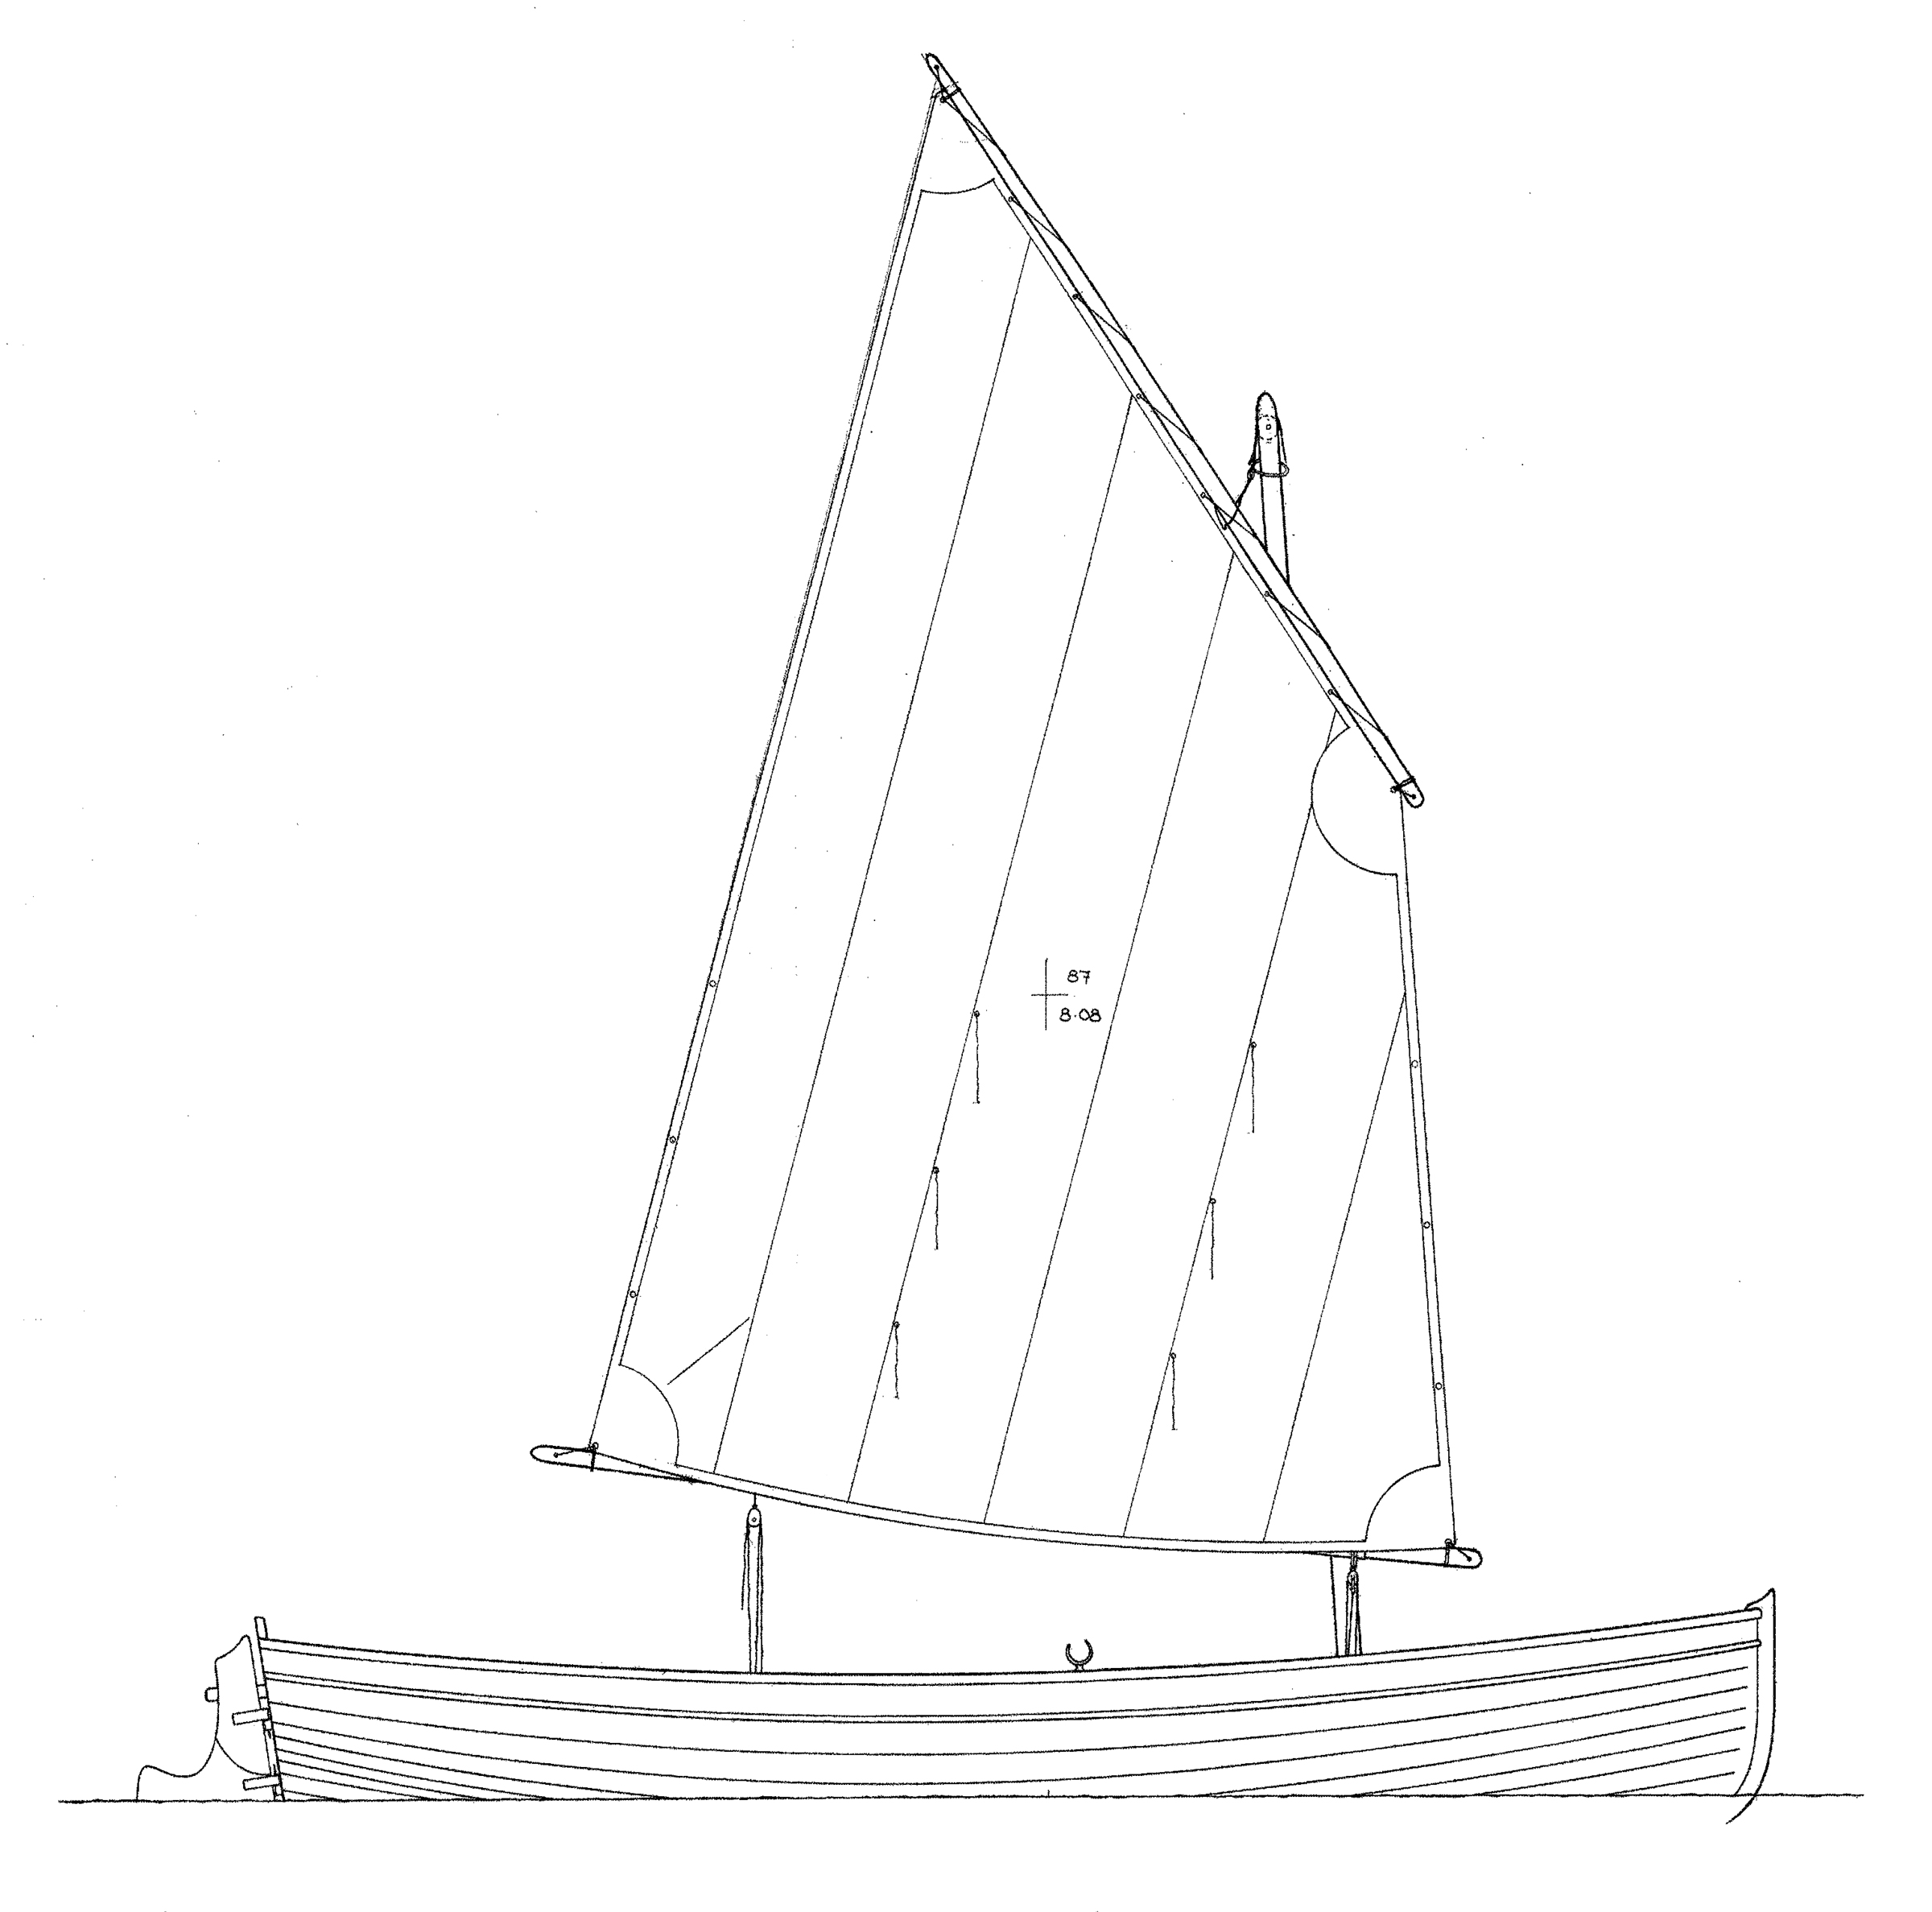
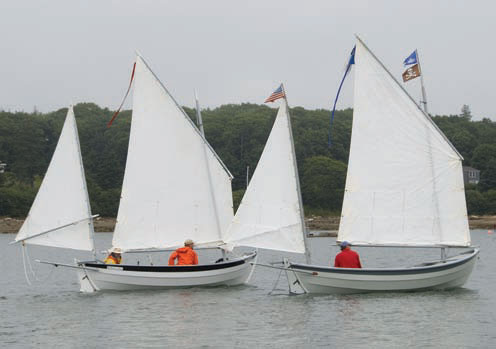
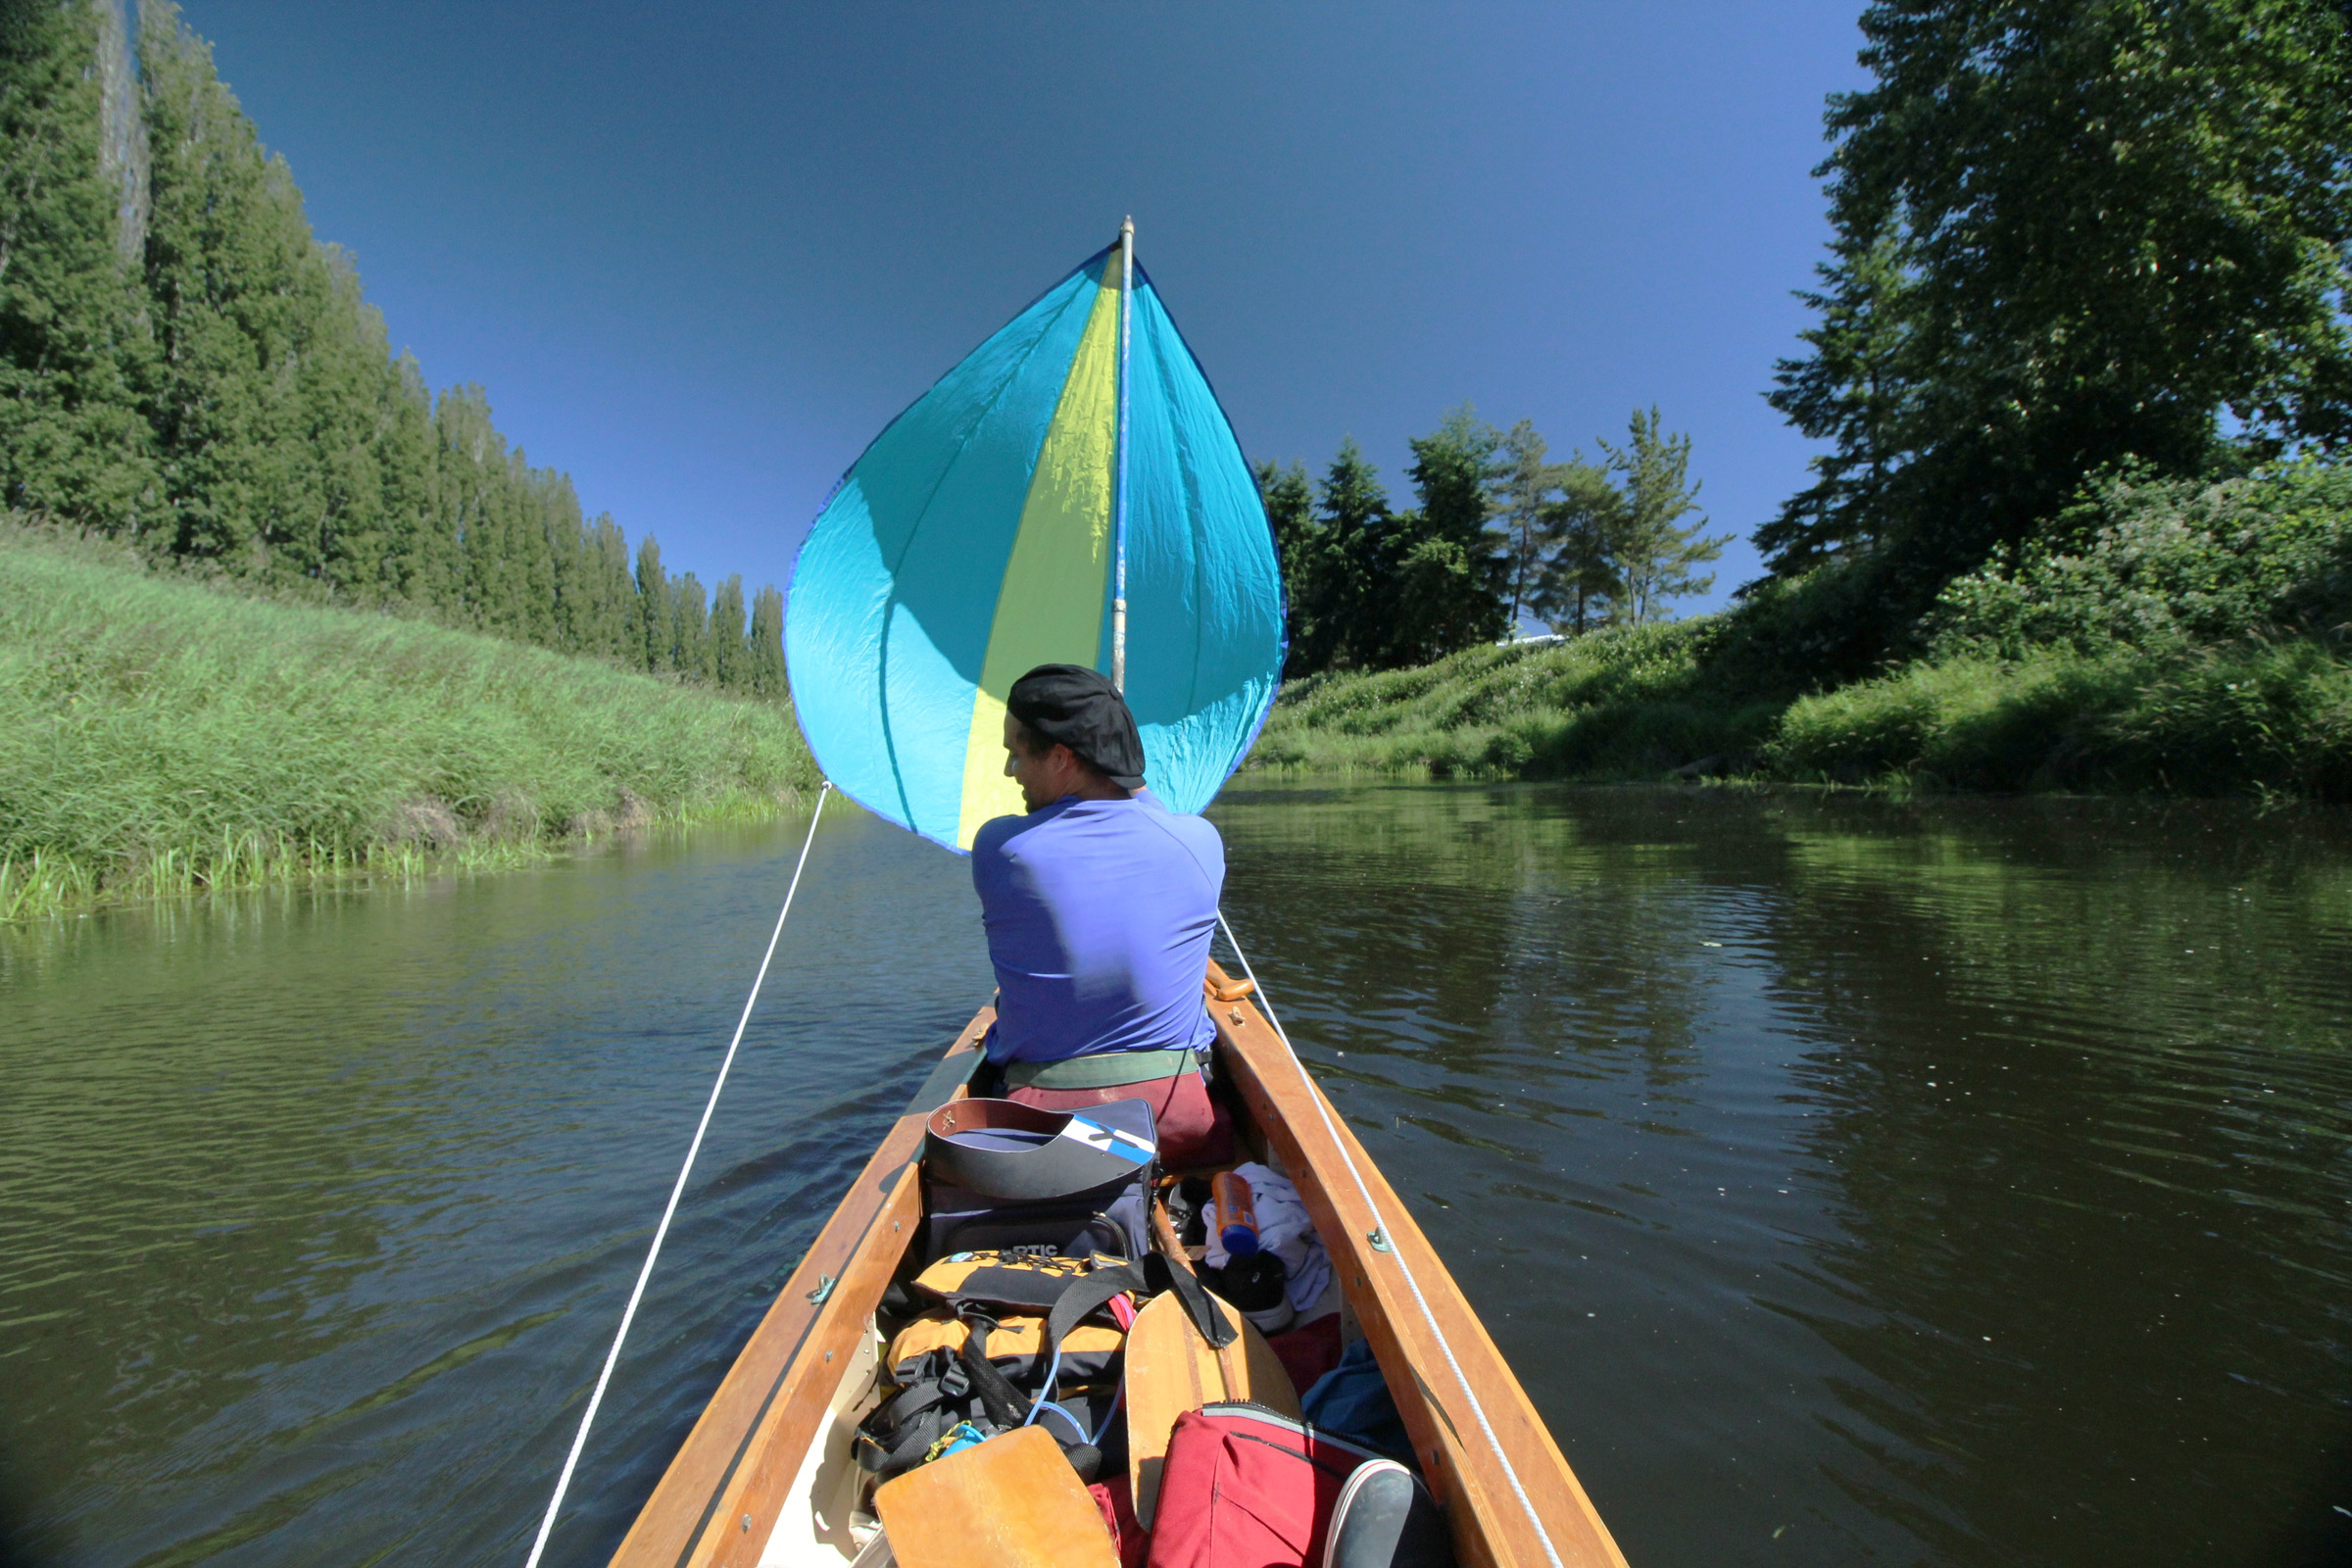
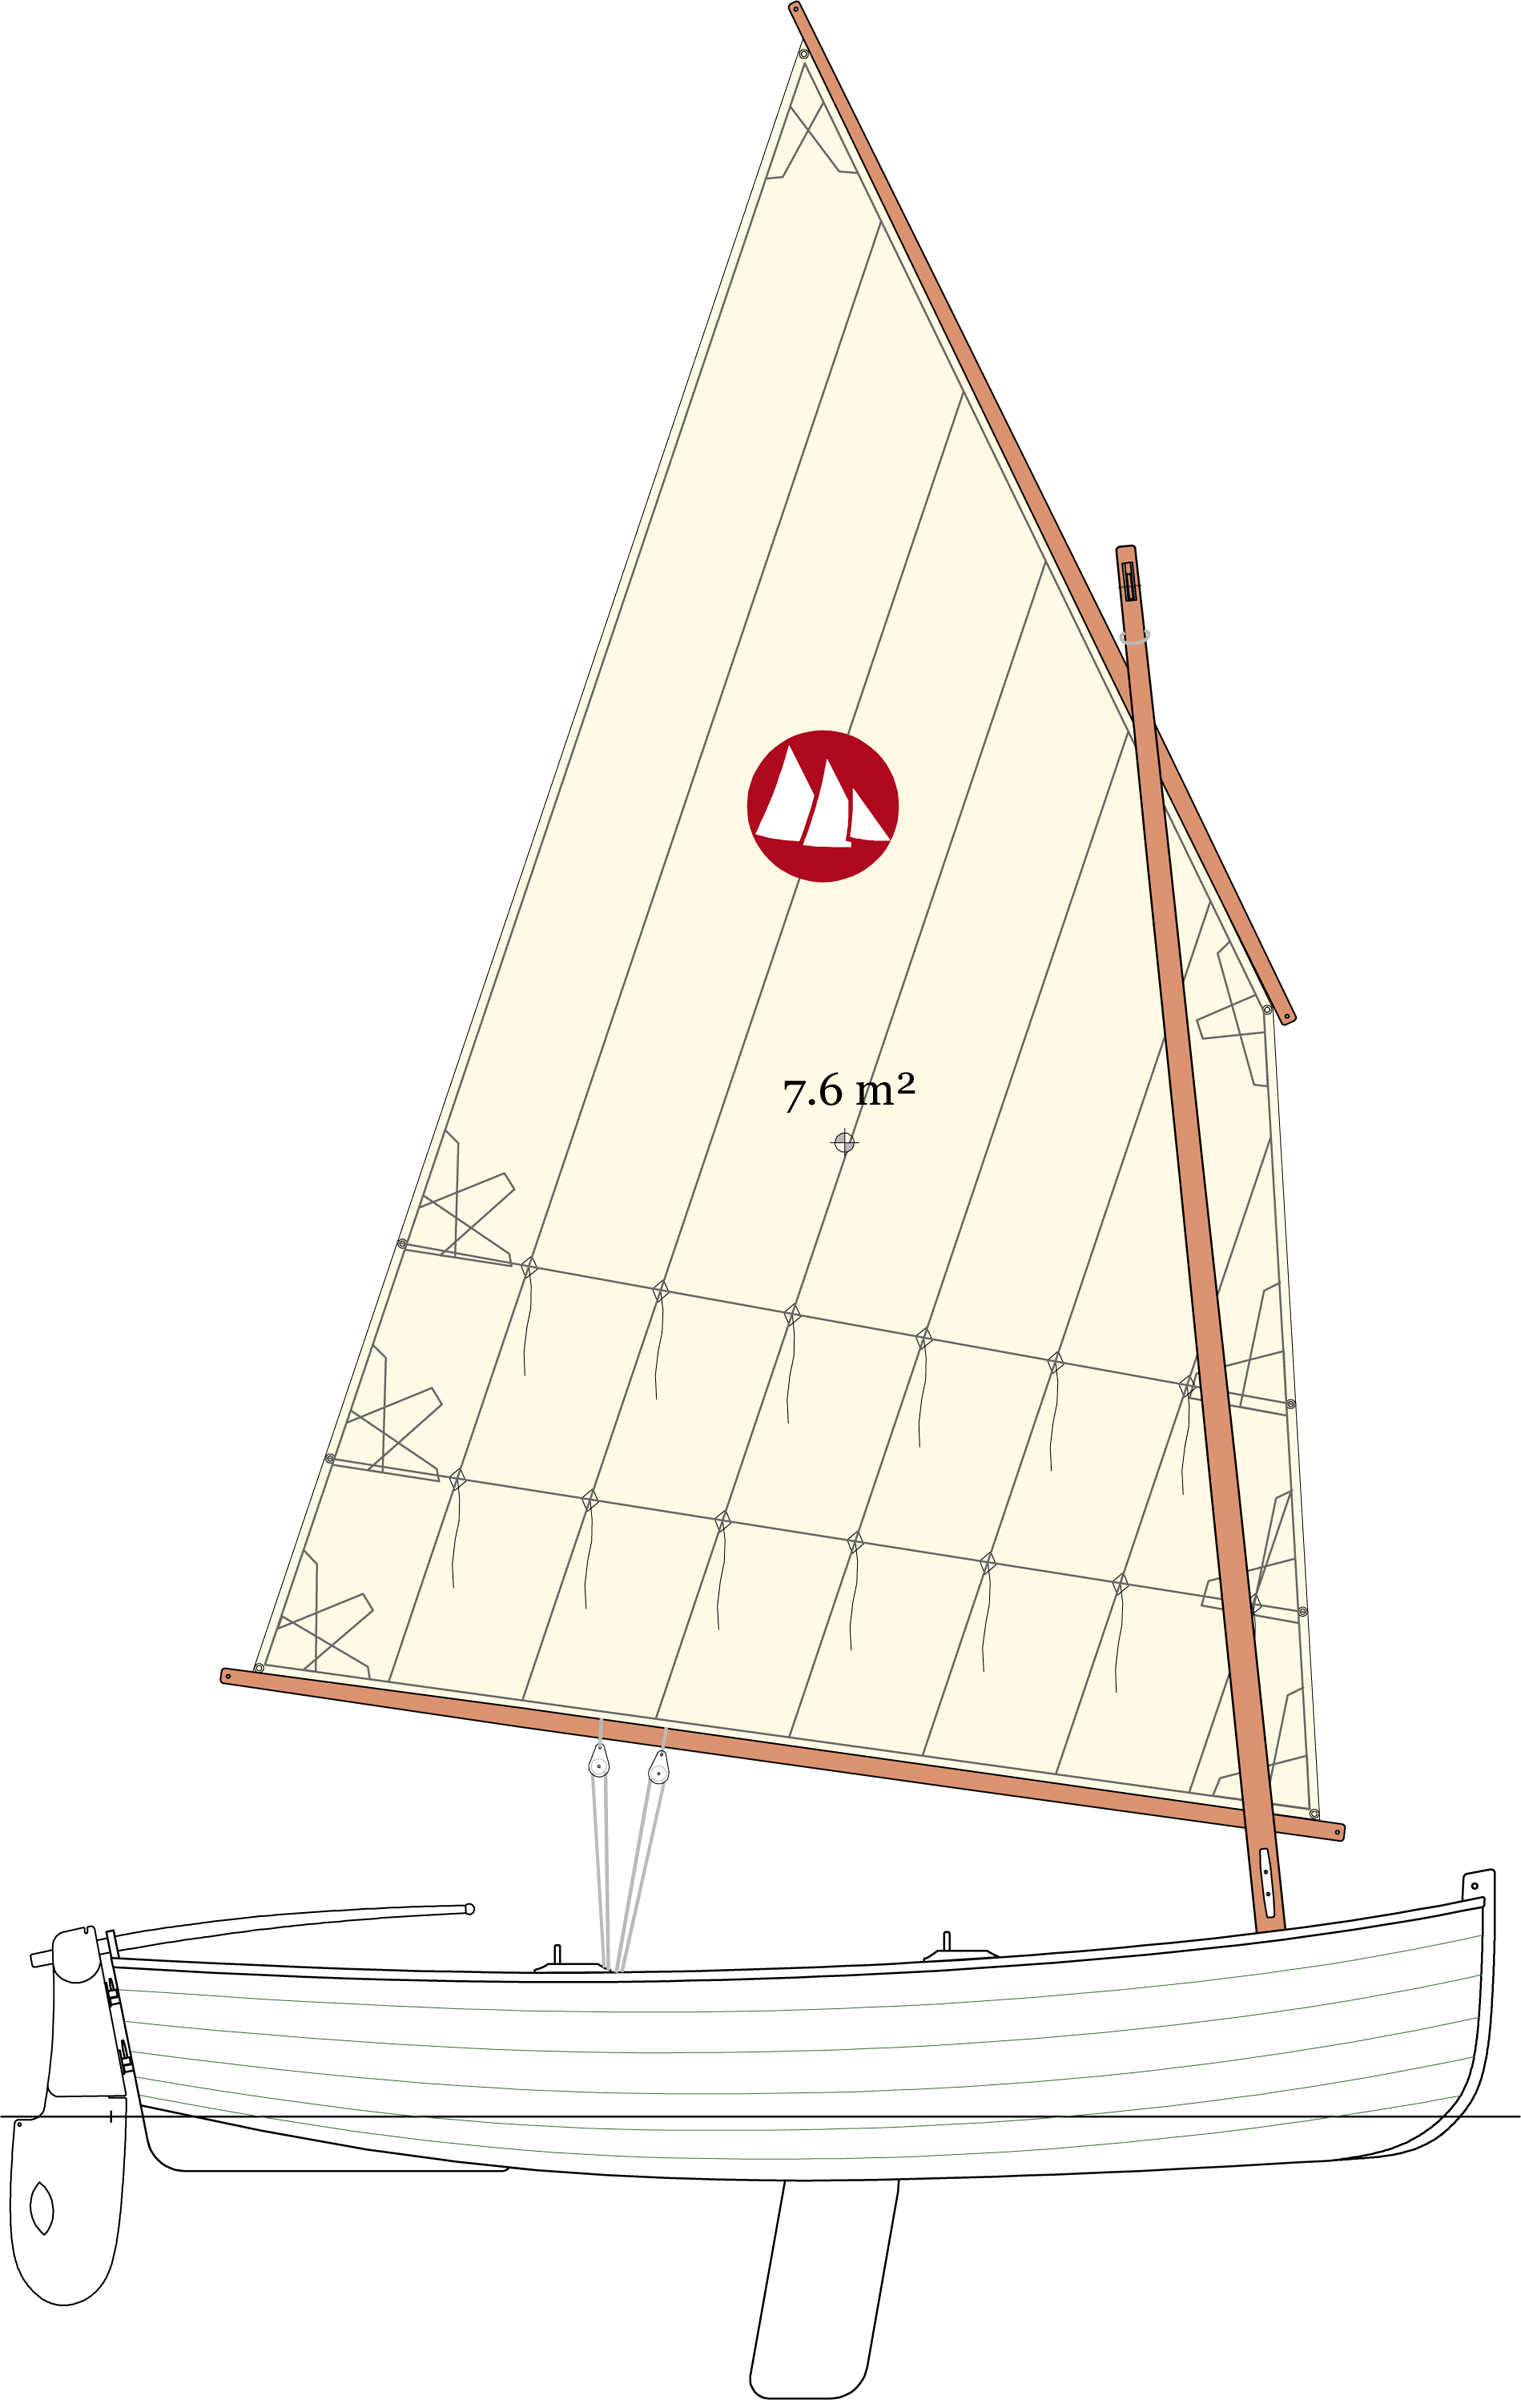
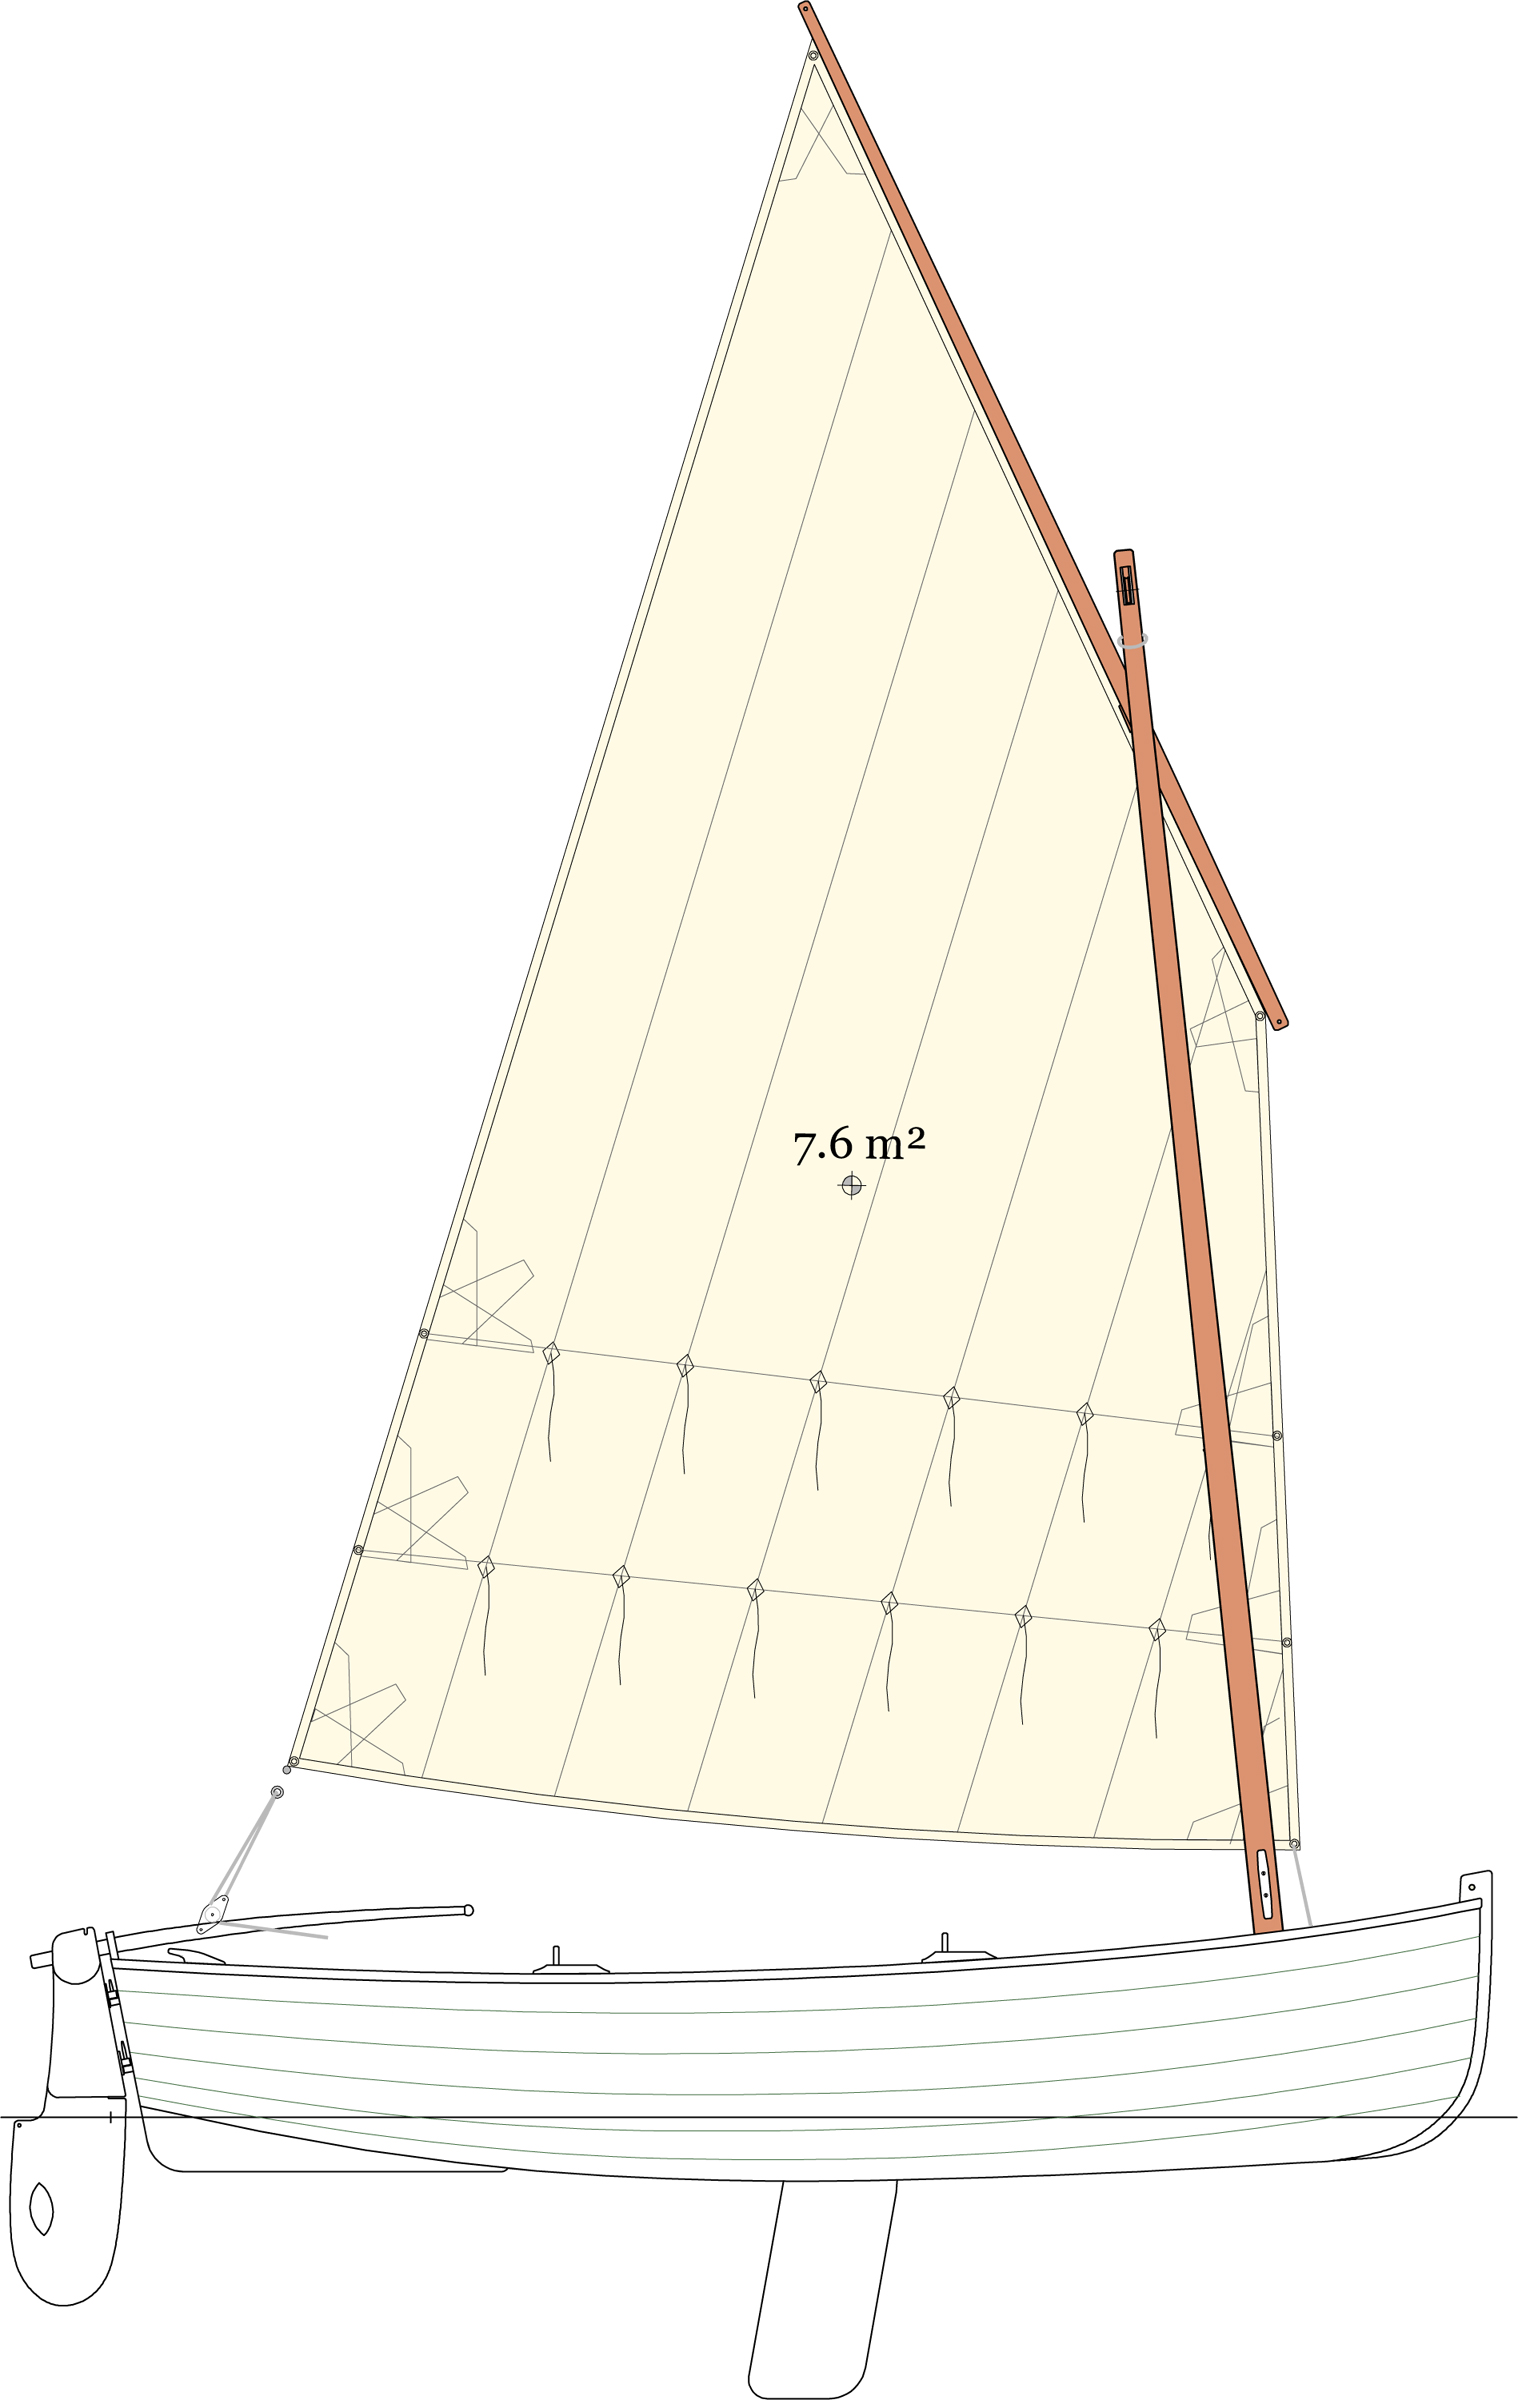
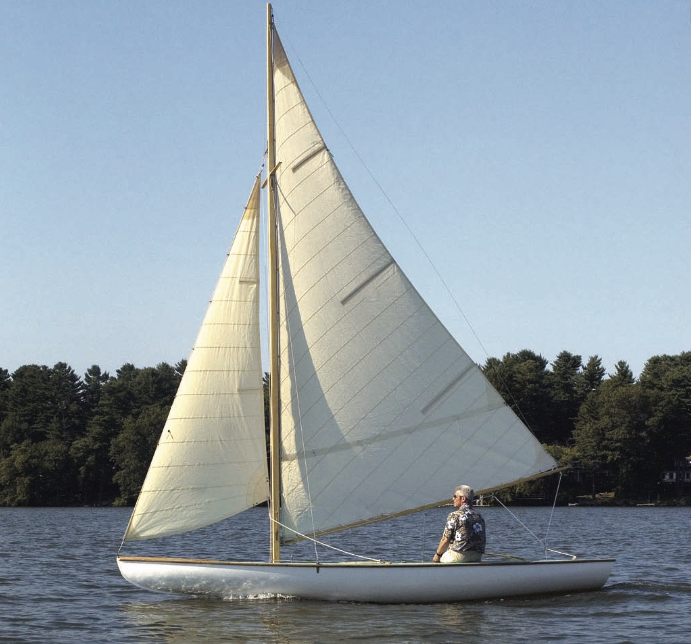
The lug rig is the simplest and the smallest of the rigs
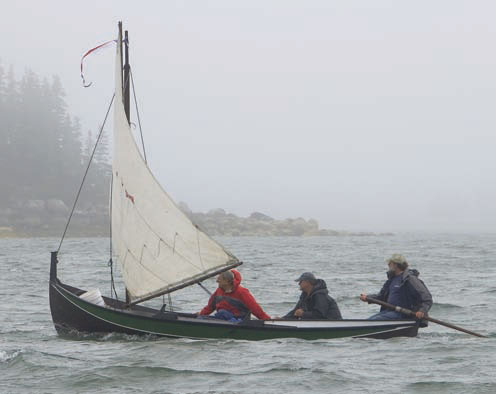
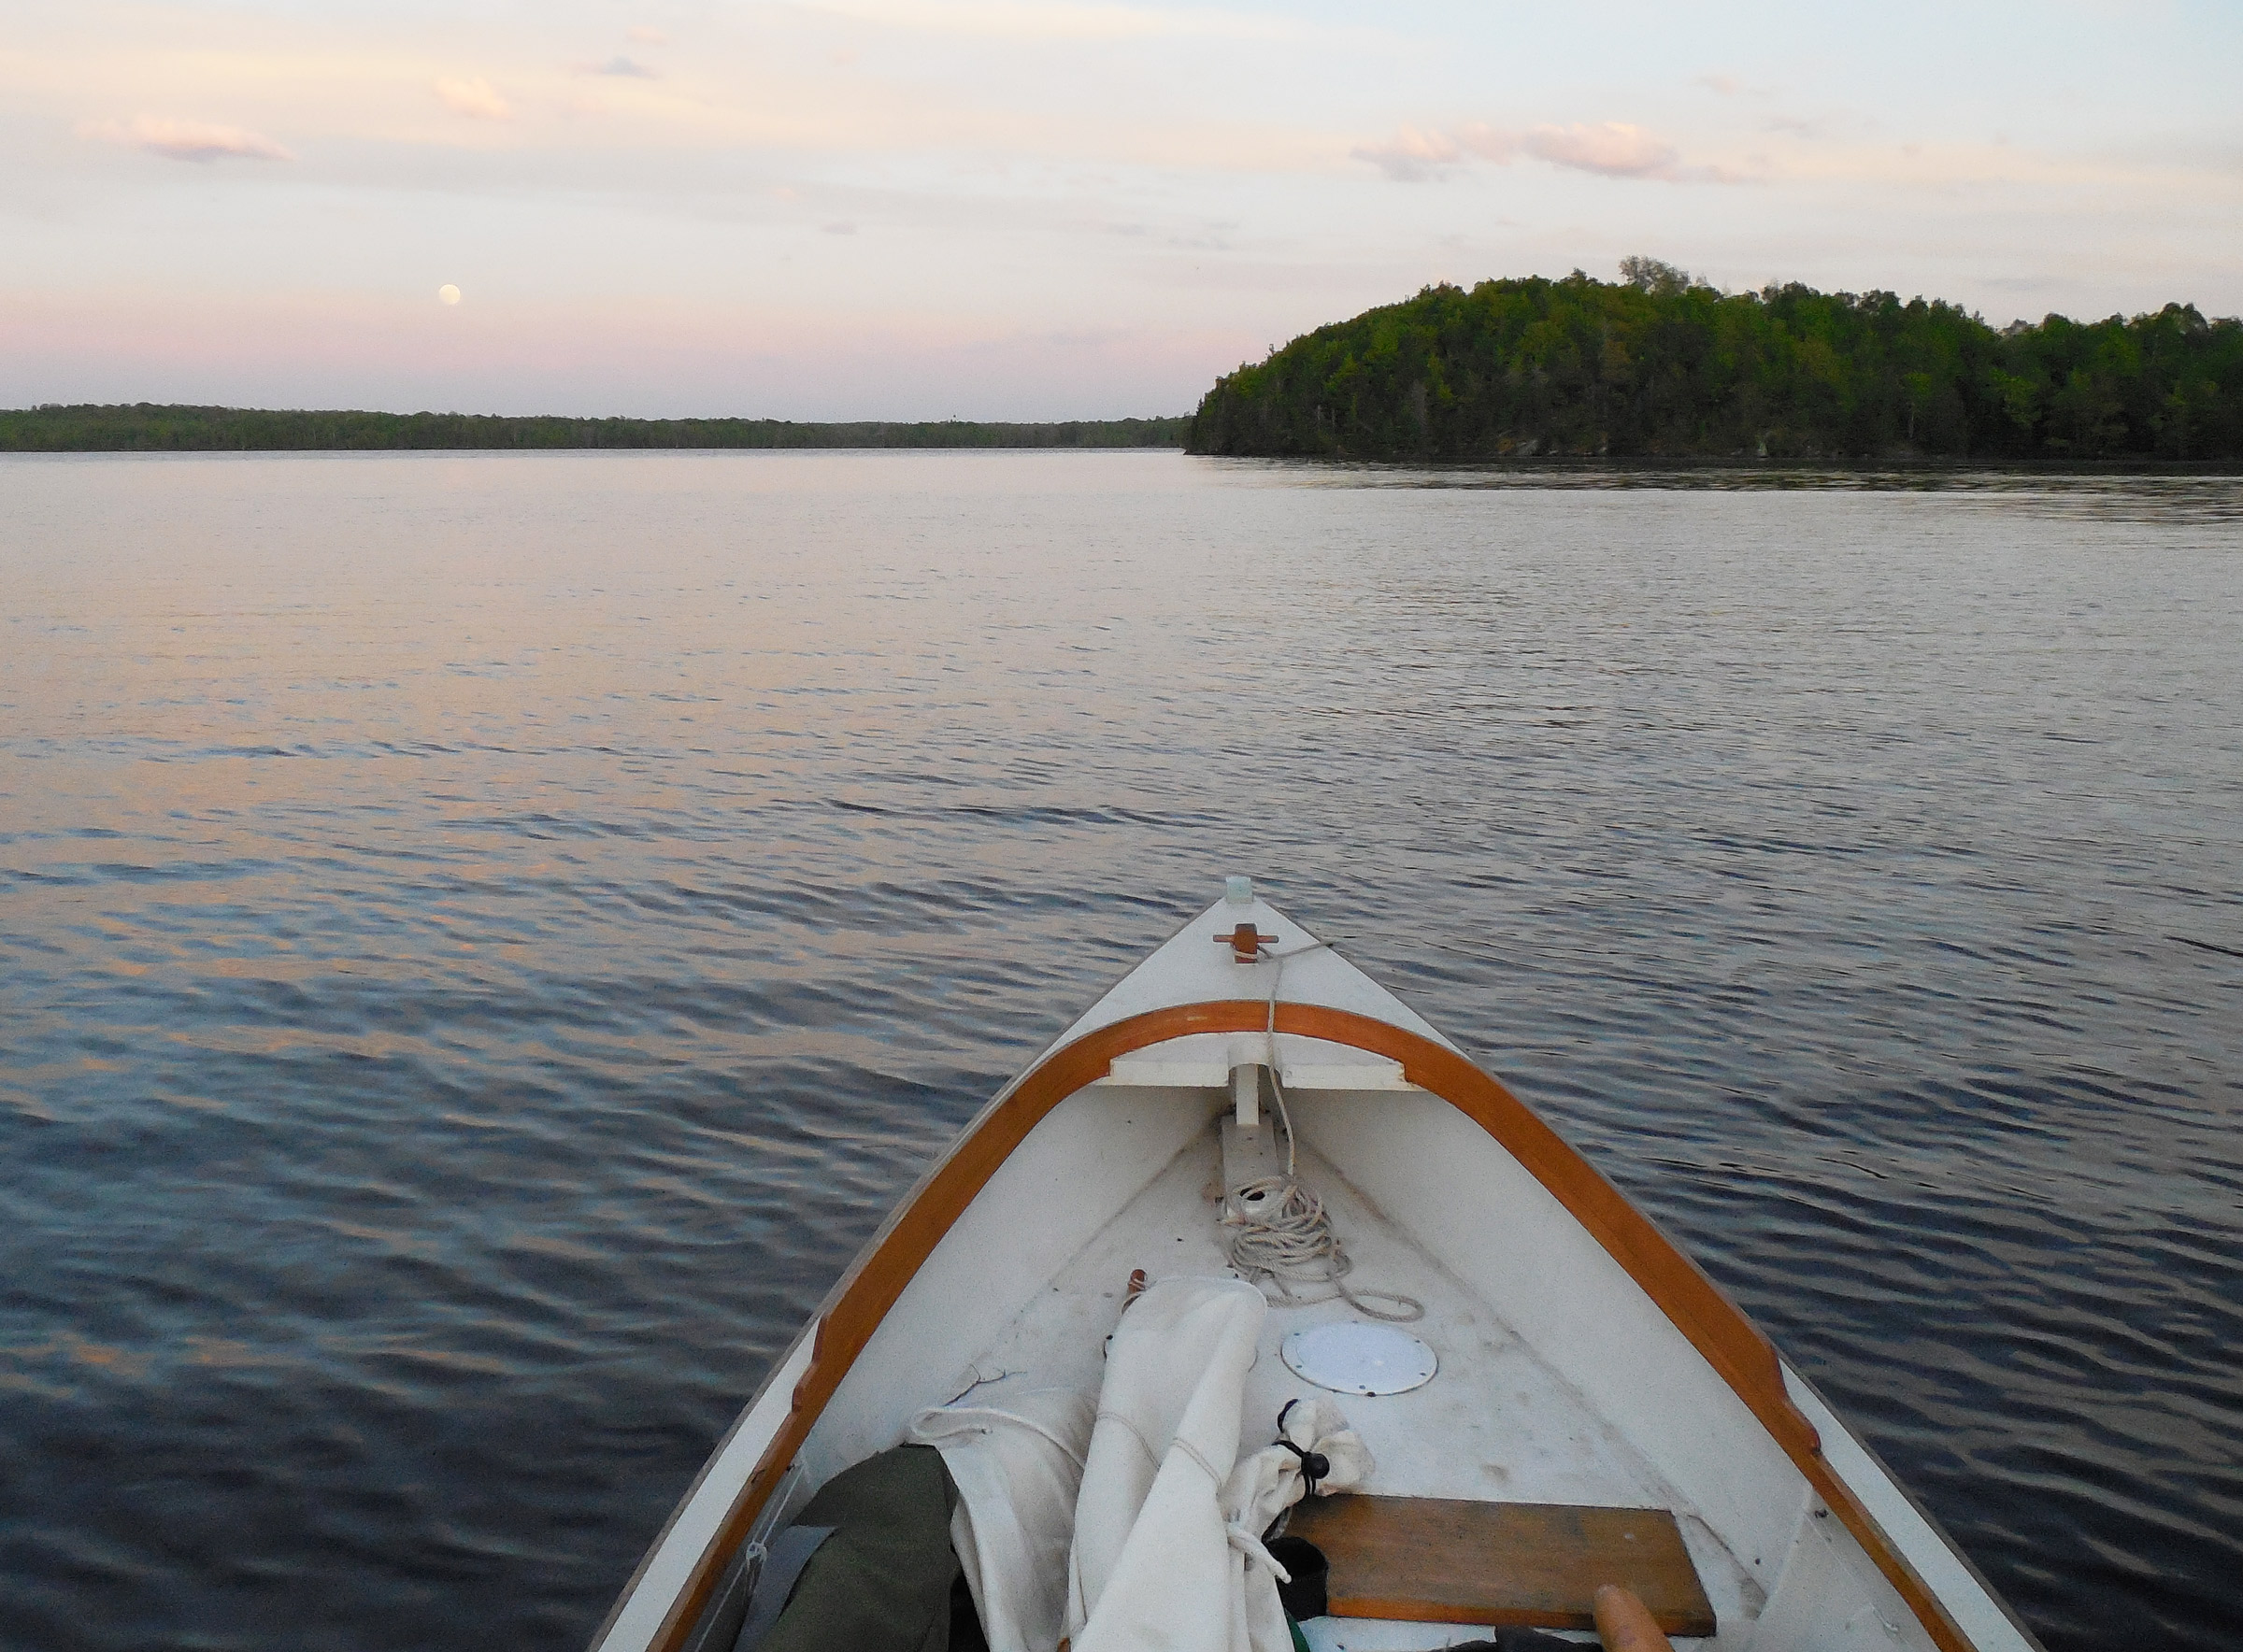
Our first sail was in mild 8- to 10-knot winds, and with three people on board the balance was near perfect, with an almost neutral helm. The sail area seemed to be adequate, giving 3 to 4 1⁄2 knots depending on the point of sail. For more exhilarating sailing, the extra sail area of the gaff sloop or gaff yawl will give you more liveliness and more strings to pull. With the single lugsail, tacking is easy, and the boat turned about quickly enough and didn’t get caught in irons. On a second outing, the wind was even lighter, only 4 to 6 knots, but by trimming carefully and not pointing too high, the Penny Fee glided through the water effortlessly and even had enough speed and momentum for effective tacking. In this wind, if I let go of the tiller the boat had a slight tendency to turn away from the wind. I did not have the opportunity to sail in heavier winds, but the solid stability and modest sail area promise good handling and the ability to carry full sail in moderate breeze with ease.
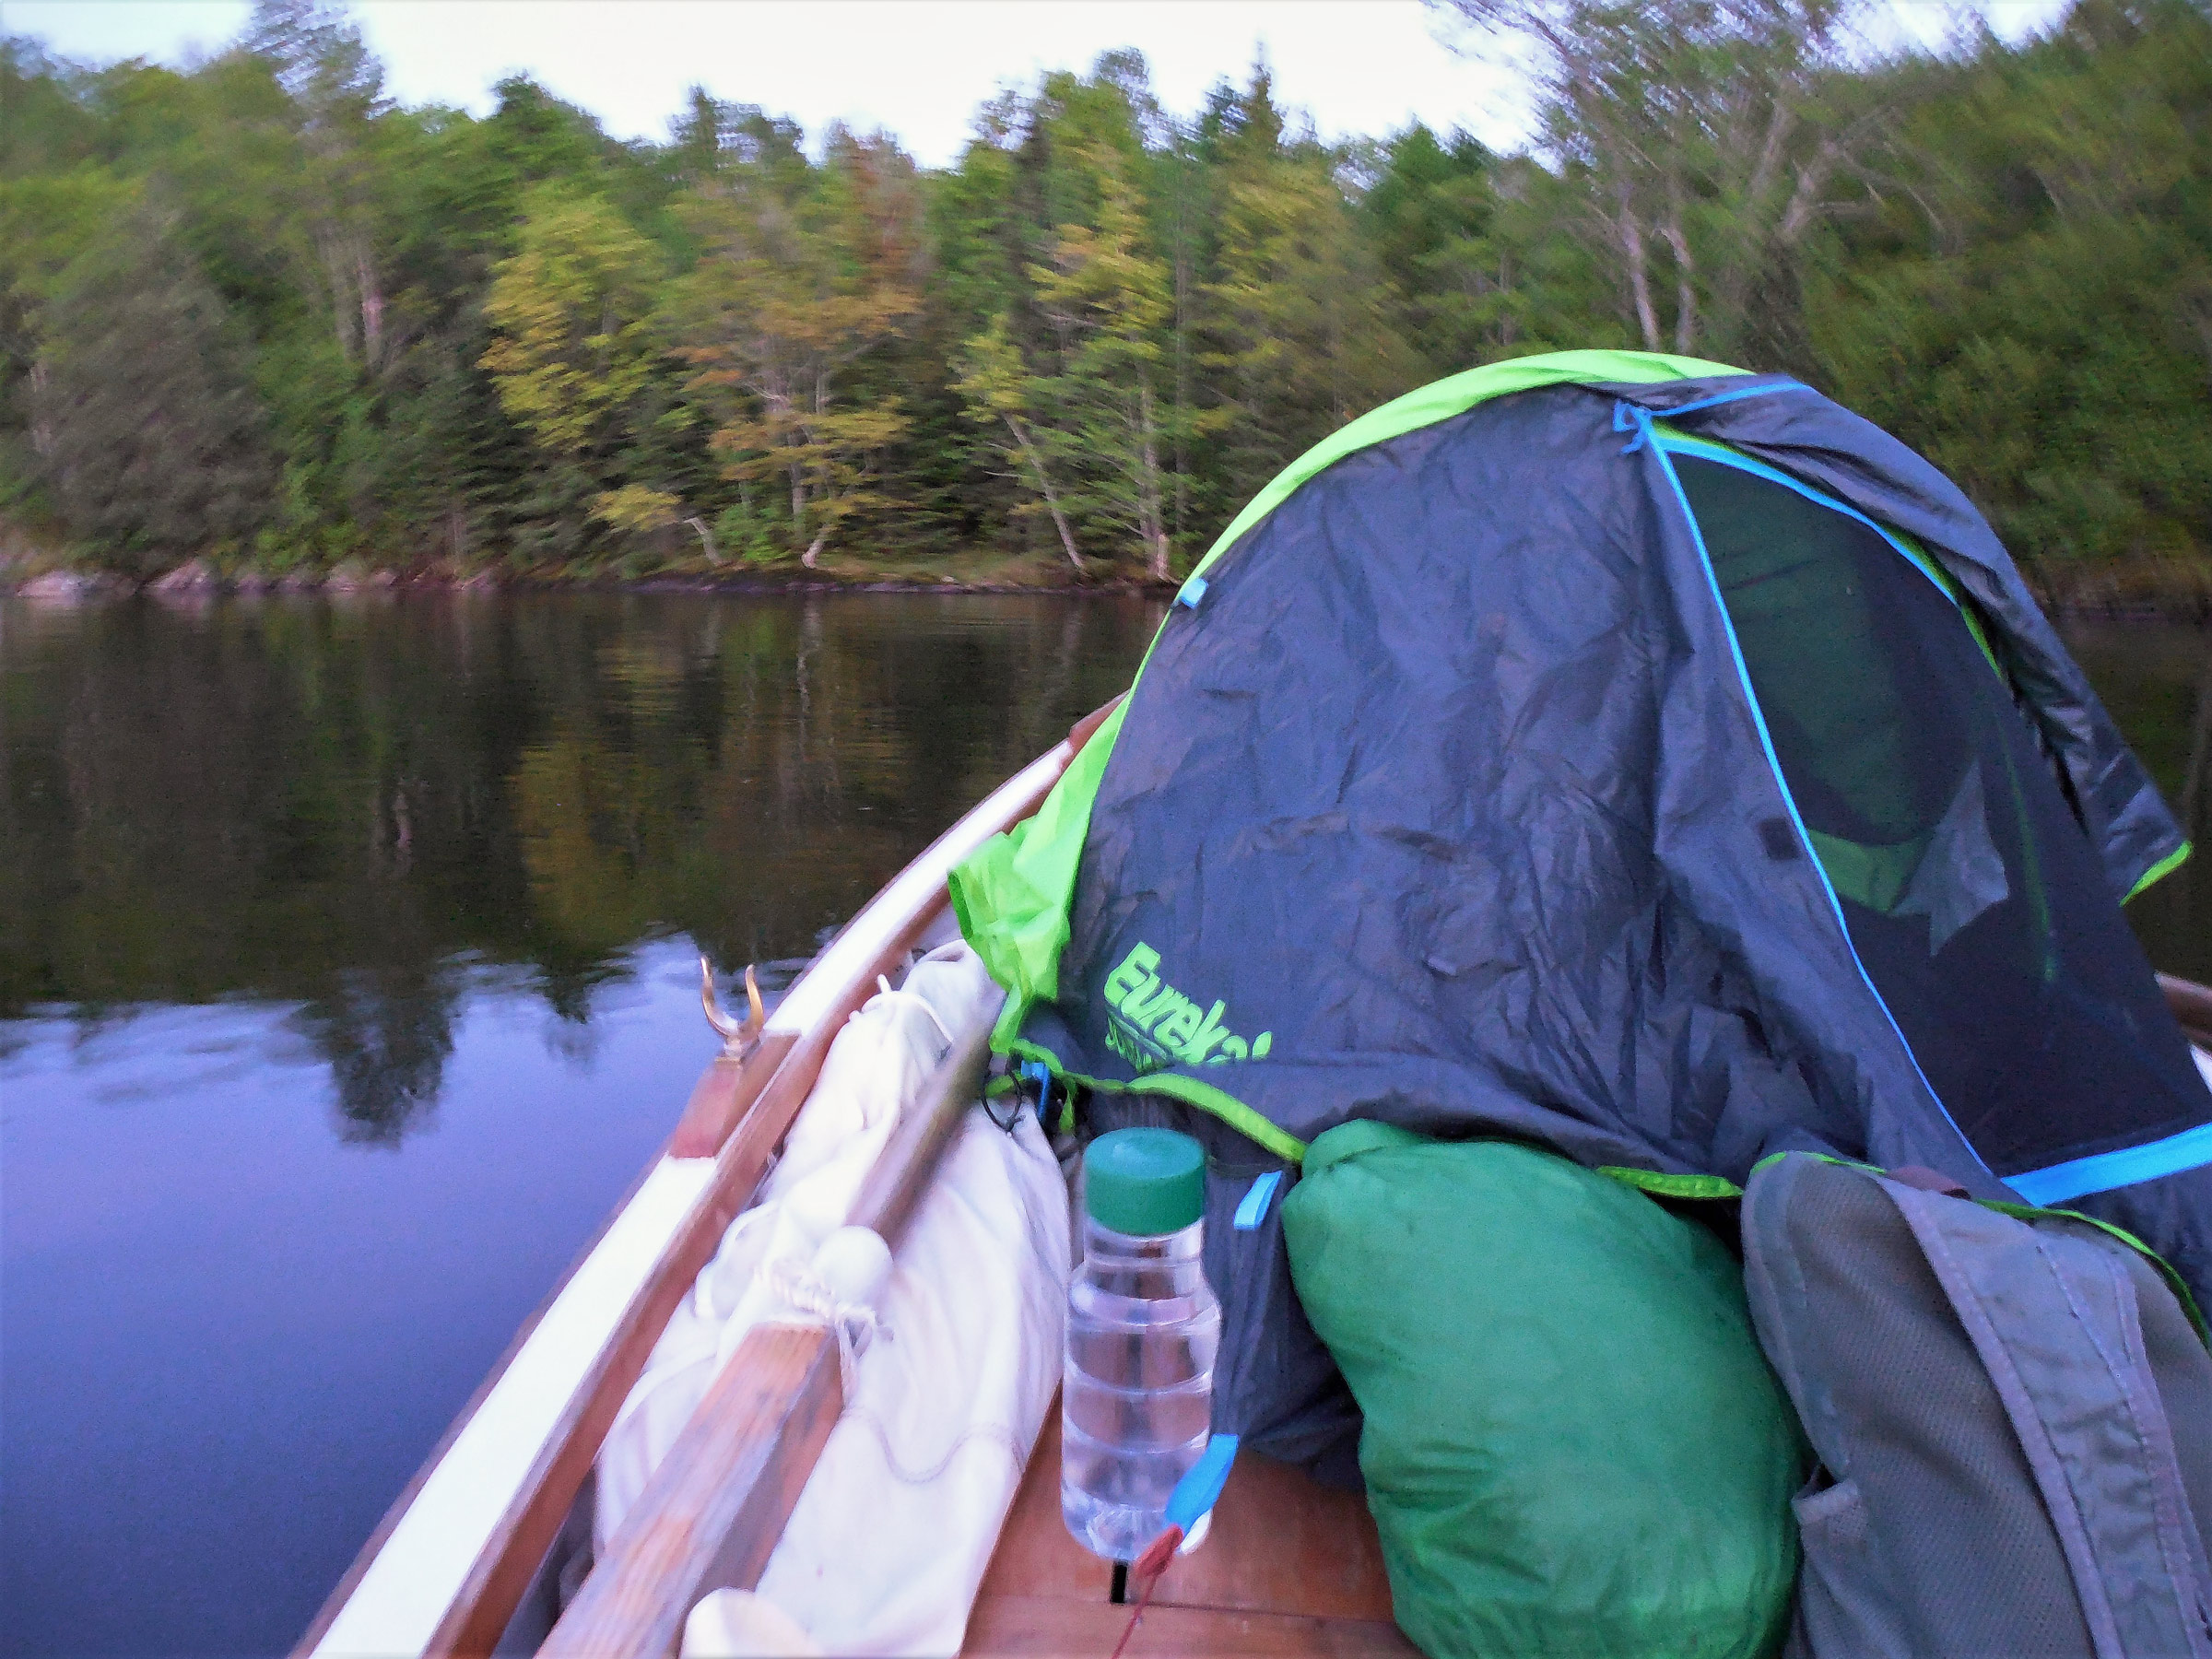
Penny Fee is more a workhorse than a racehorse, and, for camp-cruising with two, the stability and roominess really come into play. Building a Penny Fee takes some effort, but the result is an able, traditionally stylish, and handsome vessel that will serve many uses well: rowing, sailing, fishing, or cruising.
Mats Vuorenjuuri discovered the simplicity and joy of small boats after sailing various types of craft including sail-training schooners. The father of three, in 2019 Mats started building modern glued clinker plywood boats professionally and offered maintenance services through his business Nordic Craft. His son Akseli, joined him as an apprentice in 2022, and Iain Oughtred’s timeless but modern designs have been the backbone of their business. For more Iain Oughtred reviews by Mats, see “Elf,” “Elfyn,” and for some of Mats’s own adventures see “The Sea of the Sámi People,” and “Sailing the Archipelago Sea.”
Penny Fee Particulars
Length: 15′ 11″
Beam: 5′ 3″
Depth: 22 1⁄2″
Displacement: 300 lbs
Skill level: Intermediate to advanced, no lofting required
Construction: Glued lapstrake plywood, traditional, cold-molded, and strip plank.
Sail area:
Lug: 87 sq ft
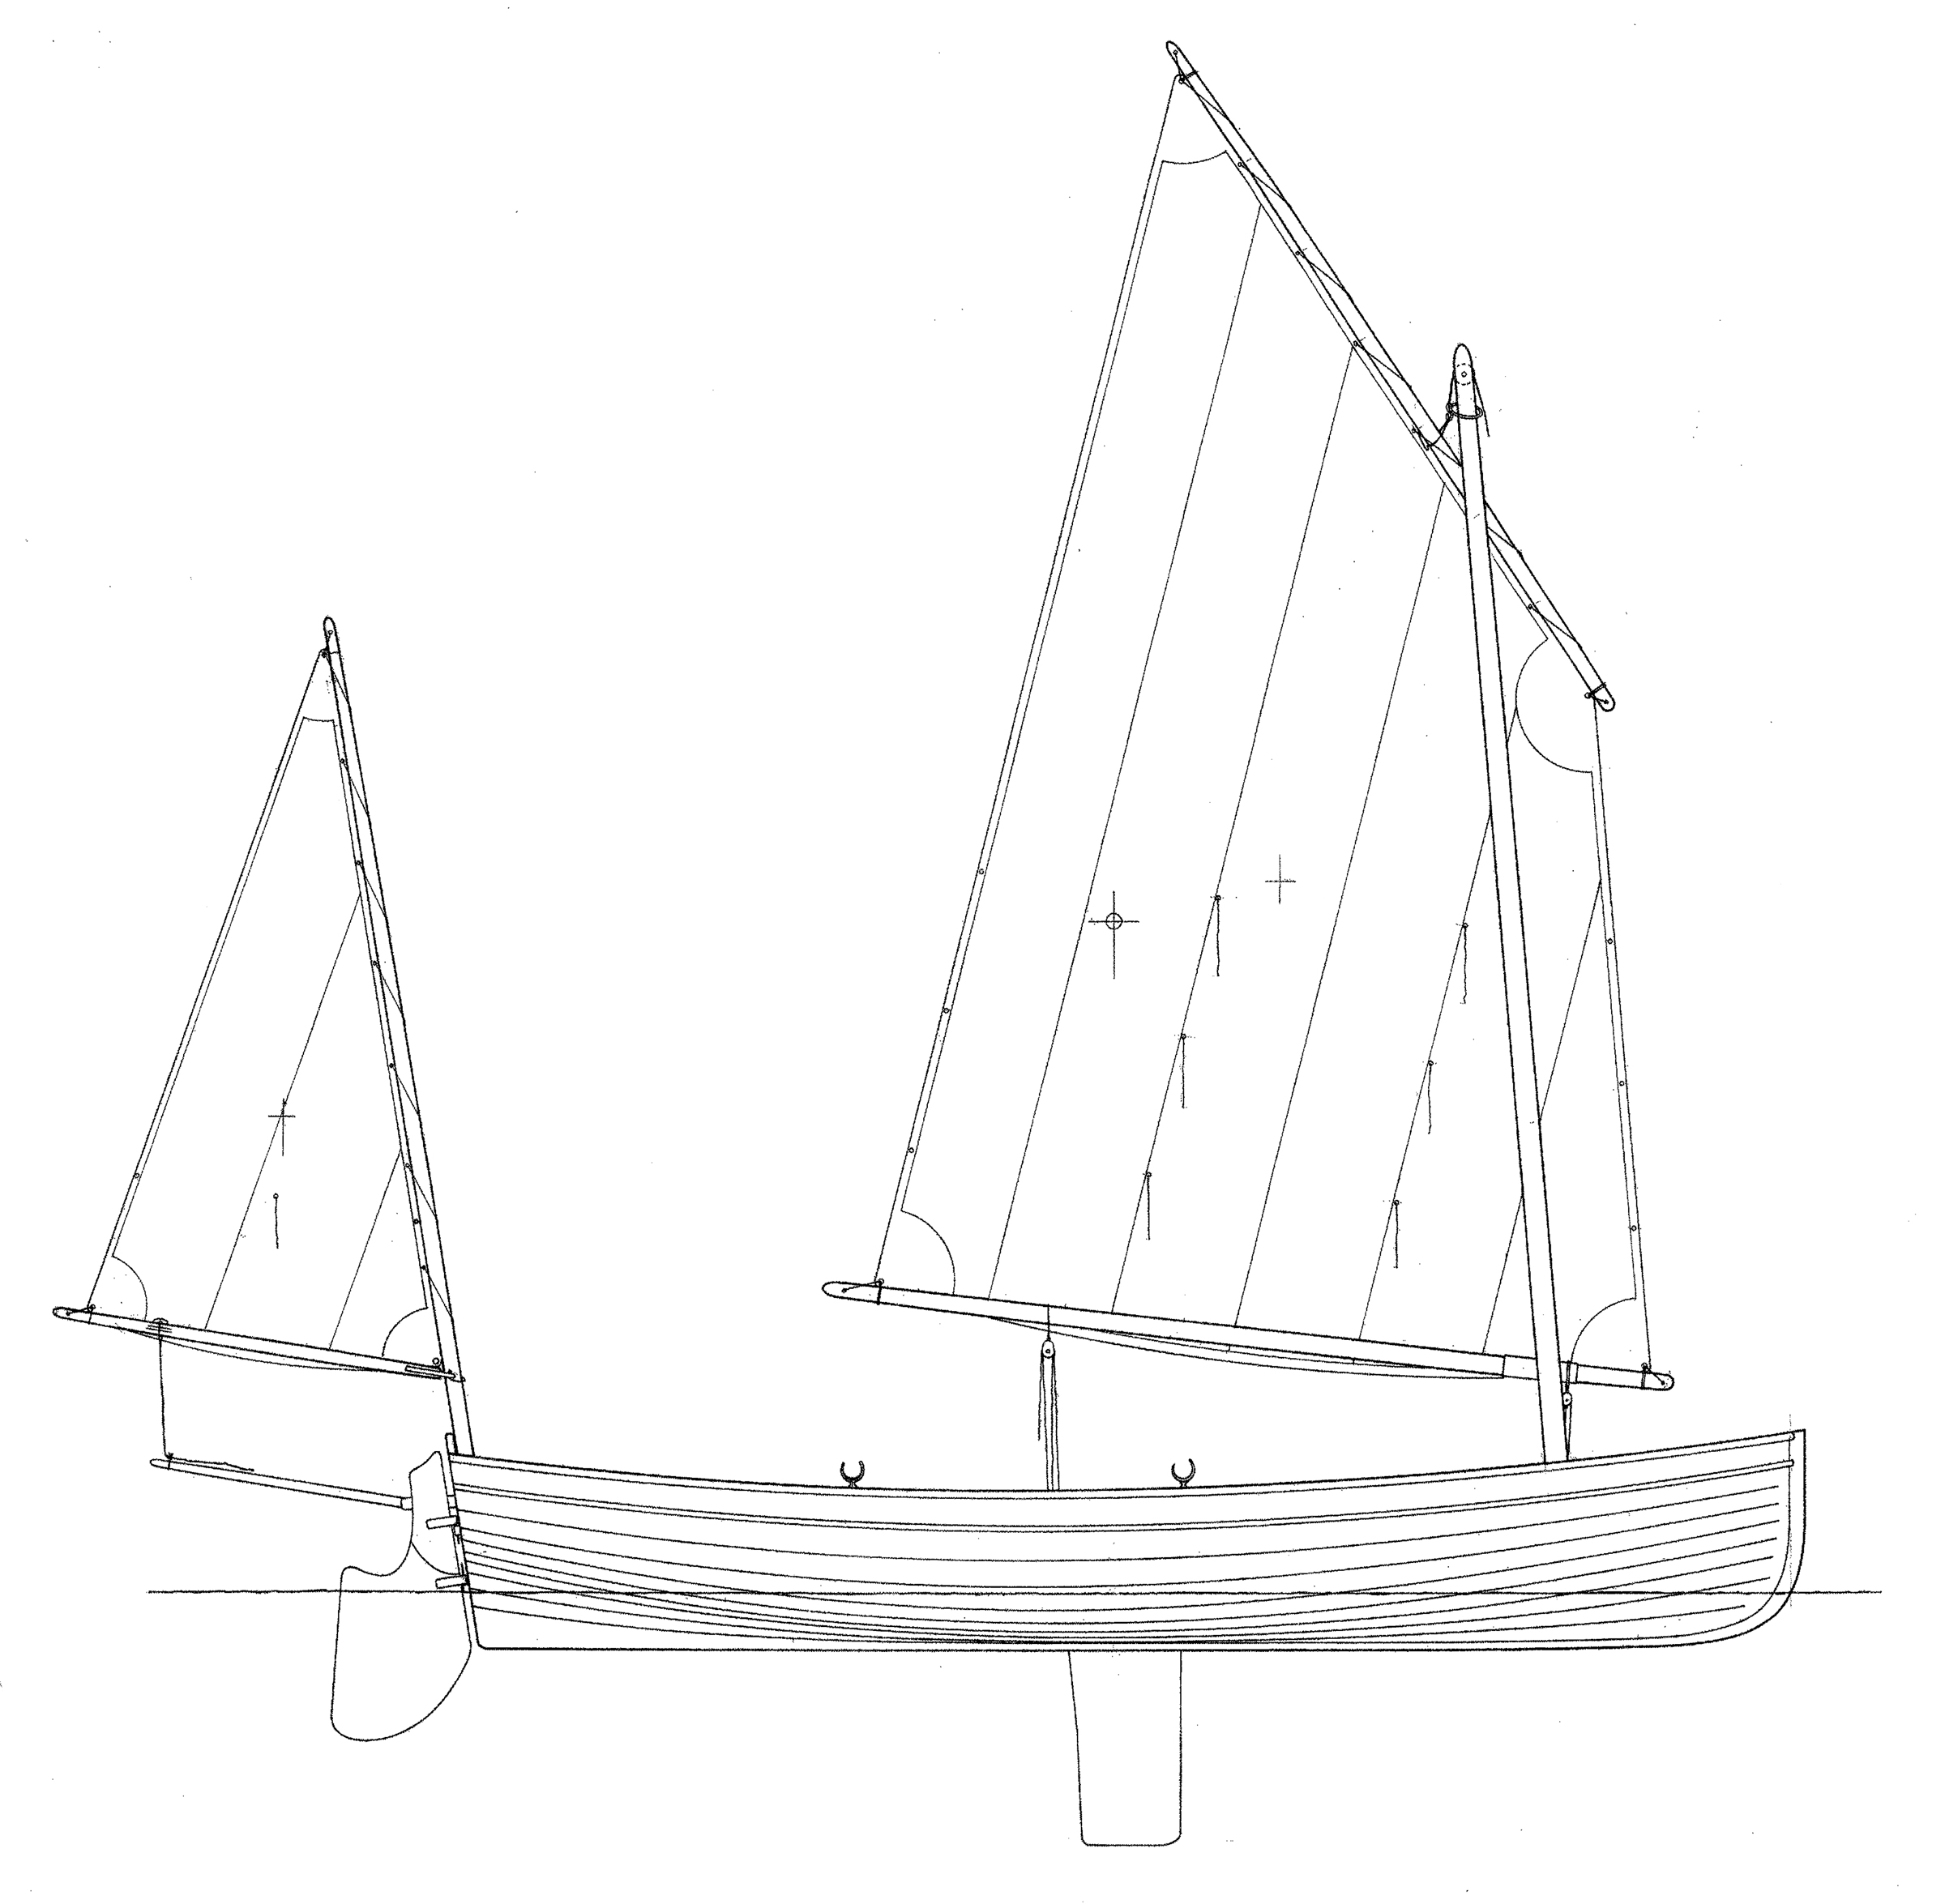
Lug yawl: 104 sq ft
Gaff sloop: 104 sq ft
Gaff yawl: 121 sq ft
This year, a helicopter developed by a team of young NASA engineers flew on Mars and became the first vehicle to fly successfully in the atmosphere of another planet. The technicians famously proclaimed the initial hop to be their “Wright Brothers moment,” and compared the Martian flight to the first sustained powered aircraft flight by Wilbur and Orville Wright in 1903. The eureka feeling of satisfaction stemming from such an accomplishment is difficult to describe to anyone who has never dreamed, planned, and surmounted obstacles to reach such a goal. I know that feeling.
In 1972, just after graduating from high school in Highland Park, Illinois, along with my friends Louis and Marty, I spent most summer Sundays racing 15′ Albacore-class sailboats at our local sailing club on Lake Michigan. One day, Louis and I stumbled upon the book The Forty-Knot Sailboat, by Bernard Smith, buried in the stacks of the Highland Park Public Library. The book, published in 1963, discussed the theory of hydrofoil sailboats, including their history and predictions for the future. While only a handful of experimental hydrofoil sailboats had ever been built by 1970, Marty, Louis, and I were inspired by Smith’s book and decided to design and build our own prototype hydrofoil sailboat. Our initial hope was to develop a class of hydrofoil sailboats that could become popular for racing and high-speed day-sailing.
Our budget was a mere $100. We were neither engineers nor boatbuilders, and high-tech lightweight materials such as carbon fiber had not yet entered the consumer market. Although these initial obstacles should have thwarted our plan, youth, idealism, and persistence kept us on track. We immediately set to work.
Photographs courtesy of the author
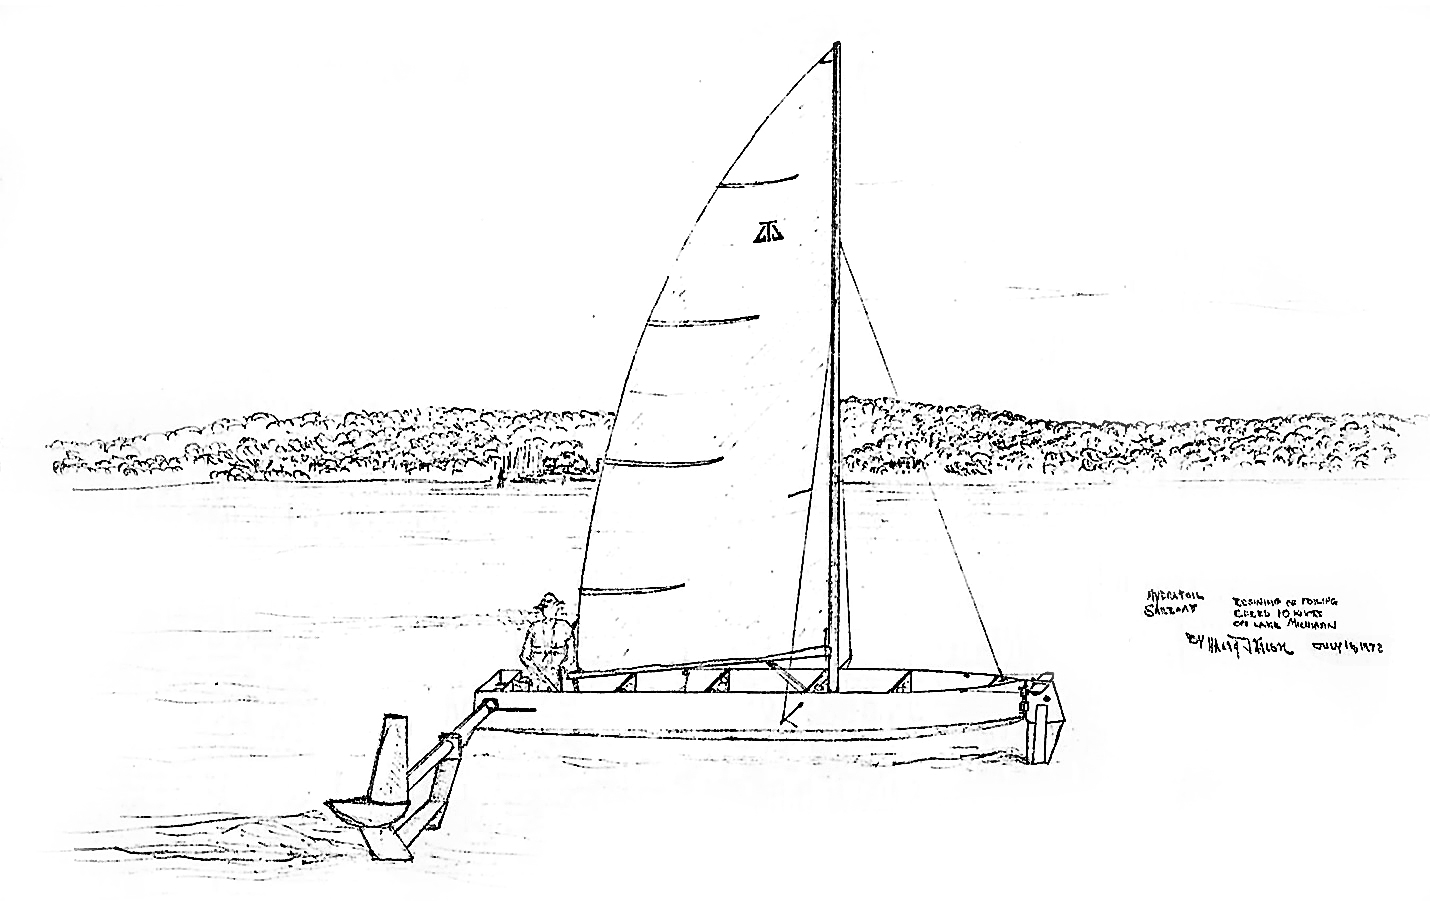
In this drawing dated July 16, 1972, Marty had sketched our prototype hydrofoil sailboat as he thought it might appear while cruising along the North Shore on Lake Michigan.
Marty, who later became a successful industrial designer, was a talented artist and sketched a few concepts that more closely resembled futuristic spaceships than any known watercraft. It was a start. Louis and I studied Smith’s book and joined, by mail, the Amateur Yacht Research Society in England to obtain its scientific publications pertaining to hydrofoil theory and design.
We decided upon a monohull with three lifting foils in a “canard” configuration. Rather than have the rudder and its foil in the stern, the most common arrangement today, our rudder and foil would be attached at the bow and the two main lifting foils would be located on either side of the hull, just aft of the center of gravity.
We were determined to learn foil theory and, for a while, even attempted to perform our own original research in hydrofoil shapes and wingsail designs. First, we constructed a test tank in the basement of my house by building a 7′-long wooden trough equipped with a plastic liner. We attached homemade plasticine hydrofoil models to one end of a rudimentary balance arm, which would pivot in a vertical plane around a horizontal axis mounted on the top of a classic Lionel model railroad car, which ran along a railroad track on the side of the tank. A long rubber band provided a repeatable force to pull the assembly through the water. The outside end of the balance arm was outfitted with a pen to mark its path on an 8′-long sheet of paper mounted horizontally on a board next to the tank. Each foil section we tested created its own unique tracing, giving us an indication of the foil’s lifting ability. We fiddled with Reynolds numbers (ratios of inertial and viscous forces) in the hope of scaling our data to full size. Needless to say, we never reached any meaningful conclusions from our crude experiments, but we had a great time trying.
Next, we decided to find a place to test some of our wingsail ideas. On a whim, the three of us drove to Northwestern University in nearby Evanston. It was early July, and the campus was a ghost town. We found our way to the deserted engineering building and boldly walked in through the unlocked front door to find a professor who might help us. The professors’ names were all painted neatly upon the frosted glass windows of the dark-stained wooden doors throughout the timeworn, traditional-style university building. Only one light was on. We knocked on the door. A gray-haired gentleman was surprised to have visitors, but instantly warmed when he learned that we were high school students with an interest in hydrodynamics and airfoil design.
He walked us through the empty building and into a dusty, cavernous room that housed a wind tunnel, dormant since the 1940s or ‘50s. Fortunately for us, he happened to be the professor in charge of this wind-tunnel lab. He demonstrated the circuit breakers that turned on the fan motors and showed us how to mount test models, equipped with strain gauges, inside the tunnels. Upon our request, and much to our surprise, he provided us with keys to the lab and granted us permission to come and go whenever we wished: day or night. Security in those days was based entirely on trust. Three enthusiastic high school boys probably represented a refreshing antidote to his dull, quiet summer. The whirring motors of an archaic wind tunnel in an abandoned lab filled with long-forgotten physics projects represented the greatest toy a teenager could imagine. Just having the key to a university building made us feel important.
We “played” with the wind tunnel a few times testing our 1:25-scale wingsail models, always wondering if some guard or faculty member would catch us conducting experiments as impostors. We were never discovered, but we also never managed to generate any useful data. Nonetheless, it was great fun to power-up the wind tunnel and watch our models flutter around through the small observation window.
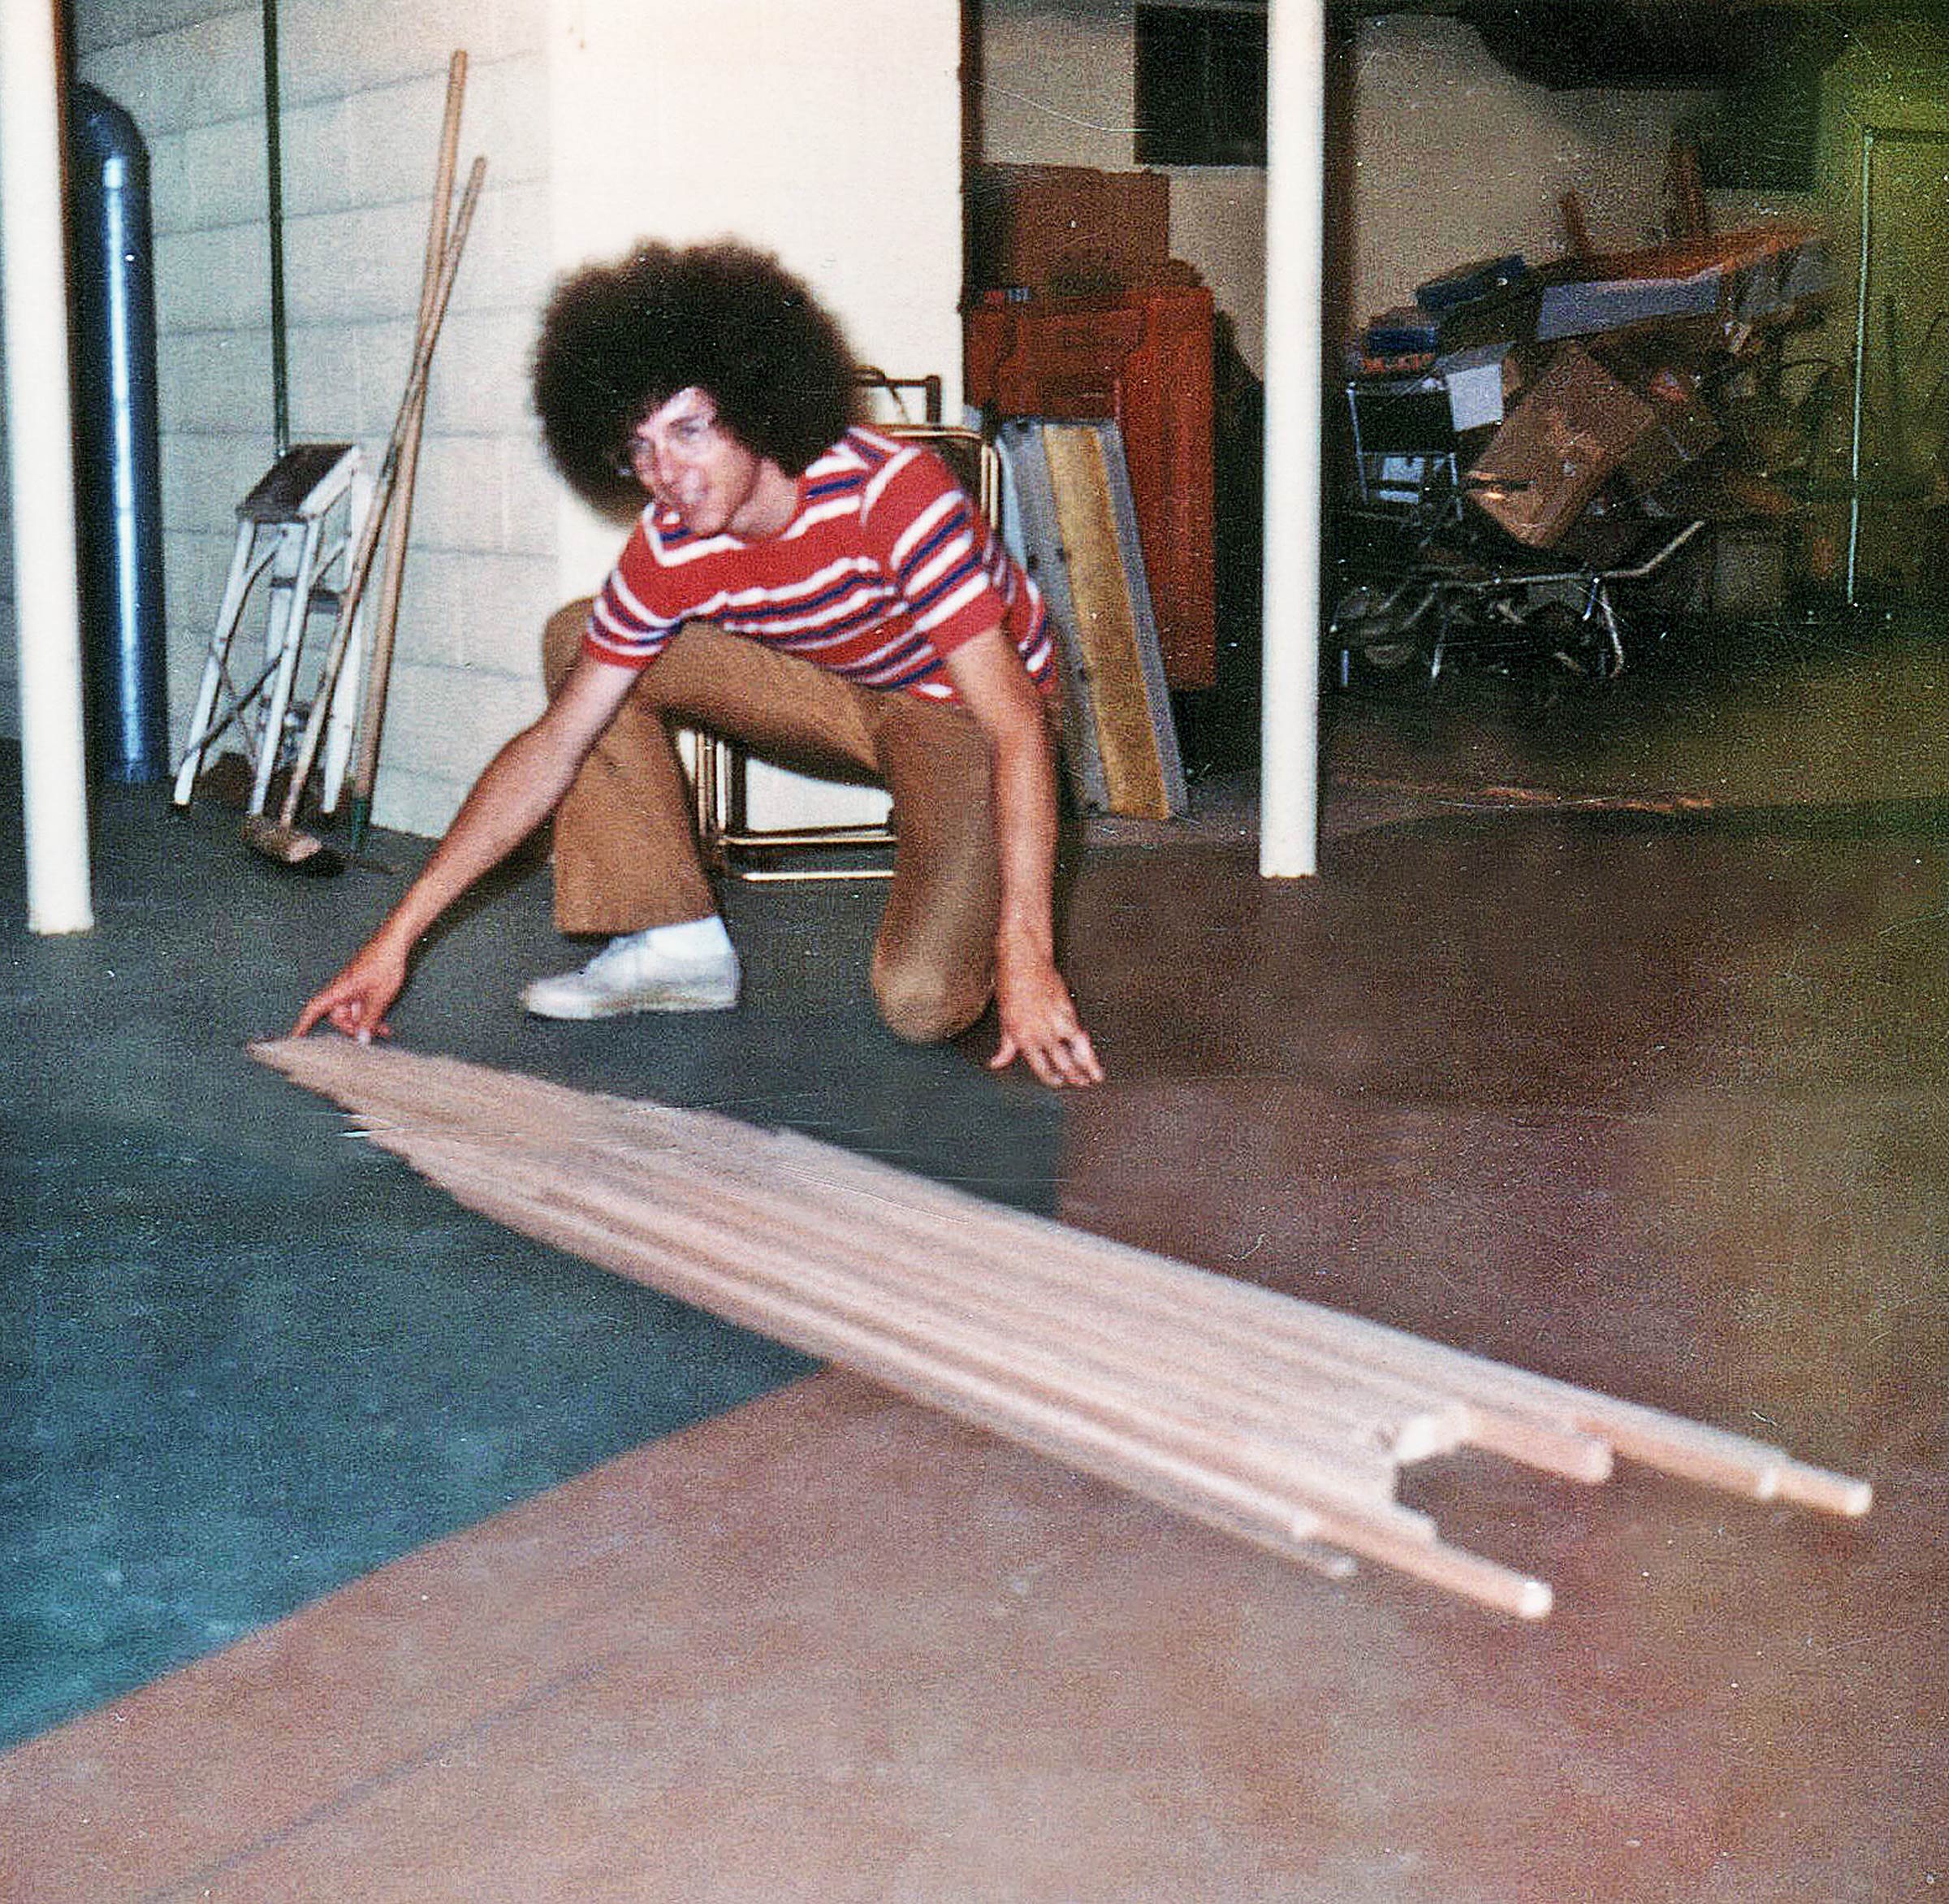
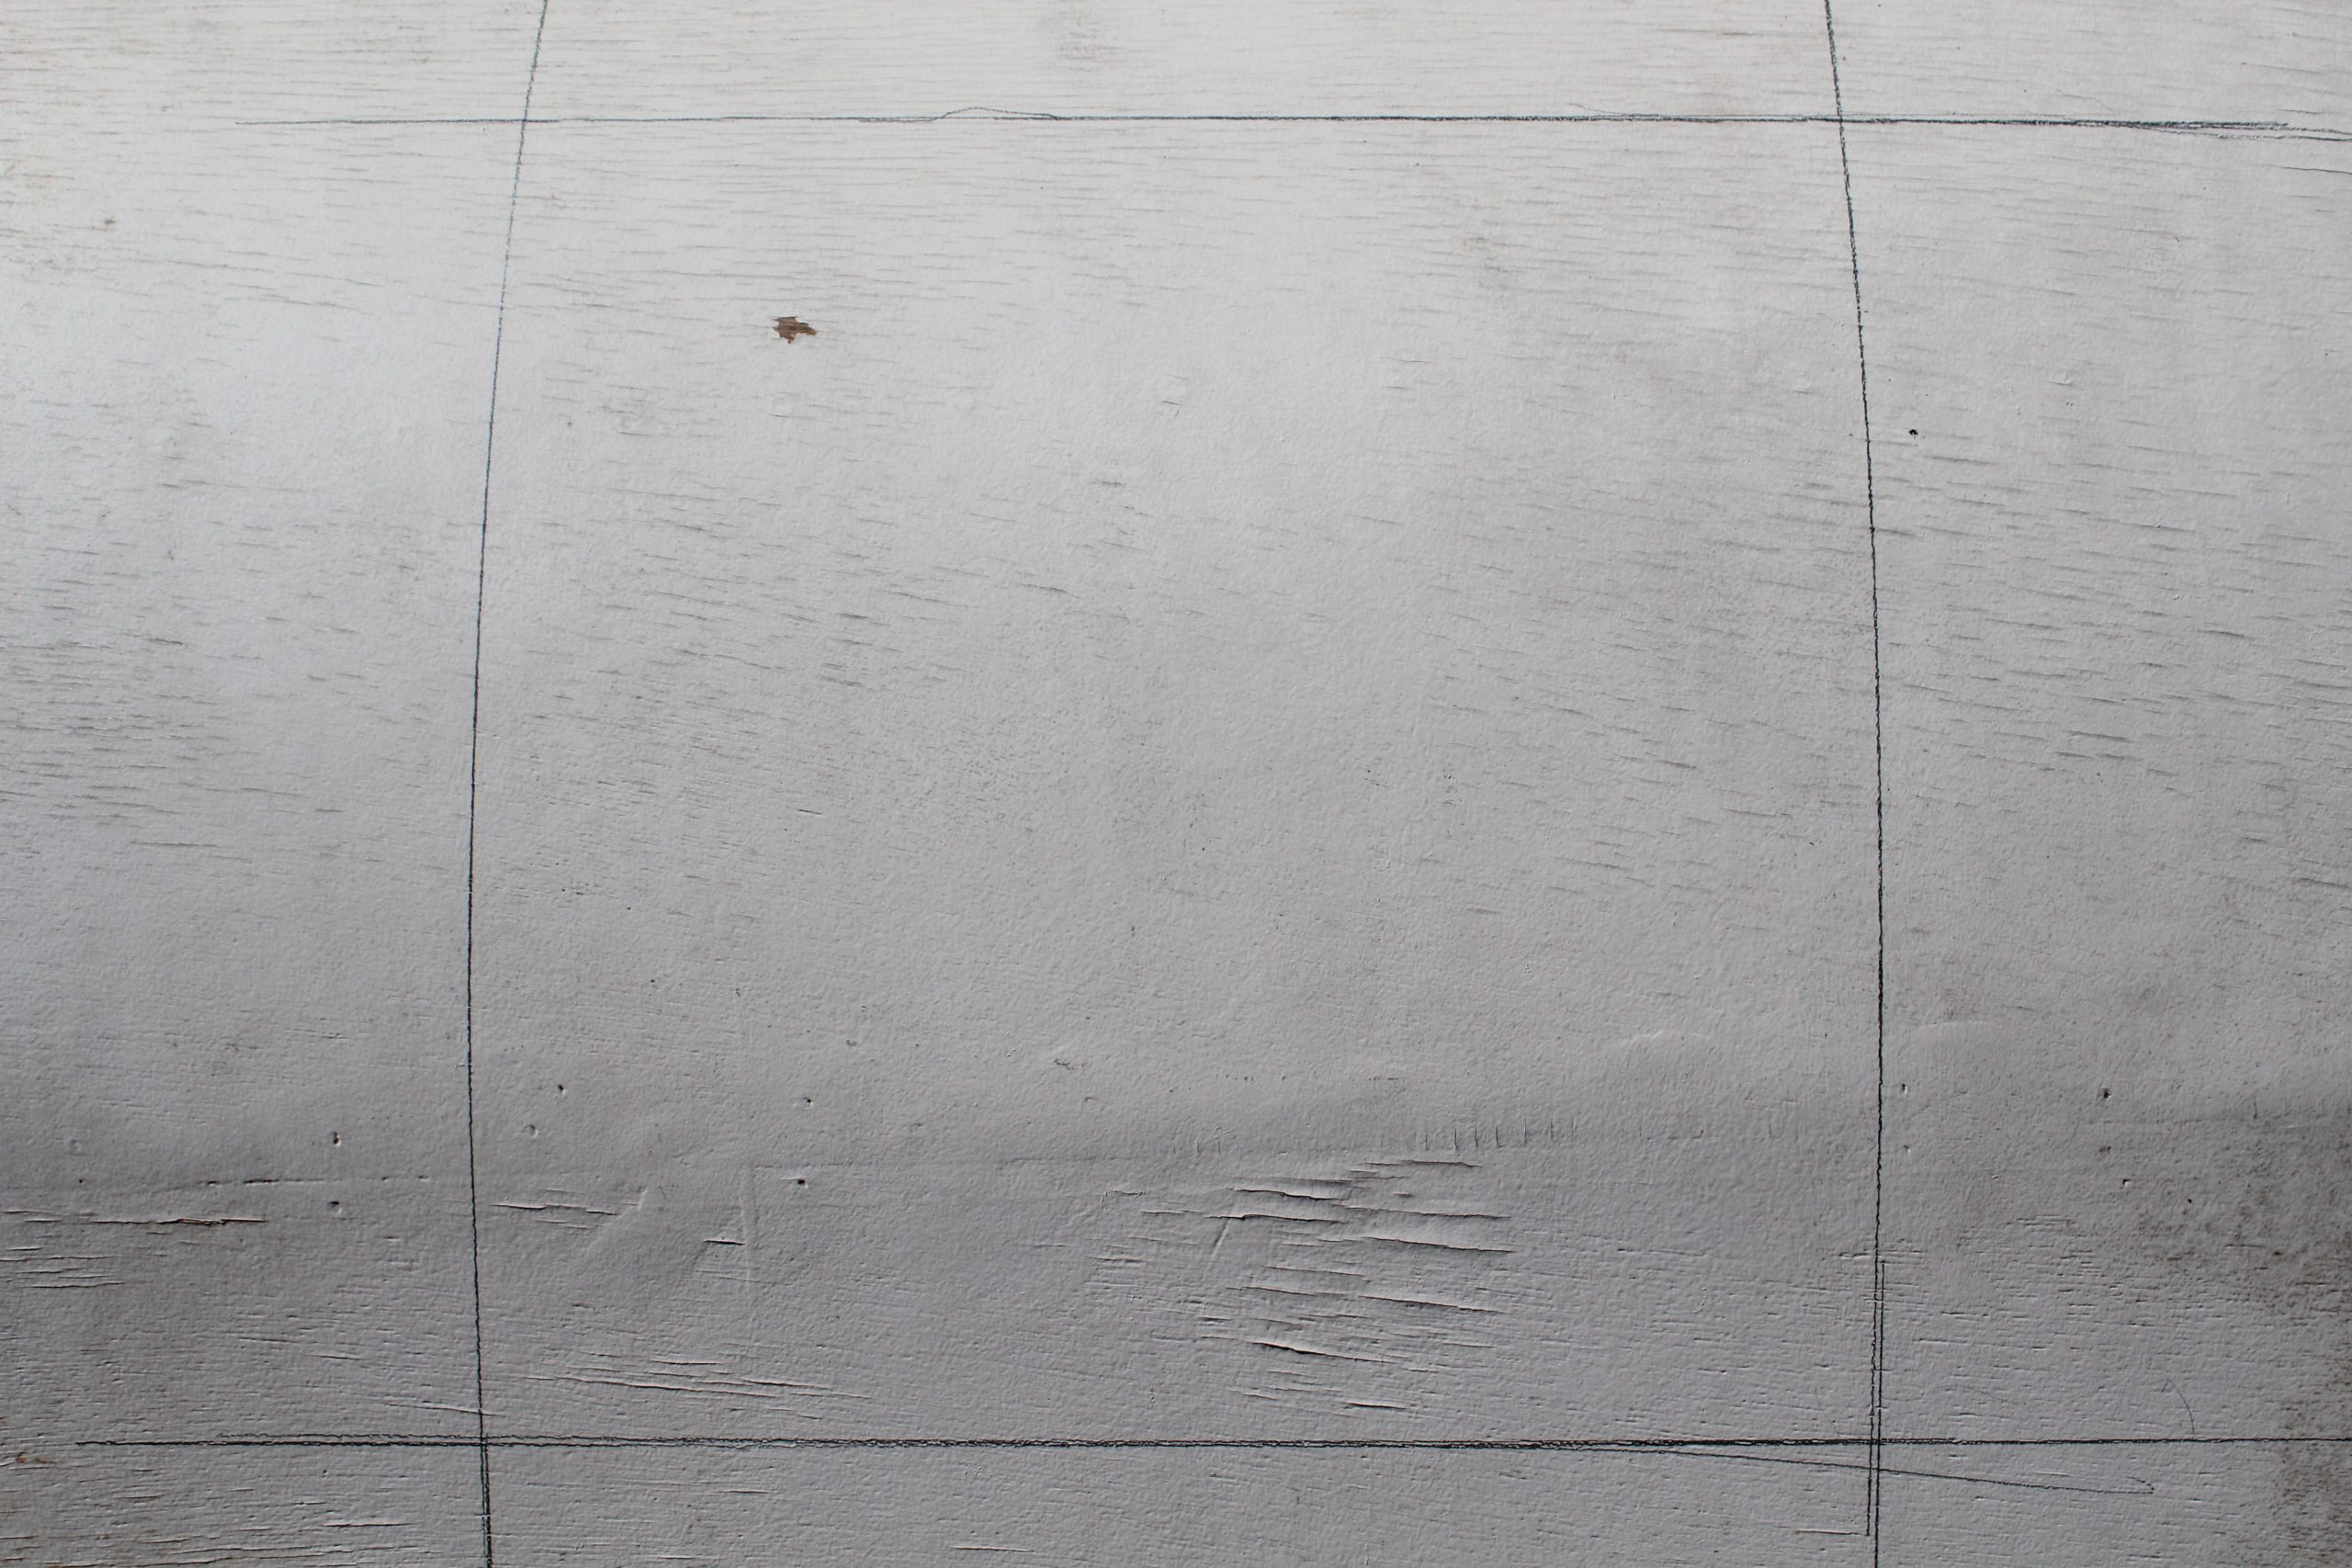
As I was I carefully painting the frame of the hull with a wood sealer, I made a special effort to avoid my hair. The weight-saving holes in the bulkheads were carefully arranged to retain wood along the lines of stress.
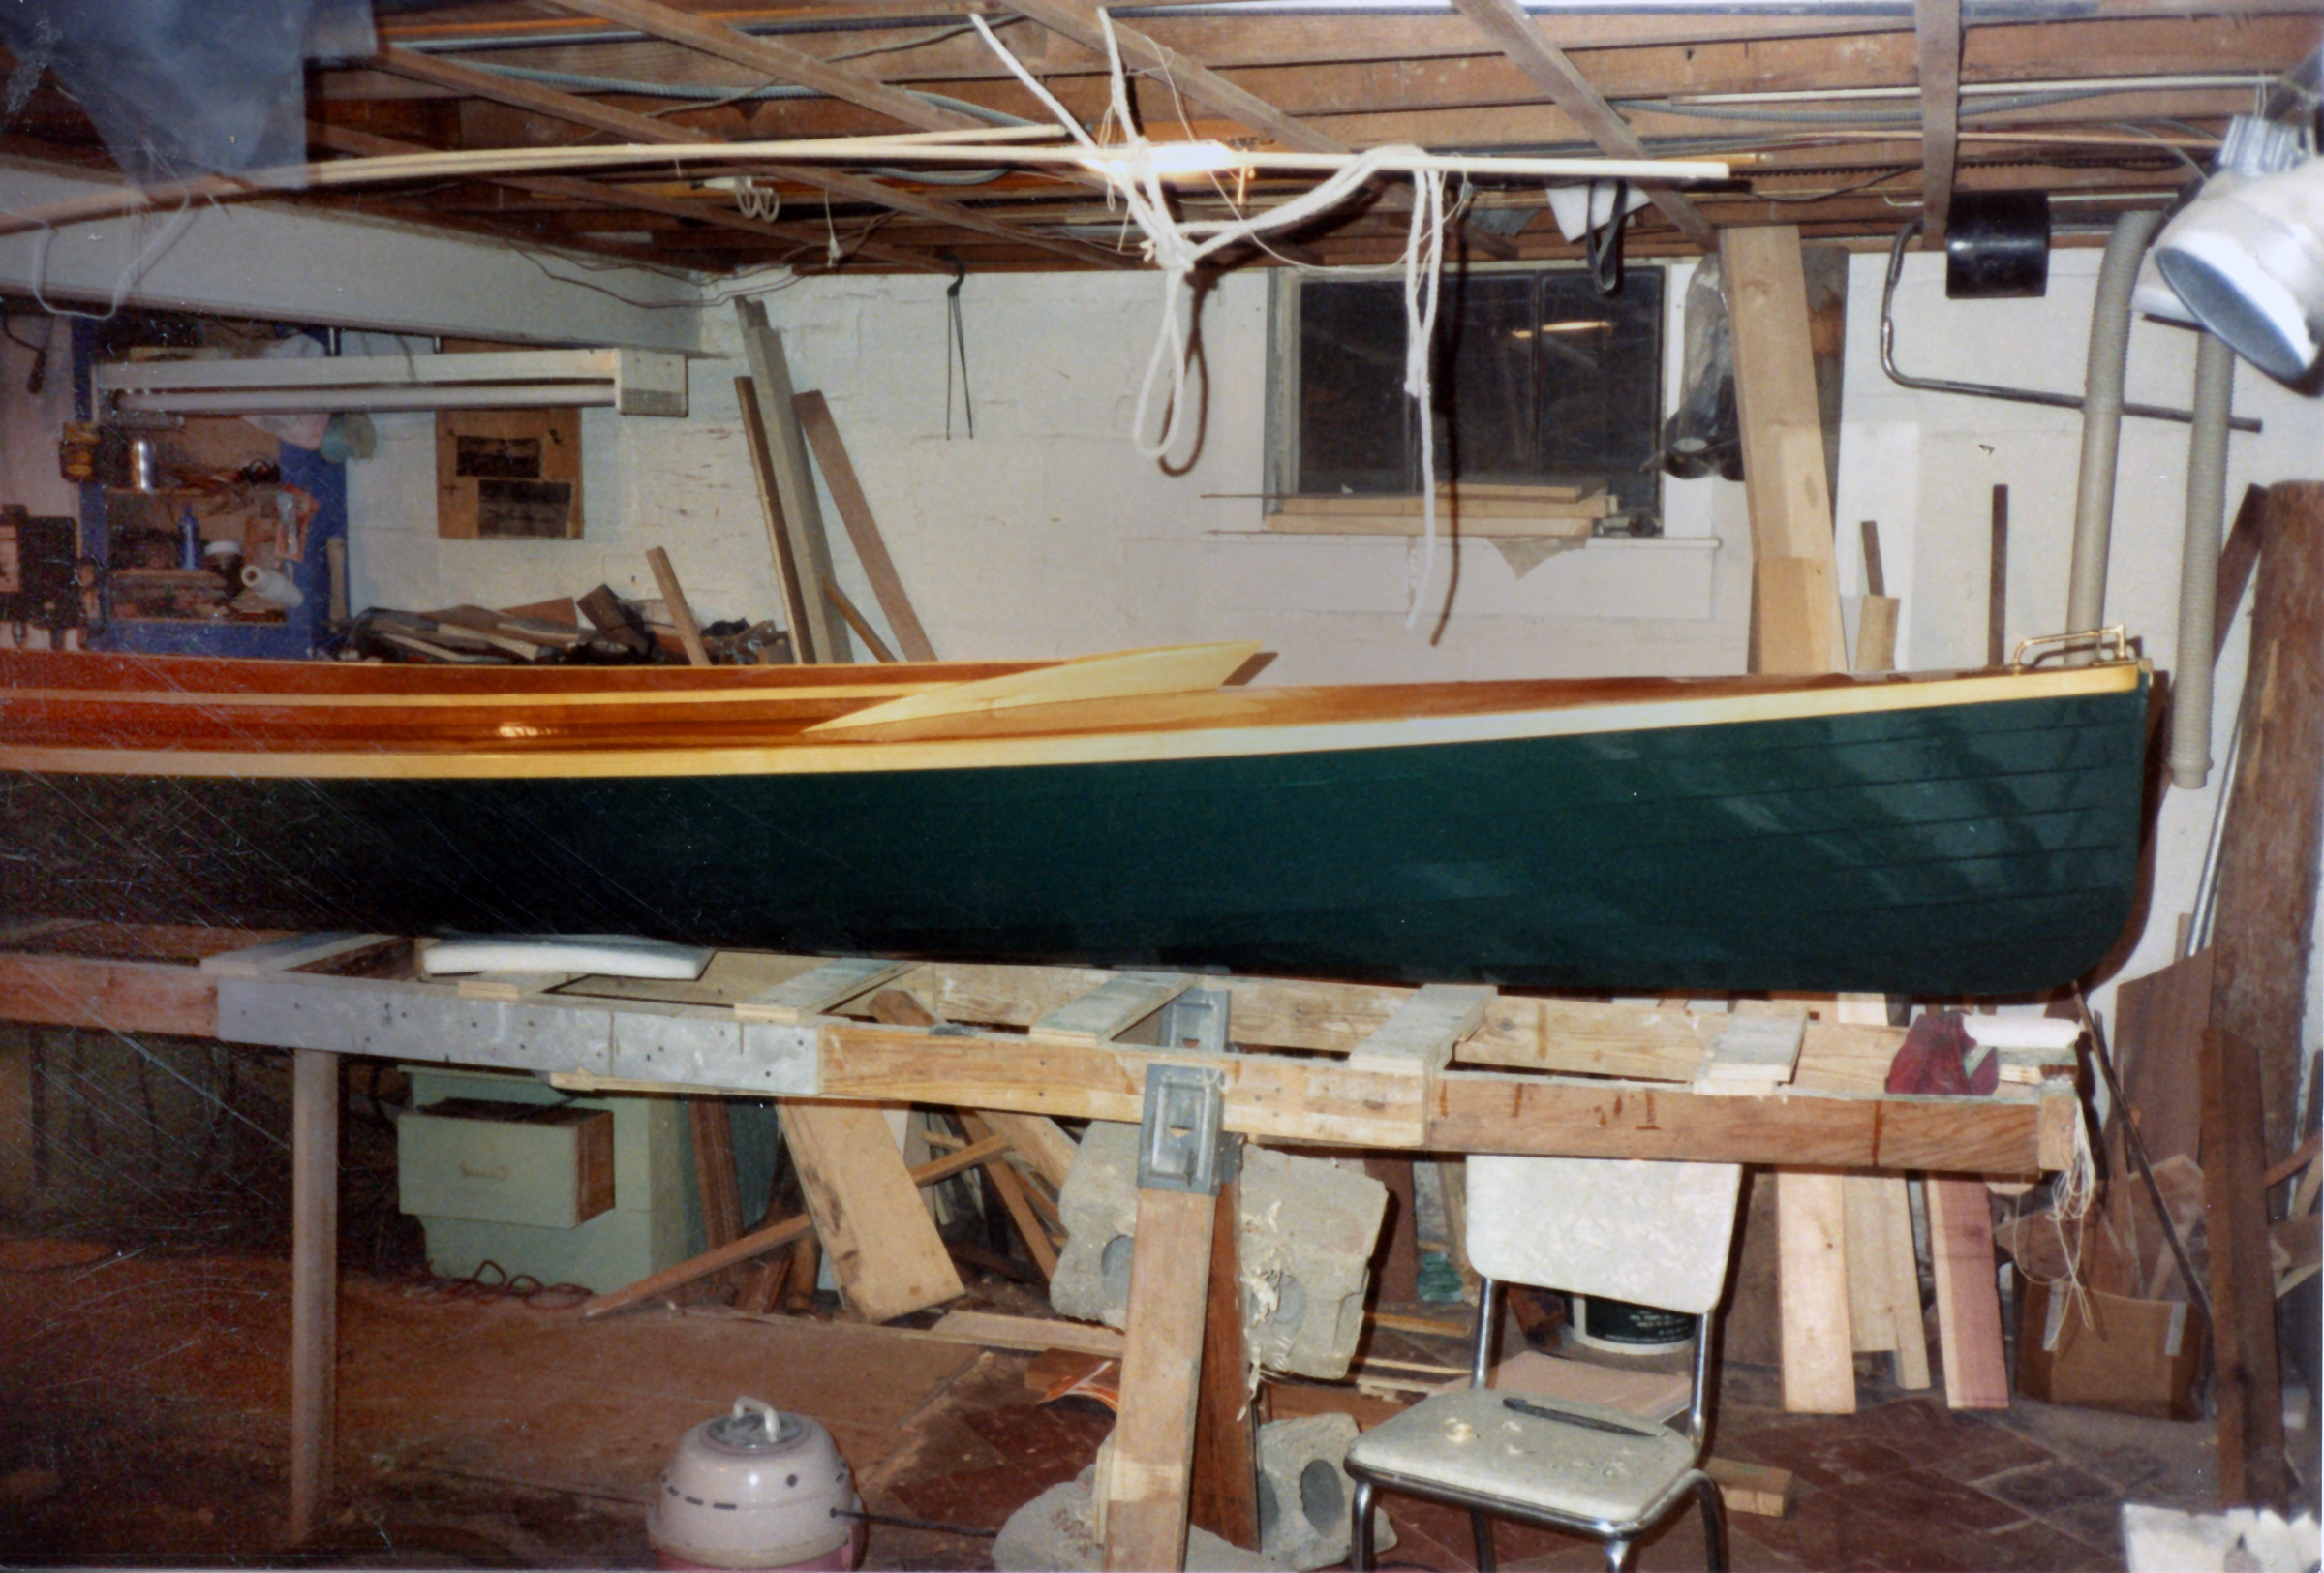
As the summer progressed, we finished drafting plans and set to work constructing the hull. My parents graciously allowed us to commandeer half of our two-car garage for the project. We began by lofting the hull as a chalk outline on the concrete garage floor. Next, we constructed a 16′ structure of four 1″x 2″ pine longitudinal stringers with several rectangular 1/4’’ marine plywood bulkheads spaced along their length. To reduce weight, we cut multiple circular holes into each of the bulkheads. Despite trying to bend the 1 x 2s using hot water, we were unable to create the desired taper for the forward sections of the hull. Instead, we made several oblique scarf joints to form the proper curve. We affixed sheets of 1/4’’ plywood to the sides and transom
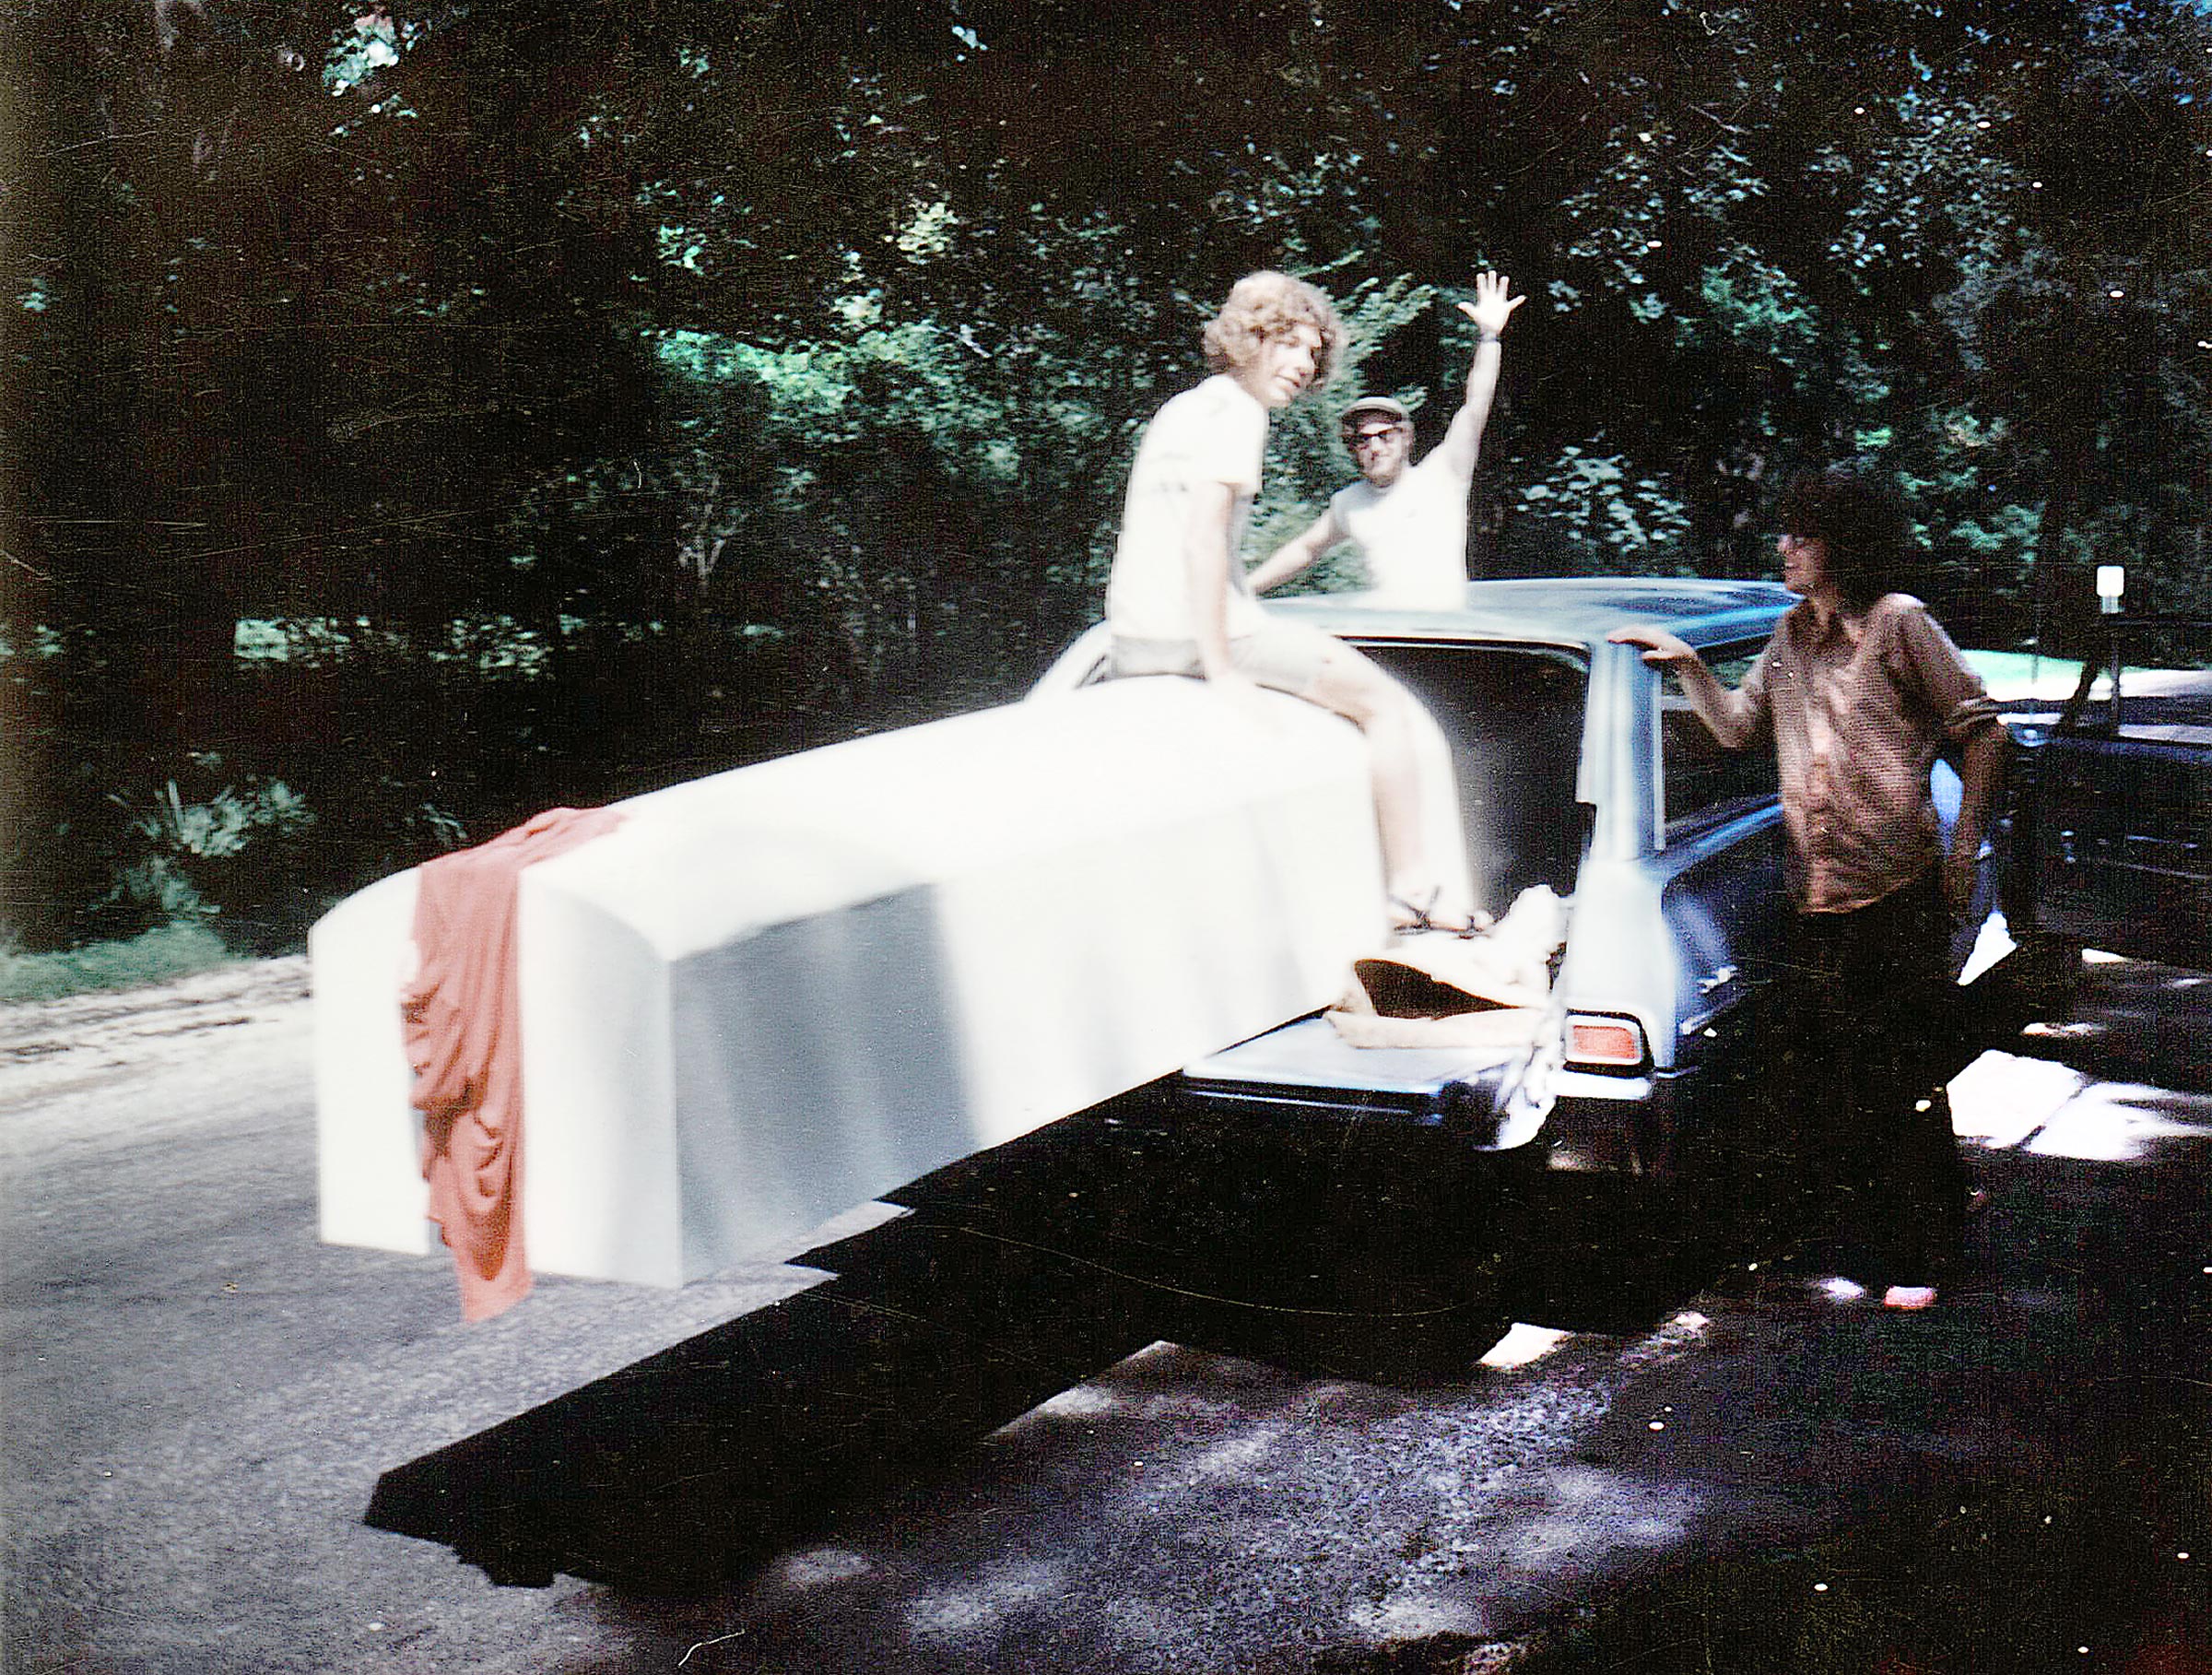
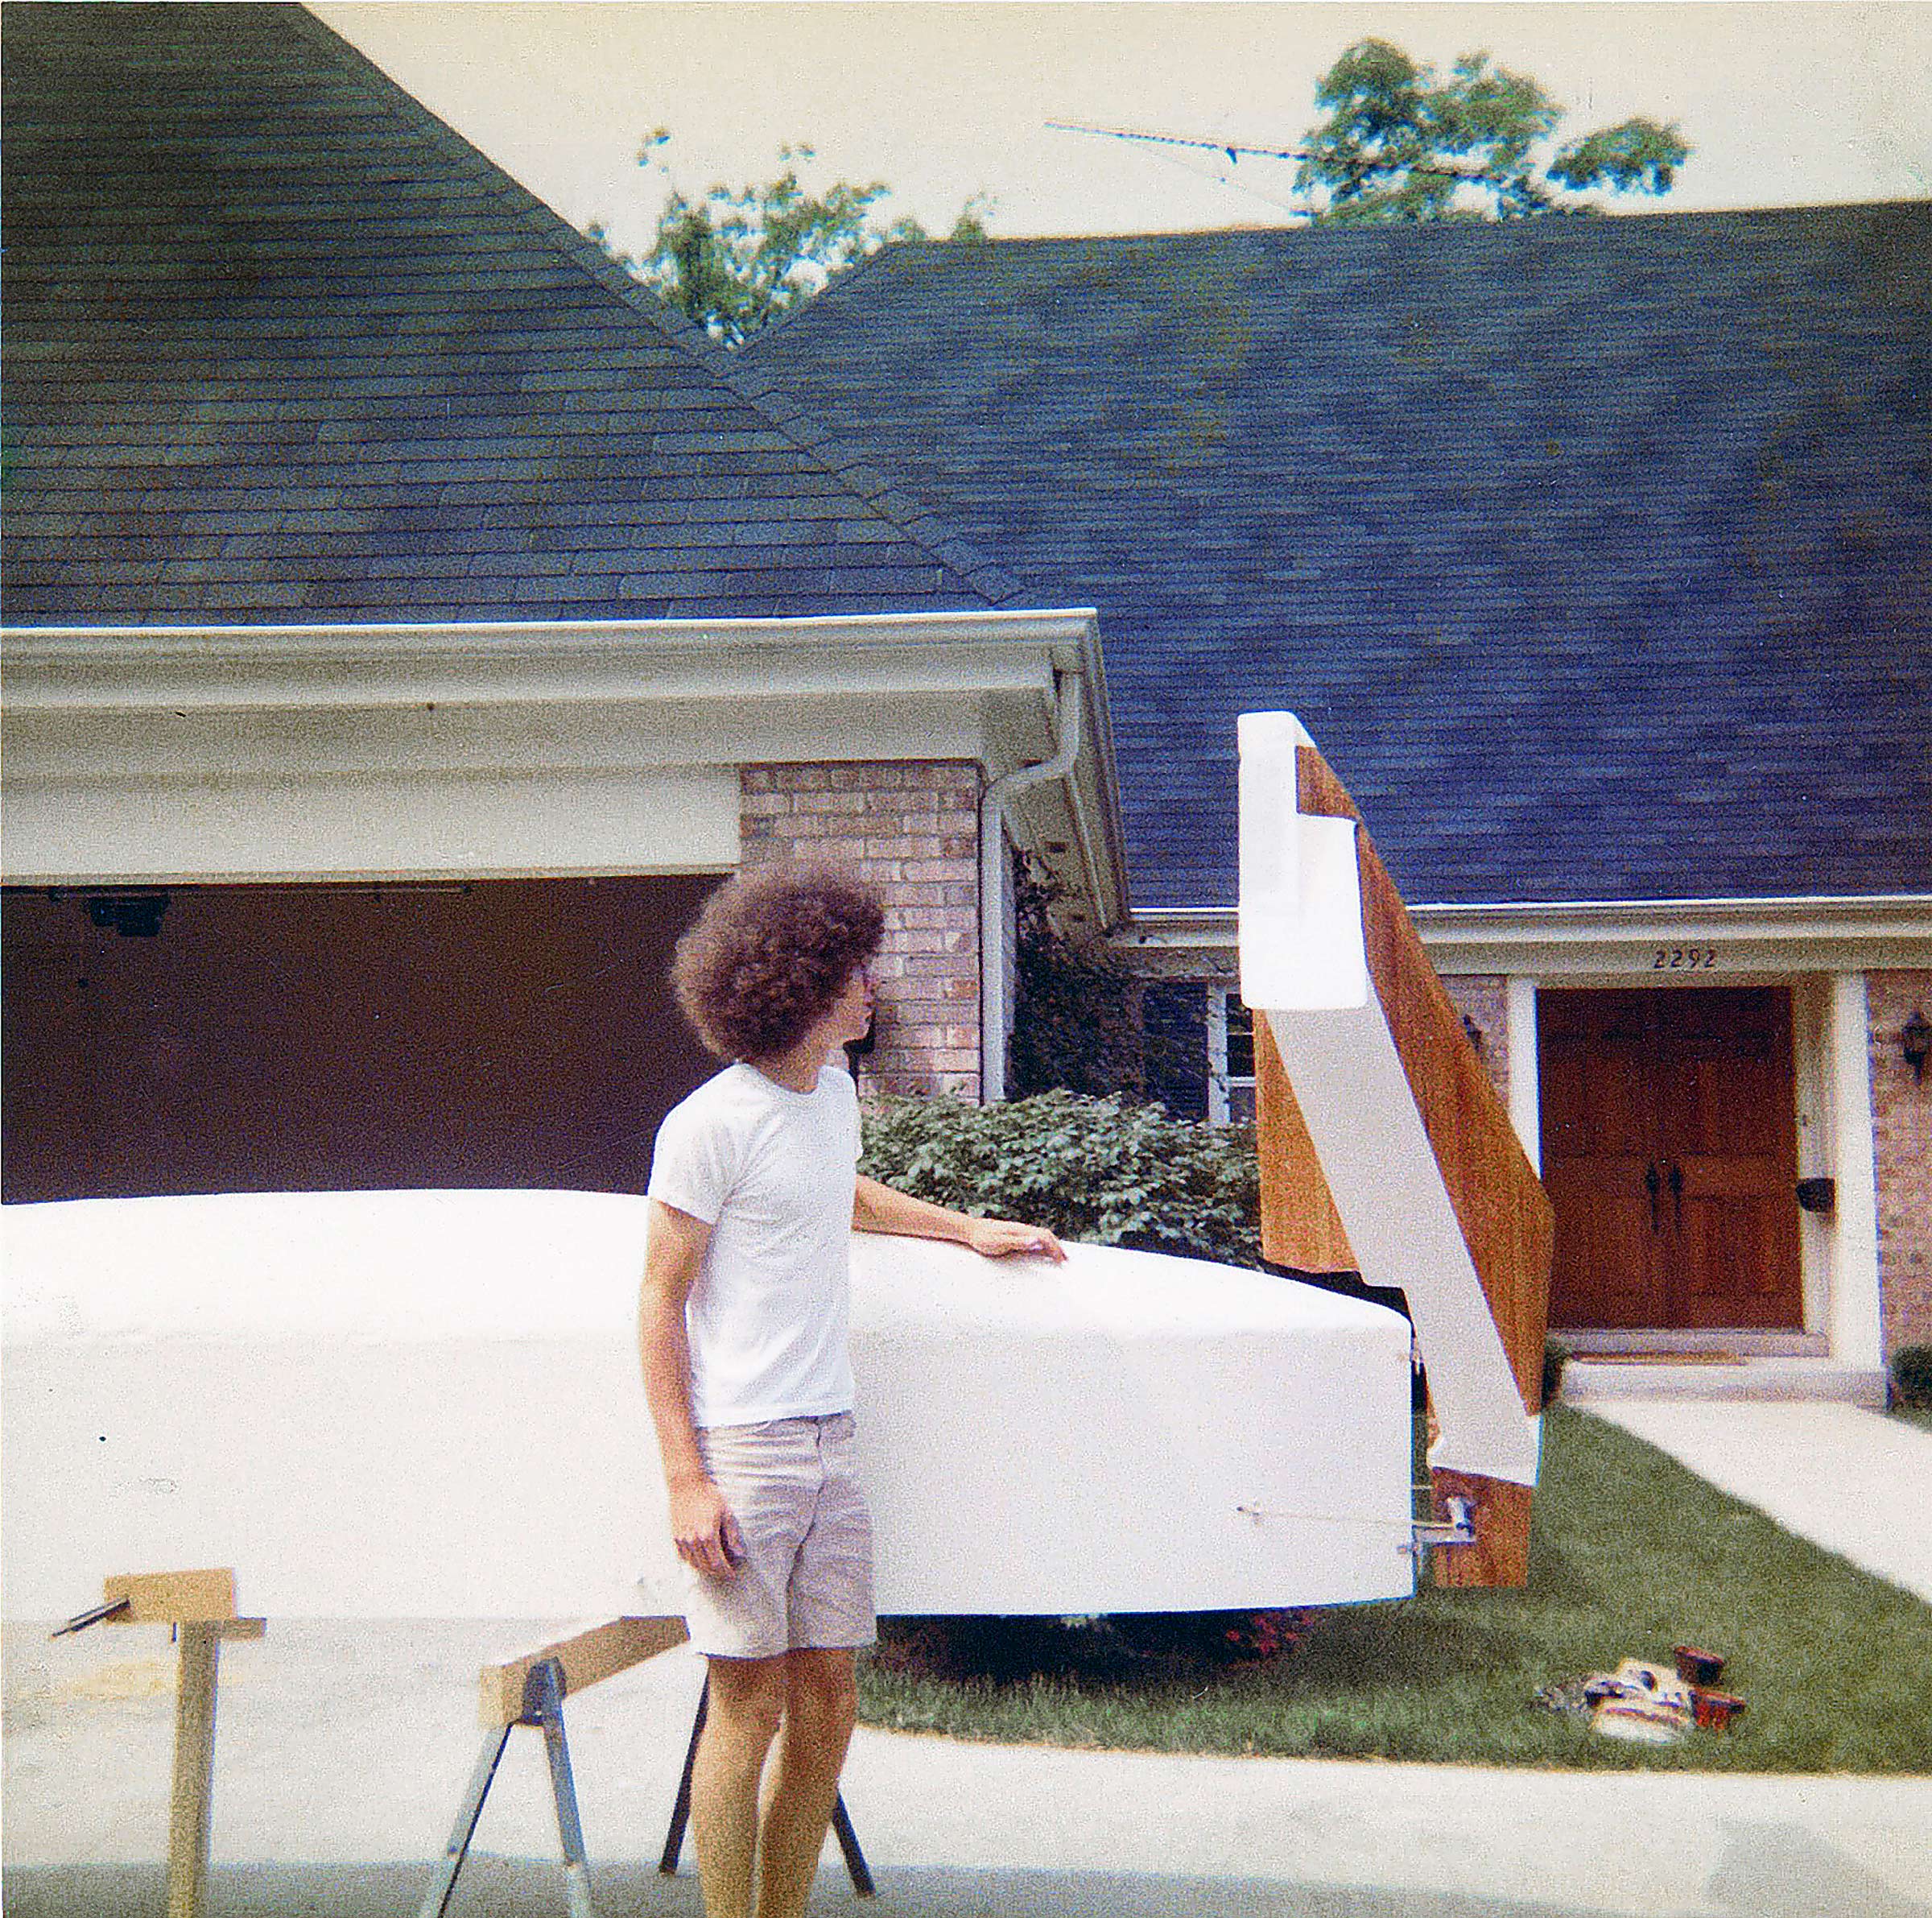
With the hull resting inverted on sawhorses, we shaped Styrofoam into a semicircular canoe underbody using a disc sander. We then applied fiberglass cloth and epoxy resin, as Styrofoam is dissolved by polyester resin, to cover the smoothly contoured foam. This long, narrow, slab-sided hull caught the attention of all passers-by on our busy street because it looked like a coffin more than anything else, and when asked, we generally told people that it was indeed a coffin. After a couple coats of white paint, the hull was complete.
While transporting the hull down the road to the beach for the initial float test, Marty and two friends stopped to wave to onlookers, explaining that we were heading to the lake to sink a coffin.
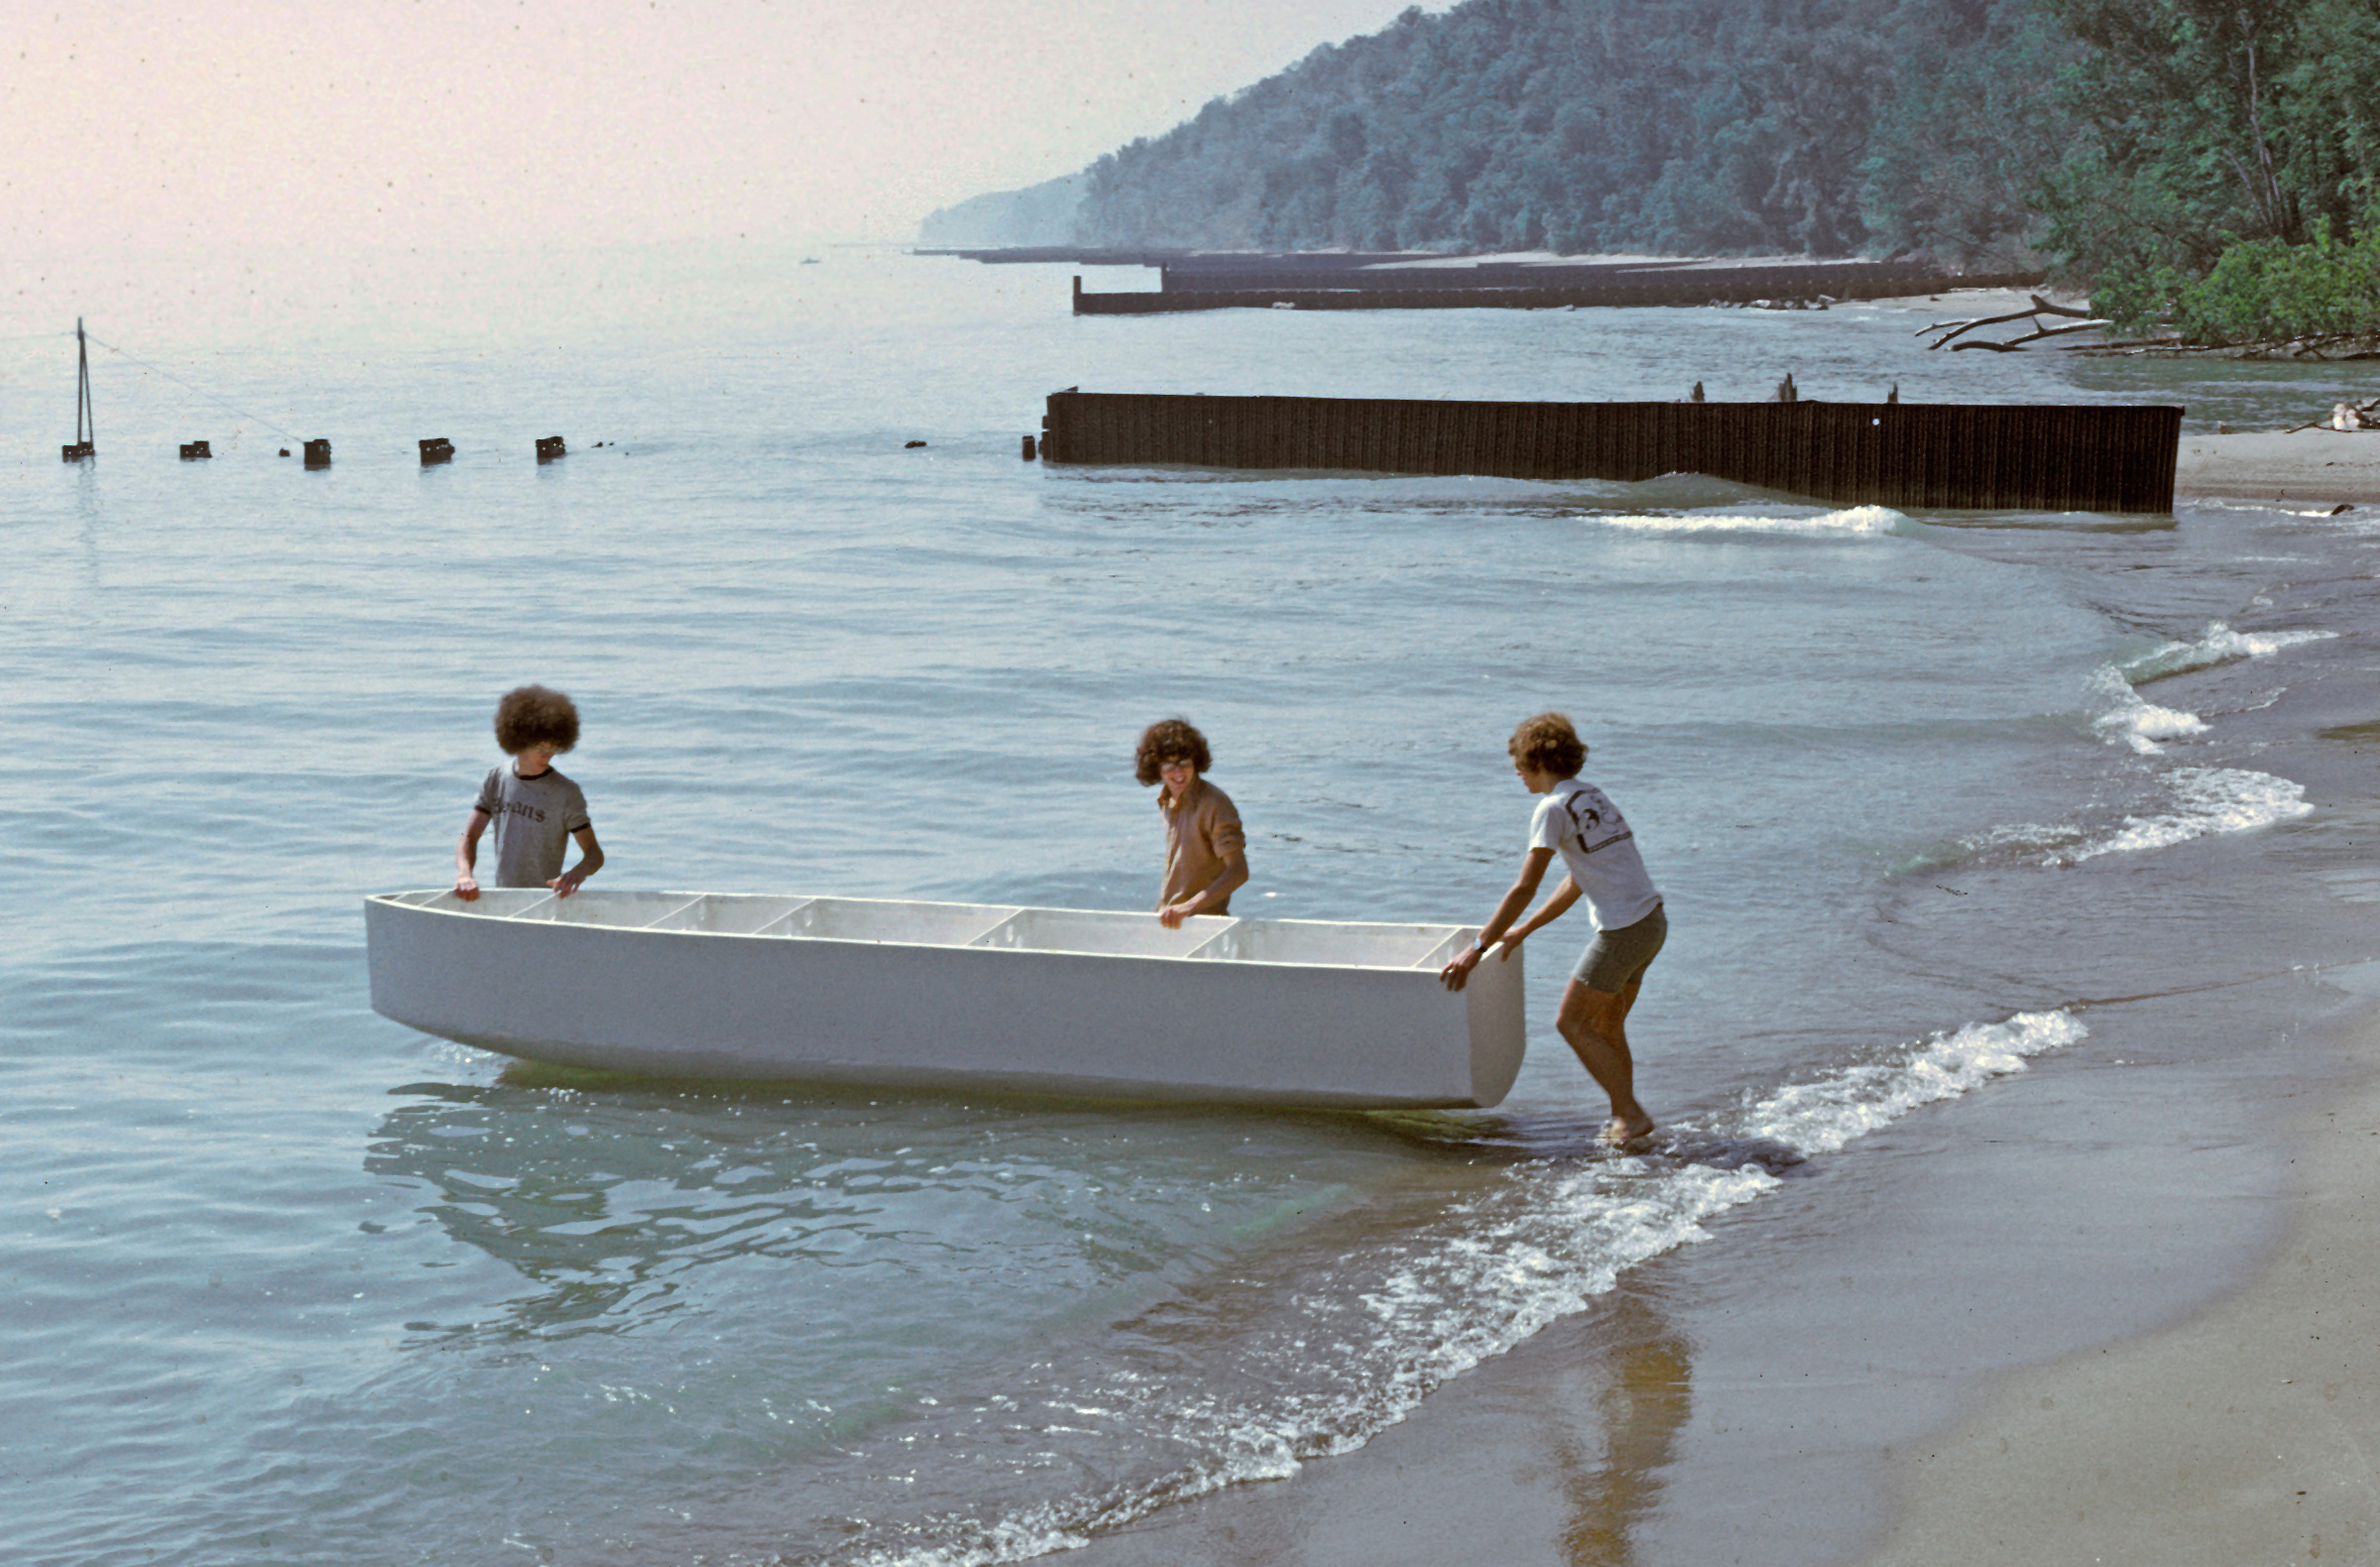
Excited, we transported the hull, protruding from the back of a friend’s station wagon, down to Lake Michigan to test the seaworthiness of our homemade vessel. When we walked it into the lake from the beach, it floated exceedingly high and was intrinsically unstable, with or without one of us aboard, immediately rolling onto its side if let go. But this did not deter us. We were delighted it floated at all.
Marty, another friend, and I cautiously walked the newly completed hull into the cold lake water at Park Avenue Beach in Highland Park, hoping that it would float and remain watertight.
Constructing the lifting hydrofoils came next. We decided to build surface-piercing, self-regulating foils rather than fully submerged foils. They would have dynamic stability without requiring moving flaps to adjust their position in the water. After considering several NACA (National Advisory Committee for Aeronautics) foil cross-sections, we decided for simplicity’s sake to use ogive sections: circular-arc upper-surface contours and flat undersurfaces.
I laid out the mahogany laminates of one of the main foils on my basement floor. Each strip is rotated 90 degrees from the ones next to it to alternate the wood grain to prevent warping.
In the early 1970s, Philippine mahogany was cheap and abundant, as well as beautiful. For strength, we chose to build our foils of long, laminated wood strips as one might do for a cutting board. The foils needed to be tapered, necessitating a complex cutting schedule for the 250 strips to be laminated. Through Marty’s father, we gained access to a woodshop, where we obtained enthusiastic assistance from an old German modelmaker named Arthur for a full day of ripping and tapering the mahogany. We painstakingly assembled the laminates and glued them together with resorcinol. We also laminated mahogany strips for the streamlined supporting struts. To provide additional lifting force in the event of an excessively deep submersion of one of the main foils, we also incorporated hand-contoured pine “safety-foils” into the complex main assemblies. We mounted these transverse foils well above the main foils to provide additional lift if the boat heeled enough to immerse an entire foil assembly.
A few people got wind of our unusual, intriguing project and volunteered their support. The father of one of our friends owned a pinball machine manufacturing company. He generously donated two large sheets of 3/32″ stainless steel which we used to reinforce the main foils. Louis’s brother-in-law gave us two 10′x 2″ aluminum electrical conduits to use as supporting beams for the port and starboard main hydrofoils. These conduits acted as the spars for the main foil arms. They mated to the hull through reinforced holes traversing the beam of the hull. The circular section of the conduits allowed the main foils and their entire assemblies to pivot about the transverse horizontal axis. Rotation of these conduit beams permitted adjustment of the foils’ angle of incidence, and enabled us to rotate the foils completely out of the water.
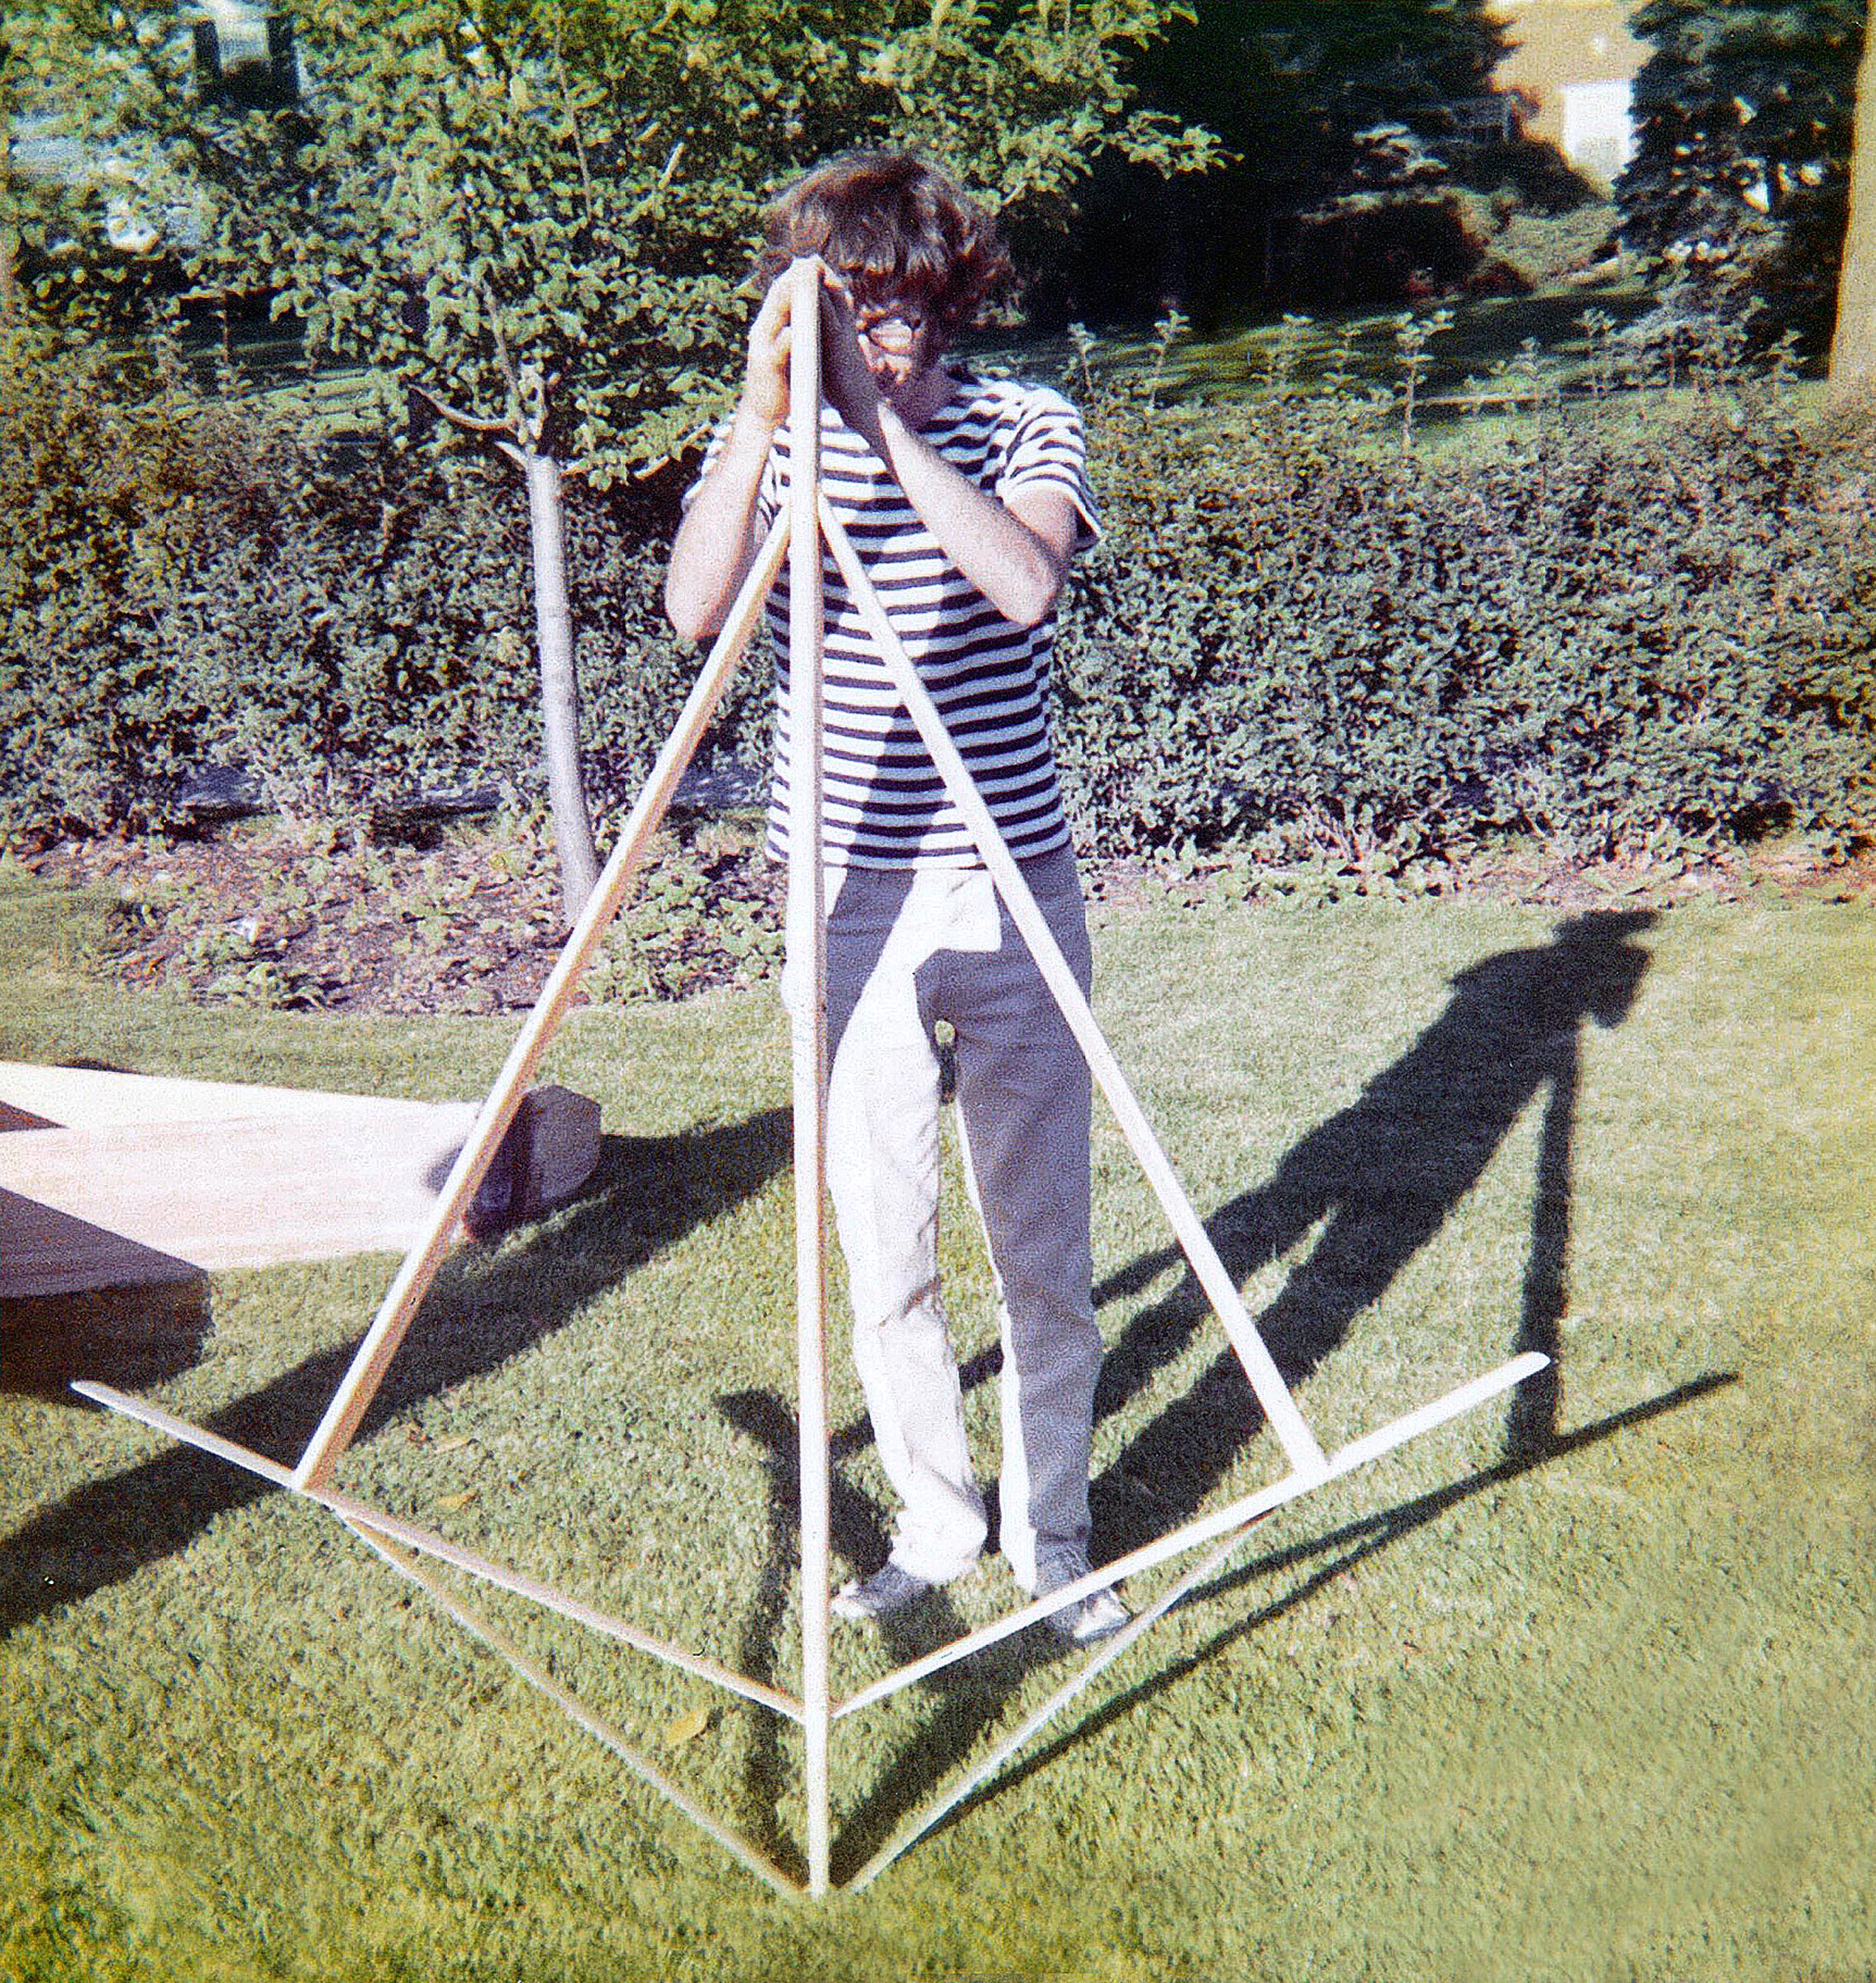
Louis held up the bow foil assembly on my lawn to show the head-on view. The center vertical element served as the rudder. The main foil is the lower and smaller V-shape and is made of aluminum. The larger foil above it is the safety foil, which was made of pine.
The most innovative feature of our hydrofoil sailboat was the bow foil. The vertical “rudder” was laminated mahogany. The V-shaped bow foil assembly was made of hand-contoured aluminum plates along with a V-shaped pine “safety foil” mounted above it. The entire complex was suspended by gudgeons mated to inverted pintles attached to the plumb bow.
I inspected the bow foil assembly after it was mounted on the inverted hull. Note that the foils and geometric center of the rudder were positioned aft of the pivot axis along the plumb bow. The foils and their support struts are painted white and the broad plane of the rudder is unpainted wood. The steering cables, attached to a transverse arm on the rudderhead, are visible emerging from the hull.
A retaining pin through each pintle helped to keep the rudder in place. The underwater portion of the rudder, with its V-shaped foils, was cleverly angled aft so that its center of resistance would be located aft of the vertical pivot axis on the stem giving it a caster effect for directional stability. We installed a vertical joystick in the aft cockpit and linked it to the rudder/foil complex at the bow by steering cables and pulleys.
One of our friends posed next to the hull and main foils assembled on the lawn. The large white Styrofoam float at the outboard end of the main foil was intended to prevent capsize and provide lateral resistance when the foils were rotated to the fully retracted position. These were ultimately abandoned as unnecessary.
We worked diligently through many long nights assembling, fiberglassing, and varnishing all the parts. The end of the summer approached quickly. It was time for the second launching, to test the hull and all the foils together, but—still without a sailing rig—a towing test made best sense. We erected a temporary wooden frame with a rudimentary mast “stump” to act as a towing post near the anticipated center-of-effort of the future sail plan.
Once again, with the help of many interested onlookers and friends, we transported the hull and the three foil assemblies from my house to the beach. Waves ranged from 1′ to 2′, higher than ideal. We carried the boat out into deep water. A small outboard runabout from our sailing club served as a satisfactory towboat. I climbed aboard our hydrofoil sailboat, secured the tow rope to the stump, and the test commenced.
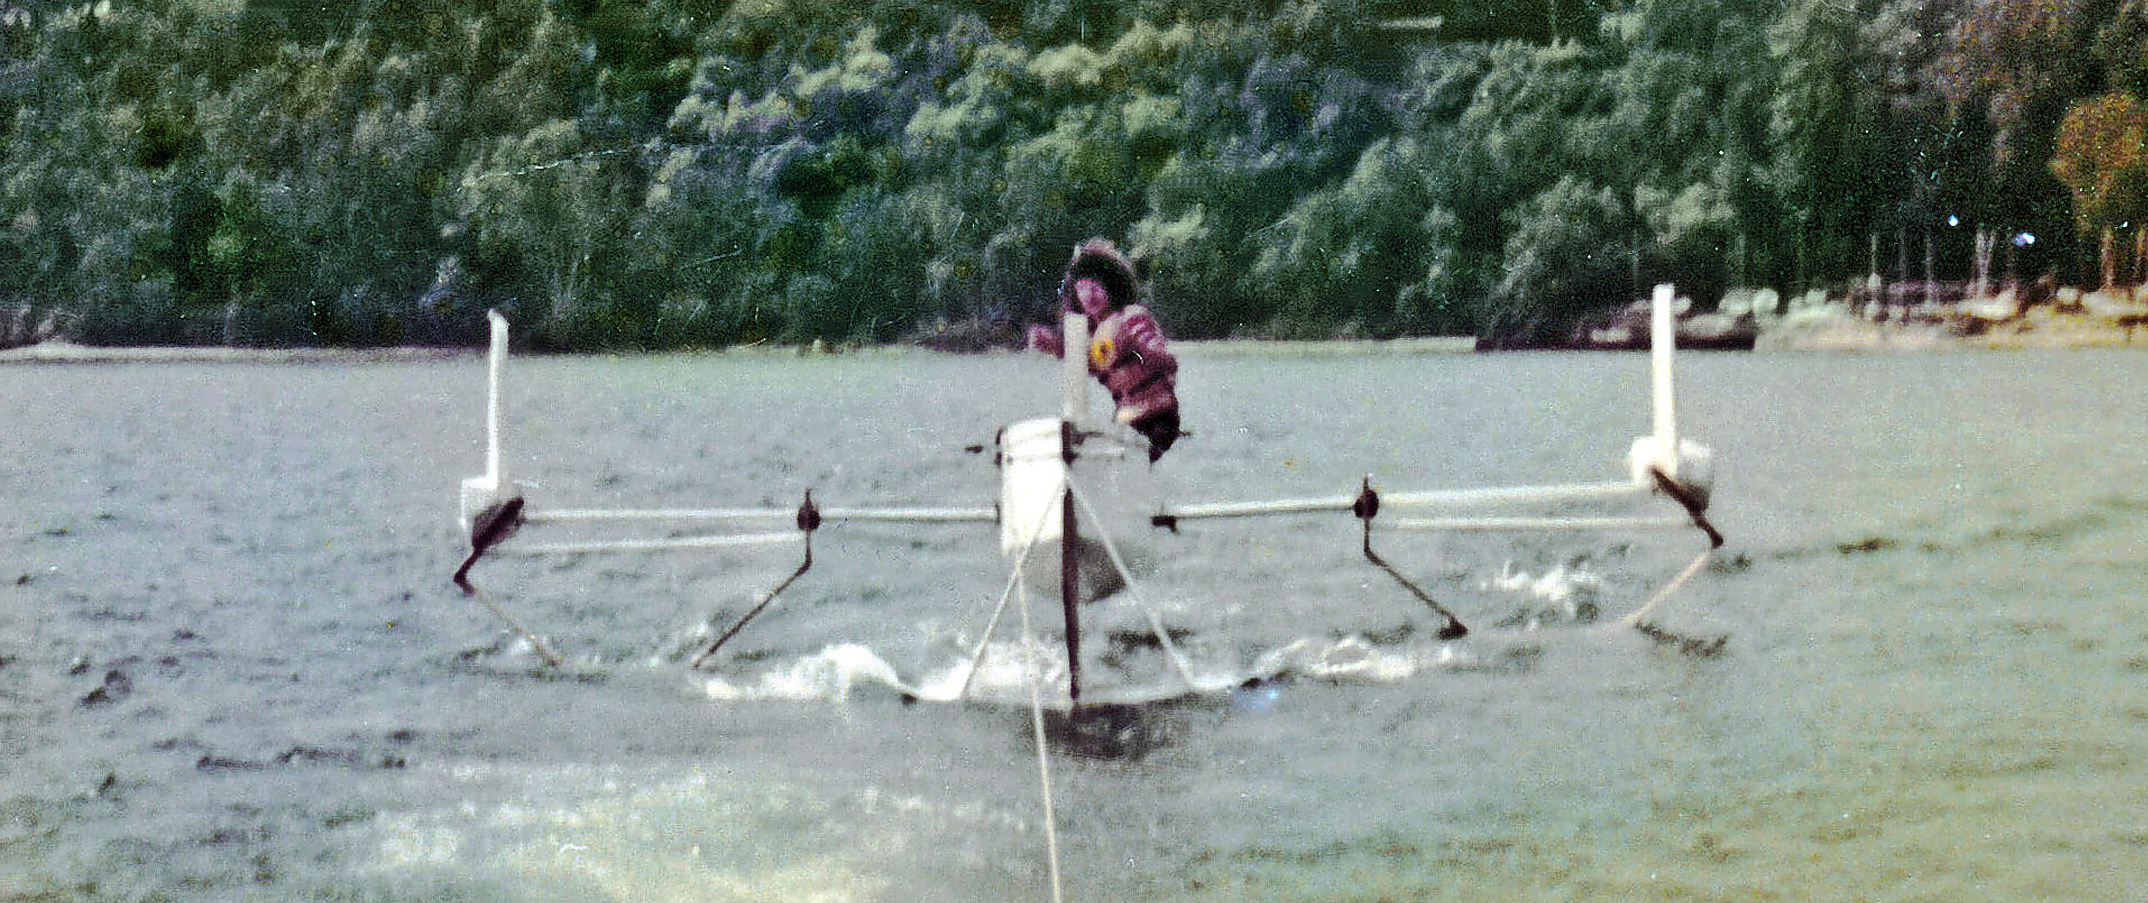
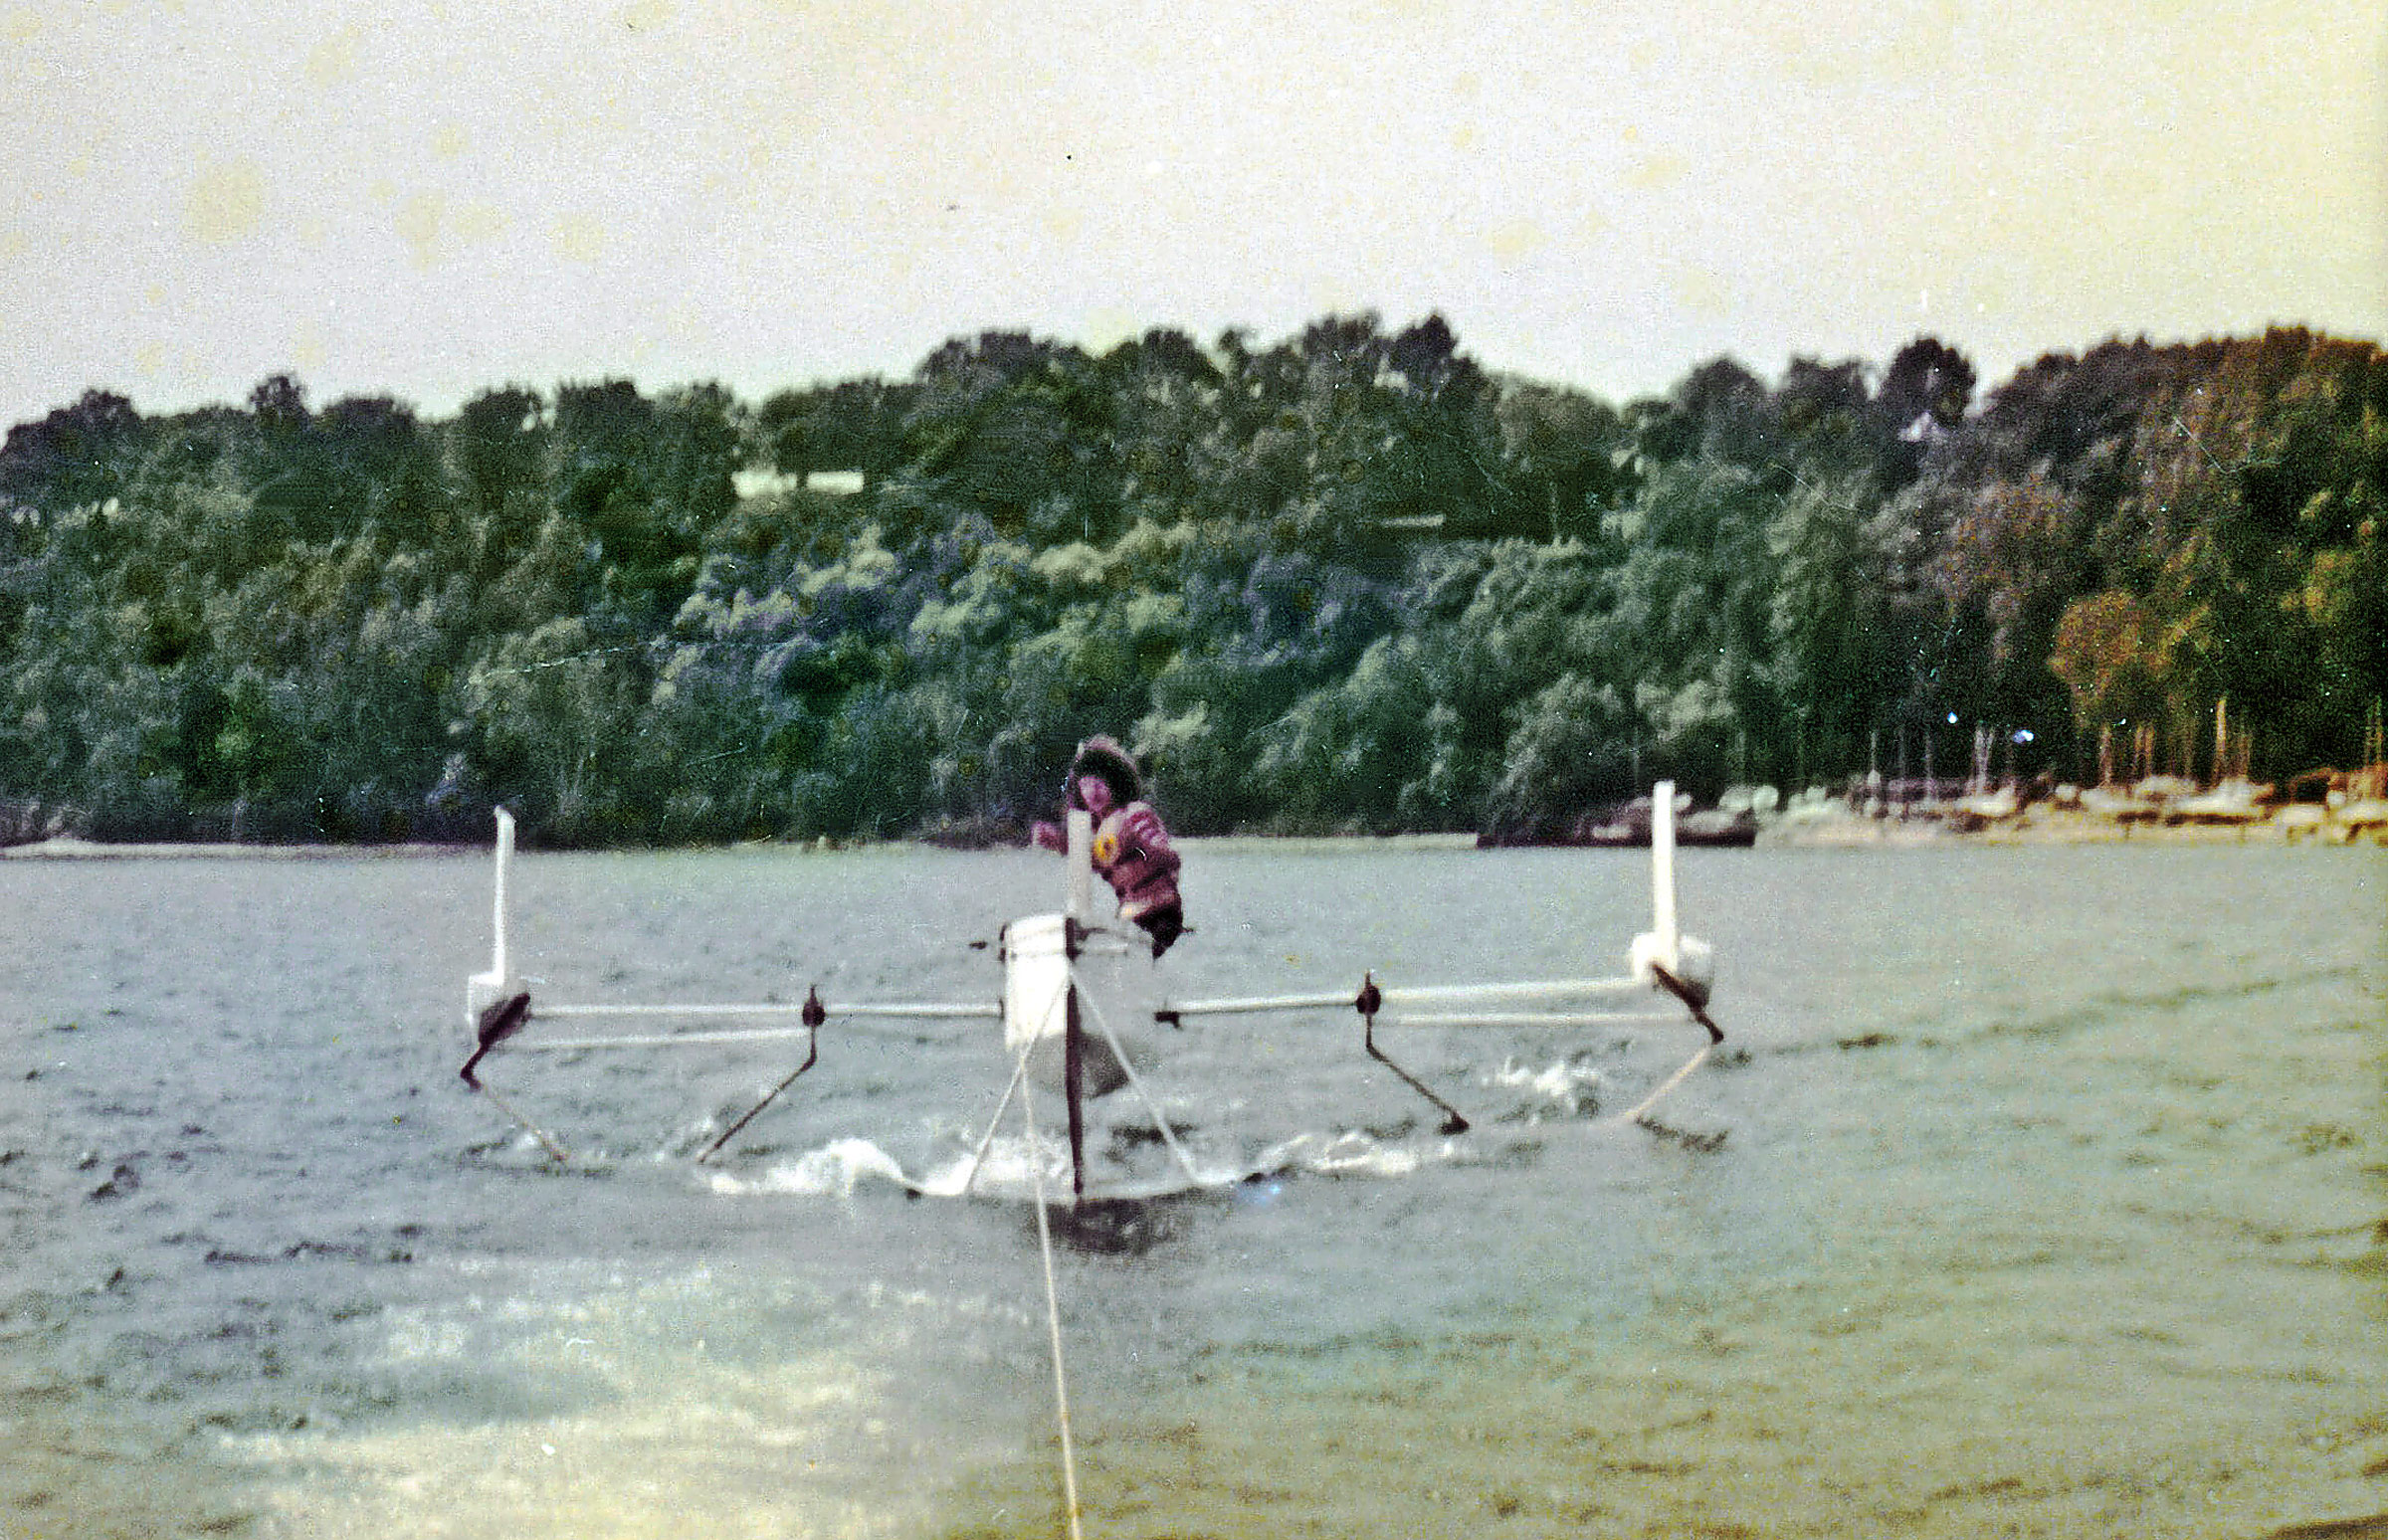
At my signal, the tow boat shifted into gear and very slowly accelerated. A friend aboard the motorboat directed his Super-8 movie camera in slow-motion mode toward our hydrofoil. I signaled the boat to go faster. At about 4 knots, the bow rose majestically from the water. The vessel’s attitude resembled a long jetliner rotating for takeoff. I stepped forward in the hull to shift my weight toward the bow. As the tow accelerated more, the entire hull lifted free of the water. For the first time, we knew with certainty that the foils could provide sufficient lift.
I rode aboard the hydrofoil sailboat as it was being towed by an outboard runabout about ½ mile off the Park Avenue Beach in Highland Park. The hull lifted clear of the water, proving the effectiveness of the foils.
I then turned the hydrofoil to port to determine if the steering mechanism worked and to see how the craft behaved with the tow rope force directed from one side, 30–40 degrees off the bow. This side force, pulling near the center of effort of the anticipated future rig, simulated the forces of sailing and tested both directional stability and reaction to an applied heeling moment. Indeed, the vessel tracked well and the self-correcting forces created by the surface-piercing main foils prevented the boat from heeling. The hydrofoil cruised along parallel to the port side of the motorboat’s wake, but after a few seconds there was a great explosion. The pull on the temporary rig ripped the hull apart and one of the main foil arms failed, causing the flying hull to crash down onto the surface of the water.
The structural failure was a major setback, but the test had been a success. Watching the successive explosions of Elon Musk’s Starship prototypes now, in 2021, makes me realize that even with the crash, our prototype experiment was truly a success. Albeit on a smaller scale, our successes and failures were comparable to those experienced in multi-billion-dollar engineering projects. Like Musk says: “It’s weird if it doesn’t explode, frankly.”
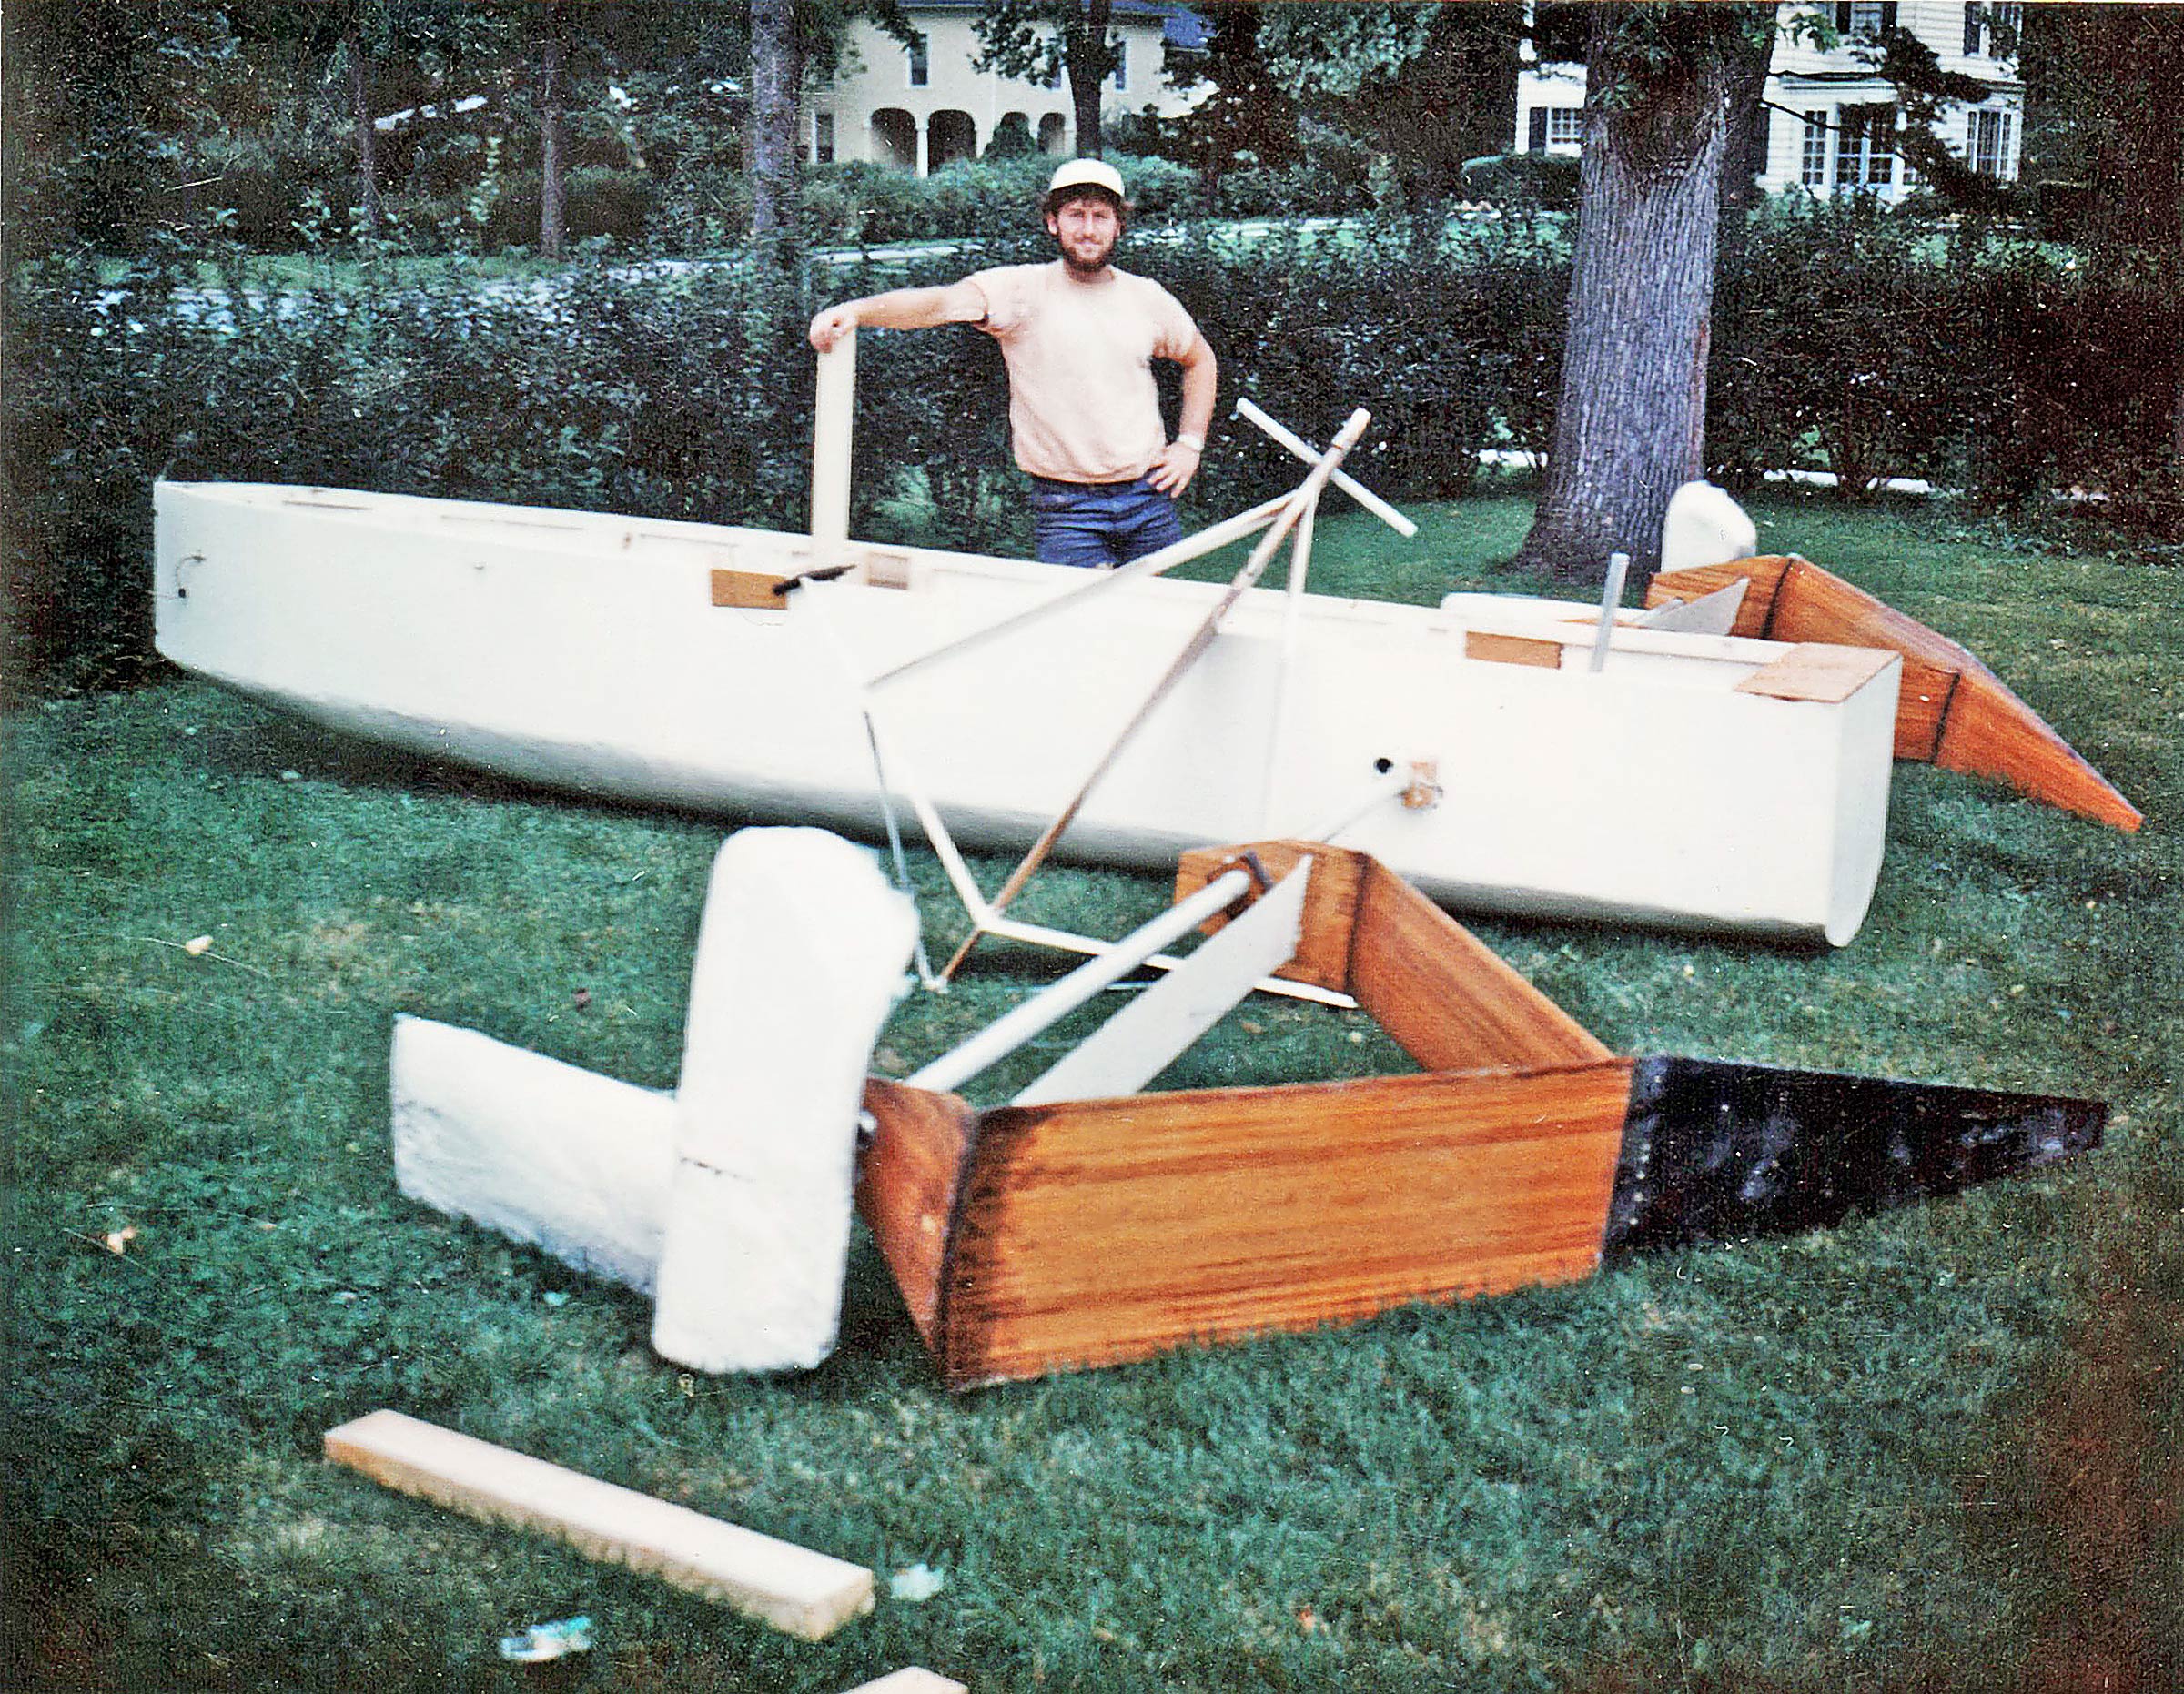
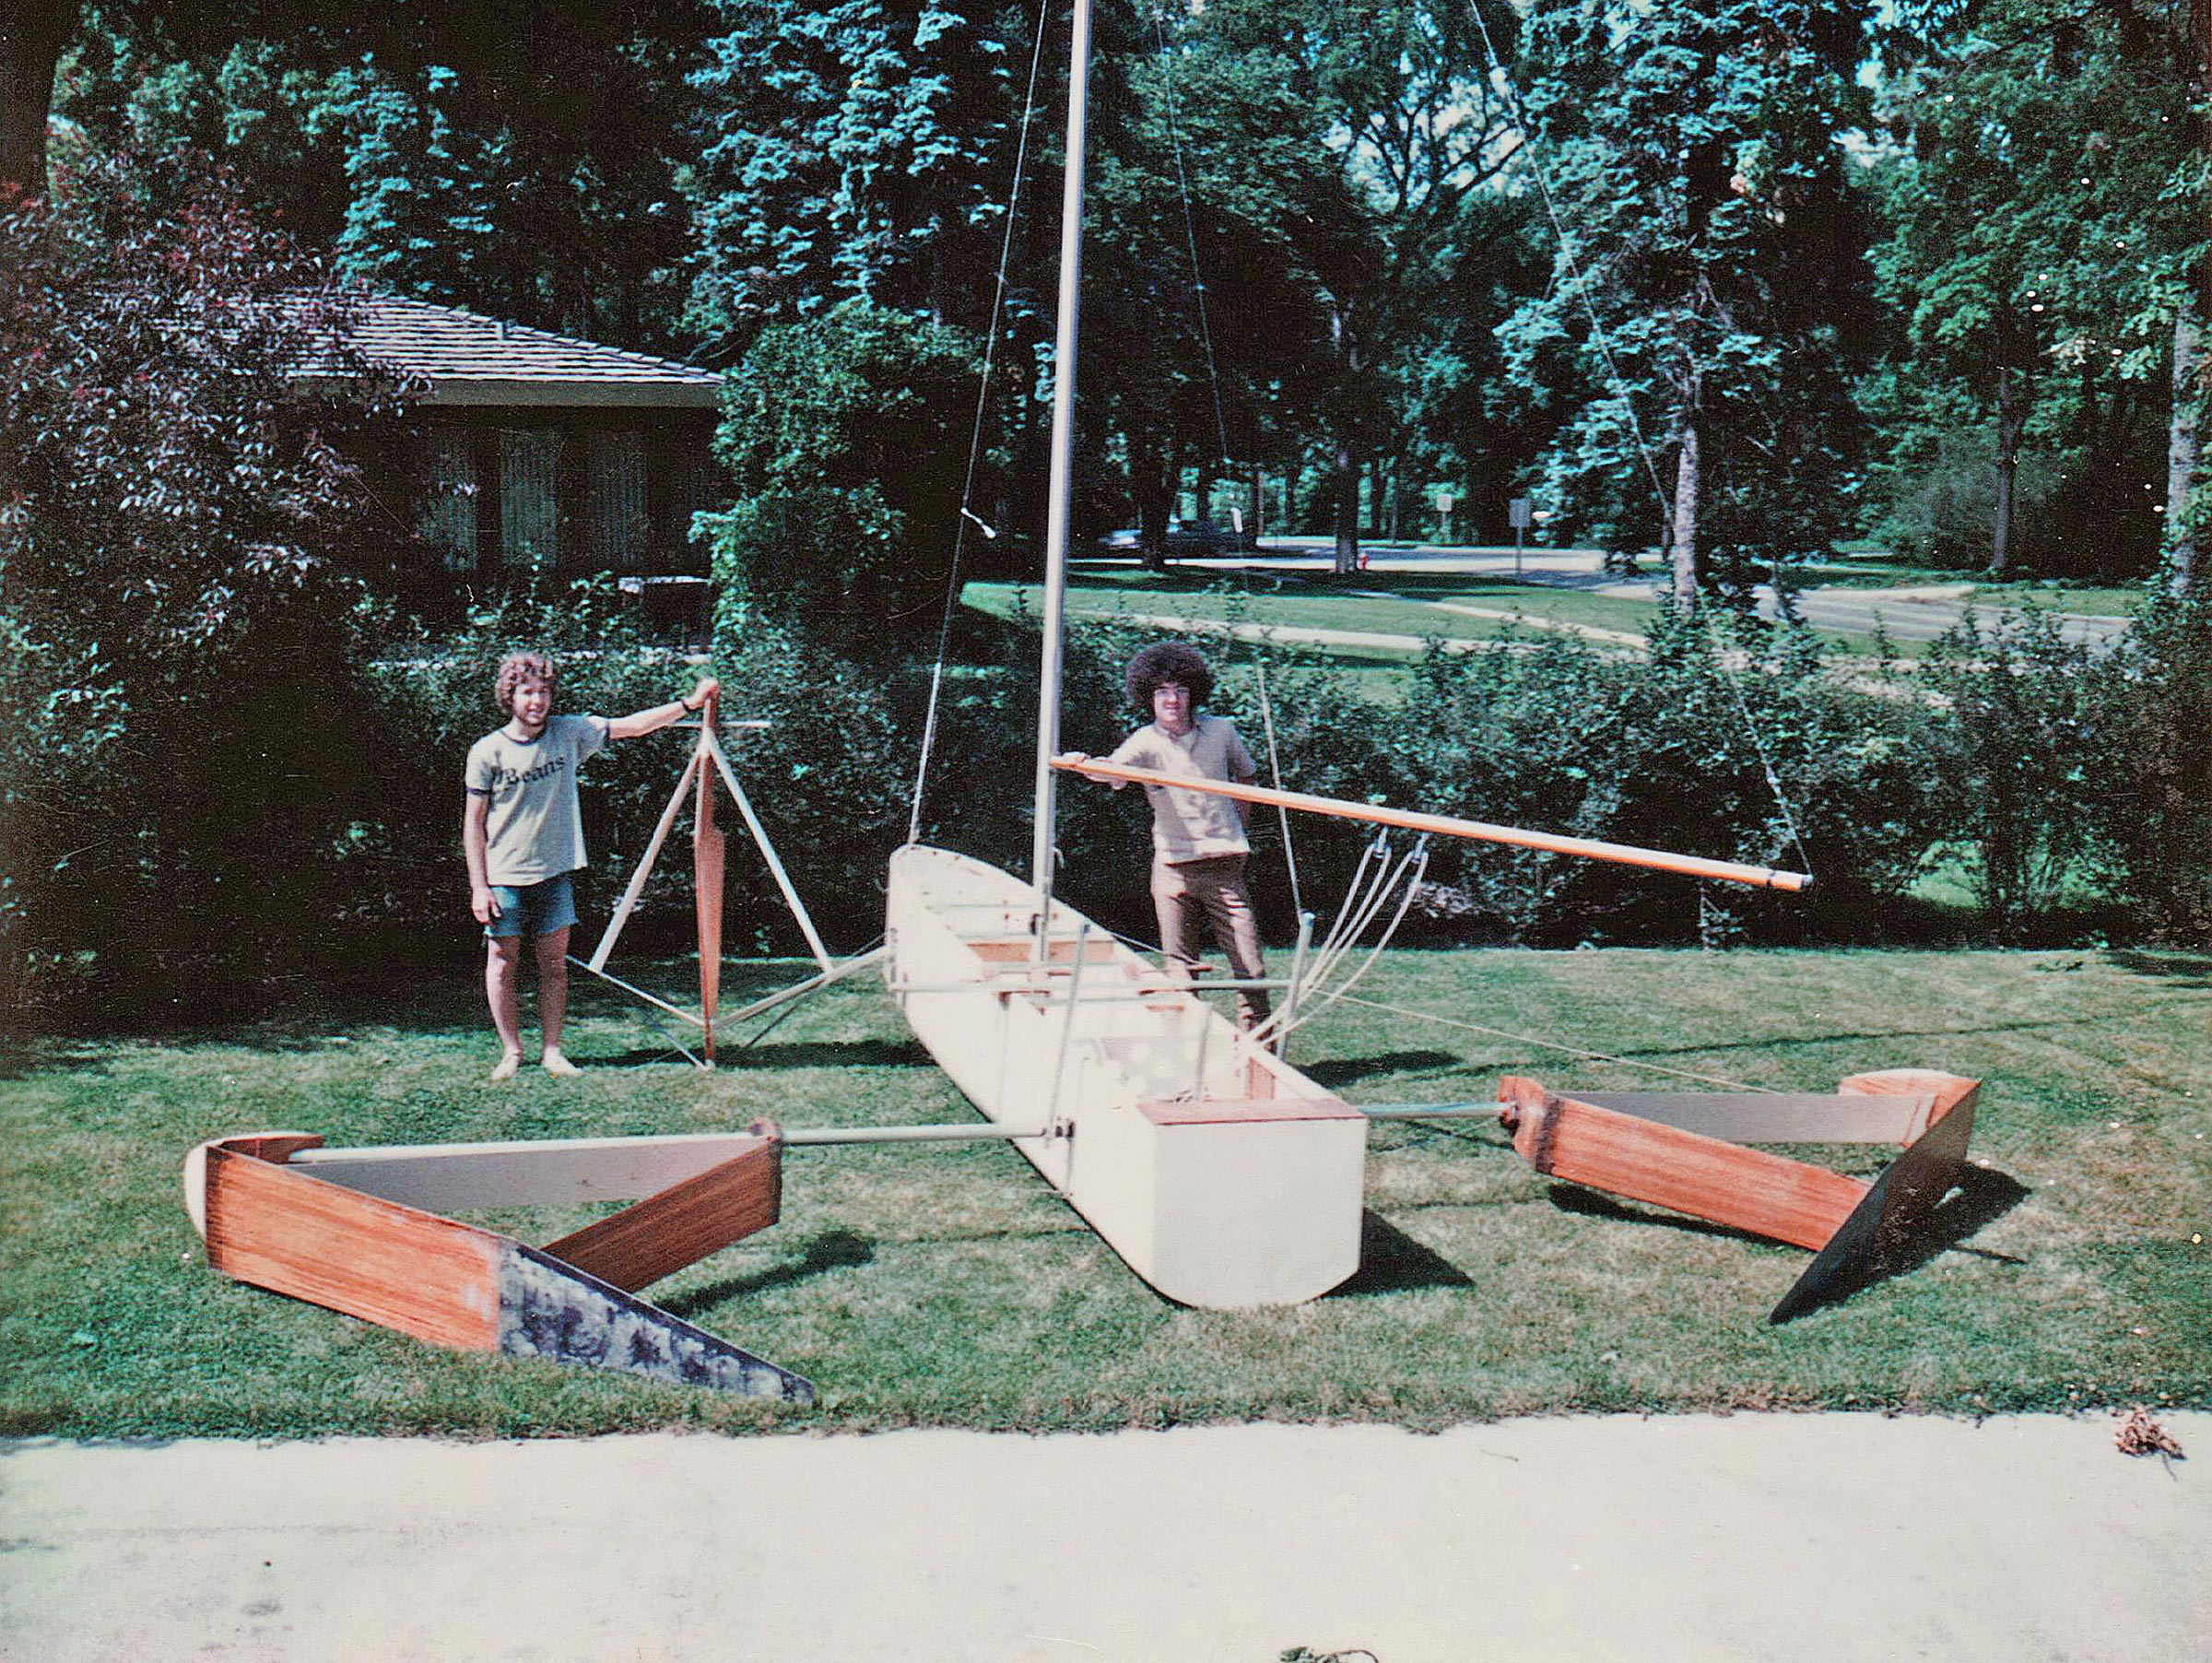
Marty, left, and I proudly showed off the assembled boat as it rested on the lawn with a sailing rig cannibalized from an Albacore-class dinghy. The foils are rotated aft as they would be for launching. The rotating main beams and the lever arms for rotating the assemblies can be seen flanking the hull.
In the summer of 1973, Louis, Marty, and I reconvened to repair, improve, and further test our hydrofoil, this time with a sailing rig. Although we had great ideas for an innovative wingsail, simply reconfiguring and strengthening our vessel demanded our full attention given that we only had the three months of vacation to work on it. We fashioned aluminum deck braces to strengthen the undecked hull. After analyzing the forces that had led to foil-arm failure the previous year, we attached guy wires of slender stainless-steel cable for additional strength. We incorporated several other small modifications to the simple vessel that had marginally passed our first proof-of-concept test.
With no time to construct a wingsail, Louis, Marty, and I decided to cannibalize the mast, boom, and sails from one of our Albacores. We added a cross strut made of aluminum conduit—again, donated by Louis’s brother-in-law—to provide a wider base to anchor the port and starboard shrouds. Next, we provisionally assembled the entire craft on my front lawn to ensure that all the parts fit together and seemed sturdy. It was an exciting moment as we admired with pride and photographed our ungainly contraption.
We waited for a day when the lake was not too rough, but still had enough wind to induce our invention to rise above the waves. A handful of friends and curious sailing-club members got wind of our hydrofoil sailboat and most deemed this to be a madman’s folly. Some sailors at the club even ridiculed us. Nobody in the area had heard of, let alone seen, a hydrofoil sailboat. Naysayers consistently scoffed at us, declaring that the feat would be impossible. The mere appearance of our flimsy-looking assemblage of seemingly random materials elicited fits of outright laughter.
We had our own doubts, as well. None of us had seen a hydrofoil sailboat or even spoken with anyone else who had. We knew that we were on our own and had spent hundreds of hours climbing way out on a limb. It was an act of blind faith. I had trouble sleeping the night before the launch, as I reviewed in my mind every detail of the planned test. We started early in the morning, transporting all the components to the beach. We cautiously inserted the foil arm spars through the hull, stepped the mast, bent on the main, and hanked on the jib. Everything fit.
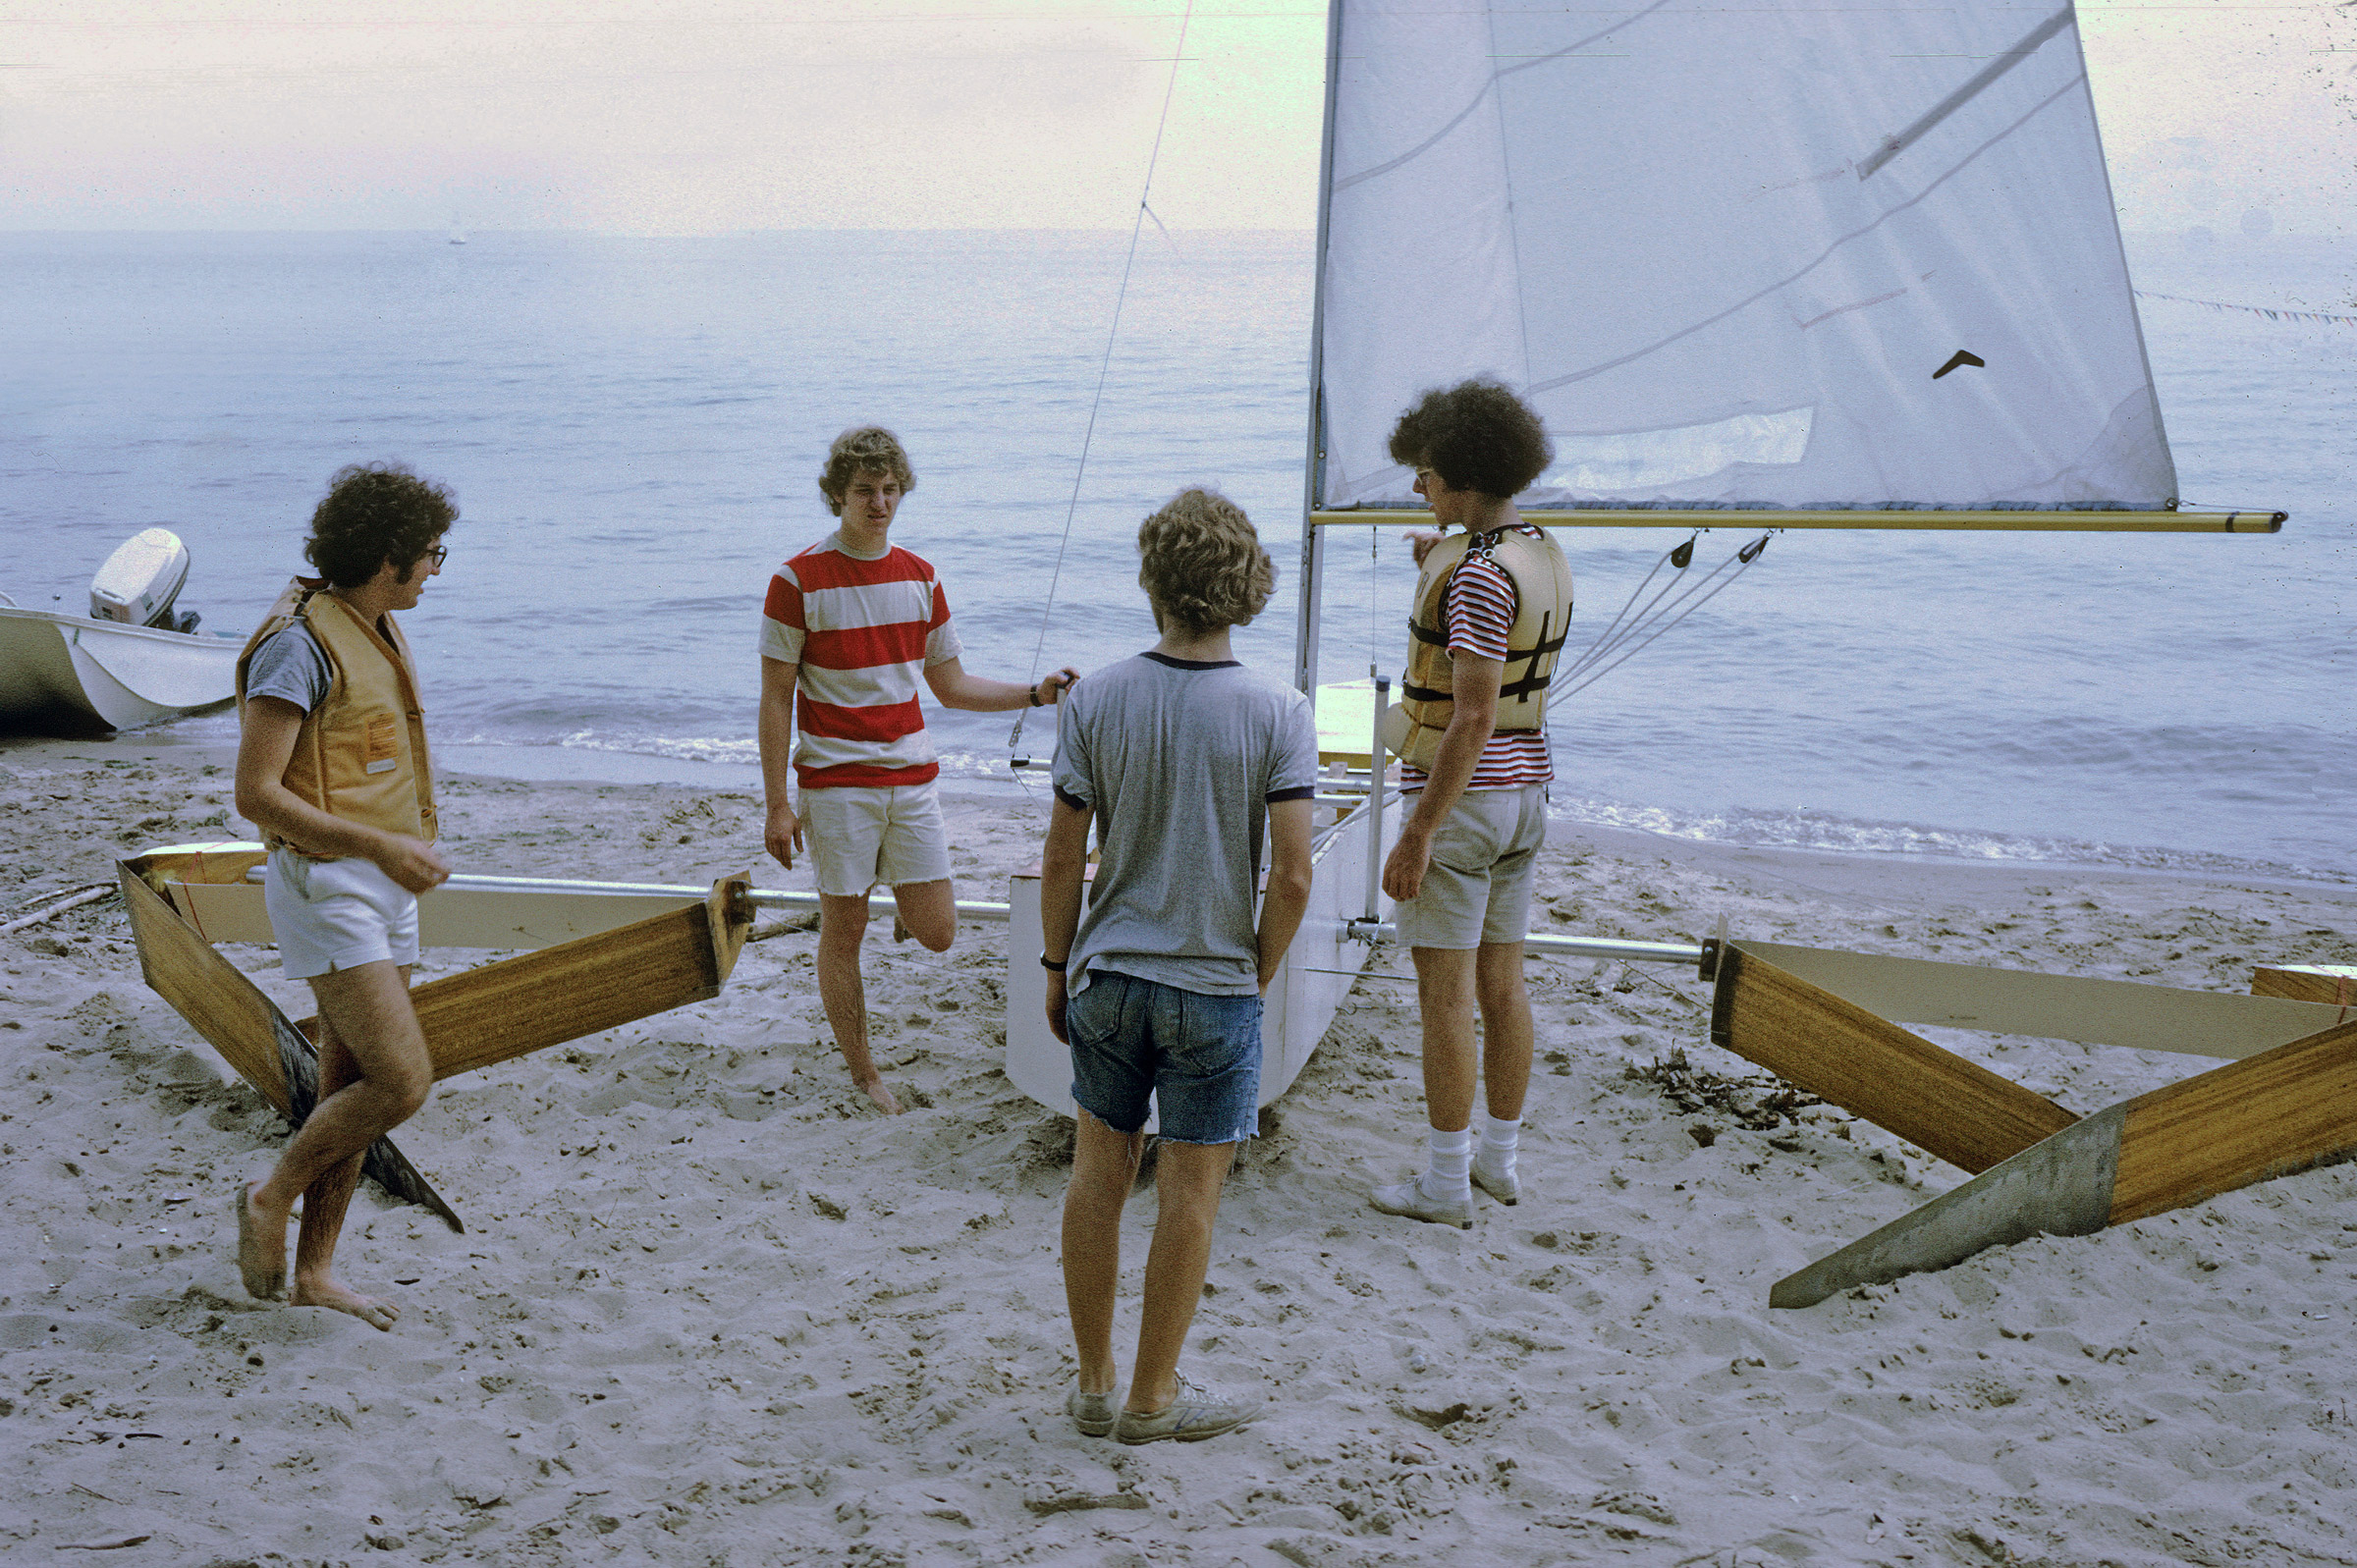
Marty and I, at right, were joined by two friends as we prepared to launch the hydrofoil for the sail test. The strut attaching the shrouds is visible beyond Marty’s left shoulder. One of the two lever arms that rotate the main foil assemblies can be seen between Marty and me.
A group of us walked the boat from the beach into deeper water. Marty swam to the bow and attached the bow foil and steering assembly, securing the pintles with their retaining pins. Our crude calculations indicated that the boat would work best with one person aboard. Accordingly, the three of us took turns hoisting the sails, adjusting the angle of incidence of the main foils, and attempting to sail.
Louis went first. The wind was light, at most 5-to-7 knots. The contraption sailed slowly but smoothly, proving that it could advance on all points of sail while in displacement mode. The rest of us watched eagerly from a Boston Whaler as a Louis maneuvered for about an hour without getting any lift from the foils.
Next came Marty’s turn with little additional success. The bow foil lifted the forward end slightly, but not much more. By the time my turn came, the wind had picked up to around 10 knots. I had trouble trimming the main and jib while simultaneously steering. I had Marty climb back aboard with me while I increased the angle of incidence of the main foils. We were getting desperate—time was passing and our naysayers were beginning to gloat.
While I was near the stern clenching the joystick and Marty sat amidships trimming the sails, the wind came up to 12 knots. The bow rose and Marty moved forward to correct the fore-and-aft trim, further optimizing the foils’ angle of attack. As he sheeted in both sails, I steadied our course on a beam reach. The boat accelerated smoothly in response. The hull pitched rhythmically in the chop. Distinct vortices formed along the trailing edges of the main foils.
Suddenly, as though by magic, the entire hull rose from the water and our boat shifted into another gear. The choppy ride instantly became smooth and swift as though gliding on ice. On the Whaler, Louis had the Super-8 camera rolling to document the event.
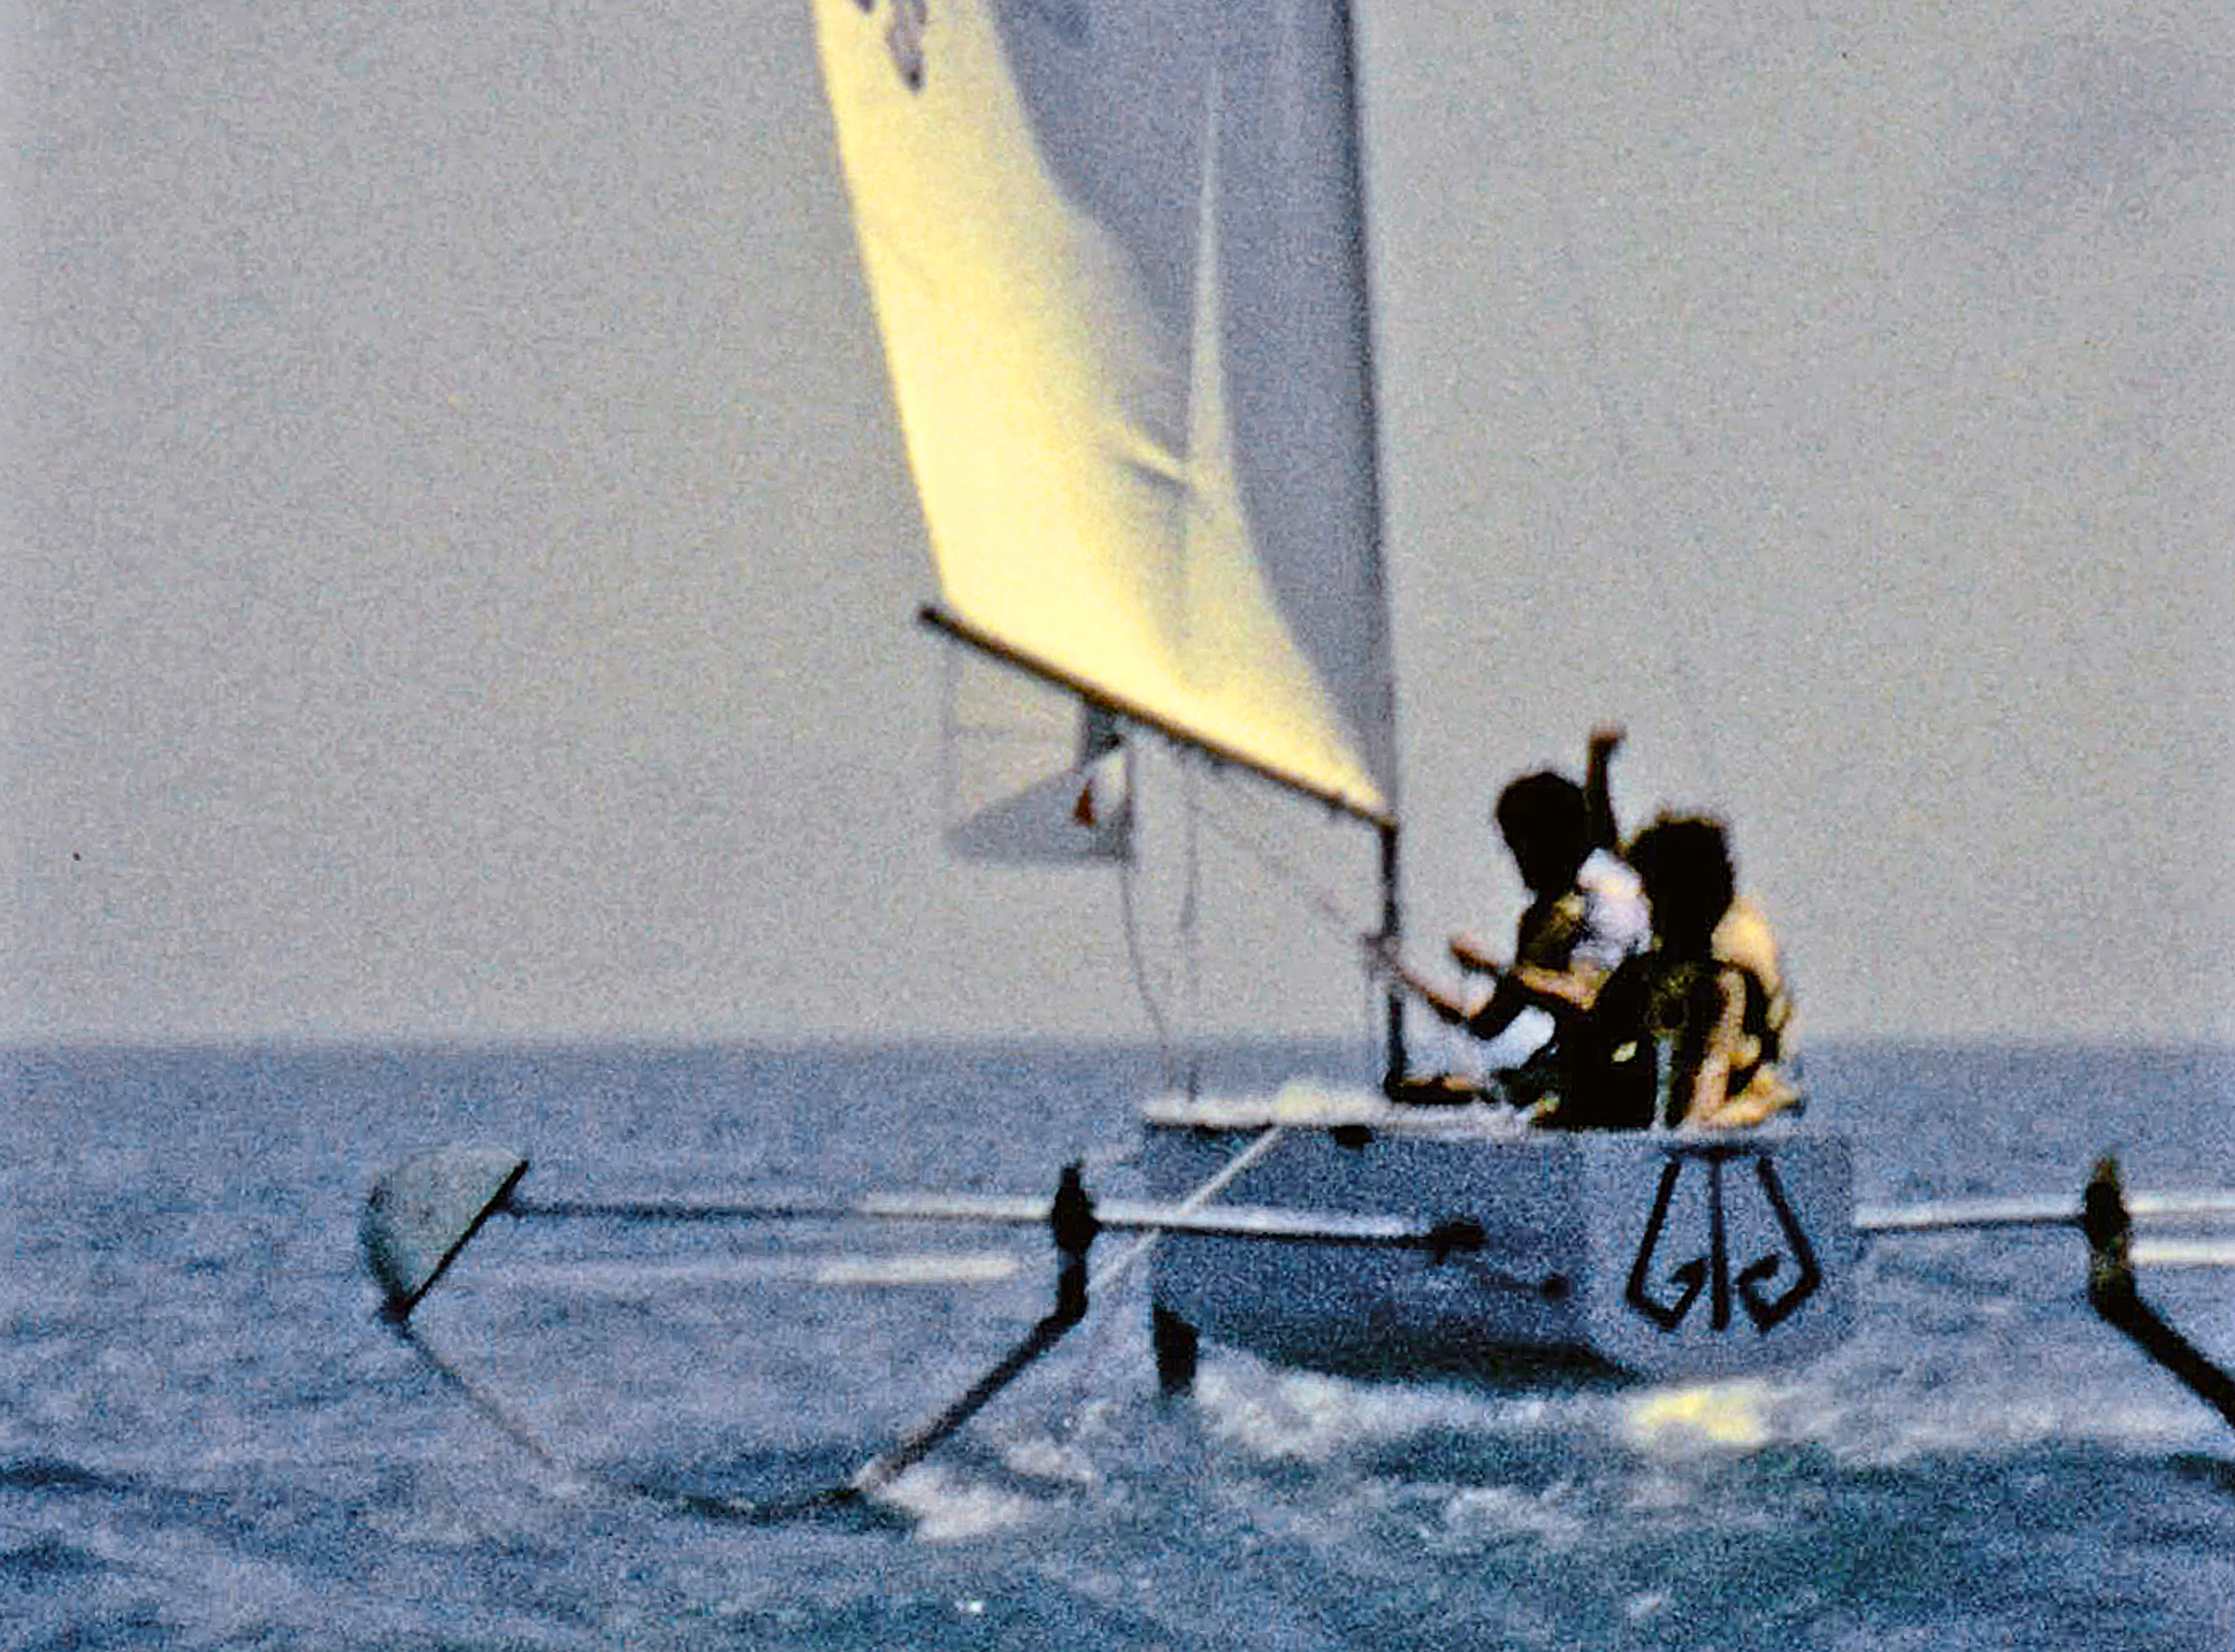
This photo, taken from Super-8 movie film footage, proves that our hydrofoil sailboat successfully flew above the waves. It was our Wright Brothers moment.
This flight only lasted a matter of seconds before another catastrophic main arm failure caused the hull to drop precipitously back to the surface. Nonetheless, we had done it! We had flown above the waves under sail with two people aboard. Louis, Marty, and I, as well as the two or three others who had witnessed the event were wildly ecstatic. During our simple proof-of-concept test, we had harnessed the forces of wind and water to accomplish a pioneering feat of physics. Although we never pursued our project any further, this event and the incomparable euphoria of our Wright Brothers moment live on as one of the greatest experiences in my life.
Mike Jacker is a retired orthopedic surgeon who lives in Highland Park, Illinois, with his wife, Laurie, their 30-year-old African grey parrot, Zeke, and their Brittany spaniel, Max. He cruises during the summer on Lake Michigan aboard JOLIBA, an Ericson 38, and also sails a Vanguard 15. In addition to sailing, Mike enjoys kayaking, flying sailplanes, boatbuilding, dancing, and photographing local wildlife. He recently published a book, Taken by the Wind, chronicling a year-long voyage to the South Pacific in 1976–77 aboard a 30′ sailboat before the advent of GPS.
If you have an interesting story to tell about your adventures with a small boat, please email us a brief outline and a few photos.
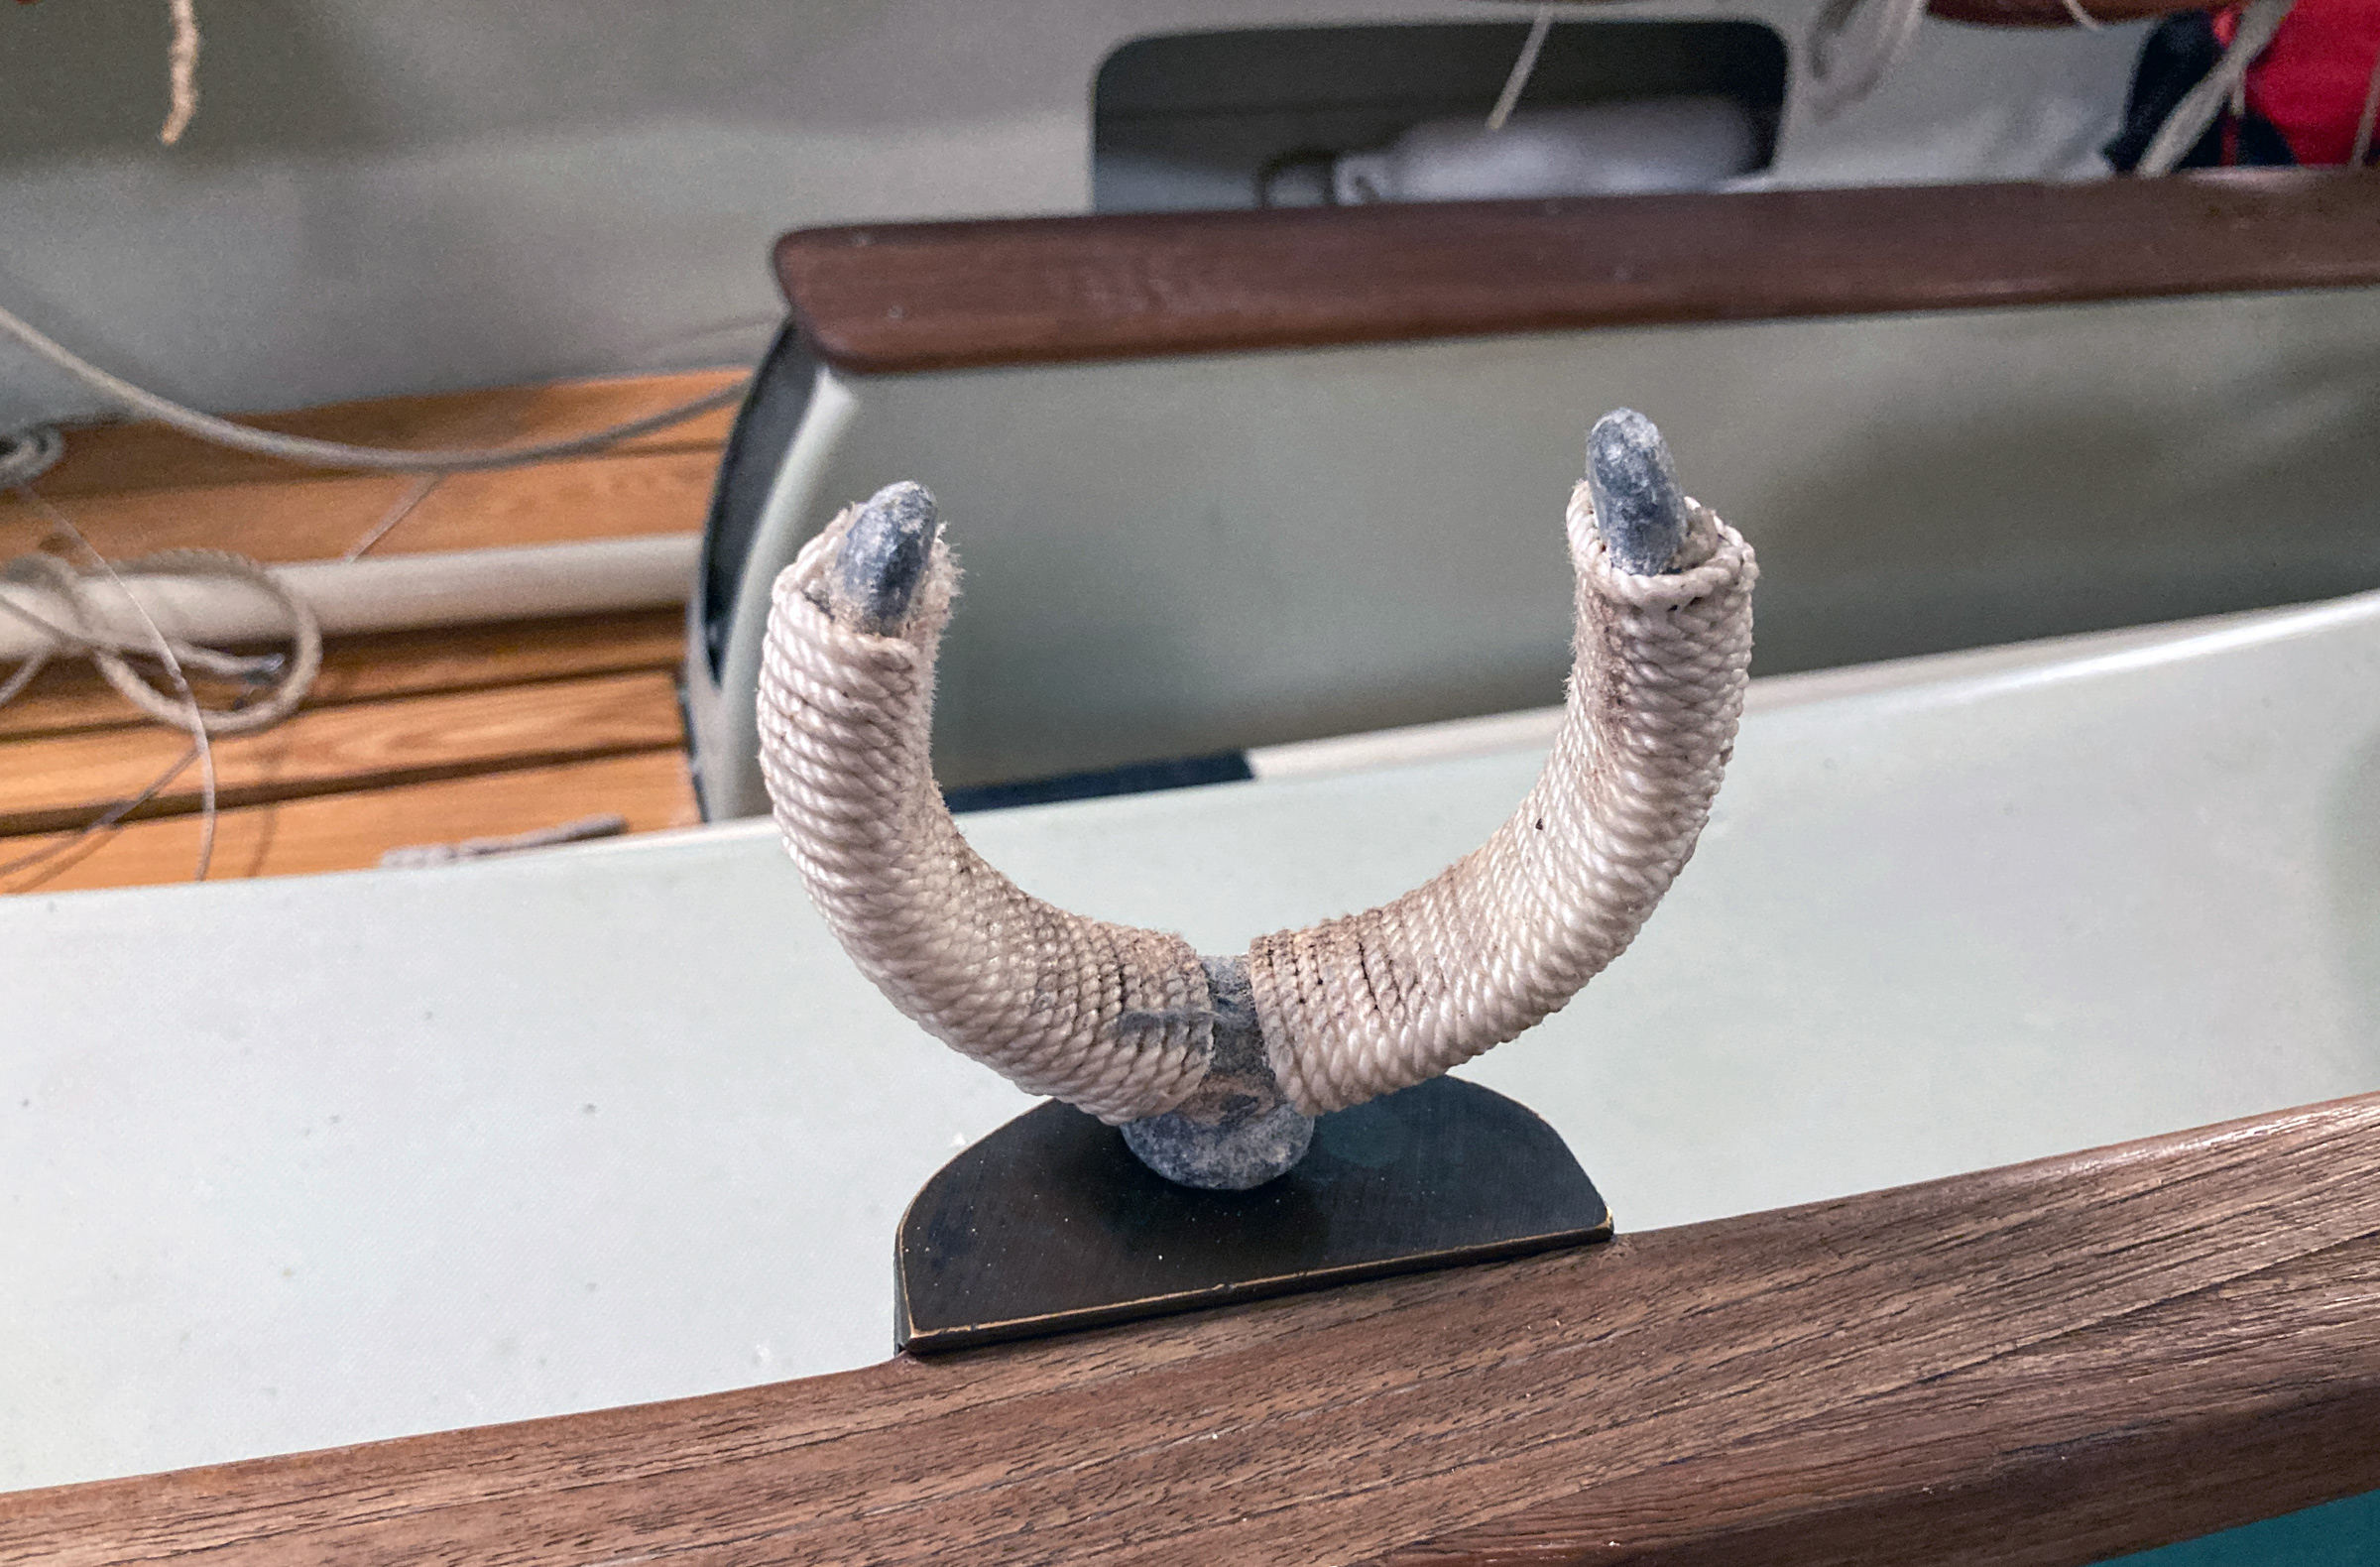
Oars can easily become damaged if they are not protected from metal oarlocks, and they are commonly outfitted with sewn-on leathers or slipped-on rubber sleeves. Skipper’s father, Cap’n Jack, chose a different approach: he liked to wrap the oarlocks with small-diameter cord as a method of protection. The cord is much cheaper than a set of sleeves or leathers, and wrapping is much faster than sewing—an oarlock can be wrapped in minutes—and won’t damage the wood in the way nailed-on leathers do.
The oarlocks on Skipper’s 1980 Drascombe Lugger have been wrapped with cord for almost 40 years now, and they are holding up great. The cord cushions the oar and provides a little friction to help keep the oar from slipping out of the oarlock. Another benefit of wrapping an oarlock is that it reduces rowing noise and, overall, the cord-wrapped oarlock looks very shipshape.
Photographs by the authors
The wrap starts with the end of the cord on the outside of one horn, squeezed tight by the first several turns.
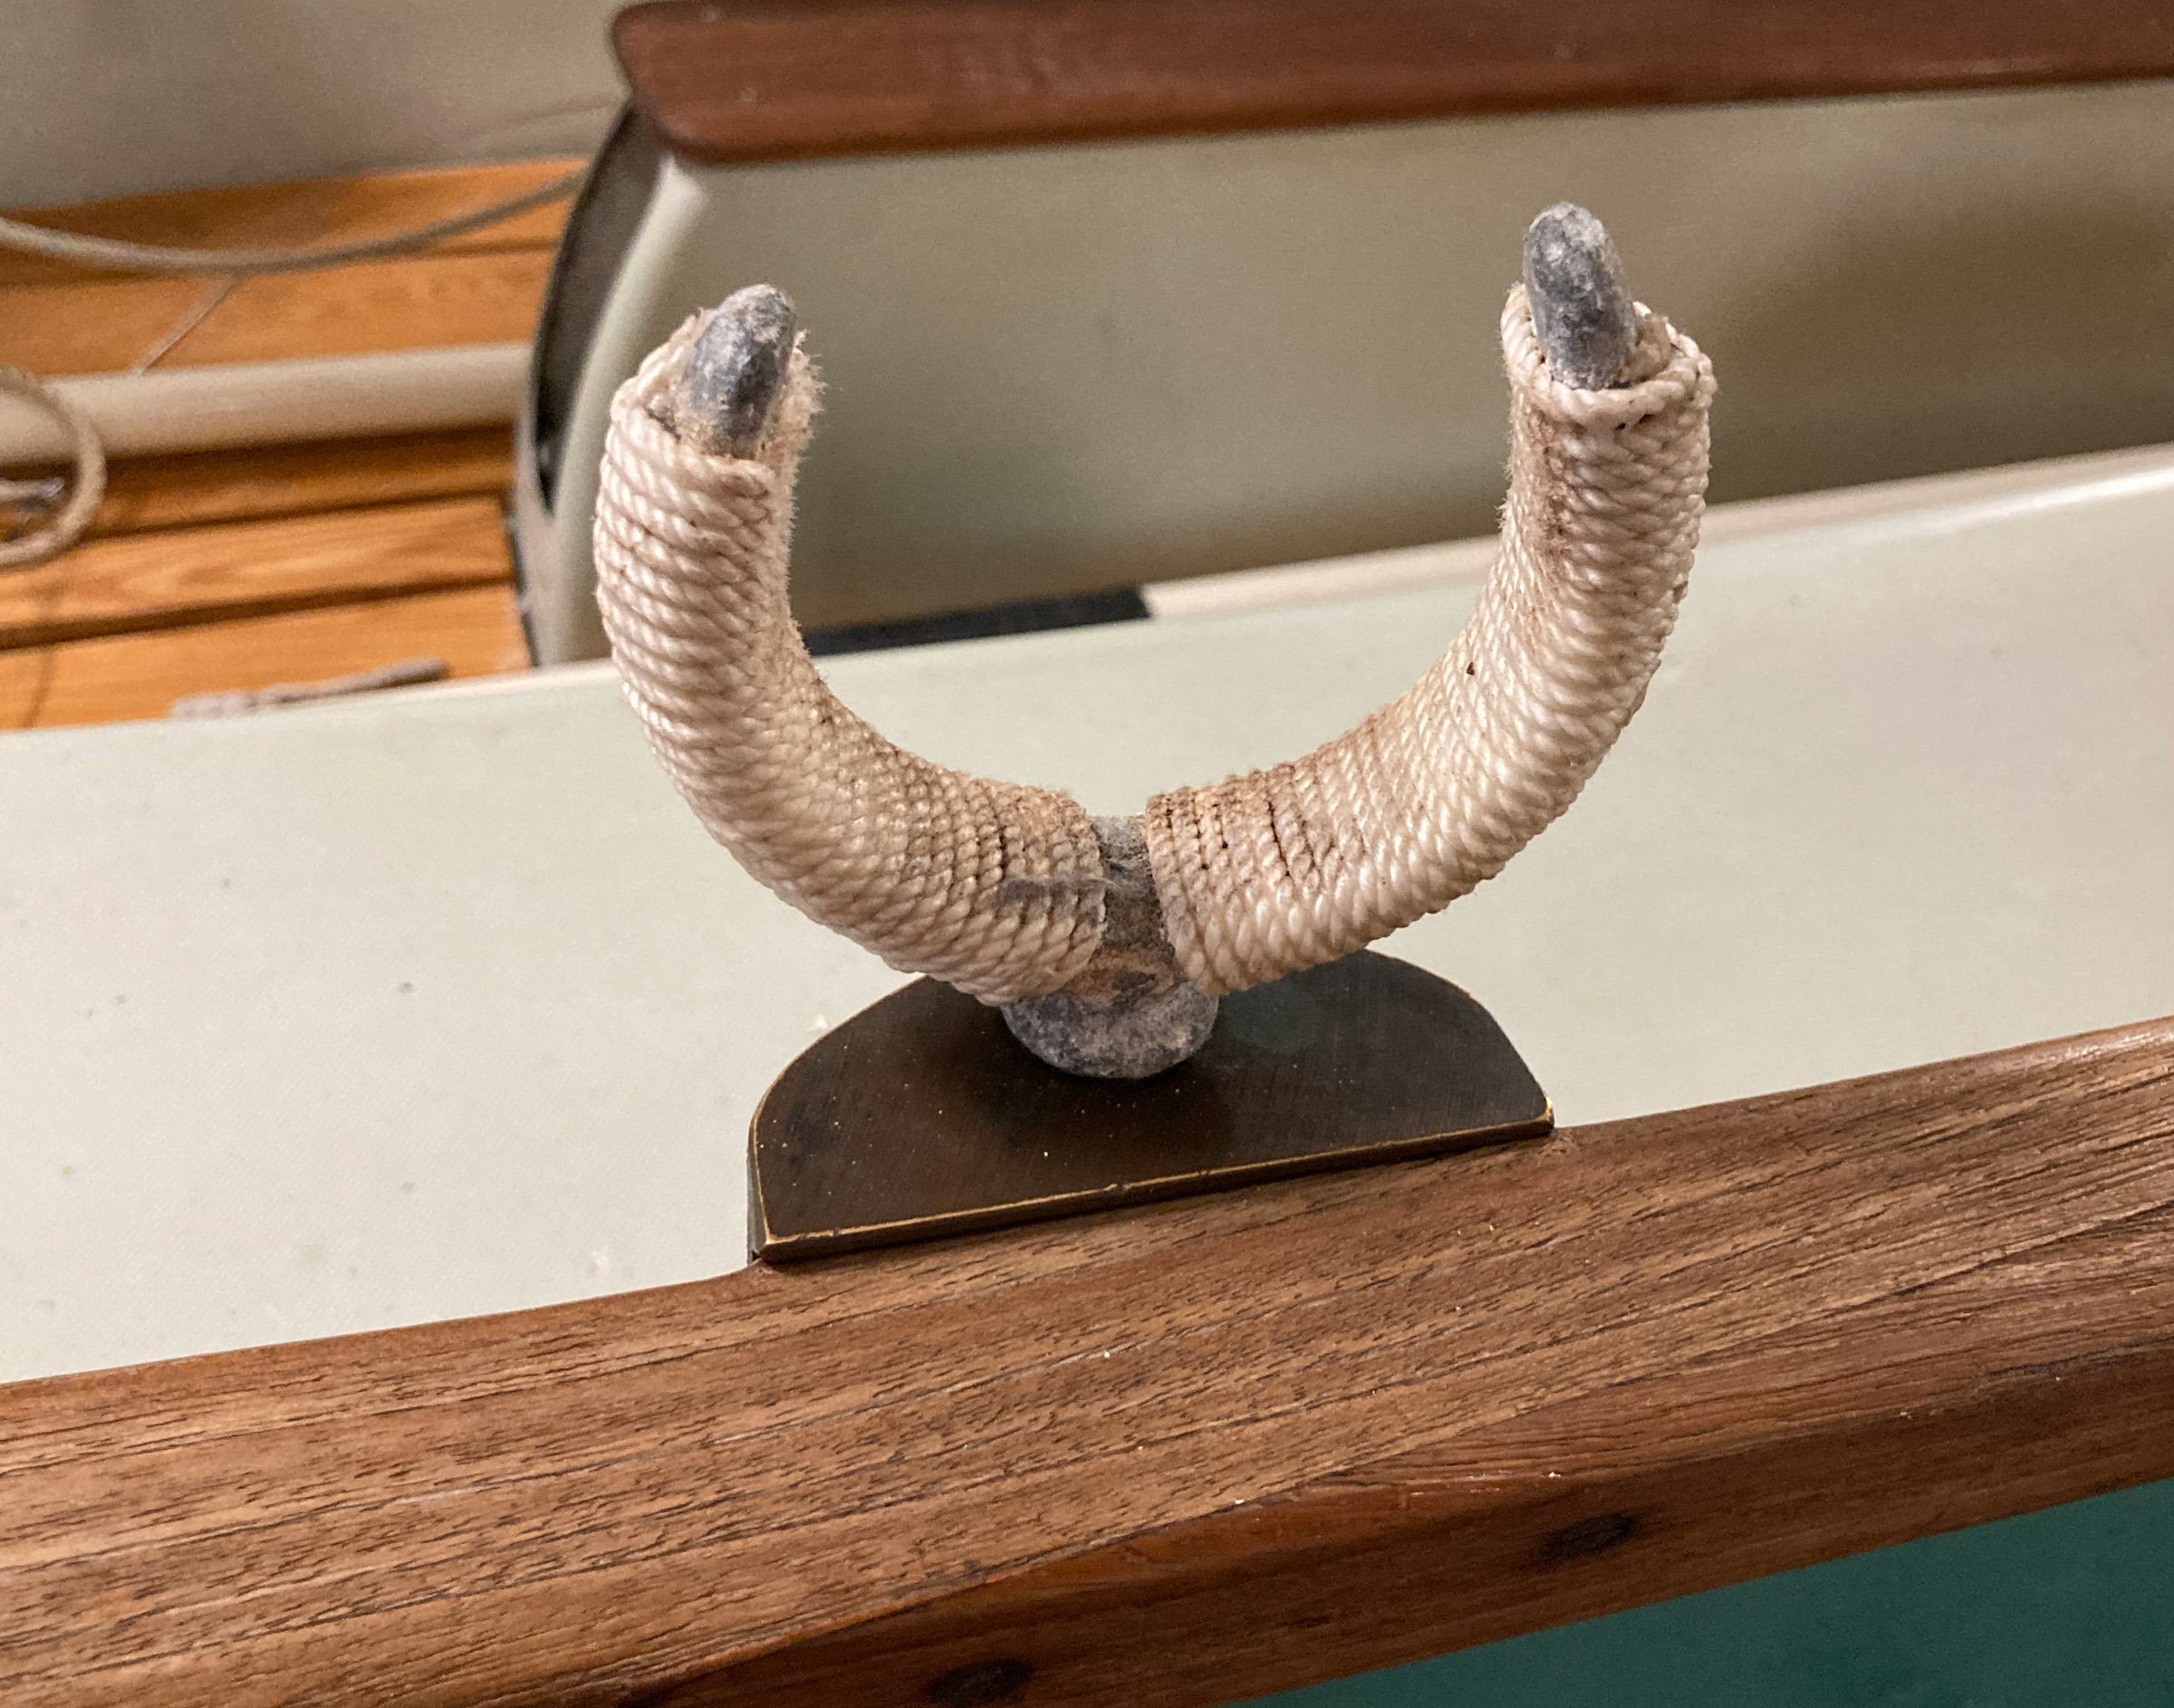
We recently wrapped a set of Wilcox and Crittenden #1-sized locks with 1/8″ braided Dacron cord. Small-diameter braided or twisted cord can be used, as long as the diameter is sufficient to provide a protective surface for the oar and still leave clearance for the oar loom. It can be a bit awkward to wrap the oarlock while unwinding cord off of a spool or from a hank, so to get the right length, you can do a quick job of wrapping the lock according to the instructions here, leaving a 12″ or more at the tail end, and cutting the cord to length. For the permanent wrap, start over and pull the cord tight this second time.
Adjust the wraps to cover the inside curve of the lock while working around the stem and eye. The wrap here is finished with hitches and the end cut flush and melted.
The beginning or standing bit of the cord is captured by wrapping the first few turns of cord around it, and then the wrap is continued around the entire oarlock, taking time to evenly space the wraps and pulling the cord tight along the way. Getting from one horn and around the shaft to the other horn will work itself out with just a little fussing to get the inside part of the wraps to butt against each other. Once the bitter end of the cord is at the end of the opposite horn, the cord can be knotted underneath itself with a clove hitch or tucked back under the last few wraps with the aid of an awl. The tail end should emerge on the outside of the lock. After the excess cord is cut off, we melt the end of synthetic cord to make a small stopper knot to prevent unraveling.
A coat of Titebond III waterproof glue keeps the cord wrap from shifting or loosening.
We then work marine-grade varnish or waterproof glue into the exposed surface of the cord to help seal everything in place. Once the wrapping dries, the oarlock is ready for action.
With many types and sizes of cord to choose from, wrapping an oarlock is an inexpensive, fun, and easy project that can provide effective protection for your oars.
Audrey (Skipper) and Kent Lewis row, sail, and paddle an armada of small boats in the Tidewater region of the United States. Their adventure blog can be found at Small Boat Restoration.
Editor’s Notes
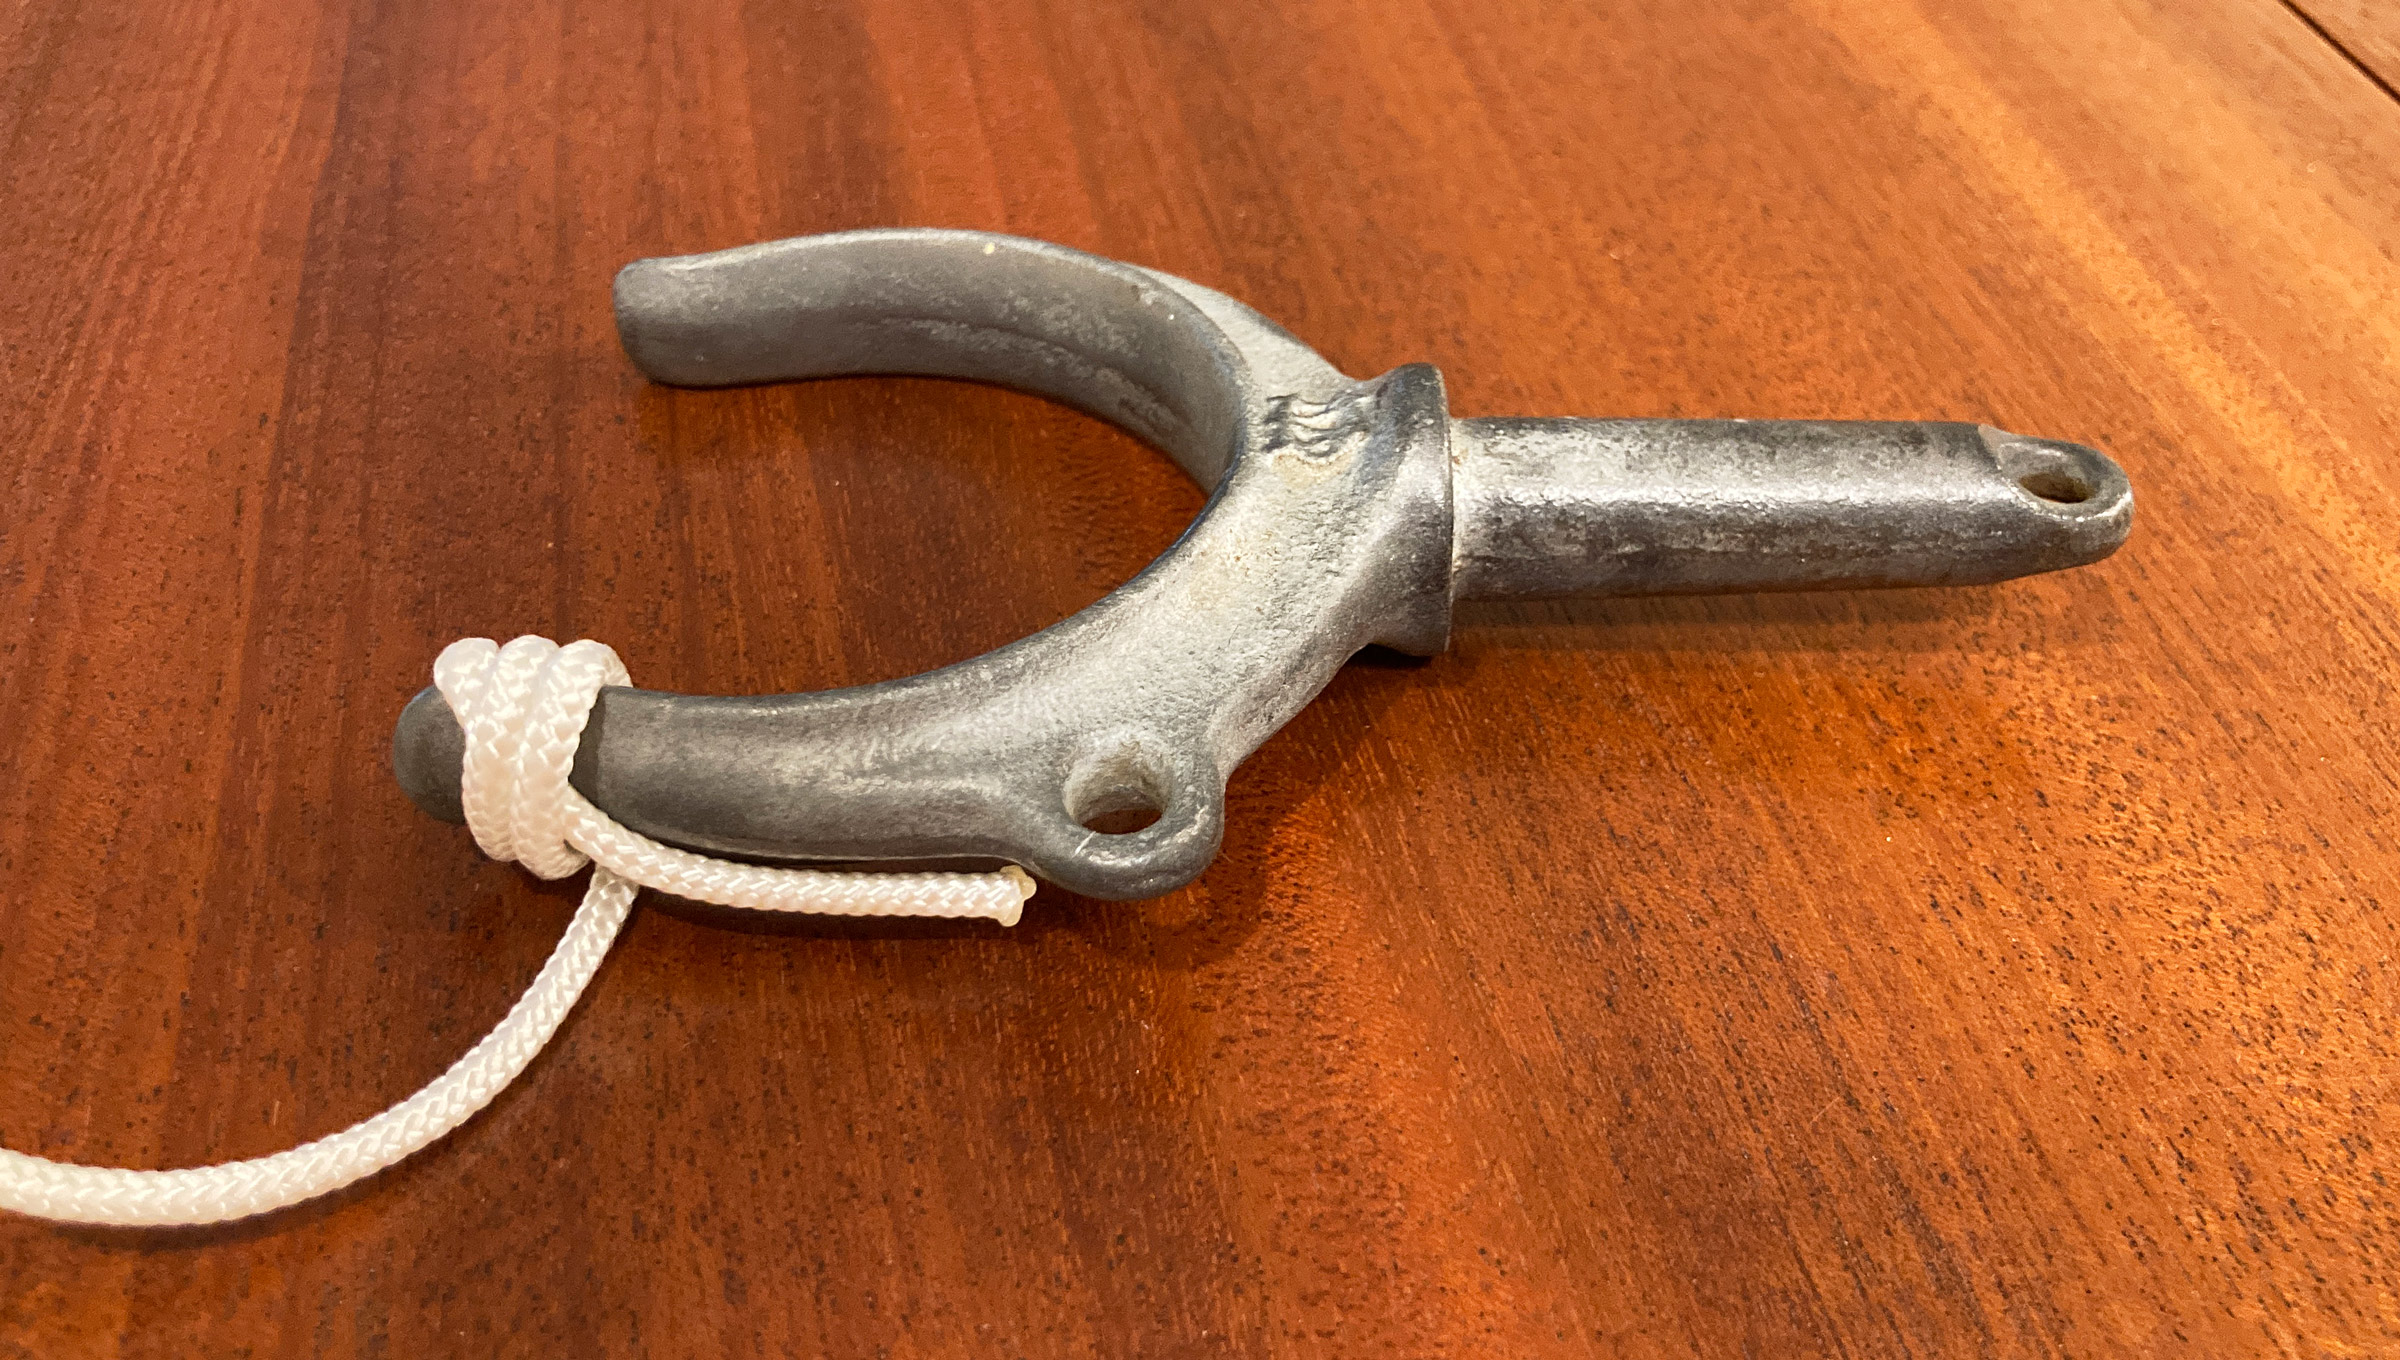
I mounted an oarlock in the stern of my Caledonia Yawl so I could use one of the oars that I have for rowing to steer if the rudder fails (again) or to scull the boat through tight quarters. For those two uses, the oar doesn’t rest with its leathers in the lock. I wrapped the lock with tape, but that didn’t hold up well in the saltwater and sunlight and didn’t offer the varnished oar loom much protection. I liked Cap’n Jack’s idea of wrapping the lock in cord and went to work. My galvanized lock has an inside diameter of 3-1/8″ and required 12′ of 1/8″ solid-braid nylon cord.
For the start of the wrap, the end of the cord should be cut and allowed to fray. Melting the end creates a hard knob that interferes with the wraps that would cover it.
The wraps have reached the frayed cut end and press it flat against the lock.
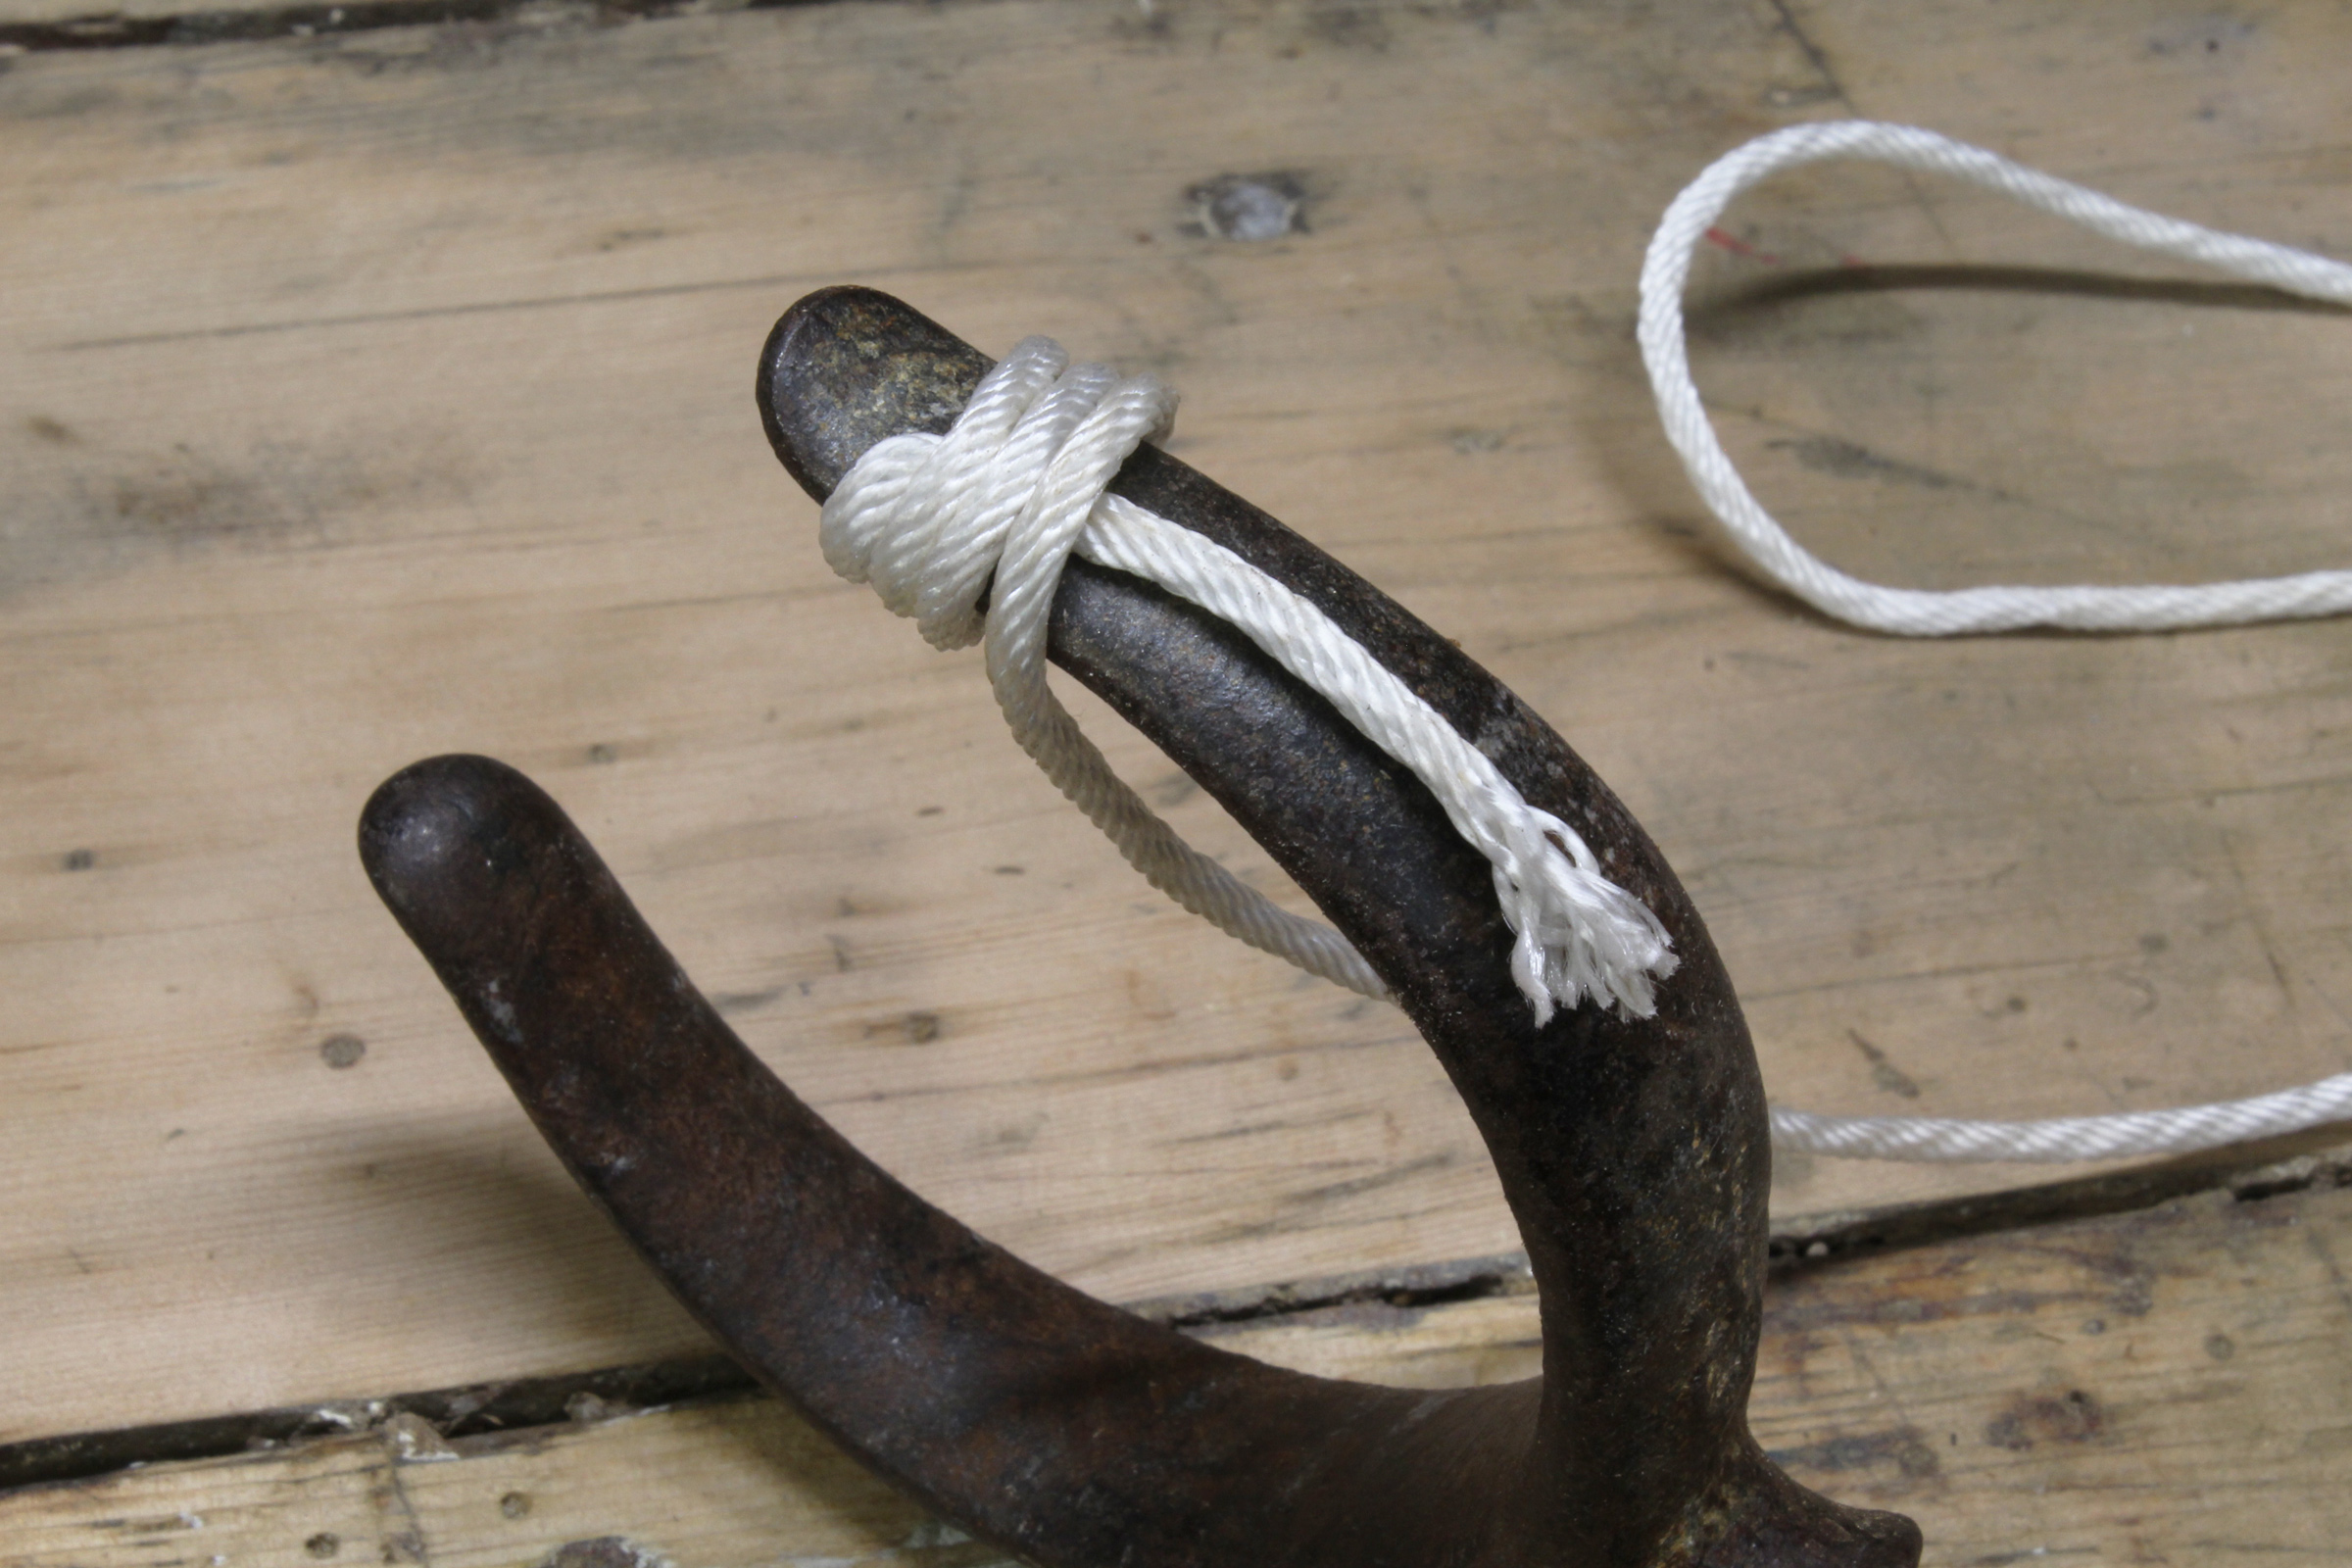
To finish the wrap, rather than use an awl to make space for the tail of the cord, I made a few turns over a loop of artificial sinew and threaded the cord’s end through it. Sailmaker’s twine would work too.
A little slack is required in the last half wrap to pull the tail end through.
A hard pull on the tail end will retighten the last wrap.
The tail end gets cut off in between wraps. Using a sawing motion with the knife will spread the fibers and flatten the end.
After pushing the wraps closed over the cut end, a dab of thin super glue will keep the cord end where it belongs.
With the lock now wrapped, I can use an oar for sculling or steering without undue damage to the varnished loom.
You can share your tips and tricks of the trade with other Small Boats Magazine readers by sending us an email.
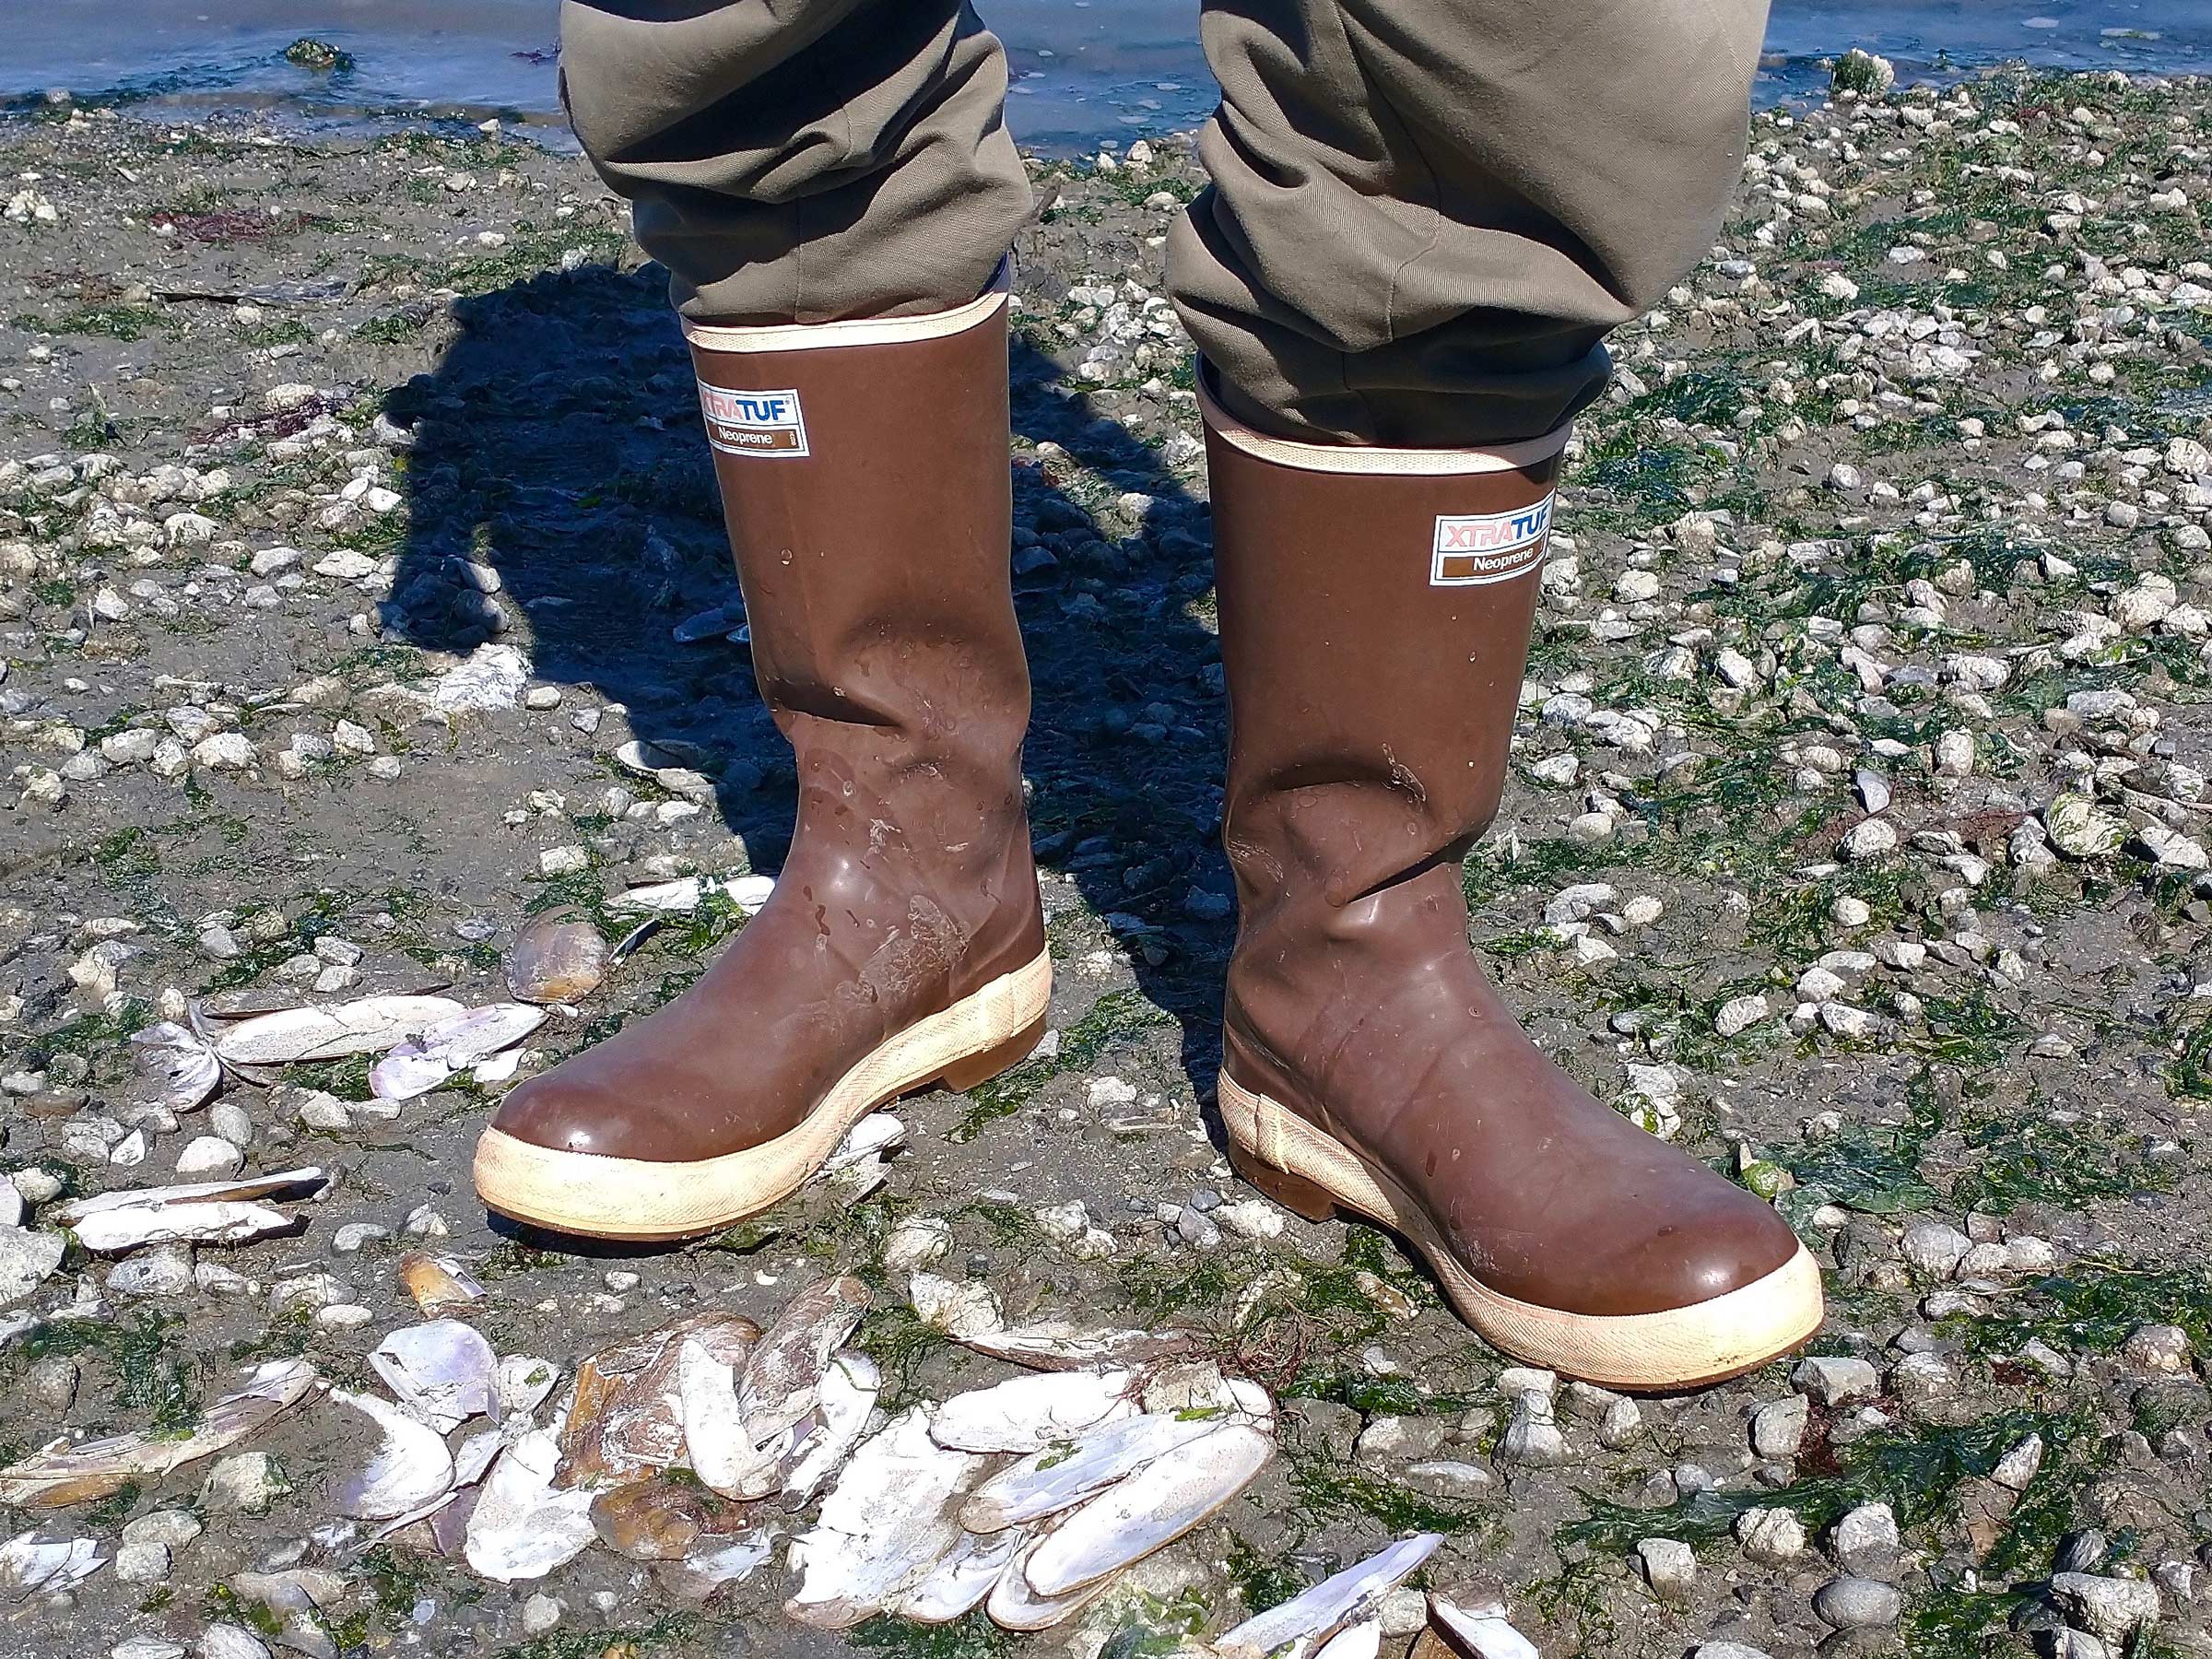
For work and play, I wear rubber boots a lot. Some have knee-high tops, which are great at keeping out water but awkward when sitting; others are useful for walking through muck, but lack traction on hard surfaces. With two pairs at work, and two at home, I have choices when I go boating. But most often, I turn to one particular pair: the Xtratuf 15″ Legacy Boot. Truly tough and highly waterproof, they’re nonetheless almost as comfortable as a big pair of wool socks.
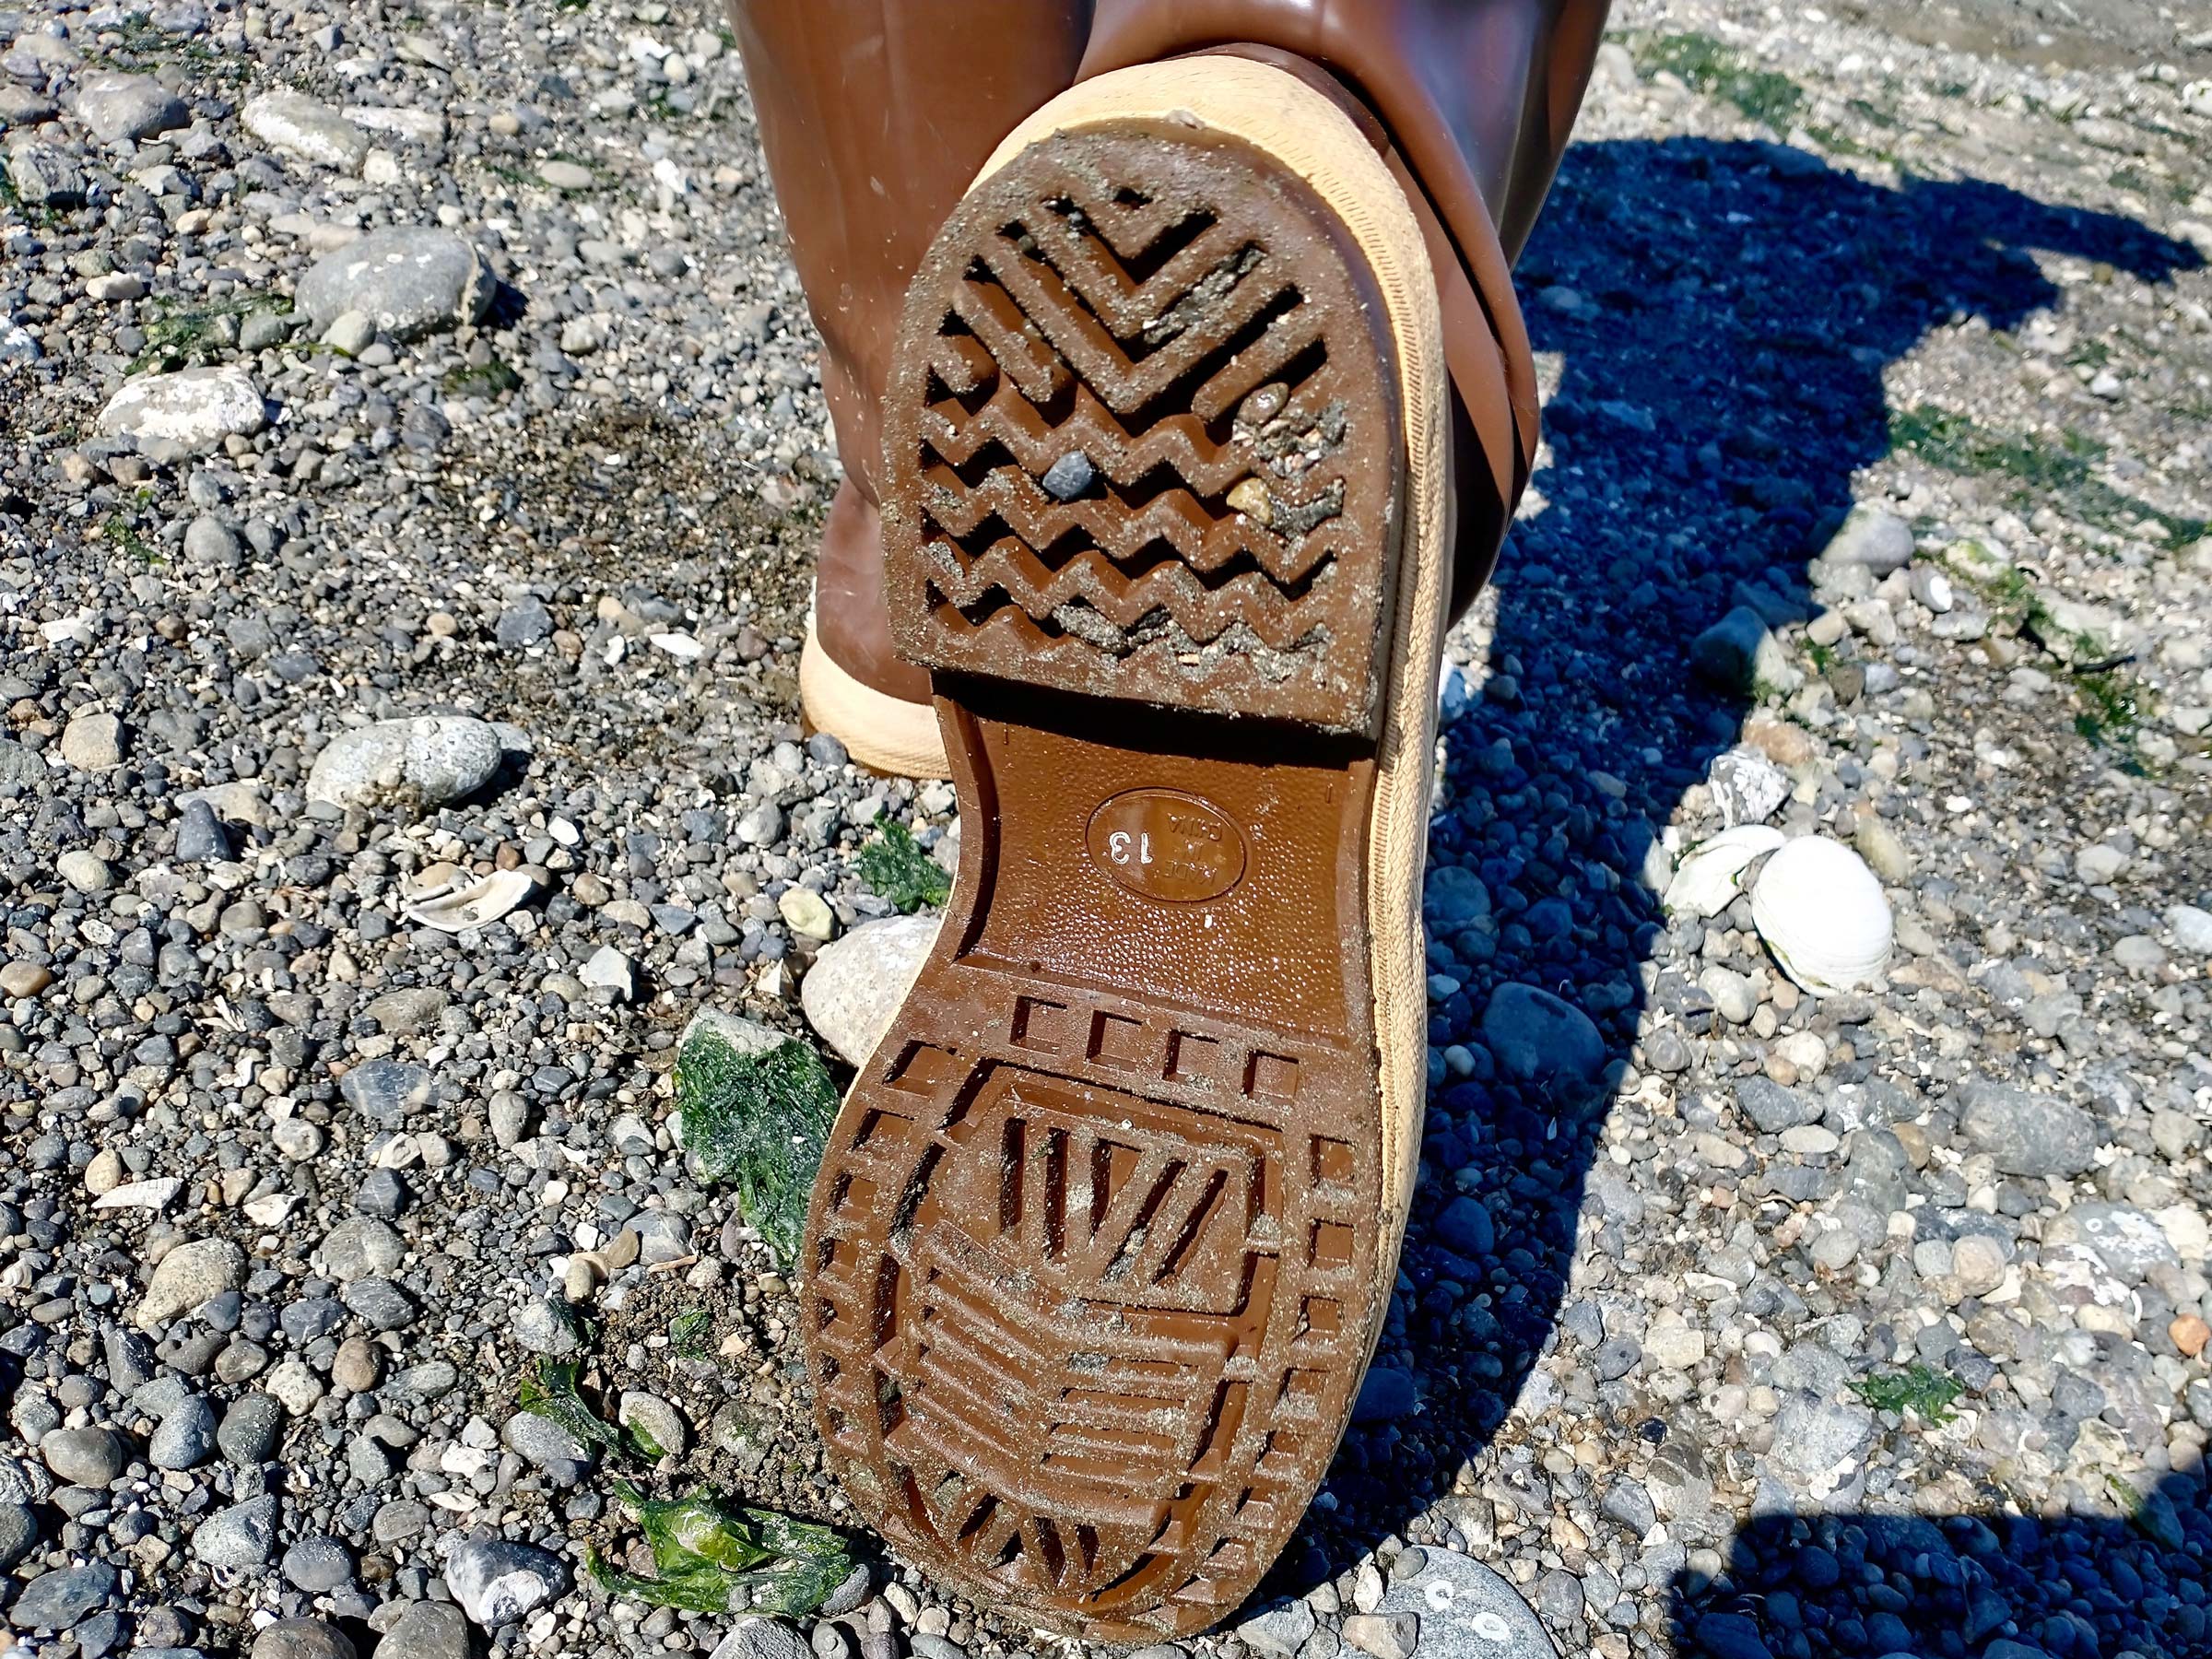
Made for deck work on Alaskan commercial fishing boats, these boots are designed to be strong and grippy, yet supportive enough for long periods of outdoor work. I wore my Xtratufs on a small-boat cruise along the Inside Passage every day for more than a month, with daily excursions over boulders, through cobble, and on barnacle-strewn beaches. The grip was equally good on natural surfaces as it was on deck, with one caveat: small shells and pebbles tend to get stuck in the tread, which can scratch wood floorboards and diminish the soles’ traction a bit. (On the bright side, picking pebbles out of the treads provides evening entertainment at anchor.) Two years later, the boots are still going strong, with barely a sign of wear.
Photographs by the author
The soles provide a good grip ashore and aboard though pebbles can get caught in the tread and require removal by hand.
The Xtratuf’s soles are pliable rubber with a flat, recessed-chevron pattern. They remind me of a high-top tennis sneaker, capable of gripping confidently on wet wood and nonskid deck material (unlike the cheap black utility boots with thick hiking-style tread used by many small-boat sailors). Xtratuf soles meet International Organization for Standardization safety standards for slip resistance, and have been laboratory tested on slippery surfaces, such as wet, soapy tiles.
The boot uppers are stiff enough to stand upright and flexible enough for comfortable walking.
The outside of the boots is constructed of multiple layers of latex neoprene, a synthetic latex that is strong, waterproof, chemical resistant, and pliable. Thicker laminated pieces around the toebox, and over the top of the foot near the ankle, provide structure. Xtratufs have enough stiffness to stay upright and feel firm around my feet, but they’re flexible enough to comfortably walk a mile or so from the boat and back.
Inside, the boot has a cloth-like lining and a removable insole with arch support. I’m pretty picky about my footgear, and these boots have always kept my feet happy and blister-free. So, what’s not to like? Some sailors may balk at the $135 price; but considering how long the boots last, and their high performance, a pair of Xtratuf Legacies may actually save you money in the long run. And, because you won’t be buying and disposing of two or three pairs of cheapies, you’ll be helping the environment, too.
Bruce Bateau, a regular contributor to Small Boats Magazine, sails and rows traditional boats with a modern twist in Portland, Oregon. His stories and adventures can be found at his website, Terrapin Tales.
Xtratuf Legacy boots are available through the manufacturer’s website for $155 and from many outdoor suppliers.
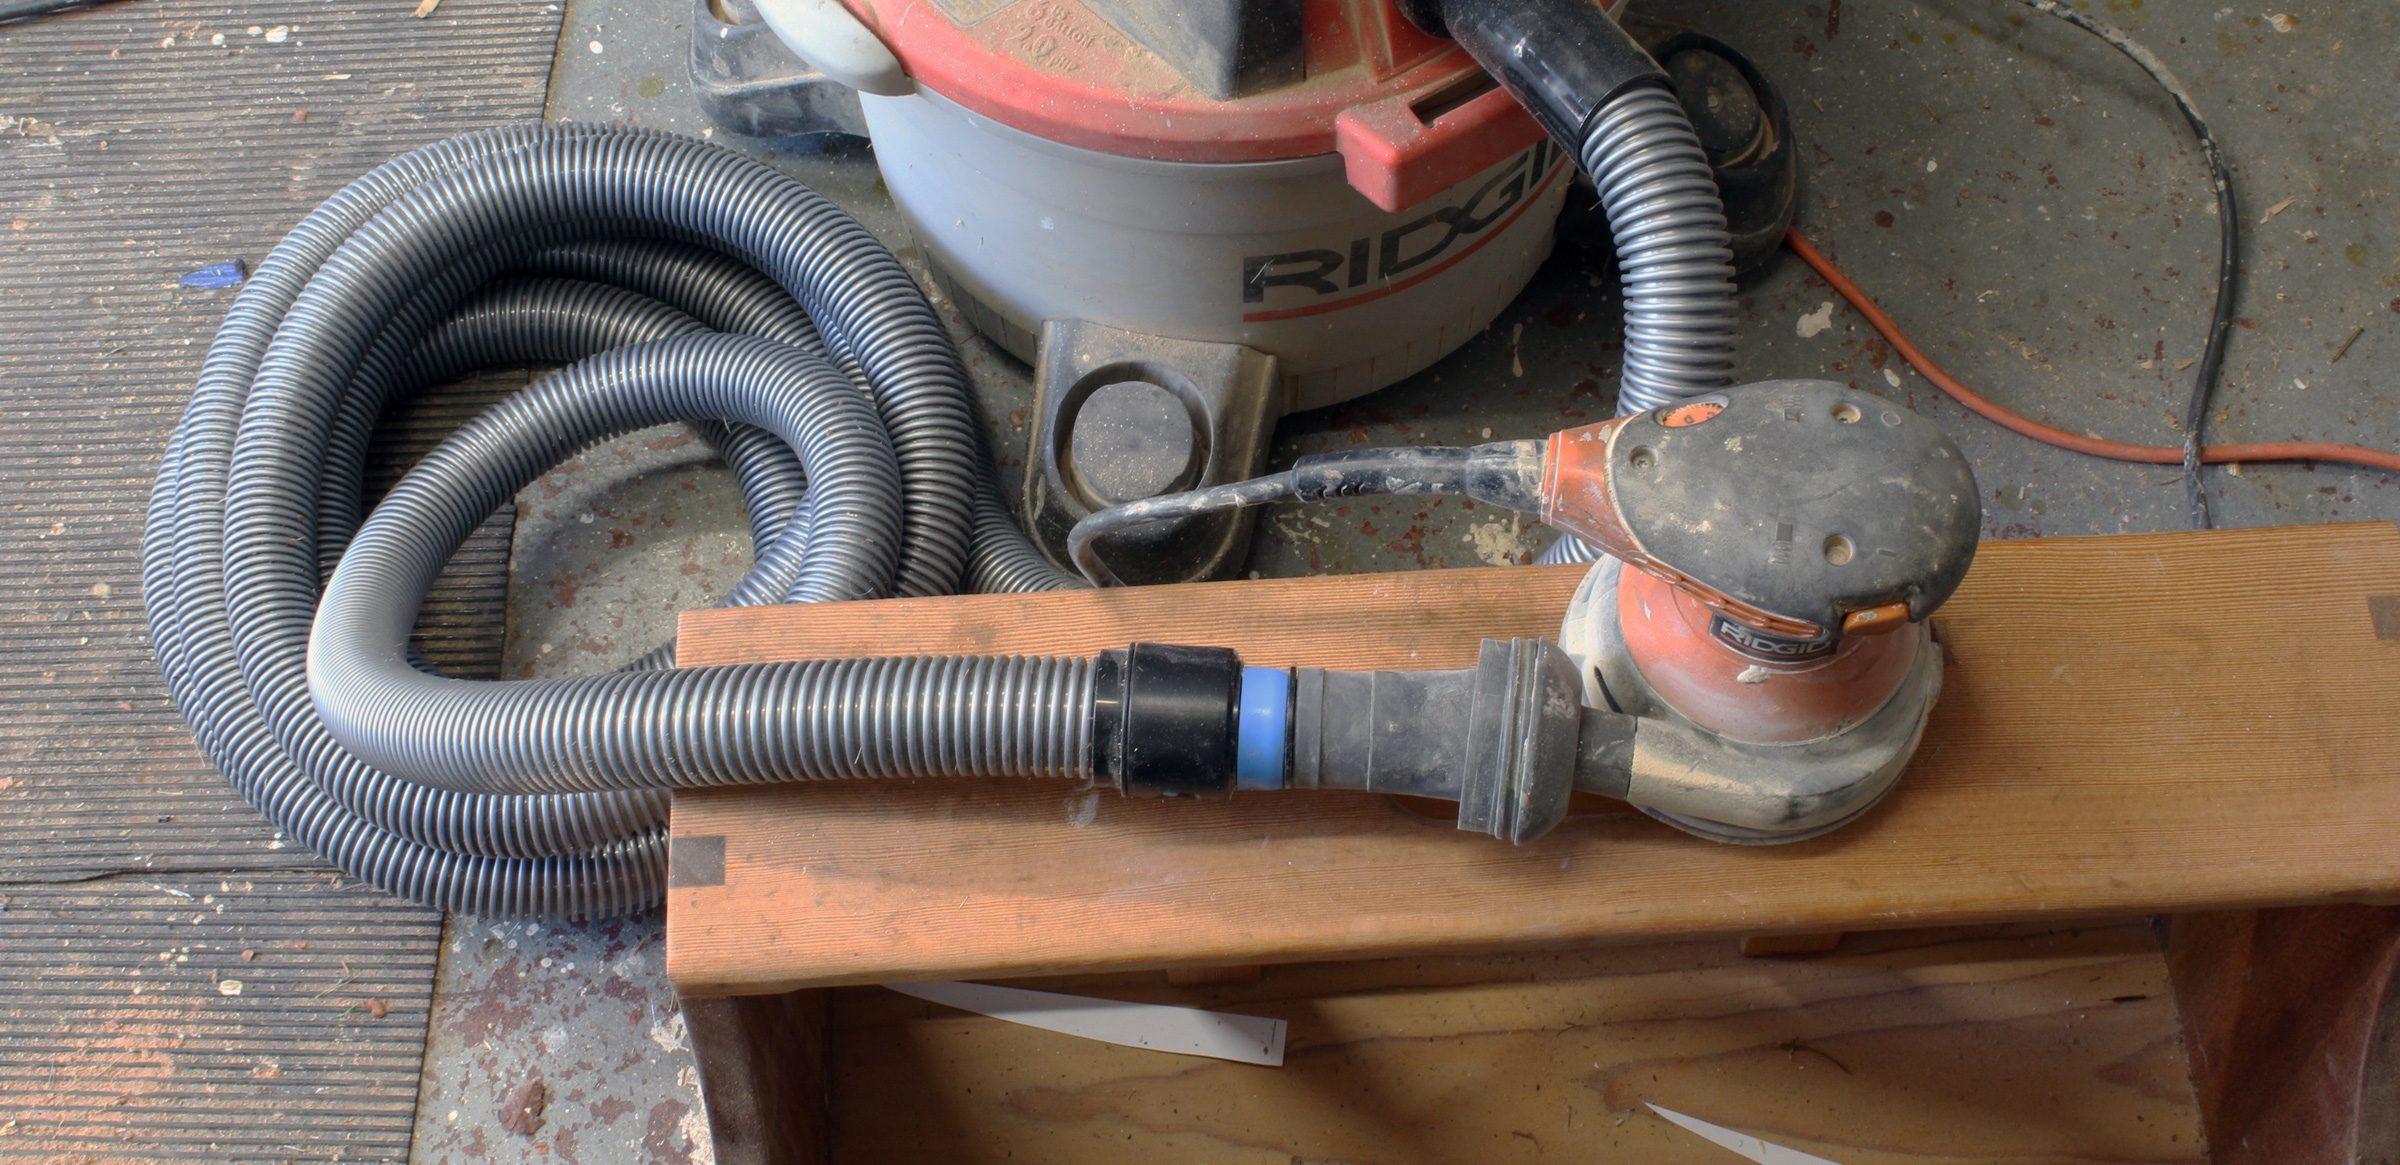
Building and maintaining wooden boats is dusty work, especially when power tools are involved. They can speed the work but they create a lot of dust, and none of it should be breathed in, whether it is from wood, glue, or paint. My thickness planer, jointer, tablesaw, and downdraft table have been connected to a dust collector with a 1-hp motor by 4″ hoses, but I’ve only recently added a system that works equally for the smaller tools. I had been relying on a shop-vac and the cloth dust bags that come with the sanders, but the shop-vac and its clunky 7′ hose aren’t convenient to use, and the bags on the sanding tools aren’t very effective.
I recently bought a Cen-Tec Quick Click hose and adapter set that solves both problems and now draws dust from my bandsaw, 6 x 48 belt sander, drill press, drum sander, 12′ disc sander, and random-orbit sander.
In my single-car-garage shop, the 16′ hose can reach all of the tools without moving the shop vac.
The hose that comes with the set I bought is 16′ long; lengths of 10′, 20′, and 30′ are also available. It has a diameter of 1-1/4″ and is made of supple lightweight plastic that is molded in a way that keeps the interior surface smooth to prevent clogging and to provide a largely unimpeded air flow. When I press the hose flat it springs right back with no indication of damage. The hose has a 2-1/4″ fitting on the vacuum end; a perfect snug fit for my Ridgid shop-vac.
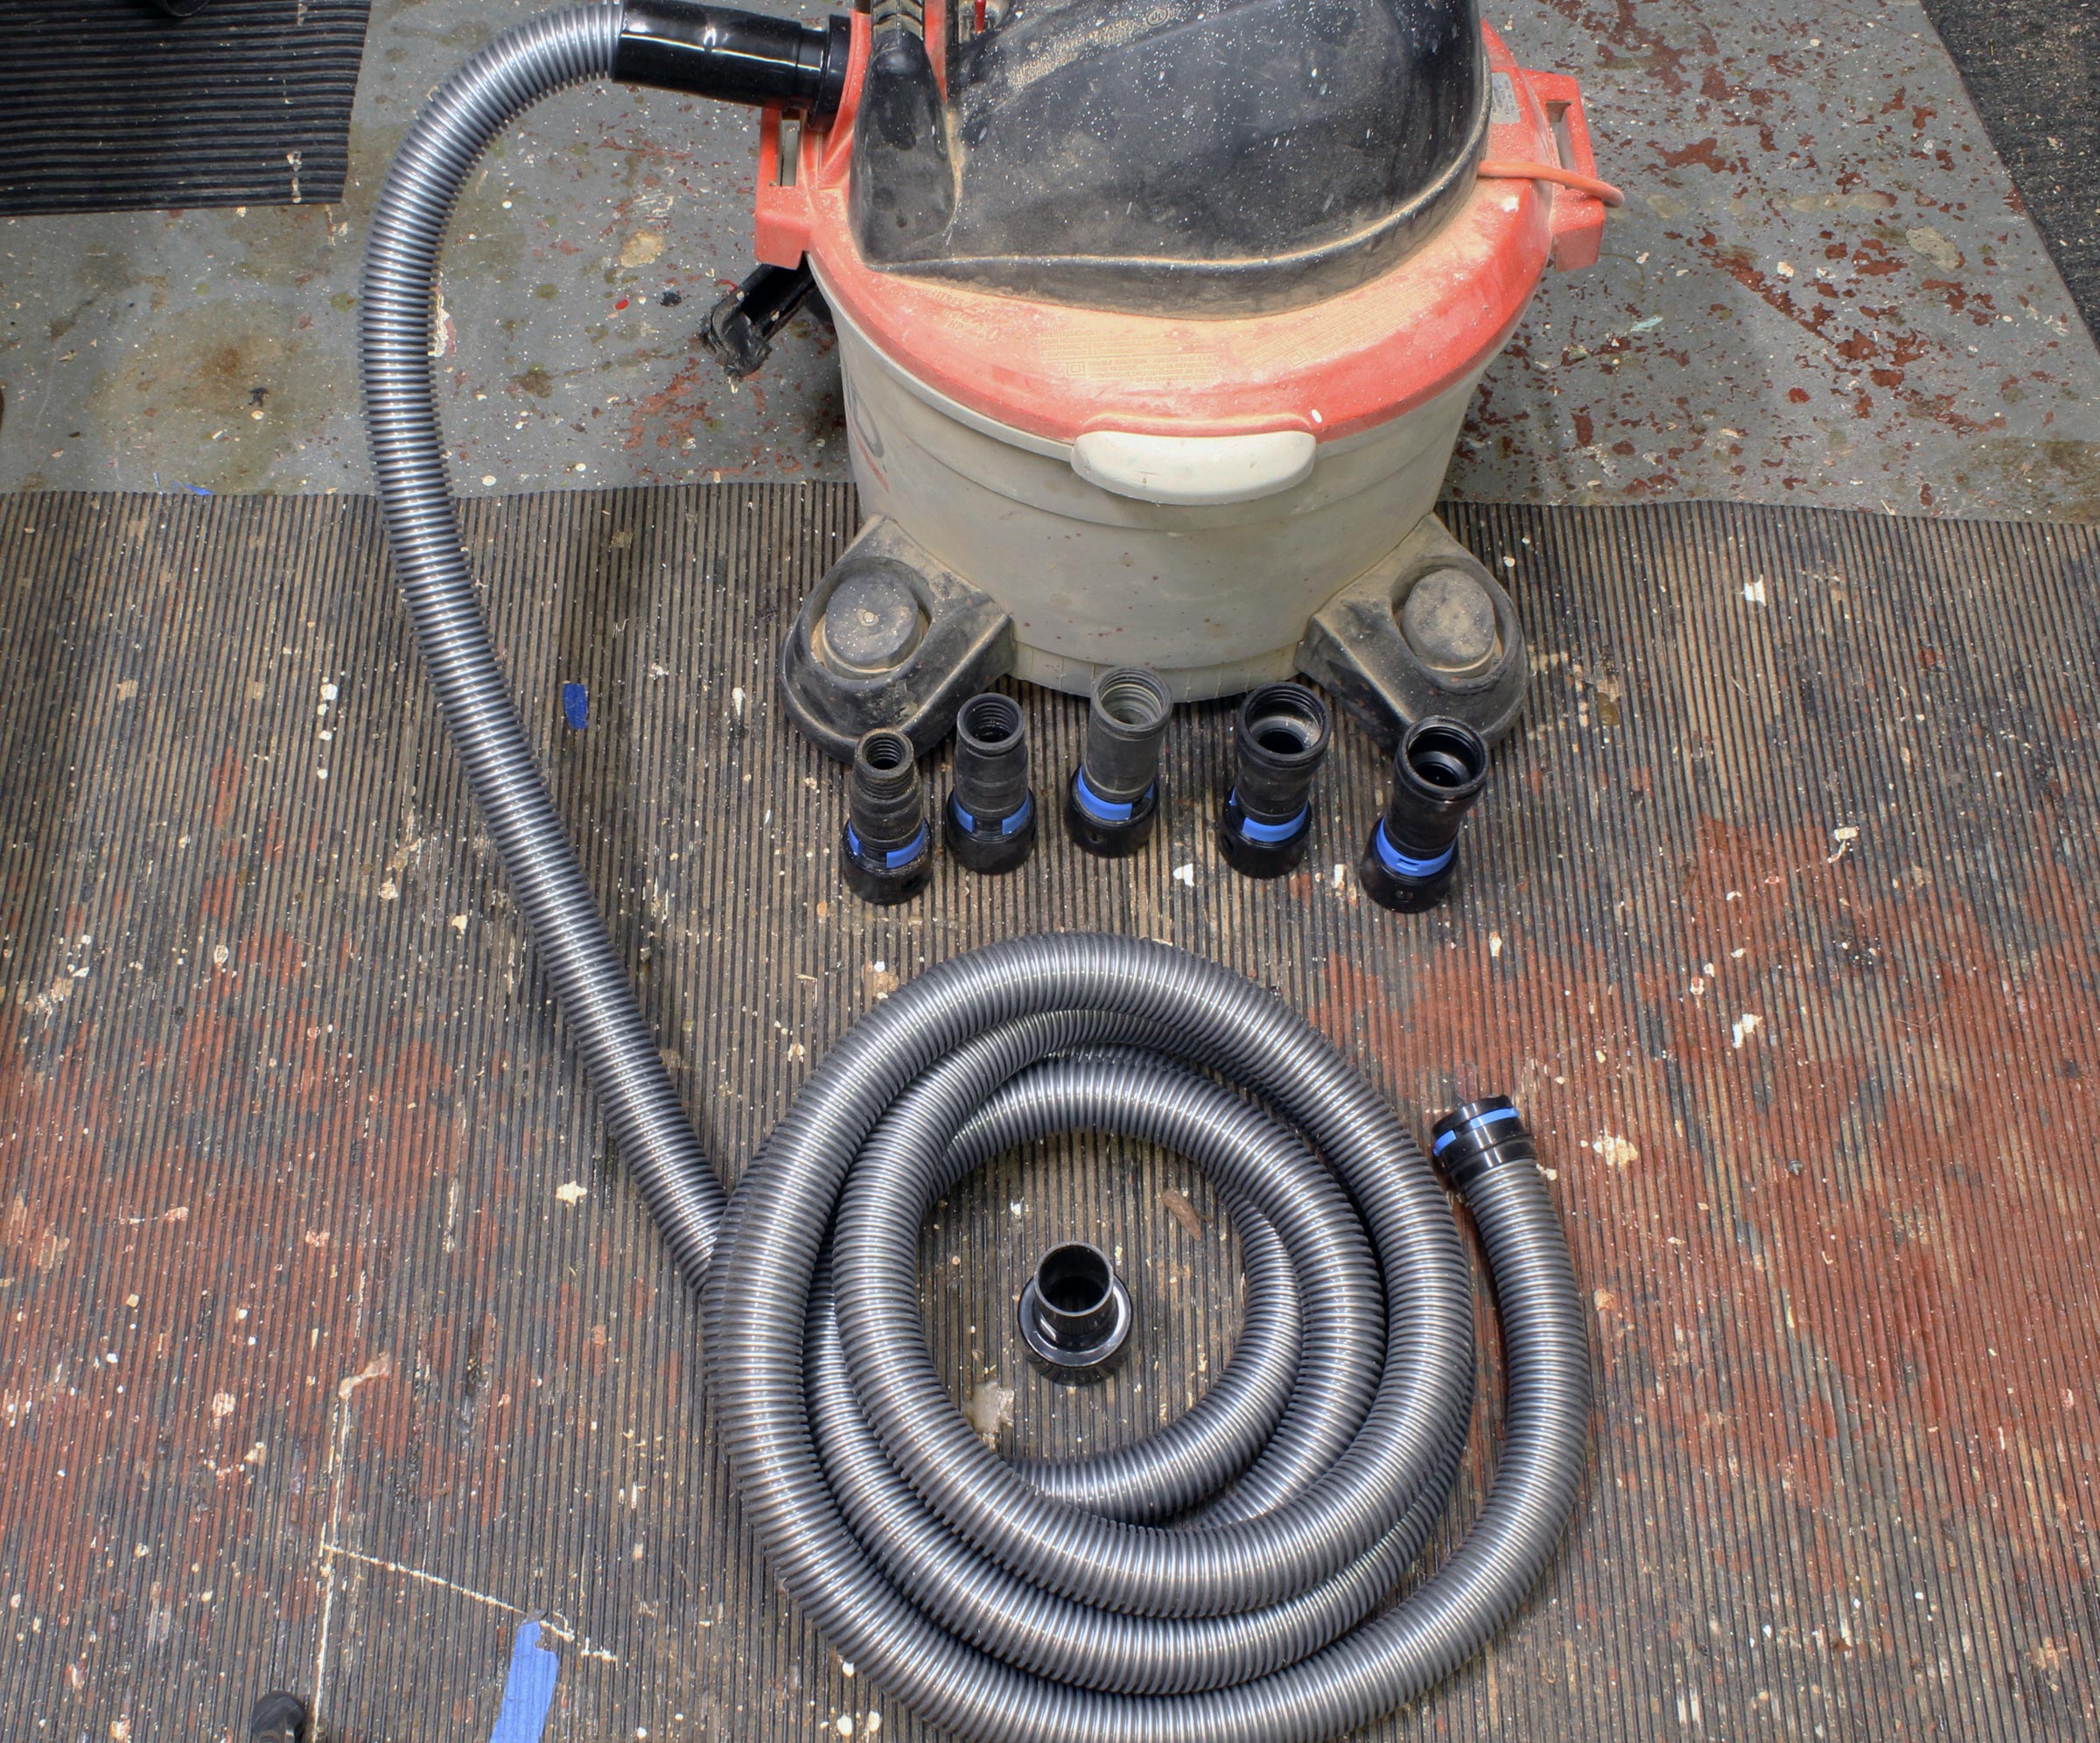
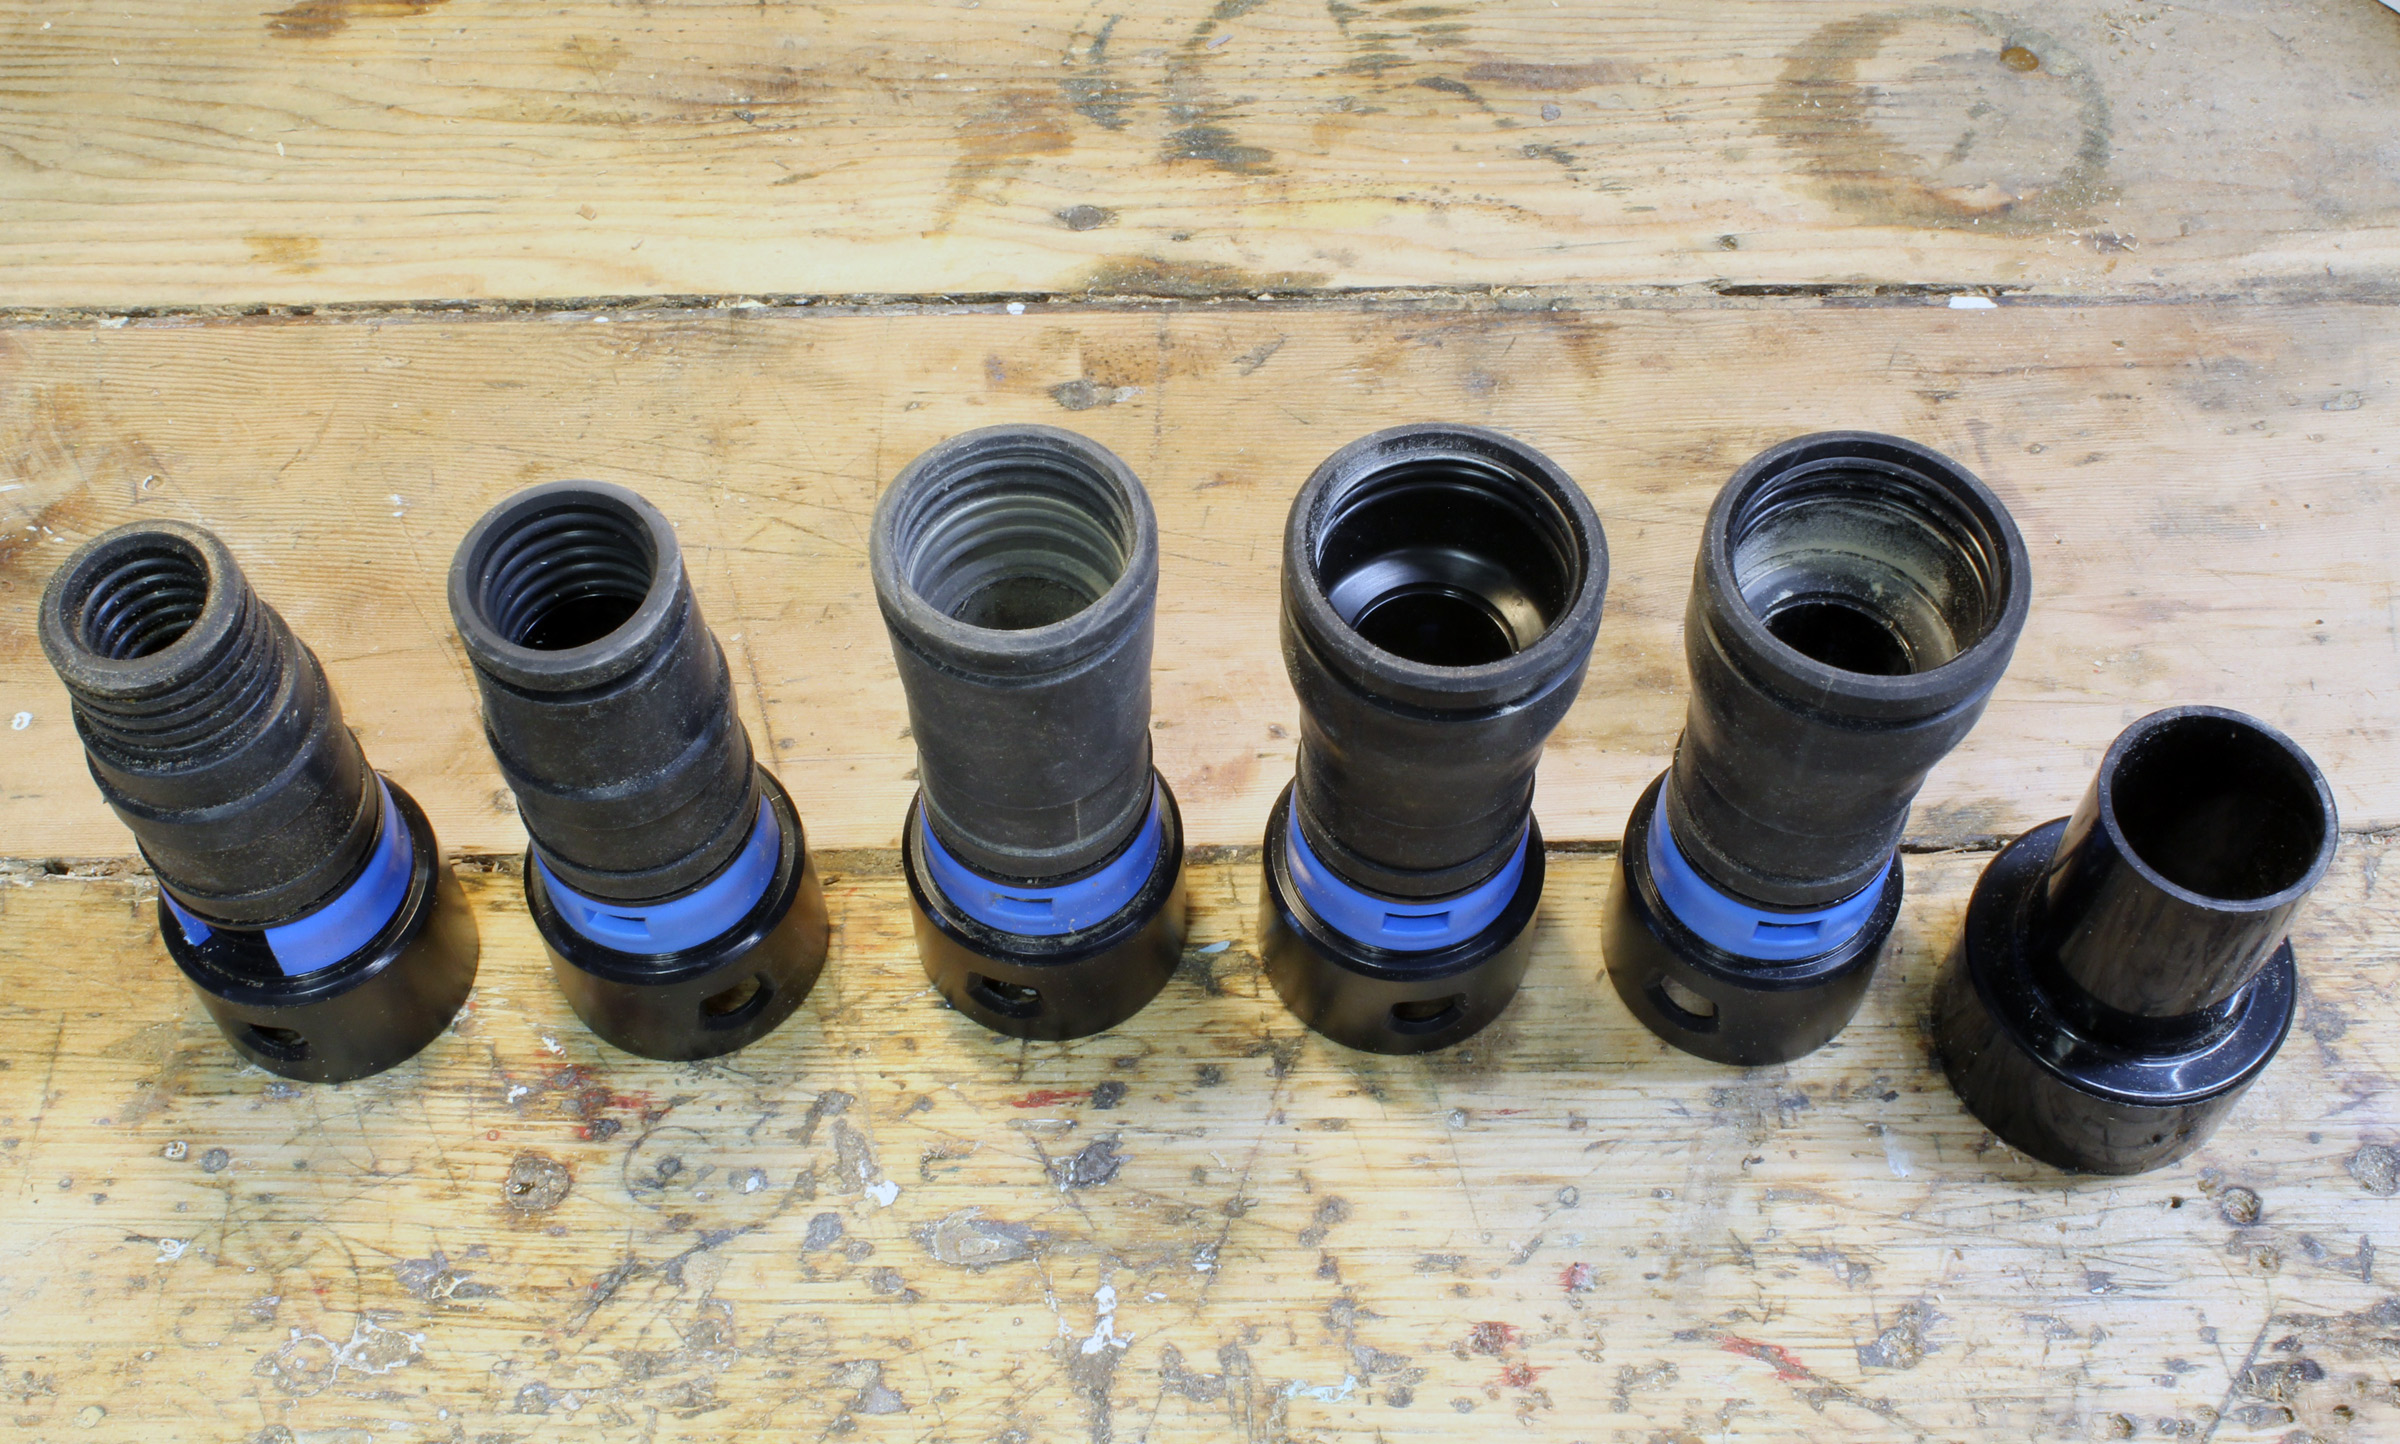
The other end has Cen-Tec’s Quick-Click quick-release fitting, which accepts a number of adapters to fit different tools. The set I bought has five of them, and on each, a flexible blue ring has a pair of buttons that lock into holes in the hose-end socket. The adapters have split blue sleeves that can open or close a vent in the side, making it possible to adjust how much suction can be applied. I keep the vent closed.
The set included adapters with inside diameters, from left to right, 3/4″, 1”, 1-1/4″, and two 1-1/2″. At the far right is the reducer for dust ports compatible with shop-vac hoses.
The adapters have rubbery TPE (thermoplastic elastomer) collars in four sizes: 3/4″ , 1″ , 1-1/4″ , 1-1/2″ . Two of the five adapters that came with the set have a 1-1/2” inside diameter and for one of them, a hard plastic adapter from 1-1/2″ to 2-1/4″ will fit devices that accept the male end of a shop-vac hose; I use that fitting for my Delta 12″ disc sander and a drum sander and drill press I equipped with wooden fittings. While I could continue to use the shop-vac hose on those tools, I much prefer the convenience and easy handling of the Cen-Tec hose and the quick attachment of the adapters.
The 12″ disc sander has a shop-vac-compatible port and used one of the 1-1/2″ adapters and the plastic reducer.
For my drill press, a shop-made bracket was required to hold the reducer and one of the Cen-Tec adapters.
Other adapters fit my Ridgid random-orbit sander and Delta 14″ bandsaw. I can leave them in place and just move the hose to the tool I’m using. And the long, flexible hose, without an adapter, makes it easy to clean up errant dust all around the shop—without having to tow the shop-vac behind me.
The random-orbit sander is able to take the shop-vac hose, but it was just a nuisance. The Cen-Tec hose is smaller, lighter, and much more flexible.
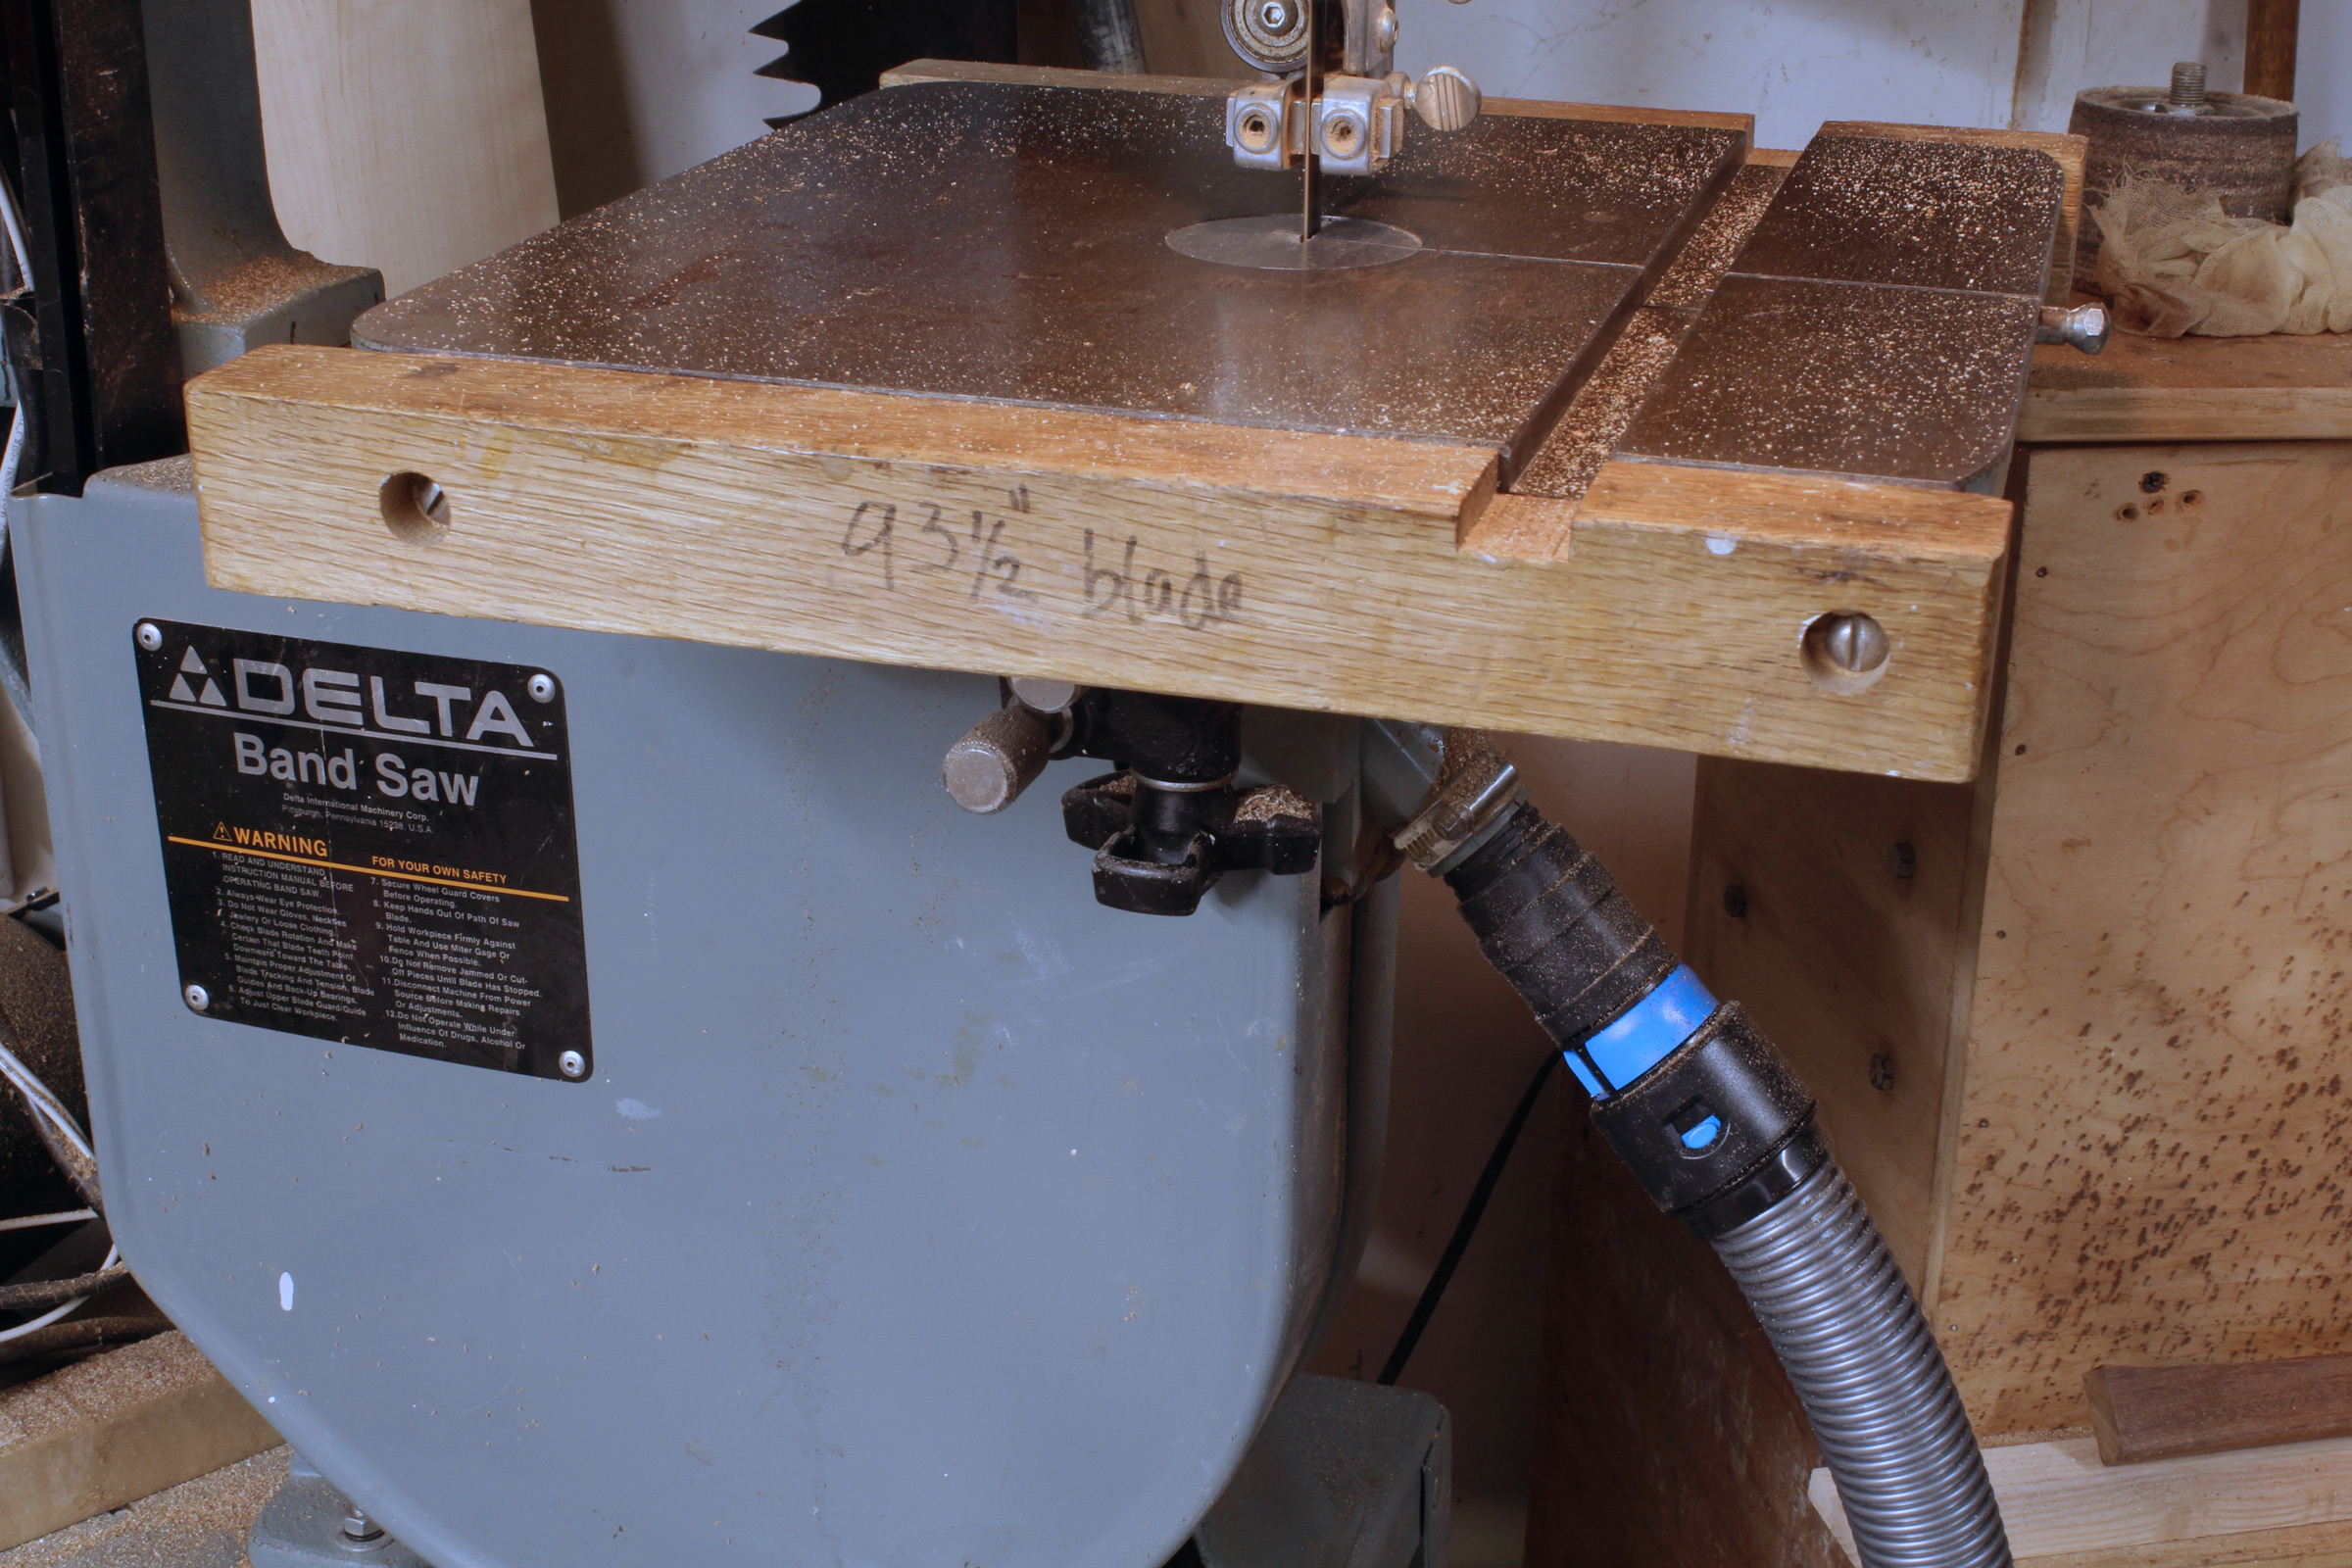
The smallest adapter was a perfect fit for my 14″ bandsaw.
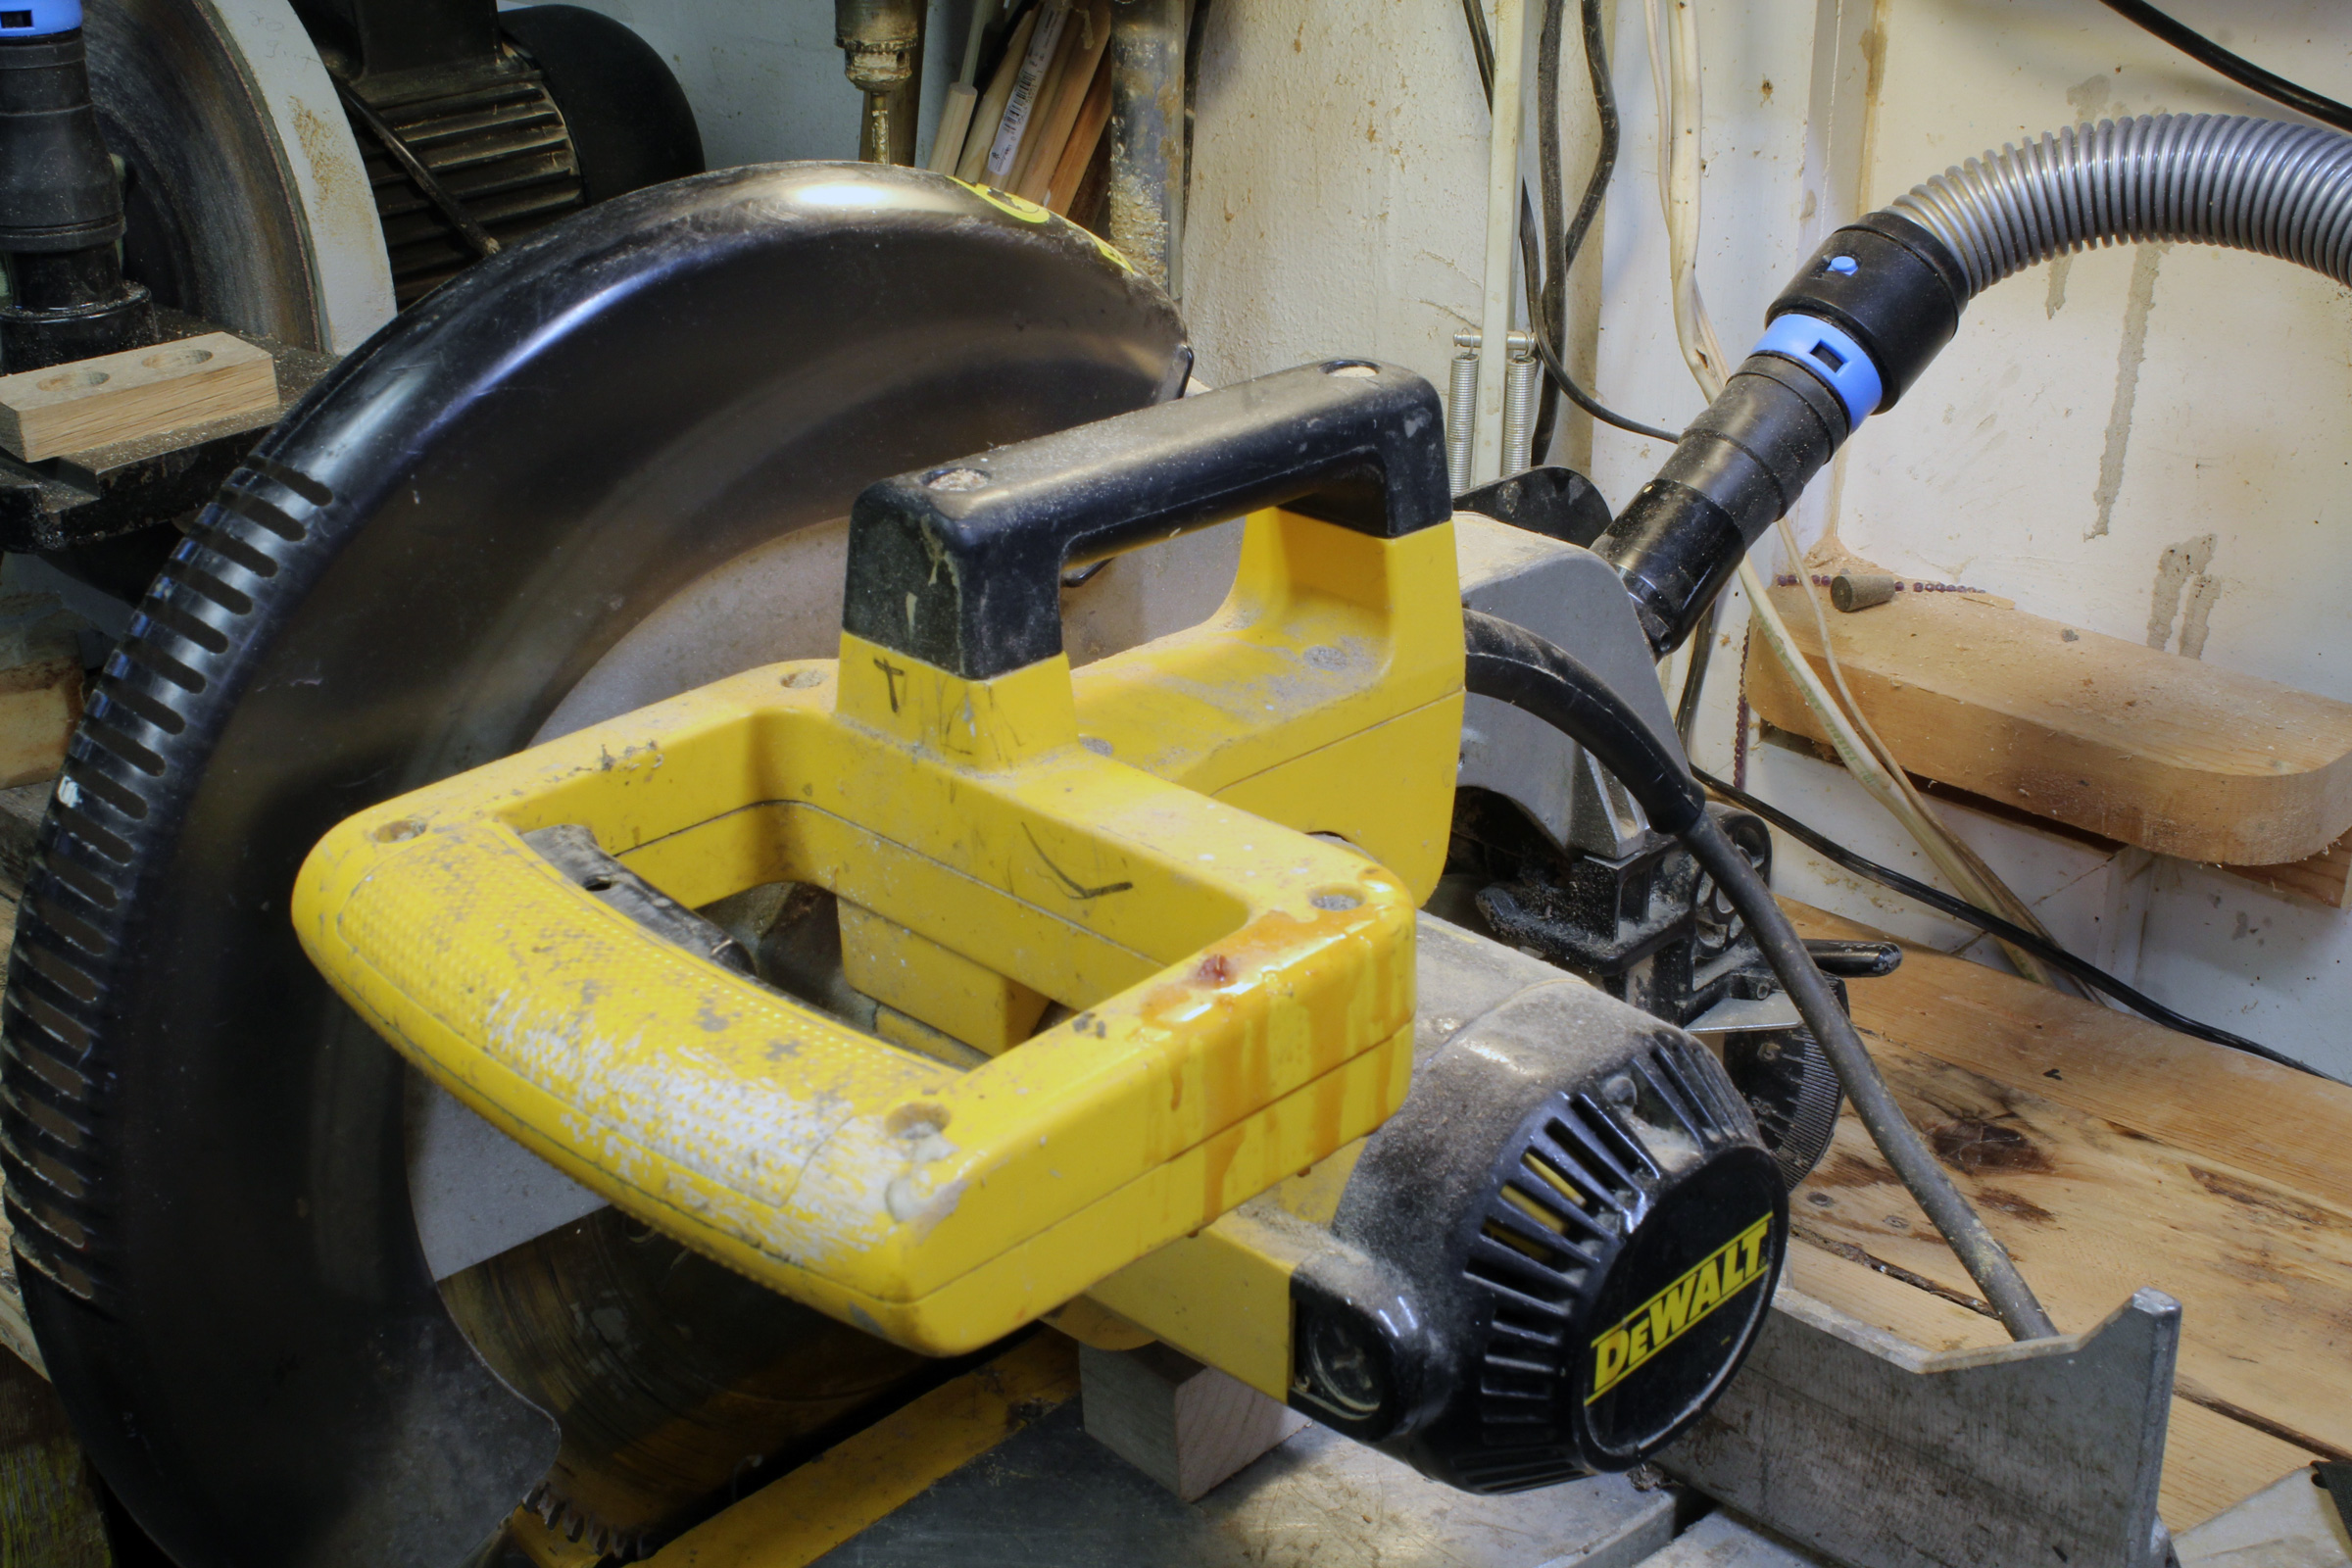
The chop saw used to make a mess of by work bench. Hooked up to the Cen-Tec hose, most of the sawdust generated gets collected.
The Harbor Freight 1 x 30 belt sander has a dust port that didn’t fit any of the adapters. I had a short piece of tubing that was a perfect fit for the inside diameters of both the port and the adapter. Note the vent in the adapter, here with the blue split ring leaving it open.
In the first week I had the Cen-Tec system, I did a lot of work with the random-orbit sander. The Ridgid sander has a dust-collection bag that unscrews, and the fitting will take both the 2-1/4″ or 1-1/2″ Cen-Tec adapters. I used the flexible 1-1/2″ adapter and was impressed with how effective the system was and how little the hose interfered with the operation of the sander. But after several hours, the TPE end split and could no longer stay connected to the tool. I was quite disappointed because I had thought I’d found the best system for the sanding tool I use most often. I noticed that the fitting that had split was a light gray, rather than the dark gray of the other adapters. I thought that might be an indication of a bad batch of TPE. I returned the set to Amazon and reordered. In the replacement set all of the fittings were dark gray and they’ve all held up well.
On many occasions in the past, I had done work without setting up the various dust-collection systems I’d had for each tool, simply because they were inconvenient. The Cen-Tec system has changed that, and my shop is now a safer, cleaner, and more efficient place to work.
Christopher Cunningham is the editor of Small Boats Magazine.
The Cen-Tec Systems Quick Click 16′ Hose with 5-Adapter Set is available from Cen-Tec for $54.95. The set here was ordered from Cen-Tec’s Amazon store for $50.63.
Is there a product that might be useful for boatbuilding, cruising, or shore-side camping that you’d like us to review? Please email your suggestions.
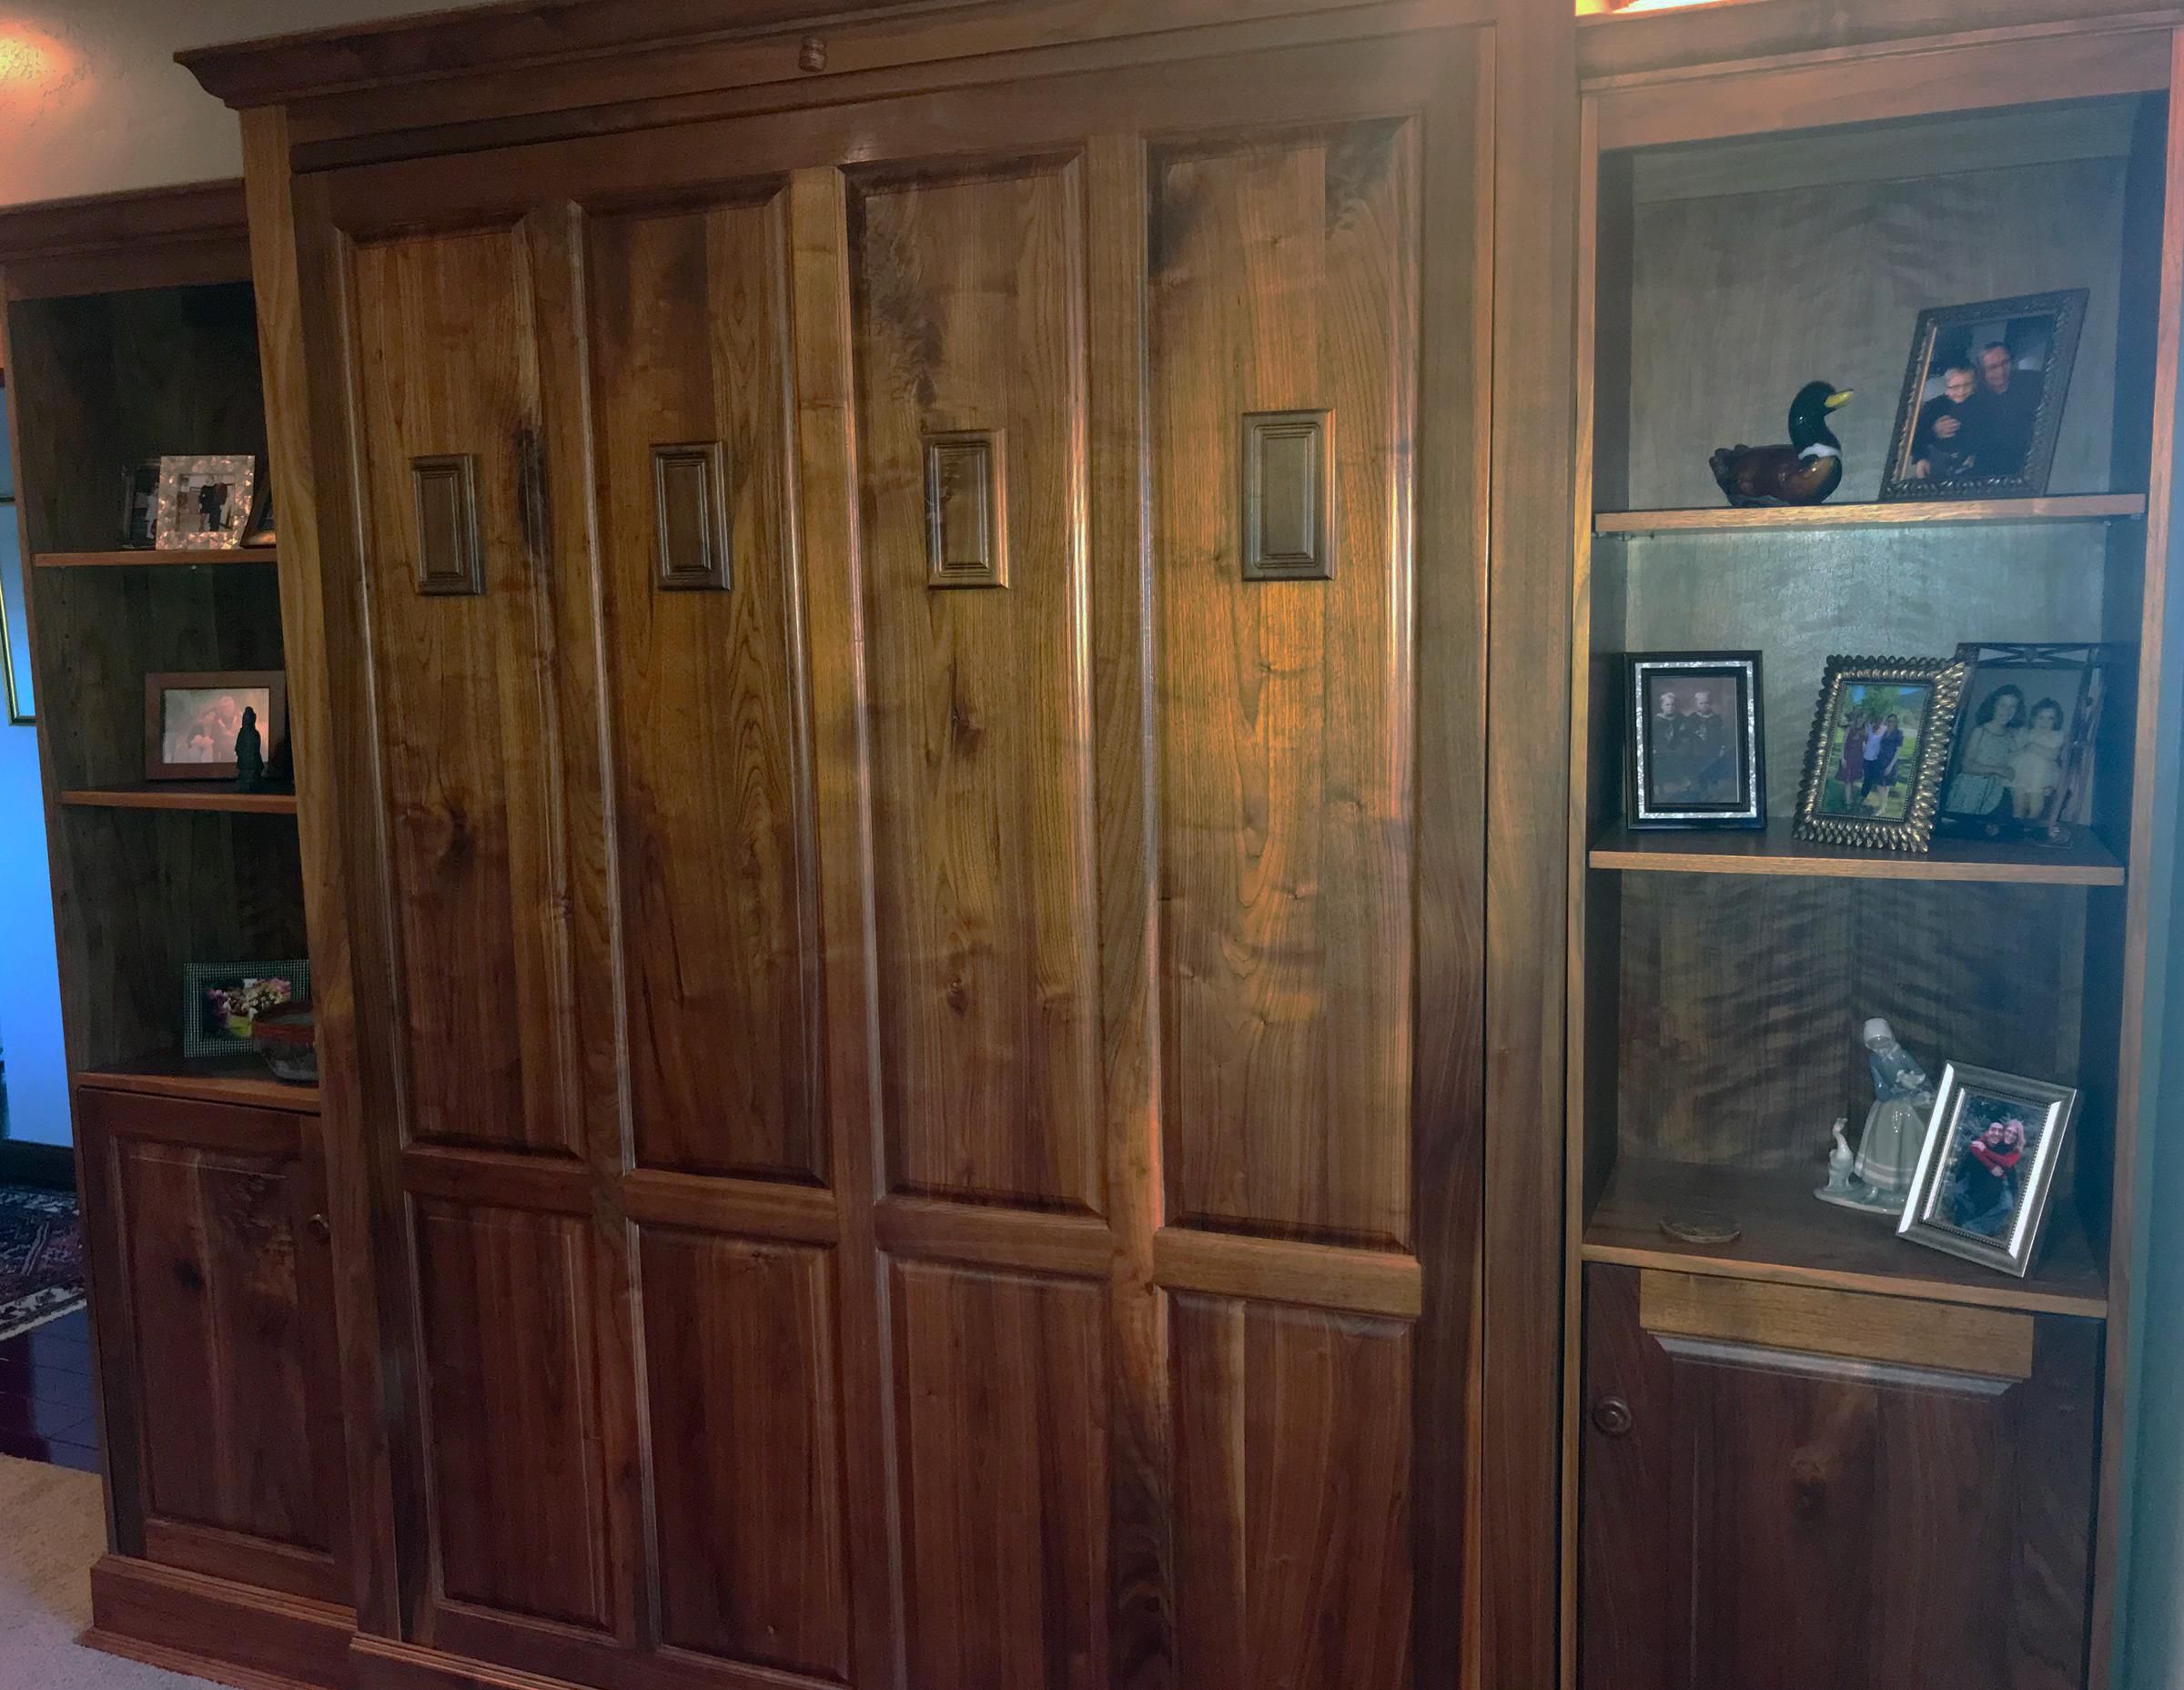
"I spent most of my career sitting behind a bank desk,” writes Dale Brevik of Polson, Montana. While his office job was a good way to make a living, it wasn’t the life he wanted to make for himself. After 27 years behind one desk or another, he retired when he was only in his mid-50s. With a wealth of good years ahead of him, he had “more to do than the day is long. I retired early so that I could spend more time using my hands to construct projects, mostly with wood.”
Photographs by Dale and Candyce Brevik
Hidden by Dale’s black-walnut cabinetwork is a Murphy bed.
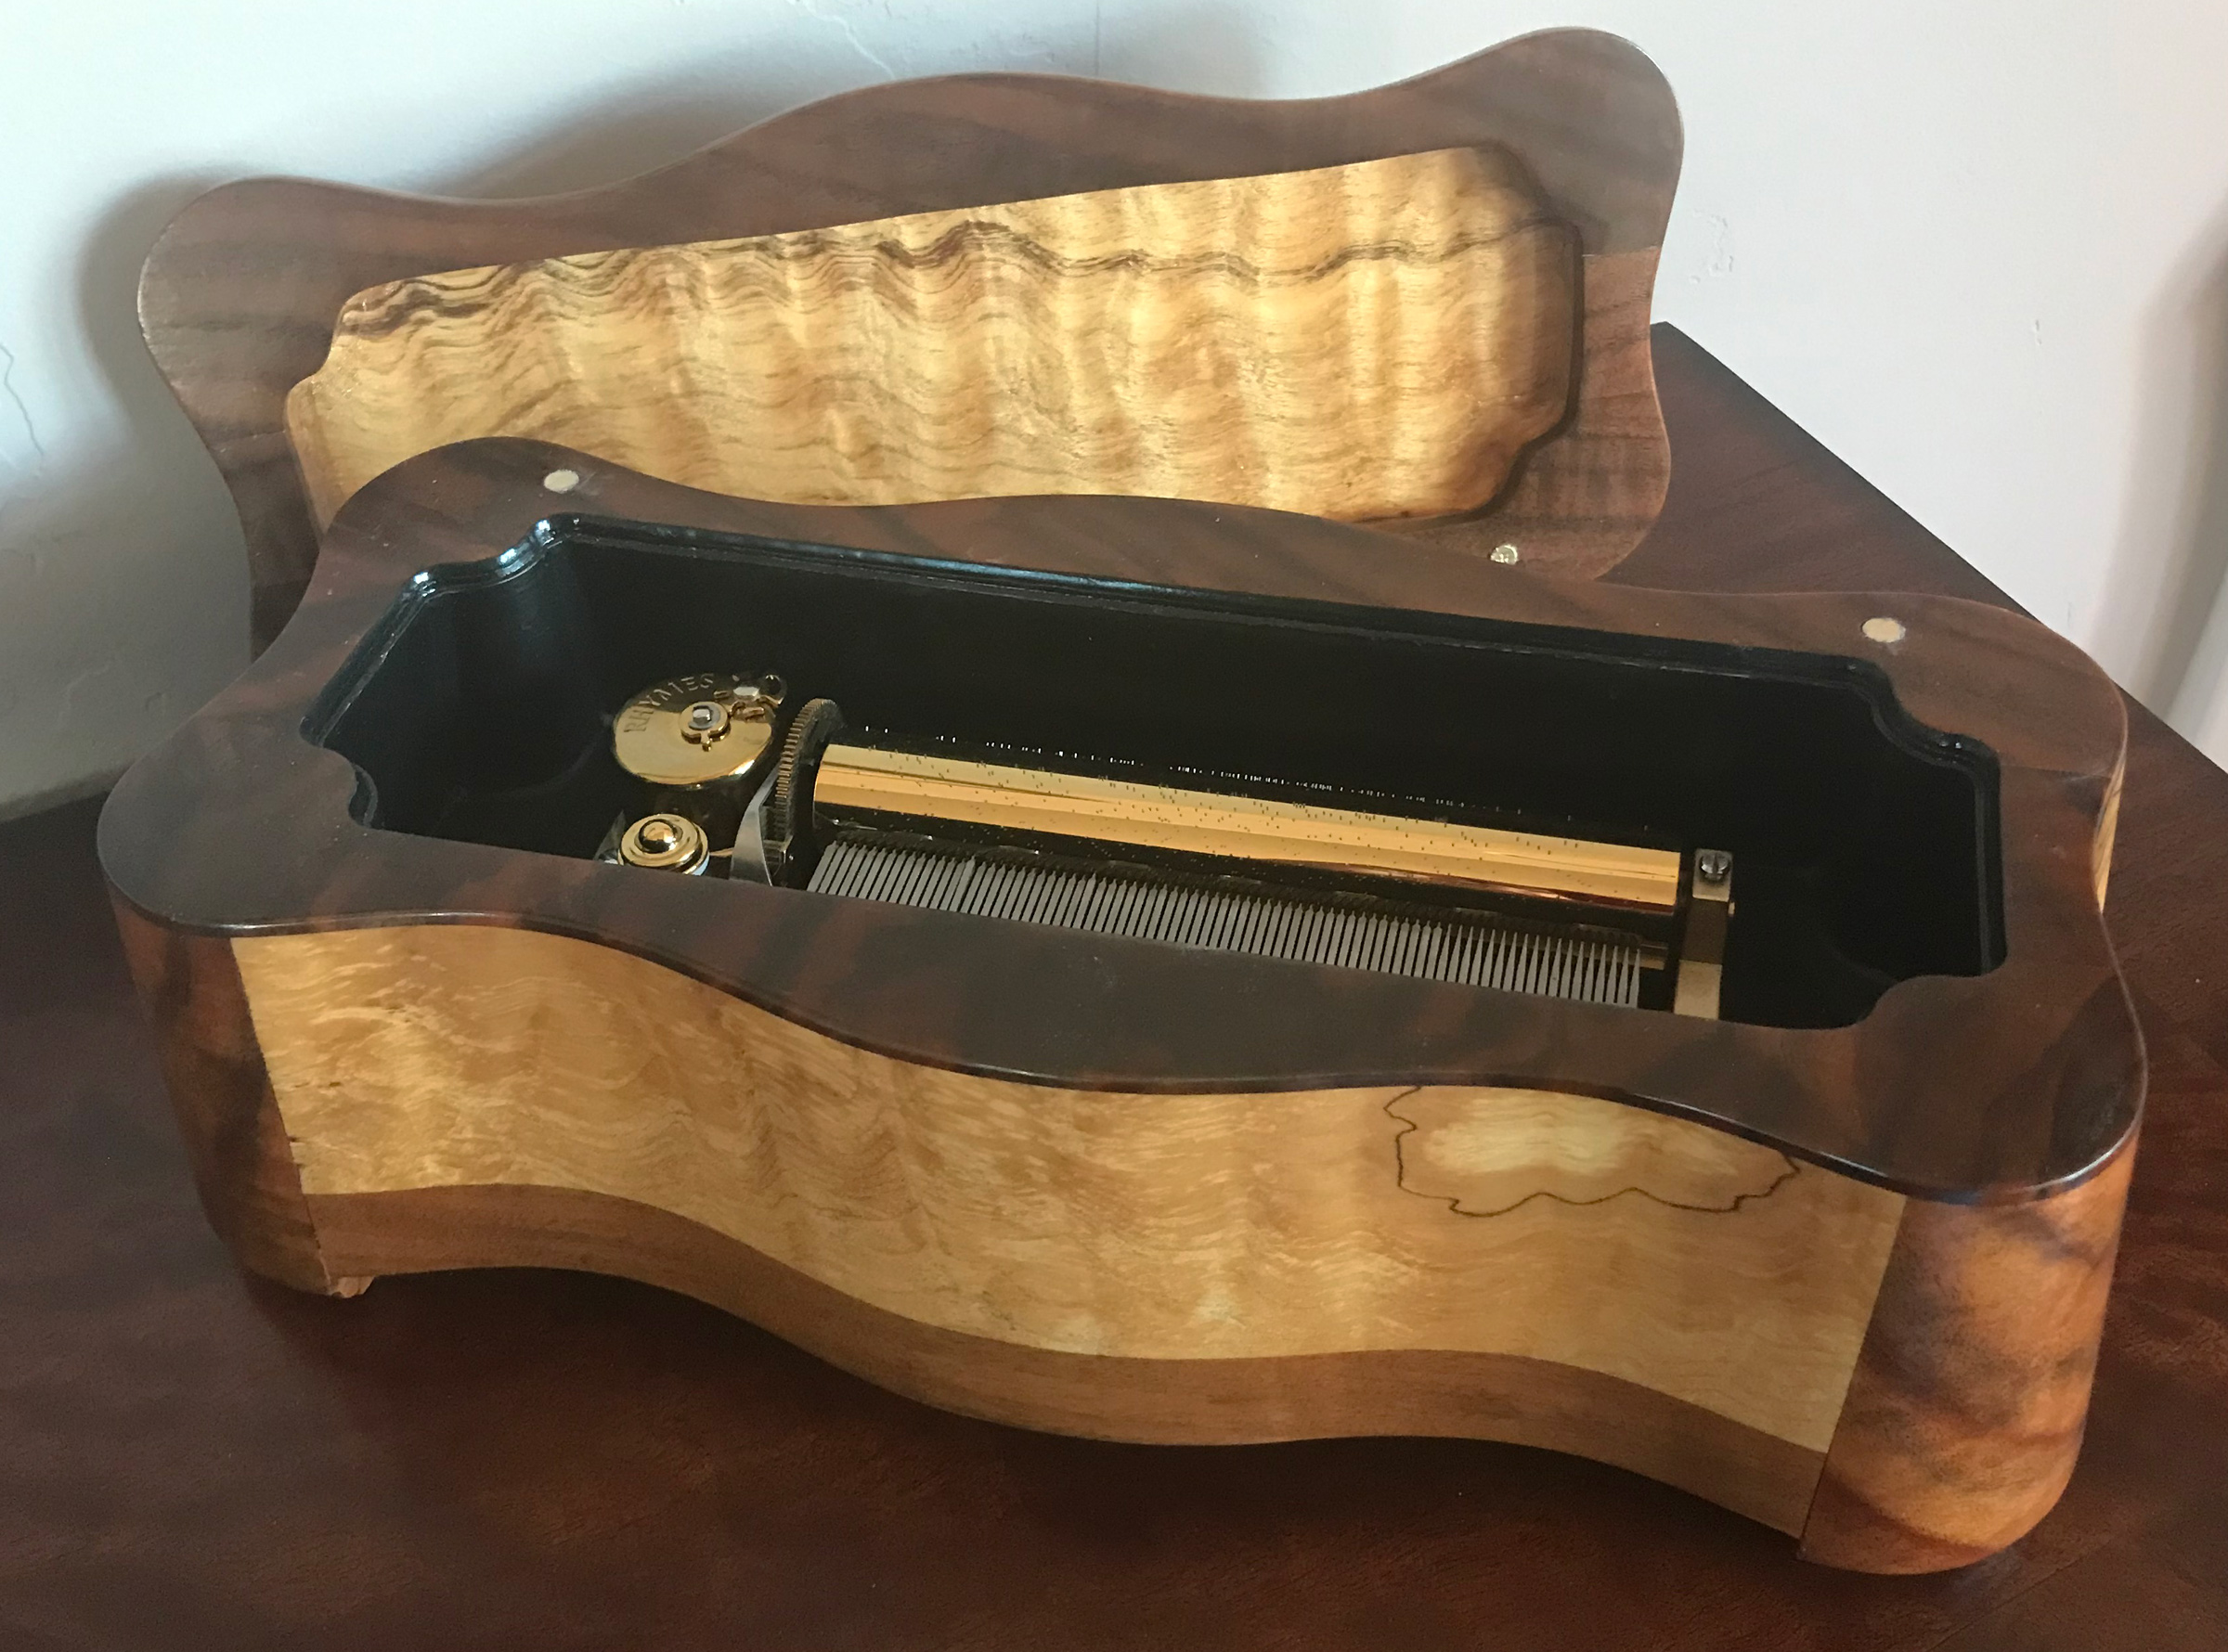
Dale used spalted curly maple and burled black walnut for one of the music boxes he made. This 72-note movement plays three Simon & Garfunkel tunes, including “The Sound of Silence.”
Dale had built many things, and retiring allowed him to follow the seductive path into the endless possibilities of working with wood. It usually begins with common lumber, straight edges, and right-angled corners—for Dale that was home construction—and leads to hardwoods, curved elements, and compound angles—like Dale’s, fine furniture, music boxes made with exotic woods and sinuous shapes. The path, for many, ultimately leads to boatbuilding with its compound curves, airtight joinery, and synthesis of beauty and utility. “Throw out your square,” Dale advises, “throw out your level and string line—boatbuilding is the ultimate woodworker’s challenge.”
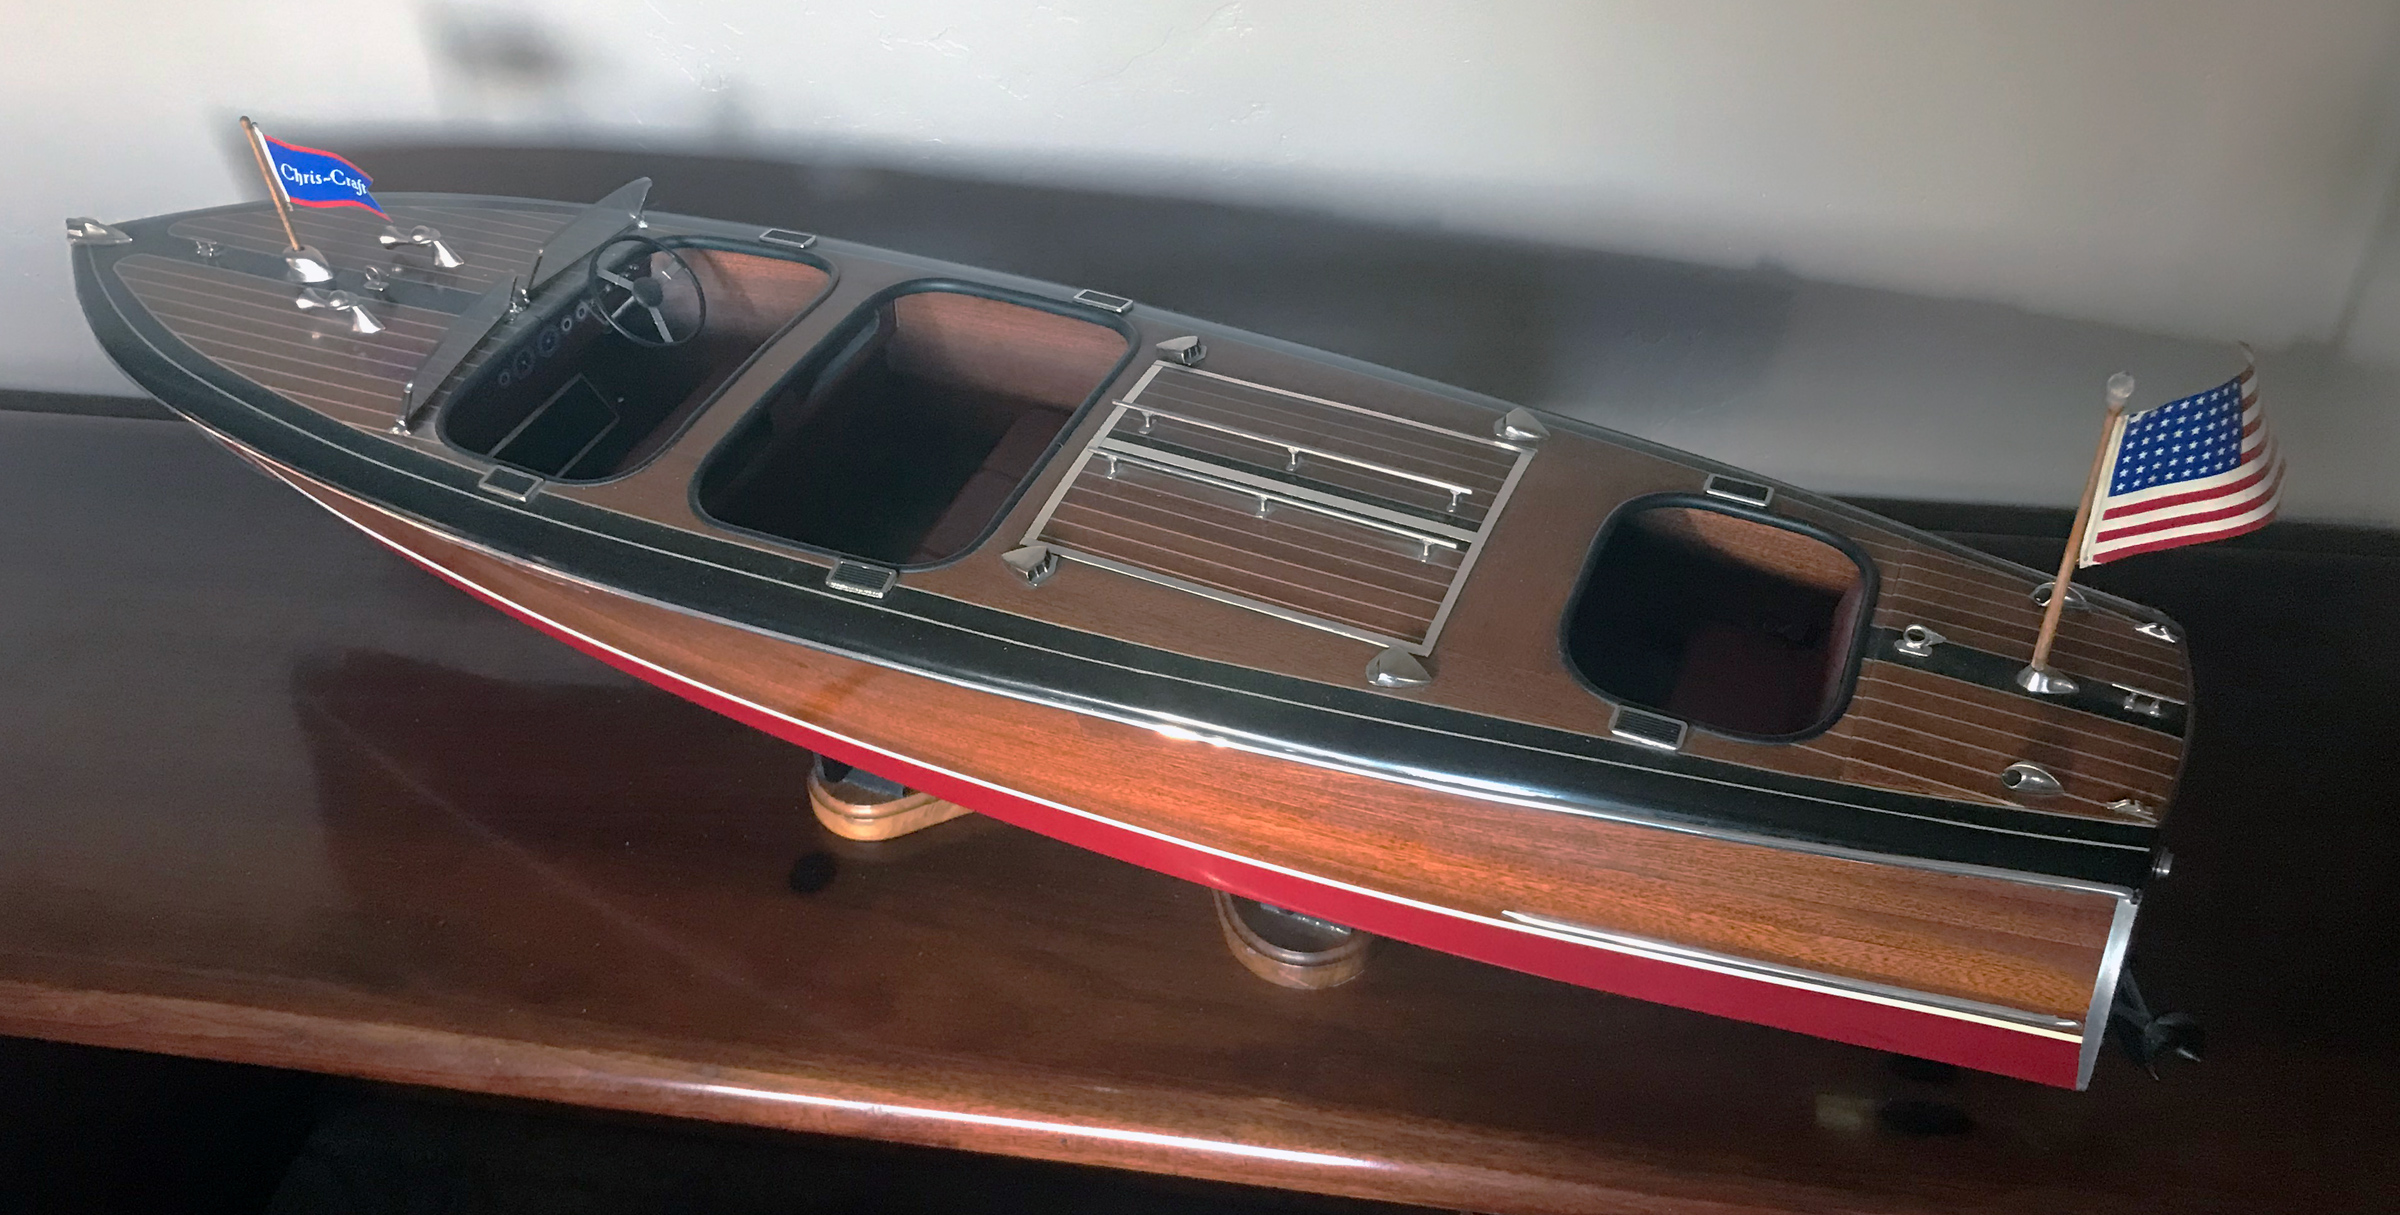
Building this model of a Chris Craft runabout inspired Dale to build the real thing.
Dale’s aspirations to build a boat took hold while he was still behind his bank desk. In 1998, he finished building a finely detailed model of a 1940s mahogany Chris-Craft triple-cockpit runabout. Working on the model inspired him to build the real thing and in 2003 he purchased plans for a Monte Carlo, Glen-L’s triple-cockpit runabout. While he waited for retirement, Dale began collecting the hardware for the boat, and found many appropriate vintage parts on eBay. Finally, three years after he retired, he began work on the runabout. The project occupied the next three years.
Dale spent three years building CANDYMAN, a 26′ Monte Carlo runabout designed by Glen-L.
On the Fourth of July of 2012, after being trailered down Main Street in Polson as a part of the holiday parade, the boat was launched in Flathead Lake and christened CANDYMAN—a nod to Dale’s wife, Candyce. That same day the boat was pressed into service towing water skiers.
Dale and Candyce joined the Antique and Classic Boat Society (ACBS) and CANDYMAN was a regular feature at many of the group’s gatherings. In June of 2019, at the ACBS Woody Weekend at Whitefish Lake, Dale was among a group of boaters at the lake’s lodge when Bob Moore, a chapter president, mentioned that he had never seen a jet ski made of wood. Jet skis and classic wooden boats are worlds apart and the comment could have been easily dismissed, but Dale, as a joke, said he figured he could make a wooden jet ski. A few minutes (and drinks) later, he committed himself to the project.
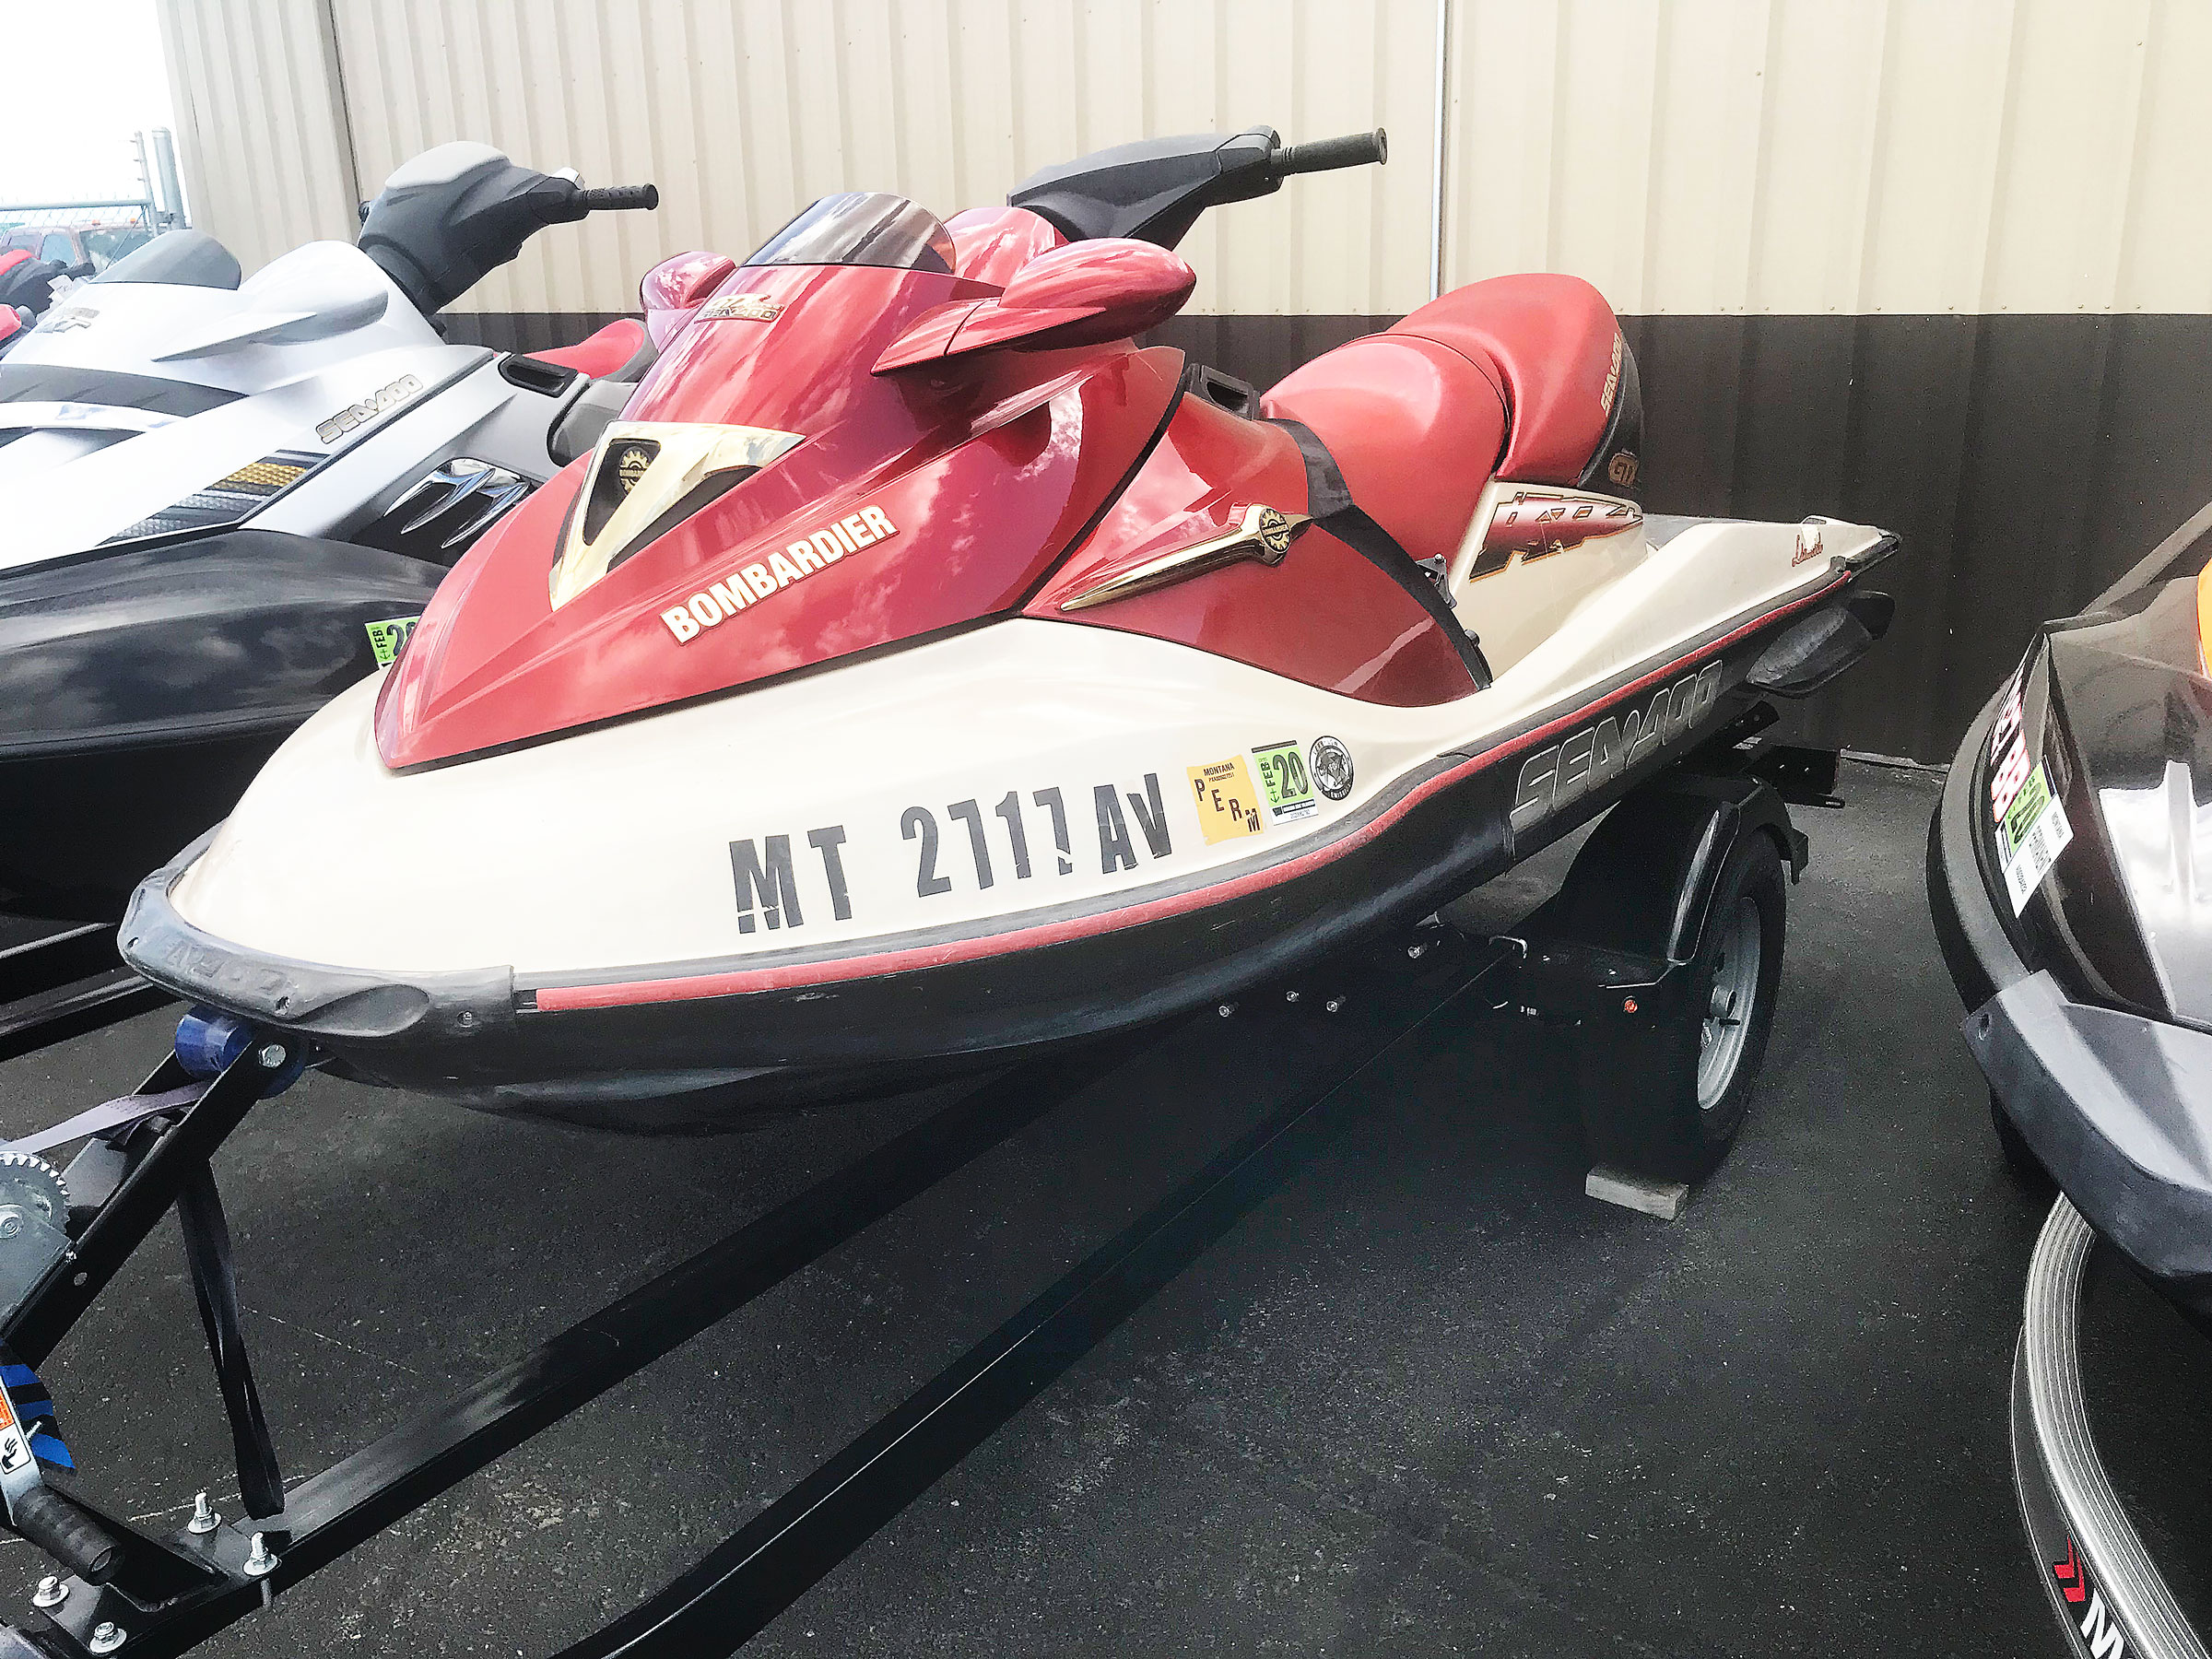
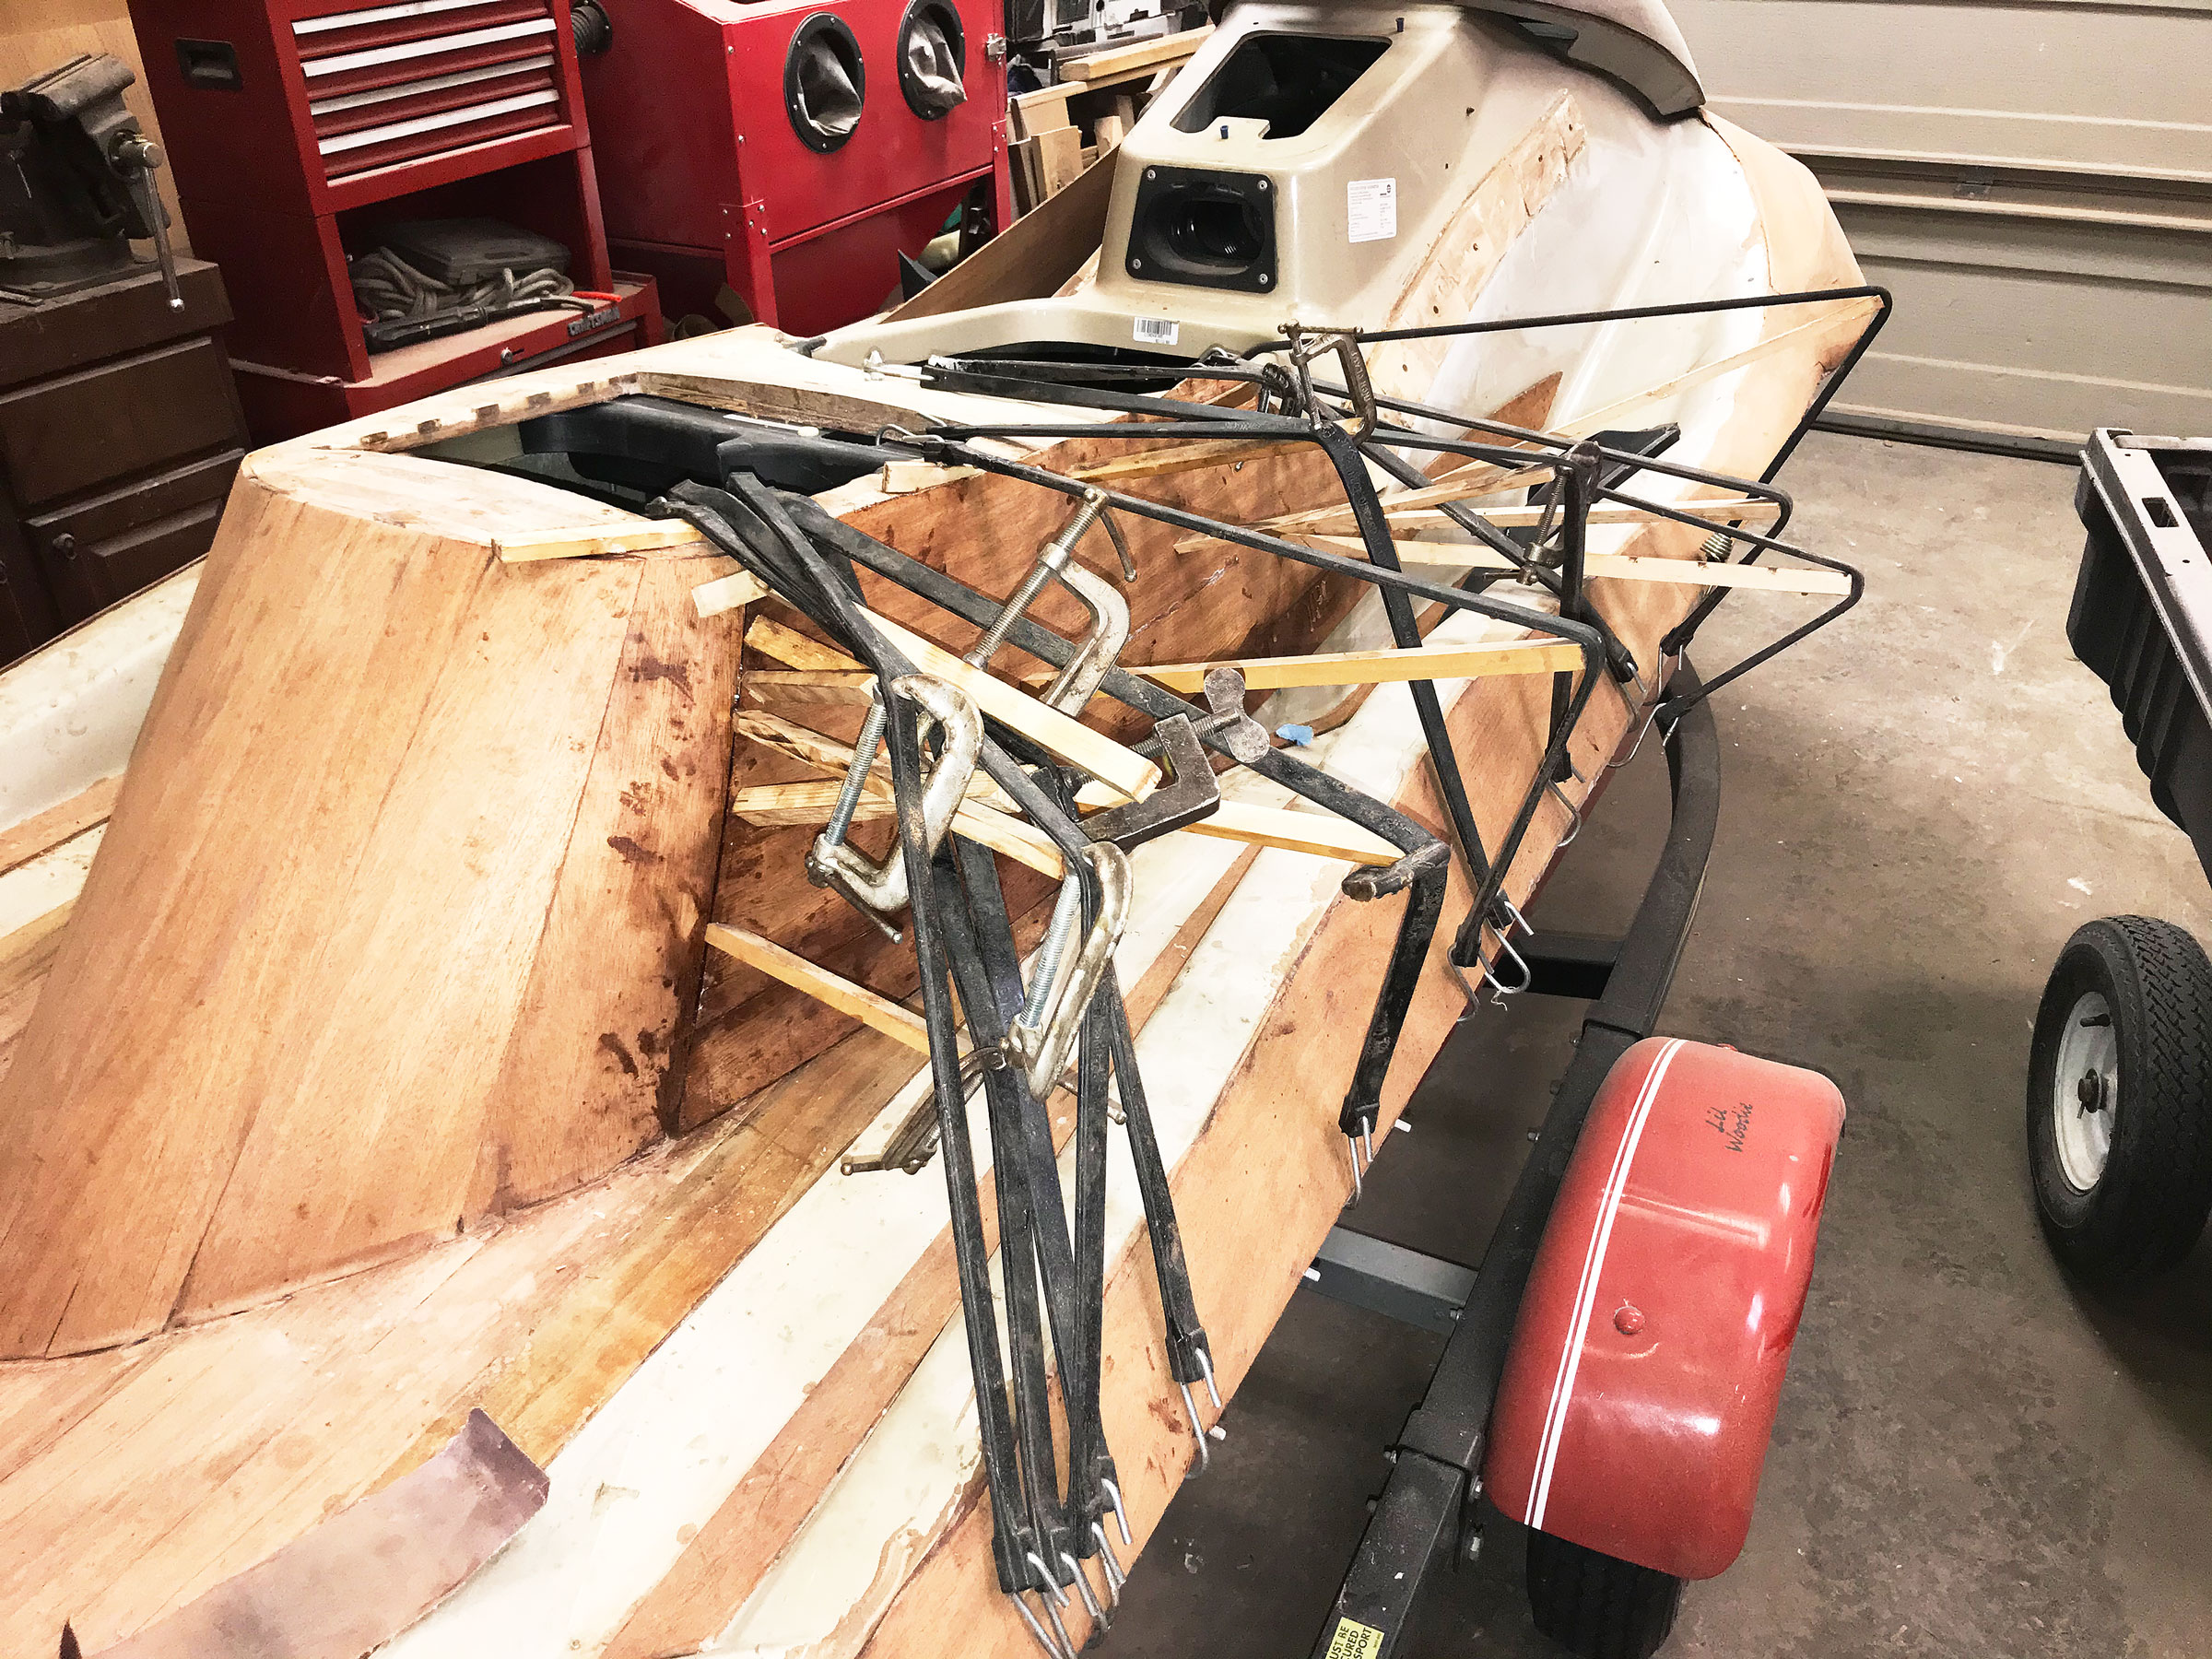
Dale’s project started with a 19-year-old secondhand jet ski with a seized impeller.
Dale had a lot of African mahogany left over from the CANDYMAN build. It was only 4mm thick and he decided he’d use it as an overlay on an existing jet ski. He bought one used—a 2002 Bombardier Sea-Doo GTX 4-Tec—for $1,200 (less than a tenth of what it had cost new). In its day, the GTX was a significant evolution of the type. It was powered by a 155-hp four-stroke engine that was significantly more powerful and environmentally friendly than its predecessors, which all had two-stroke engines. (Yamaha also introduced four-stroke engines to jet skis in 2002.) And while existing jet skis could only be steered by directing their water jets, which was ineffective while not under power, the GTX had a pair of spring-loaded rudders for control while coasting. In its debut, the GTX was lauded as the Watercraft of the Year by a leading personal-watercraft magazine.
The passenger seat was cut away and would be replaced with a runabout-style engine compartment hatch. The new shape was formed with plywood, foam, and fiberglass.
The styling of the GTX deck was considered by one reviewer a “work of art. It featured precisely tailored lines and overall elegant proportions that flowed gracefully from bow to stern. That may have been the case in 2002, but Dale thought it was merely “nice looking,” and felt he could improve on it. He cut away “various humps and bumps of the Sea-Doo styling.” He sawed off the back end of the double saddle and reshaped it—and the holes and voids that were once humps and bumps—with wood, foam, and fiberglass. He eased curves to match the bending abilities of the mahogany. Work on resurfacing the jet ski went slowly.
Holding the pieces of mahogany facing to the jet ski required some novel approaches. Here, rubber tie-down straps and scrap-wood struts applied pressure while the epoxy cured.
Clamping was often impossible and Dale had to figure out different ways to hold the mahogany pieces in place, in spite of the slippery epoxy, while the glue cured. He often could only glue two pieces in place in a day. In the end, there were 157 carefully shaped pieces neatly epoxied in place.
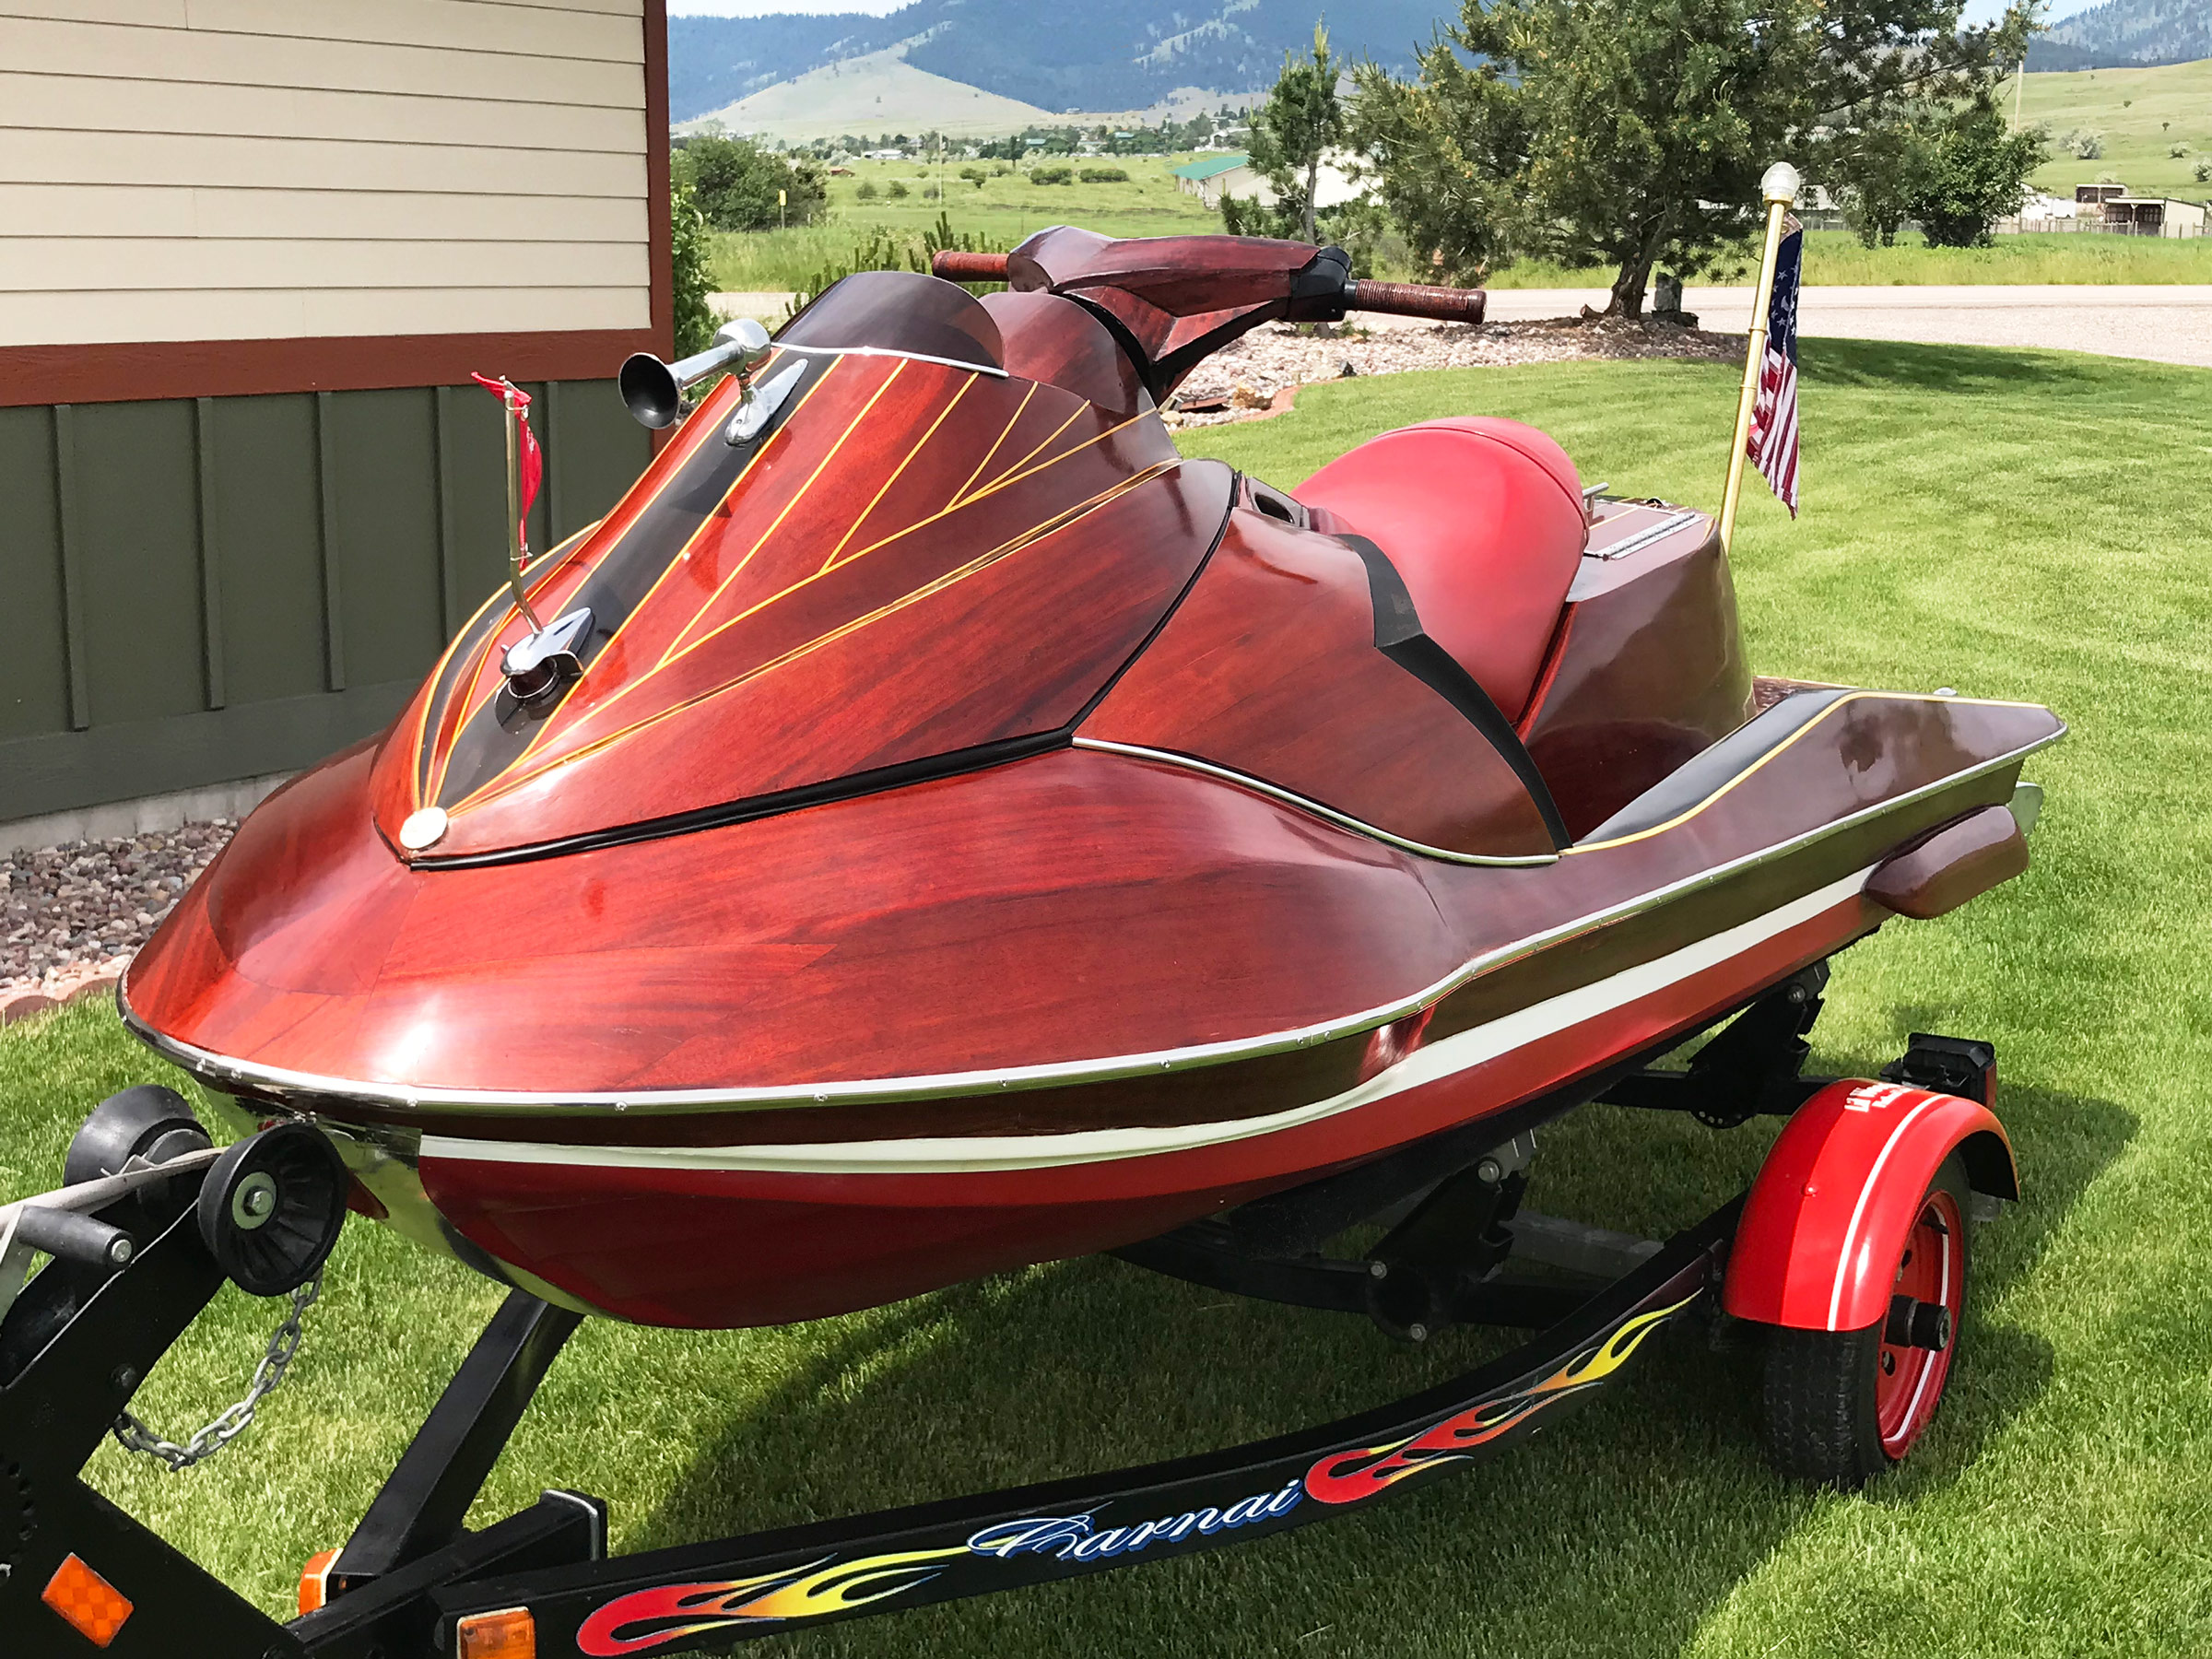
The “foredeck” has faux caulking and a king plank accentuated with ebony-black stain.
The 4mm mahogany left little room for error as Dale sanded it smooth without uncovering the fiberglass beneath it. He applied stain and 15 coats of semi-gloss varnish and sanded the cured finish first with 320-grit paper followed by 400, 600, and 800 grit. After that, it was on to 1,000- and 2,000-grit foam-disc pads, rubbing paste, and polishing compound.
The makeover included runabout-style hardware: a hinged engine hatch, faux exhaust ports, a brass flagpole topped with a classic beehive lens, and a chrome cutwater. The foredeck has a chrome airhorn, combined sidelight, and flagstaff, which carries a red pennant embroidered with the jet ski’s christened name, LIL’ WOODIE.
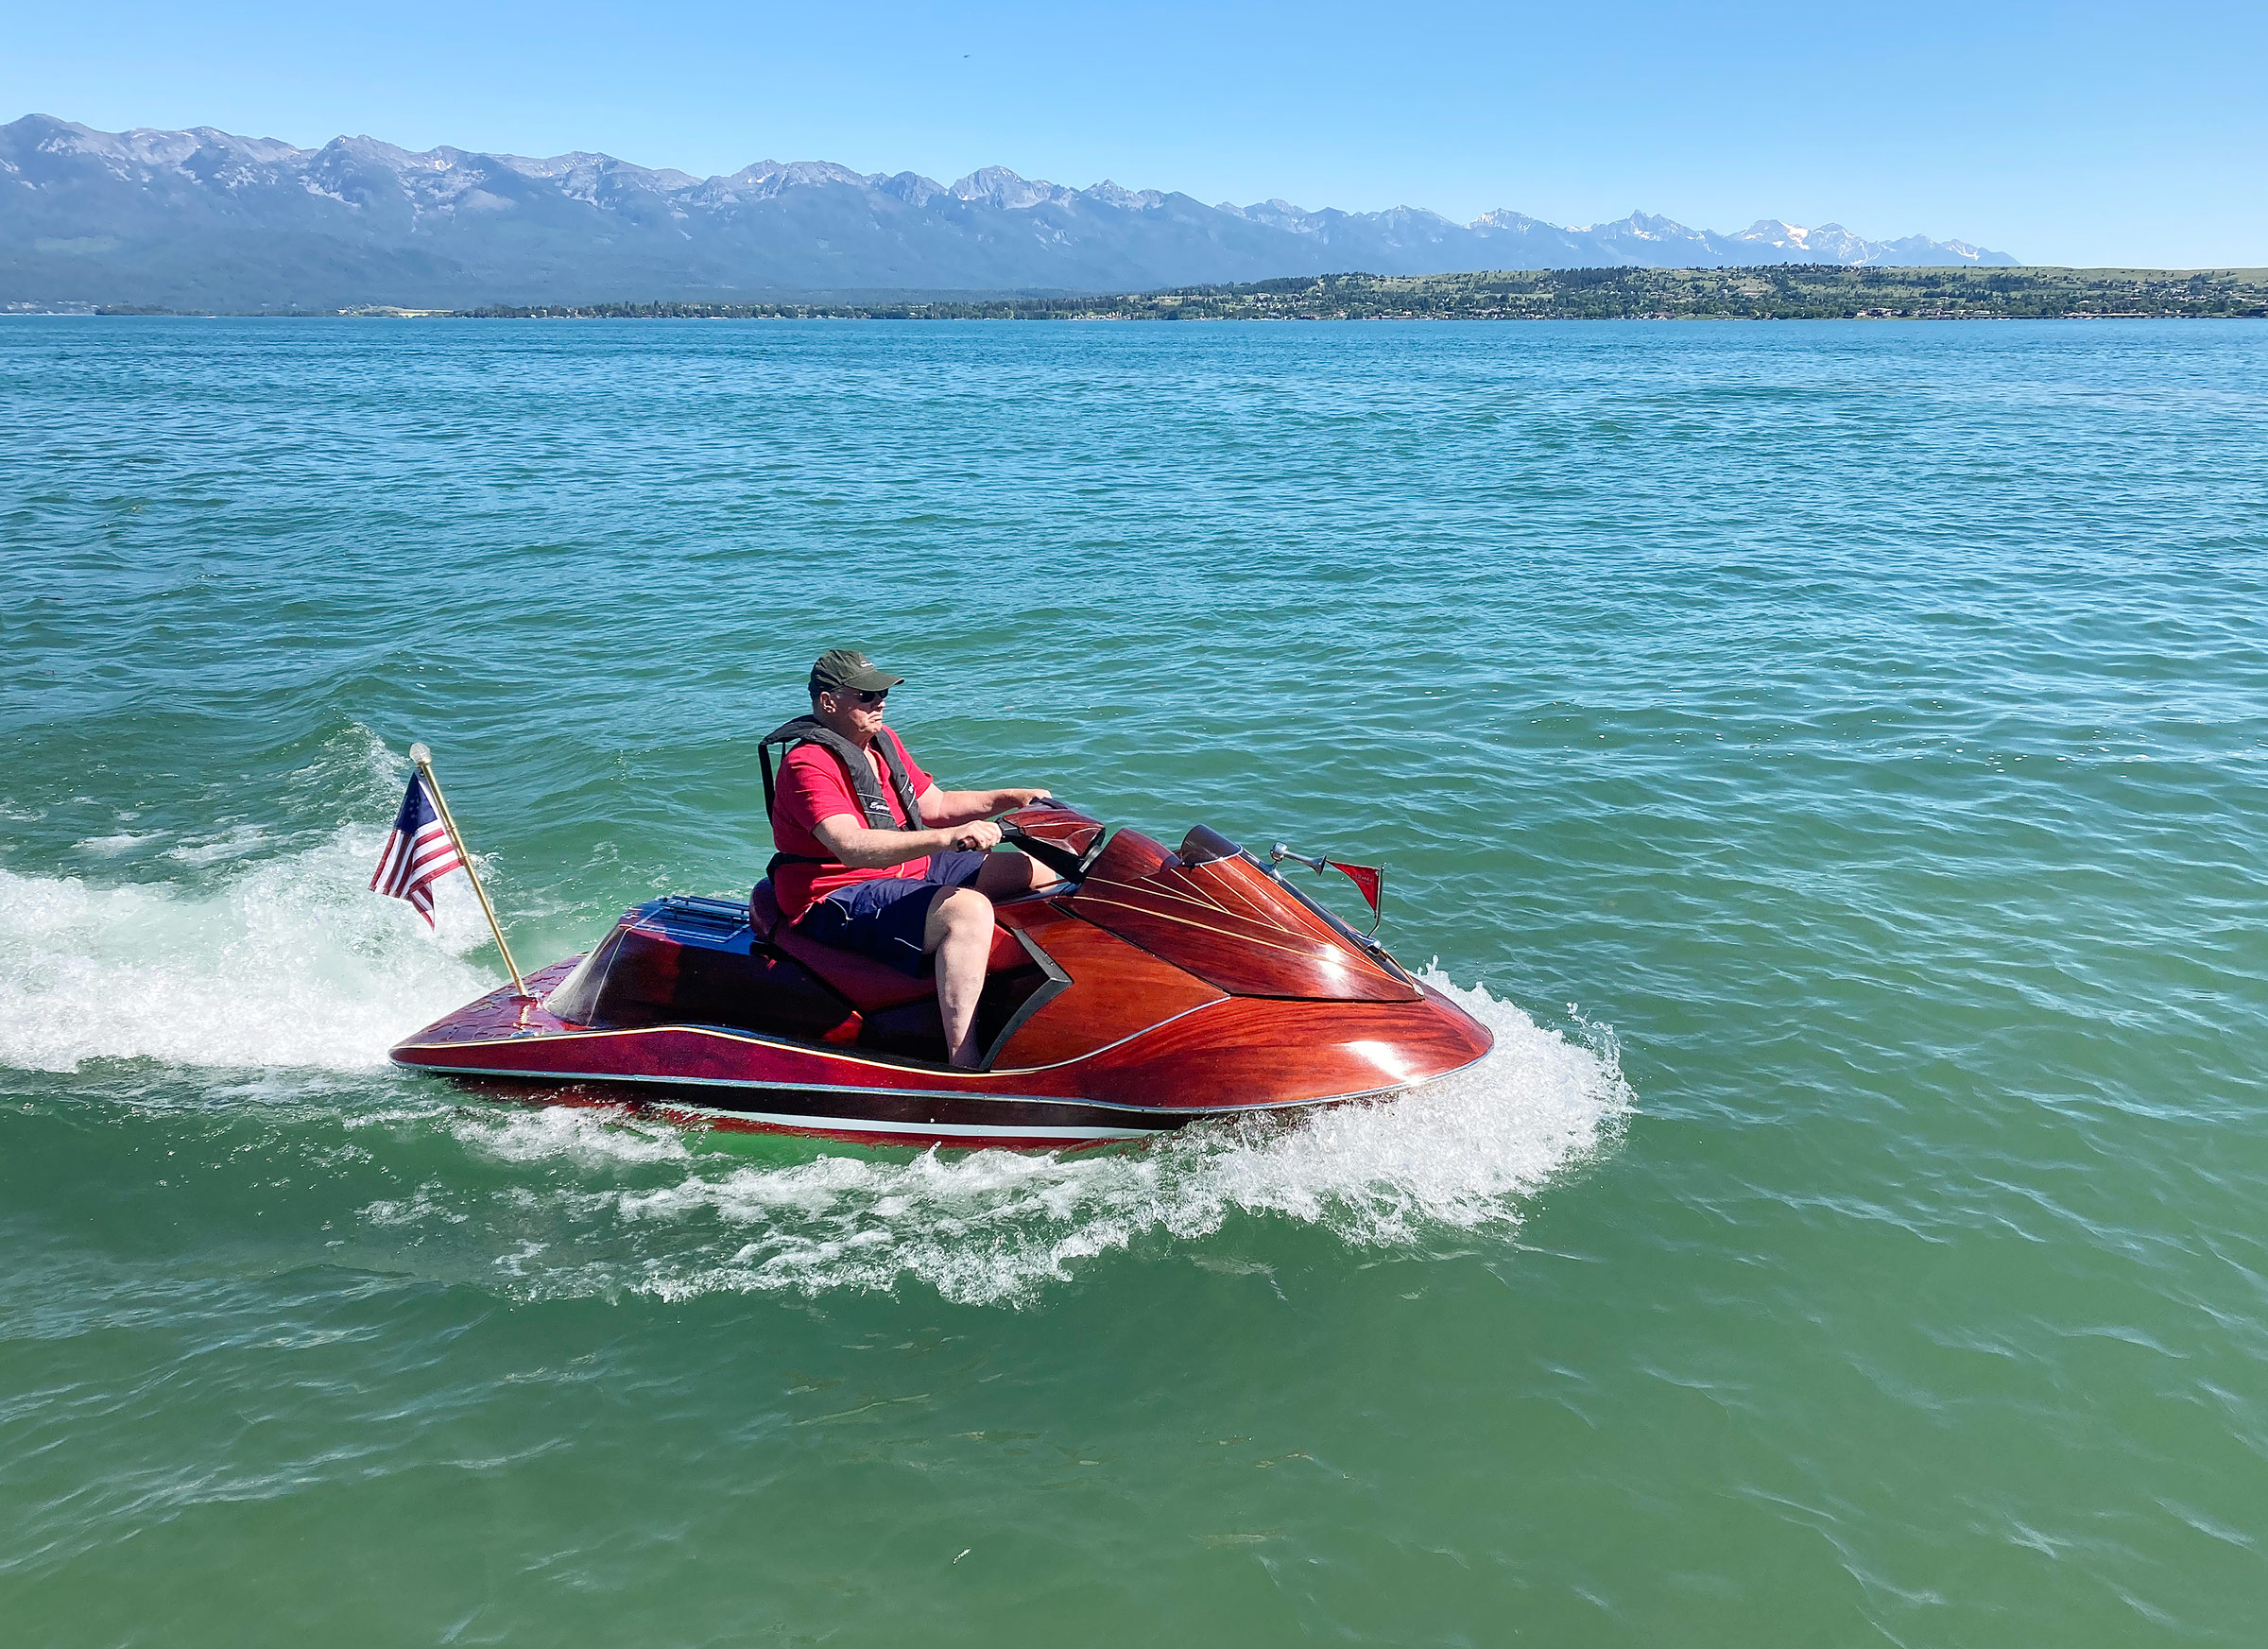
LIL’ WOODIE was a project started on a whim, and made possible Dale’s early retirement.
LIL’ WOODIE, a 19-year-old Sea-Doo turned classic mahogany beauty, is doubtless the only jet ski capable of drawing admiring looks at gatherings of the Antique and Classic Boat Society. And its metamorphosis is matched, perhaps, only by Dale’s metamorphosis from bank vice president to boatbuilder.
Do you have a boat with an interesting story? Please email us. We’d like to hear about it and share it with other Small Boats Magazine readers.
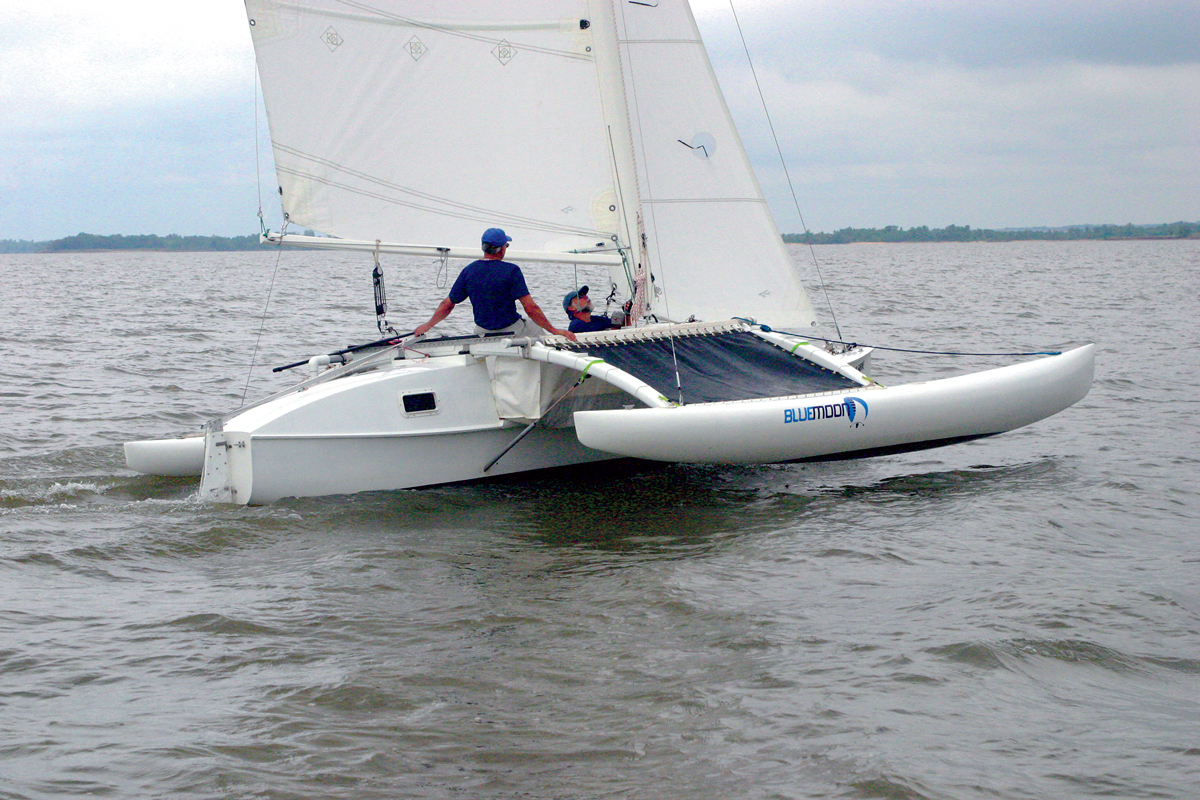
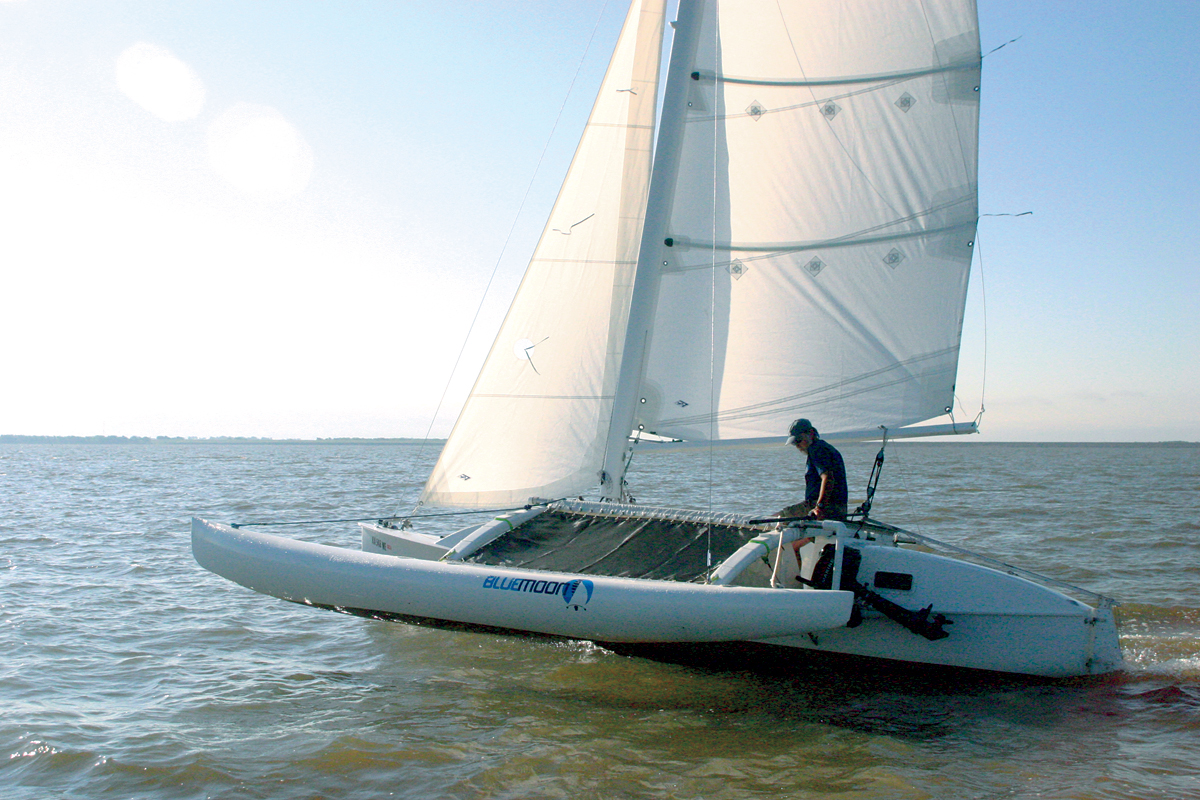
Ah…the Kansas prairie. A land of wide-open spaces that evokes images of cattle drives, farmers on tractors, wheat fields, and the world-renowned Dorothy and Toto. This isn’t the type of place I would have thought to look for an example of designer Dick Newick’s Tremolino, a fast and futuristic-looking trimaran. Yet, on a quiet reservoir known as Cheney Lake just south of Wichita, BLUE MOON quietly awaits—poised for speed. Who’d ’a’ thunk it?
The Wichita area is a hotbed for aerospace technology. That may explain the high-tech-looking trimarans and catamarans that abound on Cheney Lake. Now we know how rocket scientists have their fun. It took BLUE MOON’s builder and owner, Lew Enns, and his good friend, Tom Welk (neither of whom is a rocket scientist), several years of part-time work to complete her. Their hard work paid off, though; she’s head-and-shoulders above the rest on Cheney Lake.
Please don’t send letters. This truly is a handmade wooden boat. While she may look like something out of science fiction, there’s much less new technology at work here than one might guess. In fact, its core technology has been around for millennia.
Photo by Tom Welk
The Dick Newick–designed Tremolino blends ancient technologies with high-tech design and construction methods. The strip-built trimaran gives even the less-experienced builder a chance to own this fast and fun-to-sail craft.
Dick Newick says, “ Thousands of years ago when early Europeans had trouble crossing small bodies of water, the people of Southeast Asia developed craft with more than one hull which they used to explore and settle the widely separated islands of the Pacific. If they had ever been motivated to leave this paradise for a cold climate, they might have astonished the natives of Europe long before Magellan ‘discovered’ the Pacific and their light multihulls that easily sailed three times as fast as his heavy vessels. The rest of us are slowly relearning what those ‘ignorant savages’ knew a long time ago. CHEERS! to those salty seamen.”
First-time trimaran builders Lew Enns and Tom Welk, while perhaps not as salty as our Southeast Asian predecessors, have done an outstanding job in constructing BLUE MOON. Lew studied other designers’ trimarans before settling on Newick’s Tremolino, but most of them used parts from beach catamarans, giving them a patched-together, discordant look to his eye. Tremolino is a unified original. Lew says, “I really like the looks of Newick designs. They seem like works of art.” Another important consideration for Lew and Tom was determining where the boat could be built. They wanted a design that could fit inside a 24′-long, two-car garage. The 23′ 6″ Tremolino “just fit” when set at a diagonal.
Photo by Karen Wales
Building BLUE MOON was a community effort. Tom Welk (left) joined family members and others to help owner Lew Enns (right) with construction. Lew’s son, Greg, designed a logo for added panache.
Lew and Tom ripped out miles of 3⁄ 8″ 3⁄ 4″ Western red-cedar strips in preparation for building the hulls. The stock was only 8′ or 10′ long, so they scarfed the pieces to get the necessary length prior to ripping. During the earliest stage of BLUE MOON’s construction, a new home was being built near Lew’s place, and the owner graciously saved the offcuts and scraps for his neighbors’ use. Lew and Tom recycled these materials, turning throwaways into their strongback, some of the molds, cross supports for the hulls, and a variety of jigs.
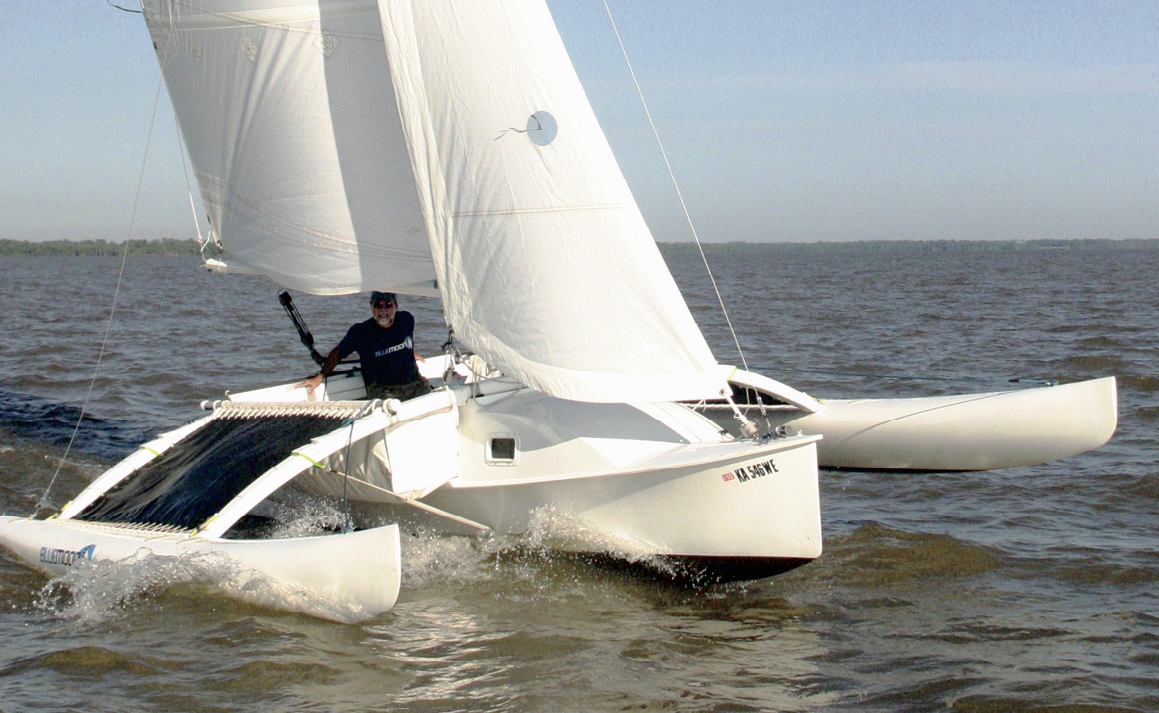
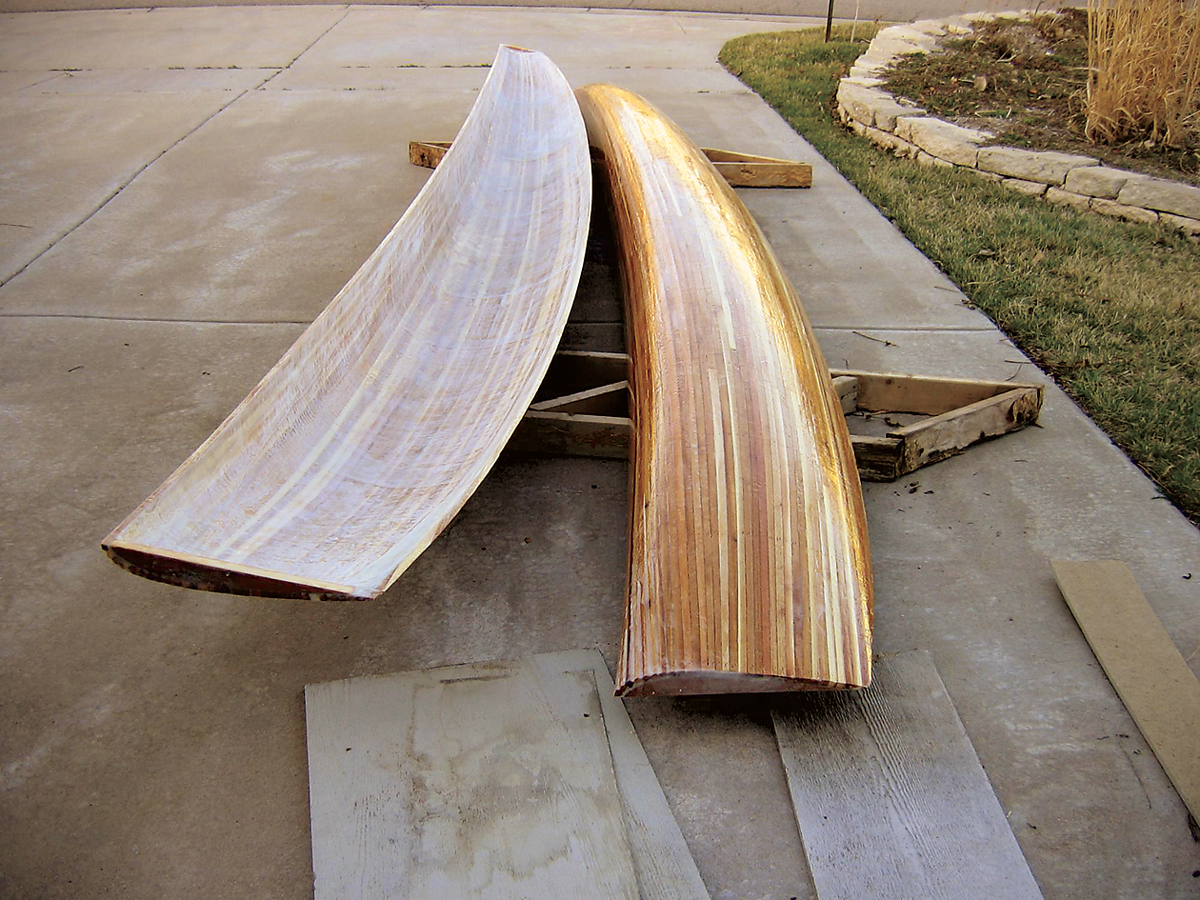
The Tremolino is a trimaran with a large, main hull, called a vaka, bounded by two smaller hulls known as amas. The cross beams that connect the three members are known as akas. Since the amas are the smallest hulls, and since they were to be built in halves on female molds (which can produce an outer hull that is truer and easier to fair), they seemed less daunting to Lew and Tom. So that’s where the builders began.
Photo by Tom Welk
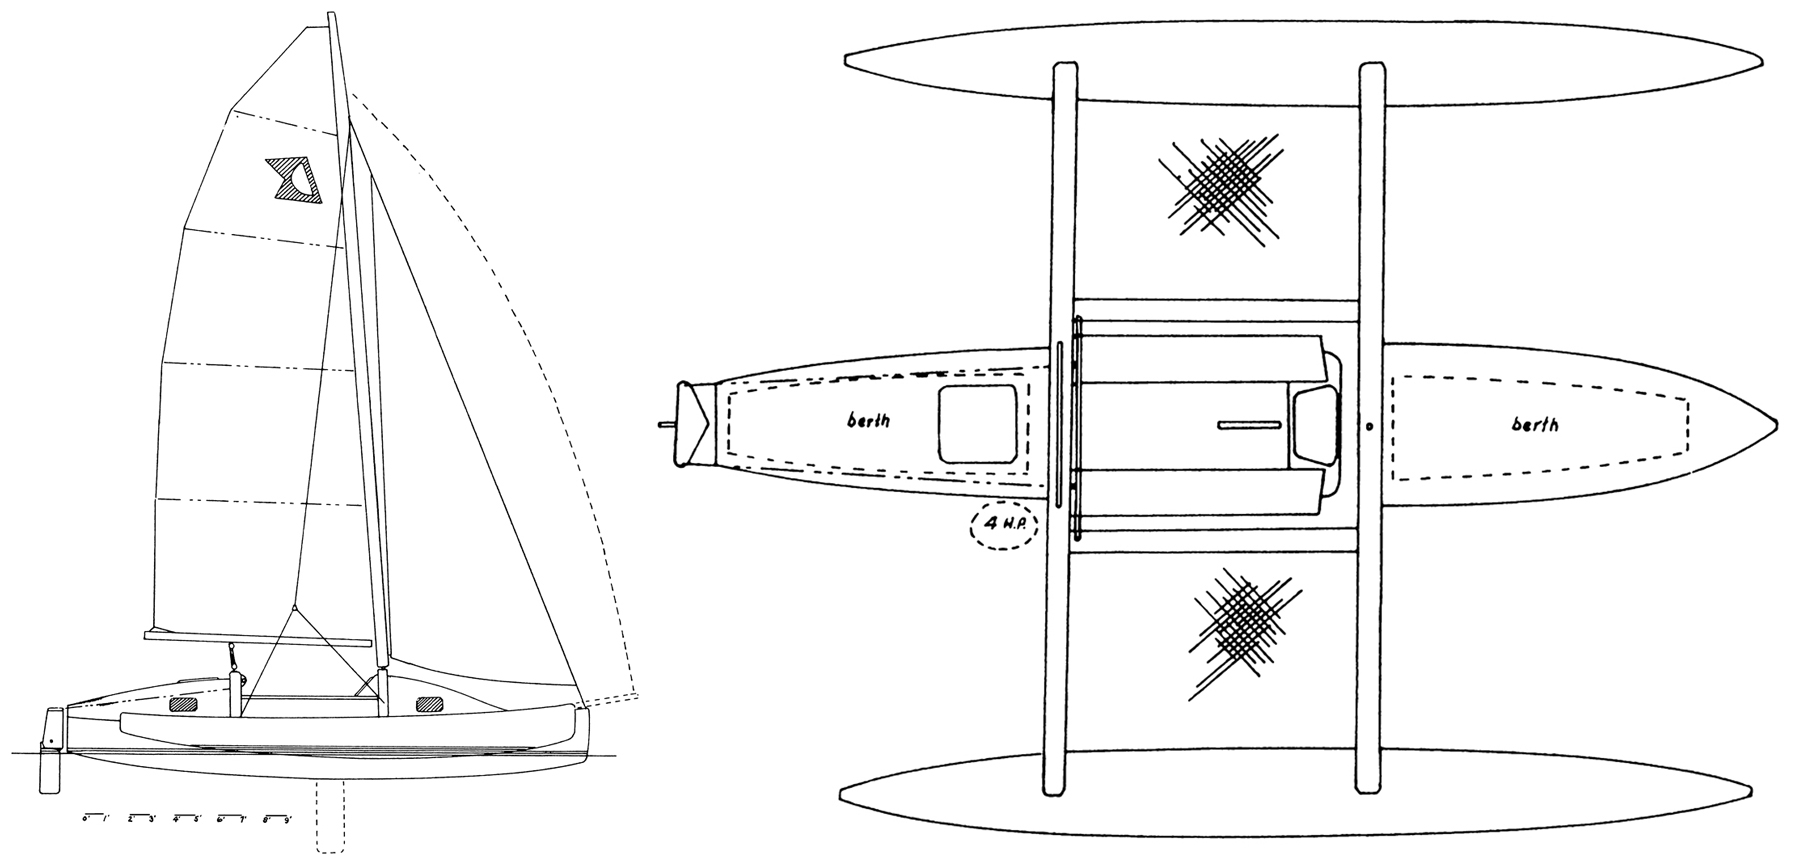
Two outer hulls, called amas, give balance to the central hull, known as the vaka. Fore-and-aft crossbeams (akas) tie the boat together. Unlike a monohull, the vaka is not designed to be stable without the support of the amas.
No lofting is required to take the Tremolino plans to full scale; molds need only be traced and cut from the full-sized patterns. Lew and Tom were faithful to Newick’s plans, which specify stations spaced 12″ apart. After sheathing the molds with waxed paper, Lew and Tom laid in epoxied strips and temporarily fastened them with 1⁄4″ staples (with waxed ends) that could be set about 1⁄8″ proud for easy removal. The builders averaged six to ten strips per evening. After building the first set of ama halves, they reversed the molds to build the opposing, complementary ones.
In contrast to the amas, the vaca was built on a male mold setup. While the strips went on more easily than they did on the female molds of the amas, fairing was much harder. Tom passed this friendship test with flying colors, working many evenings alongside Lew. There were more tests to come, especially when lining up holes in ama halves to ensure a perfect fit in final assembly. Here, Lew deemed Tom a saint, as his stalwart friend endured hours of the measuring, fitting, and cussing that went into this critical step.
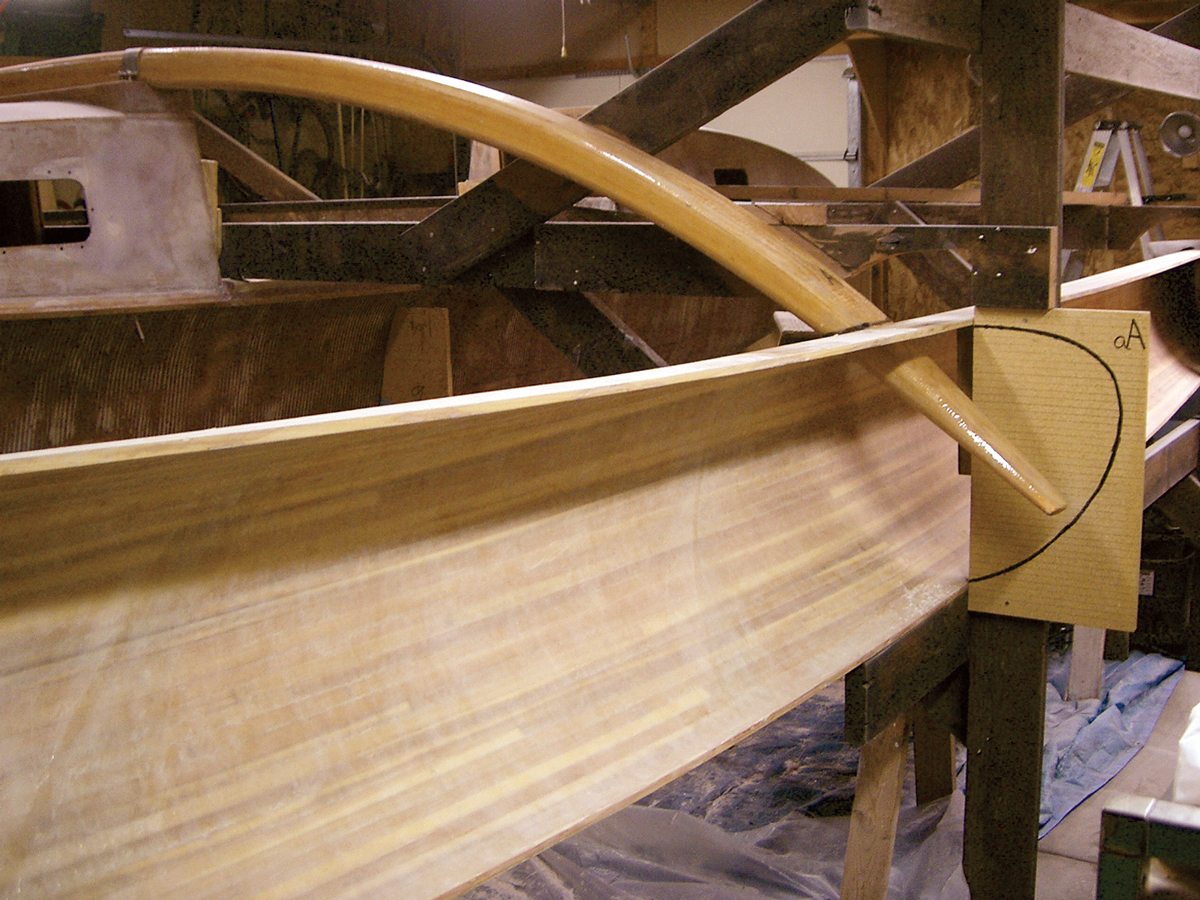
The akas were laid out on a strongback, which established bends in each one according to dimensions shown on the plans. This bending took the Douglas-fir almost to the breaking point—but designer Newick’s procedure worked well, and the completed akas came out fine. The cabin sides, foredeck, cockpit floor, and bulkheads are of okoume plywood. BLUE MOON’s cabintops are strip- built, and all three hulls are sheathed in 10-oz ’glass and epoxy.
Photo by Lew Enns
Placing the akas at the correct attitude through the inboard ama halves was one of the most critical opera- tions of BLUE MOON’s construction. Lew and Tom used a profile of each outboard ama half to ensure that both the angle and the depth of the akas were dead-on.
Dick Newick is one of the true pioneers of trimaran design in the western world (see WB No. 202, “Multihull Pioneers”). His designs take to the water like a feather drifting on a summer breeze. They look like they are moving fast even when moored. Years ago, when I was a design student at The Landing School in southern Maine, Dick Newick came to introduce us to the basics of trimaran design. His philosophy of simplicity and lightness, lightness, lightness impressed me greatly then, as it still does. His designs are not only fast (winning ocean races far and wide), but all of them are extraordinarily beautiful. In a way, BLUE MOON is high-functioning sculpture. If you are lucky enough to build a Tremolino, I hope you will follow Lew and Tom’s good example in adhering closely to Newick’s design.
If, like me, you are accustomed to sailing a monohull, this boat’s speed will knock your socks off. Kept light, she will attain velocities that one can only dream about with an average 24′ daysailer, and she will do it with just a few degrees of heel. Attaining these speeds with a monohull would require a perfect close reach heeled down on her ear. For me, less heeling means expending less energy. For some, it may also mean fewer bouts with seasickness.
The amas, though usually waterborne, provide the vaca with superb balance and agility, like a figure skater with arms in graceful extension. Because she’s a trimaran, BLUE MOON doesn’t turn on a dime, but she tacks without the awkward bumpiness associated with a catamaran.
Lew Enns
The amas were constructed in halves in a female mold. After gluing up strips for both parts of one ama, molds were reversed on the strongback to build a complementary pair.
Most owners understand that every boat is a collection of strengths and compromises. Boats that are easy and fun to use are seldom as easy to build. BLUE MOON fits that description. Another downside is that the Tremolino is not easily trailerable, although Lew and Tom are working on a customized trailer to make transport a bit easier. For now, though, she clips across Cheney Lake at a full run, or basks in her shady slip. She’s the queen of the Kansas prairie and an icon of the Newick fleet.
Tremolino is a sophisticated modern sailing machine whose construction is within reach of the dedicated amateur. The plans include full-sized patterns, so no lofting is necessary.
This Boat Profile was published in Small Boats 2009 and appears here as archival material. If you have more information about this boat, plan or design – please let us know in the comment section.
I once worked in a New Hampshire cabinet shop with a gray-bearded guy named Paul who regularly offered only two criticisms of my craftsmanship. He would say either, “We’re not making a damn pigpen here,” or “We’re not making a damn piano here.” When I put the appropriate amount of effort into the job at hand, he’d let me be. If Paul ever looked over Joe Greenley’s shoulder as Joe built one of his strip-built kayaks, I think he’d sputter, “We’re not building a damn Louis XIV escritoire here.”
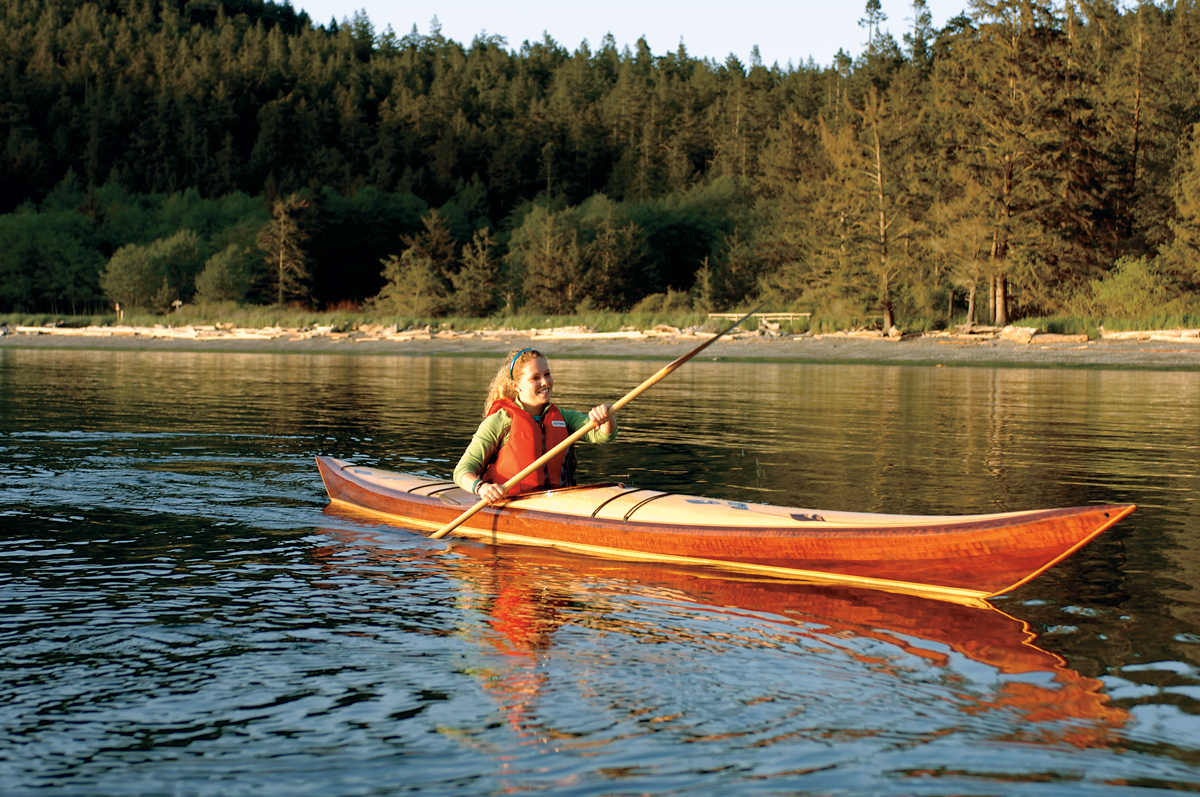
Joe has created quite a reputation for his company, Redfish Kayaks, by transforming strip-built kayaks into works of art. For years I’ve admired his craftsmanship at wooden boat festivals and kayak symposia in the Pacific Northwest, but I’d never paddled any of his boats. I suppose all I had to do was ask, but I was as reluctant to paddle one as I would be to use a guitar as a garden rake.
When I finally got a chance to paddle a Redfish kayak, it was a King built from a kit by Dale Meland under Joe’s tutelage. Dale was a disciple of decorative strip-building and did a first-rate job with his kayak’s sweeping patterns and pinstripes of Western red cedar, Alaska yellow cedar, and walnut. It was fine piece of craftsmanship, but it didn’t take long for me to realize that the kayak wasn’t just fancy woodwork; it was as much a pleasure to paddle as it was to admire.
Photo by Michael Berman
While the King kayak is for the intermediate–to–advanced paddler, the boat will introduce a willing rank beginner to the pleasures of good handling characteristics.
Redfish lists the King at 38 lbs. Dale had made a few modifications that brought the weight up to 43 lbs—still about a dozen pounds lighter than most fiberglass kayaks and an easy lift for cartopping. The cockpit is located a bit farther aft than is typical of most touring kayaks, so the balance point fell at the forward end of the coaming. While that made the boat a bit bow heavy for carrying slung over one shoulder, it was ideal for my preferred method of carrying: facing the stern with the kayak upside down and the coaming resting on both shoulders. That’s how Greenland kayakers carry their kayaks, especially when competing in races that include a portage; it’s a lot easier on the back.
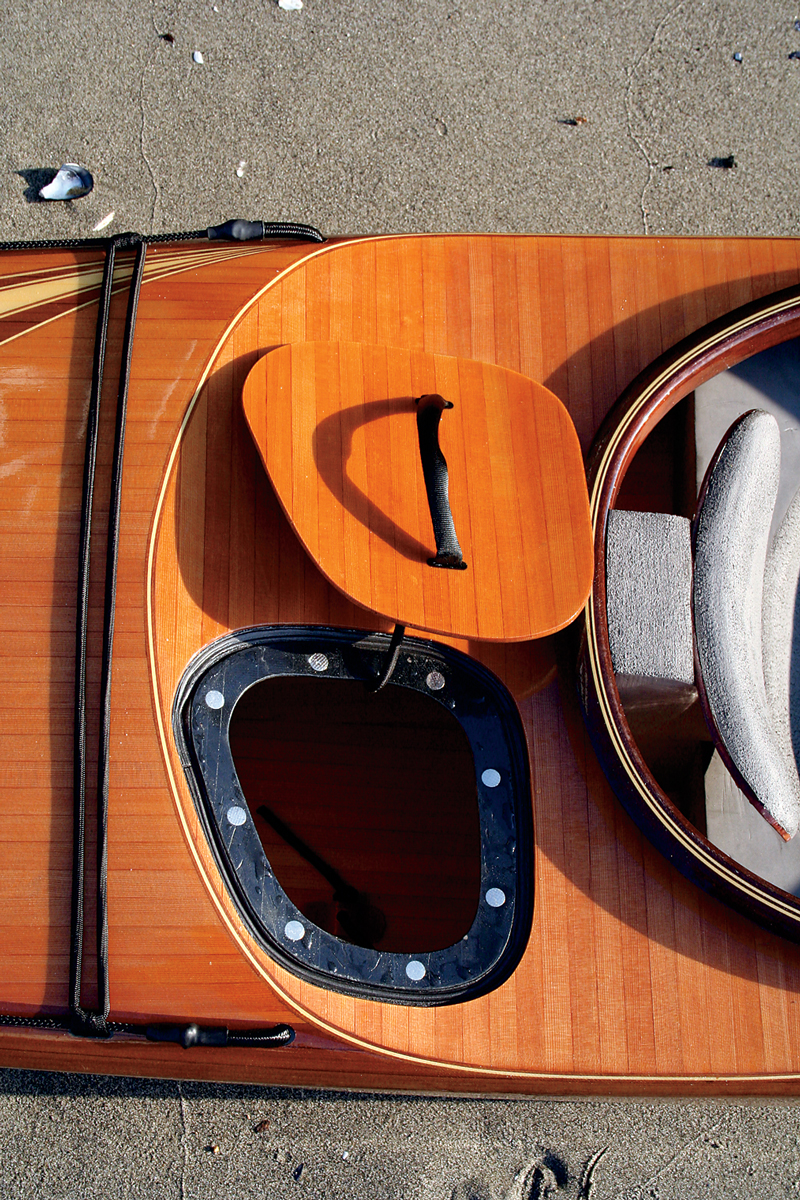
Dale’s King had an optional feature called the Roller’s Recess. The recess is scooped out around the cockpit nearly to the sheerline and drops the aft end of the coaming well below deck level. The configuration gave me a range of motion that was equal to that of the low- profile Greenland kayaks I’ve built specifically for rolling. I could lie back and touch my head to the aft deck without having my hips lift out of the seat.
Photo by Christopher Cunningham
The Roller’s Recess is a Redfish trademark. This feature lowers the after portion of the cockpit coaming, allowing for easier-than-usual rolling.
Perimeter grab lines and bungee cords were secured by short loops of webbing anchored in slots cut into the foredeck. This installation of deck lines won’t snag clothing or ding knuckles during rescues and re-entries. It’s also visually unobtrusive; through-bolted plastic padeyes would detract from an artfully crafted deck.
Dale sculpted a mini-cell foam seat for a custom fit, and fortunately the contours were a perfect fit for me, too. The seat, hip pads, and backrest securely cradled my hips and encouraged an upright posture conducive to proper paddling technique. The foredeck was relatively low for a touring kayak and sloped down to the sheer well out of the way of the paddling stroke. The trade-off was diminished space in the cockpit, but I still had just enough foot room for my size-13 neoprene booties.
Christopher Cunningham
Strip-planking allows for myriad design options.
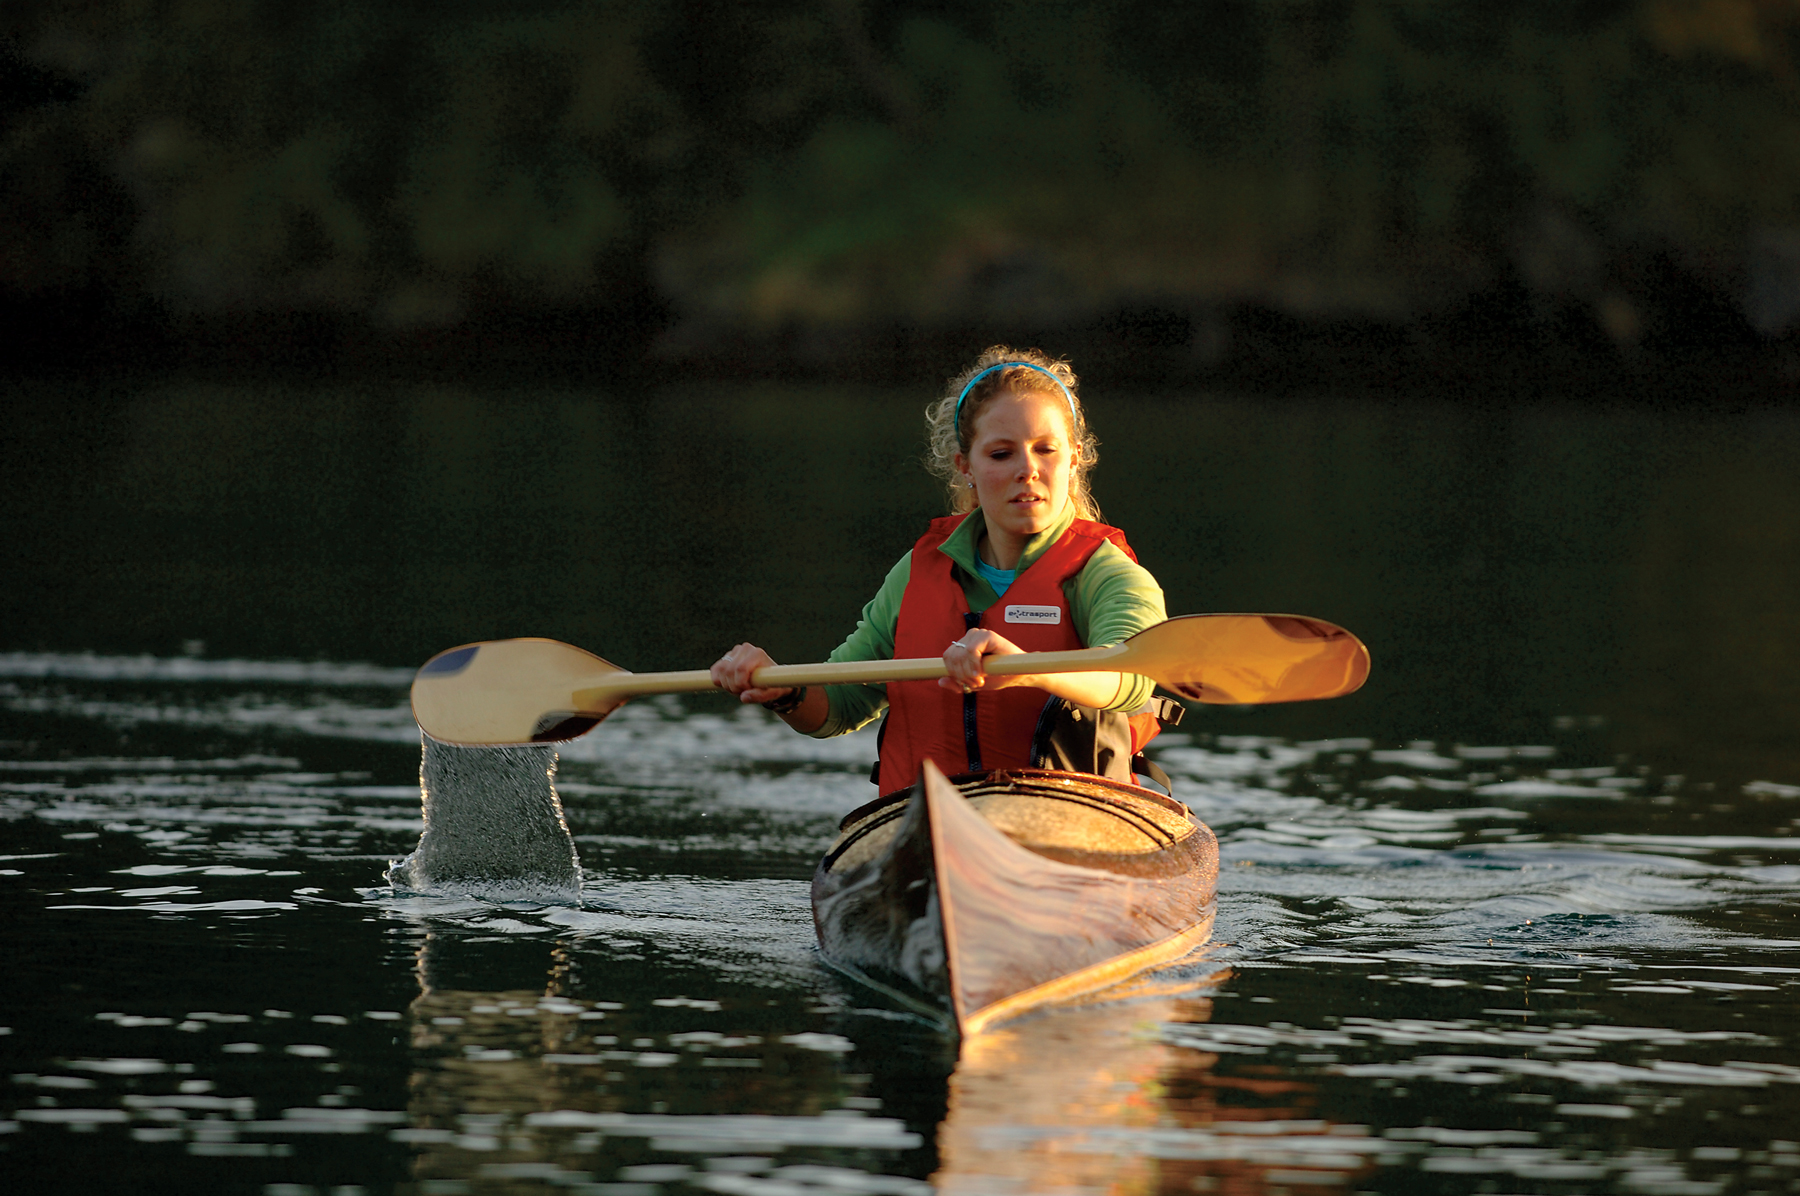
A float, the King provided a comfortably stable platform. Even in choppy water I could rest the paddle across the cockpit coaming and have both hands free to write in my notebook. While paddling in the shoals and getting slapped on the beam by breaking waves, it was easy to keep the hull underneath me. The secondary stability was excellent. Only when I canted my hips to the limits of my flexibility could I feel the stability begin to fall off, and by that time I had the coaming dipped into the water. I normally heel, or “edge,” my kayak when carving turns; this makes the boat much more responsive. When doing so in this test, the King offered plenty of righting moment for a very secure feeling. It took only a slight edging to get the King to respond to a sweep stroke with a crisply carved turn. When I wanted to maneuver in tight quarters, a bit more edging would get the stern to swing around smartly.
For speed trials, I ducked into a marina where I could find some still water and get out of the wind. The King tracked well when I brought it up to speed. The bow yawed back and forth only an inch or so, and it was easy for me to hold a straight course. My GPS showed I could slip along at just over 4 knots at a relaxed pace, hold 5 knots if I worked at it, and nudge just over 6 knots in a short sprint. These numbers are good for a sea kayak and just a half knot off my observations for the fastest touring kayaks. It’s not likely the King will be left trailing the pack.
When I took the King out in a 20-knot breeze, whitecaps were everywhere and a few wave crests lapped across the horizon. The boat was nicely balanced in the wind. If the bow strayed, a little edging was enough of a reminder to get it back on course. The King is equipped with neither a skeg nor a rudder, and manages quite well without. The only time the kayak got a bit squirrelly was when I was paddling on the lee side of a low point of land. The waves wrapped around the point, but the wind grazed over it. With the wind and waves coming from different directions and the waves growing short and steep in the shoals, I had to do a lot of steering to hold my course. A skeg or a rudder might have kept the stern from getting pushed around, but I didn’t feel I could fault the King for its performance. It responded well to my prodding to get it back on course. Farther from shore, the wind and waves weren’t so quarrelsome and the King was back on its best behavior.
In a following sea the King was quick to accelerate to surfing speed. If the bow began to drift off the fall line, it was easy enough to correct the course to keep from broaching. When heading upwind the bow had no tendency to bury itself in the oncoming waves, and what little water did come over the bow slipped over the smooth contours of the deck without throwing spray in my face.
Photo by Michael Berman
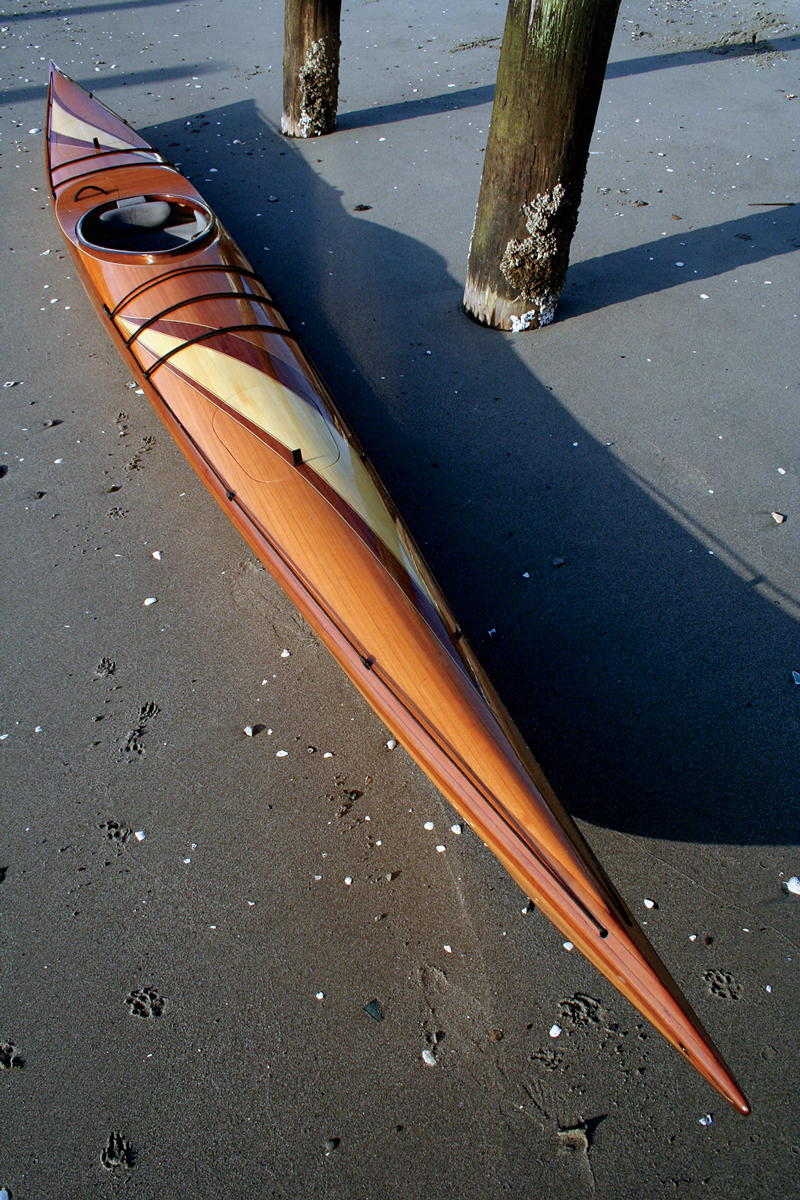
Redfish Custom Kayak and Canoe Company has built its reputation on good-performing, well-built boats that stand as works of art. The 17′ 9″ King is a kayak that will take care of a rookie and likewise satisfy a seasoned paddler.
The King is an excellent kayak for rolling. If you think of rolling as a difficult technique that you’d use only in an emergency, the King might just convince you that rolling is something to do for fun. The solid fit of the seating and thigh braces kept me locked solidly in the cockpit, and the Roller’s Recess worked like a charm. Layback rolls were effortless because I could get my torso and head right up against the aft deck.
If you have to bail out of the King after a capsize, you won’t just fall out. To clear the thigh-brace flanges I had to lead one leg ahead of the other. It is important to practice wet exits until they become second nature, and that’s especially true of kayaks with snug-fitting cockpits. After a wet exit I could empty most of the water from the cockpit by swimming to the bow and pushing it up over my head. The cockpit would drain and the King would flop upright with just a bit of water still aboard but not enough to warrant pumping out. The low aft deck made re-entries easy. I could lunge aboard, straddle the kayak, and get into the cockpit seat-first. In flat water I didn’t need to resort to a paddle-float outrigger to stabilize the King for re-entry. Dale’s King didn’t have deck lines to hold a paddle as an outrigger, but they could easily be added.
I managed to get through my sea trials with the King without marring its varnish. While handling such a finely finished boat on land made me tense, the King’s performance on the water put me quite at ease. I’d be happy to paddle a King again, even if it were painted olive drab.
The plans for the King come with full-sized templates for the stems and 16 molds. The 36 pages of instructions are clearly, if sparely written. I suspect what Joe knows about building kayaks could fill a good-sized book. While the color photographs that illustrate the book show several design motifs, Joe leaves the artistic side of the kayak to the builder.
It’s likely that people drawn to a Redfish kayak will fall under the spell of Joe’s artistry. It would be a shame to keep a kayak like the King on carpet-padded racks and away from the grit and gravel that are inevitable in getting a kayak to the water. If you build or buy an eye-catching King, have someone you care for give the varnish its first scratch so you’ll have a pleasant association with the inevitable scars, then get over it and go paddle the damn kayak.
Redfish Kayak specializes in kits and plans for a range of strip-planked paddle craft. The King has plenty of volume for gear stowage, yet is fast and responsive.
Plans and kits are available from Redfish Custom Kayak & Canoe Co. This Boat Profile was published in Small Boats 2009 and appears here as archival material. If you have more information about this boat, plan or design – please let us know in the comment section.
The Asa Thomson skiff holds quiet appeal. Appreciation for this little skiff comes on slowly but deeply, like true and enduring love. She’s a culmination of a number of elegant and subtle factors that, while not strikingly obvious, come together in a compact craft that is well balanced in look and in feel.
Asa Thomson was a New Bedford, Massachusetts, boatbuilder who clearly had a great deal of experience in skiffs. His design, devoid of any “wow” factor, has all the attributes of a craft born of lifelong learning. On a recent outing to Cape Cod, I came across a lovely and well-maintained Asa Thomson skiff that had been impeccably built by Pease Boatworks and Marine Railway in Chatham, Massachusetts. Her name is COOKIE. One look and I wanted a bite.
A flag-snapping breeze riffled the surface as my friend and I rowed around Pleasant Bay, near Chatham. In line with what I had noticed while looking at her plans over the years, the Asa Thomson skiff is high-bowed for a boat of such diminutive size. This gives her a jaunty sheer and plenty of freeboard amidships. While this perky little turned-up snout does cause her bow to blow off somewhat, it also provides an added sense of security. My guess is that she was originally designed for clamming, qua-hogging, and fishing around the New Bedford area. The wet-well, located under the ’midship seat, also indicates this use. High, secure-feeling sides and a flat bottom are good for this type of work. The wet-well, which adds strength to the boat, can instead be made to be a dry-well and, rather than stowing an afternoon’s catch, can be used to hold gear or a picnic lunch.
Karen Wales
..
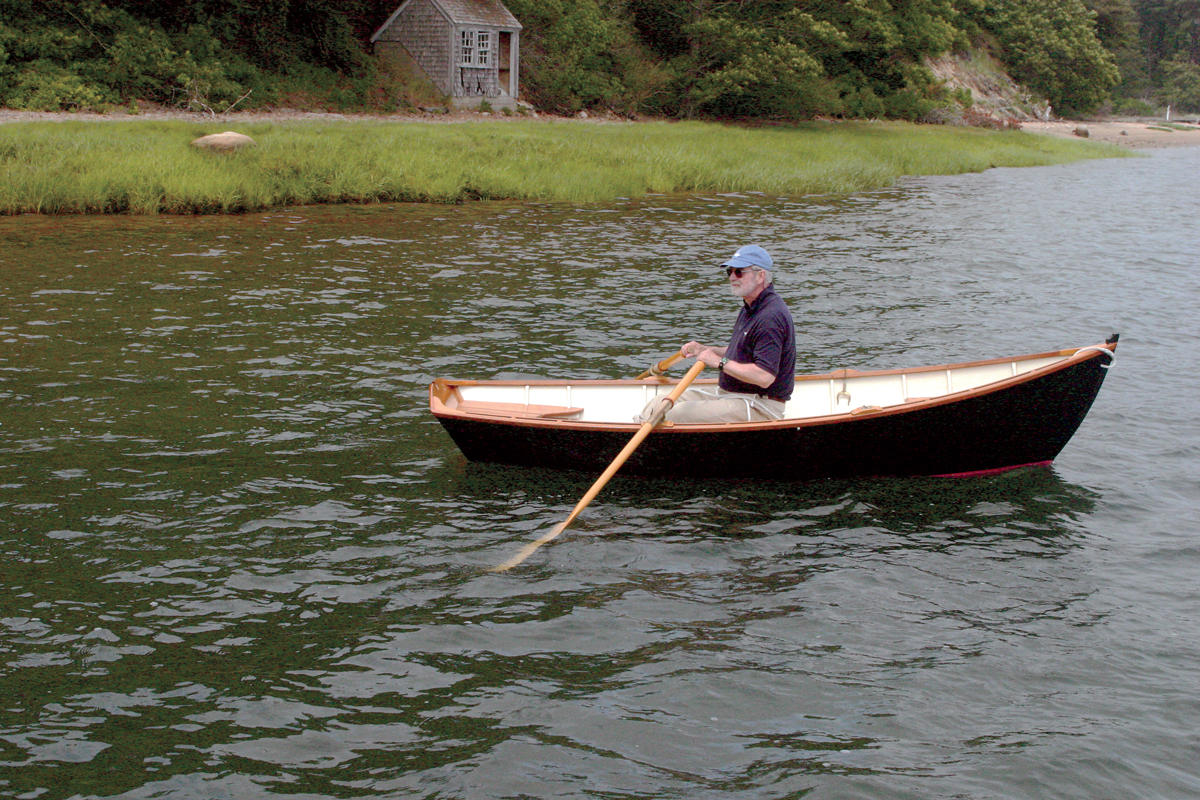
Trying to put my finger on what makes this design so special, I have been able to pick out a few of the wonderfully correct features (at least to my eye) that make this boat worth building. First, there is the profile of the bottom. The aft end of the bottom sweeps up to just clear the water for easy propulsion with oars or a very small outboard (no more than 3 hp, I’d say). This skiff rows so easily that I think very few would opt for the complications, cost, and smell of an outboard. COOKIE’s owner rows her exclusively. While the aft sweep clears the water, the straight, almost level bottom profile forward reduces pounding and helps to keep the bow from blowing off in a crosswind. This reminds me of what I have heard some old-timers say for achieving good tracking under oars: “Trim by the bow going upwind, and trim by the stern going downwind.”
Another great feature is her scantlings (size of the pieces that go into building her). Many small boats are constructed with wood as it comes from the lumberyard, with little attention to proper thicknessing. Although it may be easier to round-up a specified thickness to the next standard dimension, this leads to awkward-looking details and adds considerably to a boat’s weight. Particularly when dealing with a boat of this size, a little goes a long way. Proper proportioning of each piece is as important to good looks as putting them together well and employing tasteful details. Asa Thomson’s scantlings are just right: strong enough for the skiff’s intended use and its understated elegance. The glitz and glitter of a fancy finish can
never make an awkward detail look good. Rounding corners off with a router takes away the definition of the curves and edges that make this boat so pleasing to the eye. Keeping
to the sizes shown also will keep the weight down so this boat can be car-topped when needed. I would urge any would-be builder to please stick with the scantlings shown on the plans. You’ll be glad you did.
Karen Wales
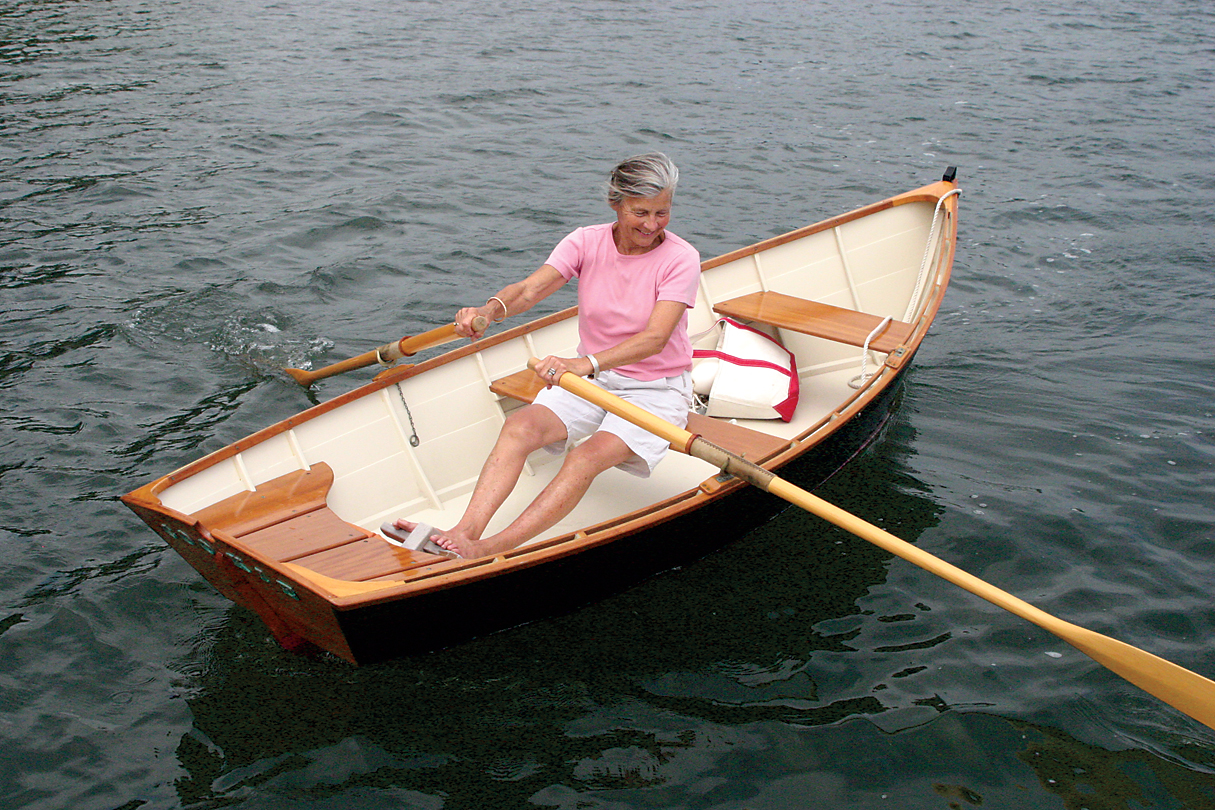
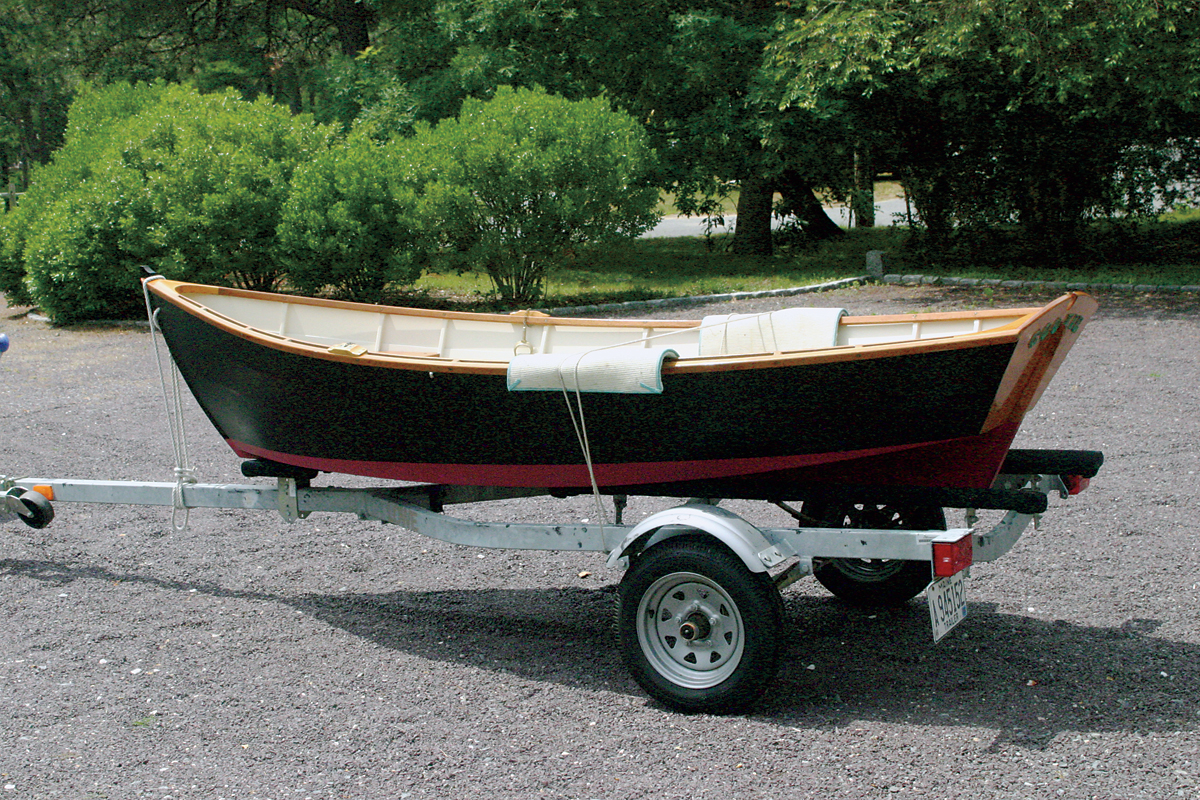
Traditionally built, the Asa Thomson skiff weighs 125–150 lbs. Plywood construction makes COOKIE, a lot lighter and renders her immediately usable upon launching since there’s no waiting for wood to swell. She is trailerable and is easily lifted and launched by two people.
While I believe that remaining faithful to the scantlings will produce the best results, there is one major modification that I would recommend: building the bottom with marine-grade plywood, say, 3⁄8″ thick. Using plywood will ensure a water-tight bottom despite long periods ashore. Asa Thomson’s original, double-planked bottom with muslin between the layers will also be watertight, but it weighs considerably more than the plywood alternative, which is about 40 percent lighter. Asa Thomson designed and built his original skiff before high-quality marine plywood was readily available. As smart as he was, I have to believe that if he were with us today, he might consider this alternative, too. Pease Boatworks gave COOKIE plywood sides as well as a plywood bottom. One of their driving factors was that the garboard strake is so wide that finding natural wood (at least 14″ wide) was difficult and prohibitively expensive. For them, plywood seemed the logical choice.
Another characteristic I appreciate is the amount of flare of this boat’s sides. It achieves the necessary width at the rail while keeping moderate width at the bottom, helping to make her easy to row. The flaring sides also contribute greatly to the boat’s stability as she sinks deeper in the water under heavier loads.
Finally, the bow and stern are in complete harmony with each other. The rake of the transom perfectly complements the overhang and the beautiful curvature of the stem.
When I started out in boatbuilding (more years ago than I’m willing to relate), I spent considerable time looking at the lines of the Asa Thomson skiff. While the plans are adequate for an experienced builder, they can intimidate the beginner. When I was new to boatbuilding and woodworking, I found her plans to be incomplete for my needs.
So, I moved on, instead building the Yankee Tender (a series of them), another smart-looking and well-per-forming flat-bottomed skiff inspired by the Asa Thomson design. I feel that it’s worth mentioning the Yankee Tender here because my familiarity with it has shed some light on how a beginner might approach building the Asa Thomson skiff. While these are somewhat different boats, they have many similarities in construction. The plans for the Yankee Tender offer a wealth of useful measurements, detail drawings, and building advice for the novice; they even include an illustrated guide to plank spiling. A lot of the tips, techniques, and examples found in the Yankee Tender’s plans can be directly applied to the Asa Thomson skiff and would be of use to any novice who wishes to build one.
Karen Wales
Students at WoodenBoat School learn traditional building techniques in a class taught by John Karbott. The Asa Thomson skiff’s simplicity, lapstrake planking, and sawn frames make it an excellent project for the first-time boatbuilder.
The Asa Thomson skiff will admirably serve a number of different uses. With her good initial stability and roominess for her length, she will be the envy of the usual work skiffs. These same features and her ease of rowing make her the ideal small boat for giving children and grandchildren their first lessons in boat handling and care. As a tender to a small, coastwise cruiser, she has it hands-down over those inflatable bathtubs you see. She can carry crew and duffel bags with ease and elegance. When push comes to shove and you absolutely have to set that second or third anchor out to windward in a hard breeze, she will get you there with authority under oars alone. This is a safety consideration seldom thought of when an inflatable is purchased.
Perhaps her best purpose, though, is as a feast for the senses. Quietly, uneventfully, COOKIE disappears to the far reach of the harbor. I am left with the impression that I have spent an afternoon with a refined and delightful lady. She is a thing of beauty, and, as it has been said, “a thing of beauty is a joy forever.” So true of this humble gem.
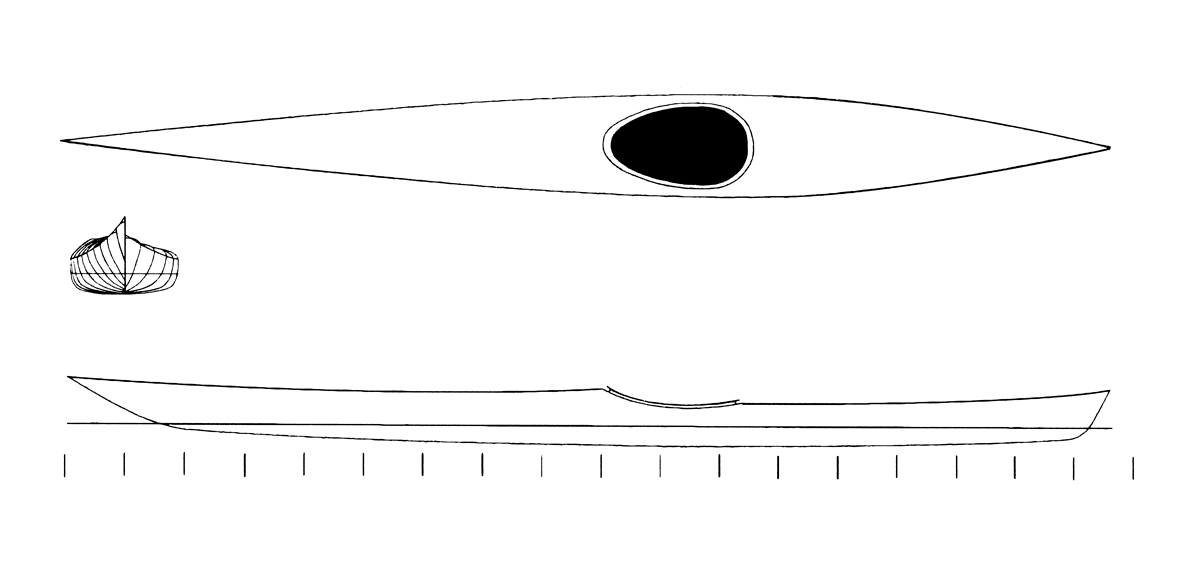
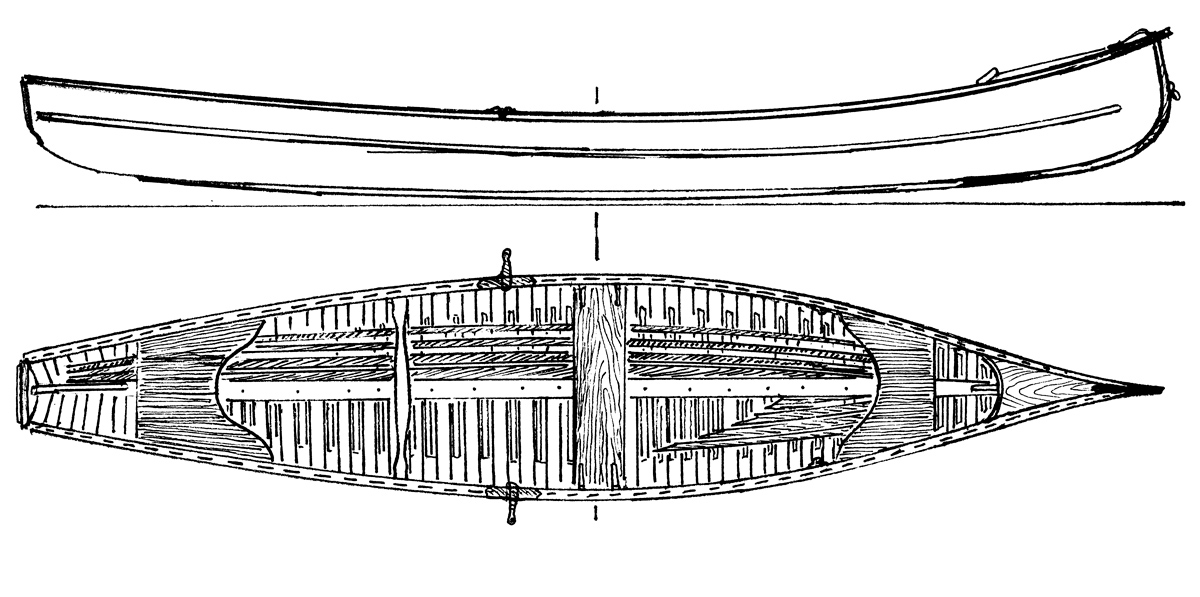
The profile view shows harmony among the stem, sheer, and transom. The plan view (bottom) gives a good indication of the boat’s flare, which contributes to its roominess and stability.
This Boat Profile was published in Small Boats 2009 and appears here as archival material. Plans are available from the WoodenBoat Store for $20 (as of 2022)
Most “honest” sailors (is that an oxymoron?) will admit to having flirted with a one-design class. With the combined appeals of match and fleet racing, of innovation and “interpretation” of the rules, of cutting-edge technology and long-steeped traditions, one-design racing enriches sailing on a completely different plane than just pottering about the harbor in any old boat. That dream of building a one-design and then campaigning her is merely a rich fantasyland for most of us, and fulfilled for very few.
The boat presented here is intended to offer this possibility to the rest of us. She is a high-tech, cutting-edge, extreme racing machine with a serious nod to history and tradition, buildable by amateurs, affordable, and transportable, with the potential for class events and the promise of fun whether sailing alone or in the fleet.
This new 16/30 class sailing canoe is the product of a long-term project on the part of John Summers, General Manager at the Canadian Canoe Museum in Peterborough, Ontario. He designed the canoe while at the Antique Boat Museum in Clayton, New York. The ABM has a long standing as a bastion of the mahogany speedboat crowd, but it deserves at least equal stature as both a repository and an enthusiastic reproducer of classic small craft. The fact that Clayton and the Thousand Islands region have long been the hotbed of sailing canoe development (see sidebar) led Summers to a natural interest in promoting the type. A survey of existing boats and enthusiasts exposed, however, a situation without much promise for growth: owners were reluctant to bash their lovingly restored antiques around the buoys, reproductions were challenging and therefore expensive to build, and the bloody things were difficult and uncomfortable to sail.
To have a chance of reinvigorating the class, the world needed a sailing canoe that was easily and inexpensively built, could be sailed by a wide range of sailors, and was a true one-design (i.e., the boats would be well matched). Not content with that set of apparently limiting parameters, let’s throw in the desire to have the design based on a boat from the glory days of the class, say a century or so ago.
Geoff Kerr
No racing boat is complete without a competitor, and several 16/30s were built in a workshop at the Antique Boat Museum.
Summers based the concept for the new 16/30 class on a boat built by the Gilbert Boat Company of Brockville, Ontario, one of a number built circa 1920 for the Gananoque Canoe Club from the Canadian side of the Thousand Islands. He found the archetype pre-served in the collection of Heritage Toronto and was able to visit and document the boat in 2004. Longtime sailing canoe builder, sailor, and pied piper Dan Sutherland took up the gauntlet at this point, and from John’s data built the prototype of the new class, STORMY SKY ES. Her debut at the ABM’s Antique Boat Show in 2006 proved her a great success, both as a sailboat and a prize-winning crowd pleaser. The next step was to make her duplication possible by the masses.
First, her lines were converted to “analog” plywood patterns for stitch-and-glue construction, STORMY SKY ES having been constructed in “traditional plywood” style with frames, chine logs, and sheer clamps. Then a week-long workshop was offered at ABM to produce several new hulls at once—an instant fleet, if you will. Chesapeake Light Craft digitized the panels and CNC-cut the needed batch of hull kits. Sails were designed and built by Douglas Fowler of Ithaca, New York, to complement the carbon-fiber masts developed for the boats by Tony DeLima of ForteRTS.
The resulting boats are reasonably true to the originals, and with a traditionally inspired finish job they could look at home on the Sugar Island float. The hulls are hard-chined and fully decked, with a small cockpit—really a footwell—that is self-draining through the daggerboard slot. The boat is steered by a Norwegian tiller rig, with a side arm on the rudderhead connected by a push/pull rod to an athwartships tiller. The hull construction is of 6mm and 3mm marine plywood, epoxy glued and sheathed in ’glass, with multiple bulkheads that stiffen the hull, support the decks, and create watertight compartments for positive buoyancy. Building the hull would be a similar-sized job to a large stitch-and-glue kayak, with the added challenge of complex but small-scale framing adventures in way of the cockpit.
The History of Sailing Canoes
Sailing canoes and cruising and racing in them date back to the mid-19th century. The first decked canoes built specifically for recreational sailing appeared in Great Britain in 1868, closely following the establishment of the Royal Canoe Club in 1866. Within a very few years, the boats had been discovered in the United States, with the New York Canoe Club being founded in 1871. By 1890, there were upwards of two dozen recognized canoe clubs on the U.S. East Coast. The American Canoe Association (ACA) was formed and held its first annual camping and sailing gathering in 1880. Sugar Island, near Clayton in the Thousand Islands, became the permanent home of the ACA gatherings in 1902. Such gatherings became boating and society happenings both in North America and in the U.K. International challenge racing was so competitive that new boats were designed and built every year, and those boats shipped hither and yon and across the pond. Paul Butler, an enthusiast from Lowell, Massachusetts, was the driving force behind many of the key features that made the boats popular, championing bulkheads for buoyancy, and by all accounts inventing or at least adapting the cross-sliding seat, Norwegian tiller steering, hollow spars, and the self-draining cockpit. By 1890, these improvements in survivability and manageability had led to such interest that the 16/30 racing class was established, with a complex rule resulting in a number of designs that were generally 16′ long by 30″ wide (hence the name), with a 90-sq-ft sail area.
The ultimate modern evolution of the sailing canoe is the IC class…recognizably a 16/30 on steroids. Come to think of it, design-enhancing substances must have been around back in the day as well. Check out WB No. 164 for an account of the “88” class of super canoes. –GK
Geoff Kerr
John Summers designed the 16/30 canoe to be built with off-the-shelf hardware, requiring no complex casting or custom work to drive up the cost of construction.
The rig is really quite simple: there just appears to be a lot of it on such a small platform. She is set up as a cat-ketch. The unstayed masts are stepped through tubes built into the decks. As well as keeping the watertight compartments inviolate, these tubes make rigging the boat on the beach child’s play. Luff sleeves on the sails (the same system used in Lasers) both refine aero-dynamics and eliminate a bagful of hardware and line. Continuous sheets for both sails lead on deck to cam cleats at the cockpit, mounted just forward of the skipper both port and starboard, allowing instant one-handed sail control on both tacks. Off-the-shelf rudder hardware is used to hang the small but efficient wooden rudder, and the daggerboard, also of wood, is simplicity itself— jam it down into the slot, and off we go. The most significant characteristic of the 16/30s is the sliding hiking board, or “thwartships sliding seat” as it is called in period literature. In spite of its forbidding appearance, it is actually the civilizing feature of this design, making the boat comfortable (even for a large “mature” adult) and far less strenuous to sail than those rigged with knee and abdominal-trashing hiking straps.
This design and setup contribute to a logistically manageable boat. She can be transported on a very light trailer by a very light vehicle, or loaded on a cartop rack by a couple of reasonably able adults. Throw the spars up there too, and the rest of the gear is small, light, and easily packed away, leaving room in most vehicles (though regrettably not in the boat) for the cooler and companions. With one of those companions, or a “Tom Sawyer’s fence” onlooker, you can easily carry her to the beach for rigging and launching.
Our real quest is the sailing, though, so let’s have a look. The skipper stays on the hiking board, because: (a) there is no other place to go and (b) anywhere else would spell a swim. With one’s feet in the footwell on either side of the hiking board, everything you need is at hand: the mizzen and main sheets just forward, and the cross-arm tiller poised aft. The steering is very light, a combination of a nicely balanced rig, great leverage, and a small rudder. The unusual-looking steering system is really very simple and quite natural in use…just don’t look at it while underway! The sheet loads are minimal, a function of small sails and mechanical advantage, although the number of feet of line squirming around in the footwell is quite impressive and somehow tends to end up long on one tack and short on the other. That will make for an interesting jibe around the mark someday. The boat is responsive to sail and crew trim, to say the least, but well within the realm of small, light sailing craft. The 34″ beam and hard chines give her a greater initial stability than many (I’d bet all) of the other classic 16/30 designs.
Trimming the boat is easy and natural. The trick is to shift the board all the way to windward while tacking, then to slide yourself in and out as necessary while sailing. No great effort is required, you’ll suffer no grooves in you buns, and you will have time to concentrate on sail trim, steering, and tactics without desperately clinging to the boat. I’d call her far better mannered than the other sailing canoes I’ve endured, and in many ways more comfortable, better behaved, and far more intriguing than many of the modern one-design dinghies foisted on the competitive-minded sailing public. I like to think of 16/30 sailing as a dance rather than an athletic endeavor.
The most difficult and awkward moment in sailing this boat is the transition from beach to sailing…shall we call it the mount and dismount? The usual shallow-water daggerboard and rudder bugaboos apply (why does the wind always blow onto the beach?) and with a hull that is extremely sensitive to the first step, I’ll predict a few swims at bathtub depth. That said, my dignity and dry shirt survived a day of demo sails. Take a deep cleansing breath, tread lightly, and distract the audience.
Geoff Kerr
The sliding seat keeps the helmsman’s ballast weight where it needs to be, and allows rapid adjustment—while still keeping control of the sheets and the tiller.
A major part of the appeal of a 16/30 as a project is that Summers and the ABM have gone to great lengths to make it amateur-friendly. The large-size high-quality drawings are accompanied by an enthusiastic manual of more than 30 pages that includes historic photos; discussions of useful tools, books, and materials; step-by-step instructions with illustrations; and something very rare, a list of sources and part numbers for hardware, materials, and equipment. Much of the work of matching specifications and sourcing materials that could bog down a novice has been done, eliminating, for example, the sometimes fruitless (though sometimes really intriguing) pursuit of custom hardware. Knowing in advance that a call to ForteRTS for masts, to Douglas Fowler for sails, and even to Chesapeake Light Craft for precut plywood hull panels will put you days ahead of the game is a great comfort.
I’d now like to offer some minor caveats here. Some of the recommended sources and materials for the hull construction are not my favorites. No one is steering you wrong, but do not be afraid to ask and shop around. While you are building, I’d suggest ’glassing the deck as well as the hull, enhancing its stiffness, durability, and the life of the finish. When I build mine, I’ll stare long and hard at the transom, hoping for inspiration and new hardware so she could be truly double-ended. Finally, in converting to stitch-and-glue construction, I’m puzzled that inner and outer stems endured. Not only are these vestiges of traditional construction a challenge for novice builders, but a filleted and taped stem joint serves the stitch-and- glue world successfully in all scales.
A philosophical note is in order regarding one-designs and their convenient standardization. The 16/30 world welcomes one and all, for the more boats the merrier. That means there is room for individual expression in the building of these boats. The boats can be clunkers or professionally sculpted icons, and depending on craftsmanship and finish work they can look like modern rocket ships or century-old antiques. Wooden spars, polished bronze blocks, stained decks, and myriad other choices could make for a show-stopper. Just be a good sport and keep the hull shape and sails true to class, or the other kids might not let you play with them when you show up at the No-Octane Regatta, The Mid-Atlantic Small Craft Festival, or the ABM Antique Boat Show. See you there!
Simple construction using 6mm and 3mm okoume plywood and an uncomplicated rigging plan make the 16/30 canoe easily within range of an amateur builder. The thoroughly detailed instruction book will help in that regard, as well.
This Boat Profile was published in Small Boats 2009 and appears here as archival material. If you have more information about this boat, plan or design – please let us know in the comment section.
Boatbuilding, like writing, can be a solitary preoccupation. Working out problems on your own time, with your own logic, is often best done in isolation. It isn’t uncommon for a boatbuilder to consult half a dozen references, seek advice from a couple of other builders at a boat show—and then go ahead and do what he was going to do anyway.
A recording of a home boatshop might reveal only a series of whacks and thuds, the momentary screech of a power tool, the scraping of a plane blade, more whacks and thuds, and maybe the occasional grunt or groan. It’s a kind of music. But only when the boat is launched and begins to live its own life will it prove the merits or faults of each decision. And when the boat sails or rows in company with others— that’s when its true personality will emerge.
Benjamin Mendlowitz
In conceiving the 2007 Small Reach Regatta, we had envisioned the cove filled with lugsails, spritsails, gaff sails, tanbark-colored sails, white sails (and maybe a blue one), pulling boats—and there it was, everything we had hoped for. For three days, the waters off WoodenBoat swarmed with small boats.
For decades now, boatbuilders have been able to participate in a wide variety of small-craft gatherings and festivals. In recent years, events of longer duration and more adventurous ambitions—especially the weeklong races known as Raids in Europe and now elsewhere (see WoodenBoat magazine No. 187)—have provided more opportunities to put boats through their paces in meaningful ways. Such events are intended for participants rather than spectators. Not all of these participants are boatbuilders, of course, but even those who have purchased boats are equally keen to fit out and handle them to best advantage, even if racing isn’t part of the program.
In 2007, building on these concepts, WoodenBoat held the first of what we’re calling the “Small Reach Regatta,” a gathering for three days of day-sailing off the WoodenBoat waterfront in Brooklin, Maine. (Well, the second one, technically: we invited a very small group of friends in 2006 to help evaluate the idea.) The name is a takeoff on classic yachting’s well-known Eggemoggin Reach Regatta, held in the same location each August for wooden boats 26′ on deck and longer. Our thought was to have an event of similar character for small boats, and we very rapidly filled our fleet quota of 40.
The variety proved gratifying. We had Kingston lobsterboats, traditional Scandinavian faerings, Swampscott dories, fast pulling boats, fast daysailers, traditionally built boats, plywood boats—and a gaggle of Iain Oughtred designs, including six Caledonia yawls and two Ness yawls. Because we partnered for the event with the Downeast Chapter of the Traditional Small Craft Association, which does not exclude fiberglass boats of traditional design, we even had three fiberglass boats in the fleet.
The logistics of the coast of Maine are challenging. There are few large parks for overnighting with a large group like this. The island network called the Maine Island Trail is superb for small groups but out of the question for large ones. We settled on a simple solution: use WoodenBoat’s shorefront for day outings and for camping ashore each night.
At the outset, we asked for a show of hands of those interested in racing. Not a single hand went up. One reason for sailing in company is to encourage builders and sailors to compare notes on such things as the fine points of sheet leads, clever solutions to problems, interesting setups for gear storage, types of line, advantages of various sail types, inspiration for what type of boat to build next, and dozens of other ideas. Another reason is to push the envelope of experience.
Benjamin Mendlowitz
As spectacular as it is to see so many boats sailing in company, it is equally satisfying to see them come in to shore for a lunchtime haulout. Here, the beaching advantages or disadvantages of various types become quickly evident. A spirit of volunteerism reigned during the 2007 Small Reach Regatta, and whenever someone needed help to haul a boat higher up the beach, or to relaunch, many hands were quick to respond. Here, too, was an opportunity to share observations, meet new friends, talk about boats, and maybe take an interesting boat out for a bit.
The old granite coast of Maine gave us just about all of her variety in three days. We had a strong breeze in dense fog, cloudy skies with moderate breeze, and a hot morning with no breeze at all. She charitably spared us thunderstorms and rain. Most of the skippers had many years of experience, but for a few, saltwater navigation was new. Some of our skippers were old WoodenBoat hands, like Sam Manning, a frequent illustrator of books and articles; Willits Ansel, who long ago taught in our school; and Maynard Bray, our technical editor.
Local skippers shared their knowledge readily. On another day of 15 knots of breeze and fog coming in, some sailors might have decided to stay at home in the easy chair. But in a fleet with this much experience—even with admonishments that the decision about whether to go is the skipper’s alone—the urge to sail with the fleet is a strong one. Maybe some will break down and peel off the bills for one of those nice handheld GPS units after such a foggy morning with rocks and islands abounding. And even without a race, it’s a rare sailor who won’t pay attention to sail trim when another is passing under his lee.
It’s often impossible to predict what a crowd of strangers will be like, but with small-craft people, it’s a pretty fair bet they’ll be among the best. Some came from far away, including one group that came from Virginia laden with cured ham, peanuts, and the makings for mint juleps for all. Some came from right here in town. Some came with children and grandchildren. Everyone pitched in with a spirit of volunteerism to launch boats, haul out, clean up, or whatever else came up. But the final reason, the best reason, for doing such a thing is to see a fleet of great boats well-handled in spectacular surroundings. And what a sight it is!
John and Susan Silverio sail OCARINA, an 18′ Joel White-designed Shearwater.
The WoodenBoat waterfront is no stranger to the 18′, lugrigged, Joel White–designed Shearwater, since the school has one in its own small-boat fleet. OCARINA, however, is from Lincolnville, across Penobscot Bay from WoodenBoat’s home in Brooklin. Behind her, WoodenBoat’s boathouse and main office building mark the extent of the waterfront. Most of the 2007 Small Reach Regatta participants, including OCARINA’s owners, John and Susan Silverio of Lincolnville, Maine, camped at the WoodenBoat School campground. Holding the event off the WoodenBoat waterfront simplified the logistics of housing and trailer hauling and parking.
Benjamin Mendlowitz
The 16’8″ Hereshoff-designed Coquina, WIZARD.
It doesn’t take much of a breeze to move a 16′ 8″, N.G. Herreshoff–designed Coquina. So when the oars come out on WIZARD, you can rest assured that there is nothing, or very close to nothing, for breeze. That was the case this particular Sunday morning of the 2007 Small Reach Regatta, when the fleet rowed to Center Harbor, some 2.5 miles away, for a “harbor burn.” The breeze filled in later, but from almost exactly the direction of the lunchtime destination—a matter of little concern to a boat that points to weather as well as WIZARD does.
Benjamin Mendlowitz
Jay Eberly’s REBECCA ANN (left) and Geoff Kerr’s NED LUDD.
Australian designer Iain Oughtred, now living in Scotland (note: Iain Oughtred passed away Feb. 21, 2024), was far and away the most-represented designer in the 2007 fleet. Six Caledonia yawls, a Ness yawl, and an Elf faering, all built to his designs, made up about 18 percent of the 39 boats in the fleet. Several of them were built by Geoff Kerr, whose NED LUDD (right above) has been a fixture at wooden boat events in the Northeast for years. Kerr builds boats at Two Daughters Boat Works in Westford, Vermont, and his three-part how-to-build article on the Caledonia yawl started in WB No. 183. Alongside is Jay Eberly’s REBECCA ANN, one of two boats that came from Virginia to join the fleet.
Benjamin Mendlowitz
Rowboats SUSAN B. HOLLAND (left) and PUCK.
Rowing is often an advantage—when the wind is contrary, there is sometimes no better way to get from Point A to Point B. As a pure pulling boat, PUCK has no sailing rig at all. She was designed and beautifully built by Harry Bryan, an off-the-grid boatbuilder in New Brunswick who is also a teacher at WoodenBoat School and a contributing editor toWoodenBoat. PUCK’s owners, Bob and Judith Yorke of Scituate, Massachusetts, love to row, and they have taken their boat far and wide, from Massachusetts to Nova Scotia.
She is similar in concept to the SUSAN B. HOLLAND, which was on loan from the Floating the Apple boatbuilding program for disadvantaged youth in Brooklyn, New York. Bob Wolfertz of New Jersey—and he is hardly alone in this— didn’t quite finish his Caledonia yawl in time for the regatta, but he was able to borrow the pulling boat, which is flatbottomed instead of round-bottomed like PUCK, for the event.
Benjamin Mendlowitz
The Atkin Little Scout (left) keeps up with the Moosabec Reach Boat.
There’s nothing like lapstrake planking to accentuate the lines of a hull. Each plank overlap (hence the name) forms its own lovely line, and when the planking job is done well, the lines all complement one another, like a topographic map of a hull. A nicely contrasting sheerstrake—left natural in the case of the Atkin Little Scout and the Moosabec Reach Boat —also helps to define the hull shape and show it to best advantage.
Benjamin Mendlowitz
Sean Irwin enjoys the day aboard SEA BISCUIT, an 18′ Swampscott dory.
Young Sean Irwin found his favorite place on his family’s 18′ sliding gunter-rigged Swampscott dory SEA BISCUIT, which had been constructed at WoodenBoat School. This day, he sailed with his father, Fred Irwin, and his grandfather, James Irwin, and by taking turns the family saw to it that everyone got a chance to sail. The Irwin family took volunteerism to a higher level, pitching in to take care of the campground, as they have been used to doing at Scouting events.
Benjamin Mendlowitz
Gavin Bauer rows an Oughtred-designed 15′ Elf faering.
Steven Bauer of Portland, Maine, finished building his Iain Oughtred-designed 15′ Elf faering just in time—in fact, he launched it for the first time on the first day of the event. She is a glued-lapstrake plywood construction, modified by the addition of built-in flotation tanks. Here, Steven’s son, Gavin, takes the boat through her rowing paces on a calm morning. Several participants had boats under construction, hoping to finish in time. Some did, but other boats had to wait for next year, and they’re unlikely to miss a second chance.
Benjamin Mendlowitz
Åfjordsfaering LITEN KULING: a Norwegian-style double-ender.
Necessity is the mother of invention, they say, and steering with an oar over the stern became a necessity when the double-ended Åfjordsfaering LITEN KULING’s rudder popped off its gudgeons during a strong breeze. Once the boat gained the lee of an island, it was calm enough to get the rudder back in service. The fully traditional Norwegian-style double-ender, 19′ 6″ x 4′ 7″ and drawing 18″, was built by Jon Etheredge in 1988 while he was attending a Norwegian folk school before assisting in building a larger boat at The Apprenticeshop in Rockport, Maine, in 1989. She is one of the boats Ben Fuller made available—this one to WoodenBoat Senior Editor Tom Jackson, who didn’t finish building his new No Man’s Land boat in time for the 2007 Small Reach Regatta.
Benjamin Mendlowitz
John Eastman and Jasmine enjoy a ride aboard JOSEF W.
Somehow it seems perfectly appropriate for a Delaware ducker to have a Black Labrador as crew, since the type was much admired on the Delaware River and the Jersey shore for fowl hunting and also for pleasure sailing. JOSEF W is a copy of GREENBRIAR, which was built by Josef W. Liener in the late 1940s and was itself a copy of a turn-of-the-last-century boat. JOSEF W was built by Mike Geer and Kevin Carney in 1978. One of Ben Fuller’s collection of small boats, she was on loan to Ben’s friend John Eastman (and his dog, Jasmine) one afternoon. The boat is only 15′ LOA, with a beam of 4′, and draws only 4″ with the centerboard up.
Benjamin Mendlowitz
The Head family rows SMALL REACH 20 along the water.
Late August on the coast of Maine can be breezy, foggy, hot, calm, or all of the above. September is cooler and breezier, and the risk of fog and calms greatly diminishes—but the risk of rain or too much wind is greater. In the end, we chose late August so families would be more apt to participate.
The success of the strategy was proven several times, and one good example came from Allen Head of Concord, New Hampshire, who designed a boat specifically for his family to use. He’s calling it the Small Reach 20, and it’s large enough for Allen and his wife, Lynn, and their son Seth, 17, and daughter Casey, 15 (who had her own boat when she was but 6 years old), to get out on the water together. The six-oared boat is 20′ LOA with a 5′ beam. She is modeled after a Swampscott dory, and because she is built in glued-lap plywood construction, she weighs only 250 lbs.
Benjamin Mendlowitz
Willits Ansel aboard a Swampscott dory he completed in 2007.
Willits Ansel, long of the Mystic Seaport duPont Preservation Shipyard (see WoodenBoat No. 171) but now retired, builds boats to his own designs, starting always with a half-hull model. His new boat, completed in the spring of 2007, is a Swampscott dory, for which he borrowed sails from one of his earlier sharpies. His finishes are workboat-style: understated, simple, uncomplicated, allowing the boat to rely purely on shape for its considerable appeal. The traditional cedar-over-oak hull looks perfectly at home on the granite-bound coast of Maine.
Benjamin Mendlowitz
EMERSON ALBURY, an Abaco dinghy built on Man-o-War Cay in the Bahamas.
Great variety is one of the hallmarks of a great small-boat fleet. EMERSON ALBURY literally brought some color to the waterfront, painted as she is in Caribbean colors of red, yellow, pink, blue, and green—combinations not often chosen by New England Yankees. She’s an Abaco dinghy, built on Man-o-War Cay in the Bahamas. She is a burdensome boat for her 16′ 6″ length, but even with her 2′ draft with lots of drag to the keel, she proved able in beaching and surprisingly easy to get on and off her trailer. Wade Smith, her owner, is the director of the John Gardner Boat Shop at Mystic Seaport and organizes the John Gardner Small Craft Workshop, held at the Seaport each June.
Benjamin Mendlowitz
Jasmine Drouin, 12, pilots an Iain Oughtred-designed Caledonia yawl.
Jasmine Drouin, 12, was right at home at the helm of the 19′ 6″, Iain Oughtred–designed Caledonia yawl only recently launched by her father, Christopher, of Auburn, New Hampshire. She was already accustomed to the yoke tiller—a “push-pull” device that takes a bit of getting used to—from four years of sailing a Skerry, a 15′ double-ender designed by Chesapeake Light Craft, which Christopher had built earlier.
Benjamin Mendlowitz
Sam and Susan Manning sail the 19’6″ HOPEFUL OUTLOOK.
Some of the boats in the fleet were like old friends. For several decades now, Sam Manning has been a boatbuilding illustrator for WoodenBoat magazine and more books than we can count by more publishers than we can remember. He and Susan sail and row their Banks dory HOPEFUL OUTLOOK year-round out of Camden, Maine, often breaking through ice to get clear of the harbor in the winter. The dory is a large one, at 19’6″ overall, but she sails well and rows well.
Benjamin Mendlowitz
Two sailors pilot the 17’6″ RAN TAN.
Traditional appearances can be deceptive: RAN TAN, built to Tony Dias’s Harrier design, is a lightly built glued-plywood lapstrake hull built for performance but also for convenient camp-cruising. Her masts are of carbon fiber, and her sails are full-battened. She is 17′ 6″ LOA, 5′ beam. She draws only 6″ of water with the centerboard up, making her easy to maneuver on and off a beach, and with her narrow, flat bottom she can stand upright when she gets there.
RAN TAN was designed with input from her owner, Ben Fuller of Cushing, Maine, with coastal cruising specifically in mind. She is one of Fuller’s gaggle of small craft of a range of descriptions, many of them—including this one—on loan to friends for the 2007 Small Reach Regatta.
Benjamin Mendlowitz
BELLA BARCA sails into the fog.
Like the “Raids” that started in Europe, the core concept of the 2007 Small Reach Regatta is that boats and crews need to be capable of independent navigation in all conditions without assistance, unless safety demands help from one of several chase boats. High wind and dense fog are among the conditions—but another is light air or dead calm, in which case miles can be covered under oars, or “motorsailing” with oars augmenting the sail’s scant power. The Pete Culler Kingston lobsterboat BELLA BARCA’s tanbark-colored sails diminish the glare of the bright sun for those on board but also reflect playfully on the surface.
This article was originally published in the Small Boats Annual 2008 special edition. For a recap on the history of the event, read “Fifteen Years of the Small Reach Regatta” by Tom Jackson.
There were big plans for the canoe I built in 1988. Cindy, my wife then, and I were living in Washington, D.C.; we had moved there for an internship she had been chosen for by the Library of Congress, and I eventually landed a job in the Smithsonian Institution. Before leaving our home in Seattle we had rowed the Inside Passage and even after moving to D.C., we still had a thirst for adventure. We set our sights on paddling the Missouri River from its start at Three Forks, Montana, to the confluence with the Mississippi at St. Louis, Missouri. The only chance we’d have for that 2,300-mile voyage would be before settling back to Seattle to begin careers and have a family.
For the boat we’d use for the Missouri, I was considering something like the decked lapstrake canoes used by John MacGregor in the late 1800s. In my copy of W.P. Stevens’s 1889 book, Canoe and Boat Building for Amateurs, I was drawn to his 15′ x 30″ American Cruising and Racing Canoe. It was designed as a single, so I stretched the station spacing to make it an 18′9″ tandem. The house we had rented outside of D.C. was small and the basement was only a little larger than a 20′ square. It would be a tight fit for the canoe. The beam of the canoe had to stay at 30″. The only way to get it out of the basement was through a window that had an opening scarcely 31″ wide.
I used Tom Hill’s Ultralight Boatbuilding as a guide to the glued-plywood lapstrake construction I chose over traditional methods detailed in the Stevens book. I had a handy source of materials for the strongback and molds. I was hired by the Smithsonian’s Museum of African Art as an exhibits specialist and was able to salvage birch plywood and lumber whenever we demolished the previous cases and platforms to clear a gallery for new installations. There wasn’t enough room to run the long lumber through a stationary thickness planer, so I put it on casters and let it run across the floor, propelled by the wood pushing beyond the outfeed table.
I had carefully measured the basement window frame to make sure the canoe would fit through it, but the dimension for the canoe’s beam that I used to check the opening didn’t include the outwales. I had to cut notches in the steel flanges of the window frame to provide clearance. I took this photograph when the canoe made its first outdoor appearance. The house was a rental, so before moving out I filled the notches with aluminum bar and Bondo and painted them with a faux weathered finish to blend in. On a trip to the East Coast 14 years later, I drove by the house and my little secret was still undetectable.
I painted the canoe before putting the decks on so we could use it during the summer of 1988. I knocked out a pair of beavertail paddles to get us on the water as soon as possible. We’d have some time to get used to paddling before the winter forced the project back into the basement to be finished.
The Chesapeake and Ohio Canal connects Washington, D.C., to Cumberland, Maryland, a distance of 185 miles. Navigation on the C & O ceased in 1924, and the canal is now a national historical park and a beautiful place to paddle. I took the canoe out solo only as a lark. It was designed to track and rely on the rudder, which I hadn’t made yet, for steering.
The ladder frame I built the canoe on and the molds it had supported early in the construction were made from lumber I salvaged from the Smithsonian’s National Museum of African Art. The butt plate connecting the side rails and the crosspieces, all painted with the museum designer’s favorite gray, were cut from flawless 3/4″ birch plywood that was used to build the gallery displays. The window is one of two in the basement; it is the same size as the one that the canoe had to fit through to get out of the shop.
The basement didn’t leave me with any room to spare beyond the ends of the canoe, so I needed mirrors to get a view along the centerline.
Figuring that the Missouri River’s valley would funnel winds along the river and some would be coming from astern, I made a squaresail from a coated nylon tarp and shaped three identical 6′ spars for the yard and an A-frame mast.
The canoe never got a formal launching or a christening and today it remains nameless. The bow footboard, seen here in the shade of the foredeck, was for Cindy and had a heart for decoration and pedals connected by cables to the rudder yoke so she too could take command of the canoe.
I sewed a cockpit cover in anticipation of wet weather on the Missouri. The center section is in place here; the sprayskirt pieces for the ends were too warm for summer paddling. The Maryland state flag, flying from the A-frame mast, was to show a bit of pride for our residency in Silver Spring while we were working in D.C. I don’t recall now if we were flying the colors for some special occasion. We didn’t need one; I’m fond of flags and Maryland’s is one of my favorites.
With the canoe finished, we started gathering gear for the river trip. The two bent-shaft paddles I made were light and much easier to use than the beavertails. The canoe was fast, even when we took a passenger along to simulate a 150-lb load of river-cruising gear.
We were in the midst of planning to leave D.C. for the Missouri River voyage when I got a call from the founding editors of Sea Kayaker magazine. After spending five years getting the magazine established, they were ready to move on and hand over the editorial duties. I had submitted an article that they published in the magazine’s second year, and they had remembered it as the cleanest draft they’d received. They figured that if I could tidy up my own writing, I’d be able to do the same for others, and offered me the position of editor. I had never considered being one, but I was flattered by the offer, interested in the work, and accepted the opportunity. It turned out to be the beginning of a career that has now spanned 32 years.
Taking the job meant moving back to Seattle within a couple of months and abandoning the Missouri River plans. In 1989, Cindy flew home to begin a job she had found and I left Washington with the canoe strapped to the top of our VW squareback. Passing through Montana, I took a short detour from Interstate 90 to Three Forks and parked at the confluence that creates the Missouri River. I took an empty plastic 1-liter bottle of Canada Dry lemon seltzer water from the car, dipped it into the river, and filled it. I still have that bottle.
Settled back in Seattle, we paddled the canoe only occasionally. In the fall of 1990, Cindy was pregnant with our first child, and 10 days past the due date. Eager to make something happen, we thought we’d try taking the canoe out. We launched on Lake Union and hadn’t been paddling for long when the first contractions started. We steered back to the ramp, drove home, and packed up to go to the hospital. After a long labor, our son, Nate, was born. (Three years later, with our second child, Alison, also well past her due date, we went paddling again with the same result.)
As a 10-year-old, Nate took the seat where, on a September afternoon in 1990, the day before he was born, he decided he was done with gestation and ready for the world. At the bow is the family house flag first designed and first flown by my 3rd great-grandfather and Nate’s 4th great-grandfather, Charles Cunningham, around 1822. Nate now has a house flag of his own for BONZO, the Escargot canal boat he built.
On Father’s Day this past June, Nate and I decided to spend the afternoon together and loaded the canoe on my car. We launched at a park on the Sammamish Slough, the sluggish meandering waterway that connects Lake Sammamish to Lake Washington. I took my seat in the stern and Nate sat forward, in the seat that 30 years ago stirred him to come into this world. It had been many years since he and I had paddled together but we instantly fell into our cadence, a brisk pace of precisely 60 strokes per minute (we timed it). Nate’s broad back, rounded with thick muscle, gave his strokes power; twin silvery vortices audibly pulled air into the water as they slipped by me. When I called “Hut!” to switch sides with the paddles, he hit the next stroke on the other side, without delay, right on cadence. I gave him the GPS and he checked our speed. We were making 5.2 knots. Upstream.
Two miles upstream from the launch, Nate and I stopped for lunch at the park in Woodinville. I couldn’t help but see myself—at least a younger version—in him. He has the same rounded shoulders and when his arms are relaxed, his thumbs point inward rather than forward. A physical therapist told him that the rotation is the result of tight chest muscles. From his teen years on, Nate and I have had a pushup rivalry, and both of us have occasionally been able to do 100 in a two-minute time limit. My thumbs point toward each other, too.
A popular bicycle path parallels the slough for almost all of its 14-mile length. From the path, you see a landscape that is a combination of farms and light industry, but from the slough none of that is visible. I could easily imagine we were paddling the pastoral canals of England or France.
There wasn’t much wind in the slough, but we took advantage of what little there was. During one good puff, when the canoe surged ahead, Nate said in a high, breathy voice, “You’re doing it, Peter. You’re doing it.” It’s a line from the Peter Pan-inspired movie Hook. It was a favorite when Nate and his sister, Alison, were young and we played the VHS tape endlessly. “You’re doing it” is now one of many movie catchphrases all three of us use when in each other’s company.
While there was more than enough water for us to paddle this stretch of the slough, the sandy bottom looked inviting, so we slipped over the side to wade upstream and cool off.
Nate and I paddled a little more than 6 miles upstream before turning around to head back to the launch site. We paddled one long straight stretch like this at a fast clip without stopping. When I started to feel my shoulders burn, I told Nate, “Enough of that.” He said he was beginning to tire too and added “I like to get to the point where it hurts and then keep going.” When I was his age, 30, I was training for triathlons on the very bike path we were paddling next to, pushing hard and using the pain as my cue to pedal even harder. Nate expressed what I would have said about myself 37 years ago.
If I had known while I was building the canoe that it would never make the Missouri River voyage it was meant for and that my marriage would eventually come to a sad end, I might not have had the heart to finish it. But if a glimpse into the future had penetrated through to a Sunday afternoon paddling with my son, nothing could have stopped me from having the canoe ready and waiting for that day.
In this new “Y-sterned” canoe, the well-known wood-and-canvas canoe builder Jerry Stelmok has taken a rock-solid design, the E.M. White 20-footer, and adapted it well for a broad range of uses. It can carry a small motor on its narrow transom, it can be rowed very successfully from two stations, it can be poled with ease, and, of course, it may be paddled. It can carry much gear and still handle well, which makes it ably suited for fishing, perhaps its best use. This boat may be built by those who have some boatbuilding experience, or it may be purchased as a finished boat from Stelmok.
Edward M. White was a superb canoe builder operating in central Maine in the late 19th and early 20th centuries. His wood-and-canvas canoes were and still are held in high esteem by many who use them. Contemporary canoe builder Jerry Stelmok, also from central Maine, whom many consider the dean of the modern-day wood-and-canvas canoe revival, builds boats to E.M. White designs. He builds this Y-sterned model by using his E.M. White 20′ canoe form and closing in the stern of the canoe above the waterline with a transom rather than a conventional stem. The stem, however, remains below the waterline (unlike a simple square-sterned canoe); the hull, therefore, moves through the water like a conventional canoe, with the added benefit of a transom.
Stelmok attaches the gunwales to the transom while the hull is on the form. Then the hull is pulled from the form in the usual manner and completed before canvasing. To build this boat in this manner, you must first build a labor-intensive form that gives the boat its shape and provides a backing for attaching planks to the steam-bent ribs. If you are lost at this point, this may not be the boat for you!
Island Falls Canoe
Unlike its square-sterned cousins, the West Branch canoe can carry a small motor on its transom while retaining the good paddling qualities of a double-ended canoe.
Stelmok has, in essence, substituted a transom for the conventional canoe end. His goal in doing so was to modify a well-proven canoe for low outboard power. He has put a 2-hp Honda four-stroke on it to great benefit, and says it will take a larger motor—but to the disadvantage of added weight. An electric motor would also work and would be quiet.
The idea for this boat, Stelmok says, came from similar although somewhat longer craft used by the salmon fishing community on New Brunswick and eastern Québec rivers. Rivers like the Restigouche and Miramichi have a uniform gradient and swift currents that make for fast descents and easily motorized ascents. So, a canoe with a small transom and small motor is a fine craft for fishing and navigating such rivers (on the Canadian rivers, both canoes and motors are somewhat larger). Stelmok refers to this canoe as his “West Branch” model, as it is so well suited to travel on that portion of Maine’s upper Penobscot River.
Stelmok typically equips the canoe with three seats—one in the stern from which the motor and associated gear can be managed, one amidships for rowing singly, and the third seat in the bow. From the bow seat one may: (a) fish if two people are fishing—two people may easily flyfish from this boat; (b) row if a second rowing station is equipped with oarlocks; (c) simply travel as a passenger.
This configuration of seat placement seems to be the best, although it makes it a better fishing than paddling canoe. It does paddle reasonably well, though, in part because the entry and exit lines of the canoe are nearly identical to a conventional canoe even though this boat has a transom.
Island Falls Canoe
The secret to the West Branch’s good paddling qualities lies below the waterline, where it’s a conventional canoe. Above the waterline, the topsides flare out to accommodate the transom.
Whereas the standard E.M. White 20-footer is 12 1⁄2″ deep and has a beam of 39″, Stelmok has stretched these dimensions a bit to improve its capabilities to carry a motor and fishing gear. He makes it 14″ deep and 42″ wide. Another small but significant and clever addition Stelmok adds are the spray rails. These are pieces of wood running longitudinally, nearly the length of the boat, and attached after the canoe has been canvased. Their purpose is to push splash from waves and chop away from the boat. Stelmok attaches spray rails to a variety of his boats and speaks highly of them. They make his Y-stern a much drier boat in windy conditions and on large lakes than it would be otherwise. In cross section the spray rails are roughly triangular.
Another excellent accessory in this boat is its floor rack. The rack consists of several slats of wood running longitudinally on the bottom of the inside of the canoe. Its purpose is to protect the ribs from the wear and tear of all the fishing gear, gas tank, etc. Gist: the floor rack takes the abuse, not the canoe (it can be removed for cleaning).
Canoes are reasonably long and sleek; they row reasonably well if rigged properly. Stelmok has taken advantage of this feature on the Y-stern by affixing a special “outrigger” oarlock near the middle seat. This outrigger was a 19th-century innovation and is currently sold for about $250 by the Shaw and Tenney Company (paddle and oar manufacturers of Orono, Maine). The outrigger oarlock flips outward when in use and back inboard when not. By flipping it outboard, one gains 3–4″ of width per oarlock, so when in use the oarlocks are about 48″ apart, an adequate width for rowing. Stelmok recommends 8′ oars (7 1⁄2-footers if the outrigger oarlock is not used) and generally uses those with spoon blades. The boat can be rigged with a second rowing station at the bow seat so two people could comfortably fish from this boat. And there would be ample room for all their gear.
Island Falls Canoe
Builder Jerry Stelmok poles the West Branch canoe through shallows. The 20′ E.M. White canoe, of which this boat is an adaptation, “has always been an exceptional poling boat,” says Stelmok. Note that oars are at the ready.
Stelmok’s boats are steeped in tradition and his craftsmanship is nothing short of superlative. The boat is canvas covered, the canvas filled and painted as is traditional for this sort of craft. It is then trimmed with either cherry or mahogany, which adds a lovely touch. Hardware (e.g., oarlocks) is generally bronze and the planking affixed to the ribs with brass tacks unless a customer anticipates saltwater use, in which case one should substitute copper tacks for brass.
Although Stelmok usually builds this boat as a 20-footer, it would work as an 18-footer, too. As a 20-footer, weighing between 110 and 130 lbs (depending on options and trim), it must be trailered, rather than cartopped.
Costs of building this boat would vary regionally and according to supply of basic materials like cedar for ribs and planking, etc. Stelmok has few problems finding good, clear stock in Maine and knows his mills and suppliers well. Whether one could be successful with suppliers in Nebraska or Algeria is open to debate.
The many capabilities of this special canoe make it an unusually attractive building project. But, beginners beware: You will need to start by building a form on which to build your canoe; then you must build a steambox in which to steam ribs for bending; and finally you must canvas your boat—not a job easily done well by beginners. But, if you are comfortable around a boatshop and all its tools, you’ll find this craft well worth the effort. The return (of pleasure) on the investment (of time) is an excellent ratio.
What a handsome craft this is to look at! The long, sweeping lines of the West Branch make it a delight to build, to be around, to show off, and to row, pole, motor, or paddle. If you have any concerns, though, about building this boat, you might consider taking a course with Stelmok, who teaches at WoodenBoat School in Brooklin, Maine.
In summary, this is an excellent, versatile, capable boat—an adaptation of a much-loved and highly respected design that is more than 100 years old. Although well-suited for fishing, it could have many uses. It is amply seaworthy for most lake and for gentle river travel. Go forth and build!
Cedar-and-canvas canoe construction is a laborious process at the setup stage; the building jigs are heavy and labor-intensive, and not ideal for one-off construction. But it’s rewarding, and readers wishing to learn more can read a multi-part series on the process in WoodenBoat magazine Nos. 141–143.
France’s rugged Atlantic coastline is a popular and challenging cruising ground, but it was not so long ago that countless fleets of small workboats called its remote harbors and rocky estuaries home. These traditional voile-et-aviron (sail-and-oar) boats inspired the French naval architect François Vivier to design boats like the Morbic 12, the Ilur, and a host of others. Like the Ilur, the Morbic 12 has become very popular in France, and in the last few years has attracted the attention of small-boat builders and sailors in the United Kingdom. The Morbic 12 is one of a series of Morbics that includes 8′ and 10′ lengths as well as an 11′ strip-planked version. The Morbic 12 has become a favorite with builders wanting something similar to the 14-1/2′ Ilur but a little smaller and easier to store and transport.
Vivier designed the Morbic 12 with the International 12 in mind. A hugely popular racing dinghy and tender for larger boats dating back to before the First World War, the International 12 set the standard for smaller sailing dinghies for many years around the U.K. and Europe. The Morbic 12 was inspired by both the older competitive 12′ racing dinghy class as well as the traditional inshore fishing boats once ubiquitous around Brittany. It has more beam and freeboard, comfortably carries a crew up to three, and is capable of coastal cruising under sail, oar, or even a small outboard. The construction manual is suited for those with some prior experience in modern glued-lapstrake construction; a novice builder might need expanded guidance for each step. I found Eric Dow’s 1993 book, How to Build the Shellback Dinghy, which I had used when I built a Shellback, a useful reference during the construction of the Morbic’s hull.
Photographs by Patricia Wisdom
There are buoyancy chambers under the foredeck and each of the side benches. The oars stow out of the way on the sides of the chambers. To the port side of the transom’s outboard cutaway there is a smaller notch for sculling.
I ordered the boat as a kit from Chase Small Craft, Vivier’s U.S. partner. It includes pretty much everything you would need to complete the boat: plans, CNC-cut plywood parts, shaped solid wood pieces, hardware, ’glass cloth, and resin. Additional kits provide sails, paint, Shaw & Tenney oars, and optional carbon-fiber spars.
The glued-plywood lapstrake hull is built on a chipboard strongback and building frame that’s included in the kit. Five temporary chipboard molds plus three permanent 6mm okoume plywood frame sections constitute the strongback’s form for supporting the planks. The okoume sections form the transom, center bulkhead, and forward bow compartment. The false stem is constructed from both 10mm sapele marine plywood and solid mahogany stock provided with the kit. Two 6mm longitudinal bulkheads form the rear watertight compartments and allow easy attachment for the two-layered 10mm transom. Puzzle joints make gluing the two-piece sole, garboards, and five strakes a quick and easy operation. The hull can be planked rapidly with little fuss, especially if a second pair of hands is available. Due to the designer’s approach to simplifying construction, many of the plywood pieces that are part of the building form remain incorporated in the hull. This not only means that much of the interior is already built prior to flipping the hull, but also a lot of the labor associated with plank-on-frame construction is minimized. The Morbic 12 is not a difficult boat to build. An intermediate or advanced beginner can expect to spend around 350 to 400 hours to finish the boat.
The large oval opening in the aft bulkhead provides easy access to a storage space under the seat that’s fixed to the transom. The smaller vertical opening is for the blade of an oar when stowed.
With its three built-in flotation chambers, the Morbic 12 is easily righted by a single sailor if capsized, and compliant with the European Recreational Craft Directive. The boat is rated as a Directive’s Category-C vessel, suitable for coastal waters where one can expect up to Force 6 winds and waves up to 2 meters. Not bad for a small boat, though I tend not to press my luck in such conditions—I sail singlehanded most of the time.
Another unique design characteristic of the Morbic 12 is that the centerboard is constructed from two glued panels of 10mm sapele and, if desired, is removable for transport. While sailing it is held under tension by a bungee cord that keeps it either fully down or up as needed. A spruce bird’s-mouth mast is standard and included as part of the spar timber kit. The mast is mounted by inserting it through a cutout in the forward deck and locked into place at a maststep epoxied to the boat’s sole. The kick-up rudder is also constructed from two 10mm sapele sections and is weighted with 1.2 kilograms of lead placed in a CNC-cut oval section in each blade blank.
The lugsail-with-boom rig carries an 82 sq ft sail. There are three other rigs: the lugsail without a boom, with a jib, and with a curved and battened leech.
The Morbic 12 can be built with three different lugsail rigs: a traditional boomless misainier rig, popular with traditionalists; a balance lug with boom and either a battened or battenless lug sail; or a sloop version that can also be converted to a lug rig by [leaving the jib off and] moving the mast forward to the foredeck’s cutout for a lug rig mast.
The mast, yard, and boom store easily within the cockpit for trailering or rowing and are quick to set up; the Morbic’s simple lug rig can be set up in as little as 15 minutes.
The unstayed sloop version will take a little bit longer to rig. A 36″ bowsprit will have to be installed on a foredeck into a samson post’s mortise. Unlike the lug rig, the sloop version includes the option of two mast partners, which allow the rig to be quickly converted to a balance lug rig by simply dropping the jib and moving the mast forward.
The Morbic 12 feels more like a 13- or 14-footer; it stiffens up quickly and easily handles any point of sail. It steers with very little effort and has just enough weather helm to round up for safety’s sake in any unexpected gusts. With the boom’s 3:1 downhaul well-tensioned and the luff taut, the Morbic sails tight to the wind and if you drop off a degree or two and build up some speed, it easily tacks through 90 degrees. The boat responds well to choppy conditions and displays no tendency to pound or take much water over the bow. I attribute this to its generous freeboard, firm bilge, and light weight.
The Morbic 12 effortlessly rides over waves and has no problem making up to a GPS-measured 5 knots in 10 to 12 knots of wind in flat water. In gustier conditions it remains stable and easy to control, especially with the movable ballast of an additional crew member out on the rail. Sailing singlehanded, I rarely have to reef as long as I sail the boat flat and keep the downhaul very tight. Once the wind pipes up to around 12 knots, it is time to put in a reef. After all, it is a sailing dinghy. Reefing is easy: you just pull up the centerboard, let the mainsheet go free, and the boat will simply stop. Drop the rig into the boat and tie in the reef, re-hoist, and sail off. To keep the yard from ending up in the water I’ve added lazyjacks to keep it and the sail over the boom when lowering the rig. Since I prefer to reef with the sail not piled in the cockpit, I installed a simple jiffy reefing system that is quicker and less liable to clutter up the limited working space within the boat.
The author’s boat is currently outfitted with a single rowing station. The plans detail a second rowing station forward.
The Morbic 12 plans come with instructions for building oars specific to each of the rowing stations located at the middle and forward thwarts. The boat can also be very easily sculled using the semicircular notch in the port side of the transom. Overall, I find the Morbic’s light hull is easily propelled with standard 8′6″ oars, even with the weight of the sailing rig and other gear aboard. The plans call for 8′9″ oars for the center rowing thwart and include a cleverly designed oar storage area alongside each bench seat with the blades locked into a dedicated cutout on either side of the storage area below the aft deck. The Morbic 12 is a pleasure to row and moves through calm water with very little effort. In a lot of wind and unsettled water, however, the Morbic’s beam and high freeboard make it hard to row against a strong head- or cross-wind, and a couple of times I have had to drop the mast into the boat to reduce windage in order to make forward progress.
The Morbic 12’s stern is full enough aft to support the weight of an outboard. The transom is notched to accommodate a short-shaft motor.
A broad recess in the center of the transom is for a short-shaft outboard up to 4 hp. I have a Suzuki 2.5-hp outboard to power the Morbic 12 when I use it for fishing local lakes and the near-shore protected waters along Grand Traverse Bay, Michigan. It is so stable that standing up and moving about is no problem at all. I will also sometimes carry a trolling motor with a small 35-amp battery when fishing on lakes where gasoline engines are prohibited. When rowing becomes impractical, that electric motor also serves as auxiliary power in case I need to get back through a crowded anchorage or can’t safely sail back to a busy public launch ramp due to powerboats or a strong adverse wind on the nose or beam.
I have not yet used the Morbic 12 as a camp-cruiser—I have a Wayfarer which serves this role exceptionally well—but I’m confident the Morbic would be an excellent choice for gunkholing and camping ashore. It has plenty of room within each of the side flotation chambers to easily carry enough gear for camping ashore for a weekend or longer if you carry a water purifier. If you wanted to sleep aboard, I’d recommend adding removable floorboards since the center bulkhead opening in the cockpit does not allow for lying flat on the sole. Vivier did not include floorboards in the plans, but it would be easy enough to add wooden risers fore and aft of the center cockpit and attach floorboards to them. The Morbic 12 is the perfect 12-footer for any builder looking for a small but very capable inland and near-shore sailboat. It is stable and forgiving regardless of skill level, and is an ideal boat for adults as well as a small family with younger sailors.
From Guam to Annapolis and points in-between, Mark Wisdom grew up never far from water and now lives near Traverse City, Michigan. He built his Morbic 12, PETIT BIJOU, to sail Michigan’s large inland lakes, Grand Traverse Bay, and Lake Huron’s Les Cheneaux Islands. When not sailing the Morbic 12, he can be found cruising in his ‘67 Wayfarer on Lake Michigan or anywhere else a tank of gas and a boat ramp will take him.
Morbic 12 Particulars
Length: 12′ 1″
Waterline: 11′ 0″
Beam: 5′ 1″
Board up: 6″
Board down: 30″
Balance lug: 84 sq ft
Sloop mainsail: 82 sq ft
Jib: 19 sq ft
Empty hull weight: around 175 lbs
Plans for the Morbic 12 are available from Vivier Boats as a PDF download for 138.00 € or a paper print for 168.00 €. CNC-cutting files and full-sized patterns are also available. Chase Small Craft provides Morbic 12 kits in the U.S.
Update:
Vivier noted that there are separate plans for an outboard-powered Morbic 12, but has yet to get them back on his web site. This version lacks a centerboard trunk, and has a wider thwart farther aft than the sailing version, and a hinged, enclosed storage area forward with dedicated open storage area on either side. M.W.
Is there a boat you’d like to know more about? Have you built one that you think other Small Boats Magazine readers would enjoy? Please email us!
I got my first impression of Hilary Russell’s Solo Carry double-paddle canoe only after I had finished building one for my daughter-in-law. It felt like a maple leaf that had fallen in autumn upon a New Hampshire lake—light, beautiful, and perfectly in place.
As part of a wedding gift to my son and his petite bride, I was looking for a boat design that would be light, manageable, and eye-catching. A canoe seemed to be the best option, so I looked for skin-on-frame designs. The Solo Carry came up in a web search, and Russell’s engaging descriptions and photographs of his designs and thoughts on building and using the boats intrigued me. I was hooked by his assurance that “If you want to customize your boat, you can, easily!” He offers 12 variations for the design, with instructions for modifying the shape of the canoe by changing the spacing between forms, adding a form, or moving the forms at the end or adding to the length of the gunwales.
Mike Doran
The author’s 13′ 6″ version of Solo Carry weighs just 25 lbs and is easy to portage.
Resources for building one of Russell’s Solo Carry canoes include a two-part how-to article, “Solo Carry: Build a skin-on-frame with substance,” in WoodenBoat205 and 206; Russell’s 150-page book, Building Skin-on-Frame Double Paddle Canoes; plans drawn by Eric Schade, or a kit that includes ribs, sinew, stembands, and a skin; and classes taught by Russell at the Berkshire Boat Building School.
I bought the book, plans, and a set of milled northern white cedar ribs, and stembands from Russell’s online store. The book’s spiral binding and heavyweight paper make it shop-friendly, and its 113 photographs clearly show just what is to be done. With Russell’s helpful instructions, each process was simple with just enough challenge to instill pride of accomplishment. The book is more than a technical manual; throughout it he offers valuable life lessons and philosophical observations.
I had made a few skin-on-frame kayaks and even a plywood decked canoe, but would not consider myself a master builder by any means; I have basic tools and lots of clamps. The construction manual recommends three sizes of spring clamps—32 clamps in all; more clamps would not go unused. You would do well to read the complete manual before starting your boat, especially if this is your first build. Building the steamer for bending ribs and the strongback for holding the forms are both good practice for getting into the project. Enjoy all the processes; don’t hurry and don’t worry. Fairly soon the elegant canoe shape will begin to emerge.
Irene Klaver
The canoe has two thwarts. The longest one, close to amidships, serves as a backrest and the shorter one in the bow provides bracing for the feet. The caned seat is an option available from Russell Boats.
The build begins with assembling four 1 x 4s to make the box-beam strongback that will support five forms made of 1/4″ plywood. Even with the canoe framework in place on the form the whole rig was light enough to carry, so I often worked outdoors and enjoyed the good weather; when it rained, I could easily move into the carport.
With the full-sized patterns, it was easy to cut the plywood for the forms, stems, and breasthooks accurately. The canoe is built upside down, and you begin by putting the stems and keelson in place. The stringers are next and I used western red cedar for them; Russell suggests spruce, yellow cedar, red cedar, or even clear pine, though he notes that the latter is not as strong as the other woods. Stringers are shaped by the forms, then ribs are bent into place inside the stringers; the steamed northern white cedar ribs took to their shape beautifully, with only two failures. If you have not done steam-bending, Russell provides guidance for making and using simple steamboxes.
Connecting the ribs to stringers involves more than 300 lashings of nylon artificial sinew, but the task was indeed, as the instructions stated, “decidedly sane and relaxing.” Stretching the nylon skin over the frame and applying UV-resistant, water-based polyurethane coating were straightforward operations. I worked on the canoe intermittently over the course of a few months; the actual work time was about a week or so.
Mike Doran
The choice of a double-bladed paddle is left up to the builder. Small unfeathered beavertail types, like the paddle here, were popular in the 19th century. Wider feathered blades are a more contemporary style.
The finished canoe, weighing just 25 lbs, is easy to cartop solo and easy to carry to the water. For the first trial, I used a foam pad as a seat; it was comfortable enough, but soon after I ordered a cane seat from Russell. The wooden frame with the woven cane fits the classic look of the canoe better than the foam and is very comfortable. If I expect muddy embarking and disembarking, I use a 2′ x 6’ camp pad on the bottom without the cane seat. It is comfortable and protects the lashings from grit.
You’ll paddle sitting on a foam or camp pad or a cane seat in the bottom of the canoe on the 1/4″ floorboards. Keeping the paddler’s weight low contributes to the stability of the boat.
My first trial on the water was on a small pond with only a bit of a breeze and no significant chop. The construction manual gives photo-illustrated lessons on how best to get in and out of the boat while it floats in a few inches of water. It is important to remember that skin-on-frame canoes should not be pulled up onto shore for entering or exiting. Make sure there are no rocks or sharp objects under the boat when getting aboard. That said, the nylon skin is tough and has resisted my collisions with submerged branches and rocks—a frequent occurrence, since much of the water in my part of Texas is often so silted as to obscure almost everything beneath the surface. The flexibility of the lashed stringers and ribs distribute and dissipate the energy of impacts, and the brass stembands protect the skin where it is most susceptible to abrasion.
Mike Doran
The Solo Carry not only tracks well in flat water but also holds a course well when the wind is blowing.
With the paddler seated, the canoe is quite stable. In a 10-mph wind, it takes no effort to maintain balance with the wind and waves/chop abeam. The canoe tracks well and holds its course even in an adverse wind or current. Its response to paddle strokes is quick and positive. The canoe is so light and responsive that leaned turns seem easy and natural, and the good stability inspires confidence.
On a day with an 8- to 10-mph breeze, I used the GPS on my iPhone to make a few readings. Whether into the wind, with the wind, or somewhere in between, easy conversation-level paddling always achieved a speed of 3 to 3.2 mph; cruising-level paddling was 4.2 mph with the wind and 3.8 mph against it; racing-level paddling was just sustainable at 5 mph, with a little bump to 5.1 mph when the wind was in my favor.
After I built the 13.5′ canoe, I built (with permission from Hilary to build a second canoe from the same set of plans) an 11.5′ version with leftover materials. This is the standard length presumed in the instructions and the plans. For any of the variations of length and shape, the width and thickness of materials remains the same, while the plans indicate required changes in lengths and positions.
Mike Doran
Sitting low in the hull, kayak style, gives the canoe its stability.
This canoe’s 21-lb weight and ease of transporting mean that it can be used for a sunset paddle at a nearby pond on a moment’s notice; its weight and resilient construction also mean that it can be used on a paddling and hiking adventure.
I think that anyone who wants to build a small boat would enjoy the experience of a skin-on-frame canoe, especially as guided by Hilary Russell. The beginner would be intrigued, then rewarded with a lovely canoe whose every part would be known on a fundamental level, while the seasoned builder would find the simplicity of the type and the scale delightfully engaging.
Each time I have taken the canoe out, people comment on its beauty, even though I could hardly claim my level of craftsmanship is on a par with Hilary’s. When the canoe is not in use, you may be tempted to hang it in your living room as a lovely piece of sculpture.
Brian O’Connor grew up in New Hampshire near beautiful lakes and rivers. Twenty-two years ago, he moved to north Texas as a professor of information science. There are no natural lakes in the area. To stay connected to his earlier days he built a kit kayak and discovered that the muddy Trinity River, some large reservoirs, and a nearby urban flood pond have their own delights. At 74 he has now built 10 boats and looks forward to the challenges and rewards of building and sharing more.
When the forecast for northern Wisconsin showed two days of fair weather after weeks of cold and rain, I loaded up my Don Kurylko–designed Alaska, which I’d lately named FOGG after Phileas Fogg, the protagonist of Jules Verne’s Around the World in 80 Days. I had nothing so grand in mind for this trip, though; my destination was Wisconsin’s Gile Flowage, a 3,400-acre reservoir near the Michigan border, a dozen miles south of Lake Superior. Here an 1880s-era sawmill dam had been unceremoniously abandoned after playing its part in reducing the old north woods to a vast field of stumps. In the 1930s, a new dam was built at the site to manage water levels for a series of hydro dams downstream. Completed in 1941, the new dam flooded a 5-mile stretch of the West Fork of the Montreal River. The result was a sprawling lake bisected by a line of rocky islands that had once been hilltops. The islands themselves, now covered with a healthy second-growth forest of oaks, maples, and spruces, remained open to my favorite kind of camping: no registration, no fees, and no reservations accepted.
The drive to Gile, a town at the north end of the reservoir that I knew only as a dot on the map, involved three or four hours of winding county roads running through long stretches of forest. I had timed my departure so I’d arrive just as a series of morning thunderstorms would be ending. I got to Gile by noon, an hour later than planned. The promised good weather hadn’t yet appeared. The rain had stopped, but bristling gray clouds raced by low overhead. A flag hung from a pole near the town-park dock, snapping and cracking in the wind. Waves were crashing over the dock and onto the launch ramp, driven by a fierce southwesterly blowing across 4 miles of open water. Streaks of white foam blown off the wave crests formed long, wavering lines across the dark surface of the water, a sure sign of serious wind.
Roger Siebert
.
I’d need two reefs at the very least—more likely three. That was verging on foolishly windy for windward work in my low-freeboard sail and oar boat, which even the designer describes as needing “a deft hand on the tiller when the wind pipes up.” It would mean a mile or two dead into the wind to reach the nearest islands—three or four hours of cold, wet sailing even if all went well. Rowing into such a stiff headwind wasn’t appealing, either. Luckily, the map showed another ramp a few miles away on the flowage’s eastern arm, which looked like it would be a little more sheltered. I got back in the car and drove off to find it, wondering if my years of small-boat sailing had made me wiser, or just more fearful. Perhaps they’re the same thing.
But the eastern arm, too, was a mess of whitecaps and foam-streaked chop. Although this ramp looked more sheltered on paper, the wind was being funneled directly up the eastern arm of the flowage by the shape of the surrounding shoreline, a common dilemma for inland sailors, who often face headwinds wherever they go. Launching here would still mean beating off a rocky lee shore into a 3-mile fetch.
Luckily, there was a Plan C: Sucker Hole, a little-used ramp hidden away at the mouth of the Montreal’s West Fork at the southern tip of the flowage, on the windward side of the lake—an ideal launch point, really, apart from its remote location. After half an hour of bumping along at 20 miles per hour on a series of lumpy dirt roads and guessing correctly at a couple of unmarked intersections, I pulled in to the Sucker Hole launch to find a gravel parking lot the size of a tennis court, and a ladder-like ramp of rebar-linked concrete slabs. Good enough. I loaded and launched FOGG, parked the car along the shady edge of the lot, stepped the mast, and hung the rudder on the transom.
Photographs by the author
Gile Flowage lies in the southernmost reaches of the Canadian Shield, and Crappie Island, seen here on the port bow, displays the classic topography: exposed granite slabs topped by white pines.
Gray skies had cleared to blue by the time I hoisted the standing lugsail and shoved off from the riverbank, sailing a broad reach on the starboard tack. Even here, a quarter of a mile up the river, the wind was more than strong enough for the double reef I had tied in before hoisting the sail. I later learned that the nearest weather stations were recording gusts up to 36 miles per hour throughout the afternoon. Almost before I could settle in at the tiller, the lee rail went under. Cool water sloshed around my ankles as I bore off and sheeted in to spill some wind. And then the opposite riverbank was coming up fast, leaving just enough room to jibe around to the port tack. I pulled in the sheet, put the tiller over, and scrambled for the high side as the sail whipped by overhead. While my sail is boomless, the snap-link I have at the clew has more than enough mass to dent the head of an incautious skipper.
In those conditions, it was a bit challenging to hook the sheet block on the new leeward side after jibing—the potential drawback of the traditional French misainier sheeting system I use. I’d have normally rigged a rope traveler for sheeting in this much wind, which would have eliminated the need to reposition the block by hand, but I had left the line I used for a traveler on my kitchen table, along with my camp stove and various other accoutrements I hadn’t even missed yet. I wasn’t sure what I was going to eat once I got to camp, but I didn’t have time to worry too much about it at the moment.
I was heading downstream now, toward the open water of the flowage. A wavering line of dark ripples racing across the water behind me, and another close behind, suggested that the gust that had put the lee rail under had been far from a fluke. Plan D: time to head for the windward shore and regroup. I steered back across the river, aiming for the 300′ gap separating the chain of thickly wooded islands from a narrow headland at the river’s mouth. Before I had time to reach back and uncleat the rudder’s downhaul in case we touched bottom at speed—or worse, slammed into a stump or rock—I was through the gap. A dense forest of spruces and maples crowded the shoreline, blocking the wind. The sheet went suddenly slack in my hand. FOGG glided slowly past the headland. The sail waved sluggishly back and forth a few times before settling somewhat unconvincingly onto a port tack again.
After a moment to tighten the downhaul and a glance at the chart to form at least the first faint glimmerings of a plan, I was through the narrows and exposed to the southwest wind again. The sheet snapped tight in my hand as the sail filled, and the boat surged forward into Goose Bay.
The first islands in the chain—Christmas Island 100 yards off the starboard bow, and Russ’s Island farther on—were rounded hilltops rising from the water, with no sheltering coves or inlets. Even on the leeward side there would be no easy place to land, with rocky shorelines backed by thick woods. The map showed a good anchorage behind Big Island, though, just 2 miles up the lake—a fast run, if not an easy one, in these conditions. I sheeted in and steered northwest, heading for the mouth of Black Creek Bay. I intended to sail as close as I could to the windward side of the lake, where the tall trees and hilly terrain might block some of the gusts.
I worked my way northward along the western shore of the flowage for 20 minutes or so, past the rocky shoals at the mouth of Black Creek Bay, jibing occasionally to avoid a dead run. A shallow curved shoreline on the northern side of Annie’s Island, tucked between sprawling bedrock slabs, might have offered a little shelter, but I thought I could do better. I continued past Birch Creek Bay and Crappie Island—a low dome of smooth granite dropping directly into the lake, making for a difficult landing—before starting the long final run to Big Island. It wasn’t easy sailing. Despite watching the sheet closely, and keeping an eye to windward to look for approaching gusts, I managed to dip the lee rail a few more times. That wasn’t particularly worrisome—during capsize tests I hadn’t been able to knock this boat over even with my full weight on the gunwale—but it wasn’t exactly relaxing, either.
Without a traveler to manage the mainsheet, I had to keep shifting the block from gunwale to gunwale by hand at each jibe. That’s a fairly a simple operation if handled carefully, one I’ve done hundreds of times without incident. Still, each repetition brought another opportunity for pilot error to creep in.
By the time I brought Big Island abeam to starboard, I was pulling hard on the tiller to fight a growing weather helm. It was well past time for the third reef—in normal conditions, FOGG can usually be left without a hand on the helm for a few moments without falling off course, even without a tiller tamer. But now, the boat was rounding up sharply at each gust, increasing the apparent wind speed and making bad manners worse.
I hadn’t intended anything close to this kind of white-knuckle outing. I had imagined an easy day lounging about in the cockpit, indulging in a bout of sustained indolence while the boat sailed itself, with the simple line-and-bungee tiller tender I call my 59-cent autopilot handling the steering. Still, there was nothing to do but use what the wind offered. Judging by the speed with which the boat was sliding past the bits of surface foam—somewhere between one-and-a-half to two seconds per 18’ boat length—I was making around 5 knots. Glancing again at the map tucked under a strap on the windward side bench, I did a bit of mental arithmetic: about 3/4 nautical mile to shelter, give or take, moving at 5 knots. I’d be pulling in behind Big Island in less than 10 minutes. Or, if I really managed to screw up, I’d be swimming.
Although I had planned to circle Big Island to the leeward side before landing, this shallow sandy bight on the northern end of the island seemed like it might offer decent protection from the wind and waves, and an easy place to get ashore. I dropped the sail and rowed in to investigate.
I had planned to round the northern end of Big Island to escape the wind, but another option appeared before I made it that far: a shallow scoop of a bay on the west side of the island’s northern tip, about 40 yards wide—open to the north, but mostly protected from the south or southwest. Even better, the low sandy shore promised an easy landing. Five boat lengths out, I dropped the board, sheeted in hard, and brought the bow into the wind to drop the sail at the center of the little bay. It was a beautiful day, really, now that I had a moment to pay attention. The wind—mostly blocked by the steep rocky shoulder of Big Island here—had gentled to a breeze just strong enough to ruffle through the trees with a shifting sigh. There were no other boats in sight; an empty cottage on Long Island, 1/2 mile to the north, was the only sign of human habitation. As I bundled the sail and yard to make room for rowing, a red-winged blackbird chirped twice from its perch atop the tangle of driftwood along the shore of the bay and then flittered off into the woods. It seemed like enough of a welcome. I hauled up the rudder and rowed to shore.
A small unnamed spot of land just east of Big Island lured me off my intended route along Big Island’s sheltered eastern shore. I came ashore for a brief exploration before continuing. Big Island’s eastern arm is visible off the starboard bow.
I had come less than 3 miles, but I felt no urge to go farther at the moment. Stepping out into shin-deep water, I pulled the boat up onto the sand—not exactly ashore, but at least solidly aground—and tied the painter to the drooping branch of a red-oak sapling. I grabbed my camp chair, a book, and the bag in which I had hurriedly packed whatever food I’d had on hand, and made my way along a faint trail through a stand of scrub brush and maple saplings to the northernmost tip of Big Island. There I found a shady spot to set up my chair beside a rounded slab of granite, a long view eastward over the lake, and enough of a breeze to keep the mosquitoes off.
The interior of Don Kurylko’s Alaska design is laid out with a thwart on each side of the oarlocks. When landing, I often move to the aft thwart and row the last few strokes while facing forward, which offers better visibility and lifts the stem to allow the boat to slide farther onto the beach.
I spent the rest of the afternoon ashore. I started to read, but soon set my book aside to simply watch whatever each moment brought: ragged wisps of white cloud passing by, a ruby-throated hummingbird buzzing around my knees, the slap of small waves at the water’s edge. Later I followed a set of wandering deer trails through the island’s interior, where the Canadian Shield started to reveal itself in broad slabs of white granite spattered with pale green and gray lichens. A band of rock faces and boulders as tall as I was formed the top of a shady amphitheater on a slope at the base of the main summit. I crossed the slope through a field of waist-deep ferns and continued on to the top of the hill, where several knee-high spruce saplings struggled to push themselves up through cracks in the smooth bedrock. There wasn’t much of a view—the surrounding maples and oaks were too tall—but there was enough of a gap in the leaves to spot a bald eagle hanging nearly motionless in the sky.
I returned to my camp chair for lunch. Dining options, as it turned out, were limited: half a bag of roasted almonds dusted with sea salt, and a small can of cashews. I must have intended to bring something more than that to augment the menu, but whatever the plan had been, it had failed. I supplemented my meager meal by browsing on some slender yellow wood sorrel I found growing along the edge of the woods—the tiny leaves had a pleasant lemony tang, though they weren’t particularly filling.
By late afternoon, the eastern side of Big Island was in the shade, with only a faint southerly breeze ruffling the water in the lee of the island. Leaving my camp chair in place on shore to pick up on my return—the little scoop of a bay was the only convenient landing spot I had found—I shoved off from the beach, rowed around the tip of Big Island, and headed south along the eastern shore to scout out an anchorage for the night. It felt good to be moving again. After five or six slow strokes to get moving, FOGG was heavy enough to glide along with no more than a moderate effort. Just as I’d expected, the broad bight on the northwestern side of Big Island was completely sheltered from the south and west. It would be a perfect place to spend the night.
By the time I got back to the landing at Big Island’s northern tip and beached the boat again, the sun was nearing the horizon, and the wind was dropping with it. I retrieved my camp chair, hoisted the sail, and set off on a beam reach toward the western shore of the flowage. Even with the double reef still tied in from earlier, FOGG wasn’t underpowered, but the wind was steadier now, making for easier sailing. In five minutes I was slipping through the passage at the south end of Long Island—at 60 yards wide, there was plenty of room—and into the unnamed bay beyond. There I lost the wind, or most of it. I eased the downhaul, slid over to the leeward side to keep some shape to the sail, and let the boat drift along, not quite becalmed. Eventually I reached a hidden finger-shaped inlet on the western side of the bay, perhaps six or seven boat lengths wide, where a row of cottages lined the shore. I dropped the sail.
I made it less than 100 yards up the unnamed creek behind Long Island before it became too narrow for rowing. Reluctant to end my evening exploration, I managed a few more boat lengths paddling SUP style with one oar before overhanging trees closed off further progress. Here I’m about to re-hoist the sail for the return trip downstream.
Thanks to the dense forest lining both banks, the sun was well below the horizon here. The water, a dark mirror beneath the hull, reflected the jagged silhouette of each shore with perfect clarity. At the head of the inlet, above the cottages, a nameless creek snaked its way through the forest past a marshy foreshore of reeds and cattails. I pulled up the board and rudder and rowed up the winding creek until it became too narrow for oars. A chorus of frogs provided the only sound other than the faint rippling of each oar stroke, and the quiet murmur of the hull sliding through the water. Eventually, overhanging trees blocked the way. With the faint breeze behind me now, I turned the boat around, hoisted the sail, and ghosted back downstream with the rudder still half-raised and dragging in the mud, gliding silently past the cottages again. It was mid-week, so I wasn’t surprised to find them empty.
The sun had already dropped below the horizon before I landed at Long Island. After climbing the smooth slabs to the summit ridge, I was able to enjoy a second sunset from my higher vantage point.
From the creek, I sailed over to Long Island’s western side, into a quiet backwater almost completely surrounded by the island’s three distinct lobes. Steep slabs of white-gray granite, 40′ tall, lined the bay, dropping directly into the water. I headed for the northern end, unclipped the sheet from the sail 20 yards out, and let the wind carry us to shore. It wasn’t a perfect landing: FOGG bumped up against a mat of floating logs stem-first, a bit harder than intended, but then lay quietly alongside. The water at the base of the cliffs was only thigh-deep. I managed to scramble ashore with the painter, which I clove-hitched to a head-sized rock 20′ up the slabby granite. I climbed to the top of the ridge, where my higher vantage point brought the sun into view again. I enjoyed a second sunset—a vivid mix of orange, red, and yellow—before climbing carefully back down to the boat.
I slipped out of the bay under oars through a narrow gap in the southern side that, according to the map, didn’t exist. Spring’s high water levels had transformed Long Island into Long Islands, dividing the southwestern summit from the rest of the island with a shallow channel a few boat lengths wide. FOGG was sliding easily through the gap, the keel 3″ above the rocky bottom, when a sudden clatter off the port bow made me turn my head. Snorting and splashing, a whitetail deer exploded from the forest and charged across the shallow channel 10′ from the bow. Even as I rowed out to open water and raised the sail, I could still hear the rattle of its labored breathing deep in the woods.
I entered the anchorage behind Big Island’s eastern arm at 9 p.m. under the light of a full moon. The sky never had a chance to darken after sunset.
That night I anchored behind Big Island as planned, and set up my tiny two-hoop backpacking tent on FOGG’s sleeping platform. The full moon hung in the sky like a spotlight, shining so brightly I didn’t even bother to pull out my headlamp. I managed to arrange my sleeping mats and blankets and crawl inside just before the mosquitoes arrived to hang on the mesh of the tent above me in a high-pitched buzzing drone that made me grateful to be inside.
As I had expected, Big Island’s eastern arm created a perfectly sheltered anchorage for southerly breezes. Hoping to keep my distance from the mosquitoes, I abandoned my usual practice of tying to shore with an anchor off the stern, and anchored 50 yards out instead.
I lay in the tent, watching through the mesh as the night came alive around me. Three or four bats began to swoop and circle overhead like flickering shadows. Hundreds of frogs on Big Island set up a continuous clamor of croaking and chirping, and I could just hear the faint whisper of a breeze in the treetops. I drifted off to sleep, happy to be tucked into a sheltered corner of the flowage, cozy and bug-free.
The Alaska’s 10′ long sleeping platform is just big enough to hold a solo backpacking tent to ensure bug protection. A custom boat tent to enclose the platform would offer far more room, and require less shifting and repacking of gear, but the backpacking tent has proven to be an acceptable temporary solution.
Later in the night, the wind shifted into the northwest. Rippling waves began to rock the boat, throwing me off balance on the sleeping platform, first one way, and then the other—enough to wake me from a sound sleep. There was more motion than I would have believed possible in inch-high waves. The moon was still bright in the sky, giving plenty of light to work by, but I didn’t want to bother with moving the boat. A halfway sleepless night didn’t seem like such a bad thing in comparison to the amount of work involved in dropping the tent, retrieving the anchor, and deploying the oars. I stayed in the tent, ate the last few cashews, and listened to the wavering call of a common loon somewhere out on the lake.
I must have dropped off to sleep again at some point, despite the boat’s extravagant rocking—I opened my eyes with the moon high overhead, so bright I had to shade my eyes against the glare. Polaris was barely visible, a pale dot of light identifiable only because I already knew where to look.
I shifted back and forth, trying to minimize the roll of the boat, but with my bed at thwart height, I couldn’t expect an open-water anchorage to provide a stable sleeping platform. I usually tuck the boat in knee-deep water just a couple of feet from shore and tie directly to shore, and had never encountered any significant motion while sleeping aboard before. But really, it didn’t seem to matter. I was afloat, and in no danger. Even the mosquitoes had vanished. I unzipped the door to let more of the breeze in.
I cat-napped my way through the rest of the night, dropping in and out of a pleasantly fuzzy state vague between sleep and waking, aware enough to trace the moon’s long stop-motion arc across the sky from one waking moment to the next. The boat rocked beneath me gentler than before, even as the ripples continued to roll past, stronger now, driven by the veering breeze. No matter. A northwesterly wind would be perfect for my return to the ramp anyway.
A night aboard requires careful repacking before setting sail again. I pulled up the anchor and rowed to shore to stow everything neatly before setting out the next morning.
I had hoped to continue up the West Fork of the Montreal River to explore that area before leaving the flowage, but fierce northerly winds would have made rowing back to the ramp a difficult chore. I chose the better part of valor and ended my trip at the ramp here, saving the river for next time.
….
Tom Pamperin is a freelance writer who lives in northwestern Wisconsin. He spends his summers cruising small boats throughout Wisconsin, the North Channel, and along the Texas coast. He is a frequent contributor to Small Boats Monthly and WoodenBoat.
If you have an interesting story to tell about your adventures with a small boat, please email us a brief outline and a few photos.
Small boats can slip into small places that can make snug places to spend the night. When I did my very first cruise up the Inside Passage, back in 1980, I usually camped on shore and used a clothesline-loop system (also known as an outhaul) to pull my 14′ dory skiff out to its anchor while I stayed on shore.
Photographs by the author
When I started cruising in 1980, the clothesline loop, or outhaul, was the standard anchoring method. It kept my skiff safe, but camping ashore, put me at the mercy of the mosquitoes. I began making a transition to sleeping aboard at anchor.
In more recent years, I’ve been cruising in somewhat larger boats, which I’ve built with comfortable accommodations spending the nights afloat, but it can be difficult finding anchorages that won’t dry out on a falling tide and are well protected from wind, waves, and currents. Some of the best-protected nooks and crannies in the shoreline are also the smallest and can’t accommodate an anchored boat that is free to swing about at the end of its rode.
This creek that feeds into the Ohio River was my anchorage for a night. I tied the clothesline to two trees high enough above the water to use it as a ridge line for a tarp rainfly as well as for holding my sneakbox away from the banks.
On my row down the Ohio River and the second cruise up the Inside Passage, small coves were the only anchorages available in some areas. To keep the boat safe, I had to secure it at both ends so it wouldn’t stray from deep water toward shore. In these little havens, I centered the boat by tying the anchor rode from the bow to a tree on one side of the cove and a collection of other lines from the stern to the other side, leaving some slack for changing river levels or the fall of the tide.
This cove was well protected from wind and waves, but not wide enough for a standard anchorage. I clotheslined the faering to keep it in the deepest water and avoid the rocks at low tide.
On this clothesline, set up for camping ashore, the boat was located over a patch of sand that would not harm the boat at low tide. Bits of wood held in clove hitches kept the lines afloat to avoid getting snagged on the bottom. The overnight high tide would rise high enough to cover the band of blackened rock. This arrangement was made possible by a cove I could walk around to tie off the ends of the lines. Here, I’m standing on the far shore.
These improvised overnight arrangements were necessitated by the absence of better anchorages, but I realized that I could sleep better with them knowing I didn’t have to rouse myself several times a night to check on the boat’s wanderings. On one occasion the boat fared well through a night, anchored in a narrow slough, but in the morning I lost my favorite anchor when I couldn’t free it from the waterlogged snags that littered the bottom. Now, I seek out the smallest coves where I can secure my boat between points on opposite banks and leave my anchor safely stowed.
At this anchorage, I tied a bank-to-bank clothesline to stumps on either side of a creek inlet. The painter is tied in at the middle and the boat has room to swing around on that single line.
I currently use two 75′ anchor rodes to tie a “fixed clothesline” from bank to bank across the water where I’ve decided to spend the night. One of my rather hefty anchor rodes is a 1/2″ solid-braid nylon line; the other a retired 7/16″ kernmantle jibsheet from a larger boat; in the past, I’ve also used my main and jib sheets of 3/8″ twisted nylon. I paddle the boat from one side to the other, paying out the first rode. When I get to its end, I tie the second rode in with a sheet bend and continue toward shore. I try to keep the line from sinking, lest it get snagged by something underwater.
This cove was about 120′ wide and had a back eddy swirling around in it. A boat at anchor would have been carried around the cove with it, likely fouling the anchor. About 120′ of a 150′ clothesline provided a secure spot in deep water, far from the banks. Here, the boat is temporarily tied near shore while the clothesline is being made fast to an exposed tree root.
When I get to the opposite shore, I’ll tie the second rode off to something solid. If I leave the clothesline at water level with just a bit of slack, I can row or paddle across it if I want to explore a bit before settling in for the night and not be stuck on one side or the other. (A cabin, chimney, or mast can make it impossible to pass my boats under the clothesline.) Most of the time I’ll just tie the painter into the clothesline with a taut-line hitch—essentially a clove hitch with an extra turn added at the start—leaving about half of the painter (about 6′) between the bow and the hitch. That arrangement will let the boat move about on its short tether.
To get the bow to face the waves coming into the cove, a short grey and purple line was tied with taut-line hitches to the white clothesline. The slack pulled out of the clothesline rests on the deck. The ends of the smaller line are tied to the toerails, keeping the boat pointed into the waves.
If there are waves entering the cove, I’ll point the bow into them, trading rocking for the gentler motion of pitching so I can get a better night’s sleep. Holding the bow facing out requires tightening the clothesline; I’ll set it across the boat and tie a short line, say 4′ to 6′, into it with taut-line hitches at each end. Then I can pull the clothesline through the hitches and take up all of its slack. With the clothesline tight, I can set the boat at right angles to it and use two ties, one on each side of the boat, to hold it. Tightening the clothesline can also elevate it to keep floating driftwood from getting snagged.
Another reason for tensioning the clothesline is to let driftwood pass under without getting snagged.
The fixed clothesline, whether it is taut and elevated or loose and submerged, makes it a barrier to other boats, so it’s appropriate to use only where it won’t be a nuisance.
When I’m spending a night at a standard anchorage, I can’t help but look up from bed to see where I am and if the boat is moving. Held in place by a fixed clothesline in a snug cove, I just sleep.
Christopher Cunningham is the editor of Small Boats Magazine.
You can share your tips and tricks of the trade with other Small Boats Magazine readers by sending us an email.
We recently cartopped our 17′ Grumman canoe 900 miles and tried out Seattle Sports Sherpak Quick Loops to secure its bow and stern. The straps took only seconds to install and provided the essential tie-down points for the long highway drive.
Skipper’s family has a history of cartopping canoes and we know it is just as important to secure the bow and the stern as it is to secure the middle of the boat to the roof racks, especially on longer vessels like the Grumman. The lines to the ends help prevent the bow from swinging sideways in the apparent wind generated at highway speeds and keep boats from sliding fore and aft during sudden starts and stops. On old cars, it can be easy to find places to attach bow and stern tie-downs, but many new cars may not have anchor points because of aerodynamic cladding of the underbody and hood-gap streamlining. Older cars were also built with rain gutters, which provided a positive attachment for a roof rack. Racks clipped on new cars don’t have a grip that is as secure, and while the straps across the middle of the boat will hold it to the racks, only the bow and stern lines can help hold the racks on the car.
Photographs by the authors
The rubber hose fixed to the end of this Quick Loop has been set just inside the engine compartment and will get trapped when the hood is closed and latched.
Each Sherpak Quick Loop consists of a flexible rubber anchor and an 8-1/2″ loop of 1″ nylon webbing and can be installed in seconds. With the hood, door, hatch, or trunk open, the anchor is placed inside the perimeter and the strap extends out from it. The flexibility of the anchor ensures a snug fit inside; a quick pull on the web loop ensures that the enclosed anchor is fully seated. For our canoe we use four loops, one on either side of the hood and one on either side of our car’s hatch.
The webbing is thin enough to fit the seams between the vehicle body and its hood, door, hatch, or trunk and won’t mar the paint finish. Even if a car has underbody tie-down points, they limit the options for locating tie-downs. There is a wider variety of locations for the Quick Loops and they can be placed to keep tie-downs from rubbing on the paint. I save time by not having to pad the tie-down line and I really, really like not having to crawl under the car to find anchor points, which can be uncomfortably close to a hot engine and exhaust pipe.
Even if this car had built-in tie-down points under the bumper, the Sherpack Quick Loops put the lines at an angle that is much more effective at keeping the canoe from shifting laterally.
We bought two pairs of Quick Loops so we could have supplemental side to side lines both fore and aft. Our canoe, SCOUT, recently traveled in secure comfort to her new Middle Atlantic homeport thanks to this uncomplicated piece of gear, and the loops have her highest recommendation.
Audrey (Skipper) and Kent Lewis are hosts to an Armada of small boats and look forward to exploring the Tidewater region of Southeastern Virginia, their new home.
The Sherpak Quick Loops are sold in pairs directly by Seattle Sports and through Amazon for $14.95.
Is there a product that might be useful for boatbuilding, cruising, or shore-side camping that you’d like us to review? Please email your suggestions.
I thought I had done just about everything I could to provide myself with all the comforts of home when I go cruising. I eat well, sleep well, stay warm and dry, but there’s one painfully obvious difference between home and my cruising boats that I hadn’t addressed. At home I may be standing or walking, but on board I often have to kneel or crawl. Even a day into a short cruise, the skin on my knees can get painfully tender.
At home, if I have chores that require being on my knees for a while, I’ll put kneepads on, but neither of the two pairs that I own is well suited for boating. One pair has very thick pads, which are great for comfort but can get in the way when they’re not needed, and the other pair has hard plastic outer shells that would do a mean number on a boat’s paint and varnish.
Gill’s kneepads cut a slim profile and offer just enough padding to protect the knees during onboard activities.
On a visit to West Marine I found and bought a pair of neoprene knee pads that are manufactured by Gill, a company specializing in apparel and equipment for dinghy sailors. They’re made of 5mm fabric-faced neoprene and contoured by glued and sewn darts to fit around the kneecap. The straps are secured with Velcro behind the knee (above and below), and have enough stretch for me to wear the pads over the combination of pants and rain pants. The cushions sewn to the front of the knee pads bring the combined thickness to 3/8″. Compared to my other knee pads, that’s not very thick, but the Gill knee pads aren’t meant to provide the same level of protection. There’s no need to guard against rocks in the garden or nails and screws on the shop floor. The cushions have a coarse, textured weave to resist wear and provide a bit of a grip.
The exterior of the pad (left) has a second layer of cushioning, which is covered by an abrasion-resistant fabric. The inside surface (right) shows the darts that give the knee pads their form-fitting shape.
The knee pads are comfortable to wear over pants and stay put. On bare skin, the edges of the straps can feel a bit sharp, but I never go boating wearing shorts, preferring pants for either warmth or sun protection. The padding is just enough to provide comfort while kneeling in the cockpit or crawling around. If I were to kneel on a bit of crushed gravel, a wing nut, or a drywall screw—I’ve tried them all—the contact is noticeable but not painful. The slim profile of the knee pads doesn’t get hung up moving about in tight quarters. And when wet, the fabric facings will absorb some water, about 1-1/4ounce per knee pad, but the closed-cell neoprene core doesn’t and won’t get squishy like wet sneakers.
With the Gill neoprene knee pads I don’t dread crawling over the foredeck or across the cabin roof for the umpteenth time, and my knees can take part in the cruising comforts that the rest of me enjoys.
Christopher Cunningham is the editor of Small Boats Magazine.
Gill’s Neoprene Knee Pads, model 4519, are available from the manufacturer as well as Amazon, West Marine, and other marine suppliers for about $44.95.
Is there a product that might be useful for boatbuilding, cruising, or shore-side camping that you’d like us to review? Please email your suggestions.
Cédric Saleck and his wife, Céline, live in Logonna-Daoulas, a village set in the center of a 5-mile-long peninsula surrounded by the waters of France’s Bay of Brest. So, it’s no surprise that the couple has accumulated a small fleet of boats. They have a 29′ sloop-rigged cruiser, a 12′ fiberglass sailing dinghy, two double kayaks, and a 15′ fishing dinghy, but still, something was missing. What they longed for was a pénichette—literally a “little barge” that could be, as Cédric called it, their “floating hut.” A search of the web turned up a lot of boats that could work as a comfortable retreat—after all, France is laced with canals and boats designed for leisurely travel on them. But everything his web search turned up was either too big and expensive or just ugly.
Photographs by and courtesy of Cédric Saleck.
While the openings in the bulkheads seen here are not in the original design, they give the cabin a more spacious feeling and will improve the circulation of heat from the woodstove. The blue foam padding that’s wrapped around the arched roof beam will come off when the roof goes on but perhaps not before the occupants learn to duck when passing through the cabin.
He happened upon the Escargot canal cruiser, designed by the late Phil Thiel, half a world away in Seattle. The Washington State city is an unlikely place to give rise to a canal boat. While it does have what is called The Ship Canal, the waterway is scarcely 3 miles long and is mostly a stream bed made navigable in 1917 by a dam and a pair of locks. The two parts that actually look like a canal have a combined length of just under 1 mile. Phil got his inspiration for the Escargot from the boats plying the canals of France where he spent many of his summers. The name of his cruiser, Escargot, is the French word for snail, both a nod to the origin of the design and a declaration of the pace he intended for the boat’s barge-like hull.
The curve of the sheer guard is decorative; each side of the hull and the cabin is one flat, straight piece.
Cédric thought the Escargot, at 18′6″ by 6′, was just about the right size, and found the decidedly uncomplicated hull and cabin to be beautiful. His exploration of the Escargot led him to his “favorite example,” BONZO, the Escargot built in 2009 by Nate Cunningham, the son of the Small Boats editor.
The design of the bulkhead cutouts became clear when they were painted with a snail wandering in the woods. The short ladder leads up to the foredeck.
Thiel designed the boat for construction by novices. There are only three functional curves in the boat, and the two on either end of the flat section of the bottom are invisible. The curve of cabin roof stands alone and yet gives the little cruiser its charm. The simplicity of the design invites making modifications to suit personal preferences. BONZO was built with a few departures, most notably by raising the cabin roof 6″ for more headroom and an airier feel in the cabin and extending the cockpit by 12″ for more elbowroom.
During the winter, a woodstove makes CARACOLE a comfortable retreat whether or not she leaves the dock.
Cédric began construction in October 2018 and followed BONZO’s lead, making the side panels and the bulkheads taller to raise the cabin roof, but beyond that, he wanted his Escargot to be uniquely his own. He built the boat with sapele plywood and intended to finish the interior bright for a warm, elegant cabin. For the accommodations, Cédric built in a sofa bed, a movable dining table, a woodstove to starboard for heat, a gas stove to port for cooking, and storage compartments forward.
If CARACOLE looks like she’s riding rather high, she’s perched on a boatyard dolly, which is strapped to a flatbed trailer.
The original design called for two Sea Cycle pedal-powered drives to be installed in wells in the cockpit, but that recommendation was omitted from more recent versions of the plans. Thiel realized that the Sea Cycle propellers were designed for a light, fast catamaran and were ill-suited for pushing a barge hull that would weigh a half-ton with just two people aboard the bare boat. Cédric liked the idea of the pedal drives but recognized that using his Escargot in the open waters and strong currents of the Bay of Brest that surrounded his hometown would require more power for safe operation. He opted for a 5-hp outboard. Sculling over the stern has long been popular among Bretons, so a sculling oar is his auxiliary power.
Bretons take their sculling seriously so Cédric made that his auxiliary means of propulsion.
Cédric thought he would need only one winter to build the large box that the Escargot appears to be, but he didn’t finish and launch until September 2020. He and Céline christened the boat CARACOLE, short for the Spanish name for a sea snail—caracole de mar.
CARACOLE has plenty of room to take guests out for an afternoon tour.
They quickly learned that their Escargot isn’t fond of struggling to get anywhere when the sea kicks up a chop, but just as quickly discovered the pleasure their boat provides by just being somewhere. “It’s such a pleasure to spend a night aground in a mudflat in winter. The Escargot Canal Cruiser became our winter hut in quiet weather, even if it’s a bit cold.” That’s just what Phil Thiel had in mind; the only thing better than boating at a snail’s pace is getting aboard and going nowhere.
Do you have a boat with an interesting story? Please email us. We’d like to hear about it and share it with other Small Boats Magazine readers.
There seem to be two kinds of small daysailers. One kind keeps the water as far away from her crew as possible for her given size. These boats have high sides. The crew sits inside, to be insulated from the elements. I think of them as cozy, happy boats.
The other kind assumes that the crew will be more intimate with the water and puts them very close to it. The crews of these boats are in the action, and of the action, in close contact with wind and waves and boat. They’re an integral part of the workings of the structure. These boats have low sides, with lots of deck to keep the water out. I like all kinds of boats. But these are the exciting ones for anyone who loves sailing.
The Ipswich Bay 18 falls into the latter camp, though not so much that bathing suits are required. Like the Snipes, Comets, and Lightnings that I grew up with, she’s low-sided with lots of deck and a footwell rather than a cockpit with seats. That makes her lighter, of course, and easier to build. It also puts her crew close to wind and waves, which makes even a short evening sail on a small lake feel like a vacation.
Photo by Vernon Doucette
The Ipswich Bay 18 is a decked sailing dory reminiscent of the small racing boats of the Massachusetts North Shore of the first half of the 20th century.
Small boats like this seem so simple. But, of course, the simplest boats are the hardest to design and the easiest to get wrong. The IB 18 worked out just fine. She sails with great drama but little worry, depending on your mood. She’s essentially a short, flat-bottomed scow—only 12 1⁄2′ waterline length—with a long, broad, overhanging stern and a longer spoon bow. The broad, flat stern gives her all kinds of stability and makes her somewhat more forgiving of fore-and-aft trim (though you want to be careful of dragging the transom), and the long bow keeps her dry and buoyant and provides her a reasonable turn of speed. These kinds of boats used to be fairly common among development race classes, including the Massachusetts Bay waterline classes on the North Shore. Those boats provided much of the inspiration for Dan Noyes when he designed the IB 18. There’s also a little Alden Indian (a highly refined one-design dory) in her sheerline and some Town Class (another decked dory, still popular in Marblehead) in her hull shape. Dan Noyes would like to see her become a new North Shore one-design class.
The family resemblance to all these boats, especially the waterline classes, bodes well for the IB 18. The early North Shore racing boats also grew into a whole series of Inland Lake Scows, though they have squared-off bows. Boats like this can be very fast; I remember water-skiing behind a 28′ E-scow in a lake in northern Michigan when I was 11 or so. Dan Noyes reports that the IB 18 planes easily in a breeze. That’s easy to believe, and I look forward to getting her out soon in more than the 8–10 knots that I had to play with.
Photo by Vernon Doucette
The IB 18 is, essentially, a flat-bottomed scow-shaped hull with firm, round bilges. She’ll lean on those bilges in a breeze, giving the boat good stability.
Even in the light breeze I had, she was great fun. She has lots of sail area in a huge main on a 21′ mast and a very small jib, 145 sq ft in all, on a hull that weighs 360 lbs. But the main’s not so large that the sheet is ever hard to handle: ease it a fraction of an inch at a time to depower, or drag it in under the snubbing cleat on the centerboard trunk for a little more action—and the jib, sheeted to open cam cleats, can be handled almost as an afterthought. With her wide decks there’s nothing in the way. Lie down if that’s the mood of the afternoon, or rig hiking straps and get your weight outboard and power her up.
With little distance between centerboard and balanced rudder, and her flat bottom, she spins within her length, but still steers easily and precisely. Just a thumb and forefinger are needed on the hiking stick—very sporty. Yet surprisingly, she tracks quite well, enough so that the tiller can be clamped under a buttock to leave both hands free.
Alone, in 6–8 knots of air, hiked out flat and main fully powered up, you can get moving fast with her rail almost down, her centerboard trunk spitting just a little, and her stern wave just starting to separate from the transom. She sails like a thoroughbred. But you don’t have to work that hard. Ease the sheet just a fraction and relax. Few boats are this versatile. Part of the versatility comes from the weight of the hull, coupled with her flat and heavy bottom. The boat is heavy enough that she reacts slowly to crew weight. She nods rather than lurches when a person walks around on her decks. She weighs about double what a full-grown crew member might weigh. That means the crew contribute to her motion—or stability—instead of dominate it. With two people on board and an 8–10 knot breeze, I doubt that anyone would have to worry about spilling beer on the deck. The first reef would go in at about 12–15 knots of air. But in any kind of a real breeze, given appropriate sea conditions, I doubt she’d ever make a reasonably experienced crew nervous.
In a chop, I suspect she’d be fastest to windward heeled well over, like a scow. With her broad beam, it doesn’t take much heel to start her centerboard coming out of the water. If I were to have an IB 18, I might consider bilge boards instead of a centerboard to keep more foil in the water at a greater angle of heel. That would get the centerboard out of the way of the crew, too. It would also be tempting to put the rudder (or rudders, if we gave in to bilge boards) in a trunk. That would make building the boat harder, but launching and trailering easier and safer.
Photo by Vernon Doucette
The wide side decks and footwell cockpit allow for quick hiking in a gust. This is an exciting solo boat that can carry two or three passengers, too.
Although the IB 18 looks like she’s all deck, the footwell is over 6′ long, and plenty wide enough to keep from banging knees with the person sitting opposite. I’ve always found wide decks like this very comfortable, with lots of lounging space, room to walk around during a longer sail, plenty of space under deck for dry stowage. On quiet days, canoe seats can provide back support; on more exciting days there’s nothing to get in the way of hiking.
Daniel Noyes is an industrial designer by training. He understands the art of matching structure to function, and the importance of making the building process fit the end product. He also understands boats. He spent summers in college working in aerospace composite materials, including vacuum-bagging foam-cored high-performance daysailers and raceboats. But he loves traditional boats as well. He put in six years building dories at the Lowell Boat Shop, and at the Pert Lowell Company—state-of-the-art industrial production shops in their day—before designing and building the IB 18.
Impressed with the logic and simplicity of dory building techniques, Noyes adapted them to the wood-composite hull. Dories are production-built boats. The IB 18 was developed to make it faster for a professional to build a series of hulls, or easier for a reasonably experienced home builder.
Photo by Vernon Doucette
Close to the water. Author Dan Segal, at the helm, says the IB 18 reminds him of such noted one designs as the Comet, Snipe, and Lightning.
Being “dory built,” the boat requires no full-sized lofting. Instead, patterns and a batten are used. All the hull molds share the same pattern, and the same 12 1⁄2-degree radius, and all the topside planks are ripped to the same 3-degree bevel. The hull is built upright on a strongback using pre-cut temporary half-molds to lay the planking against. Noyes says that it took him about an hour to cut out the sixteen molds needed.
As one would expect, the IB 18 is an interesting mix of traditional and more modern materials. The bottom is 3⁄4″ marine plywood. The topsides are strip-planked cedar. The deck, 3⁄8-inch marine ply, is canvas covered and painted, just like those boats I grew up with. Unlike those boats, there are plywood bulkheads bow and stern to create flotation tanks.
She is built from the bottom up. Half-widths are marked on the plywood, and the side shape faired with the batten. The temporary half-molds are overlapped and placed port and starboard to the edge of the bottom, then bolted in place. The transom and stem are hung. The bottom is bent to the predetermined rocker on the strongback (called a bed in the dory world). The planks are hung from the garboard up and epoxy glued. The bulkheads are added to the open hull, then sheer clamps, deck beams, and the centerboard trunk. Next the plywood deck is cut out, nailed and glued down, and epoxy-coated. The deck edge is then trimmed, in the standard manner. Noyes will sell finished boats, hulls, or parts. He also has building plans and pattern tracings available for amateur construction.
The Ipswich Bay 18 is built of plywood and cedar strips— materials readily available to the amateur builder. The boat will ride easily on a trailer, and will be easily stored in a modest garage.
This Boat Profile was published in Small Boats 2008 and appears here as archival material. If you have more information about this boat, plan or design – please let us know in the comment section.
Walter Baron, of Old Wharf Dory Co., designed the Lumber Yard Skiff (LYS) with commercial watermen in mind. It had to be simple, easy, and quick to build, and rugged enough to live at least 10 years in constant hard employ. He would build it of readily available materials—underlayment plywood for the topsides and bottom, clear spruce 44s for the stem and sternposts, and any suitable hardwood for the rails and shoes. Baron has since discovered that skiffs built with these materials have lived longer than he anticipated—and have done so without the benefit of coating the wood with epoxy. Paint on the outside, oil on the inside has been the rule, though some owners have had the outside fiberglassed.
He offers a 16′ standard LYS, a 16′ LYS Sport, and a 20′ LYS—plans or completed boats—and now prefers meranti marine plywood for the topsides and bottom and clear fir for the frames. He fastens the boats with stainless-steel screws and Sikaflex marine adhesive.
Baron, who’s been building boats for about 30 years, can knock together a LYS in about 40 hours, if he needs to hurry. A rank amateur with basic woodworking skills might double that time. When he’s finished, he’ll think that every minute was well spent, because the boat probably will exceed his expectations. Like most simple designs, especially ones that are easy to build, the LYS required more thought than we imagine. Baron took his inspiration from the Brockway skiffs, which were built by Earle Brockway in Old Saybrook, Connecticut, and well regarded along the coast from Connecticut eastward through Cape Cod.
Photo Courtesy of Old Wharf Dory Co.
Walter Baron’s Lumber Yard Skiff is so-named because its materials can be procured from local lumberyards. The boat is rugged, inexpensive, stable, and meant for a variety of purposes—from fishing to recreation.
“I designed these boats using plywood models built to scale,” Baron said. “The sheer is the hardest part.” Even workboats should be attractive, so Baron took great care in getting the sheerline just right. Drawing an attractive sheer on a flat-bottomed boat isn’t the problem here. Having that sheer look right in three dimensions is another thing altogether—they can get all wonky. Baron solved this problem by making a model.
Working on the theory that wood—even plywood— will take its natural course when you bend it around a specific point, Baron established the shape of the topsides and the bottom at the same time. He wanted a fine entry so the skiff would provide a decent ride in a chop, and he wanted substantial beam aft to make it stable for hauling traps and to reduce the influence that shifting weight has on her handling. With these criteria in mind, he located the point of maximum beam well aft. A moderate delta shape is the result.
After he bent the plywood topsides to the shape he wanted, he had to determine the arc he’d have to cut into the topside panels, as they lie flat on the floor of the shop, to permit a gently rockered flat bottom. One way to do this is to scribe a straight line, bow-to-stern, on the topside panels when they’re bent around the spreader. This line will be perfectly parallel to a level floor The rocker (longitudinal curvature) can then be added. Cutting along this line gives the panel the exact arc it needs to fit the bottom to the LYS. After Baron was satisfied with the shape of the boat, he enlarged his tracings onto full-sized ply- wood sheets—two 1⁄2″ sheets per side on the 16-footer, and two-and-a-half 3⁄4″ sheets per side for the 20-footer. Baron uses butt blocks to make panels of the appropriate length. He got the stem and two sternposts from a single 12′ fir 4 4, the bevels of which he’d determined from building the model. Baron made the transom from two pieces of 3⁄4″ meranti.
Construction starts with the components assembled bottom-up. The stem and sternposts act as the buildingjig. You don’t need a strongback. Simply fasten the side panels to the stem and sternposts, install the transom, and insert the spreader. You’ll need a Spanish windlass to draw the topsides together, especially at the stem. Baron said that installing the chine logs is the most difficult part of the process, because bending them into the shape described by the curve of the topsides can crack the wood. Baron has varied the thickness of the chine logs to ease this process. His instructions will help you decide the proper dimensions.
After you’ve installed the chine logs, you’re ready to fit the bottom. Lay the plywood sheets in place and trace their shapes along the outside. Cut to the lines, join the pieces with a butt block, and the bottom is ready to install. Fit the hardwood shoes to the bottom, turn over the boat, and install the frames, knees, and rails. You’ll cut the side frames from 2″ X 8″ clear fir and the rails from 5⁄4″ X 3″ Brazilian redwood or other suitable hardwood.
Courtesy of Old Wharf Dory Co.
Construction is simple and straightforward; here, the after ends of the side panels have just been cinched in tight to the transom and fastened.
Of the 150 or so skiffs Baron has built, some of them have side decks and some don’t, depending on each owner’s preference. Side decks definitely add class to the overall design, especially if you varnish the coamings and rails or paint them a contrasting color. Clam diggers seem to prefer a deck, because it gives them a relatively stable platform on which to rest their buckets.
Side decks or not, the LYS has an unmistakable personality—a presence on the water that begs for attention. Baron and I got together for a short run aboard a 20′ LYS that’s owned and used heavily by a clam digger who works one of the plots granted to local watermen to raise and harvest clams. Moored bow-to in a slip at Wellfleet Harbor, proud bow standing clear of her “modern” plastic companions, she left no doubts about her purpose. Like most things designed around a function—the original Austin Mini of 1959, for example—the LYS gets under your skin. “What a cool boat,” I said to Baron.
Courtesy of Old Wharf Dory Co.
The plywood hull has been fiberglassed and inverted, and is being given side decks.
Her cockpit is nearly 21⁄2′ deep and makes a person feel safe. As I climbed aboard, I stood for a moment on the side deck. The LYS curtsied slightly and then rose to her level stance. Her flat bottom made short work of damping that tiny bit of roll there in the slip, and later in the confused seas and motorboat wakes of the outer harbor she proved to be equally adept.
Although the LYS is perfectly content at displacement speeds, she planes at about 12 knots and will stay on plane at about 10 as you back off the throttle. A 75-hp Tohatsu outboard powered my ride and could push her along at 20 knots or more in flat water. In the washing-machine conditions we experienced, exceeding 15 knots seemed foolish. As you can imagine, a flat-bottomed boat pounds in the rough stuff if you don’t slow down. On the other hand, the ride of the LY S 20 was good for her type. In the turns at speed, she leans in the way a V-bottomed boat does, just not as steeply. If you shift a substantial amount of weight to one side or the other, she will carve a turn on her chine the way a West Greenland kayak does.
Though I saw her only in photos, the LYS Sport 16 would be my choice if I ever decided to build a boat. Dressed up in a varnished mahogany steering console, bright rails and cockpit coaming, and with side decks and a relatively large foredeck (kind of an extension of the breasthook), she’s fit to carry her skipper and mate to the yacht club for dinner. On this model, Baron narrowed the transom a bit, which gave the LY S Sport a 4.5″ rocker (the standard 16 has a rocker of 2.74″ ). The bow is a little higher, too, and the package just seems more elegant. Baron charges $8,950 (less motor and trailer) for a fancy Sport 16. The bare hull is $3,250; plans are $50. A bare hull for the standard 16 sells for $2,650, and the bare 20 for $3,850. Plans for these are also $50.
Courtesy of Old Wharf Dory Co.
The completed skiff can be operated with simple steering, or a console can be added (see previous page).
I don’t know where you’d find such versatile, able, and handsome boats for less money spent on materials or less time spent building. The price of a new outboard—70 hp maximum for the LY S 20 with console steering, 50 hp for a tiller-steered 20; 30 hp for a tiller-or console-model LY S 16—will far exceed the price of the boat, even if you pay yourself at $50/hour shop time. Each model’s flat bottom and reasonable weight ease trailering, launching, and retrieving. The clam digger who loaned us his boat told me that he’s carried as much as 2,000 lbs of clams aboard his 20-footer. Other commercial users have related similar tales of exceptional payload, so you shouldn’t worry if you want to transport a crowd of family and friends to an island for a picnic. The LYS can handle it— and a whole lot of other jobs as well. When it wears out, take a chainsaw to it and build another one—you’ll still be ahead of the game.
This Boat Profile was published in Small Boats2008 and appears here as archival material. Plans for the LYS are available from Old Wharf Dory.
Take a shapely traditional boat, add an artist’s eye and a practical touch, update it for the way we live now, and you may have found tomorrow’s classic. This is the case for Iain Oughtred’s Acorn skiff. More than that, the design worked so well that it became a turning point for the creator’s career. Now in its seventh refinement, the Acorn, in its various sizes, remains one of Oughtred’s most popular designs. Acorns can be found from Oughtred’s native Australia to his adopted Britain, and from the West Coast of the United States to the East Coast, where its workboat roots are found. It will, no doubt, continue to be built for years to come.
Back when Oughtred first designed the boat in the early 1980s, he also compiled an annotated directory of wooden boat builders in Britain, finding some 300 around the country struggling with precious little encouragement. The directory and the boat helped raise awareness of wooden boats there. Maynard Bray, writing in WB No. 56, described the Acorn as an ideal lapstrake plywood boat for an amateur to build, “a sweet-lined, slippery little jewel.” The magazine also described her construction and has sold her plans ever since. “It gave me the funds and encouragement to continue [designing] when I might have stopped,” Oughtred reminisced.
The traditional type on which the Acorn is based is the Whitehall, which takes its name from Whitehall Street in New York City, where former Navy apprentices started building the type in the 1820s in the same general shape as pulling gigs or wherries. These boats had long, sharp bows, plank keels, rising floors, slack bilges, and flaring sides. “The after sections were slightly hollow at the garboards, and the transom was heart shaped,” historian Howard Chapelle wrote. Soon, they were built as stock boats and used by many people needing to move about America’s harbors, including ships’ chandlers, insurance adjusters, and pilots—and also for sailors going ashore to boarding houses and brothels. They rowed well and were sometimes sailed.
Photo by Kathy Mansfield
Designer Iain Oughtred’s Acorn 13 has evolved from a series of designs, starting with a 7′ 10″ dinghy. With his 11′ 8″ Acorn, he used a finer hull for rowing and sailing, and the 13′ version of the Acorn is simply the 11′ 8″ version stretched by spacing the construction molds a little wider.
Inspired by the refined Whitehall shape, Oughtred gave the Acorn skiff a clean entry, rounded bilges, a classic sheerline with beautifully tapered planks, and a wineglass transom. The shape of the sheer, with its low freeboard, provides two comfortable rowing positions, and the boat’s narrow waterline beam and lean hull sections aft under the transom’s curves give her good directional stability and a good turn of speed under oars.
By using epoxies and modern building methods, Oughtred’s plans stipulated very light construction. The lapped joints of her plywood strakes, when glued together, act like stringers, stiffening the hull longitudinally. With eight strakes per side and no frames or stringers, she’s light enough to be lifted on top of a car and transported. The knees and floors are laminated, so no steam-bending is necessary. Oughtred first designed an 11′ 8″ version, primarily as a rowing boat. With the Acorn 13, which is set up for both sailing and rowing, the forefoot is a little deeper and the transom smaller, and any loss in buoyancy aft is made up by having a longer boat where passengers can spread out. The designed building frame has been raised slightly, with molds shifted farther apart, making the building process easier, with just seven strakes a side. The plans, much revised, now include full-sized mold patterns so no lofting needs to be done. The beautifully drawn seven sheets of plans also give hull lines, a table of offsets, construction plans, sail plans, spar and rigging details, and drawings for both straight-and spoon-bladed oars. Detailed instructions and notes are included.
Oughtred suggests a nominal 1⁄4″ plywood for the hull, using okoume with mahogany or other hardwood outer veneers, or perhaps solid mahogany if a tougher hull is required. She can also be traditionally built, strip-planked, or cold-molded. Much of the complexity of a traditional boat has been cut out: she takes about 160 hours for an experienced person to build, with an additional 30 hours for the sailing version’s spars, daggerboard and trunk, and rudder.
I first saw an Acorn 13 skiff in Scotland, near Inverary on the banks of Loch Fyne, on a day when the blues and greens of the mountains shaded down to iridescent hues on the loch, and the water lapped on the pebbles of the beach across from a castle. A sailing skiff seemed to waft along on no breeze at all, and there was a spontaneous movement of people walking down from the lochside pub to have a look. The talk seemed to turn from boat construction to whisky, and it was only later that I learned that the boat had been built by students and Oughtred had fitted her out himself, making the floorboards, thwarts, spars, and other fittings from a very close-grained Douglas-fir that in its earlier life had been used to hold whisky in a Scottish distillery. Its golden color was perhaps partly the long, slow maturing of wood and whisky together.
Photo by Kathy Mansfield
Plywood lapstrake construction not only makes the boat lightweight buy also keeps the interior uncluttered and easy to clean.
The boat, named HOOLET, Gaelic for a little owl, looked perfectly at home on a loch, and her elegant, classic rig also packed in plenty of traditional detail. There were adjustable parrel beads on the jaws of her gunter spar, and the halyard and downhaul lines led down to belaying pins set in forward thwart, which supported the mast. I’d used belaying pins on a schooner and a medieval replica, but I found they worked fine on small skiffs, too.
The rudder fitted and lifted quickly, leaving a single-hander time to concentrate on the daggerboard in shallow waters: we were to find that very useful in a strong wind. But for the moment, there was little breeze, and even though four of us piled into a boat built for three, we ghosted along nicely, slipping past becalmed yachts and tacking almost under a bagpipe band playing on Inverary’s pier. With a sail area of 48 sq ft, she’s probably a bit overcanvased, but we were happy to have that extra power. She would have slipped along beautifully singlehanded. Her long, narrow waterline gave good directional stability but meant it was best not to put the helm over too quickly or too far when tacking, rather like her traditional forebears. There are several rigs to choose from in Iain’s designs: gunter, spritsail, and standing lug. All are fun to use and no doubt give the boat different sailing performances and characters.
There was another chance to sail HOOLET, this time after a night of rain and with a gale forecast for later in the day on the boisterous west coast of Scotland near Loch Melfort. First, I rowed her. She pulls beautifully, as mannered and elegant as the finest Thames skiff from farther south, quickly picking up speed and maneuvering neatly. But it would be a pity never to sail this boat. She can be well behaved with a small sail, a reef, or an extra passenger, but she came alive as we rounded the point into a very stiff breeze. She also proved Maynard Bray’s comment about the original Acorn skiff: “Make no mistake—she is neither particularly stable nor particularly burdensome. If you’re looking for a boat that you and your passengers can clomp around in, stay away from this one.” Oughtred suggested she’d suit retired Moth skippers in a good wind. Her round bilge meant that she was less stable when boarding her, but now she was up and flying, steady and responsive as long as you remembered not to spin her but to sail her around in a tack. Her clean interior made moving about easy, the crew sitting forward of the centerboard trunk. Iain is himself an excellent sailor, and his boats are built to his standards.
Only once have I succumbed to the danger of writing about beautiful boats—the danger being, of course, falling for the boat you have described. It was all about Oughtred’s Acorn 13. The feeling starts with a deep longing, subjective comparisons with alternatives, and eventually the checkbook comes out as another boat is added to the family fleet. There is always an excuse—and in this case it was like buying a work of art that had a practical use. Our daughter happened to be along at Inverary and was just the age to covet the control of her own boat. Plus, we lived near a river, not a lake, so a good rowing skiff would be ideal for summer evenings after work, with sailing a weekend option. The gunter rig would be easy for lowering under bridges. And what a jewel of a boat it is….
The Acorn 13 has the Whitehall type’s fine ends below the waterline and a lovely wineglass-shaped transom. To make the 13-footer, the 11′ 8″ version’s construction molds are simply spaced more widely. Sprit, lug, and gunter sail plans are available, each with identical sail area.
This Boat Profile was published in Small Boats 2008 and appears here as archival material. Plans are currently available from The WoodenBoat Store, P.O. Box 78, Brooklin, ME 04616; 800–273–7447; www.woodenboat.com.
The Technique article in this issue, “Checked Plywood Repair” by Kent and Audrey Lewis, is one that I took a special interest in. Several of the boats I’d built, and the teardrop trailer I’d built using the same materials and methods, have been showing areas of plywood that had checked. Work that had held up for years was being undone and I wasn’t sure why.
The oldest of the boats is the gunning dory I built for my father in 1980. John Gardner’s The Dory Book, published in 1978, was my guide for both my introduction to boatbuilding and the plans for the dory. It was the second planked boat I’d built, the first being a Marblehead dory skiff. With the exception of the garboards, both were traditionally built with red cedar planks on oak frames, all finished bright. I had taken Gardner’s advice and used plywood for the garboards to avoid the splitting he noted that happens to the short grain at the ends of natural lumber garboards.
A section of the port garboard in the stern of the gunning dory had the worst of the checking. I had hoped sanding and painting would cure the problem, but after three efforts over the course of several years, it was clear paint wasn’t the solution.
Several years ago—after the dory was kept at my dad’s rowing club, outside, under a tarp that I frequently found not fully covering the boat—the inside faces of the painted fir plywood garboards developed pronounced checks. Looking back again at my copy of The Dory Book, I saw I had underlined “plywood garboards,” but I did not mark what followed: “…plywood does not stand prolonged soaking and drying as well as natural lumber. However, this fault in plywood may be overcome to a large extent by sealing it with plastic.” I know now that by “plastic” Gardner meant “epoxy,” but 44 pages separate his garboard advice from his description of epoxy, and that description only indirectly connects it with “plastic” and covers only the use of epoxy as a bonding adhesive. So, I had only primed and painted the plywood.
I no longer have the dory skiff. In the mid-’80s, I think, I had sold it to a man who took it to Alaska. It last turned up on eBay in Connecticut in 2013, and the pictures posted with the ad seemed to indicate the boat was in very good shape. If it had been stored out of the weather, the plywood garboards might have been in good shape, even after 40-plus years. While building the skiff, I had studied Gardner’s 1977 volume, Building Classic Small Craft. In it, he notes that when using plywood for dory construction, “…coat the surface of the wood with paint and special sealers to prevent it from soaking up water too fast or drying out too quickly.” While several of the boats detailed in the book are made of plywood with joints covered with fiberglass tape set in epoxy, none of them are given overall saturation coats of epoxy. Instead, “before any paint goes on the plywood…the boat should be thoroughly soaked inside and out with a good wood preservative.”
In Gardner’s defense, at the time he wrote these two books, epoxy was still fairly new to amateur boatbuilding. The Gougeon Brothers on Boat Construction, which introduced wood/epoxy composite construction, was published in 1979 and provided a better understanding of the uses of epoxy. In the chapter, “Wood as an Engineering Material,” the Gougeons wrote, “our basic approach is to seal all wood surfaces with WEST SYSTEMS resins. This includes those that come into contact with air as well as those in contact with water.” Later books on composite construction, such as Devlin’s Boatbuilding, published in 1996, offered similar advice: “And always be sure to seal all plywood edges and surfaces with epoxy to ensure maximum longevity and help prevent moisture invasion and veneer degradation.”
The checking on the Caledonia Yawl’s paint is quite fine, but I suspect the cracks will grow with time as temperature and moisture take advantage of the access to the mahogany plywood underneath.
For most of the boats I built in later years, I used a traditional approach and rarely used plywood. Then in 2003, I switched to glued-lap plywood construction to build Iain Oughtred’s Caledonia Yawl. I used his 1998 book, Clinker Plywood Boatbuilding Manual, as a guide and finished the BS-1088 with plywood primer and semigloss alkyd enamel, without first sealing it with epoxy. Oughtred was of the same mind and noted “I have never coated a boat with epoxy.” My Caledonia’s finish held up well during the 16 years the boat was kept in my garage, but it had to give up its place for another boat and spent 3 years outside under tarps. The paint has now developed a barely discernible pattern of fine checks.
The application of fiberglass on the Escargot was a bit slipshod and there was a gap between pieces of fiberglass. While epoxy covered the exposed plywood in between, that alone wasn’t able to keep the fir plywood from checking.
In 2009, when my son Nate and his high-school pal decided to build an Escargot canal cruiser, I steered them to marine-grade fir plywood because it was less expensive than the mahogany options. The instructions called for sealing, priming, and finishing with marine or deck paint. Nate and I had seen another Escargot—built of fir plywood and painted—and noticed that the finish had checked. We would prevent that by sheathing the exterior surfaces in fiberglass and epoxy. After a dozen years of being parked on the driveway on the sunny south side of the house, covered with poly tarps, the Escargot’s plywood is without checks, with one exception: a 1″-wide gap between spans of fiberglass where the wood was protected by epoxy alone. Some significant cracks in the paint have appeared there.
HESPERIA’s sides are in need of being sanded and coated with epoxy, if not epoxy and light fiberglass. I’ve marked a rectangle in pencil for an area to sand for a test.
The following year, 2010, I built HESPERIA, my garvey camp-cruiser, using BS-1088 plywood and finished with primer and paint. Only the cabin roof got a layer of fiberglass to give its 1/4″ plywood additional strength. The boat spends its time outside under tarps, and the painted surface is now covered with fine but easily noticed checks.
A small section of the mahogany plywood on the teardrop trailer shows that epoxy does help prevent, or at least forestall checking. Just above the patch of checking at the bottom there is a band of intact paint that covers a seam between plywood sheets. The epoxy applied to that joint coated some of the plywood around it and protected it. The pencil marks indicate another area that I would sand and apply a test coating of epoxy.
A teardrop trailer that I built in 2013, and now parked in the back yard, is in even worse condition. I’d built it with the same materials I’ve used for boats, and the plywood on the roof cracked so severely that a couple of years ago I had to peel loose veneer off and fill the voids with ’glass and epoxy before sanding the whole top to bare wood and applying 6-oz ’glass cloth and epoxy. The varnished mahogany plywood sides are badly checked in spite of being sanded and revarnished at least twice; the painted front end looked fine when I ’glassed the top, but it is now checked. I noticed one small area flanking a joint between plywood panels that was still in good shape. It had been protected by the epoxy I’d squeegeed alongside of the seam.
My plywood Greenland kayak, built in 1994, has been outside for much of its life and doesn’t seem much the worse for it.
Two of my boats have survived for decades without any evidence of checking. One is a plywood Greenland-style stitch-and-glue kayak I built in 1994. It is sheathed inside and out with fiberglass cloth and epoxy, primed, and painted. While the kayak’s red topcoat has been worn away in places, there is no evidence of checking despite being stored outside for decades, sometimes covered with a tarp, other times exposed to the weather.
The paint along the kayak’s keel has been worn away by beach launchings and landings, but there is no sign of checking.
The other boat with its finish still unchecked is a decked lapstrake tandem canoe I built in 1988. I got the design from Canoe and Boat Building by W.P. Stevens, published in 1889, and followed the construction method describe by Thomas Hill in his 1987 book, Ultralight Boatbuilding. He, too, wasn’t in favor of an epoxy coating, writing “I do not recommend epoxy saturation for these canoes. Some people believe epoxy applied to plywood prevents checking. I’m not convinced.” He cites two boats that were badly checked in spite of five coats of epoxy on a transom in one case, and epoxy and fiberglass on the deck in another. I followed his advice and finished my canoe with primer and enamel.
My lapstrake plywood canoe is 33 years old and still has only its original varnish and paint and primer.
Aside from the wear and tear caused by use, the paint and varnish on the canoe I built in 1988 has never been refinished and yet is still in good shape and So why did HESPERIA, which had received the same finish, fare so poorly after just 11 years? What differentiates the two is how they have been stored. That canoe has always been out of the weather, either in a basement, under the eaves on the shady side of a house, or in a garage. The cruiser has had only tarps to shelter it and they’ve done little to mitigate the effects of hot summer days.
While the advice I’d gathered over the past about using plywood fell into two camps—pro-paint and pro-epoxy—the experience I’ve gathered from the boats I’ve built says they can’t both be right, but there is a part of the discussion that seems to be missing from all of the books I’ve read: Where is the boat going to be stored? Primer and paint are inexpensive, get a boat finished quickly, and can last decades if kept out of the weather. Sunlight and moisture will take a toll on the plywood of a boat kept outdoors, even if under a tarp, and for those boats, epoxy saturation and fiberglass sheathing will add to the weight, cost, and labor but will buy time.
Shearwater might well be the best all-round pulling boat at the WoodenBoat waterfront—at least she was, before we installed a centerboard trunk.
When Joel White drew this elegantly simple 16′ double-ender, he recalled the traditional boats of western Norway. (At first, he named the new design “Joelselver.”) The hull’s narrow breadth at the waterline permits a slender immersed shape. Above the water, Shearwater’s sides rake outward, which provides buoyancy and reserve stability for the able little boat. The strongly raked sides also produce sufficient breadth at the rails for efficient long oars. Deliberately low freeboard reduces windage, and wind is a persistent enemy of oarsmen. Shearwater makes good speed when pulled with moderate effort, and she carries (glides) well between strokes.
A slight touch of rocker (fore-and-aft curvature) to the keel gives maneuverability, but this skiff retains adequate directional stability. Shearwater can turn quickly, and yet she handles well in a following sea. Boats with dead-straight keels and sharp ends might get us to windward quickly, but they often transform into tripping and broaching monsters when we’re running off.
Photo by Benjamin Mendlowitz
Shearwater, shown here under oars with her push-pull tiller stored aboard, rows beautifully. Her rig might be considered auxiliary propulsion, while the oarsman is the primary engine.
This plywood-lapstrake skiff goes together easily. WoodenBoat School students built our boat in less than two days. The eight sheets of building plans include full-sized paper patterns for frames and other components. Lofting, that is re-creating the hull lines at full scale, is not required…but paper has a nasty habit of shrinking, stretching, and slipping. Unless you work in a climate-controlled shop, you might want to redraw the lines on the floor or on sheets of white-painted plywood.
The act of lofting is inexpensive, educational, and clean. Many of us consider it good fun. Perhaps most important, it allows us to build the boat in our minds before cutting into costly mahogany plywood. For a friendly primer on this subject, see the “Lofting Demystified” section of Greg Rössel’s book Building Small Boats (WoodenBoat Publications, 1998).
The hull’s strakes (three per side) hang on three laminated frames. This glued-lapstrake hull almost demands the use of epoxy as an adhesive—for its gap-filling properties as well as its strength. While the epoxy cures, we’ll temporarily secure the strakes with steel drywall screws driven through the laps along the entire length of the hull. Let’s not forget to remove these ferrous fastenings, and to fill the resulting holes, sometime before painting. Where the strakes cross each frame, we’ll employ bronze screws. These fastenings of eternal metal will remain in place for the life of the boat.
Joel White drew a standing lug rig to provide auxiliary propulsion for Shearwater. This simple arrangement offers low-centered, easily controlled power and short spars that can stow in the boat for trailering. Unlike most modern rigs, it requires no standing rigging (stays, usually of wire rope, that support the mast). We’ll need only a little store-bought hardware. Just two blocks (pulleys) are specified on the plans.
Photo by Benjamin Mendlowitz
Rigged for sail, Shearwater makes a handy camp-cruiser. The one shown here, a larger, deeper 18′ version of the original, explored islands in Maine in mid-August.
Take some care in sewing and setting the lugsail. It appreciates having sufficient draft (don’t cut it too flat), and it likes to have the halyard secured to the yard in just the right place. Casual experimentation during the first few sails should reveal the proper setup. Keep sufficient tension in the luff (the sail’s leading edge) by tightening the downhaul (a short line at the forward end of the boom). As the yard comes down at day’s end, it does so head-first. Grab hold of that stick before it takes aim at your head. Minor cautions aside, this rig seems reasonably tolerant of inattentive setup.
After we become accustomed to the Norwegian-style push-pull tiller, Shearwater sails fast and handles well in light and moderate air. As the breeze comes on, the helm gets heavy and the bow begins to punch through waves. It’s time to strike the rig. Joel knew well the foolishness of pressing a low, narrow, undecked skiff in strong winds. He viewed this skiff as a pulling boat, with auxiliary sailpower.
WoodenBoat’s Shearwater spent two years as a pure pulling boat. Then, yielding to temptation, we commissioned the addition of sailing gear. The resulting clutter of spars and the hydrodynamic drag caused by the centerboard trunk degraded the boat for rowing.
If we look at Shearwater’s bottom, the narrow slot into which the centerboard retracts appears harmless. In fact, it generates considerable drag. A long time ago, I rowed and sailed prototype fiberglass skiffs that had been laid up without gelcoat (the opaque, and often colorful, outer layer of pigmented resin seen on most ’glass boats). The translucent hulls allowed us to study water flow and wave formation as we looked out through the hulls while sailing—educational, and far more entertaining
than network television.
Photo by Benjamin Mendlowitz
Shearwater is a lithe, easily built adaptation of a traditional Norwegian design—the oselver, or Os estuary boat.
As the boats moved through the water, we observed extreme turbulence in the after ends of their centerboard trunks. When we’re rowing, energy to drive this undulating light show must come from us. Even the strongest man can produce, at full effort, but a fraction of the power available from wind or mechanical contrivance.
After we learned the magnitude of increased drag, sailors worried about loss of speed—even when they were not racing. Oarsmen begrudged wasting their limited energy. In order to reduce drag, we sometimes covered the offending slots with neoprene flaps secured with bronze half-round and screws. Today, I’m told that we might use Mylar tape (slit longitudinally with a sharp knife after being applied to the hull). Perhaps you’ll consider rigging your Shearwater only for rowing. We tampered with perfection and spoiled it.
Although she’s not big compared to other 16-footers, this boat has plenty of room for solitary beach cruising. We’ll row through the morning calm and sail on the afternoon’s breeze. When we hit the beach, we can roll or drag the 150-lb cruiser up and away from danger. After supper, we’ll lift out the thwarts, and the floorboards will make for a comfortable bed. If we’ve rowed a long stretch at a fair pace, sleep should come easily.
Shearwater’s glued-plywood construction will withstand drysailing more handily than her solid wood cousins. She’s lighter, too, making for a more nimble recreational craft.
This Boat Profile was published in Small Boats 2008 and appears here as archival material. Plans are available from the WoodenBoat Store for $75 (as of 2022).
Continue Reading - Enter your email to log in or subscribe
New to Small Boats? Create a free account to get our weekly emails and two free articles each month.
Time to upgrade!
You've read all of your free content for the month. Upgrade to a paid subscription for unlimited access.
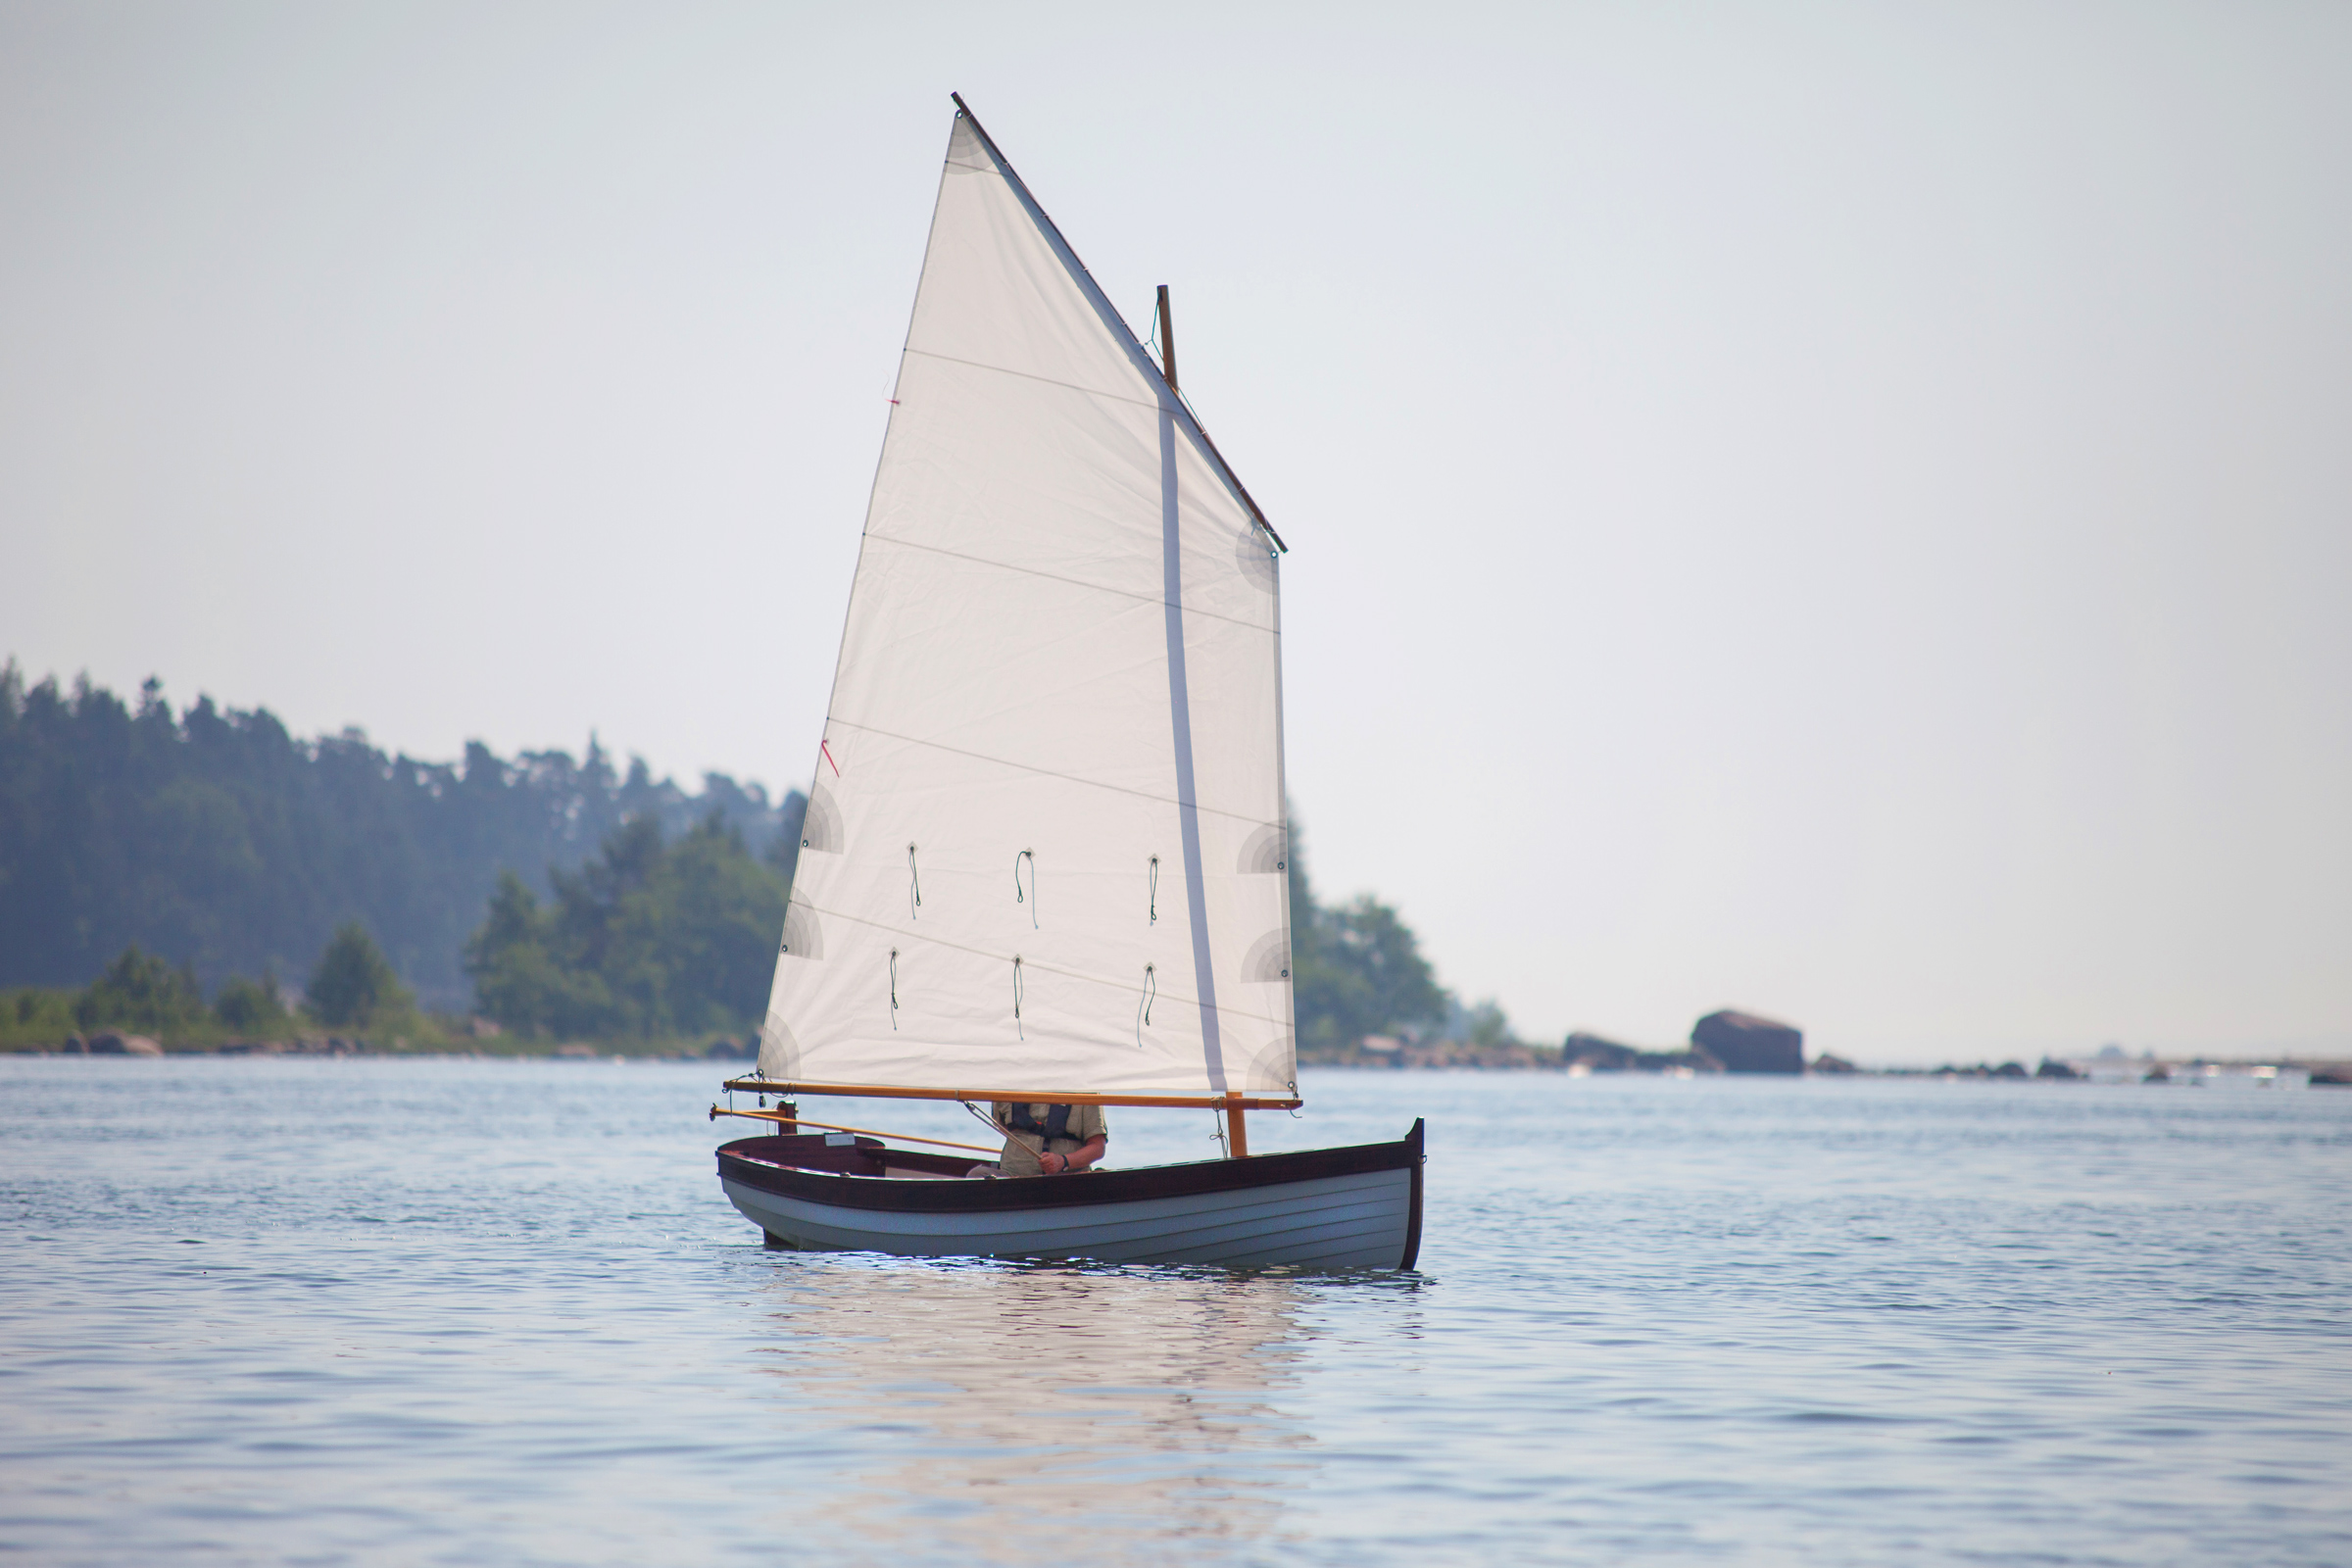 Mats Vuorenjuuri
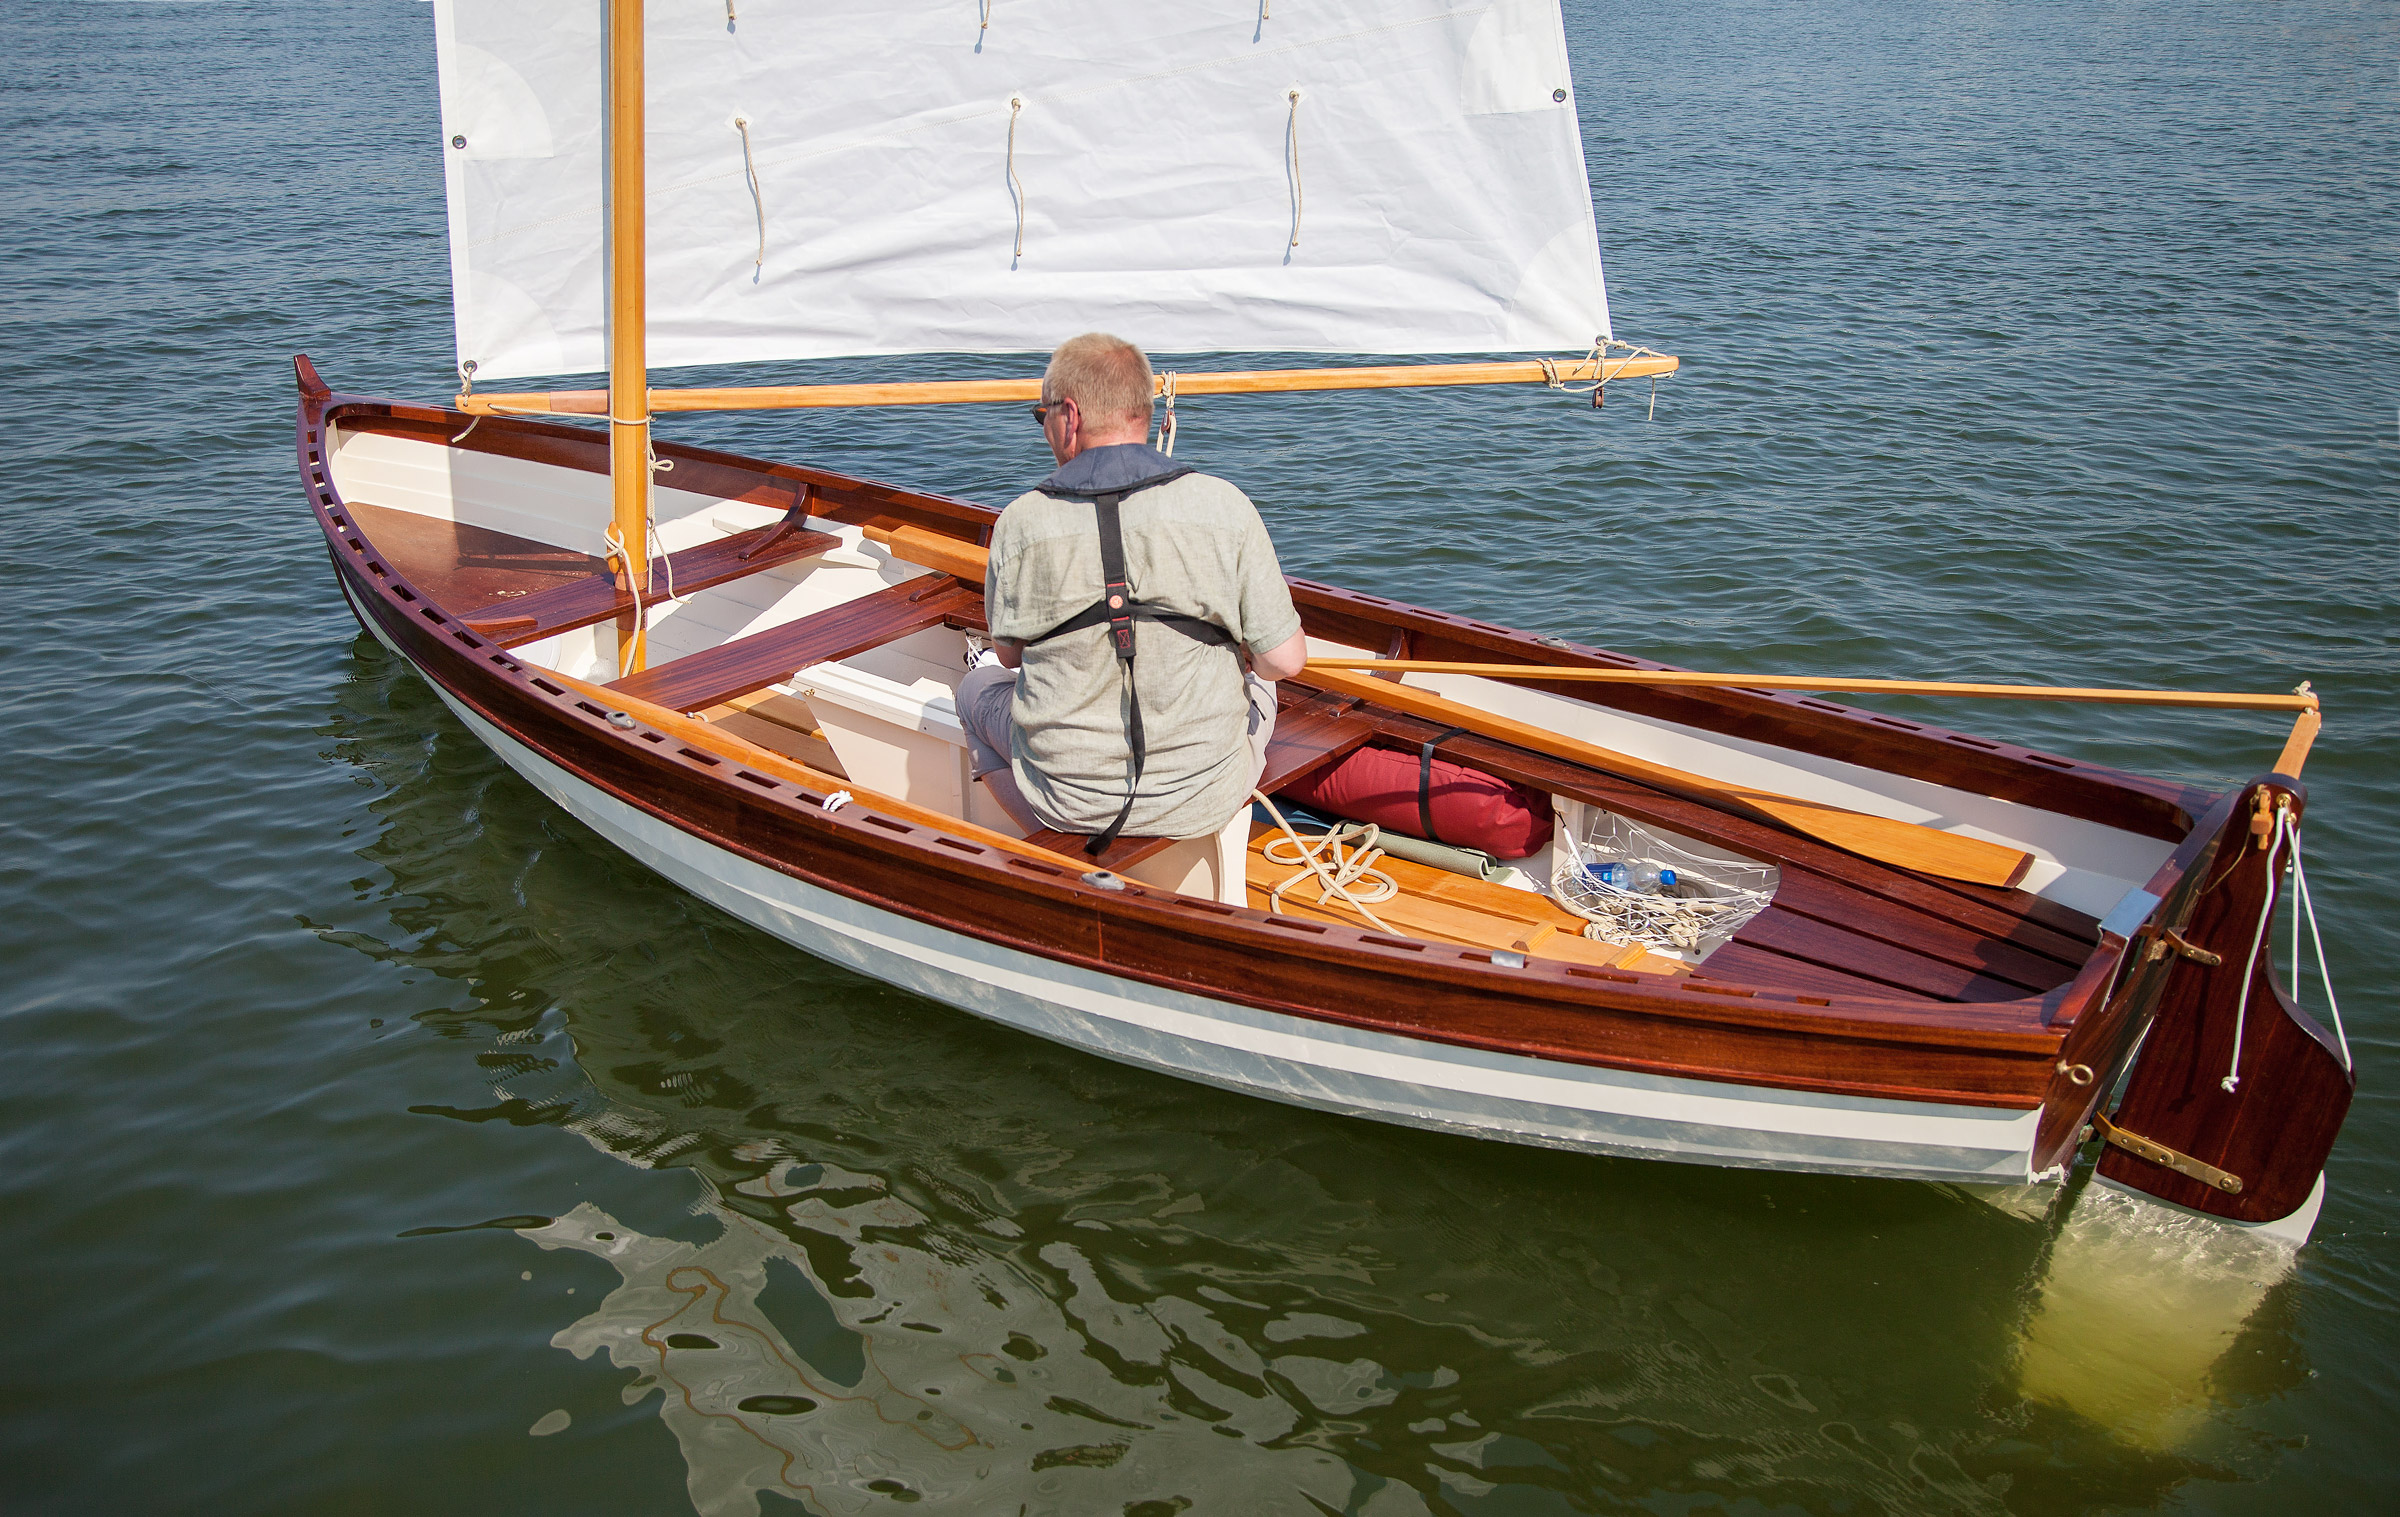 Mats Vuorenjuuri
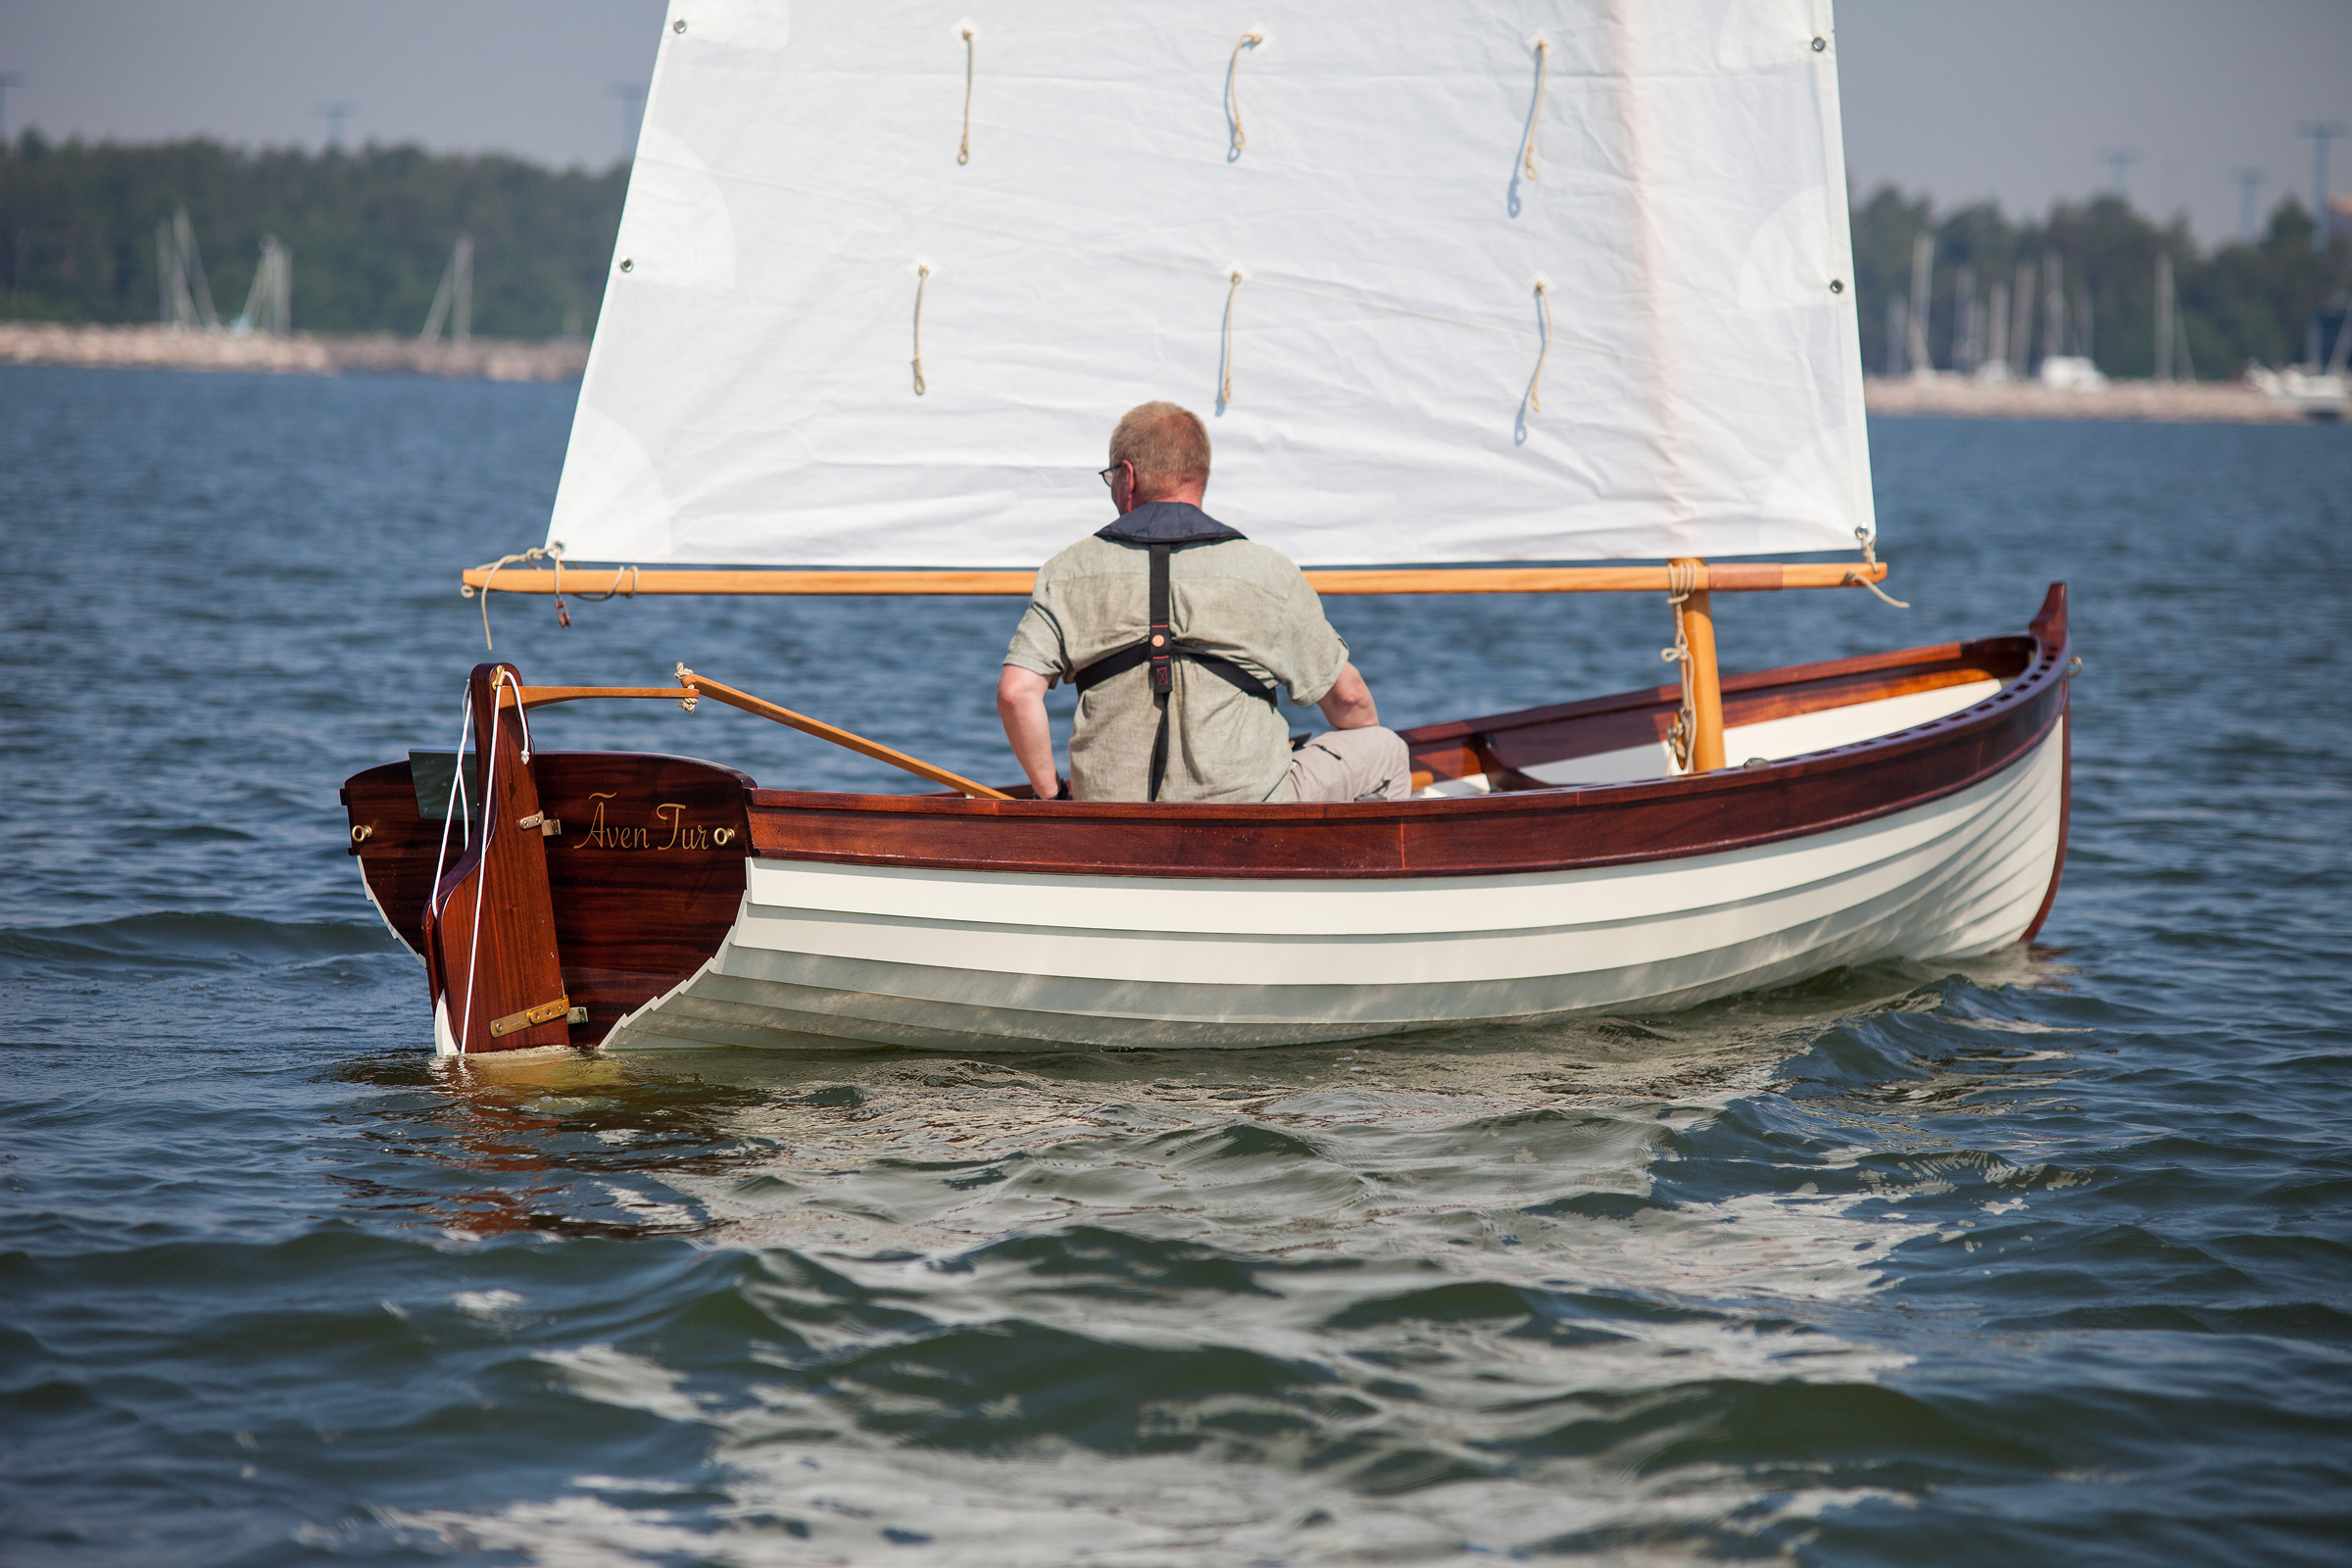 Mats Vuorenjuuri
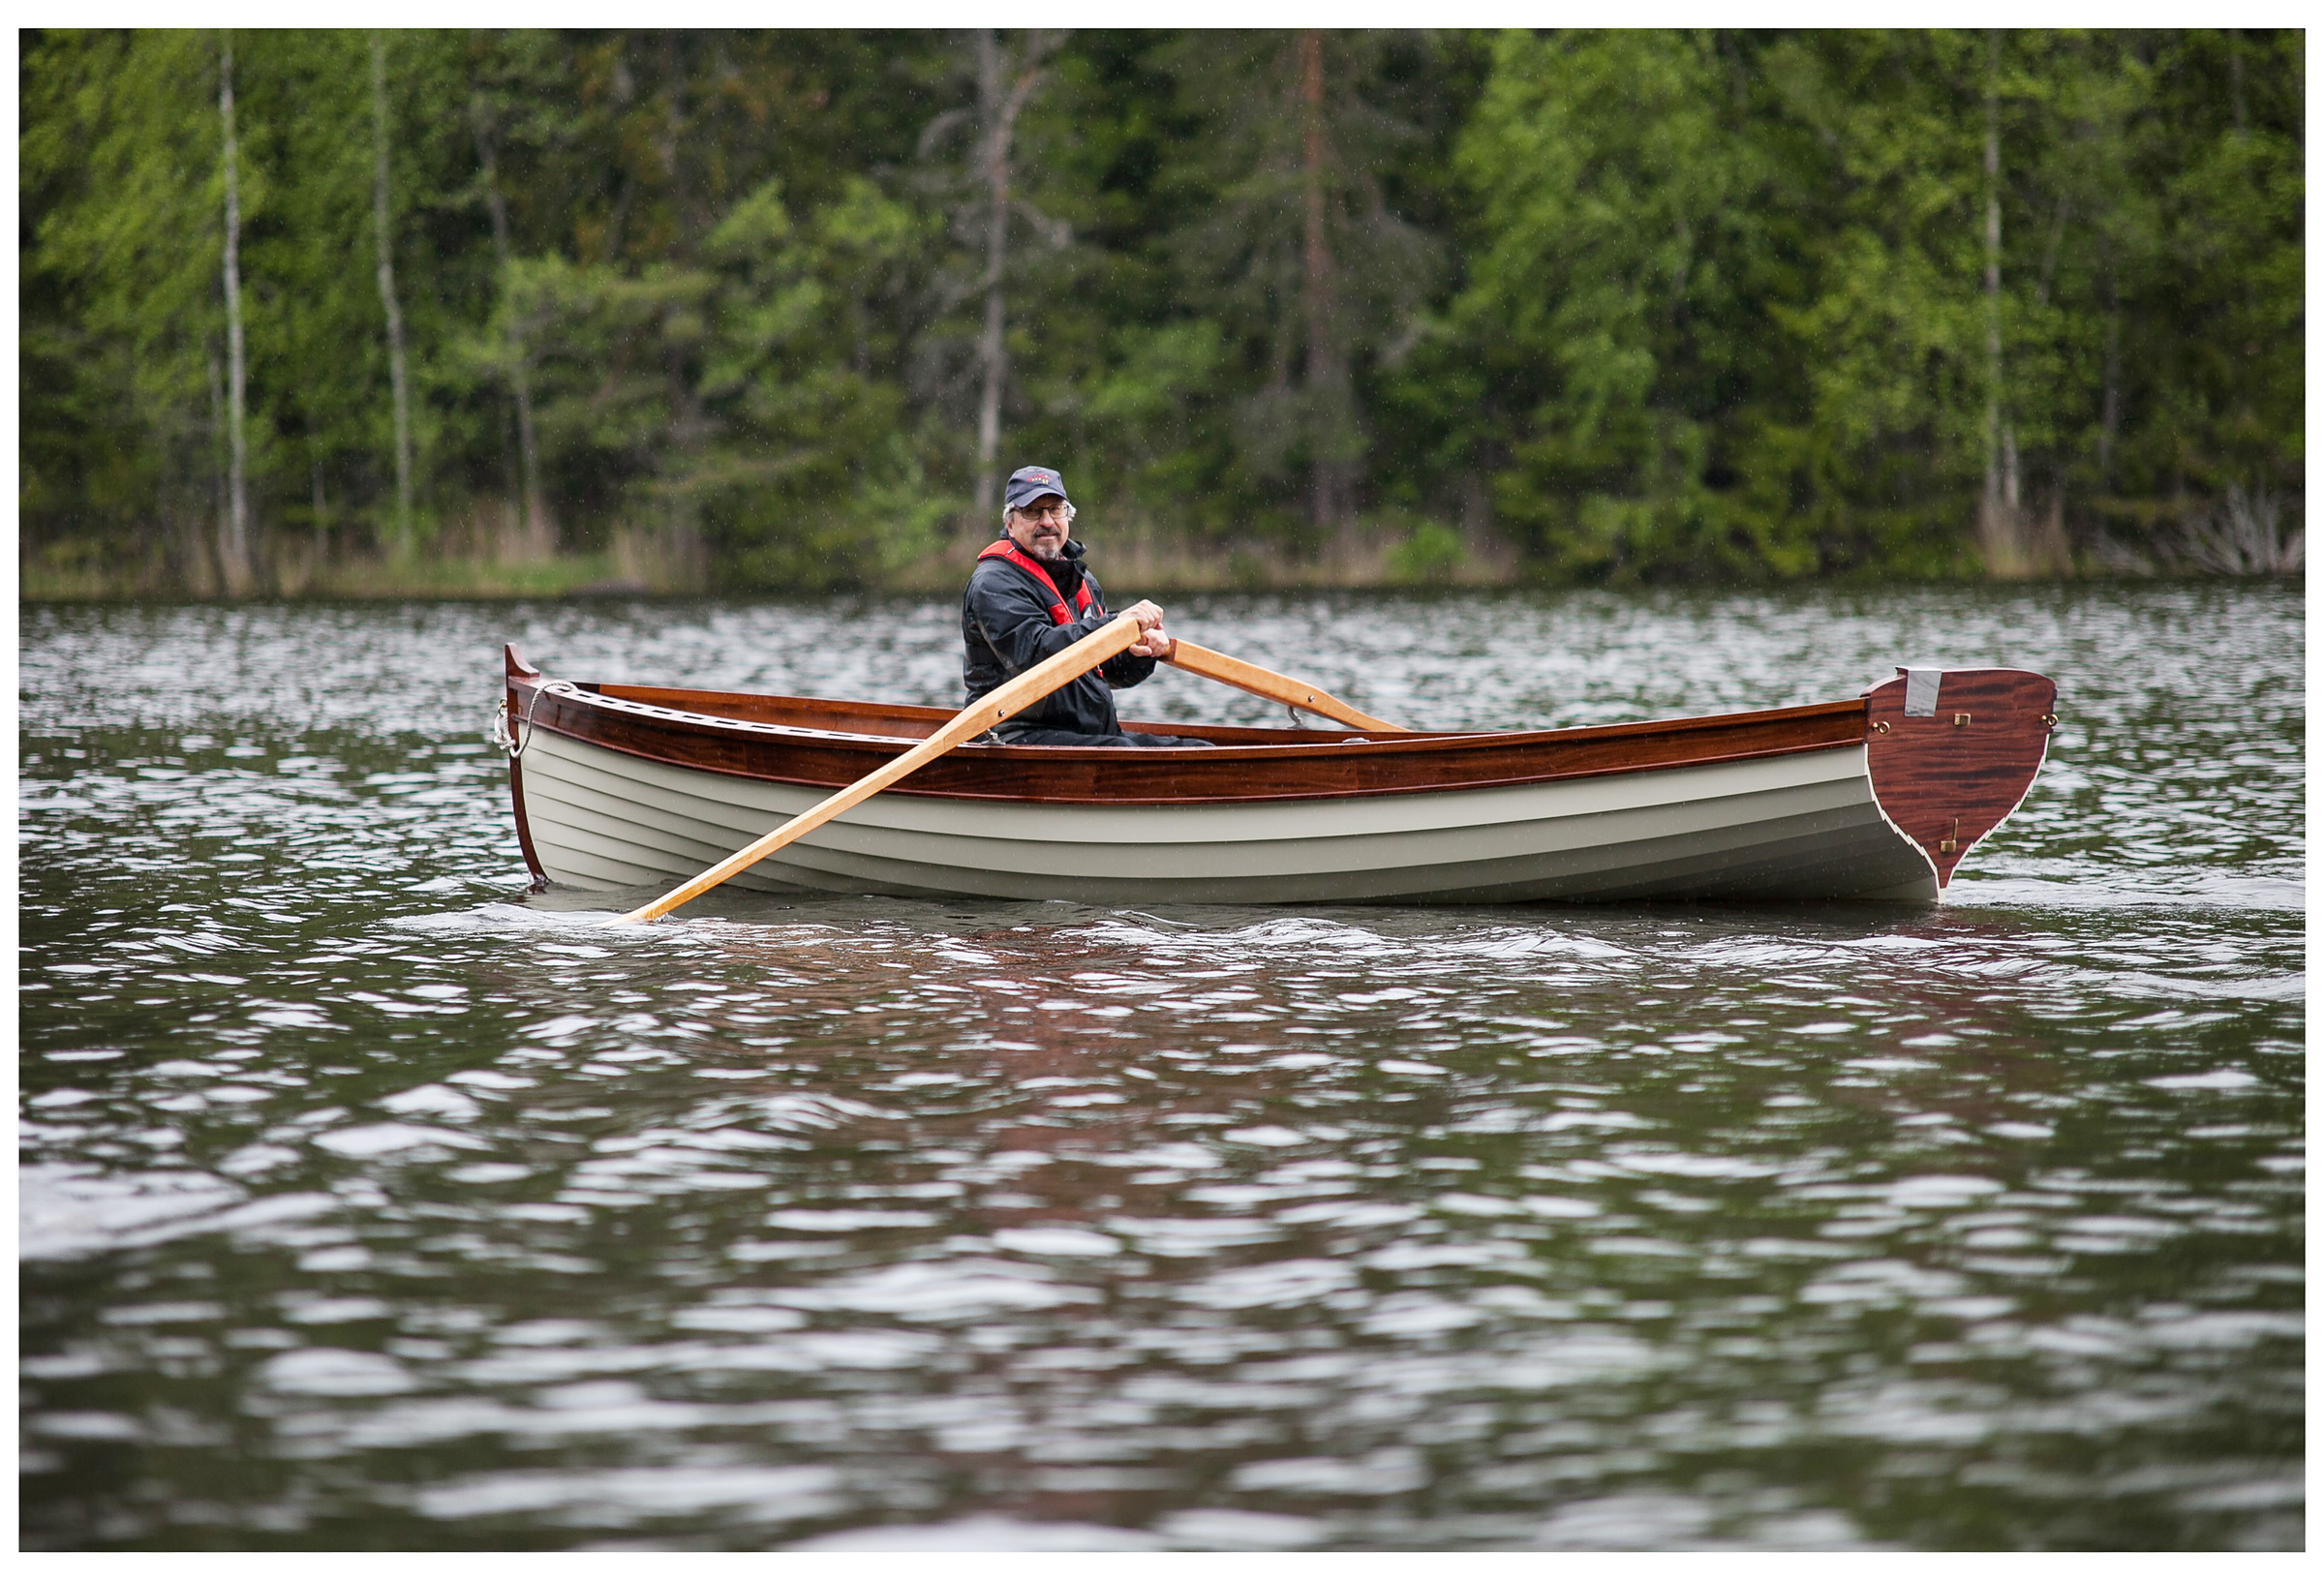 Mats Vuorenjuuri
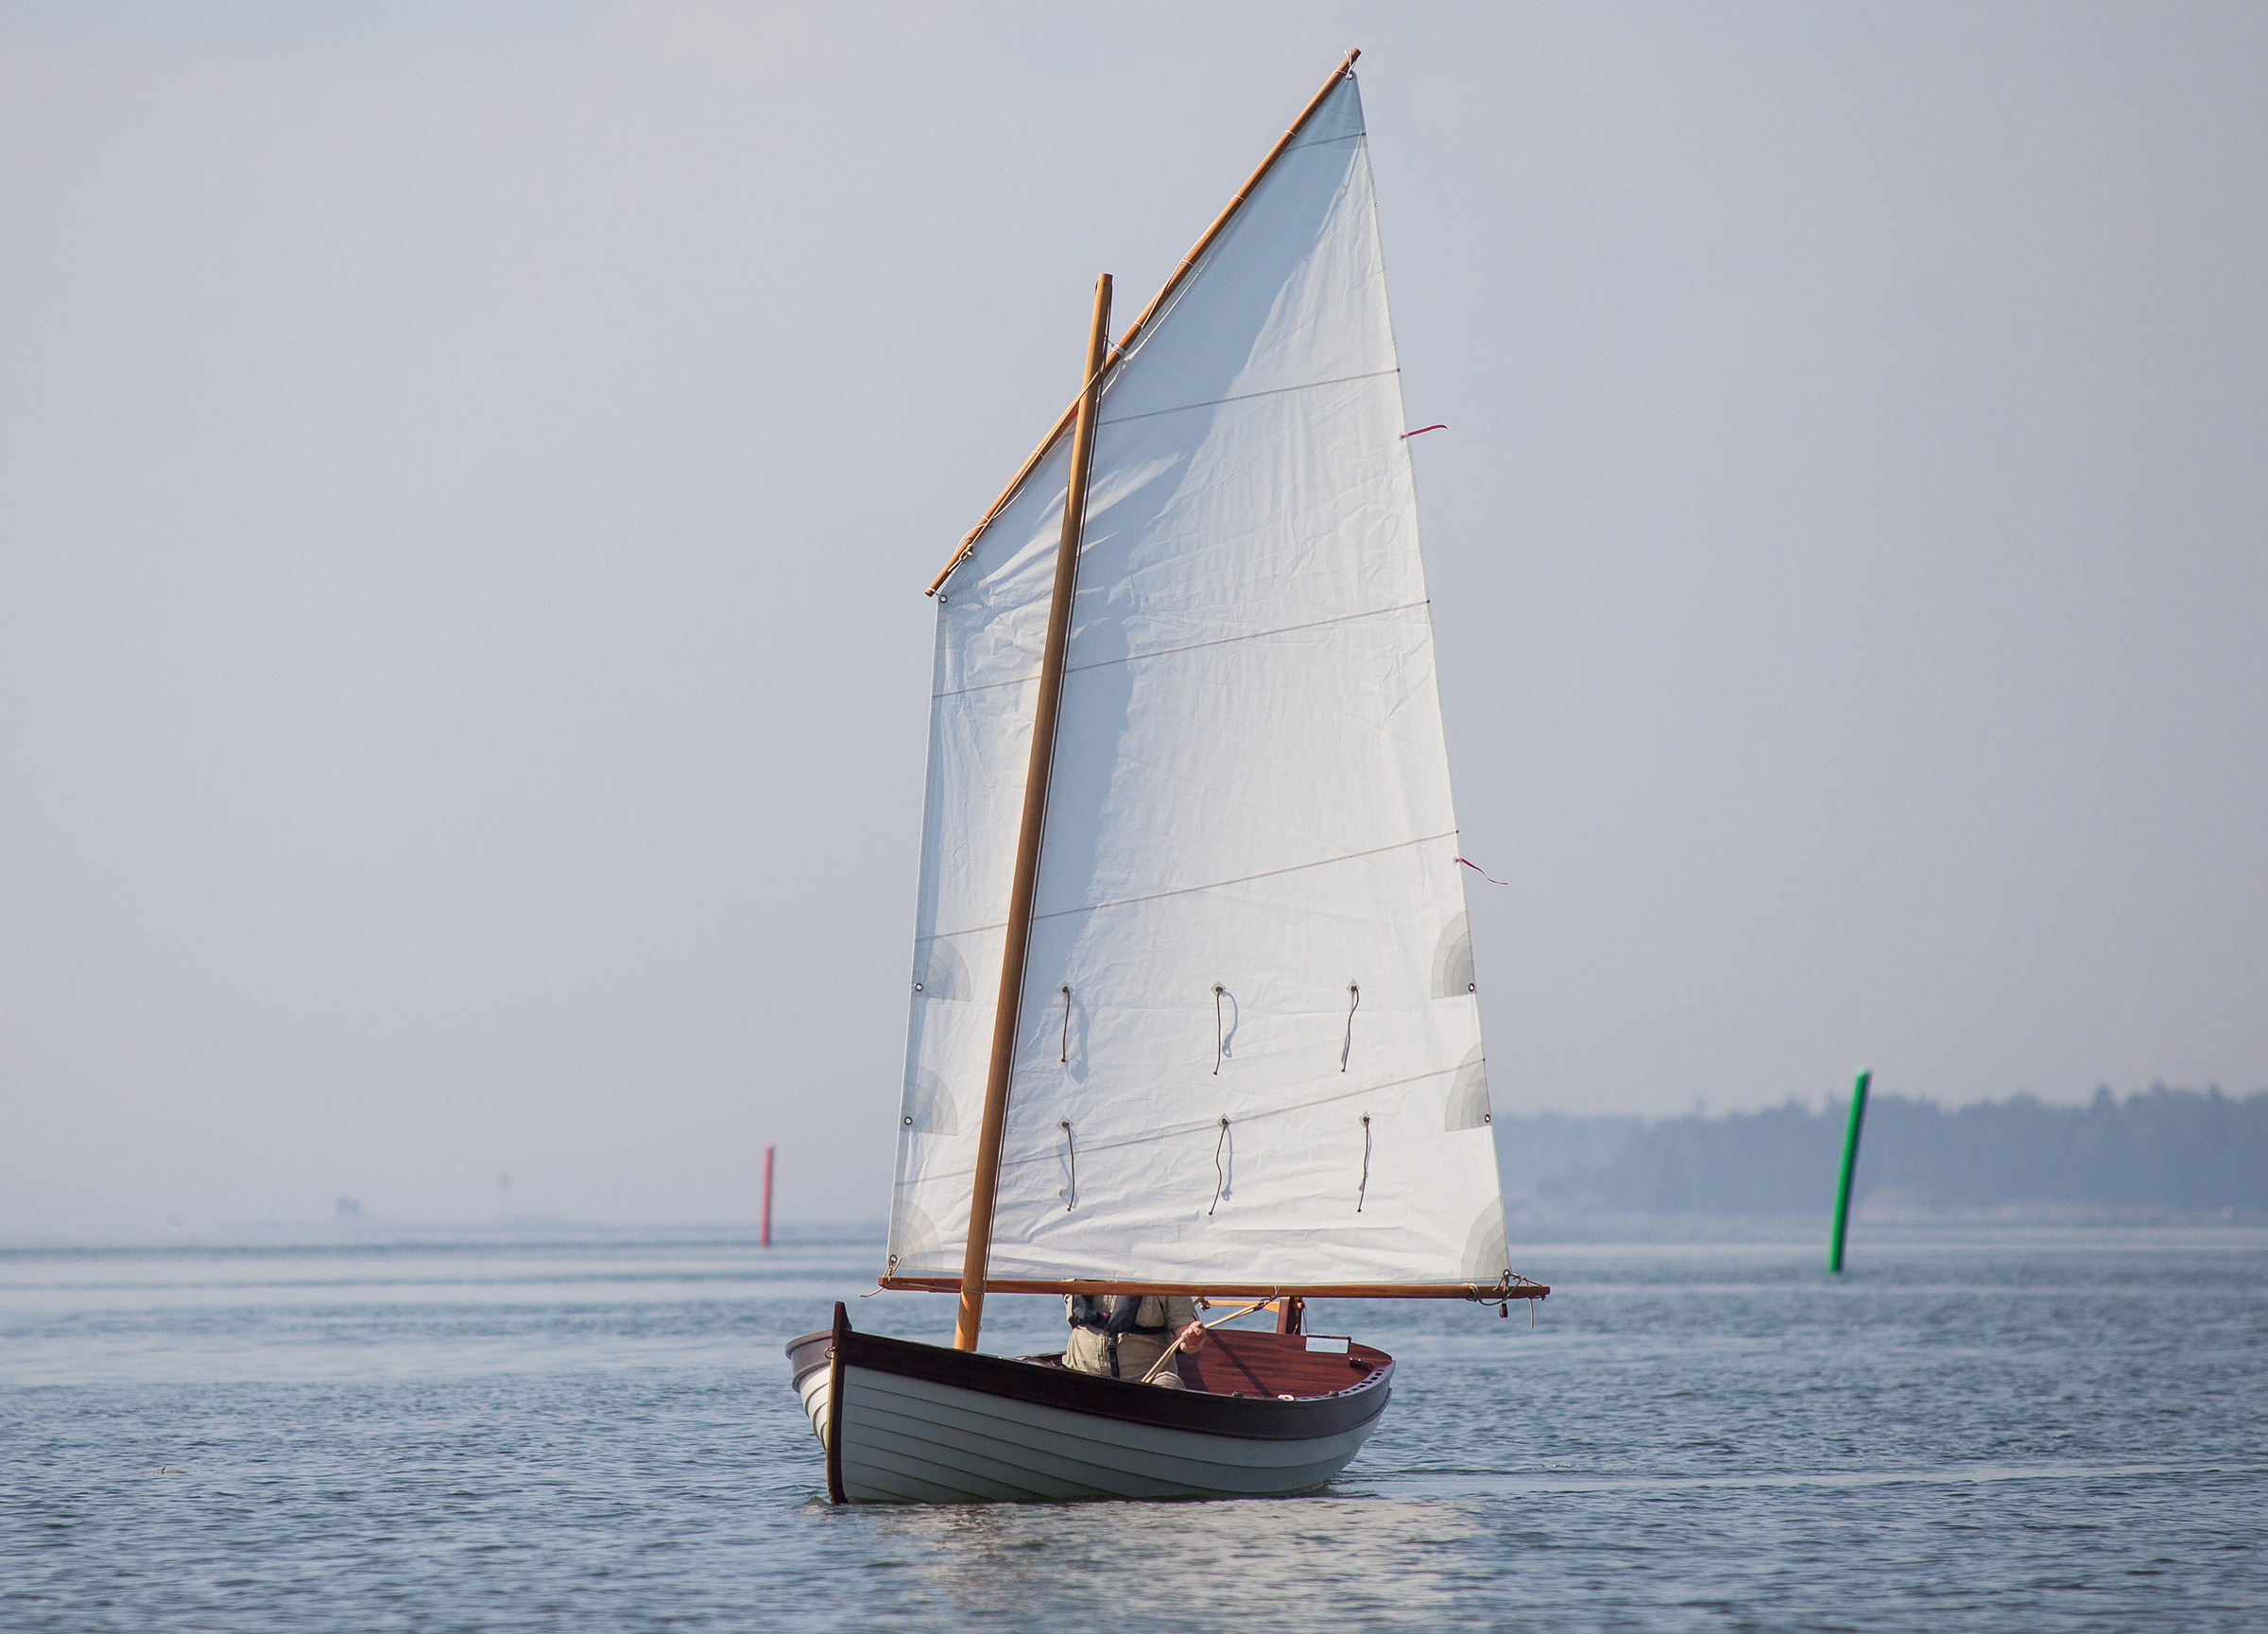 Mats Vuorenjuuri