If you are anywhere near the water, it has probably been hard to overlook the explosion in popularity of the stand-up paddleboard (SUP). Derived from surfboards, the larger and more stable SUP allows a paddler to stand in relative comfort and cruise along the water using a long paddle. Many wooden boat designers have taken notice and have answered the demand for good-looking, wooden SUPs.
My wife grew up inland and doesn’t have the deep affinity to the water and wooden boats that I do, but that changed one day a few summers ago when we rented some SUPs on a local river. She took to stand-up paddling with enthusiasm. It was fun, easy to learn, and offered an exciting way for her to get on the water; I saw a good opportunity for me to combine her interest in stand-up paddling with my passion for building wooden boats.
Right about this time, the Australian-born designer Michael Storer developed a wooden SUP and named it Taal after a lake near his home in the Philippines. The boats and canoes he designs are light yet strong, and while they may appear to look simple at first glance, they are actually sophisticated, elegant, and fast. His 12′ 6″ Taal is no exception. While many production SUPs resemble surfboards, they are rarely used for riding waves; they’re most often used on flat water. The Taal is designed like a displacement hull rather than a surfboard and optimized for speed, tracking, smoothness of ride, and stability on flat water.
I downloaded the PDF manual from Duckworks. It’s a comprehensive 72-page book with excellent instructions, color photos, and measured drawings. It is important to follow the plans exactly in order to achieve the boat Storer has designed. This build is more complex than most of his others and is not recommended for a first-time boatbuilder with no prior stitch-and-glue or epoxy experience. Precision in shaping the pieces and thorough epoxy application are the keys to a successful build. Dimensions in the manual are given in metric measurements—one millimeter is a finer measurement than the 1/16” mark on most tape measures.
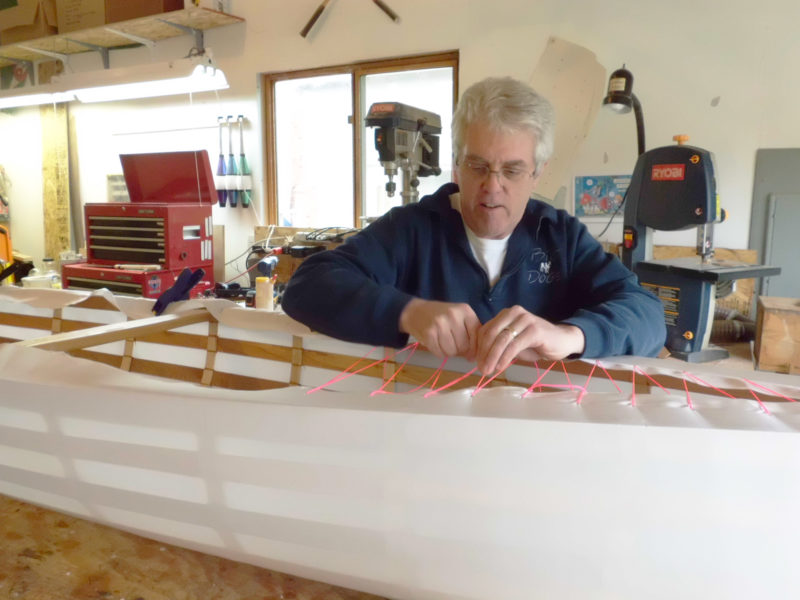
The Taal requires three sheets of 3mm okoume plywood and some 8mm western red cedar. I was able to cut all the plywood parts out with a utility knife, as suggested in the instructions. The board is built a bit like an airplane wing with six bulkheads, a transom, and a longitudinal center plywood web that defines the shape of the board. A template for the deck camber assures that the tops of the frames all have the same curve. A second template, a half bulkhead, ensures uniform placement of stringer and deck-cleat notches.
Christophe Matson
The frames are concentrated in the board’s midsection where they support the paddler, leaving the ends and the overall weight light.
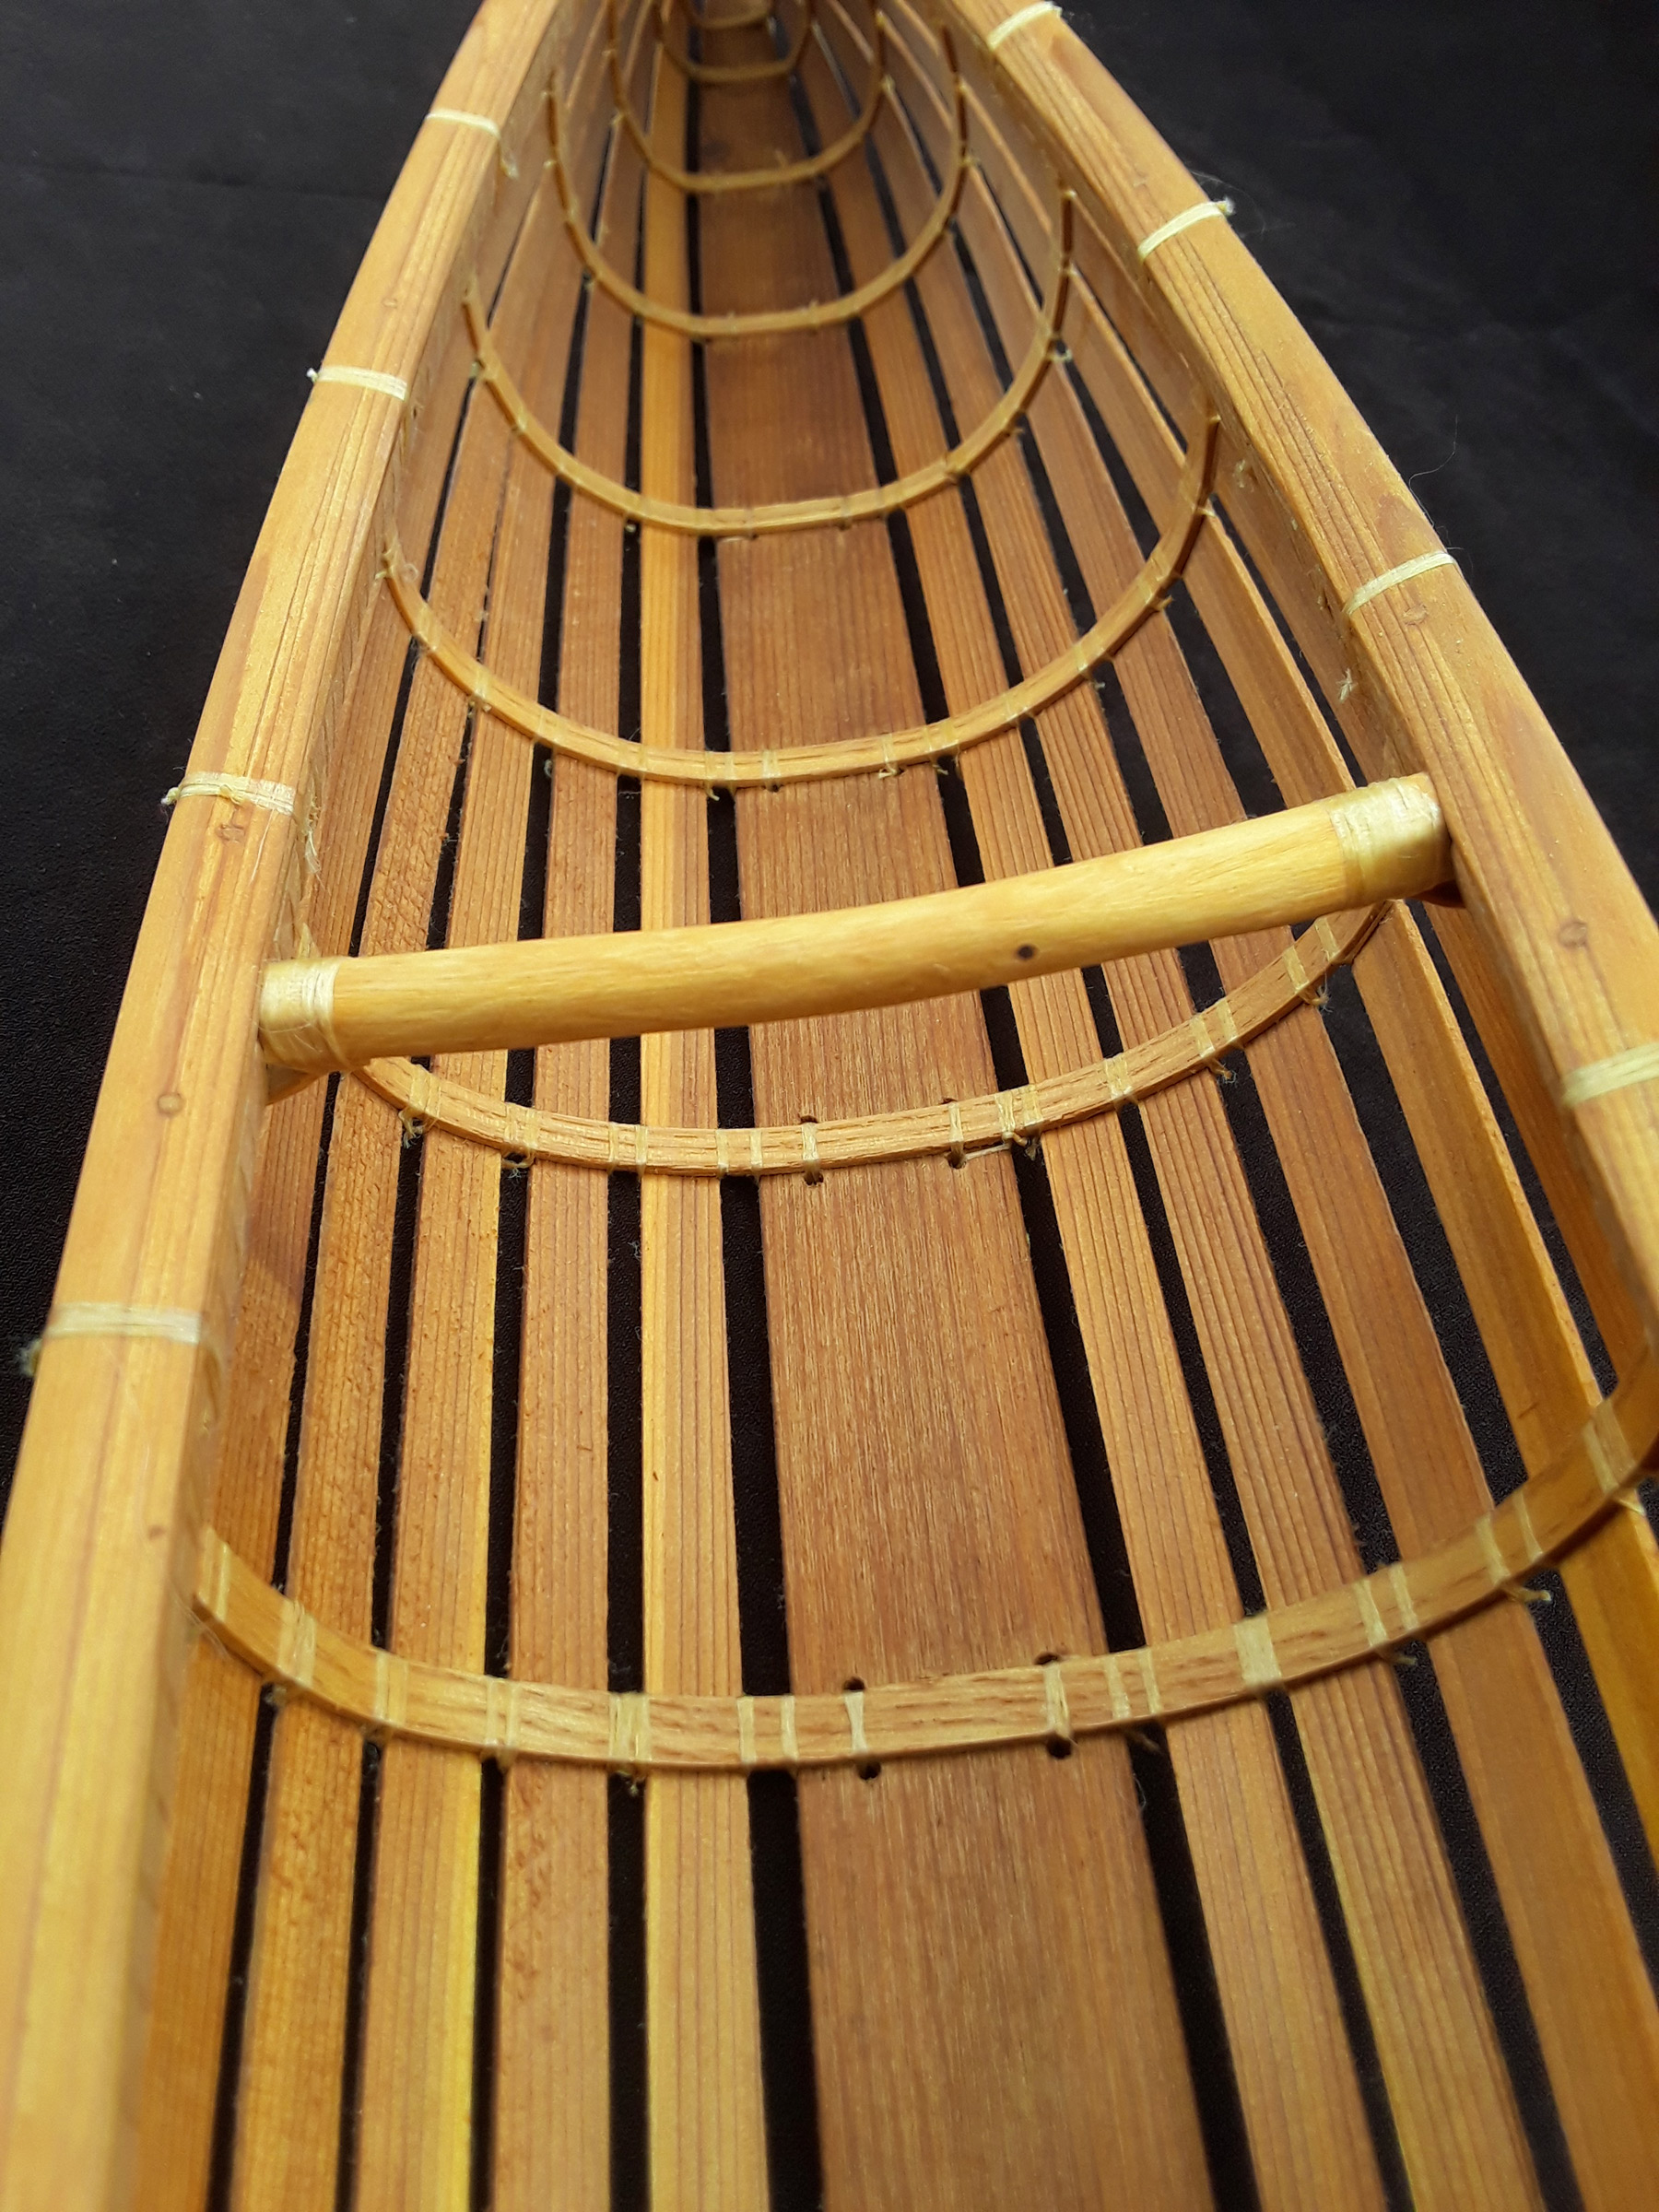
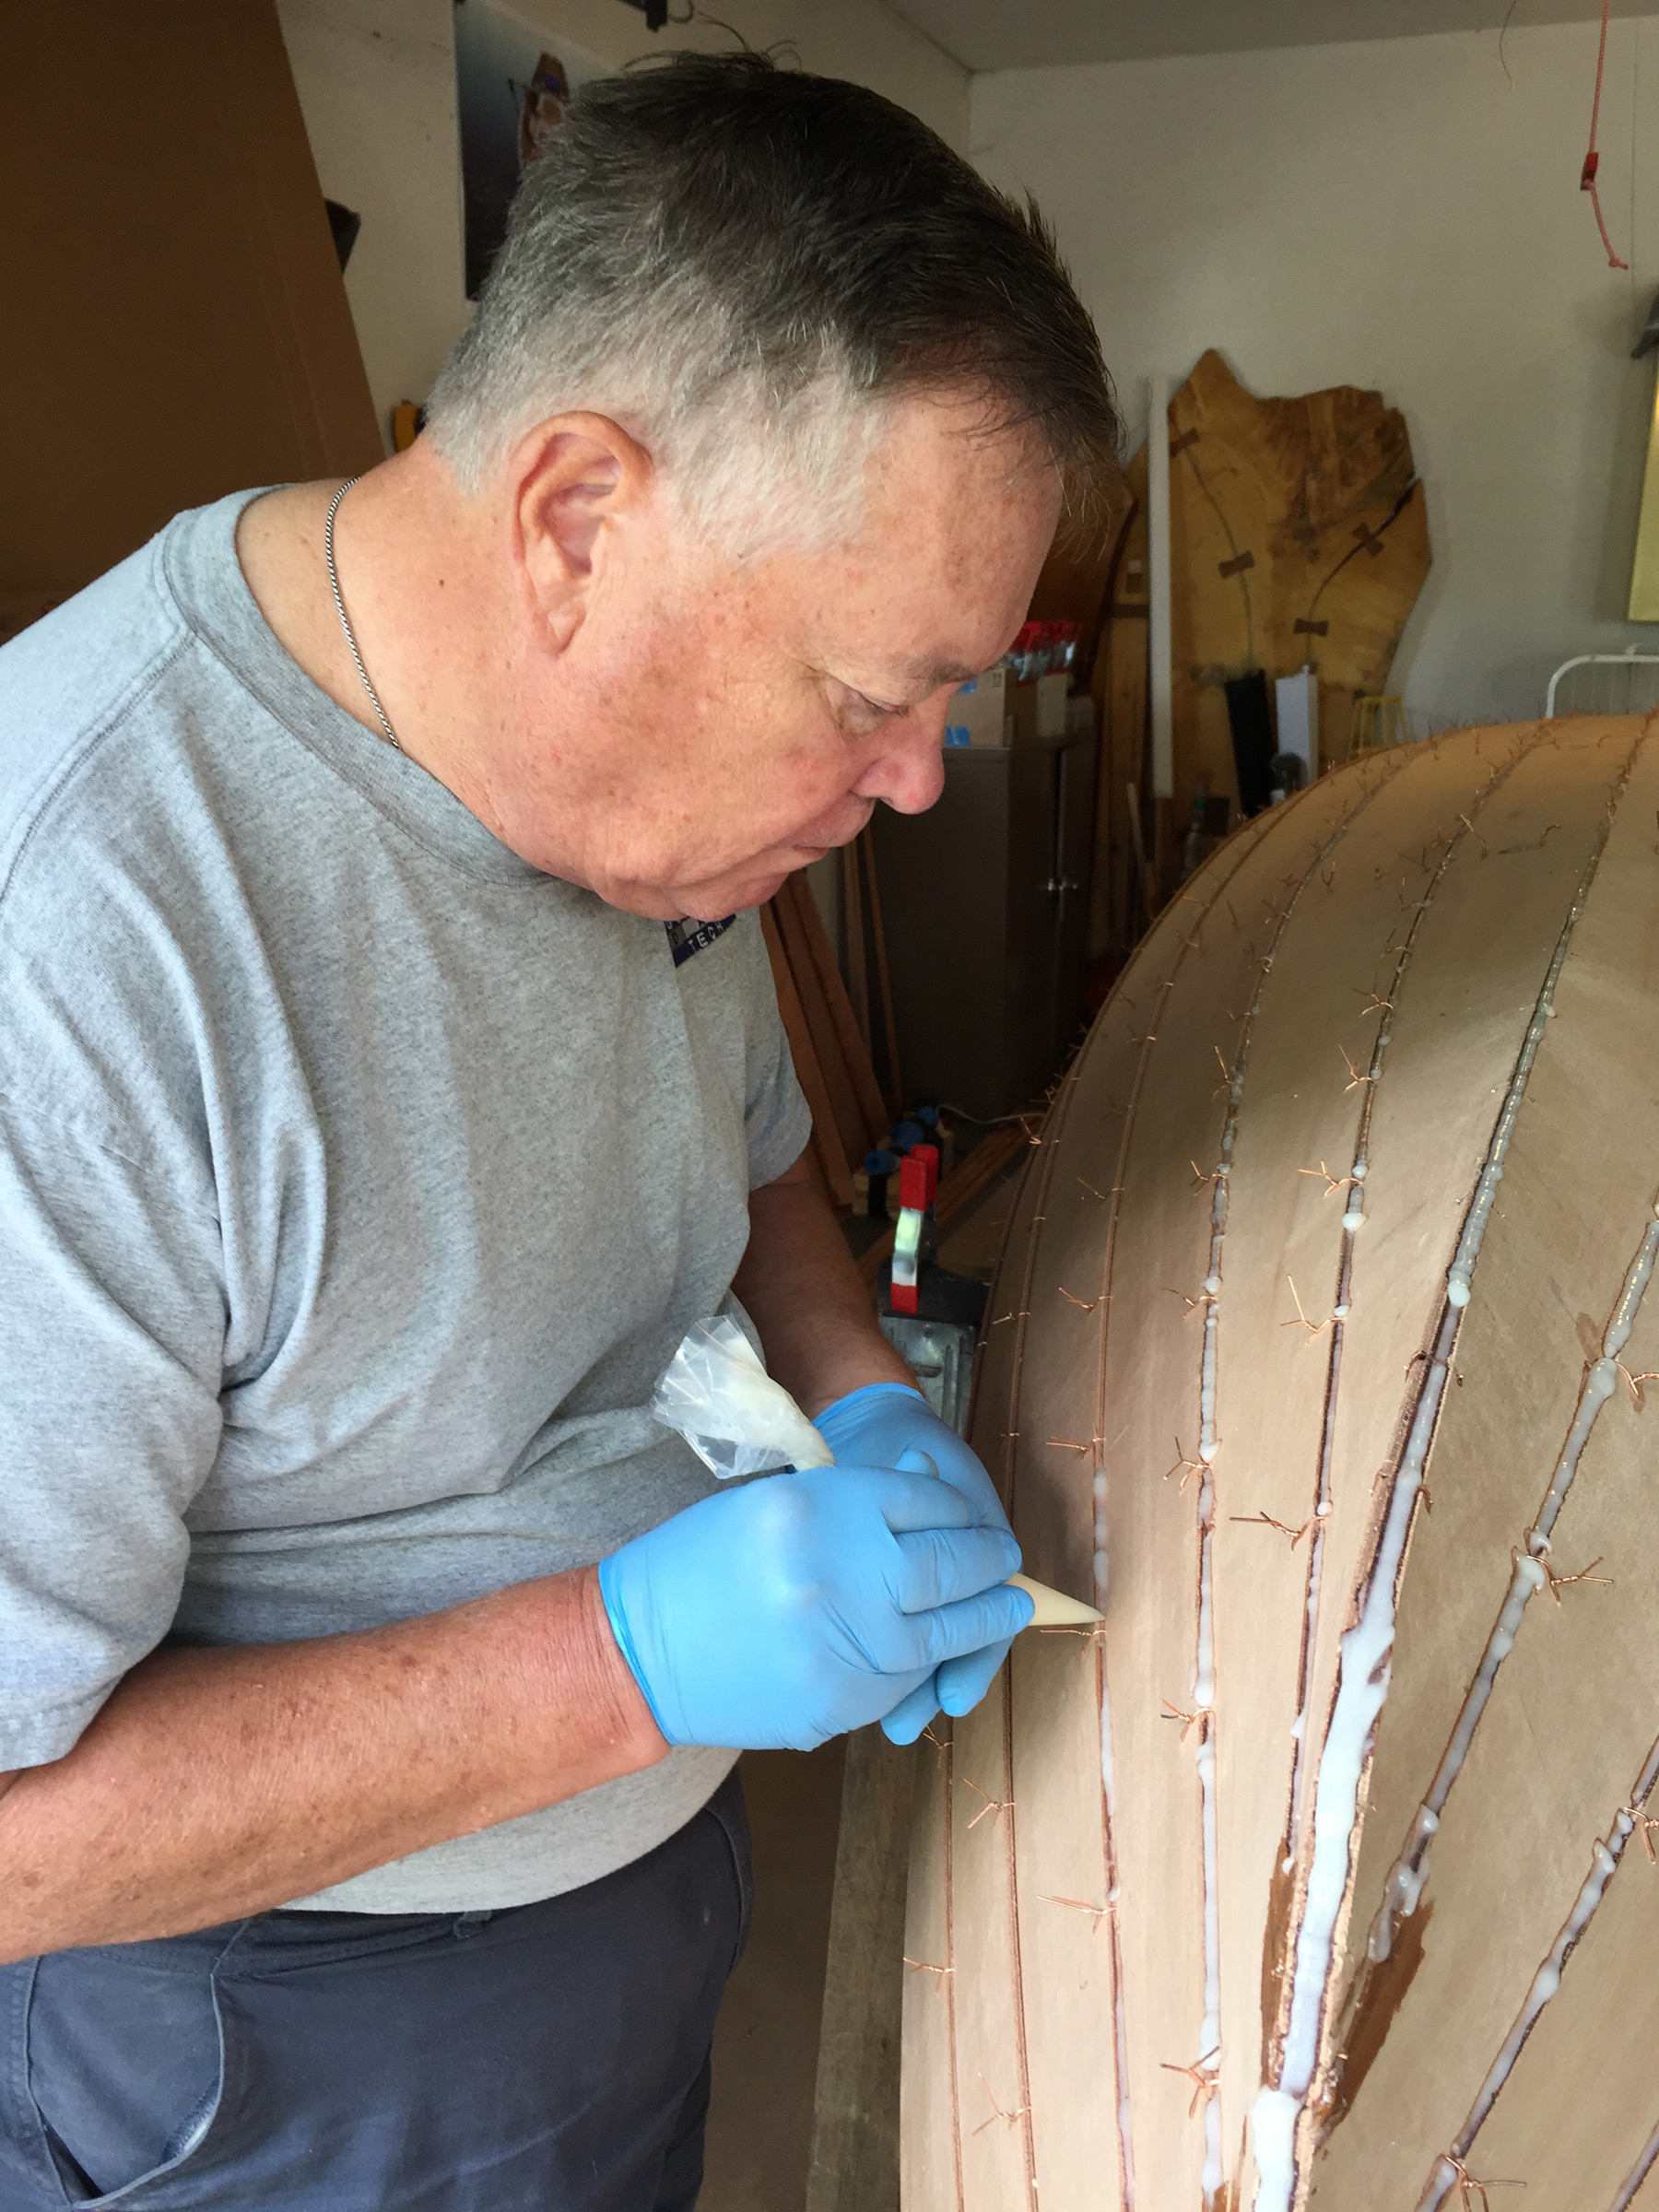
The deck, side, and bottom panels are drawn from the offsets in the plans, given at 400mm stations. The two pieces of each panel are joined with butt straps. The plans do offer advice for scarfing the plywood pieces together, but they state a preference for butt joints as they’re easier to align and have a cleaner appearance under varnish. The bulkheads are reinforced with 8mm-square cedar framing. The hull is stitched together using plastic zip-ties. The builder will go from a pile of small fiddly bits to a boat in the course of an afternoon. The deck is supported on 19mm x 8mm stringers that run longitudinally and rest on the cedar framing of the bulkheads. Weight is then transferred to two long stringers that run along the bottom of the board. I followed the plans include instructions for installing a commercial fin box and made a fin to fit it.
Christophe Matson
The vertical cutwater and the sharp V sections forward eliminate the slapping that surfboard-style paddle boards are subject to.
One fun task is using a shop-made “torture board,” Storer’s term for a flexible fairing board, to sand the support stringers to meet the deck’s graceful curve. The booklet gives both very detailed instructions for using the torture board and a template for the deck’s curve so the builder can get the stringers beveled just right.
A layer of 150 gsm (4.42-ounce) fiberglass is laid underneath the main walking area of the SUP deck which stiffens the deck considerably in this area. The deck is glued onto the hull with packing tape and a few well-placed weights. For me it was a two-person job. Be sure to watch for the slight compound curve in the forward 800mm where the crowned deck takes an upward curve to the bow.
There are a few challenges, such as placing the fin box or using a temporary bulkhead to get the correct dimensions and shape for the bow, but this is part of the pleasure of building wooden craft. I found the build to be immensely enjoyable and satisfying work.
Allison Grappone
The carry handle is offset to starboard, and taller paddlers with long arms would carry the board with the greater part of the beam under their arms. A paddler with shorter arms would carry the Taal flipped over to put the handle on the high side.
My Taal came to 30 lbs. I think I might be able to make the whole board lighter next time if I took extra care to use only an amount of glue that is strictly necessary. While I also bought a rubber nonskid adhesive mat to stand on, Storer offers instructions for making an anti-skid area by applying a coat of varnish with sugar sprinkled on it, letting the varnish cure, and then dissolving the sugar with water. That approach could be a few ounces lighter than a mat.
The handle insert is set off-center, providing a comfortable carry for long-armed paddlers on one side and short-armed paddlers on the other. I located the handle on my Taal a bit forward of the board’s center of gravity so that it would carry slightly bow high, which I find easier to handle than a bow-down board. The hard 90-degree chines make long carries slightly irritating, but this is easily alleviated with a towel draped over the board to cushion the edges.
Allison Grappone
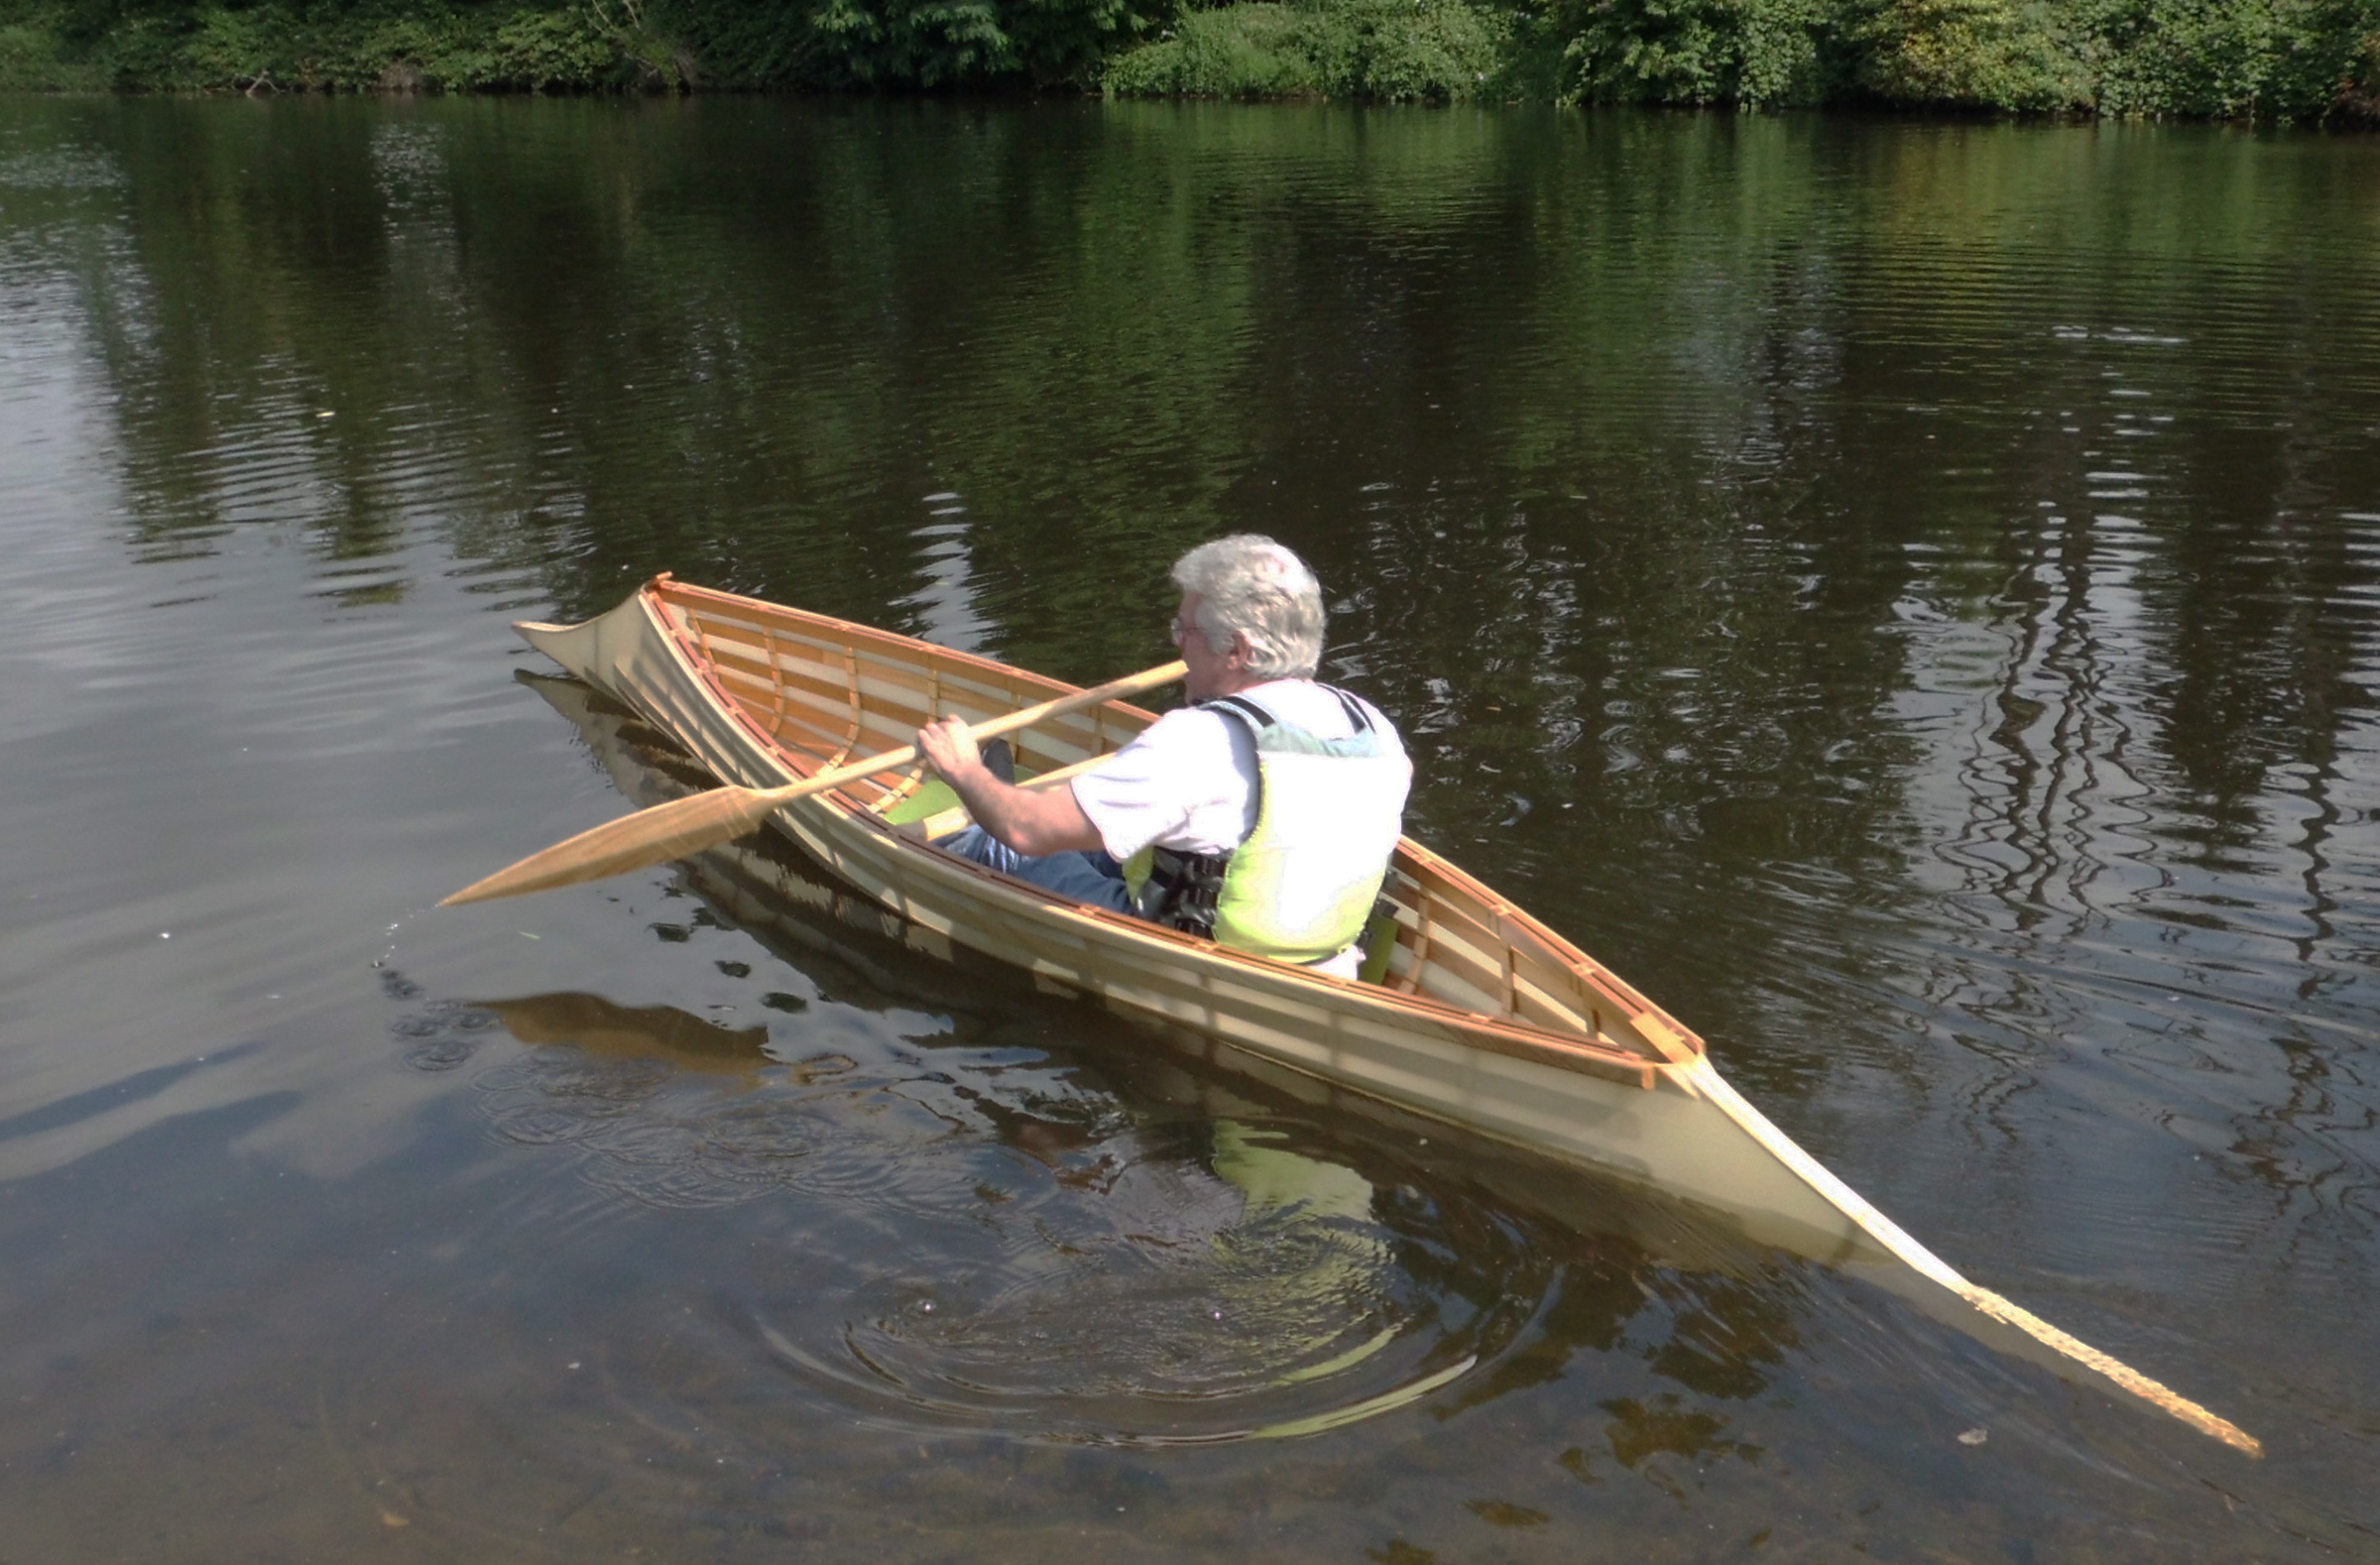
The author has plenty of freeboard. The Taal is designed to carry up to 250 lbs.
Once on the water the Taal shows its strengths and design pedigree. It is fast, stable, light, and tracks true. It is important to figure out where to stand to get the correct trim because, as with a rowboat, you do not want to drag the transom. A spotter looking at the board as you move fore and aft can help with this. The trick is to be forward enough to clear the stern but to stay within the reinforced section of the deck. The Taal eats boat wakes without drama when taken head-on. The knife-like stem cleaves the wave, the bow buries but the full body shape immediately lifts the SUP back up and over the wave with a surprising amount of ease. There is no slapping as there is with surfboard-shaped boards. The Taal has excellent initial and secondary stability for a SUP. Getting on the board requires standing in the center and pushing off. There is initially a bit of wobble until the paddler gets situated, and then they Taal settles into a very solid ride with no surprises. The board inspires confidence and the paddler can focus on the stroke and the paddle rather than the task of staying right side up.
Allison Grappone
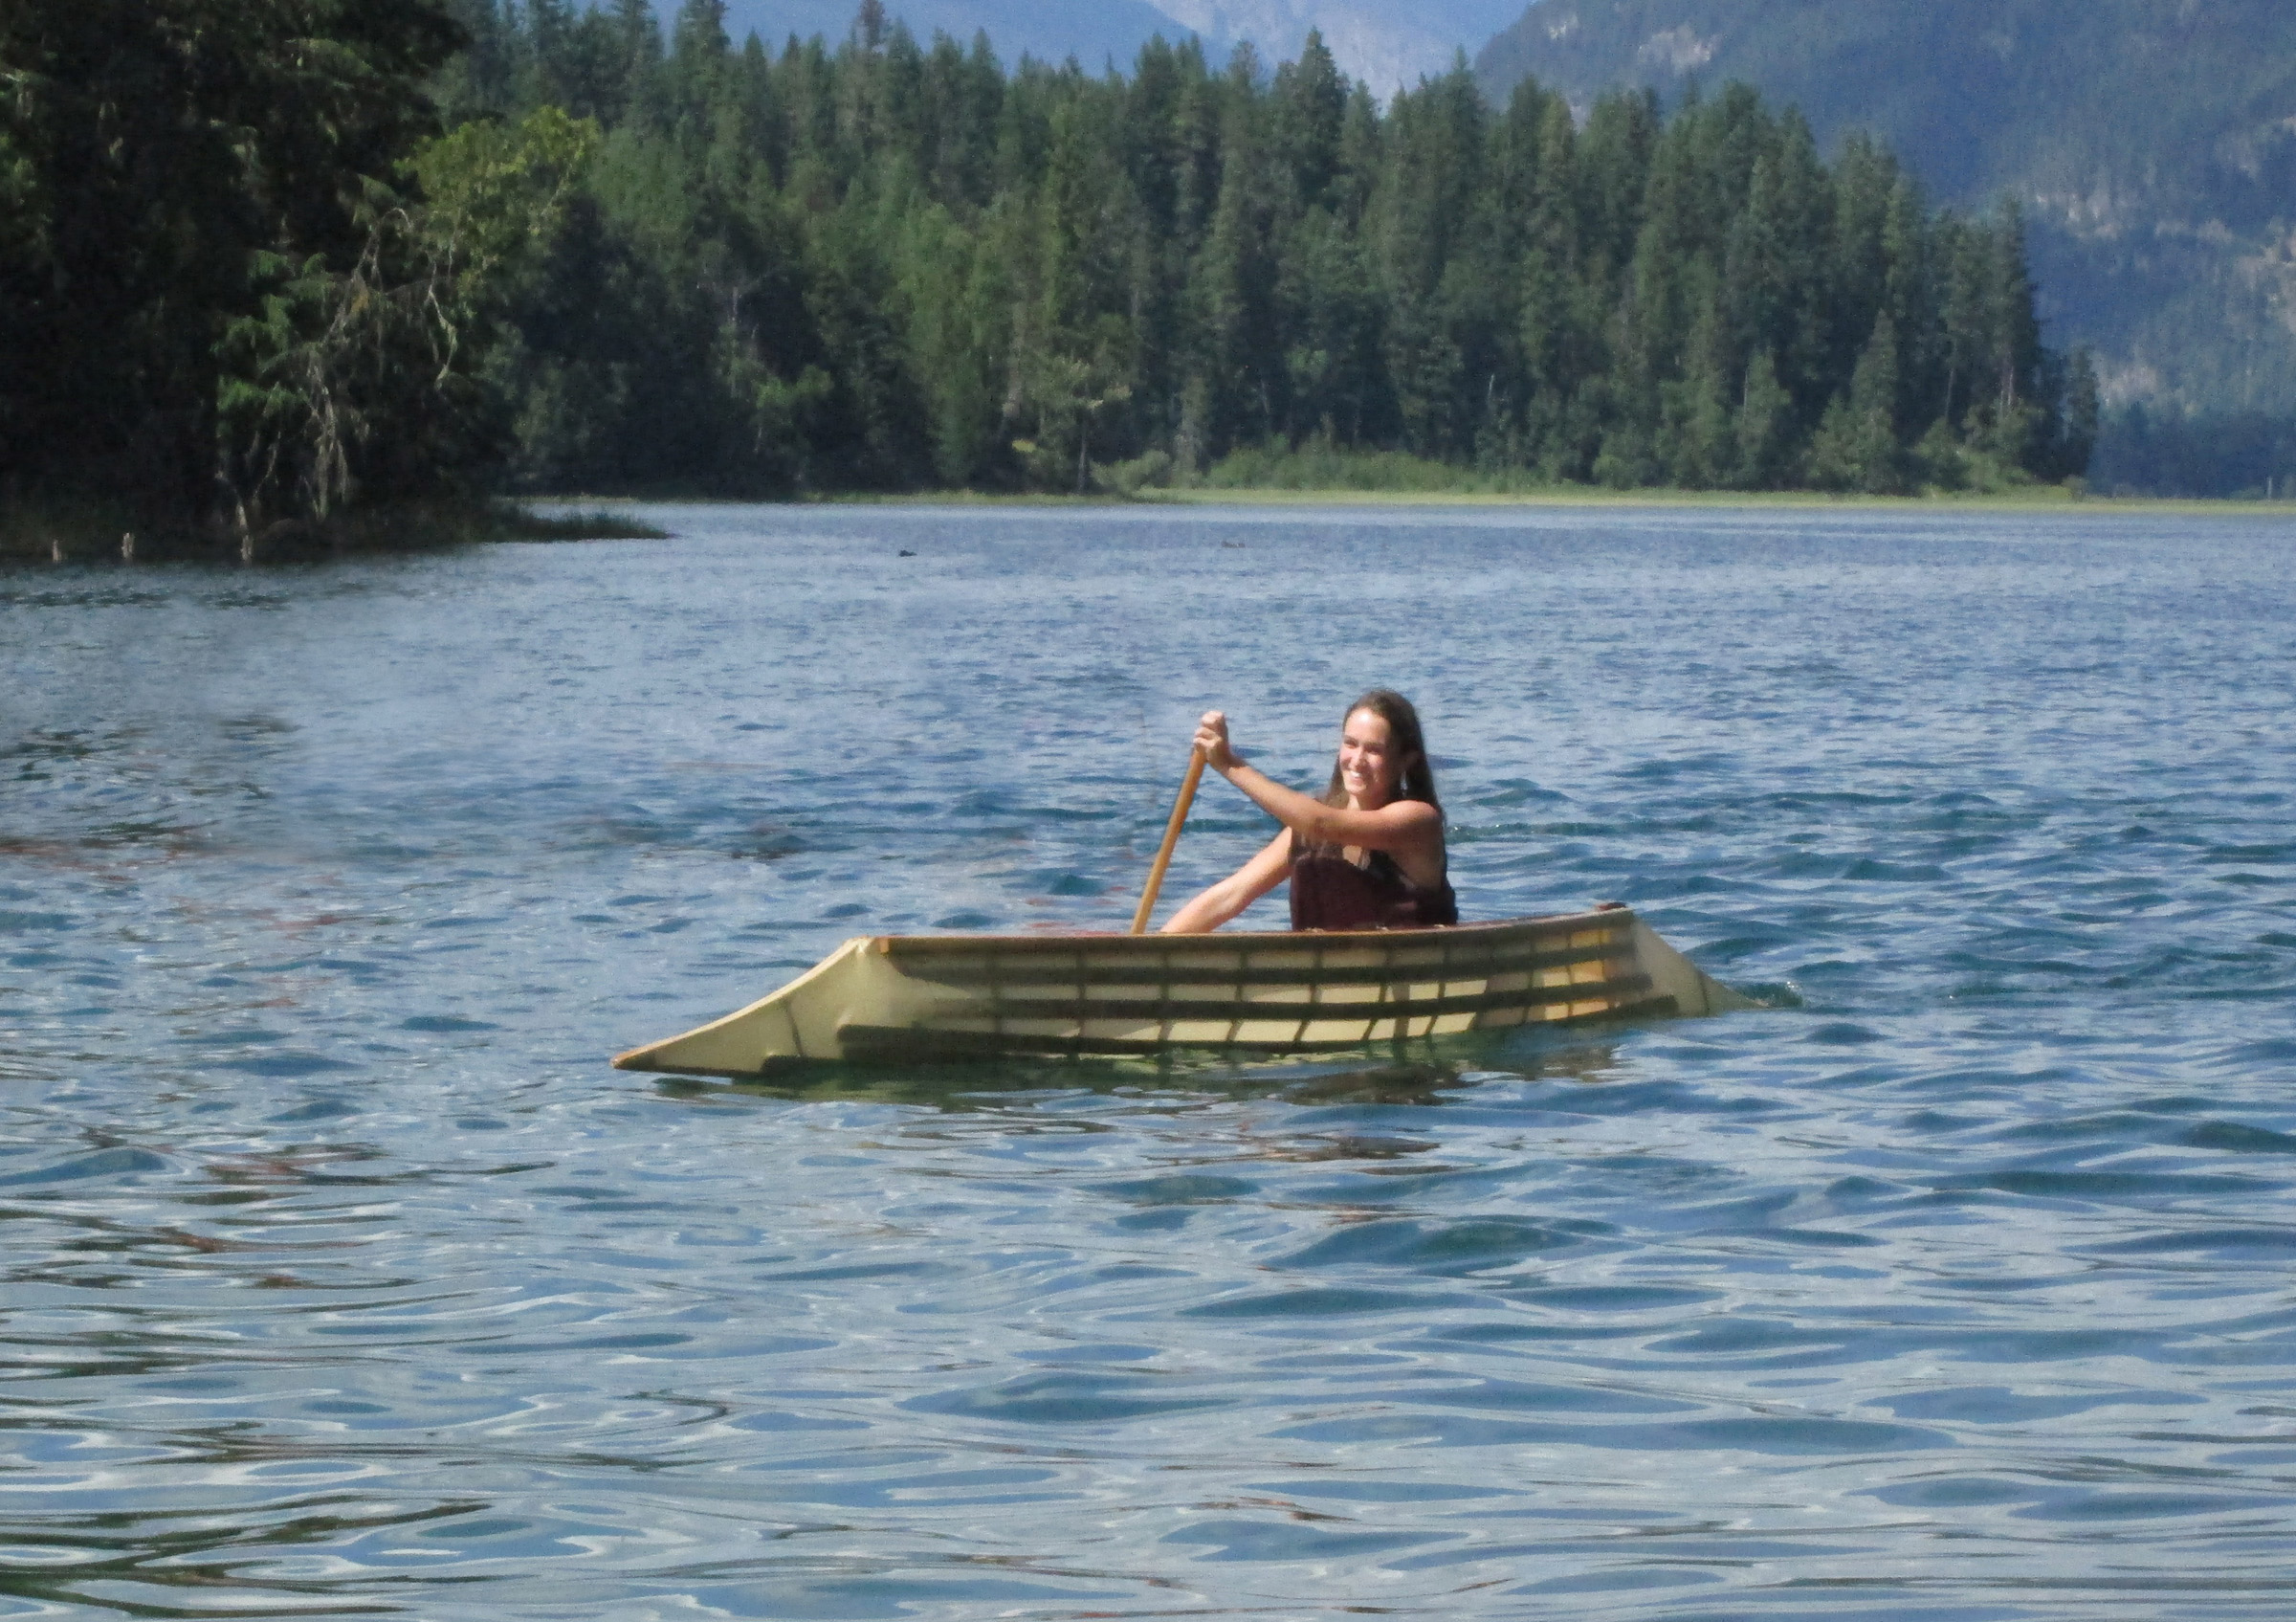
The flat bottom amidships transitions to a V cross section at both ends. The ample rocker brings the transom out of the water to minimize drag. The elevated chine adds stability when the board is heeled.
The Taal is really designed for tracking straight and covering distance while cruising. You can make course adjustments easily, but it takes some effort to turn the Taal smartly around. For a tight turns, you’ll need to use the SUP pivot turning technique, stepping back on the board to sink the stern and raise the bow. There will be a distinct wobble with every step, but the secondary stability will kick in before you’ll get thrown off. When the pivot turn is performed correctly, the Taal will then execute a 180-degree turn in its own length. When walking the board to change trim, it is important to remember that the forward and stern sections of the deck outside the center four bulkheads are only lightly reinforced, so walking the full length of the deck is not recommended.
Storer limits the Taal carrying capacity at 250 lbs. My wife and I both got aboard one day and paddled across a lake, and found we still had freeboard with our combined 280 lbs.
Everyone who has paddled our Taal has been impressed with its speed and stability. It’s a luxurious platform to paddle on, and it also looks gorgeous on the water. With the gentle curve of the deck meeting the distinctive transom, the sharp stem, and that classic look of wood, the Taal exudes style.
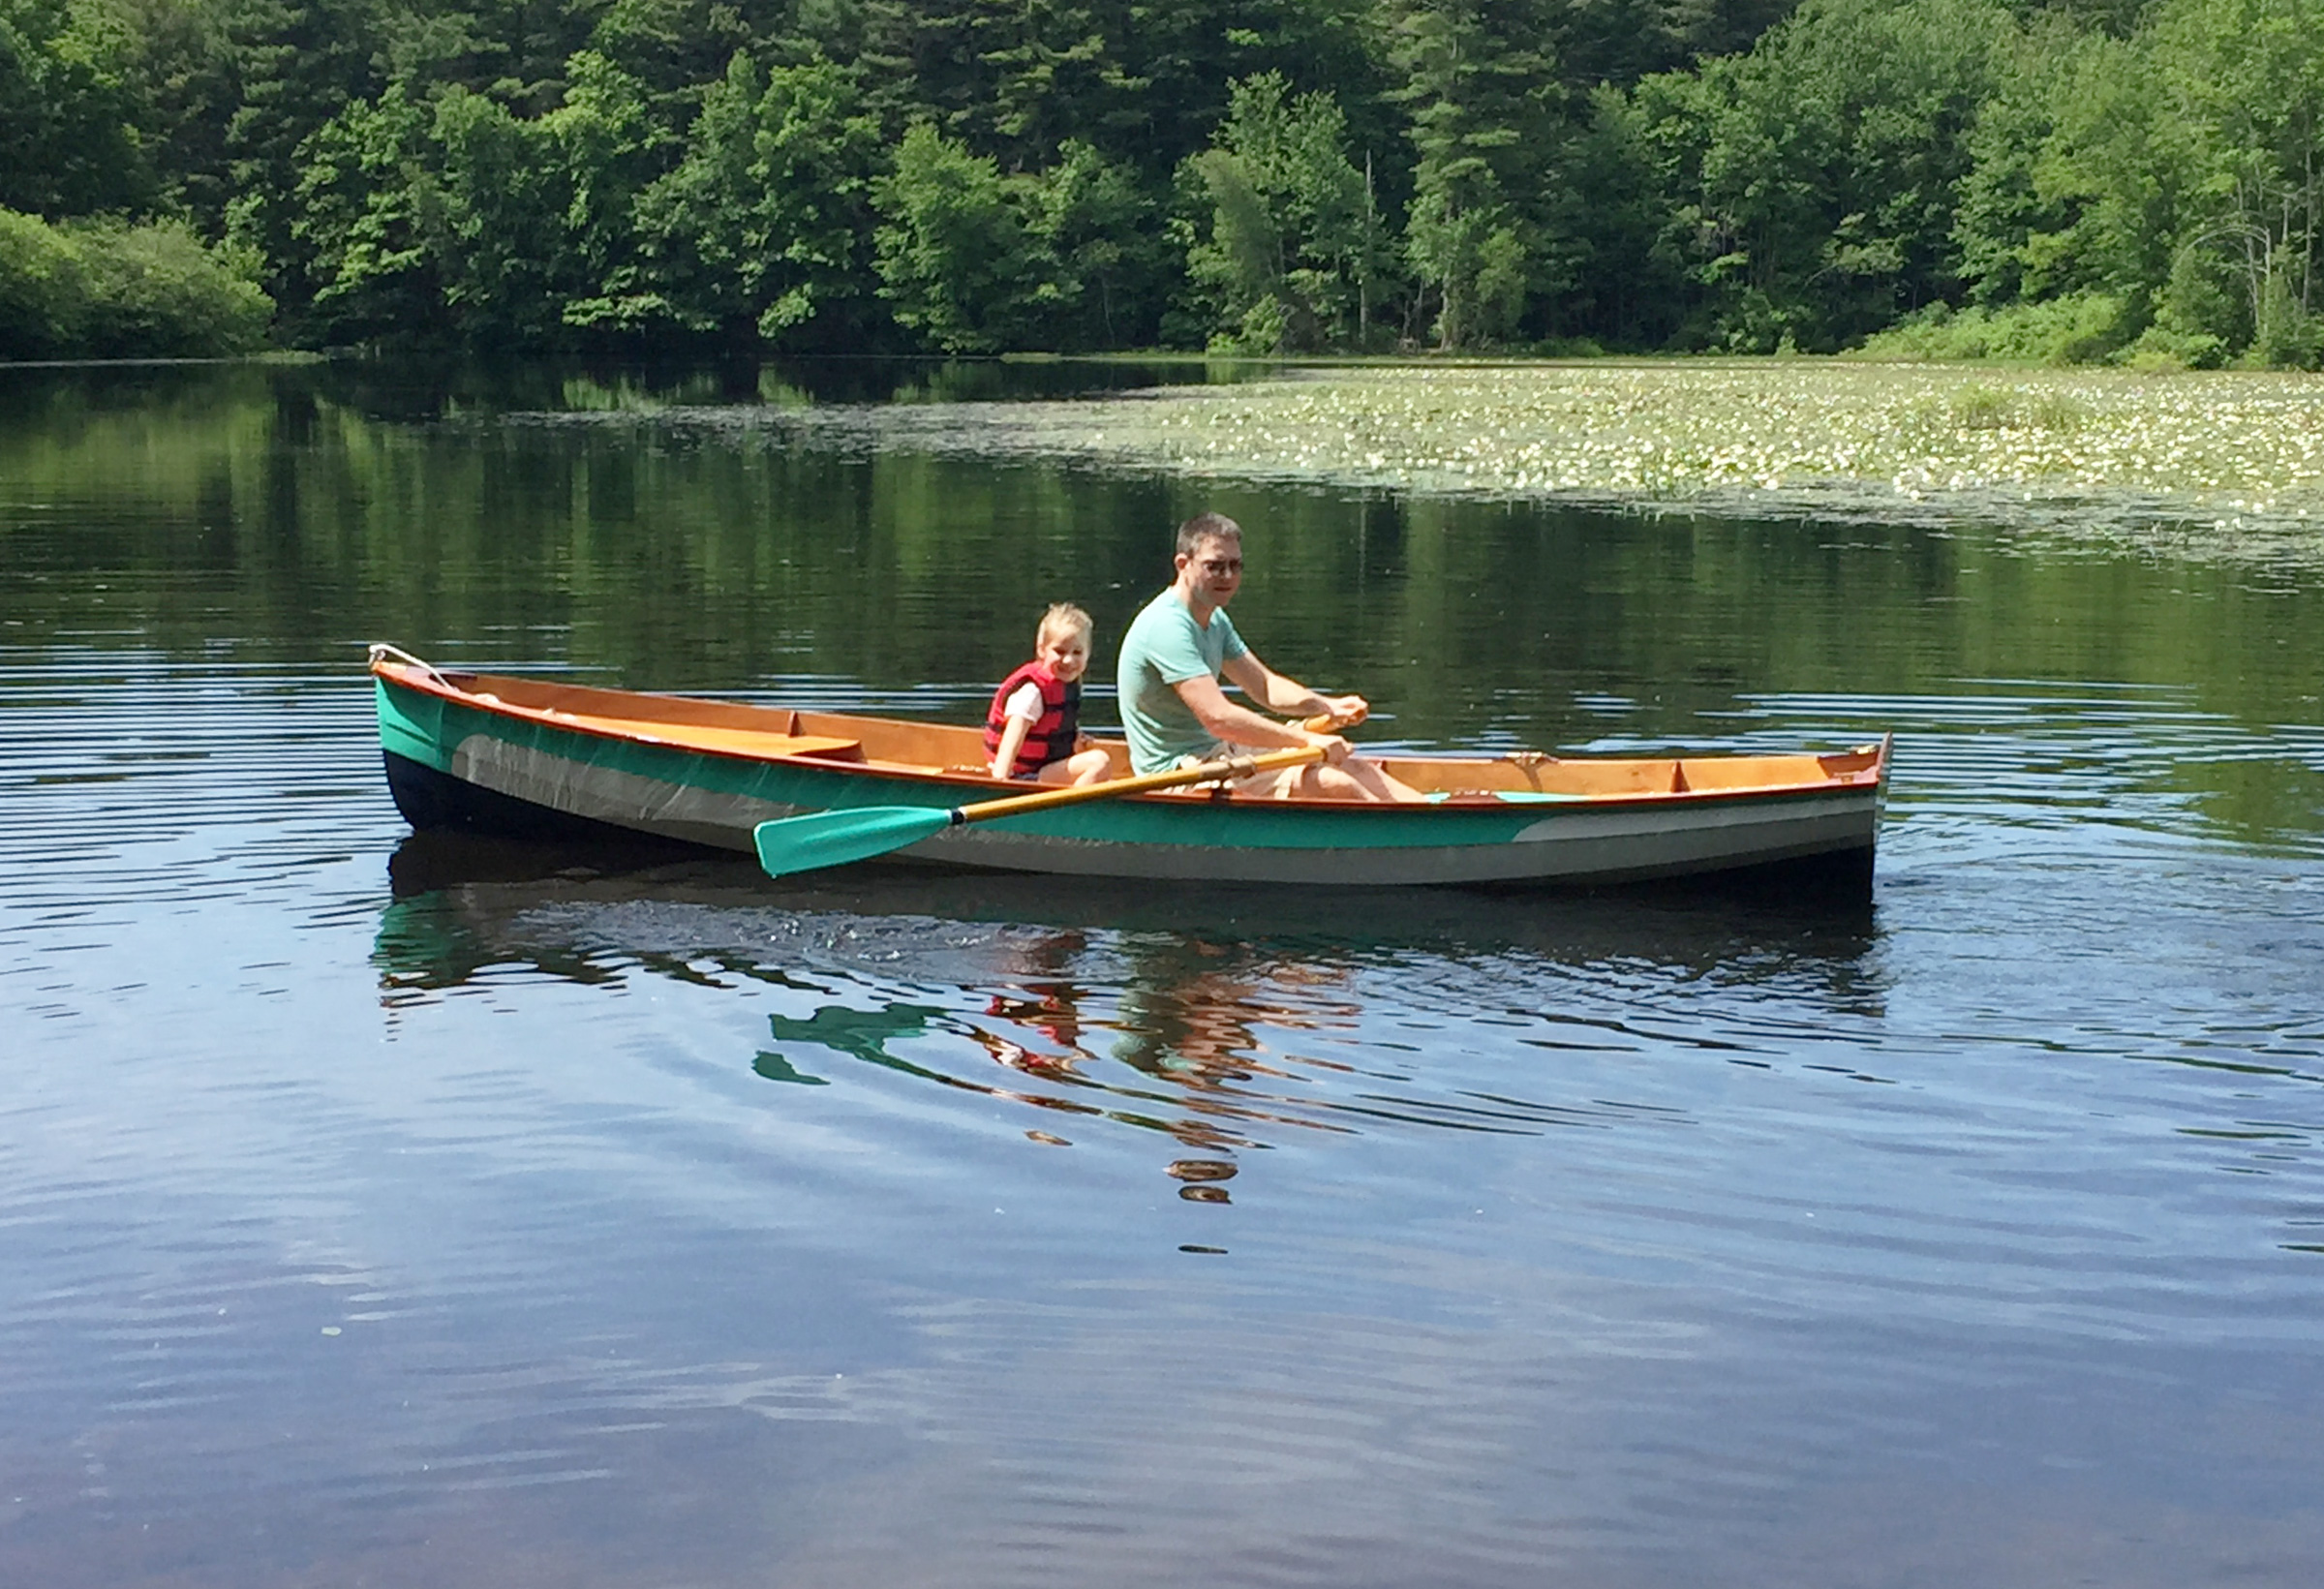
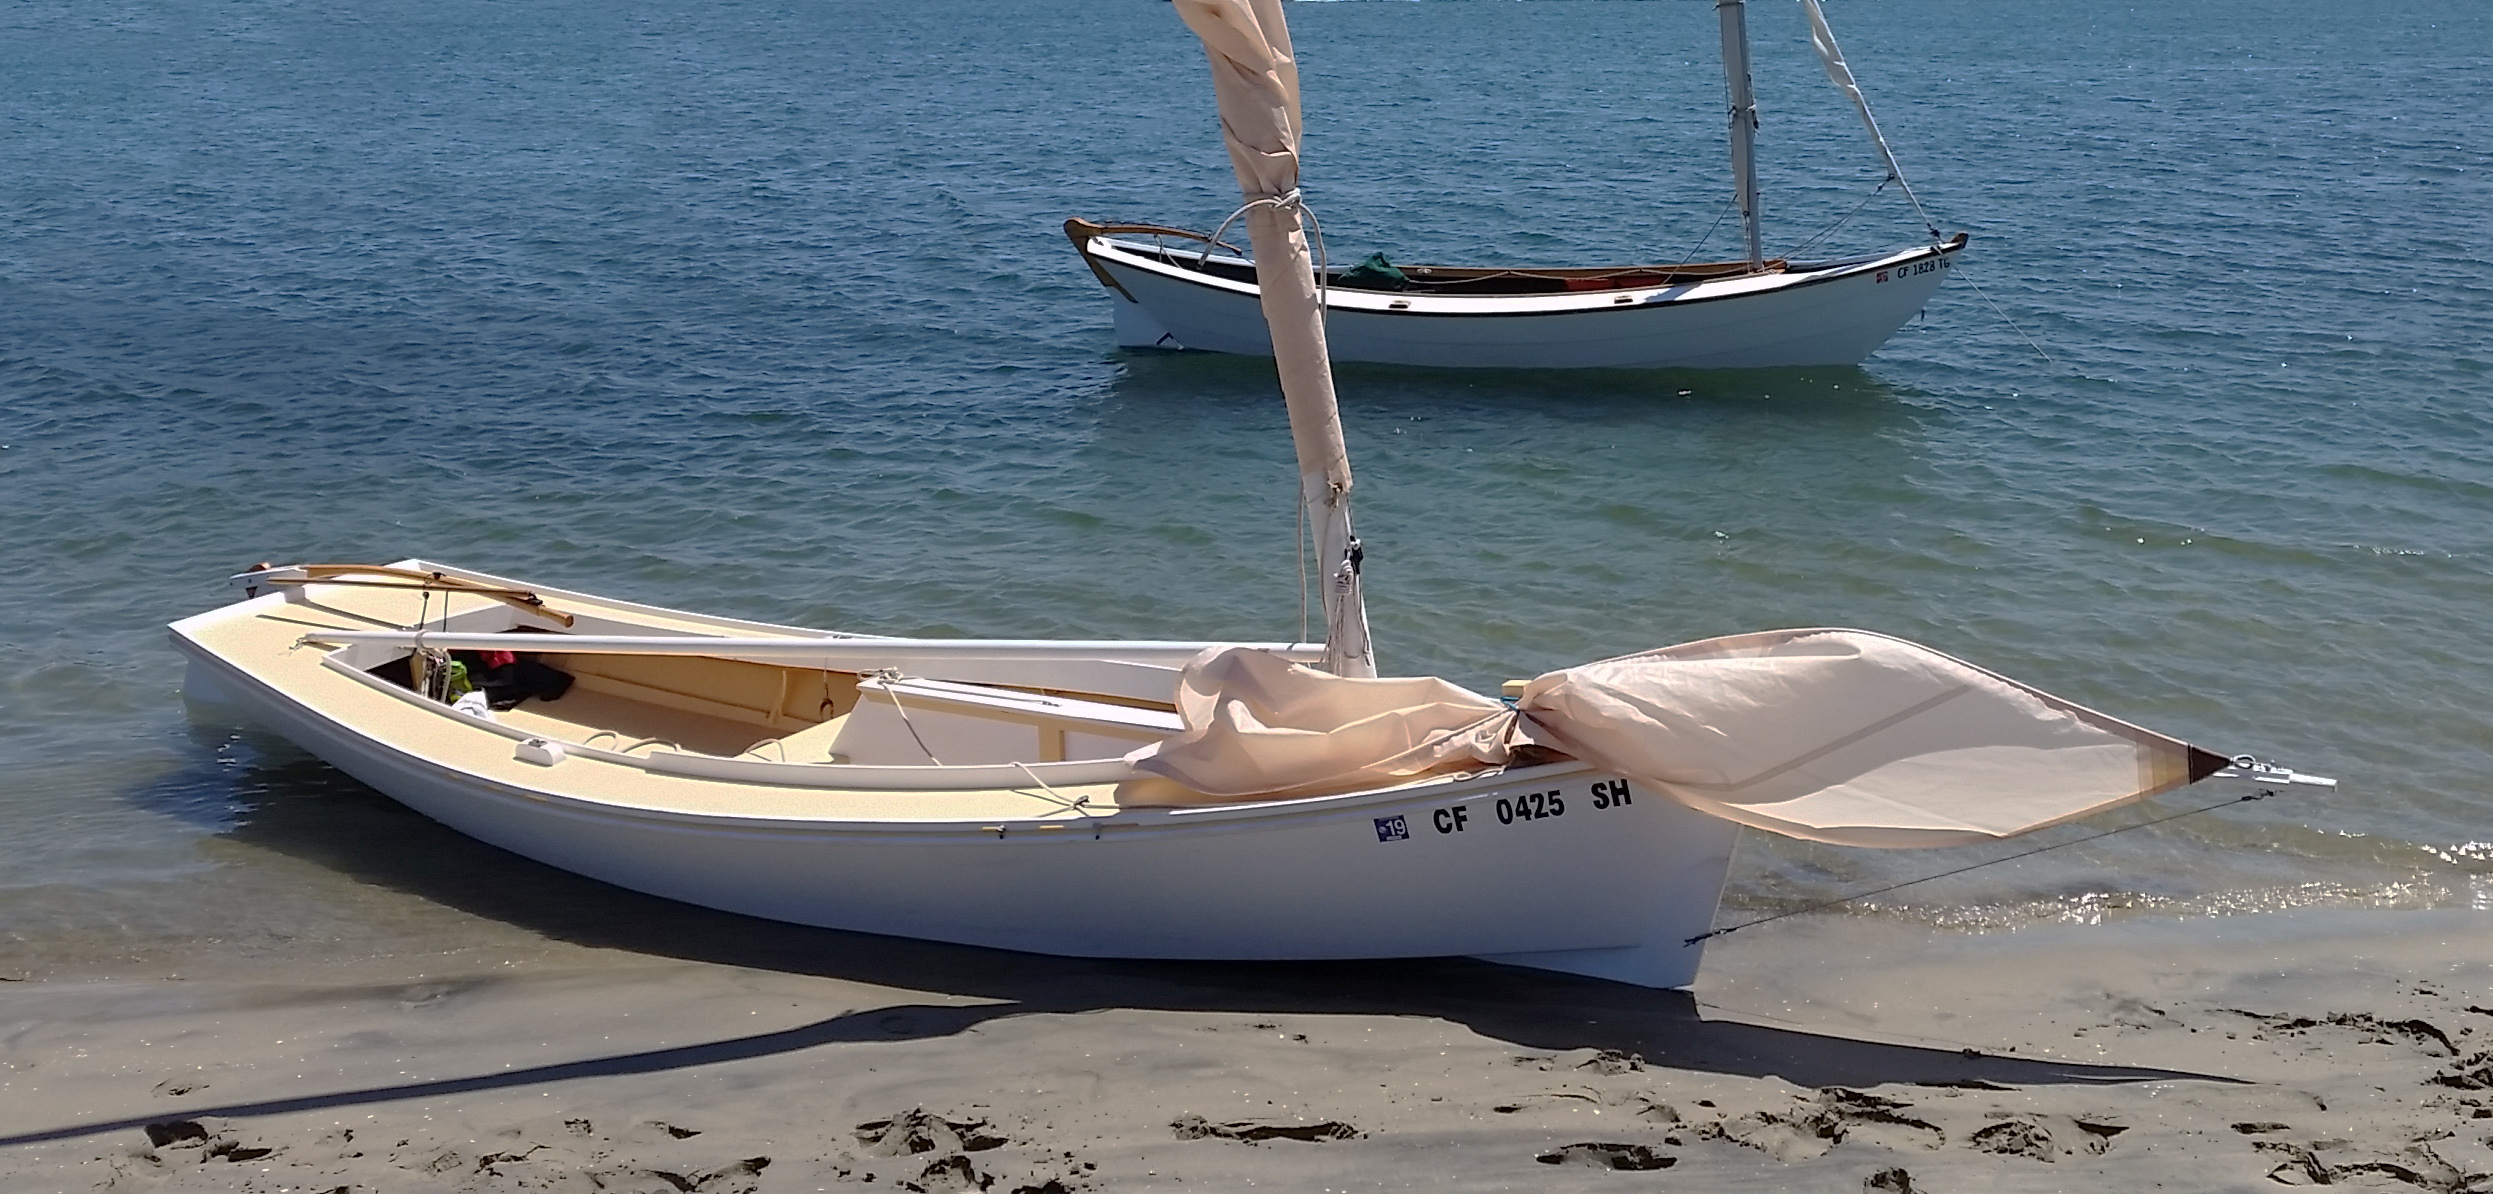
This is our second full season on the Taal, and we are completely satisfied with its performance. When my brother and I visit our parents in Connecticut, we like to cruise out into the local harbor on our SUPs and check out the boats at mooring which pique our fancy. When I’m home in New Hampshire I’ll meander with the Taal around the local rivers and lakes. My wife loves to paddle out 100 yards from shore with a book, lie down, and sunbathe high and dry with little fear of falling off. The Taal is her own private beach floating in a lake surrounded by the green hills of New Hampshire.
Christophe Matson currently lives in New Hampshire. At a very young age he disobeyed his father and rowed the neighbor’s Dyer Dhow across the Connecticut River to the strange new lands on the other side. Ever since he has been hooked on the idea that a small boat offers the most freedom.
Taal Particulars
Length: 12′6″
Beam: 30″
Weight: 18lbs to 31lbs depending on materials
Crew capacity: 150lbs to 250lbs
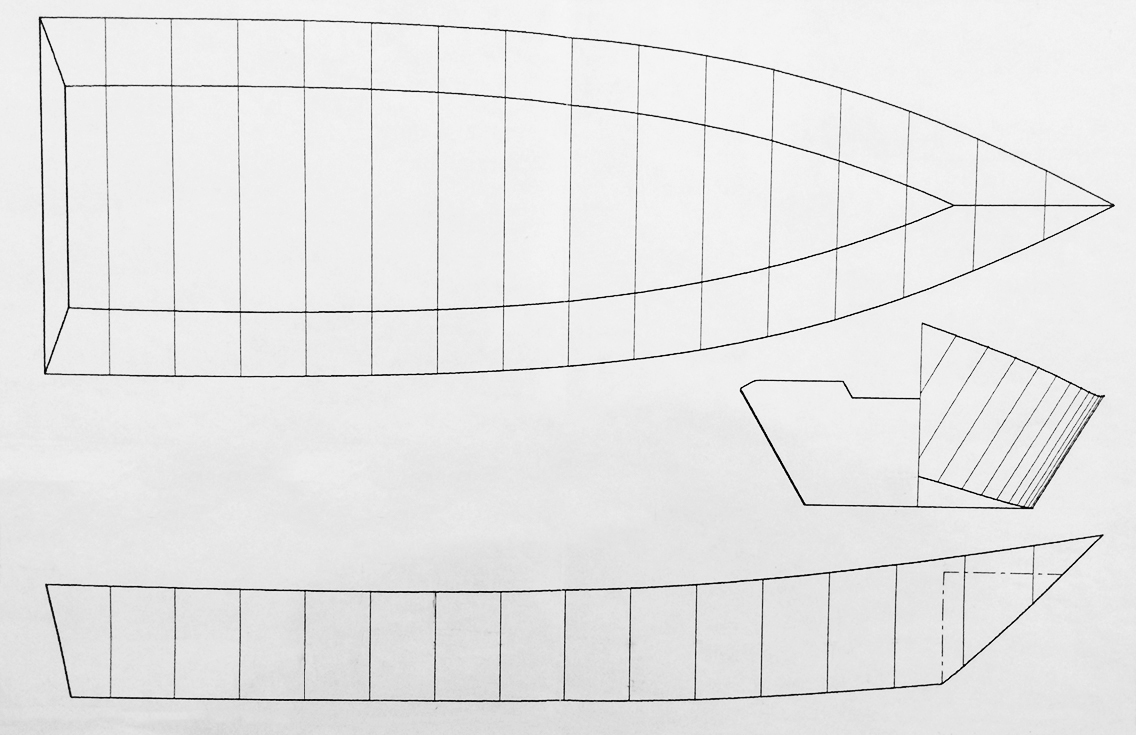
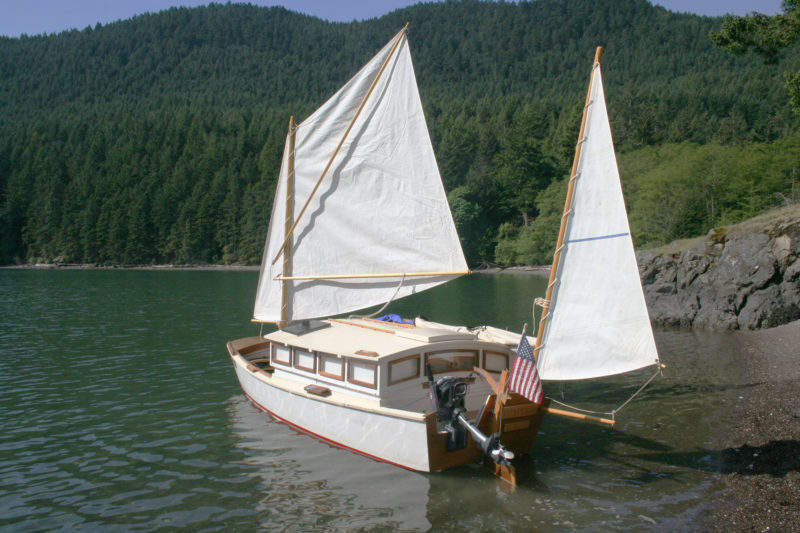
Lying in a hospital bed in 2014 after a short illness, I decided it was time to tackle one of my lifelong dreams, building my first-ever boat—from scratch. Since our boating consists of leisurely trips on lakes and rivers, I wanted plans for an open cockpit design with space for four deck chairs. After a lot of research, the Albion seemed to be the answer. Along with the plans I ordered, Spira included his 50-page Illustrated Guide to Building a Spira International Ply-On-Frame Boat. His website has an extensive collection of photos, blogs, and videos for ideas. One builder had even contributed a very helpful series of videos of his Albion build to the Spira website.
I started working on the boat in February 2015. To make sure the Albion would provide us with enough room, I drew a chalk outline of the boat on the garage floor. After I put four deck chairs on the area we’d have in the cockpit, I realized I needed an extra foot of deck space to be able to space the chairs comfortably. I contacted Jeff and he was completely amenable to this change—he notes that most of his designs can be stretched by 10 percent without having much effect on performance or cost—and worked out a new plan for the placement of the frames, adding a bit more than 1” to the span between each to add 1’ to the length.
The plans recommend using “standard dimensional lumber” for the frames, but I decided to use clear Douglas-fir from a specialty lumberyard in our town. I thought the straight, uniform grain would be easier to work and that the fir would be less prone to rot than some of the species sold as common lumber. The frames are 2x4s and the decking beams 1x4s.
I was able to find a 22′-long, knot-free 2×8 at the same lumberyard, perfect for the 20′-long piece needed for the keelson. This saved having to scarf two shorter pieces together. A Douglas-fir board this length was an amazing find for an East Coast lumberyard!
I used top-grade Douglas-fir plywood: 5/8″ for the bottom, 1/2″ for the sides, 5/8″ for the transom, and 1/2″ for the foredeck I added to the otherwise open cockpit. I built the strongback out of wood I had in my shop, and put wheels on it so that I could move it inside or out.
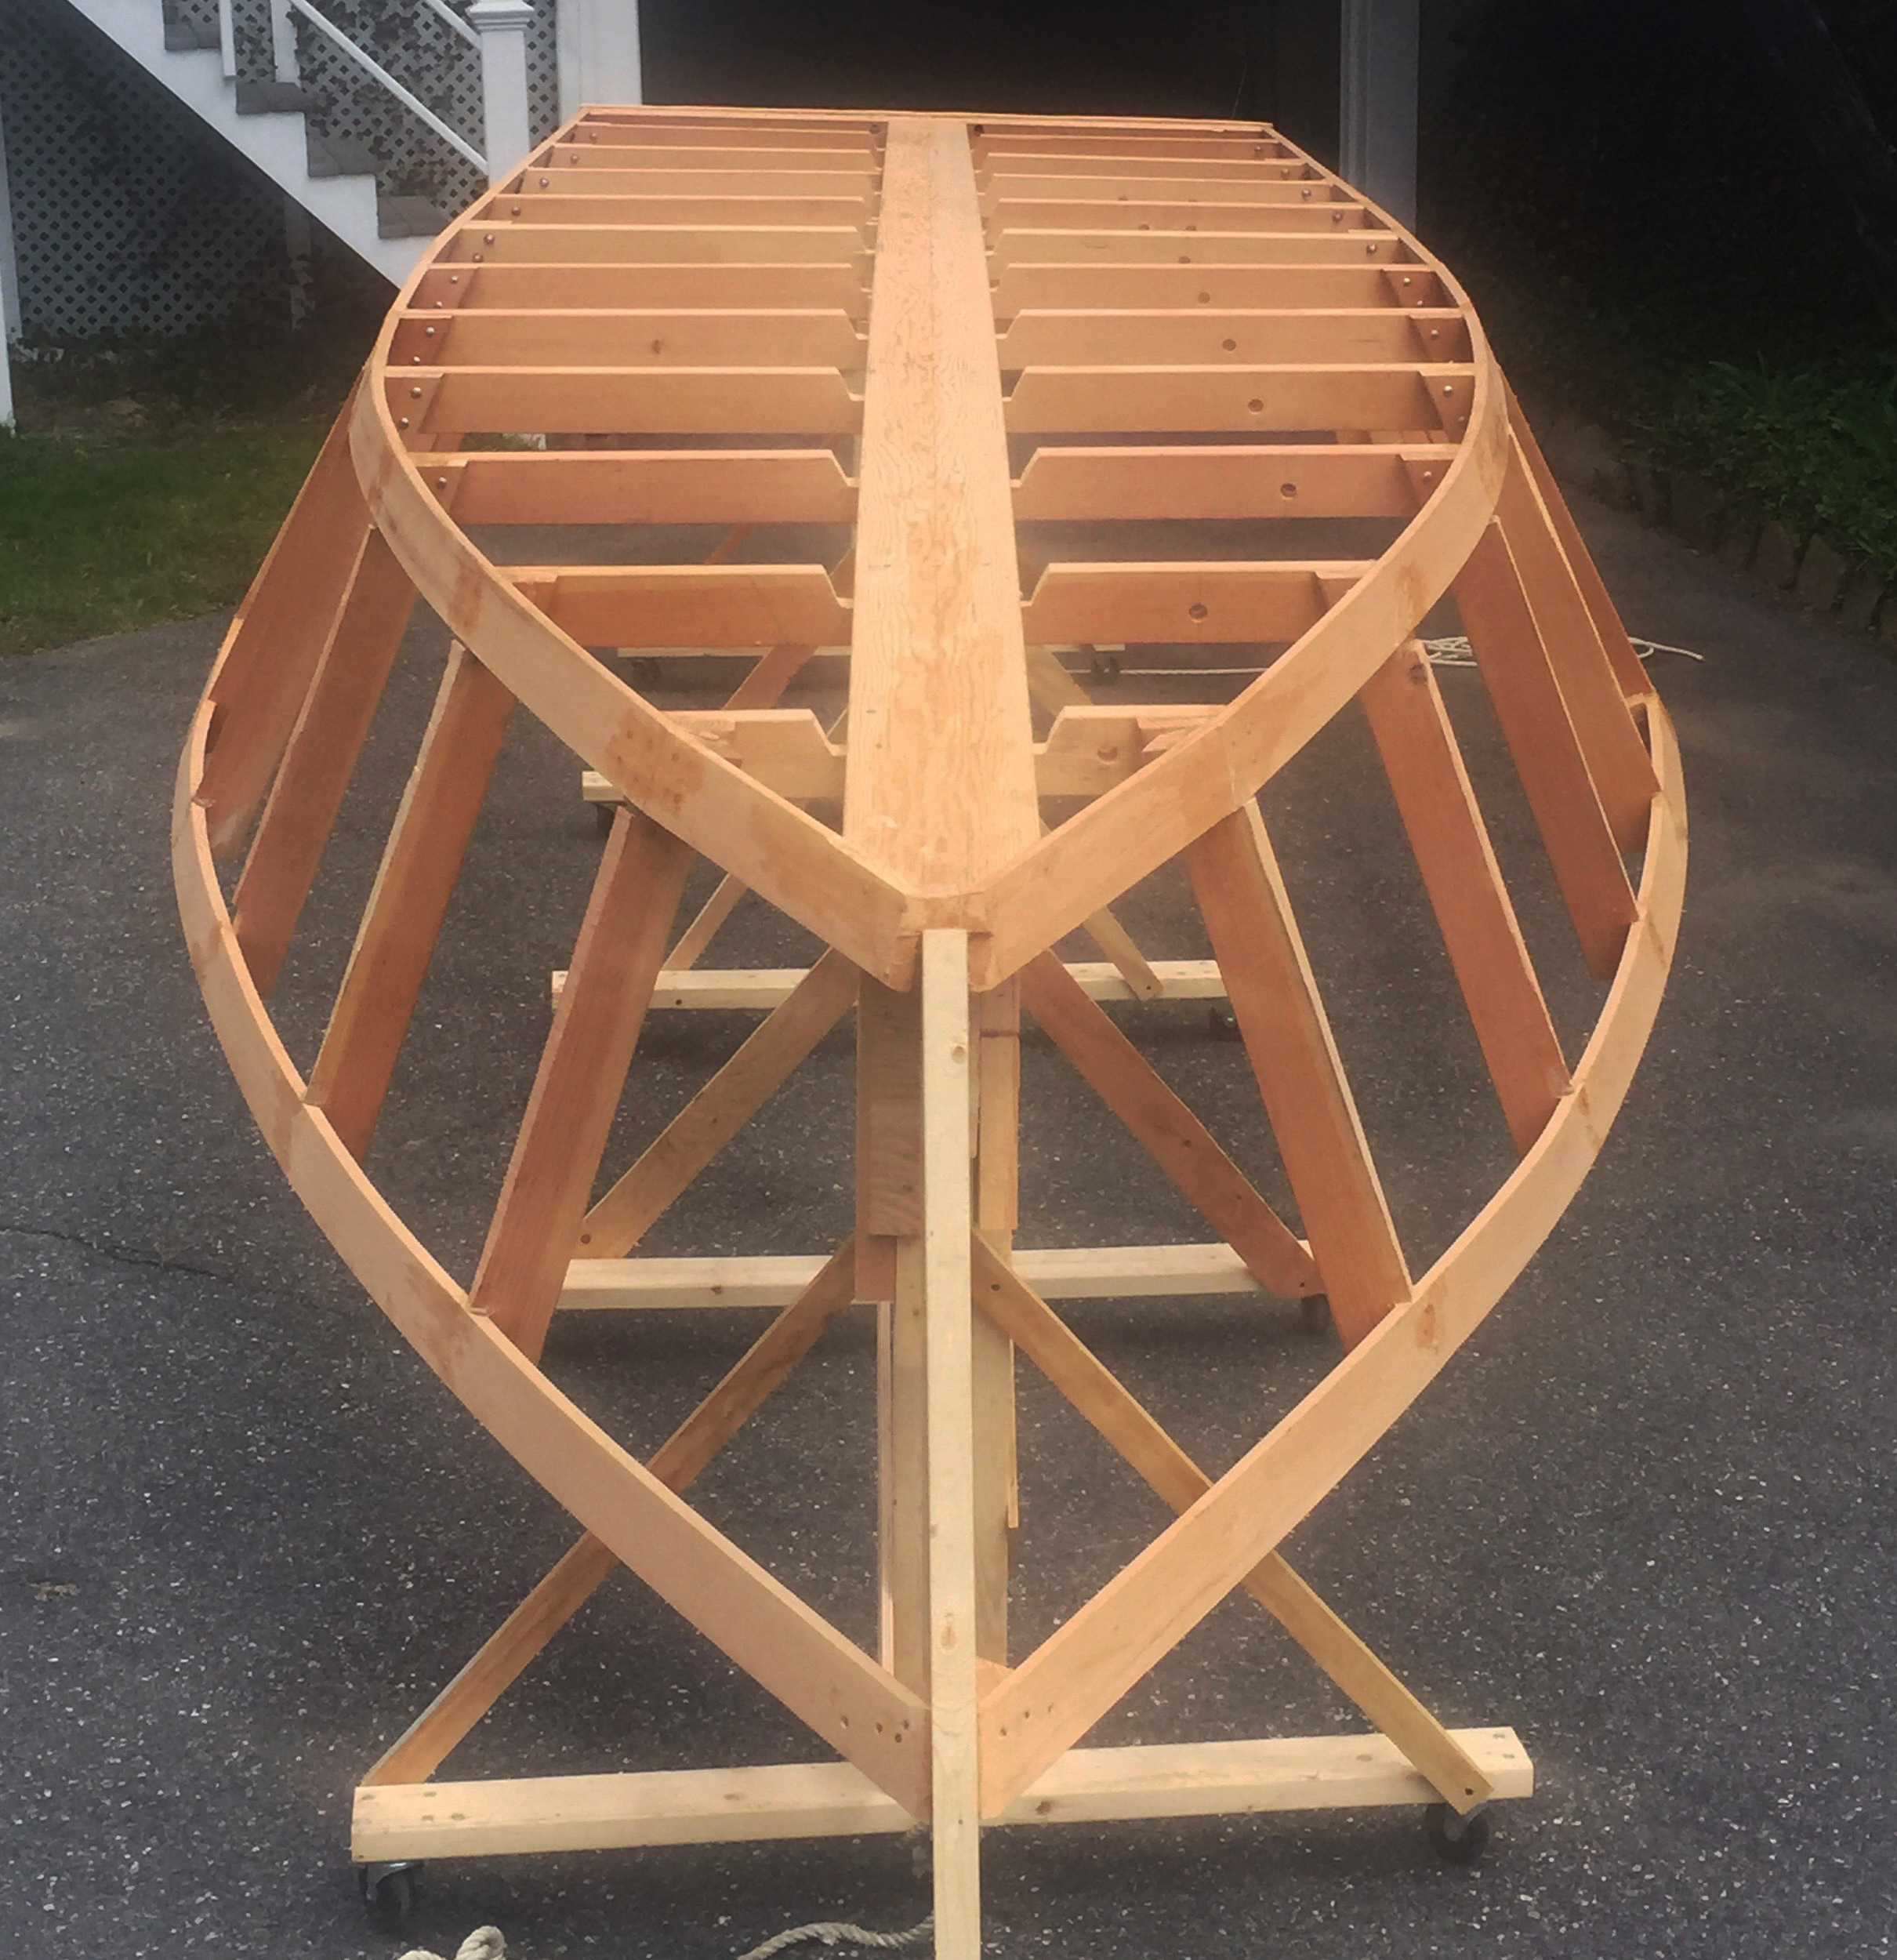
The boat can be built without lofting, so, using the measured drawings/offsets in the plans, I made full-sized templates on kraft paper for each of the 11 frames and the transom frame. The plans stress that the accuracy of each frame is the most crucial aspect of the build, and I wanted to be sure that I got it right, so I precisely lined up the frame pieces on the templates when drilling the holes for the bolts that hold the pieces together.
When building the transom frame, I missed the note on the plans that for a standard-shaft motor, the motor bracket frame member should be 5″ lower on the transom frame. Because of this error, I bought a long-shaft, 60-hp Mercury outboard, the smallest long-shaft motor Mercury makes. I originally wanted to buy a motor in the 30–35 hp range.
photographs by the authors
The framework is made up of common construction lumber: 2x4s for the frames, a 2×8 for the keelson, and 1x4s for the sheer clamps and chine logs.
Hull assembly begins when the frames and transom are placed in position on the strongback. The longitudinals—keelson, chine logs, and sheer clamps—make the structure rigid enough for the plywood to be bent over the frames.
The forward end of the keelson has to be bent to bring it to the attachment at the stem. I didn’t have a steambox, so I wrapped the keelson with towels and poured boiling water on the bundle several times, then slowly pulled the keelson down to meet the stem.
The plywood panels for the sides are bent around the framework first; the chines, sheer clamps, transom, and stem give them their shape. The bottom follows. The panels for the sides and bottom are butted together to achieve the full length and the seams are later reinforced with plywood backing plates, secured with screws and epoxy. After the plywood bottom and sides are screwed and epoxied to the frames, two layers of 6-oz fiberglass cloth, saturated with epoxy, cover the entire hull. The plans called for sanding the second layer of fiberglass cloth smooth, but I had a person from the local auto body shop apply an epoxy coating to the bottom. This made the bottom smooth without sanding, and I felt this would be a more durable finish. I then painted the bottom with two coats of George Kirby marine paint which includes UV inhibitors.
I added a 2×2 PVC keel, 16′ from the stern forward. The plans did not call for this, but I grew up rowing flat-bottomed boats and found that those with small keels seemed to track better.
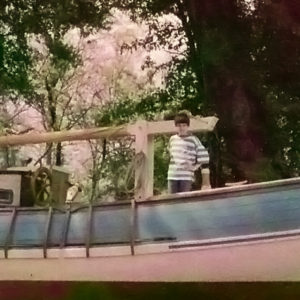
At this point, the hull was ready to be turned over for placement on the trailer. My friends and neighbors helped, with excellent advice from a video on the Spira website, to gently roll the boat over with the aid of ropes and my tractor.
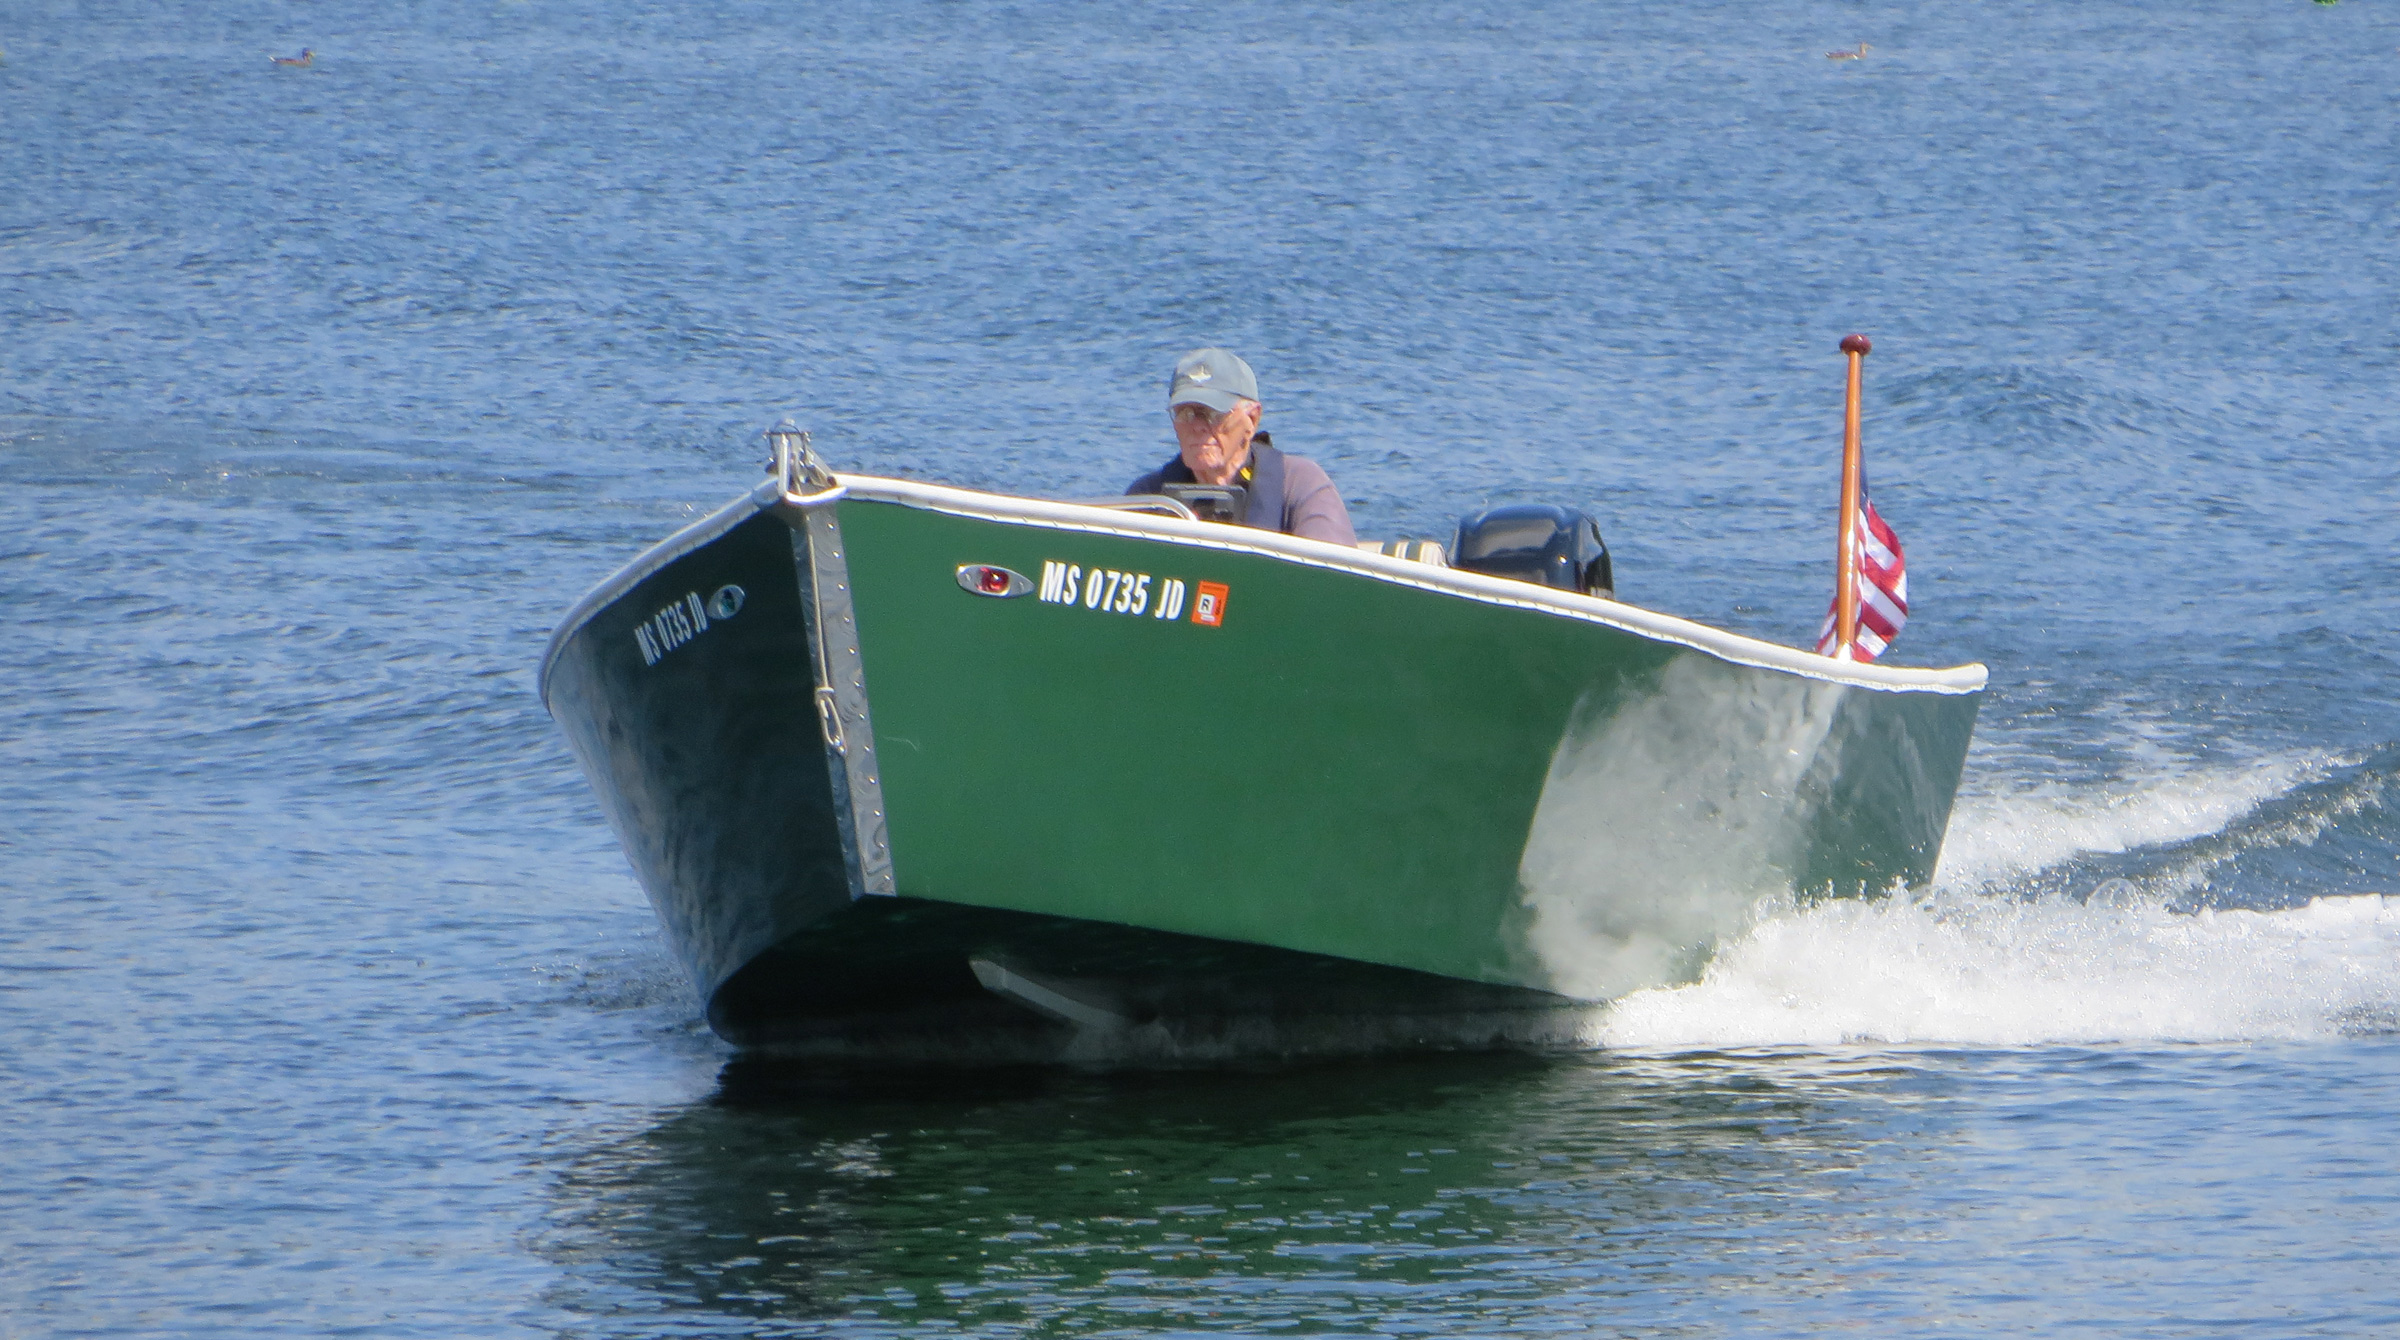
I followed the plans for forming the sides to the stem. Then I screwed on a stainless-steel bow plate that I had fabricated and polished. This was both for aesthetics and to add protection to the bow; I got the idea from the old inboard lake boats of the ’40s.
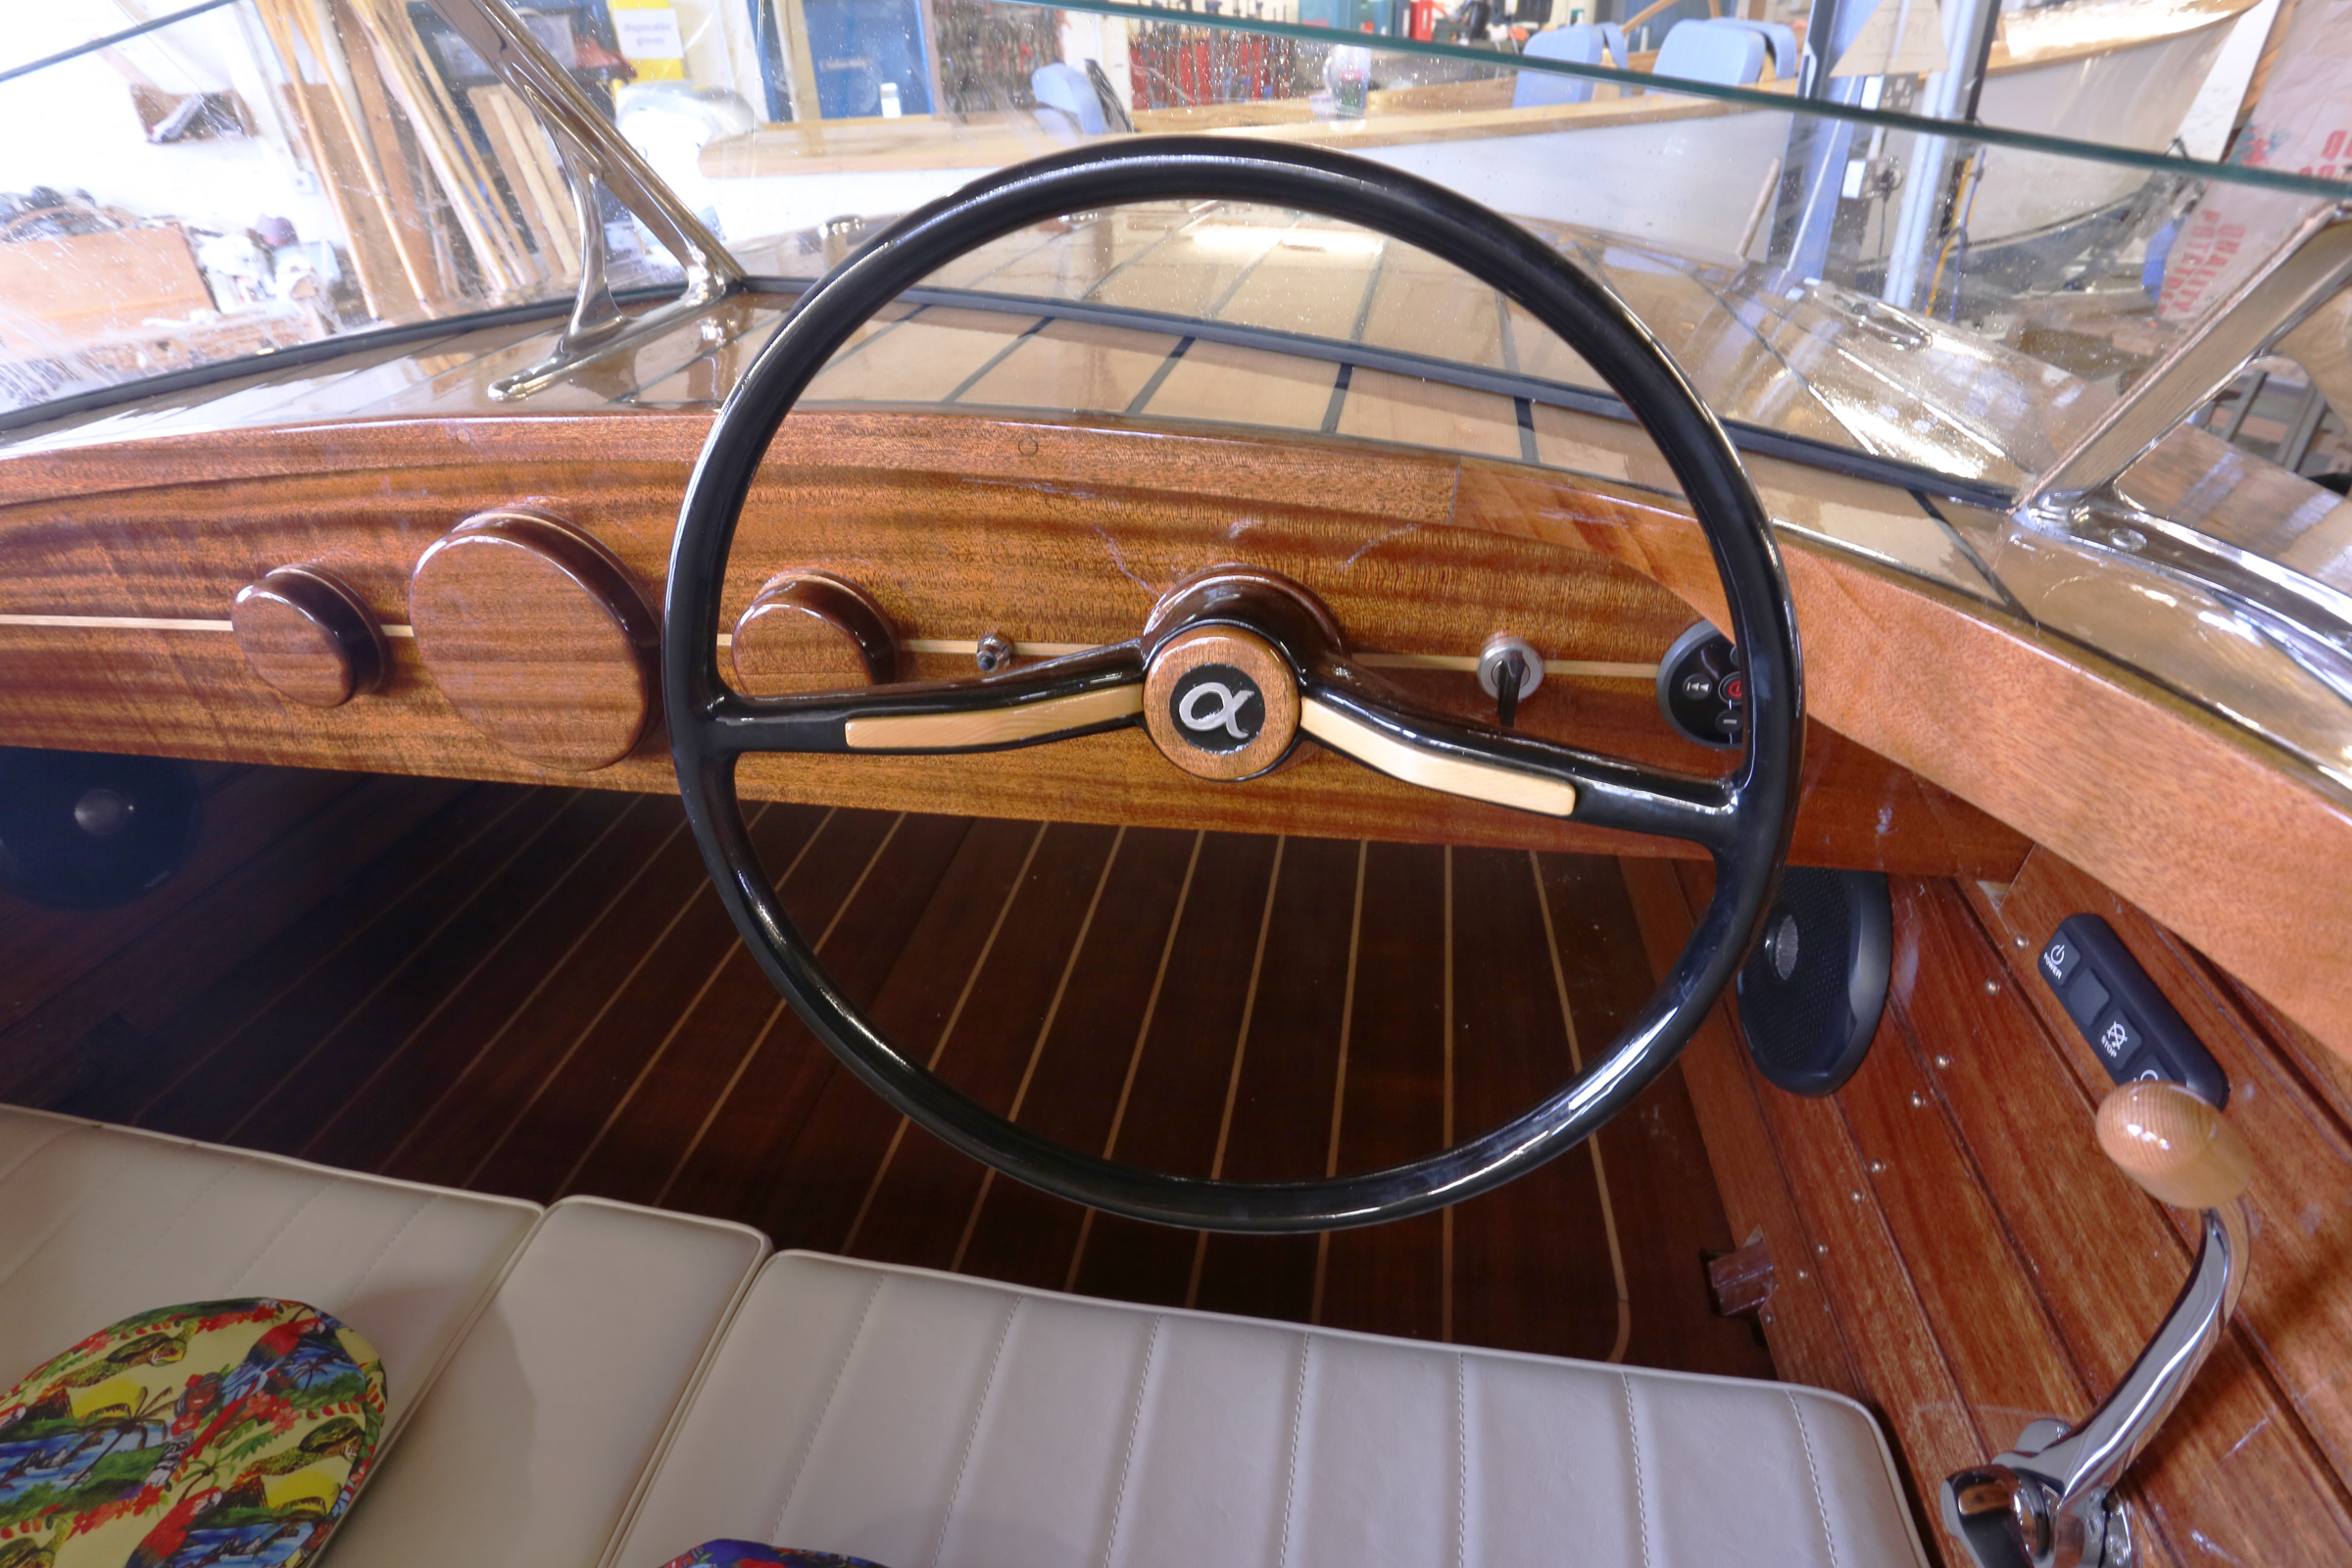
I was on my own for outfitting the interior. Jeff had learned that each builder inevitably has their own ideas for the interior, and so the handbook he provides with the plans simply states, “There are infinite possibilities, so have at it and enjoy,” and that is exactly what I did.
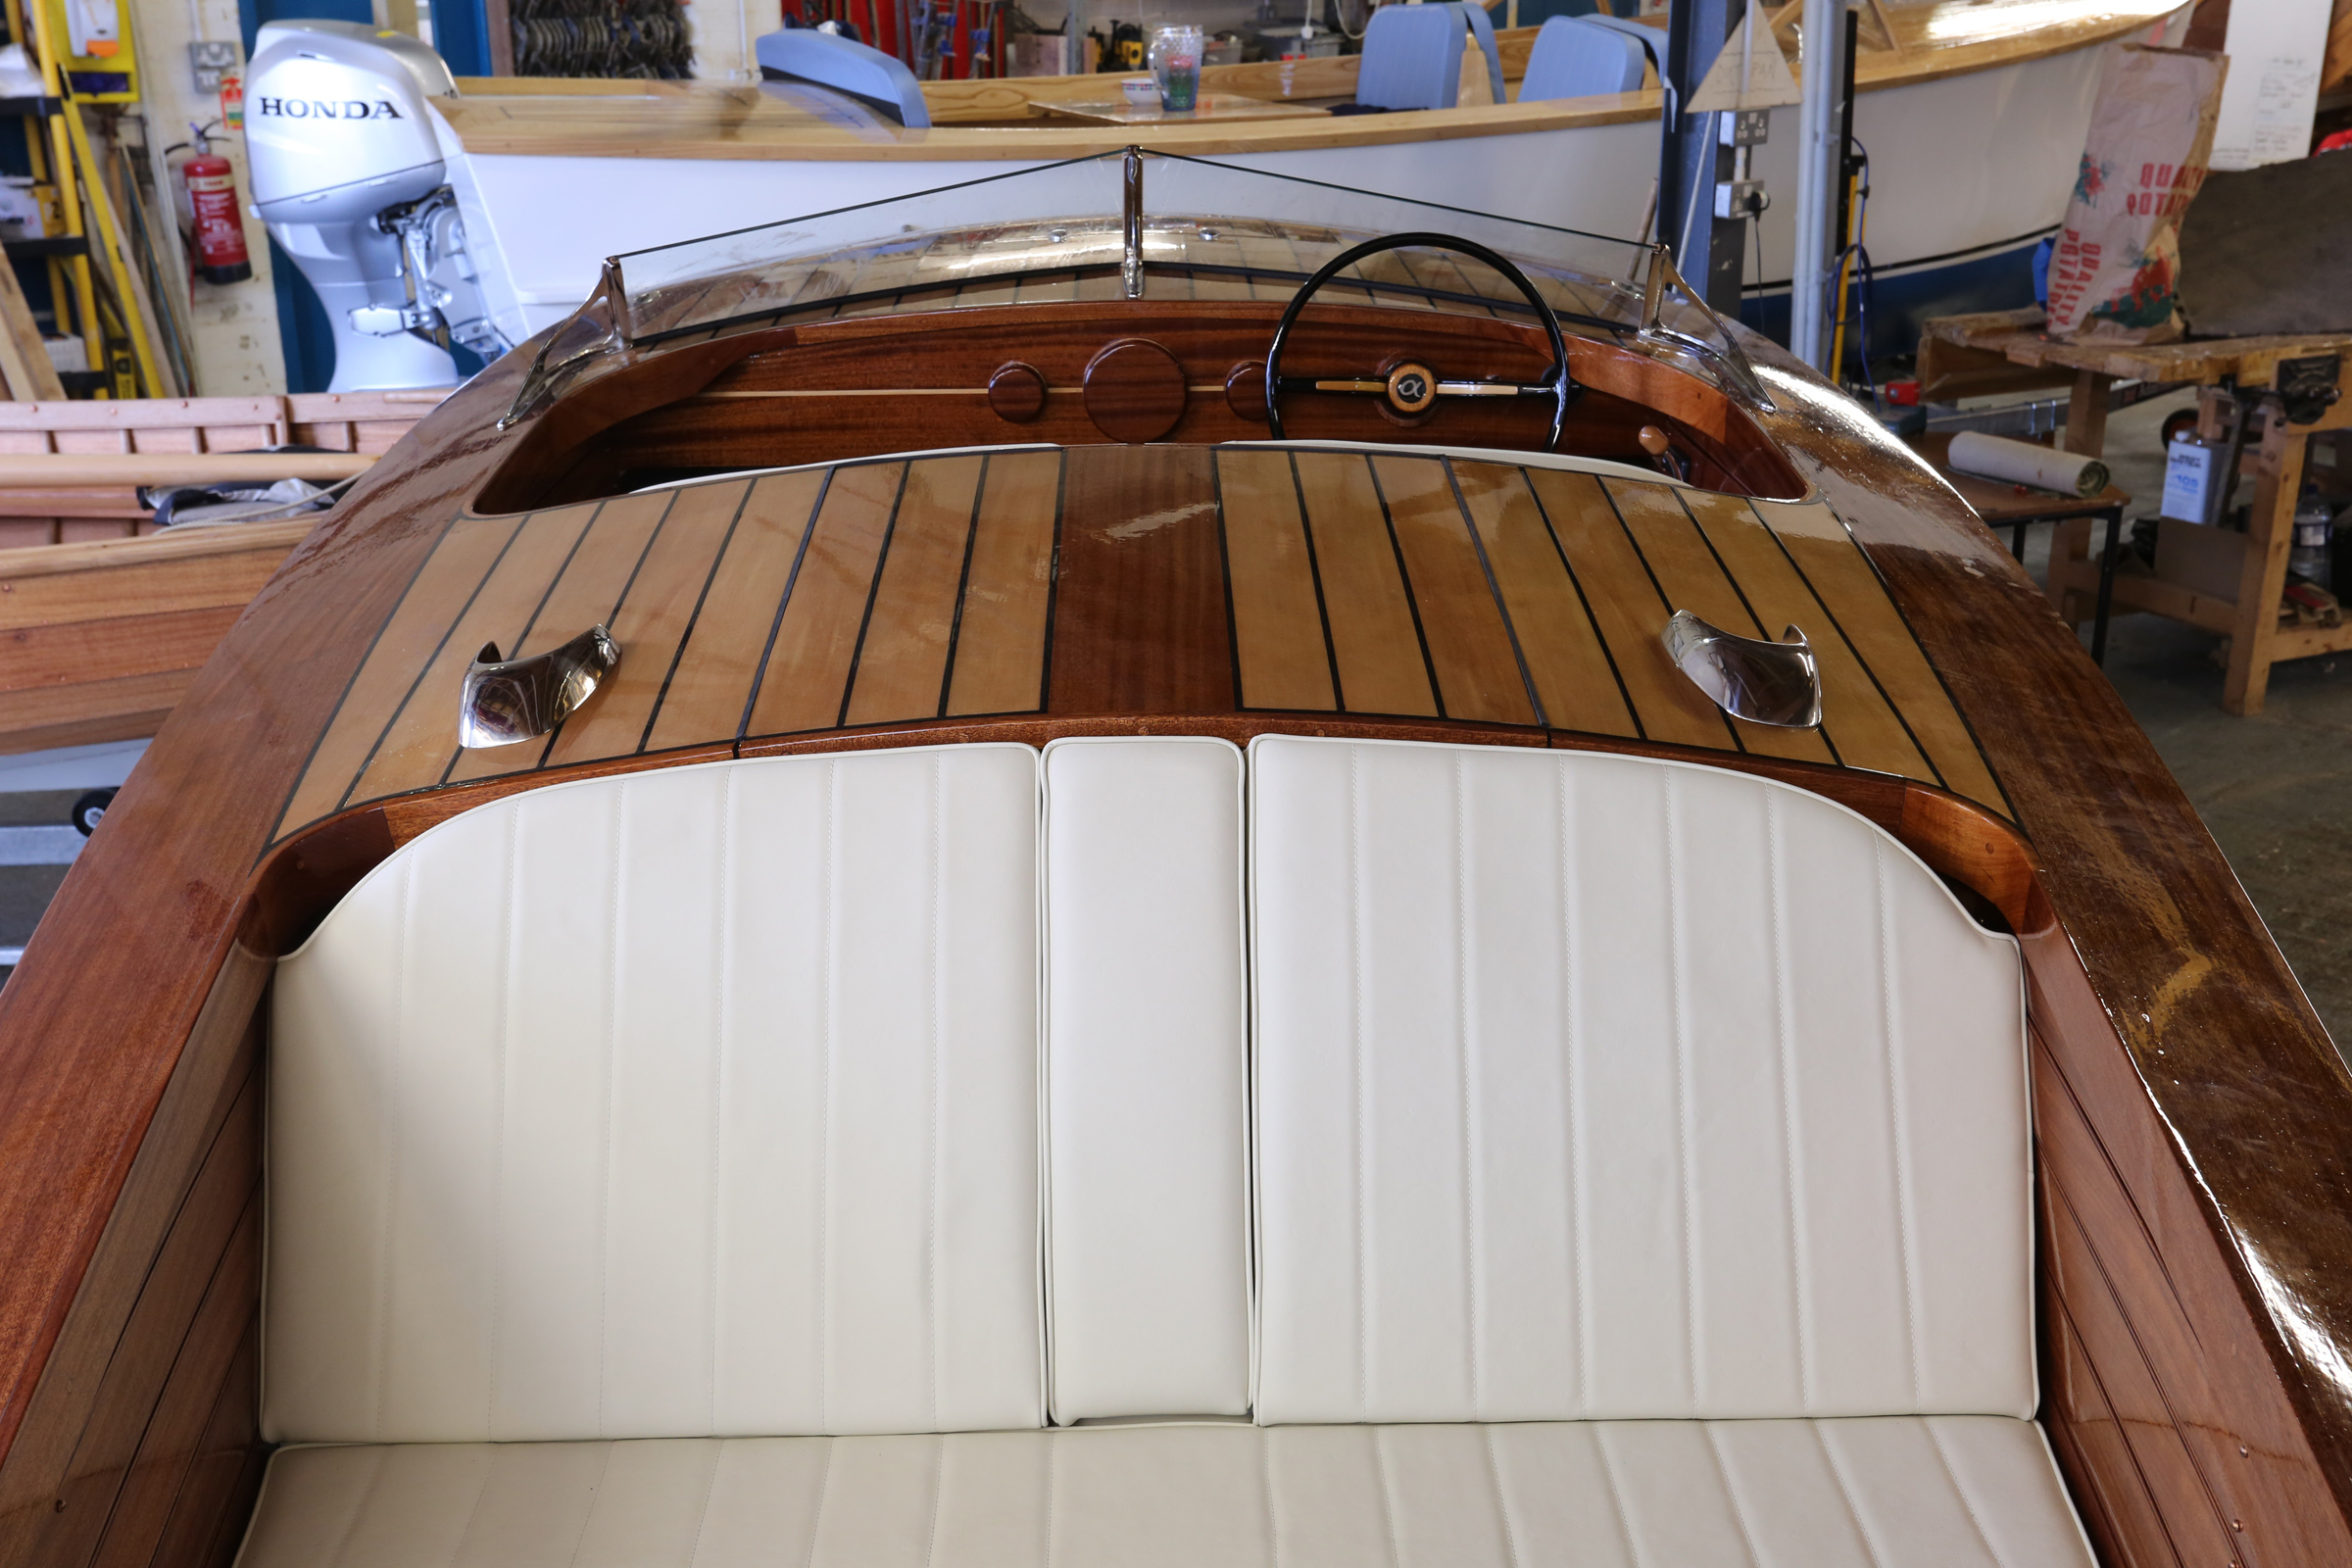
The drawings indicate optional caprails that cover the frame heads, sheerstrake edges, and outwales, but I extended those caps to 8” wide, allowing us to sit on them and swing our legs over the side to board and deboard the boat when it’s nosed up on the beach. As an added bonus, the side decks provide seating all along the sides of the boat. The canvas gunwale guard I installed along the sheer is easy on the legs when stepping over the side and protects other boats we may come alongside.
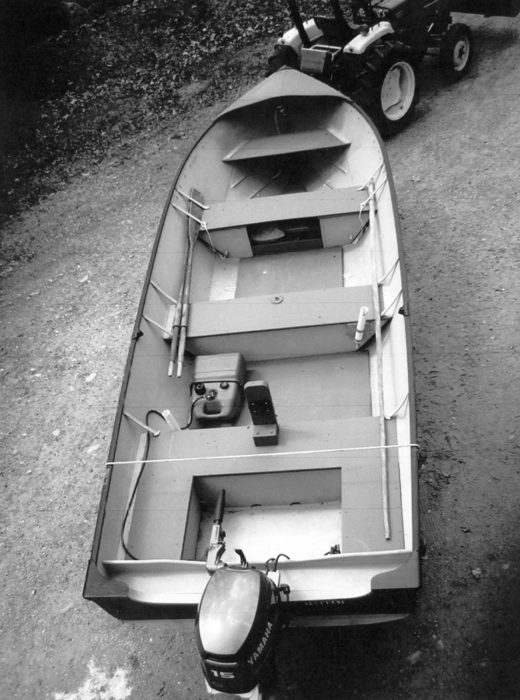
The plans leave designing the interior up to the builder. This off-center console offers easy passage from bow to stern; the carpeted area forward has enough room for four folding chairs.
The side decks curve into a 2′-long foredeck that creates space for locker in the bow section to store life jackets, cushions, and other gear. The compartment also includes an area for stowing the anchor rode, and I mounted a roller on the bow, allowing the anchor rode to go into a pipe and feed into the locker below. The foredeck also provides a safe platform while handling the anchor at the bow.
Jeff calculated the weight of the Albion hull to be 980 lbs; the decks, floorboards, and console I added brought my boat in at 1,420 lbs, and 1,680 with the motor installed. With the maximum displacement listed at 4,800 lbs, there was plenty of capacity left for crew and cargo.
I applied one coat of clear epoxy to the interior sides and two coats to the bilge area. I hired a professional painter to spray the interior sides with Raptor’s tan pickup-truck bed liner, which contains UV protection. This completely covered and sealed the wood, giving a nicely textured finish while concealing imperfections.
The plan suggested 1x2s for an optional cockpit sole; I chose to use 1×4 Douglas-fir to make six removable panels for bilge access. I coated those with Penofin Oil Finish, then assembled the panels and installed both those and some permanent floorboards.
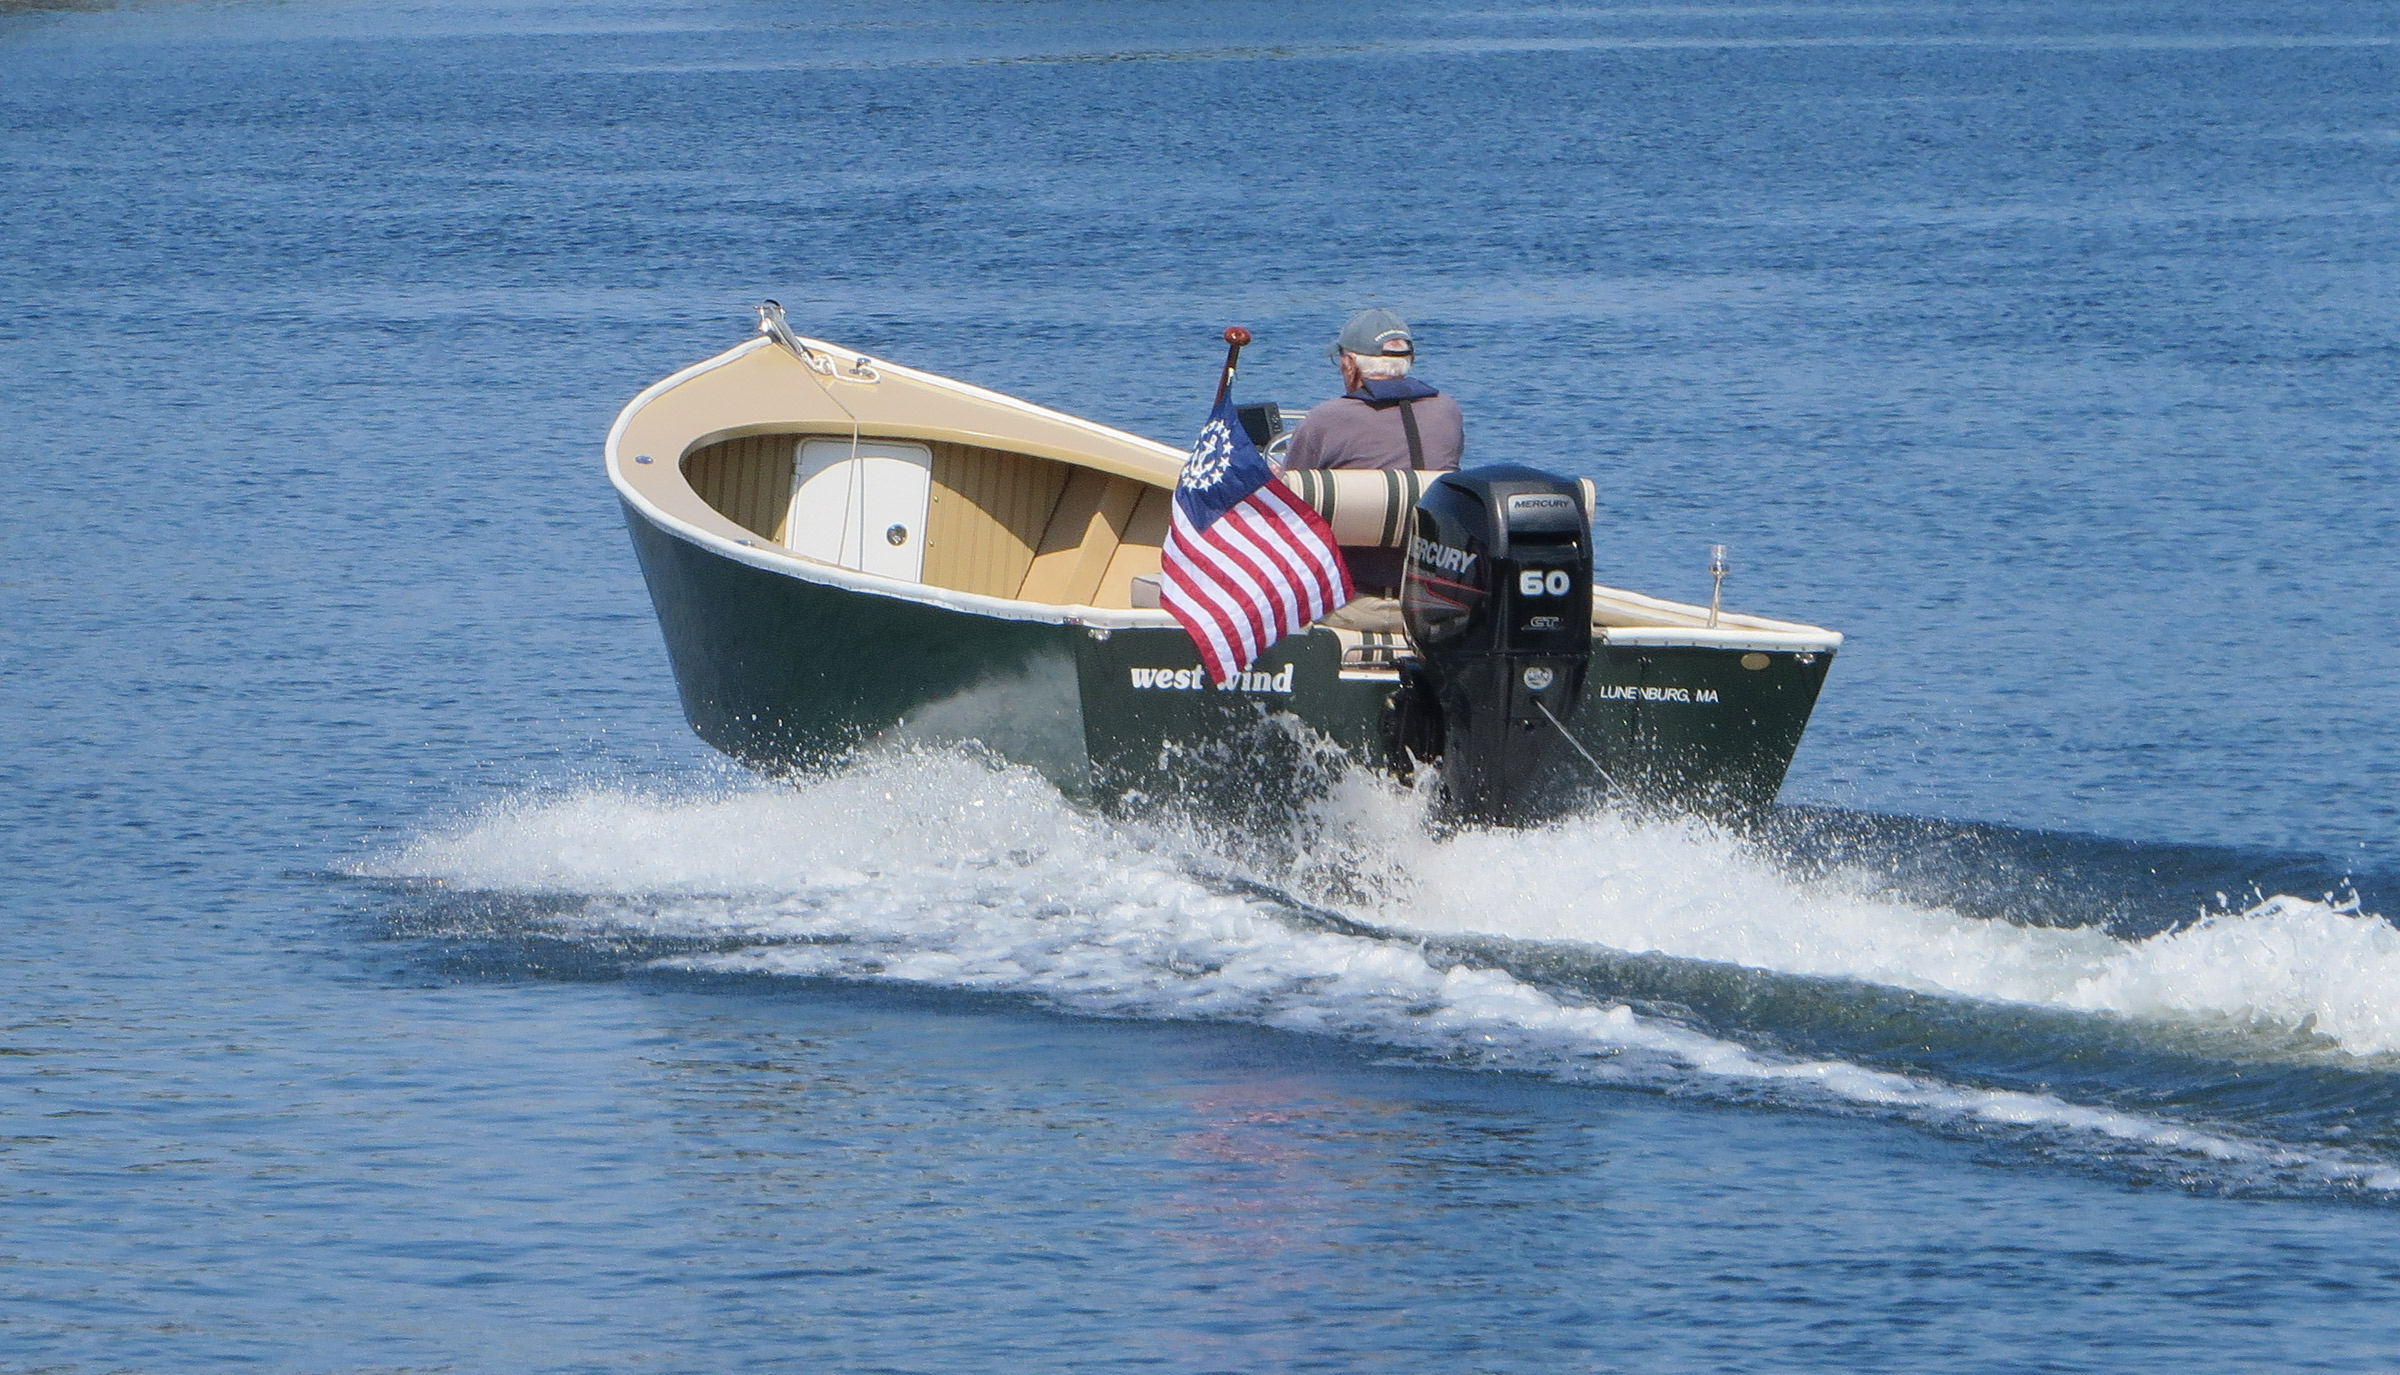
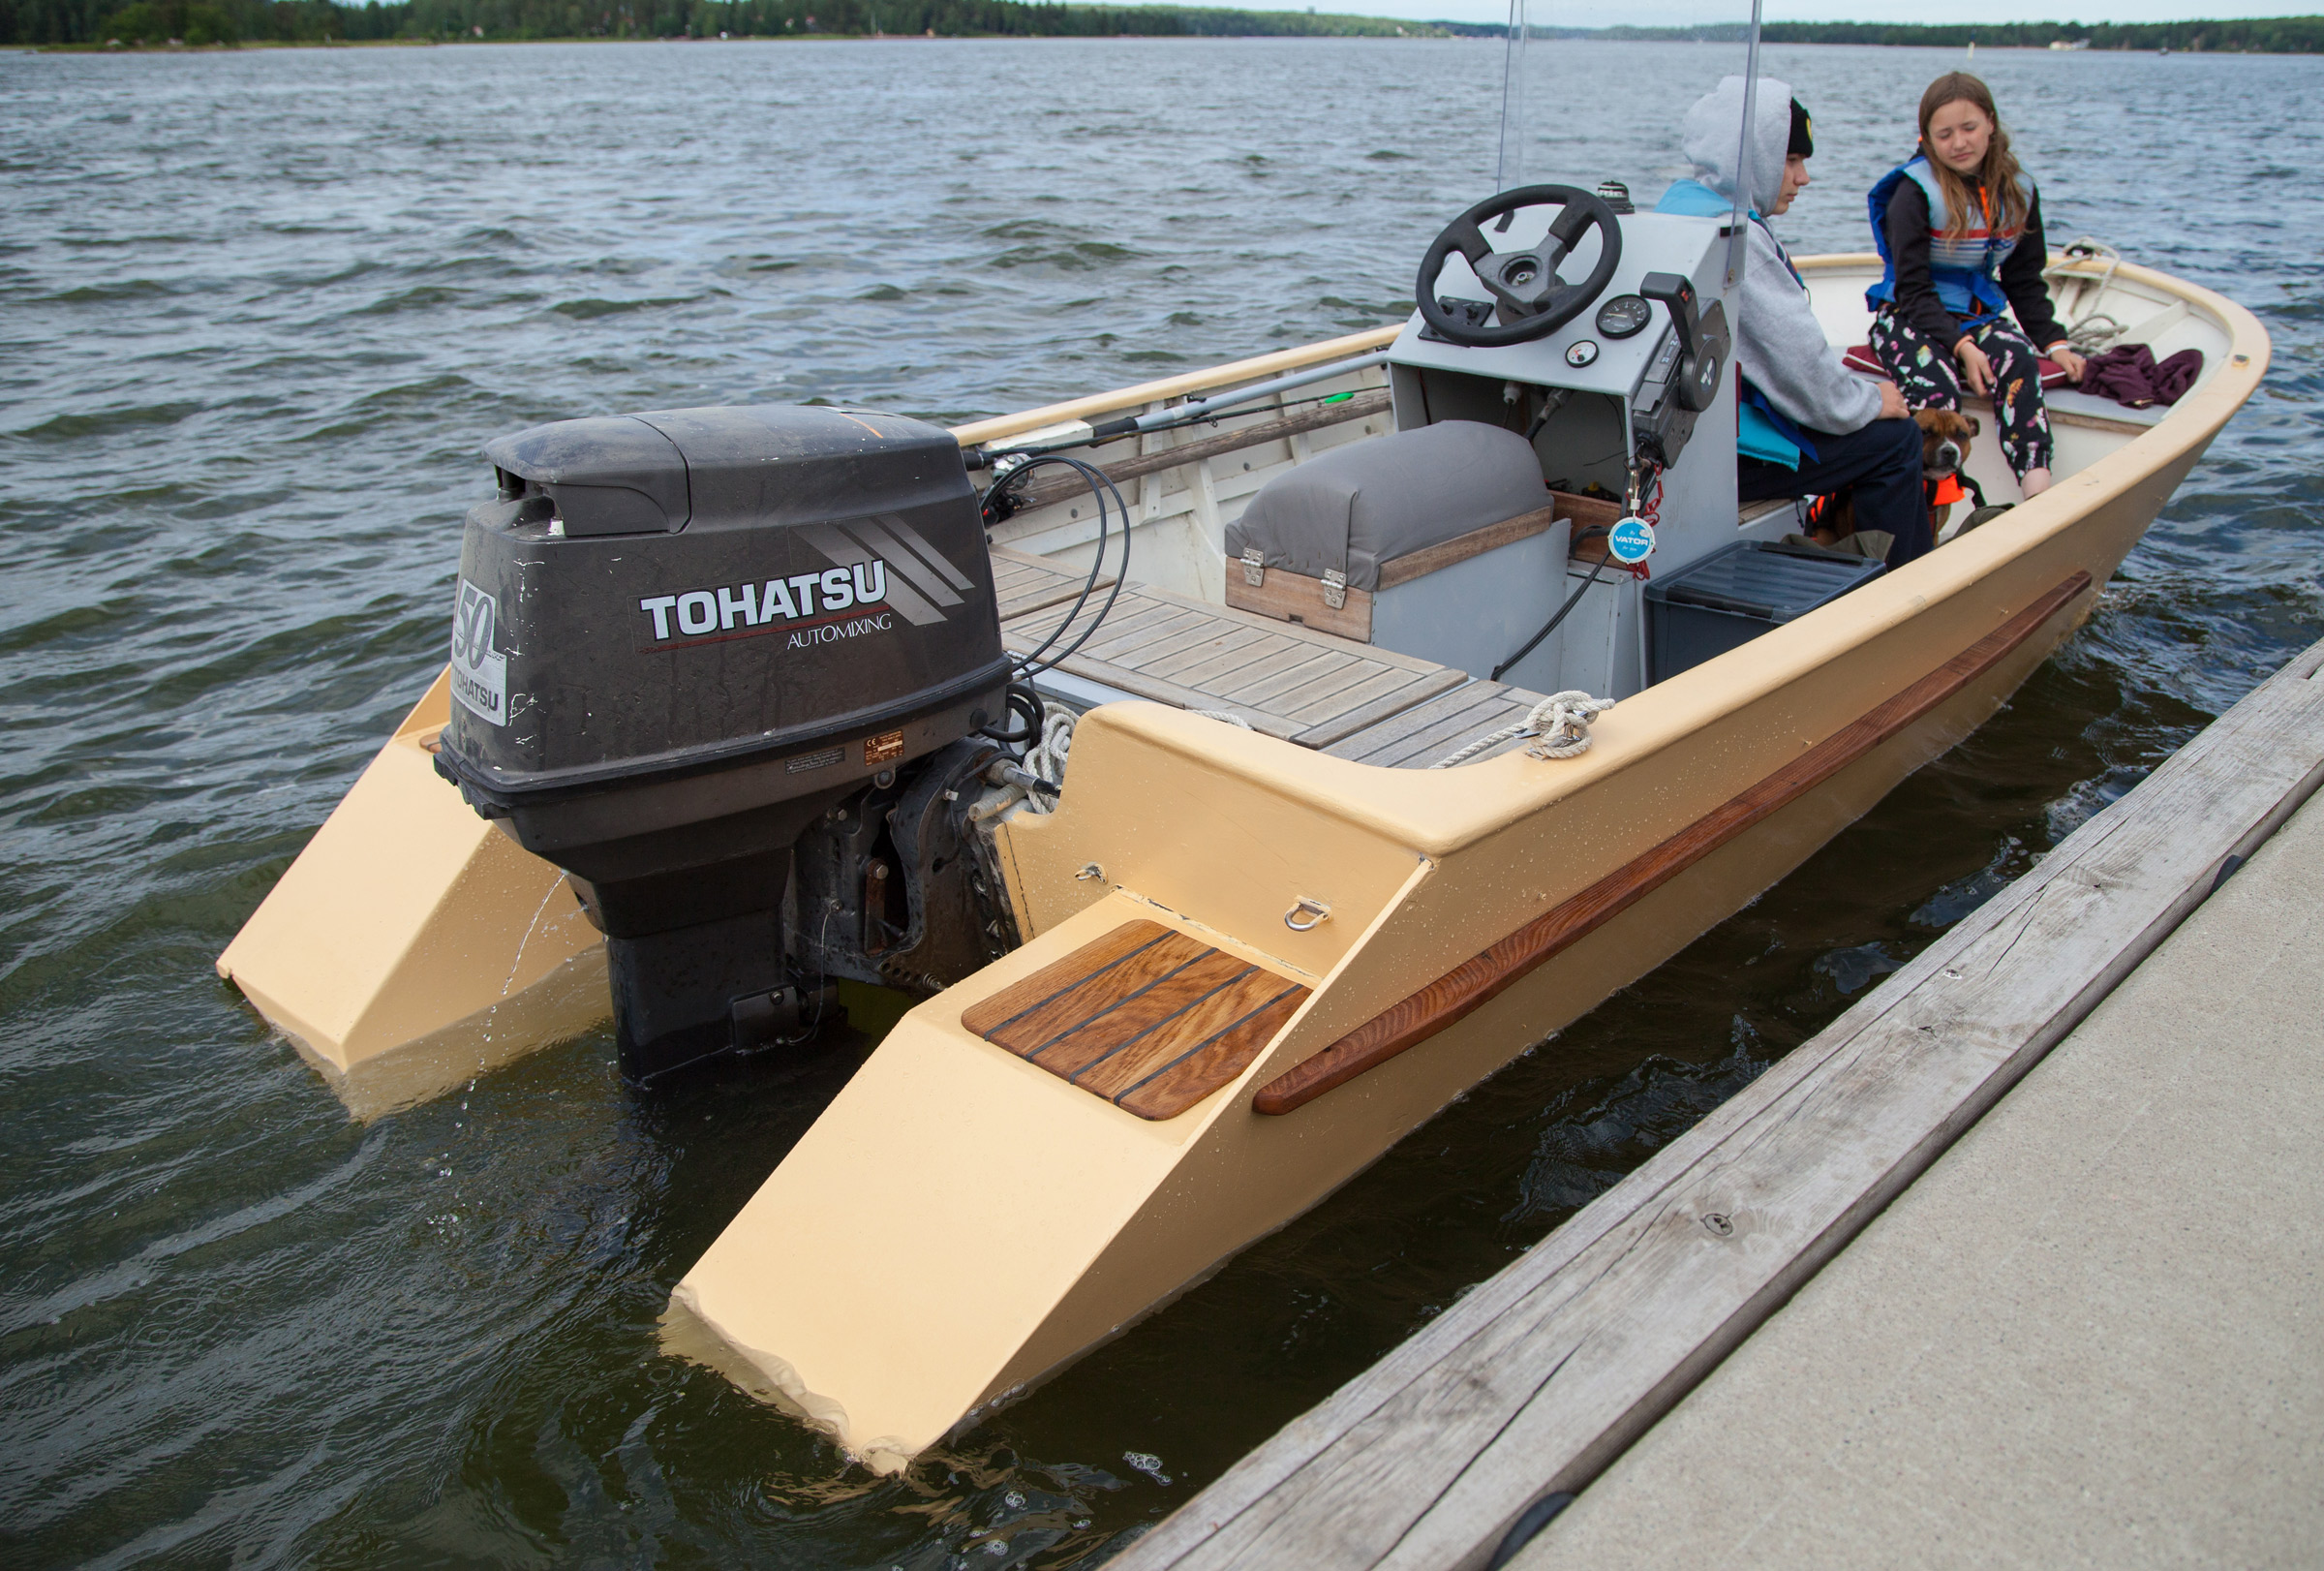
The broad buoyant stern can easily support the weight of a 50-hp outboard.
I purchased a prebuilt fiberglass center console into which I installed the steering controls, electric control panel, horn, and GPS. To make the wiring as invisible as possible, I ran all the wiring and motor controls under the side decks and into the console. Wires for the running lights run through a PVC pipe under the deck then up inside the console.
Finally, I hired someone to apply an epoxy coating to the hull and deck, then primed and painted them with the same marine paint as was used for the bottom.
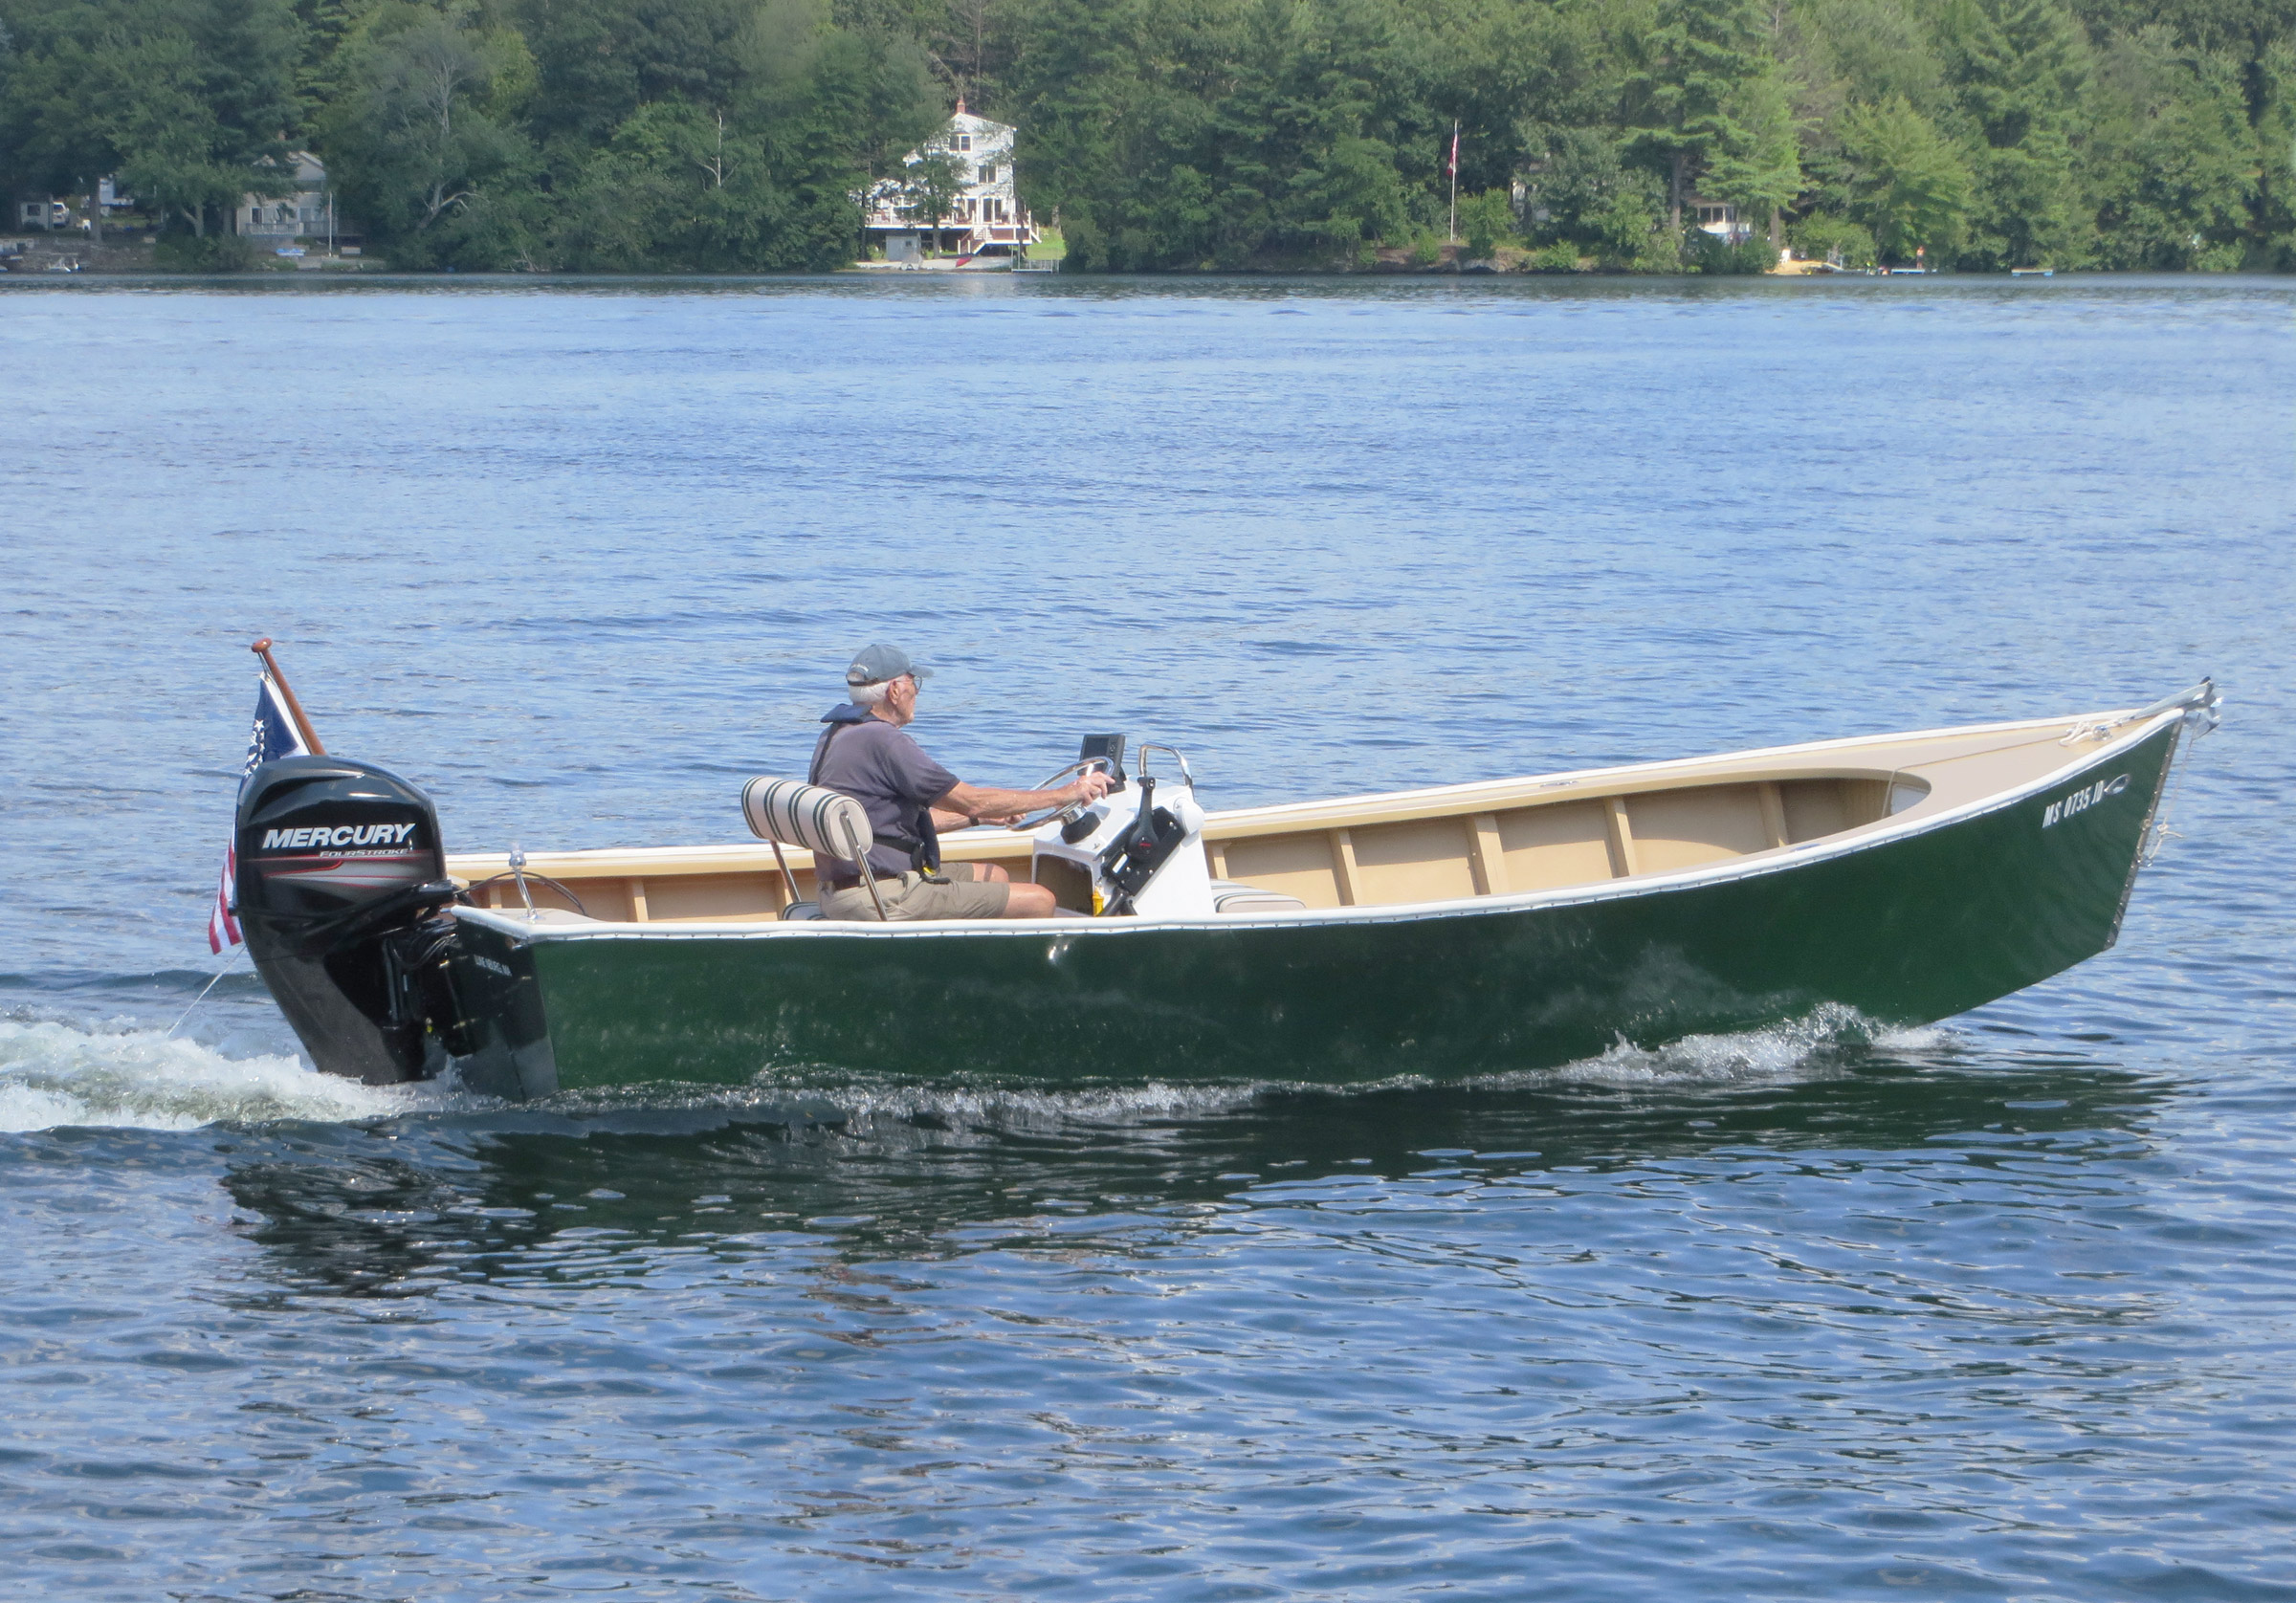
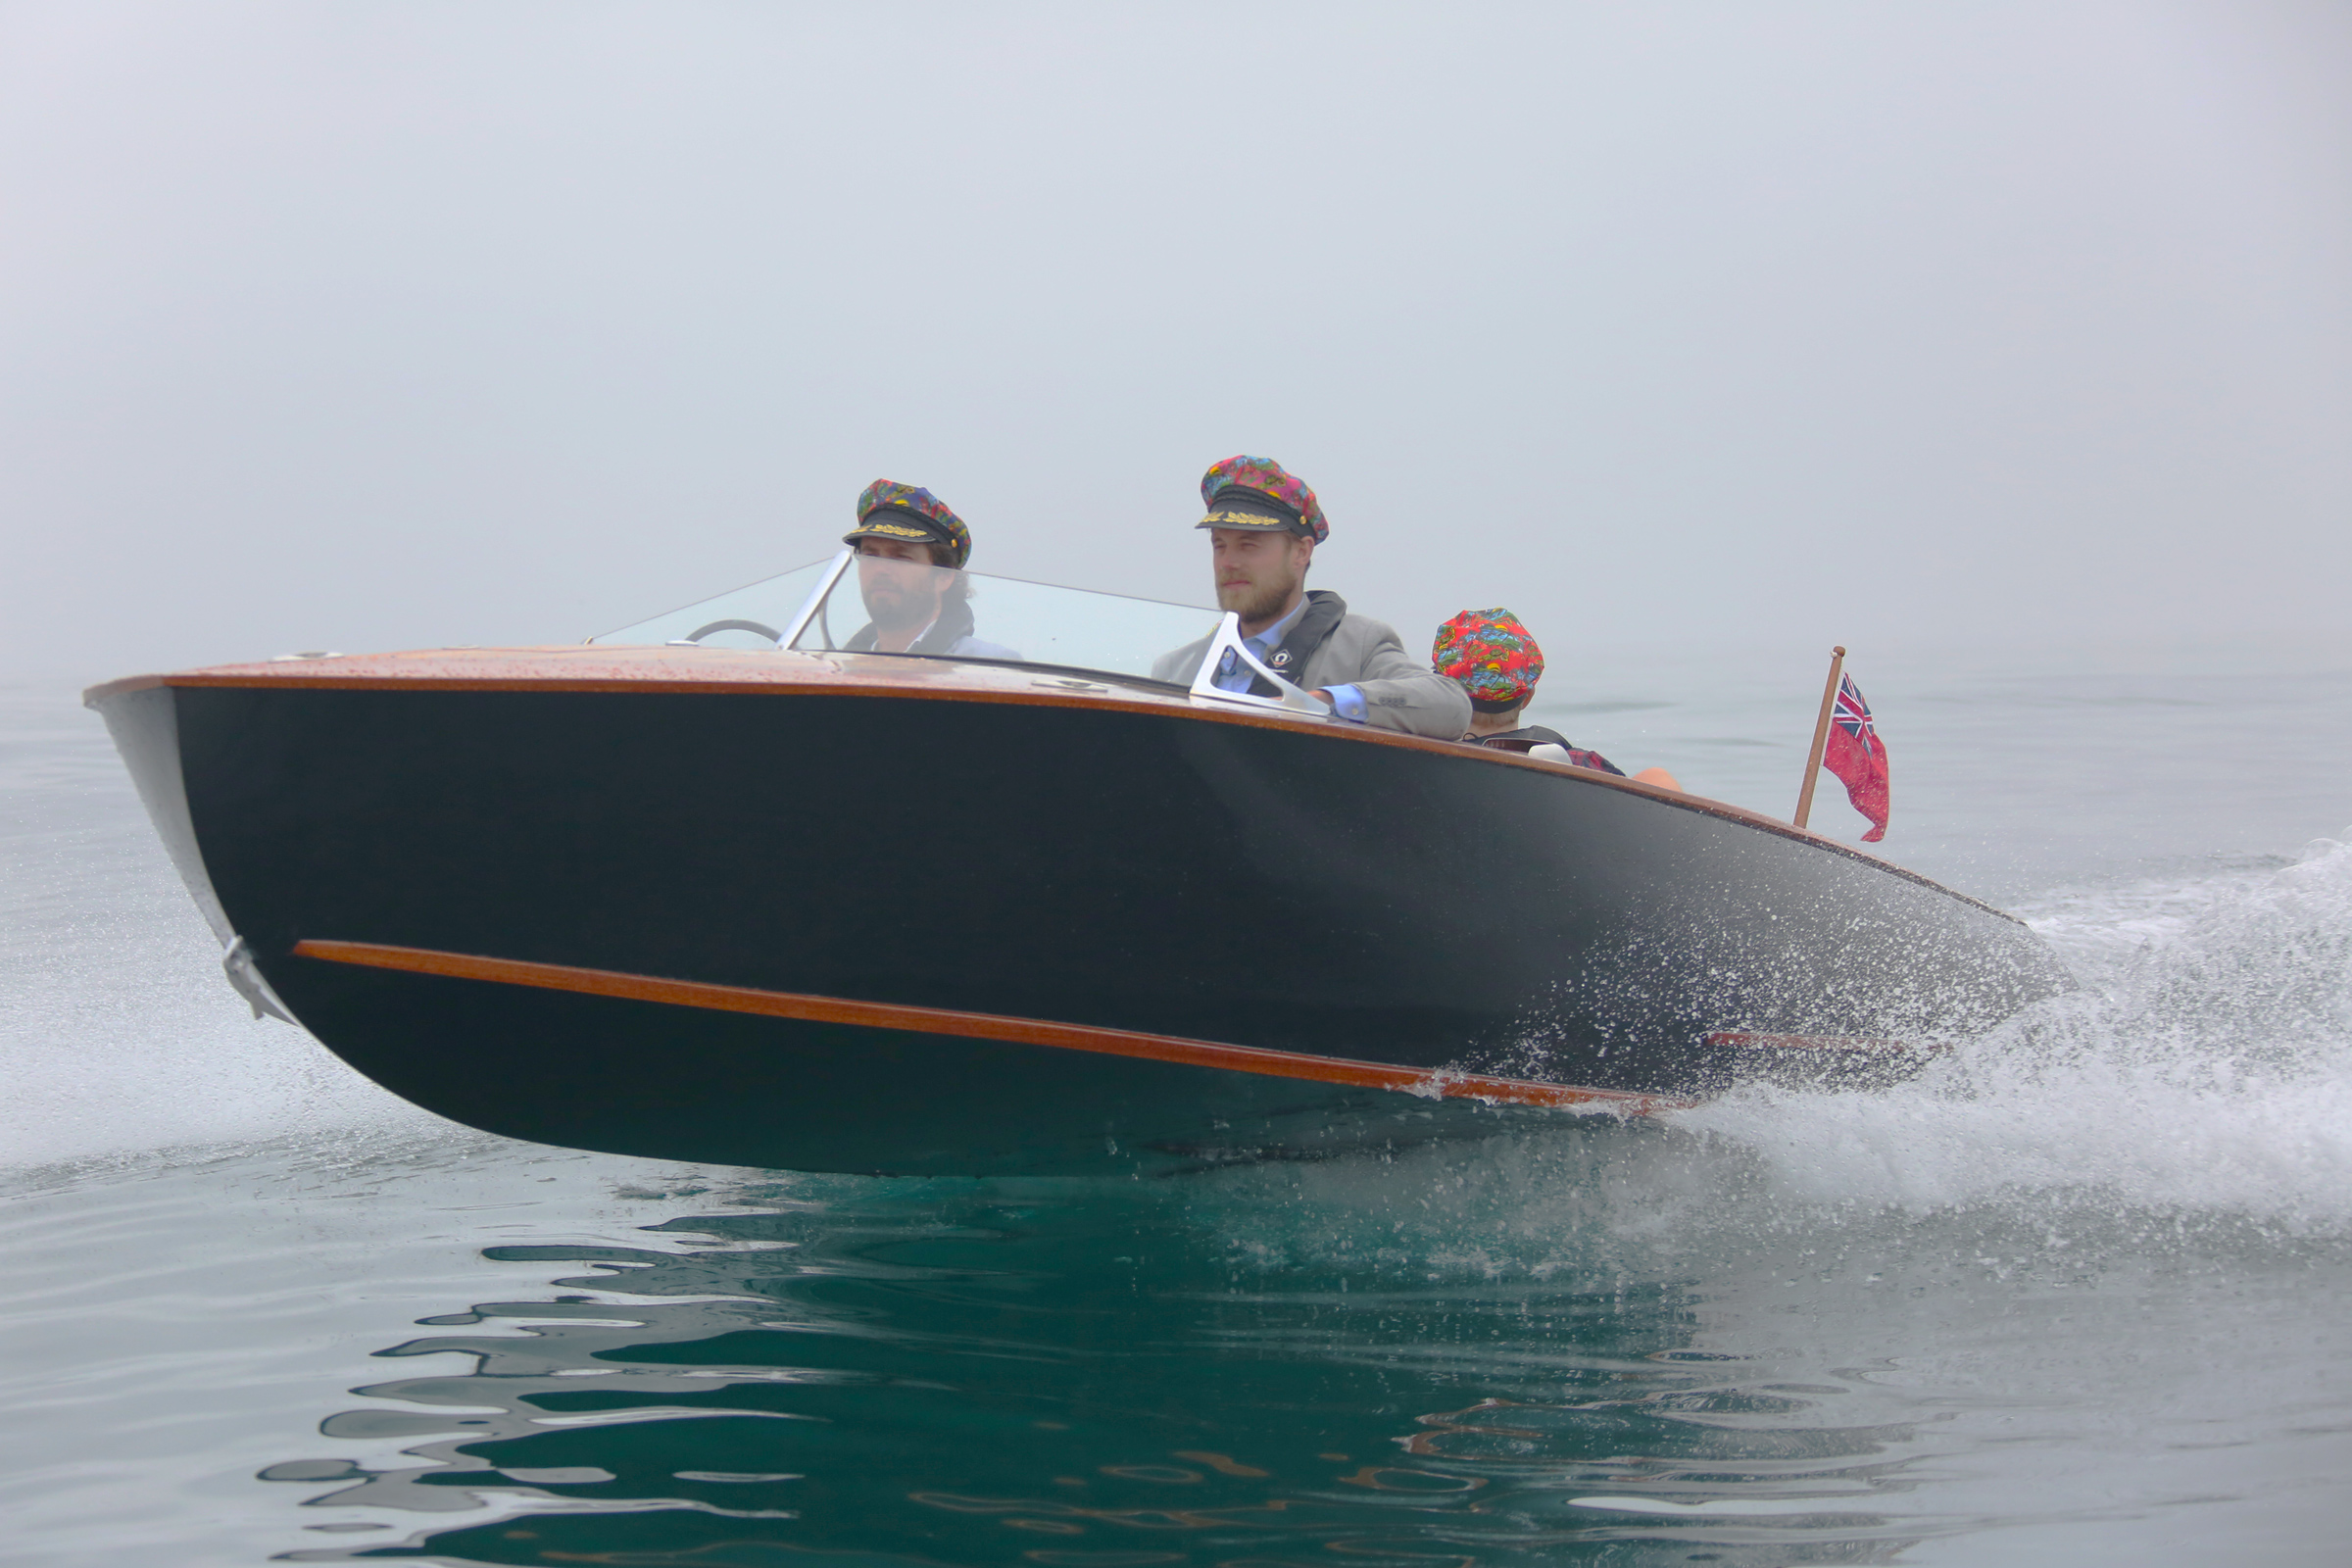
This 60-hp outboard can get the Albion moving at 29 mph.
My trials in a local lake proved that the boat trailered, launched, and performed remarkably well. The bottom is 5′ 9-1/8” at its widest point, and because of the narrow beam at the waterline, I feared the boat would be rocky, but was pleasantly surprised by its stability. Having the helm 13-1/2′ from the bow on a 20′ boat and off-center does not seem to hurt the performance or the balance. Even with the added foredeck and side decks, the cockpit is still quite open and we are able to move around freely with no obstacles or wires and cables to trip over (most important at our age!).
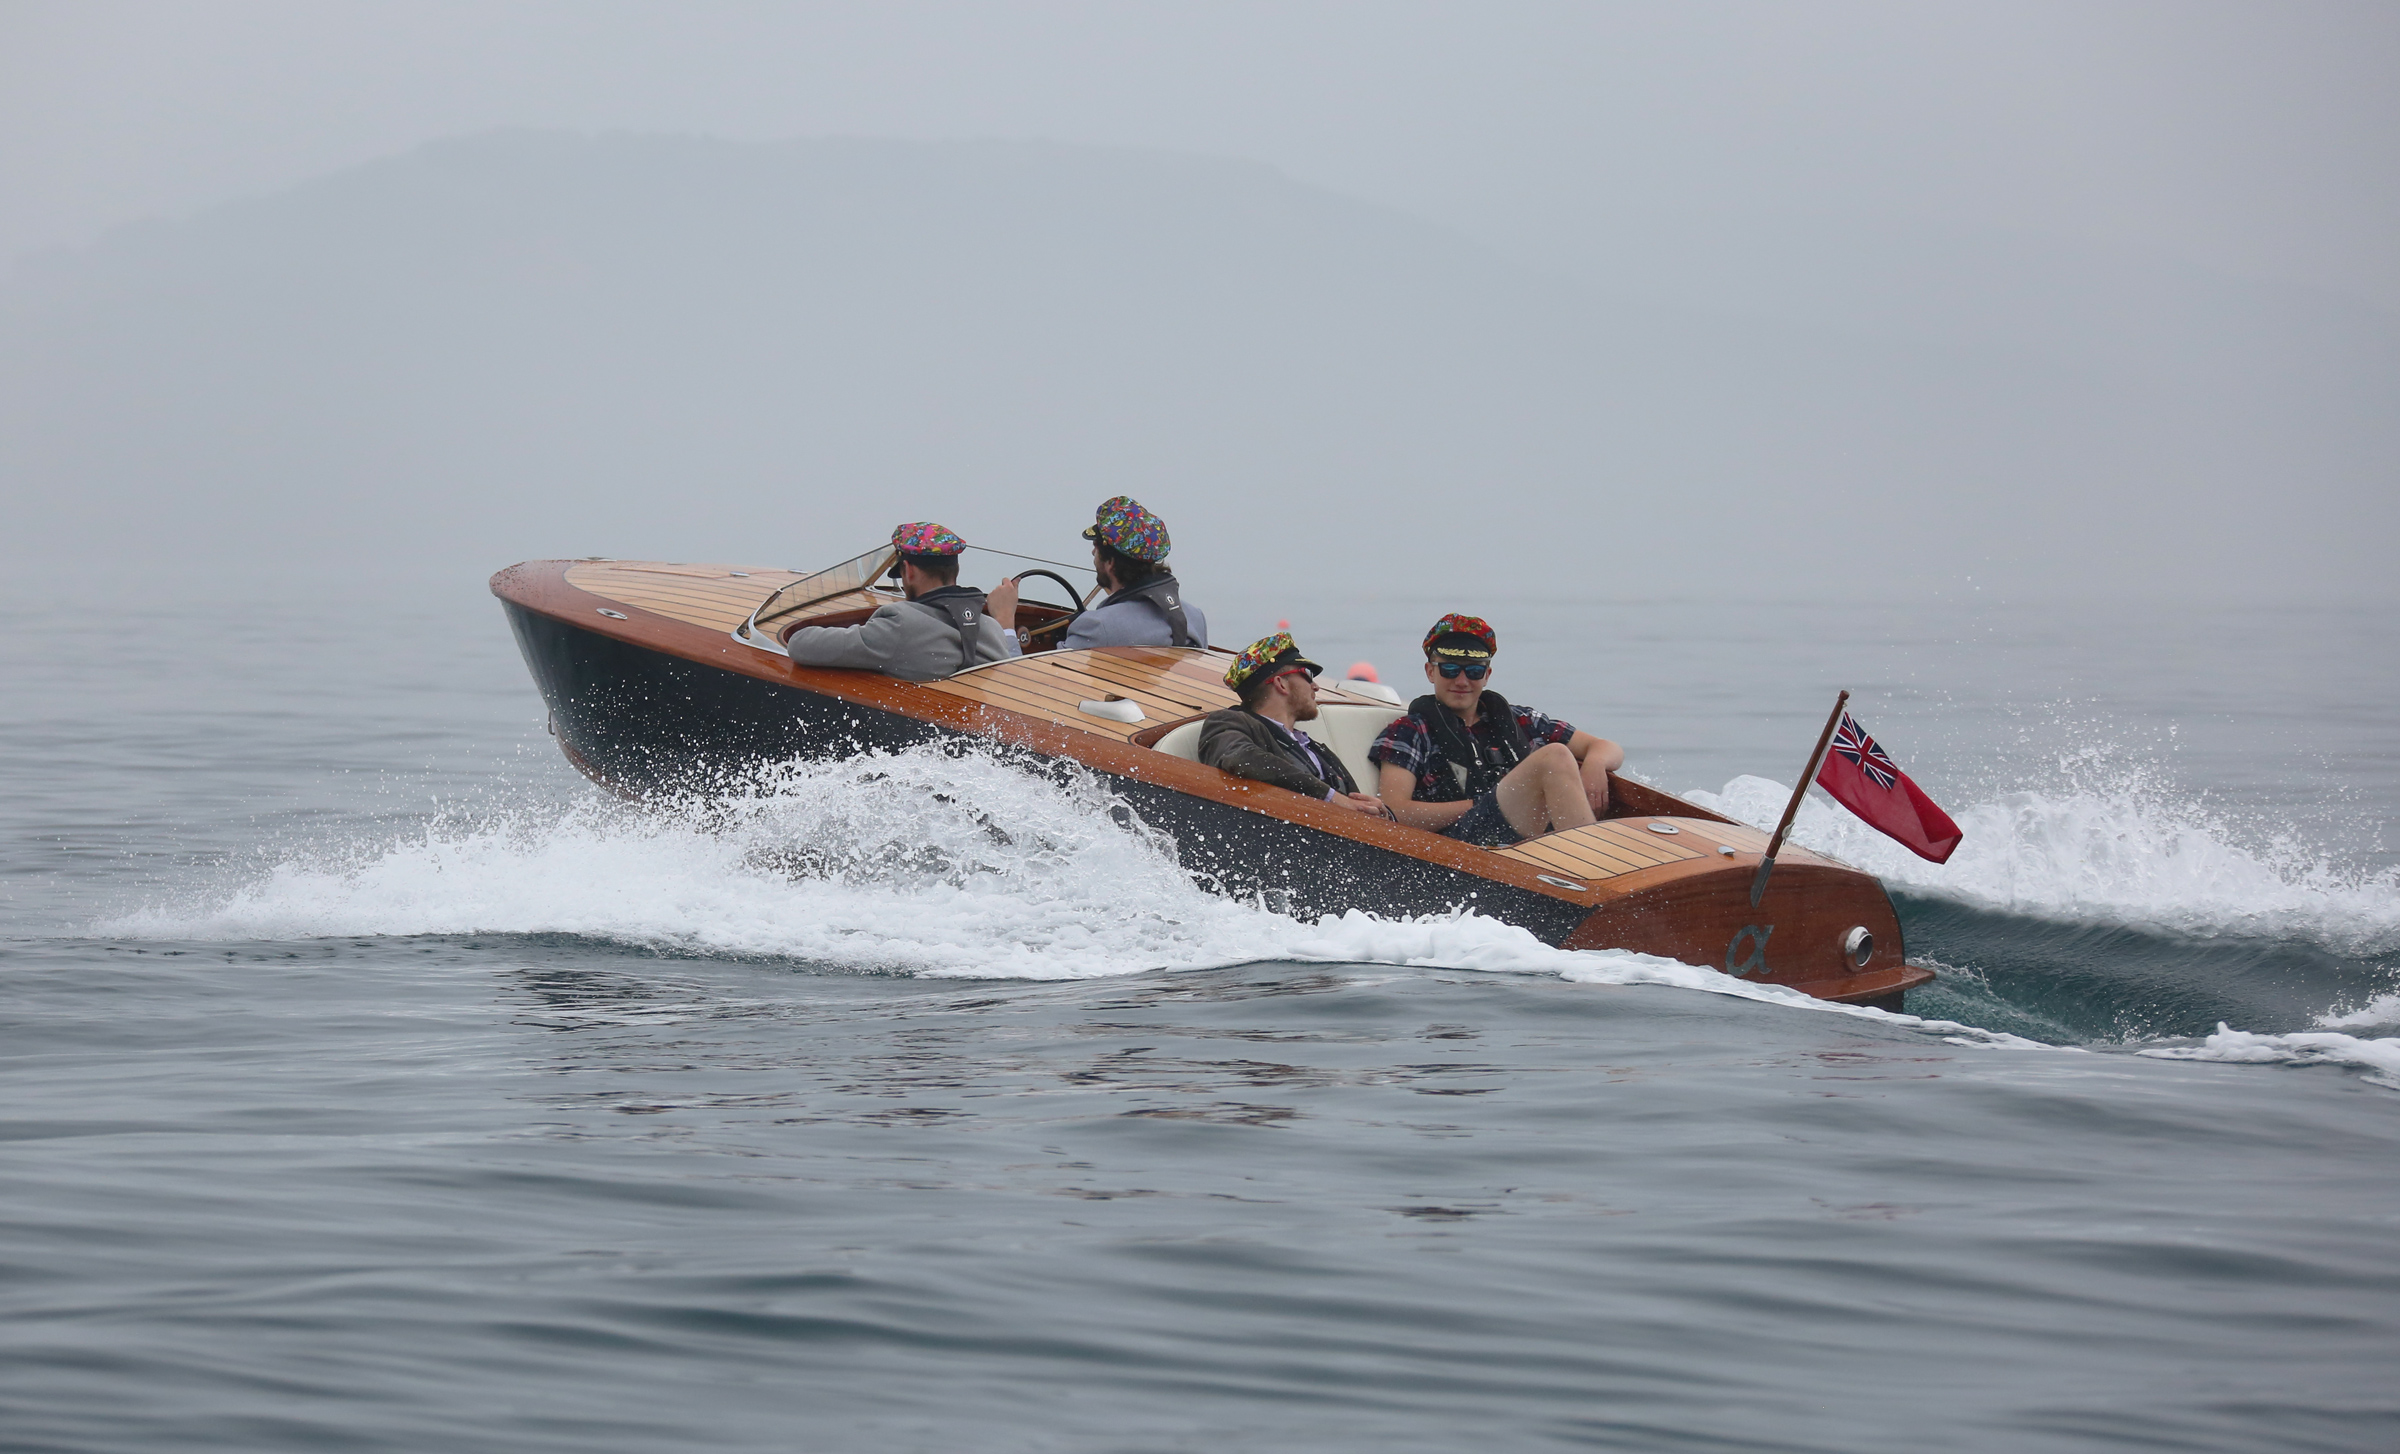
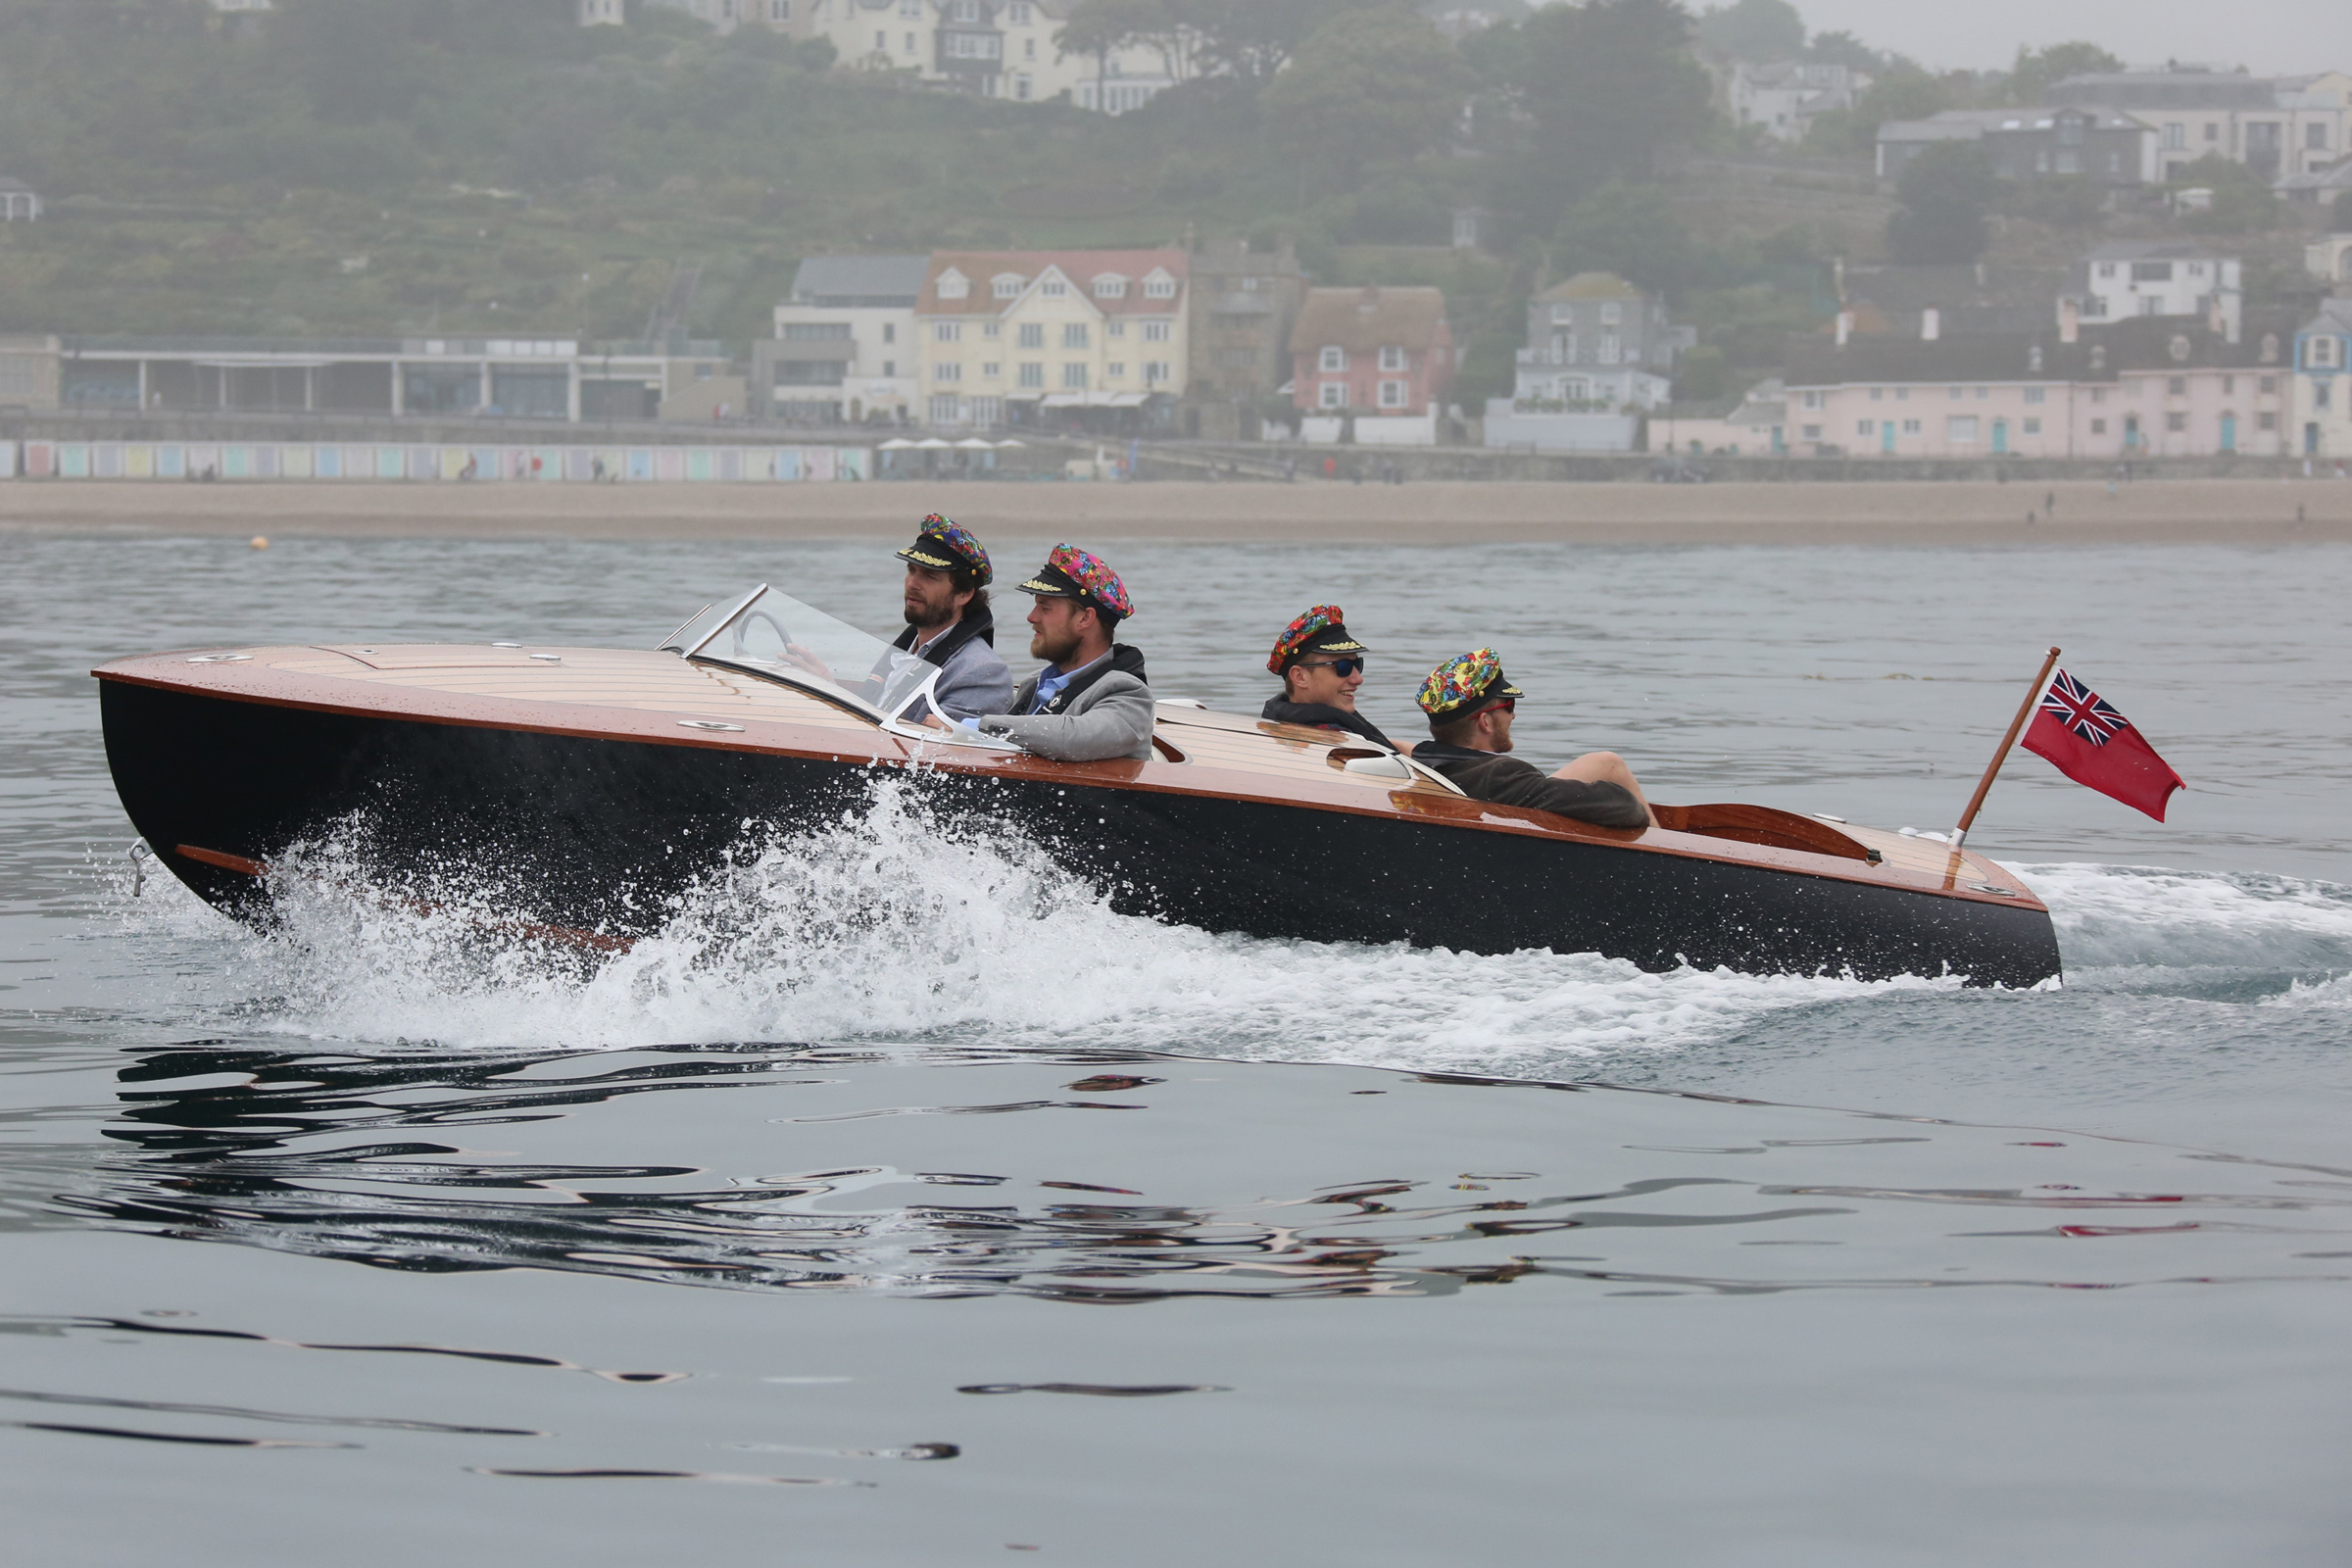
Forward of the helm, there is ample space for four people to sit comfortably in folding chairs, my main purpose for building this boat.
Coming up on plane, the bow stays low and doesn’t obscure the view forward.
Powered by the 60-hp motor, the Albion gets up on plane pretty quickly and does a GPS-measured 29 mph. It stays flat, even when climbing on plane, allowing me to have full visibility ahead. Sharp turns at full throttle, with weight in the back half of the hull, go very smoothly without any side skidding.
With the outboard at full throttle, the Albion carves turns without skidding.
We don’t encounter any rough water as all of our boating is done on small lakes and rivers, so we have no complaints about the flat bottom. One of the reasons I chose this design was because it would allow us to get up on the beach and disembark without the boat tipping.
Our aluminum trailer was designed to handle the Albion. We back the trailer into the water over the fenders and the boat floats off. When we reload, the boat floats on easily between the guide posts.
No matter where the boat is, on land or in the water, it draws a lot of attention. People are in awe and want to know what it is, where I got it, if I built it, where I got the plans, and how it handles. This build, transforming a pile of wood into a thing of beauty, has been the most satisfying project I have ever done.
June and Al Dettenrieder of Lunenburg, Massachusetts, have been messing around in boats all 58 years of their married life. They started with a rowboat with a lawnmower engine and a washing-machine transmission that Al rigged up. There were many boats after that, even a 38′ sailboat. Now they enjoy puttering and picnicking in local lakes and rivers in the outboard dory Al built at 79 years of age. His Albion dory won Best Power Boat in the “I Built It Myself” event at the 2018 WoodenBoat Show in Mystic, Connecticut.
Albion Pacific Power Dory Particulars
[table]
Length/18′ 10.9″
Waterline length/16′ 2.5″
Beam/7′ 10.6″
Draft/7.8″
Maximum displacement/4800lbs
Hull weight/980lbs
Recommended horsepower/50hp
Maximum horsepower/150hp
[/table]
Update: Jeff Spira passed away unexpectedly in the spring of 2022. His website is no longer operating and it is presumed that his boat plans are no longer available.
Is there a boat you’d like to know more about? Have you built one that you think other Small Boats Monthly readers would enjoy? Please email us!
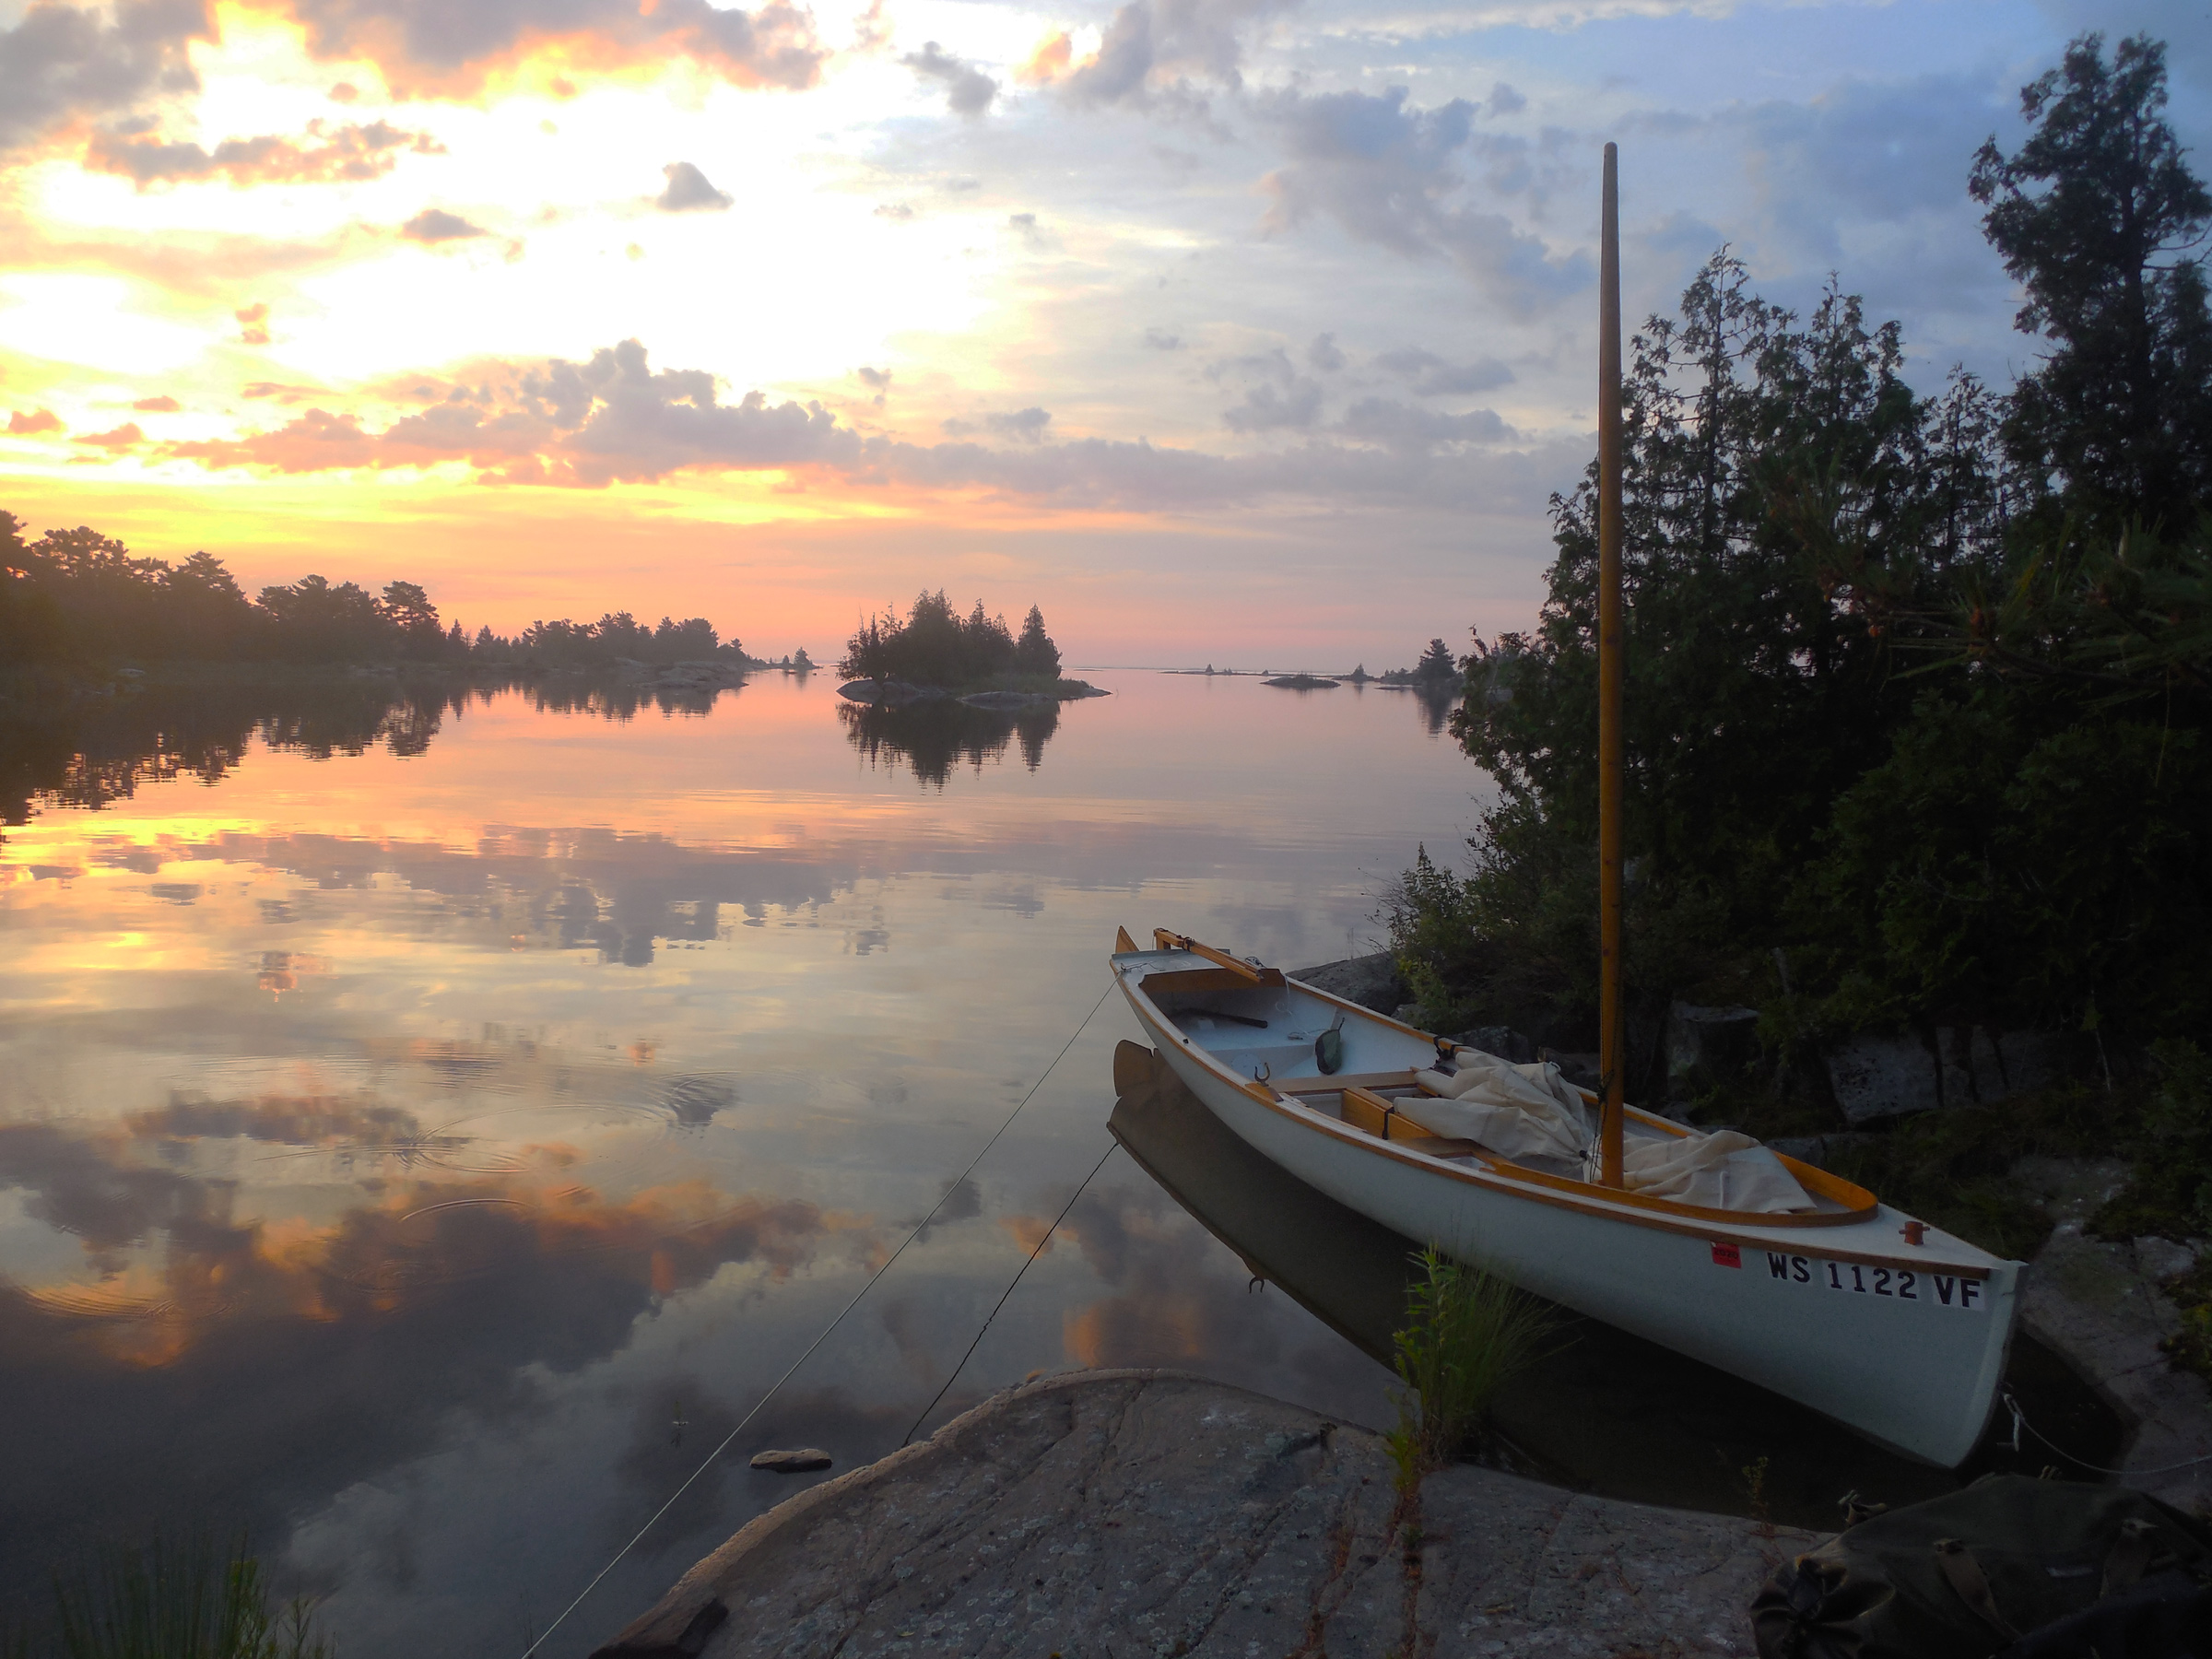
The east side of the Bustard Islands was all shoals and breakers, with a broad band of granite shelves and outcroppings stretching half a mile or more offshore. Typical for Georgian Bay, I knew, where the safest routes run well outside to avoid the rocks, or follow the well-buoyed passages of the charted small-craft route that traverses Georgian Bay’s eastern shoreline.
Here in the Thirty Thousand Islands region, only kayaks and canoes—or a sail-and-oar cruiser with her board and rudder up—can manage to sneak through to the shore in most places. And even boats like my as-yet-unnamed Don Kurylko–designed Alaska beach cruiser have to pick their way carefully. Passing through the northern end of the Bustard Islands on my approach from the west, I had seen a few cottages and sailed past half a dozen larger boats in the main anchorage between Tie Island and Strawberry Island. Out here on the east side of the Bustards I was completely on my own.
photographs by the author
Like most of Georgian Bay’s eastern shore, the Bustard Islands are a compact collection of long narrow channels running parallel to each other, divided by low ridges of the Canadian Shield’s exposed granite topped by mature white pines. After I made it through the wide band of rocky shoals offshore, I threaded my way into Tanvat Island’s east side.
Holding a close reach well offshore, I eased the sheet until we were barely moving, fore-reaching along at half a knot. From a mile away it was almost impossible to identify any features of the low-lying islands behind the band of shoals, but I made my best guess at identifying an inlet that might mark the channel I wanted and took a bearing with my hand compass. Things would become clearer as I got closer, but I wanted to have at least some idea where I was headed before starting in.
Roger Siebert
.
On the chart, Tanvat Island is a spiderweb of long-fingered inlets and peninsulas reaching out to the north, south, and east; long ridges of pine and granite surrounded by hundreds of smaller islands that made it difficult to recognize the underlying shape. It looked like I should be able to skirt along the northern edge of the shoals and work close to shore in mostly open water. Worth a try, at least. I sheeted in to gather speed and pushed the tiller over to put the boat on a port tack, then steered toward the east side of Tanvat Island, watching the compass closely. I was trying for a course just south of west, but soon I was detouring around slabs of granite lying just beneath the surface and dodging half-submerged rocks almost completely hidden in the waves. After a few minutes, I gave up. “Mostly open water” or not, it would be foolish to try to sneak in any closer under sail. Turning into the wind, I dropped the sail and unclipped the halyard. It would be oars from here.
I pulled up the centerboard and rudder and slid the oars into the locks, then glanced again at the chart as we drifted slowly toward shore. I had managed to judge my entry well, despite my somewhat rough combination of eyeball navigation and compass bearings. At least, I thought I had judged well. But the chart might as well have been an inkblot test, a convoluted scrawling of rocks, islands, and narrow channels that twisted around each other like snakes crawling through a maze. When I put the tip of my finger down about where I thought I was, it covered more than a dozen islands. I wasn’t about to put any money on which one was which.
It didn’t really matter, anyway. I was almost through the reefs and safe along the east side of Tanvat Island—if I could manage to figure out which one it was. The narrow passage opening before me was lined with tall pines and granite slabs, and surrounded by a chaotic jumble of rocks, islands, hidden bays, and gnarled peninsulas. Was this the channel I had hoped to hit? I’d find out soon enough. Either way, I had reached the Bustards. It had taken me four days and a hundred miles, but finally, I was here. I moved to the aft thwart so I could row while facing forward—an advantage in avoiding the countless uncharted rocks and shoals I knew I’d encounter here—and made my way slowly deeper into the maze.
I had launched in the center of the North Channel, at the municipal marina in the small town of Spanish, Ontario, a ten-hour drive from home. Another four or five hours in the car would have gotten me to Georgian Bay two days sooner, but from my previous visits I knew Spanish had what I needed: a good ramp, showers, a laundromat, and, most important of all, hassle-free parking for a car and trailer for weeks at a time. Although I wanted as much time in Georgian Bay as I could get, that alone made Spanish a worthwhile trade-off.
After spending the first night on East Rous Island I woke to the flat calm of a typical North Channel summer morning. Three hours later, after rowing 6 miles and stopping briefly in the town of Little Current, a slight breeze arrived and I could stow the oars and raise the sail.
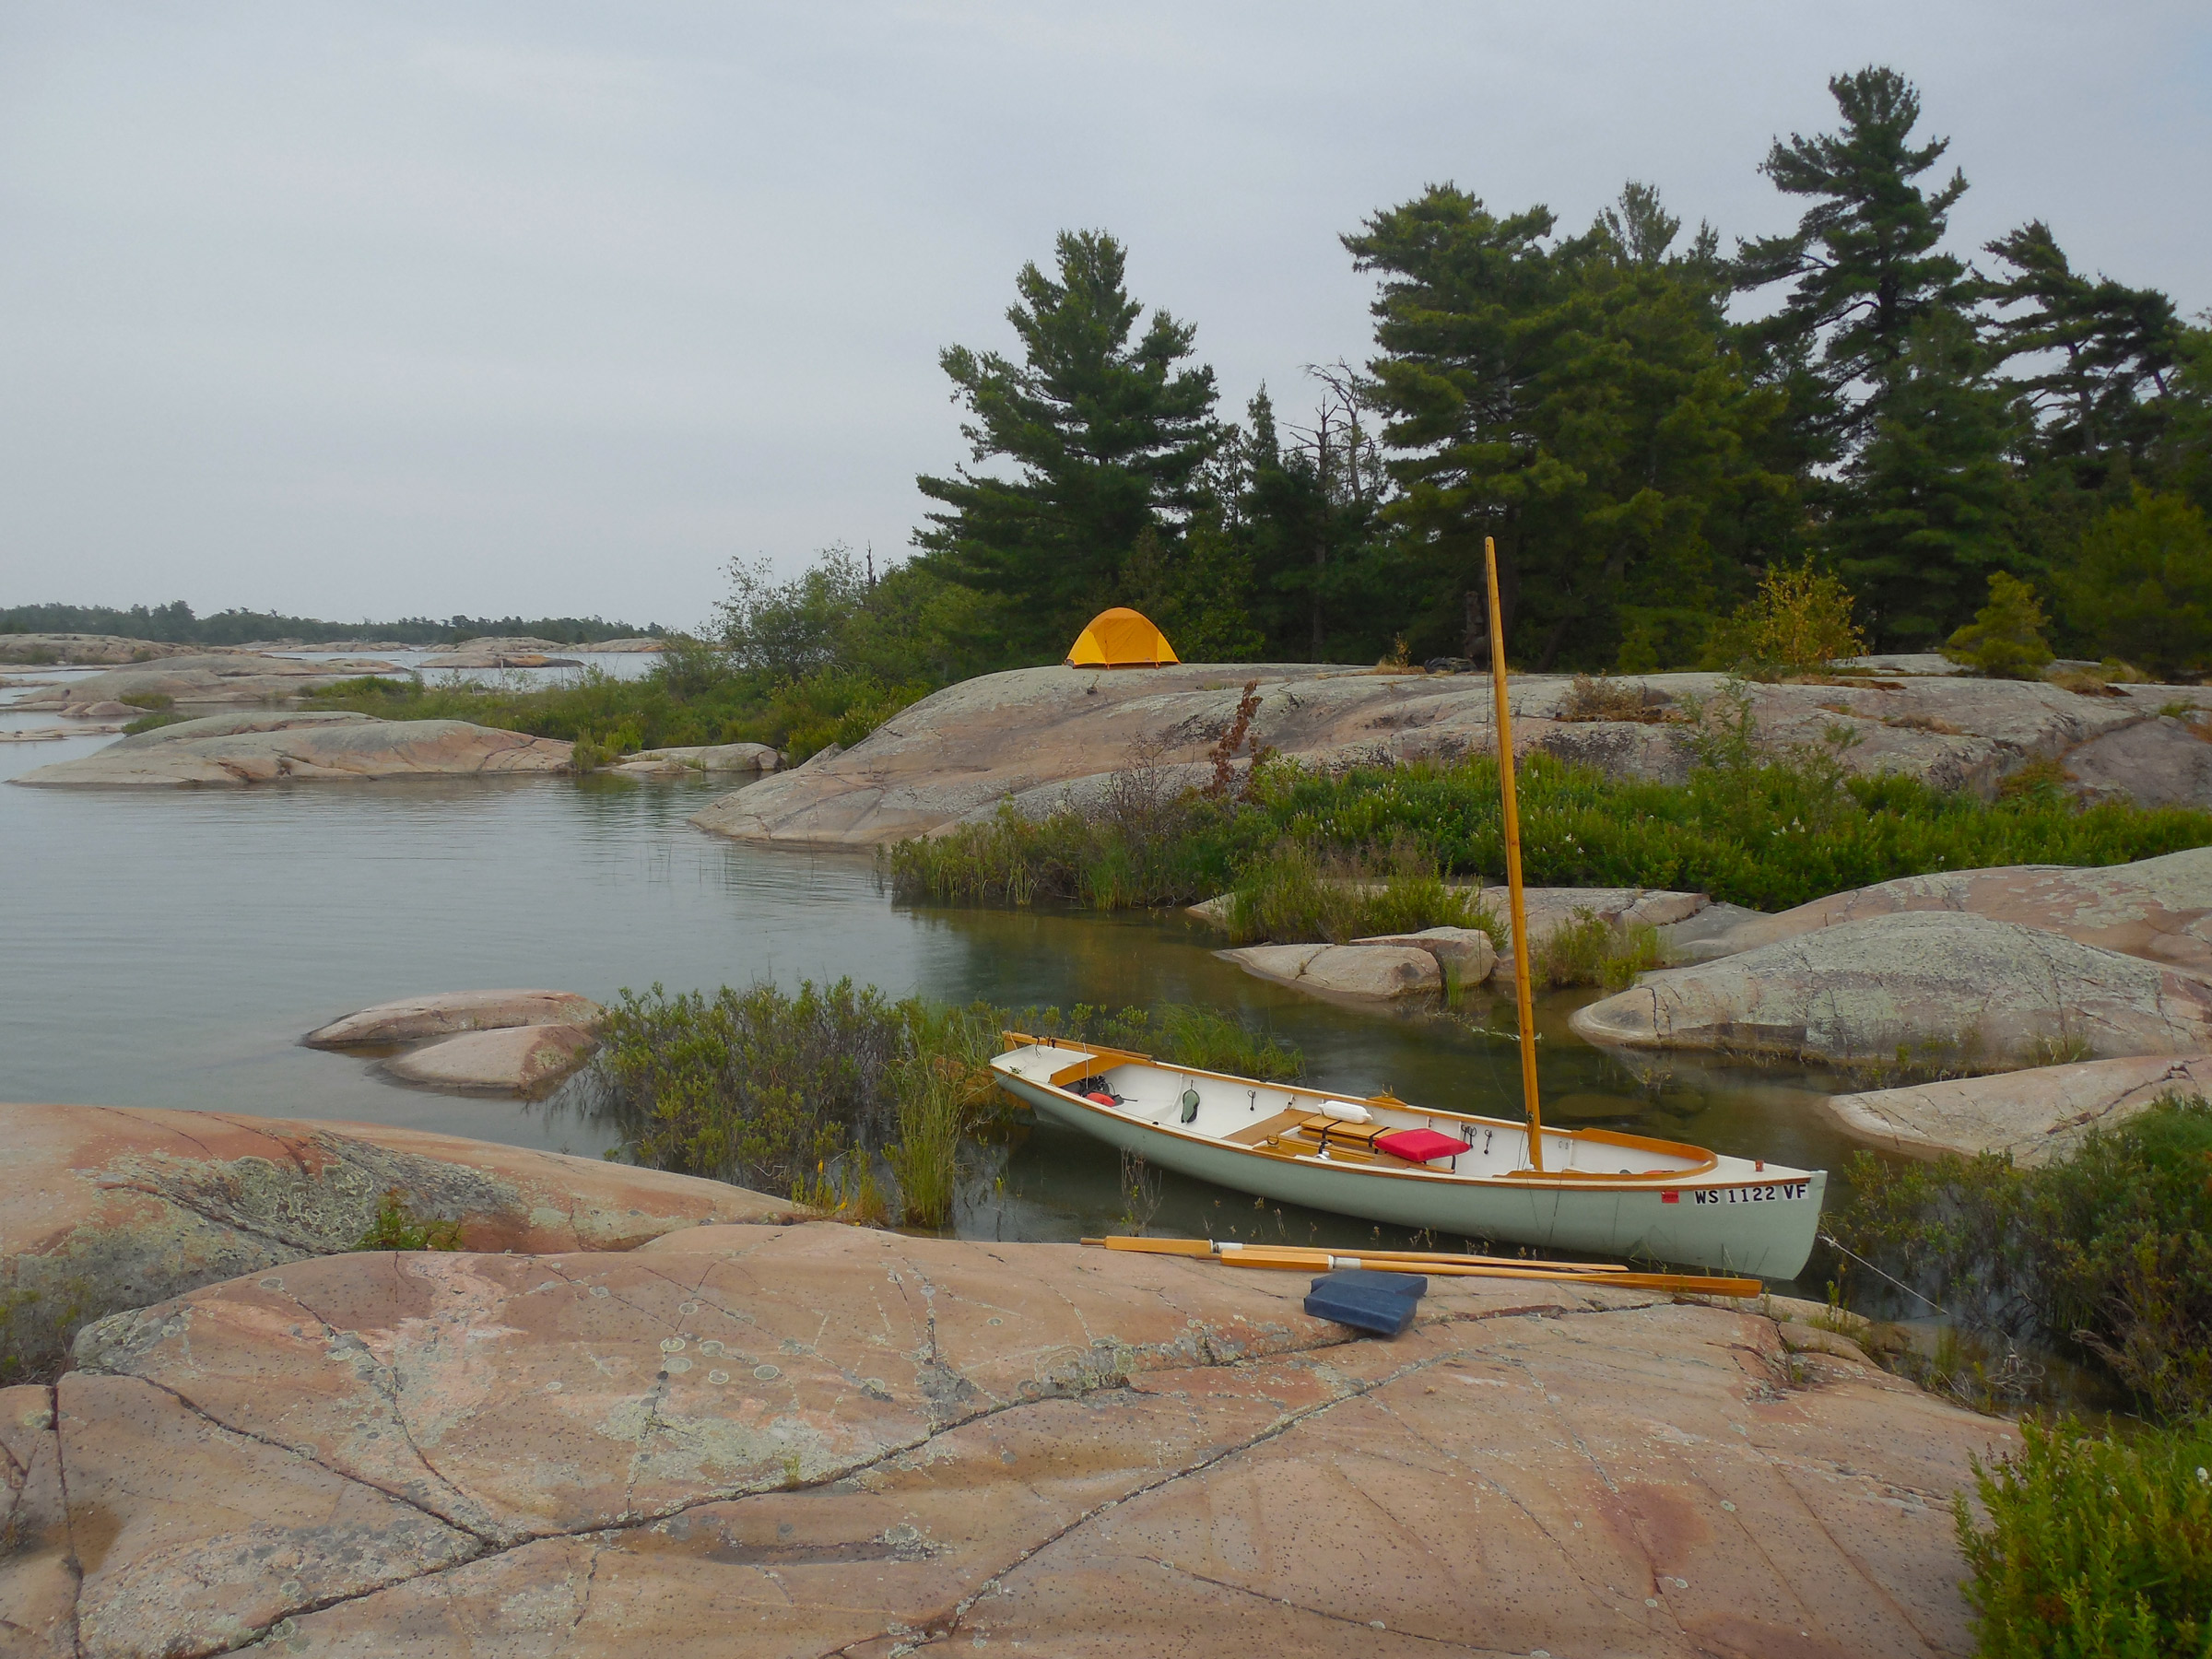
I had covered 60 miles in the first two days, broad-reaching on the starboard tack for hours on end, bypassing towns and marinas and overnighting in out-of-the-way backwaters, places too shallow or too small to see much traffic. At East Rous Island, a few miles west of Little Current, I anchored in knee-deep water outside the crowded main anchorage and slept on the Alaska’s full-width sleeping platform; at Thebo Cove a mile outside Killarney, I tied to shore and set up a freestanding tent on a granite slab.
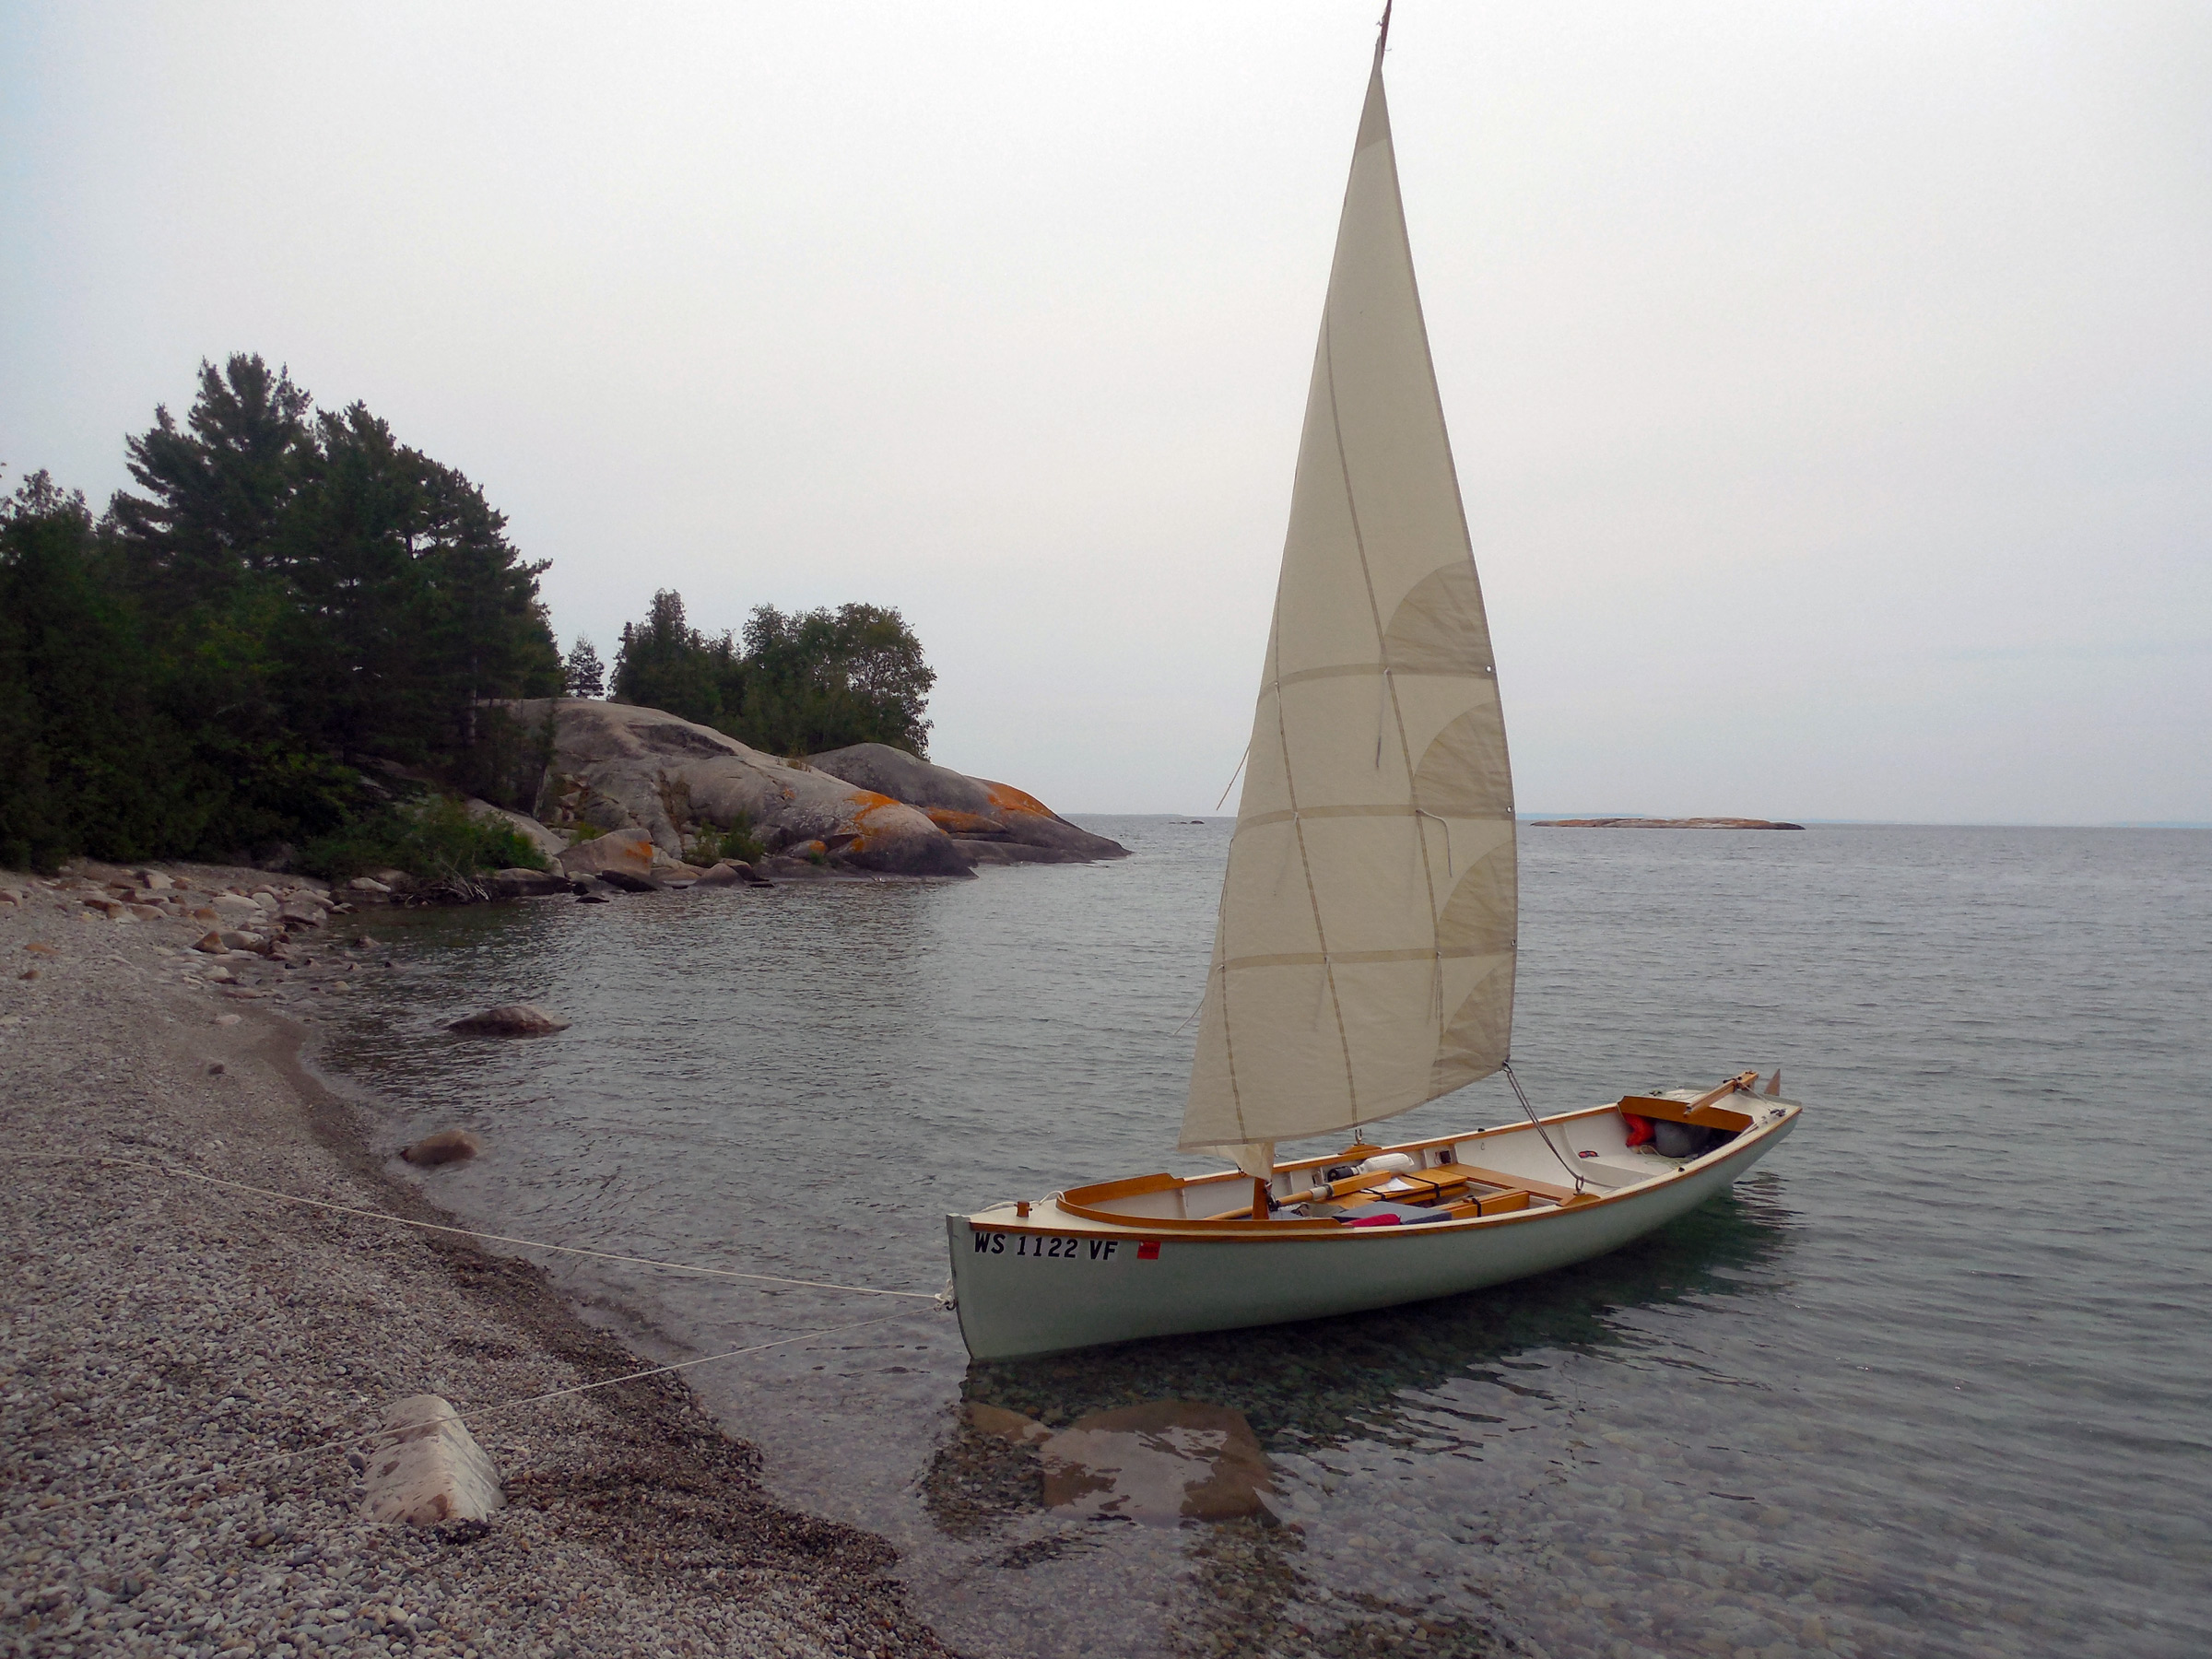
This rocky beach on the west side of West Fox Island, 7 miles east of Killarney, offers a convenient place to land a boat, but lies completely exposed to the prevailing westerlies. Overnighting here is best left to kayaks and canoes—lightweight boats that can be carried up the beach. I had lunch here and headed north to spend the night in better protected waters.
The third day had brought me 7 miles east of Killarney to the Fox Islands, a favorite destination from earlier trips. Here, finally, was Georgian Bay, wild and rocky and filled with possibilities: high granite domes rising from the water, broad smooth slabs of Canadian shield granite sweeping up to jagged skylines of tall pines, trees that have withstood the prevailing westerlies for so long that they remain forever bent and twisted toward the east as if reaching out in supplication to some unseen power. After a lunch ashore on West Fox, I set out again, ghosting along in winds so light that I could barely feel the breeze.
A mile north of West Fox Island, the cluster of islets around Anchor Island and Solomons Island offers dozens of protected campsites for small boats. With an open boat, sleeping aboard is a good option only if you have foolproof mosquito netting. I opted to spend the nights in my tent.
Well, so be it. I’ve learned to enjoy what the day gives you rather than worrying about what it does not. This would be no 30-mile day. Instead, I worked my way slowly northward toward a cluster of islands only a mile away. With the wind behind me, and rocks all around, I sailed carefully, centerboard up, through cliff-lined channels less than a boat-length wide, sneaking through passages barely deep enough for my boat’s 7″ draft. And there, in a tiny shoal-draft backwater tucked in between Anchor Island and Solomons Island, I tied the boat to shore and unloaded my gear. This would be camp for the night. An afternoon ashore, scrambling among the rocks and climbing to the island’s tall summit, a long swim in the pleasantly cool water, and a quiet night at camp. After two days in the boat, it was exactly what I needed.
But now, 30 miles farther on and ready to make my landfall in the Bustards, I needed to figure out where I was. With no GPS—I try to avoid machines that purport to do our thinking for us—that might not be easy. But I knew it was almost always possible, even in a complicated setting like this. Here. The channel I was following split into two branches, then split again. I looked closely at the chart, turned it to align with the compass. A cluster of rocky islands here, a lone rock there. This was it—I had managed to find the passage I had been looking for. All I had to do now was follow the channel’s right-hand shore—Tanvat Island, I was fairly sure—through every twist and turn, as if working my way through a labyrinth with one hand on the wall. I kept rowing. A few more rocks and islands that matched the chart precisely confirmed it. Amazingly enough, I knew exactly where I was.
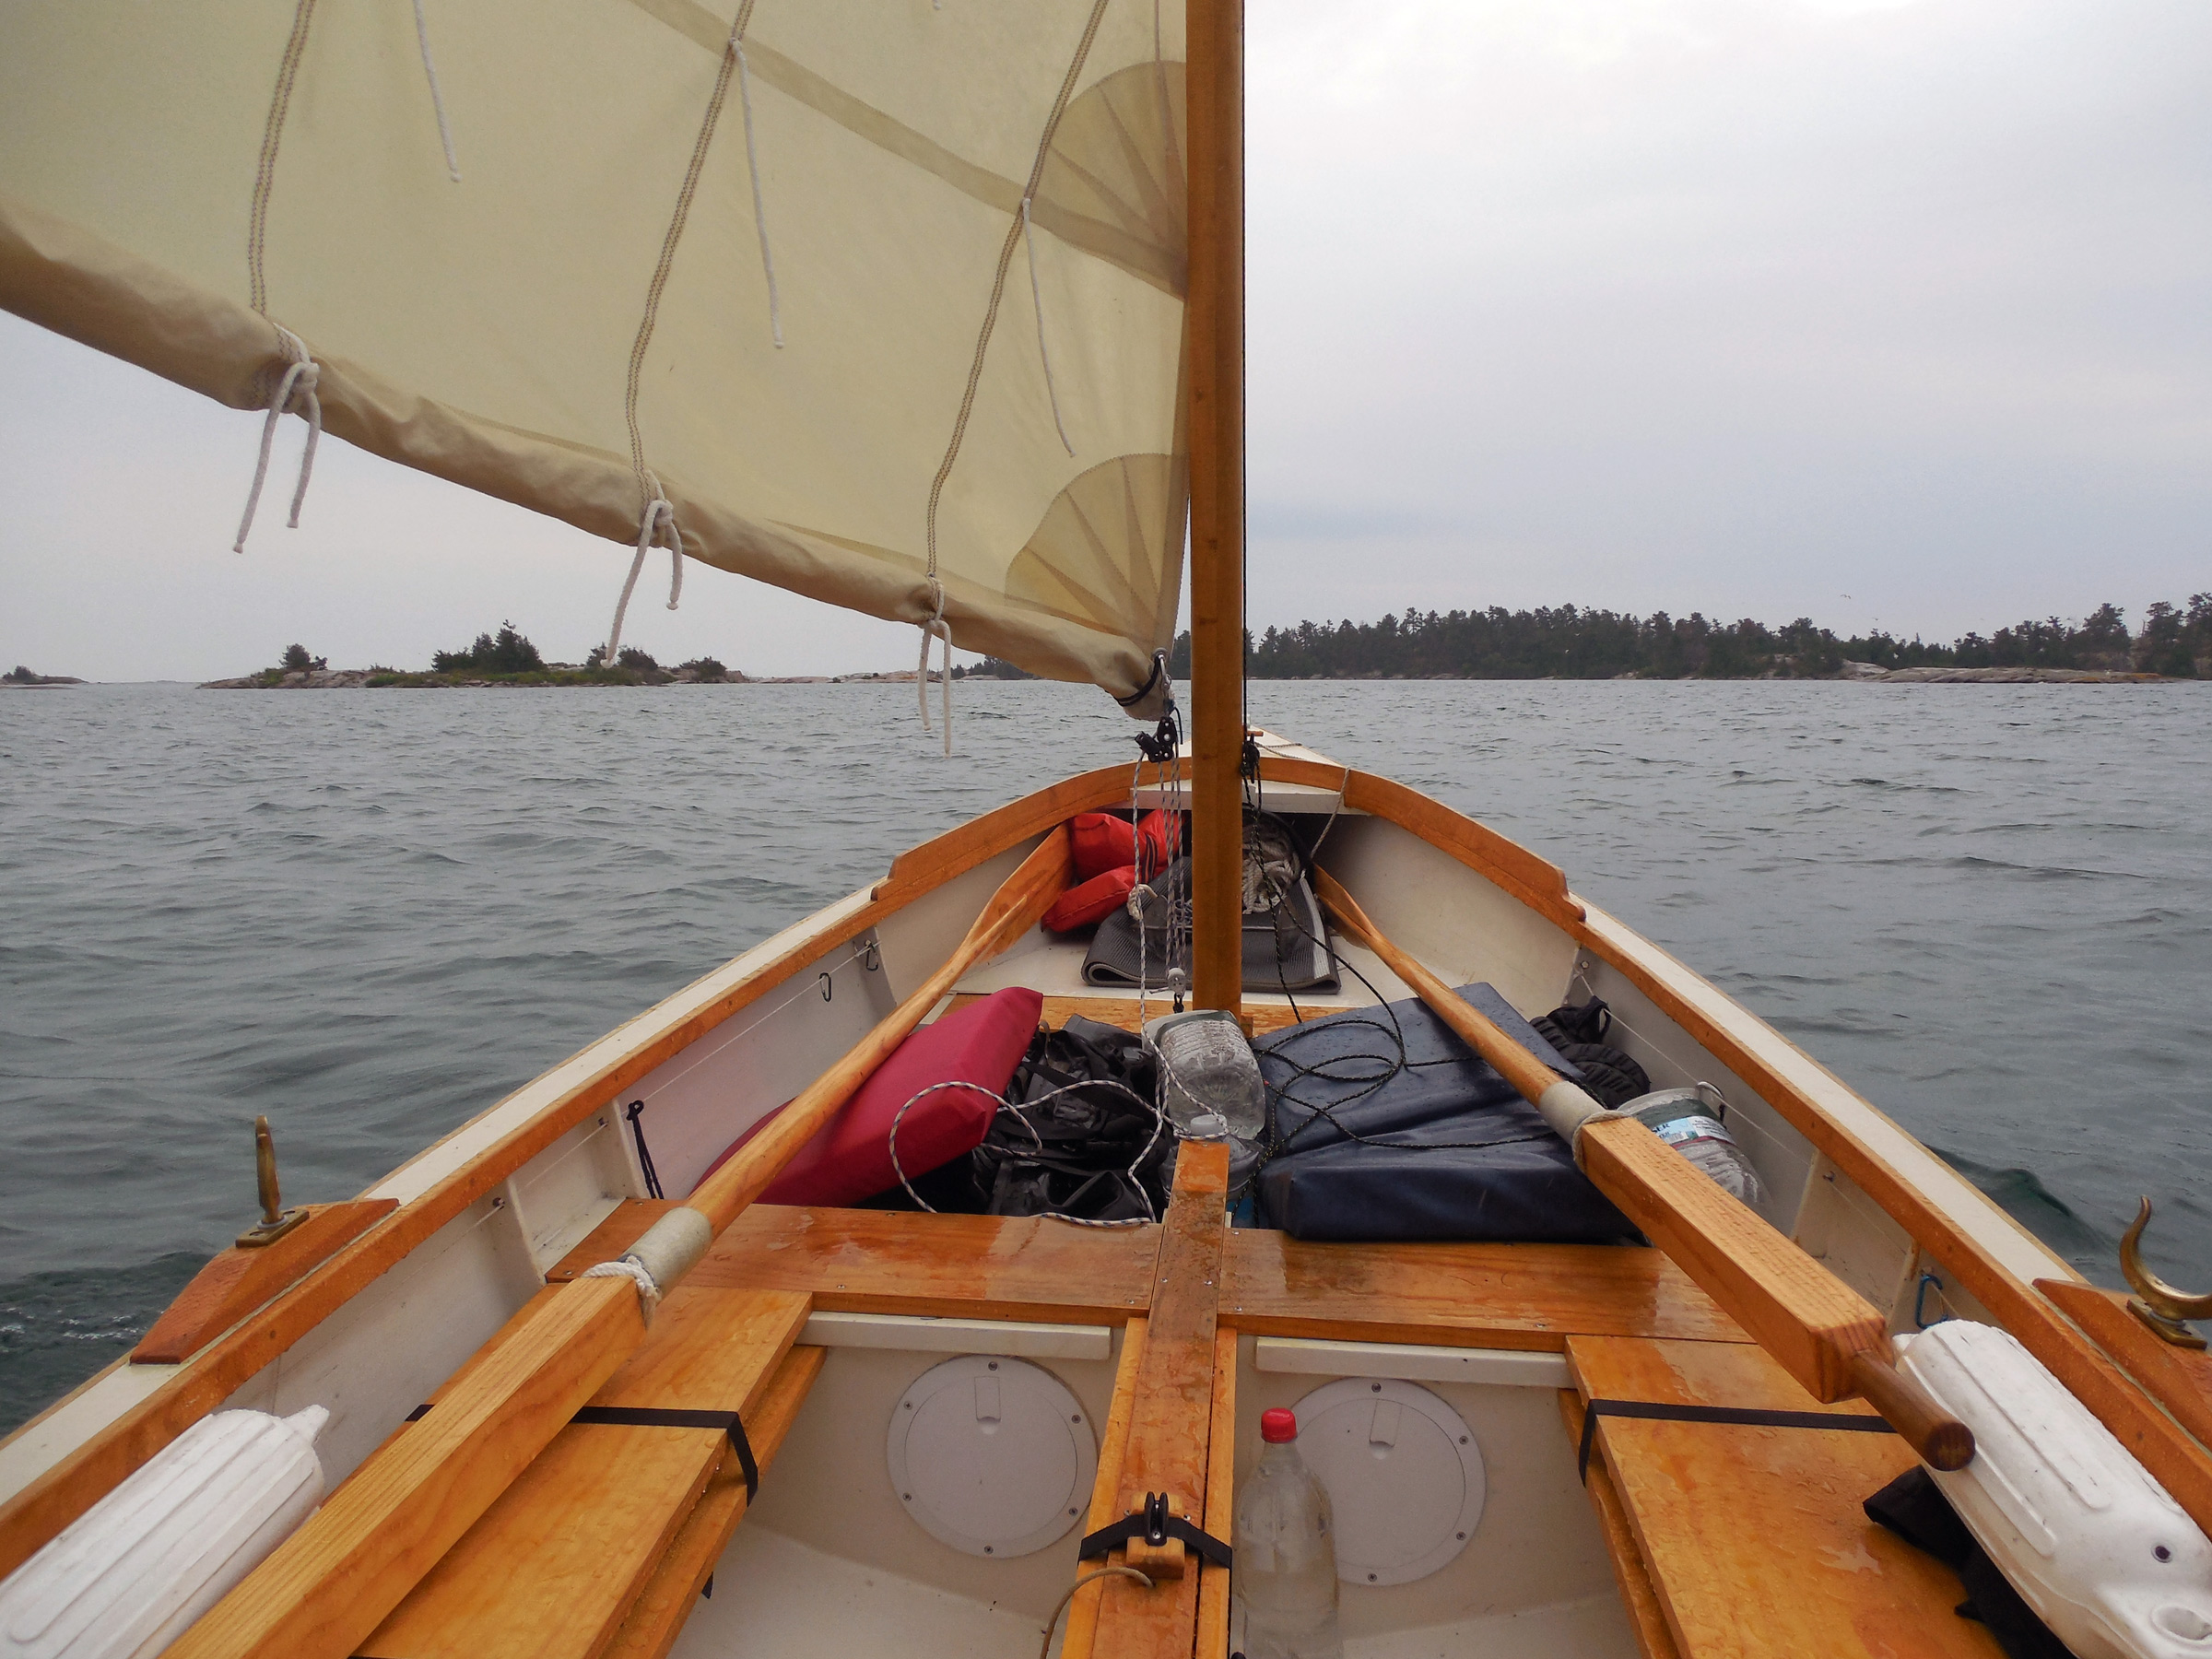
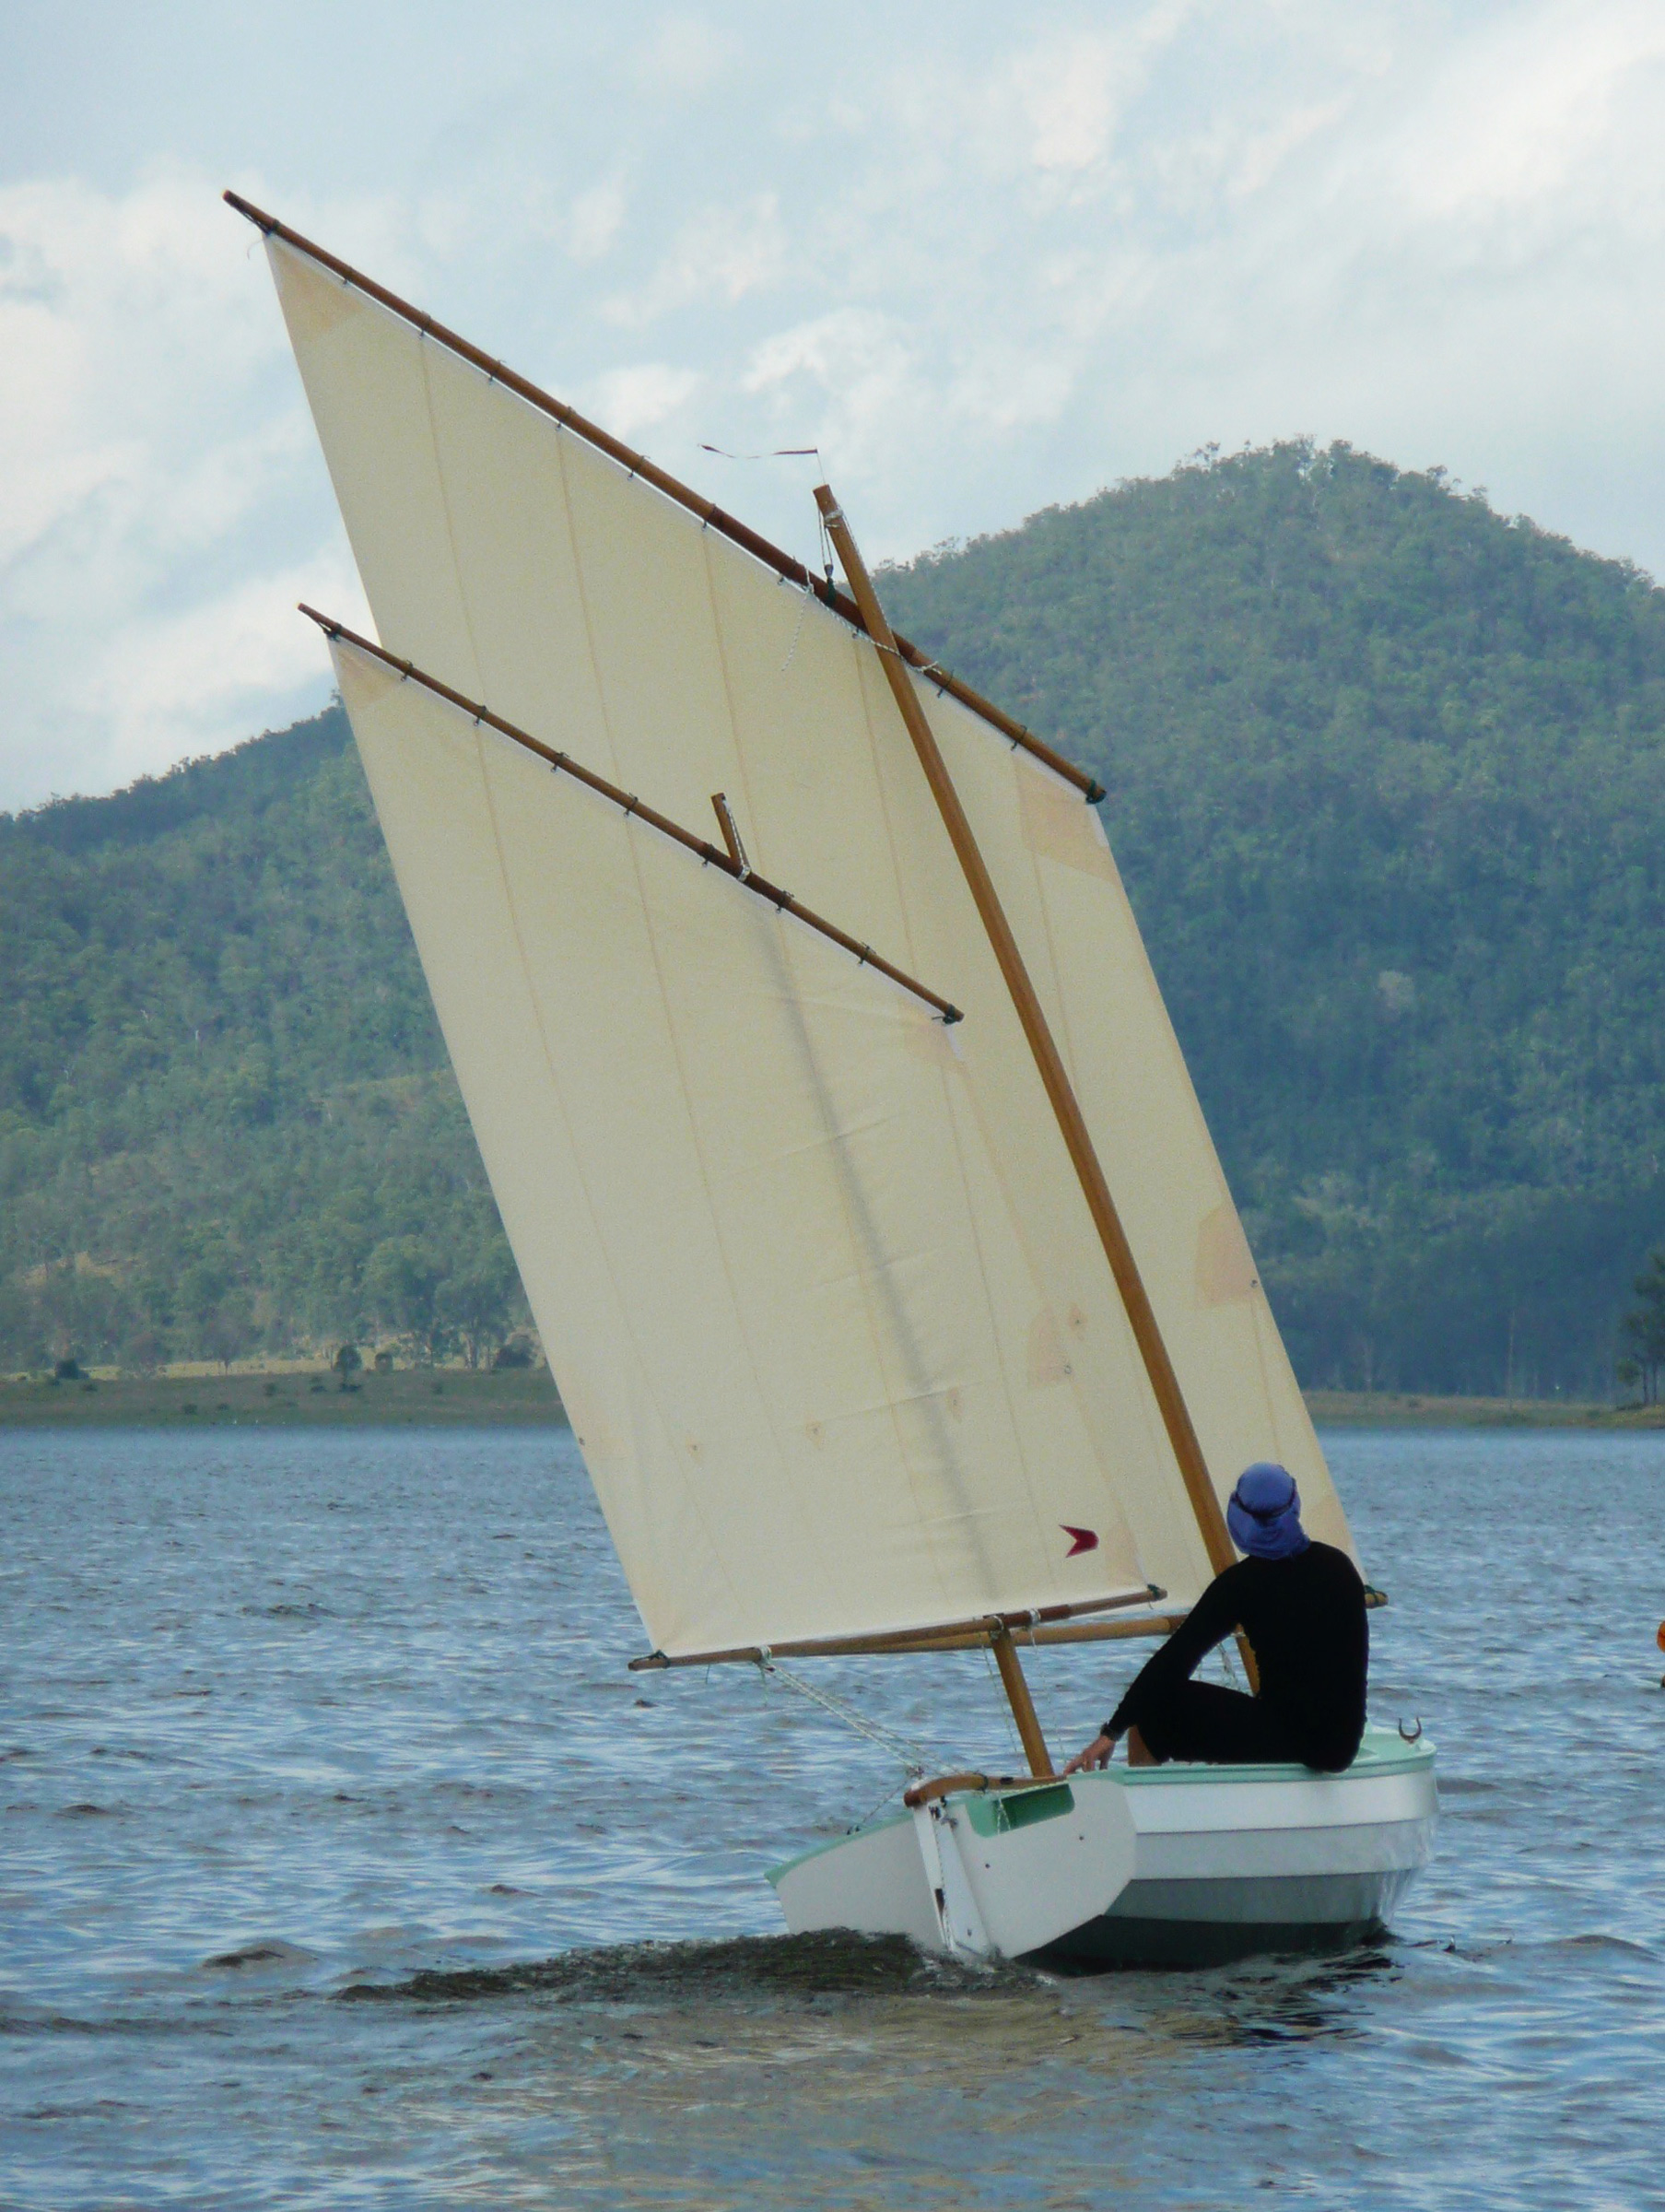
My fourth day began with cold rain and a strong breeze. Fortunately, the boat’s boomless standing lugsail is easily reefed: simply roll up the foot and tie it in place. With the first or second reef tied in, the boat performs well to windward; the deep third reef keeps things in control when running for shelter.
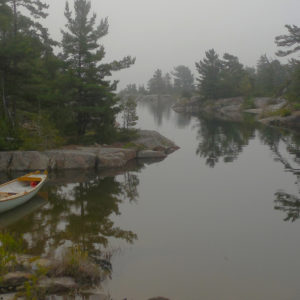
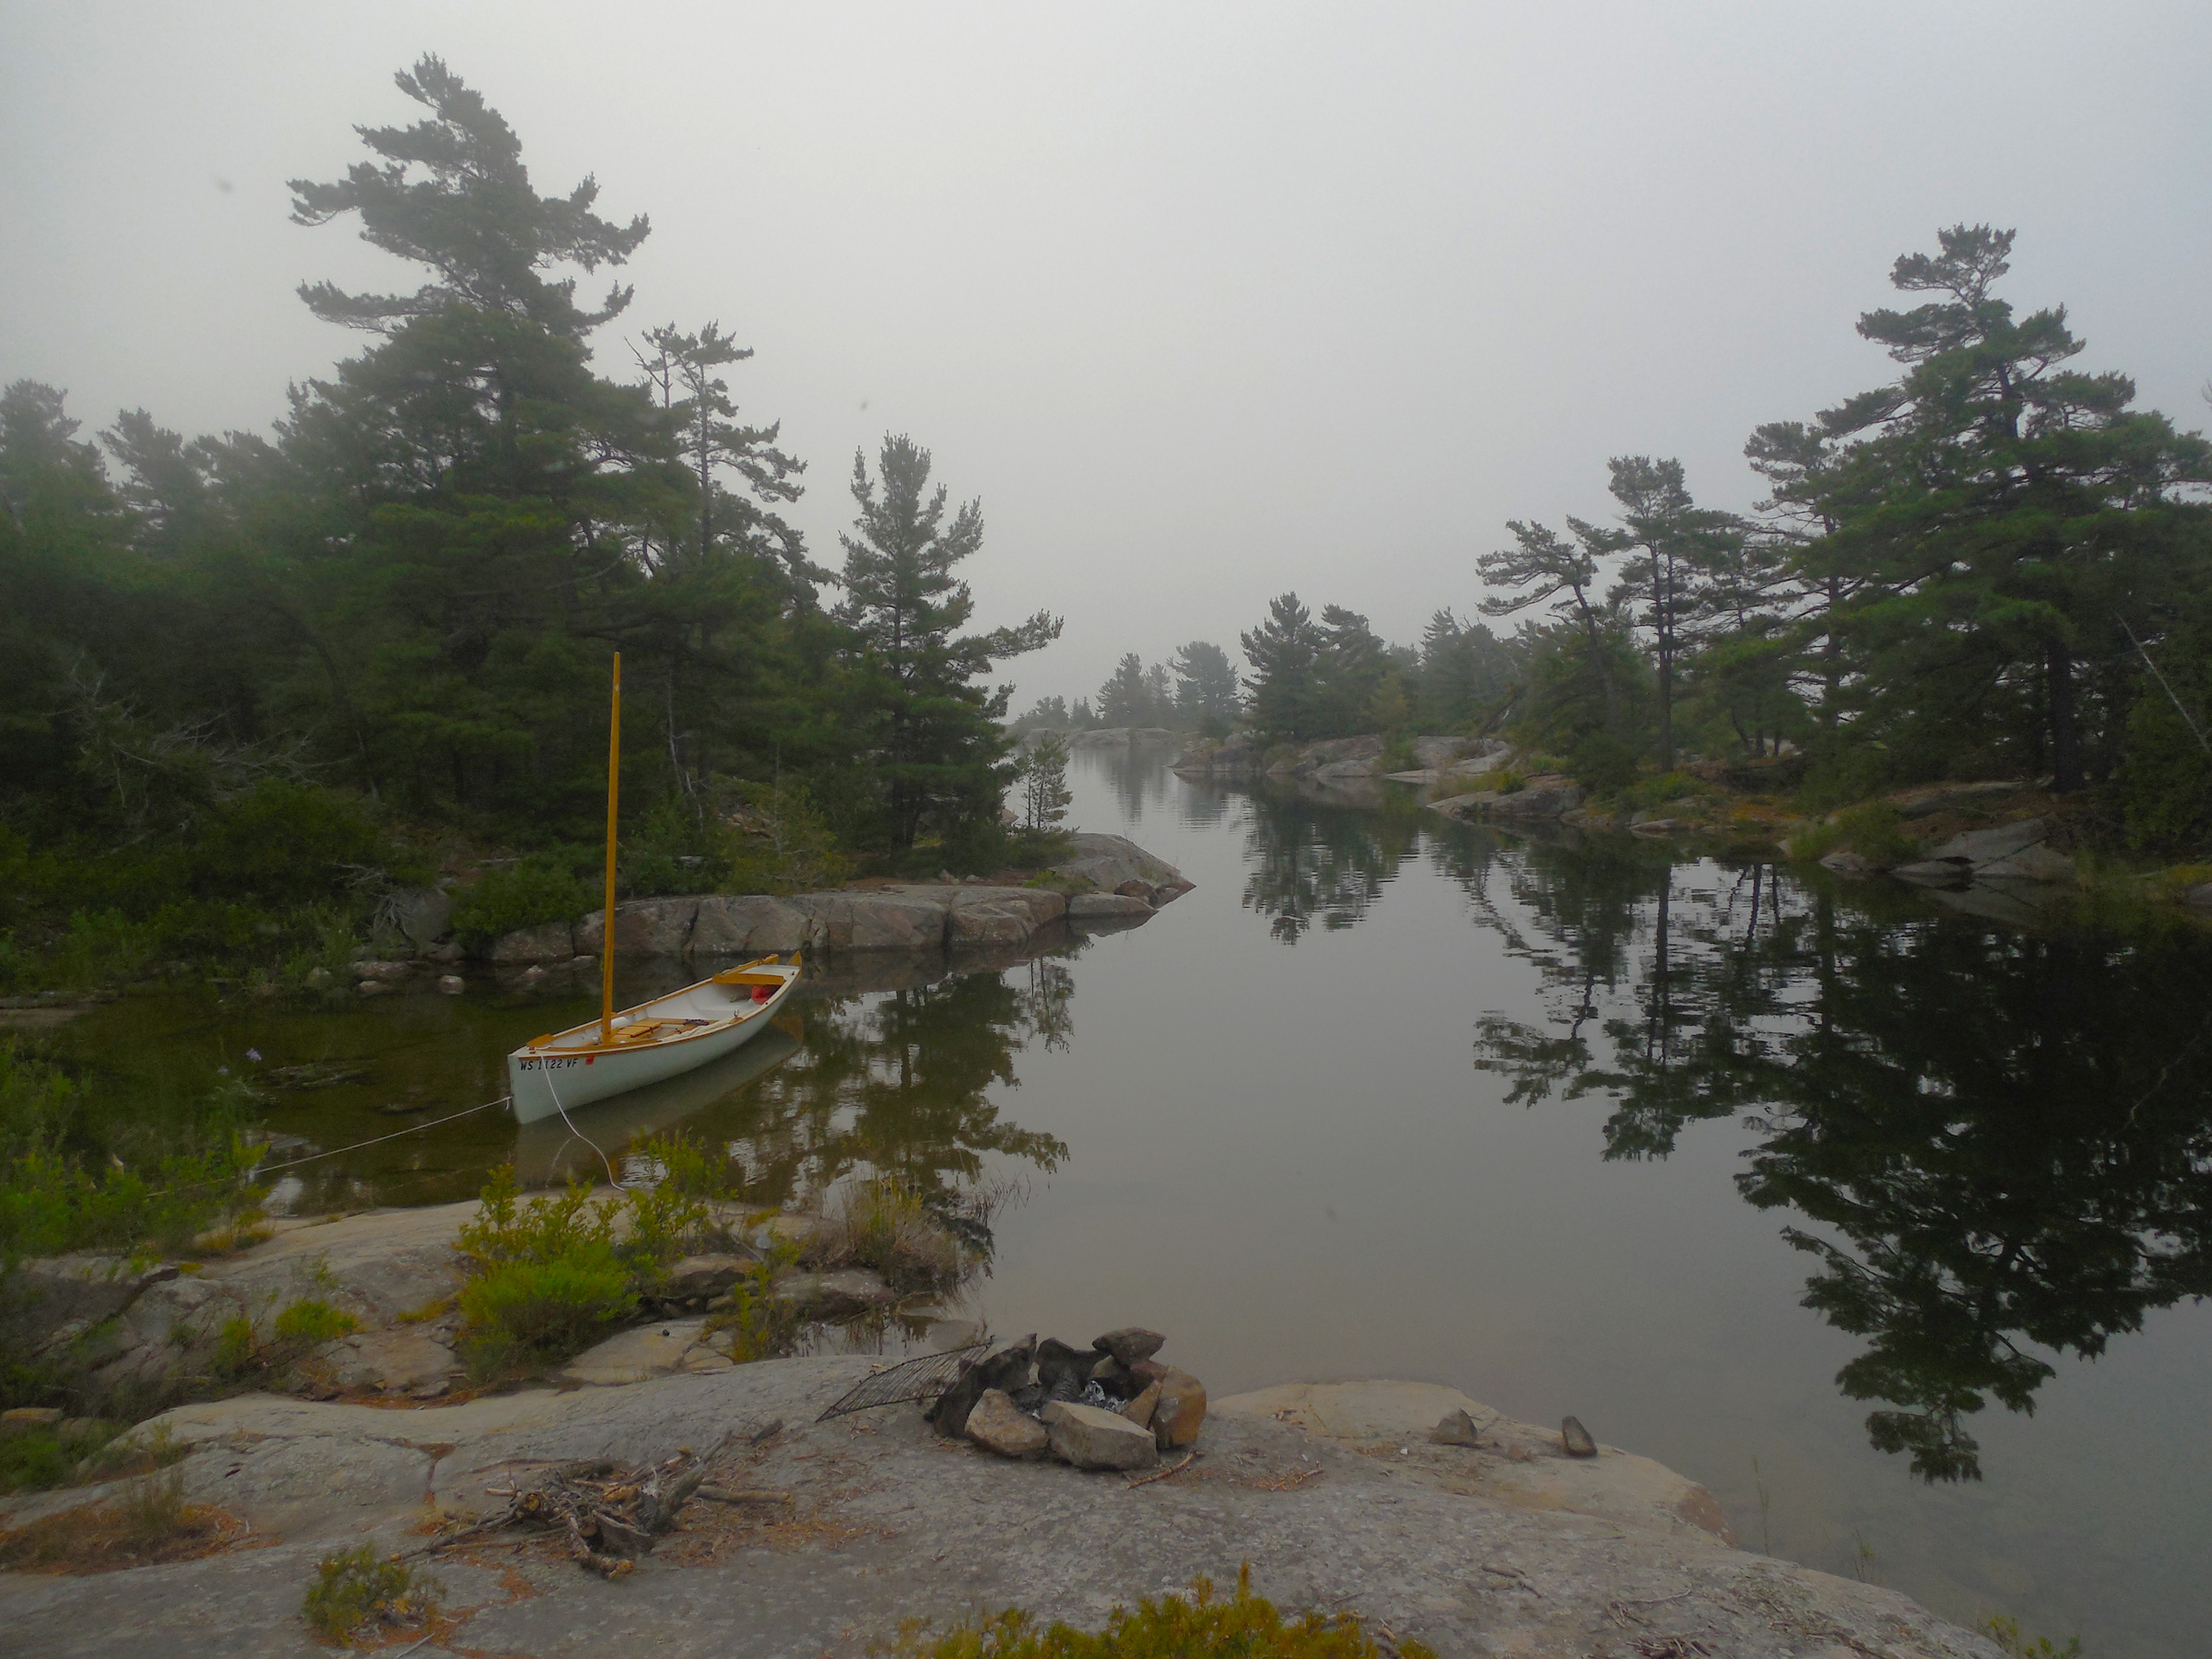
Twenty minutes later, rowing along a long narrow bay that ran between two ridges of granite topped with dark pines, I found my campsite: a broad smooth slab of gray stone that swept up from the water to a stand of gnarled pines above. Behind the trees, the ridge dropped down again to a dark pond dotted with white-flowered lily pads. The water here, so deep inside the maze, was perfectly calm with only the slight wake from our passage rippling through the reflection of the rock and sky and trees. I shipped the oars 10 yards out and let the boat glide slowly into shore, then stepped out into knee-deep water and tied the painter to a beaver-chewed stump at the water’s edge.
It had been another long day—30 miles of non-stop sailing on a close reach, and a half-hour of rowing. There was plenty of daylight left, but I felt no need to go farther. Instead, I stood barefoot on the stone and felt the rough texture of the granite, the curling lichen underfoot. Breathing deeply, I listened to the world around me. It was not silence, not completely, but a quiet stillness that seemed to hang heavy in the air. A whisper of shifting branches overhead, the faint ripple of water. And somewhere, a moment later, the call of a loon. I unstrapped my dry bags from the boat and carried them to shore.
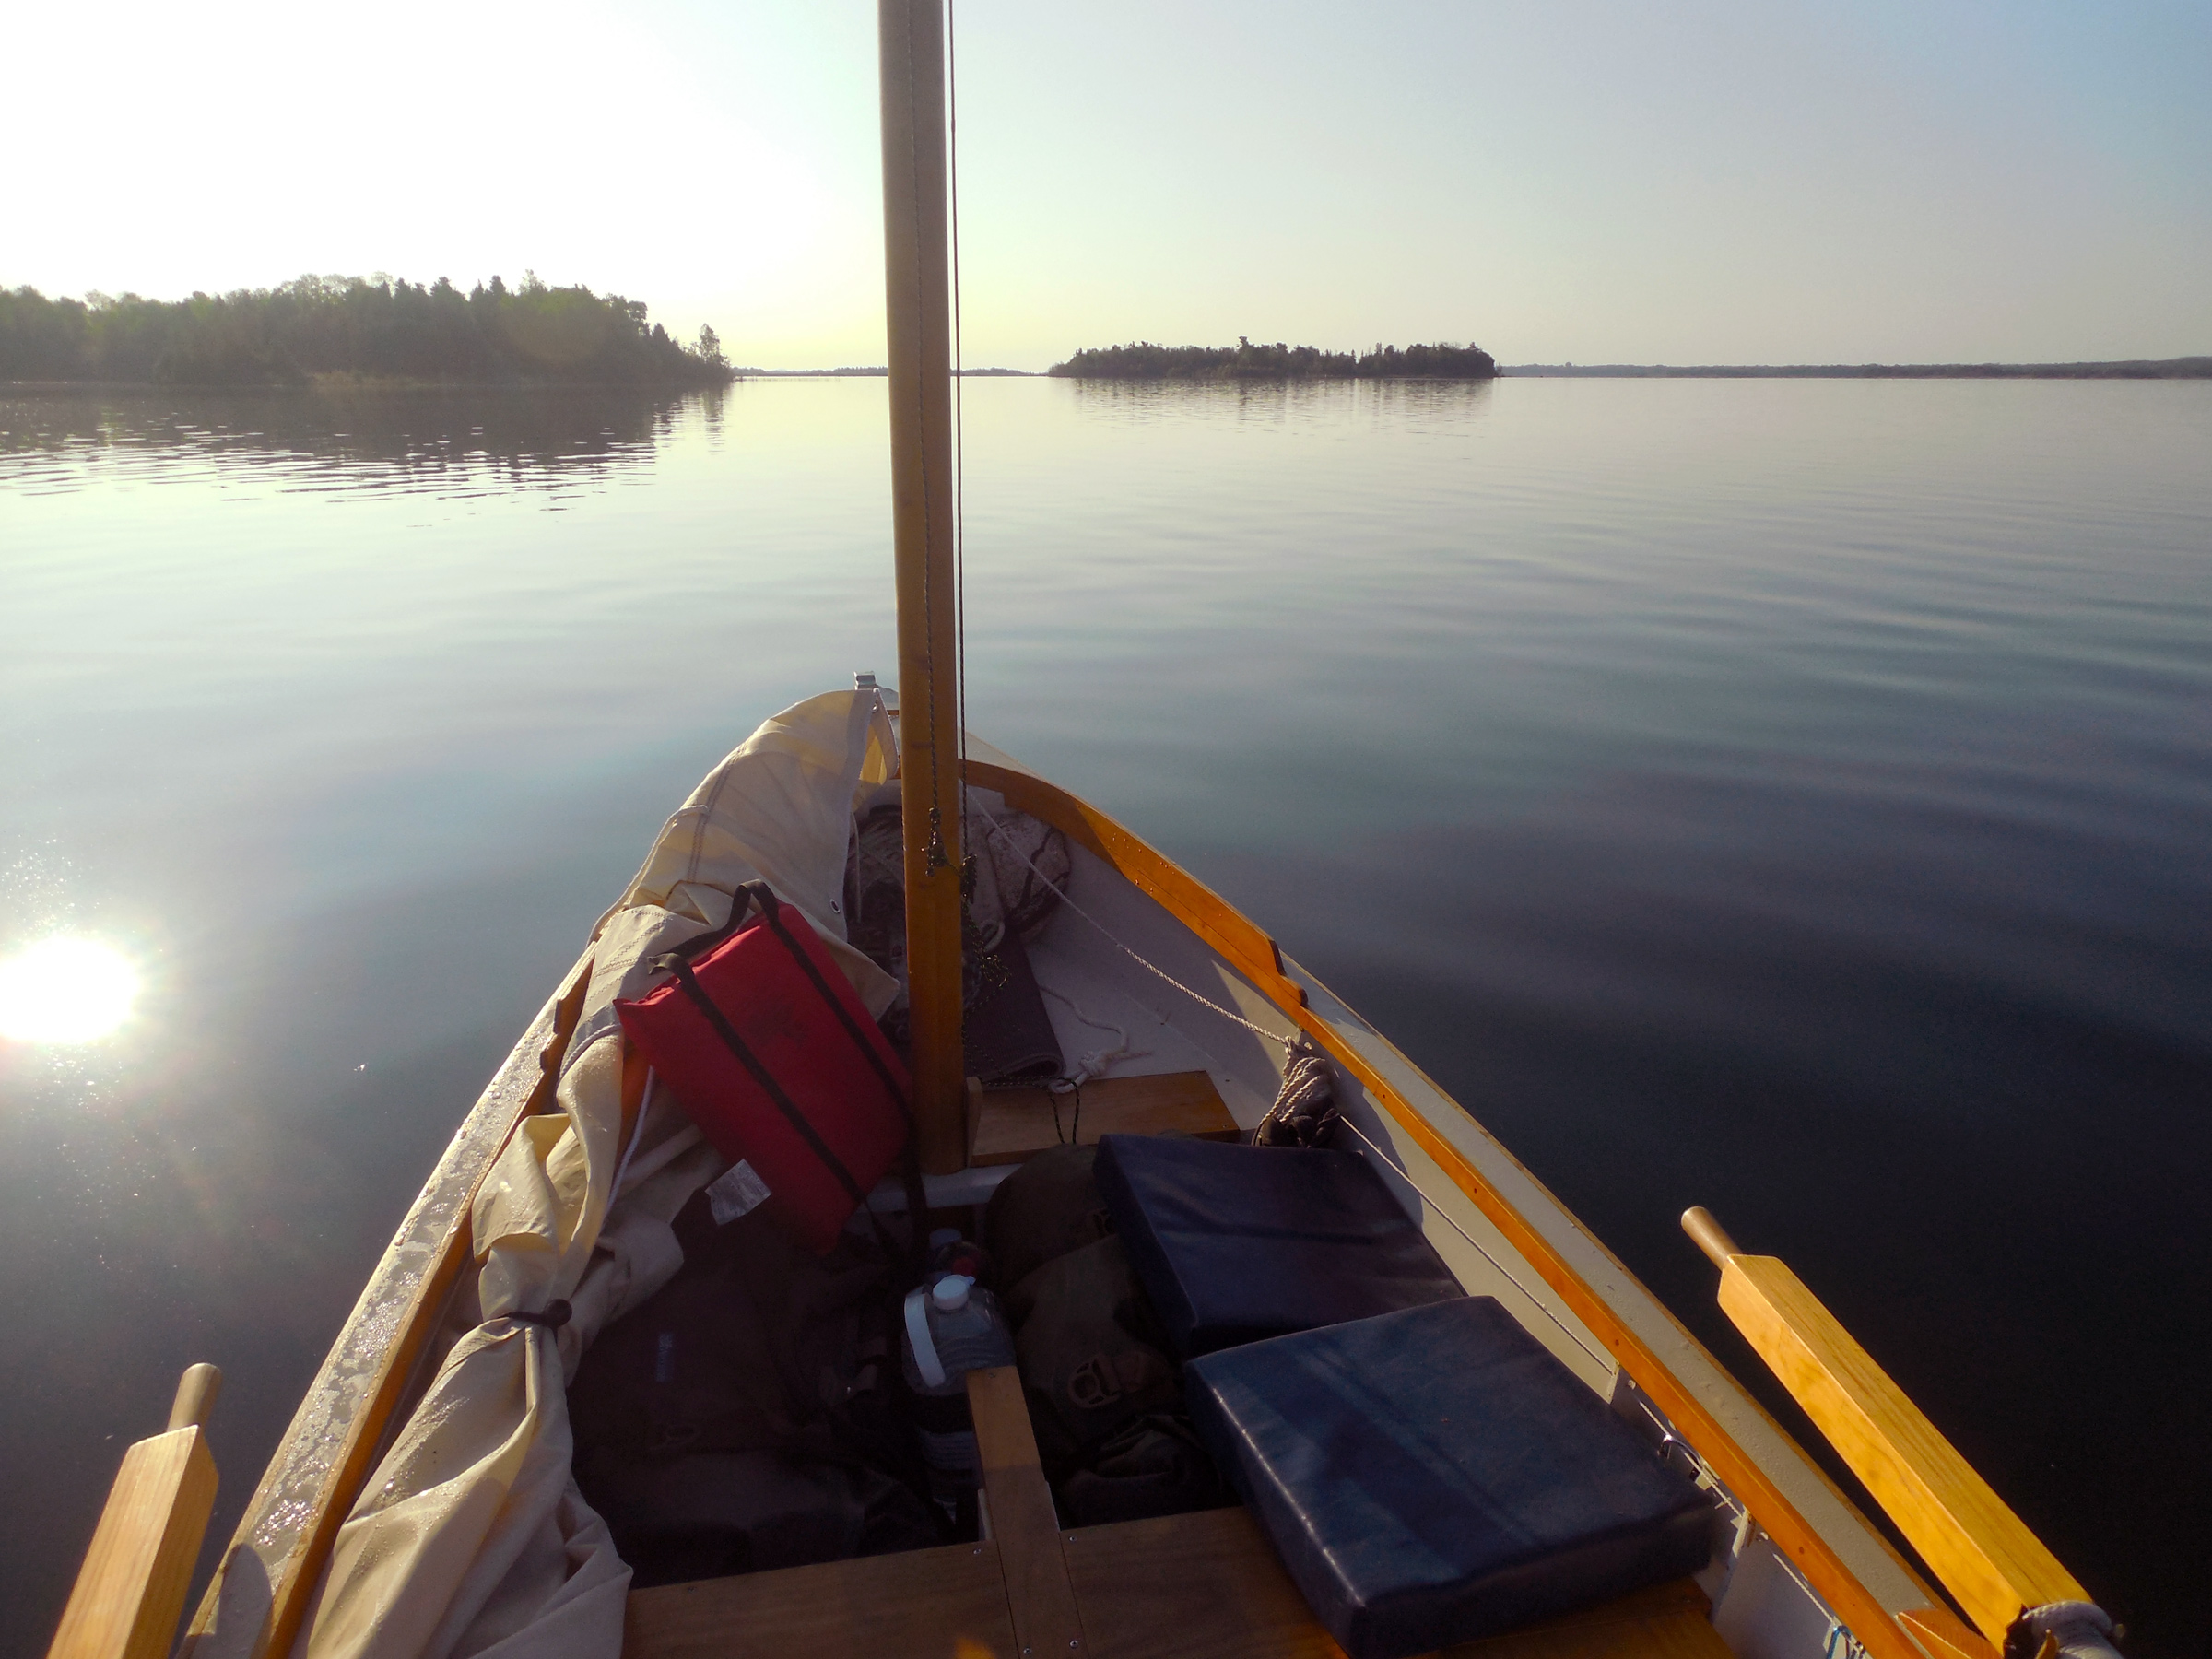
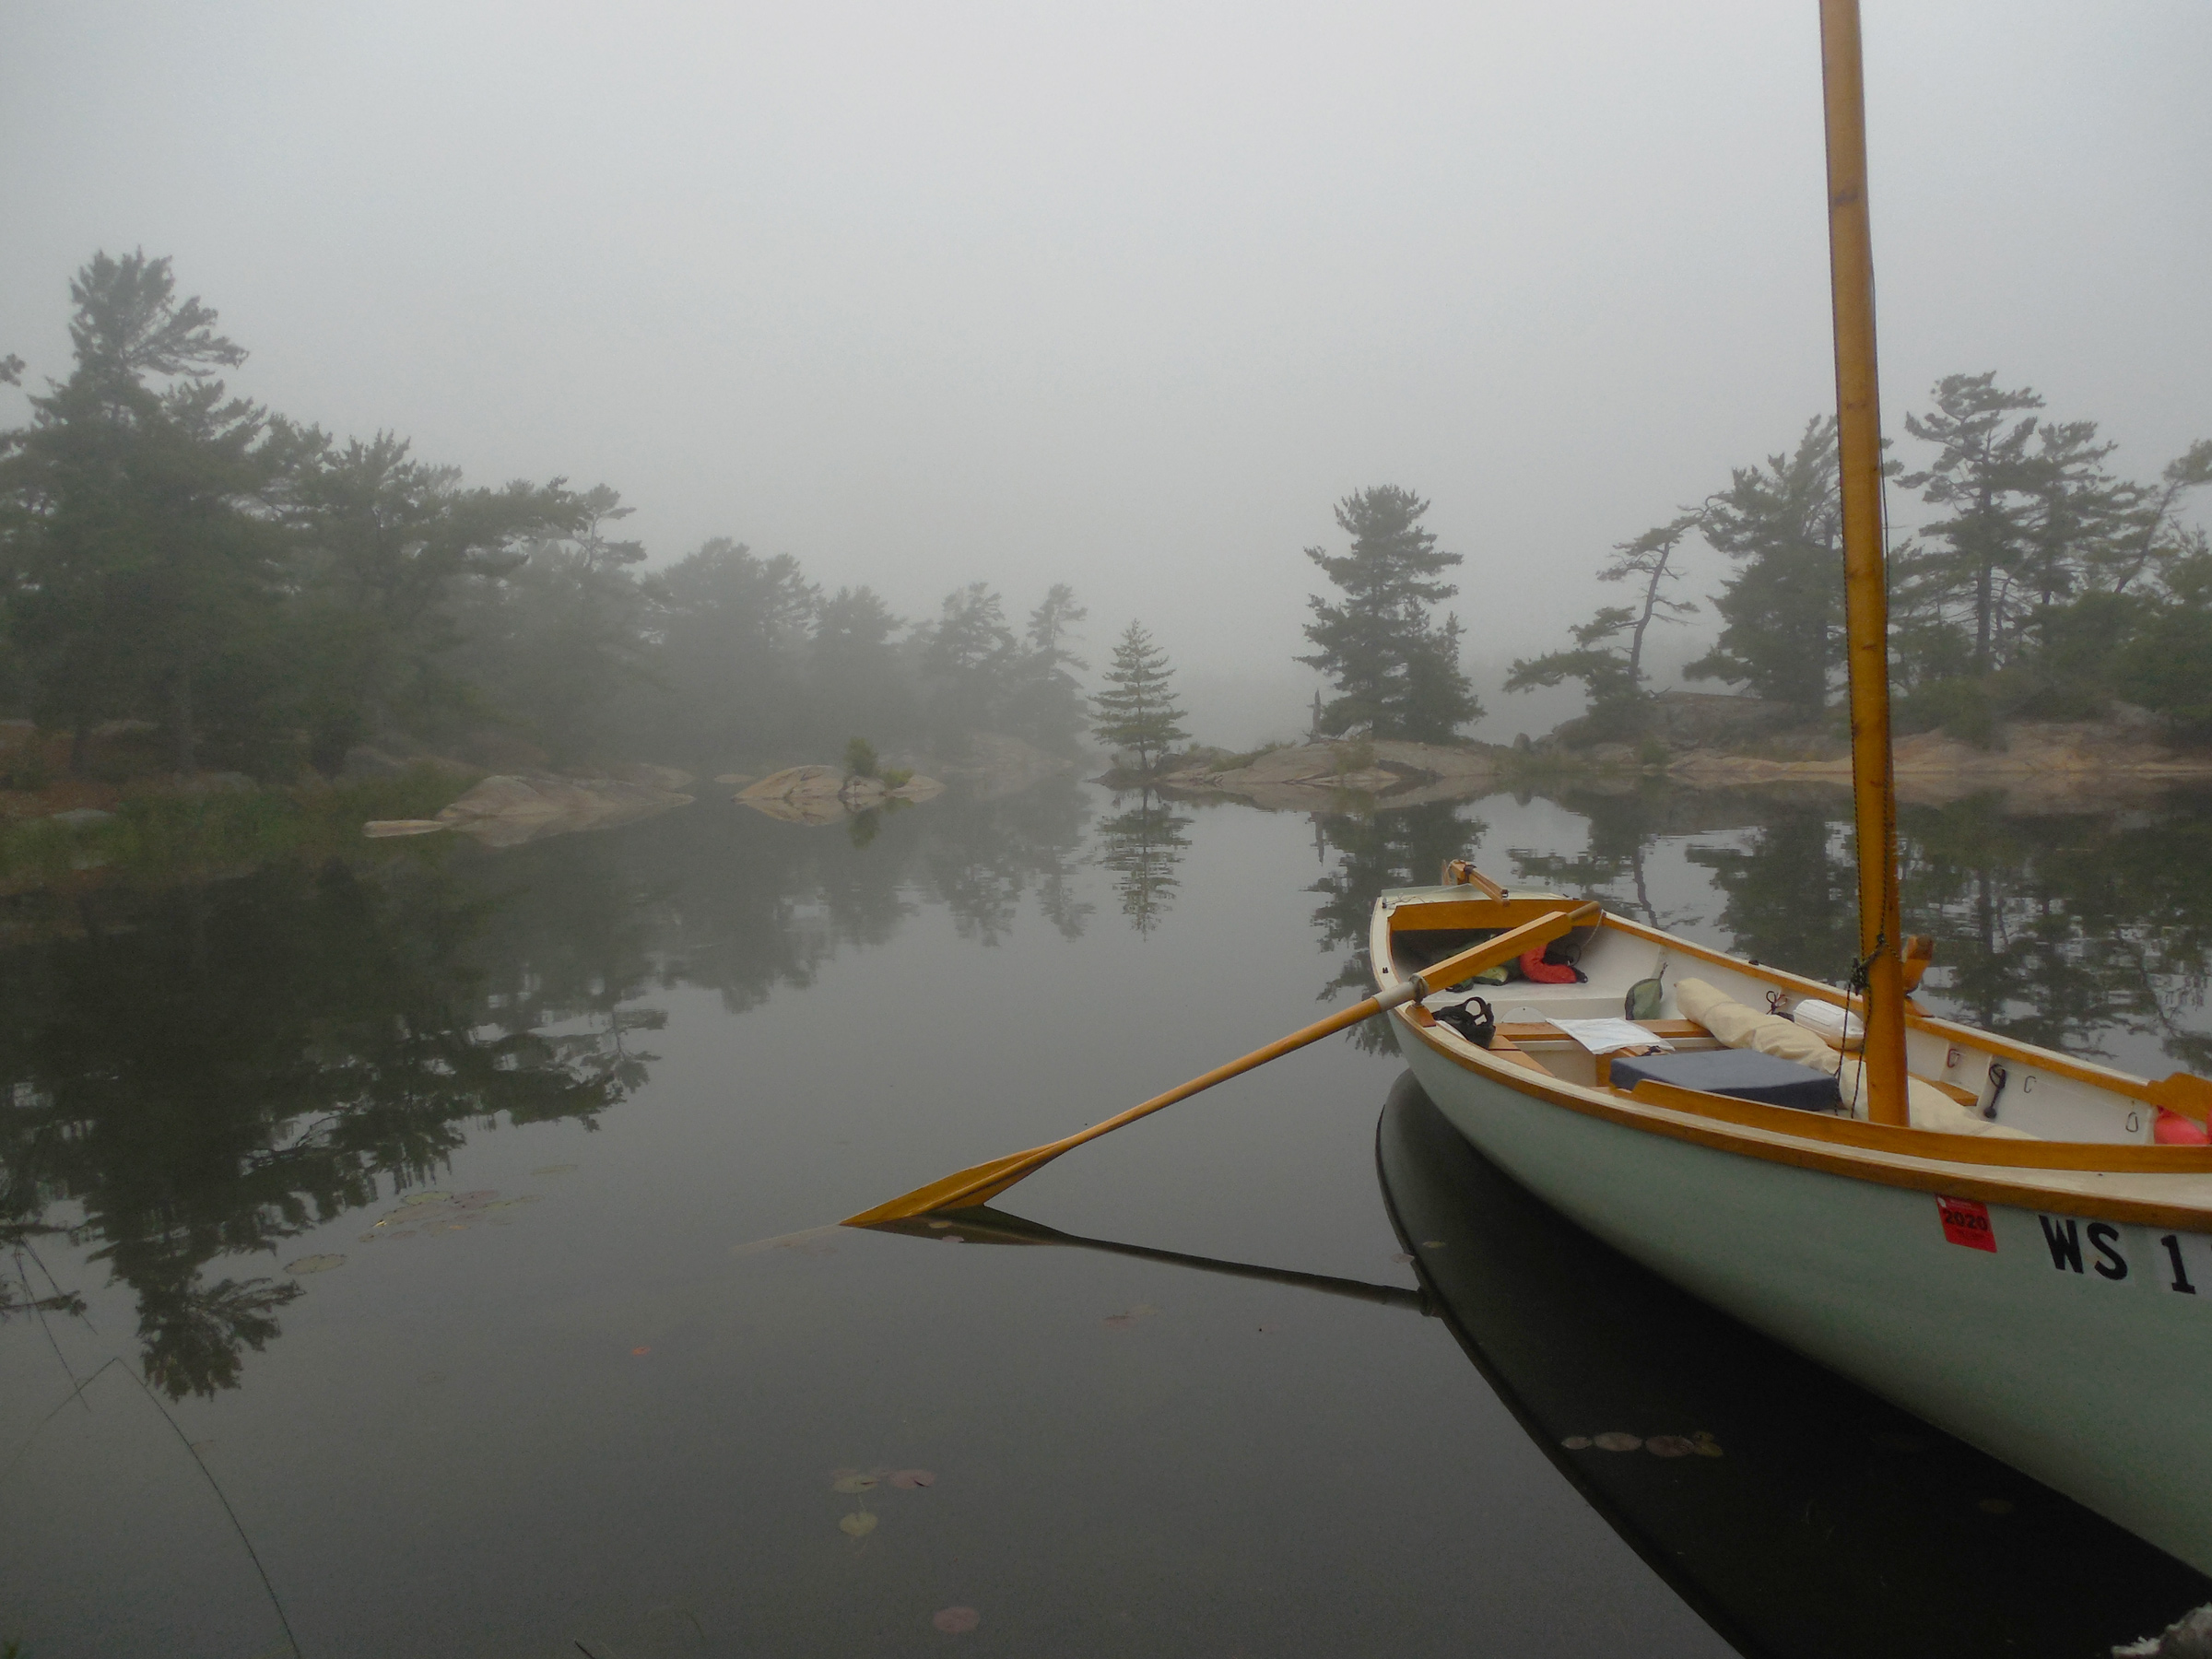
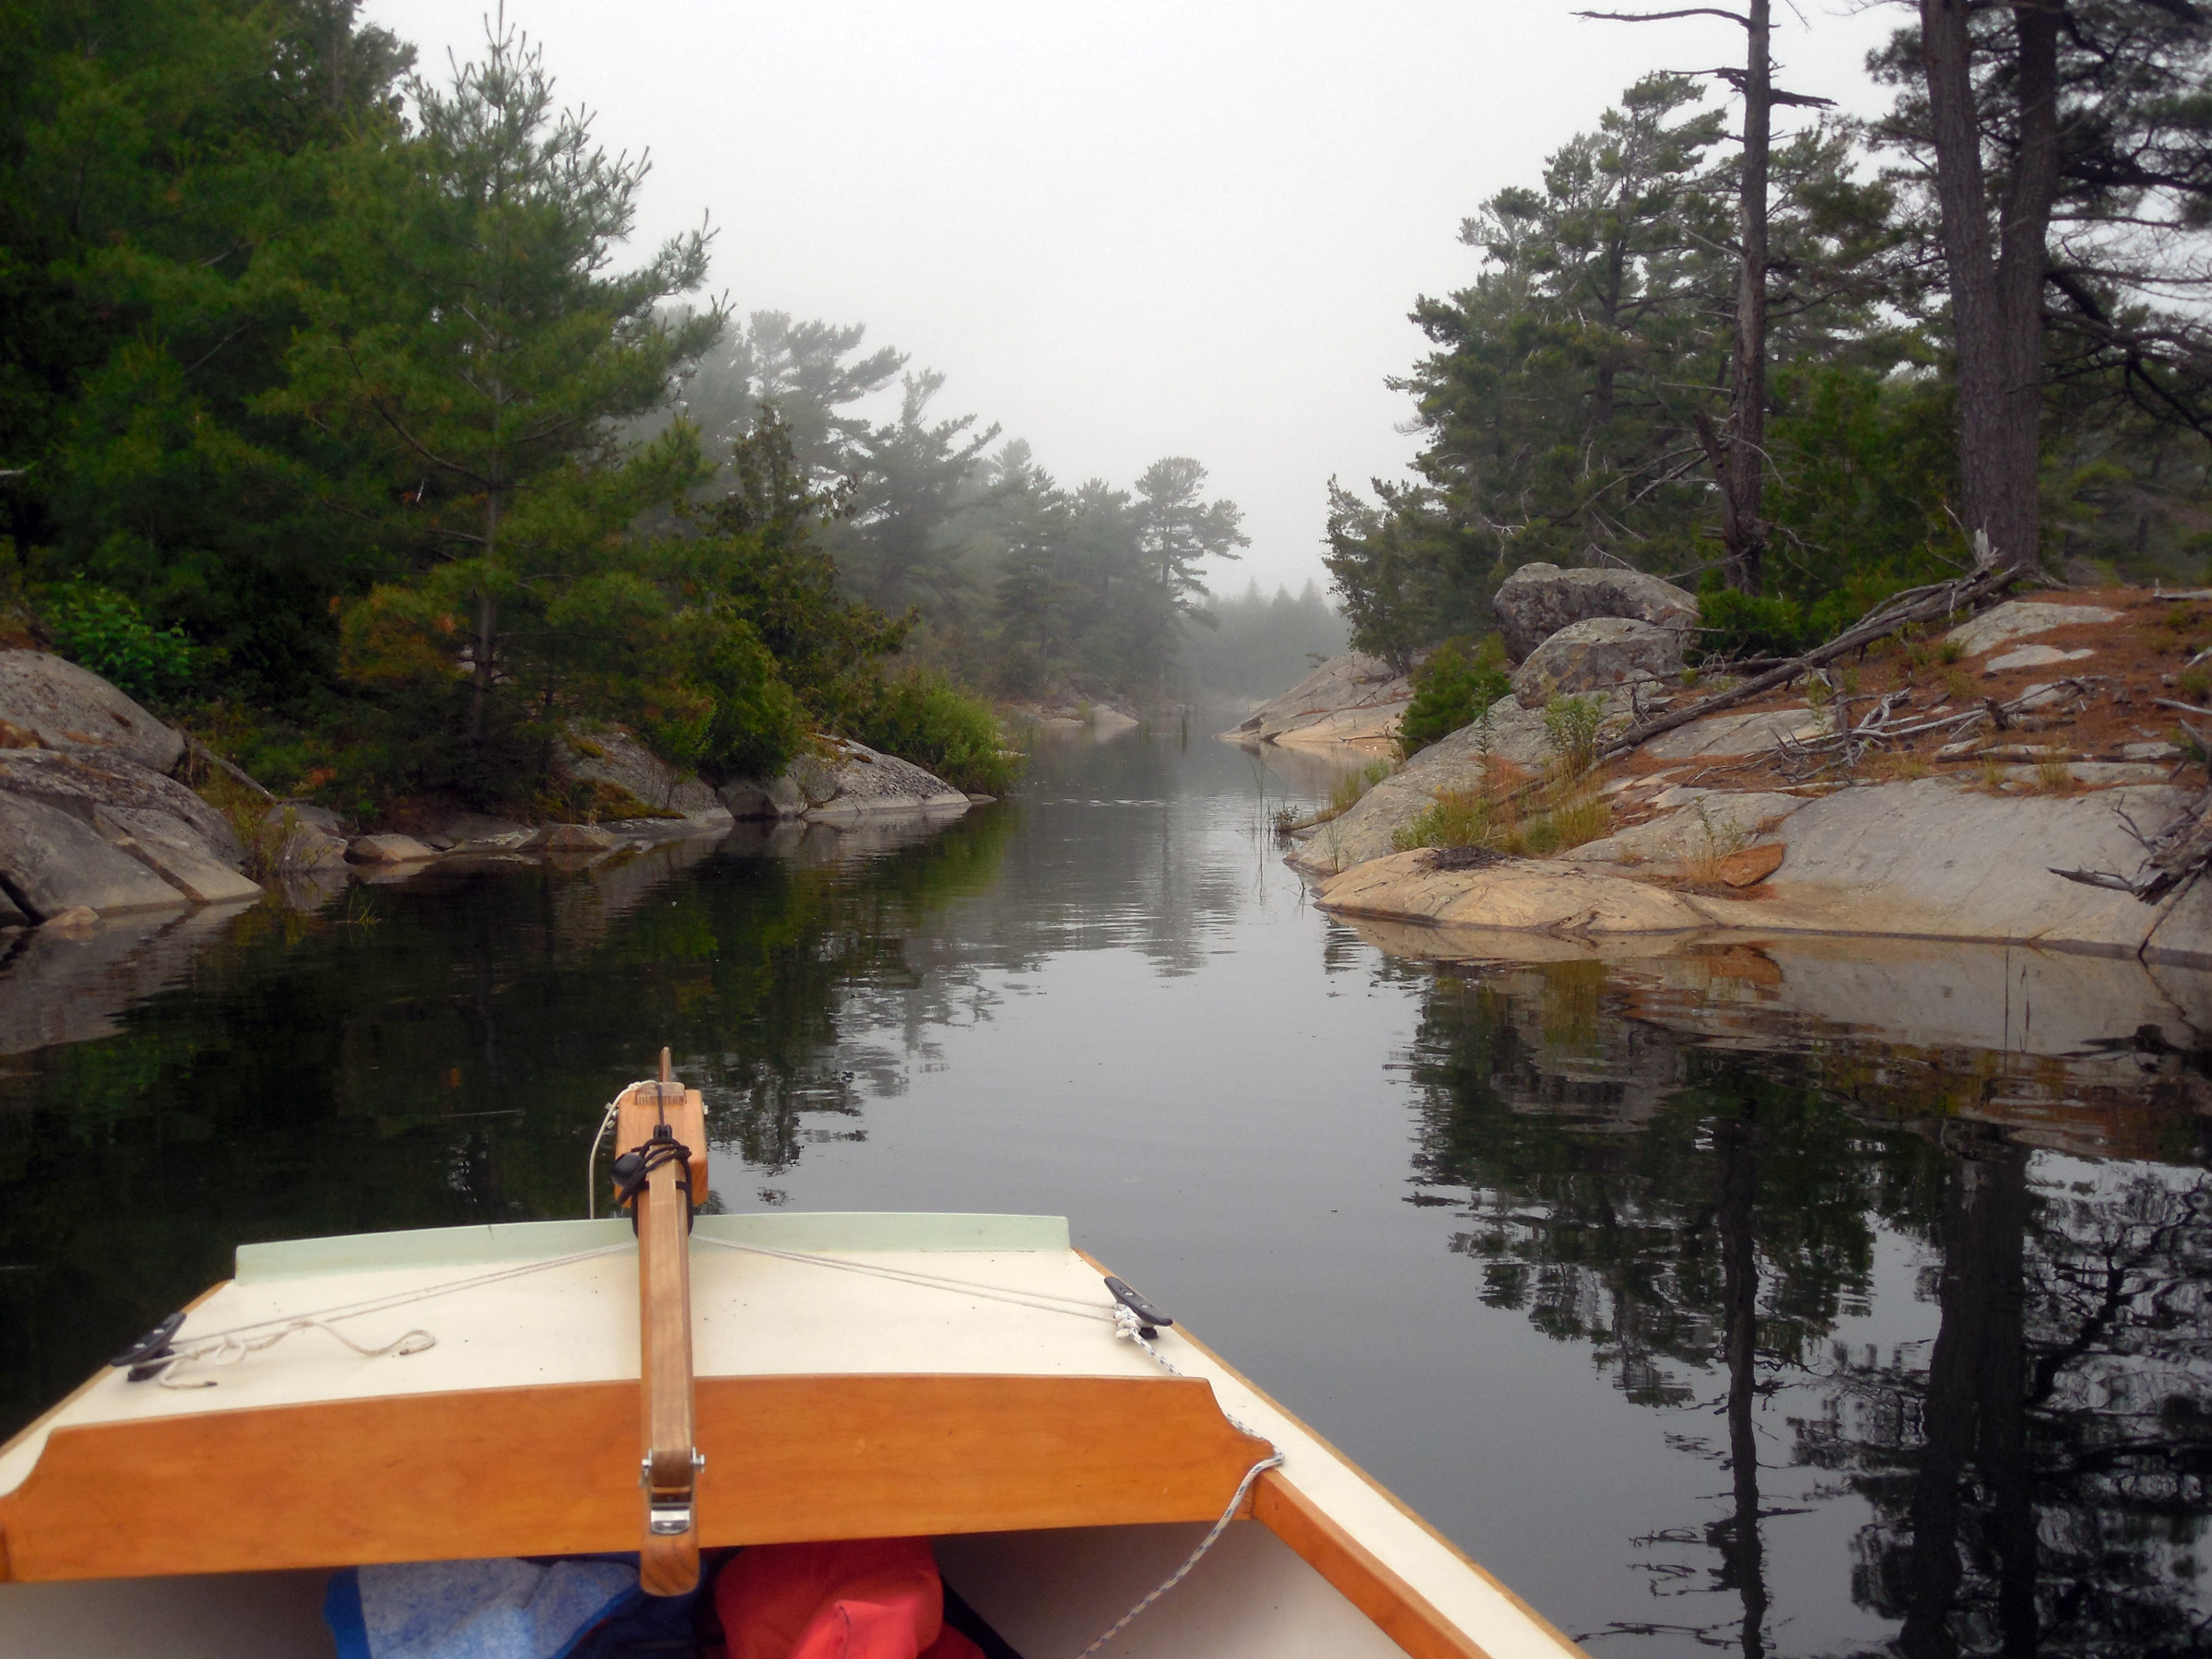
I woke the next morning to a world blurred by gray mist and shrouded in silence. The water was still and dark at the foot of the rocks, a liquid mirror unruffled by the faintest hint of motion. Far out at the eastern edge of the islands, fog lay so thick on Georgian Bay that there was no horizon, no up, no down. It was no day for offshore sailing, but it would be perfect for exploring the maze of backwaters, narrow passages, hidden coves, and islands that made up the east side of the Bustards.
Moving as quietly as I could, I got my raincoat and water bottle and set them in the boat, then untied from shore. I stepped aboard with a gentle push, easing myself onto on the rowing thwart as the boat slid away from shore. As I lowered the oars gently into the water, I realized that I hadn’t even bothered with breakfast.
The fog held through the morning, painting the world in a palette of muted grays and blacks all around me as I rowed. A hundred oar strokes, a hundred paintings. The foreground of each scene came into sharp focus as I moved through it, the background forever hazy and indistinct. A vague darkness of pines; an oddly serrated slab of rock revealed itself to be a line of gulls standing and muttering to themselves as I rowed closer. From overhead came the rattling cry of a sandhill crane.
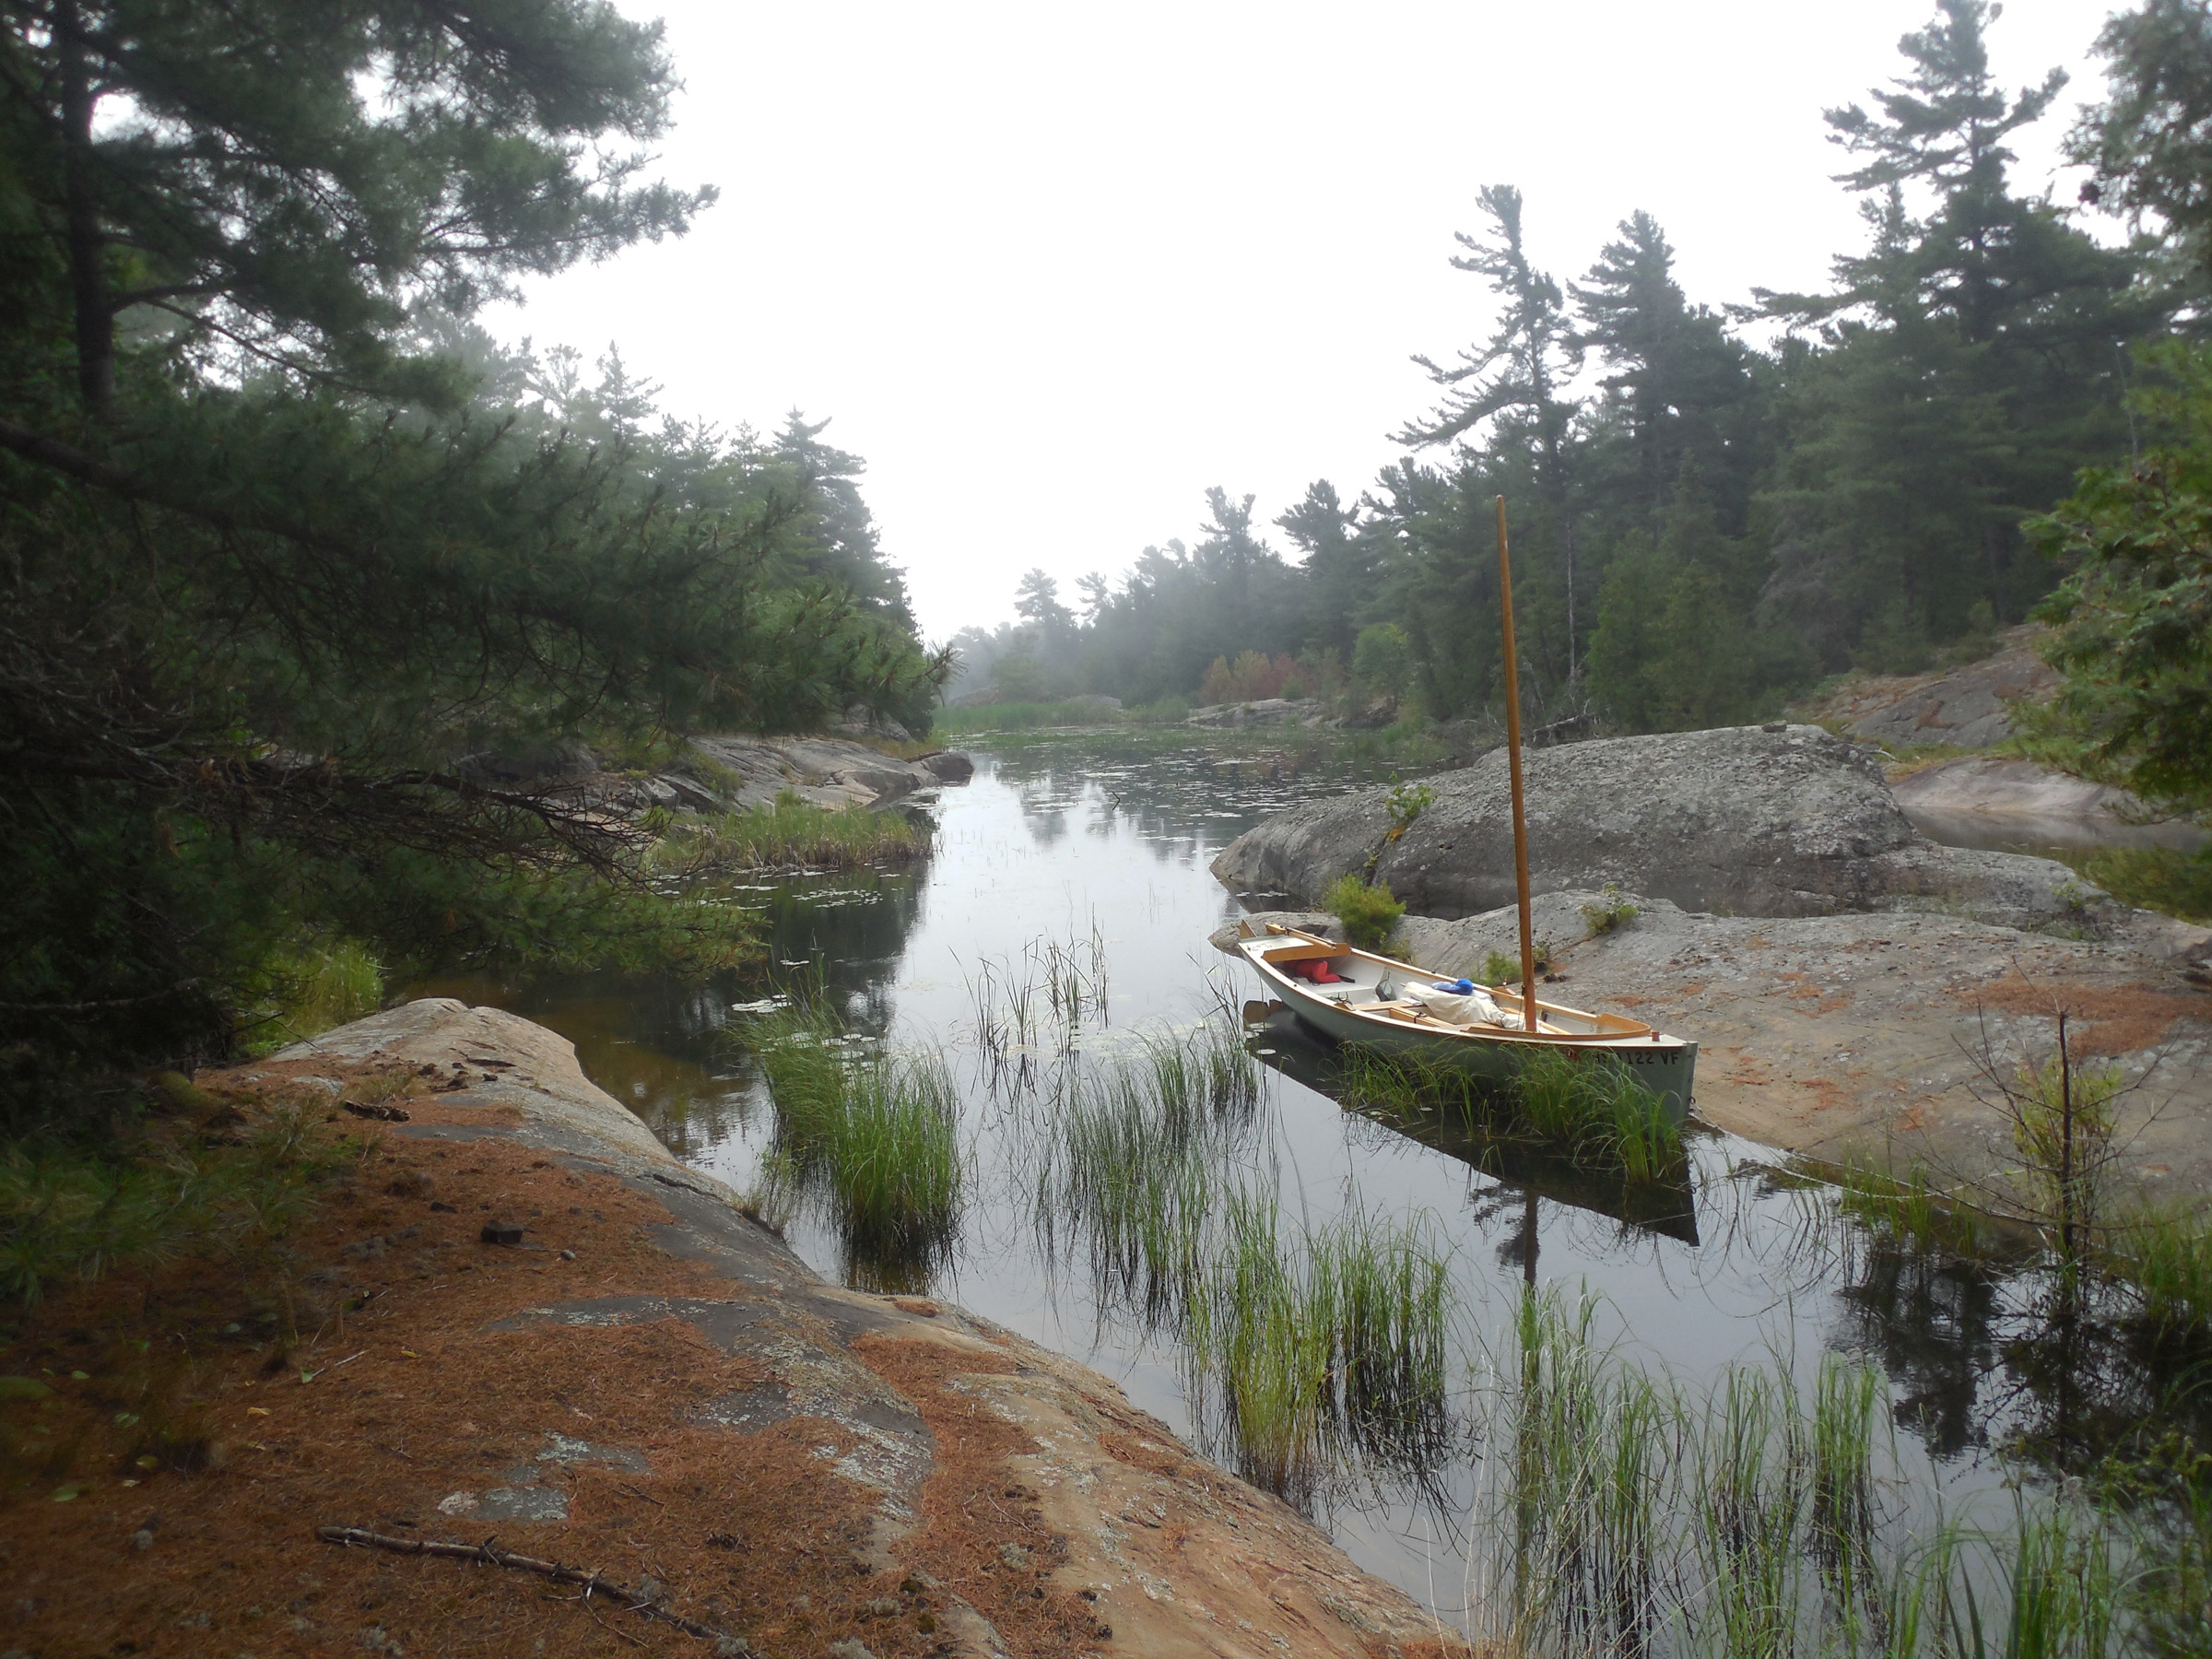
Hidden in the complex web of Tanvat Island’s surrounding maze is a wealth of potential campsites and anchorages. This perfectly sheltered inlet, my base camp for two nights, was tucked well back inside the Bustards, more than a half mile from the open waters of Georgian Bay.
My 18′ Alaska had been designed with exactly this in mind. With its Whitehall lines and narrow double-ended waterline, it was a decent sailer, but a flawless pulling boat. Built of 1/2″ planks, edge-nailed and glued—traditional strip planking—she was heavy enough to hold the momentum of each stroke. The oar blades dropped silently into the water, again and again, and glided through the maze with little effort and even less noise. At times the channel I was following pinched down to a passage so narrow there was no room to row, but the Alaska glided through easily, the hull’s weight preserving forward motion while the long keel kept her straight.
The layout of the maze become clearer in my head as I explored, my perceptions shifting to bring the chart and the world around me in line with each other. I had camped in the center of a long irregular peninsula that stuck out from the east side of Tanvat Island like a pair of weirdly twisted, frog-like legs. North of the peninsula was a large bay filled with so many islands that it was hard to recognize that it was, in fact, a large bay. By lunchtime I had explored it thoroughly under oars, making the discovery that the “peninsula” I had camped on was, in fact, an island—water levels were so high that a small circular inlet just west of camp had become a passage through to the other side. At least, a passage for boats with extreme shoal draft. Even the Alaska managed to scrape her keel as I slipped past.
A foggy morning on Tanvat Island’s east side inspired a lengthy rowing expedition before breakfast. On the chart, this bay was a dead end, but high water levels on Lake Huron and Georgian Bay allowed me to row all the way through and out the other side.
I returned to camp for lunch, a meal of red beans and rice I had prepped in my Thermos the night before. After eating, I set out again, this time following the southern edge of the peninsula. The day was still hazy and windless, the water flat and dark. I followed the shoreline of the peninsula until I reached its base, where I rowed far back into a fish-hook bay filled with lily pads, the shores strewn with beaver-gnawed branches. I had rowed 2 miles to get here, but the hook of the bay was dug so deeply into the island that a ridge of granite a few yards wide was all that separated me from the north side where I had spent the morning exploring. I had rowed for several hours and was barely a quarter of a mile from my campsite.
The Bustards, I realized, were a world of infinite possibilities.
Two hours after leaving camp, rowing steadily all the while along a circuitous route, I was still less than a mile from camp as the crow flies. The Bustard Islands hold more possibilities per mile than any other cruising area I’ve experienced.
One of the great joys of traveling by one’s self, I’ve learned, is that much of the need to plan ahead is negated. The solo traveler—the solo sailor—is free to act on a whim, and can keep all options open. By the time I had eaten a quick bowl of oatmeal the next morning, I still had no idea how I would spend the day. I suppose that many people would find that level of uncertainty unsettling, or annoying. Perhaps even foolish. I find it liberating.
I loaded everything into the boat—tent and gear, food and sailing rig—to keep my options open. First I’d row out to the mouth of the bay, where I could get a look at conditions on Georgian Bay proper. If the wind was good to continue south and east along the coast, I’d be ready to sail. If not—
Well, if not, I’d find something else to do. Just to be on the safe side, I surveyed the crew about my plan’s lack of specificity. No one objected. Taking a last look around camp to make sure I hadn’t forgotten anything, I rowed slowly out the channel toward the open water beyond. After ten strokes, the granite slab where I had set up my tent had vanished into the mist.
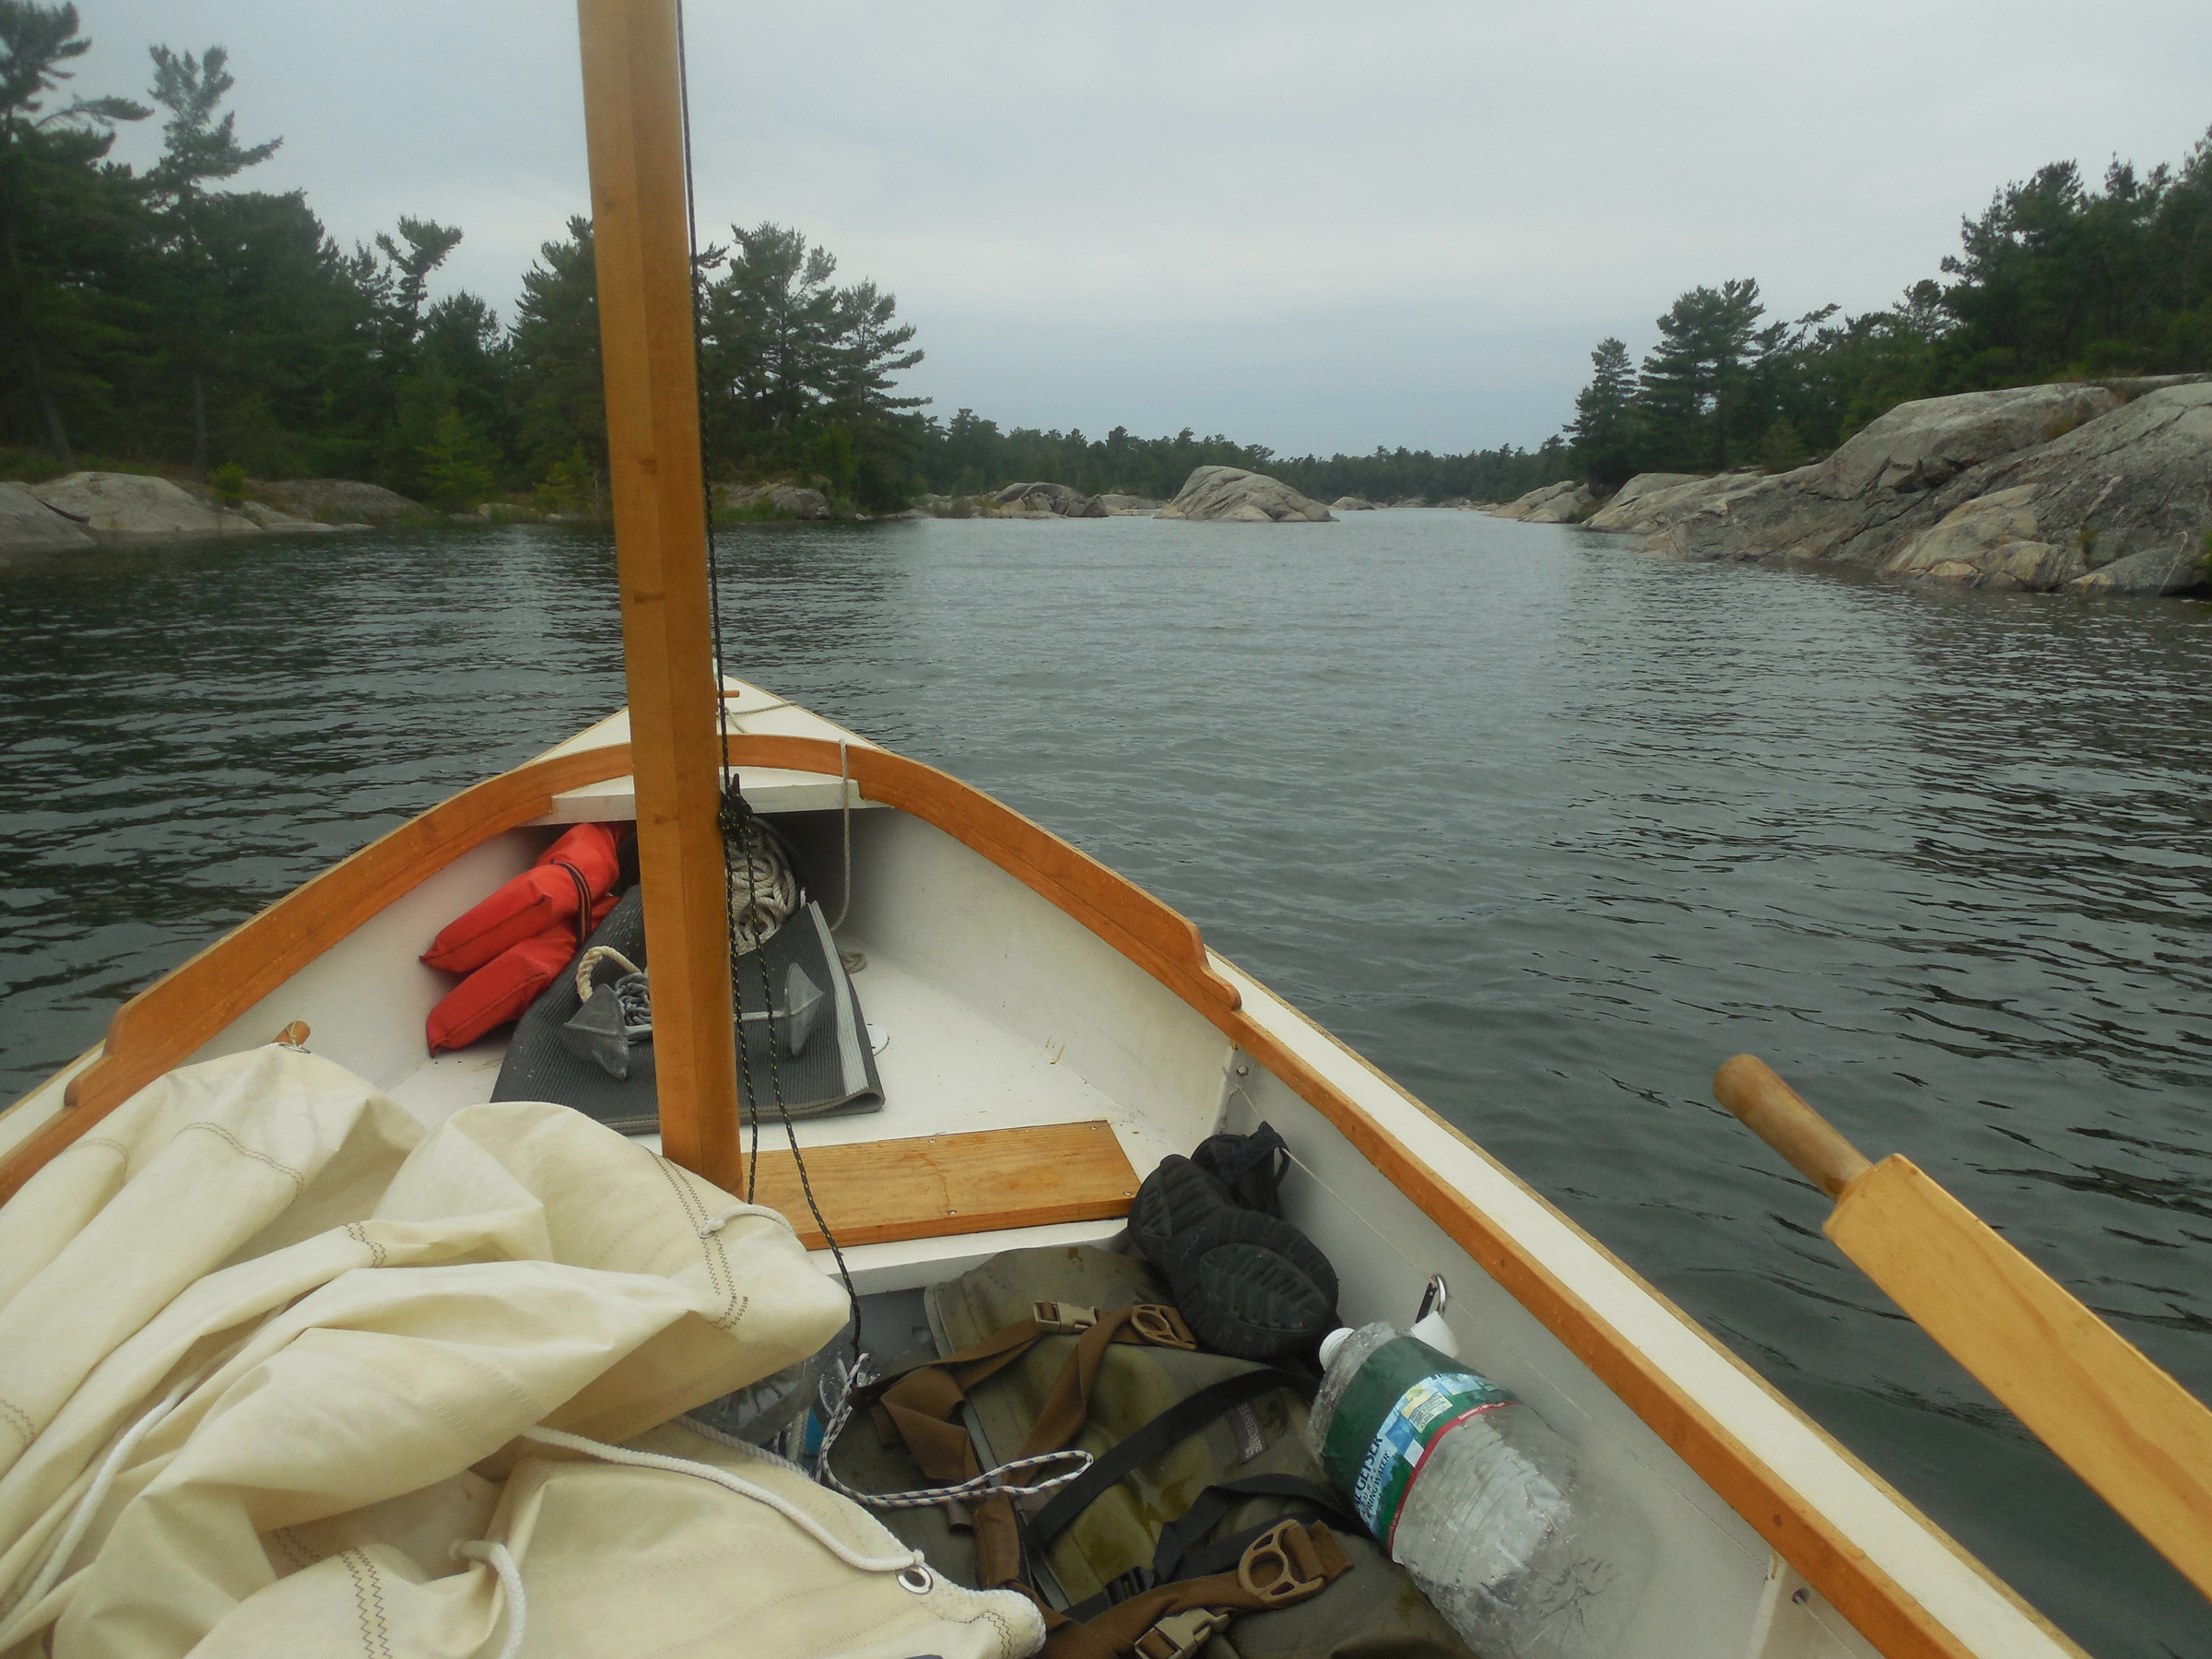
My technique for rowing the channels in the Bustard Islands was to keep the boat running straight with the help of a bungee-and-cord tiller tender and go fast enough to coast through the narrow spots.
As soon as I reached the edge of the bay, I knew that I wouldn’t be heading offshore. Fog had settled so thickly on the open waters of Georgian Bay that I doubted I’d be able to see the faintest hint of the Bustards from a hundred yards offshore. A chart and compass would suffice to get me to the next landfall, I knew—the ominously named Dead Island 3 miles to the east, where First Nations tribes had long ago interred their dead in the treetops, according to some sources I’d read—but it wouldn’t be the height of good judgment.
Besides, I was far from done here. On my only previous trip here, I had only stayed one night. This time I wanted more. But more what? I had already explored most of the eastern side of Tanvat Island, and retracing yesterday’s paths seemed less interesting than trying something new. I pulled out the chart. Tanvat Island, the largest in the Bustards, lay spread out across the page in two monstrous, squid-like lobes separated by a narrow isthmus where a deep bay cut into the shore on the western side. The area around Burnt Island just to the west housed a number of cottages, and the Bustard Island Headquarters for French River Provincial Park. There’d be other boats, other people. Burnt Island was, in other words, better to avoid.
The pond behind my Tanvat Island campsite—you can see my yellow tent through the fog—was too shallow for the boat’s 7” draft, and the entrance too narrow for the hull. It was a rare dead end.
But Tanvat Island itself? Possibilities. Tracing my finger around its convoluted outline, I wondered about a circumnavigation. But Tanvat’s northern end was pinched so tightly together with Strawberry Island that their outlines on the chart were touching. And Tanvat’s southern end was an endless scattering of rocks and shoals. Then too, there was a wide band of blue—the color used to indicate depths too shallow to bother marking—surrounding the entire island. I knew from yesterday’s explorations that not even my Alaska could always float across that blue band, and at 250 lbs for the empty hull, I wasn’t going to portage her. With water levels as high as they were, I thought my chances were good, but there would be no guarantees.
Gripping the oars lightly, I turned the boat north along the east side of Tanvat Island to begin—a counterclockwise circumnavigation. Or an ignominious failure. Either way, it’d be a good day.
The interior waterways of the Bustard Islands seem far removed from the open waters and offshore passages of Georgian Bay, but a good sail-and-oar cruising boat is equally at home in either world.
By late afternoon I had returned to the east side of Tanvat Island and pulled into the wide bay just south of my previous campsite, circumnavigation complete. I had seen no one. No one, that is, except for a few beavers, a pine marten (the first I’d ever seen in the wild), a northern water snake, a blue heron, a curious mink who swam out to the boat to stare wide-eyed at me for a moment before vanishing underwater, and an eastern massasauga rattlesnake that sidewinded its way across the surface of the water and crawled up onto the rocky dome where I had stopped for lunch.
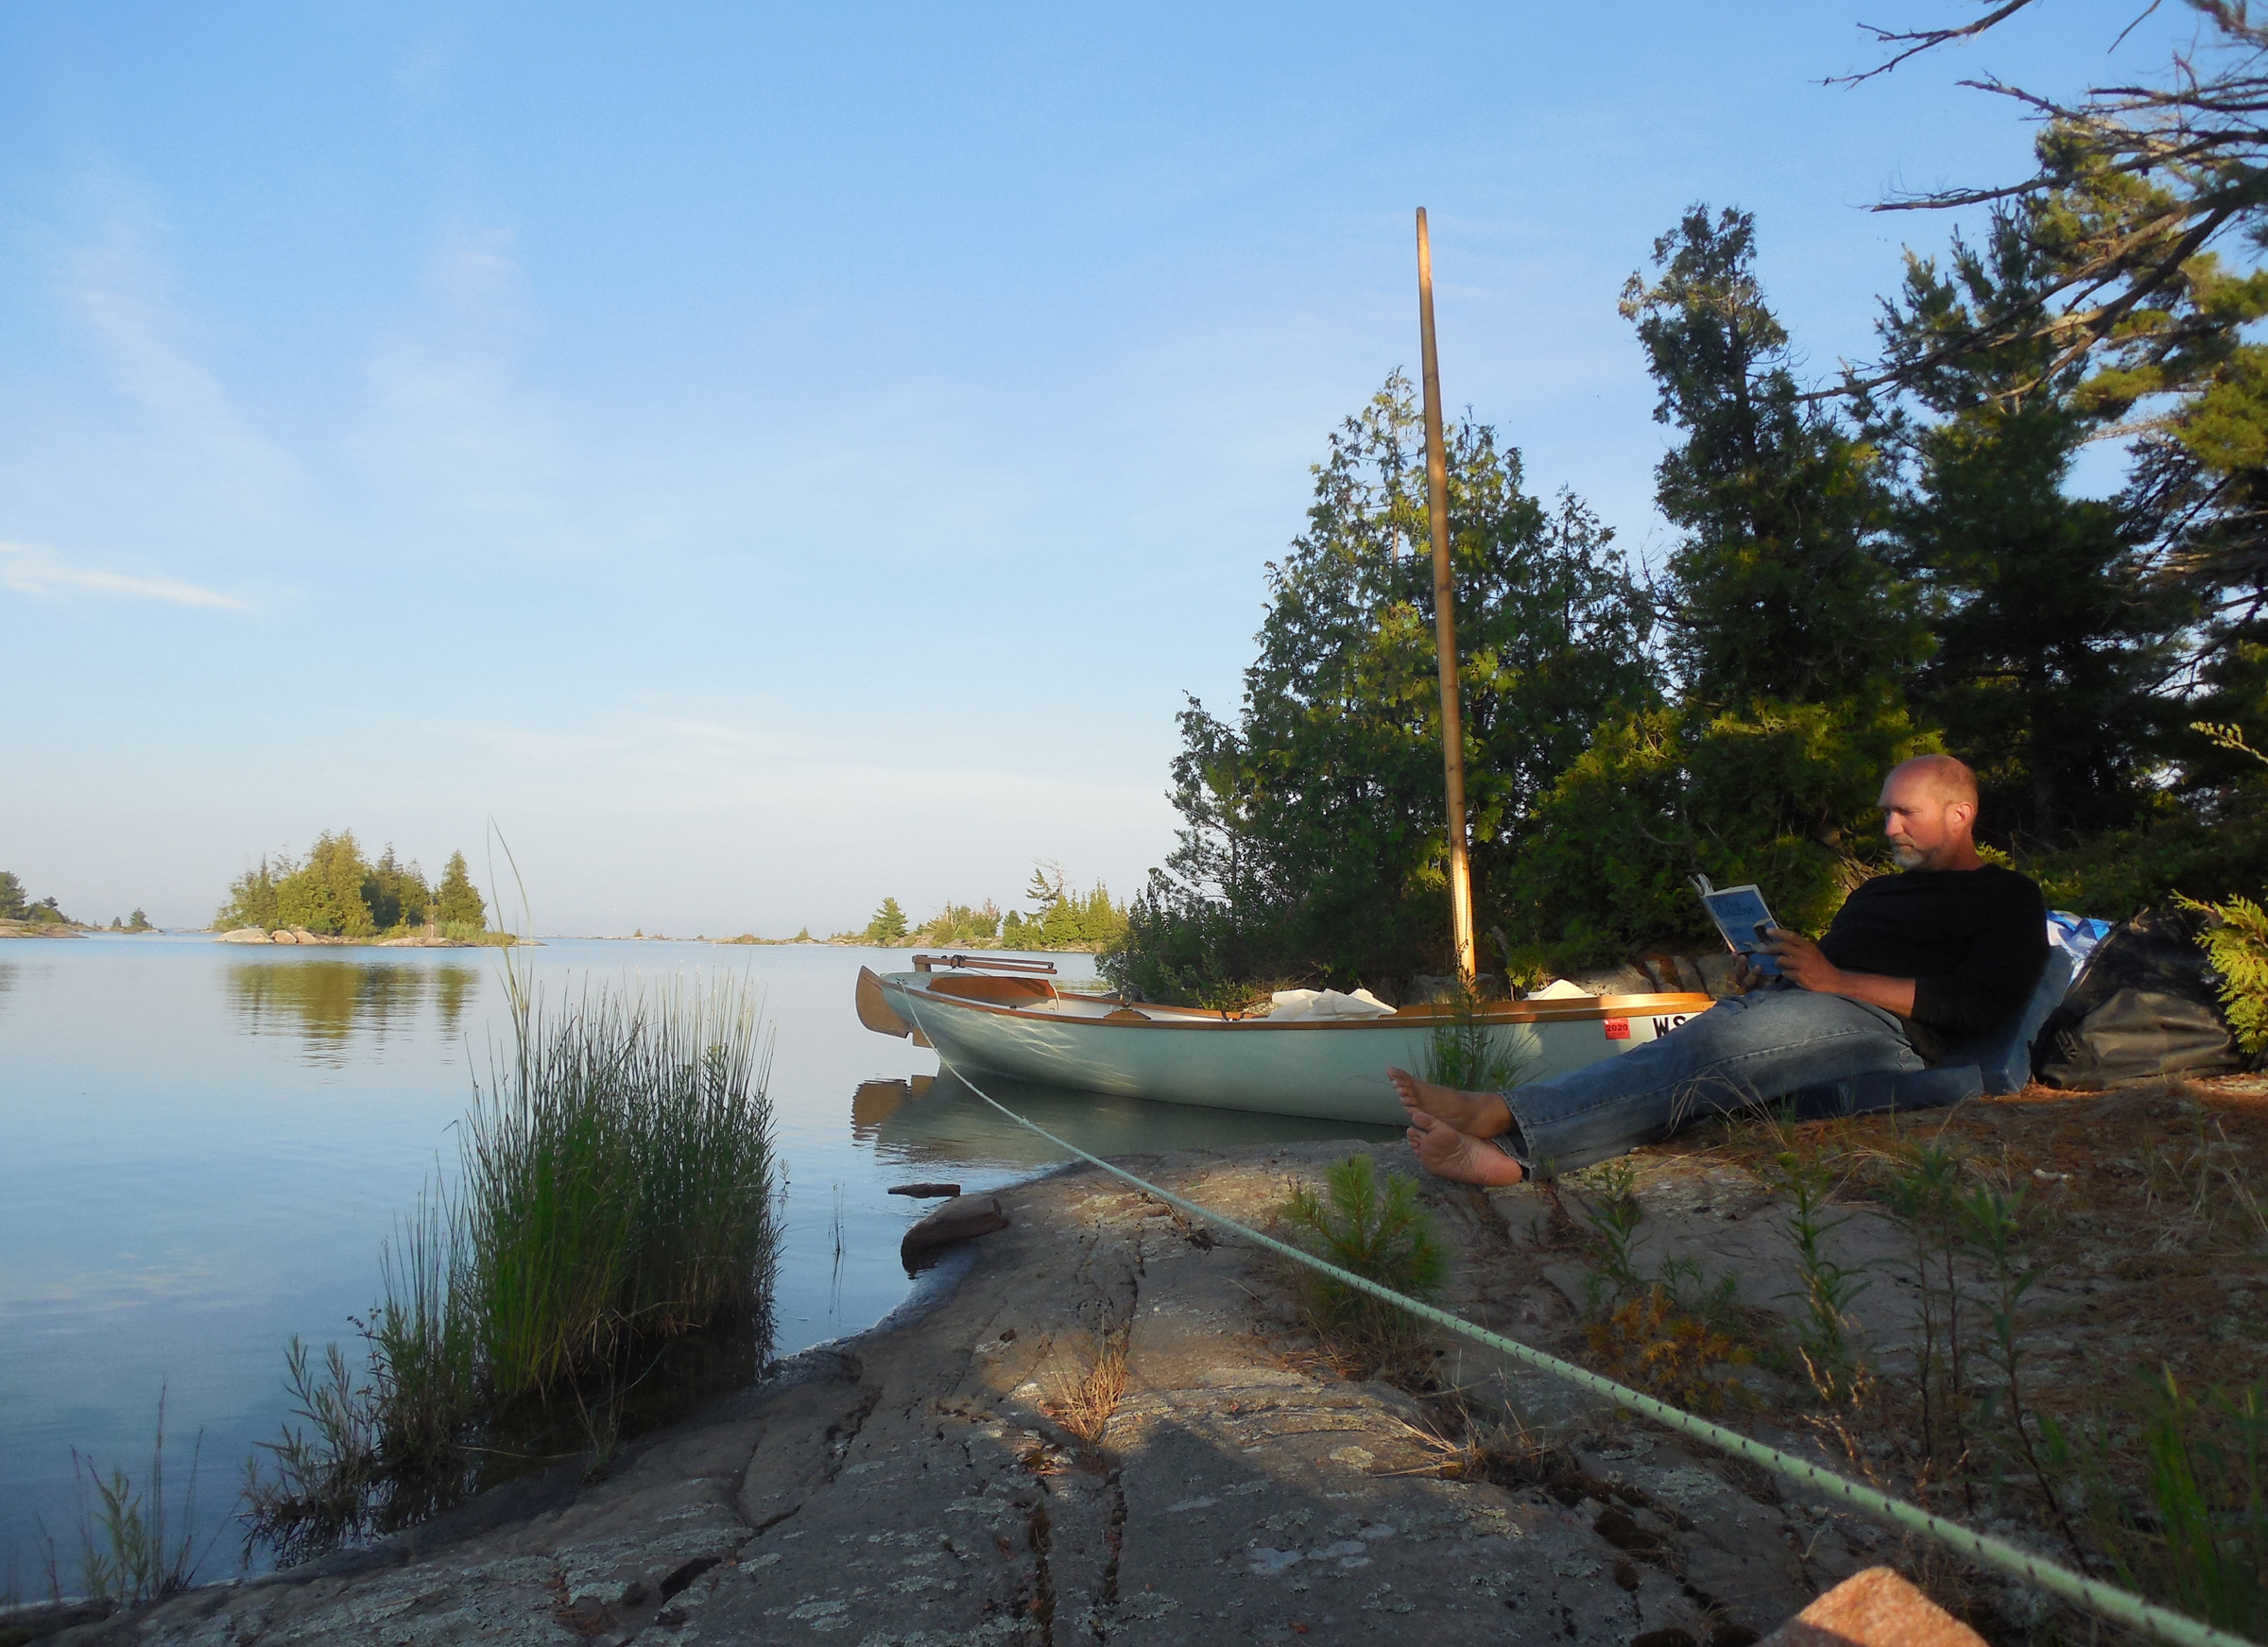
The best thing about a long cruise is that there’s never any reason to hurry. With the fog gone, I enjoyed a quiet evening in camp after my all-day circumnavigation of Tanvat Island.
In the center of the bay I made camp at a cluster of three islands—in my head I had taken to calling them the Three Brothers—and rigged lines to keep the boat in shallow water without banging against the rocks. After a long swim and another Thermos-cooked supper, followed by a second course of instant mashed potatoes, I set up my tent on the island’s eastern summit, a bare granite dome overlooking the bay from ten feet above.
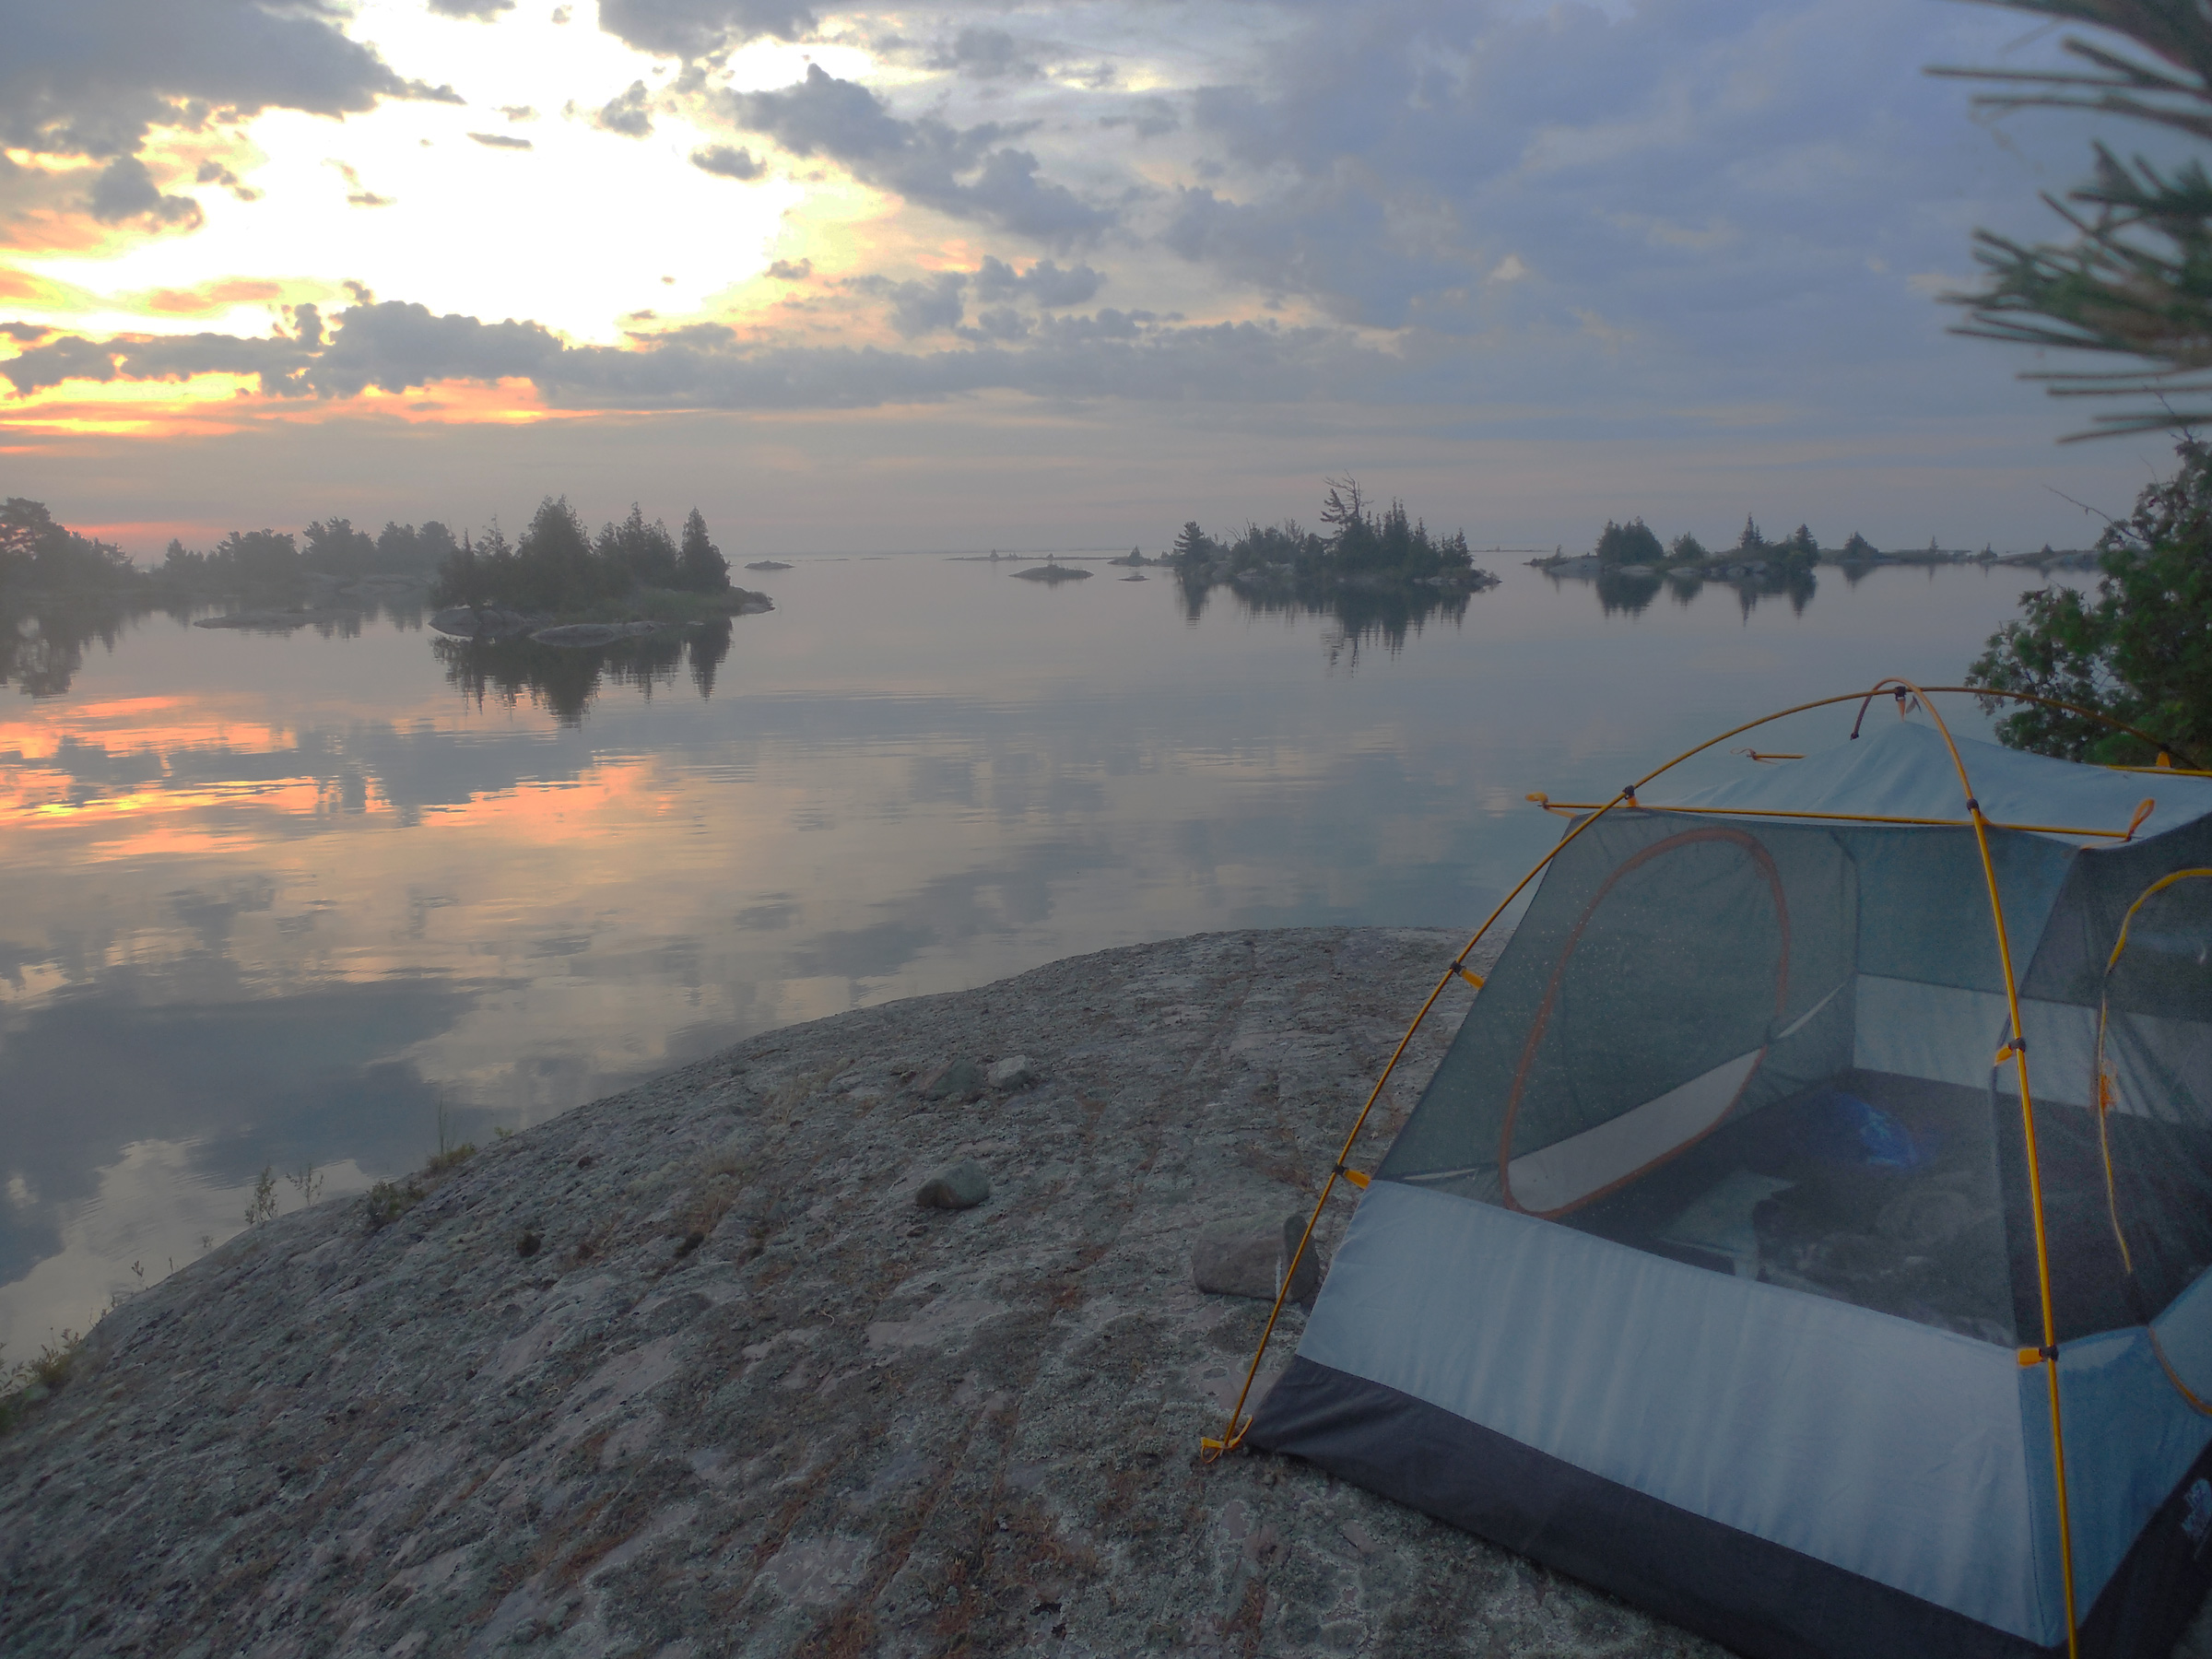
On my last night in the Bustards, I chose a tent site that faced east over relatively open water. As a result, the morning light woke me well before the sun cleared the horizon.
The sun was setting behind me, and the sky filled slowly with pinks and blues and wisps of purple clouds. The reflection in the still waters below was no less vivid. A sandhill crane flew past, wide wings flapping silently. Its rattling call was answered by another from deep within the dark pines of Tanvat Island. And then, silence.
Looking east from camp on my final morning in the Bustard Islands, it was easy to see a clear route out to the open waters of Georgian Bay to continue my journey.
I stood for a long time watching the sky grow slowly darker, until the first stars began to appear overhead. Tomorrow would be a fine sailing day and in the morning I’d be heading south along the shores of the Thirty Thousand Islands, sailing deeper into Georgian Bay. Being fogged in among the Bastards had seemed like an interruption at first, but the delay had forced upon me a mist-muted world where time and distance had become irrelevant, ambiguous, uncertain. For three days I had moved through a veiled, endless now, where each stroke of the oars only held me more firmly in place in the moment. Whatever lay beyond the mist remained out of reach no matter how far I rowed. When I woke the next morning to blue skies and bright sunlight, the Bustards felt like another world entirely, one made finite by its startling clarity.
Tom Pamperin is a freelance writer who lives in northwestern Wisconsin. He spends his summers cruising small boats throughout Wisconsin, the North Channel, and along the Texas coast. He is a frequent contributor to Small Boats Monthly and WoodenBoat.
If you have an interesting story to tell about your adventures with a small boat, please email us a brief outline and a few photos.
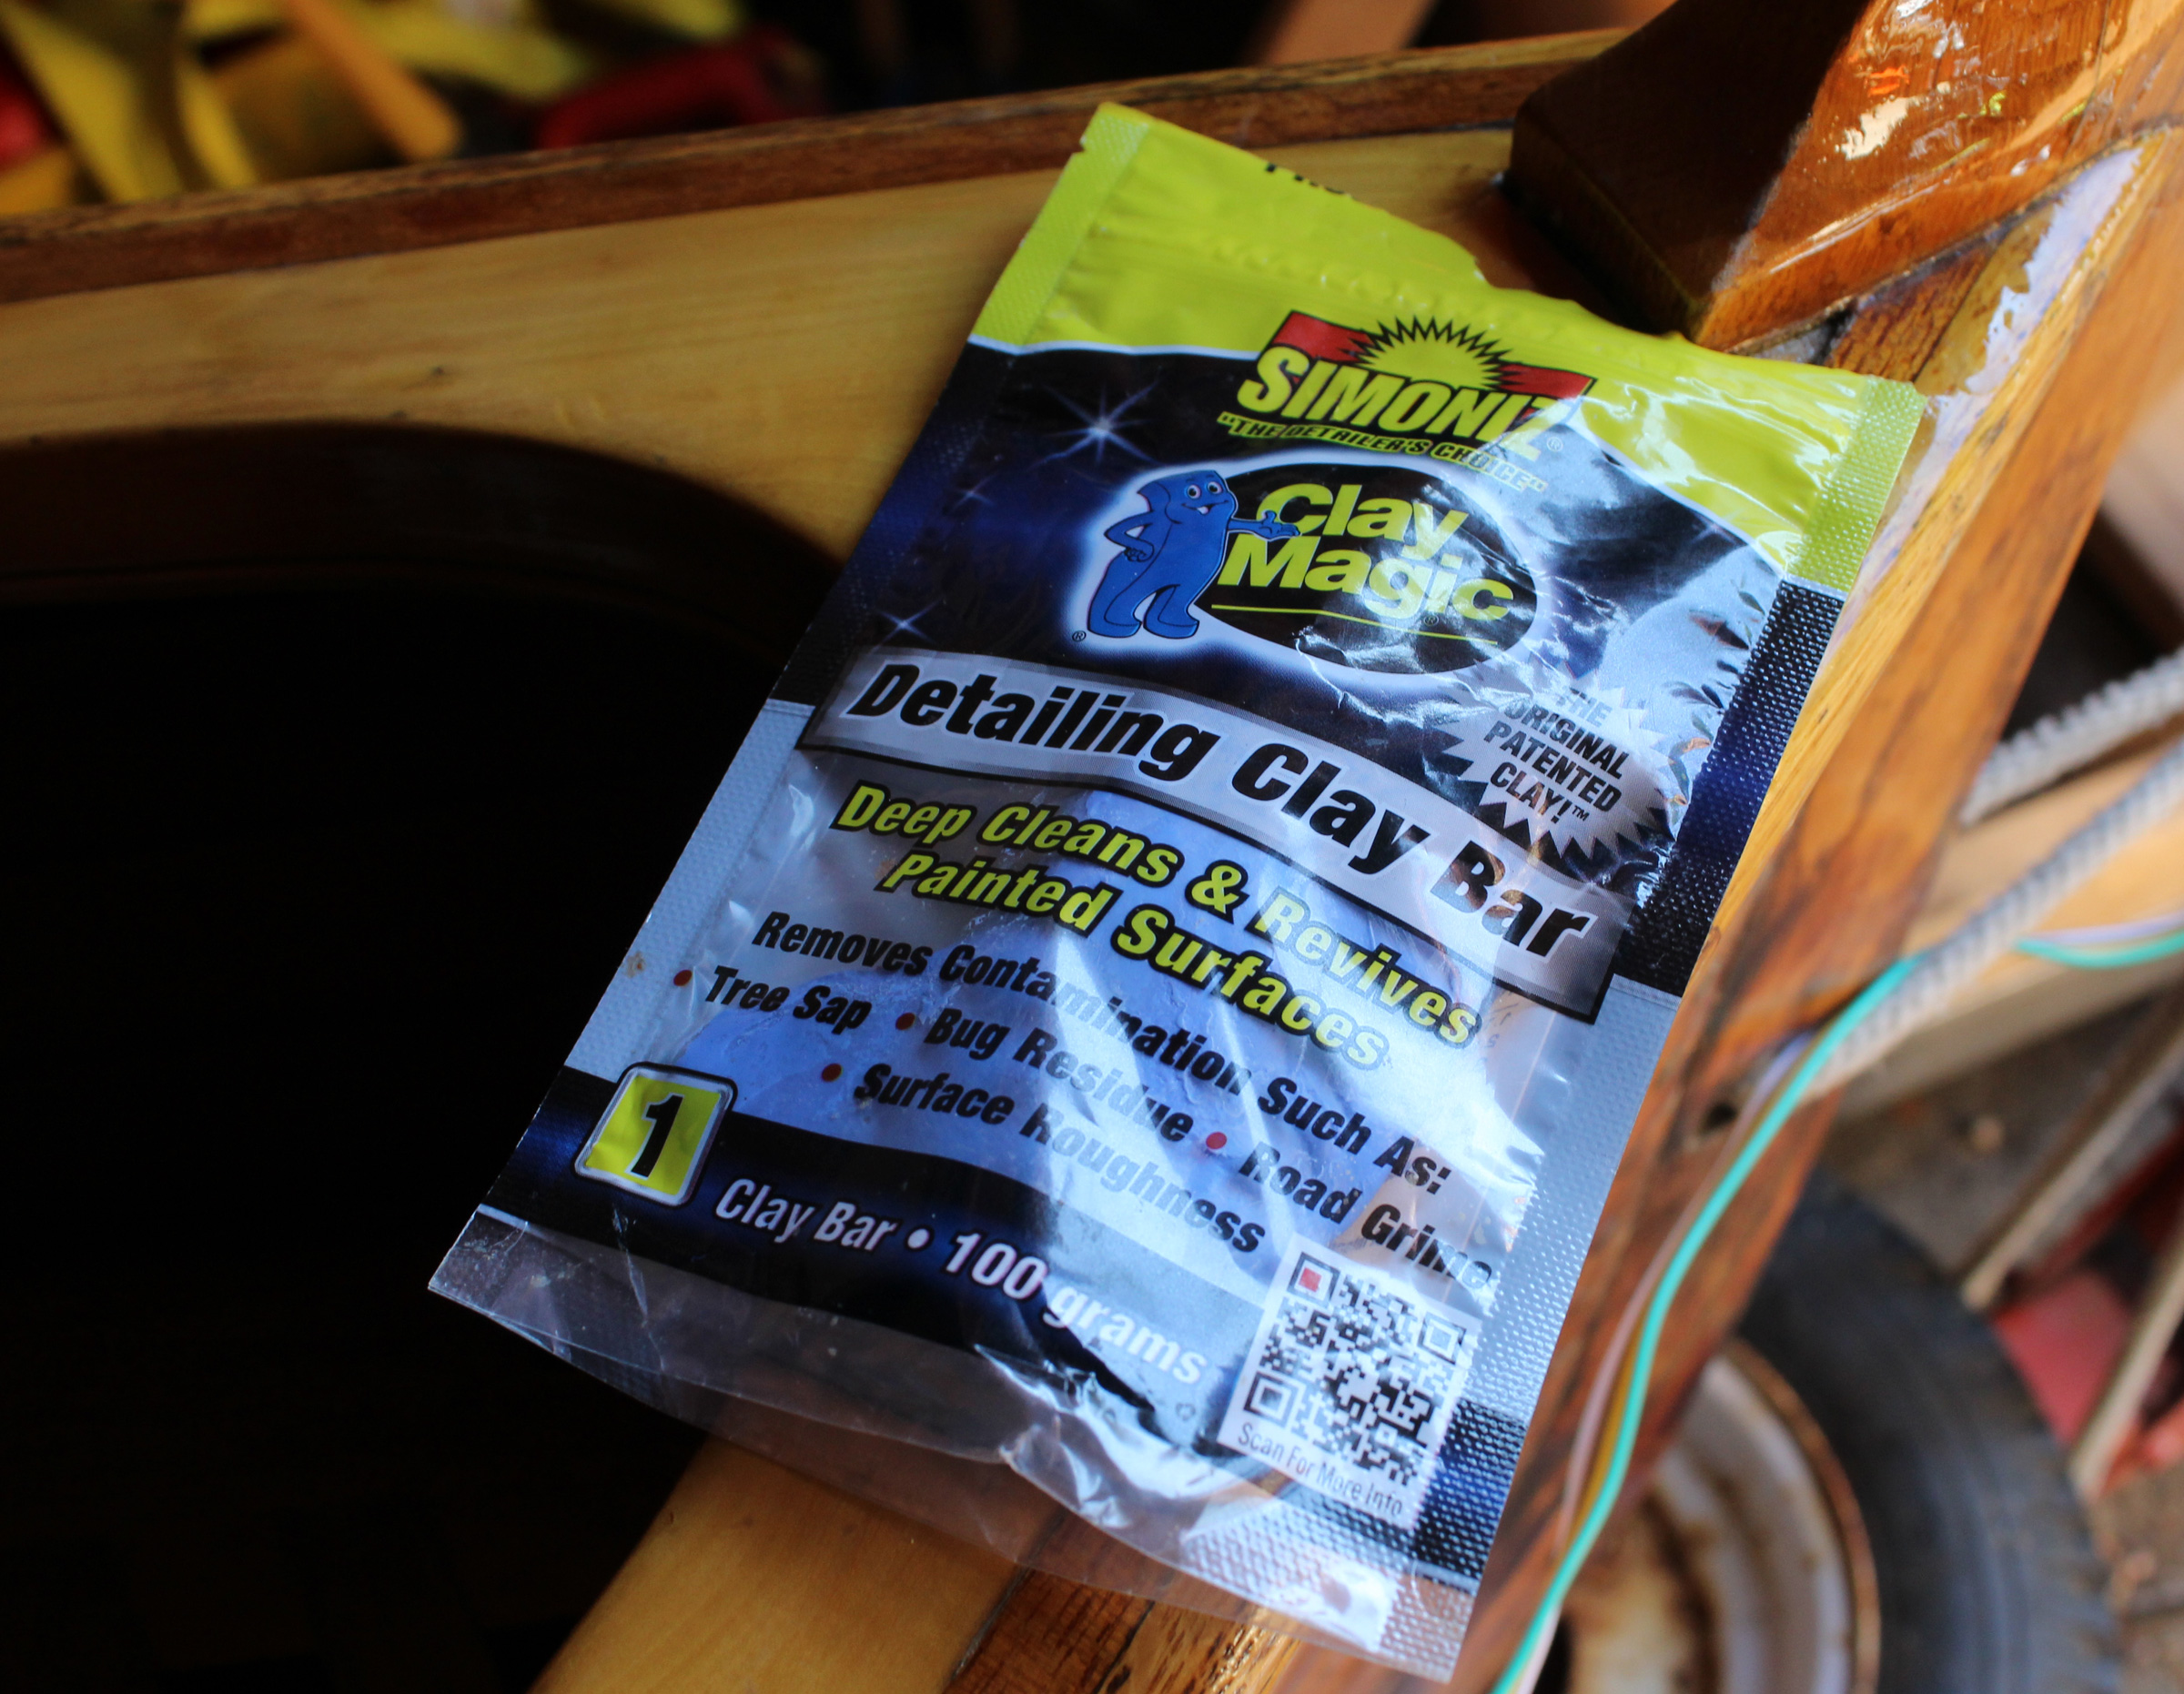
Clay bars are available at auto parts stores. They come in different grades (this blue bar is a #1/Fine) and sizes (at 100 grams, this is one of the smallest). It cost around $12 and comes in a resealable pouch to keep it from accumulating grit.
Tim Murfitt of Norwich, U.K., bought a classic car a few years ago, and while researching how to improve the paint work came across the clay bars car detailers use. Later, when he did the paint work and varnish on his Savo 650 in the same dusty shop he built the boat in, he was disappointed with the flaws to the finish and thought he would give the clay bar a go. It only took him 30 minutes to do the whole boat inside and out, and he was amazed at the transformation. It left both the paint and varnish feeling silky smooth.
SBM
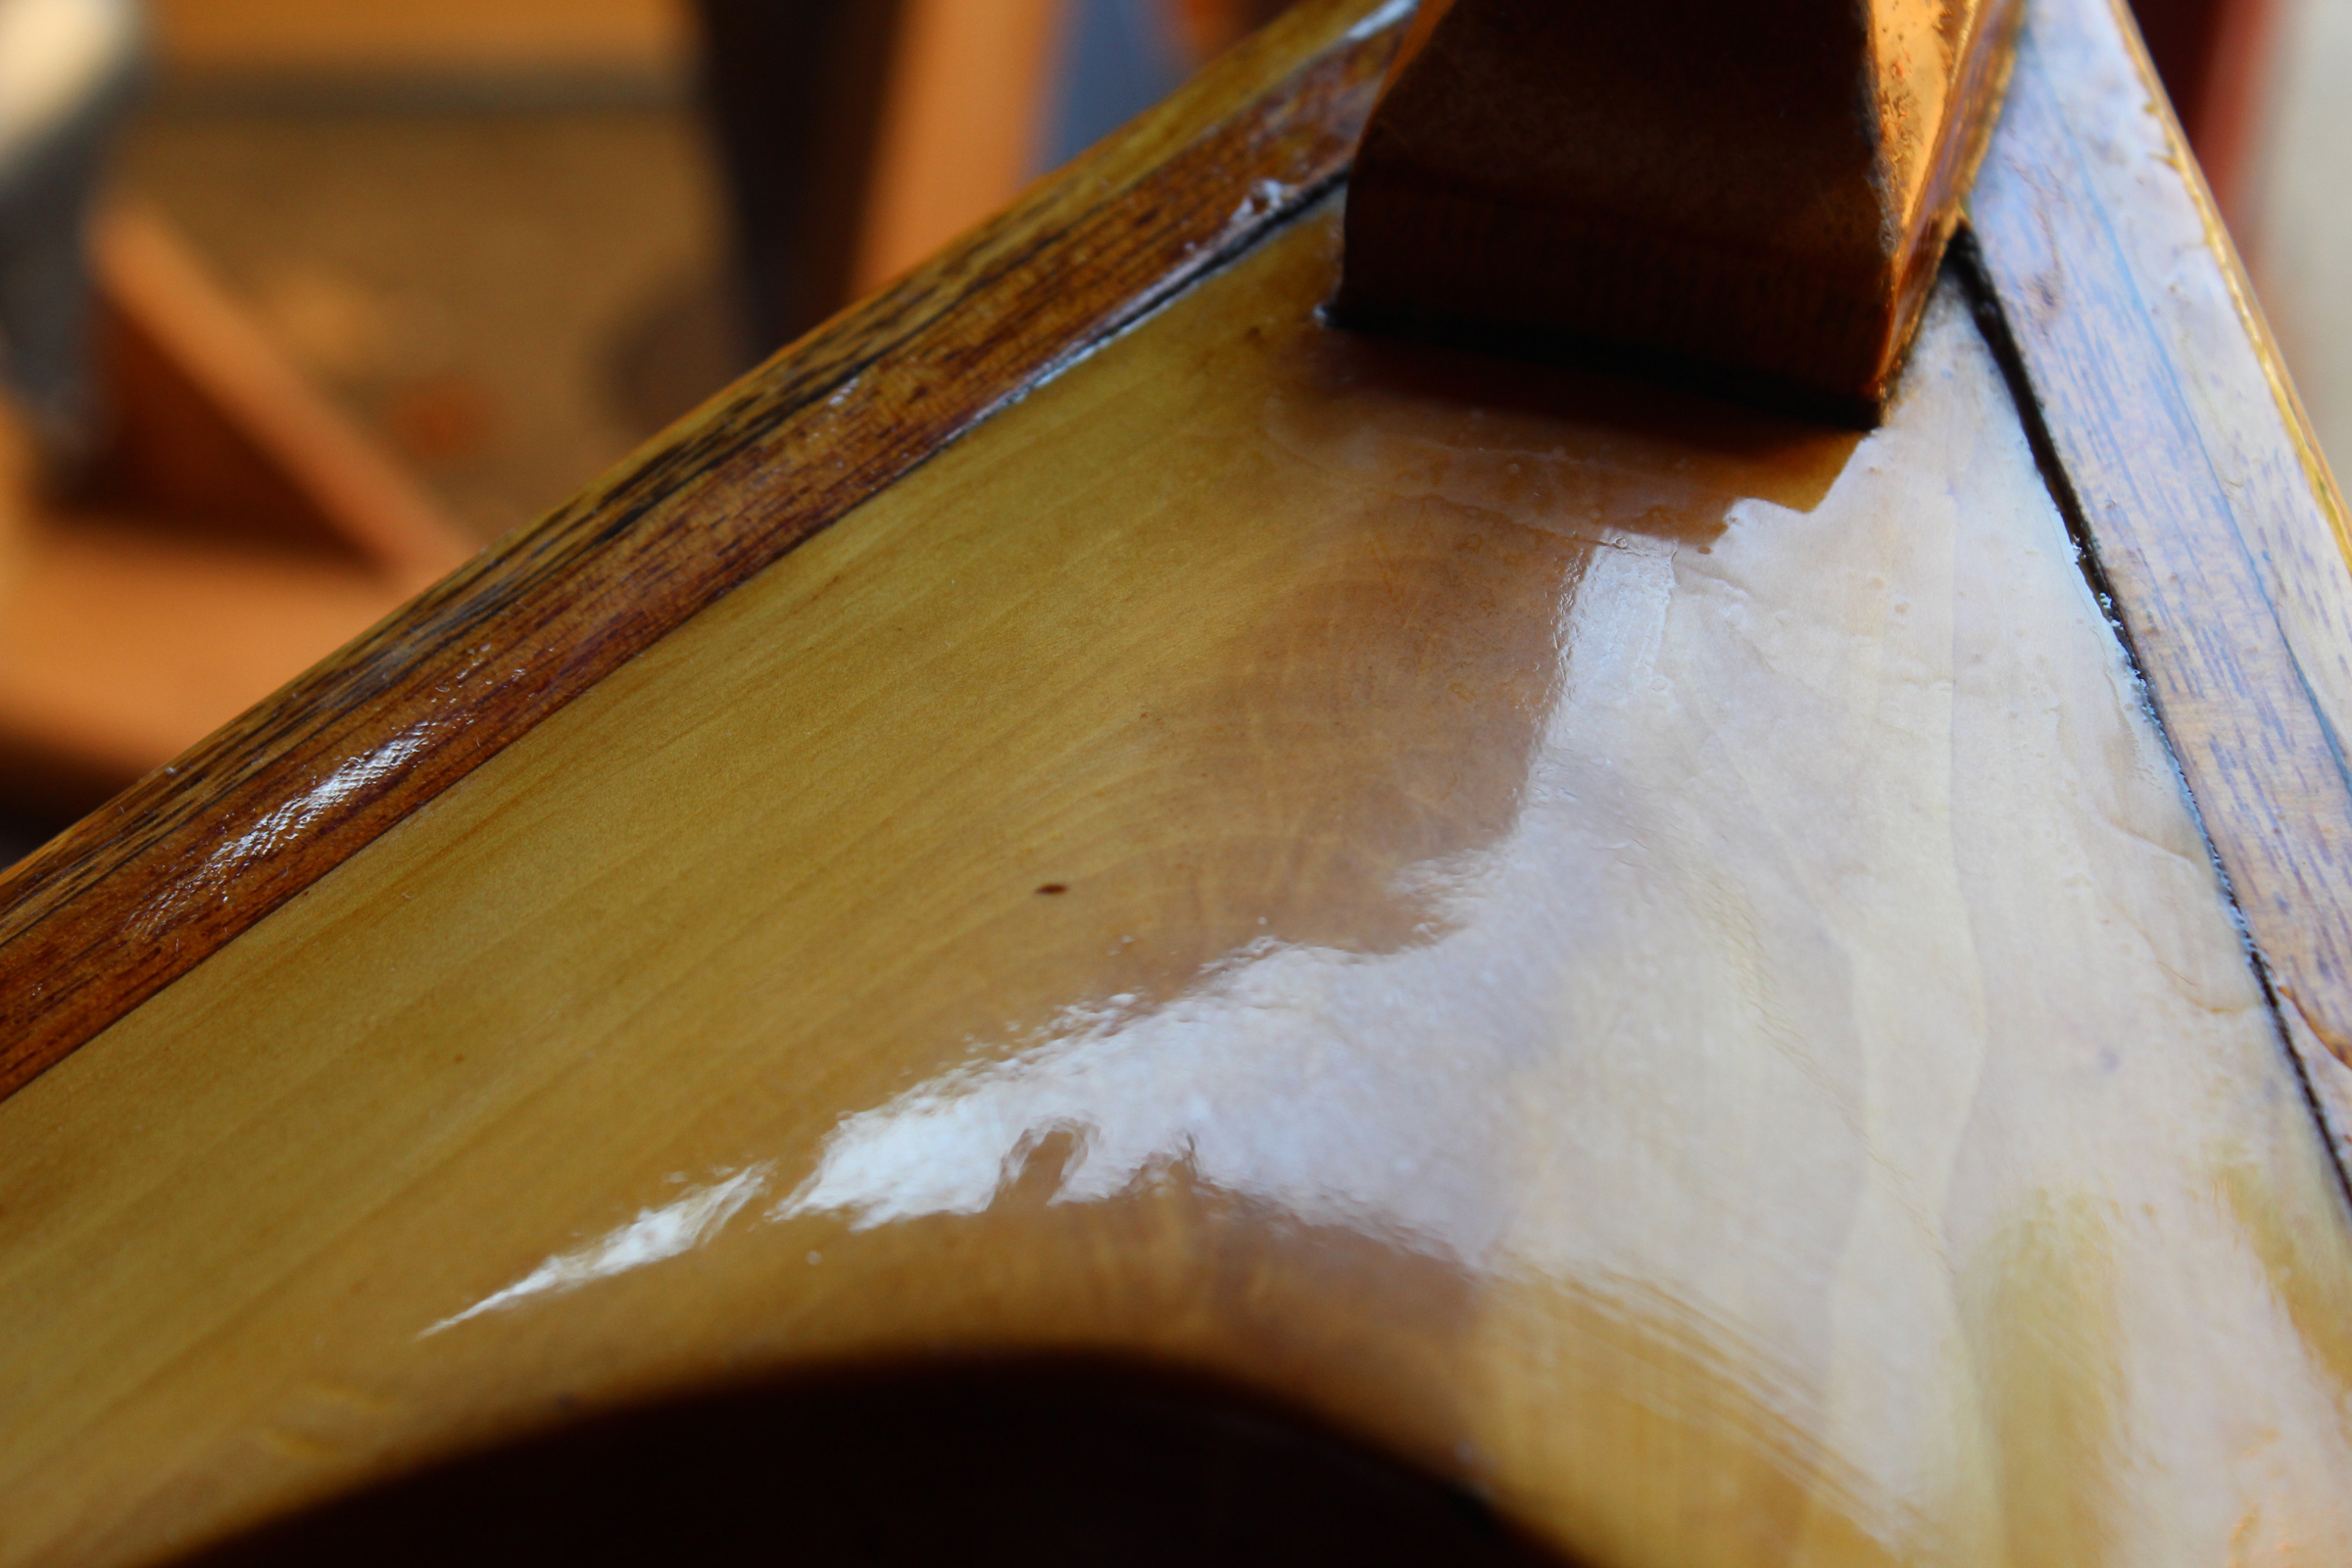
This apple-crook breasthook is a lovely piece of wood with a lousy dust-flecked varnish job.
SBM
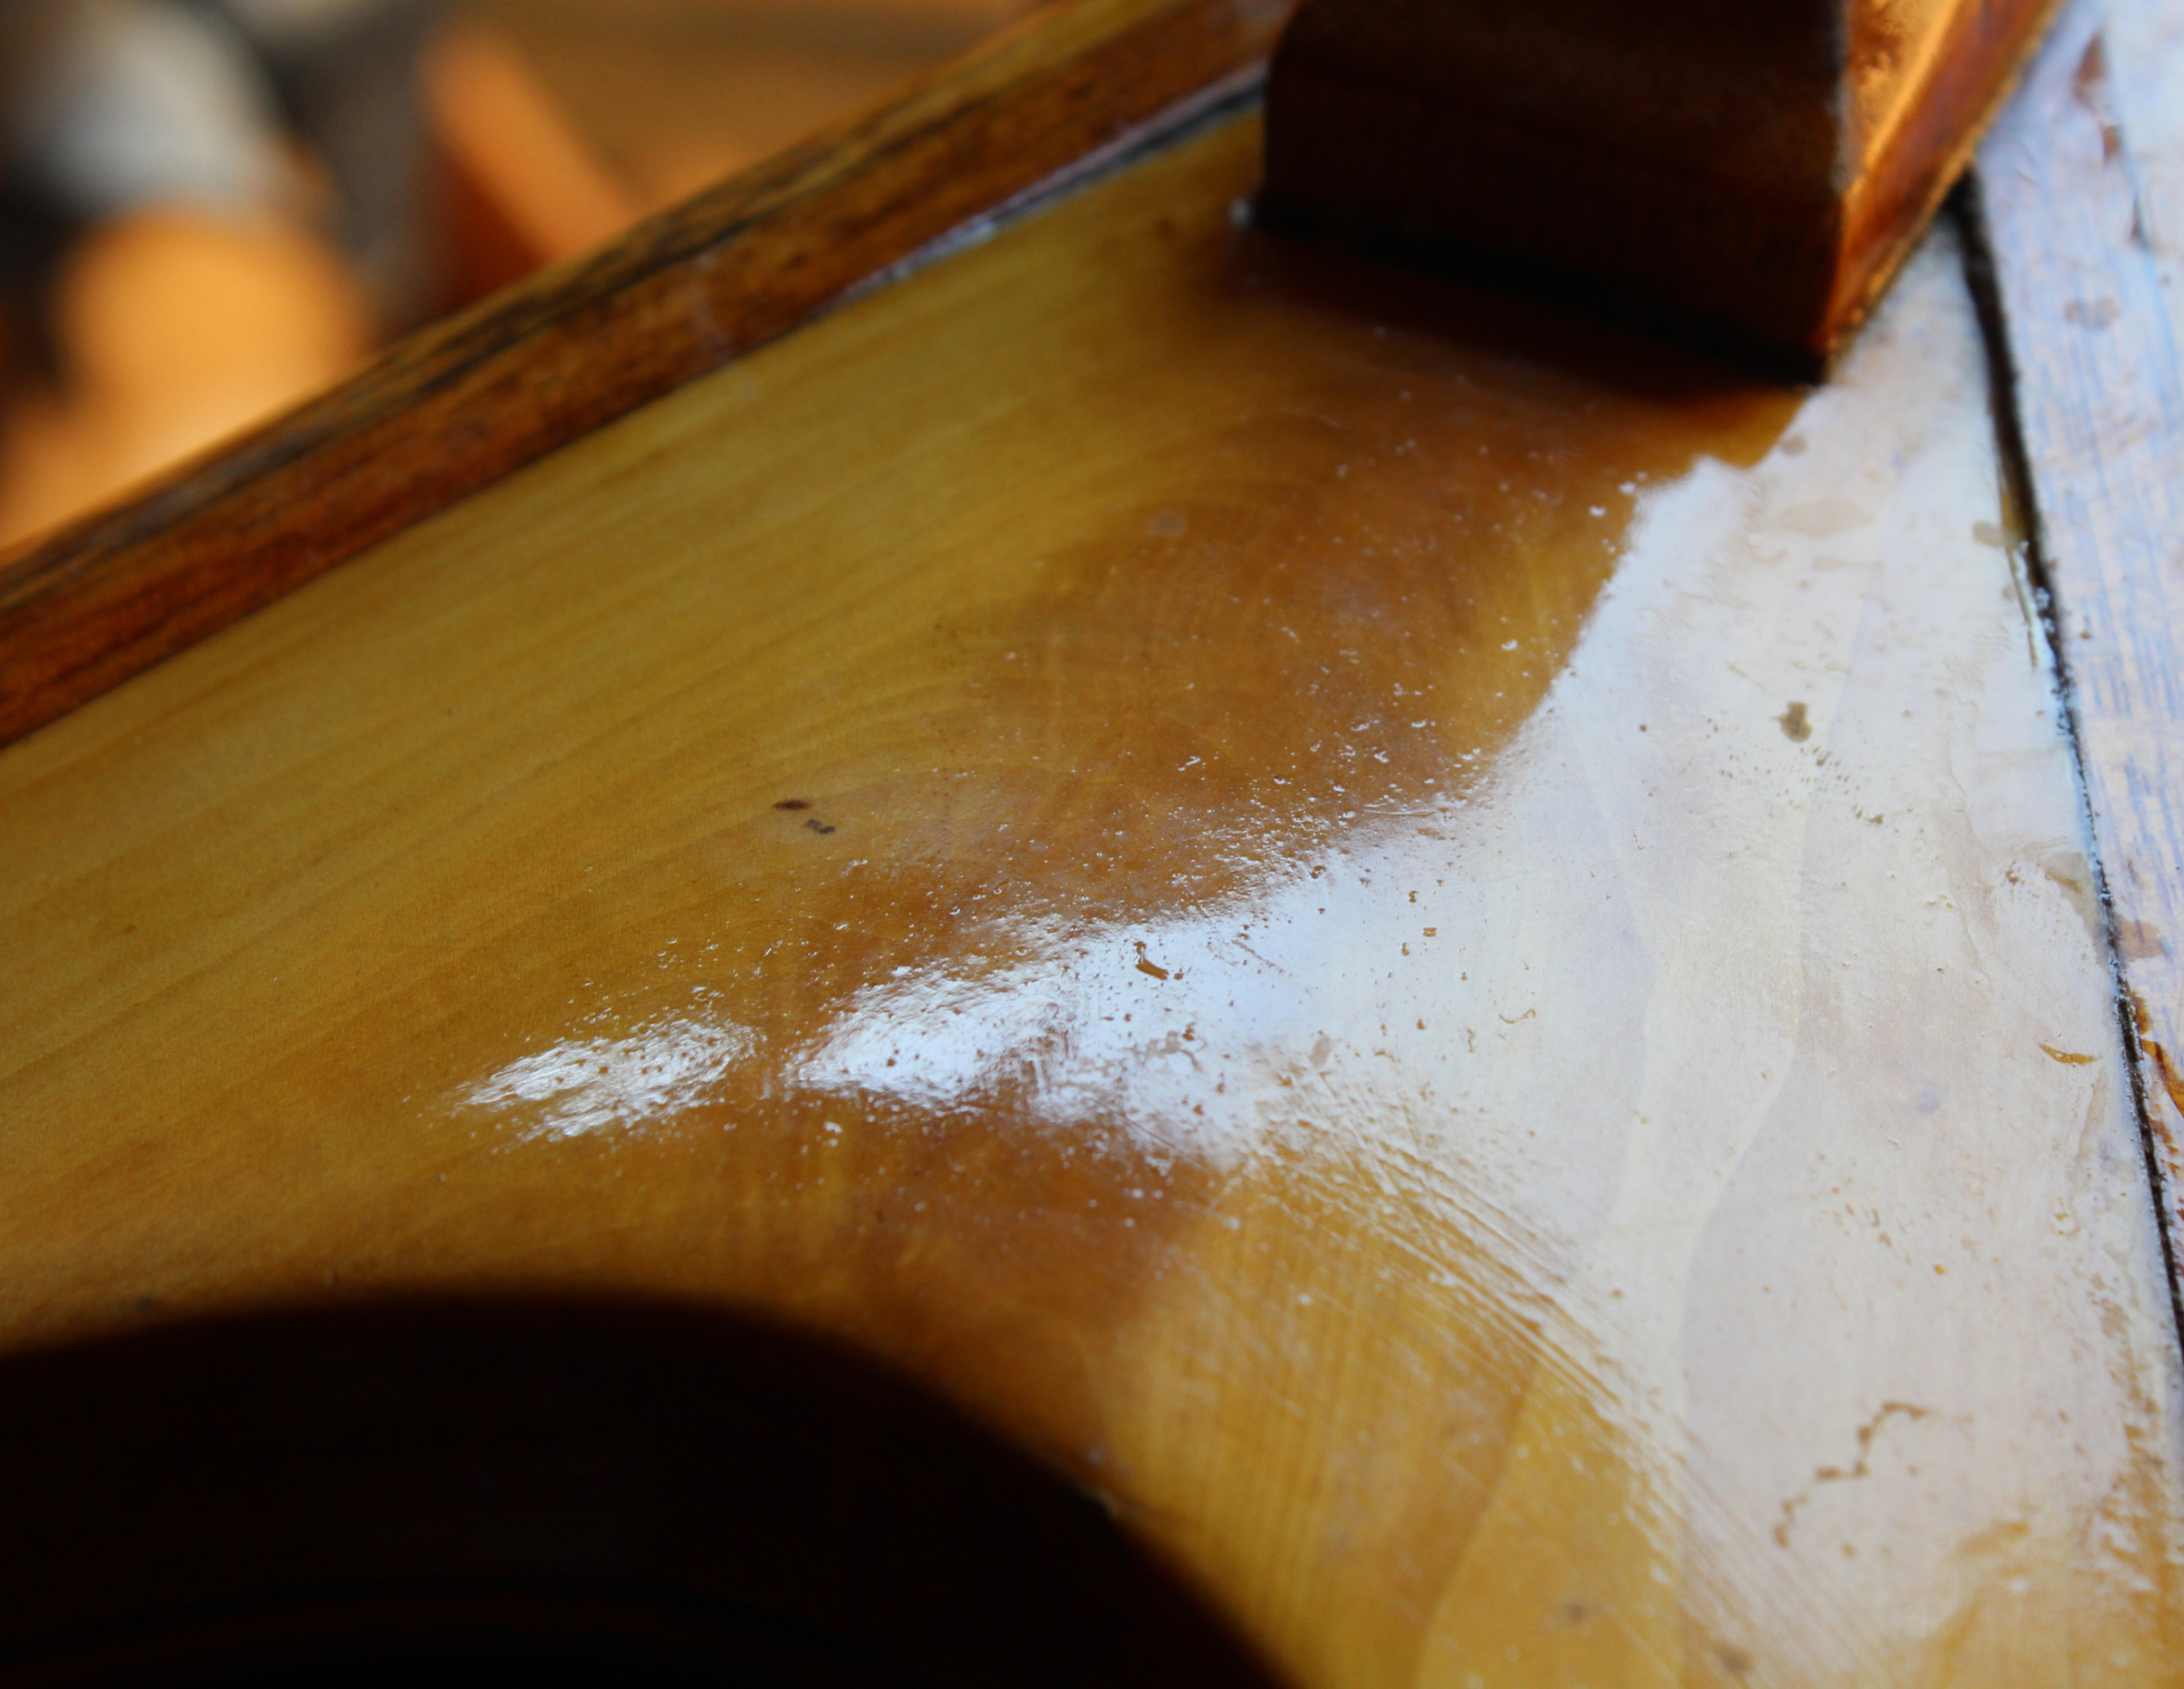
The clay bar needs a bit of soapy water on the workpiece to lubricate it and keep it from dragging. The bar is quite malleable and will contour itself around the workpiece.
SBM
After a quick rubbing with the bar, the varnish is smooth and glossy.
Editor Chris Cunningham bought a bar of detailing clay and unexpectedly got a chance to try it out sooner than he expected. He’d made a new bathroom cabinet with nice Douglas-fir, varnished it, and accidentally dropped the mirror frame while it was drying. It picked up a lot of dust so he let it dry a couple of days and just took the clay bar to it. A quick rub with the bar and some soapy water took off the imperfections and didn’t dull the shine.
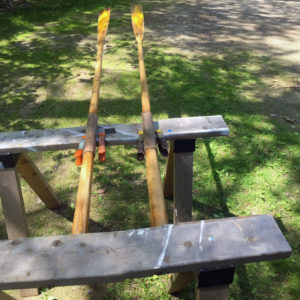
Varnishing oars
Ben Fuller
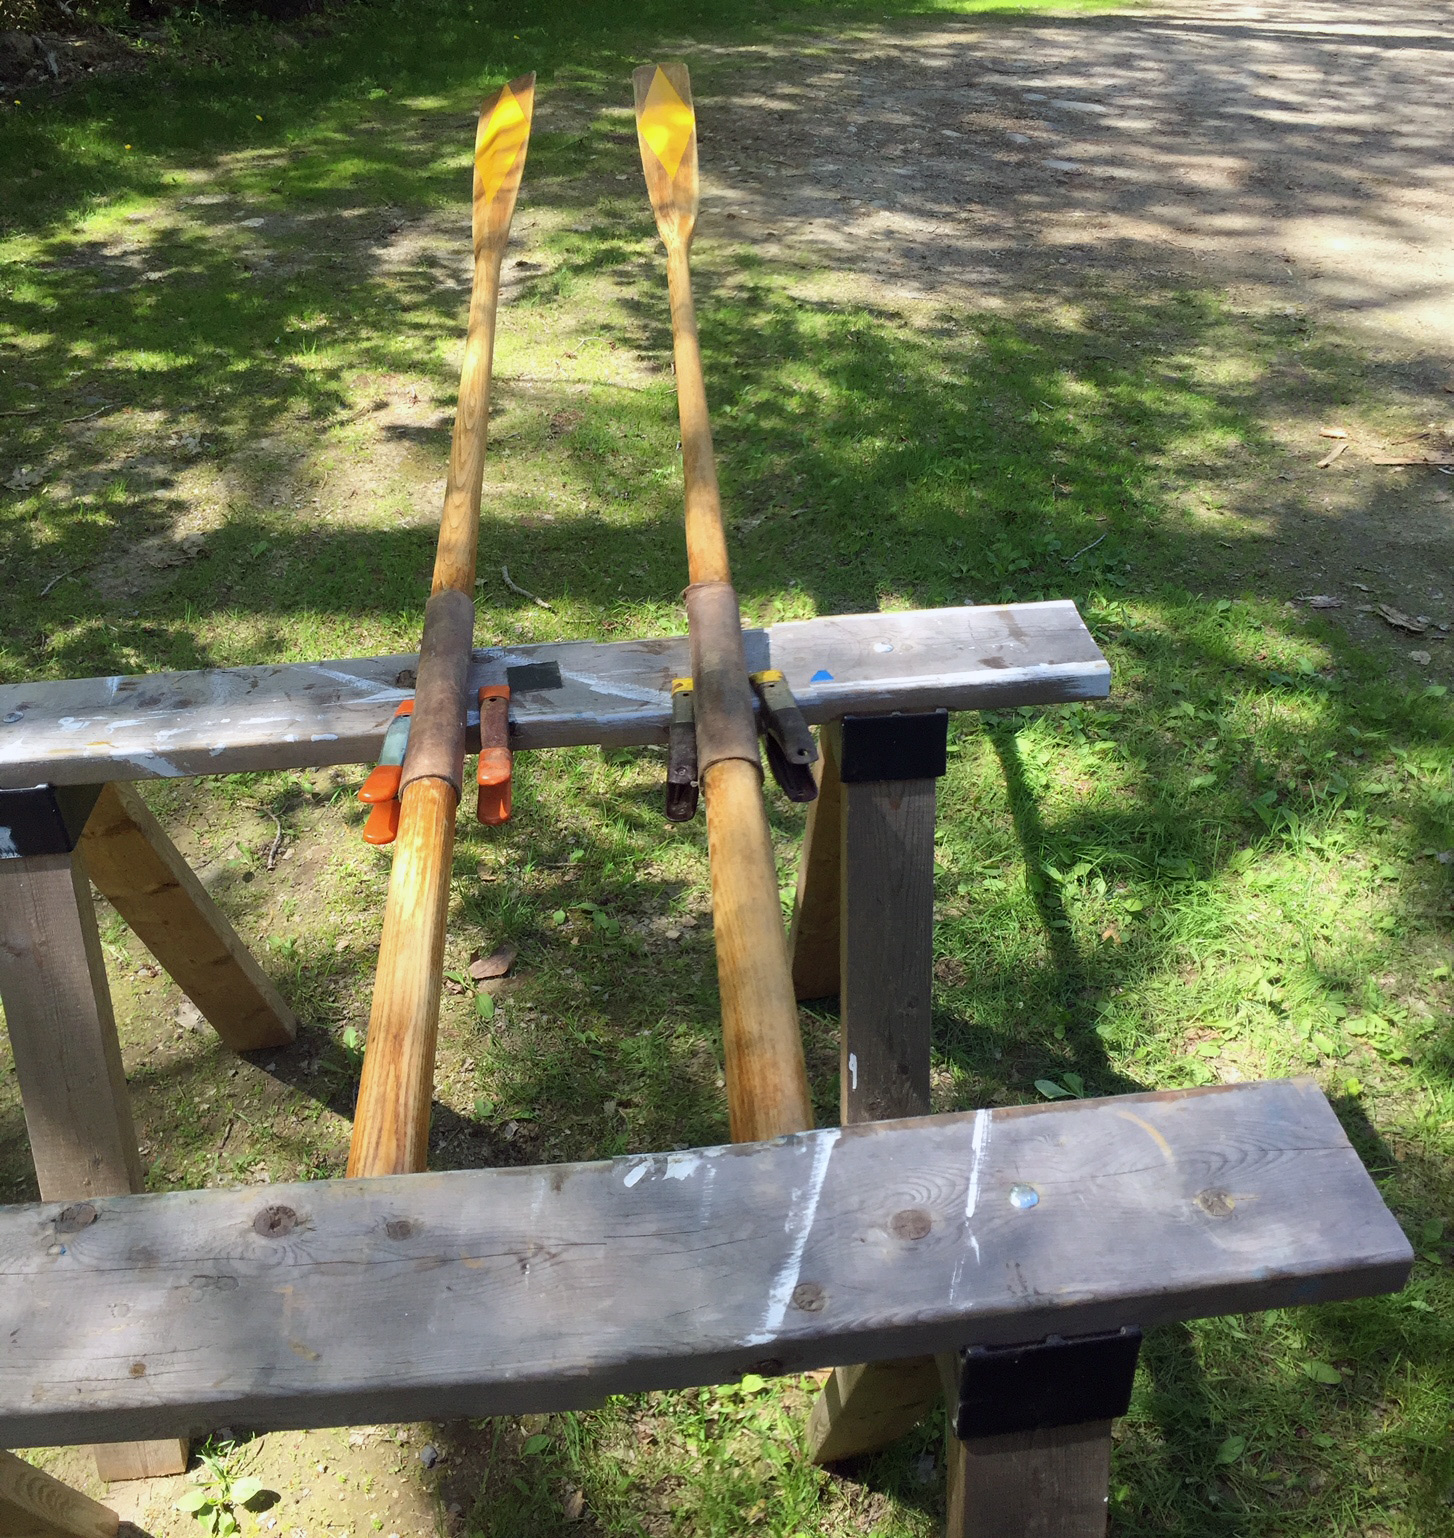
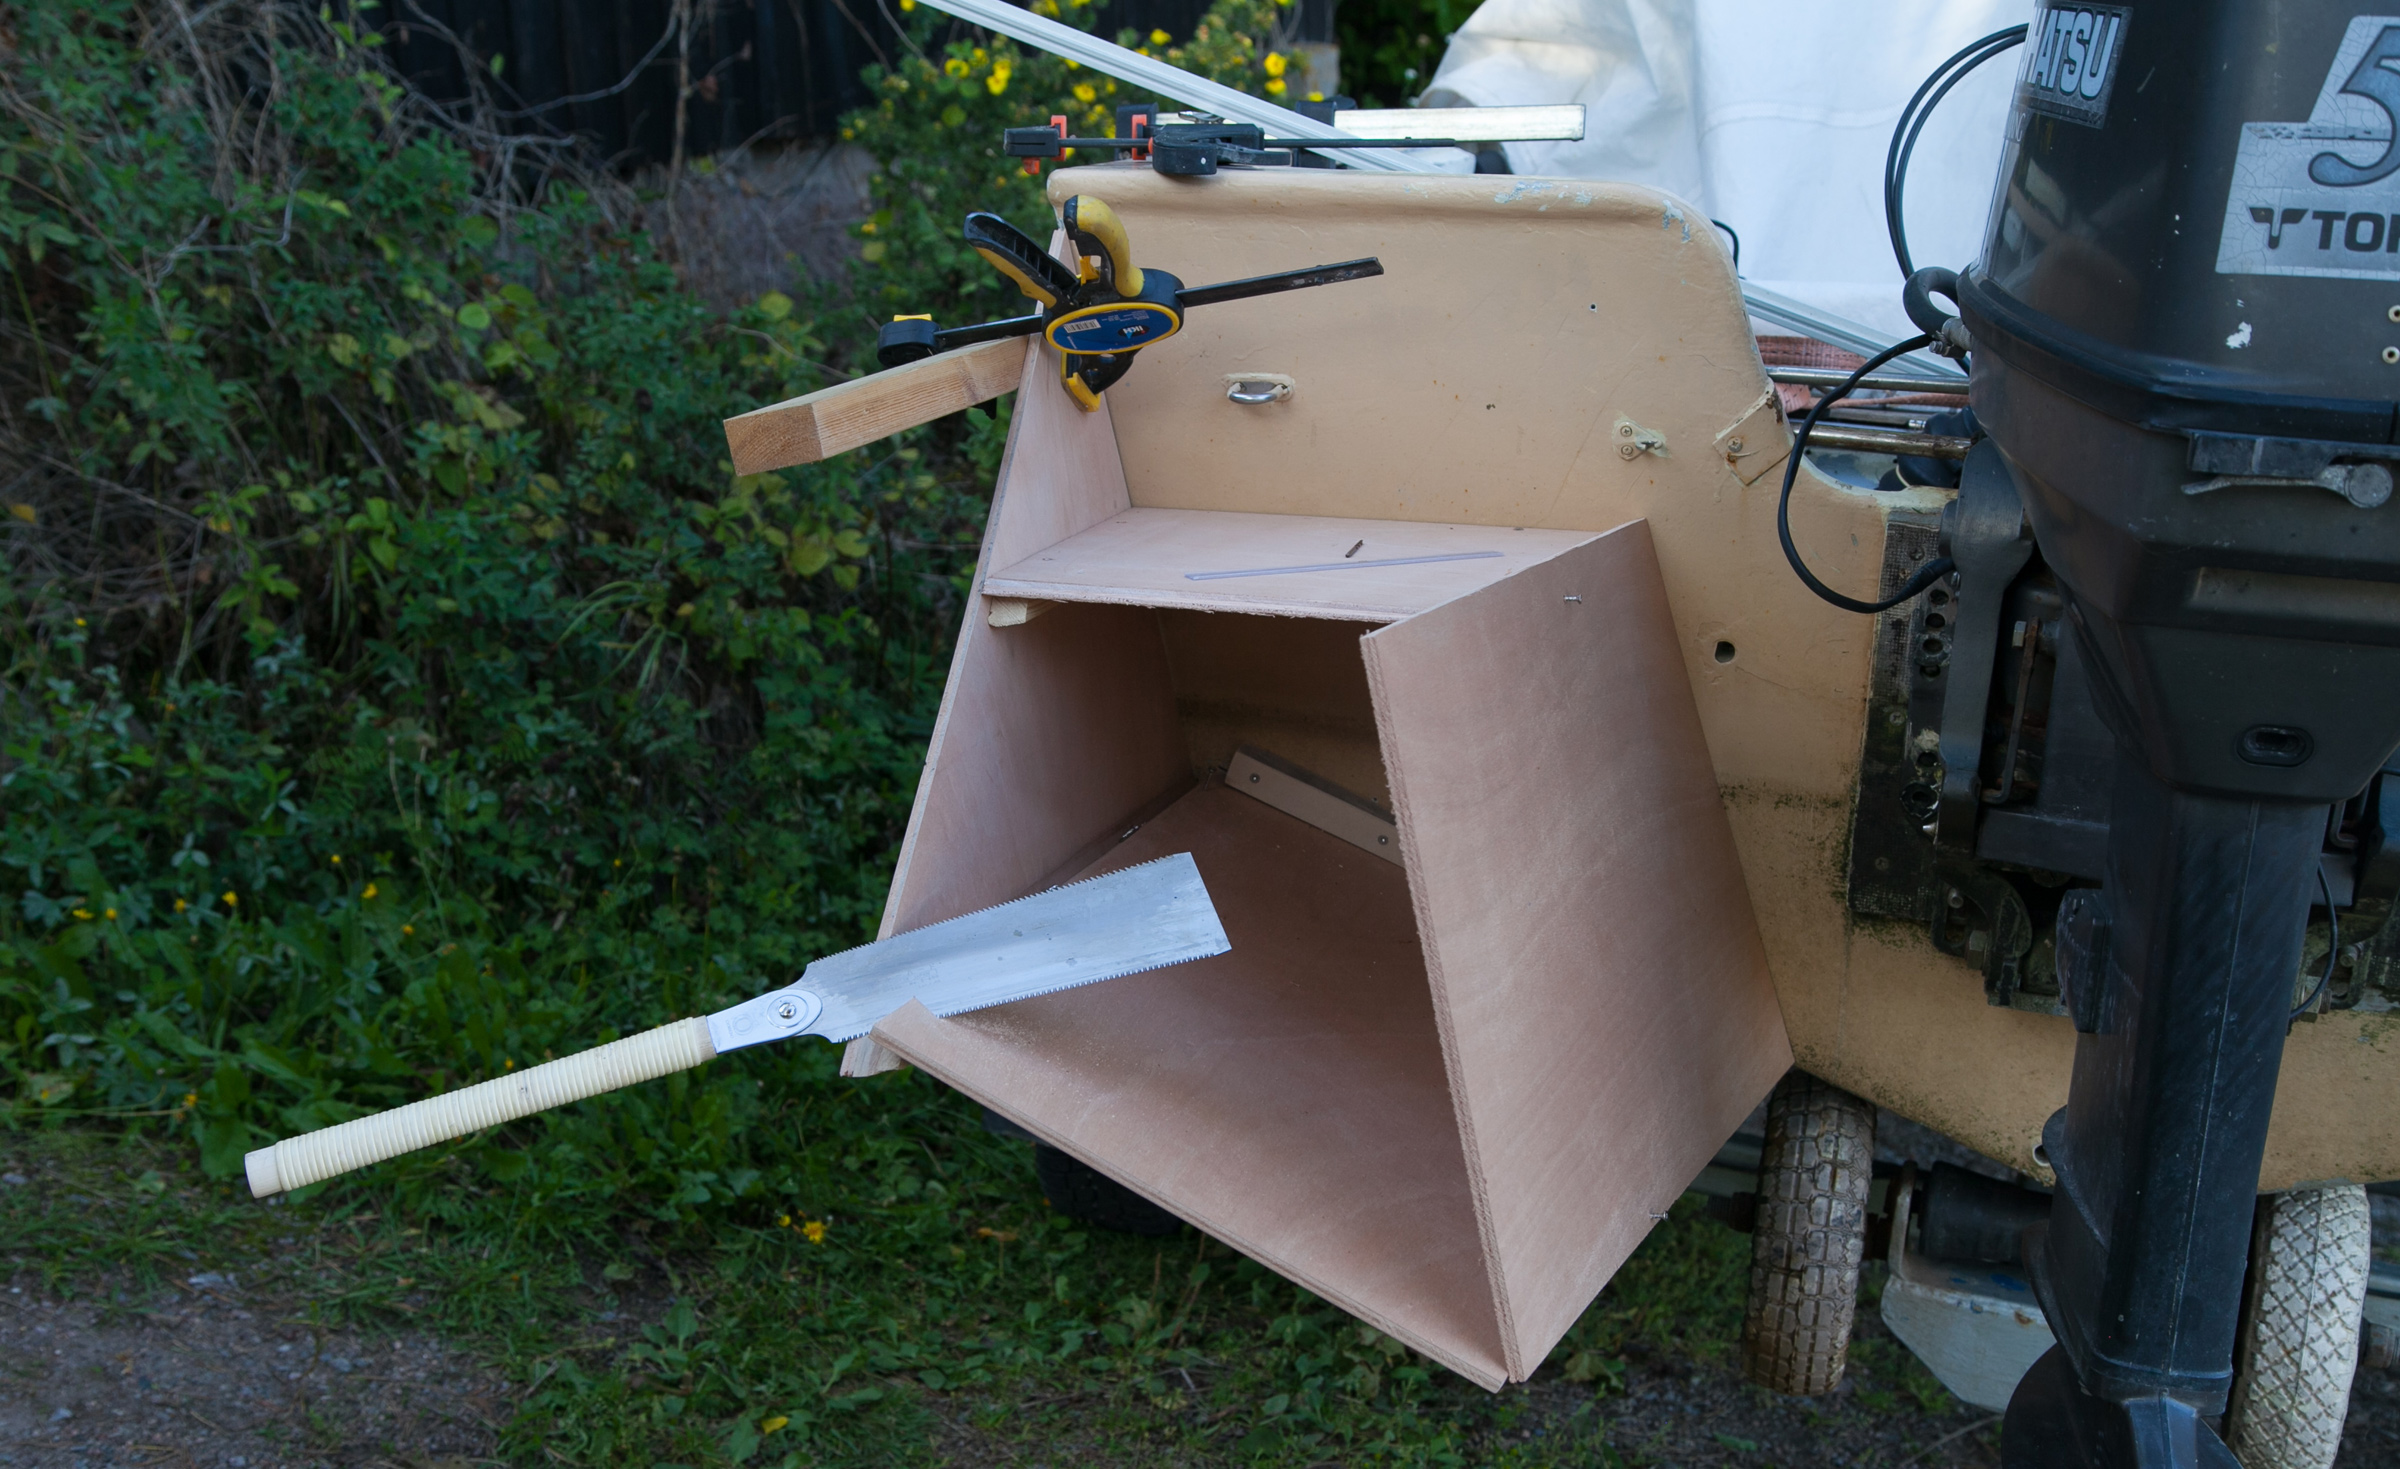
A pair of sawhorses make contact with only the handles and the leathers, leaving the rest of the oars free for varnishing.
If you find oars unruly subjects for varnishing, you can get them to behave themselves, as Ben Fuller of Cushing, Maine, does by cantilevering them on a pair of sawhorses. With the leathers resting on one, and the handles tucked under the other—weighted if necessary—nothing is in contact with the areas you’ll varnish. Spring clamps either side of the leathers keep the looms from rolling while you’re varnishing one side and allow you to turn the oar over to brush the other.
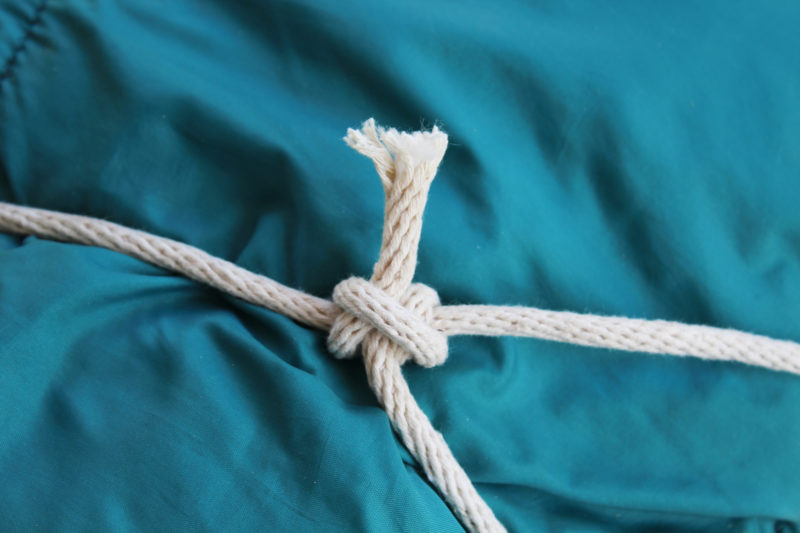
Rope cinches
Christopher Cunningham
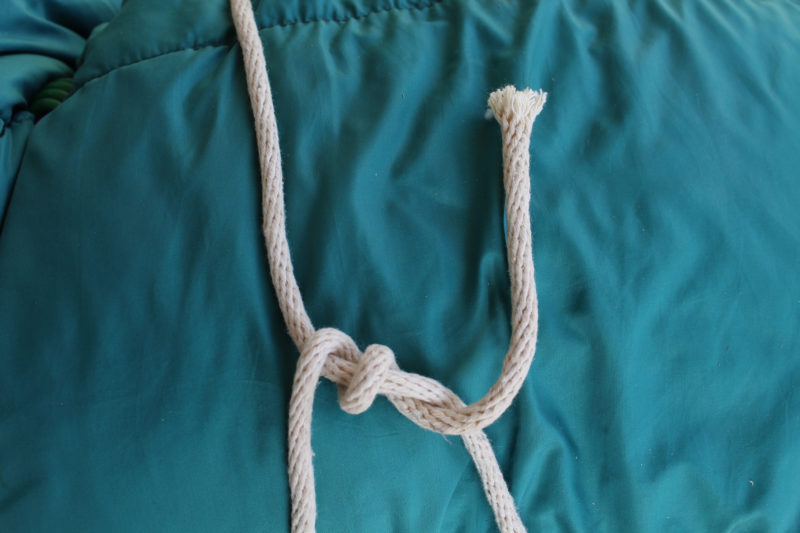
With a rope cinch, you can wrap the line around something like a sleeping bag, tie the rolling hitch, and then put the squeeze on. That’s easier than compressing something and trying to tie a knot at the same time. And unlike a bungee cord, the rope cinch has an unlimited range of adjustment.
Our editor occasionally uses a piece of rope as a belt, but it’s hard to get and keep it sufficiently tight while he ties a reef knot or a shoelace bow. A rolling hitch (Ashley Book of Knots, #1734, page 298) makes a belt that he can tie, cinch up, and have it stay tight. With repeated use the sliding knot will get tighter, so it’s best to start the next day retying the belt. Smaller versions of the rolling-hitch belt can take the place of straps and buckles for cinching sleeping bags or bundling spars and sails.
Christopher Cunningham
Start by taking two full turns around the standing part of the line. The standing part’s end is at the bottom; the cinch’s loop side is at the top.
Christopher Cunningham
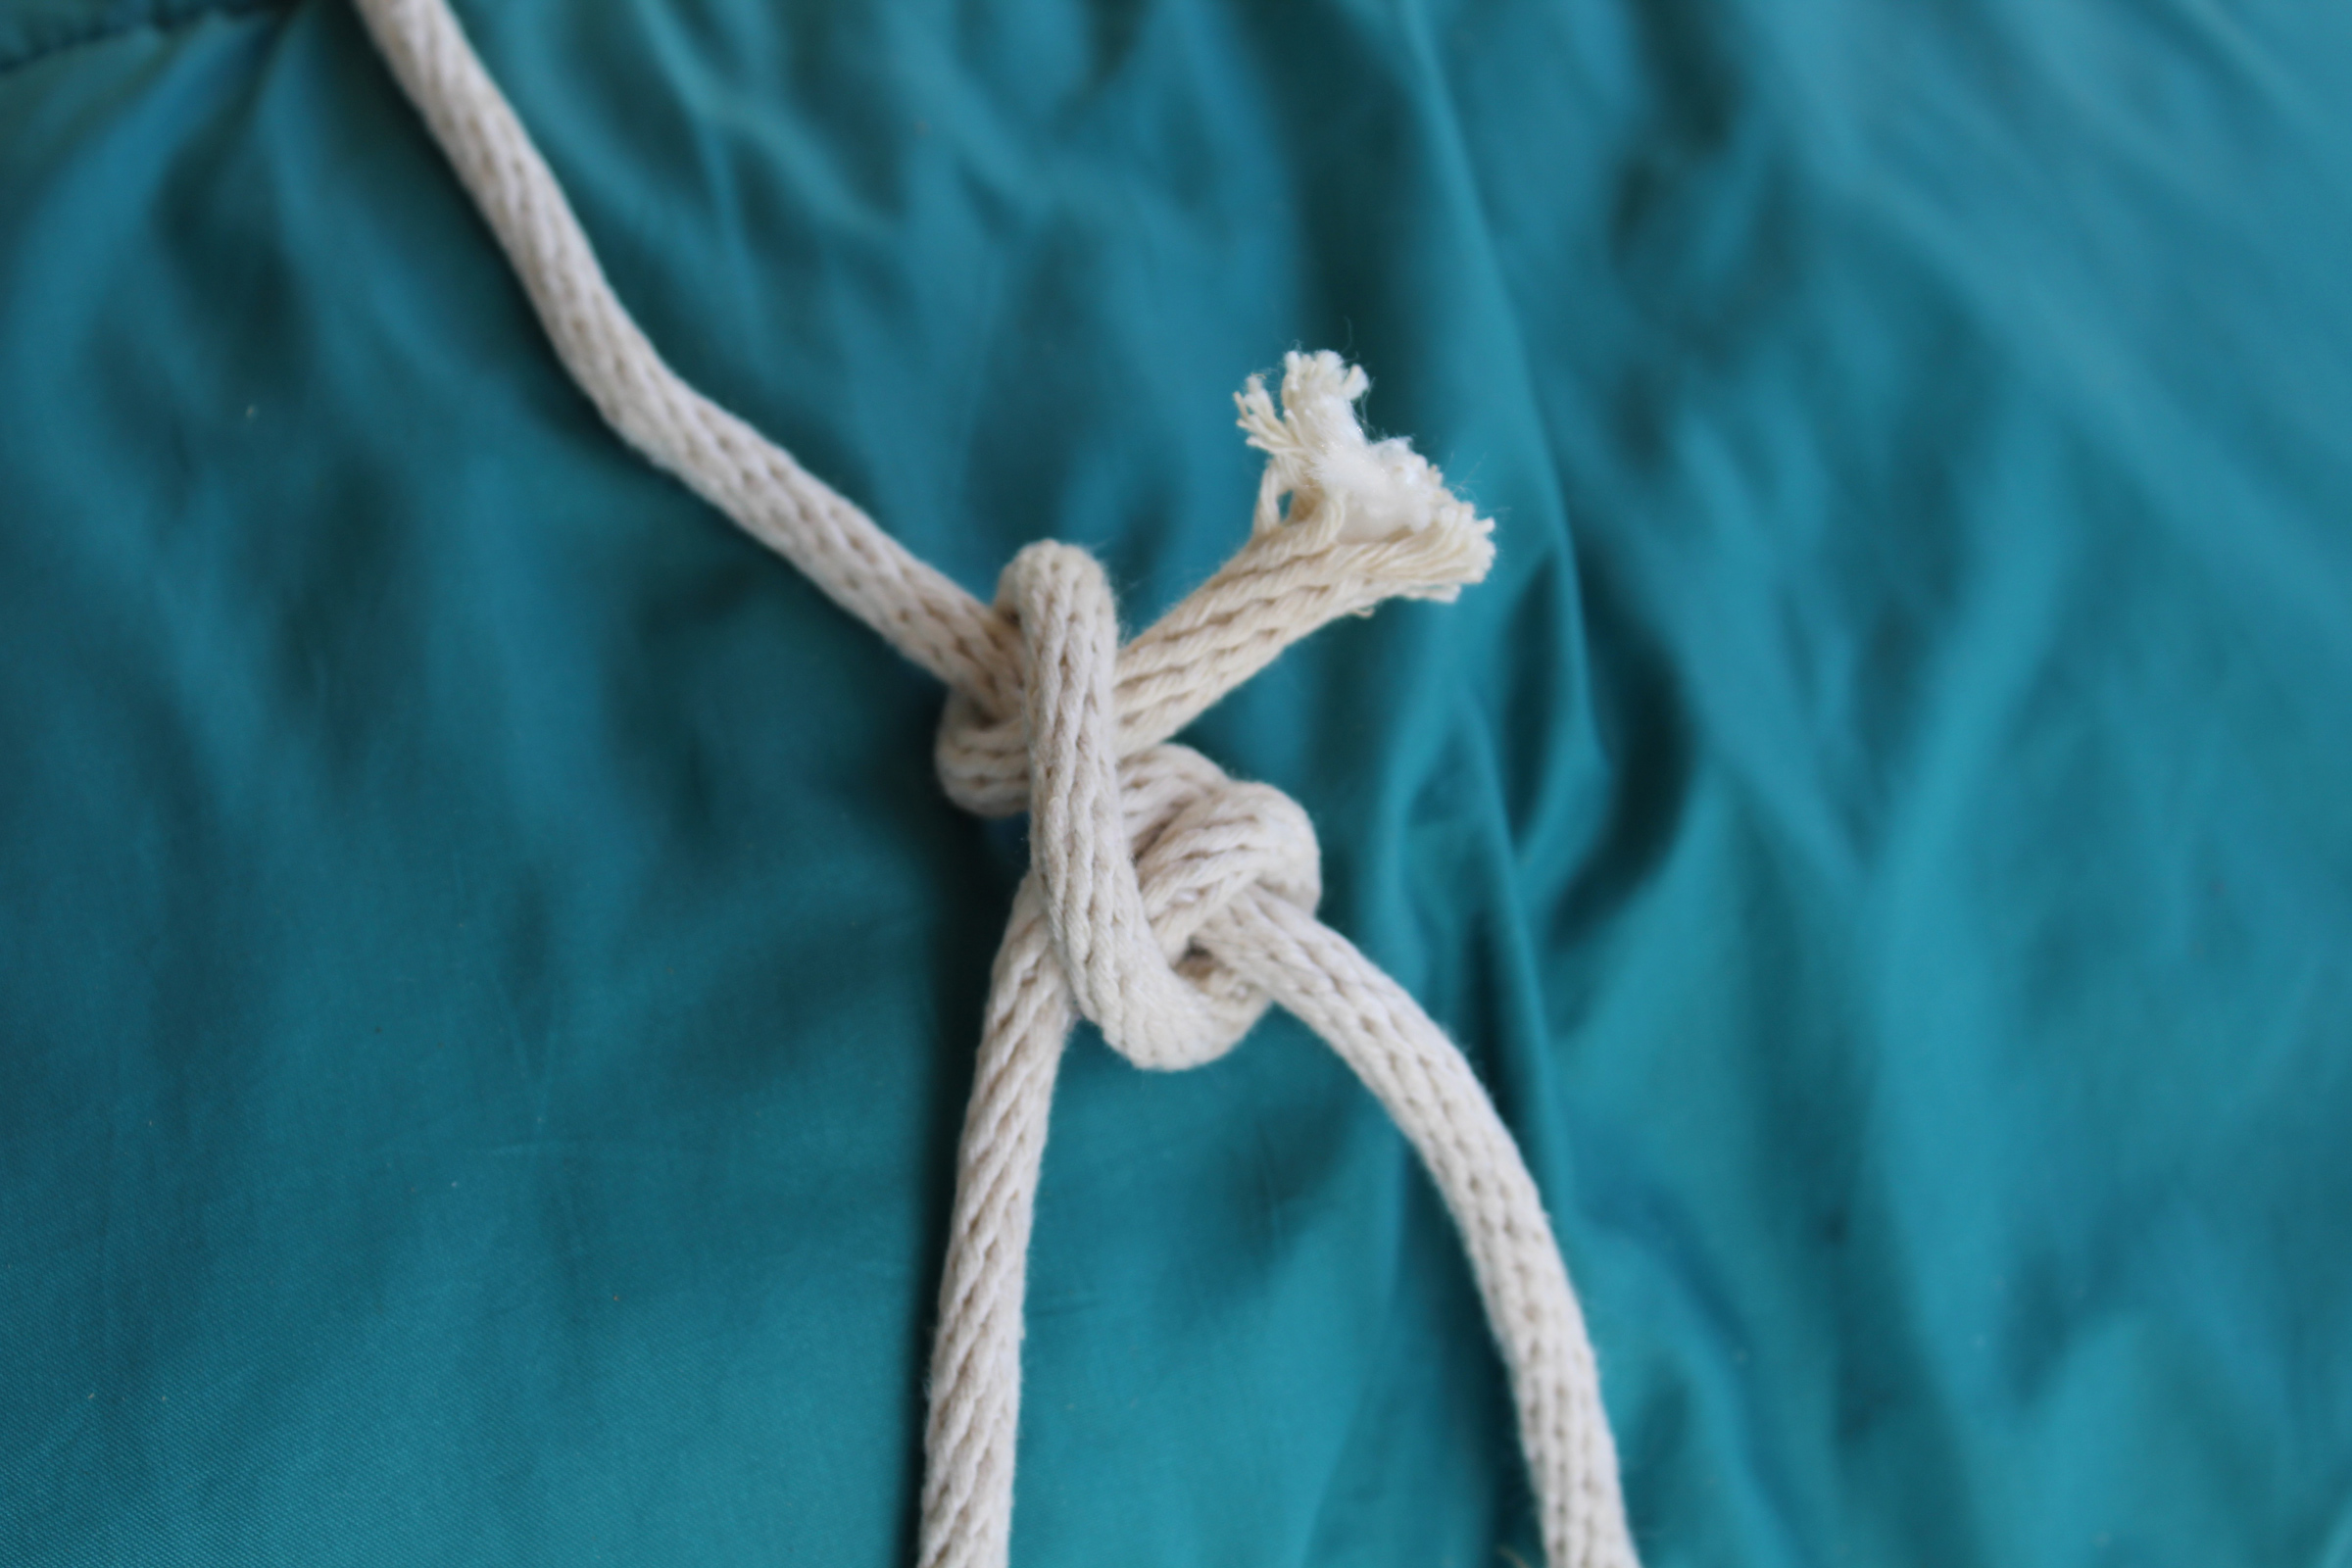
The working end then crosses over itself for another wrap, tucked under itself. The rolling hitch is like the more common clove hitch with an extra wrap.
Christopher Cunningham
Tightened, the rolling hitch creates friction and when the cinch is tightened, the hitch puts a kink in the standing part, locking it in place.
Slotted Foredeck
Patrick MacQueen
The slotted foredeck makes it easy to step the mast and raise it. For trailering, the spars all fit inside the boat by tucking one end under the aft deck and slipping the other down through the slot.
Patrick MacQueen of Hancock, New Hampshire, set out to build a Herreshoff Coquina and decided that wider decks for sitting and hiking out while sailing would be an advantage. The deck required another modification. Ordinarily the mainmast partner is set right into the breasthook and the narrow decks taper up to its corners. It didn’t seem to Patrick that the taper would be an elegant resolution for the wider side decks.
Patrick MacQueen
Patrick MacQueen’s slotted foredeck and modification of the Herreshoff arrangement for the decks maintained the boat’s original functions and gave it a different but fitting appearance.
A foredeck would look better, but would make stepping the mainmast far more difficult. Patrick struck upon making a narrow slot running up to the partner at the rear of the breasthook; it would allow for easy stepping and unstepping. The Coquina’s decks had to look pretty, of course, so he glued 1/8”-thick strips of mahogany and ash on the 3/16” marine ply decks and finished them off with ash coamings.
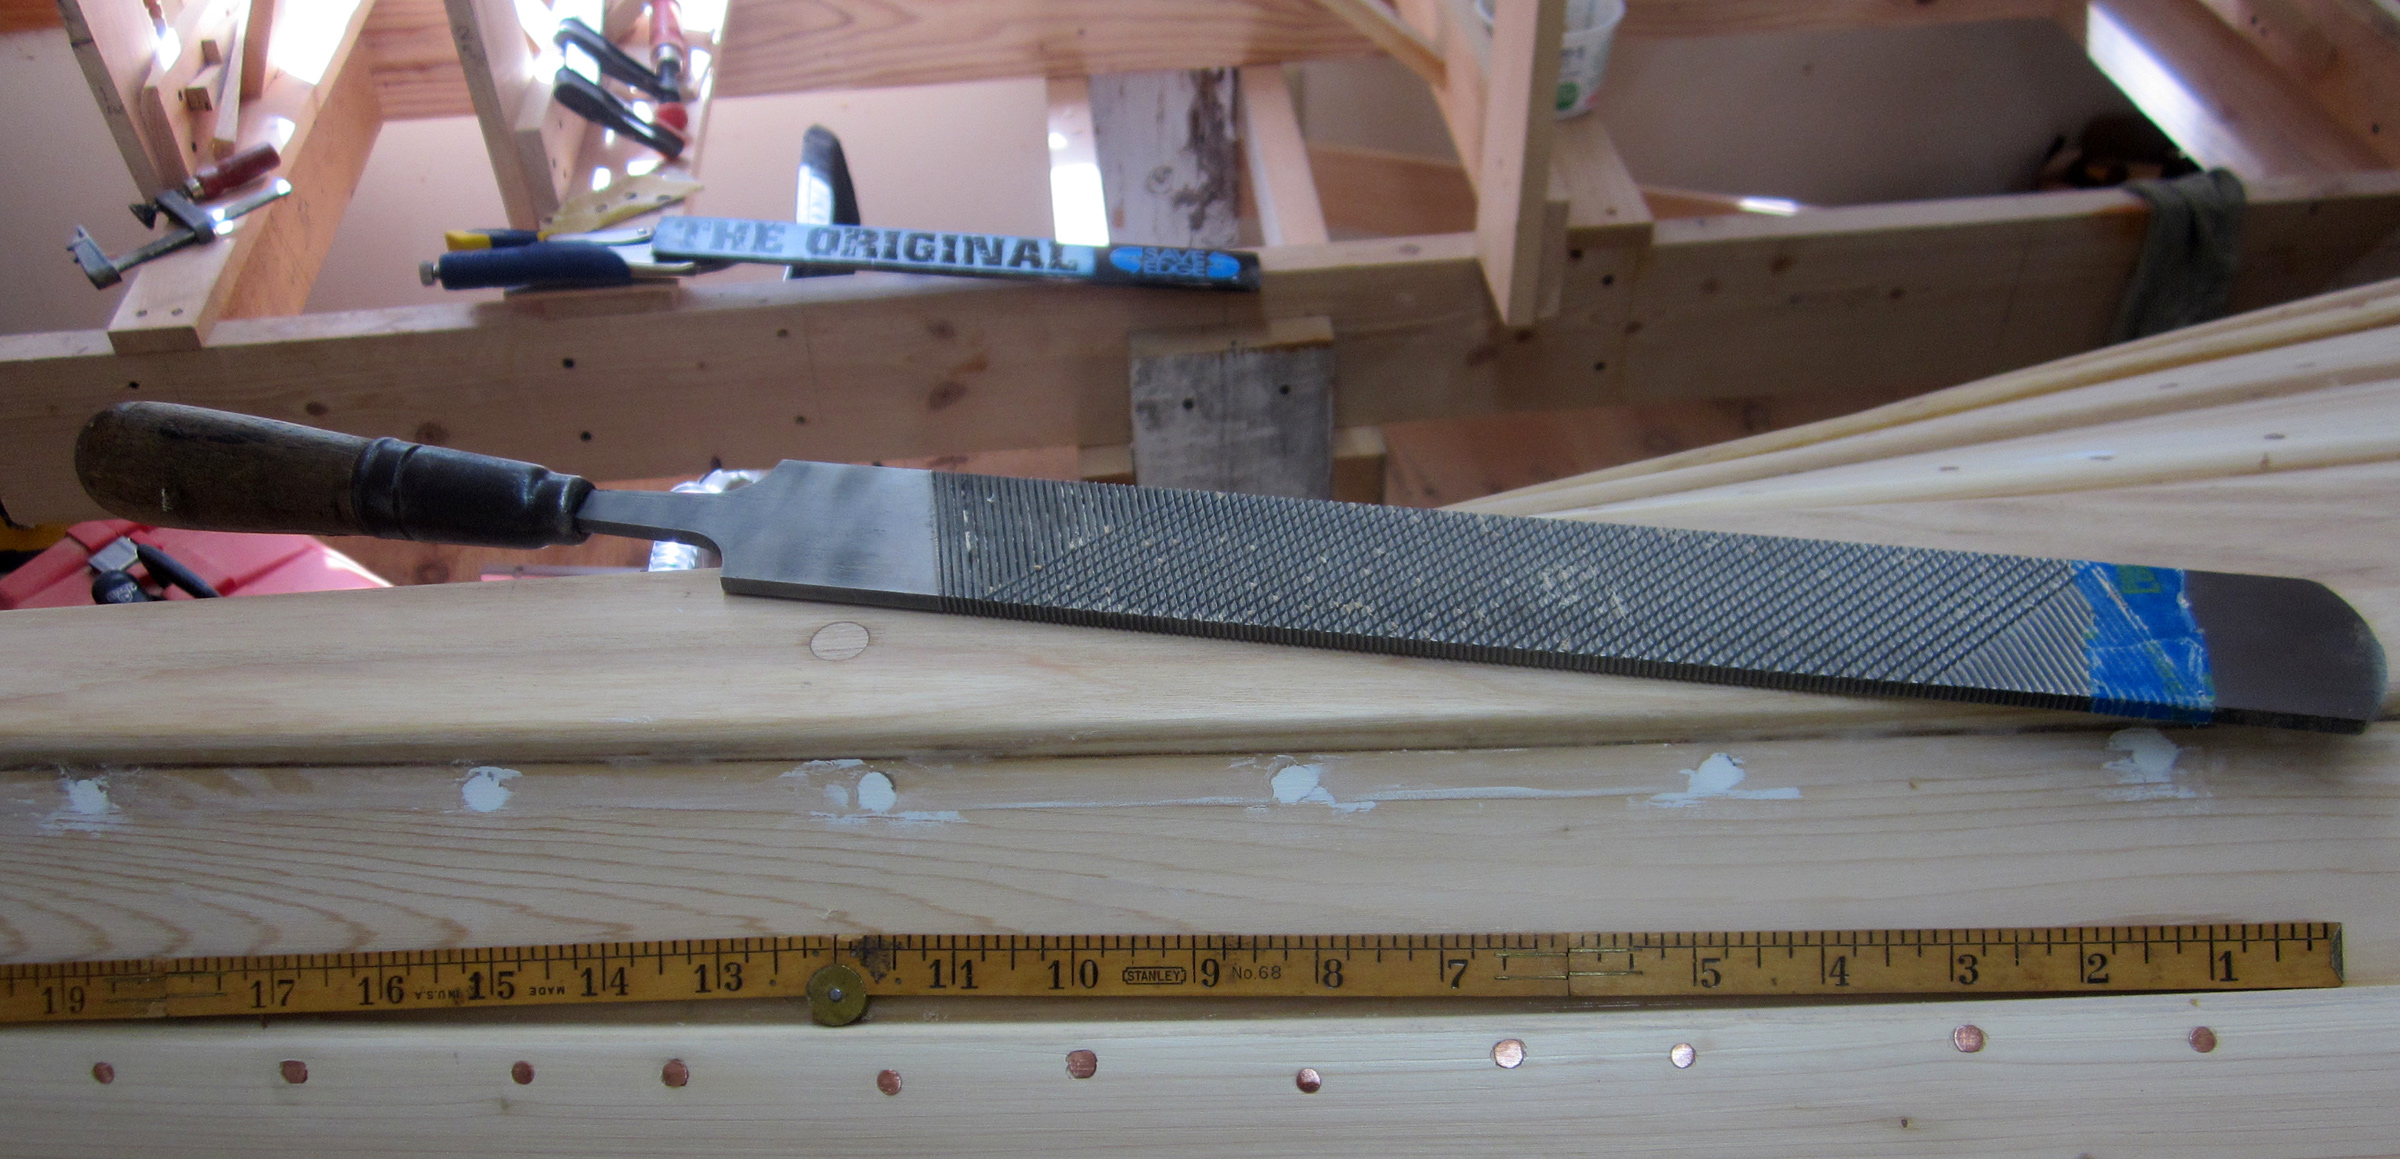
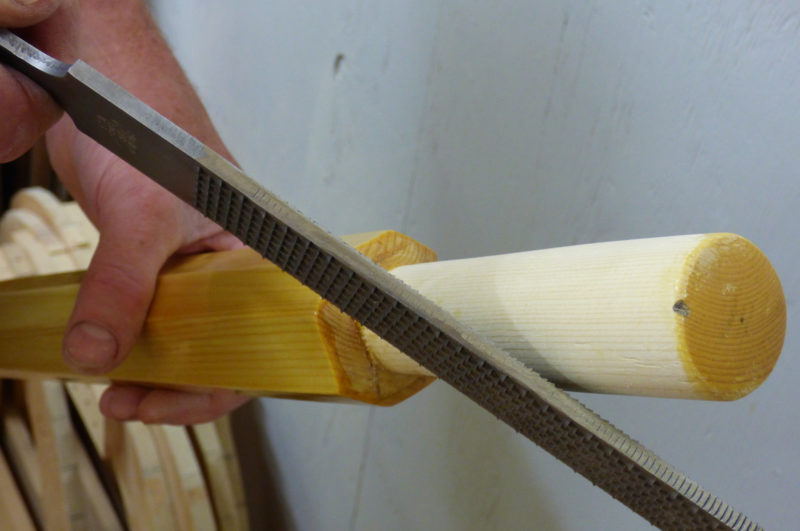
Farrier’s Rasp
The farrier’s rasp that Tom DeVries, of New Braintree, Massachusetts, bought at an antique shop for $3 was designed for trimming and shaping horse hooves, but it also works beautifully for tapering ash stems, bringing oak bungs down flush, and rounding spruce oar handles. It’s quick, quiet, and relatively safe.
Tom Devries
One side of the farrier rasp is a double-cut file for finer work.
One face has rasp teeth and the other is a double-cut file. The rasp side cuts even hardwood quickly down to size, and with a flip he can use the file face to finish smoothly. Tom has used his 17” farrier’s rasp to shape beveled stems on the double-enders he has built.
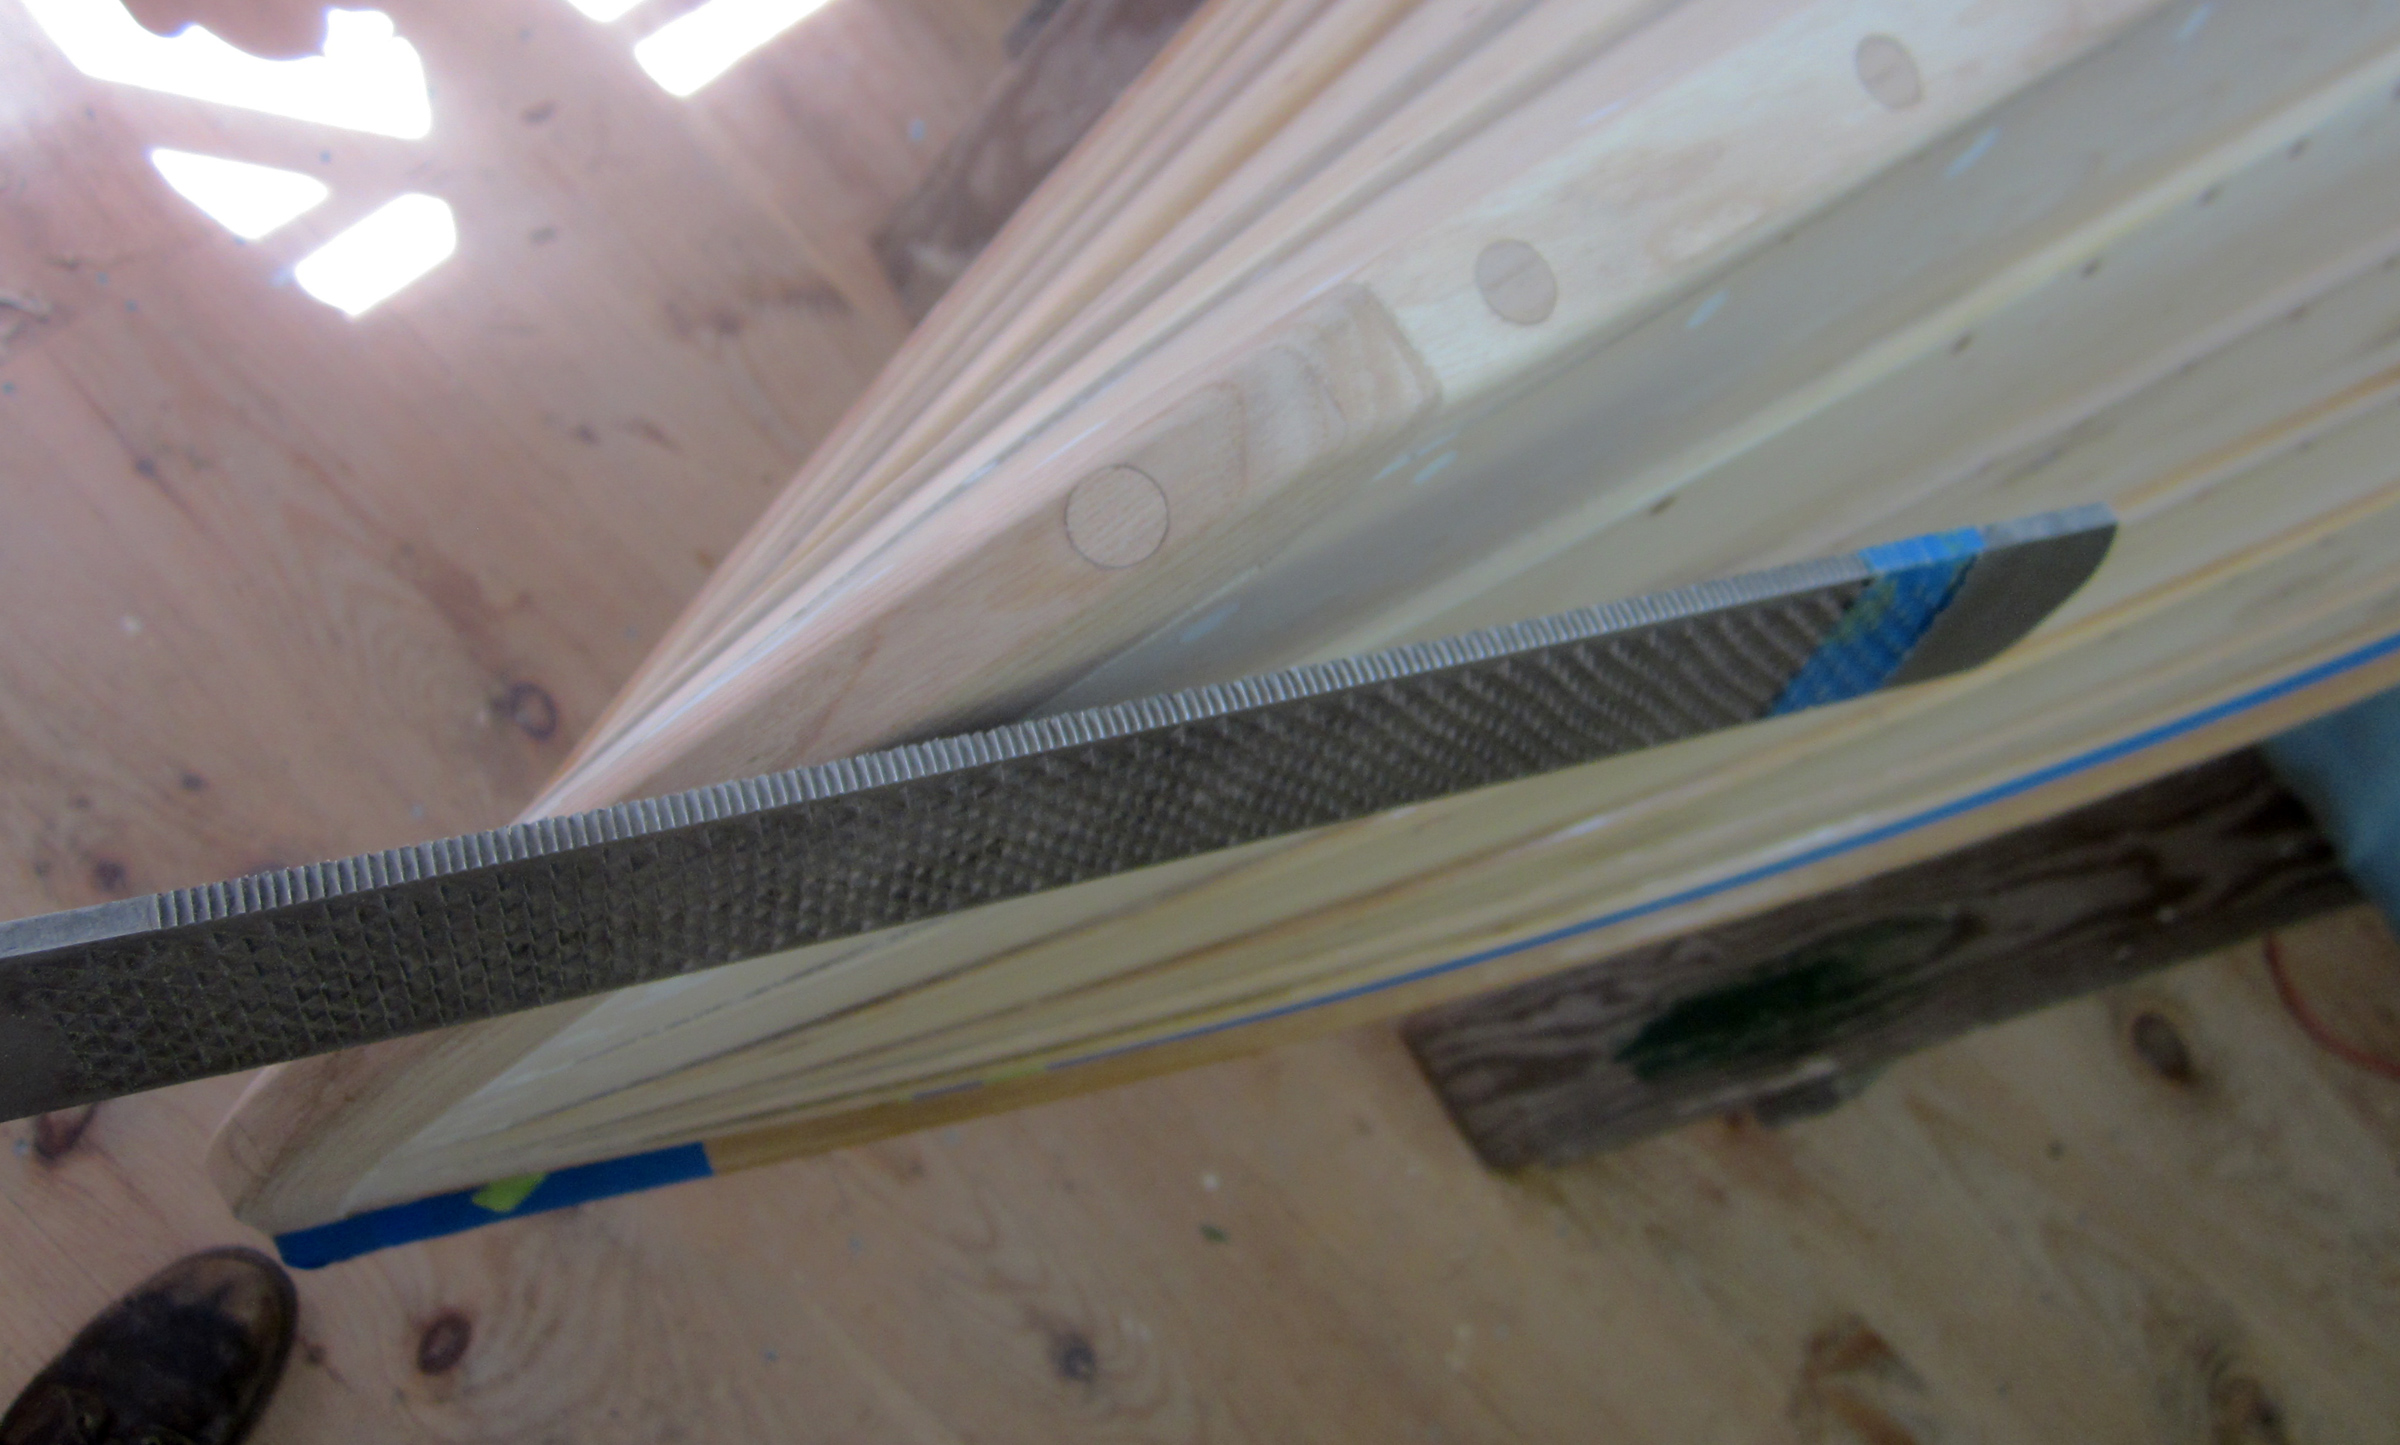
Tom DeVries
While the file side is working a hardwood stem, the teeth of the rasp side are visible.
The long, keen, shearing cut of this big file makes fairing bungs flush faster, with little of the risk of tearout created by chiseling bungs. He tapes the end of the rasp to prevent inadvertent scratches as the bung comes flush.
Tom DeVries
Tom took a grinder to this edge to remove the teeth, making a safe edge that could ride on an adjoining surface, like the shoulder of he loom, without cutting into it.
Both edges of a farrier’s rasp have teeth; Tom used a grinder to make a “safe edge” he can use to work tight to an adjacent surface. It comes in handy for working and oar’s grip up to the shoulder of the loom. Farrier’s rasps are readily available from many online sources.
You can share your tips and tricks of the trade with other Small Boats Monthly readers by sending us an email.
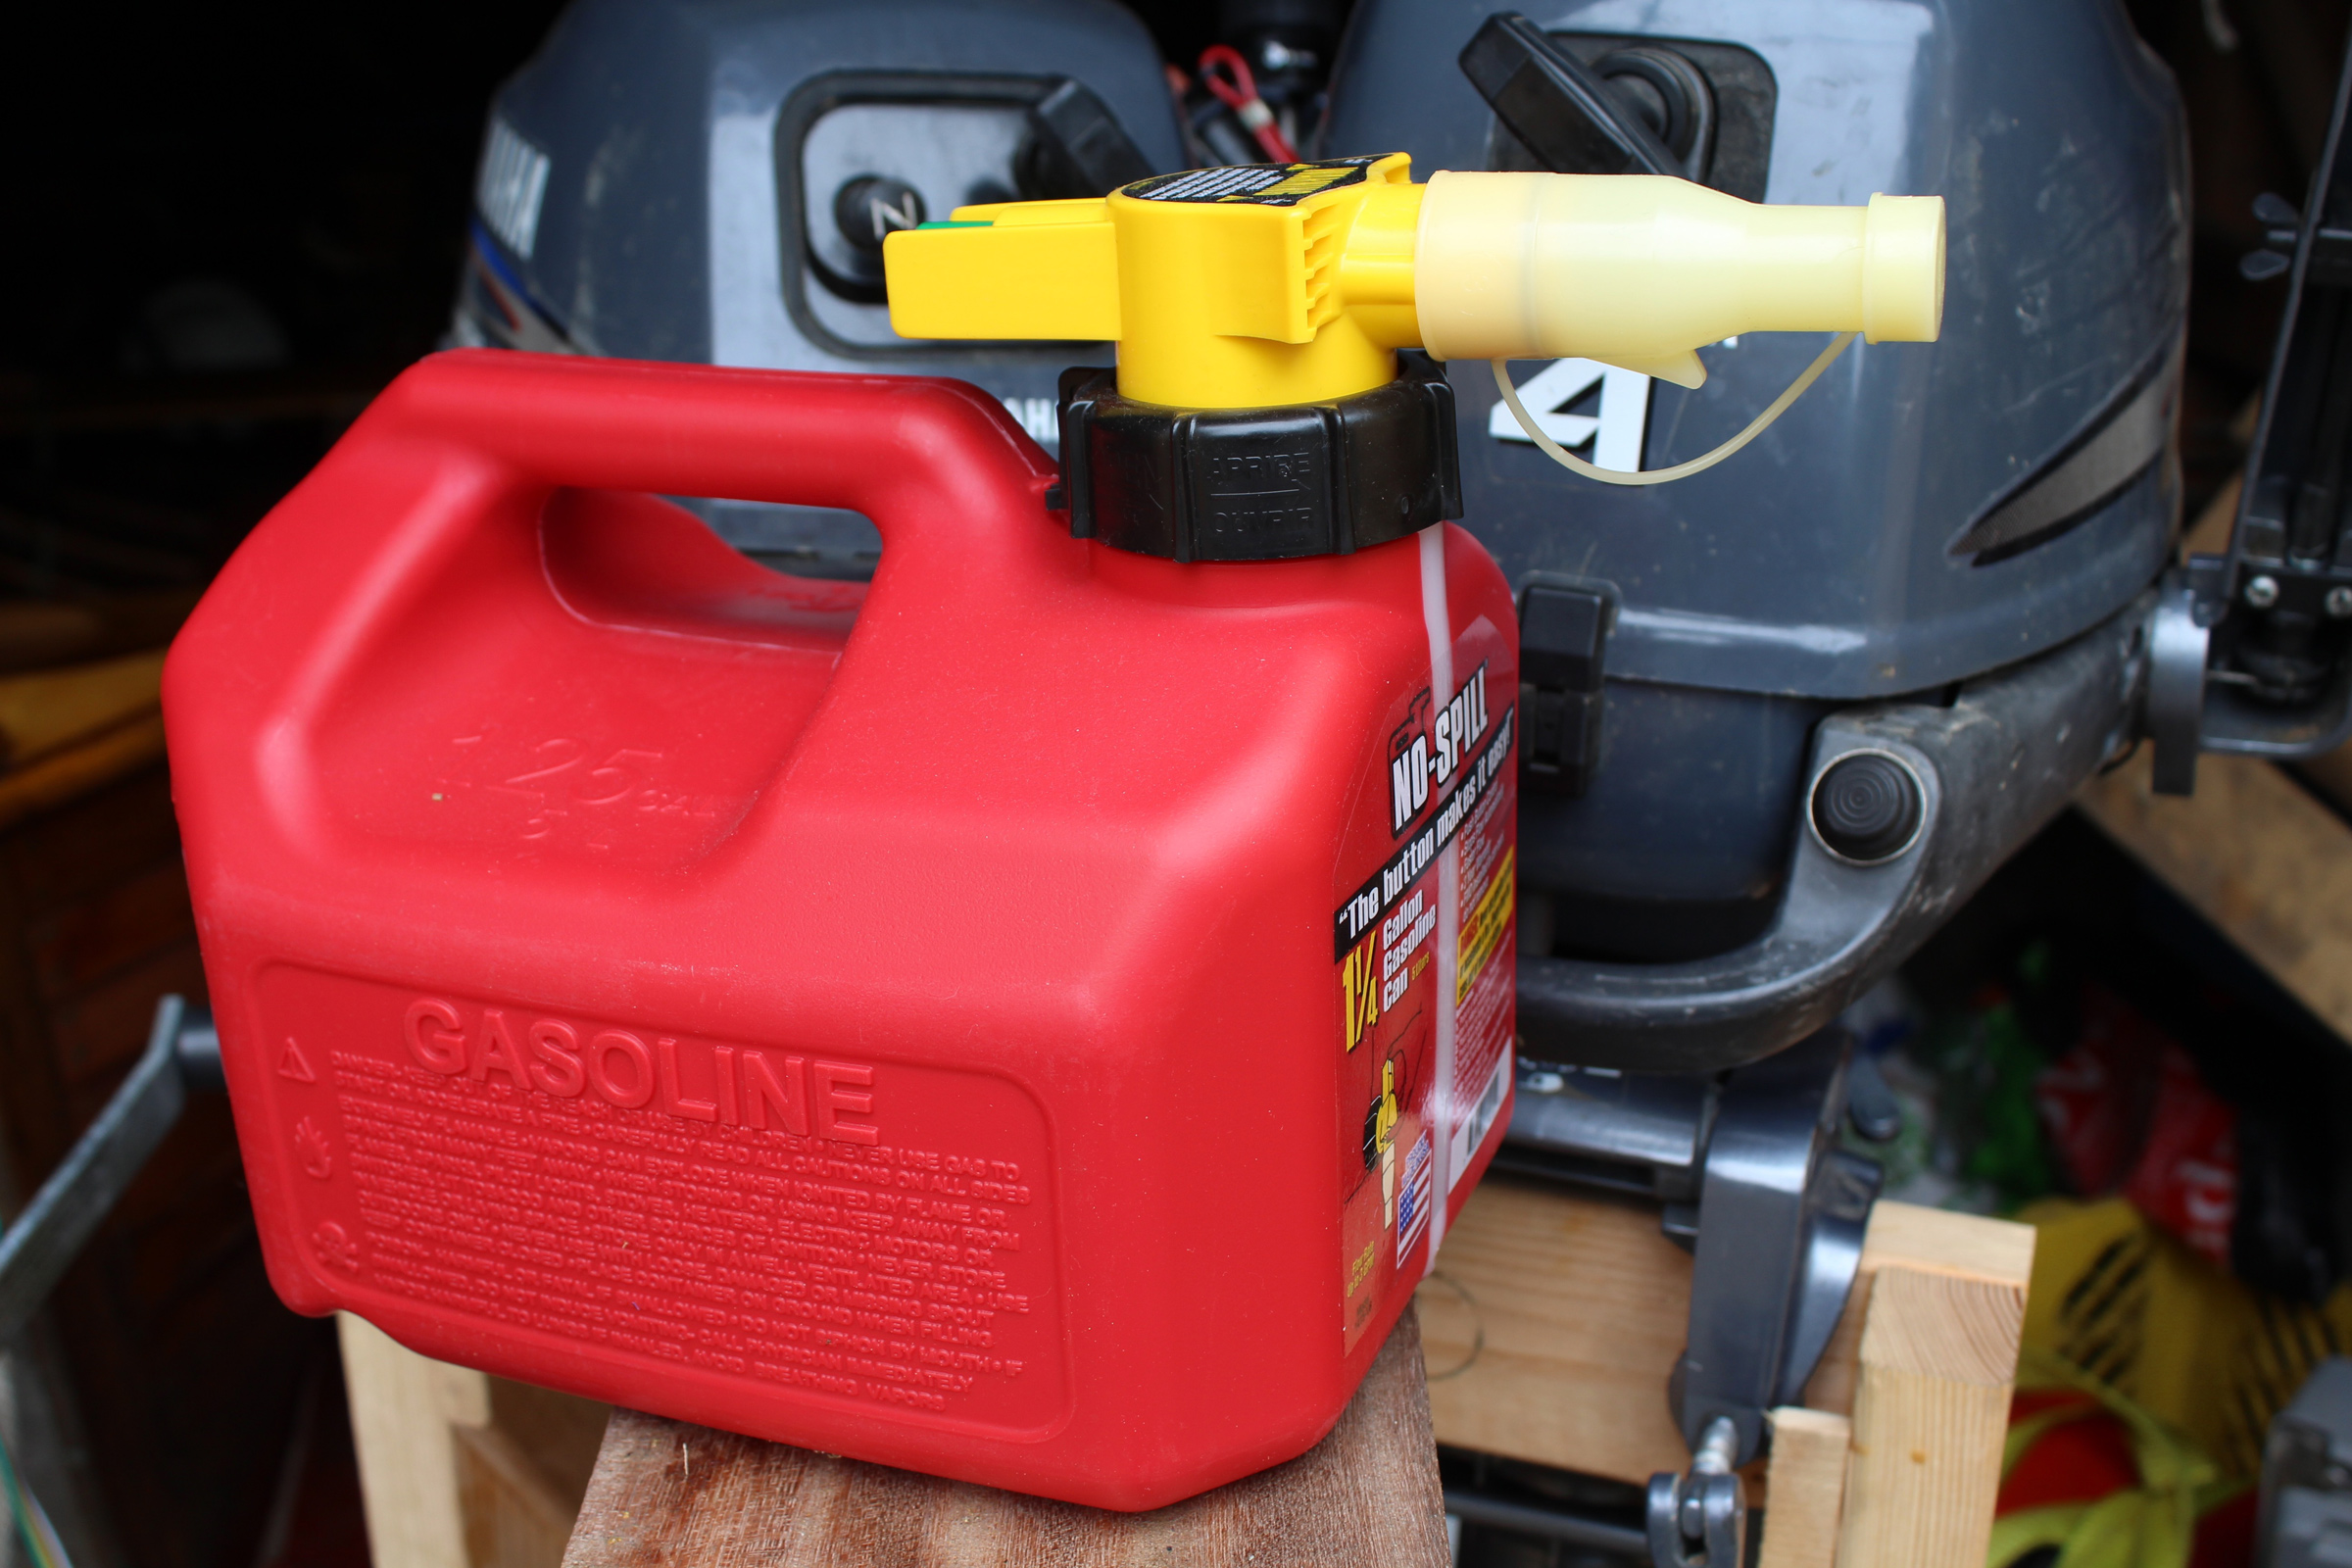
The No-Spill gas can has several features that make it easier to avoid overfilling at the gas station and spills aboard the boat.
I’ve grown rather fond of the little 2.5-hp outboard motor I bought 15 years ago, not long after small four-strokes became available. I couldn’t see myself using a two-stroke, sneering as I do at the sight of outboards trailing an acrid blue fog. The four-stroke is easier on the environment—it has a two-star, “very low emission” rating from the California Air Resources Board (CARB)—so I’m always ashamed when I overfill the little one-quarter-gallon internal fuel tank and leave a rainbow sheen on the water and adding noxious vapors to the atmosphere.
The gas cans I’ve accumulated have all been messy affairs. The oldest had a nozzle that stored inside the can, which was dripping with gas from the get-go,and an air vent on the handle, which were banned in 2009. A more recent can has a flexible nozzle with a locking valve in the handle. Both cans require knowing when to stop pouring as the level of gas rises to the fuel-tank opening. At least with the newer model I can release the valve to stop the flow, but the gas keeps coming until the nozzle has drained itself. A third can has a spring-loaded nozzle you’d hook over the mouth of the tank, and the gas is supposed to stop flowing when it covers the end of the nozzle. It isn’t very reliable, so I no longer use it.
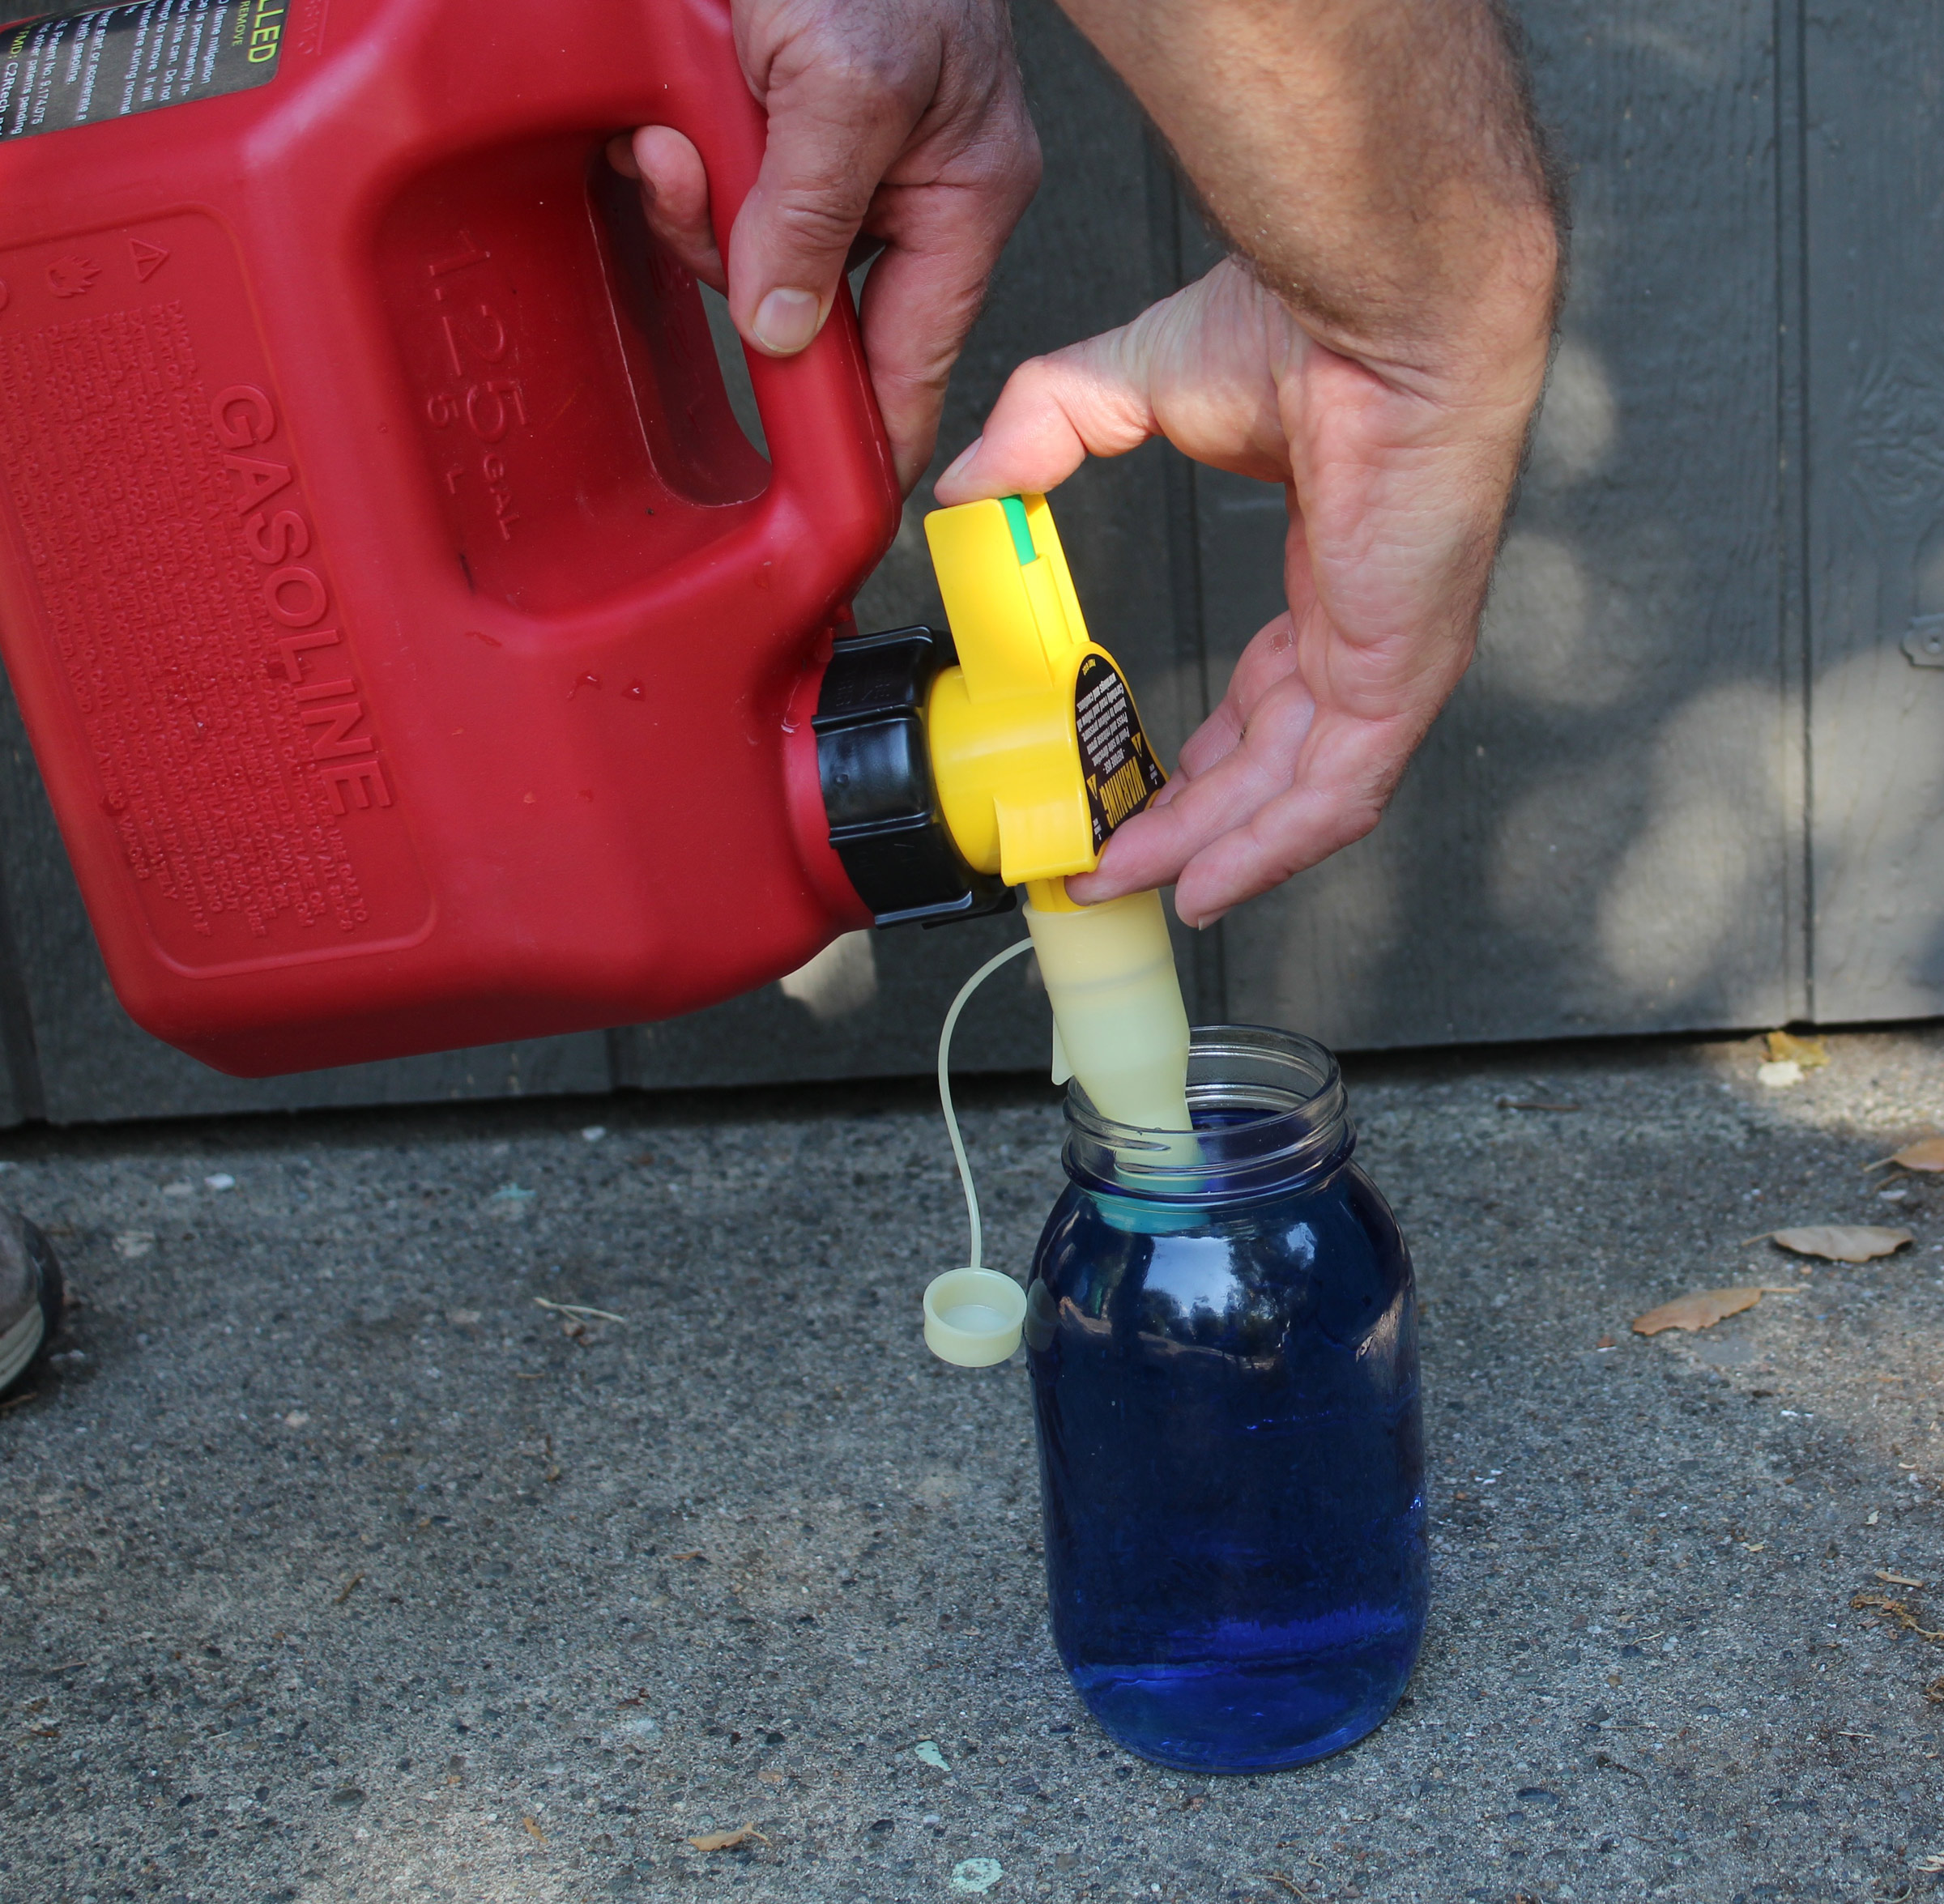
The nozzle has a flange, seen here resting on the left edge of the jar, that supports the weight of the can while pouring. With the valve’s button pressed, the fuel (colored water here) stops flowing when the it reaches the nozzle opening.
The No-Spill Gasoline Can has been a great improvement. I bought the 1.25-gallon size. There are 2.5- and 5-gallon sizes, more fuel than I usually need and too heavy and awkward to hold out over the transom to get to the motor. The HDPE can has notably thick walls and is quite rigid compared to my previous cans. It has a translucent vertical stripe at each end for a quick visual check of the level of fuel in the can. Its fill opening is 2-1/8″ in diameter, providing a much better view into the can when filling than the 1-3/8″ opening of my previous cans. Inside is a flame mitigation device (FMD), a white plastic insert like a skinny colander, that works to saturate the space with the gas vapor, crowding out the oxygen and making the mixture so rich that won’t ignite with the introduction of a spark or flame.
The locking ring for the cap has the usual ratchet to prevent children from opening the can. I found the ratchet difficult to disengage; its teeth are painfully sharp, so I sanded the points a little. When the cap is tightened, the ratchet goes well past the tab on the can. I’ve been used to having the caps on other cans come tight mid-ratchet. That’s what’s suggested by the instructions on the No-Spill can, but I found the lid sealed about an eighth of a turn beyond the engagement of the ratchet.
The nozzle has a cap that’s connected to keep it from getting lost. (If my older cans had caps, they’ve all taken a hike, allowing vapors to escape and grit to get in.) There’s also a molded flange to hook over the lip of the fuel tank’s fill spout, steadying the pour and taking the weight of the can.
Opposite the nozzle there is a green valve plunger. Depressing it allows gas to flow; releasing it stops it. The flow will also stop automatically if the fuel in the tank rises to cover the nozzle. A vent built into the nozzle is then prevented from letting air into the can, a partial vacuum is created, and the fuel stops flowing. After releasing the valve plunger, the pour spout can be removed from the tank without any spillage.
When I first tried the can, I filled it with water before filling it with gas. Several times the flow didn’t stop automatically. Air was somehow getting into the can, allowing it to continue to pour. I thought I hadn’t seated the cap thoroughly but that wasn’t the case. Air was getting through the hole at the top of the valve button when I didn’t have my thumb squarely over it. With my thumb sealing the hole, the can works perfectly.
The No-Spill can isn’t quite fool-proof, but it is sturdy, well designed, and can keep the fuel where it belongs—contained.
Christopher Cunningham is the editor of Small Boats Monthly.
The No-Spill cans are available from numerous retailers and online sources. Prices range from $21 for the 1.25-gallon can to $36 for the 5-gallon.
Is there a product that might be useful for boatbuilding, cruising or shore-side camping that you’d like us to review? Please email your suggestions.
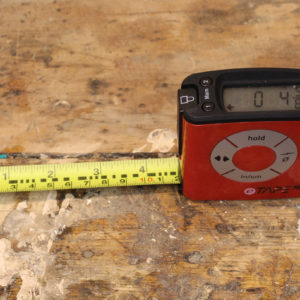
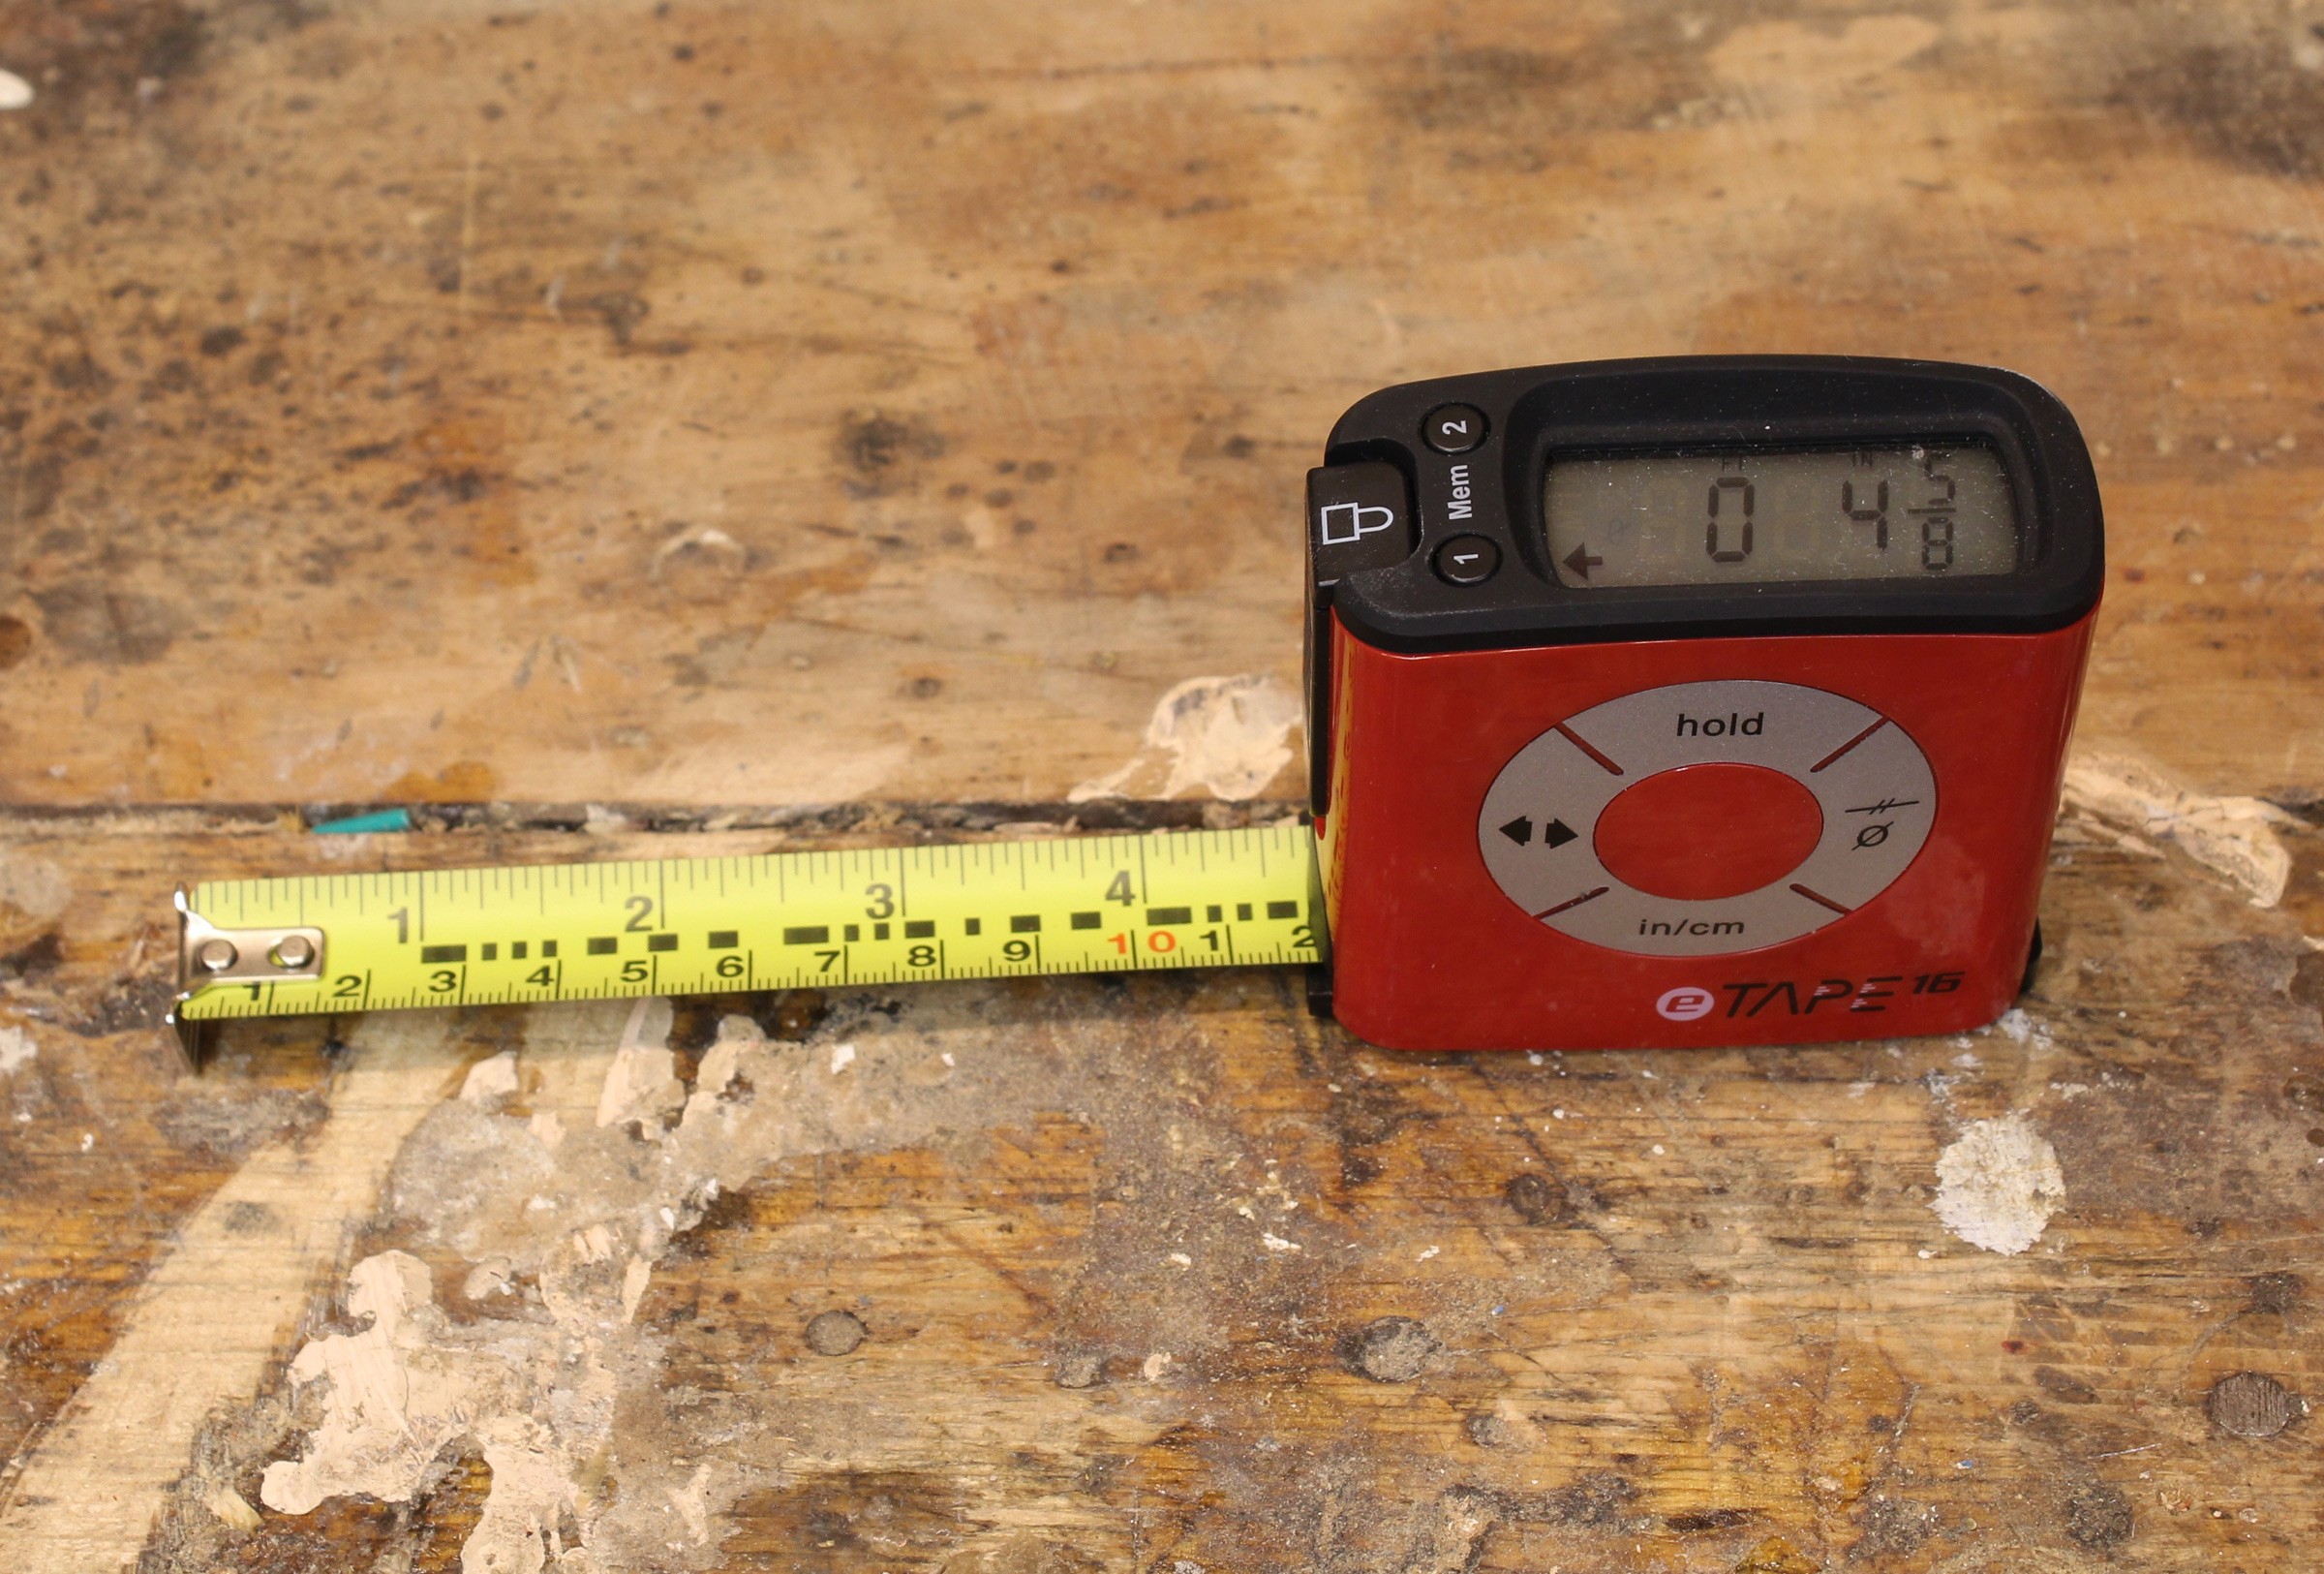
The eTape16 has four buttons for its various display options and two buttons for recording measurements.
That shopworn adage “Measure twice, cut once” has sown in me the seeds of doubt, and I frequently back away from my bandsaw, tablesaw, or chopsaw to remeasure. The habit can save me from wasting expensive materials, but it eats up time and verges on an OCD behavior. My potential for error with a tape measure is in reading the hashmarks incorrectly and mistakenly recording or remembering the numbers.
The eTape16 takes my fallibility out of the process. It is a 16′ tape measure with an onboard computer and a digital readout. The 3/4″-wide tape has the usual markings in inches and centimeters, but between them there’s a row of what looks like a Morse-code message in rectangular dots and dashes. I’m guessing the markings pass by some optical scanner inside the polycarbonate case and translate them into the numbers in an LCD display powered by a 3-volt CR2032 button battery.
There are four buttons on the side of the case. The top button, marked hold, will flash the distance you’ve measured so you can let the tape retract and not lose the measurement. The button on the left has arrows pointing in opposite directions. Pushing will change the measuring from the front of the case for outside measurements or to the back, for inside measurements, adding the 3″ length of the case. (The hook on the end of the tape has the usual sliding feature for inside/outside measuring.)
The button on the right has two functions. A click will halve the distance measured, giving you the measurement for the item’s midpoint. The second function, re-zeroing, will turn the measurement displayed to zero. You can then move the case to a second point to get the distance between it and the first point. The bottom button changes the units between feet with fractional inches, fractional inches, decimal inches, decimal feet, and centimeters.
The tape is accurate to 1/16″ or 1mm. The display will change its reading about halfway between each mark on the tape, so if I need better accuracy, I’ll look at the tape and see if I need to refine the measurement with a plus or minus sign as is often done in a table of offsets.
On the top of the case there are two memory buttons. Holding a button down for a second will store the measurement, pressing it again will recall the measurement. You can record two measurements in the memory, then save a third with the hold button. After I’ve picked up the measurement I need, I can take it to the workpiece I need to cut, hook the tape over an end, and pull the case out until the measurement I want appears on the display. With a sharp pencil I can draw a mark along the appropriate end of the base. Using the back side, and with the eTape16 set to take an inside measurement, gives me the unobstructed end for my mark; set for an outside measurement, enough of the base extends beyond the tape to make a readable mark. Moving the case very slowly to get to the number you want on the display delays its response, and then it’s best to verify the measurement using the markings on the tape.
The measuring tape of my dreams would not just record measurements but record a setting when measuring and then lock the tape at the same setting when it is pulled out along the work piece. That may not be in the offing, so in the meantime, the eTape 16 promises to save me time and eliminate errors.
Christopher Cunningham is the editor of Small Boats Monthly.
The eTape16 is available for $29.95 from manufacturer as well as some woodworking and home improvement stores and online retailers.
Is there a product that might be useful for boatbuilding, cruising or shore-side camping that you’d like us to review? Please email your suggestions.
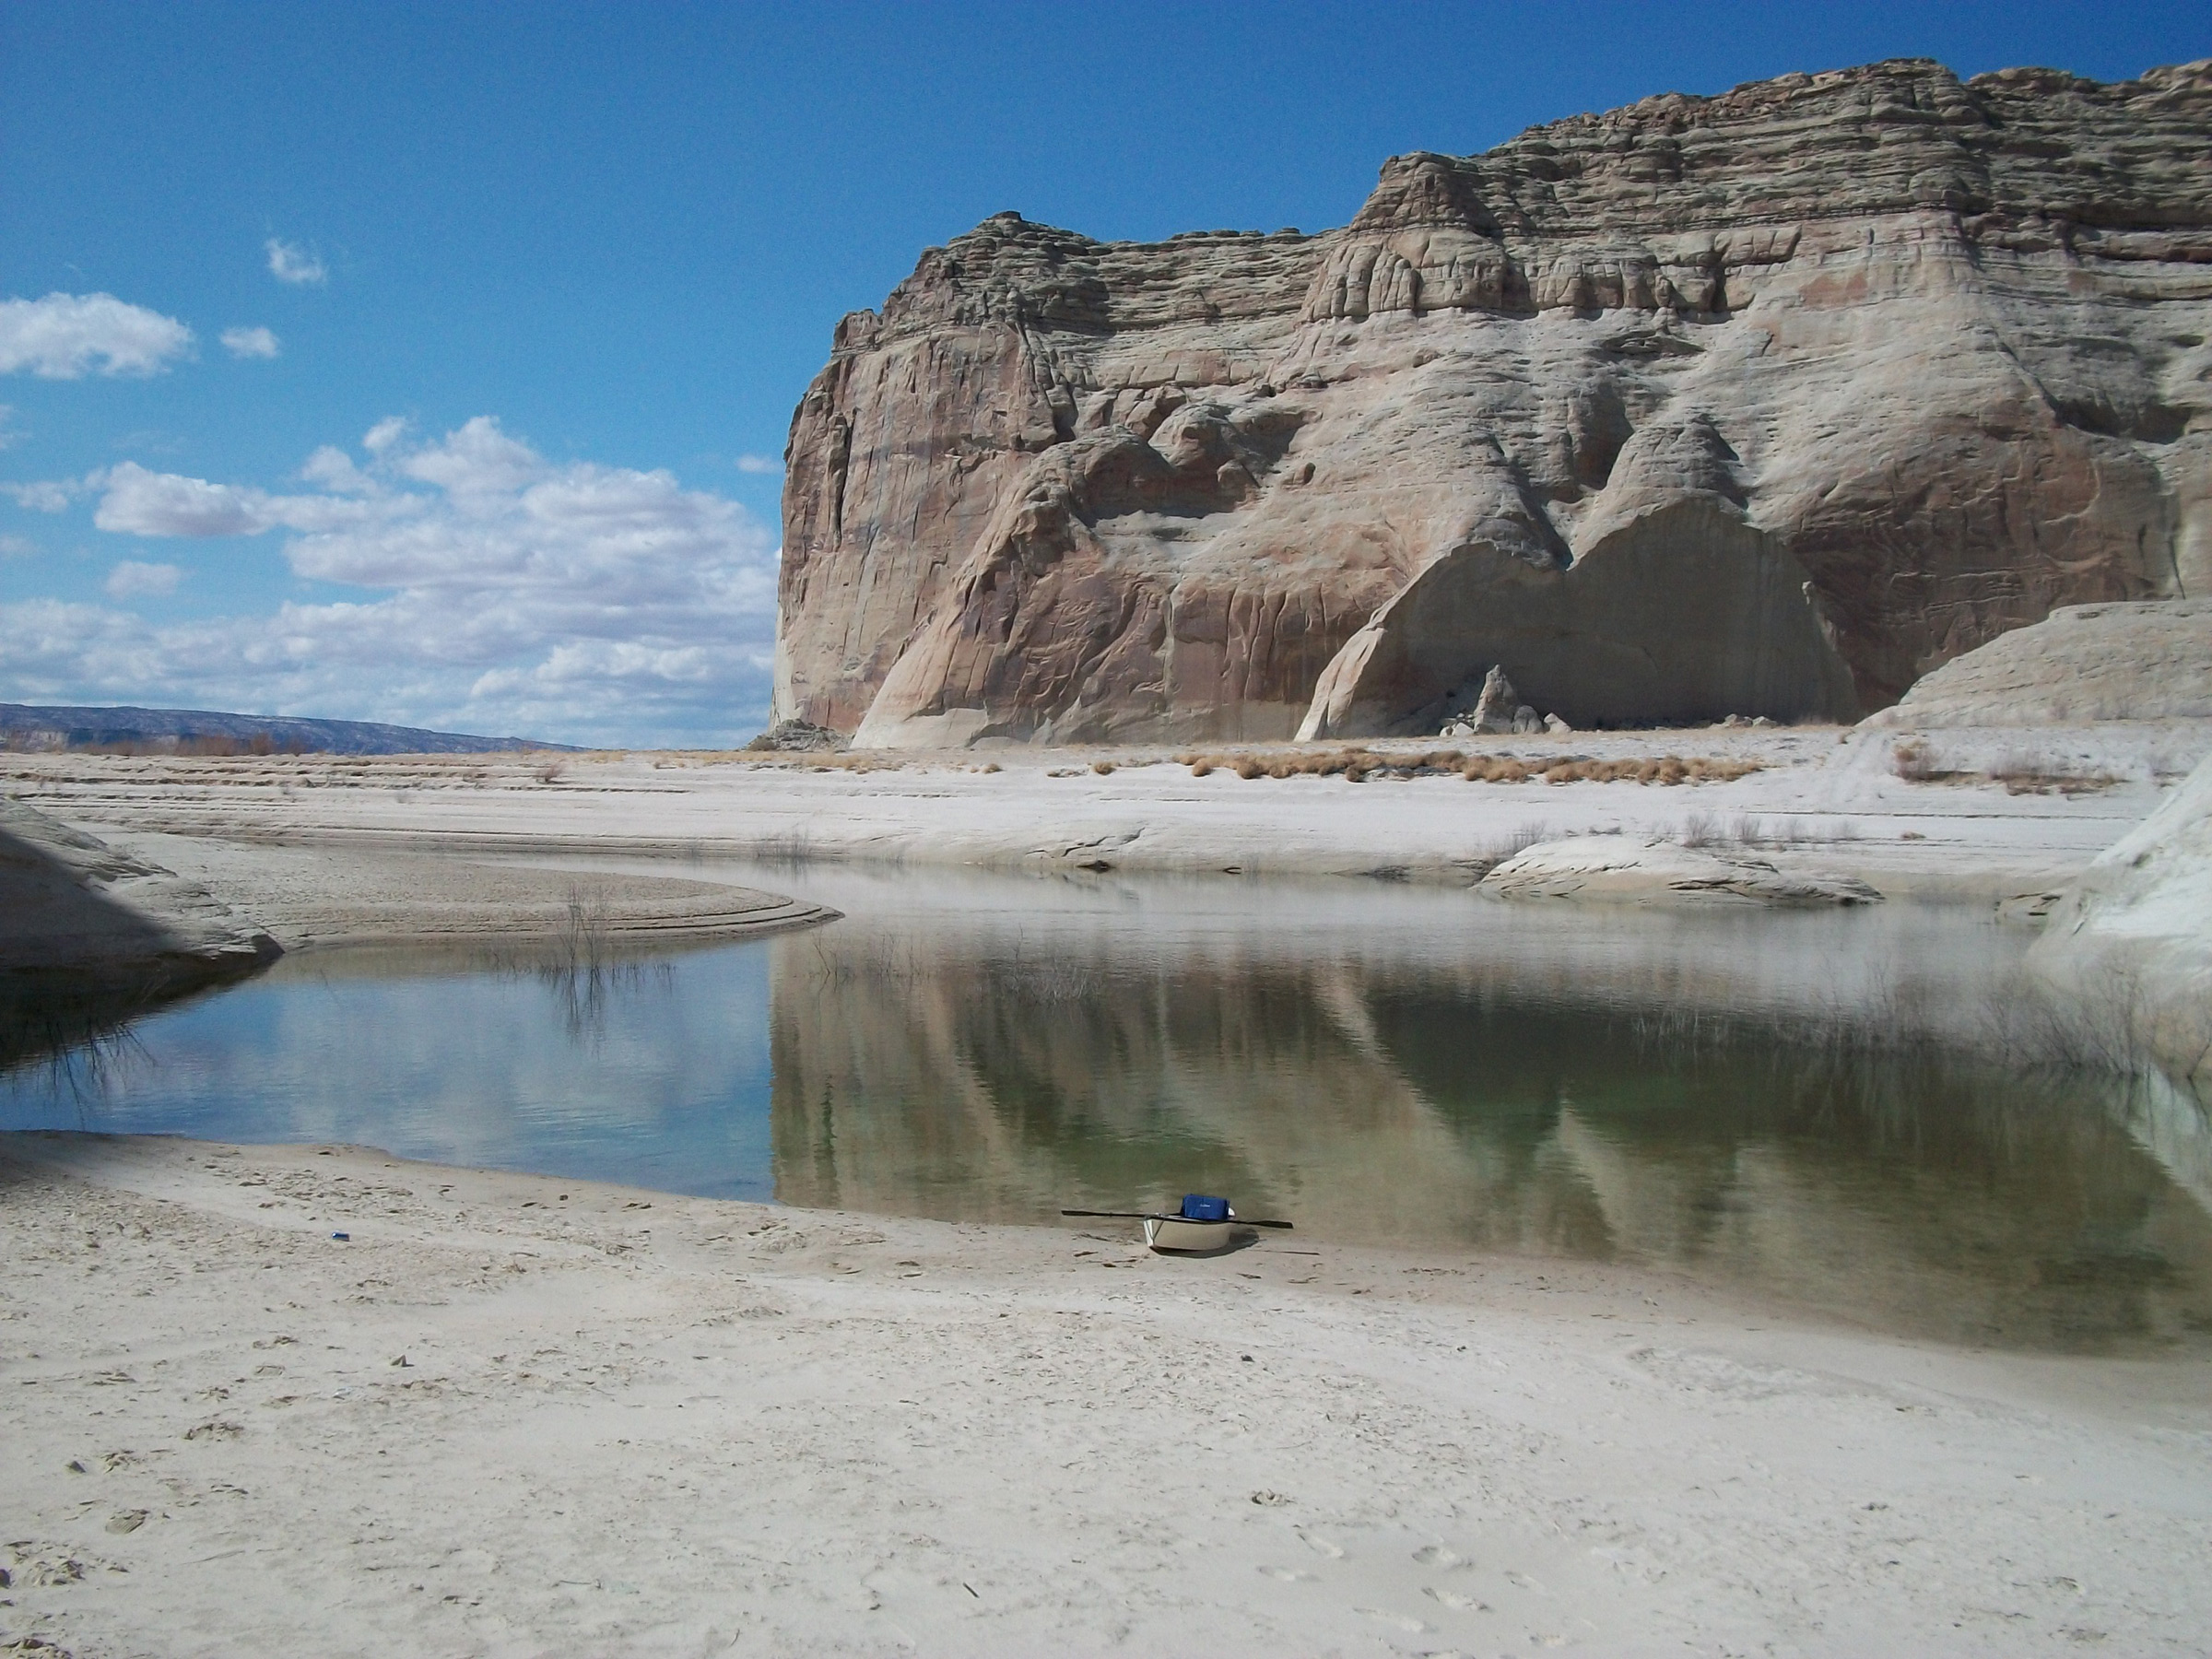
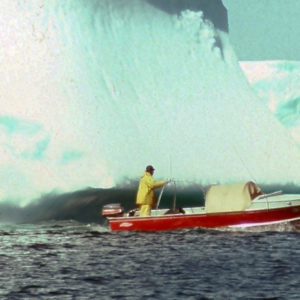
Tom’s boats are small, but they carried him into grand landscapes, like the Glen Canyon cliffs surrounding Lake Powell.
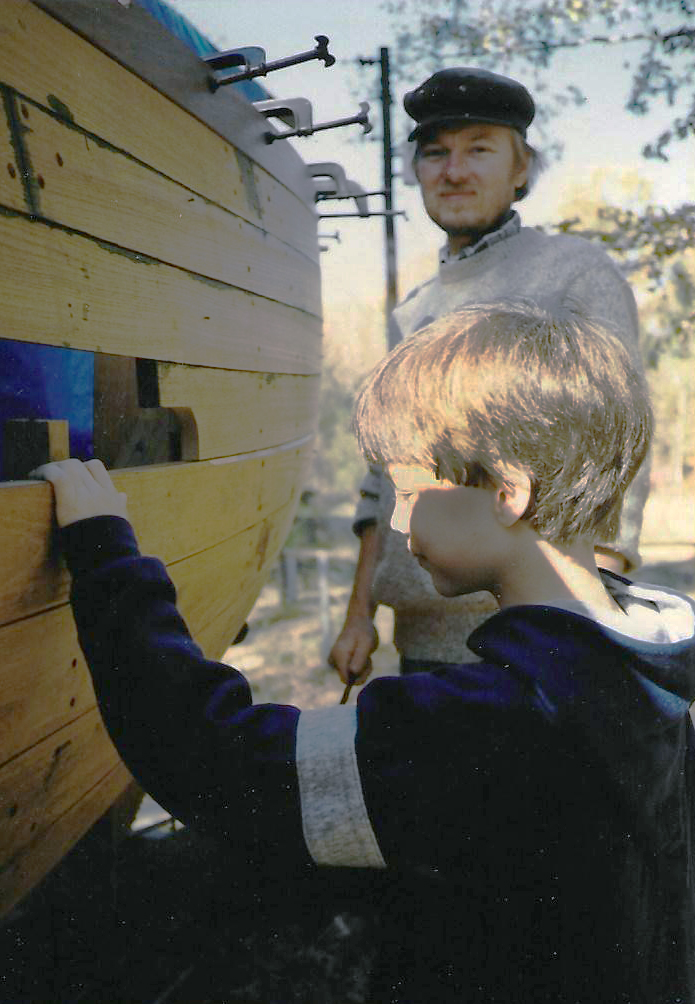
Boats have always been a part of Tom Hepp’s life. He grew up on the banks of a river in Ohio, served in the Navy, and embarked upon a career as a merchant mariner. During his vacations he often traveled along the East Coast by car, visiting the port cities where he had worked. Being landbound didn’t sit well with him, and he longed to have a boat he could take with him.
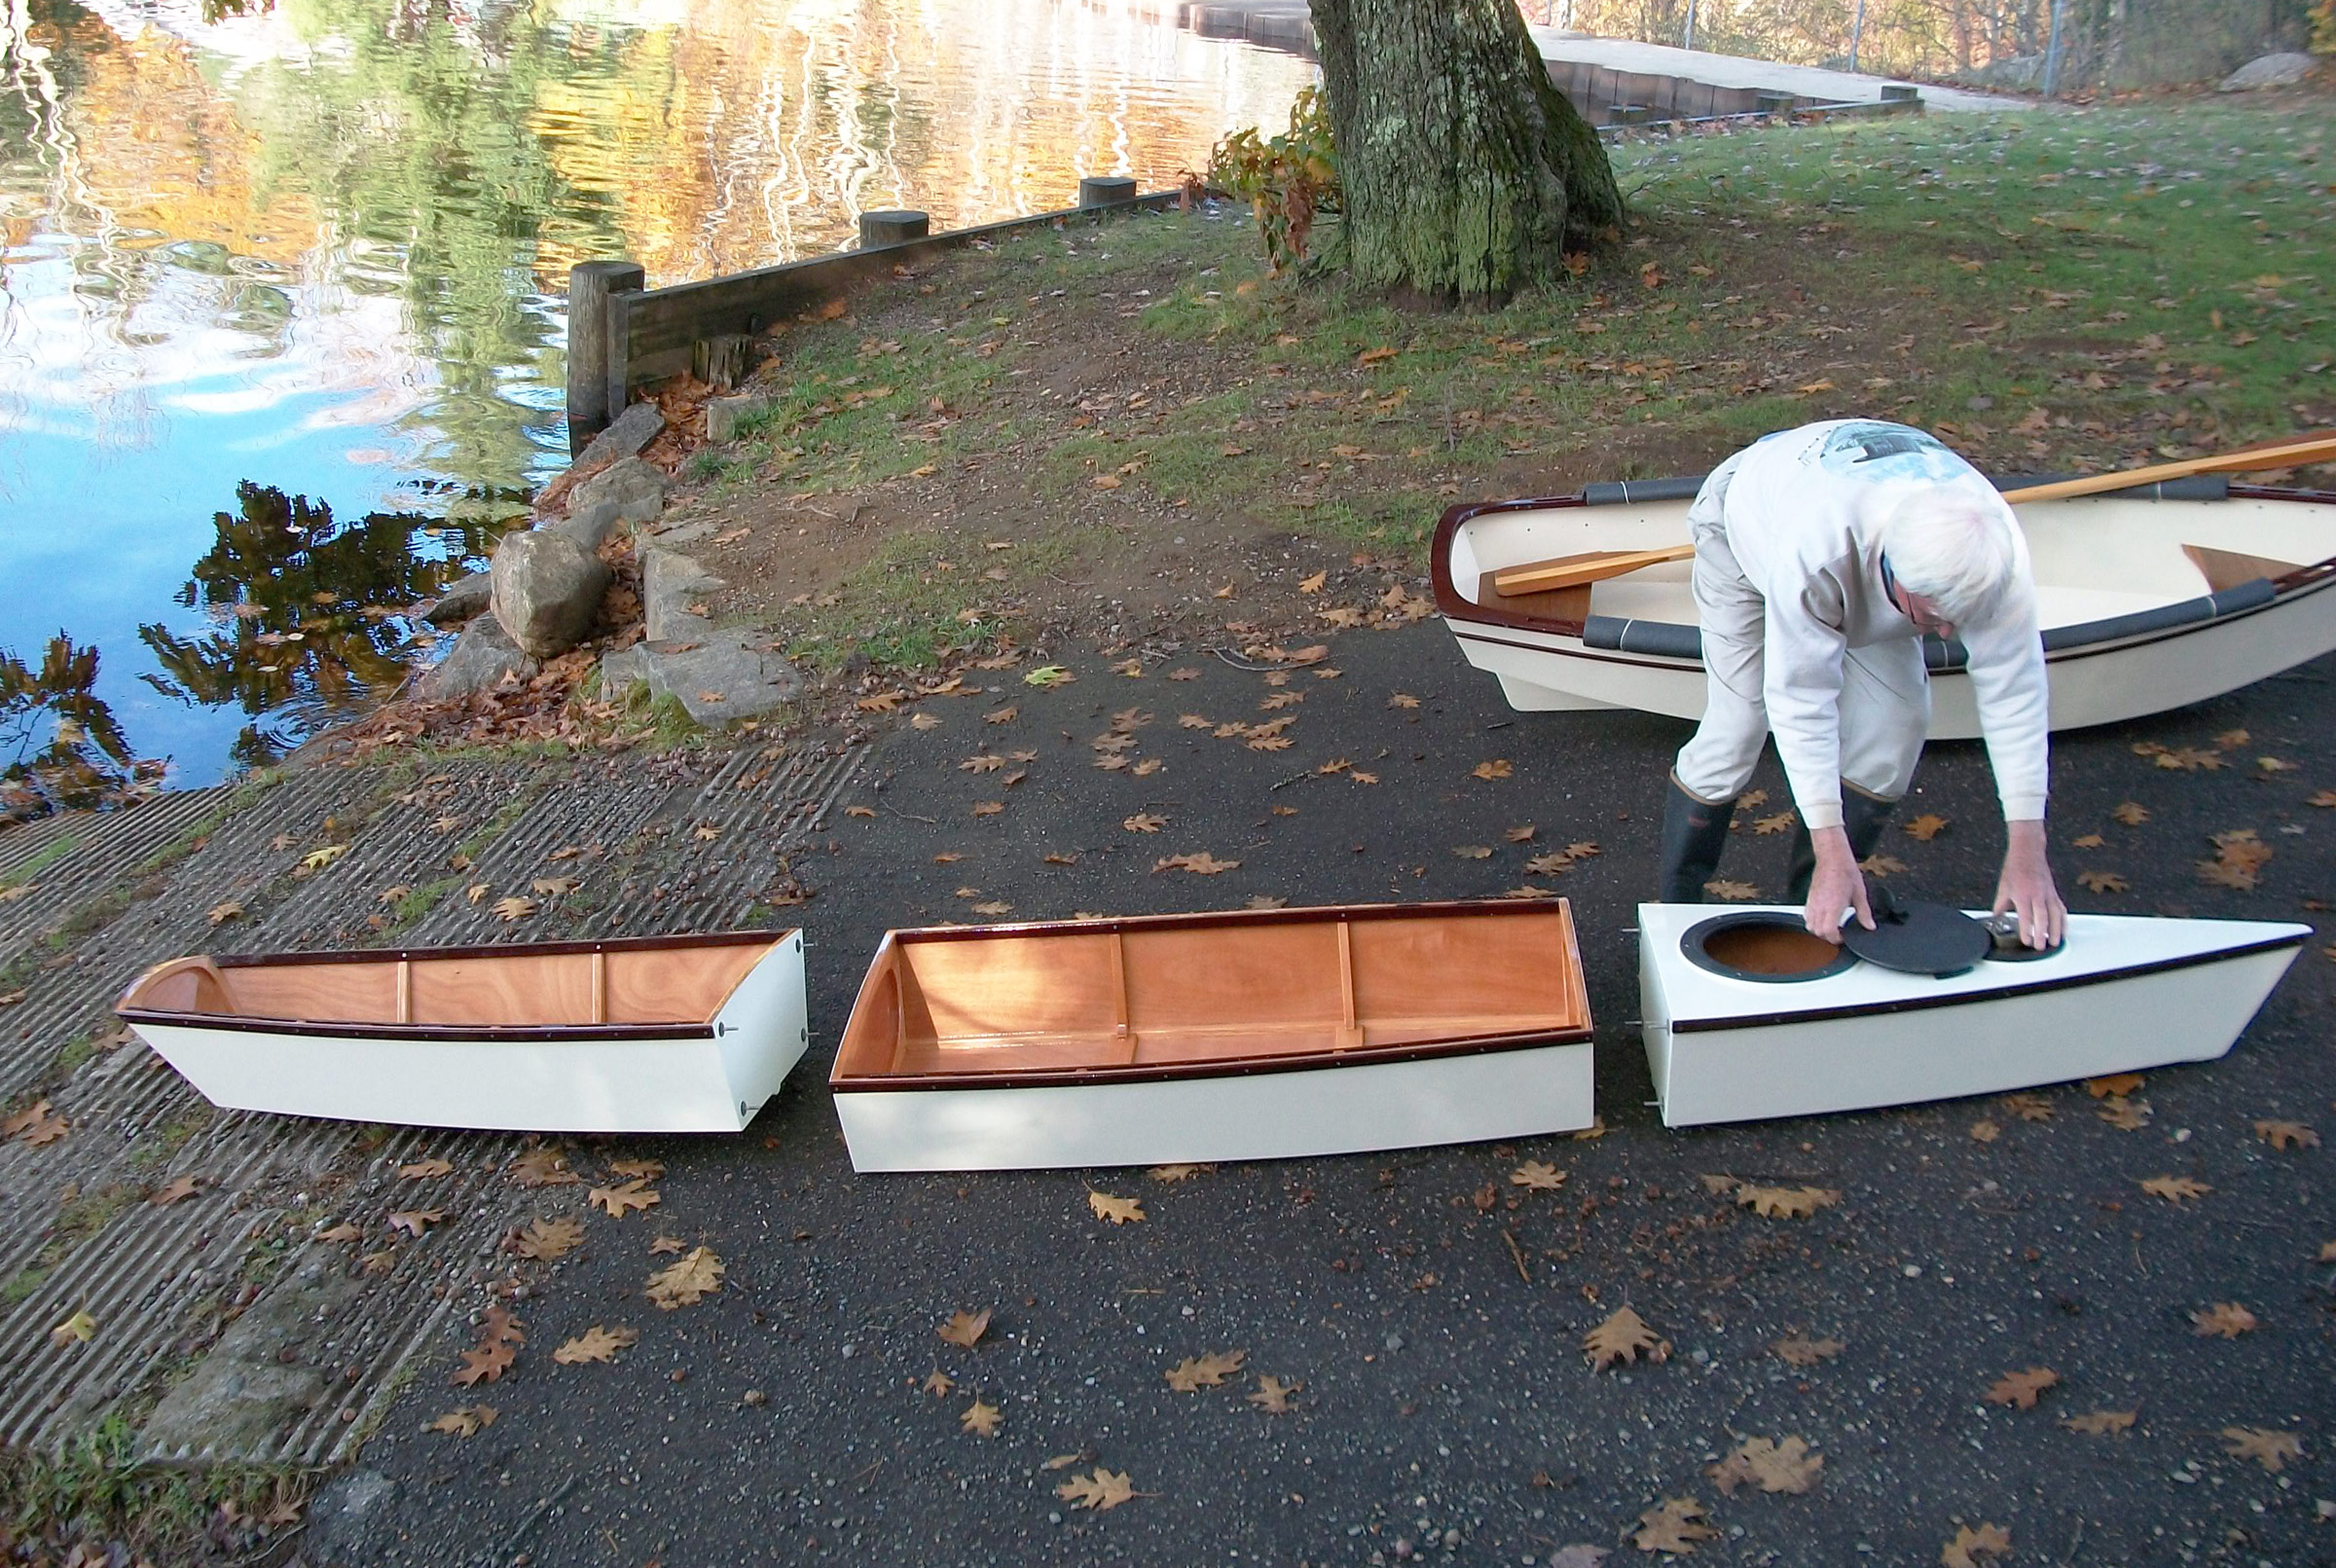
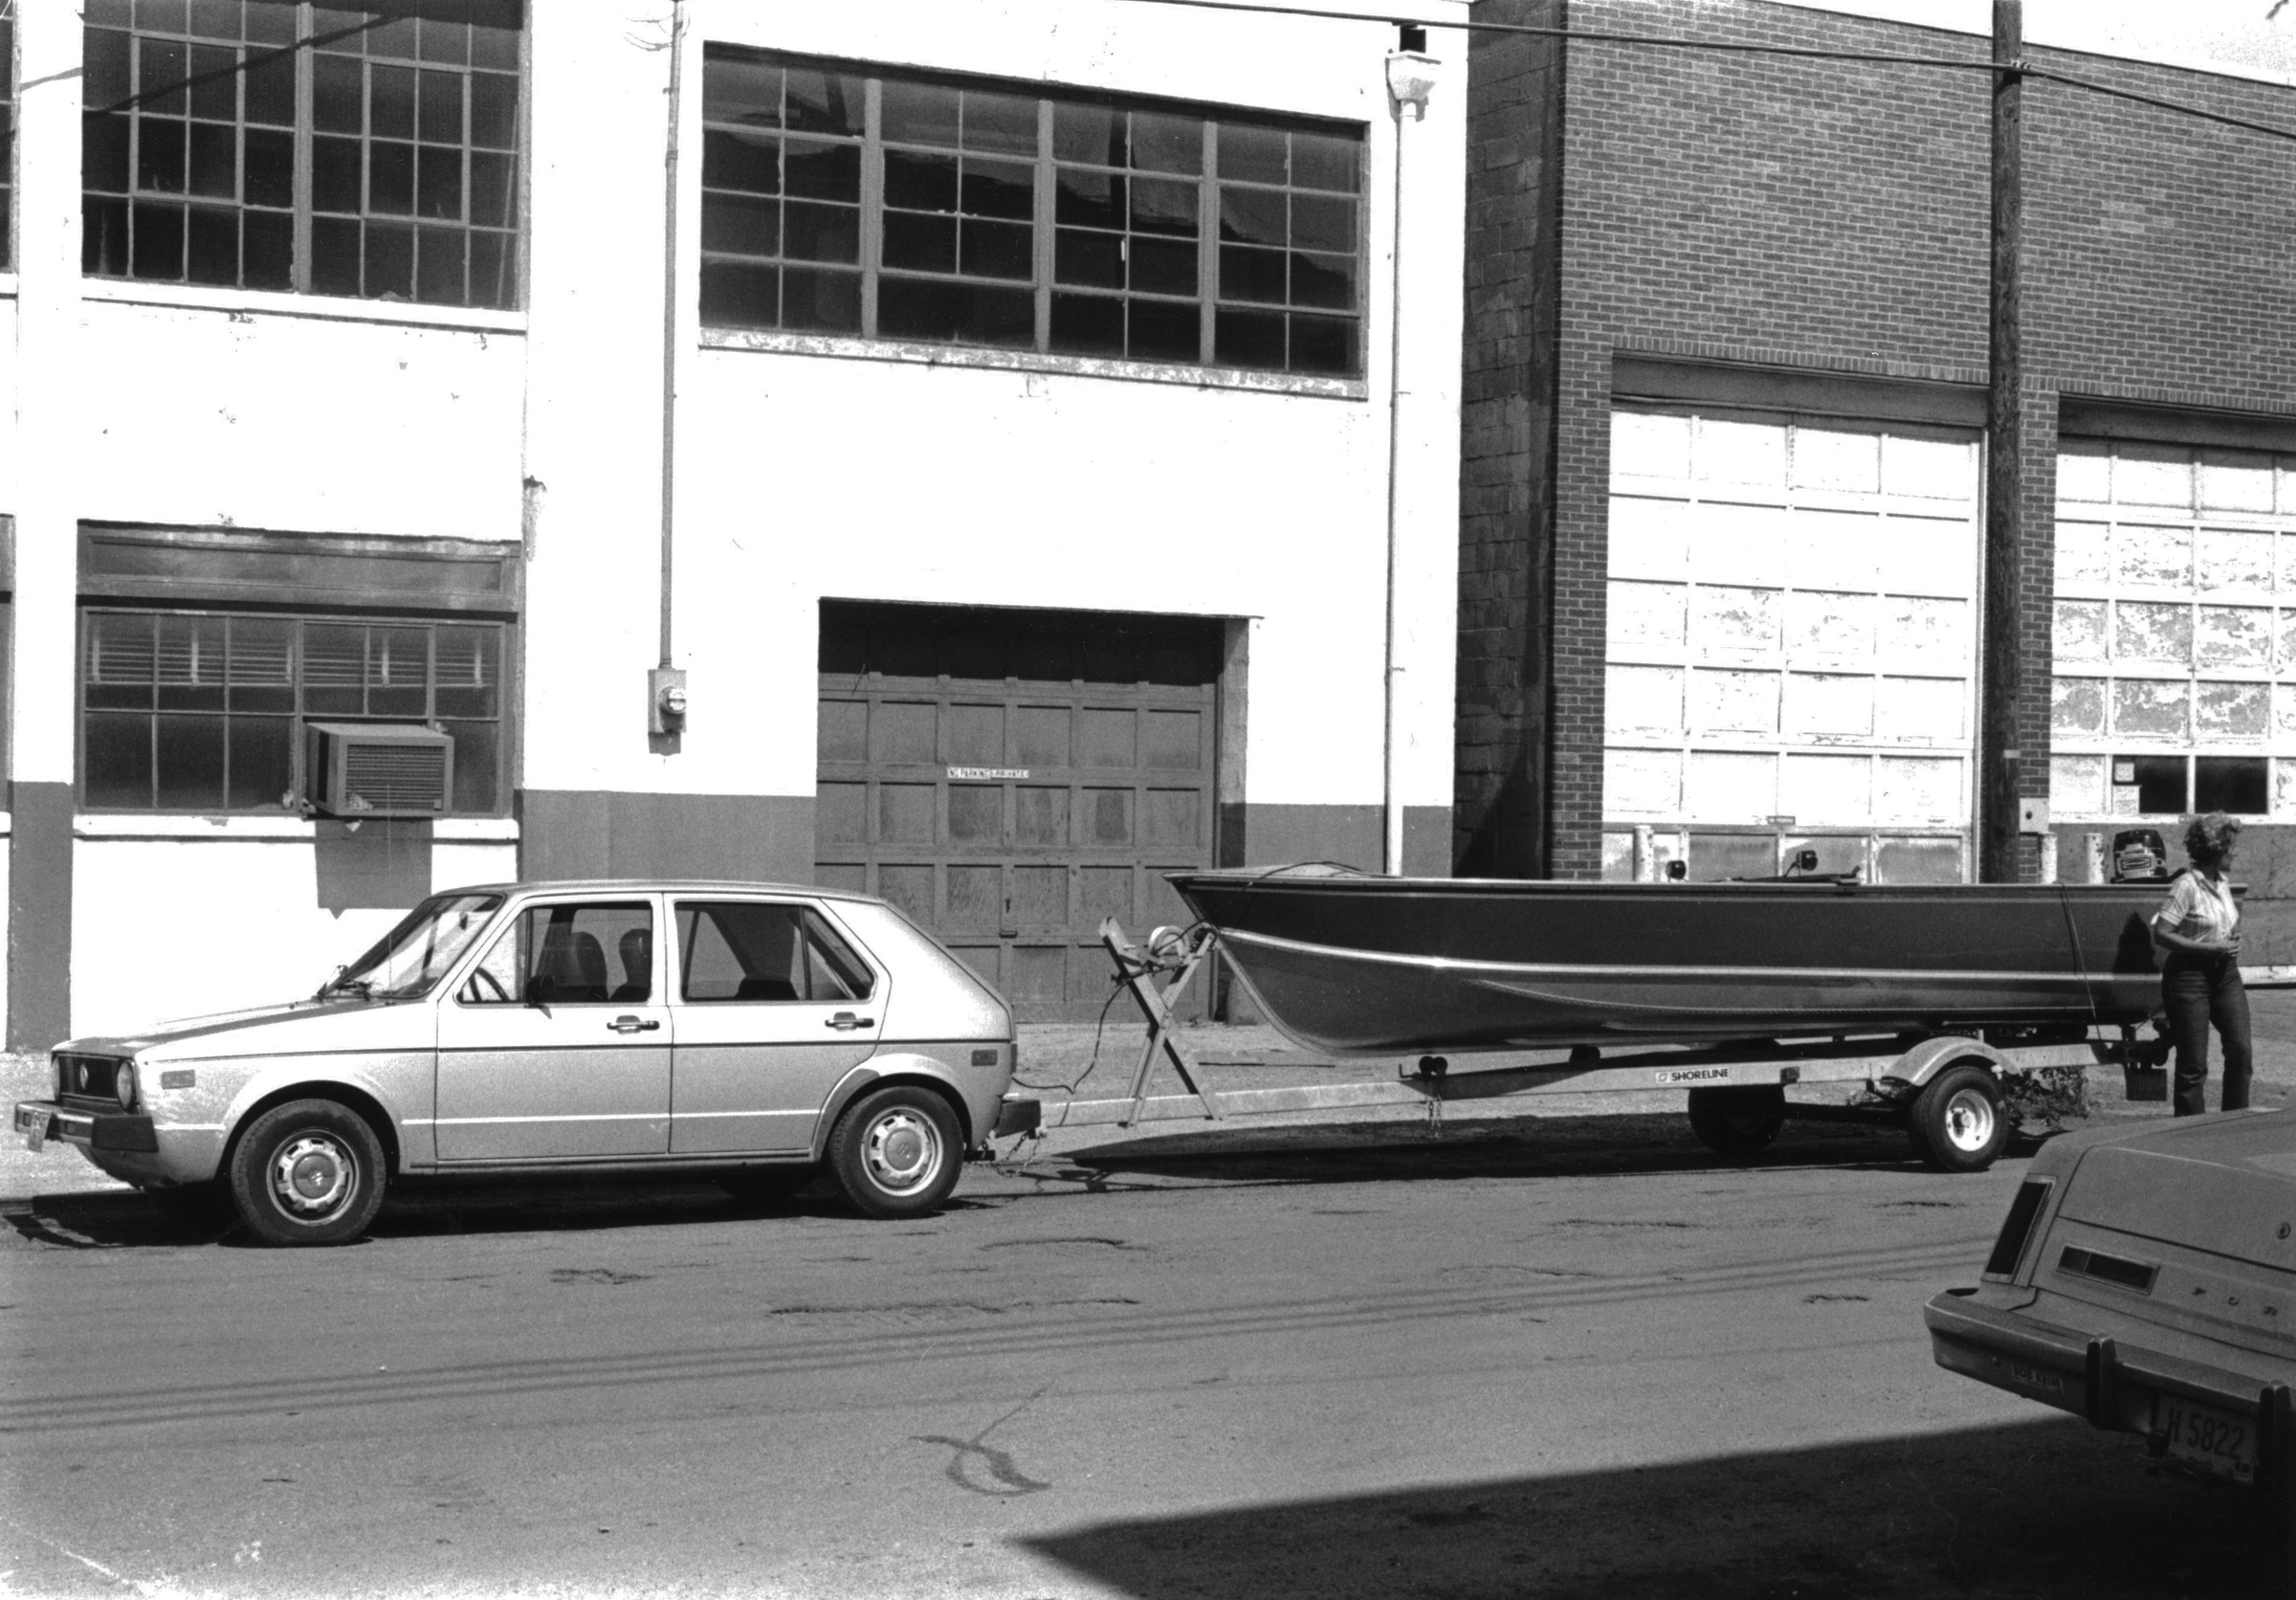
Trailering a boat comes with its own set of limitations, and cartopping a boat on his van didn’t appeal to him either, but a nesting sectional boat could go in the van, stored safely until he found an opportunity to get afloat. He checked the Internet for nesting boats and didn’t find much, just a two-piece 8′ dinghy and a kayak.
To get the boat he wanted, he’d have to create it. Pirogues that he’d seen in WoodenBoat seemed like a good starting point. The simple design would be easy to adapt, quick to build, and lightweight.
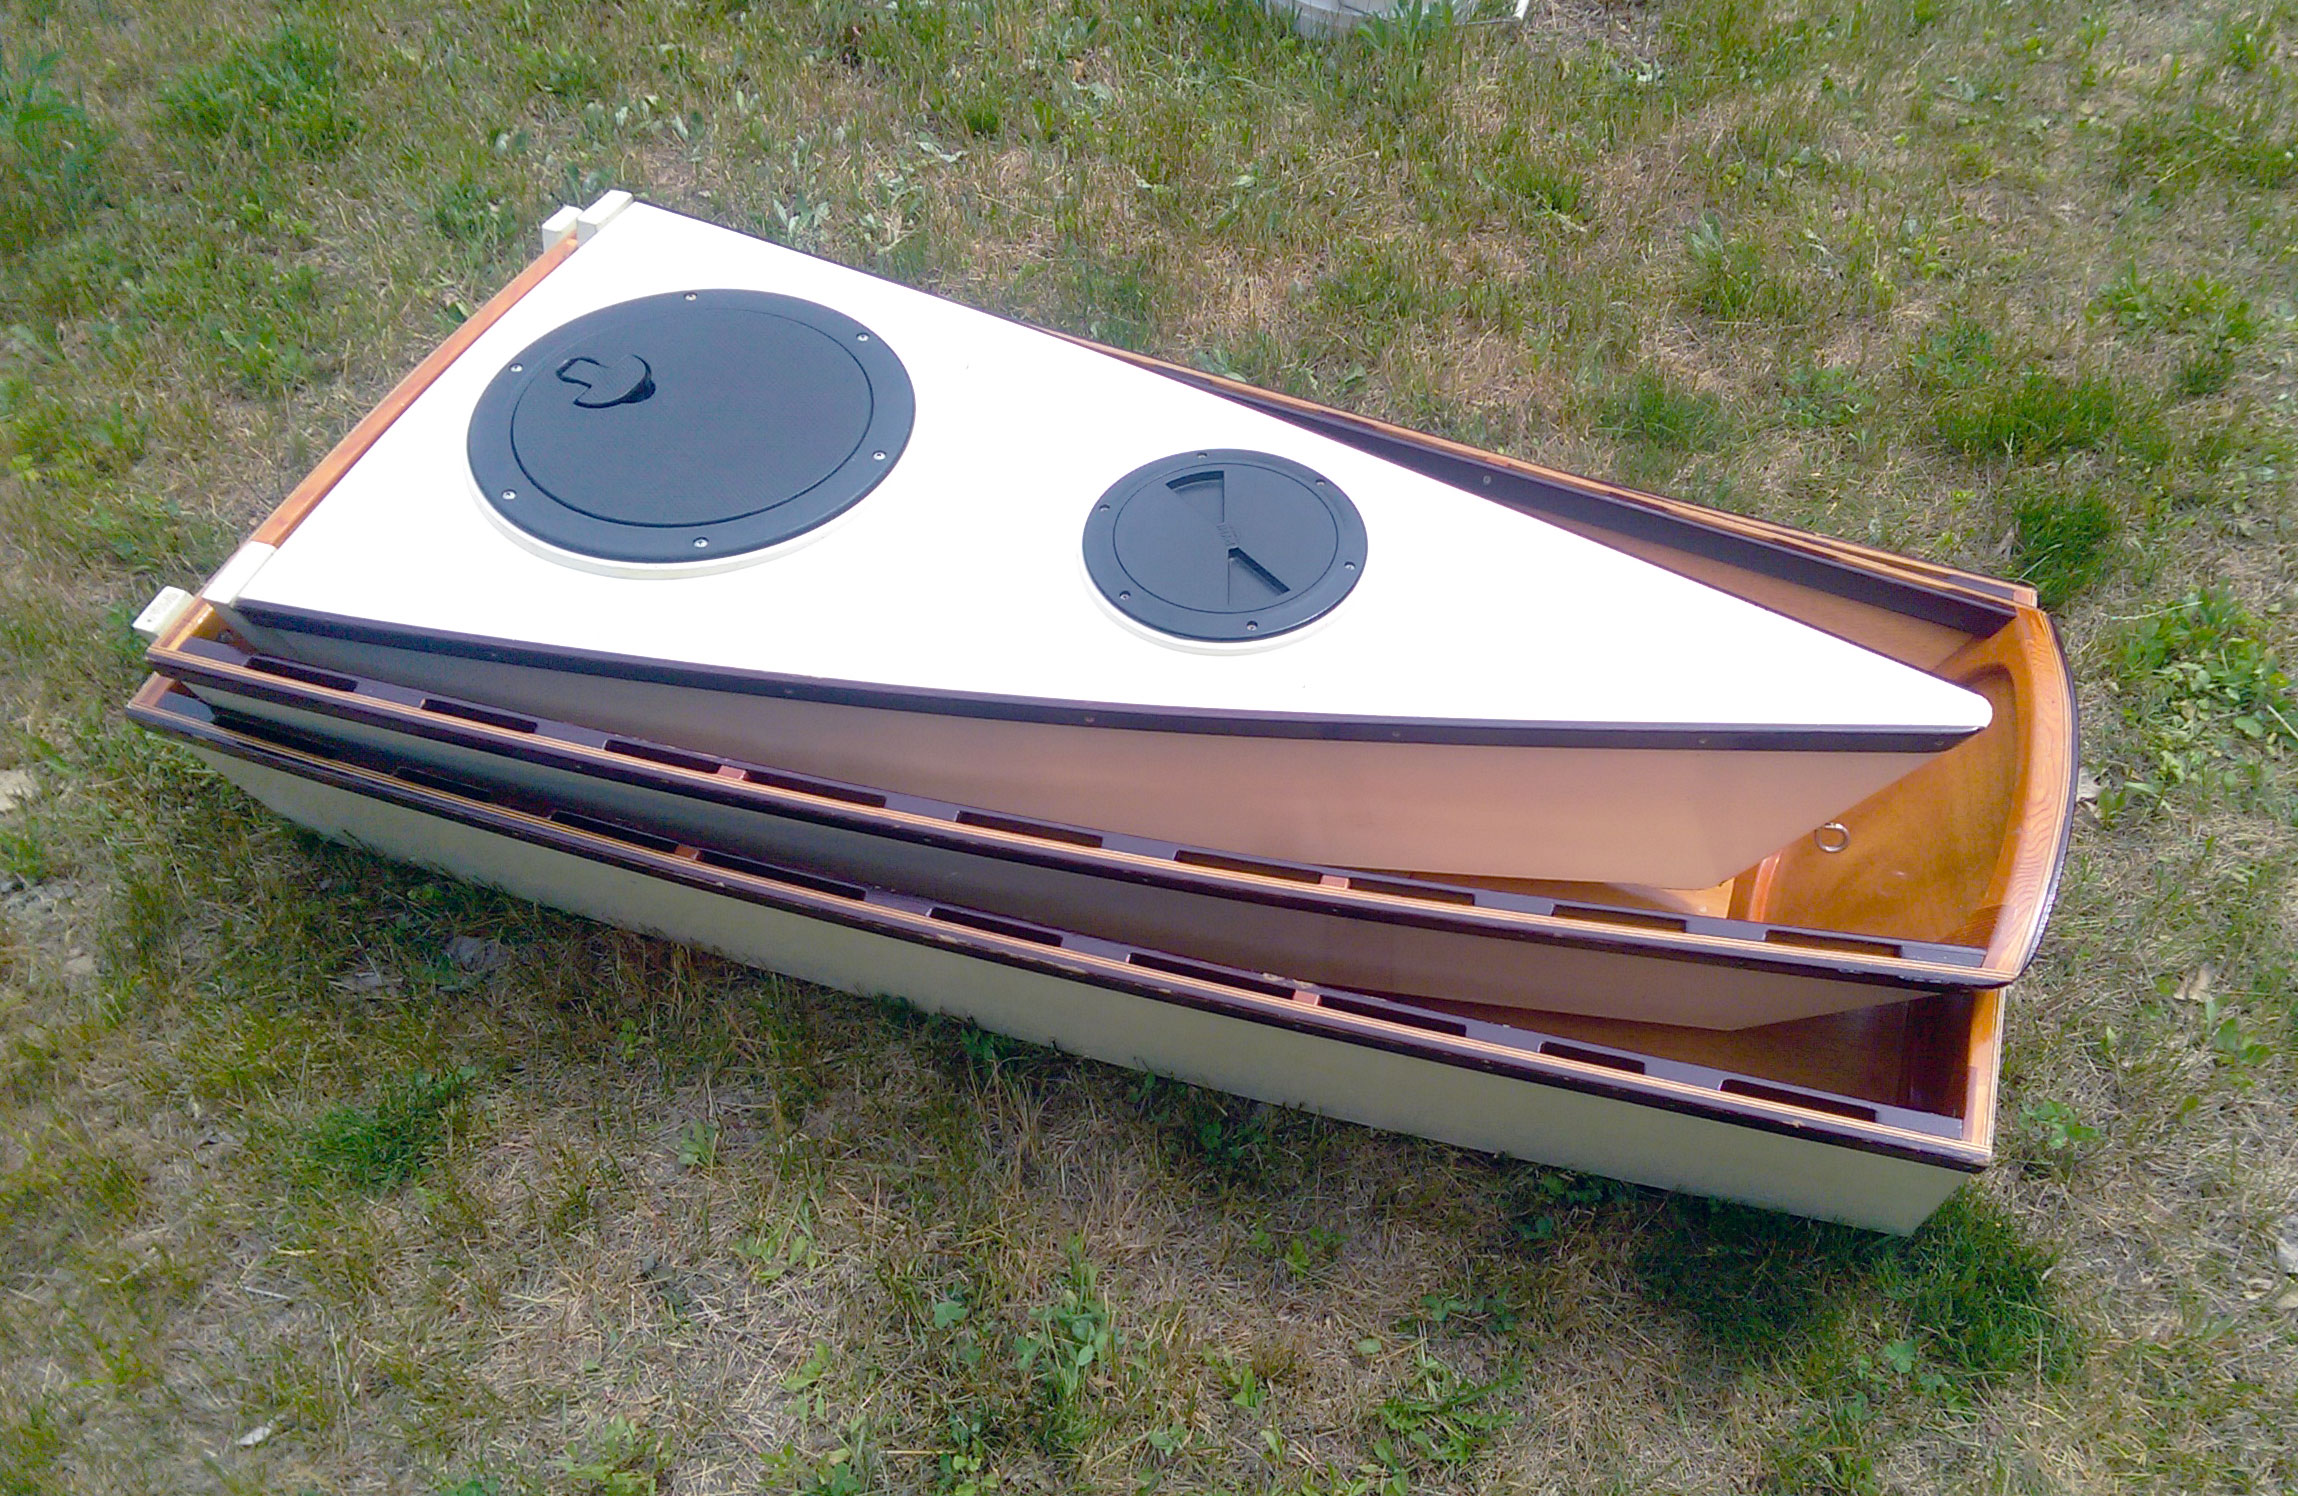
While many pirogues are open boats, meant for the protected waters of Louisiana swamps, marshes, and bayous, Tom expected he’d have to contend with boat wakes if not wind-driven chop on the more open bodies of water he wanted to explore, so he drew up lines for a 9′6″ pirogue with airtight decked ends for flotation and a generous freeboard of 13″ and beam of 30″. The length of the center section of his three-part boat was determined by the distance from his lower back to his heels while he was seated. That turned out to be 51″. The bow and stern sections would have to fit in the center section.
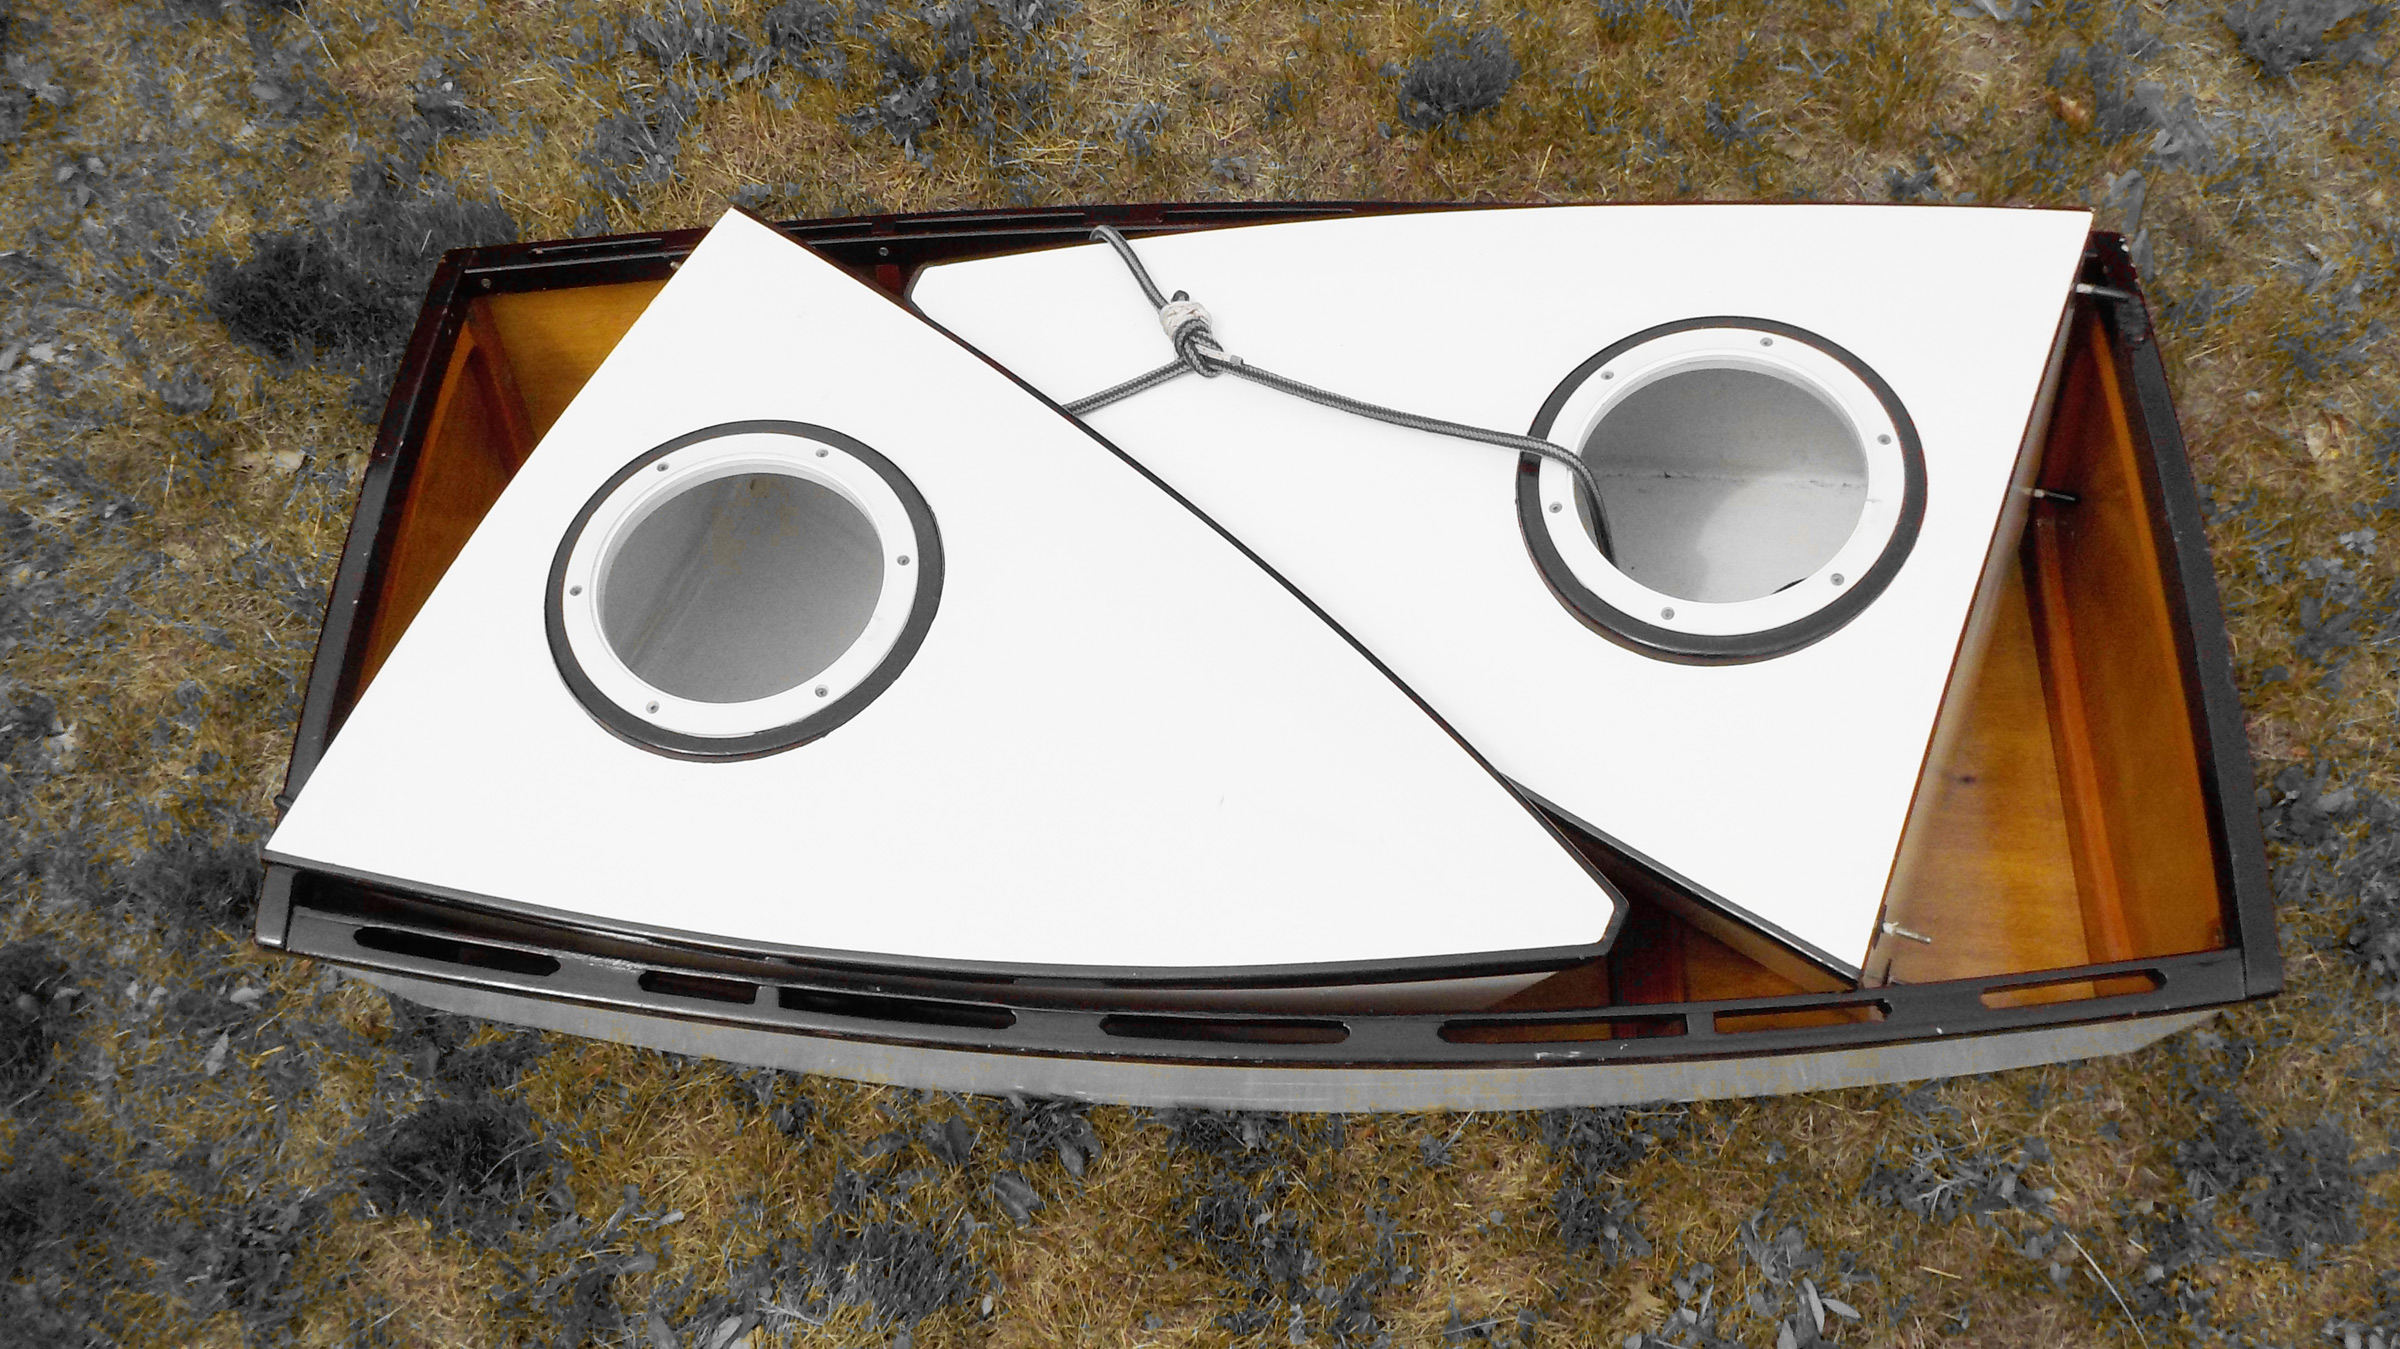
Both of the watertight ends had to fit in the open center section, limiting overall length to 9′ 6″.
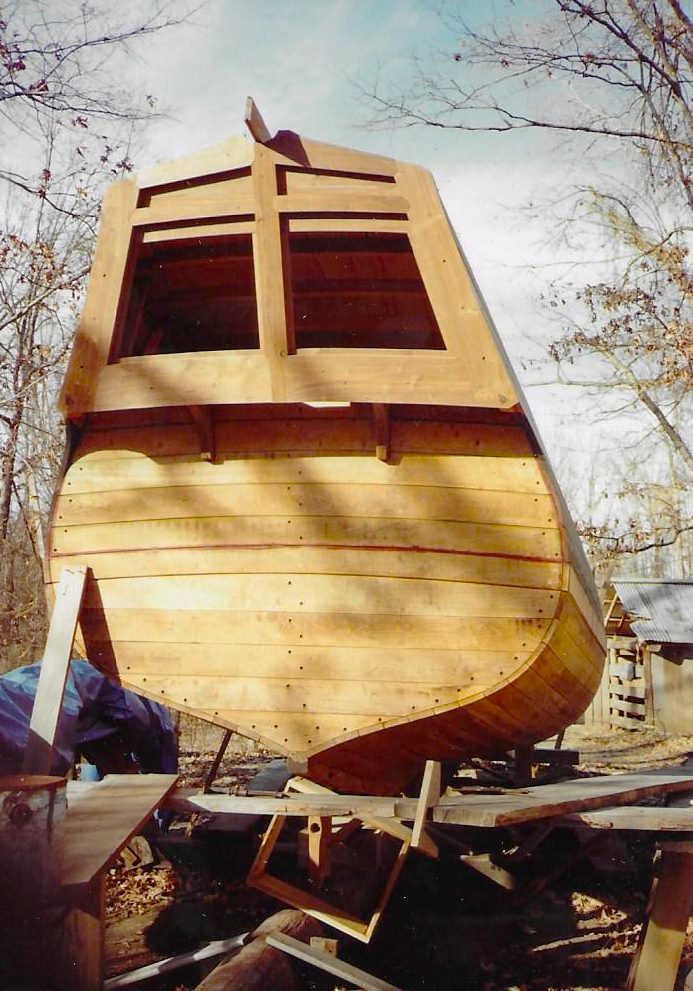
He developed the shape using a half-hull model and then used scaled-up dimensions from it to build the bulkheads and frames. With those parts and the stems set up on a strongback, he faired the hull and planked it with plywood.
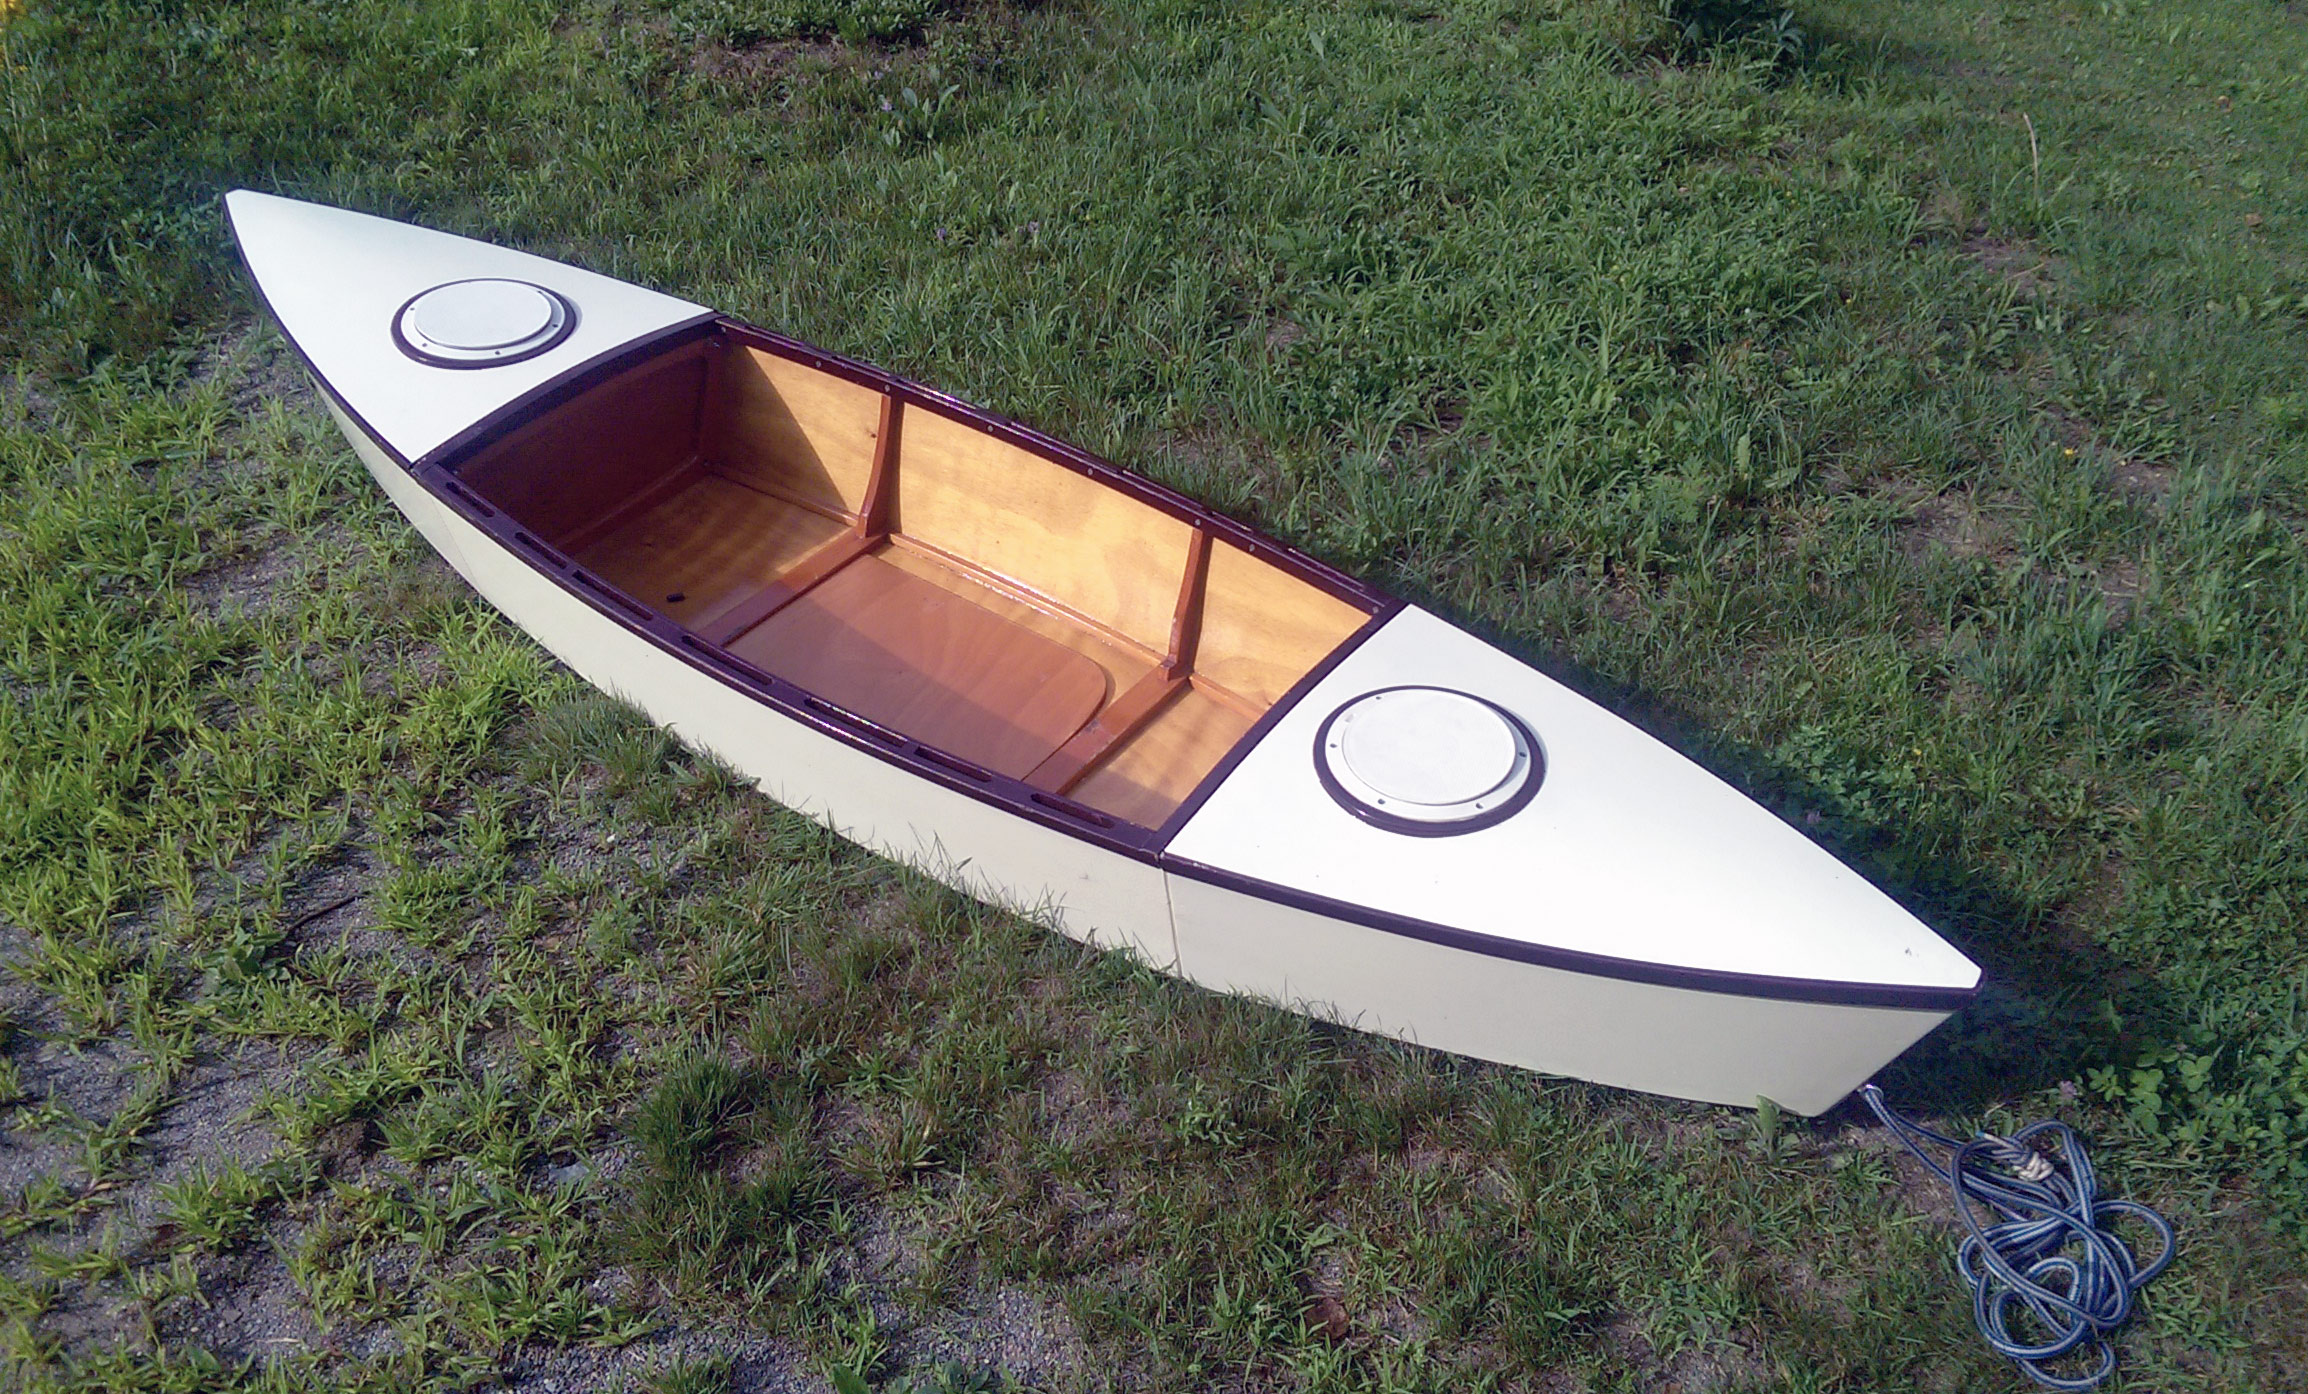
The first nesting boat was fashioned along the lines of a pirogue. The bow and stern sections were built with decks and watertight hatches to provide flotation in the event of a swamped cockpit.
He finished the boat in January 2010, a bad time for sea trials in the waters of Maine near his home in Appleton, so he packed the boat in his van and drove south to the Gulf of Mexico. The sea trials were successful, and Tom was ready to take the boat with him on his next vacation.
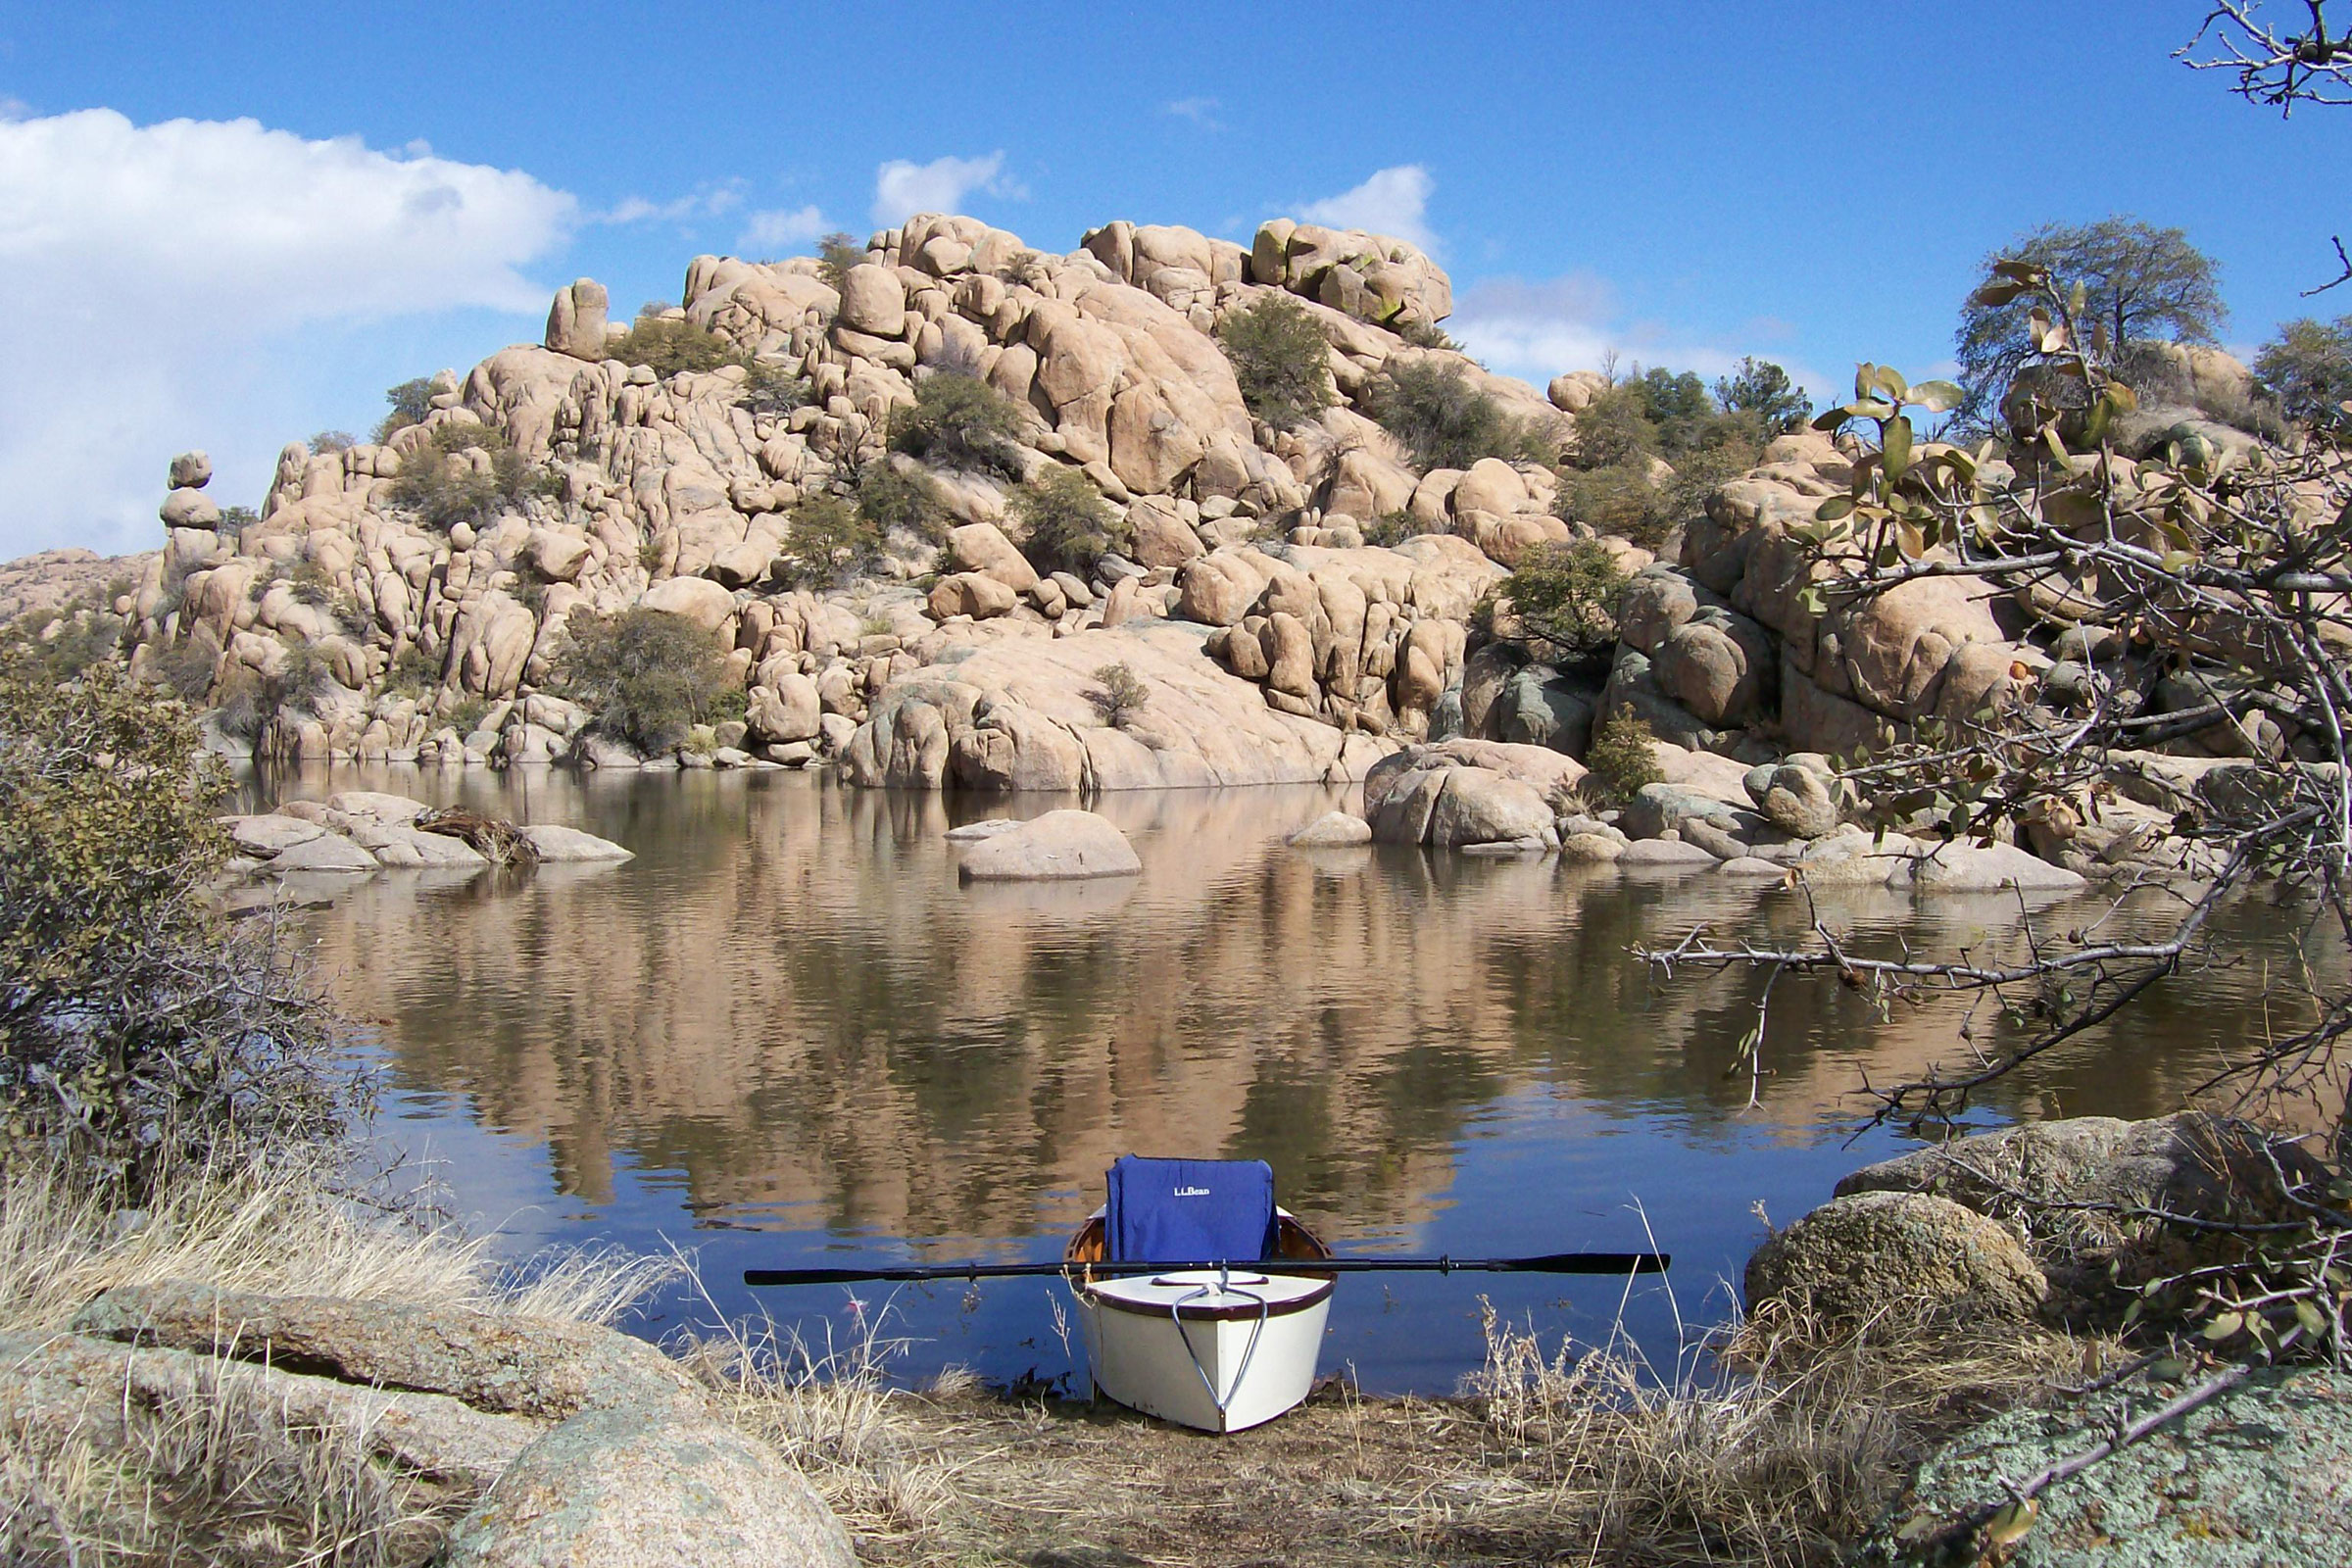
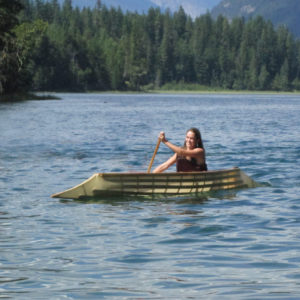
Tom took his first nesting boat to the Southwest and used it to explore the Granite Dells, which have been made boat-accessible by the reservoir waters of Arizona’s Watson Lake.
His first trip was to Arizona—Lake Watson and Lake Powell—and then to Texas and the Rio Grande. Travel in the years to come took the boat to the East Coast and back to the Southwest.
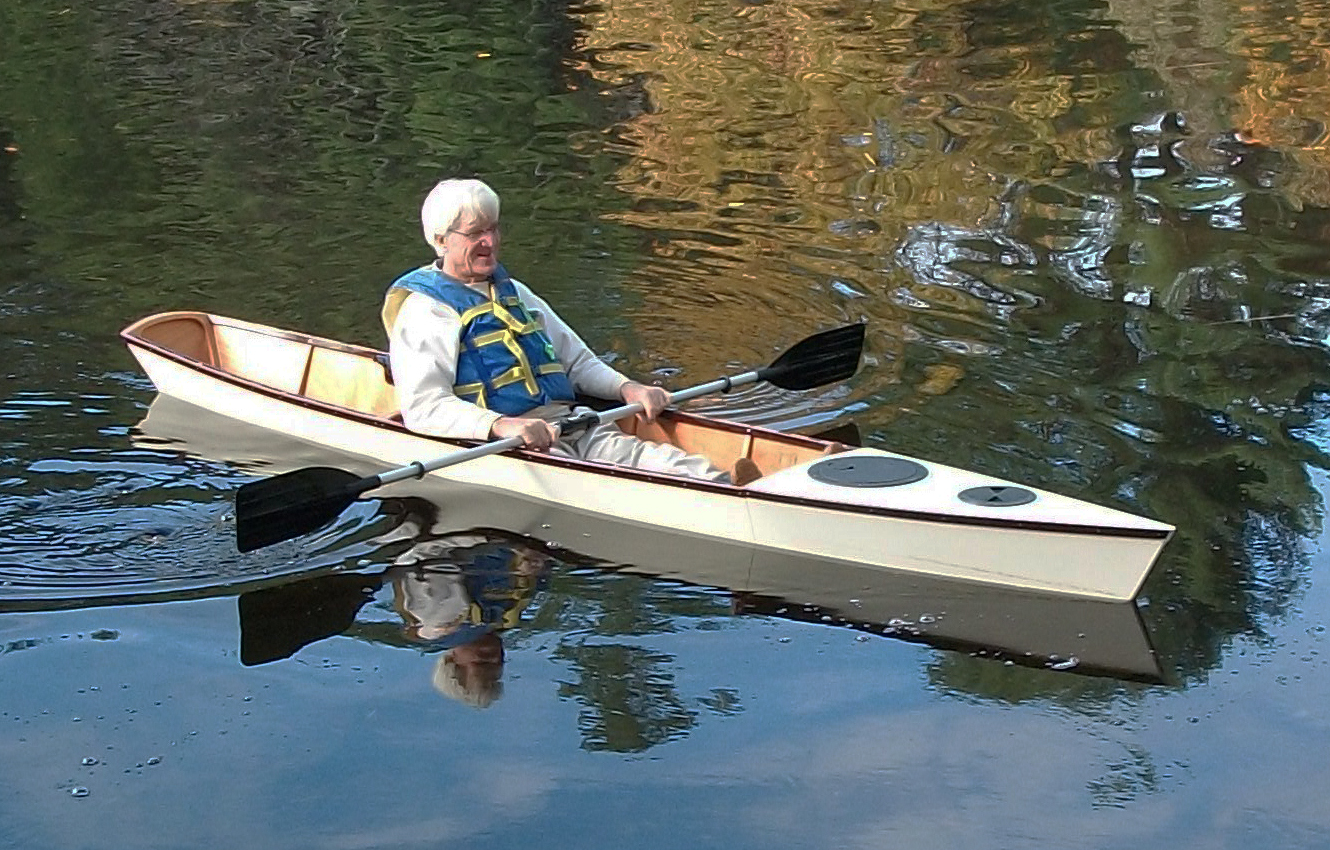
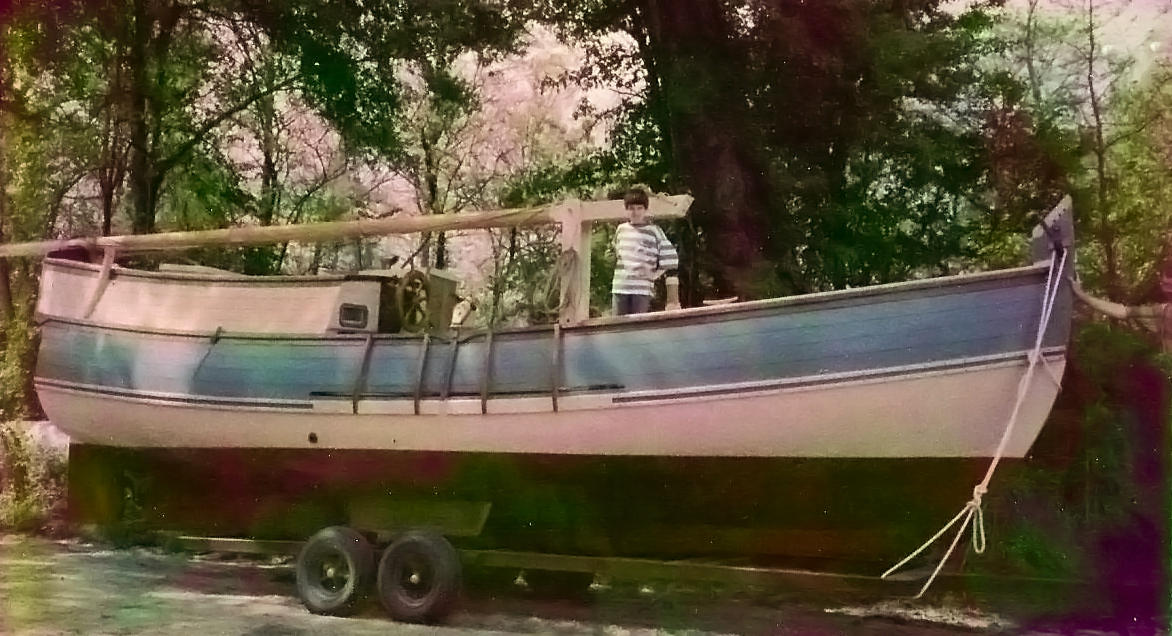
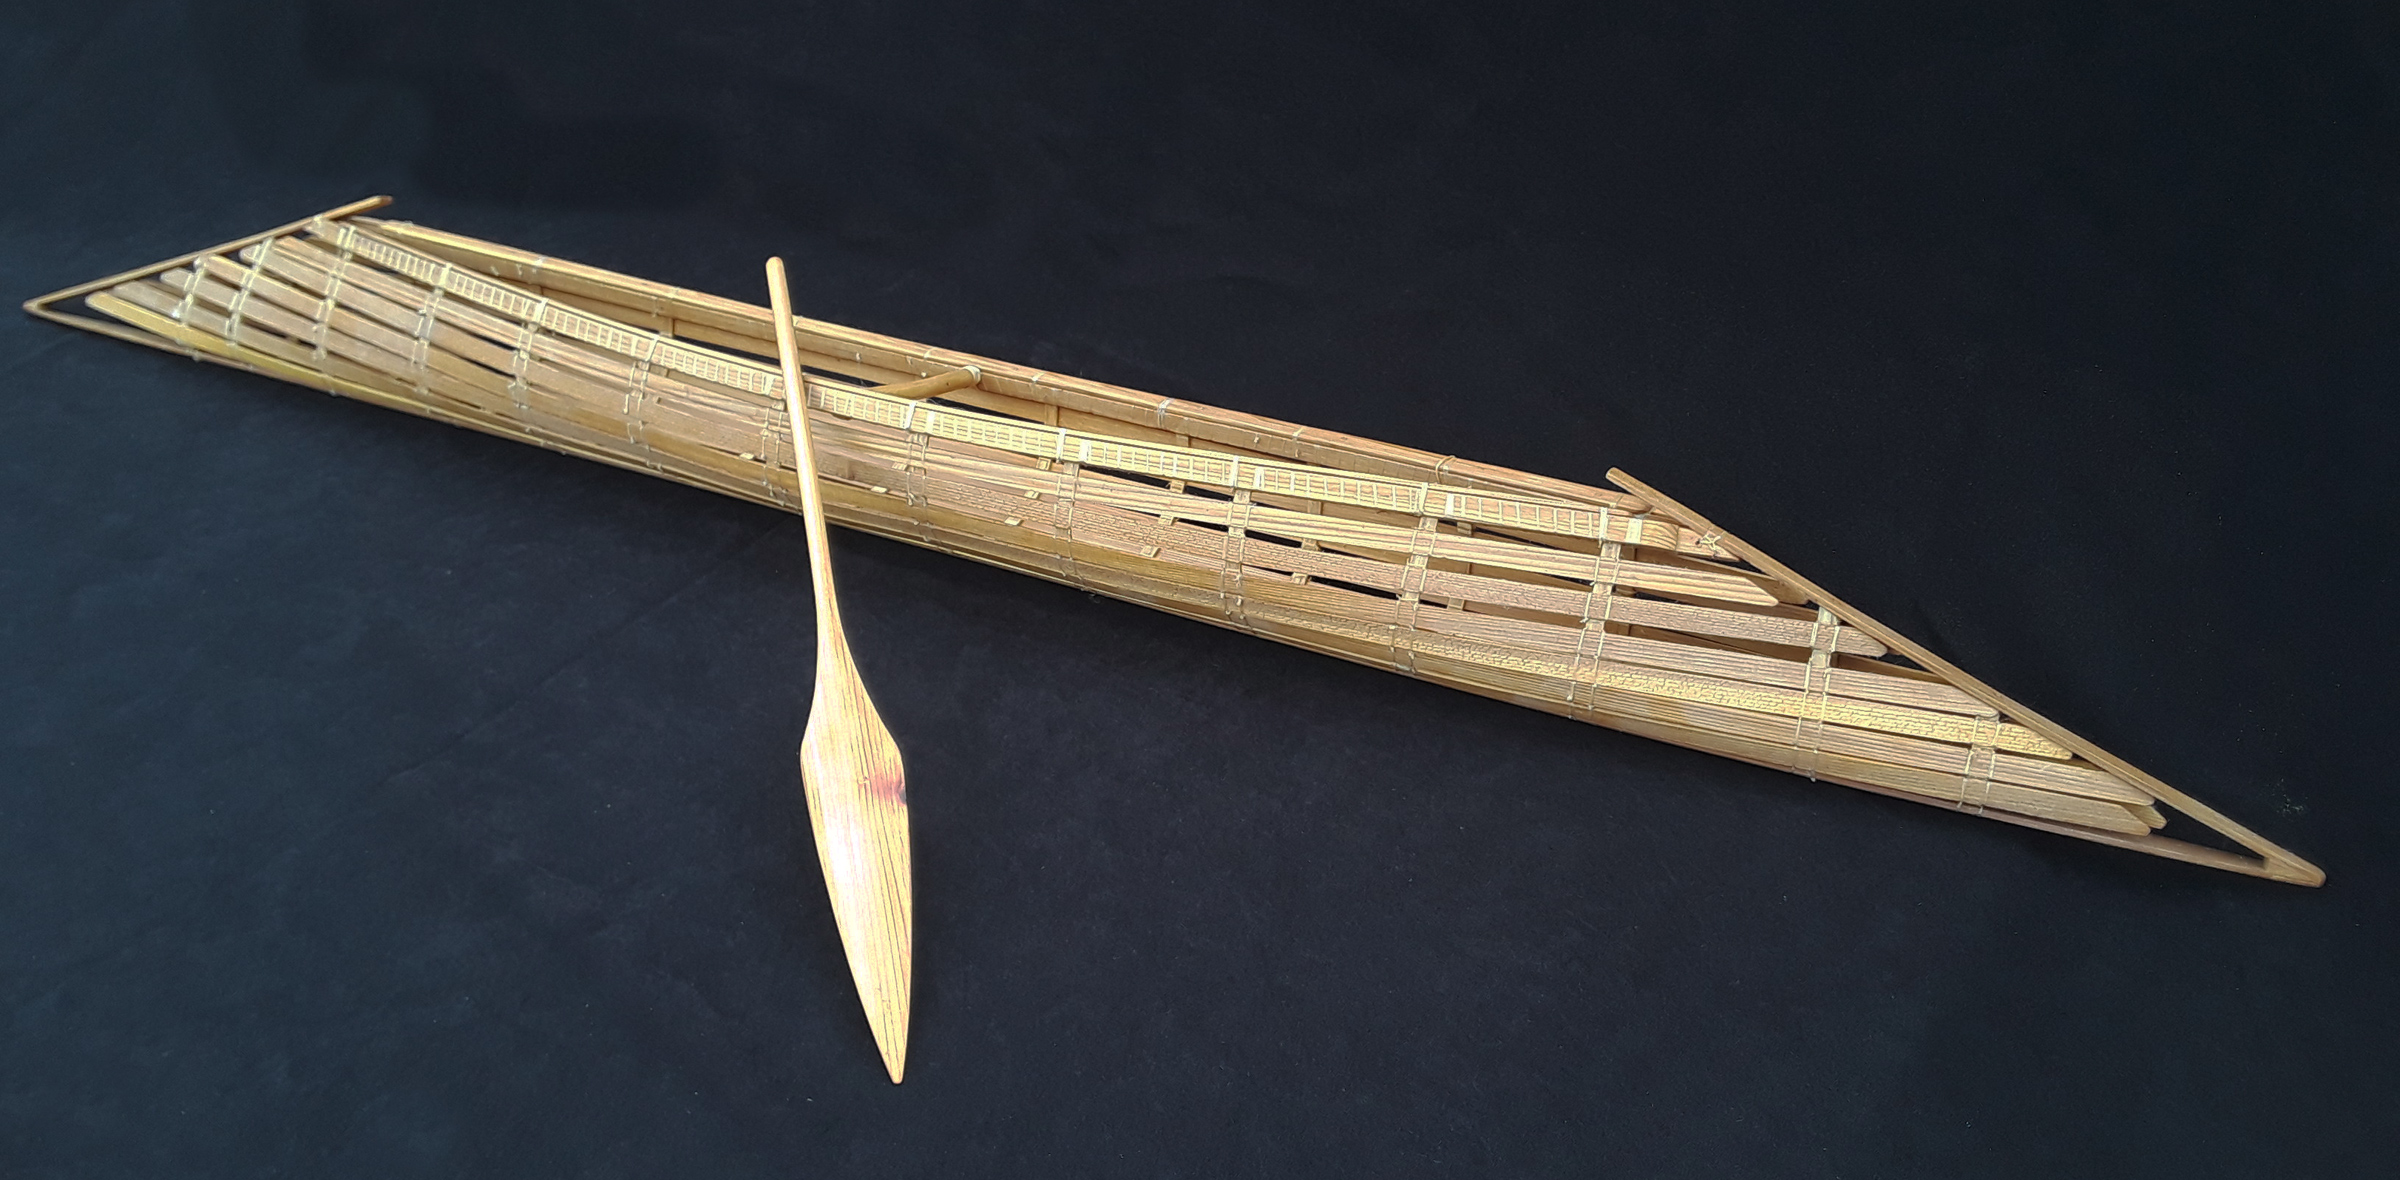
The first nesting boat provided a drier ride than expected, so this second boat had only one sealed compartment. The two open sections allowed a longer boat and the same compact nesting as the first.
That first nesting boat turned out to have more than enough freeboard for the waters Tom paddled, so he imagined building a pair of narrower nesting boats—one for a paddling companion—that would fit alongside each other in his van. He started with the same 51″ length for the center section, and opted for an open stern section.
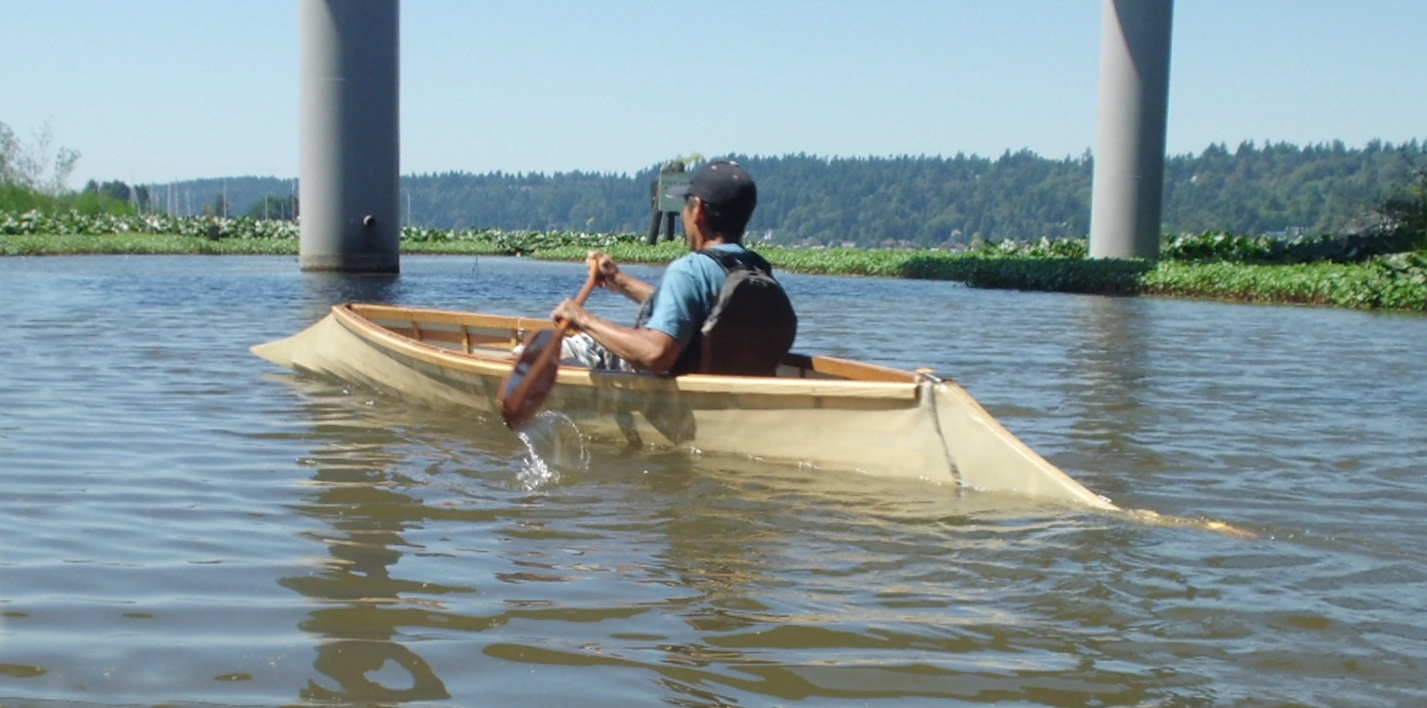
With open sections for the cockpit and stern, the nesting configuration allowed an overall assembled length of 12′.
Rather than have both ends nest in the middle, the bow section could fit in the stern and it would nest in the middle section. The new scheme allowed the boat to be 12′ long. With the greater length, Tom could reduce the beam from 30″ to 23″. He worked out the geometry on paper first, and then made a full-scale cardboard model. He built one boat to the design for sea trials. The boat performed well, so he built a second. Both fit behind the second row of seats in his van.
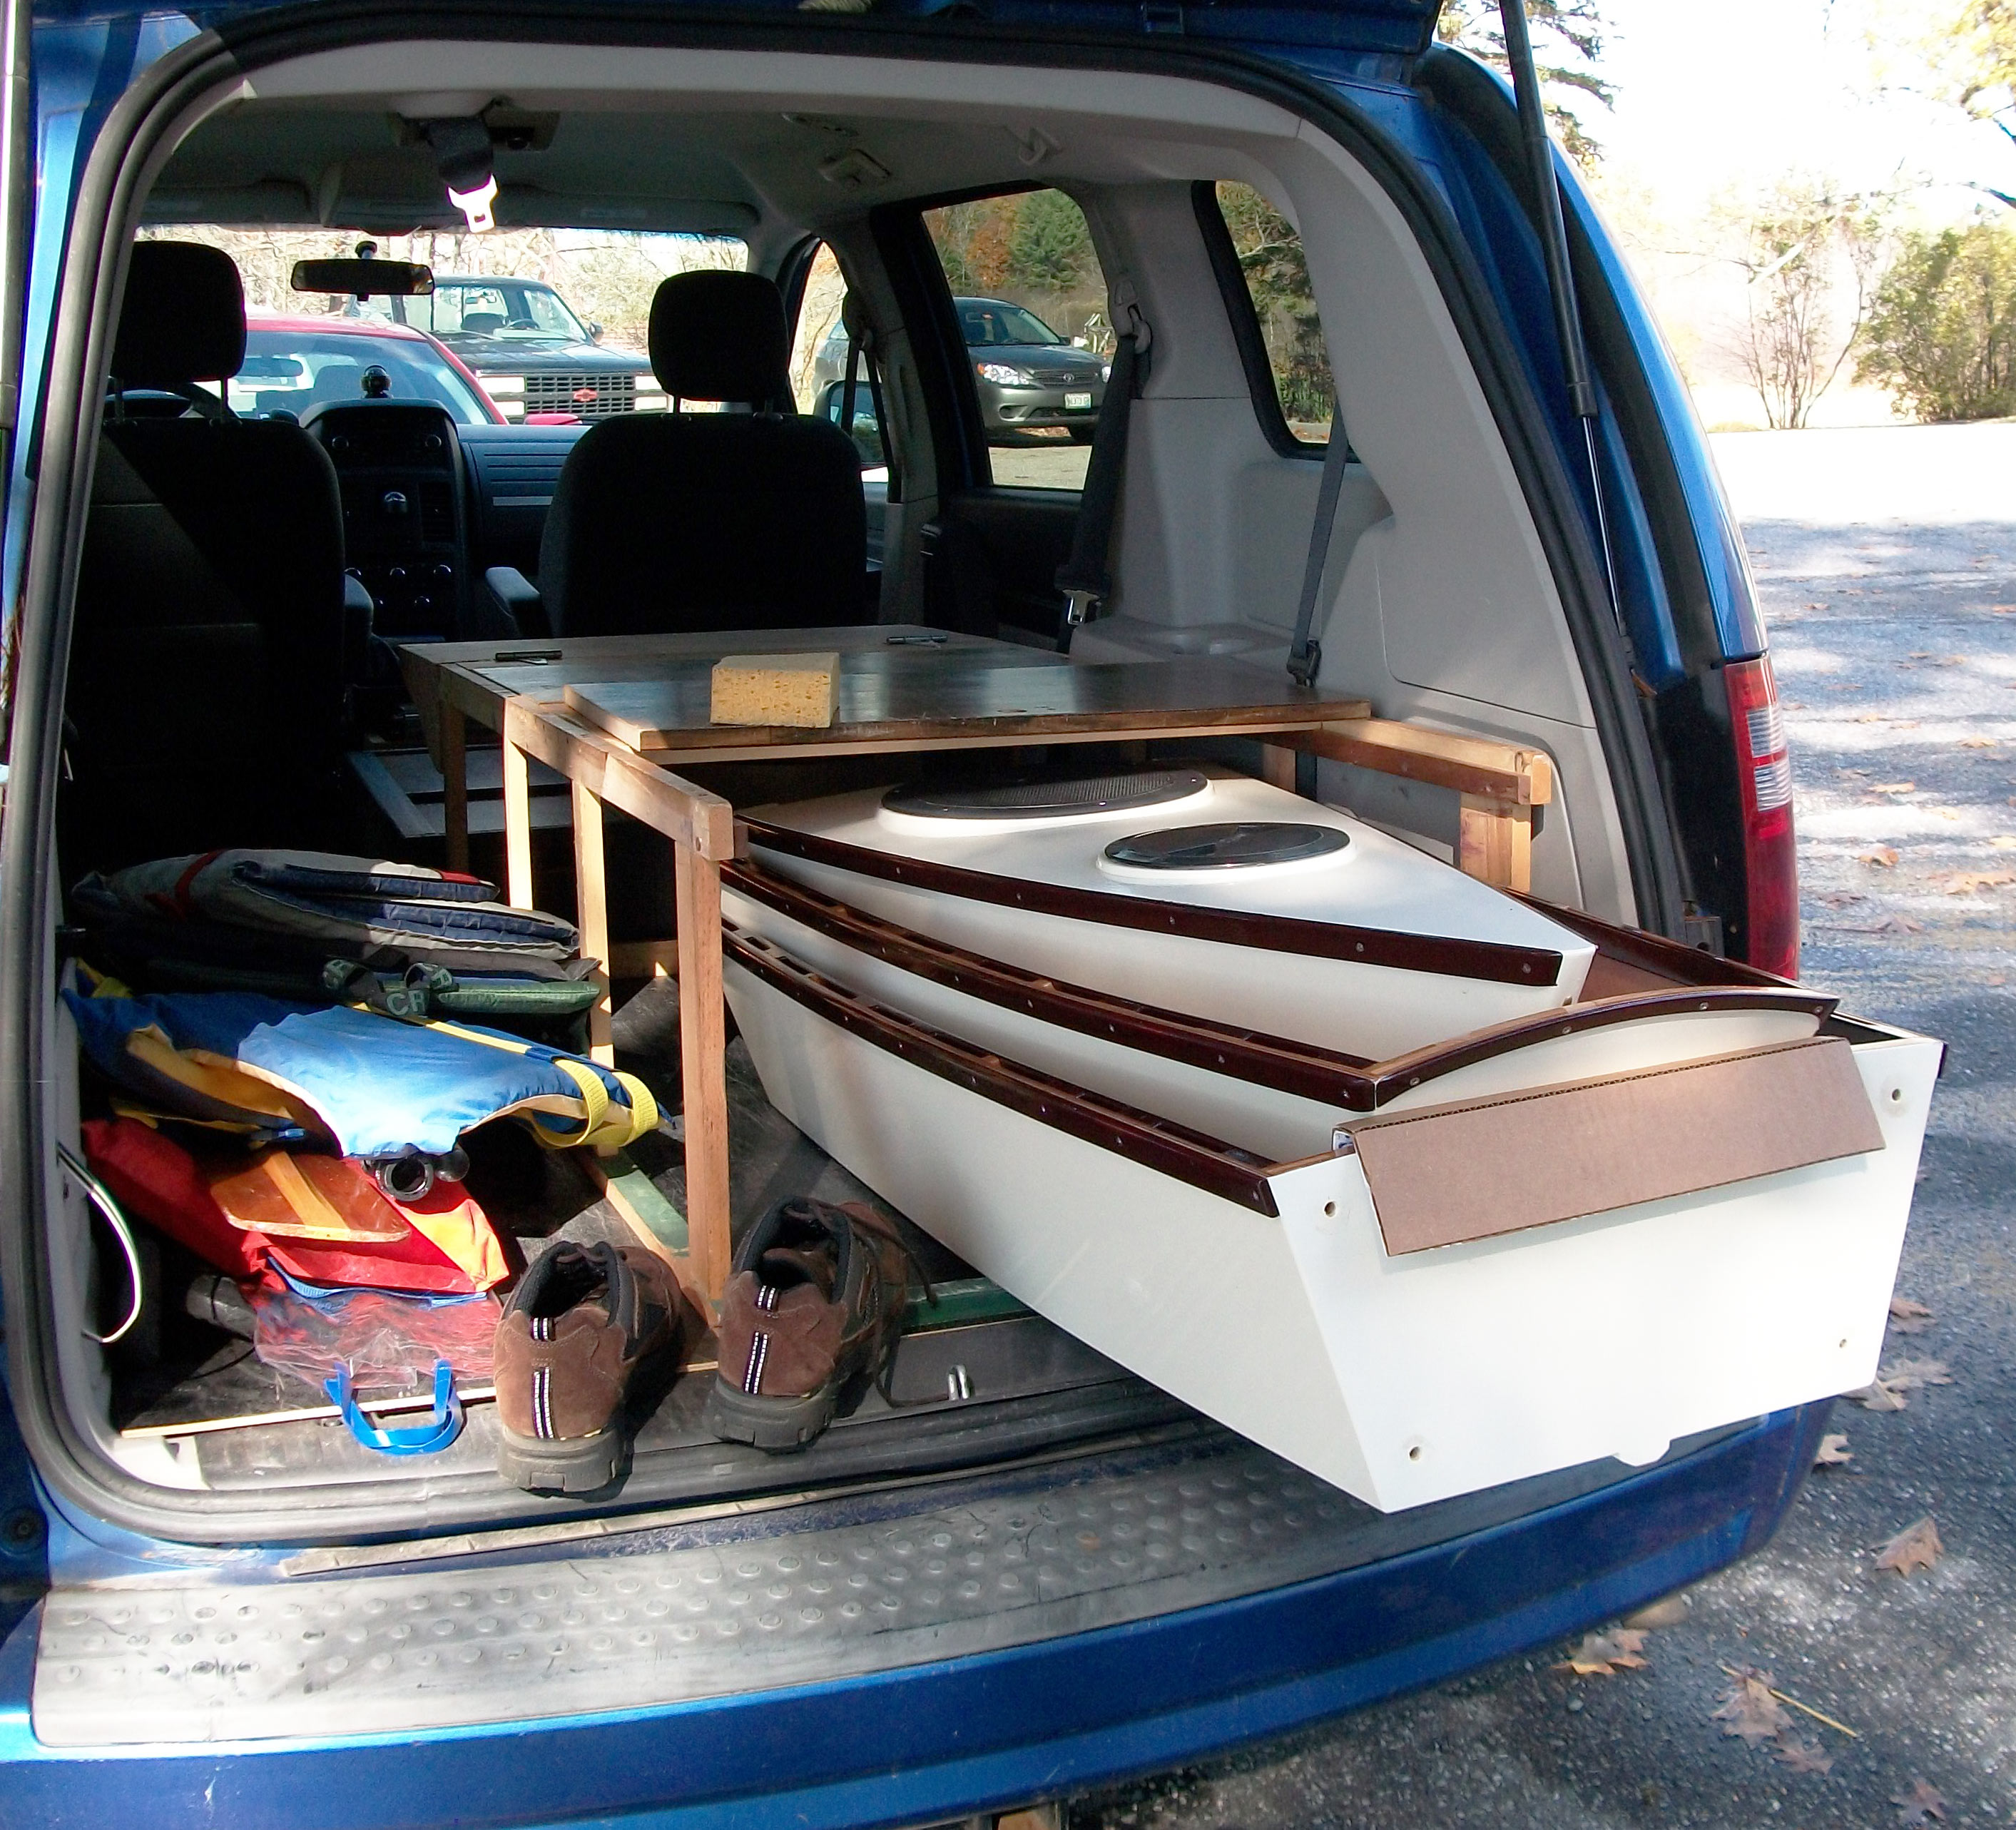
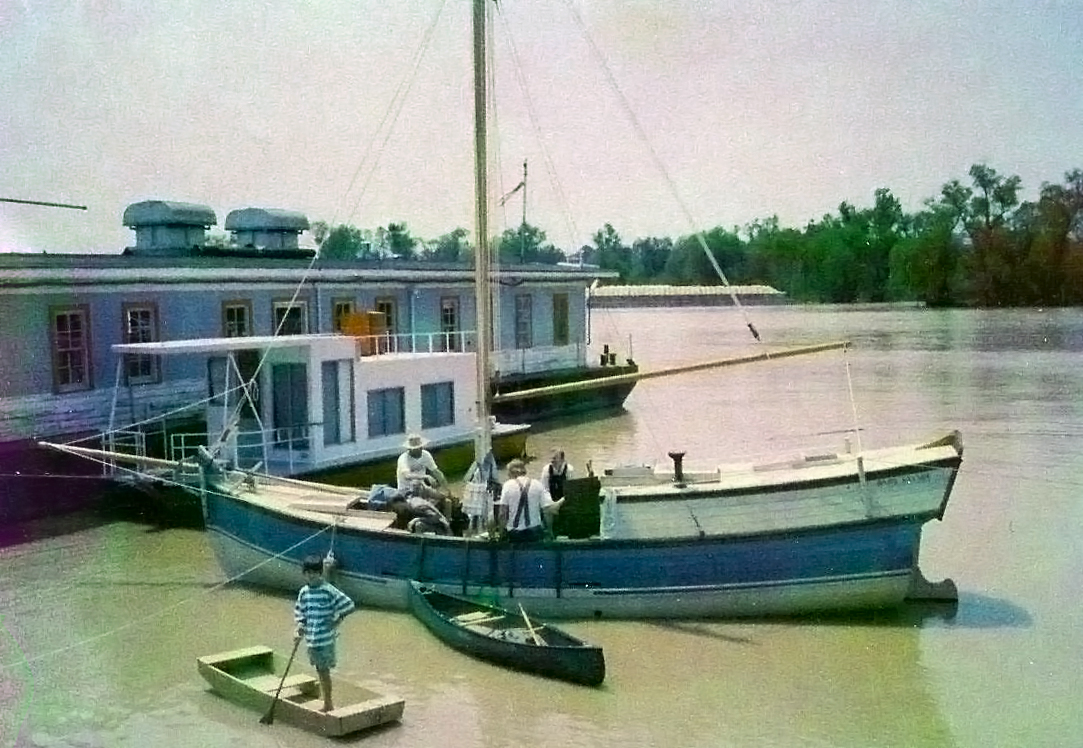
The first 12-footer fit in Tom’s van with plenty of room left for other gear. Tom would later build a second 12′ boat and find room for it in the van.
Vern Spenosa
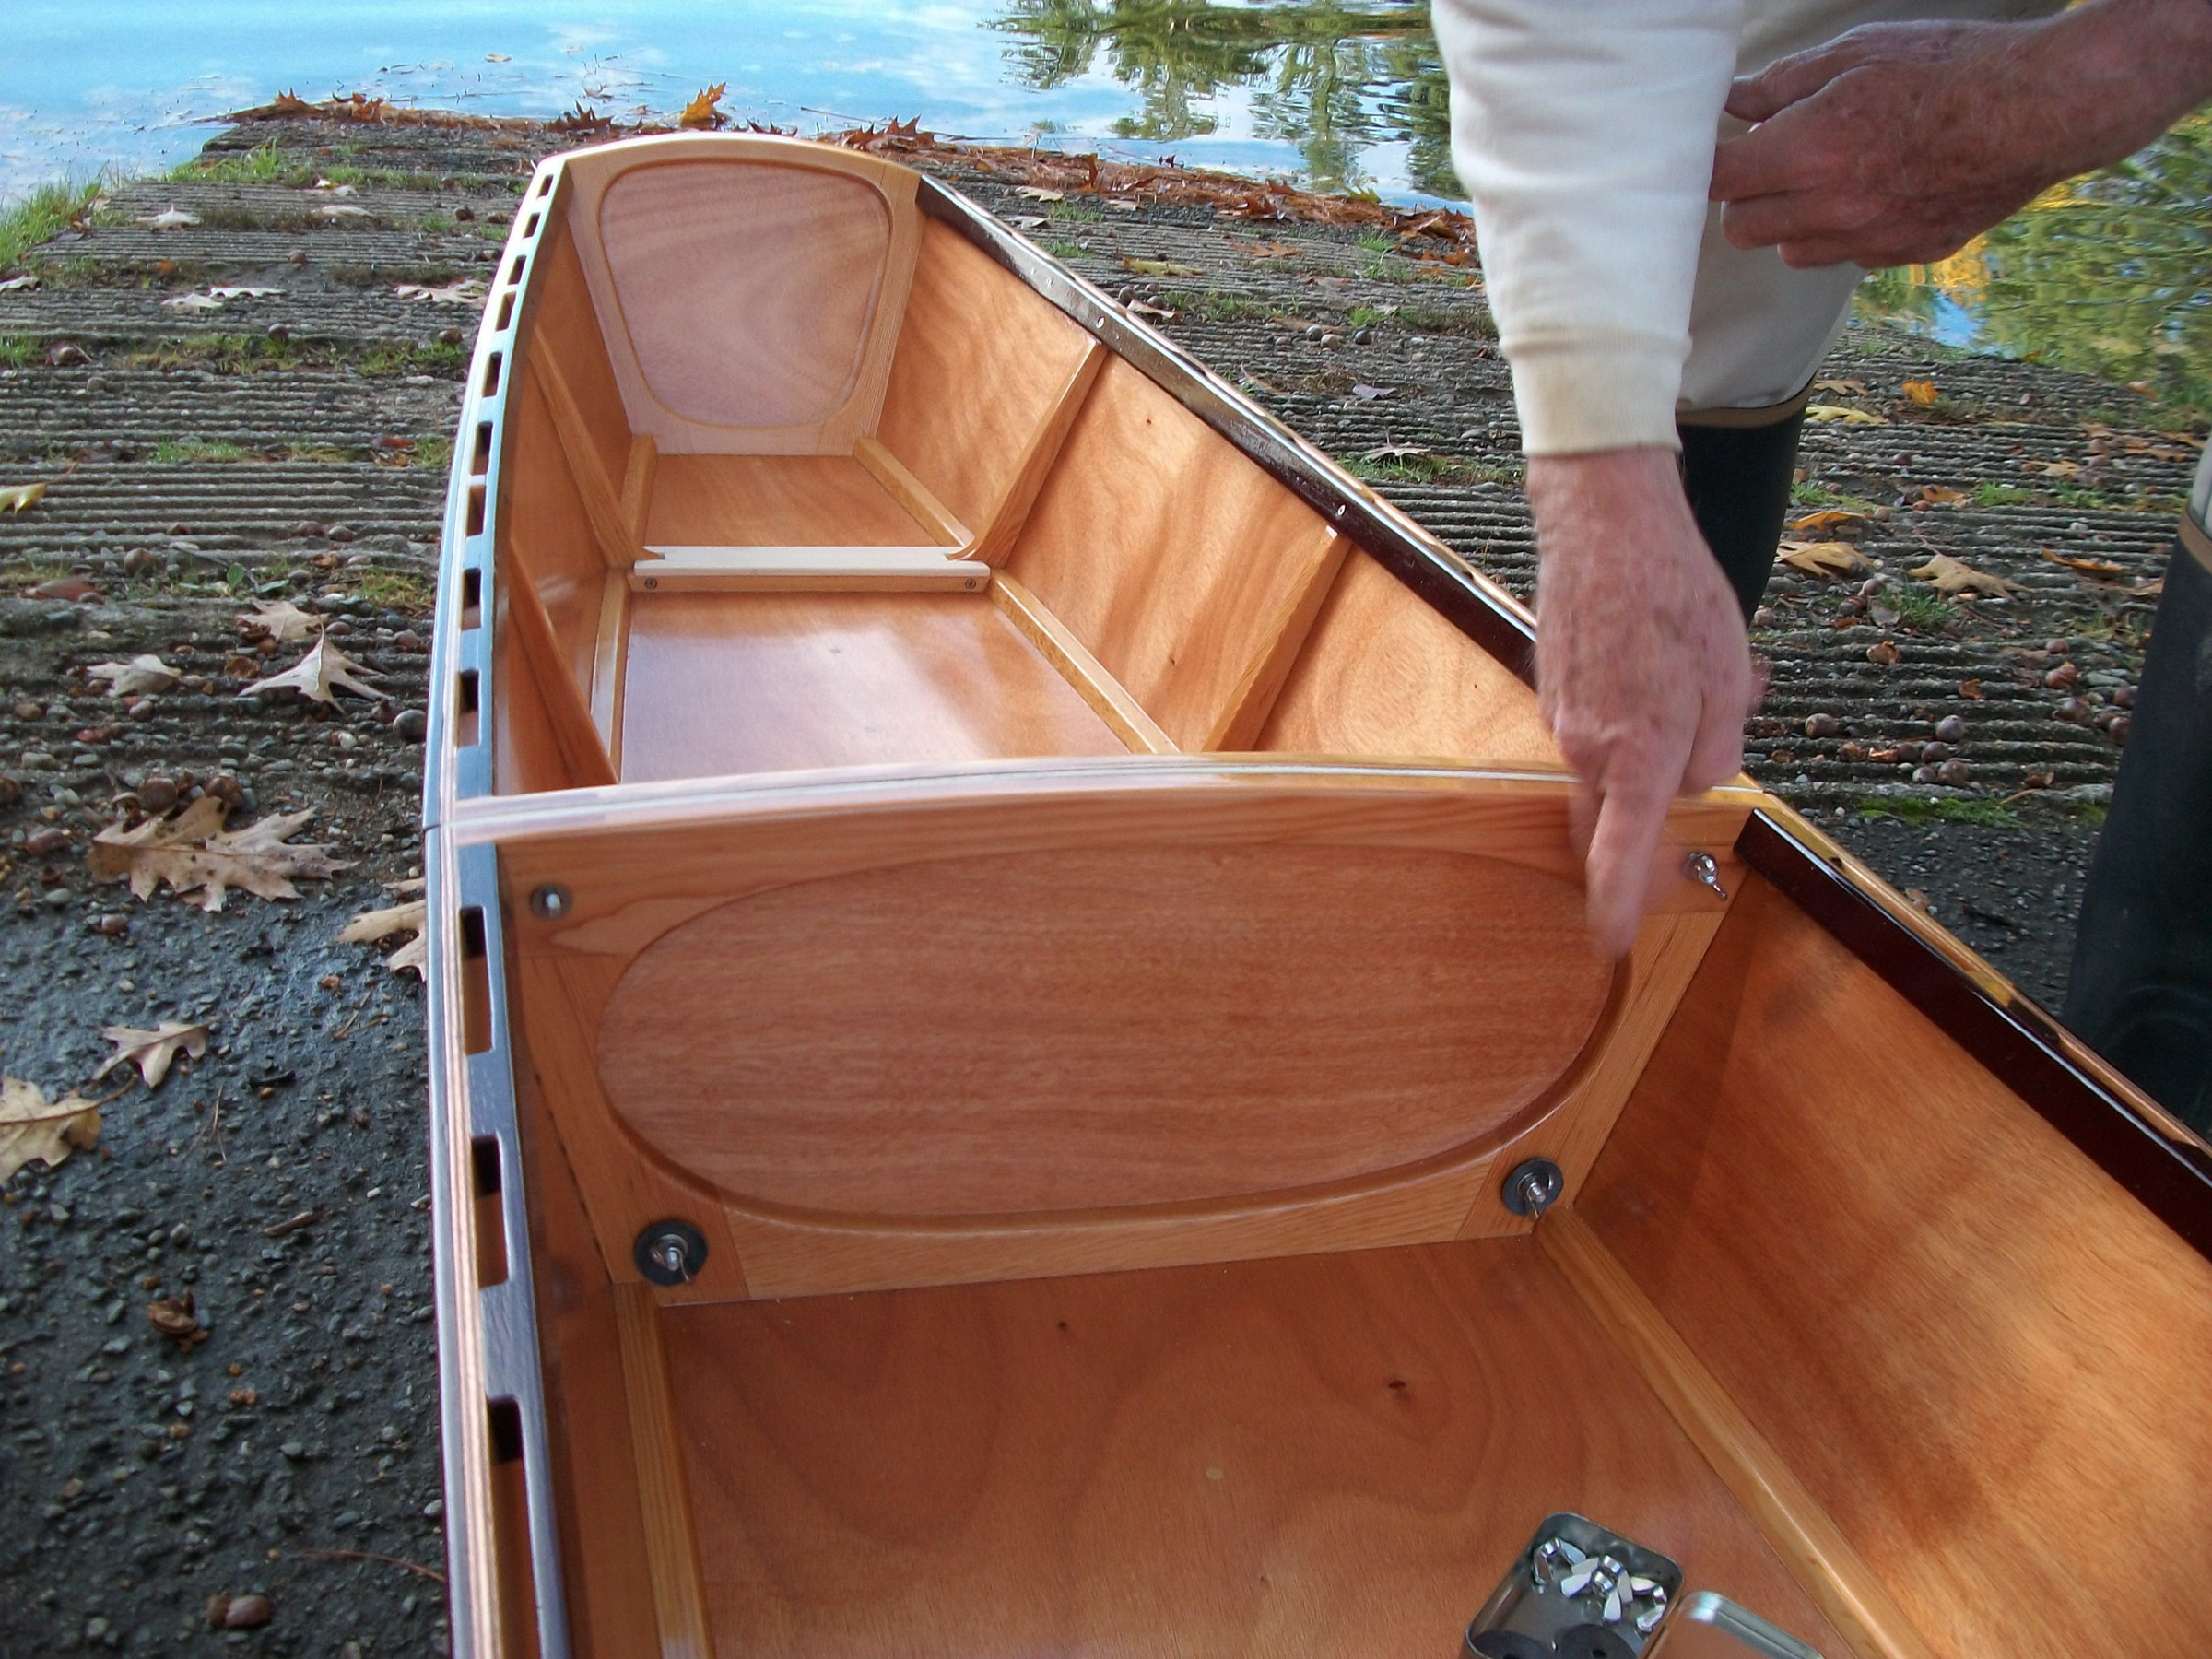
Assembly at the water’s edge takes just a few minutes. After Tom tightens the eight wing nuts on the bolts in the bulkhead corners he’s ready to launch.
Bolts with wing nuts hold the sections together. Rubber washers make the fastenings watertight.
Since launching the 12-footer he has logged 860 miles in it, and has paddled in every state on the East Coast. The only change he would make to the design is an accommodation for a window in the center section for underwater viewing in the clear waters of Florida’s springs.
Have you recently launched a boat? Please email us. We’d like to hear about it and share your story with other Small Boats Monthly readers.
In 1978, when I was setting up to build my first boat, I needed to start accumulating tools. My shop was a temporary shed in the back yard of the house I grew up in, so my dad’s tools were available, but the only power tool he had was an electric drill. As a kid, I’d been able to get by with his tools making forts along the back fence, two bunkbeds for myself, and a darkroom in the garage, but they weren’t going to suffice for boatbuilding.
The boat I started with was a dory skiff, and the limitations of Dad’s handsaws, hammers, and chisels came into sharp focus when I tried shaping its curved stem from a piece 2″-thick white oak. After I had traced the shape, I made dozens of short cross-cuts up to the line, whacked out the blocks in between with a chisel and a hammer, then finished up with a rasp and a file. It was painfully slow work, and I was pretty sure that if I ever finished the boat I’d never build another.
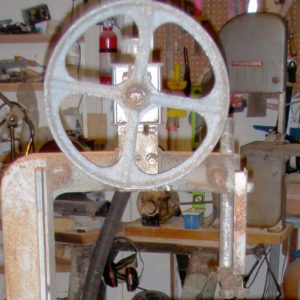
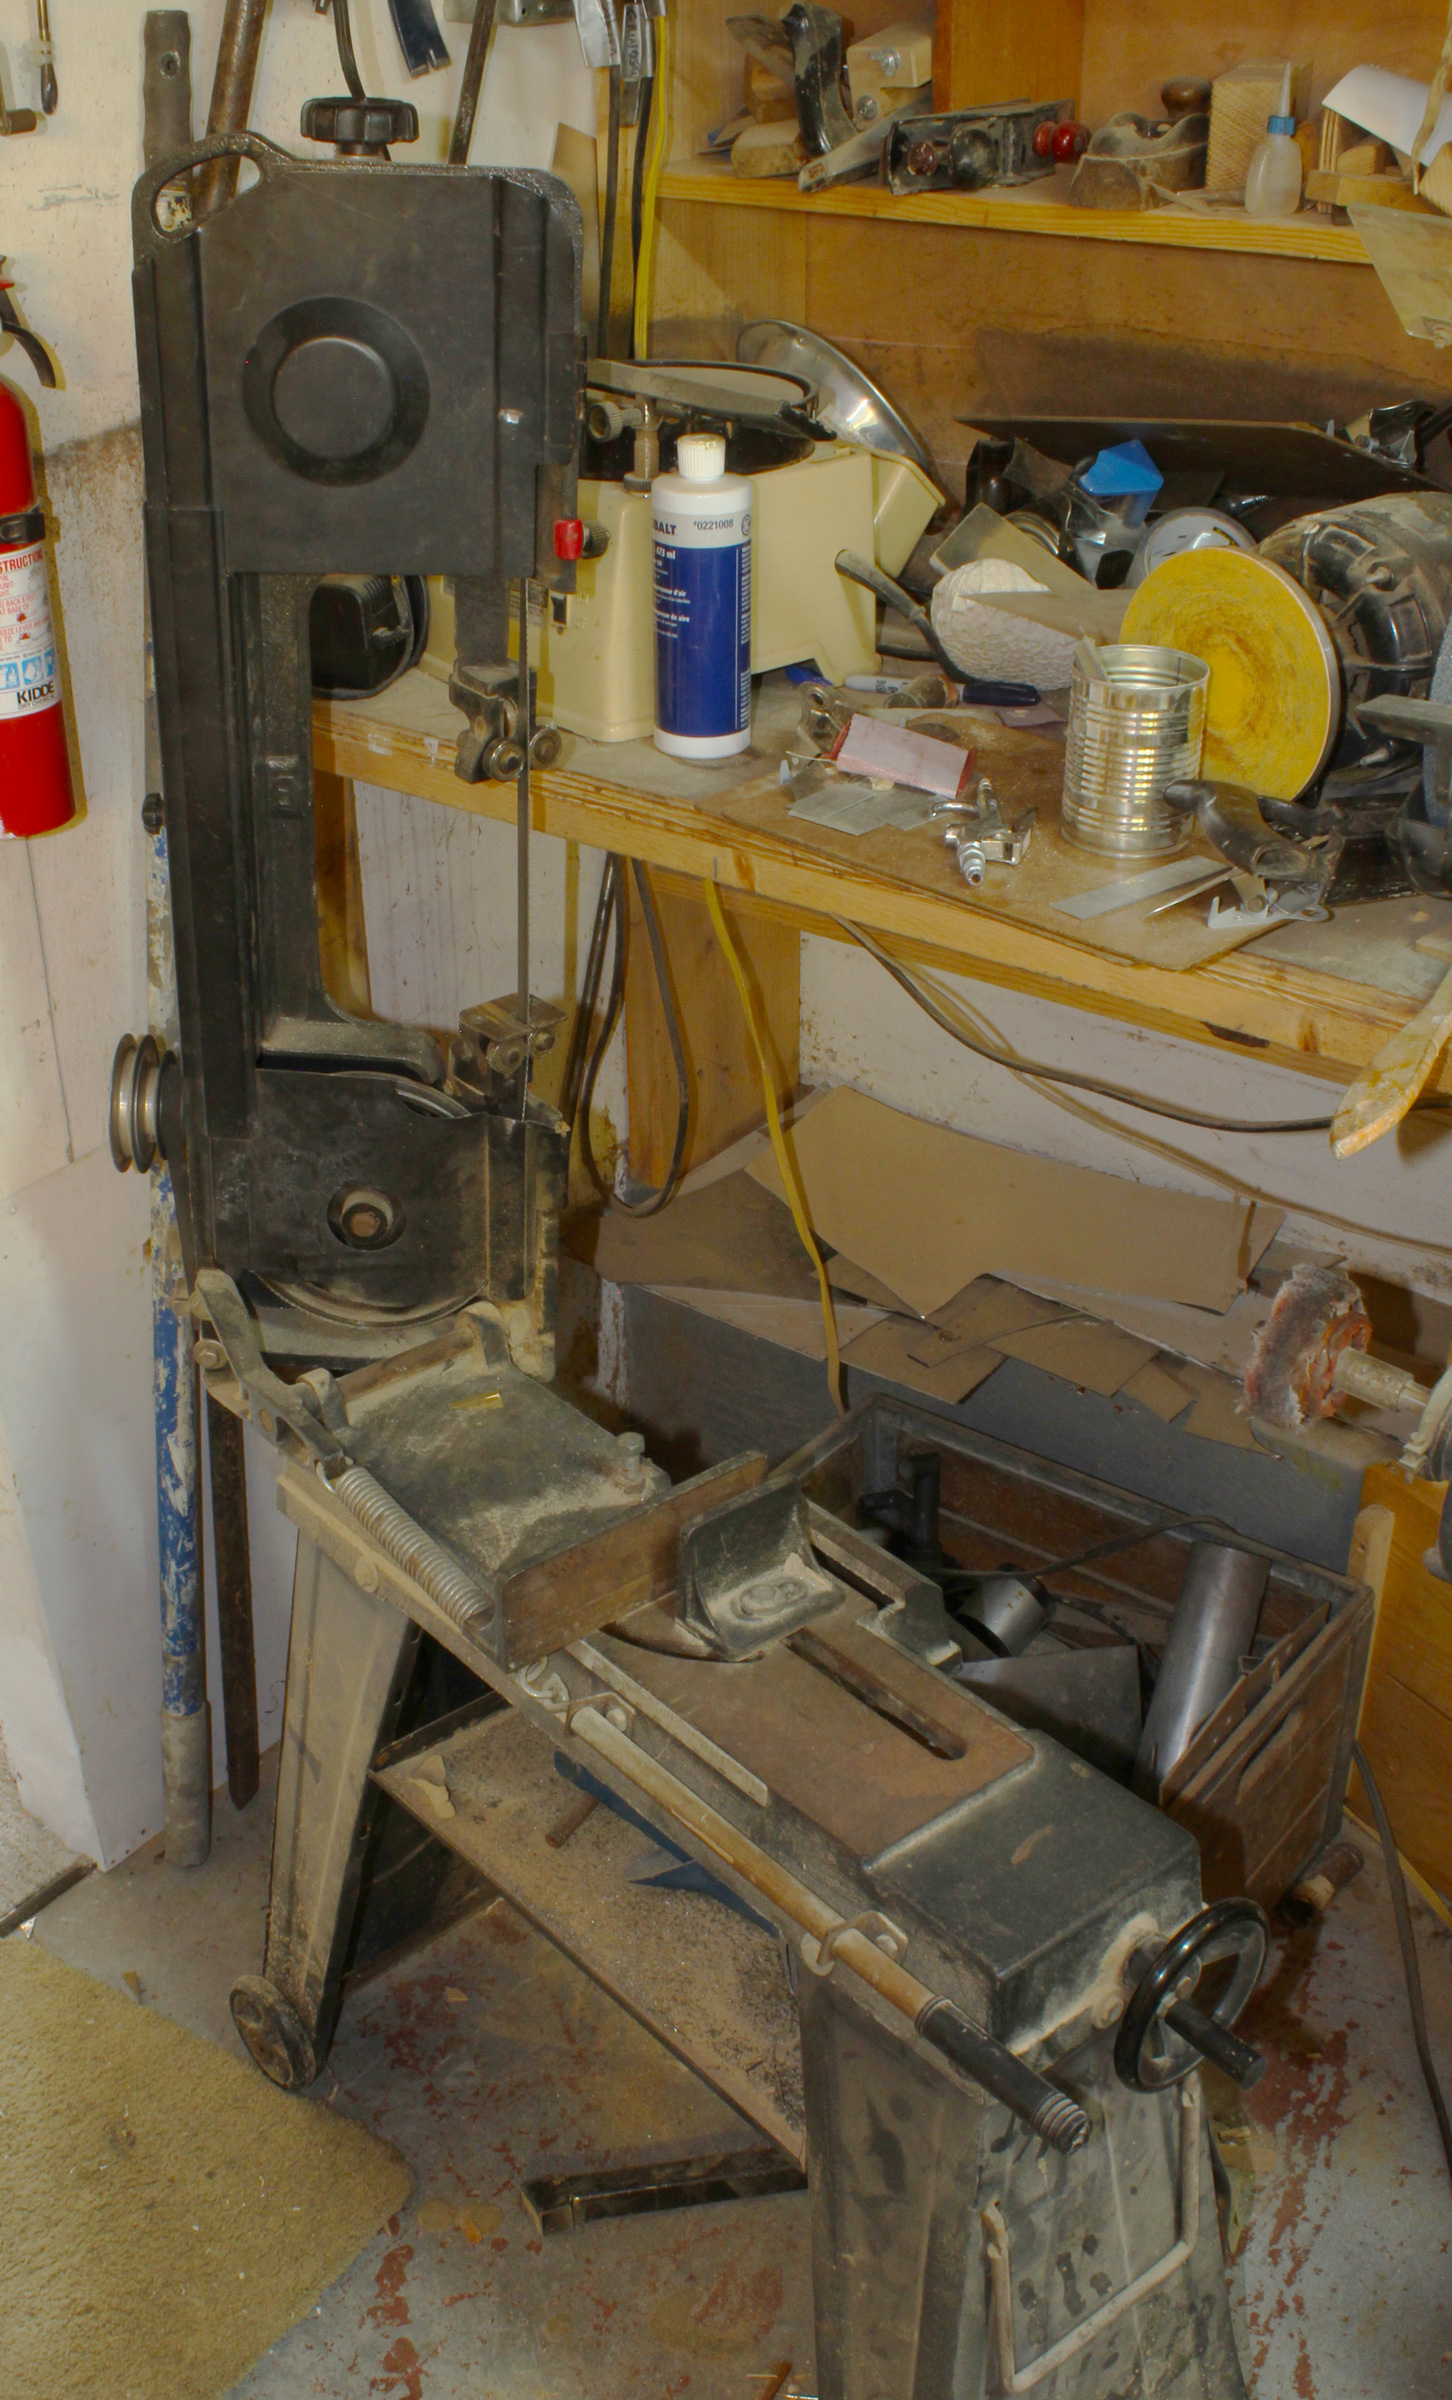
One of these once-ubiquitous ads for Gilliom kits led me to building my first bandsaw.
In one of the do-it-yourself magazines I liked to read, I saw an ad for a bandsaw built from a kit. It had the necessary metal pieces; all I had to do was make the plywood and lumber frame. I mailed my order with a check for around $35 to Gilliom Manufacturing in St. Charles, Missouri; when the plans and parts arrived I built the frame, installed the metal parts, added a 1/3-hp electric motor, and I was in business. There was nothing fancy about the bare plywood bandsaw, but it got the dory project moving along at a satisfying pace and I began to enjoy the work. I finished the dory skiff and a few months later began building a second boat, a gunning dory.
Dad was always involved with rowing and did a lot of repairs to wooden racing shells in the garage. It didn’t take him long to see the value of my bandsaw. He often had to replace shoulders, the ash diagonals in the cockpit that span the keelson, inwales, and washboards and anchor the outriggers. They have a complex shape, and while he could make them using a backsaw and a coping saw, he could do the work in a fraction of the time on my bandsaw. He ordered a Sears Craftsman 12″ bandsaw, the first standing power tool he had ever owned. Despite its thin cast-metal back and a molded plastic cover, it lasted for decades in his shop, and after Mom died and Dad sold the family home, he took the bandsaw to the shop at the Lake Washington Rowing Club where he continued to work on shells. Dad passed away a few years ago and his bandsaw has since moved on from the club, but I believe it’s still working, headed for 40 years in operation.
In the early ’80s I built a cabin/shop in the woods in the Cascade Mountains and took my Gilliom bandsaw with me. I was 17 miles off the grid, so I powered the bandsaw with a gas engine salvaged from a lawn mower. I kept the saw by a large door so I could get rid of the exhaust fumes when I had the bandsaw fired up. I built a kayak and a sneakbox while I was in the mountains, then moved out in the middle of my second winter to take up residence in a cabin on Lopez island in Washington’s San Juan Archipelago. While I was on the island I built a half dozen flat-bottomed rowing skiffs for a summer camp.
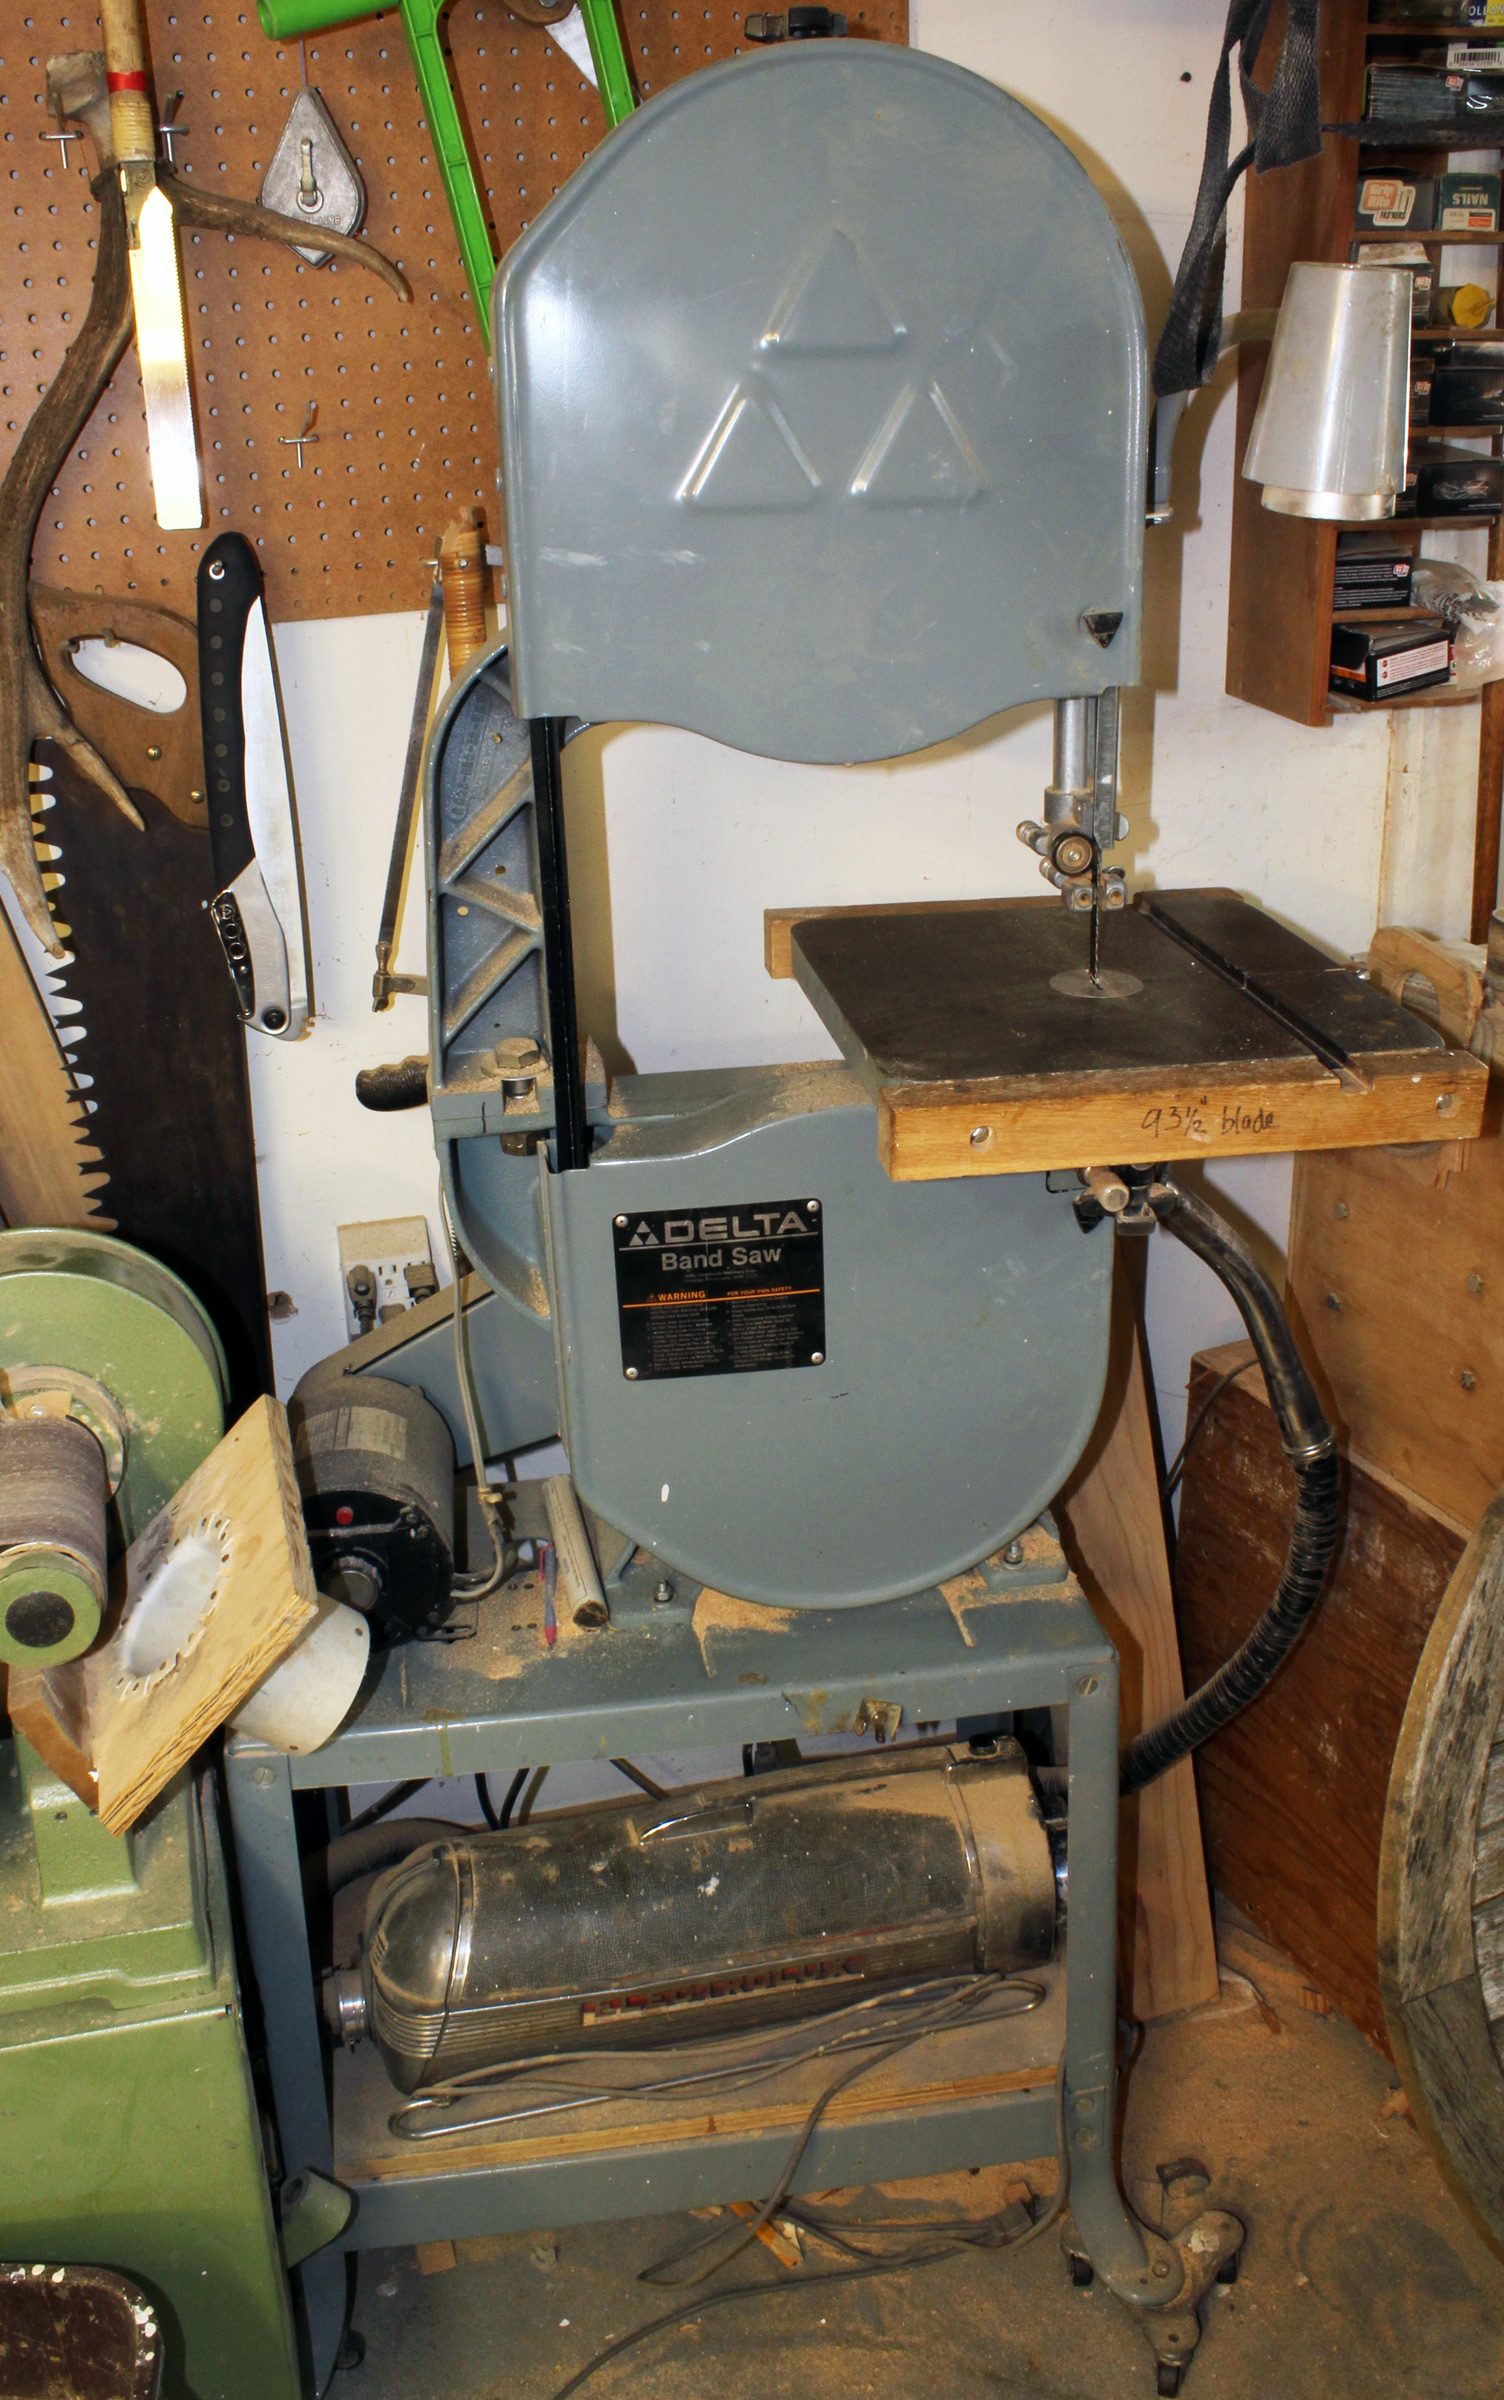
I’ve been using this 14″ bandsaw for about 30 years. It’s on casters to make it mobile and the vacuum cleaner doing the dust collection is an Electrolux that my mother bought around 1960. I remember the day the door-to-door Elextrolux salesman paid us a visit. To demonstrate the vacuum’s power he attached a clear plastic tube to the hose nozzle and sucked up three solid steel balls, one after the other, off the floor straight up into the tube. It still has enough oomph to gather dust.
In 1987, I moved to Washington, D.C. and got a job working for the Smithsonian Institution. I could afford to buy a bigger bandsaw, one that would last a lifetime, because I didn’t see an end to my building boats. I bought a 14″ Delta, a solid machine with a heavy frame and smooth-running wheels. While I was in D.C. I built an 18′ tandem decked lapstrake canoe in the basement of the rental house.
When I returned to Seattle in ’89, I took the Delta apart and shipped it ahead by rail. In my new home I had only a small one-car garage for my shop, so there was little room for non-essential tools. I retrieved the Gilliom that I’d left with my parents, scrapped the wood, and saved all of the metal parts, mostly for sentimental reasons. Over the years they’ve all drifted away and there’s nothing left. With the Delta I built only one boat in that garage, an 8’ rowing skiff for my infant son. It was afloat only once before becoming a backyard plaything, and ultimately was converted to a bookcase.
My second 10″ Homecraft bandsaw, a curbside rescue, needed a bit of attention. Behind it is my first 10″ Homecraft, and to its right, my 14″ Delta.
In my current home, I’ve had lots of room for tools. I happened upon a 10” Delta-Rockwell Homecraft bandsaw at a yard sale. I bought it and put it to work with a thin blade for curved cuts, leaving the Delta with a wide blade for resawing and heavy work. A few years later I was driving to work one morning and saw another 10″ Homecraft out by the street with a “FREE” sign on it. It was rather rusty and missing its lower blade guard, but it had a solid stand and a working motor. The blade on it was a 1/2″-wide hook-tooth with an aggressive three teeth per inch. When I got everything cleaned up and made a new blade guard, I was pleased how well this new addition to the shop worked. In spite of its small size, it has an enormous appetite for wood. I keep the same kind of blade on it and use it for slabbing crooks into knees and locust windfalls into stock for cleats. While it’s said that the poor man owns many boats, the rich man but one, I’ve come to believe the inverse is true of bandsaws.
My metal-cutting bandsaw isn’t much to look at and has a cheap, wobbly base, but it has a lot more patience than I do.
The last bandsaw to come into the shop, a metal-cutting bandsaw, was another yard-sale buy. After I get the working stock clamped in, it does its work by itself so I can tend to other tasks. When it’s done I hear the cut-off ring as it drops to the concrete floor; the saw turns itself off. With its help, I’ve grown more ambitious with my metalworking projects and have made a few sets of pintles and gudgeons and wood stoves for the two boats with cabins.
I didn’t plan on becoming a boatbuilder. The only reason I built my first boat was that I didn’t have enough money to buy one, and I bought the bandsaw kit as a way to avoid the tedium of working with hand tools and just get the job done. But that first bandsaw turned me from someone who wanted a boat into someone who wanted to build boats.
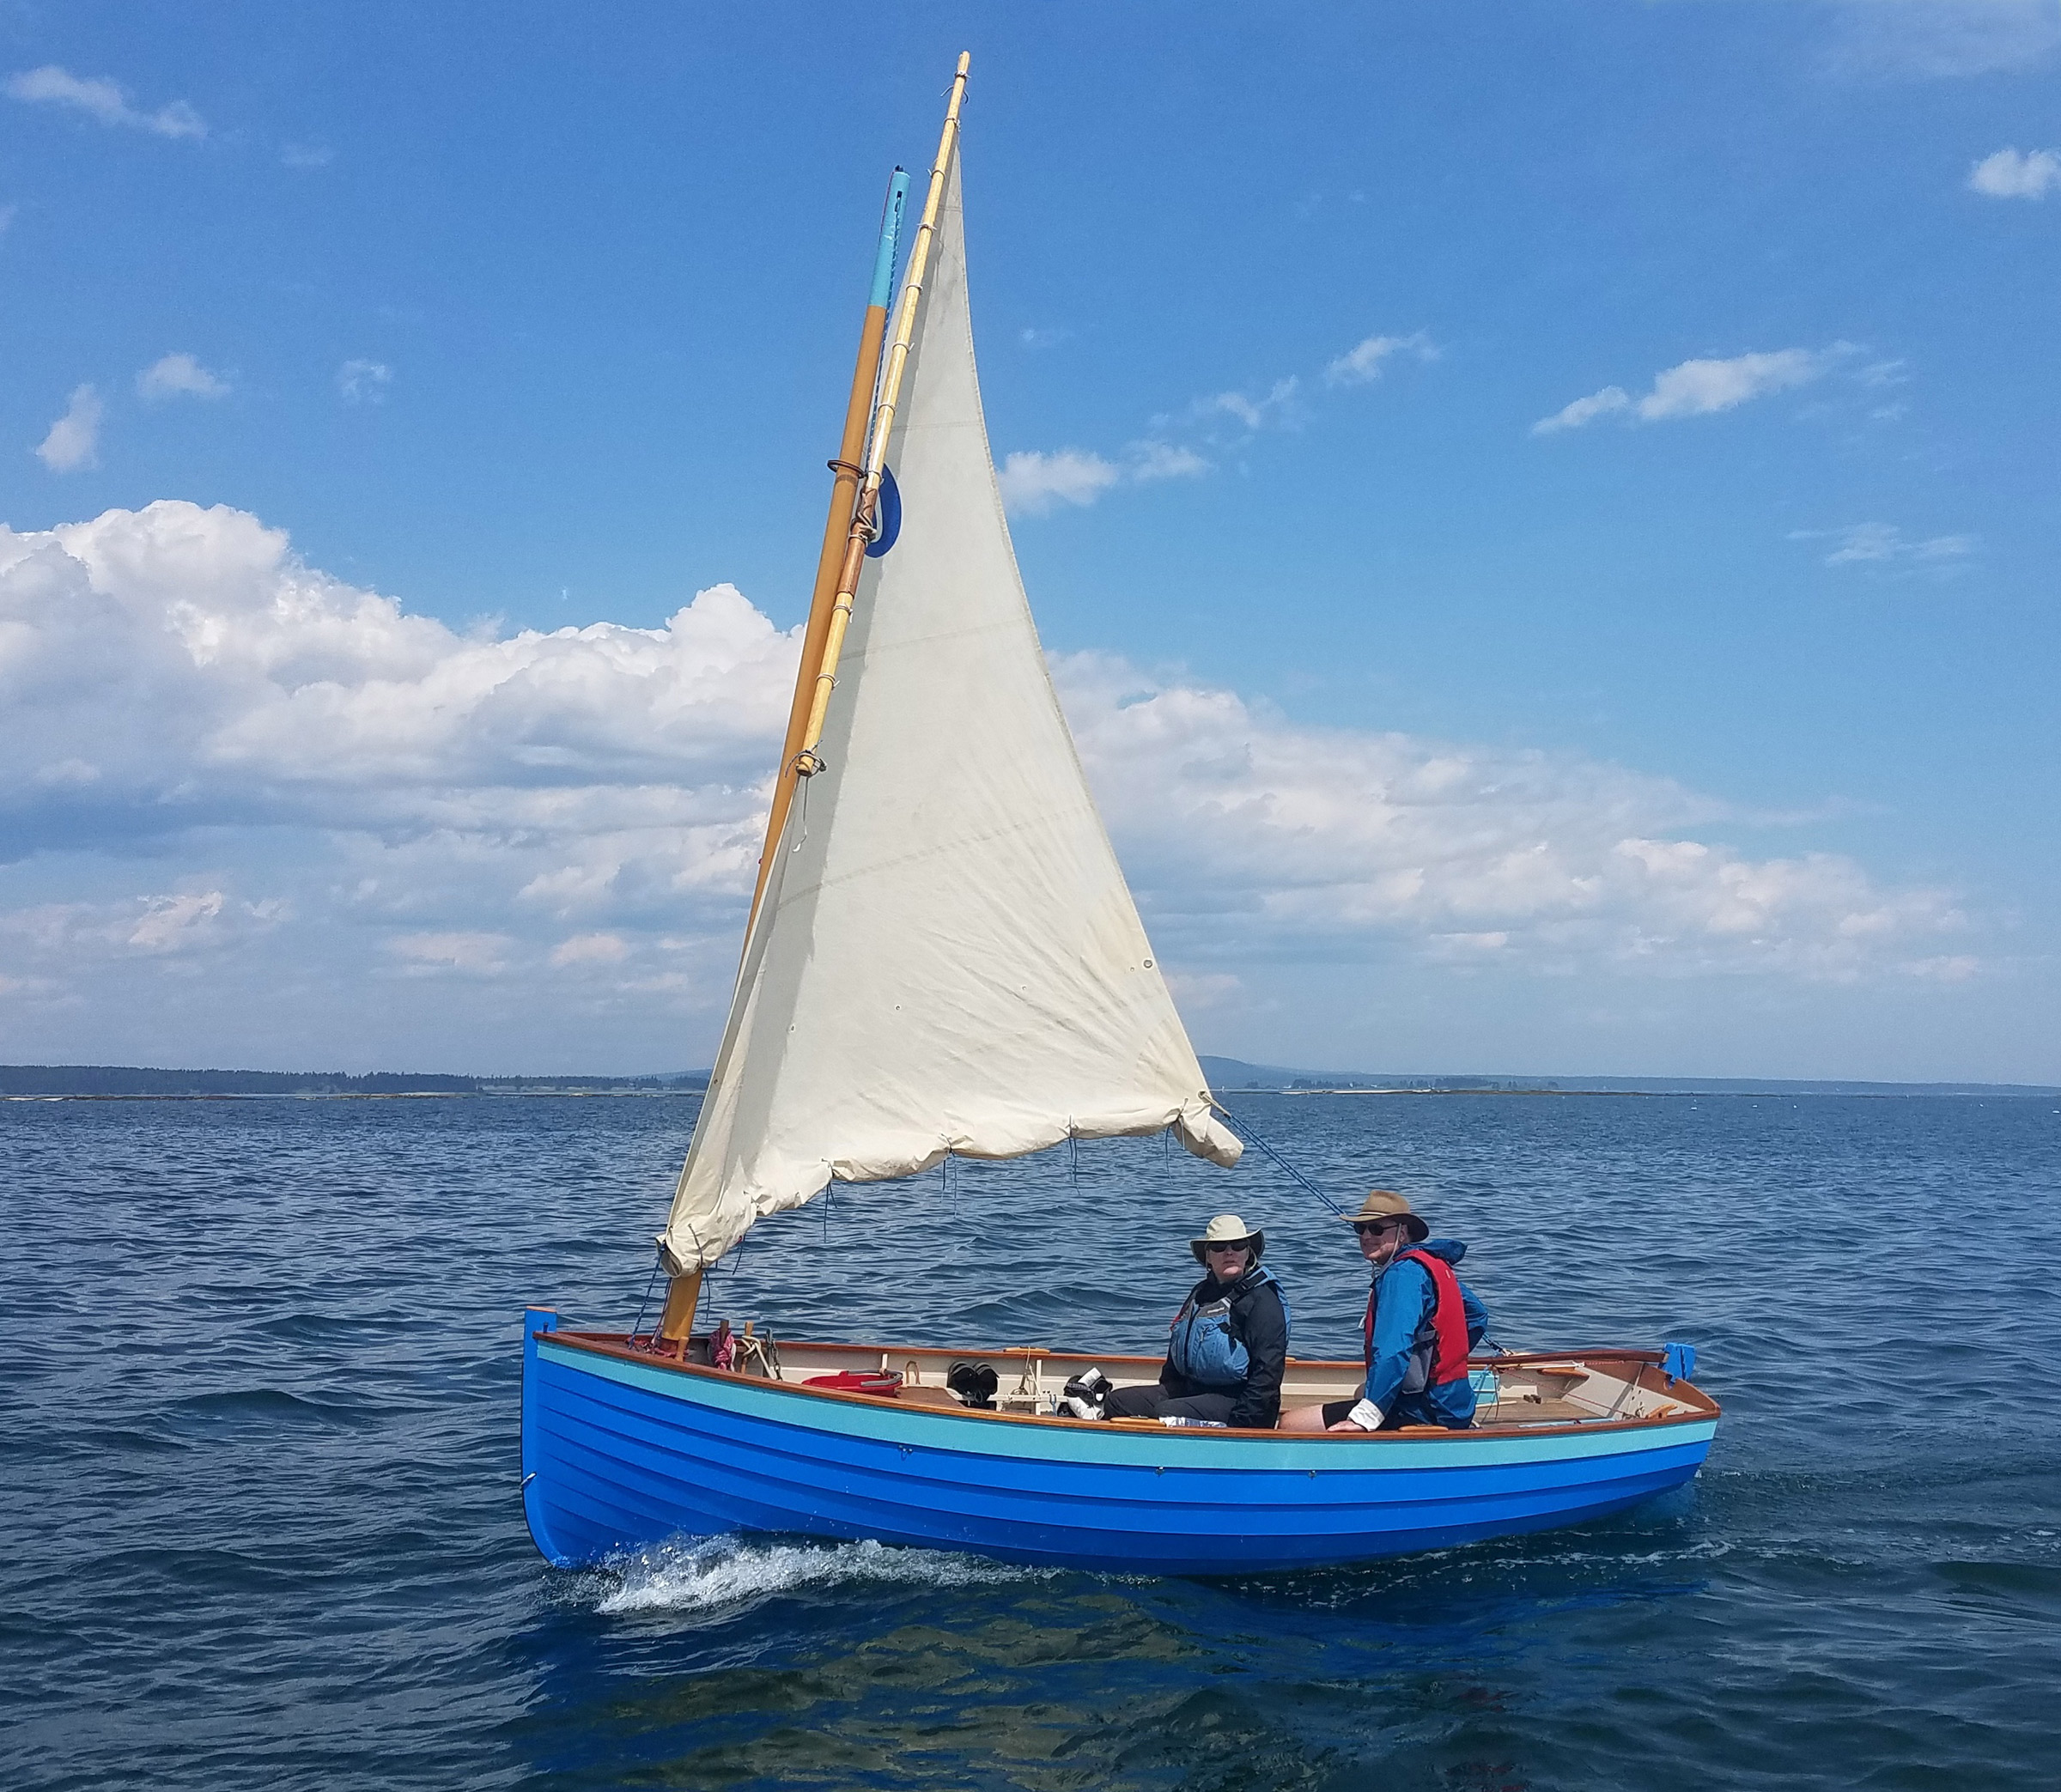
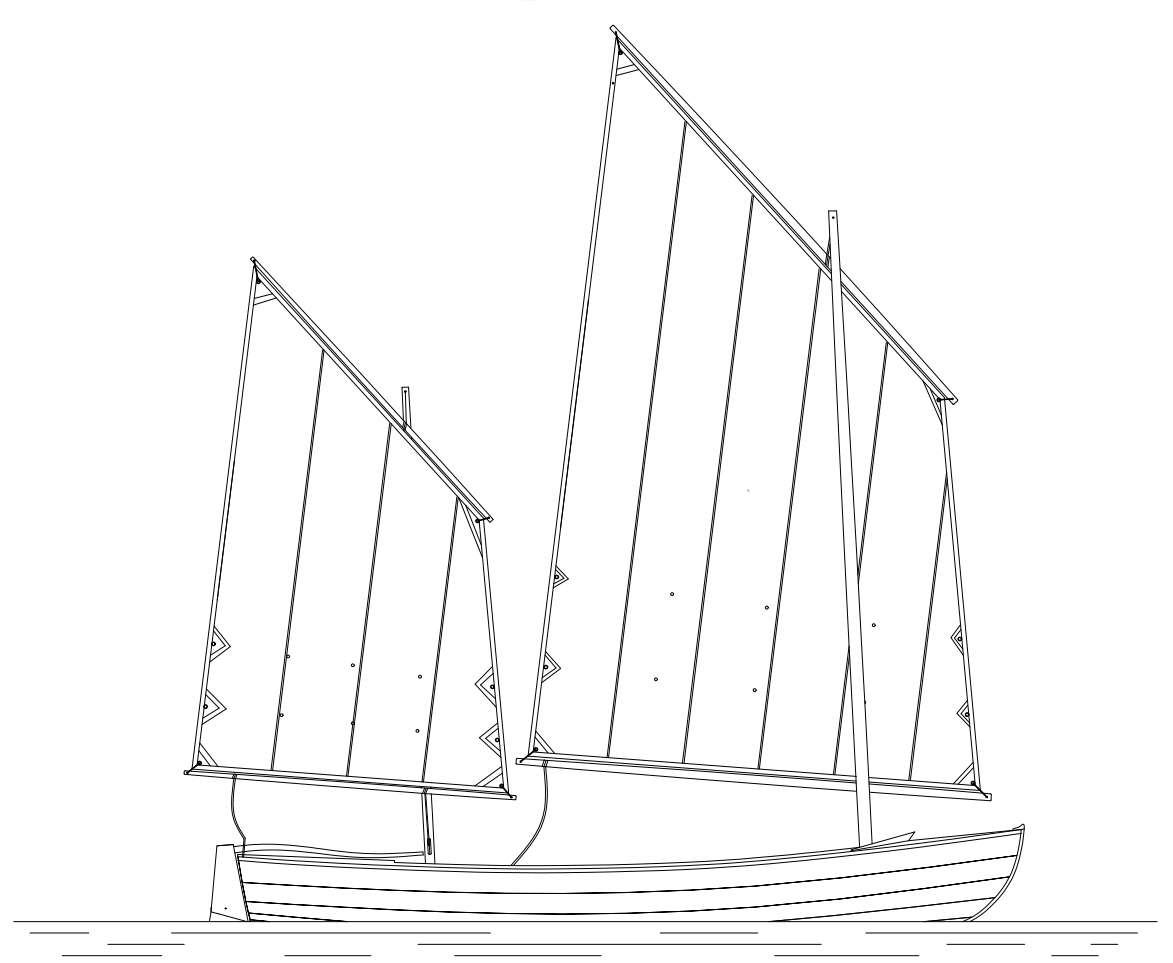
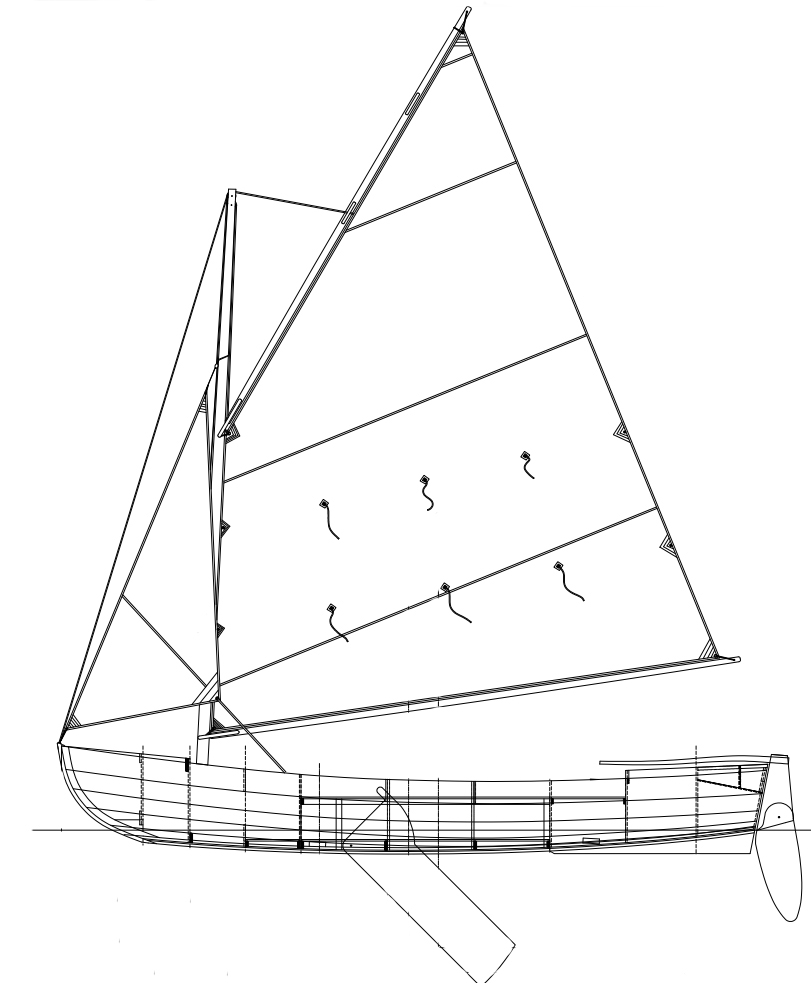
The French term voile-aviron translates to “sail and oar,” and describes a type of small cruising boats with a devoted following. French naval architect François Vivier has created an extensive portfolio of voile-aviron boats, and the Ilur is his most popular—many hundreds of them sail in France and a growing number are being built in North America. With a quiet, robust beauty, the Ilur’s current iteration represents an impressive marriage of classic form, 21st-century computer-assisted design, and modern plywood-and-epoxy glued lapstrake construction.
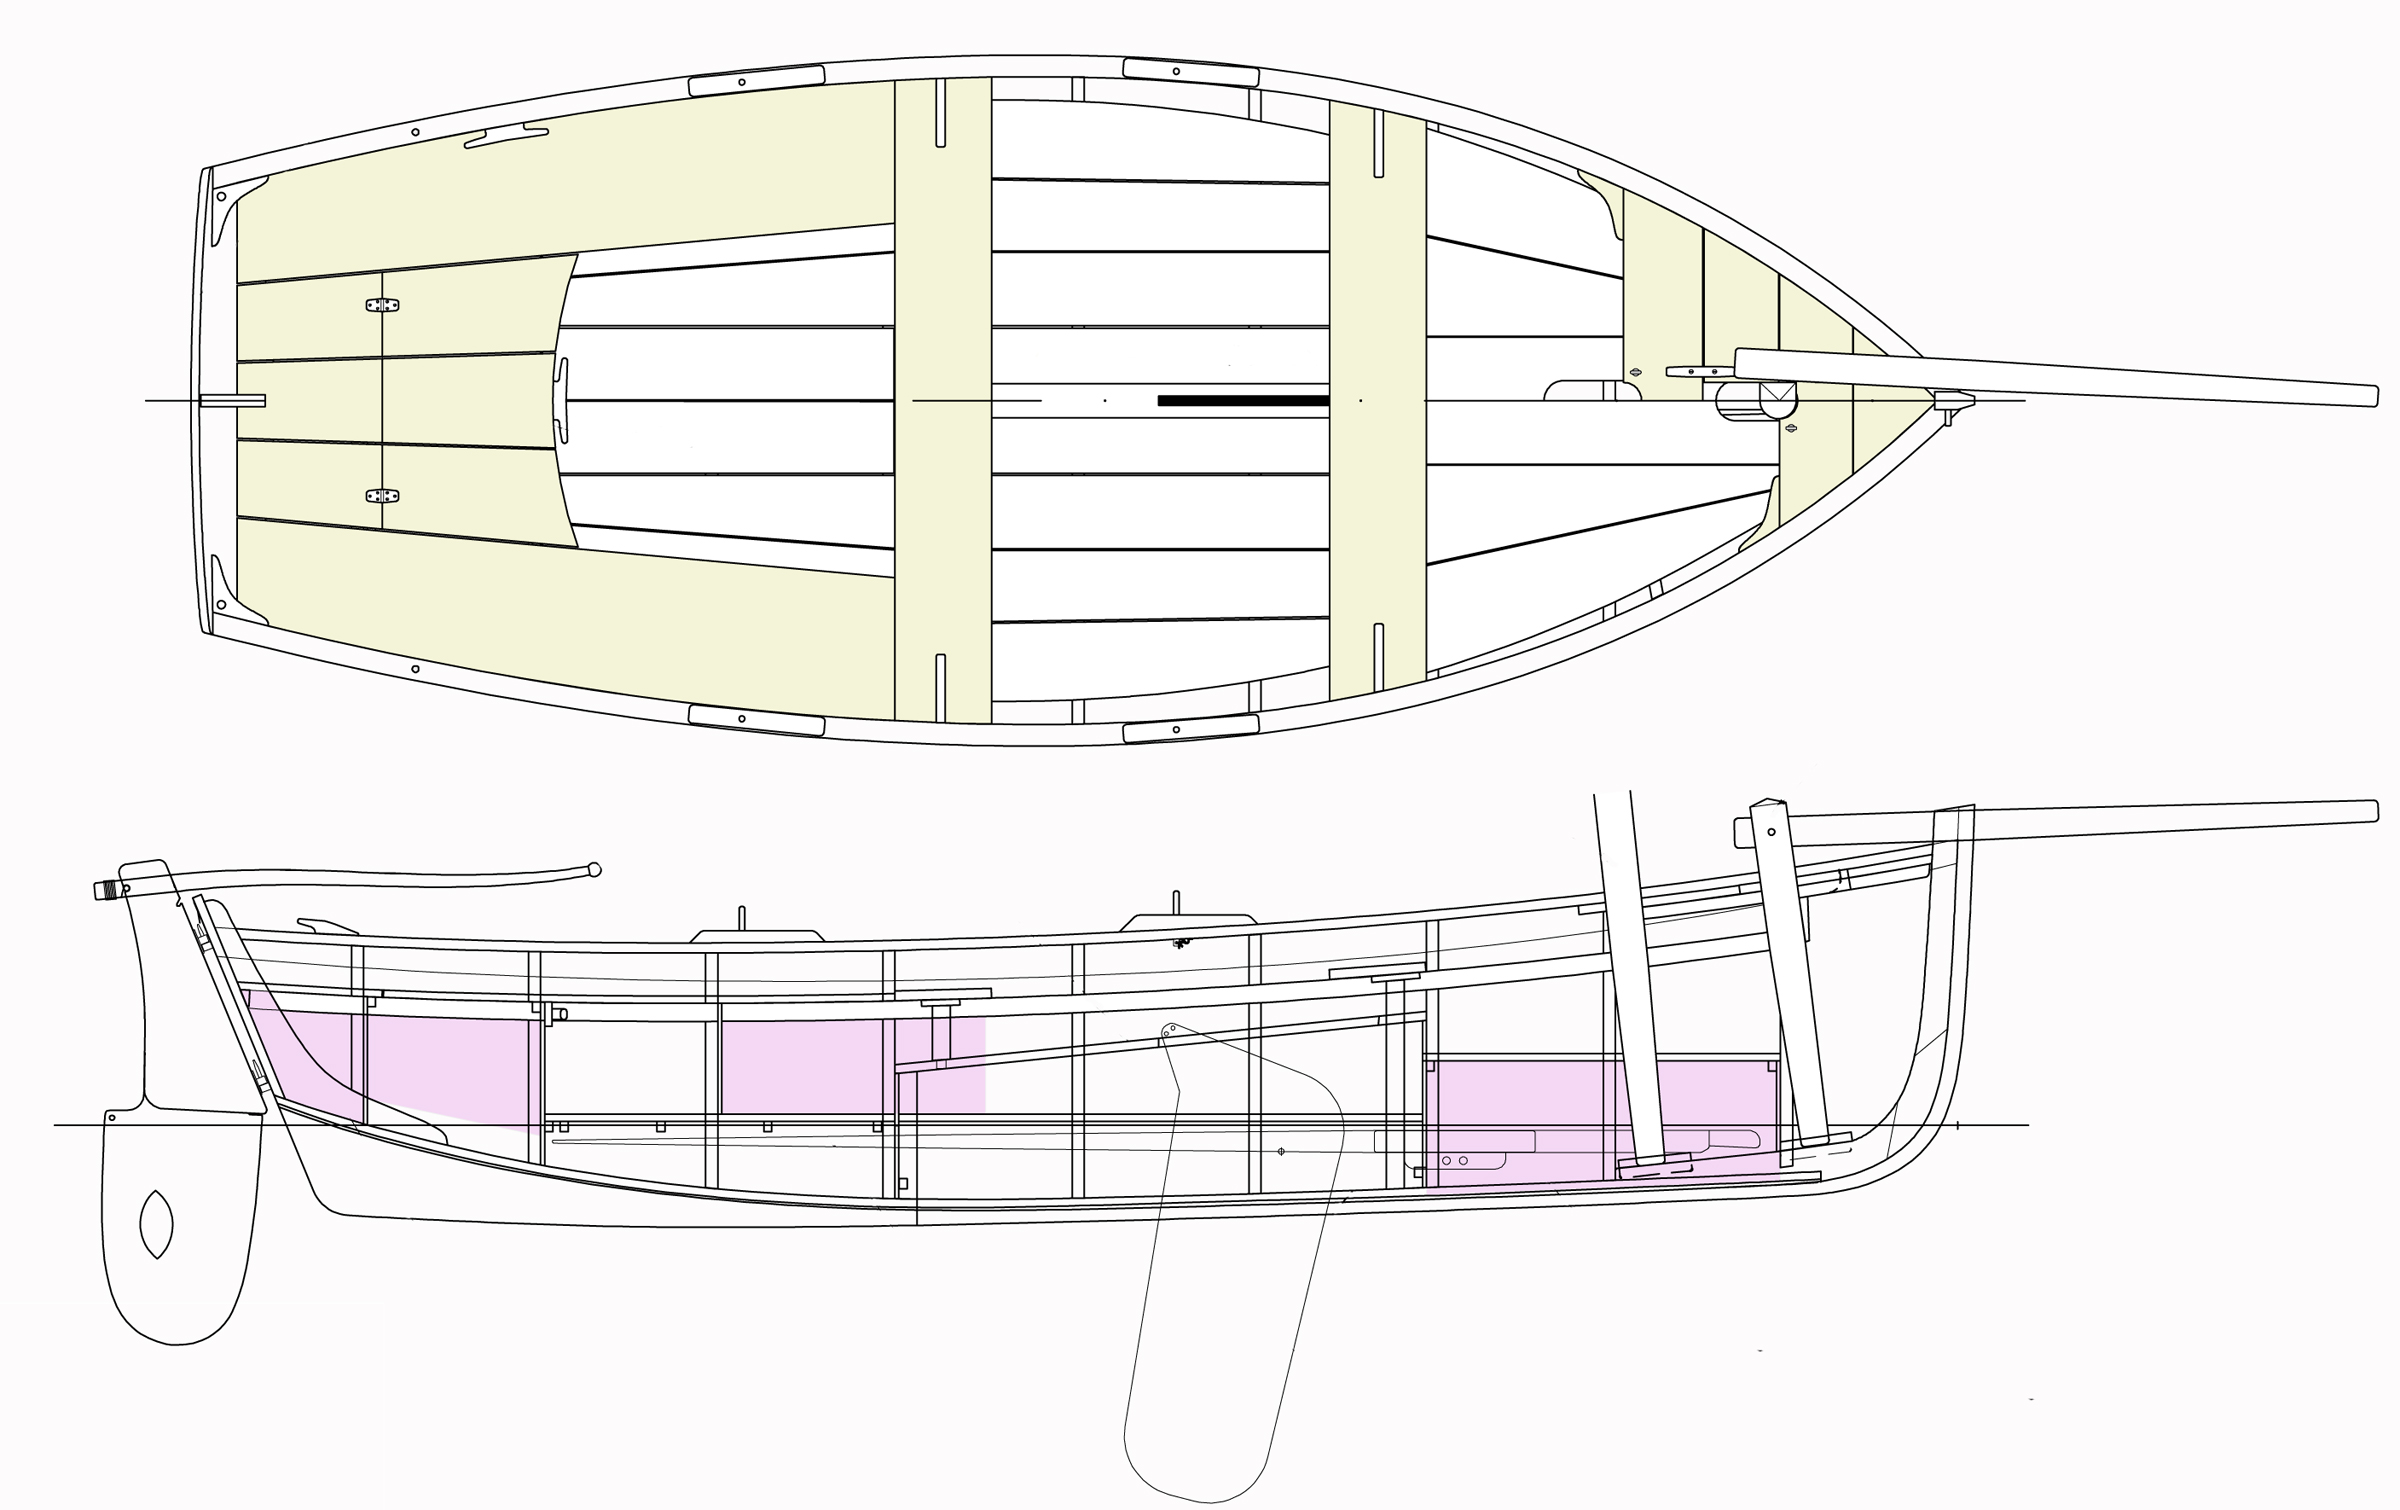
The Ilur arrives on pallets as a precut kit with CNC-cut components, including a strongback on which the hull is built. One of the key aspects of the kit-built method is the use of sawn bulkheads and interlocking longitudinal stringers that, as Vivier brilliantly executes, form both the building jig and the majority of the internal furnishings, so that after the hull is planked and flipped, much of the interior has already been completed. The result is an extremely strong hull that can be accurately and quickly executed by professionals and amateurs. The bulkheads and frames are 3/4″ marine ply, the planks are 3/8″.
John Hartmann
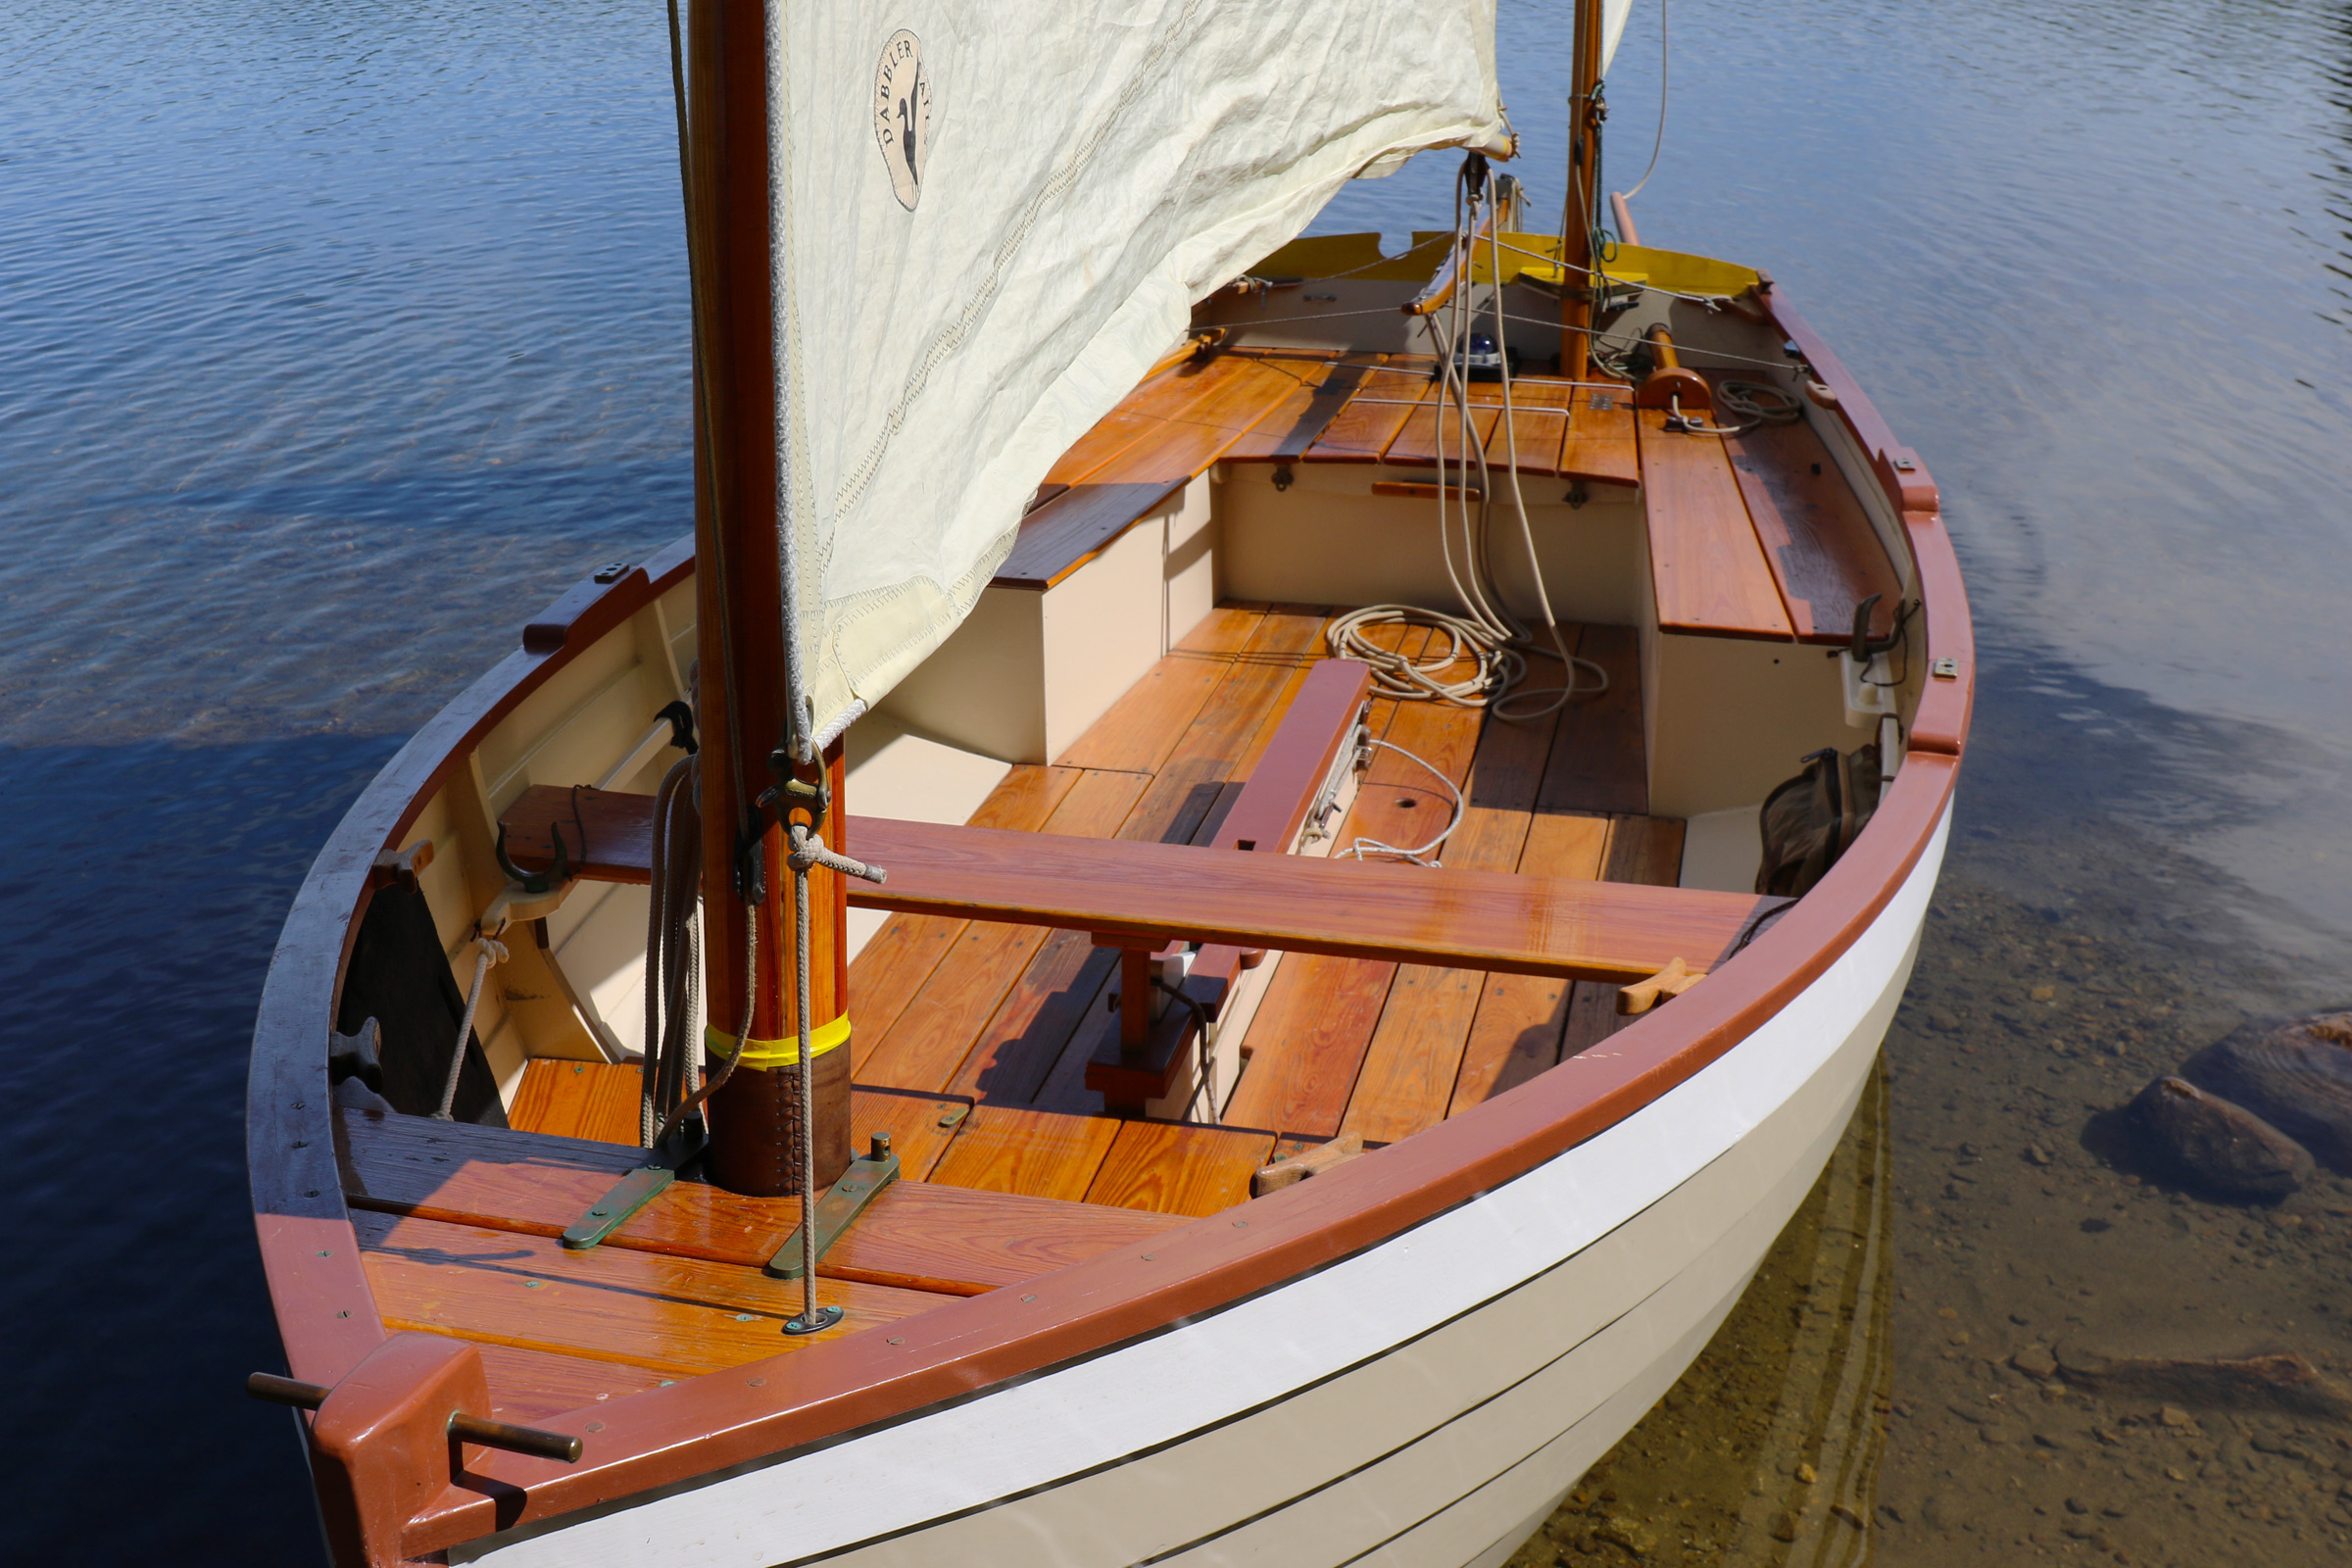
There are two rowing stations on the Ilur. The author made the aft station’s thwart removable to open up the cockpit for sleeping aboard, and he now usually sails without it.
With 10 strakes per side, there are a lot of rolling bevels to cut at the laps, and gains at bow and stern, but the work is pleasant, and not difficult. The builder will need to source lumber for the keel and keelson, floorboards, benches, thwarts, and spars. The plans are extremely detailed, and Vivier is quick to respond personally to emailed questions. Instructions are included for construction of rowing and sculling oars, and for hollow, four-sided spars. Vivier suggests about 400 hours to assemble the CNC kit; I took me almost twice that long, but the extra time went into items not covered in the plans, such as constructing hollow bird’s-mouth spars and casting a bronze mast partner.
The finished boat looks like a classic, traditional lapstrake boat. It also has ample storage with room below the cockpit sole for two pairs of 9-1/2′ oars, an anchor locker ahead of the forward thwart, and a large lazarette at the stern. For a boat less than 15′ long, it feels like a much larger boat. The hull shape is quite full, and the bilges are firm. As a result, the Ilur is very stable—I can stand or sit on the gunwale, and there are still three strakes of freeboard above the water.
John Hartmann
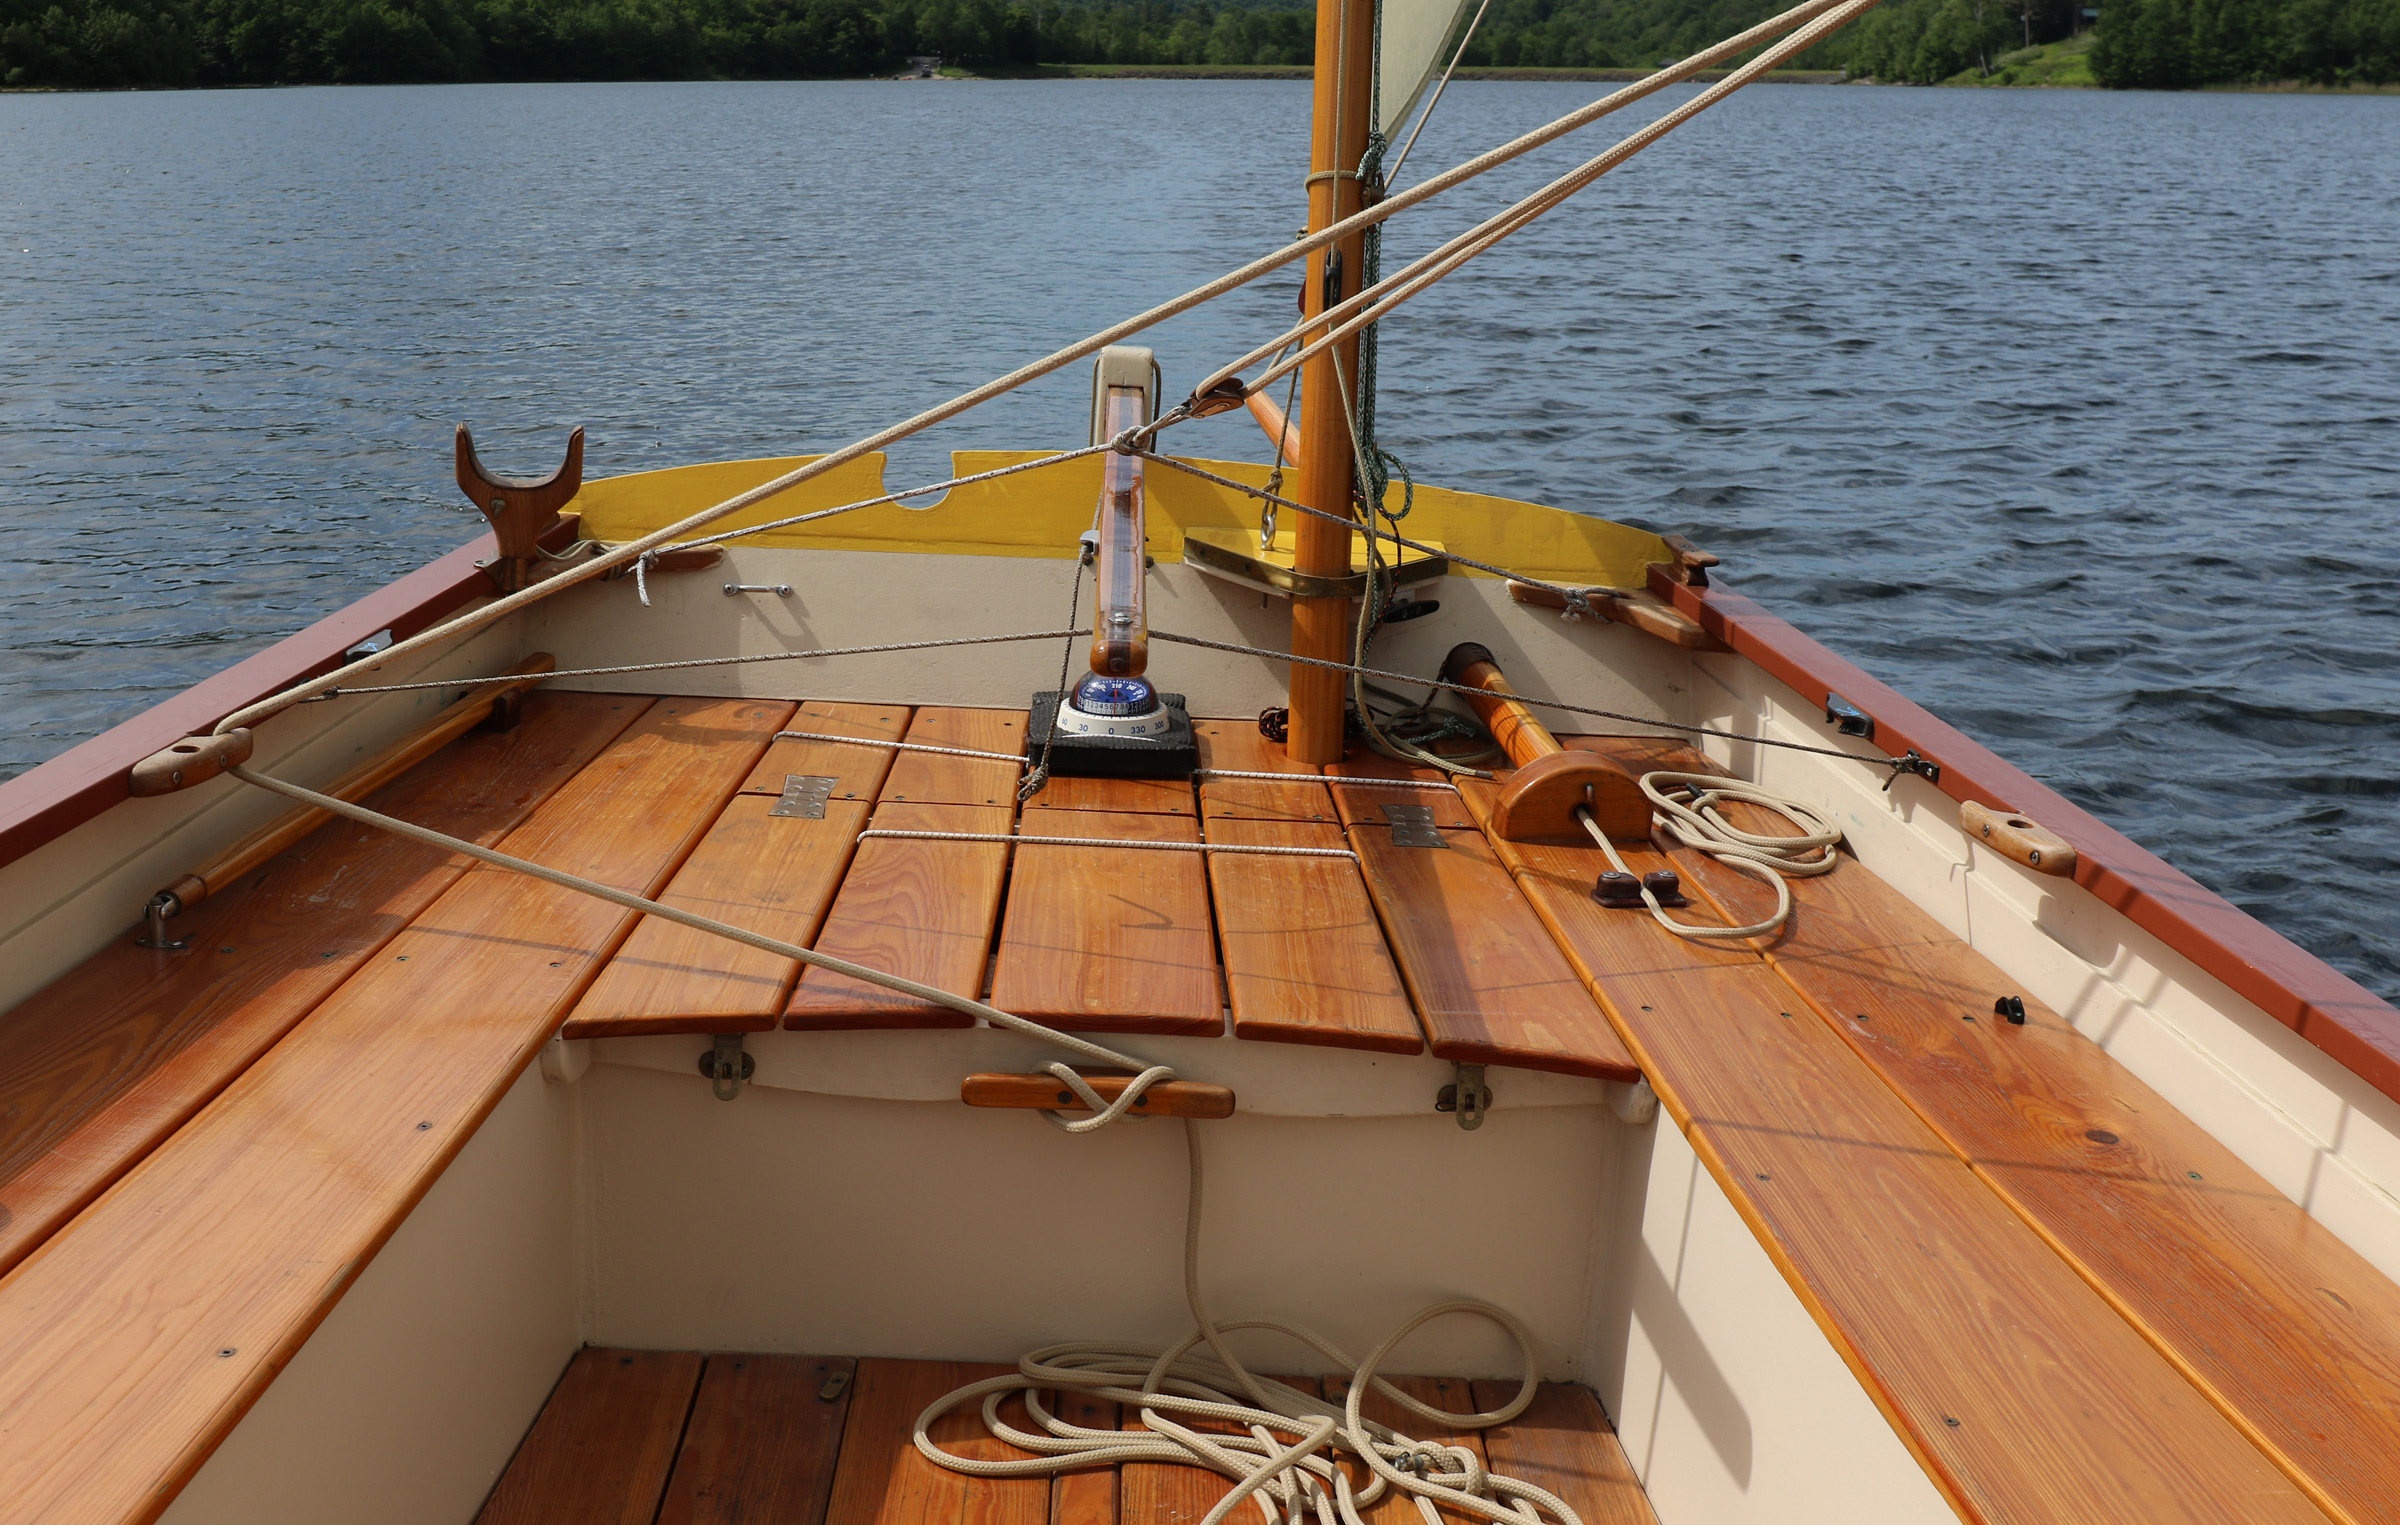
The mizzen and boomkin are set to port to keep clear of the tiller. This boomkin is hollow, allowing the mizzen sheet to run through it. The arrangement helps keep the stern a little less busy and prevents the sheet from fouling on the tip of the boomkin when coming about.
Under sail, the firm bilges show their worth in a wide range of conditions. As the breeze freshens, the boat will heel until the turn of the bilge buries, and the boat stiffens up and accelerates under its ample press of sail. In ghosting conditions, I sit to leeward, and the boat offers a sweet spot with minimal wetted surface area, while the full, curvaceous midsection of the hull maximizes waterline length for potential speed.
Though the Ilur’s measured waterline length is just over 13′, it is sneakily fast, and will happily sail in company with much longer boats such as Oughtred double-enders or Sea Pearls without struggling to keep up. In all conditions, the boat communicates clearly, gently, and progressively—there is simply nothing twitchy about her. Vivier designed the boat with built-in flotation in compliance with EU regulations, and it can be righted singlehandedly in self-rescue situations. Once upright, the water level inside the boat is below the top of the centerboard case, further improving the odds of a complete recovery.
John Hartmann
This Ilur carries the boomless Misainier rig. The lugsail, reefed here, has an area of 131 sq ft.
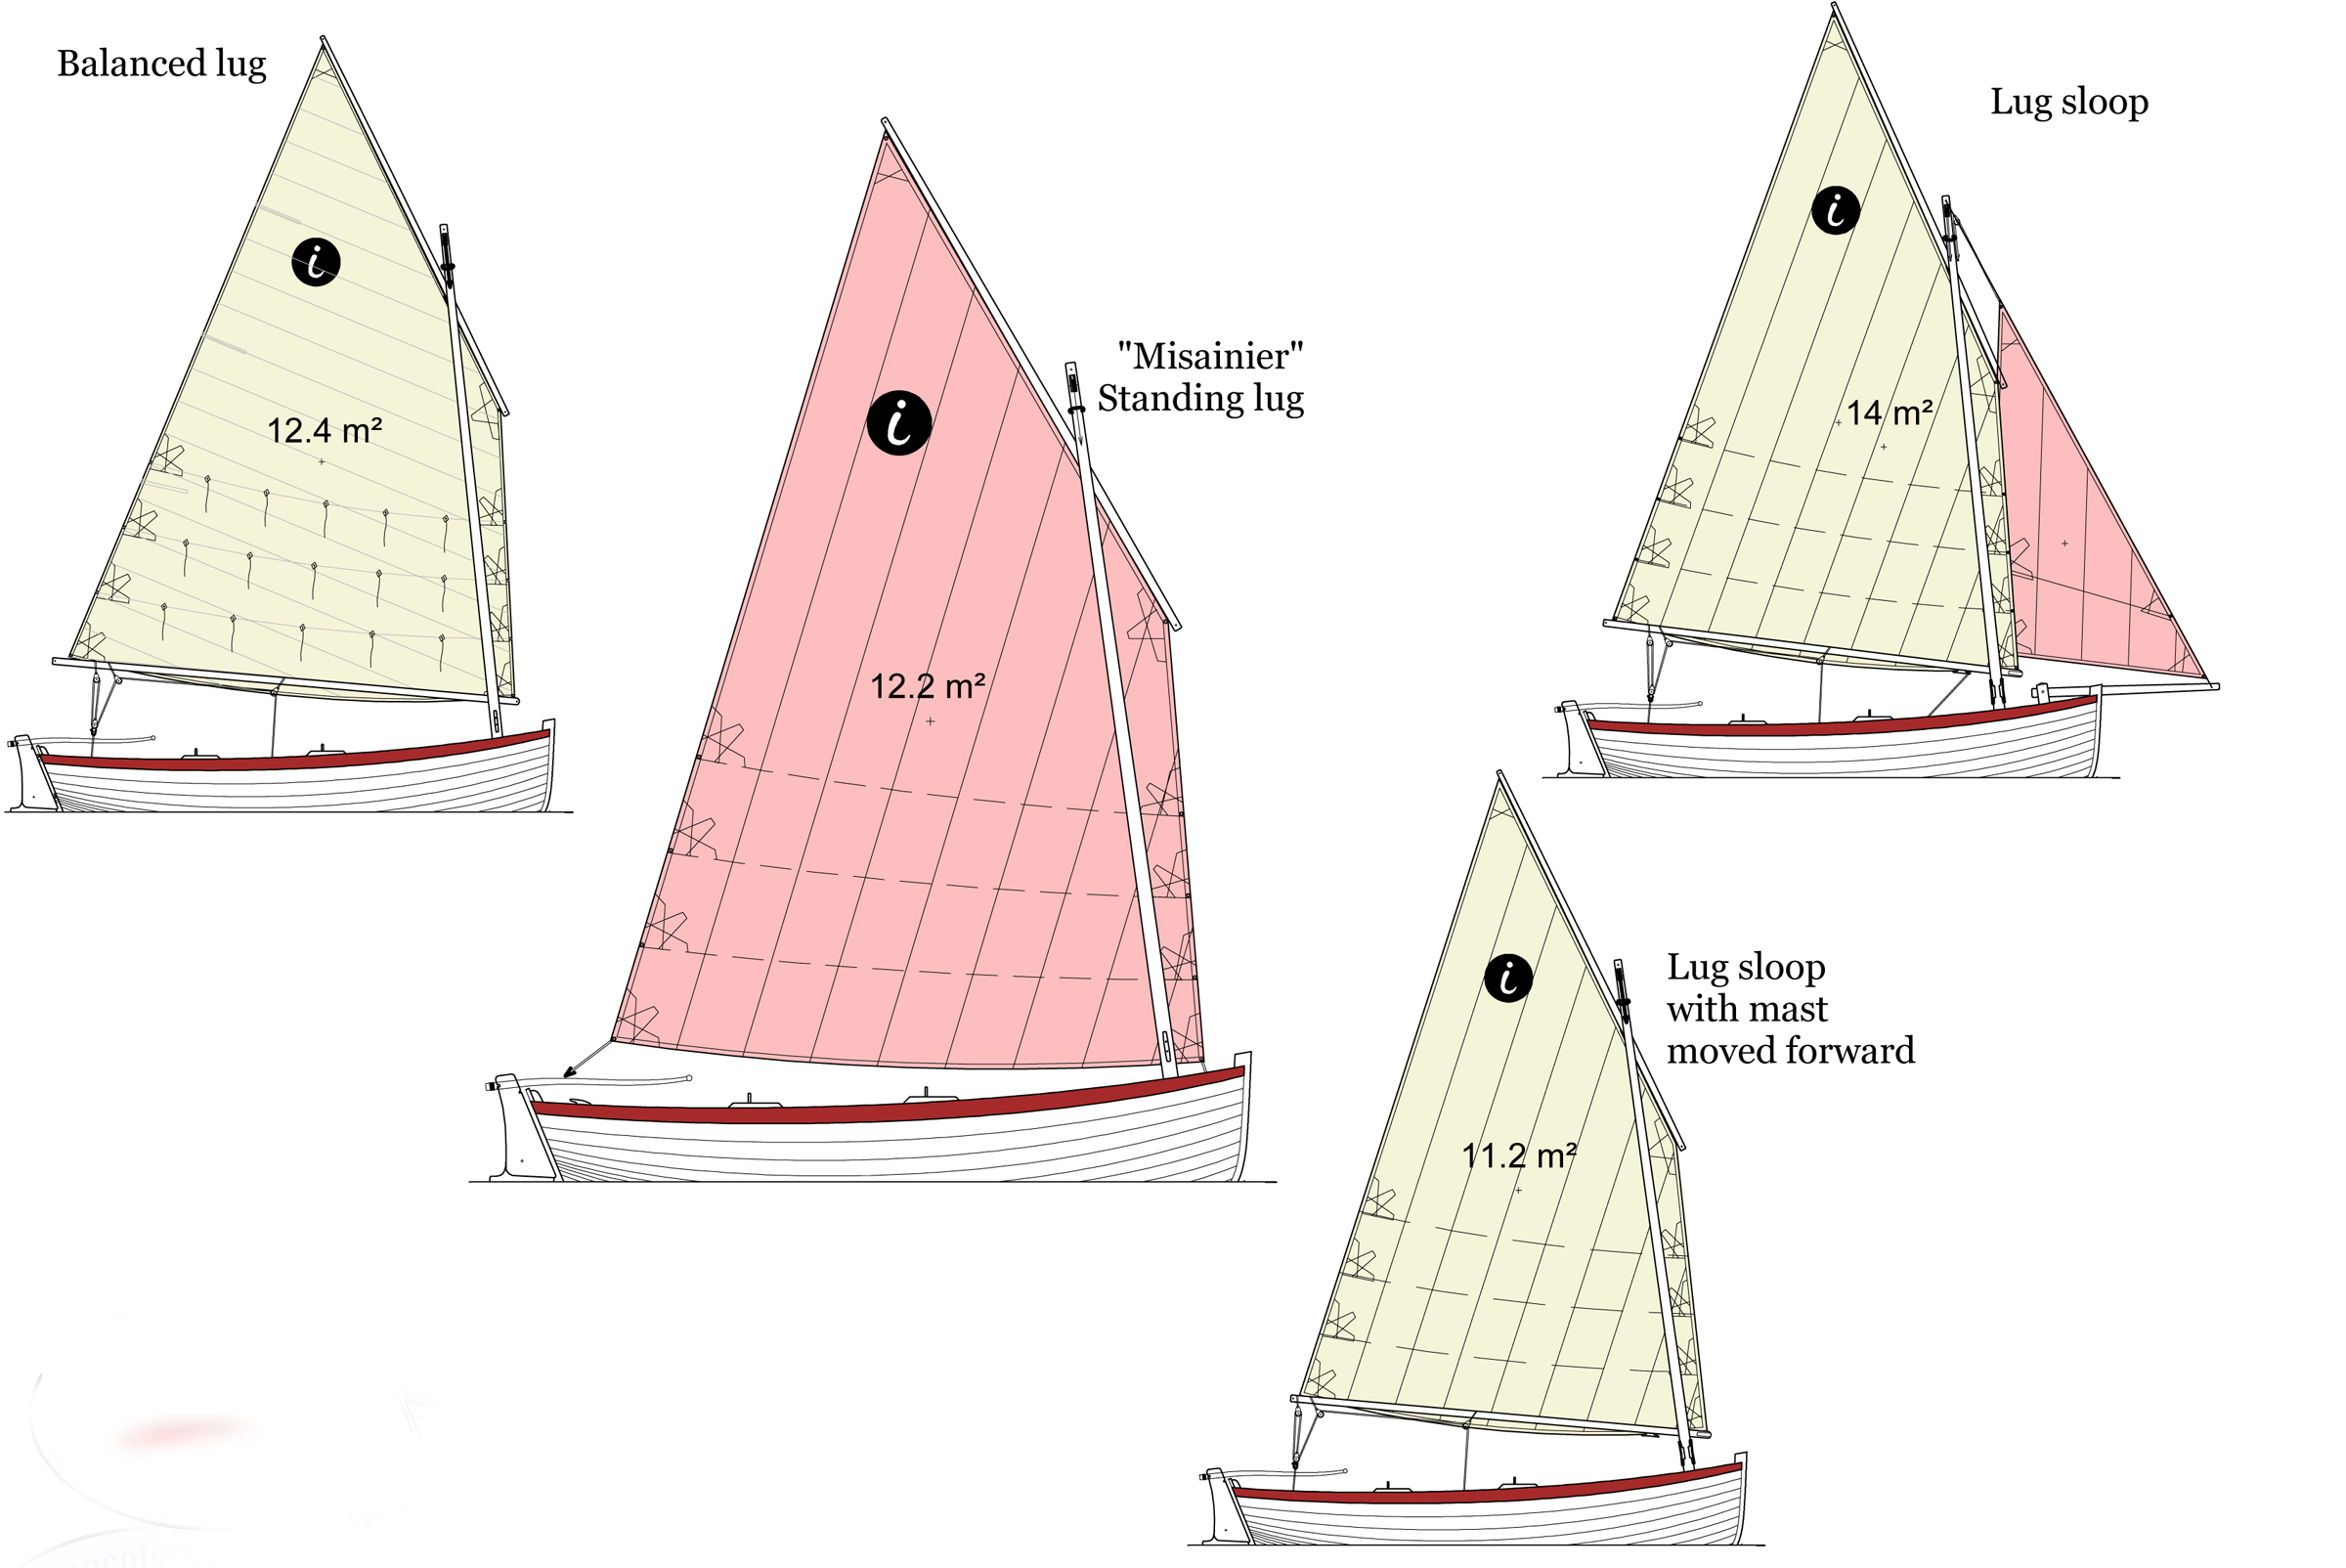
There are four rigs available, including a large, boomless standing lug, a balanced lug, a lug sloop, and most recently, a lug yawl, the rig that I had asked Vivier to create for the Ilur I built. The boat is well balanced under sail in all those configurations, and the weather helm is mild. It is surprisingly close-winded, and tacks through 90 degrees.
The full forward sections and generous freeboard provide a pretty dry interior when conditions are choppy, and any spray coming aboard drains to the bilges, so the crew is high and dry on the cockpit sole. In light wind, my favorite place to sit is on the sole, with my feet up on the leeward bench. My weight is low, the sail is well overhead, and the view over the gunwale is unobstructed. It is a delightful and cozy place. Likewise for the crew, a seat on the sole allows the gentle curve of the hull to form a very comfortable backrest, and the boat is roomy and secure.
The helm takes just a finger on the tiller, and often, using the mizzen to balance the helm, the Ilur can be trimmed to self-steer. As the winds strengthen, I sit up on the bench. Hiking out is rarely required. By the time whitecaps are widespread and the winds are in the 12–15 mph range, it is time to tuck in a reef. With the yawl rig, this couldn’t be simpler: turn the boat head to wind, sheet the mizzen in tight, and drop the tiller. The boat stays calmly hove-to, with the mainsail quietly at rest over the centerline of the boat. I walk forward and lower the sail while the boat tends itself. I move the tack downhaul up to the first reefpoint on the luff, then I move to the clew end of the sail. The mainsheet is reattached at the new reefpoint, and the sail is rolled into a neat bunt as I tie in the reef nettles while working my way forward. Back at the bow, I raise the main, then move aft to retighten the tack downhaul. After I release the mizzen sheet I can fall off onto my new heading. The whole process takes two or three minutes, and can be handled solo without any drama, even when conditions are boisterous.
The Ilur has stations for two rowers, but the glued-lap construction makes the boat light and easy to propel rowing solo in calm conditions. Even when the boat is loaded with a week’s food and dunnage, I can maintain 2-1/2 to 3 mph at an all-day pace. I drop the spars to reduce windage. The sail, yard, and mizzen fit inside the boat; the mainmast is taller than the boat is long, and is stowed with several feet overhanging the transom. The plans describe arrangements for fitting a small outboard to one side of the rudder. A long shaft is preferable, so no transom cut out is needed, just protection on both inner and outer faces of the transom for protection from the outboard’s clamps. I have not felt the urge to equip my Ilur for power, given how easily it is driven by sail or “ash breeze.”
Gabrielle Hartmann
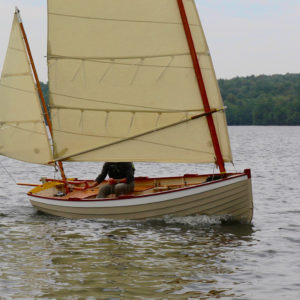
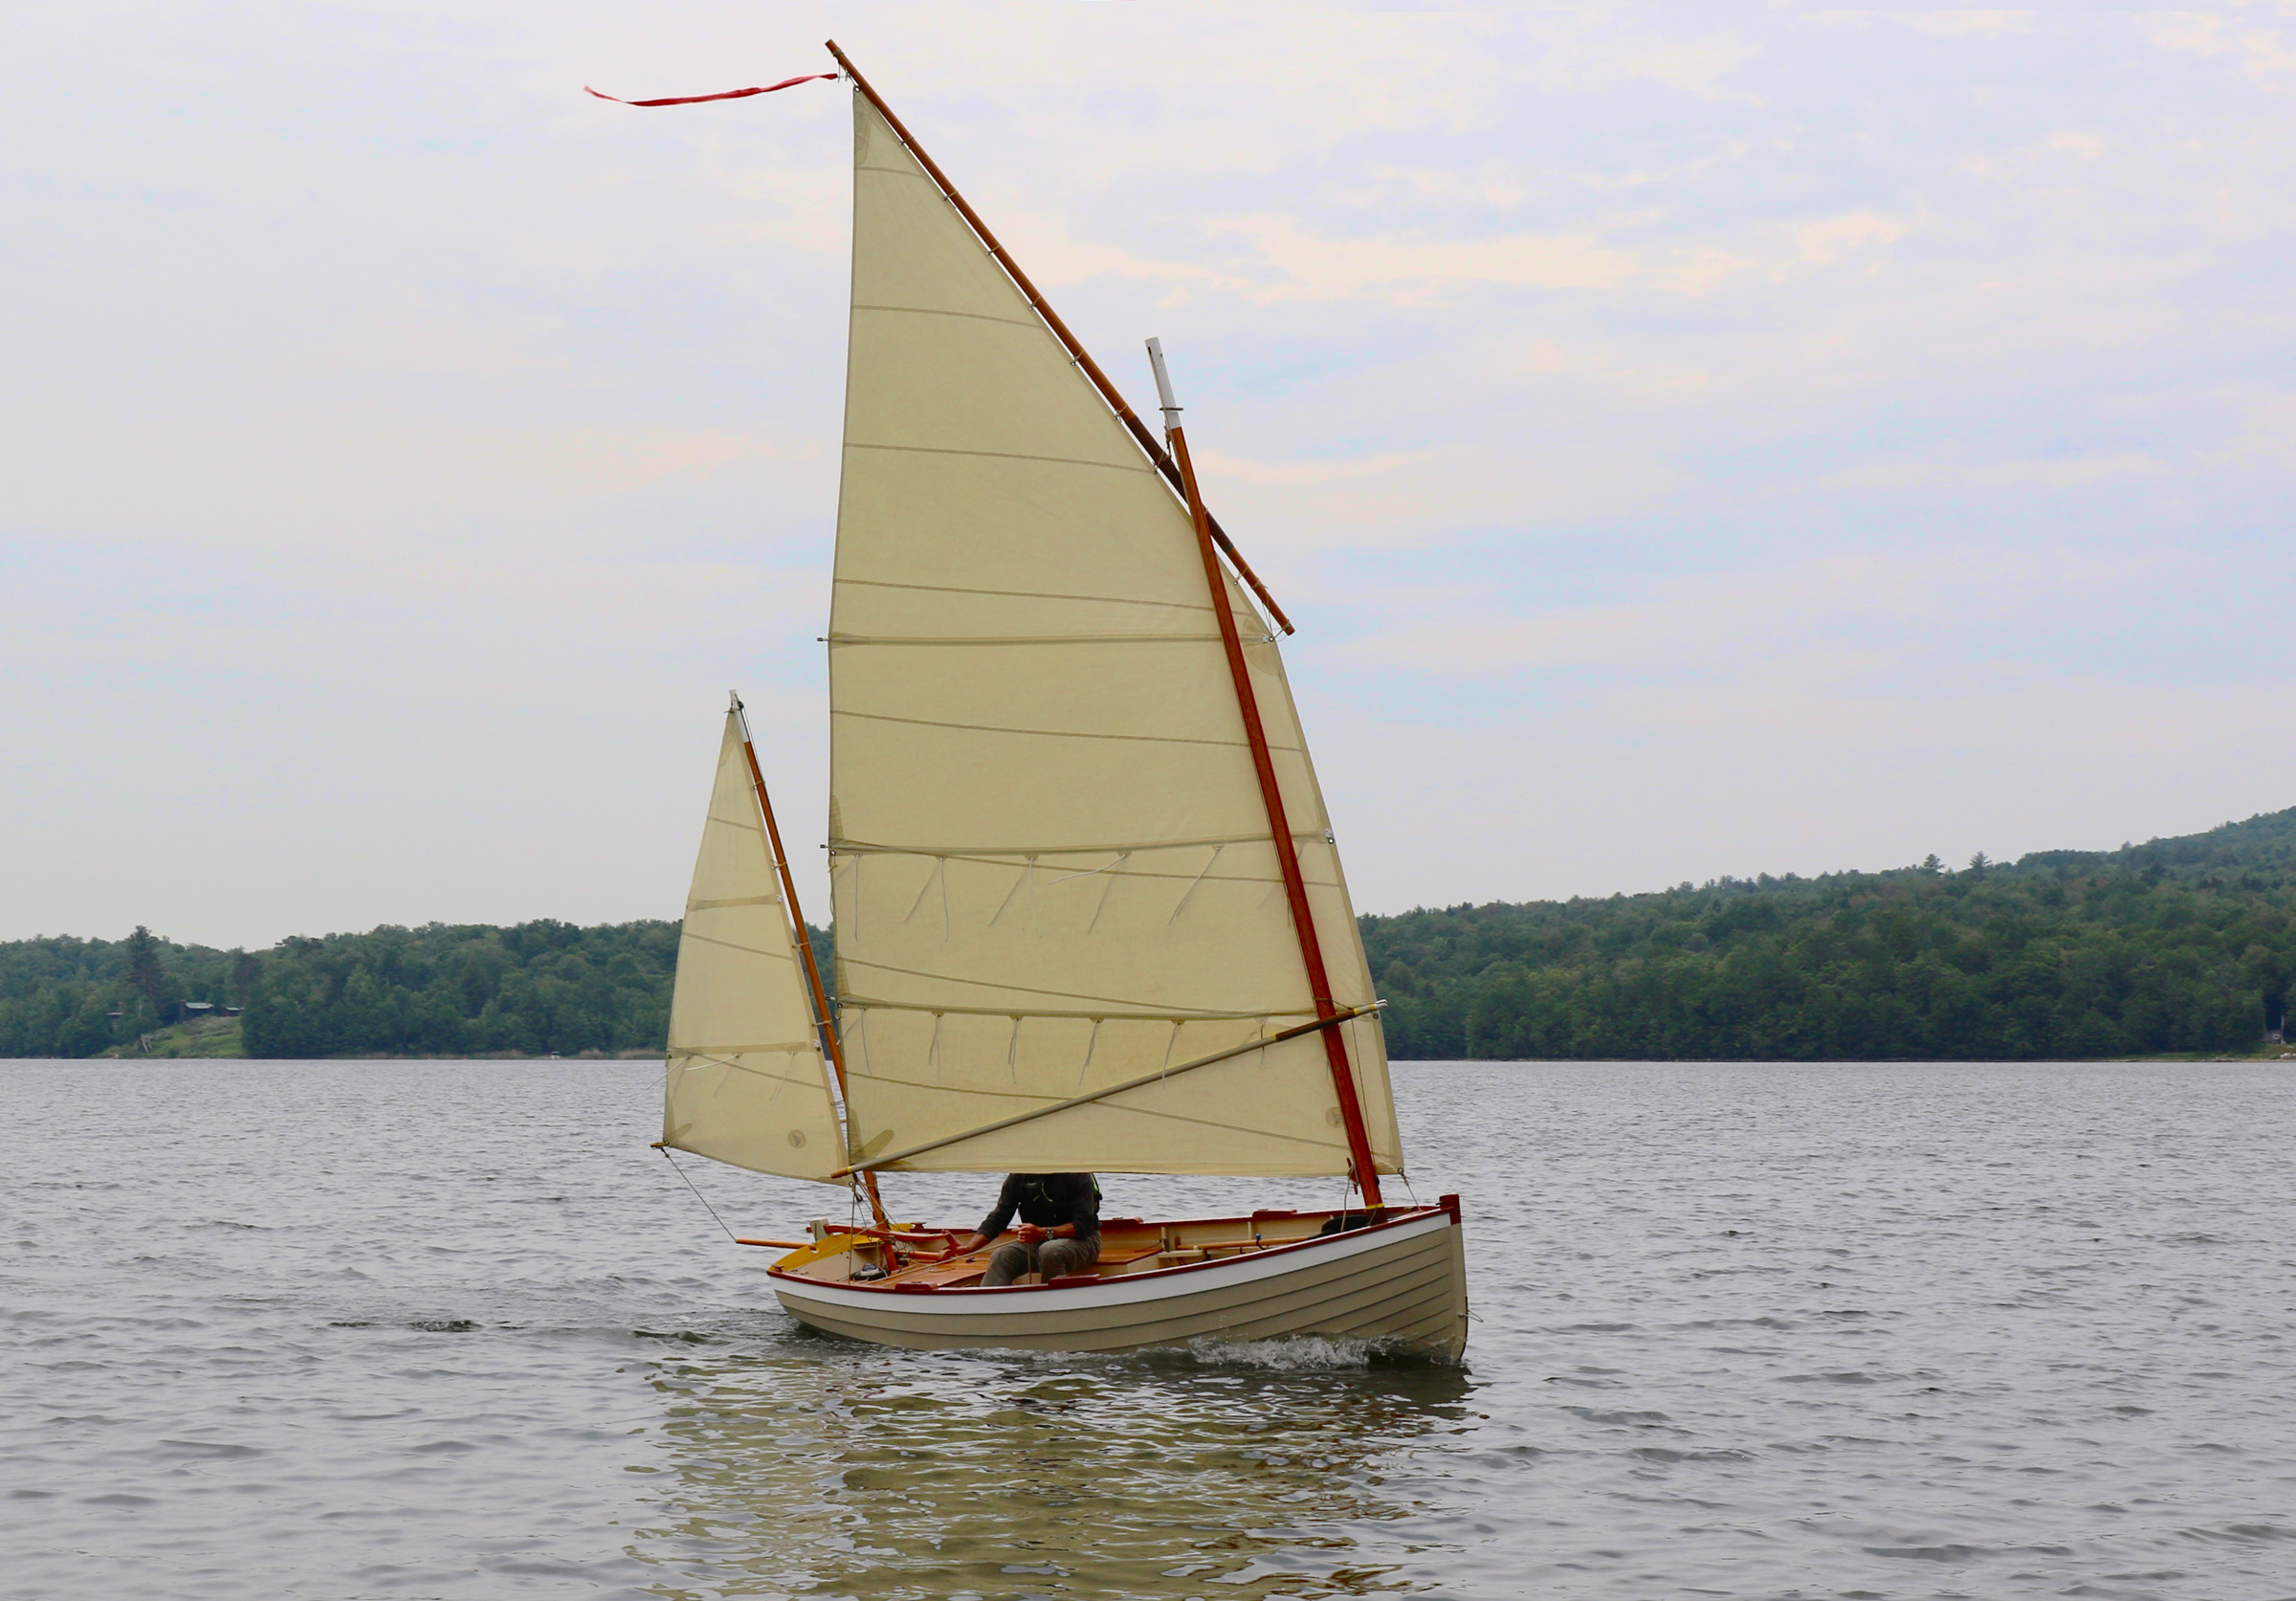
The lug yawl rig carries 134 sq ft of sail. The sprit boom on the main was suggested by the sailmaker, Stuart Hopkins of Dabbler Sails. With its forward end set high it is self-vanging, a useful attribute when running downwind.
Ilur owners who cruise with their boats can sleep aboard under the shelter of a boom tent. The CNC kit boat’s full-width sawn frames are rigid enough without being braced by a thwart, so the rear thwart can be fitted to lift out of the way, creating a tremendous open area for spreading out bedrolls. Here again, keeping the weight low in the boat pays benefits. The Ilur, like many boats designed for oar and sail, is designed with a relatively narrow waterline beam to improve its rowing qualities, and if the sleeping platform were at thwart height, the boat would feels “tiddly.” With the floorboards at the waterline, the Ilur is anything but tiddly with the crew sleeping there, and a restful night’s sleep awaits.
On a recent overnight outing on Lake Champlain, I anchored in a protected bay after a fine day of sailing. I watched an osprey catch its dinner a few yards from my anchored Ilur, and as evening fell, I was surrounded by a flock of several hundred Canada geese that shared my mooring area for the night. In the morning, as I was readying the boat and storing gear, and was investigated by a family of four otters that swam up to check me out at close quarters. Experiences like these are what I love about voile-aviron boats—they get you to beautiful places slowly and quietly enough that you join the neighborhood of wildlife without scaring it off. The Ilur is perfect for the task—capable, commodious, and comfortable.
John Hartmann lives in central Vermont. He built his Ilur, WAXWING, to sail the 1000 Islands region of the St. Lawrence River, Lake Champlain, and along the coast of Maine. You can see his Ilur flying a mizzen staysail in “Mizzen Staysails Add Power” in our August 2017 issue.
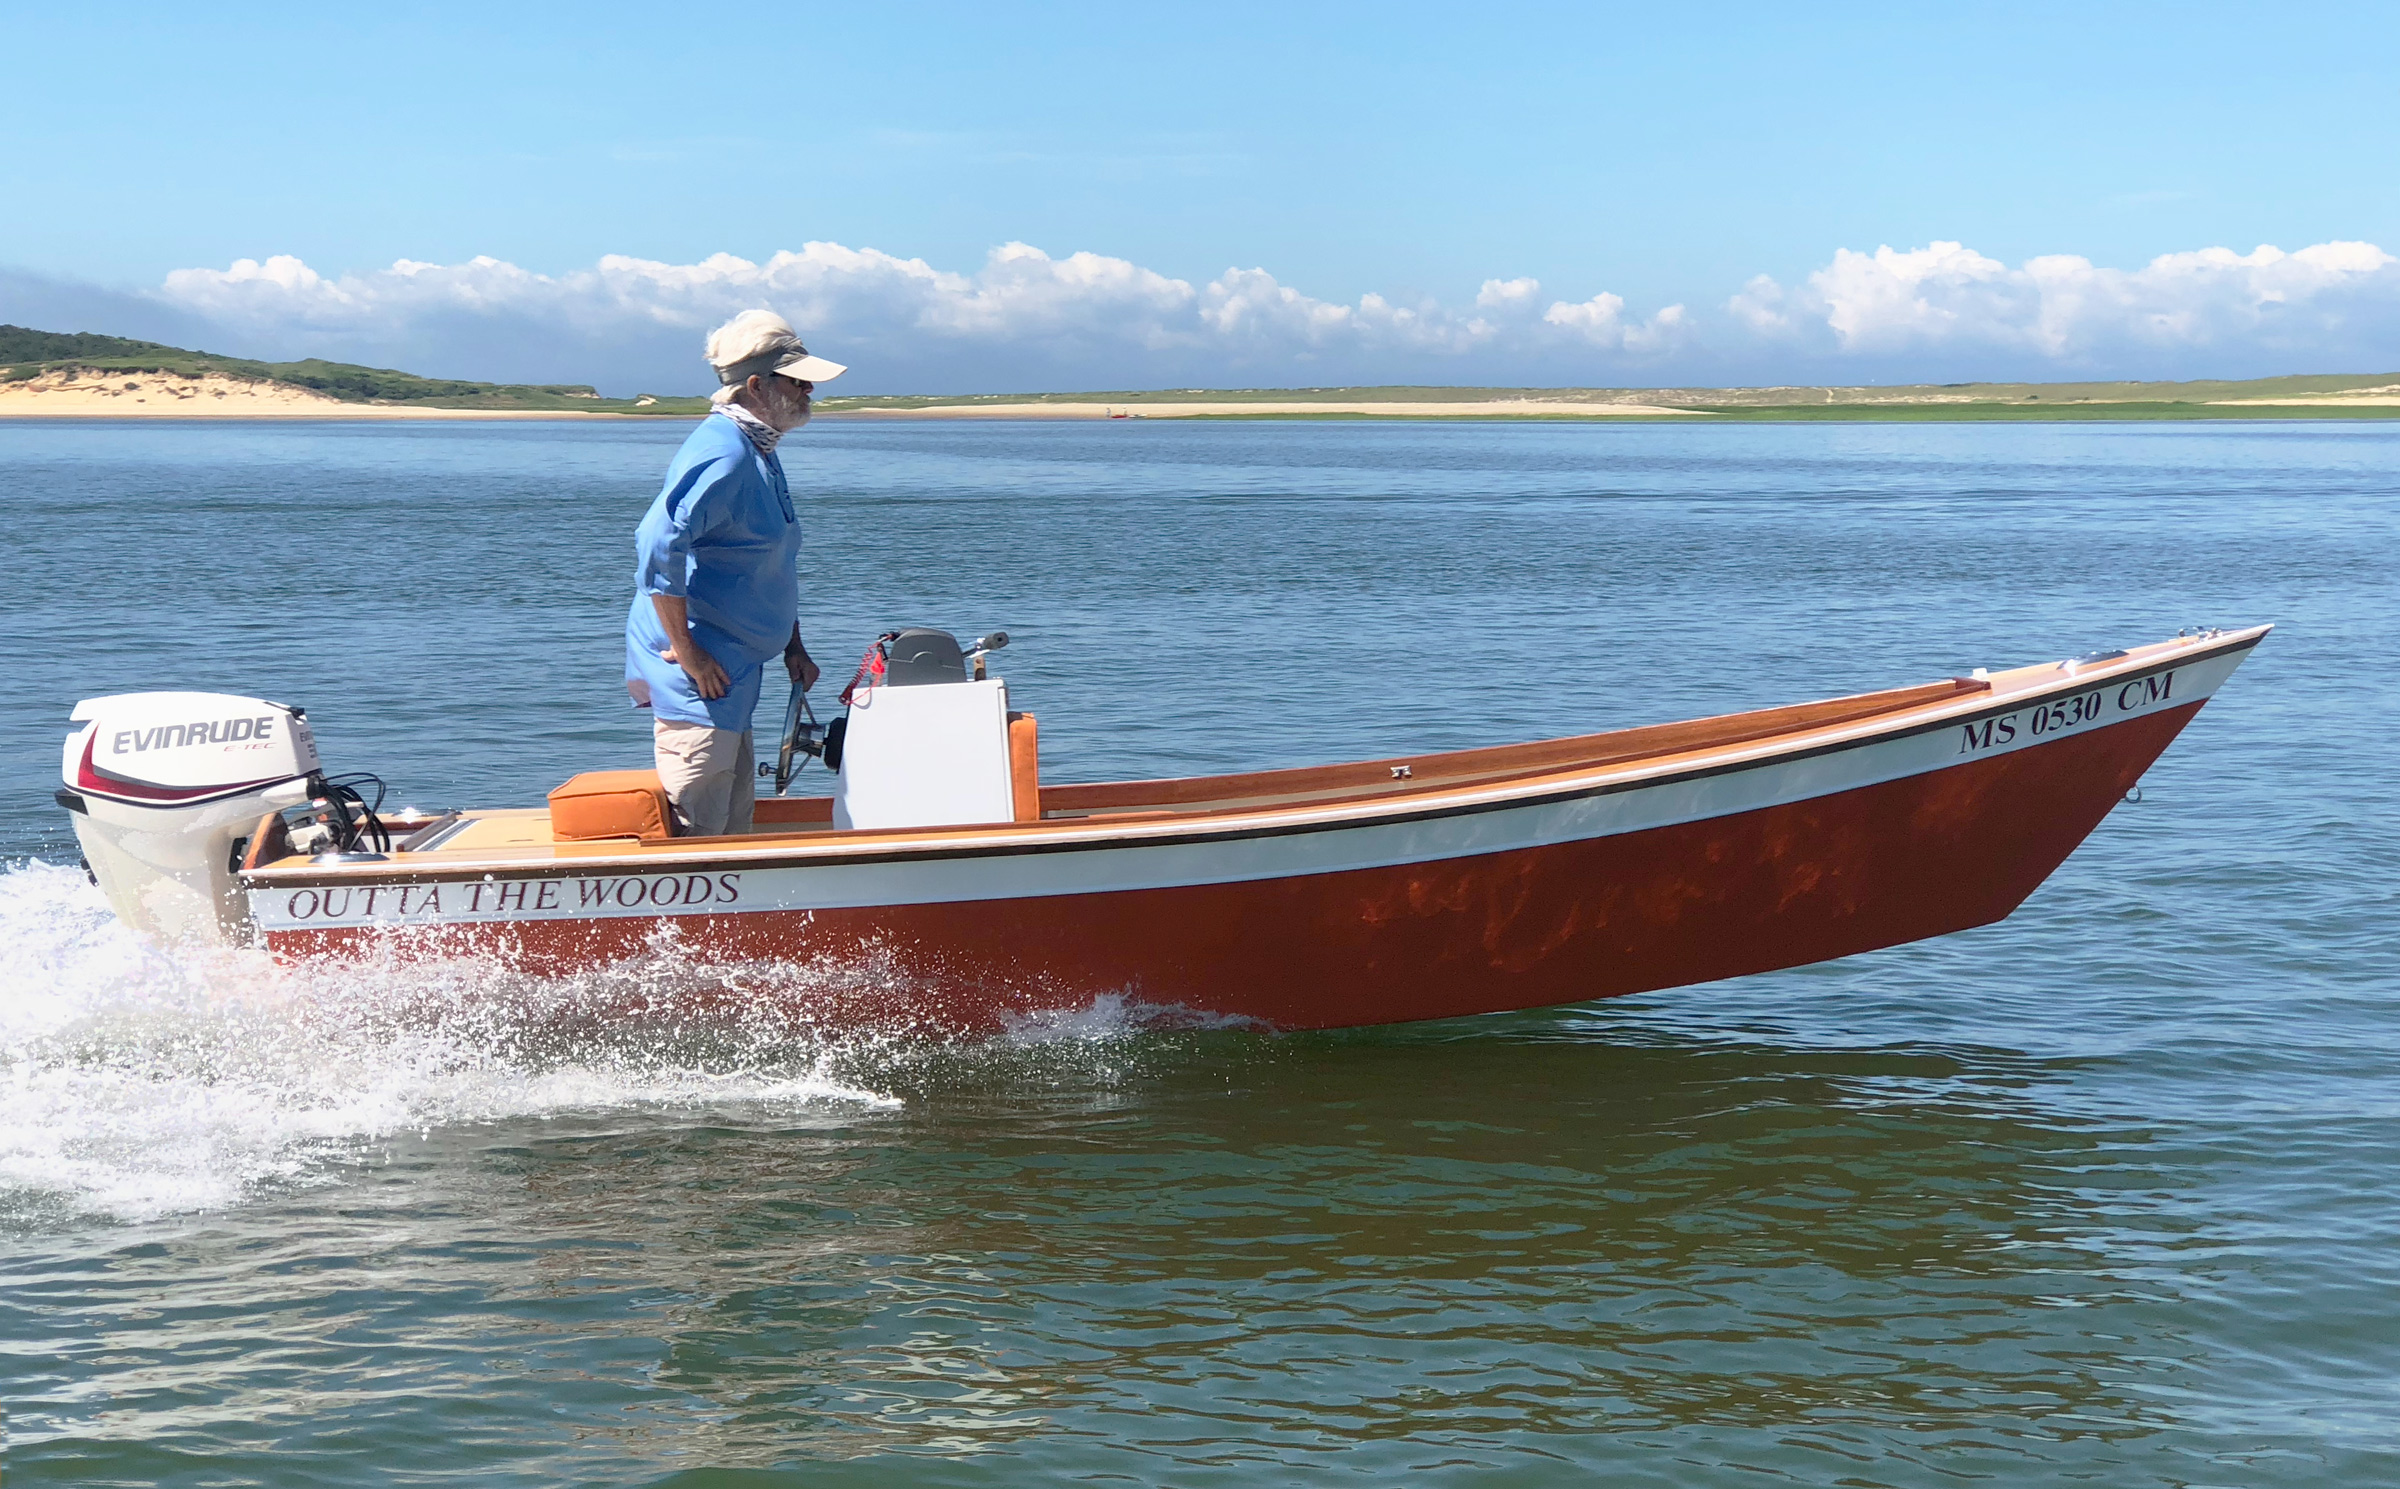
I grew up in central Massachusetts, and still live there. When I was a kid, each summer my family rented the same beach cottage near the east end of the Cape Cod Canal. It was there that my love of saltwater fishing began. Around 1990, intrigued by having seen a fellow using a fly rod on the beach during one of my saltwater spin-fishing outings, I started fly-fishing in the salt, working Cape Cod waters from shore. As it is with most shorebound anglers, thoughts about buying a boat were inevitable, but I lived two hours from the Cape and had a young family, so I couldn’t justify the expense. To get a taste of what it might be like to have access to all that water beyond the reach of my best cast, I hired Cape Cod saltwater fly-fishing guide Capt. Bob McAdams.
On the day of the charter, Bob had me meet him at a town landing on Nauset Marsh in Eastham on the lower Cape. His boat was a sharp-looking 16′ open wooden skiff with a tiller-steered 30-hp outboard. The skiff had been custom built by Walter Baron of Old Wharf Dory in the neighboring town of Wellfleet. At first glance, I was a bit concerned about the boat’s stability as both Bob and I were each over 200 lbs, but I climbed aboard and sat facing forward on the wide amidships thwart. As we got underway, the boat skimmed beautifully through the marsh, and it wasn’t long before we got to our fishing spot. When I stood and started to swing the fly rod for my first cast, my concerns about stability quickly dissipated. We caught several fish, and I was really impressed with the skiff as a fly-fishing platform.
Walter Baron
On flat water, the 30-hp outboard pushes the skiff along nicely at 25 mph.
That was in 1994. I continued to fly-fish from shore on the Cape whenever I could, sometimes even stealing time from my forestry consulting business. I help woodland owners manage their forests for healthy, sustainable timber growth, and since I love working with wood in its natural environment, it occurred to me that any boat I was ever going to own should be made of wood. I didn’t have the skills, time, or tools to build one myself, so I looked up and contacted Walter Baron, the builder of Bob’s boat, and learned that he had dubbed the design, appropriately enough, the Nauset Marsh Skiff.
I had found my boatbuilder, but another 10 years passed as my wife and I got our kids through college and out on their own. By then, building my dream skiff had moved to the top of my bucket list and I had several conversations with Walter, as well as a couple of visits at his shop to discuss a design. After years of dreaming about it, I knew exactly what I wanted in a saltwater fly-fishing skiff. It would be around 16’ and easy to trailer, launch, and retrieve by myself with a flat bottom so I could run in the shallows and beach it upright. I wanted raised casting decks fore and aft with storage below them, and economical outboard power with speed capability around 20 to 25 mph.
After exploring a number of traditional and plywood designs, we eventually circled back to the boat that had so impressed me originally, the Nauset Marsh Skiff, and Walter began construction of mine in January 2014. Five months later we launched the finished boat.
Erik Brandstaedter
The hull draws just 6″. With the motor down, the skiff needs at least 12″ of water.
The skiff has stitch-and-glue plywood construction, with the exterior sheathed in fiberglass cloth set in epoxy. The flared 3/8″ okoume topsides and the transom—a sandwich of a 3/4″ cedar core glued between layers of 3/8″ sapele marine plywood—are joined to a flat, narrow, 1/2″ fir marine plywood bottom. Assembled, these initial elements immediately revealed the pleasing lines of the boat, highlighted by a gentle, upswept sheer forward and 5″ of rocker along the bottom. The greatest beam, measuring 66″, is just forward of the stern to support the weight of a 25- or 30-hp outboard. I went with the 30 hp Evinrude E-Tec—at 150 lbs, it is no heavier than the 25 hp.
I wanted to pilot the skiff from as far aft as was practical to accommodate a large, raised, fly-fishing-friendly, forward casting deck, but still leave enough room for a smaller, raised casting deck in the stern. I abandoned the cost-saving consideration of tiller steering in favor of a small center console, with power tilt and trim controls on the motor for comfort, and ease of operation. I also wanted to be able to stand comfortably at the helm while underway without having to bend over to grasp the wheel or throttle. To that end, Walter made a cardboard mock-up of the console and had me down to the shop for a couple of fittings to get the height just right.
Craig Masterman
The gas tank hides under the passenger seat at the front of the console. Having the weight of the fuel forward helps maintain proper trim.
One of the features I had seen and loved on a couple of Walter’s boats was the look of bright-finished cedar-strip side decks. Not only are they beautiful, but they add great strength and rigidity to the hull. On my skiff, as an added detail, Walter chose red balau, an Indonesian hardwood, for the outermost strip on the side decks, and for the coaming around the cockpit. Finished with Epifanes Rapid Clear for ease of application and maintenance, the results are stunning as the rich, dark reddish-brown color hardwood contrasts beautifully with the light color of the cedar.
Foam-filled flotation chambers in the bow, and in the port and starboard corners of the stern, sit just below the cedar-strip decking. The clear-varnished transom is the last of the brightwork. Except for the cockpit sole, which is painted with Skid-No-More, an acrylic coating textured with rubber particles, the remaining surfaces, inside and out, are finished with Epifanes two-part polyurethane paint for its high gloss and durability. The orange hull and white faux sheerstrake are a tribute to my late father-in-law, who built several small wooden boats over his lifetime, the last of which, wistfully named ONCE IN A WHILE, featured similar hull colors.
Walter Baron
Putting the helm over drives the inside chine down and the hull, now angled, carves through turns without skidding.
Since my boat lives on a trailer, we skipped bottom paint. SeaDek, a peel-and-stick nonskid foam, covers the front and rear casting decks. The battery and a 6-gallon portable fuel tank sit under the console and integrated passenger seat, respectively. To keep the rigging clean and out of the way, Walter made some removable cedar floor boards to cover the fuel line, steering, and battery cables between the console and the outboard.
The 30-hp motor moves the boat along at a GPS-measured 25-mph top speed. Like any flat-bottomed hull, it will pound in a chop at higher speeds. Because the helm and console are positioned well aft of the midpoint, I initially had some porpoising above 20 knots when I was alone in the boat; 50 lbs of ballast in the forward hatch eliminated that problem completely. If I throttle back in rough water, the 5″ rocker in the bottom allows the skiff to smoothly slither up and over moderate swells and boat wakes. Even without spray rails, the skiff is remarkably dry, as the flared sides deflect virtually all spray, in all conditions and at most speeds, save for a wind directly abeam, when some spray will inevitably find its way over the rails.
Two parallel 8′ long 1″x1″ bevel-sided, white-oak shoes running along the stern half of the bottom hold the boat where you point it. They’re positioned to slide between the trailer bunks to help align the skiff when hauling out. Sharp turns at speed bury the hard chine, and the skiff holds beautifully with little or no drift. It floats in about 6″ of water with the engine tilted up, and runs in about 12″.
The forward casting deck is very stable and comfortable to stand on and cast from. There is an anchor locker hatch forward and a larger second hatch for storage below the deck. The smaller aft casting deck is higher, and is fine to cast from in flat water, but is a little less secure in a light chop. The rear deck flips up to provide access to a 50-quart cooler. Fly-rod racks and tip tubes are tucked out of the way under the side decks in tubes—two forward and one aft—and offer secure storage for four 9′ fly rods both port and starboard. Pop-up cleats fold flush to eliminate fly line’s inadvertently catching on them.
The boat’s performance has met or exceeded all my expectations. It remains a source of great joy, pride, and satisfaction. The skiff turns heads and generates questions and complements wherever I go, and I am always proud to credit its builder for creating the piece of functional art that it is. People especially seem to like and appreciate the name my wife came up with, which ties together my personal history, my profession as a forester, and my gratitude for all the blessings of my life, not the least of which is this fine little craft named OUTTA THE WOODS.
Craig Masterman, 65, has lived in central Massachusetts most of his life. He and Marjory, his wife of 42 years, have three grown children and a grandson. Craig has always appreciated the natural beauty of both trees and wood as a building material, stemming from his 40-year career as a forester. He plans to fish the flats and estuaries of southwest Florida as well as the inshore waters of Cape Cod as often as he can in his approaching retirement.
It was the spring of 1988, the year I turned seven, and Dad was restless. Mom was happy on our little homestead. Dad had built a log cabin for us on the hill at the north end of the family property, as well as a blacksmith shop, a sawmill, a henhouse, goat barn, horse barn, picket-fenced garden, and other accoutrements of the homesteader, but he was growing bored with farm life.
photographs courtesy of the Blake family
From the cypress logs to the stone chimney, Dad built every inch of the cabin where I spent my childhood. Mom’s baskets are piled on the front porch and my pet deer is visible next to them. The baskets went to the fair for sale, the deer did not.
The goats were in milk, the front porch was stacked with baskets Mom had made for the county fair, and she was happily painting in her studio when Dad announced that he was going to build another boat. His last boat, a Block Island double-ender, was christened MERRY SAVAGE, a play on his great-grandmother’s maiden name, Mary Savage. Dad had sailed that boat along the coast of the Gulf of Mexico for a few months, and then she languished around the house for a few more before being sold to a young man from Maine. This all seemed a trifle foolish to Mom, so when Dad said “I am going to build another boat,” she responded, “We will have to actually use this next one, and it should be for the whole family.” She would regret that statement several times over the next few years.
The old Model-A John Deere tractor was parked next to the mill to power the big circular saw. My dad and uncle must have been taking a break for lunch, otherwise and the sawmill would be running and one of them would be riding on the carriage.
Dad thought about the design for a few months, made a few half models, sat down at the drafting table, and the idea for a new boat was born. Based loosely on a Portuguese 16th-century caravela redonda but cutter rigged, the MARY SAVAGE would have an overall length of 31′, a beam of 8′, and a draft of 32″. The name, at my mom’s request, was the proper spelling for my great-great-grandmother’s name. We started by calling the boat the MARY SAVAGE II, but eventually we just referred to her as the MARY SAVAGE. Dad was hoping we’d sail down the Mississippi River, take the Intracoastal Waterway to the East Coast, and then decide whether to head for Maine or the Caribbean. I don’t think Mom took him seriously.
When I wasn’t in school, I’d often help Dad with the boatbuilding. He taught me how to drive cotton roving in a seam and how to buck rivets.
Soon Dad and the old Model-A tractor were out in the woods, felling timber for the new boat. He selected black locust for the timbers and the planking to the waterline, sassafras for work above the waterline, and walnut for trim. After the logs were skidded from the woods, the tractor was flat-belted to Dad’s sawmill and he and my uncle cut, stickered, and stacked the lumber for the boat.
The planking up to the faintly visible red line was black locust; above it was sassafras. I imagine even if the MARY SAVAGE were ever left abandoned to rot away, the lower hull would still hold together.
Dad built the MARY SAVAGE outside, so every night she would be covered in blue tarps and every day she would be uncovered and the work continued. As the boat came together we had many visitors; people came from all over to see the eccentric folks who were building a boat near the goat house in the little cabin on the hill. Some were encouraging, and some simply shook their heads in disbelief.
Before the boat was finished, I spent many afternoons on board, sailing imaginary seas. The fo’c’s’le would be my quarters when we eventually got underway. There was one port that faced the after cabin and a clear panel in the hatch to let light in.
For several years it seemed as if nothing would actually happen. Life went on as usual; Dad worked on the boat, Mom continued to make baskets, weave, spin, sew, and paint, and I went to school. Then in the spring of my 10th year, the paint was on, the crowd was gathered, including our Episcopalian priest, and the boat made its way to the bank of the Yazoo River for launching, blessing, and party. A bottle of champagne was smashed on the bow, the priest blessed MARY SAVAGE stem to stern, and into the river she went.
MARY SAVAGE is ready to be taken to the river to meet the water for the first time. I am aboard to give advice and stay out of the way.
There were weeks of work to do after launching, but my world had changed. We were renting our house, I was leaving school, the animals were sold, and the goodbyes began. Despite assuring my fourth-grade class that I would return by fifth grade with a suitcase of gold (I was reading Treasure Island), I began to worry. If I was worried, Mom was a wreck. She had not expected Dad to complete a boat big enough for the family in such a short period of time. I think, in a way, she hoped the project might take forever.
At the Vicksburg waterfront we were preparing for our voyage. I stand in HAPPY COCKROACH, the ship’s boat, ready to ferry friends and family.
We took up residence on the boat at the Vicksburg waterfront while Dad made final preparations. We had many visitors, and I ran the official ferry in the ship’s boat—a little 7′ scow stowed on the after cabin roof when it was not being towed behind. Mom called it “BRAIN OF POOH” as a reference to A.A. Milne and perhaps a slight dig at the builder (Dad), but, as she was my boat, her real name was HAPPY COCKROACH. As a ferryman I only lost one passenger, but it was not really my fault. He was a rather large man and unsuited for such a small boat. He managed to swim ashore bedraggled, but otherwise unharmed.
With the final preparations made, I put on the best bold, able-seaman pose that I could manage.
The day finally arrived for us to leave the Vicksburg waterfront. It was mid-April 1991. There was a huge party. It seemed as if the whole town had come to see us off. Goodbyes said, we boarded the MARY SAVAGE; Dad went below and spun the flywheel on the one-cylinder Volvo diesel. We set out southbound. The bridge at Vicksburg, spanning over a mile, seemed to rise up forever as we passed underneath. I said, “Look Mom, a gateway to another world!”
The Mississippi river stretches before us. Our old life lies behind and adventure lies ahead.
Just then, as if an omen of various mishaps to come along the way, our friend Tom, who had joined us for the first day’s travel, kicked over a can of paint that Dad had been using to touch up earlier that day. It should have been stowed, but the party and the champagne had interfered with his good seamanship. Tom began scrubbing the deck like a madman; Dad looked up and down the river for traffic, and told me to take the helm so he could help Tom get the last of the paint off the deck. I steered through the portal to other lands. Life would never be the same.
The river was in flood stage when we left Vicksburg and the current mid-river was close to five knots, so we made fast passage to our first anchorage. About thirty miles below Vicksburg is Yucatan Lake, a large oxbow. Usually you cannot get from the river into the lake, but during high water you can cross a revetment and slip through the swamp. You must be careful not to let the water fall, however, or you will be stranded until the next high water which could be up to a year later. All eyes were on the depthsounder as we slipped over the top of the revetment. There was a brief moment where the depth leapt up rapidly but the sounder stabilized at 9′, and as we crossed over, it rapidly read deeper and deeper waters.
Tom owned some property on the edge of this mostly wild lake and had left his ancient Volvo parked at the water’s edge. He headed for home, but for the next week or so he would bring us food and supplies while we got used to living on board the boat away from the amenities of civilization. We were alone in our new boat.
My cabin was before the mast. I had a bunk, a little shelf for my books and personal effects, and a bench under which spare sails were stowed. At 7′ in beam and 7′ in length, the three-sided fo’c’sle didn’t have much room, but I had my own hatch and skylight, a 12-volt, flush-mounted ship’s light, a ventilator for fresh air, and a porthole that looked out on the cockpit amidships.
I started playing violin when I was 4 years old. During our voyage, I had to keep practicing both onboard and ashore. I complained sometimes, but I am glad now that I kept playing.
Shipboard life took some adjusting, and two amusing things happened while we were on the lake. We had an icebox in the galley for fresh food when we were near a town and could get ice, but in the wilderness, everything had to be dried or canned. Dad and I both loved deviled ham, so we ate can after can of it, with crackers, on sandwiches, or just out of the can. By the end of the week we had tired of it, and by the end of the voyage I had grown so sick of it that for 20 years afterward I could not abide the smell of deviled ham.
The second thing occurred on a day that Tom came to give us a ride to the grocery store. When we returned with our goods aboard the ship’s boat and approached the MARY SAVAGE, there was a squeak from her stern. “Tell Nick to not turn around,” Mom’s voice came from somewhere near the rudder. Alone on the boat, Mom had decided to take an afternoon swim. She neglected to allow for the fact that the gunwales were quite high on the MARY SAVAGE, and she did not leave a rope to climb back aboard.
She had found a place to sit on the rudder, and Dad helped a very soggy Mom, without a stitch of clothing, climb back over the gunwale while I dutifully stood off in the ship’s boat. The seams in the rudder had been recently tarred, so it was some time before she managed to finally get clean. This was made more difficult by the fact that, although there was a head across from the galley, there was no shower belowdecks. One of those black plastic bags with the shower head was run up the mast and if there was sun, a big if, you had 4 gallons of warm water. All private bathing was done with sponge and bucket in the cabin.
The water level in Yucatan Lake had begun to fall the following week. We said goodbye to Tom and slipped over the revetment and back into the river. We were bound for Natchez where Dad had stayed on a previous trip, but the moorings at Natchez had changed and small boats could no longer dock nearby. With darkness falling, we had to continue down the river and take shelter in a muddy bayou that stank of oil. It began to rain.The next morning, we realized that there were several oil wells on the bank just up the bayou. It was still raining and the mosquitoes were out in force. We set out as soon as possible to escape the smell and the bugs. Dad, knowing that the Mississippi gets more dangerous below Natchez, had decided that we would lock into the Atchafalaya. With the speed of the current and the Volvo’s help, we could just make the trip in a day.
My parents, Phyllis and Daniel, now look so young to me in this photo. Dad has the helm and Mom is enjoying the breeze. Summer is not yet with us.
I thought we should go right down the river to New Orleans, but my opinion changed that morning. We had already passed several tow boats pushing barges up the river. Many of these tows push a load five barges wide and seven long. That’s 175′ wide and 1,400′ long, and the captains’ capacity to see anything small and their ability to maneuver quickly became practically nonexistent. Some of the towboats had 10,000 hp and their wake was incredible.
Fortunately, it is a big river. We had been rocked around occasionally, but we were never in danger until about 30 miles below Natchez. Two towboats each pushing 5×7 loads of empty barges were headed up the river, and one had decided to pass the other. We could not get too close to the banks because of the rock dikes, and it was unwise to pass between the tows lest we get flattened between two walls of steel. We hugged the bank as close as we dared and came within 150′ of the closest towboat and its barges. That captain had decided that he did not want to be passed by the other tow and had opened his throttle wide. When his wake hit us, every unsecured item below and some of the secured ones ended up on the floorboards in a mighty crash. The rock dikes not 50′ away looked like rock jetties during a hurricane, with waves breaking and spraying over the top. Finally, the MARY SAVAGE ceased to roll and we continued downriver in a shocked stupor as the two tows continued to race each other up the river.
Roger Siebert
.
The lock to the Atchafalaya was not very far away. We simply needed to get by the Old River Spillway. During flood stage the gates can open and divert an enormous amount of water into the swamp. This keeps the lower reaches of the river from overflowing and drowning thousands of taxpayers. The river was in flood and the gates were open. The spillway looked like a giant mouth full of gapped teeth cut into the levee. We hugged the far shore while we passed by. The Volvo sputtered and died just as we came in sight of the spillway. Dad used the momentum of the boat to steer away from the spillway and into the flooded trees on the far bank. We lassoed a willow tree top and tied up while Dad went below and restarted the engine. It coughed a few times and started right up. We cut loose and passed the spillway.
The Mississippi was finished with us, and we with it. We locked into the Atchafalaya just a few miles farther down and drifted into the deep swamp that covers such a huge part of the state of Louisiana. The mood lightened for the first time in three days. We had survived our time on the big river.
We passed a few tows on the Atchafalaya, but they were usually pushing one or two barges, not the like the behemoths of the Mississippi. In Simmesport we resupplied and Dad lowered the mast in its tabernacle to get under the bridge just below the town. As we headed farther south, we entered a different culture. Southern Louisiana has its own flavor, and the people who live there are uncommonly hospitable and generous. This is not to say that some of the folks we met were not rough around the edges, like the nice man in Simmesport who happily gave us a ride to a dumpster even though he couldn’t understand why we didn’t just chuck our garbage in the river, or the pregnant teenage girl who sat on the dock and yelled her whole life story to Mom even though we were moored 30’ away from where she sat with her toes in the muddy water. On the whole though, we were simply struck by their kindness to us.
About 40 miles north of Morgan City, by far the largest town on the Atchafalaya, we anchored up a bayou late one afternoon. It was near the end of April, but the day was unusually cold. During the hot days we would have been using the Primus stove, but that evening we were heating up cans of soup on the wood-burning Shipmate stove in the galley. A young fisherman came by in his plywood fishing skiff to marvel at our boat. He had never seen anything like it before. We asked him how far by water we were from Morgan City. He had never heard of it. He had never been outside a 20-mile radius of his little fishing village deep in the heart of the swamp. The next morning before dawn, we heard a thump on the deck. When we went to investigate, he was just disappearing around the bend in his skiff, and on the deck sat a 20-lb sack of live crawfish, part of his morning’s catch.
At Morgan City, we took on water and fuel then docked next to an old sailboat with a scraggly but friendly character who invited us for dinner on his boat. His name was Ralph, and he was writing a science-fiction novel about aliens. Ralph had a small dog that spent all its time leaping from seat to seat and barking at the bilge, which was inhabited by crawfish and crabs living in the bilgewater. Ralph was generous with what little he had, and the next day as we were leaving he was standing on the deck waving goodbye. “Yip, yip!” was still coming from belowdecks.
Beyond Morgan City, the water turns brackish, and by the time we made it to Houma, Louisiana, you could tell that the Gulf was influencing the rivers and waterways. The tide rose and fell, we could catch blue crabs in the bayous, and the cypress swamp gave way to an endless marsh. Our cousins from Louisiana came to visit us and brought our cat, Luciano. We had left him with them before we set out. Getting him shipboard was Mom’s idea. I think she wanted something familiar and homey, but the cat never got used to being on board. Luciano, named after the opera tenor Luciano Pavarotti, was a big, handsome cat not used to privation. He spent most of his time in the engine compartment between decks and feathered the old diesel’s oily surface with cat hair.In Houma, some folks gave me a small shrimp net to drag behind the boat, and gave my parents an ice chest full of boiled blue crabs. We asked how we could return the ice chest, as it was a quite nice one, but they just laughed and sent us along our way. We pushed southeast through water hyacinth that chokes the waterways and canals in southern Louisiana, and dined on blue crab while enjoying some of the finest weather thus far. It was May, the skies had cleared, the water had cleared, and I could smell the salt sea in the air.
Beyond the confines of the Mississippi River, the MARY SAVAGE sailed along the Gulf Coast with just the gaff main and the staysail set. The boat had a bowsprit and a jib but 90 percent of the time we sailed without it.
As we came into the bay that lies behind Grand Isle, Louisiana, the wind became consistent for the first time. We had tried the sails on the river, but usually had to lower them quickly as the wind would die and the current drove us somewhere we did not want to be. Here though, as we broke through the endless marsh and into the bay, we raised the gaff main, staysail, and the jib on its retractable bowsprit. We made good time all morning out to Grand Isle.
At the time, Grand Isle was a collection of houses on stilts, fishing boats, and some of the friendliest folks we had yet met. I hear it is now a favorite spot for Louisianans to keep a second home or camp and has grown considerably. I hope it has maintained its attitude toward life.
At about noon we dropped the sails and headed into a rather fancy marina on the east end of the island. Two young attractive girls were standing on the dock ready to take our lines. “How much per night?” Dad said. “Only $27,” said one of the girls as I started to throw her the bowline. “Hold that line!” said Dad. “We will anchor out.” The girls looked disappointed. We were on a very tight budget during the trip; Dad had allotted $100 a week to take care of all necessities, groceries, fuel, anchorage, everything. As we left the marina, a small boat with three men aboard approached.
“Where bound?” a rather round man with a big brown beard asked. “Safe harbor,” said Dad. “We are pirates,” he said, “and if you let two of us board and sail with you, we will take you to a safe harbor.” Mom was worried a bit about the possible literal interpretation of “pirates” but Dad laughed and two of the three pirates came on board. They did bring rum, and they did tell me a whopper of a tale about a shrimp boat hauling a chest of silver up in its nets, but Grand Isle was the stomping ground of Jean Lafitte long ago, and even in those days, the pirates were of a rather high caliber.
Our pirates were particularly taken with the MARY SAVAGE and admired the ship’s wheel and all the blocks, cleats, pulleys, and sheaves. They were impressed that Dad had made all of these things as well as the boat itself. We sailed on a beam reach with a fresh wind, fresh enough that the gunwales in the cockpit surged with water on the leeward side when a particularly strong puff launched us along.
We sailed all the way to the west end of Grand Isle and put in at Cigar’s Marina. Dad was afraid we couldn’t afford it. “We will pay for your berth if you don’t have the cash,” the brown-bearded pirate said, “but Cigar’s is only $3 a night anyway.” Indeed, Cigar’s marina was cheap, clean, and friendly.
While we were there, we saw the pirates several times, but we also met several other locals. Having heard about us from our mutual pirate friends, a man we had never met handed Dad the keys to his car and said, “You might want supplies. I am not using the car right now, so take it and get what you need.” Another couple came on board to see the boat, and, after inviting us to a party at their house, said, “We are going out of town for the week, stay at our house while we are gone!” We were not allowed to buy one meal or one drink the entire time we stayed at Grand Isle.
I am making my way to catch bait with my cast net in the silver bucket. I always enjoyed the look of the windows Dad made for the aft cabin. The little scow, HAPPY COCKROACH, sits on the dock awaiting its captain.
I was watching with great interest as a fisherman used his cast net. He showed me how to cast, and the next morning there was a little 4’ net in a bucket sitting on deck with a note saying, “For the young fisherman.”
We stayed longer than we intended, but eventually we had to head east. I think Dad was beginning to feel guilty that he wasn’t allowed to pay for anything. We tracked down the manager of Cigar’s and paid our pittance for the week. There was a good breeze again, and we struck off for Empire.
Empire isn’t the end of the line headed south from New Orleans, but it is getting close. The folks in Empire were very friendly, but I don’t remember the town fondly as I got violently sick there. I had been cast-netting using a technique that involves holding a piece of the net in your teeth. It’s a good technique, but should be used in clean water. The muddy, marshy backwater was home to 50 fishing boats, most with questionable sanitary equipment, and I came down with some form of dysentery. We were 90 miles from any medical help and I could not keep fluids down or up. My parents gave me gallons of water with sugar and a bit of salt. This is the treatment used by the World Health Organization in places where there is no medical assistance. I slept on the bench in the after cabin below Mom’s folding berth for several days. I still remember looking up at the rope netting under the bunks and wishing I was safe back in our little cabin on the hill.
Just before the point when I would need to go to New Orleans to be hospitalized, I managed to get down some saltines. The next day I was a bit better again. Dad made the decision to go on with the voyage and we locked across the Mississippi river into Breton Sound. I was feeling much better, but both Mom and I were at the breaking point.
Breton Sound is shallow and often gets a south wind that builds up a ferocious chop. The weather report was advising small craft to seek shelter, but we had to go many miles out to get around a rock dike. We were plowing through a 4’ to 6’ chop and while it wasn’t dangerous, it was bitterly uncomfortable. I was throwing up again in my cabin, Mom was giving Dad the evil eye, and the cat had lost its grip and was tearing around below decks.
Dad had his resolute expression glued on as Mom said, “Why did we come on this trip, you…you brought us, what is wrong with you?” Suddenly, a small plane flew low on our port side and dipped its wings to us. We waved. It came by and dipped its wings again, we began to worry. We were about to pass the end of the dike, according to the chart, and eager to bring an end to the thrashing into the terrible chop, when a large boat came roaring up in sight and hailed us on the VHF. The airplane pilot, who spotted schools of fish for the fishing boats, had contacted the fishing boat to convey an important message to us: The dike had recently been extended an extra mile and the chart we had didn’t show it. Breaking waves should have given it away, but waves were cresting everywhere because of the shallow water.
We forged on until the fishing boat signaled that all was well and we finally rounded the dike. Sick, beaten, and exhausted, we entered Bayou la Loutre. The wind had fallen to a gentle 5 knots and a full moon rose above the marsh. The MARY SAVAGE ran before the breeze on gentle ripples. The terror was gone, I was recovering swiftly, and the place was beautiful. We dined on smoked oysters on top of saltines and Mom opened a bottle of wine. “All shall be well, all manner of things shall be well,” she said as she poured, quoting the 14th-century anchoress Julian of Norwich.
We anchored for the night at the easterly end of Bayou la Loutre. The next morning, we crossed back into Mississippi and anchored off Long Beach that evening. The MARY SAVAGE had accumulated a significant amount of scum on the bottom since we started our journey despite the copper bottom paint, and Dad wanted to clean the bottom and make sure everything looked sound before we continued our journey. We careened her in shallow water and waited for the tide to go out. Before long, two men were shouting to us from shore. We thought they were interested in the boat, but when Dad went to talk to them they told us we couldn’t careen our boat on the beach. They were apparently some local officials. Things got a bit heated until the man who owned the beachfront came out, told the two to leave us alone, and apologized for their rudeness.
When the tide came in we moved on and anchored off the beach in Biloxi, but soon we moved again, this time to the harbor in Ocean Springs. It was one of the nicest towns on the Gulf Coast that we went through. We stayed for two weeks there; the slips were cheap and the folks were friendly. When we left Ocean Springs we anchored off of Horn Island, a wild and deserted island with huge sand dunes and sea oats. We trekked across the island and found its marshy interior, several large lagoons teeming with birds and animals, and the deserted beach on the Gulf side. Back at the boat that afternoon I went swimming in the clear, salty water. Around evening we saw a large alligator, close to 14′ long, swim out from shore and quietly submerge. About 100 yards away, a cormorant was sitting on the water, preening; a sudden splash and the bird was no longer there. The alligator cruised back to shore; I was glad that I had not been the cormorant.
Leaving Mississippi behind, we entered Alabama. Dad’s family had a second house in Gulf Shores for years, but the place had changed drastically. The beachside condominiums were beginning to replace the old, simple beach houses. Dad was disgusted and we pressed on. We crossed into Florida and made port in the small village of Pirates Cove. Our cousins joined us again and we took several overnight trips out to the barrier islands. Uncle Buzz, my Dad’s cousin, taught me how to gig flounder and to steam oysters open on a campfire.
A few more days and nights put us in Destin, where Dad’s uncle, Paul, lived. Uncle Paul had been in the Air Corps during WWII and flown DC3s across the eastern Himalayan Mountains—The Hump—into Burma. He lived in Africa afterward selling Cessna aircraft, but that was a front for his work as a CIA agent. He had also sailed twice across the Atlantic on his 39′ sailing yacht. He and his wife, Louise, let us stay for a few days in their fancy condo on the beach. It was good to clean up and cool off, but we were terribly out of place. Destin had beautiful waters, white sand beaches, a million tourists, and endless souvenir shops. Despite the hospitality, we did not stay long.
As we moved east along the Florida Panhandle, the heat, bugs, and tight quarters were taking their toll on morale. I asked to be towed behind the MARY SAVAGE in HAPPY COCKROACH, and to my surprise there was little argument, in fact they suggested I might do it again the following day. Dad payed out the line until I was 100’ behind the boat. I was able to pretend I was in command of my own vessel, and my parents were able to talk to each other without my frequent interruptions.
They discussed the coming open-water passage around Florida’s Big Bend, the arc of coast between the Panhandle and the peninsula. Beyond Apalachicola we’d have to leave the safety of the intracoastal waterways that stretch from Texas and Maine. Dad had been hoping Mom had grown more confident in the MARY SAVAGE’s abilities and would be ready for the leap, but her terror built. This fear was reinforced one afternoon just out of East Bay in Panama City, when a sudden squall caught us. We had time to get the sails down, but very little else. For an hour, Dad stood on deck, motoring at a standstill into the storm and trying to keep the one channel marker that was visible in the rain the same distance off the starboard side. Mom was crying, the cat got on deck and bit Dad on the foot, and the wind blew his glasses away. We were in no danger of drowning—there were shallow oyster shoals on either side of the channel—but the MARY SAVAGE would have been smashed up by the high chop and nasty, sharp, oyster-shell bottom.
We arrived in Apalachicola in July of 1991. Though we stayed aboard the MARY SAVAGE in her slip at the Deep Water Marina, we began to put down roots. During the summer we kept after cabin windows open and a rigged a makeshift awning to provide some shade.
We all needed a rest. We entered the Apalachicola River the next day and sailed along until the little fishing village of Apalachicola came into view. Dropping our sails, we turned and motored up Scipio Creek. At Deep Water Marina we saw an older couple busy working on some obviously new slips. We asked if they were open for business and they said they would be glad to have us.
Harold was a retired tugboat pilot out of Long Island. He and his wife, Dee, had moved to Apalachicola and just the week before opened the marina as a second career. The rates were reasonable because they were trying to attract business. Our plan was to resupply, take on water, and refuel before we made the Big Bend jump. Apalachicola was a quaint, untouched fishing village full of eccentrics, artists, fishermen, and slowly decaying Victorian houses. The river and bay were teeming with fish, and the modern world had not yet touched the little town. Fishing boats for shrimp, grouper, mullet, and oysters were far more numerous than yachts.
During our stay in Apalachicola, Mom passed the time painting with watercolors. The owner of a local gallery took an interest in some of her artwork inspired by our voyage.
We stayed for a week that turned into a month. Mom’s paintings of boats, swamps, and wildlife she had seen along the way were very popular, and many locals hired Dad to build or do odd jobs for them. He helped Harold and Dee with the marina and then started restoring one of the local houses. Summer was swiftly becoming autumn.
The house in Apalachicola was surrounded by big live-oak trees. Mom and Dad could not resist buying it and the voyage was officially over when they did.
I was wondering if we would ever leave when a late Victorian house under two live-oak trees in the prettiest part of town came up for sale. The price was quite low, and Dad could not resist buying it. Mom was ecstatic; she loved the idea of a house with enough room for privacy in a town that time forgot. Dad sold the MARY SAVAGE to an older couple and went to work restoring the house. I went to the local school, and Mom started selling her paintings downtown.
Before long, life shifted to a new normal. Dad would soon be anxious again to build another boat, a steel-hulled stern-wheeler, and this time he would not have to travel very far to reach the sea. I would spend my teens and early 20s exploring the Apalachicola River and Bay and the Gulf of Mexico. It would be 12 years before we returned to our land in Mississippi.
Dedicated to Phyllis Ashcraft Blake
Teacher, artist, wit, bibliophile, devoted mother
February 22, 1947 – September 21, 2016
Nicholas Blake lives on his family land in Mississippi with his wife and two boys. When he is not playing music, he is building something in his shop or at his forge, wandering in the woods, messing about in boats, or fostering his family’s penchant for eccentricity. “From Father to Son,” his article on building a Whitehall, was published in the April 2018 issue.
If you have an interesting story to tell about your adventures with a small boat, please email us a brief outline and a few photos.
Insignia cloth was used to make the skull and crossbones on the sail as well as the racing stripes on the deck.
We once decided to put a skull and crossbones on a black lateen sail for a Sunfish and, rather than take on the very awkward task running it through the sewing machine, we used adhesive-backed insignia sailcloth. The material was easy to use, and it has held up well in the marine environment and harsh sunlight of Florida.
Adhesive-backed sailcloth is commonly used for numbers and class insignia on sails. It comes in several colors, and we used Challenge brand, purchased from Sailrite. The lightweight 3.3-oz polyester fabric ensures that the insignia does not interfere with the shape and pliability of the sail. There is a heavier fabric available from Contender that has additional UV treatment and weighs about a half ounce more than regular insignia sailcloth; it comes only in white and is well suited for repairing sails. The peel-off paper backing on Challenge cloth has a grid to aid in tracing out insignias and numbers.
The plywood pattern for the skull sits on the backside of the white insignia cloth, ready to be traced. The cloth’s removable backing, marked with a grid, is removed to expose the adhesive.
We make patterns on stiff paper or thin plywood, then flip them over to trace them on the back of the cloth so the pieces will read properly when applied to the sail. Once the pieces are marked on the backing, it is easy to cut out the shape with scissors, or an X-Acto knife in tight corners. Sails should be cleaned before installation; follow the manufacturer’s directions to select the proper detergent or soap.
The adhesive sailcloth is best applied in moderate temperatures; the backing peels off easily, and sailcloth pieces can be moved a few times to ensure smoothness and correct placement before being pressed more permanently onto the sail. The adjustability comes in handy when there are a lot of pieces to work with, as there were with our Jolly Roger’s teeth. The directions recommend leaving the sail flat overnight while the adhesive fully cures. Sewing the insignia cloth’s edges make for a more permanent installation, but our applications have adhered well, even over the uneven surface of a sail’s seams.
The authors restored an old Sunfish, and Kent is a pilot, so a combination insignia is in the works.
We used some red-and-white cloth to repair our Alcort Catfish sail. It was easy to cut the cloth to size, about an inch larger all around than the repair areas, and apply patches to both sides of the sail. Small repairs do not need to be sewn, so bits of adhesive-backed sailcloth for expeditious repairs are a good addition to a ditty bag. Adhesive sailcloth serves well where spreader patches and wear strips are needed. We’ve even used some to make nice deck stripes for two Sunfish.
If your sail numbers change or you decide to trade Jolly Roger’s crossed bones for crossed sabers, insignia cloth is reasonably easy to remove. Audrey, a theater costume designer who has been manipulating fabric for a long time, gives adhesive-backed sailcloth two thumbs up.
Audrey and Kent Lewis currently seek prizes on Pensacola Bay with their menagerie of sailboats, kayaks, canoes, and paddleboards.
Sailrite and Seattle Fabrics are among the sources for adhesive-backed insignia sailcloth. It may be available at sail lofts.
You can share your tricks of the trade with other Small Boats Monthly readers by sending us an email.
The dolly offers both a good view of the trailer and the precise maneuverability that Al requires to get his trailer through the tight squeeze of his garage opening.
To get my 20′ West Coast dory out of the garage I had solve two problems: the trailer fenders have only about 2″ of clearance between the sides of the garage opening, and about 15′ from the garage the driveway makes a sharp turn up a slight incline. It’s impossible to make this maneuver with a vehicle, and the trailer is too heavy for me to move by hand. I was able to pull the boat out of the garage with a garden tractor, but its wheels usually got wedged against the curb when I tryied to start the 120-degree turn up the rest of the driveway. I’d have to get off the tractor to disconnect it from the trailer, reposition the tractor, and connect it again, repeatedly, to make the turn.
The Force power dollies can be plugged into a trailer’s 12-volt electrical system if it’s a camper trailer. Adding a battery box and a deep-cycle battery, as seen here, makes the unit self-contained.
When I read about Parkit360° Force 5K Power Dolly it gave me hope that it might be the solution to my problems. It would be easily maneuvered and compact enough to make turn and more than powerful enough to move my trailer. I called the Parkit360° factory and was assured that I would have 30 days to return it if it didn’t do the job; I’d only have to pay the return shipping. I thought that was fair so, I ordered the Force 5K B3. This little wonder maneuvers the trailer through the tight clearance and around the turn with ease! It also has plenty of power to pull the trailer up the plywood wheel ramps I placed over the sill at the garage opening.
A display on the base keeps track of the battery’s level of charge.
The Force 5K Power Dolly is 55″ long, including the handle, and 30″ high. It weighs 70 lbs, not including the weight of the Series 24, deep-cycle battery that powers it. On the handle for steering there is a conveniently located rocker switch for forward and reverse.The dolly’s 12V, 1.5-hp electric motor is rated for grades up to 6 percent. My boat, outboard, and trailer weigh 2,280 lbs total, and the Force 5K can move up to 5,000 lbs. Larger versions are available for weights up to 15,000 lbs. Some models connect to the electric brakes on a trailer.
The trailer ball is set in a post with a ring that keeps the dolly properly situated under the trailer tongue.
TheForce 5K B3 dolly requires a 12V deep-cycle RV/marine type battery (not included with the purchase). I chose to order my dolly with an optional onboard battery charger so I could plug the unit directly into a wall outlet for charging. A digital voltage indicator indicates the level of charge. After each trip in and out I push the dolly into my shop and plug it in. The battery is not fully discharged at this point, and could do a few more moves, but I like to keep it topped off. A full charge with the recommended 70- to 90-Ah battery should provide 1-1/2 to 2 hours of run time.
After I have pulled the trailer out of the garage and through the turn, it’s ready to be hitched to the truck. The driveway has a slight incline, but the dolly holds the trailer in place. (The tractor used to slide backward when I got off, so I had to chock it.) I then put chocks behind both trailer wheels and disconnect the dolly. I pull out the free-wheeling knob, putting the dolly in neutral, and push it into the garage. I then connect the trailer hitch to the truck, and I’m ready to head to the launch ramp.
The Force 5K B3 costs $1,670, and for me it has been well worth it. The Force 5K has made my job so much easier, and I highly recommend it for boats and campers that have to be maneuvered in tight places.
June and Al Dettenrieder of Lunenburg, Massachusetts, have been messing around in boats all 58 years of their married life. They started with a rowboat with a lawnmower engine and a washing-machine transmission that Al rigged up. There were many boats after that, even a 38′ sailboat. Now they enjoy puttering and picnicking in local lakes and rivers in the outboard dory Al built at 79 years of age. His dory won Best Power Boat in the “I Built It Myself” event at the 2018 WoodenBoat Show in Mystic, Connecticut.
The Force 5K B3 and the other models are available from Parkit360°. Prices start at $1,800.
Is there a product that might be useful for boatbuilding, cruising or shore-side camping that you’d like us to review? Please email your suggestions.
The handle is a stack of leather disks turned and sanded smooth by hand; it offers a non-slip grip that dampens vibration.
Audrey and I have a little fleet of small boats and do a lot of work taking care of them. Setting grommets is a regular task when we’re making and repairing sails and boat covers, and one of the best tools we’ve found for the job is the Barry King 48-oz hammer-style mallet. It was created for driving punches and stamps in leatherwork—but it can also be used for sailmaking, canvaswork, woodworking, and other boatbuilding tasks. The 3-1/8″-diameter nylon head has plenty of surface to make sure the mallet meets the tools without glancing off as a hammer often does, so you can concentrate on the business end of the tool rather than the mallet striking it. The nylon head is non-marring and reduces wear and tear on grommet sets and hole cutters. The mallet is also well suited for striking chisels without damaging them, especially when you need the power to cut mortises.
The 6″ handle is a stack of leather discs and shaped for a nice feel and secure grip in both Audrey’s small and my large hands. The mallet is well balanced, and the materials from which it’s made dampen vibrations and reduce noise. For style points, there are nice brass fittings on the handle and head.
The nylon head has enough weight to make quick work of punching holes and setting grommets, yet it won’t damage the tools.
Audrey is a costume designer and tailor who has installed thousands of grommets, and she was delighted with the weight and feel of the Barry King mallet. Three strikes set a grommet perfectly first time she used it. She has often seen the damage to the fabric caused when using a common metal hammer—off-center strikes can cause the grommet to compress too much on one side and cut into the fabric, requiring the replacement or repair of the damaged fabric, while the center section remains unset.
Grommet die sets and hole cutters also take a beating from metal hammers, and over time we’ve had to replace some of them. We have tried wooden mallets and rawhide hammers and they did the job eventually, with many strikes, but the King mallet’s weight, striking surface, and durability are perfect for these tasks. We can set large grommets with one or two strikes, and with a sharp hole cutter and a rubber cutting block we’ve cut through four layers of Sunbrella with one blow. It is a treat to put grommets into sails and canvas.
We’d highly recommend this well-designed and well-made nylon mallet for work in the shop, especially if you’re going to try your hand at sewing a new set of sails or if you’re putting grommets in your favorite sail cover. At $84, the price may seem steep, but the King mallet is a versatile tool that is a pleasure to use. The mallet is as beautiful as it is functional, and now we want to put grommets in everything.
Audrey and Kent Lewis live on the shore of the inland waters of the Florida Panhandle and curate an armada of small craft, with spare time for theatre and flying.
Barry King Hammer-style Mallets are hand– made in Wyoming. There are five sizes, priced between $65 and $85, with striking faces that are parallel (reviewed here) or angled. Sailrite sells only the 48-oz #3 ($83.95), reviewed here, for its particular effectiveness when setting grommets.
Is there a product that might be useful for boatbuilding, cruising or shore-side camping that you’d like us to review? Please email your suggestions.
photographs courtesy of Paul Montgomery and Harry Wong
The sturgeon-nose canoe Paul Montgomery built for Harry Wong brought Harry closer to his Sinixt ancestors.
Paul Montgomery of Kirkland, Washington, usually has plenty to keep himself busy whether it’s building skin-on-frame boats, keeping bees, tending a greenhouse, or making musical instruments. So when Harry Wong of Seattle called Paul, hoping he’d build a canoe for him, Paul initially turned him down, saying he was too busy. Harry mentioned that the canoe he had in mind was a sturgeon-nose canoe, the kind his grandfather used. That was all it took to get Paul to clear his workbench and his calendar.
Harry is a member of the Sinixt tribe, a First Nations people who lived in the area around what is now the land spanning the Washington–British Columbia border. The Sinixt had developed an unusual style of canoe, known as sturgeon-nose for the resemblance of its ends to the head of the ancient species of fish that inhabit the rivers in that area.
Paul made a model for himself after he delivered the canoe to Harry. Left unskinned, it’s a more interesting piece of sculpture.
Paul knew of that type of canoe from The Bark Canoes and Skin Boats of North America, by Tappan Adney and Howard Chappelle. In that volume, the sturgeon-nose canoes are associated with the Kutenai; the Sinixt also have a long history with the type. A similar type of canoe emerged in the Amur River valley, which now straddles the border between northeast China and southeast Russia.
The three-piece gunwale, lashed together, caps the frame heads.
The sturgeon-nose ends is said to make the canoe more manageable in wind and ease its passage through reeds. This shape is also conducive to construction with tree bark. The Sinixt used the bark of white pine, with the smooth inner surface of the bark to the outside of the canoe. When canvas was introduced, it was used for the waterproof covering.
After burning holes in the nylon, Paul drew the skin tight with lacings.
Paul would use nylon for the skin of Harry’s canoe, so it would be quite similar to the later canvas versions built by the Sinixt. Working from whatever information he could find, particularly the drawings in Bark Canoes and Skin Boats, Paul made the gunwale in three parts, inwale, outwale and cap, boxing in the heads of the bent ash frames. Getting the frames right took two tries. The first set was too round, making the canoe unstable. The second set made the bottom flatter for better stability.
The thwart, shown here in the model, was traditionally made from a barked sapling with its ends thinned and wrapped around the inwale. The long tail ends are then lashed to the bottom of the thwart.
A single thwart holds the gunwales apart. Unlike many of the other skin-on-frame boats he’d built, the skin would not be supported by widely spaced chines, but by closely spaced inner planking made of 5/16″-thick western red cedar. A wider plank at the bottom, 4″ across at the middle, was 16’ long, establishing the overall length of the canoe. Pegs and nylon lashings, in the form of artificial sinew, hold everything together. The nylon skin went on, stretched tight over the frame, and sewn along the tops of the stems. A polyurethane coating sealed the fabric so it would be waterproof, durable, and easy to maintain.
Paul’s first opportunity to paddle the canoe he built was on the day he delivered it to Harry. Old photographs of the traditionally built, bark-skinned canoes show native paddlers kneeling as well as sitting.
Paul and Harry launched the canoe at a slough that flows into Seattle’s Lake Washington. In his research, Paul learned that the canoe was rather unstable and upon getting aboard, noted “unfortunately, I got this part right.” The canoe took some getting used to when paddled solo; with the two of them aboard, it was better behaved. It tracked well and wasn’t bothered by a crosswind. Having a second paddler in the 16′ canoe submerged the tip of the bow, and it tended to accumulate floating weeds that had to be knocked off with a paddle to keep from losing too much speed. In many of the old photographs of traditionally built Sinixt canoes, the tip of the bow is rarely seen submerged; evidently the form is not meant to provide a hydrodynamic function.
For Harry, the canoe is more than a recreational vessel. It’s a link to his ancestors. His maternal grandfather was Alex Christian, known to his family as Pic Ah Kelowna, meaning “White Grizzly Bear.” He was the last of his family to live at the confluence of the Columbia and Kootenay rivers, land now occupied by the city of Castlegar, British Columbia. Christian’s ancestors had lived there for centuries, but the land was acquired by the British Crown at the end of the 19th century. He gathered his family aboard a sturgeon-nose canoe and paddled downstream along the Columbia River. The Christian family and the Sinixt people did not fare well in the 20th century, suffering through poverty and disease. Alex outlived his wife and children; he died of tuberculosis in 1924 and was buried in Washington, far from the graves of his ancestors. To add insult to injury, Canada declared the Sinixt extinct in 1956.
Harry takes his canoe to many river- and lake-side gatherings and lets people give it a try.
Of course, the Sinixt have lived on, and their existence was officially recognized in 2017, bringing an end to six decades of “extinction.” Harry and many other Sinixt now live in Washington. Harry takes the canoe to gatherings of the tribe and is happy to let anyone paddle it. Just the sight of the canoe, he reports, has brought several of the elders to tears.
Have you recently launched a boat? Please email us. We’d like to hear about it and share your story with other Small Boats Monthly readers.
When I decided to follow the route Nathaniel Bishop took from Pittsburgh, Pennsylvania, to Cedar Key, Florida, in the winter of 1874–75, I chose not to build a replica of his CENTENNIAL REPUBLIC, the sneakbox at the heart of his book, Four Months in a Sneak-Box. I was drawn to build instead the Barnegat Bay sneakbox detailed in Chapelle’s American Small Sailing Craft because it had an intriguing feature: a daggerboard set 10″ to starboard, on the outside edge of the cockpit coaming. Bishop’s boat had its daggerboard just aft of the mast, on the centerline, where you’d expect it to be. Chapelle offered good reasons for moving the board to one side.
The offset daggerboard of my sneak box convinced me that there were no significant advantages to having the elements of the sailing rig all set on the centerline. I slept with my feet tucked under the foredeck. I occasionally put the hatch over the cockpit opening for warmth or to keep the rain out. The boat was only 14″ deep, so with the lid on I could understand why the sneakbox was known to some as “the devil’s coffin.”
There would be no smiles trying to get to sleep with a centerboard hogging the middle of the sneakbox.
“The gunners often spent a couple of days away from home, during which they lived and slept in their small skiffs. The cockpit had to be large enough and sufficiently clear of obstruction to permit stretching out in some comfort. When the daggerboard was introduced, it was decided that its case must not obstruct the cockpit, so it was placed well off center in the boat—just outboard of the cockpit coaming. Such an unorthodox position of a centerboard did not disturb the Jerseyman, whose artistic regard for symmetry and been blunted by long years of acceptance of a single lee board.”
I didn’t expect to do much sailing on the first two legs of the journey—the Ohio River and the Lower Mississippi—but I would be sleeping aboard. Moving the daggerboard case out of the way was worth a try, even if it meant losing a measure of sailing performance on the last leg, along the Gulf of Mexico where I’d find wind and open water.
I cold-molded my sneakbox, so it was an easy matter to put the daggerboard case off-center. Monocoque construction, whether cold-molded, stitch-and-glue, glued-lapstrake plywood, or strip-built, carries its strength in the unified skin of the hull, lending itself to moving daggerboard and centerboard cases without having to work around traditional planks and frames. I just cut slots in the sneakbox’s deck and hull, and glued the trunk in.
I set out from Pittsburgh in November of 1983 and spent many nights sleeping aboard my sneakbox, LUNA. I appreciated the room I had to stretch out as well as the protection the fully decked boat offered from wind and rain. When I reached the Gulf I did a lot of sailing, including a day’s 62-mile sail around Big Bend, the open-water passage along the Florida coast that bends from its panhandle to its peninsula. I was never able to feel any difference between tacks with the offset daggerboard. Whatever difference there might be, it was less than the difference I could feel between having the sprit mainsail creased around the sprit on one tack, and curved smoothly to leeward of it on the other. I was sold on the offset board, and I haven’t built a boat with a board on the centerline since then.
The off-center-board case in my Caledonia yawl supports the starboard bench. It’s so inconspicuous that I often forget to lower the board when I set sail.
My Caledonia yawl has its “off-center-board” case set 12″ to starboard. The wide garboards of the glued-lapstrake plywood made the move fairly simple and left the center of the cockpit clear. On rare occasion, driving the yawl hard to weather on the starboard tack, I’ve been able to see the top of the board come clear of the water if I lean over the windward rail, but I’ve never detected any increase in leeway or decrease in speed.
The center of the yawl’s cockpit is clear but for one bench/bulkhead combination. I can move from end to end to end very quickly with my shins intact.
My cruising garvey also carries its off-center-board to starboard, leaving a clear path down the middle of the boat. I carried the off-center idea a step further and moved the mizzenmast as far to starboard as I could, 18″ off the centerline, to give me room to work with the rudder and the outboard motor. The garvey is no racehorse under sail, but it is well mannered even with the main and rudder on the centerline and the mizzen and board offset.
The mizzen mast on my garvey is set to starboard, clear of the tiler and the outboard. The boat’s off-center-board is also to starboard.
The outboard-powered canal boat wasn’t designed to sail, but with a leeboard (set 36″ to starboard) and a mast (set 18″ to port) we can rig for silent running without interfering with the normal use of the boat, which includes diving into the water from the cabin-top catwalk.
Our canal boat, lately rigged for sail, has its mast and leeboard well out of the way. And my Gokstad faering, of course, has its rudder hung on the starboard side, in Viking fashion. Our word starboard is derived from the Old English steorboard, meaning “steer board.” Before vessels were equipped with rudders set on the centerline, they were steered with boards hung on their sides, so putting the elements of a sailing vessel off to one side has a long history. The space in small boats is limited; I prefer to keep as much of that for myself rather than give it away to masts and boards in blind devotion to symmetry.
The Ski King was designed by company founder Glen L. Witt—a keen water-skier and a boat designer—in 1953, the year he went into business selling plans and kits to home boatbuilders. Although he enjoyed boating in his own 15′ Ski King for many years, at some point sales of the plans diminished and they were removed from the Glen-L catalog. But in 1976, Dwain Colton of Portland, Oregon, was keen to purchase a set of Ski King plans which, luckily, were still stored within the company’s archives. As it turned out, Dwain didn’t complete his Ski King until 2003, but the plans are now in Glen-L’s online catalog and “even made it back into our print catalog, which is something that I don’t remember ever happening before,” said Gayle Brantuk, Witt’s daughter who now runs the company.
In August 2017, Jonathon Clark, a former manager in the construction industry, started a 40-week course at the Boat Building Academy in Lyme-Regis. He decided that he would build a Ski King and ordered a set of plans and instructions from Glen L. He could have gone started making the frames—the comprehensive plans include detailed frame dimensions—but because lofting is required part of the Academy’s curriculum, Jonathon began work by drawing the lines full size.
As the lofting process progressed, Jonathon investigated what engine he would install. The plans recommend engines between 45 and 90 hp, noting “the only limitation on the motor is size.” In the higher horsepower range, only car engines would fit; they would have to be marinized, and Jonathon didn’t want to take on the additional challenge. He looked for as big a marine diesel as he could find, and this led him to a 57-hp, four-in-line, water-cooled Yanmar. He soon discovered that this engine wouldn’t fit in the Ski King as drawn, and so he would have to stretch the hull. The plans say that it’s acceptable to increase the 15′ length by up to 10 percent, to 16′ 6″, by spacing the frames farther apart. Jonathon had more or less completed the lofting at this point, so to stretch the hull to 16′ 6″ he simply extended the stern and added an additional frame.
The 57-hp marine diesel installed in AGAPE has enough power to get on plane with a full complement on board.
The hull is constructed upside down, with the motor stringers serving as twin strongbacks supported on temporary uprights and cross cleats. Jonathon and his fellow students would then set the transom and frames in notches cut into the stringers. The plans call for five frames: three of them ring frames, one just a floor, and the forwardmost a ring frame fitted with a plywood bulkhead.
Jonathon ended up fitting seven. He added one frame aft, and another near the bow, which would make it easier to fit the hull planking. The frames were made of 3/4″ thick sapele with 3/8″ plywood laminated to their floor timbers. Jonathon made the transom, originally drawn for 1″ framing and 1/4″ plywood, with 3/4″ ply faced on the outside with 3/32″-thick khaya veneers. The two motor stringers, which are fitted 1′ to either side of the centerline and run from the transom to the bulkhead at station No. 5, are 1″-thick sapele with 3/8″ ply laminated to their outboard faces to keep them from splitting, and they are interlocked into the frames. The stem is made up of two layers of 3/4″ plywood interlocked with the bulkhead at station No. 5 where it is joined to the keelson, which is made up of a laminate of 1-1/8″-thick sapele and 3/8″ ply, again to prevent the splitting that plywood-on-frame construction occasionally suffers. Other longitudinal components—all sapele—include 1″ x 2″ bottom battens, chines laminated in place from two pieces of 5/8″ x 2”, and sheer clamps from two 1/2″ x 2″ pieces, also laminated in place.
Once this framework was completed, the keelson, motor stringers, chines, and sheer clamps were faired to receive the plywood planking.
The plans call for 16’ sheets of plywood, 1/2″ on the bottom and 1/4″ on the sides. That may well have been available in the USA in the 1950s, but Jonathon could only obtain plywood in 8′ lengths. The plans include instructions for using butt blocks to join 8′ sheets to get the full length needed, but Jonathon opted to scarf two sheets to get the length for the bottom. Then, rather than use 1/4″ plywood for the side planking as specified in the plans, he decided that the simplest solution was to cold-mold the curved sides with three diagonal layers of 1/8″ ply.
The wheel was originally manufactured for a Volkswagen. The wooden discs are magnetically attached instrument covers that are removed when the boat is in use.
The plans suggest that, as an option, the outside of the hull could be ’glassed for increased durability. In the ’50s that would have meant using polyester resin, but Jonathon used epoxy and one layer of 450-gsm (13.2-oz) biaxial cloth. And while the plans call for Weldwood resorcinol glue, another pre-epoxy standard, epoxy was used throughout the construction, and during assembly everything was held together with a minimum number of bronze screws (far fewer than the plans specified).
Khaya sprayrails were then fitted along the chines, and in the aft part of the boat—where the tumblehome is pronounced—khaya rubbing strakes were fitted along the point of maximum beam. Once the hull was turned over, all the structural components were epoxy-filleted to each other on the inside.
The propeller shaft needed to be angled at 15 degrees, but if the engine was set at that angle, its forward end would be too high. So, it was fitted at an angle of 8 degrees on fabricated stainless-steel engine beds which were bolted to the motor stringers. A 1.47:1 gearbox made up the difference with a down-angle of 7 degrees.
The 14″-diameter, three-bladed bronze propeller came from Michigan Marine. It was supplied with a 12″ pitch, but BT Marine, a company near Lyme-Regis Academy, after examining all the available data, and tweaked the prop to produce a 13.5″ pitch with cupping to give a virtual pitch of 14″. A custom 304 stainless-steel fuel tank with a capacity of 53 liters (14 gallons), which Jonathon hopes will give him a full day’s use without refueling, was installed under the aft deck.
Photographs by the author
While the plans illustrate a motor enclosure that extends into the aft cockpit, ultimately the layout is determined by the builder and the motor chosen. In AGAPE, the motor is hidden under the deck between cockpits.
Although Glen-L’s plans suggested a narrow bridge deck with an engine box extending aft from it, and a forward-facing seating in the aft cockpit, the details are left to the builder to accommodate the engine chosen. Jonathon felt that a wider bridge deck to completely enclose the engine with aft-facing seating behind it would better suit the 1950s aesthetic and the designer’s intended function for the boat: towing a water-skier.
The top portion of the ring frames serve as deckbeams, and the remainder of the deck structure is sapele. The deck itself is made up of a 1/4″ plywood sub-deck with 1/4″ khaya covering boards and kingplanks, and spruce laid planks. While there is a hatch in the foredeck for access to a stowage locker, Jonathon was keen to avoid obvious hardware such as piano hinges, and the engine hatch will only need to be opened for major servicing or removal, so he has fitted it semi-permanently. Removing the upholstered backrests forward and aft of the engine provides everyday access. Both sets of backrest cushions are in three sections, partly to make them easier to remove and replace, but Jonathon’s attention to detail is well reflected in the fact that the middle sections line up exactly with the kingplank, and the stitching in the outer sections line up with the other deck seams.
Jonathon found it difficult to source suitable chrome and stainless-steel deck hardware in the U.K., but he was able to find much of it in the USA. The windscreen framework came from a 1950s Chris-Craft, and the steering wheel was salvaged from a 1960s Volkswagen Beetle.
The seats in the aft cockpit face the stern, appropriate for the design’s original purpose of towing water skiers.
The Academy’s launch day, with an enthusiastic crowd looking on, can be a nerve-wracking affair, especially with a high-performance boat such as the Ski King, now christened AGAPE. Initially Jonathon took co-builders Rory Pullman, Arthur Scott, and Sam Stephens, each of whom, along with fellow student Andrew Petter, gave him invaluable support throughout the project. After the inaugural spin around the bay, he returned and invited me to join him.
There was not a breath of wind, and in a very slight swell at close to the full 3,000 rpm, AGAPE got up to 22 knots. Jonathon was delighted: he had expected something like 20 knots with just one person on board. He was reluctant to try turning hard at full speed, but at 17 knots the turning circle was around 20 boat-lengths. Maneuvering at slow speeds was tricky, partly because the engine was set to idle at 800 rpm, a little high, and gave us a minimum speed of just over 4 knots. At that speed the turning circle was about five boat-lengths.
With 54-hp propelling the AGAPE, it is on the low end of the recommended power range. The upper range of 90- to 100-hp would provide a very lively ride.
Jonathon later contacted his engine supplier, Purbeck Marine, and learned this was computer controlled and would settle to about 600 rpm once the engine broke itself in. In reverse, AGAPE is very difficult to steer, but Jonathon accepts that these are typical characteristics of such a boat and hopes that some tweaks will lead to minor improvements.
Sitting in the stern seating area was very comfortable, with less motion than in the driving seat. Even at full speed I was able to write legible notes, and it was possible to have a conversation with my companions above the engine noise. It will be a perfect spot from which to safely keep an eye on a water-skier being towed astern. It was easy to see why Glen L. Witt, who passed away in 2017 at the age of 98, chose to build this one for himself.
Nigel Sharp is a lifelong sailor and a freelance marine writer and photographer. He spent 35 years in managerial roles in the boat building and repair industry and has logged thousands of miles in boats big and small, from dinghies to schooners.
I met this great bloke, Ross Lillistone, a classy sailor, designer, and builder of boats, at a boat show in 2005 and asked him to sell me plans and give me guidance in the selecting and building of a couple of small boats—a 9′ Sherpa that I rigged with a balanced lugsail and 10′ Fish Hook rowing boat—both from designer John Welsford. I’d been happily sailing then with a new cohort of like-minded sailors, but I eventually realized that I needed a faster, more versatile, but still simply rigged boat. I didn’t have the time to embark on building a third, so I was hoping Ross could both design and build a boat for me, and in 2007 he said he could.
John Shrapnel
The two masts fit all three of the mast steps, providing the option to sail with both sails, the main alone, or the mizzen alone, as conditions require.
He got to work drawing a larger, faster, but still simply rigged and sailed camp-cruiser with rowing and motor backup. He came up with a new design, and in 2008 a beautifully built 17′ cat-ketch with balanced lugsails emerged from his shop. I christened the boat PERIWINKLE, and Ross adopted the name for the design.
The Periwinkle has a glued 9mm-marine-plywood lapstrake hull with five strakes, built on its frames and bulkheads over a strongback. It has hardwood gunwales, stem, and skeg. It has very large and accessible flotation compartments, the rear one (capable of huge gear stowage) reached from a large midline hatch. The boat and sailing rig take about 600 hours to build.
John Shrapnel
The center mast partner braces the forward end of the centerboard trunk. The mast’s leather is long enough to protect the the mast in either of the partners it can be placed in.
Periwinkle has three maststeps, two for the main and one for the mizzen, giving many options for sail configuration. Ross built a beautiful bird’s-mouth mainmast, light enough to lift and drop into the appropriate mast step. Each mast, bundled with its spars and sail, fits within the boat’s length for storage and trailering.
I usually sail solo and enjoy that most but sailing with two or three aboard also works well. Being such a light boat, it is very easy to launch and retrieve singlehandedly. The lug sails and unstayed masts make for extra quick rigging at the ramp. For camp-cruising or daysailing in tidal waters, I carry two inflatable beach rollers. They make it easy to move the boat across any expanses of sand. Fully inflated, they stow neatly under each of the side decks along with the oars. If I’m daysailing from a beach camp, the simplicity of just pulling up the main, dropping the rudder and centerboard, and sailing away are always appreciated.
Paul Hernes
When fully set, the lug cat-ketch rig carries 156 sq ft of sail.
The Periwinkle excels in light air, and is a fast and easily driven boat, leaping forward in response to any puff of wind. Its initial tenderness is followed by stiffness as the aft sections come into play. With the full cat-ketch rig, I take to the ample side-decks early on to maintain the trim. An extra crew can help but is not necessary. If I’m sailing solo with the full rig I put the first reefs in at 7 to 10 knots of wind.
The rear seating, situated just forward of the rear deck, places the helmsman optimally for weight distribution. It is very comfortable tucked into those back corners with a leg resting on the seat and a foot wedged against the other side. Likewise, if hiking outboard on the side decks with tiller extension, your feet push firmly against the centerboard trunk as a counter to your pull on the mainsheet. When I spend the night aboard the boat, the floorboards offer enough room for comfortable sleeping to either side of the trunk.
Paul Hernes
The centerboard trunk makes a good footrest for the crew while they’re sitting on the rail.
Under sail, the Periwinkle points high, especially trimmed so the transom just kisses the water while the forefoot is well in—it helps to edge the bow upwind as it peels the water away. The fine entry means minimal hobby-horsing to impede its progress through choppy water. The boat is generally a very dry ride.
The Periwinkle has an ample skeg, so on every point of sail but tight push to windward using a small amount of centerboard to counter leeway. Minimal use of the centerboard, of course, helps speed. The hull has such a shallow draft that with board almost up it will get across any bit of shallow water, even as little as 6”.
When tacking, the Periwinkle doesn’t snap about like some of the other boats, probably because the centerboard acts like a long keel when it’s only partially deployed. Fully lowering the board to a nearly vertical position would make it easier for the boat to pivot around it.
Sailing on a run in stronger winds with lug sails requires care and attention. The yard shouldn’t be let out to more than 90 degrees, as dreaded rolling may put you in the drink. I learned this lesson the hard way.
And if you do capsize? The Periwinkle won’t put its mast under, so the hull will lie on its side, supported by both the mast and the watertight compartments in the ends. It was easy for me to get on the centerboard to right the boat, then slip in over the side. The built-in buoyancy limits the water scooped up, and a large bucket works well to clear the cockpit. I’ve thought an electric bilge pump would be a good addition.
I once capsized to starboard while my motor was clamped on the transom, and though it was partly dunked, I had the boat up so quickly that the motor was fine and started straight away. The air intake must have been clear of the water or perhaps there was a good seal on the cover. A capsize to port would leave the outboard well completely above water.
Paul Hernes
With the lug-rigged ketch setting only the 105 sq ft main in the middle partner, the Periwinkle still makes good speed and simplifies sail-tending tasks for the skipper.
I’ve tried all of the options the cat-ketch rig offers for sail area; the variety provides flexibility for various wind speeds. The least sail area is under the mizzen alone, and the boat really sings along in 15 to 20 knots of wind while I stay comfortably seated inboard. The helm is better balanced while using two sails, or when using one by adjusting the mainsheet and centerboard and the fore-and-aft trim. A light touch on the tiller is the reward. When tacking, moving around the centerboard case (which extends to the thwart in front of the mizzen mast) was awkward at first, but I’ve learned how to execute a flowing crossover.
John Shrapnel
In a fresh breeze, with the mizzen set in the middle partner, the Periwinkle made a GPS-measured 7 knots.
I have all the sail and centerboard controls led to the helm. If the wind is up, I can also reef both the main and mizzen from there. The yards on both sails drop readily when rounded up to the wind when their halyards are eased. If I know I’ll have brisk sailing conditions, I’ll fix about 25 lbs of lead below the floorboards, each side of the centerboard trunk. The additional weight improves performance and comfort.
As my experience with the boat grows, I have found a wonderful rig setup that’s not among those in Ross’s drawings. I step the mainmast in the forward position and move the downhaul forward to the tip of the boom, reconfiguring the balanced lug into a standing lug. This puts the aftmost part of the boom forward and well above head height—a very comforting modification. She looks good too, and still points high with great speed. As I get older and less energetic, I find this is now the optimal rig for me.
Ross kept rowing in mind when he designed the Periwinkle; the thwart and rowlocks are well situated for solo rowing. I leave the rudder hung on the transom and use a tiller tamer, as the tiller is out of reach. With a good pair of oars, the Periwinkle glides along straight and true.
For motoring I have a 2.5-hp four-stroke outboard. I fix the motor to straight ahead and use the rudder and tiller for directional control. It’s a long reach to the motor over the rear deck, so I have a small pole with loop of line for shifting gears and an extension on the throttle control. The motor well is offset to starboard, but it still keeps the motor above the water when the boat is strongly heeled on a port tack. Under power, the Periwinkle achieves hull speed at an economical half throttle.
The Periwinkle is a fine and versatile boat, and can be customized for a wide array of requirements. I’ve enjoyed the exploration of sail options and efficiency and simplicity of the lugsails. (Ross includes gaff-headed cat rig with flying jib option in his plans.)
Ross Lillistone
This Periwinkle carries the gaff cat with jib rig with a total of 132 sq ft of sail.
In its full rig option, the Periwinkle may not be a boat for a novice sailor, but with a reduced rig it offers easy and safe sailing. For those with more experience, a competitive streak, and an inquisitive mind, the Periwinkle gives a rewarding sail. I never stop learning about this boat and its abilities, and as I get older, my appreciation grows for the many options for reducing sail while maintaining performance.
We old sailors are a very competitive bunch, and all of us love our own boats. We constantly tune them to eke out every bit of speed as we close on the boat ahead (or to avoid getting closed-in on) and chuckle to see the other skipper furtively checking his trim, centerboard, and sail settings, trying to look unconcerned at being outfooted.
So, is the Periwinkle a good performer? Well, it really suits and satisfies me, and is a great all-rounder. It has taught me plenty about sailing.
John Shrapnel, a retired anesthesiologist, and his family live mostly in Queensland, on Australia’s Sunshine Coast. He has sailed enthusiastically for 10 years or so with a group of disparate older fellows in their home-built small wooden boats from designers all over the world. They often gather for meetings convened by the Wooden Boat Association of Queensland (WBAQ), whose members include boatbuilders and sailors from amateurs to masters. John has always lived by the sea, and boatbuilding, sailing, and the companionship afforded by the small-boat community are integral parts of his happy retirement.
Periwinkle Particulars
[table]
Length/17’2″
Beam/5’2″
Displacement, salt water/877 lbs
Sail area, Lug cat-ketch/156 sq ft
Sail area, gaff sloop/132 sq ft
[/table]
Plans for the Periwinkle are available from Ross Lillistone’s web site printed ($180 AUD, approx. $133 USD) or as PDF files ($170 AUD, approx. $126 USD).
Is there a boat you’d like to know more about? Have you built one that you think other Small Boats Monthly readers would enjoy? Please email us!
The year was 1979. My friend Geof Heath and I needed a special boat for a special project—a climbing expedition along the wild and mountainous coast of Labrador. The boat had to meet conflicting requirements: it had to be large enough to carry us, our food supplies, extra fuel, and climbing and camping gear, all while being reasonably safe in the open ocean. It also had to be light enough to be trailered hundreds of miles, often over gravel roads, and light enough that the two of us could drag ashore on rocky landings. Then there was the biggest factor—we didn’t have a lot of money. Now, nearly 40 years later, I am still amazed that not only did we find the right boat for our expedition, but that the little craft later proved adaptable for any number of demanding projects and today is still ever ready for whatever task we might call for. It proved the maxim, simplicity pays, both on land and sea.
And how did we find this floating marvel of versatility? Well, it took a considerable amount of searching and was not where one might expect. Geof was a former mountain guide in the American West and in Europe but at the time was busy working at a commercial boatyard. In his spare time, he was building a 15’ Friendship sloop, a very small version of a handsome and once-common fishing sailboat along the Maine coast. He lamented the fact that his boat would be too small and slow for our needs, could not be easily transported, and would require a tender to get us ashore.
So we turned to combing the boat catalogs, which was a frustrating job, given our unusual requirements. We soon ruled out fiberglass because of its cost, weight, and need for more power than we could afford. Wood seemed a possibility for a while, but time, expense, and weight put an end to that idea. A strong case could be made for aluminum—it is light and durable—but all the open skiffs we saw were too small, the longest around just 16′. The next larger series of aluminum boats call for larger motors, decks, floors, wheel steering, windshields, center consoles, cuddies, you name it, and were bigger and heavier than we could handle.
Then, in the back pages of a catalog from Lund Boats, I found the answer. One of their 18’ boats, with the soul-stirring name of S-18, was a plain-Jane aluminum skiff, just another “tin boat,” as scoffers were apt to deride its type. But aluminum is not tin; rather, it’s a metal that gets along very well with salt water, to say nothing about its remarkable strength, light weight, and workability. These last three features were the core of what we were looking for.
Photographs collection of the author except as noted
On delivery day in Ohio, TORNGAT all but dwarfed our little VW tow car. During her working life, TORNGAT was often towed by a VW loaded with camping gear and tools, along with four husky men.
I called the Lund headquarters in Minnesota and had a pleasant chat with a company official, who showed interest in our project right away. He answered my questions knowledgeably without trying to sell me a boat; his mainly positive replies were genuine. I asked how the boat was in rough water. “We sell most of our S-18s to Canadian fishing camps and Alaskan commercial fishermen who see plenty of nasty going.” What is the lowest-powered motor that would be enough for us? “The boat is rated for 55 horsepower, but a 25 should do the job in your circumstances.”
I was getting really interested, but then came the big question: How much will it cost? “You can have it delivered to our warehouse in Columbus, Ohio, for $1,400.” That was a sizable sum for our slim pocketbook but still a figure much less than expected. Columbus was a long distance from my home in midcoast Maine, and there was a major gasoline shortage in the Northeast, driving up the cost of filling the tank. Trusting my wife Dorrie would still speak to me when I told her what I’d bought, I said, “I’ll take it.”
All ready for the North Country, the three companions—Geof Heath, left, TORNGAT, and I—pose for a family shot. With all of our modifications, our boat has lost its skiff appearance.
Dorrie and I were soon on our way to Columbus, by way of Rhode Island to borrow a boat trailer big enough for an 18-footer, and several days later arrived at the Lund warehouse. The S-18 looked awfully big behind my diminutive Volkswagen Golf, but it weighed only 400 lbs, so the little four-cylinder car engine had no trouble hauling the “whale” back to Maine.
When you catch a big fish, you take a photo. When you pass a grounded iceberg, you do the same. The notorious Iceberg Alley passes down the Labrador coast just a few miles offshore; ’bergs often drift from the current and go aground on Labrador shallows. Geof and TORNGAT check one out.
Geof and I named the boat TORNGAT, after the range of mountains we were seeking in Labrador, and spent the rest of the year modifying the boat. I tested several different motors large and small and settled for a 25-horse Mariner, built by Yamaha in Japan. It proved a good choice then and for years afterward. Geof, skilled boat carpenter that he was, built a raised foredeck of plywood, pine, and fiberglass that bolted neatly into wooden channels he had fastened to the hull. Aft of this were fittings for three steel arches to support a light nylon canopy that would serve as our cabin. Our additions covered nearly half the length of TORNGAT.
I made and installed what turned out to be a tremendously valuable shoulder-high grabrail made of 3/4″ galvanized pipe. It offered support for safe passage while stepping over piles of gear and fuel containers between the helm and covered area. Grab rails, I knew from experience, are of great importance in rough water for both safety and comfort. Jarring boat seats can be torture to one’s bottom, but to stand in a bouncing small boat you need something solid to hang on to.
Carefully moored in Labrador’s Port Manvers wilderness, TORNGAT rested for a couple of days while Geof and I climbed nearby mountains. This was the farthest point we reached, 400 miles up the coast but still a bit shy of our goal. The melting snowdrifts in the background are evidence that we are in the land of short summers.
Building and rigging our exploration vessel—accomplished between working regular jobs for a living—carried through the winter of 1979–80. In July we set off on our venture in my International Scout with the boat and trailer in tow. This apparent late start was necessitated by the possibility of drifting ice. After leaving Maine, we towed our expedition boat across New Brunswick and Nova Scotia, ferried across Cabot Strait to Newfoundland, drove to the coast of the Strait of Belle Isle, ferried to Québec province, and then drove 60 miles of gravel road to Red Bay, Labrador, at the time the last coastal community north.
We parked the Scout in a fisherman’s field and launched from his rough log ramp. No trumpets, no sad farewells, only a “Have a good trip” from our fisherman friend, who stood at the top of the ramp shaking his head as we fired up the motor and headed out of the bay into a wall of fog.
For the next two weeks we motored up a coast that was fascinating but confusing, a jumble of islands, great headlands, deep bays that disappeared into the interior, and lovely “runs,” as long straits are called there, through miles of protected waters. We stopped at the very few isolated settlements for fuel, all the time enjoying a wild and beautiful country. Our speed averaged 10 to 12 mph, a reasonable pace in unknown and poorly charted waters but not with the zip to match modern go-fast craft. The Mariner 25 purred faultlessly at our usual three-quarters throttle setting. At that speed the motor used less fuel, the ride was more comfortable, and gave us the opportunity to take in our surroundings.
The coast in the early miles seemed to be an endless barrier of waves crashing against high ledges, rock-strewn flats, wall-like cliffs, and foaming reefs. But what a change when we came up on the Wonderstrand—more than 30 miles of vast sand beach backed by low forest. Though marked on the chart with two sweeping curves, we were still unprepared for this spectacular feature so far from the sun-warmed beaches of the U.S. east coast. We found this seemingly peaceful scene of broad sand beach washed by combers of the Labrador Sea to be as intimidating as the cliffs and reefs behind us. For mile after mile there was no place to land, and the threat of taking a heavily laden small boat through a hundred yards of humping and breaking waves caused us to listen intently for the slightest miss in the outboard motor. It didn’t fail us.
We never did reach our goal of climbing in the Torngat Mountains, although we did make it 40 miles north of Nain, the last year-round village on the coast. We just ran out of time while cruising 400 miles along a coast that seemed far larger than it appears on a map, dramatic and attractive in its variety. Our return down the coast was as interesting as the trip up, and we returned to Maine thoroughly satisfied with our adventure.
In her expedition mode, TORNGAT shows her long-distance layout. This photograph was taken after her return from Labrador—where she best fits, snugged up to shore on a Maine island.
For the Labrador expedition, we had transformed a simple hull into a capable cruiser with very little cost. The foredeck required a fair amount of boatbuilding skill, but all of the rest was straightforward cutting and bending of pipe and standard hammer-and-saw construction. Geof and I derived a lot of satisfaction in doing it ourselves and getting exactly what we wanted for our exploration of coastal Labrador.
It wasn’t the only transformation TORNGAT underwent.
After Labrador, TORNGAT went into local use, and here she’s unloading a sea-duck hunter on a Maine coast ledge. The big skiff was always welcome transport in late autumn’s blustery days.
For the next few years, except for rare day outings along the coast, TORNGAT lay idle in my backyard much of the time while Dorrie and I were involved in other activities. Then, in the mid-’80s, I began part-time work with the Island Institute, a nonprofit organization that concentrates its work on the larger coastal islands of Maine where people live year-round. TORNGAT and I went to sea again, carrying work parties and supplies to various projects. The only major change we made from her expedition layout was to cut down the high grabrail to waist height. We usually left the three arches and the nylon canopy ashore because the frequent landings on rough shores required a person to slide over the foredeck onto rocks or ledges.
MITA
At relatively low cost, the S-18 as a pleasure boat serves well on ocean waters. Stuart and Ellen Dawson, associated with the Island Institute, give their Lund a workout in choppy going.
At this time, the State of Maine, and had sold scores of larger islands to private owners but still owned approximately 1,500 small islands. Wondering if there might be some recreational value in the islets it was still stuck with, the state hired the Island Institute to check them out.
The first year, Institute staffers visited islands from Portland to Rockland using a boat that was considerably larger than a skiff. They soon found that greater care was required to navigate in the shallows among the reefs and ledges; anchoring off and using a small skiff to go ashore was a time-eating drawback. Believing that a smaller craft might be more efficient, the Institute again hired me and TORNGAT to inspect state-owned islands from Penobscot Bay all the way to the Canadian border.
MITA
Not a wreck but just resting, an SSV-18 of the Maine Island Trail Association is grounded out while her crew works on an island campsite. The tough aluminum boats are ideal for this sort of work. MITA has had a fleet of four of them for 10 years, and expects at least another decade of service each of these boats.
This sort of work was old hat for a boat used to “wild dockage,” that is, dealing with all sorts of shore landings. In the course of a day, I might target three or four islands. Some that appeared attractive from the water lacked good landings and were rejected as unsuitable for public use. But occasionally real surprises waited in the rubble: small, even tiny, gems of rock rising out of the sea had narrow sand beaches and grassy flat spots where a small boat, canoe, or kayak could make a safe landing. A tent or two could be pitched under a windbreak of storm-toughened spruces and firs.
TORNGAT did her job without effort. Steering the outboard with its tiller assured instant maneuvering among rocks and weed, and the tough aluminum hull absorbed bumps without harm and could be grounded out for hours or overnight through the rise and fall of the tide without having a rock wear a hole in the bottom. And there was still room for camping gear and food. I spent countless nights on the islands and was not without a few creature comforts.
As the count of attractive, accommodating, and user-friendly state islands climbed, I was reminded of similar spots in Labrador. What a wilderness treasure right in our front yard! Scattered along much of the Maine coast, owned by the state and therefore safe from private sale and development, were many islands well protected from the open ocean by a barrier of other islands, and these new discoveries sired an idea: why not set up a “trail” of islands where boat travelers—especially small-boat adventurers—could overnight as they worked their way along this water trail? The Island Institute published a handsome annual magazine and, as one of the contributors, I wrote an article in the 1987 issue proposing such an island-studded waterway. The idea caught on.
Institute Director Philip Conkling and I discussed the possibility of setting up an organization of interested boat people within the Institute. I was given the task of setting it up, choosing islands, establishing campsites, etc., along midcoast Maine. Initially, TORNGAT was the only boat in the budding Maine Island Trail Association (MITA), and I was at work almost every day, often helped by a volunteer or two. We usually trailered TORNGAT to a boat ramp as near to the work site as possible. Loading food and hand tools in the boat, we would run to the island of choice, clear a simple campsite in a copse of spruce or fir, always trying to balance protection from harsh weather against locations with the best views. With TORNGAT so easily trailered, we rarely had to spend the night on an island, and her large size for her type meant that she could handle snorting afternoon southwesterlies without need for holing up for the night.
By the second season, it was clear we’d need more help and a second boat. The Institute purchased another S-18 to work alongside TORNGAT. Meanwhile, membership growth of the organization was rapid, and a full-time director came on board. In 1990, MITA spun off from the Institute and became its own nonprofit entity. We opened offices in Portland and Rockland, hired a field staff of three or so part-time assistants, and procured two Lund skiffs just for MITA. The organization was now ready to serve the growing number of islands in its care.
MITA/Eliza Ginn
Two MITA SSV-18s pick up a load of washed-up island trash for disposal ashore. The four large-capacity open boats do yeoman service along the length of the Maine coast on both state-owned and private islands in the trail.
Lund altered the basic design of the S-18 in the ’90s by changing to a shallow-V bottom and making a slight increase in beam, all of which added about 60 lbs of weight. This SV-18 then morphed into the SSV-18, but the original simple layout remained with only minor changes. MITA today has a fleet of four SSV-18s and has modified the boats with grabrails of various designs, side seats, lockers, and flat wooden floors. The grabrails are made and installed by MITA and the rest are added while the boats are being built at the Lund factory. Power for the skiffs is now 60-hp, tiller-steered Hondas.
All of these boats have been worked hard for a decade or more. Kept in top shape and manned by specially trained volunteers, these descendants of TORNGAT are not only used for regular island visits but also serve as waterborne pickup trucks during island cleanups, carrying ashore storm-wrecked lobster traps and other washed-up trash of all shapes and sizes for disposal. The open layout of the boats and their capacity of some three-quarters of a ton make them ideal for the job.
As a family fun boat, TORNGAT is often pressed into service for camping and fishing on Maine’s big northern lakes. Driftwood abounds along these shores, and a regular chore of setting up camp is gathering a good supply of firewood.
Although my boat and I were no longer busy with the work of MITA, I remained interested in its development. Then, in a move I eventually regretted, I sold TORNGAT to a MITA member and bought a 16’, lighter-weight Smoker Craft aluminum skiff and outfitted it with a 15-hp Yamaha four-stroke outboard. Its simple layout, like most tin skiffs, served me well for several seasons of lake fishing and camping. I had no complaints except, through no fault of the new boat, I missed TORNGAT. The feeling must have been mutual, because at a MITA stewardship party in Rockport I heard the siren call again, and off in a corner of the yard was a familiar hull sitting on a trailer. It was TORNGAT, showing the signs of her long life in paint scratches, dings and dents, and an overall scruffy look. I made a closer examination and found a sound body beneath time’s tarnish.
MITA Director Doug Welch said TORNGAT had been given to the organization by one of the association’s members, and he didn’t quite know what to do with the aging boat. He was readily agreeable to an even swap, my much newer Smoker Craft for TORNGAT. The younger boat could be sold for a good price to benefit MITA—and I could have the hulk of TORNGAT to do with as I saw fit.
Recently restored to her former self, TORNGAT shows few traces of her working days. Gone is the pipe grabrail, which was to be replaced with a much smaller but very strong “chicken post” fastened to the seat in front of the boat driver. This is her current layout, roomy and open, as she is mainly used for freshwater activities.
Once TORNGAT was in my barn, I stripped her clean of grime and old paint and gave her a coat of dead-grass-colored paint on the outside. Inboard, I made removable plywood floorboards between the seats and took out the pipe grabrail, replacing it with a “chicken post” that I could hang on to while at the helm. I finished off the interior with gray paint. A question in my mind was what the 15-horse Yamaha, retained from the Smoker Craft, could do on an 18’ boat loaded with Dorrie and me and our camping, fishing, or sea duck hunting gear. Surprise. The motor can plane the big skiff with a sizable cargo or whisper at trolling speed while sipping fuel.
Despite her nearly 40 years of hard work, TORNGAT continues to serve on lake and sea. We have grown old together, but I can’t be restored with a coat of paint, so I have turned her over to my son-in-law so we can continue to fish and camp together.
Hauled out on a gravel beach on Maine’s sprawling Chesuncook Lake, TORNGAT probably qualifies as a still-active dowager. Many years ago I traveled this same lake’s 25-mile length in a lumberman’s bateau powered by a smoking, old 5-hp Johnson outboard that seemed as ancient as the boat. How times have changed!
As for TORNGAT today, she can look back to some significant events. She is the boat that sparked the Maine Island Trail, the first of the modern water trails, which in turn inspired the development of some 500 other water trails in North America. As we say in Maine, that’s a “decent” record for a plain tin skiff that first proved her worth in the Labrador Sea.
David R. Getchell, Sr. is a former editor of the Maine Coast Fisherman and National Fisherman, a writer and editor of several other publications, an active outdoorsman, and co-founder of the Maine Island Trail. An important partner in his work to establish the Maine Island Trail was Ray Leonard, an ecologist and field scientist, who was invaluable in evaluating details of the islands. Much of David’s writing has centered on boats and bicycles. He and his wife Dorrie live in a cottage they built by a pond in Appleton, Maine.
If you have an interesting story to tell about your adventures with a small boat, please email us a brief outline and a few photos.
The tops of the extensions, squared off inside of the diagonal side panels, serve as steps for climbing aboard over the stern. The bright finished squares of decking are hatch covers.
Many small skiffs would benefit from an extended waterline and increased planing surface. My own 14′9″ (4.5m) outboard skiff has deep V-hull shape that makes the ride more comfortable at high speeds in sharp chop, but the hull still weaves from side to side, drags a big wake at in low speeds, and requires a lot of power to get on plane. My boat also has a tendency to hobby-horse at high speeds; while I can stop this by trimming the motor to force the bow down, the remedy reduces top speed and fuel economy.
Trim tabs could help get the boat on plane and would probably solve hobby-horsing, but they would also add vulnerable electronics to the boat and are not a visually pleasing solution. When I saw the clever structure of transom extensions in the Tango Skiff 13, I decided to design and add extensions to my boat. Before construction, I tested the theory, temporarily bolting two kitchen-cabinet doors on the transom to extend the bottom surface. Although they didn’t add buoyancy, they surprisingly made a significant improvement in slow-speed behavior and also took care of the hobby-horsing. So the project was a go.
I purchased 9mm okoume plywood (12mm, in retrospect, would have been a better choice) and built the port extension first, one piece at a time, starting with the planing surface at the bottom and improvising measurements for the subsequent pieces from the growing structure. When I had the first extension assembled, I took it apart and used its pieces as patterns for the second.
The plywood panels were shaped and attached one after the other, each helping determine the shape of the next.
I joined each extension’s pieces together and to the transom, using pine strips above and oak strips below the waterline. I wanted to be able to disassemble the extensions if something went wrong, so I used Sikaflex and stainless-steel screws in the attachments to the hull, while the extensions themselves were glued together and filleted with epoxy. The top side of each extension serves as a step for boarding and has an inspection hatch. Before assembly, I painted the parts with epoxy primer. Because of the multiple angles, there were some puzzles to solve when putting the parts together the first time. I took care of gaps with epoxy fillets.
Once the extensions were in place, I rounded their corners, filled and faired the screw countersinks and joints, sanded everything smooth, and painted the extensions to match the hull. Mahogany rubbing strips reinforce the connection between the extensions and the hull.
Before the extensions were installed, the skiff settled heavily at the stern. Skiffs without a console would settle even deeper with the skipper seated there.
With the stern supported by the buoyancy and planing surface of the extensions, the skiff maintains better trim.
Although it was a somewhat arduous project, I am pleased with the result. Hobby-horsing is gone, turbulence and wave formation is reduced at slow speeds, and the boat does not wander. The extensions do add some drag, so I lost a knot or two at top speed, but the improved behavior is worth the sacrifice. To my eye, the side profile of the boat improved and the extensions make the boat appear more balanced. I wanted to maximize the planing surface, so I intentionally made the gap between the extensions narrow, and if I tilt the motor up in shallow water and turn it too far, the propeller can hit them if I’m not careful.
Many outboard skiffs, whether deep-V like mine or flat-bottomed, suffer from poor weight distribution, with motor, driver, and gas tank all at the back of the boat and could benefit from transom extensions.
Mats Vuorenjuuri is the father of three and an entrepreneur, making a living in graphic design, photography, and freelance writing. He has sailed all his life, and wooden boats, sailing, and boating are his passions. He has restored both sailboats and motorboats, and in recent years has discovered the simplicity and joy of small boats. He currently owns a small, open plywood motorboat, a Herreshoff Coquina, and TURBO. He wrote about cruising the Finnish coast in his Coquina in our May 2016 issue.
You can share your tricks of the trade with other Small Boats Monthly readers by sending us an email.
The Blackbird XLC and the Thunderfly are a good match for a steep shoreline and a narrow, tide-swept beach.
To preserve beautiful wild places for the future, visiting the wilderness is best done with minimal impact. The Blackbird XLC hammock by Warbonnet, a Colorado-based, family-owned business, is a flexible, all-weather camping system that leaves no mark on the landscape. It’s comfortable, too.
The hammock is available in a lightweight version, designed for backpackers looking to save every possible ounce of carried weight, and a heavier version, with a double layer of fabric which increases its weight-bearing capability. The Blackbird is an asymmetric design, so that a sleeper lies on the diagonal. Initially a little counter-intuitive, the arrangement creates a sleeping position that is fairly flat. It is easy to sleep on your back, or roll from side to side, but the hammock isn’t quite flat enough to allow sleeping on your stomach. It takes an overnight or two to find the sweet spot, but once you do, it becomes second nature, and then the Blackbird is a wonderfully comfortable place to bed down.
For warm, mild conditions in mosquito country, the zip-on bug net lets the breezes flow through and keeps the mosquitoes out.
A nice feature is a built-in shelf at the head end. If you like to read before turning in, you can stash a book and flashlight within easy reach, and they won’t wind up underneath you in the night. There is a full-coverage bug net that zips to the perimeter of the hammock. In cold weather, the net can be swapped for a top cover, which Warbonnet says increases the temperature rating by about 10 degrees, with small areas of netting at head and foot ends to provide ventilation.
For cold weather and light rain, the bug-net top can be removed and replaced with the Warbonnet Winter Topcover. Its breathable water-resistant fabric retains warmth and panels of mesh provide fresh air.
Another consideration for cold-weather camping with a hammock is heat loss from below. The double bottom of the XLC is designed for slipping a closed-cell foam sleeping pad between the layers. This is sufficient insulation for me for three-season camping. For winter camping, Warbonnet makes an insulated underquilt that provides even greater warmth and becomes part of an integral weatherproof cocoon. For rain, the company offers several sil-nylon or sil-poly tarps, ranging from minimalist to maxi in coverage. I opted for the middle size, the 11′ x 8′7″ Thunderfly. All the flies have fold-away flaps, which deploy to form a secure hood at each end to keep out wind-driven rain.Warbonnet offers several different suspension systems; I chose nylon climbing slings and carabiners for anchoring around a tree limb or trunk (which is less likely to injure the tree than cord attachments) and a webbing-and-buckle system to attach the hammock to the slings. Adjustment is simple, intuitive, and practically bombproof, and it only takes a couple of minutes to set up or take down. Lightweight, easily packed or stowed, simple to set up, weatherproof, and well-made of durable materials, the Blackbird XLC is well worth a look if you are searching for a leave-no-trace option for sleeping.
John Hartmann lives in central Vermont. He built his Ilur dinghy, WAXWING, to sail the 1000 Islands region of the St. Lawrence River, Lake Champlain, and along the coast of Maine.
The Blackbird XLC ($180 to $230 depending on style) and the Thunderfly ($130 to $155 depending on weight and material) are available from Warbonnet.
Is there a product that might be useful for boatbuilding, cruising or shore-side camping that you’d like us to review? Please email your suggestions.
The 180mm Knipex plier wrench is a good size for all of my boat and trailer applications.
I have a lot of wrenches and pliers in my shop. There’s plenty of room for them there, but aboard my boats I have to keep my toolkit to a minimum. A single tool that can stand in for several is a welcome addition; the Knipex plier wrench, as its name suggests, does the work of both pliers and wrenches. Its parallel jaws will fit hex nuts and bolts and its extraordinary gripping power makes it possible to tighten them and loosen even rusted ones without slipping off and rounding their corners.
The power comes from the short half-circle tab, a part of the upper handle that drives the sliding lower jaw. From the center of the pivot to the bearing surface on the tab is just 3⁄8″; from the center of the pivot to the middle of the handgrips is 4″. That’s a mechanical advantage of 10.7 to 1. With my grip strength of 85 lbs (measured by squeezing a bathroom scale in both hands and dividing the reading by 2), the pliers can apply 909 lbs of pressure. Squeezing at the ends of the handles pushes that over a half ton. By comparison, my old pair of angle-nose slip-joint pliers, roughly the same size and shape as the Knipex, can expert only 218 lbs at the jaws’ tip and 544 lbs at their inner angle. The Knipex can flatten the edge of a steel washer and pinch small cable crimps tight, things pliers can’t do.
My 7 1⁄2″ angle-nose slip-joint pliers (left) couldn’t do much damage to a steel washer, a 9″ vise-grip (center) could slightly dent the steel with a strong grip, and the Knipex plier wrench (right) could easily flatten it.
Pressing the spring-loaded button at the pivot adjusts the space between the jaws. At the tool’s widest setting, the jaws open up to 1 3⁄8”. At each of the 13 settings, the jaws have a 1⁄4″ range of motion. That range is what gives the plier wrench the ability to turn a nut without removing and replacing the tool repeatedly as you would a box, open-end, or adjustable wrench. When pressure isn’t being applied to the handles to set up for the next turn, the ratcheting effect makes the plier wrench as fast as a socket wrench, with the additional advantage that the handles are in line with the nut and the jaws are less likely than a socket with an offset handle to slip off the work.
The jaws have smooth, flat faces and get their grip from pressure rather than by ridges or teeth, which can mar the workpiece, particularly the brass and bronze hardware often used on boats. The smooth parallel faces are also well suited to working sheet metal.
I’ve found a couple of ways to operate the Knipex plier wrench with one hand. With my left hand I can hold the lower handle, press the button with my thumb, and slide the moving jaw up and down. With my right hand holding the upper grip, I press the button and open the upper jaw wide with a flick of the wrist; then I’ll close it with my index finger to the size I need.
The plier wrench comes in four sizes: 125mm (5″), 150mm (6″), 180mm (7-1/4″), and 250mm (10″). I bought the 180mm from Hardwicks for $56.50, a steep price unless you consider of the number of tools it can replace in your boating toolkit.
Christopher Cunningham is the editor of Small Boats.
Knipex manufactures its tools in Germany, and the plier wrenches are available at many hardware stores and online retailers.
Is there a product that might be useful for boatbuilding, cruising or shore-side camping that you’d like us to review? Please email your suggestions.
ARGUS is a kit built Chester Yawl from Chesapeake Light Craft. Argus was a many-eyed creature in Greek mythology.
James Fullton grew up in Alabama. His dad, Jim, grew up on the banks of Dog River, an estuary that rises and falls with the tides of Mobile Bay, and his grandparents, on both sides, were Alabama river people. Boats were a part of the family’s daily life. Grandpa Fulton built and restored boats for Jim and his two older sisters in their younger years, and when they had families of their own there were boats for the grandchildren.
By the time James was seven years old, he had learned to row in a dinghy that his grandfather had restored. His early sailing experiences were in his father’s Fish-class gaff-rigged sloop, and the first time they took it out James was alarmed by how much the boat heeled under the press of sail. He told his father: “If momma sees us doing this, she’s gonna fuss.” From that day forward the boat was called MOMMA’S GONNA FUSS. Jim moved his family away when James was eight years old, but they continued to visit Alabama, spending summer vacations on Dog River. In his ’tween years, James graduated to an outboard skiff and expanded his exploration of the river. The family made several more moves in his teen years, and the gap separating him from the river and boats widened.
Jim squeezed out beads of thickened epoxy along the laps prior to pulling the wire stitches out.
Some 16 years ago, James settled in New Haven, Connecticut, to raise a family of his own. The proximity to Long Island Sound and to the state’s lakes and rivers rekindled his interest in boats, and for several years he harbored a wish to build a boat. In 2016, he talked it over with his wife and they ordered a Chester Yawl kit from Chesapeake Light Craft. Soon after, as a Father’s Day gift, he took his dad to The WoodenBoat Show at Mystic Seaport, where the kit was waiting for them at the CLC booth.
James’ daughter Kyrie was three when construction began. By the time she had turned four, she had taken an interest in helping build the boat.
In the months that followed, Jim and James, father and son, assembled the 15′ hull, enjoying the other’s company as much as seeing the curves emerge from the flat plywood panels they stitched together. Jim eventually ceded his role as co-boatbuilder to his granddaughter, four-year-old Kyrie, the youngest of James’s five children. Kyrie had her own toolbox and projects to work on, but often suited up with the proper protective gear to help with the sanding and painting of the Chester Yawl.
Kyrie, here practicing coloring inside the lines, had turned five years old by the time the boat was finished and ready to launch.
The boat was launched on June 10, 2018, on Lake Wintergreen at West Rock Ridge State Park in Connecticut, and christened ARGUS. Kyrie had earned her place aboard with James for the first row from shore.
The boat was launched on Lake Wintergreen in Connecticut’s West Rock Ridge State Park. James and Kyrie take the first row.
Father’s Day fell on the following weekend. James’s two sons, 12 and 16 years old, gave him a note saying they both wanted to spend some “just us men” time with him aboard ARGUS.
James and his family have been taking ARGUS out at every opportunity, exploring the Thimble Islands just off the Connecticut coast east of New Haven, and Colebrook River Lake on the state’s northern border. They have their sights set on the Berkshire lakes of western Massachusetts. James shared photos of the boat with his extended family and recently received this reply from my aunt: “When I close my eyes I can see Daddy and your great-grandfather Poppee in ARGUS with you, all gathered together sharing giant smiles. James, you have carried on and passed on the Fullton family love of boats.”
Father and daughter enjoy the fruits of their labor; another generation is brought into the fold.
Have you recently launched a boat? Please email us. We’d like to hear about it and share your story with other Small Boats Monthly readers.
My son was late in arriving. Nine months came and went without any stirrings from him. Another week went by. Still nothing. Cindy and I had both taken leave from work and we had time on our hands, so we loaded up the lapstrake decked canoe I’d built and headed for the lake. We had paddled a mile or so and it was then that Nathan, as he would be named, made his move. Contractions had begun, and not long after putting the canoe back in the garage we were on our way to the hospital. My entry into fatherhood the next day was marked by an unforgettable display of color. Nate arrived after a long and difficult delivery and his skin was a luminescent lilac color. Then, with each of the first breaths he drew, he turned, chameleon-like, a pink so radiant that I thought he’d be too hot to touch. Ten days later, we got Nate back out on the water as a newborn, not in the canoe, but in the Chamberlain gunning dory I’d built for my dad. He was a colicky baby, but was soon sound asleep aboard the boat and didn’t make a peep the whole time.
Two years and 11 months later, his sister was also digging her heels in well past the nine-month mark. Believing we’d discovered that the gentle rocking of a canoe was a sure-fire way to induce labor, we headed for the water again. Sure enough, the first contraction arrived while we were paddling in the middle of the lake. Alison, who has always been much bolder than her brother about approaching new and different experiences, was, as the doctor discovered, already locked and loaded when we got to the hospital. We took our infant Ali out on the gunning dory too. She was born in August, the height of blackberry season, so we rowed around the lake picking the berries that grew along the water’s edge. As we passed by one of the lake’s floating homes, the sight of a swaddled baby brought the lady of the house out on the deck.
“My, so tiny!” she said. “When was that baby born?”
“Yesterday,” we replied.
Sound asleep with my father aboard MOLLY MAY, circa 1956
I was too young to remember when my father first took me boating—he is no longer around to tell me—but there is a picture of me wearing a life vest, sleeping against his chest. On the back of that photo, in ink that has faded from black to brown, is written in my father’s hand “sleepy little son.” We were aboard MOLLY MAY, my grandfather’s 31′ cutter, sailing out of Marblehead, Massachusetts, with my grandfather at the helm.
My grandfather, Francis Cunningham Sr., was usually at the helm when we sailed his 31-footer out of Marblehead.
Although I was steeped in boats while I was growing up, I took them for granted. Dad always had one, but I was more interested in riding my bike, climbing trees, skateboarding, and making explosions with firecrackers, calcium carbide, match heads, or homemade black powder.
In 1978, I was 26 years old when I built my first wooden boat, a Marblehead skiff, but it was as a means to an end: travel under my own steam. I was tired of carrying the heavy loads required of long backpacking trips and frightened by the cars and trucks that I had to share the road with while bicycle touring. When I finished the skiff, it met my expectations: it could haul more weight than I could ever carry and could take me places where I had the waterways all to myself. But when I began cruising in it, sleeping at anchor in a snug cove, cradled in the gentle rocking hull, it brought an unexpected and profound sense of comfort and safety. Perhaps it touched upon the sense that all’s right with the world that I felt when I was a child asleep in my father’s arms aboard MOLLY MAY.
I built a few more boats specifically for voyages I wanted to make, but gradually veered away from building boats to take me somewhere, to building boats that were the somewhere. When I built a Caledonia yawl in 2003, I redesigned the interior around sleeping spaces for my children and myself. Nate and Ali would have a nest forward under a fully enclosed dodger, and I’d sleep on a platform in the main cockpit under a canopy that covered the rest of the boat. For several years we took summer cruises in Puget Sound and the San Juan Islands and never took a tent nor ever slept ashore. Each night we’d drop the anchor, button up the cockpit, and play games until it was time to sleep. I’d often rise up before them and get underway with an easy row along the shore. Nate and Ali would slowly wake to the rhythm of the oars and the sound of water curdling under the laps. I’d get the galley box out and cook them breakfast in bed—scrambled eggs, pancakes, French toast, or scones.
Ali and Nate enjoyed a Dad-cooked breakfast in bed and were happy to spend the better part of the day and night in their nest in the bow of the Caledonia yawl. The dodger that covers them at night is folded forward for the day.
We were never in a rush to shove miles underneath the keel. Whenever we reached a new island, given the choice of going ashore for lunch or eating on the boat, Nate and Ali always opted to stay aboard, where the floorboards yielded underfoot and the benches rocked when you sat down. Nate and Ali cozied themselves in a nest of pillows and sleeping bags, with everything they needed close at hand. The quarters were tight and we had few luxuries, but we were, as Germans so aptly put it, wunschlos glücklich, wishlessly happy.
Is there something innate in all humans that draws us to give ourselves over to the gentle motion of a small boat in the water, just as we are compelled to stare into a fire’s flickering flames? Or is it something that slips into an infant’s heart in unguarded moments in a father’s arms before falling asleep on a boat? Whatever it is, I am drawn to it still, that gentle rocking that soothed me when I was a child and that awakened in my children the urge to be born.
Top: John Hartsock, Bottom: Lily Dickens
With Father’s Day in mind, my son Nate and I (bottom photo) went for a row in the Whitehall I built in 1983. Thirty-five years had passed since I rowed that boat (top photo) with my father, Frank Cunningham (1922–2013).
The traditional craft documented in Howard Chapelle’s books are well known, but a number of his drawings are tucked away in the Smithsonian Institution. Among the turn-of-the-century East Coast workboats in their files, catalogued as HIC303, is a handsome 18′ crabbing skiff. It has many of the characteristics associated with working skiffs used by Chesapeake Bay crabbers of the era: a shallow deadrise hull, a large skeg and centerboard, a transom-hung rudder, multiple thwarts, a foredeck with washboards down the sides, and a low coaming around the cockpit.
Christopher Walker
The gripe is a skeg-like fin on the bow. It helps balance the skiff while under sail in thin water with the centerboard up.
The skiff also has a gripe, a skeg-like appendage attached to the stem meant to keep the bow from wandering after tacking and allow sailing shallow water with the board up. The sailing rig has a freestanding mast with a sprit boom and a curved bowsprit. The leg-o’-mutton main and the jib have a combined area of around 151 sq ft with 111 sq ft in the main and 40 for the jib.
In Chapelle’s drawings, he provides no measure of the boat’s weight, but he included plank thicknesses for the oak, pine, and cedar used throughout the original’s construction, making it evident that the crabbing skiff must have been quite robust. There are some unusual things in the plans. For example, the centerboard trunk is canted at each end, sloping down at the aft end but also sloping down toward the bow at the forward end. The plans indicate two locations for the centerboard pin, about 5″ apart, but no explanation of the purpose of the options.
The skiff was my first build, and when I was looking for a design, I wanted not only a family boat for my wife, a little one on the way, and two dogs for daysailing and camp-cruising, but also one that looks nice and sails well. I found the HIC303 on the WoodenBoat Forum. Though the design was for traditional construction, all the hull surfaces were developable curves, which got me thinking about building it in plywood. I didn’t have the time, money, or experience for a traditional build. I also lacked a wet slip for a traditionally built boat to keep its seams tight—I am in the military and move frequently, so anything I’d build would have to live on a trailer.
I built GOLDBUG in my garage over the course of two-and-a-half years, starting when my son was born and then working mainly on weekends. I used Douglas-fir marine plywood for the hull: 1/2″ for the bottom, 3/8″ for the topsides, and 3/4″ for the transom. The deck is 3/8″ okoume. All of the plywood was covered with 6-oz fiberglass and epoxy. The skeg is a big timber with oak making up the biggest piece in Chapelle’s drawings; I built it up with 1-1/2″ Douglas-fir to keep it light and added a 3/4″ white oak shoe and trailing edge to take the inevitable bumps of the trailer and grounding out on rocks. I also lightened the 23′11” mast by making it hollow—bird’s-mouth from vertical-grain fir—rather than the solid spruce indicated. The bowsprit is three layers of clear, 3/4″ vertical-grain fir epoxy laminated in a curve. Rubrails and toerails are white oak. I used cedar deck boards to make the cockpit coaming.
Meg Walker
The 6′ 8″ bowsprit extends 4′ 3″ forward of the stemhead. The jib’s leech is cut to clear the forward end of the main’s sprit boom when coming about.
It was important to me to have a boat that looks good with a workboat finish. With a sensitive little one riding shotgun, if he dropped a bucket of seashells over a nice varnished thwart or ground sand into a bright sole, I didn’t want to get upset and ruin his sailing days. Cost was also a factor, so I steered away from pricey marine-grade finishes. GOLDBUG wears three coats of acrylic exterior house paint, inside and out. It has turned out to be fantastic stuff—very durable and tremendously easy to touch up and clean up afterward. Three years after launching, the paint still looks great.
I am not an engineer—no calculations were harmed in the building of GOLDBUG—but I grew up on small sailboats, raced extensively, and feel I have a good sense of forces and how they’re distributed on small boats. I altered the HIC303 design to include one thwart instead of the two specified in the plans. I placed my thwart at the aft end of the centerboard trunk to provide lateral support to the trunk while using the trunk to support the middle of the thwart. This opened the interior significantly for a cooler, a tent as well as a toddler, a dog, and the miscellaneous gear that comes with them.
Christopher Walker
The centerboard trunk in the original crabbing skiff was left partially open and the board extended above the trunk when retracted. Capping the trunk and modifying the board keeps the interior drier in a seaway.
To brace the forward end of the trunk, I butted it to the one-piece frame that supports the aft edge of the foredeck. The plans show an open frame made of multiple pieces, none of which support the centerboard trunk. The trunk of the original was open at the top with the board extending above it; I lowered it and enclosed the top, making it a nice place to sit and watch the shoreline pass by.
Christopher Walker
Chapelle’s plans have the side decks extending to the transom and sternsheets instead of an aft deck.
I also decked GOLDBUG’s stern, filling in the gap between side decks all the way to the transom. There was no seating at the stern in the original plans, and sitting at the stern would put the boat out of trim while the covered space I’ve added there comes in handy for stowing gear.
The mast steps through the foredeck, which is reinforced underneath with Douglas-fir 1x2s. The bowsprit is about 6-1/2′ long and has a mortise that seats on top of the stem with a heel secured against the bit. The bobstay keeps it secure and provides an easy, quick way to remove the sprit.
It takes me 20 minutes, working alone, from the time I pull into the parking lot to having the boat afloat with the sails raised and ready to shove off. At the dock it is tender initially, though stepping into the center is hardly necessary as long as one’s weight is anywhere on the bottom and not on the side decks. Underway it stiffens up as it heels even though I have no ballast beyond 5 lbs of lead in the board to sink it. Breaking it down at the end of the day takes the same amount of time as setup, though when folks wander over to take a gander it takes longer.
The oak gripe and stem take beaching beautifully. GOLDBUG, with its modifications and plywood construction, weighs around 350 lbs and is easy to launch, recover, and drag up on a beach. She draws about 4″ with no one aboard. With the three of us, a dog, and an afternoon’s gear, she still draws less than 1′ with the board up.
The skiff reaches well even with the board up, thanks to the balanced lateral resistance provided by the skeg and gripe. On a reach and measuring speed on a GPS, she reaches at 6.5 knots in 12–15 knots of wind with the board halfway up. She beats to windward very well. In all wind conditions I trim the main without purchase (plans call for a 2:1 purchase), but I do use one block with a ratchet mounted in the keelson to have the sheet coming to me at a more comfortable angle. Mounted in the keelson, just forward of the block, is a cam cleat into which I can cleat the mainsheet with my foot while sitting up on the deck. I feel the 1:1 pull without purchase gives me better feedback as to how much stress is on the rig.
Underway, the helm is well balanced and exhibits just the right amount of weather helm as she heels. The stern lifts to a following sea, and the ample skeg keeps the skiff on track as if on rails . In theory, the gripe could trip the boat with a large following swell by not allowing the bow to slide laterally if the skiff did try to broach. But I have yet to experience anything like this, and the conditions for which she was originally designed include short, stiff chop rather than long, rolling swells.
The gripe does slow tacking—one has to avoid rapid stop-to-stop tiller throws. The skiff she won’t spin in its own length, one must think ahead when maneuvering in close. It ghosts nicely in light air; ideal wind seems to be 8–12 knots. If strong winds are forecast, the first reduction in sail is going without the jib. Next is the reefpoint in the main. She sails well under all configurations, and adjusting centerboard depth balances her nicely while maintaining windward performance. When I sail without the jib, I remove the jib halyard from the peak of the jib and secure it to the anchor point for the jib’s tack at the end of the bowsprit. With the halyard serving as a forestay, it counters the force created by the main, and the mast bends less.
Meg Walker
The 151 sq ft of sail can get the skiff moving at a brisk 6-1/2 knots in 12 to 15 knots of wind.
When the wind dies or I find myself short on patience or in a foul current, GOLDBUG rows well, though she is more a sailboat that can be rowed. I bought an electric trolling motor, and it pushes her very nicely—though I have yet to use it much, as it looks tacky on the back of the boat. Truth be told, I have never used the oars or trolling motor except to try them out, since GOLDBUG moves in the lightest of breezes.
The 18′ Crabbing Skiff is an easy boat to sail with a very simple rig. Built of plywood, it is easy to build and goes well in all conditions, as long as one can avoid being overpowered. It is relatively dry given its lower freeboard, and the crew’s proximity to the water contributes to a fun sensation of speed. GOLDBUG’s freeboard also makes it easy for a toddler to drag his toes in the water.
Chris Walker is an Air Force officer and combat rescue helicopter pilot. He grew up sailing on Mobile Bay, Alabama, and lakes across the central Midwest. Boats have always been a large part of his life, and racing was his focus for a long time. After his fifth deployment to Afghanistan, he began looking for a design to build. He found the time he spent in the garage building GOLDBUG to be a great source for thought, reflection, and problem-solving. He built GOLDBUG while assigned in San Diego and is currently assigned to Fort Leavenworth, Kansas. Back on the lakes where he raced growing up, he finds spending time on GOLDBUG with his wife and four-year-old son far more enjoyable than racing ever was. This summer they’ll move to Virginia near the Chesapeake, and Chris is looking forward to sailing GOLDBUG in the waters she was designed for.
Crabbing Skiff Particulars
[table]
Length/18′ 7.5″
Beam/5′ 4.25″
Draft/11″
Sail area/151 sq ft
[/table]
Plans for the Crabbing Skiff are available from the Smithsonian Institution. There are three sheets for HIC303: Lines with offsets, construction plan, and sail/spar plan. Each sheet costs $10; all three will be $30 plus $5 for shipping and processing. All orders are handled by mail. Request HIC303 and enclose a check or money order payable to the Smithsonian Institution. Credit card or PayPal orders are not accepted. Foreign orders require check or international money order in U.S. funds, with airmail available for an additional $5.00. Ship Plans Smithsonian Institution PO Box 37012 NMAH 5004 / MRC 628 Washington, DC 20013-7012 USA
Is there a boat you’d like to know more about? Have you built one that you think other Small Boats Monthly readers would enjoy? Please email us!
Continue Reading - Enter your email to log in or subscribe
New to Small Boats? Create a free account to get our weekly emails and two free articles each month.
Time to upgrade!
You've read all of your free content for the month. Upgrade to a paid subscription for unlimited access.
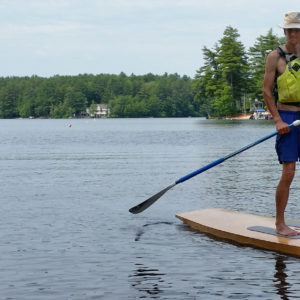
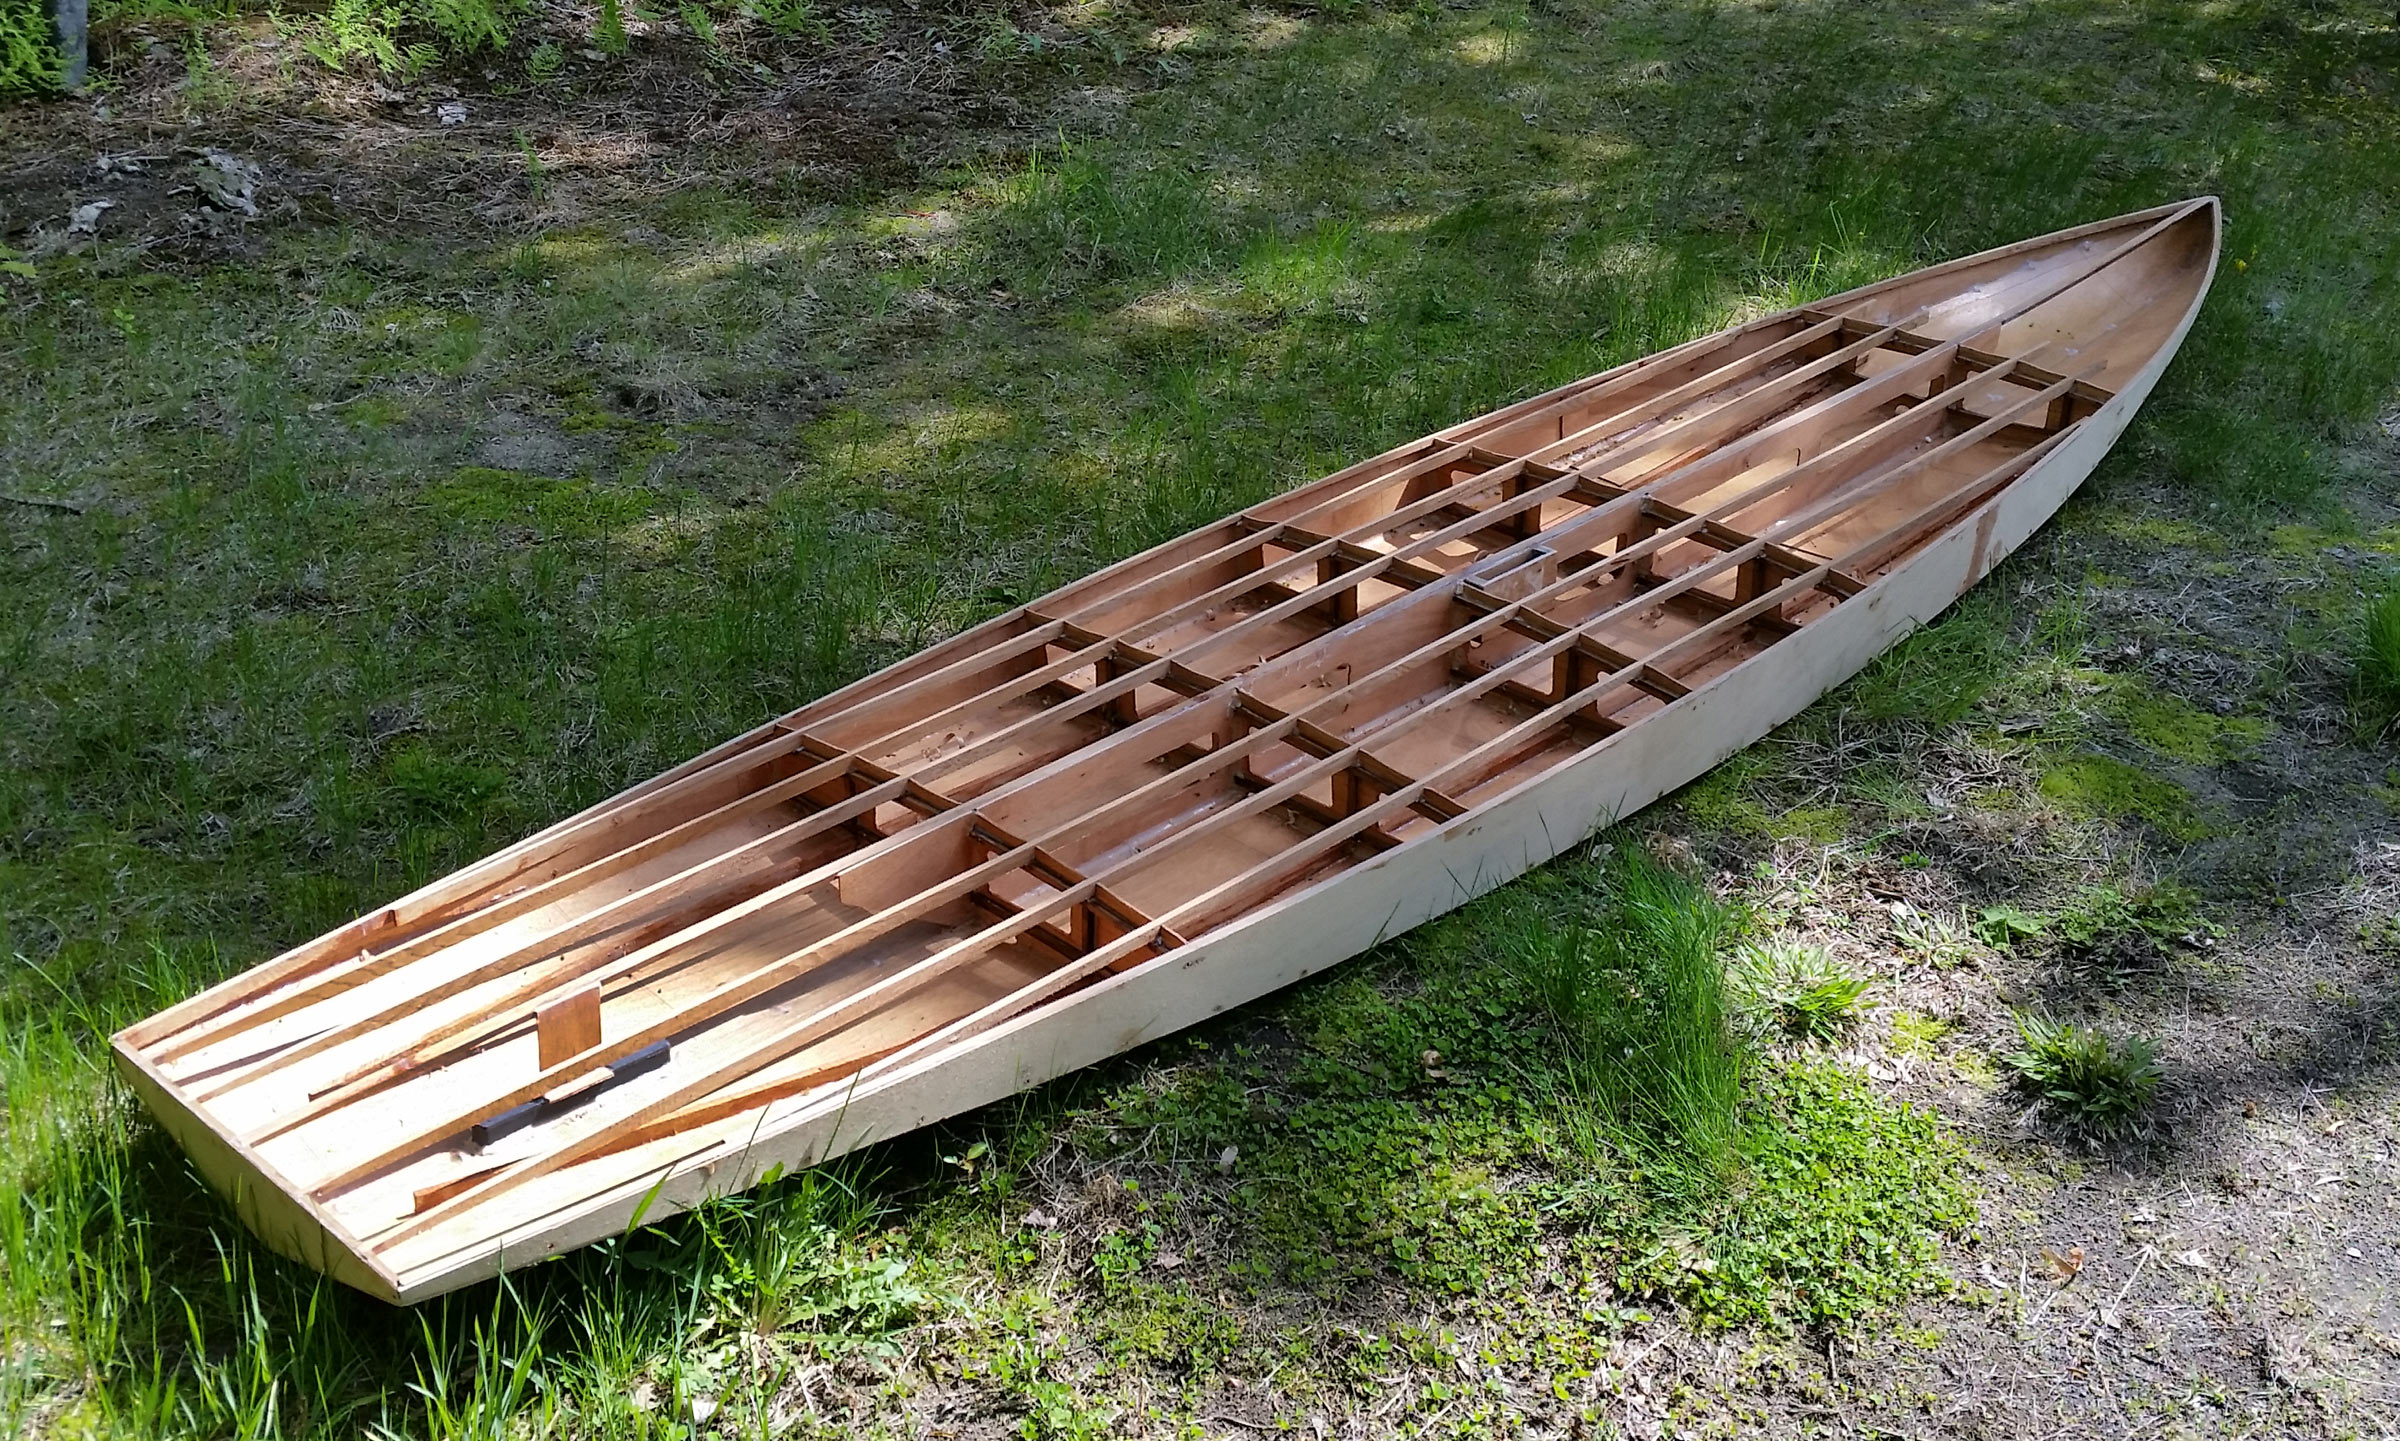 Christophe Matson
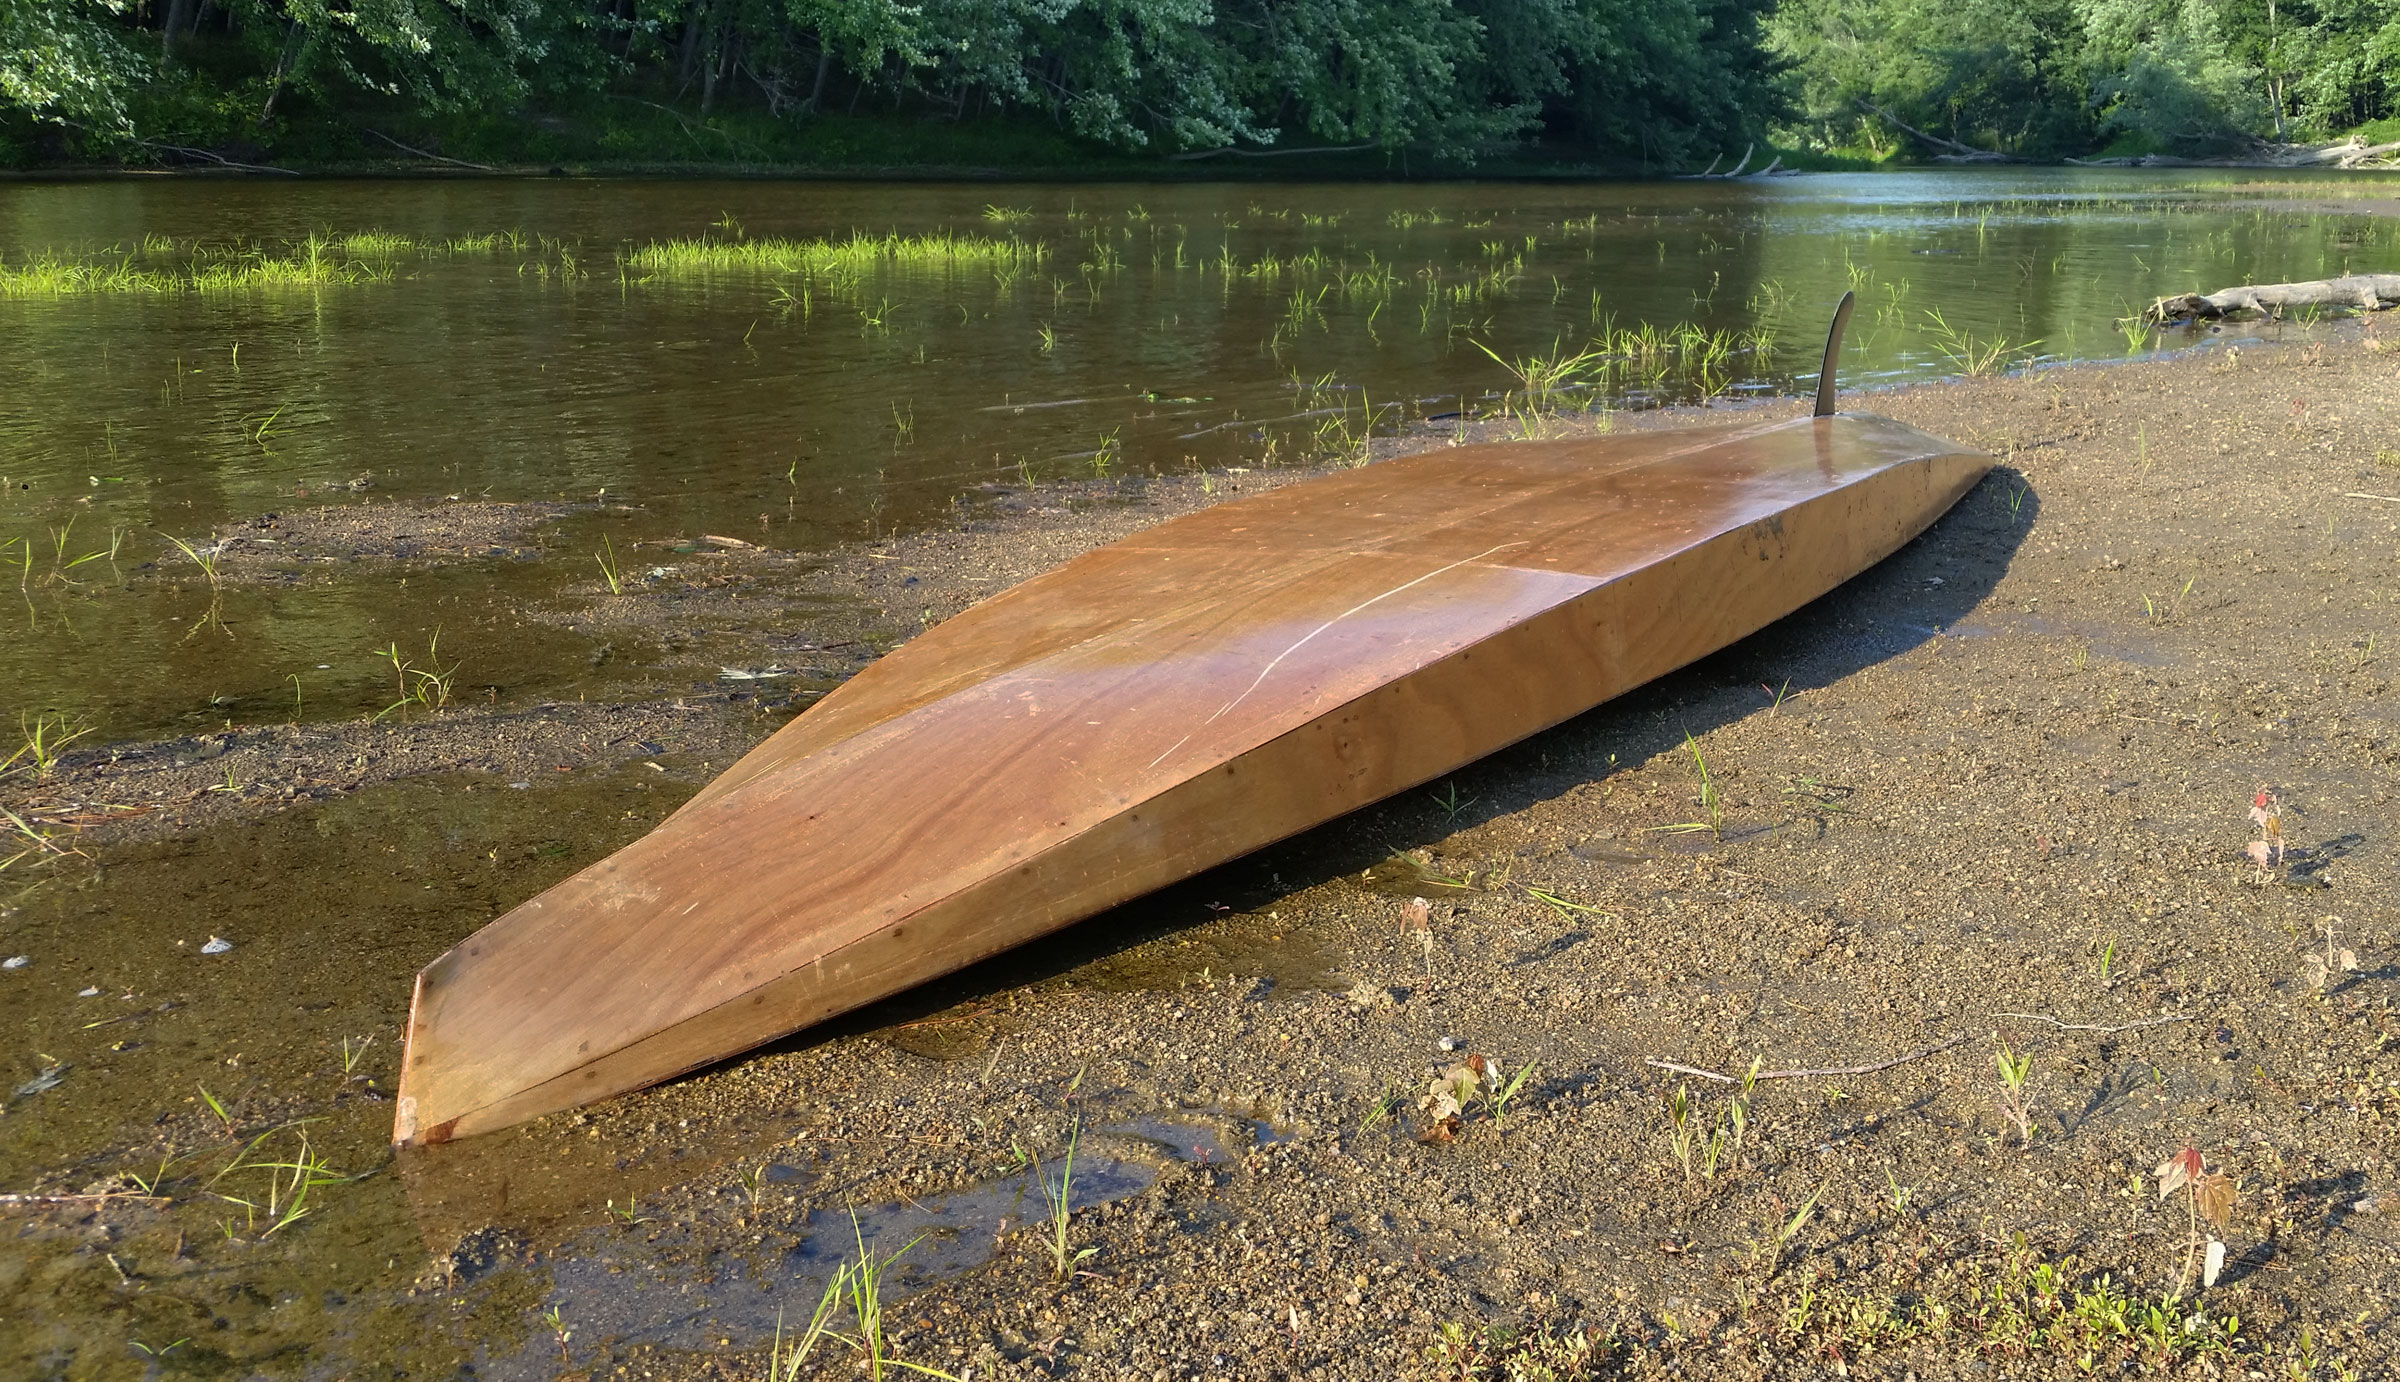 Christophe Matson
 Allison Grappone
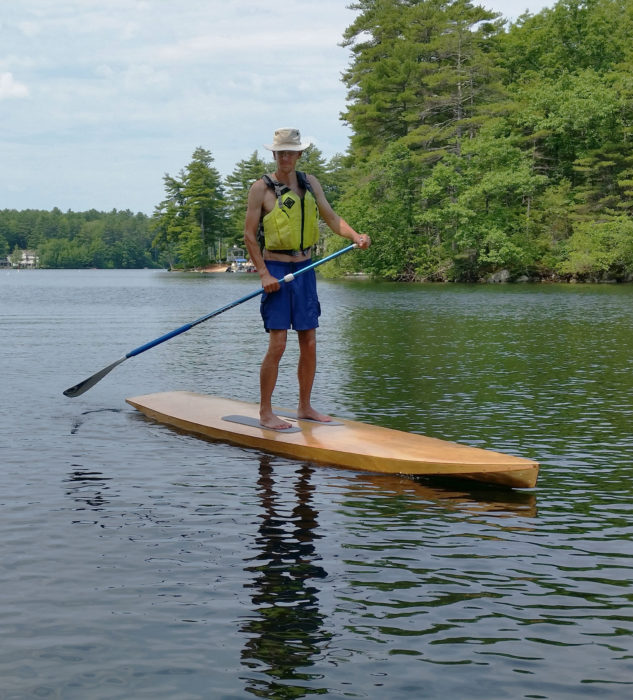 Allison Grappone
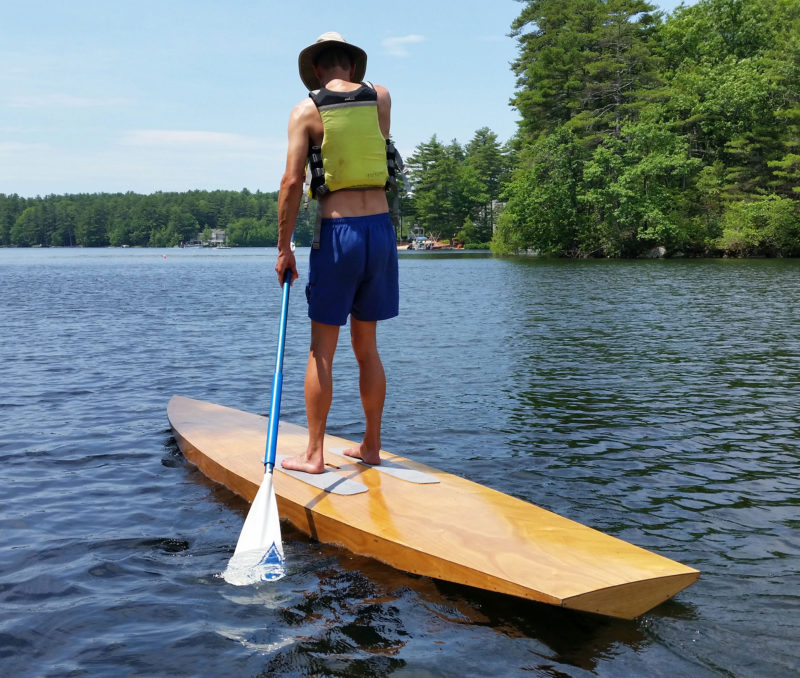 Allison Grappone