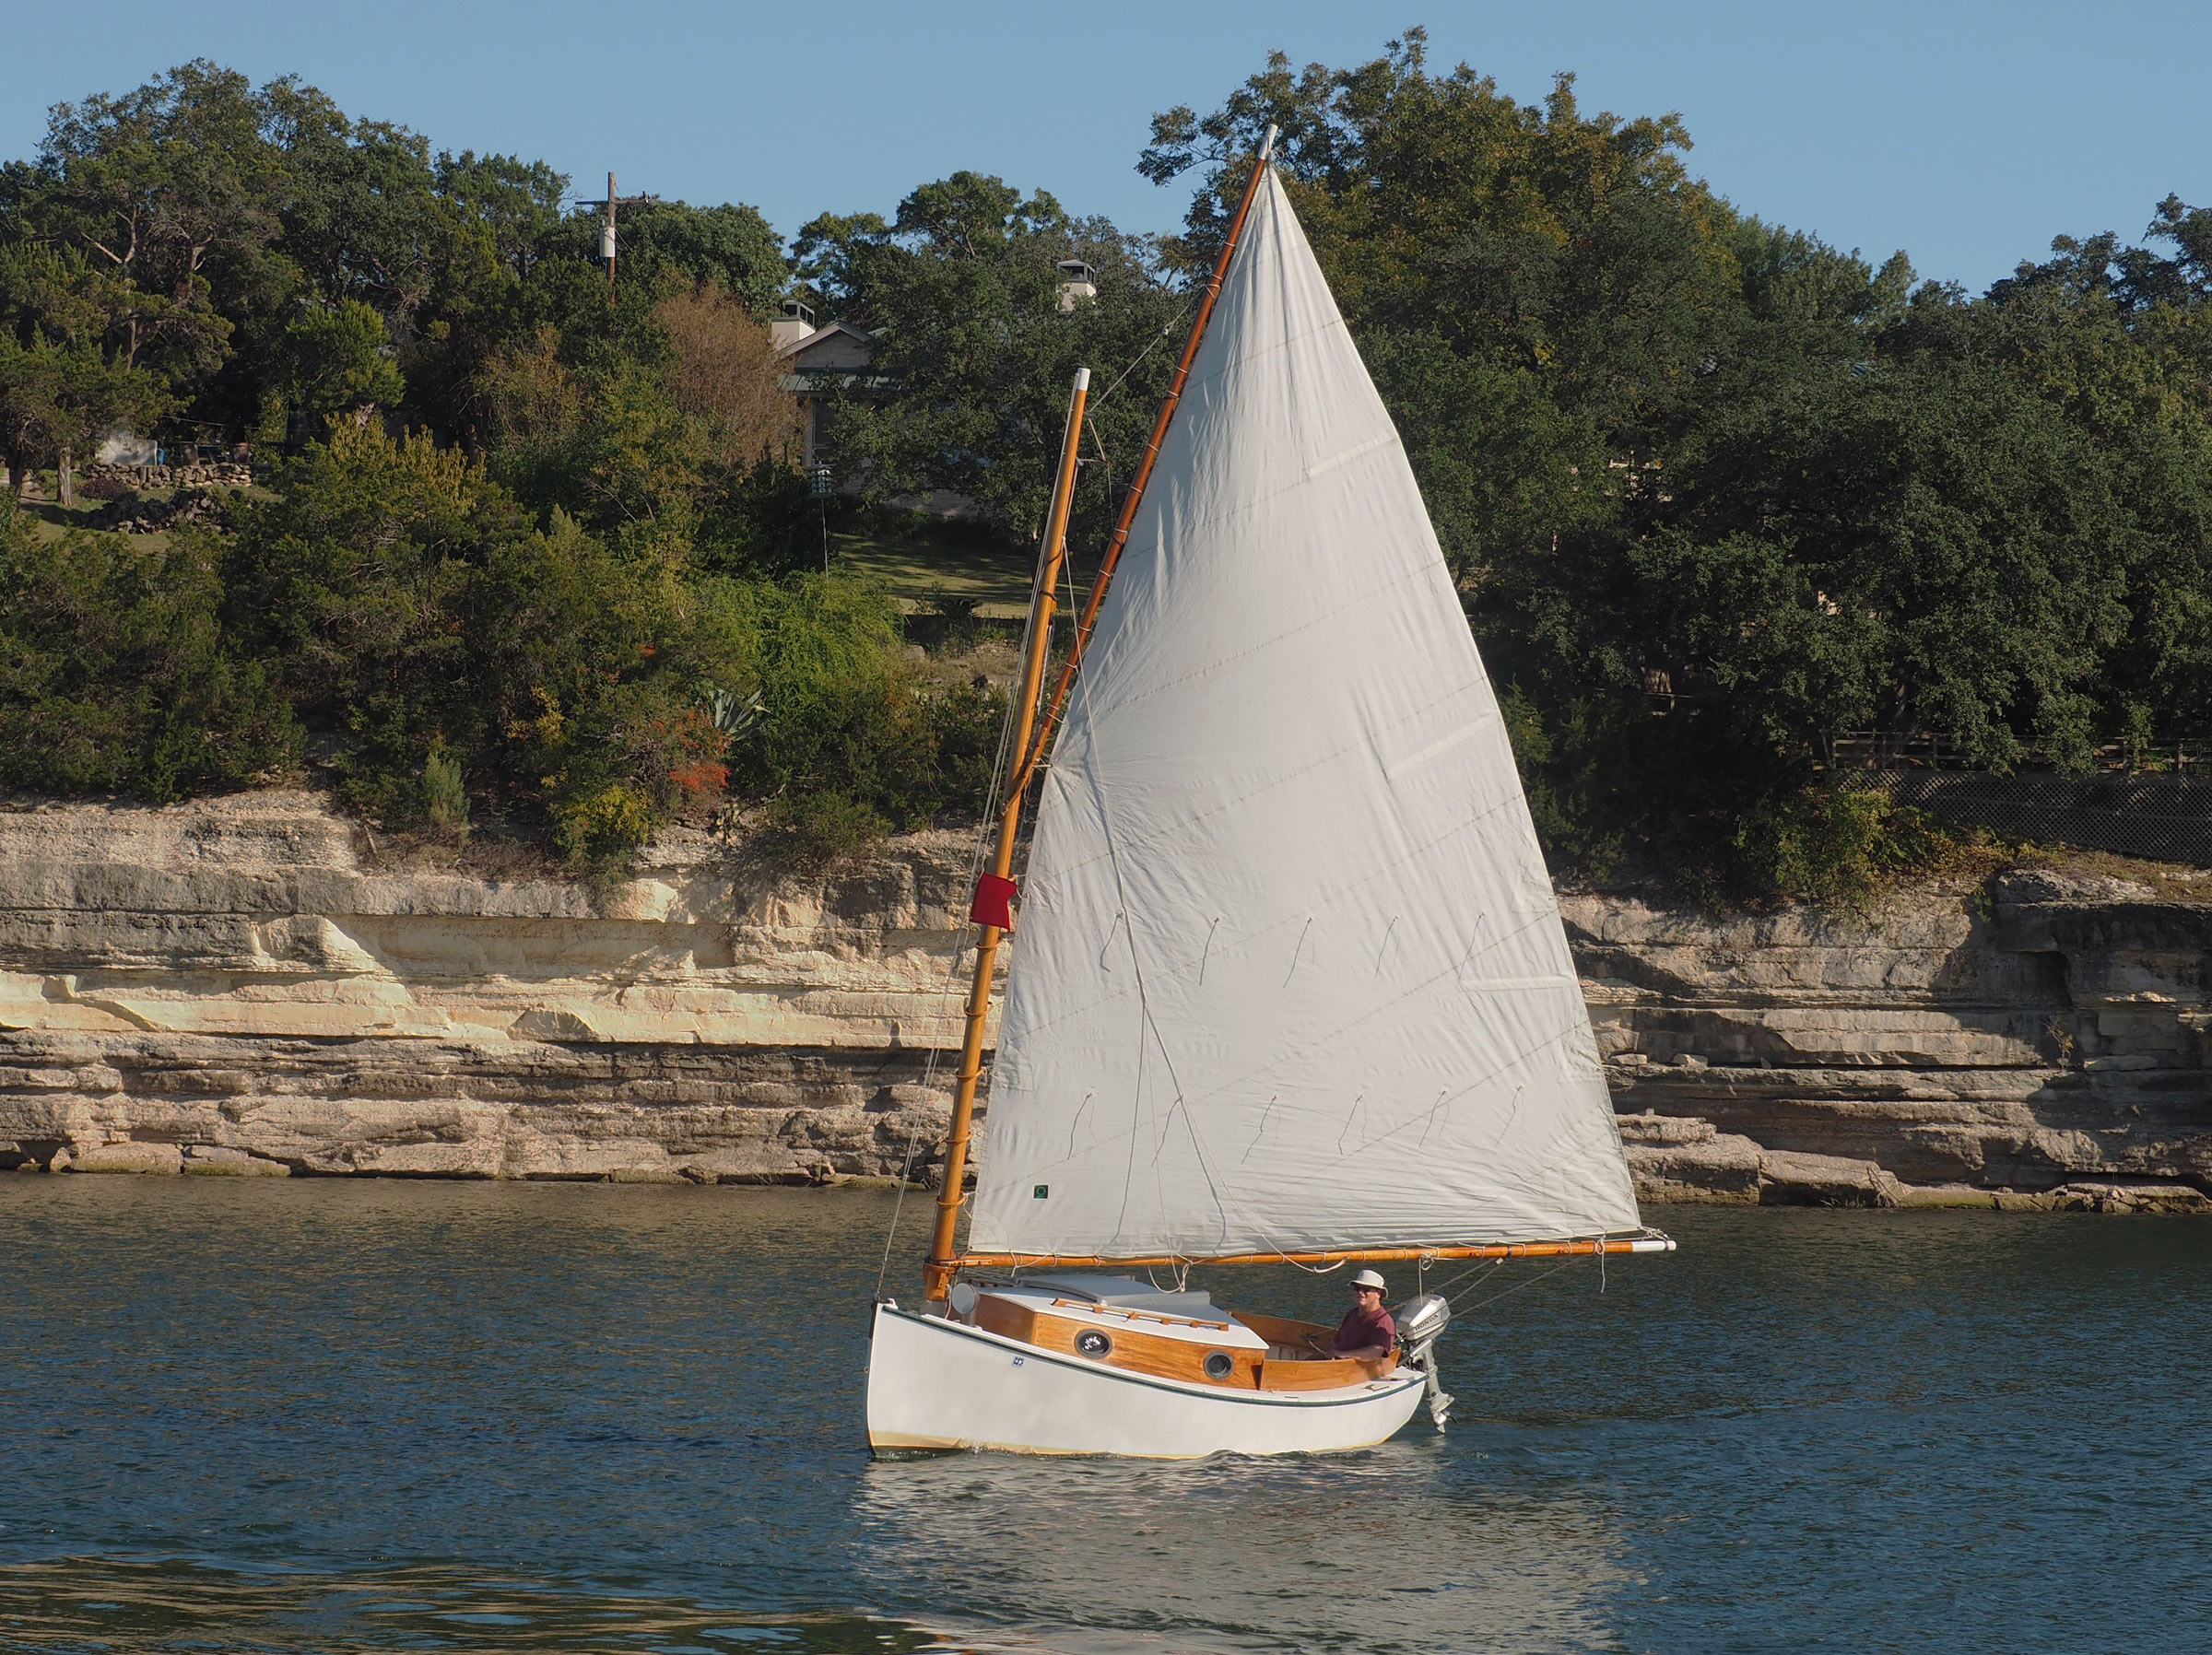
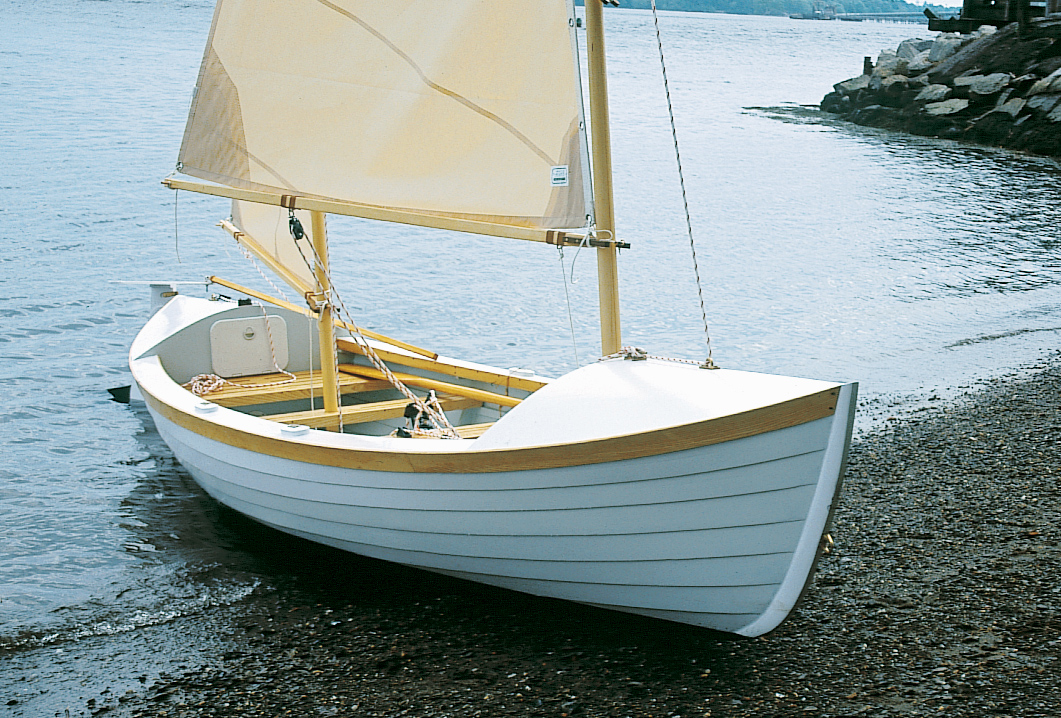
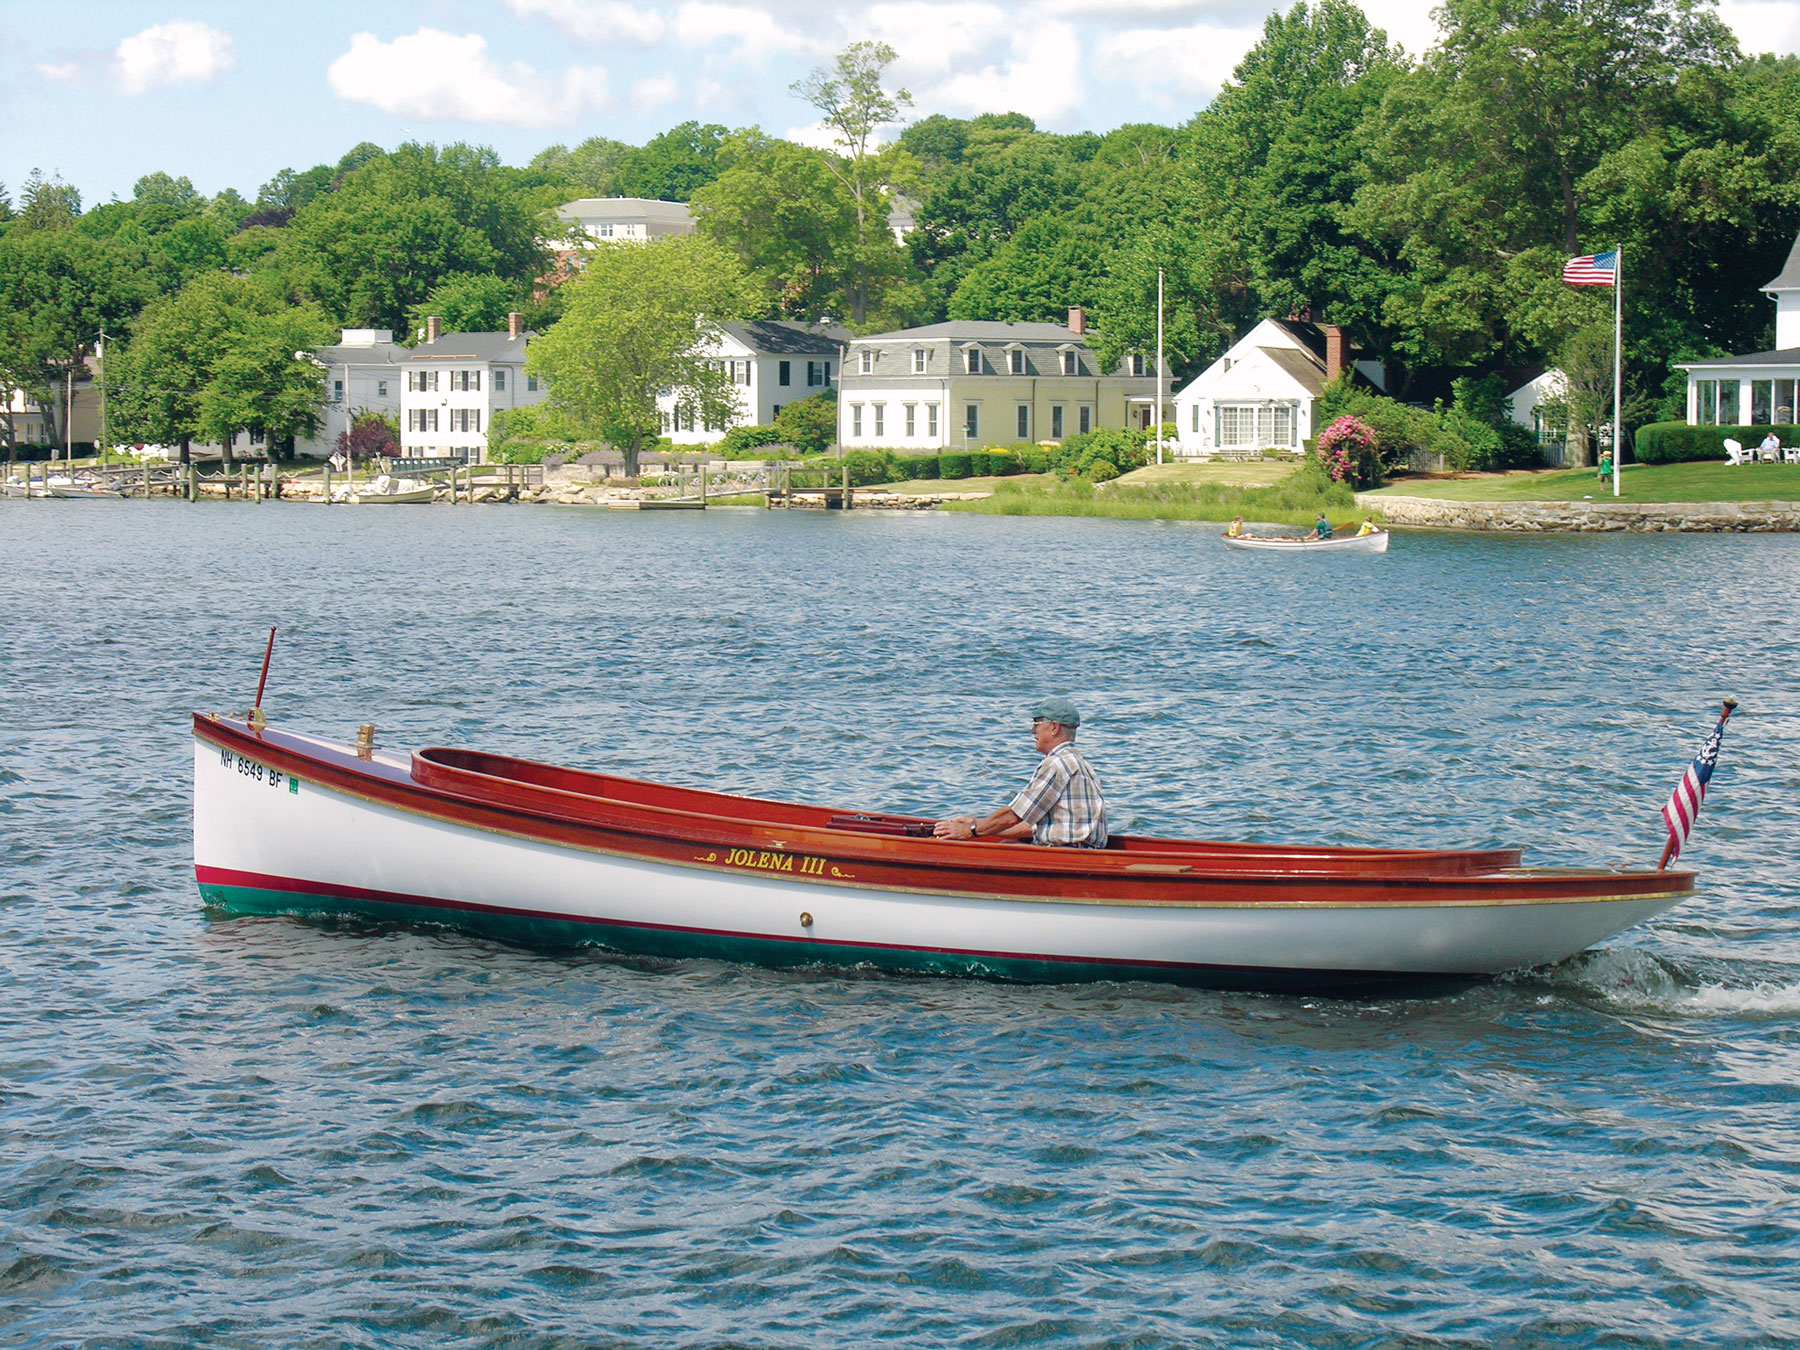
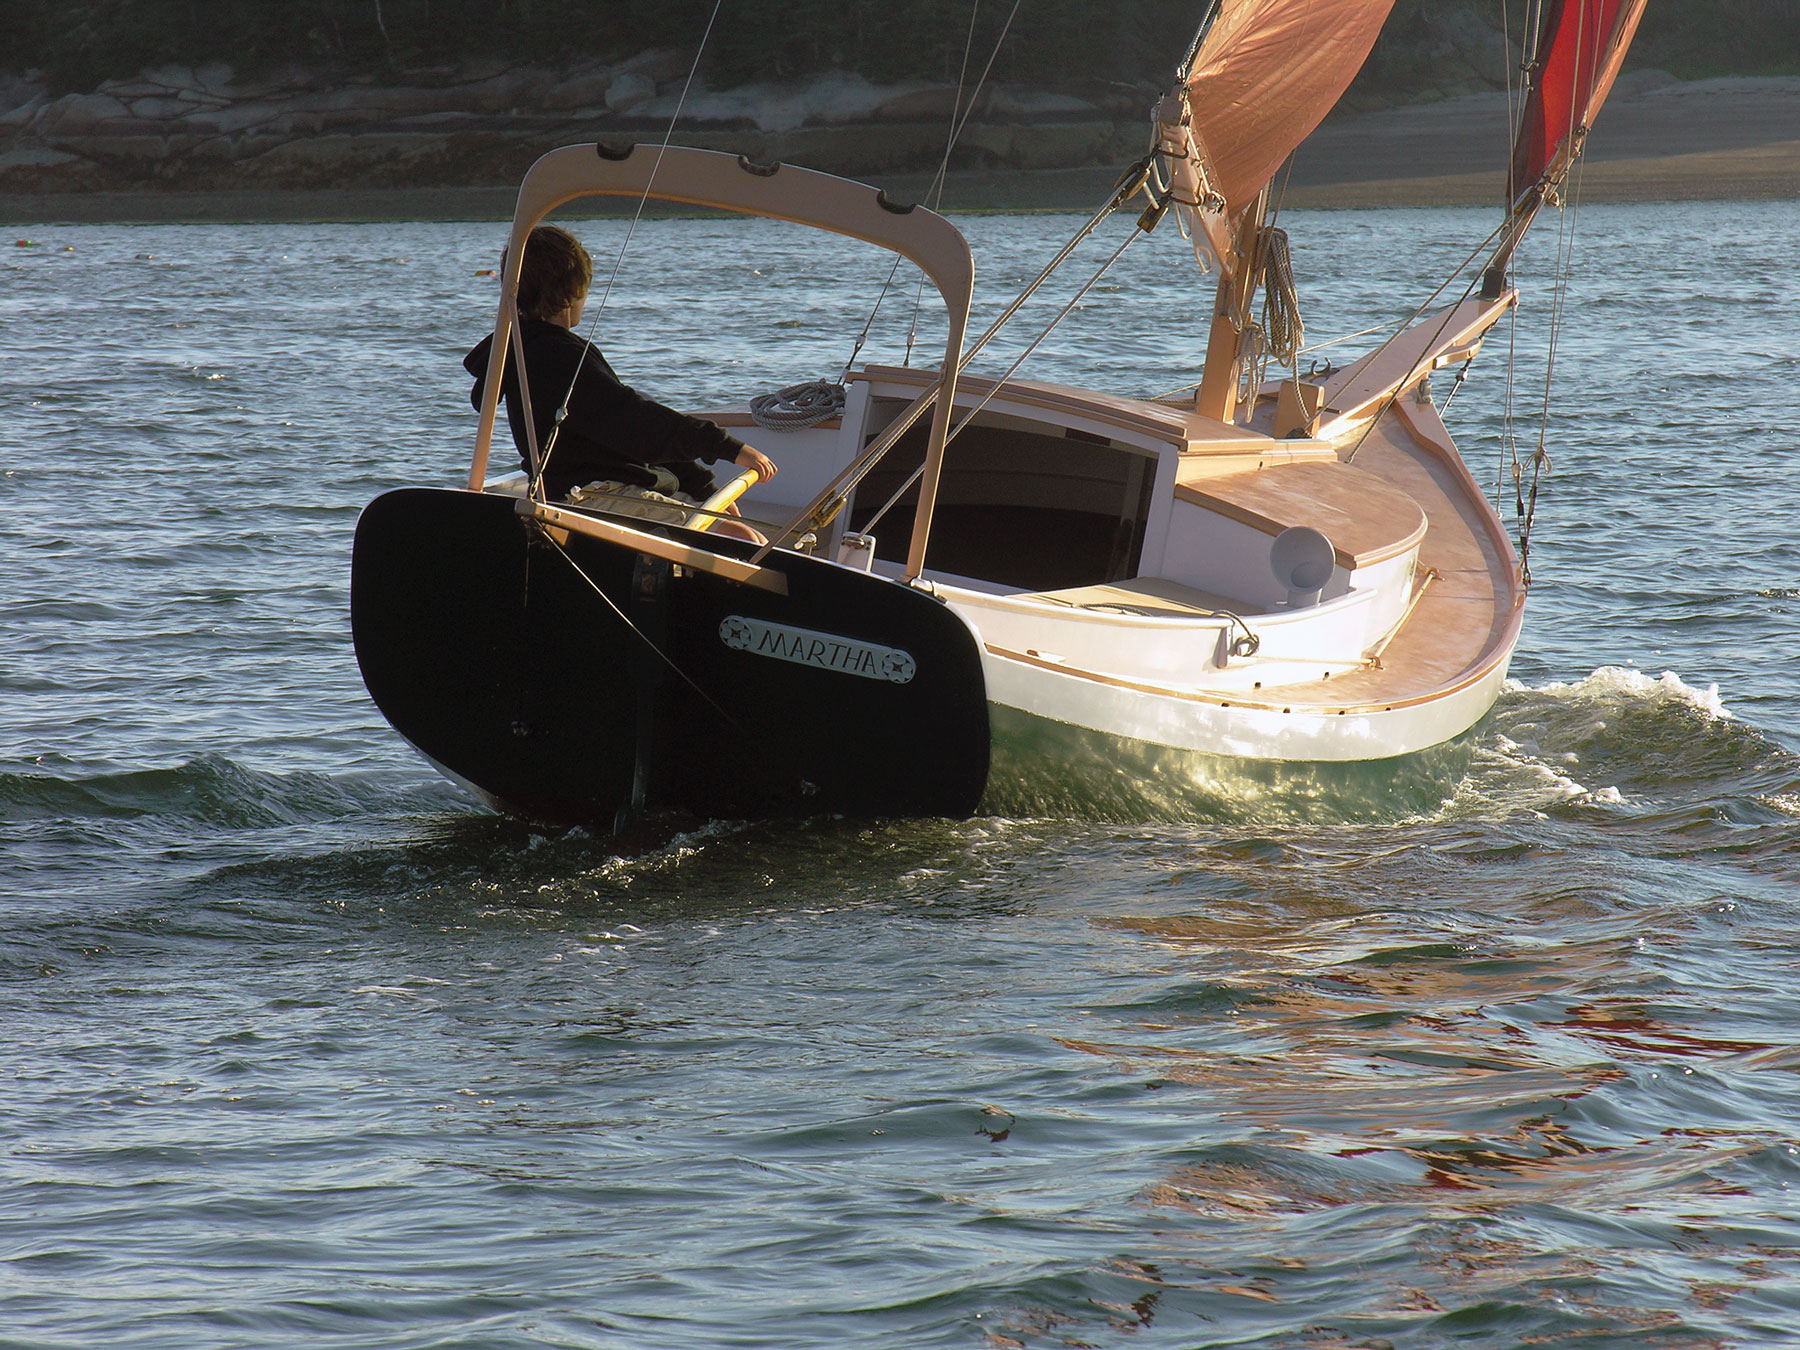
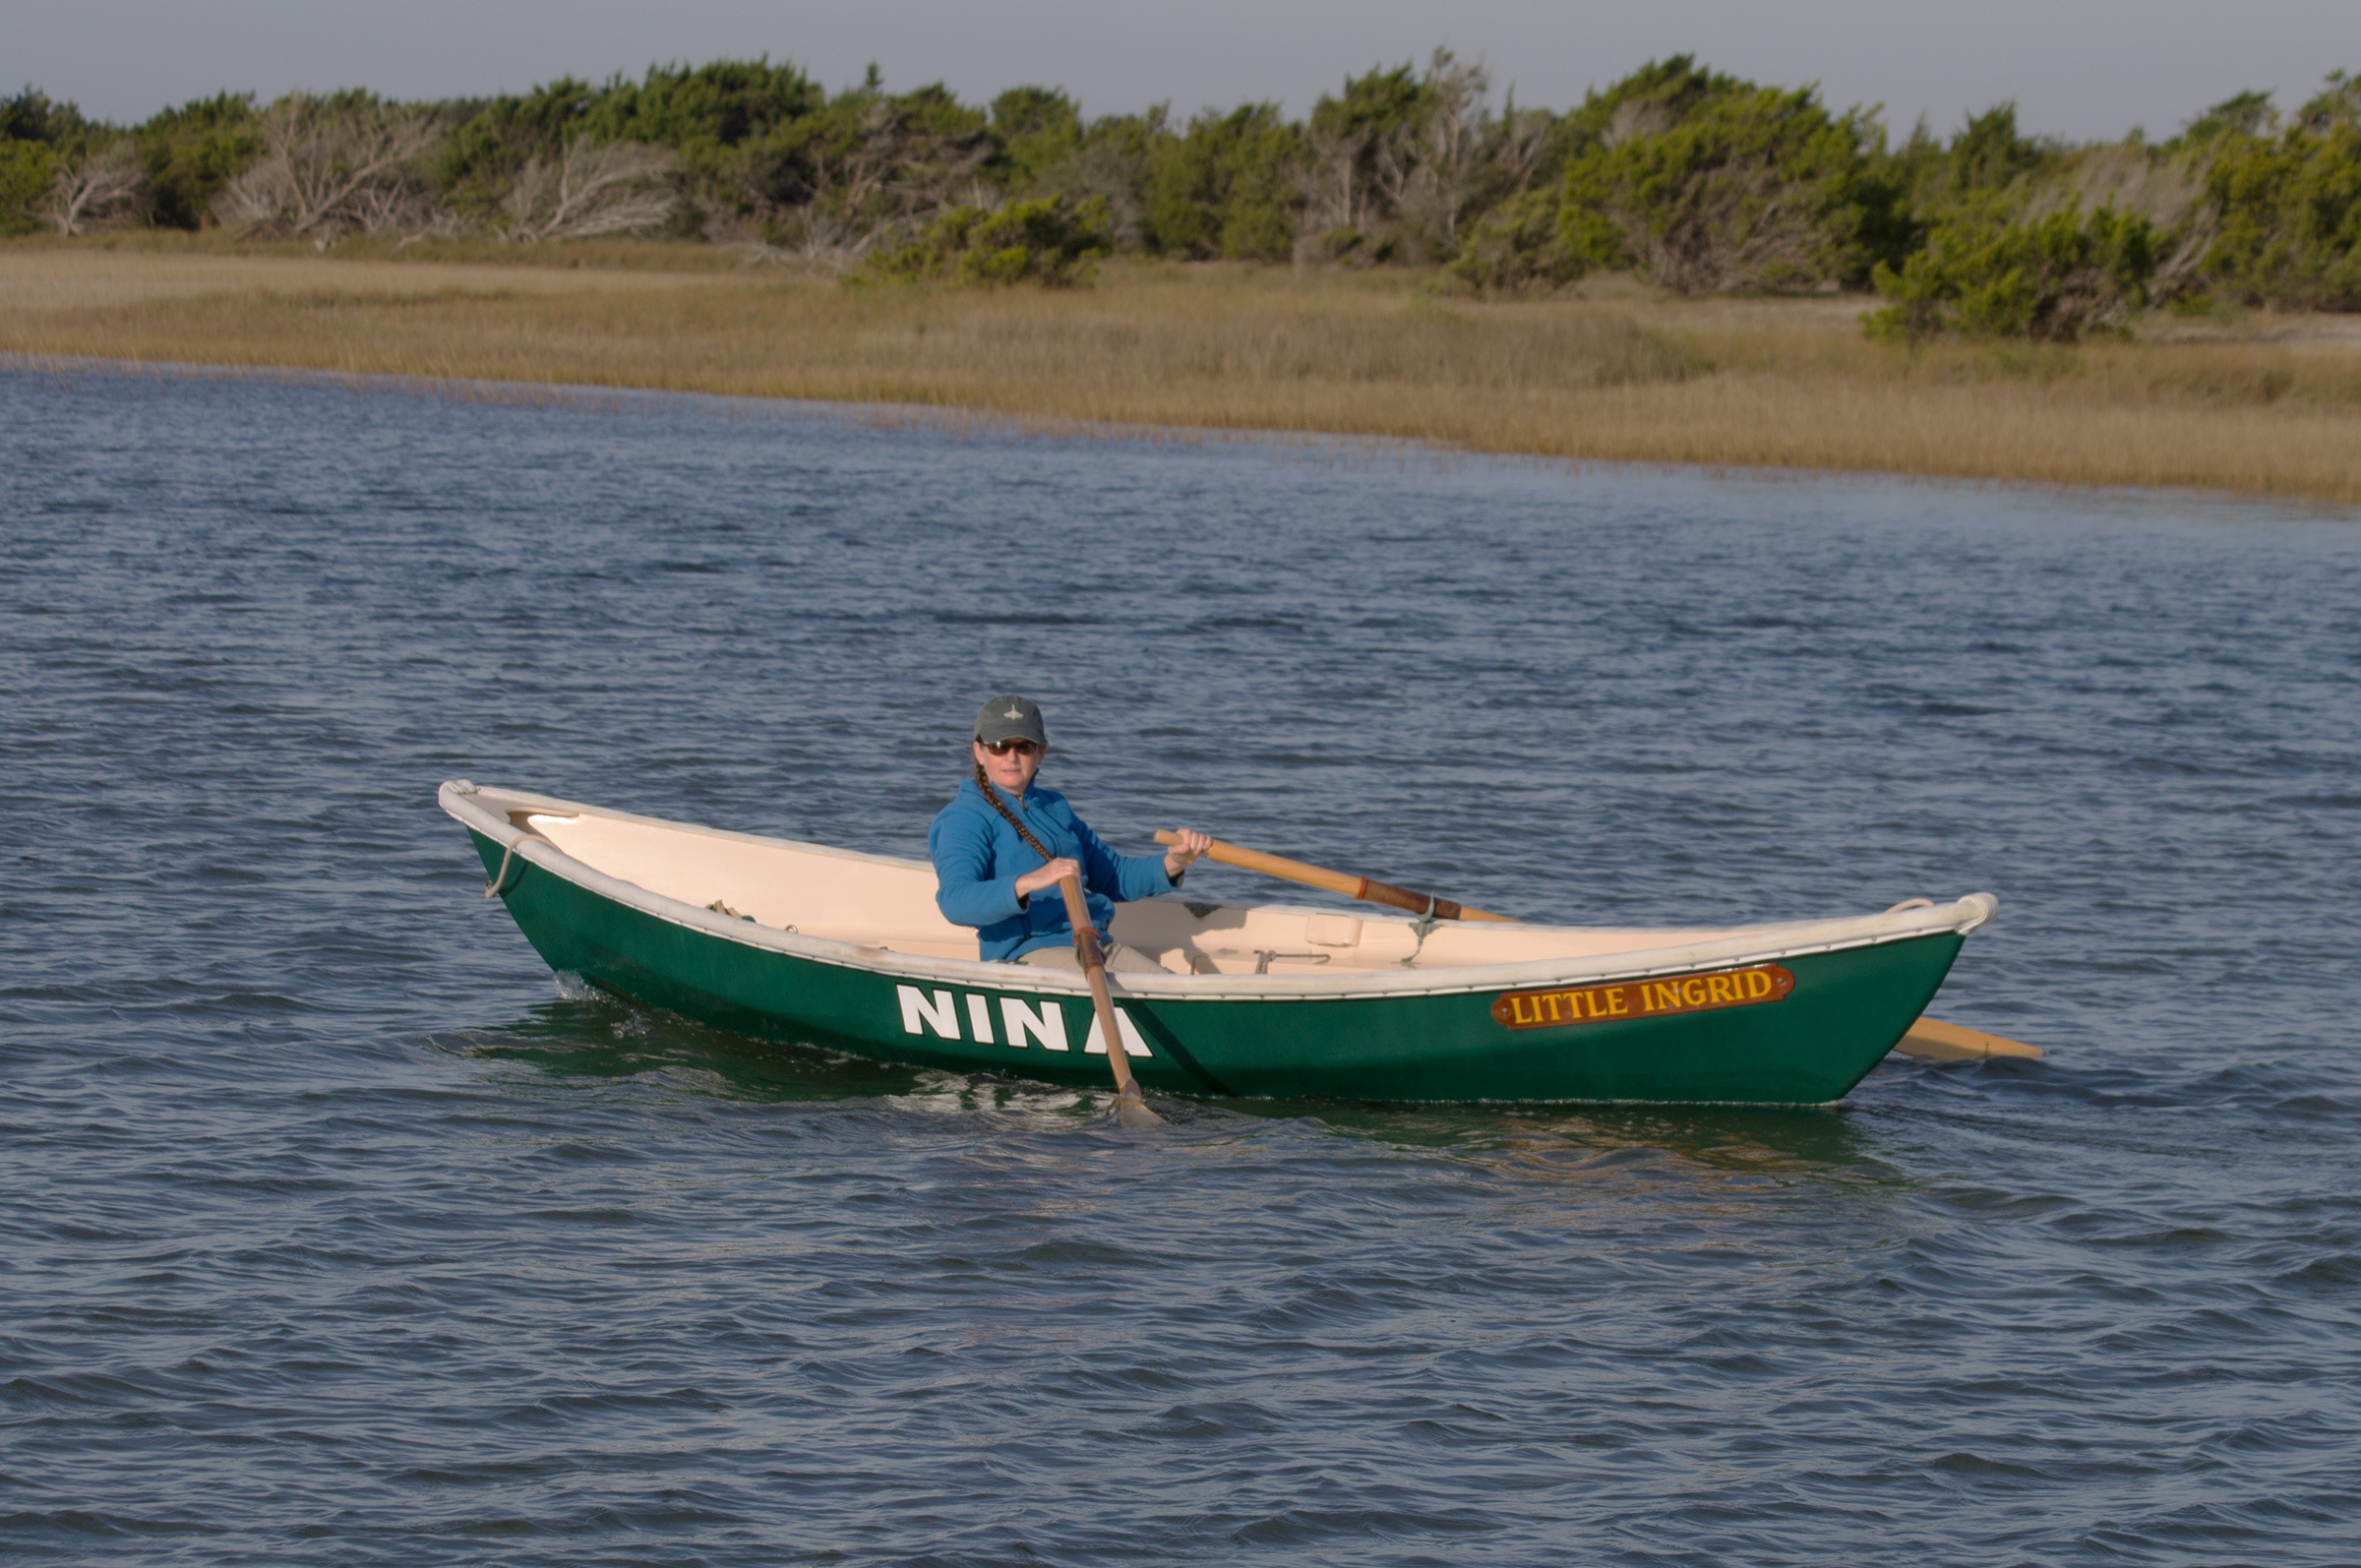
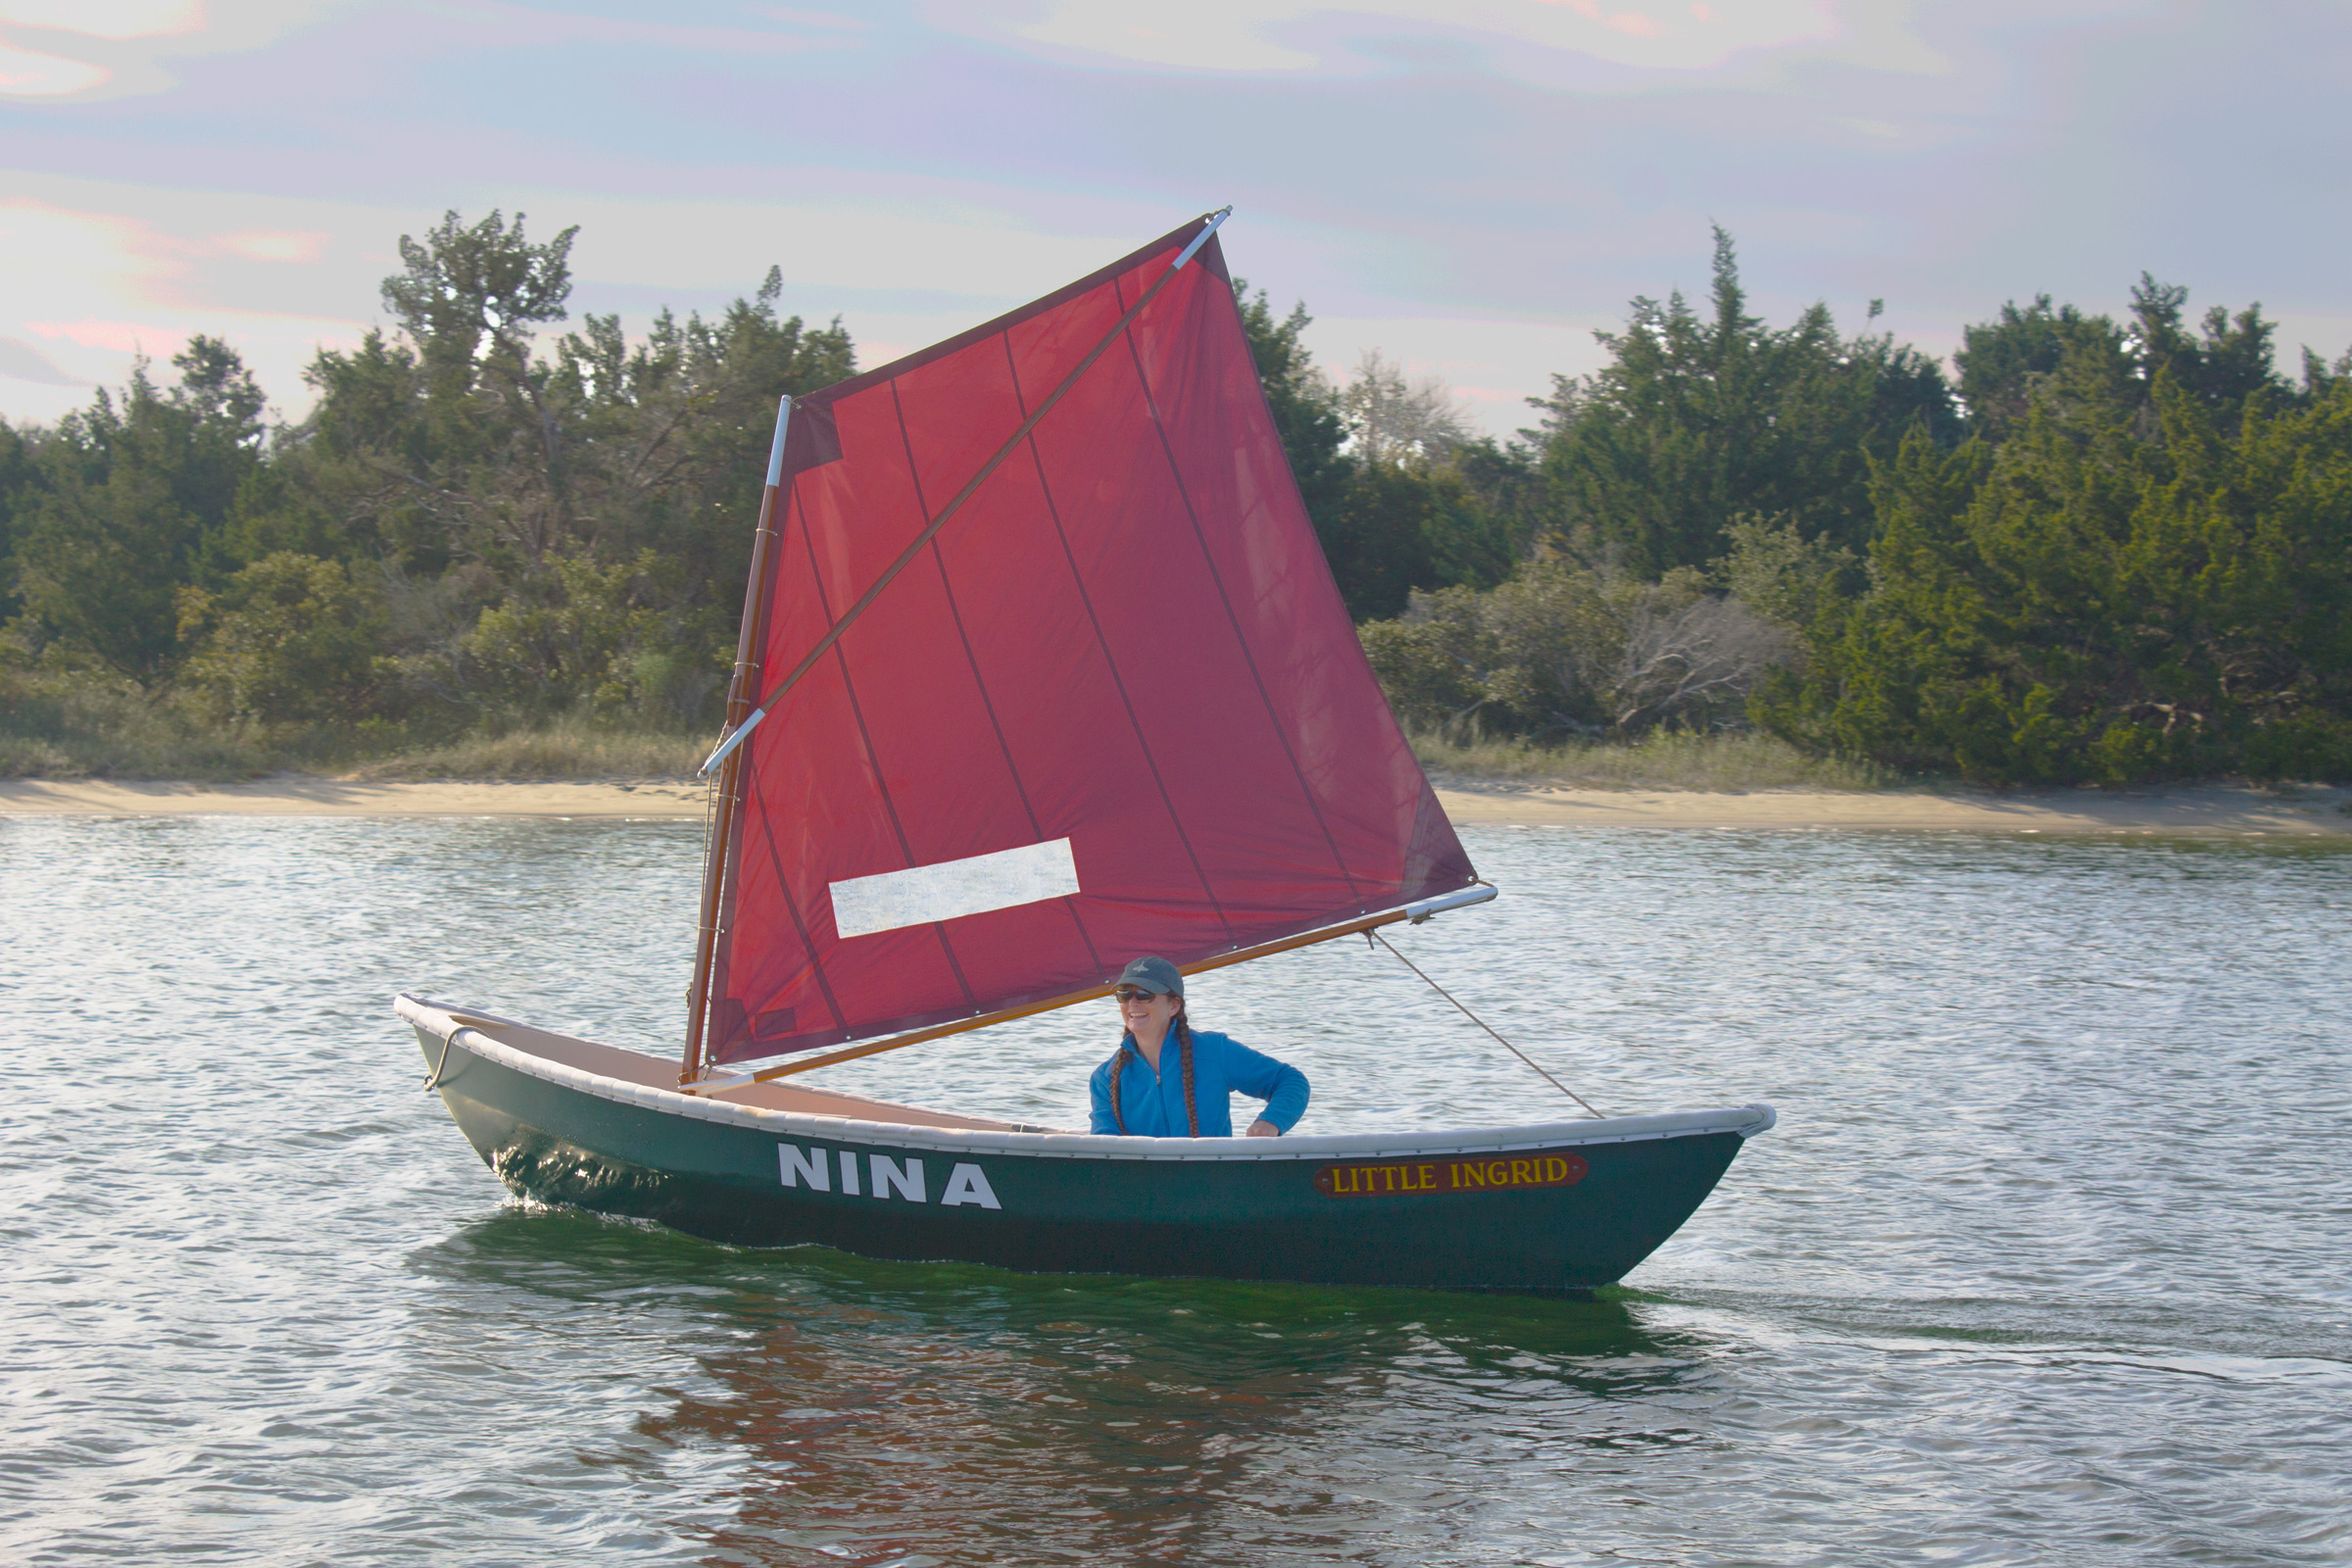
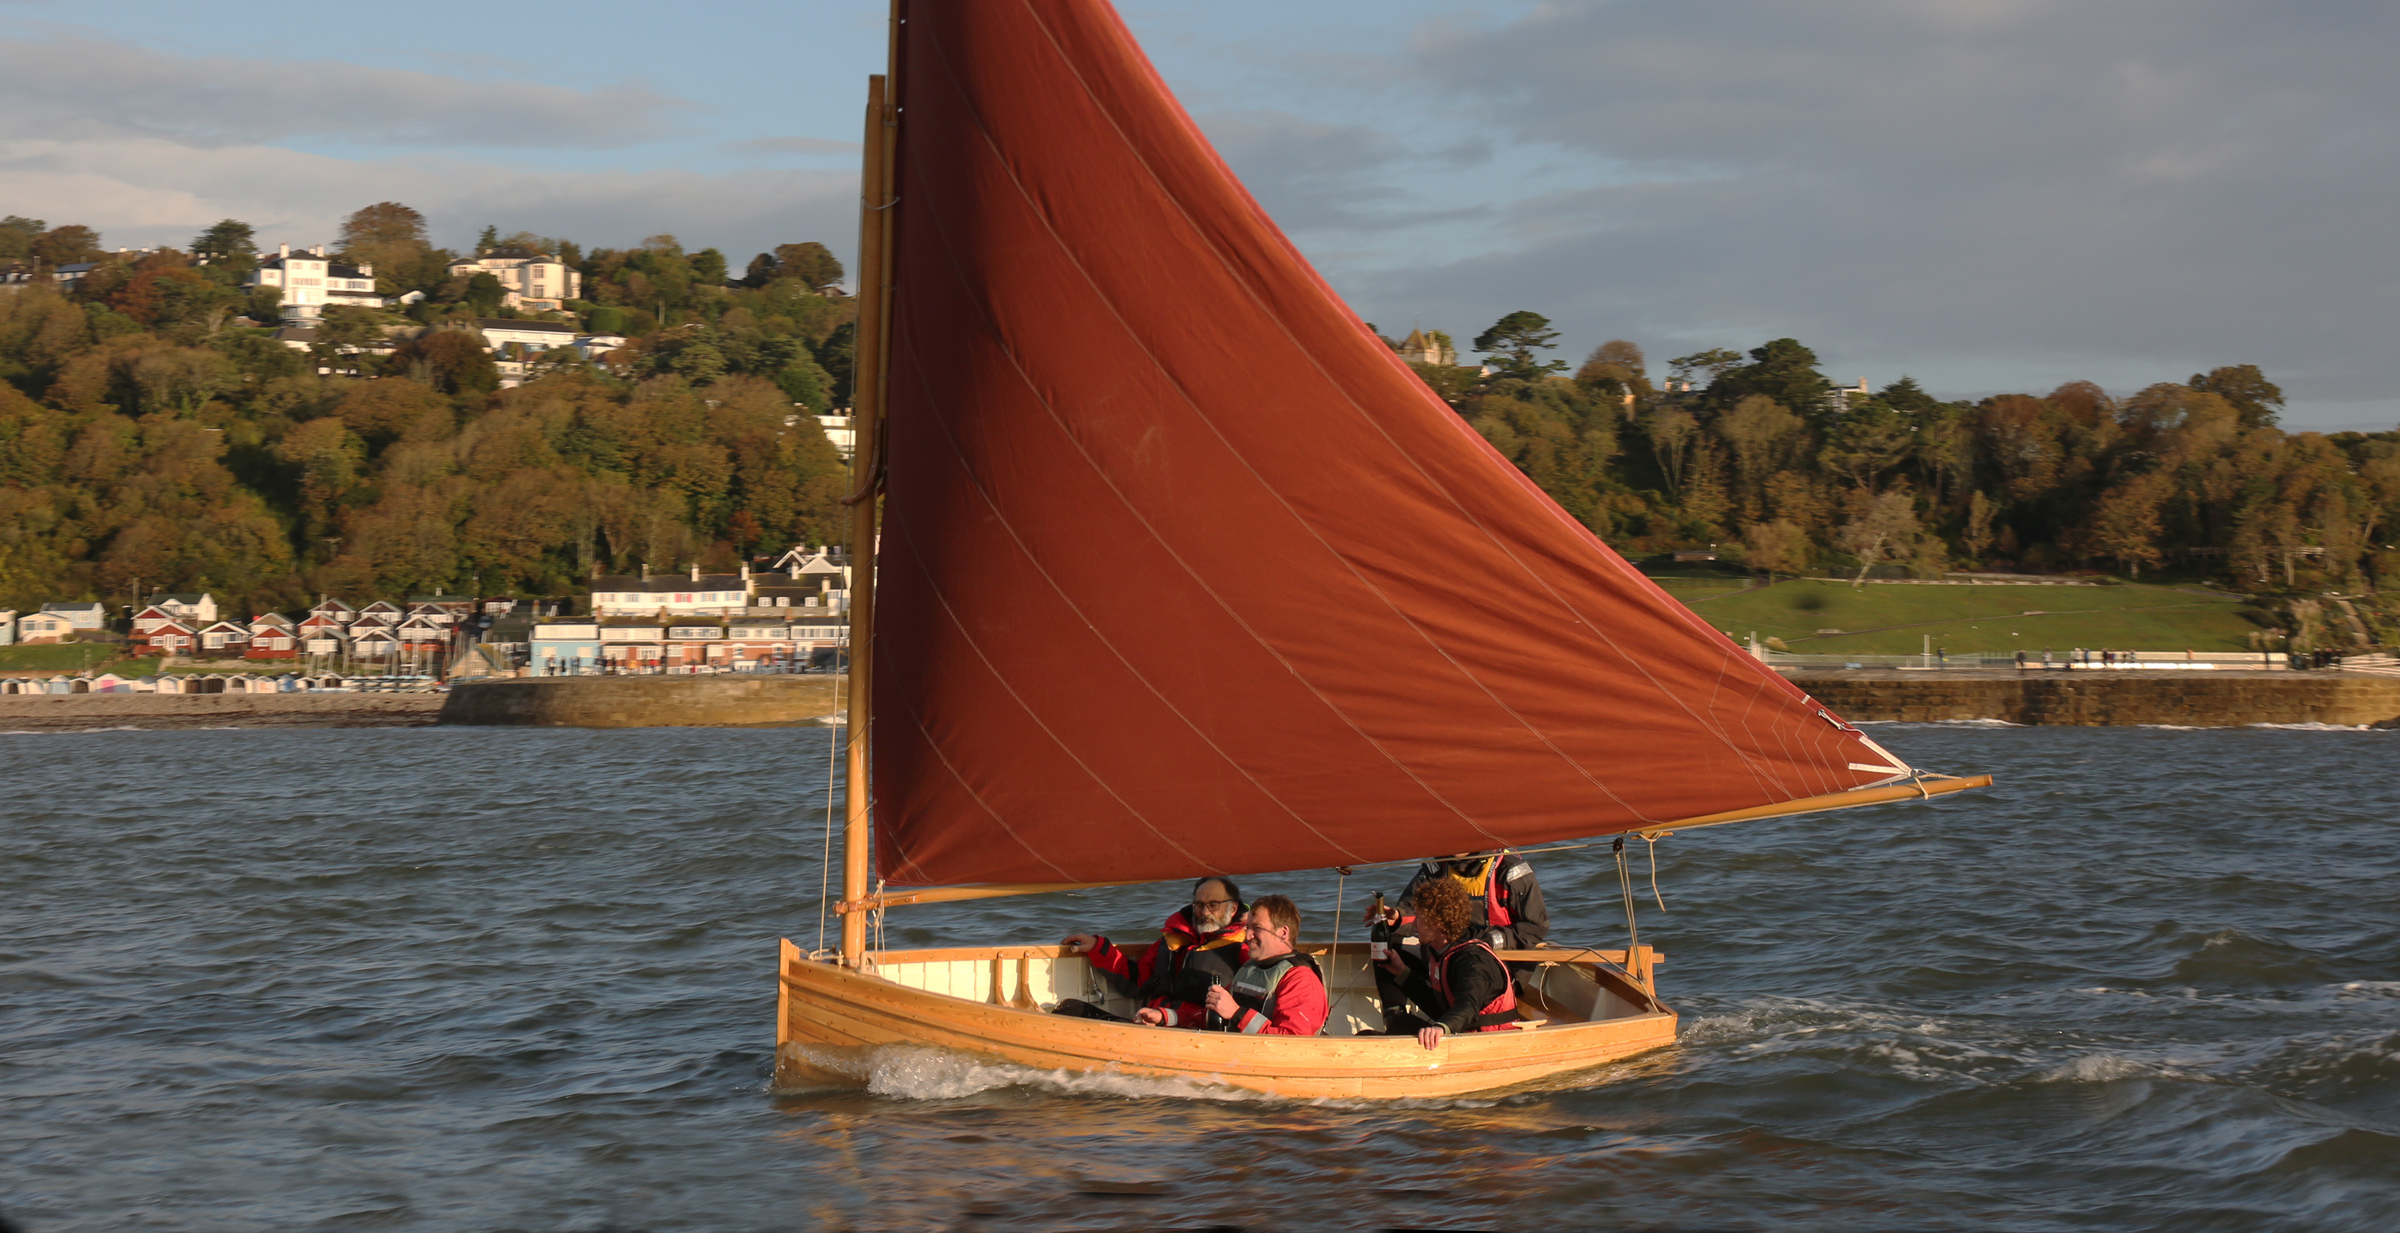
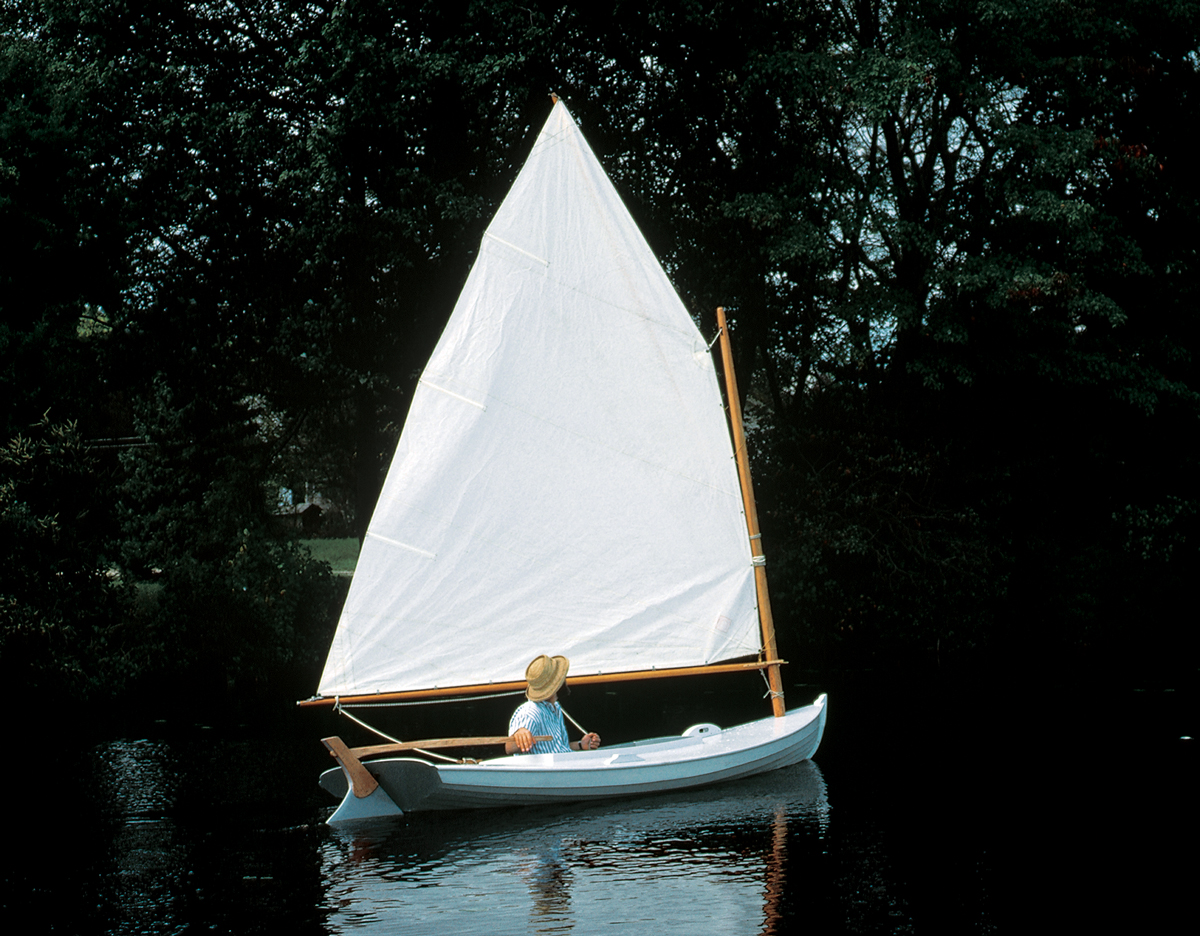
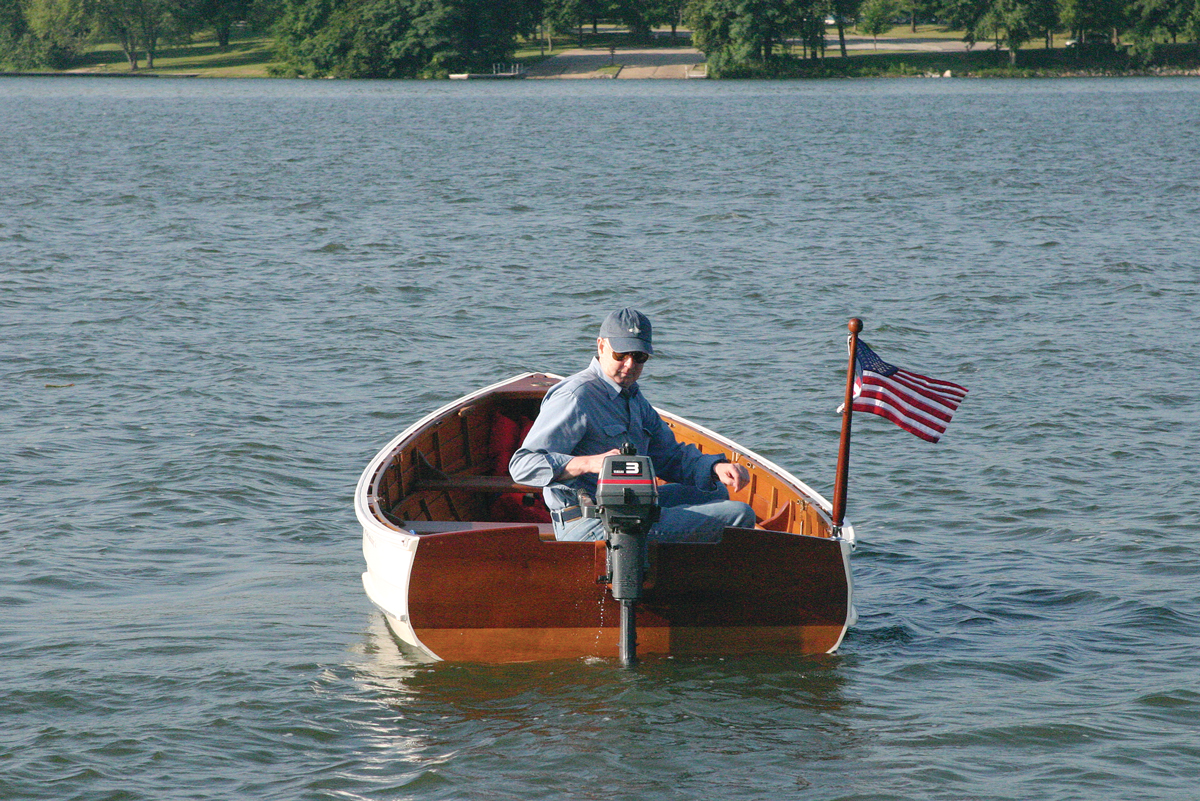
The Christmas Wherry possesses two characteristics that should be critically important to anyone looking for a small boat to use in open waters. It displays classic beauty and, as the boat’s designer, Walt Simmons of Lincolnville, Maine, says, “It will take you out, and bring you back home.”
The wherry can trace its origins perhaps as far back as the 15th century. Superb pulling boats, wherries could be found fishing or carrying passengers on rivers and harbors throughout much of England. These working boats were often equipped with sailing rigs. The fast, all-purpose boats came to the New World during the earliest part of the Colonial era.
The Christmas Wherry can trace its design almost as far back in history. The boat is based on the salmon wherries developed on the shores of Penobscot Bay in the 19th century, a time when the fishery for wild Atlantic salmon flourished in Maine bays and rivers. Some 35 miles long and more than 20 miles wide, the bay lies at the mouth of the Penobscot River and is studded with granite ledges and islands. For decades, into the early years of the 20th century, the Penobscot was among the most productive salmon rivers in North America. As might be expected of boats relied on by fishermen working on the rugged Maine coast, the ability to go to sea in all weather, and to come back laden with salmon in all but the worst of it, was critical.
Corurtesy of Walter Simmons
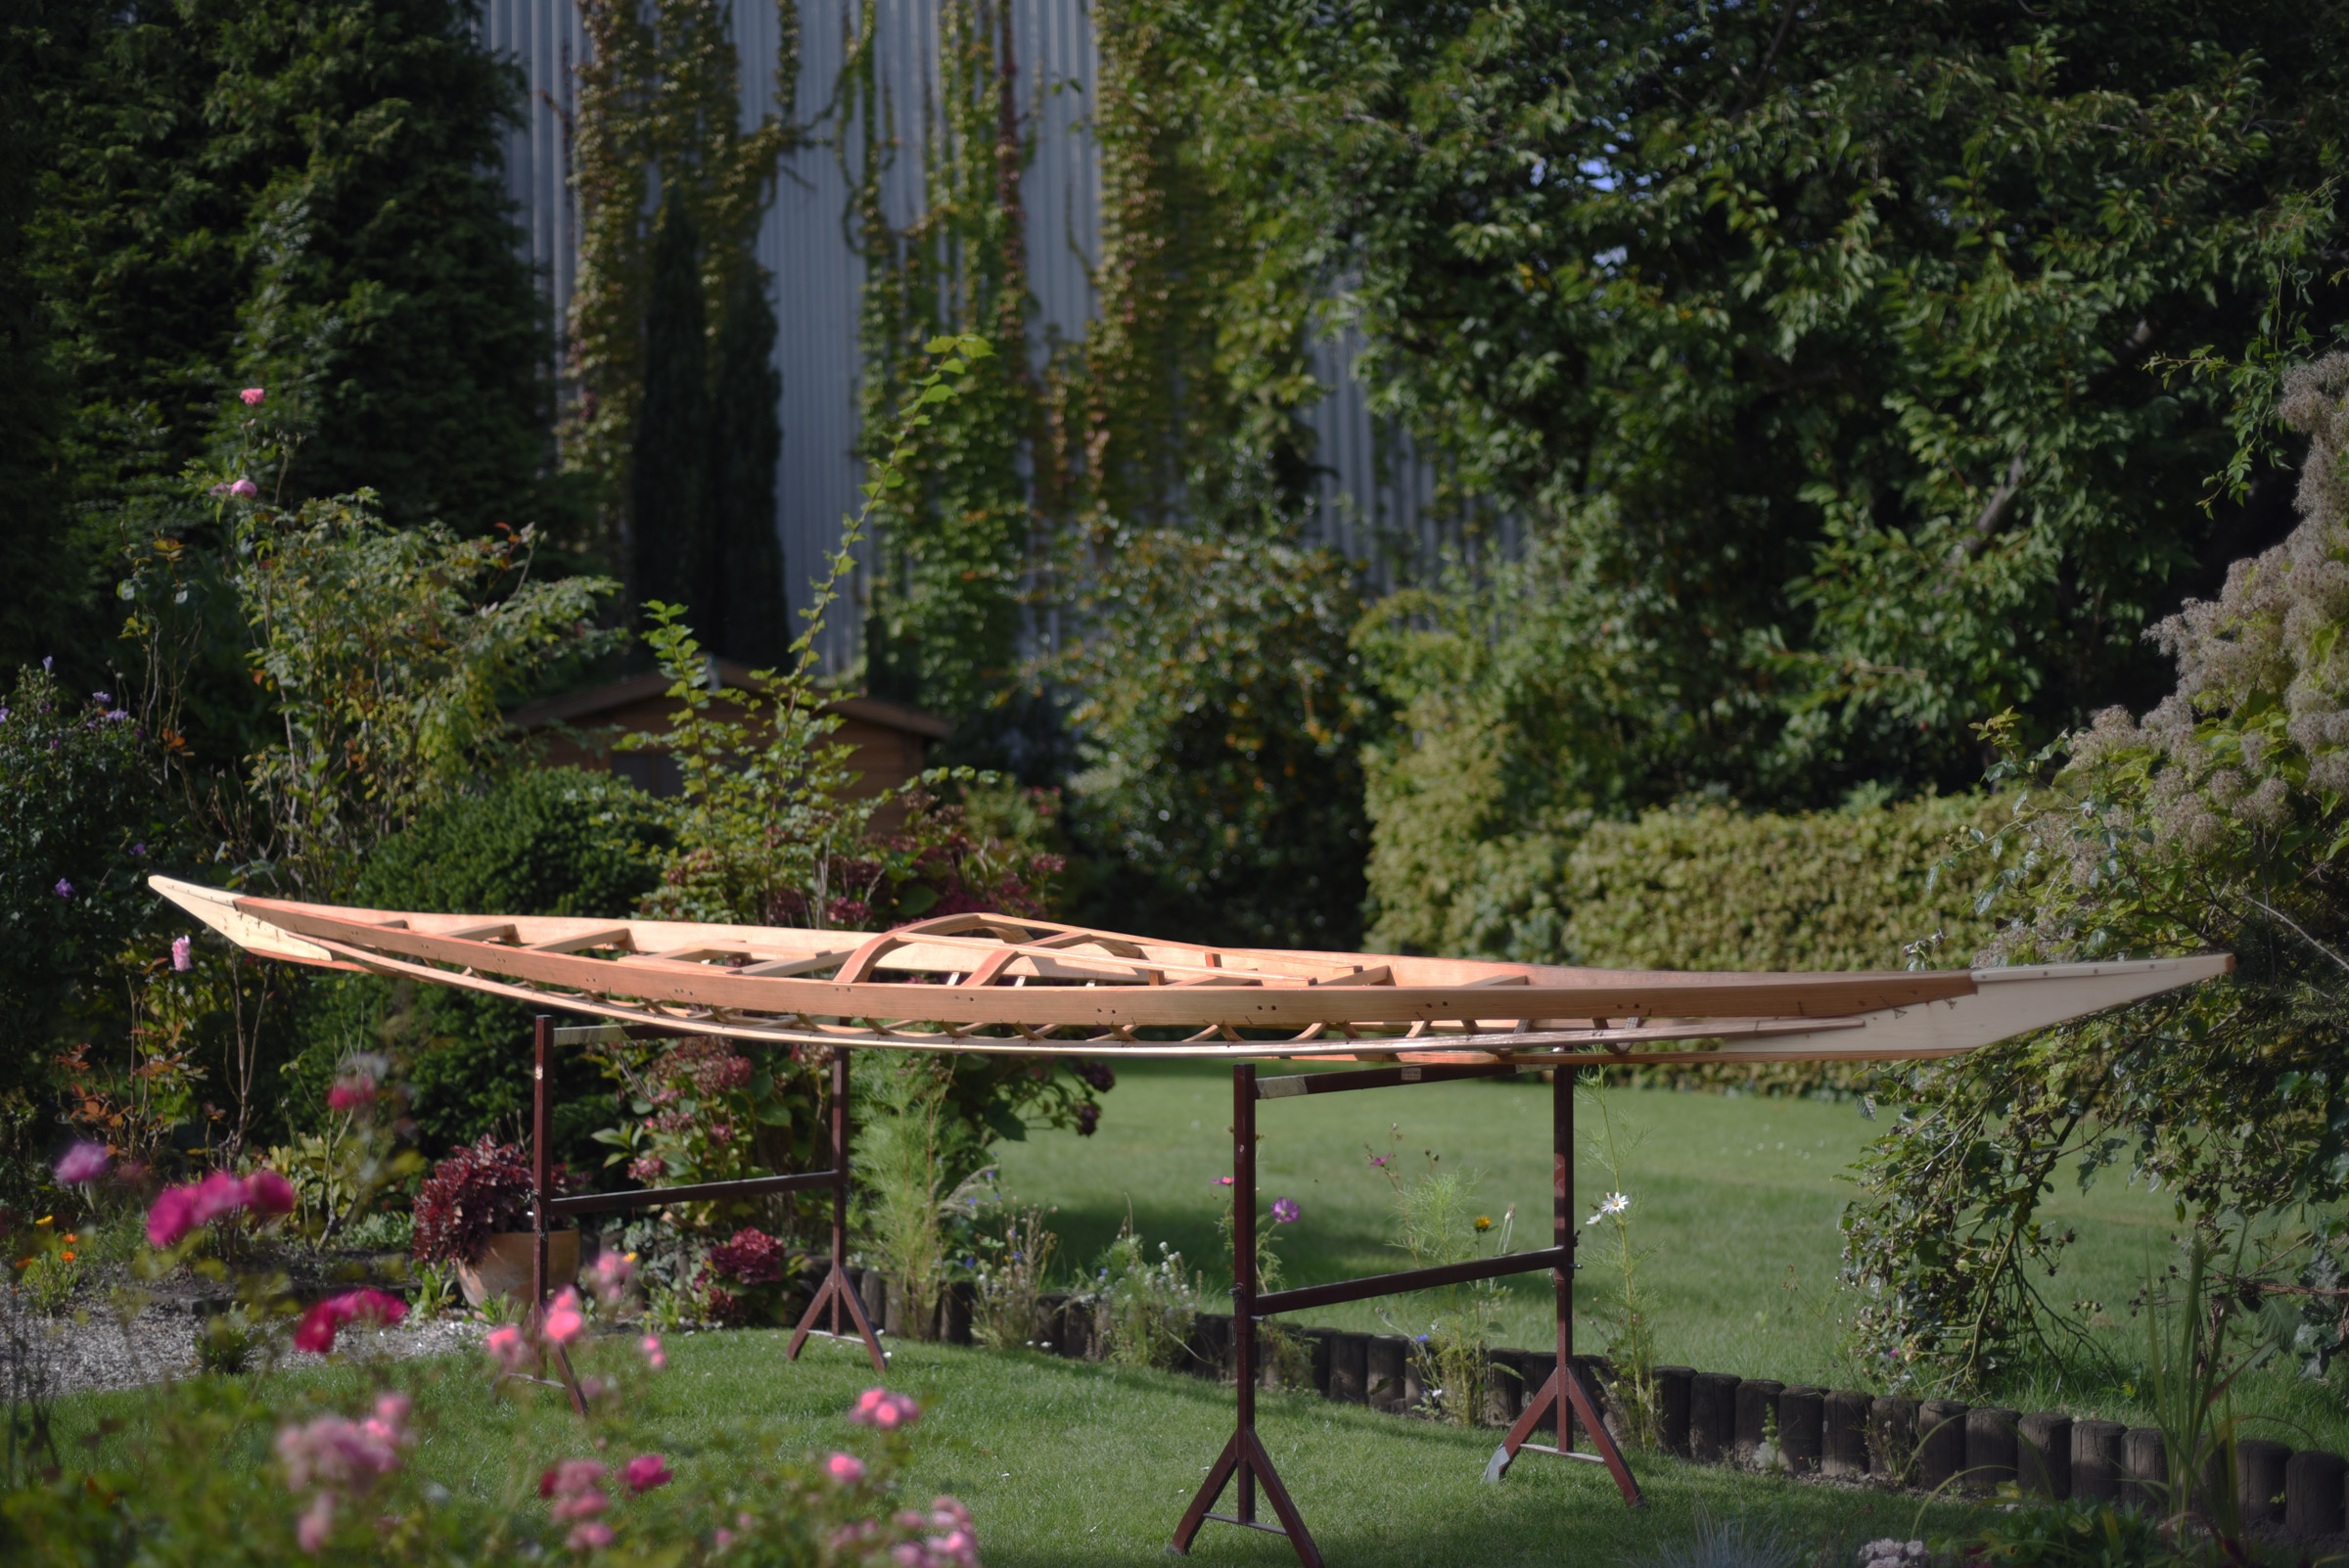
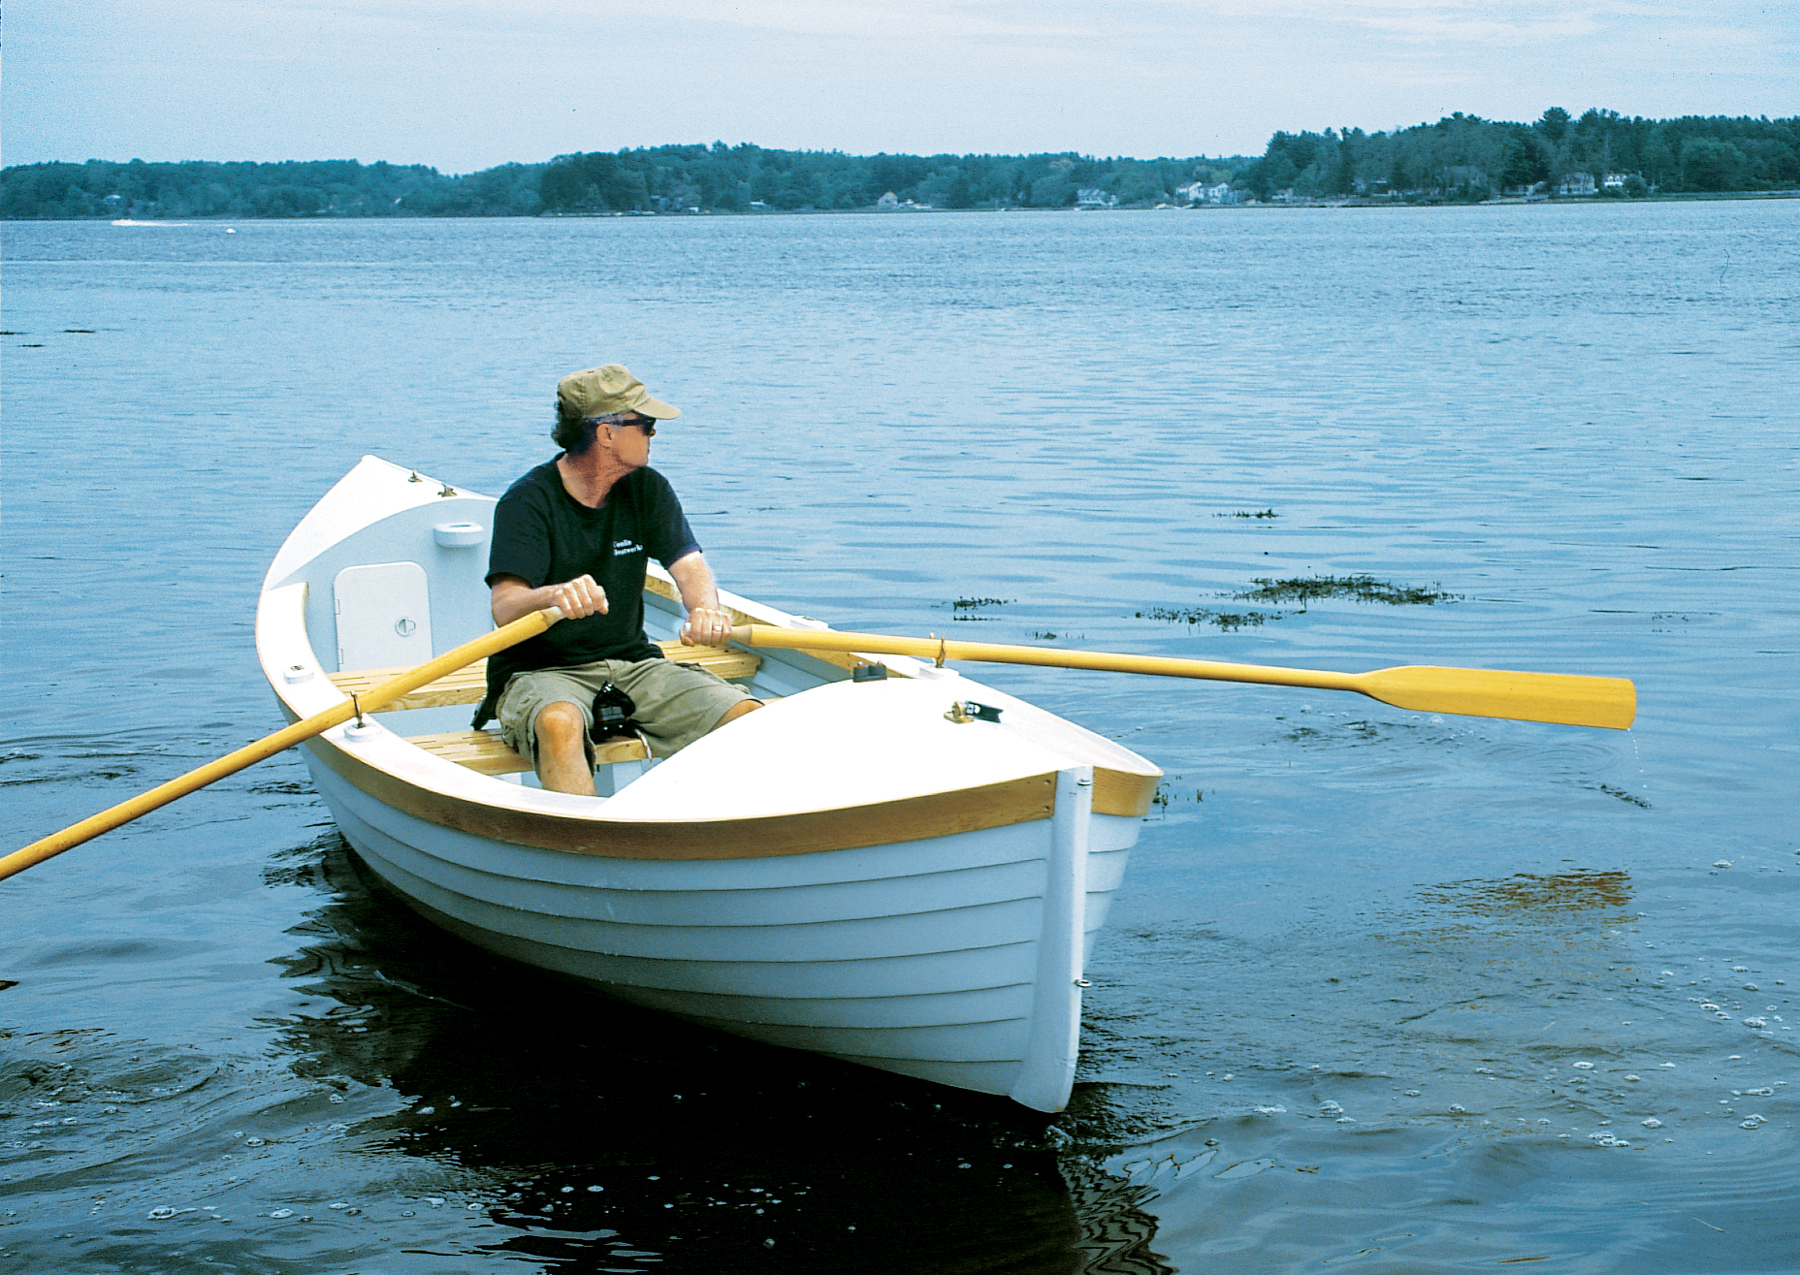
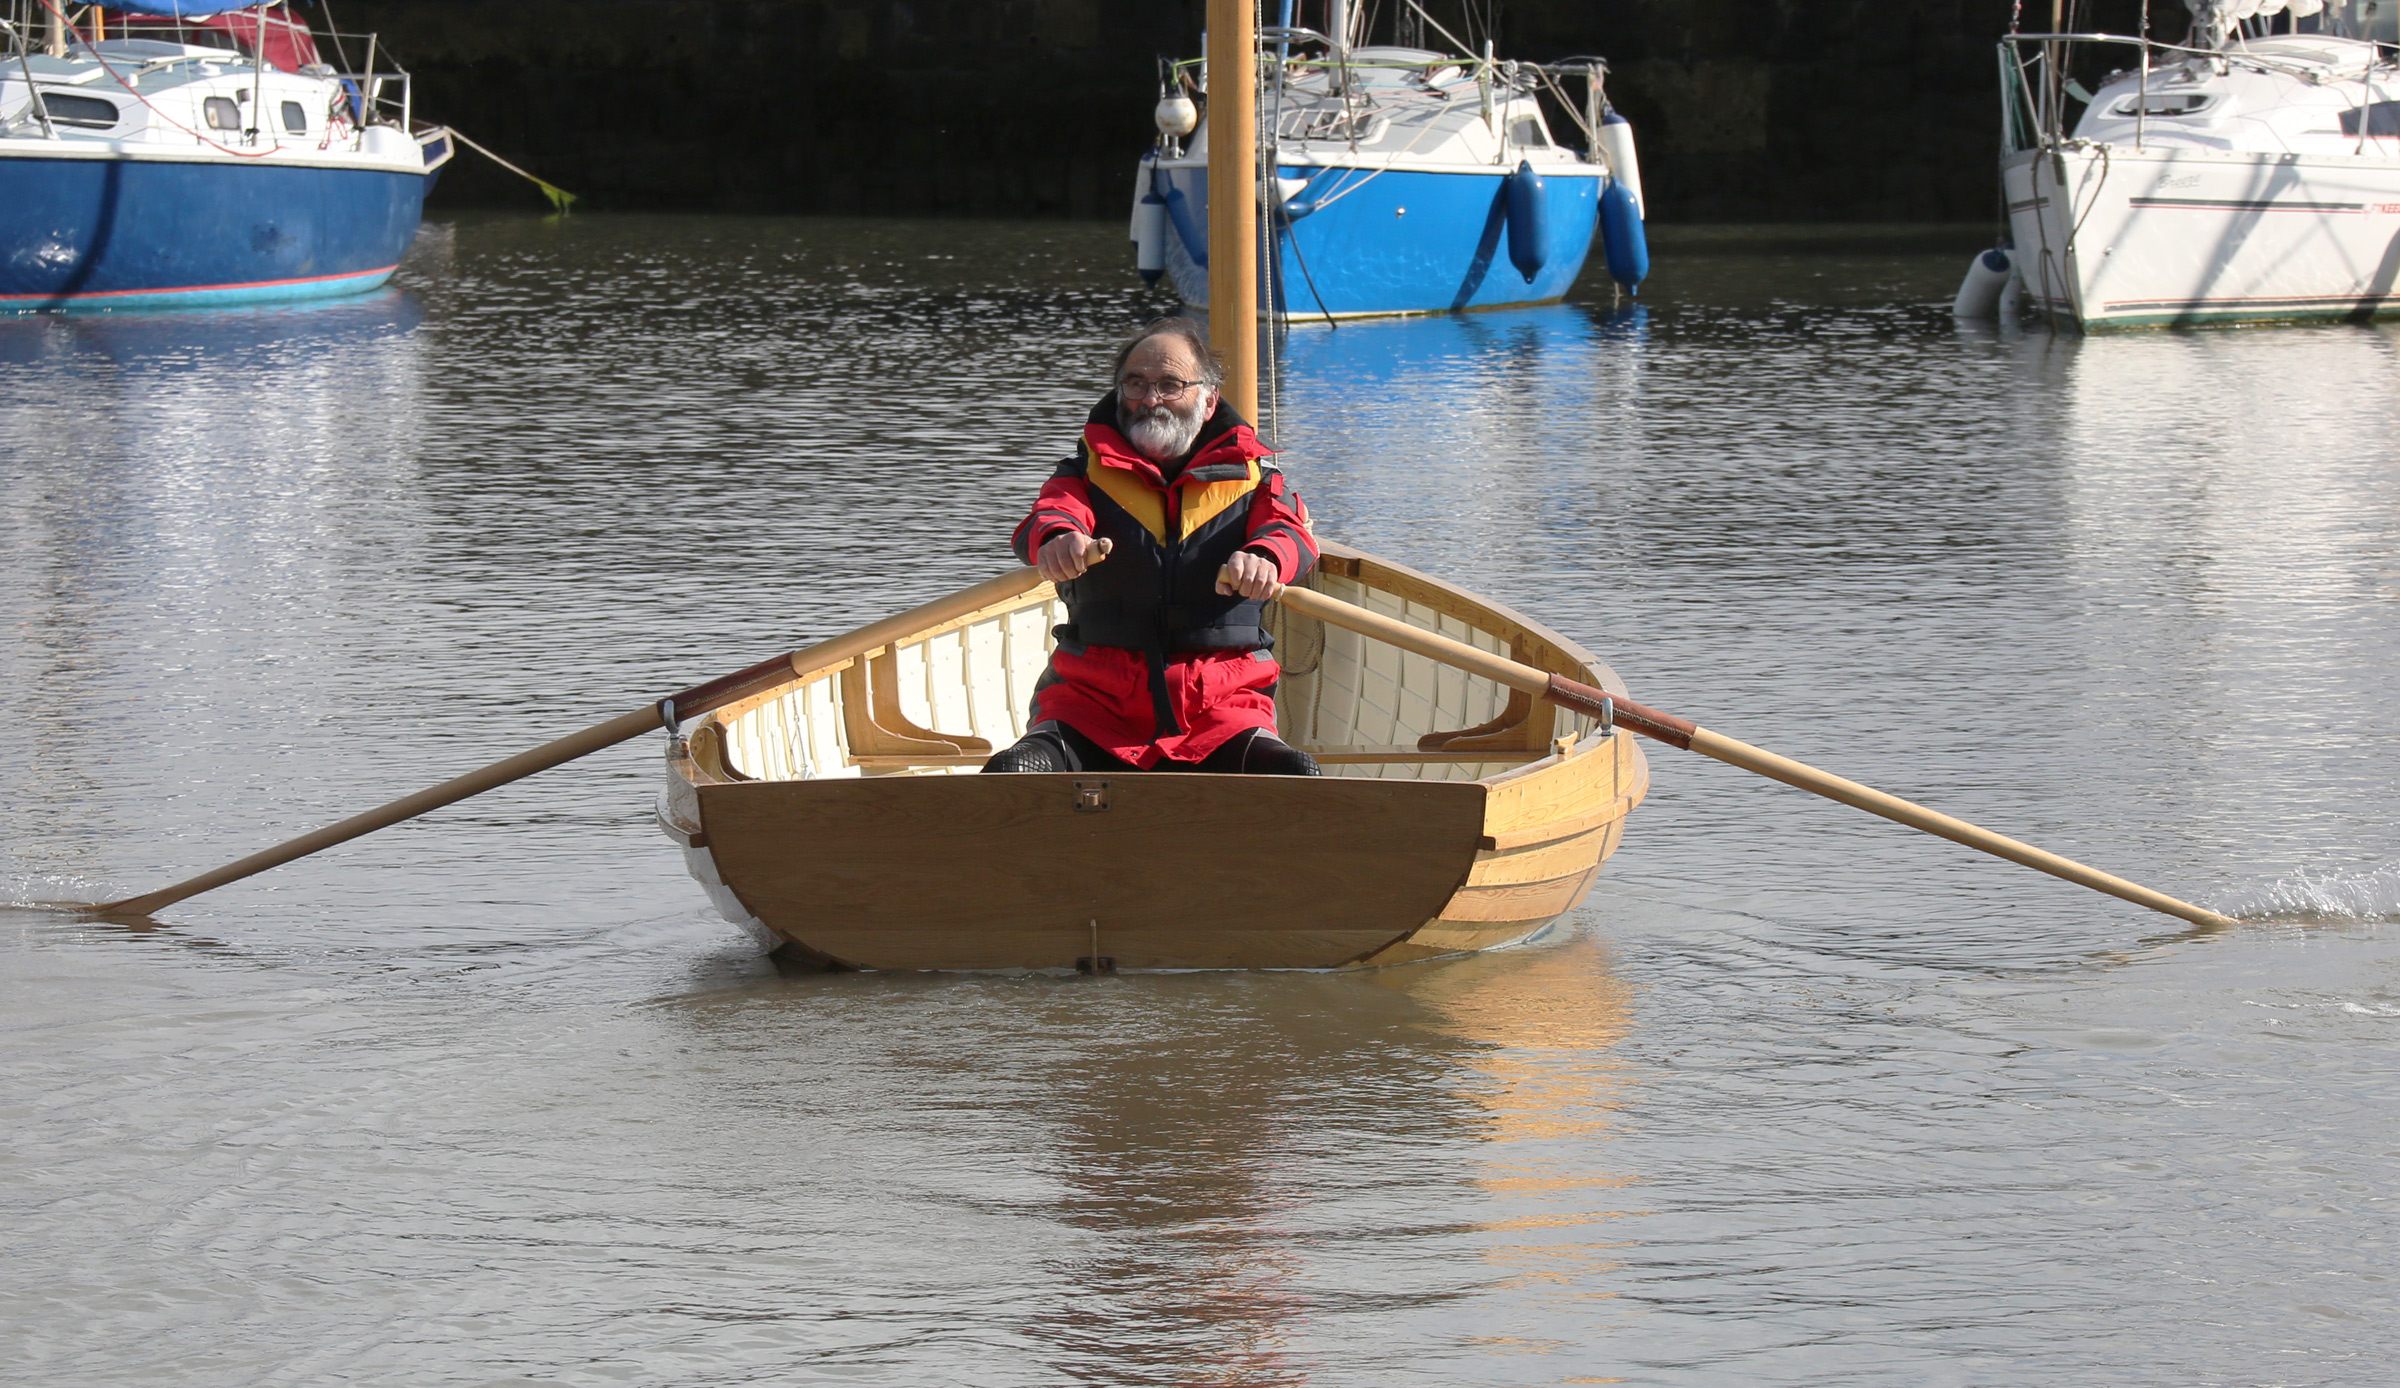
Walter Simmons rows standing up when he takes out his Christmas Wherry, a shapely lapstrake rowing and sailing skiff.
Today, the salmon and the fishery are gone, but the value of a small boat that can carry a good load in tough conditions hasn’t changed. The difference is that the boats will be used for recreation, and that poses some design issues.
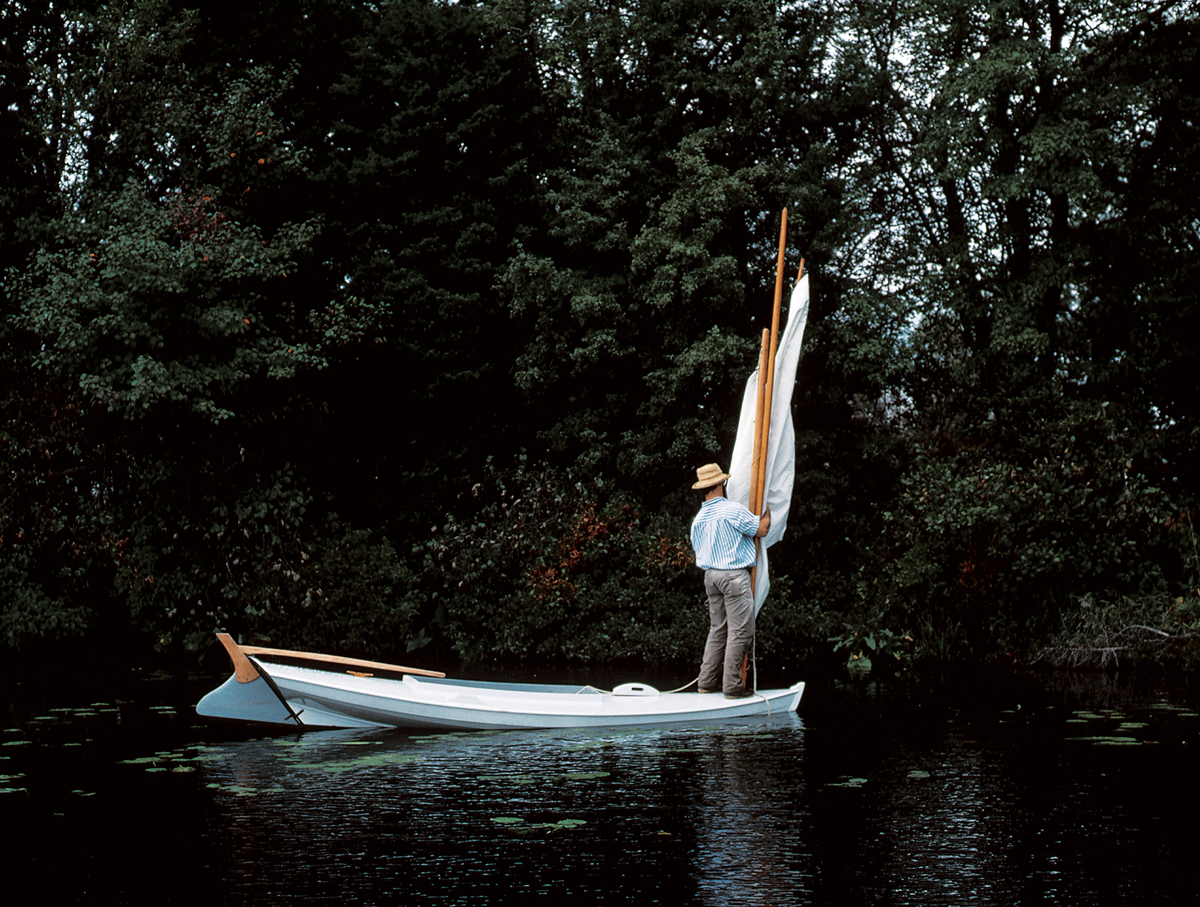
In developing the Christmas Wherry, Simmons was working within some very specific parameters. His customers wanted a shoal-draft boat in the 15′ length range that they could sail as well as row, with a rig that could be stored entirely inside the boat. The boat had to be heavy enough not to be “corky” in the water but light enough for one person to load on and off a trailer without assistance.
“That’s a taller order than you might think,” Simmons says, but the Christmas Wherry fills the bill.
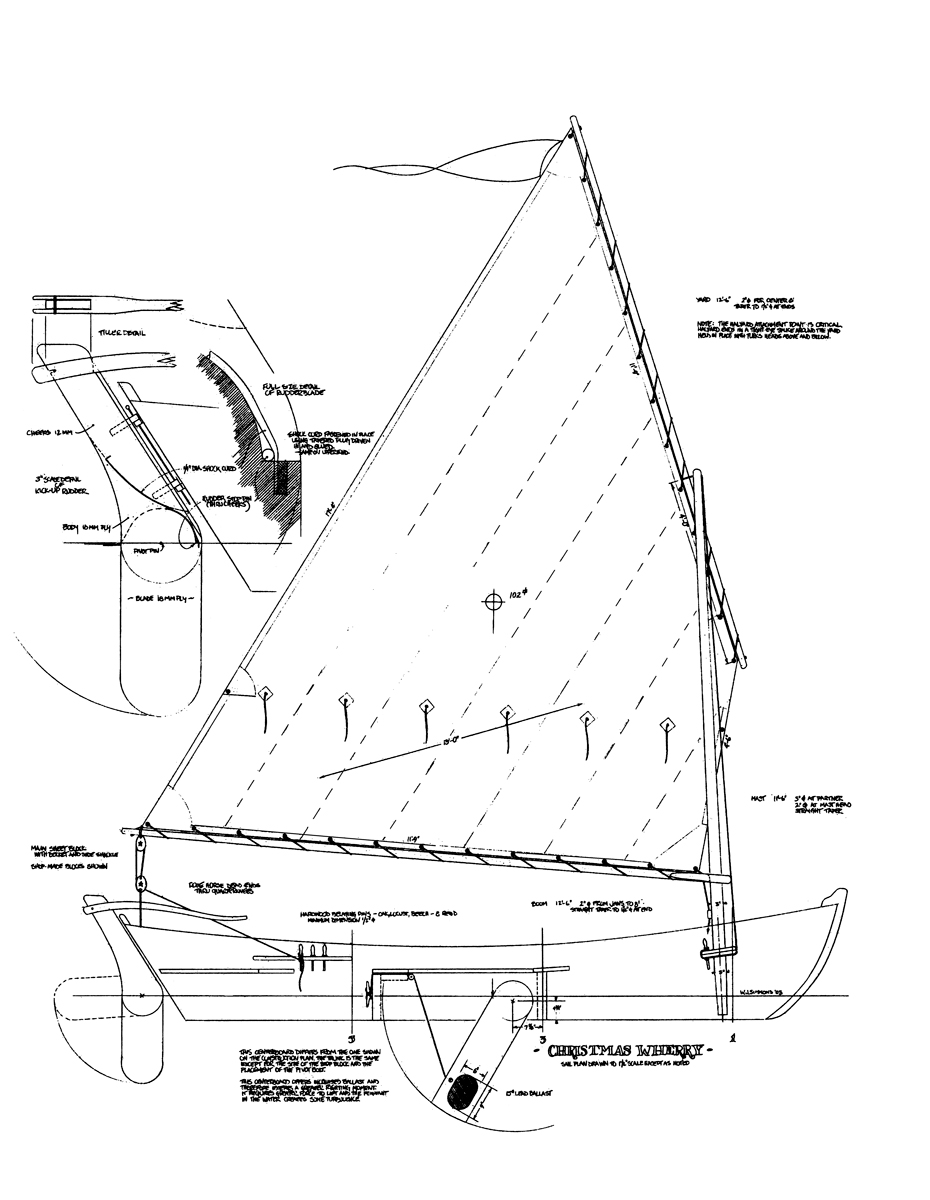
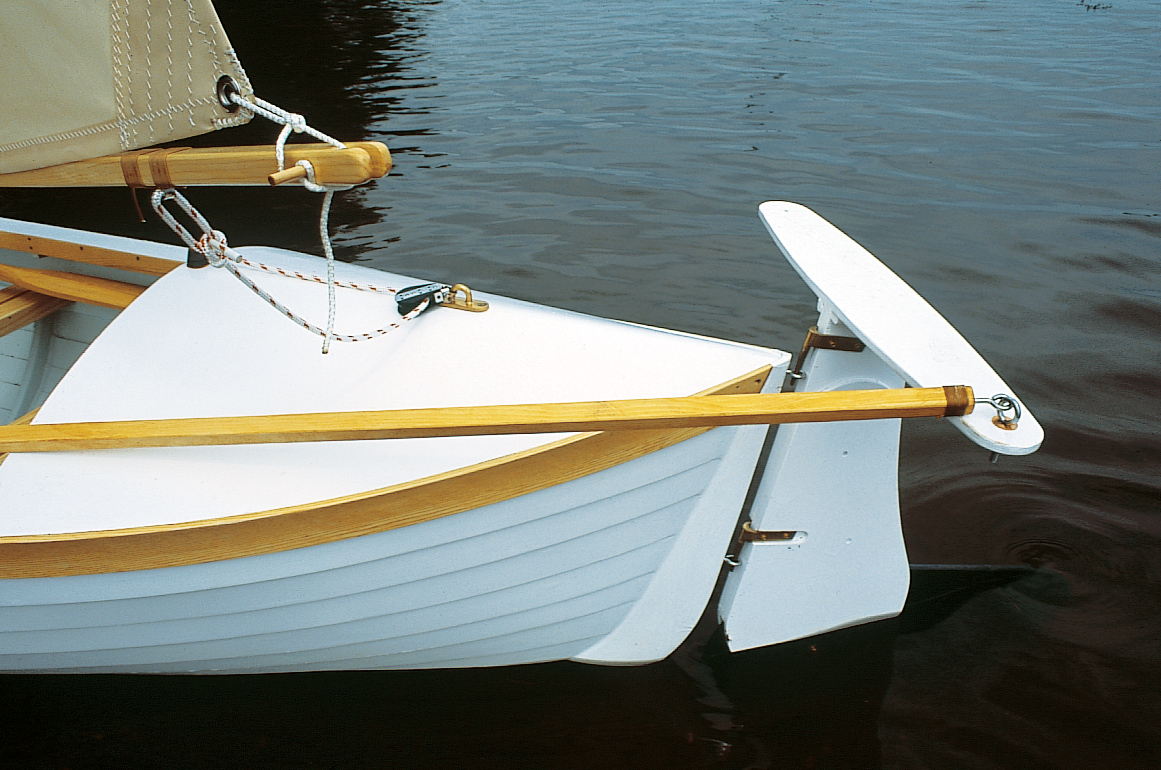
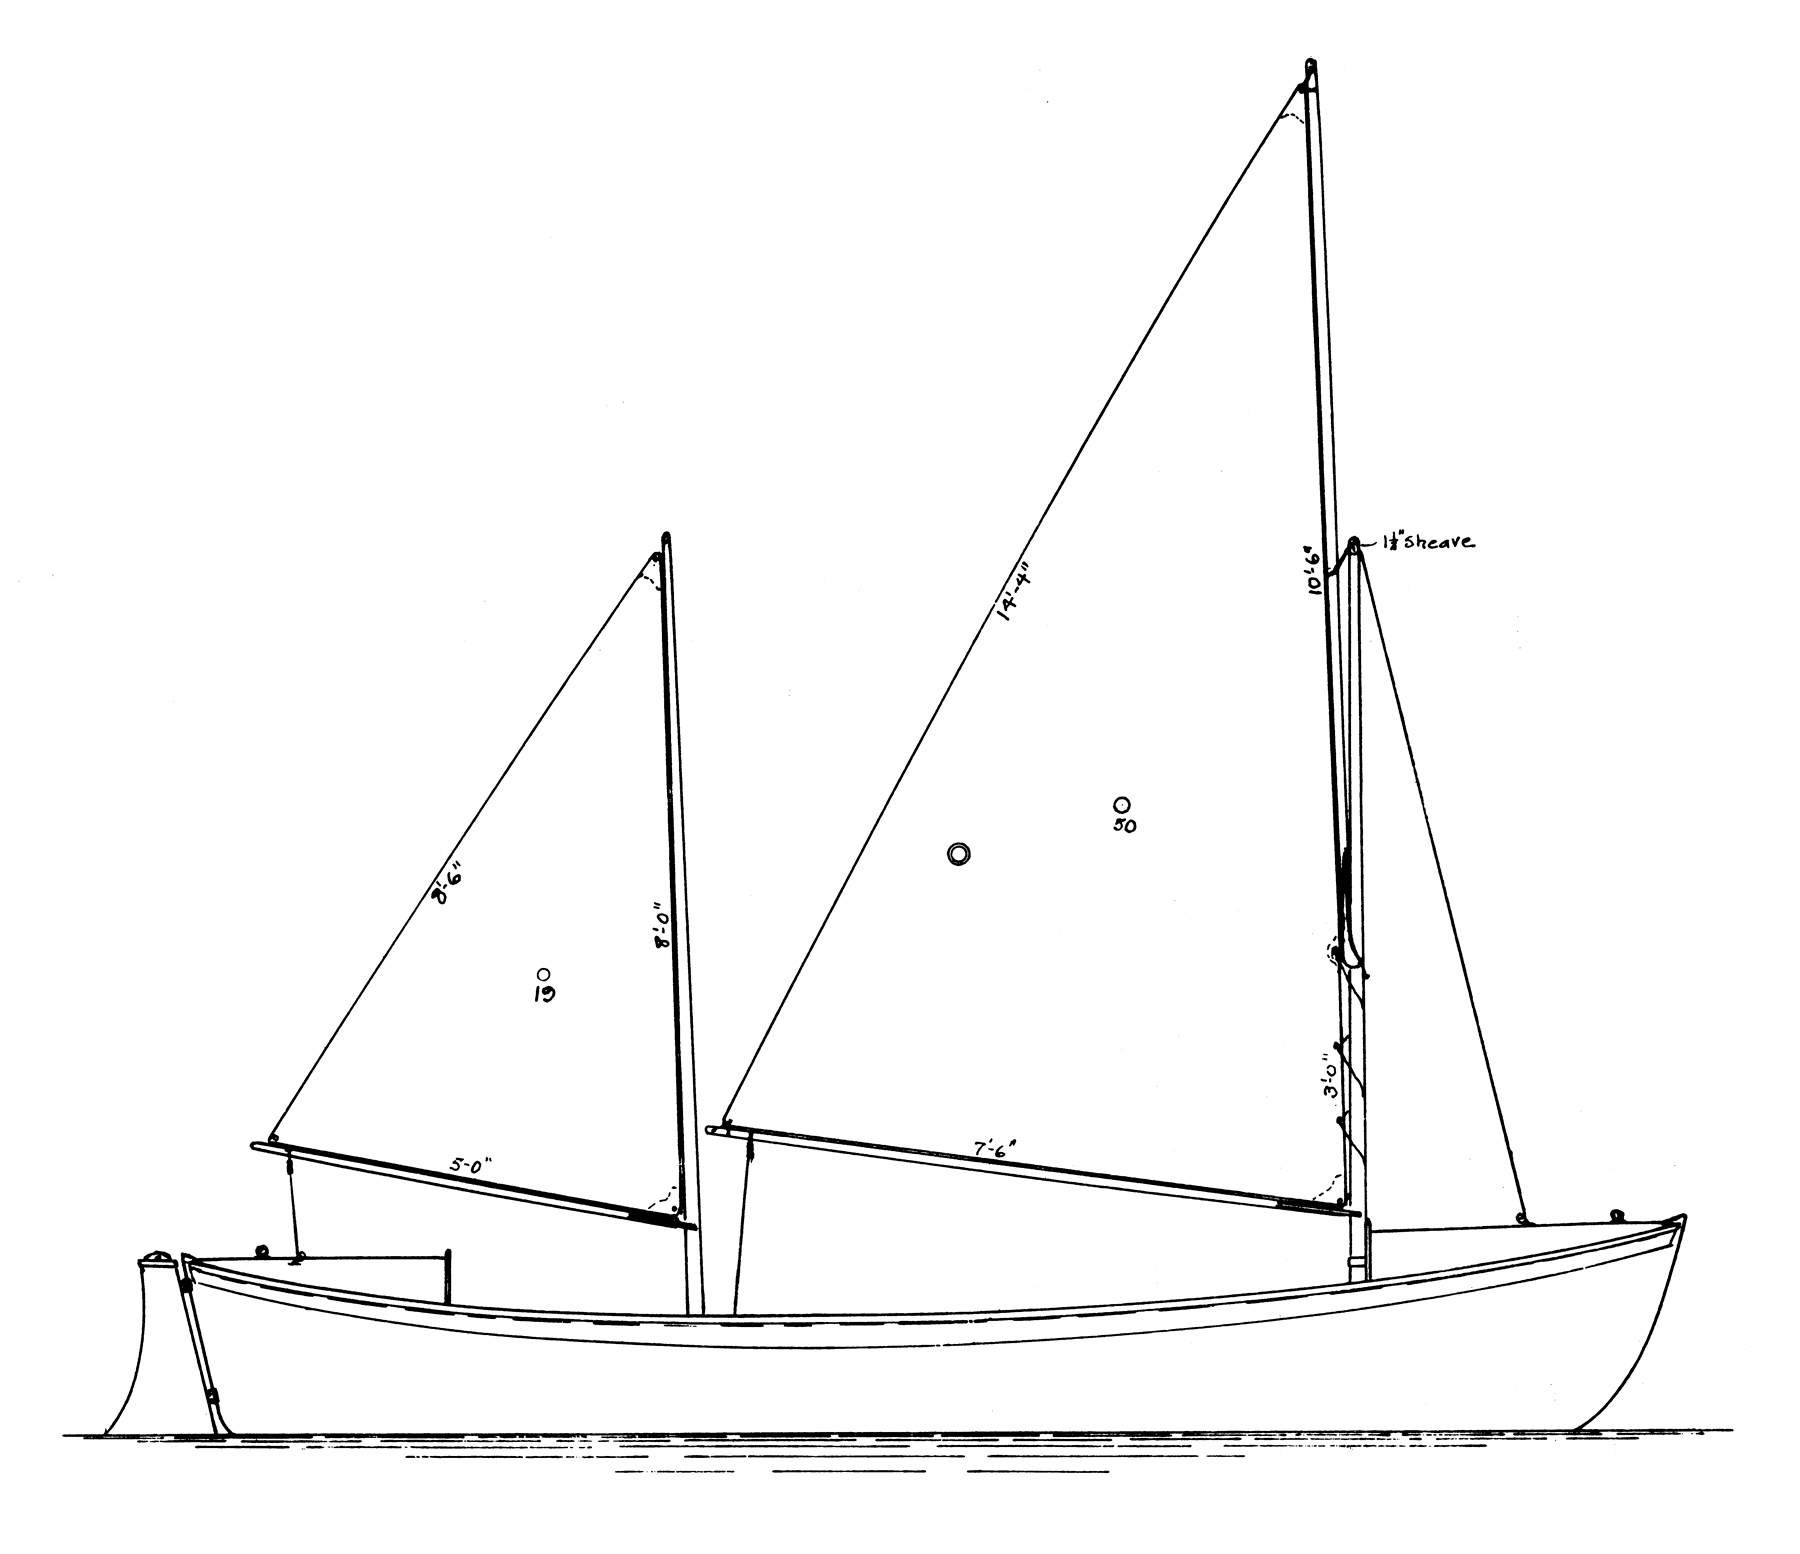
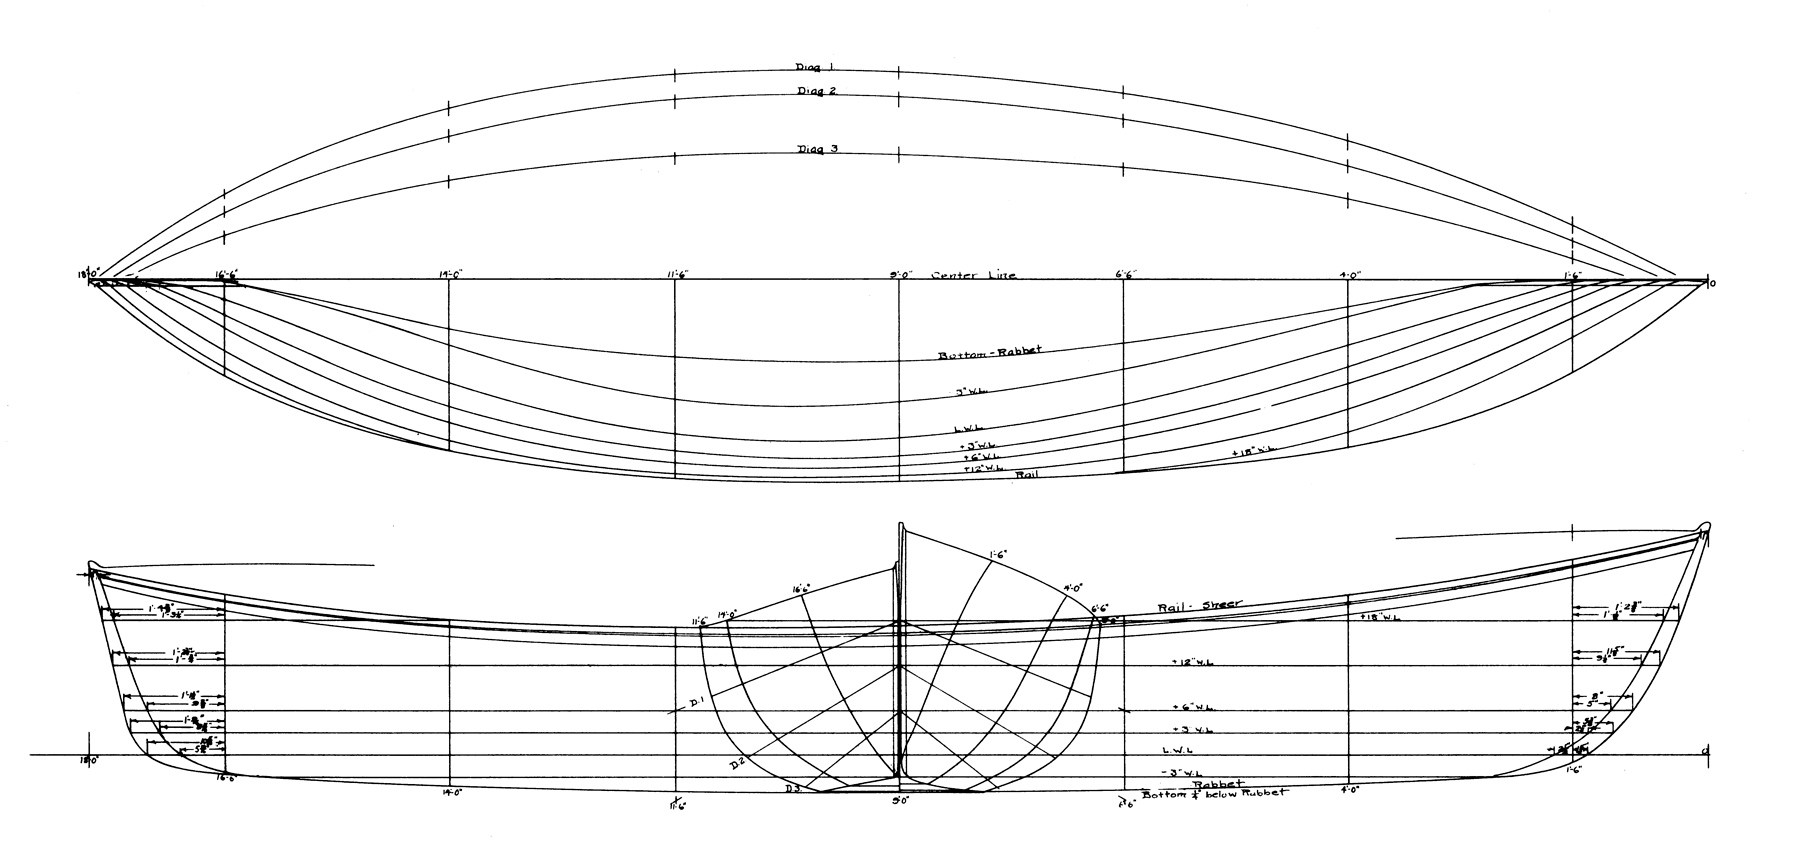
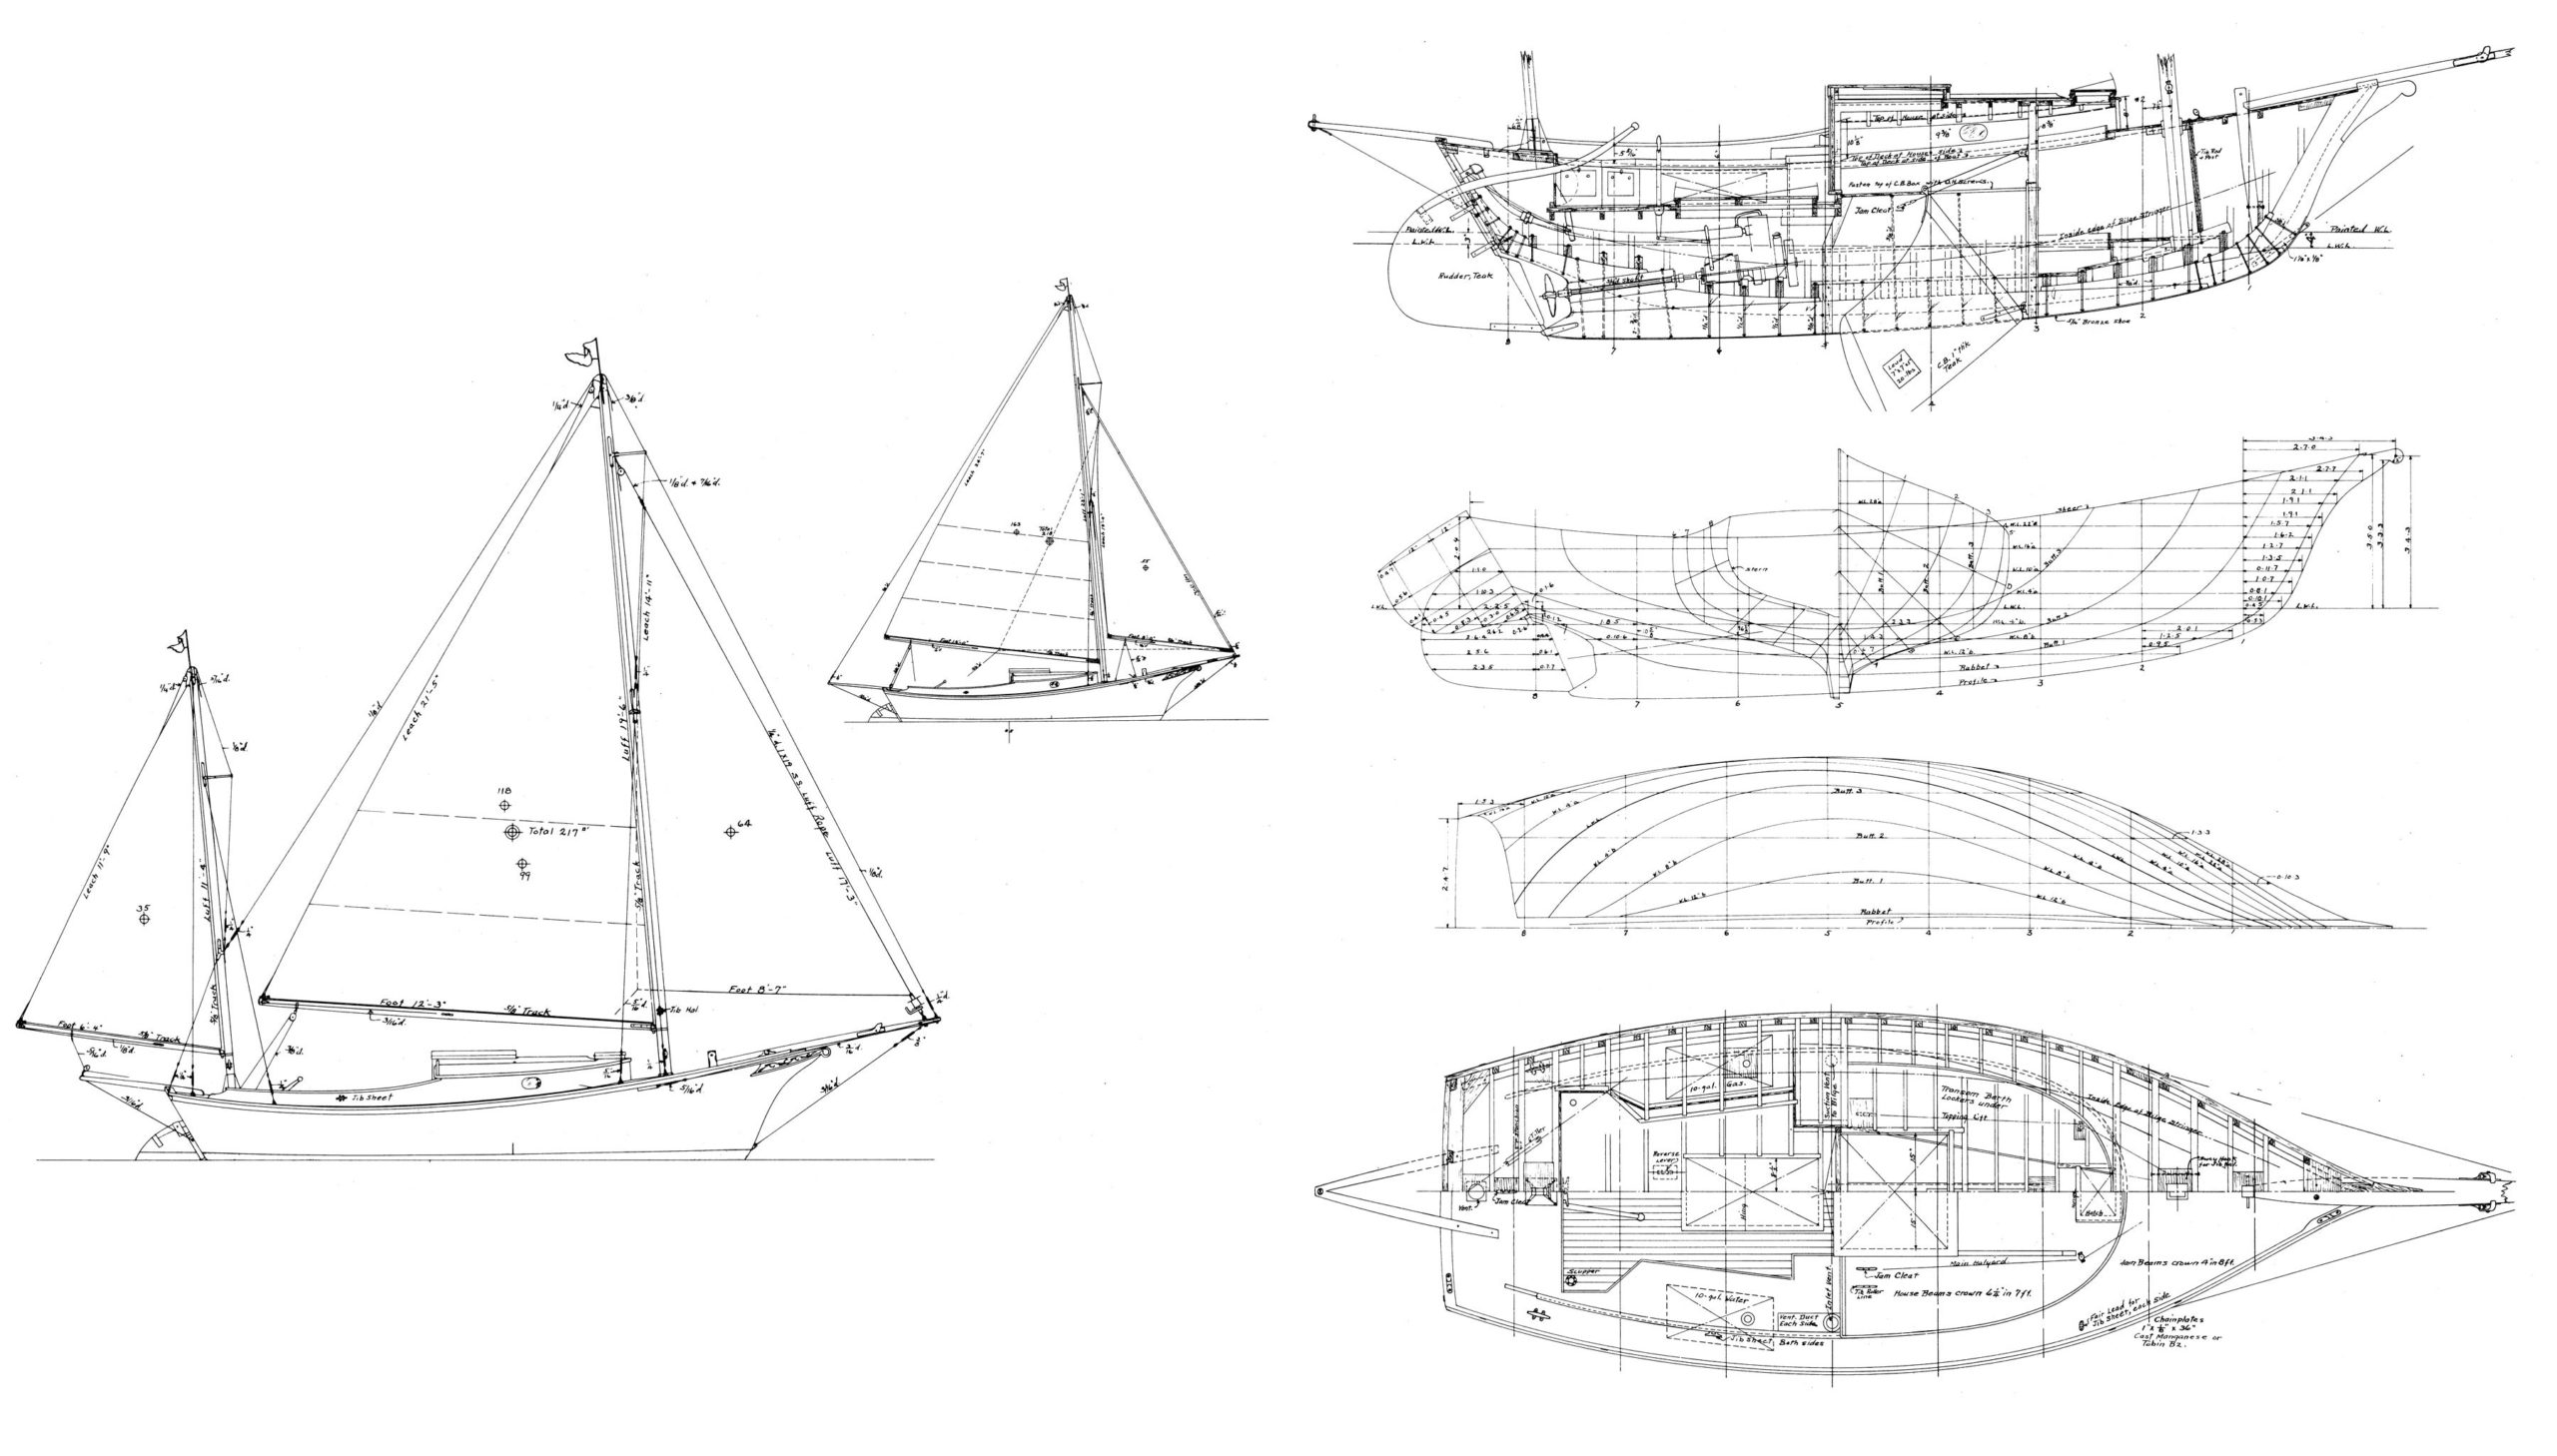
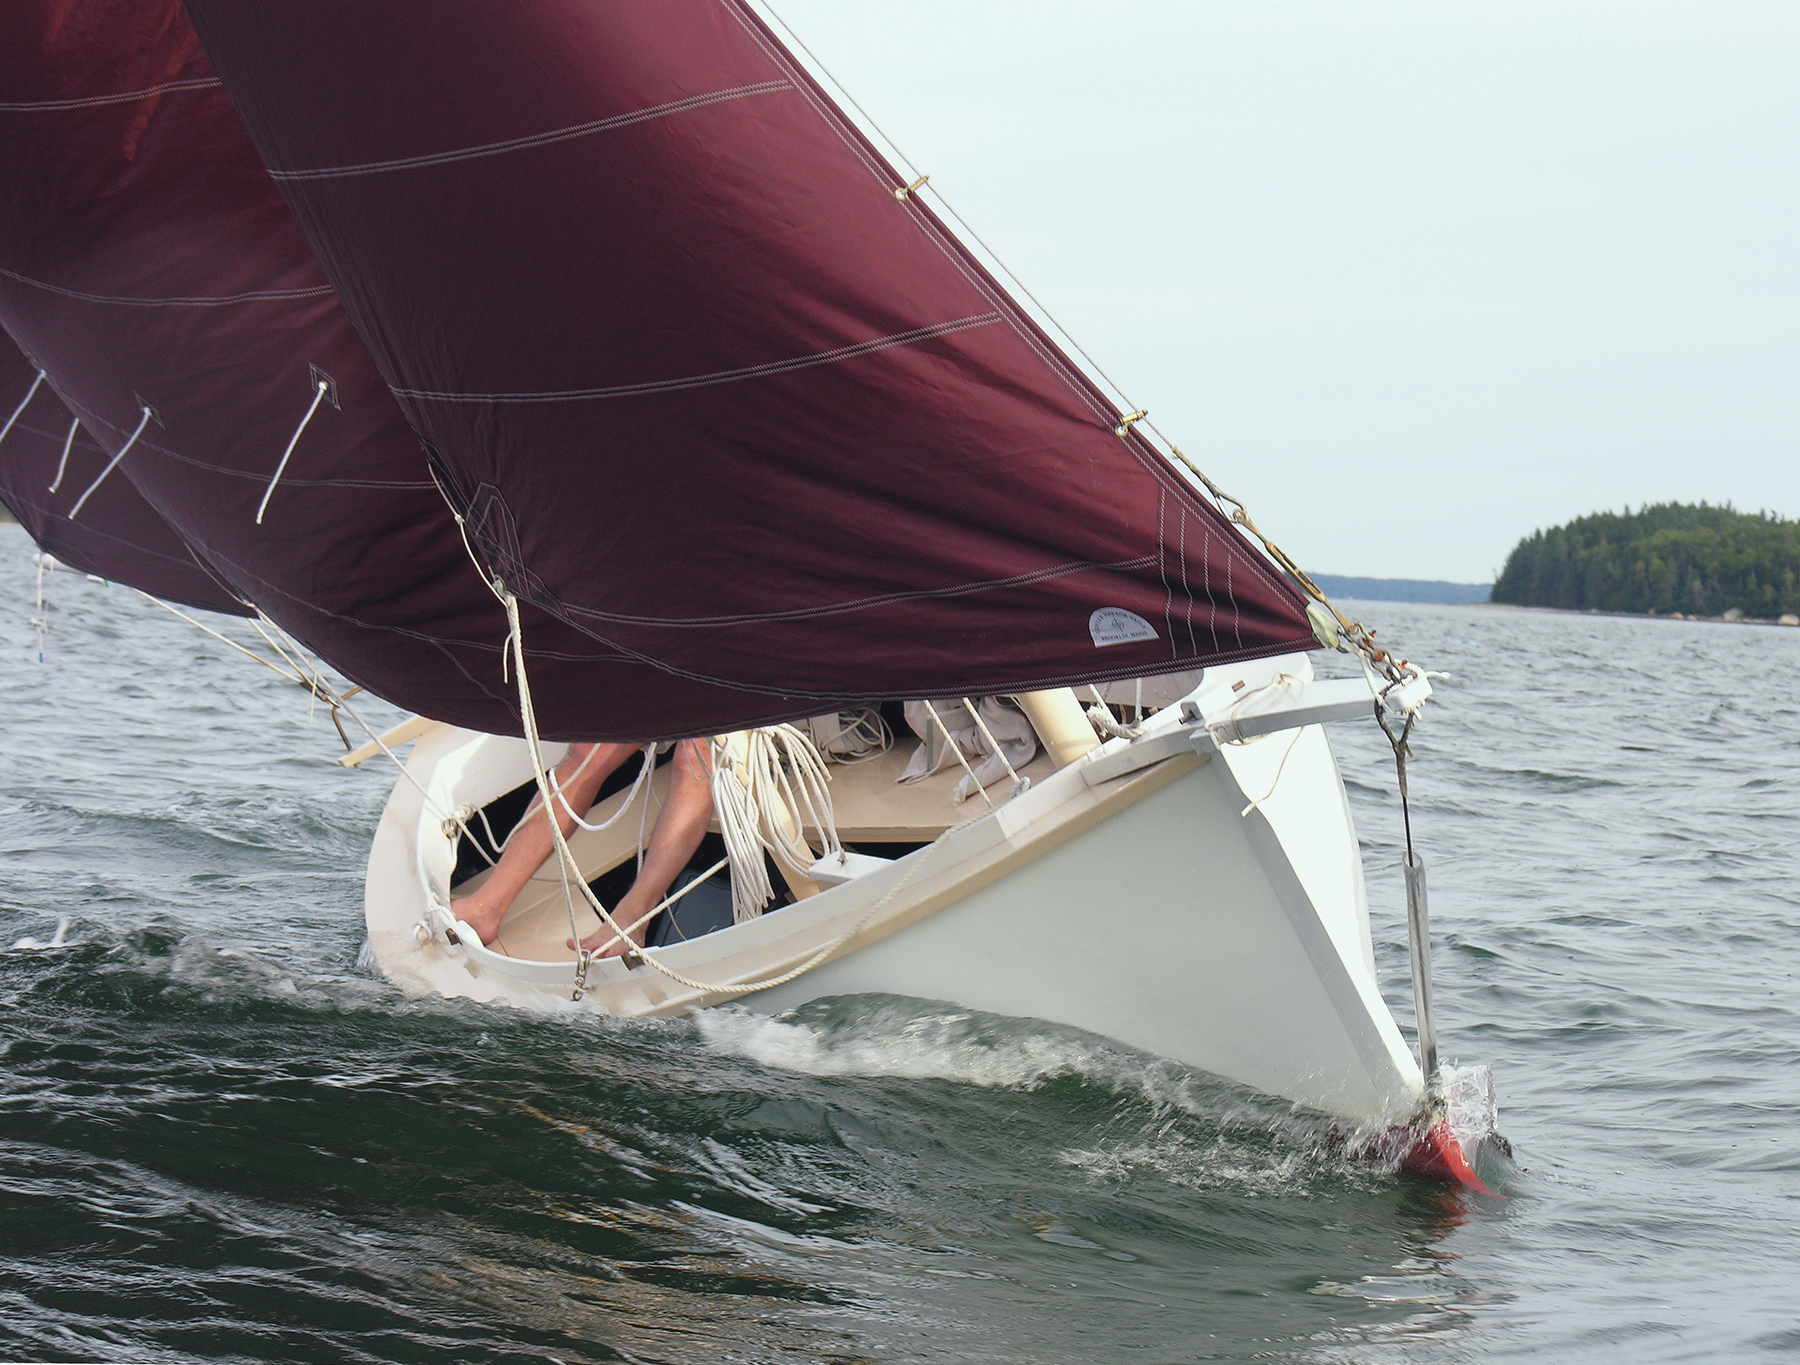
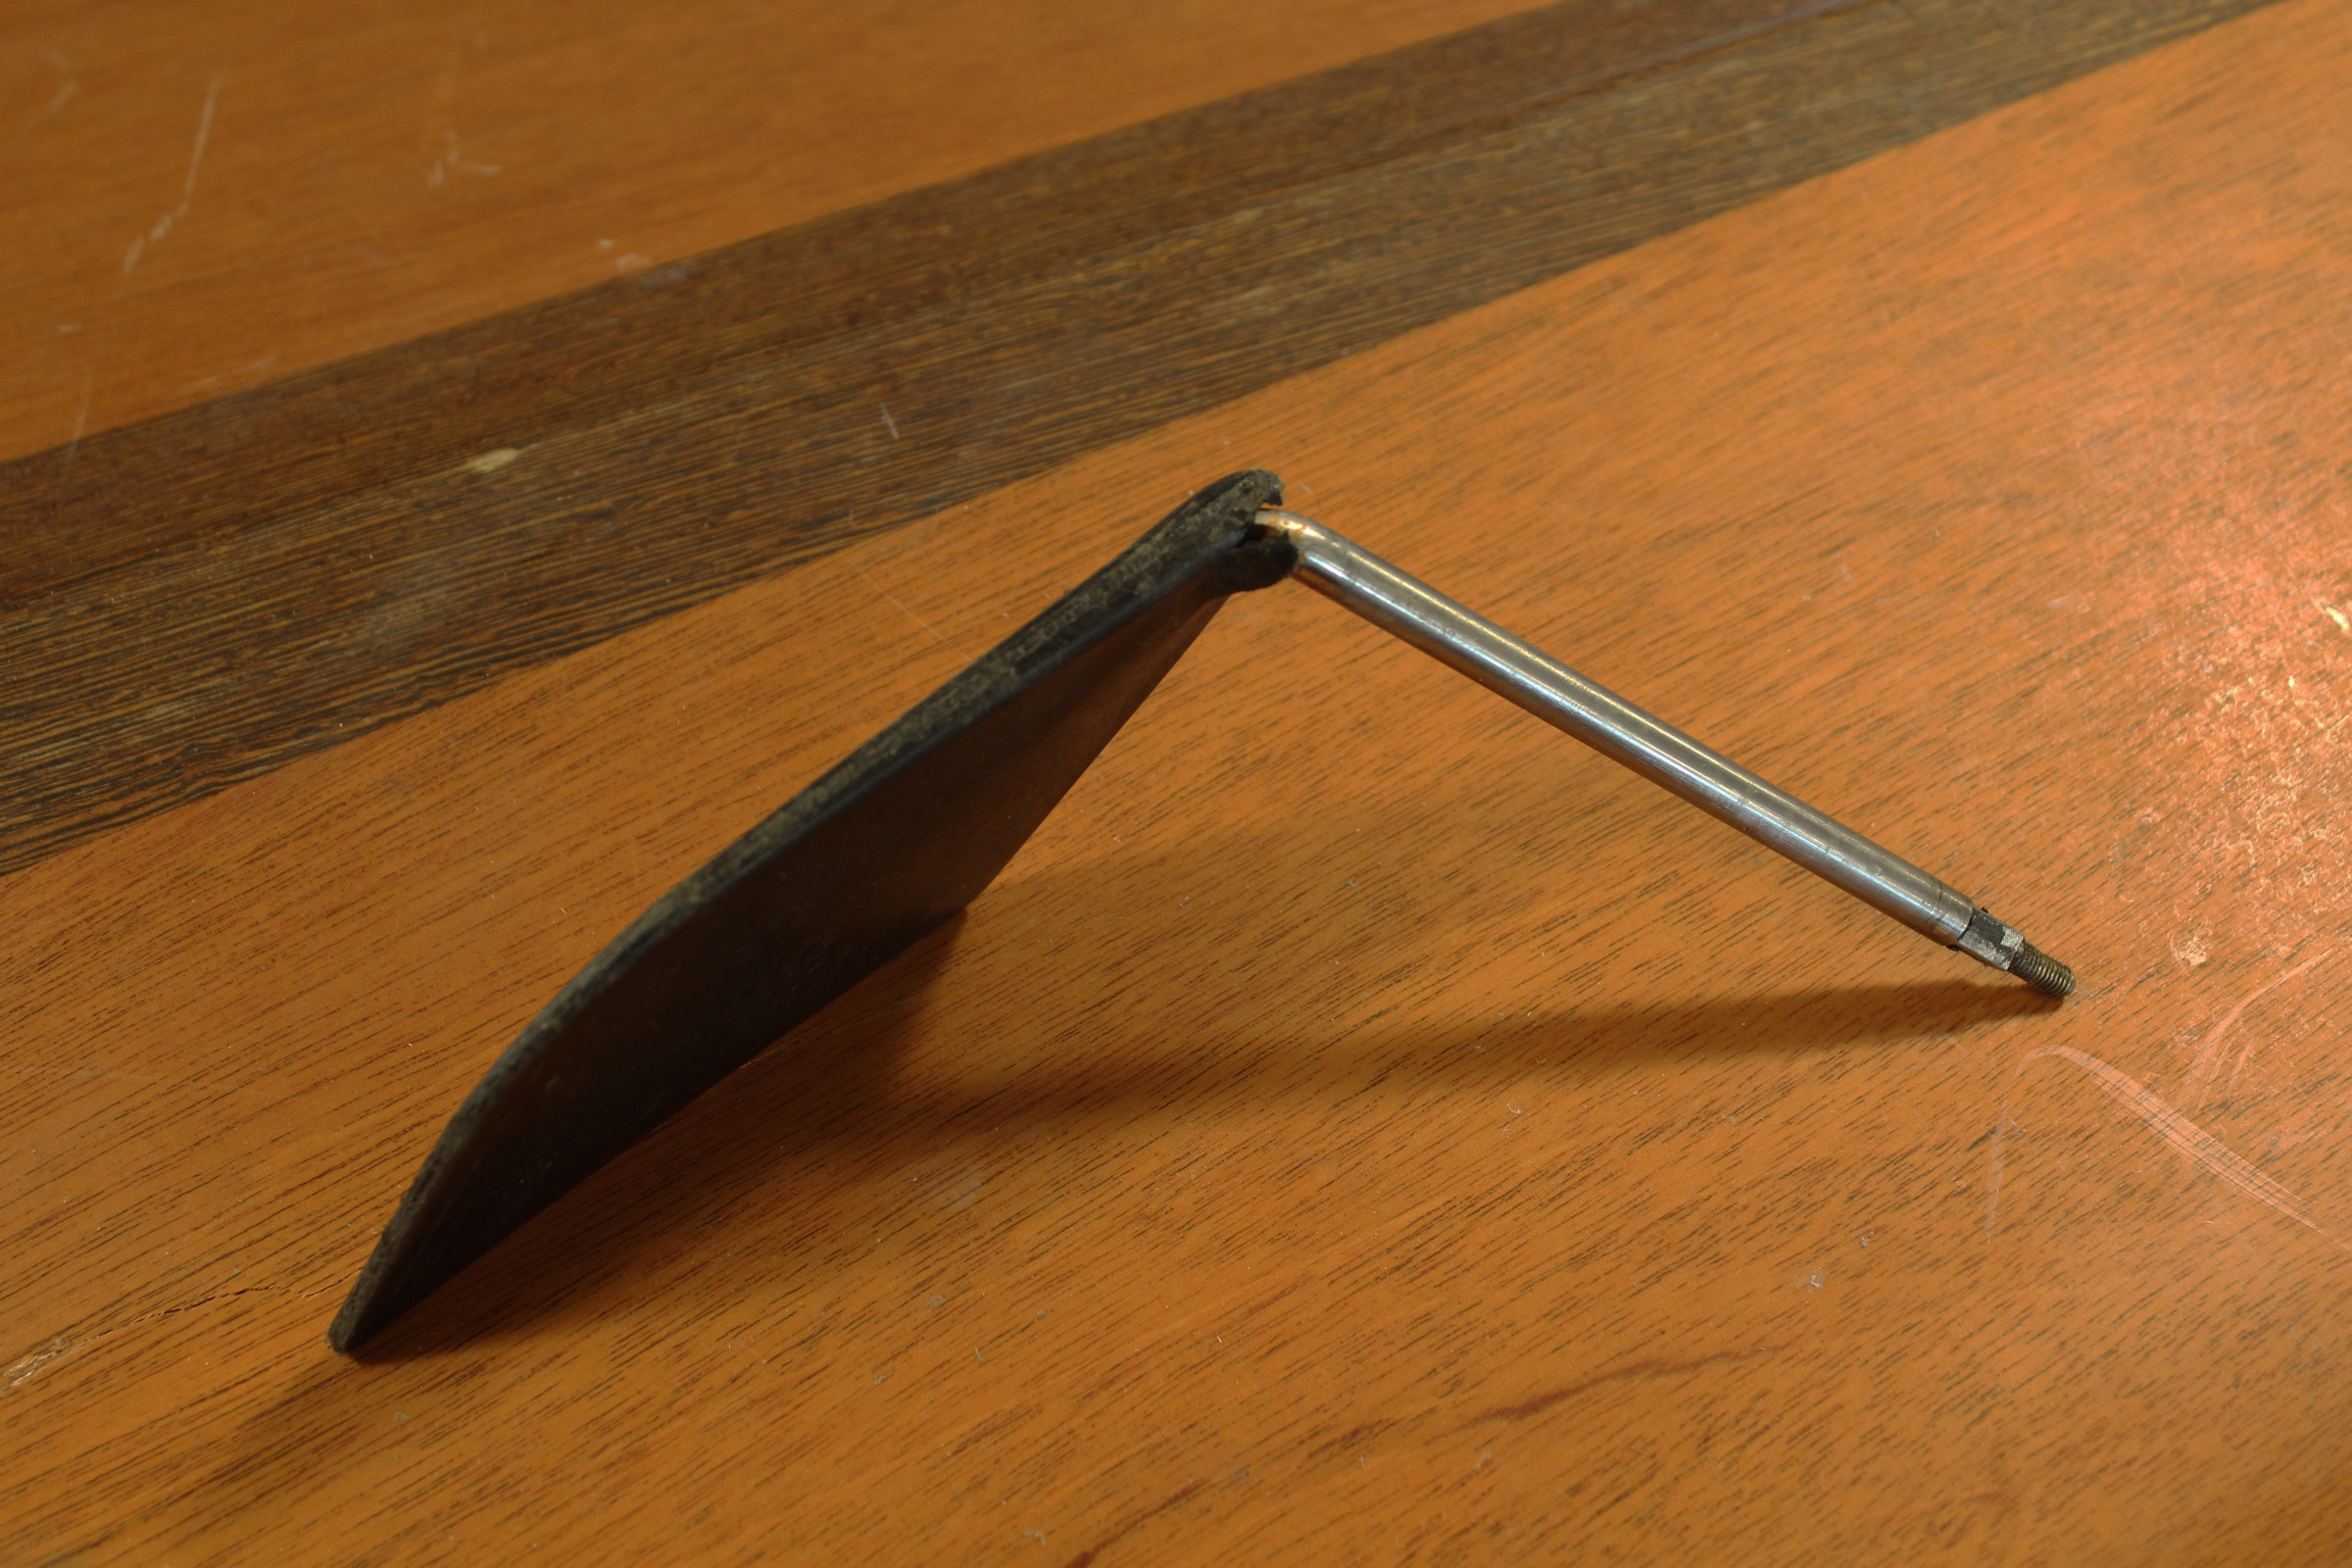
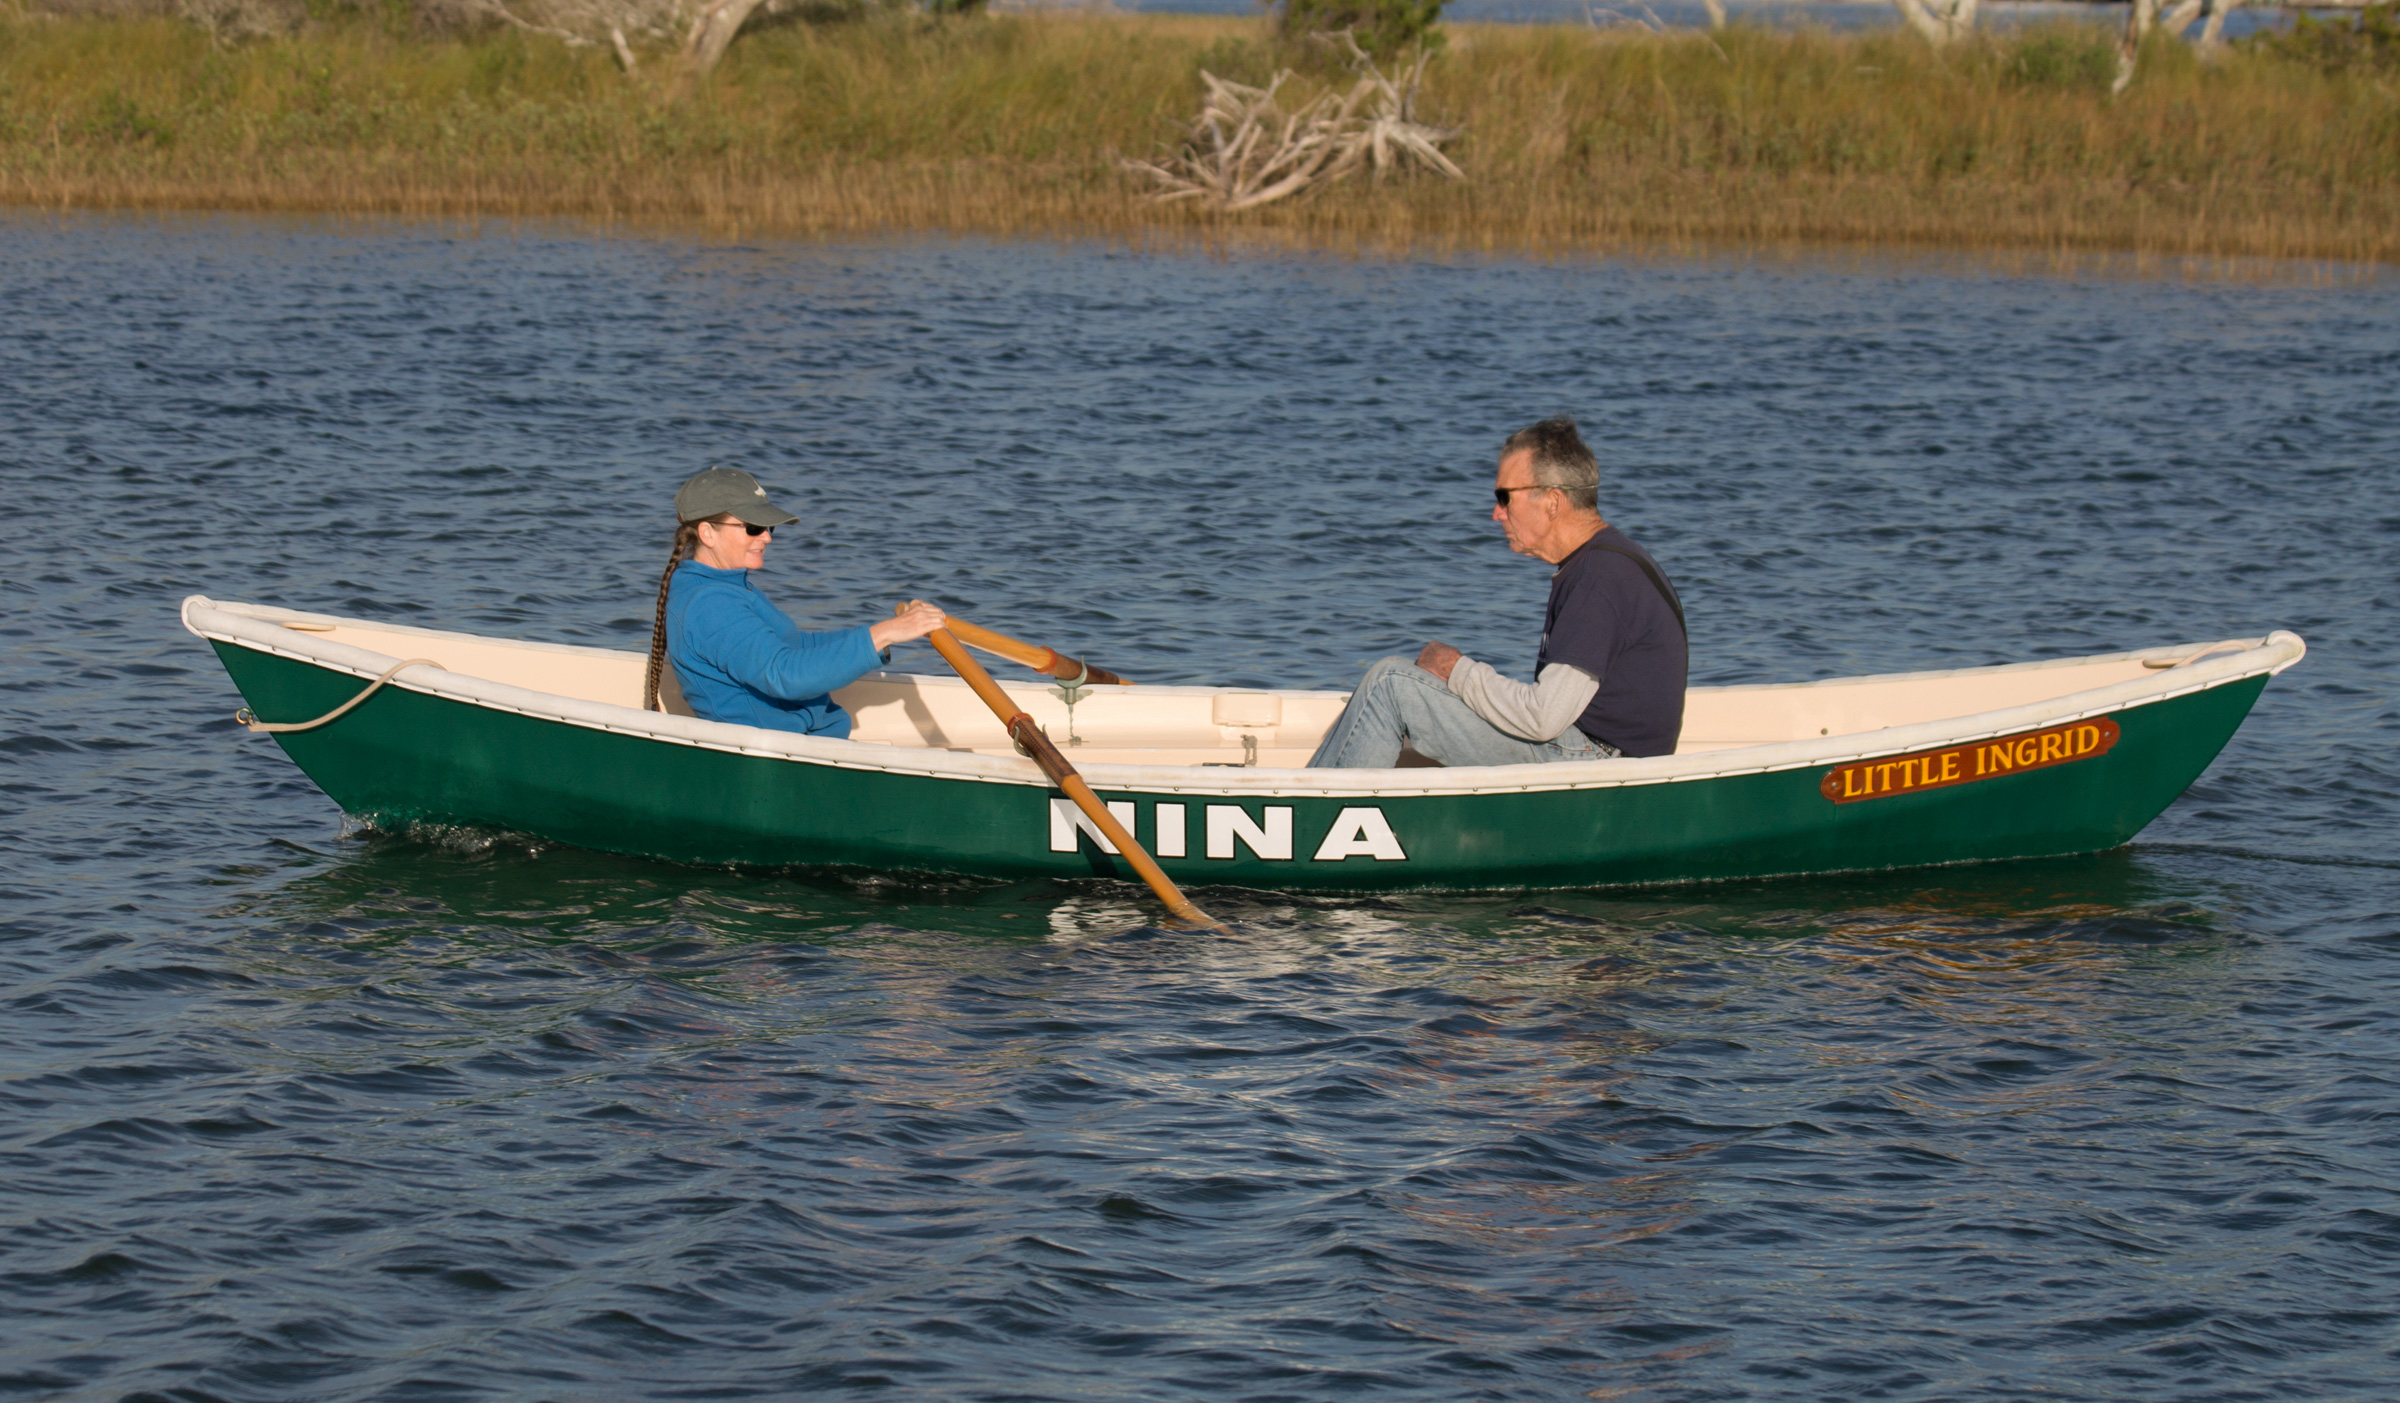
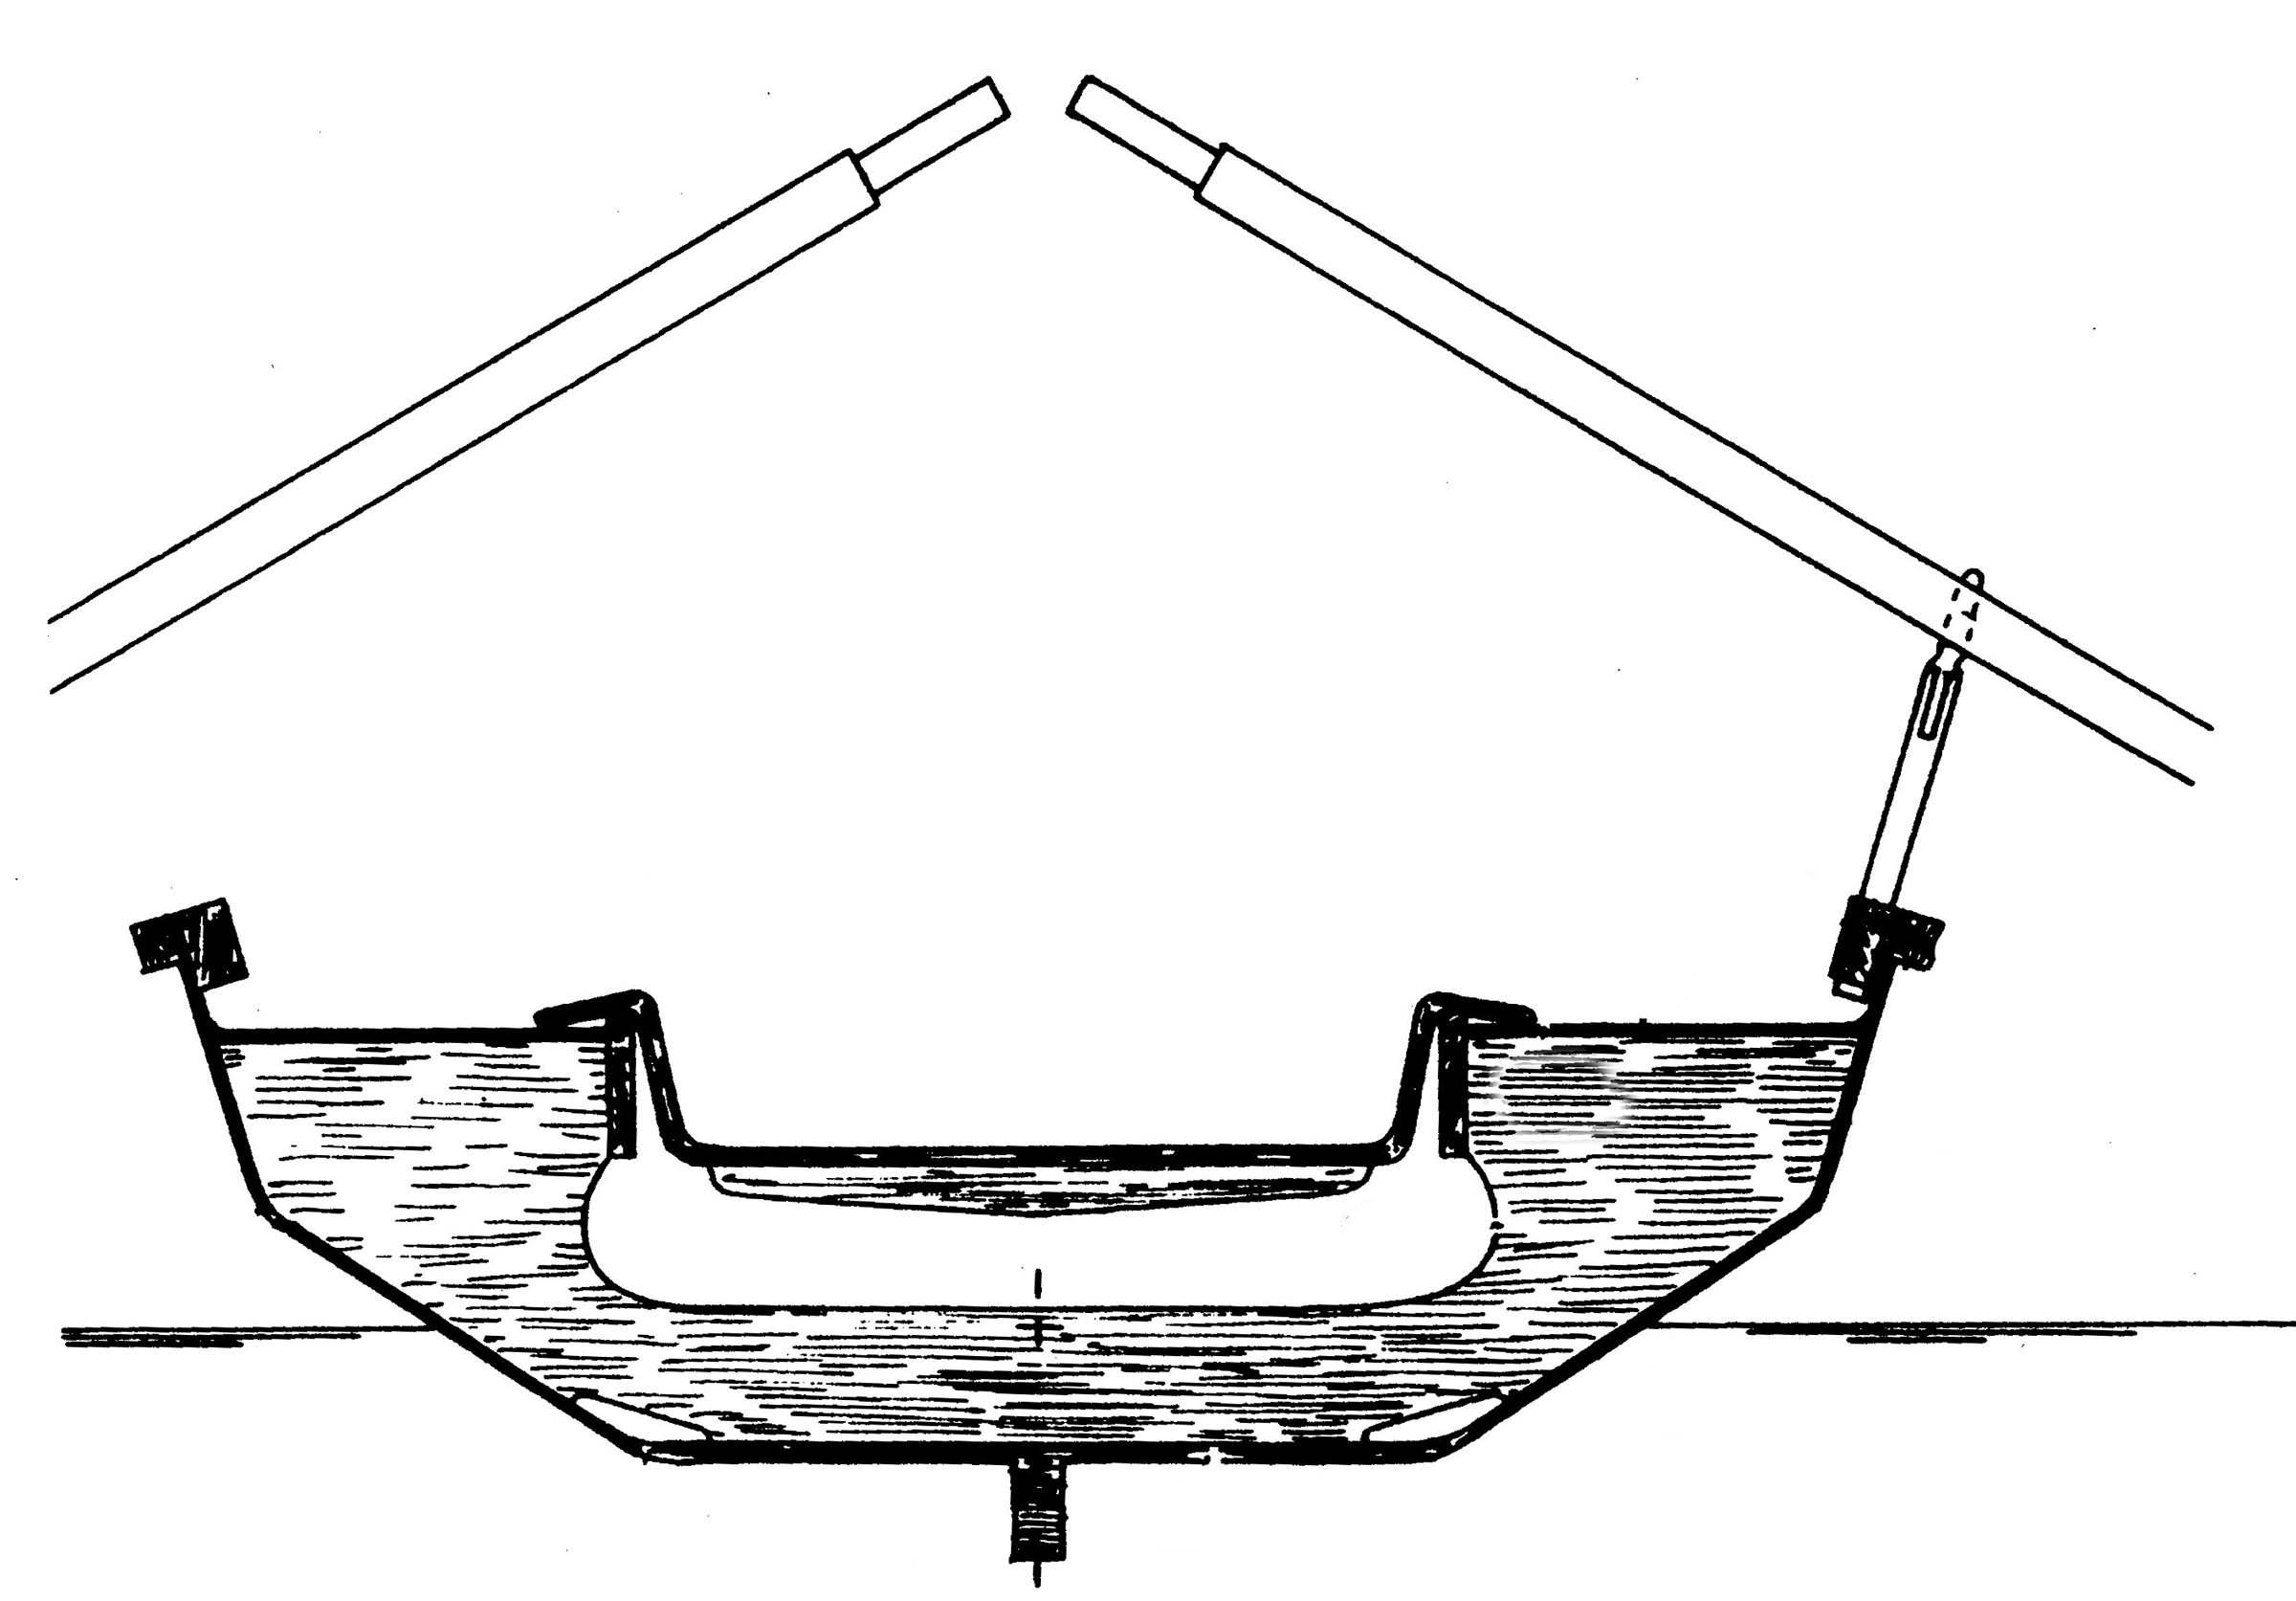
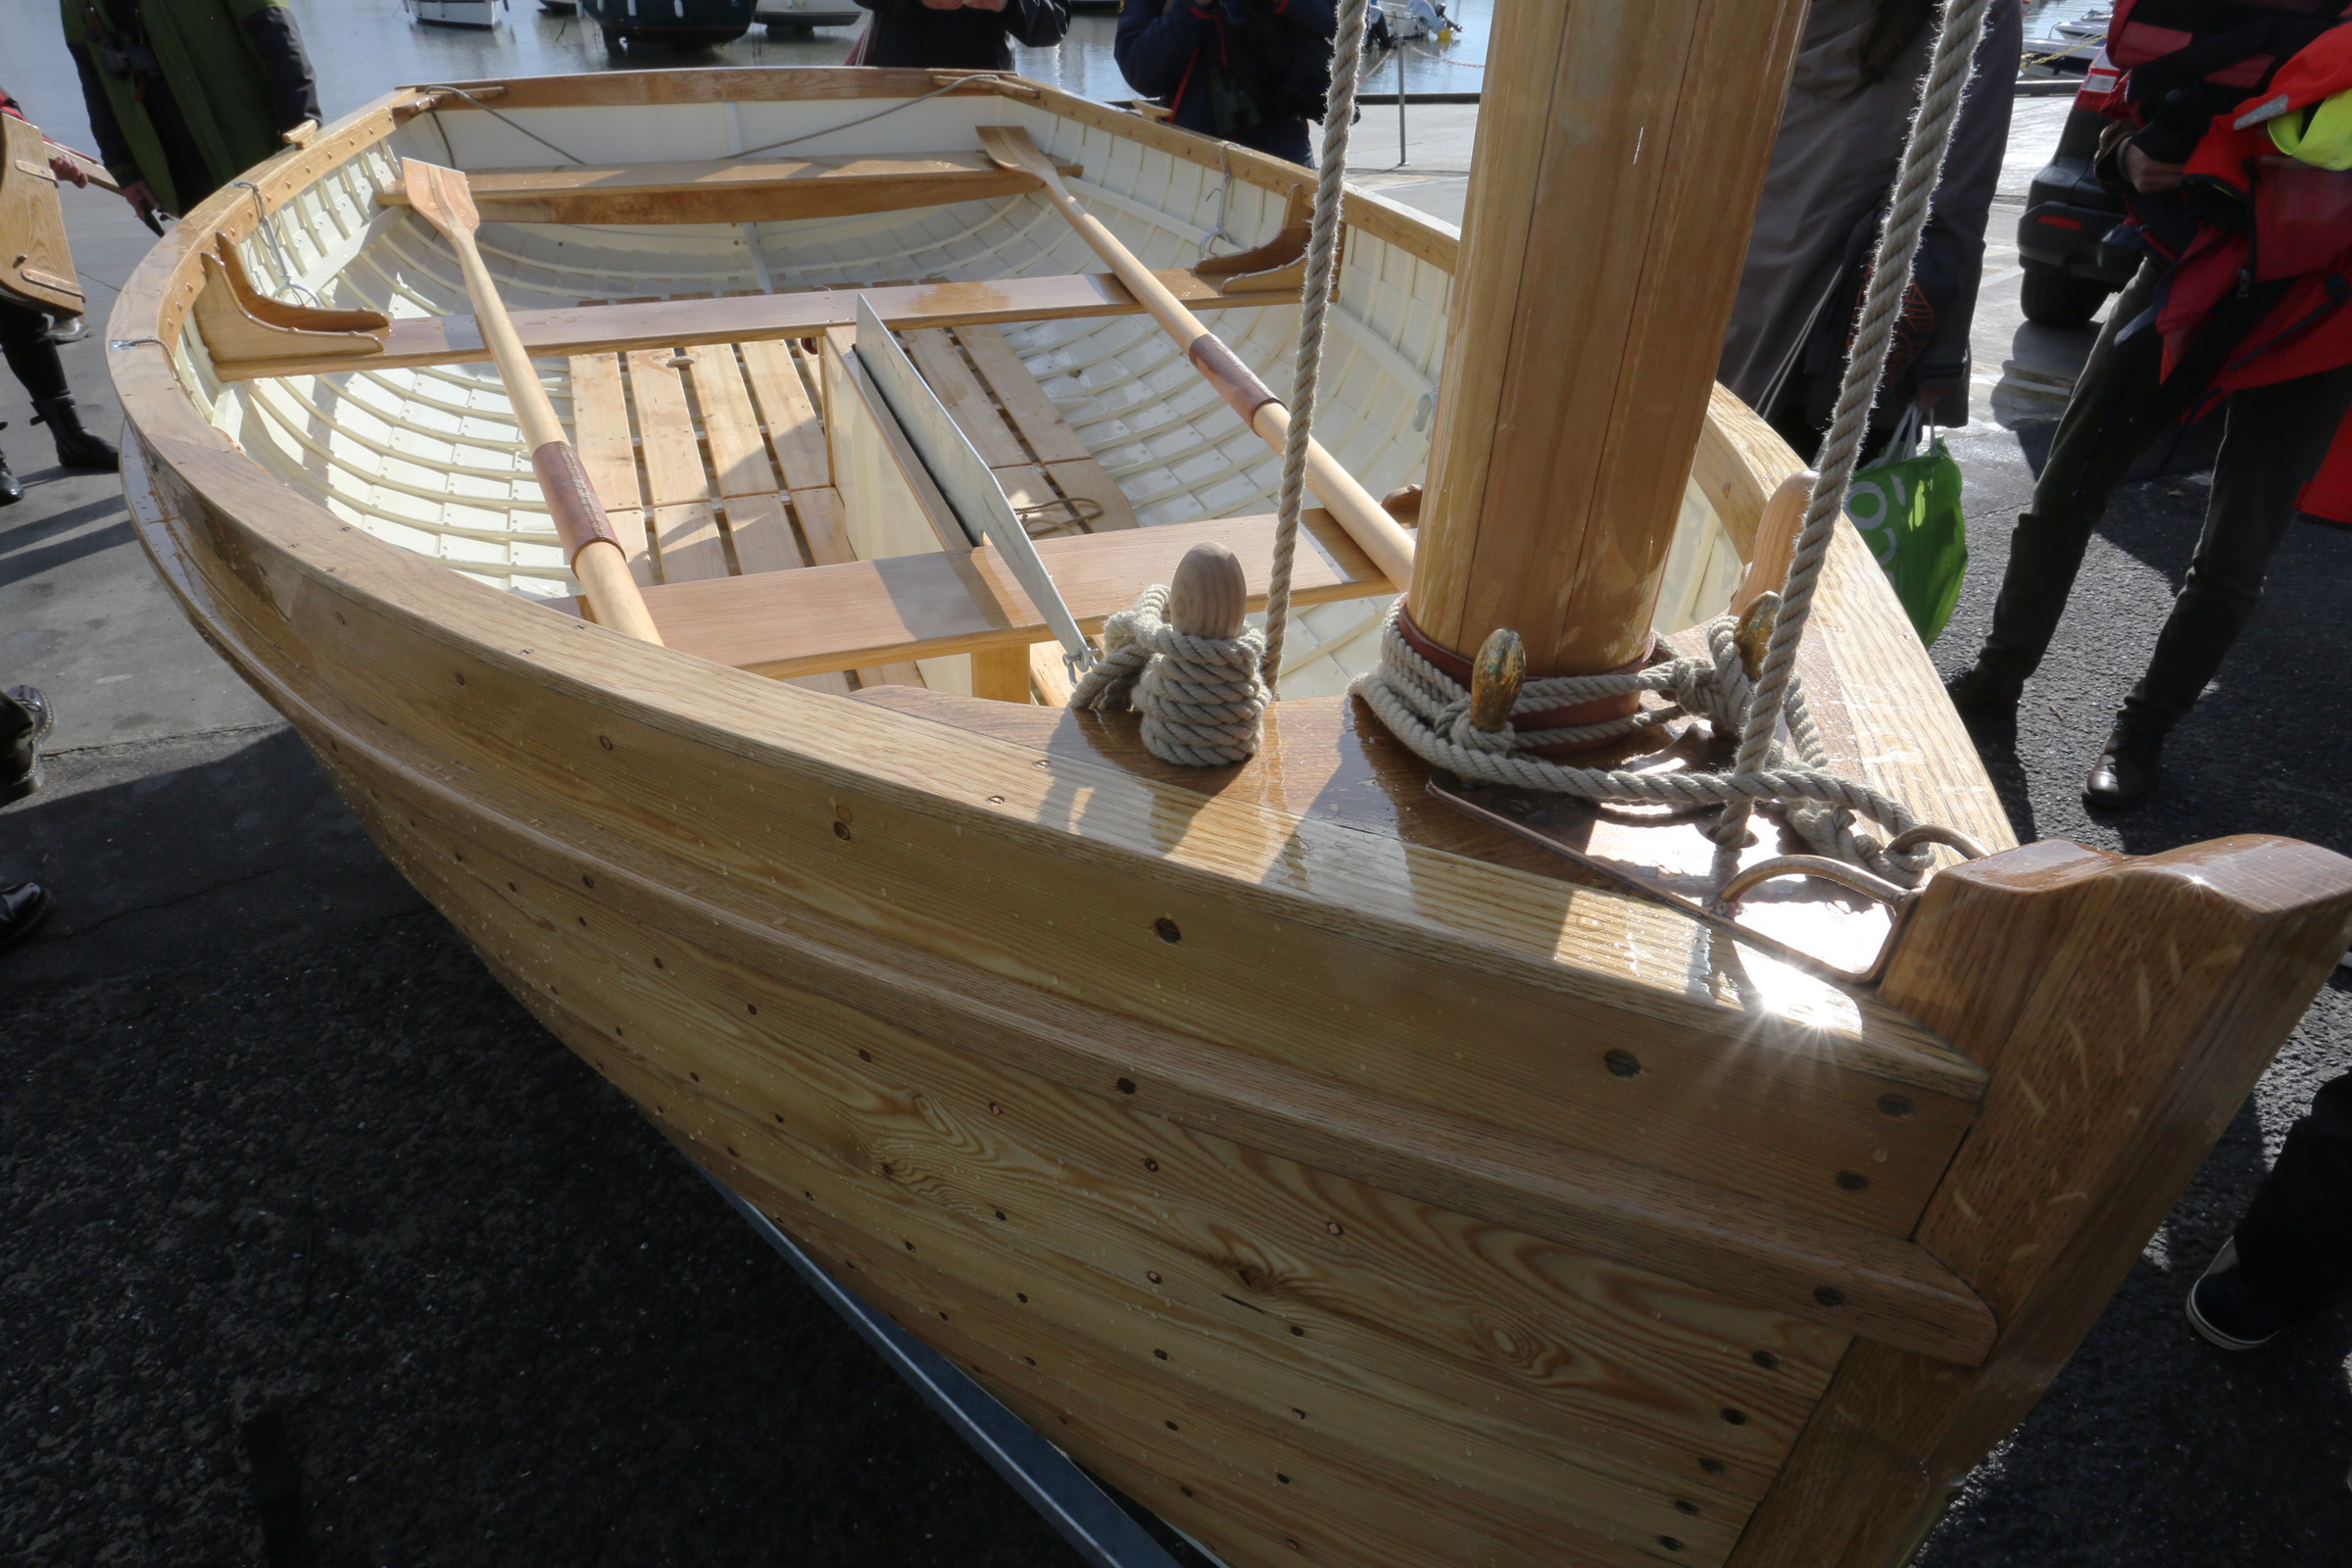
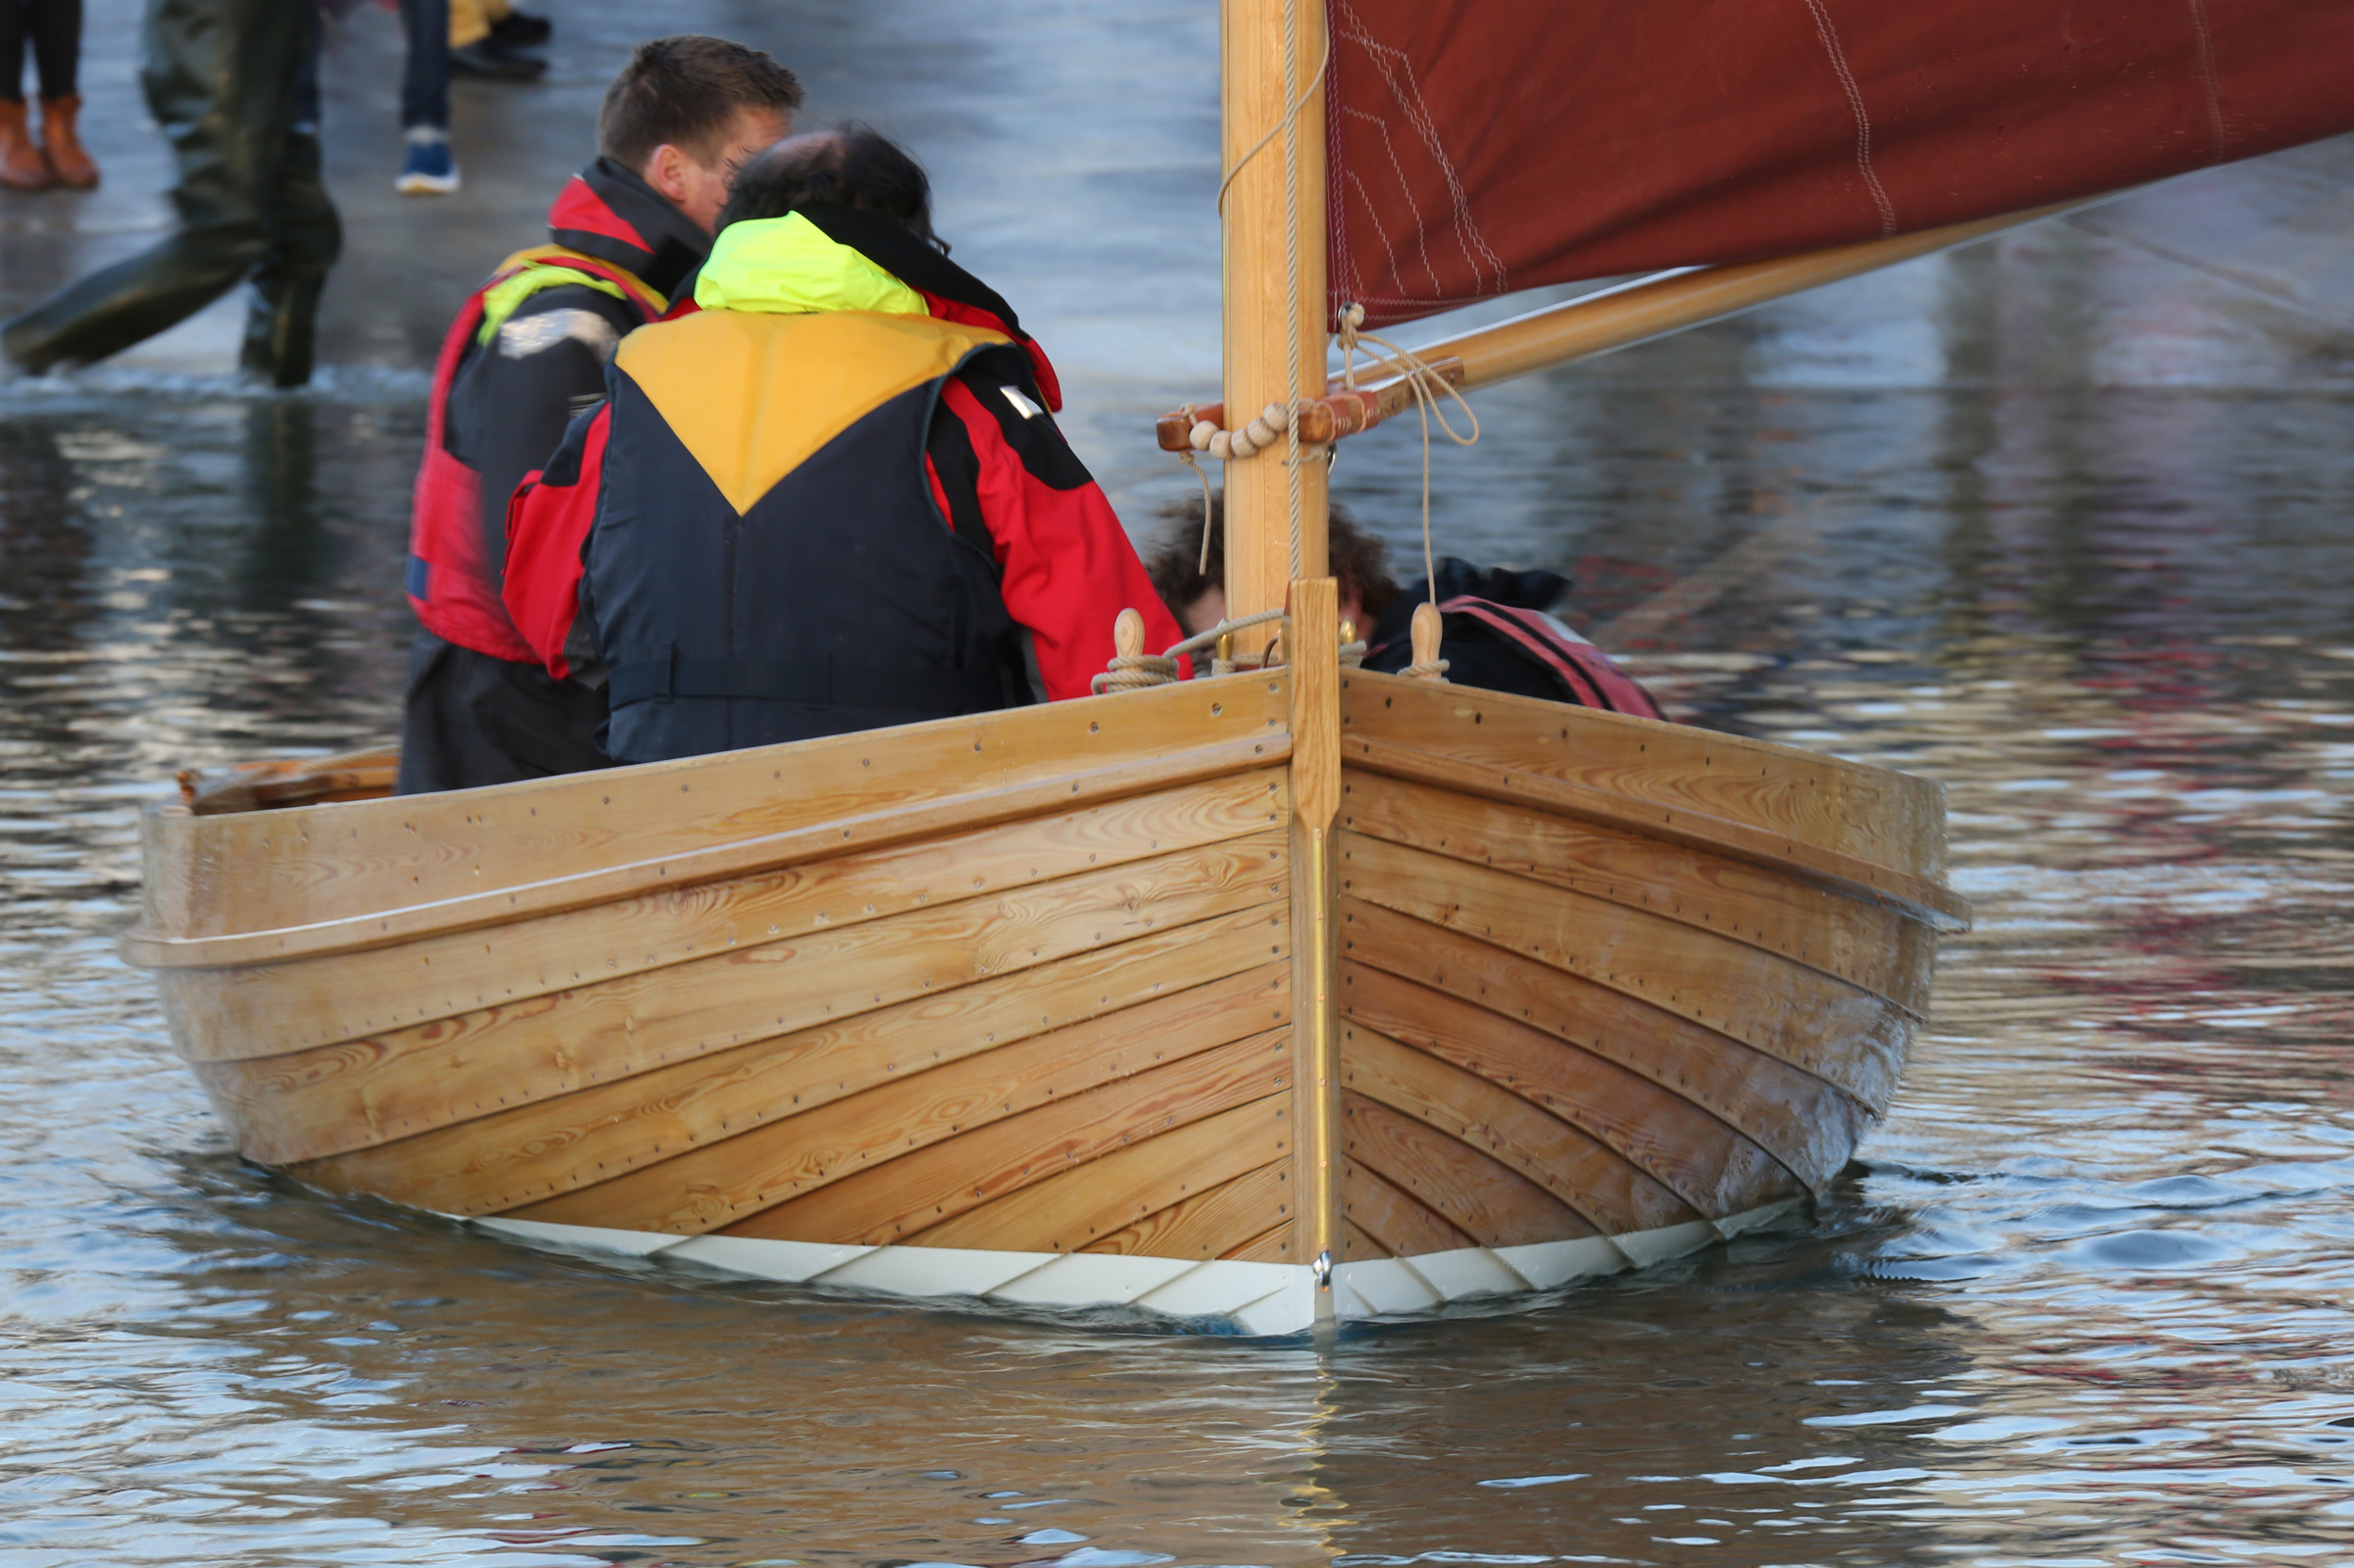
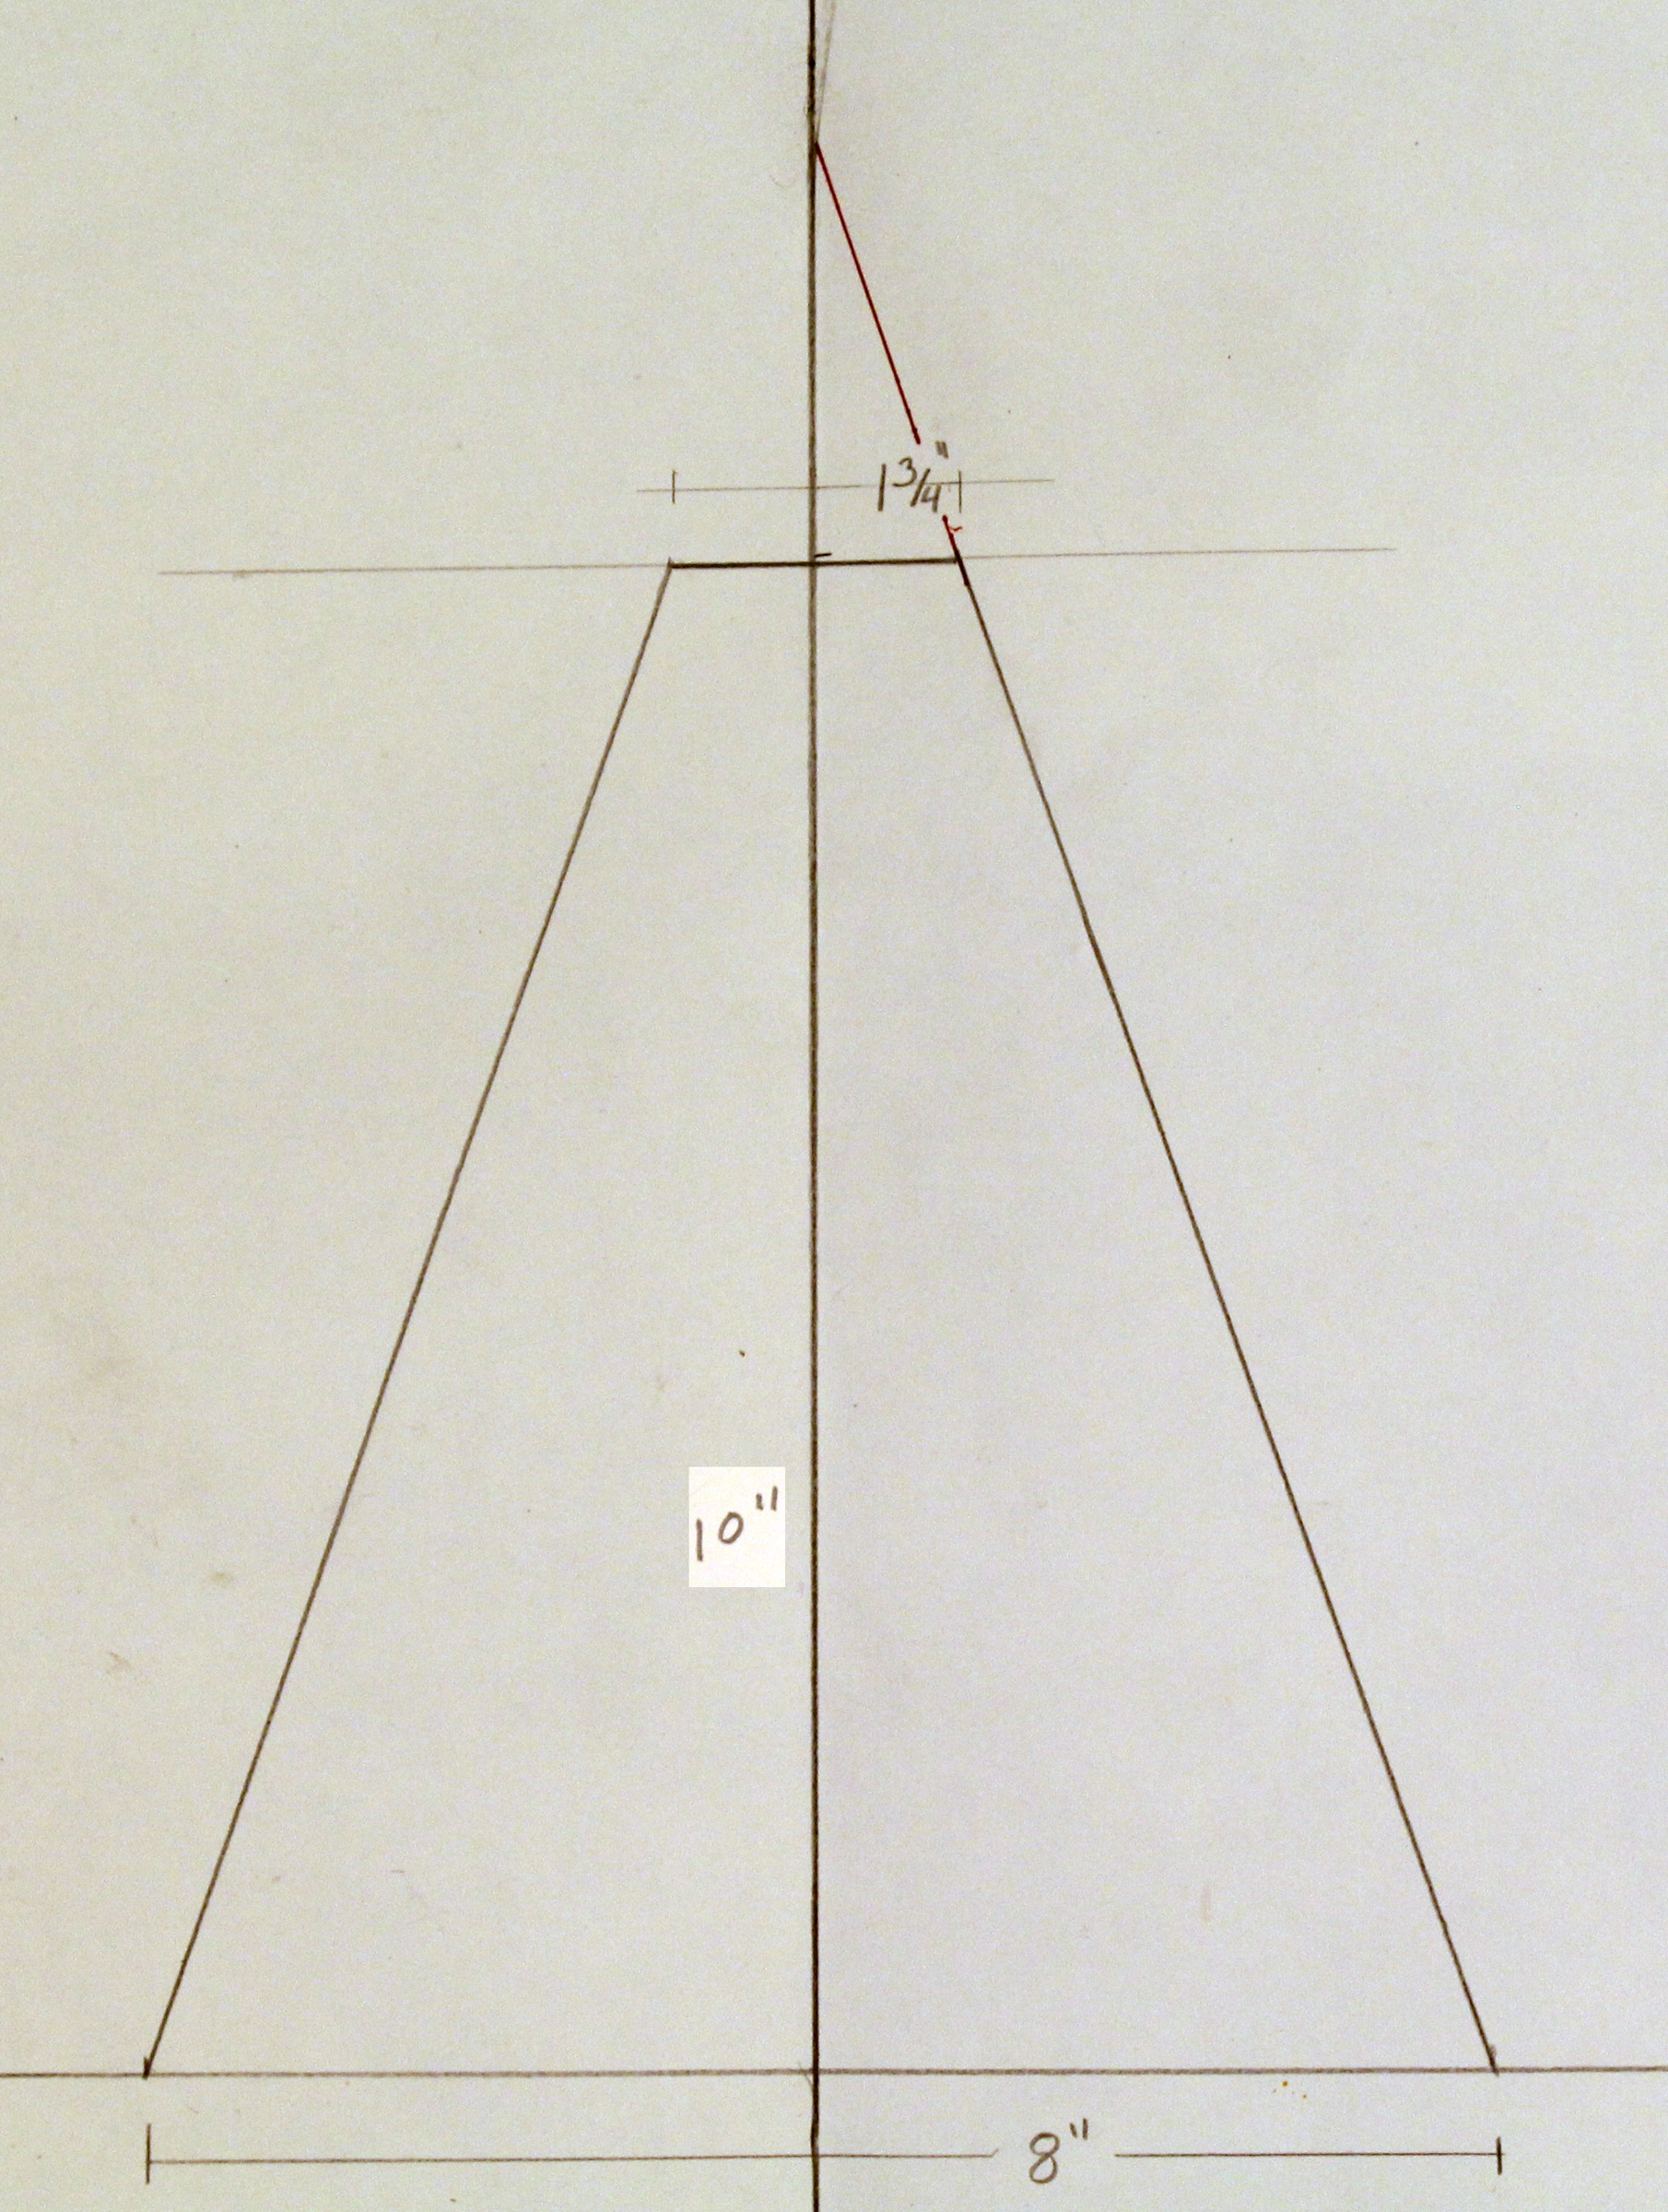
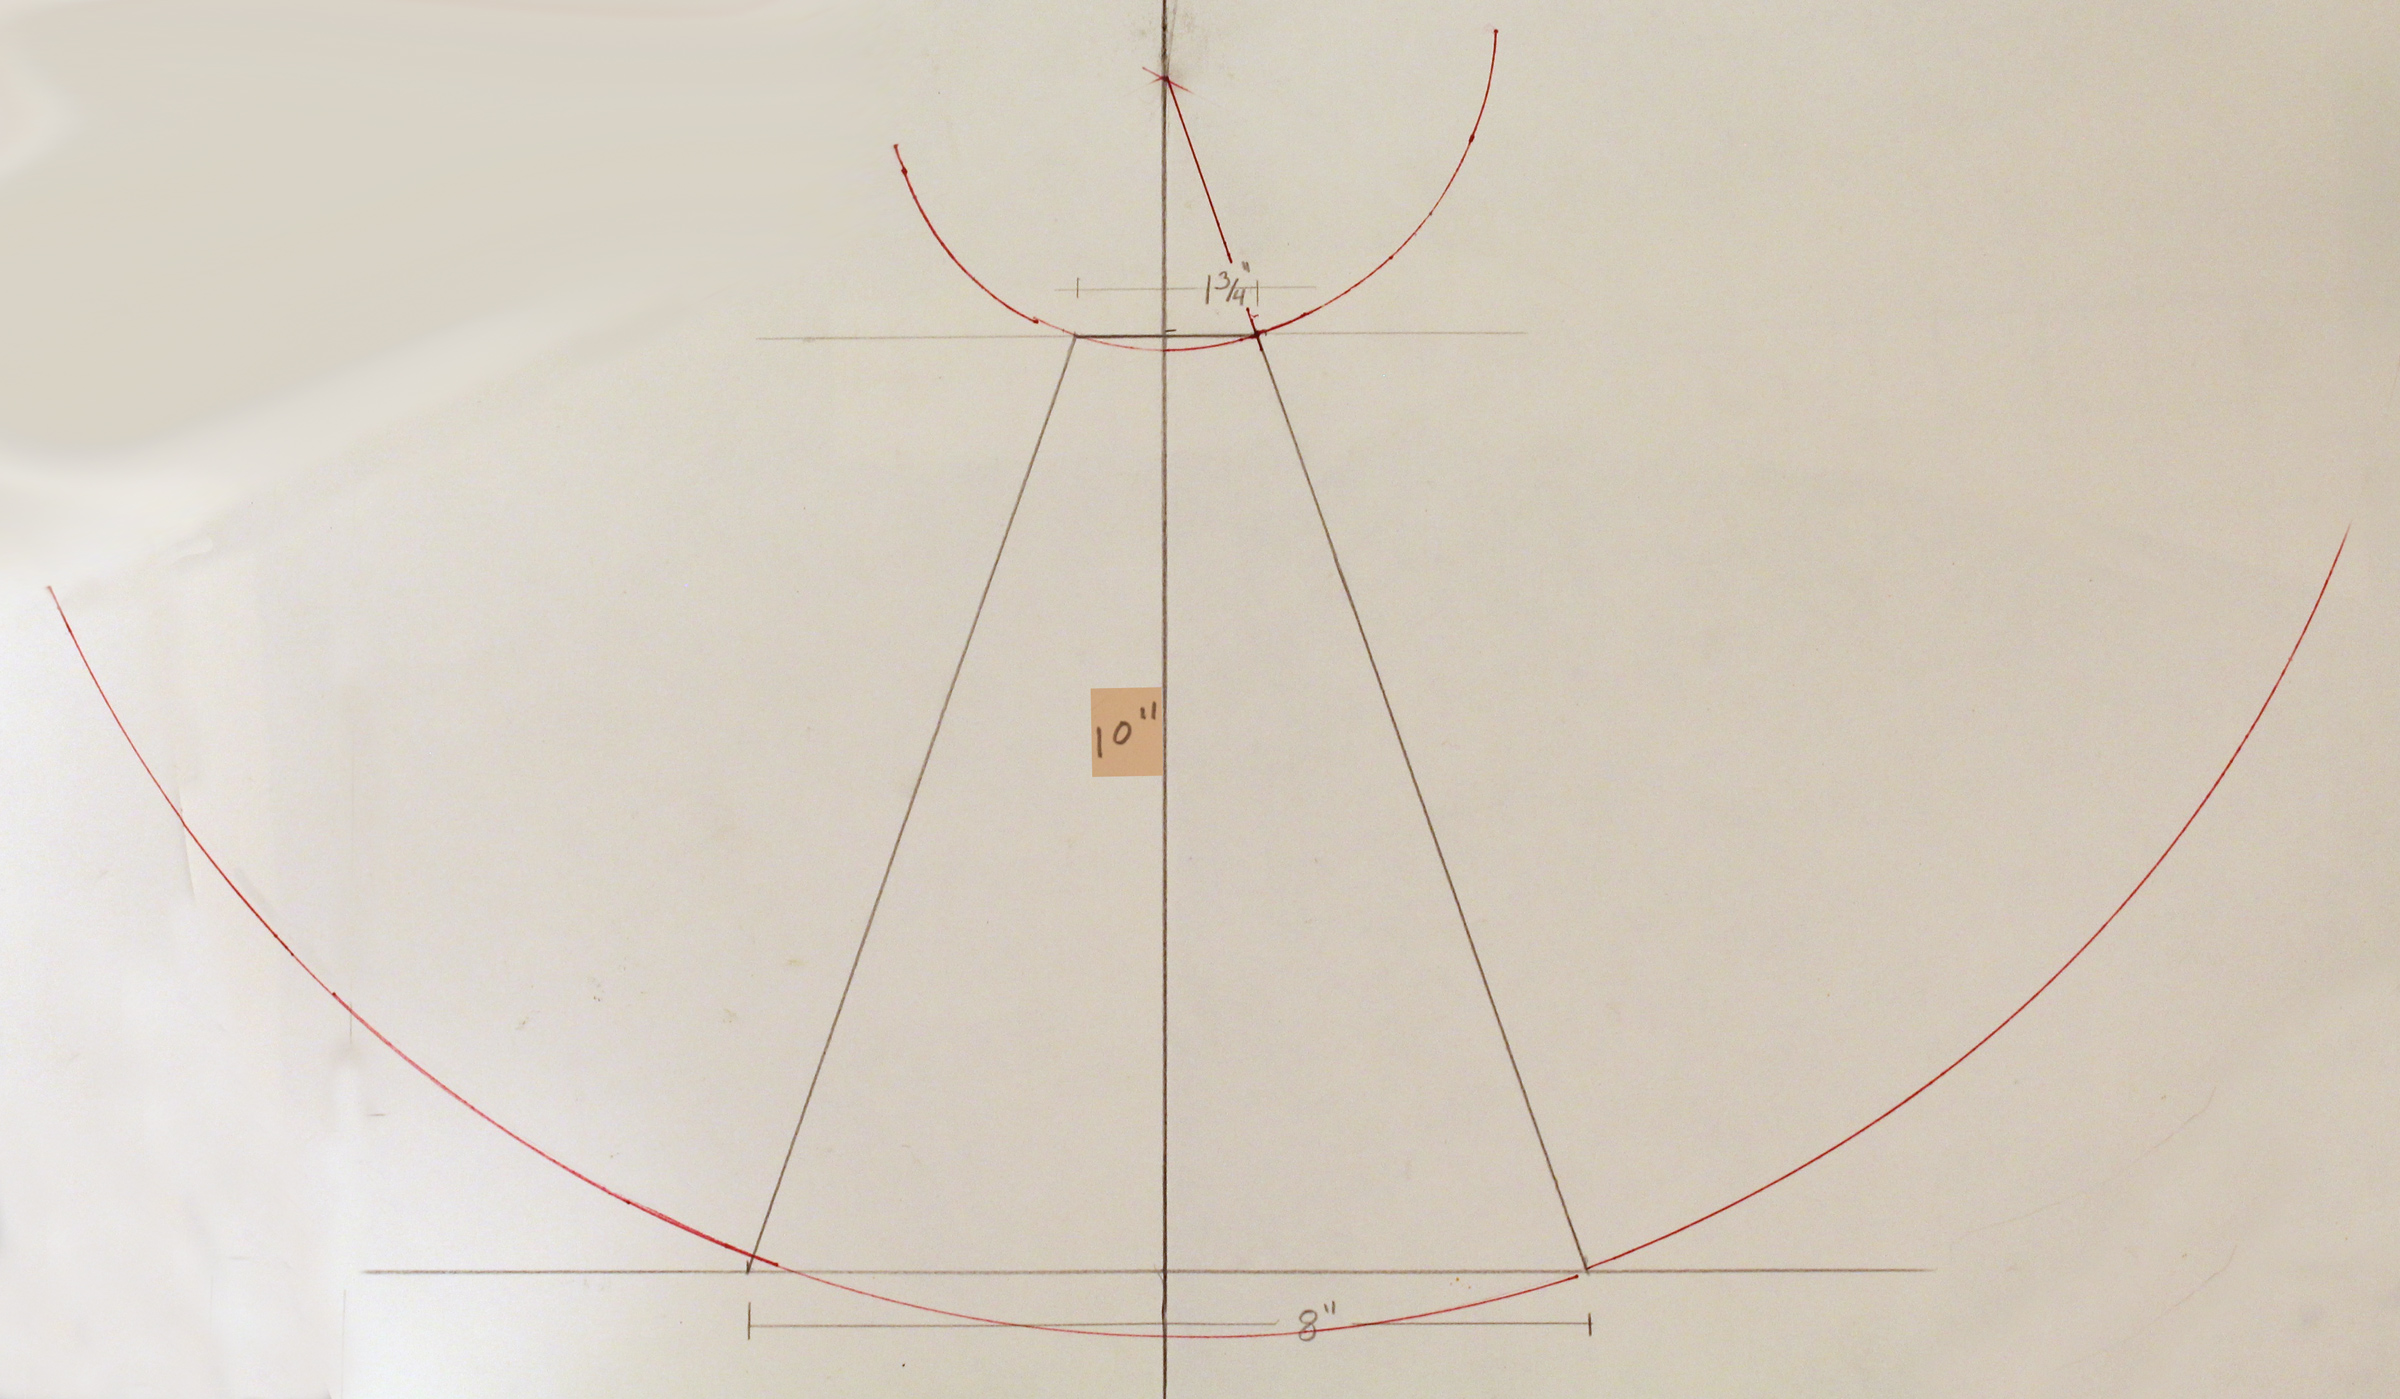
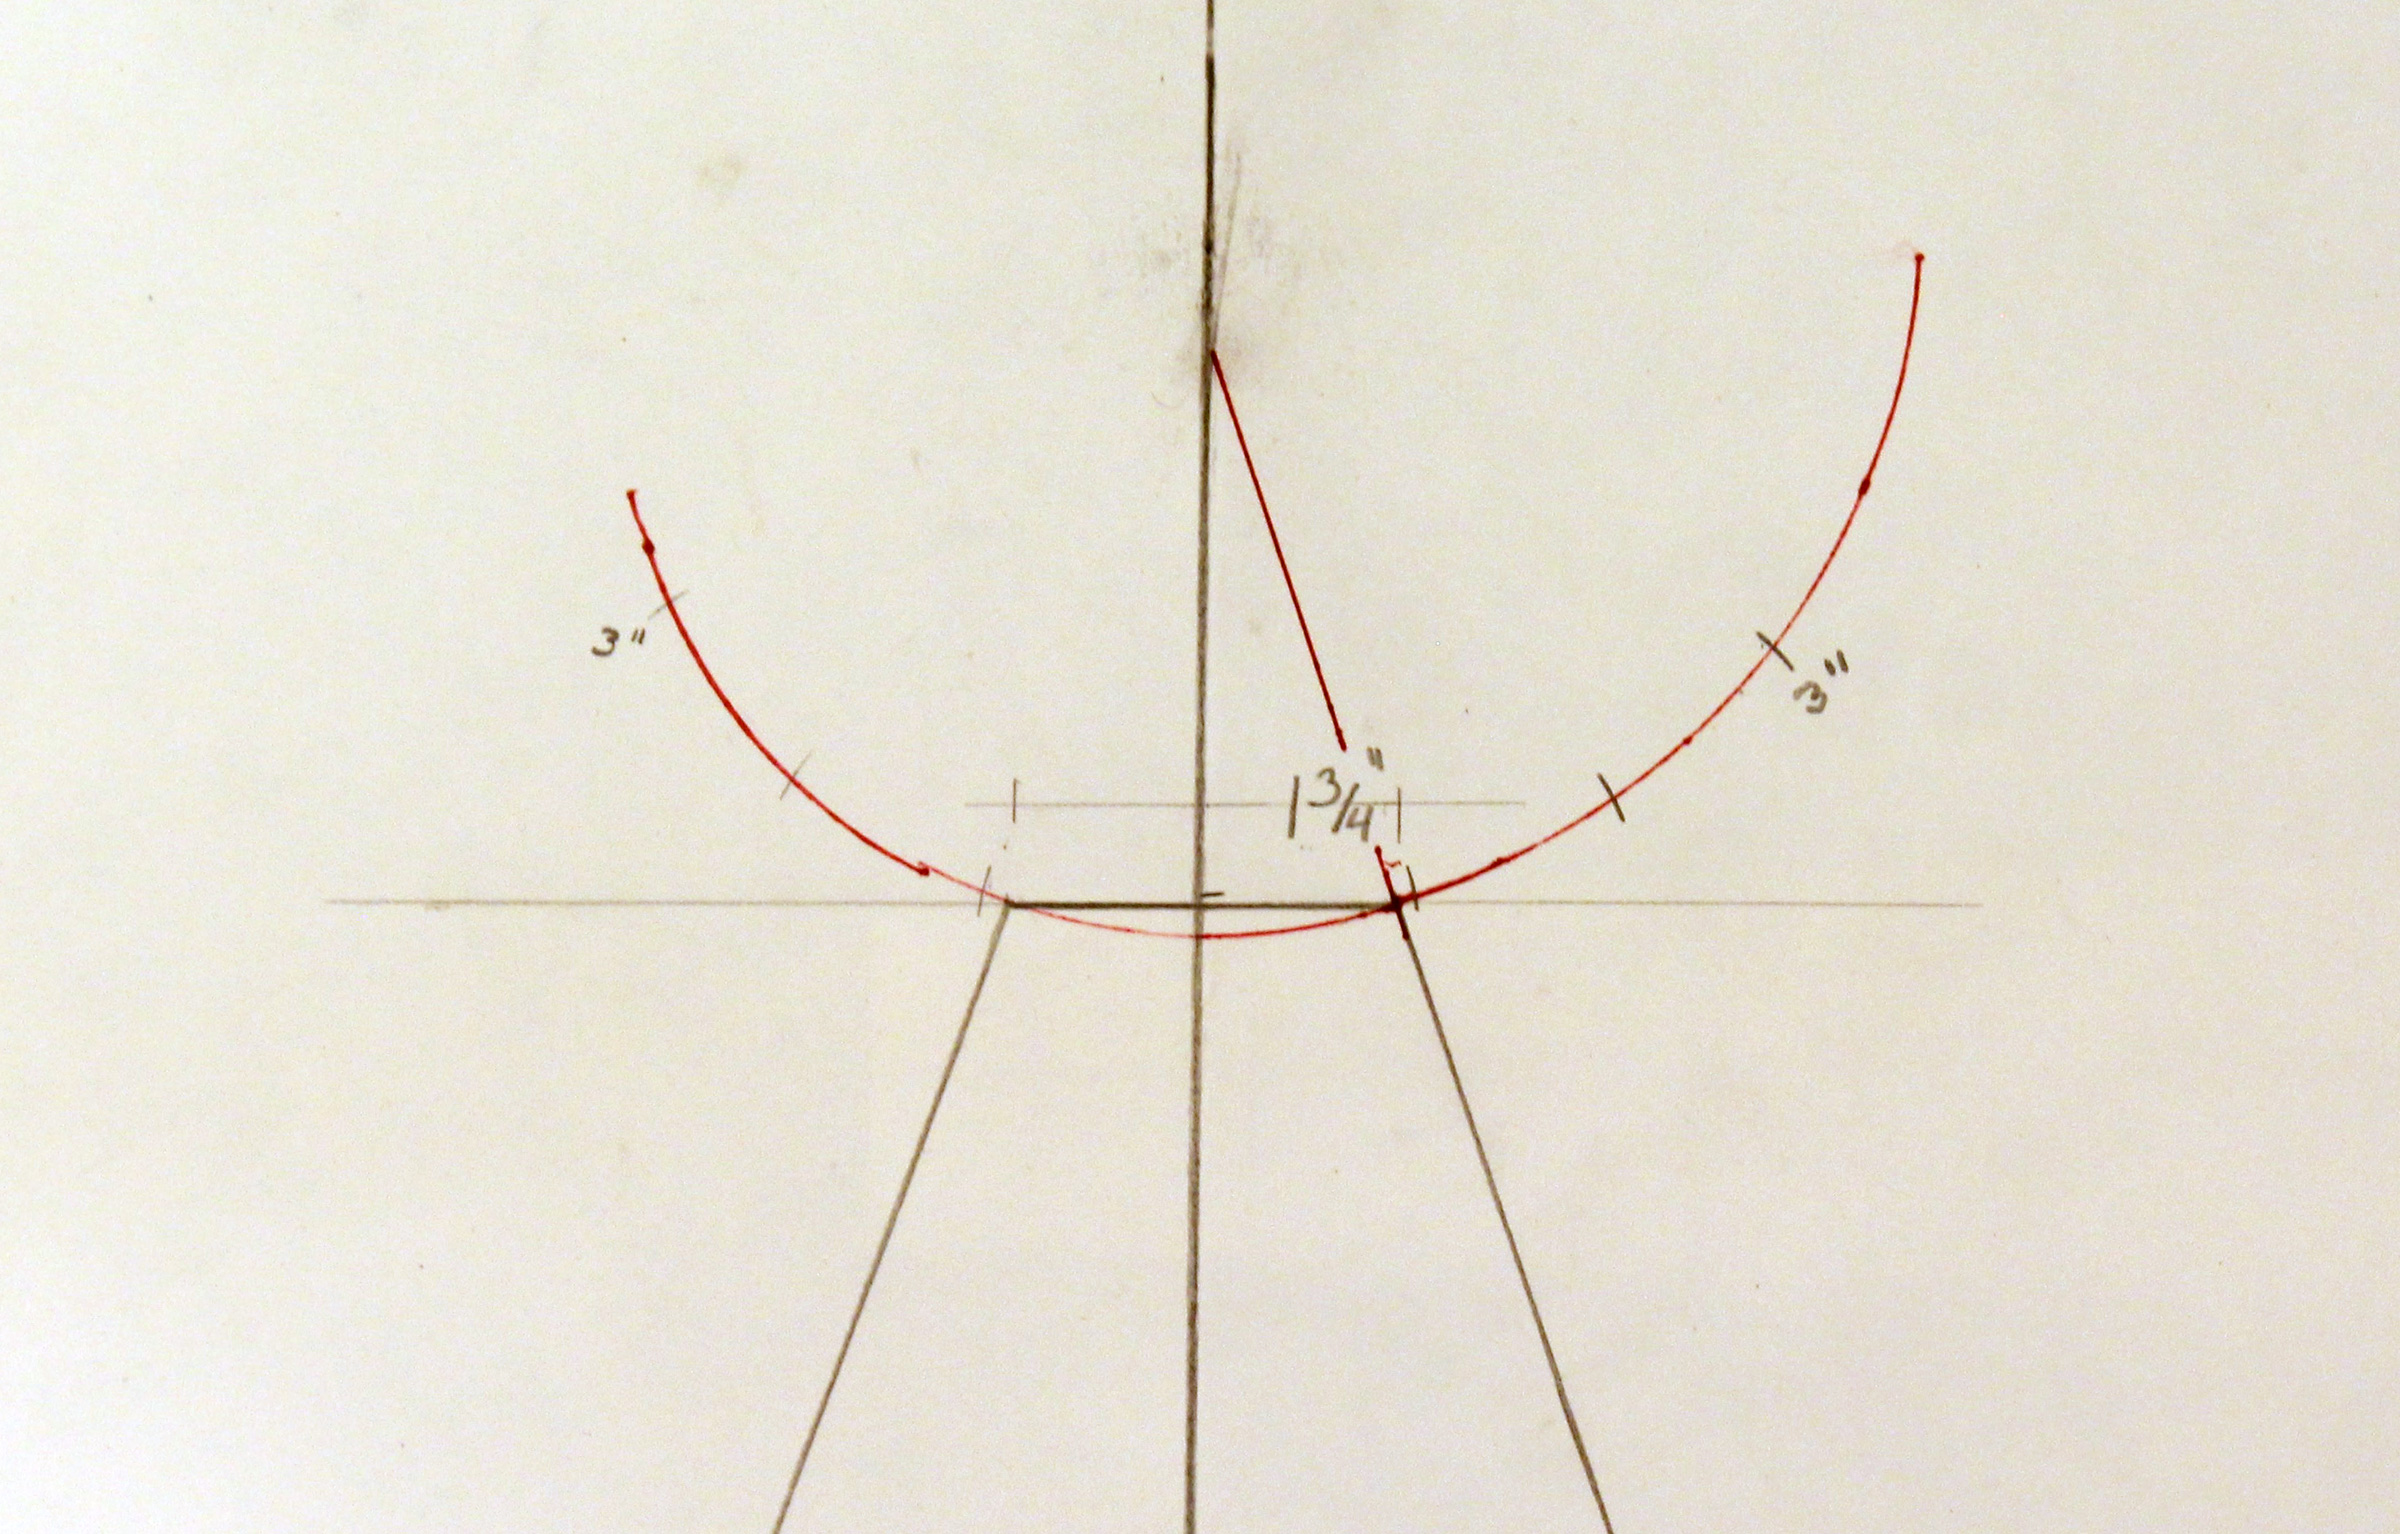
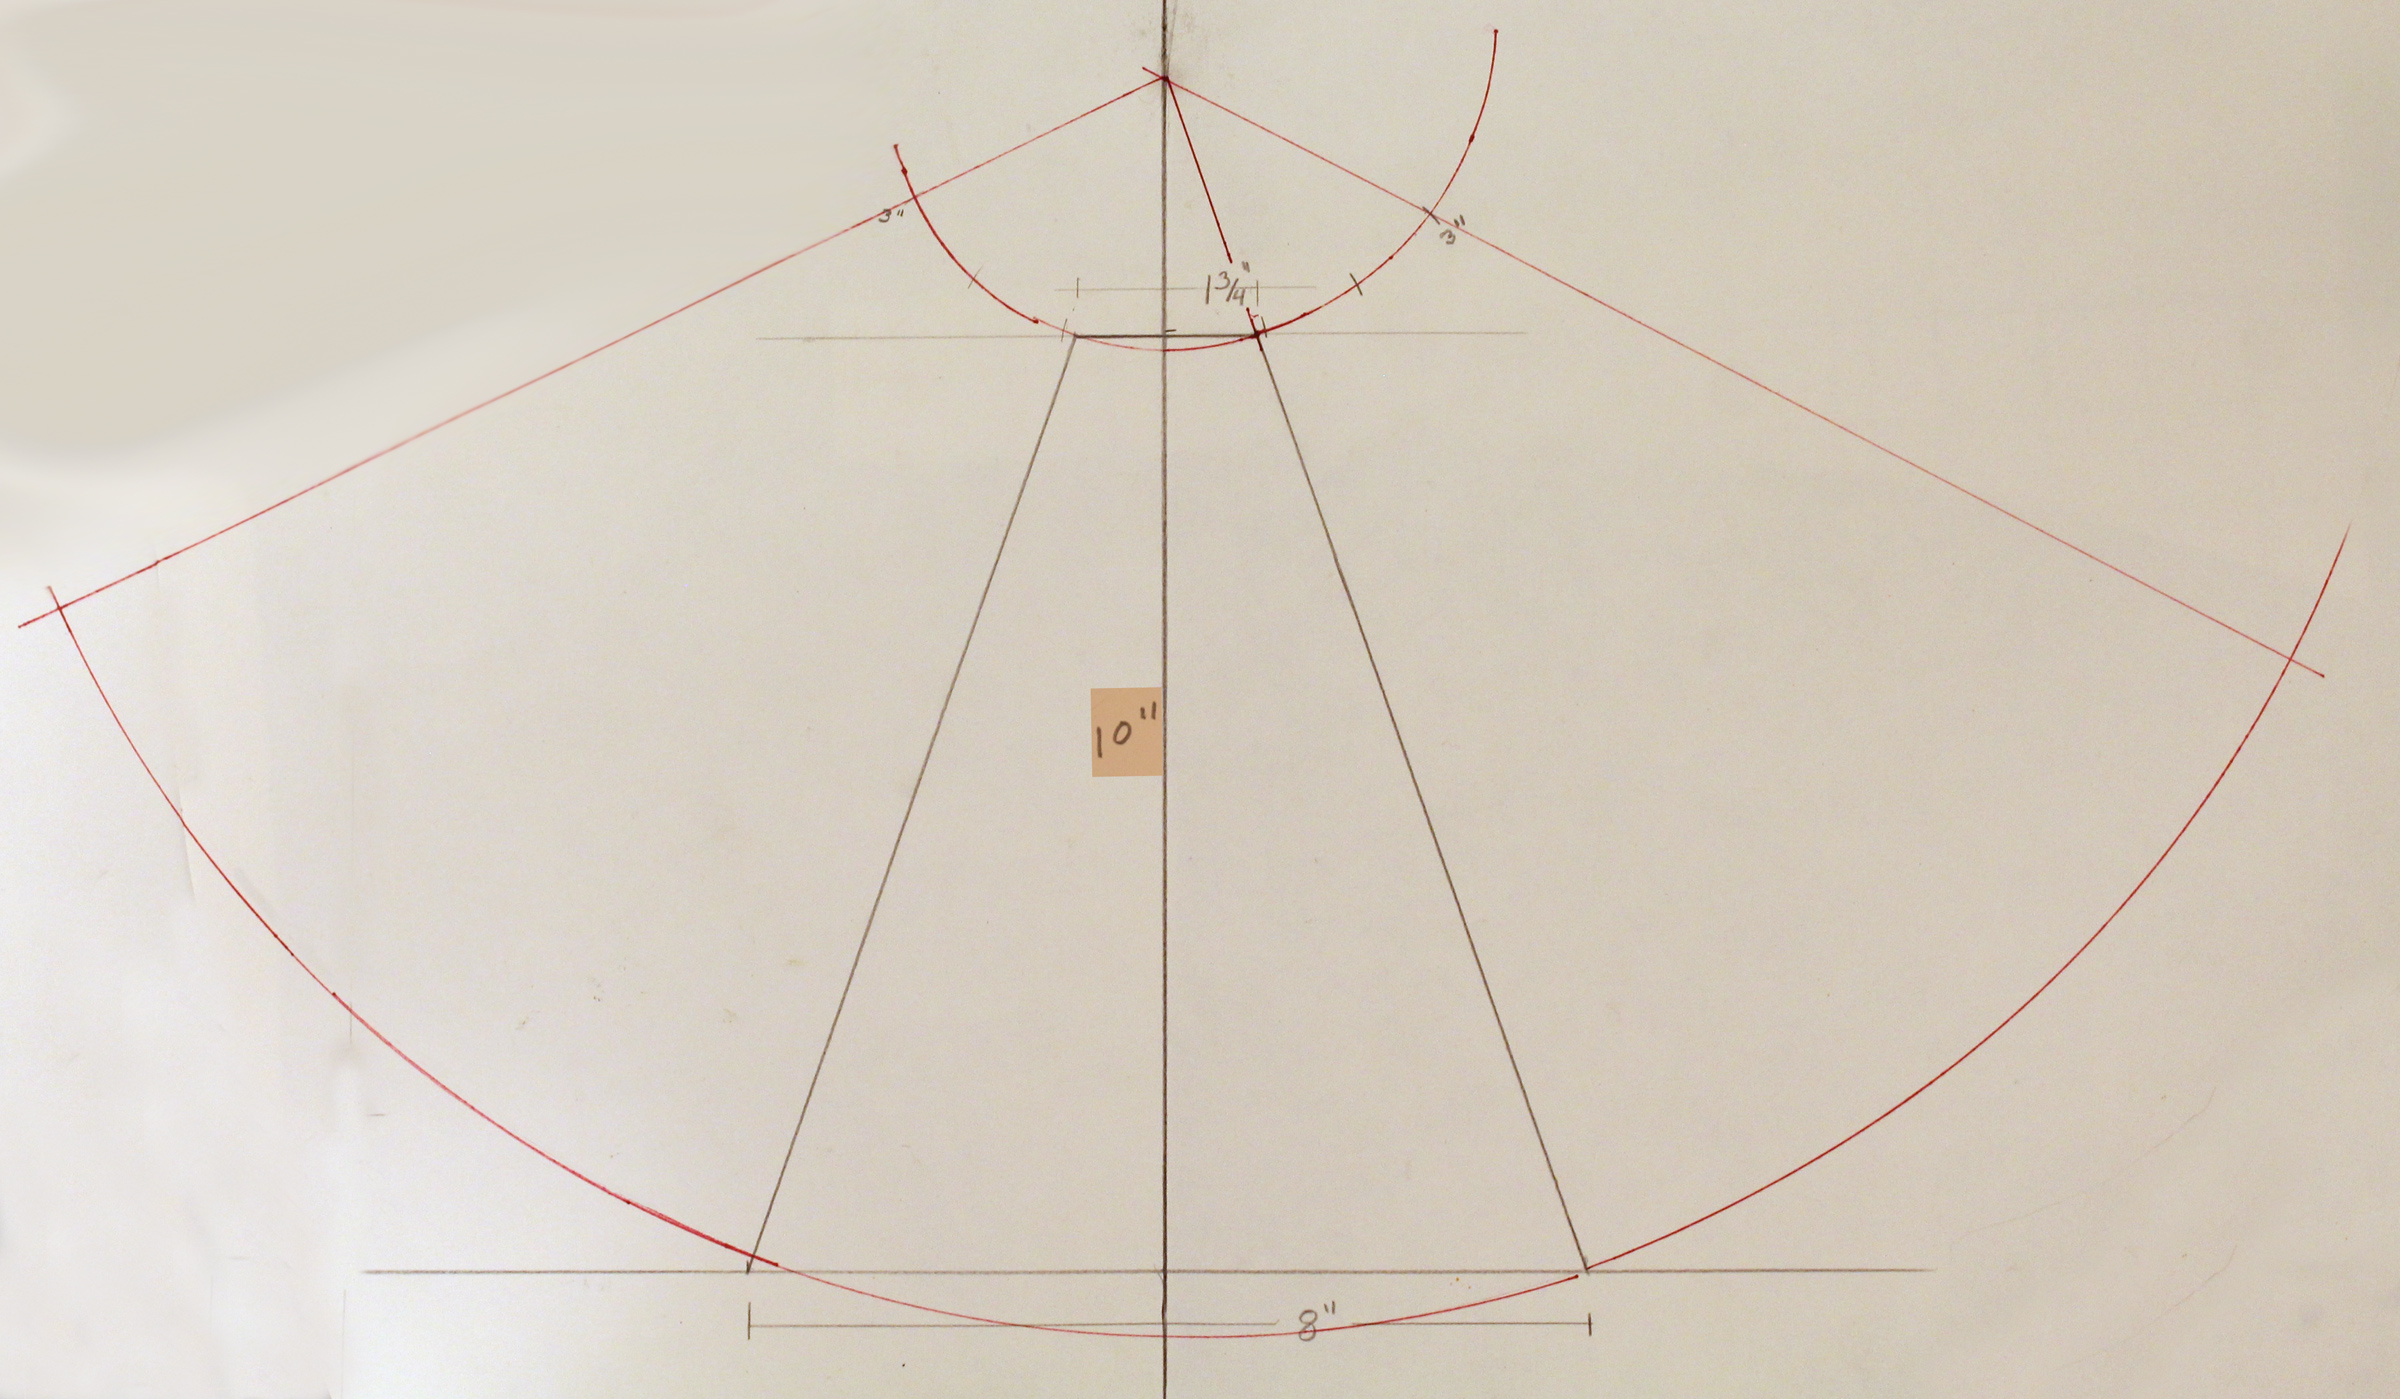
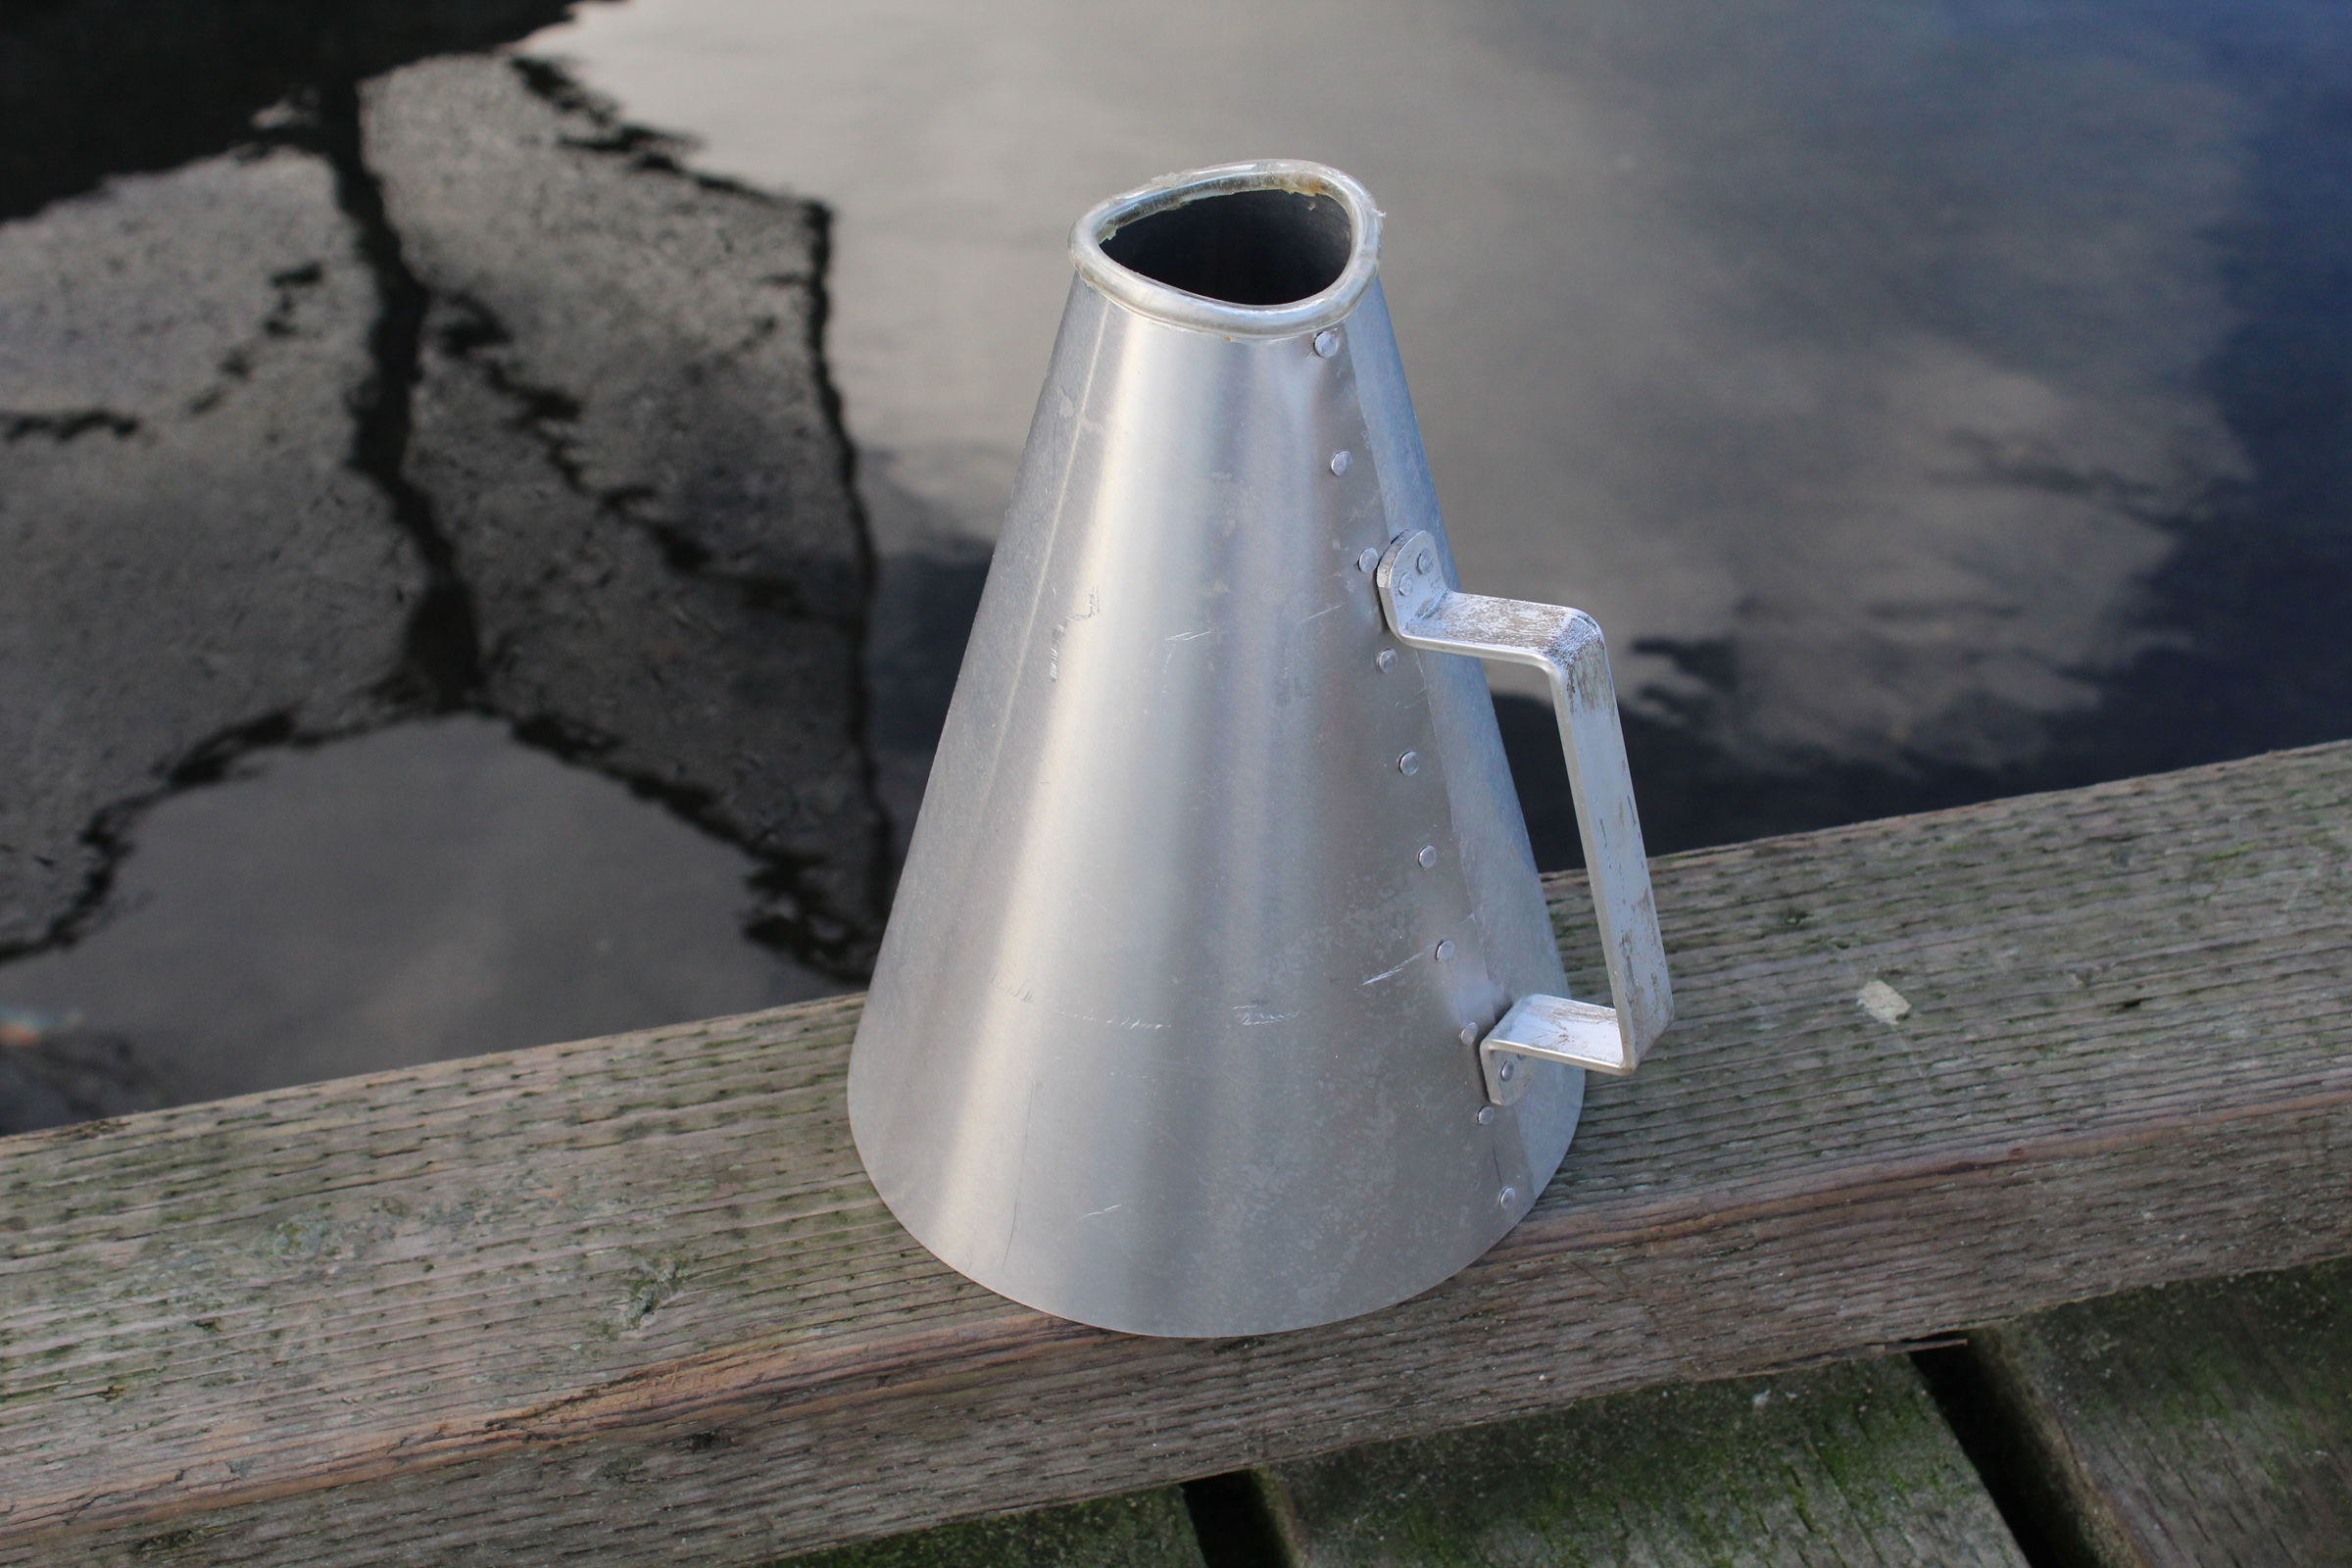
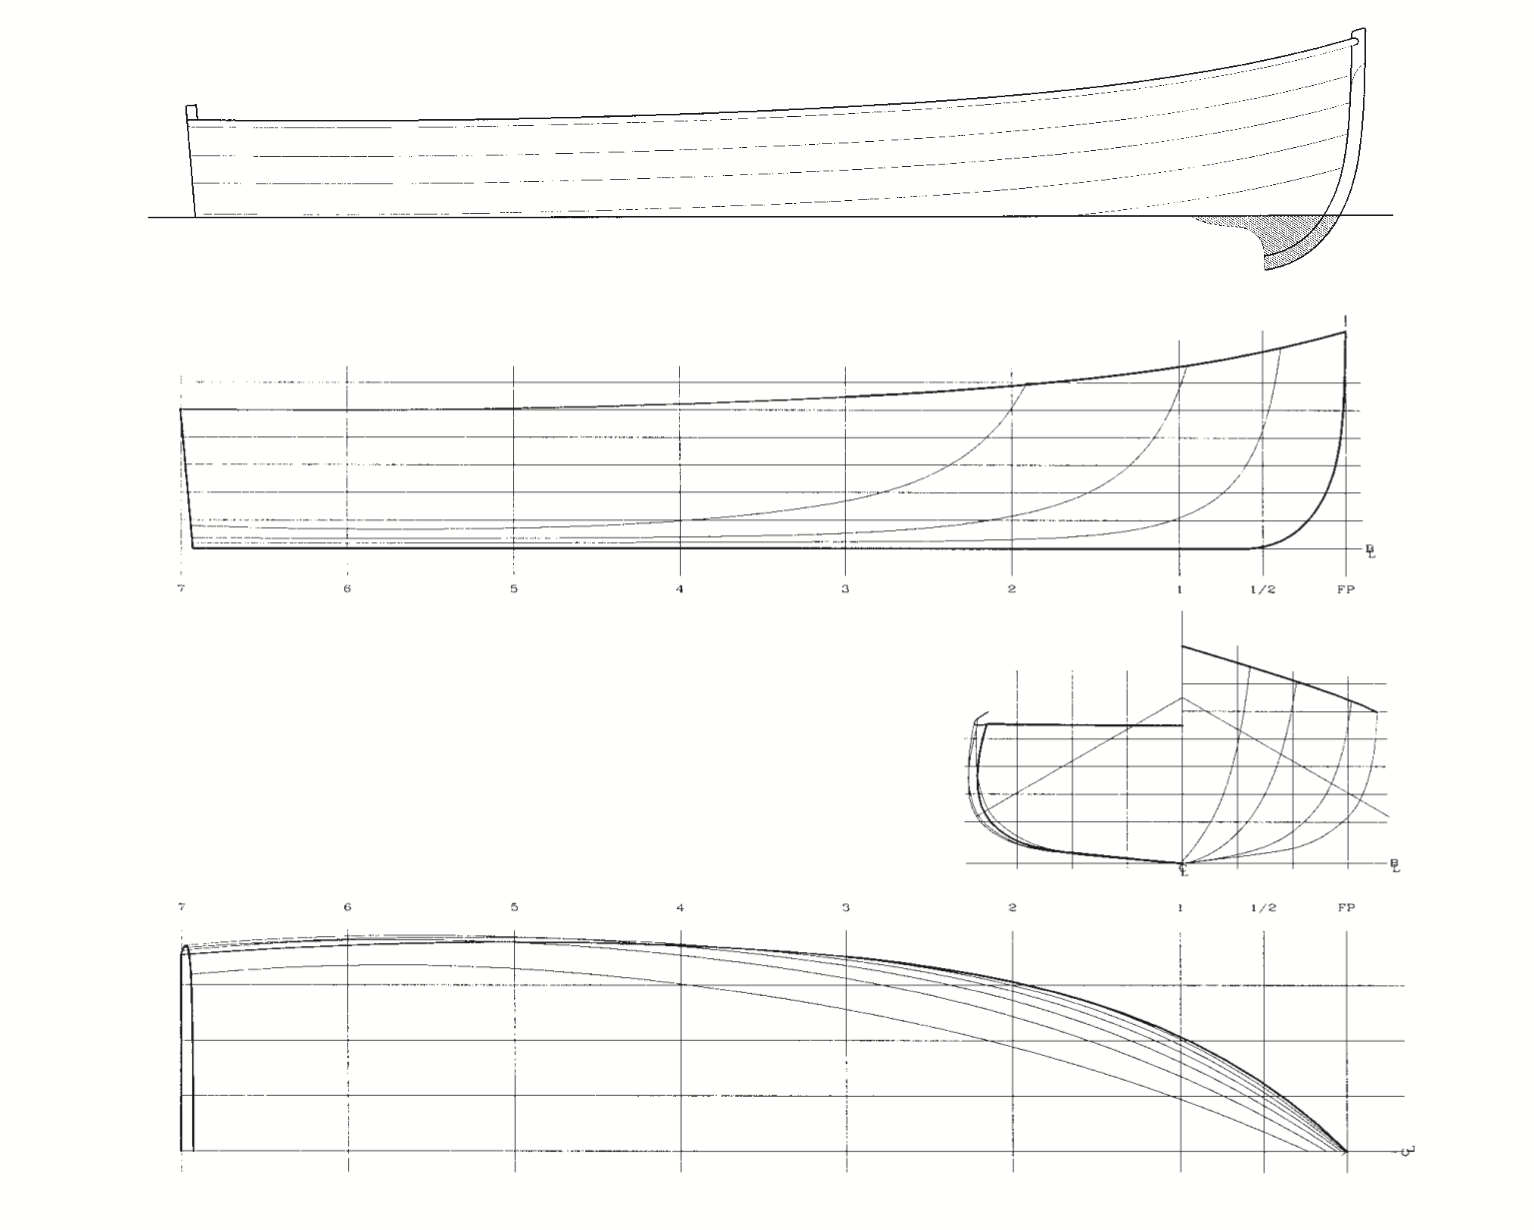
At 15′ in length between perpendiculars, with a molded beam of 5′ and depth amidships of 1’6″, the Christmas Wherry can carry two or three people with ease, “and four in a pinch,” Simmons says. She’s long enough to sail well under her 102-sq-ft lug rig and beamy enough to stand up to a good breeze under a press of sail. A plank keel makes the boat maneuverable enough for the rower to skid sideways if necessary, but her planked-down hull aft means she’ll track well, too.
The Christmas Wherry shares the excellent seakeeping abilities of other boats of the type. The owner of a Simmons–designed 19′ Newfoundland Trap Skiff, a boat very much like the Christmas Wherry, sailed his boat from Massachusetts up the coast to Penobscot Bay, a trip that at times exposed the boat to the full sweep of the Atlantic. With her broad beam (her length-to-beam ratio is almost 3:1) and her flat ’midship sections, the Christmas Wherry isn’t at all tender. Simmons says the boat can support his 230 lbs standing on the rail. Under sail, with her nicely canted stem and full sections forward, the bow stays up even when the wind is blowing hard, and there’s enough flare in the planking to keep things dry.
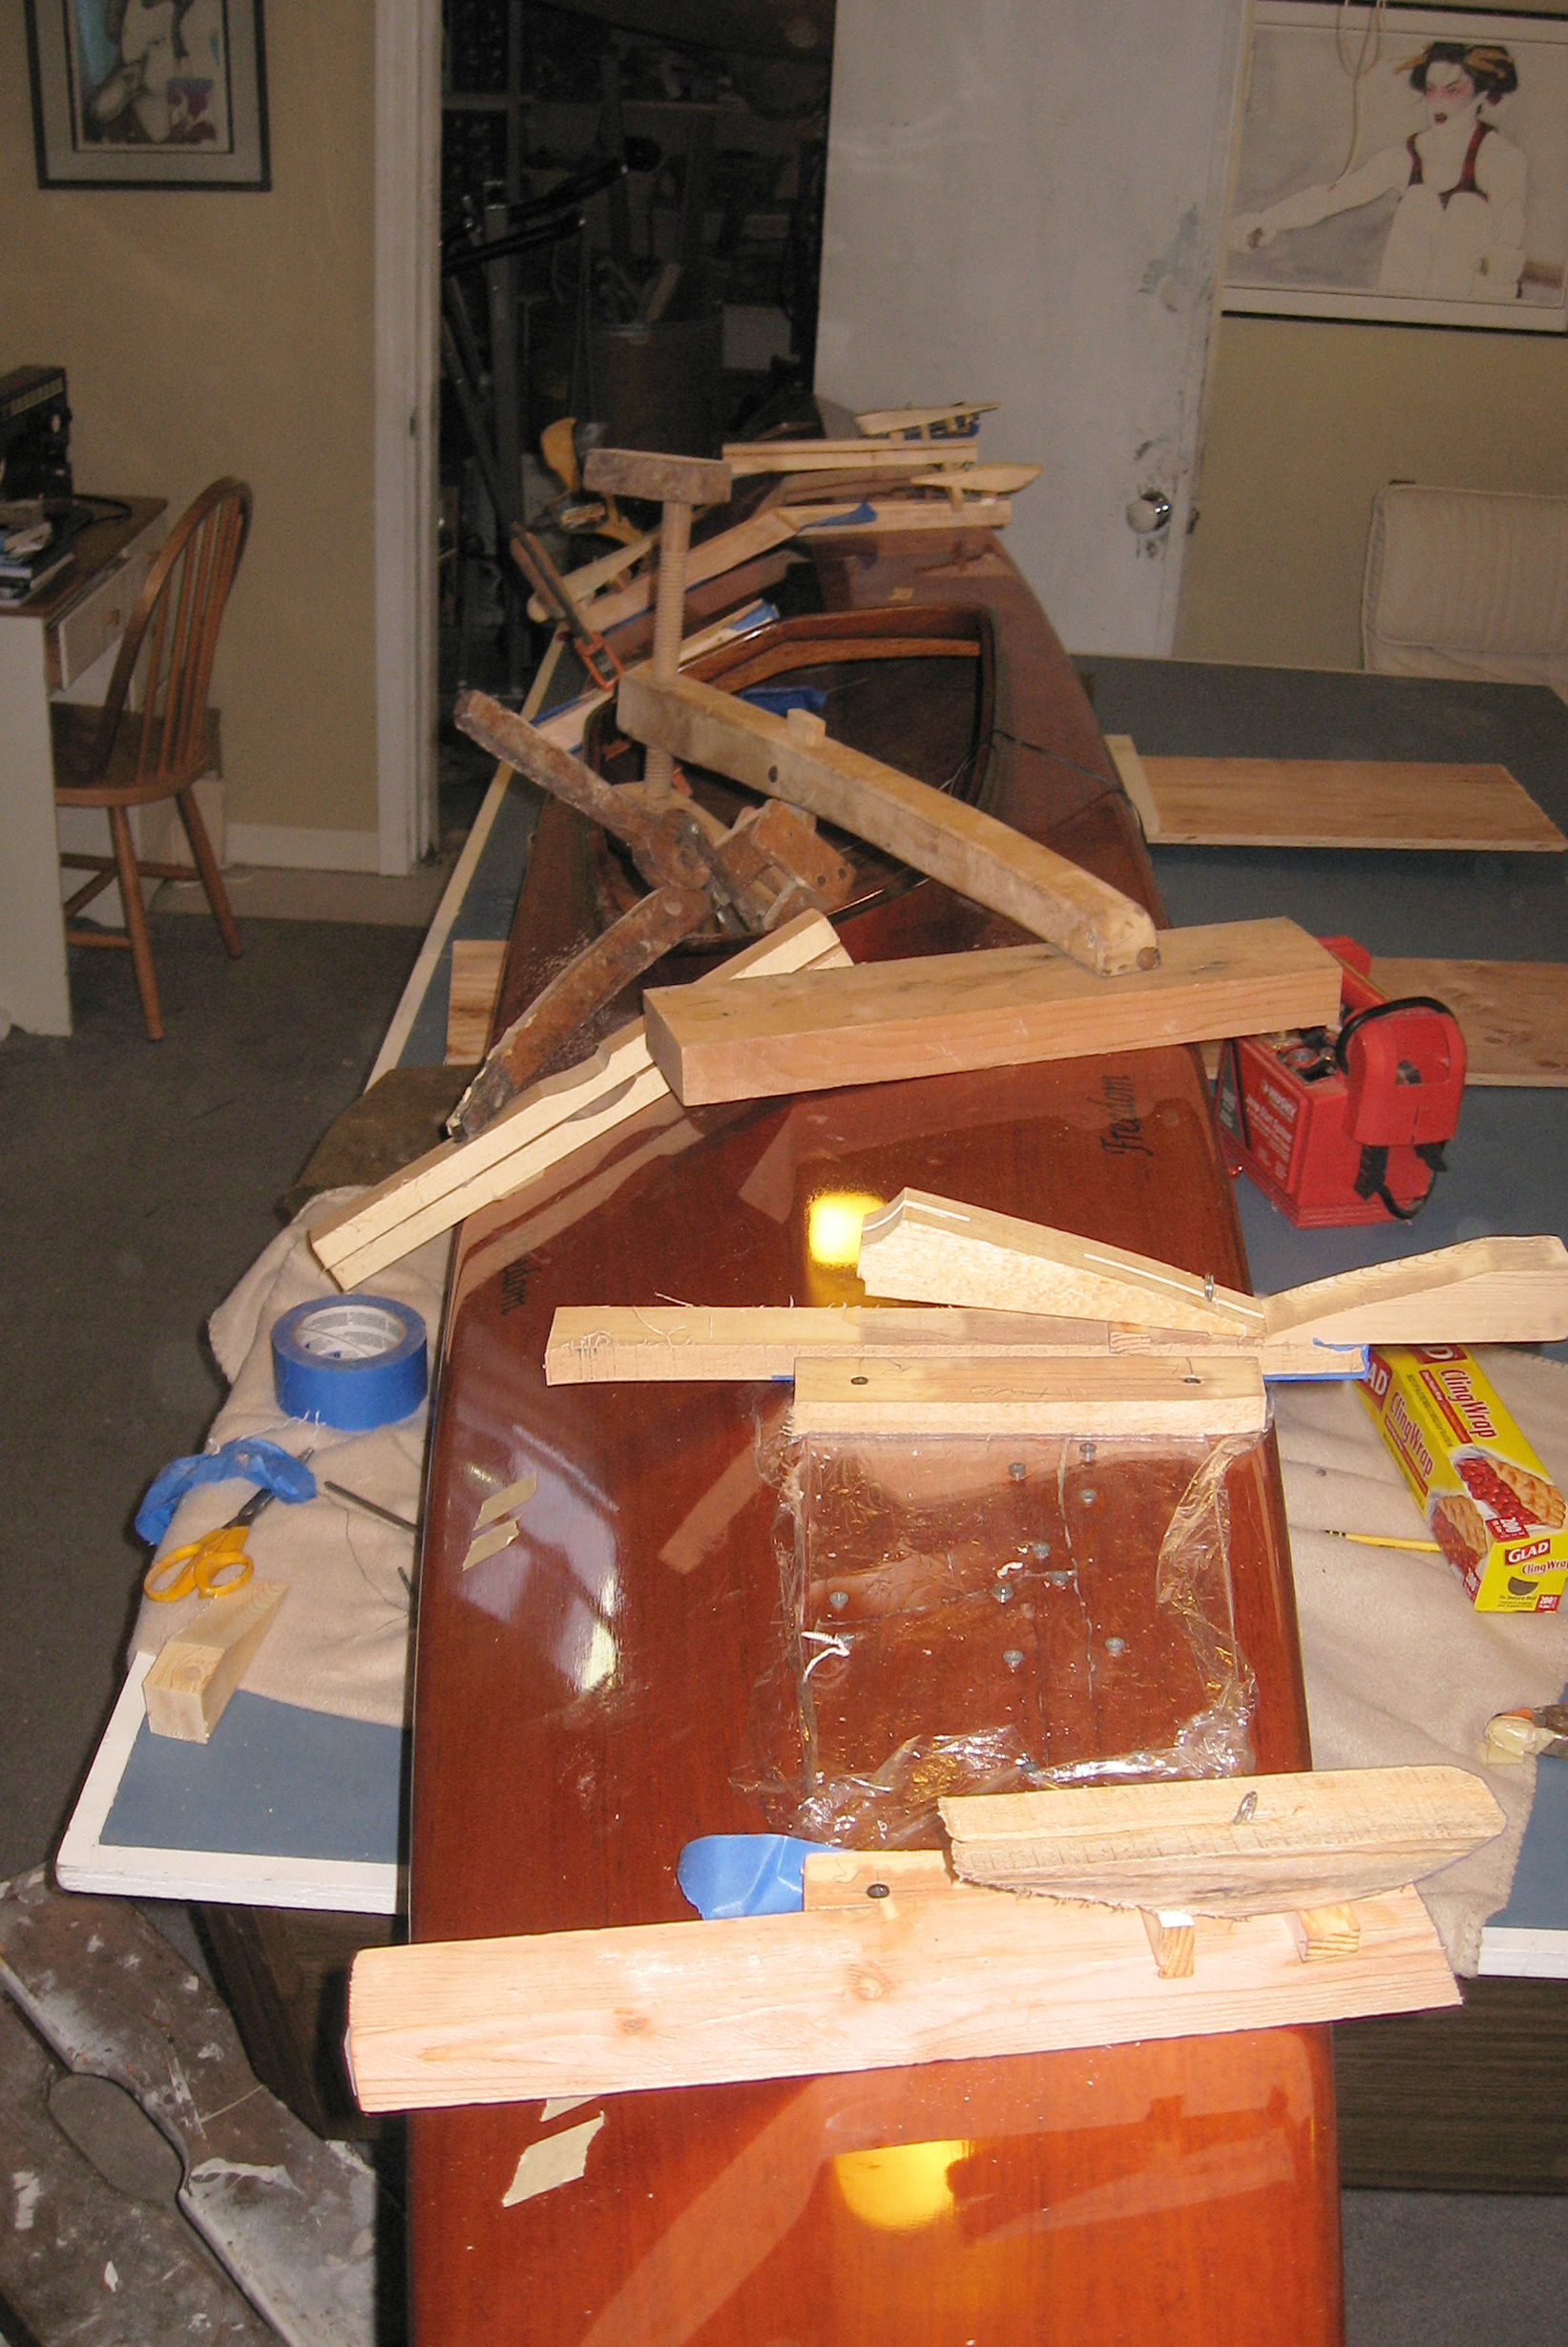
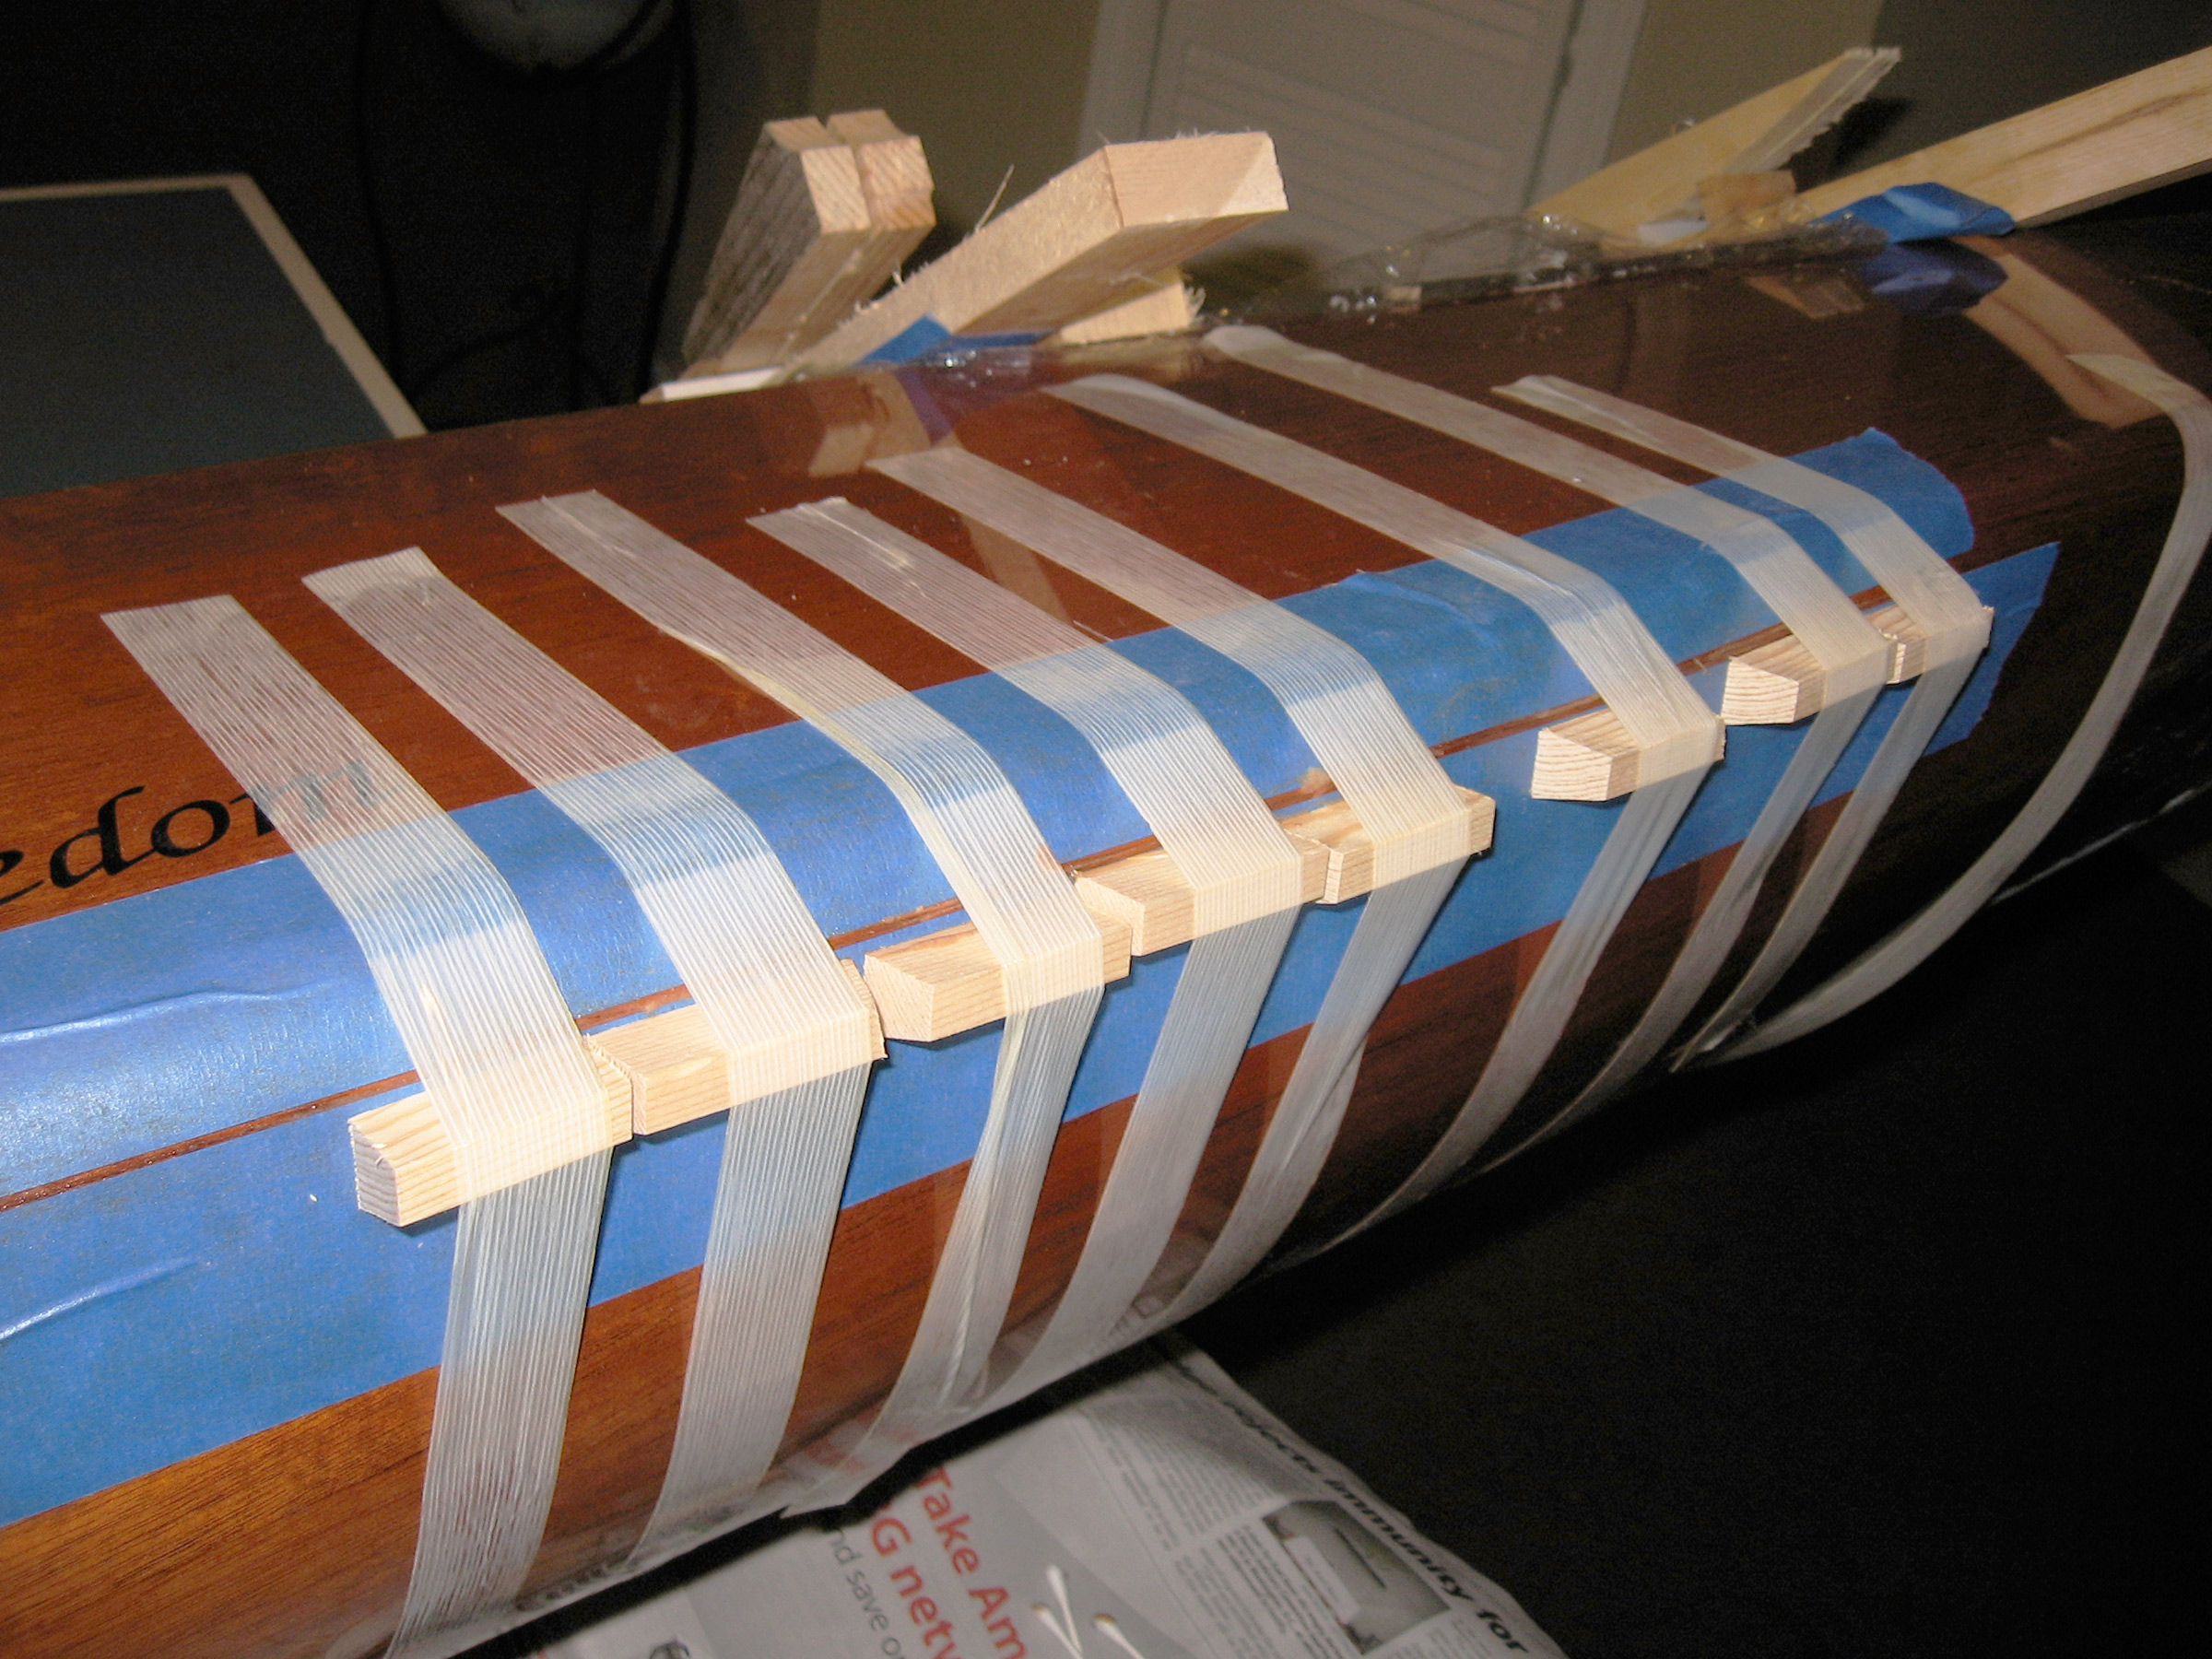
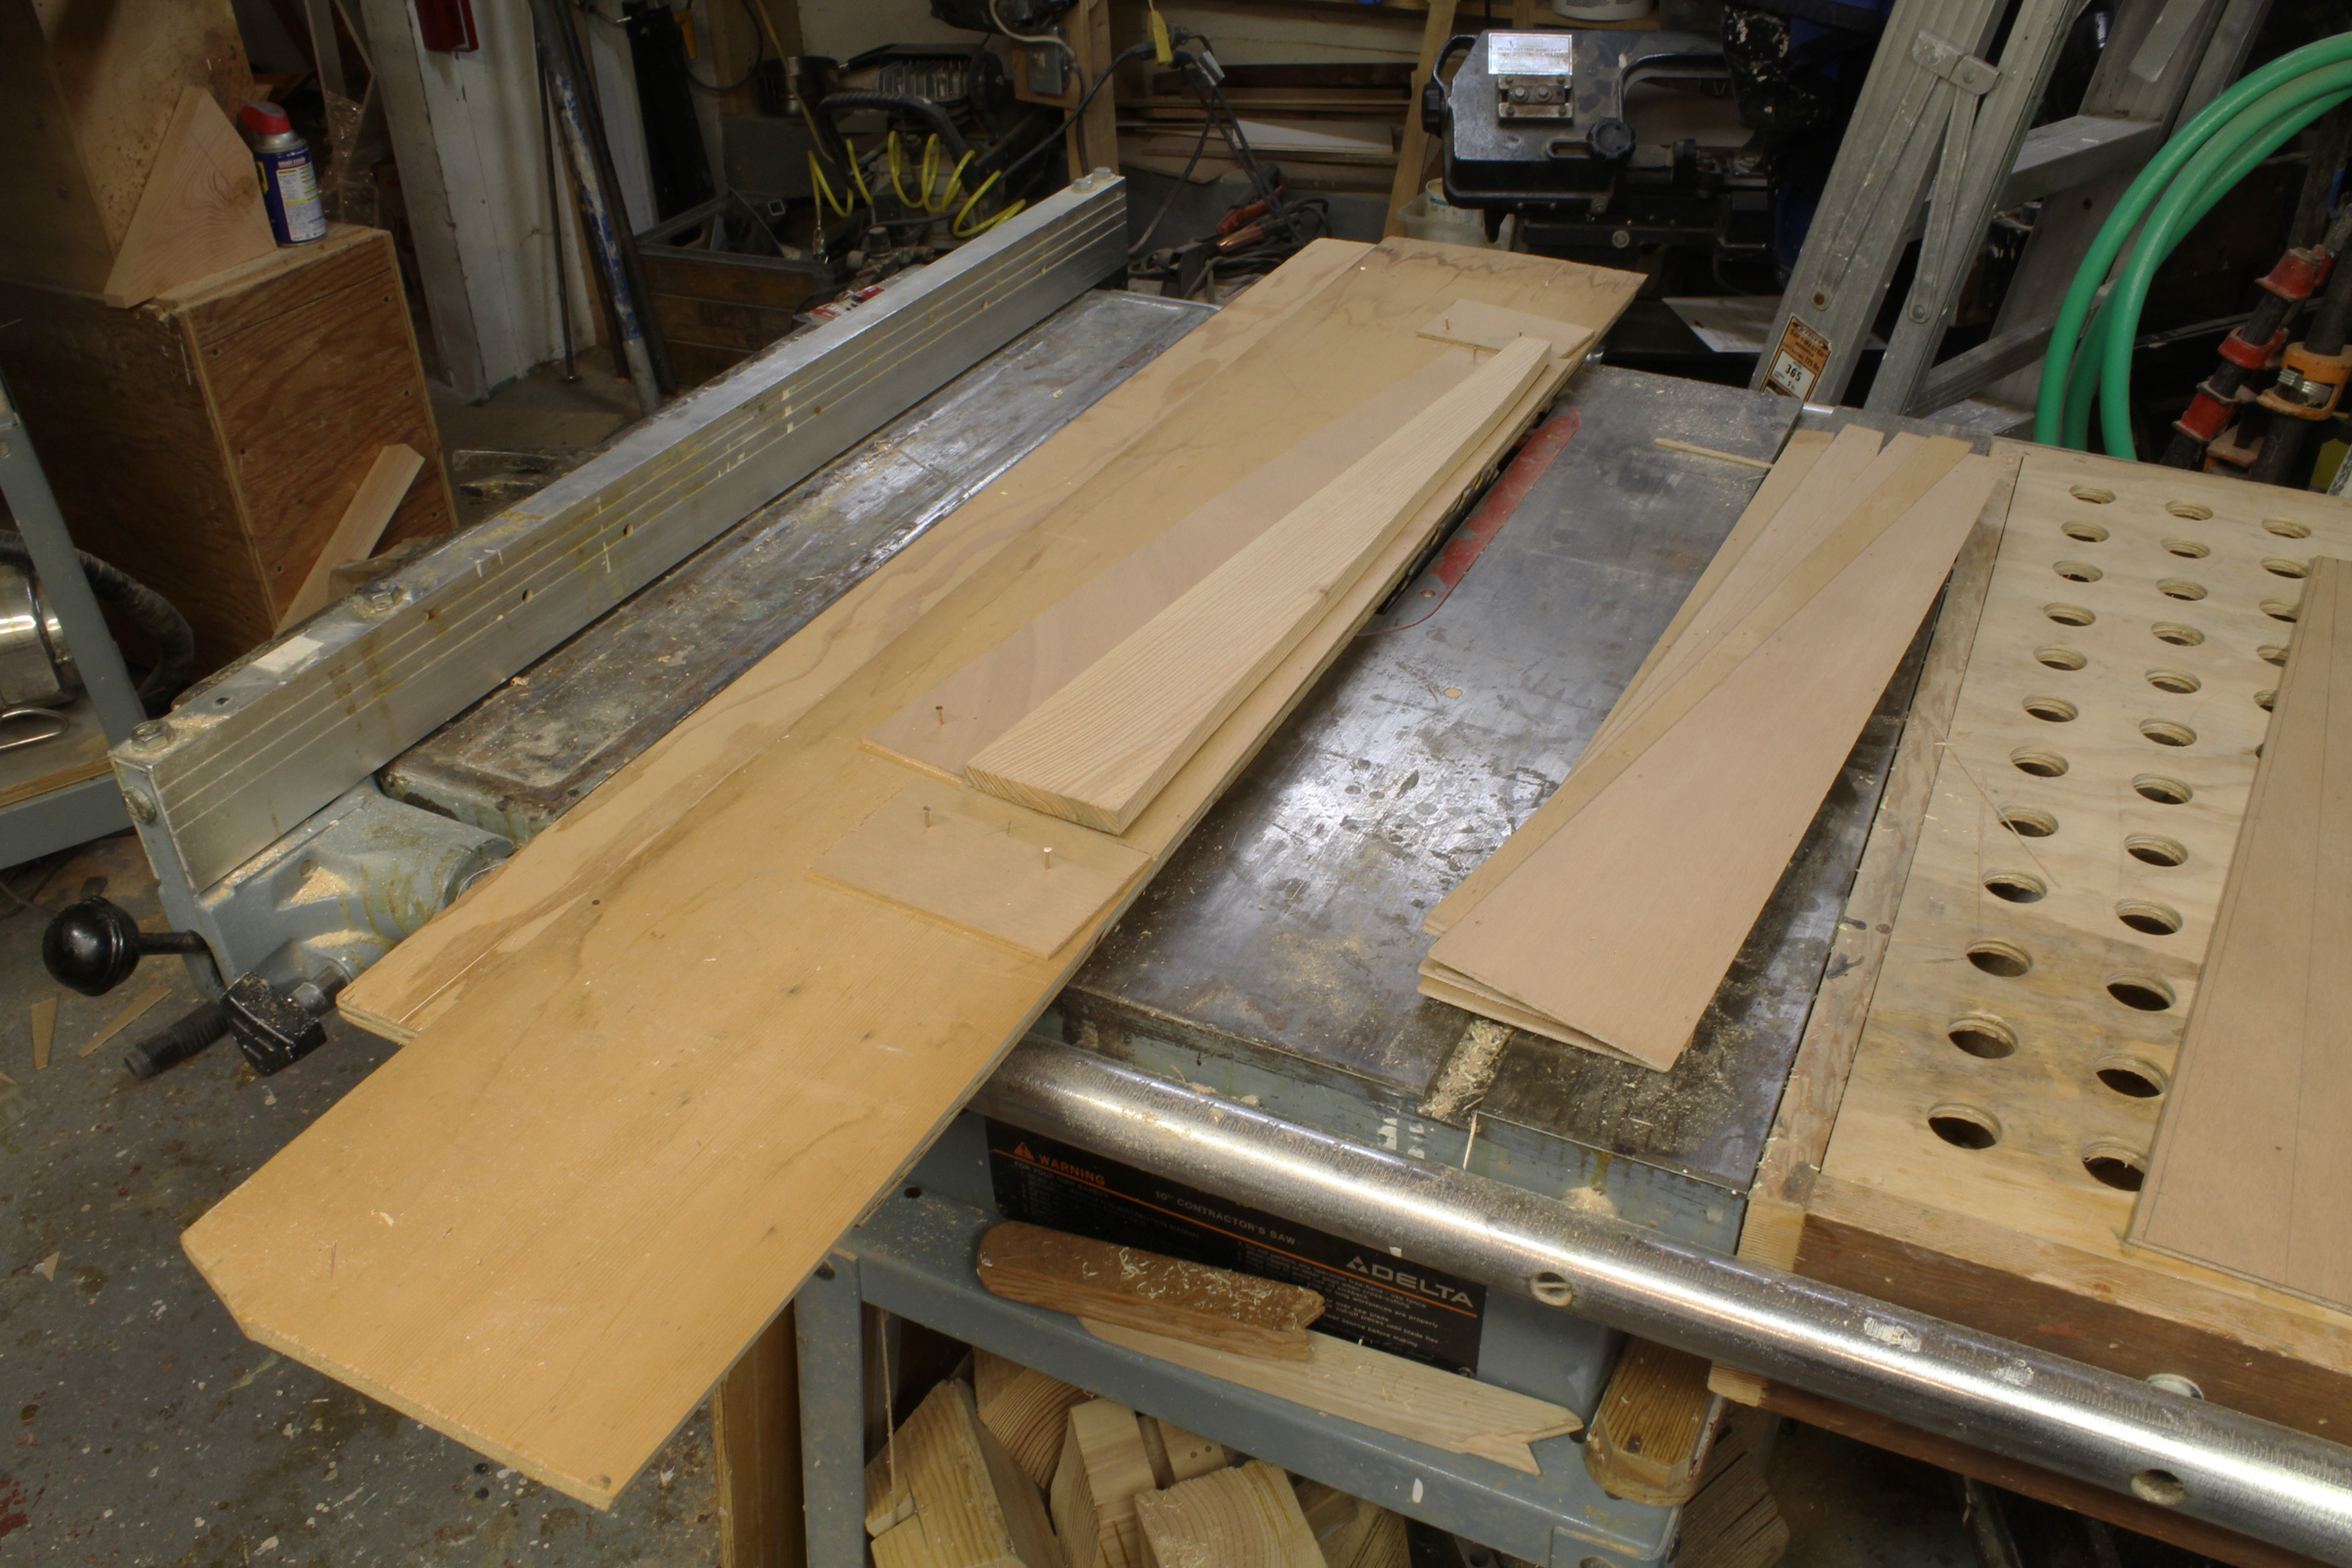
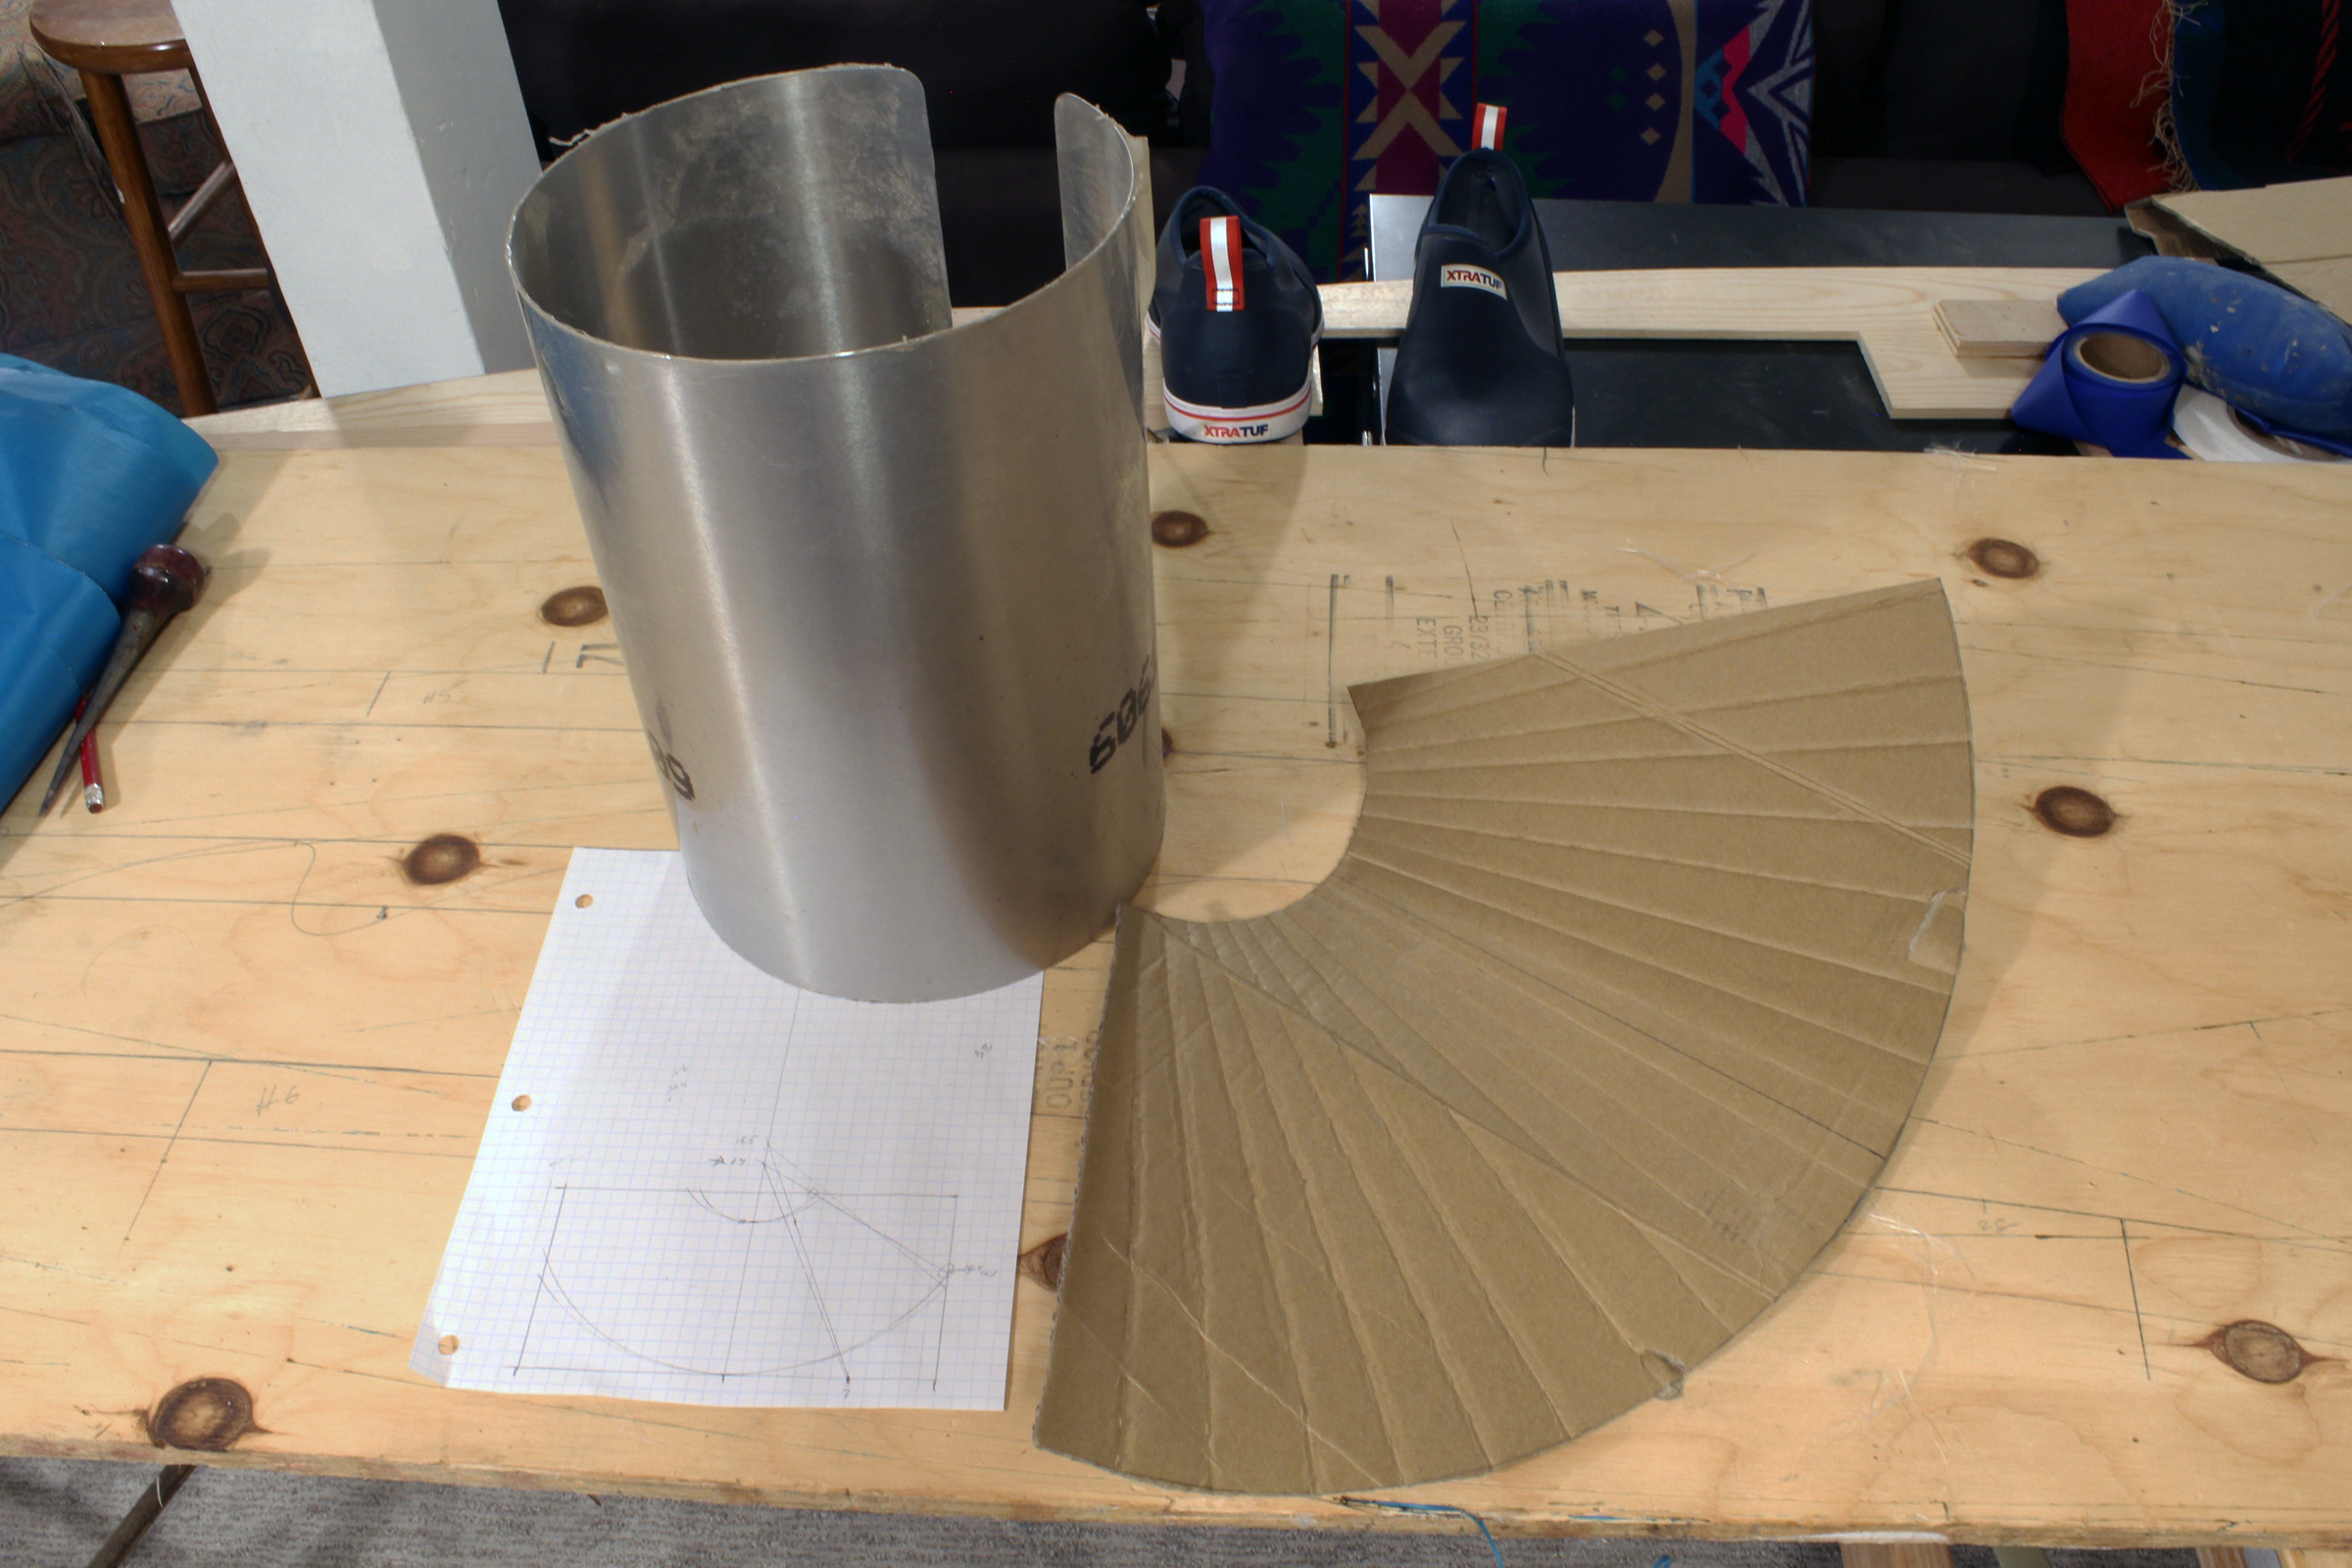
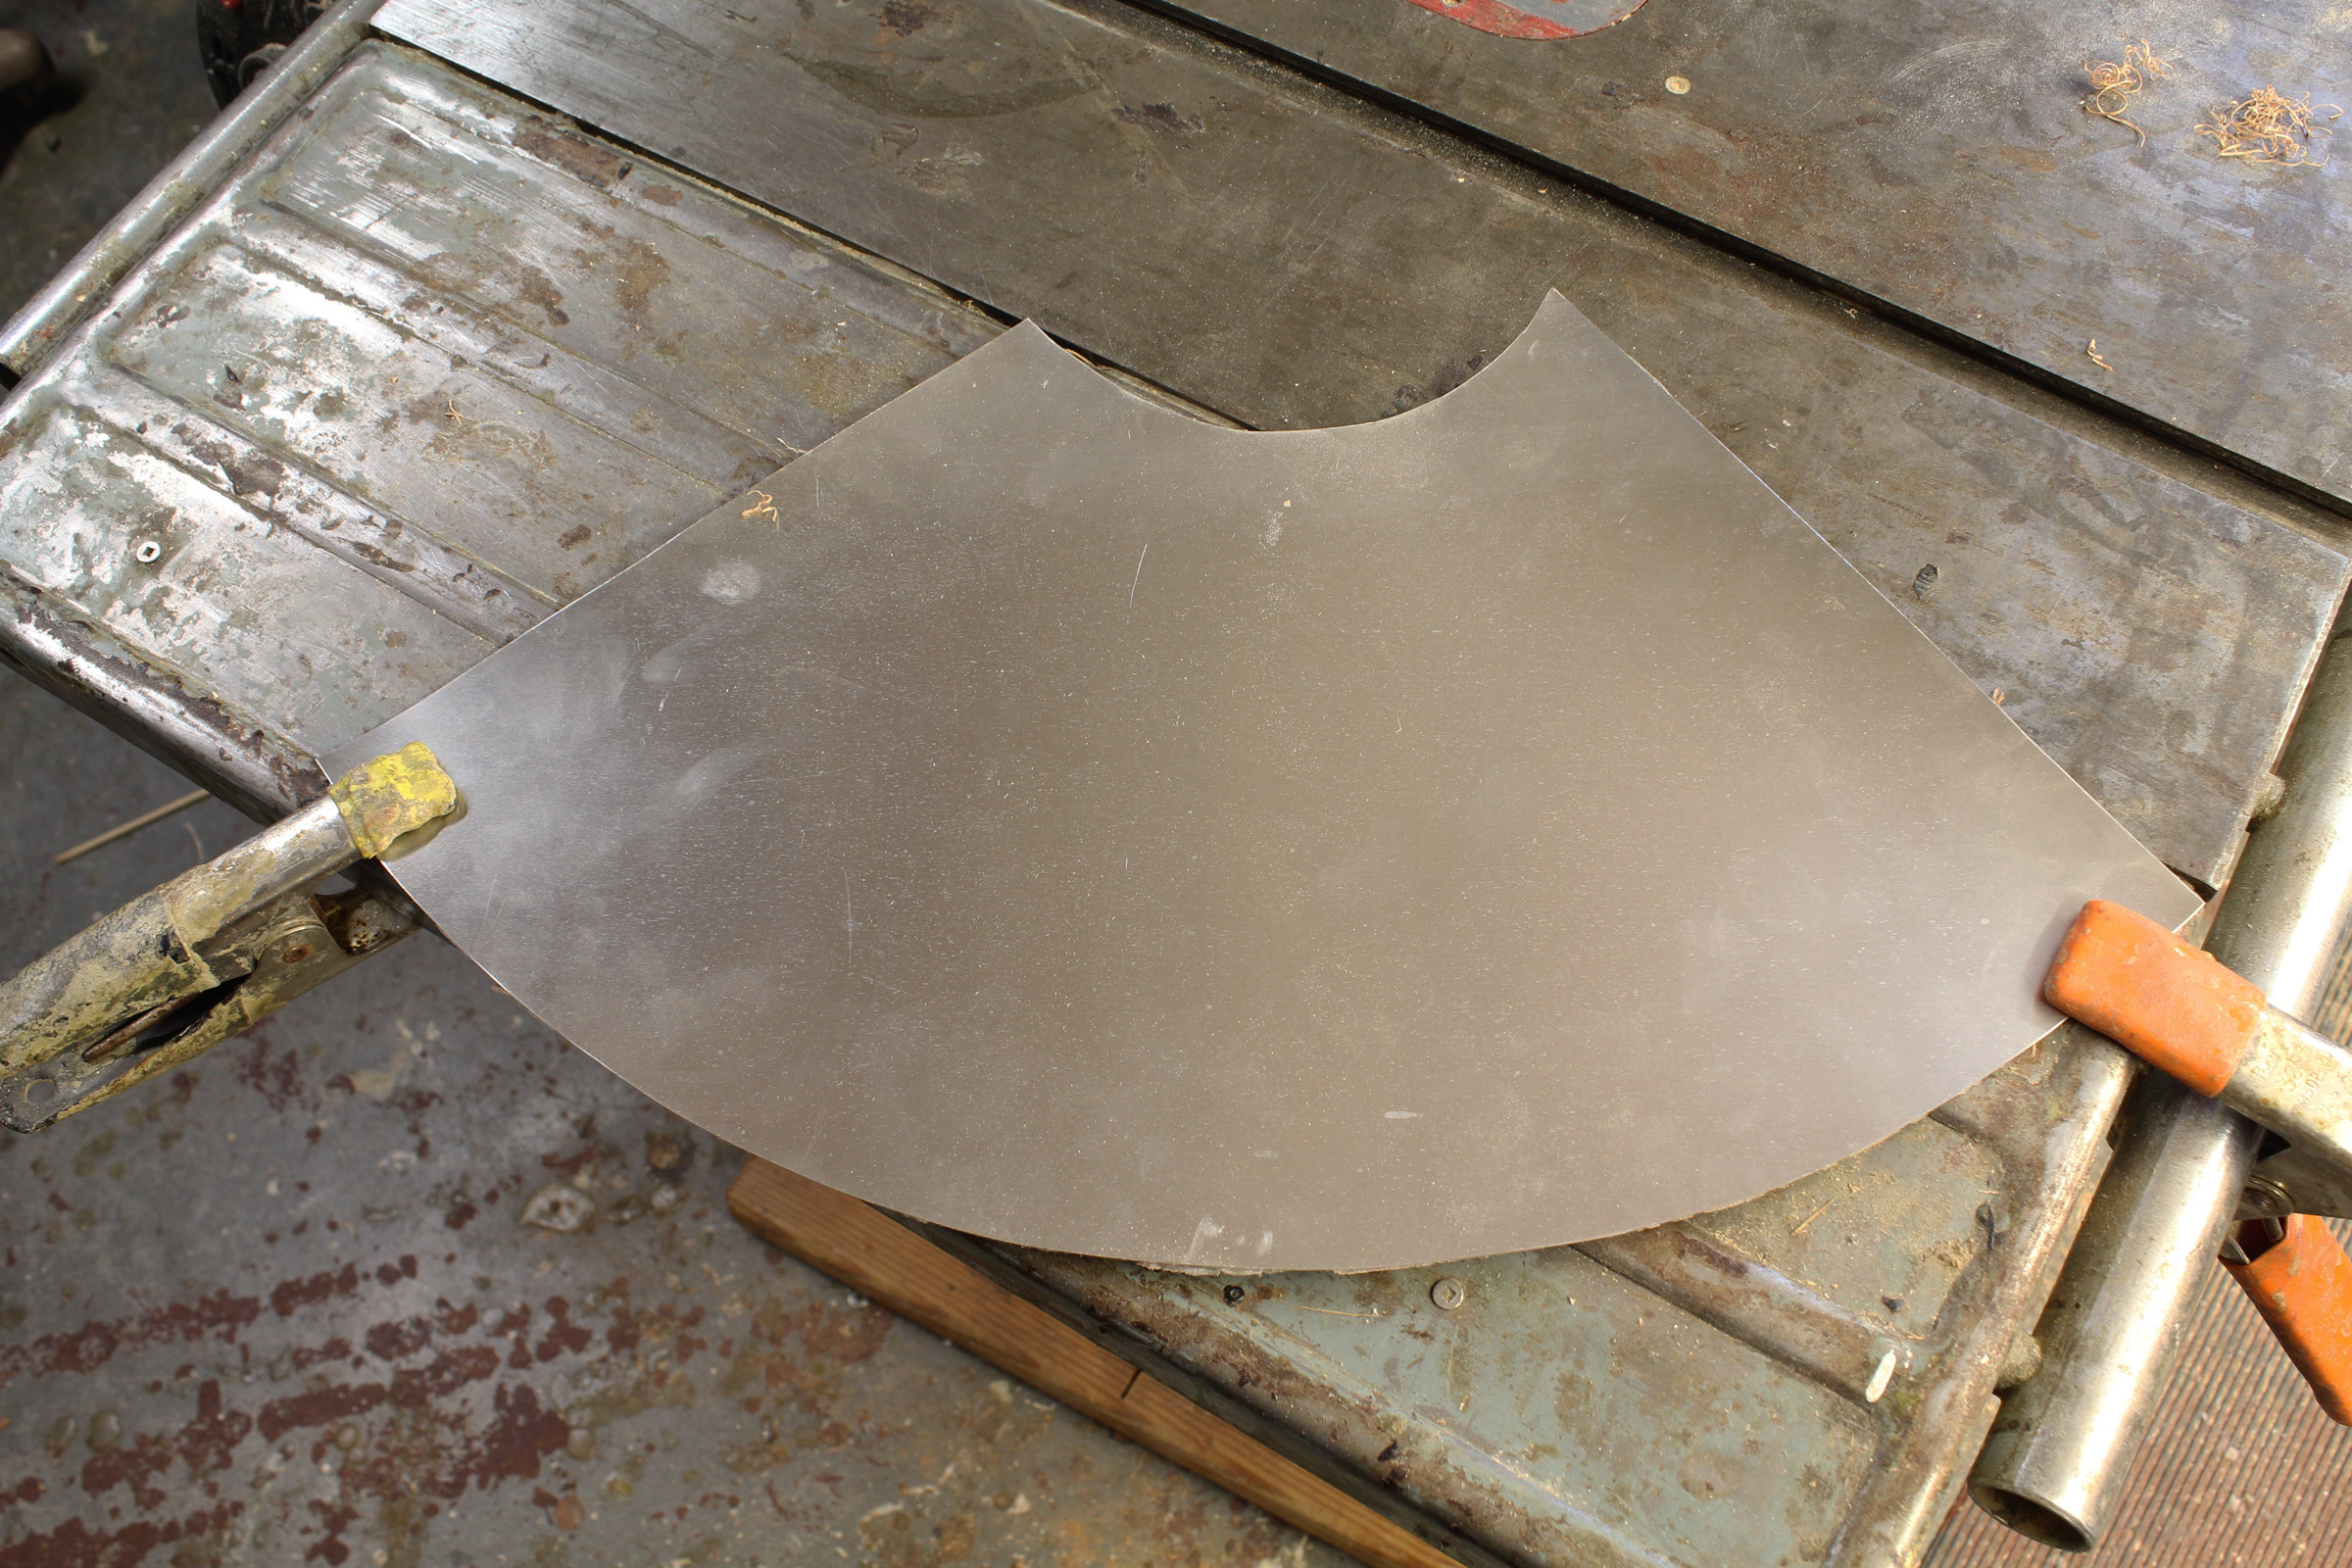
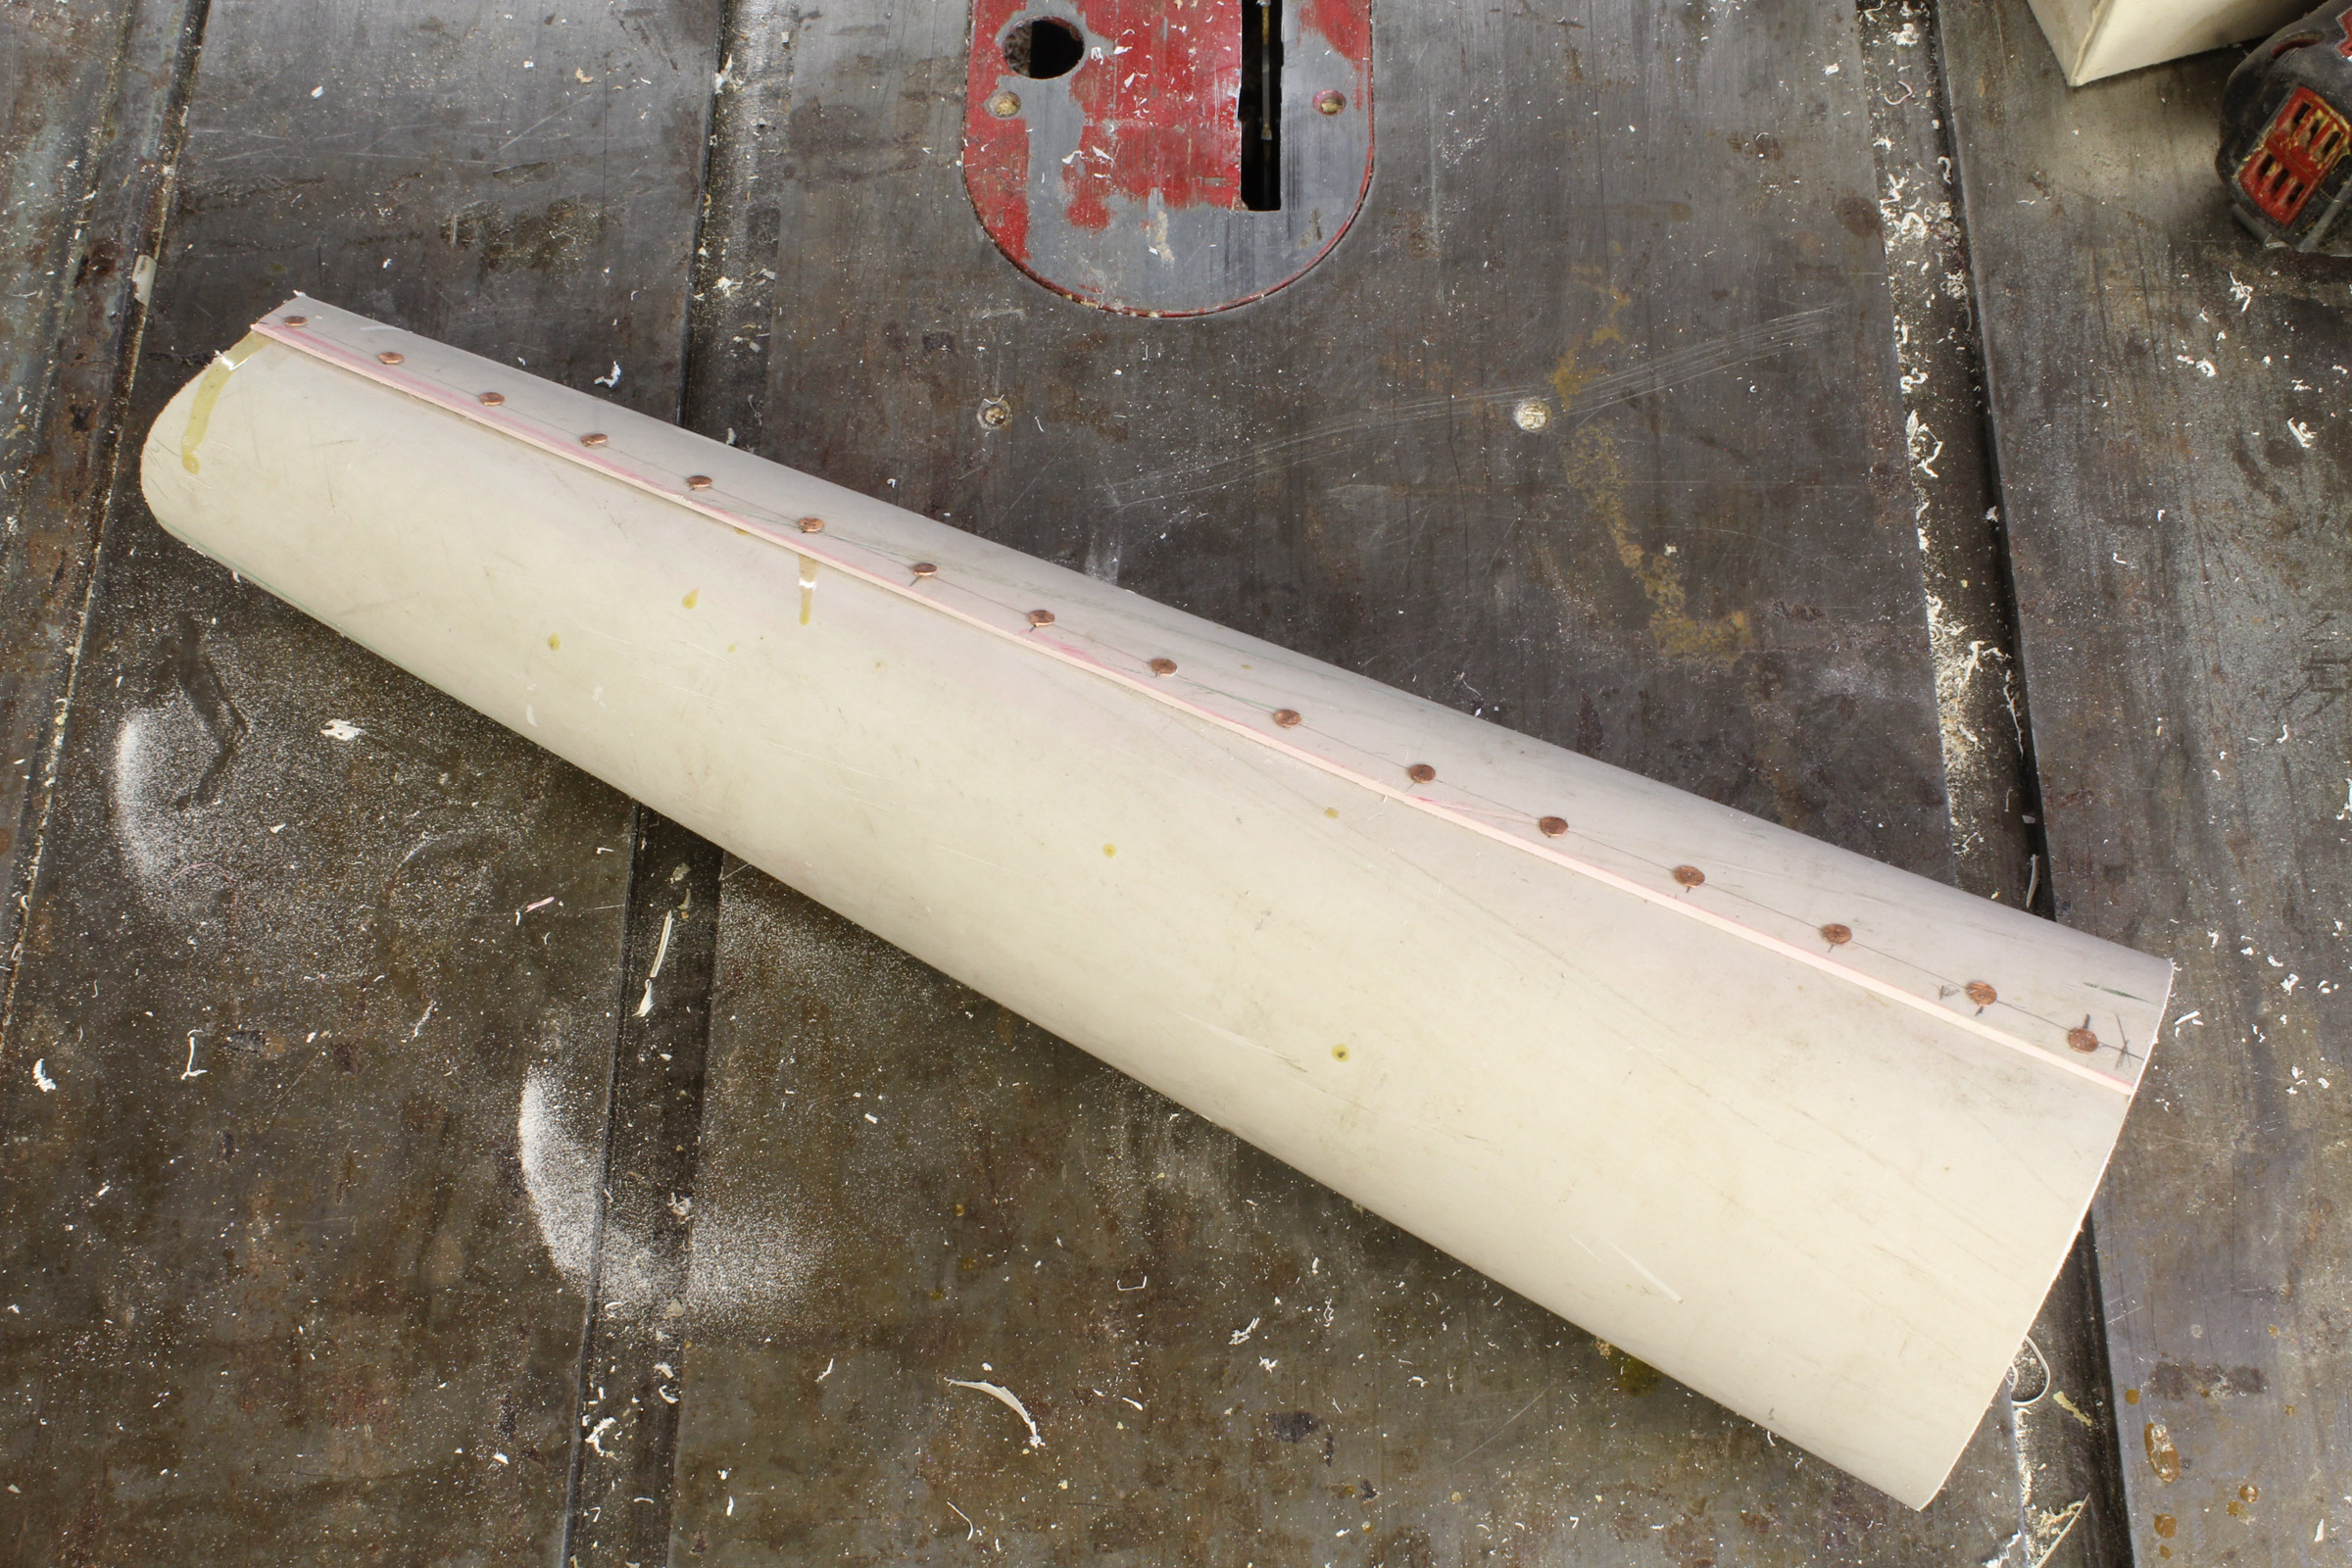
The Christmas Wherry is planked up from 9-mm okoume plywood using glued-lap construction, with eight planks to a side. It can also be built with cedar planking and traditional boatbuilding techniques, but Simmons likes the way fastenings hold in okoume, which he also used for the wide plank keel and the centerboard. Simmons uses Honduras mahogany for the thwarts and oak for the wherry’s inwales and rubrails. He doesn’t use the traditional oak keel because it’s too difficult nowadays to find wide oak planks that won’t cup.
Courtesy of Walter Simmons
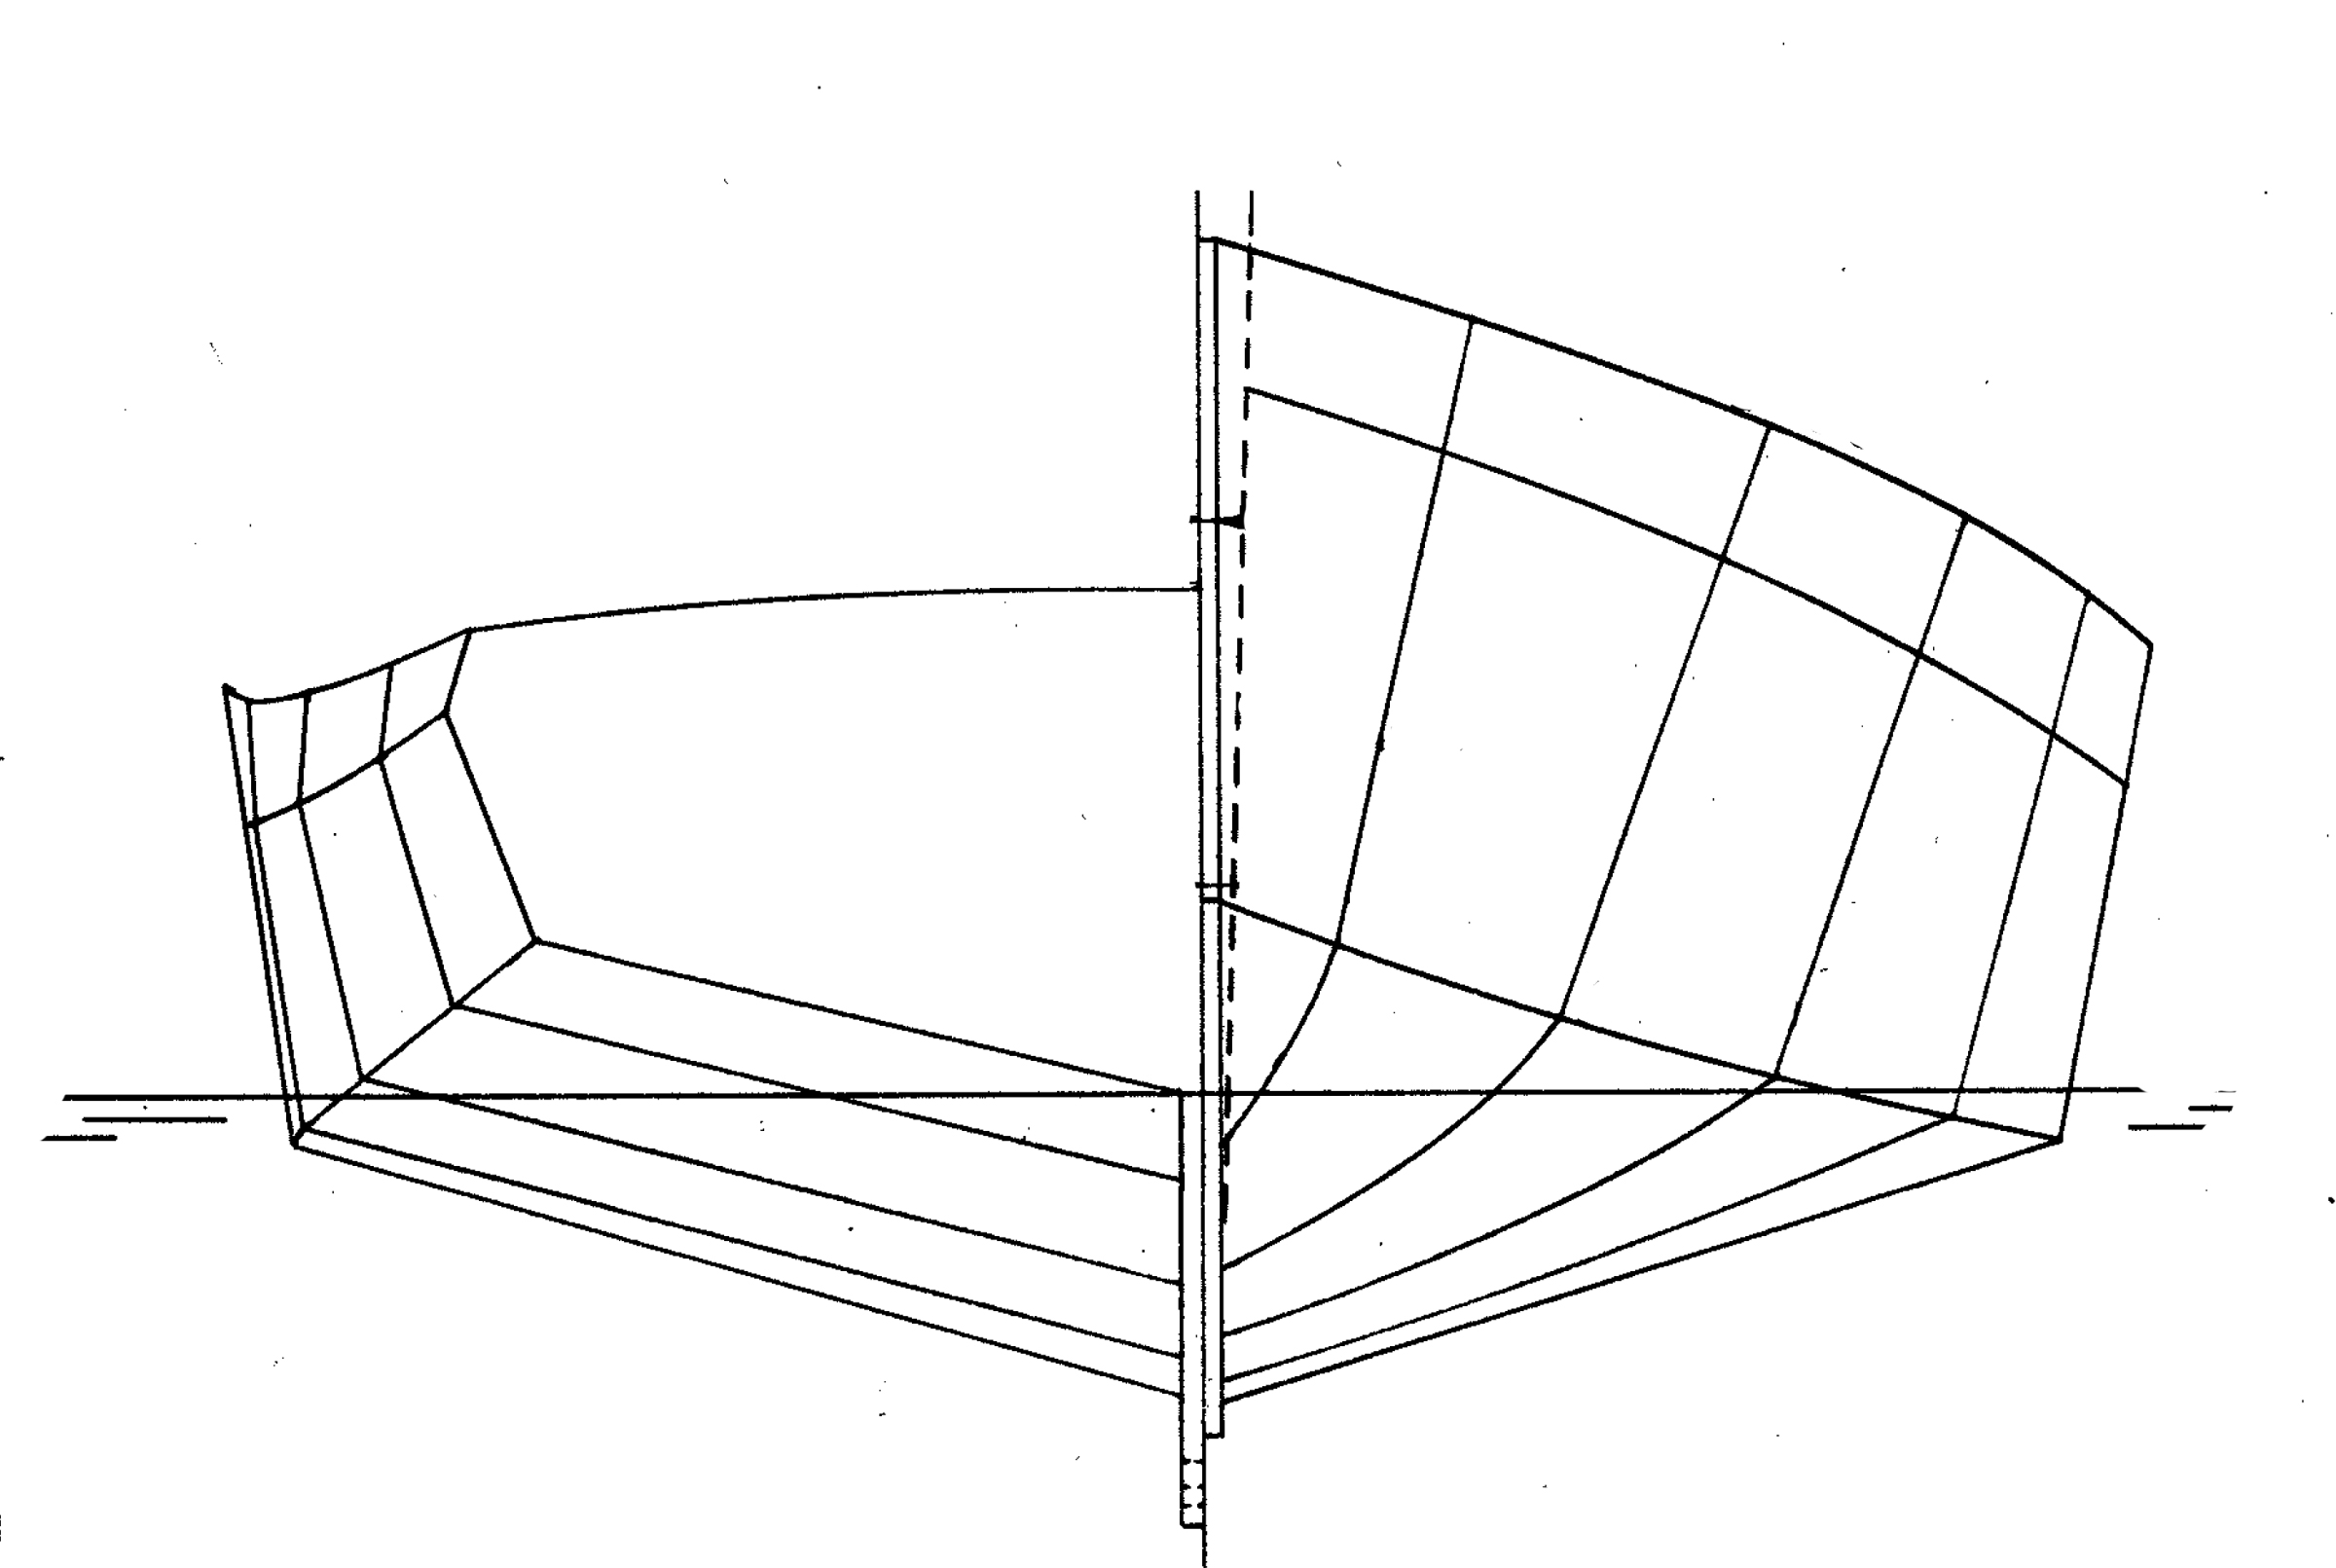
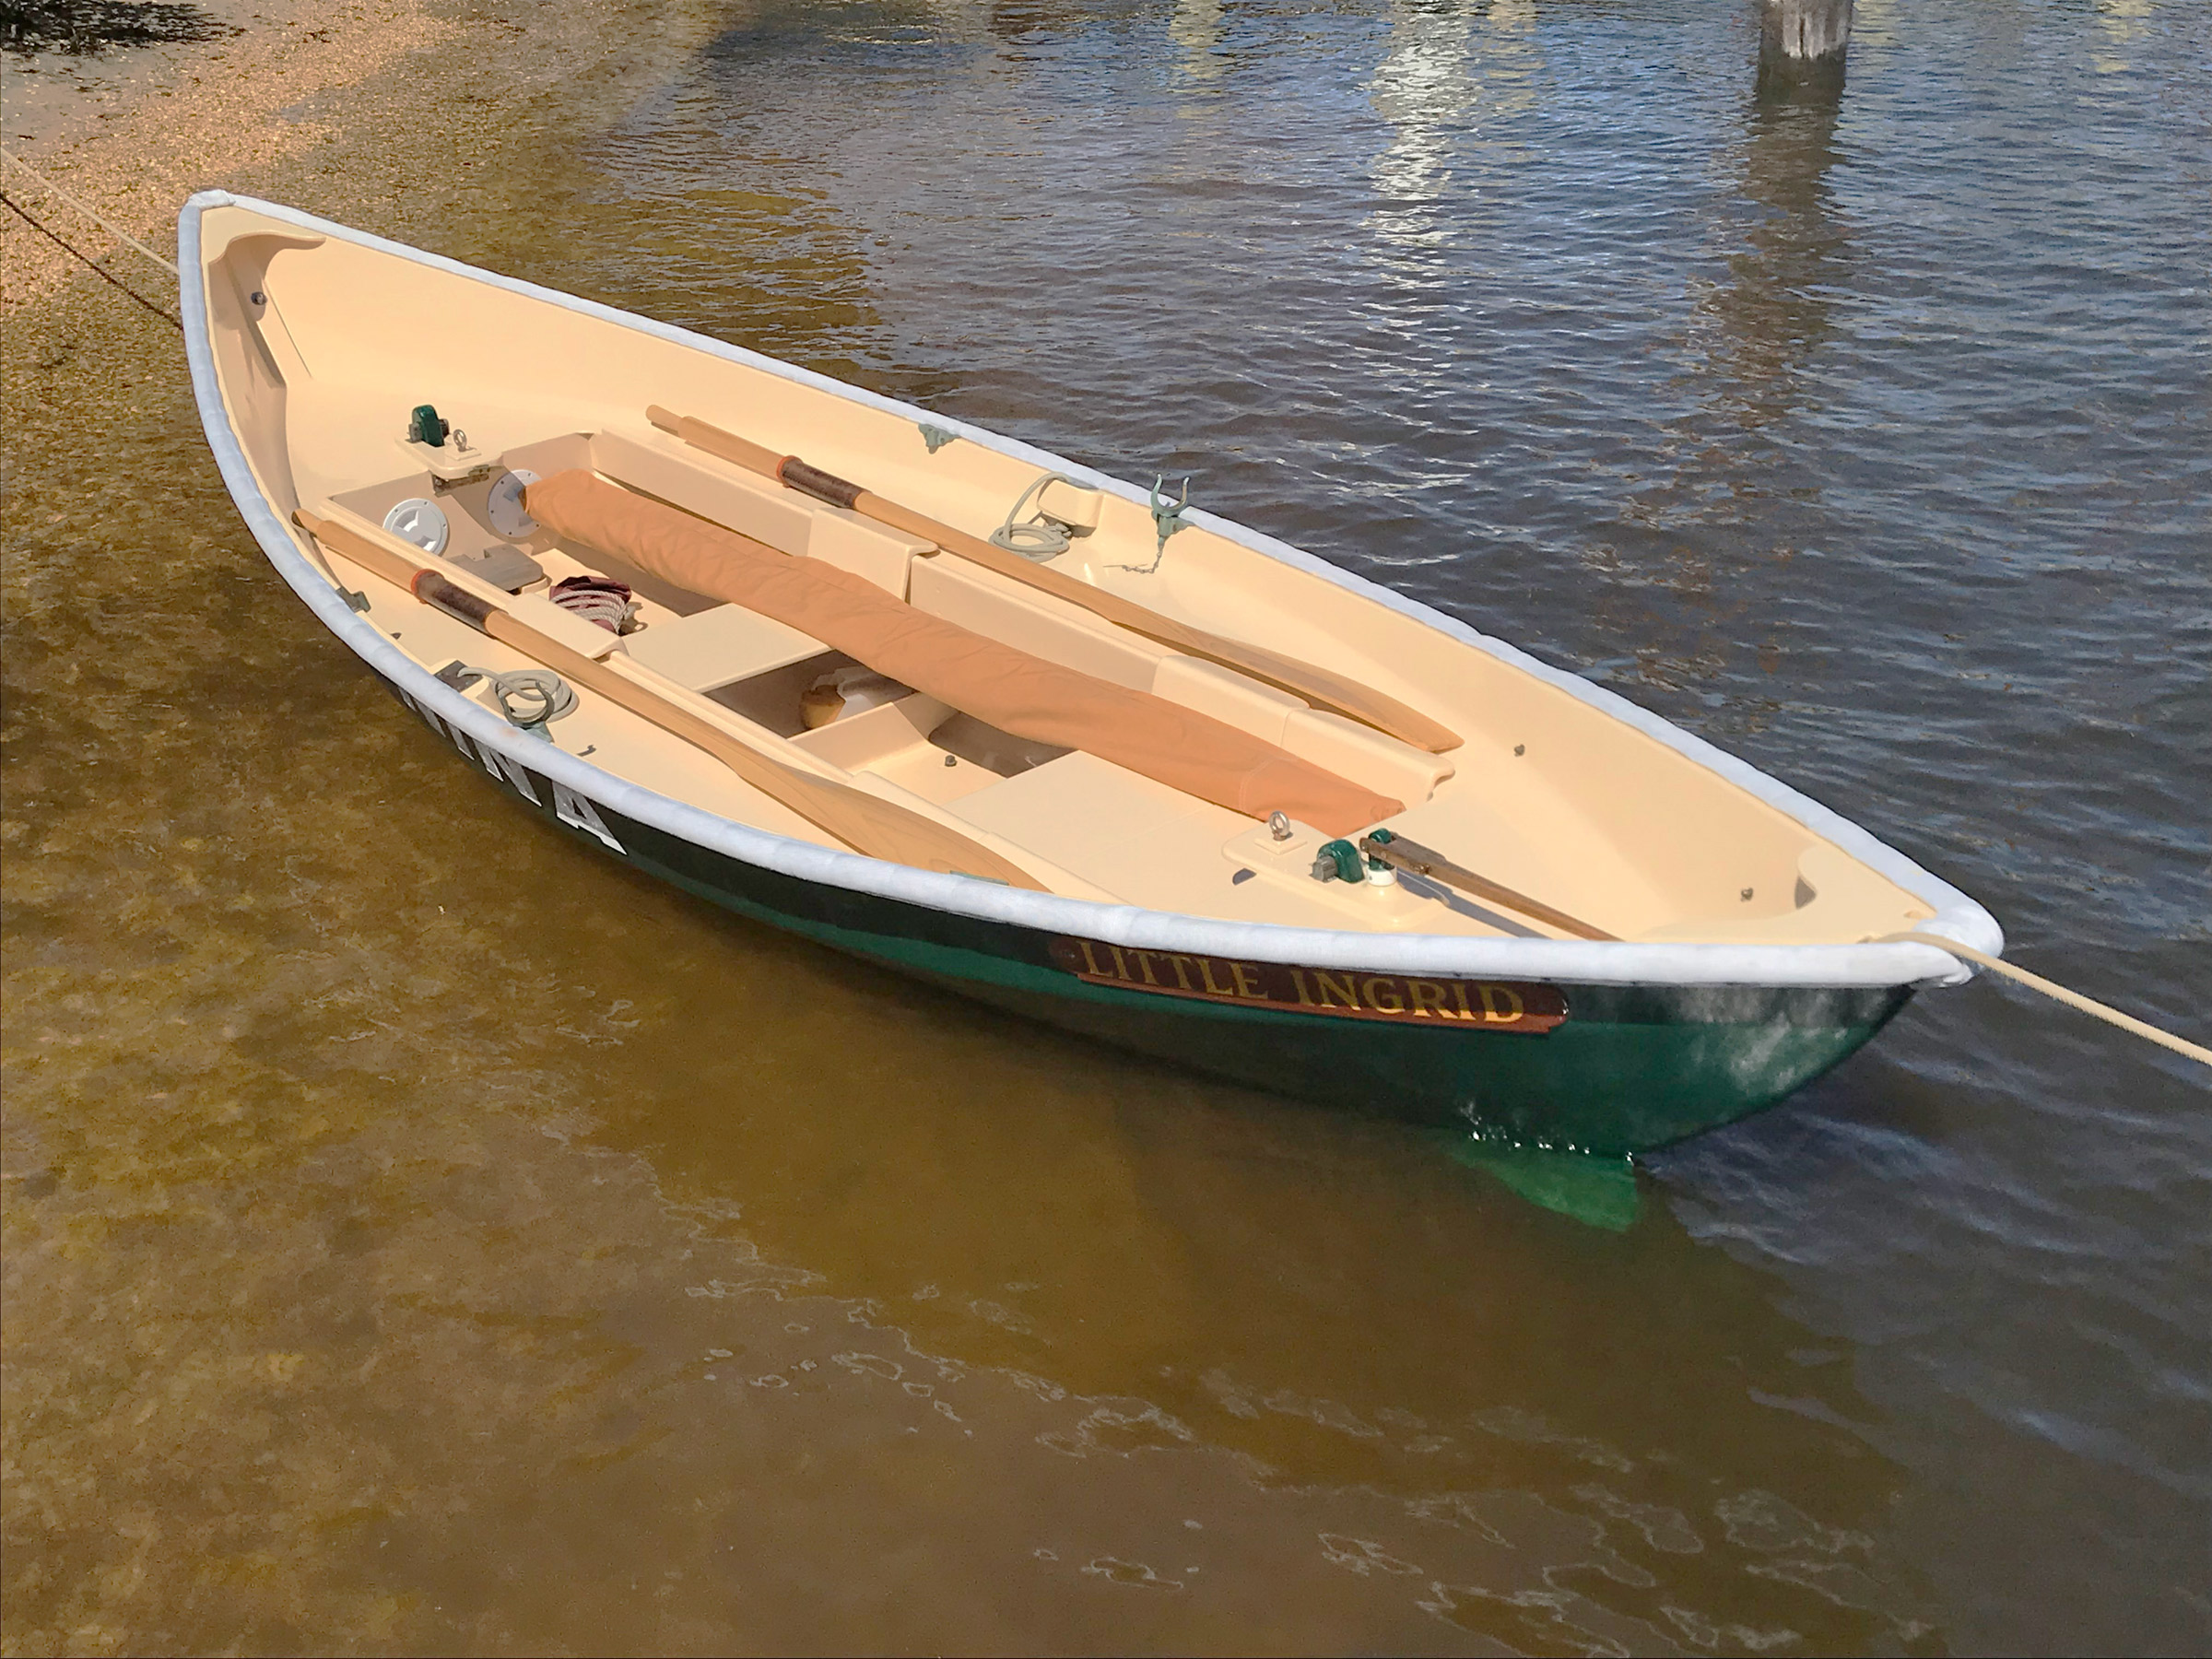
A plank keel allows the wherry to stand upright on the beach.
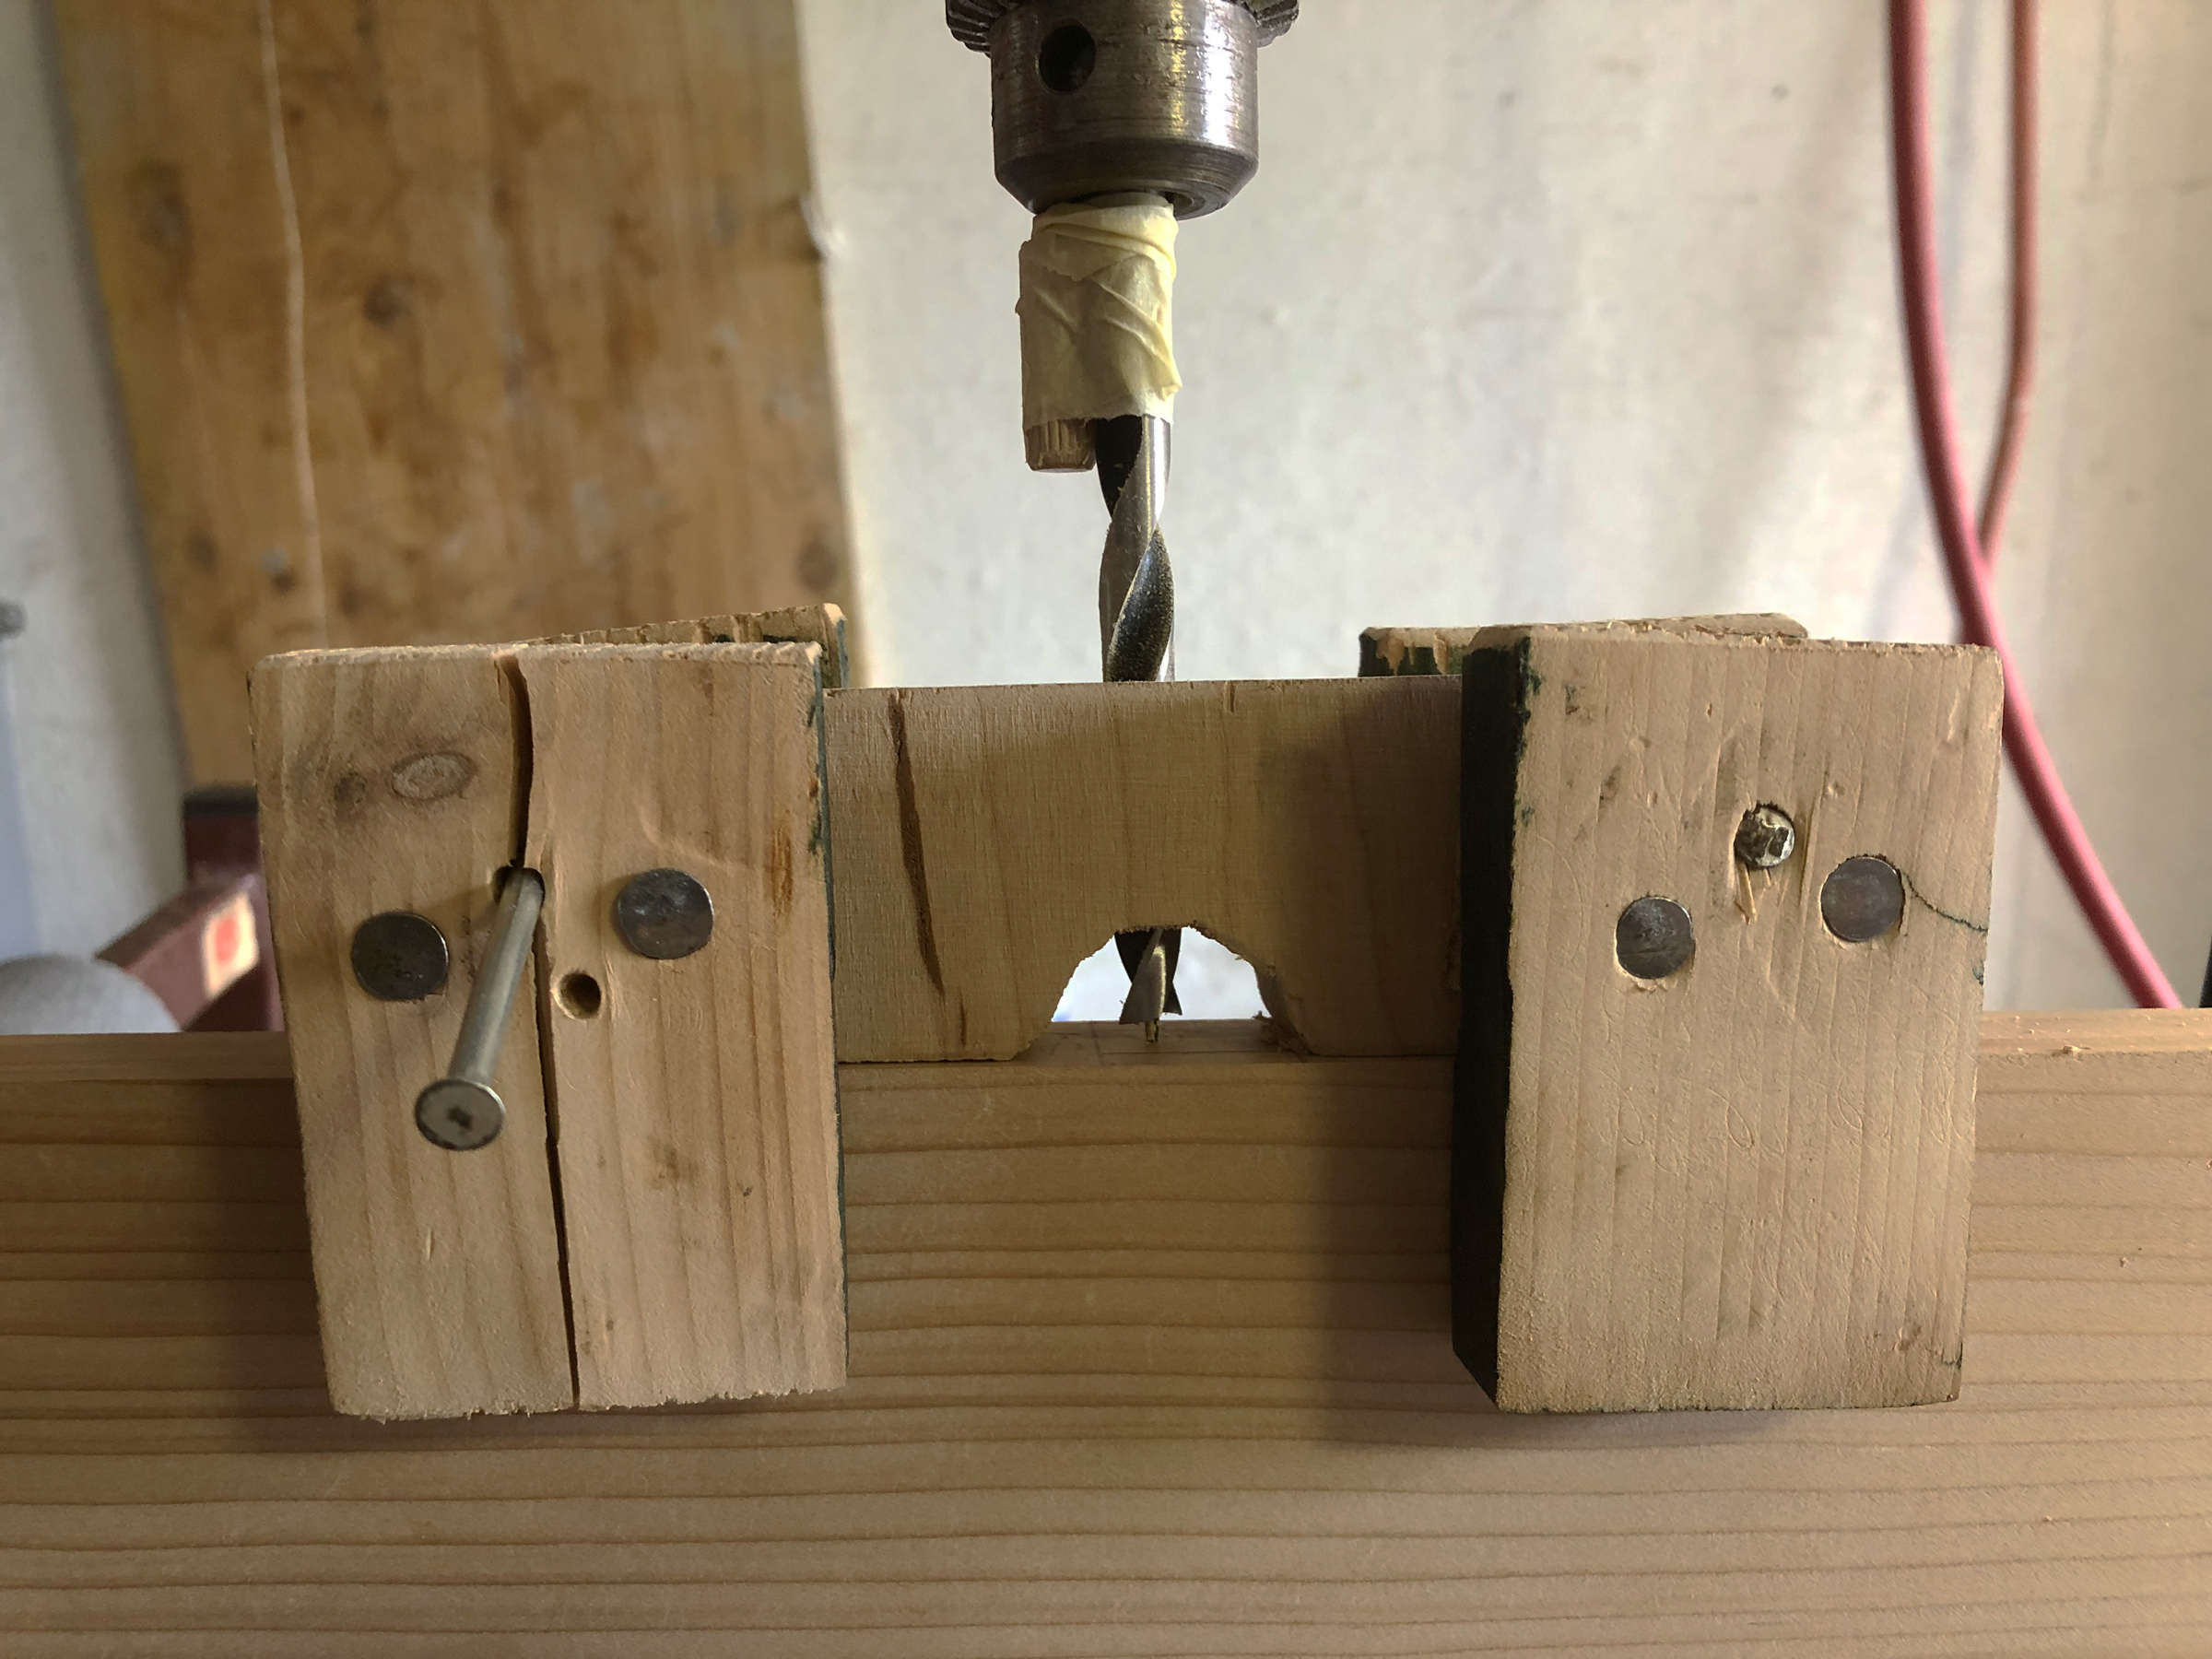
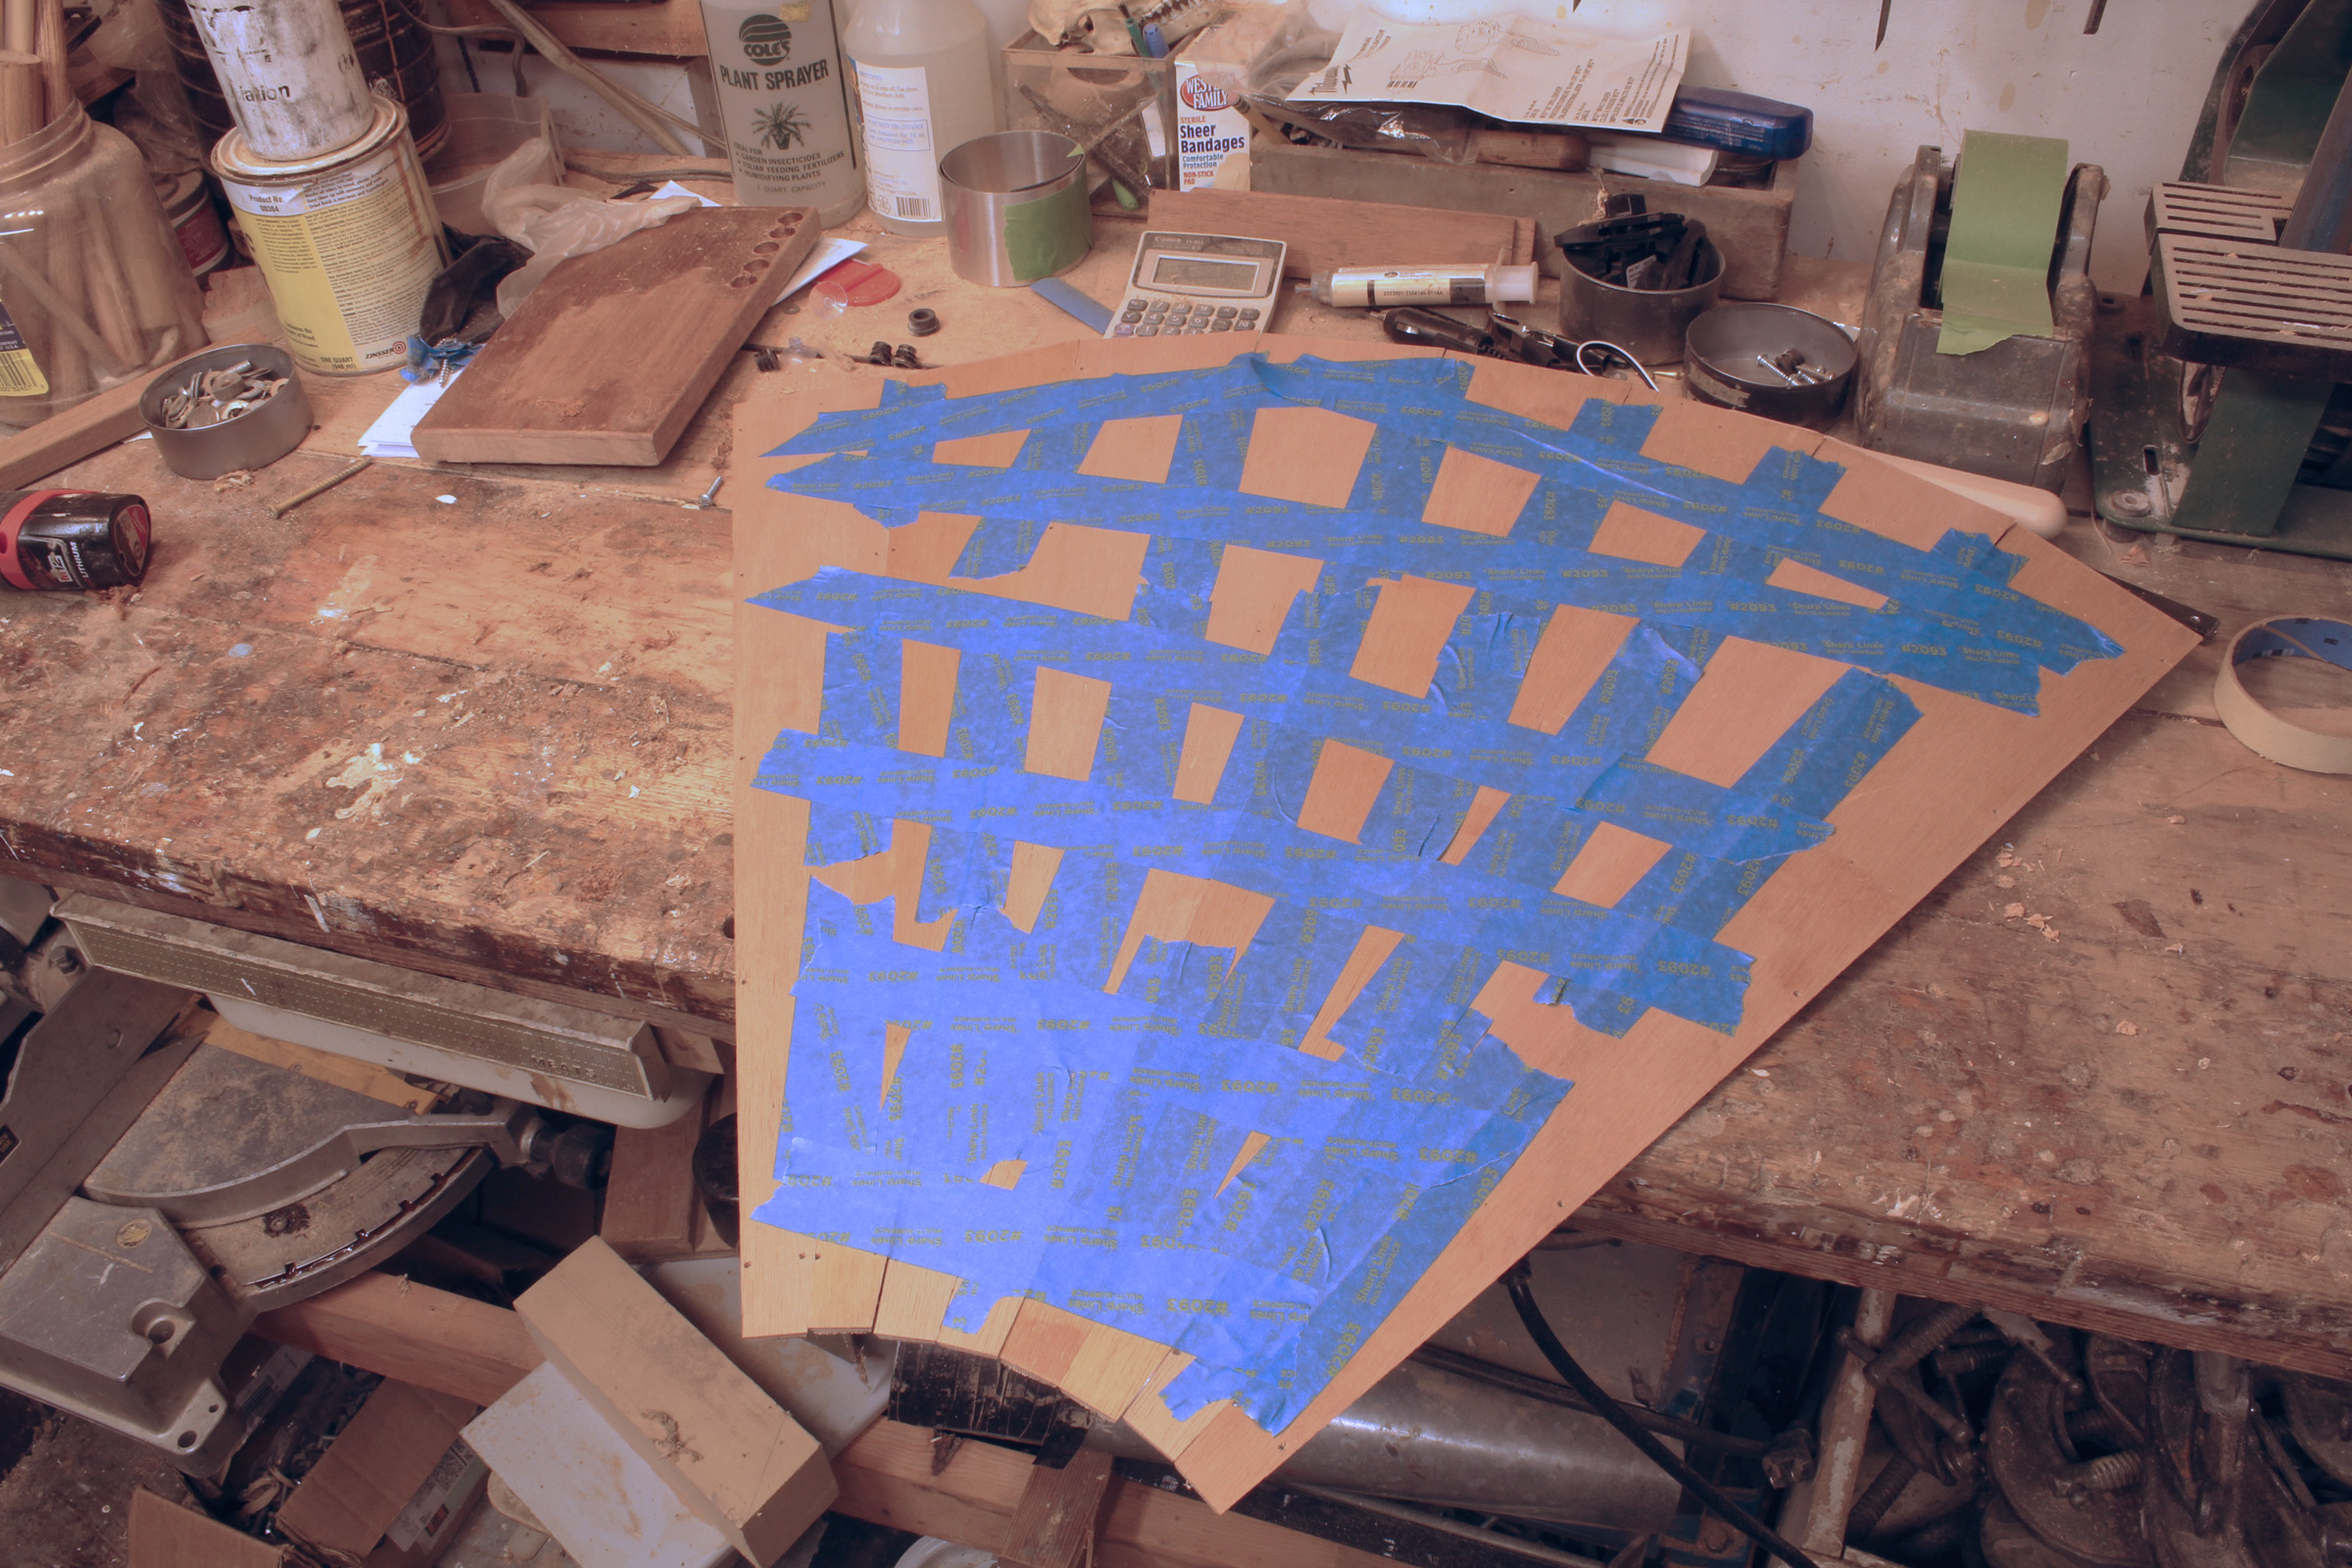
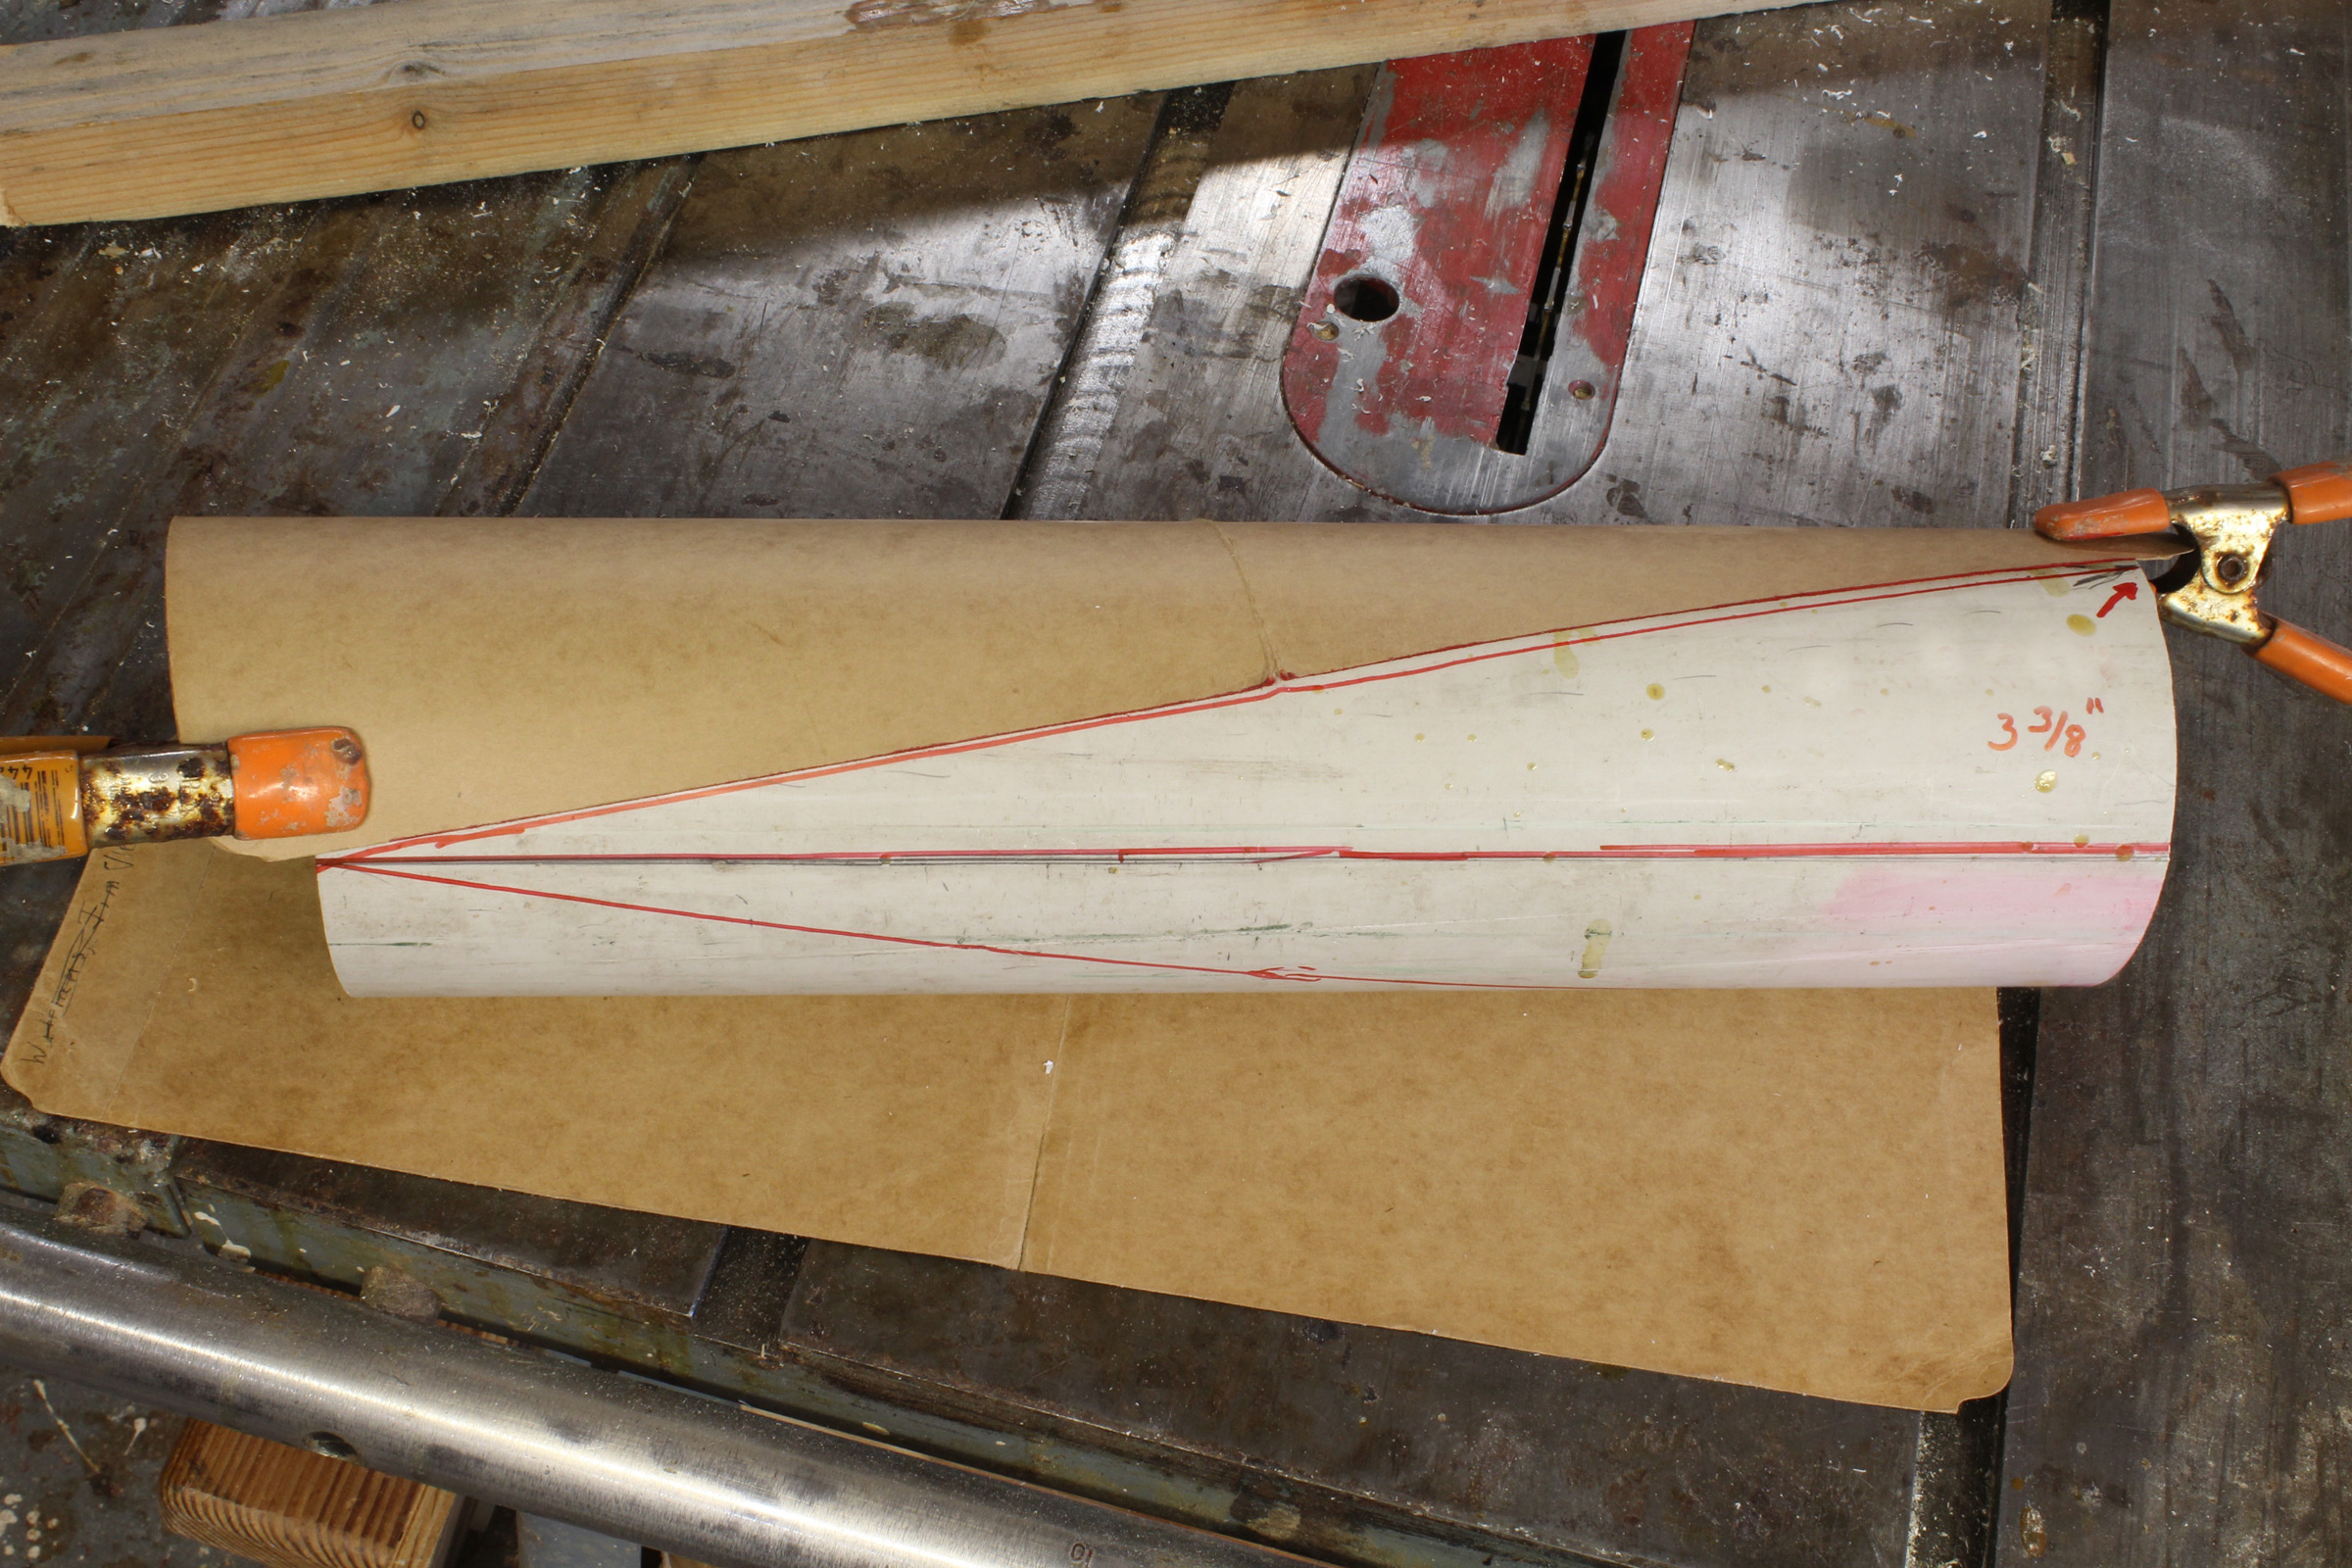
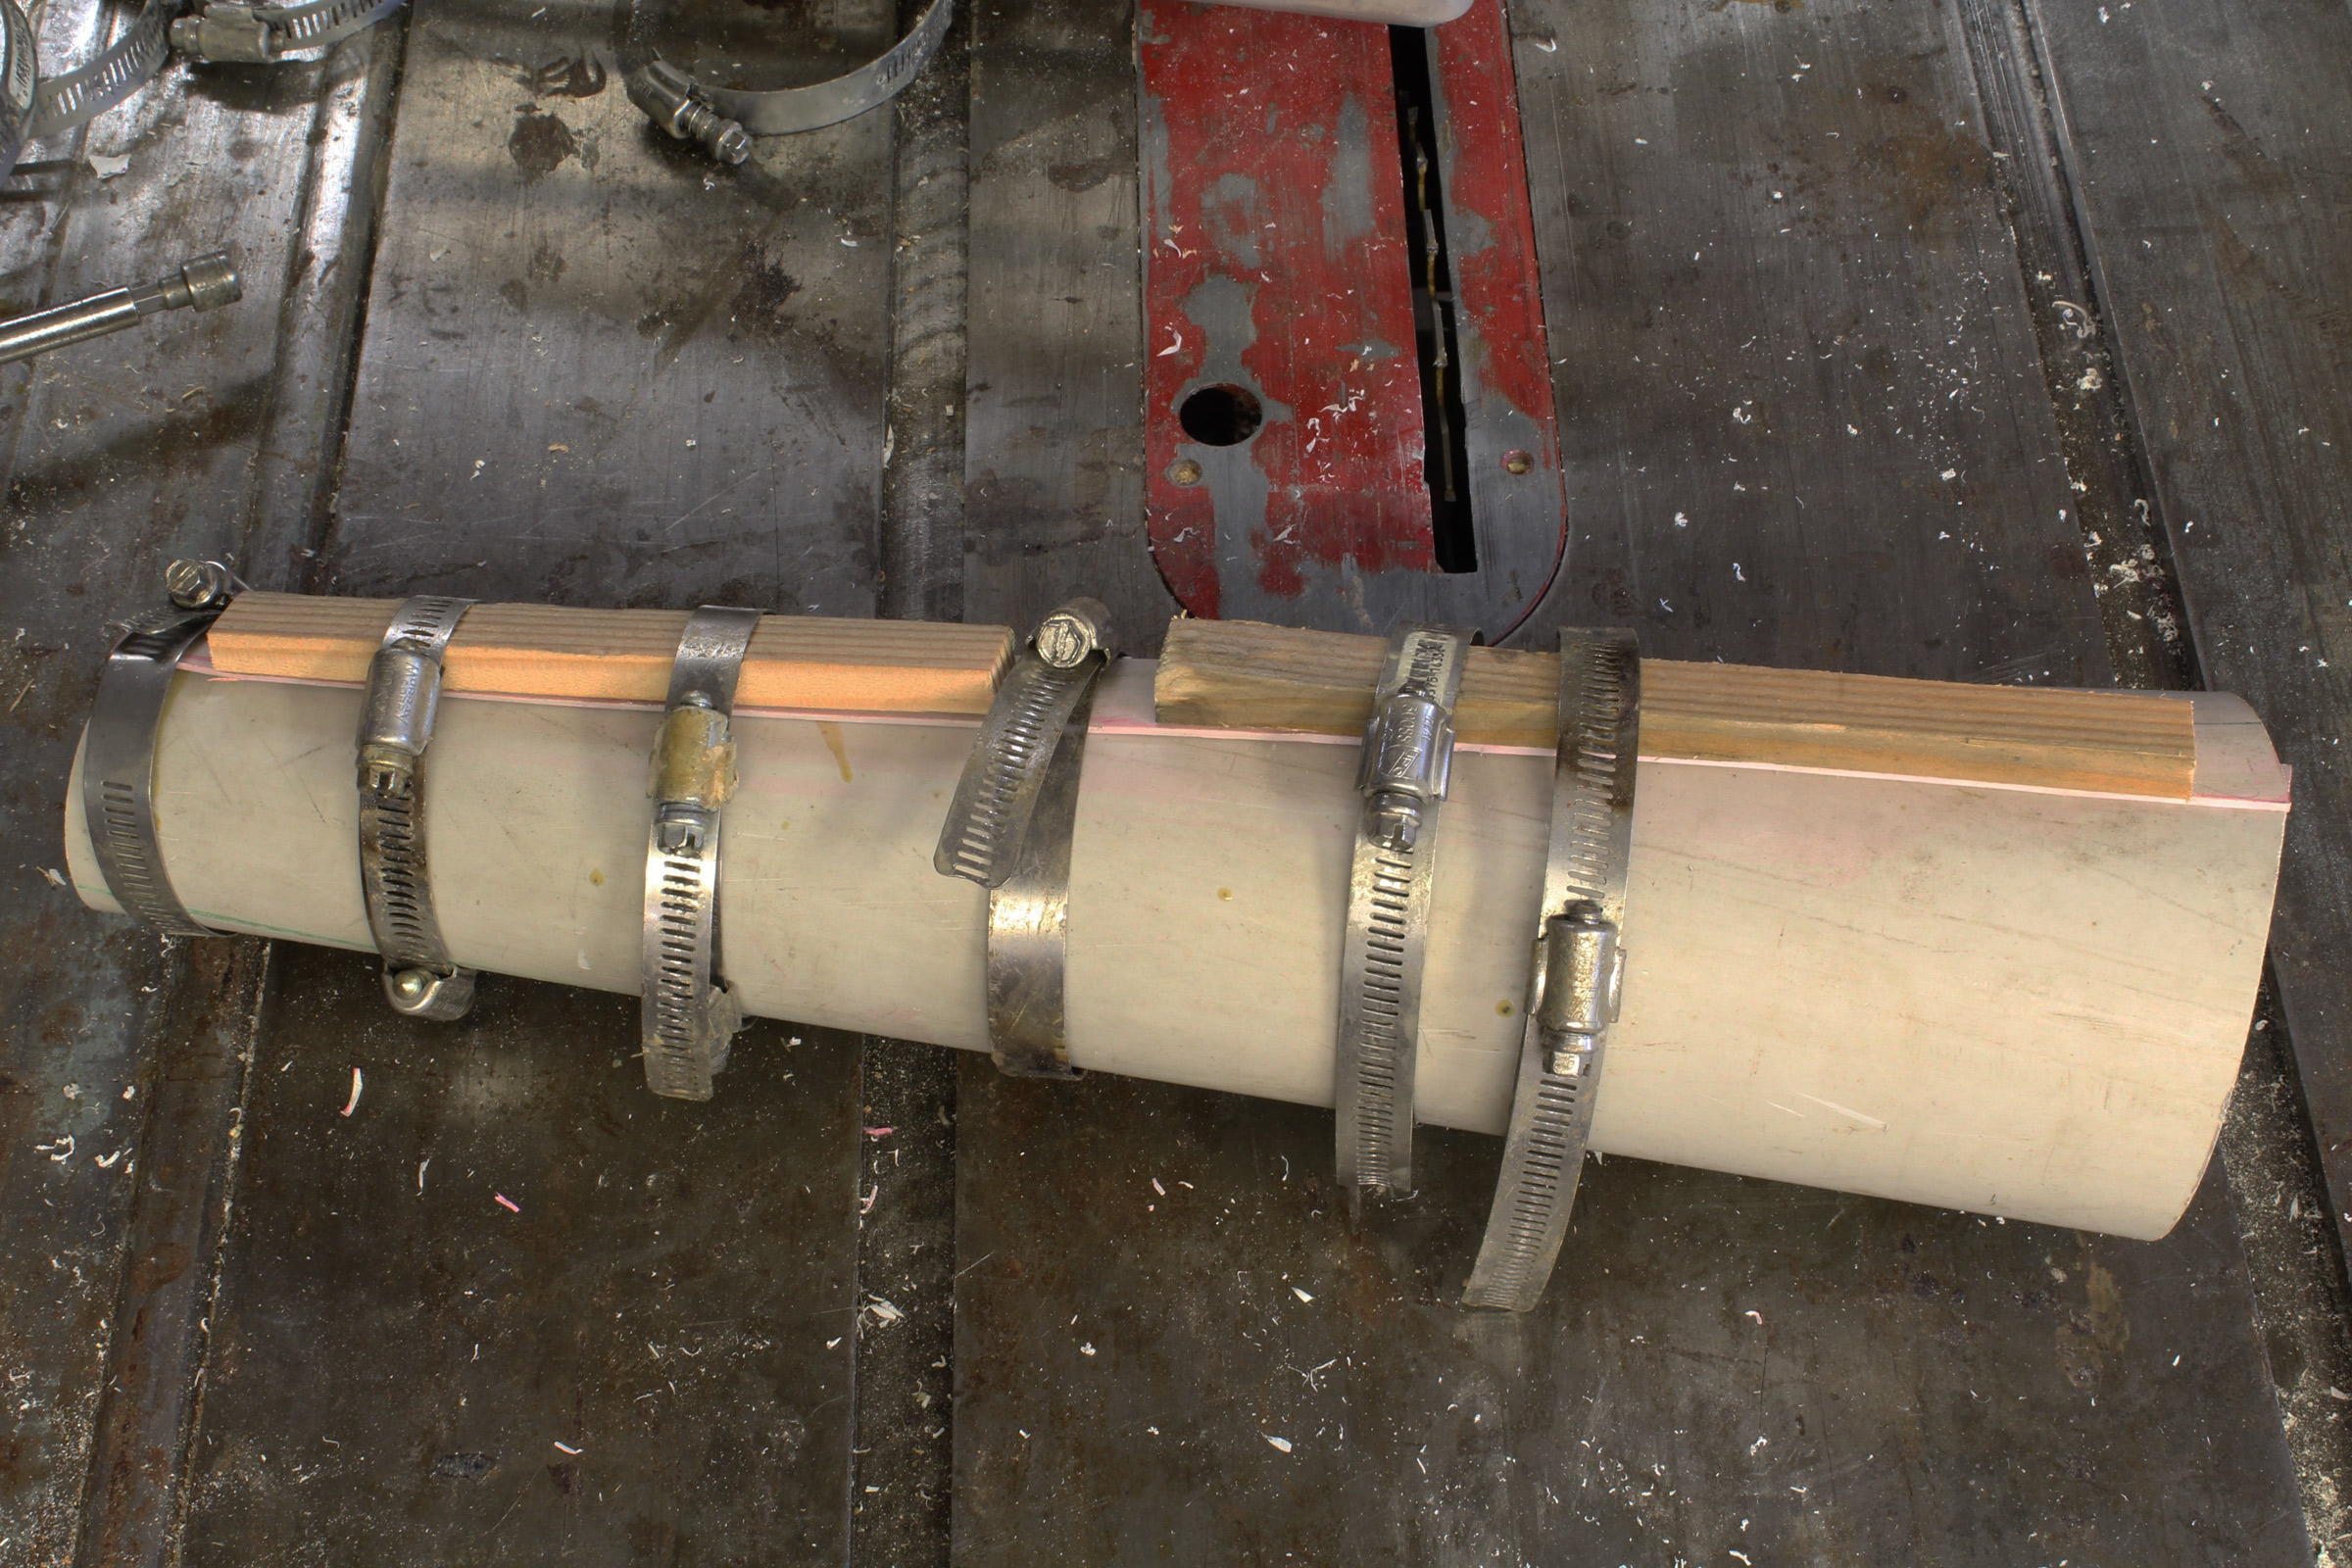
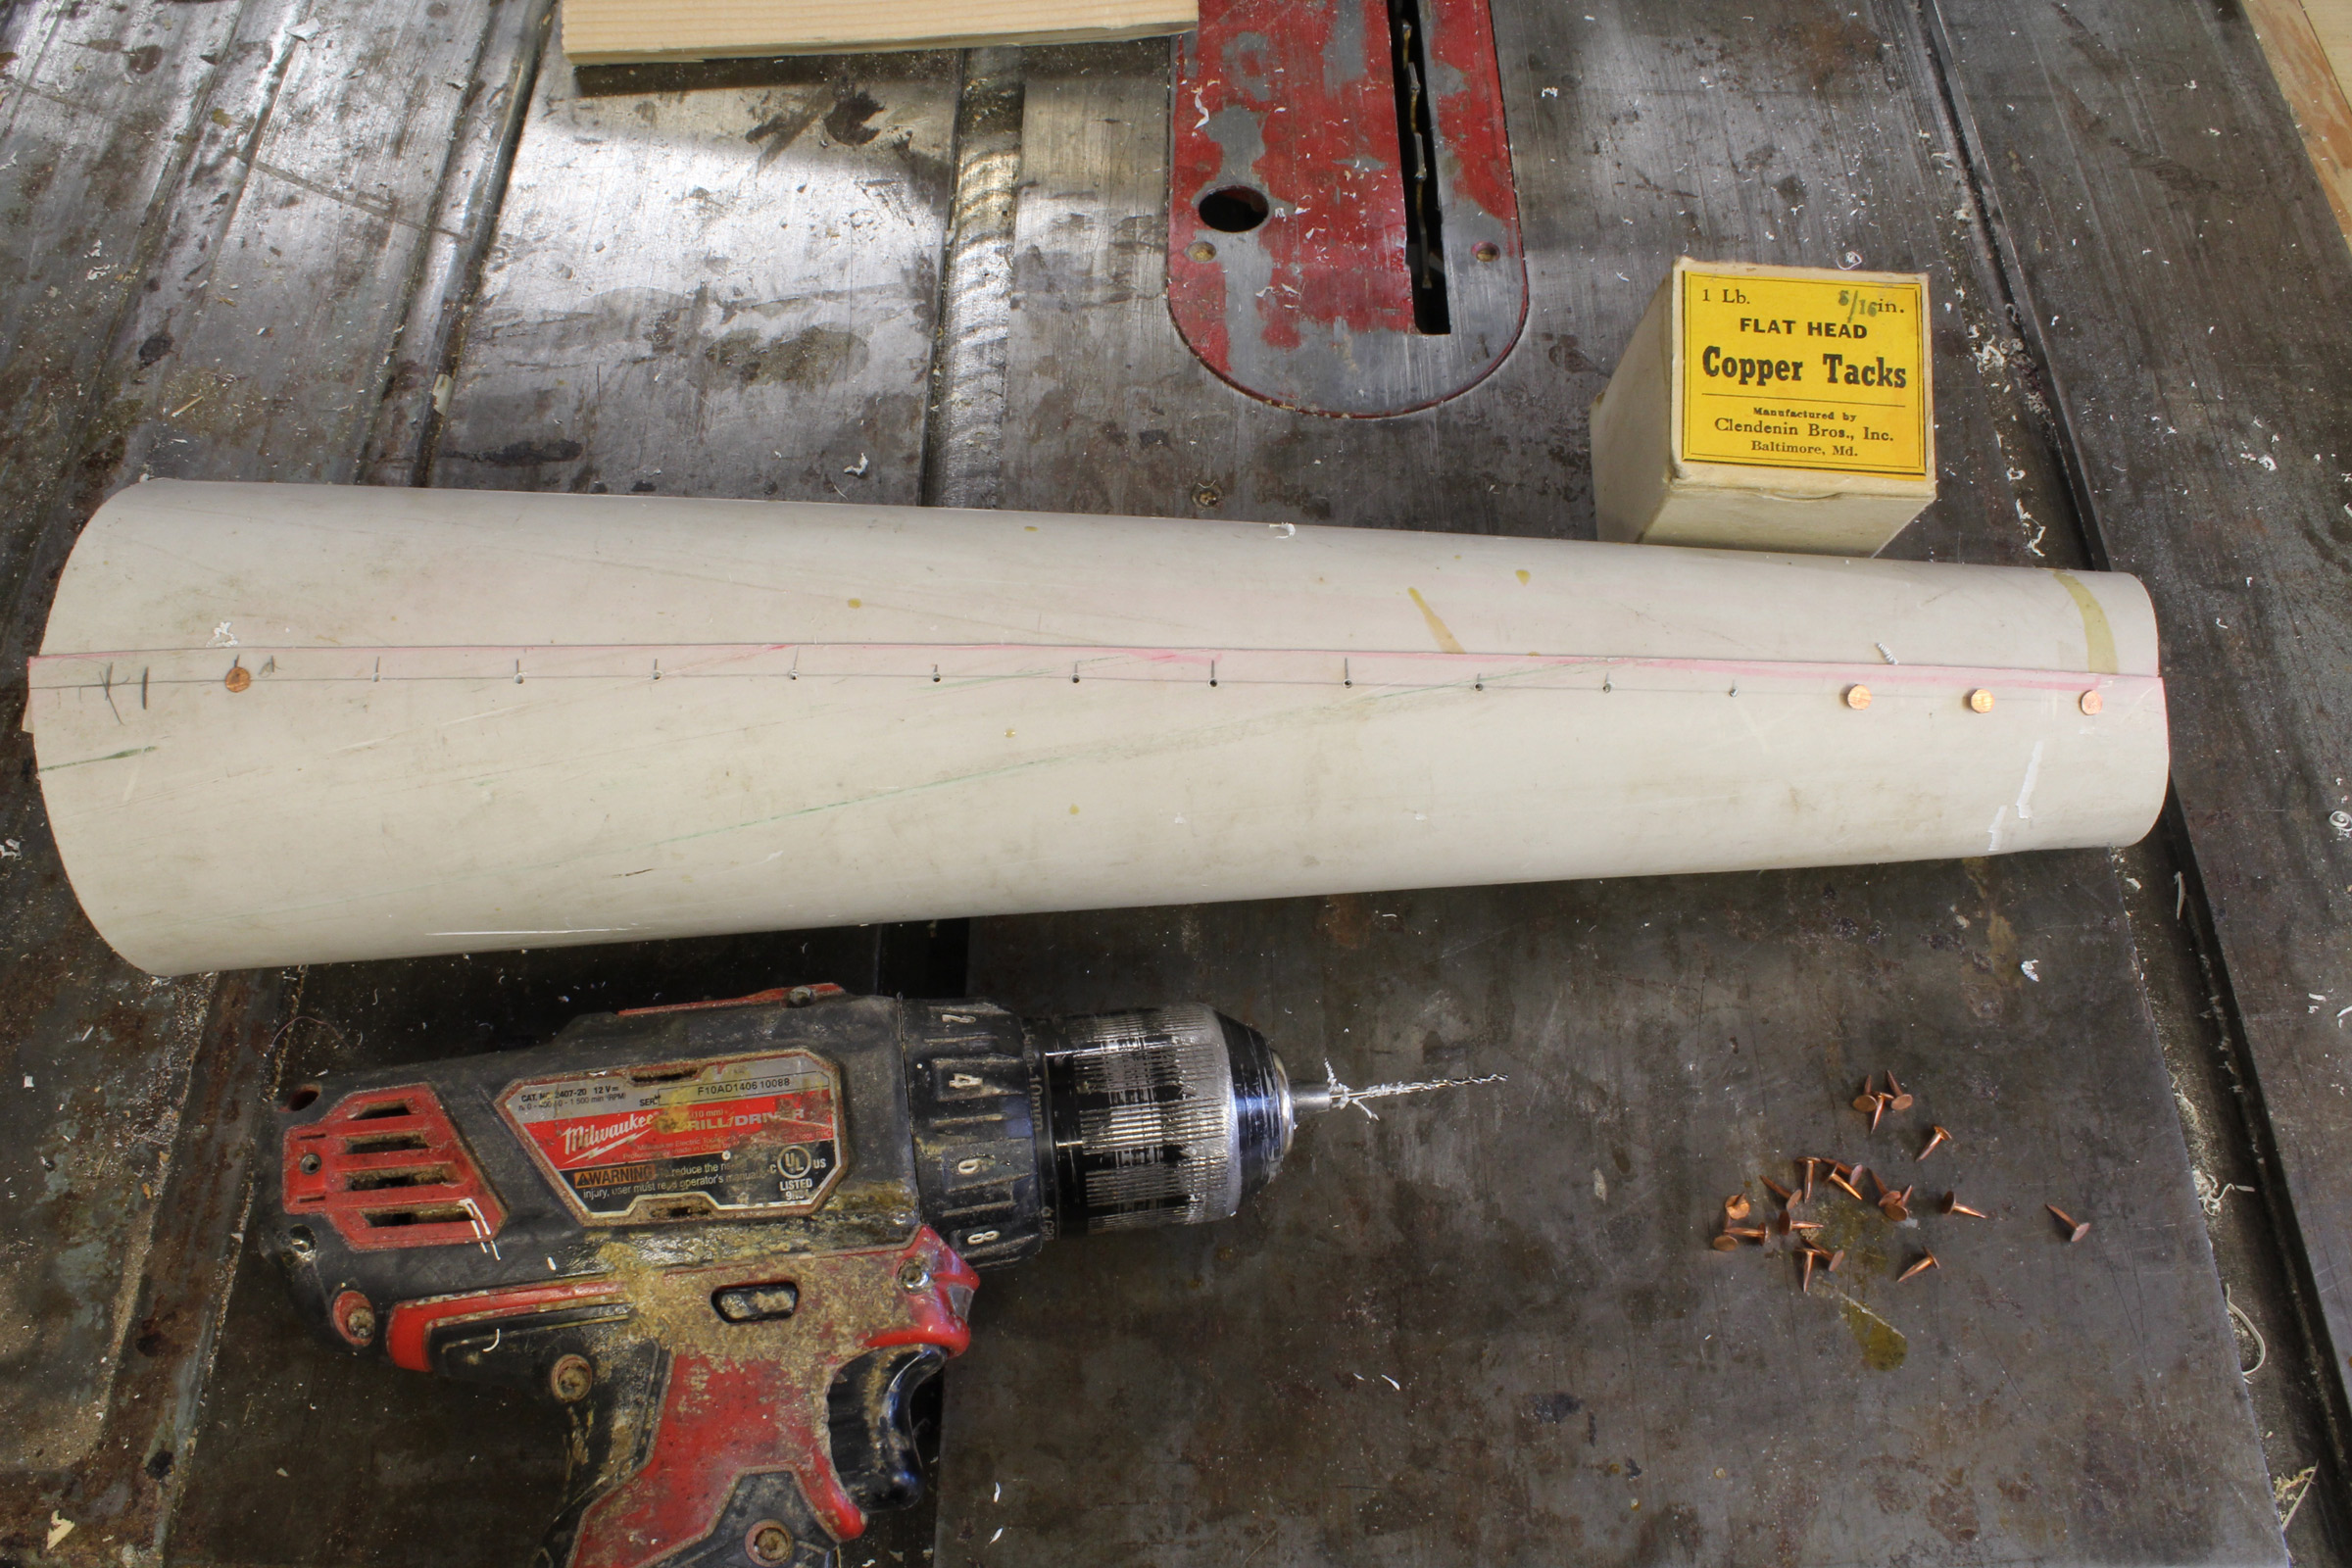
The boat has six pair of sawn frames rather than the seven pair traditionally found in wherries. Each frame is laminated from two layers of cedar. The joints are “broken,” as they would have been historically in a large vessel. Just as in double-sawn frame construction, which were bolted up of individual members called futtocks, Simmons staggers the frame’s butt joints in adjacent layers as widely as possible for strength. Using multiple pieces, Simmons says, all but eliminates any cross-grain. The Christmas Wherry’s frames are composed of two 5⁄8″-thick layers of cedar epoxied together to make the 11⁄4″ sided frame. That might mean three pieces on the forward side and two on the after side, for example, so that the butts are widely separated and each is fully supported.
Historically, wherries built in the area where Simmons has his shop used natural-crook cedar frames from trees cut along the banks of Duck Trap Stream. With today’s conservation ethic, that practice is no longer possible, but Simmons says that he utilizes modern technology to duplicate what cedar trees used to do all by themselves.
Simmons says that in a wherry built using glued-lap construction, the hull is so strong that frames wouldn’t even be necessary except for the wracking strain imposed by the sailing rig.
Although fitting sawn frames in a lapstrake boat is what Simmons calls “an interesting proposition,” he says they’re preferable to steamed frames, which have a tendency to exert a lot of pressure on the center of wide planks. Fitting the frames square to the planking makes the job easier, although there’s still plenty of beveling to be done.
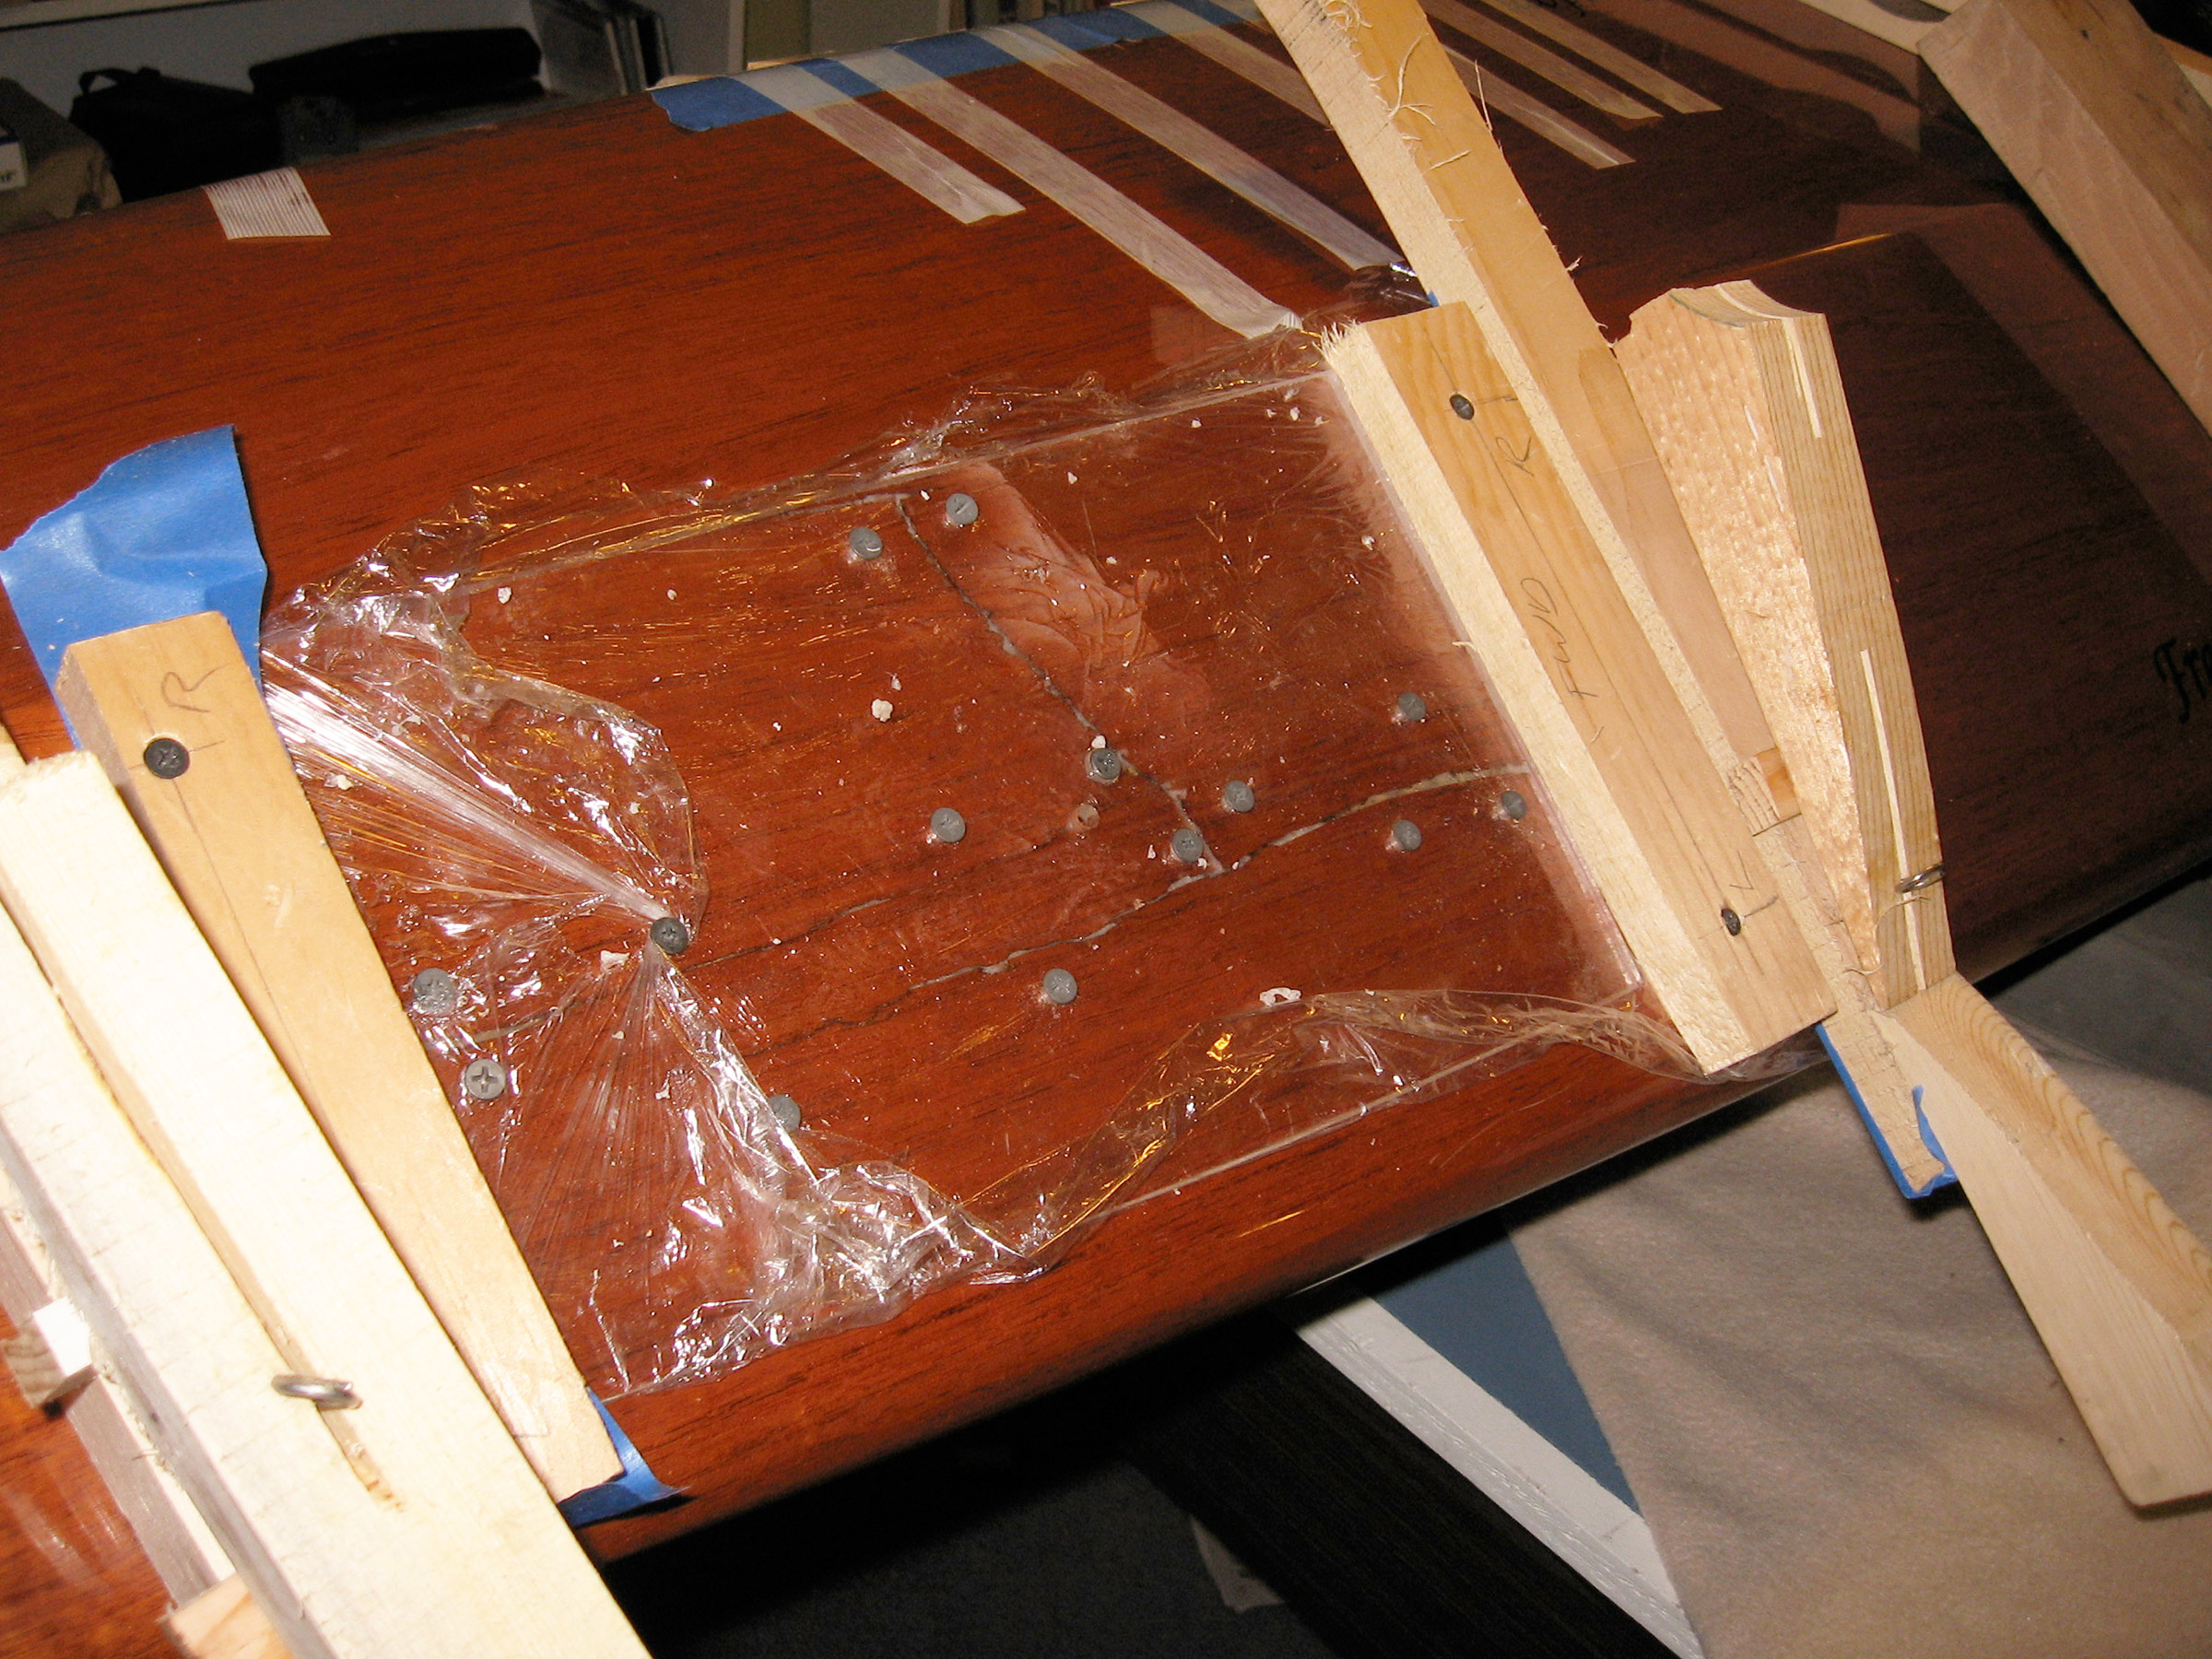
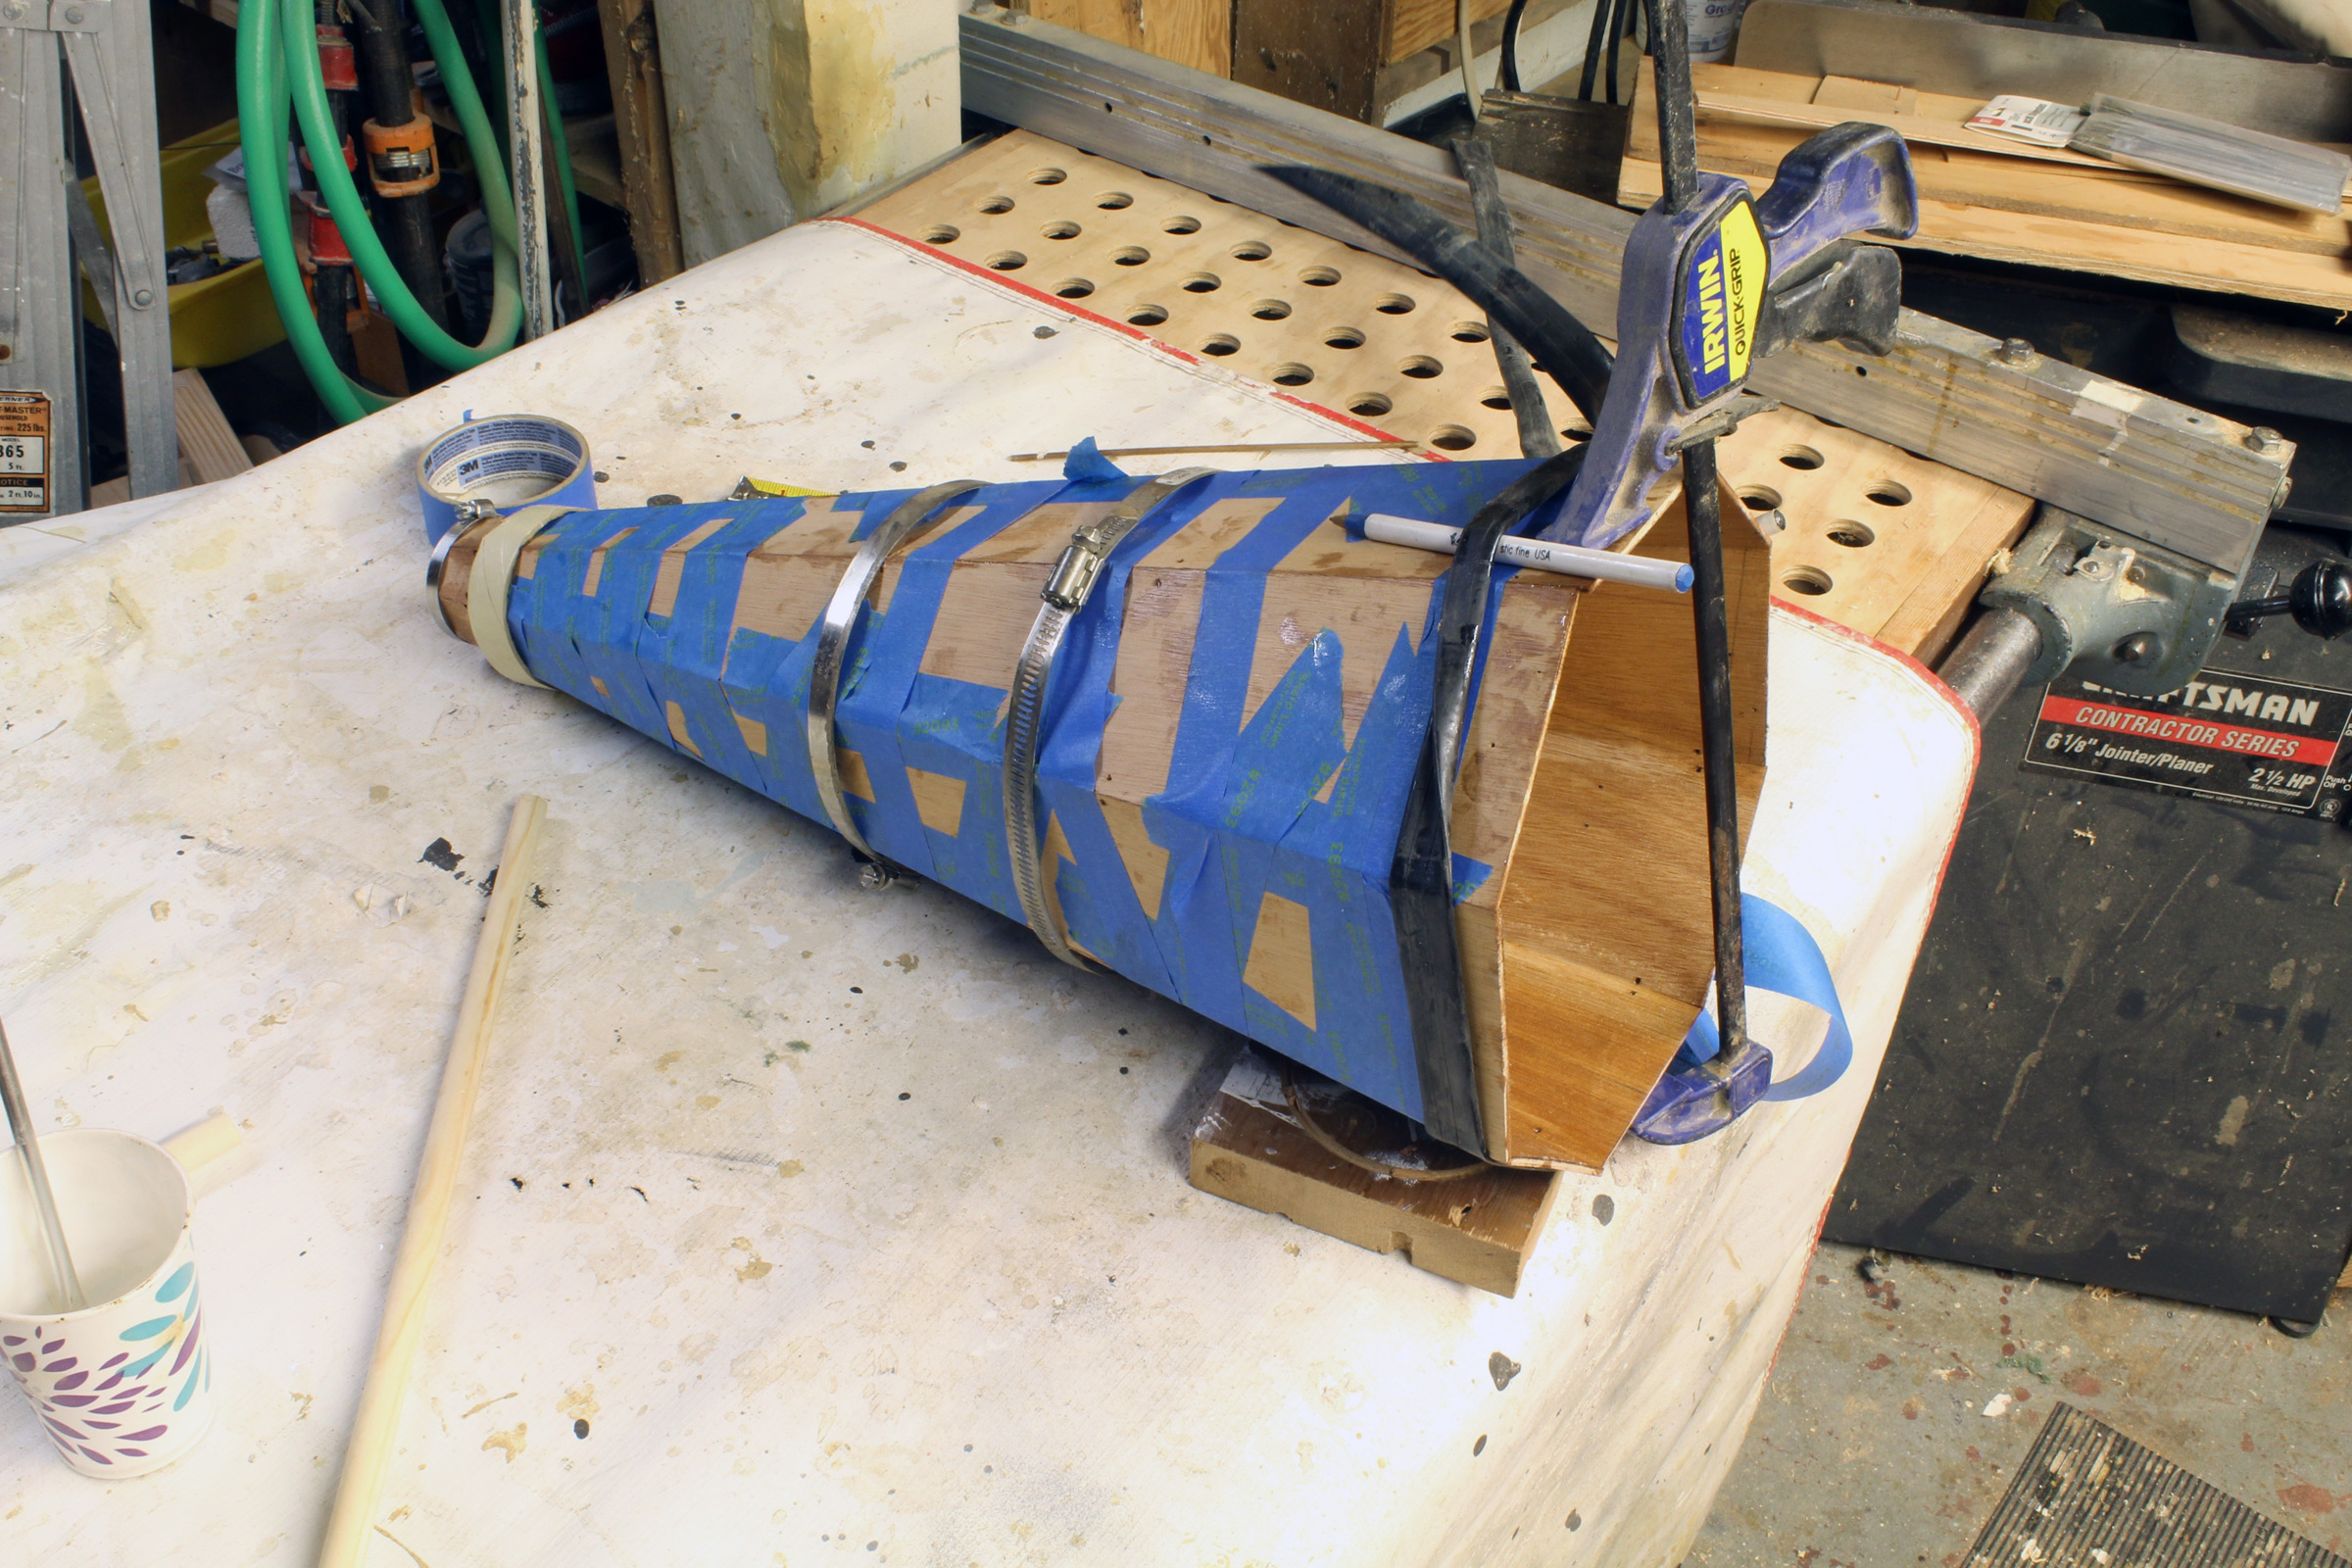
The Christmas Wherry is not the boat for a novice builder. It has the shapely, extremely tucked-up stern sections characteristic of the salmon wherry and a fair amount of tumblehome. Springing the garboard into place requires a lot of pressure, Simmons says, and constructing a centerboard trunk adds to the complexity of the project.
The centerboard itself is built from 18-mm okoume, and carries 15 lbs of lead at the bottom to make sure the board stays down. For those occasions when the board doesn’t stay either down or up but gets stuck somewhere in between, the centerboard trunk has a removable cap. Plans for the Christmas Wherry show a kick-up rudder, but the latest version built by Simmons has a traditional fixed rudder.
Courtesy of Walter Simmons
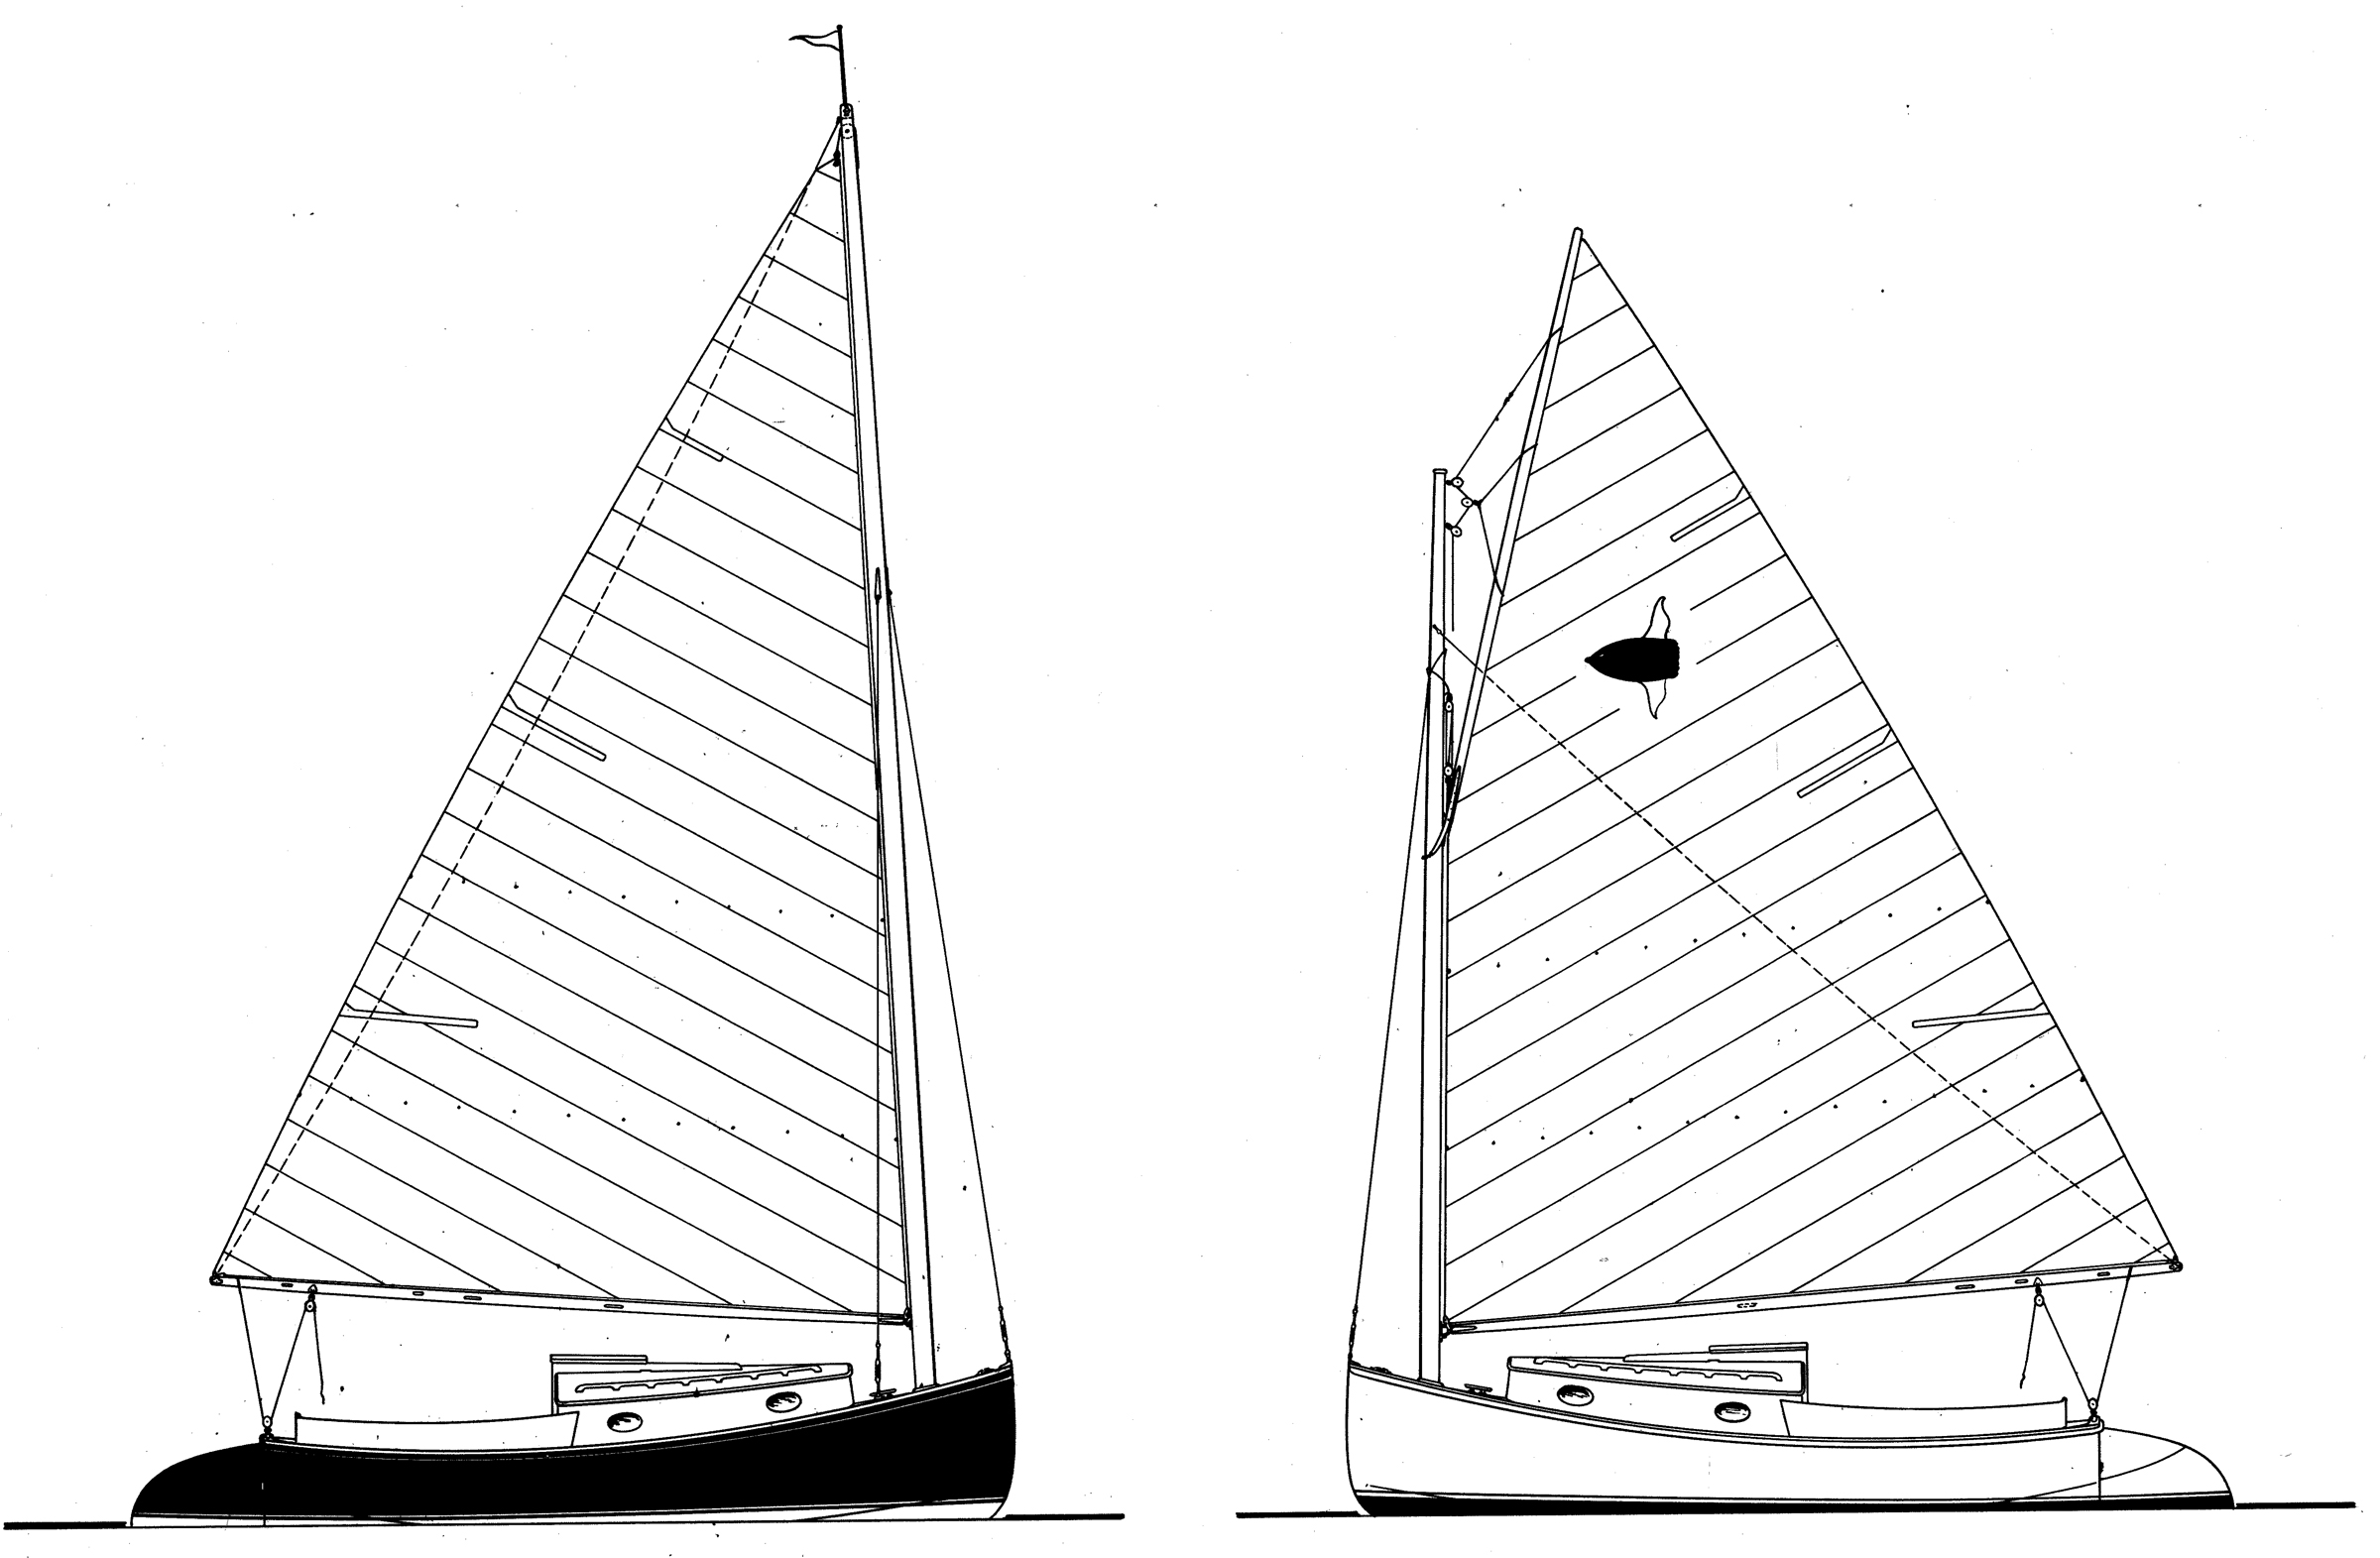
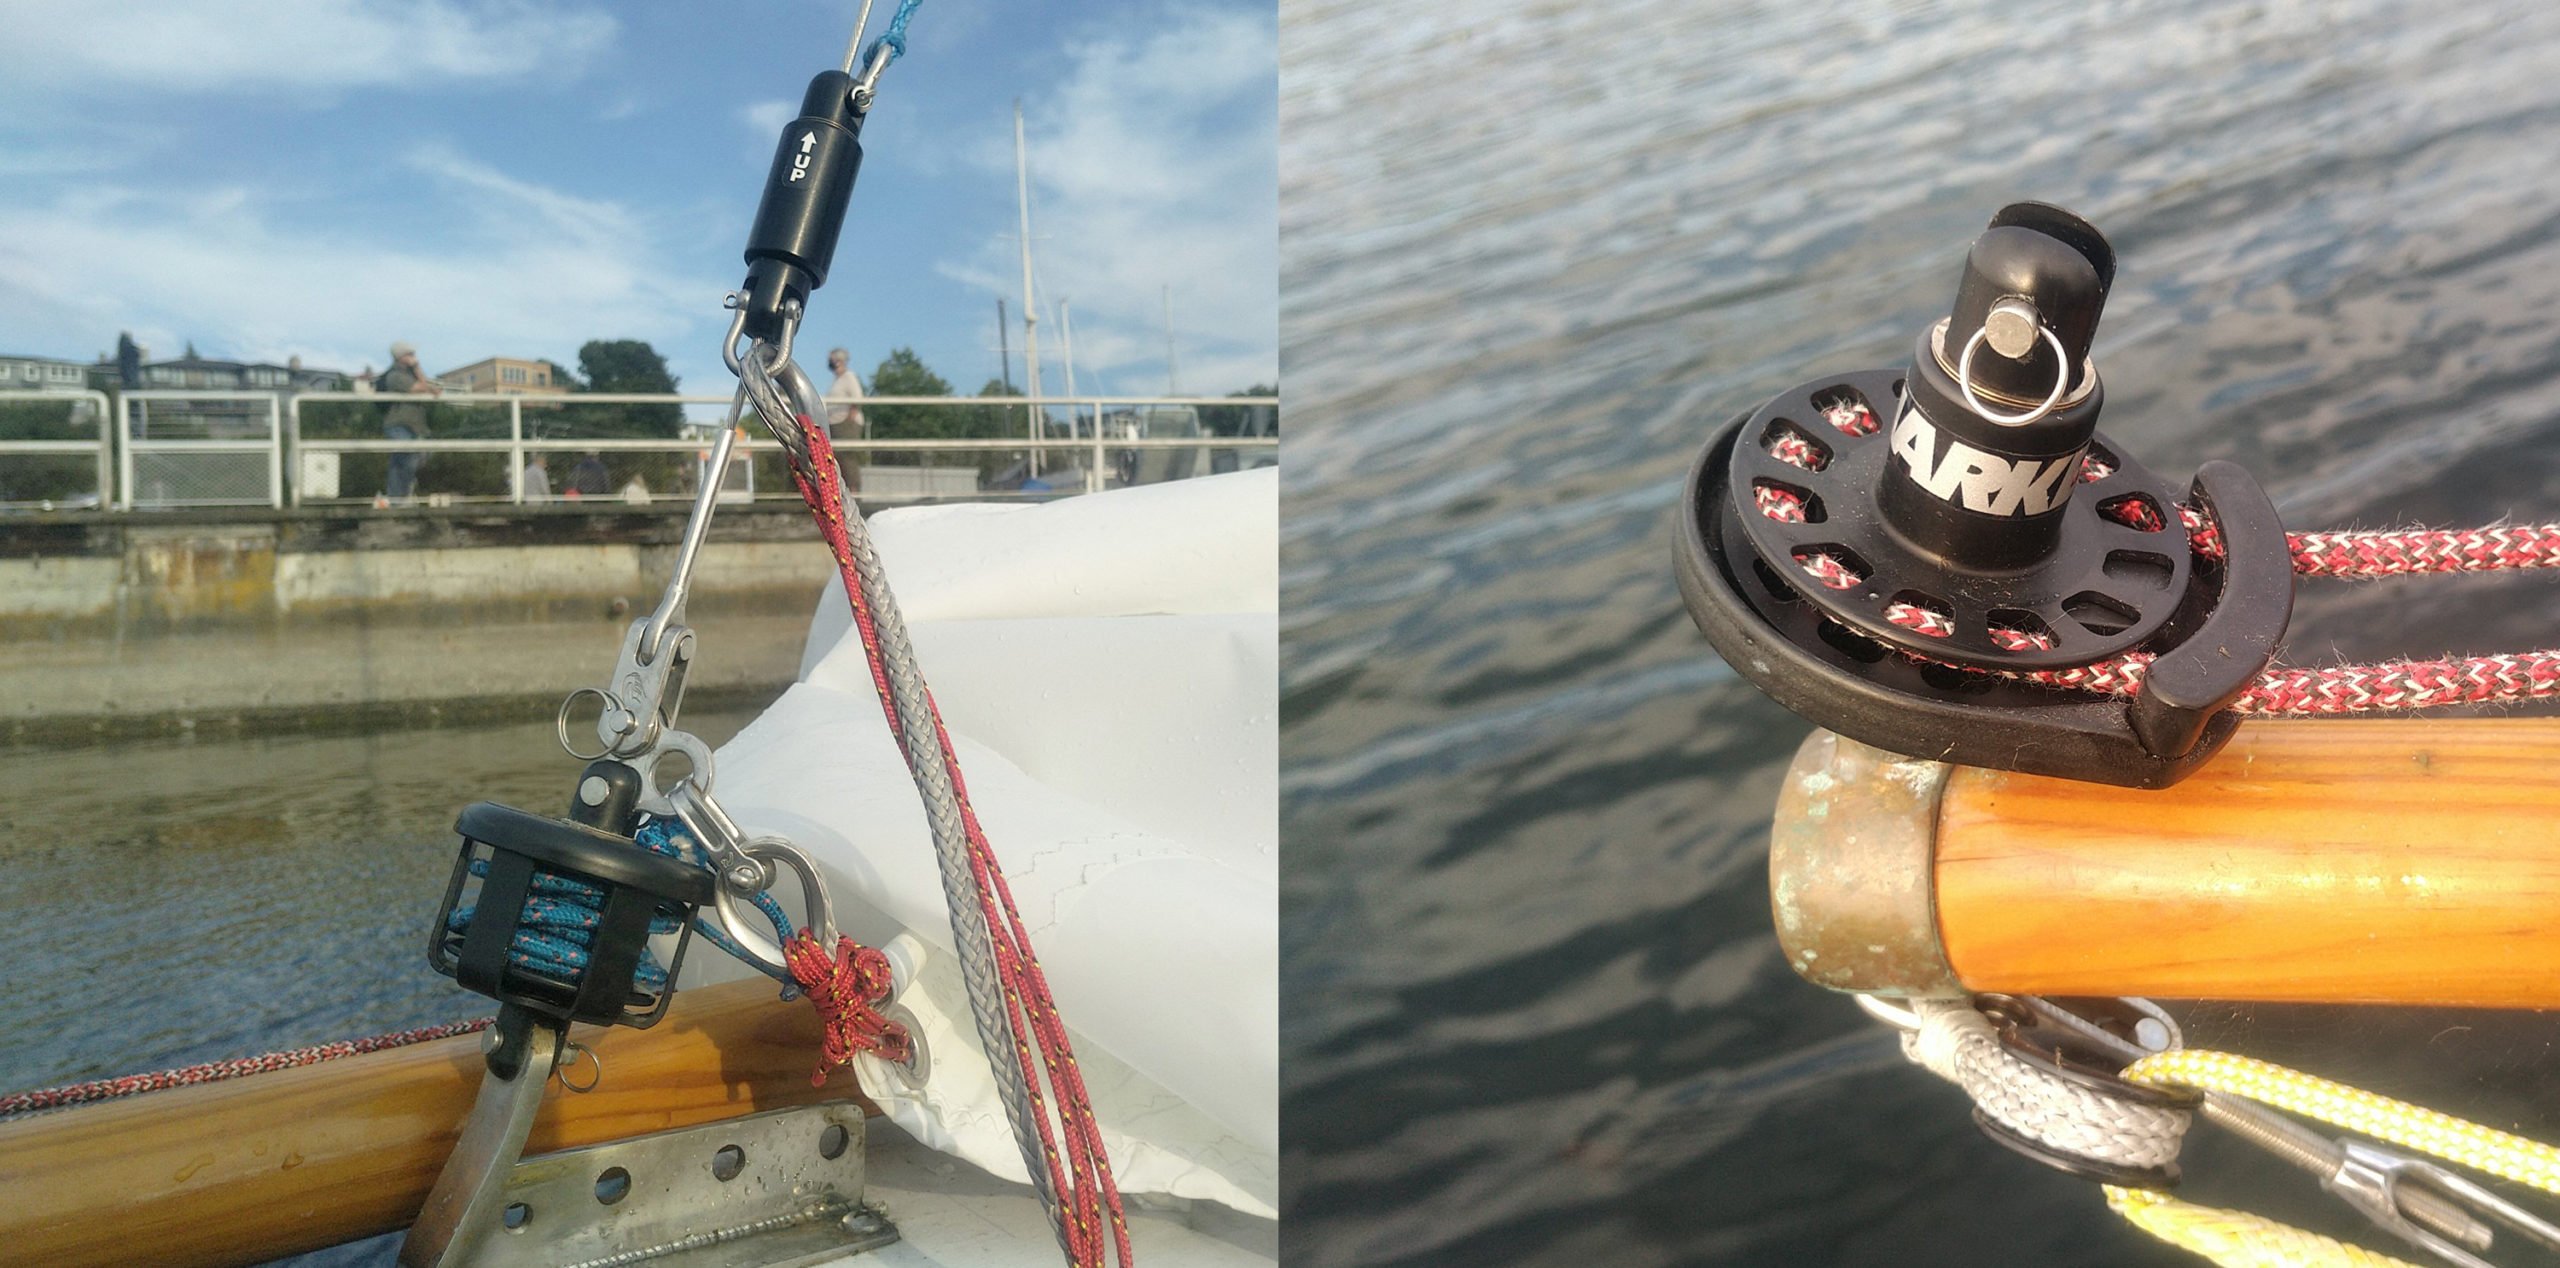
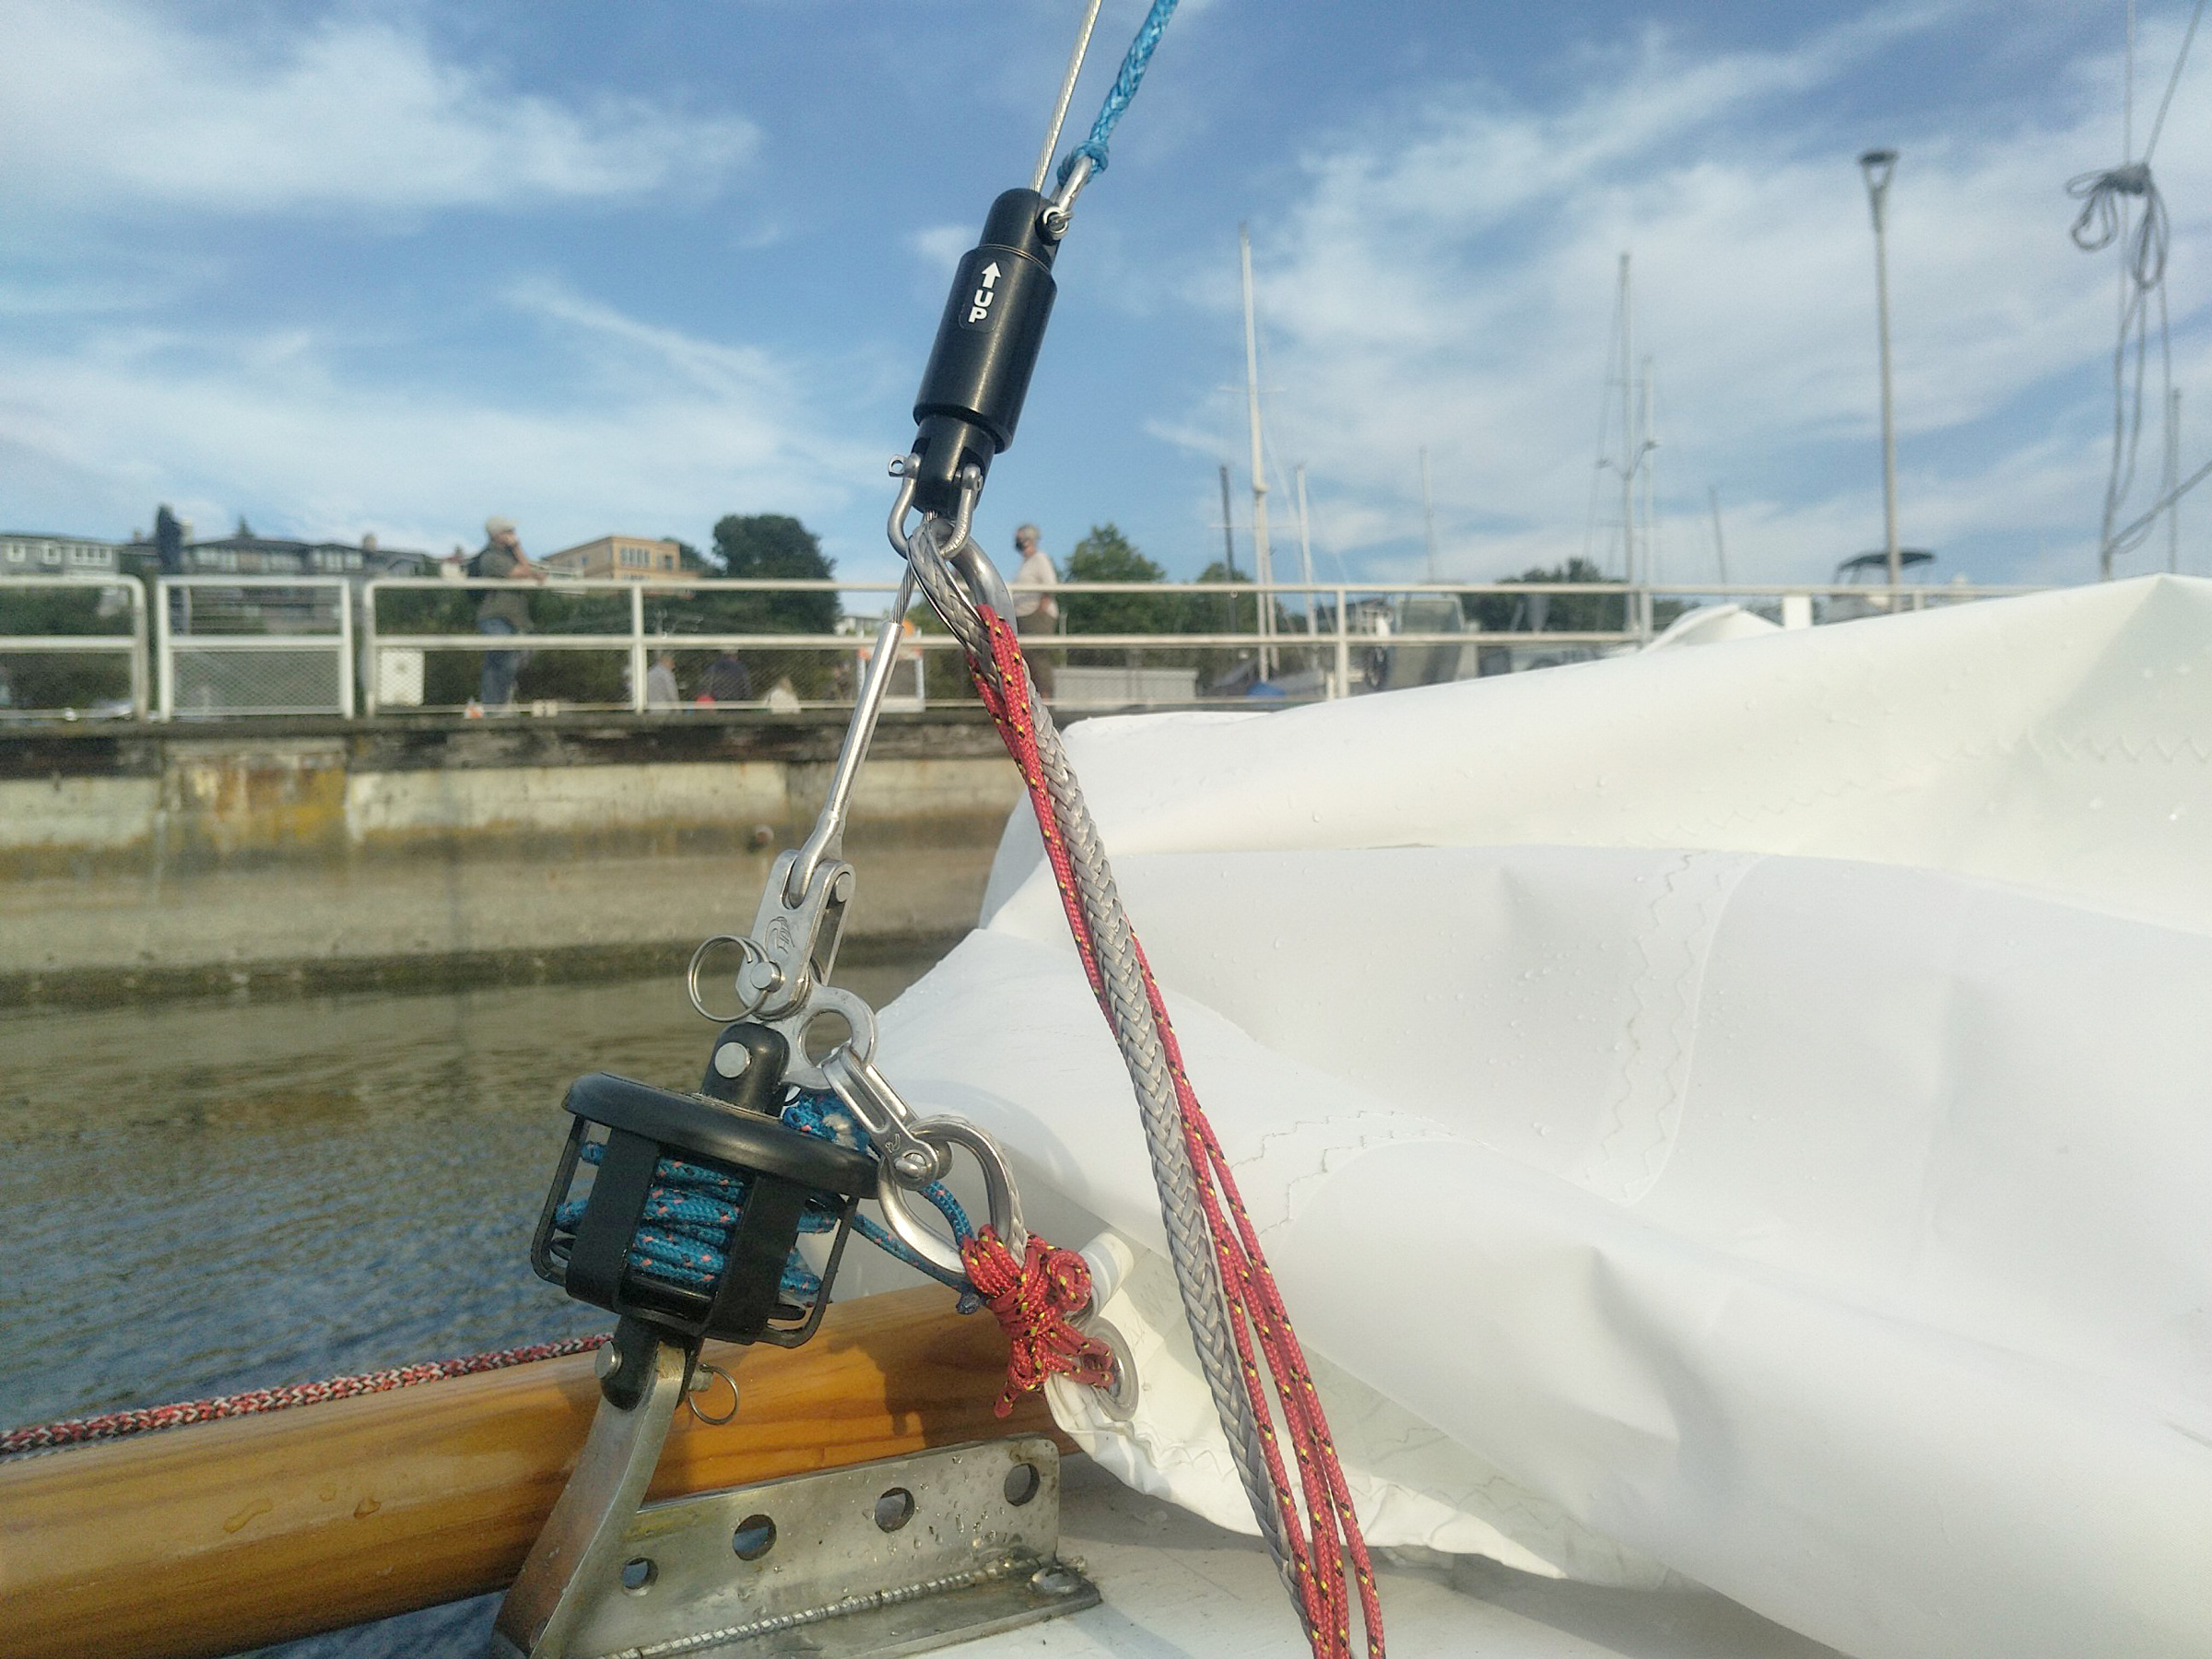
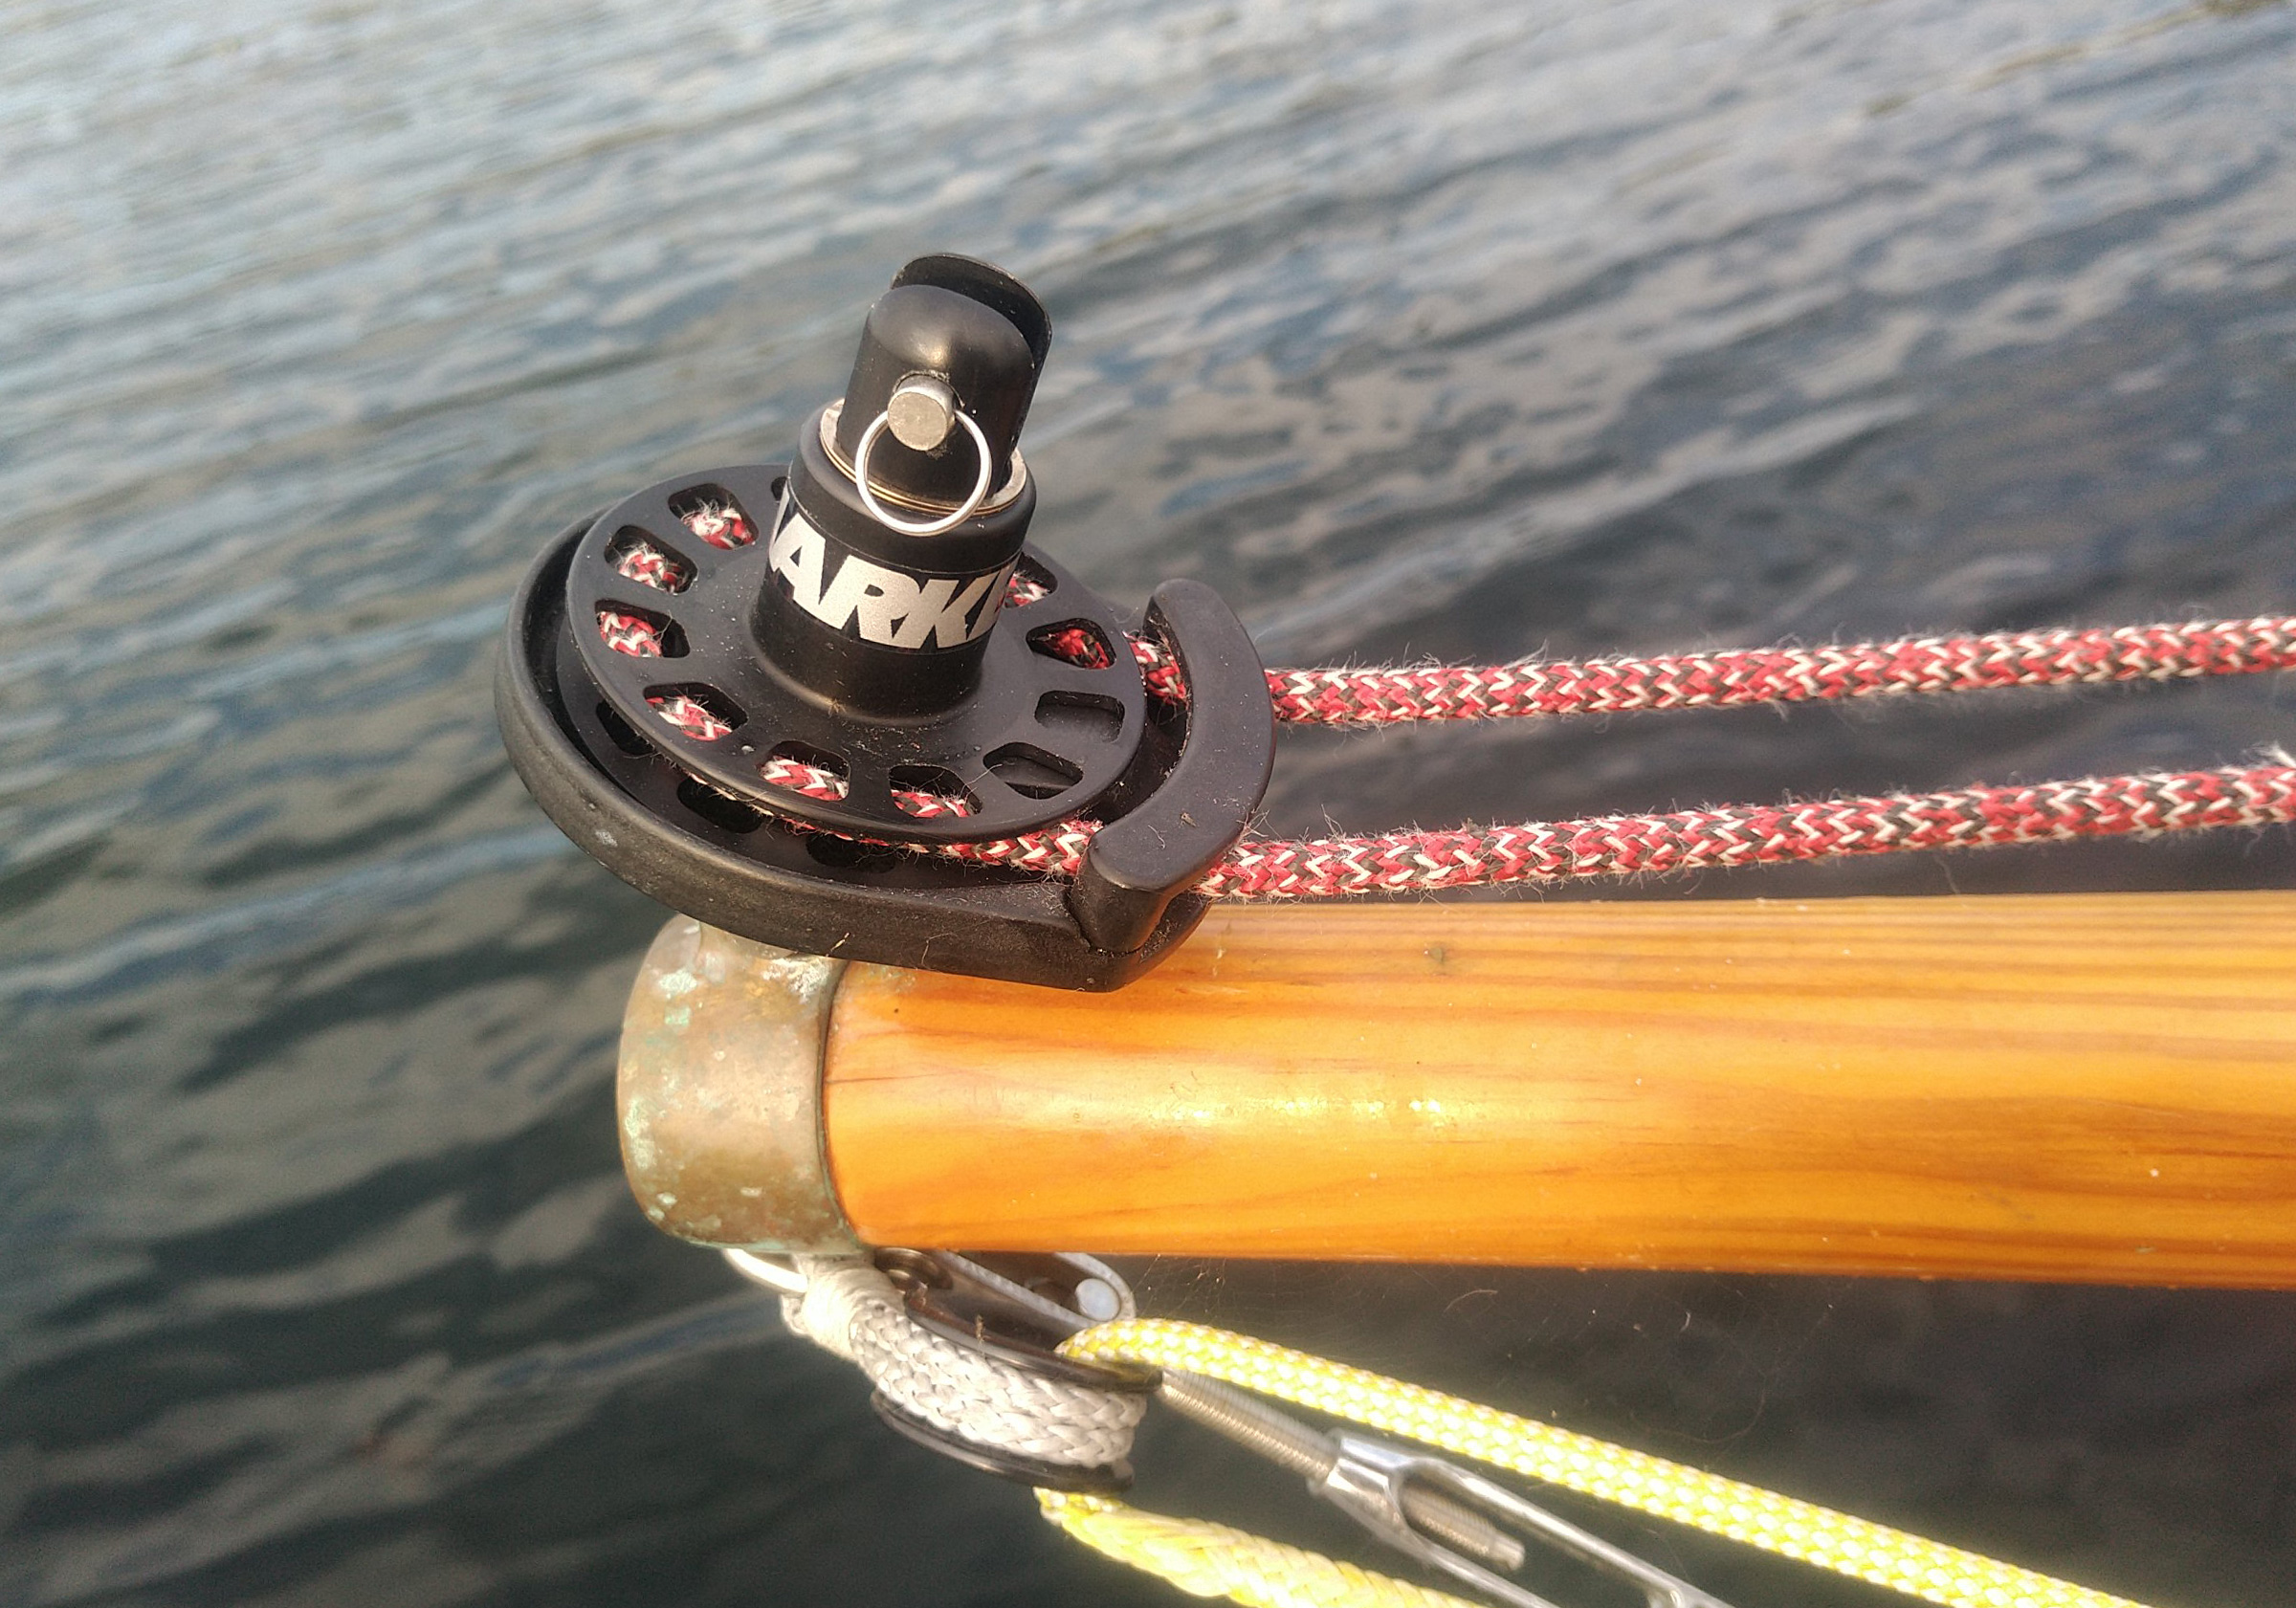
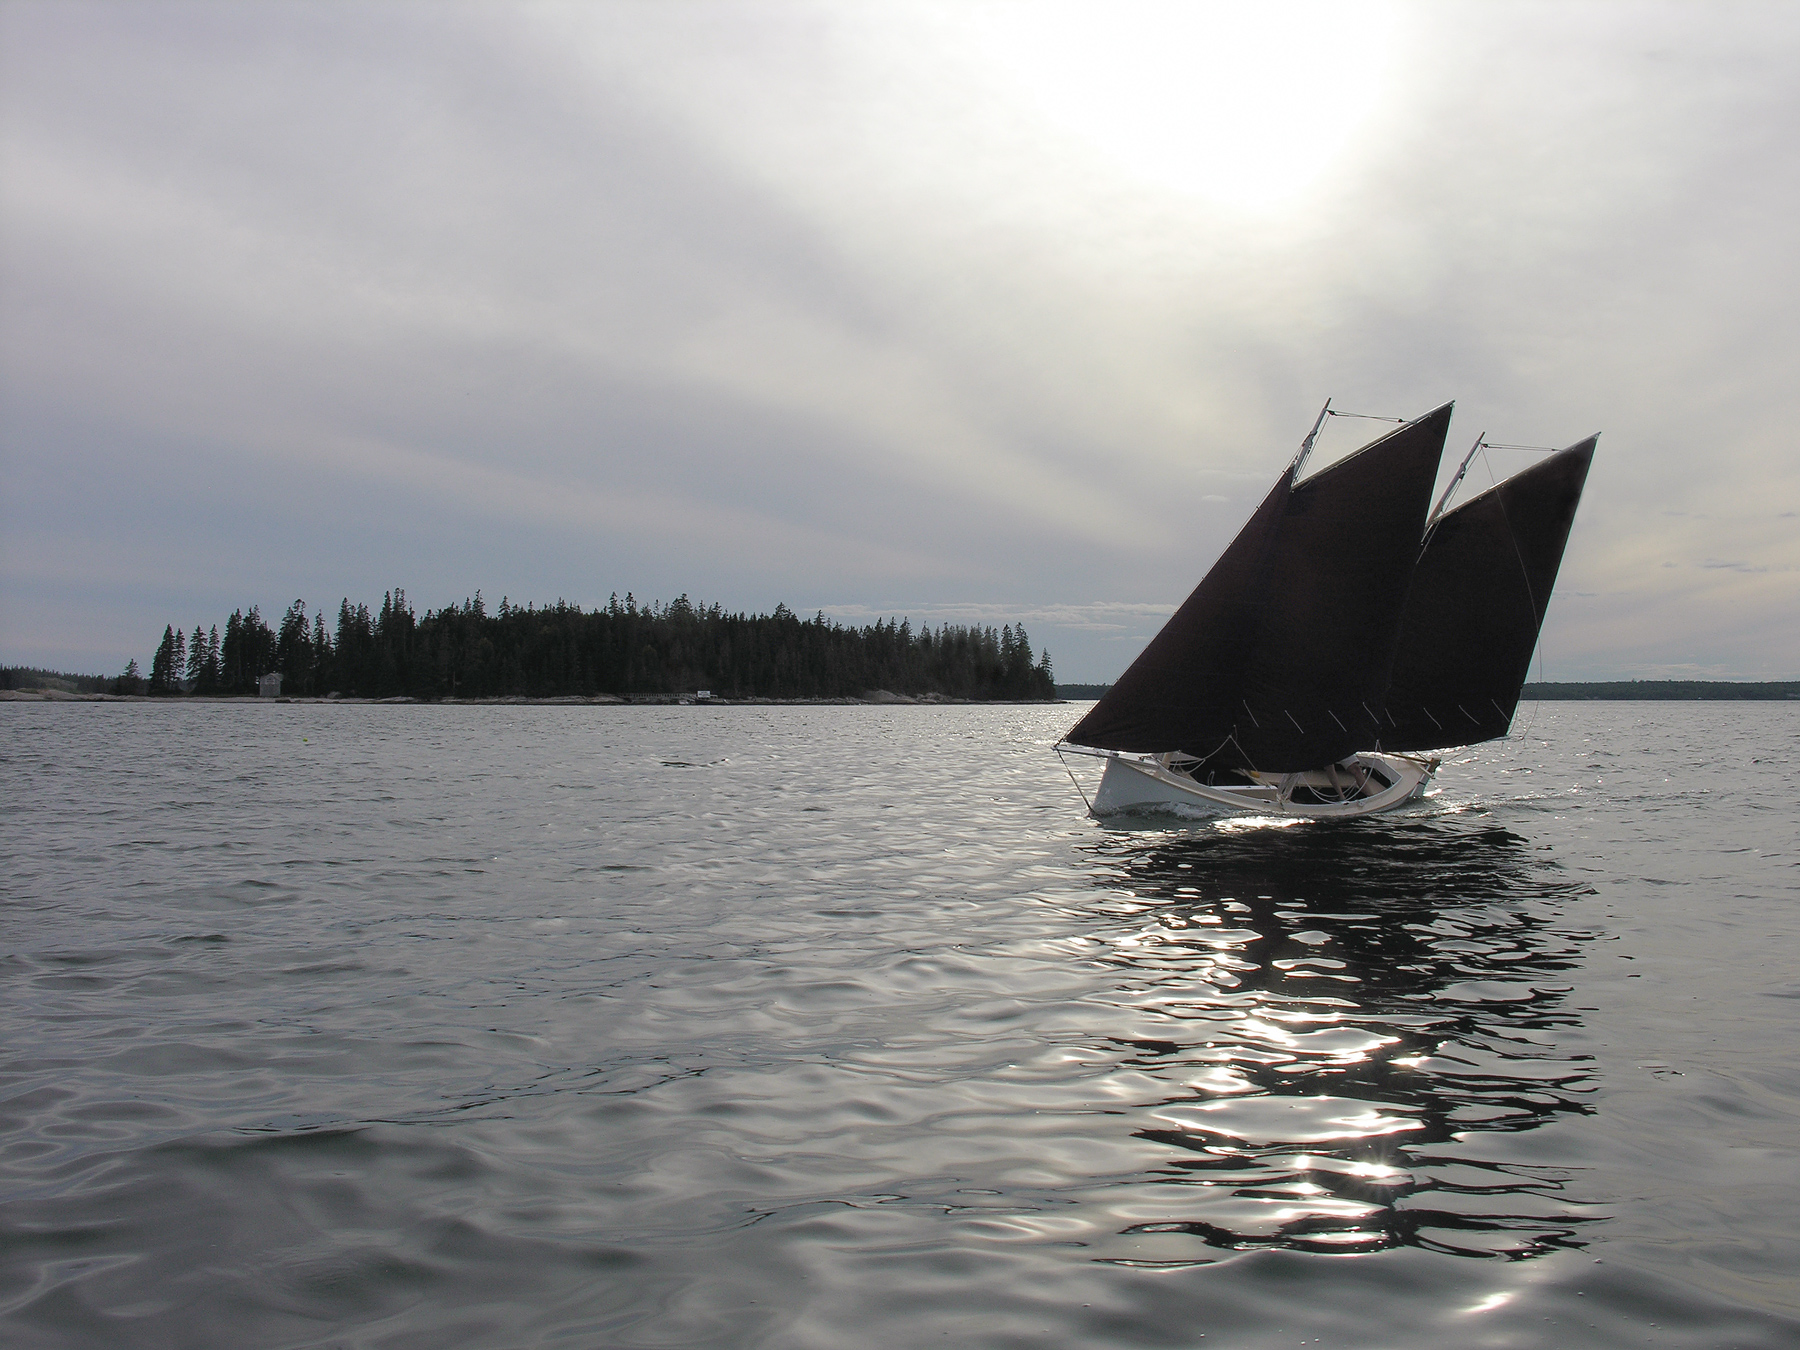
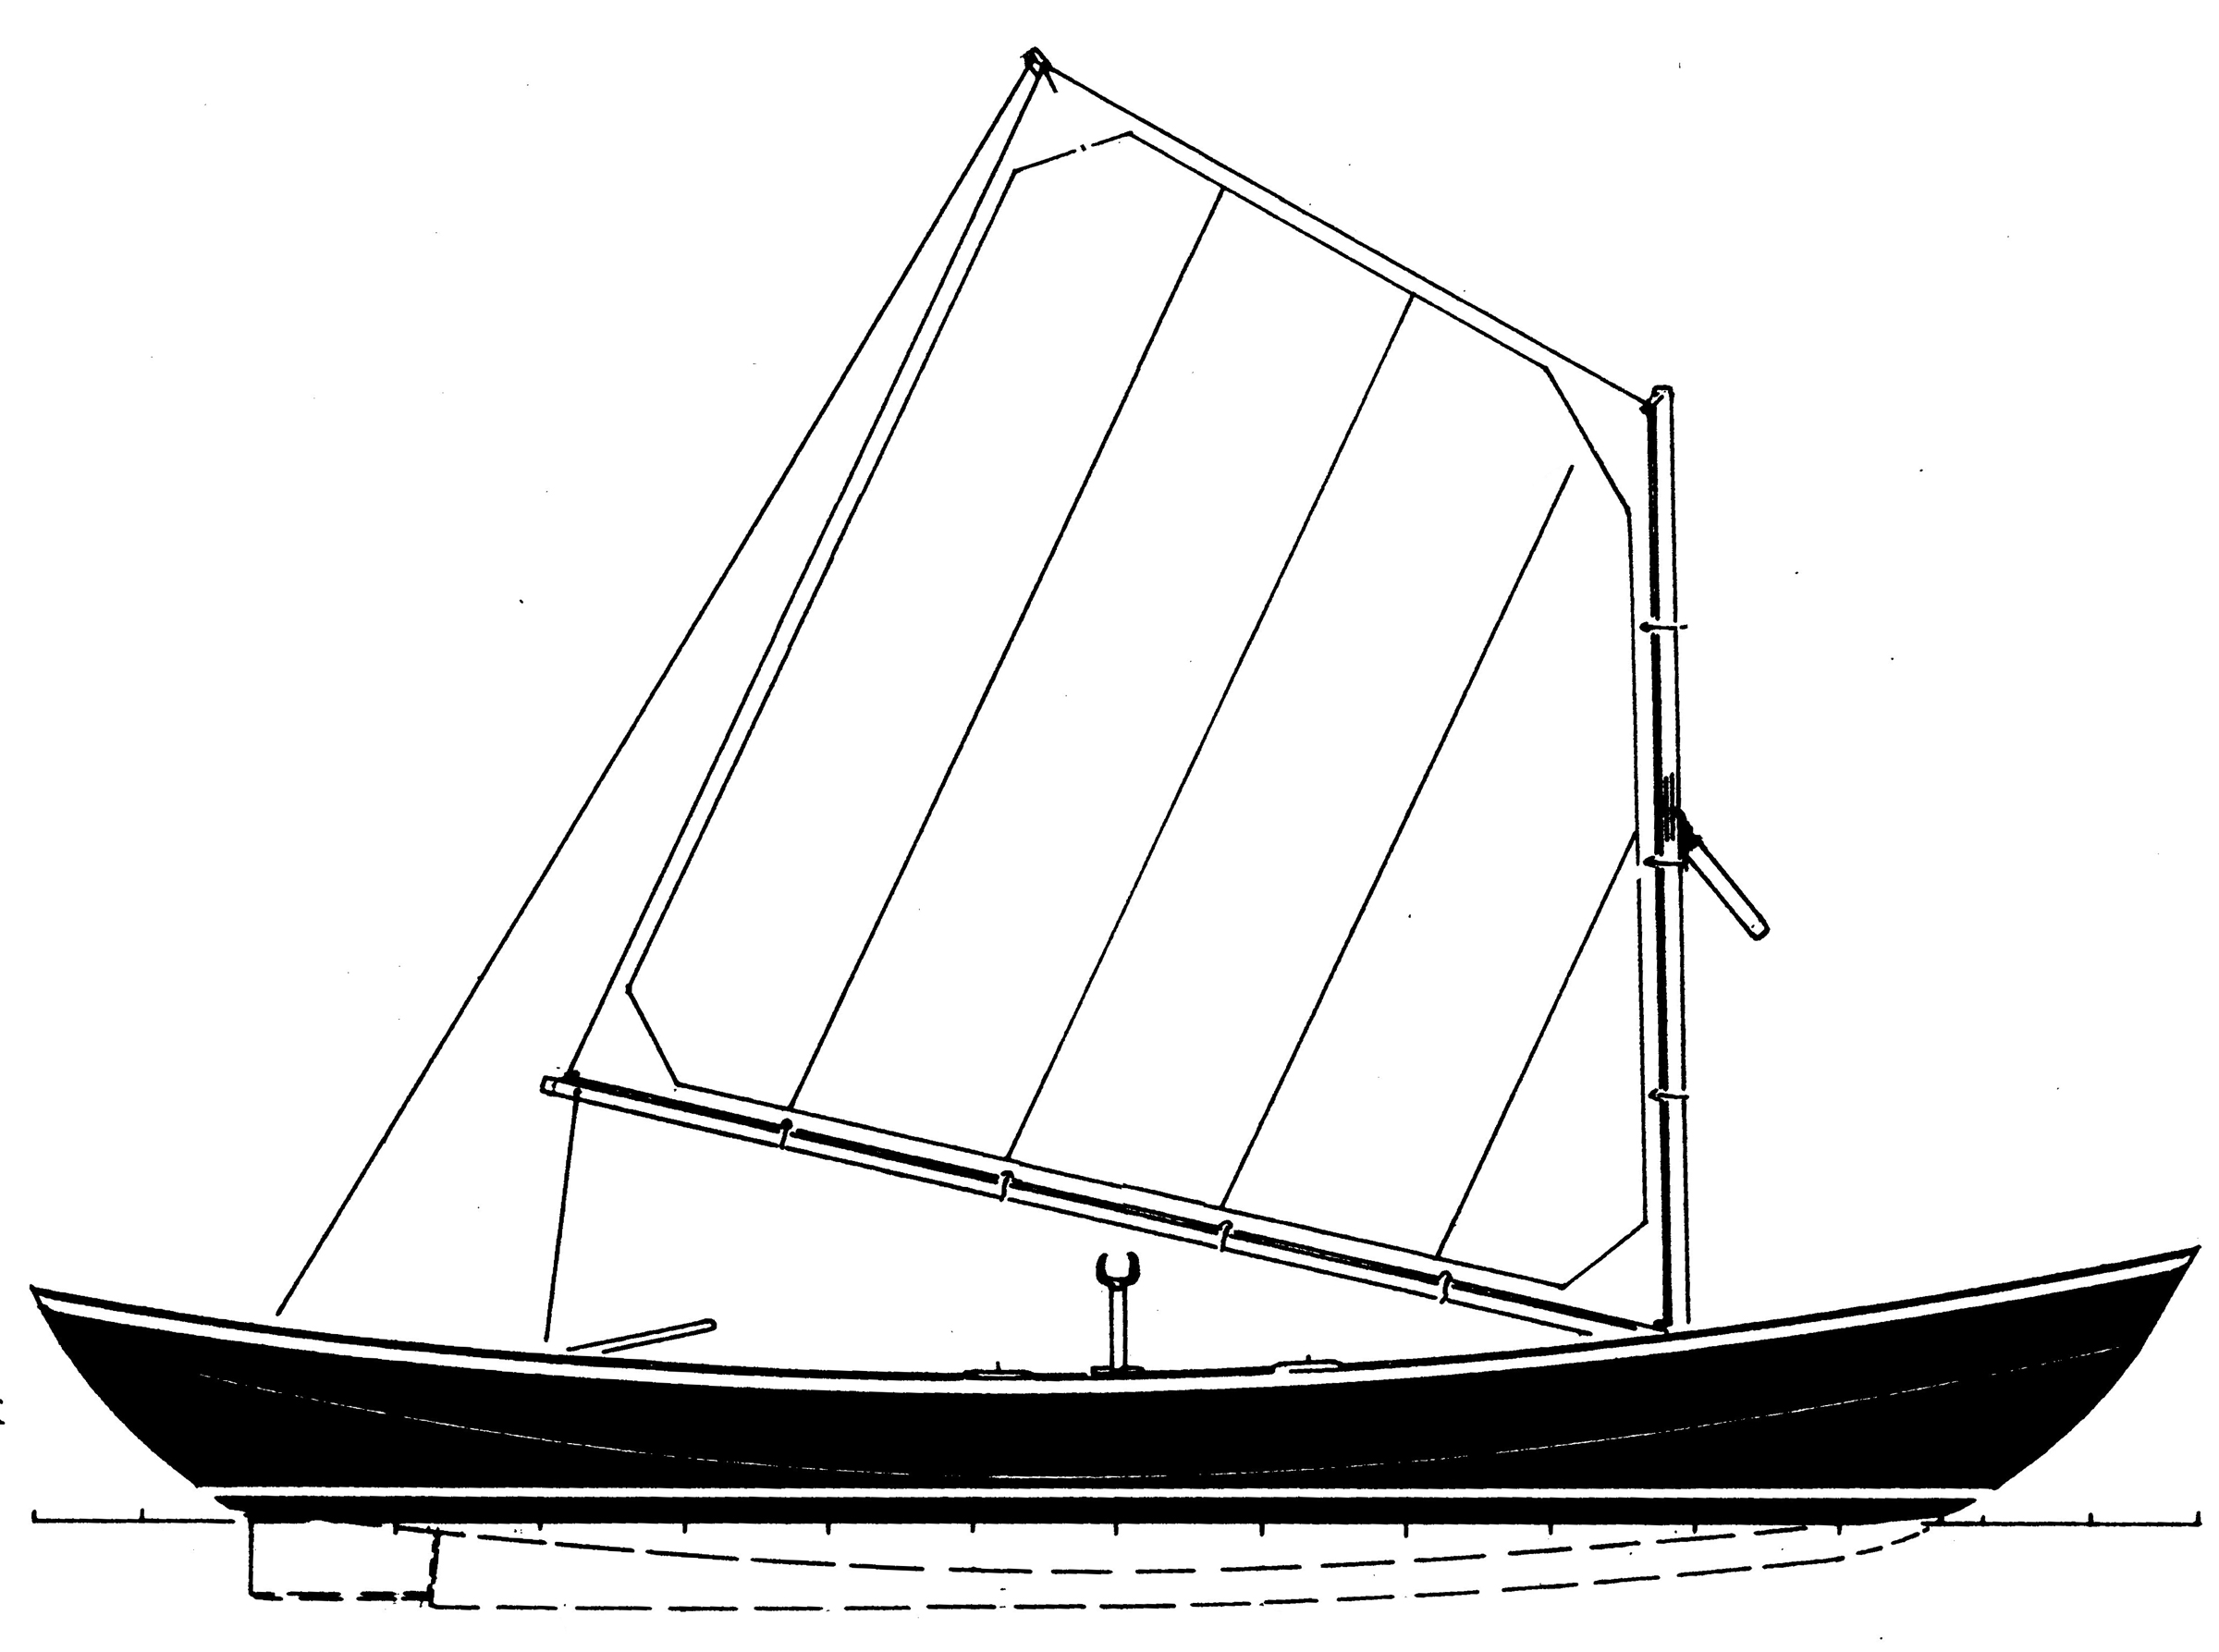
The Christmas Wherry moves well under sail, and for a boat like this an appropriately sized and uncomplicated spritsail is one possible traditional rig.
Building and repairing wherries for more than 30 years, Simmons says, “I learned the hard way.” Getting the lofting right goes a long way toward simplifying the construction. To that end, Simmons offers complete loftings as well as plans and detailed building instructions either in printed form or on a CD. He’ll also build a finished boat to order.
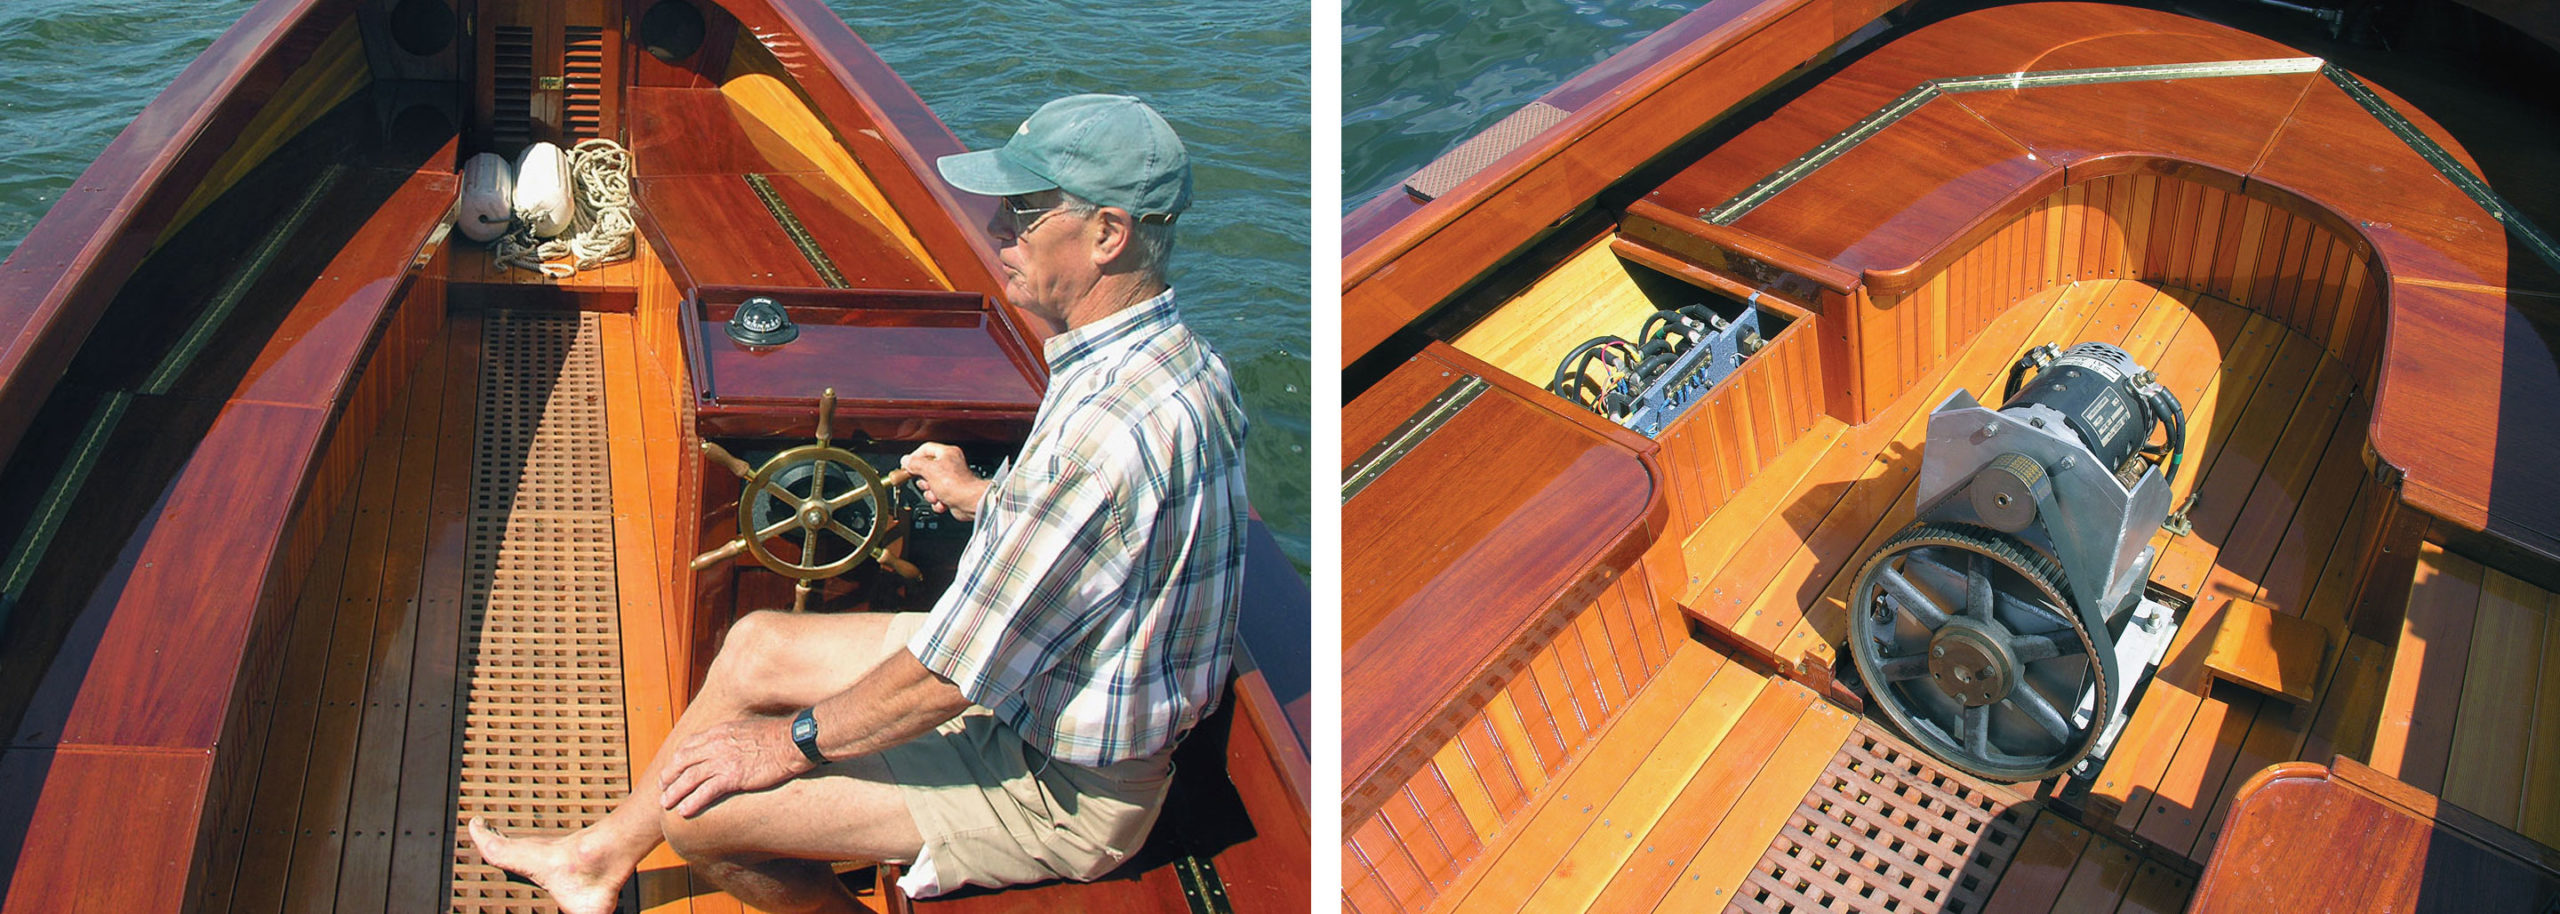
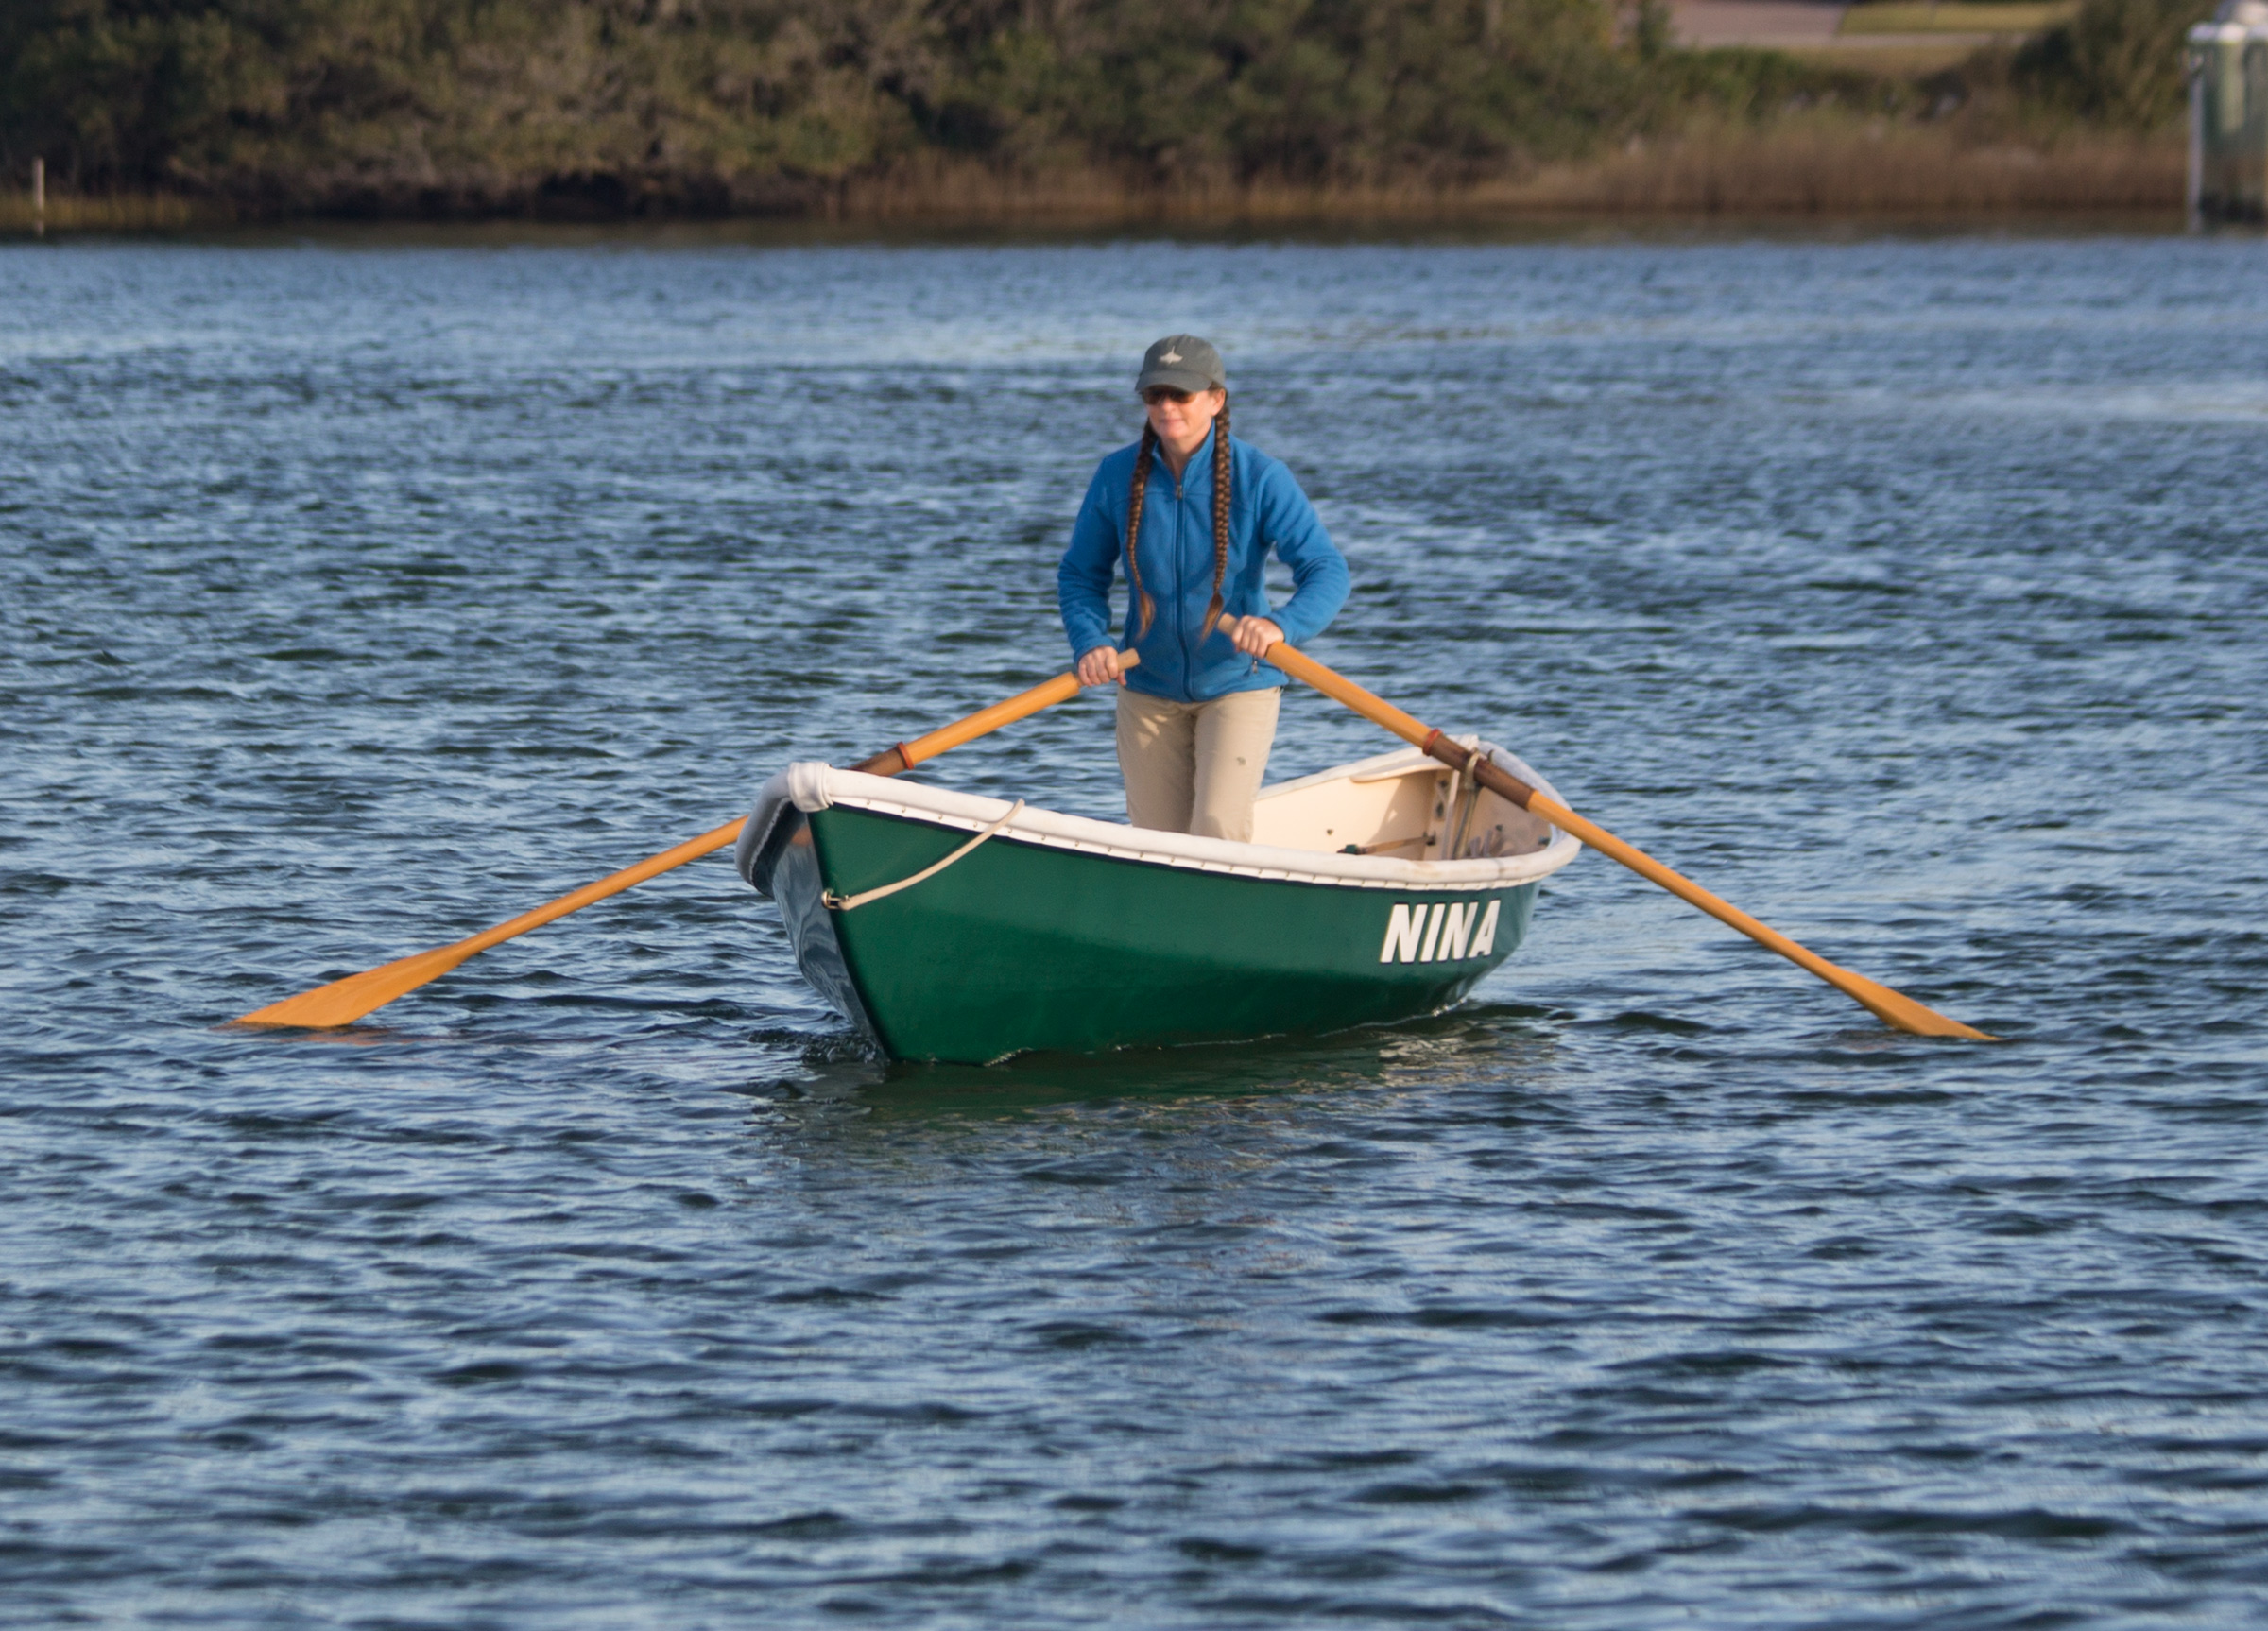
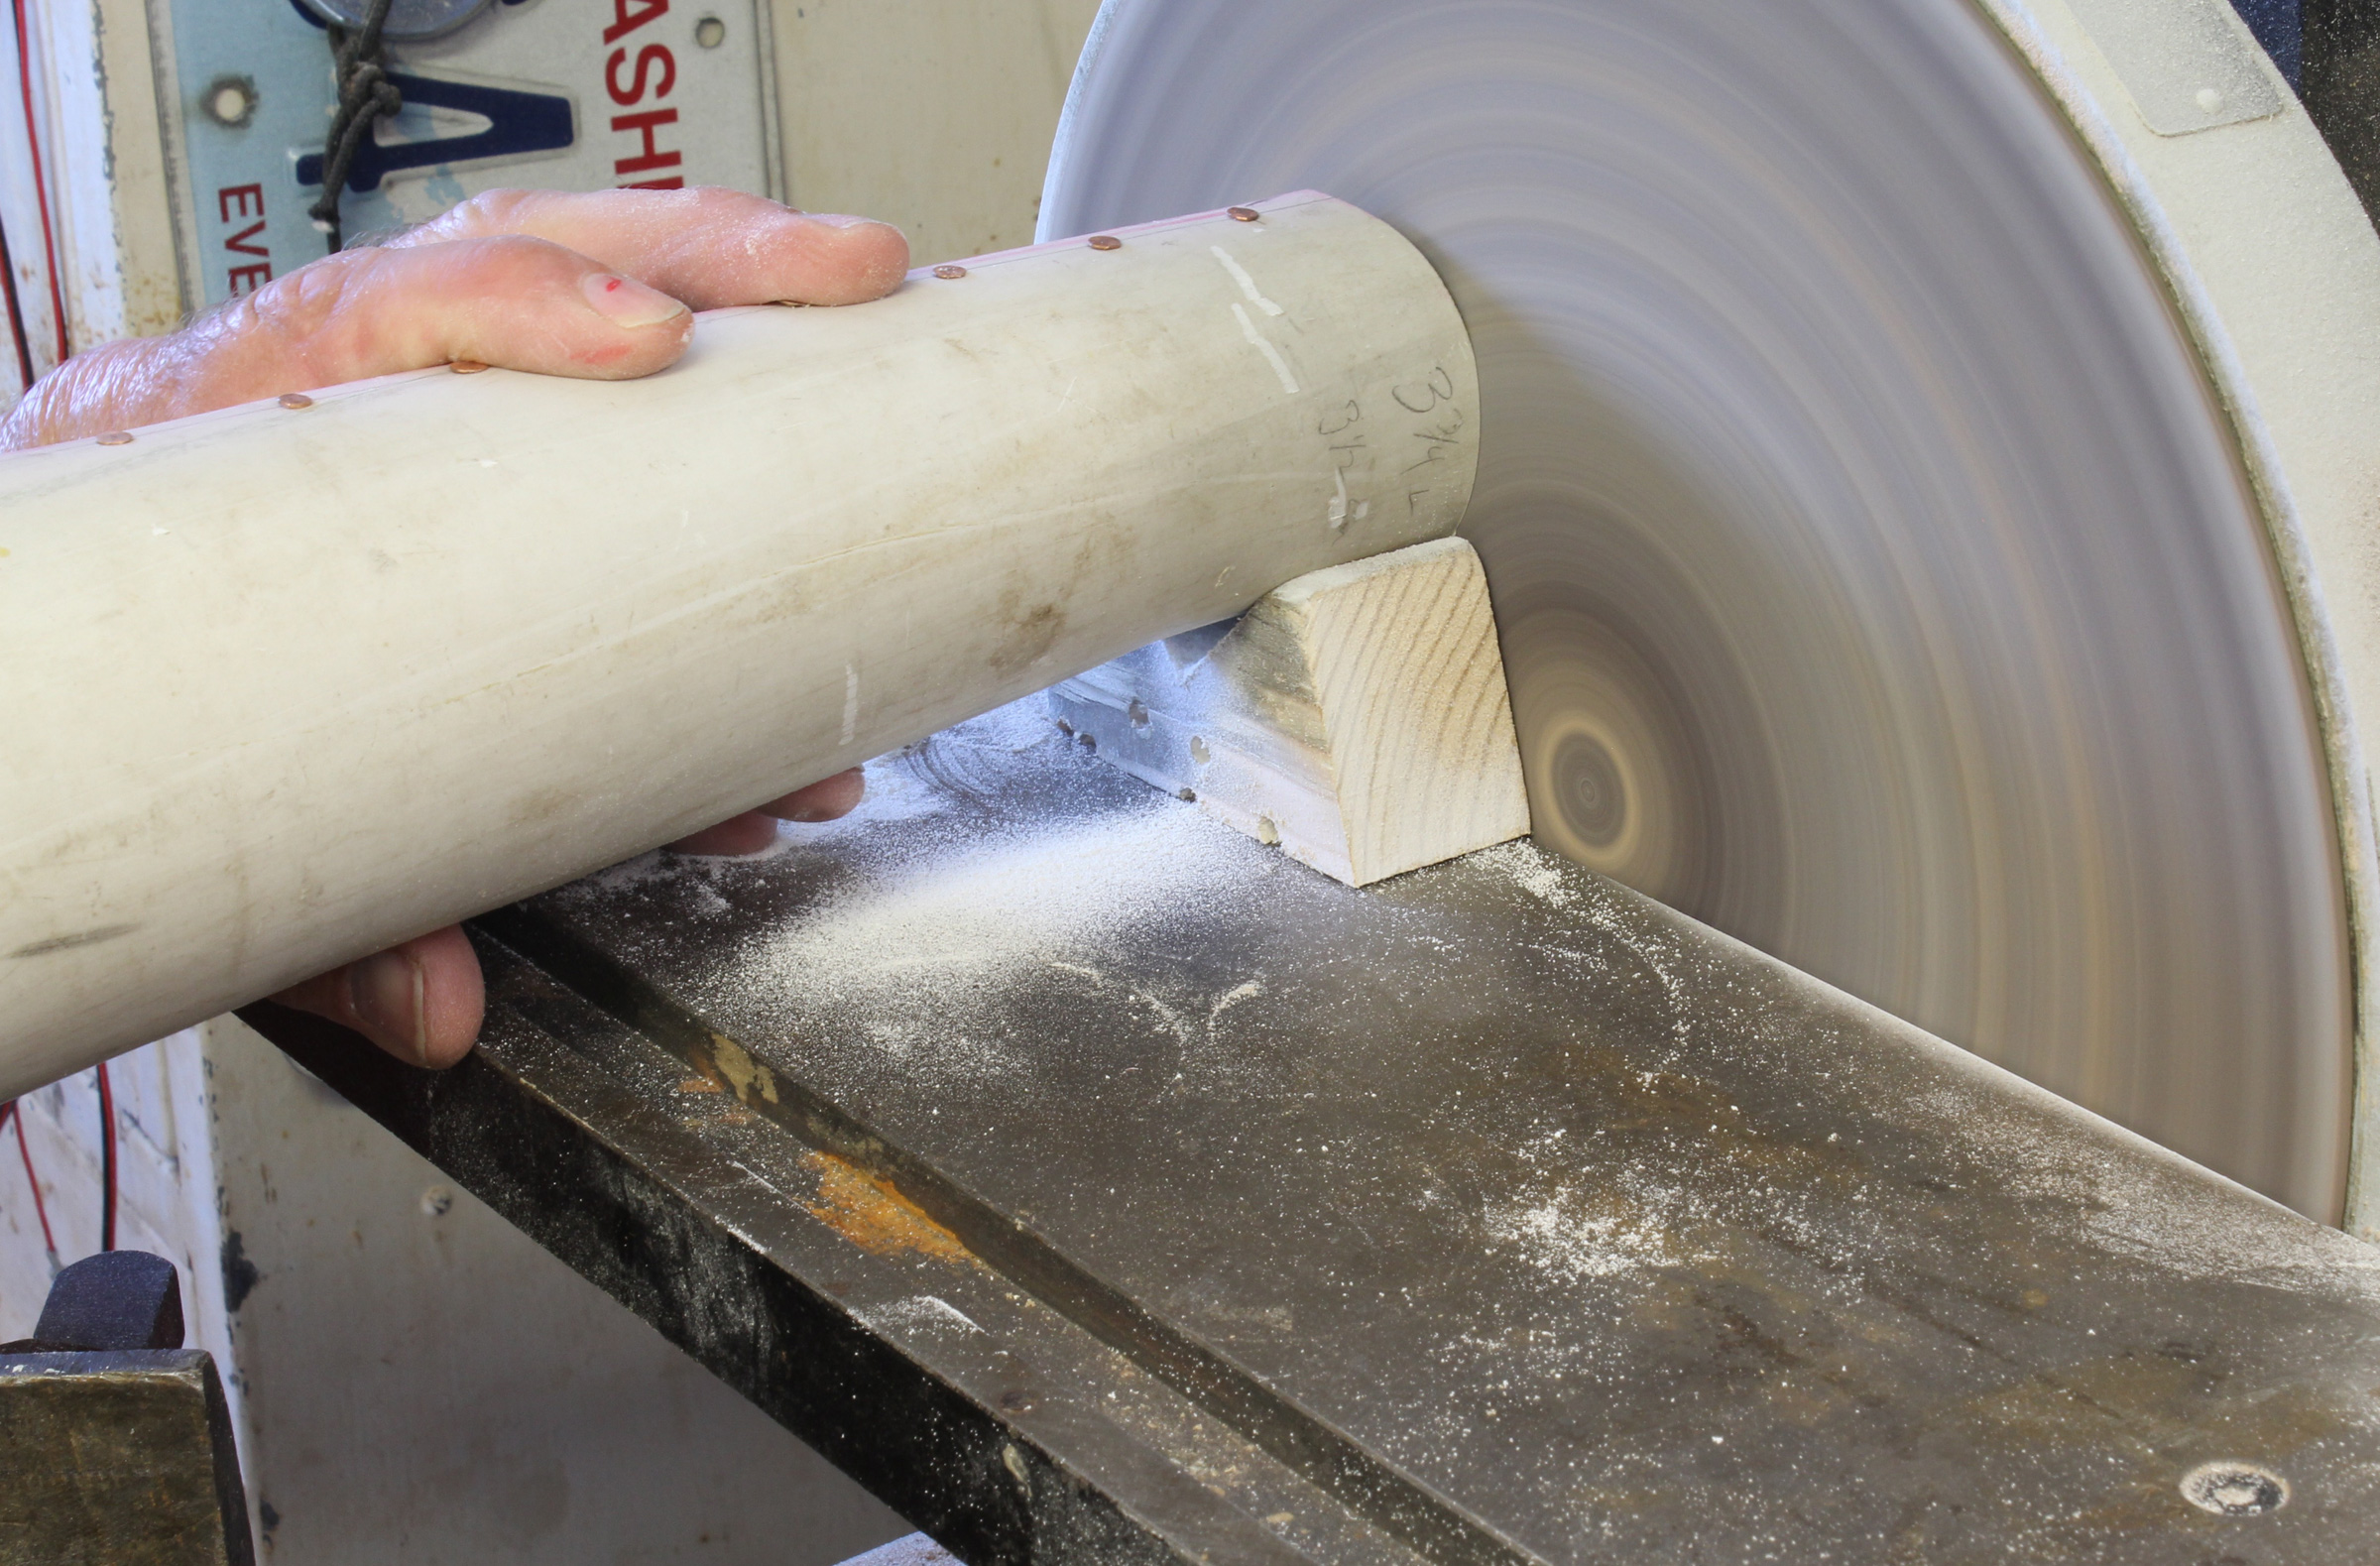
Any boat designed for rowing is only as good as the oars used to propel it. Simmons prefers to stand to row the Christmas Wherry and uses a pair of 8’6″ curved-blade oars made to his own pattern. The boat is fitted with bronze horned rowlocks that Simmons designed especially for rowing in the standing position. A 10′ oar is recommended for sculling. The shorter oars can be gotten out of a 28 plank without any laminating. For the Christmas Wherry builder, Simmons offers plans and a full-sized lofting of the oars.
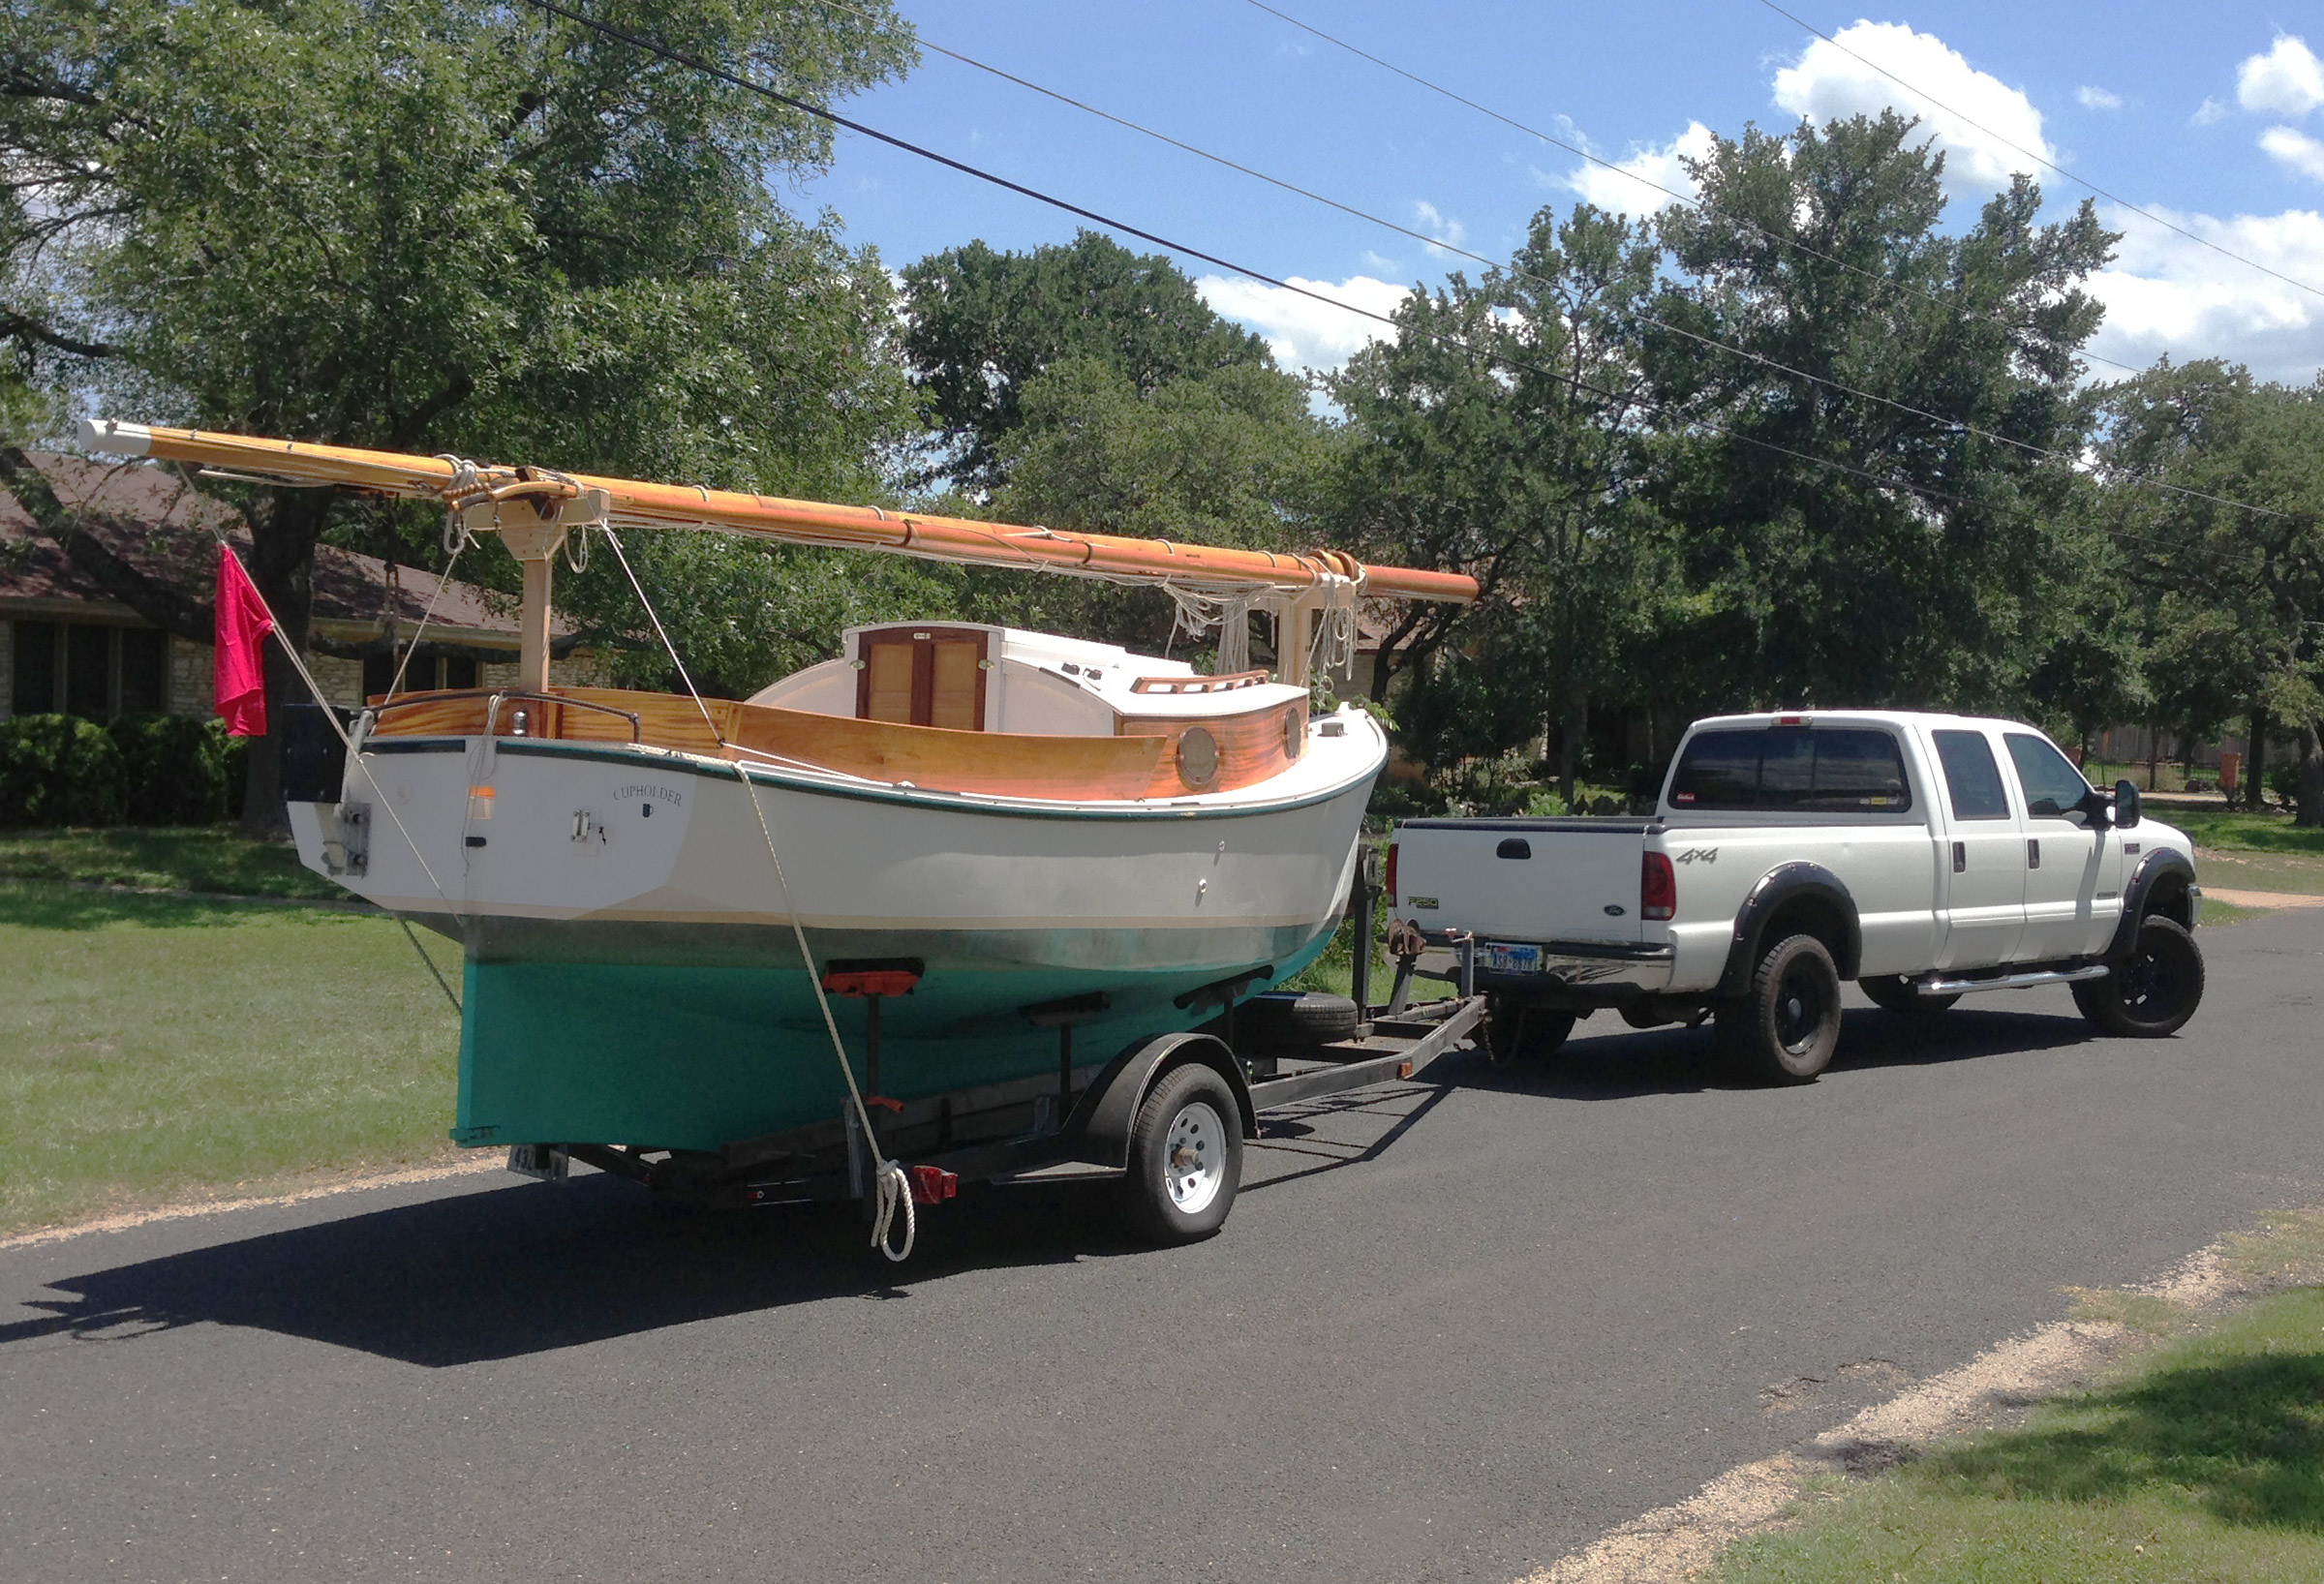
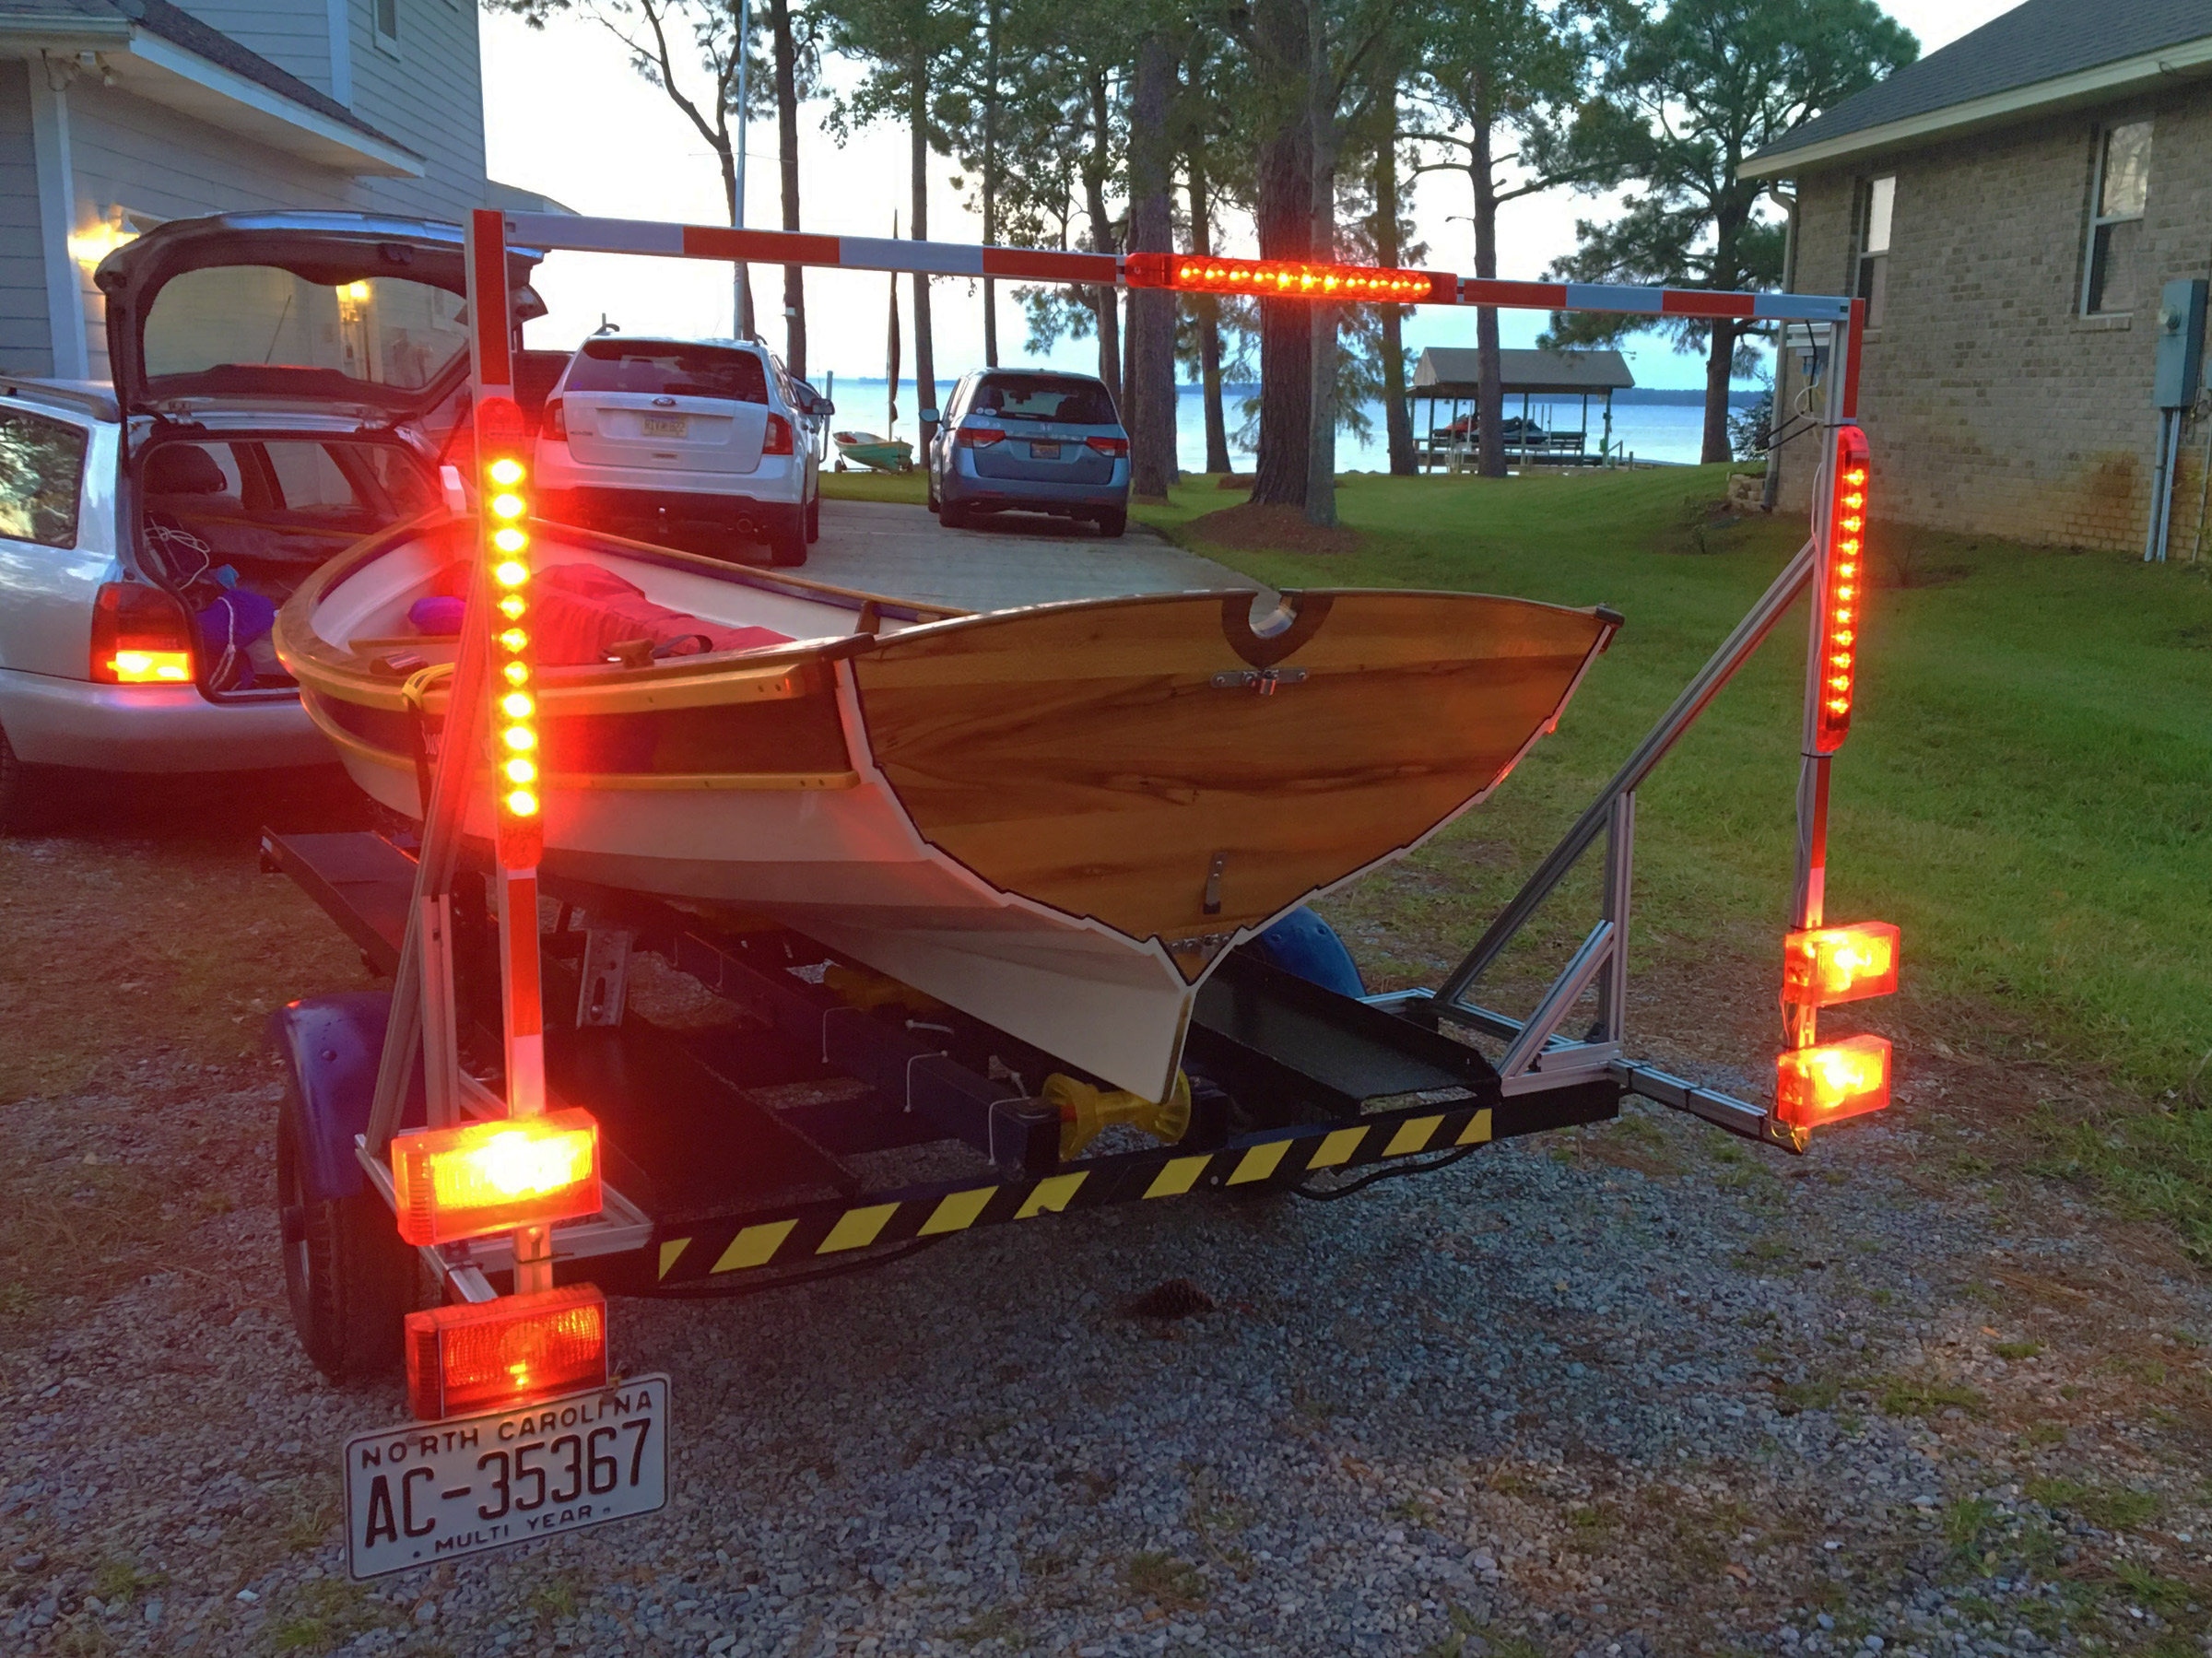
Moving the Christmas Wherry to and from the water should be an easy task, even for the singlehander. Even with her full rig and gear aboard, the boat shouldn’t weigh more than 300 lbs. She can be easily launched and recovered with a small trailer that has been modified to fit a round-bottomed wooden boat by adding a cradle to support the boat’s ’midship section and a substantial roller aft.
The Christmas Wherry may not be everyone’s cup of tea. She’s not a quick and easy building project, and even an order to Simmons’s one-man shop won’t produce a finished boat by return mail.
Still, seeing a Christmas Wherry on the beach or, even better, in the water makes it clear that she fulfills the aesthetic imperative of small-boat design. And she will take you out, and bring you home, in style and safety.
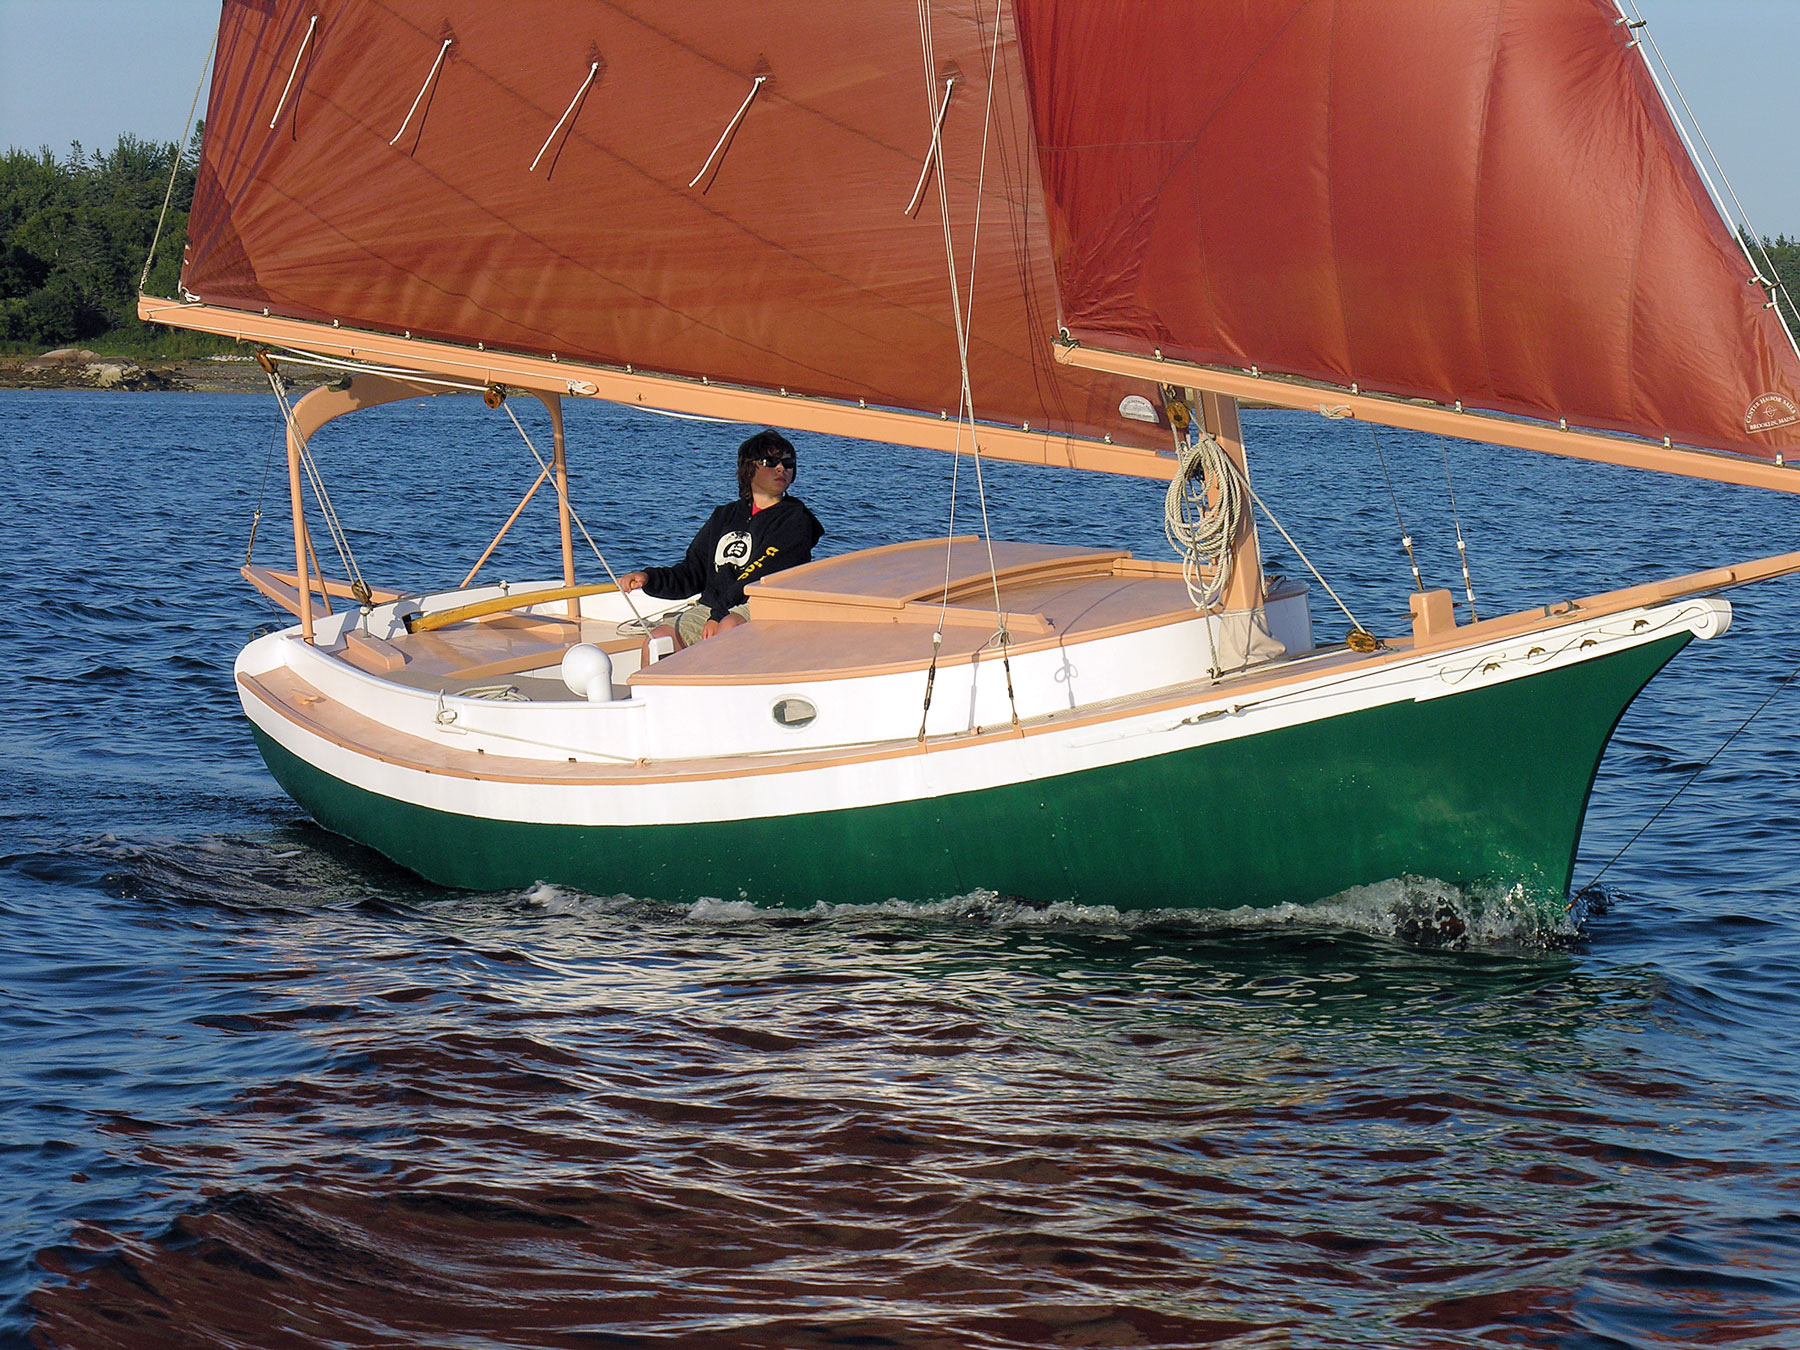
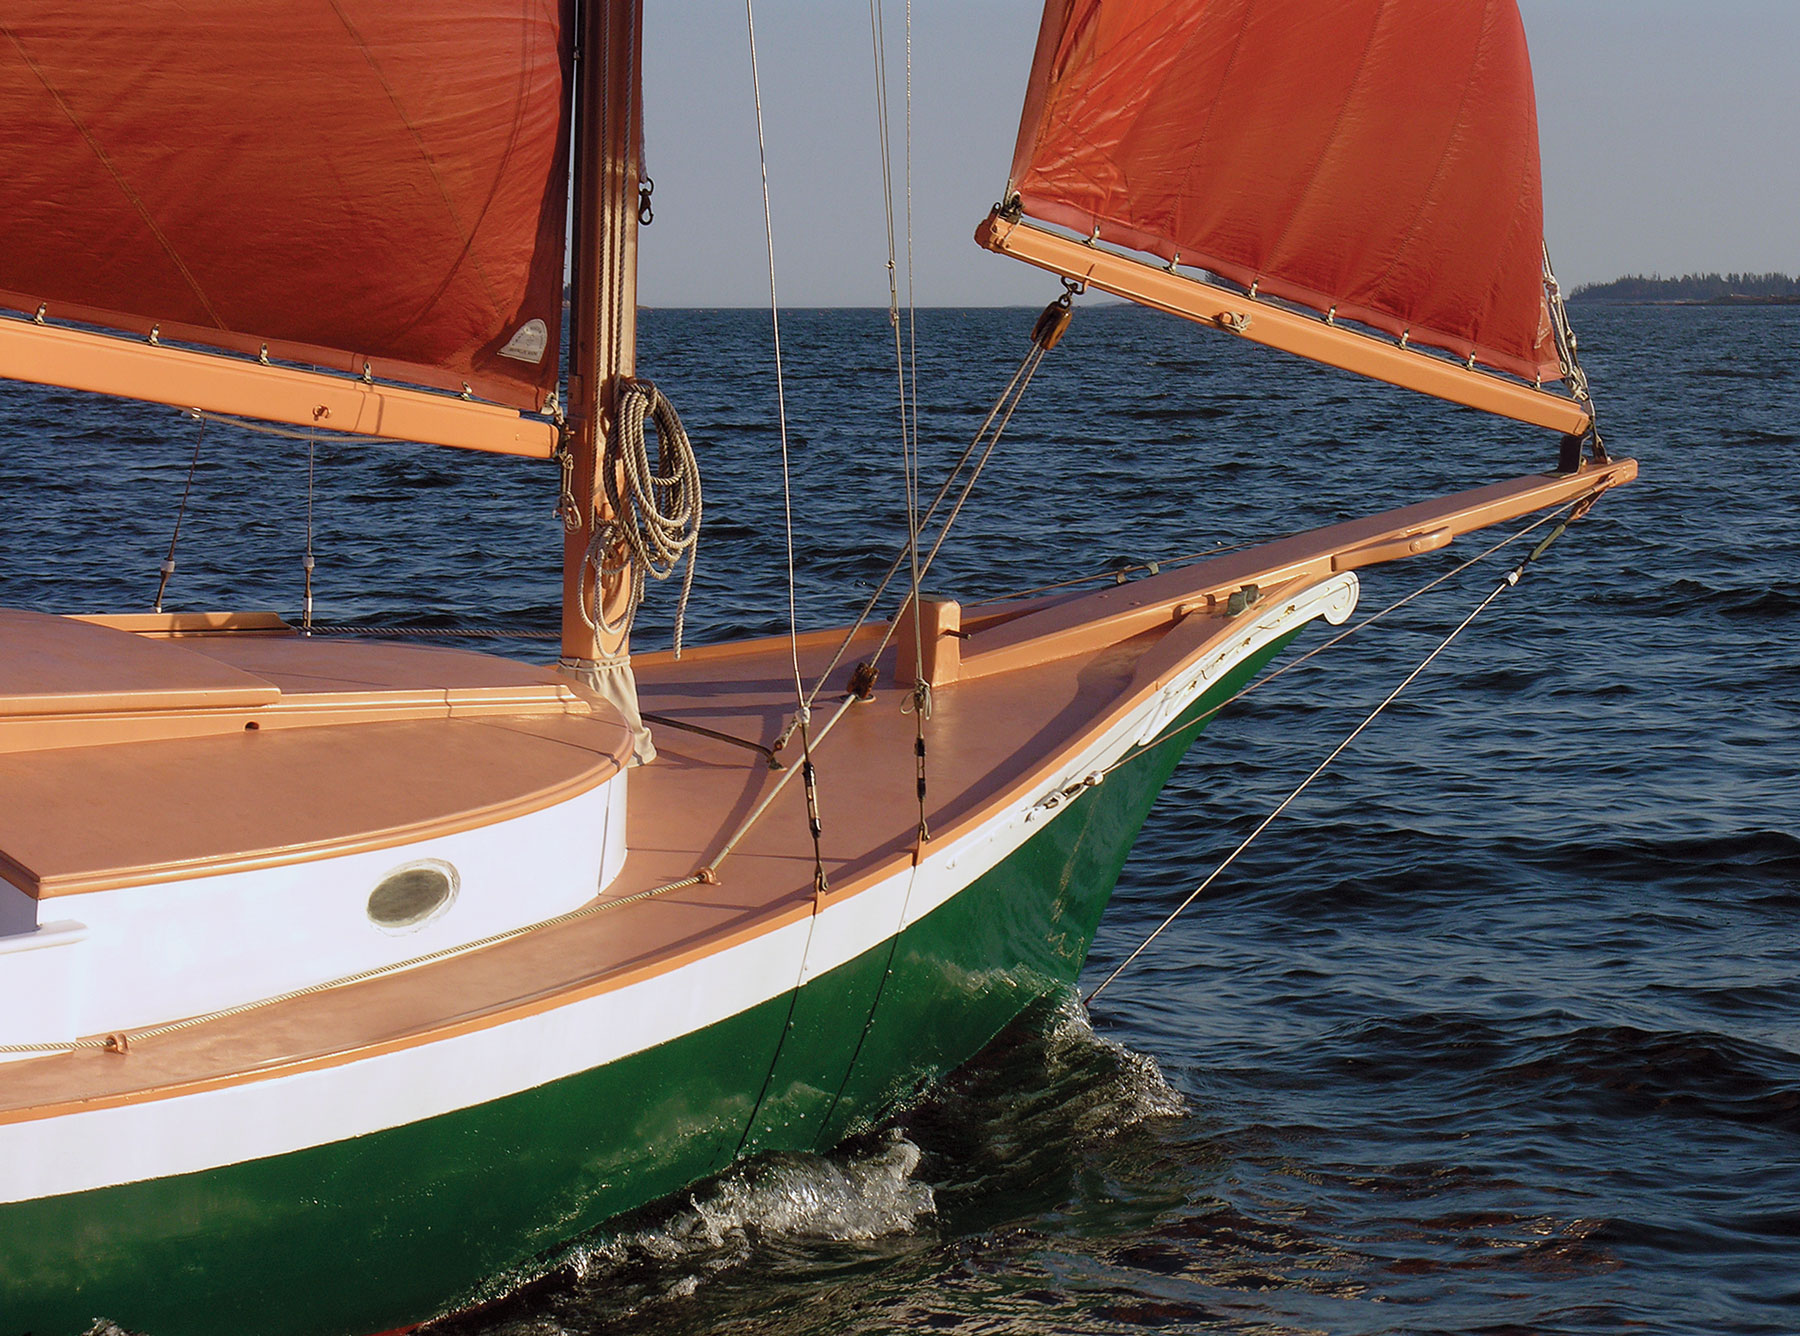
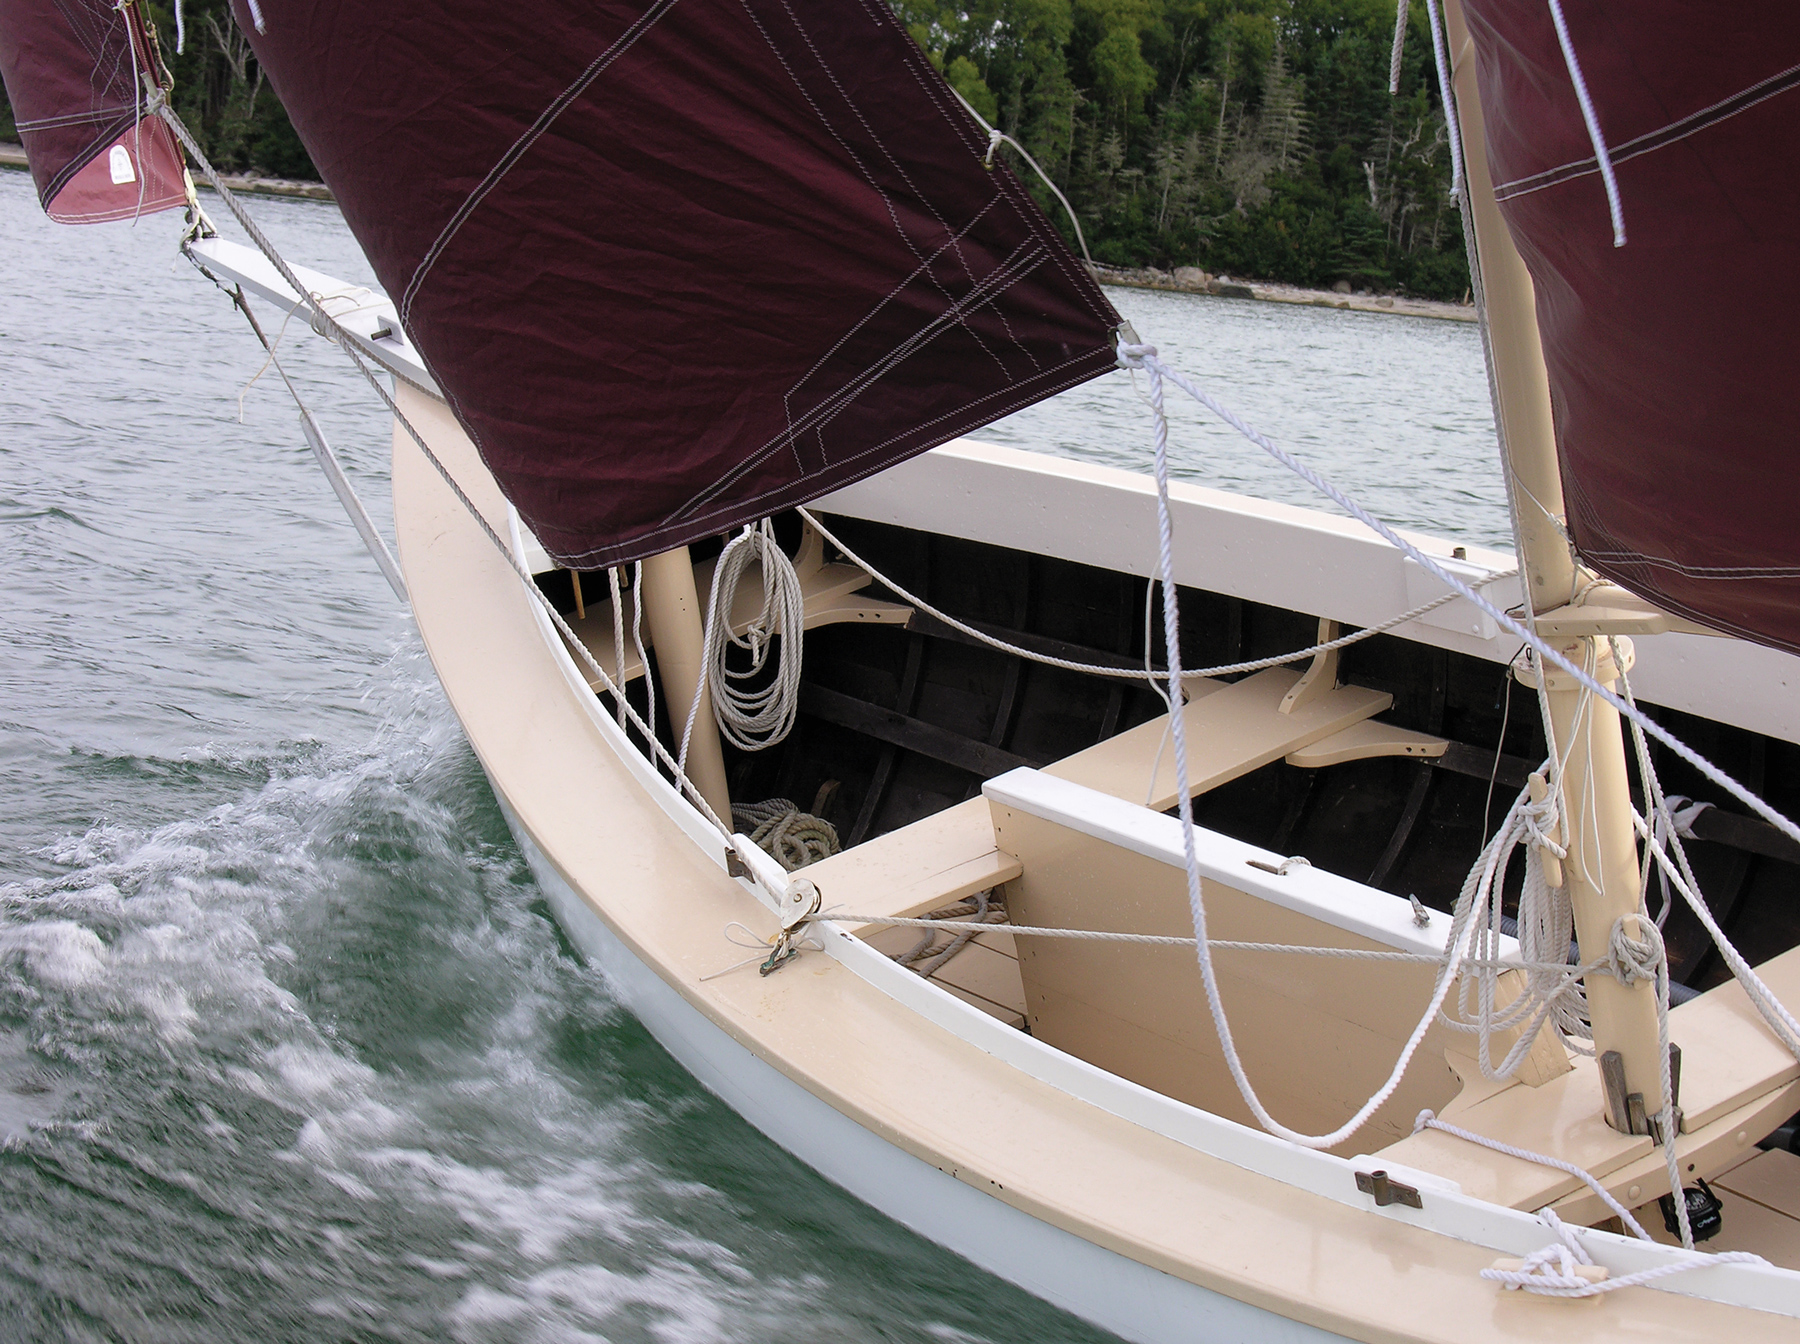
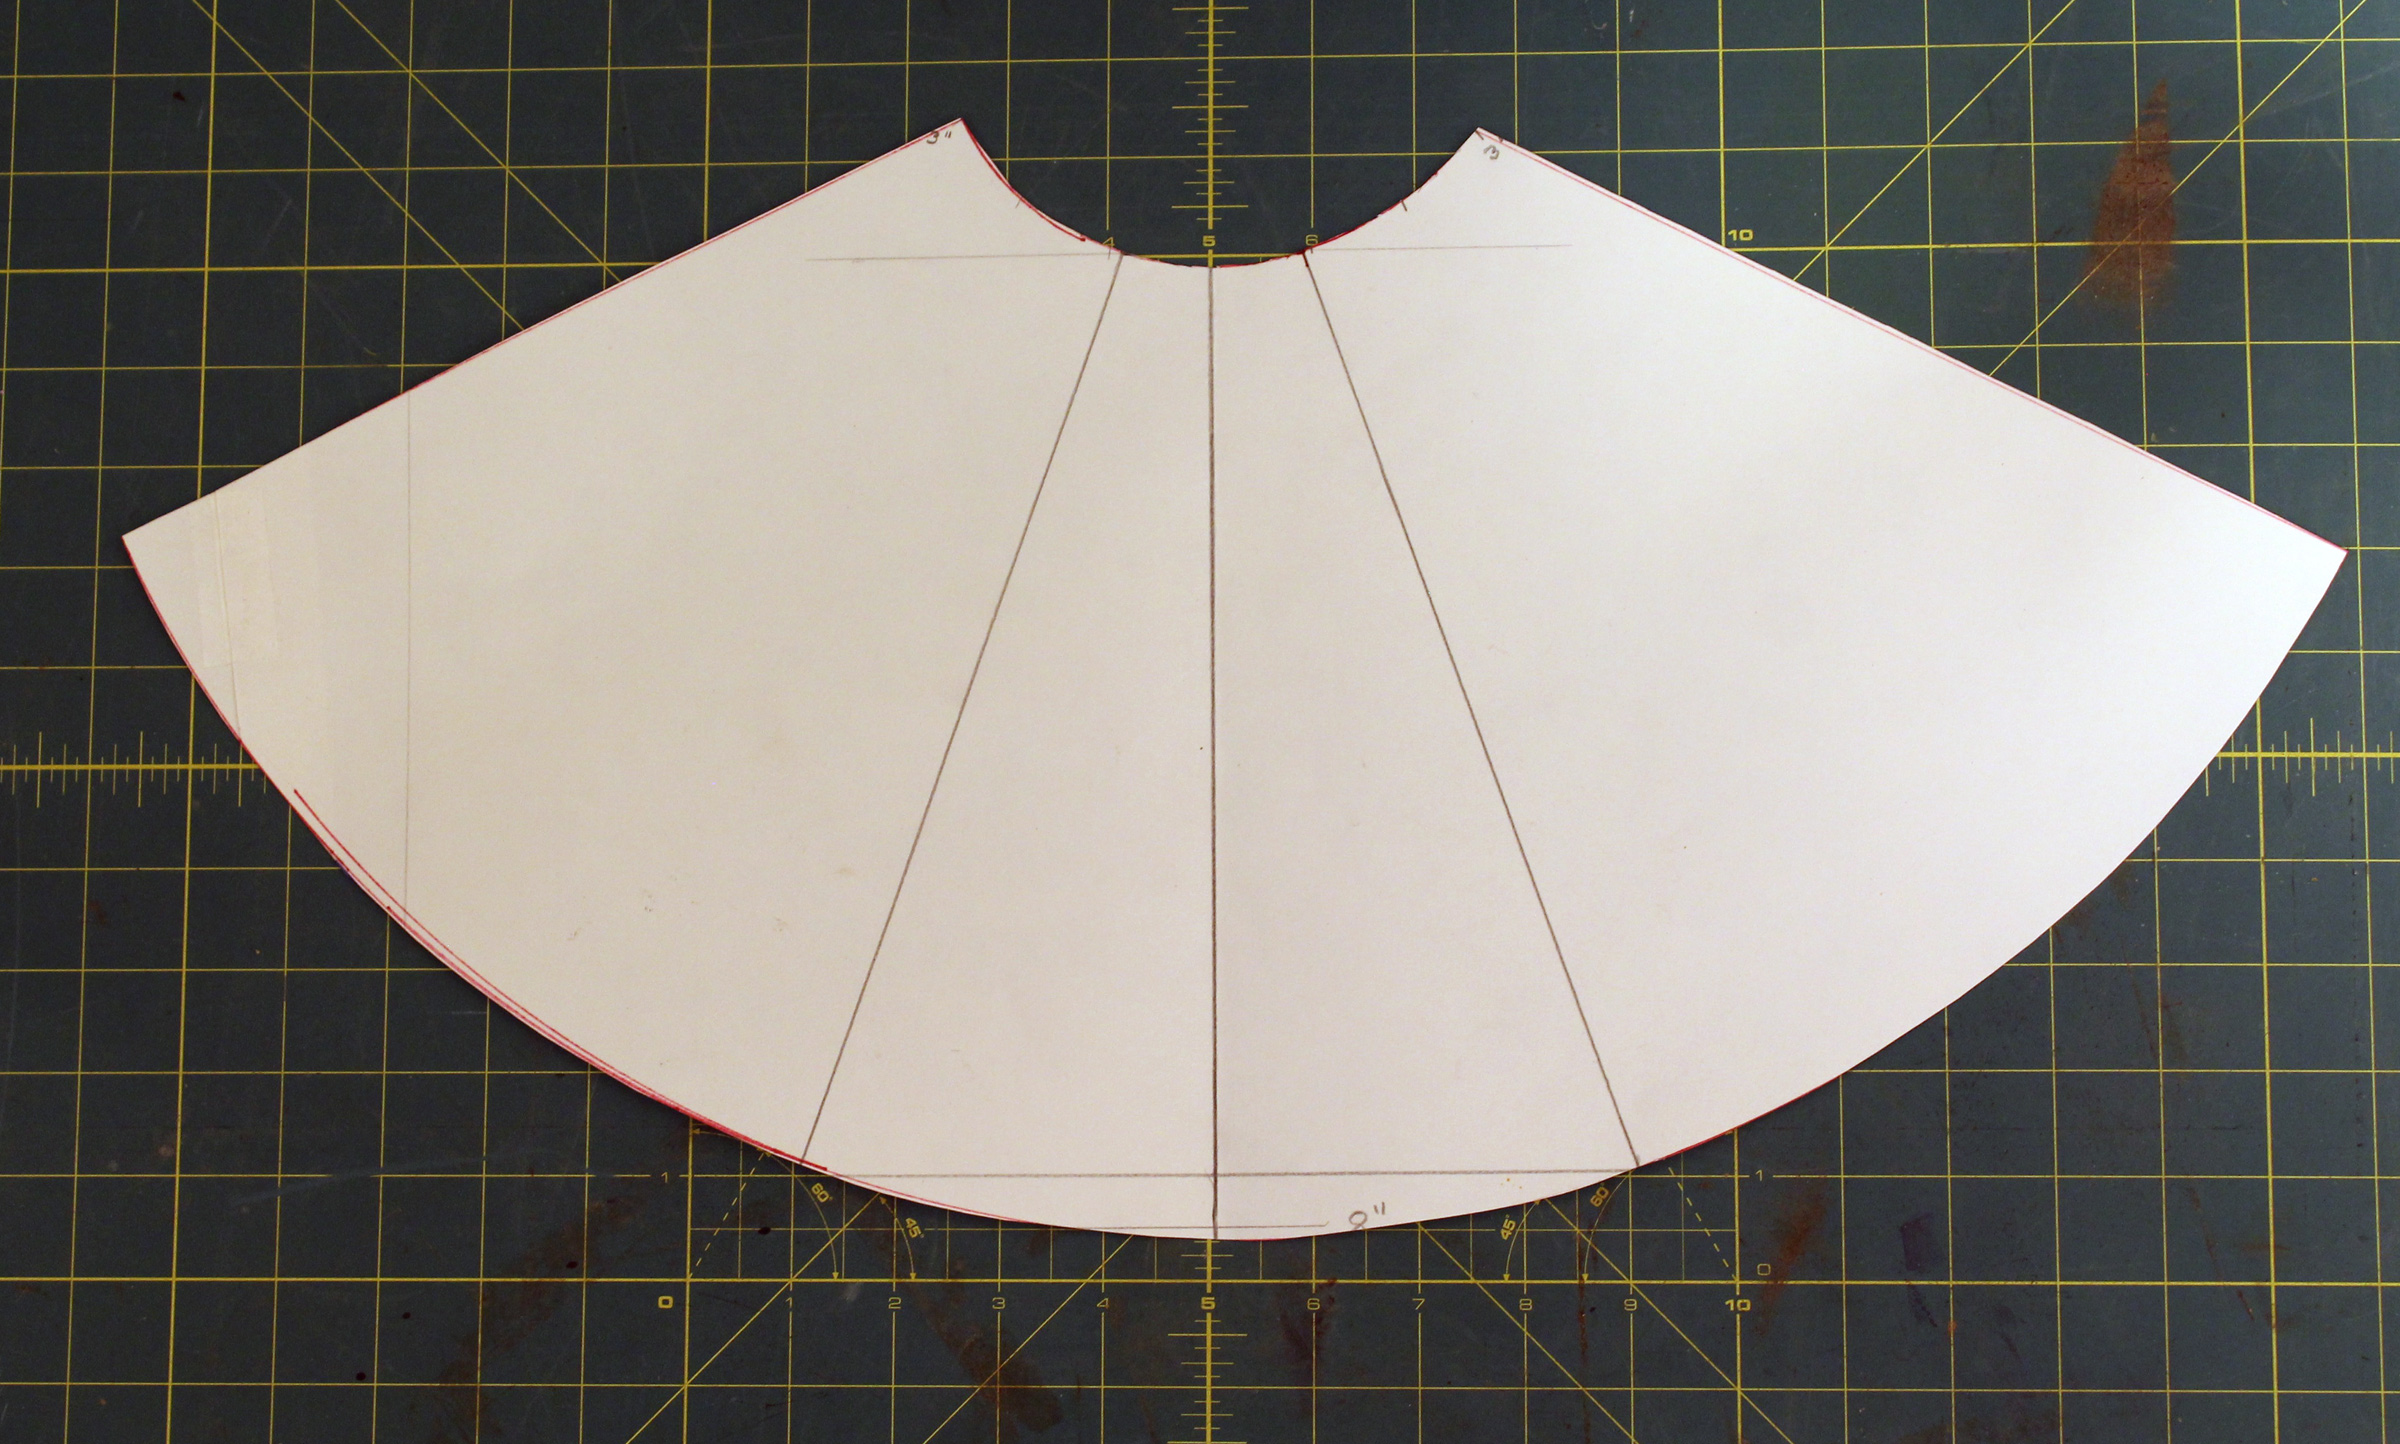
The Christmas Wherry packs a lot of enjoyment into a hull only 15′ long. In one of his rigging plans, designer Walter Simmons presents a standing lug rig, which permits better sheeting angles than the loose-fitted spritsail shown in the photograph opposite and also has the advantage of being easy to reef or douse. Two people can row when the wind fails.
Full sets of plans, completed boats, and Simmons’s boatbuilding instruction books are available through Duck Trap Woodworking.
Is there a boat you’d like to know more about? Have you built one that you think other Small Boats Magazine readers would enjoy? Please email us!
President John F. Kennedy made a speech in Houston, Texas, at Rice University on September 12, 1962. I was only nine years old at the time, but one part of that speech eventually reached me and stayed with me, as it has for most Americans:
“We choose to go to the Moon…We choose to go to the Moon in this decade and do the other things, not because they are easy, but because they are hard, because that goal will serve to organize and measure the best of our energies and skills, because that challenge is one that we are willing to accept, one we are unwilling to postpone, and one which we intend to win, and the others, too.”
The president’s declaration led to Neil Armstrong, less than seven years later, making the first footprint on the lunar surface. And getting to that point was hard, even for a nation with almost unlimited resources. As individuals, we set goals for ourselves that are more modest than going to the moon, but those that are the hardest for us to achieve, no less “measure the best of our energies and skills.”
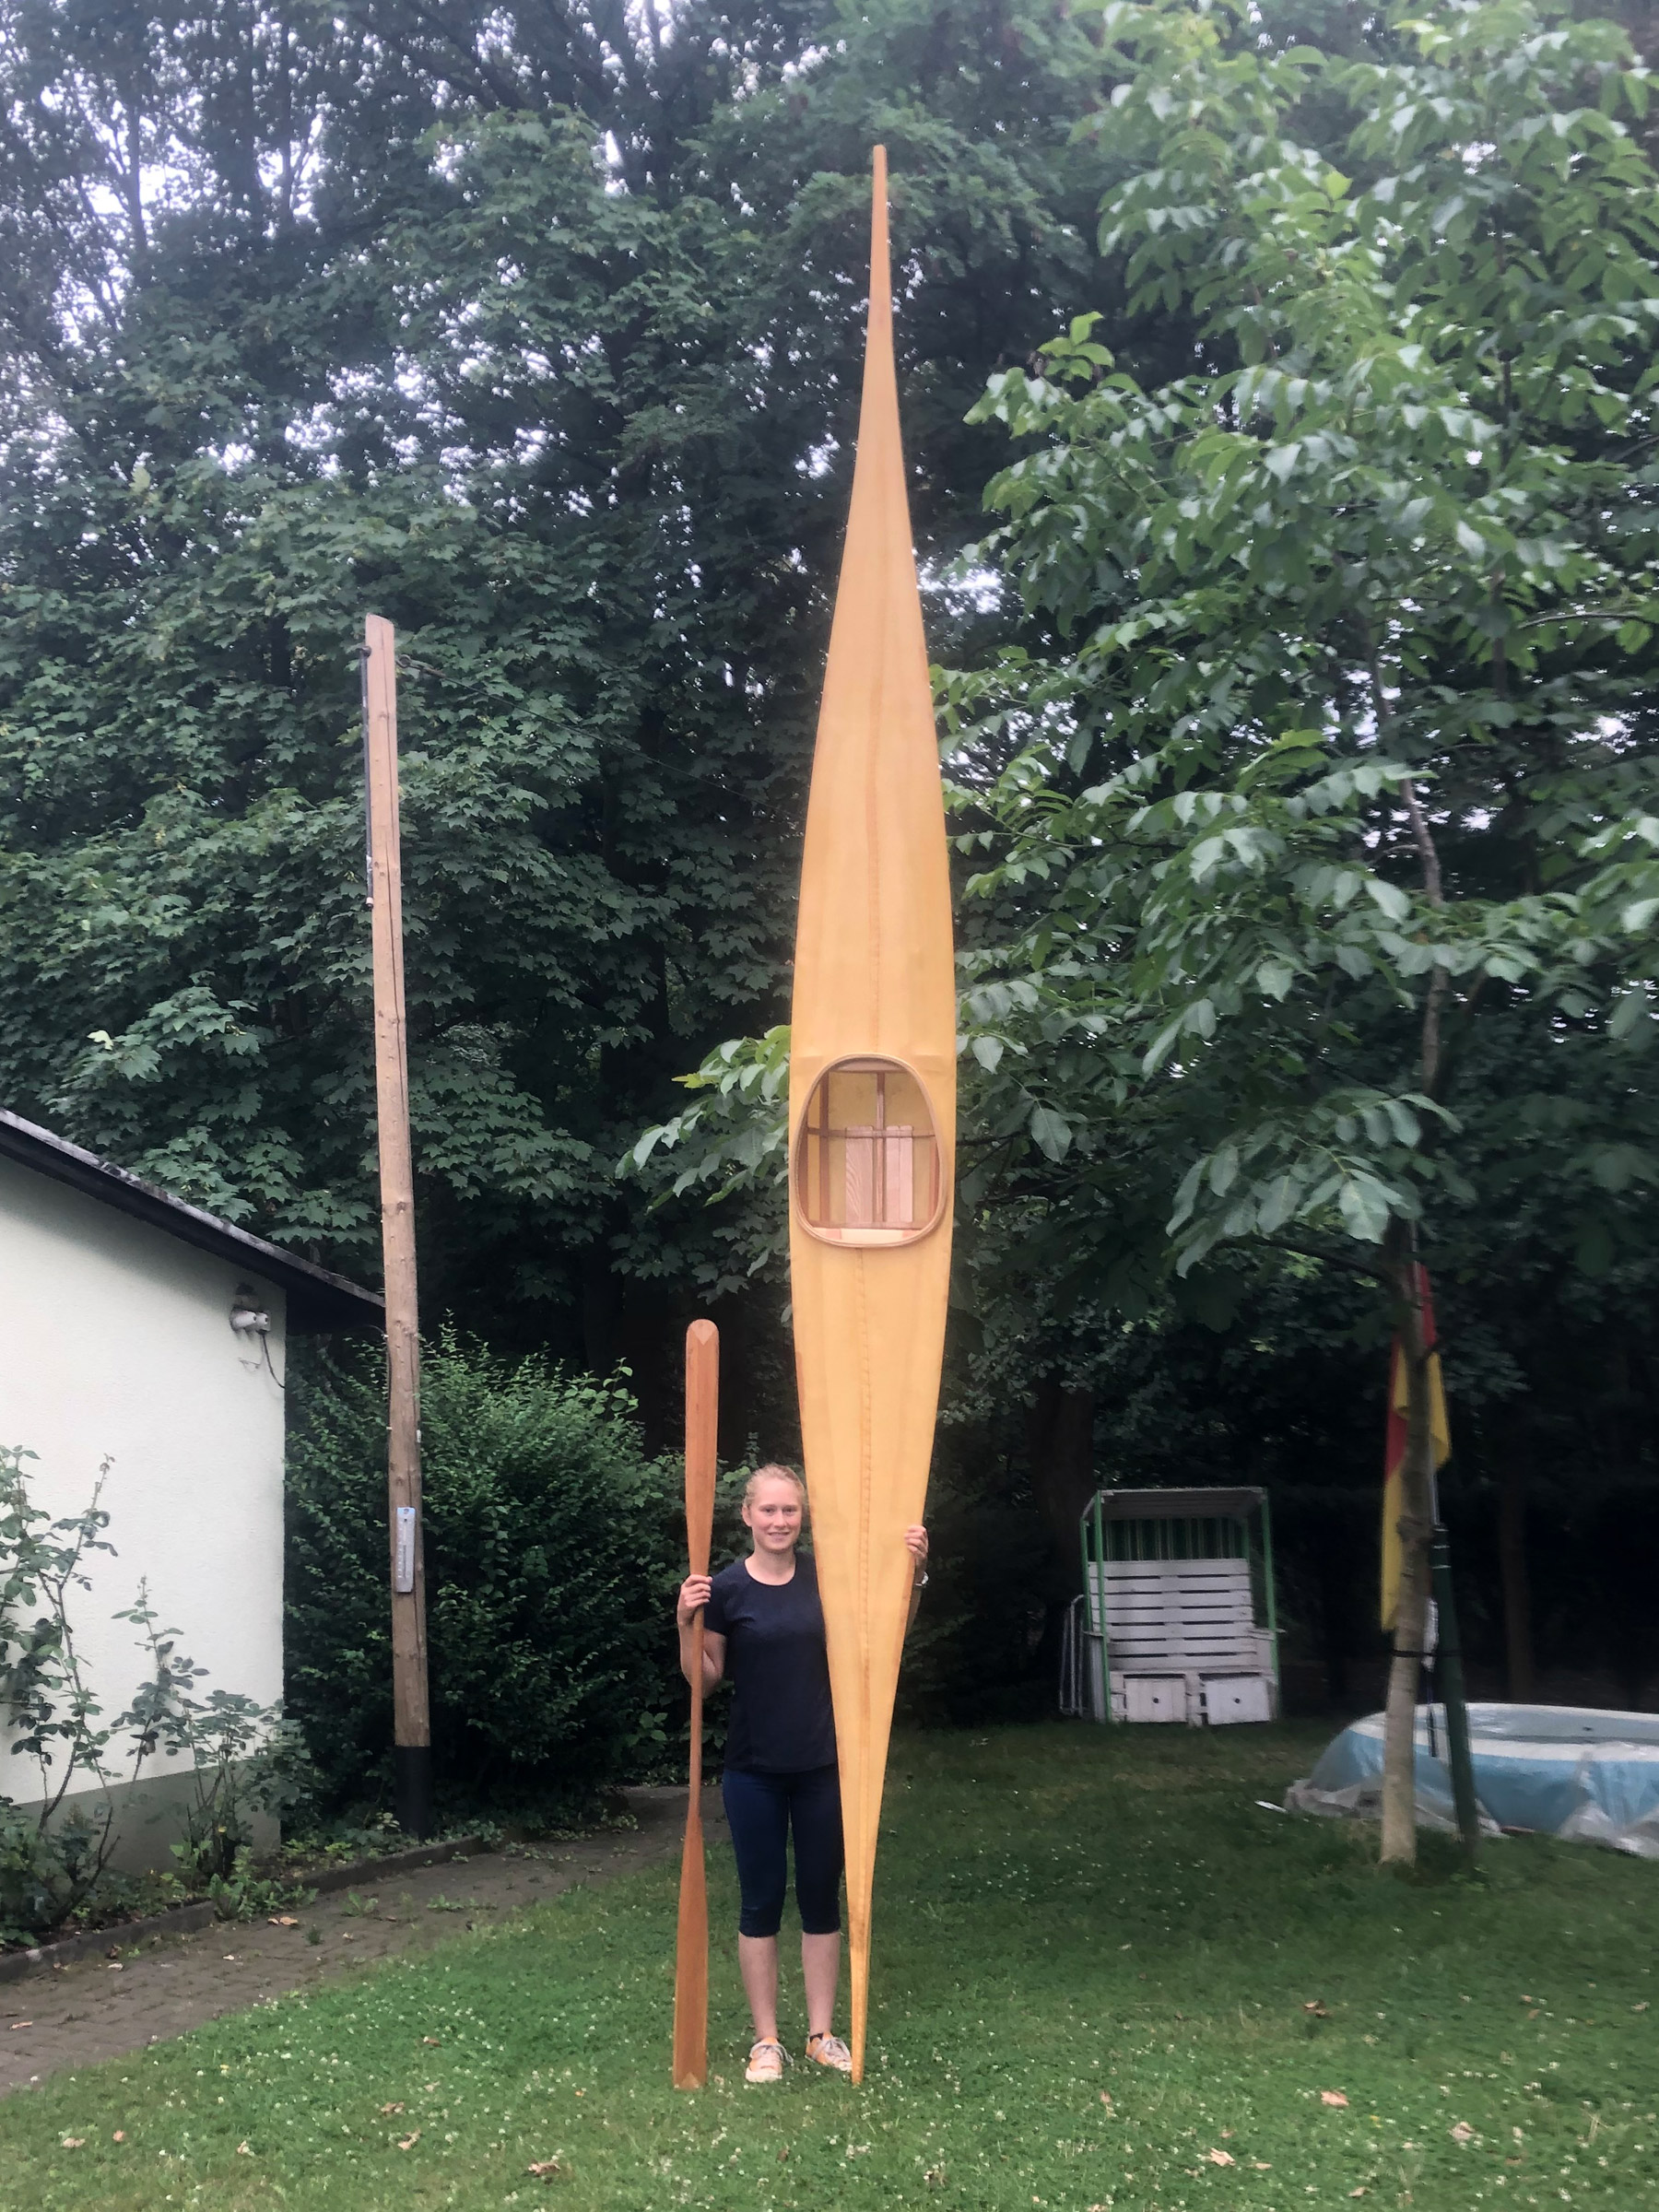
In this issue, Isabelle Heker tells us of the daunting task she took on of building a Greenland kayak in spite of her lack of skills, tools, and materials and in spite of the doubts cast by those closest to her. Dave Gibson, also in this issue, built a plywood kayak and confessed that after looking at the instructions, “I had not even started,” he said, “and I was buffaloed.”
I was also intimidated by the steep front face of the learning curve I had chosen to scale when I first started building boats. I read lots of books, gathered up the tools I thought I’d need, and made a start. I got as far as stetting the frames on the bottom of the dory skiff that was my first real boatbuilding project. A batten sprung around them showed the frames weren’t all making contact along that batten’s fair curve. I spent a week, maybe two, checking offsets, studying the lofting, measuring the frame, searching for the numbers that were causing the problem. I couldn’t find them, gave up on that approach, and decided that the only solution was to take my direction from the batten and build the boat.
Building that 14′ skiff was the most difficult thing I had done to that point. In spite of the challenges, the mistakes, and the disappointments, I often stepped back from the work, nestled in the pile of redolent oak and cedar shavings I’d swept into the corner of my makeshift shop, and gazed at the boat in wonder. The feeling of “I did that” wouldn’t have been as rewarding if the project had been quick, easy, and without suffering.
I thought the repairs I had to make to the kayak I had allowed to fly off my roof racks would have been easy. I’d made repairs before, after it had arrived seriously damaged after being air-freighted from Denmark. The new fix the aft deck required was easy, a repeat of the repair to the foredeck I’d done years earlier. But addressing the damage to the skeg and the crack in the aft half of the hull had me a bit “buffaloed” and took a lot of thinking before I could continue the work.
I had to create some new tools and new ways of using existing tools as well as invent methods for working on damage I could access from just one side. I complained to Rachel that I was having to find solutions to problems I’d never encounter again. That missed the point. The value of the exercise was not in a solution I’d never need again, but in being determined to solve a problem I’d never encountered before.
If I had taken up woodworking because I had wanted it to be easy, I would have stuck to projects that involved only straight lines and right angles. I wouldn’t have started building boats with the struggles posed by their curves and compound bevels. With each boat I built after the dory skiff, I took on more complex builds that would pose new problems to solve, knowing full well that they would at times frustrate and even annoy me, but knowing just as well that the level of satisfaction would rise with each elevation of the difficulty. To put it Kennedy’s way, the challenges would serve to organize and measure the best of my energies and skills.
In that 1962 speech, President Kennedy also said this: “We set sail on this new sea because there is new knowledge to be gained.” It’s no surprise that his metaphor was about boats.
Update:
I greatly appreciated all of the comments sent by readers who could empathize with my story about forgetting to tying my Struer kayak to the roof racks and the damage it suffered falling onto the pavement. I finished the repairs recently and, after a two-month hiatus, got it back on the water. Here is a review of the damage:
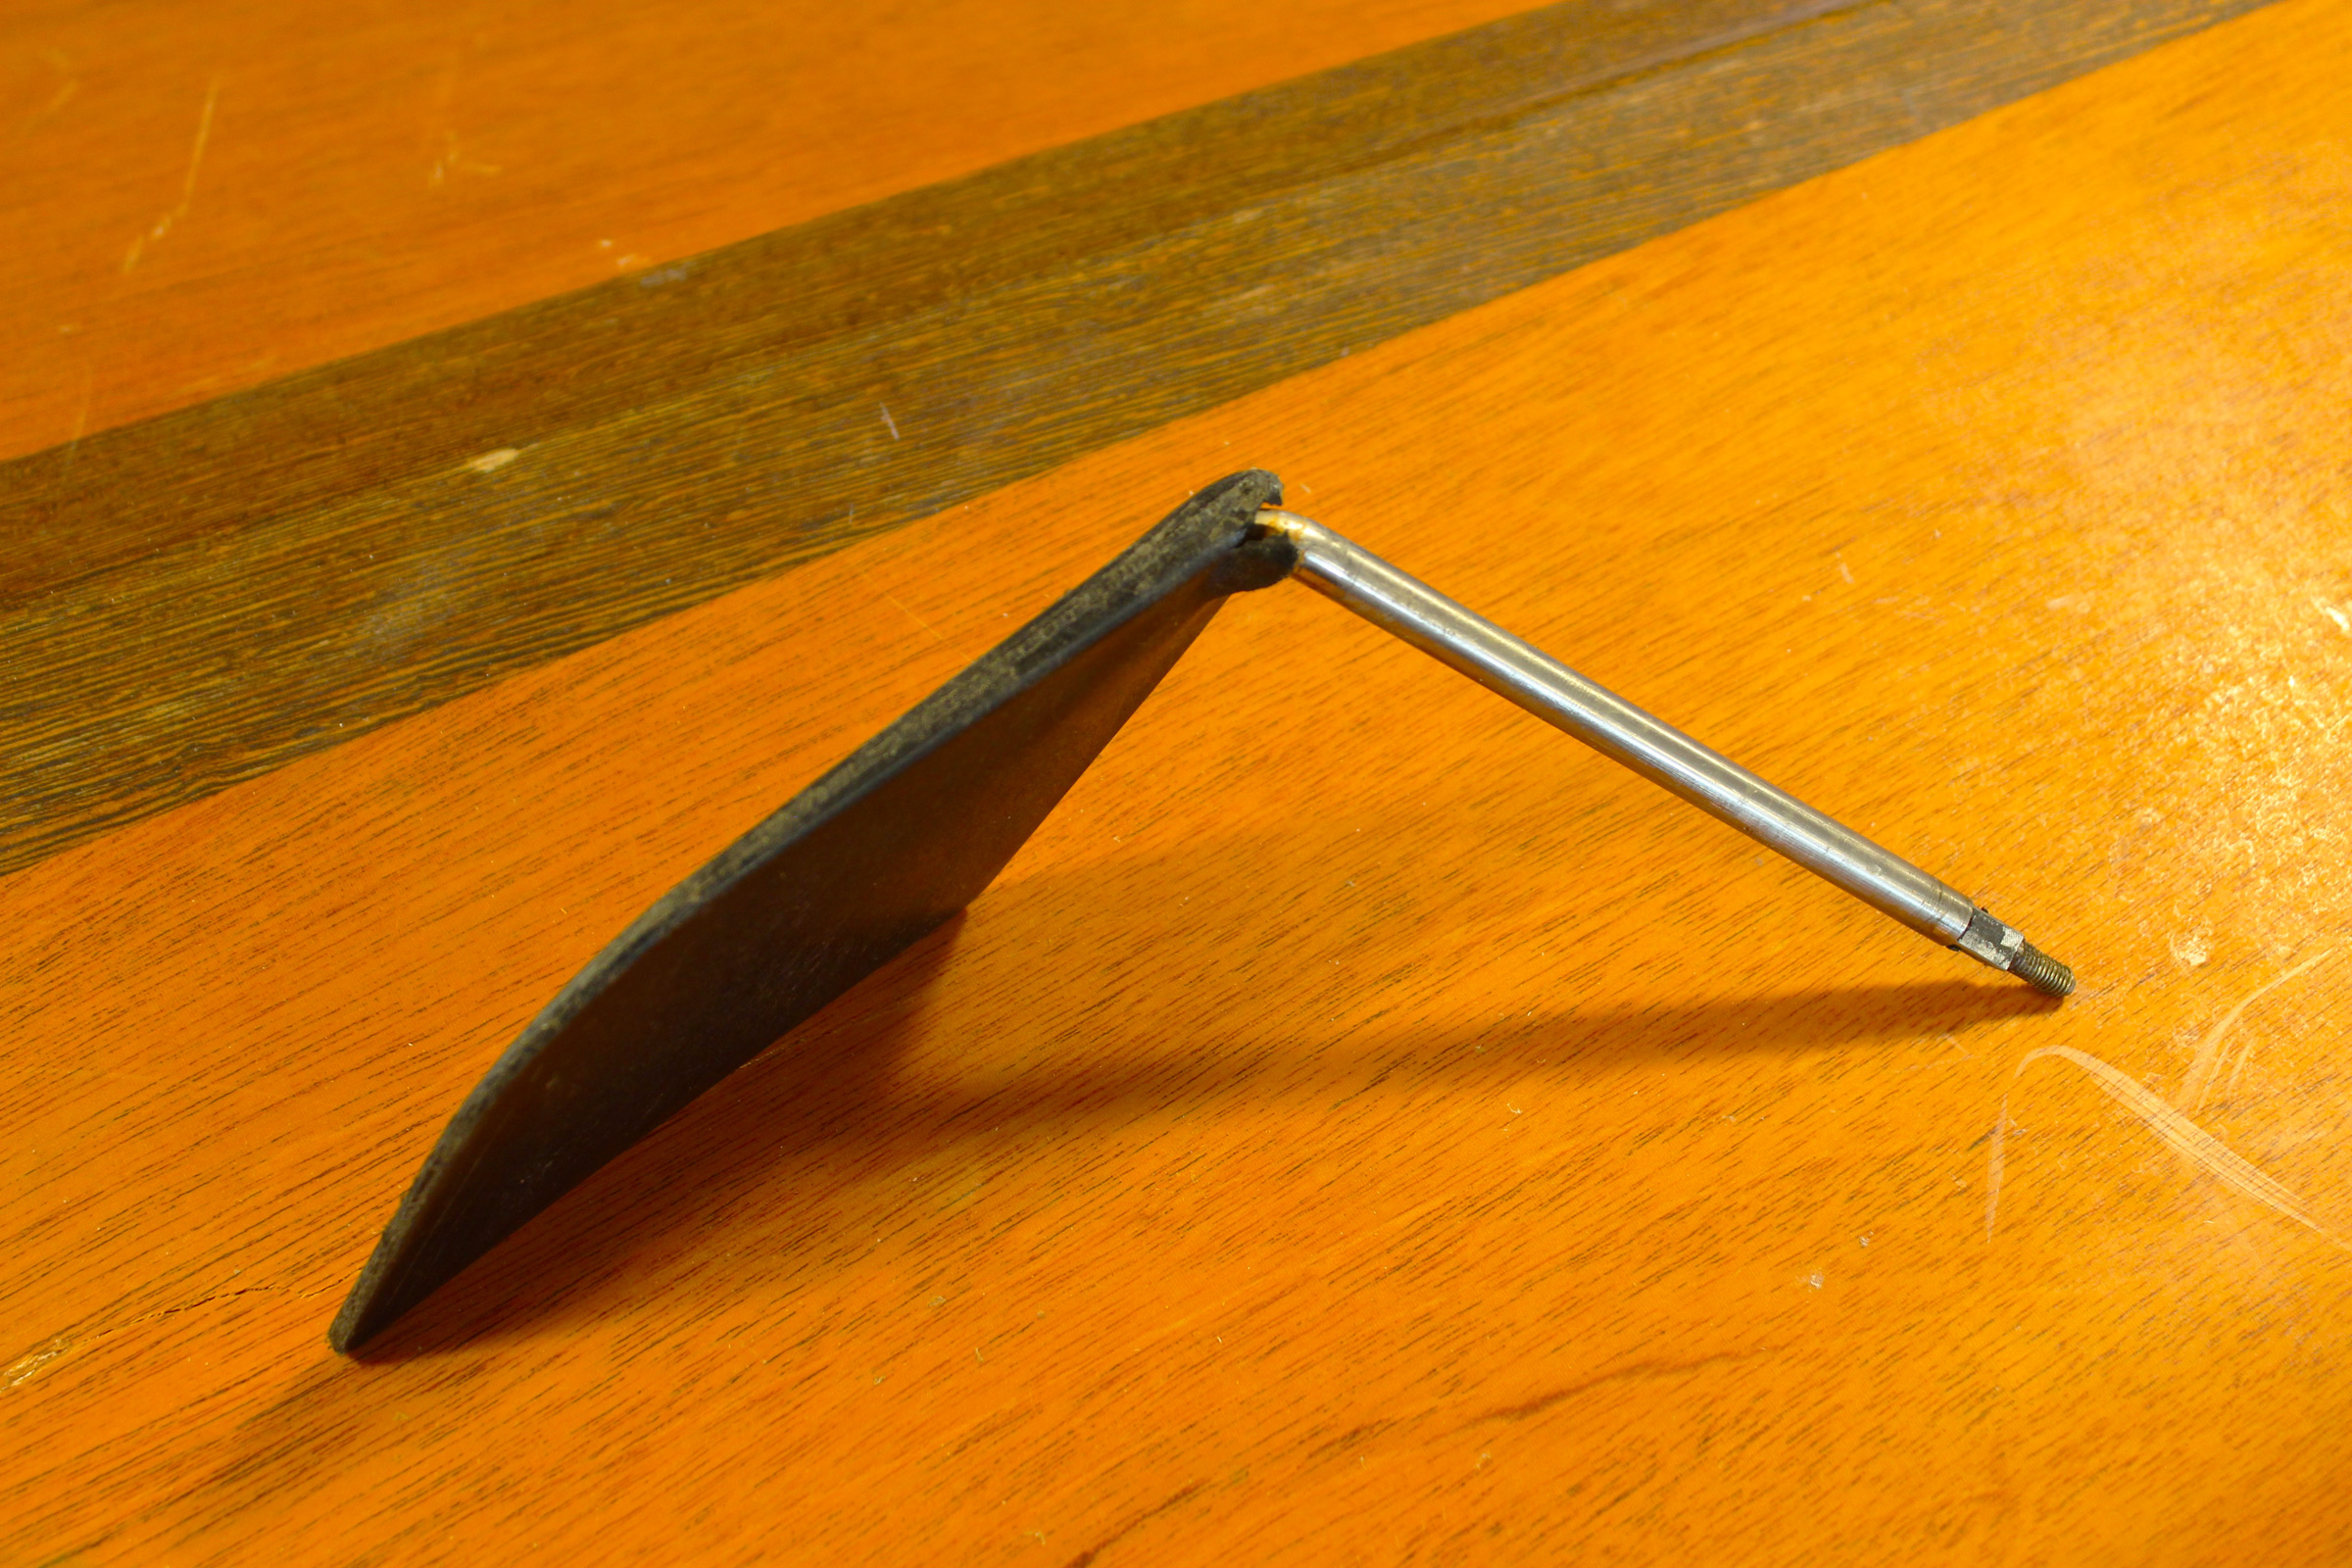
The rudder blade was bent almost 90 degrees by the impact.
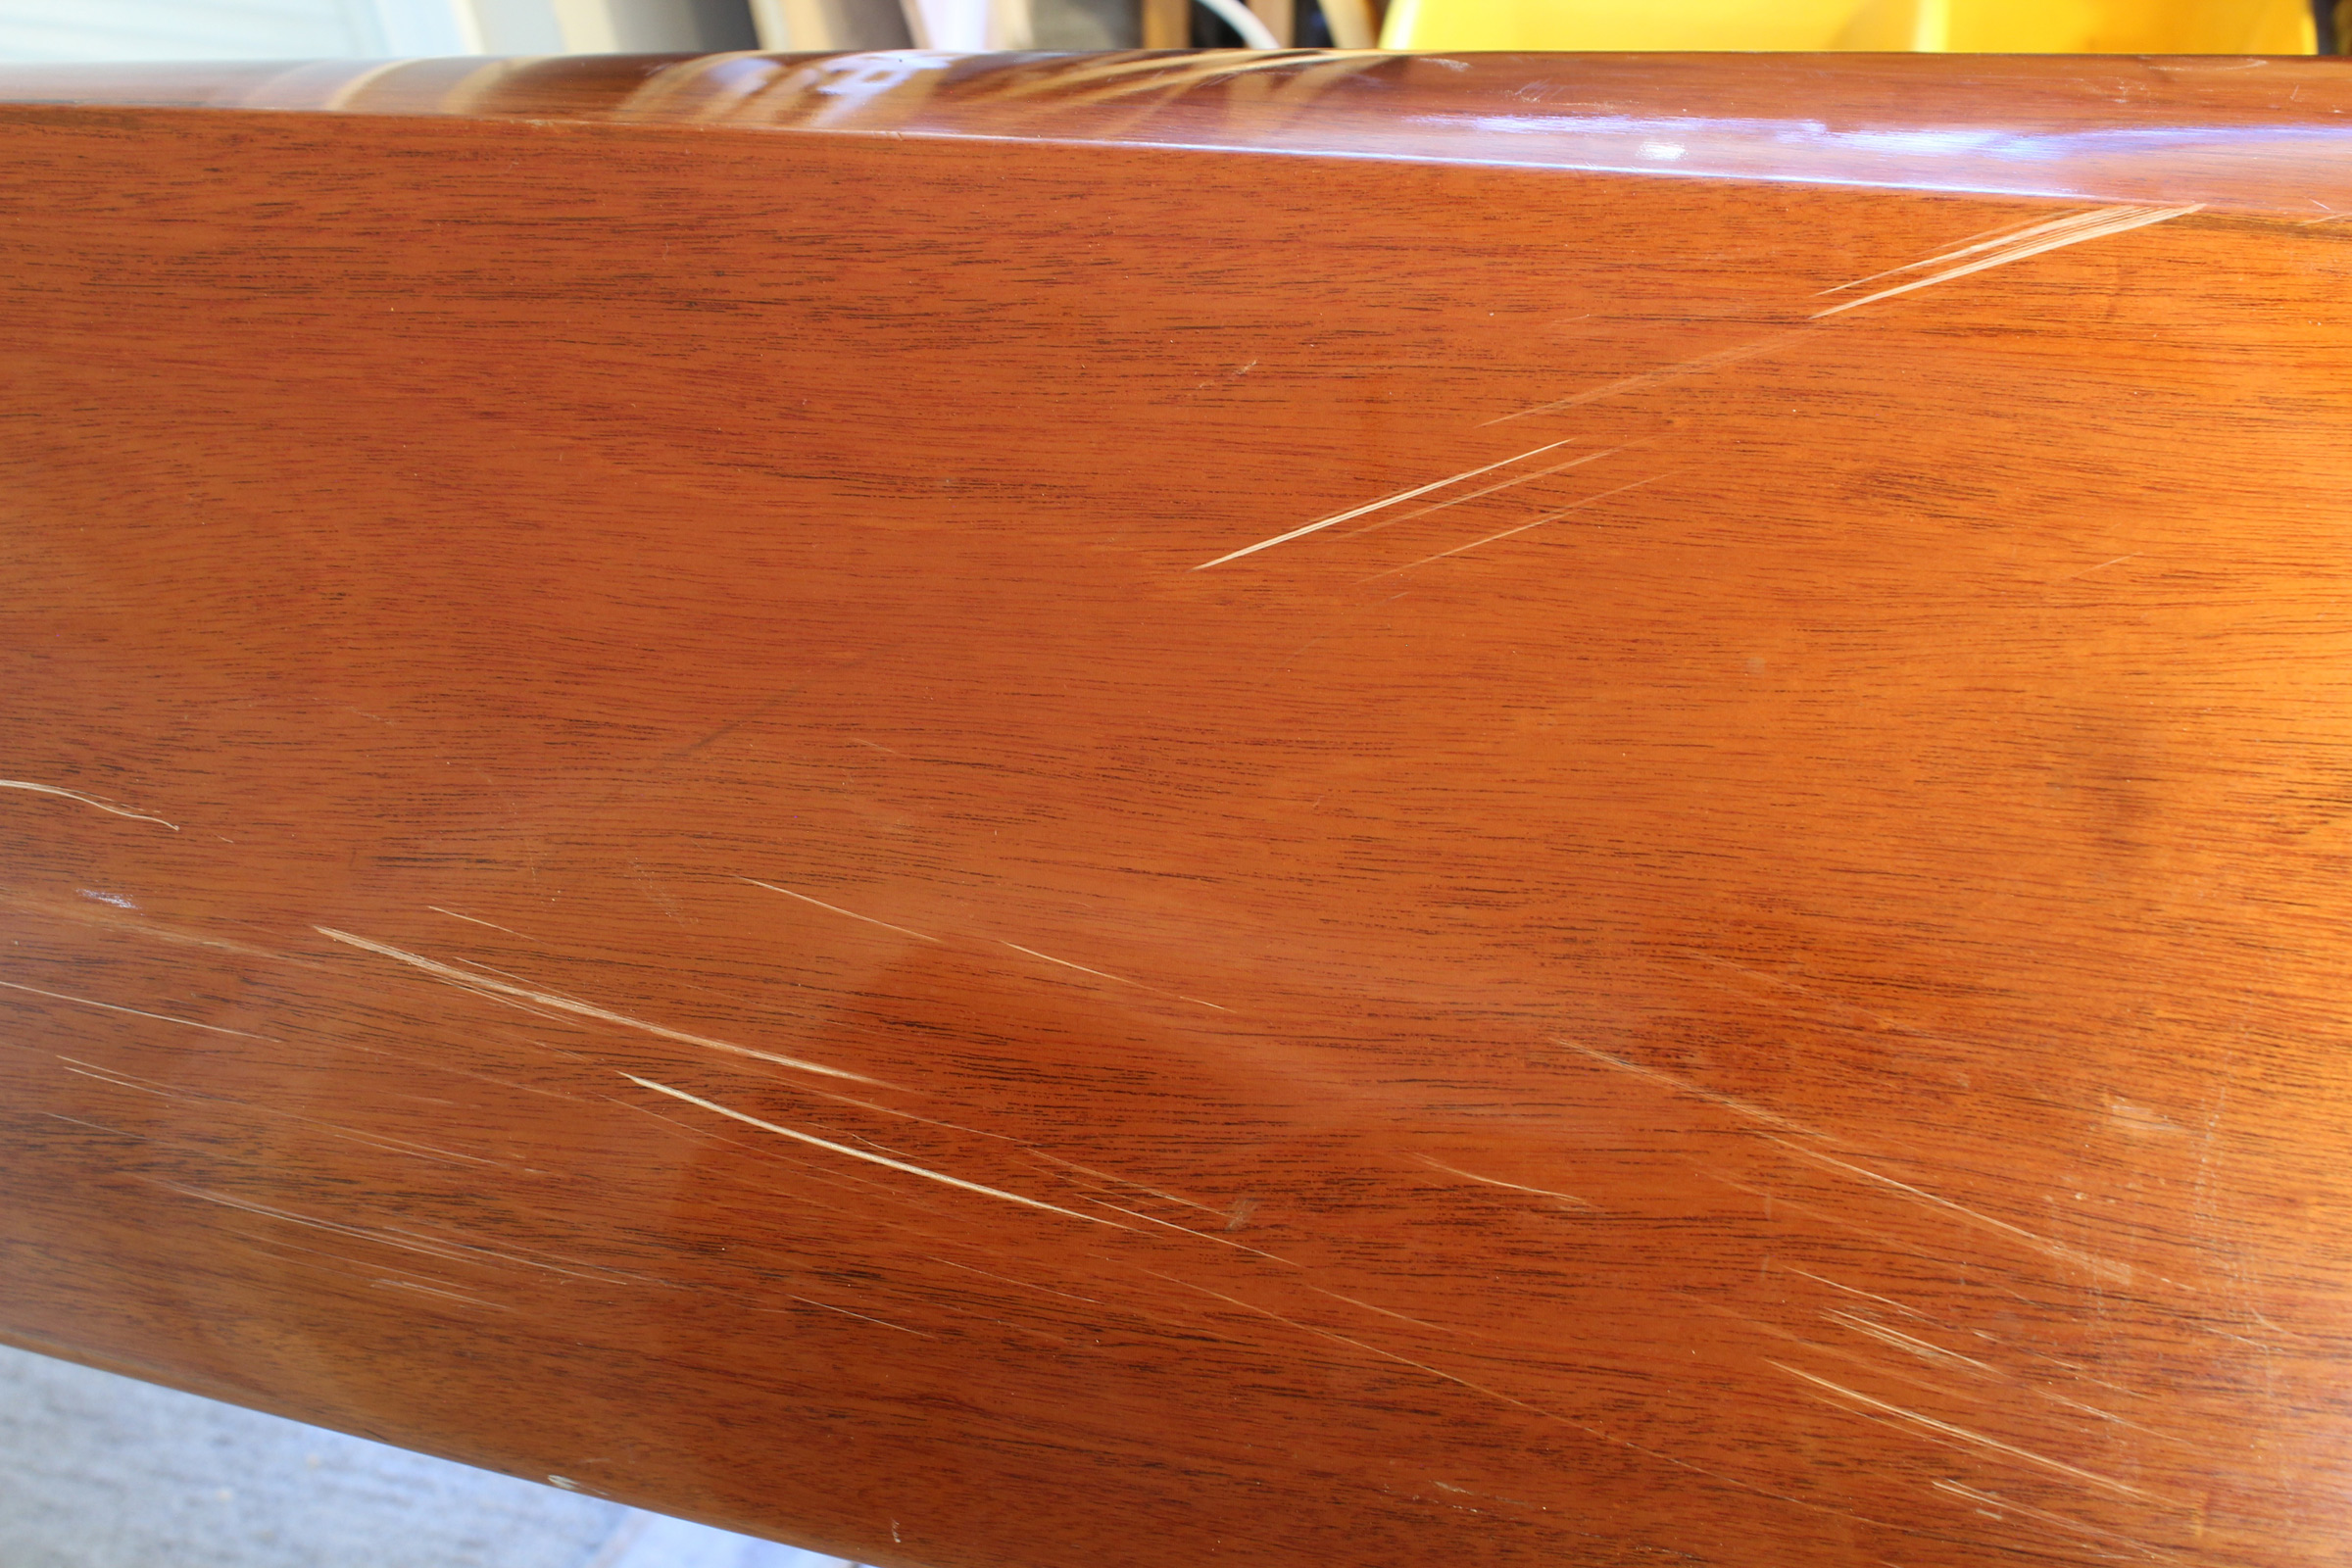
The forward end of the hull had lots of scratches.
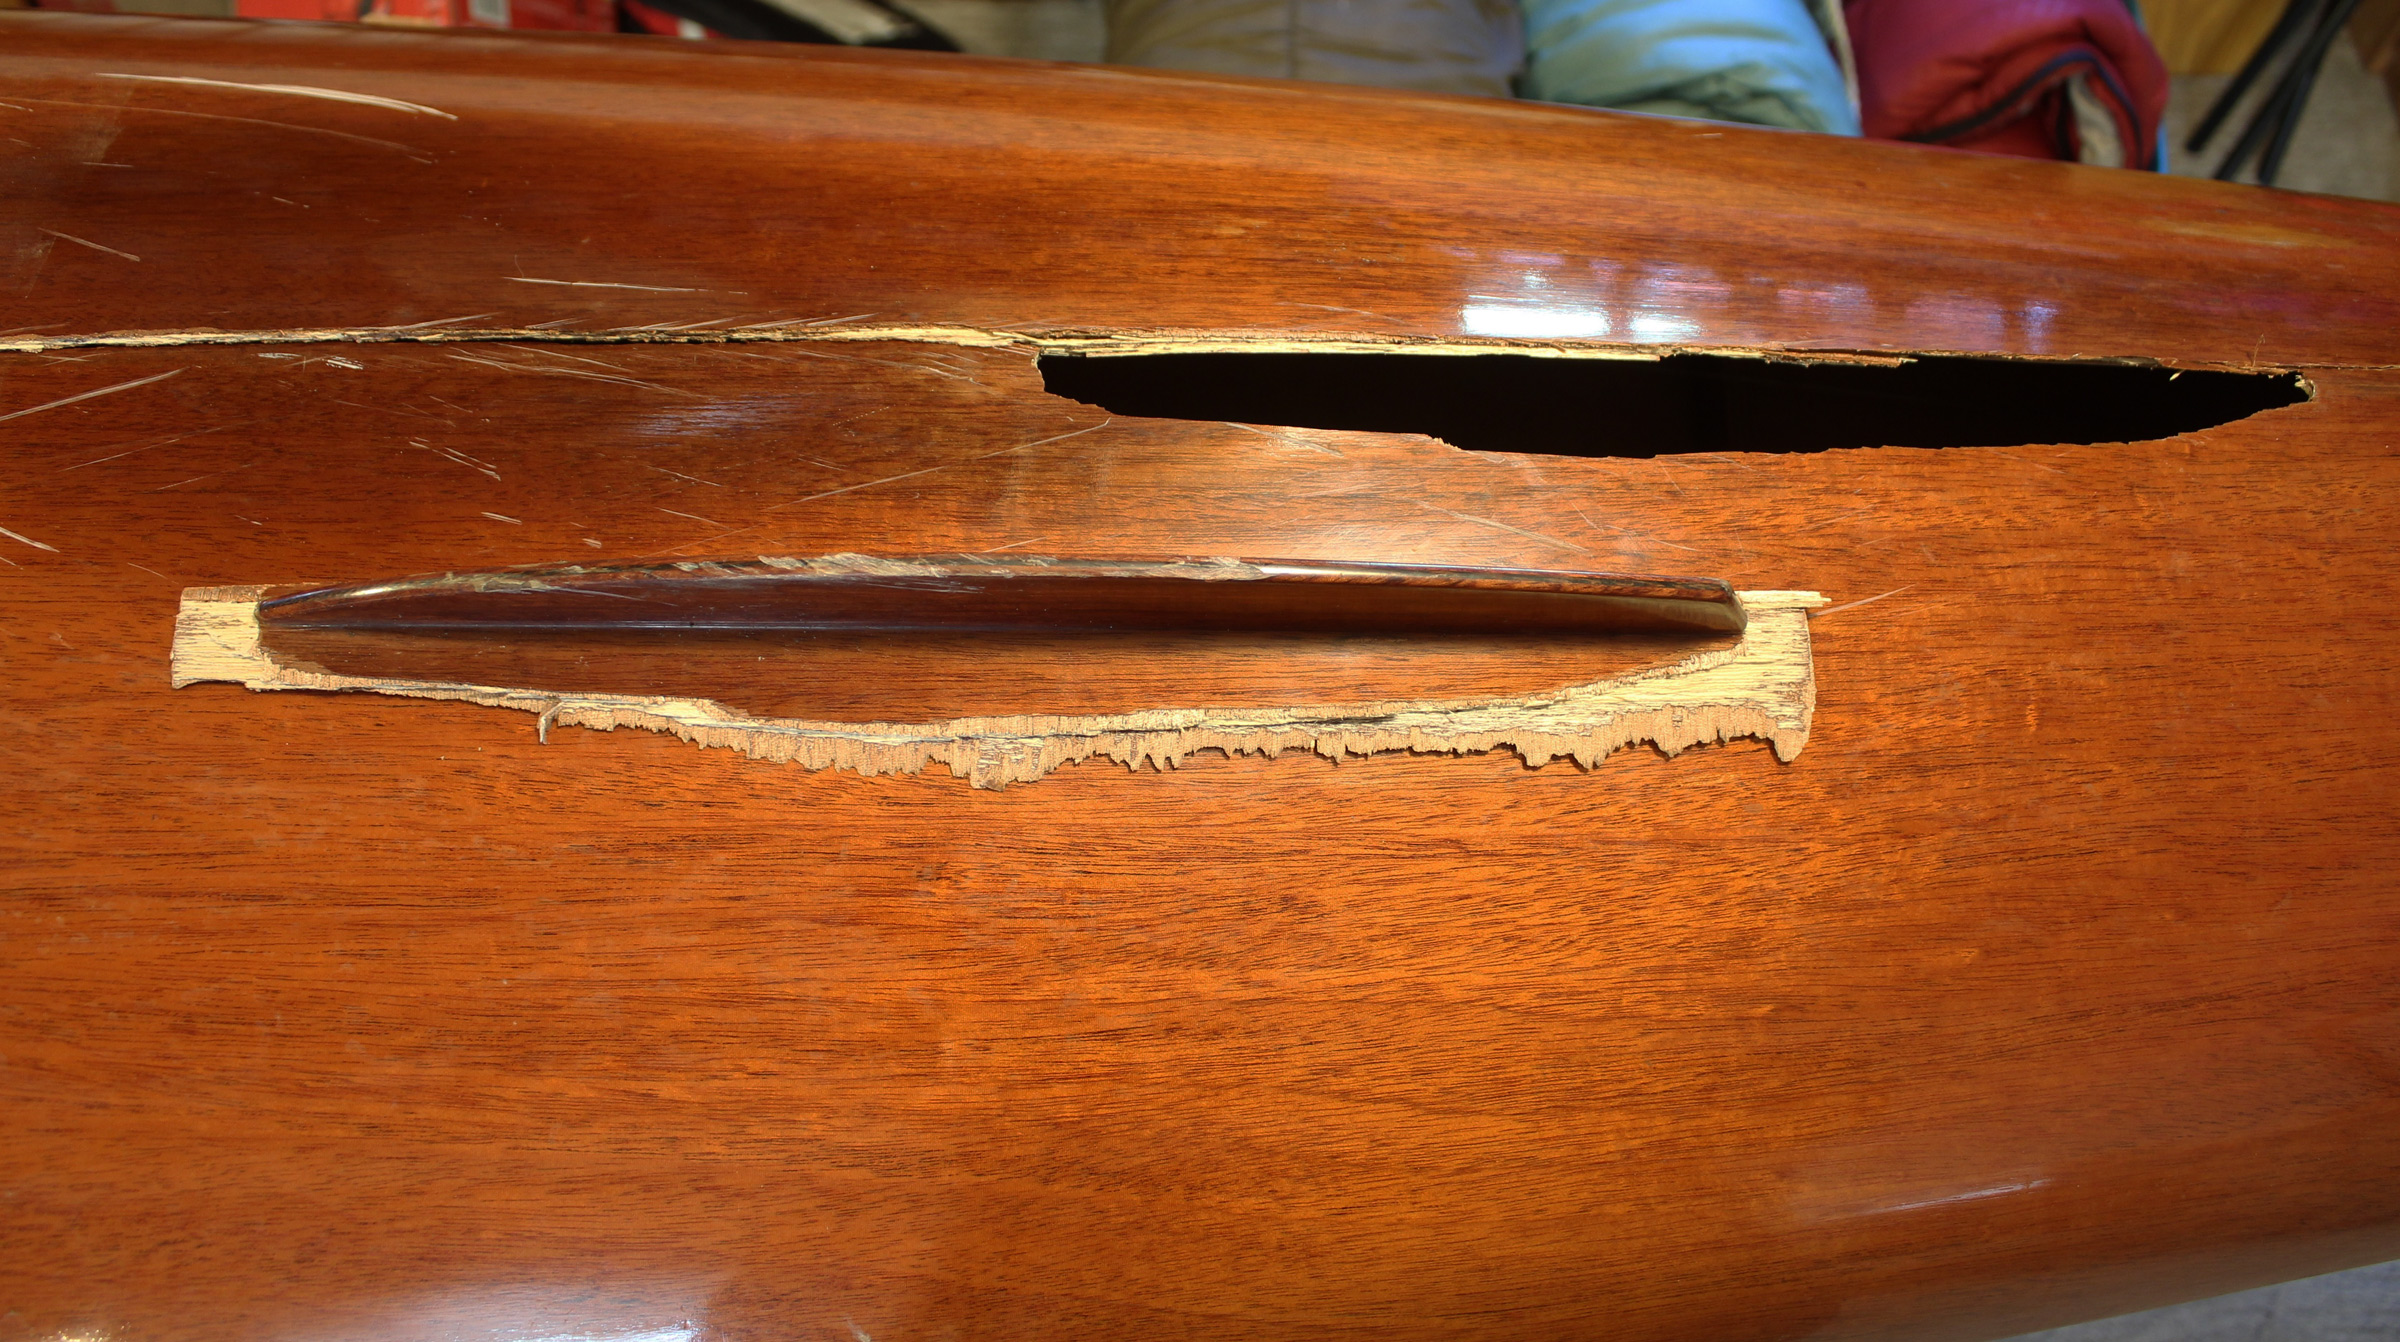
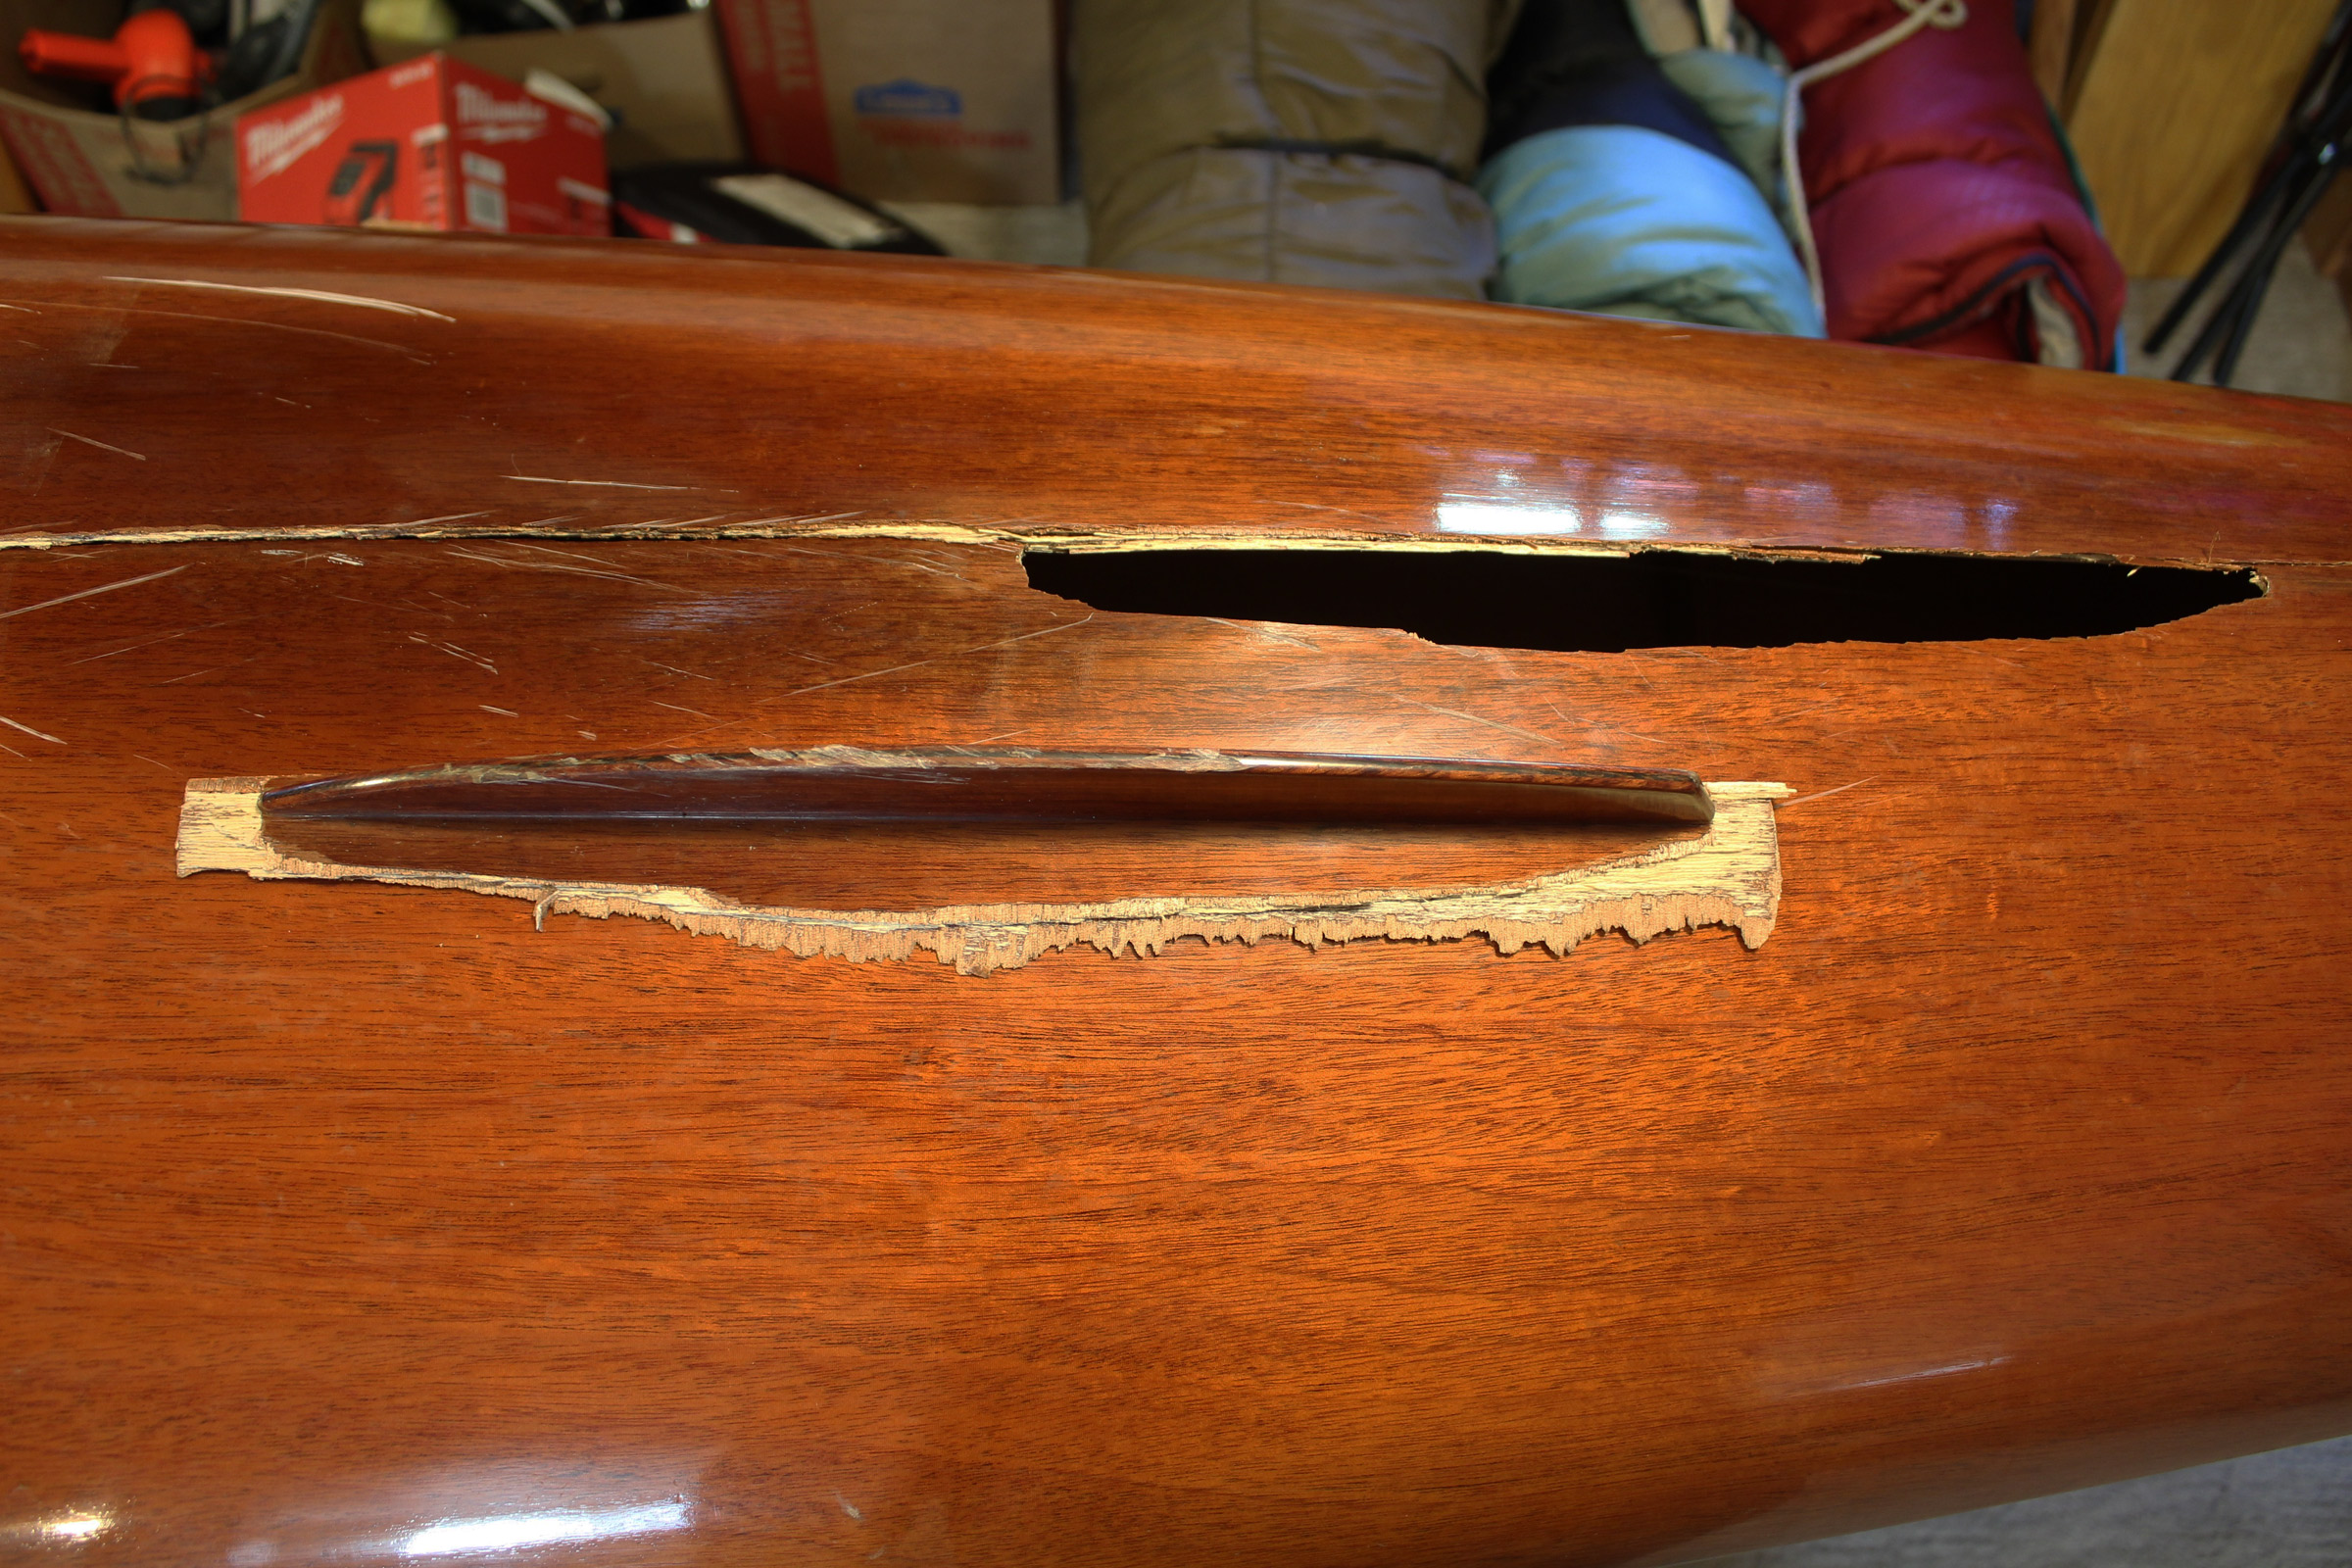
The skeg was punched into the hull and a break along the centerline extended about 5′ forward from the hole.
These cracks aft of the cockpit were the worst of the damage to the deck.
And here is what it took to make the kayak seaworthy again:
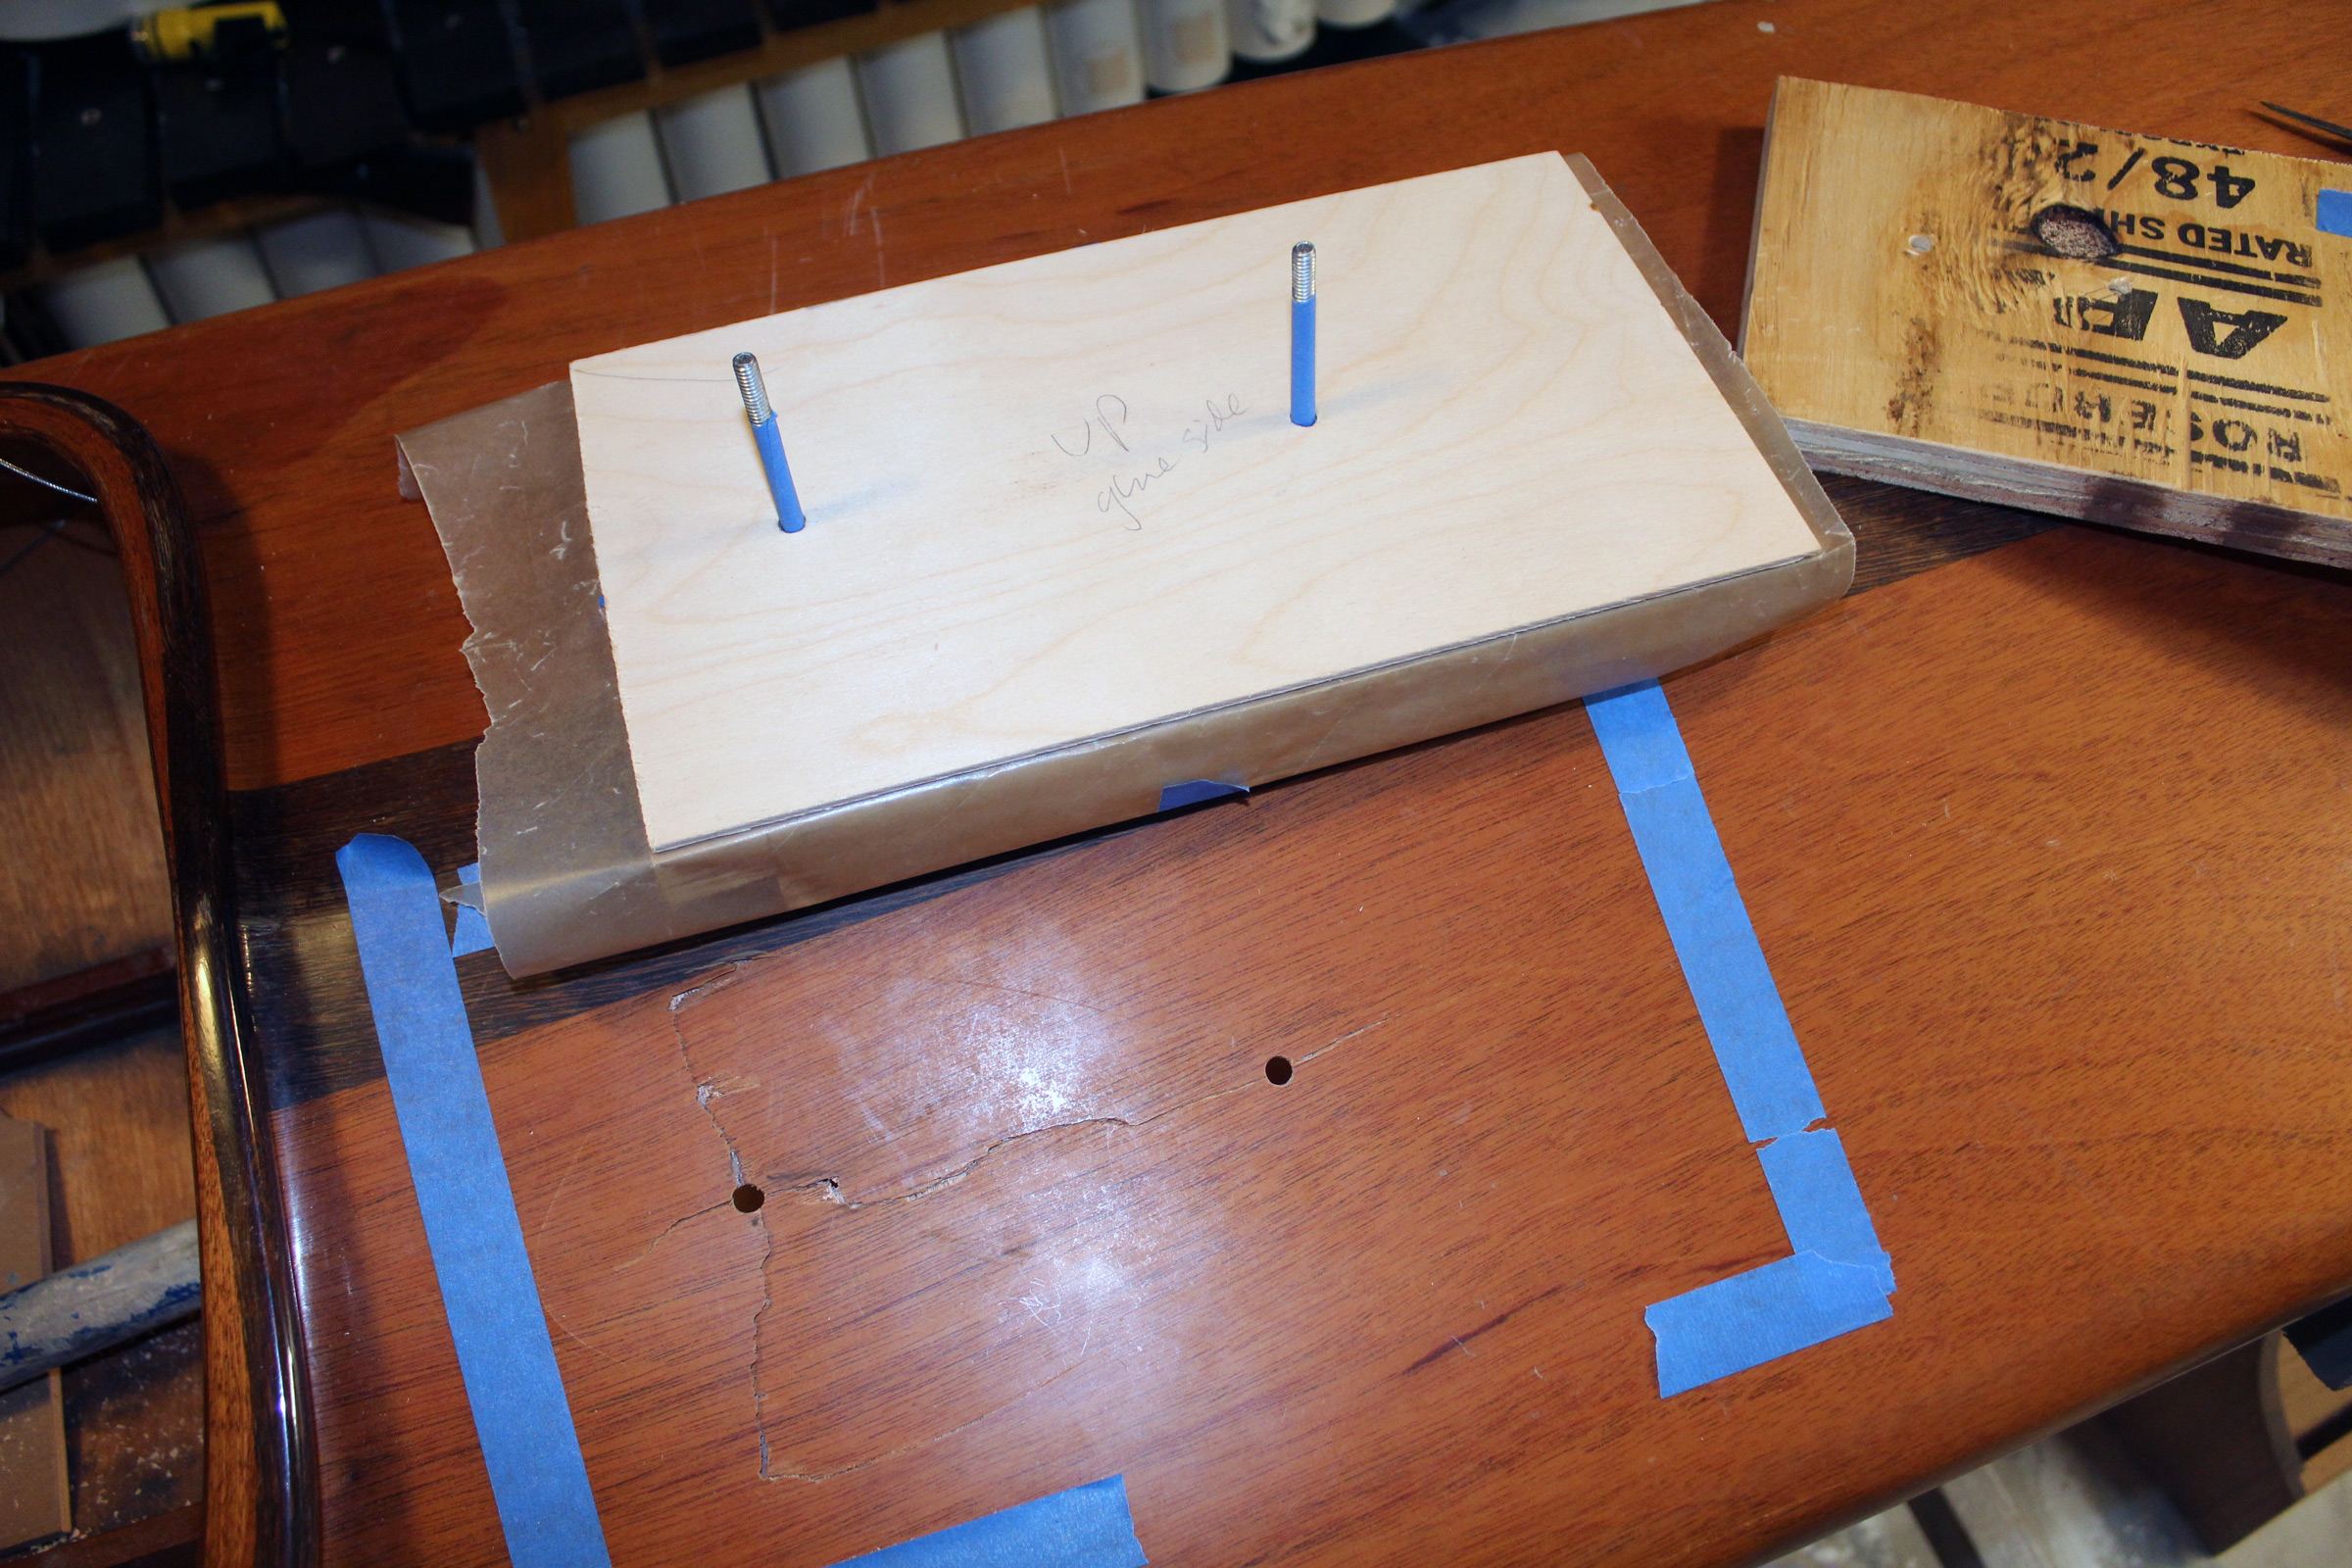
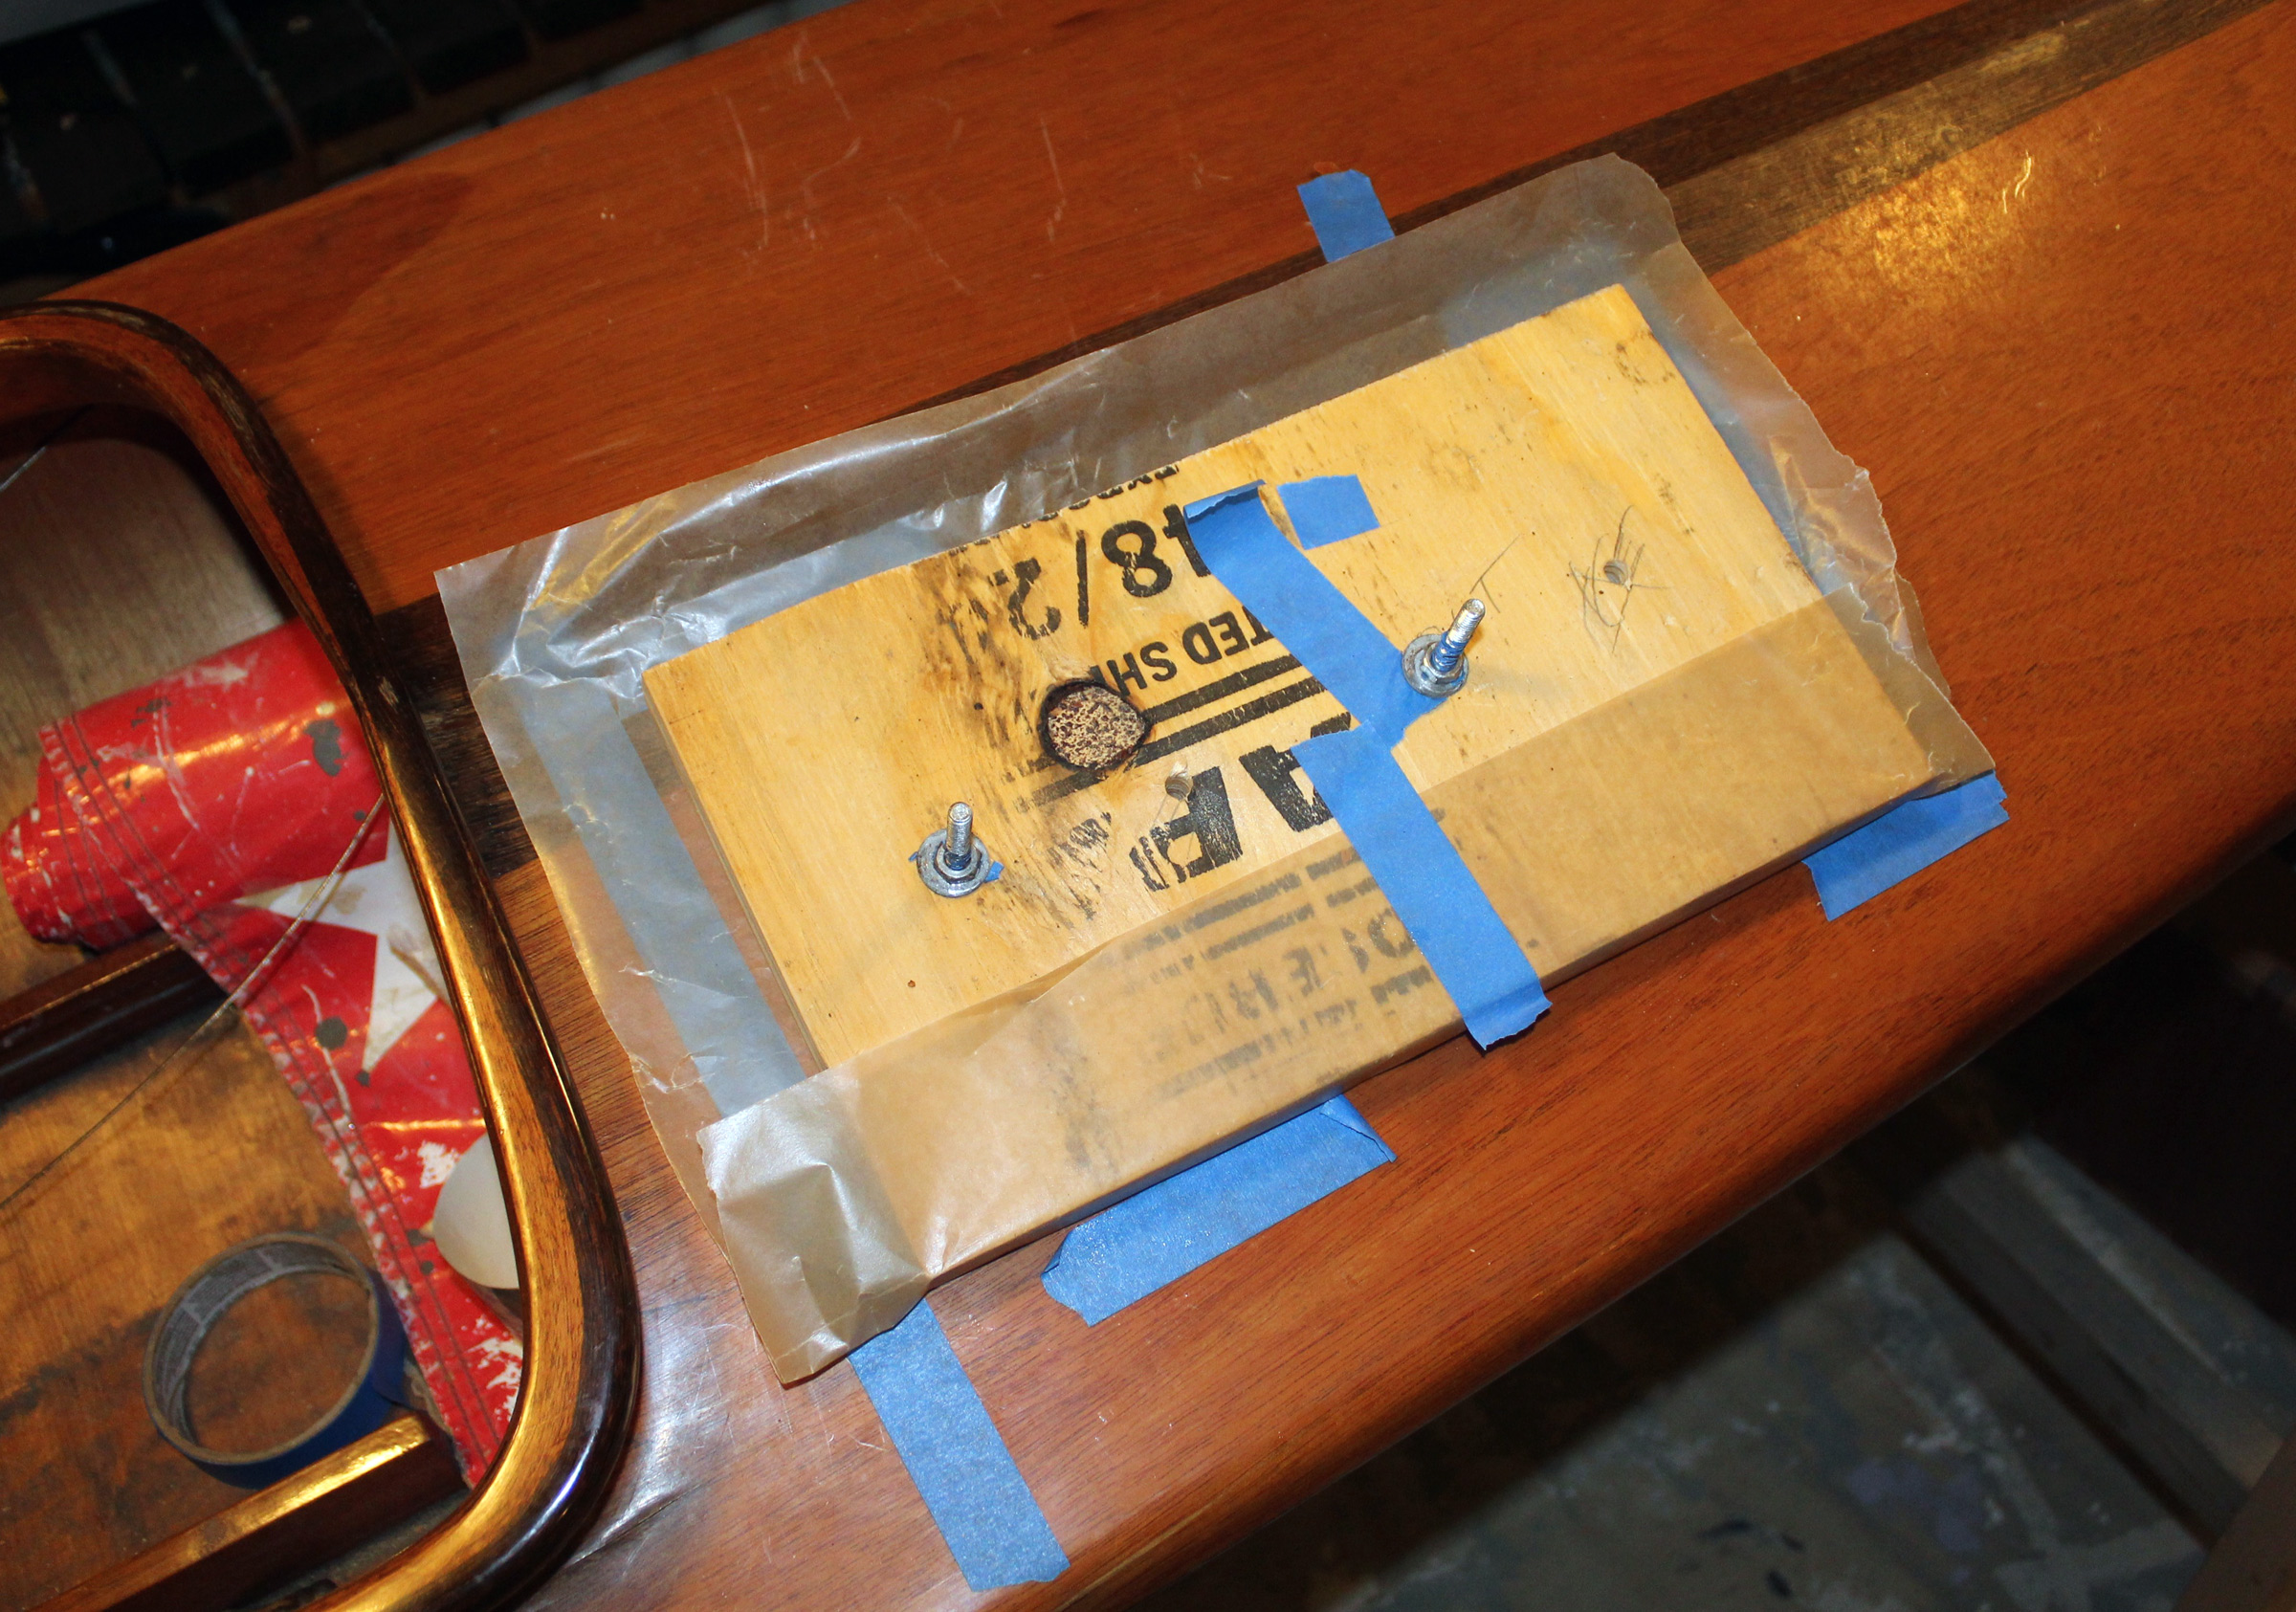
The fractured area of the deck would be epoxied to this piece of 1/8″ birch plywood. Two pieces of 3/4″ plywood, cut to the same shape and drilled through with holes to match those on the deck, would pull the interior patch tight to the underside of the deck.
Two carriage bolts pulled the sandwich together and assured that the flaps of torn plywood would all come to a smooth, fair plane.
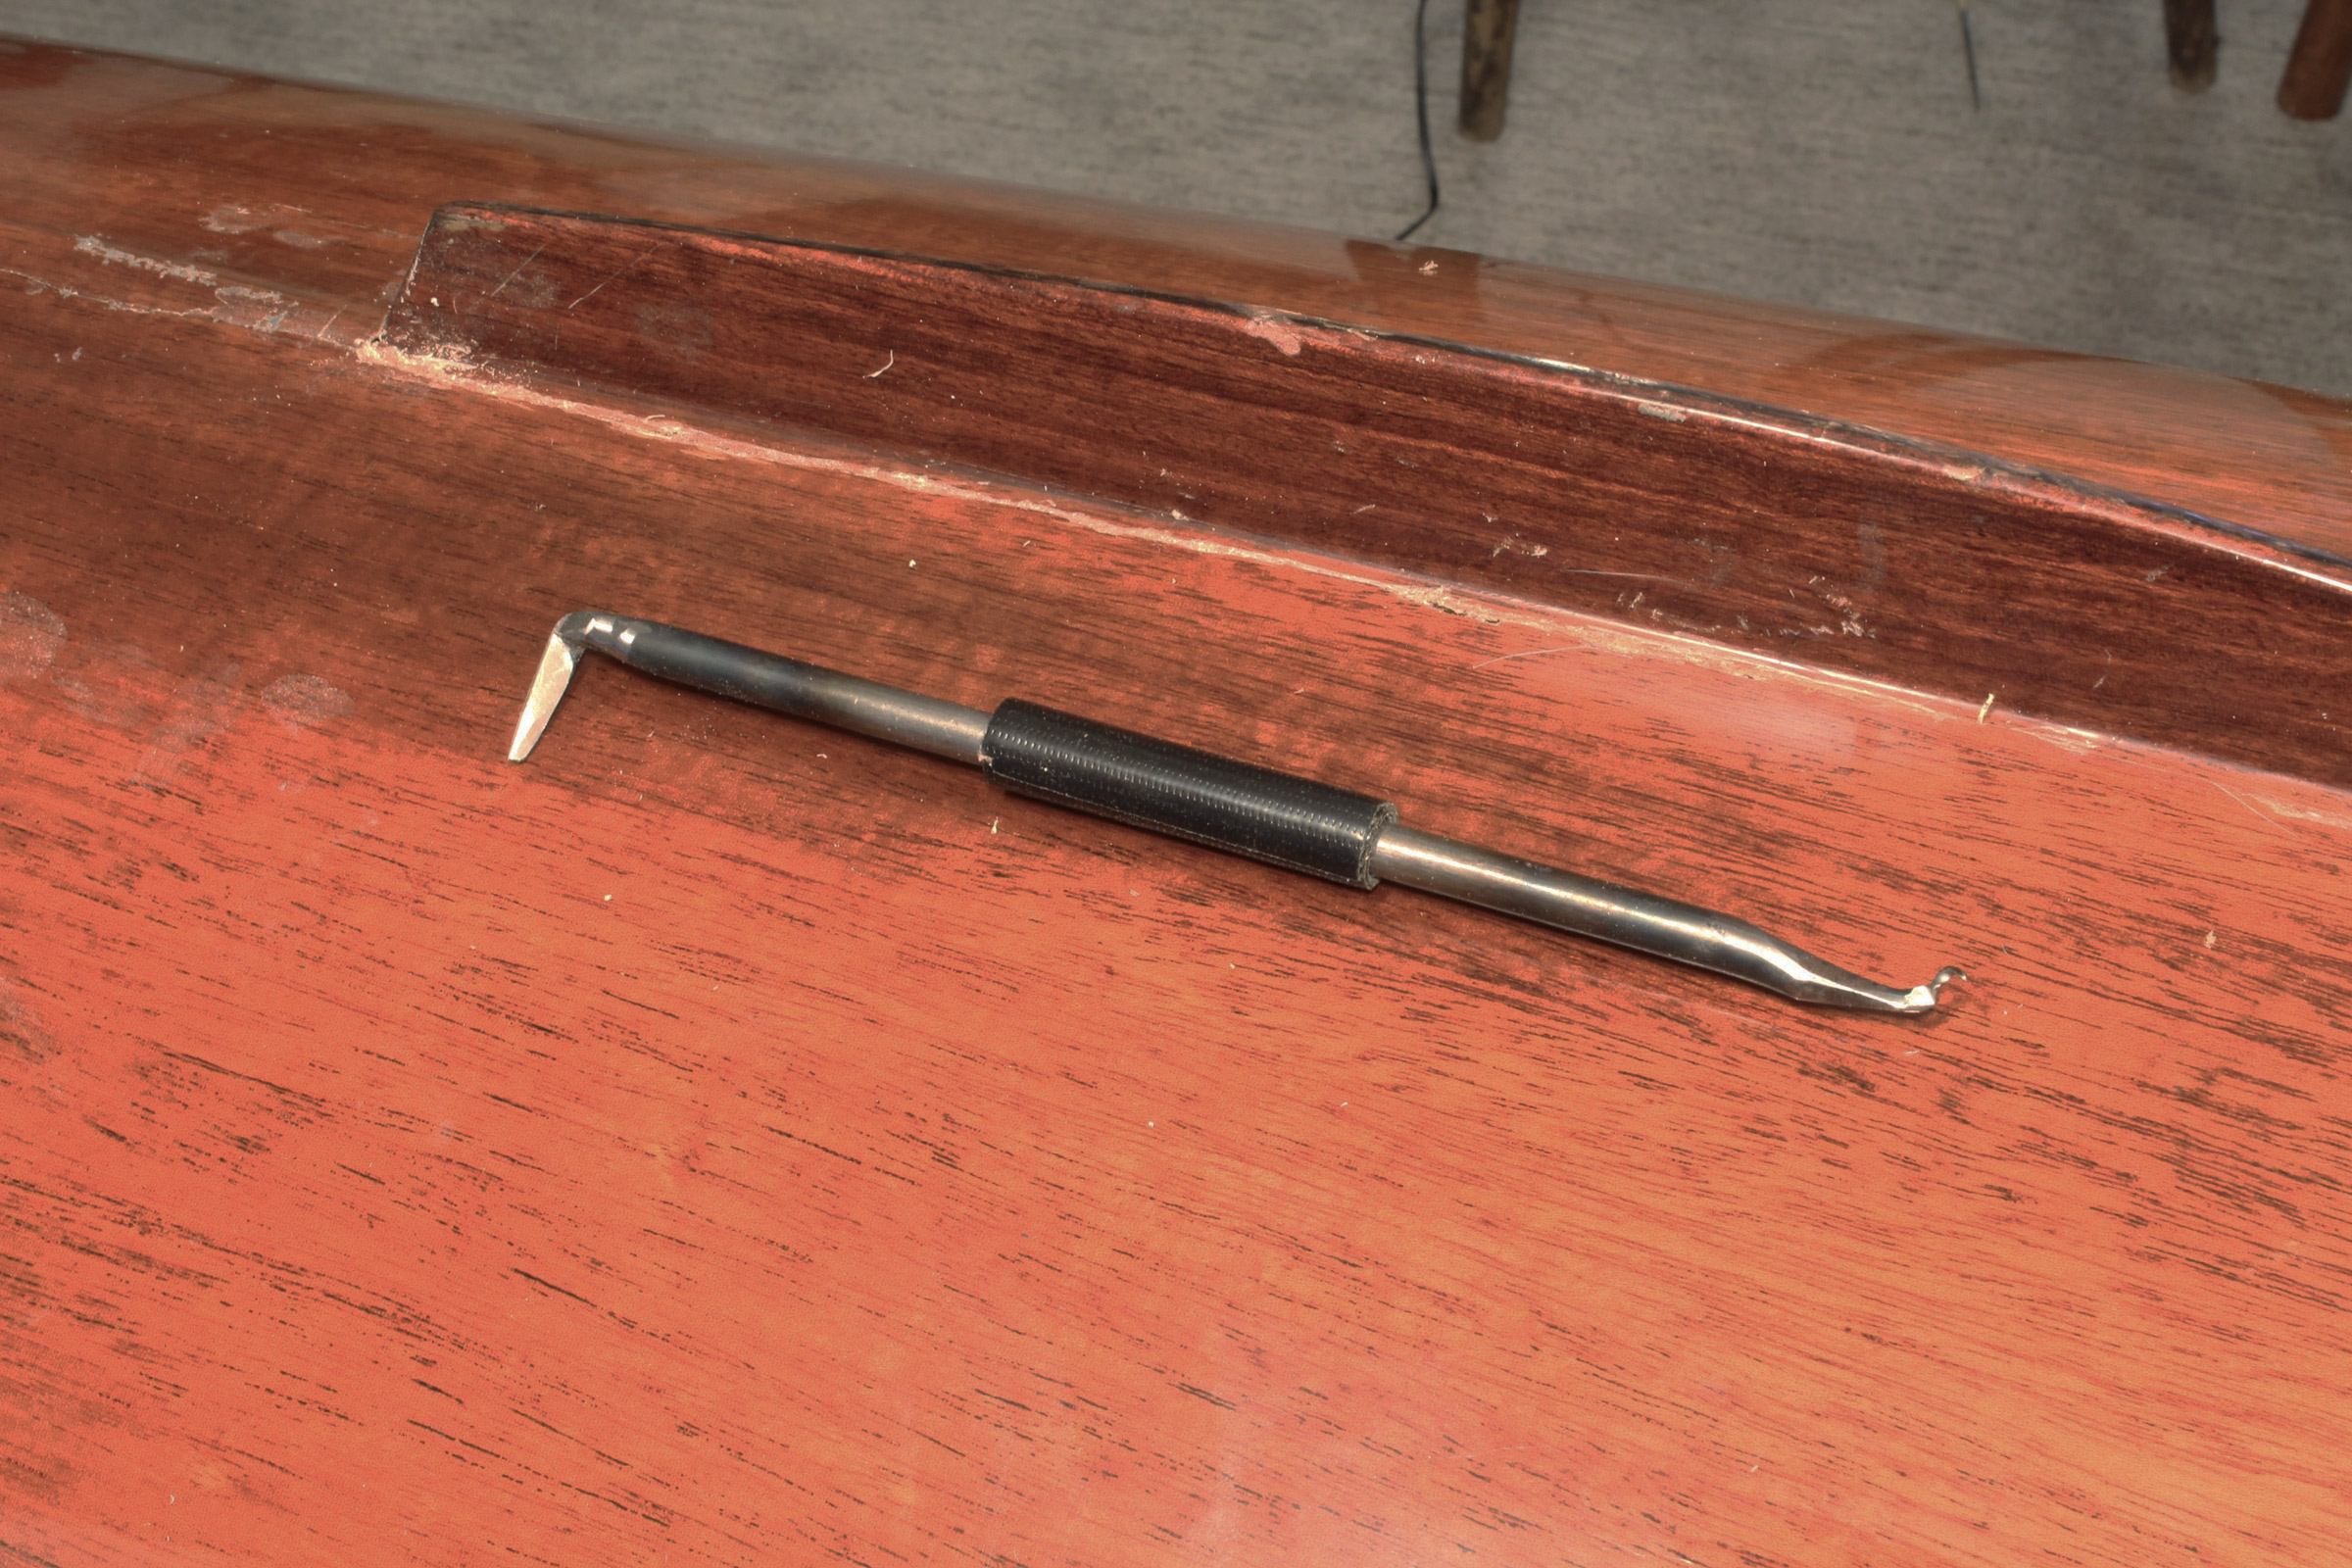
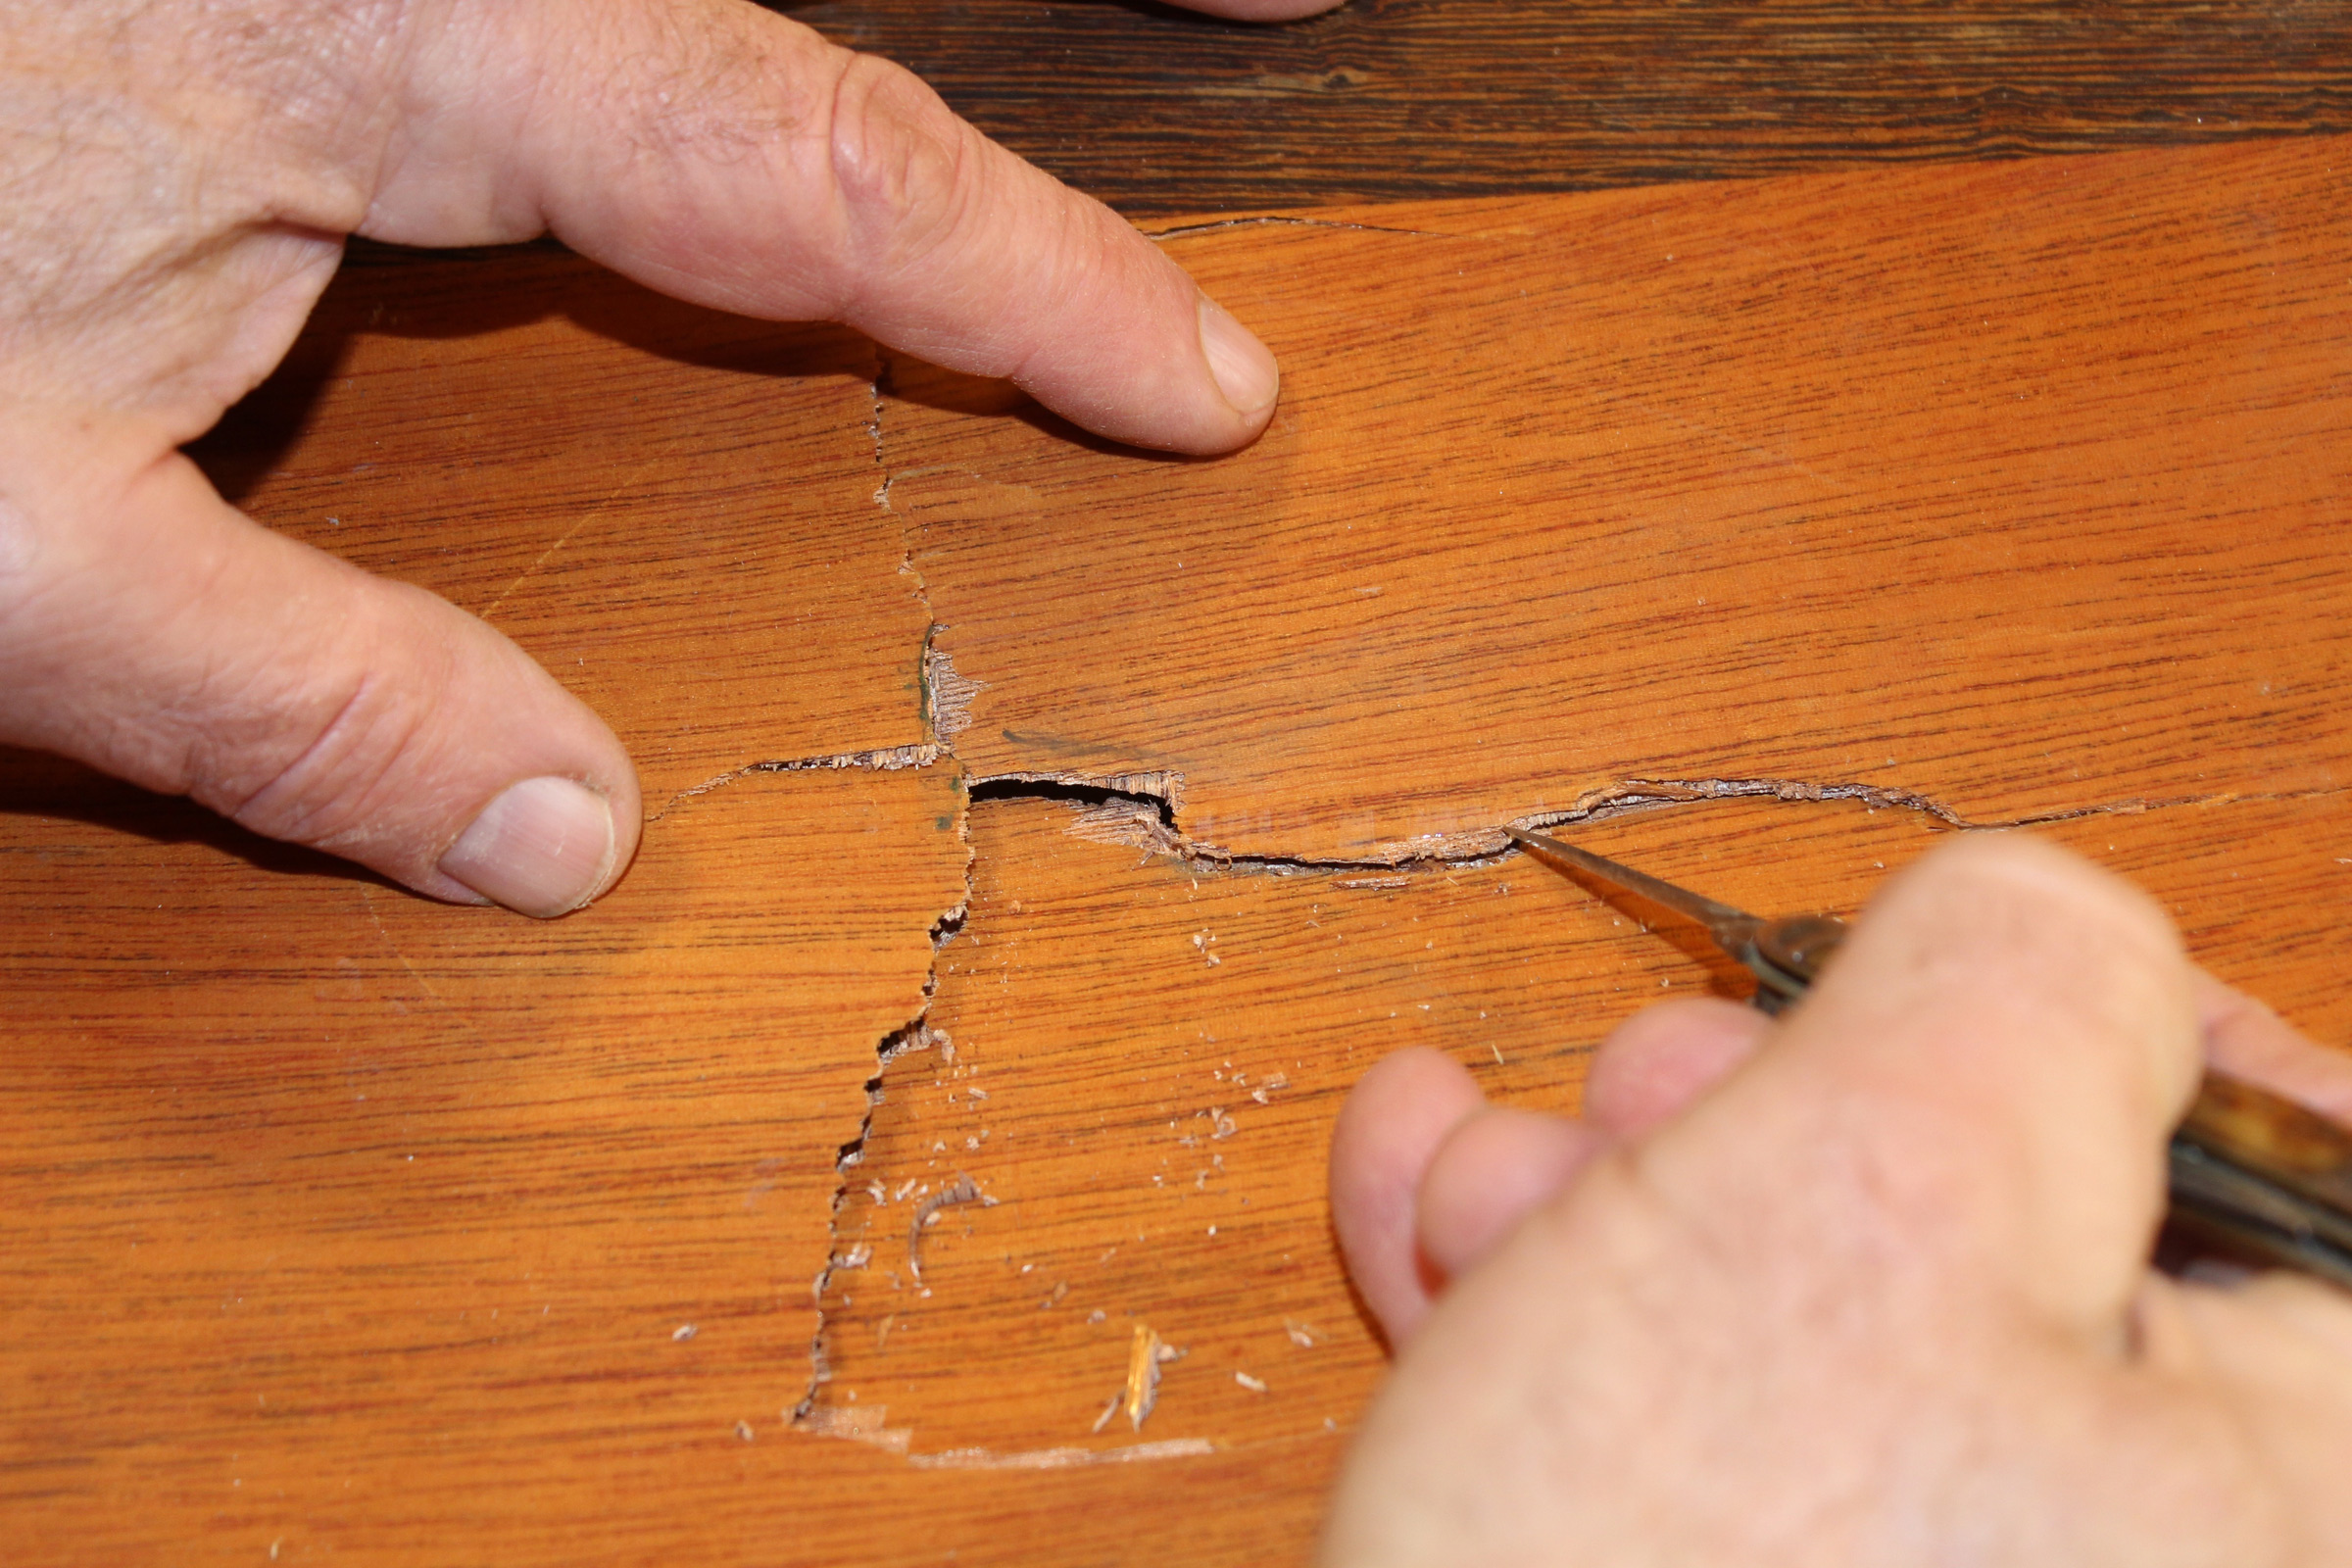
Torn plywood edges don’t just snap back together like a puzzle pieces. The frayed fibers have to be scraped away to get the edges to align. A small pen-knife blade did the job for all of the cracks except the one here on the port side of the skeg. That fracture, right at the edge of the skeg, was at a shallow angle pointing at it, blocking access. I made a tool from 1/4″ mild-steel rod with one straight edge and one hooked. I heated each end with a torch to hammer and bend them to the rough shapes required, then filed and belt-sanded the scraping edges.
I couldn’t get the skeg to line up with both sides of the hole in the hull at the same time so I glued the starboard side first. A long stick parallel to the skeg pushed the edge of the hull flat and fair. Three short sticks, weighted with small sandbags and their ends tucked under blocks hot-glued to the skeg, applied pressure. The straps, wedges, and blocks push down on two parts of the tear that needed more force to lie fair.
For the second step, gluing the port side of the skeg, I used a variation of the same cantilever pressure system. One block of wood with holes drilled in it was clamped to the starboard side of the skeg. Another block of wood, pushed down by the sandbagged dowels, applied pressure on the hull side of the break.
And here are the results, with a fresh coat of varnish:
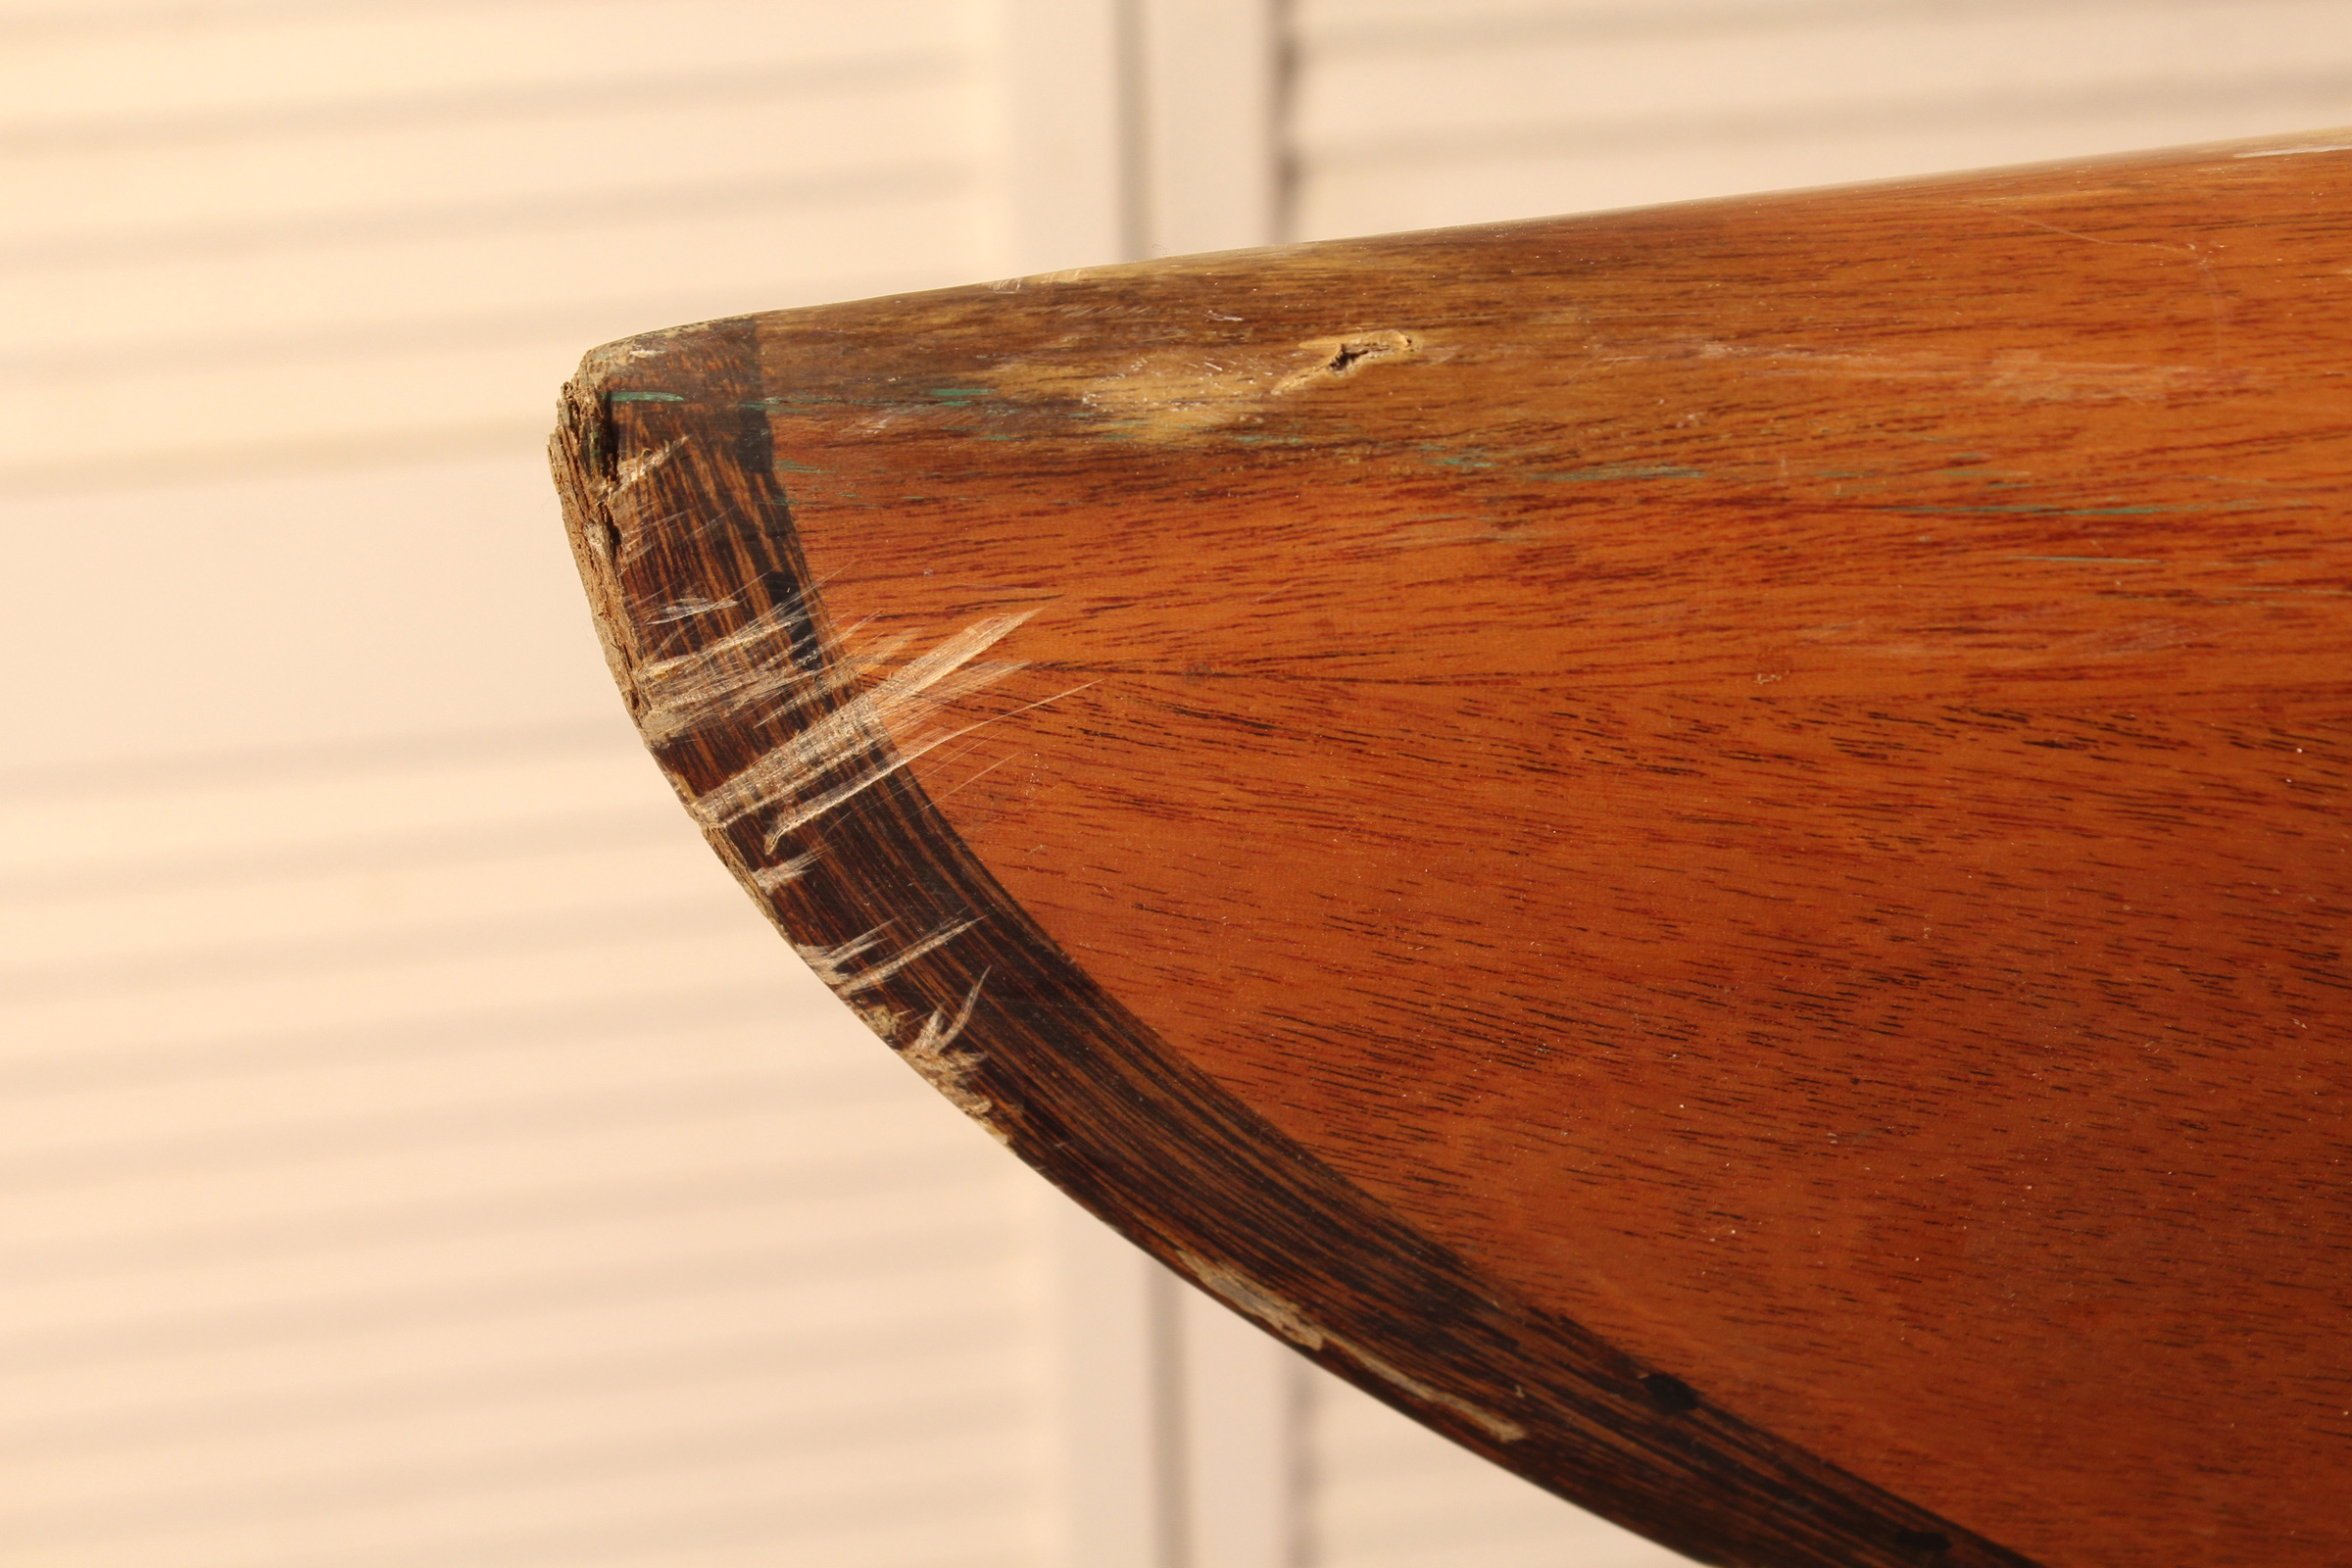
The damage to the bow’s underbody was mostly superficial and remedied with sanding and new varnish.
The skeg is back where it belongs, with very little mahogany missing along the breaks, and the rudder has its proper posture back.
I didn’t bother to disguise the bolt holes, filling them with white thickened epoxy instead. I’m OK with the visible reminder to tie the kayak to the roof racks.
Two months after dropping the Struer from my car, it is back on the roof racks. This time I tied it down.
Out for the first time this winter, the kayak felt and looked almost as good as new. There were few other boats out on this chilly January day. A sailboat on the south end of Seattle’s Lake Union was one of them and the only one I passed by within earshot. The skipper took a long look my way, then called out: “Nice looking kayak!”
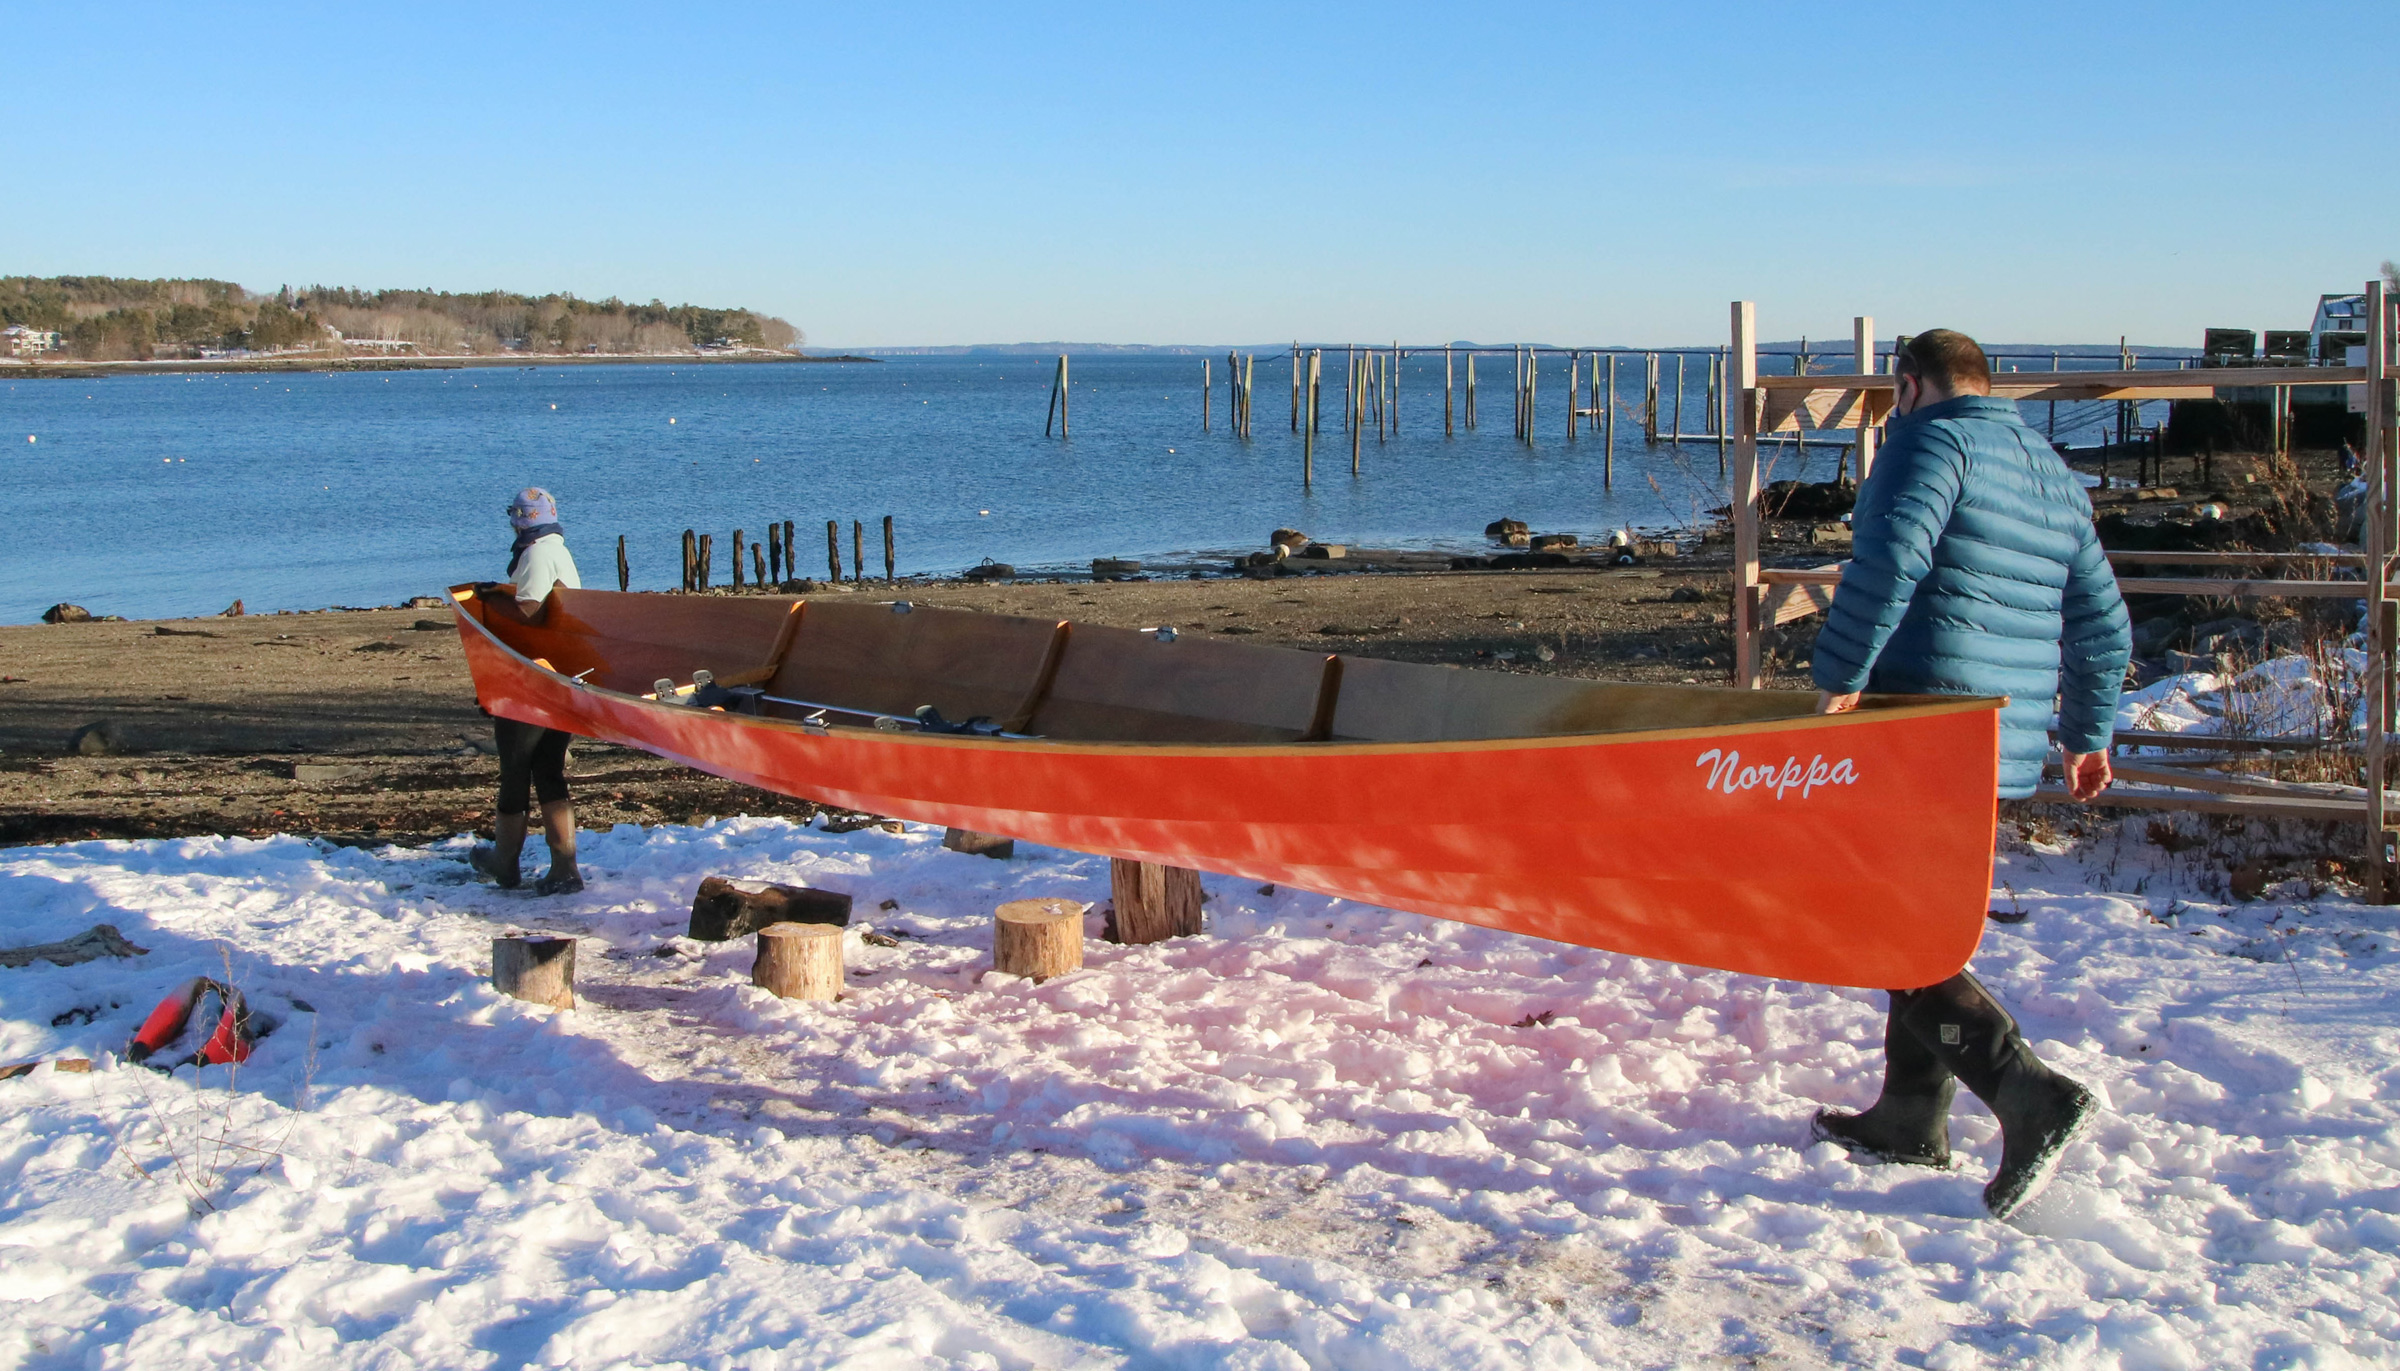
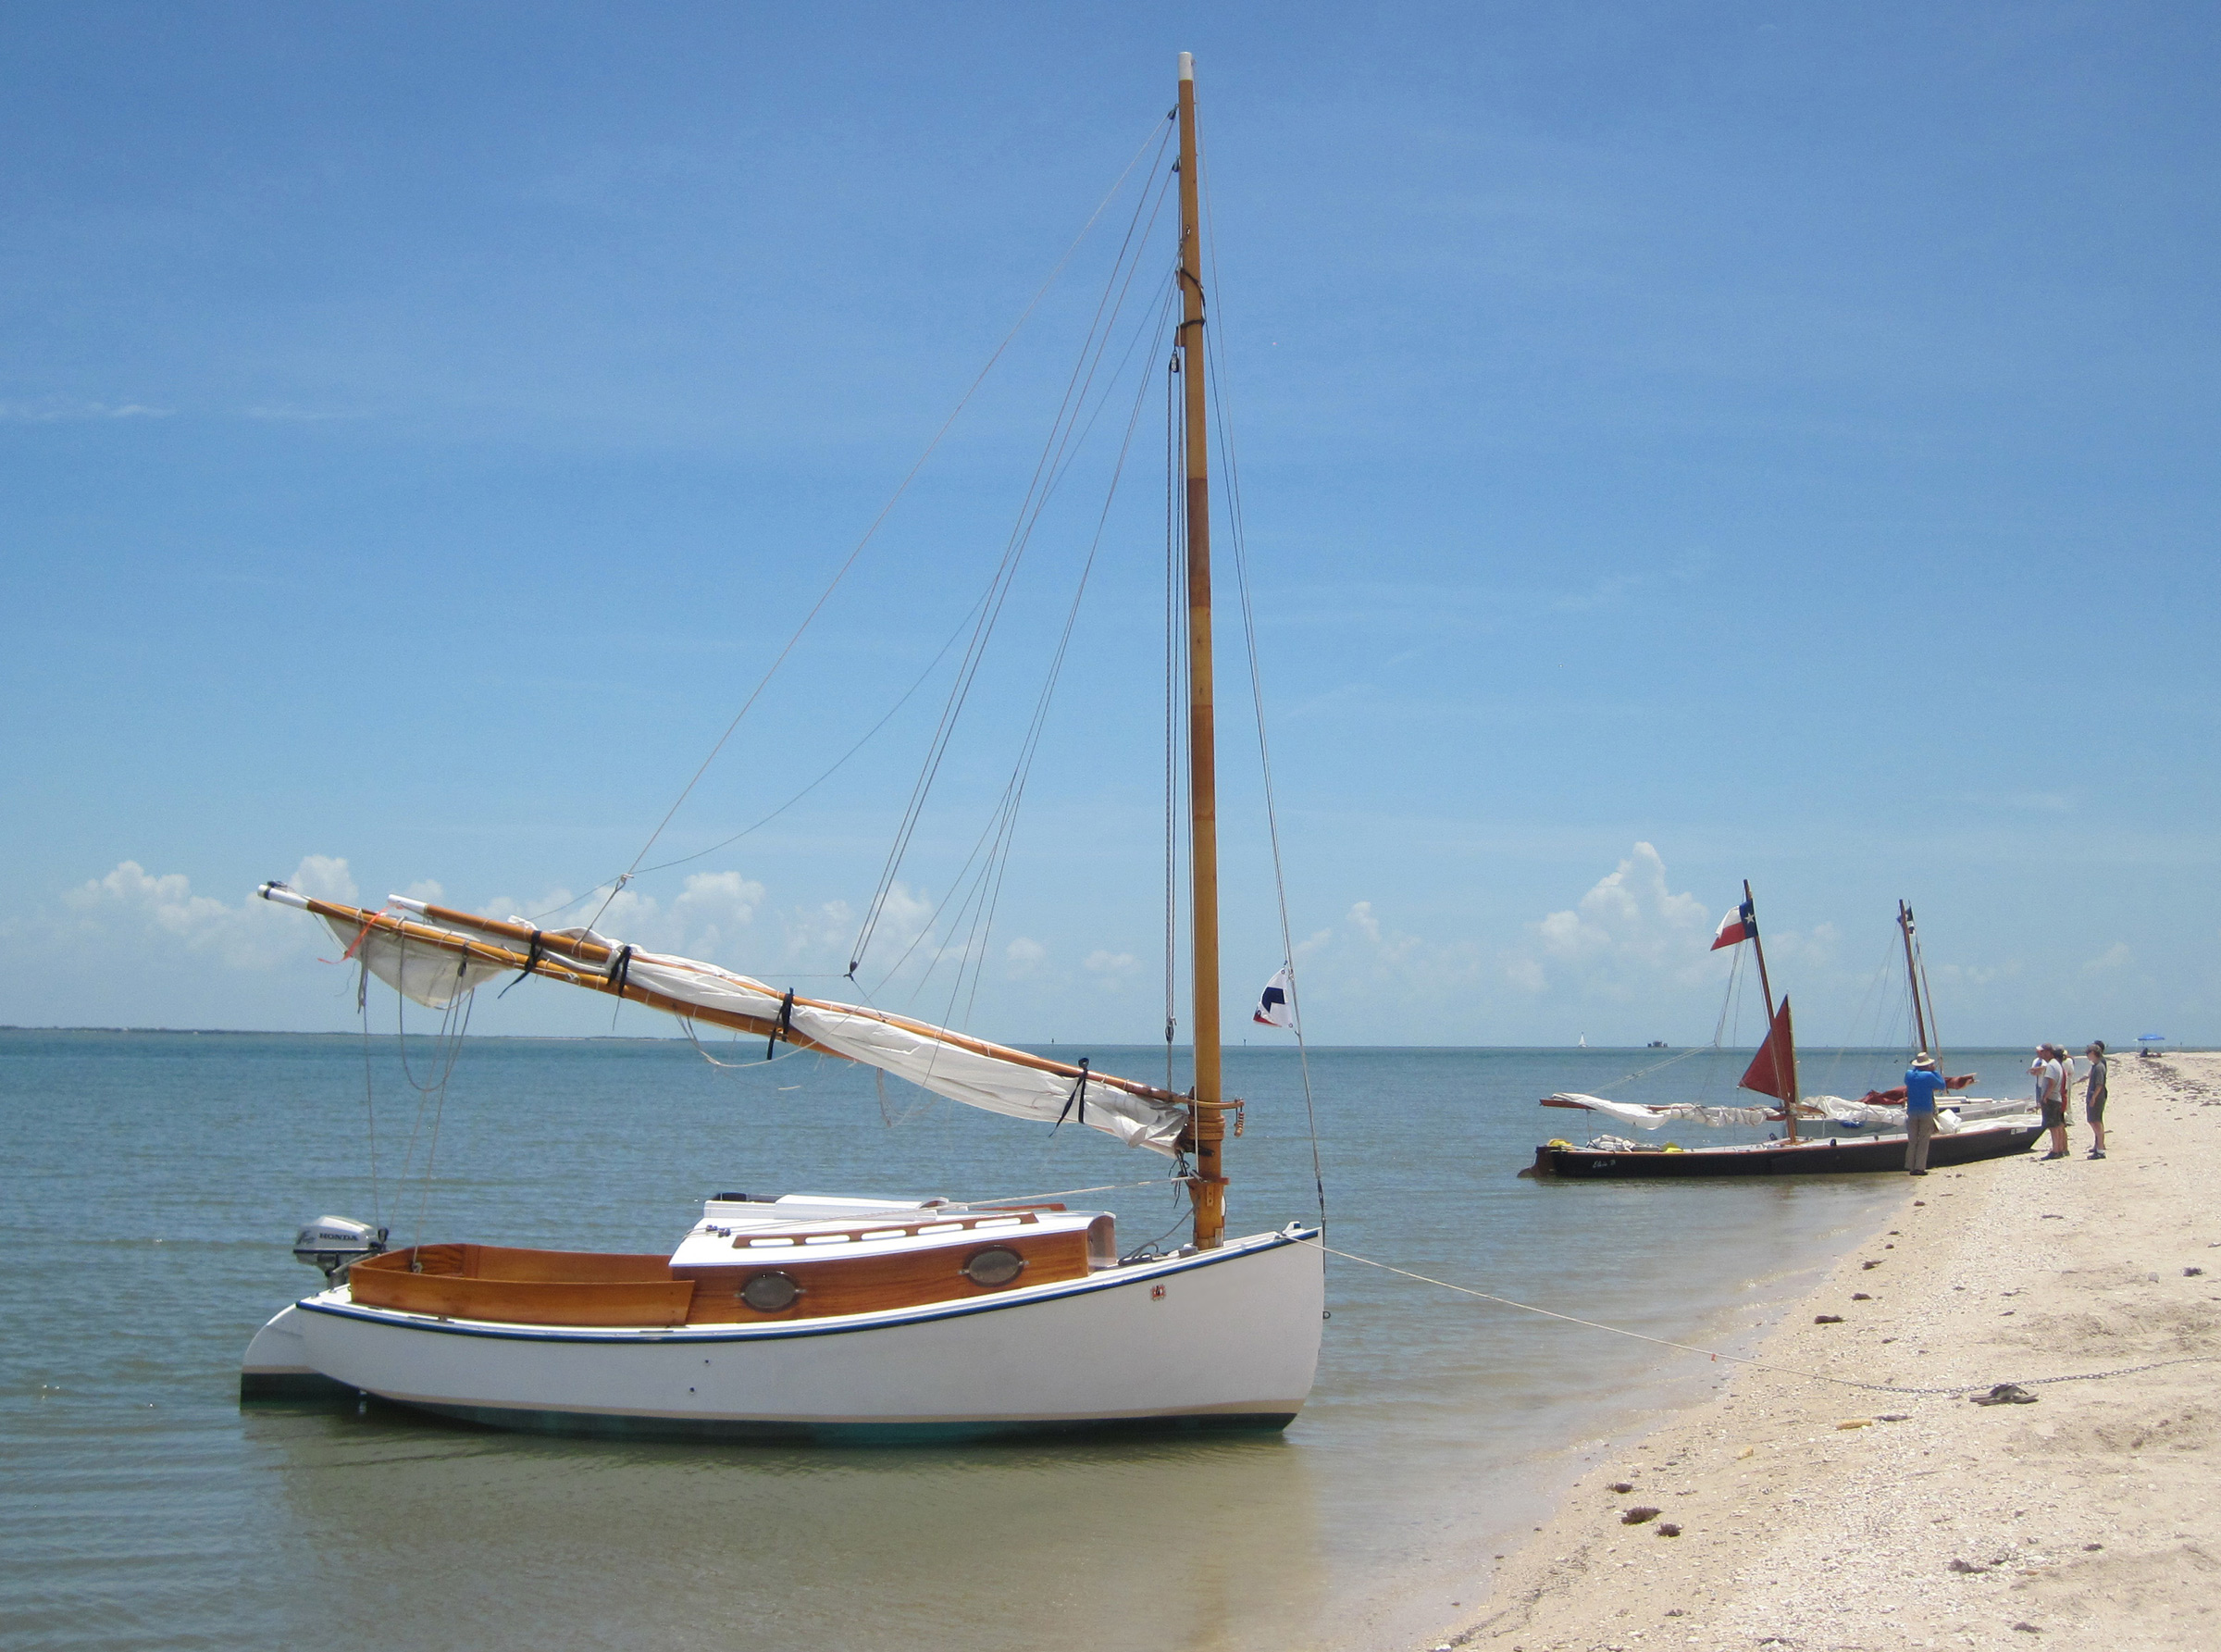
With one of us at the stern, the other at the bow, we lift our Savo 650D off the boat trailer, step to the water, and swing the bow until the boat is perpendicular to the shore. When we set it down, it balances on the smooth surface of the water like a leaf that has just landed with a whisper, light as a feather. We’ve set it in the water hundreds of times, yet the sense of the boat’s spirit always comes alive at that moment when its hull alights on the water.
We often imbue certain inanimate objects with human qualities. We have bonded strongly with our boat, and think of it as an individual with its own personality. It sounds a bit crazy, but perhaps it has something to do with the strong emotions, both good and bad, that we have experienced while rowing it. Slipping across a perfect glassy mirror of salt water at sunset, awash in pinks and blues, gold and silver. Bashing across the chaos of Petit Manan bar off the Maine coast, in an opposing wind and tide, our every fiber focused on not tipping over, and looking up to see a jellyfish in the crest of a wave above our heads. Riding the long lazy swells of a perfect summer morning on the ocean, and wishing we could keep rowing to the horizon and beyond. Maybe it is a strong sense of gratitude that creates a deep connection with, and subsequently a persona for, an object. NORPPA, as our Savo 650D is named, is eager and spirited, somewhat sassy, and a bit wayward. She detests rocks, especially large ones that are barely awash and sneak up on her from nowhere. She loves attention and pampering.
Photographs by Murray Carpenter
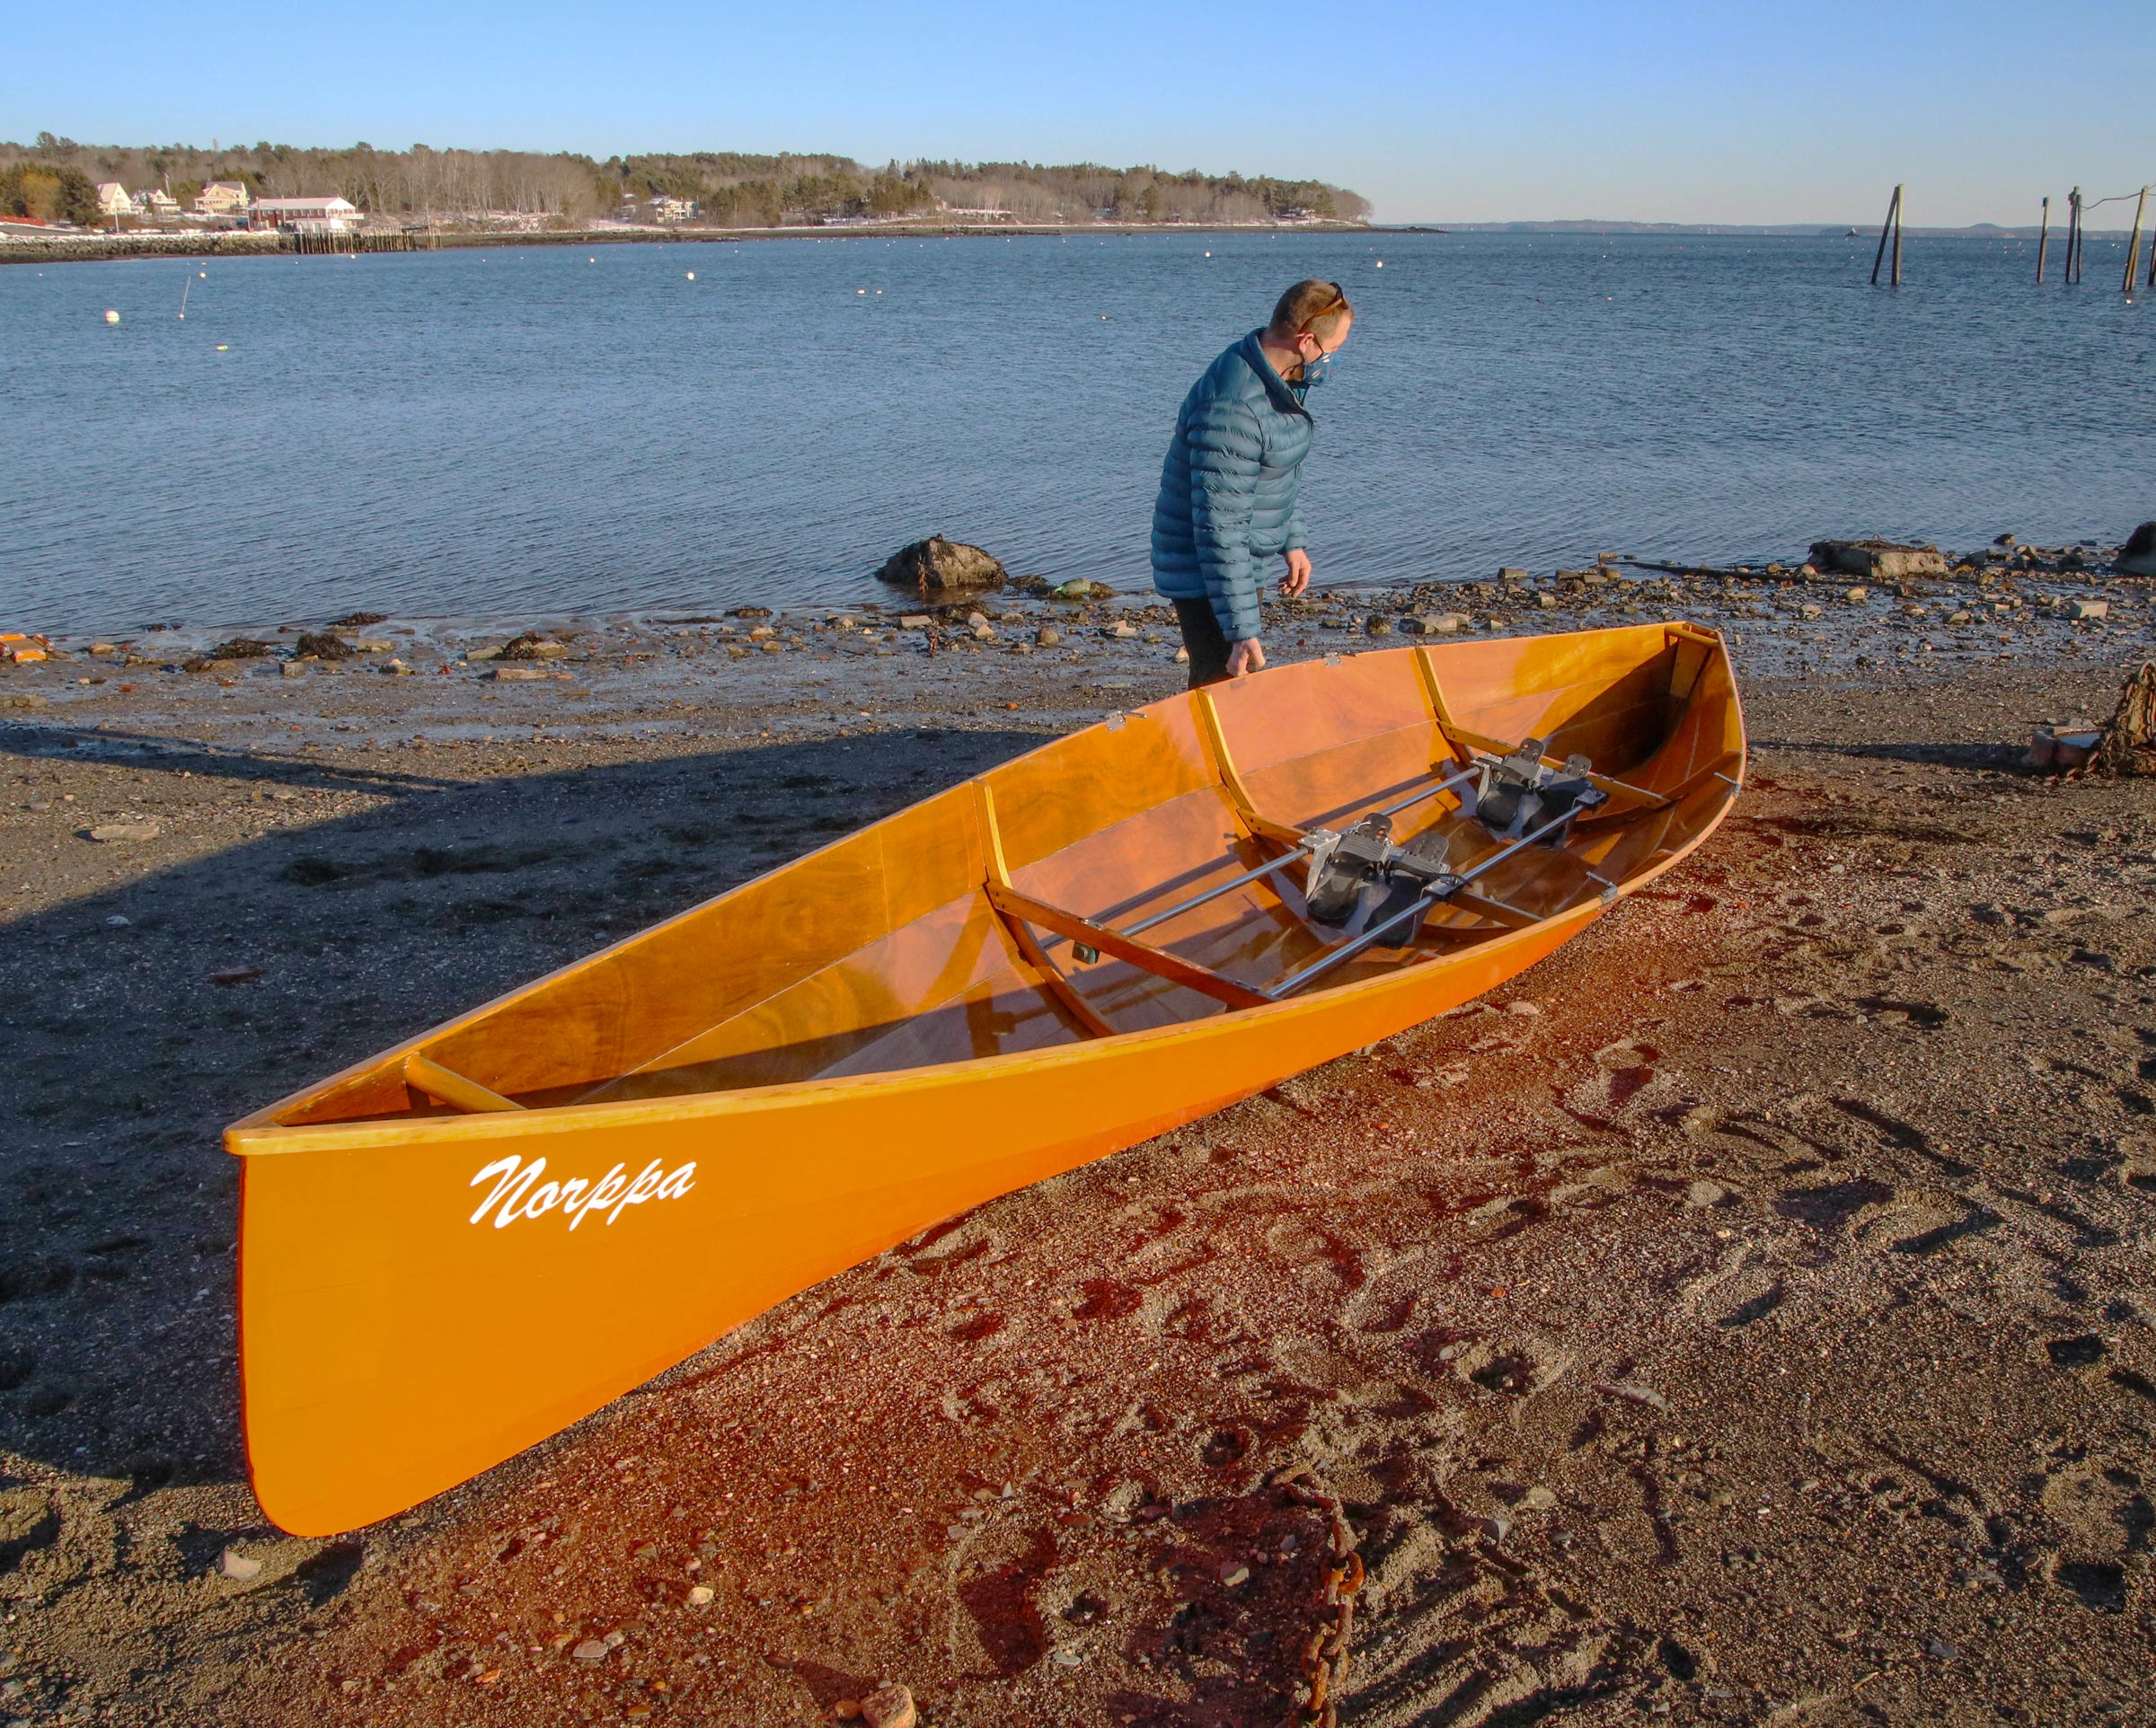
Weighing 101 lbs with the rowing rig installed, the Savo 650D is a manageable carry for two. Dowels set across the ends serve as handholds.
The Savo 650D’s predecessors were traditional rowboats built and used in Savonia, a Finnish province crisscrossed with a network of navigable freshwater lakes and rivers. The rowboats were a fixture of everyday life, used for exploring, fishing, transport, and visiting. Children were borne by rowboat to their baptismal ceremonies, and family members rowed their deceased to their final destinations. After a lifetime of dependable service, Savonian rowing boats were traditionally burned at the midsummer bonfires.
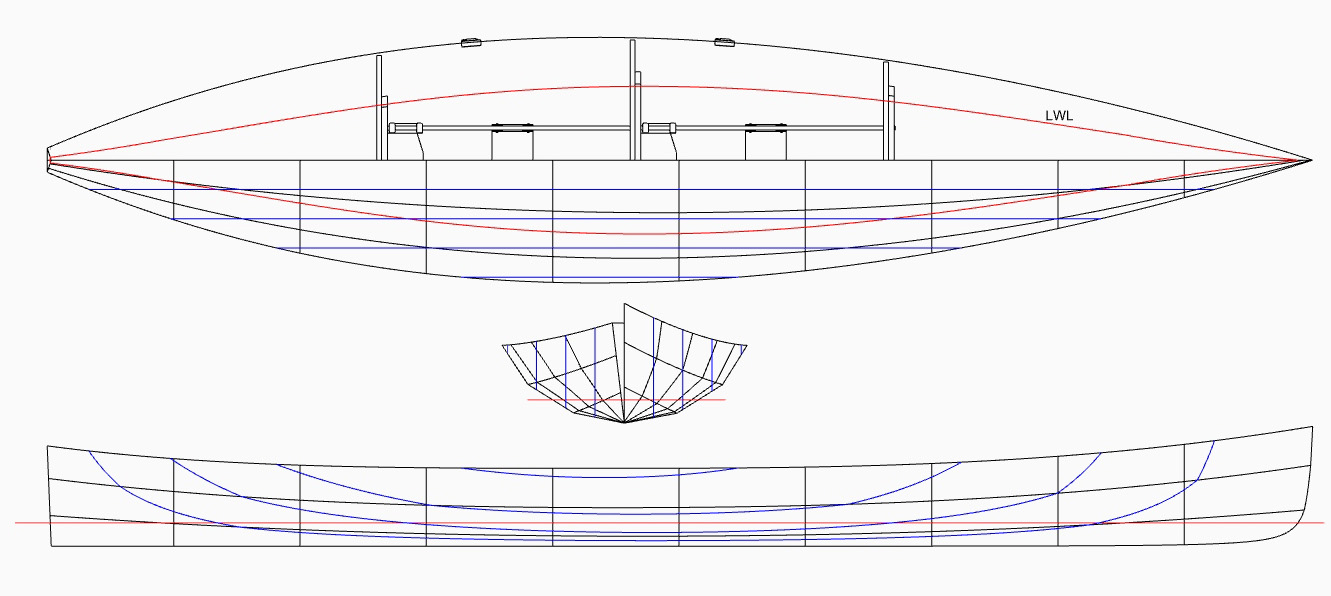
The Savo 650D from Puuvenepiste in Finland features a hull of glued-lap planks of 6mm marine-grade plywood over three laminated frames. The plans offer a three-strake version designed for a combined crew weight of 350 lbs or more and a four-strake version for crews weighing less. Together, the two of us weigh close to 350 lbs, and we have the tendency to load a lot of gear for camping trips, so the three-strake version might have been the better choice, but the four-strake version came to us serendipitously, and it has worked well for us.
Designed to be light, the Savo 650D’s keelson, gunwales, and frames are made of pine or spruce. The fully equipped boat weighs in at just over 100 lbs. The length is 21′ 4″, with a nearly plumb bow and stern so its waterline is virtually the same as its overall length. The hull flares wide at the gunwales and tapers to a V-bottom that is shallowly curved amidships, and narrows sharply at bow and stern. Its interior is simple and clean, with only three frames and the sliding seat system, so there’s lots of room for stowing gear.
With the boat bare for racing, it draws only 4″. Loaded for a multi-week camping trip, it sits a bit lower, but handles even better. Though we didn’t build the boat ourselves, a kit version is available and comes with detailed instructions and diagrams.
The two tubular rails support two Poseidon rowing stations. They can be adjusted to position a single rower for proper fore-and-aft trim. The sliding seats are not in place here.
The Savo 650D is designed for two rowers, though it is simple to outfit the boat with a third set of oarlocks to row as a single as well (though there’s also a version of the boat—the Savo 575—that is designed as a single). The 650D is equipped with two Poseidon sliding seats, which have concave wheels that rest on round stainless-steel rails. This setup is a huge improvement over most sliding-seat systems, which have convex wheels that fit down into concave rails that collect all manner of grit and debris making for lots of friction and extra maintenance. Any debris that falls on the Poseidon rails just drops off. The foot stretchers are clamped onto the sliding seat rails, and can be easily loosened to slide the foot stretcher to any position to accommodate taller or shorter rowers, or to set the boat up to row as a single.
There are no storage or flotation compartments—the Savo’s original purpose is to be a racing boat. If you’re considering taking the Savo out for an extended open water expedition that may land you in rough water, you’ll want to consider lashing some sort of flotation into the boat.
We transport our Savo on a lightweight aluminum trailer, but in Finland, where these boats are common, they are often cartopped. At 100 lbs, the boat can be lifted on and off the trailer or car top by two fairly sturdy people with relative ease.
Compared to a racing shell, this boat is quite stable. Compared to many traditional wooden rowing boats, it feels a bit tender. It is somewhere between the two in terms of stability, but closer to a traditional rowboat. With its V-bottom and wide flare at the gunwales, it lacks a little in primary stability, but makes up for it in secondary stability. In rough water you’ll be in for a bit of a wild ride, but it won’t go over. We once did a test to see what it would take to flip the boat and found that it took both of us getting off our seats to lean all of our weight out over the gunwale. That being said, when loading the boat with gear it’s important to take care to distribute the weight evenly. It is sensitive to small differences in port/starboard loading. Also, with its relatively light weight and large freeboard, wind on the beam can heel the boat. It is minor yet noticeable; sometimes it helps to have some ballast available to counterbalance a wind-induced heel.
The standard oarlocks for Finnish rowing are pins through the looms preventing the oars from being feathered, an advantage on long hauls. The oars here are not the standard Savo oars but the ones we used on our expedition Savo, with blades about 10 percent larger.
Finnish racing rules don’t permit oarlocks that allow the oar blades to feather, so the Savo is equipped with Sarana oarlocks, hinged pins that pass through bushings in the center of the oar looms. These non-feathering oars were a revelation to us. The pin system is ingeniously simple, and makes great sense for long-distance rowing. Though not being able to feather may at first seem a limitation, it is in fact a great bonus. The blade is always at the perfect position at the catch and no energy is wasted on feathering. And the traditional Finnish blades are slender enough that only the strongest headwinds have caused us to momentarily wish we could feather. The other 95 percent of the time, we dearly appreciate not having to think about blade angle at every catch, and our forearms are happy to forgo feathering, especially on the long-distance rows that we enjoy so much.
The Savo’s oar shafts are laminated spruce or pine, with hatchet blades made of marine plywood. Overall length of the oars is 8′ 4″, with blades approximately 17″ long by 5″ wide. Despite the relatively small size of the blades, we have found that they keep the boat clipping along nicely. One thing that may take some getting used to for American rowers is the amount of cross-over of the oar handles, which is much greater than that in most rowing or sculling boats in the U.S. That cross-over provides the right amount of leverage for oars that are mounted on the gunwales with no outriggers, but it does feel a bit different at first. While learning to row in rough water, the cross-over can be a contributing factor to bruises and scrapes on your hands and arms. But this is not an issue on flat water, and is overcome with practice in rougher sea states.
We have rowed our two Savos—one standard, the other equipped with decks, bulkheads, and a kayak rudder for the Race to Alaska—hundreds of times, in all conditions, and for very long stretches across open water off the coasts of Maine and British Columbia, and have found joy in all of it. These boats have carried us safely across rip tides and whirlpools, over ocean swells, and through the worst chop that our home waters of Penobscot Bay can whip up. On calm water, the Savo is a dream to row; it skims along with long glides between strokes and you almost feel like you are flying. It seems to barely notice a slight chop; it’s not uncommon for us to be out in 1′ to 2′ chop and stay dry. In rougher water, it can be quite fun, once you acquire the skills to stay on your seat and keep time with your partner. Any minor downsides to rowing the Savo that we have noticed are probably only due to our continued insistence on taking the boat out into water and conditions that are not usually encountered on the lakes of Finland.
Due to its relatively light weight, moderately high freeboard, and shallow draft you’ll need to row with quite a crab angle to make up for the effect of a strong wind on your course over ground.
The Savo 650D’s long waterline makes for slow turning, so trailing the oars on the inside of a turn to serve as rudders can help bring it around more quickly.
The Savo’s long waterline and V-bottom give it good speed and tracking along a straight-line course. The trade-off is a reluctance to turn sharply. We routinely drag an oar (sometimes two) to act as a rudder to assist a course correction or a larger turn. The original Savo does not have a rudder, or any kind of skeg or fin. It tracks fairly well upwind, but can be a bit squirrely in a downwind swell, suddenly taking 30- to 60-degree turns out of the blue when its stern gets caught by a wave (not an unusual trait for small boats). We have become adept at quickly dragging an oar on the fly to correct these sudden departures from our intended course. To be sure, steering issues are much less of an issue on flat, inland water, and in any case can be overcome with experience and practice.
The Puuvenepiste website states that the 650D can attain speeds of up to 9 knots (for a short period with exceptional rowers), and cruising speeds of 4.5 to 5.5 knots. We have briefly achieved speeds in excess of 8 knots, and have consistently achieved cruising speeds right in line with the designer’s range. In 2018, the Savo 650D was our boat of choice to row the entire Maine coast, 260 miles from Kittery to Lubec. We chose the Savo because of its capacity to hold all our camping gear with ease while maintaining a great cruising speed. Even with our increased payload on the trip we averaged 29 miles a day, and when we got to the end we wished we could keep going.
Over the past three years of rowing the Savo, we have gradually built our skills and learned to trust the boat in rougher and rougher water. We do all of our rowing on salt water, mostly on the coast of Maine. At first, it was nerve-wracking to be out in 2′ chop. Now, we have rowed across long stretches of open water in steep, choppy, 5′ waves, and have been in swells of up to 8′. Although the Savo was designed for flat-water racing on the lakes of Finland, we have found it to be quite seaworthy. In very rough, steep seas from 4′ to 7′, we have had to regularly stop and bail, but in sea states that are more typical for rowing, the boat stays dry inside. The greater barrier to rowing in rough water has not been the boat, but our own level of confidence and skill with the oars. It takes time and patience to learn how to row well, and stay in sync, when the boat is pitching all over the place.
The Savo 650D lies somewhere on the spectrum between the ultra-slim, lightweight racing shell and the heavier, more stable traditional rowboat; all in all, we find it to be the best of both worlds. It is fast, yet dry in most sea states. It is light, yet sports beautiful, traditional lines. If you’re a sliding-seat rower who wants to enjoy that amazing, weightless feeling of skimming along across a mirror-like surface, you can do that, and probably win some open-water races while you’re at it. If you’re a busy person trying to spend time in the outdoors while also getting in a good workout, you won’t have to bend and warp your life schedule around finding perfect flat-water conditions; you can go out in a bit of wind and chop. If you live for adventure and you want a boat that you can load with camping gear and shove off for multiple weeks away from modern life, you can do that, too. The Savo is also a great training boat for beginners. With its wider beam and freedom from feathering, newcomers to sliding-seat rowing find the Savo to be a much more forgiving, less frustrating boat than a typical shell. Yet, experienced rowers will find much to love as well; if you’re like us, you’ll find that the boat’s extreme seaworthiness will have you continually testing yourself in more and more rugged conditions.
Leigh Dorsey and Dameon Colbry are rowing addicts lucky enough to be living on the coast of Maine. They have found no more enjoyable way to experience the sea than in a small boat, and no more rewarding journey than one completed under their own power. They feel a strong connection to the generations of humans who explored their world by oar and paddle.
Savo 650D Particulars
[table]
Weight, equipped/101 lbs
Length /21.3′
Beam /4.2′
Depth/24.6″
Displacement/441 lbs
Waterline length/21′
Waterline beam/29.4″
Draft/4.5″
Freeboard/12.6″
[/table]
Finished boats and kits for the Savo 650D are available from Puuvenepiste in Finland. Old Wharf Dory is the authorized builder in the U.S. Kits in the the U.S. are available from Hewes & Company in Blue Hill, Maine.
Is there a boat you’d like to know more about? Have you built one that you think other Small Boats Magazine readers would enjoy? Please email us!
The catboat is a beamy, monohulled sailboat descended from a line of working watercraft. No one is sure of the origin of the name “catboat.” Some said the boat was as fleet as a cat. Or, the name might have been inspired by dock cats that greeted returning fishermen. Catboats fished, hauled freight, and ferried passengers along the U.S. Eastern Seaboard as early as 1850. Their spiritual home is Cape Cod, Massachusetts, where generations of the Crosby family built catboats, determining their shapes with hand-carved models.
The beam of a catboat is typically half its length. Such generous beam afforded room for a fisherman to work. A single mast, stepped far forward, has a forestay but generally no shrouds. The rig is a single sail, often a gaffer. Fishermen made headroom by furling the rig then hiking it high overhead with one of the halyards. Because catboats worked in shallow waters, most have shoal draft and a centerboard. Catboats have a characteristic barn-door rudder, hung proud of the stern and steered with a tiller.
Working watermen eventually adopted steam and gasoline. But a new kind of sailor, the pleasure boater, adopted the catboat, which retains a loyal following to this day.
Naval architect Charles W. Wittholz of Silver Spring, Maryland, designed boats ranging from 11’ dinghies to 85′ replica ships. In his career, Wittholz designed several catboats, but it was the 17-footer that he himself sailed on the Potomac River. Built in 1967, he named his boat GOOD OMEN and sailed her for more than 20 years.
Monte Copeland
The keel version of the Wittholz 17 catboat has its greatest draft 13-1/2′ back from the stem, so it can be brought fairly close to shore. The bundled boom and gaff have been hiked up by the peak halyard to provide more headroom in the cockpit.
The plans for the 17′ 1″ plywood catboat include 11 sheets with good construction detail: materials, dimensions, fastening schedules, notes, and comments. Several alternatives are included: self-bailer instead of deep cockpit, lead-ballasted full keel instead of a centerboard, open cockpit instead of a cabin, gaff or marconi sailing rig, optional anchor-handling bowsprit, and an optional inboard engine. The plans date to the early 1960s, so some of the suppliers mentioned have long been out of business.
The Wittholz 17 requires lofting from the plan’s offsets. Drawing the body plan (the end-on view) requires a 6′ x 10′ drawing surface and is critical to loft accurately as it provides the full-sized patterns for the frames. The 6′ x 6′ side-view lofting of the stem provides patterns for the stem/forefoot assembly. The lofting for this catboat is not complicated; Greg Rössel’s book, Building Small Boats, covers lofting nicely.
Hull construction is straightforward: assemble the oak stem, the 1/2″ plywood transom, and the nine frames of mahogany or oak with 1/2″ plywood gussets. Set those elements on a level building jig, upside down, with the frames 22″ apart. Fit the mahogany or fir sheer stringers and chines, and the mahogany keelson to the frames.
The hull sides and bottom are 3/8″ plywood. The plans suggest a layer of fiberglass cloth on the ply for extra durability. I know from personal experience that if you get the catboat sideways to the wind and ram the dock, you can crack some plywood along the sides. The most vulnerable areas are between the frames forward of amidships, aft of the forward bulkhead. I suggest adding oak blocking between frames about 12″ above the waterline and heavy-duty fiberglass-epoxy on the inside of the plywood in these areas.
In my experience, fir and Aquatek plywoods check and crack if painted only, so they must be covered on both sides with fiberglass cloth set in epoxy. If you do cover plywood in fiberglass, do it after cutting pieces to shape, before installation, while they are still flat. This is so much easier than fiberglassing an assembled boat. High-quality okoume plywood is nice stuff: no voids, many plies. Okoume, when used for parts of the boat other than the hull, benefits from a barrier coat of unthickened epoxy on both sides, but it does not require fiberglass cloth.
This boat will always have a little water in the deepest part of the bilge. Seal this area with several coats of epoxy resin.
Get the sides from 5′ x 20′ panels (two sheets 5′ x 10′ scarfed). Attach the sides first. Get the bottoms from 4′ x 20′ panels (4′ x 8′ sheets scarfed). The bottom panels overlap the side panels most of the way then transition to a butt seam forward. Fit the keel to the keelson before turning the hull over.
The sail plans include both marconi and gaff rigs. The gaff-rig mast I built is solid spruce: 5-1/4″ in diameter, 25′ long. The gaffer requires a single forestay but no shrouds. The hardware called out in the plans is all from Merriman Yacht Specialties, a company no longer in business. Most parts have readily available equivalents, but if gooseneck hardware is hard to find, try wooden jaws. See William Garden’s article, “The Right Jaws for your Gaff and Boom,” in WoodenBoat No.59.
The gaff rig’s solid mast is too heavy and awkward to step handling it solely from the foredeck. Lacking a crane, it requires a person on a low bridge or atop a neighboring houseboat to steady the mast while a crew of two lifts/lowers on deck. Spare halyards from two neighboring sloops would also work to step this mast.
Those wanting a trailer-sailer will look to the marconi rig then make modifications for folding. The builder will have to design the modifications, because the plans say nothing about folding. The marconi mast is a 5-1/4″ x 4-1/4″ hollow rectangle, 32′ 3″ long. This mast requires a forestay and two shrouds that belay aft of the mast partner.
The gaff rig peaks up higher than is usual for a center of effort similar to the marconi. Build either sail with two sets of reefpoints as shown on the plans. The second reefpoint has a calming effect in 40-knot winds.
The optional bowsprit is not for a jib, as a jib of any kind would unbalance the boat. The bowsprit is for anchor handling, equipped with a chock to guide the chain and rode.
The Wittholz catboat has a centerboard, as catboats commonly do. Draft with centerboard up is 21″, down 4′ 3″. The centerboard case is 6′ long, most of it in the cabin, with 19″ extending aft into the cockpit. The centerboard itself is 3/8″ galvanized steel. There are 500 lbs of movable ballast in the form of lead pigs under the cabin and cockpit floorboards.
Monte Copeland
The trailer for this keelboat version of the catboat is fitted with screw pads to steady the hull while the weight of the boat is supported beneath the keel. The centerboard version could slide onto a trailer equipped with bunks.
The plans include an option for a full ballast keel, as seen in the catboat pictured here. The draft of the full-keel version is 28″. The builder must make a mold to pour 600 lbs of lead shaped to fair with the deadwood in the keel. The mold requires lofting, too; refer to the Bud McIntosh book, How to Build a Wooden Boat, for a simple explanation.
Either model weighs about 2,200 lbs, including the ballast. The trailer for it could be a bunkboard arrangement, but a trailer with boat stands is better. When trailering, the boat must rest on its keel, not its garboards.
Monte Copeland
With the tiller swung to port, there’s room for the stove when the cockpit is pressed into service as the galley. The plans call for an engine box, which would occupy the center of the cockpit. A transom-mounted outboard motor frees up that space for the crew.
The cockpit is seriously spacious. Sloop sailors often walk by and exclaim, “Look at all that room!” The cockpit can easily accommodate six people. The seats have a comfortable slope, and the coamings are tilted as backrests should be. The footwell is deep but not self-bailing. Water will sump to the deepest part of the bilge where a reliable pump awaits. For a self-bailing cockpit, see the plans; there is a sheet for that. The high sheer up forward keeps the cockpit dry in most conditions.
At anchor, it is a fine thing to hike up the sailing rig for standing headroom in the cockpit. On the gaffer, do this by furling the sail, lashing boom to gaff, and hauling on the peak halyard. For the marconi rig, modify the wire topping lift. Its upper end is fixed to the top of the mast, so modify the bottom end with 1/4″ rope, blocks, and a cleat on the boom to adjust it.
Monte Copeland
The plans for the cabin include two berths and cabinets aft of them, one equipped with a sink, the other a two-burner stove. The keelboat version, seen here, leaves the space between the berths unobstructed by a centerboard trunk.
In the cabin, there is sitting headroom on berths port and starboard. The two lockers amidships are sure to be customized by the builder. At anchor, a Coleman stove works well in the cockpit aft, so the two-burner alcohol stove in the cabin shown in the plans may not be required. The drawings show a head up forward, but it flushes straight into the sea. Better find a place for a porta-potty, either forward or perhaps amidships port or starboard. When it comes to building the cabin, How to Build a Wooden Boat is again a good companion to the plans.
The plans show where to fit a small inboard engine, but a 5-hp, four-stroke, long-shaft outboard motor serves well as an auxiliary. The plans also show an option for stowing an outboard under a hatch set in the cockpit floor. On smooth water, the outboard will push the boat at 6 knots. Mount the outboard to a bracket on the transom, but keep it clear of the big rudder. Add framing in the transom for attaching the bracket to the boat. The bracket should be adjustable up and down to keep the propeller in the right amount of water, no matter where the passengers are. Most 5-hp outboards come with a propeller suitable for light craft or inflatable dinghies. For a boat of this size and weight, select a propeller with less pitch so that engine rpms are high enough to avoid lugging the engine.
Sheila Harnett
The 220-sq-ft sail here is held to the mast by hoops and lashed to the gaff and boom. The plans not using sail track along the boom.
In good conditions, expect this boat to sail to windward at 45 degrees off the wind. A sloop, with its two sails and narrower beam, might sail closer, but the catboat sailor specializes in his one mainsail and strives to get the most from it. The peak and throat halyards of the gaff rig provide control over sail shape. A three-part boom outhaul for either rig is useful to control the belly of the sail. The position of the crew greatly affects overall trim. Move crew aft or to windward to reduce weather helm, something catboats have in abundance. On this boat in particular, moving crew leeward can help push the hard chine underwater, so the side acts like a leeboard.
It is best not to oversheet a catboat. When hauled hard, the boom should be over the stern quarter of the boat. Hauled any harder, the boat slows down and crabs to leeward. Best to let out the sheet, find the wind, then adjust by looking for the sweet spot. On gusty days, do not cleat off the sheet; instead, wrap just enough turns around so it will slip when hit by a strong gust. On a reach, 15 knots of wind will move this boat at 6 knots. In stronger winds, reef the sail to match, preferably sooner than later.
At the helm, keep the tiller in one hand and the sheet in the other. One can sense immediately how the combination affects boat speed and trim.
This boat is built for comfort, not speed. What appeals most to me is how the Wittholz catboat provides so much space for its 17′ length. It’s a sailboat with berths for overnighting, and yet is buildable in a 20′-deep two-car garage. Over the years, I have come to appreciate its comfort, safety, good looks, and ease of sailing singlehanded. If I could add one thing to the plans? Fishing rod holders just aft of those stern cleats.
Monte Copeland grew up in a lumberyard along the Ohio River, but never connected wood with water until after moving to Austin, Texas. Now retired from computer programming, Monte and his wife Sheila sail on Lake Travis. In his shop is an old Shellback dinghy getting ready for new paint.
Thanks to reader Dick Lafferty for suggesting we review the Wittholz catboat—Ed.
Is there a boat you’d like to know more about? Have you built one that you think other Small Boats Magazine readers would enjoy? Please email us!
What is a catboat?
Catboats are traditional American sailboats that are built wide and with a single mast that’s usually set forward in the bow. Their single sails are typically gaff-rigged, though the marconi option for the Wittholz catboat shows that isn’t a hard and fast rule. Learn more about catboats in the profiles below.
"Don’t you think such a project is a little too big for you?” That’s what my father said when I told him I was thinking about building a kayak. He used to do little craft projects with me when I was younger, and I remember when we made a small wooden figurine for Grandma to put in her garden. He did the sawing out and let little me do the painting. While he had in mind teaching me to use some tools and different materials, in the end, he always did the building and all the work with the tools, while I watched and cleaned up afterward. When I was old enough, I stopped taking part in these projects and turned to some simpler craft projects I could do on my own, such as sewing, braiding, and working with leather.
“A little too big” came back to me as I stood in a lumberyard collecting the first of the materials for building a Greenland skin-on-frame kayak, but the echoes of my father’s words faded as I breathed in the wonderful fragrance of the wood surrounding me. Thomas Bruns came out of his storehouse carrying a very long packet of lumber. He is the father of an old friend of mine, and I’d recently found out, just by chance, that he’s a lumber wholesaler. I could not really believe my luck, because for weeks I had searched the Internet for a source of wood of 16′ or more in length, knot-free and straight grained. Thomas had been very friendly when I emailed him, offering me wood for my project and not wanting any money for it—the amount of wood I needed for my kayak was not a quantity they think twice about giving away. For two big boards of pine and four beautiful, knot-free 20′ boards of hemlock I paid one homemade chocolate cake.
As I strapped the boards to the roof rack of my parents’ car, I still could not believe I was doing this. These boards were longer than any kayak I had ever handled, and “too big for you” was suddenly something I could see and struggle with as I loaded them.
The idea for this building project came up when I was practicing Greenland rolling in pool sessions during the winter months with my fiberglass Greenland-style sea kayak, christened NAAJA. In the Greenland tradition there are rolling techniques for every eventuality. In the Greenland National Kayaking Championship there are 33 different rolling techniques, from the Standard Greenland Roll with a paddle, to the Straitjacket Roll without a paddle, arms held tightly across the chest. I love my kayak, but it is just not perfect for rolling. I needed another kayak, one meant for rolling.
There are only a few manufactured models available that would fit for me, as I am not very big—5′ 7″, around 130 lbs—and a boat for rolling should be very low in volume. Suitable boats turn up only rarely in Germany as used boats, and shipping a new one is too expensive for some playing around in pool sessions. My boyfriend Martin said “just build one for yourself. It can’t be that difficult.” He was not really being serious, but still, the idea stuck with me. Then I started reading everything I could get from the Internet, and finally ordered the book Building the Greenland Kayak by Christopher Cunningham. I read through the whole book in a few days.
With every page I read, I tried to imagine if I could do each step, if I had or could borrow the tools I needed, and so on. As I got more and more interested in the idea of building, my thoughts drifted to it no matter where I was or what I was doing; I even had a dream about it. As I read and planned, it slowly became clear to me that the process of building the kayak was not that difficult. I became more and more determined to take the project on.
My parents did not take me very seriously at first, and I tried not to bother them as they had already been complaining “you only ever talk about kayaks,” even before this project got stuck in my head. I was used to this. For the last 15 years before I took up paddling they complained I “only ever talked about horses.”
I discussed everything with my boyfriend, but even he grew tired of the topic at some point, even though he was the one who got me to take up kayaking three years before. He is still making fun of me that I took it up a bit too well, laughing at my ever-growing collection of kayaks and gear and list of places I want to paddle. He also taught me paddling and rolling in the first place, and my first kayak was given to me by his grandpa.
I plotted where I could get my materials and find some space for building. When to do it was clear: I was to finish my master’s thesis in microbiology/biochemistry by the end of March 2019, and would start a PhD program on the first of June. I looked forward to building with my own hands something I could actually use. It would be just the break needed from lab work and sitting in front of computers trying to make sense of weird measurements of microscopic bacteria.
I needed a place to build the kayak. I was living with my parents in a flat on the third floor, and our cellar was so small that there wasn’t even room for my bike. I would have moved out earlier, but I wanted to wait until my boyfriend and I both had jobs and knew we would not have to move farther away within the next few years.
As I earned a lot of skeptical looks from family and friends alike for my project, I got more and more determined to do it. I did not expect it to come out perfectly, but I wanted to prove, not just to them but to myself, that I could do it and do it on my own. The biggest projects I’d done were a leather book bag and two leather guitar straps—nothing like building a whole boat from scratch. The more I thought about it, the more I realized that proving what I was capable of was driving me more than any need for another kayak, but I would never admit that to anyone.
Photographs by and courtesy of the author
Ralf-Peter’s workshop is amazing, but not a place to visit if you are claustrophobic. It is filled to the ceiling with boats, wood, and other materials, as well as all kinds of machines. To get from one end of the shop to the other is an exercise in acrobatics because you have to climb over and duck under boats and stacks of wood, and there is scarcely any bare floor.
Even before I set up a workplace to build the kayak, I needed to get my stack of boards sawn to the dimensions required. This necessitated a tablesaw, a machine I had never used before, and was the only step I was willing to accept help with. My friend Ralf-Peter Stumme has a prehistoric tablesaw with no safety features at all; I am always amazed that after using that thing for years he still has five fingers on both hands. He would not let me use it anyway, but he would do the rip sawing for me.
I rounded the corner into the yard of the rowing club in my hometown of Mülheim, Germany, where Ralf-Peter has his workshop, and heard a radio blasting some audiobook from the station he is always listening to, and I saw him in his customary red-and-white striped shirt working on a century-old four-oared racing skiff. The red and white stripes are the “official outfit” of the Classic Boat Club he founded in 2004, and about the only color of clothing Ralf-Peter owns.
As we unloaded the boards from the car roof rack, we chatted a little about my project. I was really happy to finally talk to someone who actually knows something about boatbuilding and who was interested in my plans.
Ralf-Peter put my boards through the tablesaw and I, at a safe distance from the blade, supported the boards as they came off the saw. We milled two gunwales, two chines, and a keelson for my kayak. After we loaded the milled pieces back on the car, I paid Ralf-Peter with a chocolate cake.
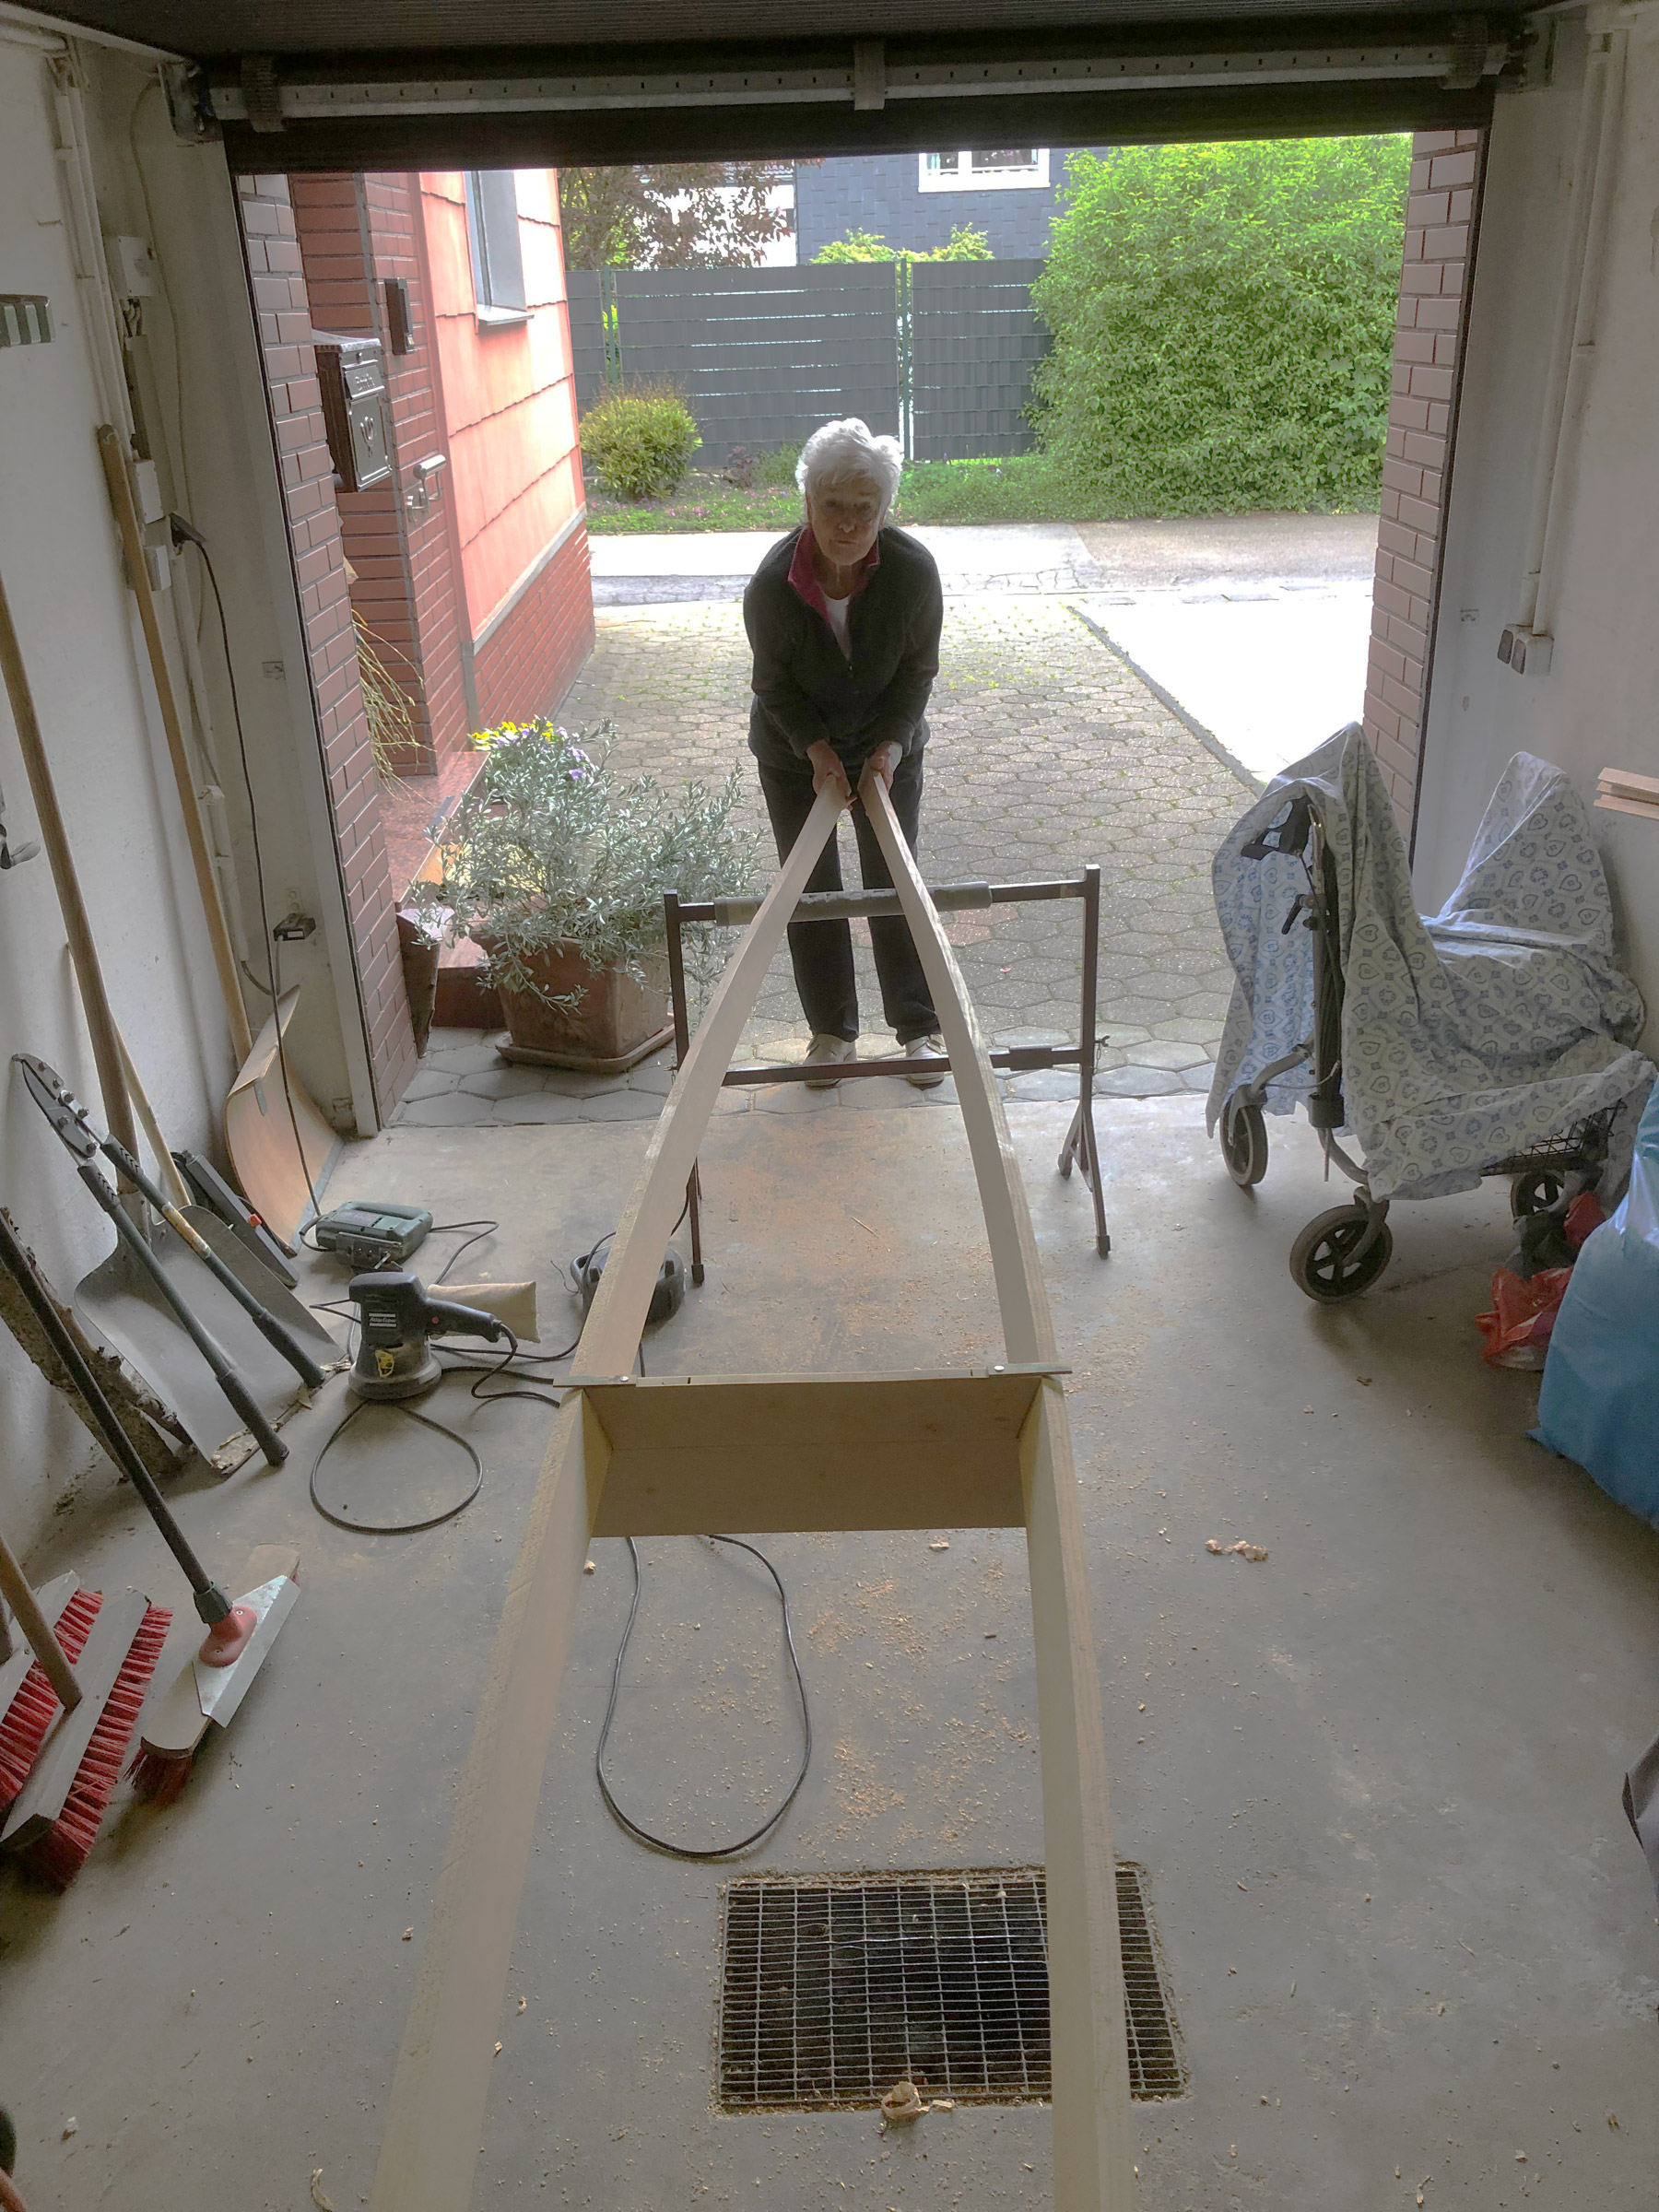
During the previous weeks of planning, I had figured out the perfect, secluded place to build my boat: my grandma’s garage. It is not very big, but if I kept the door that connects the garage to her garden shed open, there would be just enough space for an 18’ kayak and some tools. I had tidied up and moved out old flower pots, garden furniture nobody needed, and bits left over from projects my grandpa had done decades ago.
The space was small, but I’d have it mostly to myself and be free to make every mistake on my own. I trusted my grandma would not get involved too much, unlike my father or some people from our paddling club. I had a very good connection to my grandma ever since I was a small child. Her name is Ingrid, but I always called her Lieblings Oma— “Favorite Grandma” in German— when I was little, and only when I grew a little older did I learn that this was not very nice for the other grandma, so I just called her Ingrid or Oma. I would spend a lot of time in my late granddad’s little workshop as a child and was allowed to use some of the tools that he had left in the cellar. As I grew up, Ingrid would be the only person to witness my budding skills and trust me enough to let me do useful things, like install a ceiling lamp in her living room and doing minor repairs around the house.
Working at my grandma’s place had another great advantage: every day around noon, that good soul appeared in the dusty doorway to my wooden cave and called for lunch. A few hours later, there was cake. Or ice cream. Or both.
As lovely as this was most of the time, it became a kind of stress factor over the time I worked there. One day, while I was painting the frame, with my hands full of sticky boat oil, she could not accept that I did not, and could not, eat anything right then. She ended up standing directly next to me and shoving bites of ice cream into my mouth while I kept working. I accepted this to keep her happy, even though it really got on my nerves. Except from these minor occasions where I was stressed because of varnish needing my attention or steamed wood ready to be bent, we got along very well and I think she enjoyed having me there.
The first jig I made for the kayak project was a drill guide for drilling rib mortises into the gunwales. I nailed it together from some scrap wood I found in my granddad’s cellar. I didn’t focus on the aesthetics very much, but it still worked well. Over the course of the project, the contrast between this early piece and later parts became ever more apparent as my woodworking improved.
I quickly got into a routine of reading the book in the evening on the couch at home to memorize the next step I wanted to work on the next day. Then I converted all imperial measurements into meters and centimeters, looked up a few specific terms I didn’t know (English is not my first language), and put down some notes in German to use while working. This prevented a lot of time from being wasted while working in the shop.
As I shaped the gunwales, I built a few jigs to help with marking all necessary mortises and drilling holes in the correct angle and make it more efficient and precise. After about a week, they were ready to put on the building forms that would hold them in their proper angle and shape. This sounds easier than it was. As soon as one end of both gunwales was put into a form, the other end sprung apart, adding to the chaos in the crowded garage. After a few attempts I asked Grandma to help me and hold one end while I worked on the other. Together we finally managed to put the forms on. With just the gunwales sprung around them, what I had made already was looking like a kayak.
I’d been struggling with putting the building forms on the gunwales, but when Grandma happened to come by to see what I was doing, she lent a hand and held the ends of the gunwales in place.
Oma is way over 80, with age-worn bones and joints that barely allow her to walk properly, but she would never refuse an opportunity to help me with minor things on the kayak. She would look very content to be part of the project and was at least as proud of the boat as I was, but never trusted it would be seaworthy. She had been afraid of the water her whole life, and never learned to swim, so she expected the river would swallow me and the boat the first time I slipped into the cockpit. I tried to convince her it would stay afloat, or at least sink slowly enough for me to get out, but I don’t think she ever believed me.
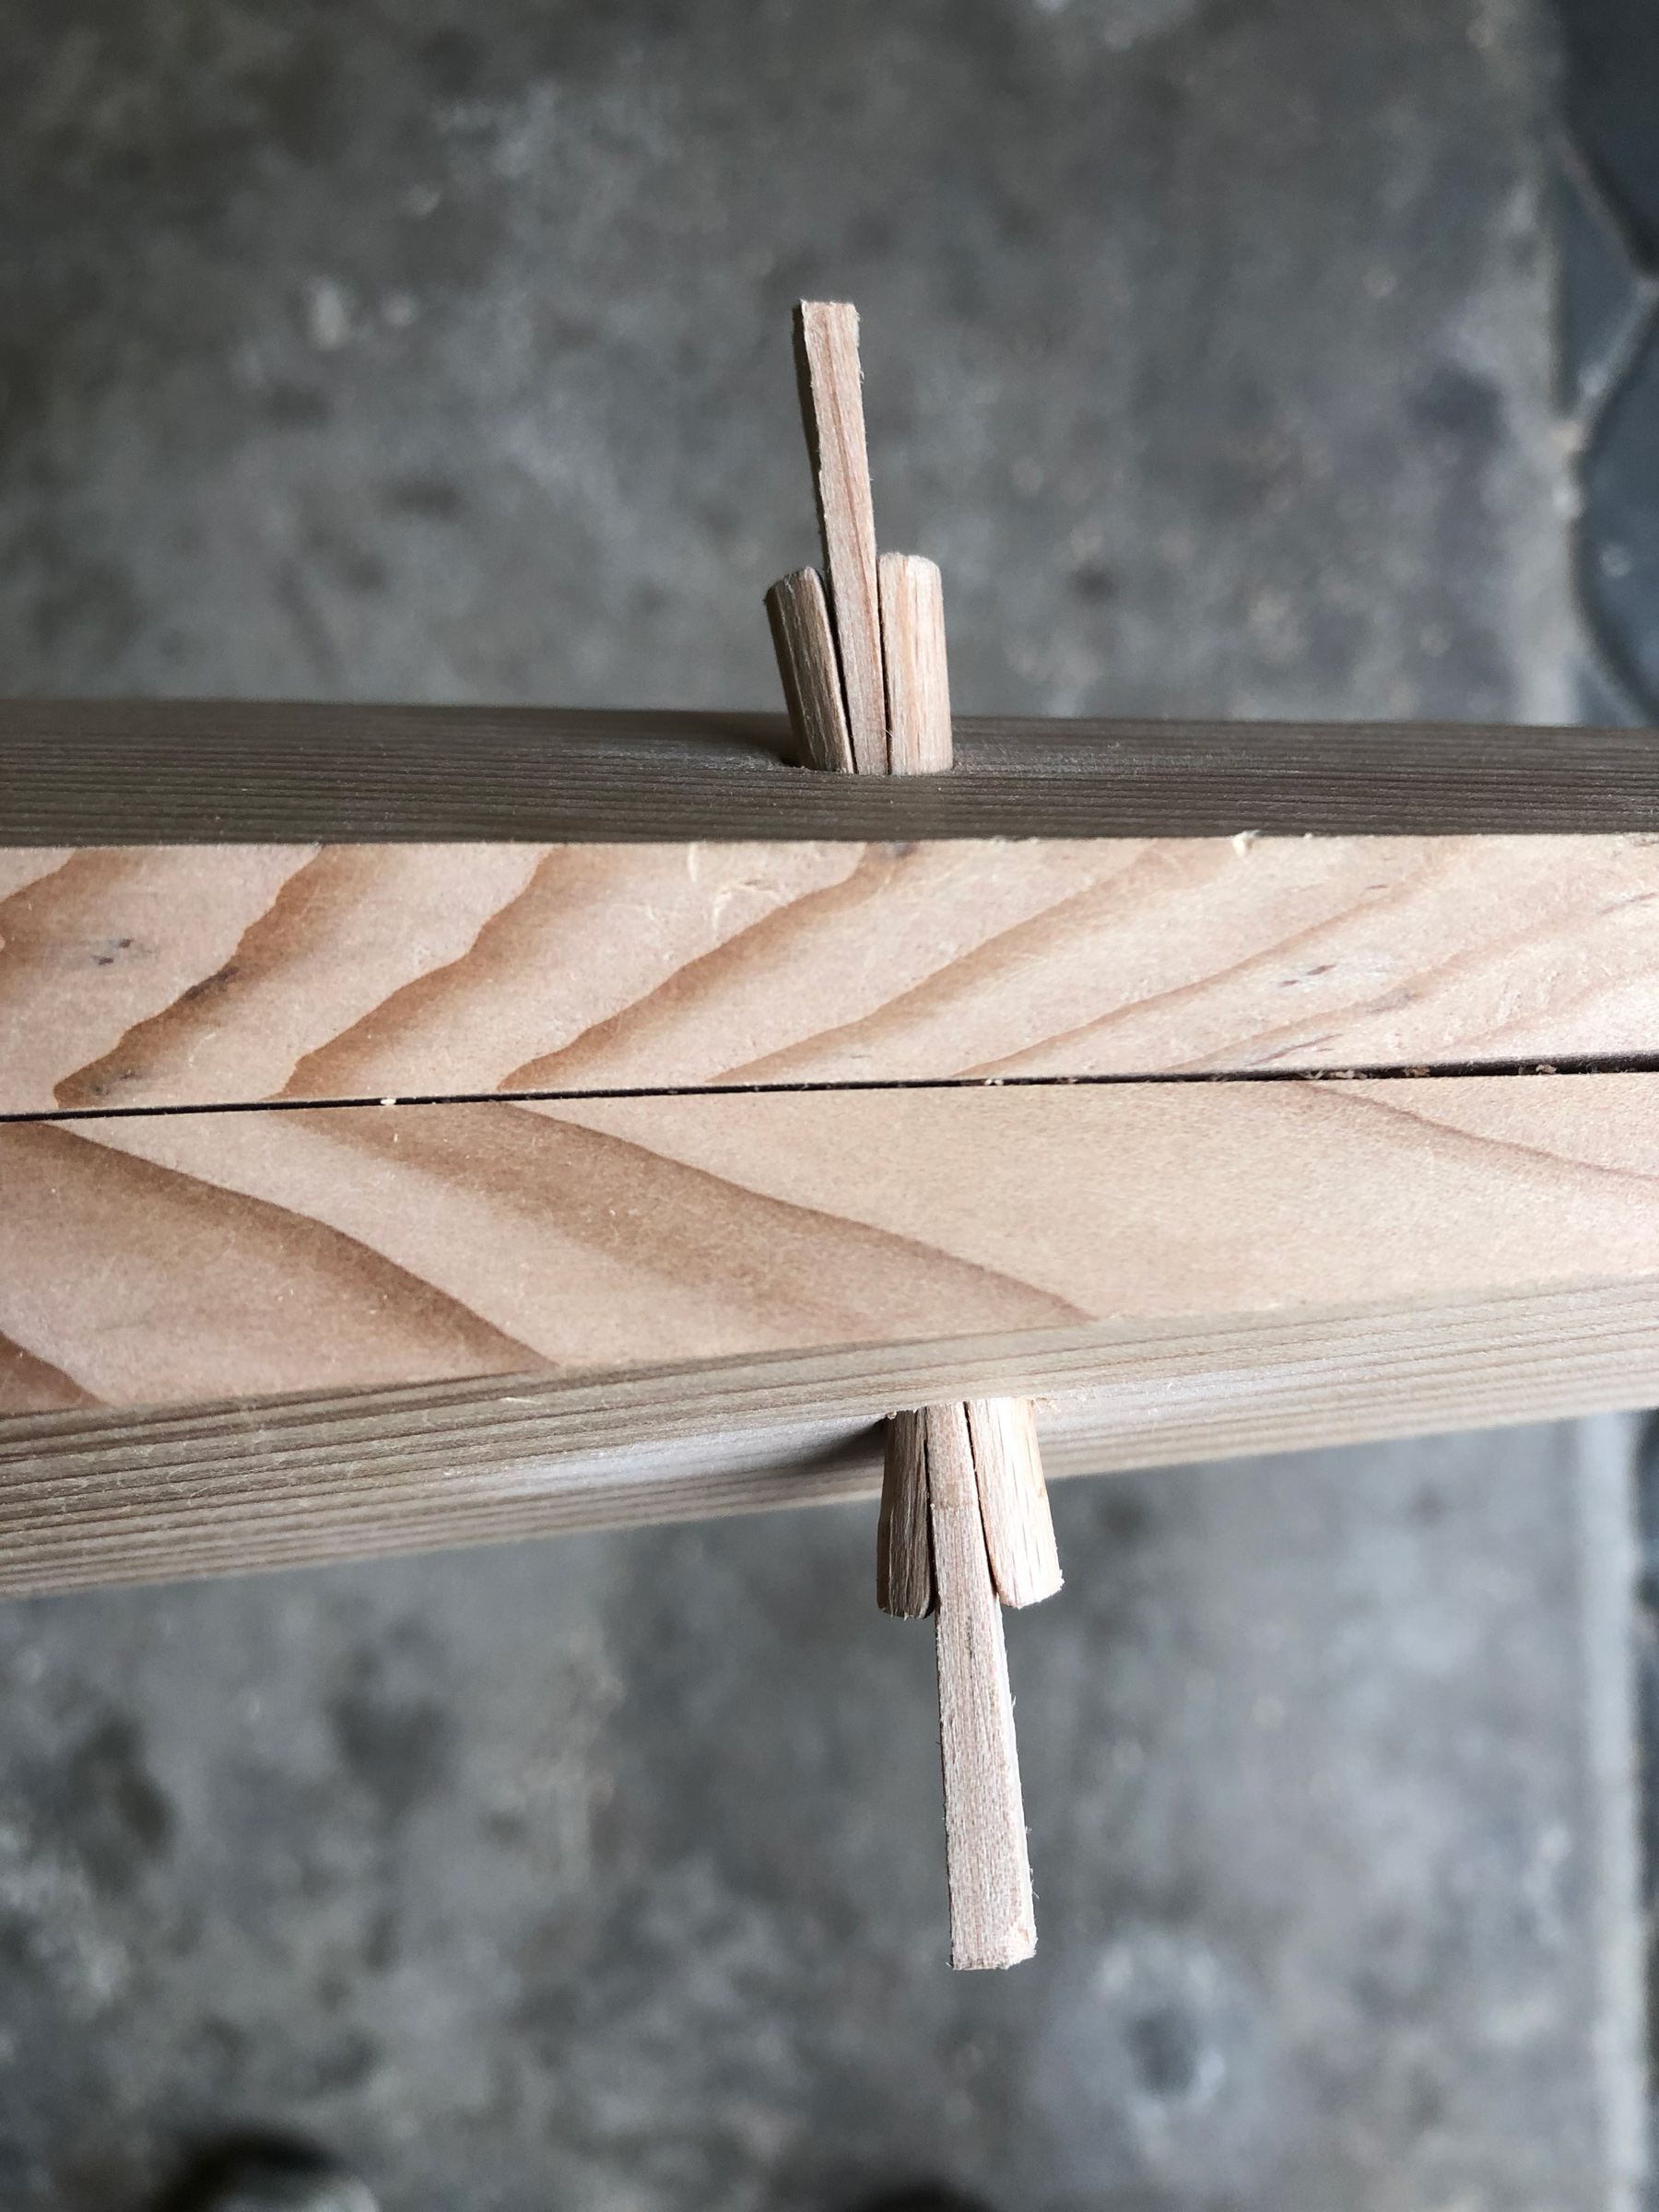
The trunnels that keep the gunwale ends together have kerfs flared by wedges, so they cannot be pulled out when the kayak frame flexes. They’ll be sawn flush with the gunwales. At first, I struggled with the wedges because I made them too small and they broke off when I tried to hammer them into the kerfs, but when I made them from ash instead of pine and with a thicker tip, they held up very well. I was amazed by the fastening. It is cheap and elegant, requires very few tools, is super easy to do, and yet it is a very strong connection.
The weeks followed the same routine: I’d have breakfast with my parents before they left for work, drive to my little boatshop, work on the kayak for a few hours, have lunch with Grandma, work some more, have some cake or dessert, and then go home to do some paddling, horseback riding, or play my saxophone.
Every morning, I arrived to find my kayak lying there, waiting for me. The garage was fragrant with wood, reminding me of when my dad took me shopping for wood when I was little. Even the shop floor, littered with shavings and wood dust, had its own bouquet.
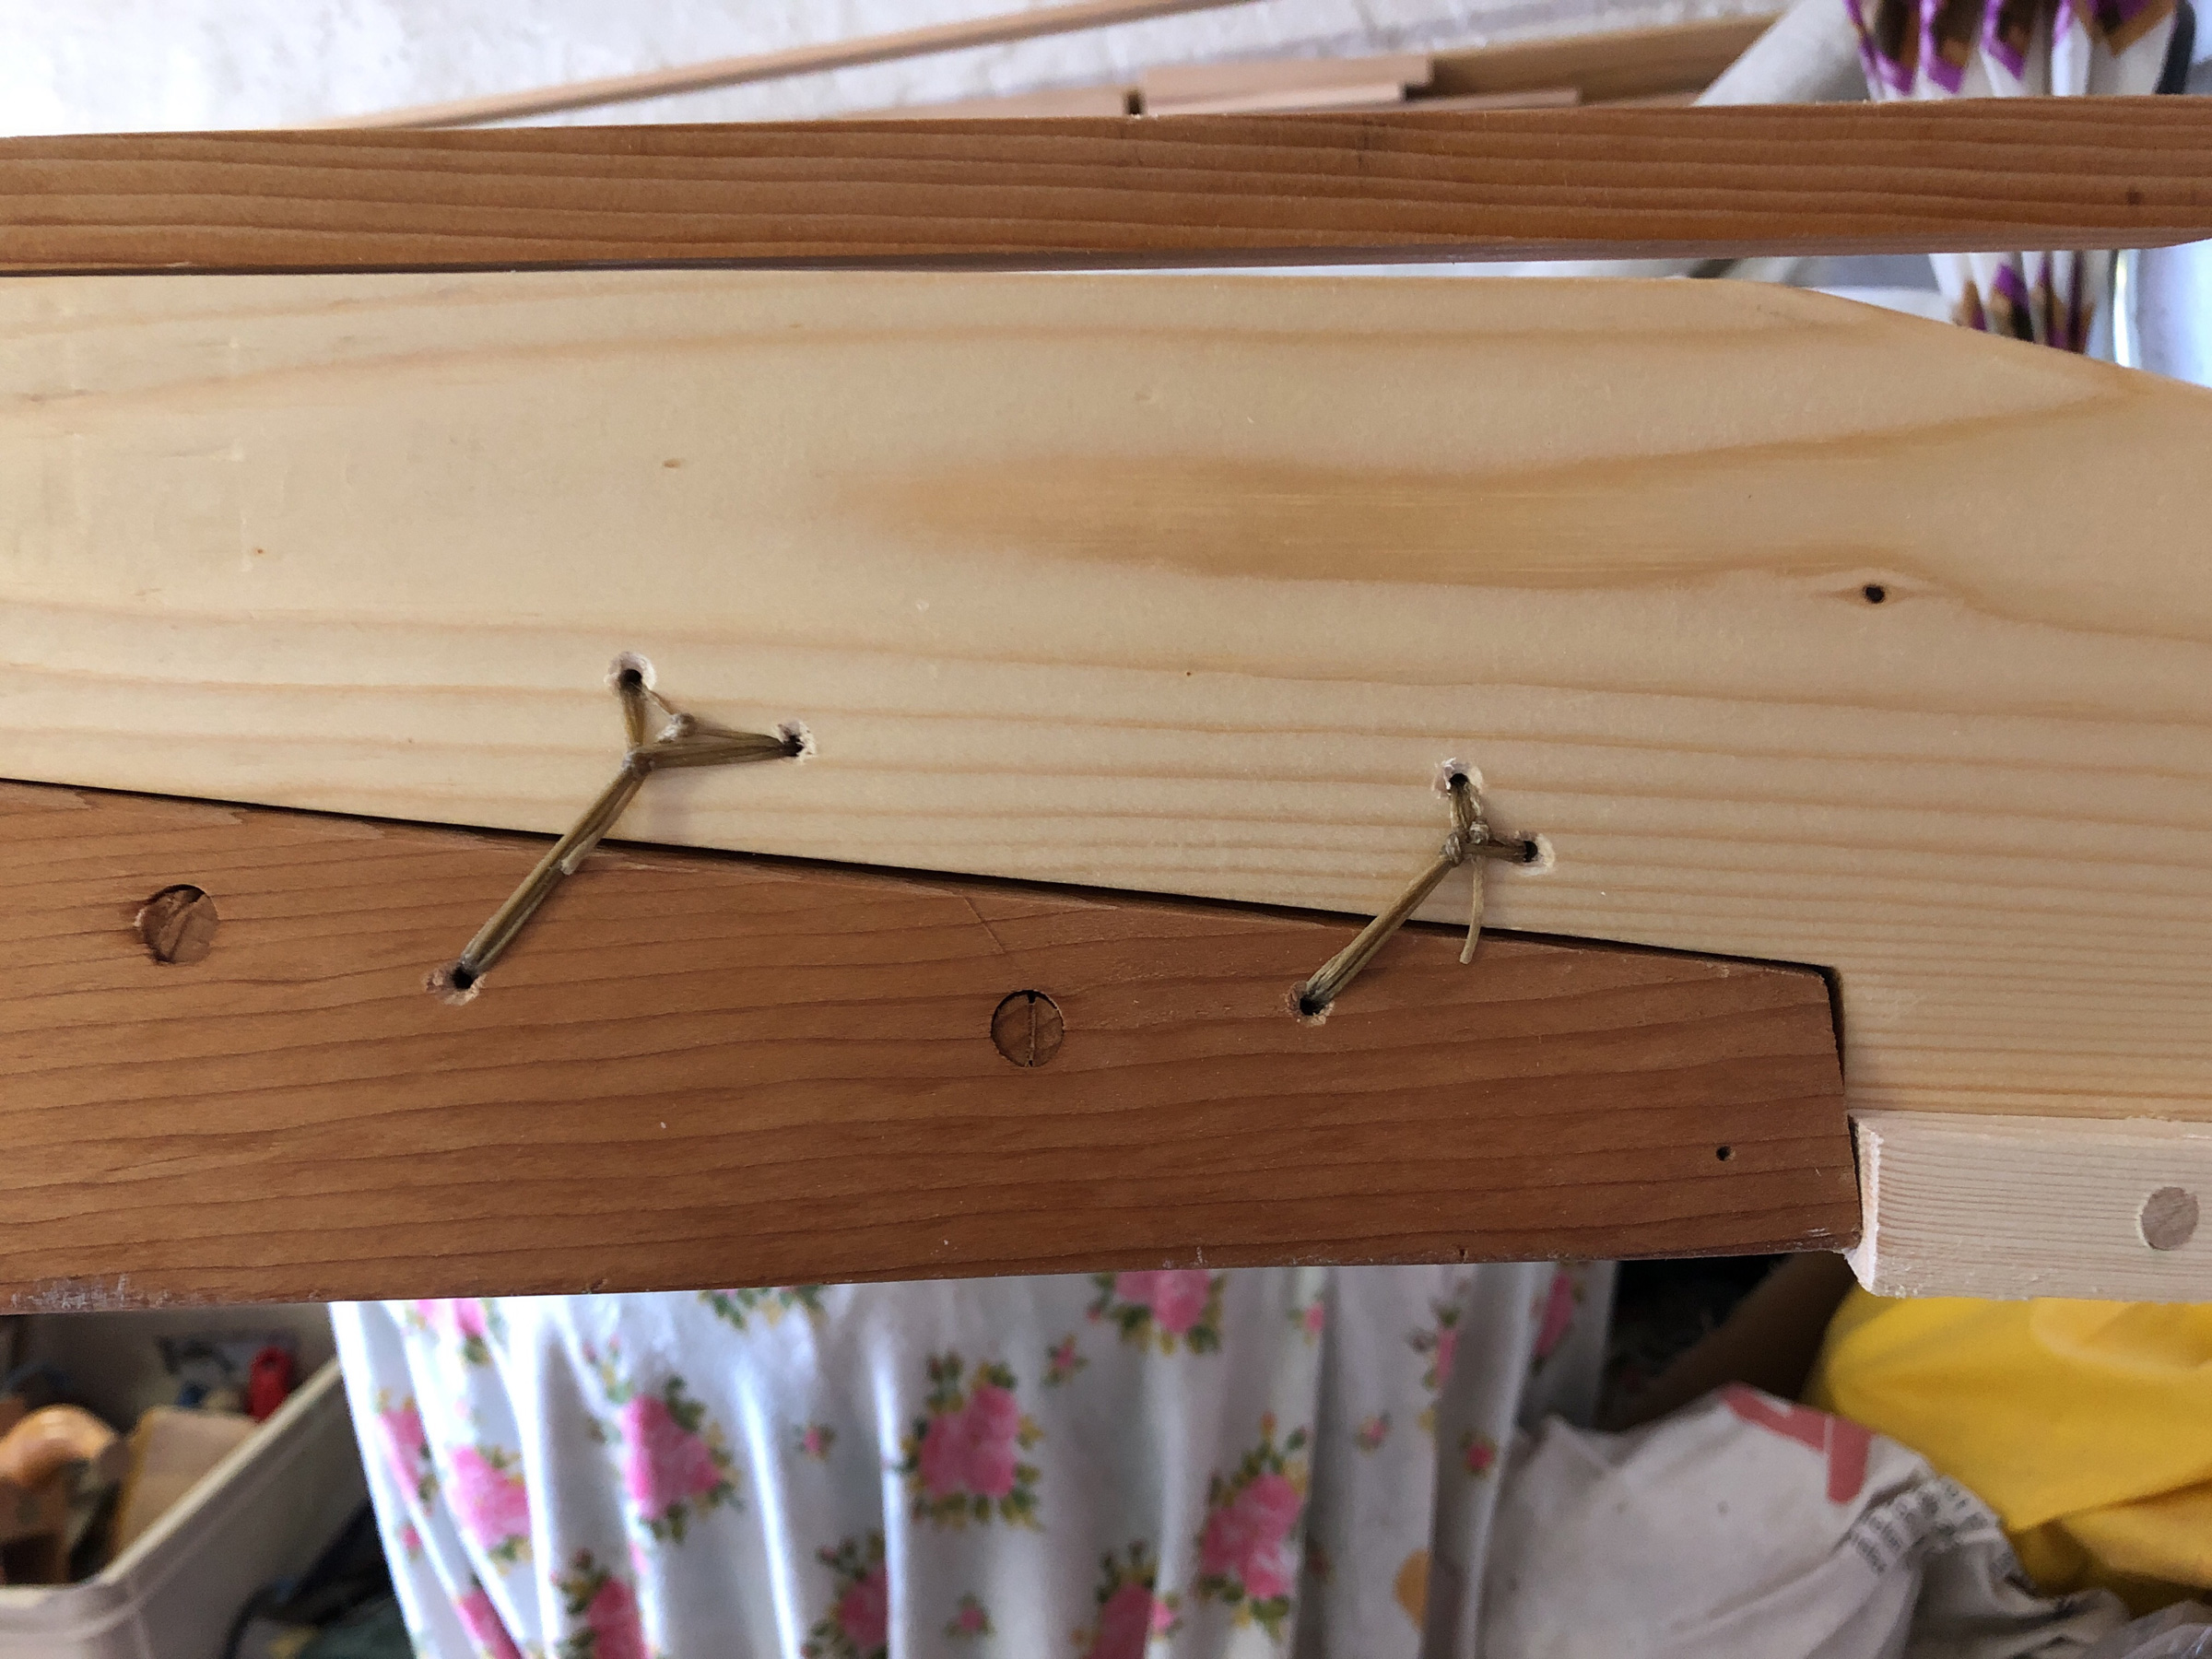
Each stem piece is fastened to the ends of the gunwales by lashings. They start with the turns of artificial sinew making a V shape between three holes. Turns around the two arms of the V to pinch it into a Y shape greatly increase the tension. The lashing is angled across the joint to pull the stem tight to the gunwale ends. The keelson, at top, will get pegged to the stem with the pegs set at different angles to lock the keelson in place.
When I opened the door to the garage, sunlight gave it a nice golden glow and the warm spring air and the songs of birds filled the space. As the weather grew warmer, the garden behind the garage came alive. It was full of flowers of every kind and color, but especially roses, which my grandma loves most. Some of them are much older than I am—they were planted by Ingrid’s mother. She is a good gardener and spends almost every day in her garden. Nearly every week, there are new flowers blooming somewhere. Among the flower beds there are herbs for cooking and a little grassy lawn to just lie upon and watch clouds drifting across a blue sky.
As spring warmed toward summer and I worked with the garage door open, I became entertainment for the neighbors. Little Emilia, who lived next door, was at first afraid of me and my electric sander because it is so loud, but when I switched it off, she was too curious to stay outside any longer. Sitting in the half-finished frame and using a little broom as a paddle, she laughed so loud that her older brothers came over to see what all the fun was about.
My grandma also did her part spreading the rumors about the girl building a boat in a garage, giving tours of the shop and showing the kayak to everybody who came to visit, but only after I went home for the day, because she knew I did not want the attention while I was working. She even showed it to a handyman who had come to the house to repair a broken window blind. After he saw the kayak and admired the work I’d done he said, “And this was really built by a woman?” Grandma was still very angry about that comment when she told me about it the next day.
When the deck part of the frame was finished, I put it to a test by resting it on the work stands and sitting on the deckbeam just aft of the cockpit, the one that will later be the backrest while paddling. I was amazed by how sturdy the structure was already—it did not bend or flex when I set my full weight on it.
The nine straight deckbeams and the two arched deckbeams forward of the cockpit were attached with pegs angled through the gunwales; the ends of the gunwales were joined with trunnels and lashings. As someone who has never worked with wood before, I was amazed how strong and stable the delicate-looking framework was at this point, even if it was just the deck and the whole hull was still missing. Resting on two work stands, it could support my full weight without any significant flex.
The hull consists of ribs made from ash and steam-bent to achieve the shape of the hull. Before bending, the ribs needed to soak in water for a while. After a lot of looking around, the only fitting container I found was the old bathtub in the cellar, dating back from when the house was still divided into two separate flats and my great-granddad had his bathroom in the cellar.
Steaming and making the bends was the step I was most afraid of and thought was most likely to go wrong. Just in case, I ordered more wood than necessary to have some backup. I made the steambox out of Styrofoam and attached a steam generator meant for removing wallpaper. When it was fired up, the workshop smelled and felt like a sauna: hot, wet, and fragrant from the heated wood.
Looking from the foredeck area toward the stern, I checked the ribs for symmetry. The deckbeam in the foreground is the one that will serve as the foot brace.
Steaming the ribs for the first time was a stressful task. The ribs are in danger of breaking, and I could scald my fingers. This was not the time for me to answer questions or have someone getting in the way. Oma—always interested in what I was doing and eager to hear that the next steps of the construction would be—stood between the kayak and my steambox, asking way too many questions while I was intensely focused on bending the wood. As I was doing it for the first time, I was not sure how important it was to stick to the steaming time exactly, and I did not want to take any chances. As soon as the wood is out of the steambox, it starts to cool and dry and becomes inflexible, so it needs to be bent without delay. This was the only time I ever had to throw Oma out of her own garage. I could tell she was a bit offended, so I explained the problem to her later and showed her all the parts I’d bent. That reconciled the two of us (well, mostly). I had to eat an excessive amount of ice cream afterward to finish making amends. After the ribs were all in their mortises in the gunwales and secured with lashings to keep them in place, I lashed the chines and keelson to them. I was amazed by the simplicity and the ingenuity of traditional Inuit boat building: pieces hand-hewn from driftwood, all held together with pegs and lashings. A few simple hand tools and materials gathered from the land produced seaworthy boats with such beautiful lines.
There wasn’t enough space in the garage to work on the stems, so I put the kayak frame out on the driveway and set it on cardboard boxes. I clamped each rough-cut stem to the gunwales several times to check its shape, and then did some adjustments until I liked the lines. Ingrid often came outside to see what I was doing and, with the boat sitting outside the front door, she could perch comfortably on her steps and watch my progress.
The last parts of the hull to make were stems, which I cut out of the pine boards Thomas gave me. They were lashed to the gunwales and attached to the keel by pegs. The ends of the chines were beveled and then pinched to the stems by a lashing that allows them to give a bit to dissipate impacts and accommodate the flexing of the kayak in rough water.
When all of the ribs were in place, the hull started to show its shape, so I brought it outside to try it on for size.
I made some minor changes to the stem shapes described in the book, just to fit my personal taste and the kind of kayak I wanted to build. I worried a bit about changing the paddling characteristics, as I knew there are many complex connections between shape of the kayak and its speed, maneuverability, and seaworthiness. A rolling kayak should have a minimal volume—the lower it sits in the water, the easier it is to roll—and I did not want to compromise the paddling and rolling properties too much, so I made only small changes.
The deckbeam that I’d brace my legs against is called the masik in Greenlandic. It had to be high enough to allow me to slip in and out of the cockpit and low enough to provide for a solid connection to the kayak.
When I sat in the kayak to test the fit of the cardboard masik template, I would have preferred to sit in the garden with the boat, but on that day it was raining. I read a book to keep myself entertained while I made sure that I could sit in the kayak for a while without my legs hurting or going numb. I had left the garage door open and, when I heard people walking by, I turned around and was often met by curious stares.
To find out a perfect shape for my masik, I cut out a cardboard test pattern and clamped it to the gunwales to see if I could get in and out of the boat and sit in it comfortably as well. To test the long-term comfort, I sat in my boat, on the floor of the garage, and read a book for an hour. This attracted even more long stares from the people walking their dogs or on their way to the bus stop. Many of them I did not know—they probably lived a few streets away—and they passed without stopping, so I didn’t get to explain why I was sitting in my kayak with a book.
When I was fitting the masik, the aft deck ridges were already in place behind it. Here, the arched deckbeam forward of the masik is not yet in place. This will give the forward deck ridges a nice curve from the straight footrest deckbeam to the masik.
After adjusting the cardboard masik until I was happy with it, I traced its outline on a 2″-thick ash board and cut it out with a sabersaw. After I pegged it in place around the top inside corners of the gunwales, I attached the deck ridges just forward of the masik as well as the pair aft of the cockpit. The frame was finished. The weather was very nice and I gave my boat a little photo shoot in the garden before covering it with its skin, concealing the elegant structure for the next ten to twenty years.
There were so many flowers and shrubs in my grandma’s garden that there wasn’t room to photograph the finished frame without damaging the plants or having them in the way. Her neighbors are not as keen on flowers as she is, so I used their garden as a photo-shoot setting with more space.
With the frame finished, I decided it was time to give the kayak a name. I wanted a Greenlandic name, with a meaning that matches the boat. After some research and a lot of reading through various online dictionaries I finally settled for alleq, the Greenlandic word for the long-tailed duck—Clangula hyemalis—a species common in the Arctic and famous for being very vocal. That made it a good match for me—as a child I was often scolded for talking too much.
After steam-bending the cockpit coaming around its form, I set it out to cool and dry overnight. On the next day, the hoop held its shape very well and I would bend the coaming flange over it.
While the frame was complete, there was only one more wooden part to make, and that was one I was kind of afraid of: the cockpit coaming. It is a wooden steam-bent hoop and it would be attached only to the kayak’s skin. I’d had some splits develop when I was bending the ribs, so I made the stock for the cockpit hoop thinner. That worked quite well. I used thicker stock to make the coaming flange, which would hold the spray skirt. It failed when bending so I ended up making it in two separate pieces, joined with glued scarf joints. The end result had an acceptable shape and was pretty strong.
I gave the frame and the coaming three coats of boat oil, a mixture of boiled linseed oil, tung oil, and other natural oils. Its smell was not unpleasant but it carried a few hundred yards down the road, leaving the whole neighborhood smelling like a boatbuilder’s workshop. I often noticed people passing by with their noses up in the air, sniffing to figure out where the smell was coming from.
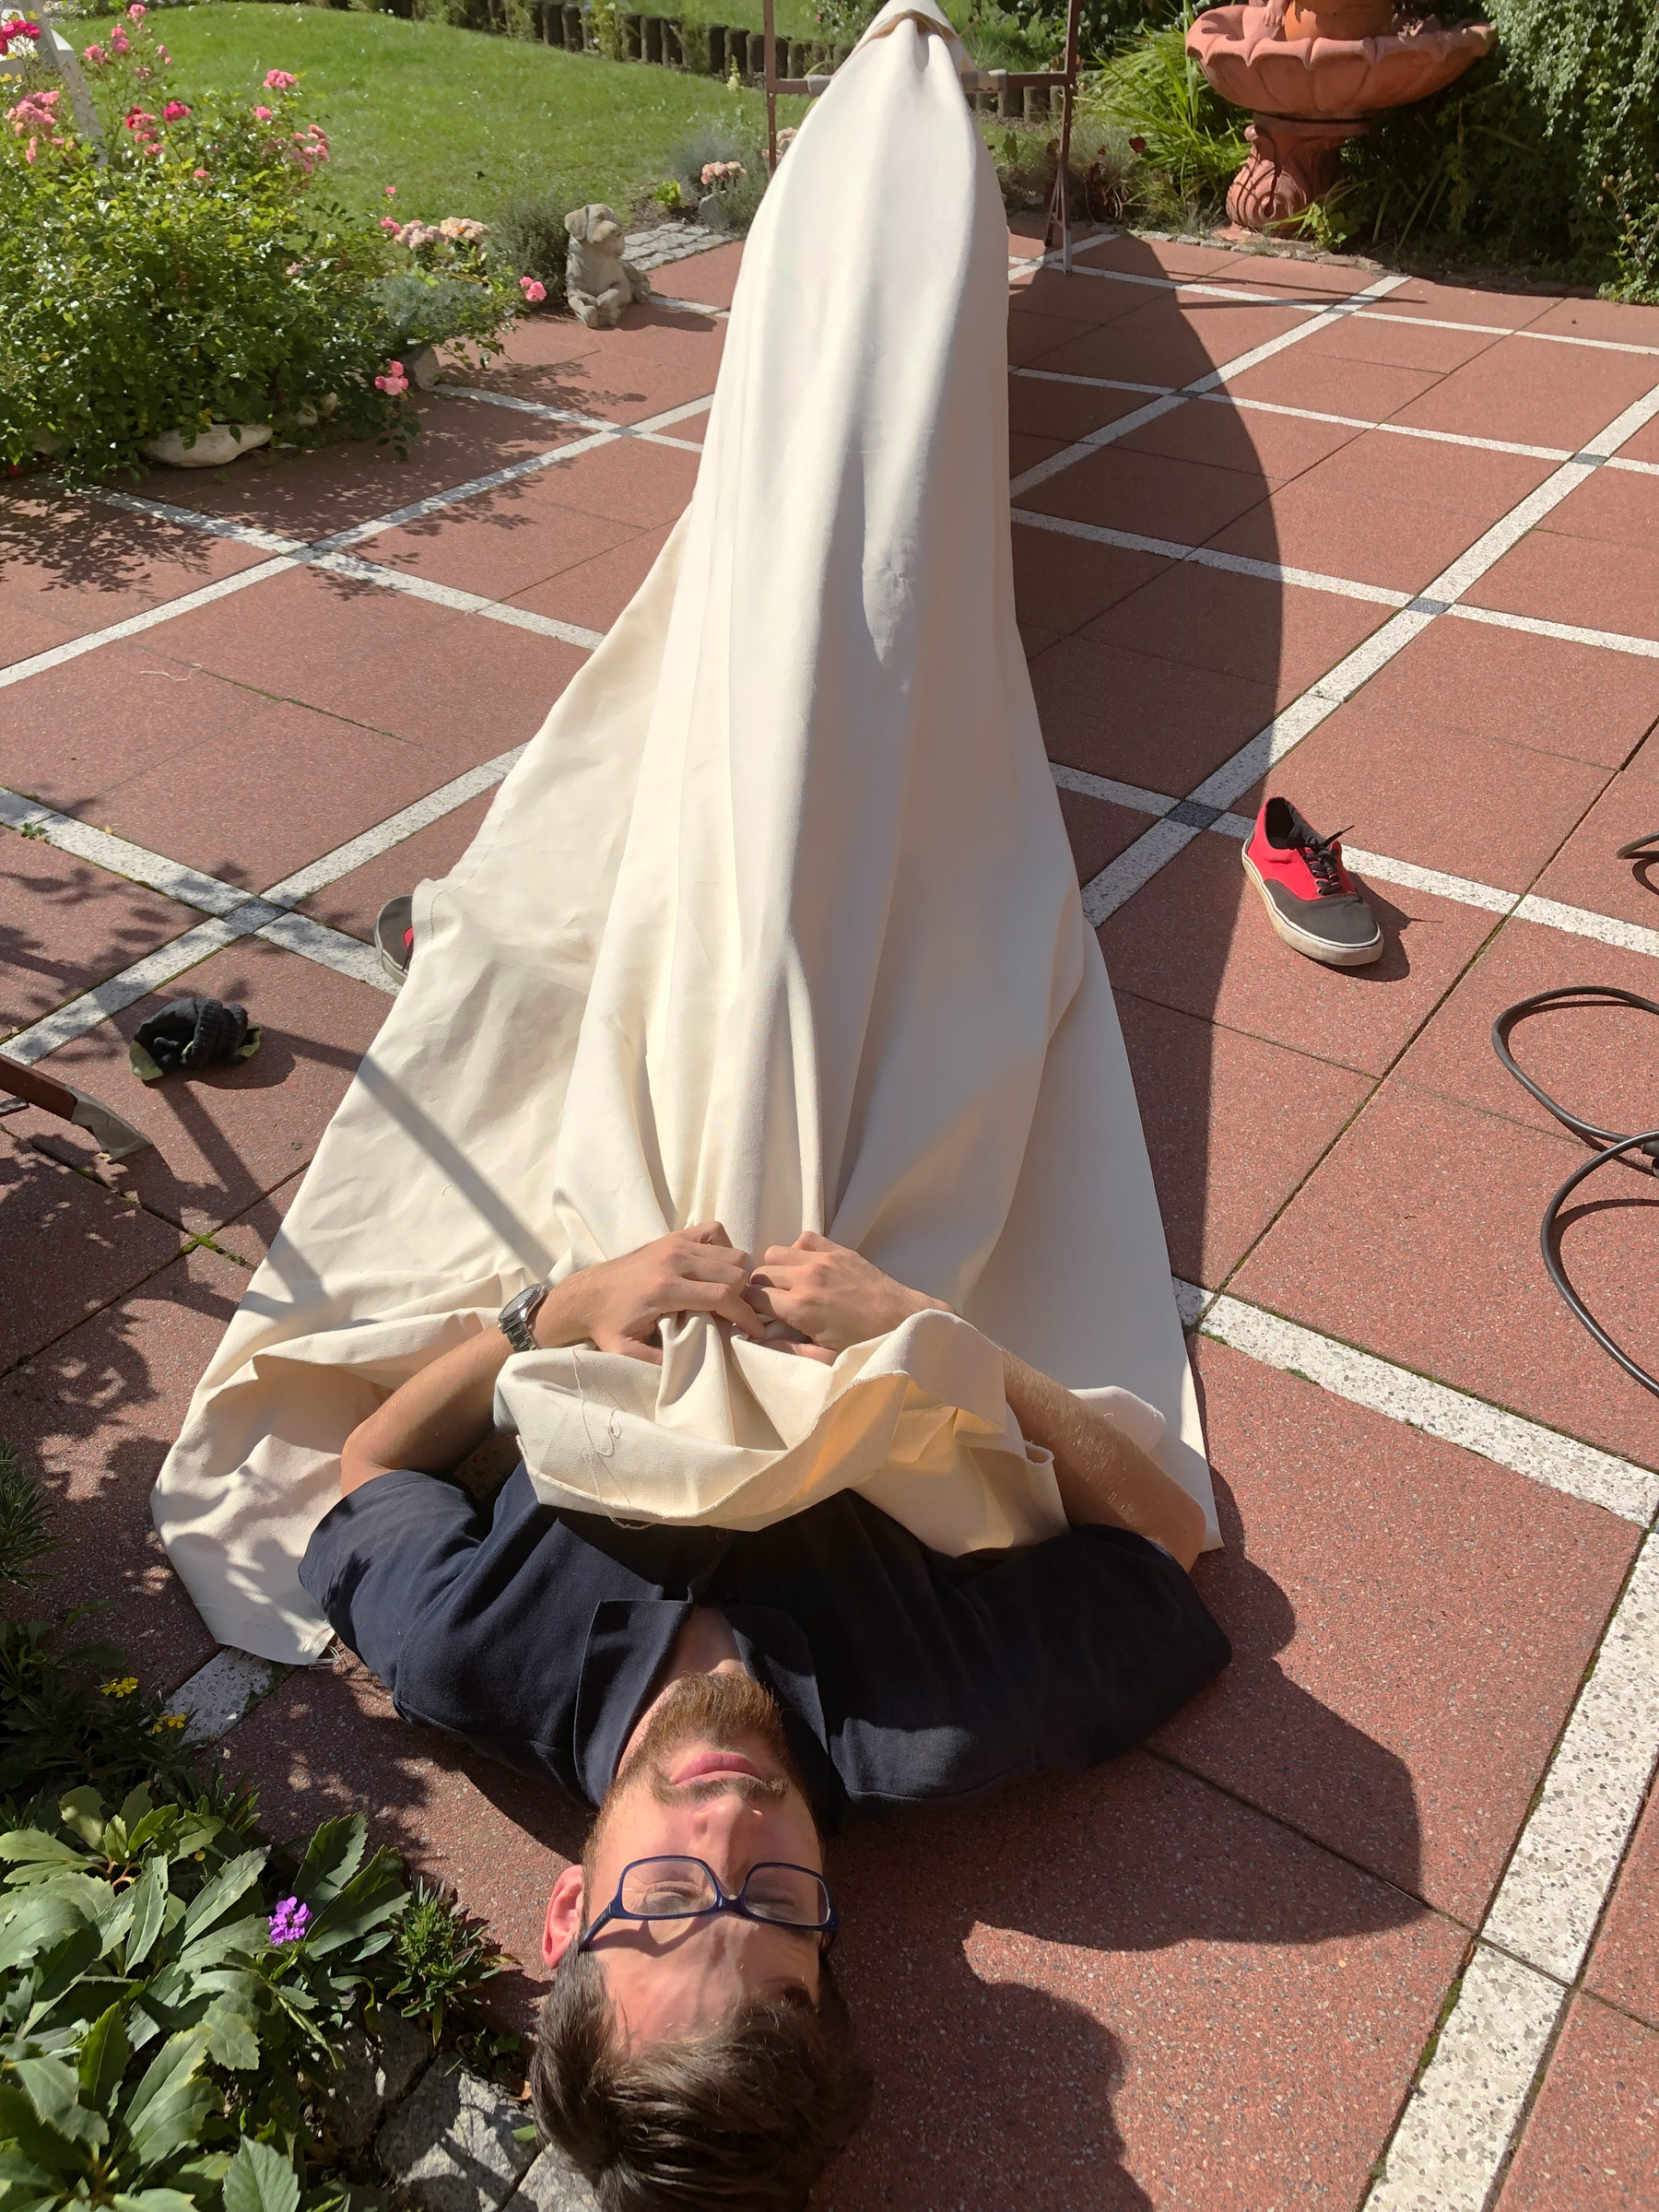
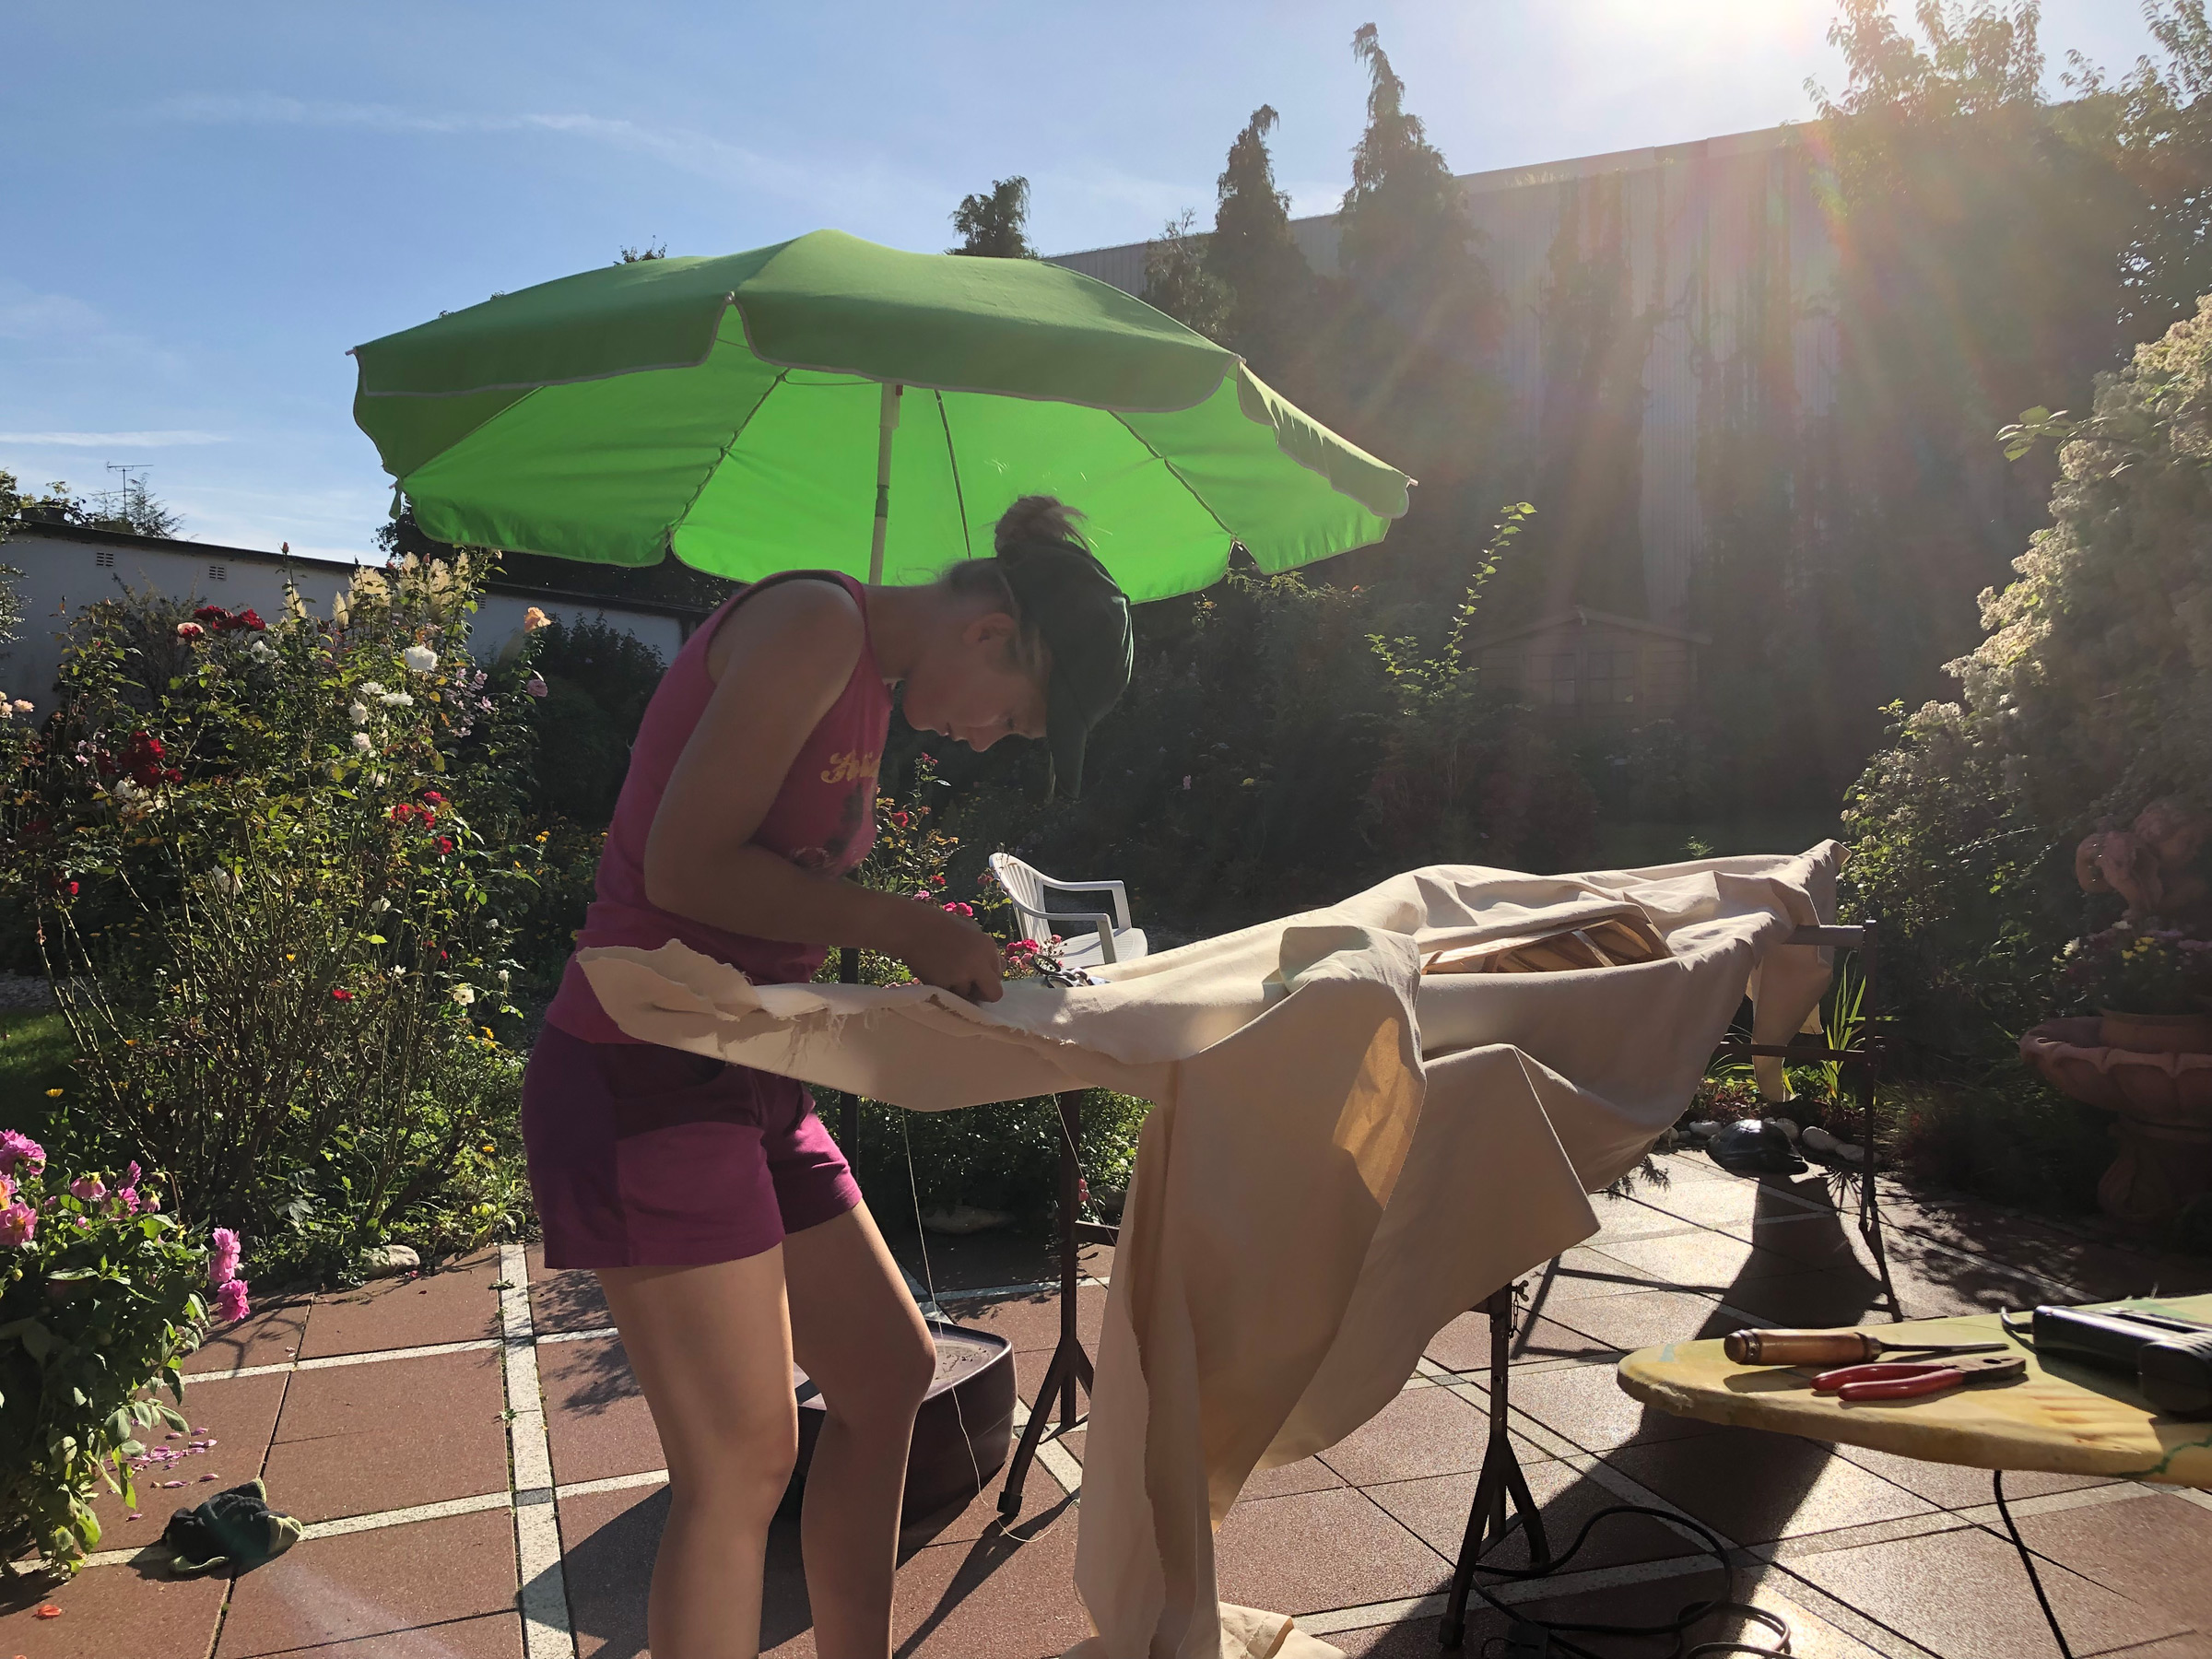
With all woodworking done, it was time to sew the skin on. ALLEQ’s skin is made from cotton duck, which would later be painted with oil-based boat varnish to make it strong and waterproof. To get the skin on without having wrinkles on the finished boat, I waited for a very hot and sunny day, because cotton canvas can’t be fully stretched when it has moisture in its fibers. It takes two working together to get the skin pulled really tight—one to pull the canvas tight and the other to staple it, temporarily, to the gunwales—so, for the first and only time during my build, I asked Martin to help me.
I was so nervous and excited when we arrived to do the work on my grandma’s terrace. I warned her that we wouldn’t be able to stop in the middle of the process, so she brought her armchair and cup of coffee outside and settled in to watch us in silence. In the glaring sun, with the temperature climbing into the 80s, I felt a little sick when Martin and I started to work.
Getting the canvas skin on the frame pulled really tight requires two people and some strange contortions. To pull the longitudinal tension into the skin, Martin laid on his back with the stem on his chest, braced his feet against a deckbeam, and pulled the canvas while I stapled it to the stem. Here, he gathers his strength for the big pull.
Finding a good position to pull the skin tight on the frame of the kayak led to a few funny positions, but Martin is used to crazy jobs from working in Ralf-Peter’s workshop as a student and did not complain. Ingrid stayed in her armchair all day, sometimes smiling or grimacing as she watched us struggle, and wisely kept her thoughts to herself.
We managed to stretch the skin over the hull, holding the tension with a neat row of staples along the sheer, and sewed half the deck by evening. Sewing up the rest and removing the staples took me another two days, but I could easily do that alone. The cockpit coaming was attached to the skin by sewing as well, resting its forward end on the masik, and the aft end steadied by the two aft deck ridges.
Sewing the canvas skin under the hot summer sun was not very pleasant, but Ingrid thoughtfully lent us her little parasol to make the work a bit more tolerable. She also served up lots of ice cream and cold drinks, so it could have been a lot worse.
When all sewing was finished and ALLEQ already looked ready to go, the time-consuming process of coating the skin started. I wanted to do it with the natural oil-based varnish, to avoid any harsh chemicals and having to wear breathing protection while working. This meant having to put on several layers of varnish, each of which needed to dry for at least 12 hours before I could paint the next layer. As the boat always had contact with the stands I placed it on, I could only paint either the hull or the deck each day.
The whole building project had gone on much longer than I had planned: I had started working on my PhD project full-time in June, and the kayak’s progress was slowed down as I was only able to work on it on weekends and some afternoons.
Summer slowly faded into autumn, the days grew shorter, the weather got colder, and I slowly became tired of a routine of work–varnish–eat–repeat. In the end, I went to the garage every day to sand the varnished surface and then brush on another layer not because I enjoyed doing it, but because I wanted to get it over with. Grandma had started to worry about where she could put her garden furniture over the winter if my kayak was not finished—another reason to pull through and get it out of that garage.
The varnishing went on for three weeks and I finally finished it in time for our kayak club’s end-of-season paddle at the beginning of October, roughly five months after starting the project.
After taking the finished kayak to our club’s boathouse, I wanted to take the usual look-what-I-built photo. My friends laughed at me as I posed, but they obliged and took the picture for me.
From the beginning, I was looking forward to bringing ALLEQ to the club without any announcement beforehand, to enjoy the surprise on people’s faces. On the day of the tour, I took the car with the roof rack to my grandma’s house and loaded up the boat with a little help from Martin. Then we drove ALLEQ over to the club slightly early, placed the gleaming amber kayak on the grass in front of the boathouse, and waited. Two more friends arrived who knew what was going on, so there were four of us, standing in the doorway, giggling, and brimming with excitement.
My plan was fulfilled: people stopped, looked a little confused, and started searching around for whoever placed the kayak there. There were lots of questions and even more compliments. Some people did not even realize the boat was self-built and thought it was bought somewhere. I was really happy to answer all questions and…I enjoyed the attention. I had kept quiet about the project all along, to make this moment even more fun and special. Now I enjoyed it as best as I could.
When everybody was ready to go, we finally took ALLEQ down to the river Ruhr. Getting aboard was a little bit tricky as expected, but worked out fine and I stayed upright and dry. Finally paddling my boat, I could not get my huge grin off my face: ALLEQ paddles very nicely, is very maneuverable, and is faster than I had imagined. Unfortunately, Ingrid could not be there on the day, as it would be too far for her to walk from the parking area to the water to see us depart, but I took lots of pictures for her and promised I would find a place where she can watch me paddling ALLEQ without having to walk far.
ALLEQ looks good on the water, very sleek and elegant, and, when I’m aboard, rests perfectly in the water with just enough freeboard. Sitting on the bare wood slats is much more comfortable than I had anticipated. I had planned on putting in a seat cushion later, but that does not seem necessary. I did, however, add a piece of pool noodle around the coaming as a backrest.
When I took ALLEQ to the swimming pool for the first time, I was really happy about the rolling I could do. In this picture, I’m doing a balance brace, a way of floating on your side, halfway between capsized and upright. The paddle, held on an extended arm, provides extra flotation. Properly done, this position can be held with little effort and nearly endlessly (or at least until you get hungry).
The weekend following the launch, I took ALLEQ to a pool session for kayaks, and it again fulfilled my expectations. It rolls better than my sea kayak and its masik gives me a very good connection; I could easily complete some rolls that were difficult before. For the first part of the session I was so busy answering questions that I barely had the time for rolling. Everyone at the pool was surprised by the kayak from the moment it arrived. There was an endless stream of compliments.
Martin and his father both were eager to try the kayak, but it was built to fit me and was too small for them to slide into the cockpit even though they can easily fit and paddle all my other kayaks. Neither of them is that much bigger or heavier than I am, but their feet are at least two sizes bigger, and that is enough to form two bumps in the deck when they try to slip into the cockpit. My parents were not very interested in the kayak, and did not see it launched and paddled, but they happily listened to my report about the event the next day. I am pretty sure that they are secretly proud of my work and that I achieved it all alone, especially my dad, but he would never tell me.
For myself, I am very happy with the outcome of the project I had taken on and seen through. I had feared that there would be visible flaws on the finished boat and that the kayak would not paddle with the modifications I had made to improve its rolling ability. The project was a huge success, and gave me a lot of confidence in my abilities. I am a little worried about being overconfident, but I believe future projects, like making a Greenland paddle for ALLEQ, will work out if I just take the time and try.
Martin got a new job and we were able to move into a new home of our own. It needed some work and, when we began to remodel the kitchen, I was suddenly responsible for all the sawing, because Martin said I was the one with the skills required. He cannot have been entirely wrong, because all of the countertops fit quite well, and our new kitchen is working just fine.
Isabelle Heker lives in Essen in the Ruhr area of western Germany. She is currently working at the University Duisburg-Essen in the laboratory and writing her PhD thesis in microbiology/biochemistry. She was introduced to paddling by Martin about four years ago, and since then accumulated a collection of eight kayaks and two canoes. Paddling soon took up an increasing part of her life, with membership in a club, paddling holidays and tours, and organizing and instructing paddling courses for the university’s sports program. The Greenland-style kayak, ALLEQ, was her first attempt at boatbuilding. She had no previous experience in woodworking, but used to repair fiberglass boats with Martin sometimes when necessary. When she is not paddling or working, she is horseback riding or playing saxophone in a Big Band.
If you have an interesting story to tell about your adventures with a small boat, please email us a brief outline and a few photos.
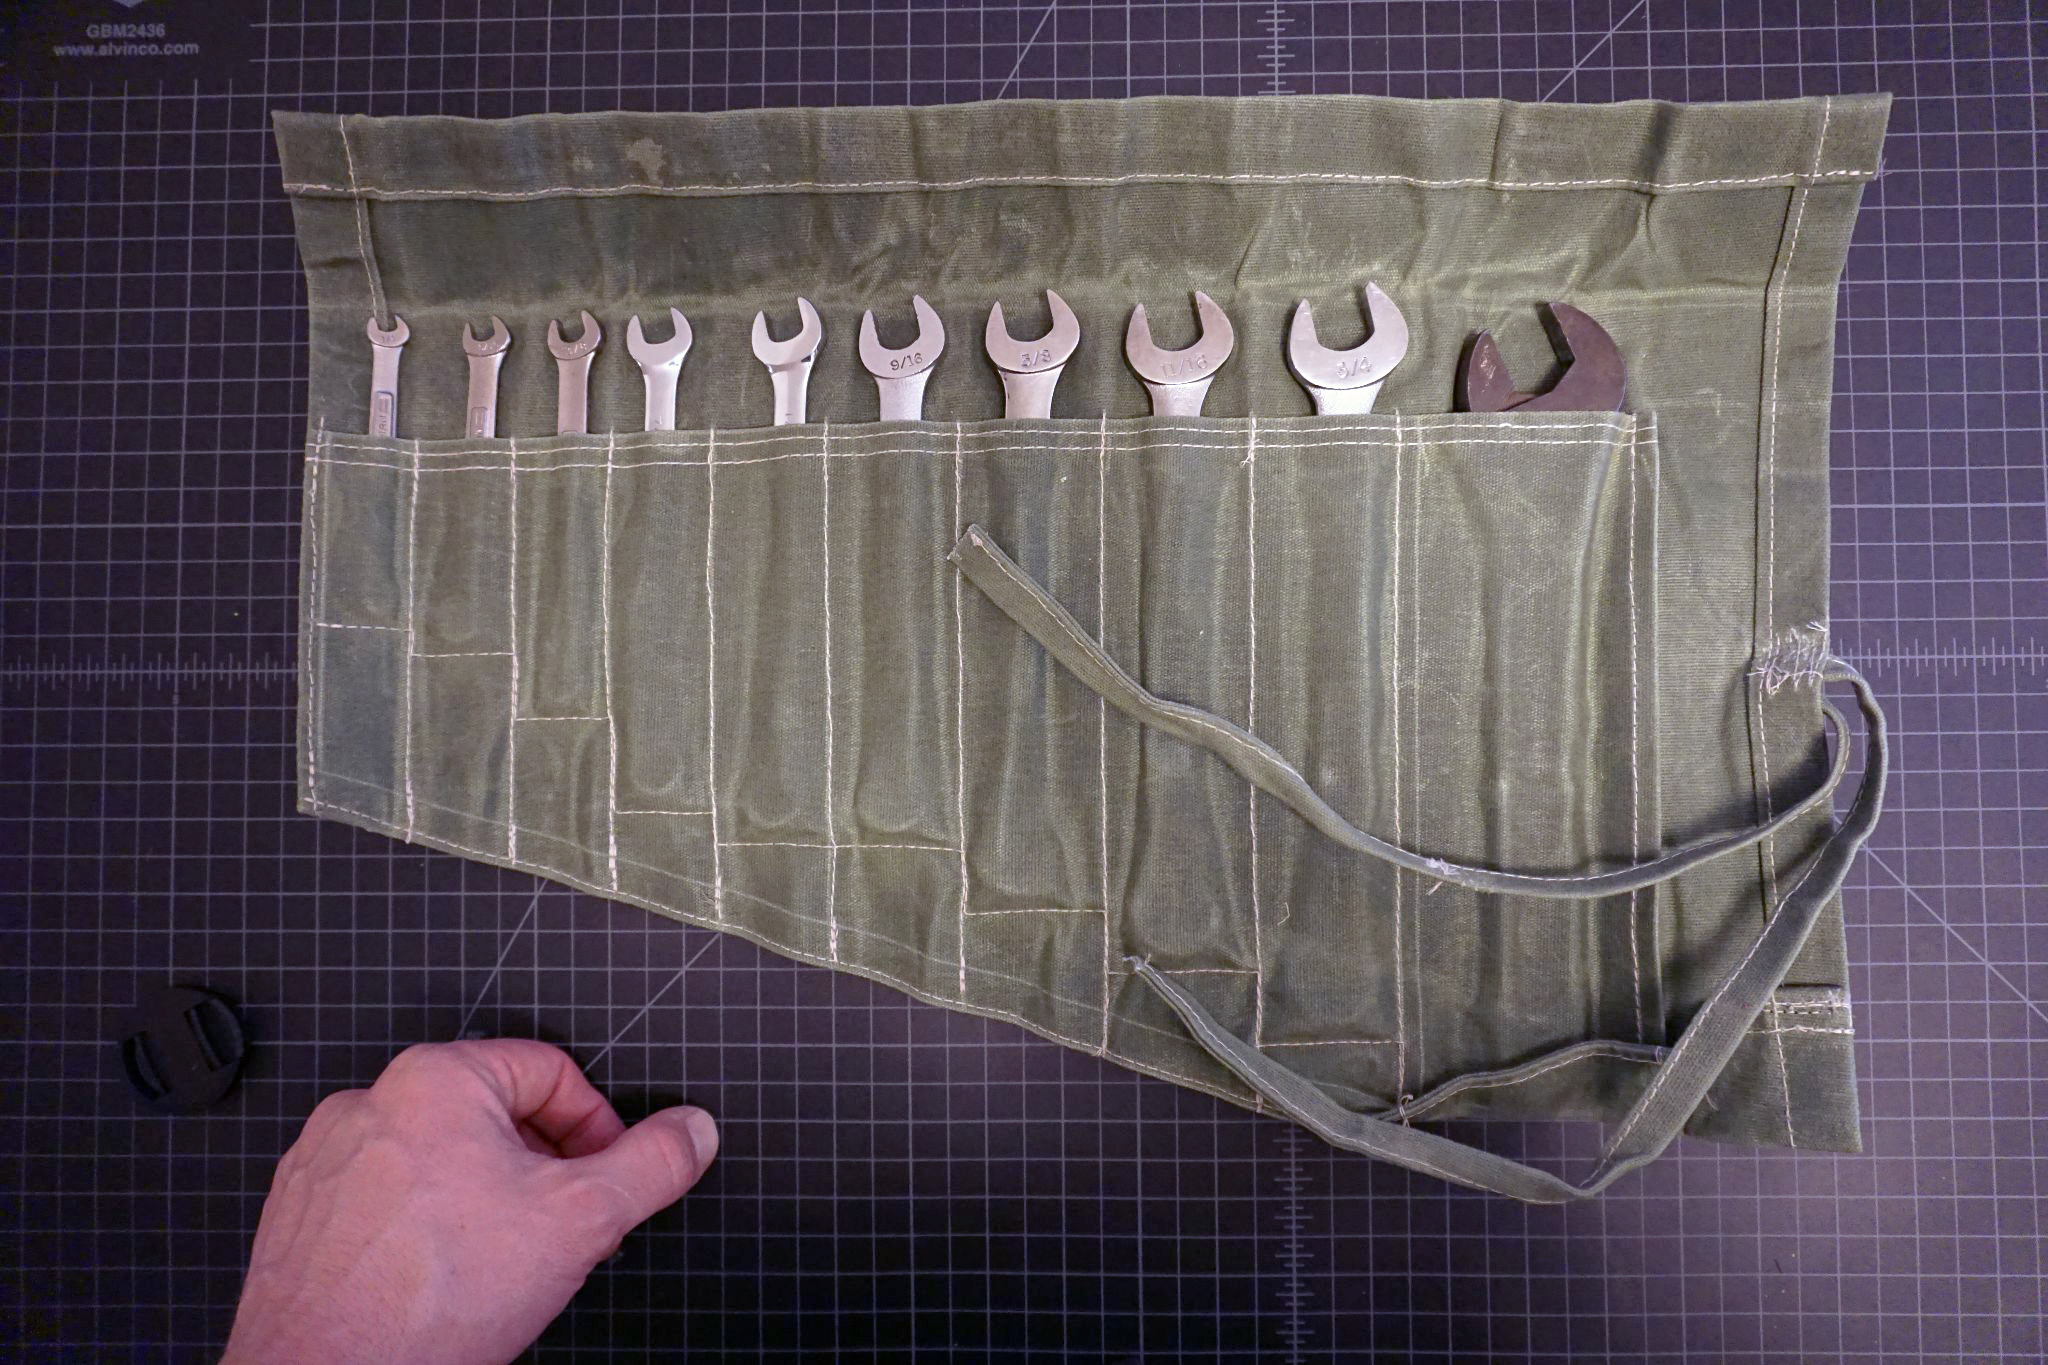
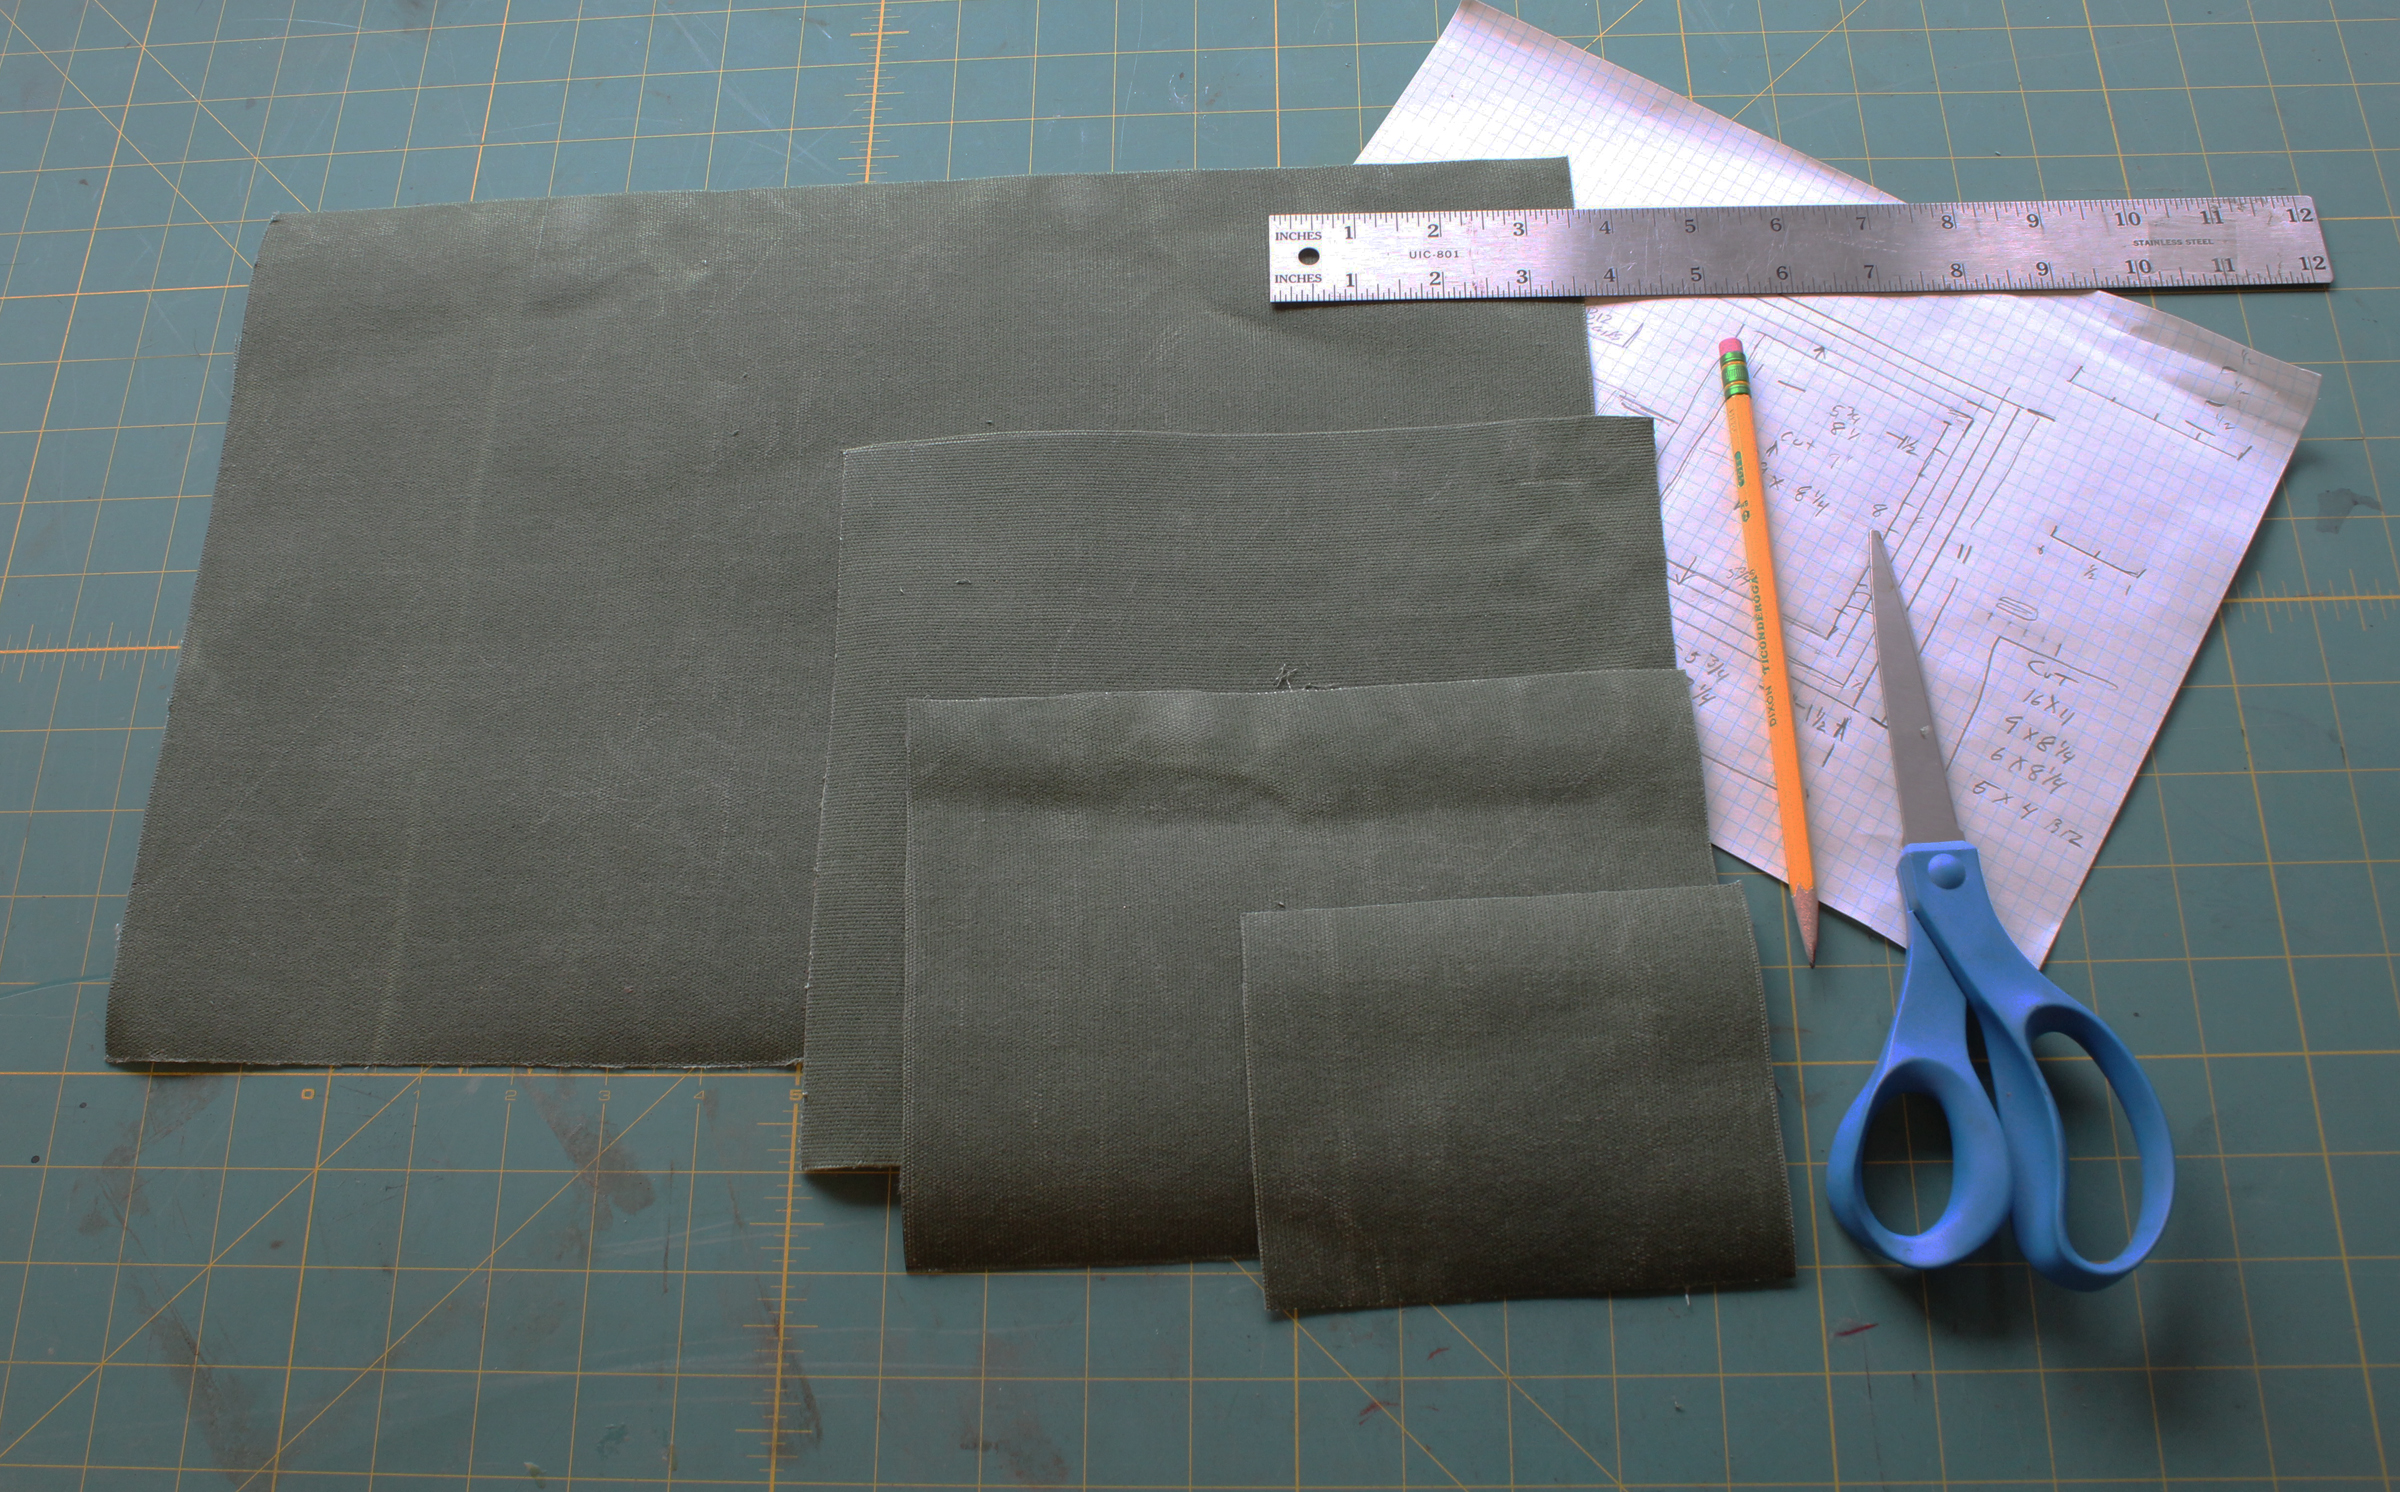
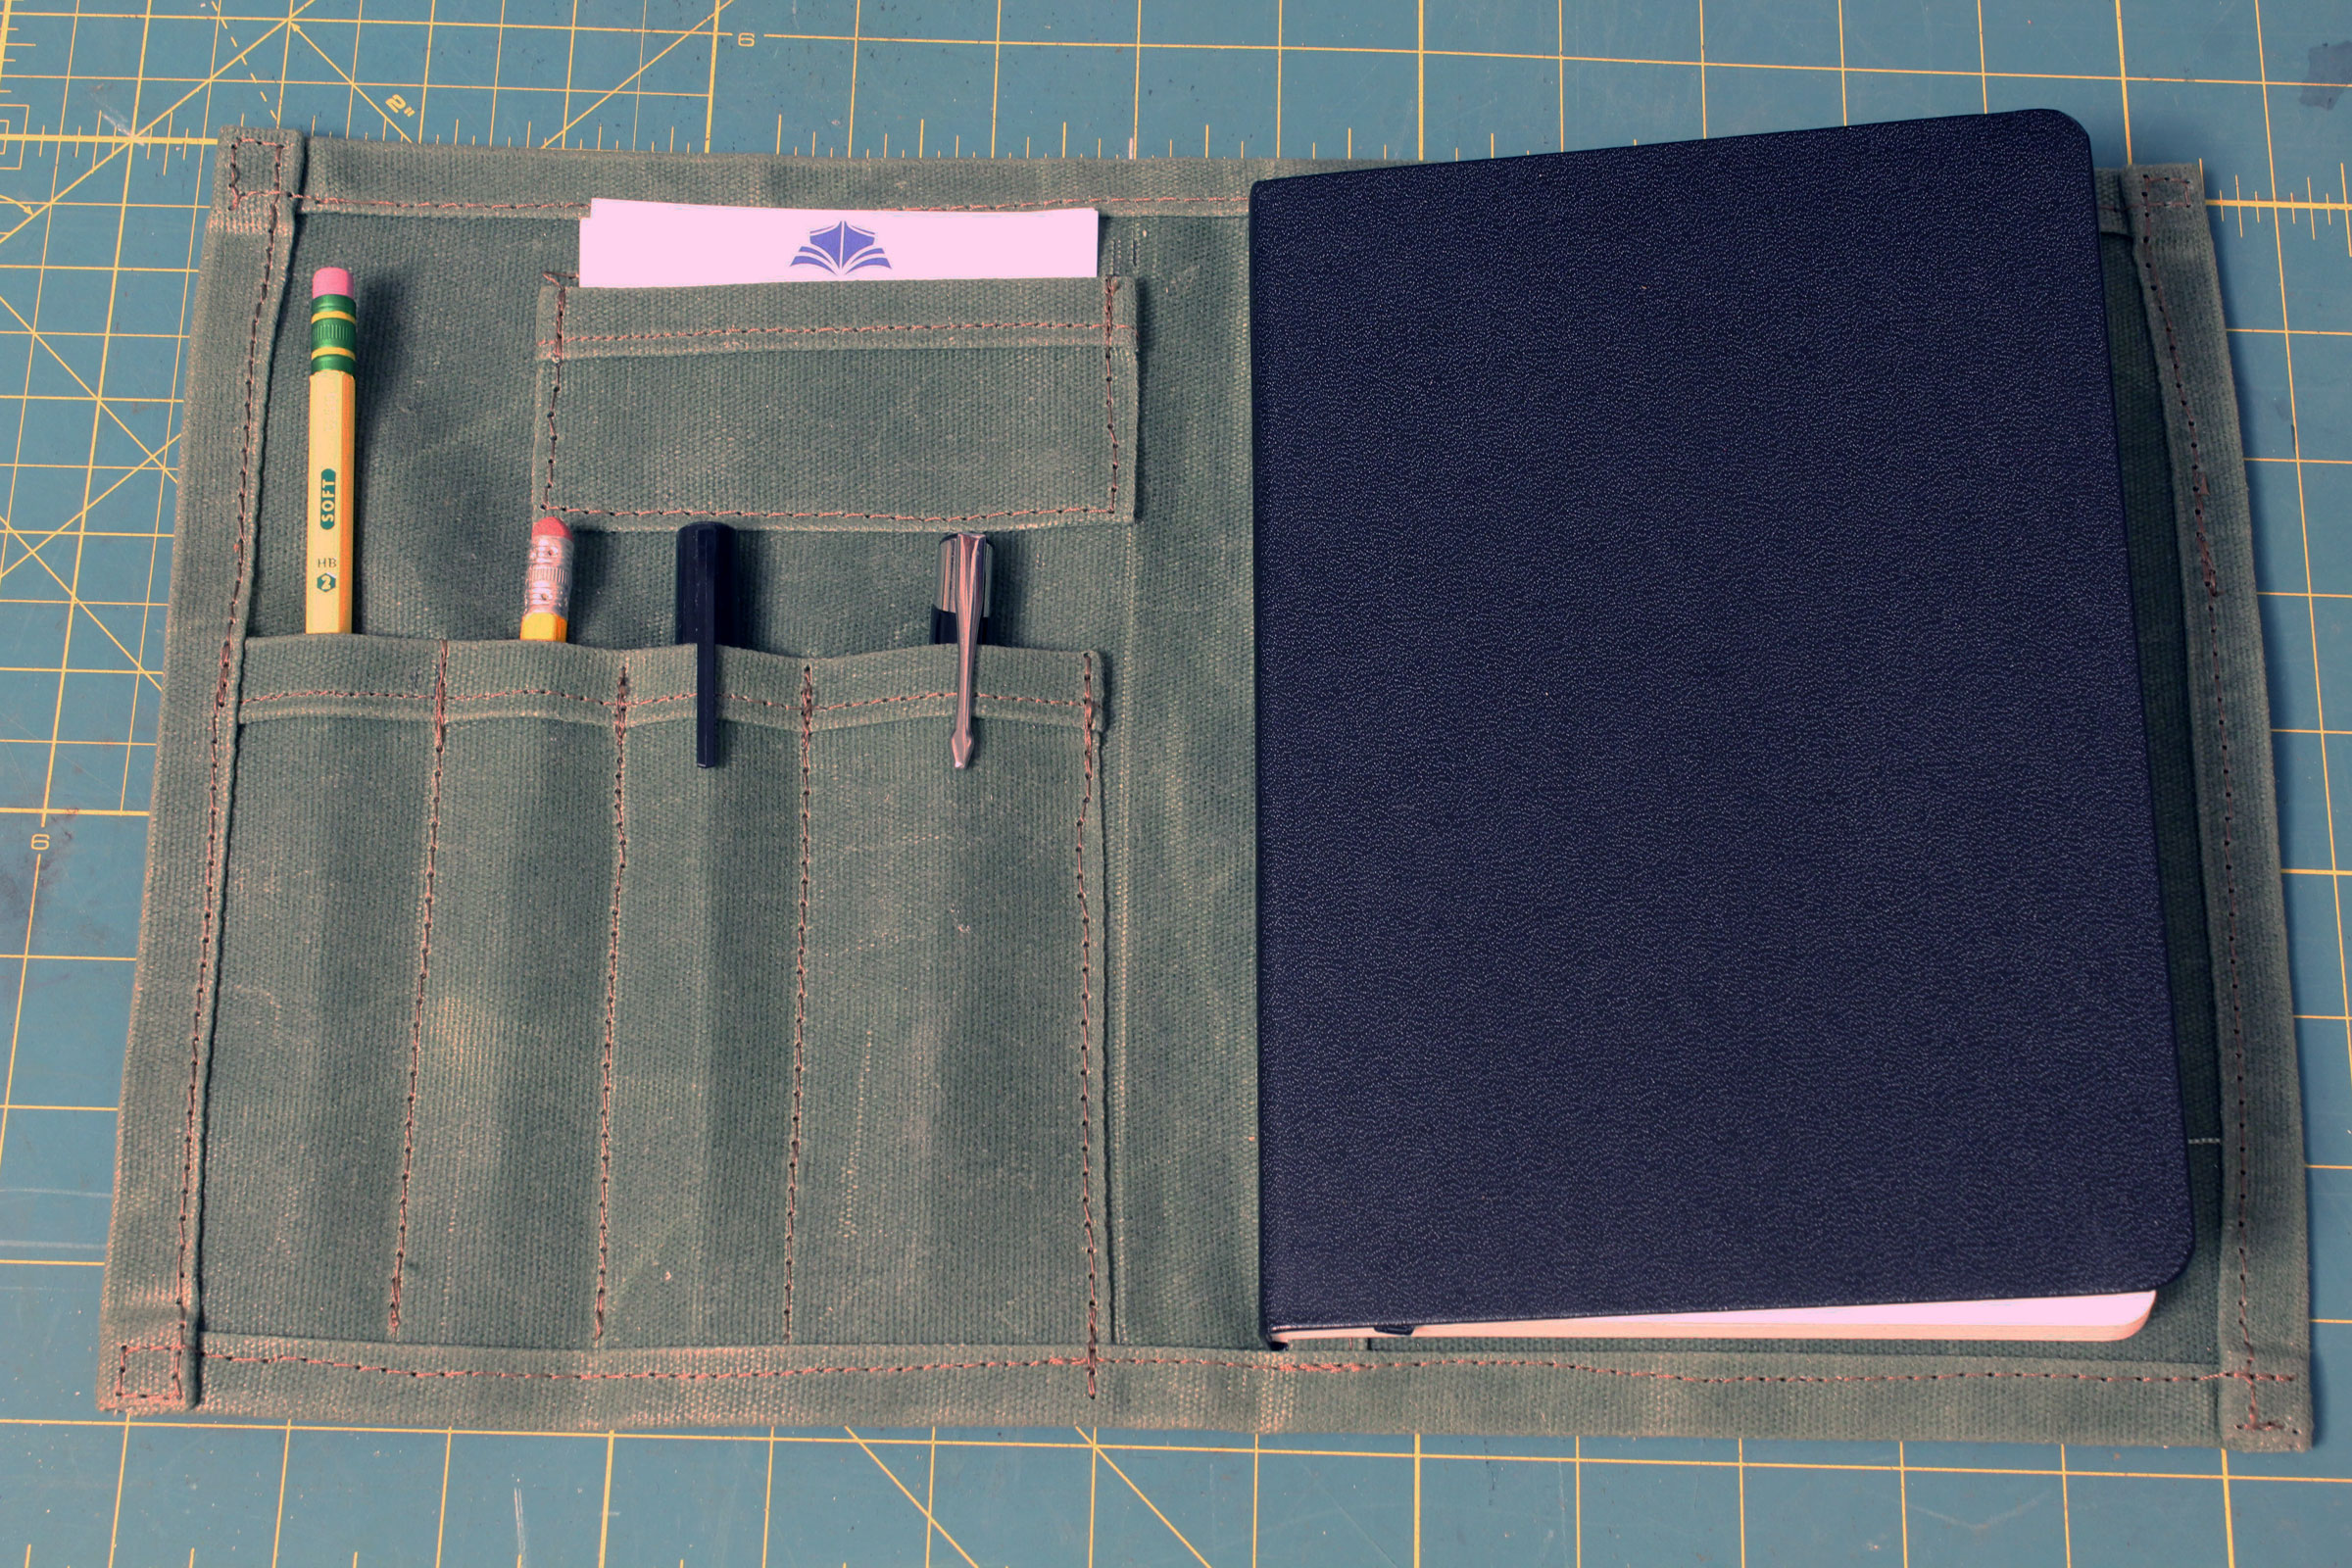
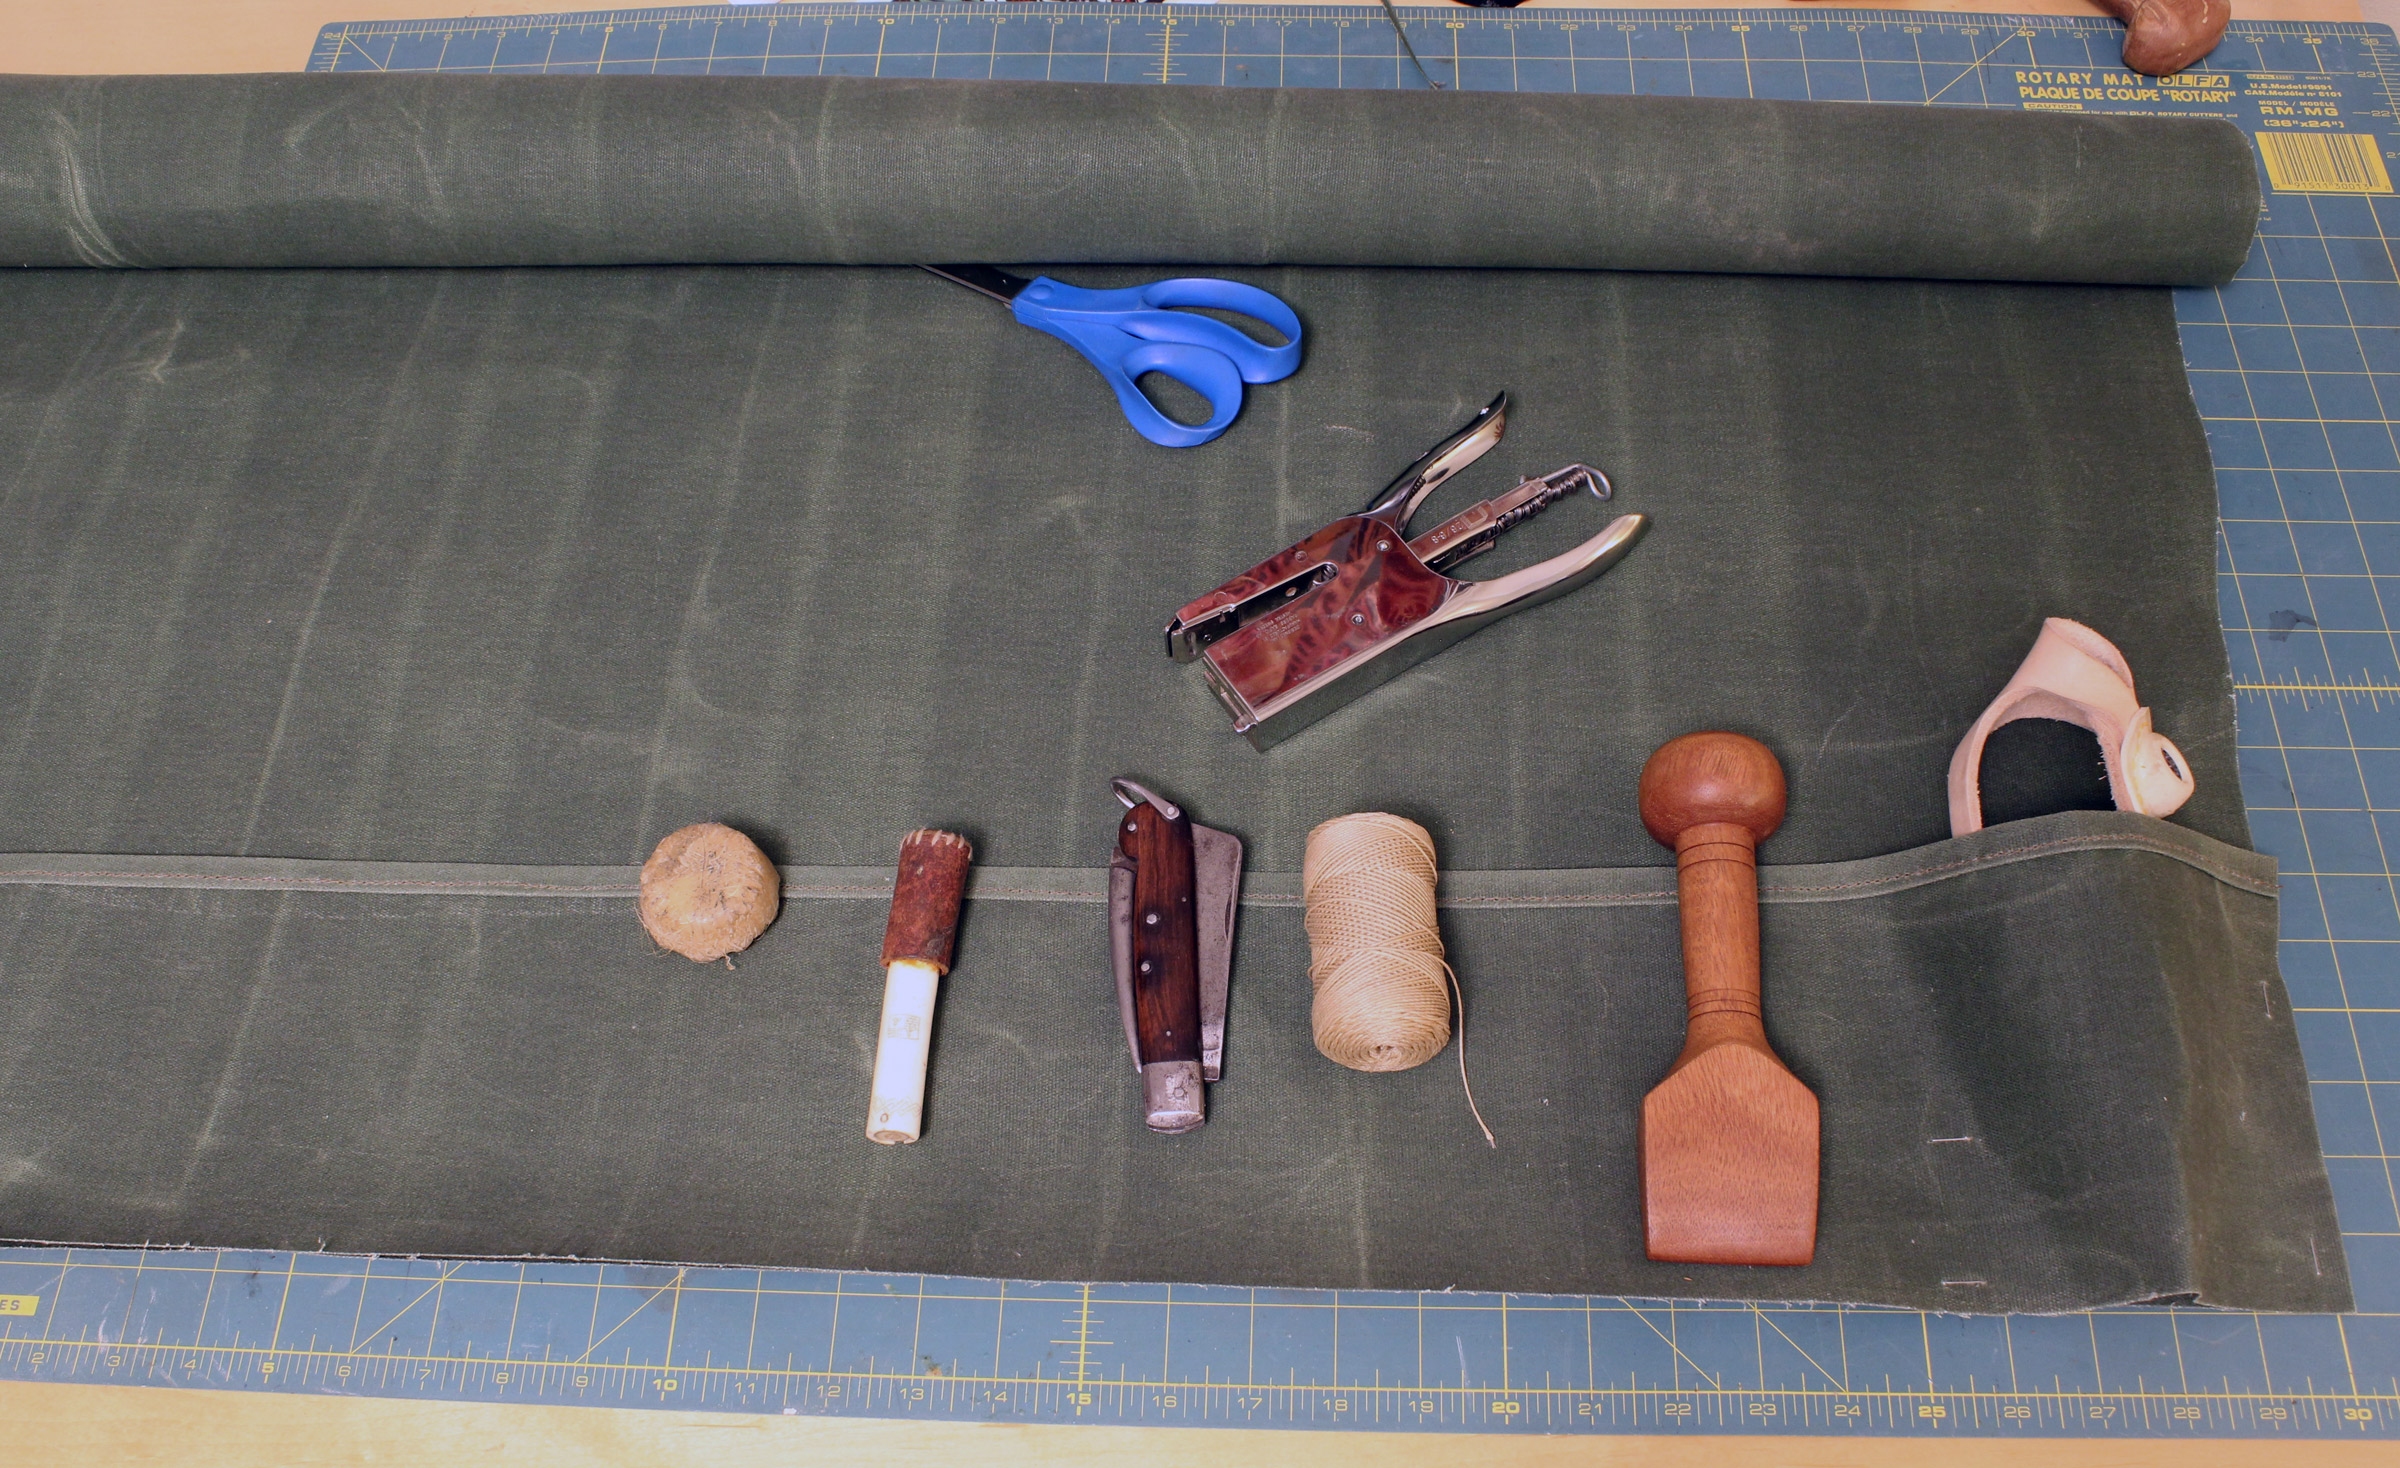
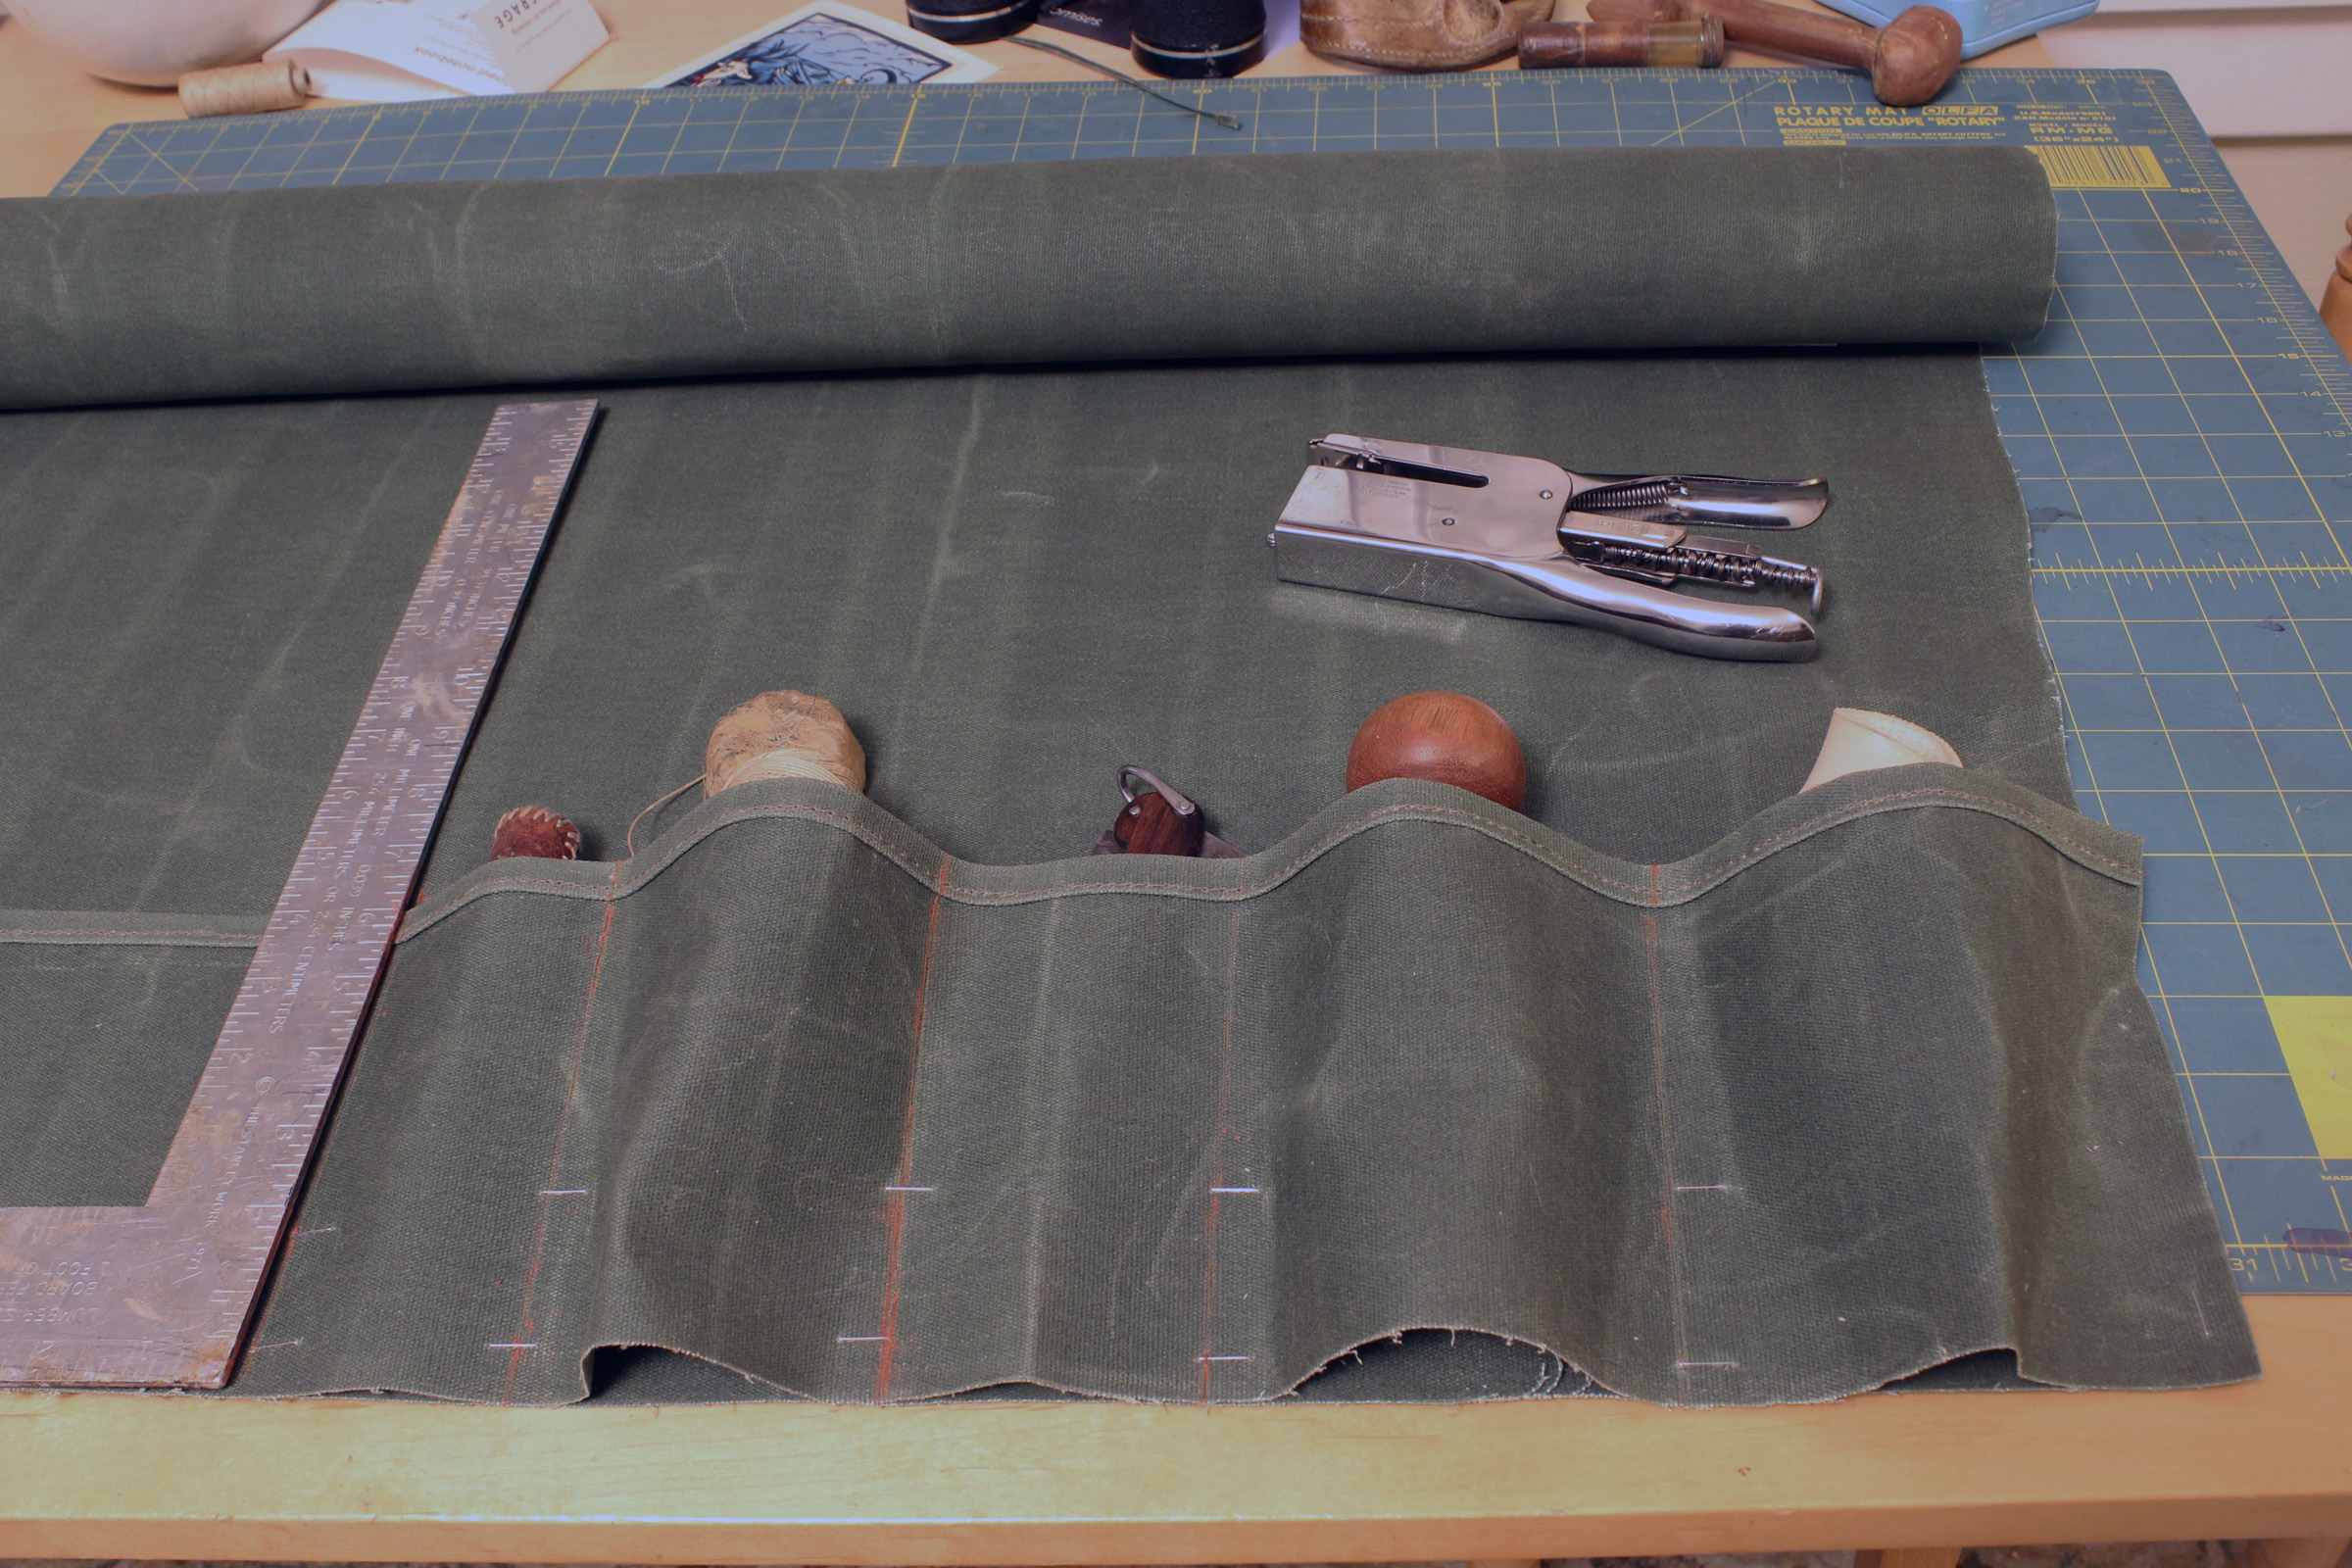
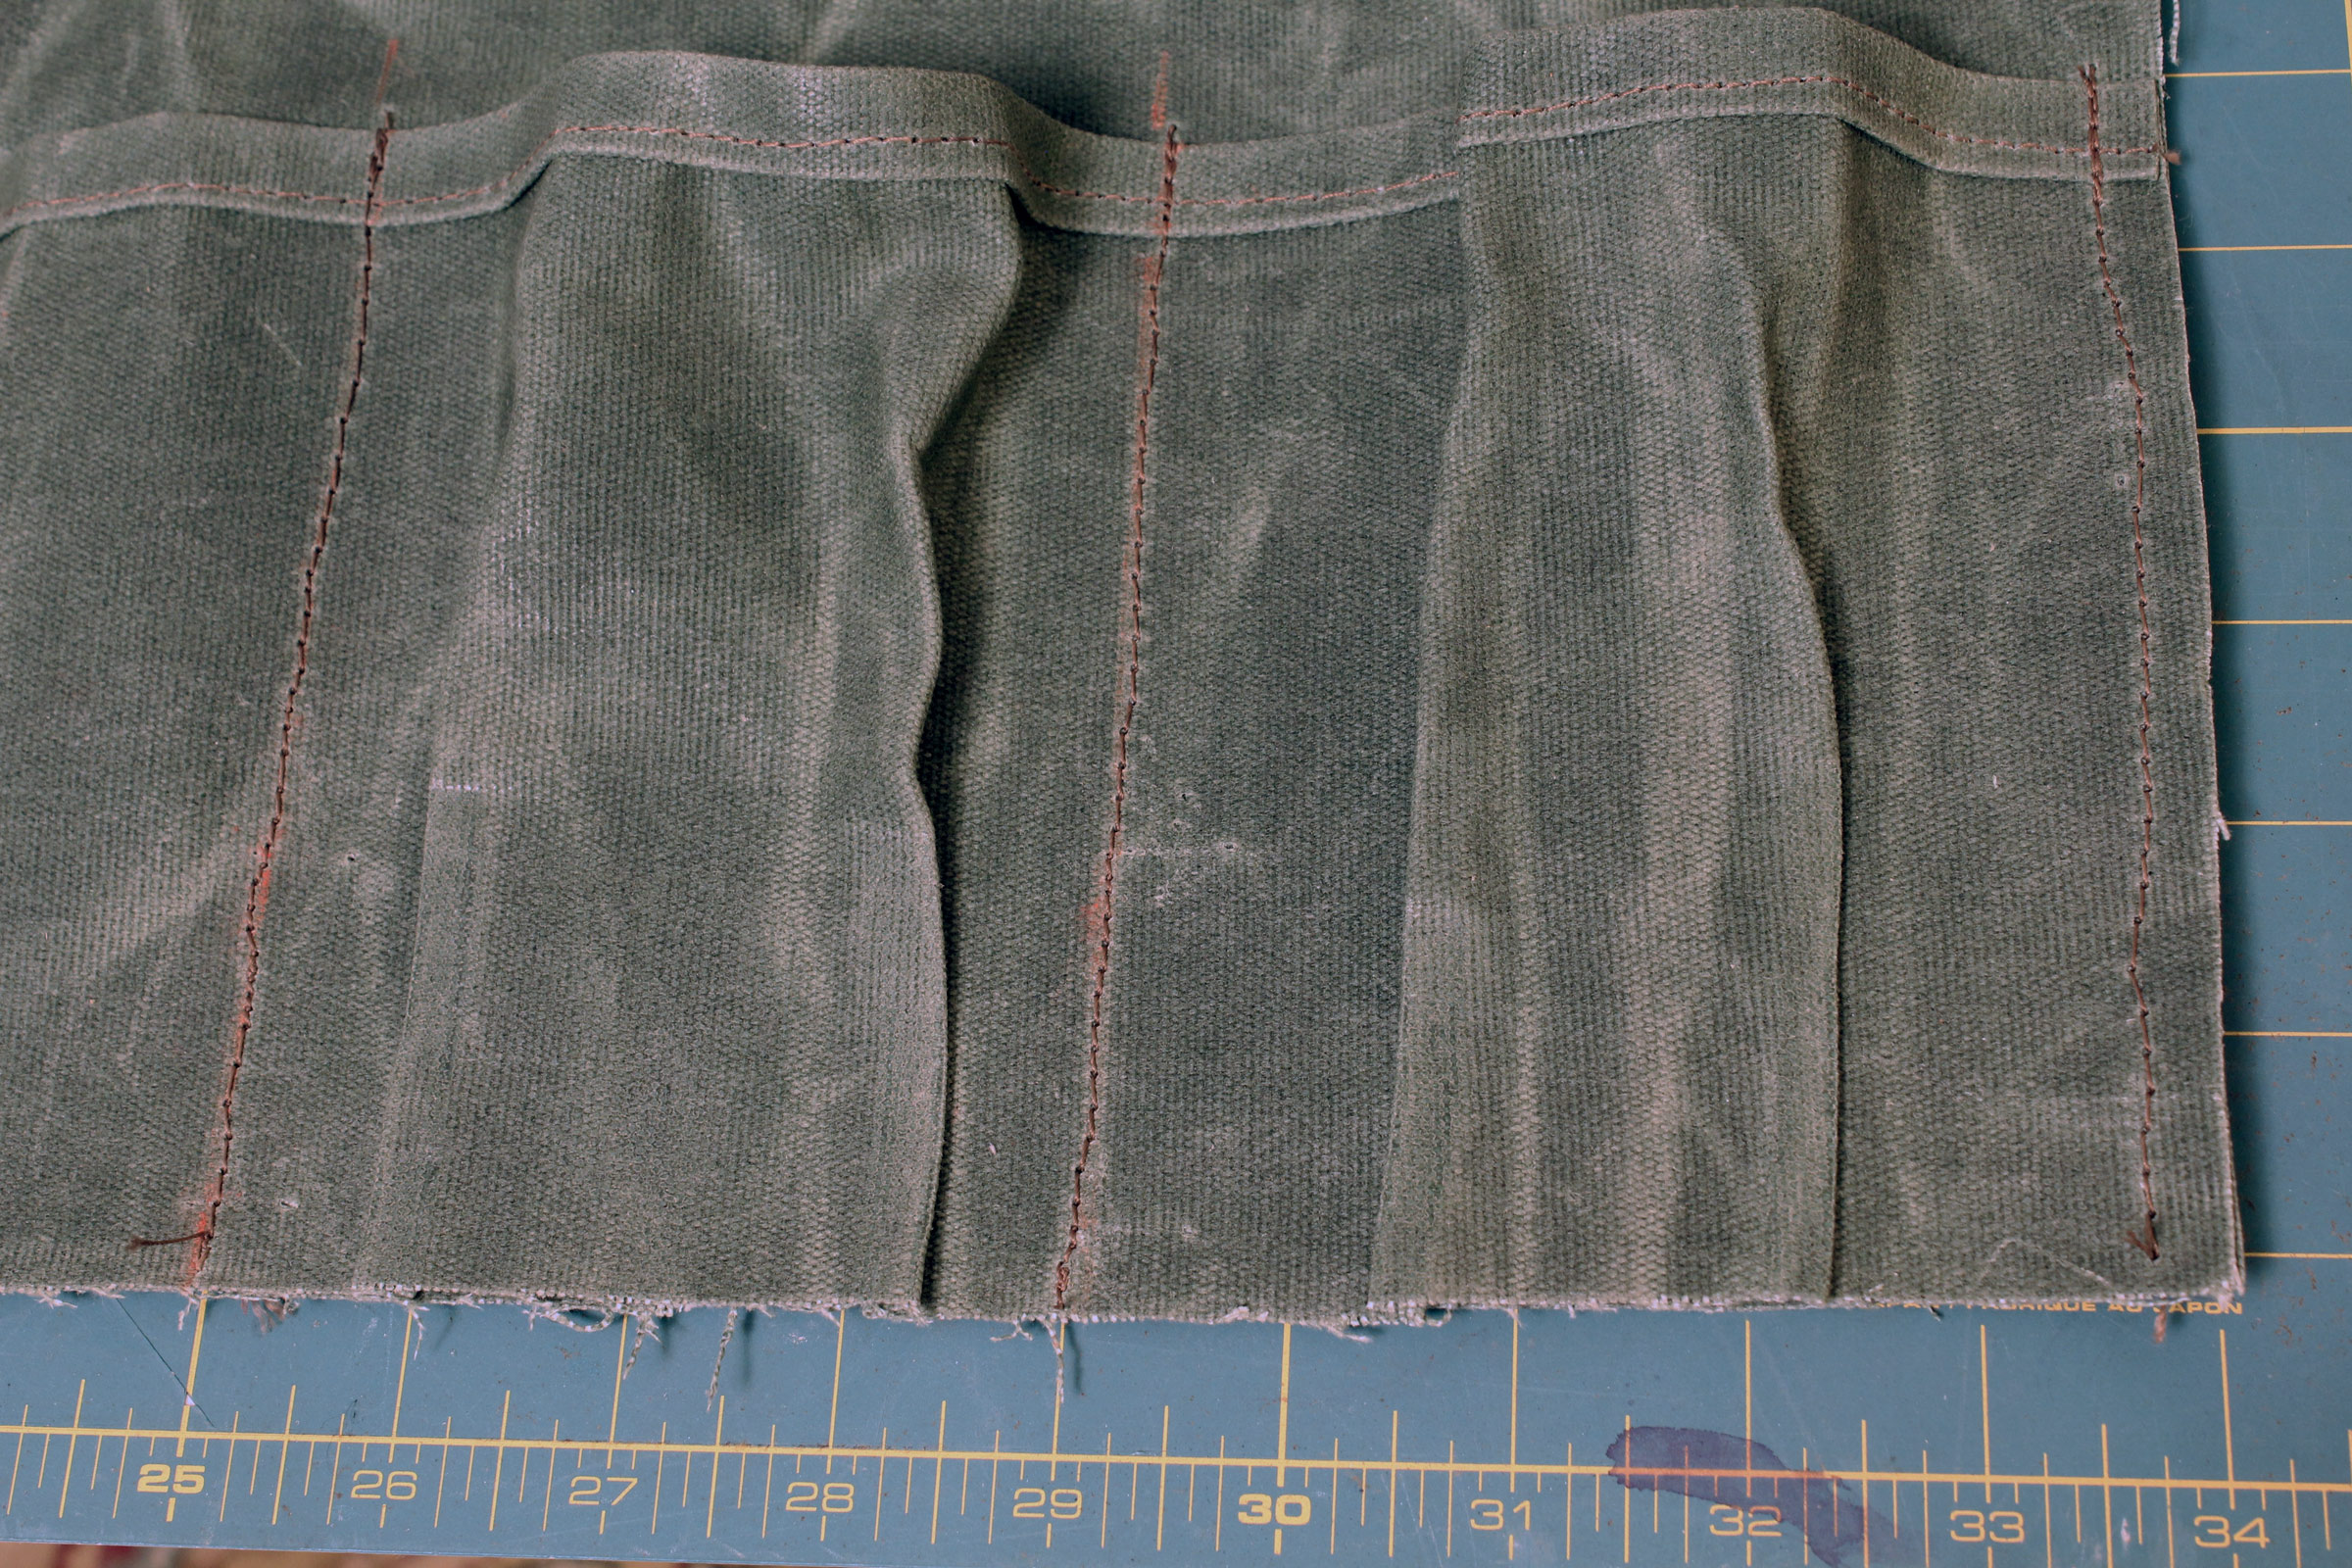
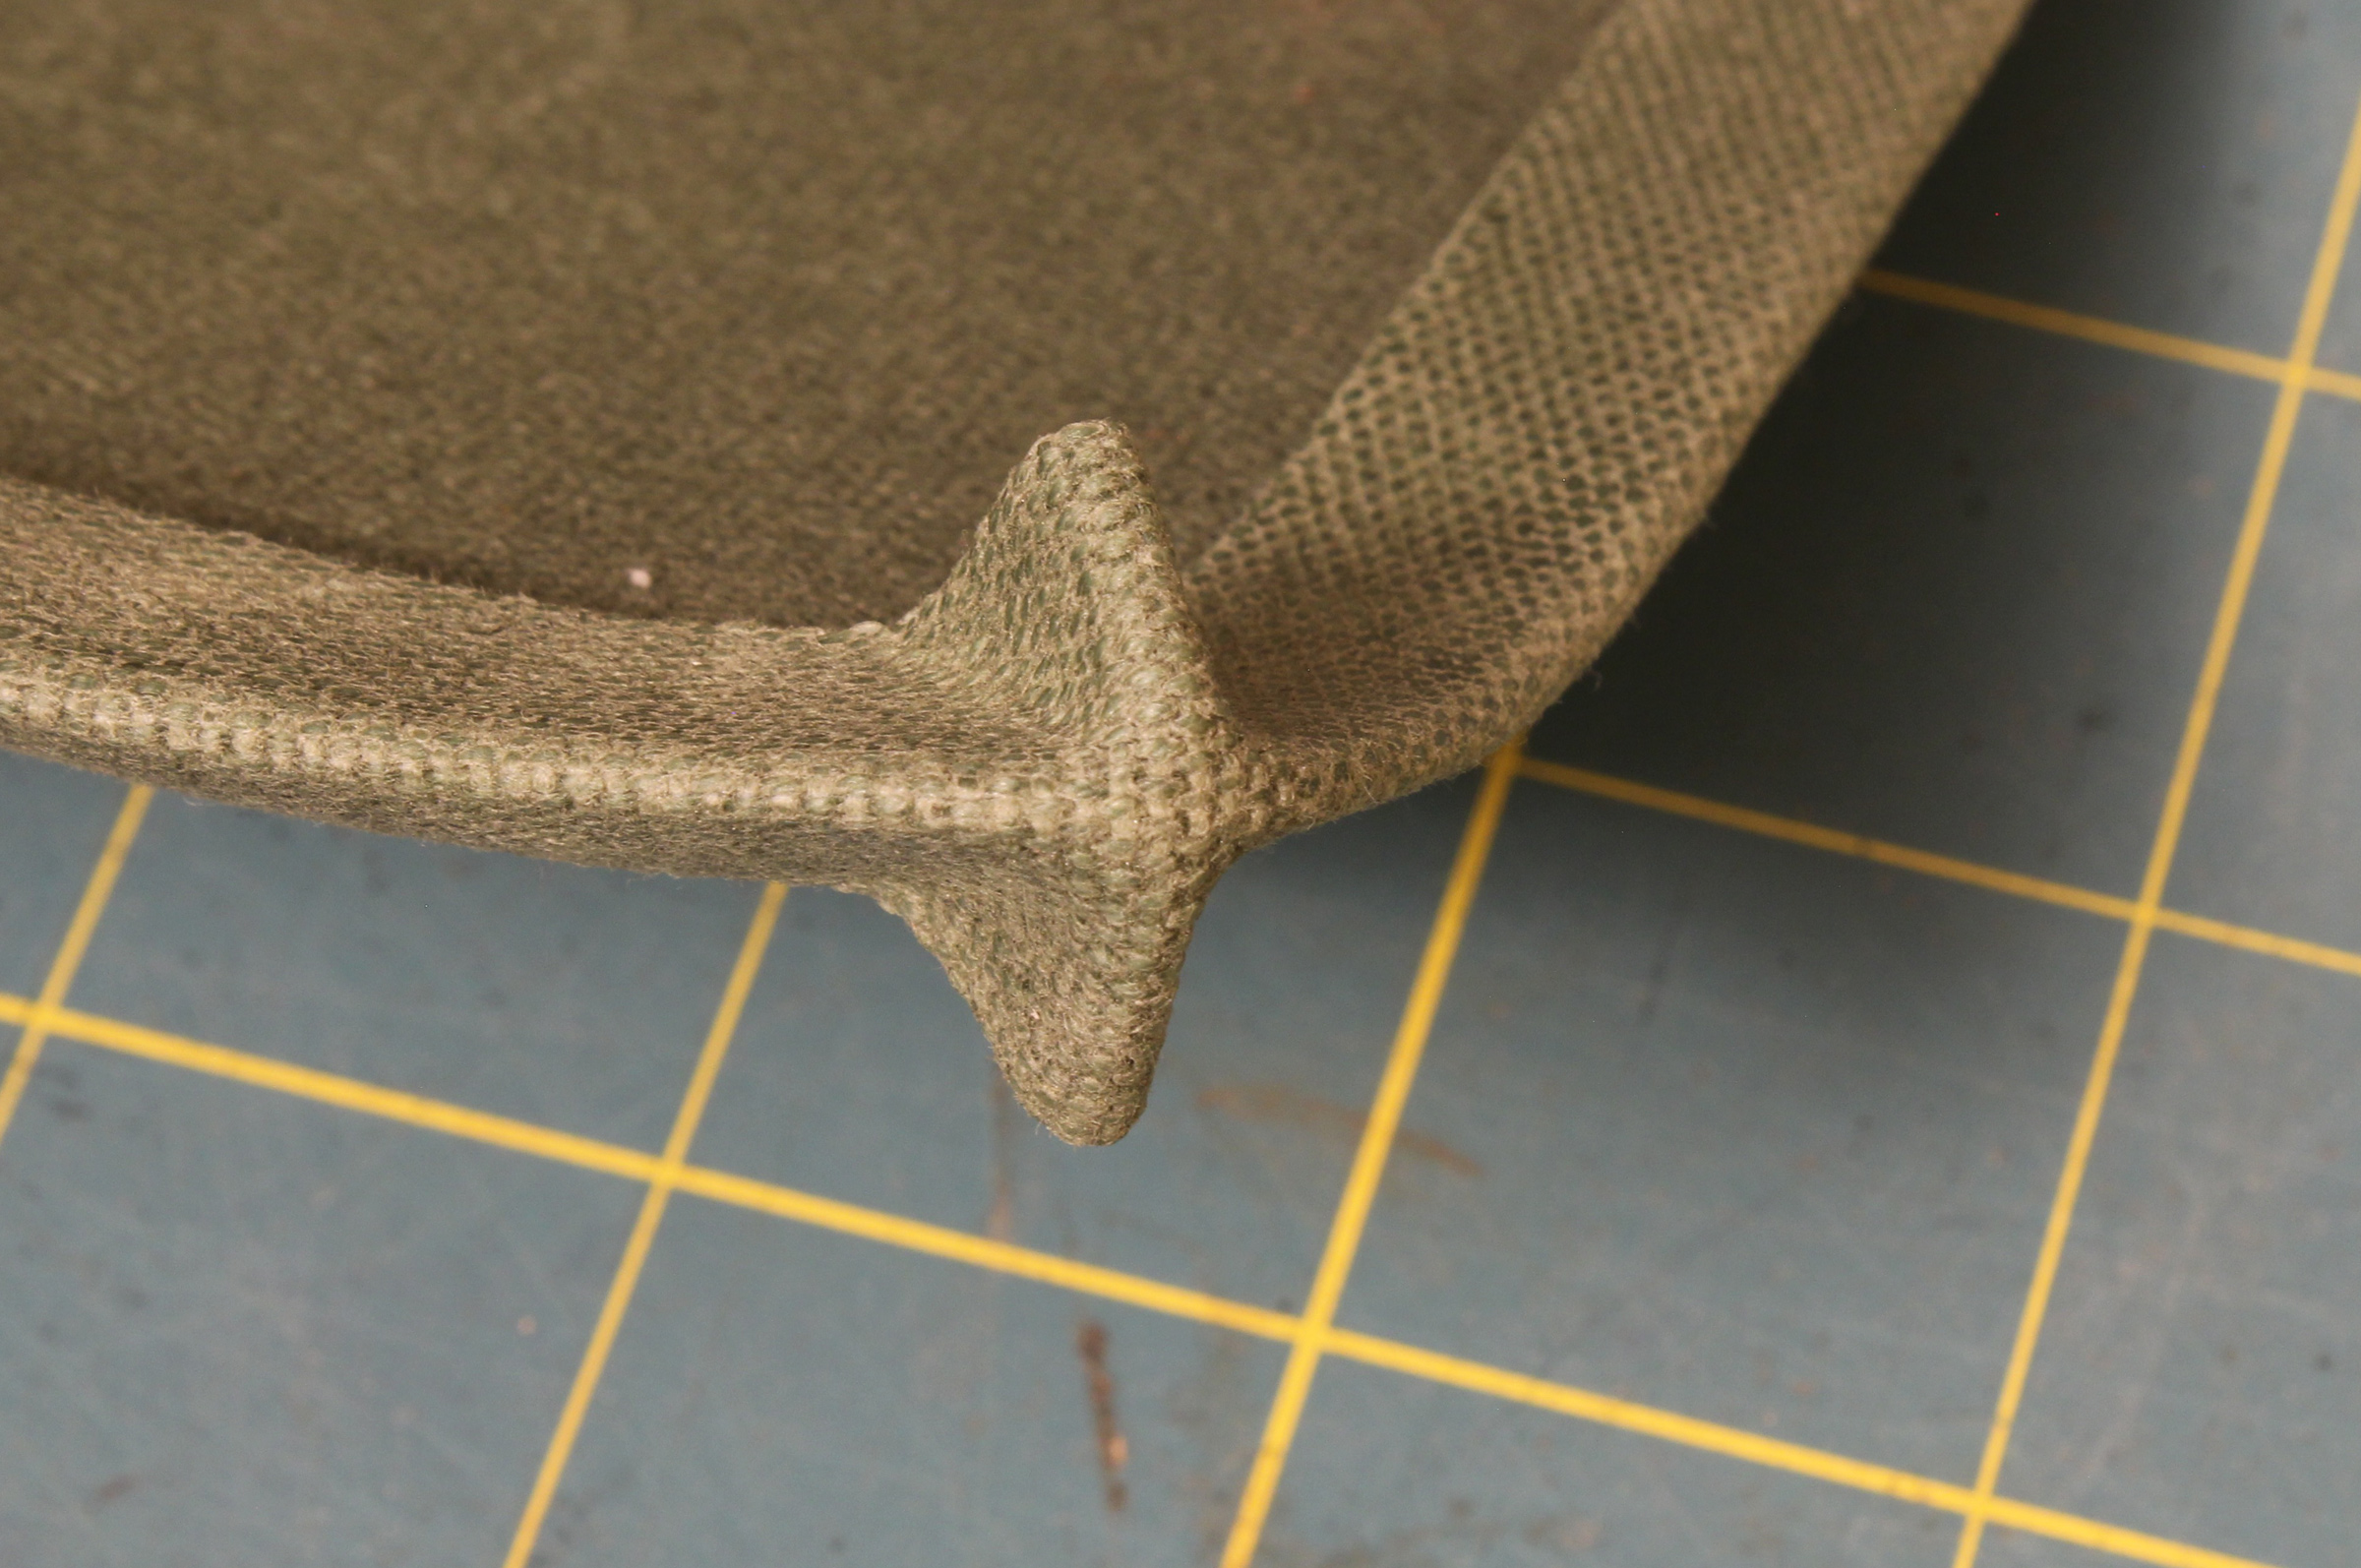
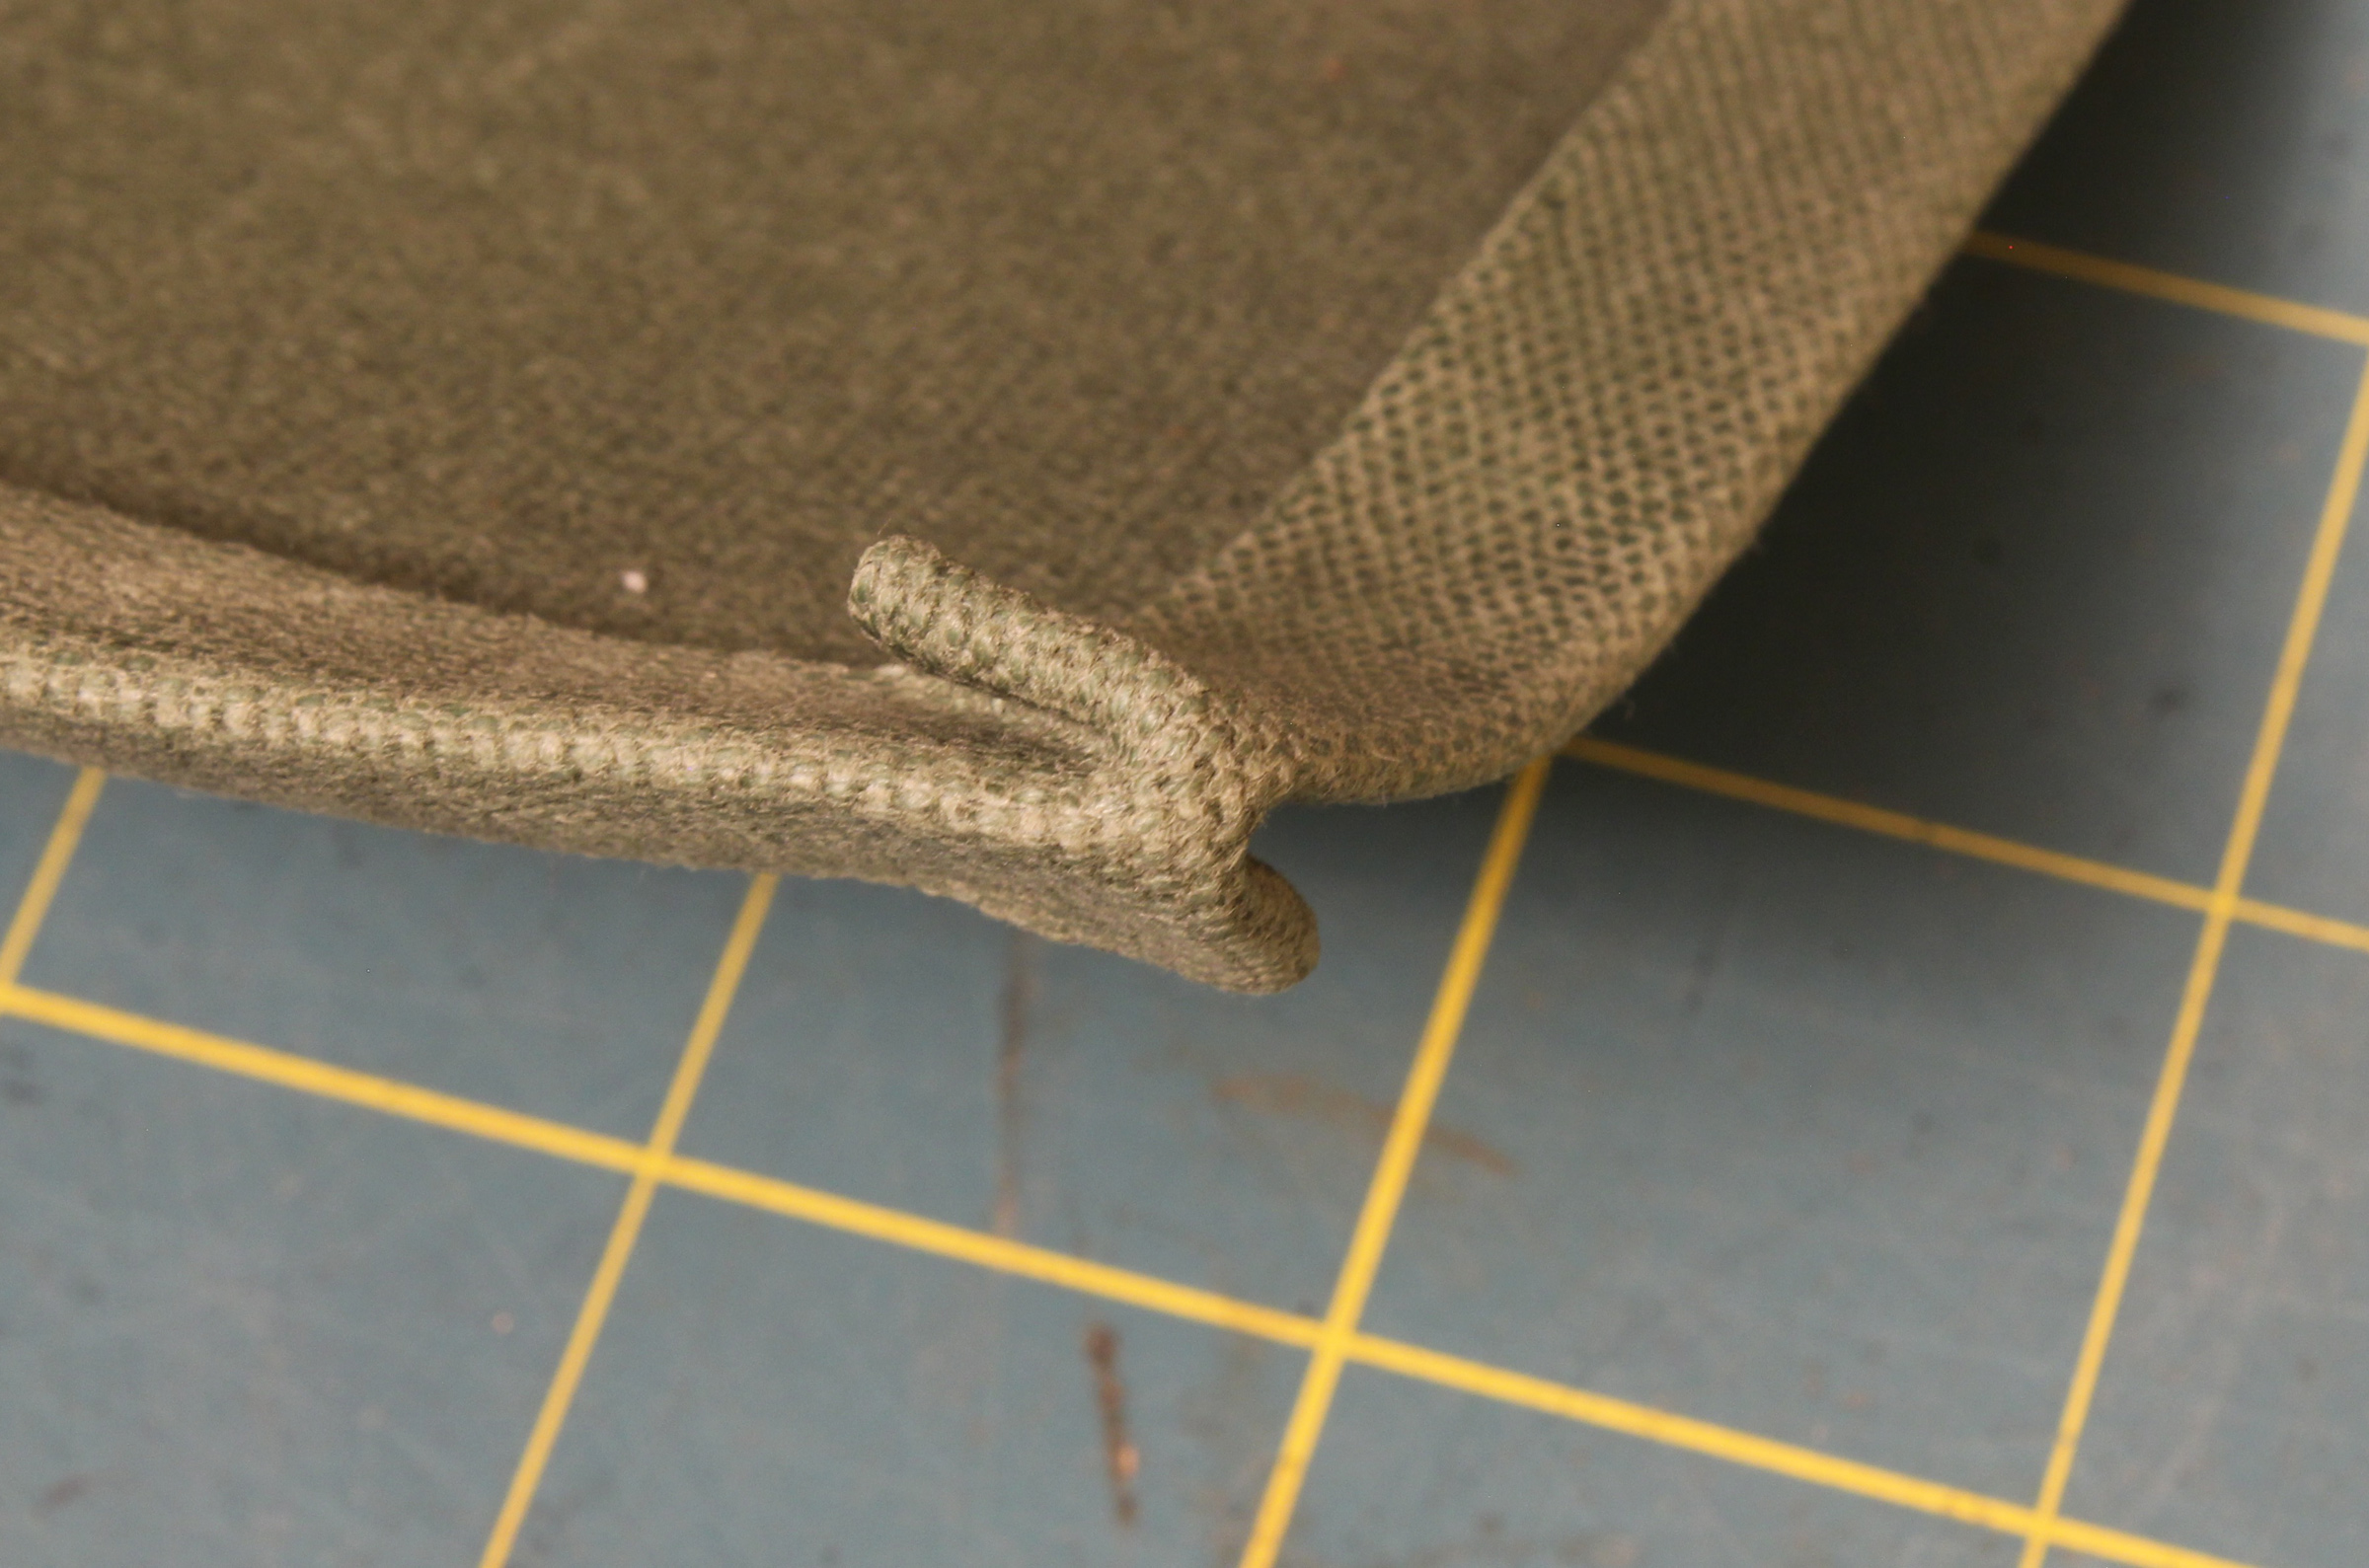
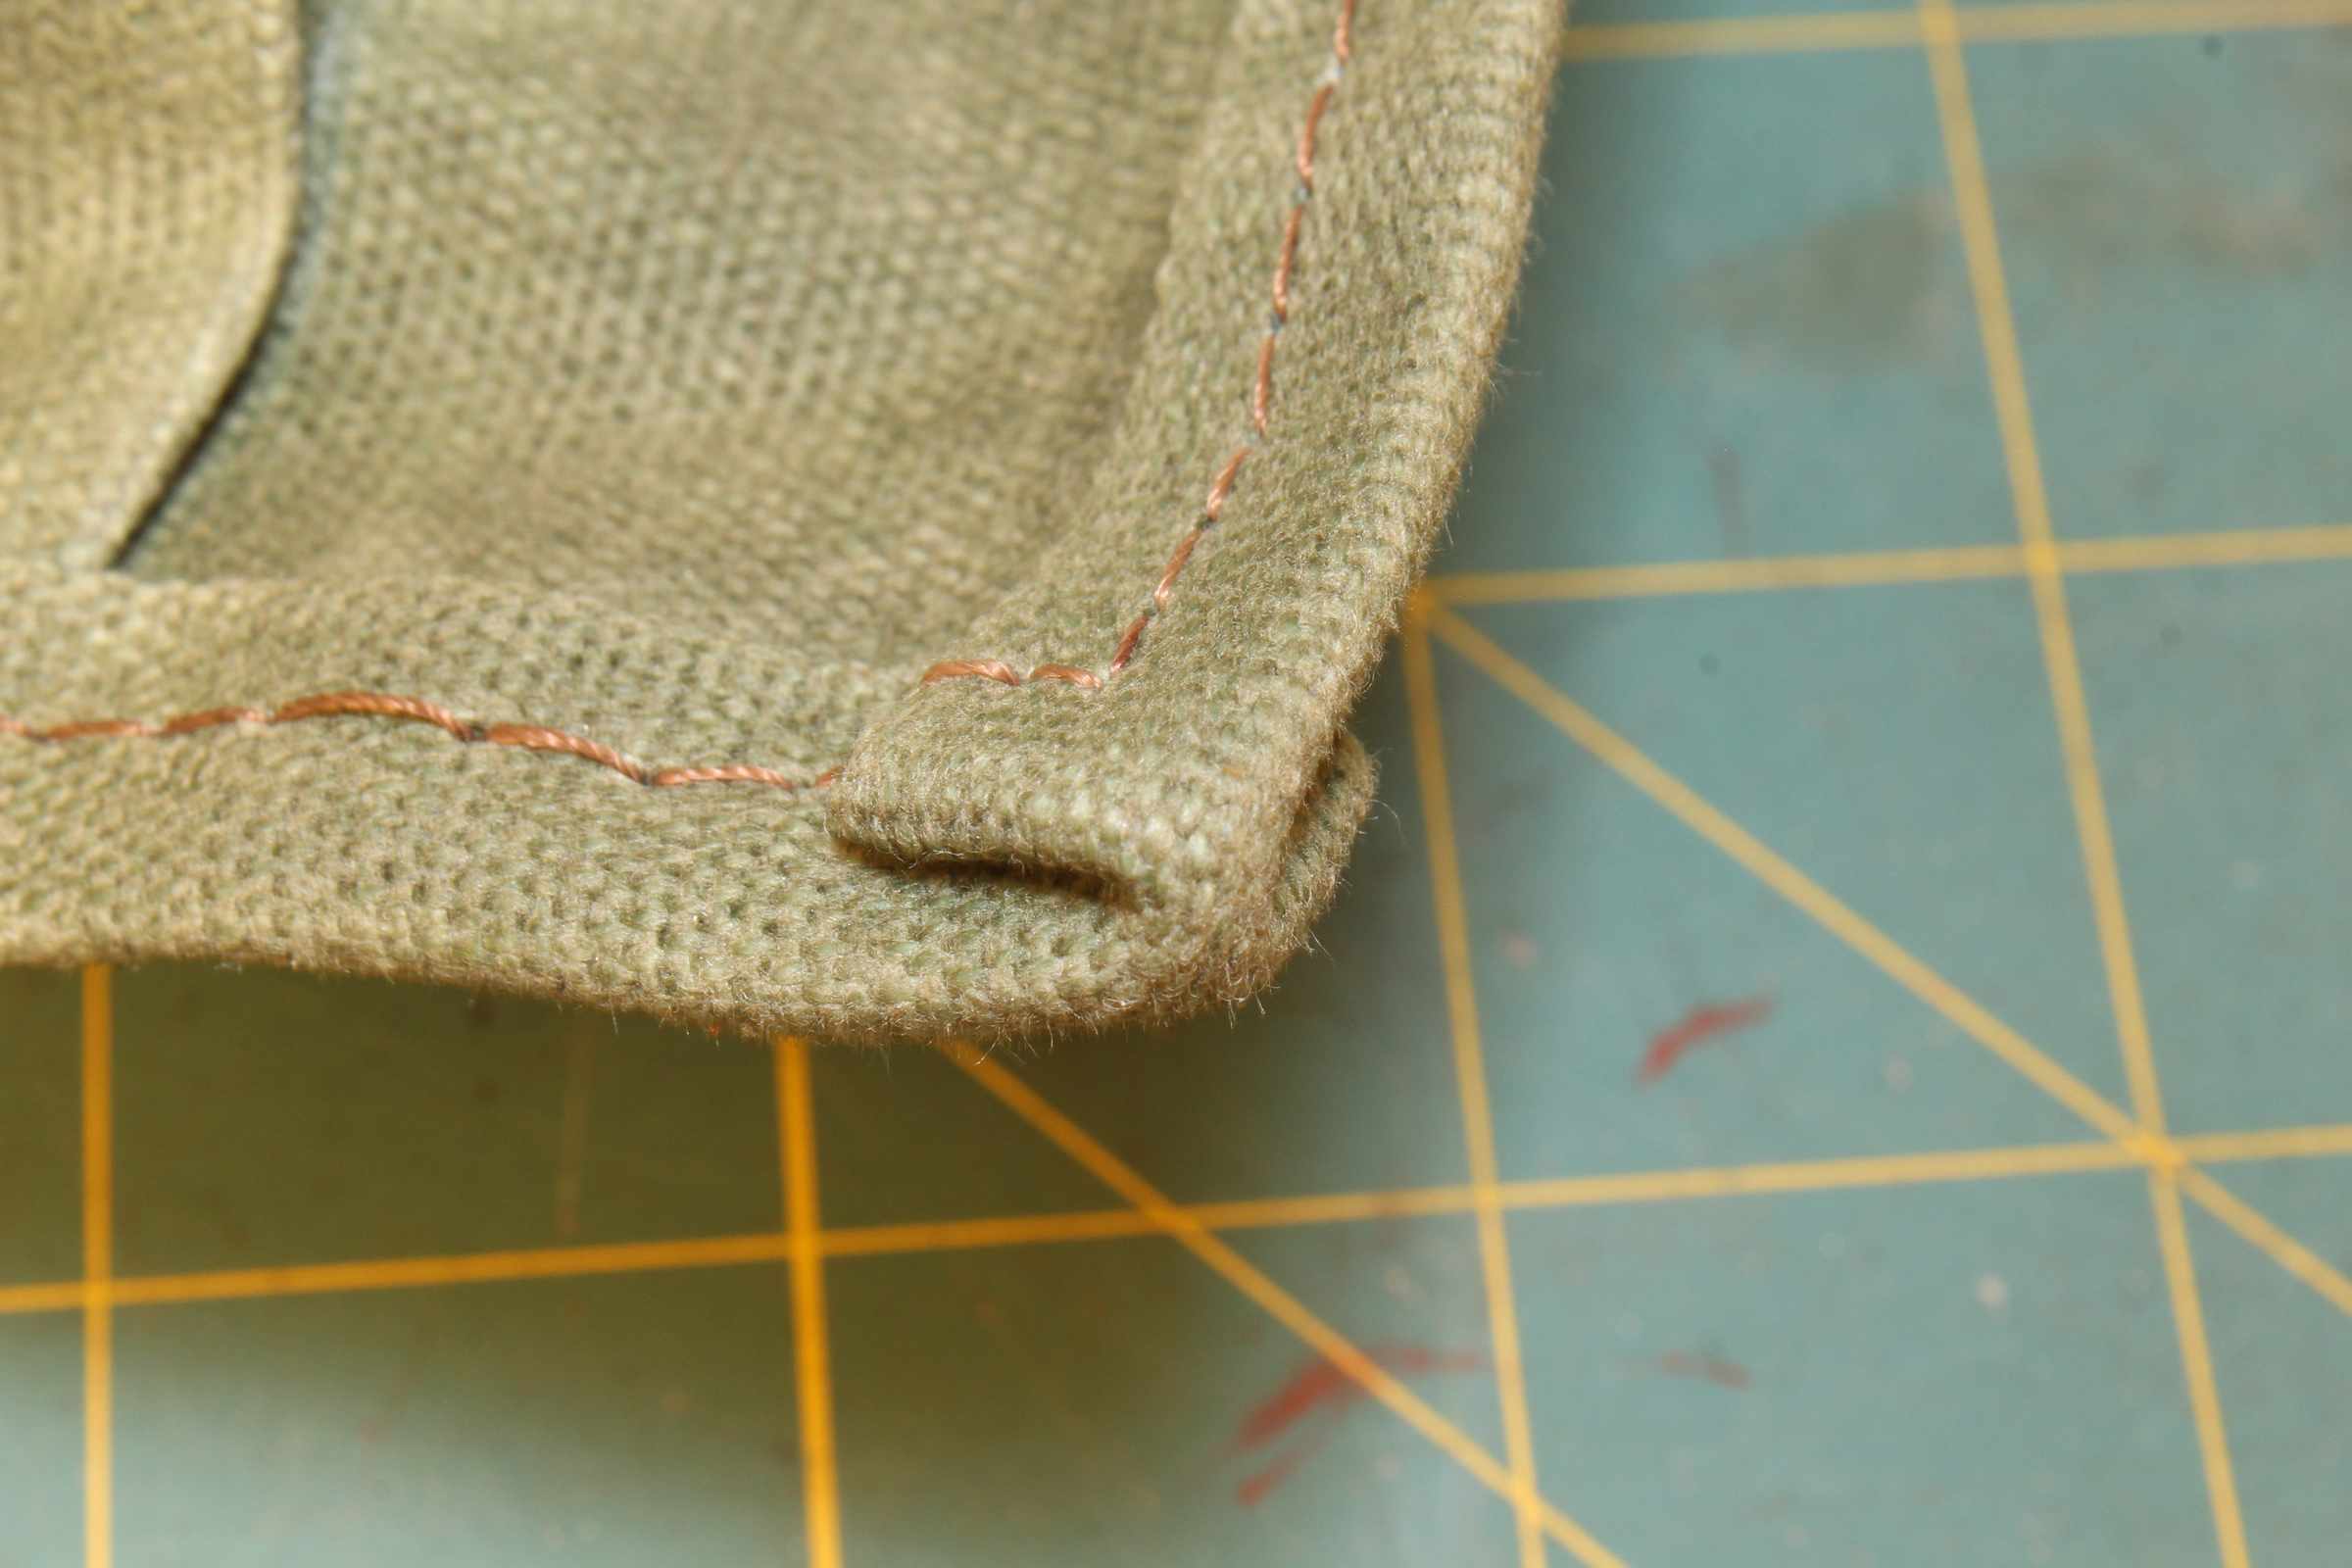
For a fabric with its heyday in the distant past, waxed canvas is enjoying a remarkable resurgence. Your nearest hip boutique probably stocks a few bags and jackets made from the stuff. But how does it stand up to use on the boat and in the workshop? I purchased a few yards of DuraWax Heavy Waxed 12-oz duck from Sailrite and found it useful, attractive, and easy to work.
DuraWax comes in two grades: light, which is treated with paraffin wax, and heavy, treated with beeswax. Both have the same underlying 12-oz cotton-duck fabric and, in both, the added wax is an integral part of the product, not a superficial coating. According to Sailrite, the light grade is 50 percent paraffin by weight—there’s just as much as cotton. The heavy grade is 54 percent beeswax. Wax contributes water resistance, windproofing, stiffness, and shape memory to the fabric. Both grades are available in ten traditional-looking colors.
Photographs by the author
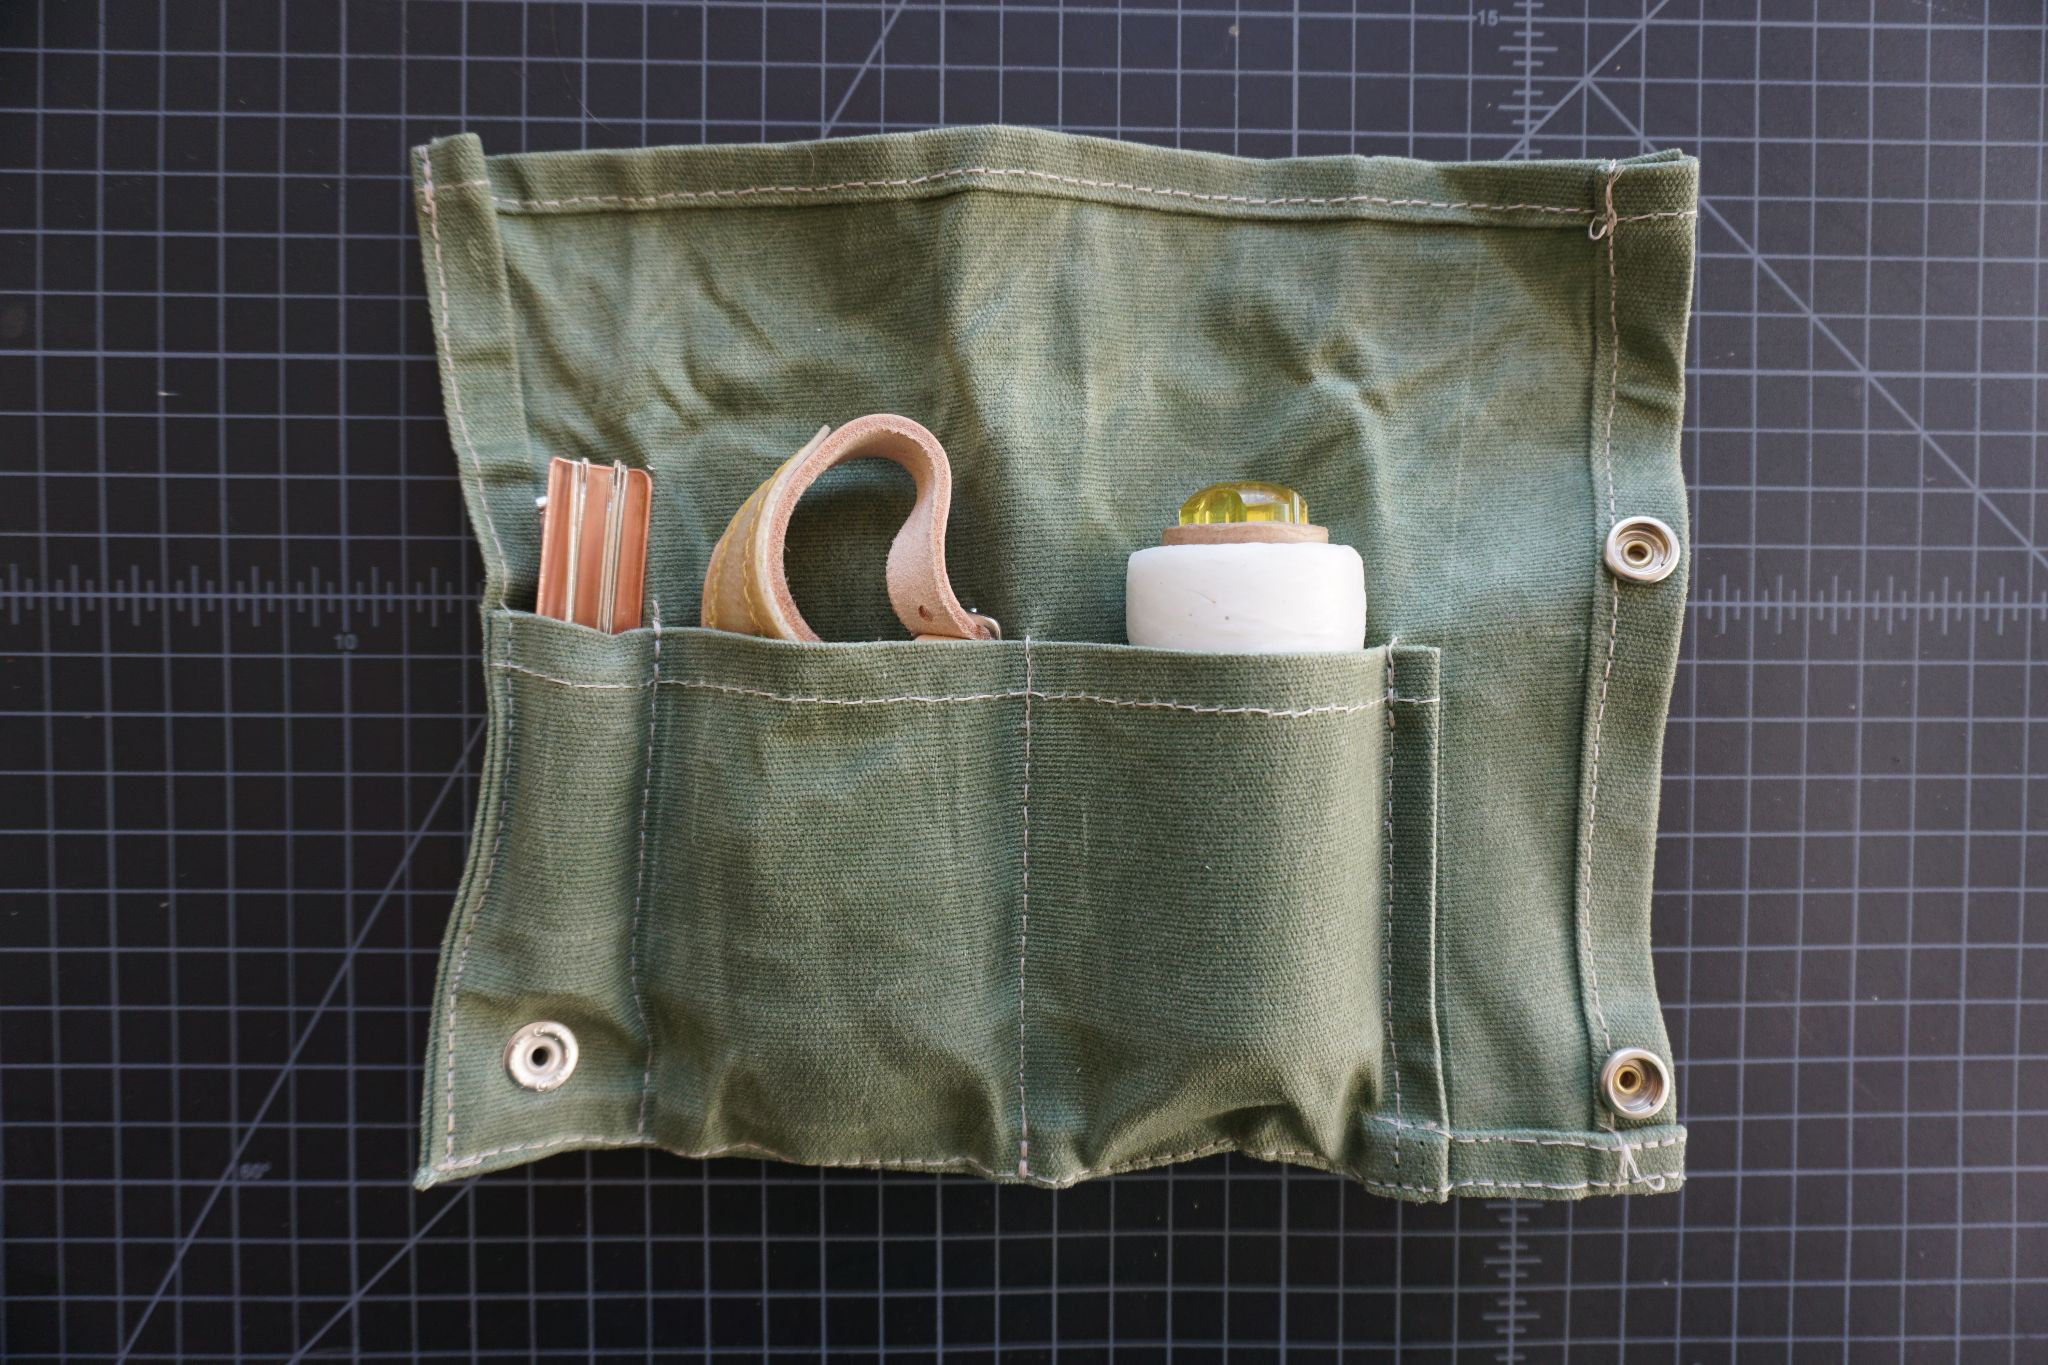
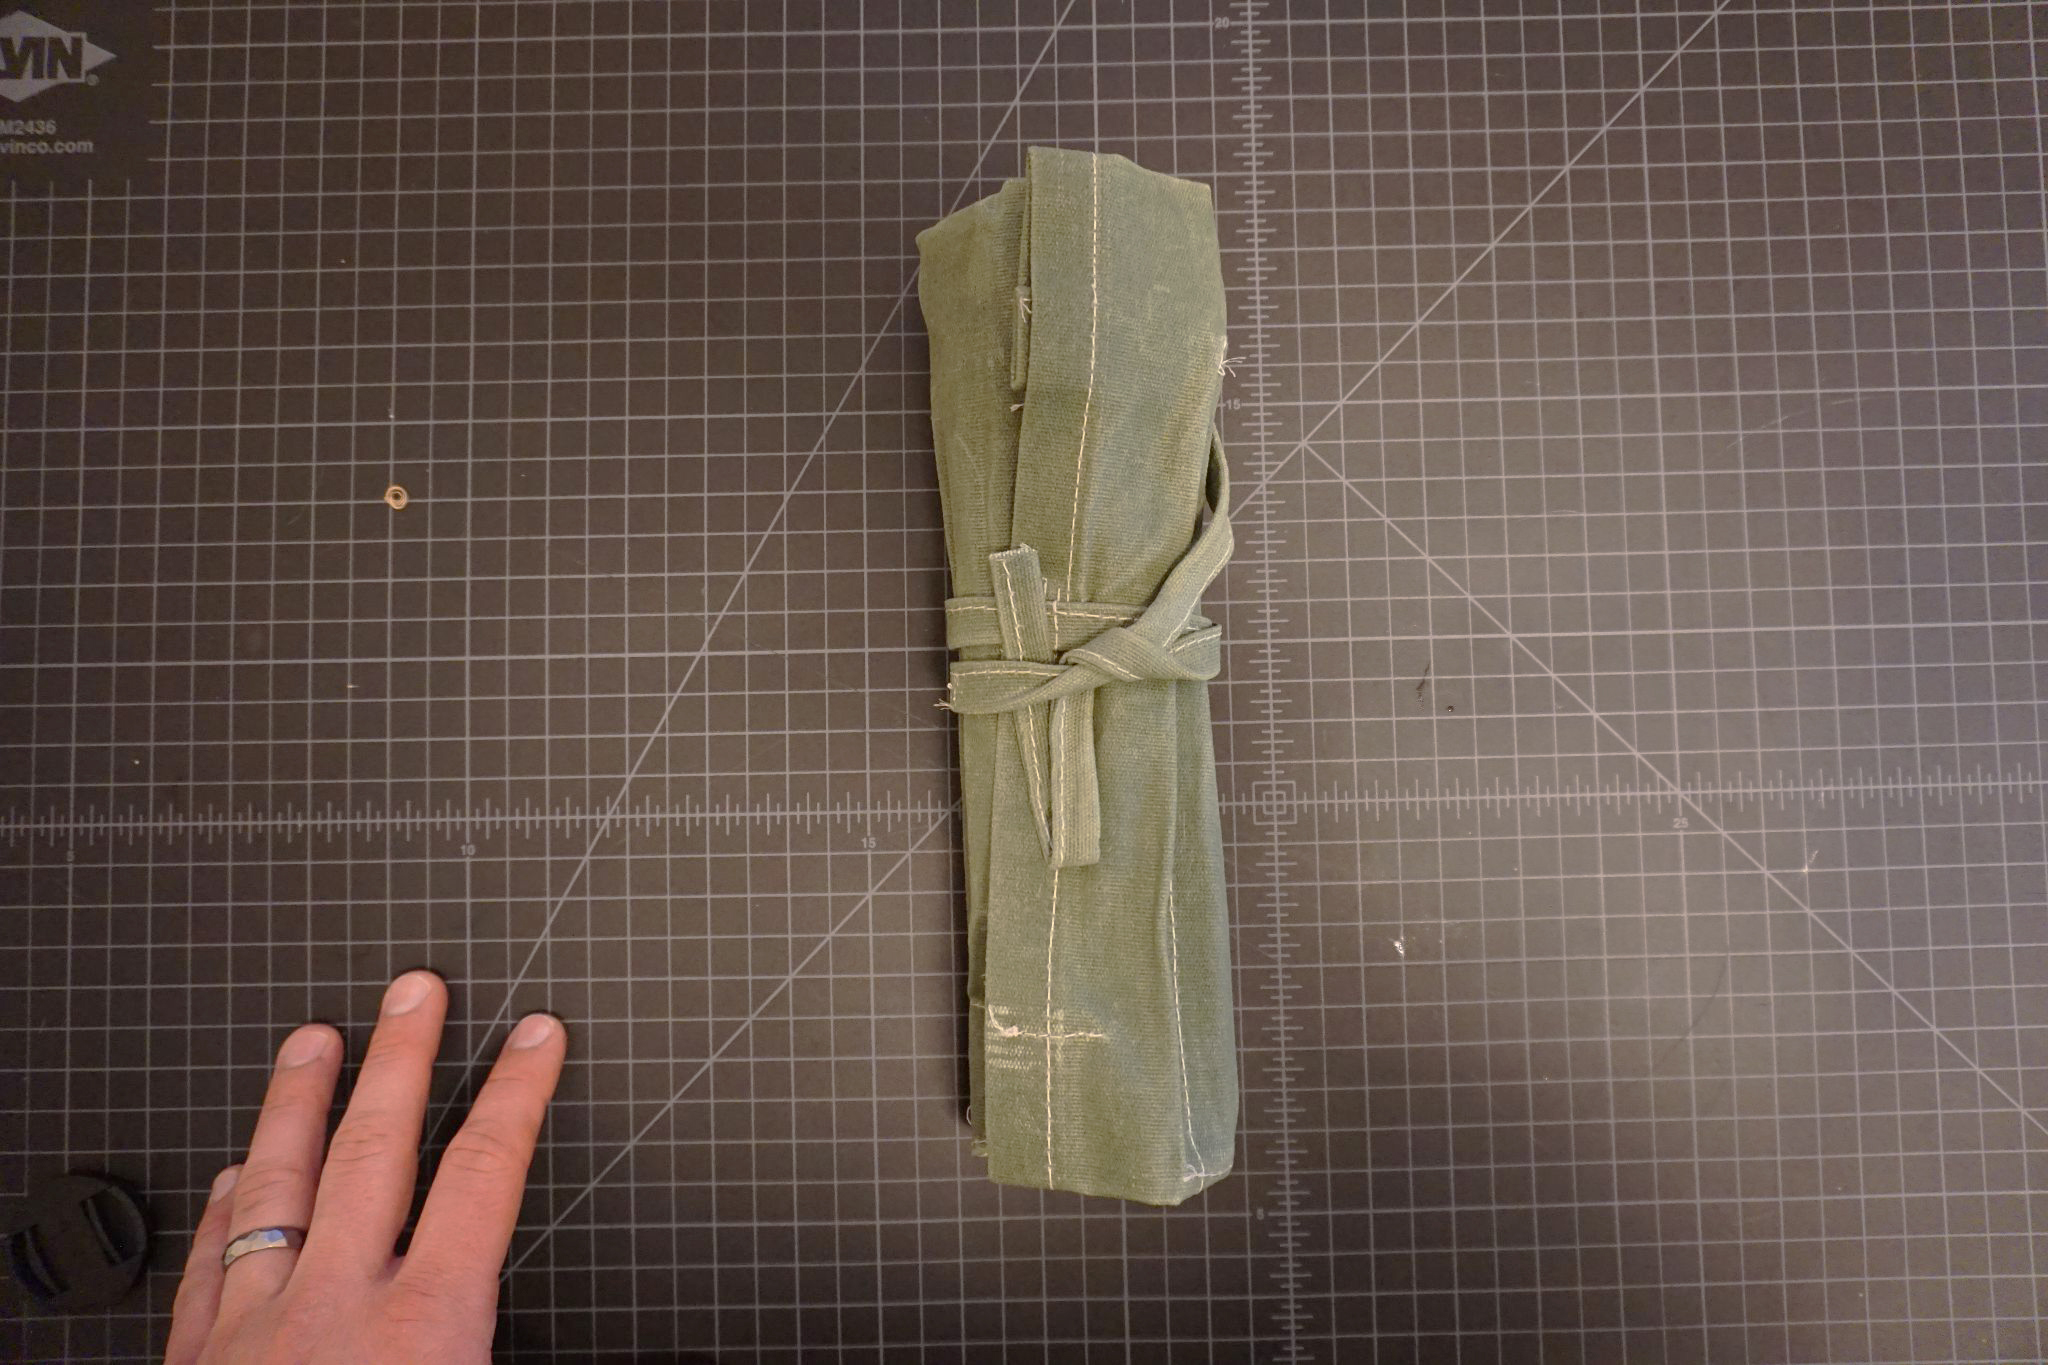
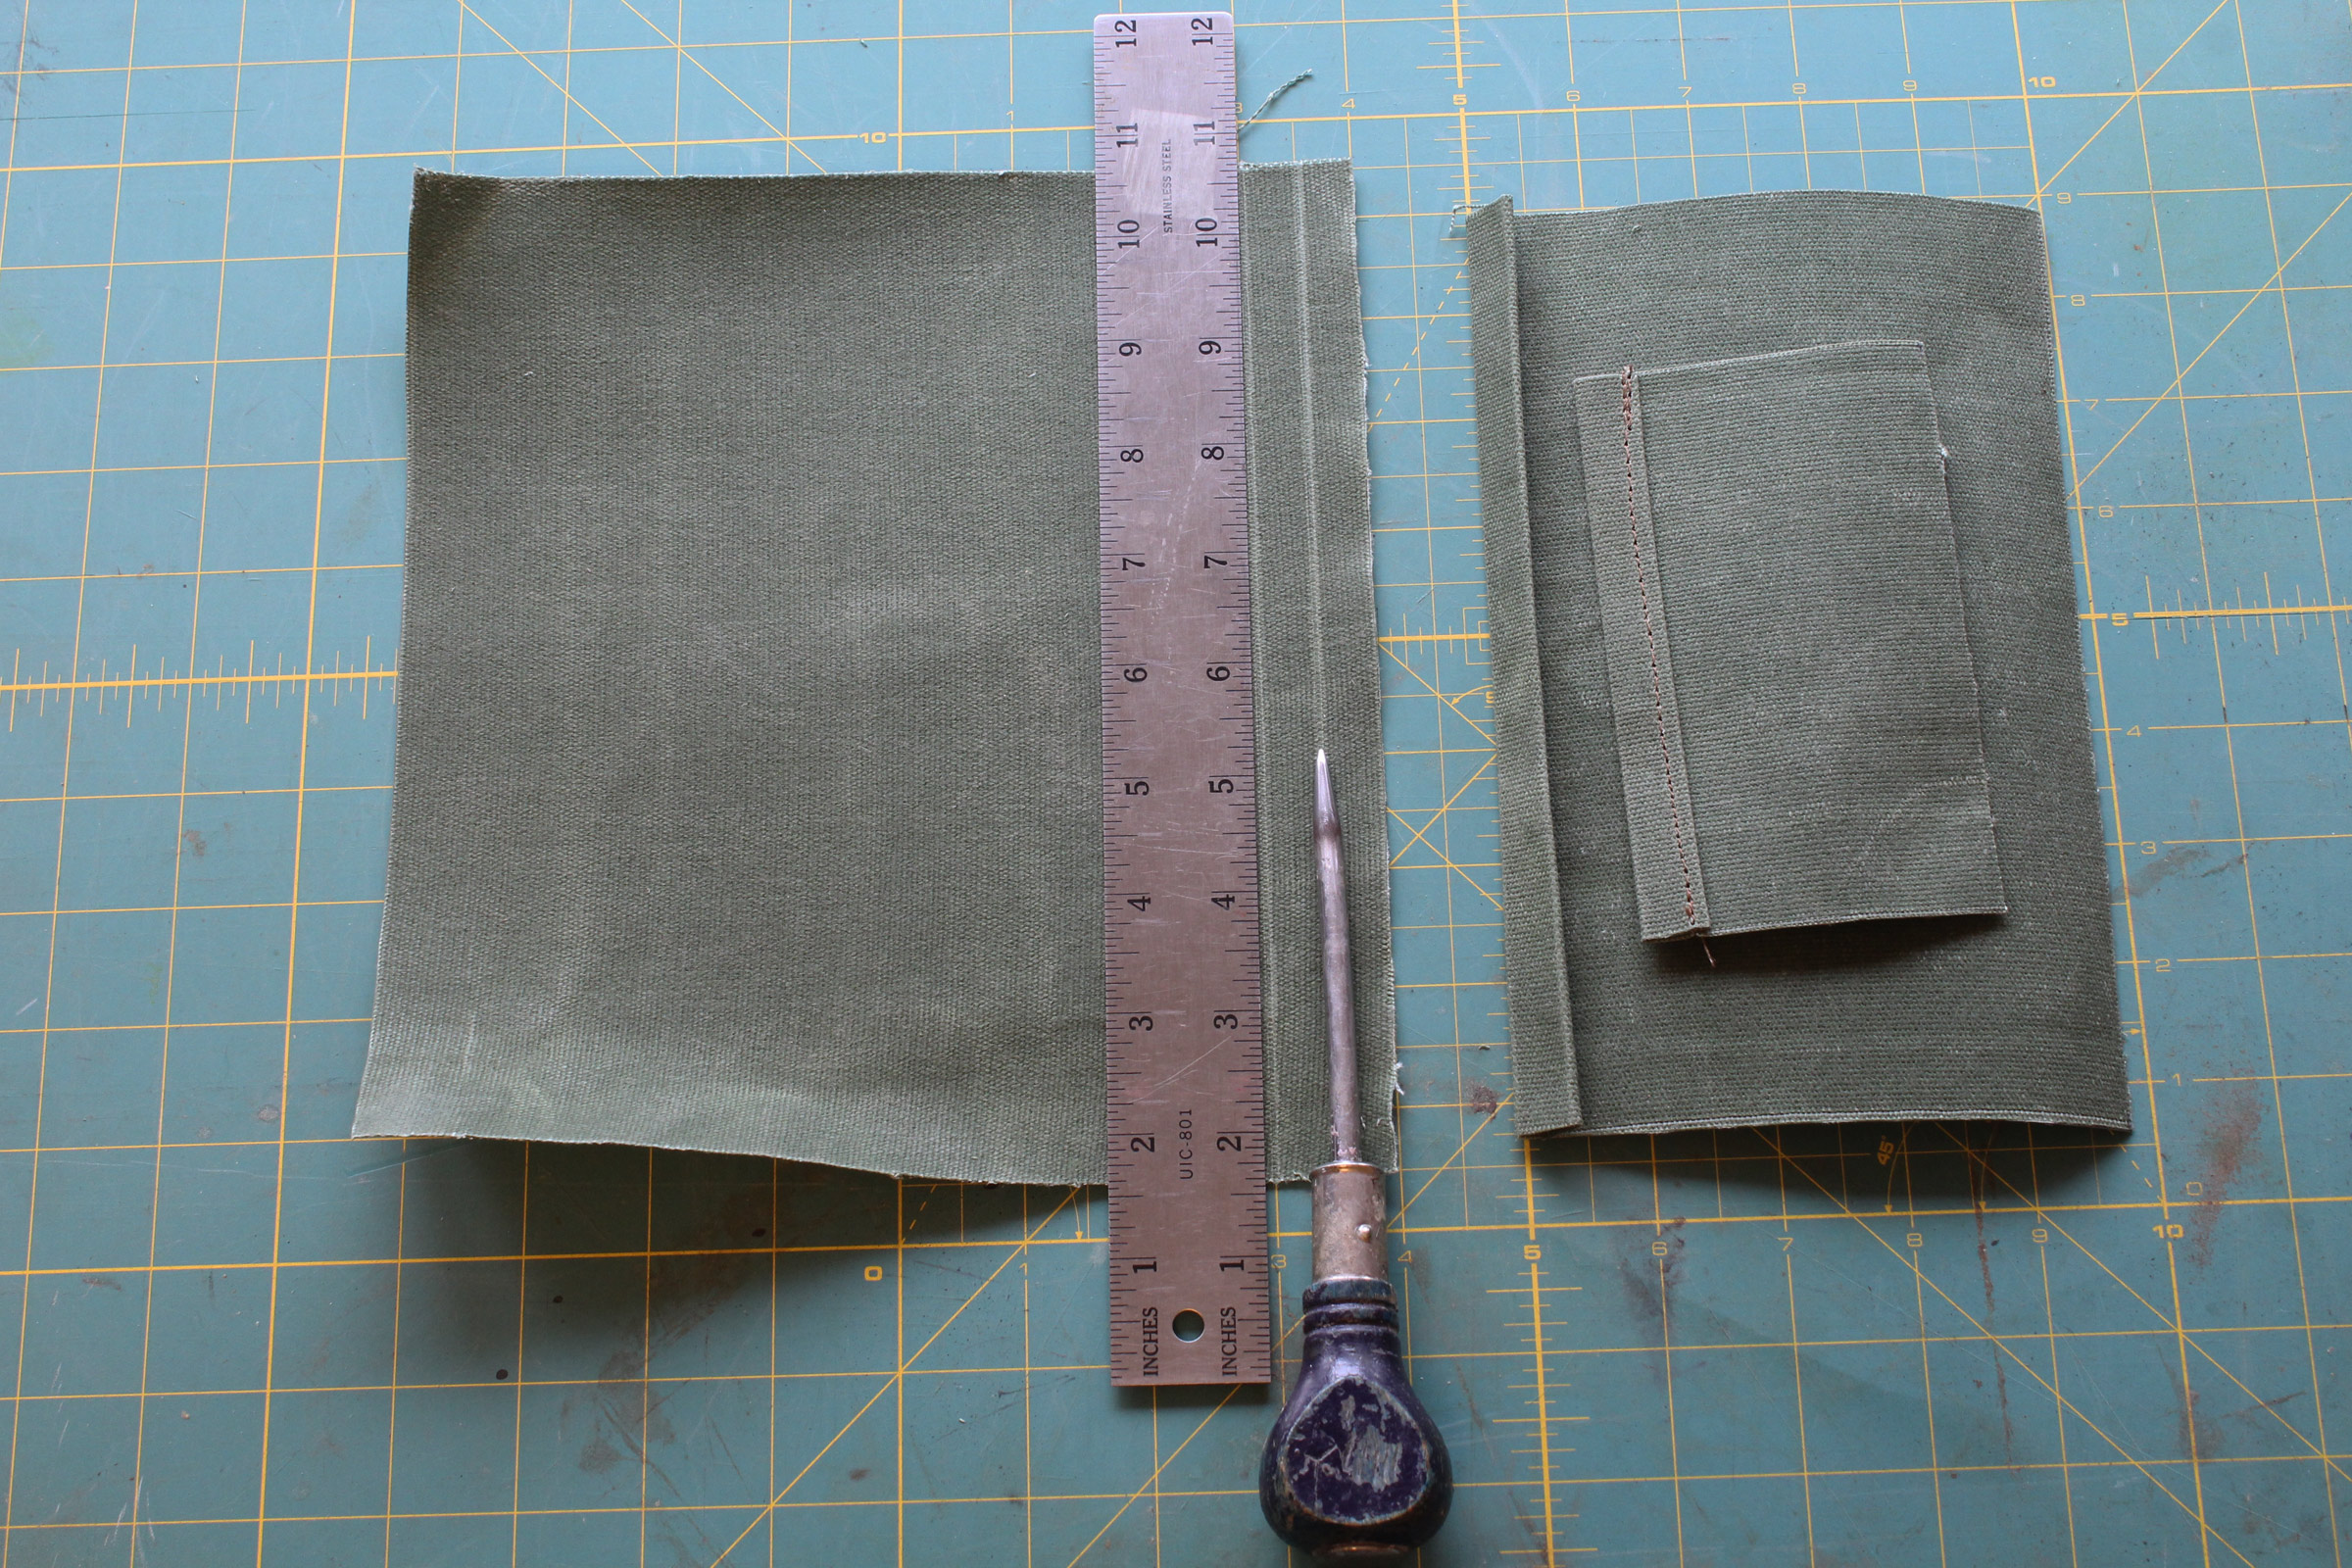
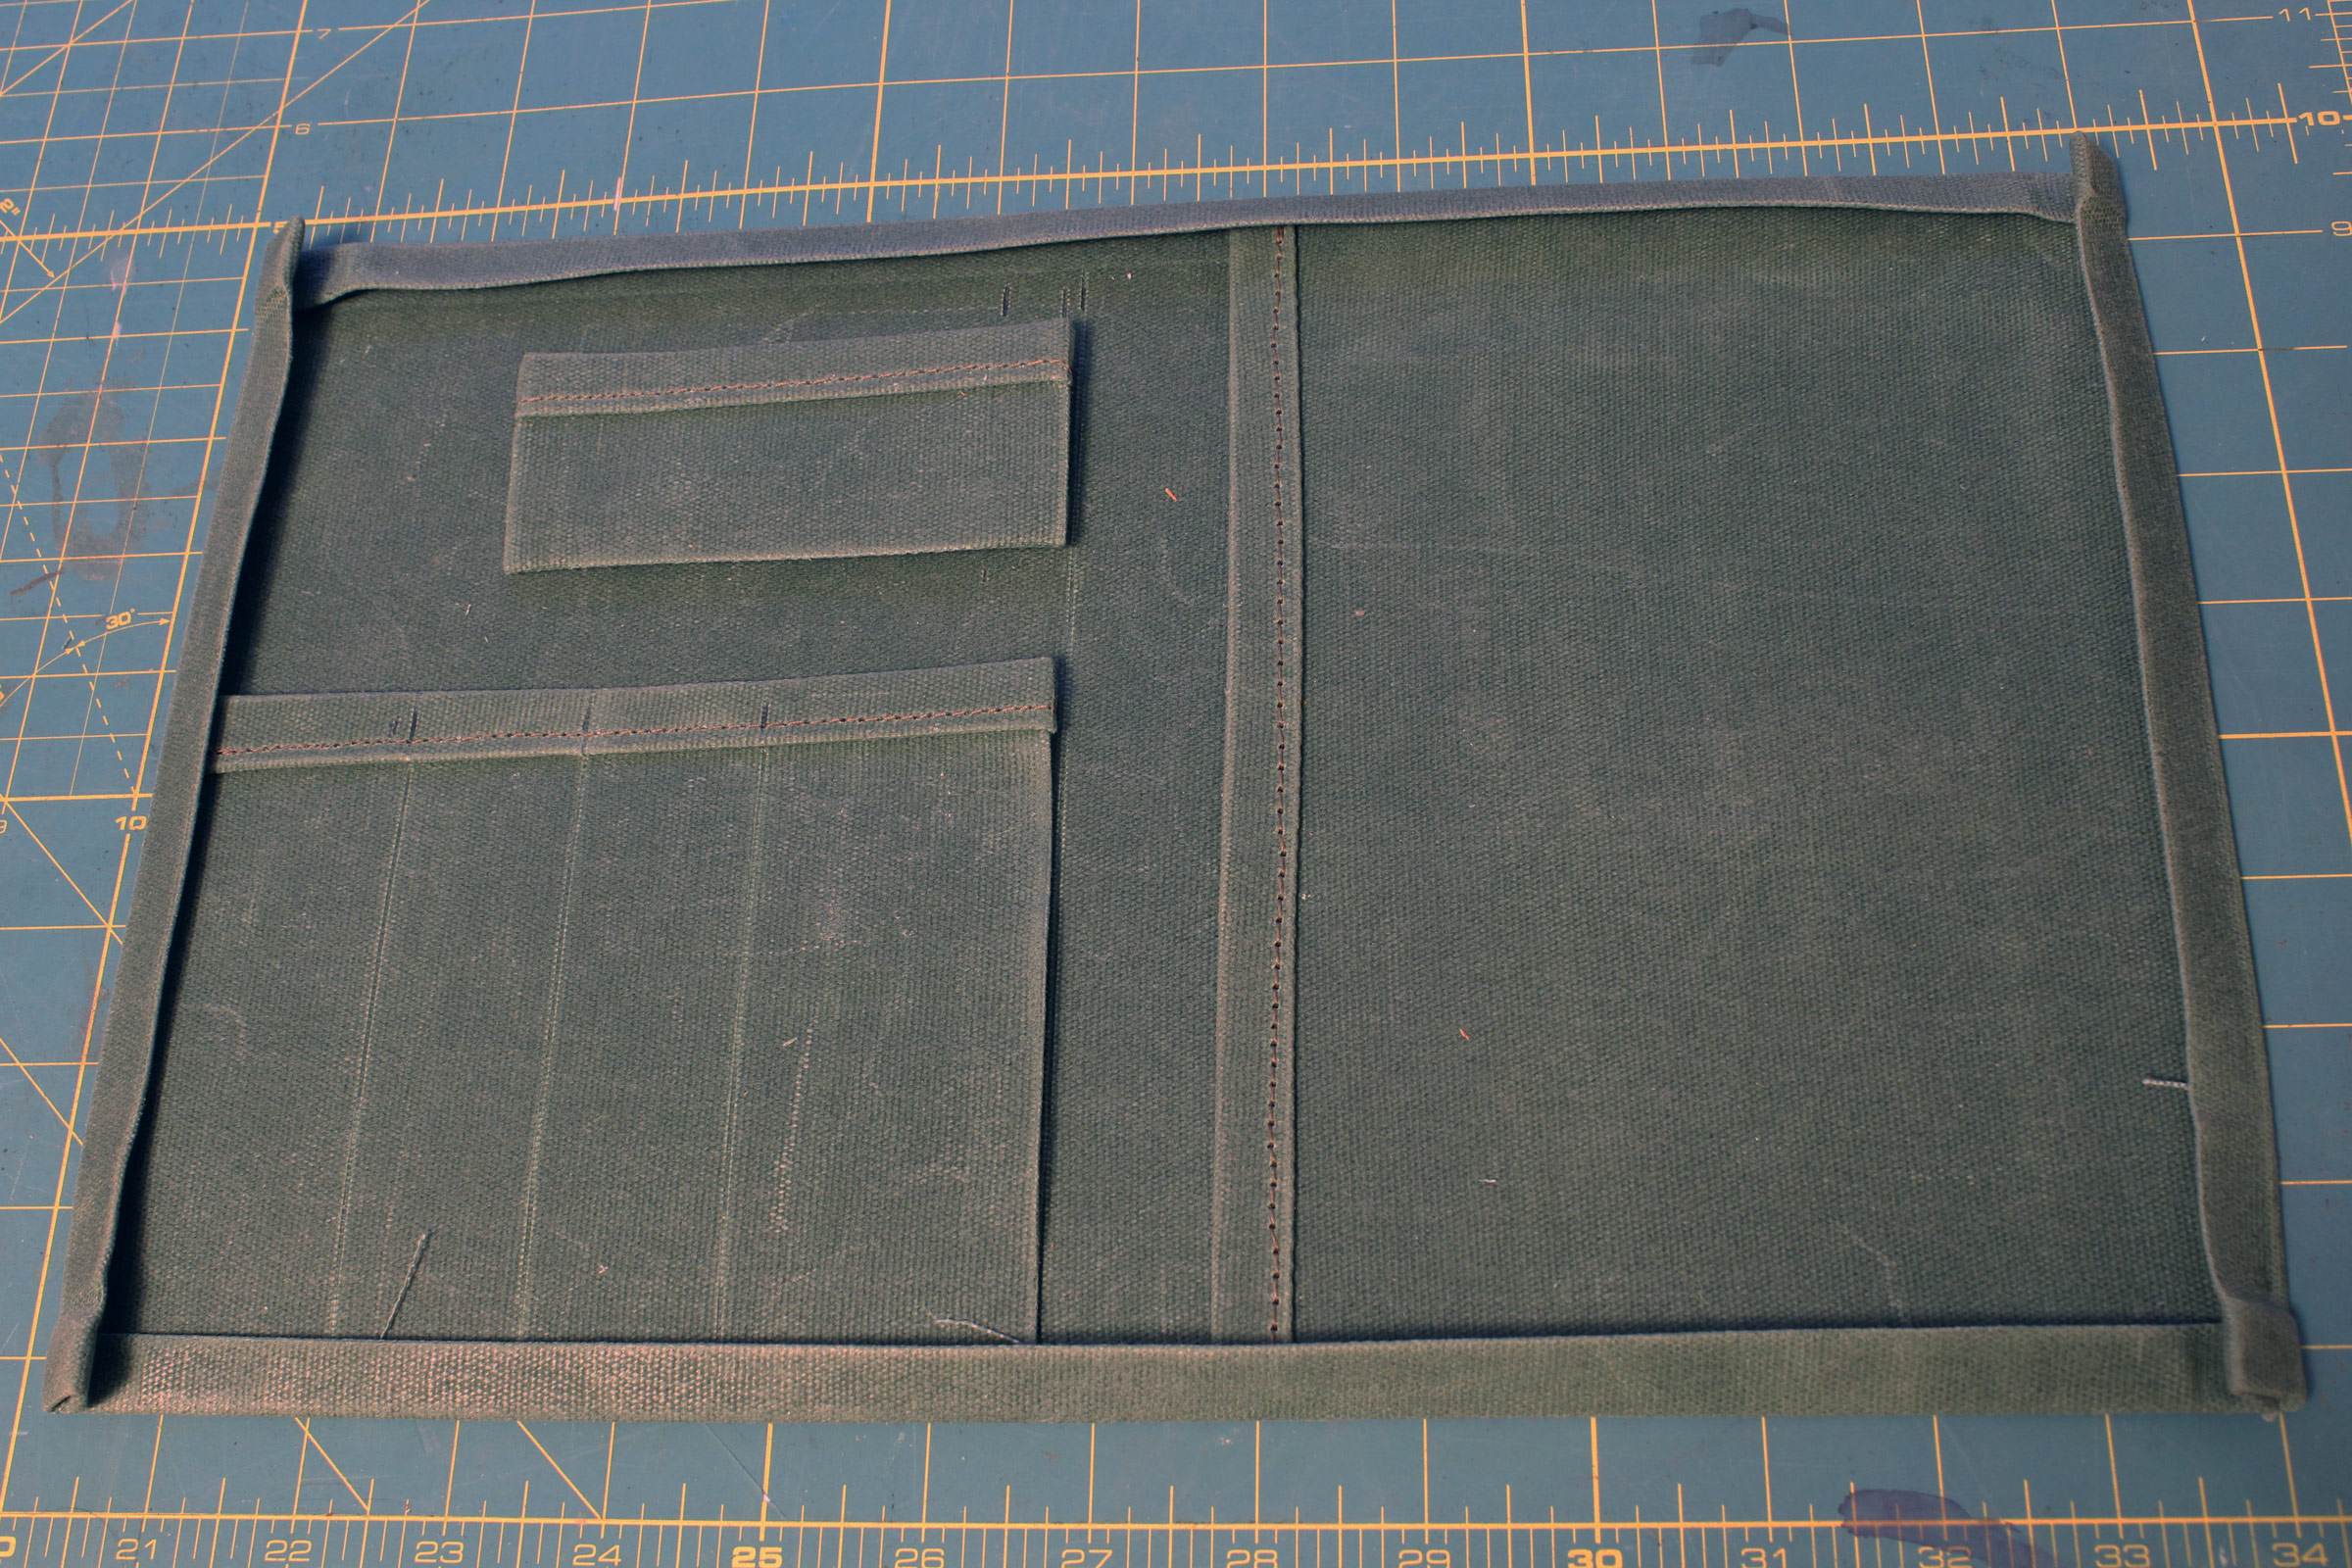
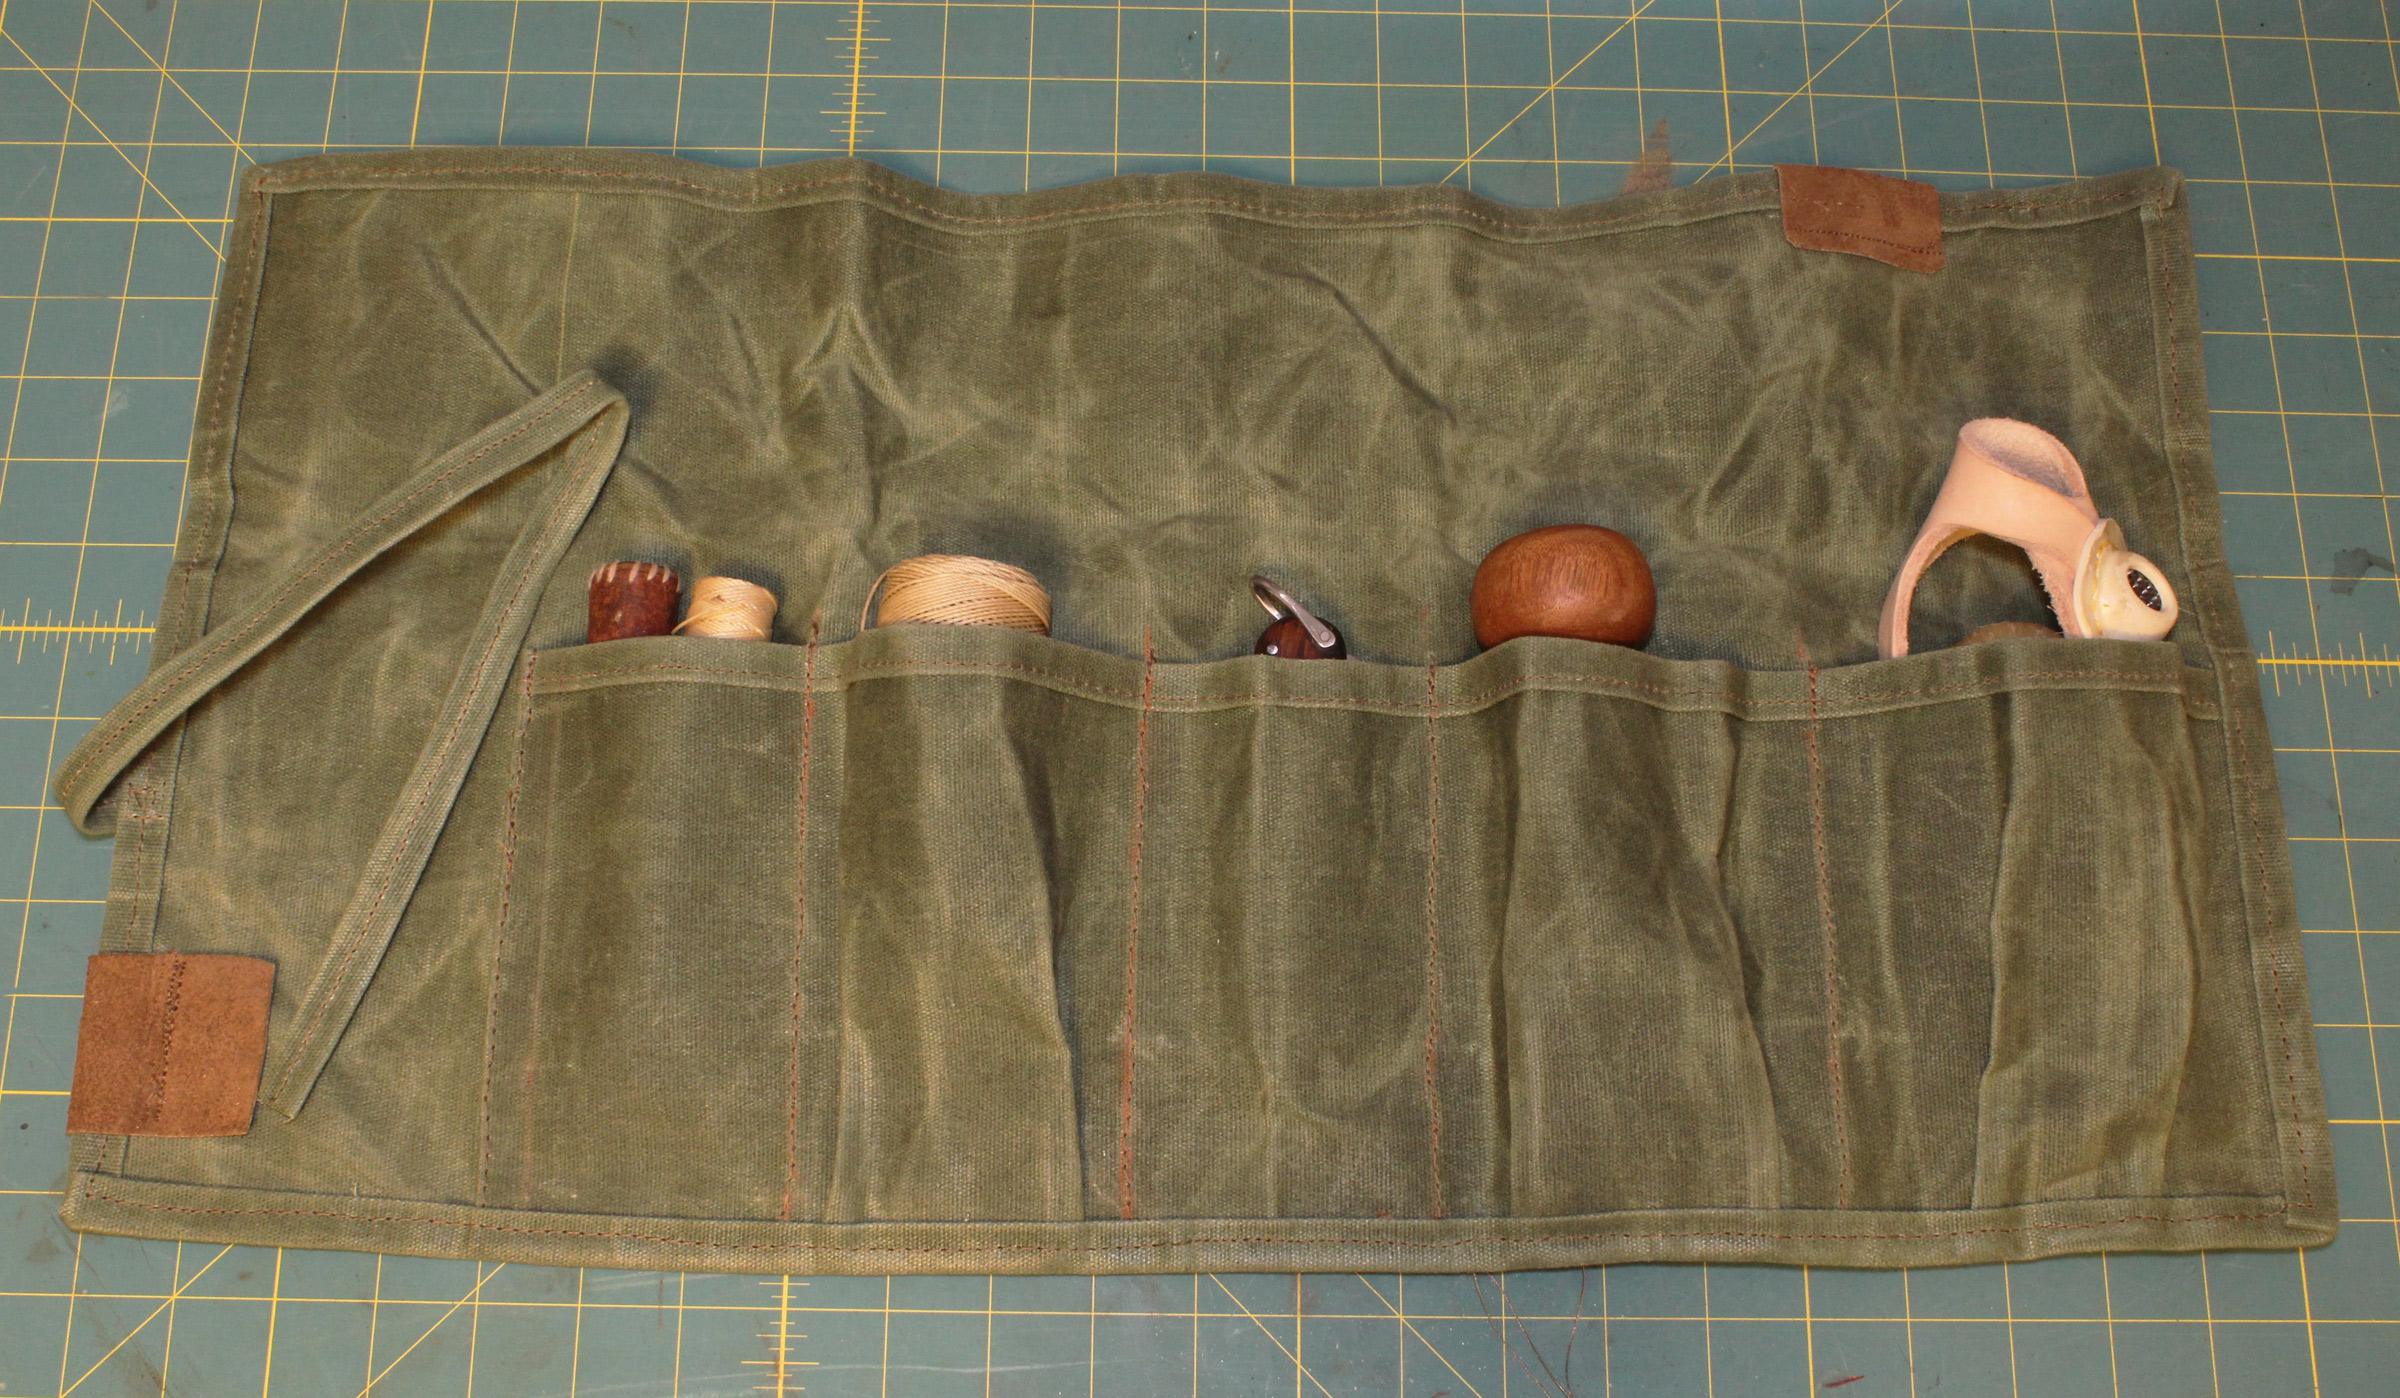
The sewing kit roll keeps a needle holder, a sewing palm, and a roll of whipping twine with an awl tucked inside. When the top flap is folded down, prior to rolling the kit, its top right corner needs to be angled inward to keep from covering the upper snap.
The Heavy Waxed duck arrives as a 57″-wide roll of remarkably stiff fabric with uniform color and texture. It’s a pleasure to work. Cut it with scissors or a rotary cutter; make marks with a scratch awl, which will leave a fine pale line in the waxy surface. The fabric will fold cleanly along these scored lines and will stay folded while you sew it down. My home-duty sewing machine stitches it beautifully with a size-18 denim needle and V-69 polyester thread. The machine punches comfortably through up to six layers of the fabric; anything thicker requires occasional hand cranking. Sewing a lot of waxed canvas will leave an accumulation of wax in the machine’s lower unit, requiring periodic cleaning. One source reported a minor clean-out was needed after making four backpacks. After a few medium-sized projects I haven’t noticed any wax in my machine.
The pockets for this set of nine combination wrenches and an adjustable wrench has its pockets sewn to keep them from slipping too deep into the pockets.
Waxed canvas is thick, tough, and feels durable. In use, it develops a patina—a faint spiderweb of whitened regions where it has been folded or crumpled; these marks are part of its appeal. When new, the waxed canvas has good water resistance, and rain and spray will bead up and run off. As use and time wear on the wax, the fabric becomes less waterproof but re-waxing is straightforward: simply rub wax on the fabric and apply gentle heat with a hair dryer. Sailrite sells bars of wax, as do other sources for the fabric, formulated for re-waxing canvas.
A strip of fabric, folded like binding tape and sewn, serves as a tie to keep the wrench roll closed.
I can’t imagine a better material for tool rolls than waxed canvas. Easily made in an evening, rolls like those pictured here offer a lifetime of organization and satisfaction. The thick fabric provides some protection for contents, and the memory of the material makes unfolding, unrolling, and then returning to the desired shape almost automatic. I learned to make these rolls from a Sailrite video. Once you’ve got the basic idea, they’re easily adapted to your needs. I’ve also enjoyed using waxed canvas to make covers, like the one I made to store my rowing machine outdoors. The canvas makes it stiff enough to stand up just fine even without the machine underneath it, leaving ample room for ventilation.
Try your hand at making something from it. Durable and easily worked, waxed canvas makes the maker and the user look good.
James Kealey lives and teaches in Richmond, California. When he’s not chasing his two young sons, he can usually be found banging away on some project in his garage workshop. In high school, he rowed in racing shells. He still gets away most summers for sail-camping trips on mountain lakes.
Editor’s Notes
Inspired by James’ article, I bought a yard of the same heavy Durawax canvas from Sailrite. For the journal cover I wanted to make, I drew a pattern on graph paper. The hems of the outside cover would enclose the cut edges of two of the pieces that would be sewn inside, one to hold the back cover of the journal, the other to have pockets for pens and pencils. The smallest piece, for business cards, would have a folded hem at the top and the cut edges tucked under on the sides and bottom.
I’ve made all of the double-fold hems 1/2″ wide. They start with “drawing” two lines 1/2″ apart using a ruler and an awl with the point rounded over and polished so it doesn’t cut the fabric. The tip turns the wax in the fabric white. The edge gets folded twice, then sewn.
[Update: For corners that have fewer layers of fabric and are easier to sew, see the mitered corners in “A Canvas Lounger.”]
A seam rubber is a useful tool for tightening the folds of the double-fold hems. I turned this seam rubber on the lathe from a scrap of hard, dense mahogany. A piece of hardwood with a slightly softened edge and polished wedge faces will work just as well. I pressed the corners especially tight so they’d stay in place for sewing.
The four pieces are arranged prior to sewing. The pen and pencil pocket has a double-fold at the top and a single-fold hem on the back of the right side. The business card holder has three single-fold hems.
The double-fold hems create a minimum of three layers of fabric where there are no pockets and eight layers in the corners with pockets. I sewed squares of stitches in the corners by hand cranking.
The finished cover keeps my writing tools in one place. The pen at the right has a built-in light for midnight note-taking.
I sewed a length of cord to the spine for a tie to keep the cover closed. Note how the pens and pencils create ridges on the outside of the cover. Pleated pockets would leave the outside smoother.
I also used the waxed canvas to replace my grandfather’s tattered 55-year-old sewing kit. I first laid out the pockets to be sewn. I lined up beeswax, a needle case, my marlinspike knife, whipping twine, a seam rubber, and a sewing palm. I later decided the beeswax could fit in with the sewing palm.
To make the pockets, I put the items I wanted them to hold in place, and curved the hemmed strip over them. Staples held things in place while I sewed along the lines I drew for the stitching.
The extra fabric gets folded into mirrored pleats and pressed flat with the seam rubber prior to sewing. The edge can be sewn before the binding tape goes on to keep things from shifting.
After the pockets are sewn in place the outer perimeter is ready to be finished with binding tape. The tape starts as a 2″-wide strip cut from the same waxed canvas and gets its edged folded in along lines scored 1/2″ apart, creating four layers of fabric. The roll will add one layer (left and top), two layers (right side of pockets), and four at the pocket pleats and hem. I got through the extra layers by hand cranking the sewing machine.
To get the binding tape neatly around the corner, I pinched the tape into two crests…
…and folded them flat in opposite directions.
Then I sewed around the corner by hand cranking the sewing machine to push the needle through 10 layers of fabric.
Where the two pieces of binding tape met, overlapping them with one folded back on itself created more layers of fabric than my machine could manage, so I butted them together and covered the seams with thin leather.
A length of binding tape sewn shut made the tie for my sewing kit. The binding tape is quite stiff so a loose square knot is all that’s needed.
You can share your tips and tricks of the trade with other Small Boats Magazine readers by sending us an email.
There was a time when we got to the boat ramp that we would remove our trailer lights before backing boat and trailer into the water. To prevent the lights from being dunked and their internal metal fittings from instantly corroding, we had mounted the fixtures with wing nuts on the bolts and installed separating connectors in wires. Then, a few years ago, we started switching our fleet of trailers over to LED lights and have been very happy with their longevity, even when dunked with every launching.
Kent and Audrey Lewis
Submersible LED lights are brighter, longer lasting, and quicker to illuminate than their incandescent predecessors.
LEDs, light-emitting diodes, provide bright lighting for trailers, much brighter than incandescent bulbs, making trailer lights more visible even during daytime towing. This is especially important with tail lights tucked under overhanging boats, making them harder to see. Research has shown that LED lights reach full brightness milliseconds faster, which translates to as much as 16′ more braking distance for vehicles following at 65 mph. And LEDs are less susceptible to failures caused by vibration while traveling down the road, and have a much longer life than incandescent bulbs, as much as 100,000 hours.
Kent and Audrey Lewis
Because LEDs draw far less power than incandescent bulbs, additional fixtures can be added without overloading the towing vehicle’s fuse box.
Our friend John built a beautiful Penobscot 14 and, worried that someone might drive into the back of the boat, added vertical and horizontal light strips to the back end of his trailer. We have also opted for supplemental lighting and attached LED lights to the top of our trailer’s guide posts. Our friend Eddie owns a boat-trailer business, and has sold many red LED light strips to folks who use them to make light bars that attach to a boat’s transom, providing additional lighting. He recommends adding a second plug to the vehicle’s wiring harness, and giving the light bar its own plug and wire so it can be easily disconnected and connected at the ramp. LED lights, because of their low amperage draw—one-tenth of incandescent equivalents—can be added to the trailer lighting without overloading the towing vehicle’s circuit and fuse. A four-way plug and wire to the light bar provides the ground.
SBM
This square submersible LED fixture is an equivalent replacement for common trailer lights. The square fixture’s LEDS are protected by permanently attached red lenses. Note the ground wire screwed to the trailer frame in the upper left.
SBM
This rectangular fitting has removable red lenses and a clear lens in the bottom to illuminate the license plate. The fixture doesn’t have watertight seals on the lenses as it doesn’t require them. Water drains through the bottom.
SBM
The LEDs inside are all protected by interior clear lenses, permanently sealed and watertight.
When shopping for LED trailer-light kits, look for fixtures with submersible, sonic-welded housings, even though most LED trailer lights have sealed diodes and electrical components that can stand a dunking at the ramp whether the housing is sealed or not. Housings can be permanently sealed because the LEDs have such long working lives and won’t require replacement. It is usually easiest to buy an entire kit that includes wire and plug, as these parts degrade with age. Make sure the wire is long enough for your trailer. If the wires are enclosed by the trailer frame parts, use the wires as you would an electrician’s fish tape to pull the new wires through.
SBM
This sealed amber clearance light is grounded to the trailer. This replacement required drilling a new set of holes for the screws that attach it to the trailer frame.
Some kits include amber clearance lights for trailers equipped with them; white LED back-up lights are also available for towing vehicles with connectors equipped with a wire to power them.
LED trailer lights have kept us free from unexpected interruptions to boating outings, will save us plenty of lost time troubleshooting inoperative trailer lights, and have cleared out a glove box once full of spare incandescent bulbs.
Kent and Audrey Lewis maintain a fleet of five trailers to haul around a small armada of mess-about boats. Their adventures are blogged at Small Boat Restoration.
Submersible LED boat trailer lights are available from many automotive, marine hardware, and online retailers. Kit prices range from $20 to $40.
Is there a product that might be useful for boatbuilding, cruising, or shore-side camping that you’d like us to review? Please email your suggestions.
There’s no easier way to douse a jib than with roller furling, and Harken, with a line of small-boat furlers, has brought the ease and convenience normally employed by larger boats within reach of small-boat sailors. Unlike furlers on larger boats, which use a rigid foil that spins to furl the sail, Harken’s small-boat series uses stainless wire for the forestay, simplifying the setup and lowering the cost. These small furling drums are available in both conventional single line and the newer endless-line style.
Photographs by the author
This hoistable swivel, used here with the conventional furler drum, is installed over the forestay for a regular hanked-on sail to be hoisted and furled. In this picture, the peak of the sail is attached via a pendant—the gray Dyneema and red lashing line—to set the jib peak below the jumper stays, so they do not interfere with it. The sail will be hoisted with the blue halyard attached to the swivel.
With the conventional furler, pulling on a jibsheet unfurls the sail and pulling on the 4mm furler line furls it; the latter doesn’t spool line, so the line can be thicker and easier on the hands. While the conventional drums work perfectly fine, the endless-line type can handle a larger sail and provide finer control over the rotation of the tack, allowing one to fully unfurl the sail without relying on the sheet tension, and helping to overcome any curl that may be induced into a sail that has spent significant time tightly rolled on the furler.
This endless-line furler on a bowsprit will be attached to a straight-luffed code-zero spinnaker. The peak of the sail will be equipped with a swivel. This type of furler isn’t limited by the amount of line it can coil, making it more versatile for larger sails than the conventional furler.
The endless-line type can also be used to furl some of the more straight-luffed flying sails, such as code-zero spinnakers or gennakers common on beach cats and multihulls, and would be more suited toward jib setups under less tension, such as jibs used on traditional rigs with unstayed masts.
These Harken furlers employ the drum at the tack, a wire installed into the sail’s luff, and a swivel at the head of the sail. The luff wire becomes the forestay, and this combination is spun to furl the sail. This configuration is ideal for smaller trailerable sloops (where the mast is removed for trailering) and boats with traditional unstayed rigs, but makes it impossible to change or remove the sail without disconnecting the forestay on boats that rely on forestay tension to support the mast.
On these boats with tensioned standing rigging, a slightly more complicated setup can be used to enable sail changes without disconnecting the forestay. In this configuration, the furler is installed at the base of the forestay and a swivel is installed at the top. The forestay connects these, and a sliding hollow swivel is installed over the forestay. When installed in this manner, the tack of the sail is attached to a fitting at the furler drum, and the head is attached to the hollow, hoistable swivel. The sail is hanked onto the forestay as usual, and the hoistable swivel is hoisted by the jib halyard. While slightly more expensive and complicated, this setup enables sail changes and allows you to set the jib halyard tension independently of the forestay tension.
One important thing to note is that these furlers do not enable roller reefing as there is nothing to prevent the head and tack from furling and unfurling unequally and, therefore, sail shape cannot be maintained on a partially furled sail. Modifications may be necessary to your sail in the form of a different luff arrangement that incorporates a stainless-steel wire or high-tech Dyneema line to strengthen and stiffen the luff. If the sail will be left furled and hoisted for extended periods, UV protection to the sail’s foot and leech is a recommended addition.
I’m very happy with the performance of these furlers on my boat. Managing the headsails has become so easy that I rarely motor into or out of my mooring, opting to sail instead; singlehanding is also made much easier. I’ve also found that I am much more likely to grab a quick afternoon or evening sail now that the jib is stored on the furler with the hoistable furler setup and UV protection, as I spend more time on the water and less setting up and putting away.
Robert Hodge lives aboard a 42′ sailboat in Seattle, and cruises Puget Sound on his 1960s wooden Lightning that has been restored and extensively modified. He works seasonally in commercial ship repair in local shipyards and in the retail store at Fisheries Supply. He is a veteran of two first-leg Race to Alaska attempts and has plans to compete in the full R2AK in 2021.
Harken’s full range of small-boat furlers is available in individual pieces and in kits. A basic setup for a low-load application runs a little over $300, and the more heavy-duty ones come in at around $750.
Is there a product that might be useful for boatbuilding, cruising, or shore-side camping that you’d like us to review? Please email your suggestions.
If you had the good fortune to grow up in the 1950s and ’60s, when the Sears catalog, not Amazon, was the source of everything you could ever want or need, you’d remember the Advent excitement of scanning page after page of pictures of toys, printed in muted colors on paper as thin as that used in Bibles. As a young Dave Gibson leafed through the Sears special year-end Christmas Book, he traced lopsided circles around everything that struck his fancy, which was more than half of the offerings for kids. Of course, he was far too young to order anything on his own, so he would count himself lucky if his parents checked the catalog and bought only one or two things as presents. But the dozens of things he circled were more than a wish list, they were the treasures for the imagination no matter what he got for Christmas.
Photographs courtesy for Dave Gibson and Dave Elliott
Dave, not a loyal British subject, named his kayak after the Royal Highness of his kingdom.
His habit of circling the stuff of dreams didn’t abandon him when, a half-century later, at the age of 58, he leafed through a catalog from the Pygmy Boat Company of Port Townsend, Washington. Among the kayaks featured, there was just one that he circled: the Borealis XL. It was the “XL” that caught his attention. At 6′4″ and 230 lbs, with size 12 feet, he was a tight squeeze in most kayaks. The Borealis XL was designed for kayakers weighing 230 lbs and more, the cockpit was stretched to make it easy for long-legged paddlers to get aboard, and the high foredeck would accommodate feet up to size 15. Dave cut the page from the catalog and pinned it up at home, thinking, “One day I am going to build that boat.”
The cockpit of the Borealis XL is extra long and deep, big enough to fit a paddler as tall as Dave is.
Along with all of the excitement that the Sears Christmas catalog provided came lessons in patience—weeks could pass between drawing the circle and opening the gift-wrapped box—lessons that held Dave in good stead even in his 60s as he continued daydreaming about building a kayak and paddling something he had put together with his own hands. Dave couldn’t justify diverting funds from family and household to indulge himself in a Borealis kit, so the Pygmy catalog page stayed pinned to his wall for close to ten years.
Dave and his wife, Kathi, were living in Cypress, Texas. He was nearing the end of a 42-year-long career as a minister and looking forward to retirement, when in 2018 he was asked by a church in McKinney, a town north of Dallas, to fill in for a pastor taking a sabbatical. He eagerly accepted the invitation and spoke for them for the 13-week opening while still working his other ministry position.
At the end of Dave’s service to the McKinney church, the congregation wanted to present him with a gift of thanks. Being Texans, their first thought was a pair of cowboy boots, fancy ones with a price tag of $1,500. Perhaps unaware that a man who is 6′4″ doesn’t need to be elevated any higher on 2″ boot heels, they wisely consulted with Kathi before making the purchase. She told the church representatives, “I am sure he would be grateful for them, but what he really wants is a kayak kit.” Quite pleased to be giving Dave something he had wanted for years, the representatives purchased the kit (and saved the church $400 in the bargain).
For Dave, getting afloat in the kayak he built was a moment well worth the wait of over a decade.
After preaching one of his last evening services to the congregation, the leaders of the church asked Dave to join them for a meeting and then surprised him with the gift. It wasn’t a big gift-wrapped box; the kit in it had been shipped to his son, Grant, in Boise, Idaho, where he and Kathi would soon move upon leaving Dallas. What Dave received that evening was a picture of the Borealis XL. He was overjoyed with the parting gift.
Dave and Kathi moved to their new home in Boise but he continued serving in Dallas for another year, commuting back and forth every other week. The kit stayed in Grant’s garage for another year. Dave then retired and the house he and Kathi bought, a fixer-upper, kept them busy for another year. The kit, at least, was in the garage where it would be built. Someday.
Two years after being given the kit, Dave was ready to start and pulled the plywood pieces out of the box they’d been shipped in. The visions of his dream dimmed as the garage light fell upon the dozens of pieces of computer-cut plywood and every page of the lengthy instruction manual. Dave doesn’t consider himself a skilled craftsman; projects are an exercise in patience and determination, and often require help from a friend or online videos. While the kit pieces were so precisely cut that they fit exactly and the instructions were clear and comprehensive, the scope and complexity of the stitch-and-glue build was overwhelming. “I had not even started,” he said, “and I was buffaloed.”
Looking online at the Pygmy Borealis XL page, he noticed at the bottom, in small print: “To check out Dave Elliott’s photographic blog of building a Borealis, click here.” The link led him to Dave Elliott’s comments and photographs of the Borealis XL he had built. It wasn’t the first Pygmy kit he had put together; Dave had first built two for his nieces and nephews to use at a family retreat in Maine, then two more for a friend in Montana. All of them were a tight fit for his 6′2″, 235-lb frame, so he ordered a Borealis kit for himself. In the blog he made an offer to help other kit builders.
Rev. Dave (as we’ll call Dave Gibson now) connected to Dave (Elliott) through Pygmy and corresponded via email and phone. They hit it off right away, but despite all of the help, the project made only slow progress. “I wouldn’t say I begged Dave to come out,” Rev. Dave recalls, “but it was pretty close.” Dave drove to Boise—over 450 miles from his Montana home—and spent five days at the Gibson household. He had brought his own Borealis with him to give Rev. Dave an afternoon of paddling to energize him for the work ahead. Over the next four days, the two Daves spent long hours working together, and transformed the pile of plywood pieces into a kayak that needed only finishing touches that Rev. Dave could do on his own.
Rev. Dave had shared with his helper and new friend his decision to name the kayak HMS KATHI LENETTE to honor his wife. After Dave returned home, he had the name cut in vinyl and mailed the port and starboard copies to Rev. Dave. Kathi learned of the name her husband had chosen for the christening only when she saw it fixed to the bow of the newly varnished kayak. “One would think that a woman would be pleased to have a boat named after her,” Rev. Dave observed. “This woman was not. Maybe it related to my habit of doing things without asking her or maybe she had a little bigger vessel in mind for her namesake.”
Fast friends Dave Elliott, left, and Dave Gibson, right, were a fortunate meeting of an experienced kayak-kit builder and a kayak-kit builder just getting started.
Rev. Dave had spent about 150 hours on the build over the course of 10 months and planned a maiden outing for August 2020, on the lakes of Grand Teton National Park, in northwest Wyoming, the corner of the state bordered by Idaho and Montana. Among the group of friends who came with their own kayaks and a canoe to take part were Dave and his wife, Carol, having made the 200-mile drive to be there.
The Rev. Dave, left, and his friend Dave, got together with their twin Borealis XL kayaks in the Grand Teton National Park for the maiden voyage of the HMS KATHI LENETTE.
The fleet paddled String Lake, made a portage to Leigh Lake, and paddled across that lake to their first campsite. Rev. Dave found HMS KATHI LENETTE a joy to paddle. Accustomed to canoes that “felt like you were pushing the lake ahead of you,” he was impressed with his kayak’s speed, even though it was loaded with over 100 lbs of gear. The following day, the wind lumped up swells 4′ high, making the 3-mile paddle to the next campground challenging for the group, but Rev. Dave made good headway; “KATHI rode the swells like a cork.”
With Wyoming’s Mt. Moran towering above Leigh Lake to an elevation of 12,605’, Dave paddles HMS KATHI LENETTE toward a campsite in the lake’s northwest corner.
There’s no telling how many things Rev. Dave has circled in catalogs. Most of them were only his in daydreams. The kayak he lassoed with his pencil demanded a decade of patience, but ultimately it was the perfect present and well worth waiting for.
Do you have a boat with an interesting story? Please email us. We’d like to hear about it and share it with other Small Boats Magazine readers.
Paul LaBrie is new to professional boatbuilding, but the design he chose for his first commercial project is one of the oldest in this publication. CARPENTER was drawn up by L. Francis Herreshoff in the summer of 1929—his Design No. 41—and featured in his book Sensible Cruising Designs.
In an era when small boats were less commonly created for their own sakes, Herreshoff devised CARPENTER as a tender for the 50′ auxiliary power cruiser WALRUS. (The names come from Lewis Carroll’s poem “The Walrus and The Carpenter.”) He described CARPENTER as being a “sort of cross between a whaleboat and a dory, for she is whaleboat-shaped above the waterline, but has the narrow, flat bottom of the dory. The combination would make an admirable seaboat, whether loaded or light, yet a boat that would also take kindly to being beached.” He went on to explain that the “turtlebacks fore and aft provide dry stowage space and extra buoyancy,” and that “the rig is extremely versatile, for…there is an additional mast position at the forward end of the centerboard trunk, which would allow sailing her as a catboat with either the big sail or the small one.” In short, Herreshoff mused, “she would make an excellent secondary cruising boat for exploring small waters within range of the WALRUS’ anchorage.”
For Paul LaBrie it was love at first sight. About 10 years ago a friend gave him a copy of Sensible Cruising Designs and as soon as he saw the drawings for CARPENTER, he “just fell in love. I always thought, if nothing else, it would be a fun boat to have for myself. Then two years ago we moved to Maine—we have a log home in the woods with a barn and access to lakes, the Penobscot River, and the upper Penobscot Bay. Once I’d built the new shop it seemed that CARPENTER was ideal to be my first boat.” Paul had built boats before: an English punt for his son, two kayaks—one an Aleut baidarka, the other a “tortured-ply” Severn from a Chesapeake Light Craft kit—and a strip-planked canoe, but CARPENTER was the “first bigger boat” and the first to be built “on spec.”
Photo by Jenny Bennett
The characteristics that made the L. Francis Herreshoff–designed CARPENTER a fine companion to the power cruiser WALRUS for day treks also make her a fine daysailer and gunkholing boat.
I met up with Paul the day after his first sail in CARPENTER when, despite a few minor details that he felt needed attention, he was pleased with how things had turned out.
Just as he had surmised when first he saw CARPENTER’s lines, she is, indeed, a pretty boat. Double-ended with smoothly curving turtleback decks fore and aft, her sheer sweeps pleasingly from end to end and is picked up in each of her narrow lapstrakes. Her shape is reminiscent of the lifeboats seen on oceangoing ships of the early 20th century, but her construction is altogether lighter—with an overall length of 18′ and a beam of 4′ 6″, she has a total hull weight of just 400 lbs. Following the lapstrake building technique described in Tom Hill’s book Ultralight Boatbuilding, CARPENTER’s glued side planks are of 7mm BS1088 meranti plywood, while the single-piece bottom board is of 18mm meranti ply covered externally with Dynel fabric and epoxy mixed with graphite to give a strong abrasion-resistant finish in anticipation of the boat being beached. For the rest, Paul used native lumber: ash for the frames, seats, and gunwales, and white pine strip planks for the decks—these he built in situ before removing them to glass-sheathe them top and bottom. The decks have a pleasing smooth-radiused curve, which Paul thinks may not have been Herreshoff’s original intention: “I think he would have built them with a flat top and vertical board, but I think the curve is prettier.” Like the bottom board, both the centerboard and rudder are in 18mm meranti plywood finished with epoxy and graphite powder; the centerboard and lifting rudder blade are both weighted with lead pockets (the rudder follows the designed profile, but Paul made it lifting for beaching).
Photo by Jenny Bennett
Her flat bottom makes CARPENTER an excellent boat for beaching, yet she has an elegant lapstrake appearance above the chine.
It’s always a treat to go sailing in someone’s new pride and joy, and when its performance lives up to the sweetness of the appearance, it’s a true joy. Paul and I embarked from his father’s dock in the upper reaches of the Piscataqua River on a day of little wind, yet we slipped right along, the chuckling of water against the narrow strakes a cheerful accompaniment to our conversation. Despite the strengthening ebb current (always an issue on this river that marks the southern border between New Hampshire and Maine), CARPENTER made good headway, and, as was to be expected given her light weight, she responded quickly to even the smallest breath of air. Paul told me that he’d heard criticism that the design is undercanvased—with the mizzen measuring just 19 sq ft and the main about 50 sq ft, it is certainly a small sail area, but judging by her progress that day I would have no qualms about it. Indeed, the reverse of the argument is that in a blow she could keep sailing when, perhaps, others of her size and narrow beam would run for shelter. For our outing we had set both main and mizzen. Sadly the wind never filled in enough to see how she fares cat-rigged with the main or mizzen mast stepped through the forward thwart, but I would expect her to remain well balanced. Under her ketch rig she tacked and jibed with grace, held a steady course on all points, and with no headsail to push her off, lay head-to-wind calmly and steadily whenever required.
Photo by Jenny Bennett
Yoke steering is necessitated by the centerline mizzensheet lead and works very well in a long, fine hull.
Inevitably with a new boat and an early outing we had one or two teething problems but with a bit of experimenting ironed them out. As we set off I found that she had rather pronounced weather helm, and this didn’t help me familiarize myself with the push-pull tiller. First I tried slacking off the mizzen sheet a couple of inches, and that did help but only with some loss of performance. Next we sheeted in both main and mizzen and raised the centerboard just a few inches—success! The helm was immediately lighter and, even when heeled to a gust, no longer a problem. The tiller did take some getting used to. For anyone accustomed to a conventional helming system it will surely seem awkward at first, but after awhile I did find that it became—if not quite second nature— at least logical.
Photo by Jenny Bennett
With her rig struck, CARPENTER rows and maneuvers well, with either one oarsman or two.
After a happy couple of hours’ sailing we returned to a beach by the Dover Point public landing and ran CARPENTER up on the shingle beach—just as she is designed and built to do. Her flat bottom now came into its own—she sits perfectly upright so that you can lean in and de-rig without grinding the topside lands into the beach. The masts and spars all fit within the boat’s length (one end of the mainmast tucked into the forward storage locker) so that you can row unimpeded, and trailer the boat without the need for support crutches. Once we were all tidied away Paul rowed around to the ramp, and within minutes CARPENTER was on the trailer and hitched to the back of the car—the ideal scenario if all you have time for is a short morning’s outing, or you’re lucky enough to be returning from a long weekend of camp-cruising with a friend.
L. Francis Herreshoff described his CARPENTER design as a cross between a dory and a whaleboat, flat-bottomed with well-rounded sides. Her rig is simple and versatile, with an alternative maststep at the forward end of the centerboard trunk for sailing single-masted when the wind pipes up.
This Boat Profile was published in Small Boats 2008 and appears here as archival material. If you have more info about this boat, plan or design – please let us know in the comment section.
I’ve been the subject of a helluva lot of flattery over the past three days—not to say that I don’t appreciate it,” said Jim Hulm, beaming, while working his fantail launch alongside a floating dock at Connecticut’s Mystic Seaport. It was a Sunday in June, the third day of the 2007 WoodenBoat Show, and Hulm’s 26-footer, JOLENA III, had created a buzz among spectators. Its power plant, on the other hand, had created hardly any buzz at all.
Hulm, an Englishman living in New Hampshire, had built the boat a few years before to a modified design by Iain Oughtred—who had developed the plans for a client in England. The original was 30′ long, and had a cabin and head and other accoutrement. Hulm shortened the distance between the construction molds, creating a hull 4′ shorter than the original boat. “Iain was quite excited about that,” he said of the modification, “because it would give more spring to the sheer—which it does.” The shorter boat has no cabin. It’s an open day launch.
Photo by Matthew P. Murphy
JOLENA III is an adaptation of an Iain Oughtred design. She is inspired by the steam powered Thames River launches that came into vogue in England in the 1860s, but her propulsion system and construction are thoroughly modern.
The builder changed the propulsion, too. The 30-footer was launched with “a big old gas engine about amidships”—though designer Oughtred reports that the original boat is now electric powered. Hulm’s 26-footer, on the other hand, has had an EVA Advanced Electric motor since its launching. “EVA [Electric Vehicles of America] is a small company that set out to provide vehicle conversions — for deliver y vans and the like.” Hulm chose a 36-volt motor, though it will withstand the 48 volts of his battery bank. The battery bank is composed of eight 6-volt golf-cart batteries. The motor is coupled to the propeller shaft by a timing belt running at a 5:1 reduction ratio and turning a 20 x 19 three-bladed bronze wheel. “Dave Gerr’s book, The Propeller Handbook, was my bible when I was putting this together,” said Hulm.
What does this machinery translate to? The motor puts out about 5 hp and the boat will travel 20 miles on a single charge. Hulm said that “people often ask, ‘What if you slow down? Do you get better mileage?’ The answer is no; it’s still 20 miles [on a single charge],” regardless of speed. “While it’s true that the power needed to move a displacement hull drops off dramatically at lower speeds,” he said, “the electrical efficiency of the motor also drops at lower RPM. Running at 5 mph for 4 hours puts the same demand on the batteries as 2 mph for 10 hours.”
This is the first boat Jim Hulm has built from scratch. His previous experience included the construction of a Glen-L 14 kit sailboat and the restoration of a Turnabout. He then restored an 1890s fantail launch. “I restored that and put it in a museum,” he said, “and then I got to this.”
Richard M. Mitchell, in his book The Steam Launch (International Marine, 1982), gives an excellent history of steam launches. He notes the year 1860 as “a convenient peg” after which steam power in small boats became possible. “They [the boats] grew lighter, trimmer, thriftier, and more numerous, and as their marketability increased, competent builders began to produce a few, at the same time making further refinements.”
One of the principal refinements of this era was the development of the elliptical, overhanging stern— the so-called “fantail.” This stern configuration allows a narrow, fine-lined shape like a steam yacht to swing a big, slow-turning propeller. The stern, Mitchell notes, is “only incidentally beautiful.” Some might say it is downright seductive, for that stern shape has outlived the power-plant technology that gave it life.
Steam launches developed on the Thames in response to the demand for livery boats. There is a long tradition in London of fluvial courtships, and thus a tradition of oar-powered pleasure boats. “Commercial steam launches,” writes Mitchell, “evolved out of rowed boats and small working steamers and were shaped not by custom but by determined efforts to make money with engines in boats.” Between 1868 and 1875, one builder, Yarrow, had built 350 launches “at first for gentlemen and their ladies along the Thames, later to be used as ship’s boats on oceangoing vessels.”
Photos by Matthew P. Murphy
Jim Hulm (at helm) installed in JOLENA III a motor devised for electric delivery vans. The timing-belt drive provides a reduction ratio of 5:1.
One of the beauties (depending on your bias) of power-boating on the Thames is its strict speed limit. It varies between 4 and 8 knots, so there is no pressure to develop faster, resource-guzzling boats. An outing under power remains, essentially, a motorboat excursion at rowing speeds. In fact, there is a unique craft there—a cousin to the early fantail launch—that appears fast in profile, with its sloping stern (almost a reverse counter) and rakish windshield. Its speed, however, is restricted to the low legal maximum.
JOLENA III, said Iain Oughtred, “is a fairly typical Thames River launch.” Her predecessor was designed “for a guy from Egypt who wanted an impressive-looking launch,” and was built of glued lapstrake plywood. In addition to tweaking the original’s dimensions and power plant in the creation of JOLENA III, Jim Hulm changed the construction. He built his boat of 3⁄8″ strip planks covered with two diagonally opposed layers of cedar veneer, creating a smooth-skinned hull more in keeping with the early carvel-planked launches. The hull is covered inside and out with 10-oz fiberglass cloth, with an additional layer of 4-oz Dynel cloth on the outside. Jim Hulm accomplished much of the modification on his own, in conversation with designer Oughtred. Strip planking, said Oughtred, “is just not a type of construction that interests me.” Oughtred is known mostly for his exquisite small sailing craft, and glued plywood is his construction method of choice.
People interested in owning a boat such as JOLENA III, but not interested in building, would do well to speak with the folks at Elco. They manufacture a line of fiberglass fantail launches, and also sell complete drive systems. Their power plants range from below 2 hp to 8 hp, and there’s a hybrid arrangement (think Prius), as well. These systems would be of interest to readers wanting to build a boat, but not wanting to engineer the mechanicals from scratch, as Jim Hulm did. Other fantail launch plans are available, too. Phil Bolger has drawn an exceptionally pretty one (a 23-footer whose plans are available from The WoodenBoat Store, ). JOLENA III has a varnished deck, seats, and console—and plenty of other brightwork, too. This will raise maintenance concerns for some readers. Here’s what Jim Hulm has to say about that: “I haven’t put a lick of varnish on it in five years.” The boat’s brightwork is in fine shape—a testament to the benefits of thoughtful storage. He keeps the boat under cover when it’s not in use. “People talk about the high cost of maintaining a wooden boat,” said Hulm, but he has demonstrated that the cost can be reasonable “if you keep it [the boat] in the right environment.”
At the helm of JOLENA III, Jim Hulm is a happy man. During our brief excursion on the Mystic River, he reduced the satisfaction of building his boat to these three things: “First,” he said, “it’s the satisfaction of building something with your hands; second, it’s the intellectual challenge of laying out the interior; and third, it’s the artistic challenge of creating something that just plain looks nice.” Uncounted builders worldwide owe a debt to Iain Oughtred for giving them a leg up on point number three.
JOLENA III was built to the modified lines of this 30-footer that Iain Oughtred designed for a customer in England. Jim Hulm reduced the station spacing for his boat, creating a 26-footer.
As of November 2022, Plans for the 30′ version of JOLENA III do not appear on Ian Oughtred’s website. The review appears here as archival material.
Is there a boat you’d like to know more about? Have you built one that you think other Small Boats Magazine readers would enjoy? Please email us!
Sam (S.S.) Crocker designed the 19′ 9″ pocket cruiser Sallee Rover as a yawl in 1953; later, in 1955, he drew the sloop-rigged version seen in the accompanying photographs. Making just a few changes to her for aesthetic purposes, Joel White built this sloop in 1967 for his father, E.B. White, and named her MARTHA.
E.B. White enjoyed sailing her for many years in the waters of Eggemoggin Reach and nearby bays. With the passage of time and E.B.’s eventual health problems, his use of the boat diminished, and MARTHA would sit at her mooring in Center Harbor for most of each sailing season, used only occasionally by grandchildren and great-grandchildren. I was encouraged by Joel, along with a few others, to use her as often as I liked, and over the next few summers I grew comfortable, confident, and at home sailing E.B.’s little sloop.
I’ve had numerous visits of good fortune in the 24 years I’ve been working here at WoodenBoat School in Brooklin, Maine, and high on that list is getting to know and work alongside Joel White at Brooklin Boat Yard in the mid-1980s and, more important, becoming friends with him. I will treasure that friendship my entire life.
Photo by Matthew P. Murphy
MARTHA is an example of S.S. Crocker’s Sallee Rover design built in 1967 by Joel White, for his father. Here, Keenan Hilsinger, age 11, shows considerable facility at the helm.
After managing the WoodenBoat School shops for seven years, I took over the Director’s helm in 1991. I had recently brought my father up to the area from Pennsylvania and was helping him adjust to life at the Island Nursing Home in nearby Deer Isle. He had suffered a stroke and was battling dementia, so between caring for my dad and my new responsibilities at work, my plate was full. At times, it felt overloaded. Joel happened to phone me at work one day during this chapter in my life and asked if he could come over to the office that afternoon. There was something he wanted to discuss. In those early days of WoodenBoat School, we were often at Brooklin Boat Yard asking to borrow this or that. As the time approached for Joel’s visit, I feared we had overstepped the boundaries and either requested the tap-and-die set once too often or damaged one of the yard’s tools. Within minutes of welcoming him into my office, I was relieved and quite surprised when he explained that his family had decided to sell MARTHA and were hoping I would be interested in becoming her new owner. He asked that I think it over and get back to him. If I wasn’t inter-ested, another individual in town was, and it was important to Joel and his family that the boat remain in Brooklin.
My initial thought was, “Why now? I’ll never find the time to use her with all I’ve got going on.” I resigned myself to the fact that it just wasn’t the right time to take on the commitment of owning such a boat. Later that evening I felt myself drawn over to the boatyard just to take a look at her. She was sitting in her cradle in one of the storage buildings, and as I approached her, it took all of a few seconds to realize that this special little boat was exactly what I needed to help cope with all the anxiety I was often feeling. Returning to the boatyard the following day, I asked Joel if he was certain the family wanted to let her go. After explaining that they wanted to see MARTHA used and appreciated, I accepted his proposal and we shook hands, which sealed the deal. I was profoundly touched that the White family would entrust me with this heirloom, and, as one might expect, MARTHA has brought me and my family countless days of joy under sail exploring the same waters E.B. loved and wrote about.
With her small house, low topsides, spacious cockpit, and simple deck plan, MARTHA is the quintessential pocket cruiser. Her round-fronted cabin trunk fits perfectly with the clipper-bow profile and strong sheerline. Whether sitting on her mooring or out under sail, she always draws admiring looks. Down below, the cabin is small and simple. Two settee bunks, one on each side of the centerboard trunk, suffice for overnight cruising for my 11-year-old son, Keenan, and me. Adequate storage exists under these bunks and forward of the mast. A cedar tabletop fits into the trunk for meals, or a game of cards. Cruising with the basics, we do just fine with an ice cooler, a small camp stove, and a cedar bucket. For the two of us, small is beautiful.
Photo by Matthew P. Murphy
A self-tacking jib and uncluttered foredeck make MARTHA a delight for short afternoon excursions. Her painted surfaces are simple to maintain. MARTHA’s owner estimates he spends 8 to 10 hours per year readying her for the water.
The hull is of shallow draft and wide beam, sort of a cross between a catboat and a Muscongus Bay sloop. She is ruggedly built. The keel is 7″ 9″ white oak and her stem is sided 41⁄2″ and molded about 8″.These are big timbers for a boat only 20′ overall. This hull structure alone incorporates much of the ballast required, which simplifies the construction process. She is planked with 1″ Northern white cedar over 1 1⁄ 4″-square bent-oak frames on 9″ centers, and 1 1⁄ 2″-thick white oak floor timbers. Her deck is 1⁄2″ plywood covered with Dynel and epoxy fastened to oak beams. With both the designer’s and builder’s expertise, she is an extremely stiff and strong boat and is enjoying a long life. Approximately 700 lbs of lead ballast are stored under the floorboards on both sides of the centerboard trunk, and combined with the heavy backbone and 7′ 7″ beam, MARTHA holds her own in a breeze.
Sallee Rover is a project well suited for someone with prior boatbuilding and woodworking experience. In fact, she’s such a great example of classic carvel construction that her construction details were drawn by Sam Manning and published by WoodenBoat as a poster over two decades ago in the tenth anniversary issue (“ The Anatomy of a Wooden Boat,” WB No. 60). Individuals interested in building to the Sallee Rover design may purchase the six sheets of plans. They won’t be disappointed in the process, or in the results. Weighing 4,000 lbs, MARTHA is easily trailerable by car, pickup truck, or tractor.
Once rigged and in the water, she provides a steady platform with no unexpected motion. And she is stable. Complementing MARTHA’s reassuring initial stability is her deep, self-draining cockpit. Her marconi mainsail and self-tending jib total 218 sq ft, which allows the boat to sail well on most points in moderate and strong winds. The main is rigged with a single row of reefpoints, which come in handy if the wind blows over 15 knots. MARTHA performs best off the wind on a reach or a run. With both sails trimmed and pulling, she sails herself, and all I need to do is adjust the jibsheet from time to time. Sheisa relaxing boat and not sensitive to shifting weight. Her helm is pleasant, with a steady feel and just enough weather helm to keep one attentive. She answers her barn door rudder instantly—even to tiny corrections. The oak tiller is the only varnished piece you’ll find aboard.
Photo by Matthew P. Murphy
Although she’s only 20′ long and displaces about two tons, MARTHA feels like a big boat and will accommodate two for a weekend excursion. At the end of the season, you can haul her home with a small truck.
Of course, a builder can choose a highly polished finish if desired, but MARTHA’s painted surfaces look right on this workboat-inspired hull, and yearly maintenance is minimal. I do all of this work on MARTHA myself. During the winter months, she lives in WoodenBoat School’s lumber barn, which has a dirt floor, the ideal storage environment for a wooden hull.
Drawing only 2′ with the centerboard up, MARTHA can take us into shallow waters most bigger boats avoid. An 8-hp, single-cylinder Palmer Baby Husky gasoline engine is installed under a big hatch in the cockpit floor. I very rarely use this anymore and, for a variety of reasons, am planning on switching over to a small, solar-powered electric motor in the near future.
These days, Keenan is handling MARTHA quite ably on his own, and it’s fun listening to him dream about additions he would like to make down below, changes to the rig, and which distant ports he’d like to visit when he calls the boat his own. We share a lot of good times on the water and I savor every one of them. Over the years I’ve found MARTHA to be extremely gratifying to sail— exhilarating really, when conditions are right—and I’m certain my son will experience similar sensations in the many sailing seasons to come.
S.S. Crocker drew this boat as a yawl in 1953; the sloop rig came along two years later.
Boat plans are available from The WoodenBoat Store, P.O. Box 78, Brooklin, ME 04616; 800–273–7447.
Is there a boat you’d like to know more about? Have you built one that you think other Small Boats Magazine readers would enjoy? Please email us!
This boat is a pint-sized version of a well-known and respected type that worked Lake Michigan from the late 19th century until the beginning of World War I. It’s called a Mackinaw boat—though historically that name applied to a range of boats that have only tenuous family connections.
The plans for this 18-footer, designed by Nelson Zimmer, appeared in WoodenBoat magazine in July 1978. The first example was built as an exhibition in the lobby of a bank. Subsequent accounts of that project suggest that it remained on display there, never to be launched.
The WoodenBoat design review stated that “The spars and gear are simple, inexpensive, and not particularly finicky. An unusual detail is the main and mizzen halyards’ arrangement, combining peak and throat into one line for each sail.” A single halyard for a gaff-rigged boat cuts the volume of spaghetti in half.
Photo by Matthew P. Murphy
A Mackinaw in Maine. The 18’ Nelson Zimmer–designed Mackinaw boat, with her ample sail plan, takes full advantage of a dying southwesterly. Although the plans specify a single halyard for each gaff sail, the boat shown here has both throat and peak halyards.
The boat we sailed for this review was launched by Doug Hylan, a designer-builder and frequent WoodenBoat contributor, in 1982. (In a way, the boat launched his career.) Hylan did not use the single halyard specified, instead opting for separate throat and peak halyards. Twenty-five years later, he says he’d revert to Zimmer’s rigging plan, jokingly calling the boat the “world champion for number of feet of line per foot of boat.” There are other complications, too, though they are easily remedied. “I think the rig made sense,” said Hylan, “when the boats were 26′ long.”
Why?
“Because they had half the complications per pound of displacement.”
Hylan’s boat is now in the fleet at WoodenBoat School. I’ve long been fascinated with the type, and finally sailed WoodenBoat’s in August, trading the helm back and forth with my colleague Aaron Porter, an editor with Professional BoatBuilder magazine and a veteran schoonerman. The boat went like a freight train in a 7–10-knot breeze. She was also a handful, which I’ll describe in the form of a short digression into nomenclature and sheet leads. First, this boat is a ketch, though it looks like a schooner. The masts are of equal height, but there’s a few square feet of difference between the mainsail and the mizzen. The mizzen is set on a boom, and its sheet leads to the helmsman’s hand—sort of like a mainsheet would, except it’s a mizzen sheet. There is no cleat for it, though there’s archaeological evidence of one, in the form of four screw holes in the sole. Hylan’s boat sat for several years before coming to WoodenBoat, and the fate of the cleat (a swivel-based cam cleat, Hylan said) is lost in the mists of time. Its presence seems to be a linchpin to good solo sailing: you need a place to belay the mizzen while tacking the boat.
Back to nomenclature: The mainsail, then, is the forward gaff-rigged sail, and it is boomless. It has two sheets, as would a jib, and these lead to jam cleats near the helmsman, and are meant to be controlled by the crew. The reach to them is awkward for a solo sailor. A turning block and an ergonomic lead across the boat—and a means of easily belaying (and casting off)—would ease the job of tacking.
The jibsheets lead to jam cleats on the side decks, and need no further comment—except to say that the reach to them would be awkward, but manageable, for a solo sailor. This boat is set up for two or more.
I’ve gone on a bit about the shortcomings of the running rigging of our example boat. None of this is meant as a criticism of Hylan, whose catalog of designs and list of new builds and restorations speaks for itself. This boat sat for several years after Hylan had been using her regularly (and singlehanding with ease, he recalls), and a critical cleat has gone missing. As a school boat, she usually has ample crew, and so-staffed, the sheet leads as-rigged are not an issue. But for the solo sailor, they matter. I’m glad in a way that I experienced her like this; the absence of these things clearly defined the need. Once tacked and settled down, the Mackinaw sailed beautifully. Did I mention that she goes like a freight train?
Photo by Matthew P. Murphy
The Mackinaw has a boatload of sheets to tend. But, rigged efficiently, the design can be singlehanded. Note that the mizzen halyards are belayed on the mast. If they led to the thwart instead, they’d add some security to the rig.
This paragraph from the old WoodenBoat review sums up the 18′ Mackinaw boat’s niche: “Anyone looking for a roomy, shoal-draft boat which would give a good account of herself in a broad range of wind and sea conditions, and with a variety of loads, would do well to consider this boat. She would be great fun for several people to sail or row, and she could also be a good friend to one seeking solitude. With her shoal draft she could sneak into some pretty tight places, or ground out at her mooring at low water without trouble. She wouldn’t be too big to haul up the beach when winter comes, either.”
Doug Hylan, however, questions the boat’s utility as a camp-cruiser. “She’s too heavy,” he said. “You get tide-nipped, you’re there.” He’s right about that, of course. There are many boats on the market that have this kind of volume—or even more—and yet are lighter. A sailor shouldn’t be completely swayed against camping in this boat, however. A properly rigged outhaul anchor will get it to deep water for the night.
Twenty-five years of hindsight have helped Hylan form another opinion about the boat: He thinks it should be a sloop, rather than a ketch. He’s had more experience with the boat than most people around here—indeed, he nearly dumped her in a sudden squall. I must say, however, that I’m rather taken with the rig (sheet leads aside) as configured—and not just because it looks right. The colossal sail plan would be a delight (is a delight) in evening zephyrs, and shortening options are numerous. Here they are, gathered during a conversation with builder Hylan: For the first reef, you reduce the mizzen. For the second reef, you douse the mizzen entirely, and proceed under full main and jib. For the third reef, you douse the jib, sailing under mainsail alone. A quick study of the sail plan suggests that the boat will remain balanced. Finally, you can reduce and then dump the mainsail, proceeding under bare poles.
Those masts, by the way, are unstayed, and this simplicity of standing rigging provides a great counterbalance to the relative complexity of the running rigging. But, sailor beware: WoodenBoat’s waterfront director reports that the mizzen has jumped its step in the past, on the mooring in a lumpy blow. The remedy for this behavior is simple: cleat the halyard on the partners (the after thwart) rather than on the mast, as it’s done now. The tension of the halyard will keep the mast put.
Photo by Matthew P. Murphy
This 18’ Mackinaw will sail in a range of conditions, though the first reef must be taken early. The reef nettles seen flying here are on the mainsail; they’re the last of four options, before dousing everything and proceeding under bare poles.
Here’s another quote from the 1978 design review, addressing the matter of construction: “She would be a moderately easy boat for the experienced amateur to build, with no particularly complex structures to deal with, and no need to be very concerned about saving weight.”
Which brings us to ballast. My colleague, after being surprised at the boat’s short “carry” when shooting the mooring on his first attempt, reckoned our example could use several hundred pounds more ballast. Hylan concurs; years ago, when he still owned the boat, he removed a portion of her inside ballast and melted it into a shoe that he bolted to the keel, freeing room inside for more lead pigs.
Doug Hylan reckons the boat would take a professional builder 1,200 to 1,500 hours, and thus cost about $40,000 to $50,000 to have one built. As great as this design is, that price has some stiff competition in the marketplace. A professional builder is not likely to make a career building Mackinaw boats. But this should be an inspiration, and not a deterrent, to would-be amateur builders. This figure supports John Gardner’s notion that the survival of traditional small craft like the Mackinaw boat rests in the hands of amateurs. (Gardner was a boatbuilder, a teacher, and the Curator of Small Craft at Mystic Seaport Museum. His writing and teaching inspired many builders to the profession—and many more amateurs to the avocation.) Boatbuilding is fun and rewarding, and to re-create a Mackinaw boat in one’s garage would be a wonderful way to spend 1,500 hours—far more wonderful than two or three years’ worth of sitcoms, in my opinion.
I’m reminded of a story I was told once of a woman who’d built a boat, and was asked how long the project took. The questioner expressed surprise at the hours, and at her dedication. Her simple retort: “It would have taken that long not to build it, too.”
With the after sail a few square feet smaller than the forward one, the Mackinaw is labeled a ketch. The plumb ends and deep forefoot are hallmarks of the type, as is the straight keel with no drag (or slope).
It rarely gets cold enough here in Seattle to keep me from getting out on the water, so I’ve been getting year-round exercise and recreation paddling my Struer K-1 trainer on the canal that connects Puget Sound to Lake Union. The launch ramp is only 1-1/2 miles from my home and I’ve made this outing hundreds of times, so often that it has become an efficient routine that takes well under two hours from the time I decide to take a break from work to being back at my desk, rejuvenated and clear-headed.
This dock, at the ramp just 1-1/2 miles from home, is where I’ve launched the Struer kayak many hundreds of times to go paddling on Seattle’s inland waterways.
When there was a break in the wind and rain on the last Sunday of last November, I changed into my paddling wet suit, loaded the kayak on the roof racks, and headed for the ramp. The news being what it was in 2020, I usually didn’t listen to the radio, and instead put the seven-minute drive to good use, often doing memory exercises. On this particular Sunday, I was trying to remember cast members from the movie Young Frankenstein. Gene Wilder was easy and I could picture Peter Boyle, both as the monster and as himself; his name wasn’t long in coming to mind. I knew that the name of the actress who played the ingénue laboratory assistant was one I’d be able to recall, but I got stuck on the similar-sounding name of Vikki Carr and it took me a while to come up with Teri Garr. Later in the drive, out of the blue, the face of a neighbor I hadn’t seen in over a decade came to mind, and his first name dawned on me in a few seconds: Craig. I was pretty sure I wouldn’t be able to come up with his last name, but a half minute later, after I’d given up trying, it too popped into my head.
Within a couple of hundred yards from the ramp and feeling pretty good that my memory wasn’t too far gone for a 67-year-old, I heard a thump on the car roof and caught a glimpse in the driver-door rear-view mirror of a brown diagonal shape crossing the field of view. The kayak had flown off the racks.
I pulled off the street and walked back to the delicate, 30-lb Struer. It had flipped over and come to rest upside down on a diagonal across the edge of the roadway, half on concrete, half on the dirt and gravel of the median. The car coming up from behind had plenty of distance to stop and the driver rolled down his window and asked if I needed help. I replied “No, thank you. I’ve got it.”
I picked up the kayak, got it out of his way, and carried it back to my car to inspect the damage. Aft of the cockpit there was a T-shaped crack in the deck. It was as big as my hand and had a gumball-sized rock wedged between the jagged edges of one of the tears. The rudder blade was bent from vertical to nearly horizontal and there was a 1′-long hole in the bottom, just ahead of the rudder. I looked up and down both sides of the road looking for a missing piece but didn’t see any stray bits of the hull. I didn’t realize until I got home that the skeg, which guards the rudder, had been punched into the hull and stayed there.
I suppose I could have been angry, but I was numb with disbelief, not by why my kayak could have flown off the car, but by how I could have missed something I had never failed to do in nearly a half century of driving boats to the water: tying one down on the roof rack.
In the instant I saw the kayak in the rear-view mirror, I knew what had happened: I had made one small change in my routine. I have been loading the Struer the same way for years: I open the twin doors to the garage, slide the kayak off the carpeted eye-level shelf it shares with my lapstrake canoe and my son’s two paddleboards, and carry it to the car where I set it on the foam cradles and tie it down. On this Sunday, right after I’d put the kayak on its cradles, I glanced at the garage. The doors were open, as they always are at that point in the routine; I don’t close them until after I tie the kayak down. But one time last year I’d forgotten to close and lock the doors, and I was surprised to see them open when I came back from paddling. Not wanting to forget this, I walked away from the car and closed the doors. By the time I had returned to the car, I had slipped into the rest of the routine—the steps I do without thinking— got in and drove off.
If the bow of the kayak were visible from the driver’s seat, I would have noticed it bouncing and swaying; if I were heading to a distant put-in, I would have, as a backup to memory, rolled the window down, reached up and checked the tension on the rope.
The kayak stayed put for five turns, four stops, a 1/4-mile of arterial westbound at 25 mph, and 3/4 mile of boulevard southbound at 20 mph. It might have been a bump in the pavement that lifted the bow enough for the kayak to take its short flight.
The fall of the Struer from my car’s roof racks left the rudder’s stainless-steel shaft bent nearly 90 degrees.
The skeg, which keeps weeds from getting caught on the rudder, got punched into the hull. I couldn’t find any missing pieces on the road and was lucky that the skeg didn’t fall out through the hole on the drive home.
When I first picked the kayak off the road, the longitudinal part of the crack in the aft deck was tightly holding a piece of gravel; I couldn’t tell what had hit the deck here.
While the stern sustained the most damage, the bow took a hit, too, probably on a bounce as the kayak turned upside down.
As bad as the damage was, I had fixed the kayak once before and already knew how to approach the repairs. It had been air-freighted, brand new, from the Struer factory in Denmark, protected only by a soft, translucent cocoon of bubble wrap and a “Top Load Only” label. The label had evidently been ignored and the kayak made the flight to Seattle under a pile of other cargo. The deck and hull had pancaked, splitting the seam between them and breaking deckbeams free of the gunwales. The corner of a box or a crate had pushed through the bubble wrap into the foredeck, tearing through the plies of hot-molded mahogany. I’d put the kayak in slings and left it hanging from the ceiling in my basement for about two years as I mulled over how I’d put it back in working order.
Repairing the damage done to the Struer in transit from Denmark was rather complicated. Bringing the collapsed deckbeams back into position would restore the boat’s shape; planking clamps could work on the deckbeam forward of the cockpit and the rest required bicycle spokes inserted through the hull—their flared hub ends hooked under the beam ends—and drawn up with blocks of wood and slotted wedges.
The seam between the deck and hull had split in several places. Masking tape limited the spread of epoxy and packing tape drew the edges back together. Blocks of wood under the packing tape pushed the edge of the hull back in line with the deck’s edge.
The cracks made by a box during shipping required gluing a piece of 1/8″ mahogany plywood to the interior side of the deck. A piece of 3/4″ plywood inside temporarily backed the mahogany. Clear plastic food wrap and Plexiglas provided a surface to pull the damaged area flat and provided a view as drywall screws squeezed everything together.
The finished repair of the shipping damage was as smooth as it had been new. I didn’t bother tinting the epoxy to match the mahogany and hide the boat’s history.
Afloat for the first time, the repaired Struer proved a great pleasure to paddle and provided great exercise. It became my most frequently used boat, taken out well over 150 times each year. This time, it won’t take two years to make the new round of repairs. I’m eager to have the kayak available again for the outings I’ve come to rely upon for physical and mental wellbeing. I trust the Struer’s new scars will make an equally indelible mark on my memory, a prompt to tie the kayak tightly to the roof racks.
Harold “Dynamite” Payson, famed small-boat builder, wanted a boat he could row out to the islands of coastal Maine in the morning calm and sail home in the afternoon breeze. He wanted to be able to row standing up, facing forward, as he had done earlier in his life when tending lobster pots off Metinic Island. He was thinking of a sturdy Maine peapod, but wanted something lighter, like a light dory, only more stable. He asked Phil Bolger to design the boat for him and together they brainstormed ideas until both were satisfied. The result was the Sweet Pea.
It’s a cross between a peapod and a surf dory, primarily a rowing craft, 15′ in length, 4′ 4″ of beam, and 150 pounds or so when fitted with the spritsail sailing rig, slipping keel, and inboard rudder. For rowing, the sailing rig can be left behind altogether, the slipping keel and rudder removed from their wells, reducing the weight to just 125 pounds.
Ingrid Code
There is no centerboard or daggerboard trunk taking up precious space in the cockpit. On the deck at each end of the foot well, note the green protruding tongues with fids holding the slipping-keel in place. The tiller is folded back to rest in its notch on the sternpost. All spars and oars will stow inside the cockpit. This Sweet Pea is tender to the schooner NINA and hangs in the davits when cruising; a stainless-steel eyebolt with heavy backing plate at the mast partner (mirrored aft) serves as the attachment point for the lifting tackle.
In our case, we were looking for a tender to NINA, our 45′ Pete Culler-designed scow schooner. We were cruising full time and needed a rugged tender capable of carrying a heavy load of supplies or ferrying guests out to the schooner at anchor. We didn’t want a rubber dinghy with an outboard, but something that fit the aesthetics of the schooner—beautiful, in other words. It had to be a good rowing boat, but we thought it would be a lot of fun if we could sail it, too. Dayton Trubee, NINA’s captain, called Dynamite about a new rowing dory that could have a sailing rig also. Dynamite suggested the Sweet Pea design as the perfect boat for our needs. Dennis Hansen of Spruce Head, Maine, built it for us over the winter of 2002–2003, and delivered a work of art as beautiful as it is functional.
Sweet Pea has a multi-chined plywood hull designed for tack-and-tape construction and the resulting rather open seams are filled and shaped with putty before the hull is fiberglassed. Foam flotation beneath the side decks and the buoyancy compartments at either end of the boat will keep it afloat even if swamped. The bulkheads for these compartments, along with the ’midship frame, give support to the hull and help form its shape as the sheer panels are put in place. The bilge panels go on last, completing the hull.
Ingrid Code
The full-length slipping keel rests against the 1/2″ bottom and is secured only by the two fids fit through the ends of the tongues, which slide into the two wells at each end of the boat. The inboard rudder extends only to the end of the bottom. Sweet Pea’s straightforward, hard-chine construction is evident here.
The two wells for the full-length, 3″-deep slipping keel need to be included in the build only if the boat will be sailed. The slipping keel is an interesting way to go, and eliminates having a centerboard or daggerboard trunk crowding the middle of a small boat. As Phil Bolger describes, the slipping keel is based on those of England’s Norfolk Wherries, 50′- to 60′-long cargo vessels whose keels could be slipped off, while still afloat, before navigating shallow waters, and replaced upon return to deep water. The Sweet Pea’s shallow, full-length keel has two vertical tongues, one at either end, that slip up into small wells that are braced by the bulkheads and decks of the buoyancy chambers. A fid slipped into a hole at the top of each of these two protruding tongues holds them in place above the deck and the keel snug against the bottom.
The round rudderstock has its own deck opening aft of the slipping-keel well; the rudderstock pivots between the coved aft end of the slipping keel and the rounded aft end of the well. The rudder is kept from swinging free when rowing by the wonderfully efficient method of folding the tiller back all the way—180º—to set its end in a notch on the sternpost.
The rowing seats are built in five parts over a jig and are moveable to any part of the boat interior, resting on the parallel ledges that support the cockpit’s side decks. The plans call for two seats, but we’ve found that an extra seat aft (making one deep seat) adds considerably to the comfort of the passenger and doubles as a foot brace for the long-legged rower in the primary rowing position. It works for us because the two seats are butted up against the aft bulkhead. Heel cleats are indicated in the plans, but they’re absent in our boat. When using the forward rowing station, the ’midship frame works well as a foot brace. A savvy builder or owner could add foot braces to fit.
According to Payson, a skilled boatbuilder could complete a Sweet Pea in three weeks to a month working full time. Dynamite Payson’s meticulous instructions on building Sweet Pea in his book, Instant Boat Building with Dynamite Payson, give a detailed account of each step in the process, with a few modifications from Bolger’s suggestions in the plans. All in all, these directions are straightforward and clear, accompanied by photographs at each stage in the process. It would be well-worth studying these 21 pages with care before diving into the project.
Dennis built our Sweet Pea without the stacked foam panels filling the buoyancy chambers as indicated in Payson’s instructions. He left them empty and provided access to the enclosed space with watertight access ports in the bulkheads, two at each end. We’ve found these compartments most useful as places to store a dinghy anchor, a set of stand-up oarlocks, or our lead-weighted sounding line.
Paula Gillikin
Rowed solo from the primary rowing station, the boat is considerably lighter and easy to maneuver. The slipping keel and rudder are still attached in this photo, but can be removed.
Sweet Pea Double-Ender Layout
There are two conventional rowing stations as well as the stand-up rowing station amidships. The two rowing stations are too close together to allow for tandem rowing but can be used to row solo from whichever rowing station achieves the best boat trim. The Sweet Pea rows well even when carrying a heavy load. We’ve had four adults aboard at one time or two adults with schooner provisions.
Paula Gillikin
An unusual feature of the Sweet Pea is its stand-up rowing station amidships. The rower faces forward “to see the rocks before hitting them,” as Dynamite Payson would say. The boat is surprisingly stable when standing. Stand-up oarlocks are essential for this practice.
The amidships station is used for stand-up rowing with tall stand-up oarlocks. One stands aft of center facing forward, propelling the boat by pushing on the oar handles. The motion feels different physically as one rows by pushing forward—and facing forward—rather than pulling the blades backward through the water, looking over one’s shoulder. It’s quite fun! The perspective is different, reminding me of stand-up-paddle-boarding, and approaching shoals are visible well before feeling the surprise of hitting bottom with an oar blade. And the boat is so stable there is no difficulty in being able to stand up and keep your balance. Only a powerboat wake caught beam on will prove momentarily challenging.
We usually row without removing the slipping keel, hoping that we might get in an afternoon sail. It’s easy enough to remove the keel for rowing only, though Payson suggests a skeg be made to fit the aft well to help the boat track straight. Without it, it’ll happily spin in its own length, as I’ve found, and curve off in one direction or the other if I’m momentarily resting on the oars. With the keel in place, coming alongside the schooner or a dock is easily done and the shallow keel will hold the boat in place, keeping it from sliding sideways at the wrong moment. Only a strong side-current or an unusually strong wind will make things difficult, though I suspect that would be the case with any small boat.
Paula Gillikin
When rowing with a passenger, the boat is well balanced using the forward rowing station and bracing one’s feet on the midship frame.
We’ve beached our Sweet Pea many times while out exploring. The breasthooks at each end do make it easier to haul the boat up the beach. It’s doable with one person, but easier with two. We make sure to lift the rudder clear of the sand when beach launching to avoid grit or mud getting up between the rudder and slipping keel, to prevent it jamming the rudder and making it hard to turn.
Since we leave the slipping keel in place, even for beaching, we slide a cushion or small fender under the chine to keep the boat upright. We’ve found removing or replacing the keel on the beach requires two people, one to hold the boat up on one side, the other to handle the keel and rudder. It could be done solo if there were a post or tree nearby to lean the boat up against. The operation can be slightly finicky.
Because the rudder is braced against the aft end of the slipping keel, we’ve always found we needed to remove the rudder also when removing the keel, and that means removing the tiller with its associated acorn nuts and washers, which have a tendency to slip out of your fingers and vanish down the well. Early on, we removed the rudder and slipping keel much more often—and contemplated having a skeg made for rowing only that would utilize the aft well and lighten the boat. In the end, we’ve found it suits us to leave the keel in place, have the option of sailing more frequently, and accept whatever drag it creates as an improvement in the exercise we get while rowing.
We keep the spars and sail inside the boat most of the time, even if just back from running an errand onshore, in case a breeze pipes up for a little sail. Payson talks about chocks on the fore and aft bulkheads to hold the spars off the ’midship frame and bottom panel, but without chocks in our boat and all spars and sail rolled snugly in one long canvas bag that fits inside the cockpit, the rig is secured with a single lanyard amidships and tucked up half under the side deck and out of the way.
When not in use, the 7′ 6″ oars get stowed in their own protective bag on the opposite side, beneath the seats and under the other side deck. It doesn’t take long, 10 minutes at the most, to pull the canvas bag off and set up the little sprit rig. We move the seats into a neat, nested stack forward or aft and sit on the bottom of the boat to sail in light air. There’s more room that way and, with the center of gravity lower, the boat feels more stable. We ended up adding a visibility panel in the sail because it was hard to see under the sail at times.
Paula Gillikin
In the right conditions, the Sweet Pea will move along at a nice clip under sail with her spritsail rig, especially bearing in mind her shallow keel and primary purpose as a rowing craft. On the day this photo was taken, the Sweet Pea took off in a rising wind and favorable current, leaving the photographer in the chase boat calling out, “Slow down!”
With the Sweet Pea double-ender rigged to sail, the slipping keel shows that it works well in a little sailboat that’s more concerned with rowing and carrying gear than high-performance sailing. The boat doesn’t really like to go to windward, but then that was never the point of the design. Sailing with a nice breeze on or aft of the beam, it goes along smartly and is a lot of fun. For a while we sailed it without the boom—one less thing to carry aboard—but for close-hauled work or running the boat does better with it. We run the sheet through a block attached to a small cleat in the sternpost and it feels more controlled that way, lighter in the hand. In light airs we’ve occasionally “motor-sailed” (rowing while the sail is up), though we’re more likely to take the sail down and just row.
A year or so after we’d got our Sweet Pea, we corresponded with the designer, Phil Bolger, about the boat. His own Sweet Pea was built for rowing only and he was curious as to the performance under sail. He wrote:
“I’ve been wondering if another inch and a half on that keel would gain more in sailing ability than it would cost in rowing effort. This is prompted by an anecdote of a big, three-masted schooner, wall-sided and deep-loaded, which showed an allegedly dramatic improvement in windward performance by a quite small (proportionately!) addition to her salient keel. (She had no centerboard.)”
A home boatbuilder with time to experiment may want to make up a second, deeper slipping keel to see if Bolger’s musings on this improve her sailing performance any without too-great a detriment to rowing.
When I’m out for a row just for the fun of it, maybe to get some exercise, or to explore some new harbor, the Sweet Pea rows along smoothly at a decent pace, steady as can be. In a steep chop, the bow will stomp or slap a little. If the stern is weighted down (usually with me, while Captain Trubee is at the oars), some spray will make its way aft when pulling into a headwind. I’ve never noticed much spray, if any, coming aboard when rowing solo. Payson said the same of the boat. Bolger gives the Sweet Pea a hull speed around 3 ½ knots, 4 knots if rowing hard. It’s not a race boat and there are some craft she just won’t compete with that way.
Recently I rowed with a friend in an Adirondack guideboat fitted with a sliding seat. His paper-light boat flew along, gliding across the water with great ease and speed. But, on quick reflection, I considered how tender his boat is, how limited the conditions are for safely taking it out, the loads it can’t carry, its lack of a sail, and my momentary envy yielded to a solid appreciation for Bolger’s sweet design.
We once had our Sweet Pea out in a bad squall, trying to row back to the schooner out at anchor; the wind gusted across the tops of the waves, rain poured down, and lightning was all too close. Our success that night was partly due to the skill of the rower, but also to the boat itself with its seaworthy design and solid construction. We never felt at risk of being swamped and knew even if we were, the boat would stay afloat.
After more than 17 years of continuous service, very little about her has needed attention, besides cosmetically. The one area that should not be neglected is the insides of the slipping keel wells and the tongues on the slipping keel. We had left the keel in place a little too long and it was only on removing it for maintenance that we discovered some wood hidden up in one of the wells (and along the corresponding slipping keel tongue) that needed the attention of a shipwright. Take care that these areas are well sealed in the building process and then remove the slipping keel and rudder periodically to inspect. Otherwise, our Sweet Pea was remarkably solid after considerable, hard usage as tender to the schooner.
The Sweet Pea is the perfect little hybrid vessel that fits our needs perfectly. It’s a handsome boat with pleasing lines and, despite the modern construction, has a heritage in its workboat ancestors. It’s an able, sturdy, rowing/sailing, weight-carrying double-ender with a graceful sheer and a penchant for exploring beautiful harbors and creeks in myriad anchorages, sailing along the sedge, taking us for picnics on deserted islands, and carrying loads of provisions out to the schooner. It tows well behind the schooner when the need arises and is light enough to be carried on the davits with ease. We’ve cruised NINA from Bar Harbor, Maine, to the Dry Tortugas and all points between, and our Sweet Pea has been an indispensable part of that—a great joy to row and sail.
Ingrid Code is a sailor, freelance writer, and musician who sails aboard the Joel White-built scow schooner NINA. Currently sailing south for the winter, she has spent the last twenty years exploring the rivers, creeks, bays, sounds, and byways of the US East Coast.
The Droleen, a 12′ lapstrake catboat, was designed in 1896 by W. Ogilvy of Bray, a town on the east coast of Ireland. It was intended to be launched off a stony beach and to be sailed “in any weather, plenty of wind and sea—not infrequently encountered off the coast of Bray,” according to H.C. Folkard’s 1906 book, Sailing Boats from Around the World.
Eight boats were built—some, if not at all, by Mr. Foley of Ringsend, Dublin—but it is thought that the development of the class was hampered when some of the original owners, who were in the British Army, were called away to fight in the Boer War (1899–1902) in South Africa. There was, however, some class racing up until the First World War, after which the boats gradually disappeared. None survive today.
Photographs by the author
The trailing edge of the 3/16″ galvanized steel centerplate is fully exposed when retracted in the open-topped trunk.
The plans survived somehow and in 1996 they were redrafted by the renowned naval architect and small-boat designer, George O’Brien Kennedy. This allowed the Bray Droleen Heritage Association—founded in 2013 and led by the late Frank de Groot—to build two new boats, the first of which was launched at an Old Gaffers Association event on Dublin’s River Liffey in 2014. When Irishman Michael Weed enrolled at the Boat Building Academy (BBA) in Lyme Regis, U.K., he was keen to build one. He managed to get hold of a set of drawings from Jim Horgan, who runs the Galway School of Boat Building on the west coast of Ireland.
Before the lofting process began, BBA course tutor Mike Broome decided that there should be five molds instead of the three shown in the plans. This, and other anomalies in the plans, meant that the lofting process was more problematic than it might have been, but it allowed Mike to then produce a significantly more accurate lines plan and table of offsets.
The boat was built the right way up, and the construction process began with the dead-straight 1-1/2″ x 1-3/4″ sapele keel being laid on top of a temporary strongback. The triangular oak deadwood was fitted aft, and then the 1/2″ x 3-1/2″ sapele hog was laid on top of it and the keel, all glued with epoxy. The keel and the hog already had the centerboard slot cut into them. The 3/4″ oak transom was fitted along with its 1″-thick oak knee, while the laminated oak stem and apron—each 1-1/2″ thick and together forming the rabbet for the forward ends of the planks—were scarfed-in forward. The five temporary molds were then put in place.
The Droleen has 11 strakes of 5/16″ planking. The 6′ beam in the 12′ boat gives the hull a notably full shape.
The planking starts with the garboards. The plans called for 11 or 12 strakes, and it was considered that 11 would be enough, despite the extreme beam. Two strakes have full-length planks, but all the others have scarfed joints, some of them two. To cope with the bend and the twist, about 3′ of the forward ends of the bottom three planks had to be steamed. The planks are 5/16″-thick larch with 3/4″ laps between them. Once all the planks were fitted and fastened to each other with rivets, three struts were taken up from each sheer to the roof beams to allow the molds to be removed without the hull losing its shape. The inside of the hull was then primed.
Most of the steam-bent 9/16″ x 1/2″ oak ribs are continuous from sheer to sheer, but the two most forward are divided by the maststep, eight amidships by the centerboard case, and the aft two by the stern knee. After the ribs were bent in place, they were allowed to cool, then removed to be primed before they were riveted into place.
The internal fit-out began with the 13/16″ sapele floors, which also serve as sole bearers. The plans called for just four, all of them aft of the centerboard case, but it was decided to fit seven in all, partly for extra strength, but also to allow later fitting of sole boards over a greater area. Next came the 1-1/8″ x 3/4″ oak seat risers. It was initially thought that these would need steaming, but it was just possible to fit them without. The centerboard case—made of 5/8″ sapele with varnished oak trim—had previously been dry-fitted, and this was now fixed into place. The centerplate —3/16″ galvanized steel—was “originally a quadrant shape, meaning a large portion of it stuck up into the boat when raised,” said course tutor Mike. “I just tweaked the shape to a more conventional parallel-sided one to avoid this.”
Next came the 7/8″ x 1-5/8″ inwales, the 3/8″-thick caps, and the 3/4″ x 1-1/8″ rubbing strake, all in oak. The latter had to be steamed. The three 7/8″ oak thwarts were then fitted. The 8″-wide forward and middle thwarts gain some support from the centerboard case (the latter also with a knee fixed to the aft end of the case) and each of them also has two knees per side, while the 10″- wide aft thwart has a 5/8″ support, 3″ deep amidships tapering to 1-1/2″. The quarter knees are 1″ oak, while the breasthook, which doubles up as the mast gate, is 1-5/8″ thick. This is brought 17″ aft along the inside of the inwales—not as far as shown in the plans, but it was thought that they would become too thin to contribute any strength if they were brought farther aft. On top of the breasthook between the mast and the apron is a custom bronze fitting through which bronze pins are fitted to allow the mast to be lashed firmly into its gate.
The 7/8″-thick sapele blade pivots within a 2-7/8″-thick oak rudderstock. The tiller is also oak. The spruce spars are of hollow bird’s-mouth construction with oak cappings to seal the end-grain. The predominant feature of the unstayed cat-rigged sail plan is the length of the boom which, at 14′ 6″, is 2′ 6″ longer than the boat. It is thought that this was originally to allow a seaworthy low-aspect rig.
The aft end of the breasthook has a notch that serves as the mast partners. The mast is lashed in place with turns anchored by a pair of bronze belaying pins forward.
Stepping the mast is a simple enough job for one person by placing the heel into the maststep, pivoting it forward into the breasthook, and then lashing it there. The sail plan also shows a second sail which is referred to as a “jib/spinnaker,” but in truth it seems to be not really either. It is set with its tack on the end of a conventional spinnaker pole but is too small to be an effective spinnaker. Michael plans to make such a sail and pole at some time in the future, but for now the boat just has the single sail.
Although the Droleen in only 12′ long, it has plenty of room for a crew of four. The 112 sq ft sail has a boom that’s 14-1/2′ long, keeping the center of that sail area low.
I had the chance of a sail the Droleen on the BBA’s Launch Day when I climbed aboard from a RIB, swapping places with a couple of students. It was blowing a Force 3, with occasional Force 4 gusts; by the time the transfer was complete, the Droleen was in irons. Wishing she had a jib to back to turn the bow away from the wind, I put the tiller over the “wrong way” as we began to go backwards. I fully expected that when I then pulled the mainsheet in to fill the sail, she would just luff up again, but it immediately started sailing very easily. It then proved itself to be a very enjoyable and easy boat to sail on all points of sail, at all times well balanced and responsive. I had been a bit intimidated by the length of the boom and wondered how it would be to jibe. But I did so a couple of times with no issues at all, each time partly pulling the sheet in beforehand to give some control over the boom.
At one point the Droleen touched 5 knots in a gust on a close reach while the centerplate hummed satisfyingly. The massive beam gives the boat not only a great deal of internal space but also great stability. There were three of us on board—and there would have been plenty of room for two more—and while I steered from the stern seat to windward, my two shipmates sat each side of the centerboard case, sometimes on the center thwart, and sometimes on the sole where they were well clear of the boom. At one point when sailing to windward we had a bit of a gust and the leeward crewman instinctively began to move to windward. Before he could do so, however, the boat’s angle of heel stopped at about 10 degrees and he realized there was no need for him to move.
A pair of 9′ oars proved to be a good fit for the 70″ span between the oarlocks.
The Droleen also makes a nice rowing boat. Michael was concerned that the beam of the boat would make it difficult to row from the center thwart where the rowlocks are spaced 70″ apart and that it would be easier to use the forward thwart where they are 65″ apart, although he would need to make a raised seat to cover the centerboard’s handle, which lies across the thwart with the board up. As it happens, there was no difficulty rowing from the center thwart with the 9′ oars.
The Droleen is a versatile, well-behaved boat whose extreme beam gives plenty of space and stability, and it is great to see that the class is experiencing something of a revival after all these years.
Nigel Sharp is a lifelong sailor and a freelance marine writer and photographer. He spent 35 years in managerial roles in the boatbuilding and repair industry, and has logged thousands of miles in boats big and small, from dinghies to schooners.
Droleen Particulars
[table]
Length/12′
Beam/6′
Draft, board up/6″
Draft, board down/32″
[/table]
The Droleen lines and offsets, drawn by BBA instructor Mike Broome, are provided here. For more information, email Mike at the Boat Building Academy.
Is there a boat you’d like to know more about? Have you built one that you think other Small Boats Magazine readers would enjoy? Please email us!
On a warm midday in November, I cast ARR & ARR’s lines off from the dock at Goose Island State Park and rowed into the fickle breeze coming down the double row of low pilings marking the channel to Aransas Bay on the south-central Texas coast. The channel was only 100′ wide, too narrow to beat to weather in the light air with a balanced lug—at least for me—especially with fishermen or hunters speeding back to the park’s ramp in their high-powered skiffs and airboats. Instead, I rowed across the shallows between the channel and the park’s 800′ fishing pier.
Photographs by the author
After a 3-hour drive from my home in Austin, I left my car and trailer at a campsite at Goose Island State Park while I explored the bays. The landscape of the Texas Coastal Bend is flat with sand and shell beaches, brackish marshes, and bay depths of only 10′ to 15′. While mild conditions are the norm in early November, northers can blow through and drop temperatures 20 or 30 degrees in only minutes and build up a steep chop. I was fortunate to have five straight days ahead with afternoon highs near 80, overnight lows in the 60s, mostly clear skies, and winds rarely over 15 knots.
Near the steps that lead down from the pier into the water, two anglers in waders cast lines in long arcs. A kayak fisherman floating just past the end of the pier reeled in a slack line little by little. He paid no attention to me as I rowed past him on the side of his kayak opposite his fishing line, but a man and a boy standing on the end of the pier waved to me. I returned a wave and rowed another 1/4 mile into Aransas Bay. The bay was crinkled by wavelets in the light air. I had only 5 miles to go that afternoon, so I took my time stowing the oars, fenders, and dock lines before raising the sail.
I would rendezvous with another seven or eight boats across the bay at Paul’s Mott, a point of scrub and shell jutting about 1/4 mile into the bay from San José Island, for our first of two nights camping together. Most of them had set sail from Rockport an hour or two earlier. I would have launched from there as well, but I planned to spend an extra two days and nights exploring Aransas Bay by myself after they all headed home, so I left my car and trailer in the Goose Island campground where the gates are locked at night, giving me peace of mind and allowing me to relax completely.
Roger Siebert
.
Oyster reefs run out into the bay in a broken line from Paul’s Mott. In the light air, waves wouldn’t break over the reefs, and with the murky water, I doubted I’d be able to see them. The Intracoastal Waterway (ICW) crosses the bay left and right about two thirds of the way to Paul’s Mott. Crossing the navigational channel at its marker 15 would keep ARR & ARR well away from the reefs, so I sailed closehauled south-southeast, as close to the marker’s bearing as I could while still maintaining 2 or 3 knots.
Within half an hour, the wind freshened to the 5 to 10 knots that had been forecast. It was easy sailing under a clear sunny sky, exactly the stuff I had wanted after months of being cooped up with a computer in what had become my office at home.
Tugboats pushing barges paired end-to-end crossed in the distance from left and right. I studied their courses through my monocular and made out the ICW’s numbered markers, green square and red triangular signs set on piles driven either side of the route. Two tacks put me back on track toward marker 15 and put more distance between ARR & ARR and the reefs, and I crossed the ICW during a lull in the barge traffic. By then, the wind had picked up another few knots, so I was able to point higher and made Paul’s Mott after only another hour on a single tack of easy sailing.
While I was still 200 yards from the point, where the chart shows a dip in the reef to a depth of 2′ to 3′, I raised the daggerboard and crossed the reef on a reach. Once on the other side of the reef and back in 5′ to 10′ of water, I put the board back down and closehauled back toward shore, where two boats were beached near a large portable canopy with a peaked fabric top.
Oddly, neither boat had a mast. I tried to recall if any of the group I planned to meet were to arrive in powerboats. I’d figure out what was what after I beached ARR & ARR. To cross the last 100 or so shallow yards to the beach, I dropped sail, unfastened the sheet’s lower block from its anchor point on the main thwart and moved it to a quarter cleat, swapped the daggerboard for the slot’s rowing plug, and set to rowing.
I heard “ARR & ARR, ARR & ARR, this is MYSTERY MACHINE, over” from the handheld VHF clipped on the front of my PFD. Matt, the sailor who had organized the trip, informed me that our group was not at Paul’s Mott—that the spot had been occupied when they had arrived—but about a mile southwest instead. I noticed a cluster of five masts then, well down the coast.
I decided to row instead of raising sail again and bent to the oars. I hadn’t rowed regularly in months, and it felt good to work my back and arms again. ARR & ARR slipped past the coast of waist-high cordgrass dotted with tiny oyster shell beaches, chest-high mangrove clumps, and narrow gaps where sloughs led into the island’s interior.
At our first night’s camp on San José Island, Matt, Ziggy, Dave, and I pitched our tents on the higher ground near the vegetation line. The island beaches in Aransas Bay are mostly oyster shell, and the water from the bay, at left, seeps through the sieve of piled-up shell to and from saltwater pools, at right, making them rise and fall with the tides.
MYSTERY MACHINE, Matt’s modified Bolger Featherwind, and MARILYN J, Glenn’s Mayfly 16, were already pulled up on the shell beach; Bobby and his wife Pam, with PILGRIM, a custom Princess 22 cat ketch, floated about 20′ off the beach on a bow anchor and a stern line run ashore; and CHICKEN PARTS, a MacGregor 26, swung on anchor about 100 yards out. I rowed ashore between MARILYN J and PILGRIM, stepped out, and pulled ARR & ARR’s bow as high as I could onto the beach.
The beach was mainly broken oyster shell piled into ridges paralleling the water and varied from as narrow as 10′ where I had beached ARR & ARR to as wide as 40′ interrupted with a saltwater pool so wide that cat’s-paws scurried across its surface.
Behind the beach, where soil mixed with the shell, thick vegetation transitioned through narrow, distinct bands. Closest to the shell beach and spreading onto parts of it were ankle-high saltwort, salt-tolerant succulents with pink runners and thick, light-green, inch-long leaves. Behind that was a dense, soft, shin-high layer of saltgrass, its narrow dark-green leaves in herringbone patterns that reminded me of the softer evergreens. Interspersed with the saltgrass were patches of prickly pear and knee-high sea oxeye daisy, some with dark, dried flower discs long gone to seed. The ground behind dipped back down into swampy swales and sloughs lined with cordgrass. Twisted limbs of scrub oak reached skyward above bushy, dark green mangroves.
As I unloaded ARR & ARR to make my camp, two WindRider 17 trimarans arrived, one skippered by Ziggy and the other by Dave, whom I had met the year before on a similar excursion. The three of us set up our tents at the edge of camp, on the flatter, higher ridge of shell running along the back edge of the beach’s wider stretch, next to the vegetation and separated from the shoreline by that pond-sized saltwater pool.
The tide would rise only 6″ or so overnight, and the wind was forecast to lighten and continue blowing across the island and out into the bay, so Ziggy, Dave, Matt, and I—those of us with tents—left our boats pulled up on the beach with anchors set on shore. Glenn planned to sleep aboard MARILYN J, so he repositioned her just off the beach with a stern anchor and a bow line running to shore.
Dave and I caught up over our dinners, he on his chair next to his tent and me, maintaining safe social distancing, on my two-gallon bucket next to mine.
Michael sailed in on RED TOP, a highly modified Lehman 12, and anchored about 15′ off of San José Island. The barge in the background stayed in place overnight and was on its way early the next morning before we got underway.
While we ate and chatted, a tiny red and green boat sailed in from the direction of Rockport and dropped anchor just 15’ from shore. It was RED TOP, a highly modified Lehman 12, now with a lugsail, leeboards, and a cuddy cabin. After stowing the sail, Michael, its skipper, came ashore and joined in the still-scattered reunions and conversation.
Most of us had brought firewood along—driftwood being rare on these bay beaches—and soon after dark, Matt had a fire going. An inflatable tender motored in from CHICKEN PARTS and Nick and his young son Mason disembarked. We gathered in ones and twos around the fire until the whole group of nine or ten was present. The air was pleasantly warm, so we didn’t sit in a circle around the fire but sat in a rough line stretched along the narrow beach facing the bay instead. I sat on my bucket at one end of the line, vigilant about keeping the recommended 6′ from anyone else whenever in company for more than a few seconds, but with the wind blowing across our line and out into the bay instead of along the line, even that was probably unnecessary.
I mostly listened, taking in the others’ stories and plans as much as I did the breeze and the deepening black sky. Mars shone bright and orange high in the southern sky, and Jupiter and Saturn stood poised above the horizon where the sun had set.
After daylight the next morning, we took our time breaking camp. I made a cup of coffee and sat on my bucket outside my tent. An airboat hummed in the distance and a bird trilled from somewhere in the cordgrass or mangroves, then went silent at the dull thud, thud of hunters’ distant gunfire. Ducks flew in wavy lines over the island.
The air was only slightly cool. I hadn’t even pulled my sleeping bag from its dry bag the night before, but had instead slept directly on my sleeping mat, comfortable just wearing jeans and a fleece shirt.
I walked down to the boats with the last of my coffee. The wind blew across the island from the east, so the waves were small but fell obliquely against the shore and had pushed ARR & ARR beam-to the shell beach. With her V-shaped hull, she rolled with the waves and ground against the shells. I knew it had probably done a number on the paint job during the night but hoped the double layer of fiberglass I had laid over her keel when I built her had provided adequate protection. I couldn’t see any damage, and I wouldn’t know for sure until I had her out of the water at the trip’s end, but this was exactly the type of camp-cruising wear and tear I had built her for.
I changed from my camp clothes back into the previous day’s quick-drying hiking wear and neoprene booties, broke camp, loaded the boat, and started to rig her for sailing. I had left the rowing plug in the daggerboard slot overnight, and now it was jammed in place by bits of shell that had worked their way into the slot.
I pushed the boat a few feet into the water, rocked her to work the water in the slot, and tried to wiggle the plug loose, but it didn’t budge. Using my push pole’s unattached duck foot, I pried the top of the plug away from the top of the slot, and the plug finally came out, the bits of shell grinding and squealing between the plug and the inside of the slot. I scooped water into the slot with my bailer to rinse away any remaining shell.
We planned to camp that night on 3-1/2-mile-long Mud Island, only 7 or 8 miles southwest, at most a couple hours’ sail, so most of our group were sailing back to Rockport to have lunch at a dockside bar and grill. I had been avoiding public places, and even though Aransas County had reported only one or two confirmed cases of COVID-19 in the previous week, I joined the others to head straight to Mud Island to see if the 2020 hurricane season, particularly Hurricane Hanna, had left either of two naturally fluctuating passes through the island suitable for our boats and tents. I also wanted to explore Blind Pass, the 60-yard-wide gap between Mud and 19-mile-long San José Island, for possible future overnight trips. Satellite images I’d studied showed what looked like promising beaches flanking the pass.
I shoved off and joined MYSTERY MACHINE, MARILYN J, and RED TOP on a broad reach under full sail south along the protected west coast of San José Island. Except for a few puffy white clouds just above the horizon, the sky was an unbroken expanse of blue. The wind grew from gentle to moderate, and soon we were sailing at 4 or 5 knots through only wavelets in the lee of the island. Dolphins converged on our boats and swam along for 15 or 20 minutes, moving mostly as a group from one boat to the next.
Dolphins are common in Texas bays, and the pod that accompanied ARR & ARR in Corpus Christi Bay seemed especially engaging, sometimes swimming so close that their puffy exhalations misted my face. On the low line of land on the horizon sit Point of Mustang and, tiny at the right, Port Aransas, marked by the towers of three deepwater drill rigs.
When we reached Mud Island, we sailed west along its northern side looking for the two cuts and beached our boats in what we thought was the smaller, easternmost one. A 15-yard-wide channel flowed north to south through the island between oyster shell beaches. The western beach was too short and steep to pitch tents on, but the eastern beach was a good 100′ by 50′ and curled around in a short hook at its southern tip, creating a sheltered cove that had deep water right up to shore along most of its length. The surface of the water flowing through the cut churned in eddies and swirls in a 4- to 5-knot current. Dolphins surfaced in tight arcs in the cut, likely after fish.
Like the beach we had camped on at San José Island, this beach consisted primarily of oyster shells piled in ridges, with a few wide depressions in the beach’s middle, some with shallow pools.
We relaunched and continued west looking for the larger cut. After a mile or so of sailing by nothing but narrow, steep shell beaches backed by unbroken mangrove thickets, we realized that we had landed in what had been the larger cut and that the smaller cut must have closed up, so we returned to where we had originally landed, beached our boats in the hooked cove, and scouted out tent sites.
The predominant plant on that part of Mud Island is black mangrove, growing too thickly to easily walk through and ranging from knee- to chest-high, with stiff, dark-green oval leaves only an inch or two long and seeds the color and shape of large lima beans. Sea ox-eye was thick there too, along the edge of the mangroves, and salt-tolerant succulents grew here and there. Sea purslane sprawled across low stretches of bare shell in the depressions, the purslane’s pink runners and 1″ leaves looking like saltwort at first, but with flat leaves instead of the bulbous succulent ones and with five-pointed, purplish pink flowers the size of a pinky fingernail.
Having found several good patches of flat ground, we returned to the boats. We had the entire afternoon remaining, so Matt and I decided to circumnavigate the eastern part of the island. We walked our boats from the sheltered cove, around the hook, and against the current along our side of the cut and launched from the cut’s entrance. We both set sail, and Matt pulled well away from me in only five or ten minutes. MYSTERY MACHINE bettered ARR & ARR in both pointing and footing.
Not wanting to admit that Matt was simply the better sailor, I decided that ARR & ARR was undercanvased, so I set a new jib I had been eager to experiment with. To accommodate the addition of the jib, I moved the main aft by setting the balanced lug as a standing lug. I moved the boom vang to the tack to serve as a downhaul, and let the downhaul move aft to become the vang. I set the little jib flying, and with the new sail plan’s center of effort properly set, ARR & ARR, now a sloop, took off.
I had not yet installed cam cleats for the jib sheets, so I had to hold both sheets, jib and main, in one hand while managing the tiller with the other. The boom still stuck a bit forward of the mast, and on each tack, the jib sheet caught on it. But the boat did make good speed and pointed higher.
I found Matt waiting for me at Blind Pass, and we sailed together through it. MYSTERY MACHINE drew less than ARR & ARR and my daggerboard hit the bottom several times. Although I quickly released both sheets, spilling most of the air from the sails, ARR & ARR pivoted on the grounded board and turned her beam to the wind. I pulled the daggerboard up and sheeted the jib to turn the bow downwind to get moving again.
We sailed on a broad reach up the southern side of Mud Island. This side of the island didn’t have beaches but was more of a wetland, with mangrove islets of all sizes scattered among inlets and flats. Although the water was opaque with mud and the chart showed less than a foot there, I didn’t run aground again.
At our second camp, on Mud Island, the little cove on the south side of the cut was deep enough right up to the beach that even PILGRIM and CHICKEN PARTS were able to nuzzle up to shore still fully afloat.
We beached back in the cut’s little cove, and before long we were joined by the four boats that had gone to Rockport for lunch. The cove was deep enough for even PILGRIM and CHICKEN PARTS to nuzzle up to the shell beach while fully afloat, and set anchors ashore on dry land.
RED TOP left by early evening, and two other boats joined us, CHEESE CUTTER II, a Hobie trimaran with skipper Chris aboard, and a Westsail 32. The Westsail came in under full sail and anchored a good 1/4 mile off Mud Island’s northern shore, and its crew—Chris, Cathy, and dog, Gus—sailed into camp on its lug-rigged tender with a tanbark sail.
At dusk, we collected the rest of the firewood we’d brought and gathered around in the warmth and light of the fire as Jupiter and Saturn set and Orion rose high in the darkened sky. I mentioned wanting to spend the next day sailing 15 to 20 miles north to explore Cedar Bayou, the 3-mile-long natural cut that separates San José and Matagorda islands and sometimes connects Mesquite Bay with the gulf. Matt suggested that, given the north wind forecast for the next day and the south wind for the day after that, I should go with the wind instead of against it to some beaches he had seen on Mustang Island’s Corpus Christi Bay side on a previous trip. Sailing with the wind abaft the beam both days was appealing, so that became my plan.
Glenn, Dave, and Matt (left to right) enjoyed fishing, coffee, and chatting on the second morning, at the cut through Mud Island, while maintaining safe social distancing.
The next morning was calm. On the south side of camp, the still water in the cove reflected the boats’ hulls and masts and the wetlands’ little islands of cordgrass in a perfect mirror of the sky’s growing gray-orange light. A haze on the eastern horizon separated the mile-long stretch of Mud Island’s mangroves from a line of palm trees on San José Island beyond. To the north, toward Rockport, the water rippled in the distance but had only dull crinkles next to shore. Dull thuds of duck hunters’ gunshots and the distant thrumming of engines carried through the still air but, with the air so heavy with moisture, I couldn’t tell which direction the sounds came from.
The saltwater pools in our beach’s wide depressions had risen overnight. The water in one had even reached the foot of Matt’s tent. It surprised me, because the night had been calm and dry, except for the heavy dew. Matt and Glenn surmised that the rising tide must have seeped through the coarse shell ground as through a sieve, which would explain why the depressions at our camps had water in them, despite no visible inlets and no recent rain.
In the early orange light, Rockport’s lone spheroid water tower and row of two-story buildings were strung along the northern horizon, like a string of pastel-colored beads. A haze over the rippled bay thickened until the entire horizon dulled and then disappeared.
The haze moved toward us in a thick bank. Fog. On the Coastal Bend. It is rare and was a first for me.
To the southwest, where I had decided to go, the water and horizon were clear. Even three deepwater drill rigs in Port Aransas were visible though low, tiny, and washed-out from the 6 or 7 miles’ distance. A moderate southwesterly breeze was forecast, and an encouraging hint of that breeze touched the back of my neck.
I was eager to get going, before the fog could reach Mud Island, so I said my goodbyes to the other sailors and raised ARR & ARR’s sail, leaving the jib stowed this time. I set the downhaul snug but not tight, so the sail could stay out perpendicular in the light air and catch what little there was. Chris, CHEESE CUTTER II’s skipper, gave ARR & ARR a good push to set me on my way, and I drifted from Mud Island at a turtle’s pace. The water had gentle dull ripples, like wavy window glass in a century-old home.
Sailing at a lazy pace, ARR & ARR didn’t need my full attention, so I gazed over the stern and watched the others leave the campsite for Rockport. One by one, they set sail and vanished into the fog. Whenever one hailed another on the VHF, I switched with them from 16 to the working channel and eavesdropped. I wanted to learn what sort of coordinating they were doing in the fog, and it made my departure feel less abrupt. Eventually, even their radio calls were out of reach.
ARR & ARR drifted past one of the lima-bean-looking black mangrove seeds floating on the bay, then another. I counted the seconds it took one seed to travel the 15′ from bow to stern—five or six seconds, which meant I was moving at only about 1-1/2 knots. I settled in on the sternsheets on the starboard side of the tiller, resting back against a dry bag, and enjoyed the easygoing morning.
A couple of hours passed before the breeze picked up, but by noon I was sailing up the channel to Port Aransas on a reach past the Lydia Ann Lighthouse, a 68′-tall tapered octagonal tower of red brick with four low, weathered wooden buildings tucked about 200 yards back into the surrounding mangrove marsh. Just past the lighthouse, on its south side, a bayou led from the channel into the marsh and next to the lighthouse.
In the nearly two centuries since the lighthouse was built, Aransas Pass—the channel separating Mustang and San José islands and connecting Corpus Christi Bay with the gulf—has shifted a mile south, so it wasn’t until the lighthouse was well astern that I rounded the point and sailed down Corpus Christi Channel.
ARR & ARR, sailing on a run down Corpus Christi Channel on the third day, passed three deepwater drill rigs under construction or repair in Port Aransas. The oarlock sockets on ARR & ARR’s transom allow me to use an oar as an emergency rudder if the need arises.
I was especially glad to have the wind driving ARR & ARR along the channel, while I watched for ship and barge traffic. About 1/2 mile down the channel, the ferries shuttling between Harbor and Mustang islands timed their 1/4-mile crossings to avoid me, and I was glad I didn’t have to hold them up too long.
On my approach to Sting Ray Hole, a 1/2-mile-wide pass between the sand-spit ends of Pelican Island and Point of Mustang, two white pelicans flew overhead, their black wingtips stark against their bright white plumage. Once through the pass and into the easternmost part of Corpus Christi Bay, I skirted the East Flats, a 2-mile stretch of shallows and low, mangrove-covered islets, and sailed closehauled toward the shoreline just south of the flats. The closer I got to the low stretch of undeveloped greenery, the more patches of white I saw between it and the water. I pulled the daggerboard up 8″ or 10″ to reduce draft without sacrificing too much pointing ability and aimed for the windward side of one of the larger white patches.
I pulled ARR & ARR ashore to camp on Mustang Island. The beaches in Corpus Christi Bay are white sand with clamshells instead of the piles of oyster shells that make up Aransas Bay’s beaches. Visible at left on the horizon are the storage tanks of an oil-export terminal at Ingleside.
I approached three beaches, the first two about the size of a modest kitchen, and settled on the third one, which was larger and higher than the others. Instead of mounds of oyster shells, these beaches were white sand just peppered with clamshells.
Beyond the mangrove wetlands, Port Aransas was still visible on the horizon from the three deepwater drill rigs—small and hazy in the northeast—to the low dark, angular spread of downtown buildings and the sprawl of two- and three-story homes to the east. Across Corpus Christi Bay, an oil export terminal’s spread of wide, squat, cylindrical storage tanks glowed with a bright splash of white sunlight.
All around me, silent except for the shush of wavelets on the sand and the occasional quack of a duck, was the wide, nearly motionless lapis and teal bay. Vast spreads of navel-high mangroves were interwoven with brackish bayous and sloughs. A quarter mile toward the thick spread of homes to the east, a man in waders fished 20 yards from a boat half hidden by mangroves. A skein of ducks flew overhead, all black except for flashes of white with the upward movement of their wings. This part of Mustang Island was an island of its own, an oasis of wild in the midst of human development.
I ate dinner cold: chowder straight from its can, the last bits sopped up with flatbread. It was simple and surprisingly good.
Although my mostly screen tent would have been comfortable with the light air and the pleasant temperature, the heavy dew that sets in overnight warrants setting the fly. After pitching the tent, I could change into dry camp clothes and hang up the day’s damp clothes to dry on paracord run between the tent’s inside webbing anchor points.
It was nice to be camping by myself. While I was sitting on the bucket watching the sun set, my shoulders and back relaxed and I felt as if my body’s weight had settled into my hips from its perch on tense shoulders. I had thoroughly enjoyed my time with the other sailors and was eager to see them again on future trips, but I prefer to do the social thing only in bits.
As darkness fell on Corpus Christi Bay, the oil export terminal at Ingleside lit up the horizon. The bright orange light, the fire on top of the flare stack, was clearly visible from the previous night’s camp at Mud Island, 14 miles away, and even discernible from Paul’s Mott, at 22 miles.
The last of the sunlight faded. The lights of Corpus Cristi and Port Aransas filled the horizon and spilled their glow into the night sky, masking all but the brightest stars.
I heard a puffy exhalation coming from out in the bay. I didn’t see a disturbance on the water’s surface. If it had been a dolphin, it could have covered a lot of distance before surfacing again. I didn’t hear it again.
I put my bread-mopped chowder can in with the rest of my double-bagged garbage, sealed the bags inside the bucket, and set the bucket on a clear spot of sand and shell 30’ from my tent. I crawled into the tent and fell asleep within minutes.
I woke up cold in the middle of the night. The half moon had risen and my tent was glowing in its light. I crawled out of the tent, pulled my sweatshirt out of its dry bag, and put it on over the fleece shirt I had been sleeping in. The bay was like glass, without the slightest of undulations. The light breeze, coming from over the land, didn’t stir the water’s surface for as far as I could see. The tide had come in, and ARR & ARR floated, motionless, 1’ from the beach with her stern pointed straight out into the bay. Having warmed up, I stayed up for a while and took in the stillness.
I turned in and when I woke again in the early morning light, the gentle breeze was still blowing across the land and into the bay. Low, thin puffs of gray clouds drifted north. ARR & ARR still floated free of the beach, but tugged gently at her anchor line.
I ate a breakfast of granola with boxed milk, broke camp, and set off to return to Aransas Bay. The breeze pushed ARR & ARR at only a knot or two; the sail’s sheet drooped toward the water between the boom and the gunwale. A lone brown pelican swooped down and glided across the bay, so close that its shadowy reflection almost merged with its breast.
Four or five dolphins swam in close and surfaced in ones and twos. Some surfaced gently, as if half asleep; others, quickly and tightly arced, as if diving after fish. They’d swim off 100′ or so and then return. Once, while they were farther from the boat, one leapt completely out of the water. Each time they approached the boat, one would swim right up to my quarter, turn on its side still beneath the surface, and watch me watching it, and a couple of times, when they surfaced on my windward side, their exhalations misted my face.
The wind steadily grew, and just after noon I was sailing a good 4 knots in Aransas Bay back toward Mud Island. A sea turtle with mottled skin on its fist-sized head surfaced soporifically just off my starboard bow and then ducked back beneath the water with a plop.
I was all alone at a midday break at the cut through Mud Island, where our entire group had camped two nights before. These cuts and beaches are in constant flux. The spattering of olive green near the shoreline are hundreds of black mangrove seeds that have washed ashore. Given enough time between hurricanes or other storms, some will set down roots and make this spit of shell more permanent.
At the cut through Mud Island, I spilled the air from my sail and coasted to a stop as the bow growled into the shell beach. I pulled the boat higher on the shore, had an apple and an energy bar for lunch, and refilled my water bottles from my 3-gallon jerry can.
I thought I might be able to make it back to Goose Island State Park before dark, but I wasn’t sure. I knew, however, that I could make Paul’s Mott. I decided I’d rather be camping alone on an island than in the park in the middle of a row of RVs on the mainland. Opting for the park would also mean driving the boat through the waves on the leeward side of the bay, and crossing the ICW, and navigating through the oyster reefs, all possibly at the same time, and all likely after dark.
I walked the boat through the cut and set sail to close the distance with San José Island. In its lee, the waves were small, and I sailed on a reach with full sail in the freshening breeze. The wind thrummed the sail’s leech, and water gushed away from the hull in foamy surges. It was an absolutely thrilling sail.
On my final night of camping, at Paul’s Mott, Aransas Bay was calm. Jutting partially from beneath the tent, just below the door, is a 2′ piece of an old foam camping sleeping mat that I pull out and rest my knees on while working at the tent’s door, to protect my knees from the jagged oyster shells. I tuck the mat between the tent and the ground tarp when not in use to prevent the wind from carrying it away.
When I arrived in the waning evening light, Paul’s Mott was deserted, save for a few shore birds alternately skittering toward and away from the swoosh of wavelets on the beach, and a mockingbird singing from the highest limb of the point’s thicket of scrub oak, tanglewood, prickly pear, and other undergrowth. An undulating line of brown pelicans flying low over the bay crossed over the island and disappeared.
The shells that make up the point’s beach were so coarsely piled that when I tried to set the anchor ashore, even a light pull would drag it plowing through the shells and clanking down the beach. I finally set it in a bit of scrub, where the roots bound the shells together and held the flukes tight. For good measure, I pulled the boat as high onto the beach as I could and set a second line with a bit of chain at its end around the trunk of one of the little oaks.
The next morning, I woke before first light. A fat crescent moon high in the sky cast the tops of the clouds in a silvery light and left their bottoms a deep catfish blue. Between the moon and the clouds, Venus and Mercury flanked Spica, the brightest star in Virgo. The water’s horizon was a sprinkling of lights. Wavelets plashed occasionally against the shell shore, and the mockingbird chirped from within the thicket. The air was still but not stale, and a heavy dew soaked the tent’s fly. I had my coffee and oatmeal while daylight crept into the sky.
I casually broke camp and, as I loaded the boat, a powerboat of about 25′ motored leisurely to the reef just off the tip of the point. Two more soon followed. My first thought was that they were fishing charters, but they soon set to work dredging for oysters. The closest had a 6′-wide panel running from its port gunwale down into the water. Chains and machinery clanked and banged, and a dredge ground its way down the panel and splashed into the water, was dragged grumbling across the bottom, and then was pulled clanking and banging back up the panel, over and over. The boat’s engine clattered at just above an idle, and boom-box music with thrumming guitars, an accordion, and Spanish lyrics carried through the air. I was glad I hadn’t been trying to sleep when the boats had arrived.
After I had ARR & ARR ready to go, I still couldn’t feel any wind or see any cat’s-paws on the water. The forecast was for light wind and then calm in the afternoon, but I raised sail anyway. I pushed the boat into the water and, wading knee deep, walked it around the tip of the point so I could launch on the same side of the reef as the state park and wouldn’t drift near the oyster boats.
I pushed away from shore with one foot and clambered aboard. ARR & ARR moved 20 yards, slowed, and coasted to a stop. There wasn’t a whisper of wind. I put the oars in the locks and rowed away from the land.
After about a half hour of rowing, with Deadman Island nearly abreast and the ICW markers in sight, having already covered nearly a third of the distance to the state park and still with no sign of even the slightest breeze, I lowered the sail and set in to row the entire distance. I didn’t mind, really. Moving under oars is where ARR & ARR comes into her own—the Flint was designed primarily as a rowboat.
The row to the park turned into a hot one, with the sunlight glaring off the water as well as from the sky, and I paused often to wipe the sweat from my eyes. But I didn’t mind at all. I’d had everything from arduous rowing workouts to drifting lazily along like a mangrove seed to flying at hull speed on nearly flat water. I had enjoyed the company of friends, made new friends, and recharged in silent solitude. For such a disruptive year, the trip had been a perfect relief.
Roger Siebert is an editor in Austin, Texas. He rows and sails his Flint on local lakes, and has trailered it to a few of his favorite places on the Florida coast.
If you have an interesting story to tell about your adventures with a small boat, please email us a brief outline and a few photos.
When sailing masters aboard tall ships needed to call out commands to the crew, they used speaking-trumpets, a type of megaphone, to aim and amplify their voices so they could be heard the full length of the ship and up to the topmasts. On a small boat, it’s not likely you’ll have trouble making yourself heard by anyone on board, but your voice may not carry well to people on shore, lockmasters, or other boaters in the area, especially if the wind and waves are making a lot of noise.
Cupping your hands around your mouth is instinctive and will help a bit, but megaphones are much more effective. For short distances, they can be small, like the pre-electronic type coxswains wore strapped to their heads to reach all members of the rowing crew; for more range they can be larger, like the traffic-cone-sized megaphones coaches once used to communicate between their launches and their crews.
Photographs by the author
Megaphones come in many shapes and sizes. In general, the longer and larger the better, but the more compact ones are easier to keep aboard a small boat.
As you’d guess, megaphones work by focusing sound in a particular direction, but there’s another factor at work that accounts for the perceived amplification of sound: acoustic impedance. The sound energy produced in the small space of your vocal tract can’t effectively make the transition to the wide-open space around you. I have to admit I don’t fully understand how this works, but I think of it this way: If you poke your finger into still water, it won’t make much of a splash or generate anything more than a small ripple. If you hit the water at the same speed with the flat of your hand you’ll make a splash and a wave. The megaphone effects the transition from a small area of impact at one end to a larger area at the other, setting more air in the open space in motion. A writer on one web site put it more accurately: a megaphone “acts as an impedance-matching acoustic transformer to efficiently couple the sound from your mouth to the open space.” And the effect isn’t restricted by the direction of the megaphone. I’ve noticed that rowing coaches using non-electronic megaphones are very easy to hear even when their megaphones aren’t aimed at me.
The most familiar acoustic megaphones have conical shapes (properly called frustums, as they are cones with their pointed peaks lopped off). Bullhorns and electronic megaphones flare like the horn of a trumpet. A conical megaphone may not be as efficient, but it is much easier to make, and I’ve made a several from plywood, aluminum, leather, and PVC drainpipe.
Staved plywood
This eight-staved plywood megaphone is 22″ long and 9″ across at the wide end. It greatly amplifies the sound of a voice.
My largest megaphone, and the loudest, is made of 1/8″ mahogany plywood. I cut eight staves 22″ long and 4-3/4″ wide at the bottom, 7/8″ at the top. It’s a bit much for my smaller boats.
I have a simple sled for cutting tapers on the table saw. It’s a piece of plywood with a strip on the bottom, which rides in the slot. Scraps of plywood tacked to the top orient the megaphone staves. The staves are stacked at right, The thicker piece of wood on the sled was made to hold the staves flat while being cut.
I had intended to join the staves with copper wire, stitch-and-glue fashion, but getting them to line up edge-to-edge wasn’t working. I went back to the table-saw sled that I set up to cut the staves and beveled the edges at 22.5 degrees.
Rather than wire the newly beveled staves together, I taped them together, flipped the bunch over, and brushed the edges and inside faces with epoxy.
After brushing the interior surfaces and seams with epoxy, I folded the bunch of staves to bring the last two edges together and close all of the joints tight. I taped the last seam and slipped hose clamps loosely over the megaphone to set its shape. A lightly applied bar clamp fine-tuned it.
After the epoxy cured, I sanded the exterior smooth, supported the megaphone on a horizontal stick, and gave it a layer of 2-oz fiberglass and epoxy. A coating of epoxy to fill the weave was followed by varnish. A brass window-sash handle finished the job.
Sheet Pattern
Many common megaphones have been made from sheet material. To make one in that manner, you need to create a frustum pattern.
Draw a side view of the megaphone you want to make and extend its centerline. For the small end of the megaphone, I use a diameter of 1-3/4″. The length and the diameter of the large opening of my sheet-material megaphones were somewhat determined by what I had available to work with. The pattern here has a length of 10″ and a large opening of 8″.
Extend one of the sides to intersect with the centerline. The is the center point of the arcs that follow.
With a compass or a trammel bar, swing arcs from the top and bottom of the side of the megaphone profile.
The circumference of the 1-3/4″ circular opening plus 1/2″ for the overlap at the edges comes to 6″. With a compass set to 1″, walk off 3″ on each side of the centerline.
Draw lines from the center point through each 3″ mark on the top arc.
Cut out the pattern and trace it on whatever sheet material you’ll be using
Sheet metal
All of the megaphones here were made from scraps I had around the shop. I wanted to make one from brass, but I didn’t have any suitable material, so I worked with aluminum.
This commercially made brass megaphone is the one my father used for coaching crews. It is 8″ long and 4-3/8″ in diameter at the large end.
Aluminum is easily worked and makes an effective and durable megaphone. A piece of vinyl tubing, slit along its length and glued over the mouthpiece with vinyl cement, covers the edge of the aluminum. The opening is contoured to fit around my mouth. A handle bent from 3/4″ x 1/8″ flat bar, is riveted over the seam.
I had some aluminum which had been liners for bear-proof food containers. It was 1/64″ (0.5 mm) thick, quite stiff, and big enough for a megaphone 10″ long and 7-1/2″ at its widest.
The aluminum, cut to the pattern, is ready to be curved into a frustum. The piece still had the curve of the bear-proof container, but it didn’t resist taking the new shape for the megaphone.
Hose clamps squeeze the aluminum to shape. I drew a line for the 1/2″ overlap in red Sharpie. Alcohol will remove the line later.
A 2×2 clamped to the workbench provides a support for drilling holes along the seam. I used 1/2″ aluminum tacks as rivets.
To form the rivets in the small end, I clamped a steel pipe in a vise and hammered clipped tacks in the holes from the outside. This didn’t flare the trimmed ends of the tacks, but folded them over, which was good enough.
Leather
I thought leather was an unlikely material to use for a megaphone, but it was commonly used prior to the development of plastics. A handle is useful for a megaphone that is too large to hold with one hand. A leather strap works here. The small end, contoured to fit around the user’s mouth, adds to the effectiveness of the megaphone.
Stiff leather was once used to make megaphones, typically those used by cheerleaders. Metal rings were usually fit to the ends, but they aren’t necessary if the leather is stiff. A scrap of leather I had—2.5mm vegetable tanned full-grained cowhide—was just big enough for the pattern I made for the aluminum megaphone.
To cut the 1/8″ leather, I drew the pattern on it and marked the intersection of extensions of the edges. With a stick with one hole pivoting around an awl at that intersection, I pushed a knife point into holes drilled to cut the two arcs. Cutting freehand works too.
Some of the old leather megaphones had a metal strip along the seam to stiffen them. I predrilled a length of 1/8″ x 1/4″ brass, set brass canoe tacks in the holes, and tapped them through the leather (without pilot holes) to clench inside against a piece of pipe.
PVC Plastic
My first PVC megaphones had their overlapping edges held by pop rivets and were painted with silver hammered-finish spray paint.
PVC is a versatile and remarkably tough material that can be coaxed into new shapes by heating it in a kitchen oven to 170 degrees F. I’ve used some 4″ drainpipe—with walls about 1/16″ thick (Standard ASTM D 2729)—for other projects and it’s well suited to making megaphones.
Starting with a 16″ length of pipe, I drew a centerline and measured 3-3/8″ from either side of the line on one end. The section of pipe removed between these two marks will take the small end to a diameter of 1-7/8″ (with a 3/4″ overlap). Draw a line from each mark to the centerline on the opposite end. A file folder makes a flexible straightedge.
Saw along both lines. A fine-toothed Japanese saw cuts PVC quickly though almost any handsaw will work. Sand or plane the edges to smooth them.
Draw a line 3/4″ along one edge and curl the other edge toward it. Hose clamps hold the overlap of the edges against the resistance of the PVC. Sticks on the outer edge hold it flat for the next step. Heat the whole set-up in a 170-degree oven for 8 minutes. This will relax the PVC and allow it to hold its new shape.
After the PVC has cooled, the hose clamps can be removed and the edges will remain overlapped. Drill a 1/16″ hole near each end, 1/4″ from the edge, and tap a 5/16″ copper tack in each, clenching them with the megaphone slipped over a steel-pipe bucking iron. Drill the rest of the holes 1″ apart and clench copper tacks in them. (On other PVC megaphones, I’ve also used pop-rivets to fasten the laps instead of copper tacks. I prefer the tacks.)
The ends of the megaphone will need to be flattened either by sawing or sanding them. On the disk sander, because of the megaphone’s taper, the small end needs to be elevated on a V-block.
The mouthpiece end is sculpted on a 2″ drum sander to create a contour to fit the face. PVC takes spray paint well (when the surface is scuffed), so a sanding with 150-grit paper follows.
I made two PVC megaphones as gifts for my son and daughter and spray-painted them with a pattern derived from the Cunningham coat of arms and house flag.
Curved Megaphone
This wooden megaphone with a flared shape was surprisingly effective.
While the conical megaphones work well enough, I wanted to see if a more sophisticated shape would make a difference. Exponential curves shape the horns for hi-fi speakers and P.A. systems. I couldn’t make sense of the exponential formulas I found online, so I just copied a section of a graph that I found.
I copied a section of a more complete exponential curve from a graph I found on the web. To my eye, it is close enough to other megaphones of the type.
The paper pattern, here folded in half, was used to shape pieces of 1/8″ three-ply birch plywood. I drilled holes every 1″ for stitching the pieces together, but only needed a few copper-wire stitches to get the piece bent to shape—a good thing since my hands didn’t fit very far into the opening to insert wires. I brushed epoxy along the seams and filleted the joints. After the epoxy cured, I removed the wires, heating them to release them from the epoxy.
With everything sanded smooth, I sheathed the exterior with epoxy and 2-oz fiberglass. I shaped the small opening for a good fit at the mouth. Although I don’t have a similarly-sized megaphone with straight sides as a comparison, this curved megaphone did seem to project my voice louder than I had expected.
ADDENDUM
Reader John Bishop, in the comments below, thought that a megaphone would be useful, but rightly guessed it would be bulky aboard a small boat. He wondered about making a leather megaphone that could be stowed flat or rolled up to take up less space in a small boat. A century ago, several inventors filed patents for easily stowed megaphones. Here are a few:
Zellers’ 1905 patent, the last of the four above was for “a foldable trumpet or megaphone consisting wholly of a sheet or blank of flexible material, like heavy paper or cardboard….” It could work for the leather megaphone John had in mind. I didn’t have any more scraps of leather large enough to make the Zellers megaphone, so I bought a $9 flexible plastic roll-up snow sled. It wasn’t as thick as I thought it would be, but rigid enough to hold a cone shape.
I drew the frustum pattern on the sled with a 1-3/4″mouthpiece (with 1/2″ overlap) and an 8″ diameter. The length of 15″ , fits within the 17″ width of the sled.
After the drawn shape is cut out, the snaps are located while the plastic is curved into the megaphone shape. The handle, at right, slips into two slits in the triangle on that side of the megaphone.
The Zellers-style megaphone rolls up to an easily stowed cylinder.
The handle makes it easier to grip the slippery plastic. The megaphone produces good voice volume when in use.
I came up with my own pattern for a square folding megaphone that could be stowed flat. I had in mind to make it with corrugated plastic (Coroplast) and the only piece I had was a neighborhood sign I’d put in my front yard to remind passing cars to go slow. I painted it gray.
I made a stiff paper pattern and traced it five times on the twin-wall plastic panel. The fifth tracing was modified to create a tab to insert in a slot that I’d later cut in the first traced panel. I cut the shape out with a ruler and a sharp utility knife.
To make the folds, I clamped a ruler on the panel and creased the plastic along the fold lines with a pizza cutter. (The cutter doesn’t have an edge sharp enough to cut the plastic.) After rolling the crease, I folded the outside panel up to make the bend against the ruler.
The tab, inserted into the slot cut for a tight fit, holds the folded megaphone together.
Christopher Cunningham is the editor of Small Boats Magazine.
You can share your tips and tricks of the trade with other Small Boats Magazine readers by sending us an email.
Skipper, her father Cap’n Jack, and I have tried a lot of varnishes over the years, looking for one that hits the sweet spot at the convergence of ease of application, nice finish, durability, and maintenance. After Jamestown Distributors introduced TotalBoat Halcyon Rugged Gloss in 2017, we began using it in 2018 and it has lived up to our expectations.
Halcyon is a one-part water-based polyurethane varnish that comes in pint- and quart-size flexible plastic pouches. We like saving money, and the pouches keep varnish from going to waste as it does in cans when the air space increases after each job. We have found Halcyon varnish was ready to go several months after we first opened it, with no skinning over. For information on this type of container, see “StopLossBags.” We also like saving time, and we’ve applied up to five coats in one day without sanding in between coats. At 72 degrees, it takes just a one-hour interval between coats. For applying additional coats after 12 hours, a light scuff with 320-grit sandpaper is recommended to ensure proper flow and adhesion.
Photographs by the authors
The soft-sided bag allows storing the unused varnish without the airspace that causes skinning over and waste of varnish sold in cans.
Halcyon pours well out of its pouch without the dribble that comes when pouring canned varnish, and does not require mixing or thinning. It can also be applied with a roller or sprayer. If thinning is required, water can be added up to a 20-percent mix. It has an application range of 50 to 90 degrees F, and from 0 to 90 percent relative humidity. There is little to no odor with water-based varnish, so working indoors with it is a possibility. Using a medium-quality sash brush designed for oil paints, we can brush out the varnish without leaving any bristle ridges. Halcyon is self-leveling and doesn’t puddle on flat surfaces, and isn’t prone to sagging or dripping down vertical surfaces. This varnish can be applied over epoxy—cured, deblushed, and sanded—and provides UV protection. It is also compatible with one- and two-part varnishes for refinishing. Cleanup is easy with soap and water.
We decided to use Halcyon to refinish our daggerboards and paddles: we sanded them back to wood, and Halcyon leveled nicely over the grain without needing filler to provide a smooth surface. It flowed on smooth with the brush, dipped directly out of a work cup. Halcyon dried quickly into a gloss finish, even with just three coats, and we were able to use the paddles the following day. We prefer the subtle finish, so we have not experimented yet with more coats than three to see how deep a luster can be achieved.
Brushed on mahogany, the Halcyon Rugged varnish filled the pores and leveled itself to a smooth surface.
The Amber Gloss Varnish has a nice hue that accentuates the beauty of wood. Its finish is harder than a traditional spar varnish, so it will hold up well in high traffic areas. Halcyon is designed for interior and exterior use above the waterline, and is available in clear gloss, amber gloss, and clear satin. The satin finish, which was added to the Halcyon Rugged line in 2019, should be applied over a base layer of gloss. Our applications of it have held up well so far in our Florida Panhandle tropical marine environment, with no signs of chipping, cracking or peeling. We will continue to use Halcyon on new and old projects, and are very pleased with the performance on our fleet bits. It hits the sweet spot.
Audrey (Skipper) and Kent (Clark) Lewis row, sail, paddle and motor the coastal waters of Northwest Florida in their fleet of small boats. They blog their mess-about adventures at Small Boat Restoration. They are unpaid ambassadors for Jamestown Distributors.
The Halcyon Rugged finishes in stop-loss bags are available in clear and amber, gloss and satin, in pints and quarts with pints at $17.99 and quarts at $31.99.
Is there a product that might be useful for boatbuilding, cruising, or shore-side camping that you’d like us to review? Please email your suggestions.
As a backpacker in the early ’70s, I wasn’t picky about the food I carried; it just had to be light. Textured vegetable protein was a staple, though it was like dog food packaged for humans, and my gourmet dinner was Knorr’s powdered leek soup thickened with Ore-Ida potato flakes and cooked on a Svea 123 stove. When I switched to camp-cruising, my boats carried the weight and I could afford to indulge in better food and cooking equipment. For the past few years I’ve been doing almost all of my cruising cooking with portable table-top butane stoves. I recently added the Gas One Mini to my galley kit. It’s a dual-fuel stove that burns propane as well as butane, and I’ve been pleased with its performance, so when I saw Gas One’s 7,200 BUT dual-fuel portable camping grill, I was eager to see how it could expand my cruising cuisine.
The 8-lb 10-oz grill measures 16-1.2″ x 11-3/8″ x 4-5/8″. That’s larger than my standard butane stoves (13″ x 12″ x 4-1/4″), so it won’t fit in the galley box I built for them. It goes aboard in its plastic case. The griddle is made of cast aluminum, has a cooking surface that measures 12-3/8″ x 9-7/8″, and has a non-stick coating. Beneath it is a fat pan (stainless steel, according to the manual, but strongly magnetic) with a spout that lets drippings flow to a tray that slides into the bottom of the stove. The fat pan rests on an enameled steel support that’s open to the burner, which produces two 7″-long rows of flame. A piezo spark ignites the flame. The grill houses an 8-oz butane canister and has a hole in the back for the passage of an adapter hose when using a 1-lb propane canister.
Photographs by the author
Butane fuel canisters fit in the compartment to the right, here with its hinged lid open. The griddle has been removed to show the burner element and the two rows of blue flames that it produces.
The stove is easy to operate: press the lever down to engage the butane cartridge (if that’s what’s being used), turn the dial until the igniter starts the flame, then adjust the flow of gas. The fat pan can be a chore to clean, but the griddle easily sheds grease and grime. I weighed the canisters after several cooking jobs, and while how long they last depends on the setting of the dial, the calculations I made with it in the two-thirds to three-quarters range came to 1 hour 45 minutes for butane and 4 hours 20 minutes for propane. These figures may be a bit generous, as fuel delivery is better from a nearly full can than a nearly empty one. The griddle is for outdoor use; the instruction manual has a carbon monoxide warning and cautions against using the griddle indoors. Some foods—raw chicken, for example—can produce a fair bit of smoke that needs someplace to go.
The grill has provided several welcome additions to my cruising cuisine, including kebabs, grilled chicken, turkey burgers, and toast.
The fare I had in mind for the griddle—dishes I was unable to cook with pots and pans on my stove—all worked out well on it. Turkey patties, salmon patties, veggie burgers, kebabs, mahi-mahi fillets, and chicken all got their stripes on the griddle and had a taste and texture that pan-frying can’t achieve. (Although I gave up beef and pork decades ago, I’d venture that they would cook just fine, but perhaps produce more drippings.) Skinless, boneless chicken was the slowest to cook of the foods I’ve tried, so cutting it into quick-cooking strips will save fuel and time.
Having a cover quickens the cooking, especially in cold weather. The chicken thighs outside of the cover here took several minutes longer to cook than those under it. To burn propane, an adapter hose and fitting connects the stove to a 1-lb canister.
An open-face sandwich with melted cheddar on grilled chicken warmed up nicely under the cover while resting on a bit of foil. Crinkled and folded into four layers, the foil kept the bread from getting scorched.
I used the grill on a couple of cold evenings (down to 44 degrees) and that slowed cooking, so I bought an 8″ x 10″ x 3″ stainless-steel baking pan to use as a cover. There was no way to get a hold of the cover when hot, so I added a pair of stainless-steel pad-eyes, fastened with rivets made of aluminum nails. The cover speeded up cold-weather cooking significantly, and because the pan does not completely cover the griddle, it doesn’t seem to affect the function of the grill. When not in use, the pan holds two butane cartridges and serves as a wash basin.
A dream come true: pizza at anchor. A 10″ cook-pot lid turns the grill into a pizza oven. With the heat on low, the cheese melts before the crust chars.
Using a cover with the grill makes it function like a toaster oven, an unexpected bonus, and I’ve happily added pizzas, toast, and open-faced grilled-cheese sandwiches to my camp-cruising cuisine. Foil, crumpled then straightened out and folded, makes a good insulator to keep bread and crust from charring as the toppings are warming and the cheese is melting. French fries, grilled under the cover, also worked out well. I just cut 3/8″-thick strips, rotated them a time or two and in about 10 to 12 minutes, they were ready.
Fish ‘n’ chips. Mahi-mahi fillets cooked quickly and tasted great. A russet potato, cut into french-fry sticks and brushed with olive oil, cooked surprisingly quickly.
In my 20s and 30s I relished roughing it and was quite content to suffer through cold, wet weather and get by with meager meals. I got over that, and now I like cruising in comfort with meals that I can look forward to. The Gas One Griddle opens up a lot of possibilities.
Christopher Cunningham is the editor of Small Boats Magazine.
In 1936, Kenneth With bought a 24′ cabin cruiser, secondhand, for $595. It had a compact but comfortable cabin, just right for taking his young family cruising among the myriad of islands of Ontario’s Georgian Bay. The cruiser, BLACKDUCK, needed a tender, and in 1945 Kenneth consulted with his son, Ritchie, who had already taken an abiding interest in wooden boats at the age of 10. The two looked over the boat design catalogs Ritchie had collected and decided on the Bantam Pram, a 6-1/2′ plywood rowing boat designed by Charles G. MacGregor in 1939.
Photographs courtesy of the With and June families
This volume in Ritchie’s collection of catalogs provided the plans for the Bantam Pram, Design No. MM-10 by Charles G. MacGregor.
MacGregor was a prolific designer of boats large and small; between 1906 and 1949 he published 58 designs in TheRudder magazine. From 1930 on, most of his designs were intended for plywood construction, breaking new ground in boatbuilding. The 25′ Sea Bird Yawl is one of the best known from this period.
MacGregor’s design patent for the pram provided 14 years of protection for the form and appearance of the boat. It’s not a utility patent protecting the idea of a pram.
The plans for the Bantam Pram note, in handwritten capital letters: “THIS DESIGN IS PROTECTED BY U.S. PATENT.” The patent for the boat appears to be Design Patent 112,120, granted in 1938, stating: “Be it known that I, Charles G. MacGregor, have invented a new, original and ornamental Design for a Row Boat.”
In 1945, Kenneth ordered Bantam Pram plans and materials and got as far as cutting out the plywood panels before setting the project aside. A salvaged dinghy was pressed into service as BLACKDUCK’s tender. The plywood pieces were squirreled away in the With family home (then near the shores of Georgian Bay), and later moved to a new home in Toronto on Lake Ontario, then to Midland on Georgian Bay, and finally to Sarnia on Lake Huron. The parts of the pram were always near the water, but the boat was never built. Kenneth passed away, Ritchie grew up and had a family of his own. His son, Greg, grew up, married Tammy June, and they had four children: Logan, Sawyer, Sarah, and Jasper.
One afternoon, early in the pandemic, Tammy and Ritchie were visiting in their back yard, and Ritchie recalled his fond memories of boating on Georgian Bay and spending summers at the With family’s island retreat. He mentioned the Bantam Pram, his father’s unfinished project. Tammy was well acquainted with the plywood pieces, having helped to haul them with each of Ritchie’s moves. When Ritchie expressed an interest in seeing the boat built and launched, Tammy saw it as both an opportunity to occupy her kids during the pandemic and a way to connect them to their grandfather and even the great-grandfather they never knew.
On the first day of construction, Ritchie and daughter-in-law Tammy examine the plans and decipher the pieces rescued from the garage attic.
She wasted no time in getting the ball rolling. She located Kenneth’s original plans and asked her husband Greg to retrieve the pieces of plywood from Ritchie’s garage attic. There were no instructions and no one in the family had any boatbuilding experience, so they watched a lot of online instructional videos.
The last time Ritchie, left, worked on the boat he was ten years old. Tammy, right, is the principal boatwright and her daughter, Ritchie’s granddaughter, 4-year-old Sarah, supervises the project.
Sawyer is the first of the grandchildren to try his hand at sanding. He works his way along the center edge that will be drilled and stitched together.
Tammy set up shop in her family’s back yard in a space bordered by the garden, garden shed, and swing set. Her two older kids helped at times, but their attention often wandered and Tammy’s motherly tasks limited her work to small windows of time. The boatbuilding lurched along in five-minute increments.
The pram was designed for construction over eight molds set on a strongback, but the stitch-and-glue plywood method they’d seen in the videos seemed like a quicker way to get the boat built. Kenneth had cut the bottom and the side panels, but there was no sign of the 3″-wide plywood chine pieces—the element that likely had given MacGregor’s Bantam Pram the distinctive shape he had patented. The budding With family boatbuilders, given their study of stitch-and-glue construction videos, can be forgiven for mistaking the measurements on MacGregor’s half-breadth drawing as a pattern for the chine panels; they cut curved pieces from new plywood. The pieces would have, in fact, been nearly straight, and would have taken their shape on the molds.
Frustrated but determined, Tammy attempts to attach the chine to the bottom panels. Soon after, the chine was removed and the side panels attached directly to the bottom panels.
The chine piece—laid flat and nearly parallel with the bottom panel when the two were stitched together—was clearly not the right shape. Not one to give up, Tammy decided to forge ahead without the chine panel and stitch the bottom directly to the side panels. The edges went together as if that’s the way it was meant to be. The pram would be a bit narrower and have less freeboard, but better that than abandon the project.
Time had taken its toll on the old 1/4″ plywood. It yielded easily to the drill bit making holes for the cable ties, its edges were rounded soft, and it was thinner than the new 1/4″ plywood. Tammy decided to fiberglass the hull and give its exterior two layers of ’glass to restore some of the strength that the old plywood had lost. After the seams were all stitched, Tammy called on her father, Rick June, to help with filleting and taping the joints.
Rick and Tammy apply the first layer of boat cloth on a steamy August morning.
Rick’s professional experience working with fiberglass came in especially handy on the day for the fiberglass sheathing. It was the hottest day of the year, approaching 90 degrees, and the work had to be done quickly before the epoxy kicked. With Rick’s help, they got the job done. Days of sanding and painting followed. Sarah, the youngest child and the only girl in the family, pitched in wiping the hull down after sandings.
PUDDLE DUCK waited 75 years from the beginning of her construction to her launching.
Sawyer and Greg take PUDDLE DUCK for her maiden voyage. She needs a few adjustments to get her to float on her lines.
Rick, left, and his son Derek carried PUDDLE DUCK back to the van after her launching and first trial.
The kids decided on PUDDLE DUCK for the boat’s name, and the With and June families gathered on September 5, 2020, to launch the pram at a park pond. Before the boat took to the water, Ritchie, now 84 years old, gave a speech about its origins 75 years ago and then he and Tammy christened the boat with a splash of sparkling cider.
His son Greg and grandson Sawyer rowed together on the maiden voyage. Sawyer couldn’t be pried out of the boat and stayed aboard while others took their turn with him. The kids—all of them Kenneth’s great-grandchildren—took advantage of what remained of the warm weather to get PUDDLE DUCK afloat. One neighbor had a pool, so the boat was secured to a wagon and Sarah took it in tow there with her tricycle.
Sarah towed PUDDLE DUCK with her tricycle to her friend’s pool. She captured the interest of many passersby as she pedaled down the street in her pink dress.
Tammy enjoyed building PUDDLE DUCK and has been looking at plans for a boat to build with her father next summer. MacGregor’s little Bantam Pram may only be 6-1/2′ long, but this one has bridged four generations.
Do you have a boat with an interesting story? Please email us. We’d like to hear about it and share it with other Small Boats Magazine readers.
This fine gunning skiff from the bays and coastal lagoons of southern New Jersey might have evolved from the lapstrake beach skiffs that worked the exposed Atlantic beaches of the Garden State. Similarities of line and construction between the beach skiffs and the melonseeds seem too powerful to ignore.
The melonseed’s dates are not certain, and some debate swirls around their history (WoodenBoat No. 180, page 50). Howard Chapelle (American Small Sailing Craft, W.W. Norton, 1951) mentions 1882 as the earliest written reference to the boats. They certainly coexisted for a time with the more famous Barnegat Bay sneakbox, a much easier boat to build. Most observers seem to agree that the melonseed came about in a search for a gunning skiff that could work in more open waters.
The sneakbox, which curiously does resemble a seed that we might find in a melon, works well in marshes and protected waters. In rough water, the sneakbox behaves as we might expect a seed from a melon to behave: it stuffs its low teaspoon-shaped snout into the first appropriately steep wave and submerges. If we clamp an outboard motor to a board bolted through a sneakbox’s transom, the little sliver of a boat will point its bow to the sky and pound our kidneys into submission.
The melonseed, with its sharp-yet-buoyant bow, knows enough to slice right through tiny waves and to climb over the big ones. Firm ’midship sections grant it stability and the ability to carry sail. A shapely, and relatively broad, raked transom eases our concern about waves that might come down on us from astern.
Photo by Benjamin Mendlowitz
Although evolved from a Barnegat Bay duck-hunting boat, the melonseed skiff is well suited to recreation. There are several plans available for the type; the one shown here was recorded by Howard Chapelle.
By the time I arrived at the Jersey shore in the 1940s the type almost had disappeared. I never saw an original working melonseed, but the old gunning skiff left a legacy of daysailing catboats along the shores of Barnegat Bay and other shallow estuaries. These often were longer than their forebears (they ranged from about 17′ to 21′ ), and they almost always carried the fashionable gaff-headed sail in place of the gunning skiff’s spritsail. Hunters, then and now, would view the gaff rig as too heavy, too complicated, and too expensive for their purposes.
Most of the melonseed’s descendants carry pivoting centerboards in place of the original’s daggerboard. We’ll find the pivoting board far more convenient to use when sailing across the endless flats of the Jersey bays. So why did the old fellows employ daggerboards? Because day-sailing wasn’t their occupation. They were in the business of shooting ducks—lots of ducks. The longer trunks necessary to house the pivoting centerboards would have been much in the way, and they tended to leak in those pre–plywood-and-epoxy days. They were (and are) slightly more expensive and time consuming to build than the shorter, boltless daggerboard trunks.
As a further convenience, the first builders of melonseeds located the daggerboard trunk far forward below the deck, which cleared the cockpit for the job at hand. A scimitar-shaped daggerboard moved the center of lateral resistance back to where it needed to be. And it allowed the gunner to insert, raise, and lower the board without standing up. The board could be inserted almost horizontally into the trunk.
Many of the original melonseeds appear to have gone together lapstrake fashion, as did nearly all beach skiffs that worked in the surf on the Atlantic side of Jersey’s barrier islands. Other ’seeds were planked smooth— perhaps to account for some hunters’ prejudice against lapstrake hulls, which they considered “too noisy.”
Today, the nature of a melonseed’s construction might be determined by its intended use and by the extent of its builder’s experience. Smooth, plank-on-frame hulls tend not to survive life on a trailer so well as strip-built or lapstrake hulls. Given epoxy, high-quality plywood, and detailed plans, glued-lapstrake construction can be reasonably beginner-friendly. No matter how we decide to plank our ’seed, its backbone will be a sprung plank keel that we’ll bend over molds set up on a building jig. Let’s steam-bend the frames…quicker, cleaner, less expensive, and more fun than laminating them.
Photo by Benjamin Mendlowitz
When the wind fades, the melonseed’s simple sail can be brailed up, freeing space in the cockpit for rowing, poling, or paddling. The forward sections are fine, but still sufficiently buoyant and stable to float the crew.
As for construction plans, experienced builders might consider Howard Chapelle’s well-drawn “melonseed of 1888.” He traced the lines shown here from unpublished plans that had been found in the files of Forest & Stream magazine. Large-scale reproductions of these drawings are available from the Smithsonian Institution, Ships Plans, P.O. Box 37012, NMAH–5004/MRC628, Washington, DC 20013; order plan ASSC–78. The drawings describe a particularly handsome boat, and they often were employed by builders of melonseeds during the type’s revival in the latter half of the 20th century.
Along time ago, I had several occasions to sail a melonseed built directly to the Chapelle drawings. The good little boat belonged to Dennis Caprio, former editor of Small Boat Journal. We sailed along the shores of western Long Island Sound. I recall one early autumn morning when (typical of that area) the breeze came on just a notch above slick calm. The melonseed ghosted well. As our weight heeled the tiny skiff, gravity seemed to fill the 51-sq-ft spritsail more easily than it would a modern jibheaded sail (particularly when the sprit rested to the weather side of the canvas).
As we tacked out from the gentrified Westport waterfront in search of a real breeze, a powerboat’s wake caught us broadside. The resulting violent rolling caused the rudder’s pintles to lift from the transom’s gudgeons. The shallow rudder now trailed uselessly astern, towed by the tiller. On its own, the melonseed immediately rounded up into the faint breeze…directly into the path of a huge express cruiser (well, it likely measured about 26′ on deck—big enough). I grabbed the free-swinging rudder blade and sculled the skiff out of harm’s way. Sometimes there’s much to be said for small, maneuverable, easily manhandled boats.
Photo by Benjamin Mendlowitz
When the wind fades, the melonseed’s simple sail can be brailed up, freeing space in the cockpit for rowing, poling, or paddling. The forward sections are fine, but still sufficiently buoyant and stable to float the crew.
In fact, the little melonseed always seemed to do everything better than the design numbers might have predicted. Given any breeze at all, it sailed faster than the diminutive rig would have suggested. It sailed drier than a boat of such slight freeboard had any right. It sailed with an easy motion, and the small cockpit and flat deck seemed acceptably comfortable…at least for a not-yet-old crew.
Sprit rigs, when properly set up, deliver about as much drive-per-dollar as any arrangement. We’ll need to keep adequate tension in the snotter (the line that secures the heel of the sprit to the mast). In strong breezes we’ll snug up the snotter. As the wind dies, we’ll ease the snotter just slightly. If we should ever have to make a sprit for one of these boats, I’ll suggest cutting the stick slightly longer than seems necessary. A little extra length will be, at worst, an easily correctable nuisance. A too-short sprit can ruin the sail’s set and the boat’s performance.
When the time comes to purchase a new sail, let’s visit a maker who boasts more than a little experience with four-edged sails. Folks who cater solely to the racing fleets might want to cut the sail too flat. The spritsail should have considerable draft (fullness) by modern standards, and the point of maximum draft should be farther forward than in a highly strung sloop’s mainsail. Thanks to the current revival of traditional arts and design, we’ll find competent makers of four-edged sails along many waterfronts.
Yes, the melonseed’s shoal draft, likable sailing characteristics, and casual trailerability all contribute to the continued popularity of this 19th-century design. But some of us are convinced that it survives primarily because it is a beautiful boat…well worth building, even if we’re not inclined to blast unfortunate ducks out of the sky.
The Melonseed lines shown here were recorded by Howard Chapelle and published in his American Small Sailing Craft. They can be purchased from the Smithsonian by writing to: Smithsonian Institution, Ships Plans, P.O. Box 37012, NMAH–5004/MRC628, Washington, DC 20013
For a comprehensive list of available melonseed plans, see “A ’Seed Catalog,” WoodenBoat No. 180 , Page 54.
You can build your own melonseed or commission custom construction at one of the fine small shops that prosper, to varying degrees, along our coasts. If you prefer fiberglass, Roger Crawford makes ’seeds in that material to the Chapelle lines. He does business as Crawford Boatbuilding. His boats include considerable wooden trim. A good friend of ours refers to them as “fiberglass-hulled wooden boats.”
Is there a boat you’d like to know more about? Have you built one that you think other Small Boats Magazine readers would enjoy? Please email us!
In a sea of wooden boats that are out of reach for many of us, here is one that offers some respite—Dad’s Ol’ Outboard Skiff. She’s the brainchild of Michigan builder Mike Kiefer, who has been building boats and teaching wooden boat building at the Great Lakes Boatbuilding Company, for well over 20 years. Dad’s Ol’ Outboard Skiff is a glued-lapstrake plywood constructed boat with steam-bent sassafras frames and a mahogany transom. Virtually anyone with a little ambition and modest skills can build her. She offers a lot of pride for the effort.
On a cool Iowa morning in mid-July, my friend George Jepson and I took the boat out for a spin on Lake MacBride. A fresh breeze off the eastern Iowa prairie kicked up a few riffles on the water as George and I motored along the pastoral, grassy shore. Dad’s Ol’ Outboard Skiff is the type of boat that conjures images of summers on the lake and Dad in his high-waist shorts. An archetypal, 1950s-style family cottage boat, it’s handsome, roomy, maneuverable, and built icebreaker-tough. With outstanding initial stability and an excellent aptitude for tracking, she is a safe and enjoyable boat, designed and built for protected waters.
Dad’s Ol’ Outboard Skiff has an LOA of 14′ and a 5′ beam. She weighs approximately 250 lbs and draws about 6″ in fresh water, a dash less in salt. Though she may look dainty perched on her trailer, step aboard, and you’ll see that she has the feel of a much larger boat. Get her on the water, and you’ll be pleasantly surprised at her performance, too. These are some of the great achievements of the design.
Photo by Karen Wales
This is not your father’s outboard. Or is it? Builder Mike Kiefer and designer Ken Workinger created Dad’s Ol’ Outboard Skiff to have the look and feel of boats that were the norm during the 1950s. Glued-lapstrake plywood construction, the type already a coastal favorite, has proven to be a welcome alternative in freshwater areas, too.
Mike Kiefer is a boatbuilder’s boatbuilder. In 1978, having decided to enter the trade, he embarked on a tour of New England boatbuilding shops. At Lowell’s Boatshop in Amesbury, Massachusetts, builder Jim Lowell encouraged Mike to get a copy of John Gardner’s Dory Book and to build anything in there. He began with the Swampscott dory and has been building ever since. He opened his own shop, Great Lakes Boatbuilding Company, in South Haven, Michigan, in 1986.
Inspired by the family watercraft that companies like Dunphy, Wolverine, Larsen, and Thompson used to turn out by the hundreds, Dad’s Ol’ Outboard Skiff captures the romance of an earlier, simpler time. Romantic overtones aside, the builder is also pragmatic in his approach to serving today’s boat owner. Kiefer says, “I wanted this boat to be a little deeper and wider, since folks today are generally just bigger. The transom is fairly wide and gives good initial stability. Outboard bilge stringers, port and starboard, help with directional stability. It is a pretty thing on the water and scoots with the right horsepower.” Because Kiefer is also a boatbuilding instructor, he requires most of his boats to hold potential as projects for his classes. That practicality came into play in the design spiral of Dad’s Ol’ Outboard Skiff.
Photos by Karen Wales
Meet George Jepson. At 6′ 3″, he seems to dwarf Dad’s Ol’ Outboard Skiff when she’s dockside. But, once he’s aboard, it’s clear that the boat is roomy and comfortable, even for a man of George’s size.
I admire his humility. Some builders, by virtue of the fact that they have built a lot of boats, think that they are also qualified boat designers. While a small number of builders have had good results with this empirical approach to the design process, many more have not. Mike Kiefer knows that having a dream in your head is a long way off from having a boat that accomplishes your goals. So, in order to get it right, he asked designer Ken Workinger to help turn his parameters into a working plan. The result is a lovely and seaworthy boat that handily accomplishes the builder’s intentions. She is deceivingly larger than she looks. At 6′ 3″, owner George Jepson appreciates every inch of roominess afforded to him.
Dad’s Ol’ Outboard Skiff is a traditional-looking lapstrake boat, built with okoume plywood, using glued-lapstrake plywood construction. This type of construction is a particularly good choice for small boats that are to be used in fresh water. High-quality marine plywood is made from straight and tightly grained, stable woods. There is also a high glue content between veneers. Add to that the clear-coating of epoxy that occurs just before painting, and you have a construction type that is extremely rot-resistant.
Photo by Karen Wales
Called “A Sweet Alternative,” sassafras is the builder’s first choice for structural members like frames, risers, and gunwales. “Sassy” is more decay resistant and more limber than white oak. And, Kiefer adds, “It smells like root beer when you cut it.” What’s not to like?
I wondered why a glued-lapstrake plywood boat would also require steam-bent frames. After all, the planking seam glue joints already provide longitudinal strength and good overall stiffness. To me, installing keel-to-sheer frames on top of that seemed a belt-and-suspenders approach. The designer says that this element is mostly for the benefit of students. Bending-in steamed frames provides new boatbuilders with a fun and important lesson that transfers to more complicated work. Kiefer nearly always factors in a design’s suitability as a teaching tool in his classes. While not a common theme in glued-lapstrake plywood construction, the sassafras frames add stiffness to the hull and heighten the traditional look of the boat.
For such a round-appearing boat, Dad’s Ol’ Outboard Skiff is remarkably stable. Absent is the roly-poly feel that usually accompanies a round bottom. This impressive initial stability is a function of a combination of elements, the primary one being her deceptively clever shape. The lines indicate how her belly nearly flattens out for a good run of her length below the turn of the bilge. That, combined with her generous beam, provides the feel of a much larger, cushier boat. Stepping aboard, she feels solid underfoot. And she remains steady, even as a big fellow like George Jepson settles in at the helm. These elements make it an exceptionally good choice for family use…just as the name implies.
With all that, she handles extremely well; she can sweep around a turn with the grace of a young lady sashaying about her partner at a square dance. This agility is due in part to Kiefer’s careful placement of outer hull stringers. Found near the lap of the first and second broadstrakes on the outer hull surface, these outboard “bilge stringers,” as Kiefer calls them, run from about amidships aft, all the way to the transom. In addition to providing better tracking, the bilge stringers protect the bottom when the boat is dragged onto a beach.
Photo by Karen Wales
Spray rails and outboard “stringers” have been added to the outer hull, fore, aft, and below. Made to reduce spray, protect the hull, and improve tracking ability, they give the boat a saltier look too.
Located farther up each side at the aft area of the hull are two more “stringers” that designer Ken Workinger refers to as the quarter fenders. Like the bilge stringers, the quarter fenders also serve a dual purpose. Because Dad’s Ol’ Outboard Skiff has tumblehome, those areas of the hull that protrude beyond the sheer are vulnerable to damage from pilings, piers, and other boats. Workinger says that the quarter fenders protect the hull in these regions. He adds that they also manage unwanted spray that may be migrating up the hull. Finally, Kiefer placed a third set of stringers (spray rails) at the forward end of the boat. Their sole purpose is to deflect spray from the cutwater area. These are much appreciated by frequent bow riders like me.
There is some friendly contention among builder, designer, and owner regarding the appropriate size outboard motor for Dad’s Ol’ Outboard Skiff. The builder feels that a 10–15-hp motor is just right for this boat. The designer commented that she’s “Fun to run with just an 8-hp motor.” Yet the owner likes his 3-hp motor just fine. My only personal experience with the skiff has been running her with the 3-hp motor. It was fine—it felt appropriate for quiet motoring, which is her purpose on Lake MacBride. However, I can appreciate how a larger outboard might have gotten her up and out of the water more efficiently. I figure that puts me in the builder and the designer’s camp. Whatever floats your boat…
Photo by Karen Wales
To each his own…motor. For calm motoring, the owner prefers his 3-hp outboard. However, the builder, designer, and author concur that something ranging from 8 to 15 hp would give her more zip.
All in all, I am charmed by Dad’s Ol’ Outboard Skiff. She has an understated elegance that allows her to travel in any boating circle. Her roots are honest, her design well thought out. Produced by a longtime builder who has mastered his craft, she is destined to become a Midwestern classic—a yacht for the ordinary citizen.
Dad’s Ol’ Outboard Skiff is a lot of boat for her size. Her beaminess and expansive, almost flat bottom give her the wherewithal to carry a large payload of picnickers and remain unperturbed. Her plumb bow, the restrained sweep of her sheer, and nearly vertical transom cap off her classic look.
Update: This review of Dad’s Ol’ Outboard Skiff appeared in Small Boats 2008; plans are still available from Ken Workinger. For details, email him at [email protected].
Is there a boat you’d like to know more about? Have you built one that you think other Small Boats Magazine readers would enjoy? Please email us!
In 1985, the weeks leading up to Thanksgiving hadn’t been easy. I’d been rowing my sneakbox LUNA from Pittsburgh down the Ohio River and the days had been either wet, cold, or both. The rowing warmed me up but several nights just before had been especially cold and I slid into my sleeping bag fully dressed with my rowing pogies over my socks to warm my toes. Rowing day after day had inflamed the tendons in my right wrist, so I taped that hand to the oar handle so I could pull without taking the strain on my fingers. And my heart was acting up—every time I looked over my left shoulder it would take a hard, late beat. I stopped in the town of Cloverport, Kentucky, found a grocery store not far from the river, and bought a bottle of Gatorade, hoping the electrolytes would get my heart settled into a less worrying rhythm. Back on the river, I kept myself company by singing “Poor Wandering One” from Gilbert and Sullivan’s Pirates of Penzance, though I remembered only a few verses of the song and improvised the rest.
On Thanksgiving Day, I rowed some 15 meandering miles from an unnamed hollow at river mile 705 to the Cannelton Locks. LUNA was the only boat locking through. That was usually the case, as recreational boating had come to an end with the approach of winter. In the chamber I slowly dropped about 40′ and the dark, dripping concrete walls pinched off the sky above me. A middle-aged couple peered over the railing as I descended beneath them and asked where I was going. I told them that I had rowed about 500 miles from Pittsburgh and was bound for Florida. They said they’d like to hear all about it and asked me to join them for a Thanksgiving dinner at a restaurant not far away.
I found a safe place for LUNA just below the locks and the couple, Rosemary and Chauncy, drove me a few miles along the river to Tell City where a family restaurant was serving an all-you-can-eat Thanksgiving buffet. I washed my hands and face in the restroom; there wasn’t anything I could do about the rest of me. I’d been wearing my clothes night and day for almost a week, and the thighs of my wool pants were spotted with mustard stains where I’d made cheese-and-tomato sandwiches while descending in the shelter of the many Ohio River locks. It was midafternoon and Rosemary and Chauncey were between lunch and Thanksgiving dinner, so they didn’t order anything. I worked my way through a plateful of turkey, dressing, mashed potatoes with gravy, and a square of cornbread and returned to the buffet. In between refills, I answered questions about the boat and my experience on the river, a small price to pay for some company and a hot meal. When I had eaten all I could, I thanked Rosemary and Chauncey for their kindness and they drove me back to LUNA. As I set to rowing again, my stomach ached. I wasn’t at all used to big meals—to fuel my rowing I snacked my way through the days.
I spent Thanksgiving evening and night in Muddy Gut, a small creek on the Kentucky side of the Ohio River. Just opposite, on the Indiana side, is the mouth of the Anderson River, where Abraham Lincoln operated a ferry service as a teenager, rowing a scow that he’d built.
About 10 miles downriver from the locks, I passed the town of Troy on the Indiana side of the river and found a creek mouth on the Kentucky side where I could spend the night. The creek, called Muddy Gut, was narrow and meandered between banks too steep for camping ashore, so I tied a line between trees on opposite sides of the creek and secured LUNA beneath it where the water was deepest—the river was expected to drop overnight. With a tarp covering the cockpit I had a quiet place to spend the night and LUNA would keep me warm.
During that winter of 1985, I often felt I was the only person for miles around, whether on the Ohio River or the Mississippi River, seen here south of Natchez.
By Christmas Eve, I had left the Ohio River hundreds of miles behind and was well on my way down the Lower Mississippi. Just north of Natchez, Mississippi, I was rowing a 10-mile-long straight stretch of the river when two johnboats raced toward me with wings of feathery white spray spreading from their bows. The first veered around me , but the second slowed down and idled a few boat lengths away. There were two men aboard, both dressed in thick camo clothing. The helmsman said, “You’re the craziest thing I’ve seen so far.” I answered, “I haven’t said two words and you’ve already decided that I’m crazy. It’s hardly fair.” That got him laughing. He promised to meet me at Natchez and buy me a drink and the two buzzed off downriver.
I made a brief stop in Natchez—there was no one waiting to buy me a drink—and then rowed another current-assisted 24 miles to Dead Man’s Bend. I came ashore on a narrow sand beach at the base of a brush-covered lump of land. The sky was only partly cloudy and the air was still and merely cool. I pulled LUNA up the beach, out of the water and set my tent on the high ground.
To celebrate Christmas, I dressed in red and hung a red wool sock from a bush that had red berries and the only leaves left after fall.
On Christmas morning, the sun rose in a clear sky. I was in the middle of a wilderness where only tree-lined banks bounded the river as far as I could see. As far as I knew, there wasn’t another human being within miles. Even so, I was as happy as a kid finding a pile of gifts beneath a brilliant tree on Christmas morning. I clothespinned one of my red wool knee socks to a bush next to the tent, tied my oars together at their throats to make a Christmas tree of sorts, and put on everything red that I had—red sprayskirt, sunglasses, pogies, and balaclava—and danced around camp in my black rubber boots. There were no gifts in boxes waiting for me, just the joy of being exactly where I had chosen to be, living out a dream I’d nurtured for years. And everything I’d left behind would be waiting for me when I returned. I don’t recall now if I sang Christmas carols, but I’m quite sure I didn’t sing “Poor Wandering One.”
In the spring of 1970, the Marine Historical Society, now the Mystic Seaport Museum, sent out a flyer inviting recreational rowing enthusiasts to a “Small Craft Conference–Rowing Workshop” sponsored by the Small Craft Laboratory, which had been started by then Associate Curator John Gardner. Topics would be pulling boat design, reviving recreational rowing, and comparing participating boats. The flyer also suggested that participants submit a design for the “perfect boat.”
Capt. Pete Culler took an interest in the design challenge. A yacht captain, boatbuilder and designer, he had designed and supervised building the schooner INTEGRITY for his friend and sometimes employer, Waldo Howland, owner of Concordia Company. Pete and Waldo discussed the idea and Pete sketched a simple 13-1/2′ flat-bottomed skiff, similar to a 15-1/2-footer he had built in 1968. Waldo liked the result, and mimeographed a pamphlet about it which was distributed at the workshop. In it he wrote that the new skiff was “a learner’s boat for rowing and sailing, and for fun and satisfaction. Suitable for instruction and general use in summer camps, in youth training programs and at home. Rowing is fun if the boat is the right model. Big enough to be useful, long and fine lined enough to row easily. With sufficient length, she will be stable. There are many uses for a good skiff besides rowing alone. Pulling up on a beach for swimming & picnics. Go fishing or clamming. Carry passengers or cargo. Imagination and a bit of water is all you need.”
Designed to be built by amateurs, the skiff received an enthusiastic reception and, after the workshop, Culler drew up plans for what has become a classic, the Good Little Skiff.
Ben Fuller
The plans don’t include a footbrace for rowing; a board spanning frames serves as a simple and effective stretcher.
I bought my 13′ Good Little Skiff, SMILE, in 1977 from Fred Kemp when he and I were working at the Chesapeake Bay Maritime Museum. I rowed and sailed her on Chesapeake creeks, then took it with me to Mystic Seaport where she was my commuter boat for more than a decade, then to Maine. The bottom is her second, as the galvanized fastenings into the chines used by Fred throughout the boat (except for the copper-riveted planking) had started to weep after 40 years. Lately she’s been in storage, and in honor of the 50th year of the Small Craft Workshop, I recommissioned her.
Traditionally built, the Good Little Skiff is perhaps 50 to 60 lbs heavier than a similar craft built today in plywood. It has more flare than most and a little powderhorn in the sheer, something Pete, unlike most designers, could get away with. Its raked transom and stern rocker make it extraordinarily unsuitable for outboards, probably no accident.
The flare is nice. Besides making the skiff distinctively handsome, it provides the width to swing an 8’ oar. Since there is a continuous riser following the sheer, the flare gives you a place to sit or squat against when sailing; if you want to shift forward or aft of the center seat, one can perch on the flare and riser as kind of a narrow bench.
Pete didn’t give the skiff much freeboard. For rowing on the open Penobscot Bay, my friends, Sam and Susan Manning, raised the sheer on theirs several inches by adding another narrow strake. After work with a batten, they tapered the strake into the stem as if it were a rubrail, and added a piece to the outboard edge of the transom to match the height of the new sheerstrake. Amidships, the new sheerstrake pretty much hit the height of the oarlock blocks needed with the original sheer because of the low freeboard.
Traditional construction provides some maintenance challenges. There are a lot of different angles, planes, and nooks to sand and paint when it’s that time. That said, a good, sound interior paint job lasts many seasons, with maybe some attention to the chines where water can pool and the seat tops, worn by sun and use.
Culler left many construction details to the builder, so I expect that no two Good Little Skiffs are the same. Following the Chesapeake tradition in which he was schooled, he called for a tight-seamed cross-planked cedar bottom. It needs to swell tight before use, as the planks shrink when dry and the seams let light through—I use “boat blankets” and a hose. You can trailer the Good Little Skiff with a traditional bottom, but you’ll have to manage the swelling. Better is to use 1/2″ marine plywood in a continuous sheet instead of cross planking.
David Cockey
With the author aboard, the Good Little Skiff sits right on its lines with the transom just above the water’s surface.
This skiff, like most very small boats, is really sensitive to fore-and-aft trim. Pete drew in just one thwart, so when rowing with a passenger, the bow will aim skyward. It is a simple fix: add a removable seat forward of the rowing station; the seat just rests on the riser. Mine stows under the sternsheets when not needed. There is more freeboard forward so the second set of oarlocks can be mounted on the sheer without blocks to elevate them.
Culler assumed, I think, that the boat would be sailed by two, since the tiller can’t be reached from the amidships seat. For solo sailing I added a tiller extension that is about as long as the tiller. It is just right. With my weight on the center thwart the skiff is in good fore-and-aft trim, and sitting sideways lets me slide athwartships or move to the rail to respond to heeling.
I’ve reengineered the sternsheets to have a movable section in the center, which makes painting under the seat—something recommended by Pete—a less painful process. As it happens, you can lower that section down to rest on the stowed bow seat and use the space to hold your boat bag. The bow seat becomes a shelf to keep lunches and sweaters out of the bilge, a handy feature for a boat not equipped with floorboards.
As designed, the skiff has no stretcher to brace your feet against when rowing. I used to use the end of the short keelson to which the skeg was bolted. In the recommission, I tried a plank set on edge on the chines and braced it against the frames and, after some tapering and other tuning, it proved perfect.
I’d forgotten how much fun the Good Little Skiff is—as long as the water is suitable. You can move around in the skiff without it feeling uncomfortably unstable, something that can be a little more difficult in some of today’s lightweight and often twitchy craft. What it does well is proceed under oar and sail at an easy 3- to 4-knot pace, which is doing well for a boat with a hull speed of about 4-1/3 knots. It doesn’t like a chop. Rowing in a chop where the bow slaps into the waves is miserable. And the skiff is ill-suited to open-water whitecaps.
David Cockey
The loose-footed spritsail is equipped with a brail that can quickly furl the sail and the sprit against the mast.
Pete gave the skiff an ample loose-footed spritsail of 70 square feet. Rigged with a brail to bundle it up, it is simple to set and douse. It moves the boat well in light summer breezes, but when you start seeing whitecaps, if you are solo, you will need a reef. Like most spritsails, it is easier to reef when the rig is struck.
Sailing to windward against a 1- to 2-knot tidal current, my tacks take me straight across my river and back a lot but don’t make much progress. It is simple to brail up the sail, pluck the mast out of the step, and lay it down over the bow. Taking to the oars, I can make steady headway uptide.
One of the things I don’t think Pete realized is how well balanced the Good Little Skiff is. As long as there is not a sea running, you can straddle the center seat and sail it without bothering with a rudder: lean forward and to leeward and the boat turns upwind, flatten it out and lean aft to turn downwind. You can keep it straight running with a bit of windward heel. It’s so easy that I mostly don’t bother to bring along a rudder when sailing, and just take along my old sculling oar, setting it into the transom’s notch for a little help turning.
David Cockey
The skiff has good stability for standing while sculling over the stern. The boat’s heavy construction keeps it from wagging excessively.
And the Good Little Skiff sculls beautifully. Light dinghies and skiffs can be sculled, but they don’t have the weight and fore-and-aft resistance to keep them from being wagged by a seriously wielded sculling oar. There is plenty of stability to stand and lean into the oar. My old oar has a 4′ blade and a 10′ shaft which, like duck hunter’s oars, has some curve in it. As you scull, the oar blade digs deeper.
The Good Little Skiff does skiff stuff: poking along the river shore on a leisurely afternoon sail in a nice 10-knot breeze, checking out craft in a harbor, idling the tide downriver on a calm morning under oars to explore tidal shallows, lunching on a tide-revealed sandbar, then catching the afternoon breeze and turned tide to ride home. Pete’s Good Little Skiff is hard to beat. As Howland put it in his pamphlet about Culler’s boat: “A good skiff is a fine boat and for many uses no one has ever figured out anything better or ever will.”
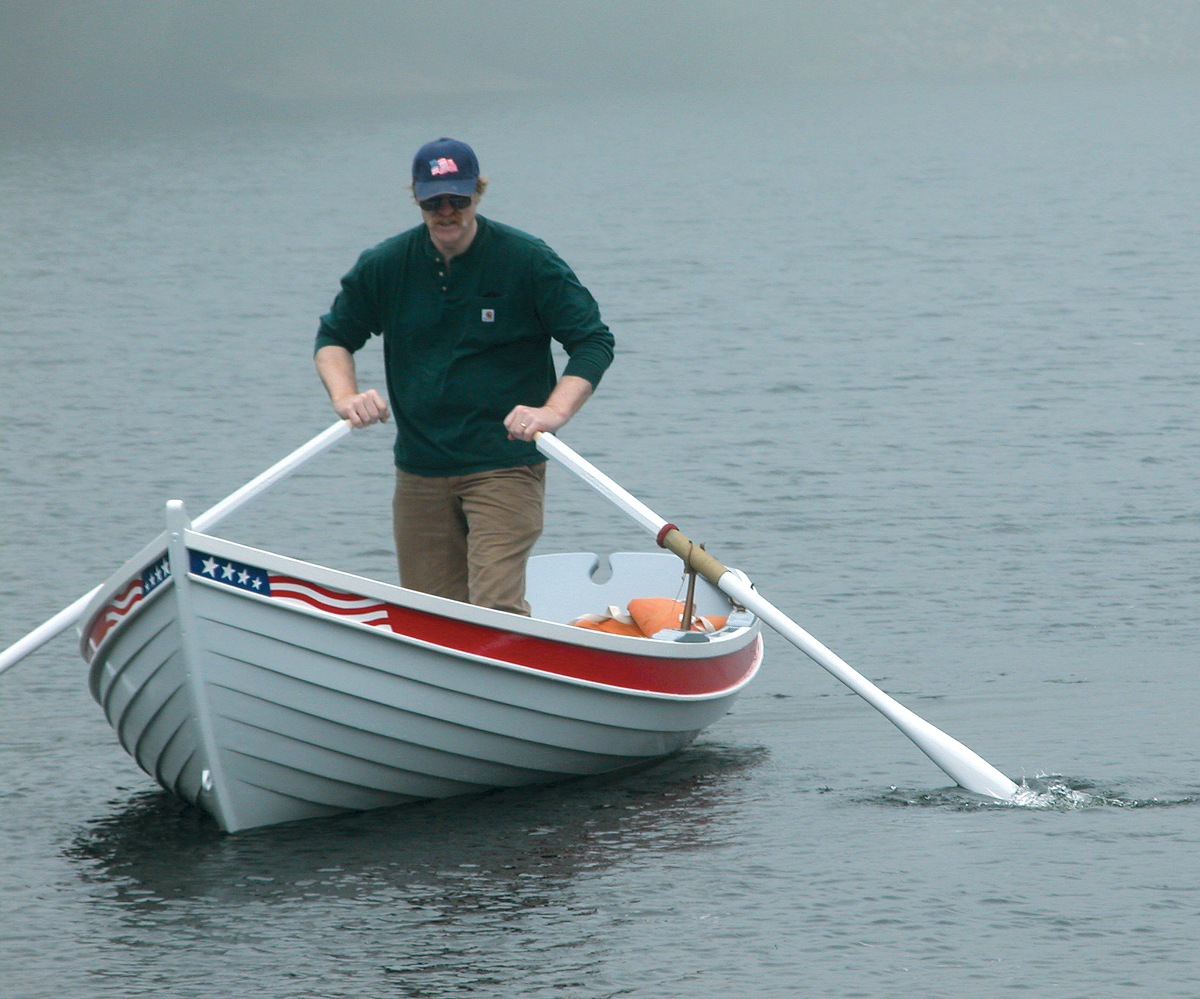 Corurtesy of Walter Simmons
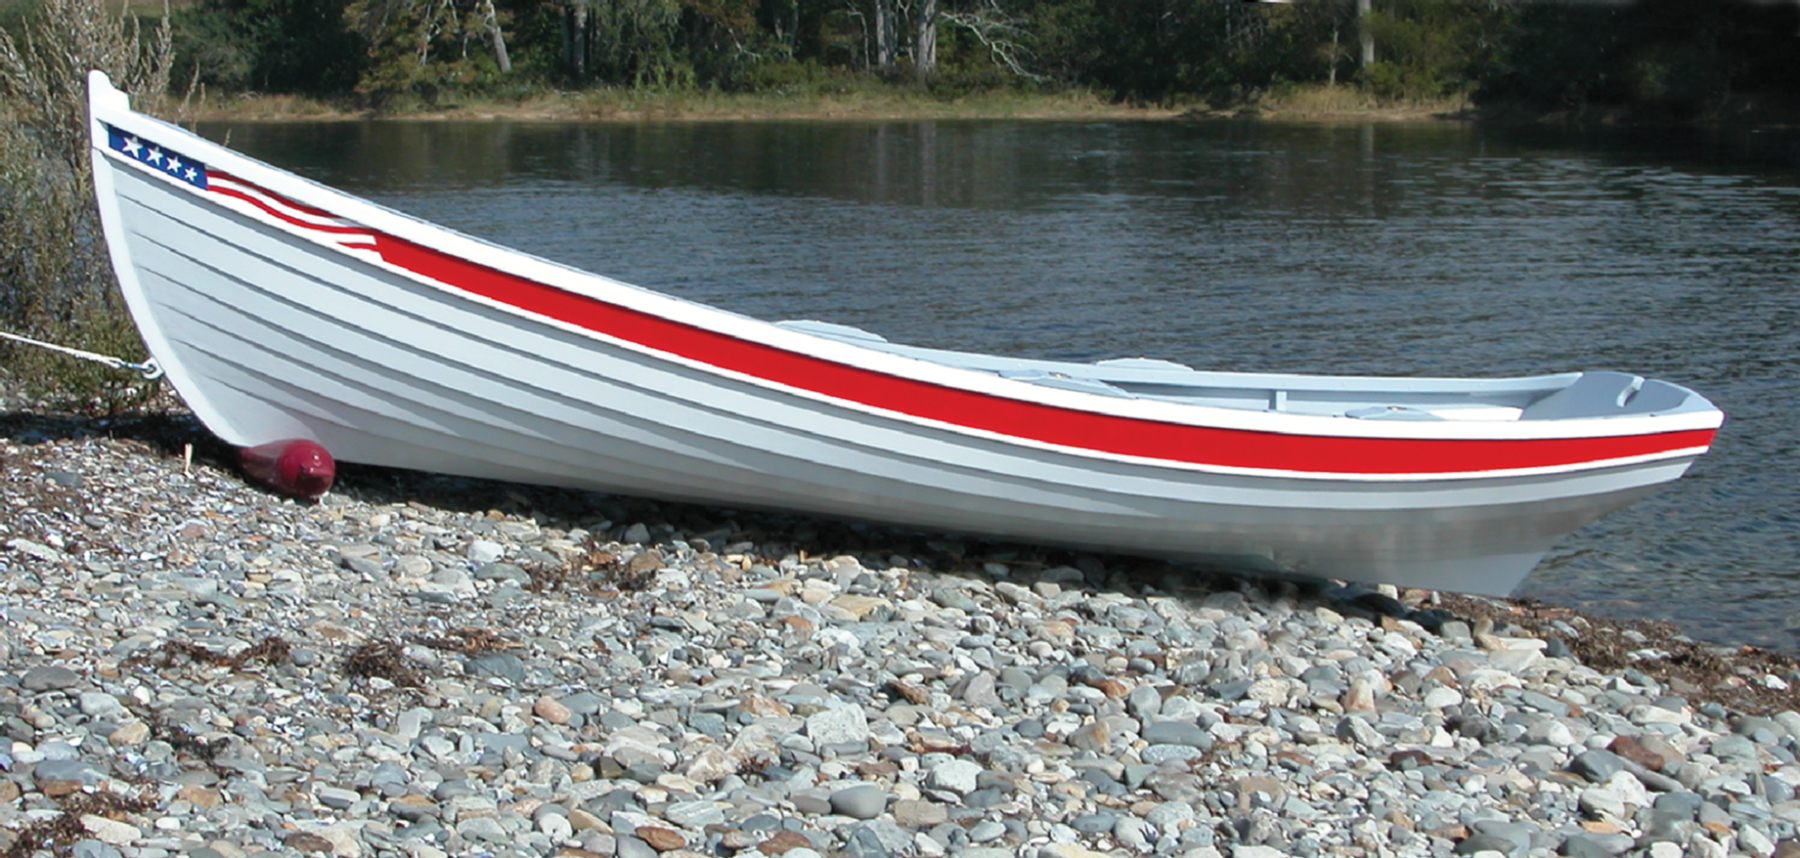 Courtesy of Walter Simmons
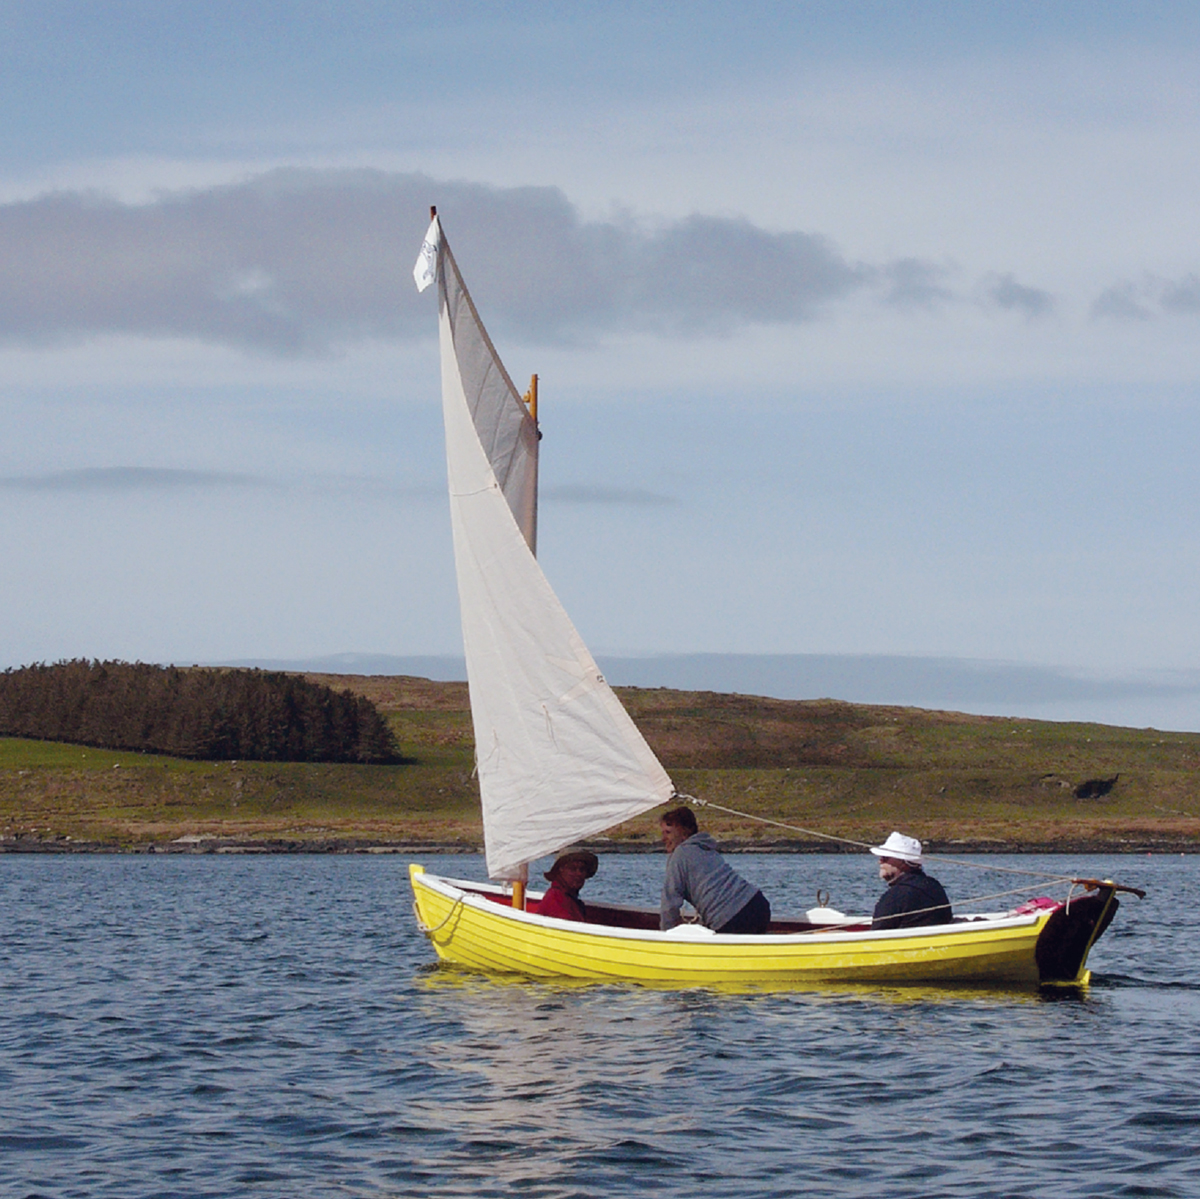 Courtesy of Walter Simmons