During the turn of this century, Jon Persson, a boat designer based in Westbrook, Connecticut, wanted to create an open-water rowing craft that would be not only economical and simple to build but also accessible to someone new to the sport and yet still please those who were more experienced.
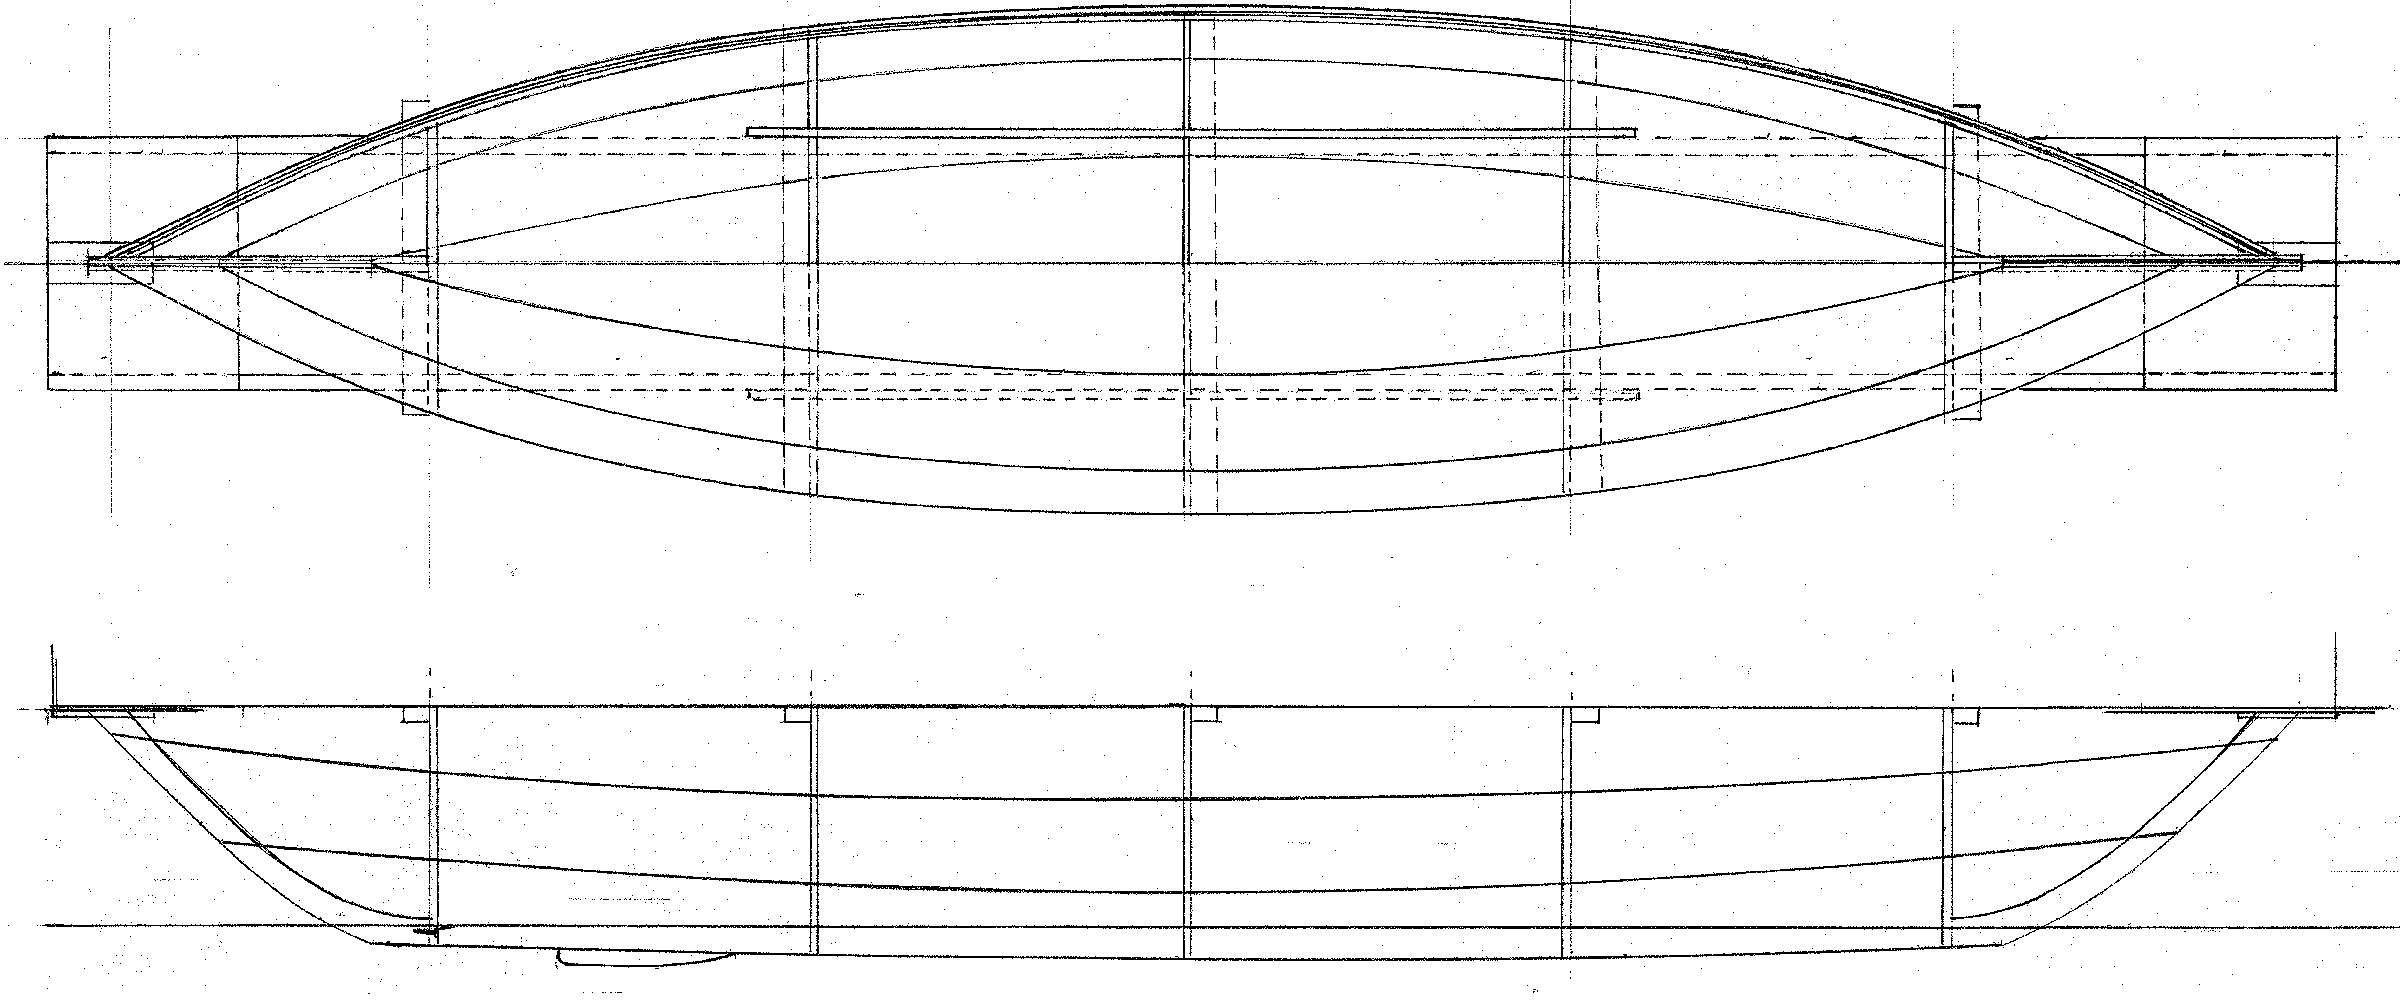
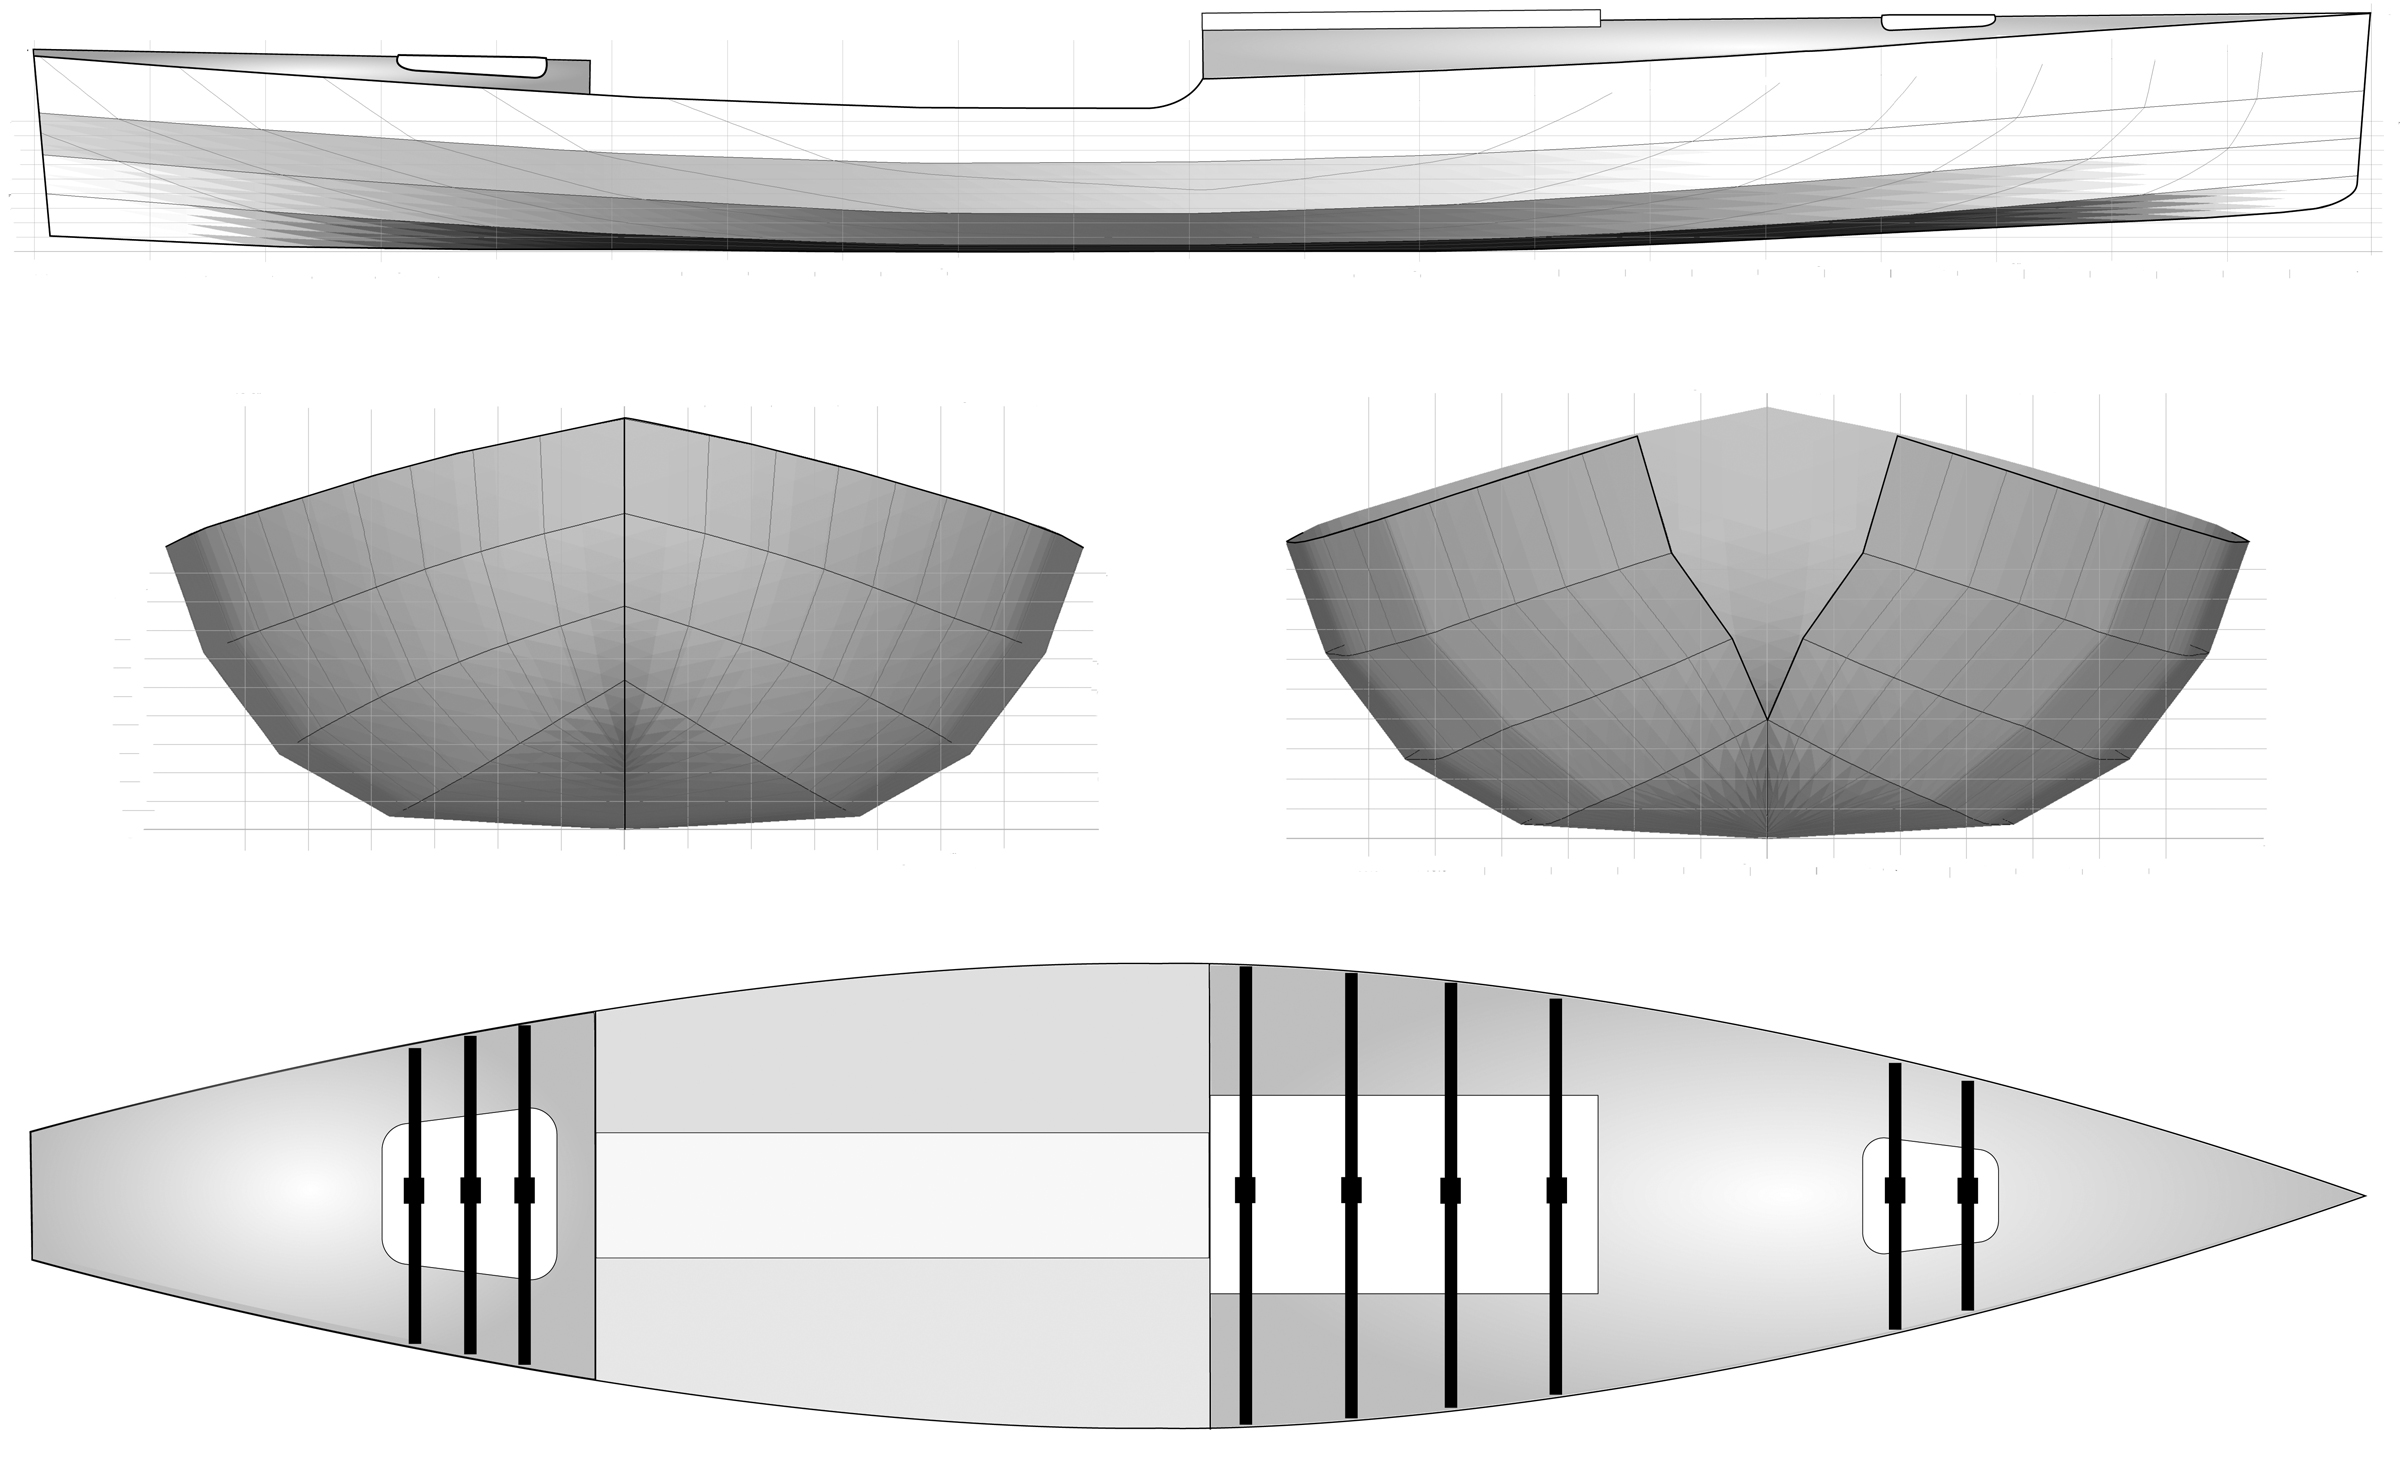
Persson began the design development with inspiration from the Francis Herreshoff–designed and John Gardner–drawn pulling boat the Green Machine, a beautiful lapstrake affair with dozens of steam-bent frames, and along the way incorporated aspects of the Chamberlain Gunning Dory. After several half models and prototypes, Persson finalized the design as the Atlantic 17 Dory—a symmetrical, double-ended, 17′-long boat that has a 48″ beam with the speed of the Green Machine, the seakeeping qualities of the Gunning Dory, and a very simple plywood-on-frame construction process.
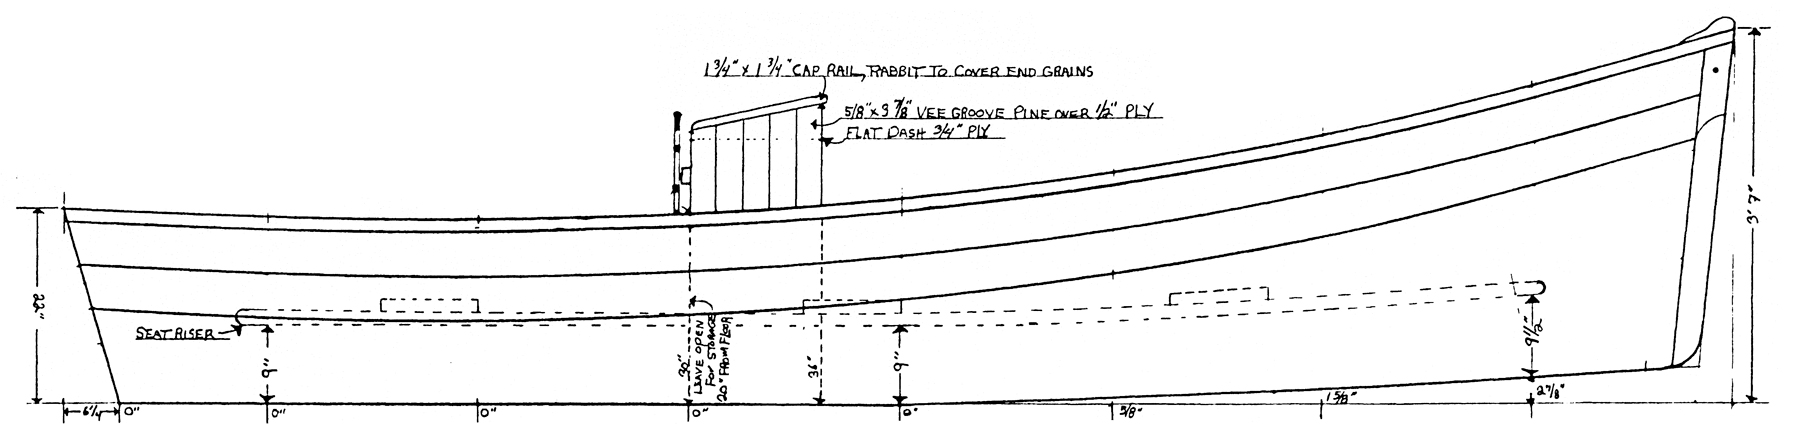
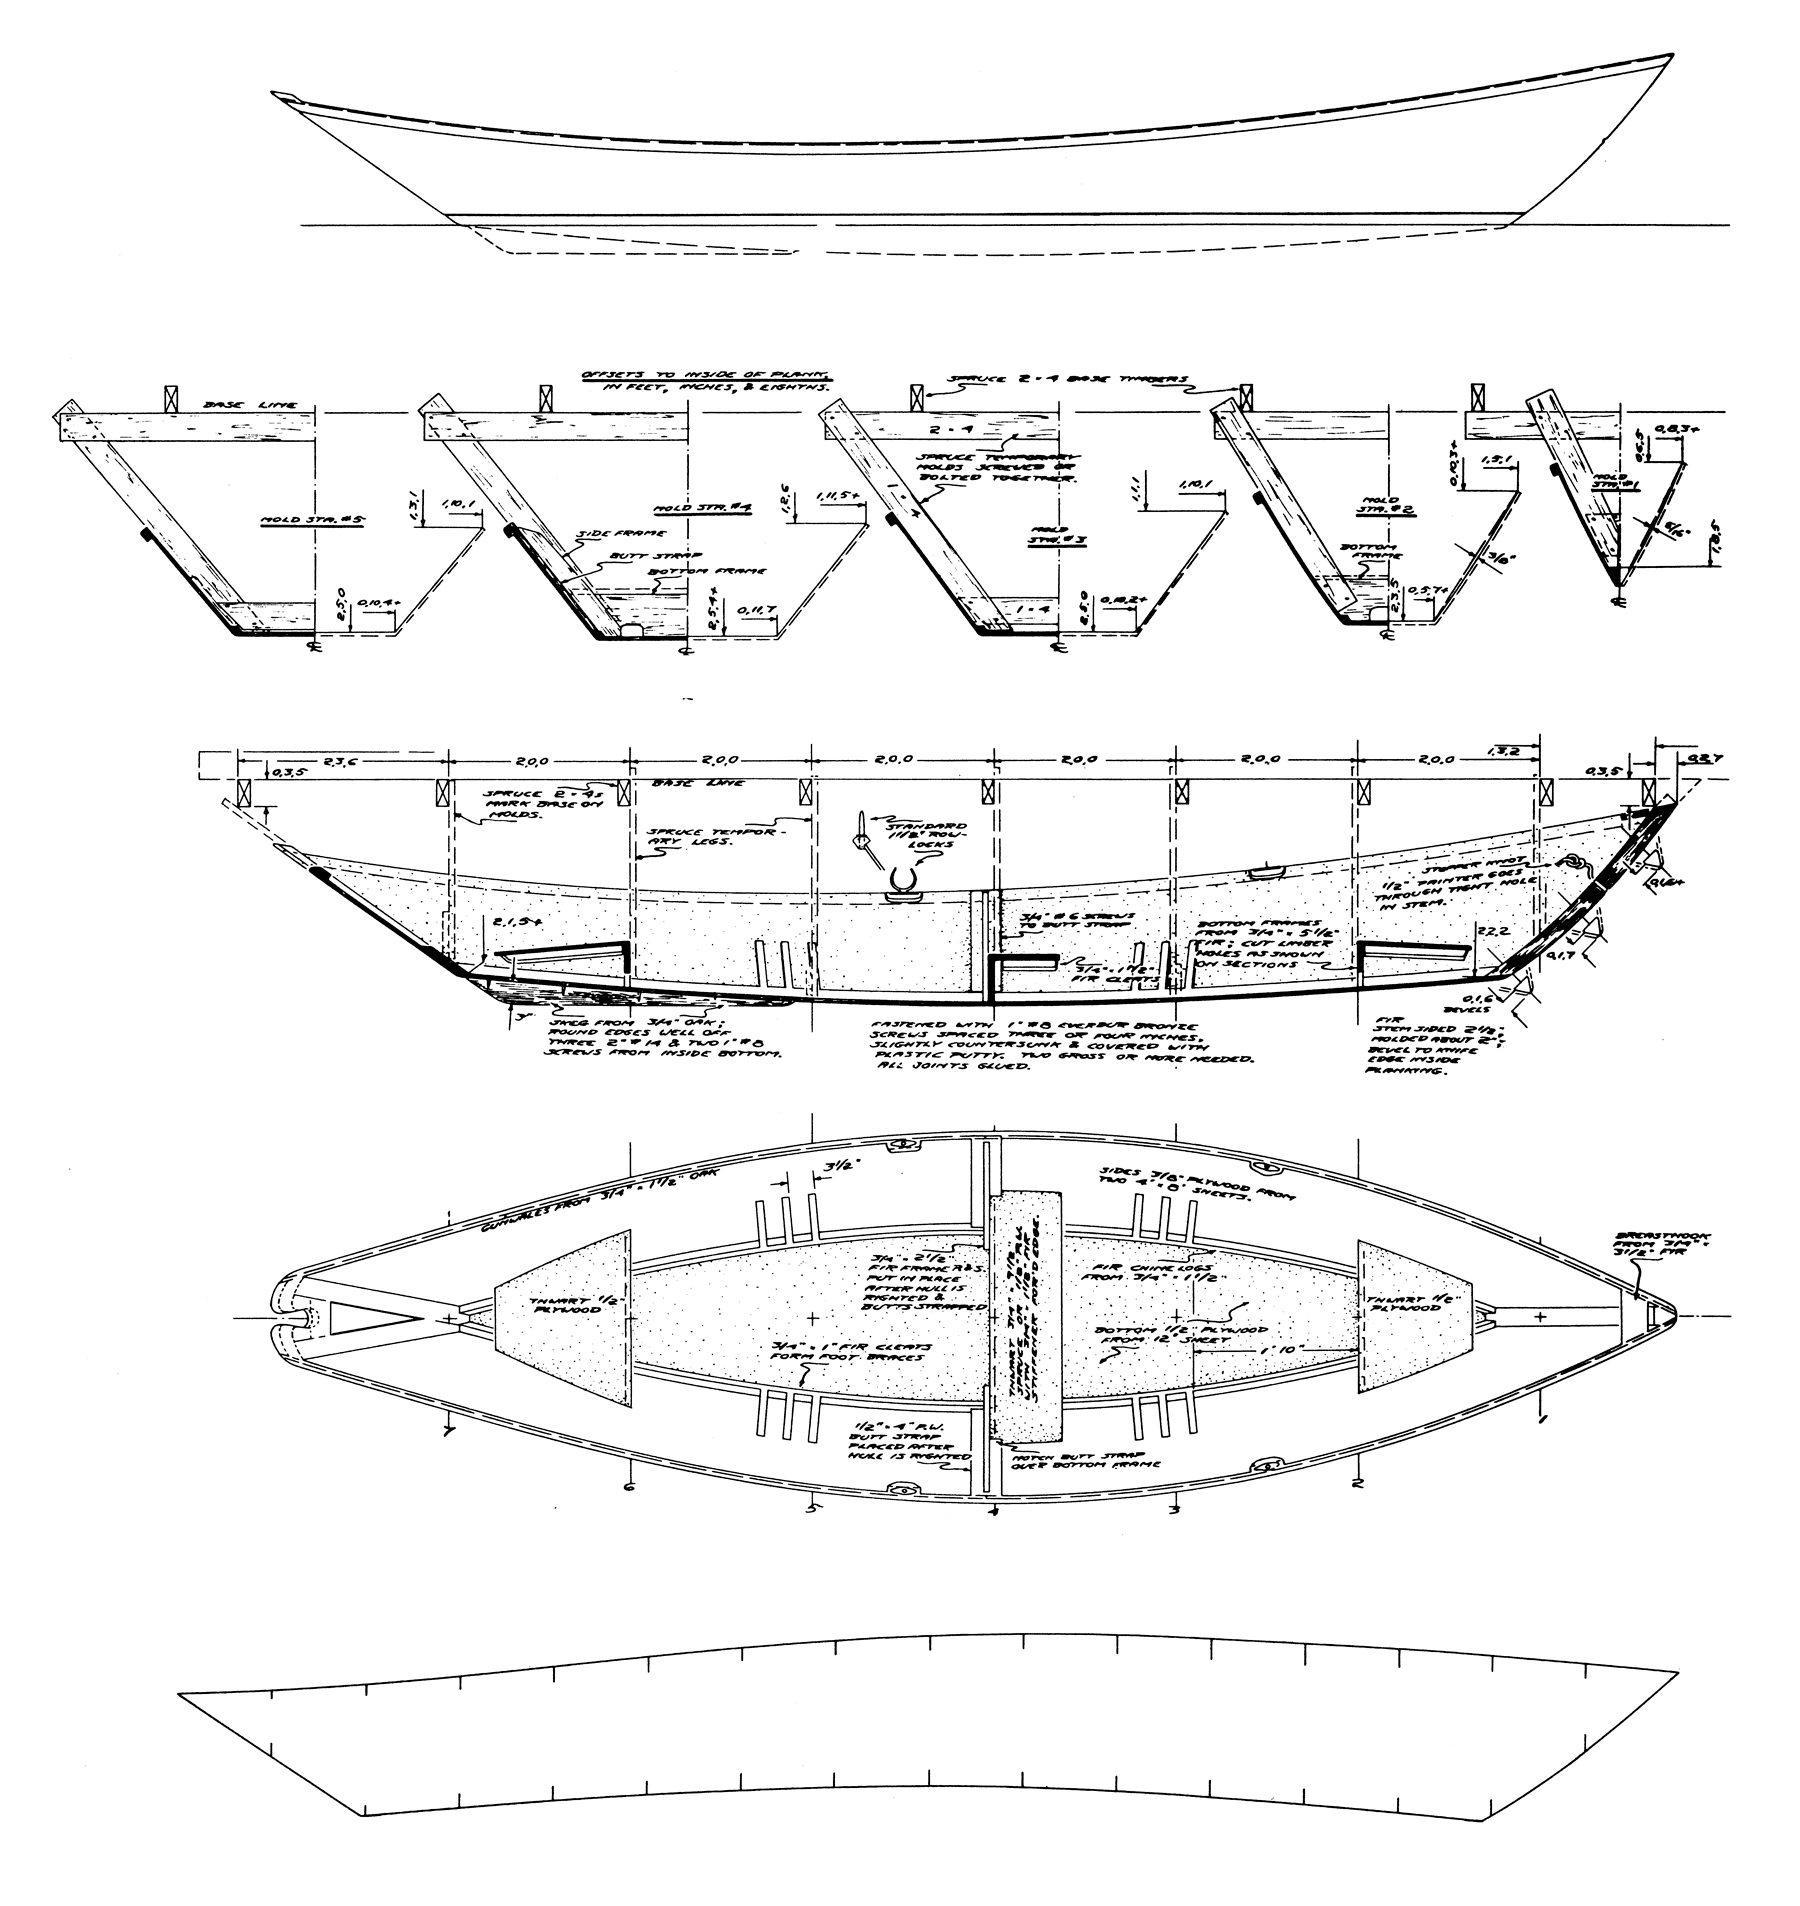
I recently ordered Jon’s plans. They include profile and plan drawings, full-sized frame and stem patterns, and four pages of written instructions, which include a technique that ensures fair planking. The hull has two strakes, a flat dory-like bottom, and a small skeg. Construction is straightforward and detailed in the plans, and is within easy reach of an amateur who has some previous woodworking and epoxy skills.
Christophe Matson
The flotation compartments in the ends are not included in the plans but are an easy modification to make when their bulkheads are combined with the frames.
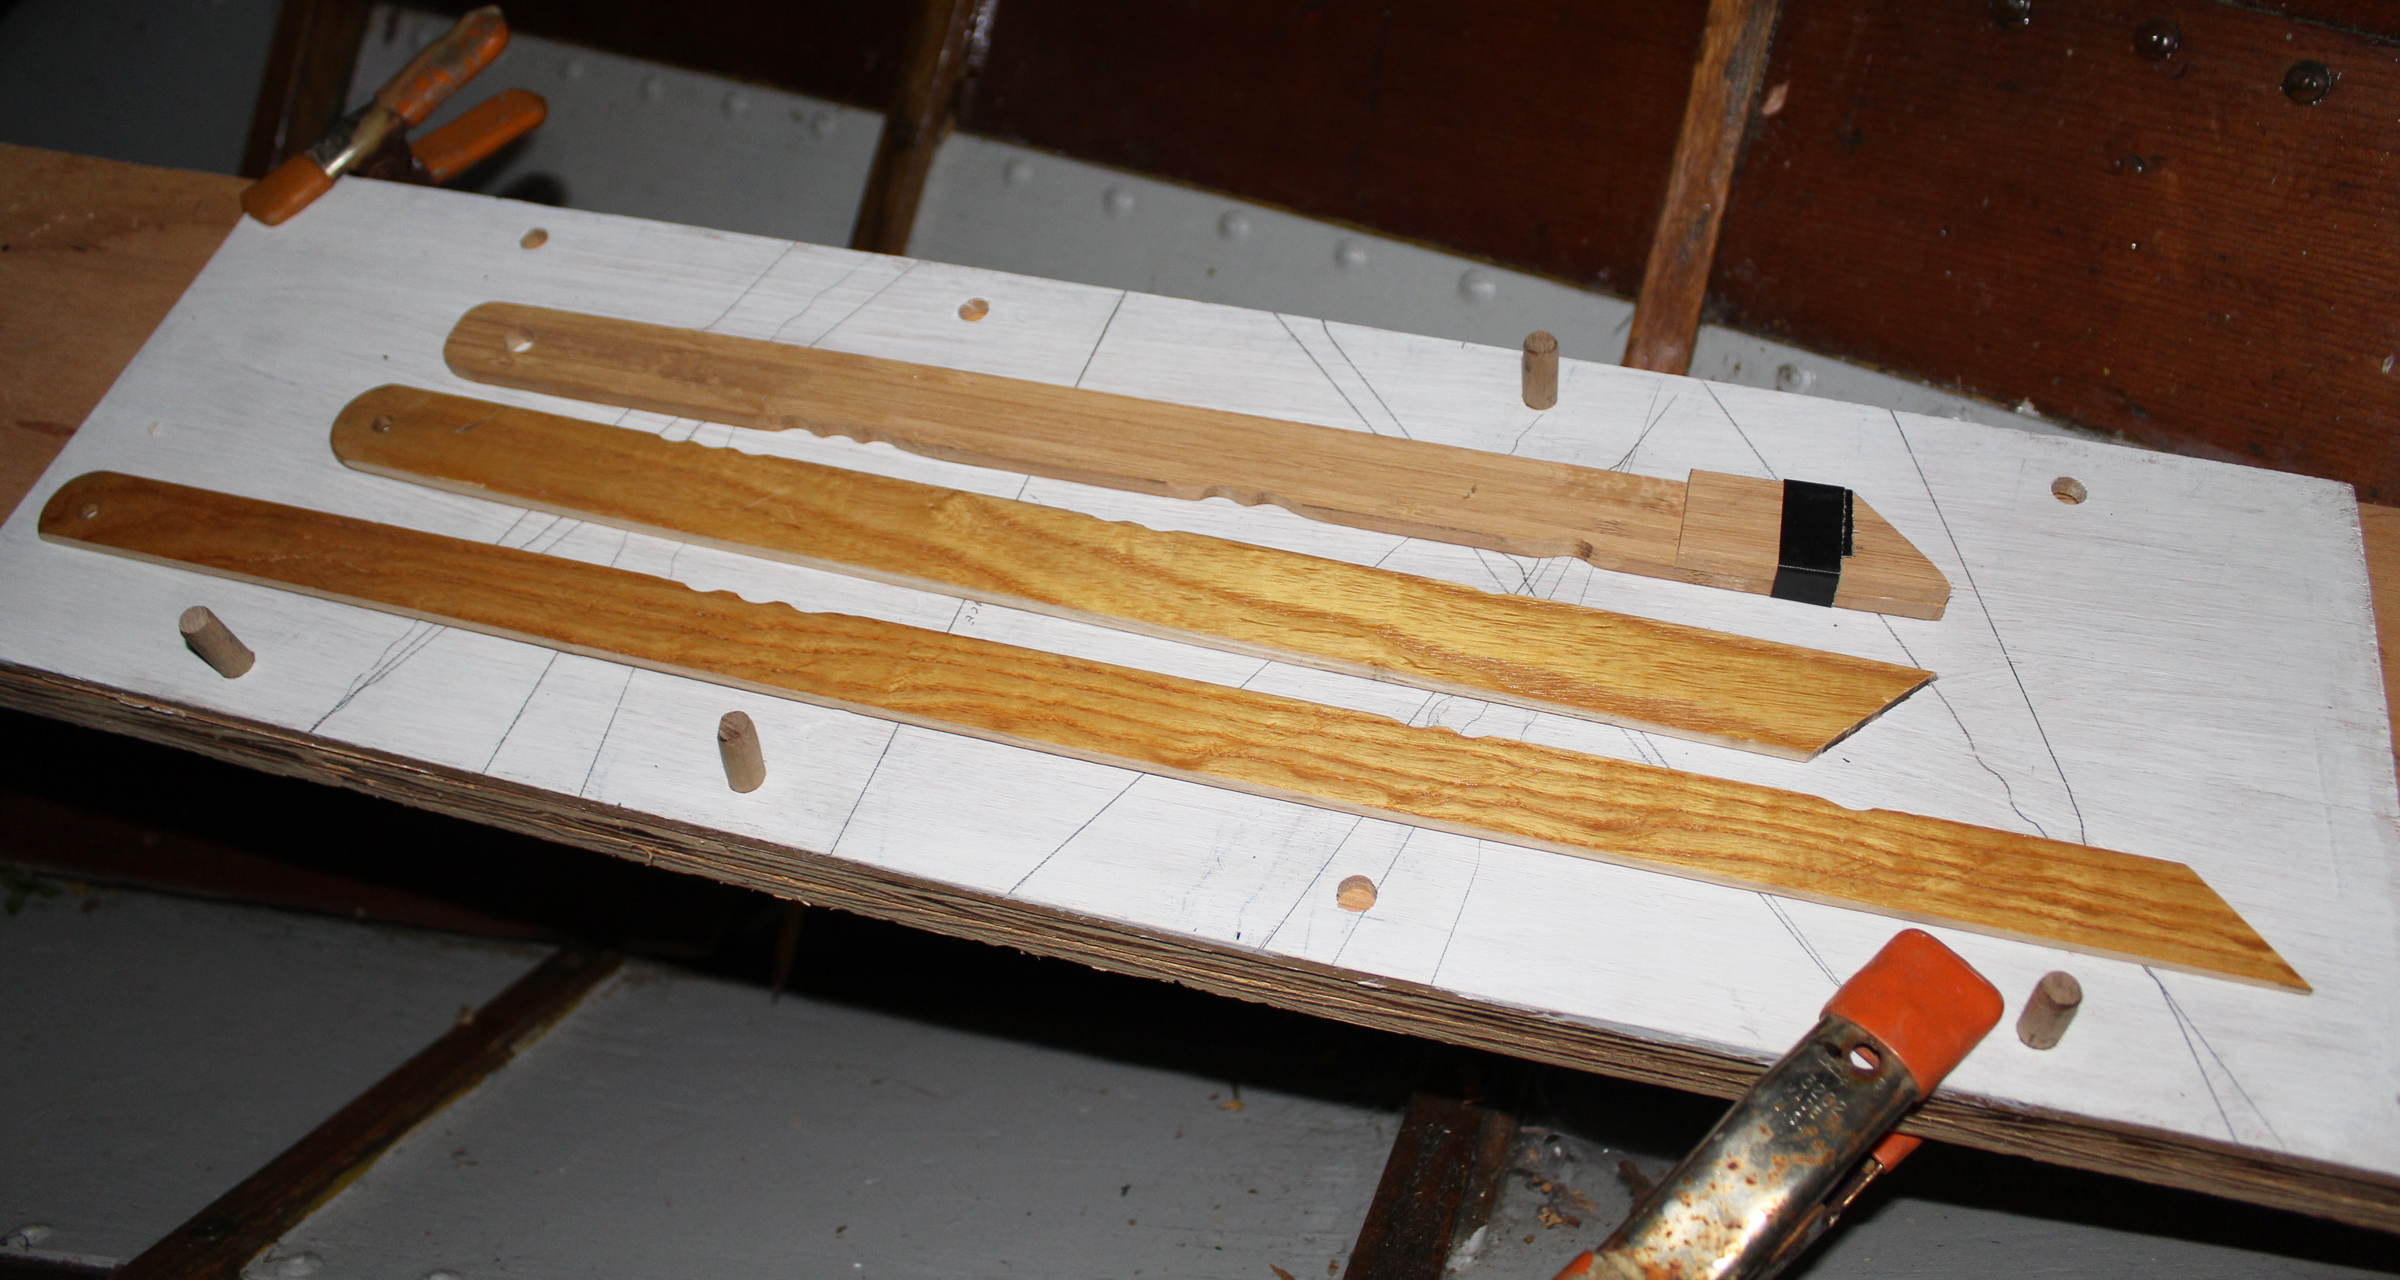
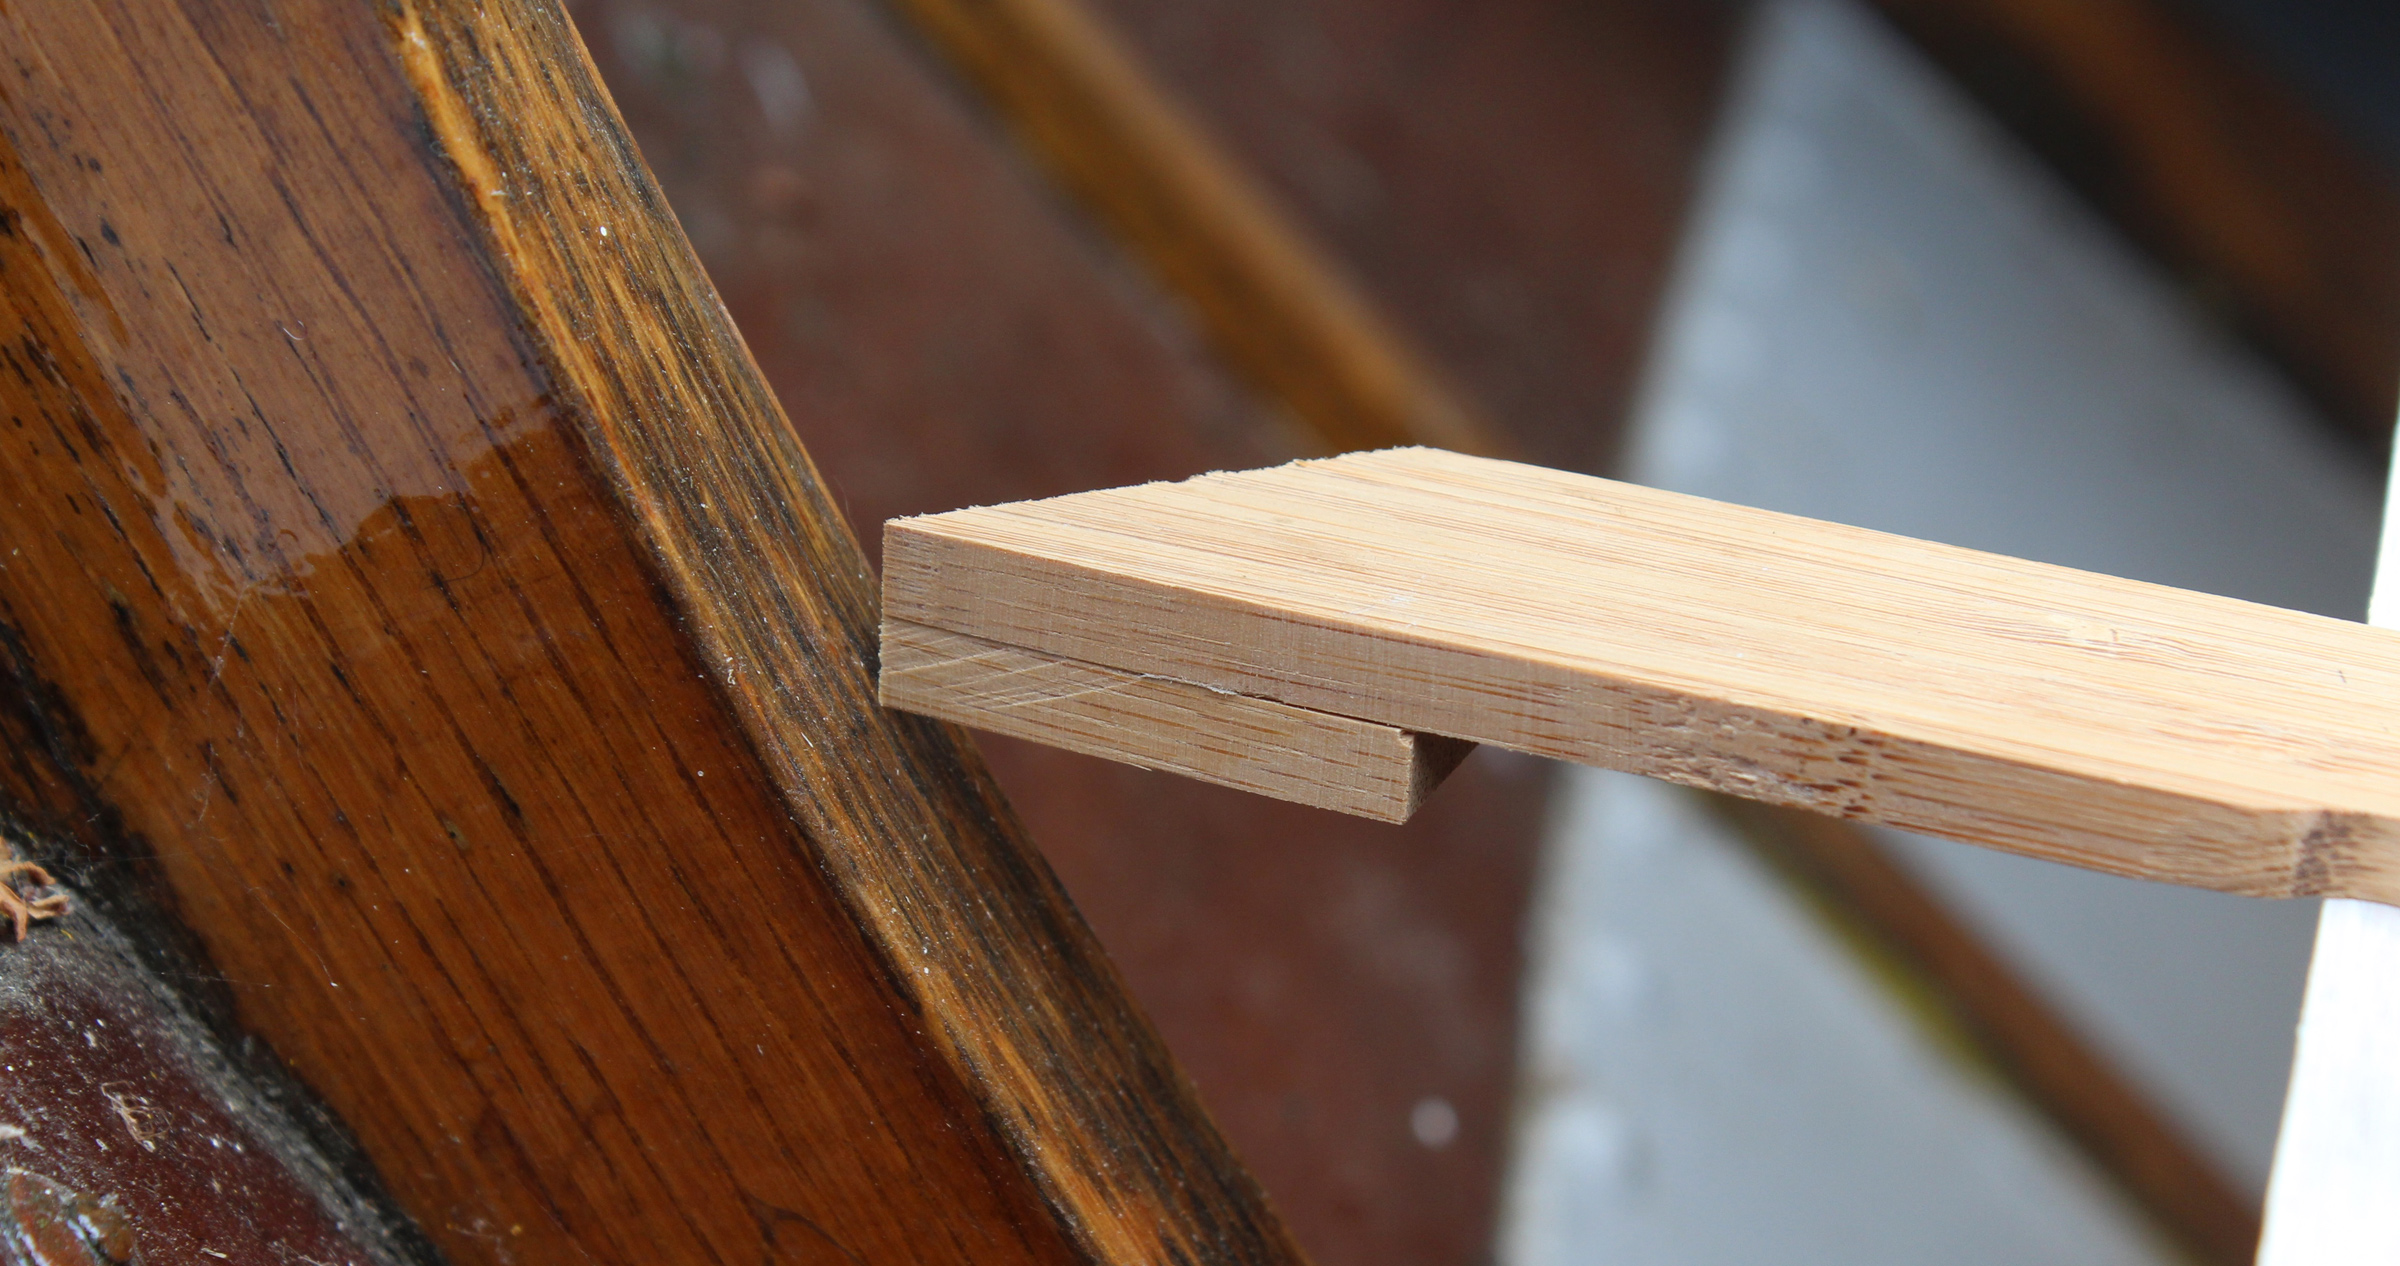
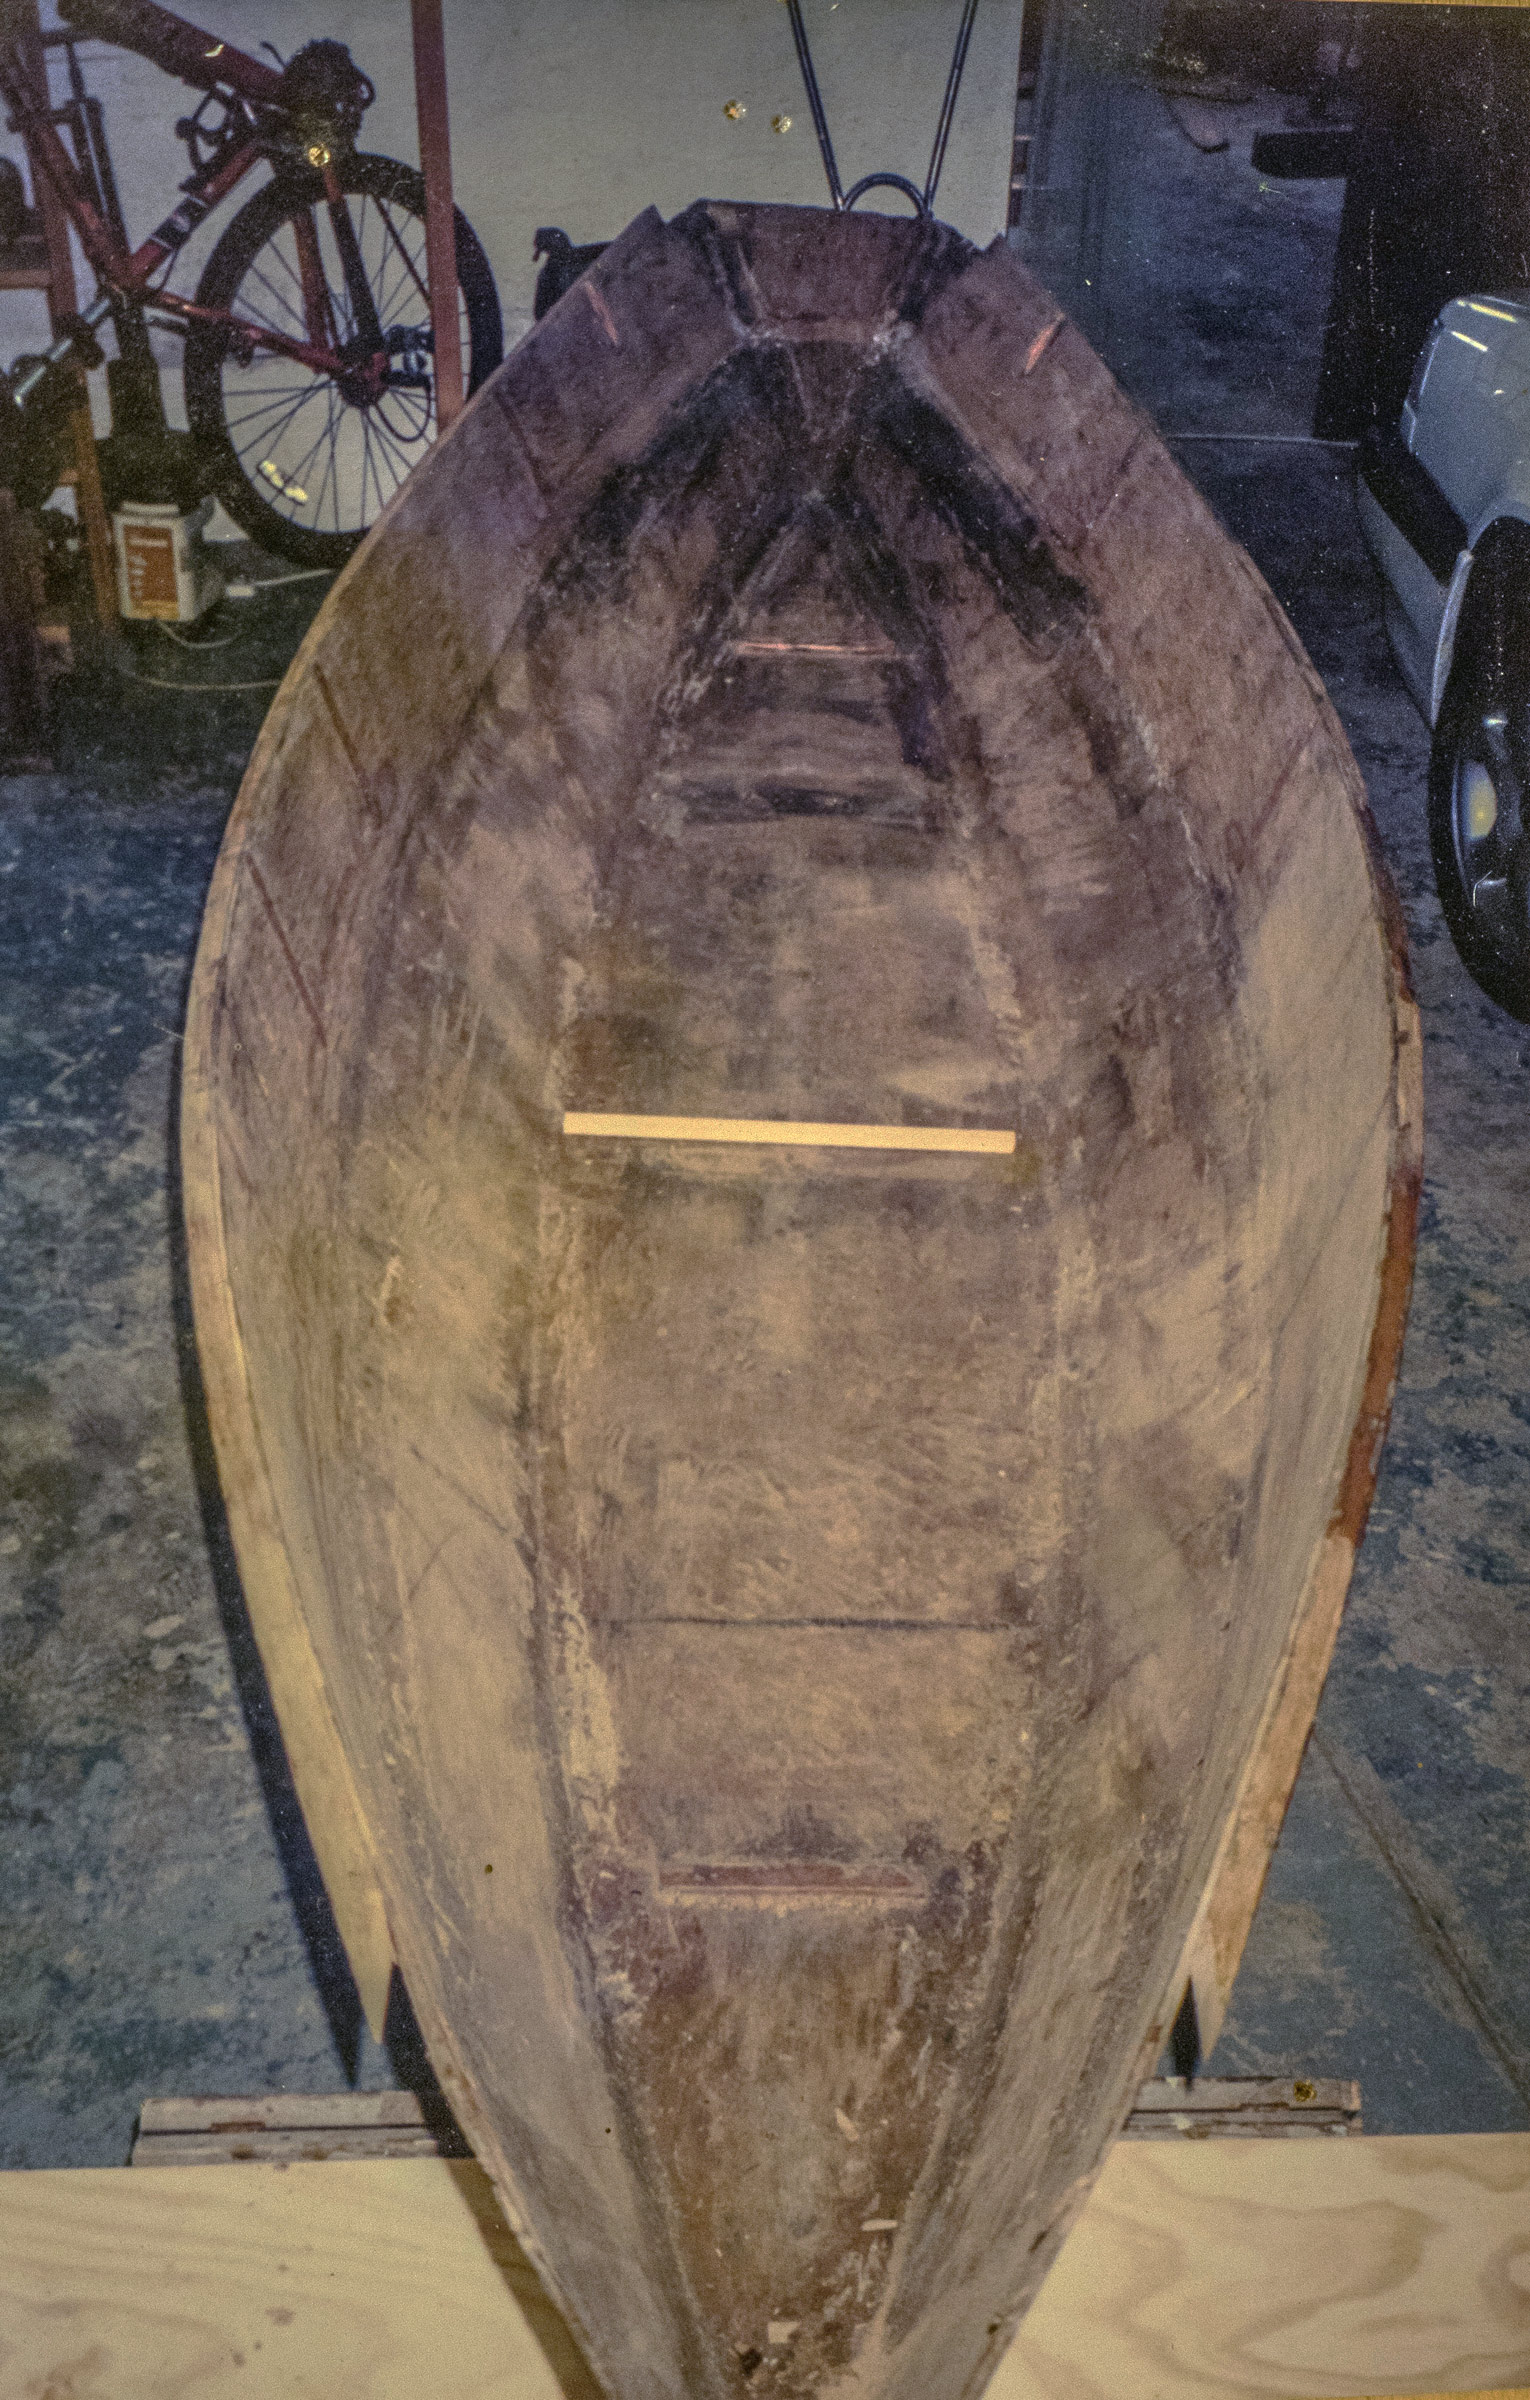
The dory requires four sheets of 6mm okoume plywood for the planking and one sheet of 18mm meranti for the frames. The hull is constructed upside down on a strongback using its five frames as molds. On each side, three battens—a chine, a seam batten where the two planks meet edgewise, and an inwale—span from stem to stem. The seam battens need to be beveled to accommodate the plank joints. The joining of the battens to the stems without twisting the stems out of vertical is the most technical aspect of the build. The frames do not need to be beveled; gaps are backfilled with thickened epoxy.
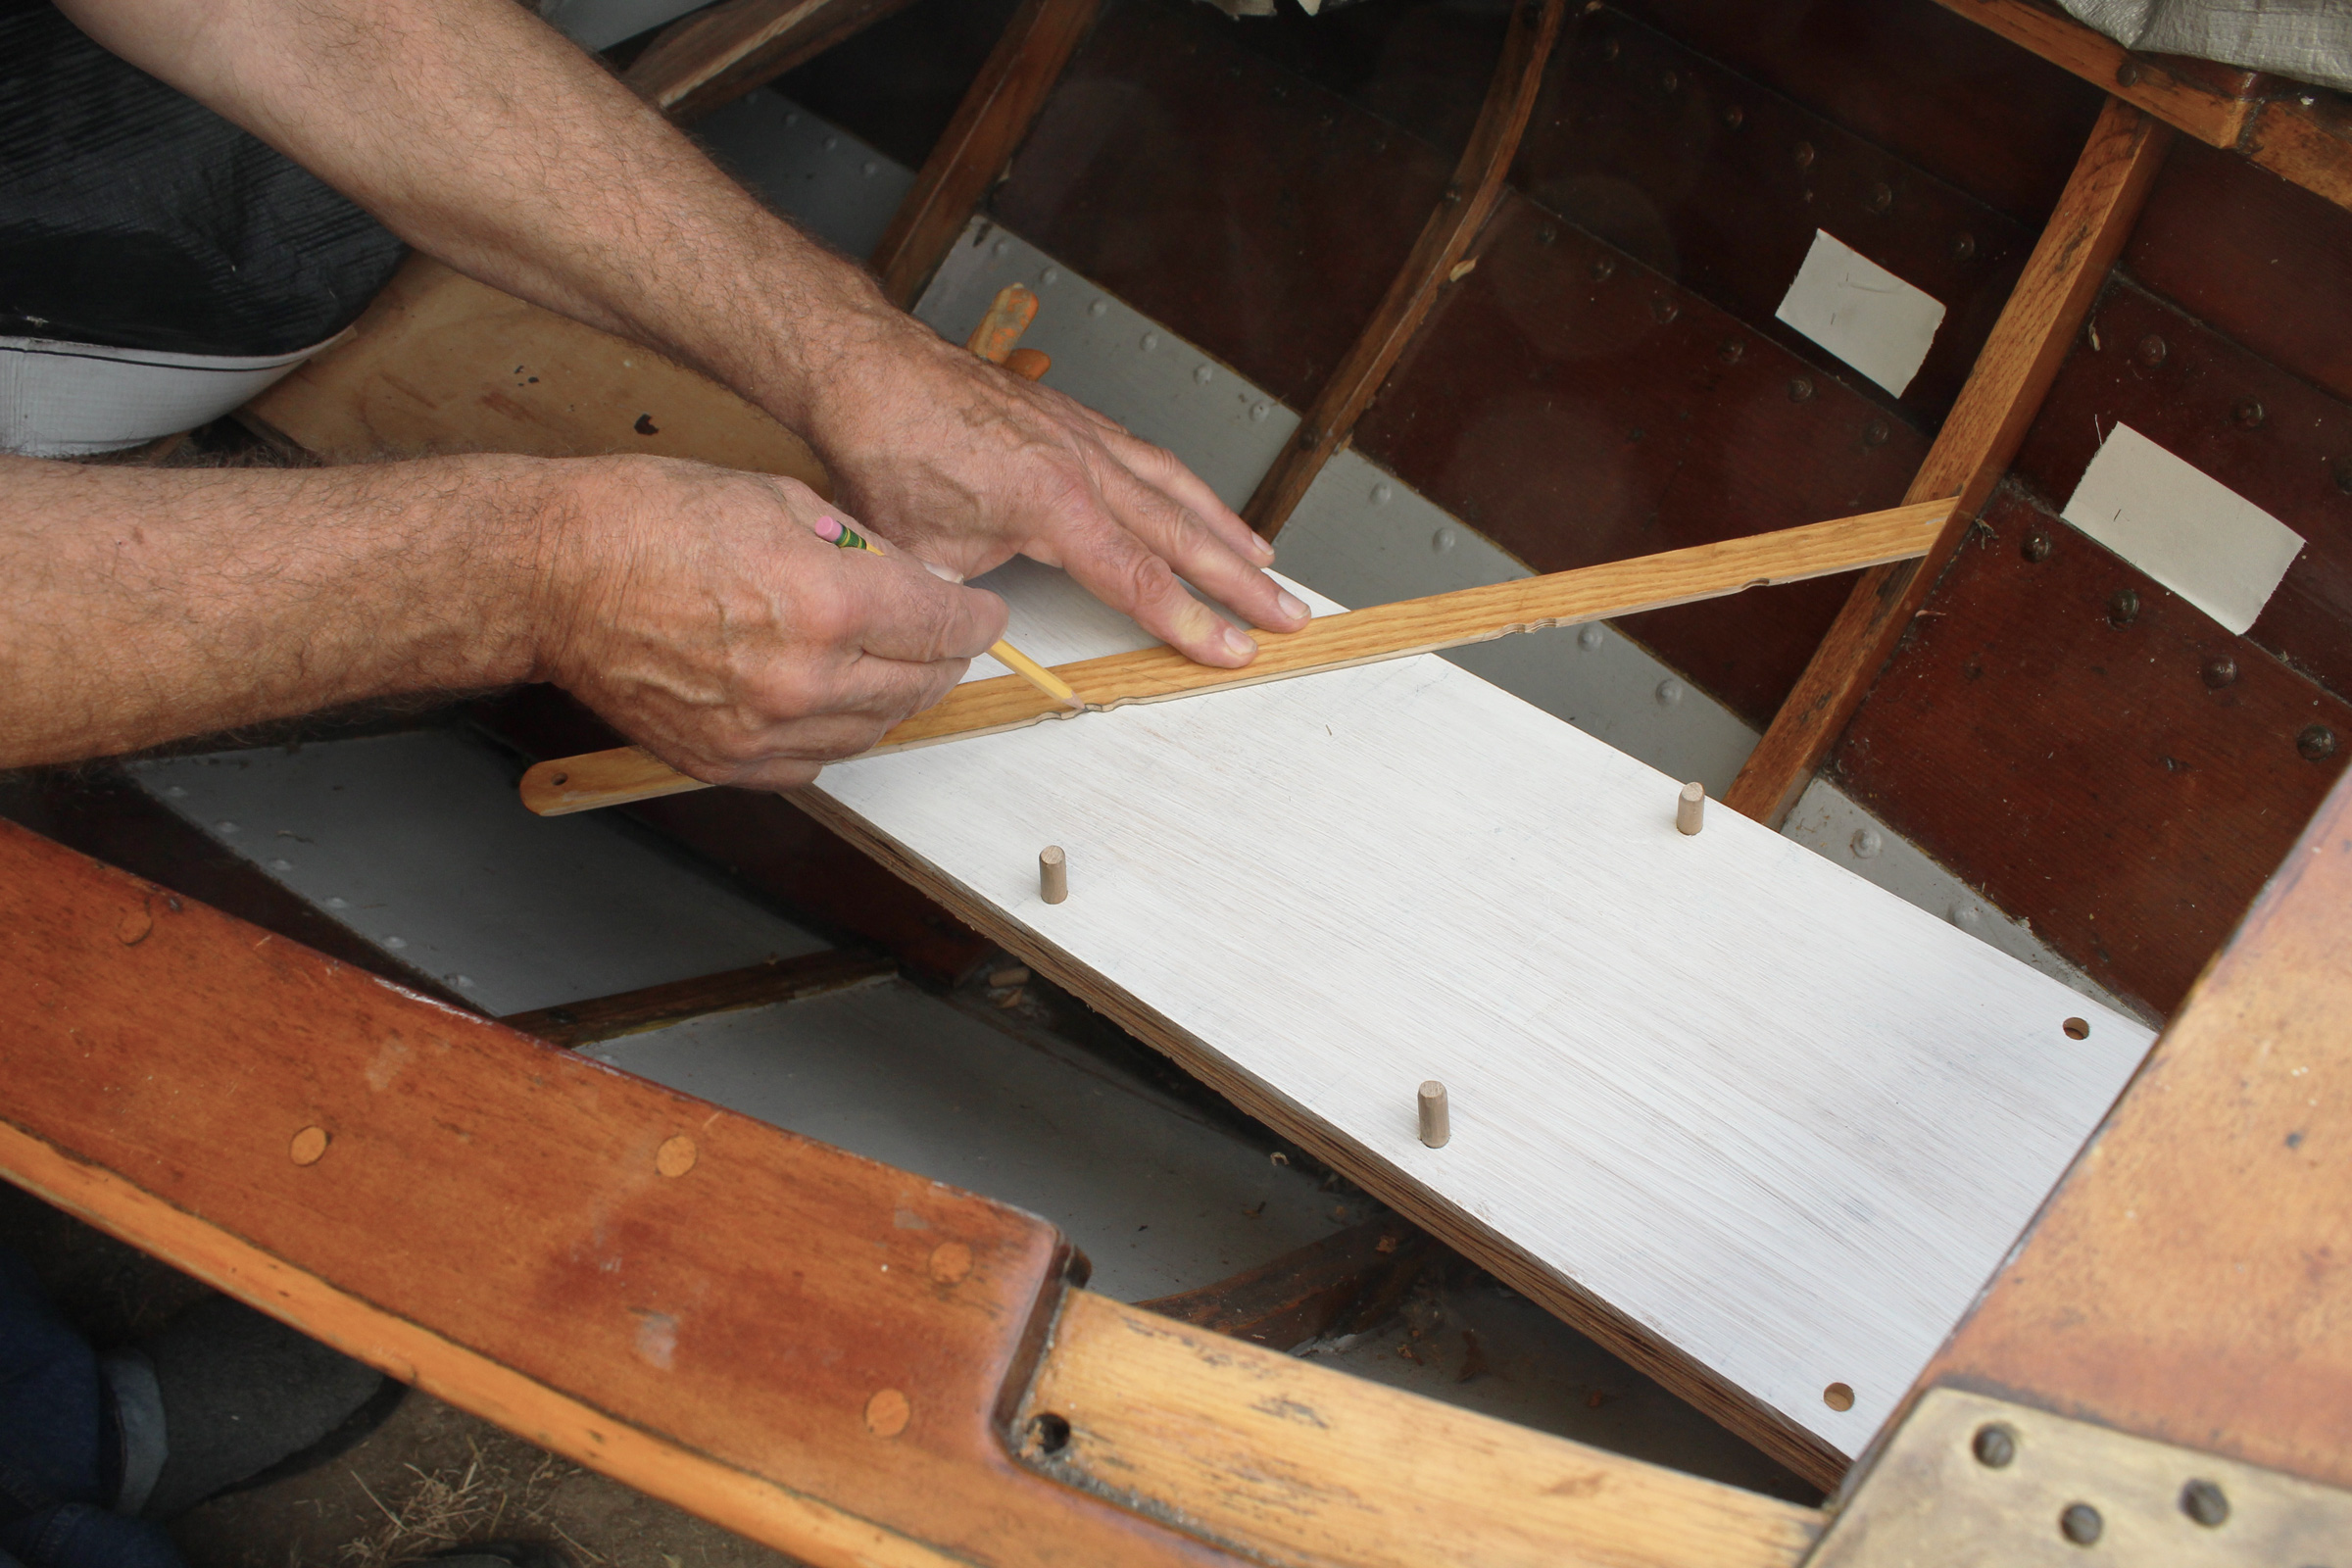
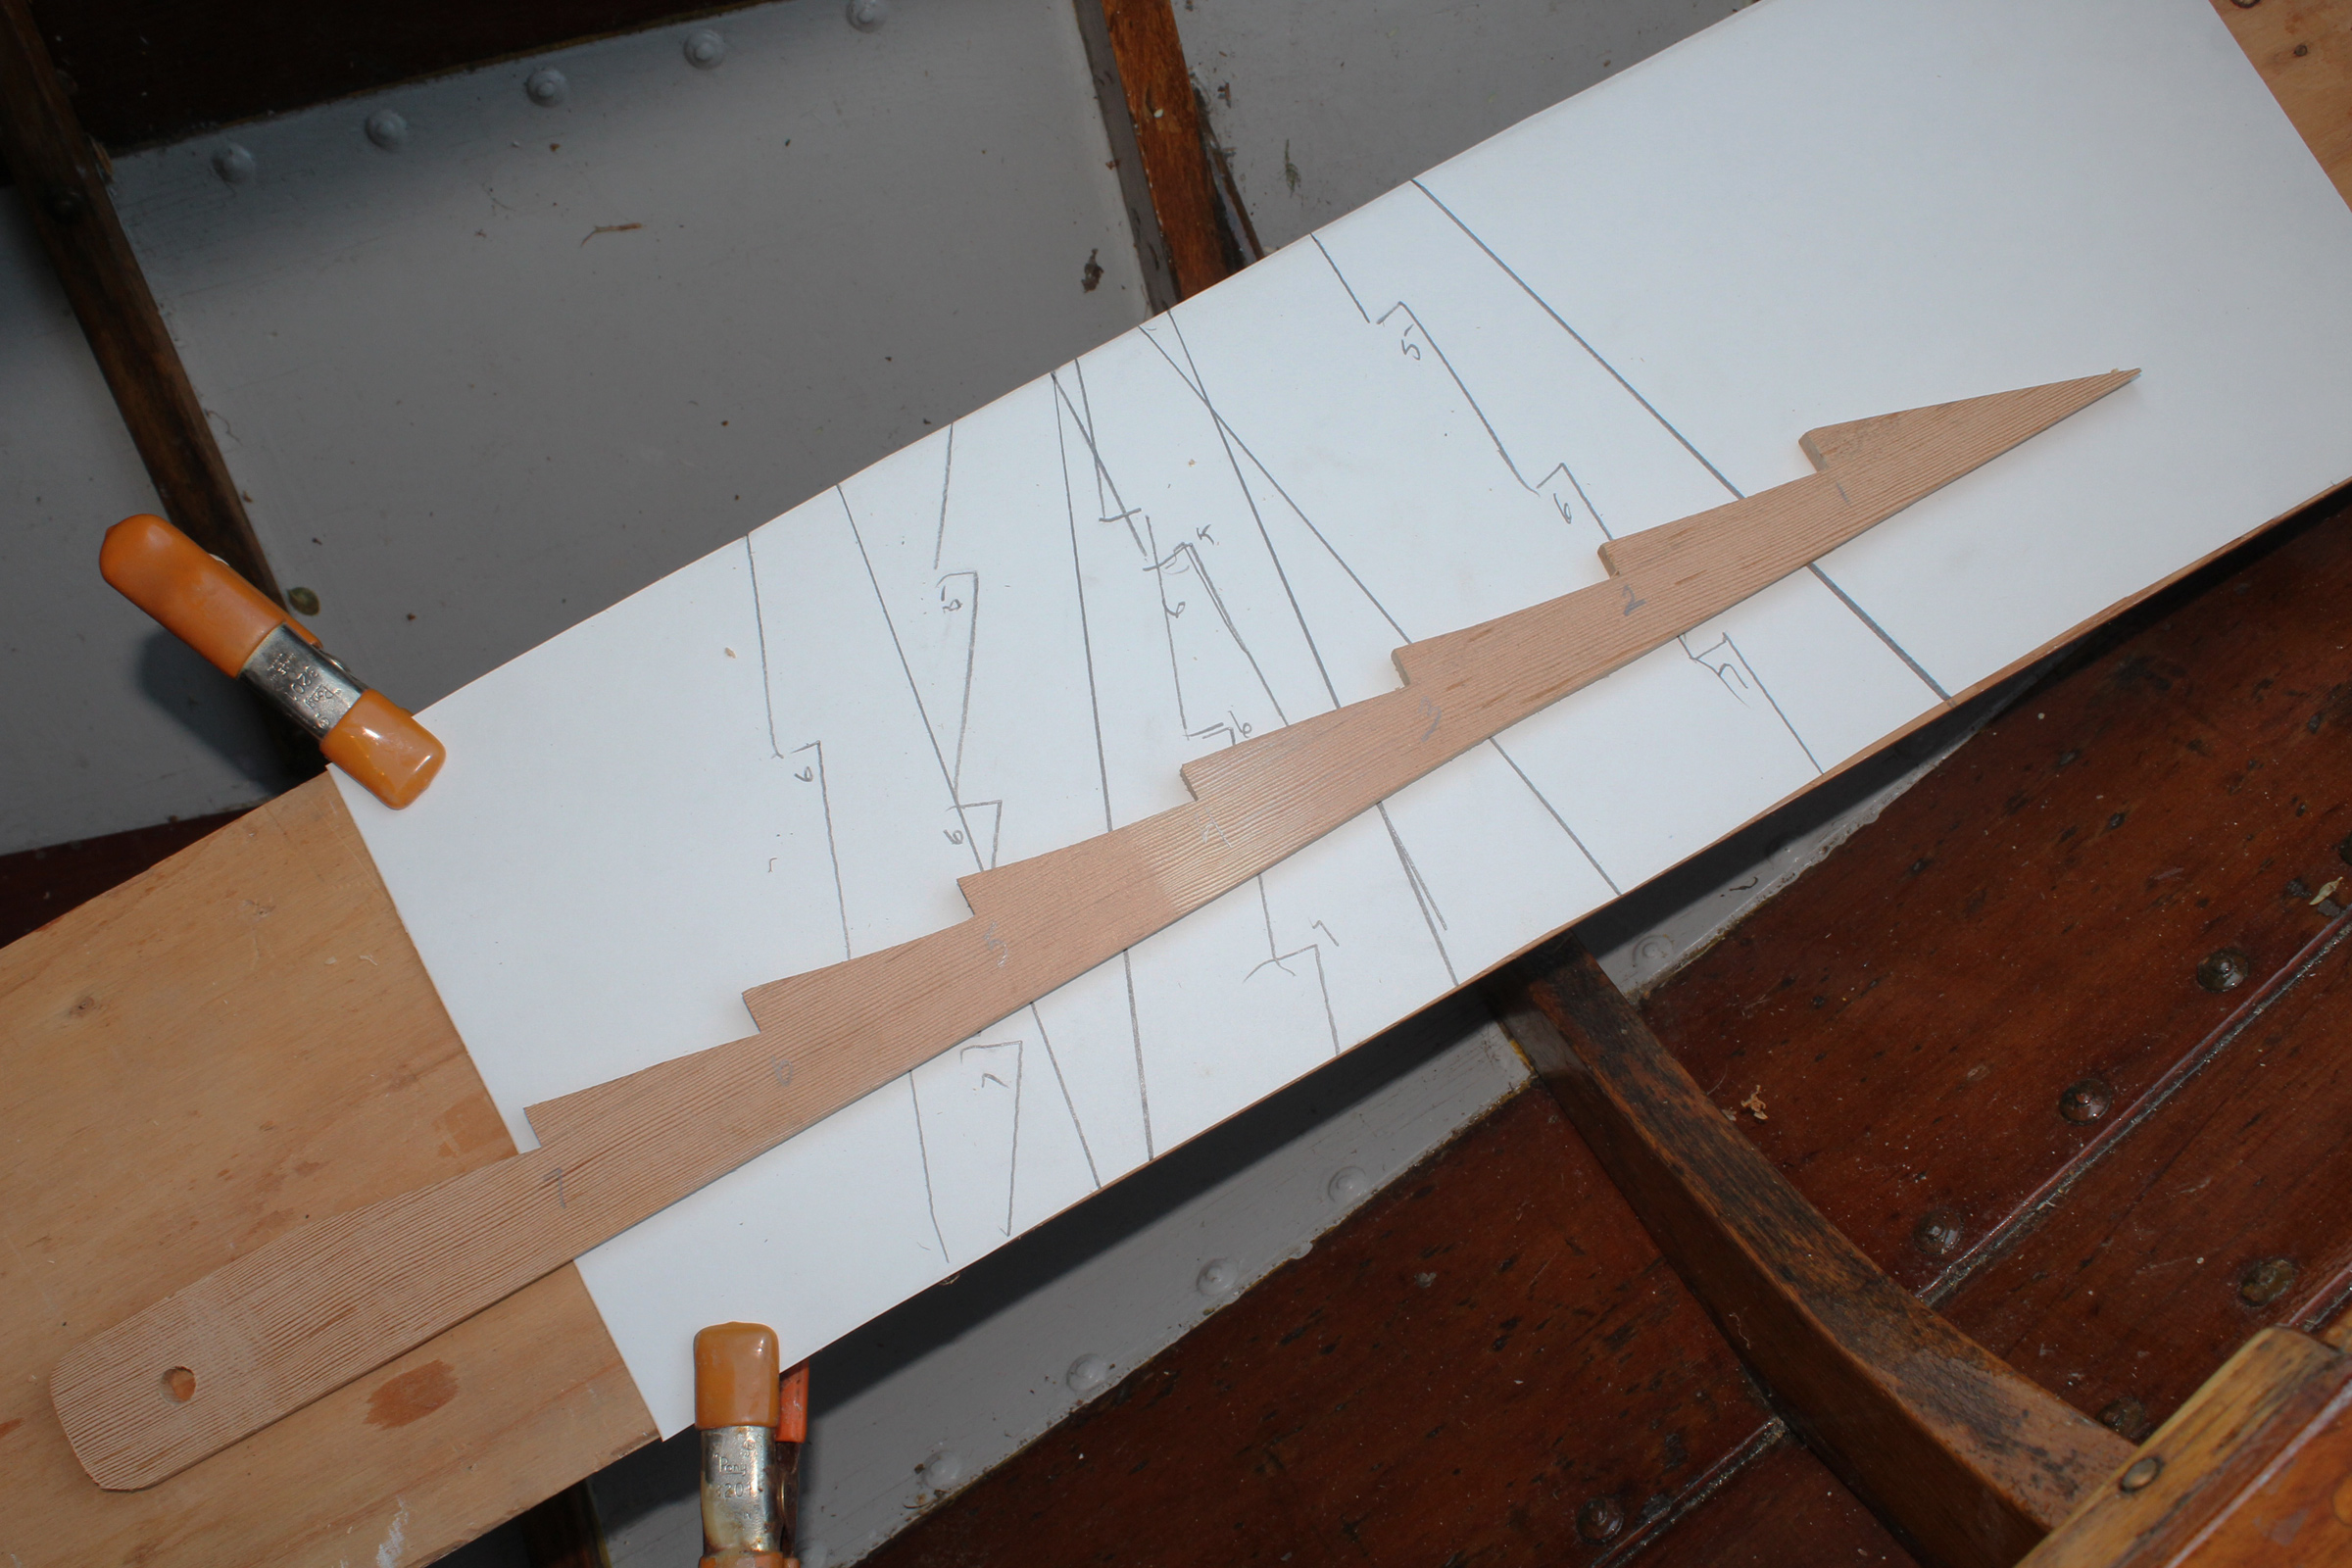
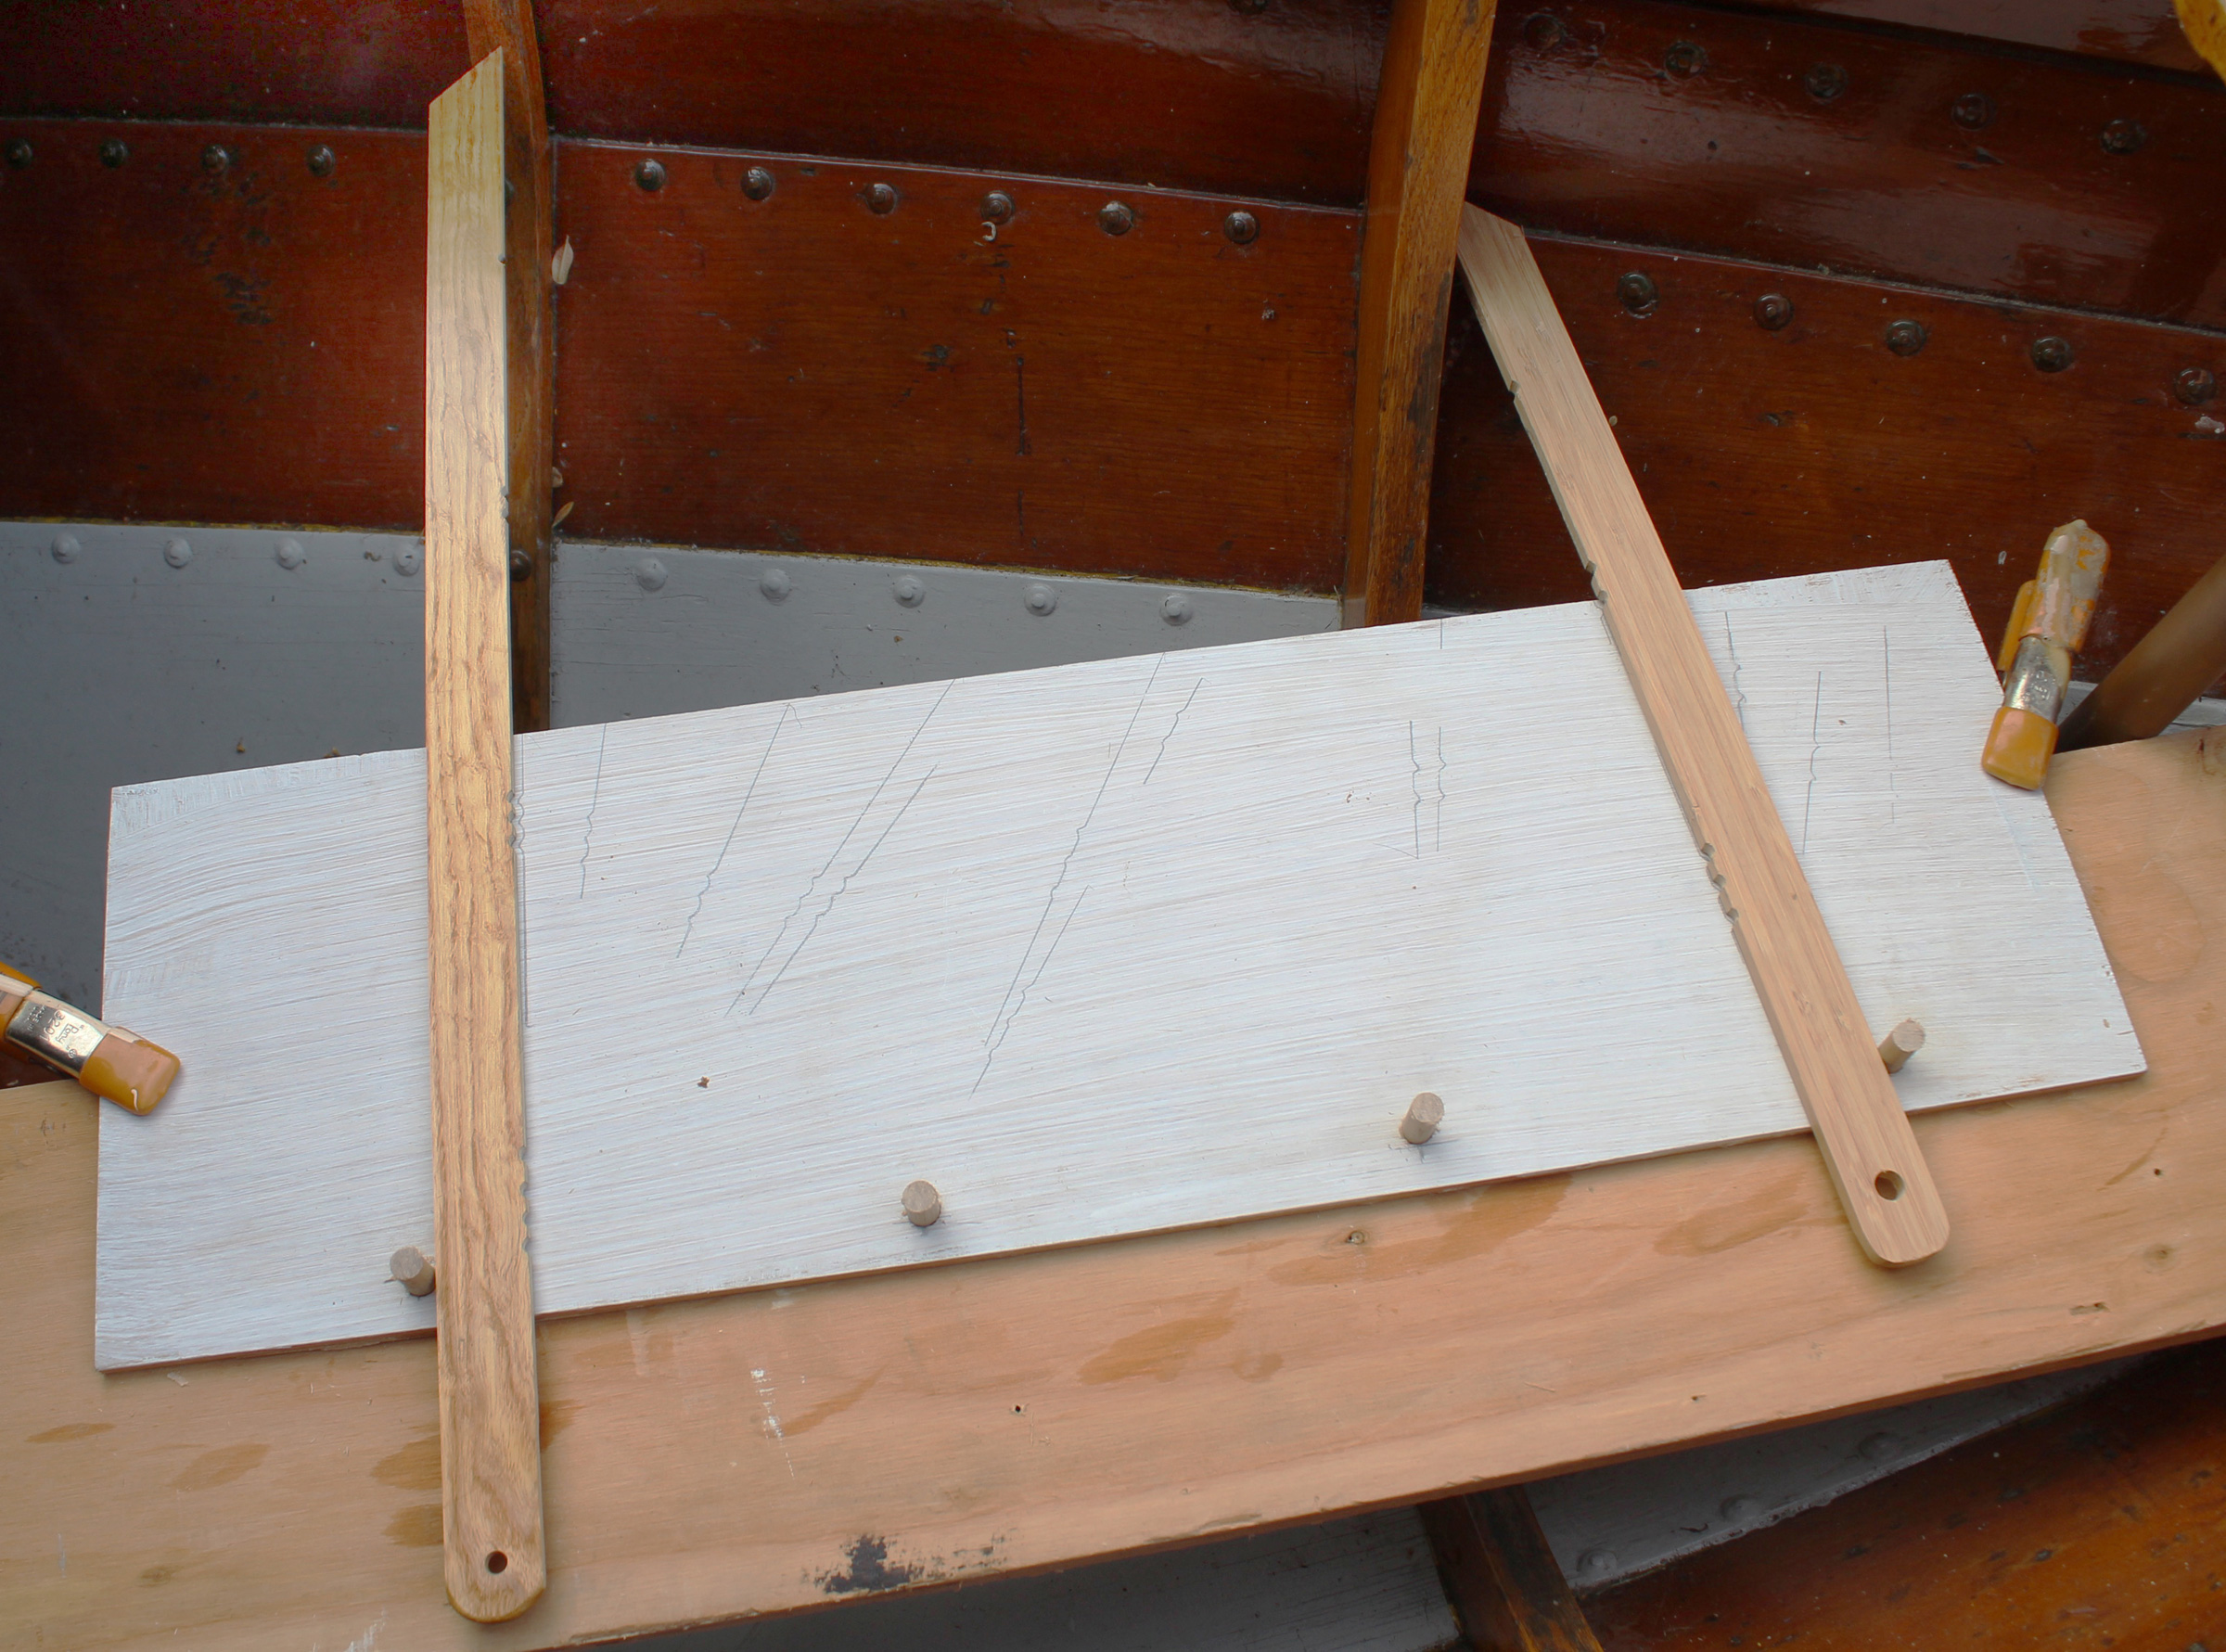
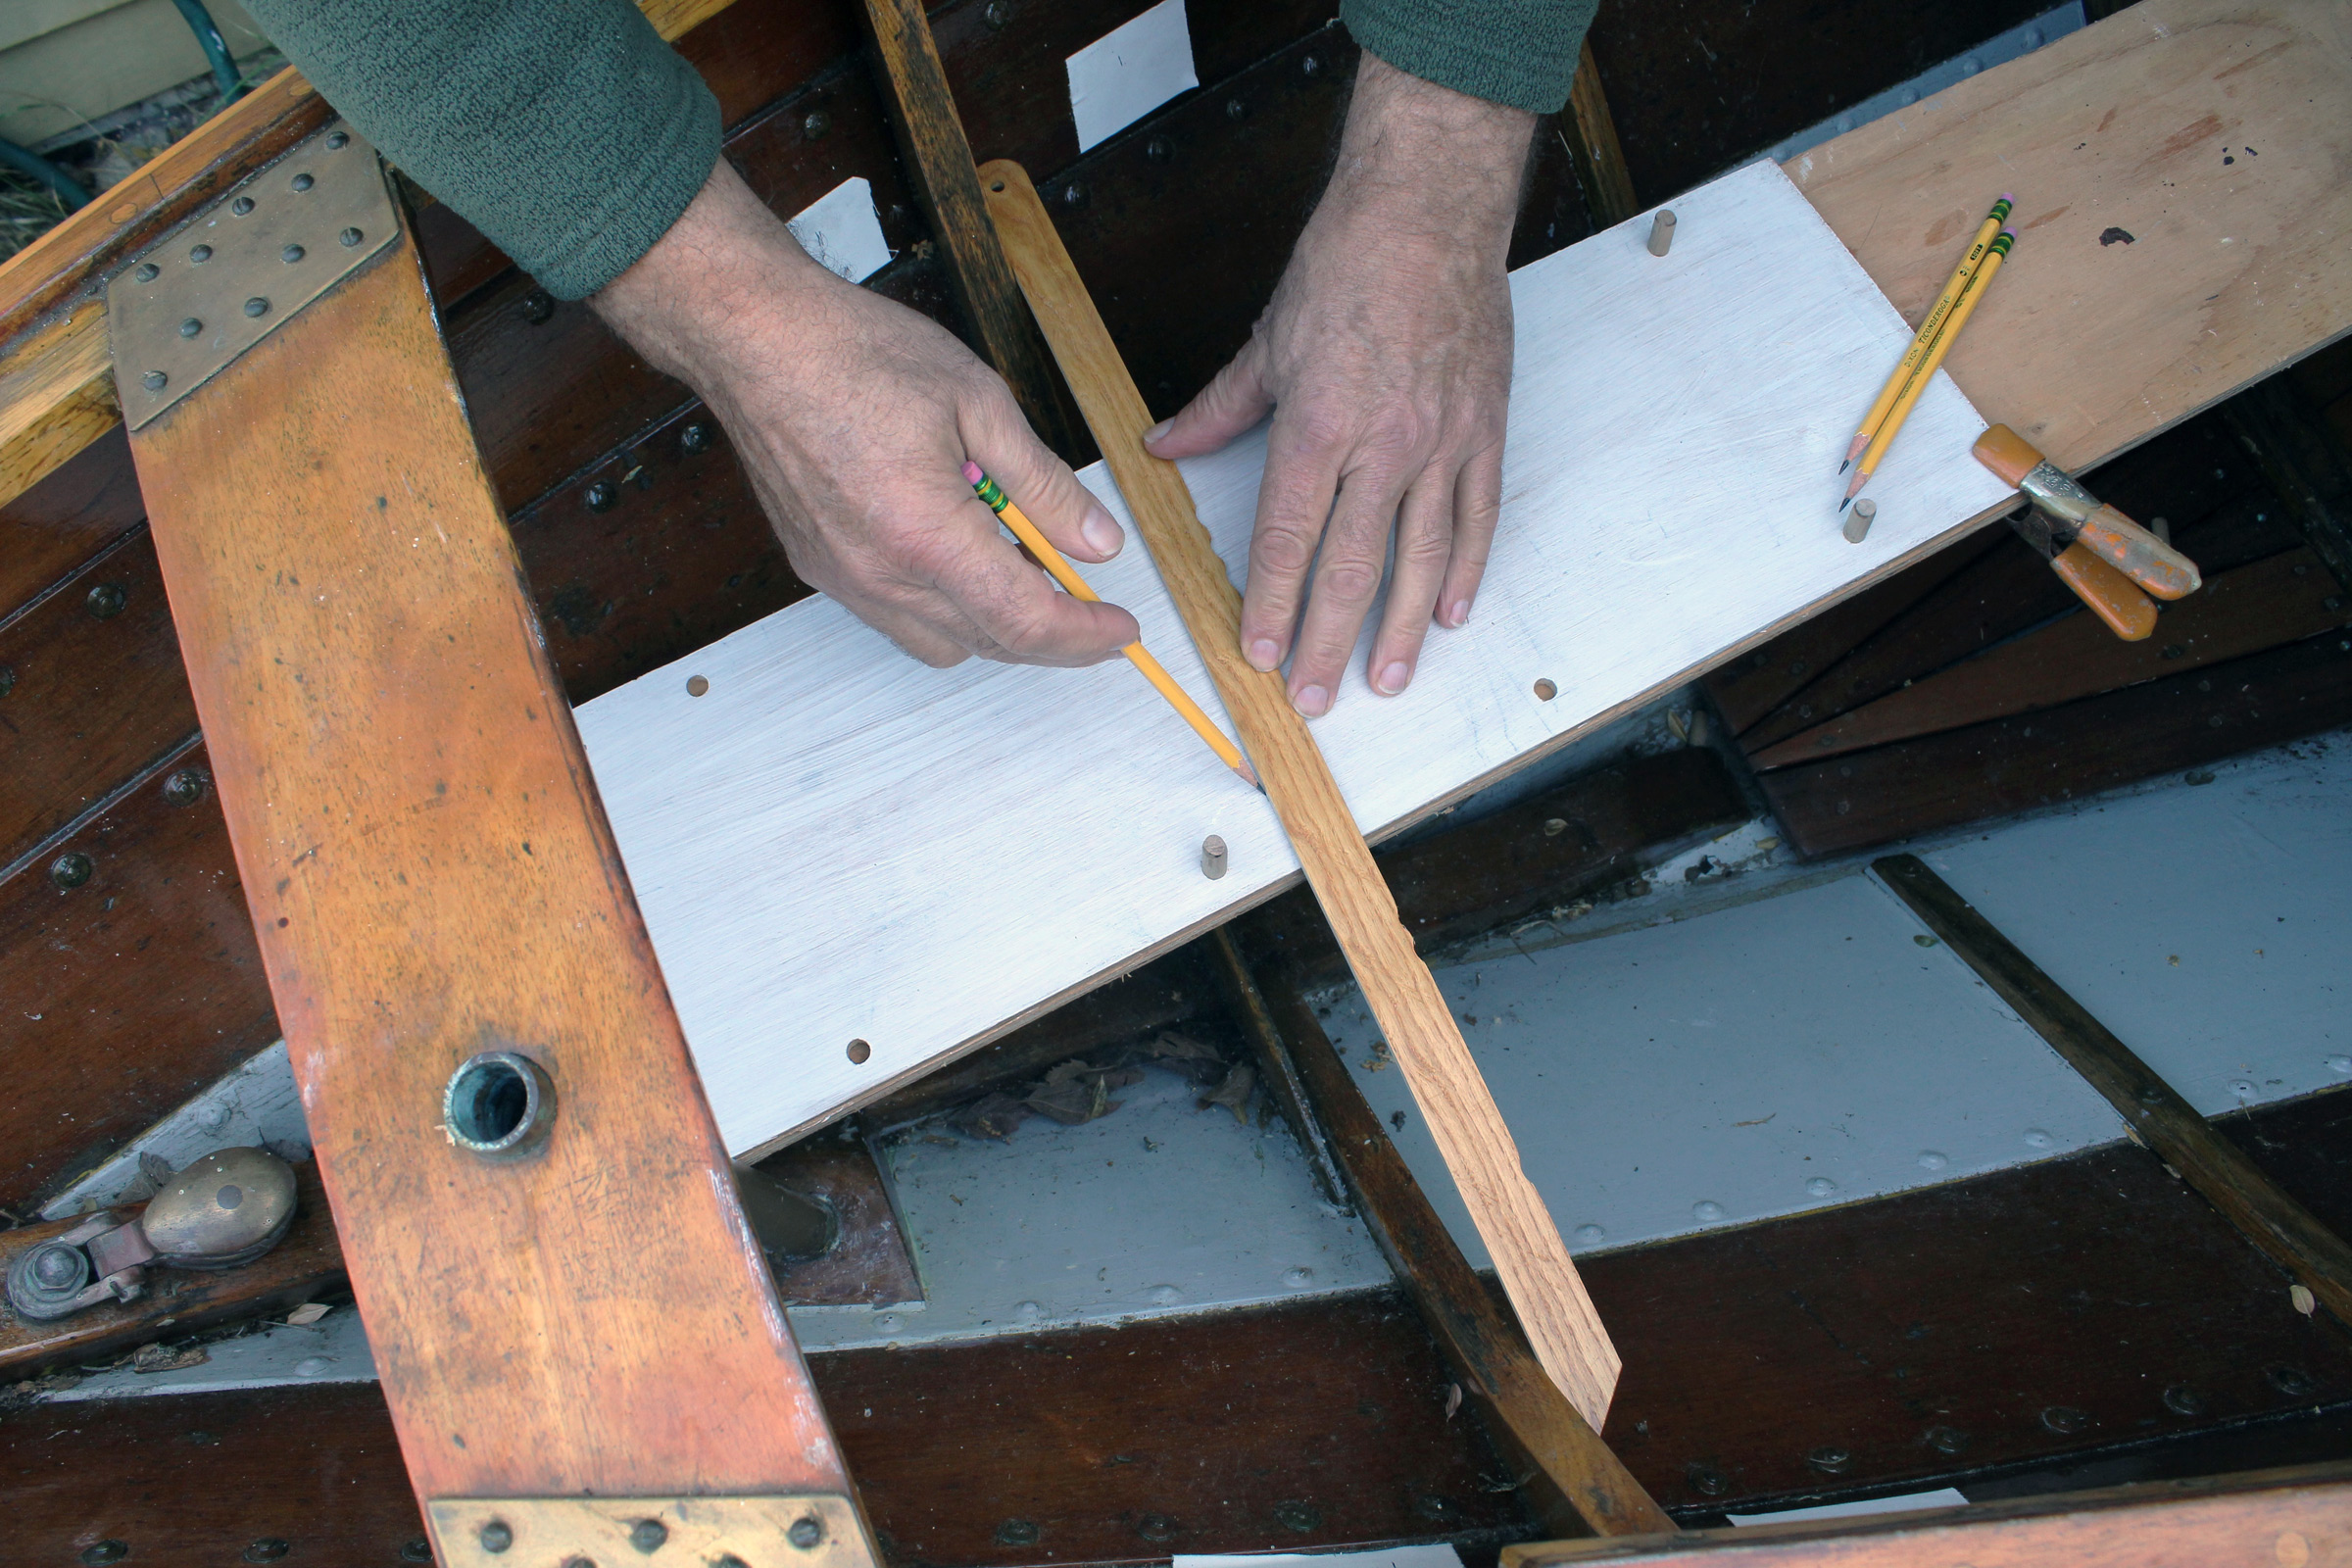
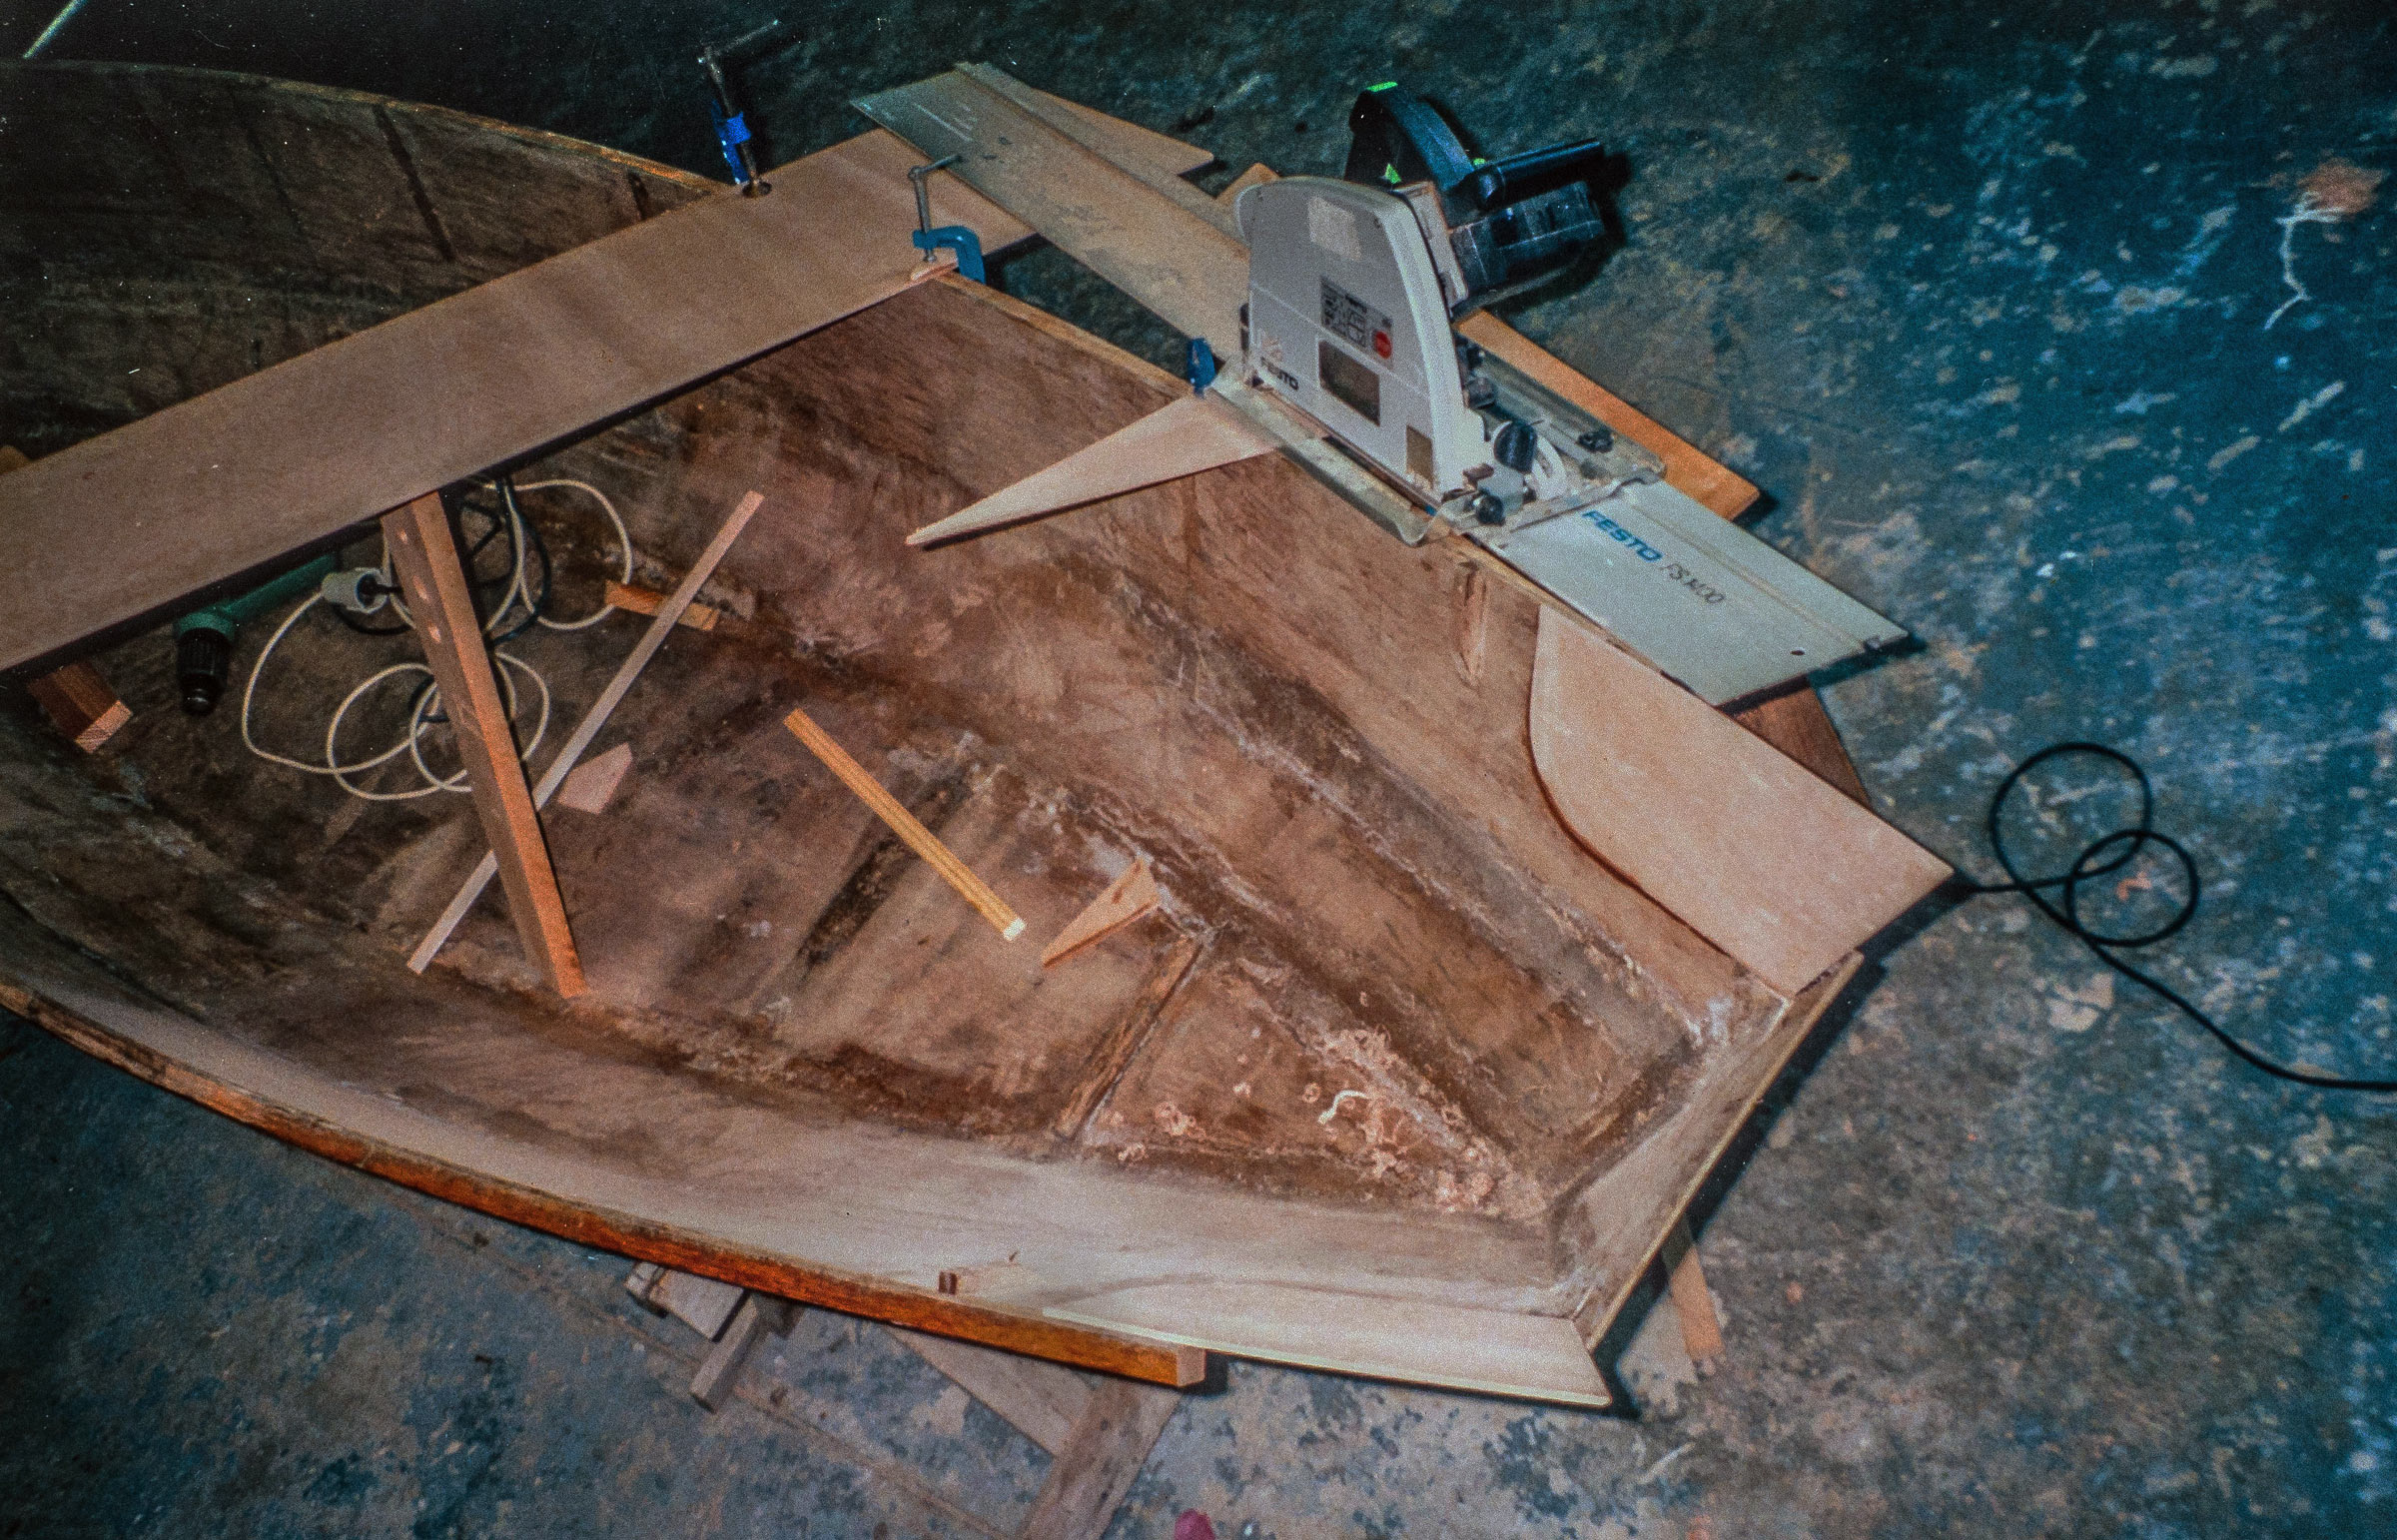
The oversized plank blanks are plotted onto the plywood from scaled plans and then trimmed to fit on the boat. The plank sections are joined with butt straps which, used in combination with the batten construction, allows the planks to be clamped and glued onto the boat in an unhurried process—one piece at a time—without wrestling with full-length planks. If care has been taken in trimming the planks neatly to the seam batten, only a little detail work should be needed to fill the joints between the garboards and sheerstrake with thickened epoxy. The planked hull is ultimately ’glassed on the exterior with 6-oz cloth.
Christophe Matson
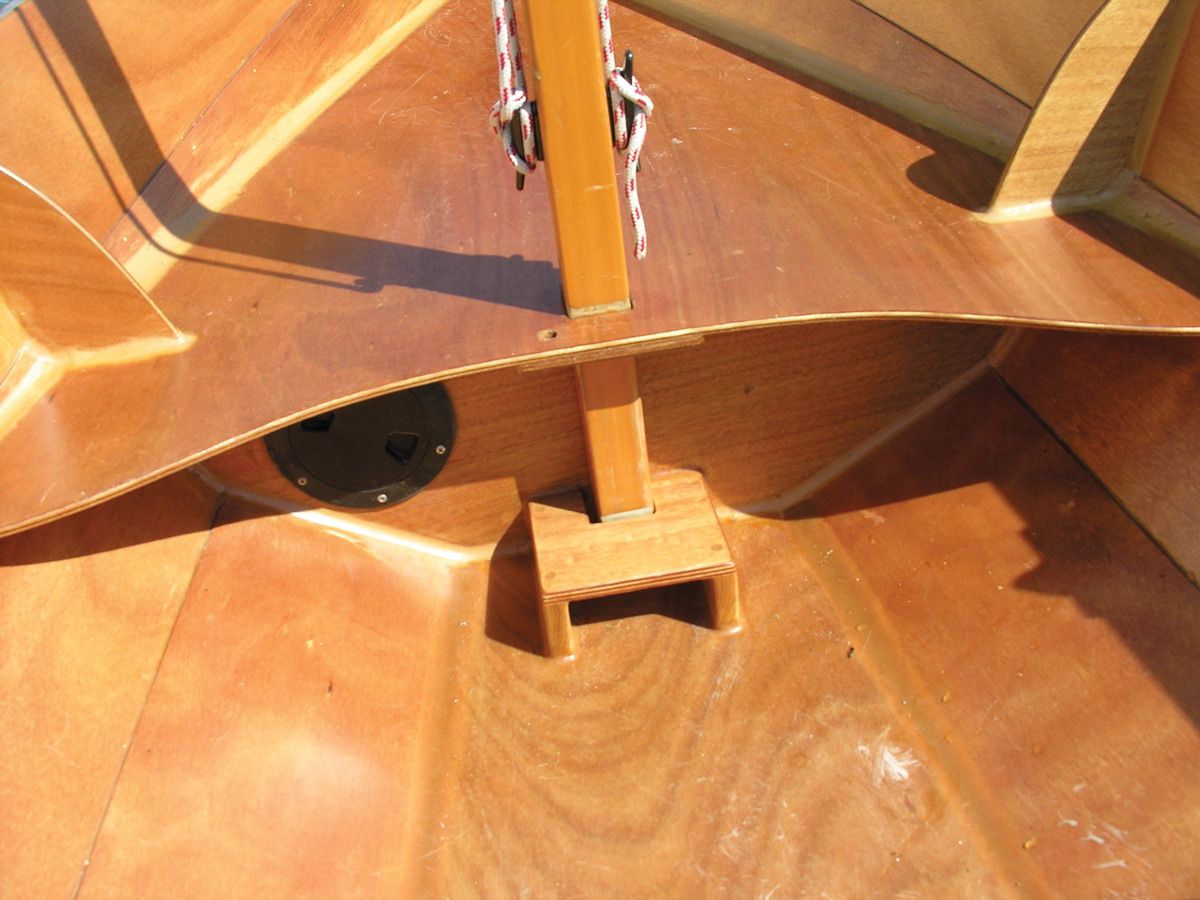
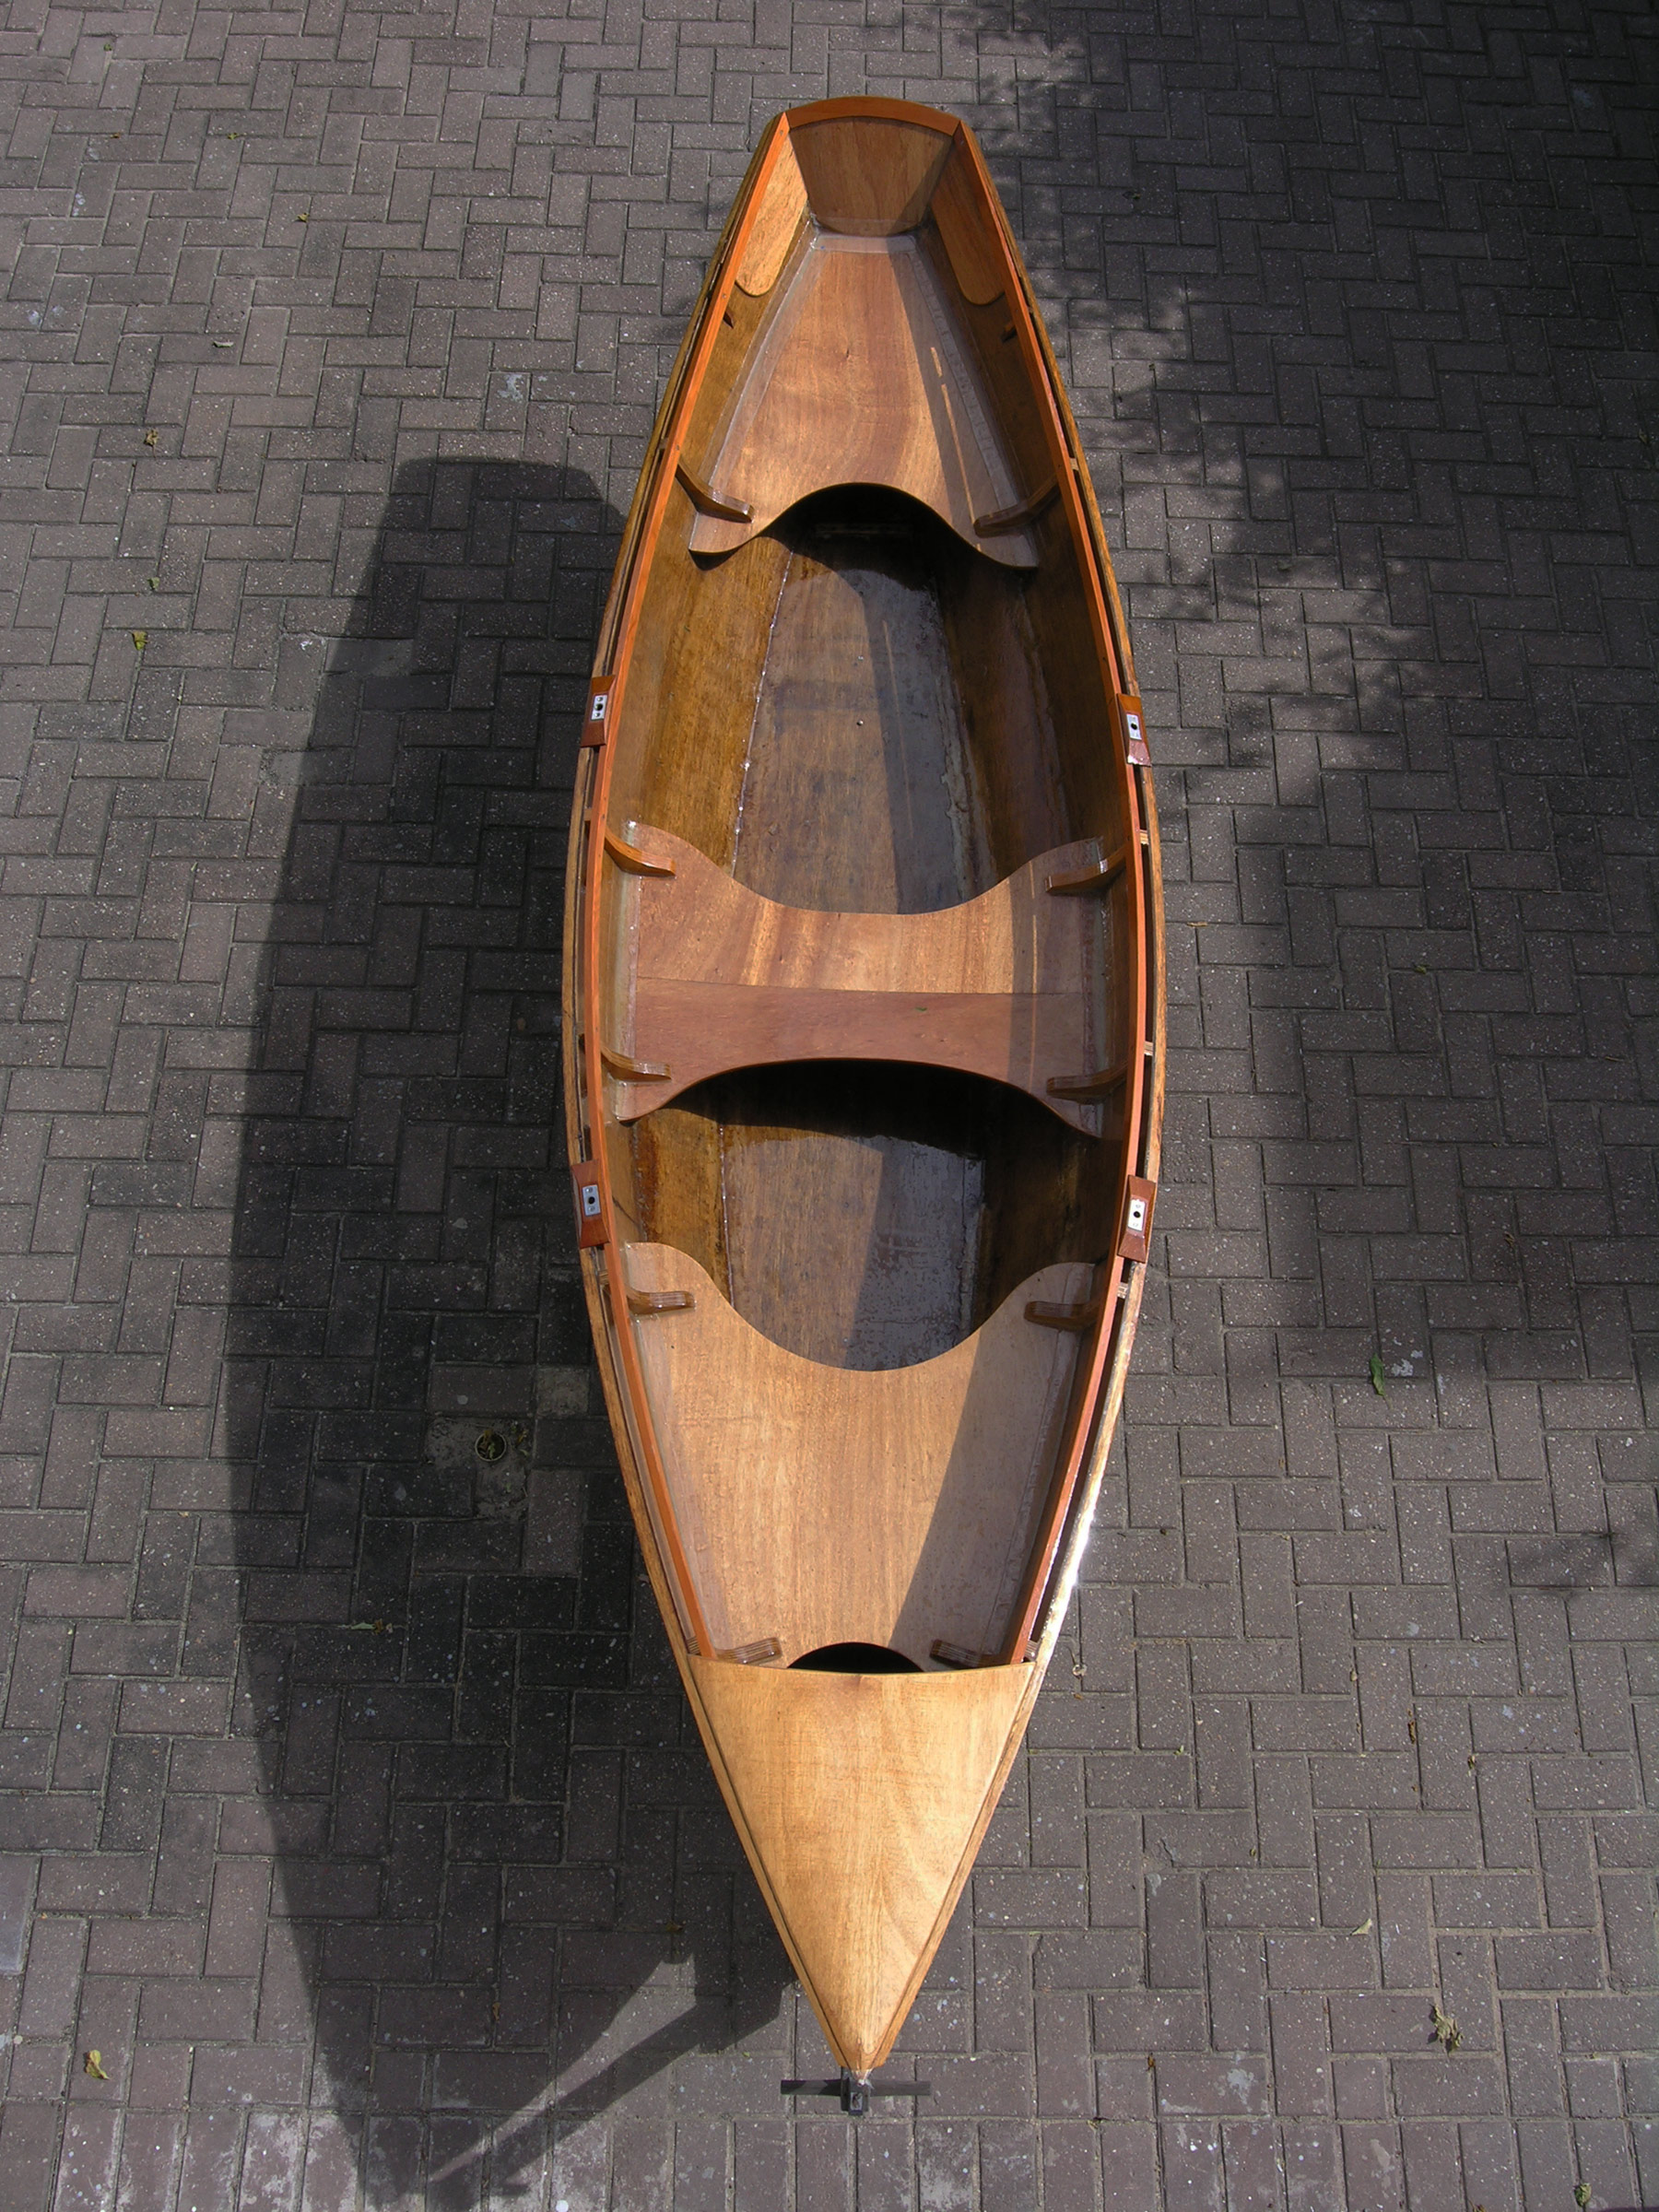
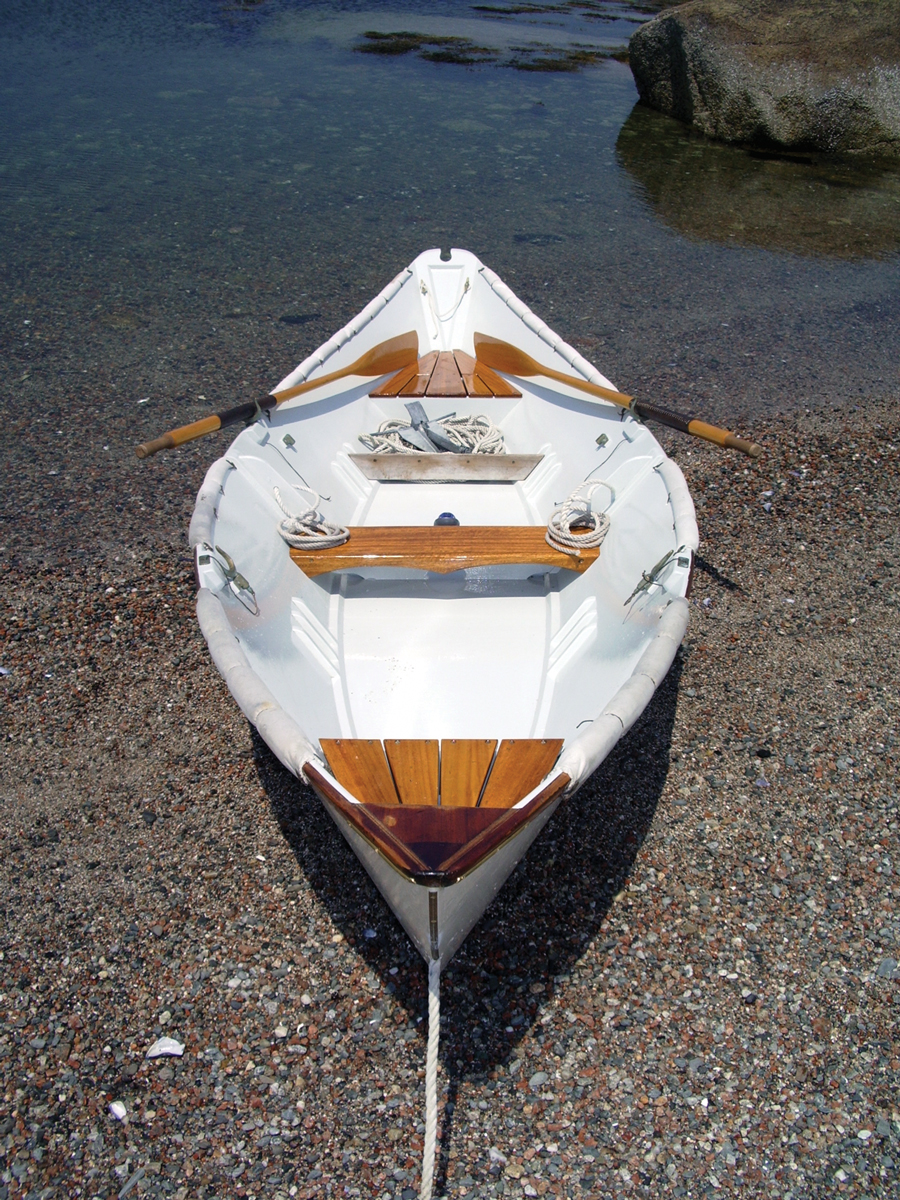
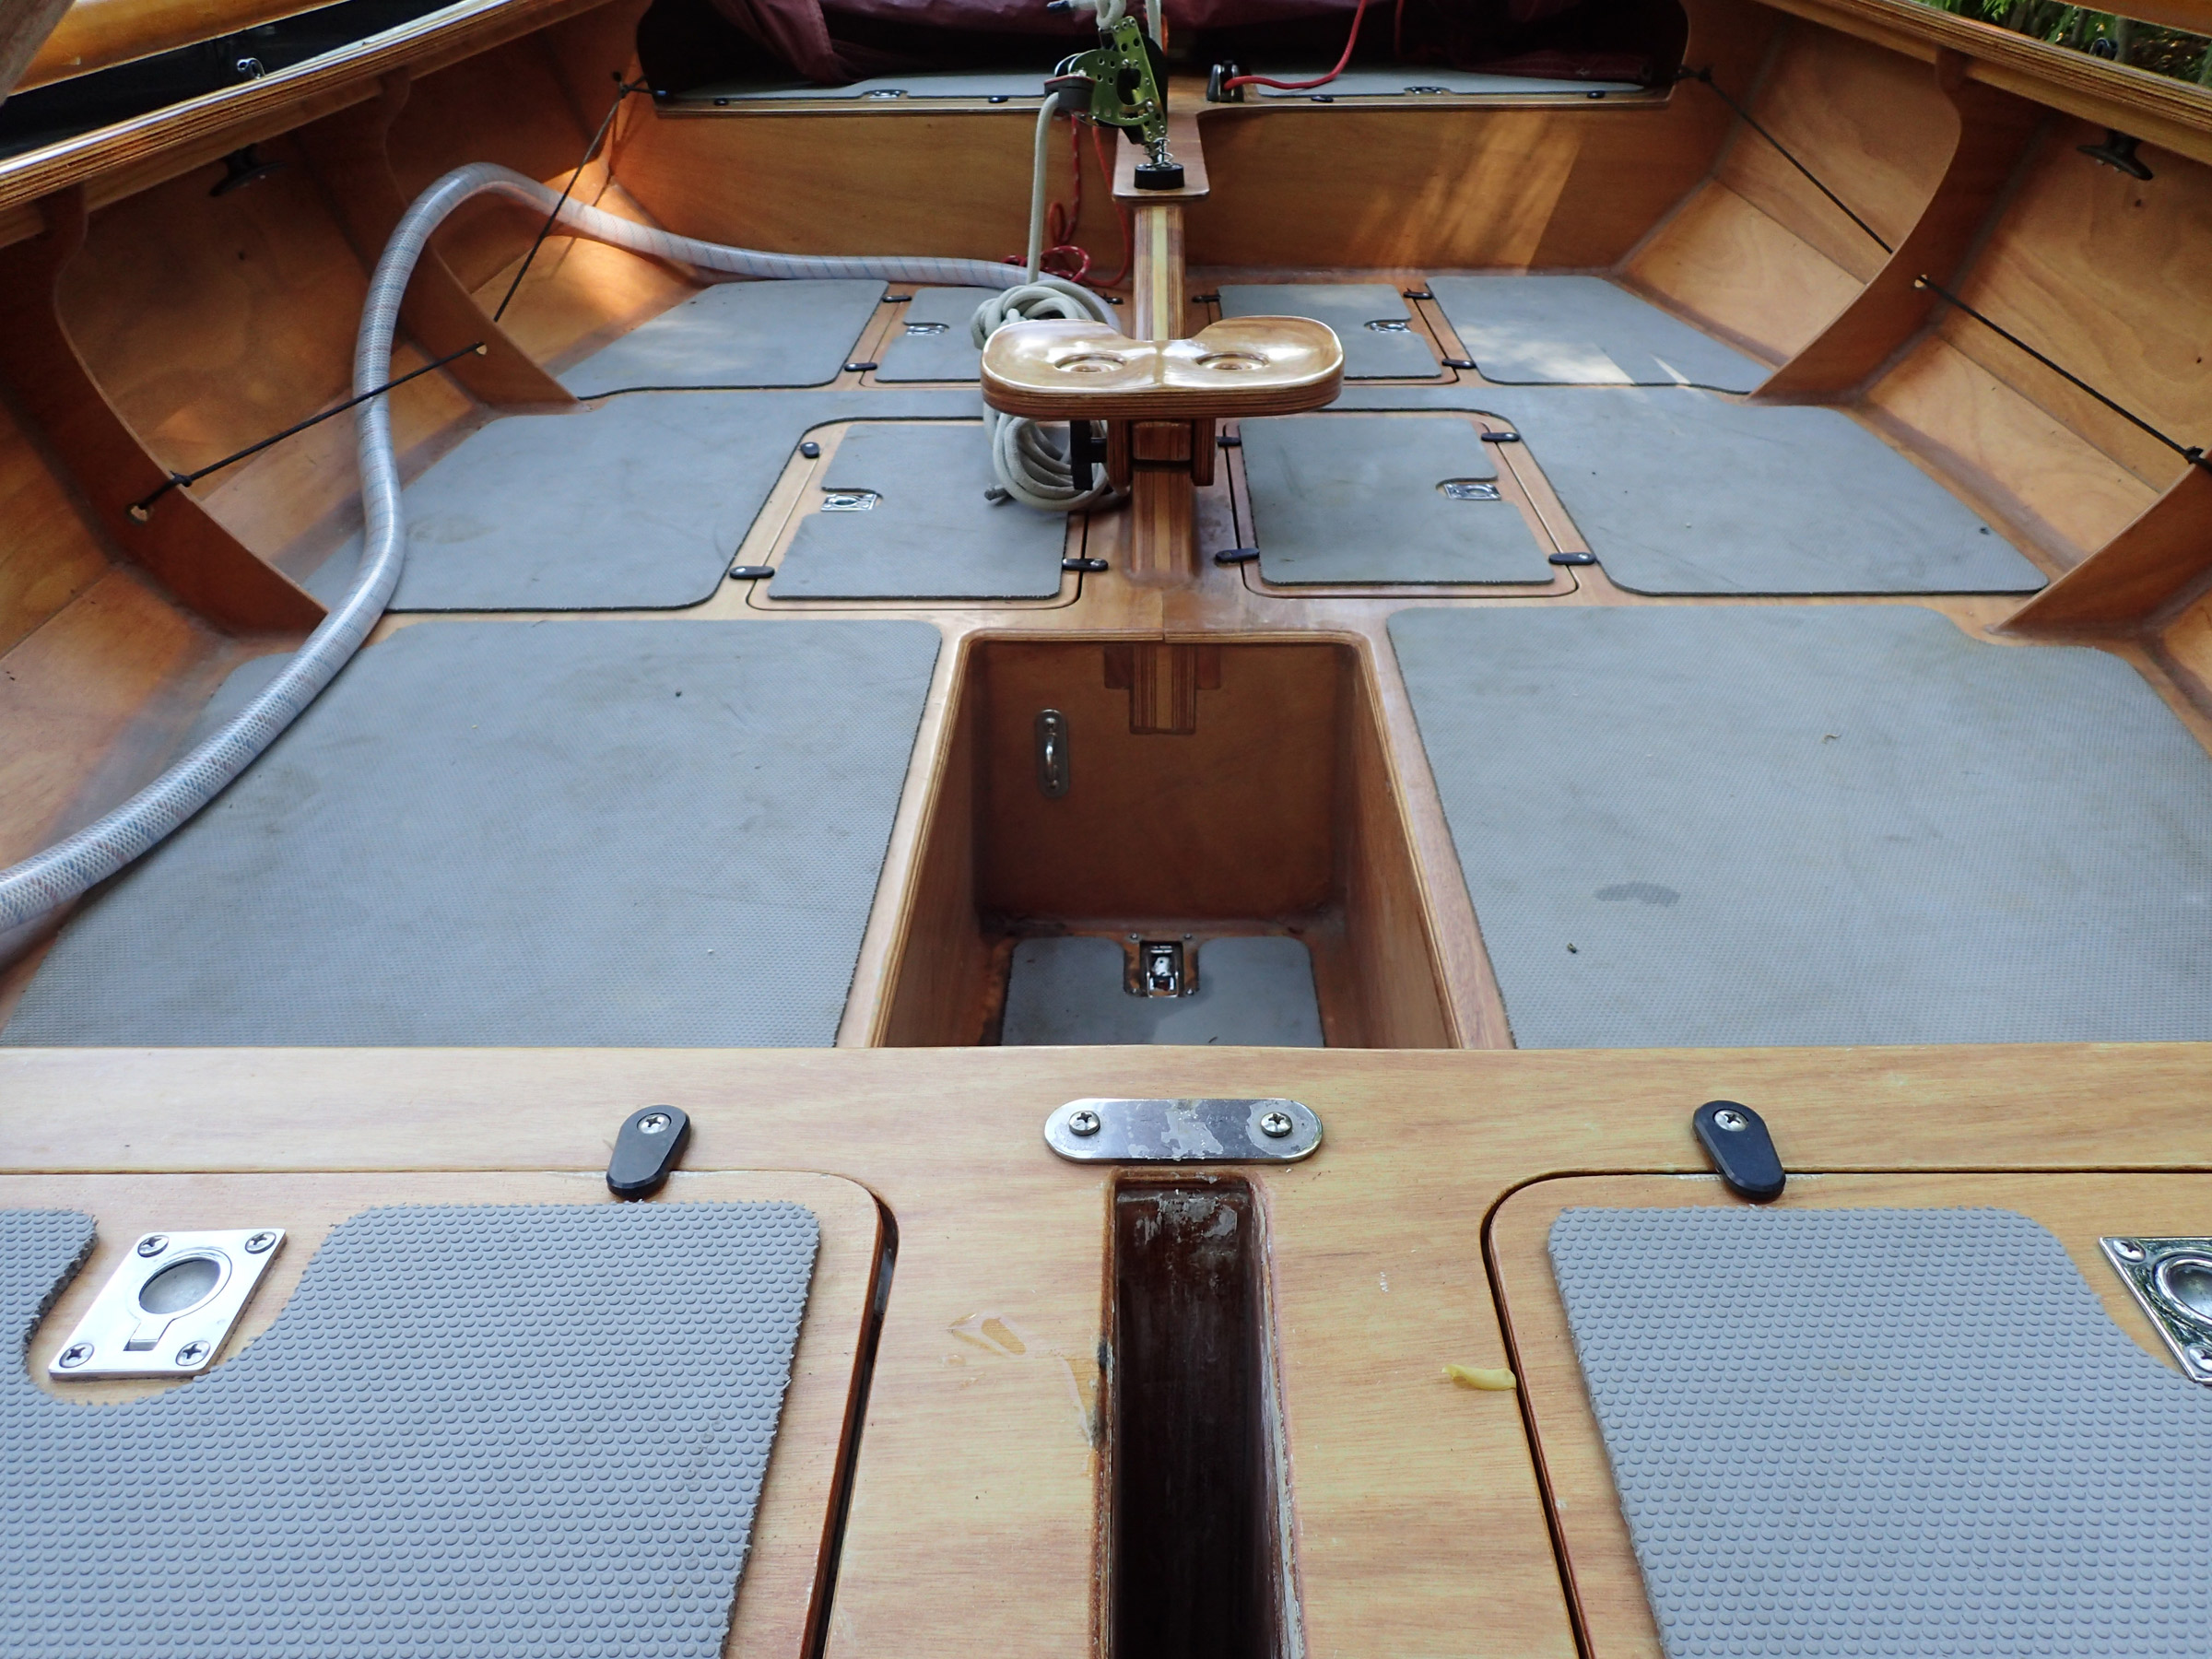
The parallel risers allow for easy adjustment of the slip thwart. The two sets of combs for the stretcher accommodate the switch from rowing alone to rowing with a passenger.
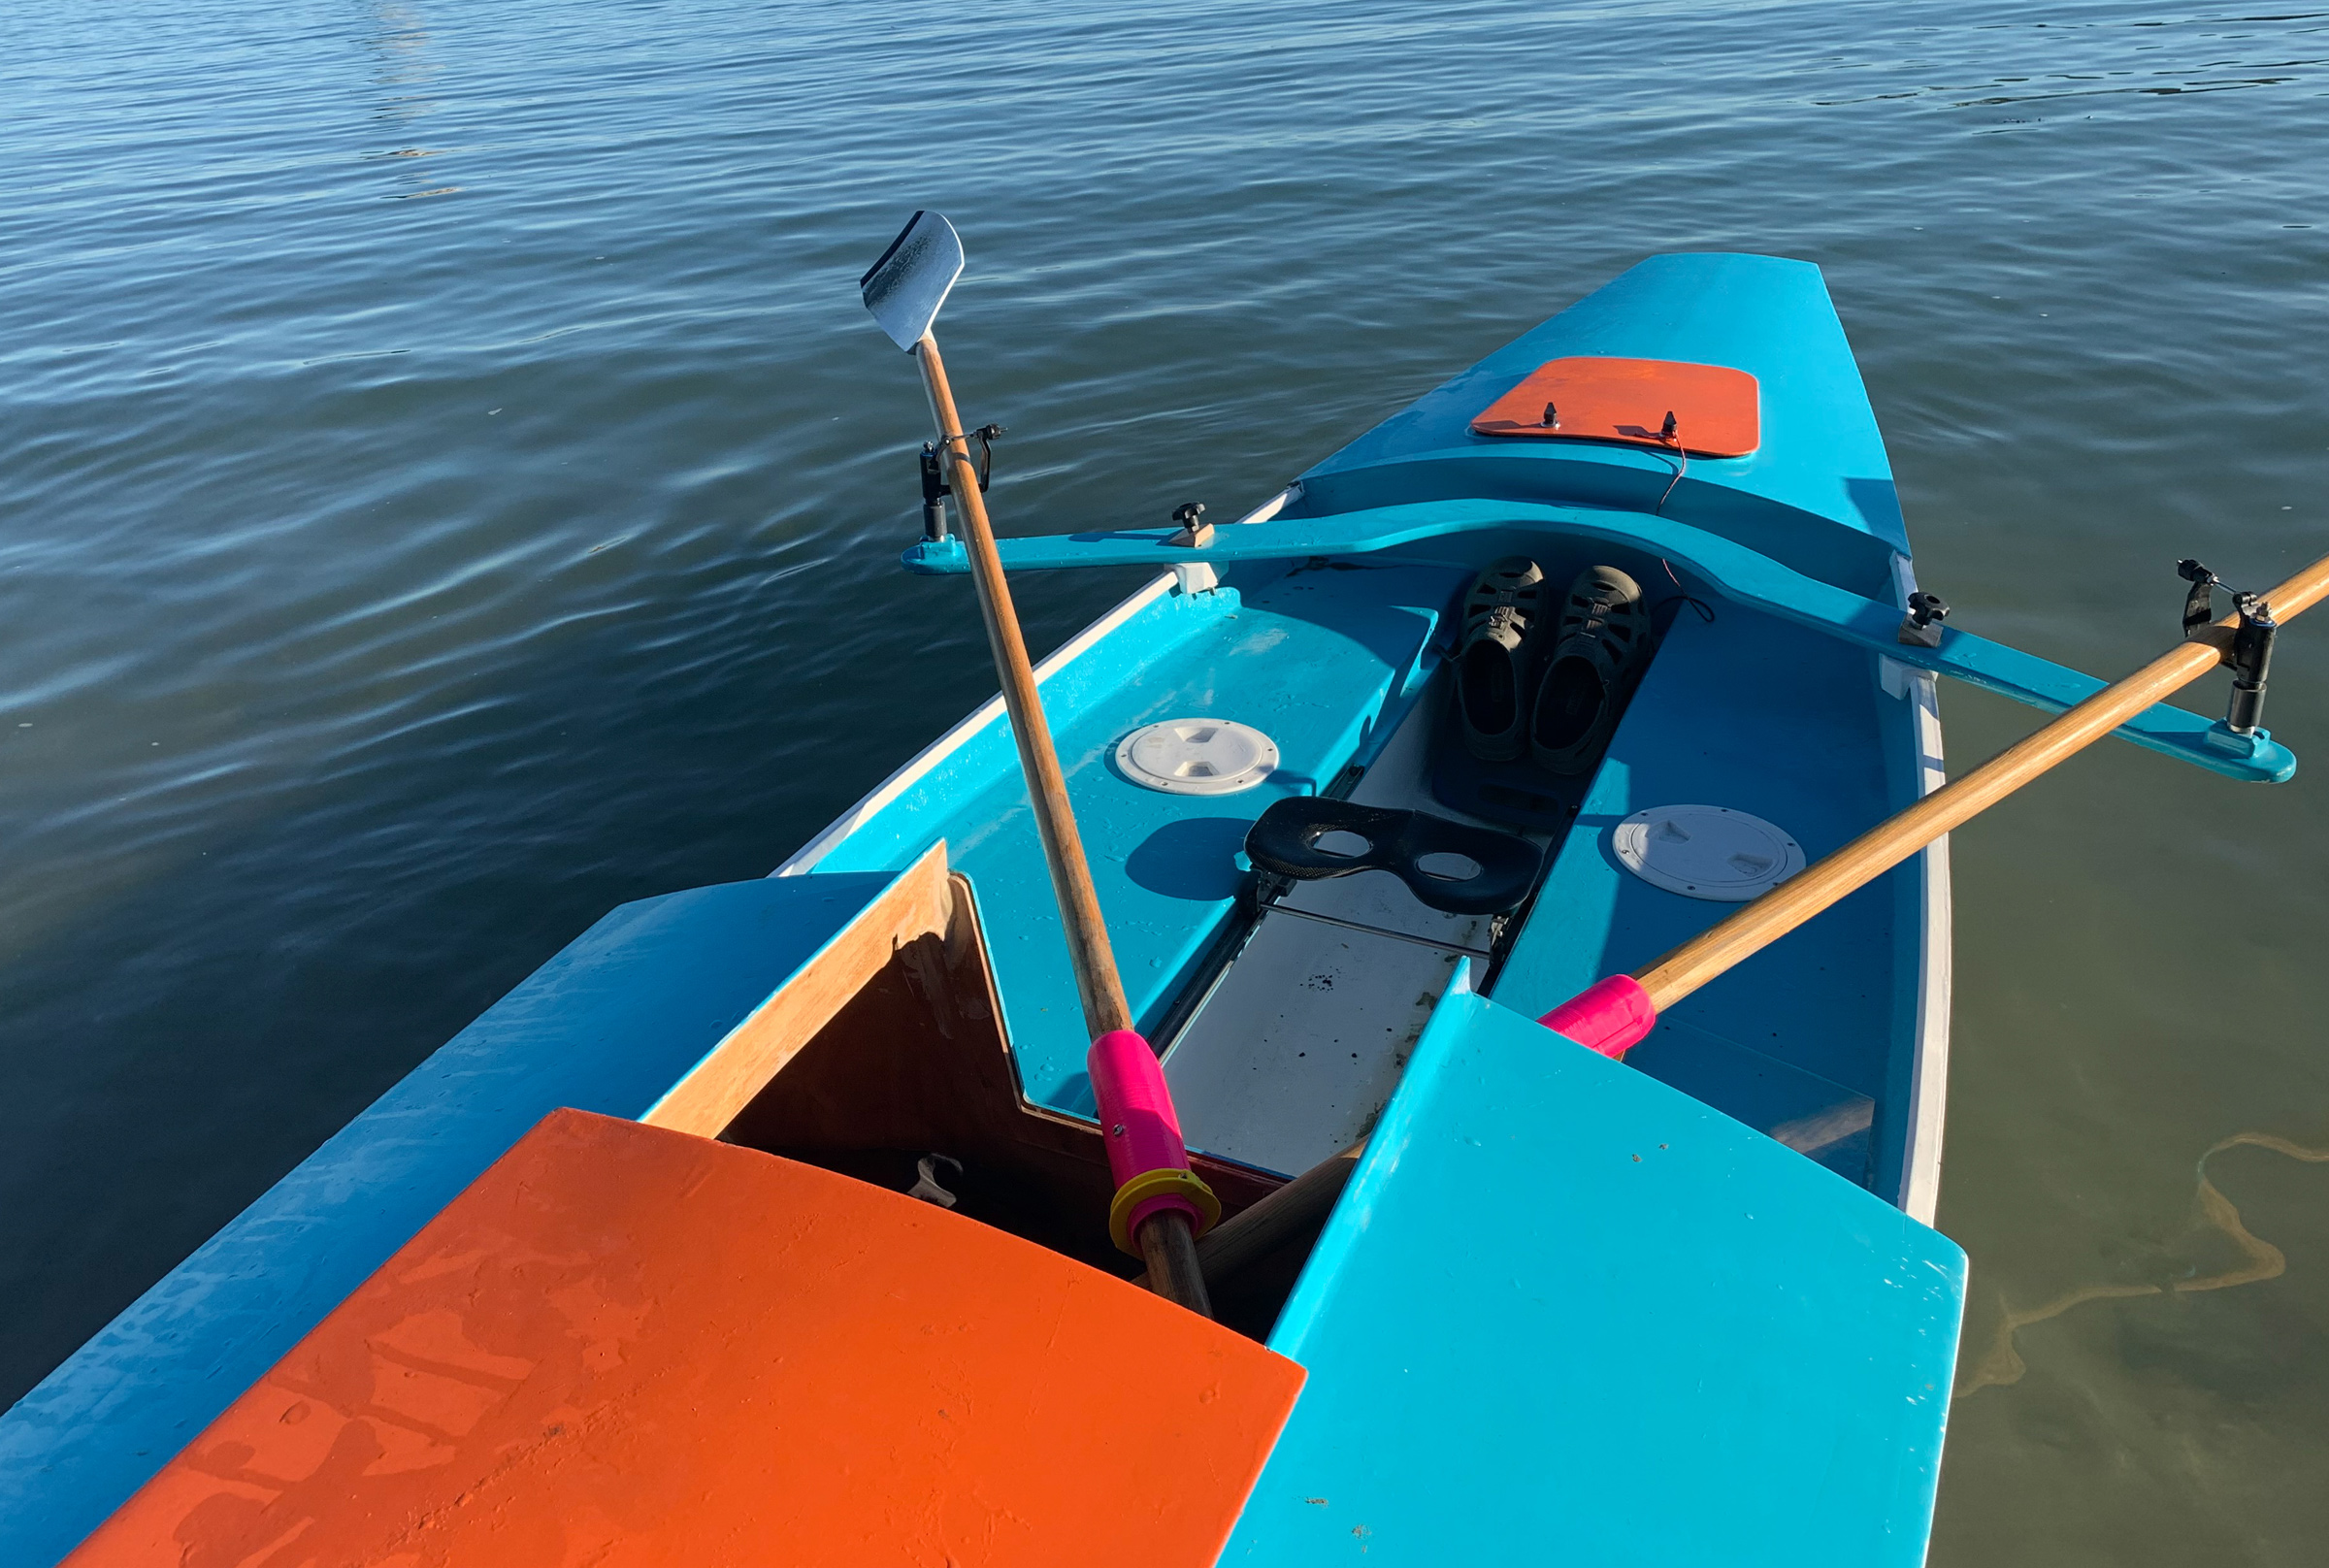
The thwarts are laid out on two straight and parallel seat risers that are supported by the three center frames. The thwarts are not permanently secured to the boat and can be moved anywhere on the risers to accommodate any rower’s size and preferred distance to the oarlocks. The thwarts are specified at 10″ wide, but I made mine 8″ since they are infinitely adjustable. Also, the risers extend past the two #2 frames by 6″, which allows for a passenger to place an 8″ thwart as far aft as possible and face forward with additional space for legs. A wider thwart would be cantilevered beyond the risers and could invite an unwanted backward spill.
The only items not fully described in the plans are the oarlock pads to accept the sockets. In every Atlantic 17 I have seen there is a different solution, from neat little pads that don’t add any height to the gunwale, and nylon blocks with multiple sockets that allow for fine adjustments to the trim of the boat, to large pads that extend out from the gunwale. Since I am over 6′2″ tall, I decided to pad the solo position and forward position straight up by 1-3/8″ from the gunwale to help the looms clear my knees. I left the aft socket at gunwale height for my wife, who is shorter, to row from this position.
My boat, including the buoyancy tanks fore and aft that are not in Persson’s plans, came to 106 lbs. Even with the extra weight, the boat is effortless to trailer, hand-carry by two, or trolley from trailer to water. I even entertained ideas of cartopping but found the 17′ length to be a bit unwieldy, though a longer car with a wider roof rack and a second strong person could make this more feasible.
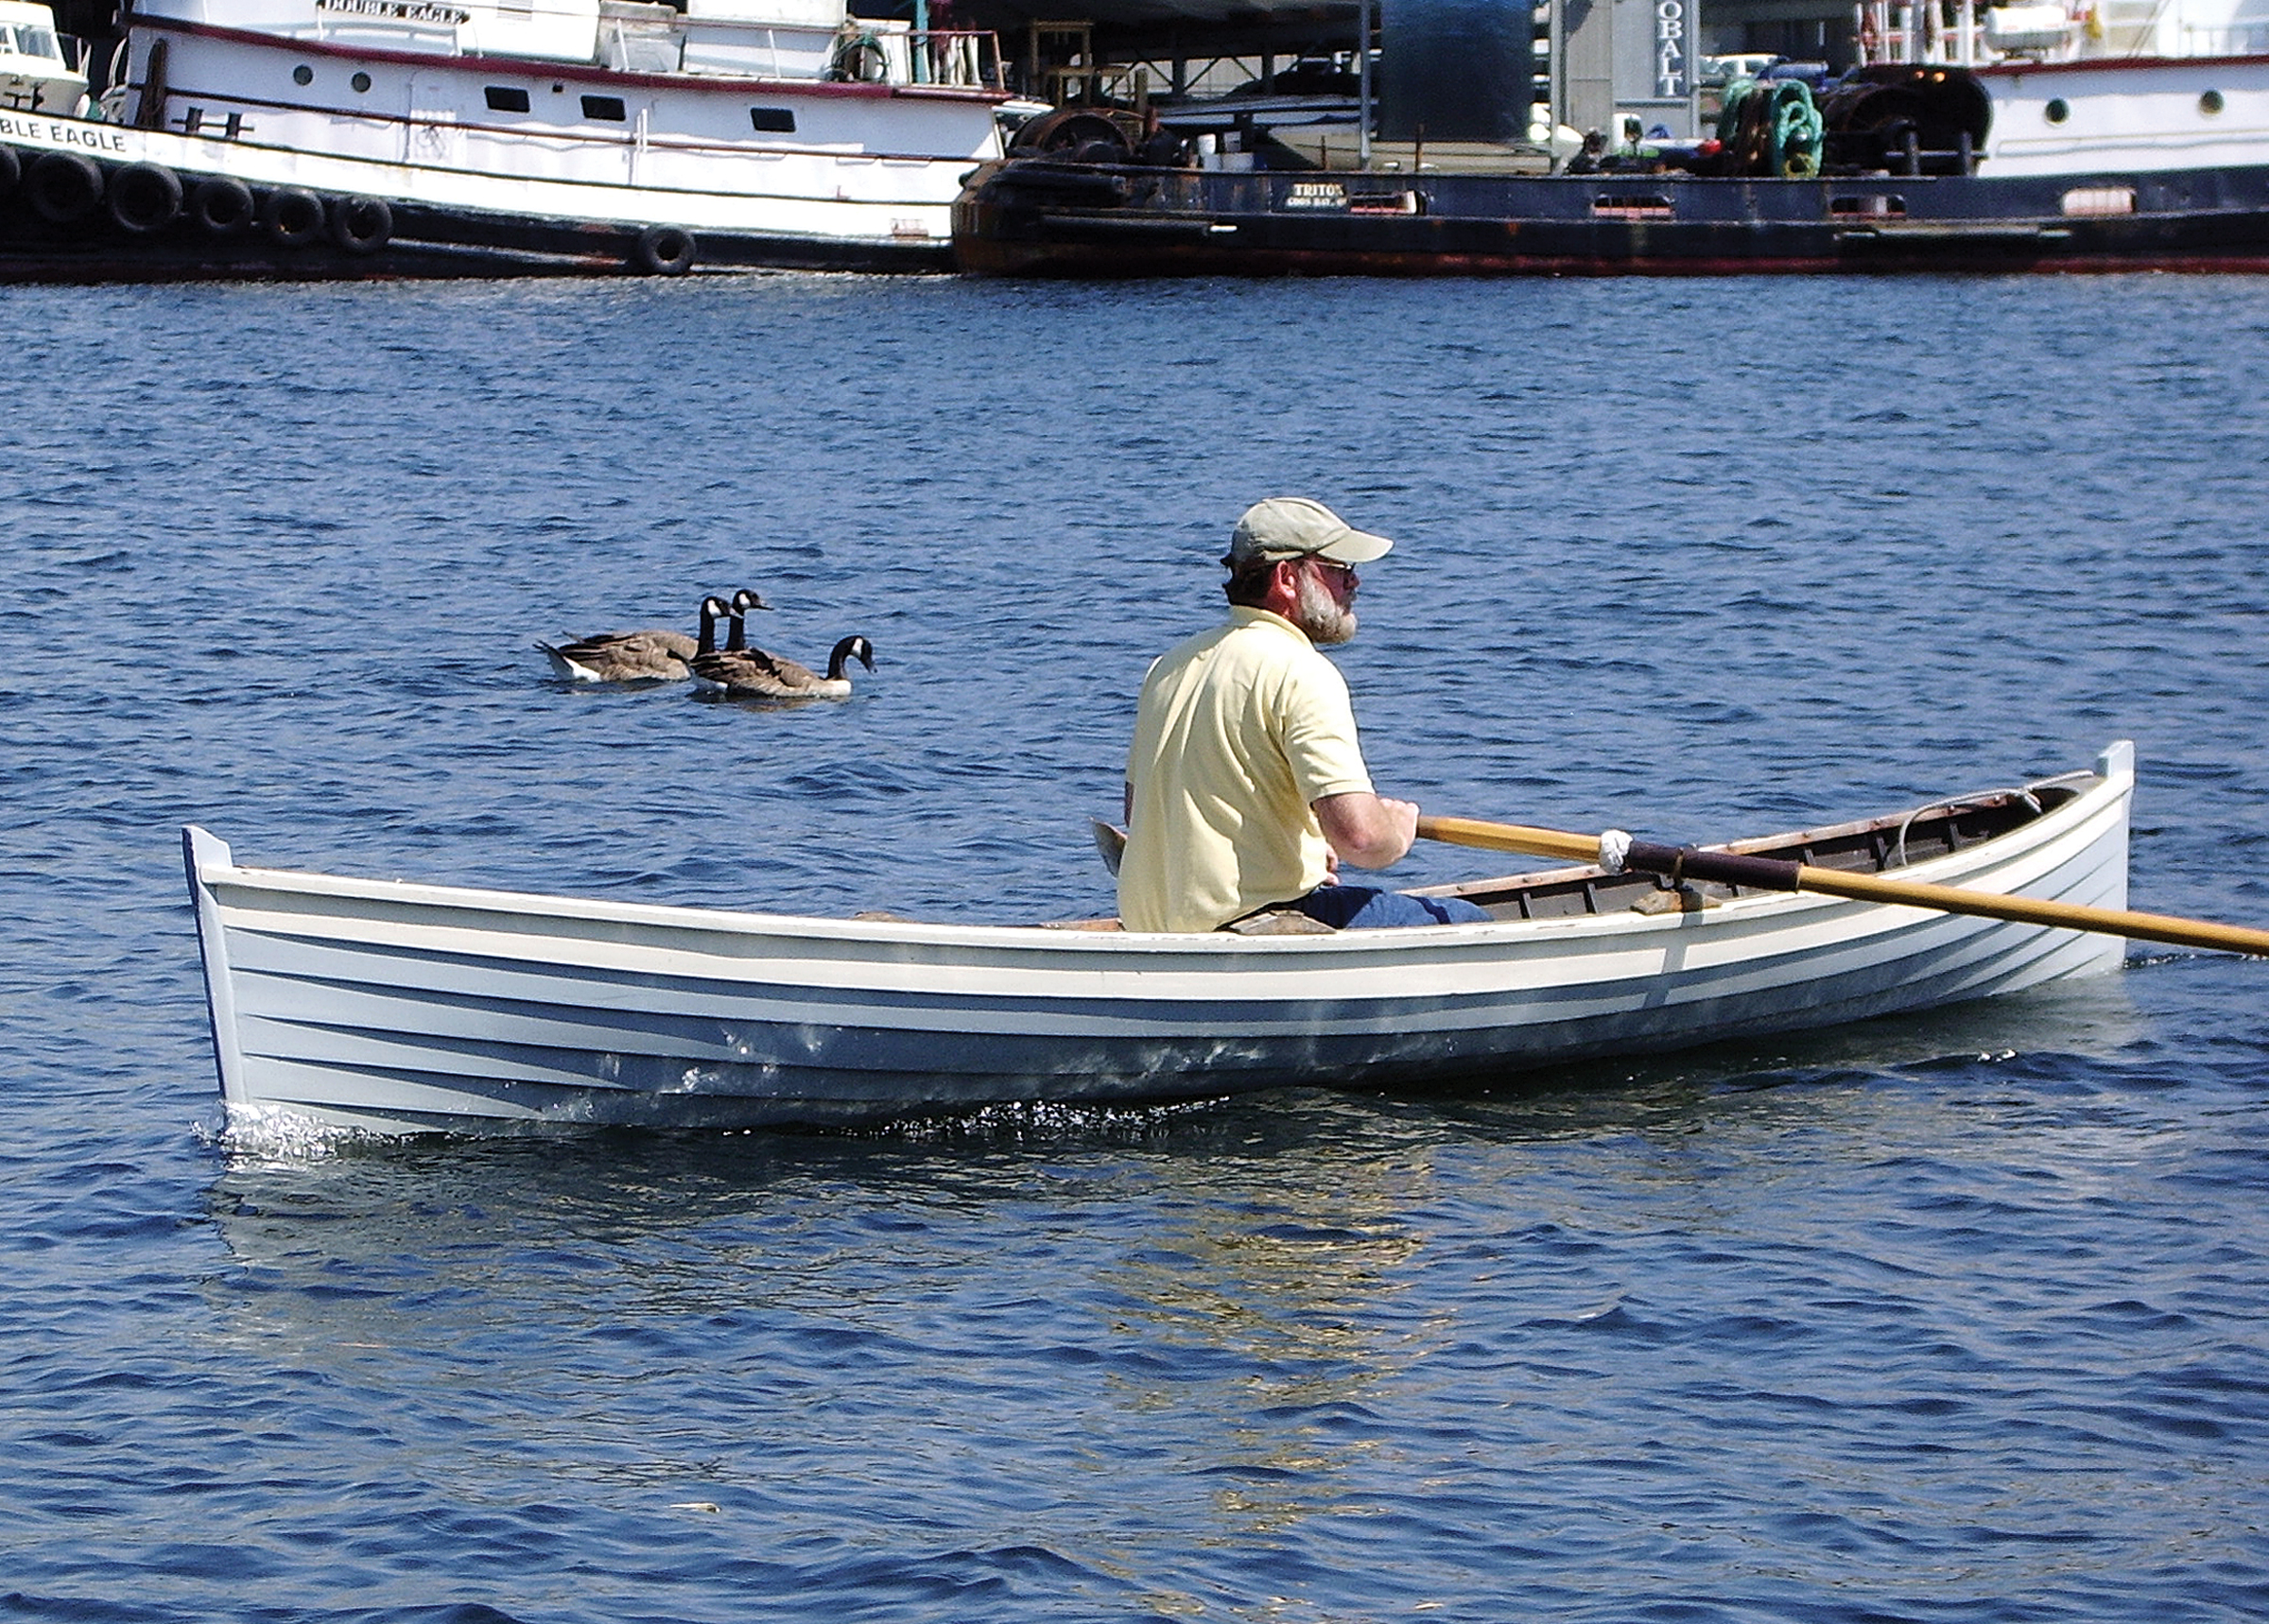
Allison Grappone
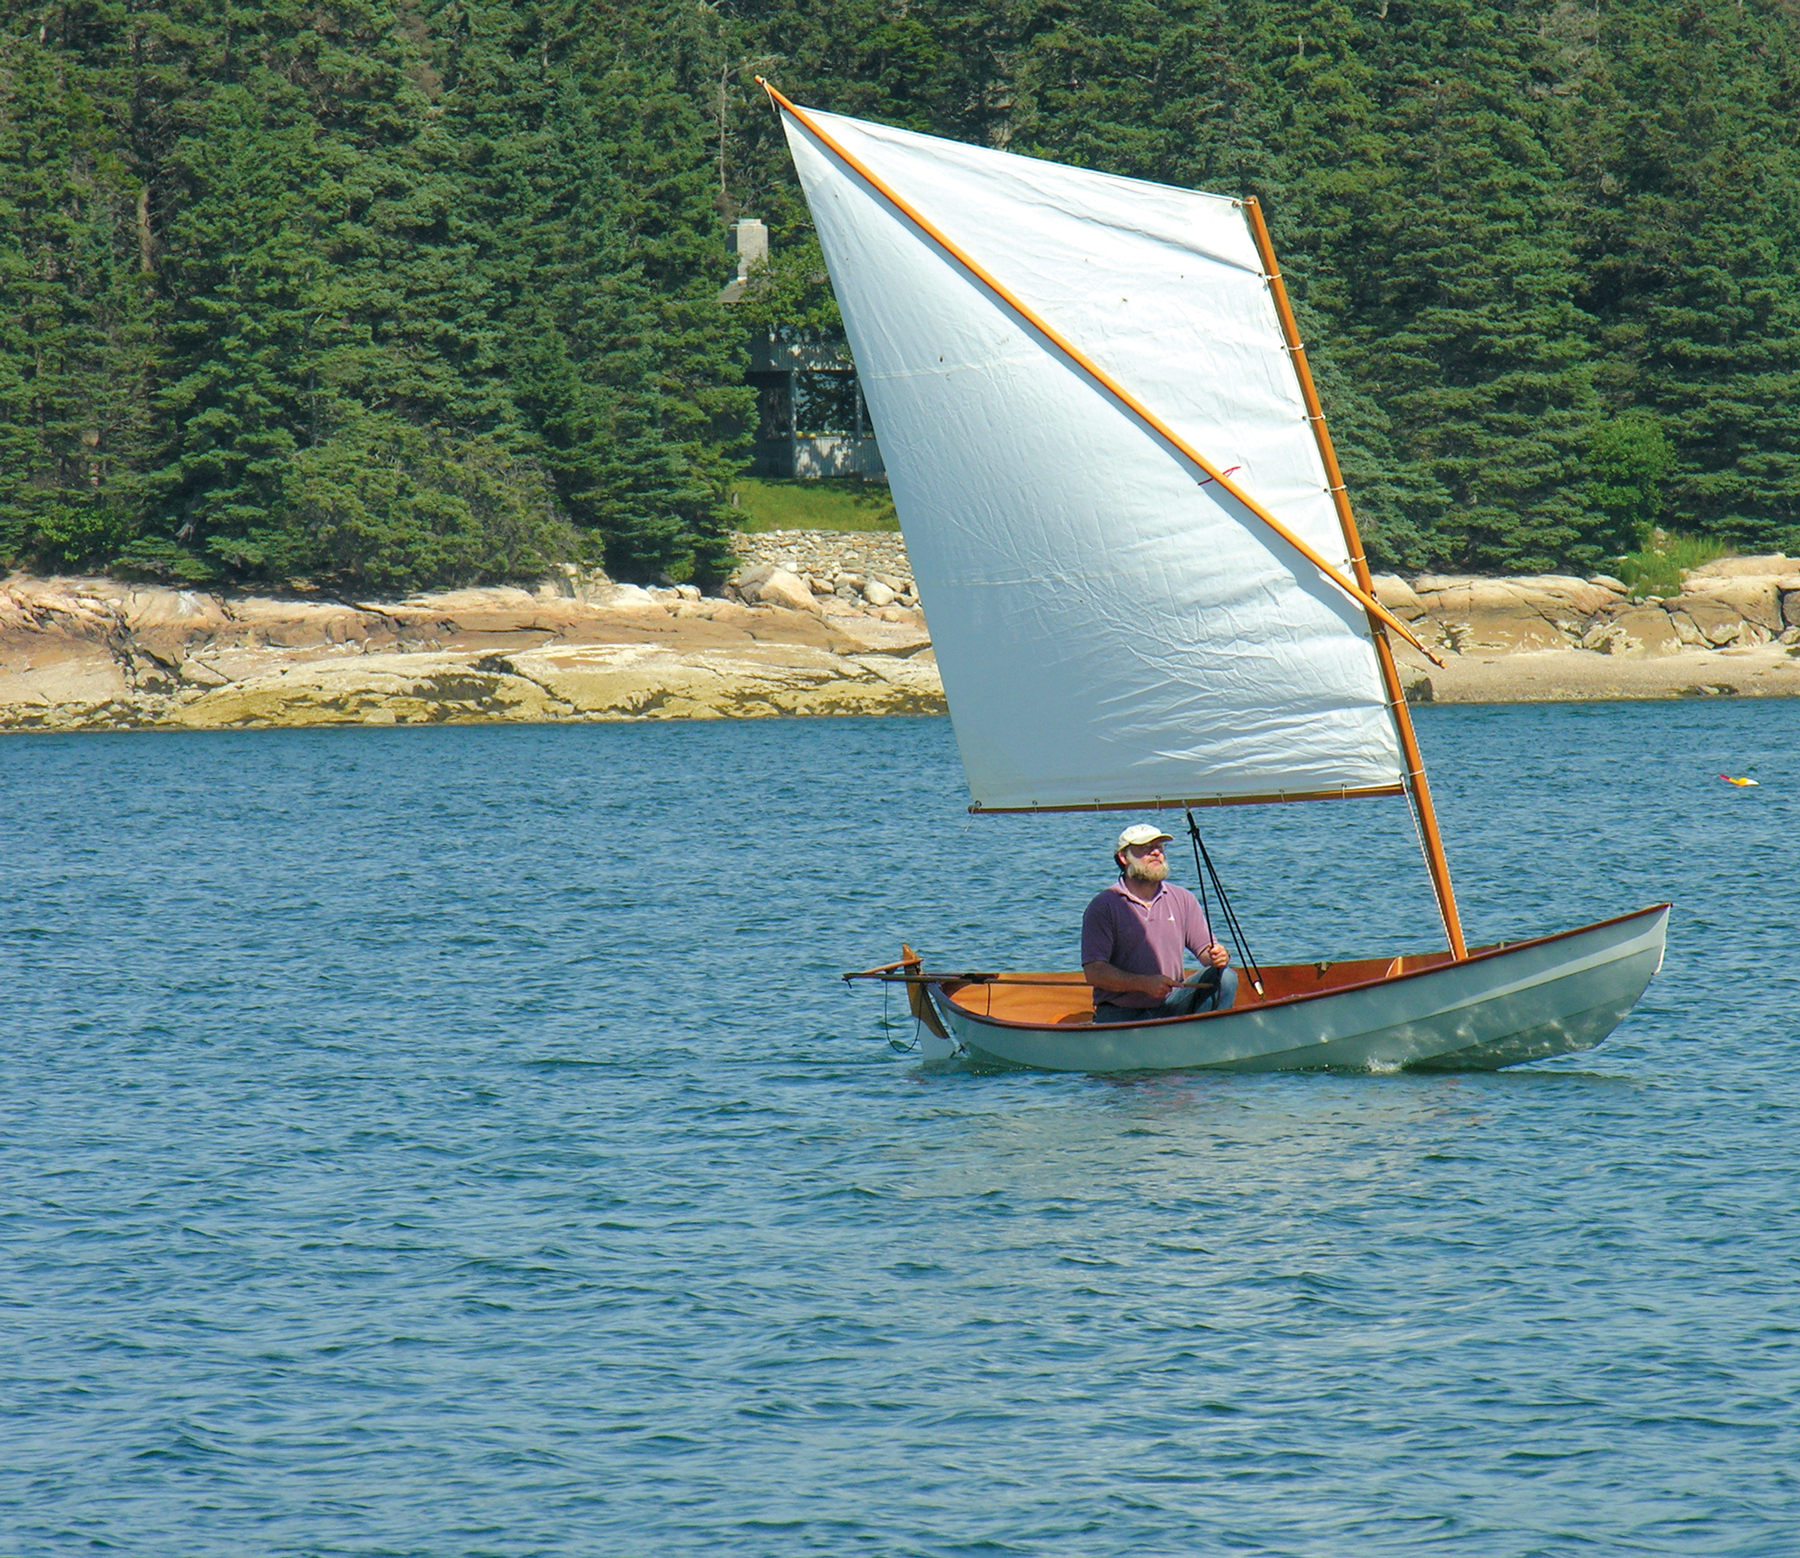
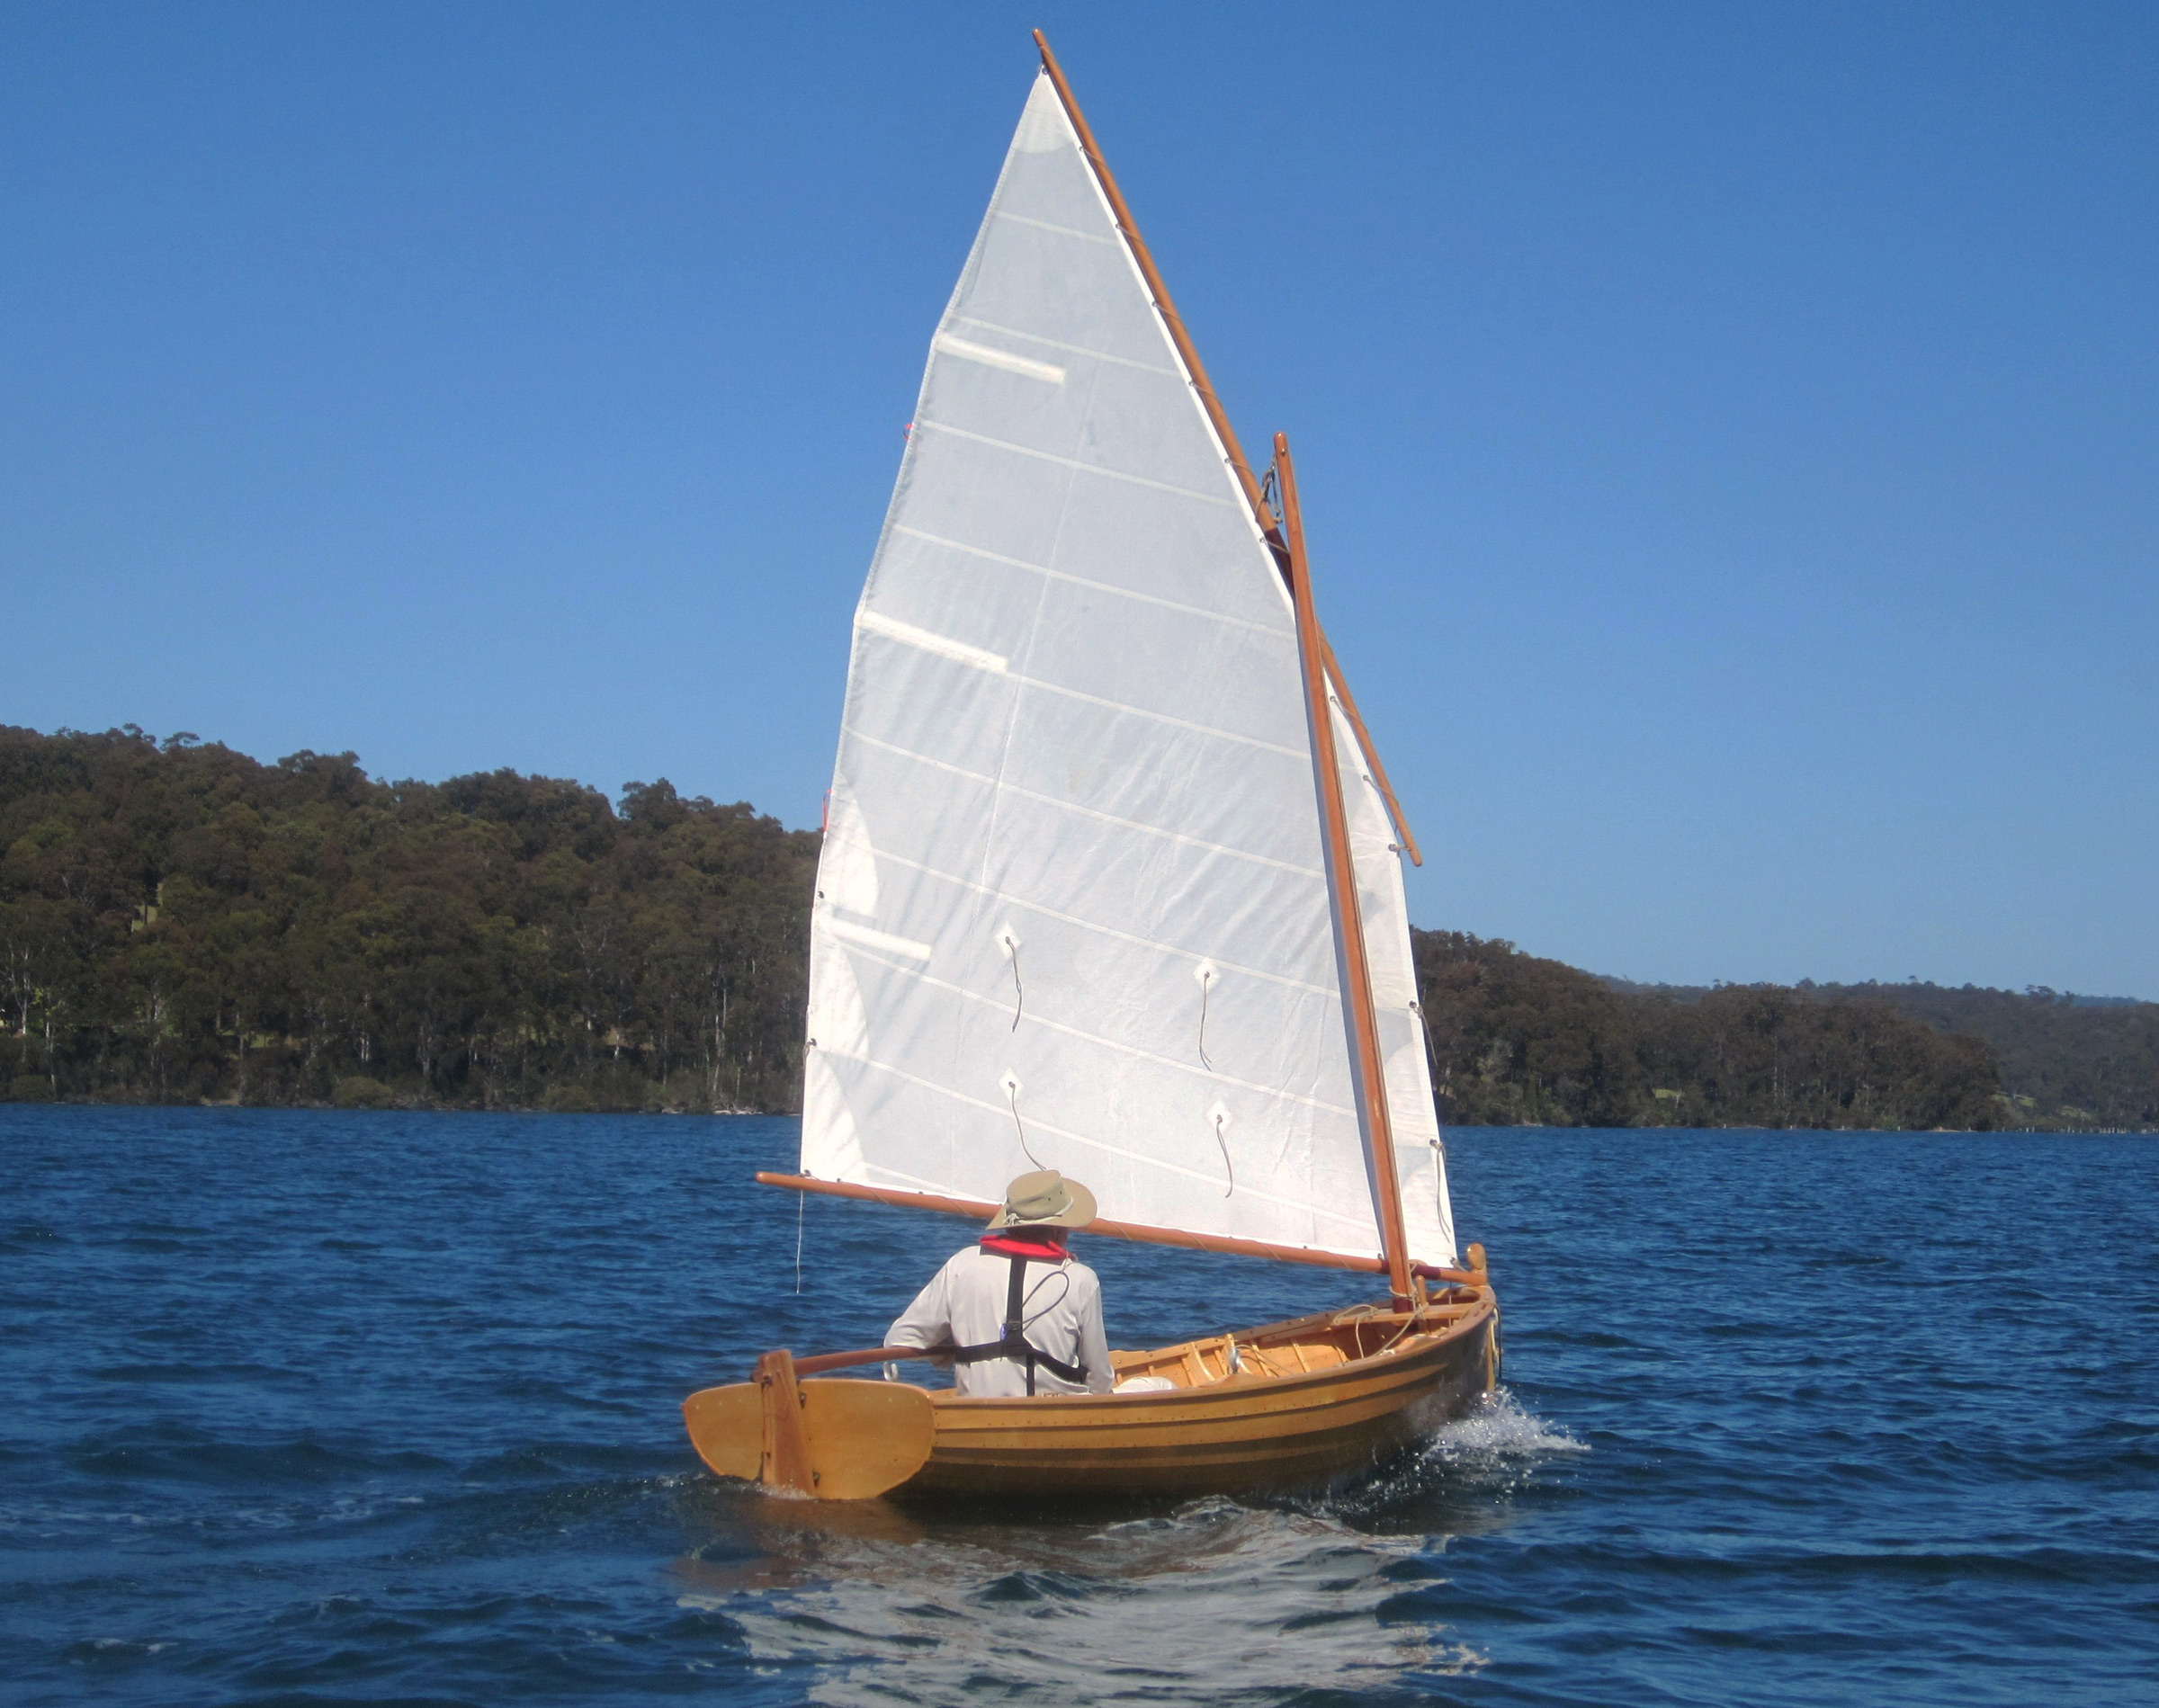
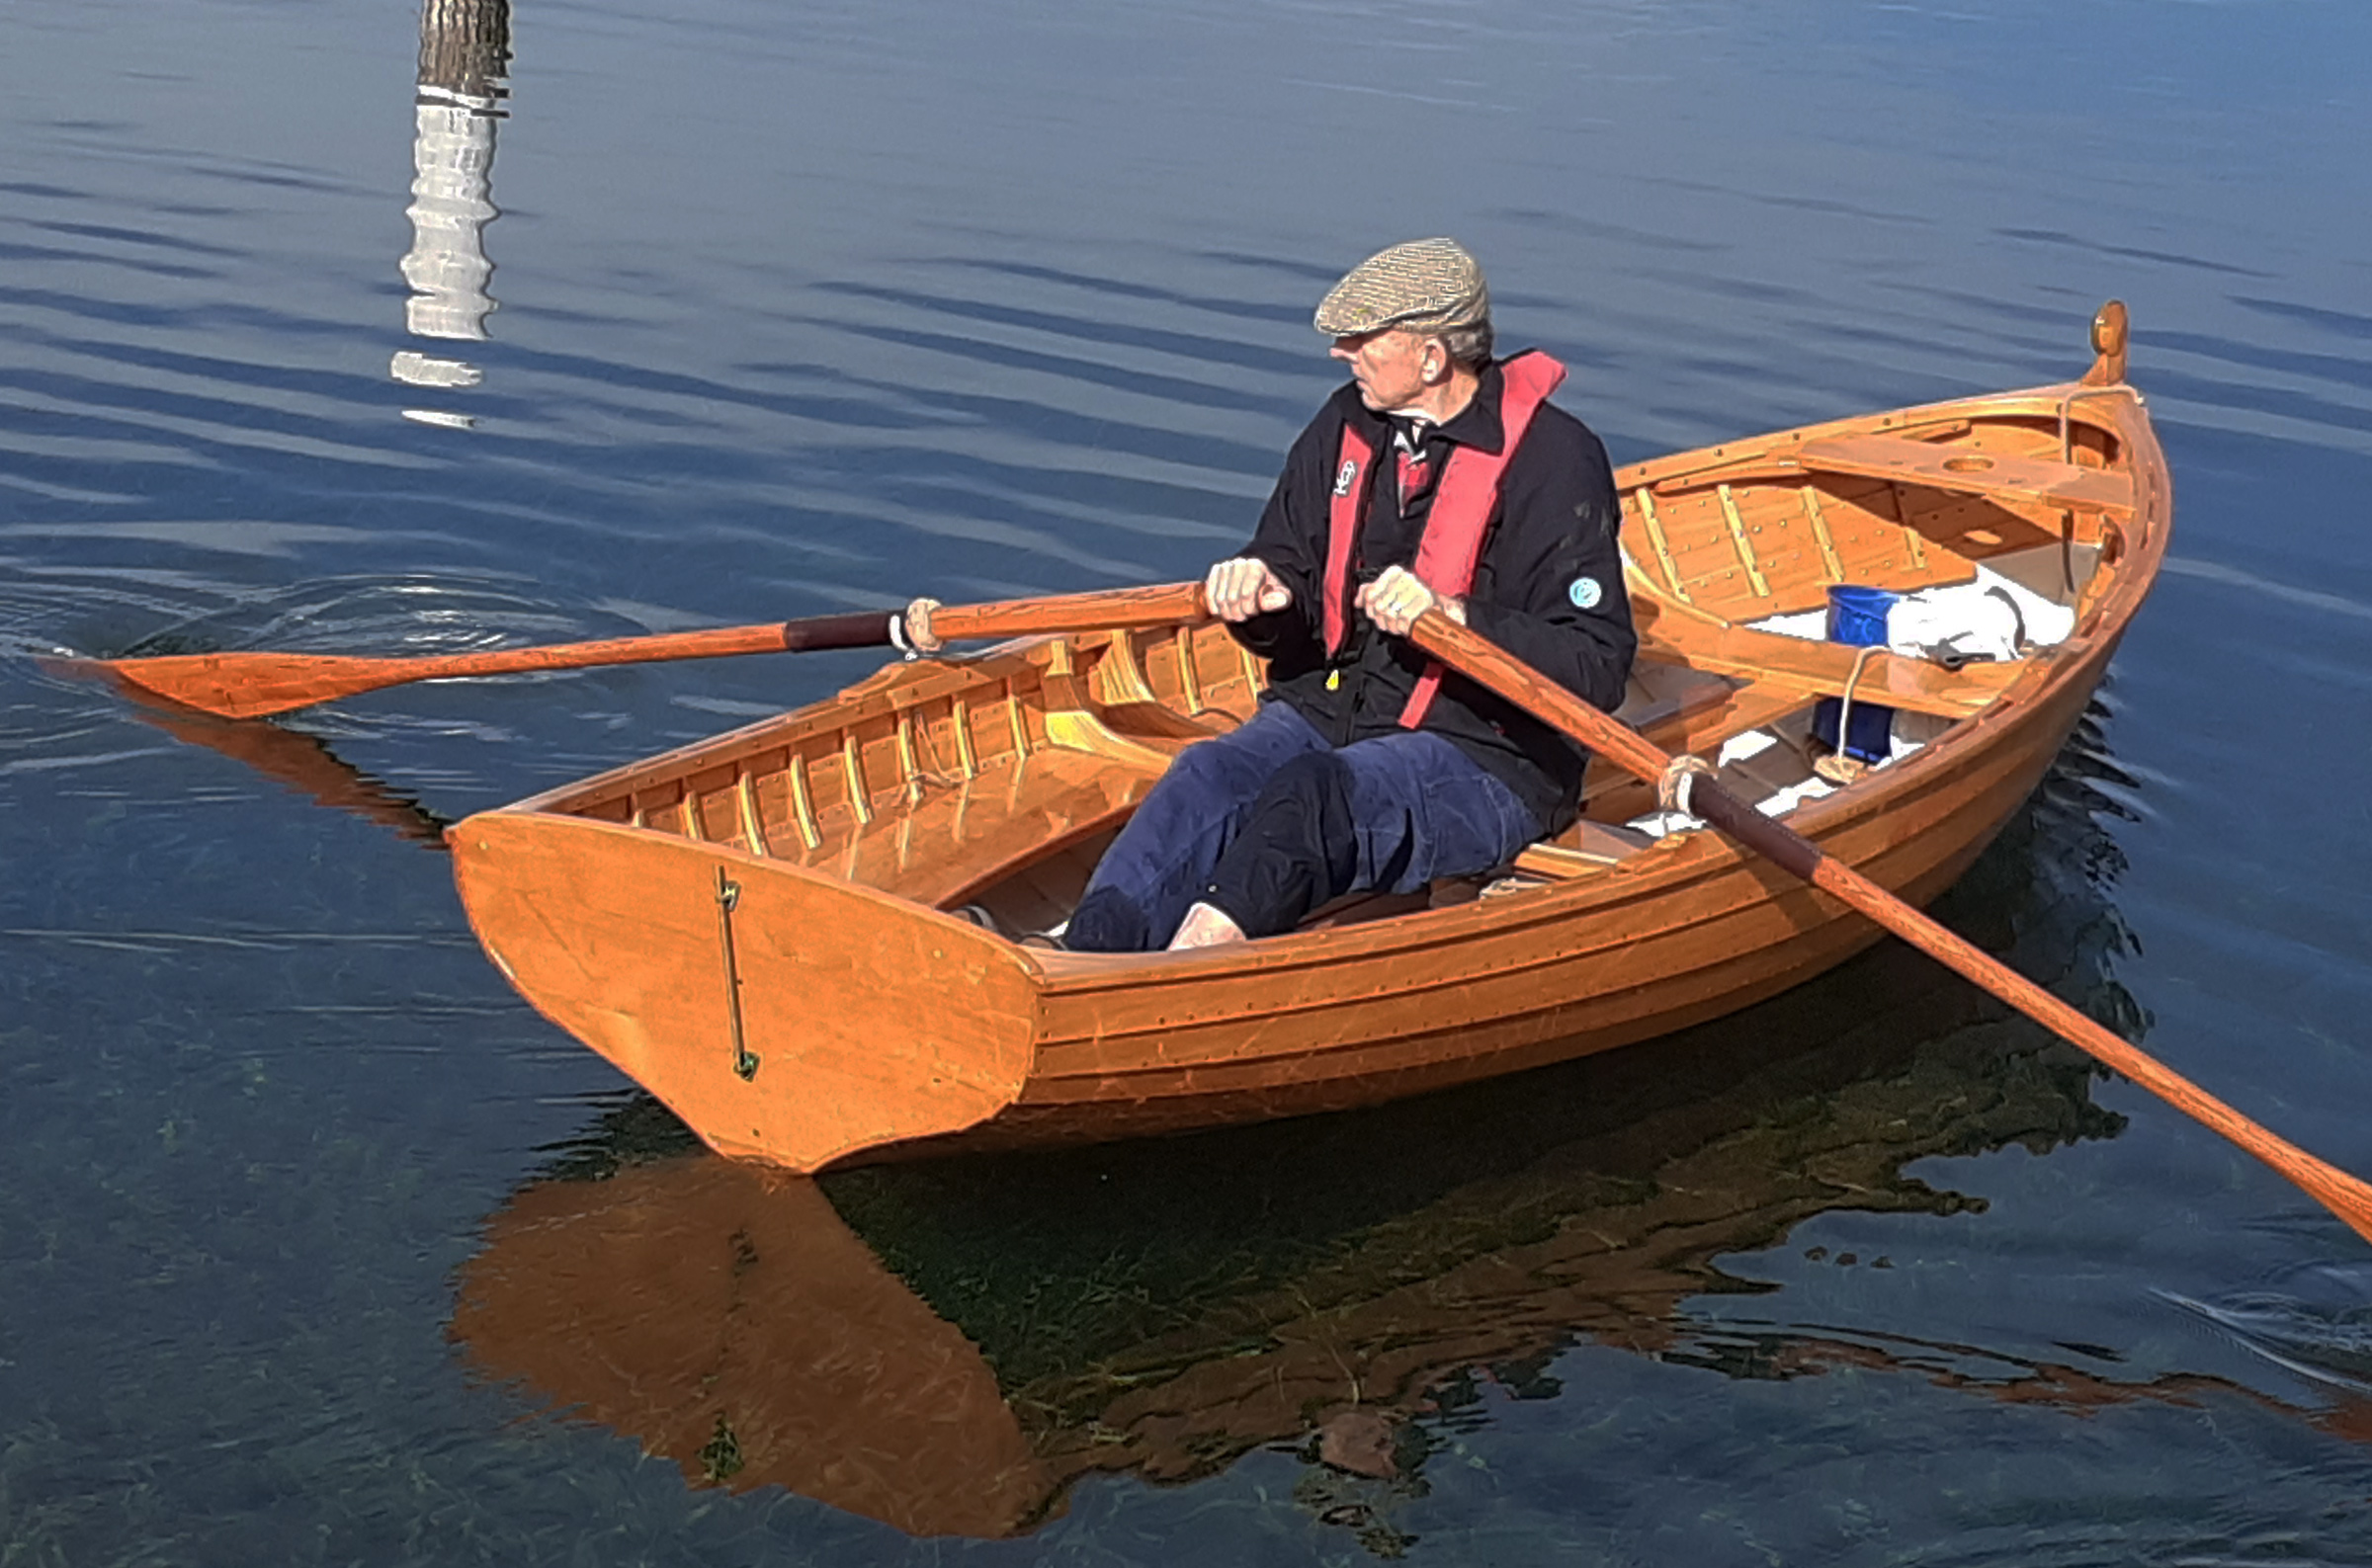
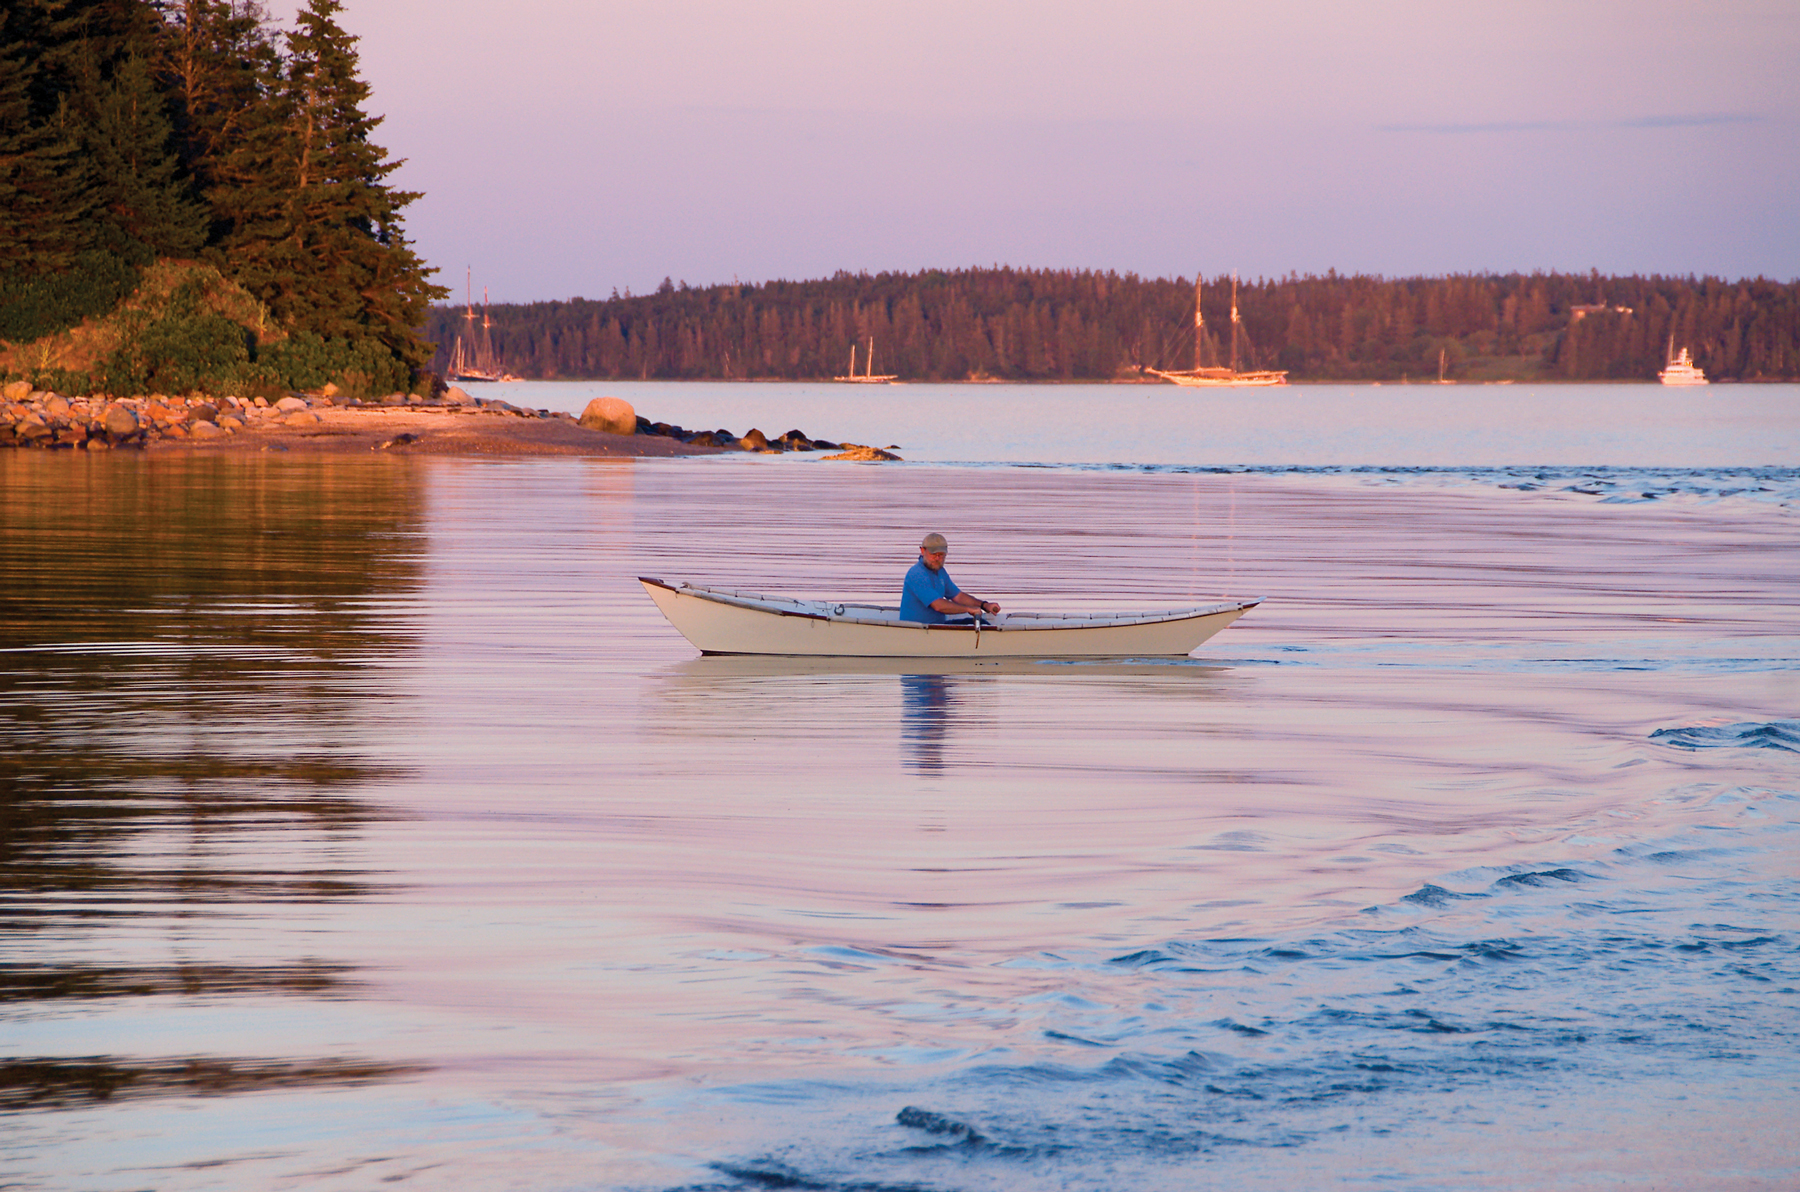
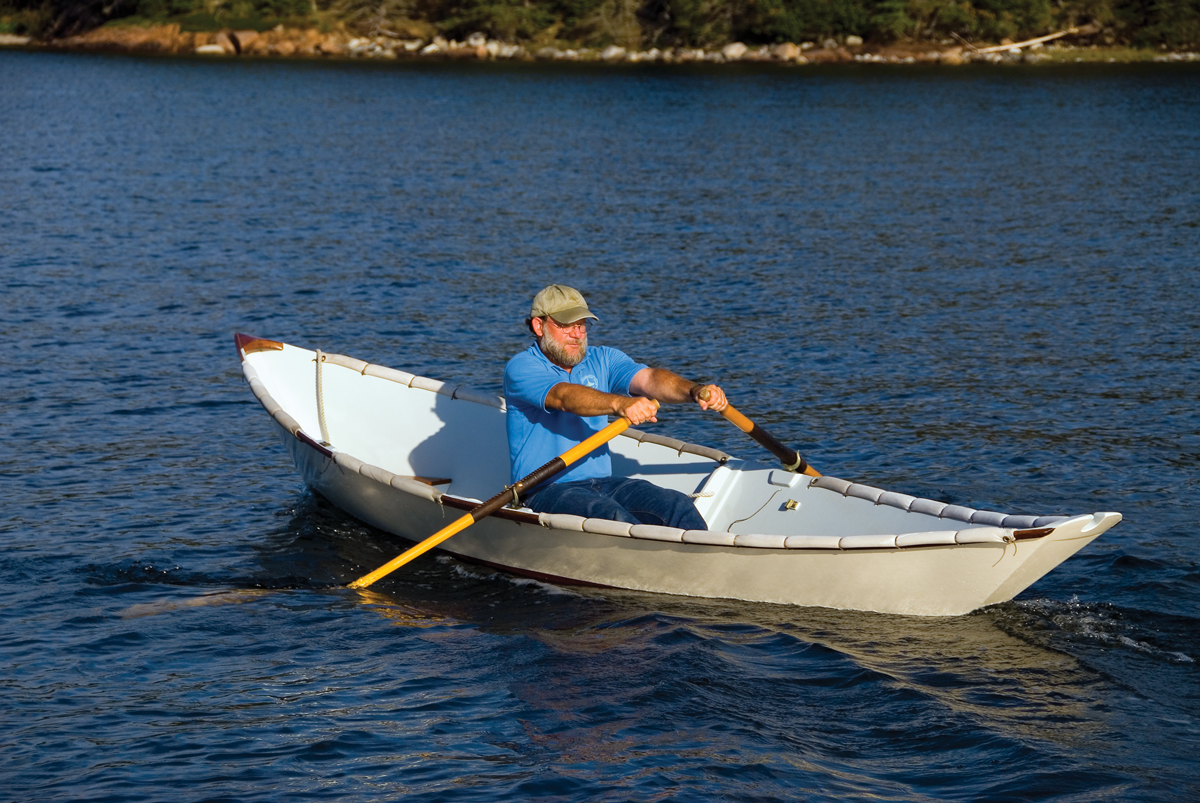
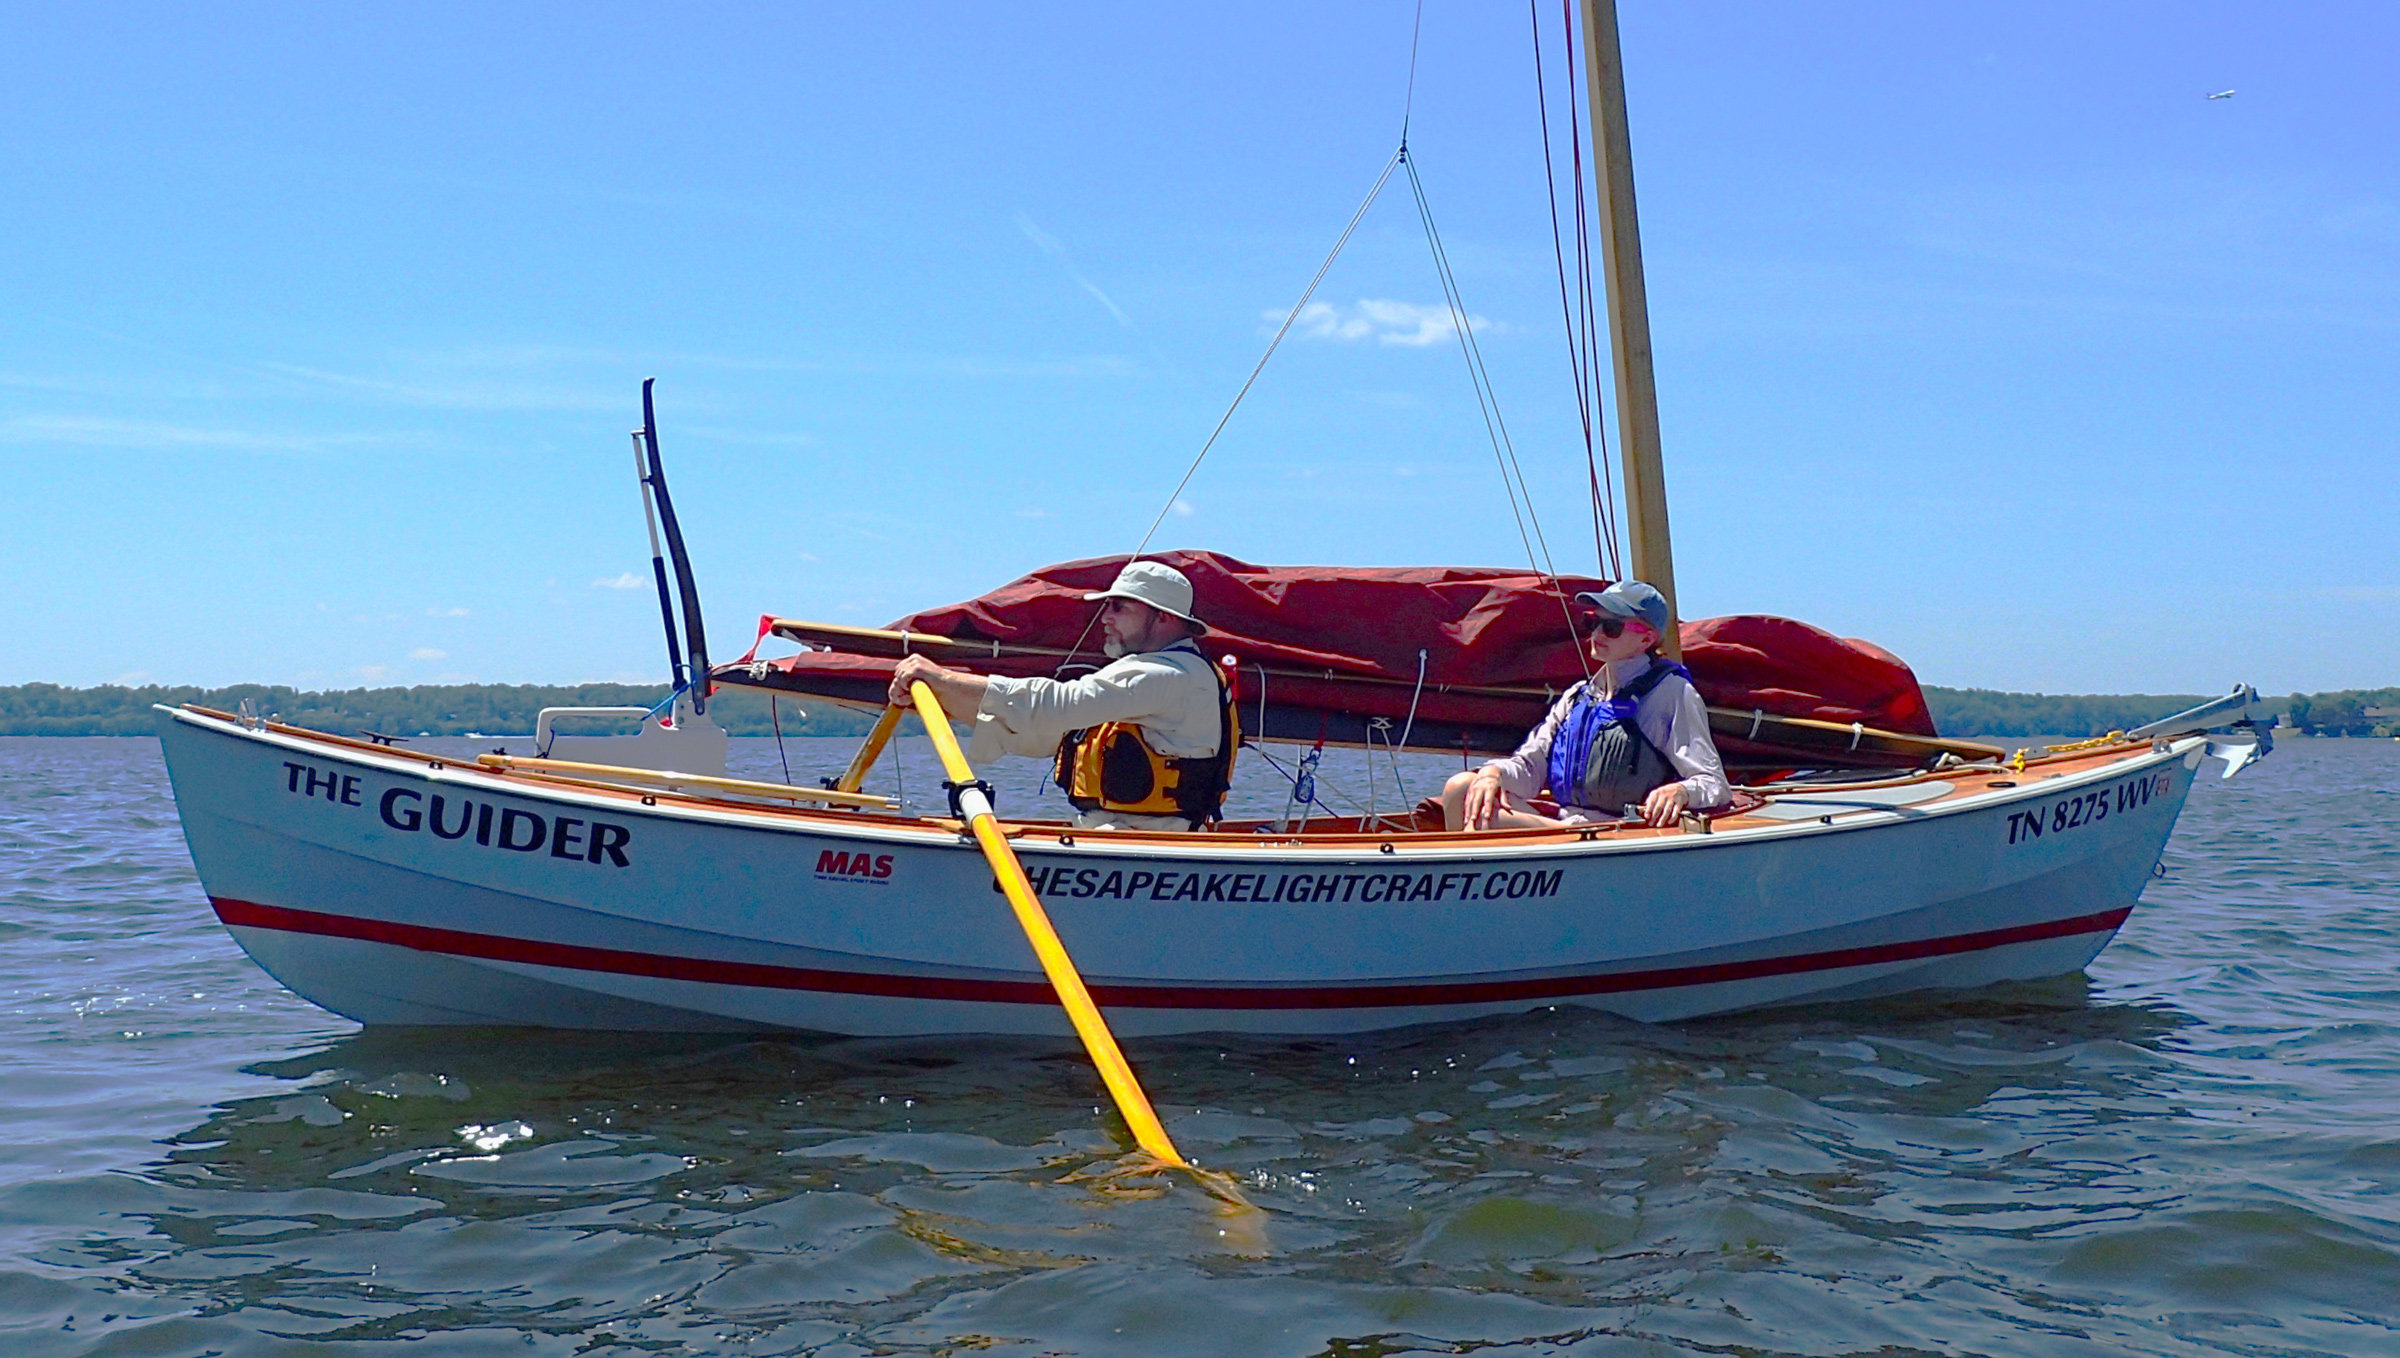
The author, here at the oars, has been able to push the Atlantic 17 to a speed just over 5 knots.
The boat, with its narrow bottom, is initially tender when stepping aboard or standing up, but once the rowers are settled on the thwarts, the boat becomes stable and predictable. The wide garboard acts as a hard stop when the boat is heeled and provides enormous secondary stability. I swim off this boat and can climb back in amidships with ease with only a few cups of water slipping over the gunwale during the maneuver. The high stability is also appreciated when rowing broadside to rollers.
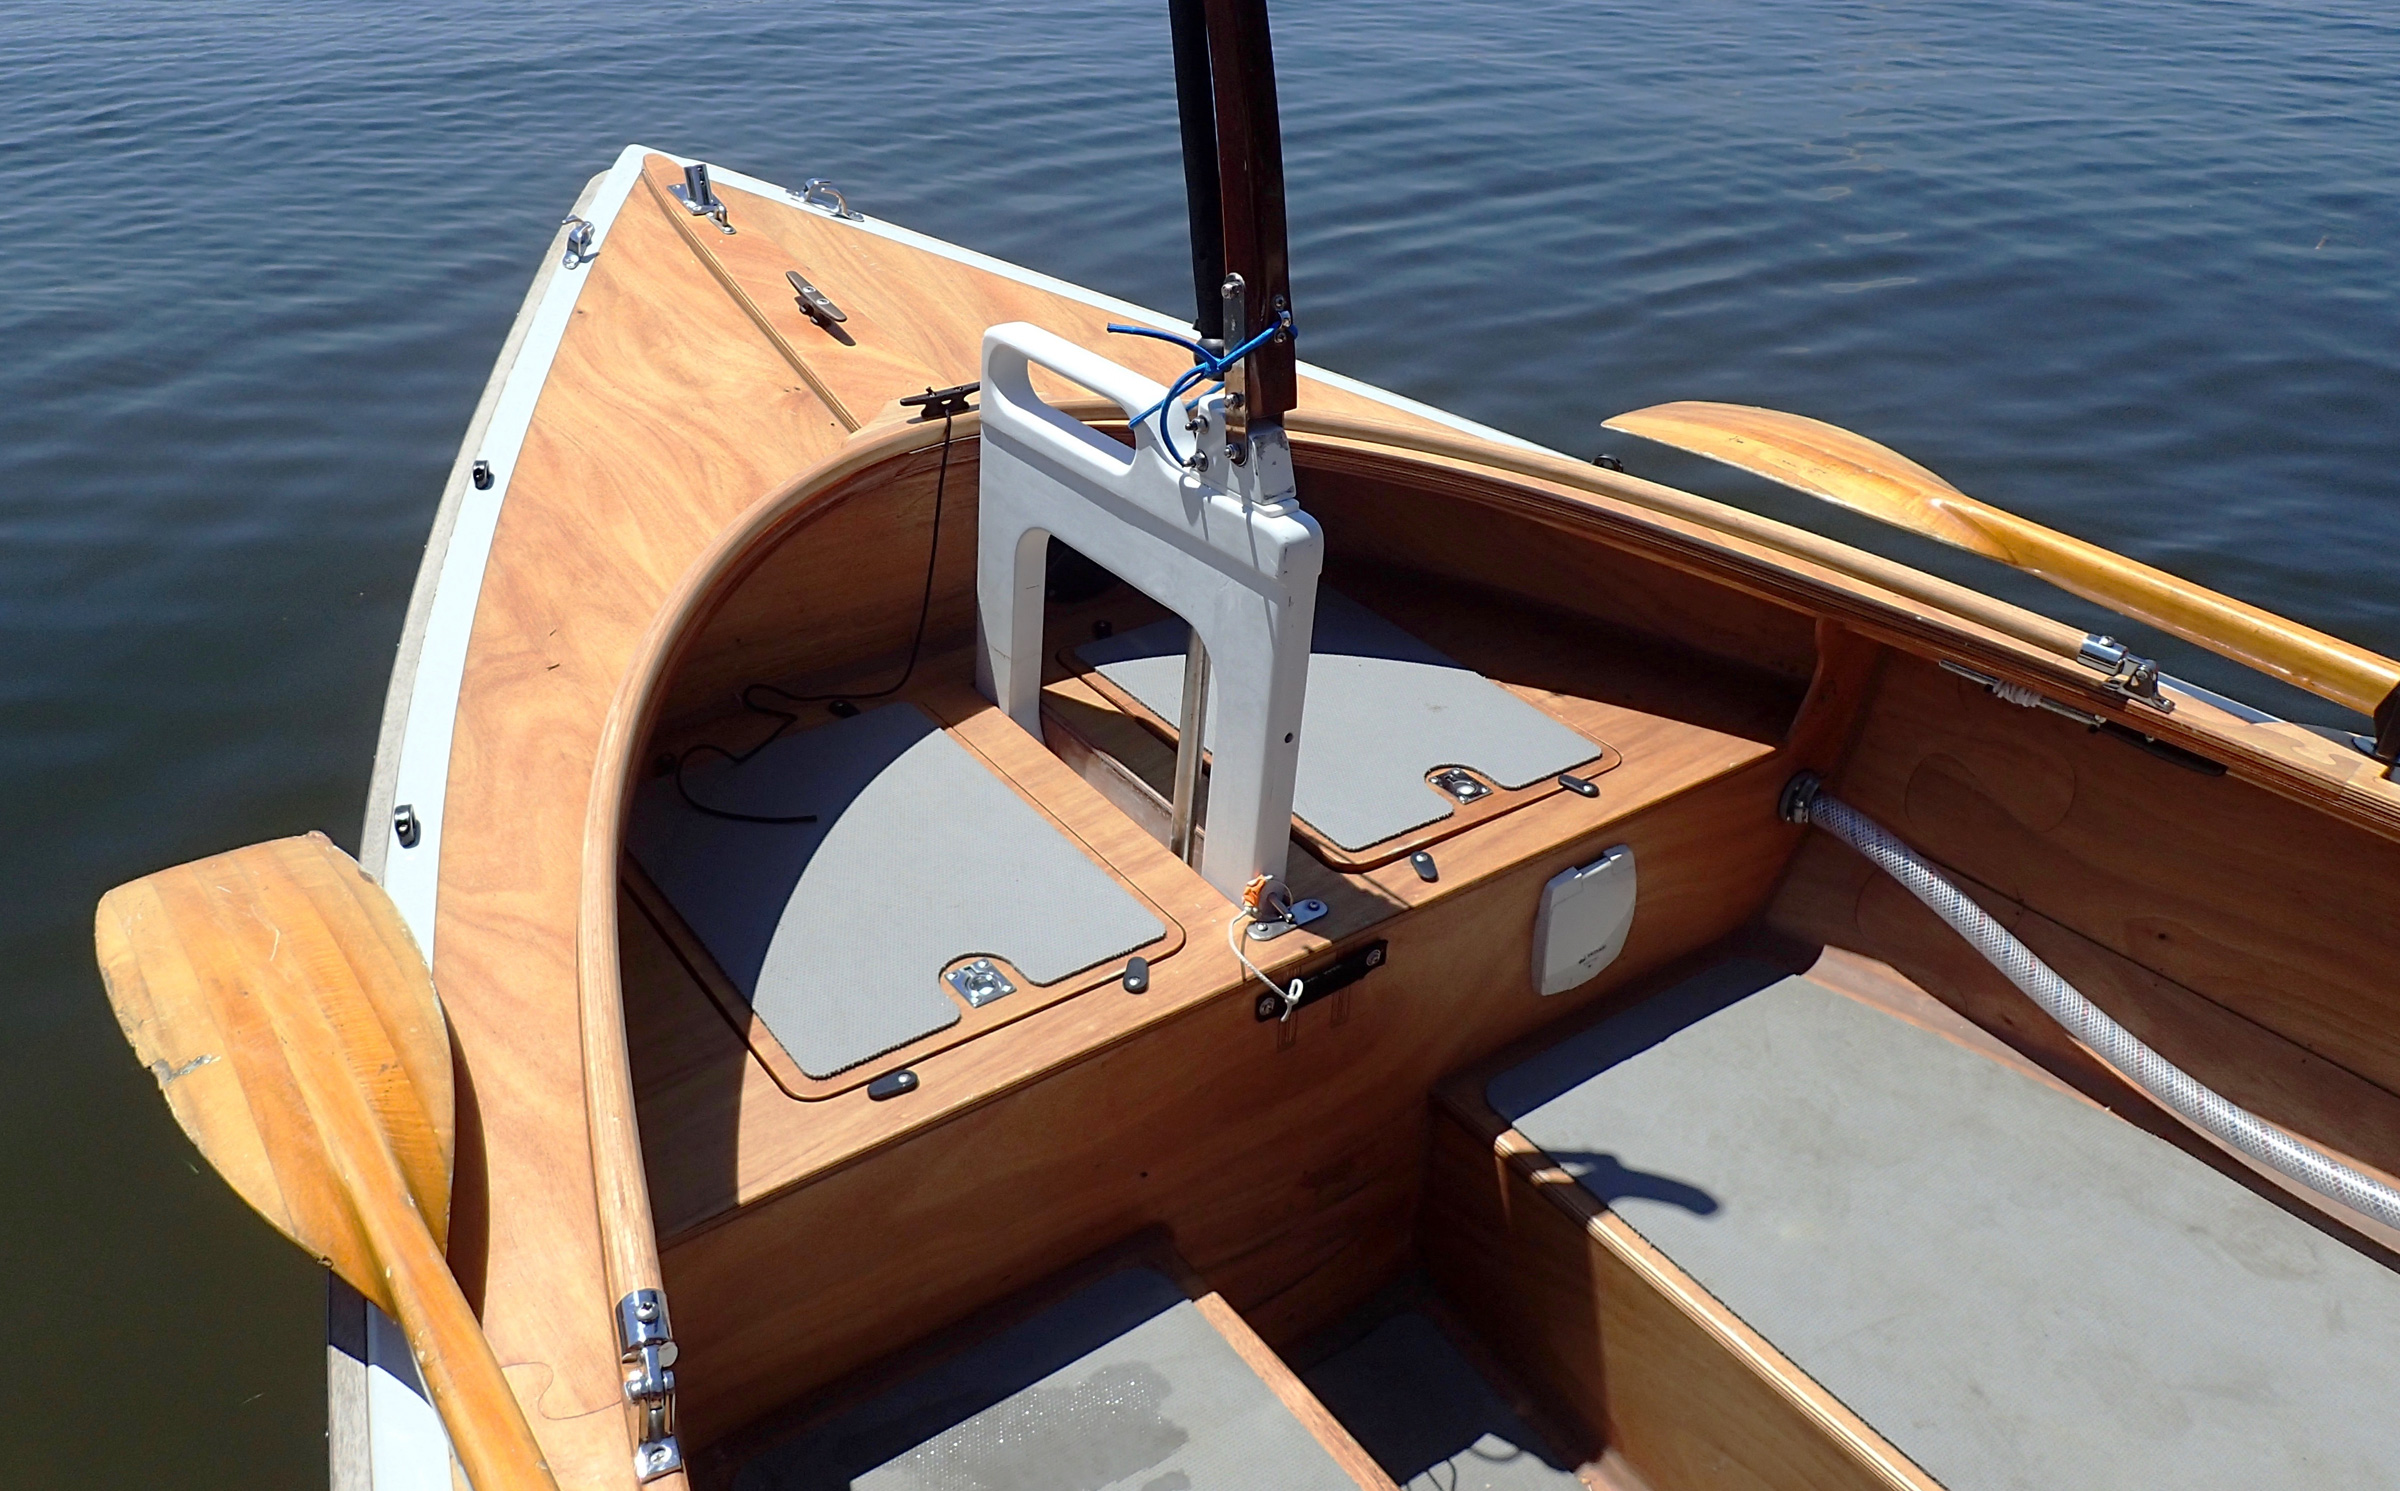
The foot stretchers for the solo and forward position are adjustable and drop into notched ladders that are glued to the inside of the thwart risers. The aft rowing position, per the plans, places the foot-stretcher set into a notched spine that is glued to the bottom of the boat. I decided this 16″ x 5″ spine would take up room for camping equipment and left it out of my boat. Some Atlantic 17 boats have employed other methods to add a less obtrusive foot-stretcher system, such as cleats glued to the inside of the garboards which accept a board slid between them.
Rowed solo the boat pulls and accelerates quickly. Oar length is not specified in the plans, but I use 8′ spoons for the center and forward positions. A second rower in the aft station could use the same length or 7′ 10″, depending on preference. A friend with another Atlantic 17 uses 8′ 6″ oars at the solo position with much success. Once the boat is up to speed, it carries almost two boat lengths after the last stroke before slowing down. Using my GPS, I found that a gentle sightseeing pace gets 3.5 knots, pulling harder (but still at a long-term sustainable amount) achieves 4 knots, and pulling all-out I indicate slightly over 5 knots. Add a second rower and the speeds at the same efforts conservatively increase by half a knot.
If the boat is appropriately balanced, the base of the stem should be sufficiently buried and the bottom does not slap. For such a light boat with a flat bottom and rocker, the boat tracks fabulously in a crosswind and does not exhibit much weathercocking as long as the rowers are correctly positioned. Someone along for the ride in the far aft passenger position can exert some weathercocking effect.
Allison Grappone
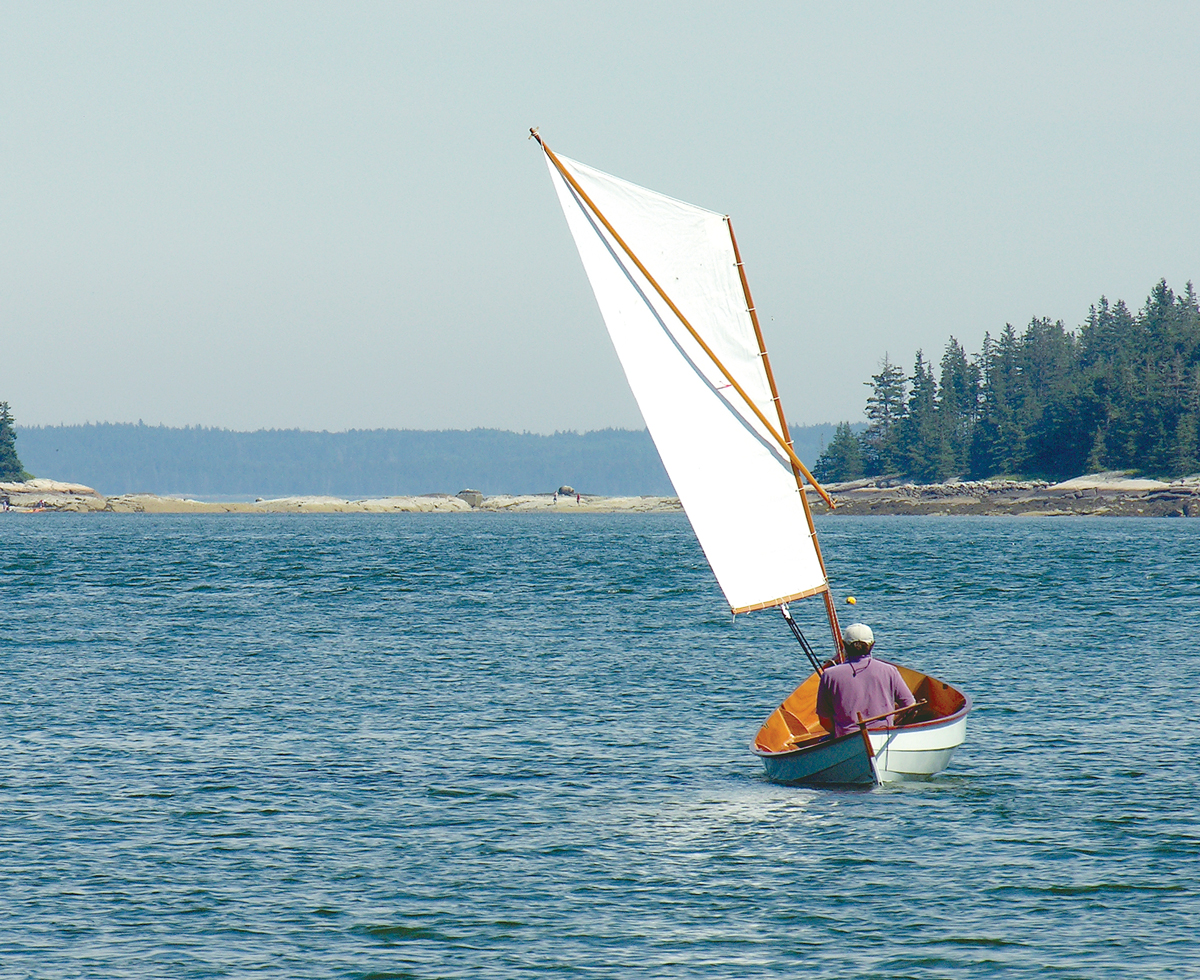
The dory handles waves with ease, holding its heading and its speed.
I recently went for a row in Casco Bay, Maine, during a blustery day with sustained southerly winds of 15 to 20 knots and higher gusts. The harbor opened to the southeast and was filled with short rollers and some windblown crests. The fine bow struck a clean path through the waves, and the boat rode nimbly up and over the crests. On the descent into the face of the next wave the flaring sheerstrake diverted the water and kept the interior of the boat dry. Unlike a heavier, traditionally built dory, the Atlantic 17 won’t punch through waves carrying its momentum; instead, it rides lightly on the surface. Without the extra mass a little more work needs to be expended to keep her going against both wind and wave, but quicker acceleration and lack of spray is paid in return.
Allison Grappone
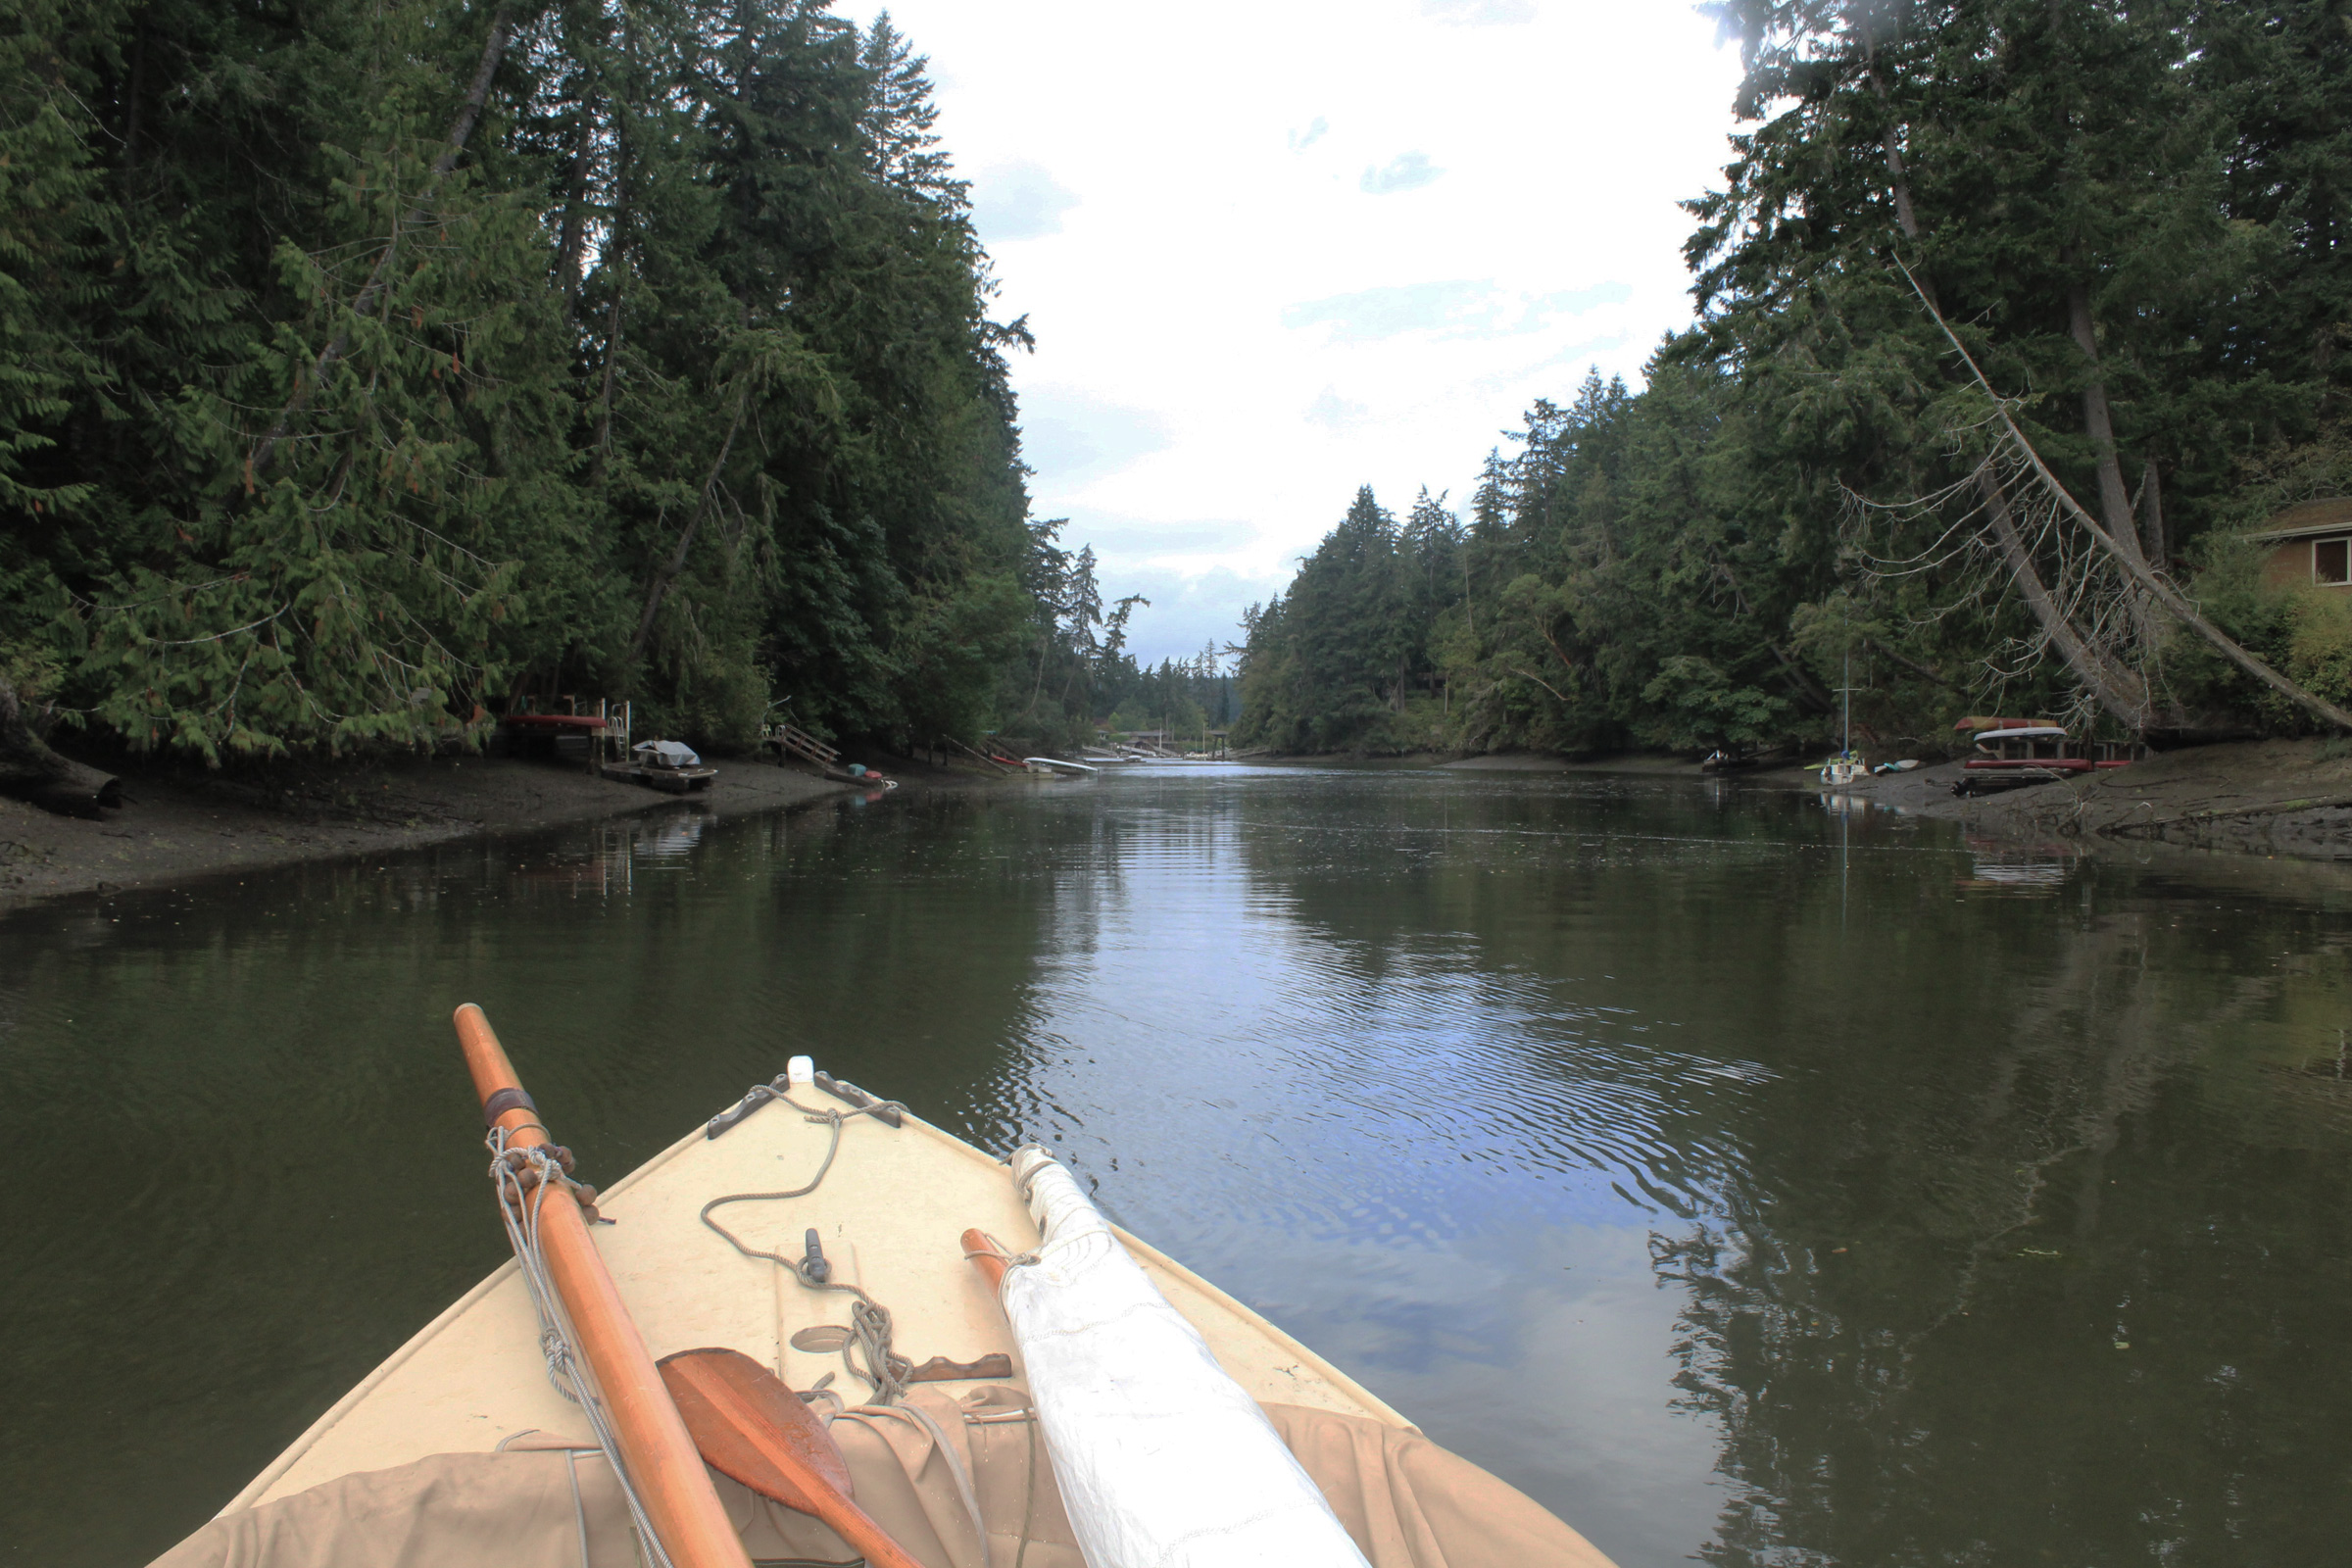
The fine ends let the dory make a smooth passage through the water, leaving very little disturbance in its wake.
When I row downwind, surfing the rollers, the bow does not aimlessly veer but maintains solid directional integrity, an attribute that is much appreciated in an open-water boat. However solid its own tracking, the Atlantic 17 is also easily turned. At full speed on flat water, I can turn it 90 degrees from its course with three solid strokes on one side. At rest, the boat easily spins in the footprint of its own length.
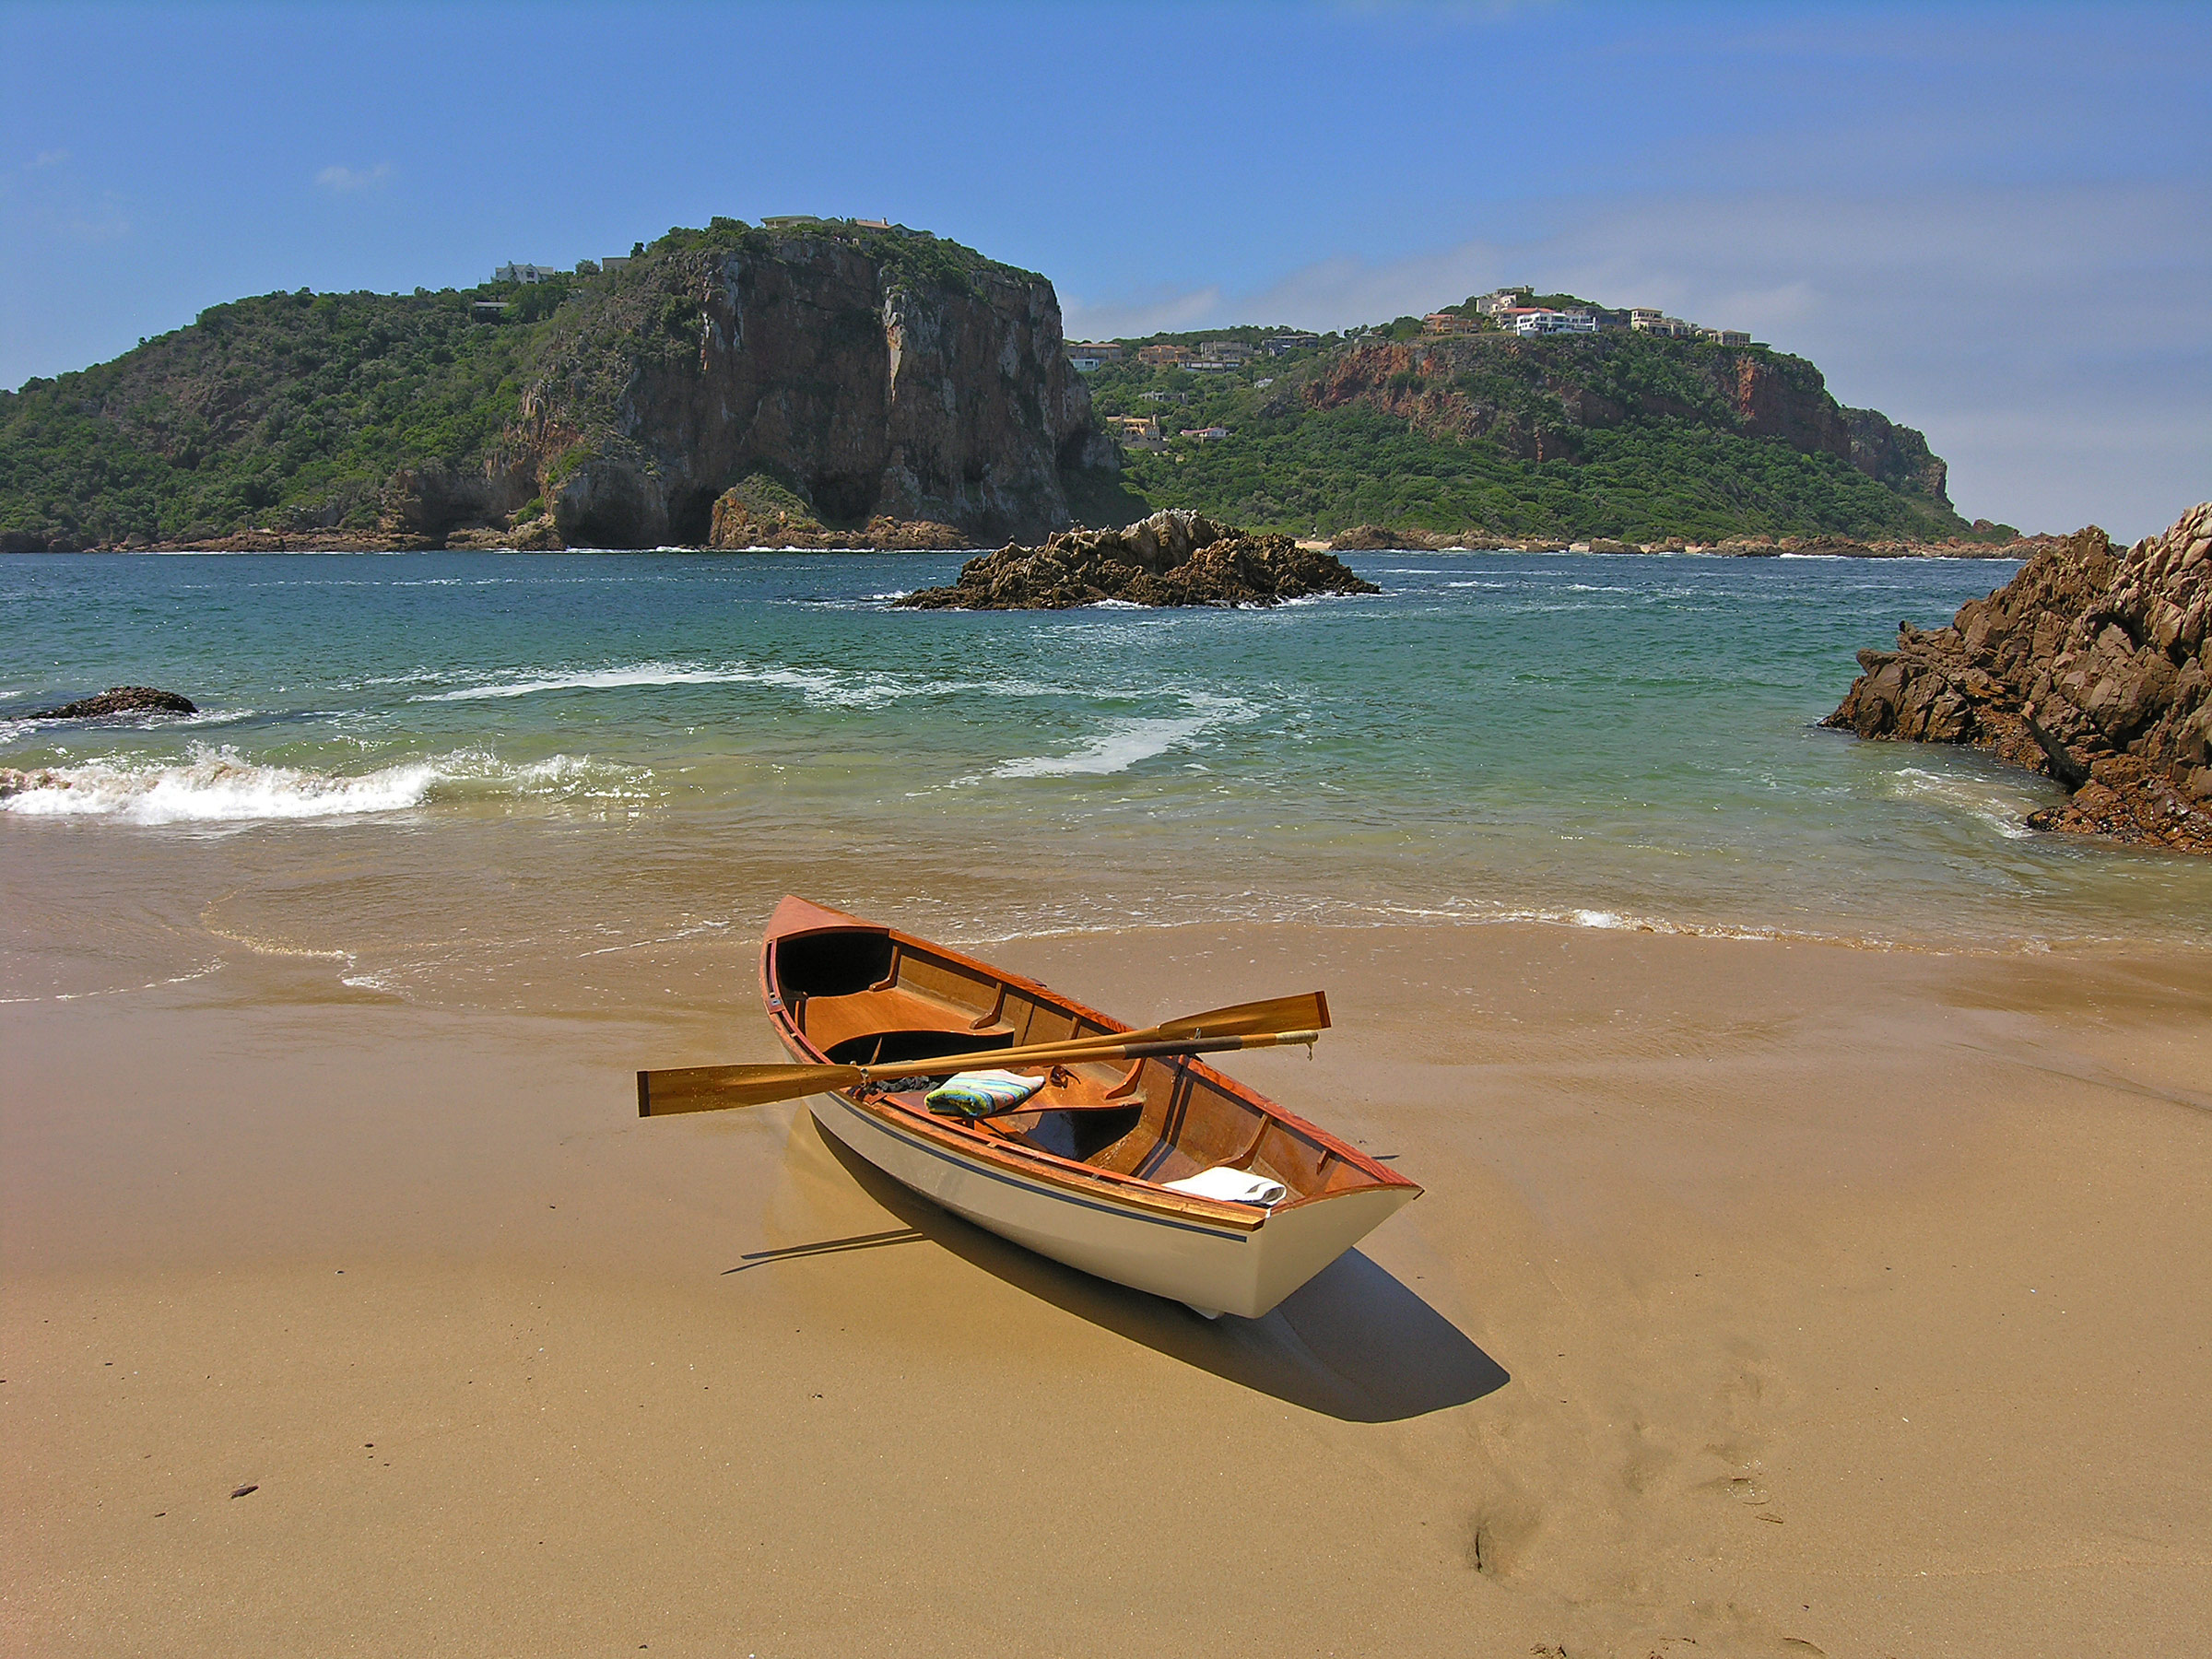
This beautiful, sleek boat fulfills the requirements of a simple and economical build, with easy handling and safety for beginner rowers and speed for experienced ones. It makes a great day/picnic boat for two, and an efficient and safe camping vessel for one. The Atlantic 17 is a fine introduction to the joy of open-water rowing and has quickly become my most frequently used boat.
Christophe Matson lives in New Hampshire. At a very young age he disobeyed his father and rowed the neighbor’s Dyer Dhow across the Connecticut River to the strange new lands on the other side. Ever since, he has been hooked on the idea that a small boat offers the most freedom.
Atlantic 17 Particulars
Length/17′
Beam/48″
Depth amidships/15″
Plans for the Atlantic 17 are available, in printed form only, from Jon Persson Designs for $60 plus shipping.
Is there a boat you’d like to know more about? Have you built one that you think other Small Boats Magazine readers would enjoy? Please email us!
Comments:
We welcome your comments about this article. If you’d like to include a photo or a video with your comment, please email the file or link.
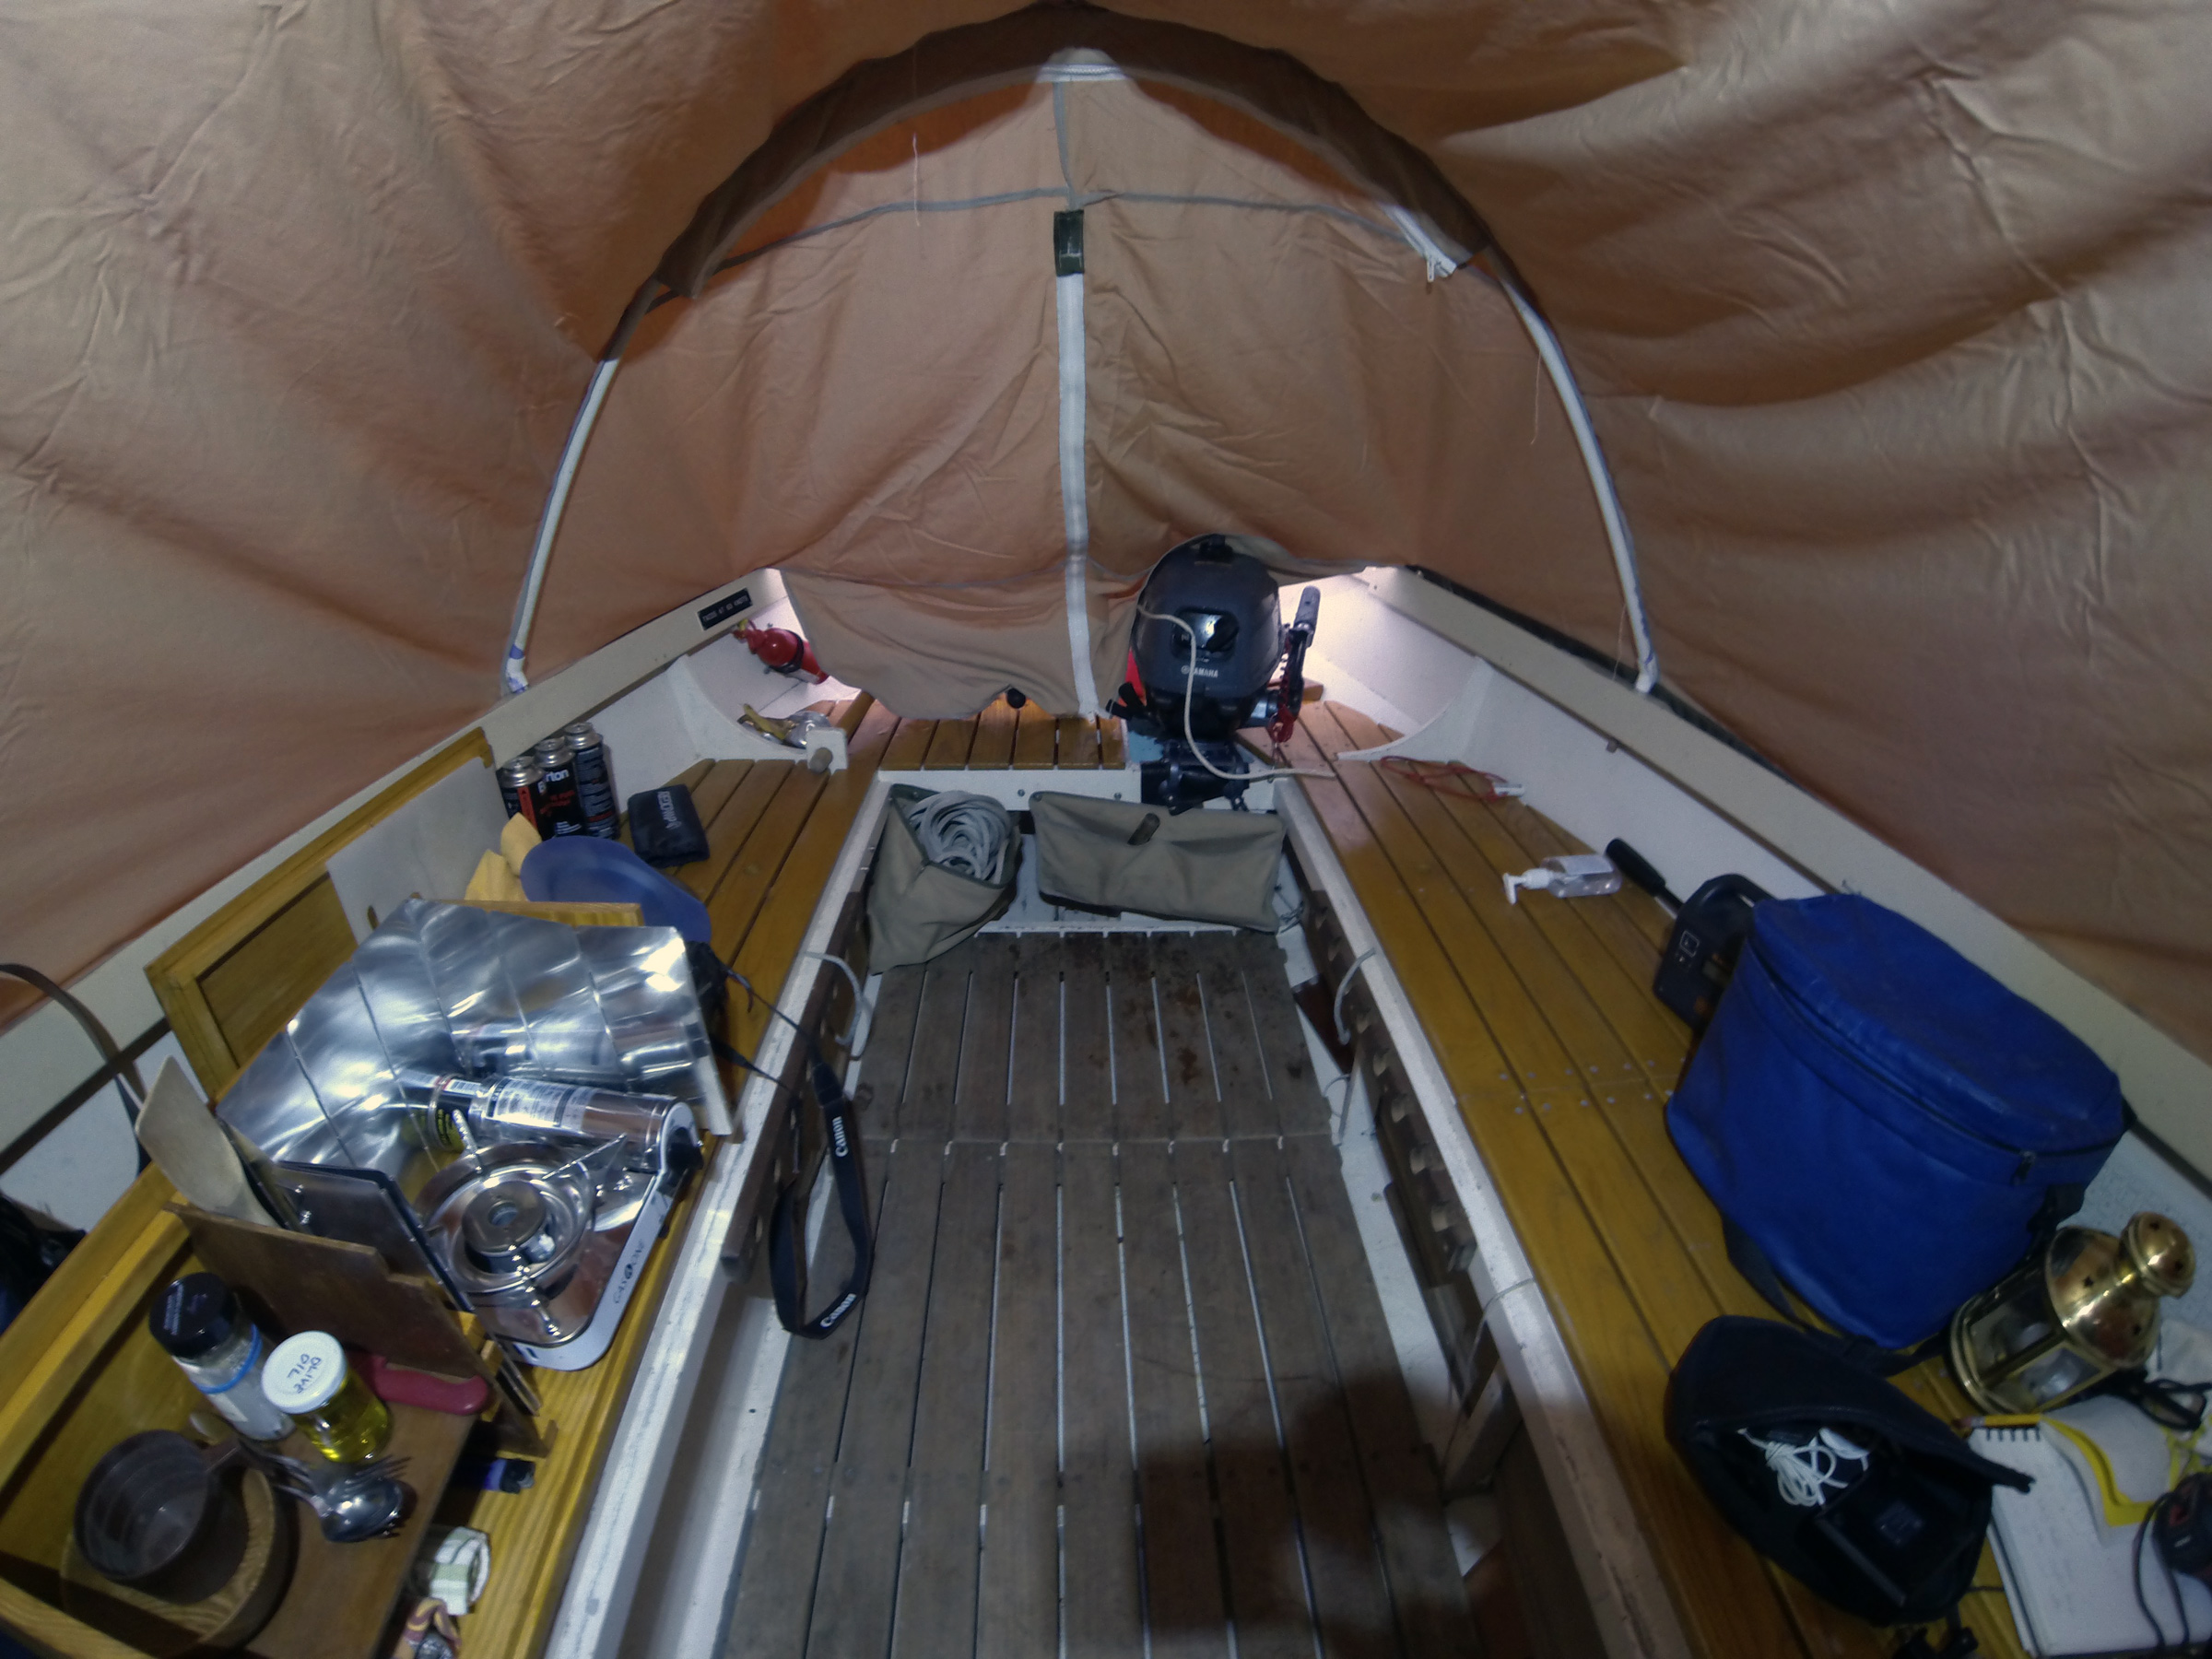
A summer of sailing seemed like the perfect solution to a global pandemic. What better quarantine than a few weeks alone outdoors, aboard an open boat designed for long-distance cruising? As classrooms emptied overnight and the school year ground to a halt online, I established a nightly ritual of studying charts after the last papers were graded: Georgian Bay, Lake of the Woods, Lake Nipigon, the Pukwaska. In early May, my wife helped me wrestle the boat upside-down atop its trailer for a partial refit. Three coats of paint, inside and out; a few sessions of oiling thwarts, spars, and gunwales; a length of brass half-oval screwed to the stem to protect the forefoot; a new becket block for the downhaul—these small chores offered a welcome diversion to rising case counts, mortality rates, and other grim portents of the looming disaster.
By mid-June I was more than ready, but closed borders had thrown a wrench in the gears before I could even get started. There’d be no trip to the Canadian side of the Great Lakes this summer—no trips to the Canadian side of anything. Even travel within the U.S. seemed like a dubious proposition. Like Huck Finn, I wanted to “light out for the Territory,” at least for a while, but I couldn’t even make it out of my own backyard. I was thoroughly landlocked.
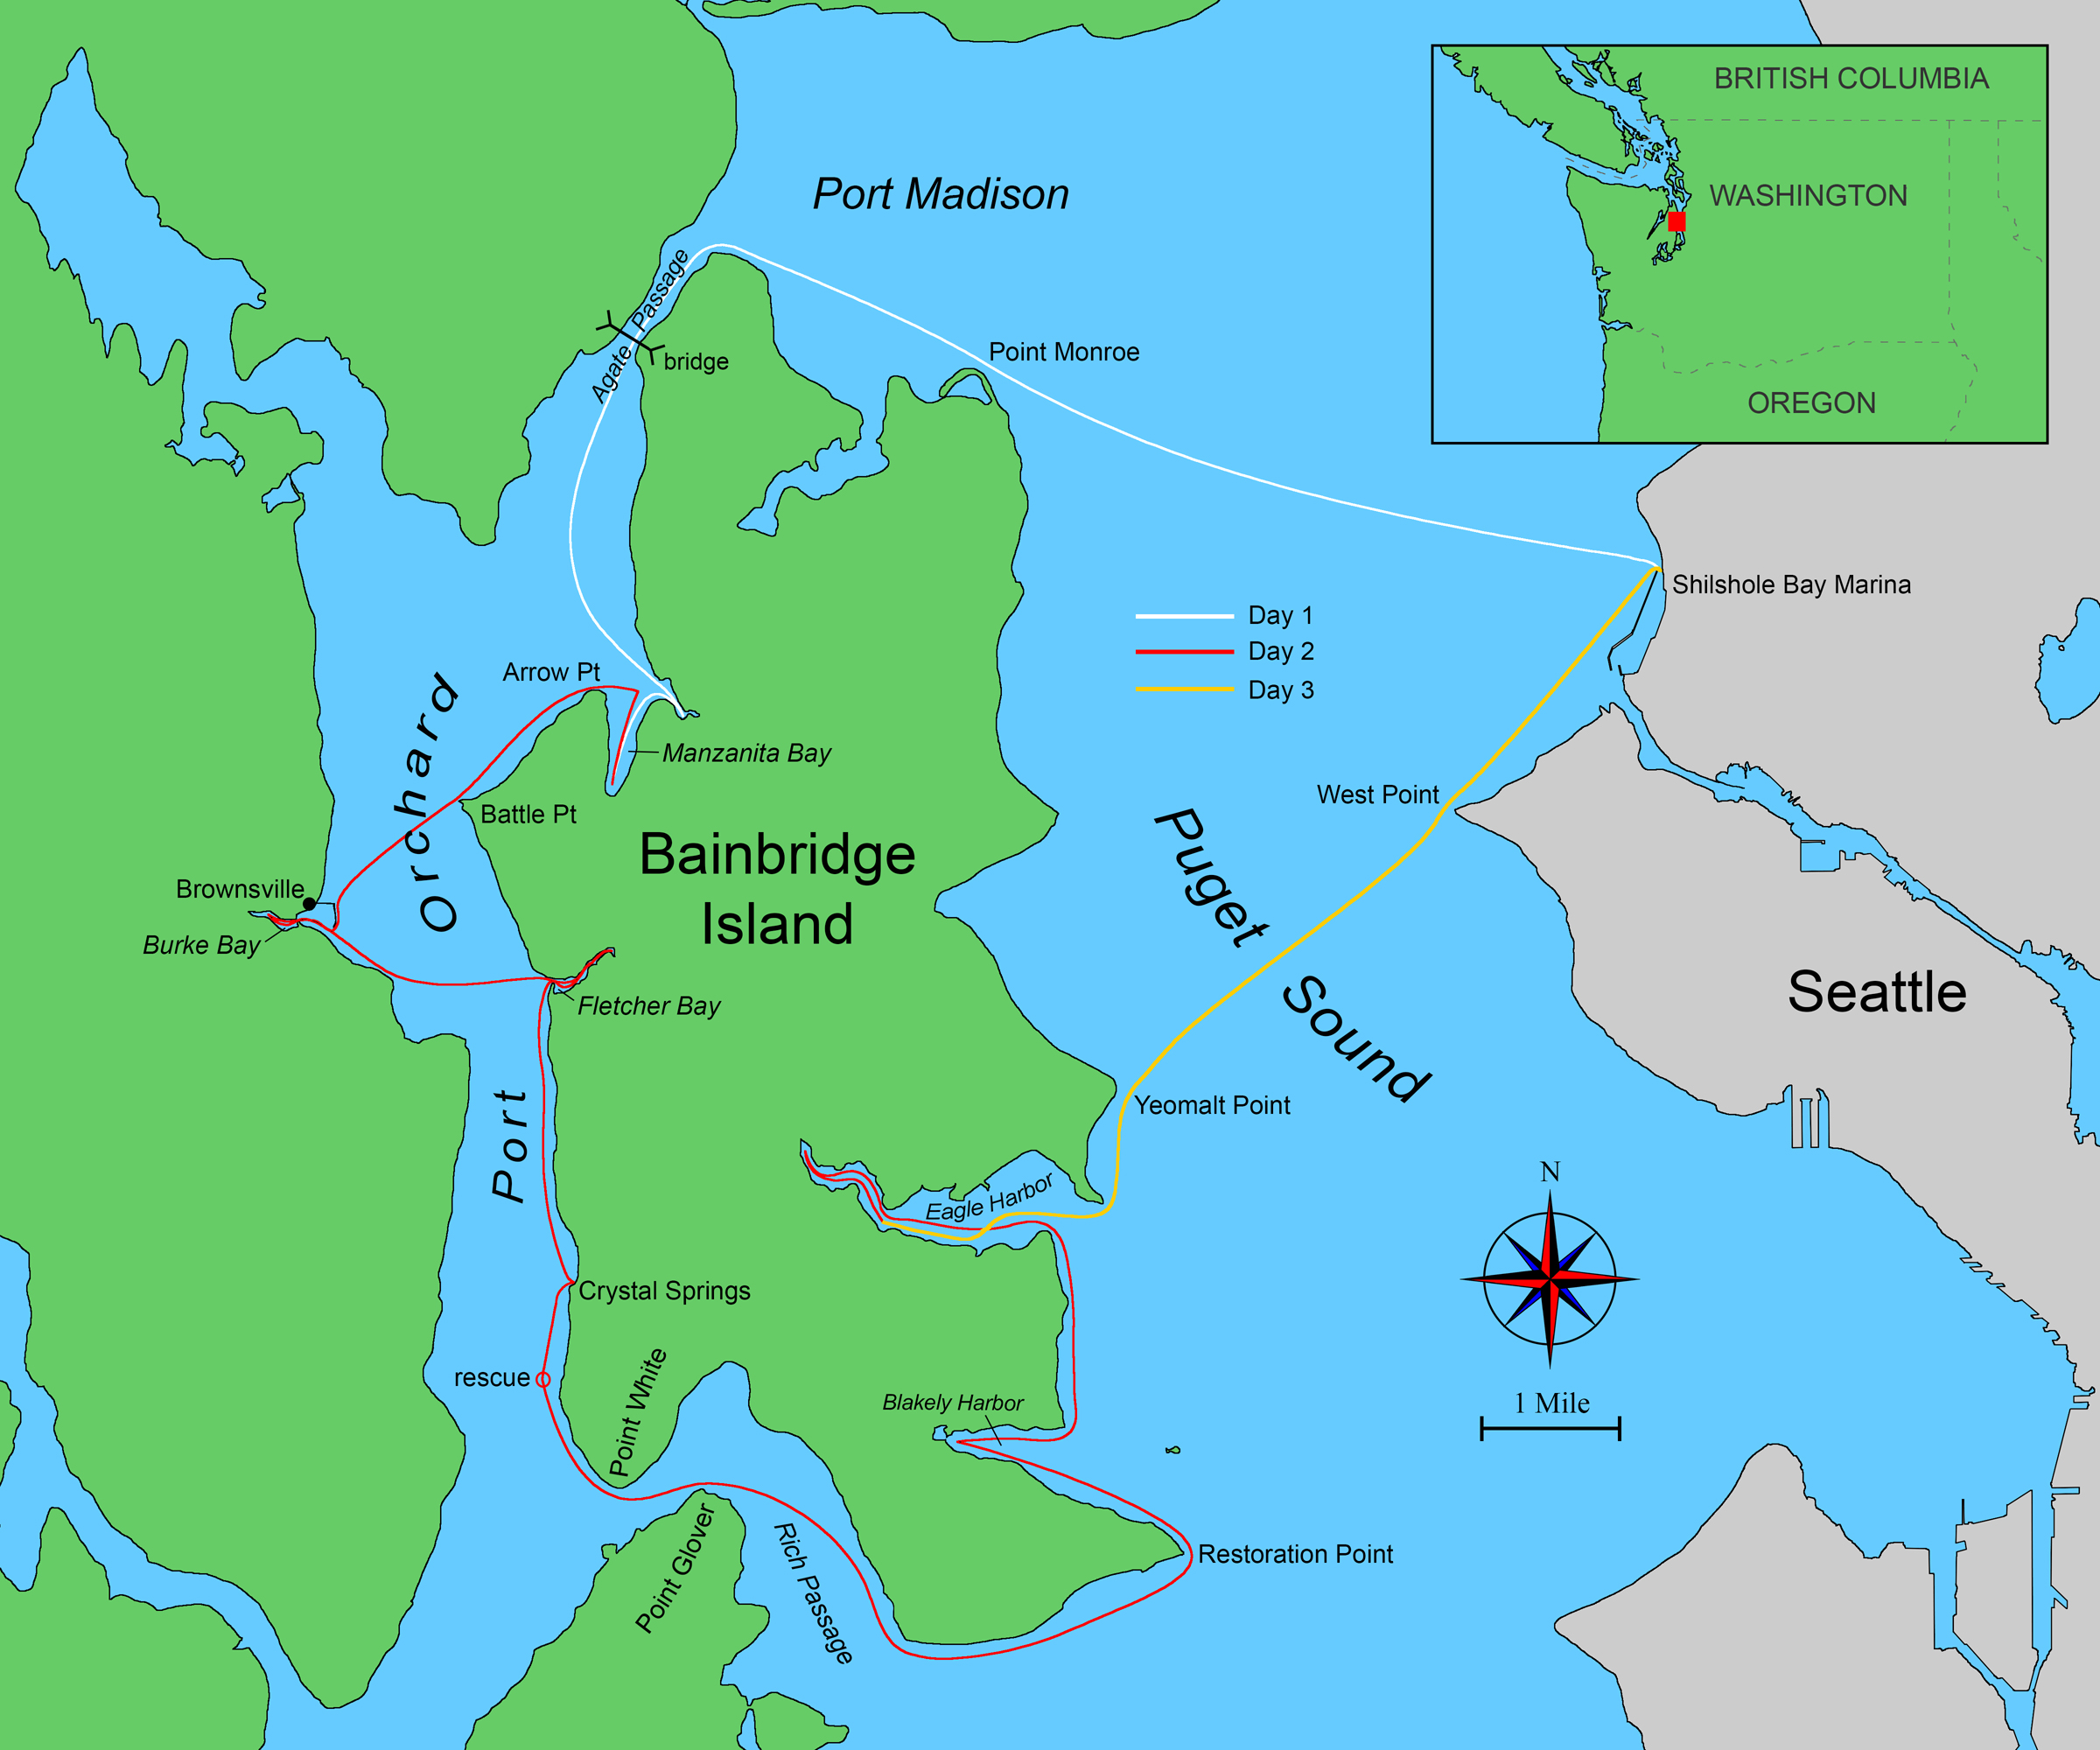
Roger Siebert
.
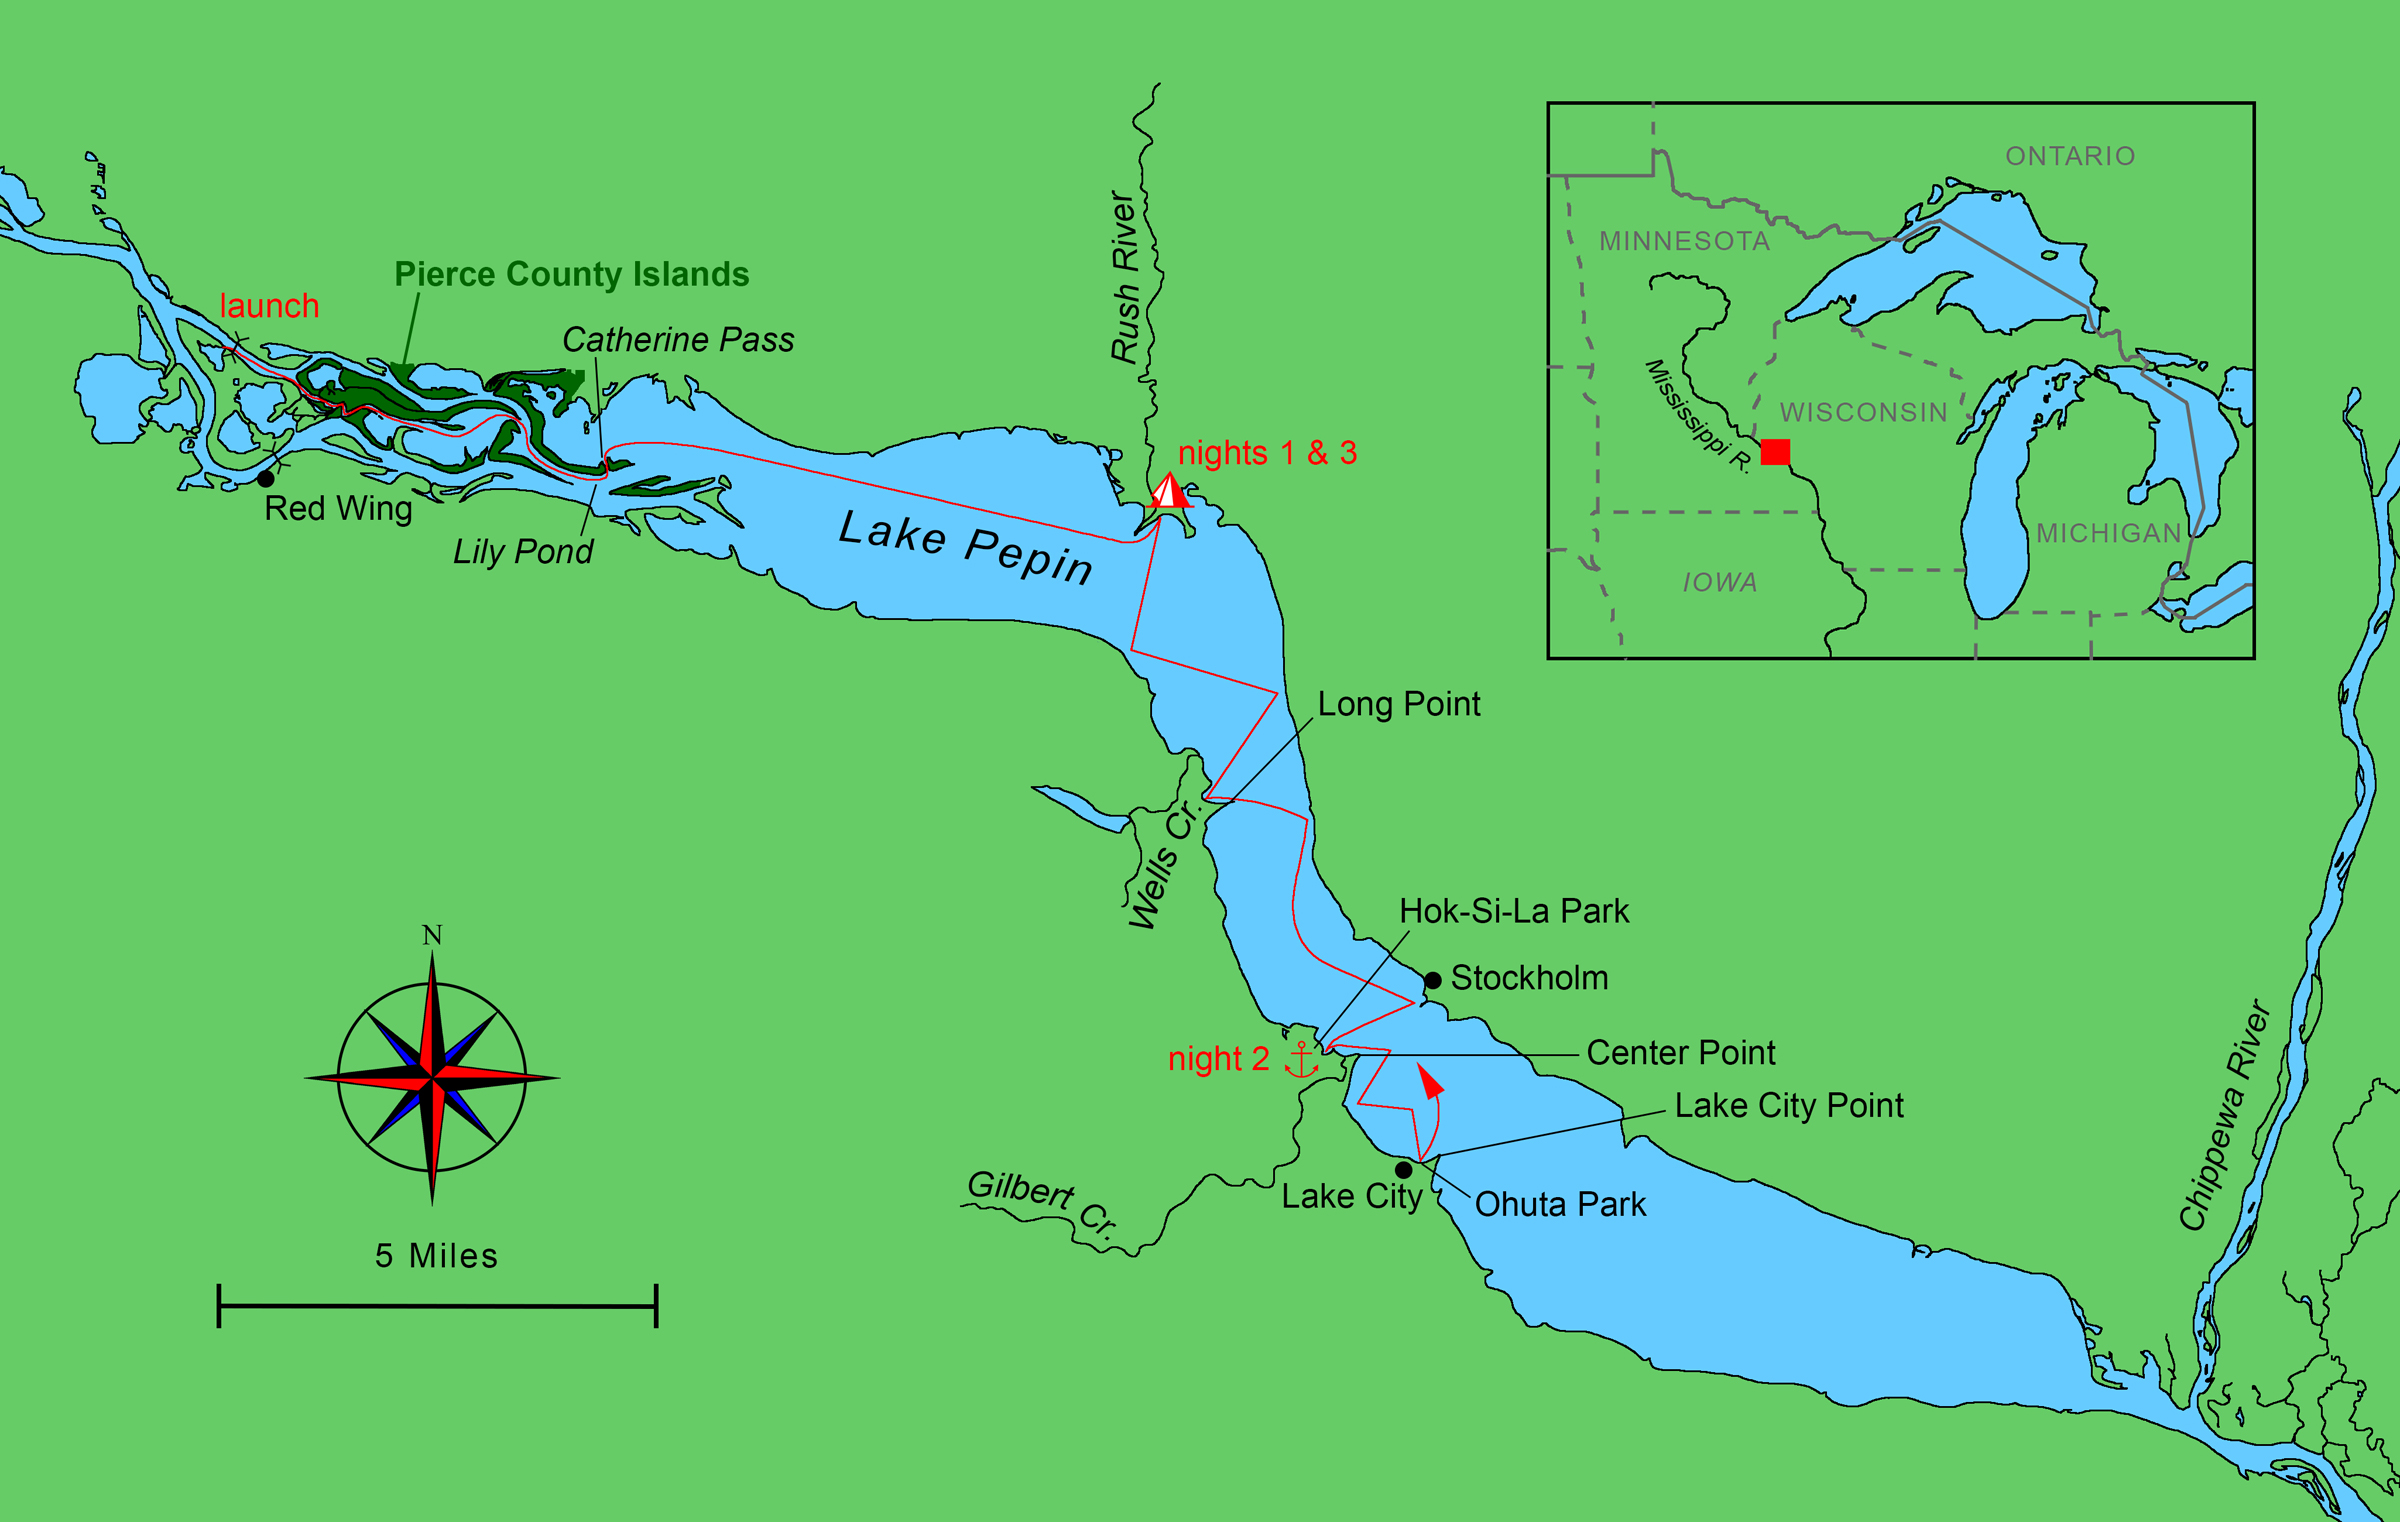
Landlocked. Except…Wisconsin is surrounded by water on three sides. The U.S. side of the Great Lakes was inaccessible for now—the Apostle Islands and Isle Royale, the obvious choices, were closed to overnight visitors, and Green Bay was a COVID-19 hot spot—but the Mississippi River offered a West Coast of sorts. Here the dramatic bluffs and coulees of the Driftless Area—land untouched by the last Ice Age—lined the river for more than 250 miles along the Minnesota–Wisconsin border. Better yet, the broad flood plain was largely uninhabited, offering plenty of space for a small boat to pull in for the night undisturbed. Suddenly I could envision weeks of cruising possibilities, all of them starting just an hour or so from home. I could wander the sloughs and back channels by sail and oar, exploring the swamps and tributary streams, the islands and sand bars, and all the marshy backwaters that bordered the big river—coastal cruising, inland style. I ordered a complete set of charts for the Upper Mississippi and started packing my gear.
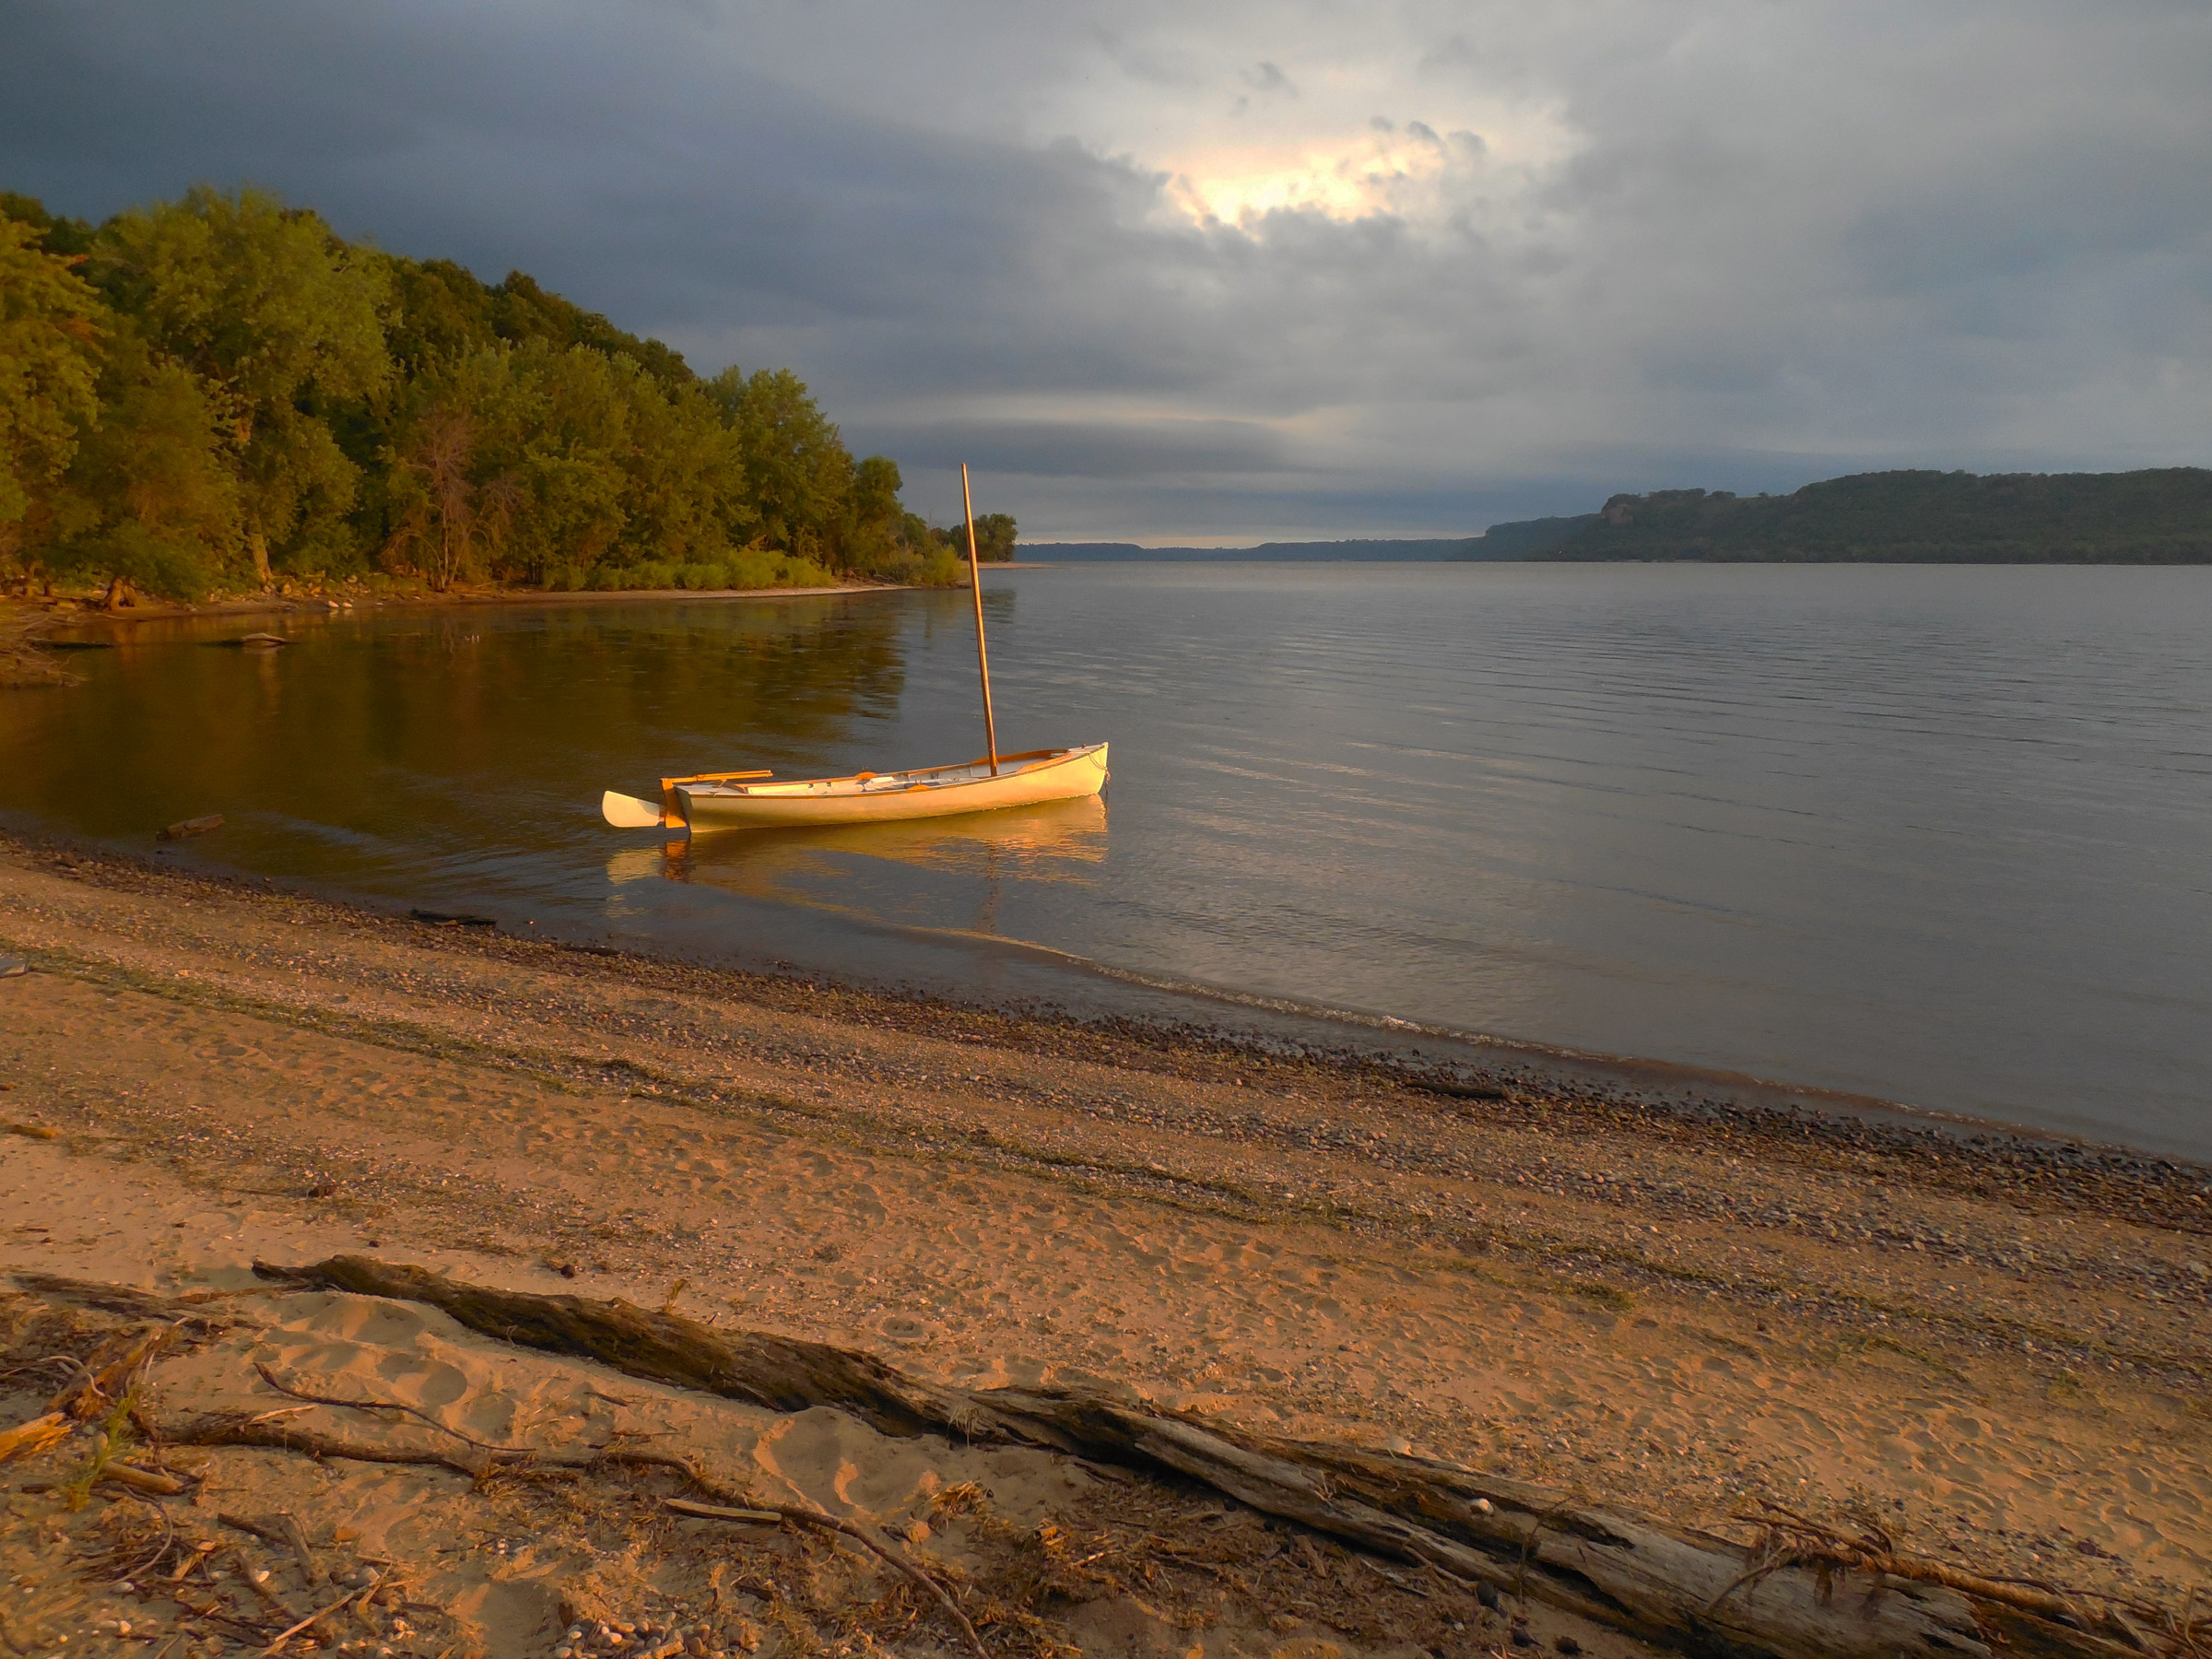
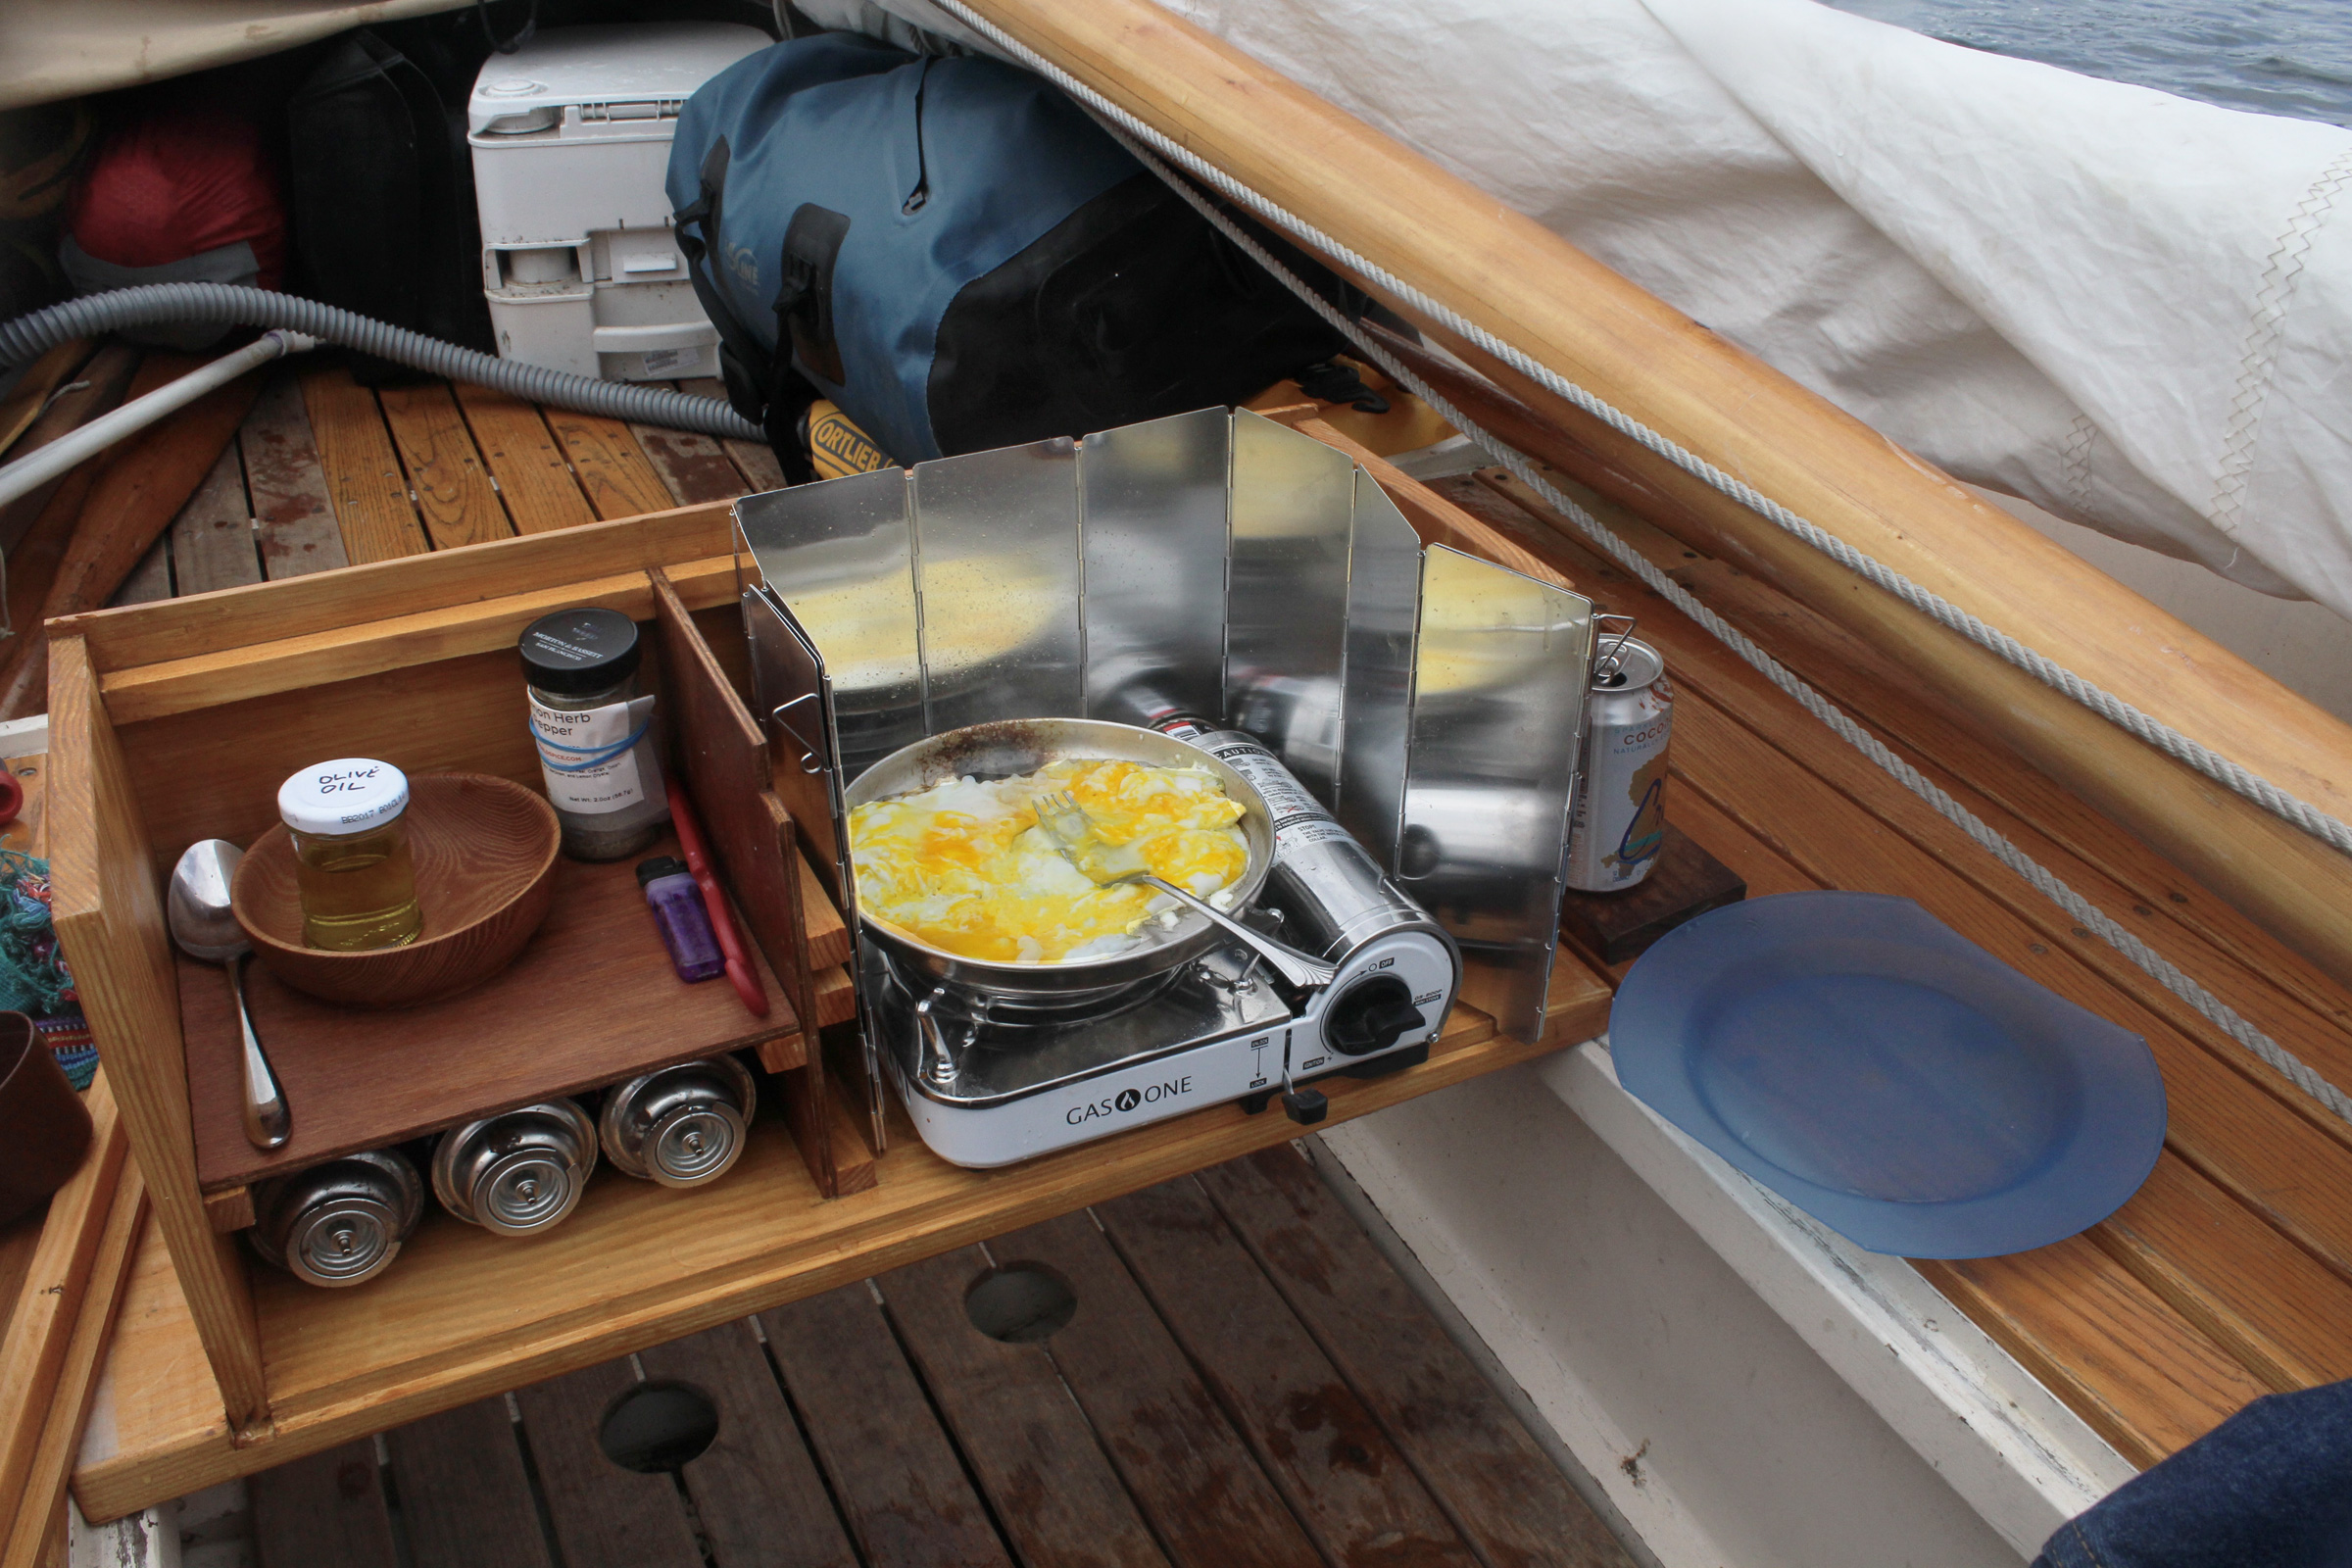
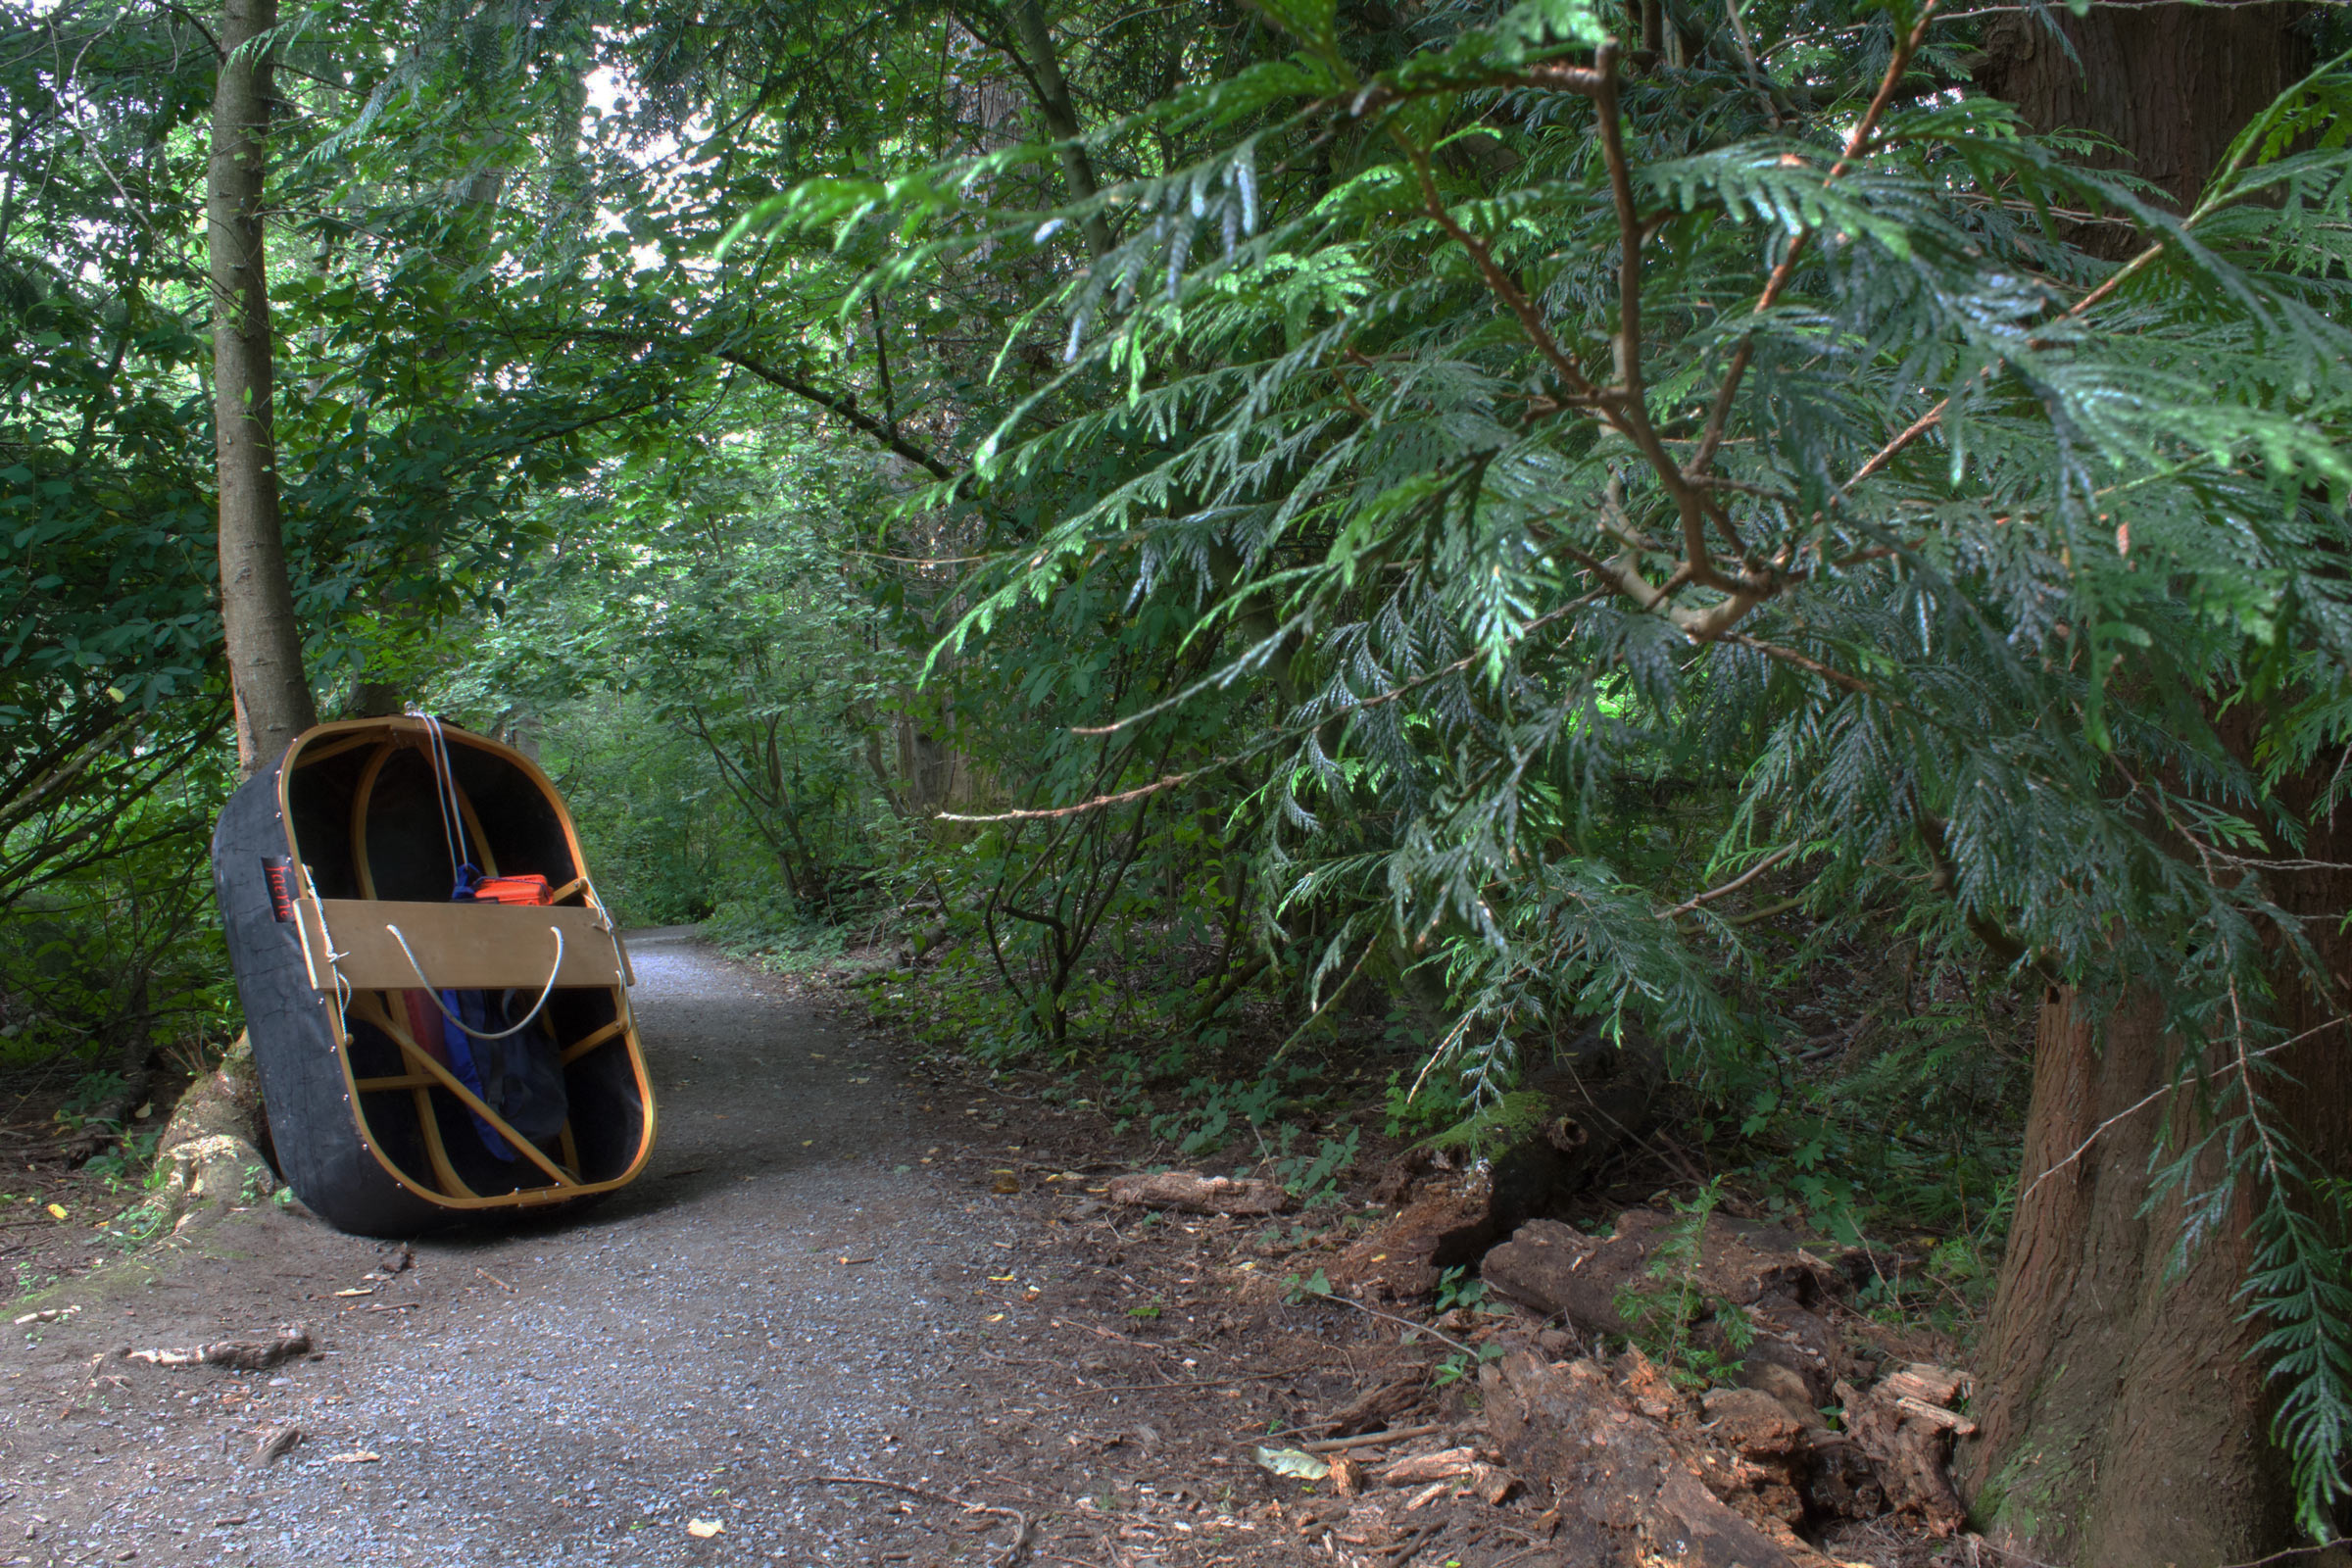
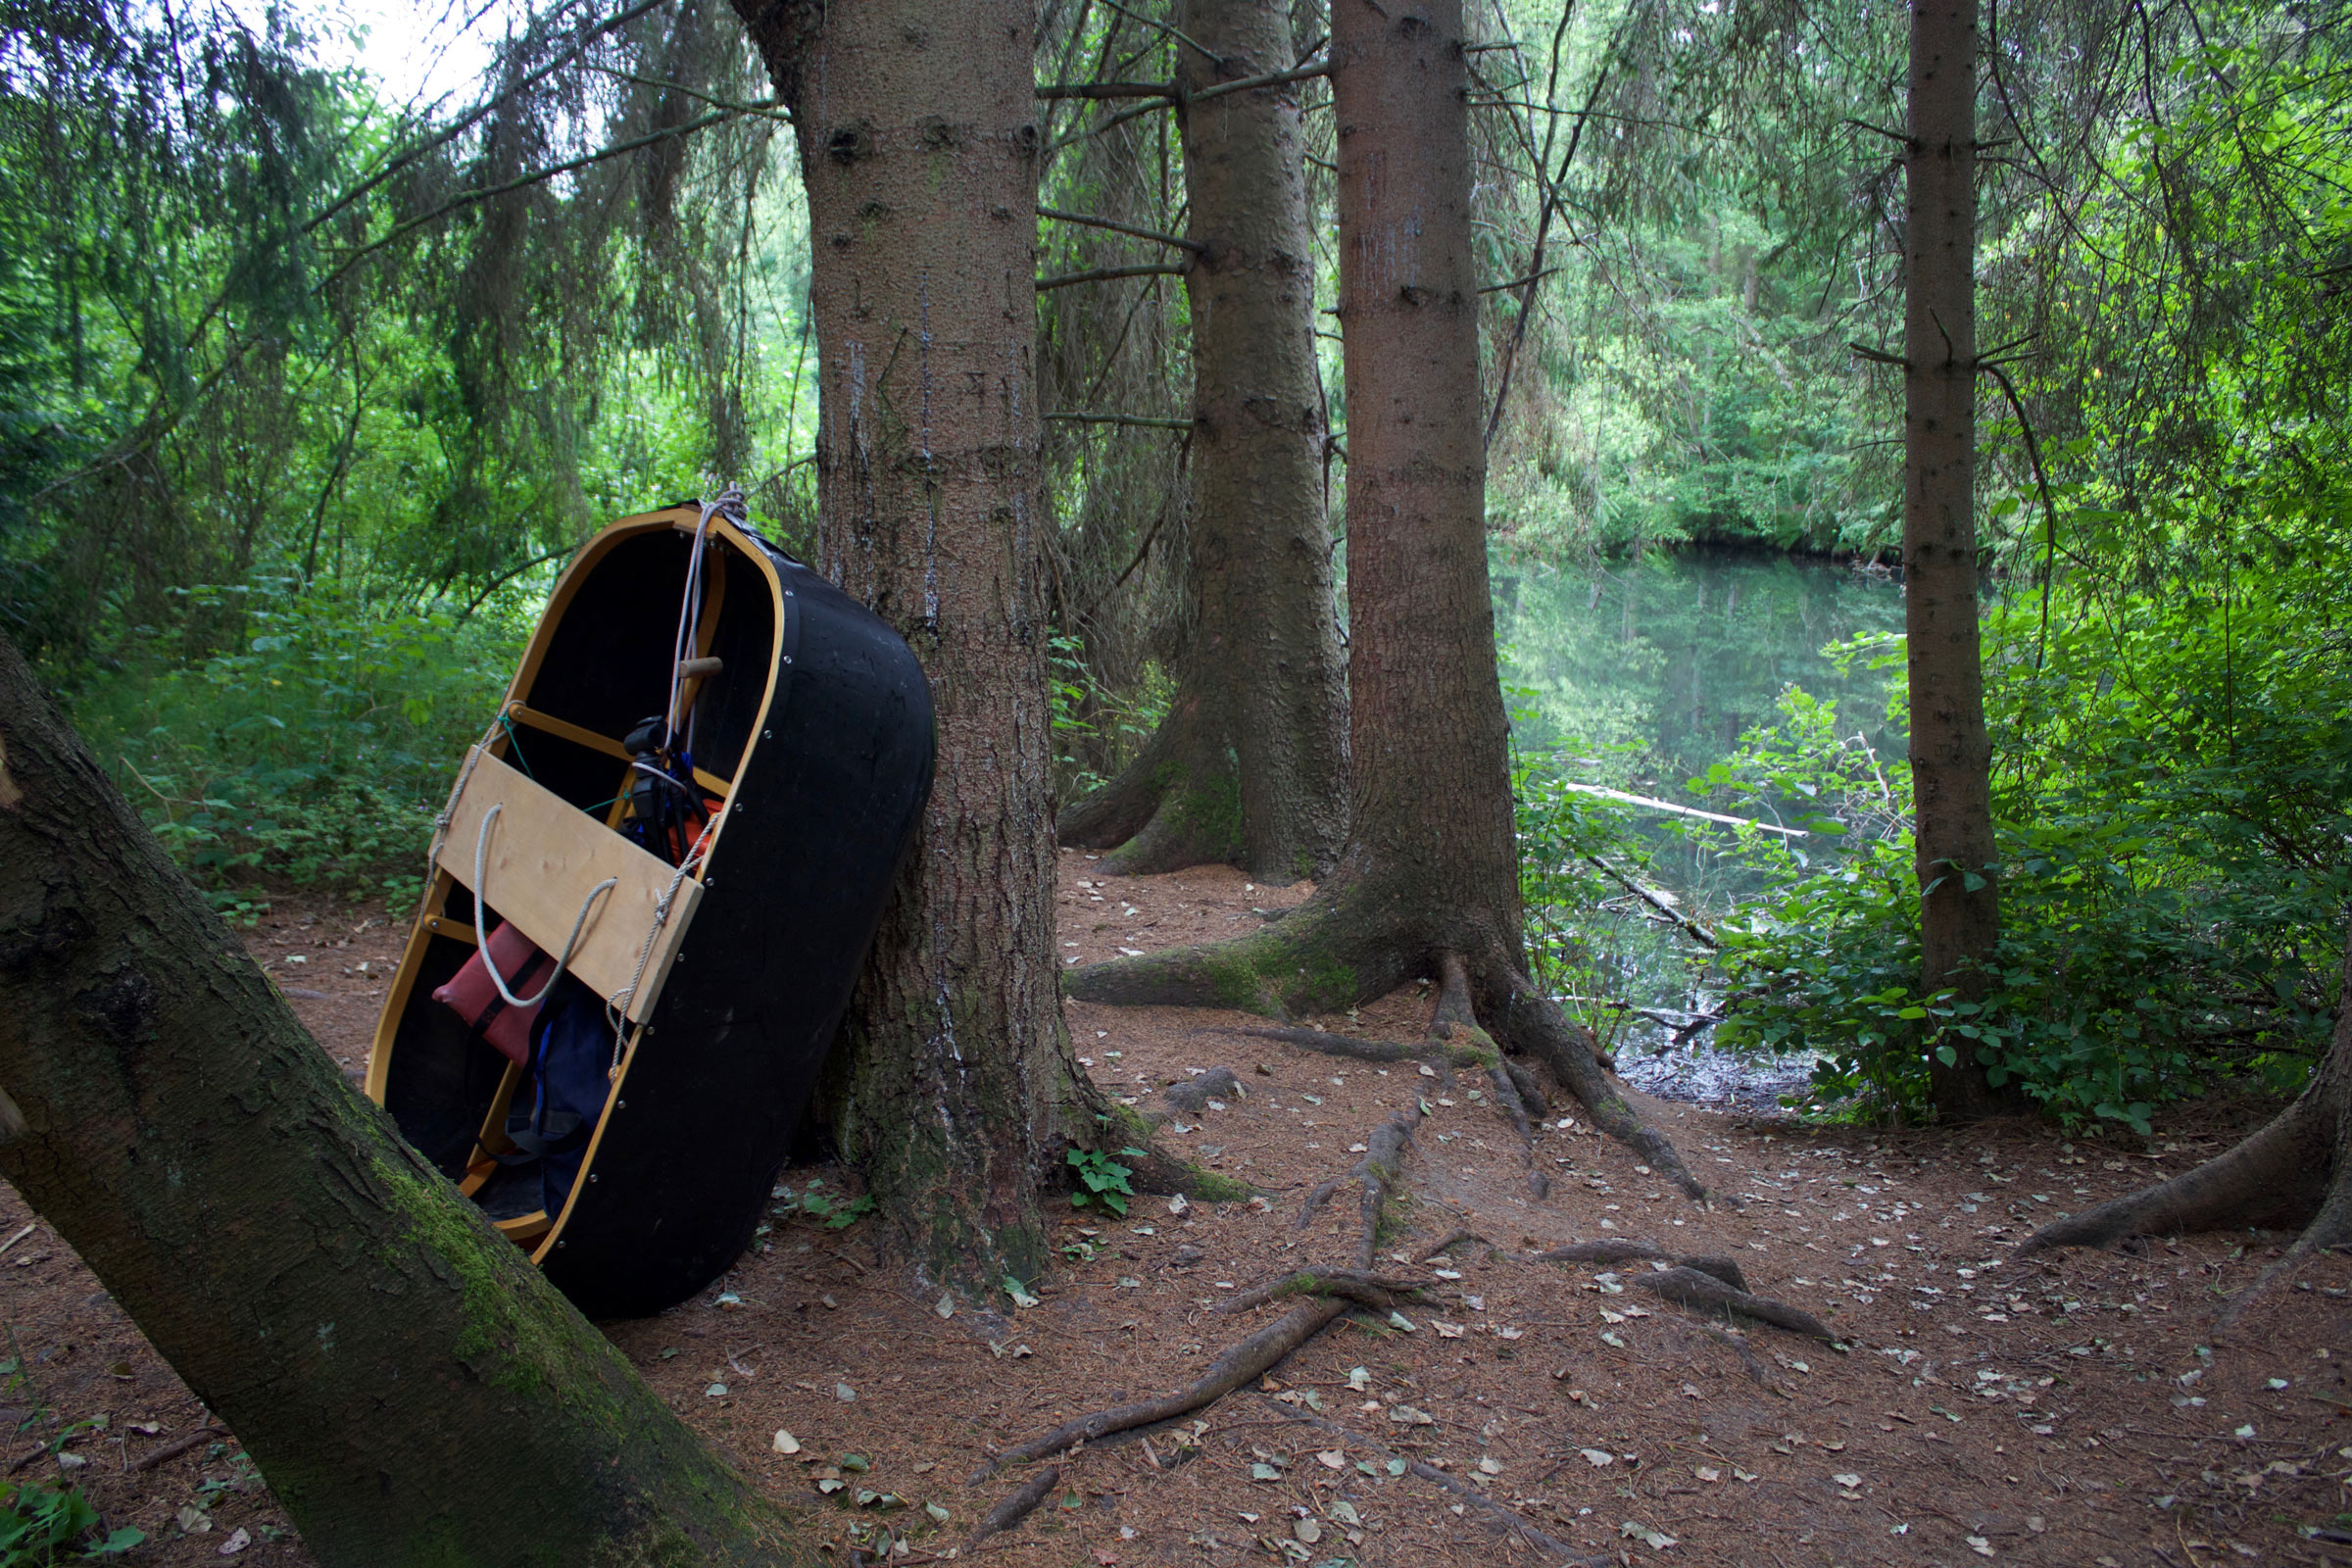
I put in at a public ramp on an island just off the Wisconsin side, 45 miles southeast of Minneapolis: not quite the very beginning of the Mississippi River’s run along the Wisconsin border, but close enough. Besides, I needed a landing that offered overnight parking, and this one fit the bill. Better yet, just a half mile from the ramp, the river spread out into a sprawling swirl of ropy islands that stretched for five miles downstream. After loading the boat with two weeks’ worth of food and gear—this would be a quarantine cruise, with no stops to resupply—I stowed the sailing rig and headed downstream under oars.
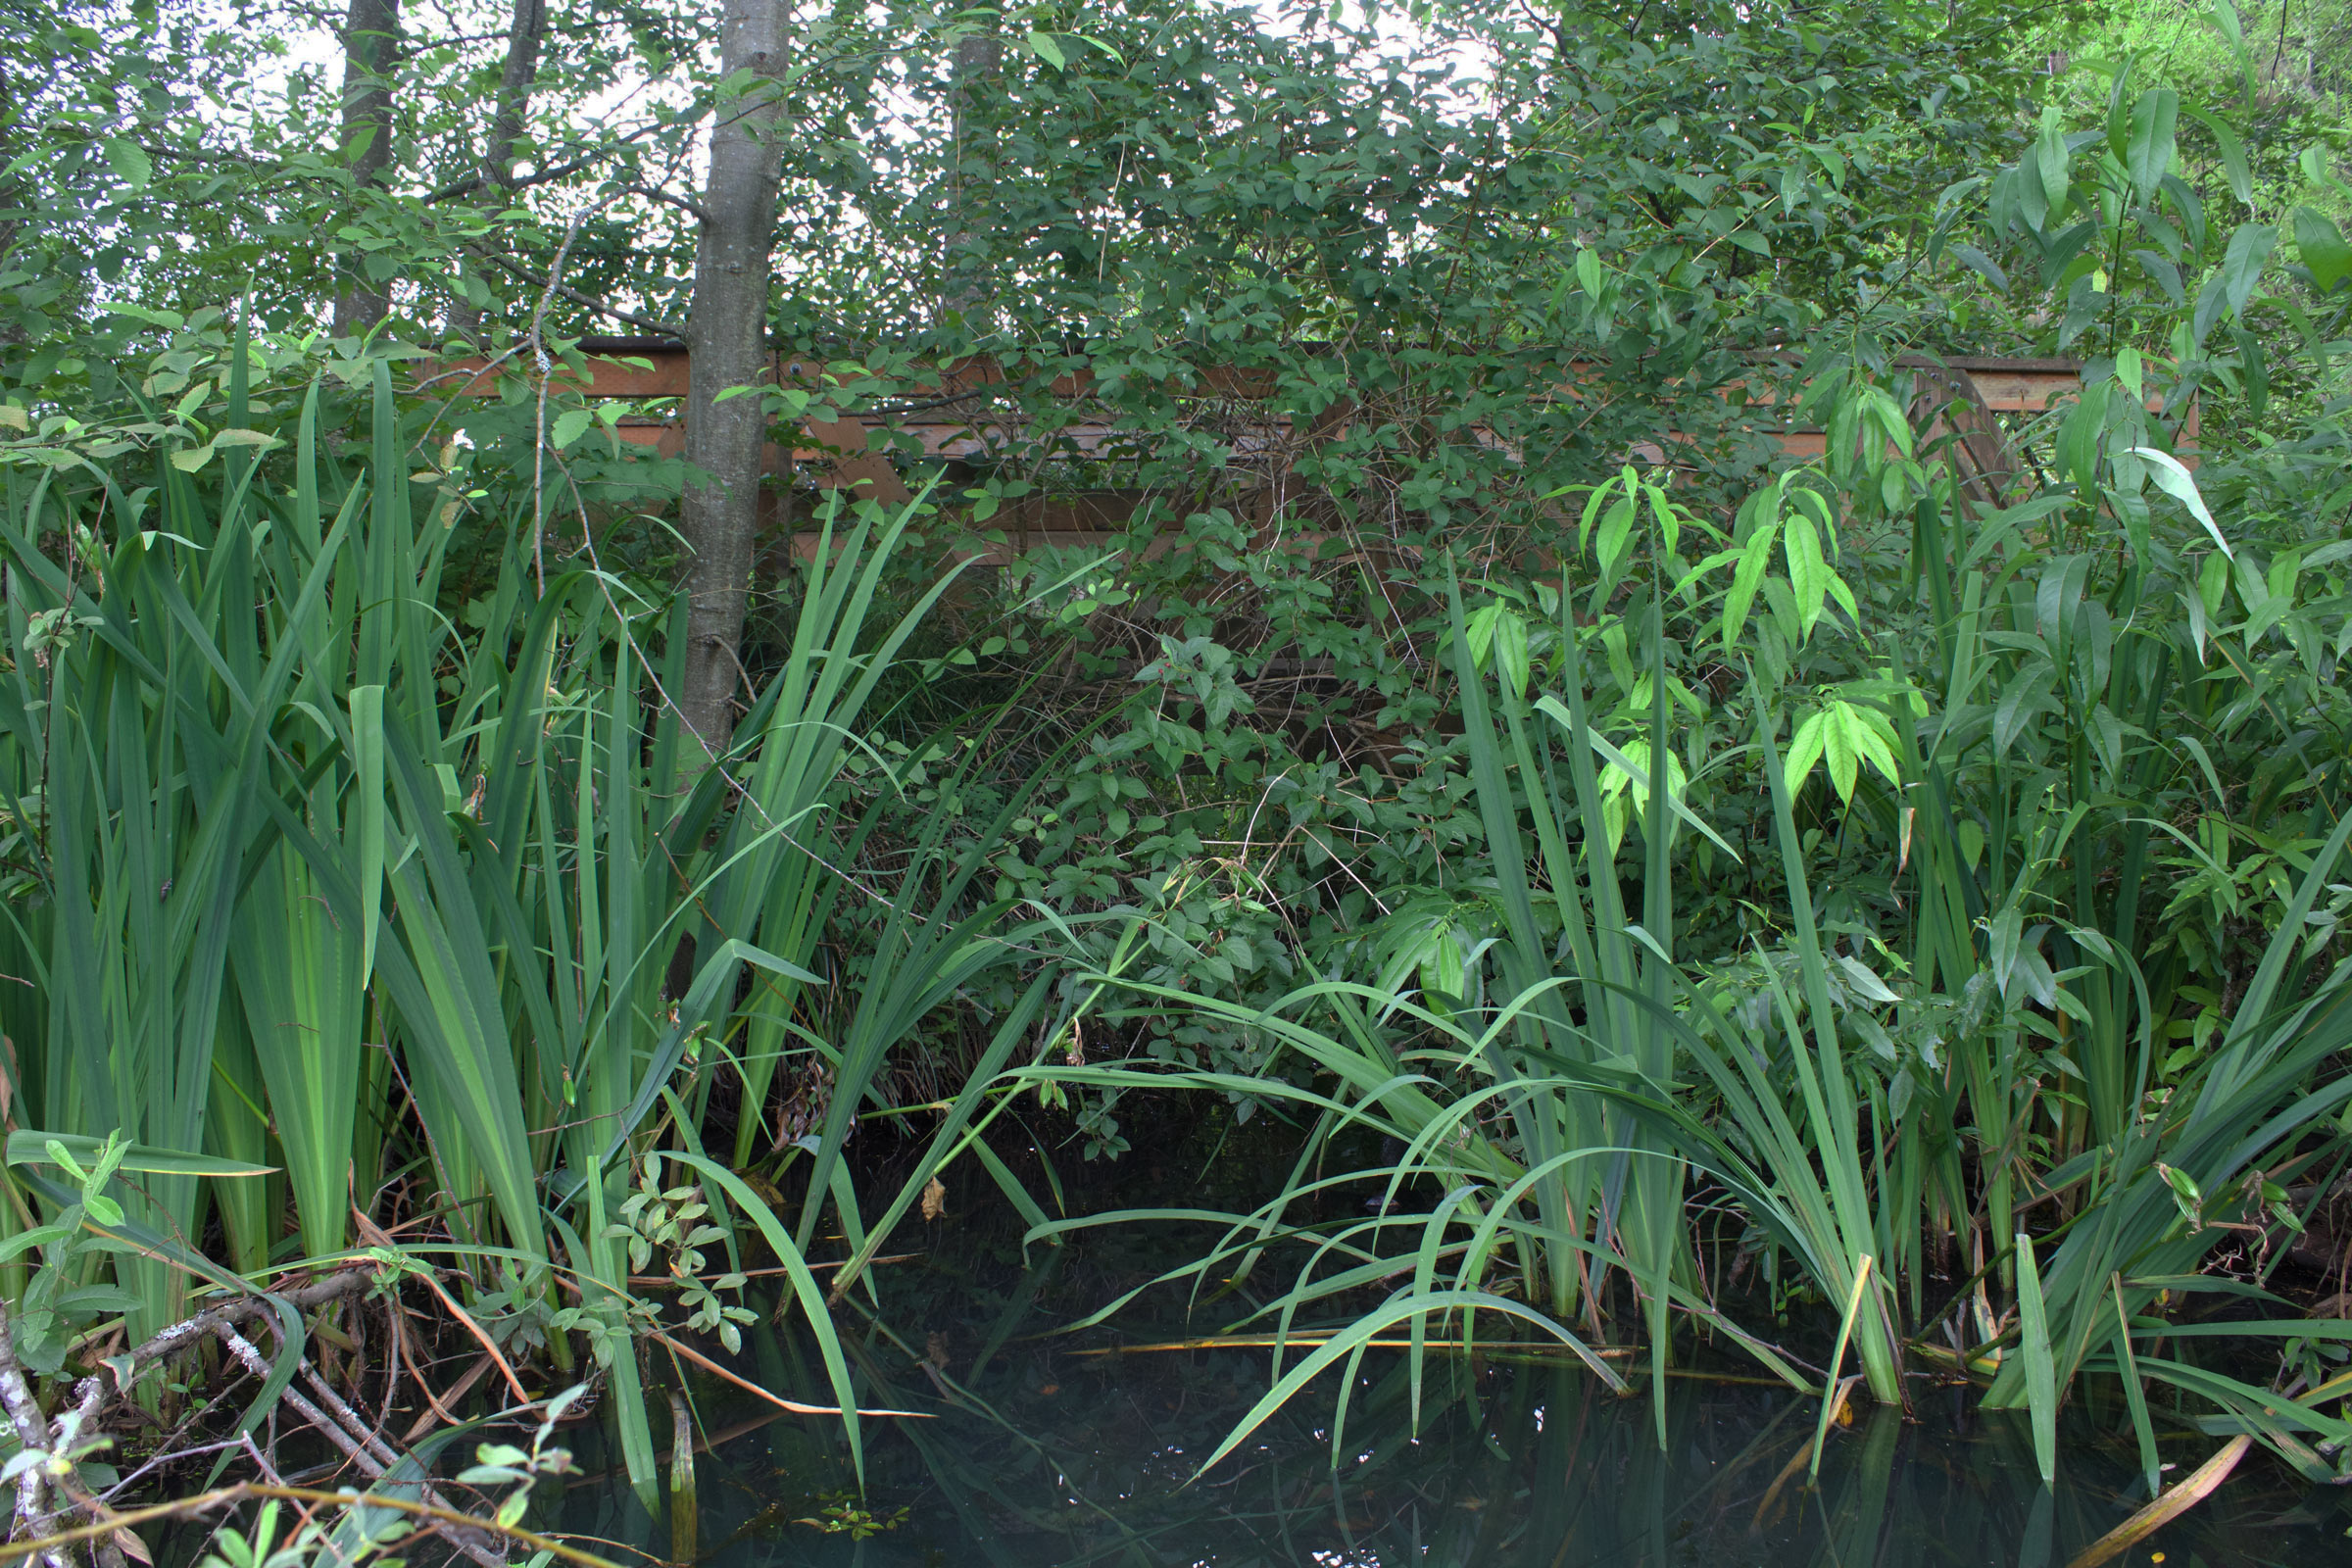
Even at my usual leisurely rowing pace—between 2 and 3 knots, but probably closer to 2—it took me less than 10 minutes to reach the islands. Almost immediately the riverbanks drew close on each side, offering impenetrable walls of midsummer greenery. Dead branches and even entire tree trunks rose from the water here and there like bleached bones, almost blocking the channel completely in a few places. The sound of police sirens in nearby Red Wing, Minnesota, drifted faintly across the water as I rowed, but the city itself was invisible; I could have been days from home, lost in a world of swampy forests and lowlands. Sloughs and side channels crossed and re-crossed each other at every bend, overhanging with oaks and cottonwoods, forming a network of overgrown canals with a vaguely post-apocalyptic feel—Venice, maybe, a few hundred years after its human inhabitants had fled. A belted kingfisher flashed by in a swooping rush along the bank on river right as I rowed past, its chattering call echoing behind me. It was the only traffic I encountered.
A thousand yards away on the Minnesota side, I knew, the river’s main navigation channel was busy with barges and powerboats hurrying along the foot of Red Wing’s tall sandstone bluffs. Nine hundred yards in the opposite direction, the wide Wisconsin Channel hugged the northern shore, offering a clear route for recreational power boats. But here in the center of the Pierce County Islands State Natural Area, my only company was the kingfisher I had seen earlier—and now, a pair of bald eagles that repeatedly fled downstream at my approach, only to be startled from each new perch a few minutes later as I rowed past again. It was a game I was familiar with, but one I associated with blue herons, on smaller rivers; this was the first time I’d played it with eagles. After a few more intermittent retreats downstream, they finally got tired of my interruptions and flew off for good, leaving me alone again in the winding back channels.
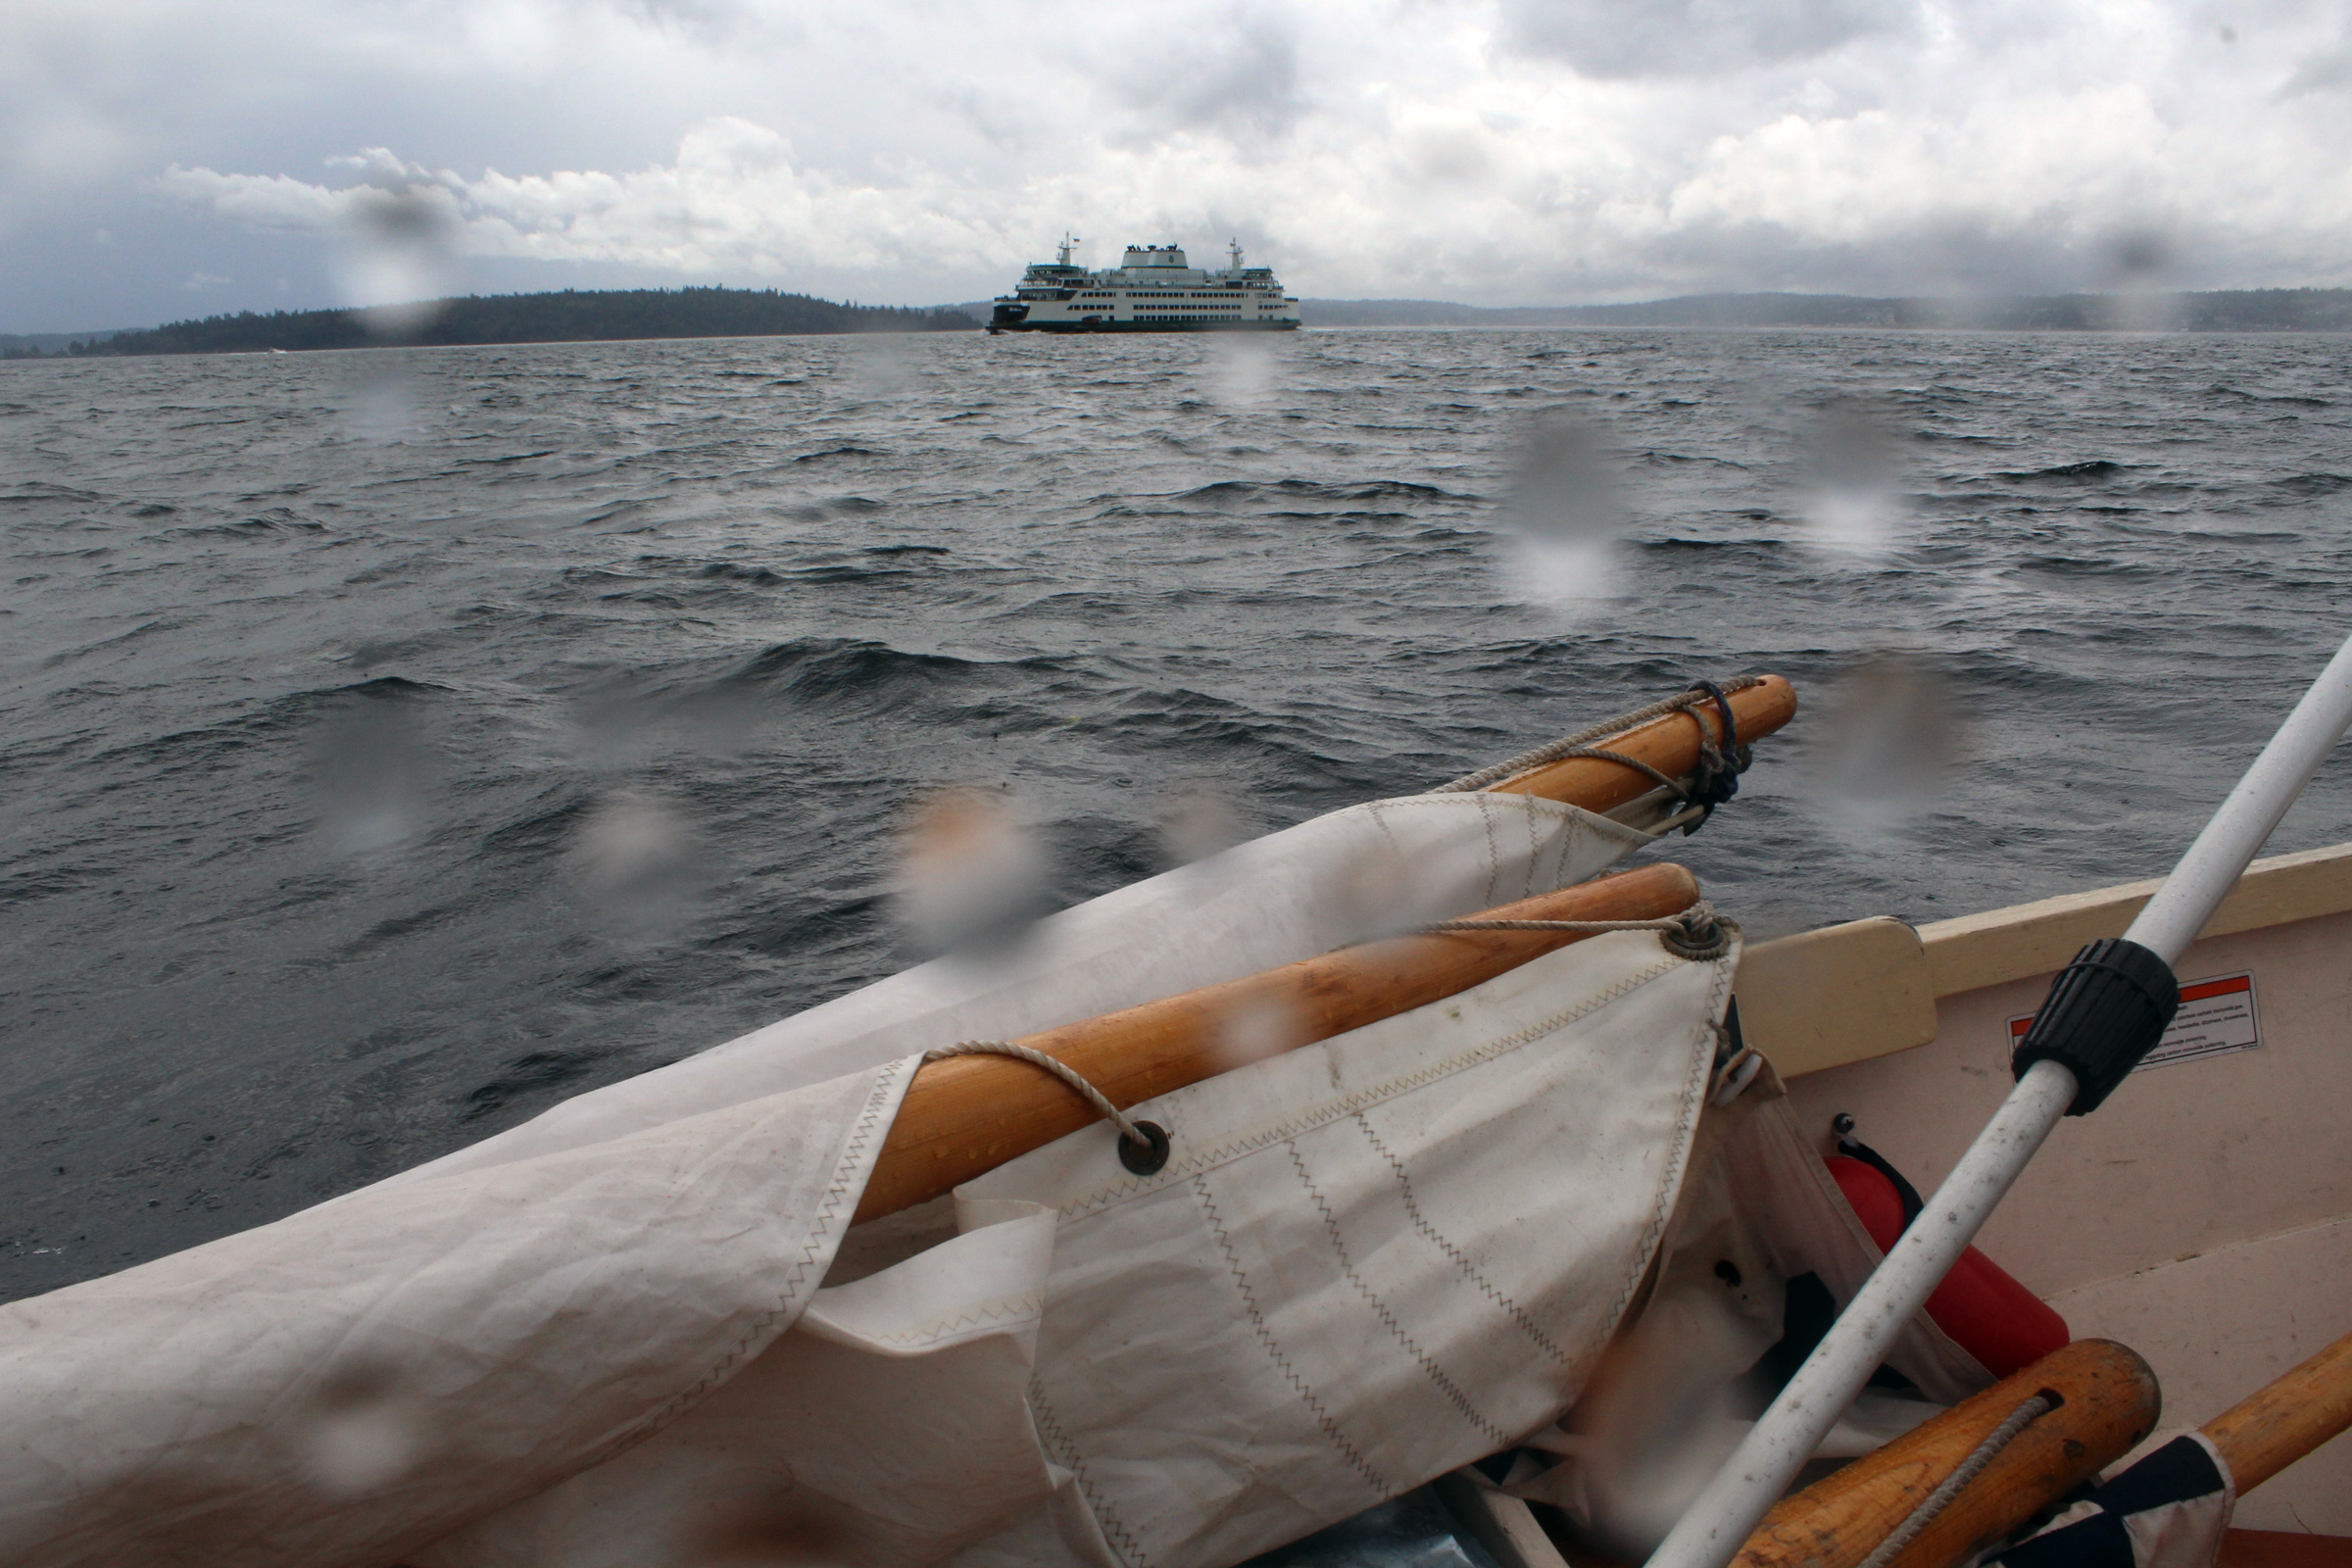
After 90 minutes or so, my winding route brought me to the edge of the islands at Lily Pond, within sight of the main traffic channel. I pulled onto a sandy beach at river left to stretch my legs. The day was overcast, and not too hot—perfect weather for rowing—but I didn’t want to pass up an opportunity for a brief stop ashore. Half a mile away, close in along the Minnesota shore, a nine-barge tow pushed past, just visible behind the long thin island that bordered the main channel. From my place on the riverbank, the towboat’s powerful diesel was barely audible. Eight hundred feet of boat and barges running a river barely 800′ wide, coming into a hairpin curve 3 miles long—a good reason for a small sail-and-oar boat to stay in the sloughs and backwaters.
Photographs and video by the author
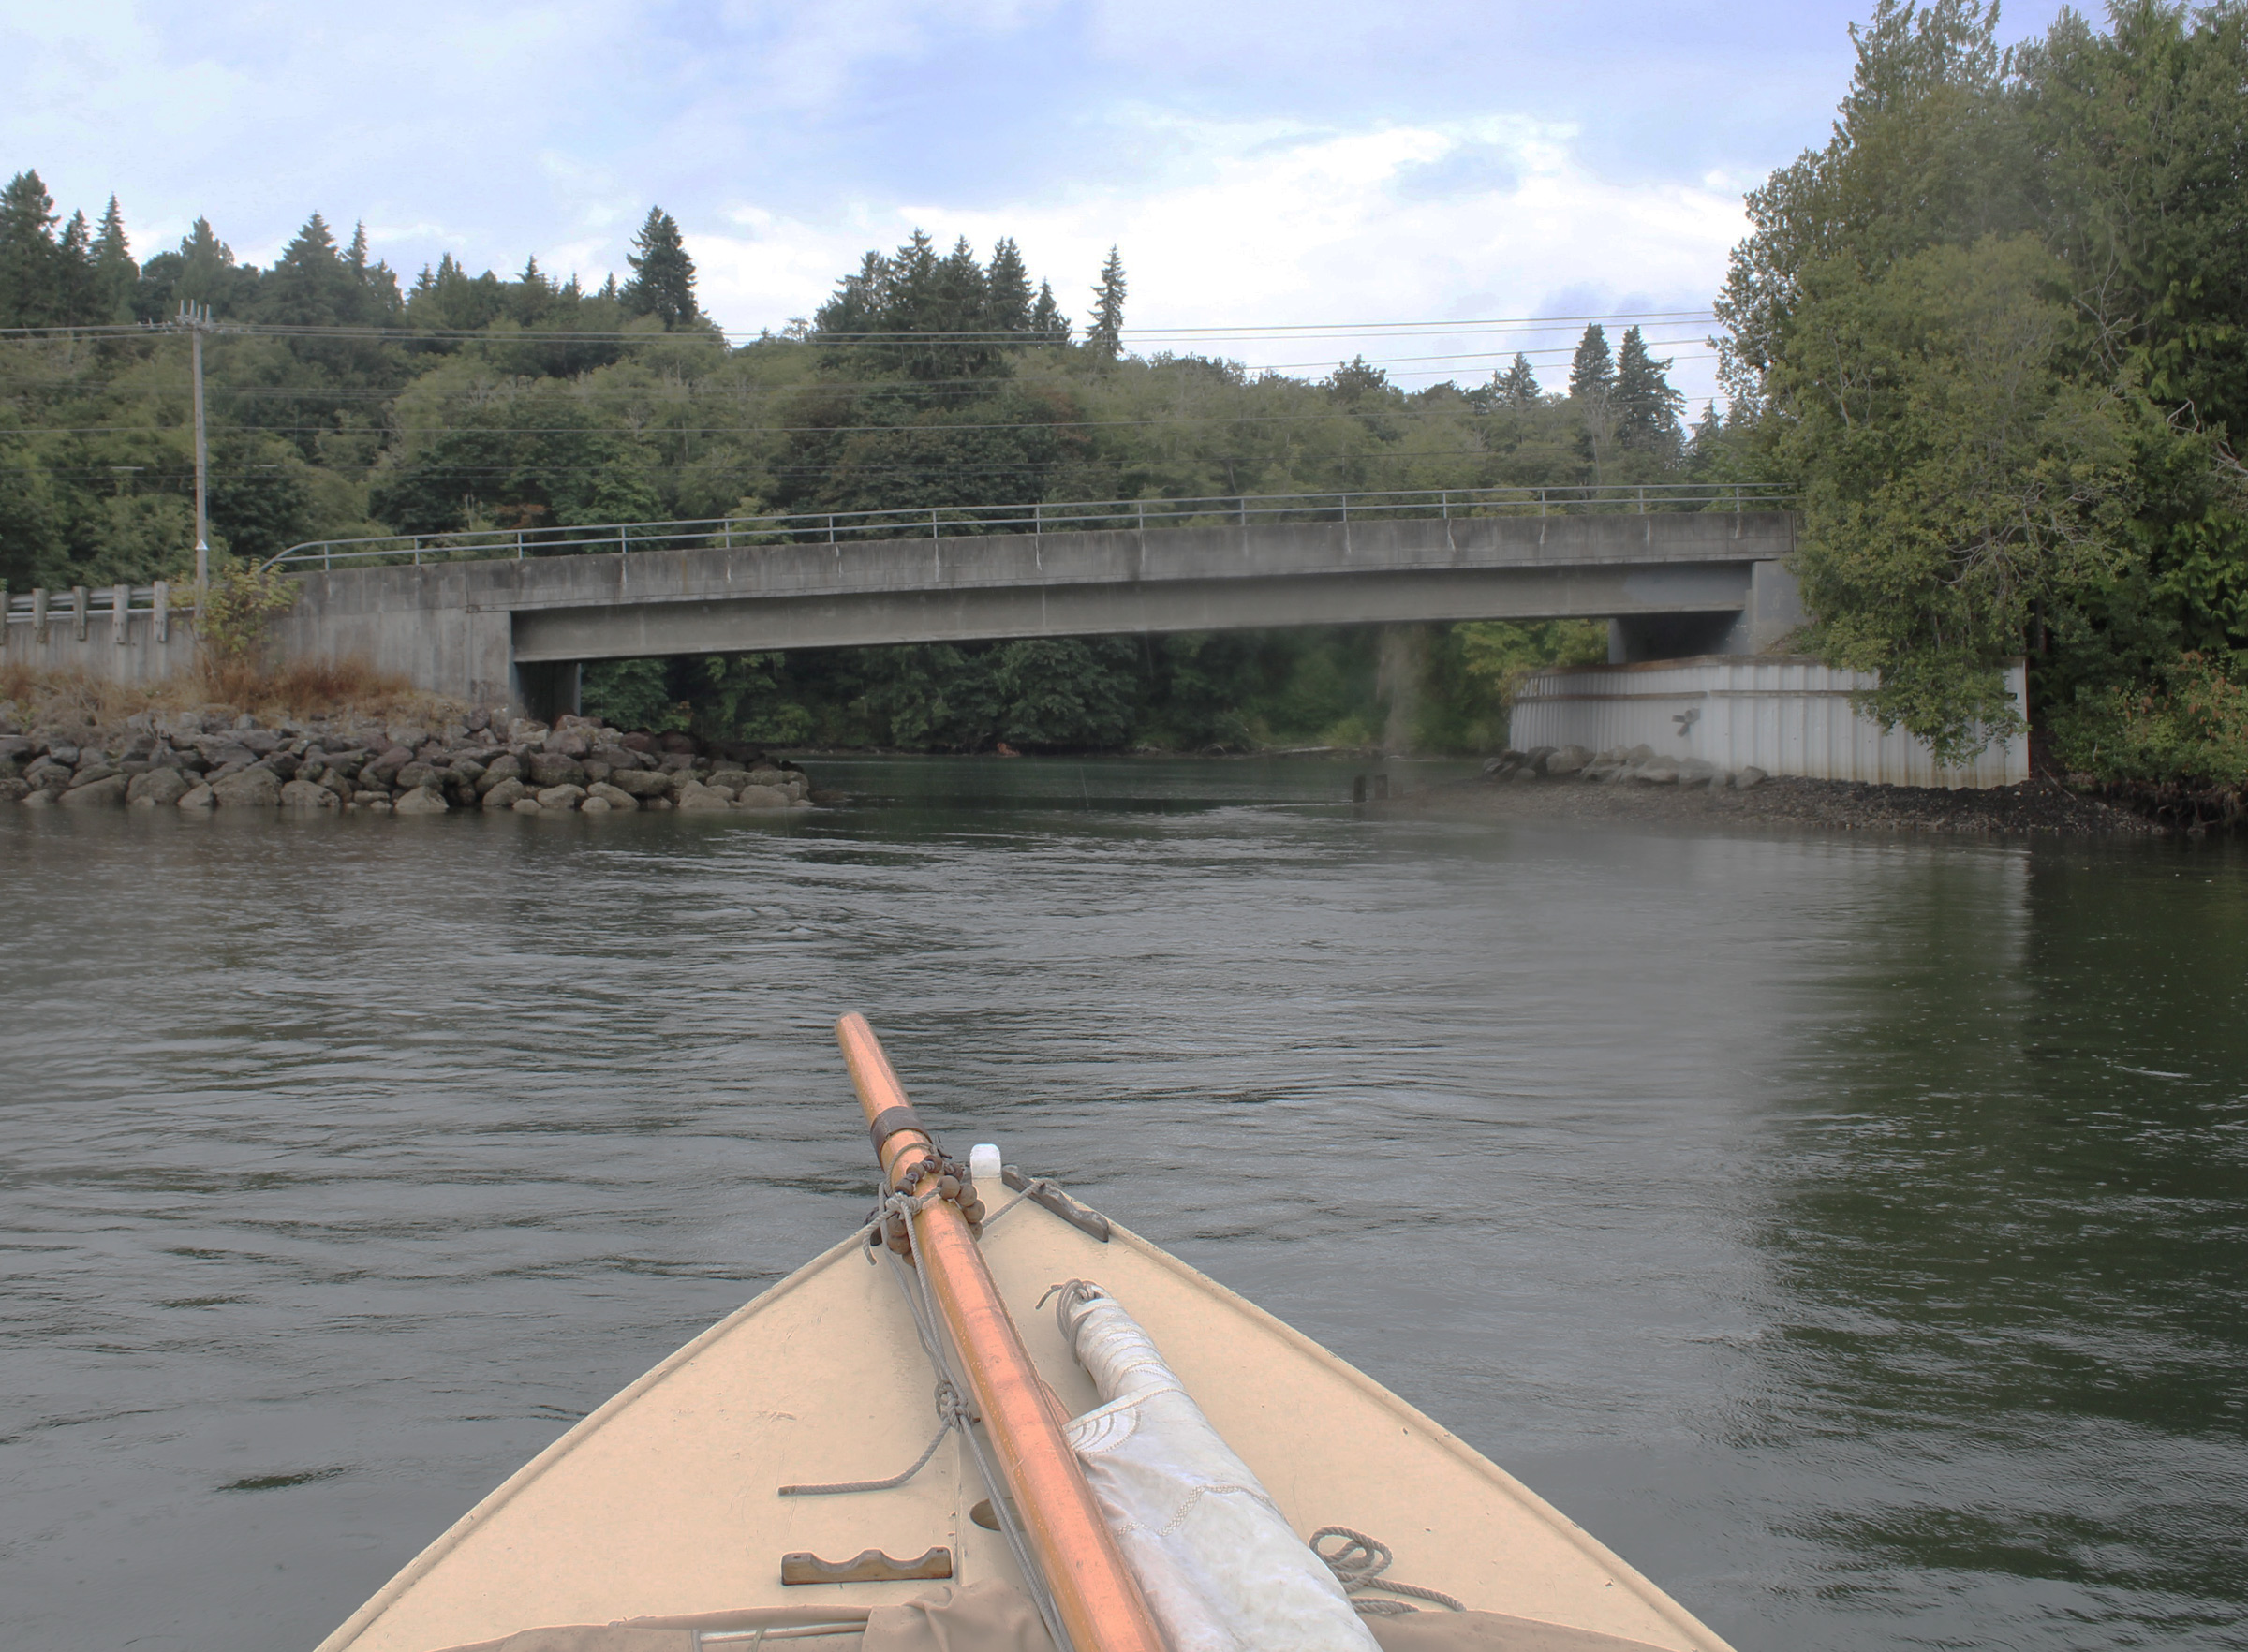
The narrow channel into Catherine Pass looks like a detour from the direct route into Lake Pepin. In fact, a huge expanse of shoaling sandbars blocks the northern reaches of the lake, making Catherine Pass the better option.
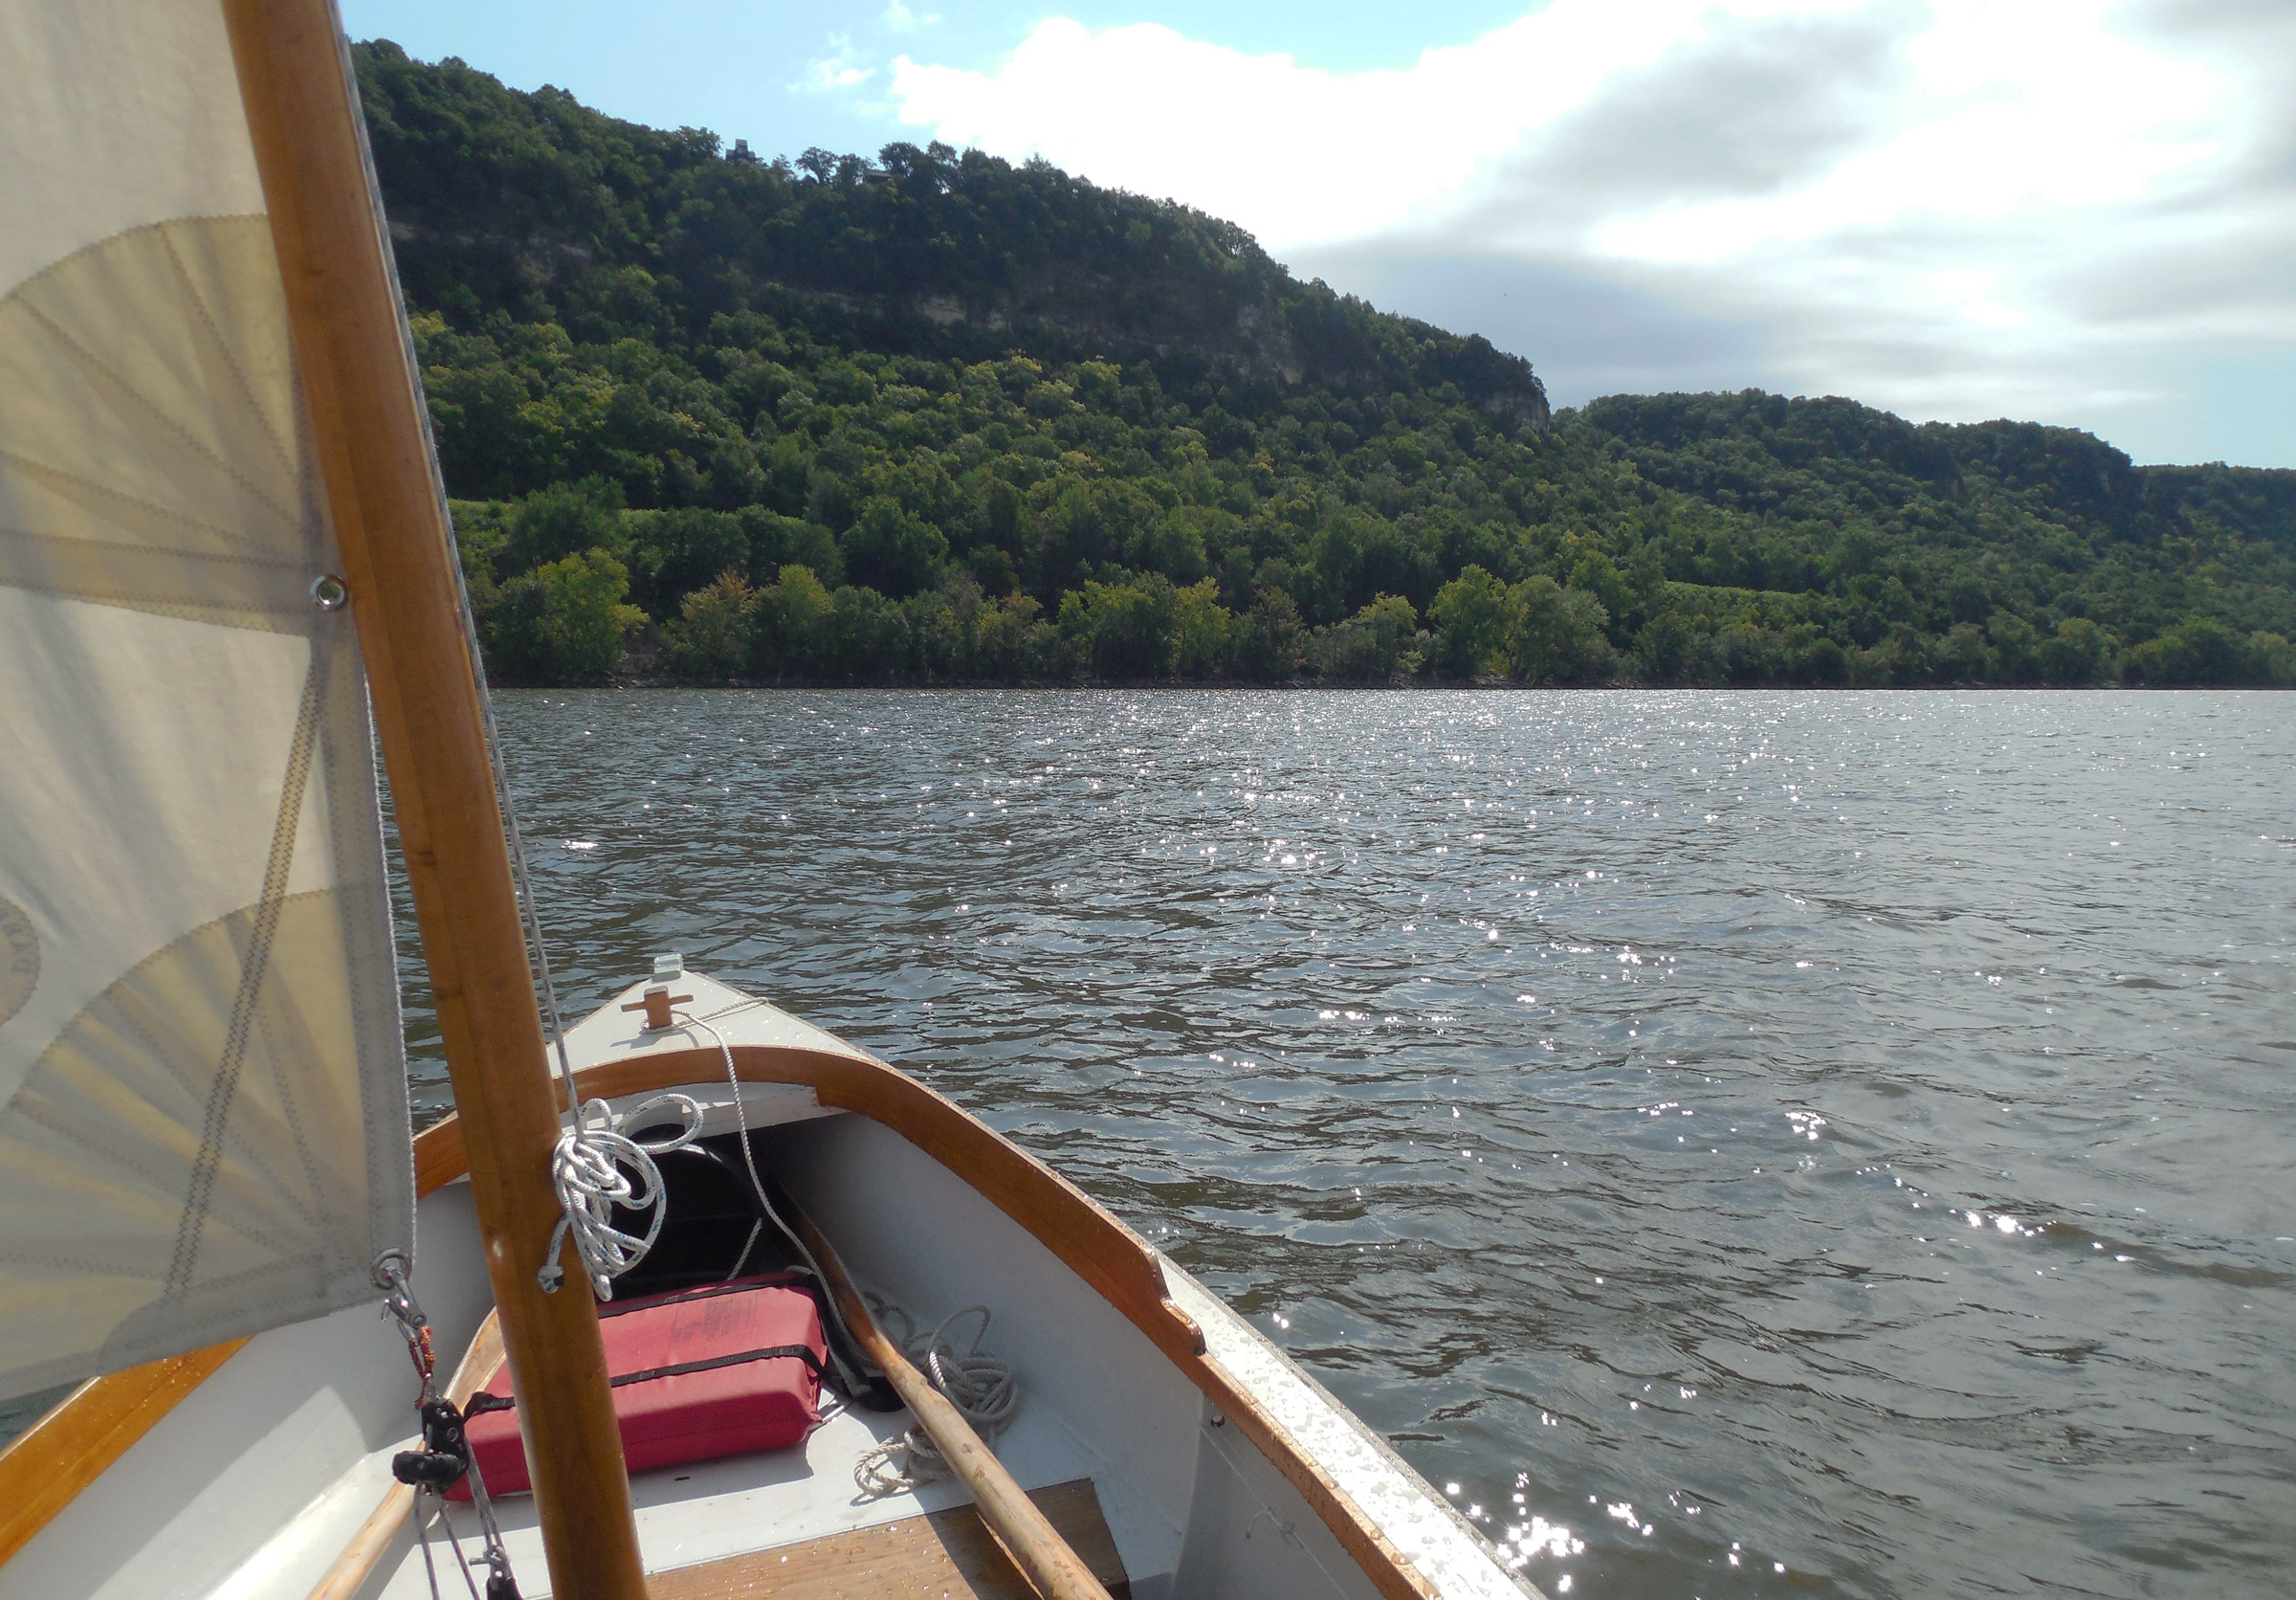
After another hour of rowing and dawdling, I reached the eastern edge of the islands and slipped through a narrow passage into Catherine Pass at the upper reaches of Lake Pepin. Leaving the oars trailing in the mud-brown water as the slow current carried the boat downstream, I stood up to see over the tall reeds that lined the shore—the small-boat equivalent of posting a lookout at the masthead. There was open water ahead, and the first faint stirrings of a breeze rippling the water’s surface. The boat drifted past the mudflats on each side of the pass, each as wide as a city street, and coasted out into the lake in a silence broken only by the cry of seagulls circling overhead.
I rowed past the shoals at the mouth of Catherine Pass, rounded the corner into Lake Pepin, and stepped the mast, lifting it into the partner and tapping a couple of wedges in place. A few more moments later, I had the standing-lug mainsail up, a simple operation in such calm conditions. I tightened the downhaul, lowered the centerboard and rudder, stowed the oars aboard, and trimmed the sheet for a close reach. Once the sail was drawing well, I tied the sheet off to an oarlock with a slippery hitch and settled in.
At the upper end of Lake Pepin, the steep and exposed shoreline limits options for shelter in a real blow. In 1890, the 135’ excursion boat SEA WING overturned and sank just a few miles downstream, with the loss of 98 people. Fortunately, I enjoyed better weather on my passage to the Rush River.
Lake Pepin forms an elongated backwards S shape on the map—east, then south, and finally southeast again—running from Red Wing, Minnesota, to the mouth of Wisconsin’s Chippewa River 20 miles downstream. Here a broad sandy delta pours into the Mississippi, sediment from the 6,000 square miles drained by the Chippewa River in its 180-mile run from northwestern Wisconsin, forming the natural dam that created Lake Pepin. Elsewhere, the Upper Mississippi is drastically undersized for the valley through which it flows, which was cut by the much larger Glacial River Warren 10,000 years ago. Here in Lake Pepin, water fills the ancient flood plain entirely, forming a channel 2 miles wide, hemmed in by forested bluffs topped by 60’ sandstone cliffs.
Each tributary stream along Lake Pepin forms its own delta, and I was counting on one of these tributary deltas, at Wisconsin’s Rush River, to provide shelter for the night. Luck was with me. The faint afternoon breeze grew stronger, and veered toward the south, letting me steer a direct course toward my destination. With the sheet tied off and my line-and-bungee autopilot steering, all I had to do was enjoy the ride. After a 6-mile crossing that barely required me to touch the tiller or the sheet, I was closing in on the long sandspit at the mouth of the Rush River, just an hour ahead of sunset.
I cut the corner a little too closely. The boat ground to a gentle halt just off the spit, on a shoal that extended a bit farther than I had expected past the line of wading gulls I had been using for a channel marker. With the sail still drawing, I raised the board and rudder, hopped out in shin-deep water, and waded alongside for 10 yards before climbing back aboard to continue up the Rush River.
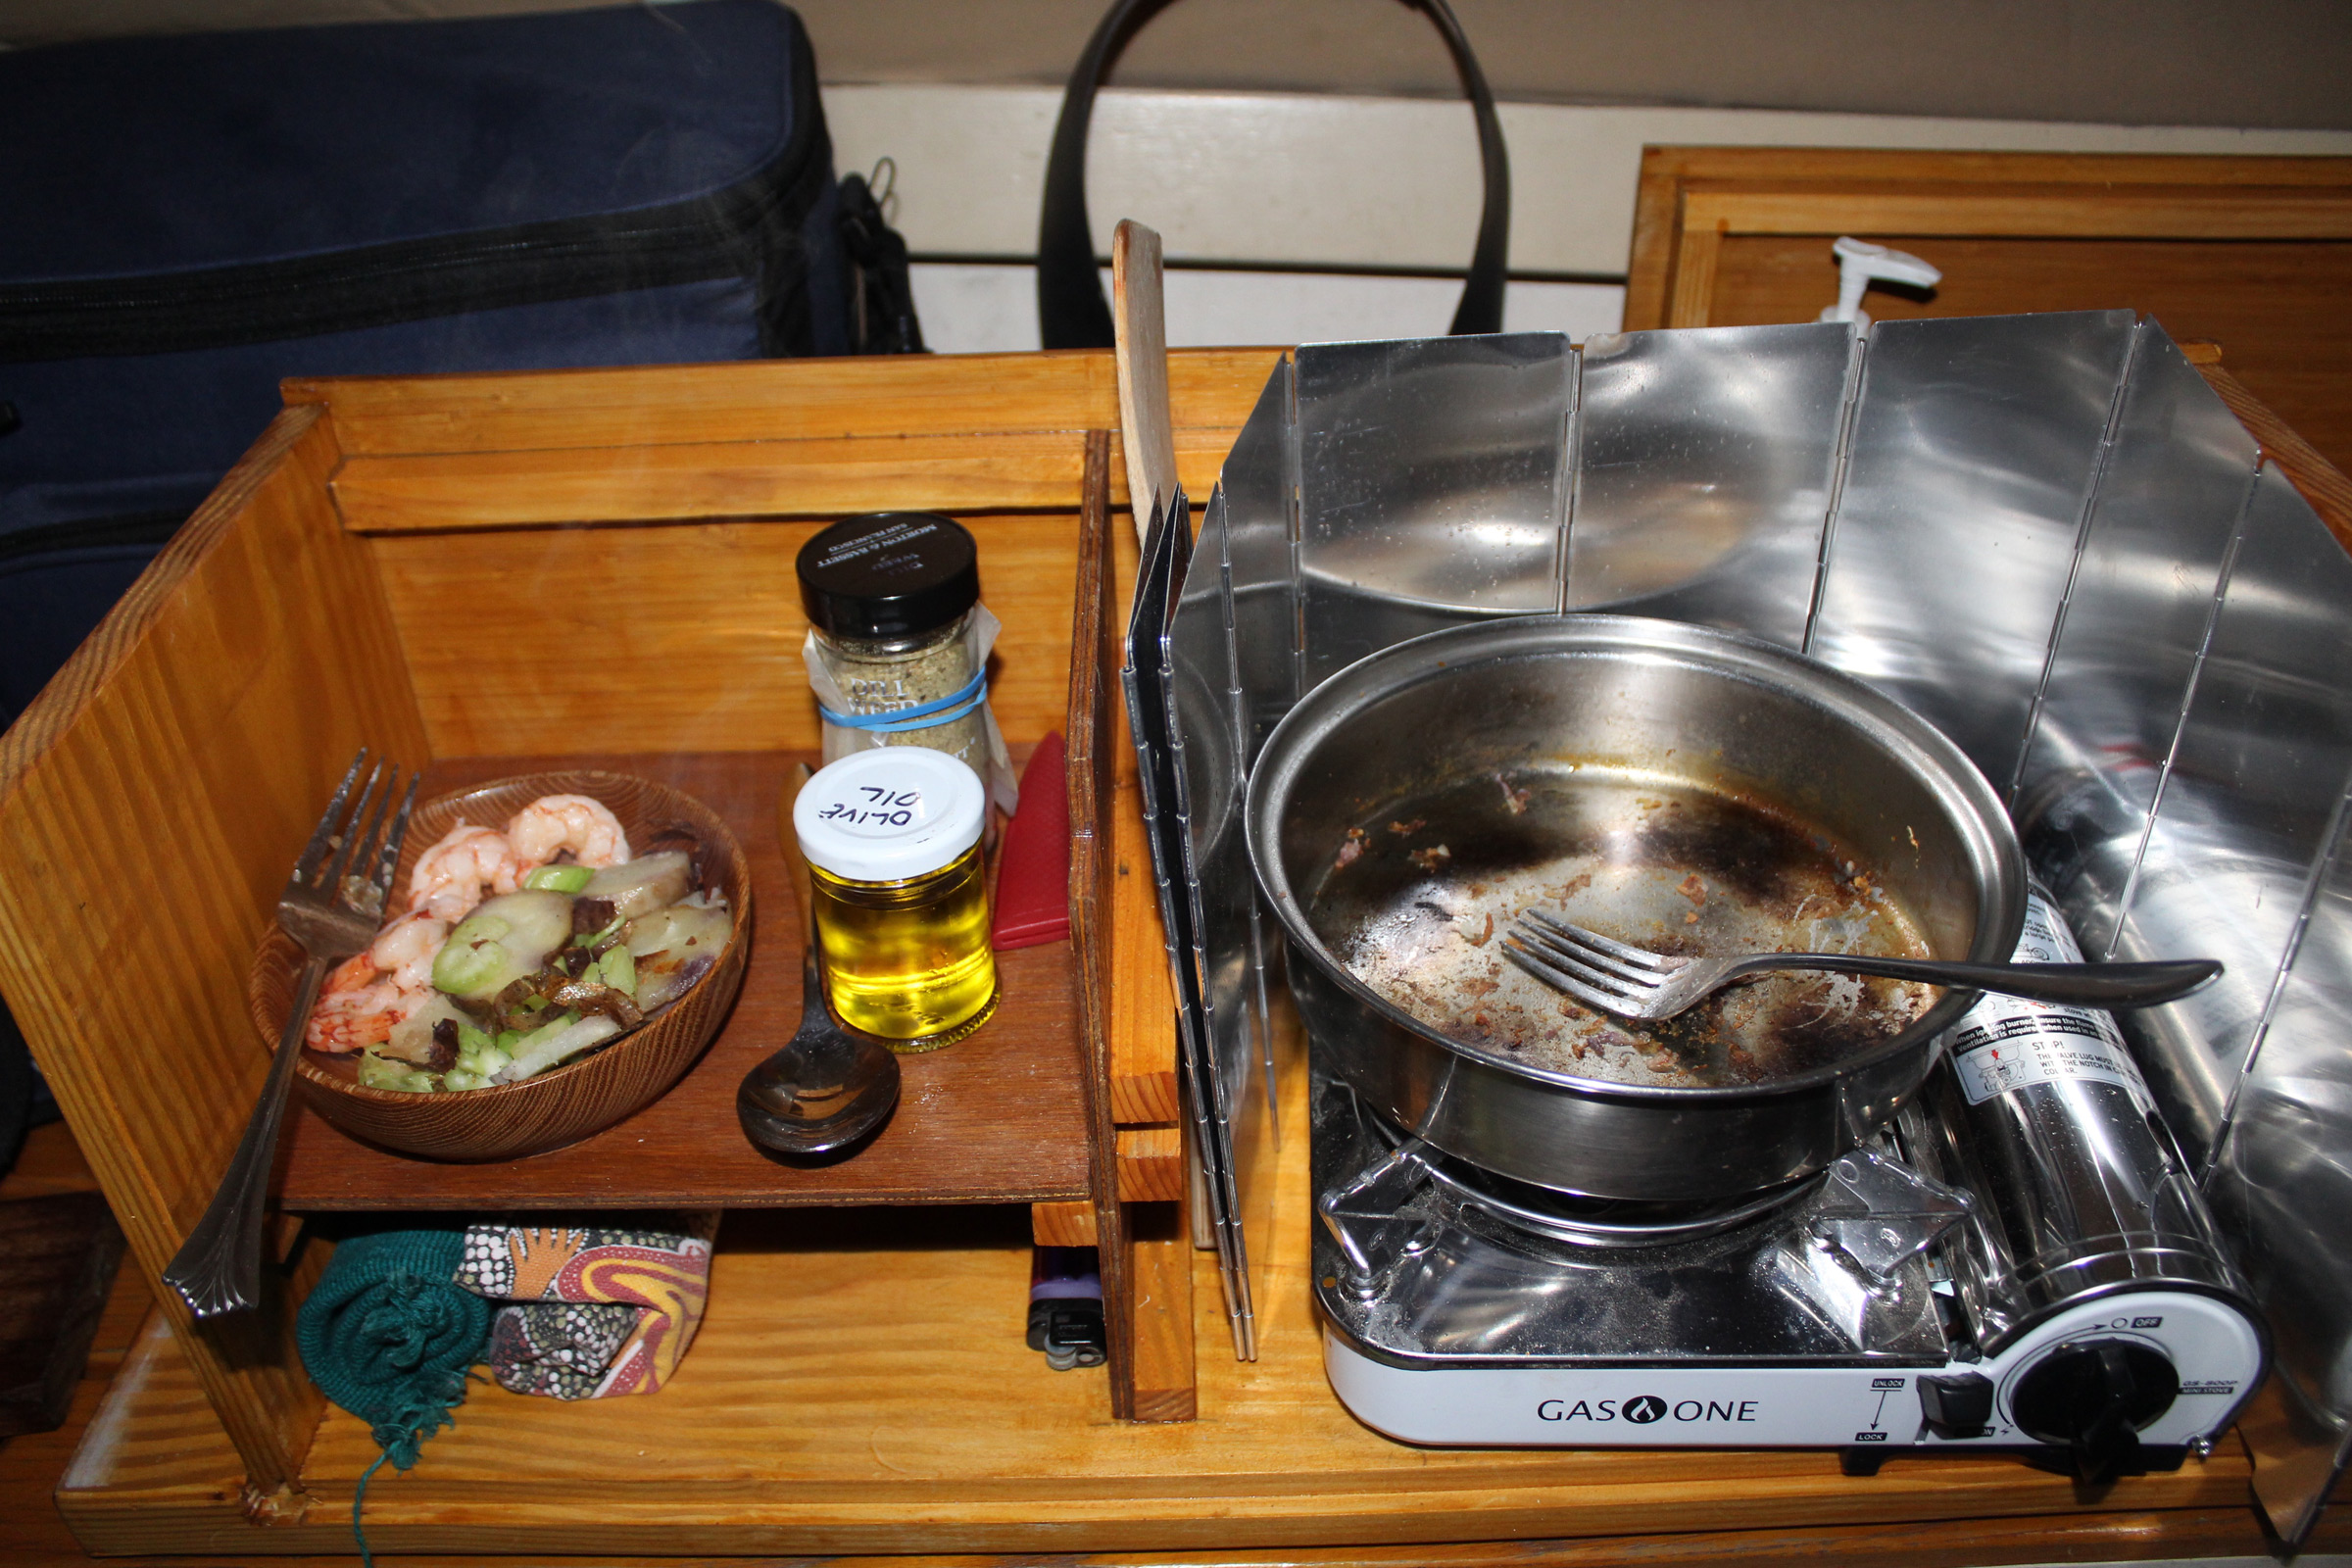
Wisconsin’s Rush River is, by all reports, a prime trout stream. Lacking the requisite fishing gear, permits, skills, and, more importantly, having no inclination to work for my supper, I had to be content with a carry-out pizza from Pizza Hut that I had stowed aboard.
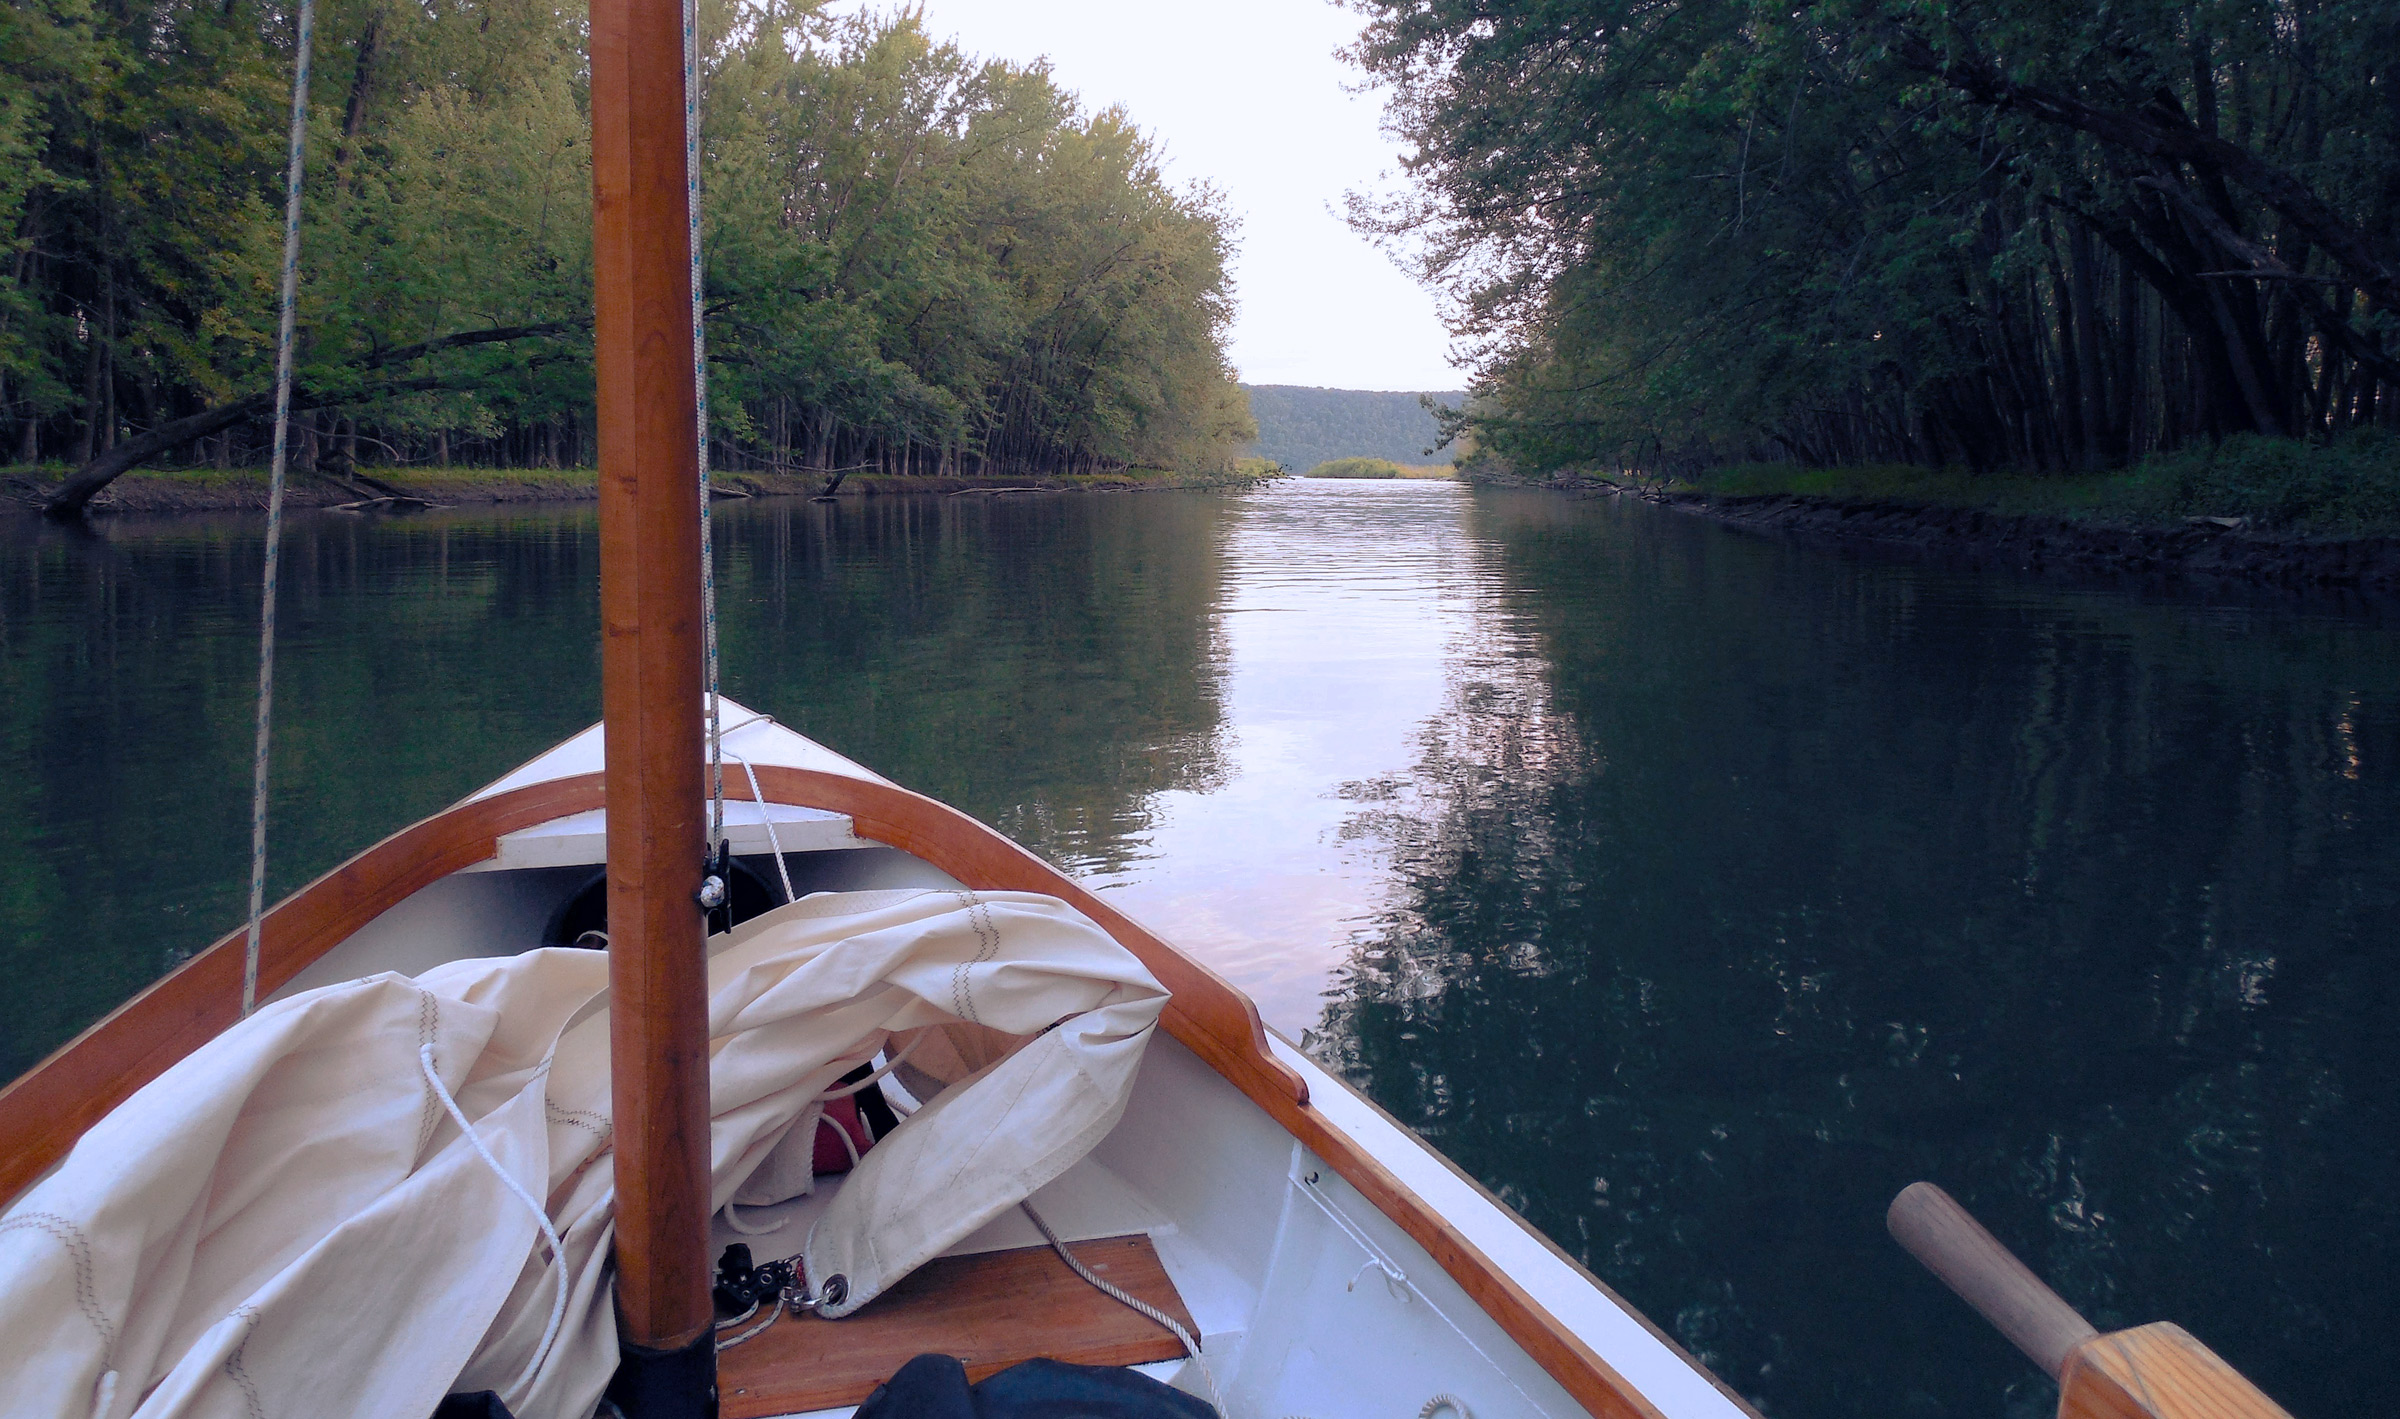
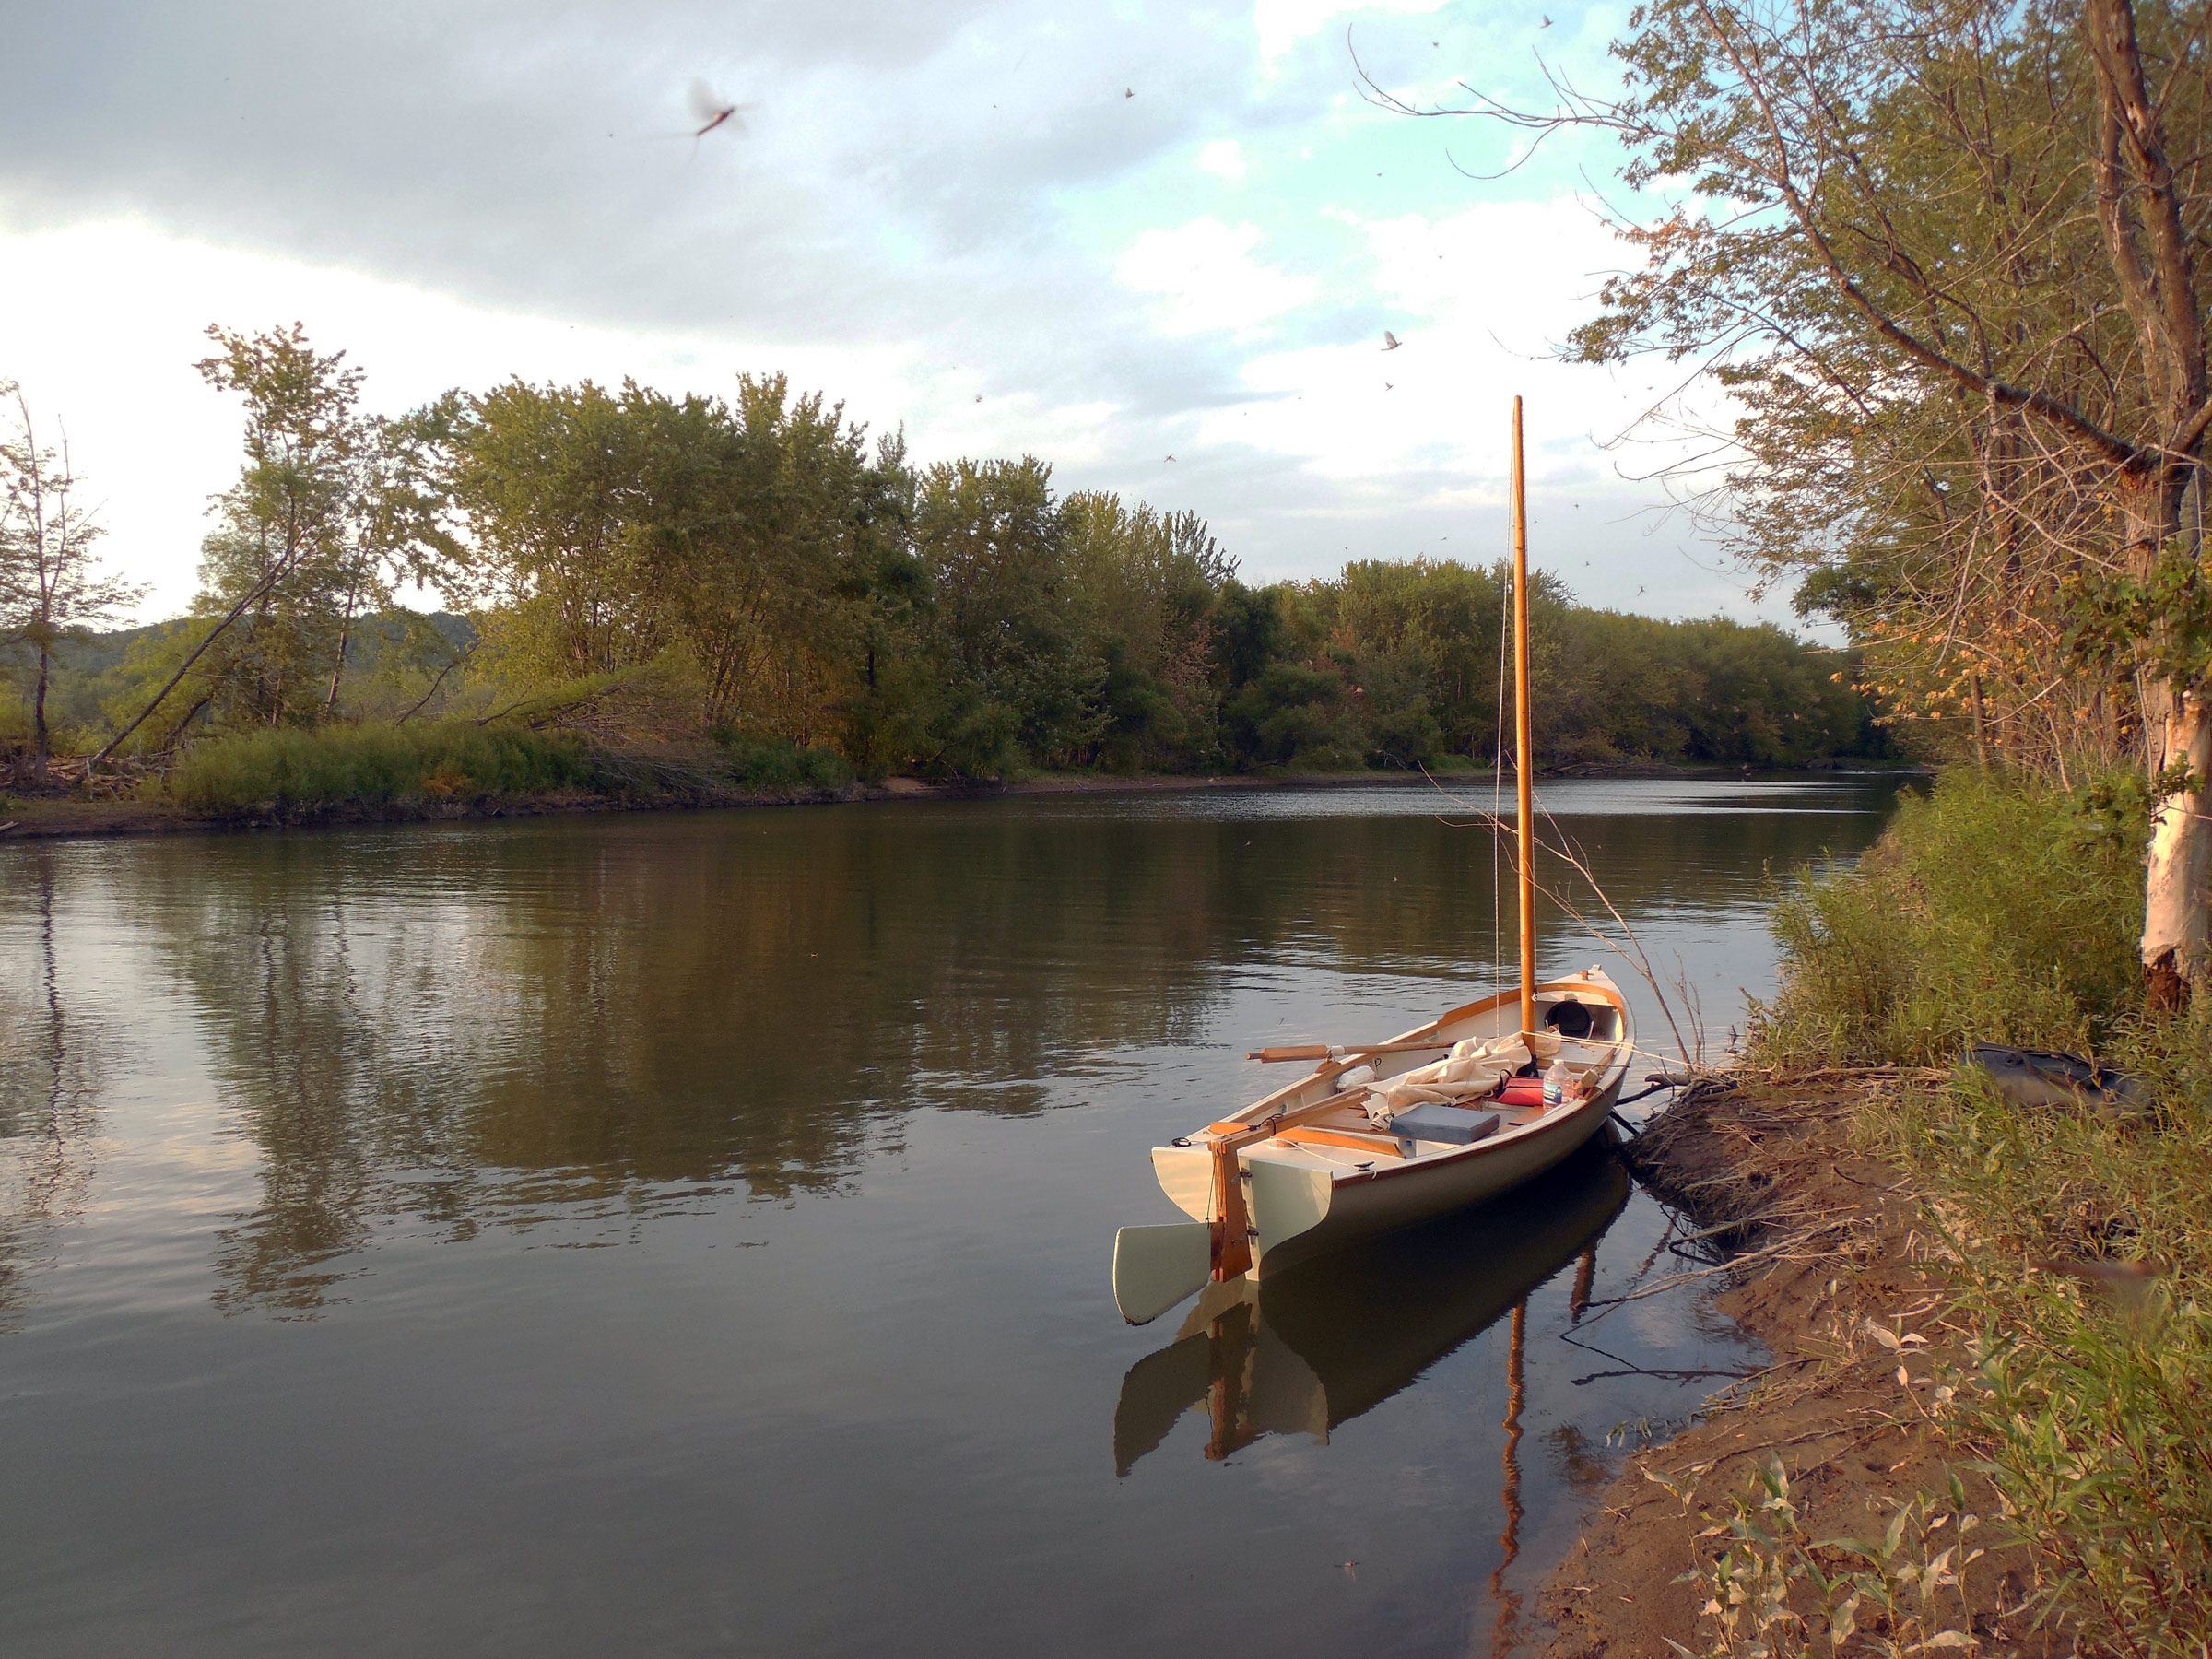
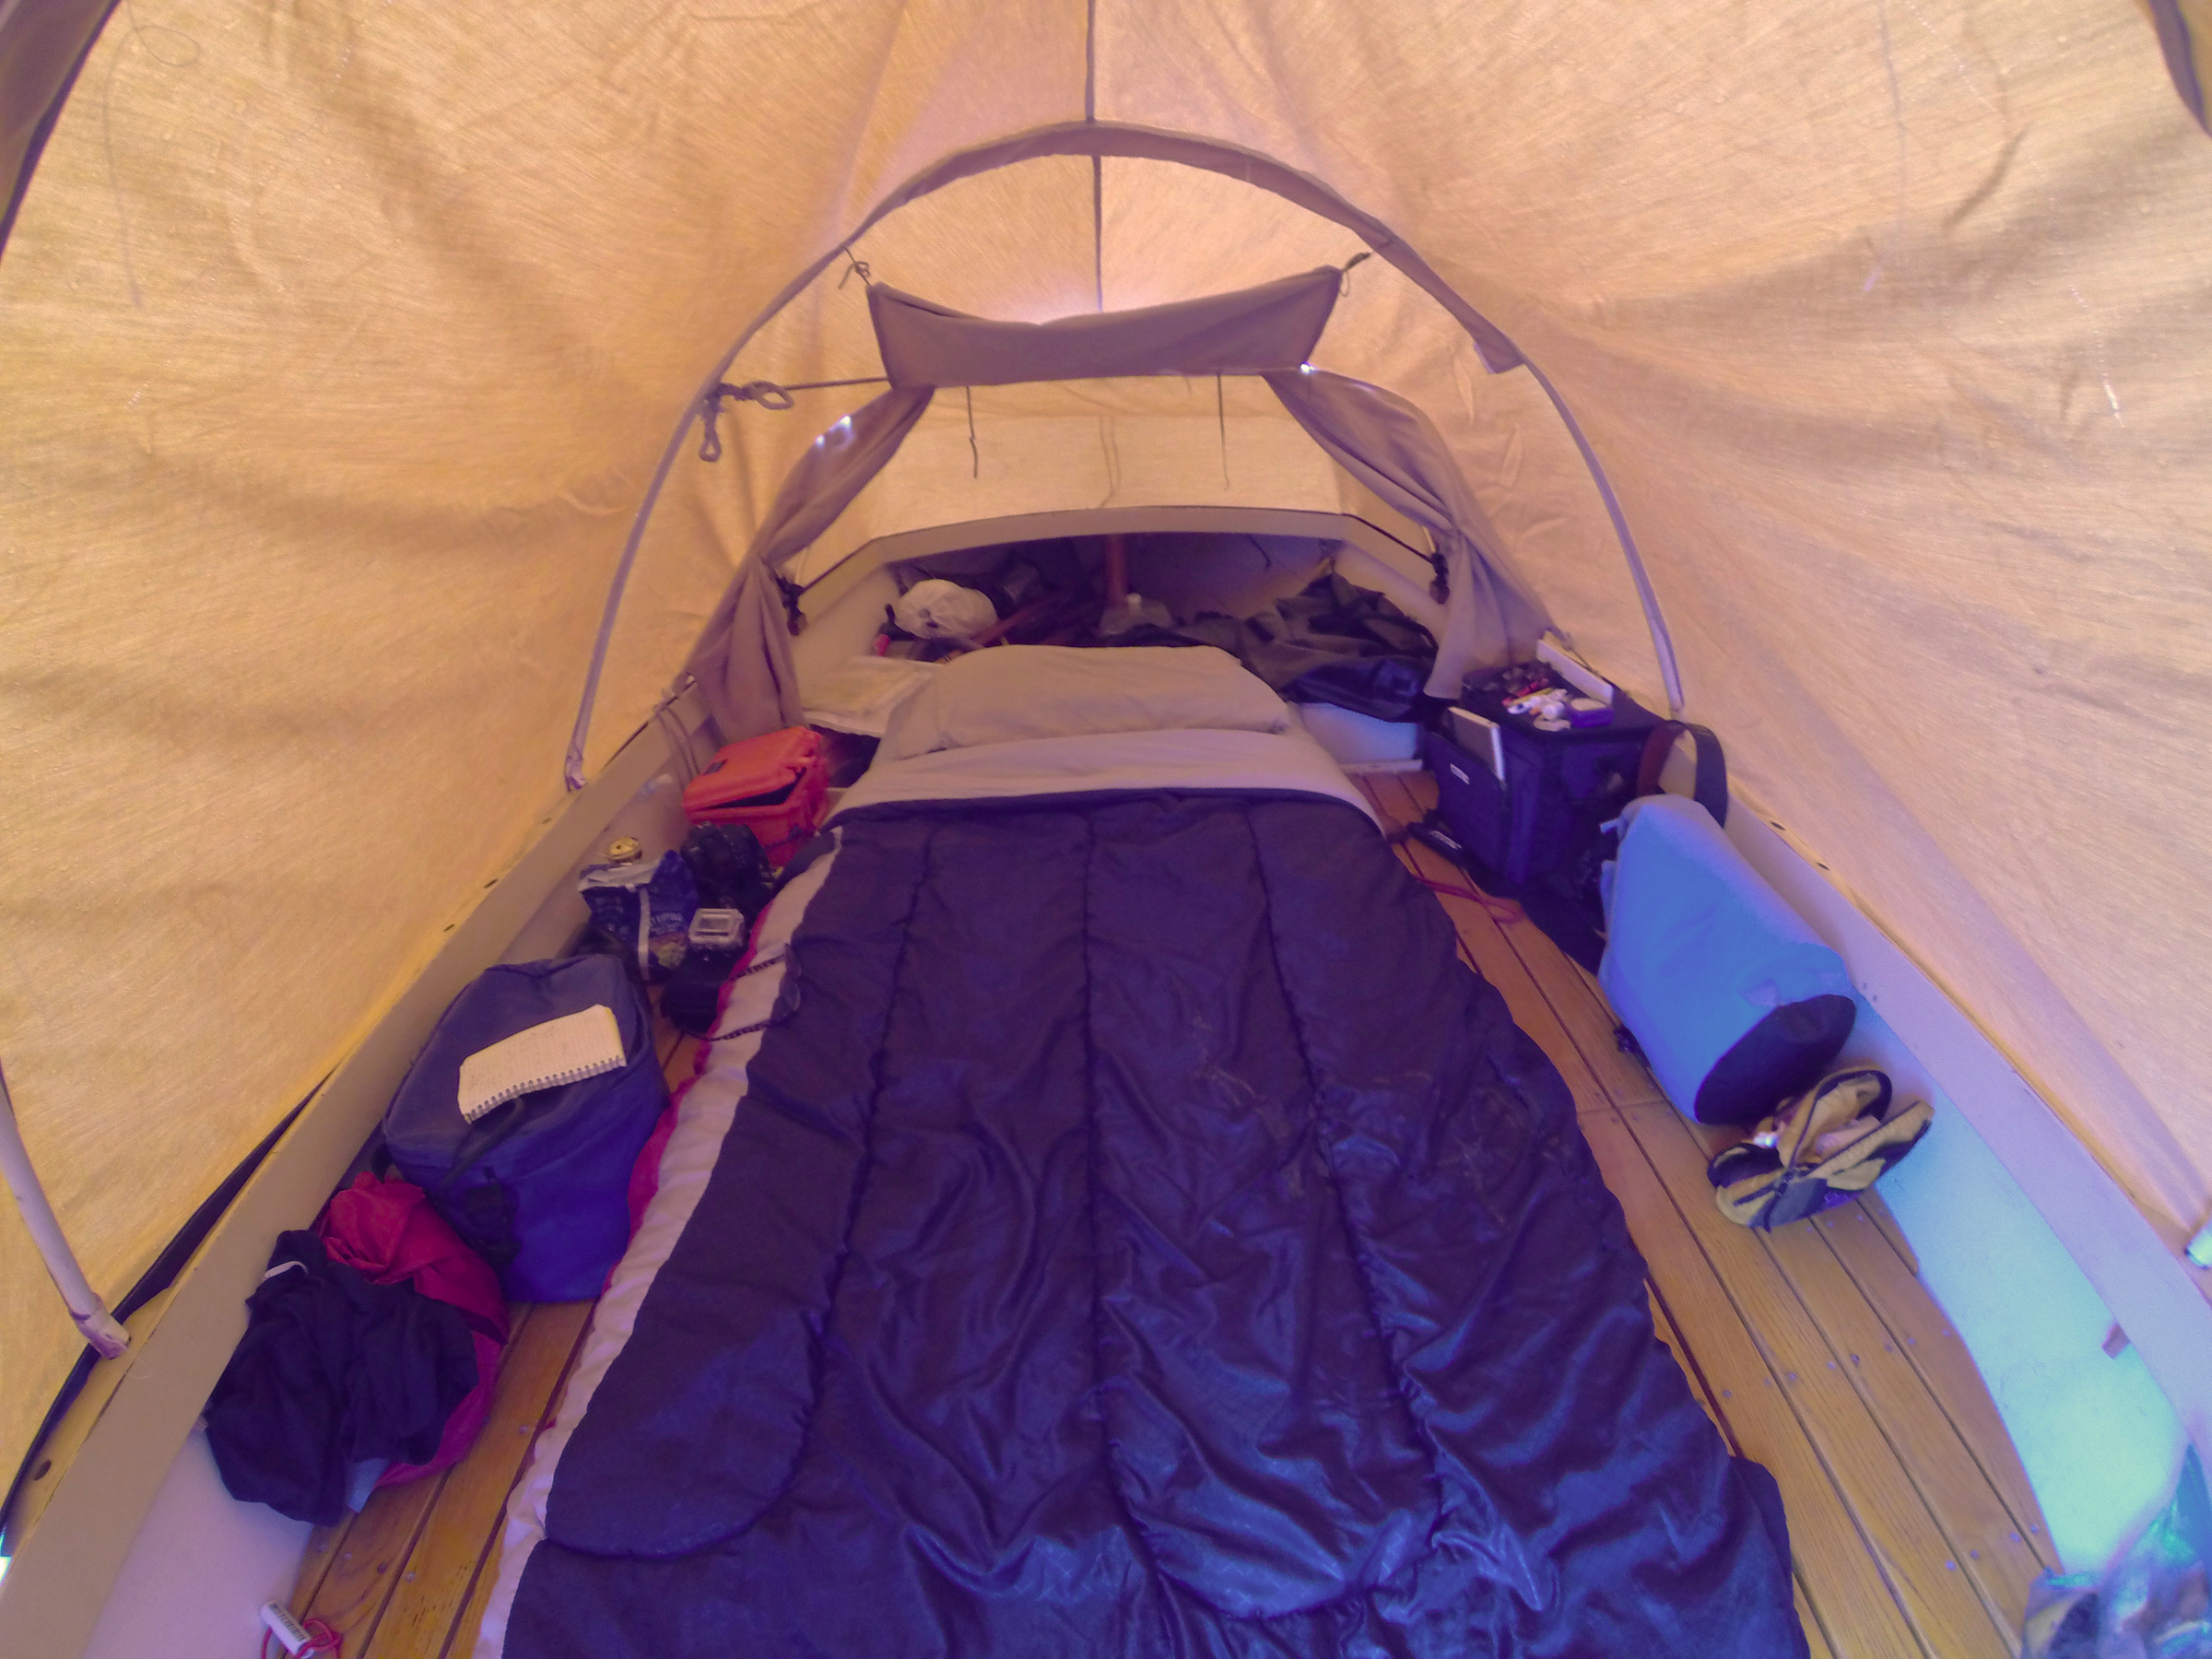
I was running downwind against the current now, making slow but steady progress. The banks closed in, forming tangled green walls on each side, leaving just enough wind to keep the boat moving. I eventually pulled up on the eastern bank, alongside a low sandy ridge shaded by widely-spaced oaks and cottonwoods. Tying off the painter to a convenient branch, I carried my bags ashore. Expecting mosquitoes—I always expect them, and am rarely disappointed—I set up my tent on the flat sandy ridgetop under a massive oak tree and laid out my sleeping gear inside. Then, ready for a quiet evening ashore, I spent an hour or two wandering along the sandy beaches of the delta’s eastern shore.
The next morning, I packed up the tent and returned to the beach for a preview of the day’s route down Lake Pepin. Even this early in the day, a blustery southerly breeze was blowing, and knee-high waves were rolling up the lakeside beaches. Yesterday’s south wind had served perfectly for my generally eastward route. Today, as I turned the corner to follow Lake Pepin’s backward S to the south, that same breeze, stronger now, would be a stiff headwind.
As usual, I skipped breakfast to set out early, but then squandered my head start by rowing up the Rush River for a mile or so, until a house-sized pile-up of fallen trees blocked the stream from bank to bank, forcing me to turn back. Another kingfisher showed a flicker of black and white as it swooped across the stream, but only the quiet dip of the oars, stroke after stroke, broke the morning stillness. Soon enough I was back at the river mouth. My upstream diversion had cost me almost an hour, but I didn’t feel any regret about that. Diversion was the whole point of the trip.
The wind was still blowing when I reached open water, and still from the south. I had guessed that the region’s prevailing westerlies would carry me easily to the mouth of the Chippewa River, and I had guessed wrong. At least the broad channel, 2 miles wide, would provide ample sea room, with no need for short-tacking. It was a bright blue-sky morning, and perfect sailing. Sunlight glinted off the waves as the boat bumped along to windward, with a spattering of cool spray every now and then. With an open boat, an open calendar, and room to wander, I wasn’t going to complain about a few headwinds.
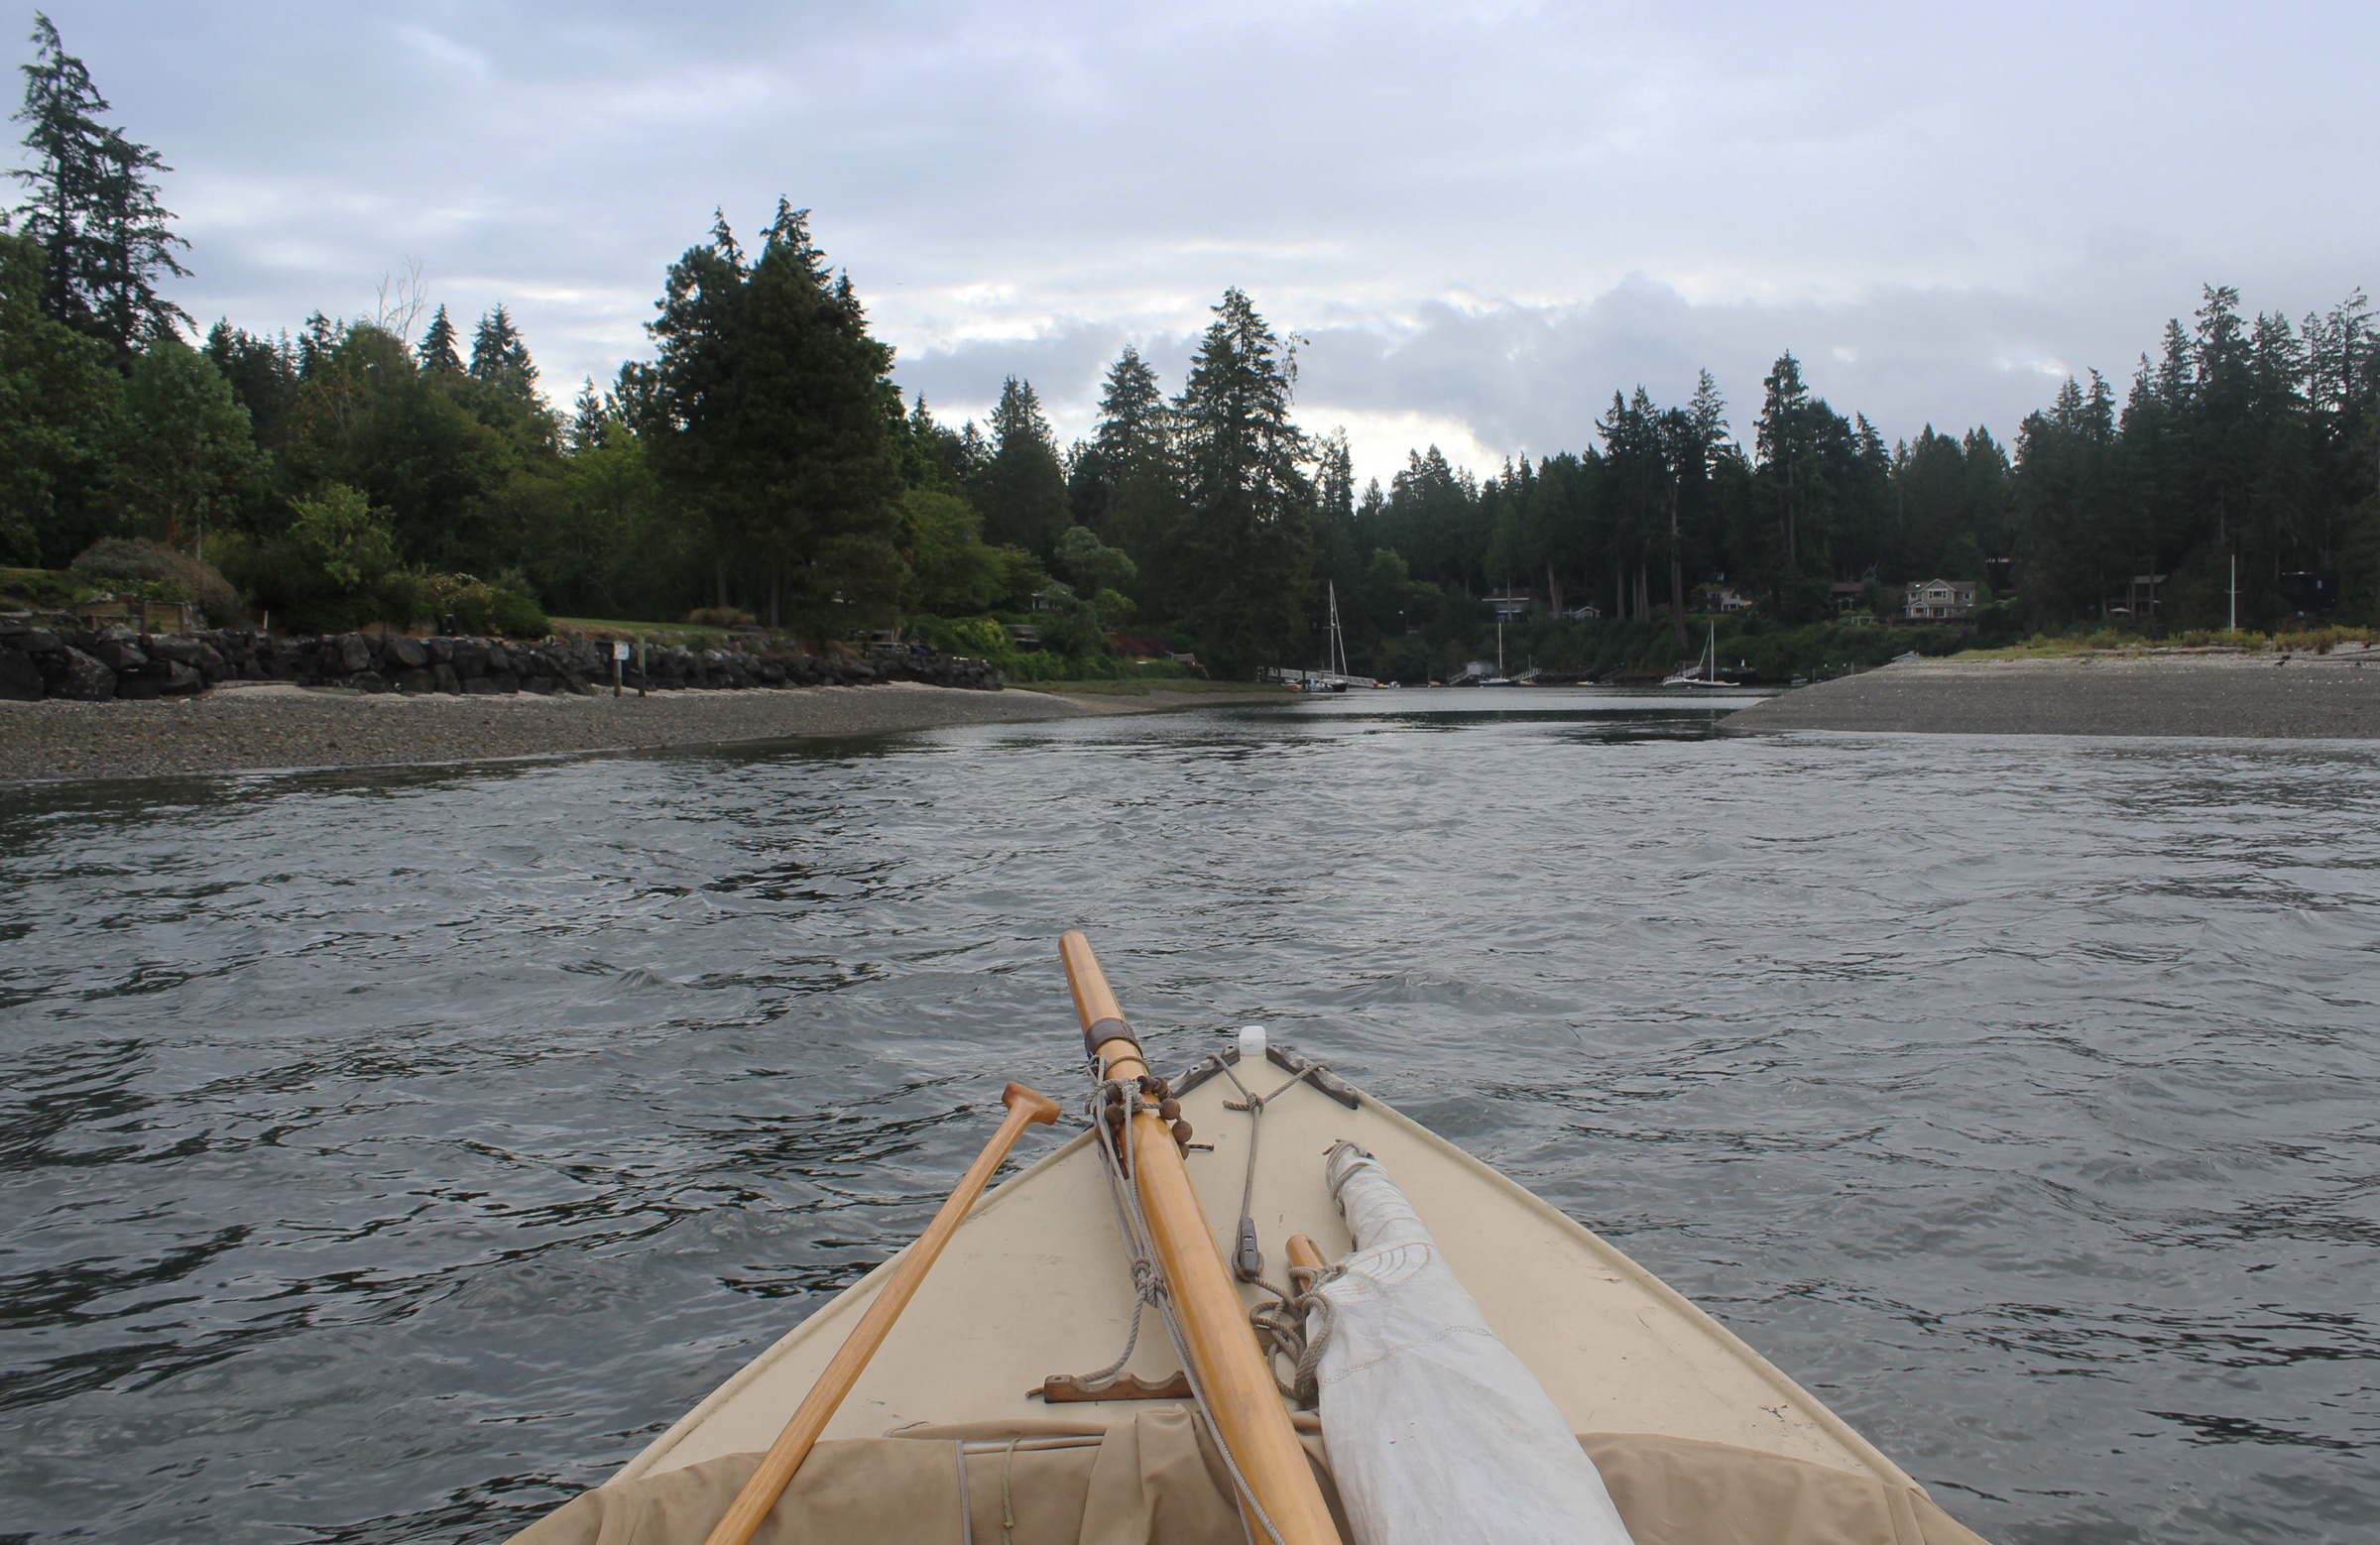
The sandy banks of the Rush River transition to thick mud along the water’s edge—a fact I discovered when I set foot on shore and sank in above my ankles. Still, the river delta provided a welcome sheltered mooring spot along Lake Pepin’s exposed shoreline.
A couple of hours later, after 3 miles of progress earned by 6 miles of blustery windward sailing in three long tacks, I was ready for a break. I sailed into the lee of Long Point on the Minnesota shore, where tiny Wells Creek had dumped enough sand to create a long spit that protruded from the river in an elegantly symmetrical dagger point. It looked like a perfect place to wait out the wind, in the lee of the spit’s low wooded ridge, but I barely had time to brail up the rig and drag the boat onto shore before I saw a dozen powerboats headed for the beach in close formation. Radios blaring, people shouting, outboards roaring—a typically overbearing Midwestern cheerfulness sustained by an excess of cheap beer, and painfully lacking in self-awareness. I wasn’t sure I could endure it all with any measure of grace. I took a brief look around me—the pale fine-grained sand of the beach, the network of shady trails running through the delta’s swampy woodlands, the marshy backwater I hadn’t even begun to explore—and re-launched the boat. After rowing a few yards offshore, I deployed the sail again. I was 100 yards out by the time the powerboats hit the beach. My quarantine would remain intact.
A narrow-beamed pulling boat isn’t at its happiest sailing to windward, but I kept bashing my way southward under full mainsail without too much trouble. It was slow going now, and not particularly restful, but it wasn’t until late afternoon that I started thinking about reefing, or getting off the water entirely. I made a final tack just outside the marina breakwater at Stockholm, Wisconsin, and headed back to the Minnesota side. Hok-Si-La Park, just upstream of Lake City at Lake Pepin’s Central Point, offered waterside camping. Or it had, before the pandemic started shutting down options. I wasn’t sure what I’d find now.
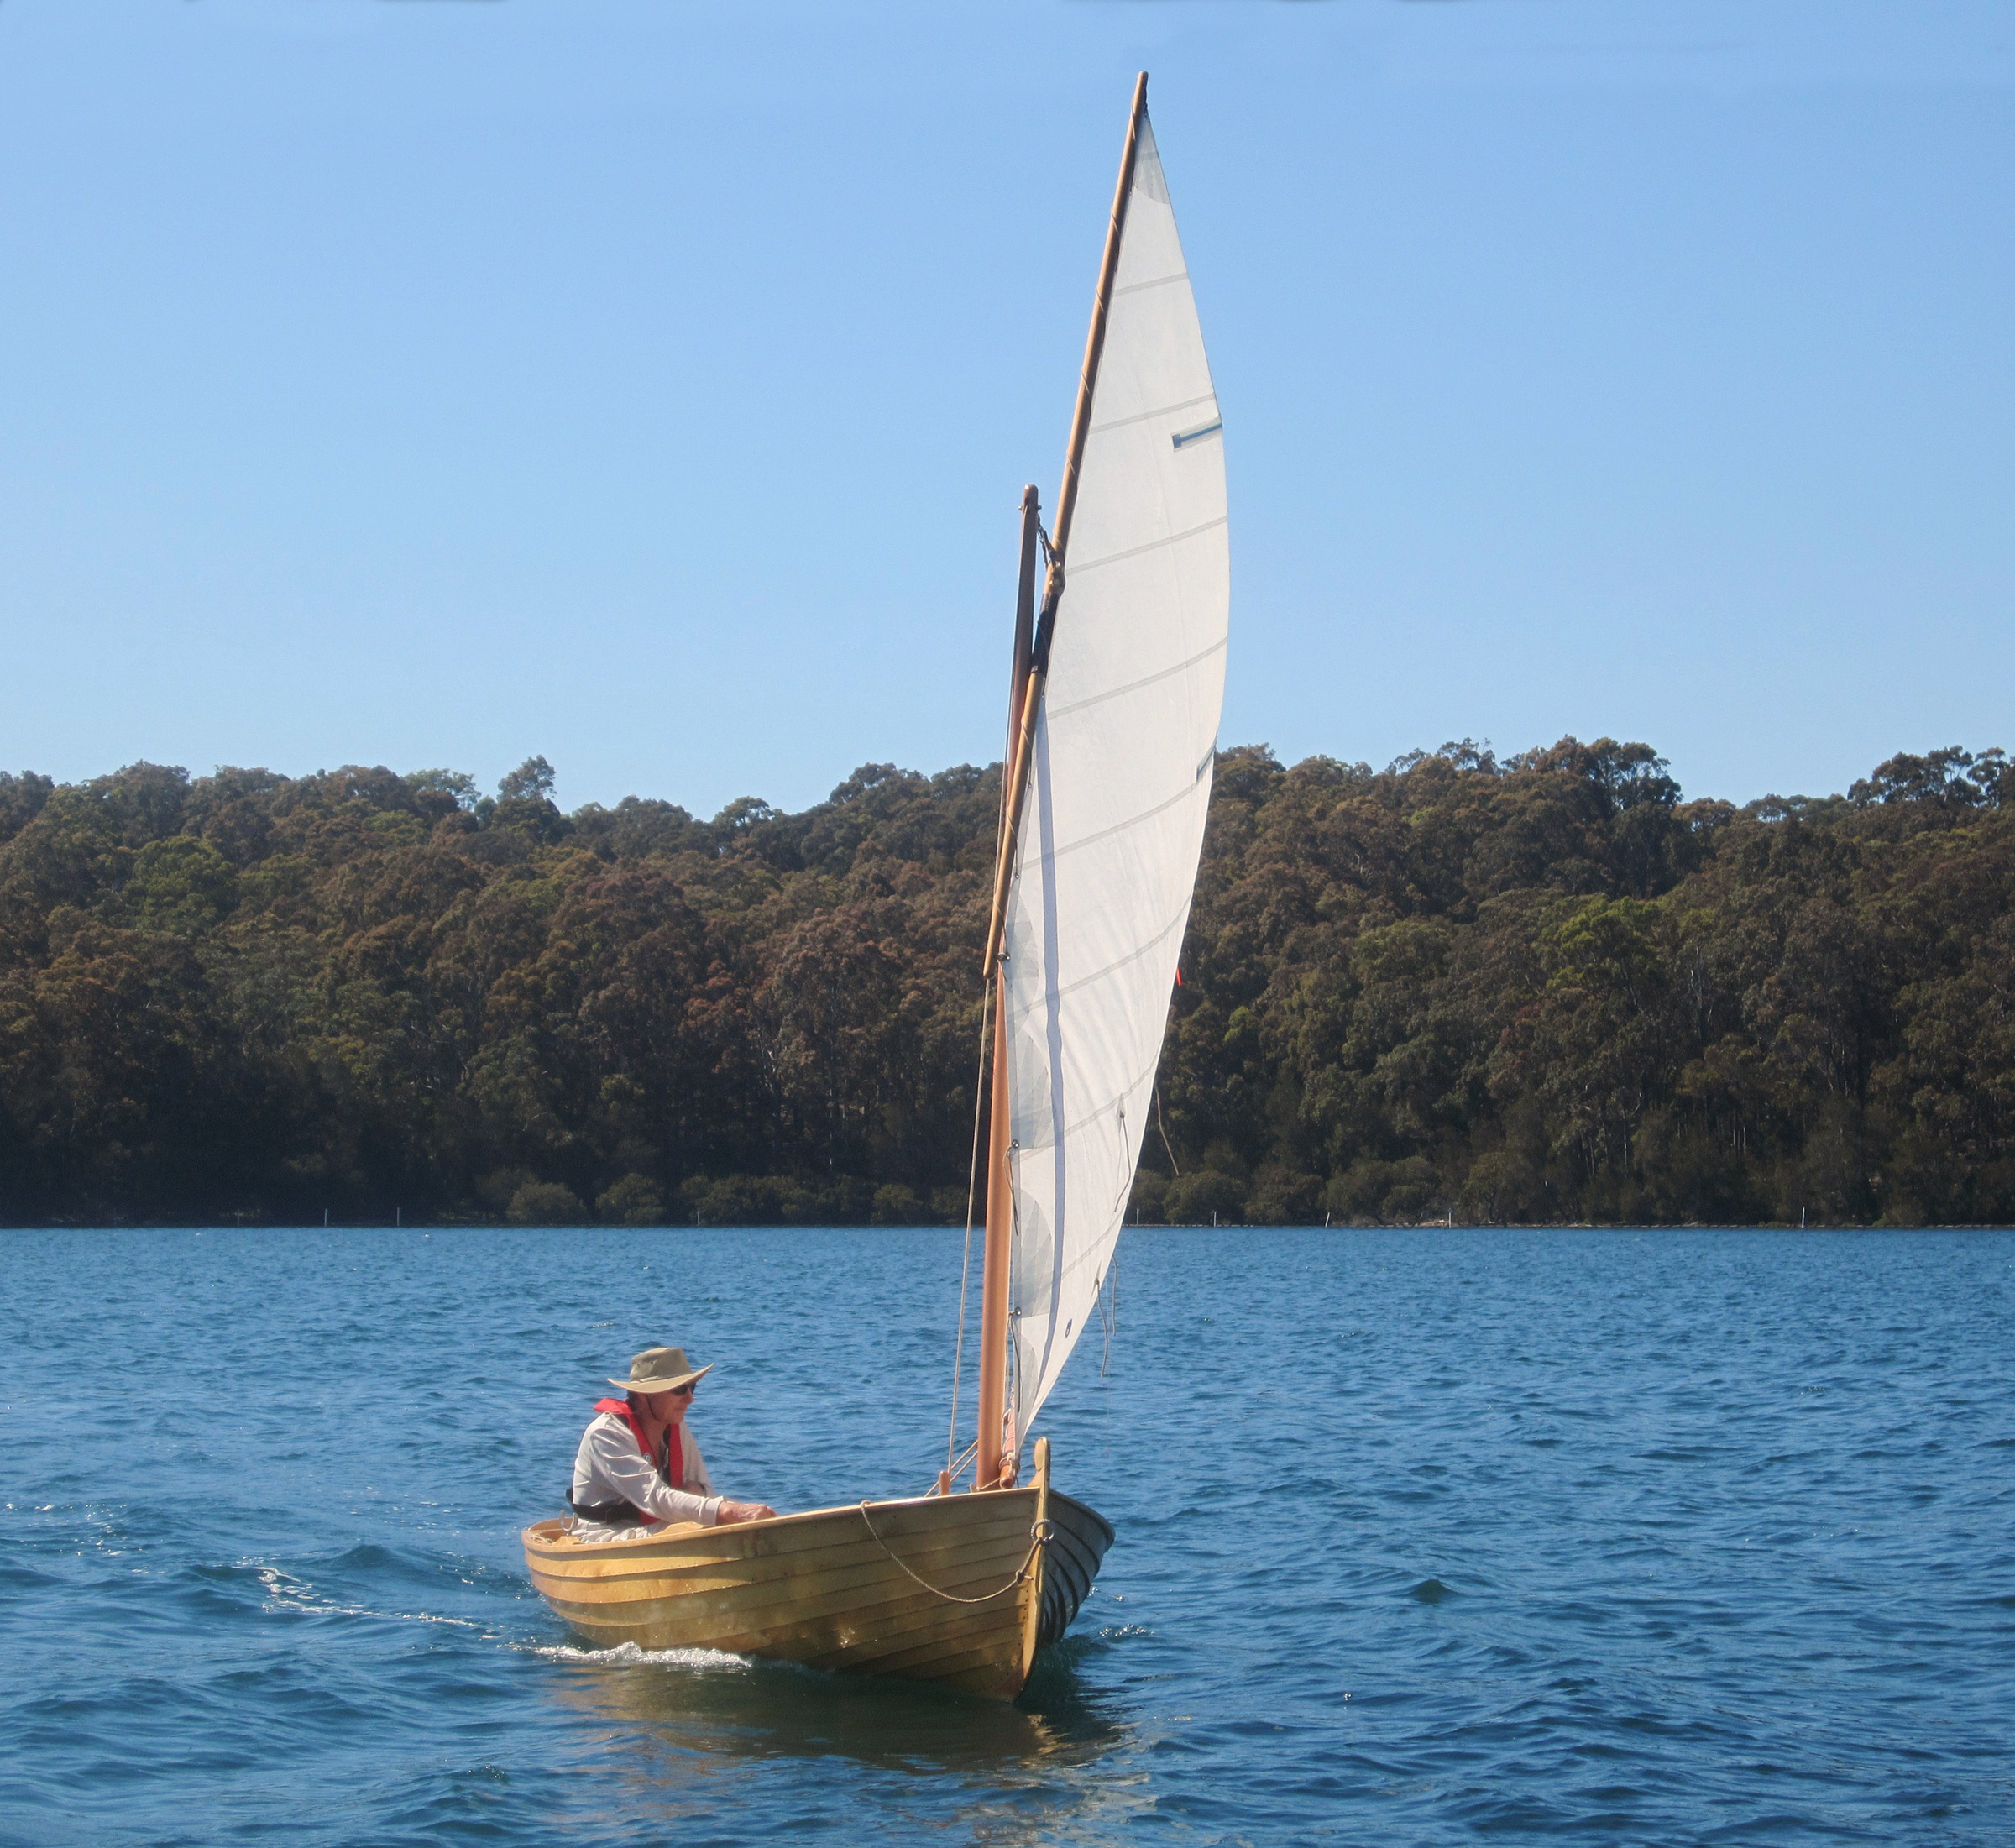
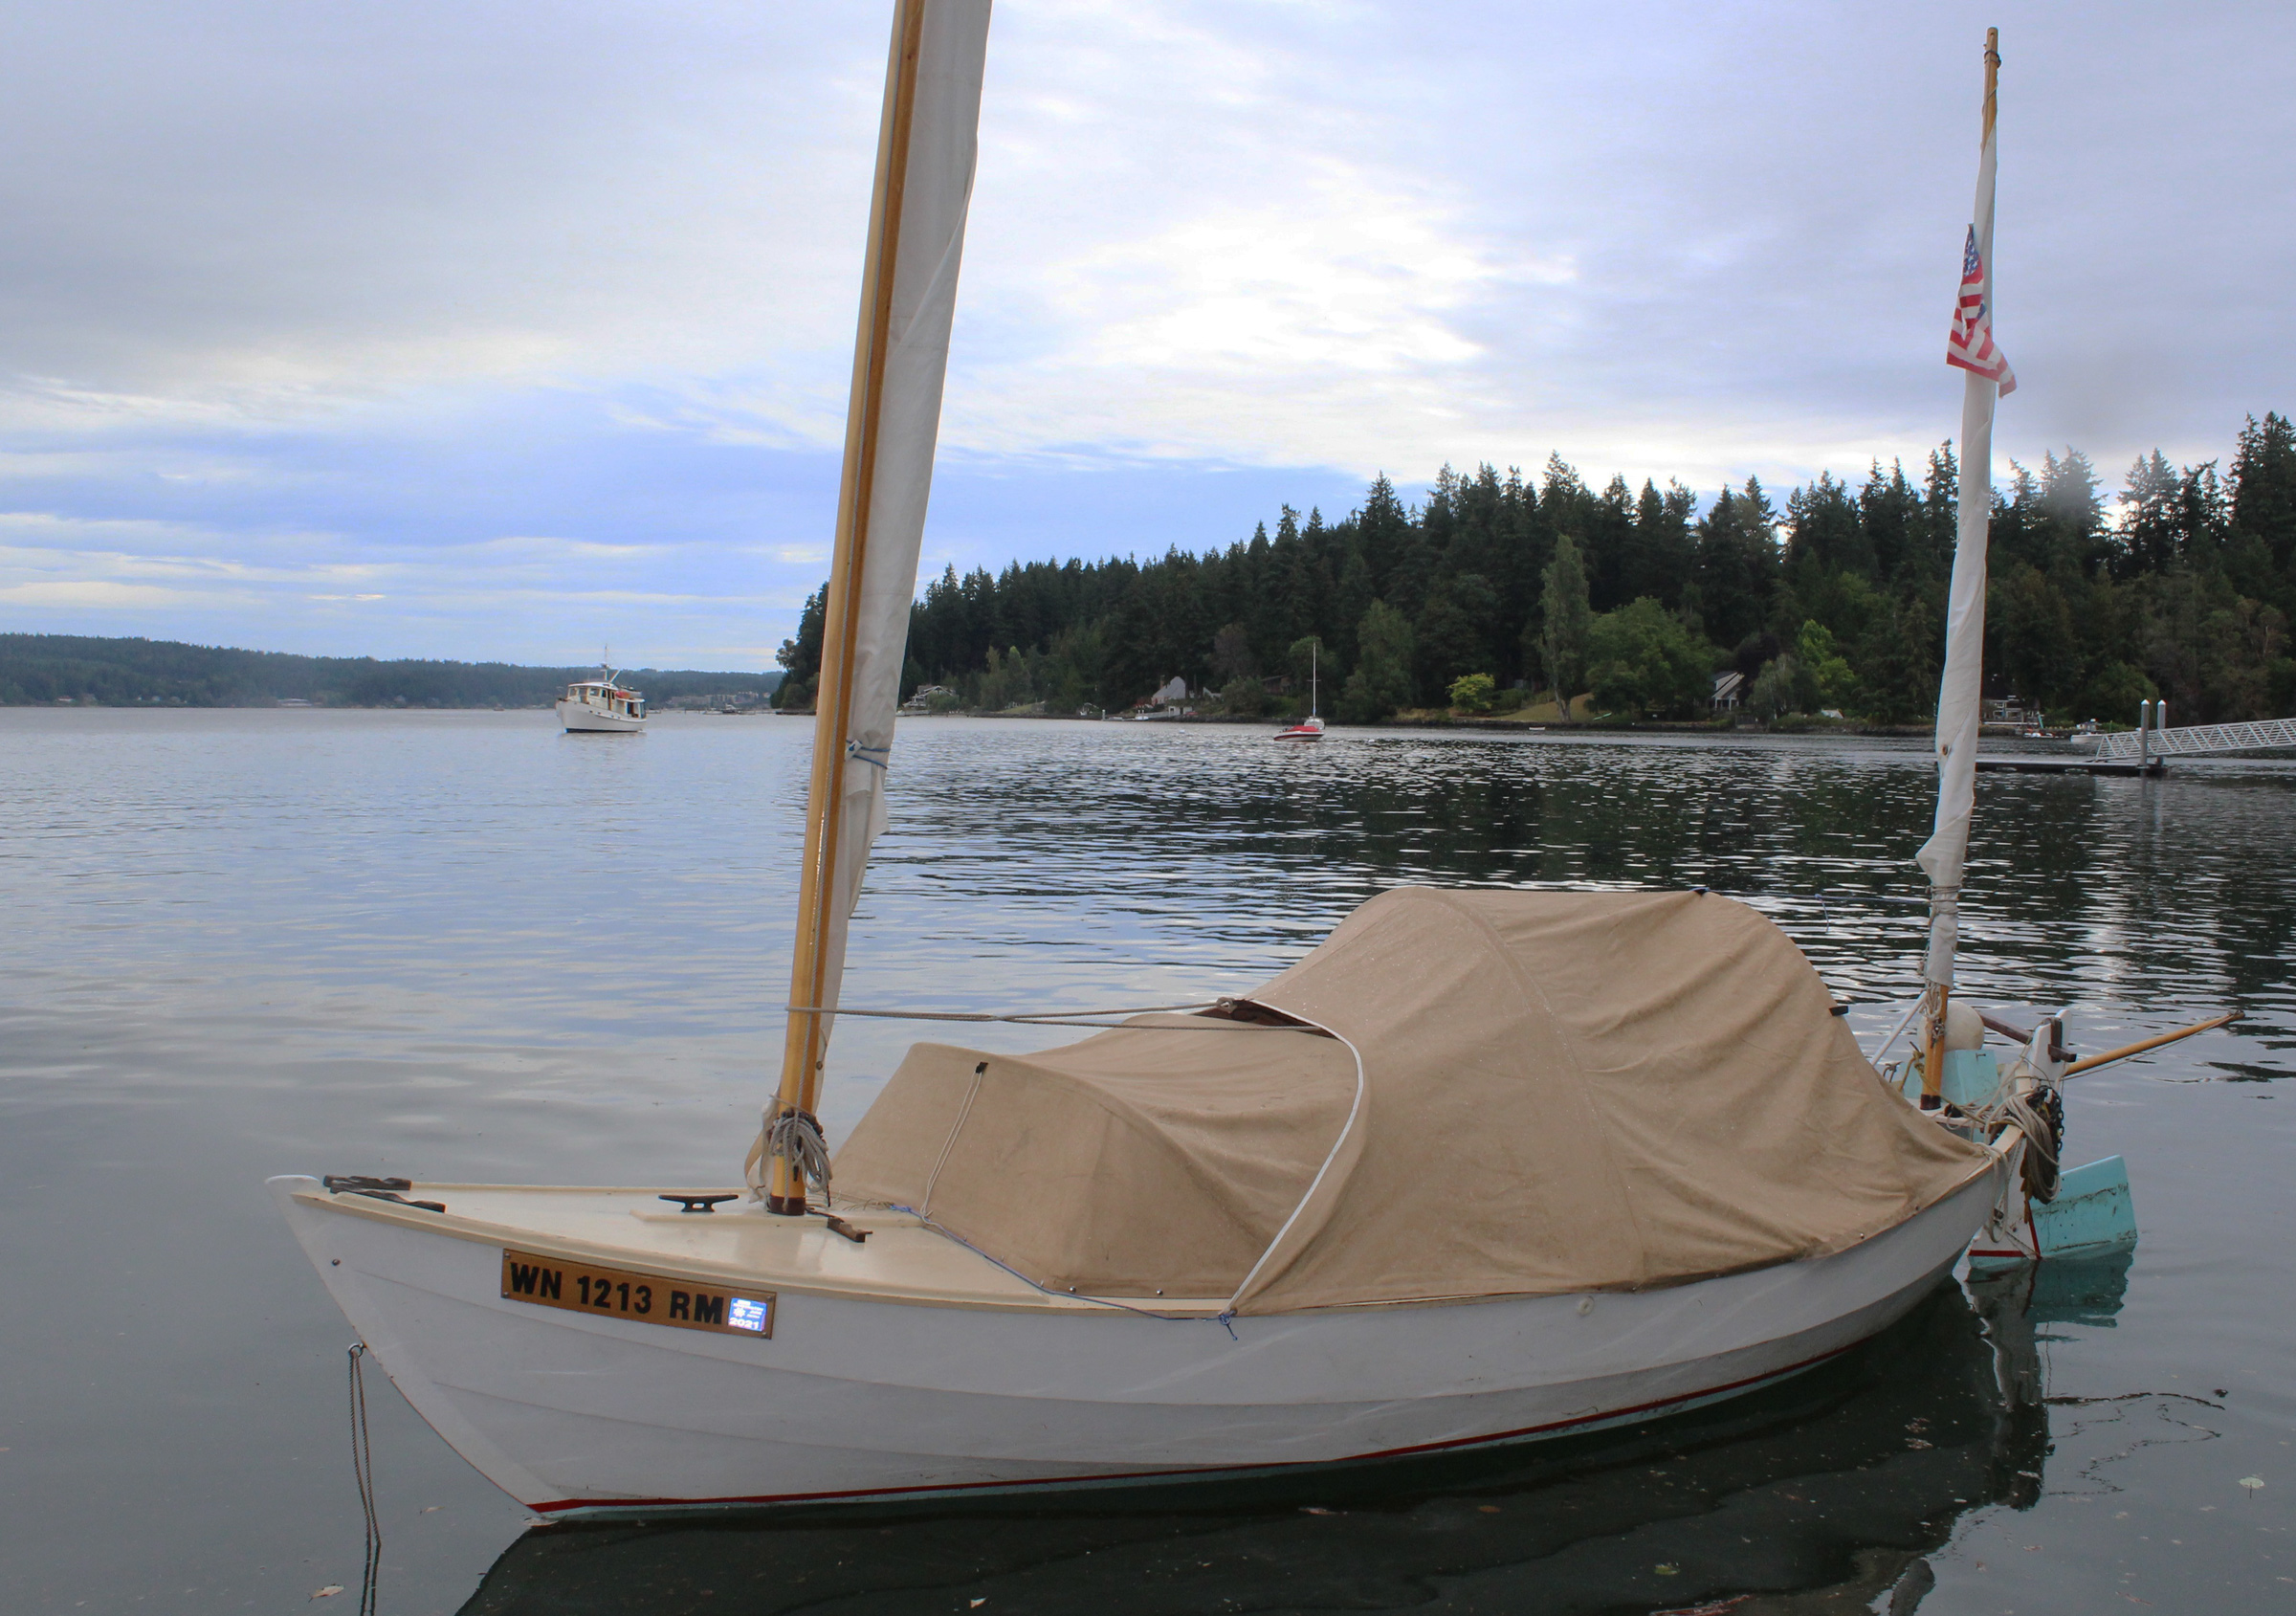
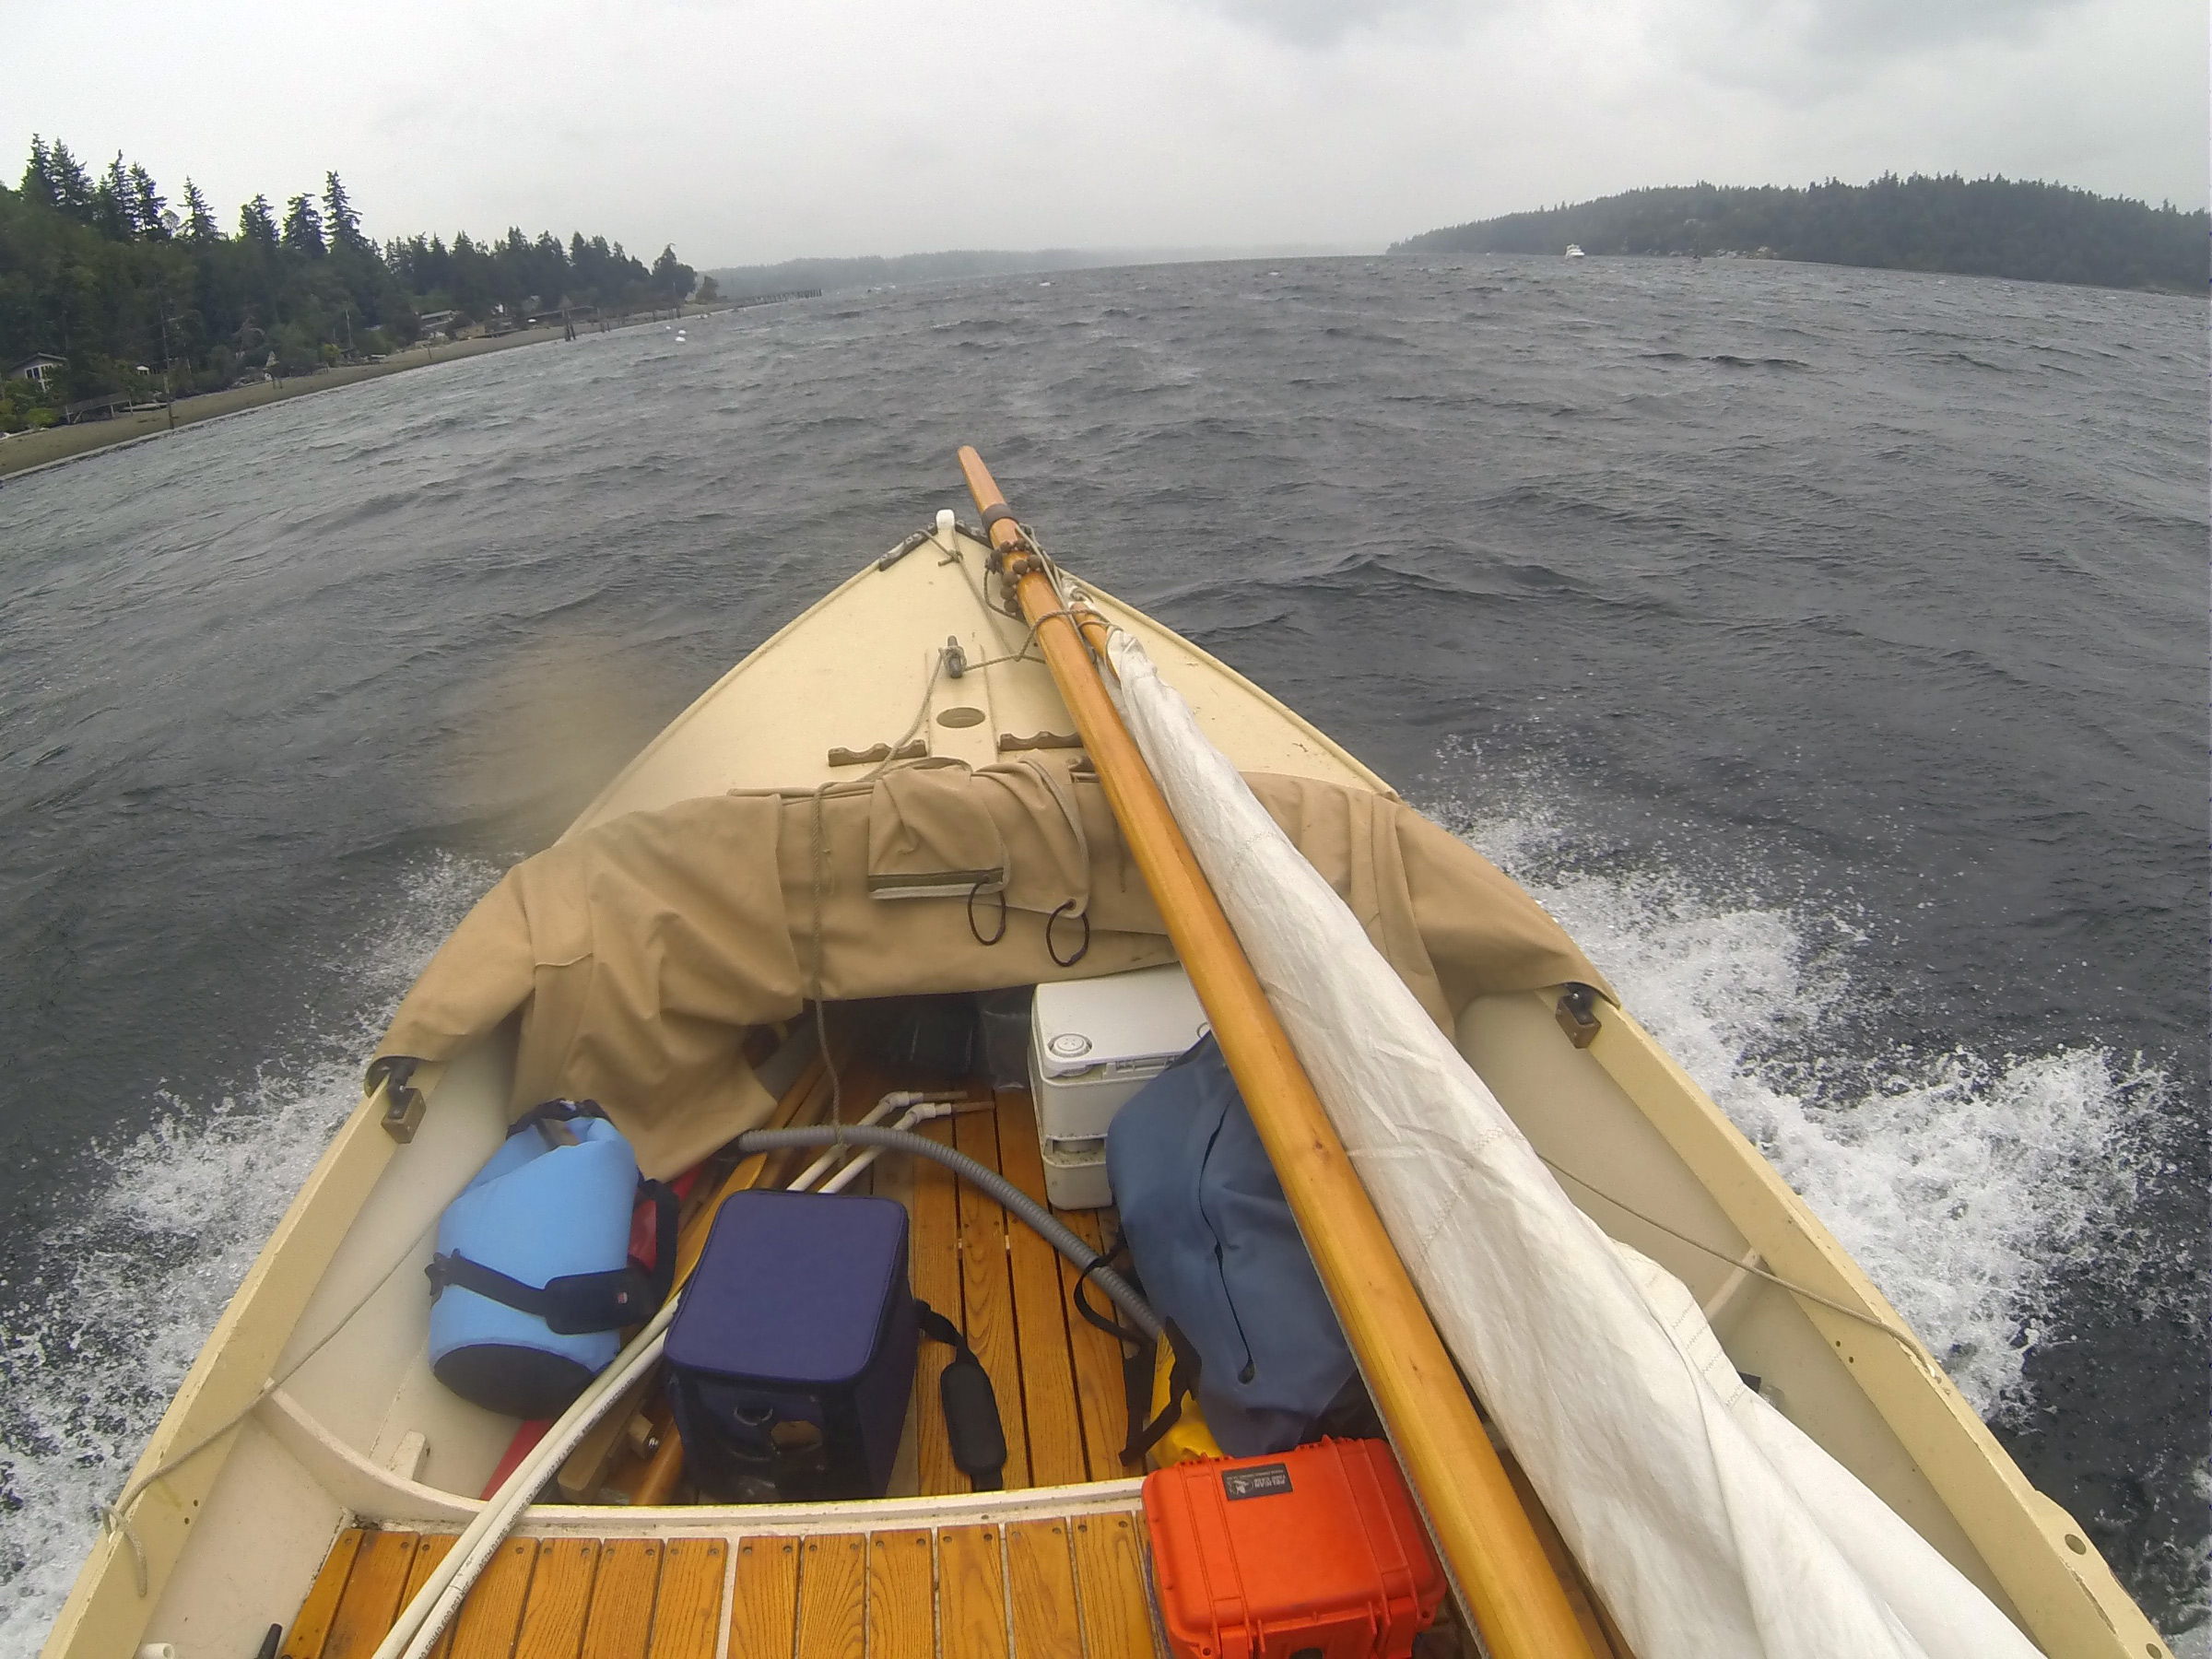
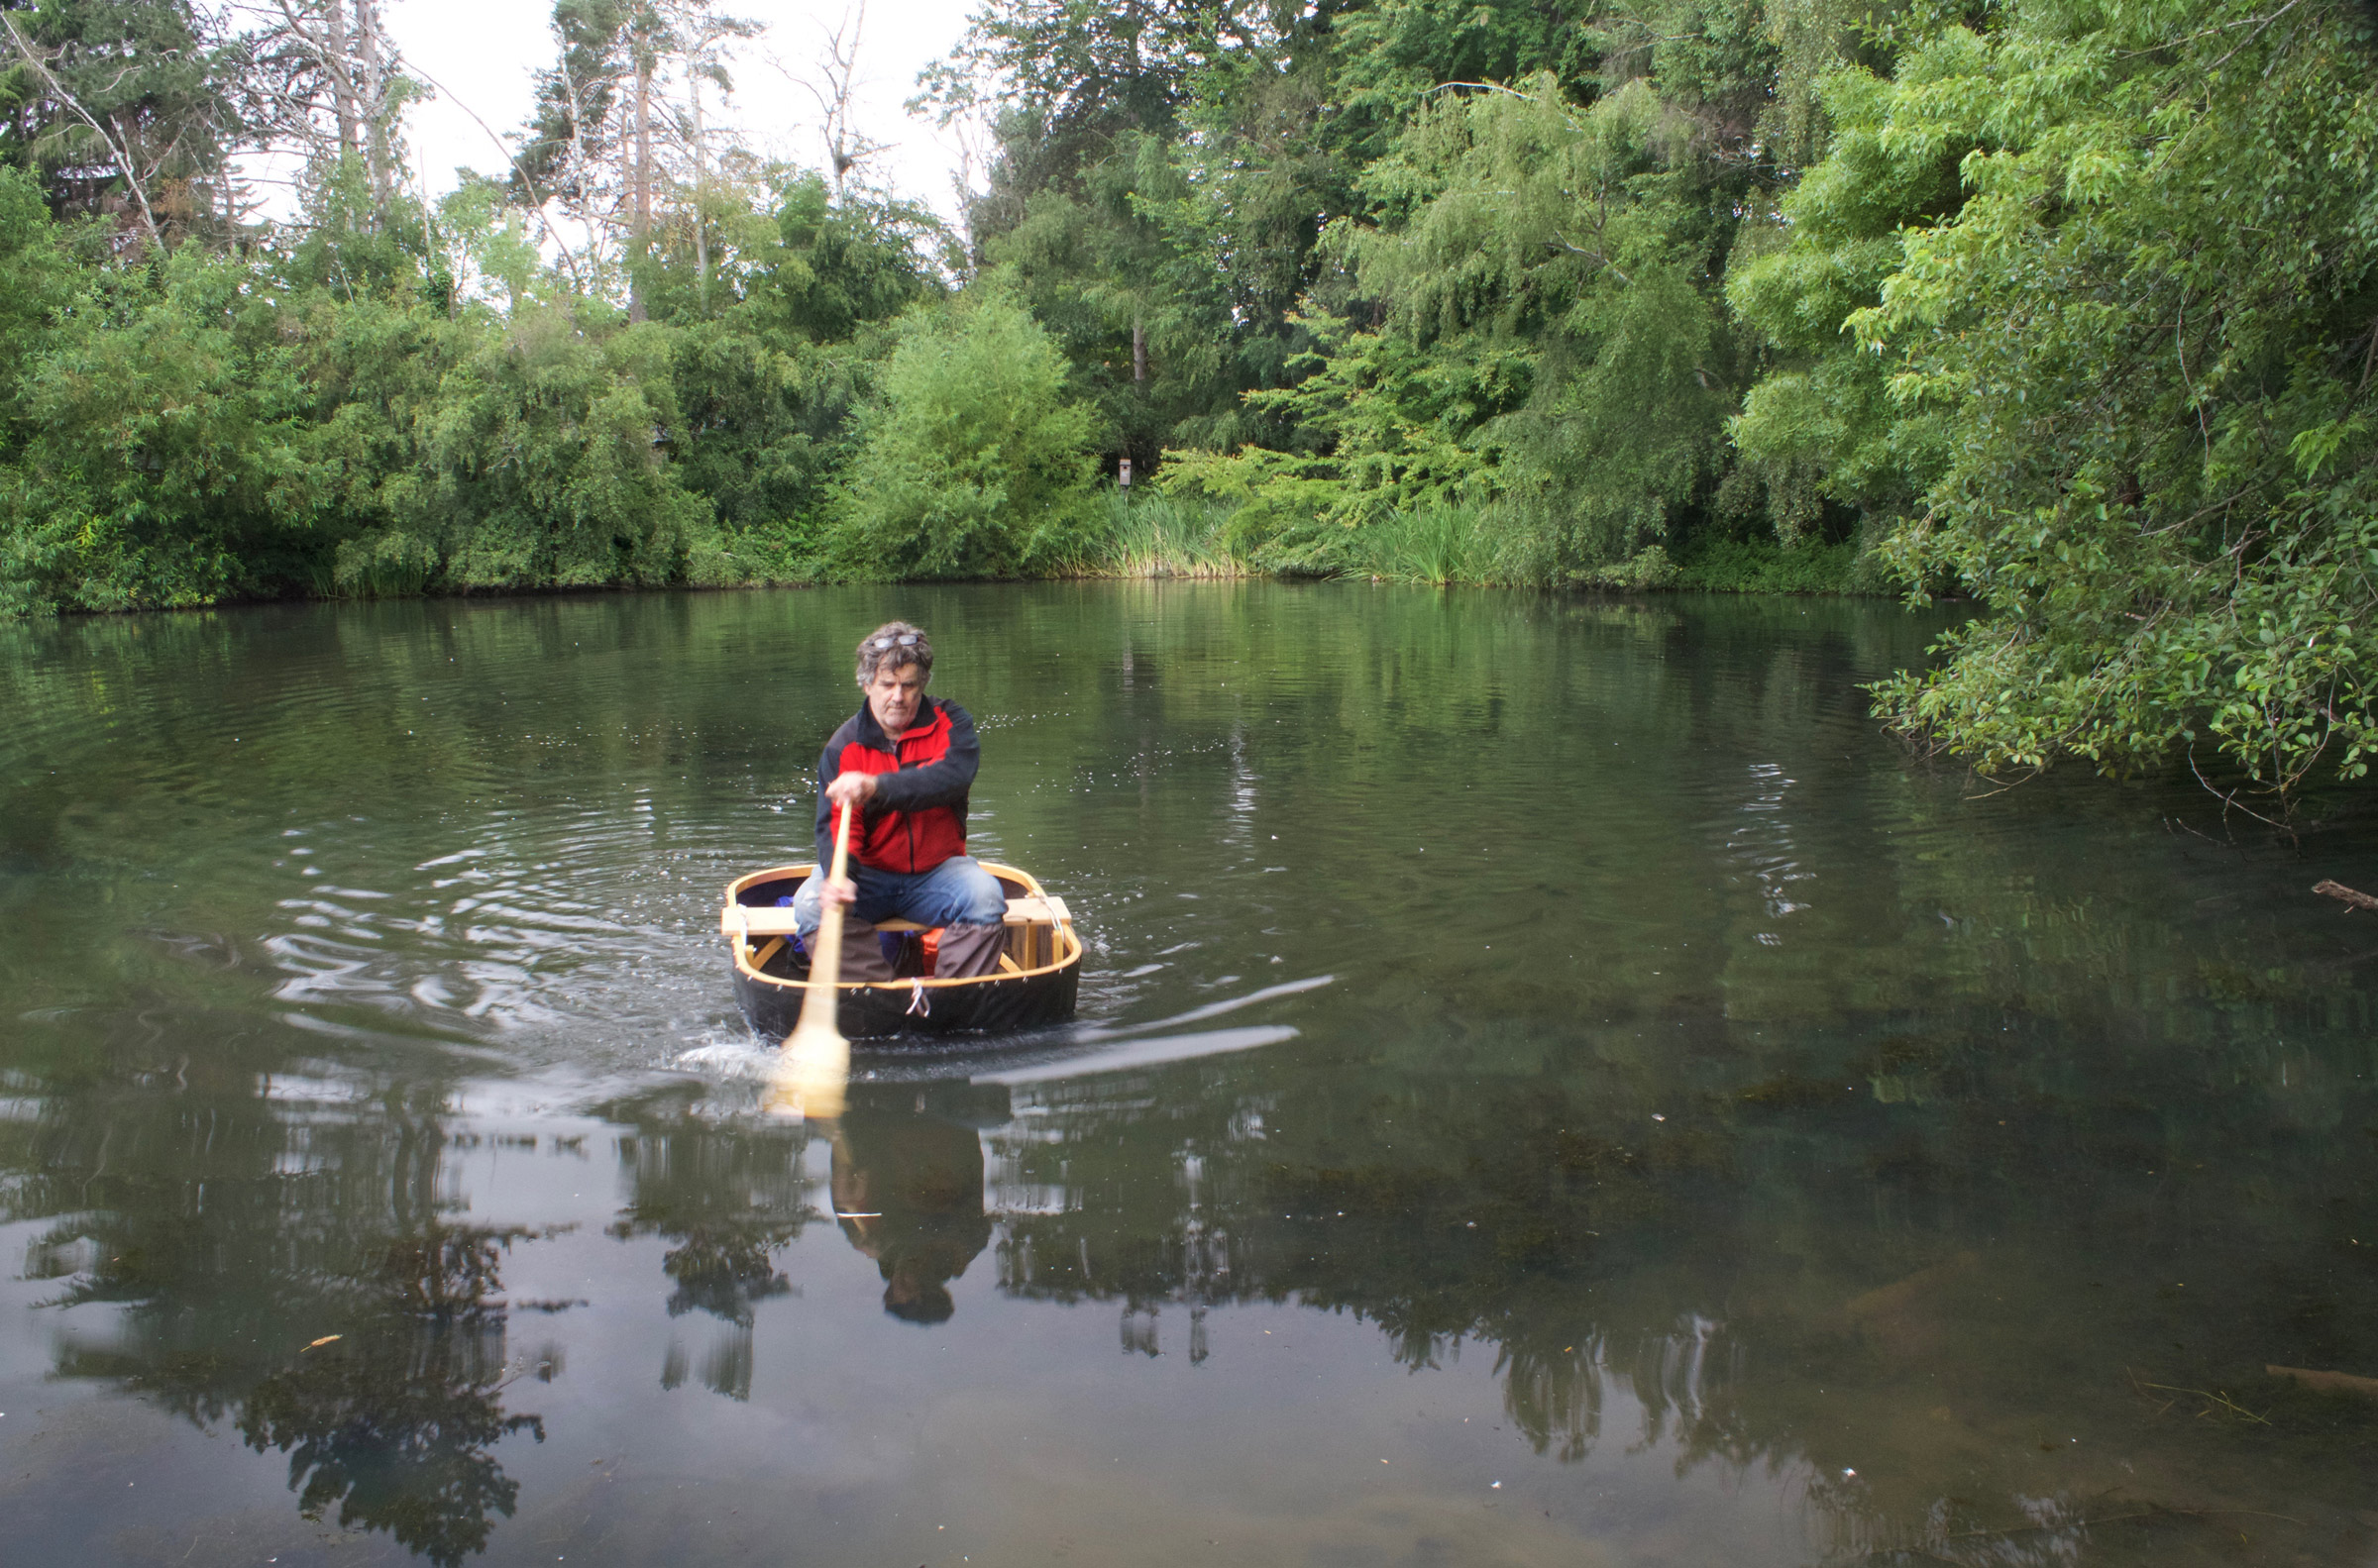
Although it’s essentially a narrow pulling boat, Don Kurylko’s Alaska does well to windward under full mainsail. Once it really breezes up, though, the shorter luff of the reefed mainsail doesn’t perform as well. Fortunately, I set out from the Rush River with a perfect breeze—not too weak, not too strong.
I reached the sheltered water on the north side of Central Point and coasted into a quiet bay at the mouth of Gilbert Creek—a creek too shallow even for my boat’s 8″ draft, and blocked by a large flock of geese that didn’t appear eager to give way. I dropped the rig, pulled out the oars for the final approach, and anchored 100 yards west of the creek, taking a line from the transom to a driftwood log on the beach. Despite the day’s unimpressive run—only 7 miles of real progress—I was ready to be ashore for the rest of the day.
Once the rig was stowed, I climbed the bluff above the bay to find Hok-Si-La’s campgrounds empty. There were a few cars in the day-use parking lot, and a few widely spaced families on the main swimming beach, but no one at all in the campground above my anchorage. A sign posted on the locked restroom building proclaimed that overnight camping was closed until further notice. I walked along the shaded campground loop again, past dozens of empty campsites. Not a single car, or a single camper. But on the edge of the campground loop above the lake, just a two-minute climb from the beach, I found a pit toilet still open. Good enough for me.
The morning sun woke me early at my unofficial anchorage at Hok-Si-La City Park, near the entrance of tiny Wells Creek. The park’s swimming beach and boat ramp are out of sight, just around the headland.
I returned to the boat and set up the platform for sleeping aboard—anchoring out would keep me within the letter of the law. The geese left Gilbert Creek and paddled by 30 yards offshore, then took flight in a sudden honking flurry to head off across the lake in a straggling V. A long-legged heron swooped in to stalk the shallows at the mouth of the creek, while a pair of eagles rode the thermals along the bluffs high above.
Before long, I had finished my onboard sleeping arrangements—platform, tent, and gear—but it would be hours before I needed them. The strong southerly breeze was reduced to a quiet stirring of leaves along the edge of the beach, and the warm sun felt good after a long day of beating to windward. I carried my folding camp chair ashore—a recent concession to comfort—and spent the afternoon reading in the shade of a tall cottonwood while the heron speared frogs from the creek. Out on the open water of Lake Pepin, keelboats and cabin cruisers bashed their way through the whitecaps. I was perfectly content to be ashore.
The next morning, a fierce southeasterly was blowing, even stronger than the day before. Out on the open water beyond Center Point, the waves were bigger than ever. Any upwind progress today would be slow, wet, and cold—stupidly so, in fact. But I couldn’t quite bring myself to give up on the trip and turn back to the car just yet, even though—secretly—I knew that I would end up doing exactly that. But I told myself I’d sail up to Lake City before deciding, a 2-mile test run.
I hoisted the sail, rowed out into the wind, and spent an hour beating into a whitecapping chop, making slow progress—and the wind seemed to be getting stronger, backing just enough to remain stubbornly opposed to my intentions. Just off the beach at Lake City’s Ohuta Park, in the lee of Lake City Point, I dropped the sail and set an anchor off the bow. Then I rowed in to take a line ashore from the stern, leaving the boat afloat in knee-deep water.
Once the boat was squared away, I walked to a bench overlooking the lake to enjoy a sandwich for breakfast. The wind was roaring, the open water all whitecaps and rolling waves. The mouth of the Chippewa River, with its islands and backwaters, was still 8 miles away, dead to windward. Enough was enough. I felt no more than a vague twinge of disappointment. Or, to be completely honest—not even that.
I returned to the boat, untied the shore line, climbed aboard, and drifted out over the anchor, 20 yards off the beach. I was coiling lines and tidying up when I heard someone calling me.
“Sir?” a quiet voice said. I didn’t see anyone. “Sir? Help, sir.”
A few yards out, a young boy was treading water—barely—with his chin just above the surface. Then he ducked under until the top of his head was all that showed for a moment before bobbing slowly back up. “Sir? Can you help me, sir?” he called again.
It wasn’t the least bit dramatic—but then, I knew from my experience as a lifeguard that real drownings rarely are. Moving quickly but calmly, I tossed one end of a line to the boy and pulled him over to me. With the boat’s low freeboard, he was able to pull himself aboard without much trouble. I rowed him to shore and left him with his mother, who had been watching helplessly from the beach while her son nearly drowned. A non-swimmer, he had waded out to the edge of the buoyed swimming area and lost his footing, drifting out into water well over his head.
Headwinds or not, I was glad I had decided to sail down to Lake City before turning back. The boy’s mother was even happier—pandemic or not, I wasn’t able to avoid several hugs and a series of tearful thank-yous. As I rowed away, she was escorting the boy back to their car—the only one in the lot—toweling his hair dry, hugging him over and over, and keeping up a running commentary that was more relief than anger: “What were you thinking? What on earth were you thinking? If that man hadn’t been there in his boat.…”
Smiling to myself at the thought of being known forever as that man, I rowed off the beach, tied a double reef in the mainsail, and stowed the oars. I’d come back another time to explore the Chippewa River delta. Meanwhile, these conditions were just what I needed to take me back to the Rush River at speed. Too much speed, maybe, but I was going to give it a go. Still smiling, I hoisted the sail, turned off the wind, and moved aft to put my weight where it was needed for downwind sailing.
Although it’s essentially a narrow pulling boat, Don Kurylko’s Alaska does well to windward under full mainsail. Once it really breezes up, though, the shorter luff of the reefed mainsail doesn’t perform as well. Fortunately, I set out from the Rush River with a perfect breeze—not too weak, not too strong.
White-topped waves rolled past, setting the boat pitching and rolling as we slowly steadied on our northward course. The sky overhead was gray and filled with rolling clouds. I eased the sheet for a broad reach on the starboard tack and felt the boat take off with a surging rush of speed, a sustained acceleration that continued until cold spray was flying past in tall rooster tails that reached well over my head. I steered for a tall headland 3 miles upriver on the Wisconsin side, a course far enough off the wind to avoid an unexpected and possibly disastrous jibe, and settled in for the ride.
The boat sailed northward in a wild rush between white curtains of spray, yawing slightly back and forth atop each passing wave, surfing and heeling and settling as wave after wave passed beneath the hull. It was a wet ride. I pulled on my rain jacket one arm at a time, managing the sheet and tiller carefully. Still, what would have been desperate sailing under full sail was merely exhilarating now; under the double-reefed main I had perfect control.
Five miles down the lake, my northward run halfway over, a foiling kiteboarder swept by at 20 miles per hour—the only other sailor in sight.
“Sweet!” he shouted, and then he was gone.
I knew exactly what he meant.
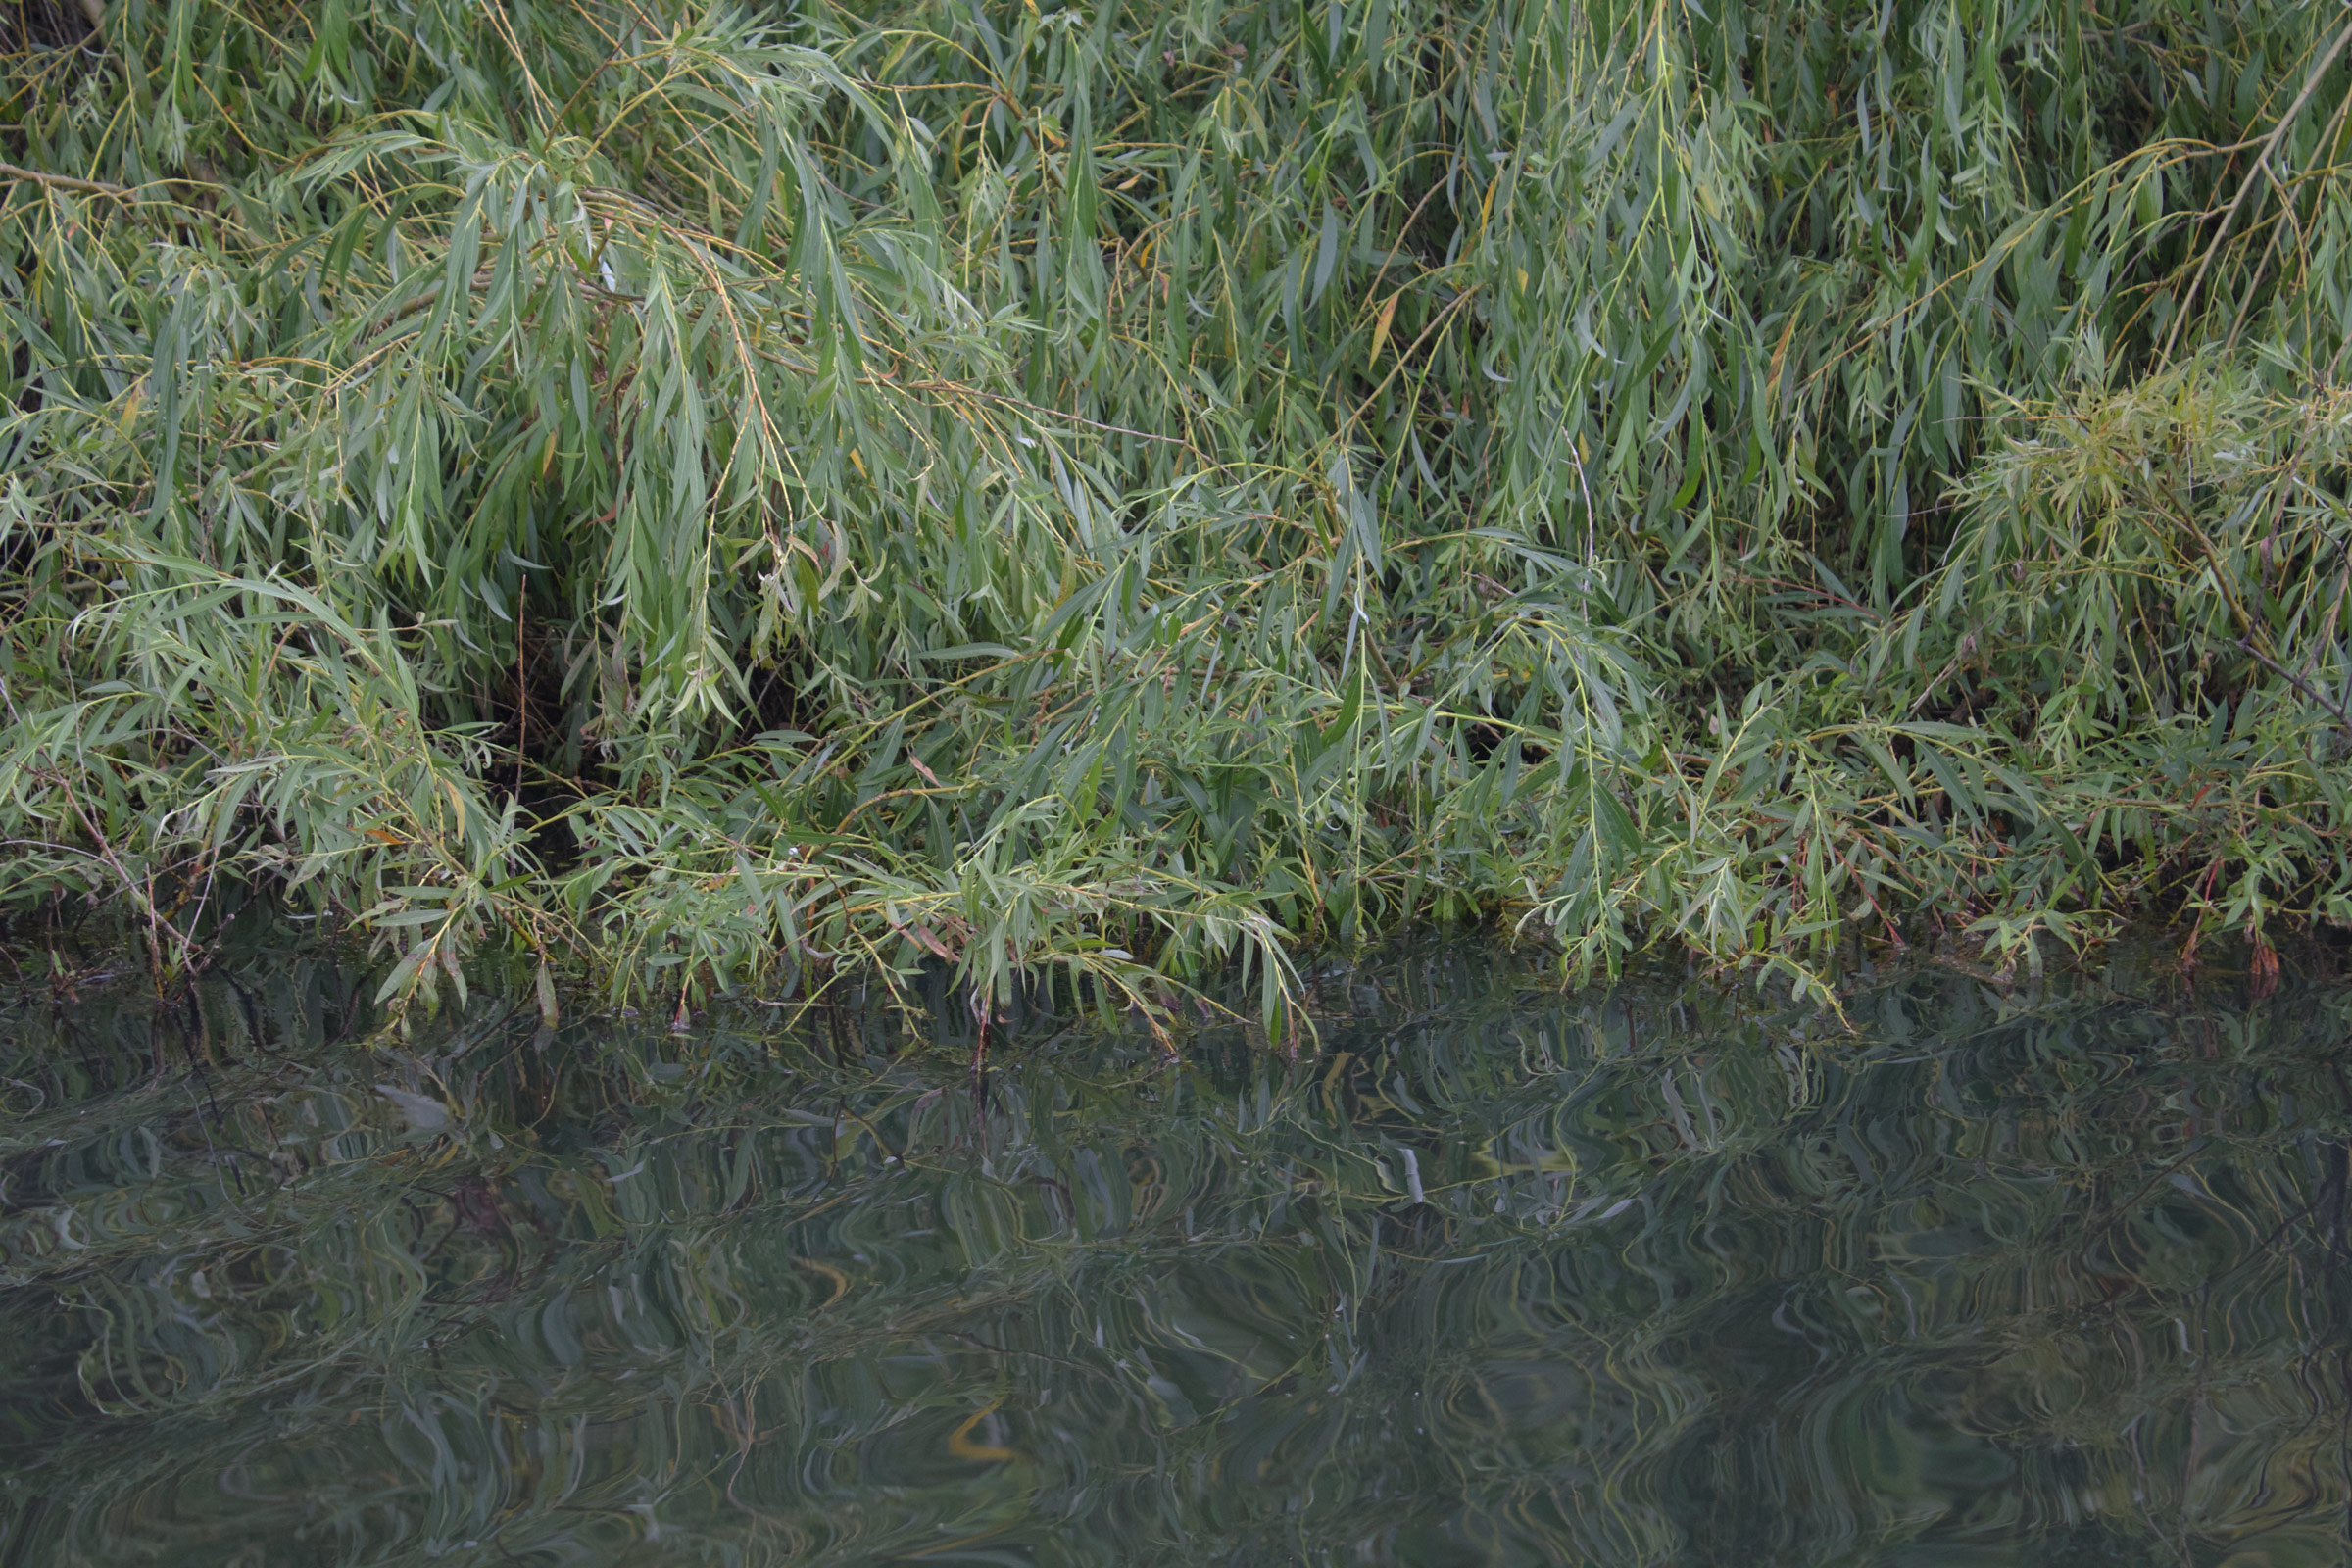
On my return journey, I camped again at the mouth of the Rush River. I tied up alongshore in the middle of a small cloud of mayflies, seen here flying over the river. They are short-lived insects that briefly emerge into adulthood—and flight—after a series of aquatic larval stages that can last a year or more. While they don’t bite, a large hatch can be big enough, and dense enough, to show up on weather radar, and can bury a beach or shoreline in dead mayflies in just a few hours.
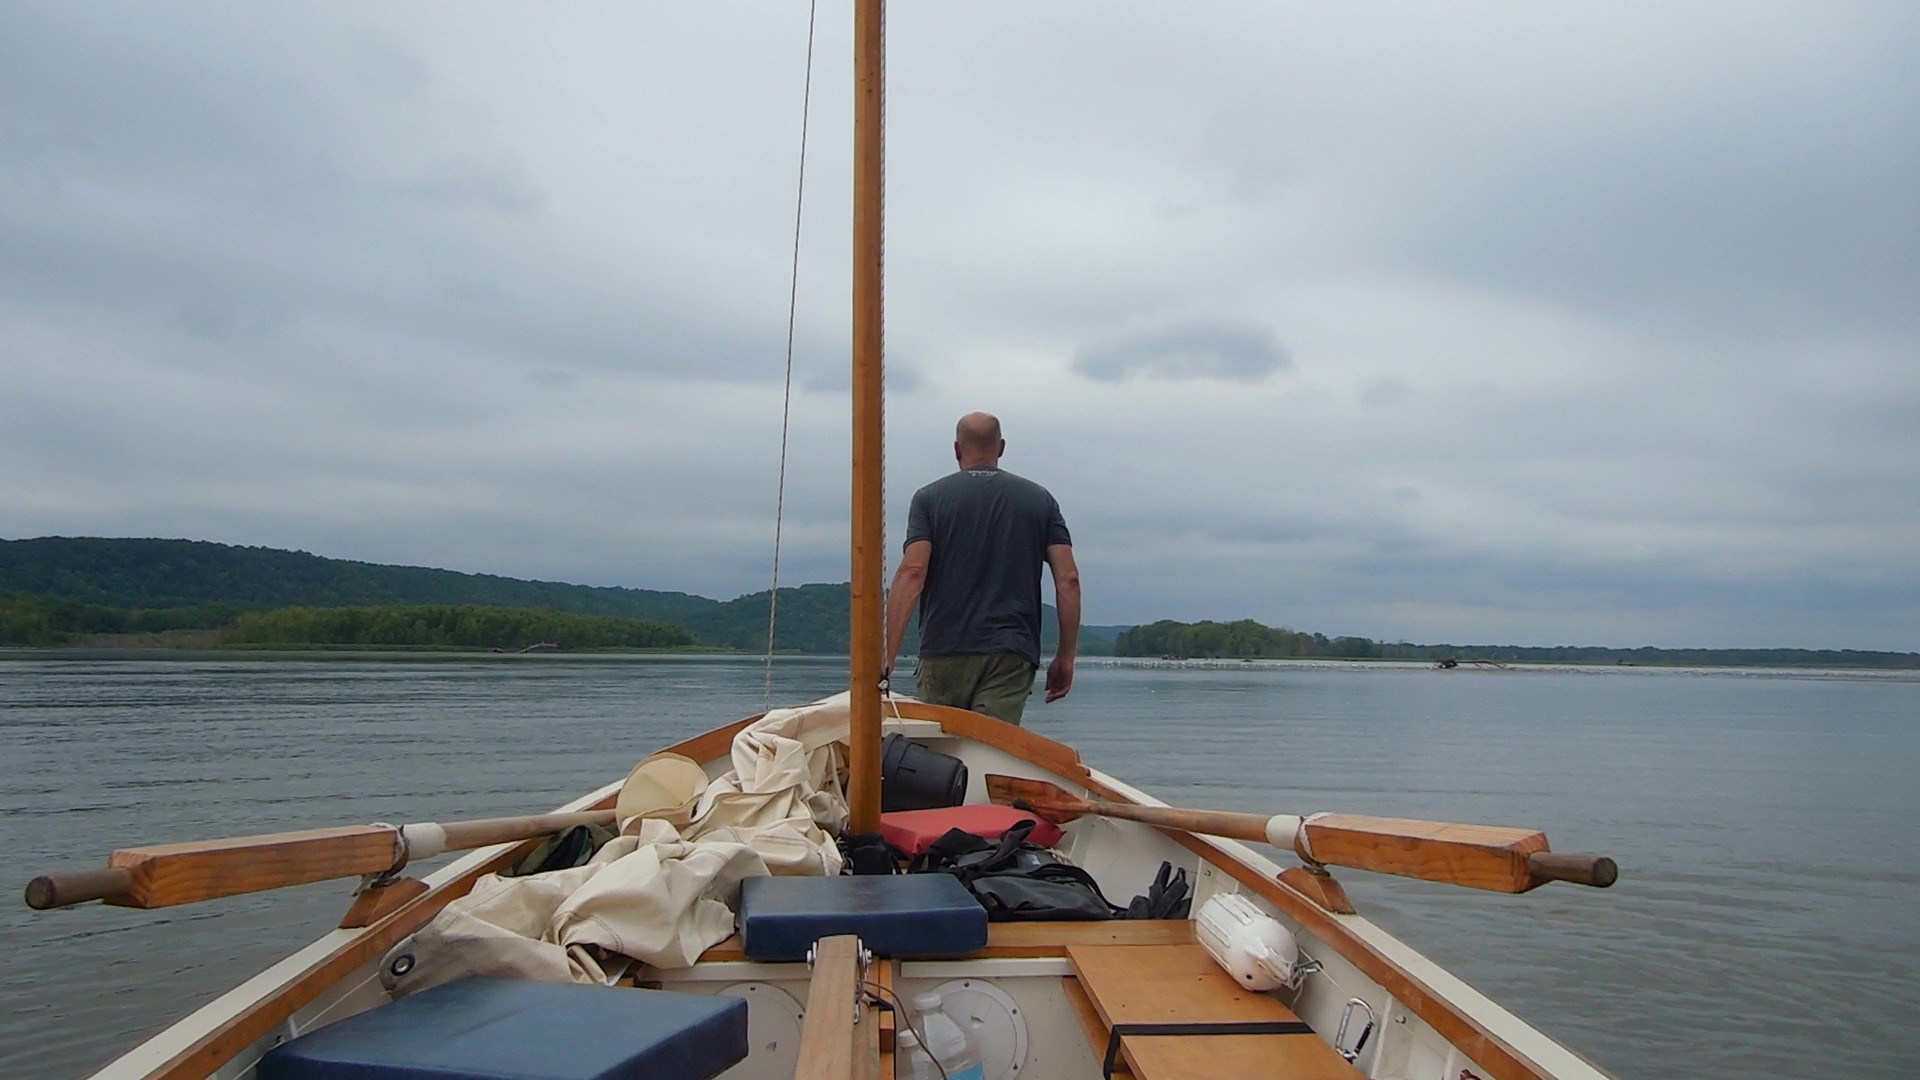
On my way back home, I tried (and failed) to find a passage through the sandbars at the northern end of Lake Pepin.
Firmly aground a mile from shore. At one point in my ill-advised detour, I was forced to leave the boat parked securely in the middle of the lake while I wandered around the shallows looking for an escape route.
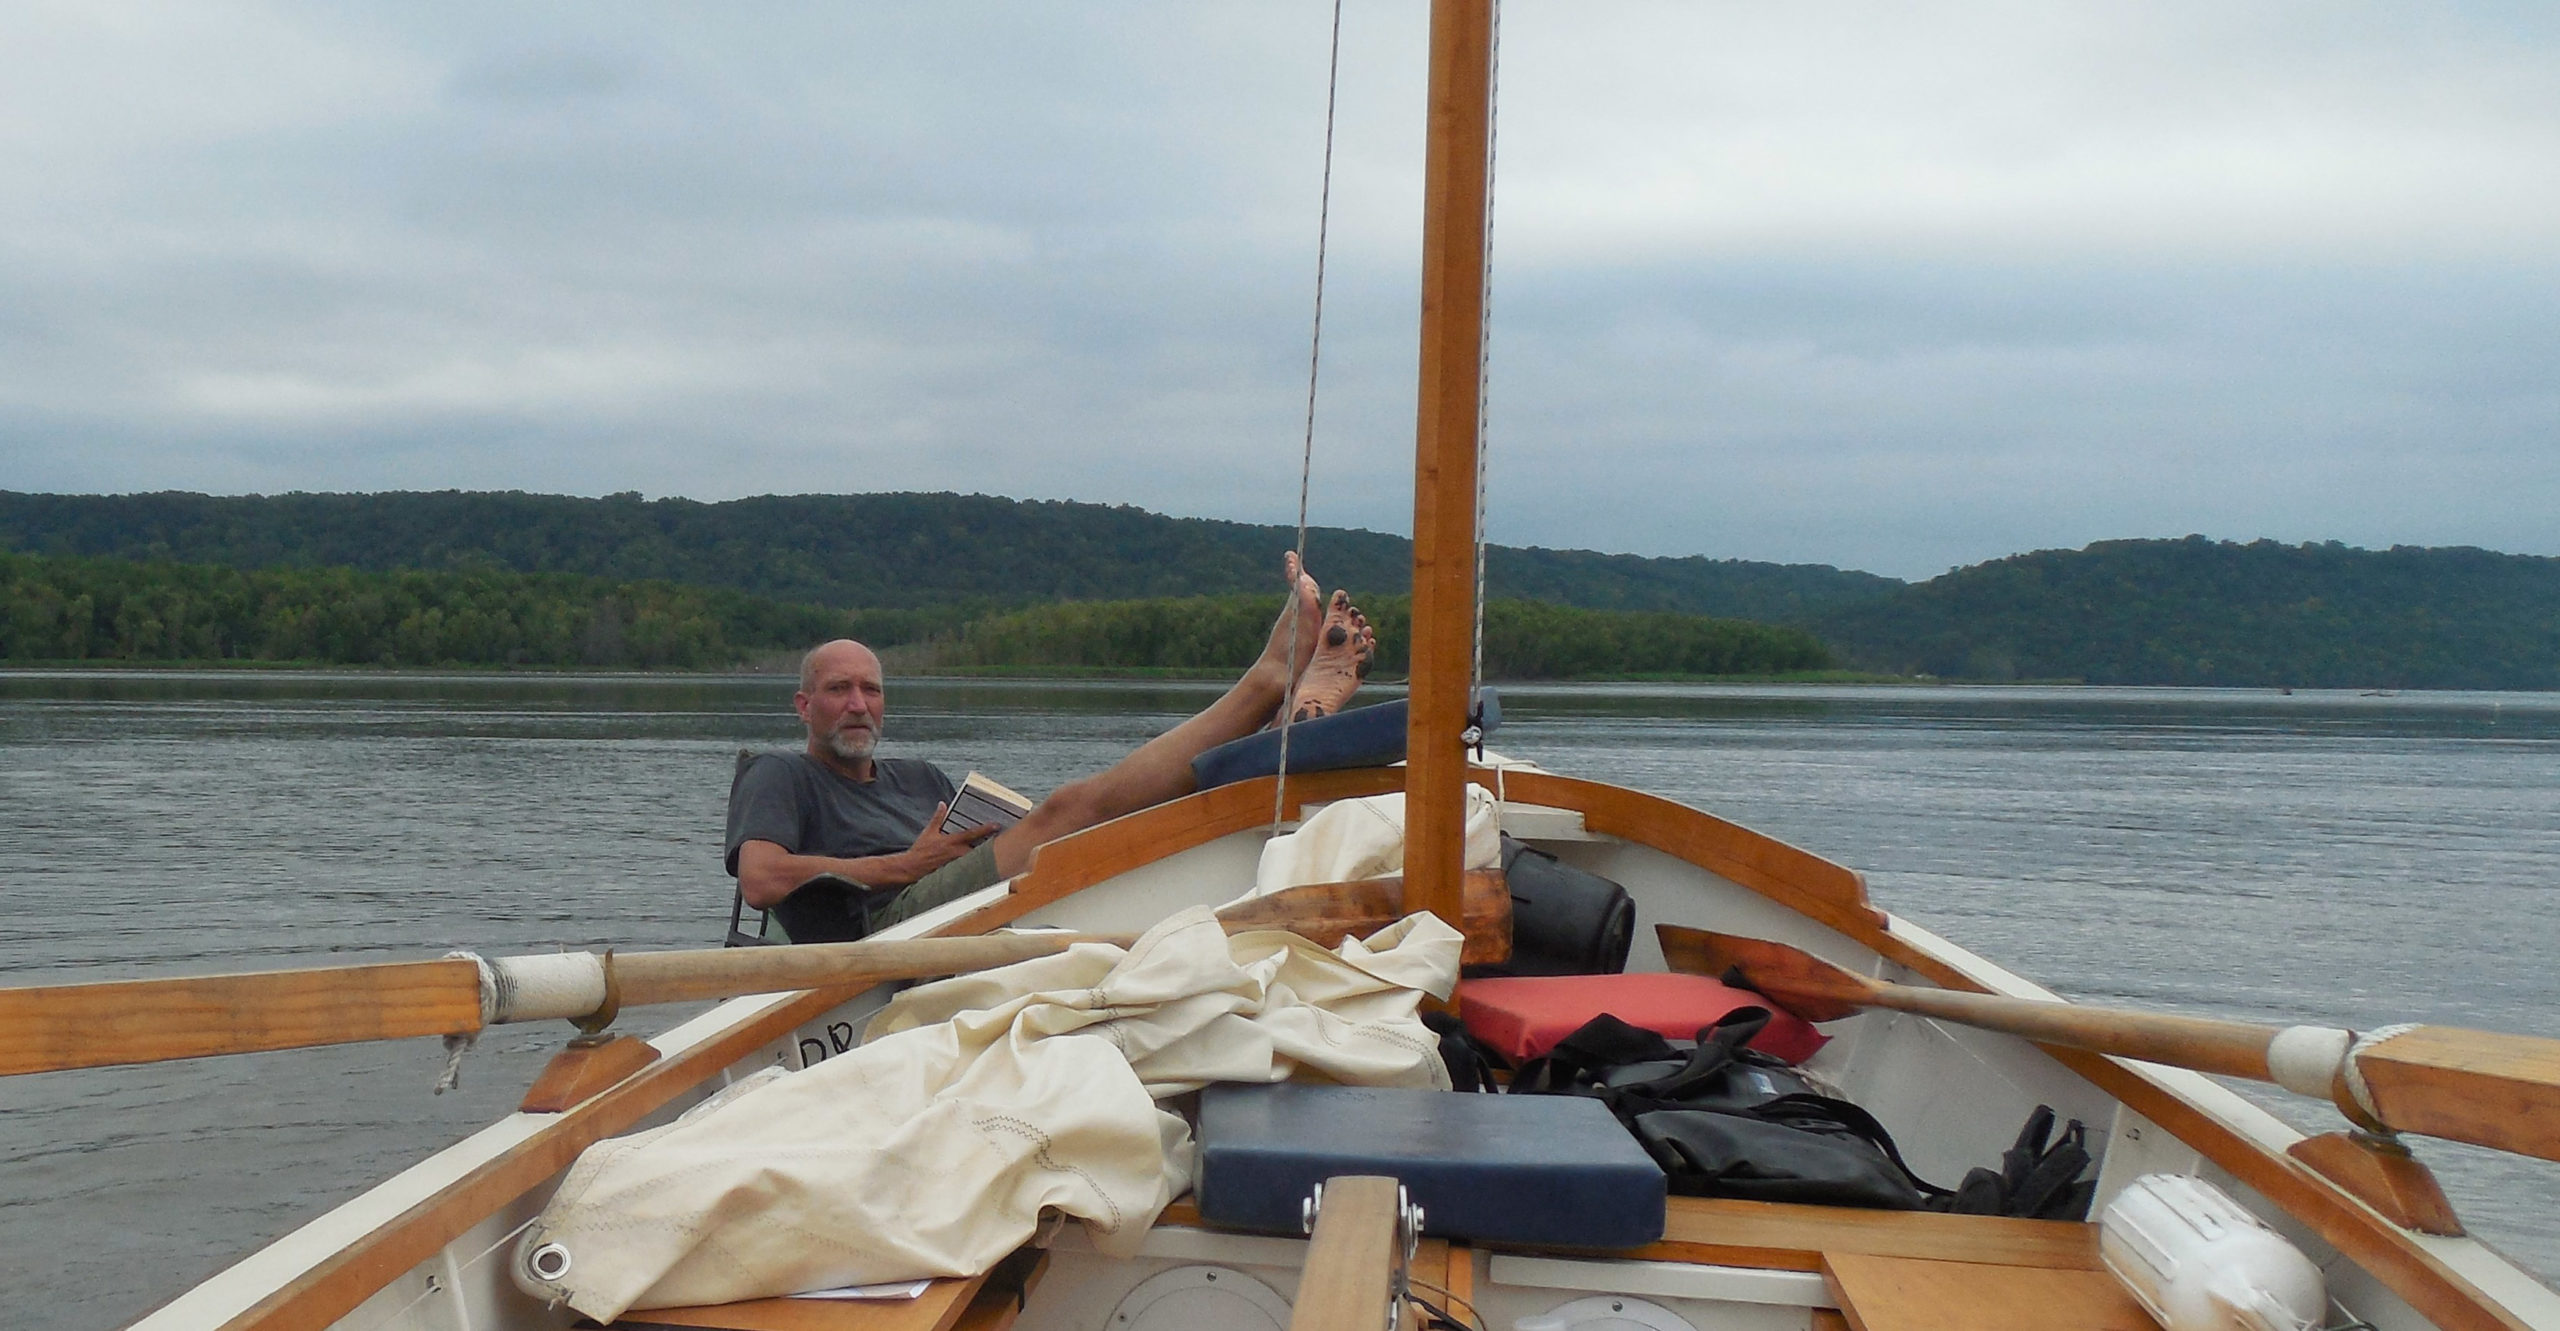
A mile wide and 1” deep. A good book and a comfortable chair can help a sailor deal with the inevitable setbacks of small-boat cruising. I’d eventually have to get up, put the book away, and find a way back to deeper water, but on a journey without a clear destination, there’s no such thing as getting lost.
END.
Tom Pamperin is a freelance writer who lives in northwestern Wisconsin. He spends his summers cruising small boats throughout Wisconsin, the North Channel, and along the Texas coast. He is a frequent contributor to Small Boats Monthly and WoodenBoat.
If you have an interesting story to tell about your adventures with a small boat, please email us a brief outline and a few photos.
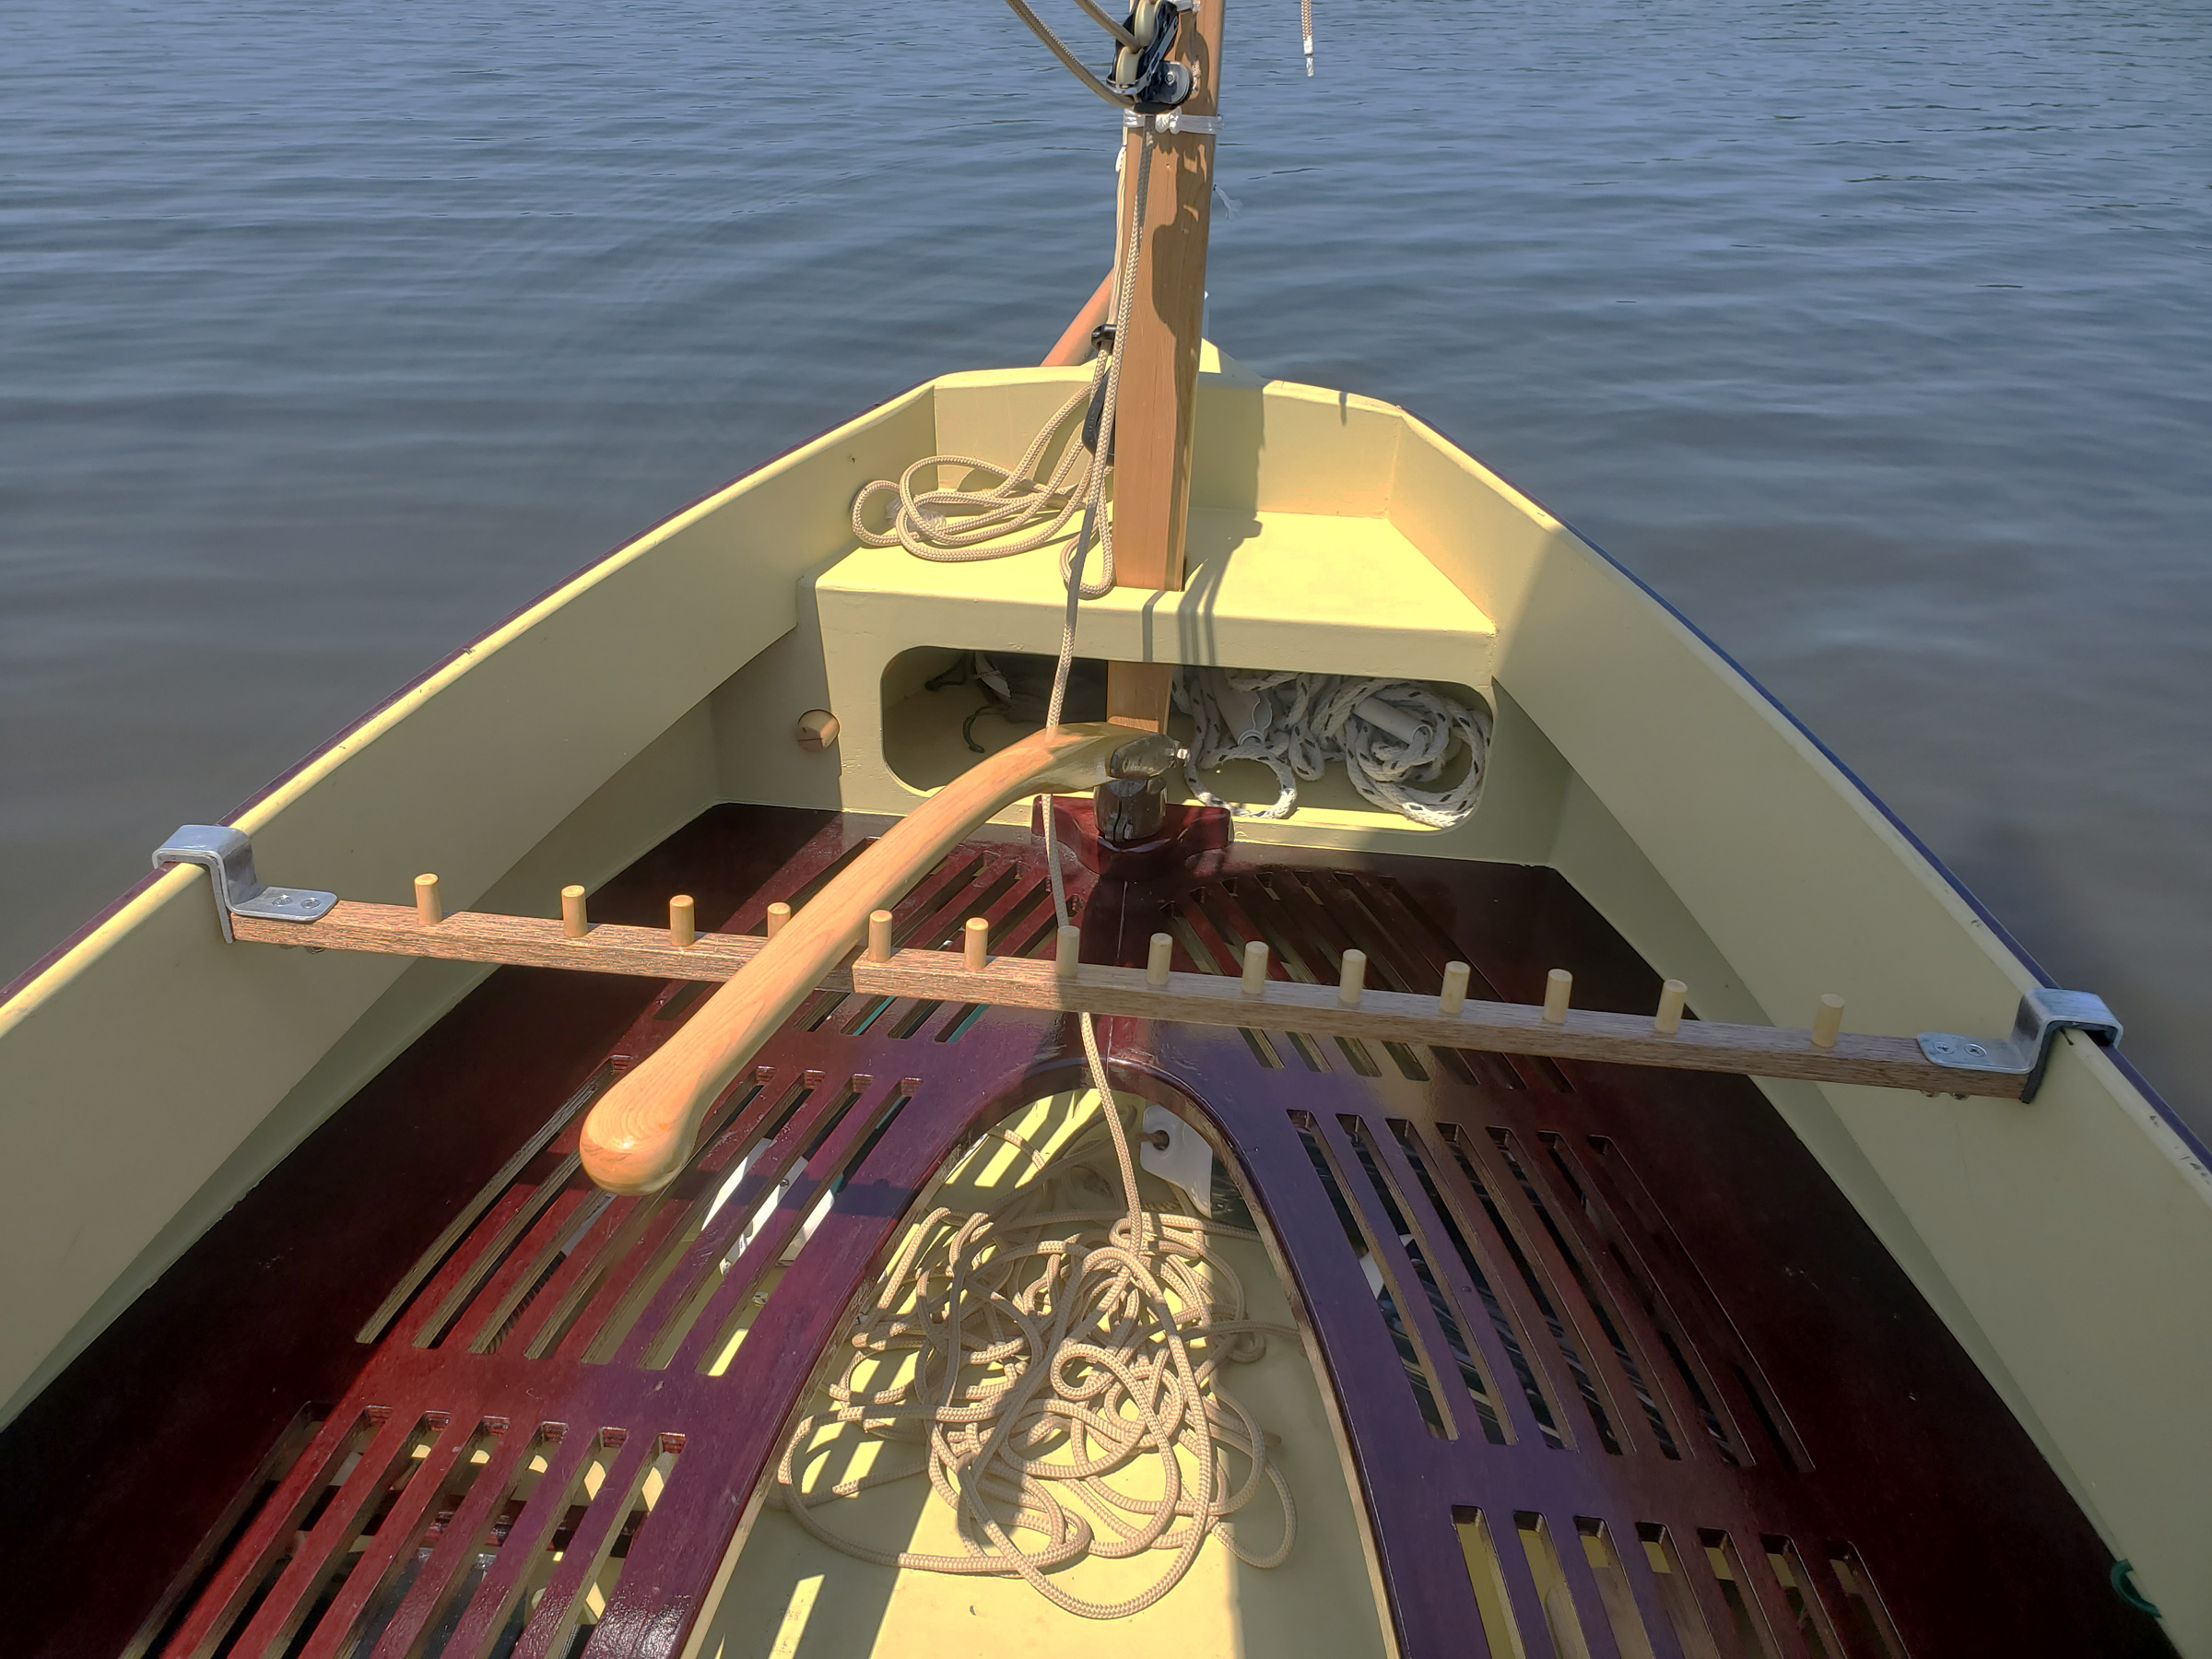
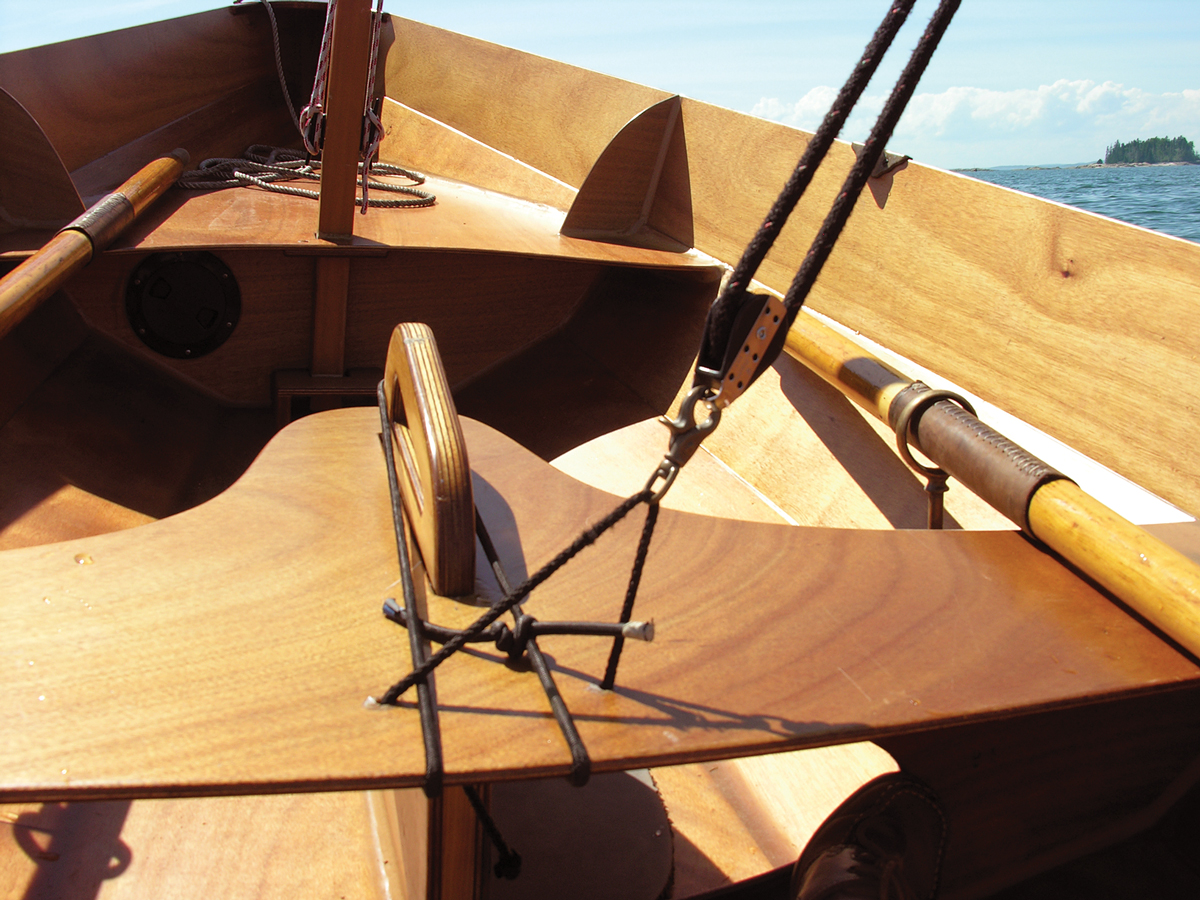
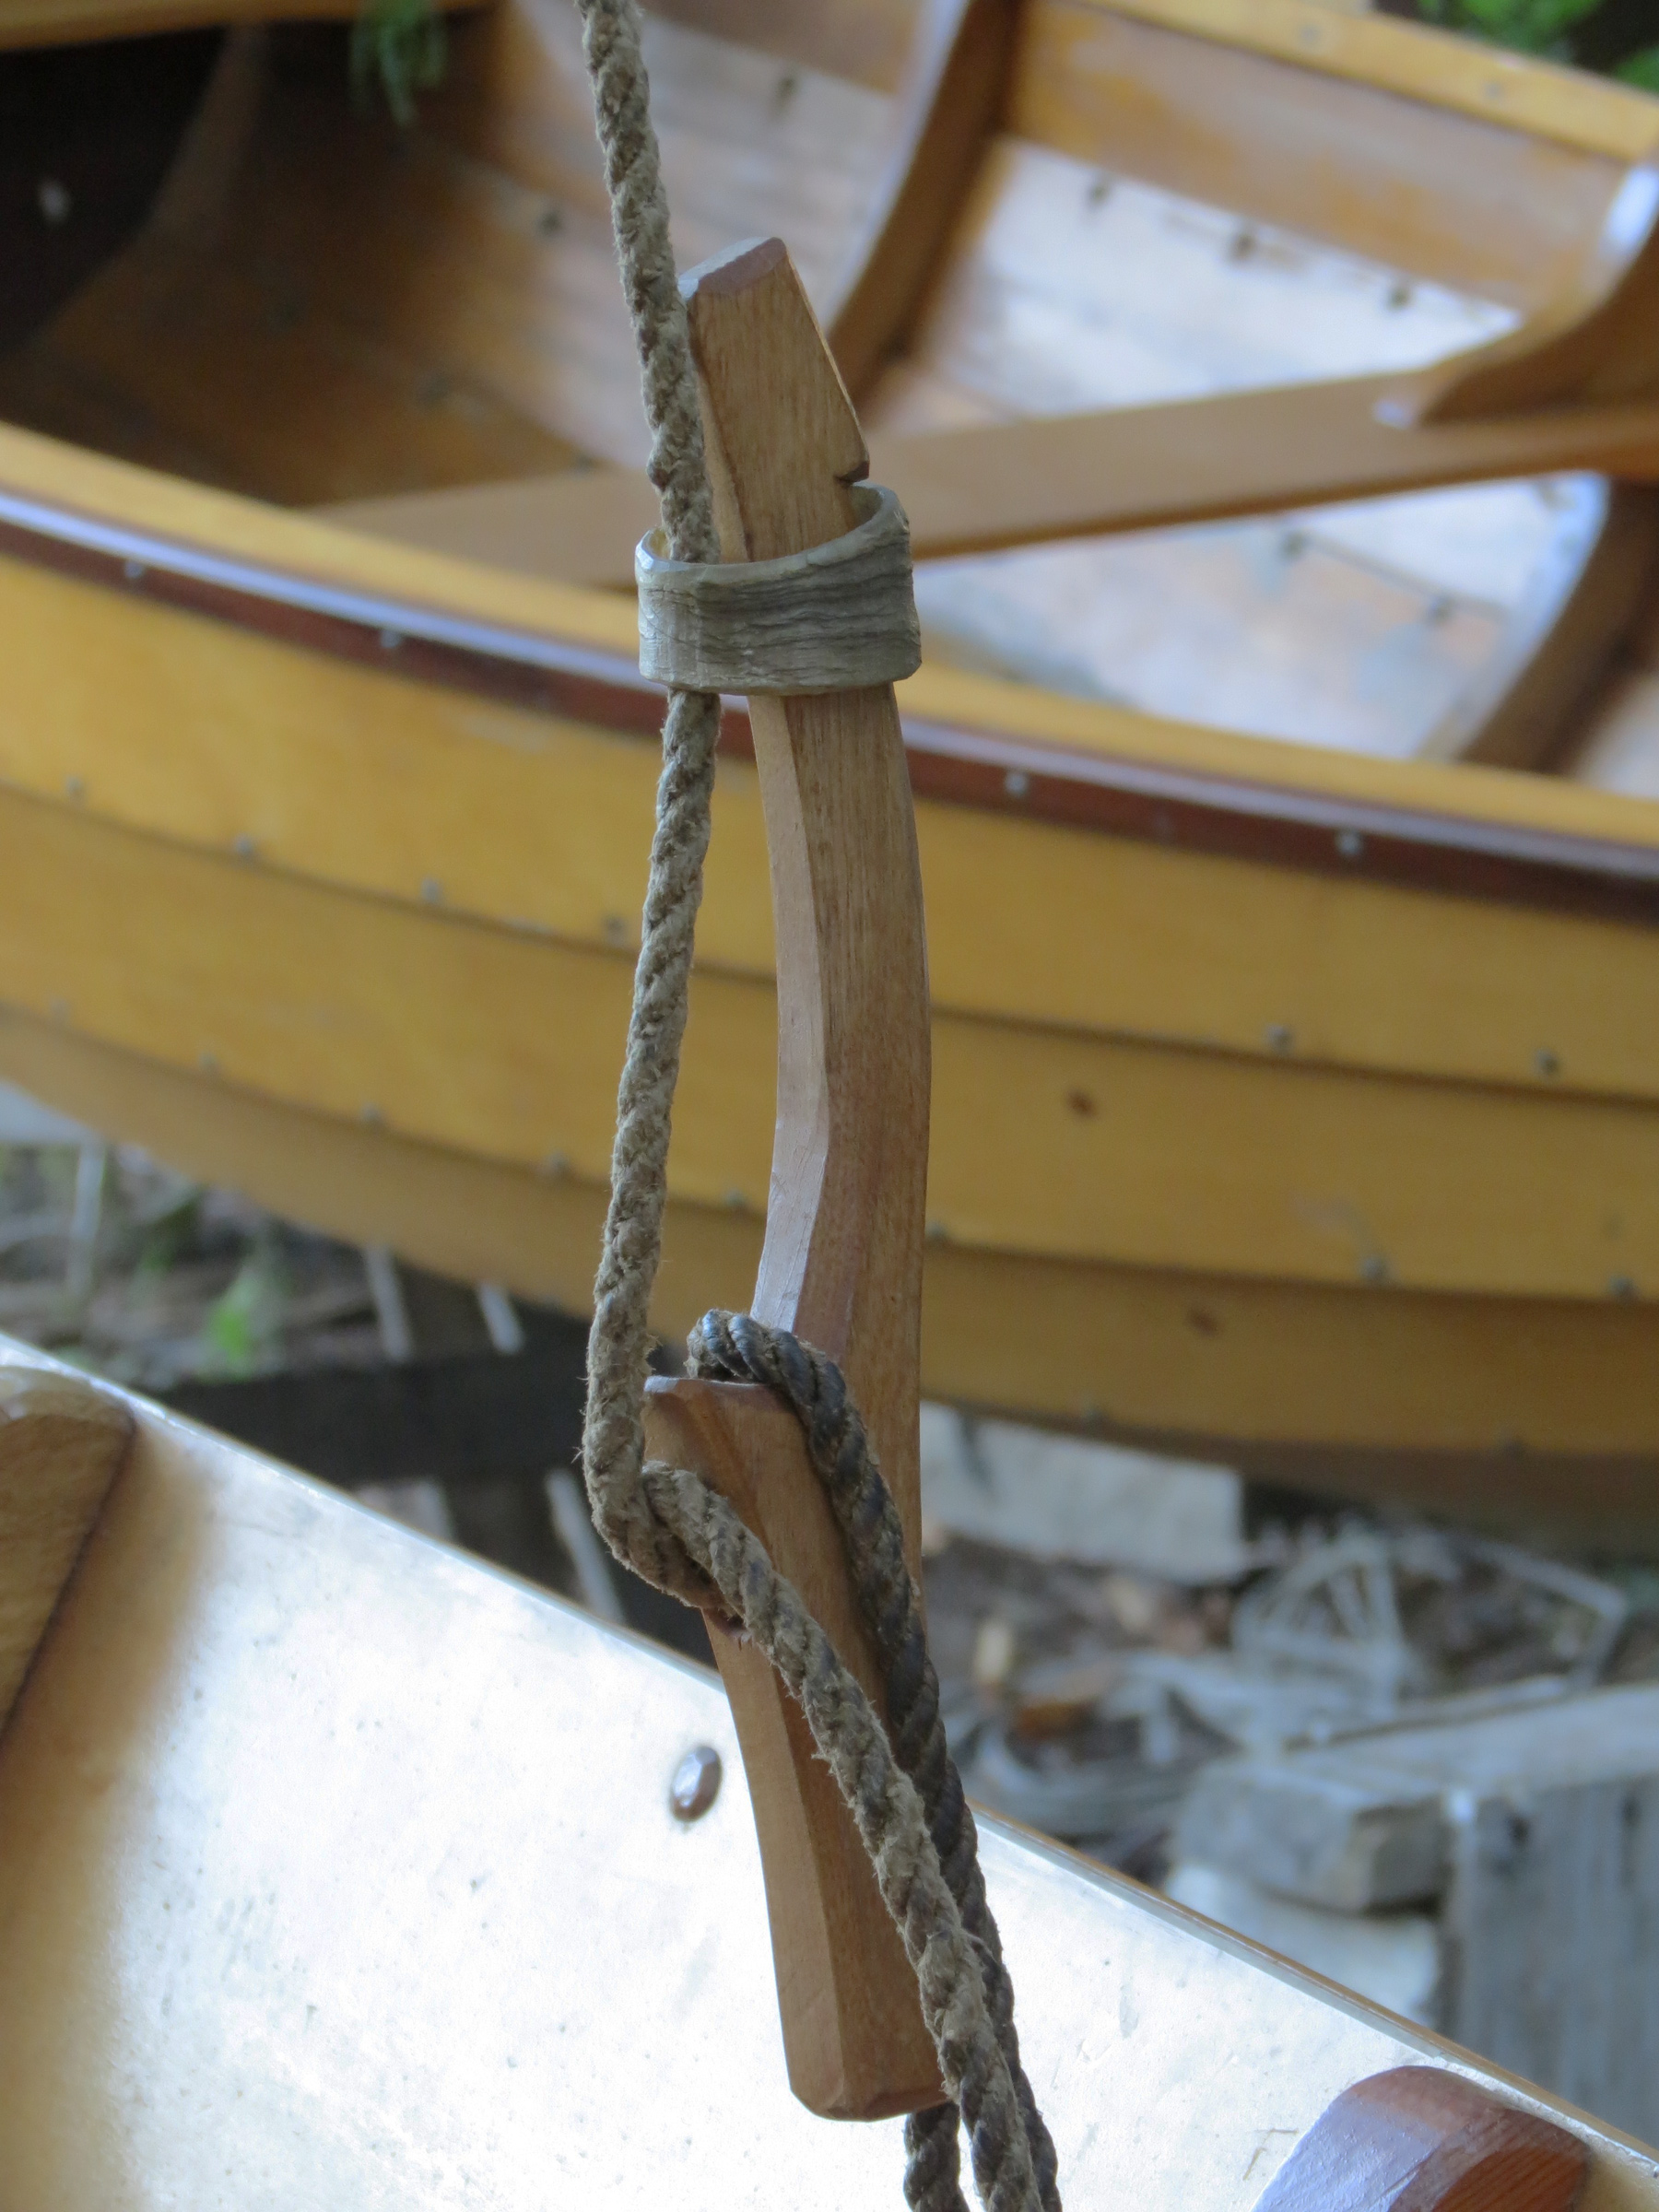
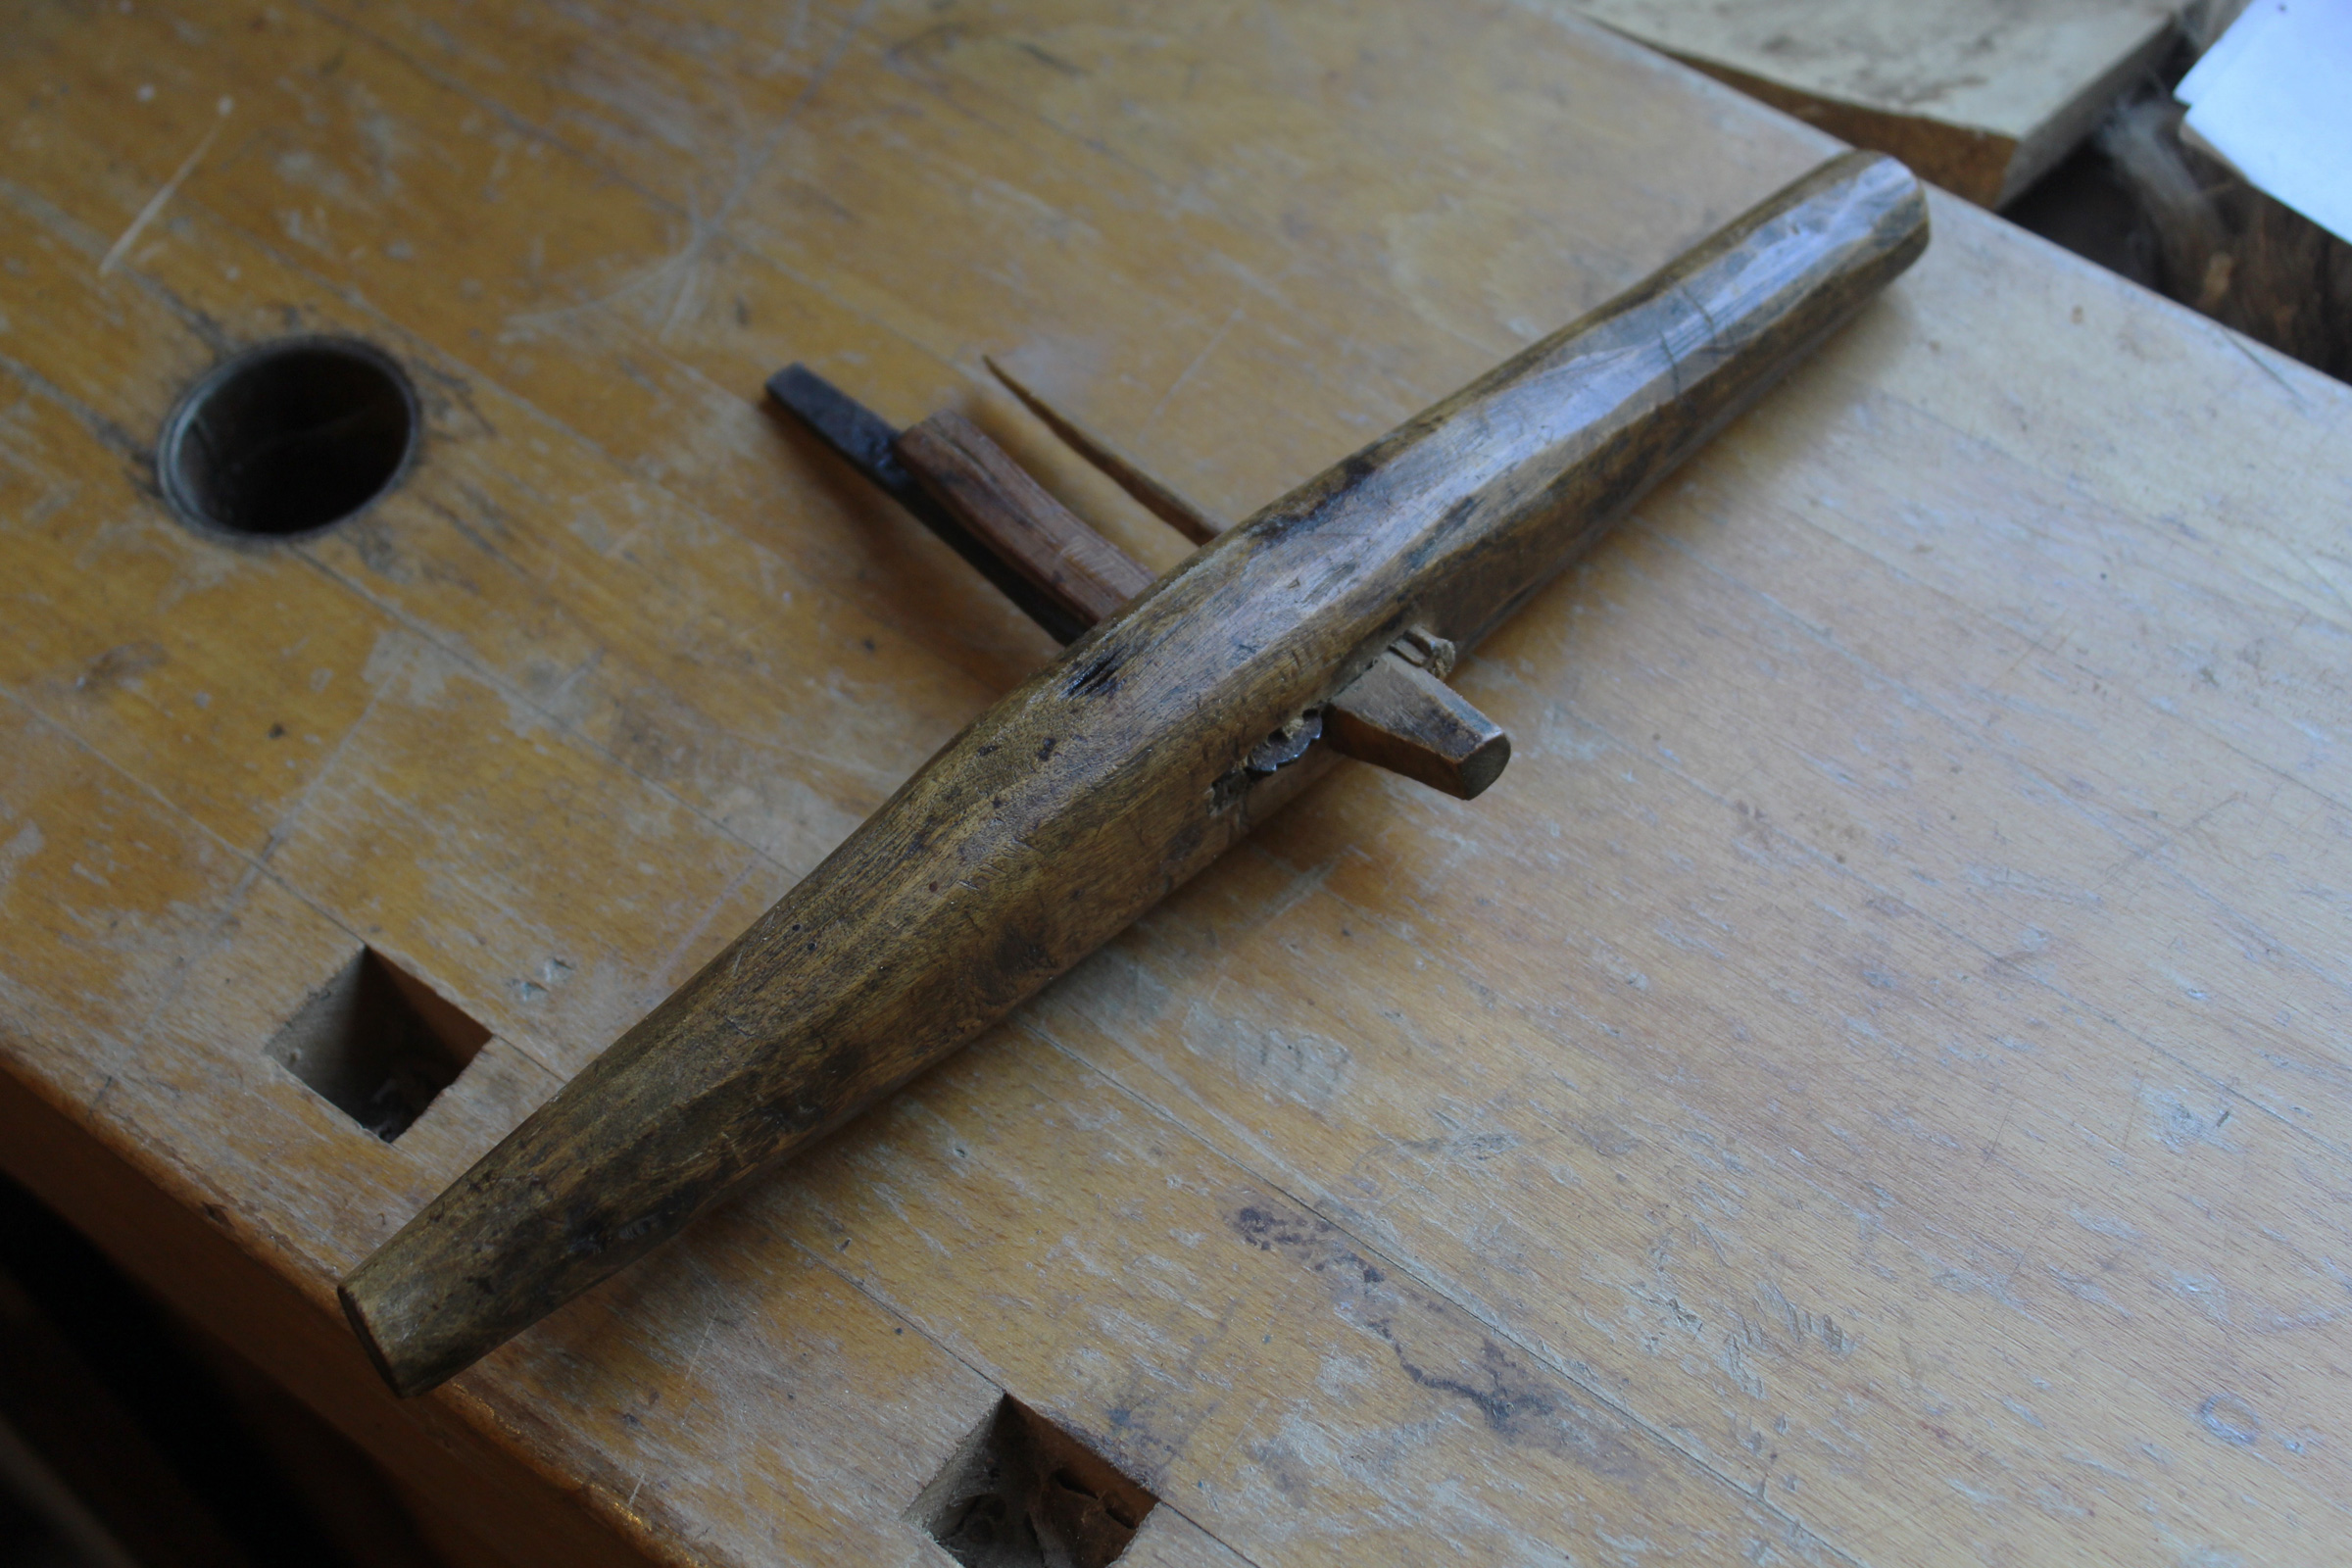
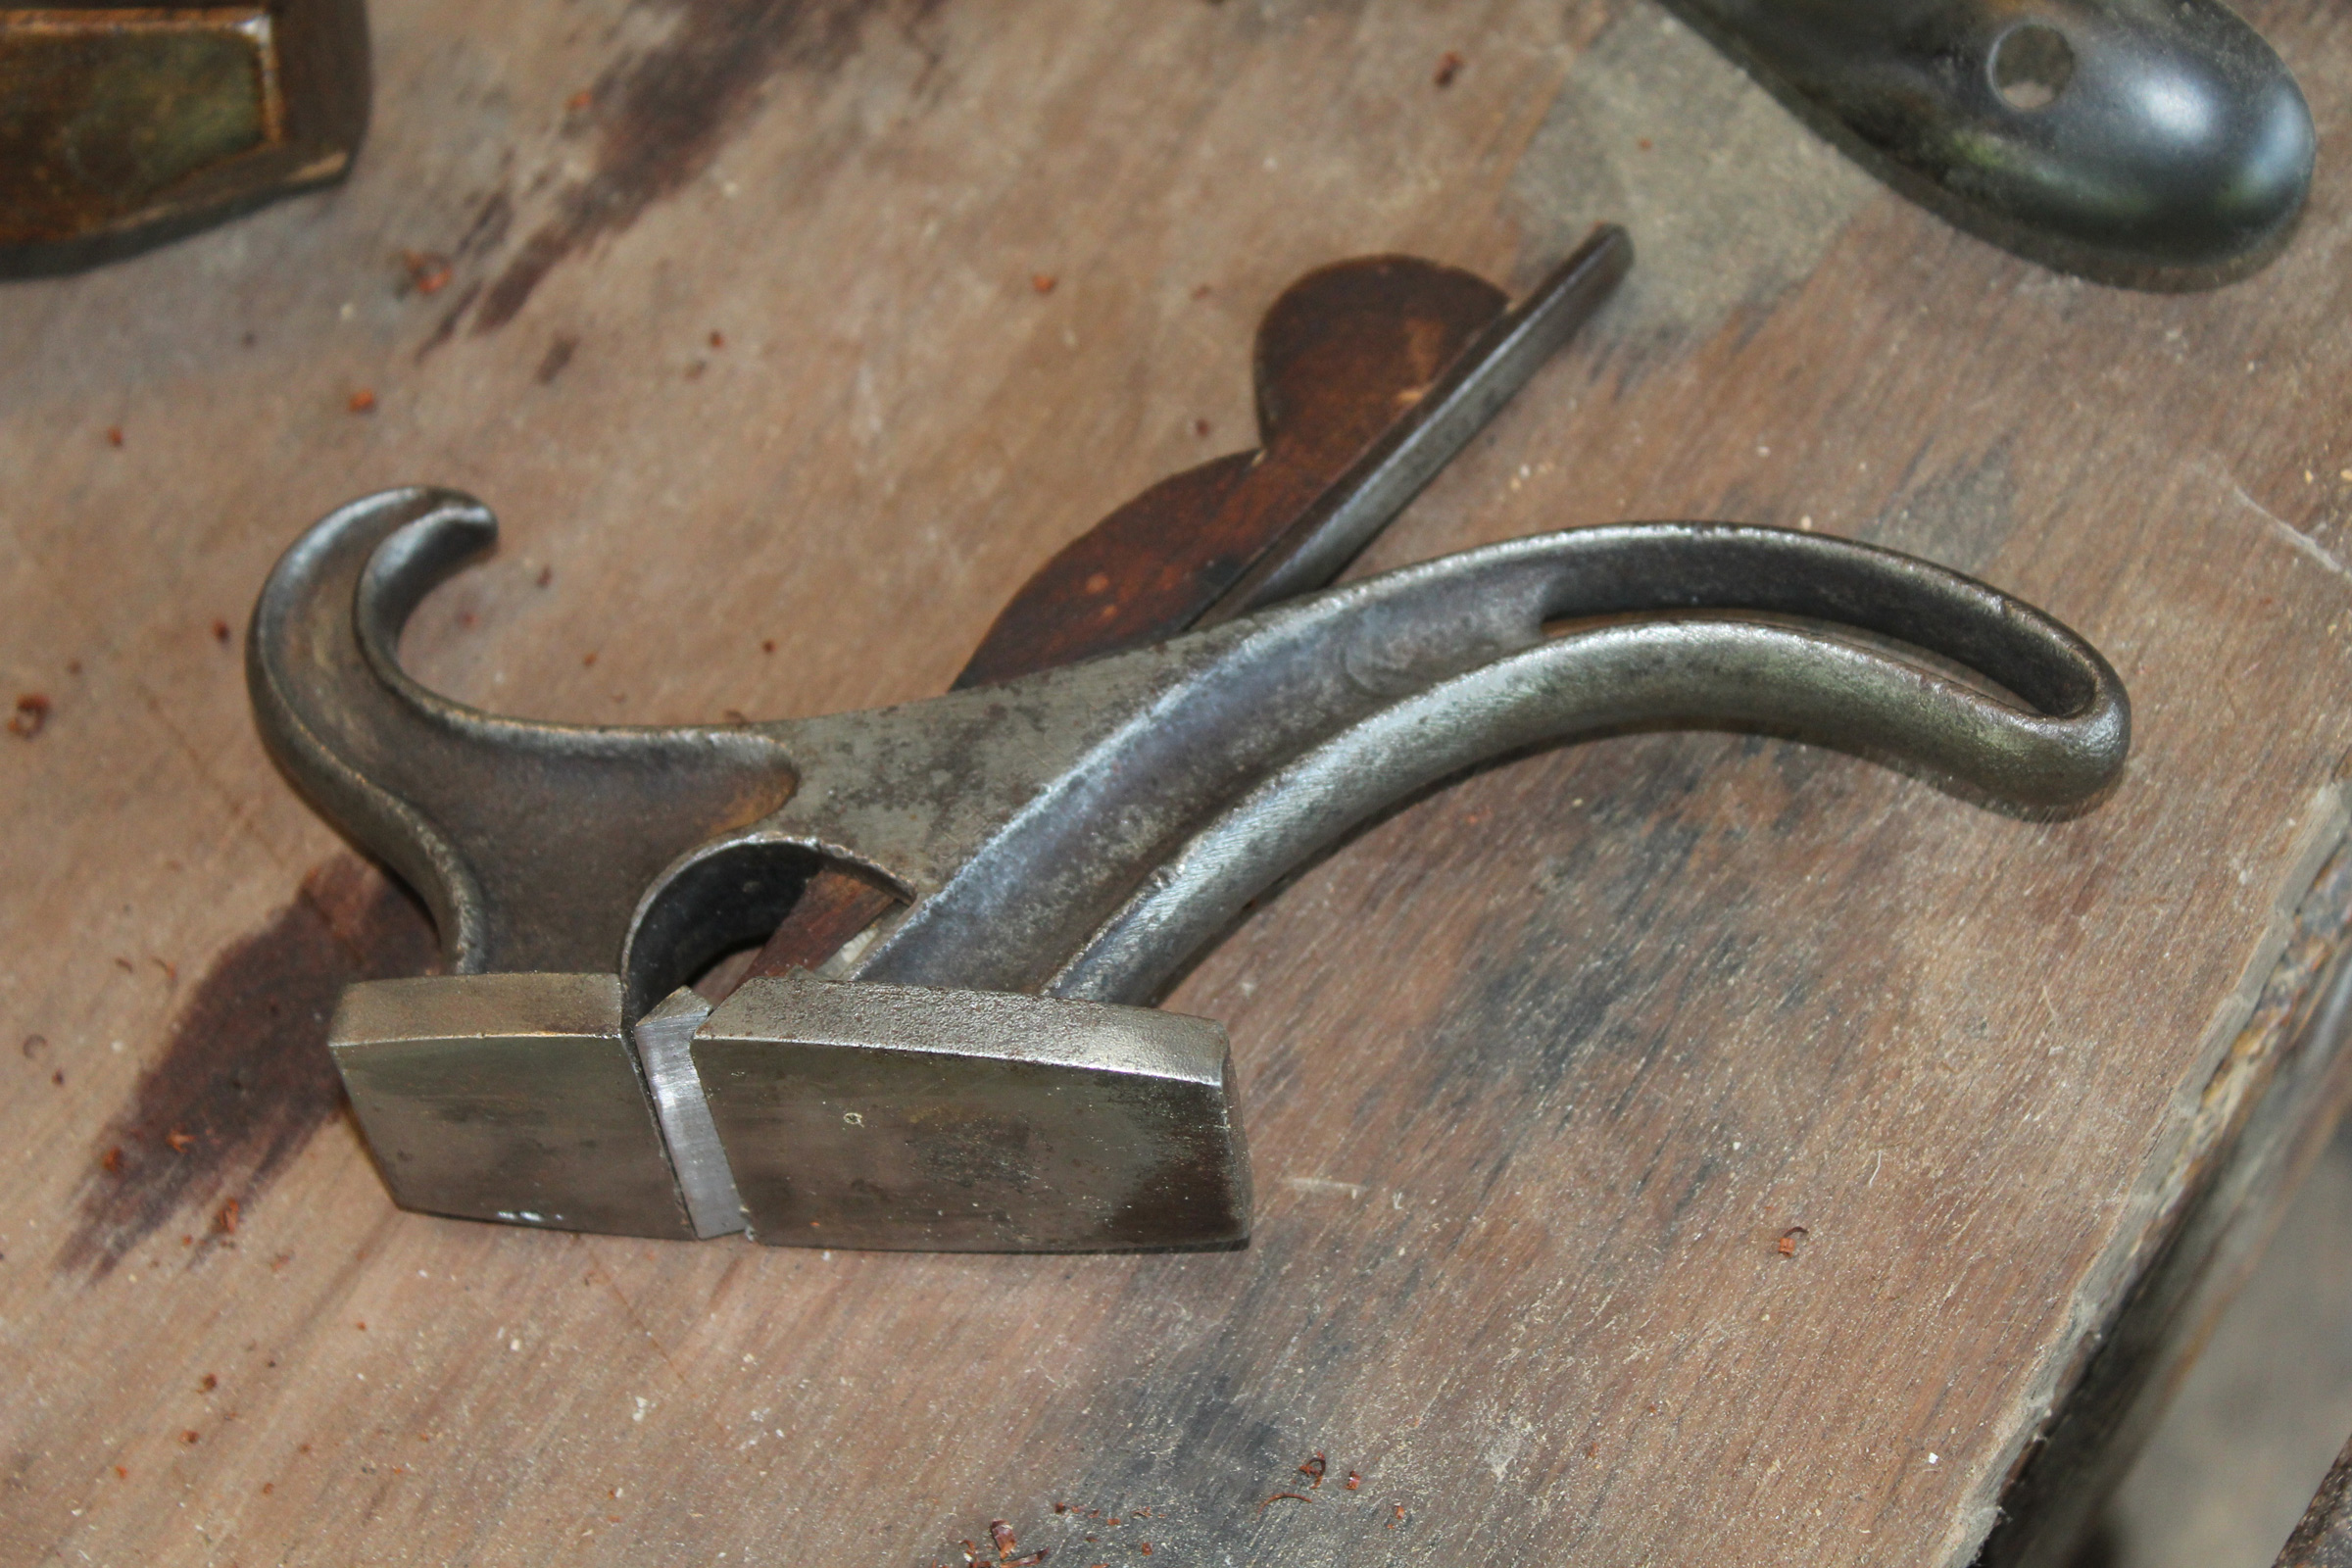
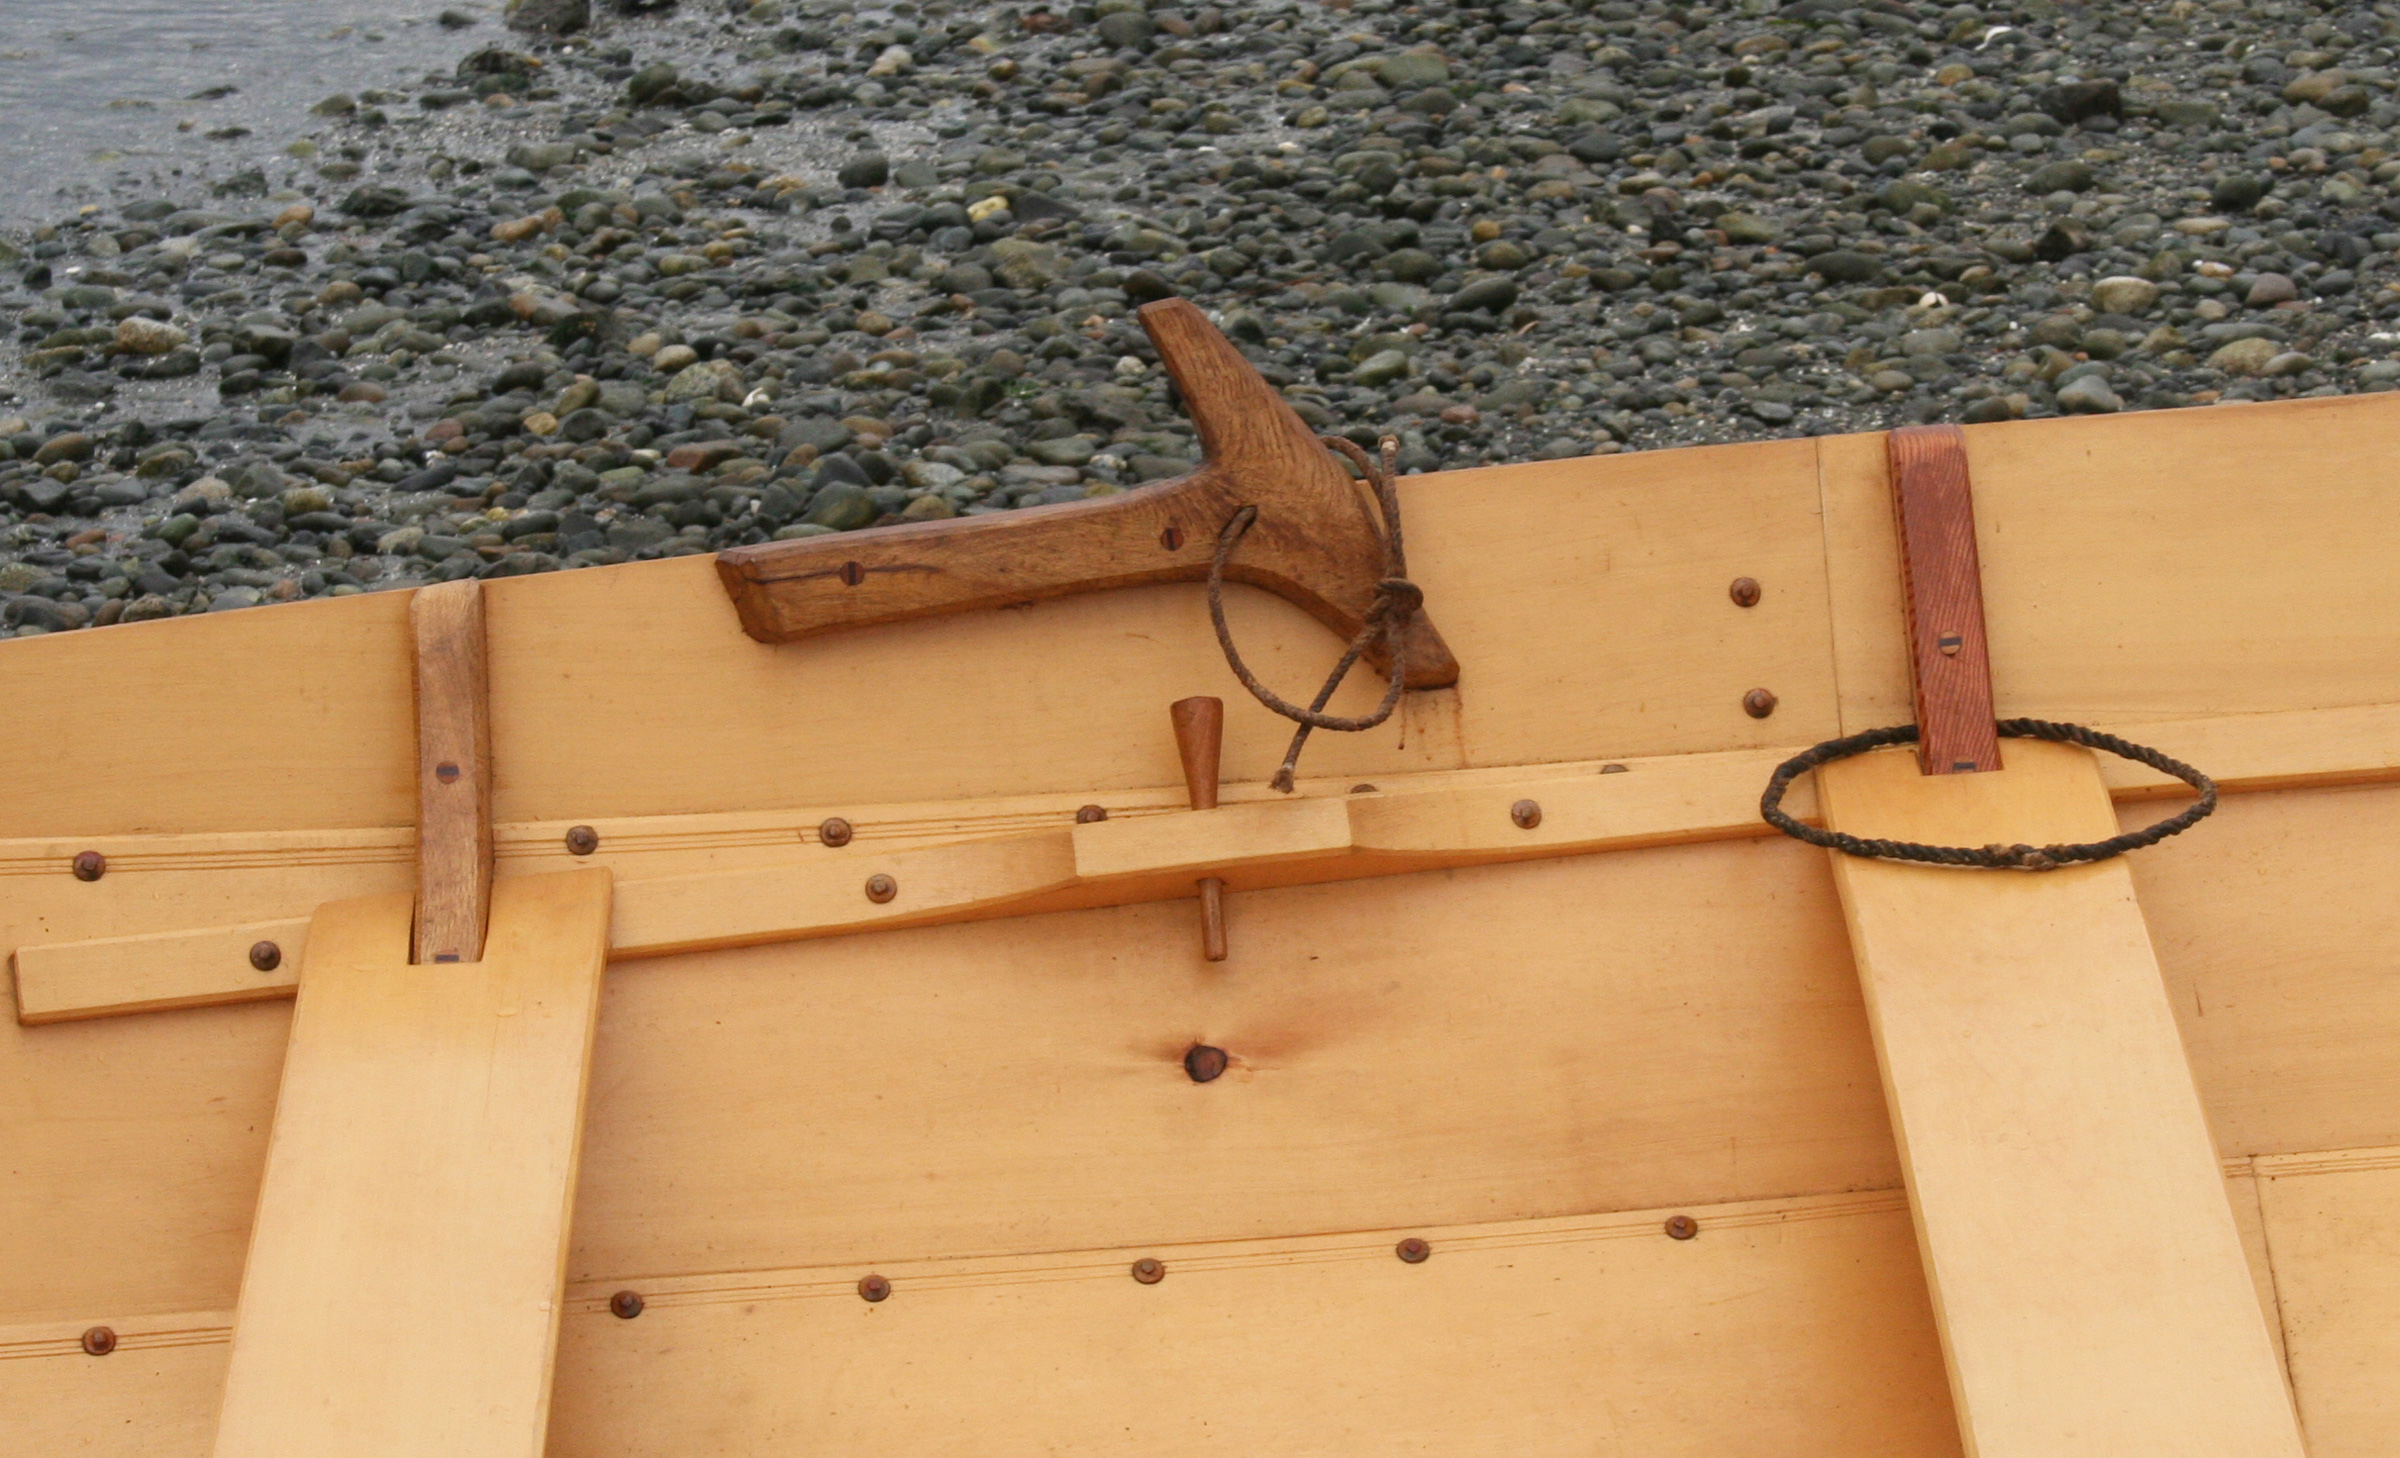
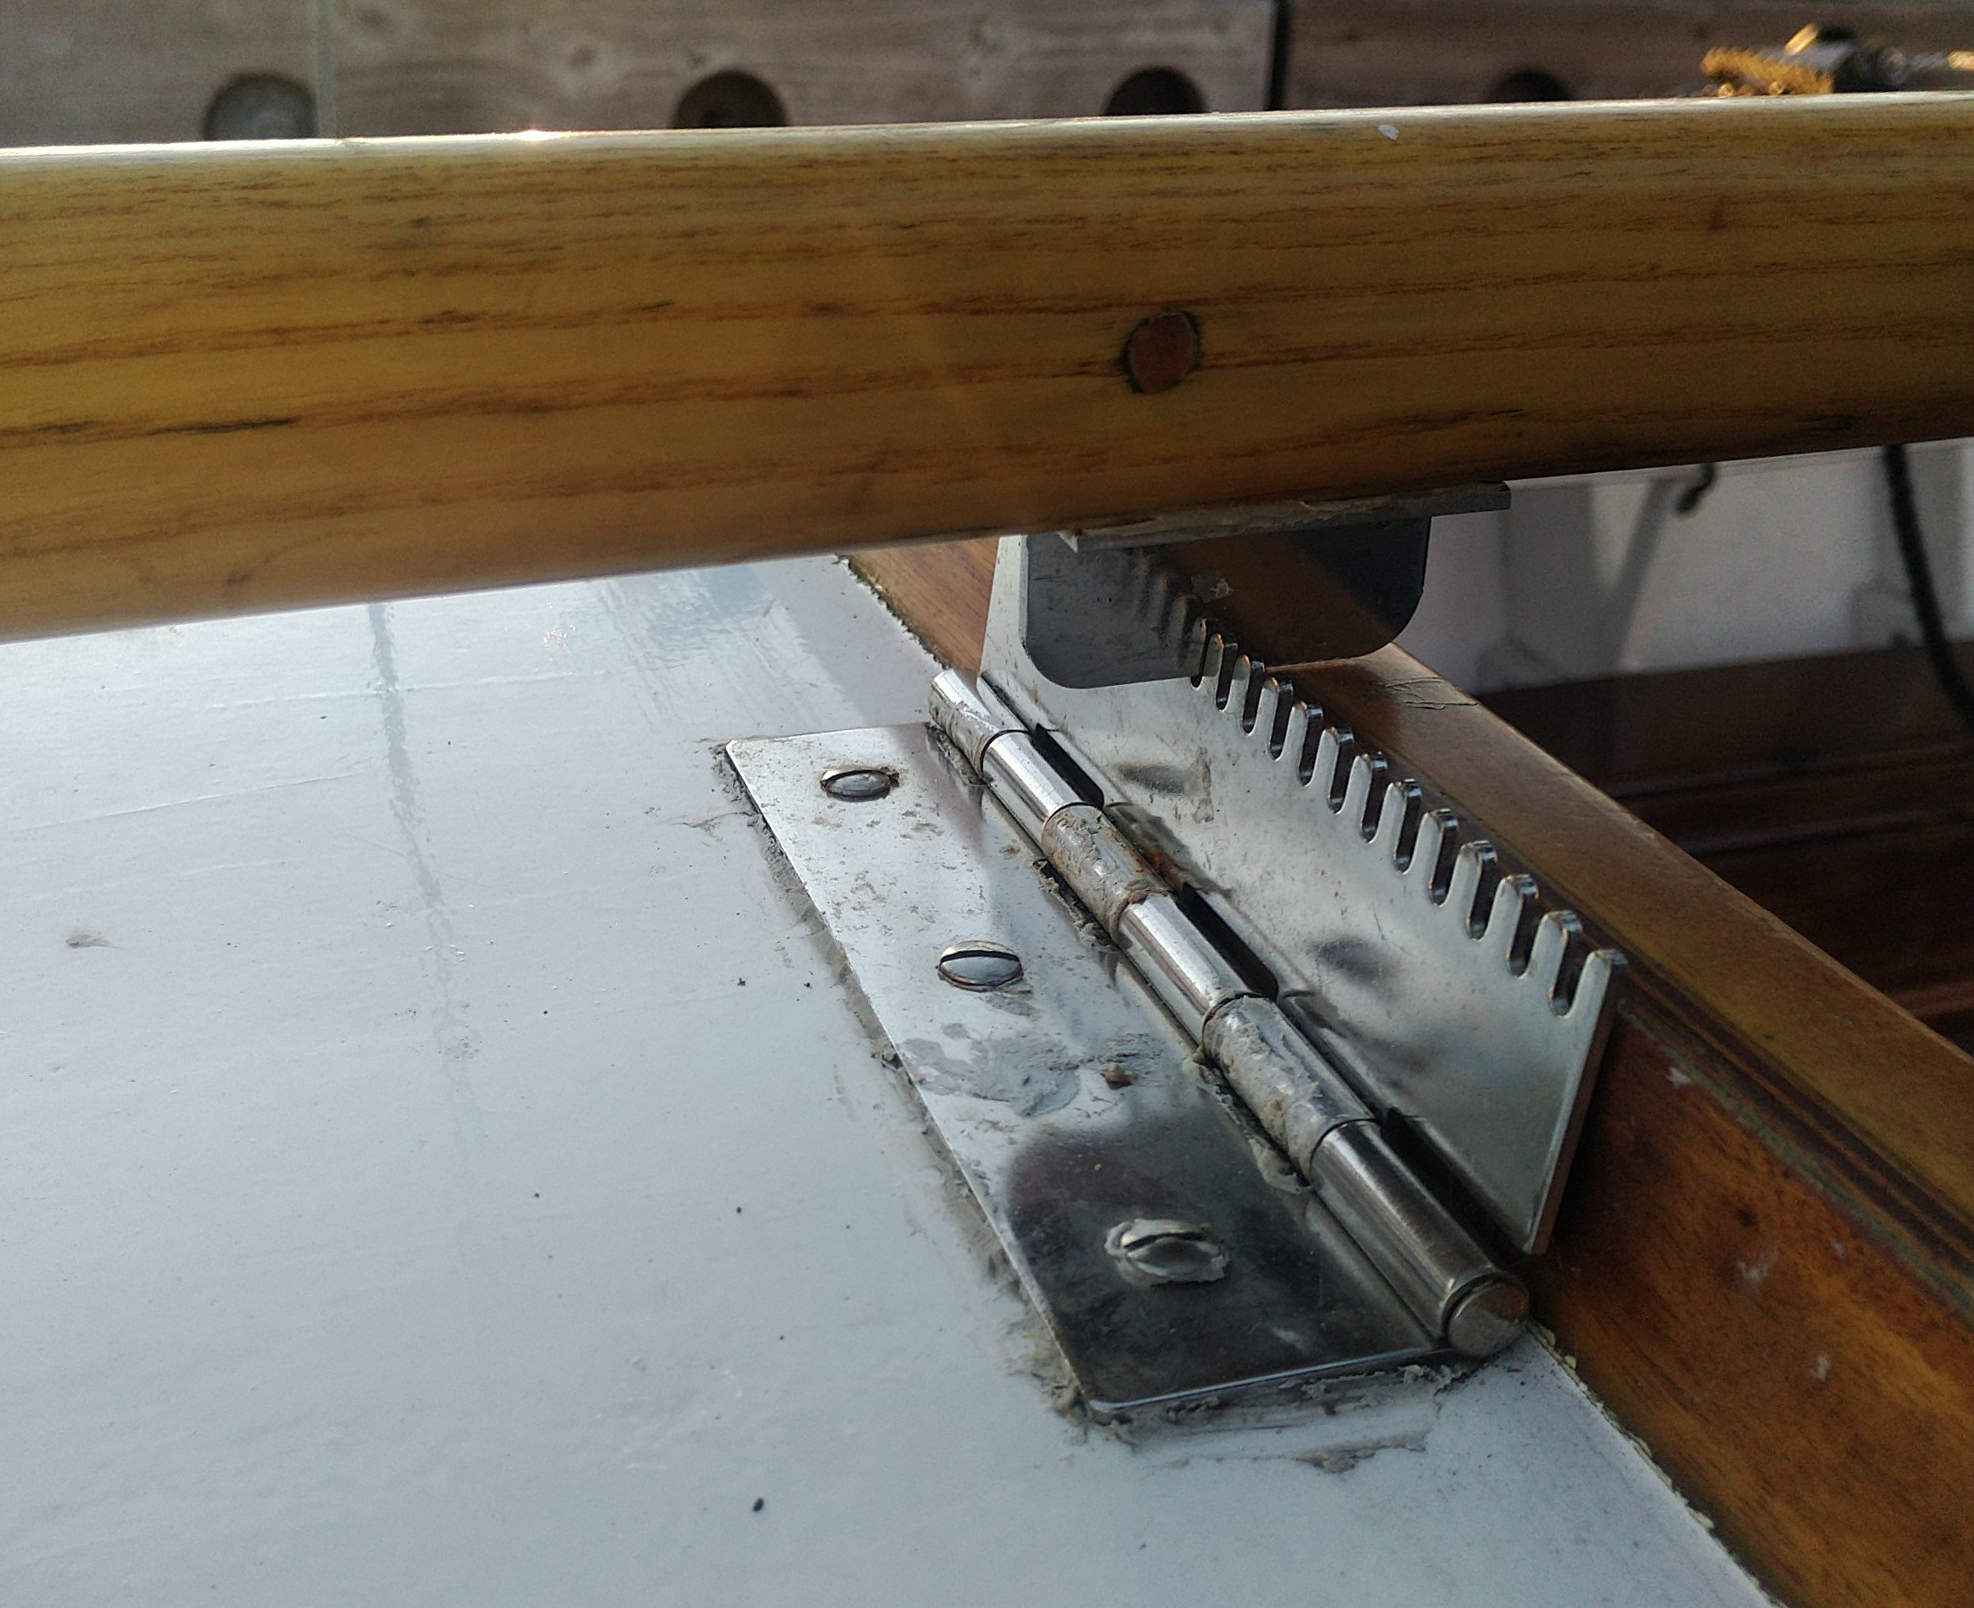
This simple shop-made tiller comb drops in place in a few seconds and can be removed even quicker. The length of the comb and the fittings on its ends are determined by the boat it’s built for.
Dave Dawson has owned several boats and has tried a number of devices to hold their tillers to free both hands so he can relax or tend to other tasks. None of the bungee cords, ropes, and commercial tiller clutches he tried worked with a quick one-handed motion, so when it came to outfitting his canoe yawl, TERRAPIN, with a tiller minder, he decided on a simple, old-school comb. All it required was bits of wood and metal he already had on hand and an enjoyable afternoon in his shop.
In TERRAPIN, a Chesapeake Light Craft Autumn Leaves, the comb spanned the cockpit to accommodate the tiller’s full range of motion. The crosspiece, a length of 1″ x 3/4″ mahogany, has at each end an aluminum bracket that drops over the coamings. The brackets are bent from flat bar and lined with a thin minicell foam to hold the comb snug and protect the coaming’s varnish. The comb tines are 1/2″ dowels and their spacing was worked out in the boat, as the tiller requires a wider gap between them when hard over than it does when it is set amidships. The outermost pins hold the tiller in a position for heaving-to.
It’s easy to raise the tiller to steer or make course adjustments, then set it between pegs when the boat is on the right track. When the comb is no longer needed, it lifts free quickly and is put aside.
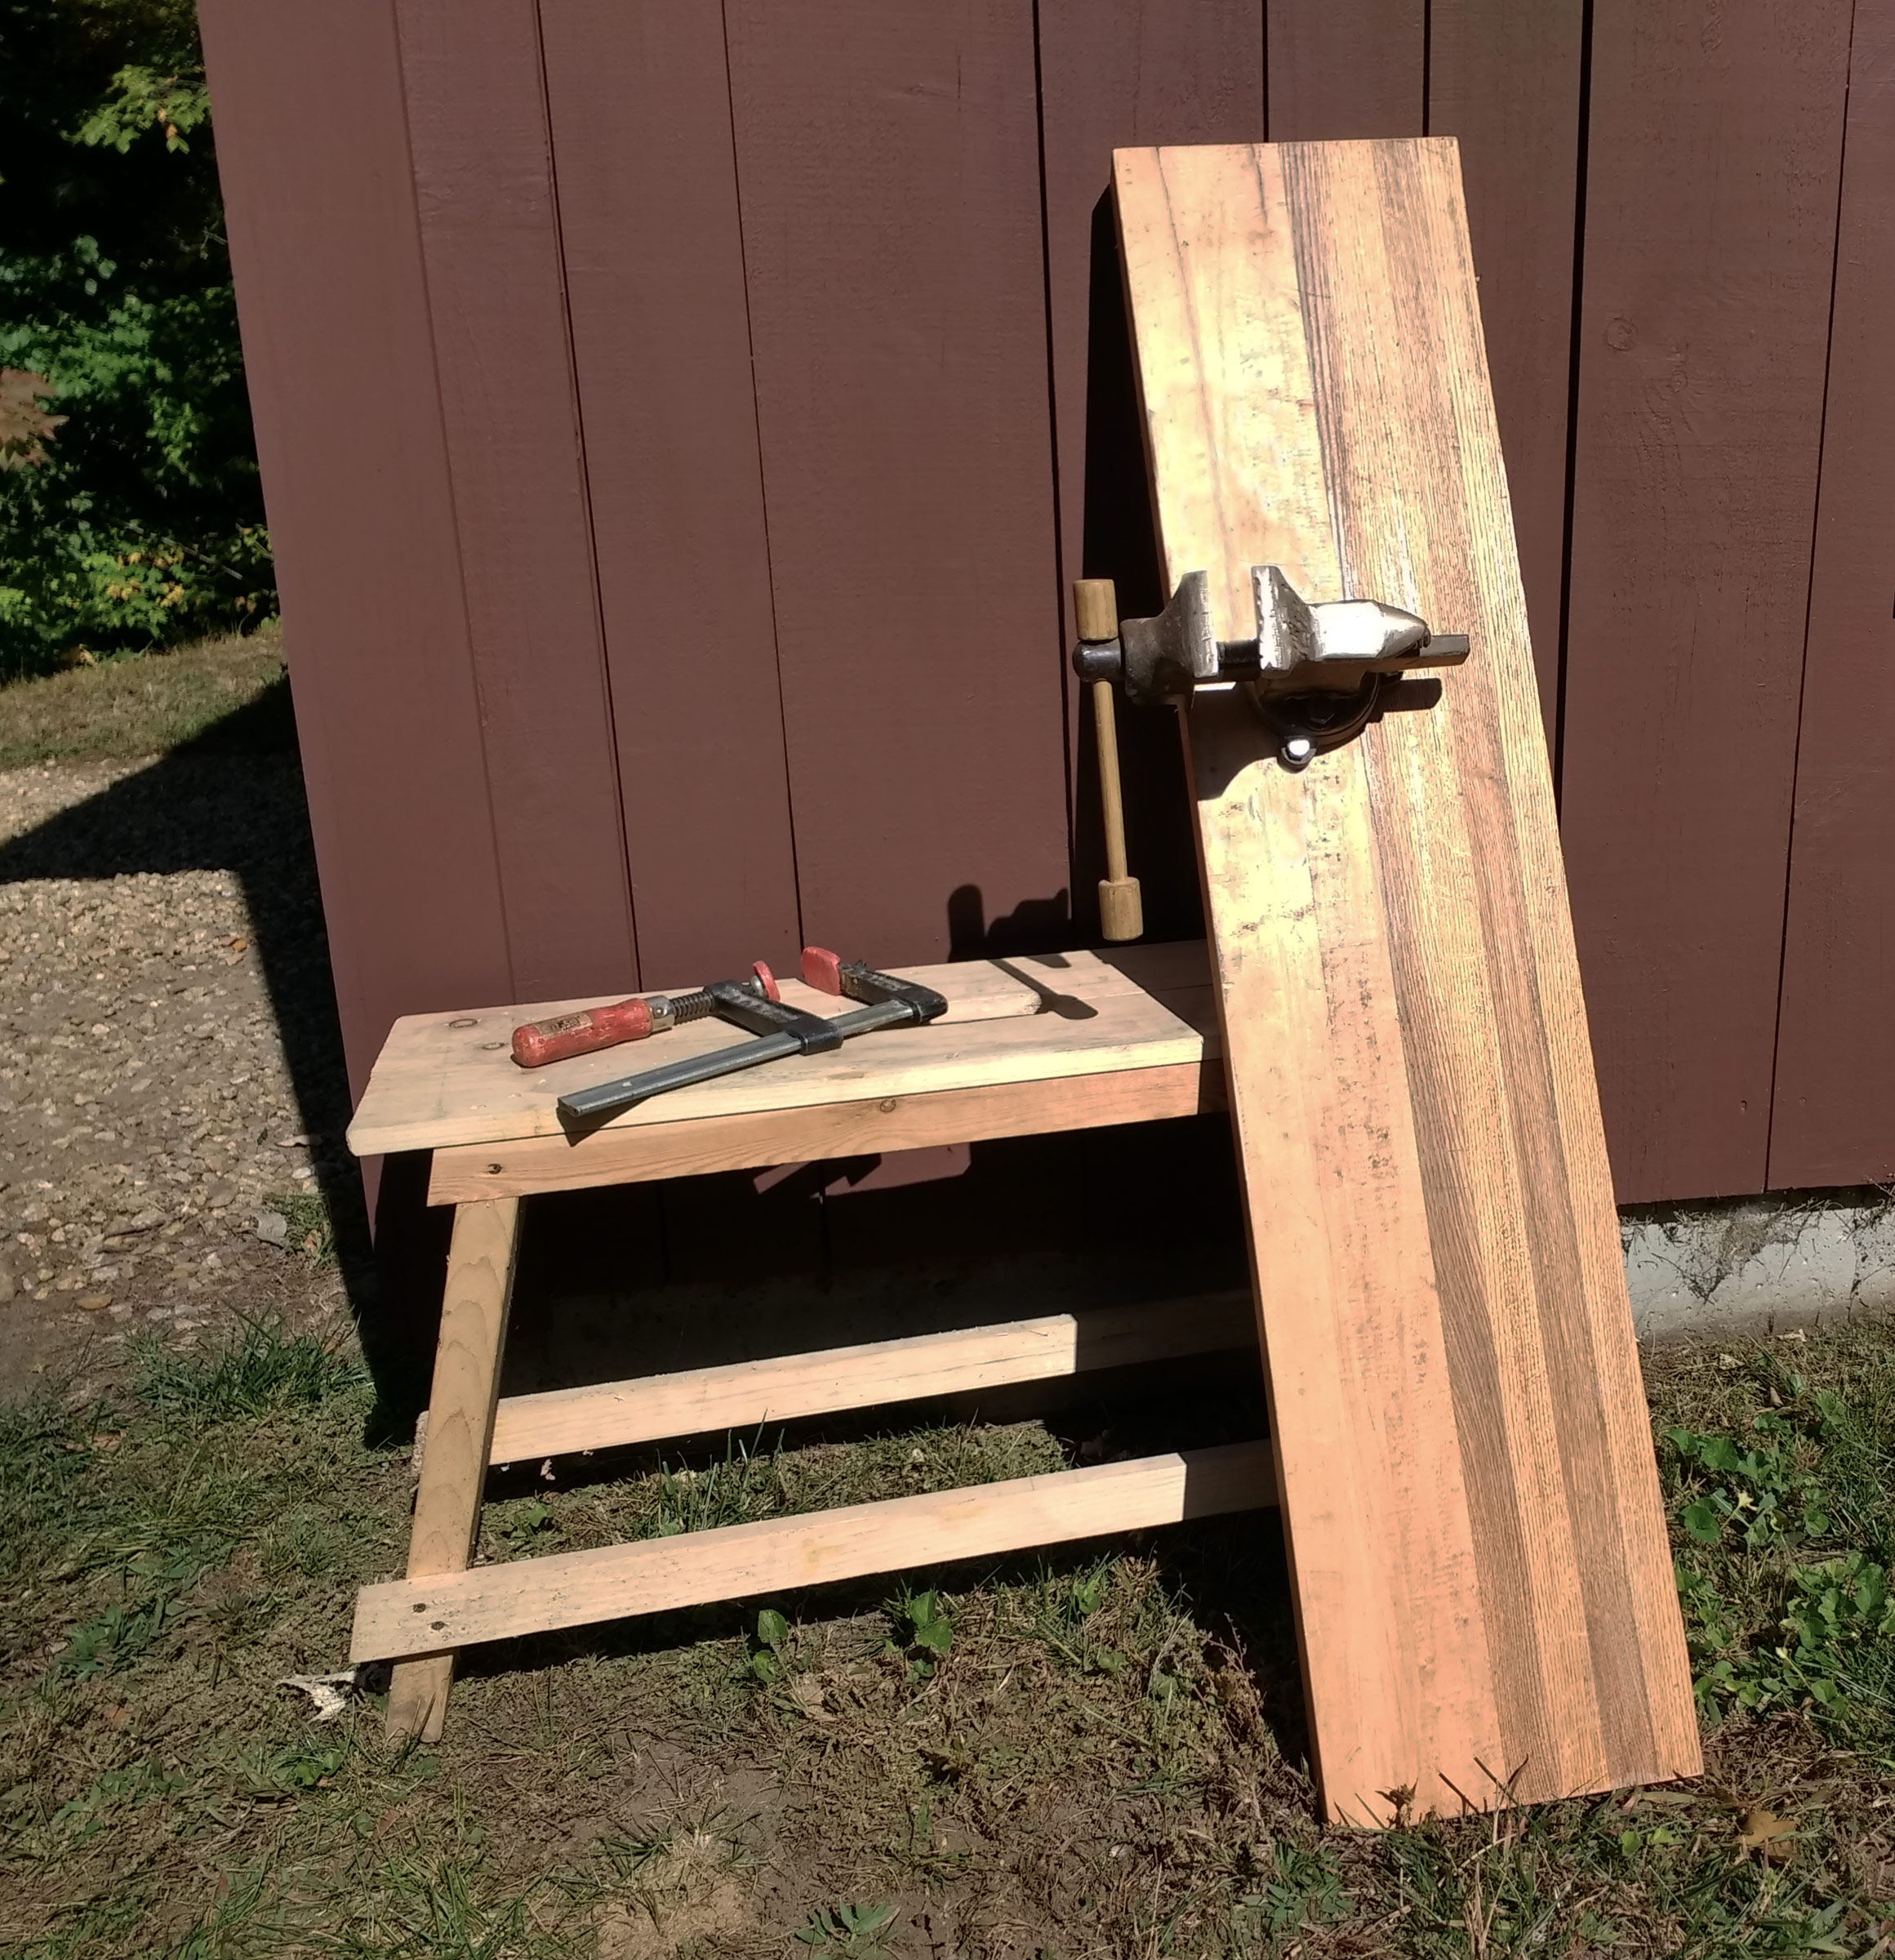
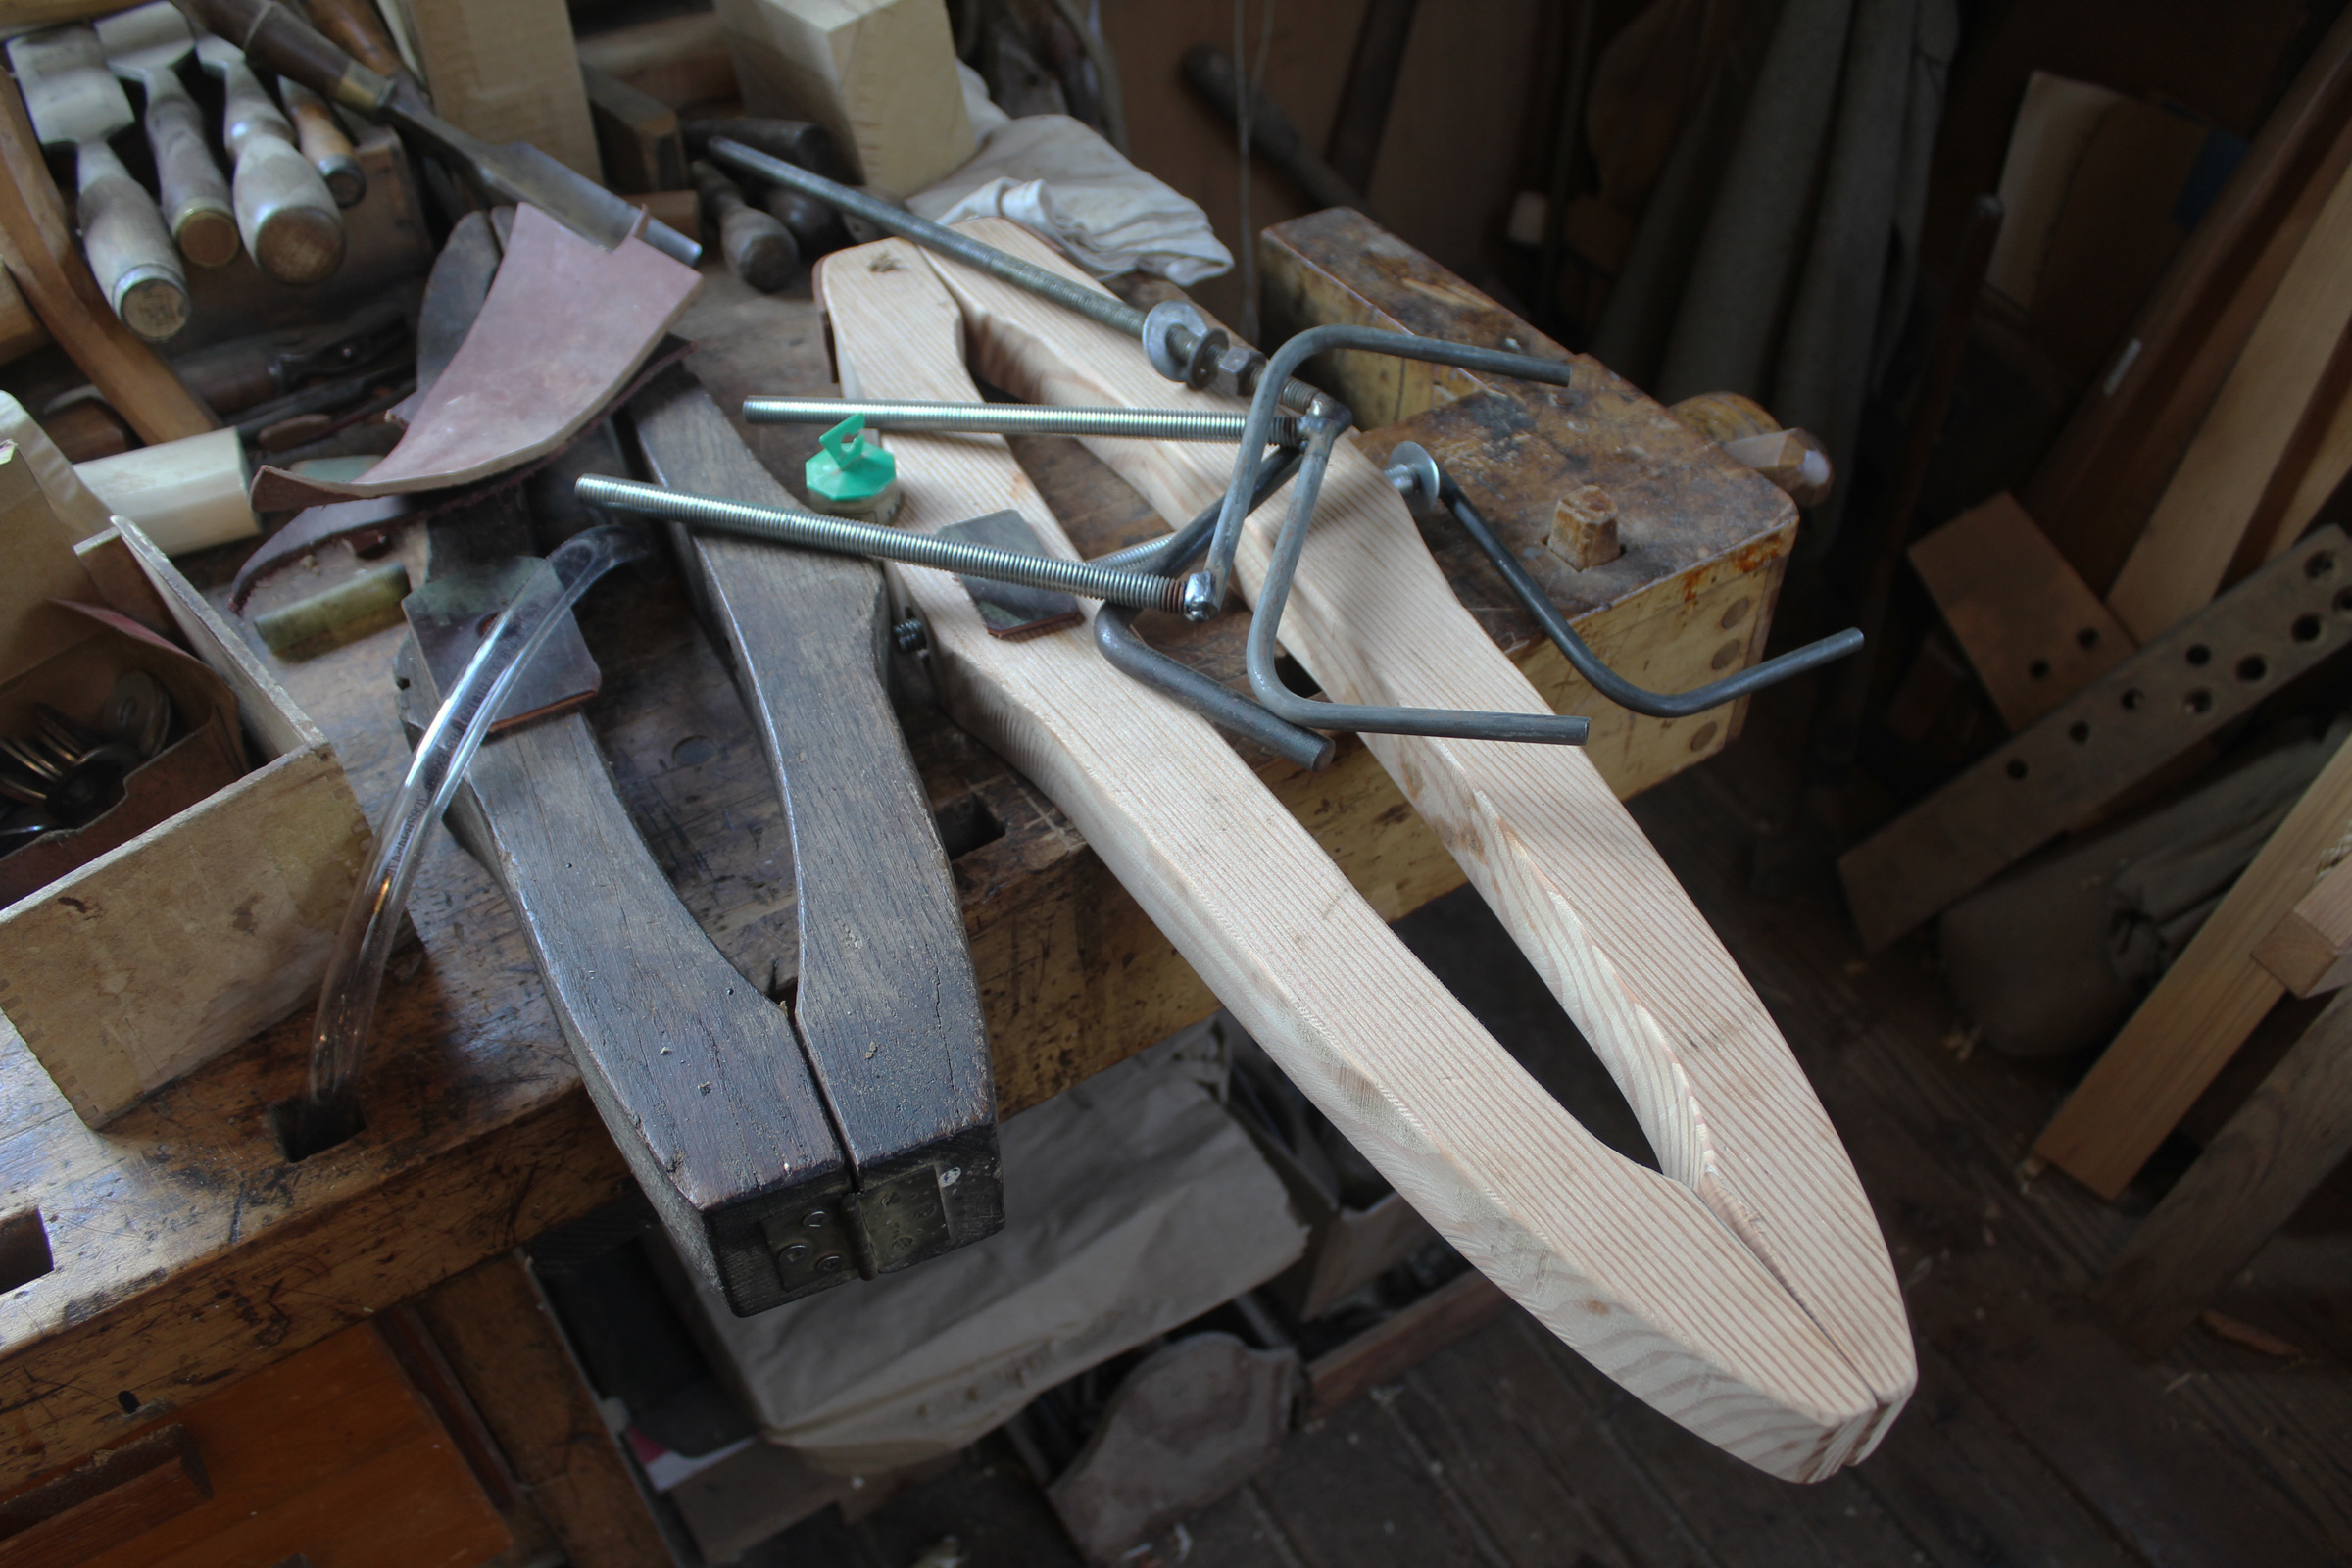
Portable Bench Vise
Tom DeVries
With a small bench, a pair of clamps, and a vise mounted on a thick plank, Tom DeVries can set up a workstation wherever the work is.
Tom DeVries bought a 4″ bench vise at a second-hand store—it was especially cheap because it was missing its handle, remedied with a lathe-turned length of ash—but he didn’t mount it on his workbench. Bolting the vise to its top would create an obstacle to projects that require the bench’s whole surface and its smooth and clean top was too nice to subject to the dings, burns, and sharp filings of metalwork that come with using a bench vise. Instead, he mounted the vise on a 48″ x 10″ remnant of butcher block (a similar length of heavy plank would do as well). Countersinks on the bottom keep the mounting bolts from protruding. When he needs a vise in his shop, he clamps the vise’s plank to the workbench.
Tom DeVries
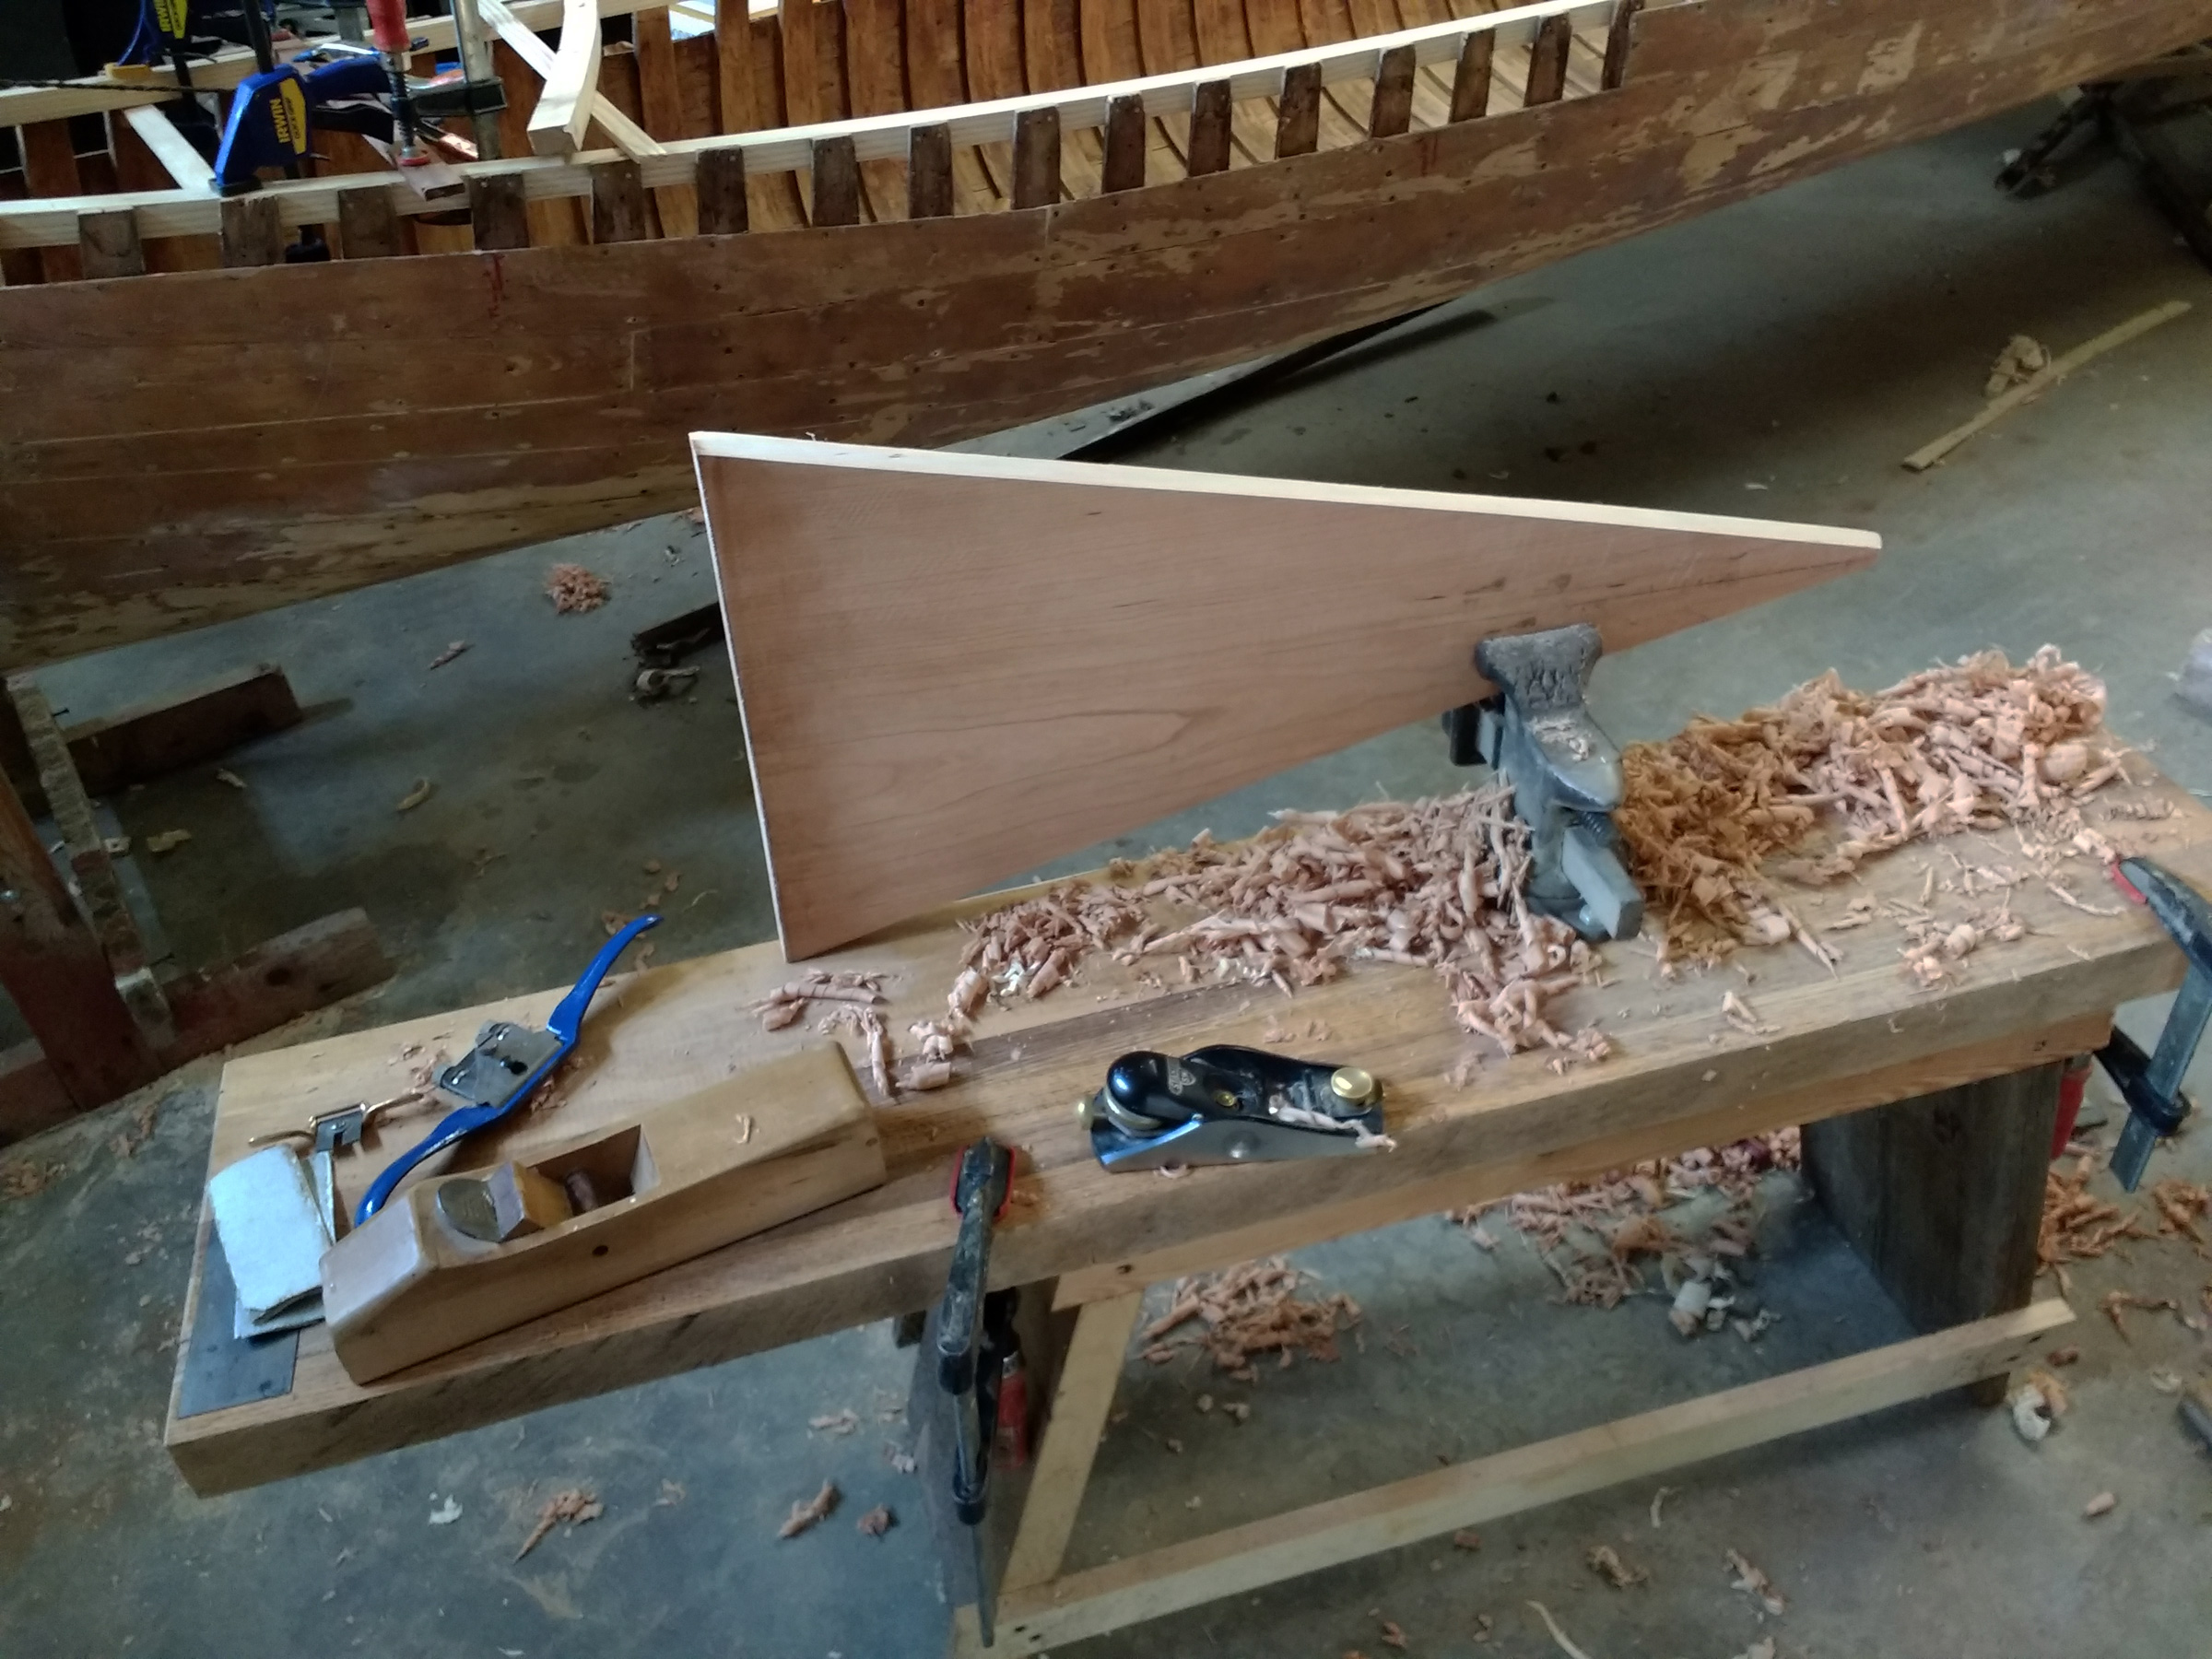
To fit the decks of an old wood-and-canvas canoe, the vise can be set just a step or two from the canoe’s end.
For projects that don’t fit in his shop, like the 19′ wood-and-canvas canoe he restored, Tom clamps the portable vise on sawhorses or a short stool. The portable vise has also come in handy when he has worked on boats at the dock.
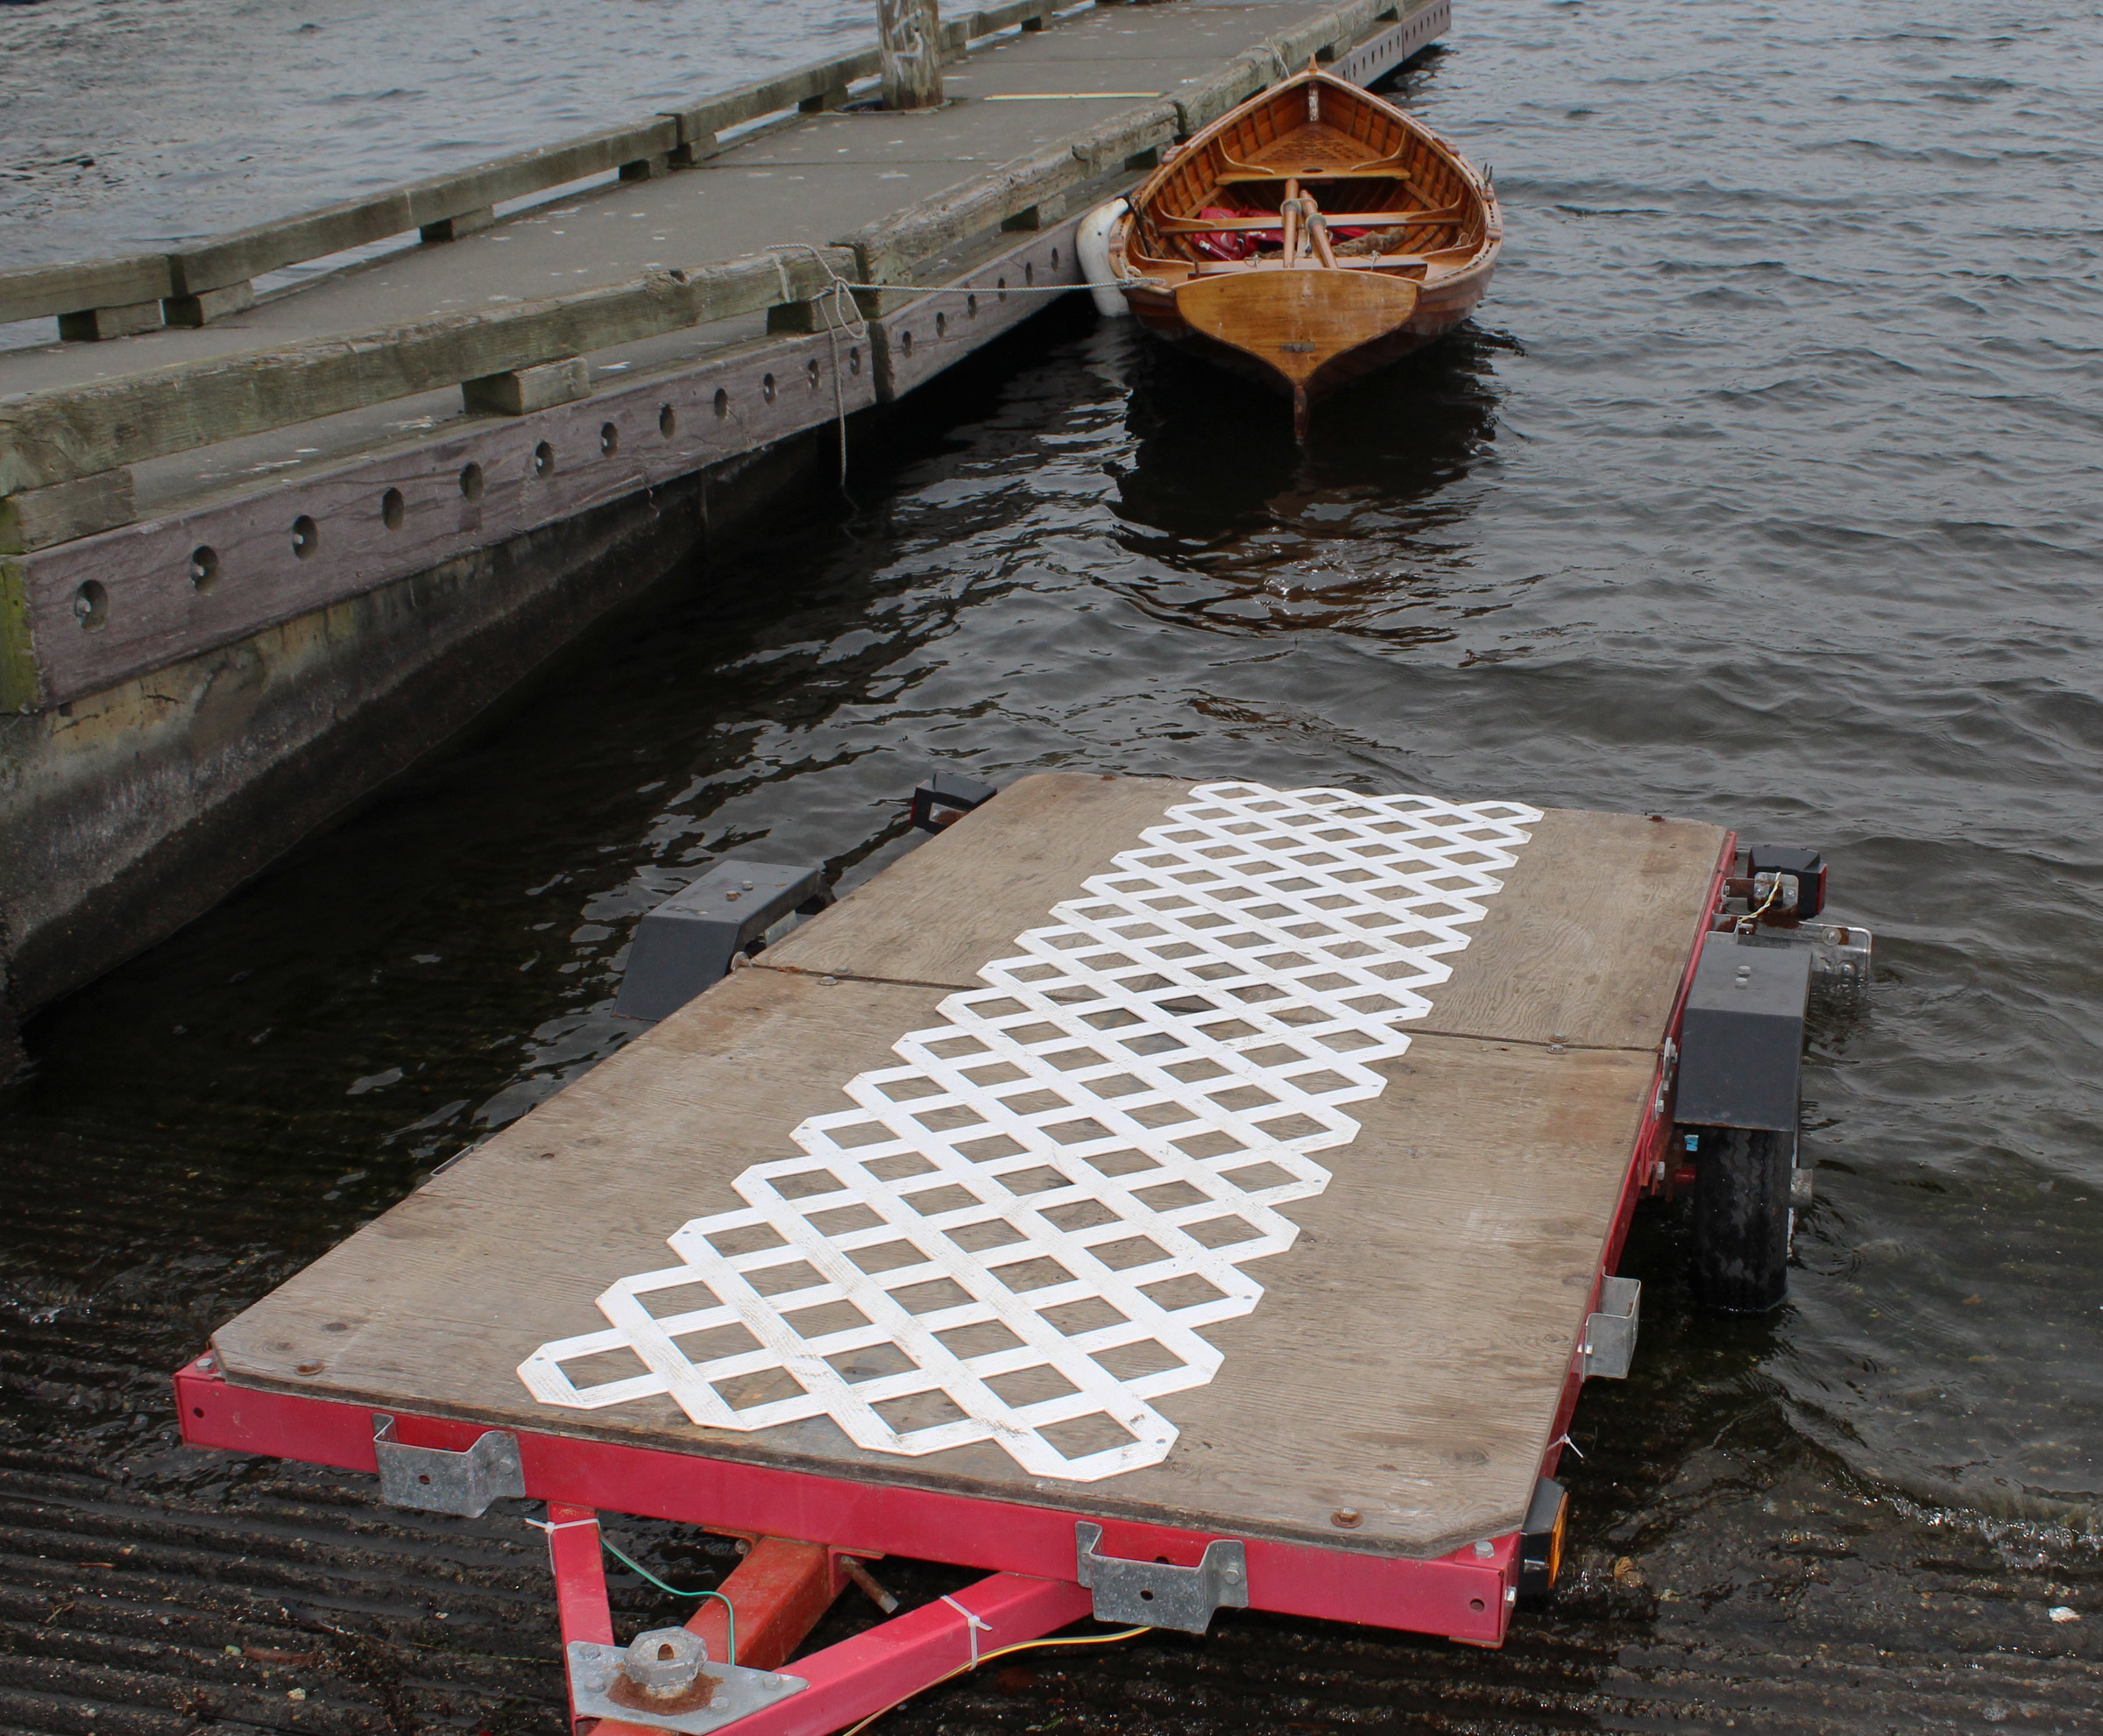
Vinyl Lattice Trailer Deck
Christopher Cunningham
The plywood deck of this utility trailer created a lot of friction when the Whitehall was dragged across it. The vinyl lattice made launching and retrieval much easier and wasn’t so slippery that the boat wouldn’t stay put when unstrapped at the ramp.
John Ernst has been using vinyl lattice on his boat trailer for years. The vinyl provides a low-friction surface for sliding a boat across a plywood trailer deck and the grid pattern offers enough grip for shoes. The lattice, available at home-improvement stores, is inexpensive—$21 for a 4′ x 8′ sheet and $13 for a 2′ x 8′ sheet. It is 1/5″ thick, easily cut with woodworking tools, and gets screwed down with flathead screws, just slightly countersunk.
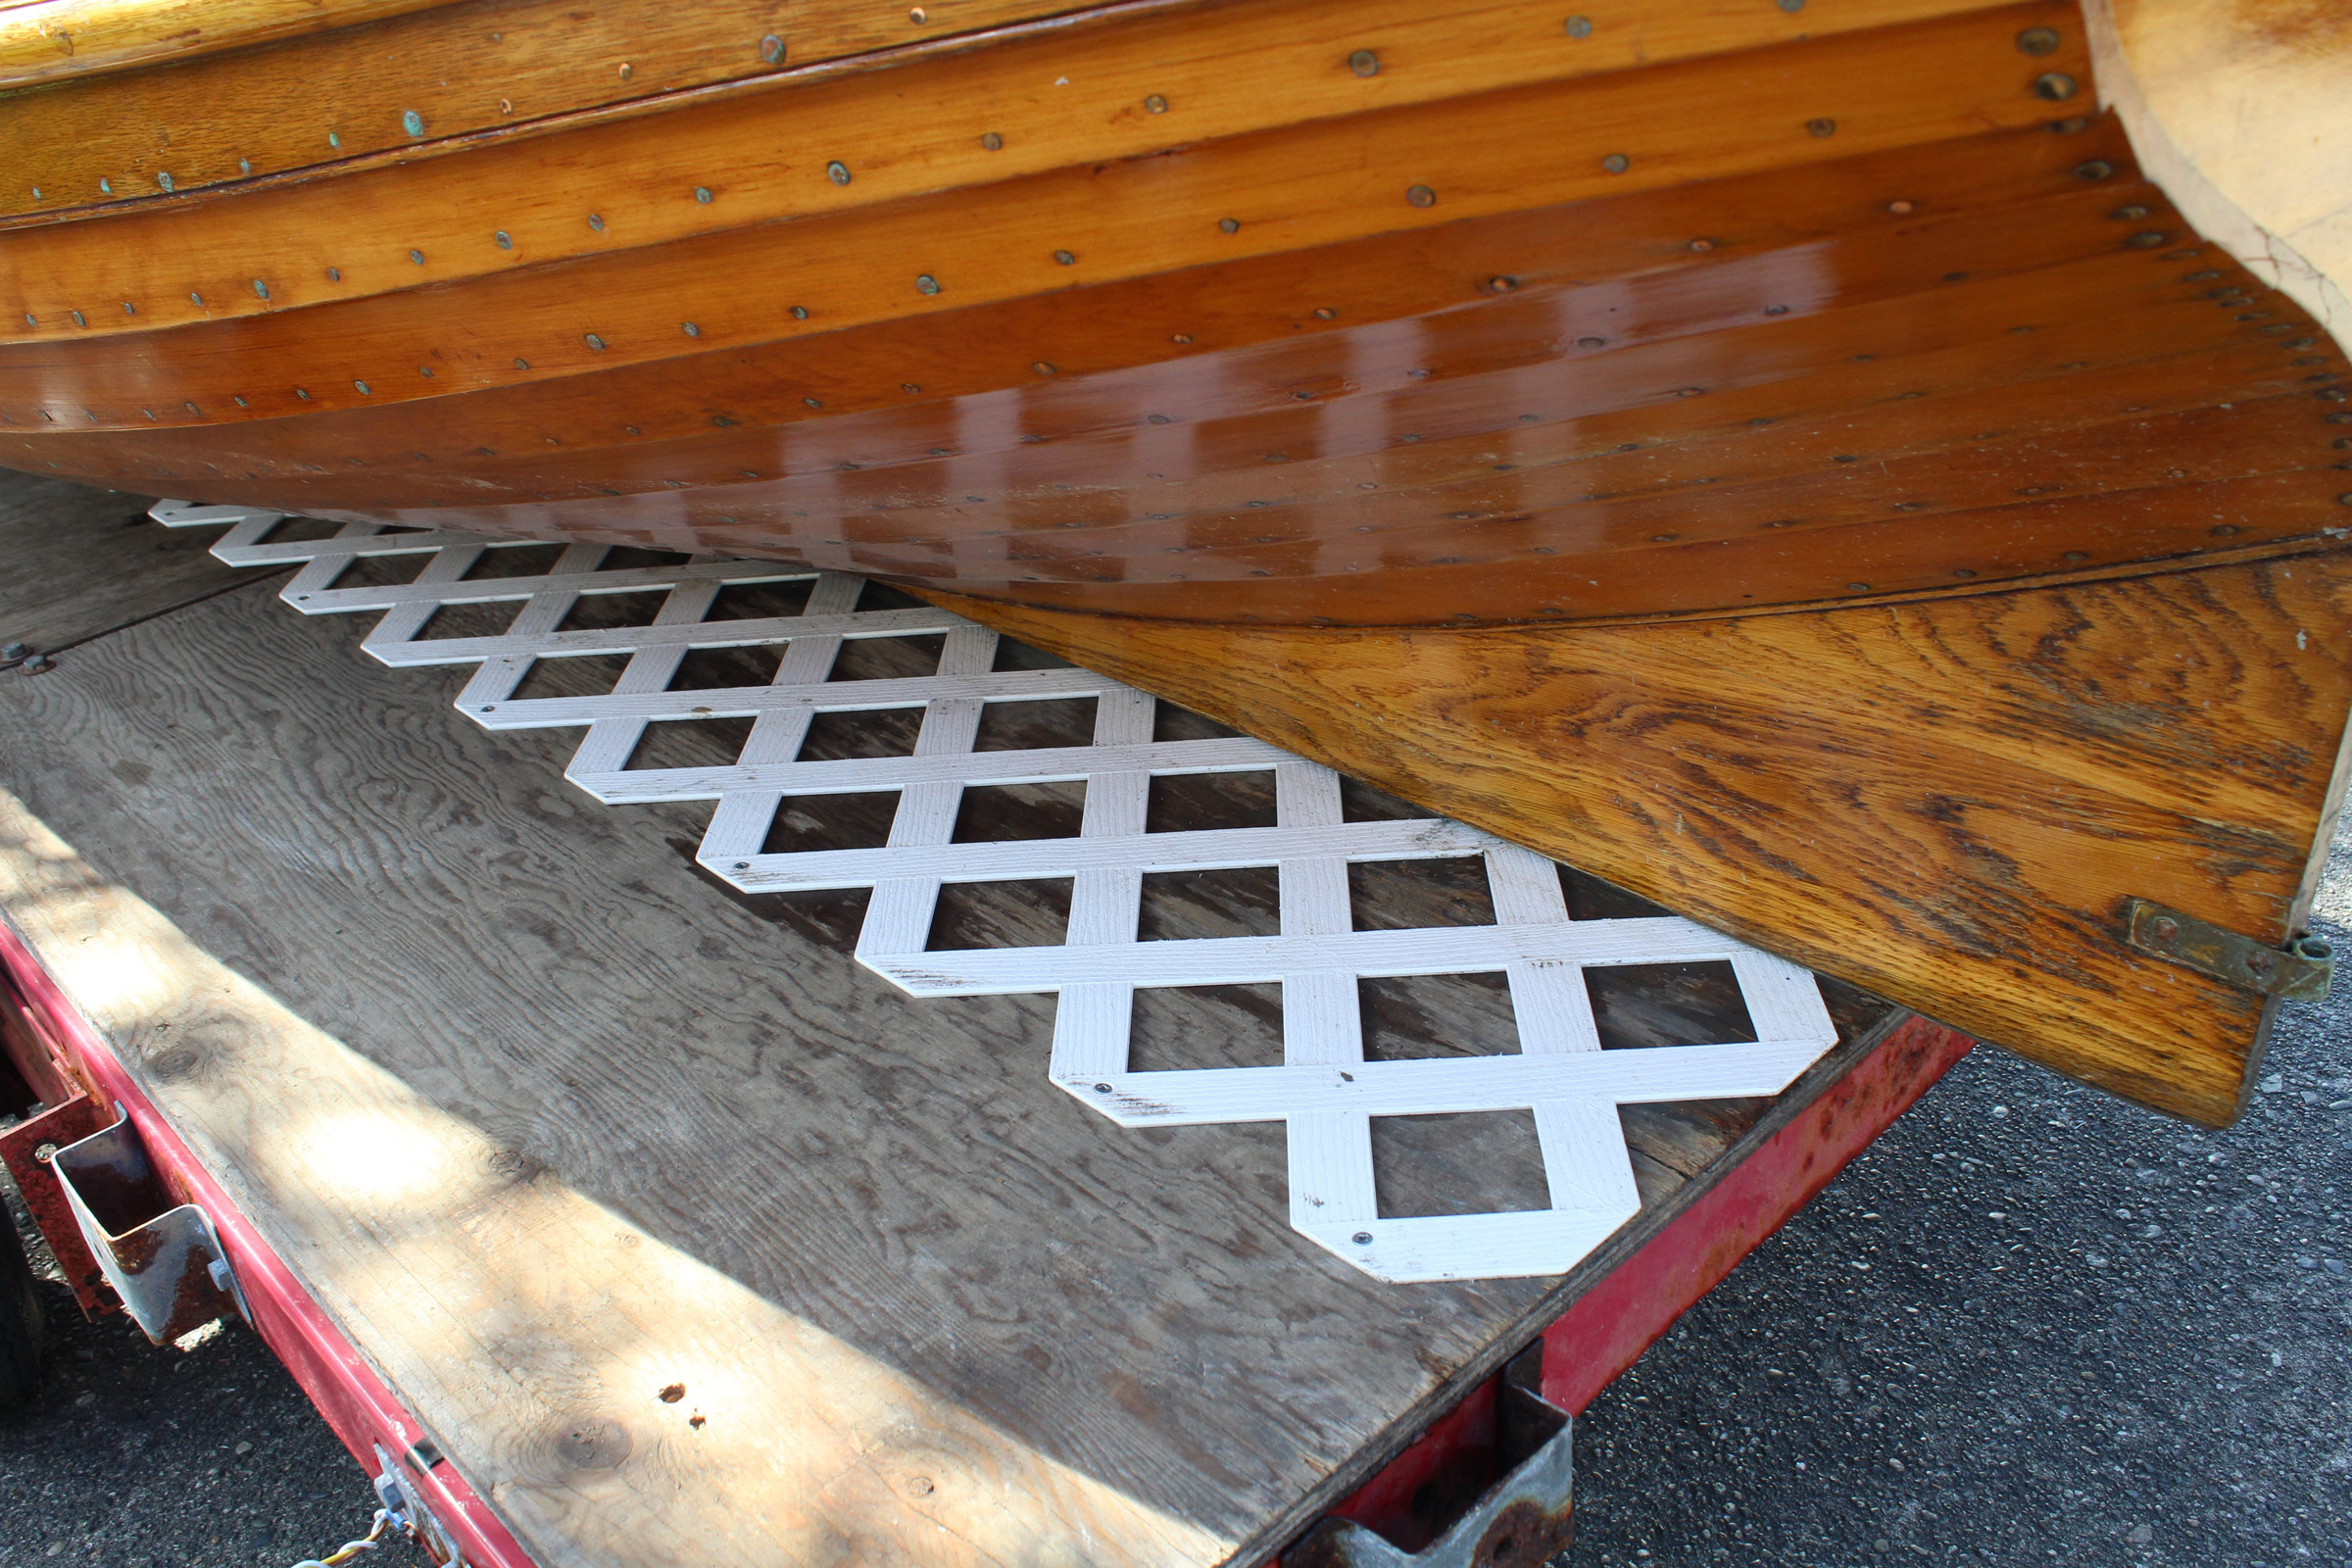
Christopher Cunningham
The lattice is set back from the edge of the plywood so it won’t get snagged when lifting the bow to the trailer bed.
The lattice is flexible and can fit curved surfaces. John also uses lattice sheets laid on the ground to slide boats easily and without damage over cobble.
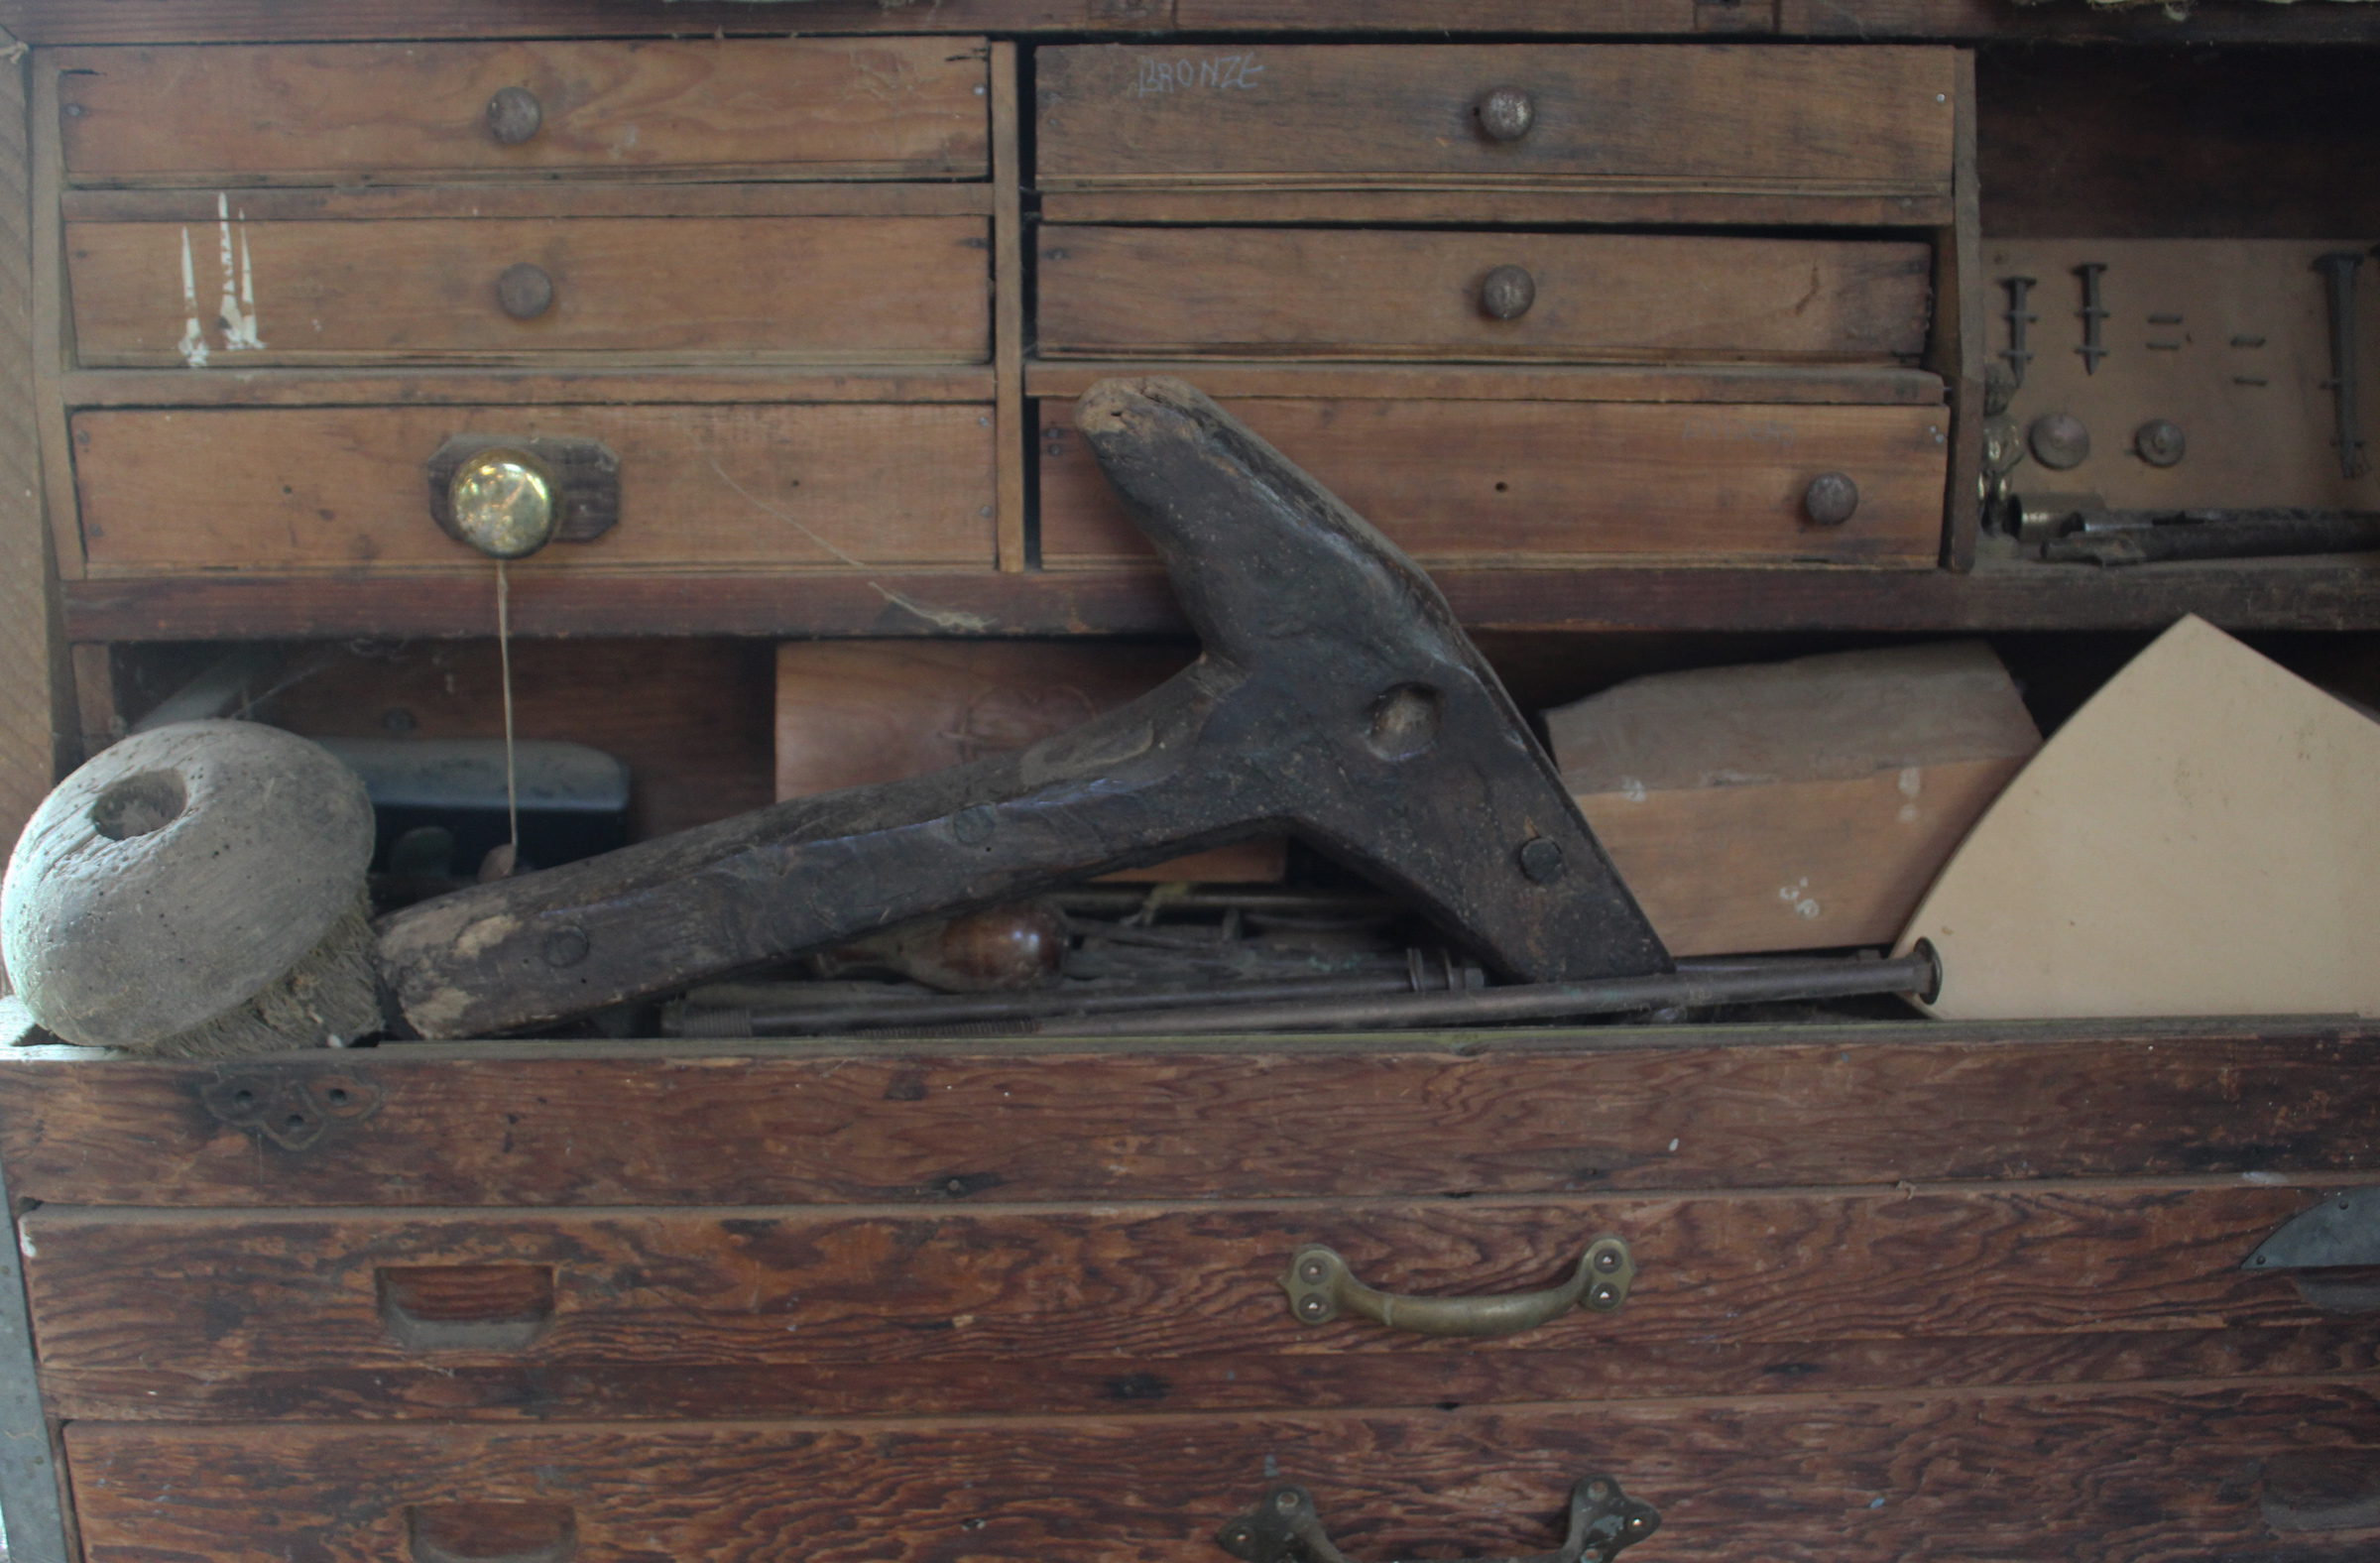
Rust Erasers
Christopher Cunningham
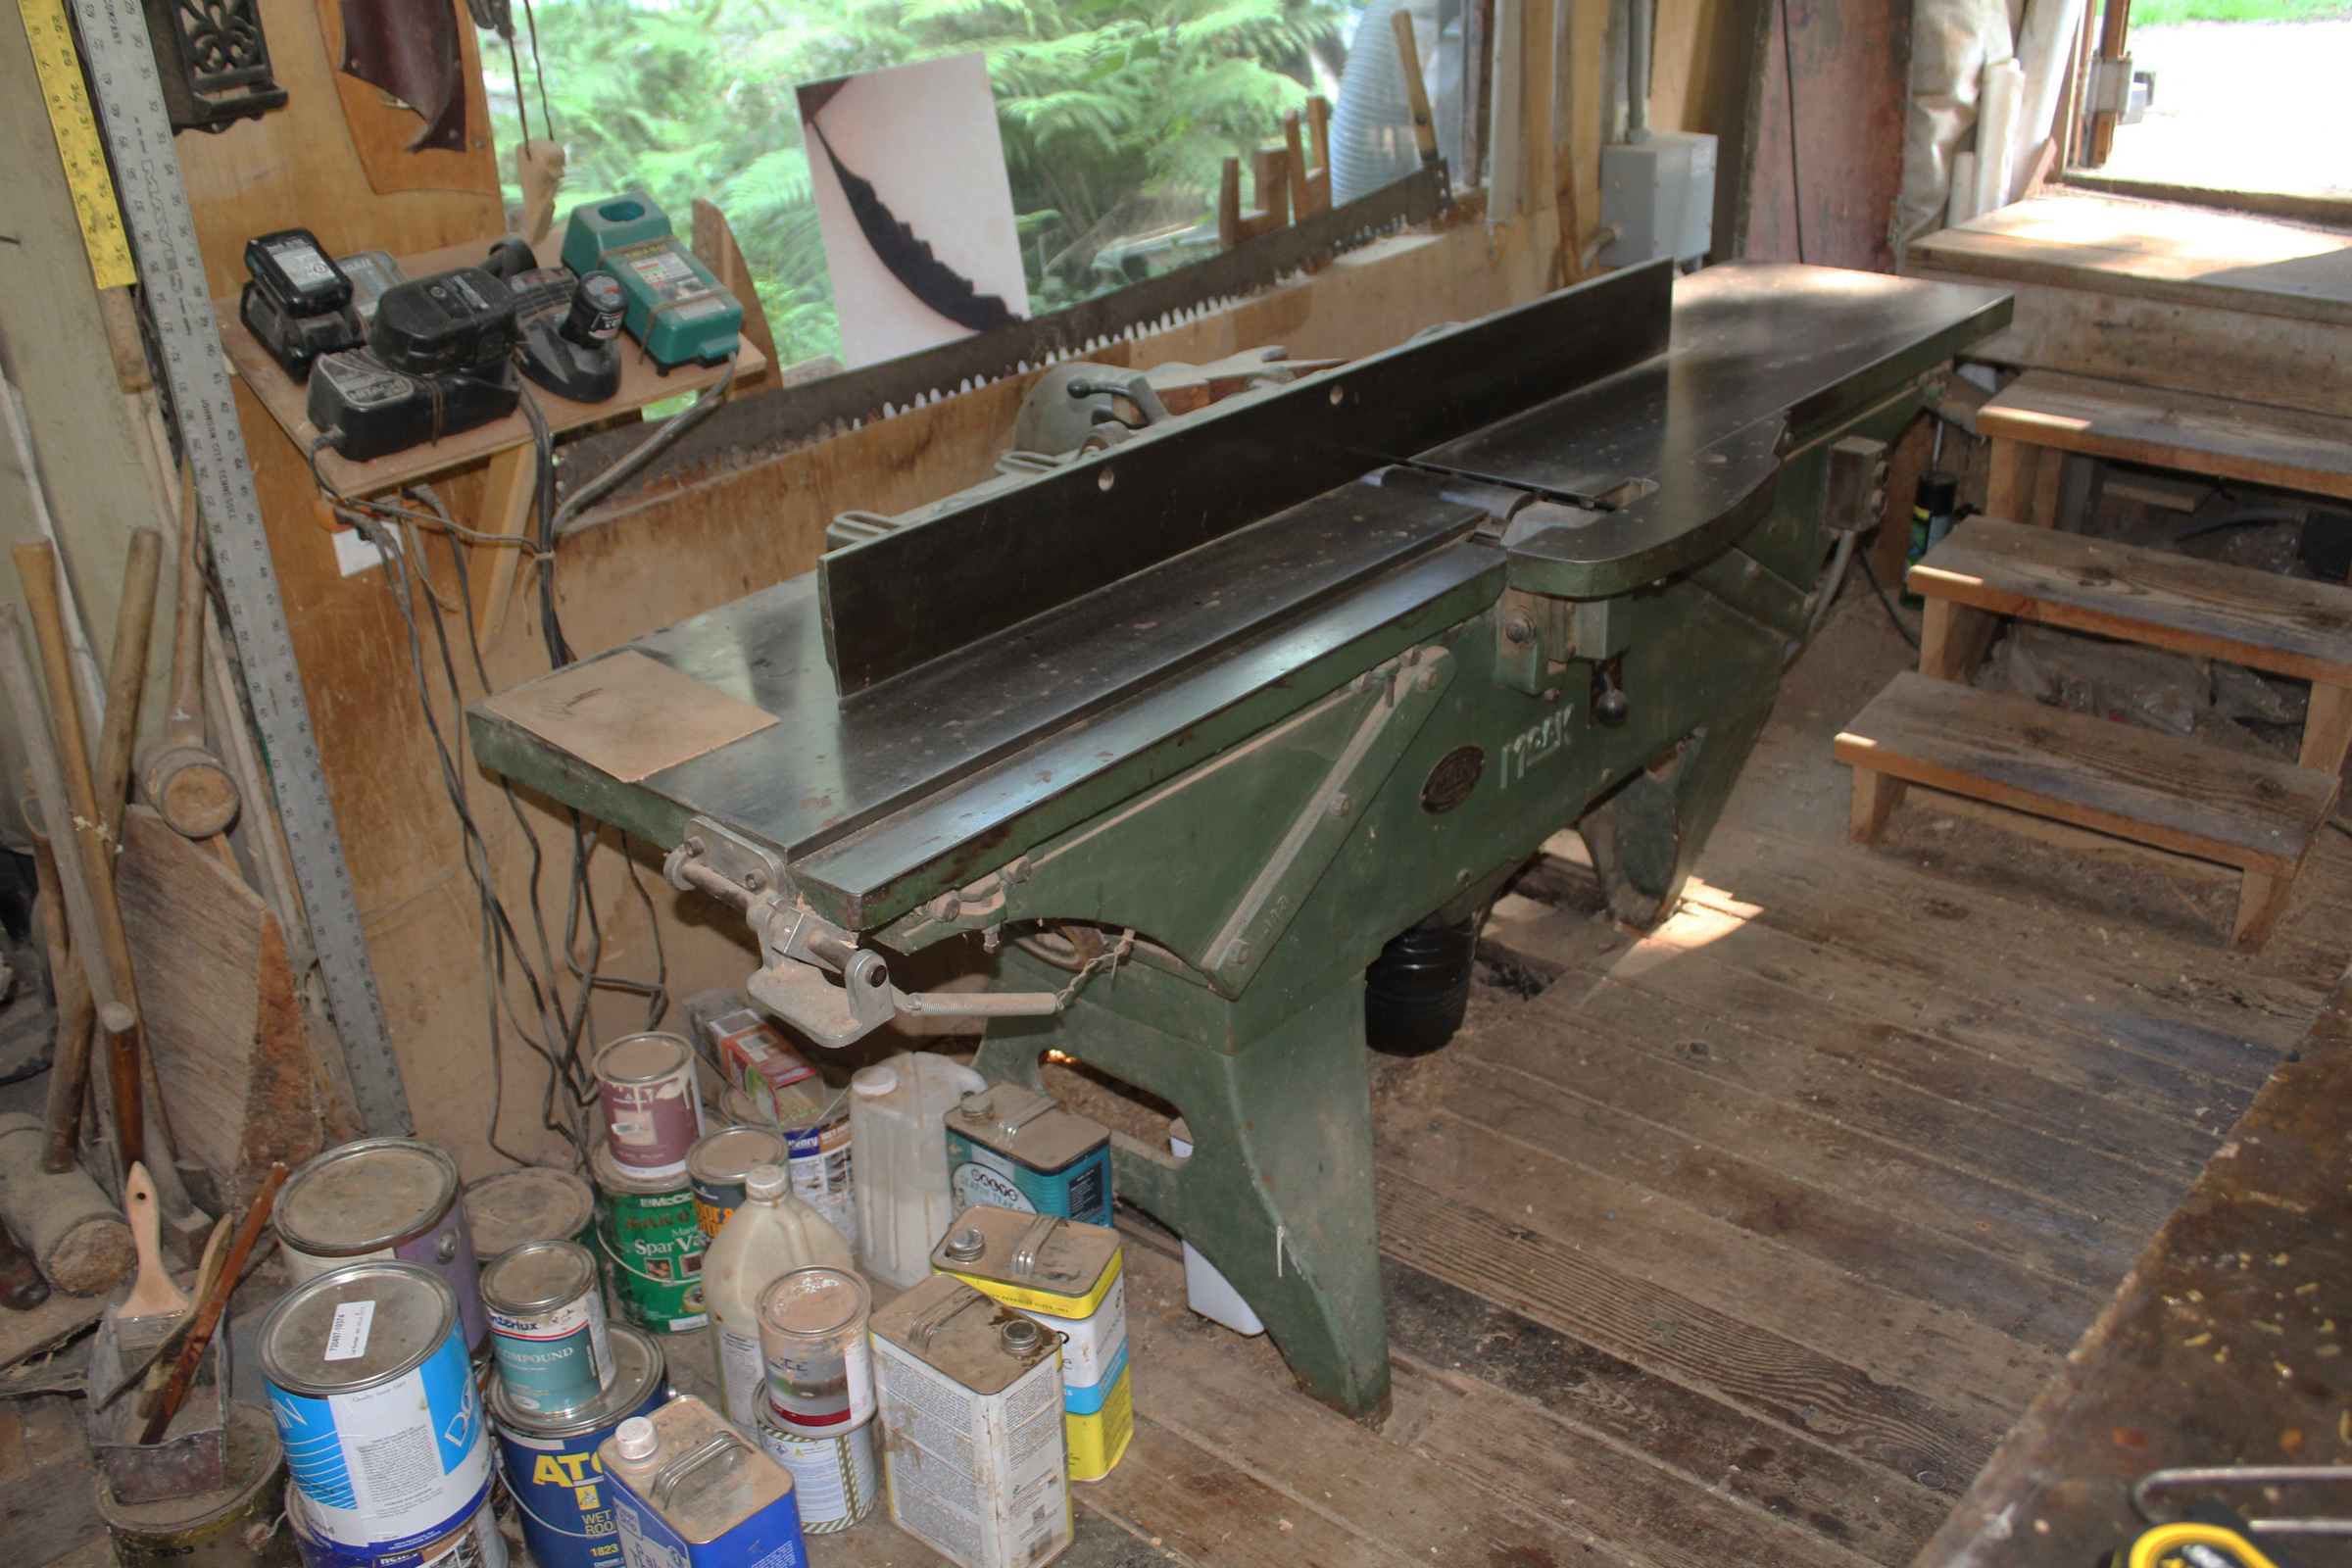
The jointer’s bed has been discolored by wet things set on it. The rust erasers remedy the damage.
Rod Koozmin runs a sharpening business, so he’s seen a lot of rusty knives and tools. To get them shiny clean again, he uses rust erasers. They’re made of a rubbery compound mixed with silicon-carbide grit and can be used dry or soaked in water before use. Rod also uses them with WD-40 to float away the abraded rust. He has used several different brands and favors those made in Japan, but notes they’re all good. The Japanese rust erasers here made by Kuniyoshi are sold by Amazon in pairs—one medium grit, one fine—for $18. Each polished section of all of these tools in the editor’s shop was done in less than a minute, using erasers soaked in water.
Christopher Cunningham
A few seconds of scrubbing with these two rust erasers brightened the steel of (from left to right) a Chinese cleaver, a combination-square ruler, a scraper, and the combination-square body.
Stubborn rust spots can be worked quickly by using the edge of an eraser, which concentrates the effort in a smaller area. The rubbery compound is quite durable and doesn’t noticeably erode with use. Because there is grit all the way through the eraser, it will continue to work even when it does wear away.
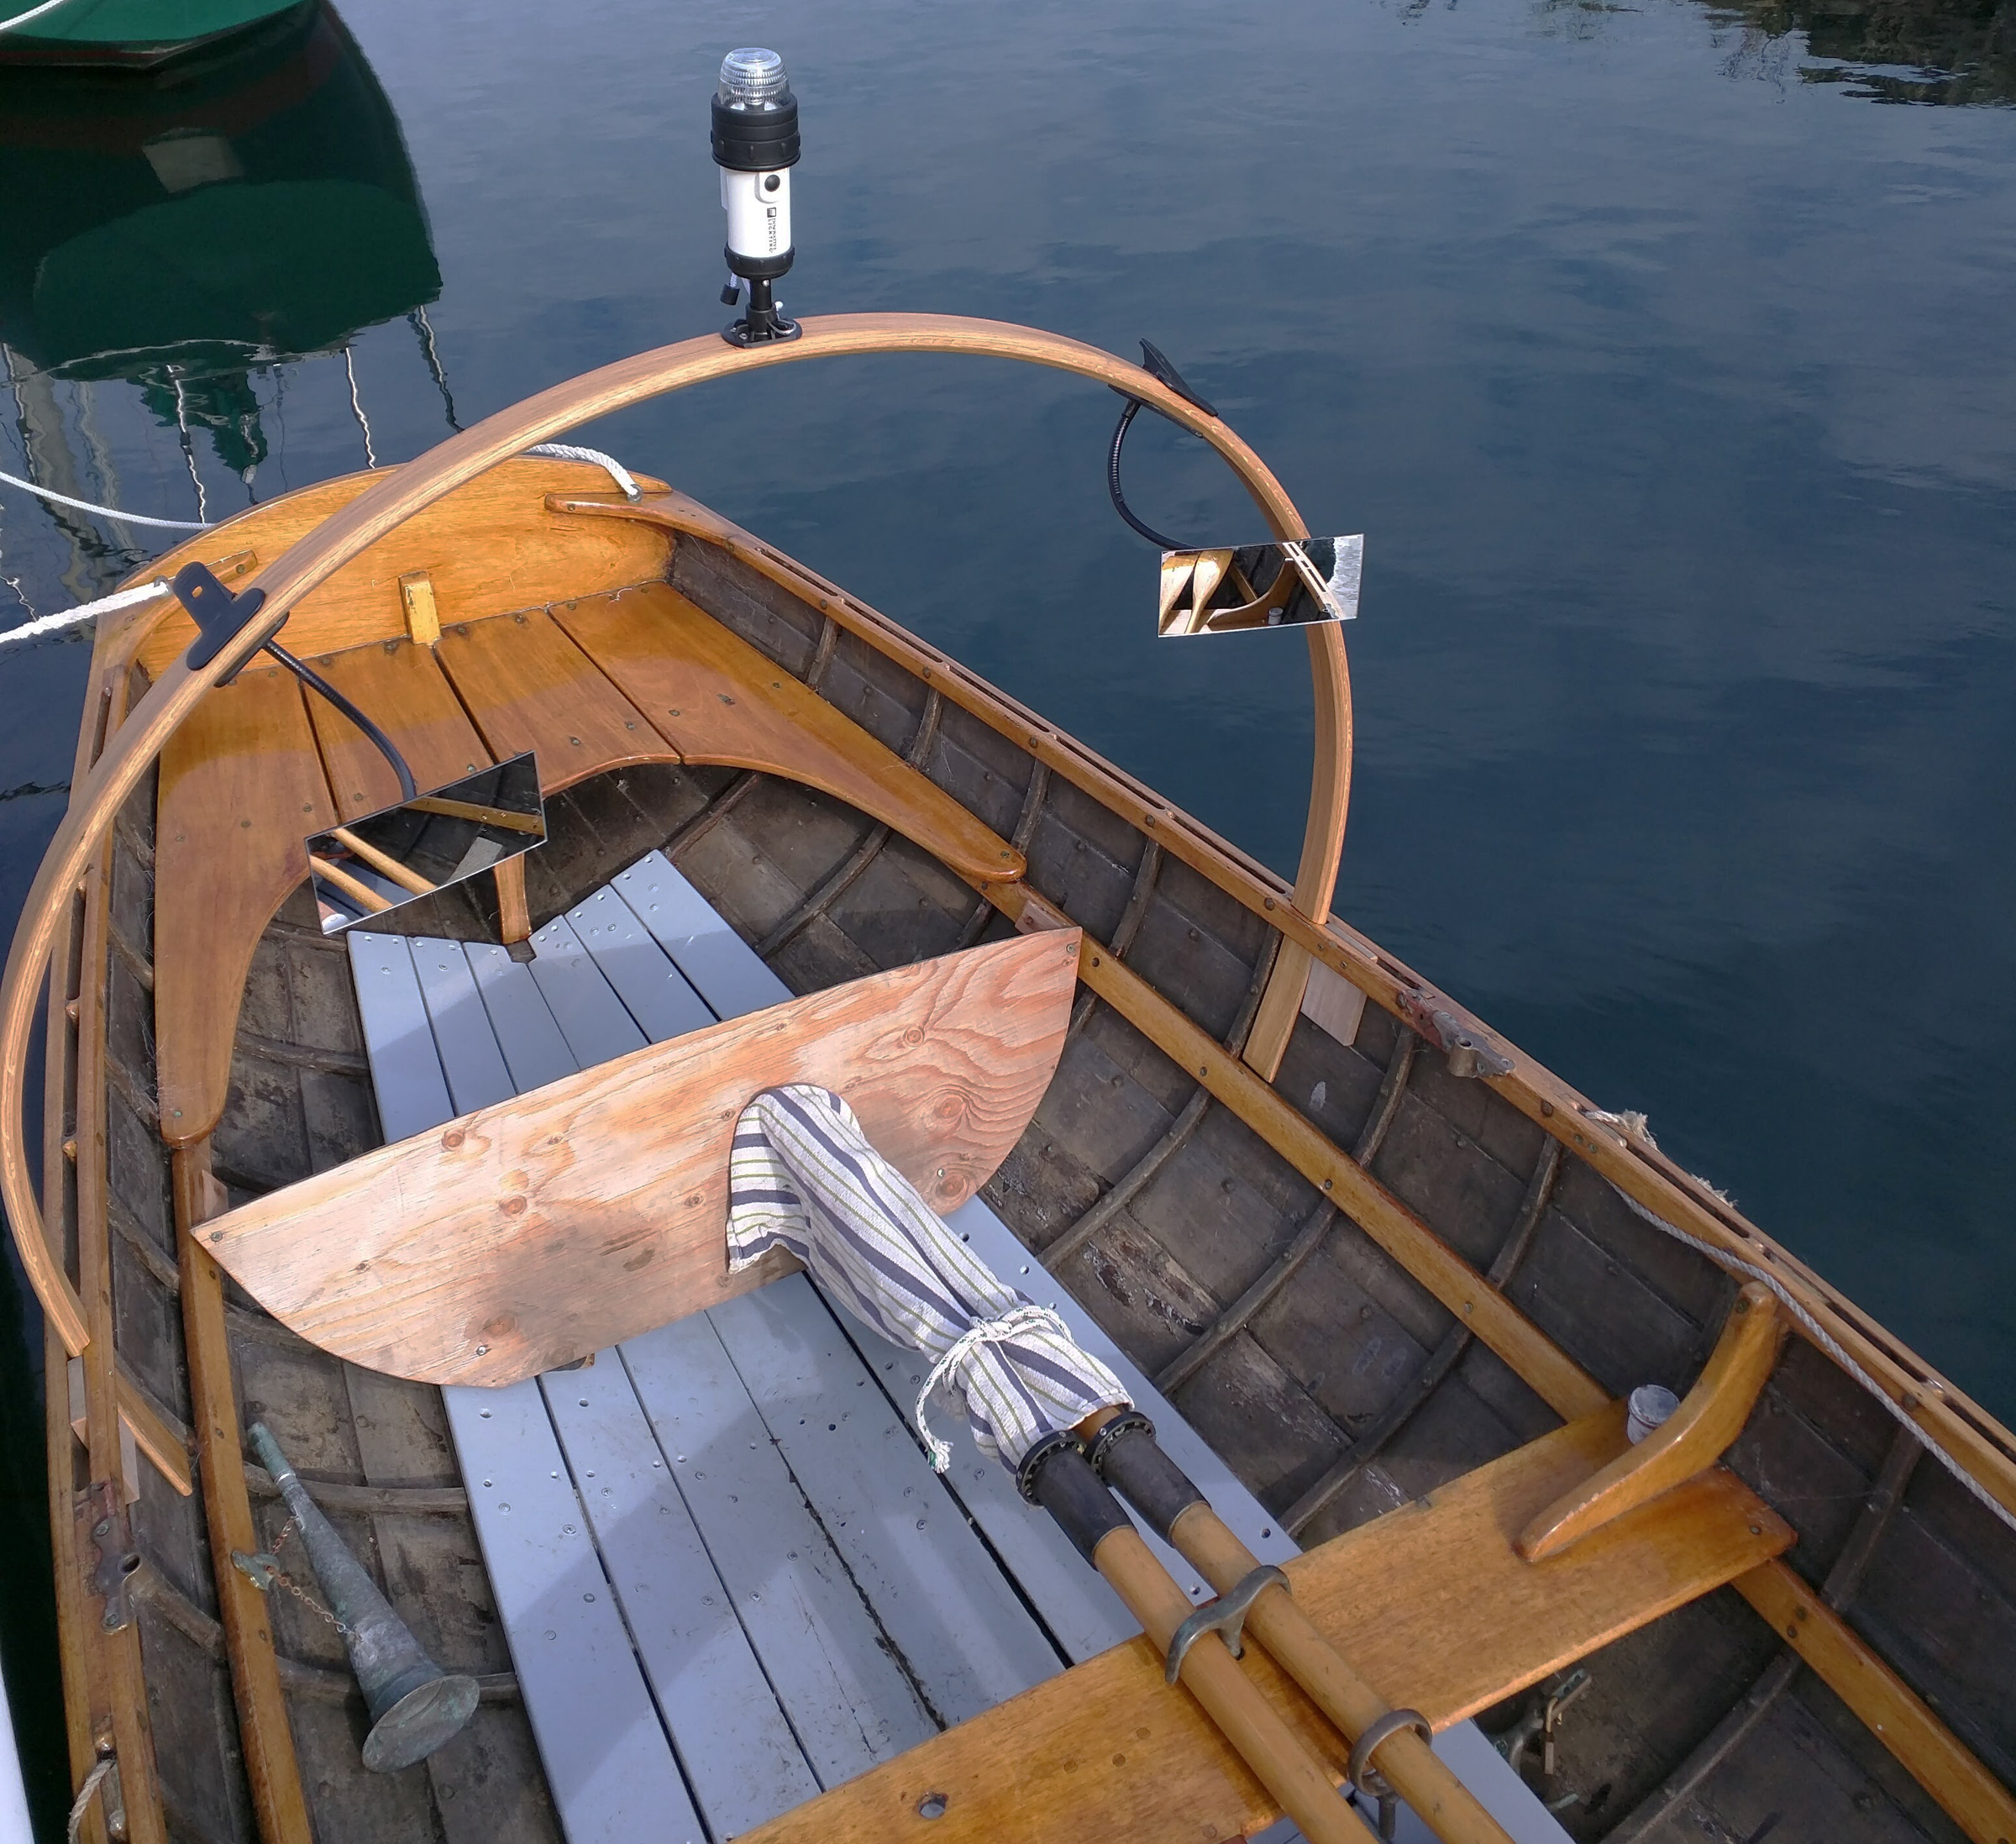
Rowing Hoop
Jim Tolpin
Jim Tolpin’s hoop supports an all-around white light high enough to to be seen from all directions and not interfere with his ability to see at dark. The mirrors let him keep close tabs on what’s ahead.
The diminishing daylight hours of fall and winter weren’t going to keep Jim Tolpin from rowing, but he needed to do something to improve his visibility, both seeing and being seen, at dawn. Front-view mirrors would take care of the former, and a battery-powered all-around white navigation light would address the latter, he just needed a place to mount them. A post anchored on the centerline could work, but it would make it difficult to move about in the boat and require a likely obtrusive fitting to anchor it, so Jim created a hoop to support mirrors and a light. It is a laminate of four strips of 3/16″ white oak. The ends are thinner, sized to slip between the inwales and the sheer plank.
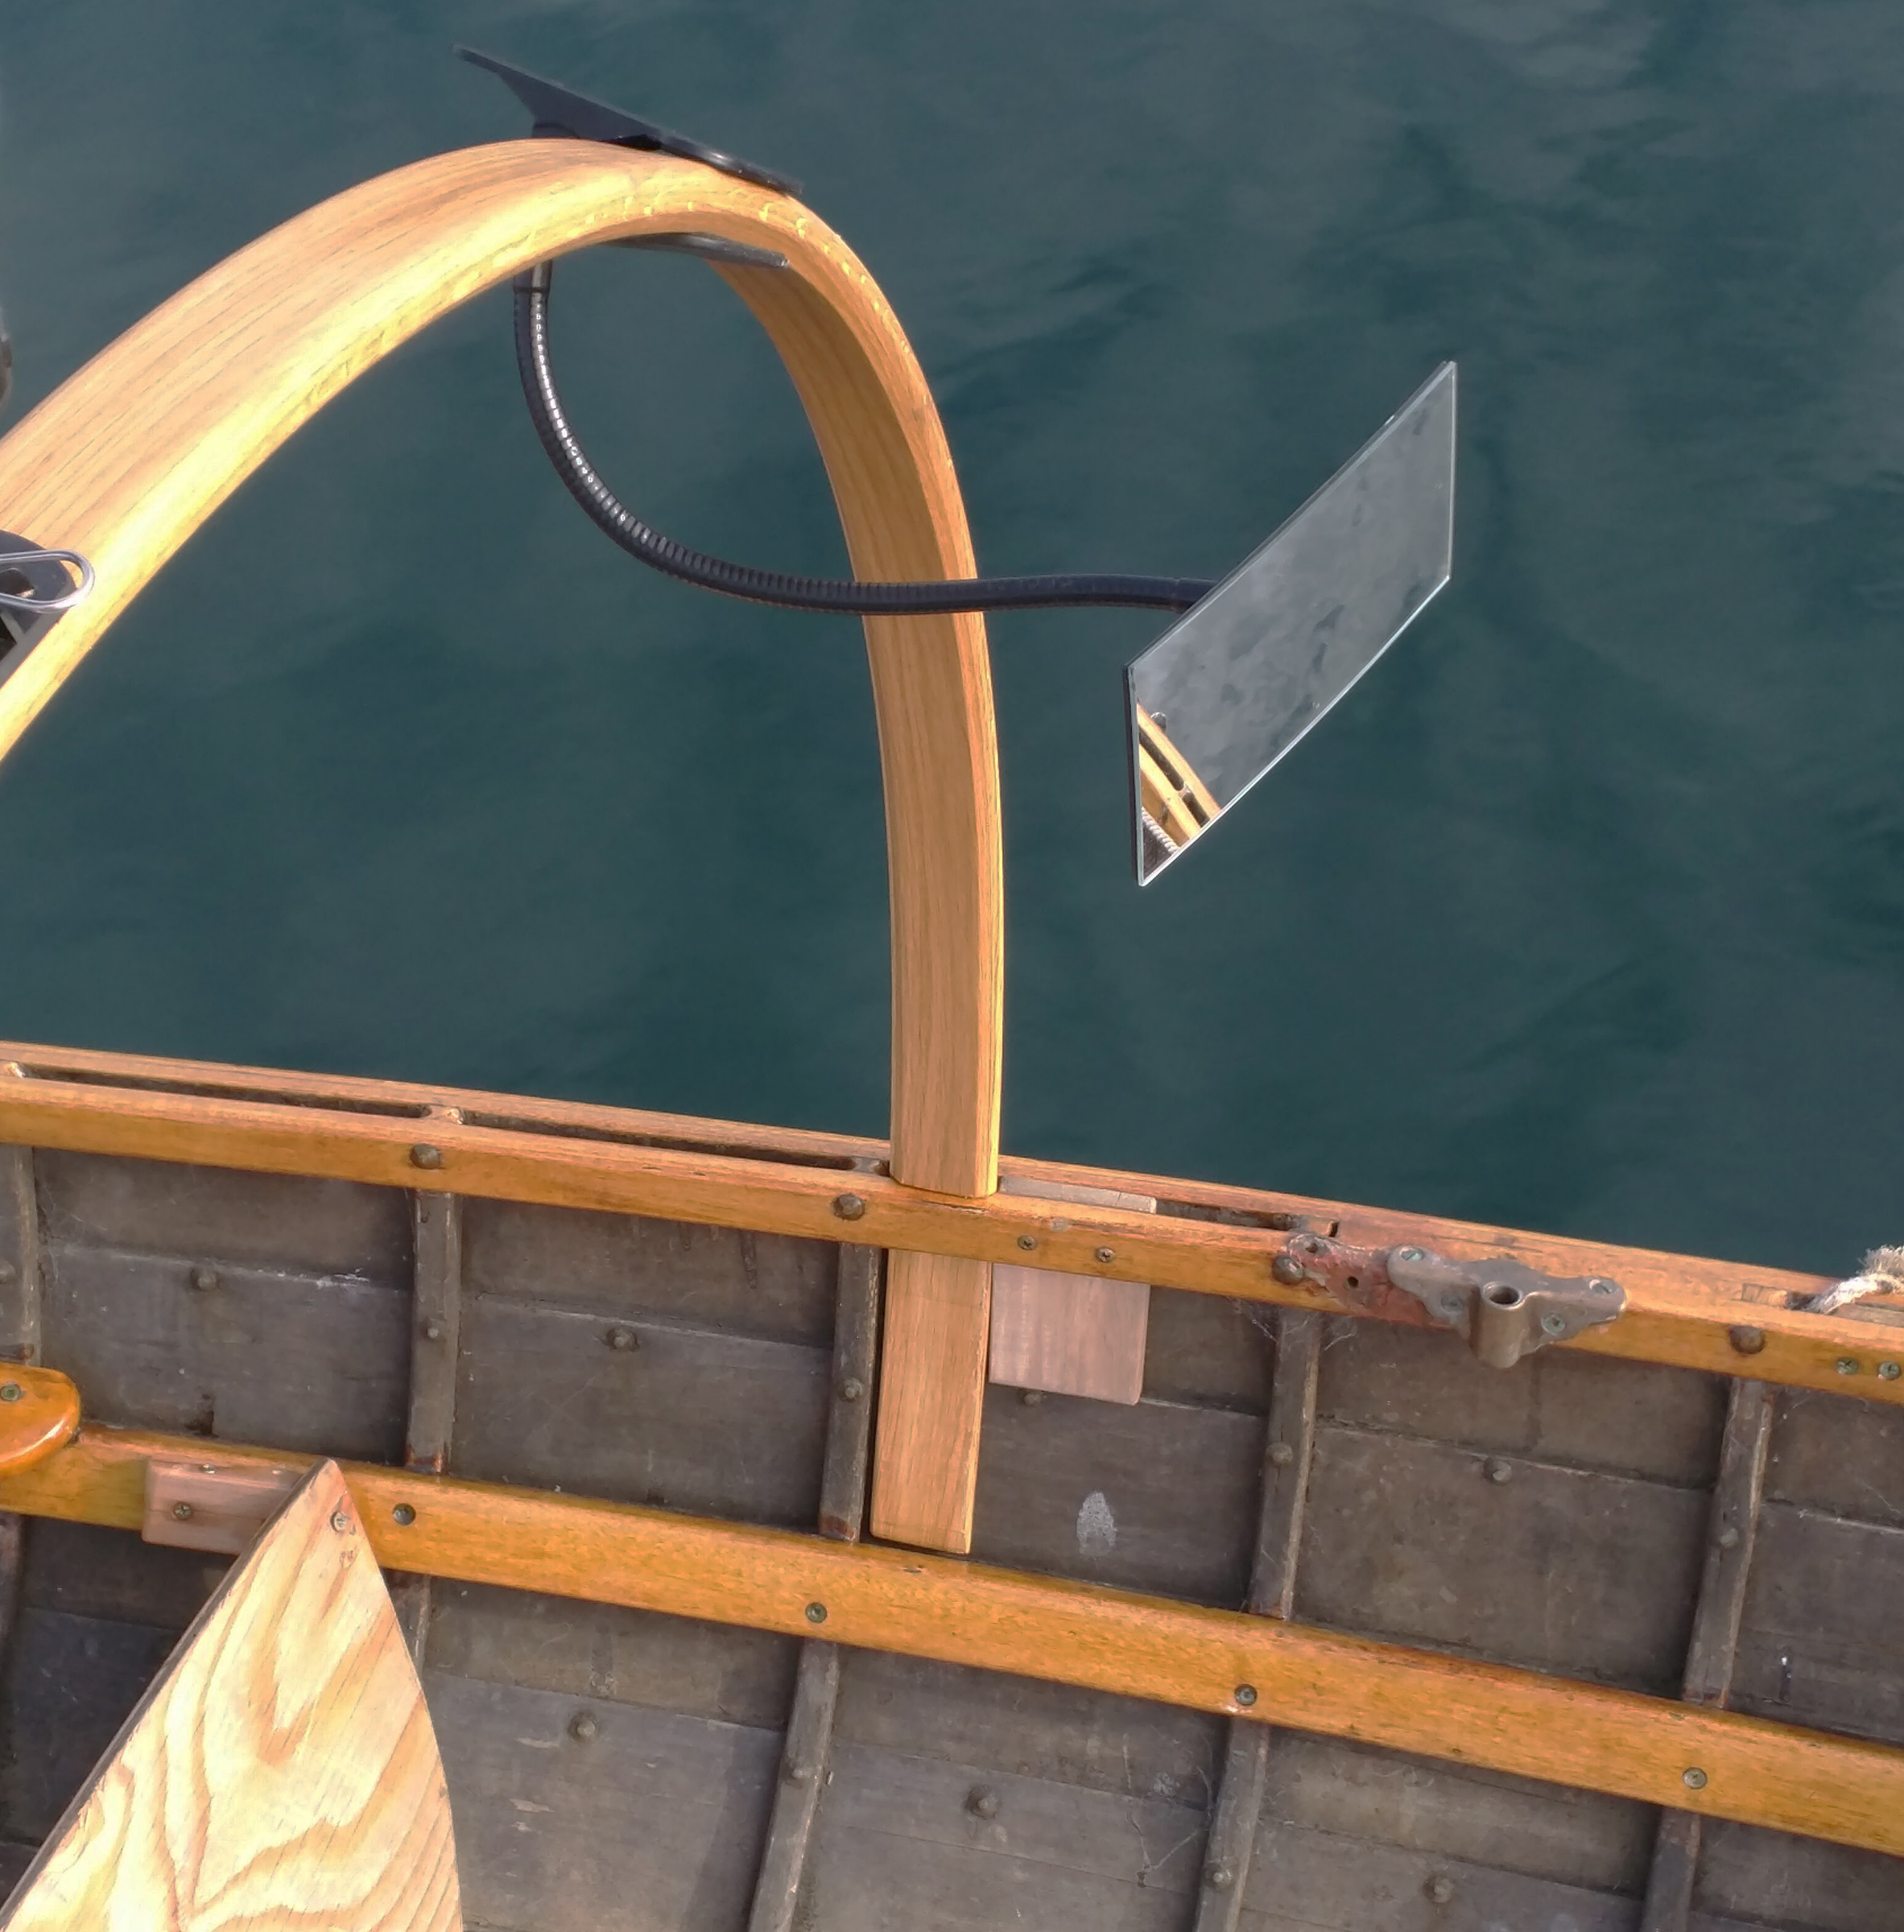
Jim Tolpin
The mirrors were designed for computer work stations. They’re slightly convex to give a wide-angle view over the bow.
The hoop is kept upright by a steam-bent frame on one side and a block screwed to the inwale on the other. The hoop is high enough to keep the white light out of his line of sight; wearing a baseball cap conceals it entirely. The mirrors are designed for computer work stations and each has a spring clamp and a flexible neck. The slightly convex mirrors provide a wide view with distances a bit foreshortened. They’re not designed for outdoor use, so the metal will corrode if not greased or coated with anti-seize compound. The hoop is strong enough to use as a handhold while getting in and out of the boat. It’s easy to imagine making a second hoop for the bow to support a canopy.
You can share your tips and tricks of the trade with other Small Boats Magazine readers by sending us an email.
Comments:
We welcome your comments about this article. If you’d like to include a photo or a video with your comment, please email the file or link.
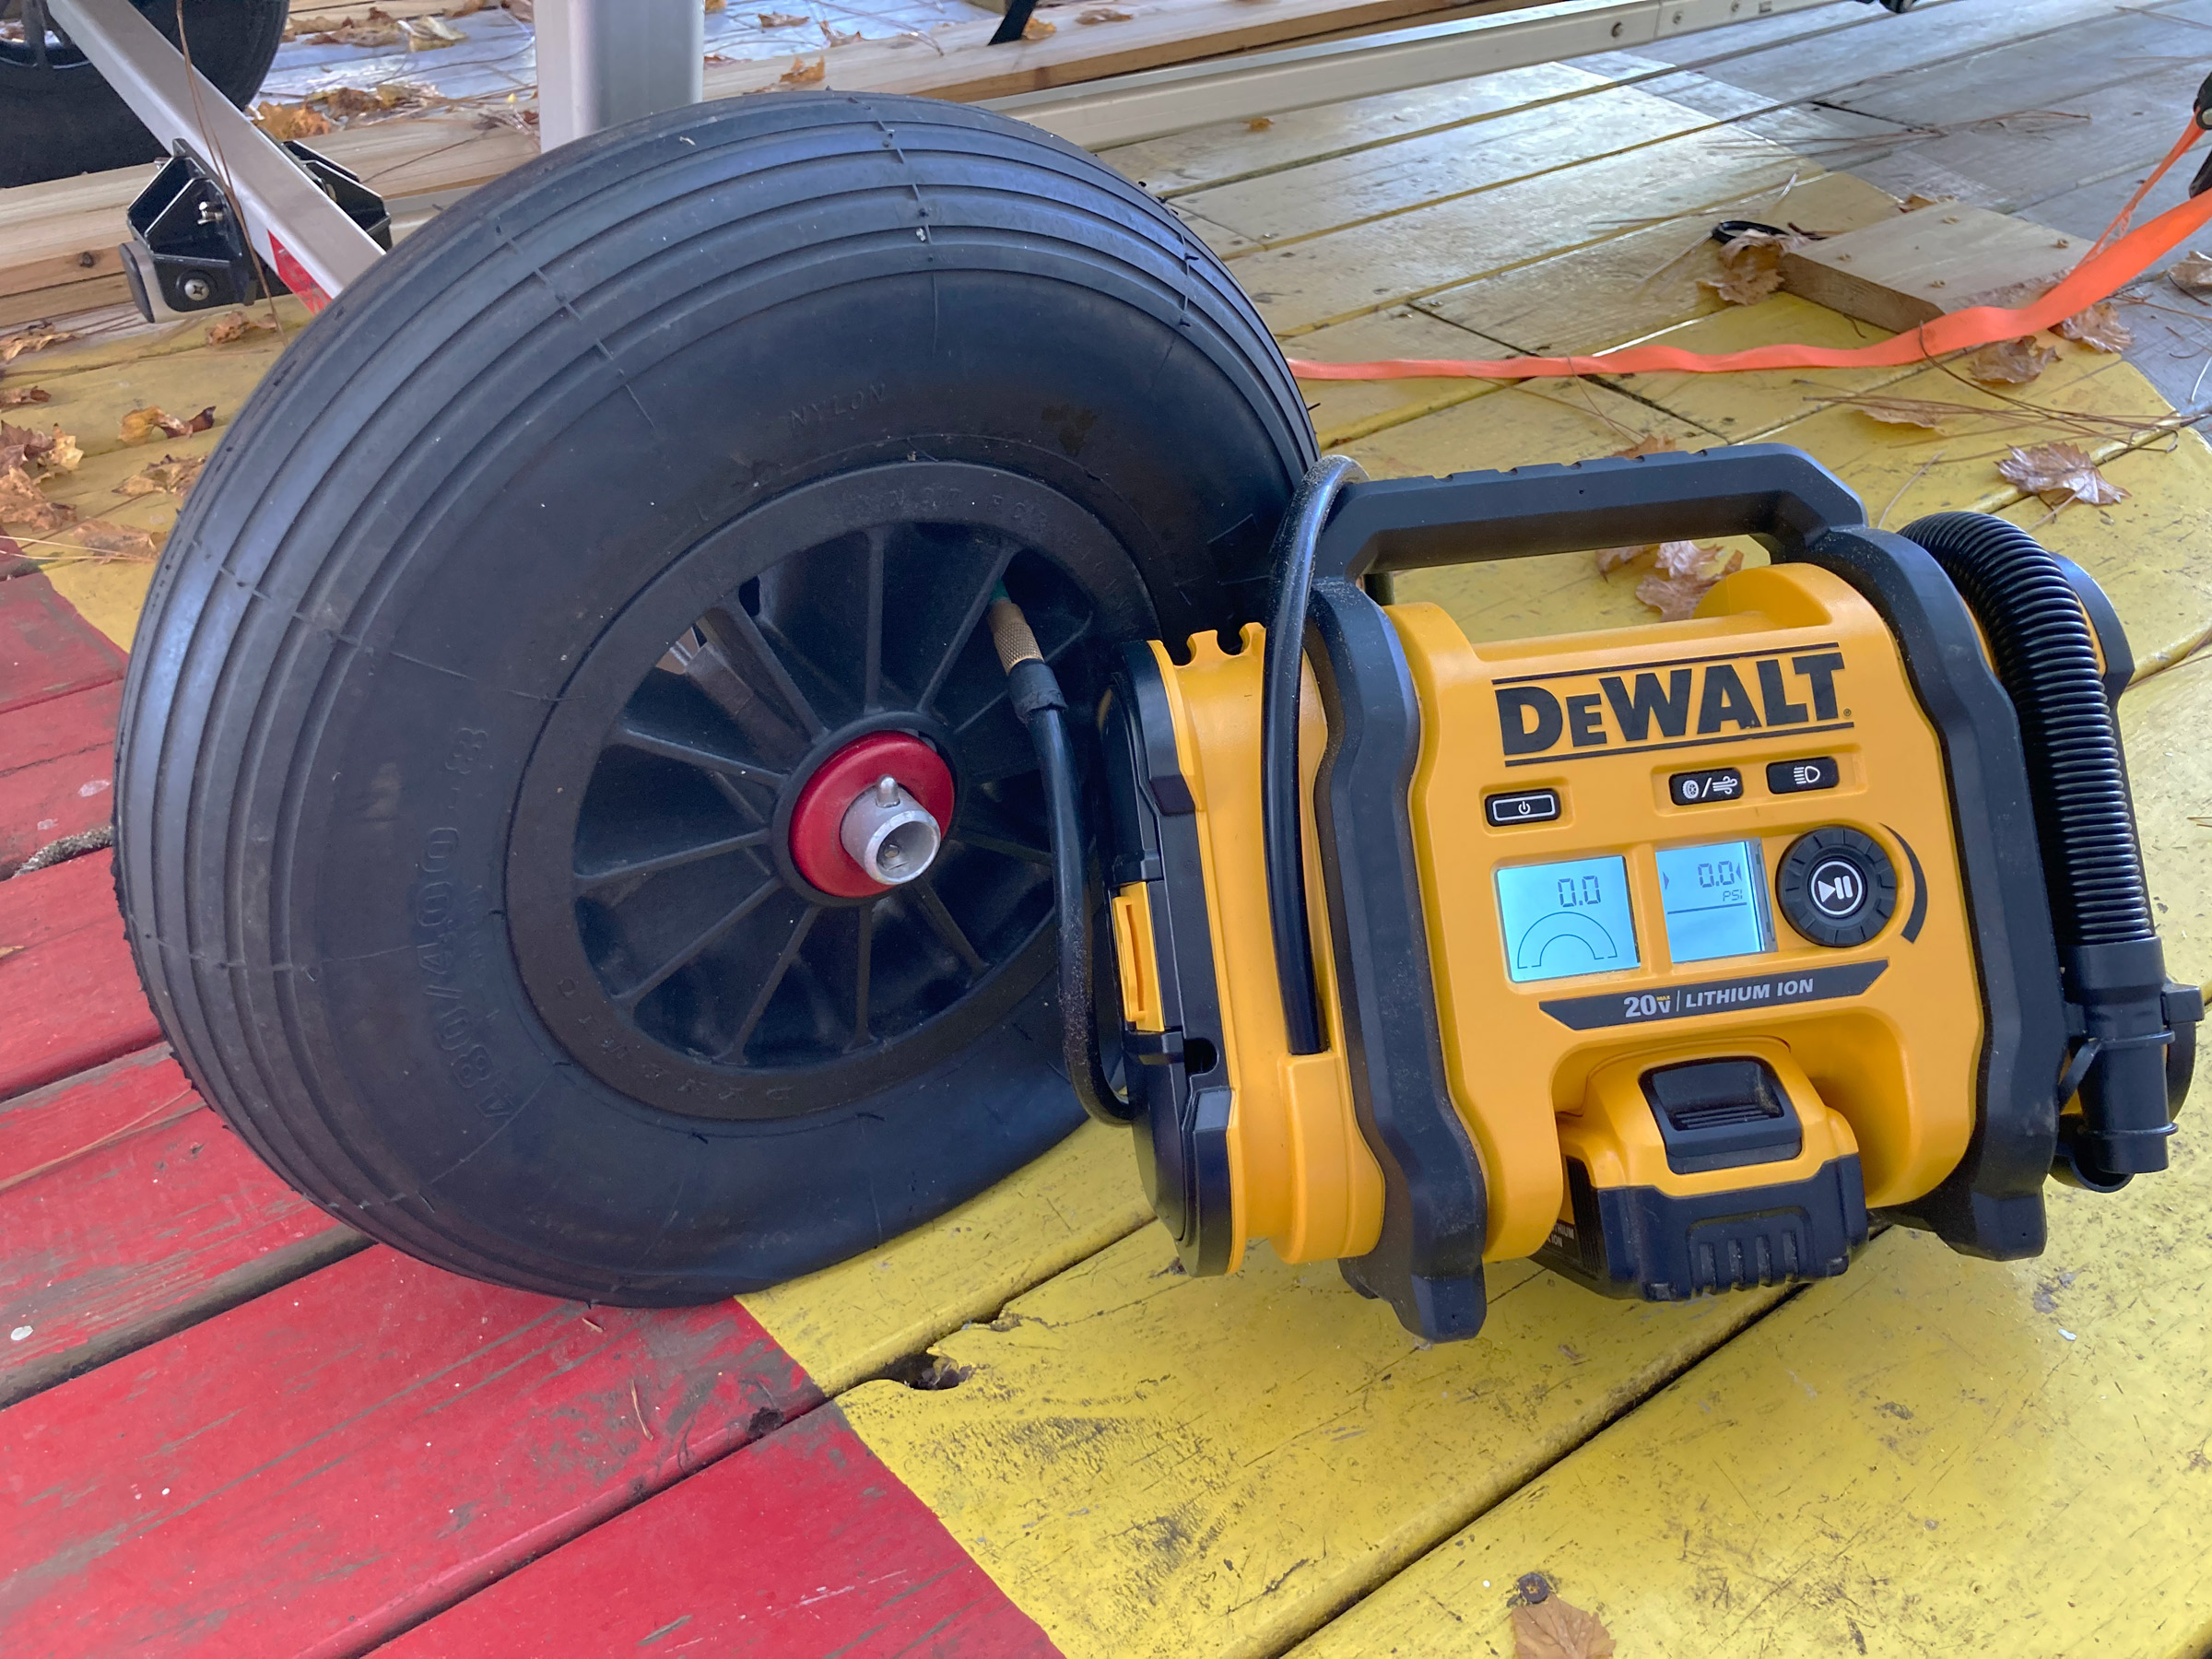
Our small fleet of boats comes with a lot of tires. They’re attached to trailers, dollies, and towing vehicles. In the past we had to position the gear near our compressor, but recently we discovered a fast and easy way to keep the fleet maintained: a cordless air inflator. We already had several DeWalt 20V cordless tools, with batteries and chargers, so we went with the DeWalt 20V Max Inflator.
The inflator is light, just 5 1/2 lbs, and compact for its capabilities. It measures just under 10″ high, 12″ wide, and just over 5″ deep. The inflator can use three different power sources: the included 12V DC cord that stows in a compartment with a latching door, or (available separately) DeWalt’s 20V Max batteries, and a 115V AC power adapter.
Kent and Audrey Lewis
The DeWalt inflator has a high-pressure hose for auto and dolly tires. The corrugated hose at the right can be used for inflatable mattresses and boat rollers.
We first used the inflator powered with one of our DeWalt 20V Max batteries to air up vehicle, trailer, and dolly tires. That project went quickly, with no need to drag long hoses, endure a noisy compressor, and hold the air chuck to the valves. We have several 20V Max batteries, rated from 3 amps up to 5 amps, and they all did the job with the larger amp-hour batteries, as expected, providing air at a faster rate. The 3-amp-hour battery, fully charged, lasts long enough to air up 10 to 12 dolly tires.
The inflator has an auto-shutoff feature that allows the target air pressure to be set on a digital display, and then shuts itself off upon reaching that pressure. This has been a timesaver, as we can attend to other tasks while the inflator takes care of the tires.
We’ve used the inflator with the 12V DC plug on our largest vehicle, an RV. Plugged into one of the vehicle’s lighter sockets, the 15′ cord got the inflator within reach of all of the wheels. The RV’s tires require the inflator to pump to 75 psi—not a problem—its top pressure is 160 psi. The 115V AC adapter has a 5′ cord, so for the RV we needed an extension cord.
The inflator’s auto pressure setting is very useful as there was no need to keep remove the fitting to check the air pressure. The high-pressure rubber hose is 29″ and can reach the valve on any size of wheel. Its screw-on fitting stays securely on a wheel’s valve stem while the tire is being inflated, an advantage over the clamp-on type, which doesn’t have as reliable a grip.
The inflator’s high-pressure hose can be used with the included nozzle to blow dust and debris out of small spaces, though not as forcefully as an air compressor can. The inflator also has a low-pressure/high-volume hose for inflating and deflating air mattresses or other water inflatables. An LED flashlight is built into the carry handle, and molded clips on the right side hold the nozzle for the high-pressure nozzle, a Presta-valve adapter, and a ball-inflator needle. The DeWalt inflator is versatile and takes up very little space, important considerations in our world of small boats.
Audrey and Kent Lewis command a small armada of kayaks, a canoe, and sail and motor boats when not inflating dolly tires. Their small-boat adventures are chronicled at Small Boat Restoration.
I’ve been guilty of not taking care of my tires. I inflate my bicycle tires regularly because they go soft so quickly, but I haven’t attended to my car, trailer, and dolly tires unless I see them bulging where they meet the pavement. I keep a 12-volt electric pump in my car and use it when I have to but it is slow to top off a tire, awkward (because of the long power cord), and, with its tiny dial gauge, not very precise.
Christopher Cunningham
Milwaukee’s portable air inflator, has a single use—inflating tires—but it easily earns its keep making cars and trailers safer on the road and preventing uneven wear on tires.
I was inspired by the Lewis’s article above to get a pump compatible with my Milwaukee M12 system so I could use the batteries and charger I already have. I bought the M12 Compact Inflator, tool only, from Amazon for $79. It’s not as versatile as the DeWalt—it has a single hose, an inflator nozzle, inflation needle, and a Presta adapter—but it has made itself very useful. It is much faster to inflate tires than was my 12-volt pump and it stops when it reaches the required pressure, so I don’t have to stand in the street dodging cars while keeping an eye on the gauge.
Is there a product that might be useful for boatbuilding, cruising, or shore-side camping that you’d like us to review? Please email your suggestions.
Comments:
We welcome your comments about this article. If you’d like to include a photo or a video with your comment, please email the file or link.
I’ve carried aerial pyrotechnic flares for more years than I can recall but I’ve never fired a single one. When the flares reach their expiration date and no longer meet U.S. Coast Guard requirements, I’ve replaced them with a new set to remain in compliance. I’ve chafed at the expense for things I’ve never used (and intend to keep it that way) but they’ve been like auto insurance—I have to have it, keep it up to date, and hope I never truly need it.
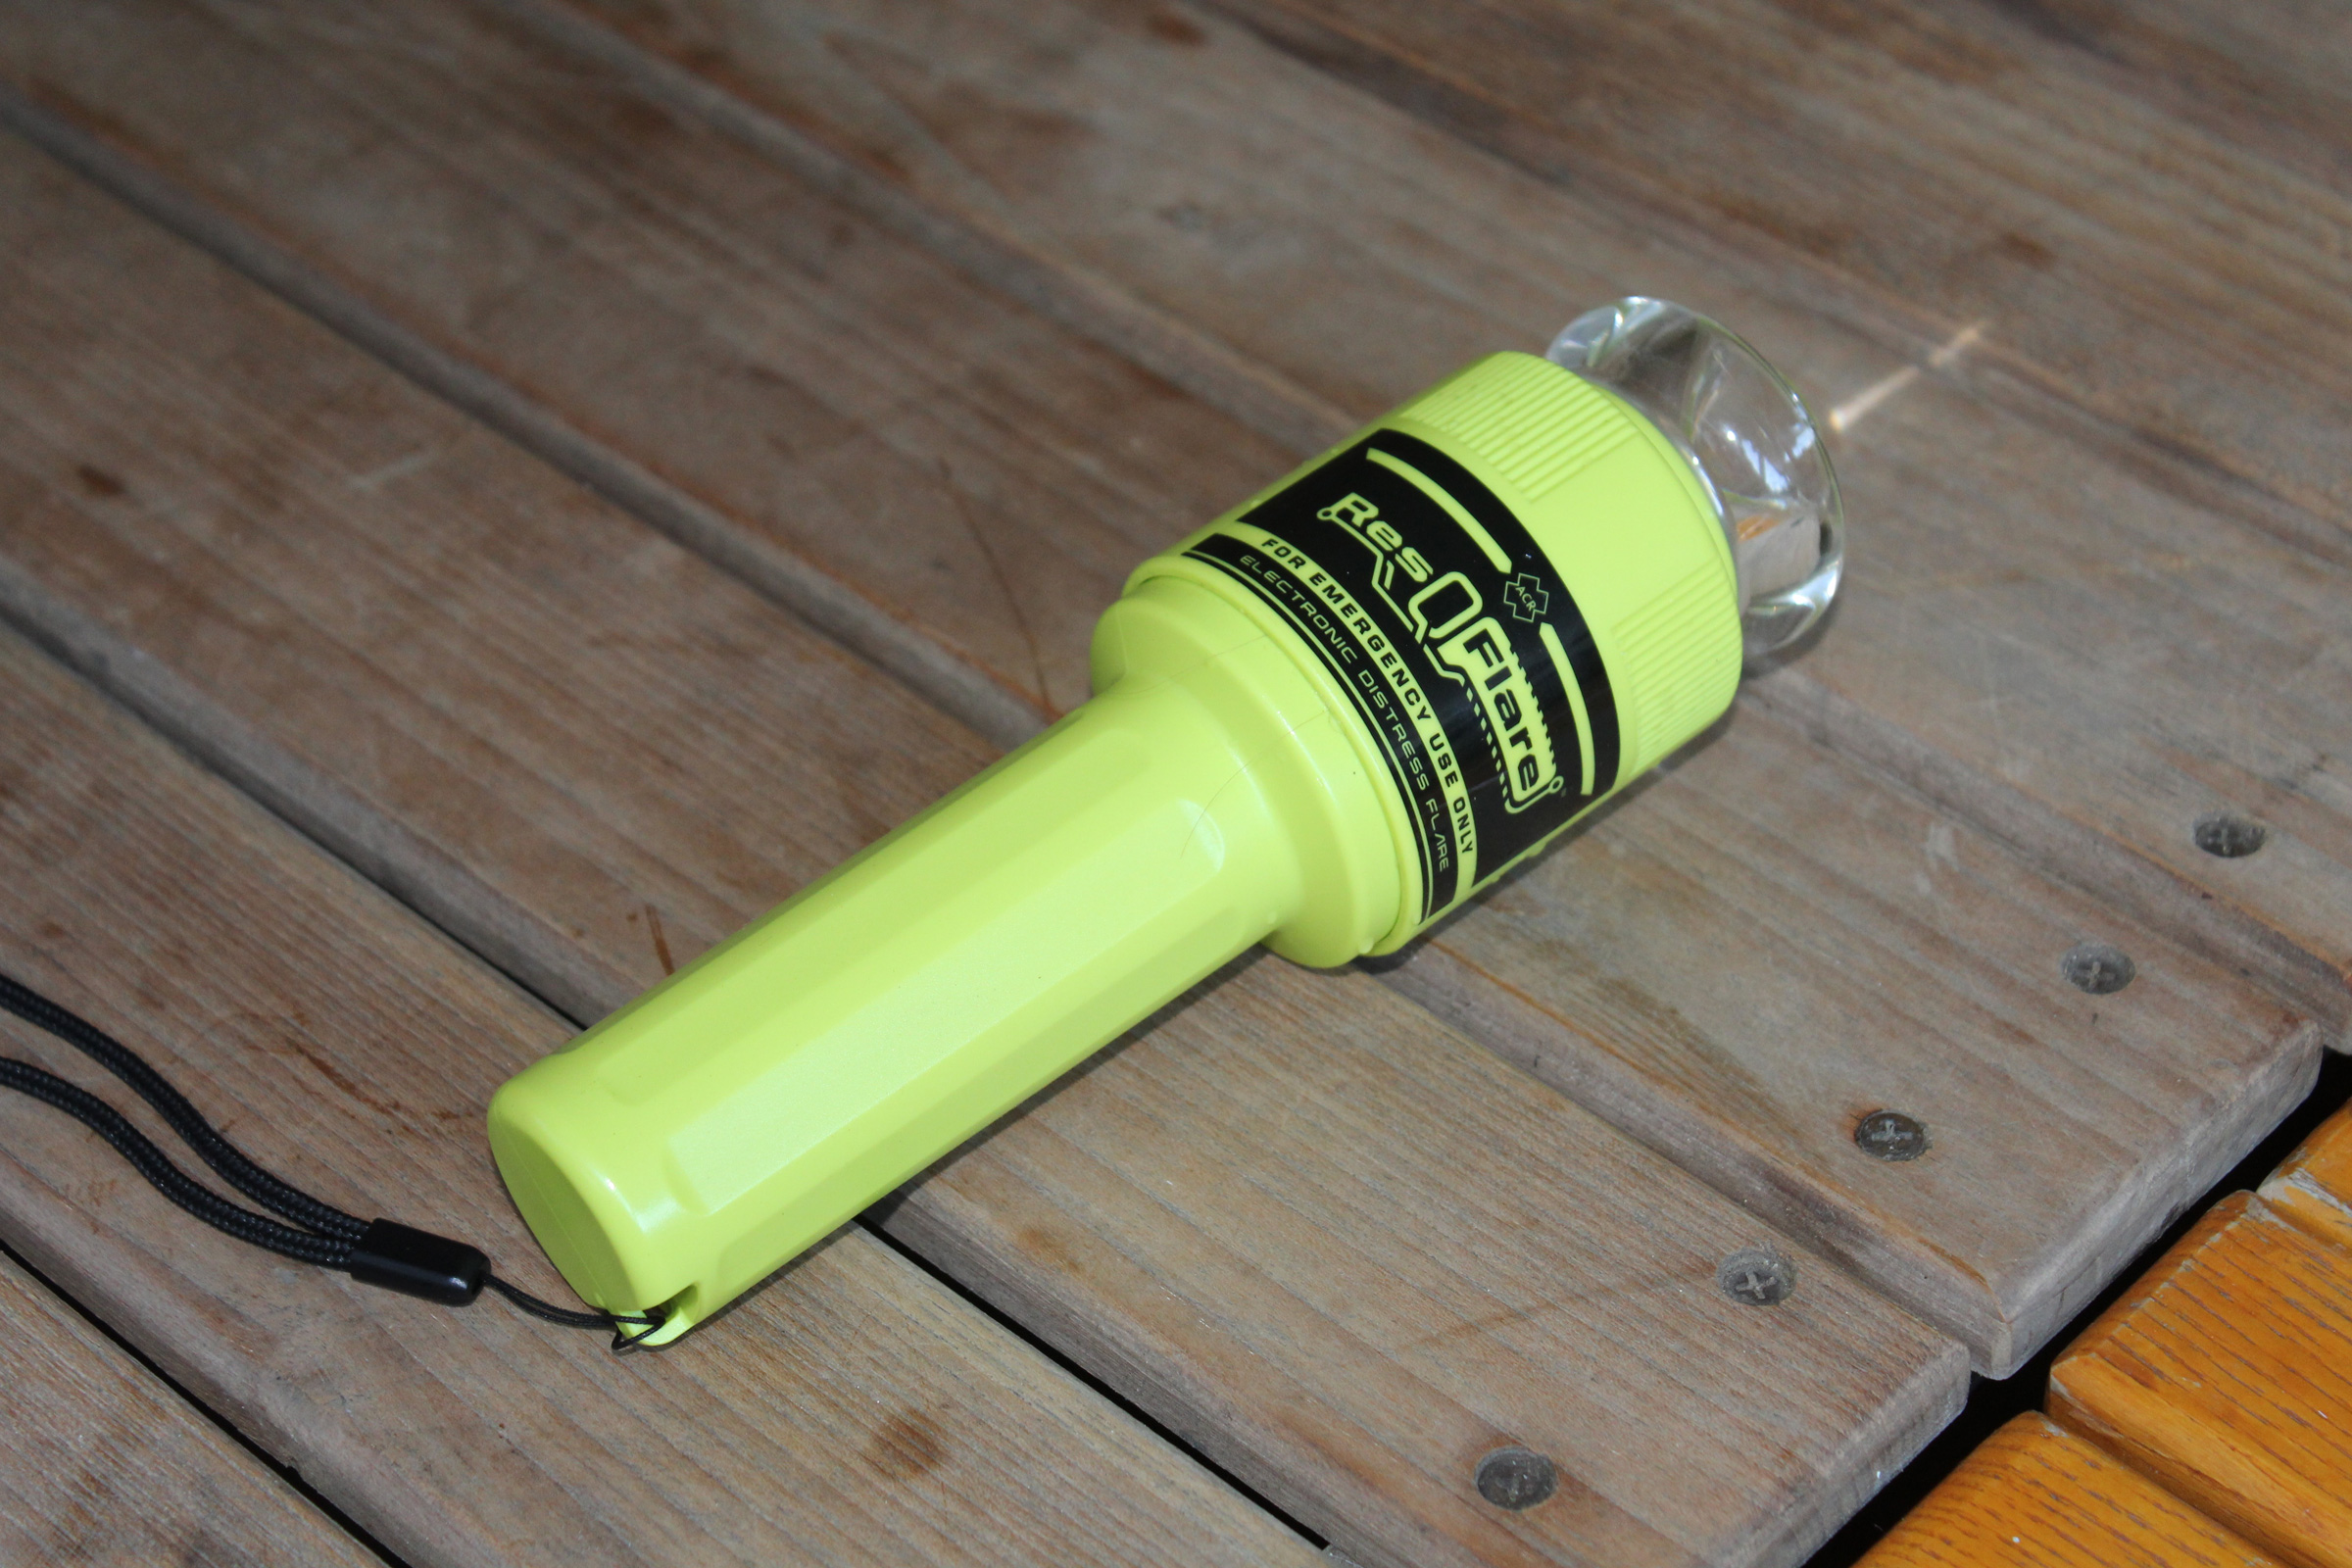
So, I was pleased when a battery-powered flashing light—the SOS Distress Light from Weems & Plath—was approved to meet the requirements. I’ve carried one since it came on the market early in 2016. It is no longer listed on the Weems & Plath web site, but in April of this year, a similar device, the ResQFlare from ACR Electronics, received USCG approval. It’s a significant step ahead: brighter, lighter, less bulky, and less expensive.
Photographs by the author
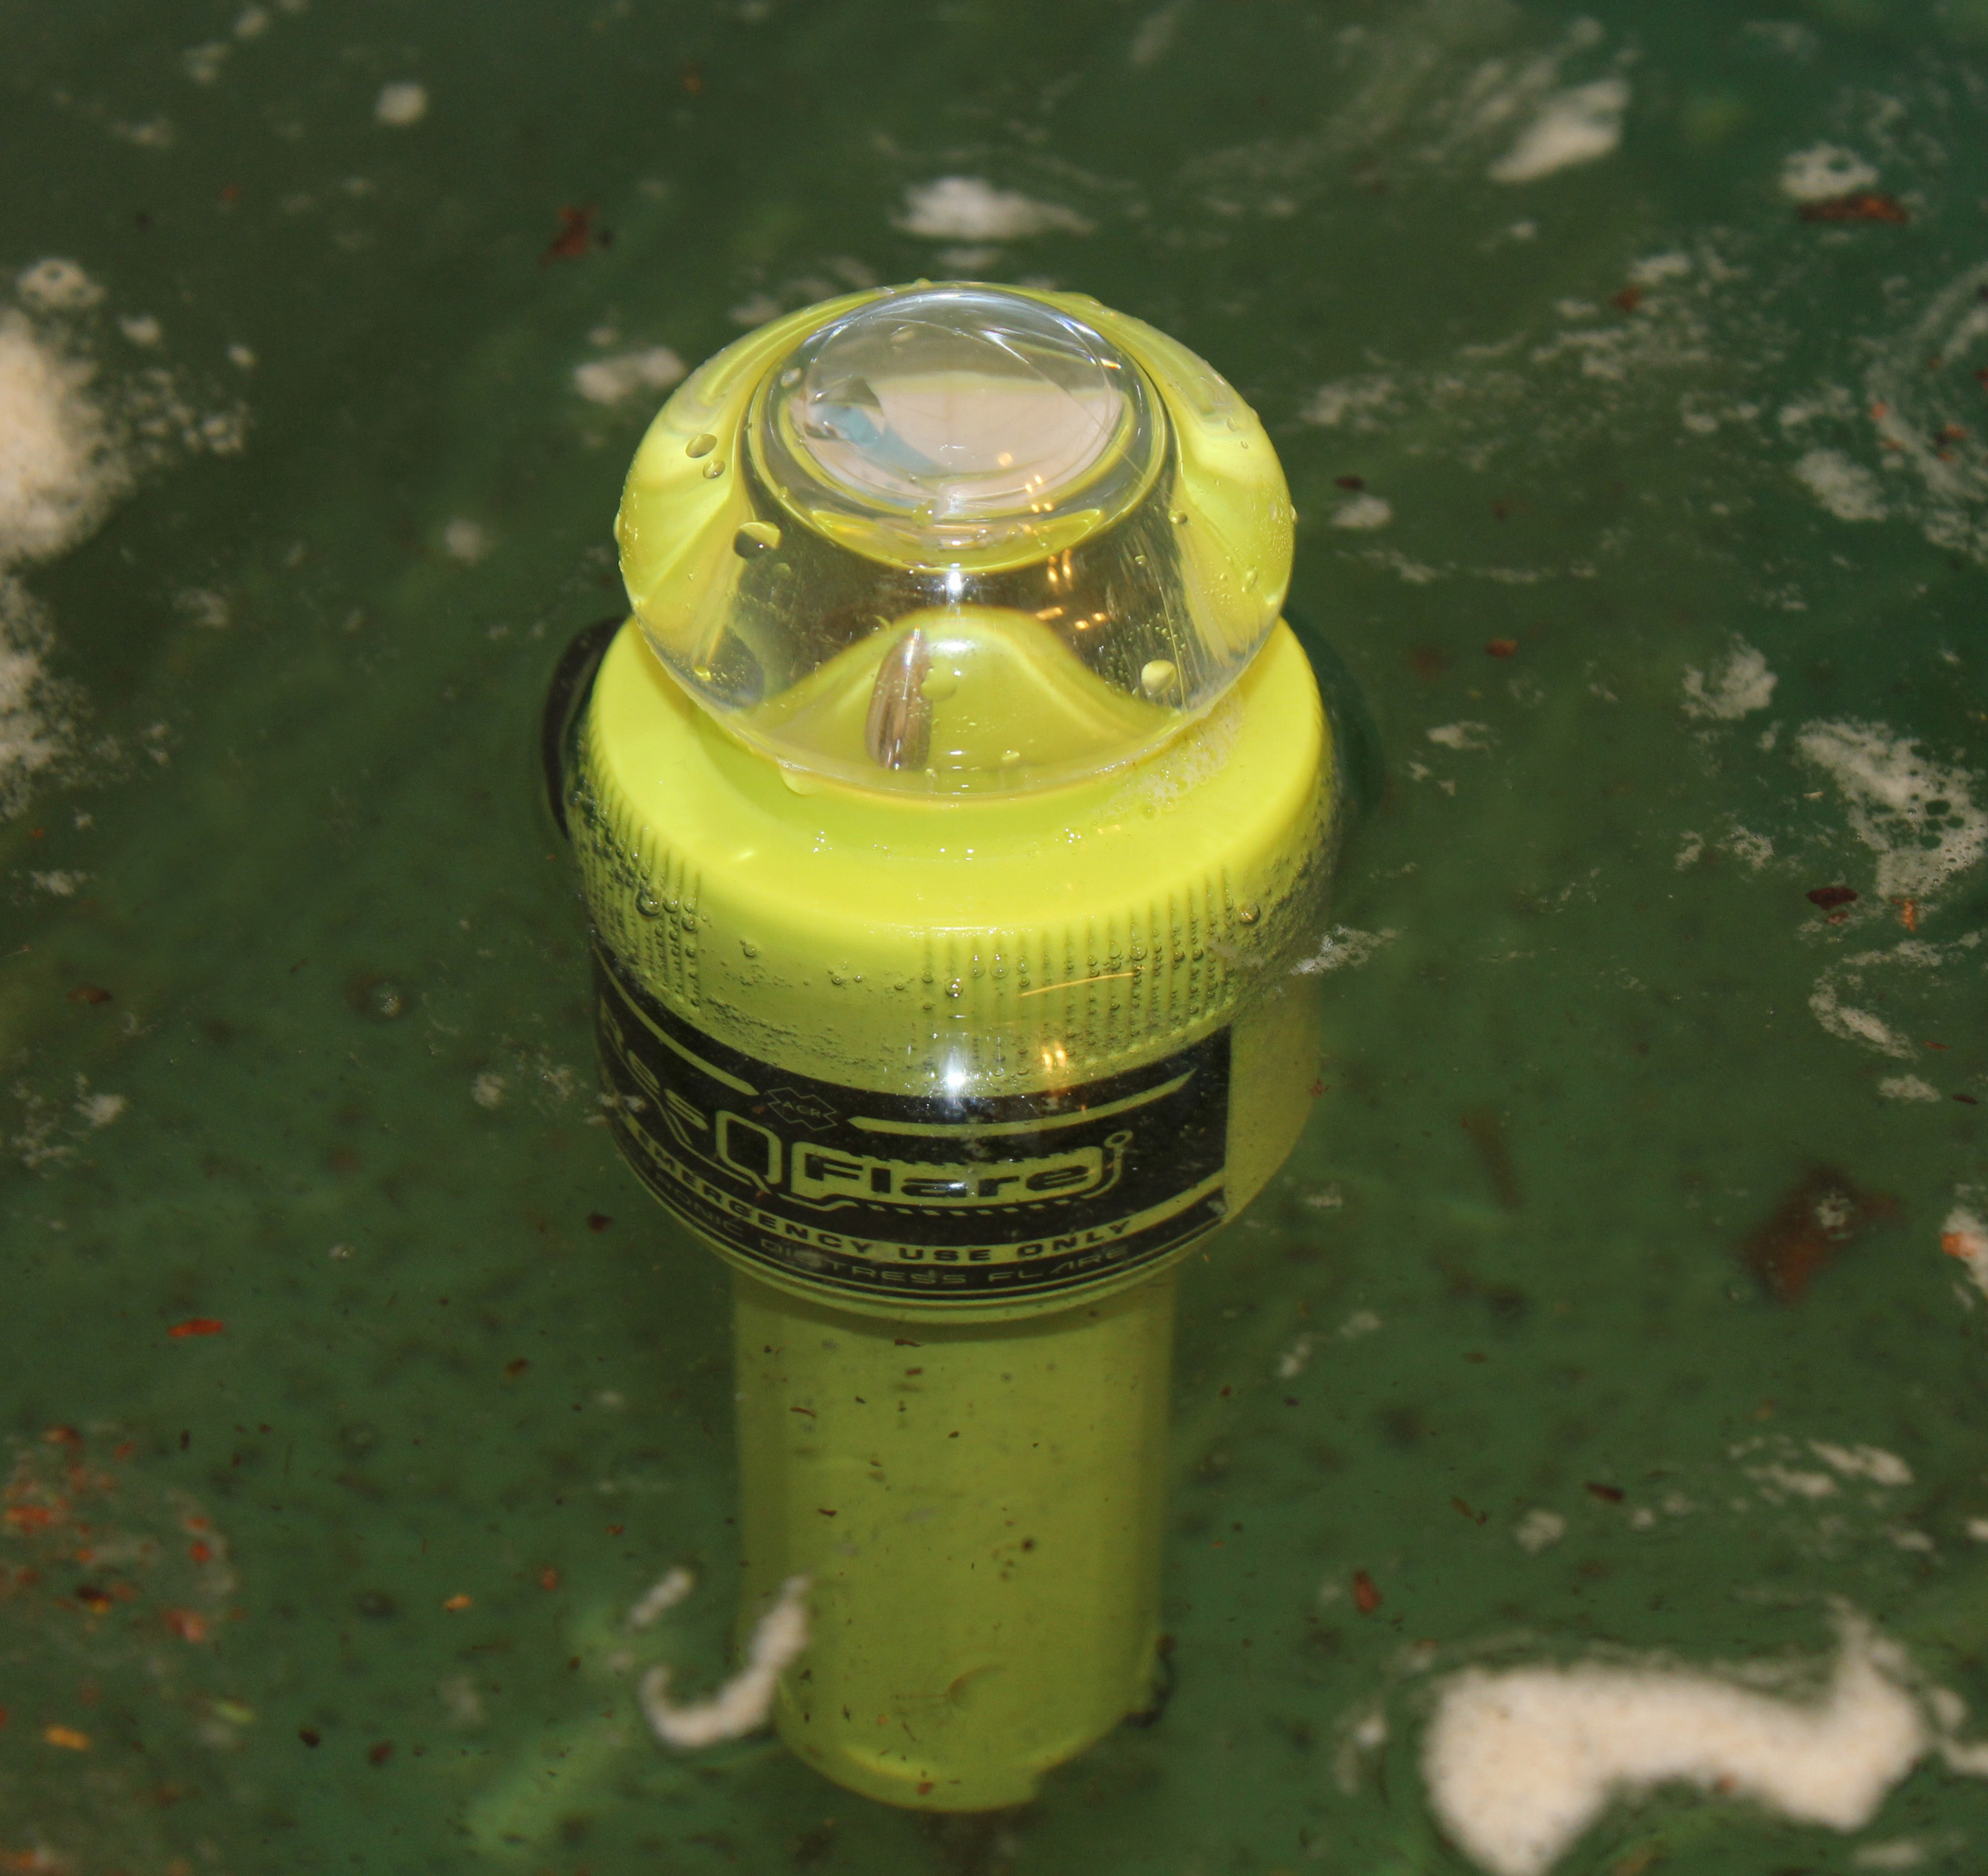
The ResQFlare’s watertight housing contains two common C-cells and keeps the device afloat.
The ResQFlare is powered by two C-cell alkaline batteries; the SOS Distress Light took three. The ResQFlare has a rubber O-ring to provide a waterproof seal between the top and bottom, and while it has a rating of IP67—waterproof for 30 minutes at a depth of 1 meter—it floats with the lens above the water. The SOS Distress Light required a soft, detachable foam ring to keep it afloat.
The ResQFlare is submersible and floats with its lens above the water’s surface.
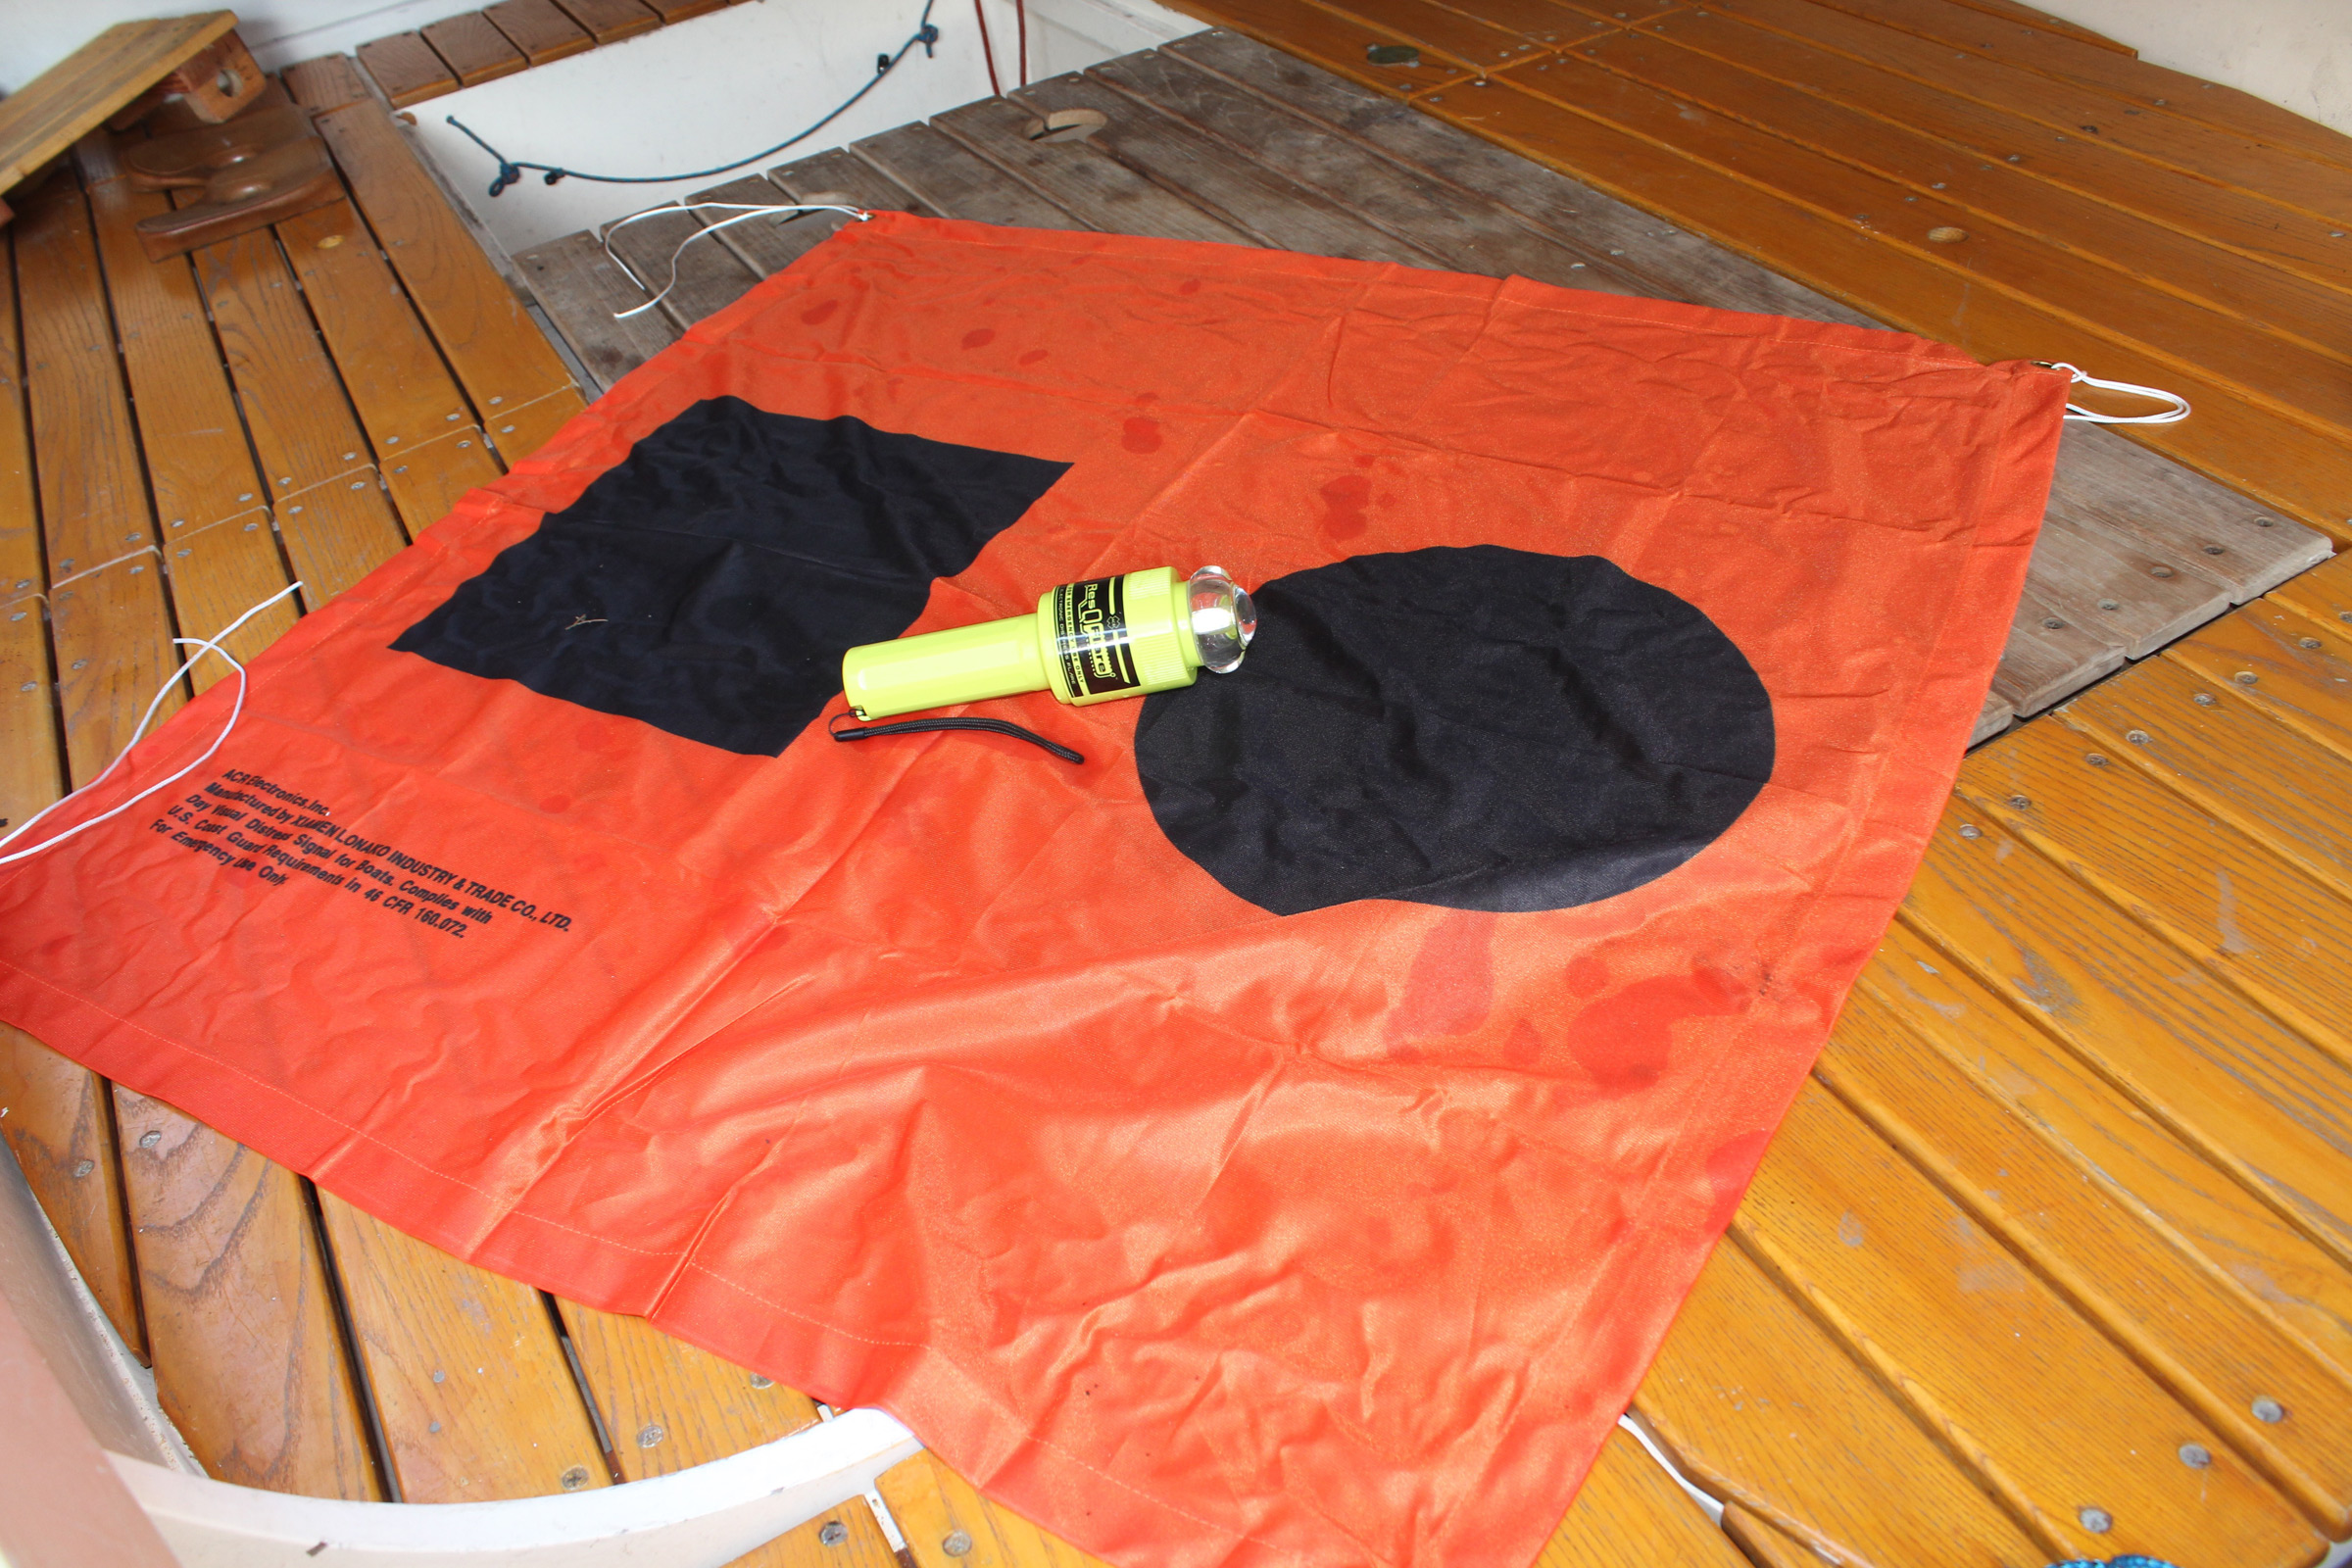
The ResQFlare weighs less than 10 oz and is 8″ long and 2-3/8″ at its greatest diameter, not quite compact enough to fit in a PFD pocket, and is a bit too bulky and slippery to be held strapped to a PFD lash tab, so I’ll continue to carry on me my usual array of safety gear, including a rescue laser flare and a waterproof VHF radio. A lanyard is attached to the bottom of the flare to help keep it from going astray. It comes with a daytime visual distress signal—an orange synthetic fabric flag measuring 3′ square and bearing the black square and circle—that must be carried with the strobe to qualify in the USA as a replacement for pyrotechnic flares.
While the signal flag may not seem like an effective signal device, carrying it with the ResQFlare is required if pyrotechnics aren’t aboard.
The top of the ResQFlare twists to turn on and off and to open the case to replace the batteries. It flashes sequences of three short flashes, three long, and another three short, Morse code for SOS. The SOS Distress Light flashed the same pattern, and used a single LED (Light-Emitting Diode) bulb for its light source and a transparent cap molded to direct its light in a horizontal plane. Some of the light was transmitted through a lens that surrounds the bulb and some of the light emitted from the top of the bulb was reflected by a conical dimple in the top of the cap. The ResQFlare has seven SMDs (surface mounted diodes); six rectangular chips in a hexagon facing outward and one on top facing upward. The transparent cap has a torus-like lens surrounding the hexagon and a circular lens on top. The plane of light emitted both horizontally and vertically by the ResQFlare has a brightness of 75 cd (candela), which is three times the USCG requirement, and stated by the manufacturer to be visible for over 6 miles. It is notably brighter and covers more area than the SOS Distress Light.
I may still carry my aerial flares and the pistol to fire them as a backup; when help is needed, the more resources, the better. The ResQFlare can also make itself useful in an emergency and will keep me in the good graces of the Coast Guard if they ever decide to check up on me.
Christopher Cunningham is the editor of Small Boats Magazine.
The ResQFlare from ACR is available from the manufacturer for $59.95 and from online and marine supply retailers.
Is there a product that might be useful for boatbuilding, cruising, or shore-side camping that you’d like us to review? Please email your suggestions.
Comments:
We welcome your comments about this article. If you’d like to include a photo or a video with your comment, please email the file or link.
Richard Nissen really didn’t need another boat. At the beginning of the year, he already had a small fleet of at least eight small boats, not counting the houseboat he lives aboard on the River Thames. We have seen two of his boats in previous Reader Built Boat features—a skin-on-frame Walrus kayak and a Venetian s’ciopon. Nonetheless, in the spring he decided to build another boat, not so much to get afloat, but to occupy the time at home during the pandemic.
George Nissen
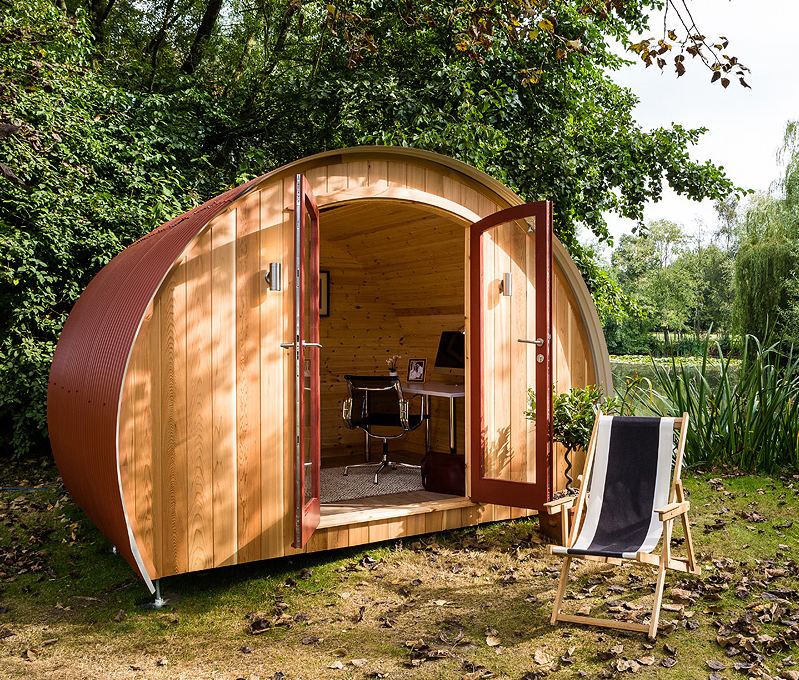
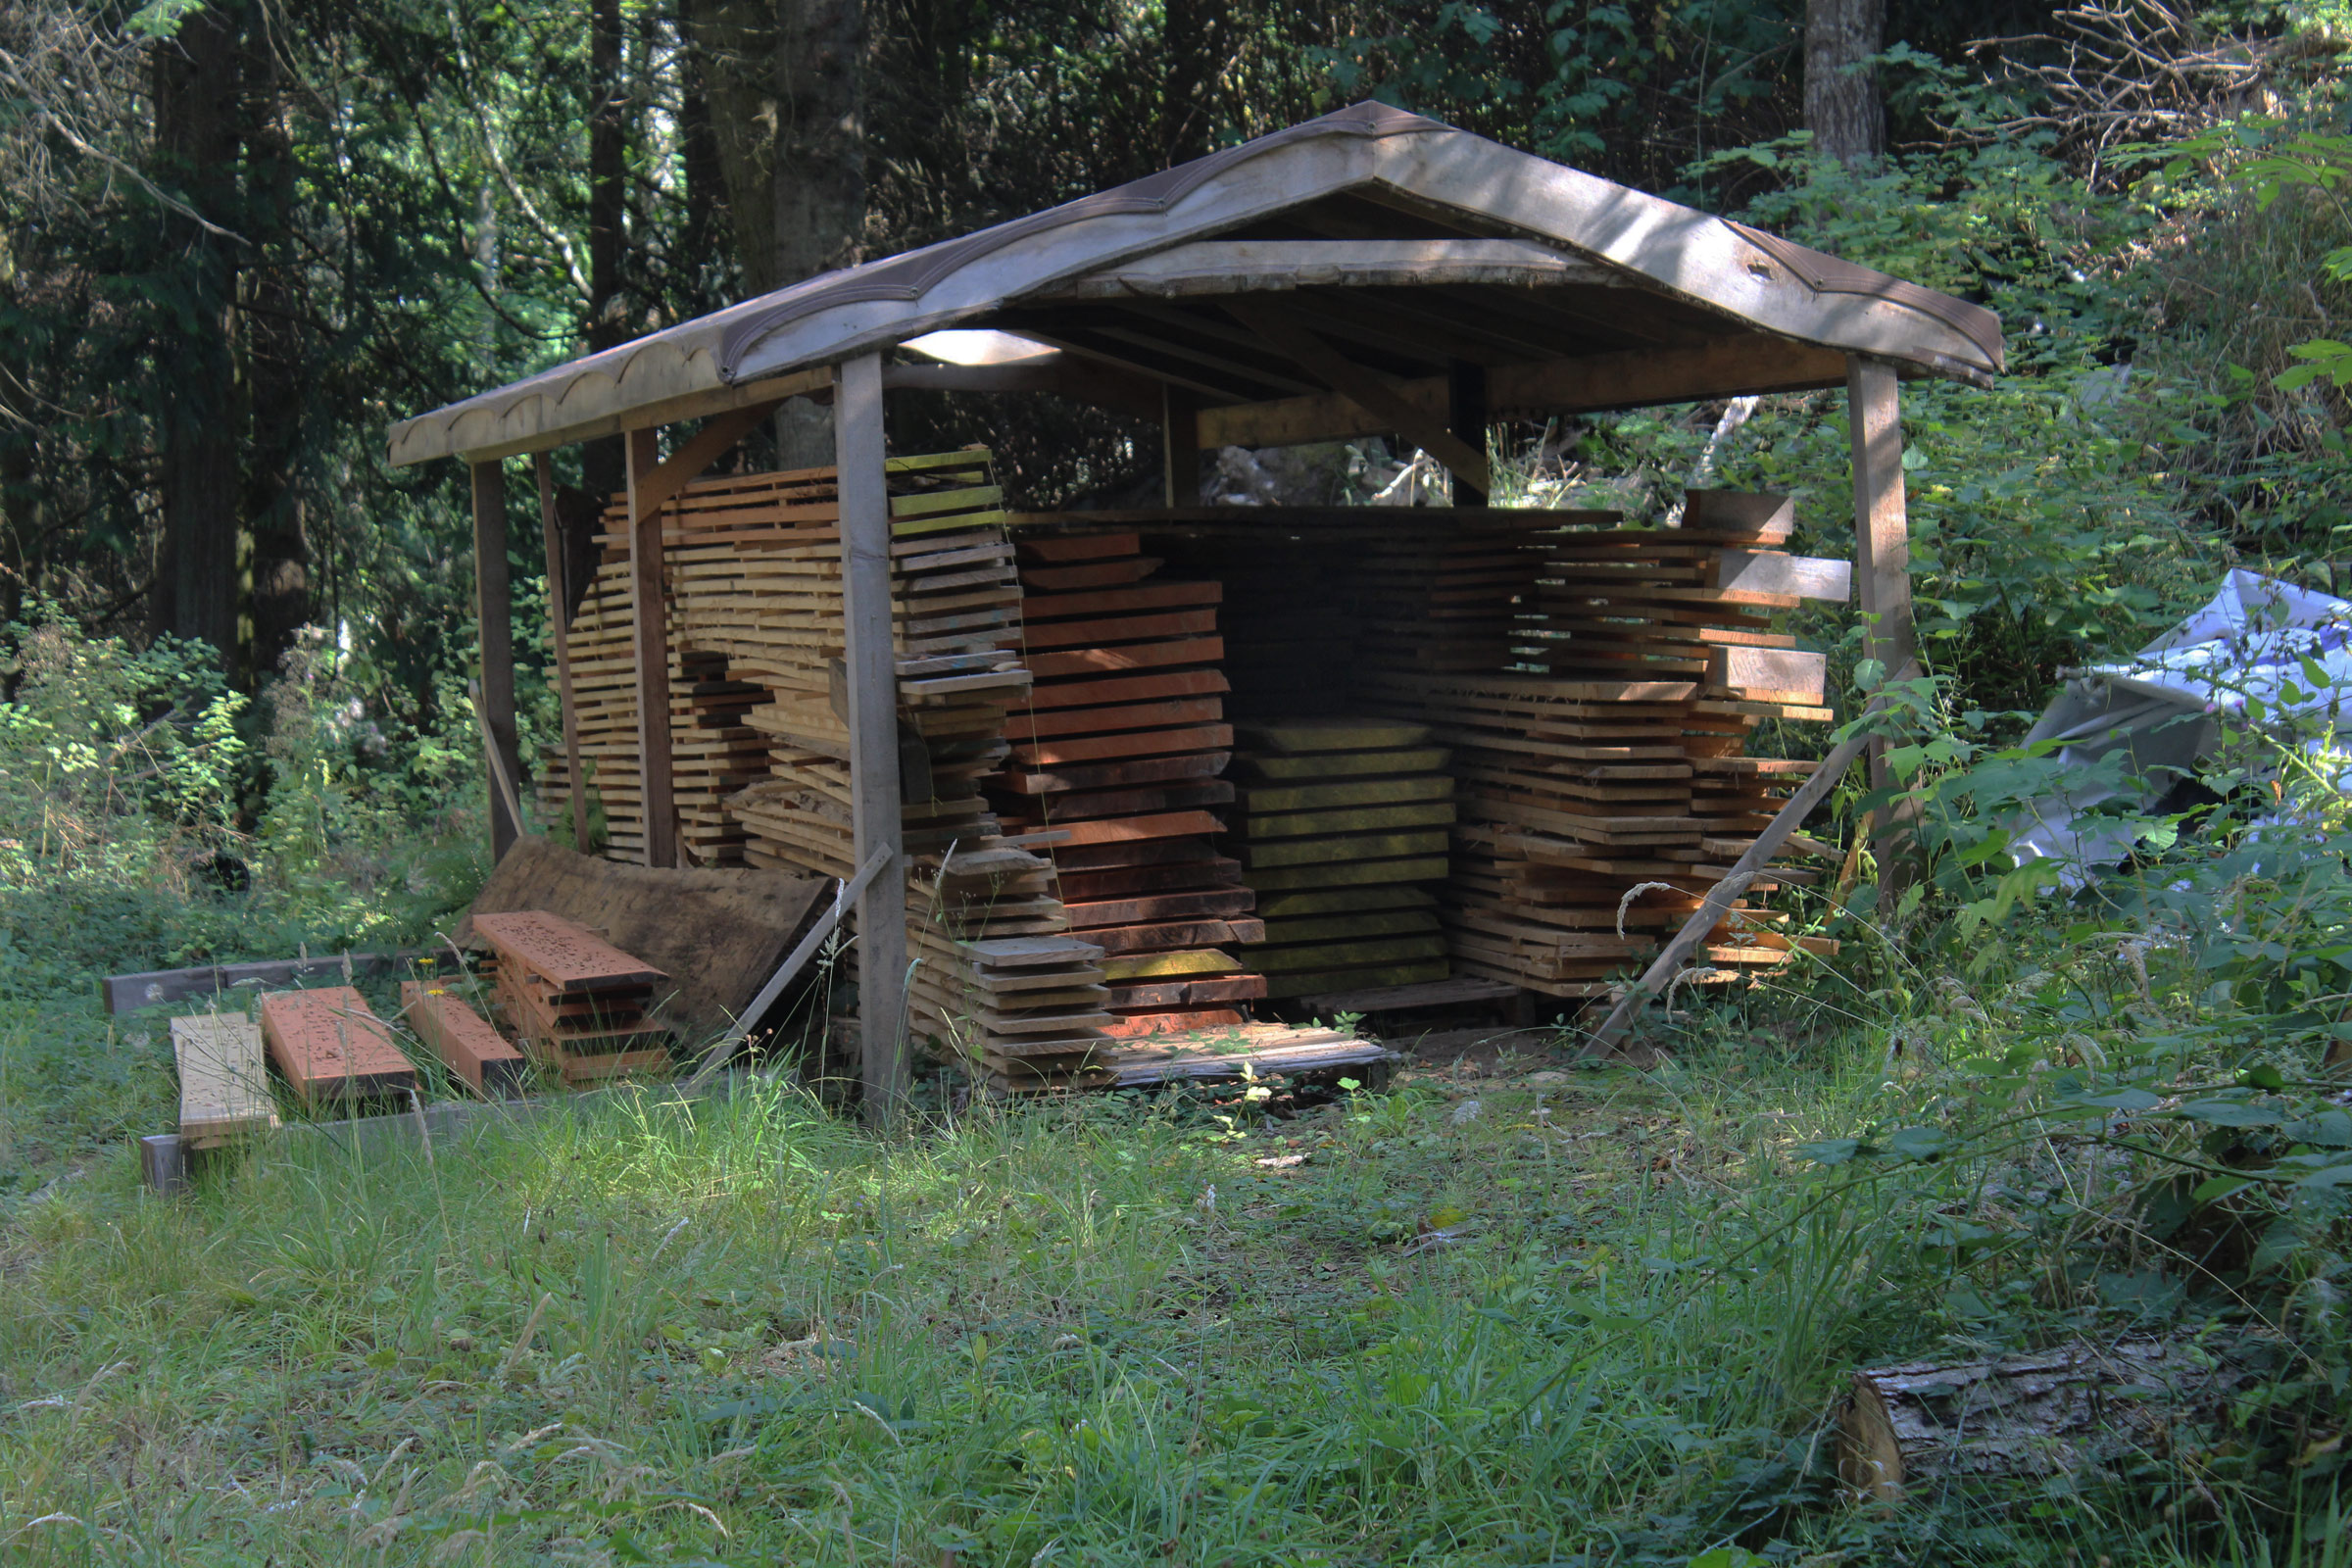
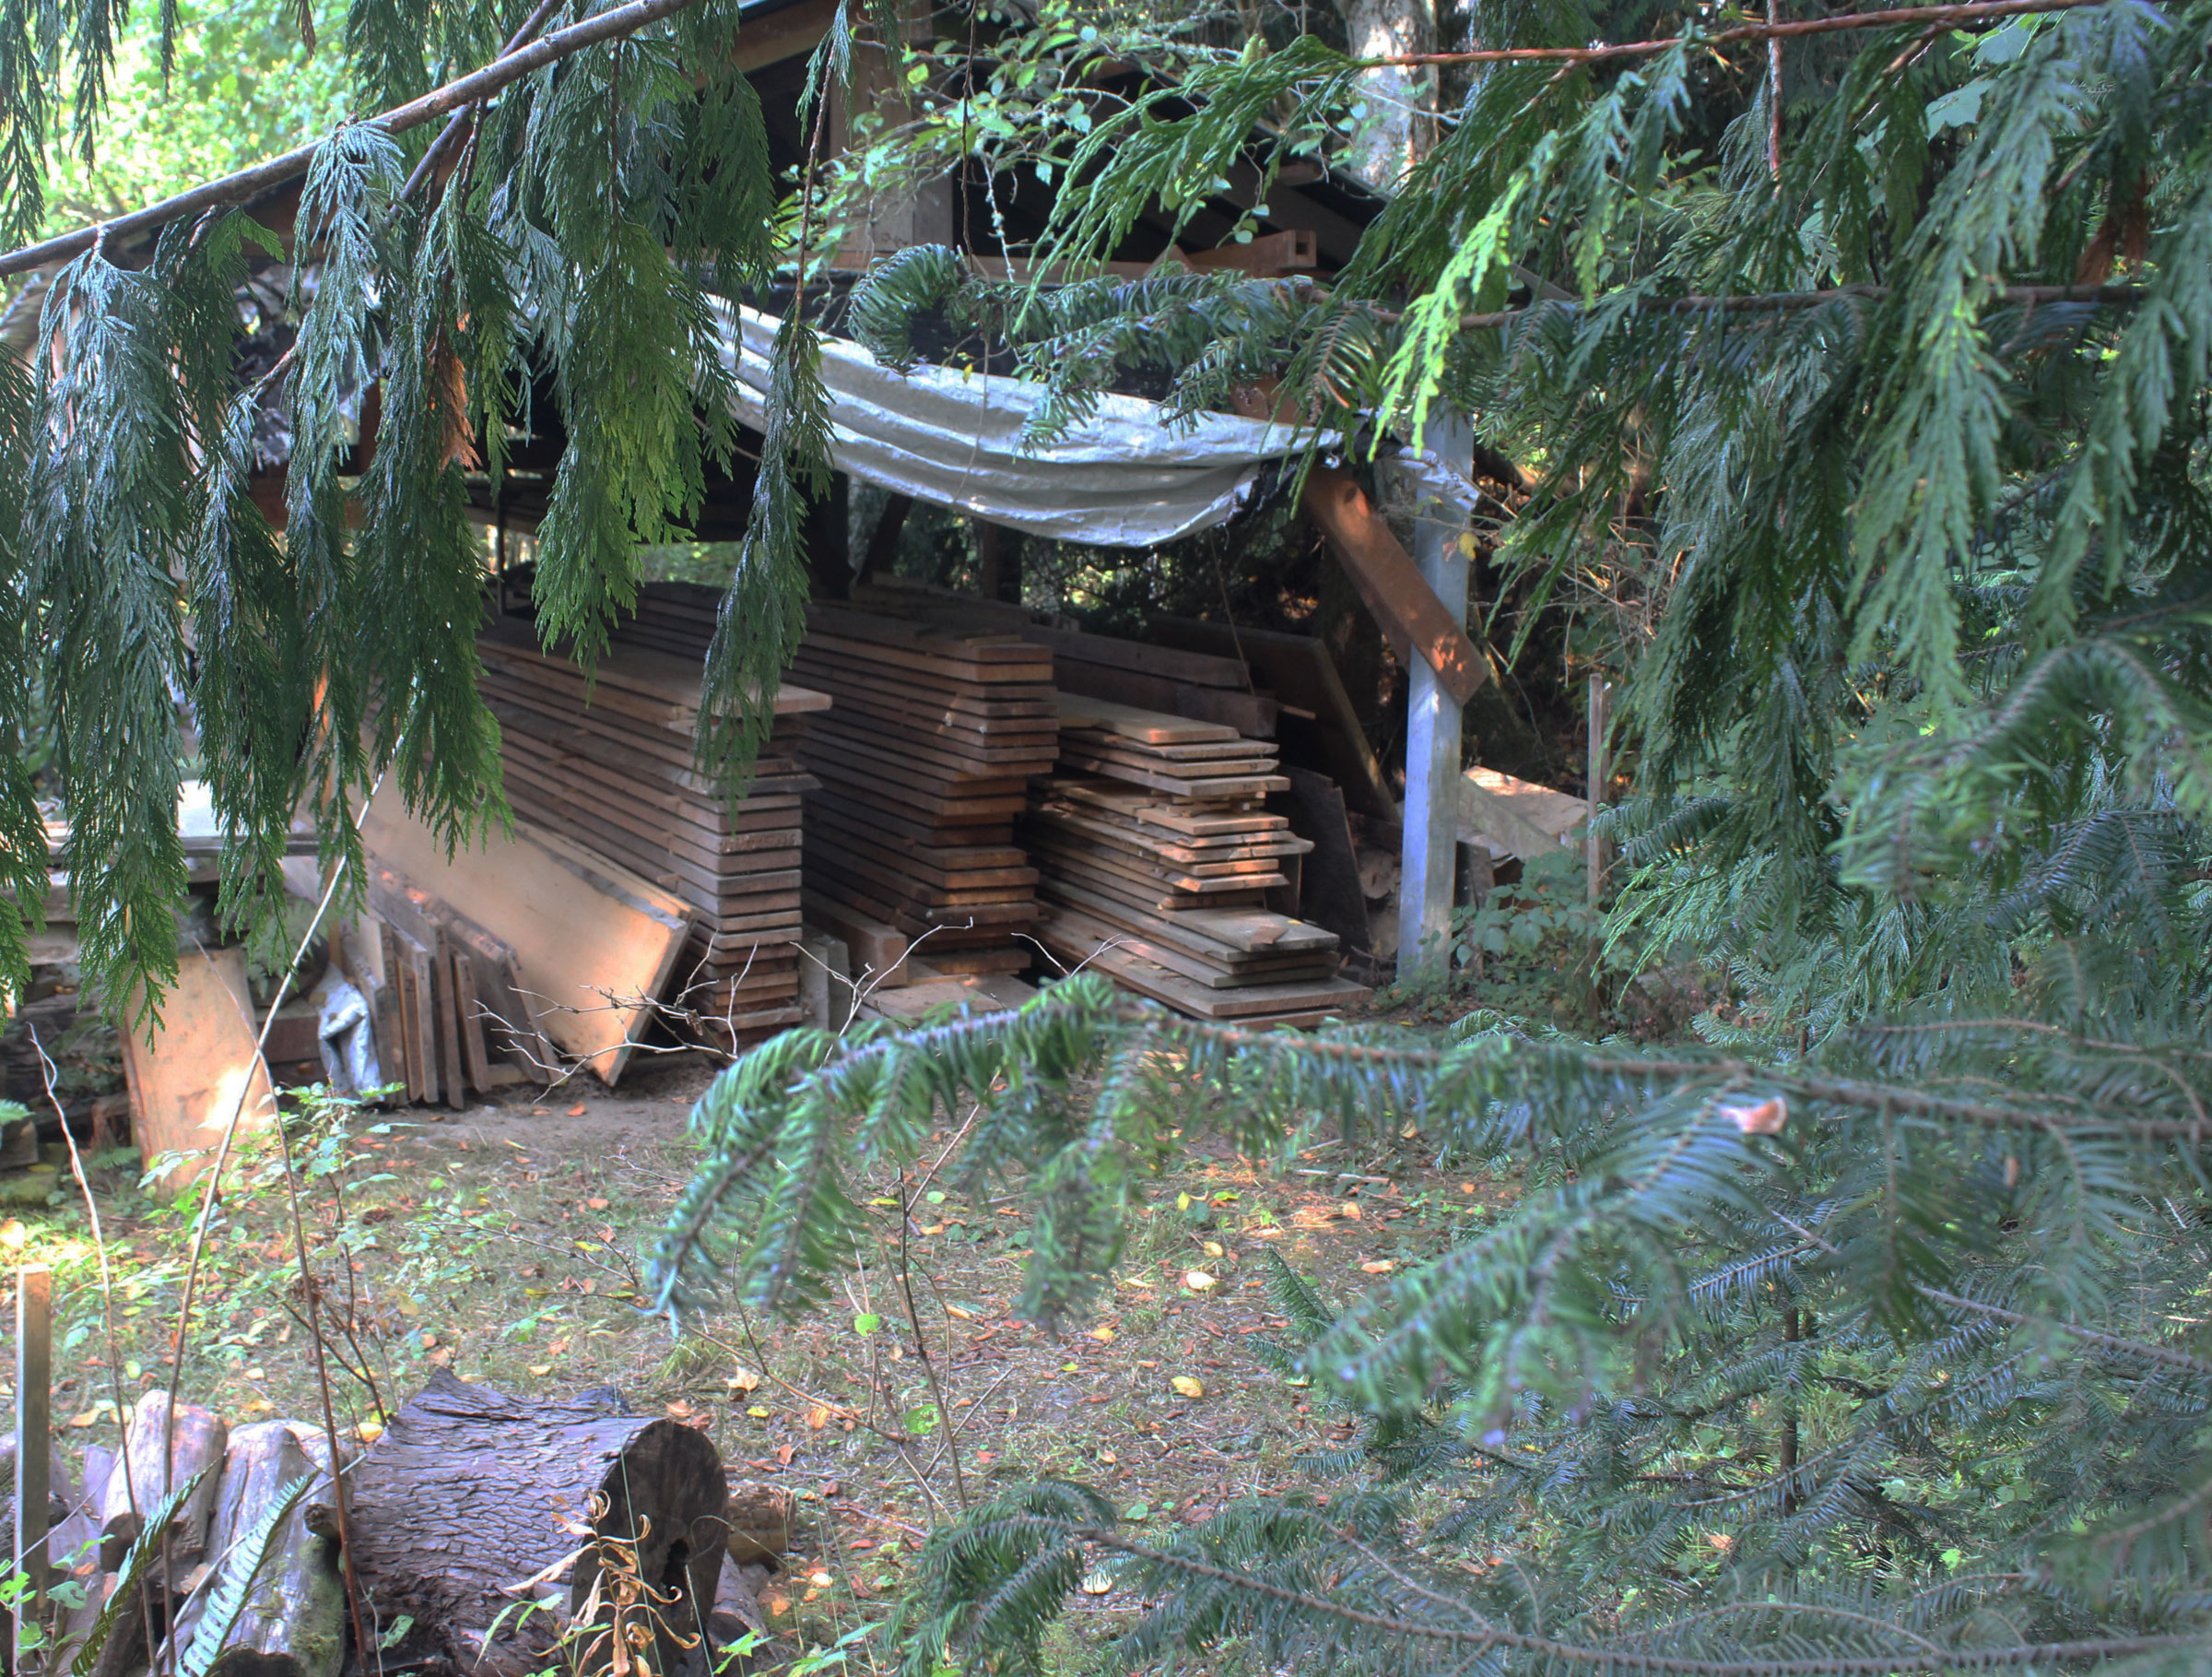
George has gone into business designing and building a new peacetime version of his great-grandfather’s invention. The lumber left over from building this hut was what made it possible for his father to build the skiff.
He started the project in March at the beginning of a three-month lockdown in England. Under the restrictions imposed, “no person may leave the place where they are living without reasonable excuse,” so anything Richard chose to build would have to use the materials he had on hand. He happened to have a lot of 1/2″ tongue-and-groove pine that his son George had left over after building a prototype for a new kind of Nissen hut, or Quonset hut as it is called in North America.
Courtesy of George Nissen
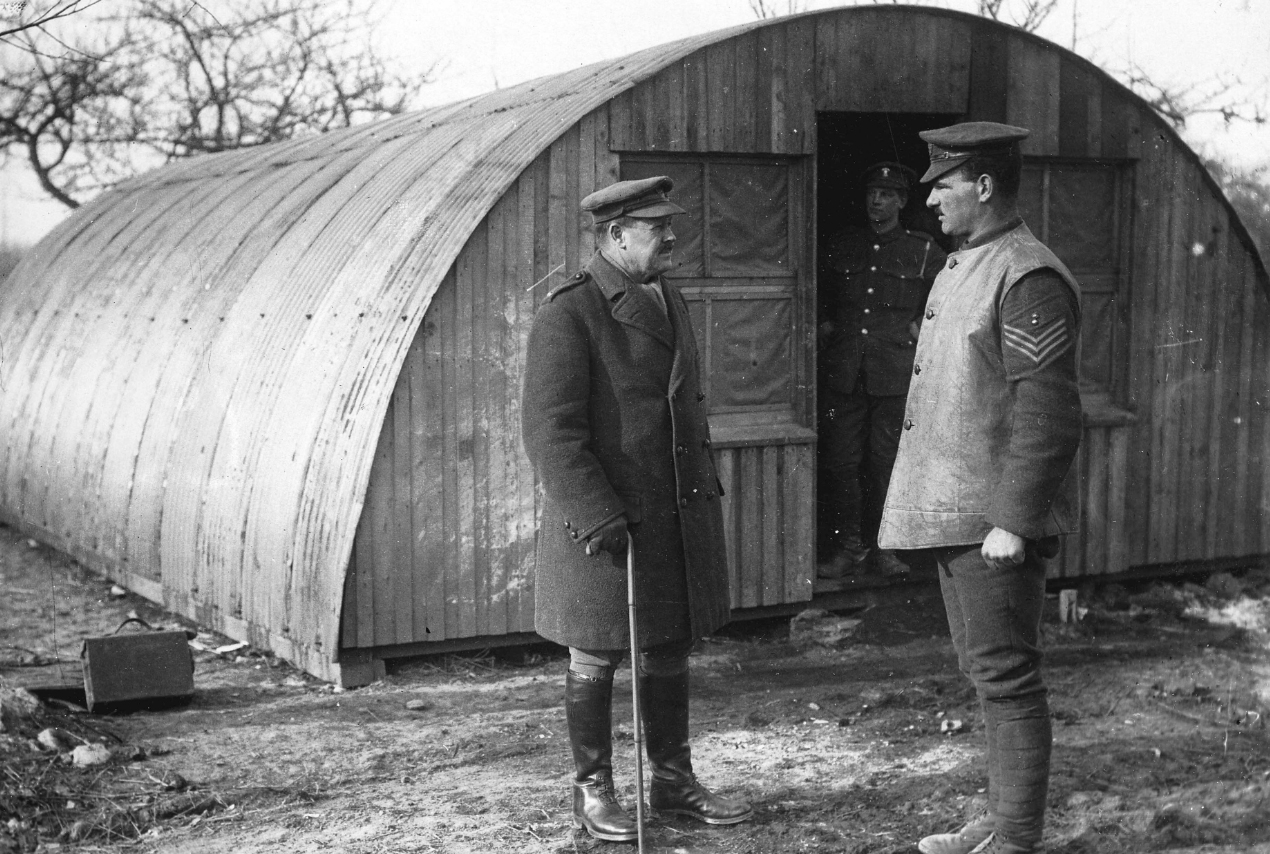
Major Peter Norman Nissen, of the Royal Engineers, left, was awarded the Distinguished Service Order (DSO) for his service to the United Kingdom on the Western Front during World War I. Having invented the Nissen Hut as a serving soldier, he received no compensation for his design, but was allowed to patent it after the war.
Richard’s grandfather, Peter Norman Nissen, invented the Nissen hut in 1916. The iconic semi-cylindrical corrugated metal buildings were used to shelter British troops during World War I, and they proved to be good protection from bomb blasts and shrapnel. The American military adopted and adapted the design in 1941 and named them after Quonset Point in Narragansett Bay, Rhode Island, where a Navy construction center was building them. George designed his Nissen hut as a residential backyard retreat that could be used as a home office. His prototype had the signature Nissen curved metal roof and walls; the ends and the interior were sheathed with the tongue-and-groove pine. The leftovers of that stockpile were what Richard had available, so it was what he’d build a boat with.
Courtesy of Richard Nissen
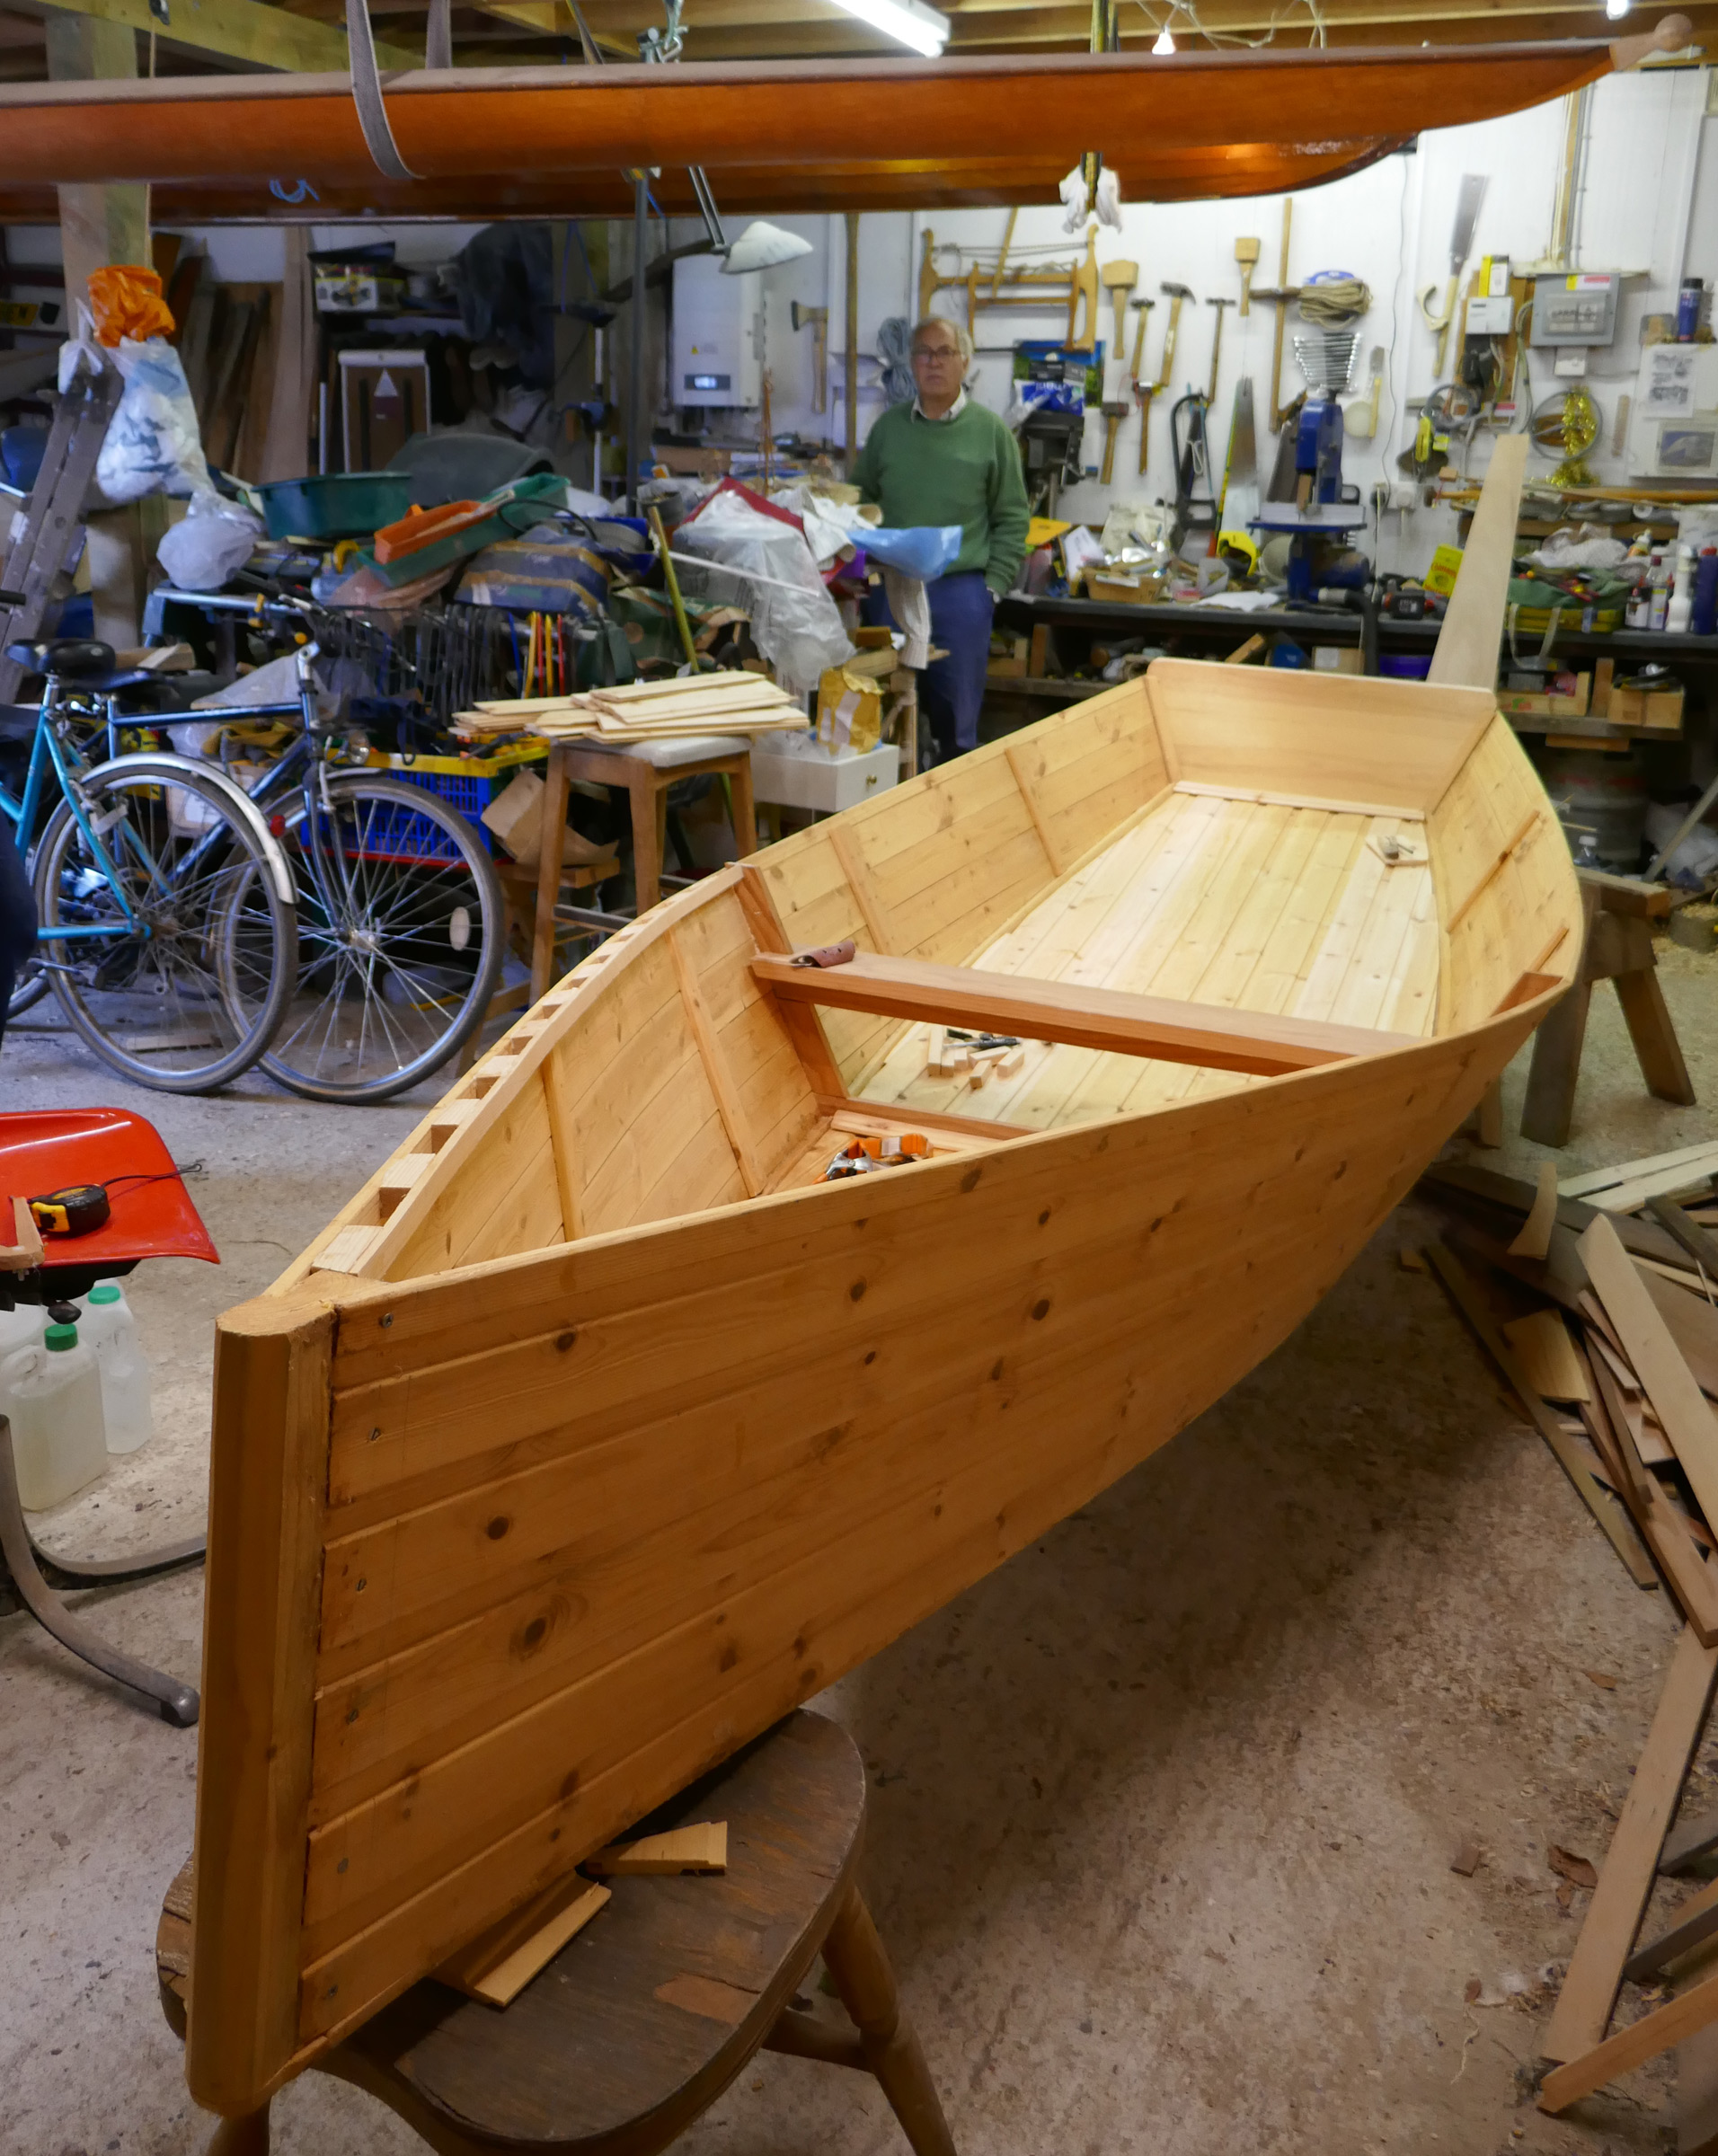
Richard, here standing at the back of his shop, is not one to be idle. He worked as an architect, moved on to develop a virtual office system, then set up a plumbing company called Staunch and Flow, and now putters with small boats and maintains a website devoted to the mysteries of animal navigation.
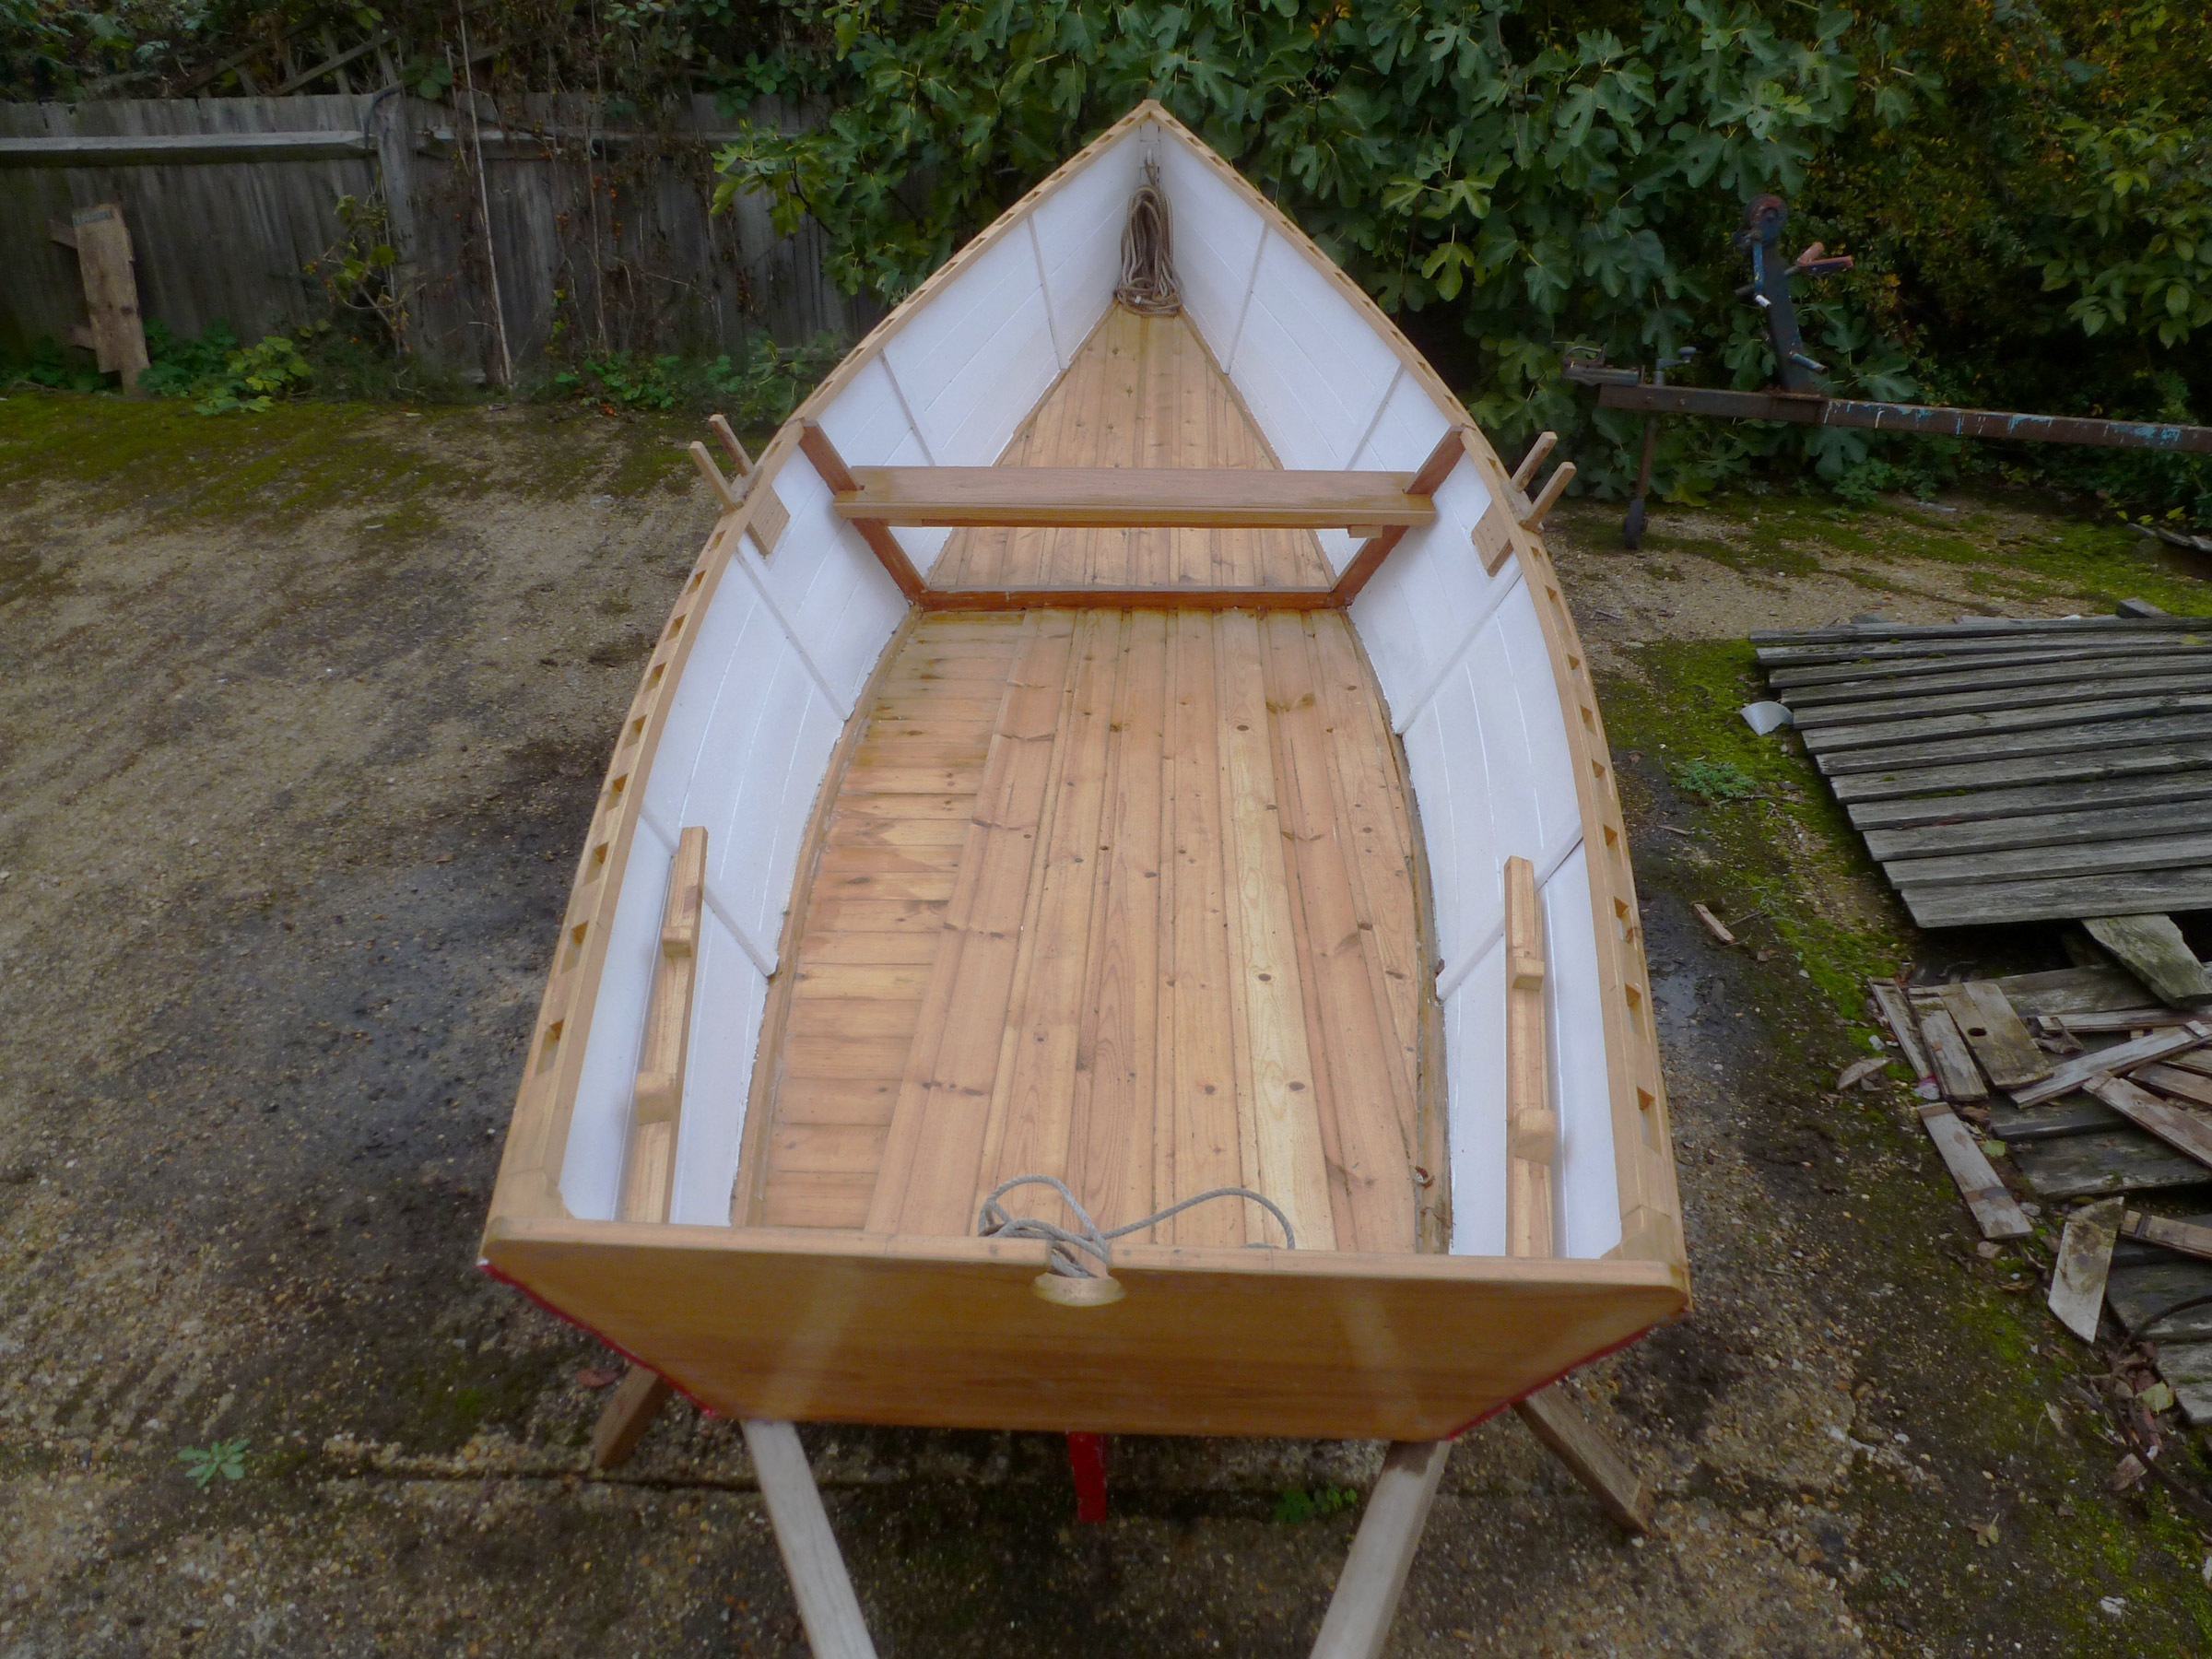
Richard also needed plans for a boat that would be simple to build and not too fancy for the knot-speckled pine that would go into it. He found an article by Greg Rössel about cross-planked flat-bottomed boats in a 20-year-old issue of Watercraft magazine. The article drew on a design originally presented in a boatbuilding manual published in 1917. It suited Richard’s vision for the project, almost. The boat would have had a beam of 5′ to 5-1/2′, but the oars he intended for the boat (given to Richard by his next-door neighbor) wouldn’t have been long enough for it, so he narrowed the beam to 4′.
Richard Nissen
The skiff’s cross-planked bottom was backed up with another layer of tongue-and-groove pine, laid lengthwise.
In 1917, each side of the boat would have been built with a single, wide plank, all but impossible to find these days, so Richard glued up each 17″-wide side from five pieces of the tongue-and-groove pine, using Gorilla Glue as an adhesive. Then, following the method from the 1917 book, he pinned the ends of the sides to a rabbeted stem, bent them around a single mold, and fastened the aft ends to the transom.
Courtesy of Richard Nissen
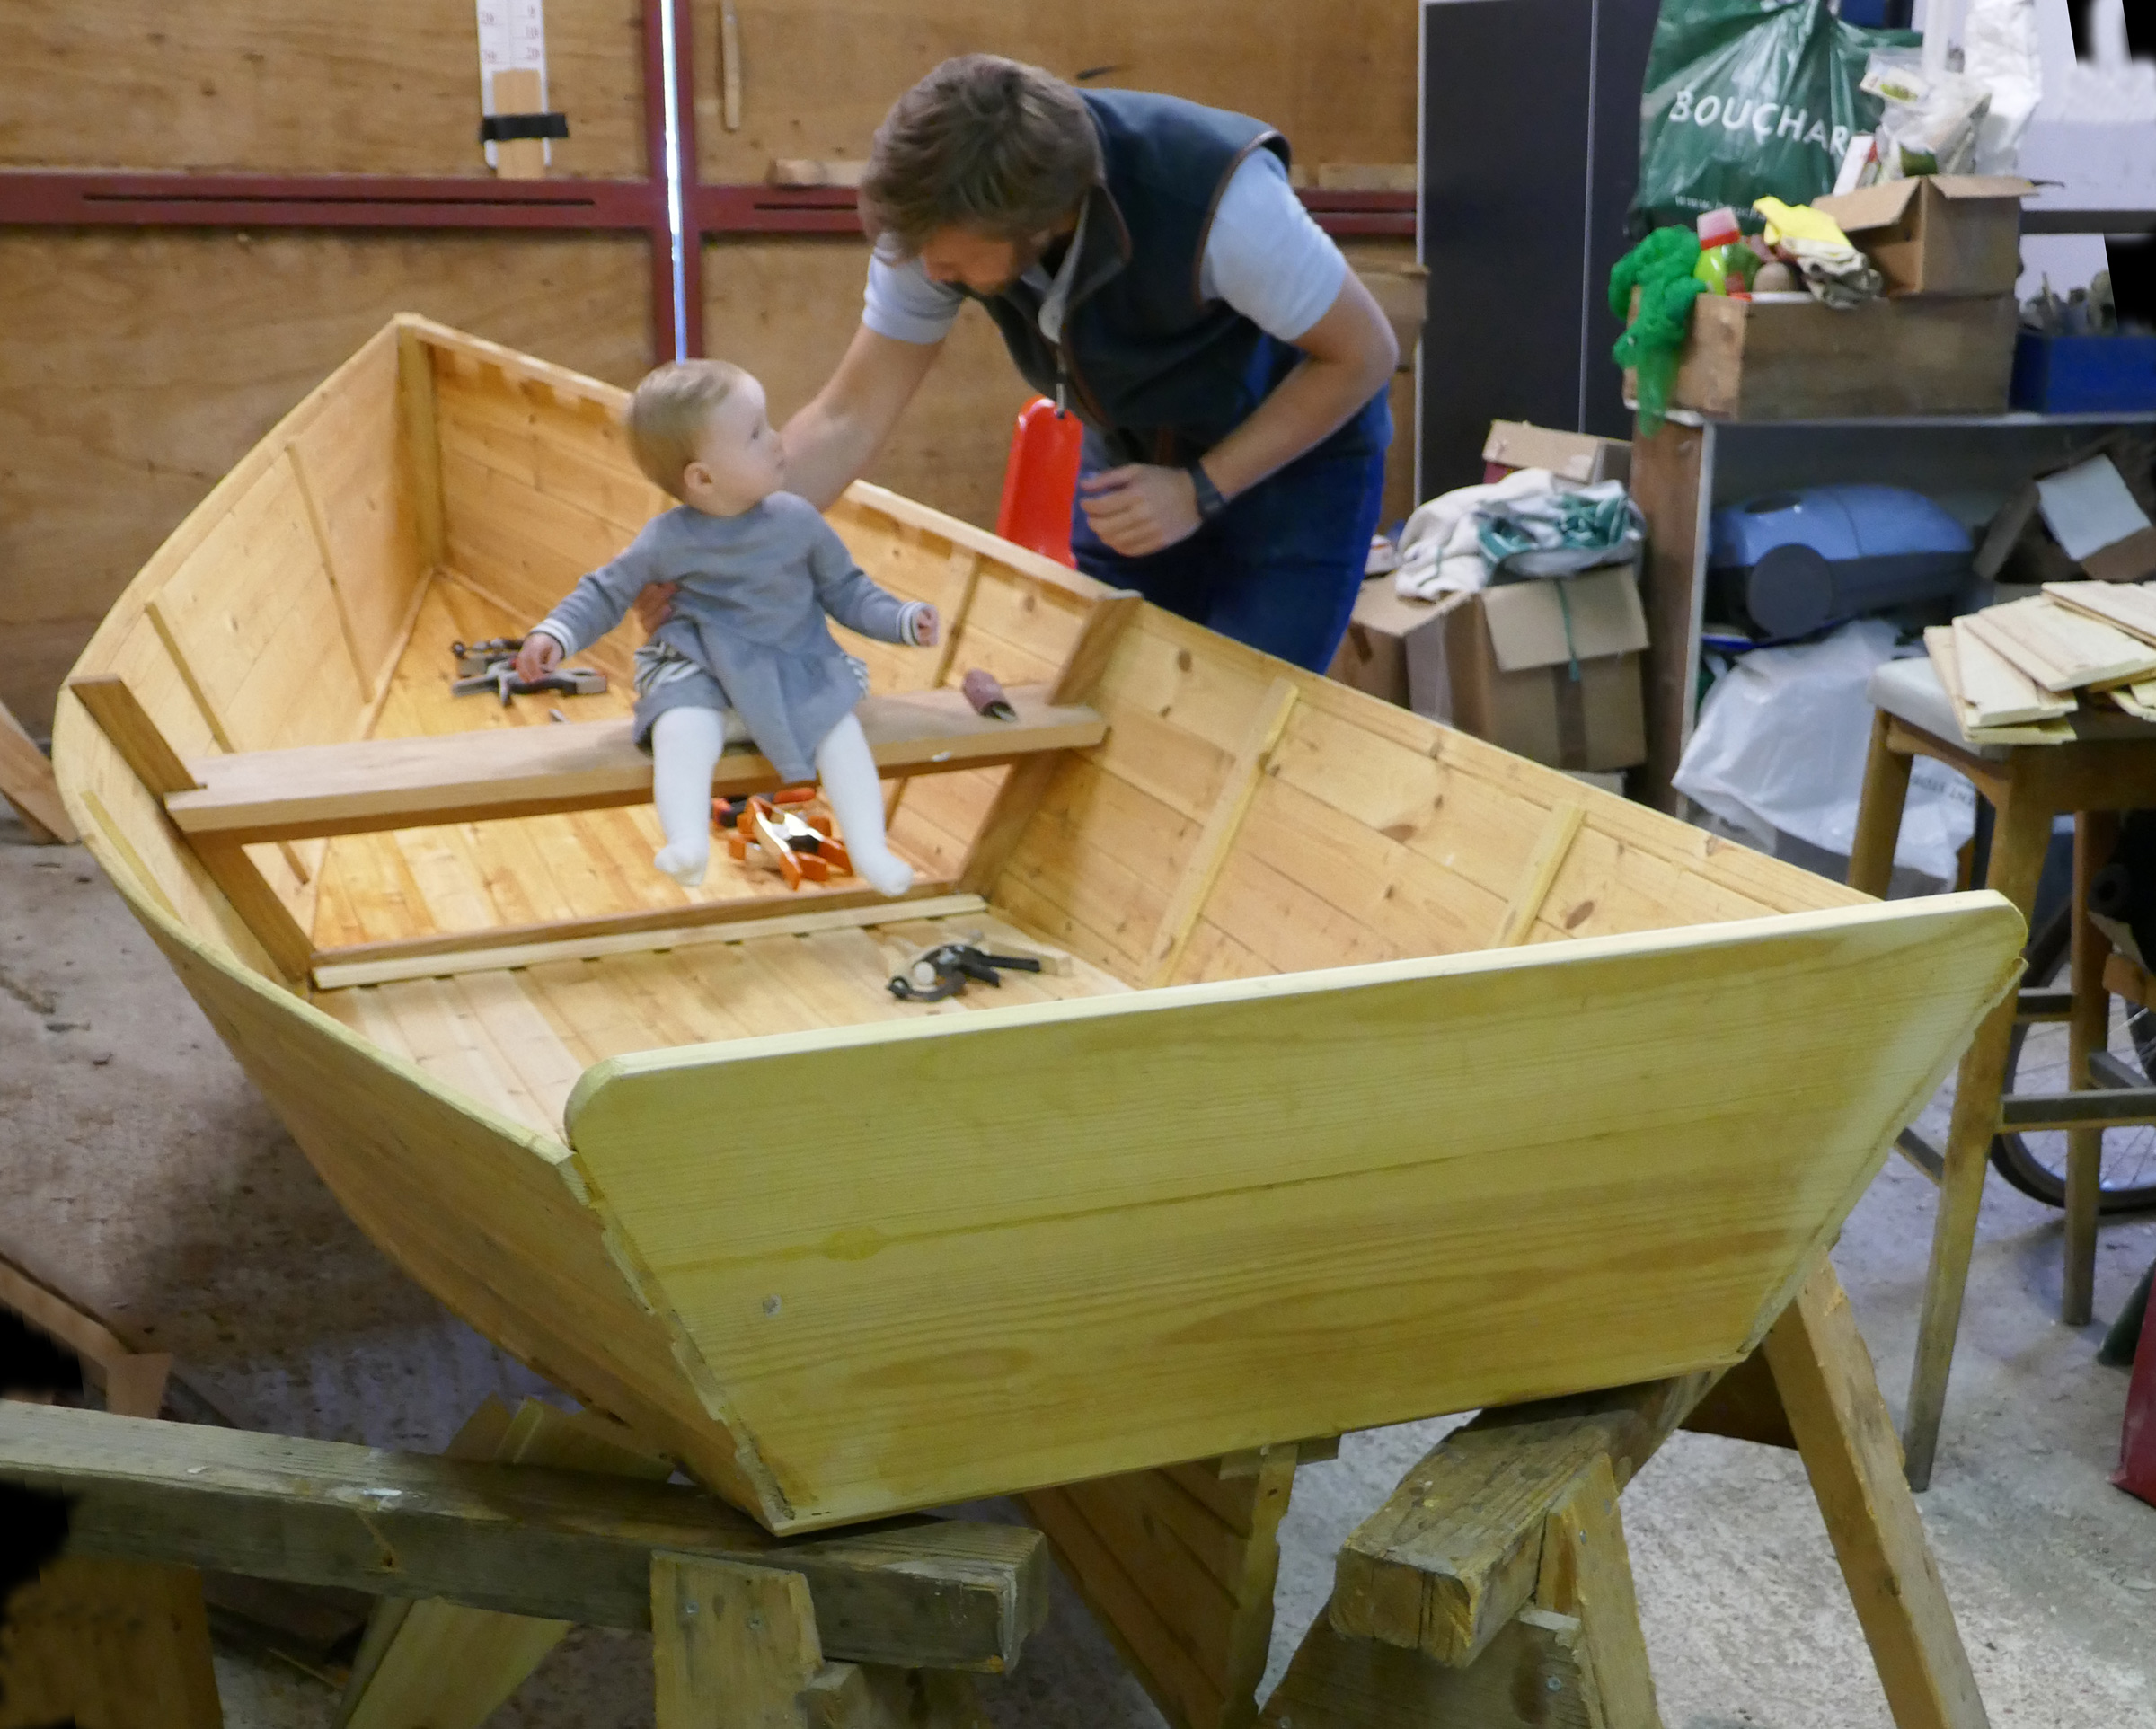
Richard’s son, George, brought his daughter to try the skiff out before the paint went on.
During the lockdown Richard worked on the boat every day, leaving home only for exercise allowed under the restrictions. He was building the boat outside and neighbors, taking their constitutionals on the path along the Thames, stopped by regularly to check on his progress.
After the sides were secure, chine logs installed along the bottom edge provided a place to fasten the cross-planked bottom. The interior face of the bottom later received a second layer of pine, laid fore-and-aft.
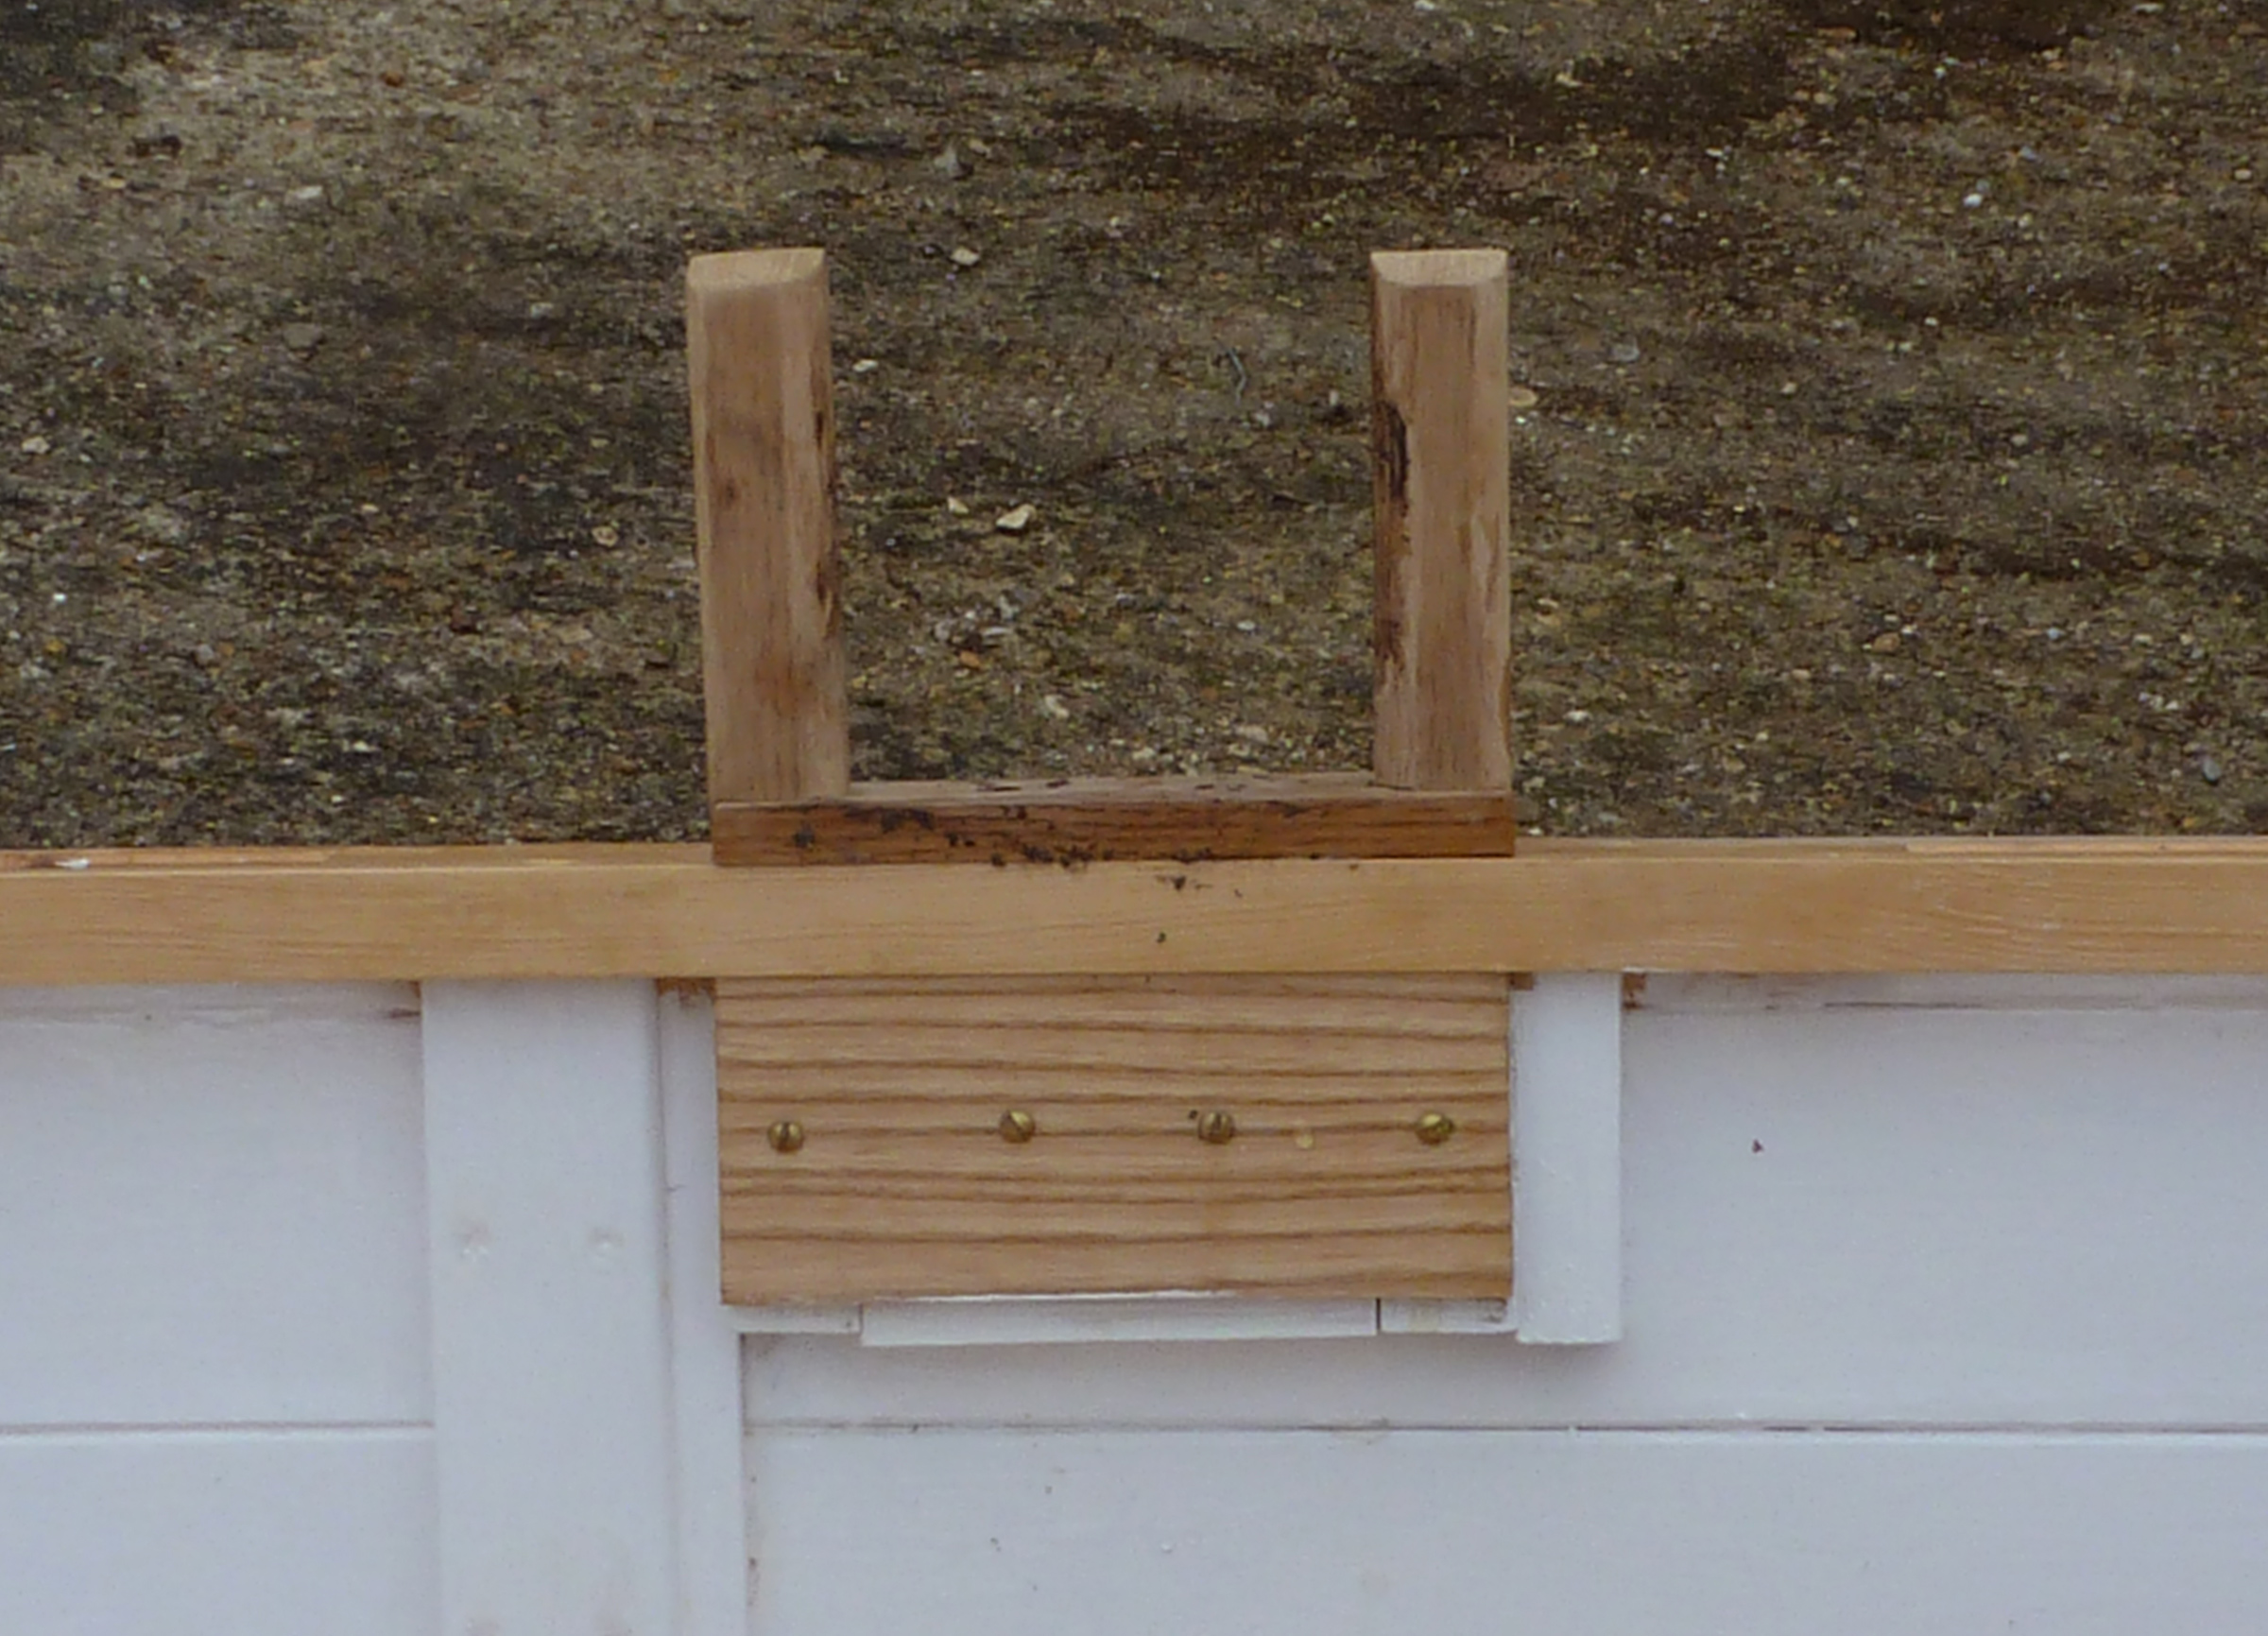
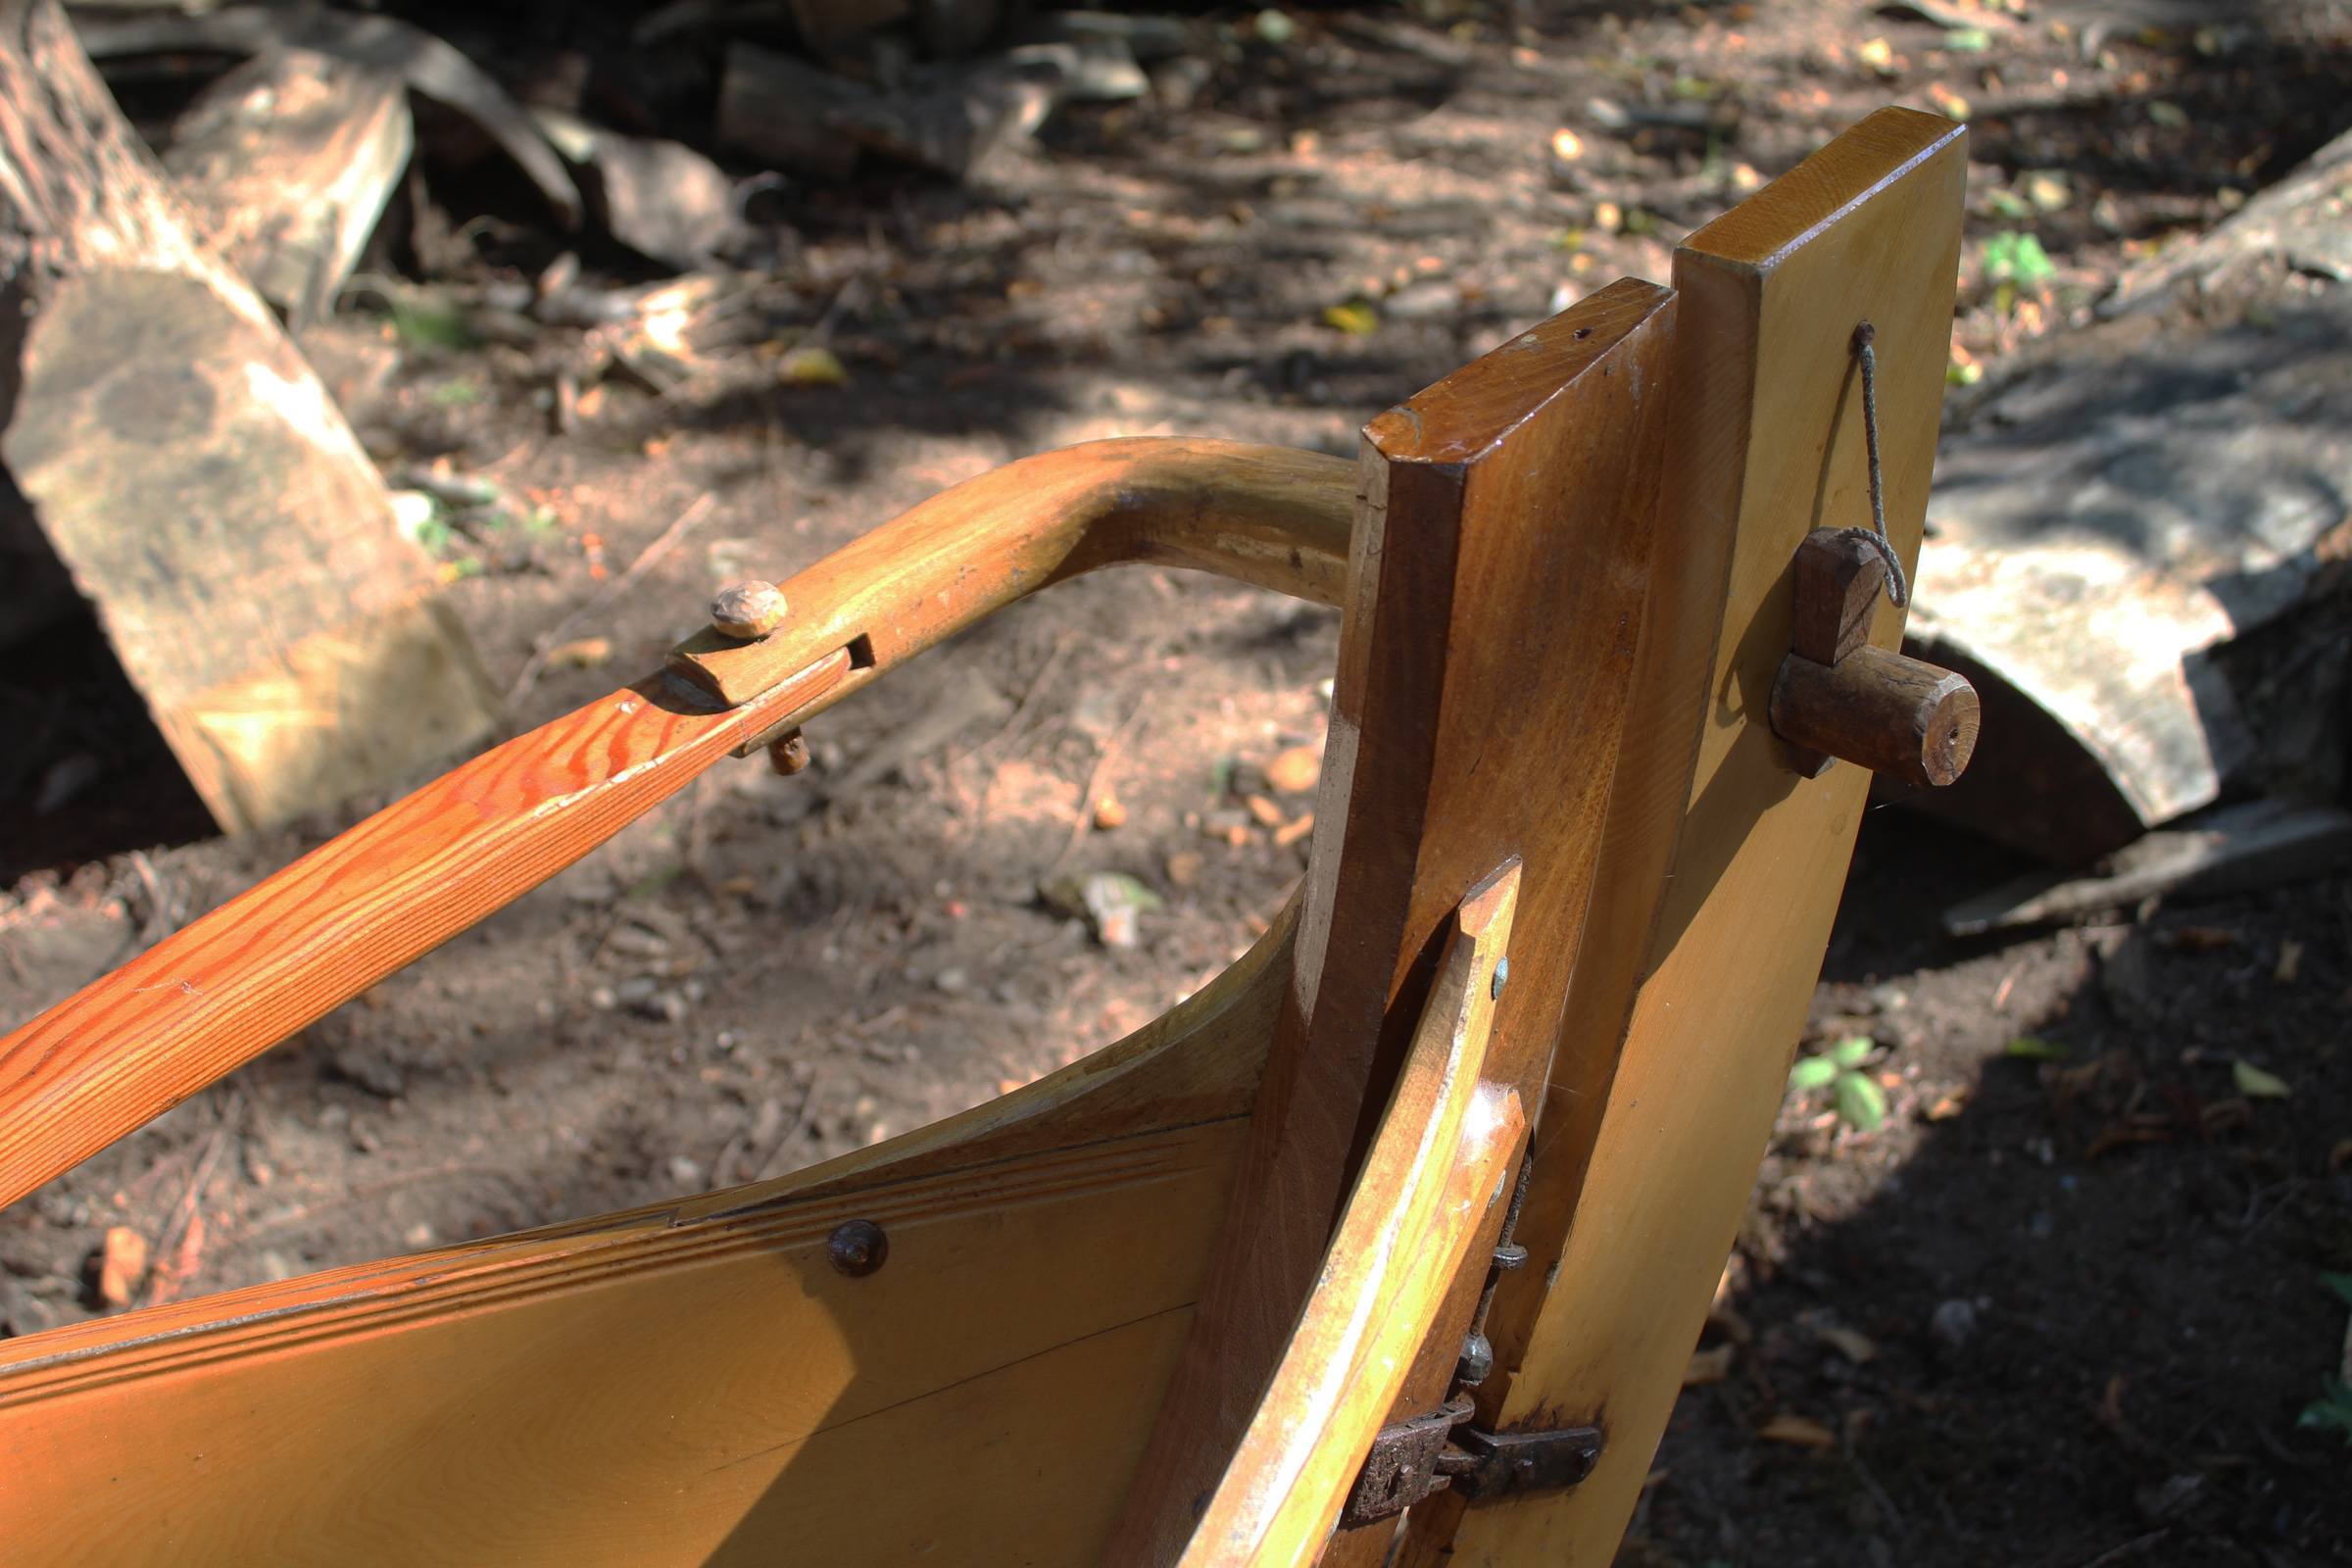
The double tholes on the skiff harken back to Richard’s days rowing as a schoolboy.
The main thwart in the boat was cut from a piece of 1″ Douglas-fir Richard happened to have in the shop. Instead of installing metal oarlocks, he equipped the boat with the same type of flat wooden tholes that he used as a schoolboy when he first started rowing, in lapstrake skiffs built in the 1920s. His father rowed with that same type of tholes in eight-oared shells he raced while a university student during World War II. In fact, the same kind of tholes have been in use on the Thames since the 14th century.
Courtesy of Richard Nissen
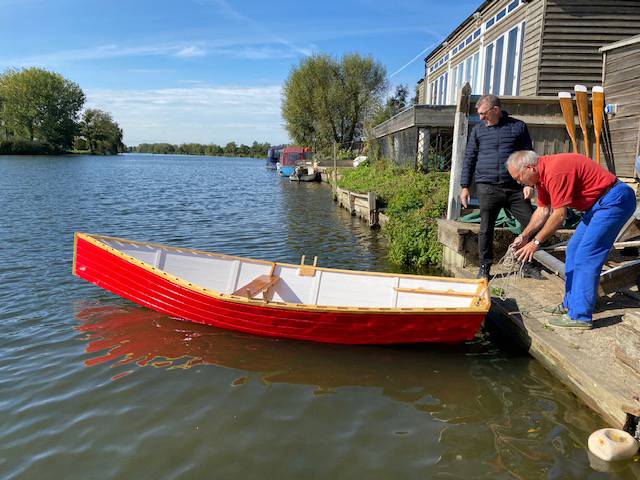
Richard, in the red shirt, introduced the skiff to the River Thames, at the bulkhead next to his houseboat.
Richard painted the hull exterior a bright red with the paint left over from the boot stripe on his 1920s motor launch. The paint has scarcely had time to get a few scratches in its comings and goings on the Thames but Richard is already at work on two more boats: a stitch-and-glue pulling boat he’ll equip with a sliding seat and racing sculls, and a Rob Roy canoe from the 1860s, given to him and in need of restoration. There’s no doubt that the time he spends at home staying safe will be time well spent.
Do you have a boat with an interesting story? Please email us. We’d like to hear about it and share it with other Small Boats Magazine readers.
Comments:
We welcome your comments about this article. If you’d like to include a photo or a video with your comment, please email the file or link.
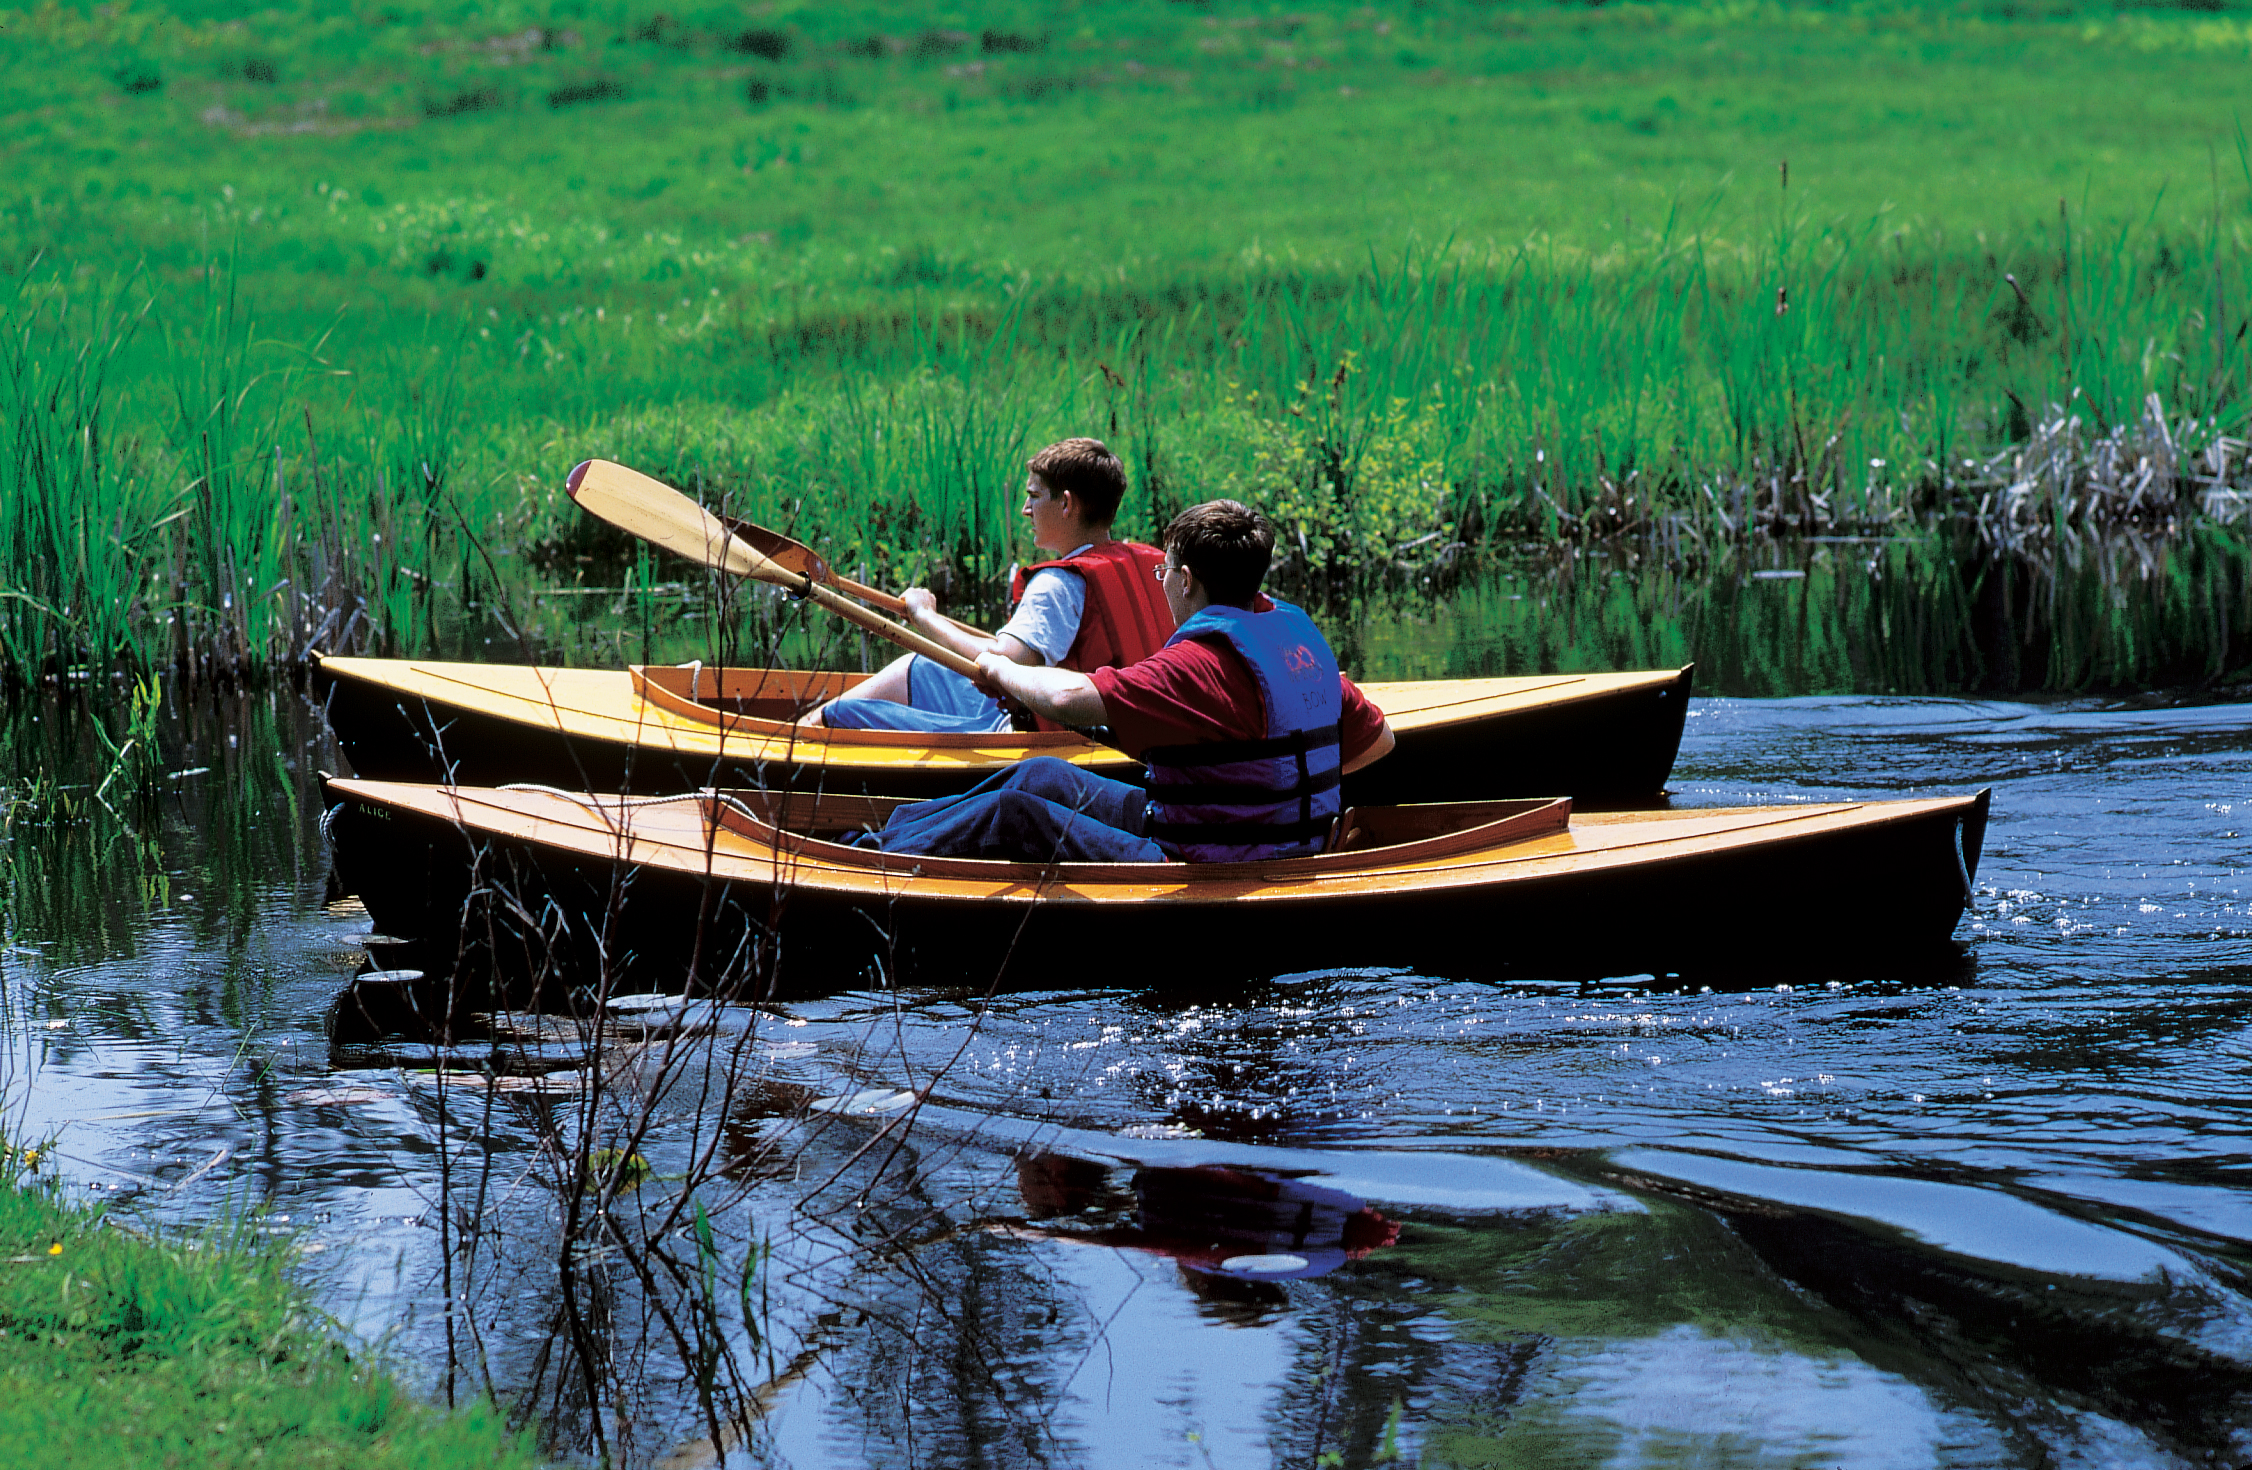
Have you noticed all of those kayaks riding along atop cars and trucks on their way to waterborne adventures? Their owners have seen the light. These slender double-ended boats require little initial investment, not much maintenance, and can be put on the water in seconds. In them we’ll cross open water, and when we get to the other side, we can follow an unspoiled creek to its source deep in the woods…far from the everyday annoyances of an intensely populated shoreline. Along the way, we’ll rest in shallow coves and watch as the life struggle of the bottom community plays out like a movie six inches below.
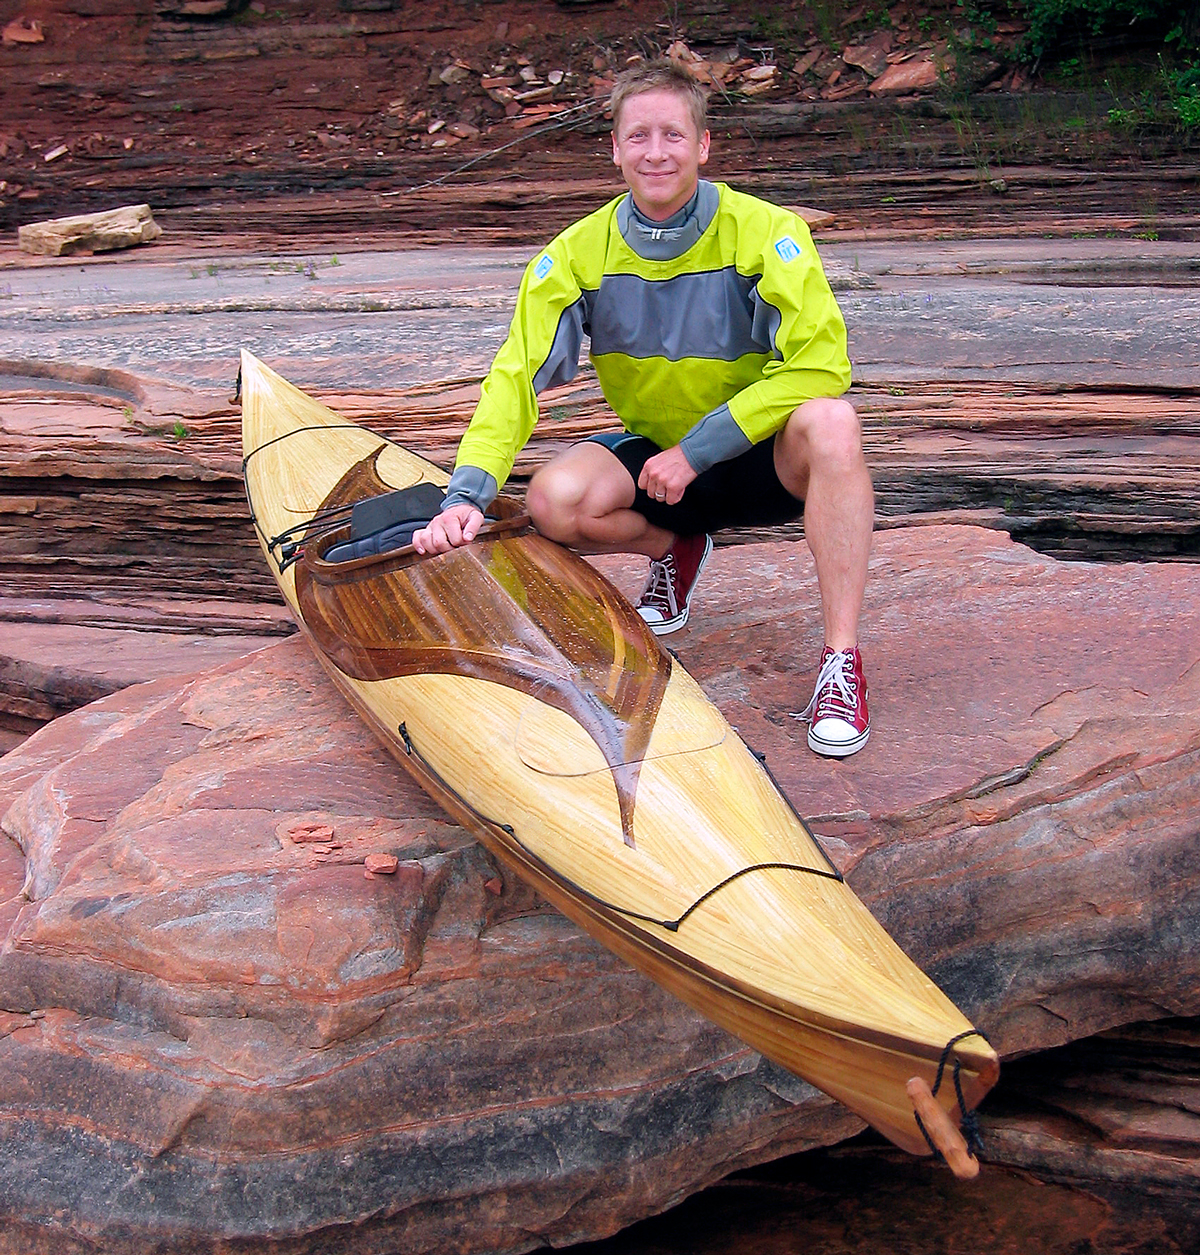
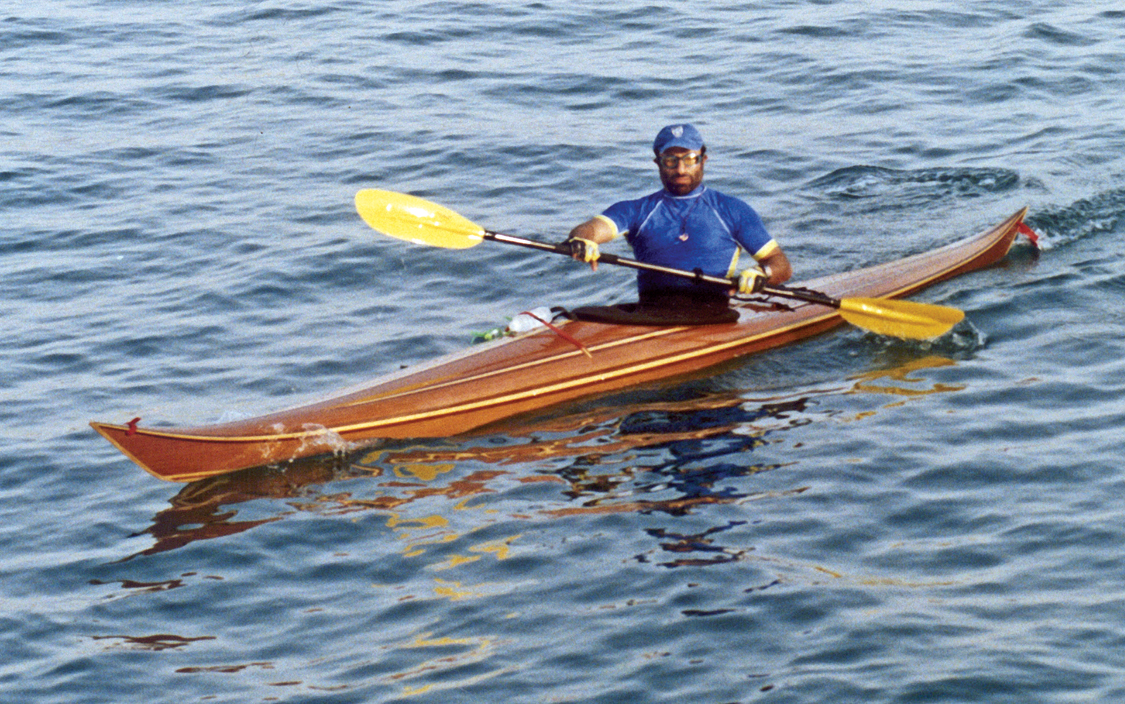
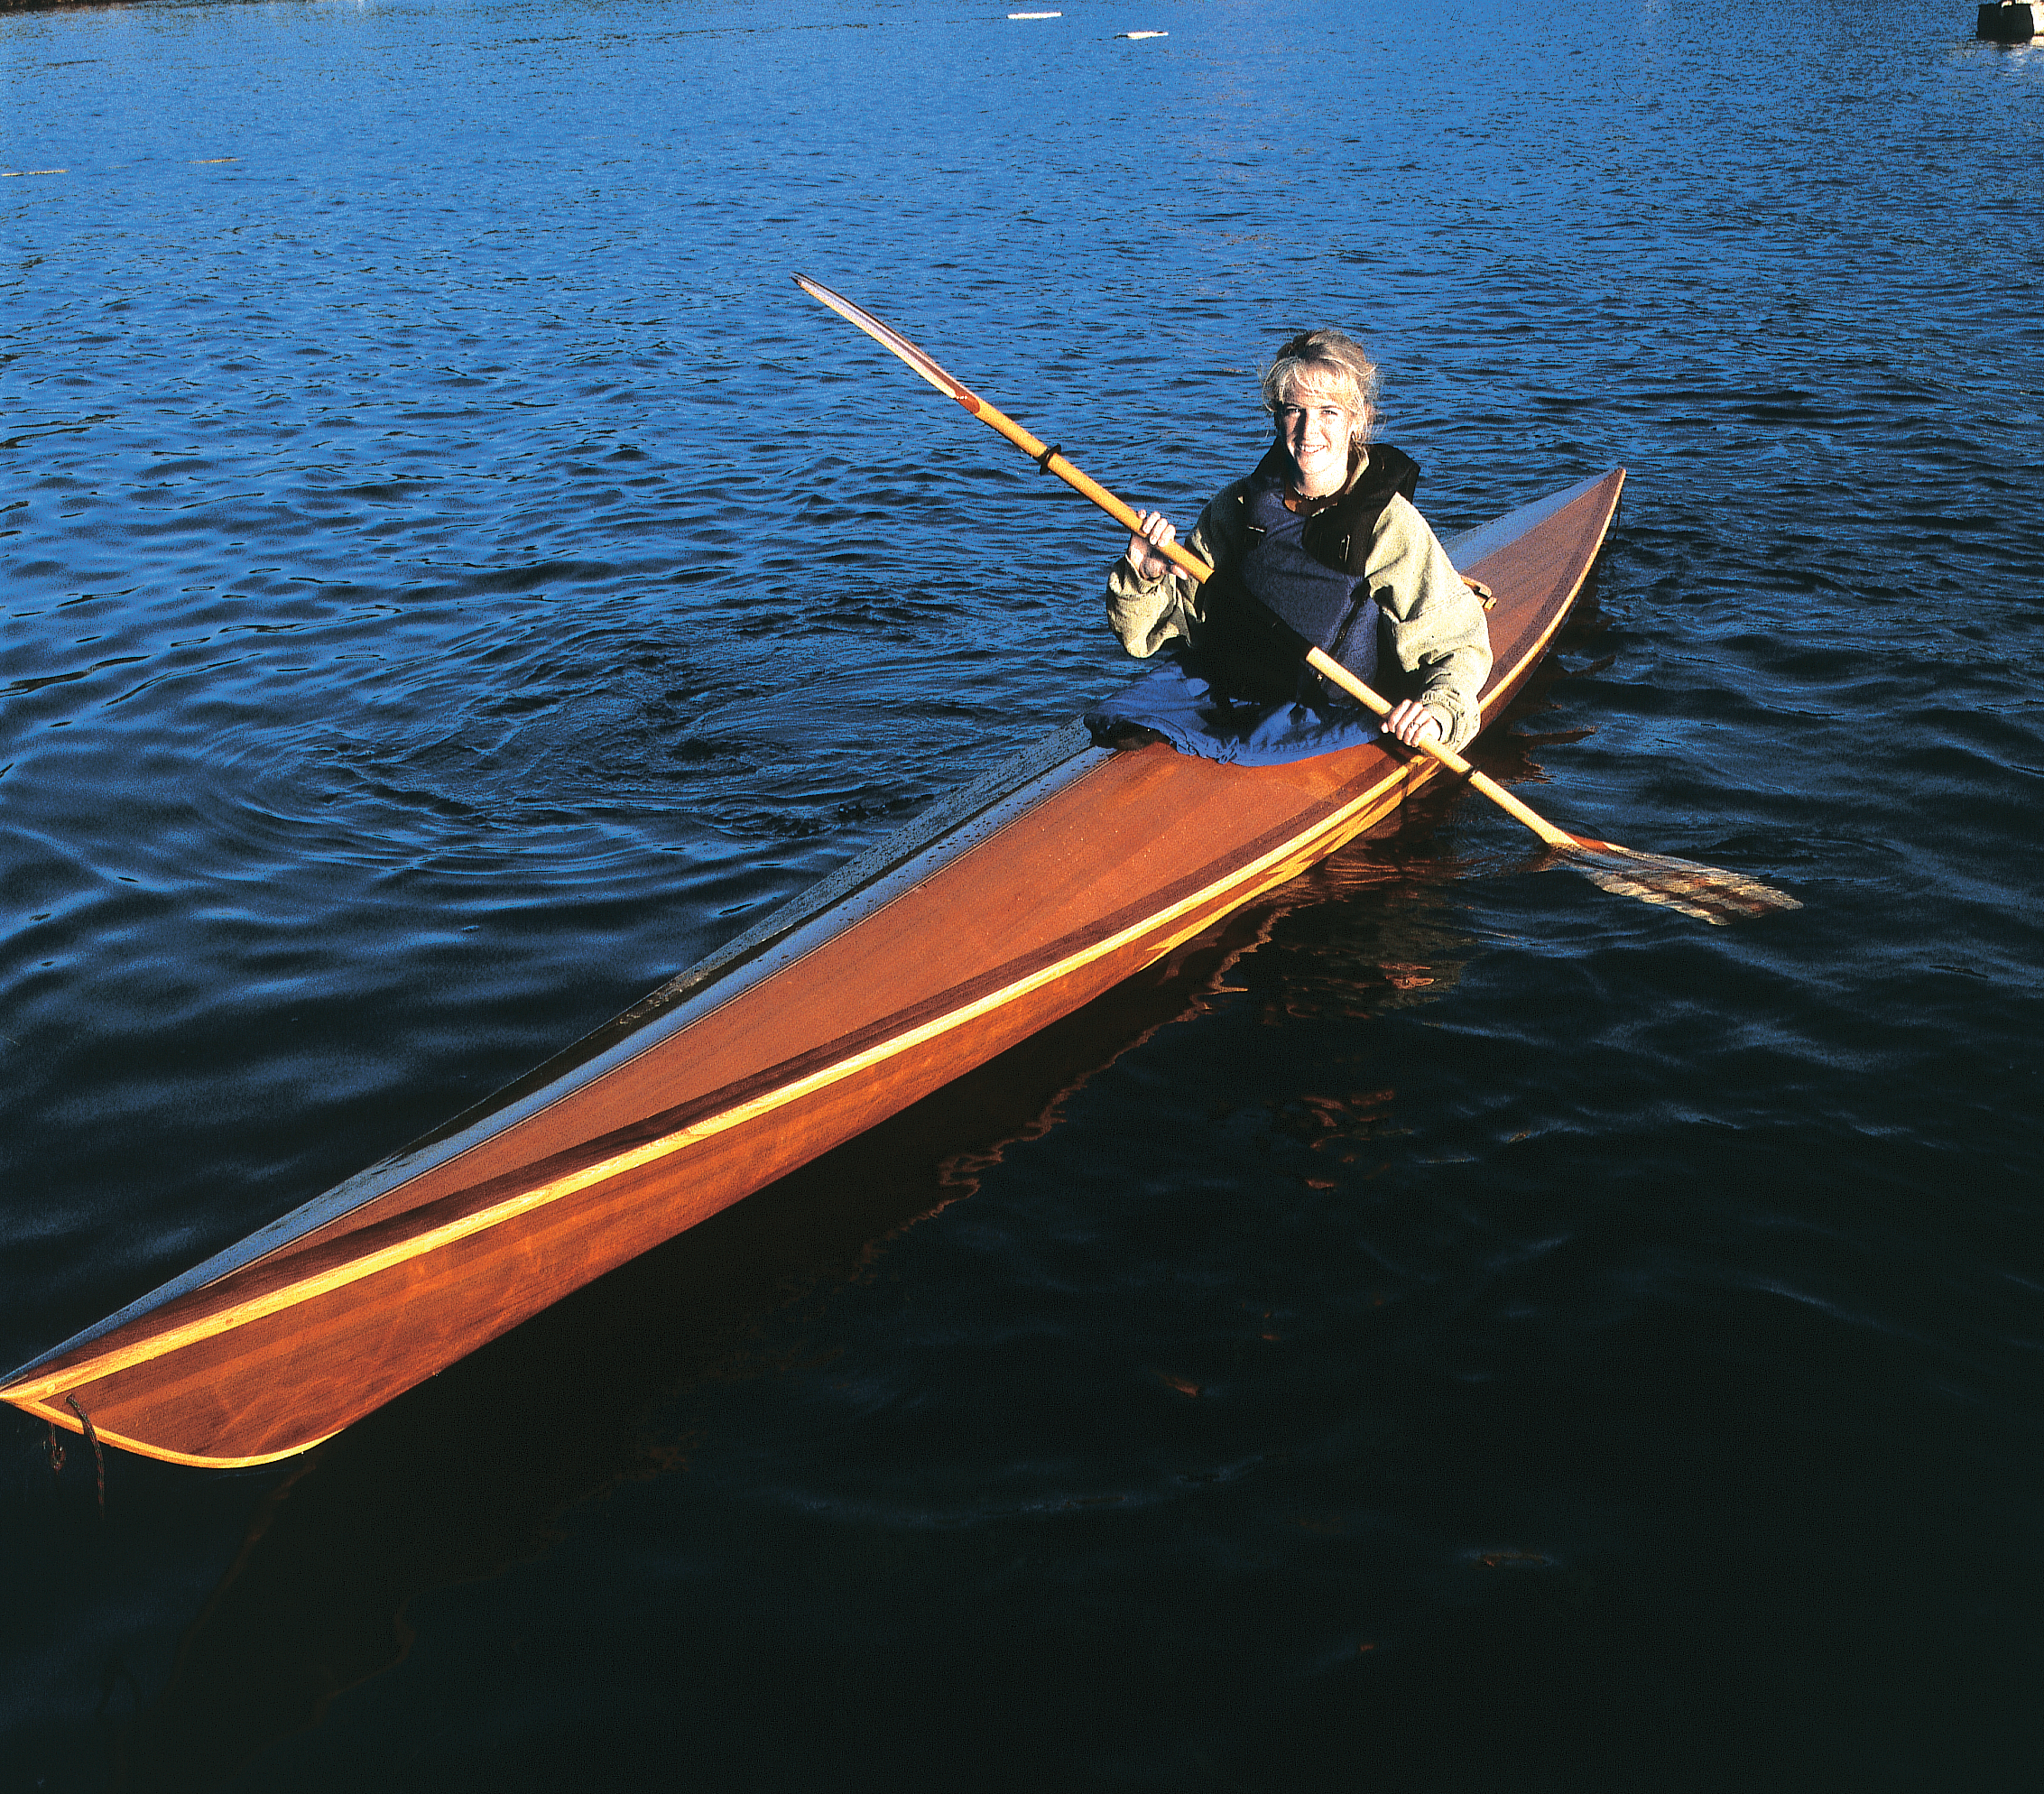
Nick Schade, a highly regarded designer-builder of kayaks, works out of Glastonbury, Connecticut, where he does business as Guillemot Kayaks. The inspiration for the Night Heron came from his ventures into rough water. The striking 18-footer is fast, able, and more stable than its 20″ breadth might suggest.
On a clear day in late summer, Nick stopped by at the WoodenBoat waterfront here in Brooklin, Maine. His Subaru Forester carried two bright-finished strip-built kayaks of his own devising: the Night Heron and the longer, wider (19′ 21″) Expedition Single.
Photo by Edith Royce
The Night Heron kayak is fast, narrow, and voluminous—a rare combination of good traits in a single boat.
Night Heron is a striking boat. Its ends sweep up in the style of native Greenland kayaks, and the edges of the decks are well rounded over. This is an organic creature…alive to our eyes. The designer explains the lack of sharp rails: “Sheer clamps ease construction; but after we’ve put the boat together, they’re just more weight to carry around.” The rounded-over “rails” reduce the chance of rapping our knuckles when working with the paddle held low. The lack of sharp edges lessens the possibility of tripping and rolling should we get caught abeam
in the surf.
We launched the boats into a rising 8-knot breeze out of the southeast, which allows a fetch that stretches to somewhere on the coast of Africa (if one discounts a few small islands). Heron’s sharply raked coaming (high forward, low aft) eases entry into the 31″-long cockpit opening. Still, the larger and less flexible among us might choose to lengthen the opening to about 36″—one of the benefits to building our own boats.
Despite its rounded-all-over appearance above the waterline, this kayak has what amounts to a V-bottom with radiused chines; and the hull’s volume is carried well out into its ends. For its type, Heron has what the naval architects would refer to as a “high prismatic coefficient.” The rest of us simply will say that the boat paddles more efficiently at relatively high speeds and shows surprising stability.
Photo by Steven E. Gross
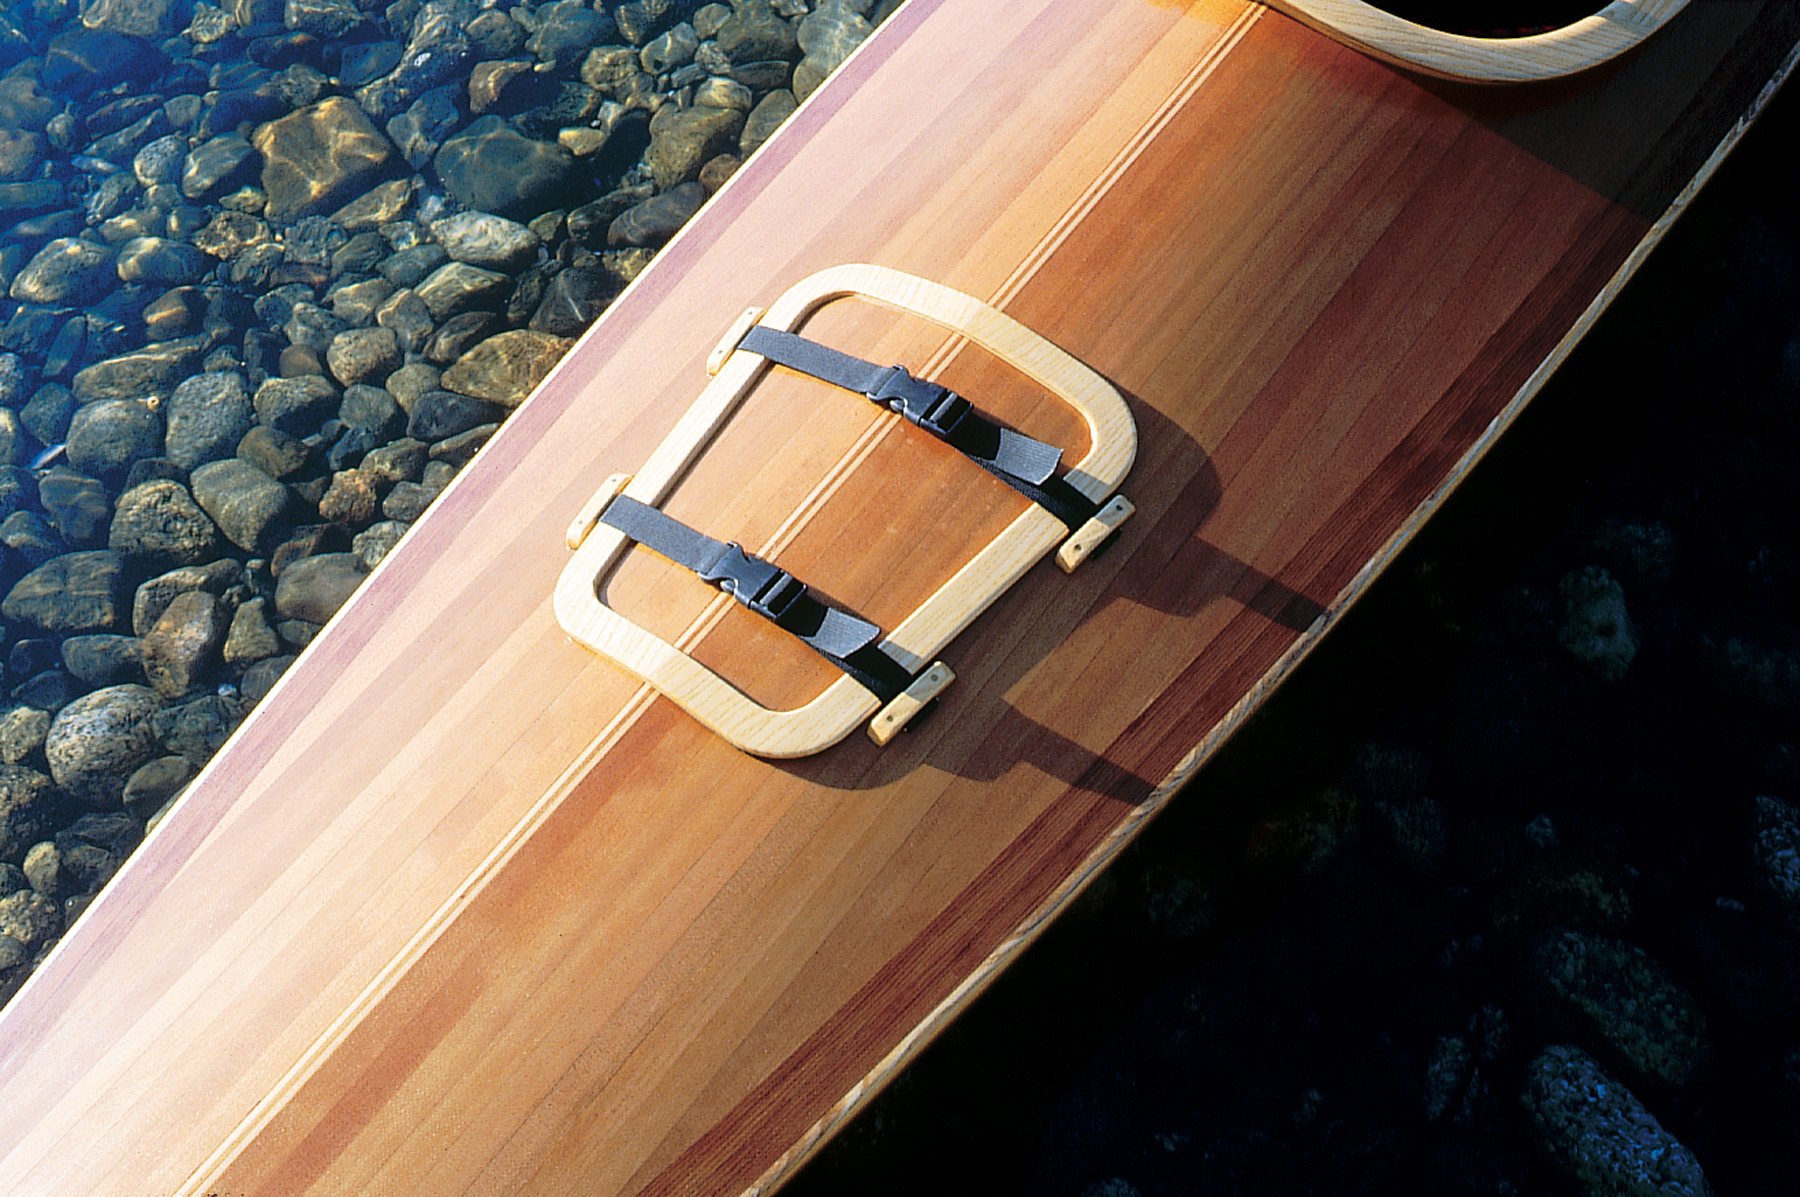
Because of its rounded chines, the Night Heron can be built in strip planks or stitch-and-glue plywood. Strip planking allows a fair amount of creative design, as seen on the decks of this example.
When leaned, Night Heron stiffens quickly. Left to its own devices, the boat wants to spring upright firmly but not suddenly. When we reach the angle at which positive stability disappears, it departs gently and predictably. There’s no catastrophic transition that might leave us eye to eye with the local fish population.
Night Heron moves easily through a chop. It seems to throw more spray than do round-bilged, needle-sharp kayaks; but most of that spray stays low and away from our faces. Anyone who thinks he can remain completely dry while sea kayaking might consider taking up croquet.
This kayak’s sense of directional stability is strong, but not overwhelming. It likes going in a straight line, yet turns easily—particularly when leaned. No rudder is needed. No skeg is needed. Nick Schade got it right. Let’s not tinker with perfection. Too often, rudders seem fitted to kayaks in an attempt to overcome poor hull design and/or incompetent paddling technique. Rudders are expensive, prone to failure at inconvenient moments, pick up pot warp and weed, and often result in weak and imprecise foot braces. Good single kayaks in the hands of competent paddlers do not require rudders— no matter what the sales brochures might suggest.
As Nick and I paddle across Eggemoggin Reach, the Expedition Single and Night Heron seem to achieve about the same top speed. The smaller Night Heron requires less effort to propel at all speeds and much less effort at full throttle. The bigger boat’s greater wetted surface likely accounts for some of the difference, especially at low and moderate speeds. As we approach maximum speed, Heron’s slightly convex waterlines (and higher prismatic coefficient) prove more efficient.
Choosing the proper kayak for each of us seems more akin to selecting hiking boots than shopping for a boat. We don’t sit on top of a real kayak, we sit in it. After finding the boat that comes closest to a perfect fit, we’ll adjust the accommodations with strategically placed foam blocks and sheets. The fit should be snug but not too tight. Secure contact with the boat allows us to lean, brace, roll, and accomplish all of the other maneuvers that bring joy and safety to paddlers.
Photo Courtesy Guillemont Kayak
“Choosing the proper kayak for each of us seems more akin to selecting hiking boots than shopping for a boat.”
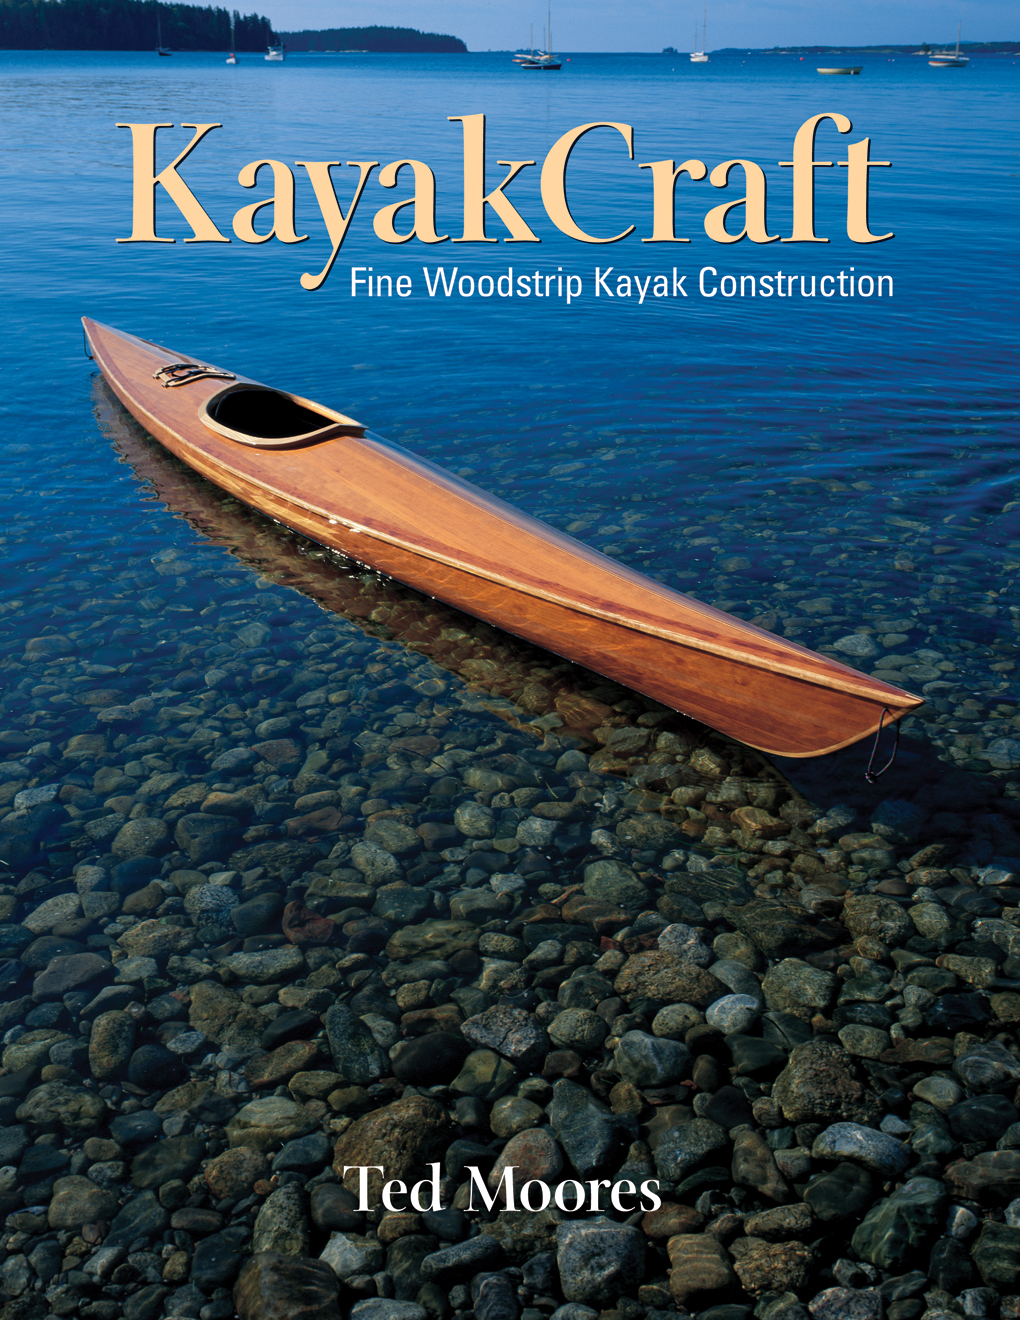
We’ll want to choose the type of construction that’s compatible with our building skills and patience. Nick helps us by offering plans and kits for several different Night Herons. The original design specifies strip-composite construction for hull and deck. Most of us will elect to build this model with bead-and-cove strips. These strips self-align along their edges. They mate well at various angles, which eases and quickens assembly. We’ll cover the whole boat, inside and out, with fiberglass cloth set in epoxy. Nick’s book The Strip-Built Kayak (Ragged Mountain Press, 1997) illustrates the procedure in clear fashion.
Those of us with larger than average feet (or who simply require more room for lunch or camping gear) might consider building the high-decked version of Night Heron. It’s not quite so sleek as the original, but….
Paddlers for whom launching day can’t come too soon, might select the stitch-and-glue Night Heron. As the name suggests, we’ll stitch together (with wire) and then glue (with epoxy and ’glass) pre-shaped plywood panels. The stitch-and-glue boat has exactly the same profile as the strip-built original. As built, it tends to track a little more stiffly than the stripper due to sharper deadrise (V-shape to the bottom) at both ends of the plywood hull. Because the plywood hull has a well-defined hard chine where the bottom and side panels meet, it responds to edged turns more readily. A foredeck “chine” provides clearance when we work the paddle close to the hull, and it creates more room below. As a design device, the multi-faceted deck looks just fine. On the whole, performance of both Heron hulls seems quite similar. And, yes, we can build a high-decked stitch-and-glue Heron as well.
And there’s more: we can build something called a Hybrid Night Heron, which mates a strip-built deck with a stitch-and-glue hull. The practical sense of this combination eludes me, but perhaps some folks will appreciate the marriage of a fluid deck with an aggressively angular hull. I don’t know…seems it might be better the other way ’round. If you wish, you can build a high-decked hybrid.
Finally, we have the option of building a Greenland Night Heron. In this model, Nick has lowered the after deck to ease layback Eskimo rolls (and perhaps because it looks nifty). The cockpit opening has been shortened, but the steeper rake to the coaming should ease entry and exit. In any case, all but the double-jointed will have to jackknife into the boat.
So, there you have Night Heron: a fast, able, reasonably stable kayak that you can build at home. If well crafted, it can be achingly beautiful. A strip-built original Heron resides in the permanent collection of the Museum of Modern Art in New York City.
Night Heron will bring great satisfaction to intermediate and advanced kayakers. It will tolerate prudent beginners and nurture their skills. Nothing, absolutely nothing, conveys the simple joy of being afloat quite so purely as a light paddling boat…but be careful out there.
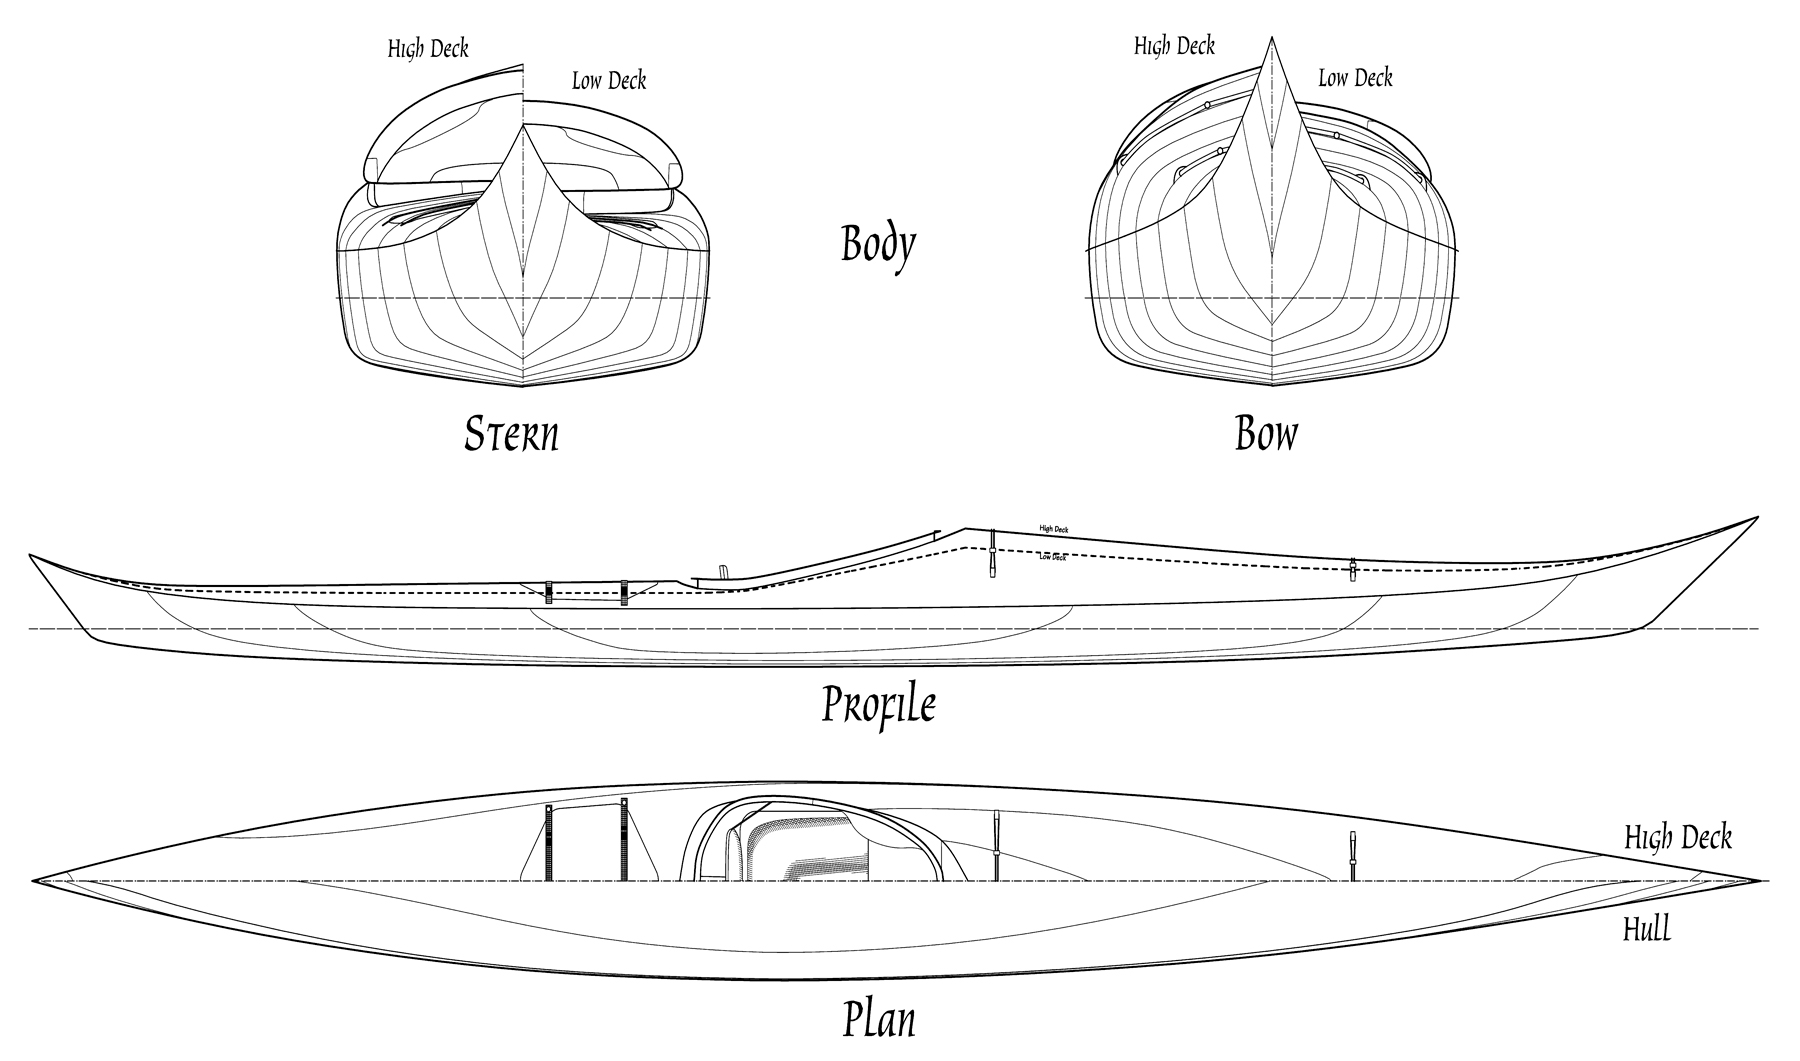
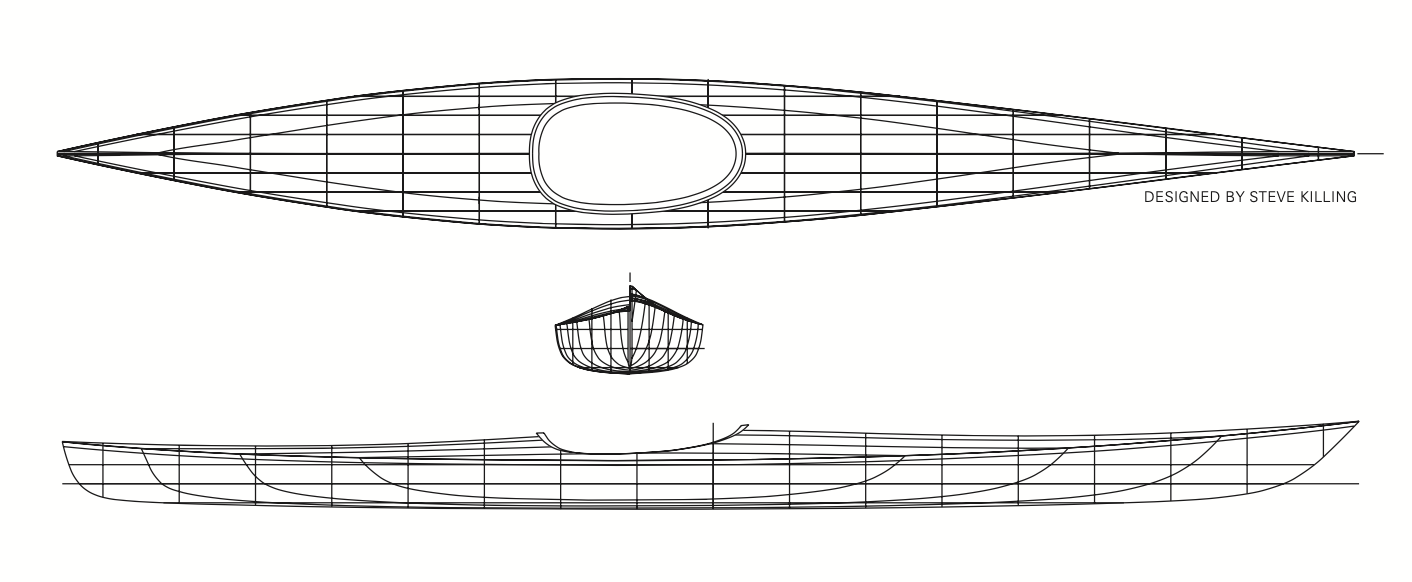
Night Heron’s slight V-bottom makes for good directional stability, while the modest rocker allows for easy turning. The narrow beam is offset by firm bilges, for good initial stability.
Plans for Night Heron are available from Guillemot Kayaks.
Kits and plans for Night Heron are also available from Chesapeake Light Craft.
Is there a boat you’d like to know more about? Have you built one that you think other Small Boats Magazine readers would enjoy? Please email us!
I never met John Gardner, but I’ve spent many an afternoon with him. Leafing from one chapter of his books to another, it’s easy to get distracted by the down-to-earth practicality, the enthusiastic descriptions of traditional boats, and the ringing call to action to see these boats built anew and put to use. Just when you think you’ve got one picked out, you accidentally flip the page to another chapter, and your indecision is off on a new tack, evaluating the great Mystic Seaport historian’s solid reasoning on the virtues of yet another historic type.
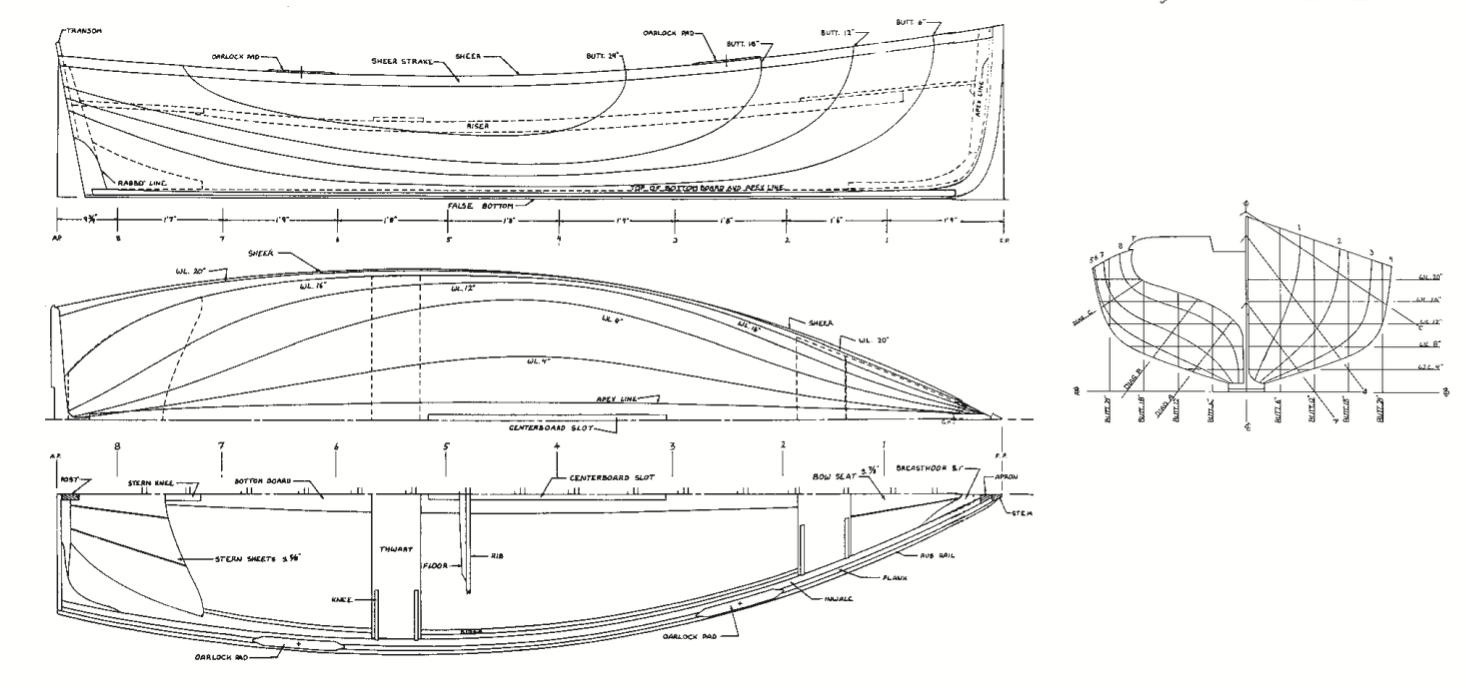
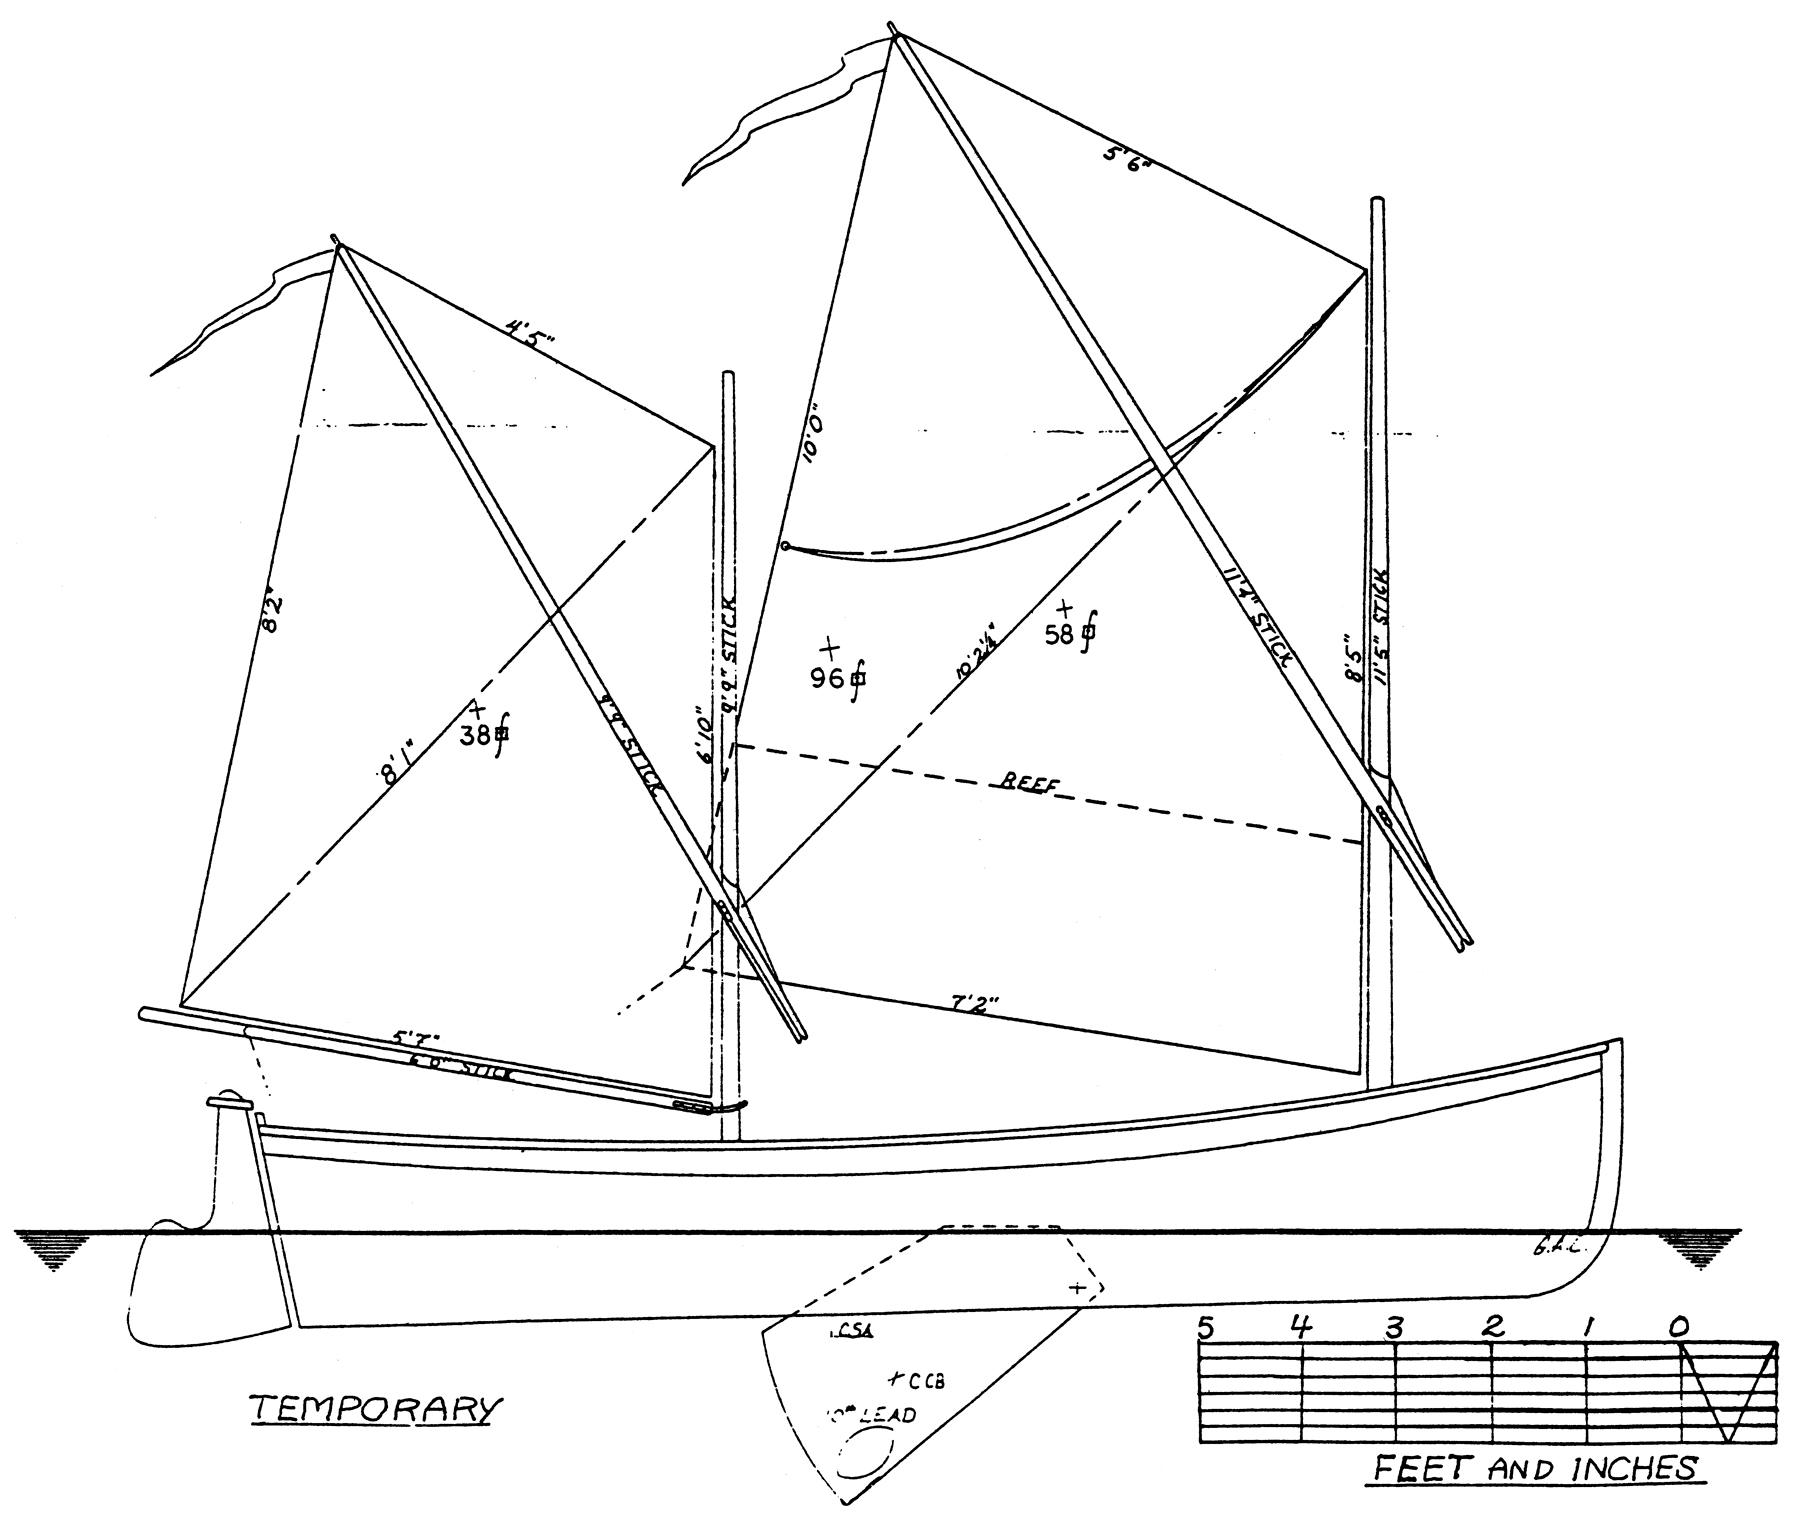
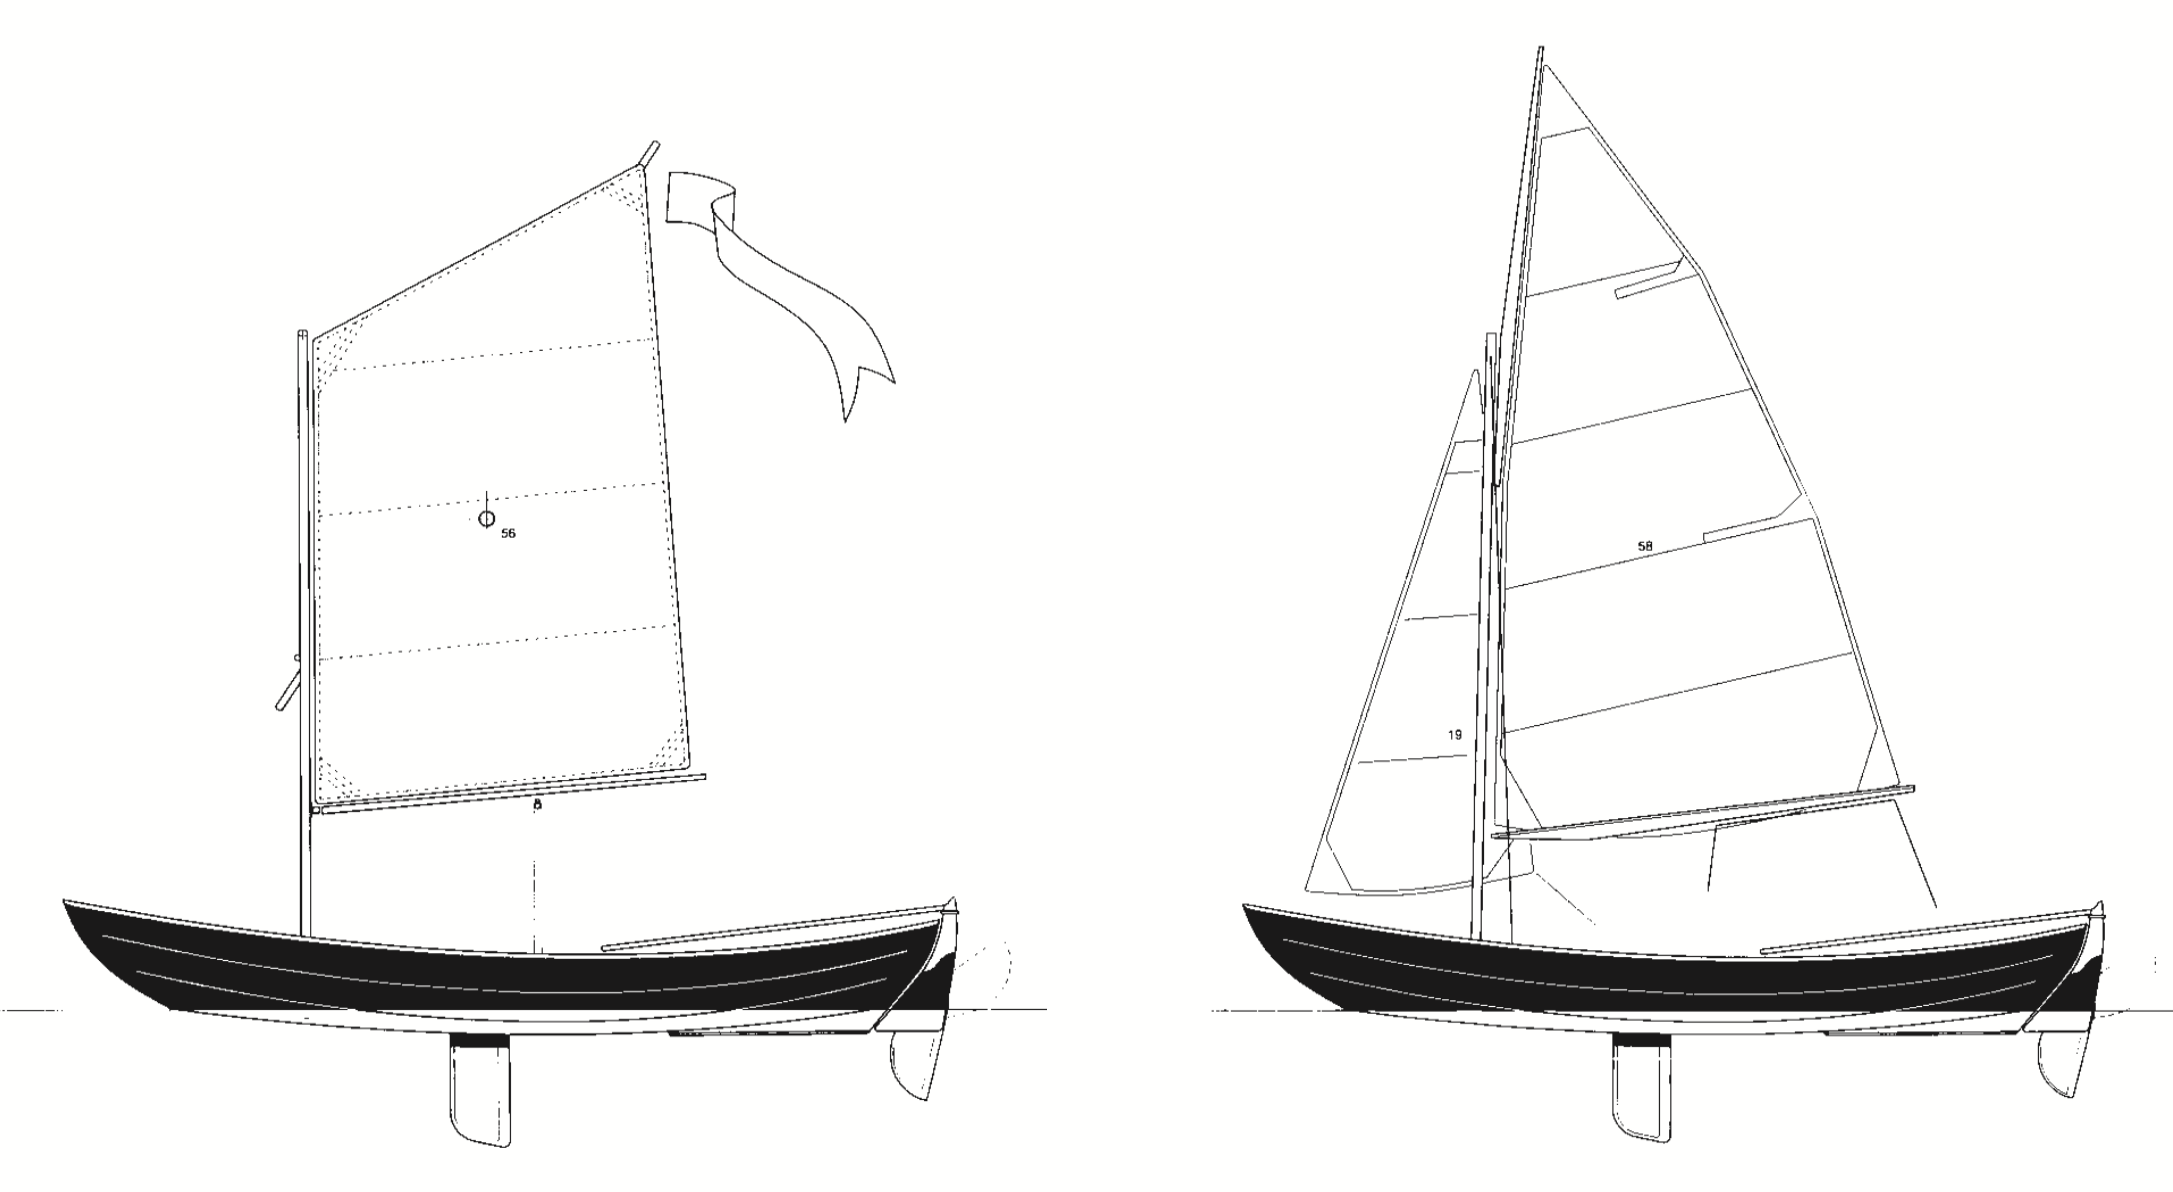
Such must have been very much the way that Rick Hayden of China, Maine, spent an afternoon—or maybe many afternoons. Ultimately, he did what we all must do: he made a choice. The boat that suited his needs—the one that proved irresistible, the one he would see built— was the Moosabec Reach Boat, which occupies Chapter 3 of Gardner’s Wooden Boats to Build and Use (Mystic Seaport Museum, Connecticut, 1996).
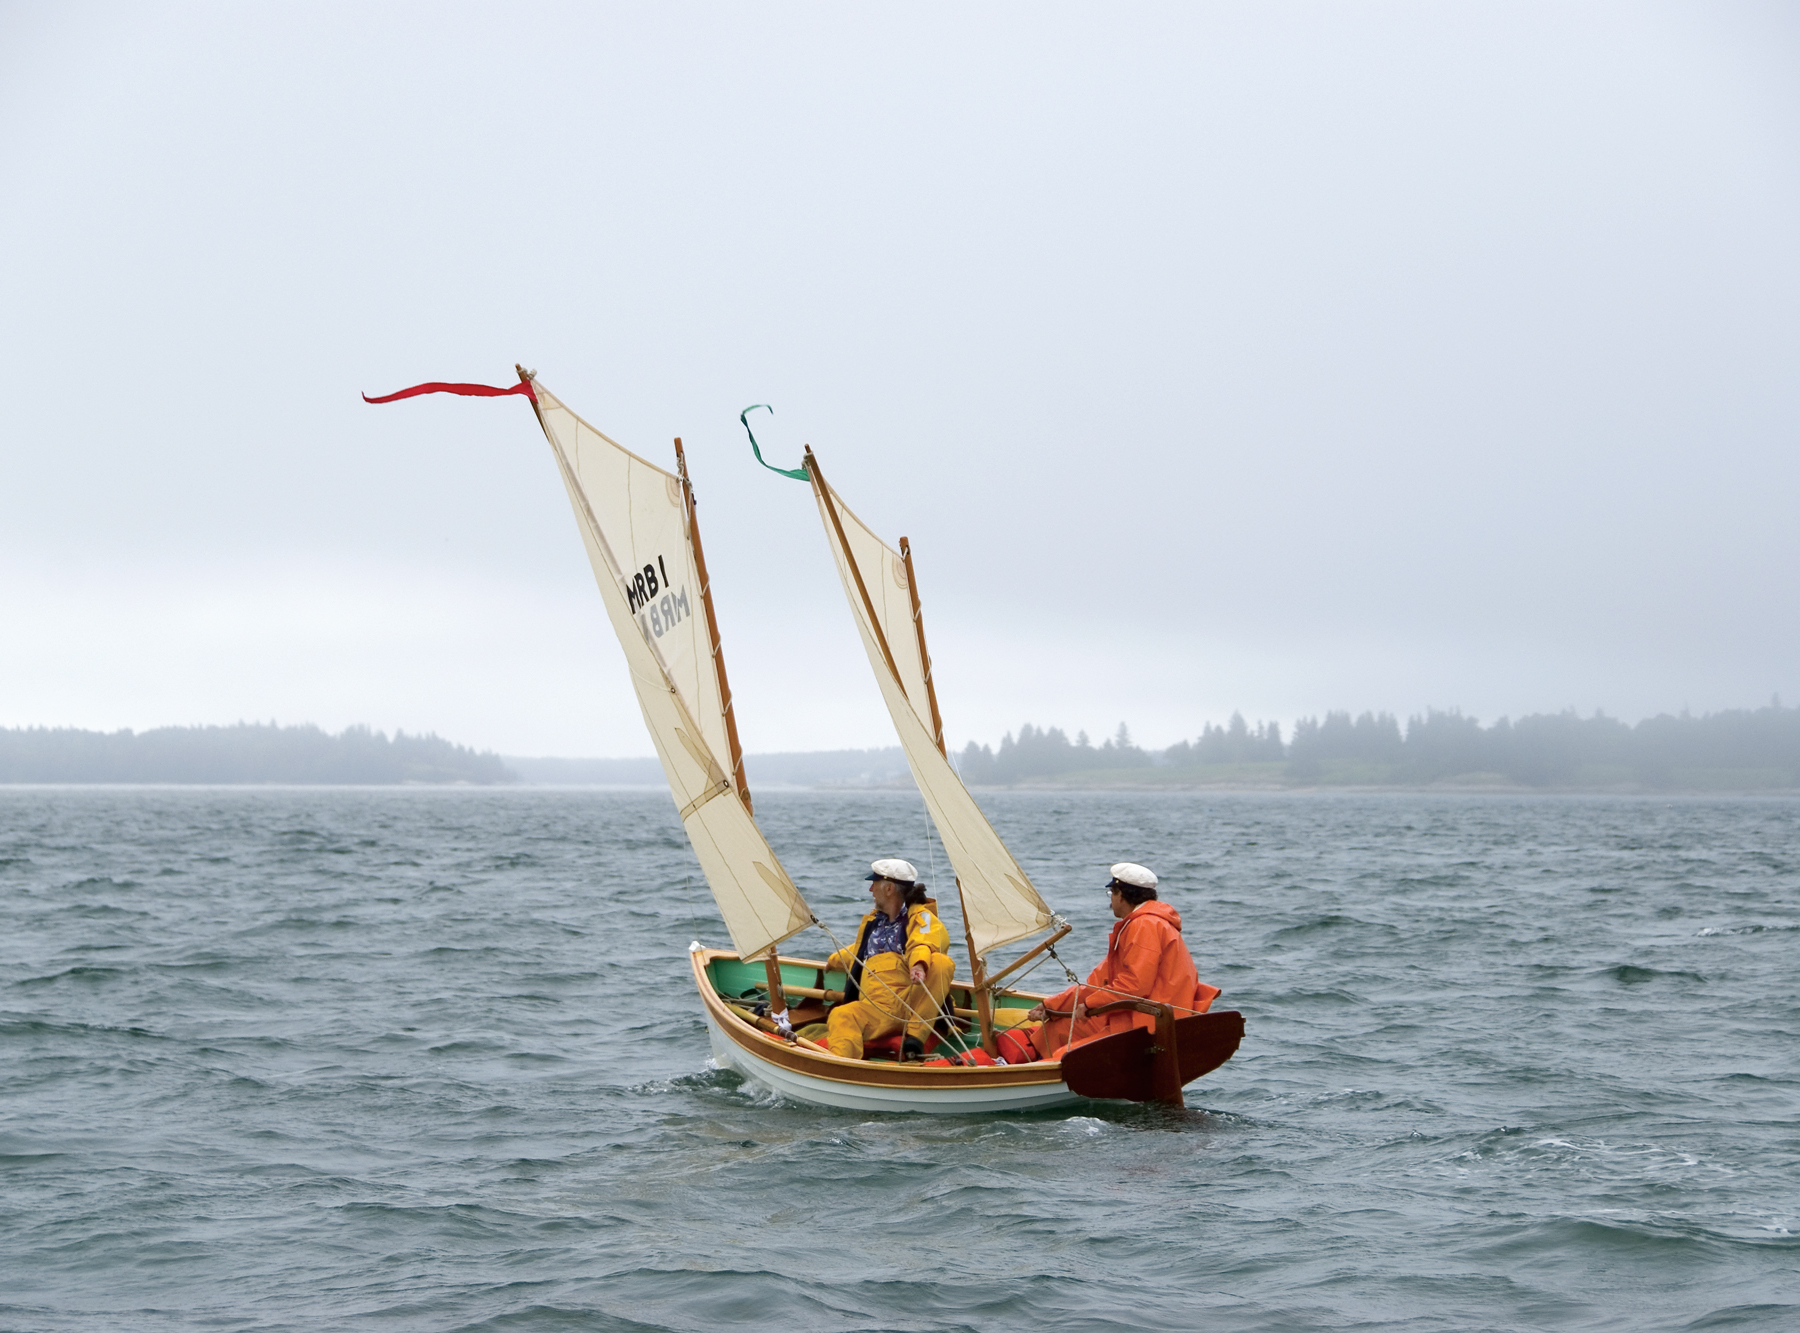
She’s a 14′ 3″ boat, with a 4′ 6″ beam, two rowing stations, and a handsome and practical two-masted sprit rig. Andy Chase of Castine, Maine, bought the original boat, which may have been built in the 19th century, in the 1970s. It was he who brought it to Gardner’s attention. Chase also documented the hull during a work-study program at Mystic Seaport while still a high school student. Originally used for lobstering and fishing on Moosabec Reach near Jonesport, Maine, such boats followed the demands and needs of their owners and builders, rowing easily to get the catch home on a calm day, and sailing safely when the wind came fair.
Photo by Peter Simpson
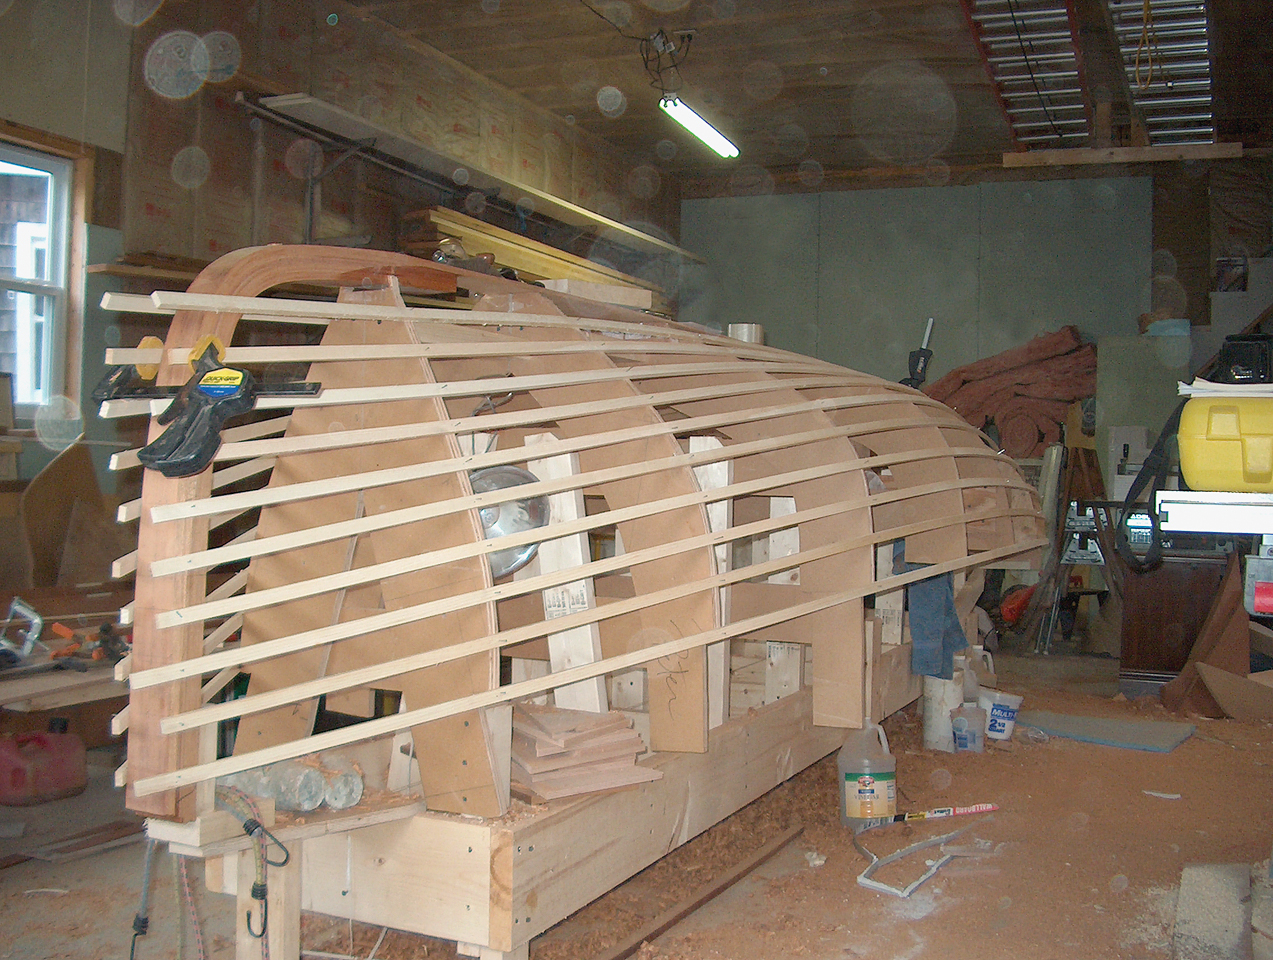
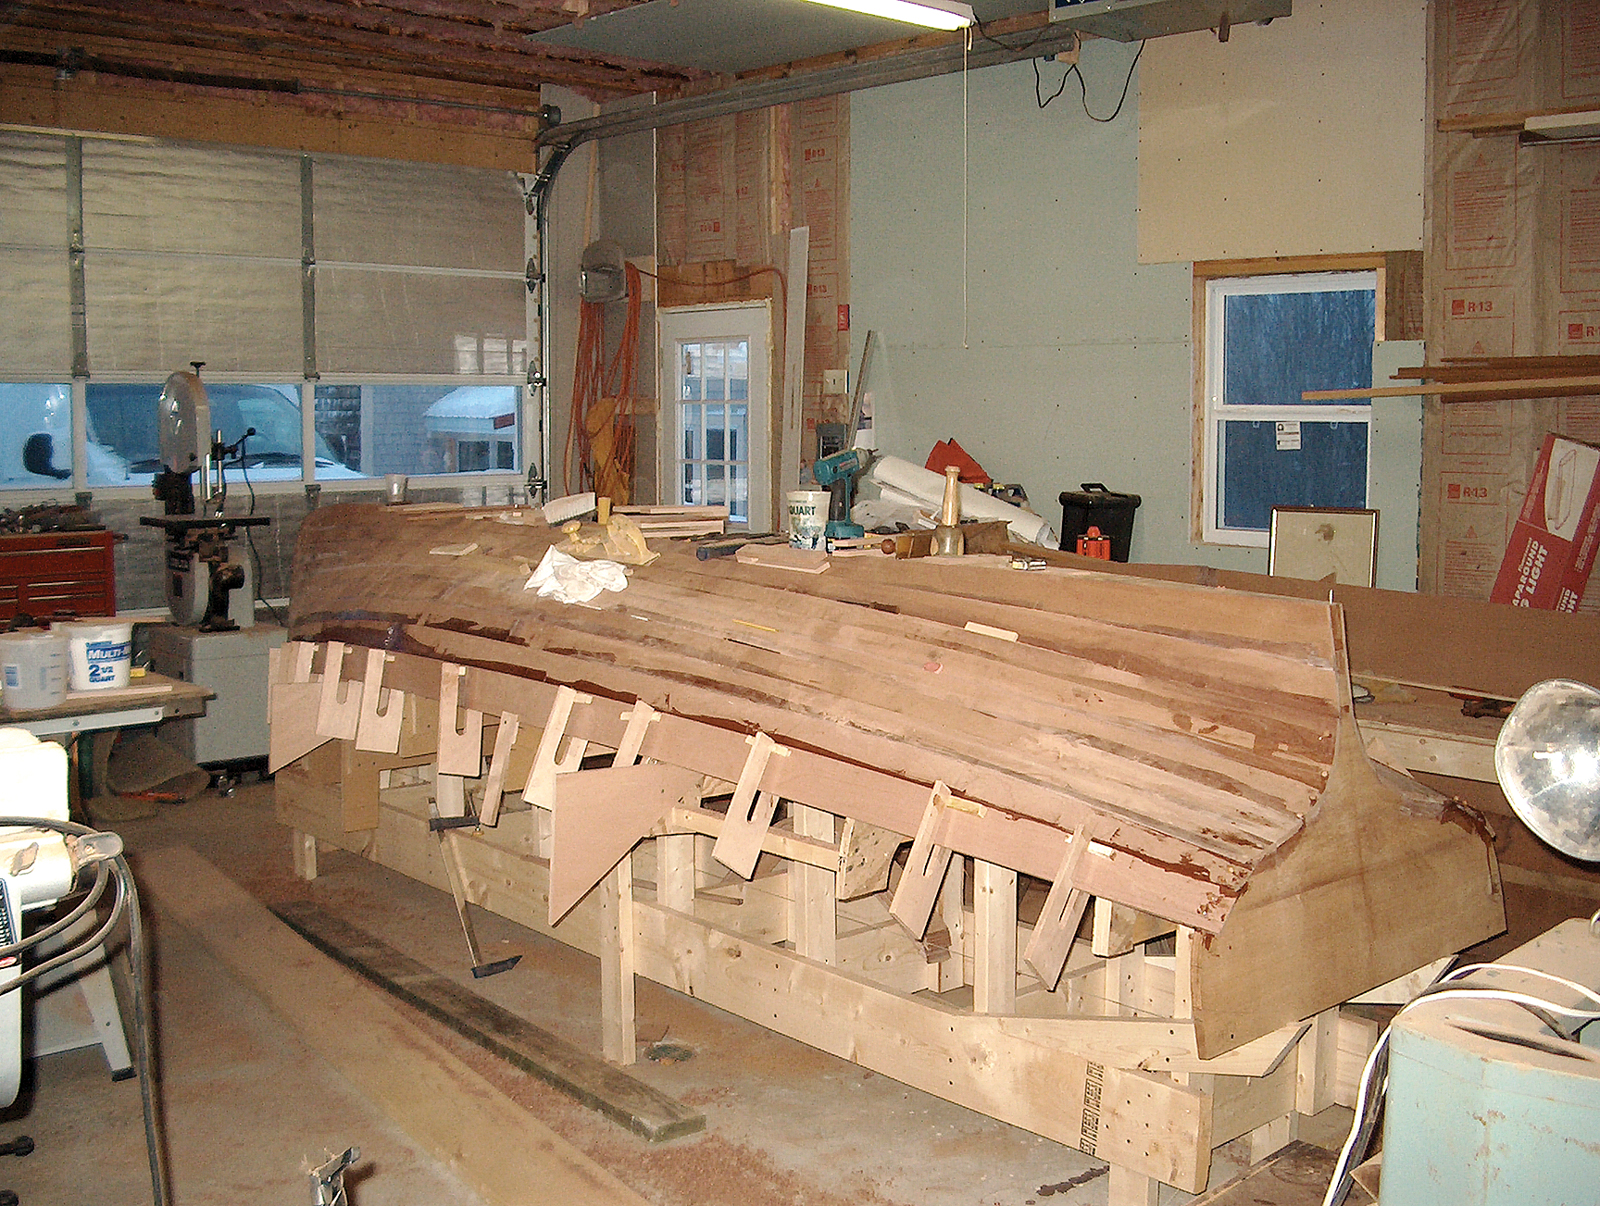
Builder Peter Simpson worked directly from Gardner’s Wooden Boats to Build and Use to set up the boat’s molds—though he did find an error in the table of offsets.
Knowing the fine reputation of Rockport Marine, Hayden contacted the yard about the possibility of having the boat built there for him. It’s far outside of the yard’s usual repertoire of premium yacht work, which involves both new construction and restoration. Maybe in a couple of years they could fit it in, Hayden learned. But the yard’s purchasing agent, Priscilla Simpson, told him that her husband, Peter Simpson, one of the yard’s boatbuilders, might be able to build the boat for him at his own home shop during his spare time. Over the winter of 2005–06, it turned out to be an 800-hour project— and an enjoyable one—for Simpson.
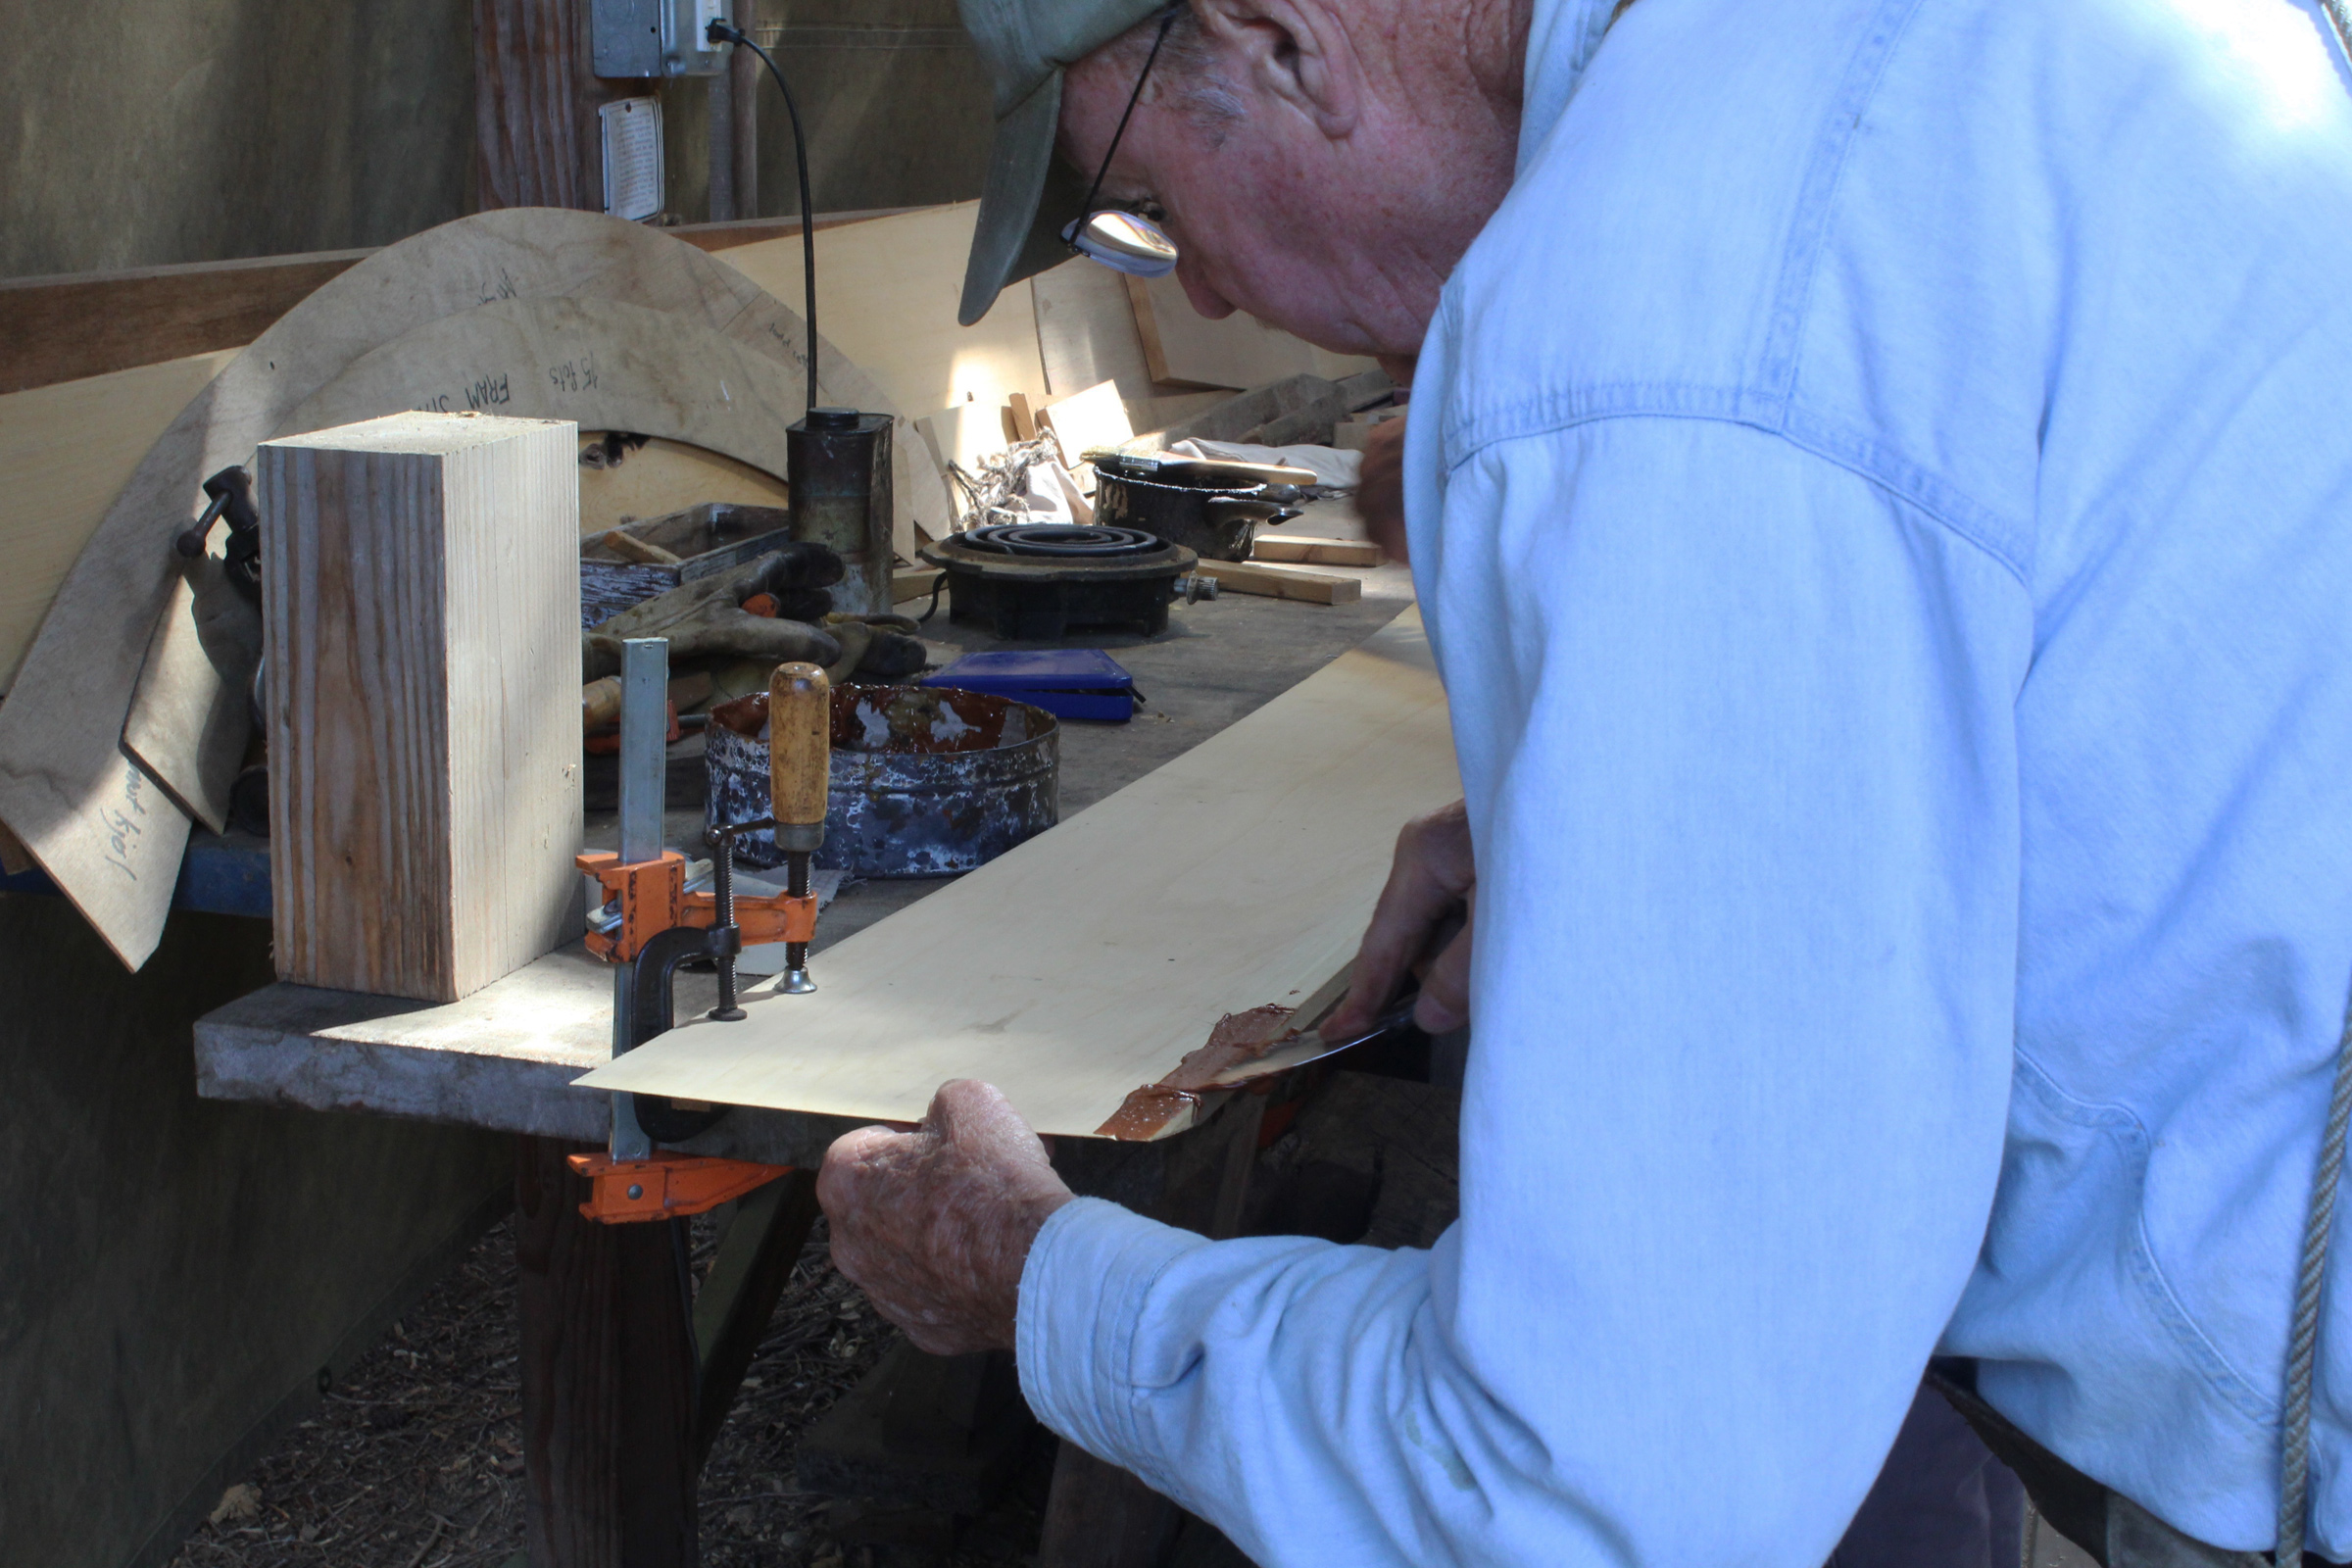
One of the great things about Gardner’s books is that he includes plans and details enough to build the boats straight out of the pages—including the critically important table of offsets, those measurements of every design line in the hull that you must have for lofting, or drawing out the lines full-sized. True, a boatbuilder needs some experience to do this. Simpson, for example, found an error in the table of offsets in the plans developed by Chase, which he said was an obvious mistake and easily fixed during lofting. A novice, however, might have a sleepless night or two and moments of self-doubt over that discrepancy.
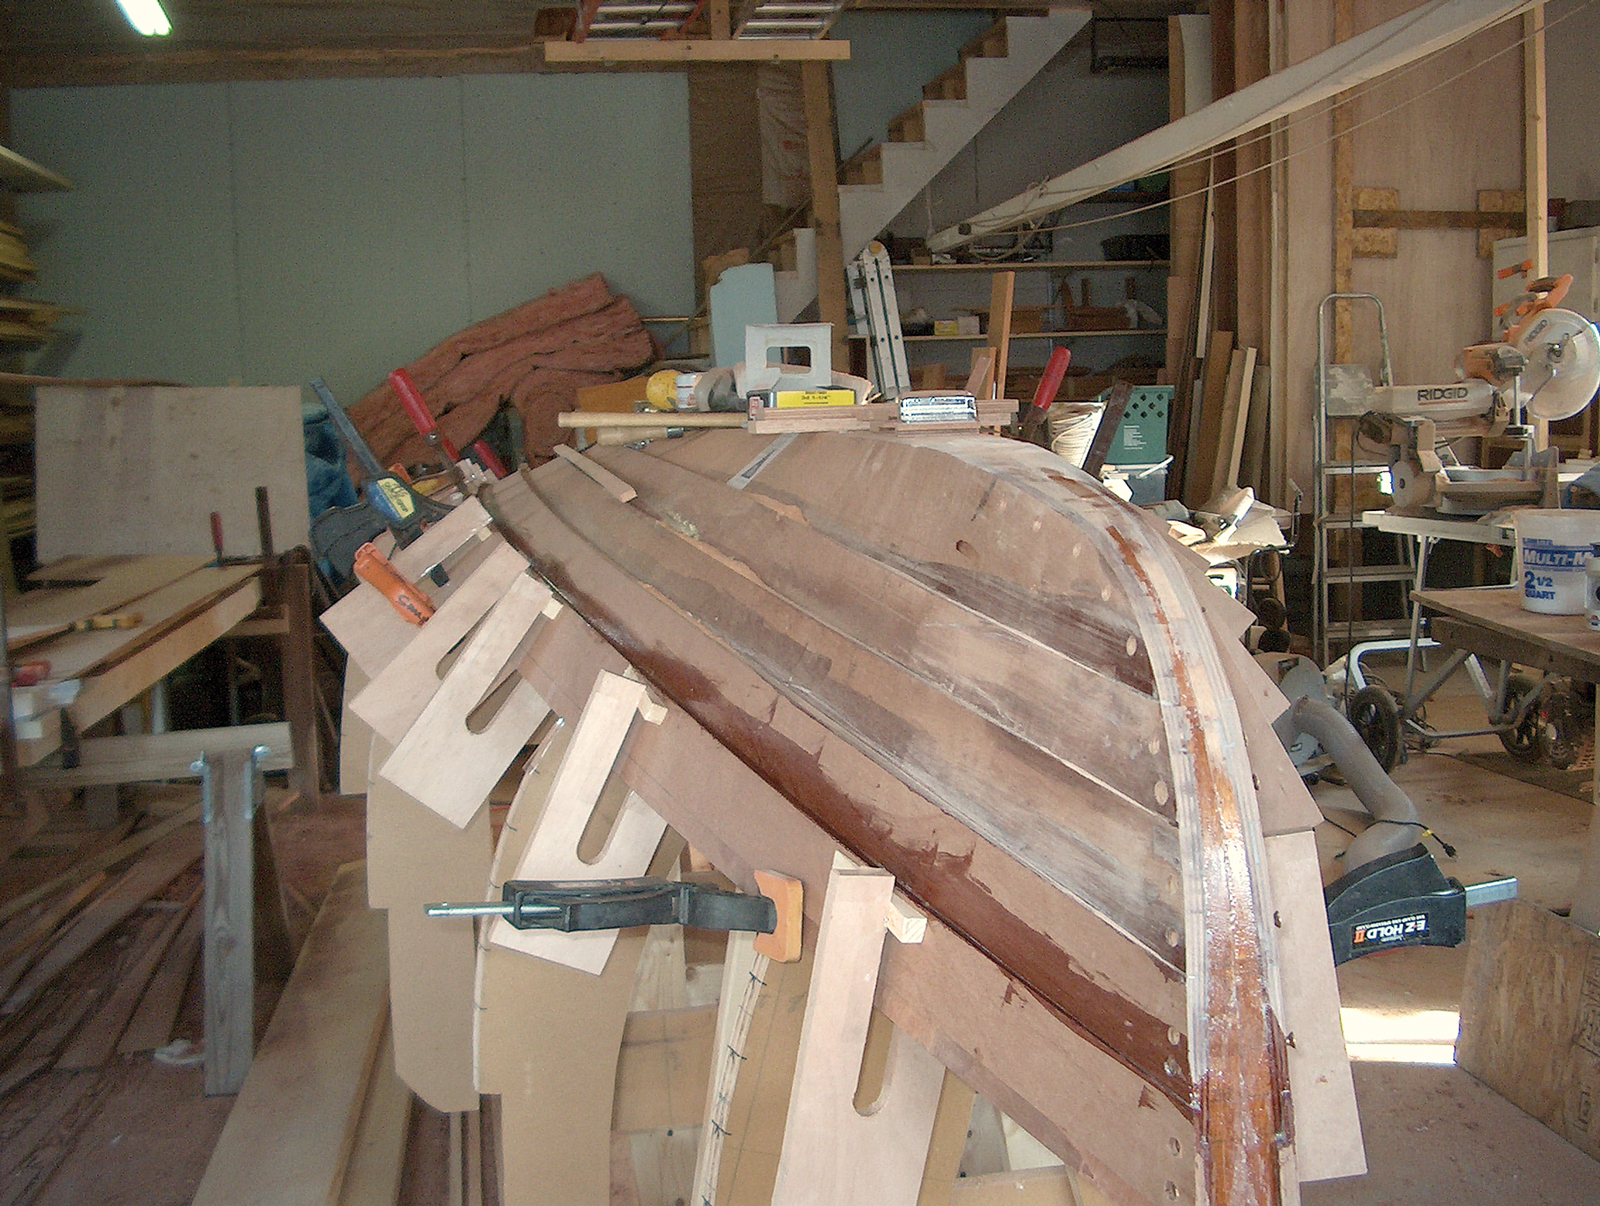
Decisions, decisions. The boat could be built in the traditional manner, of course, using the time-tested white cedar planking on white oak steam-bent frames. Simpson, however, used 3⁄8″ okoume plywood planking to meet Hayden’s specification for a glued-lapstrake boat. She’s a rather heavy boat when fully rigged and with all her gear aboard, and yet she’s easy enough to get on a trailer when stripped down to her 200-lb hull weight. And with her plywood planking, she can be led to new waters for different kinds of adventures without requiring time to “take up” and stop the seams from weeping.
Photo by Peter Simpson
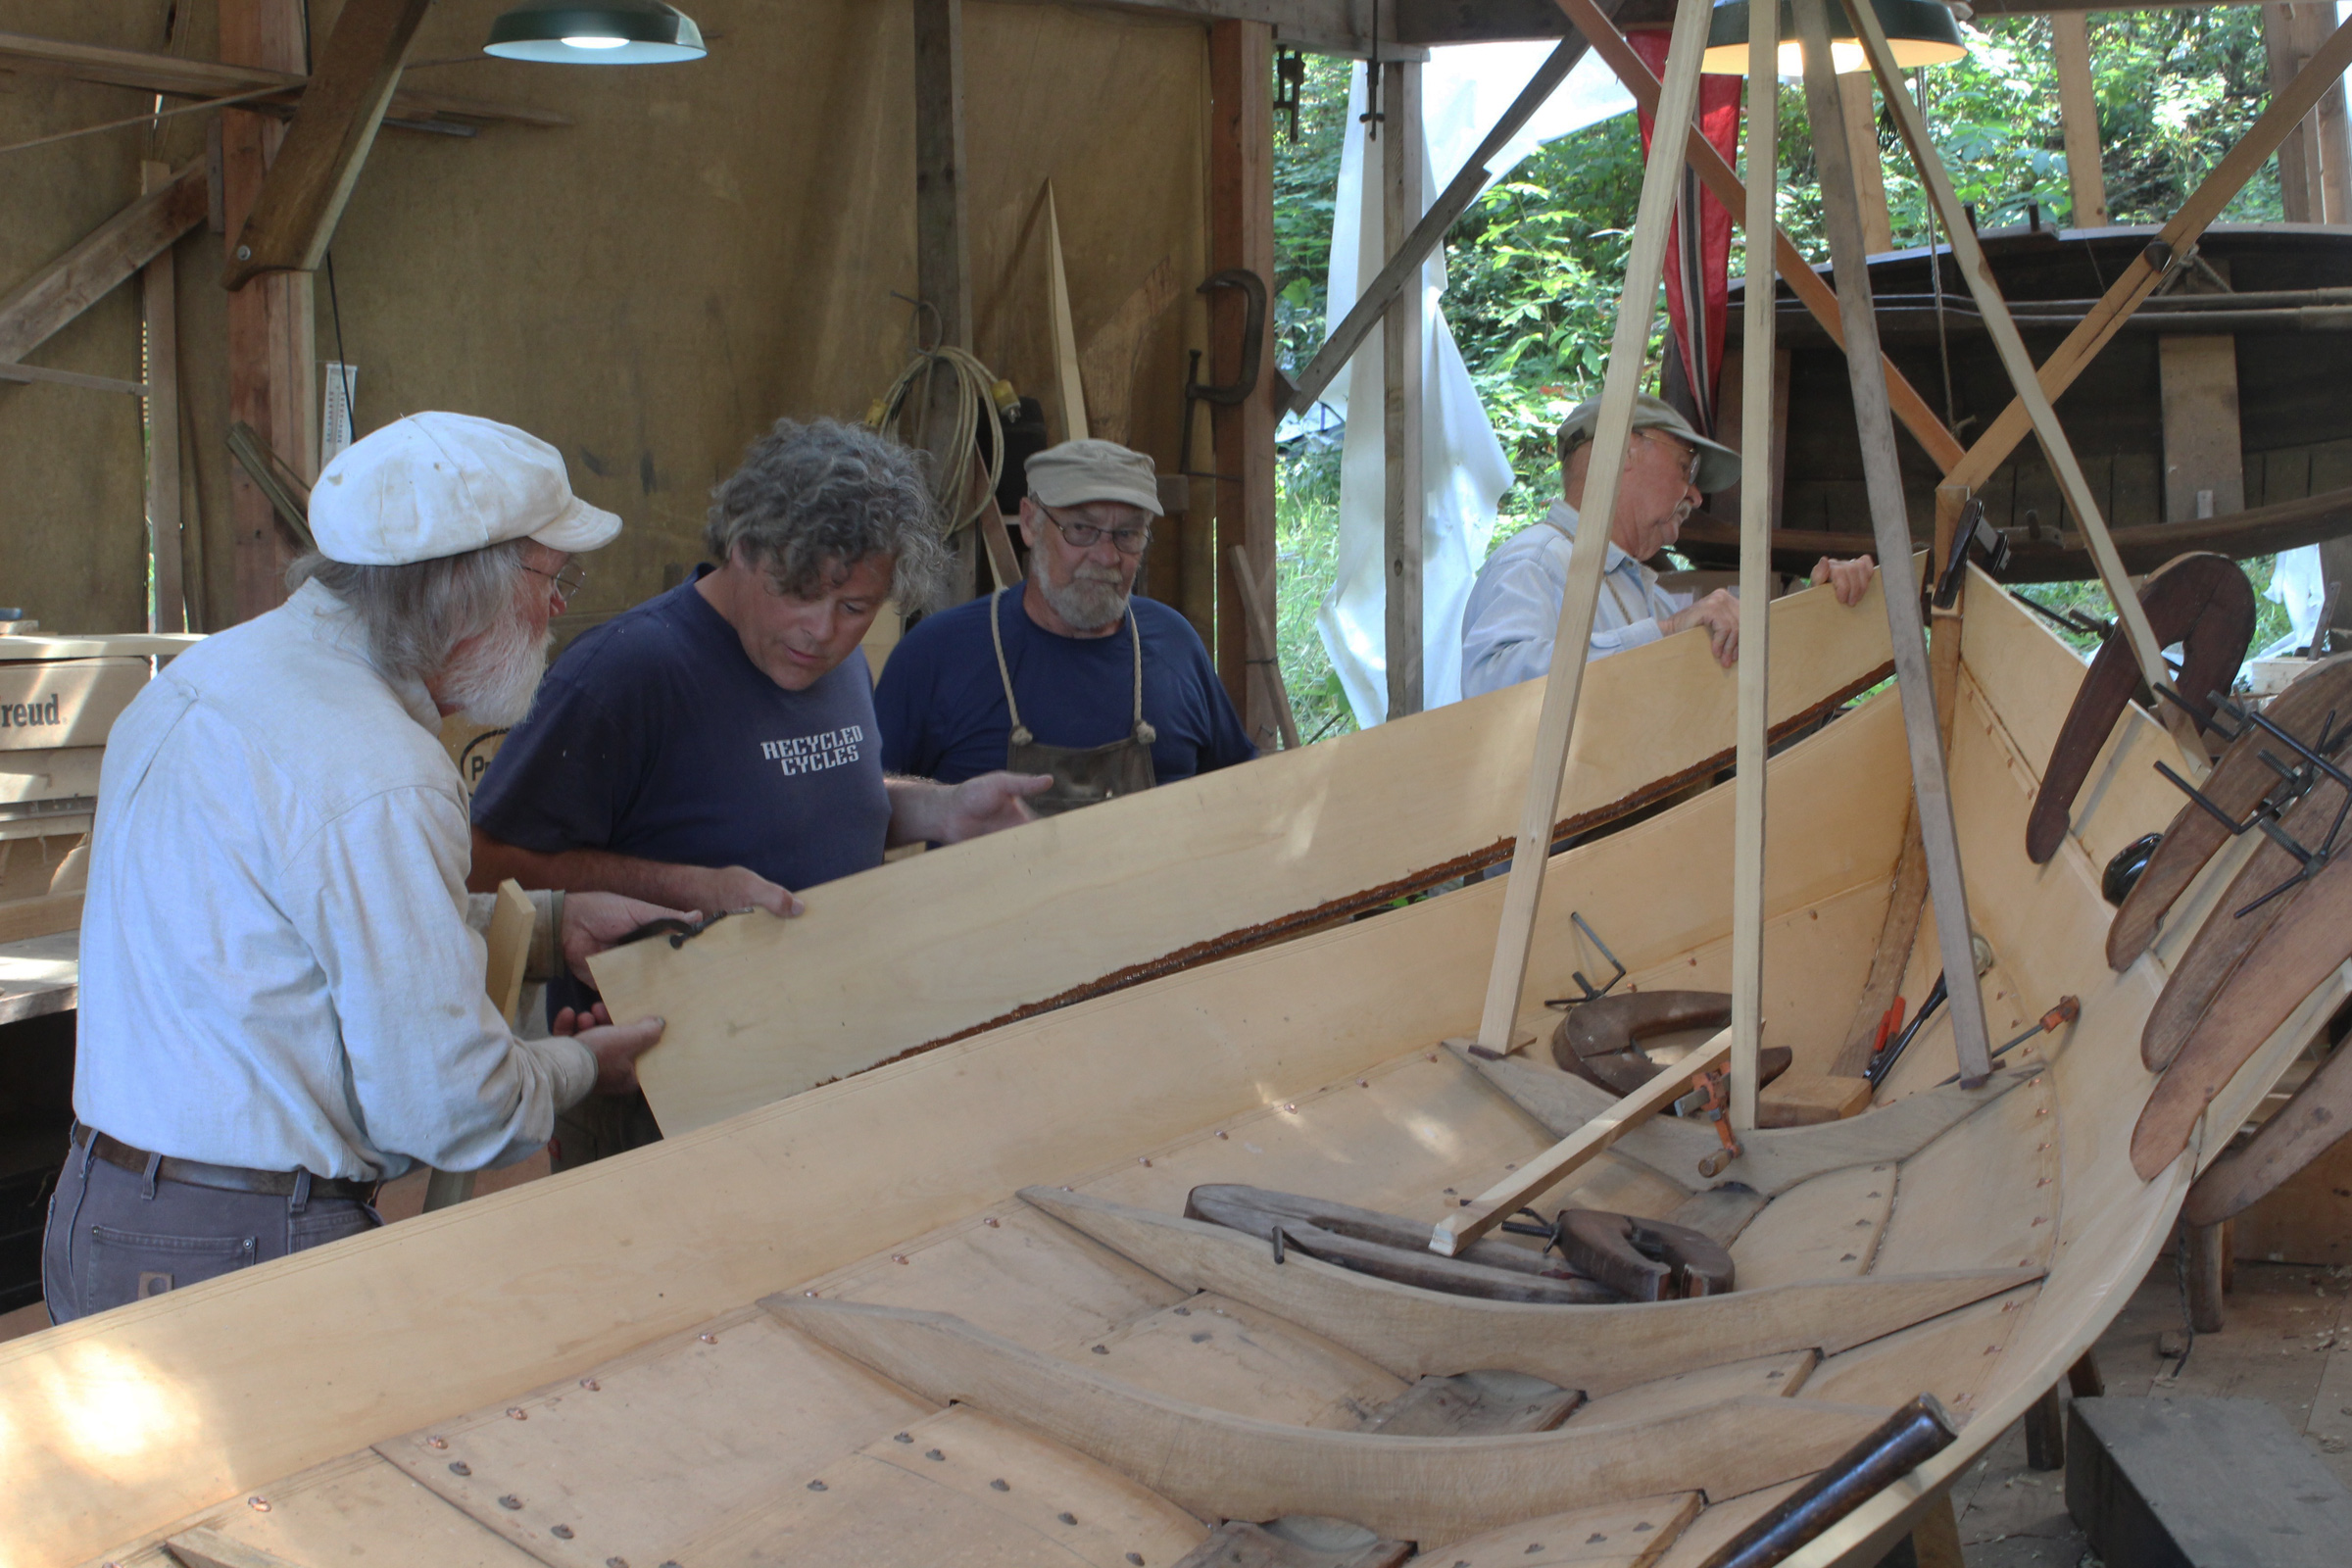
The Moosabec boat is a traditional type, but builder Peter Simpson, working with client Rick Hayden, chose plywood-lapstrake construction for her.
The original boat, which is in the collections at Mystic Seaport, was planked in the carvel manner, meaning it had a smooth hull, with planks meeting edge-to-edge. In lapstrake planking, as the name implies, the strakes, or runs of planking, overlap, and when this is done very competently, the laps visually accentuate the shape of the hull. There isn’t any reason why this boat couldn’t be built in any number of different ways, including traditional carvel or lapstrake planking; glued-lap plywood, as in Hayden’s case; or even cold-molding, that technique of using veneers of thin planking glued up in several layers. The method chosen will reflect the builder’s experience, intended uses, and preferences.
The builder better know something of what he’s about, however. This isn’t the kind of thing a new boatbuilder should undertake, at least not without having done considerable research. It might be a good idea to have at least one glued-lap boat under your belt, completed perhaps with the aid of good instruction books or maybe even full-sized patterns for parts. A hull like this, built upside down over molds, will have to be carefully lined-off to plan where the planks and overlaps will fall. Then, the planks will all have to be “spiled,” or measured one-by-one. These traditional techniques are still necessary for this type of plywood-planked construction.
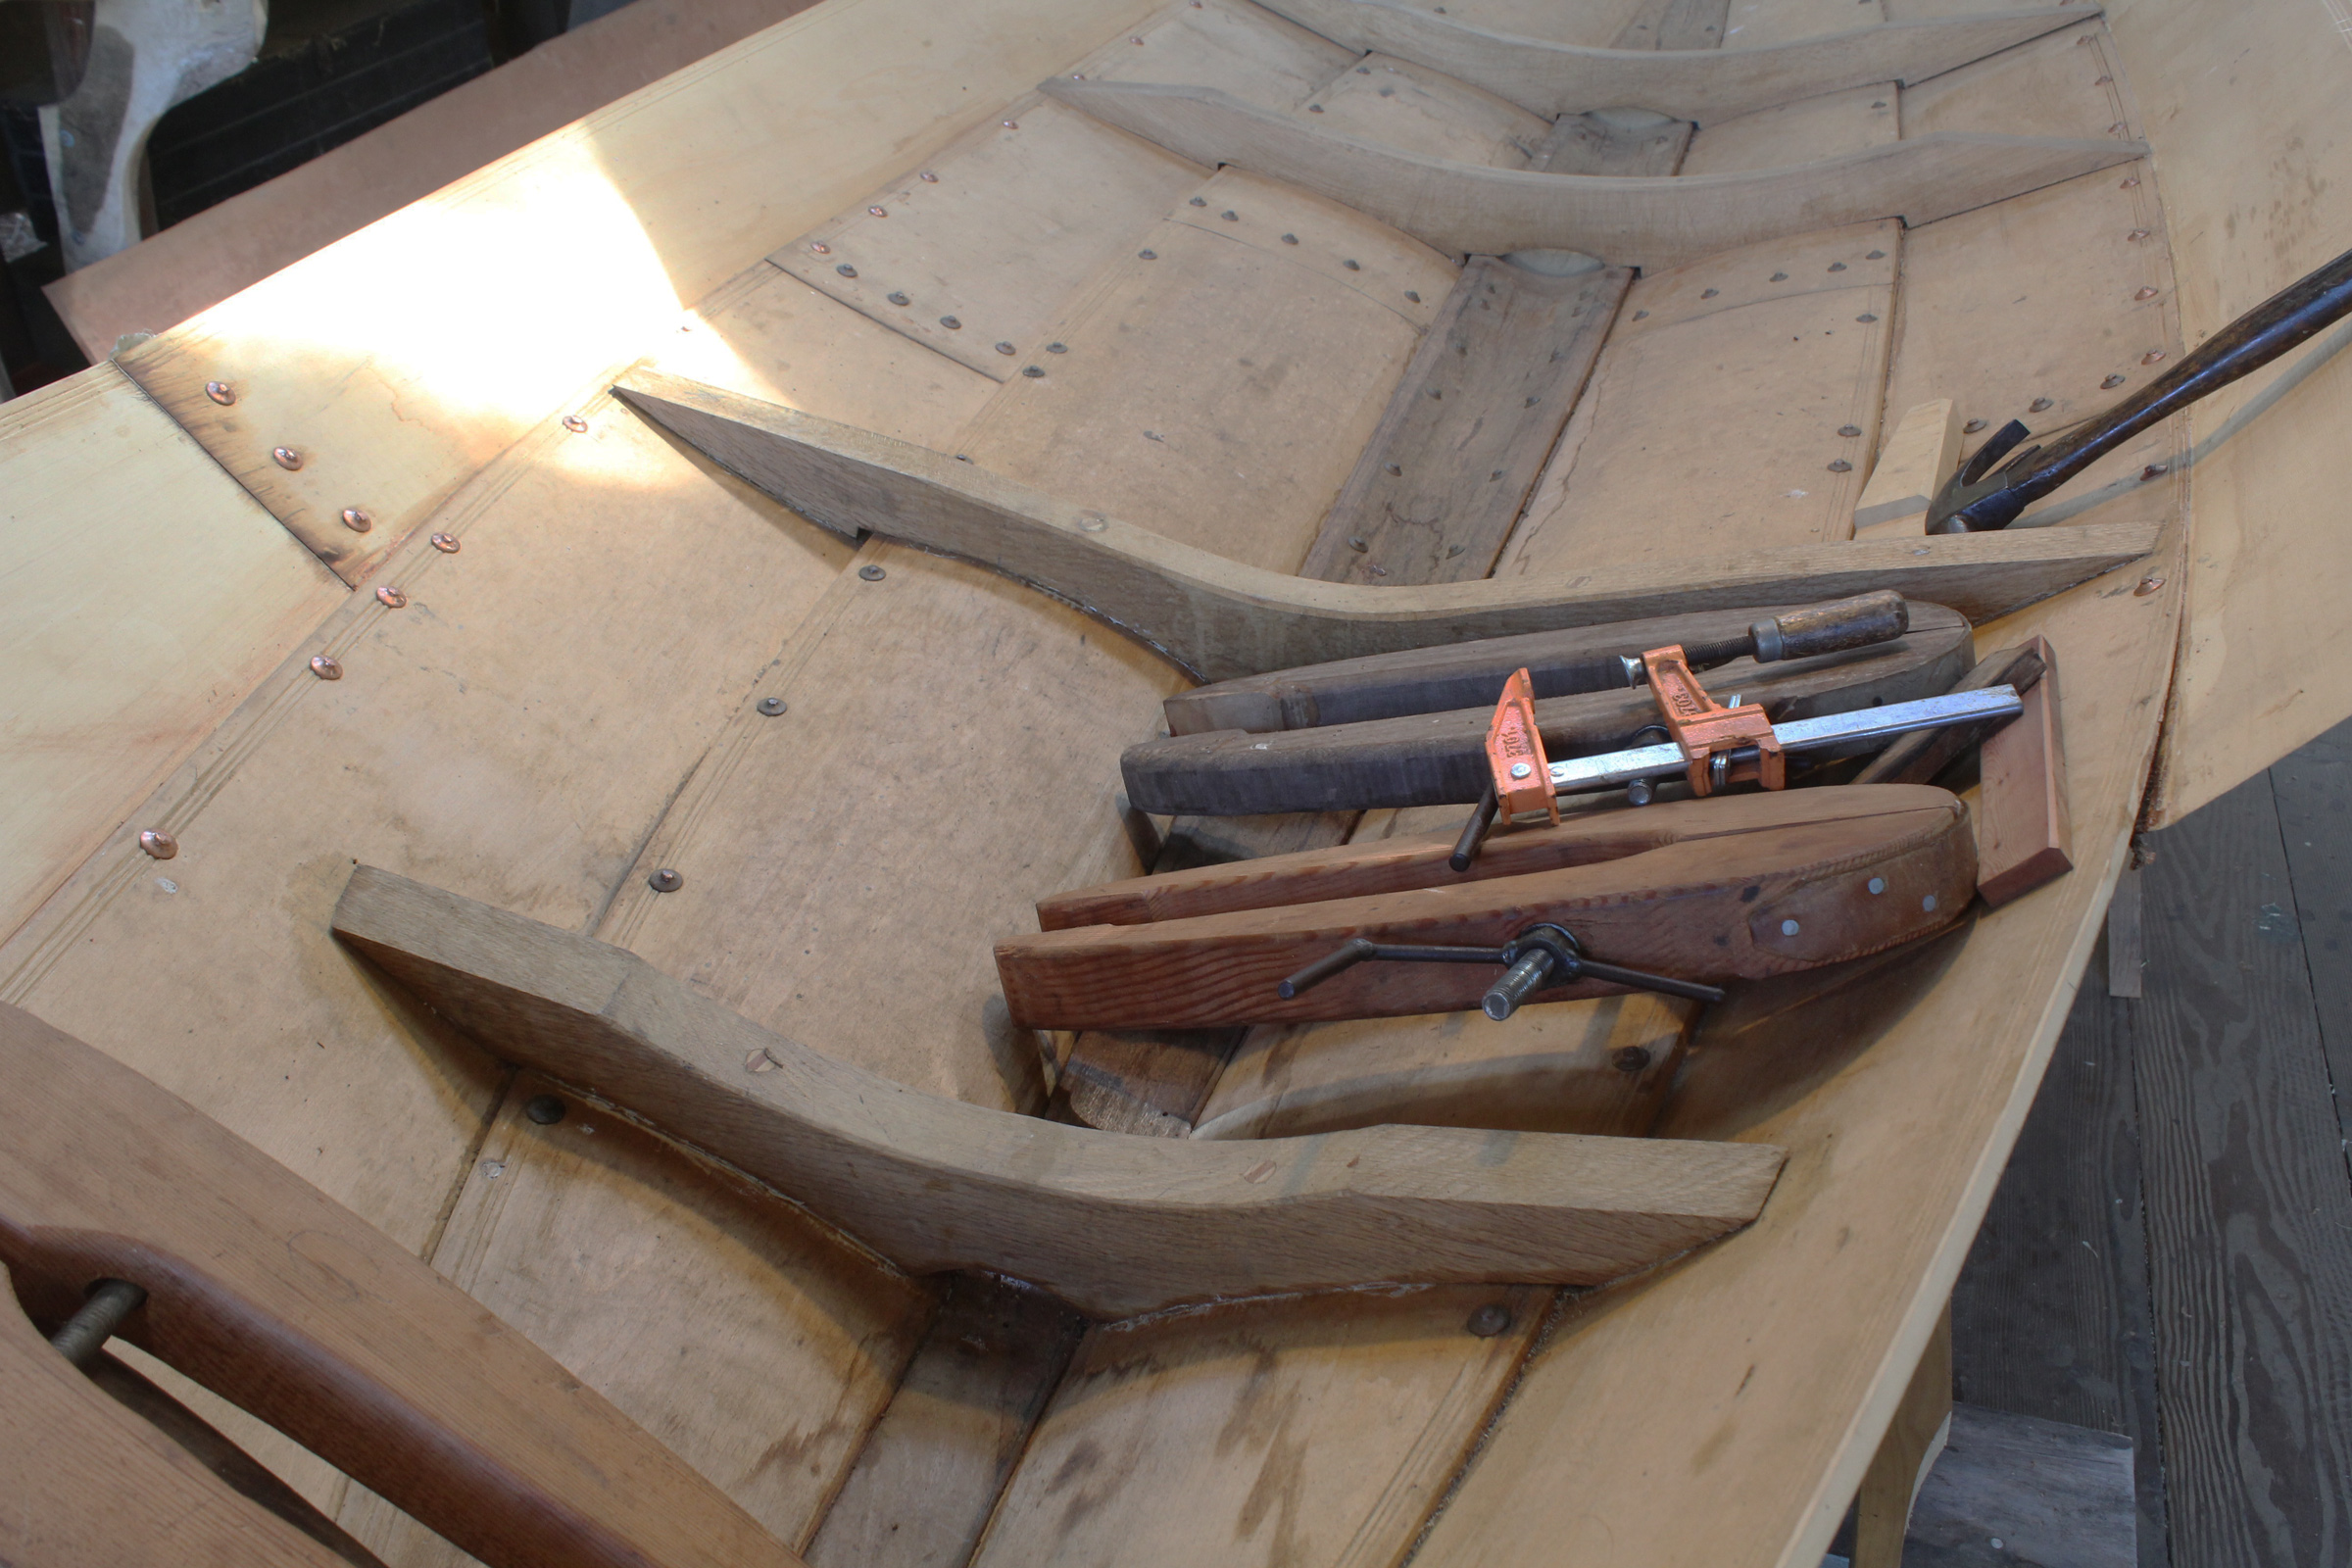
Photo by Peter Simpson
Glued-lap plywood construction makes a light boat, but many of the elements of building are as they would be with traditional lapstrake construction—including the use of multiple lap clamps.
On the other hand, it seems to me that John Gardner would have been the last person to try to frighten anyone away from taking on a boatbuilding project. Someone with good determination—which is something boatbuilders seem to have in common and in abundance— can gather the necessary skills. Gardner’s books are among the many excellent titles available for any boatbuilder’s library shelf. Better still, go watch someone like Harry Bryan of New Brunswick or Clark Poston of the International Yacht Restoration School of Newport, Rhode Island, or any number of other experienced professionals as they demonstrate boatbuilding skills at The WoodenBoat Show. If you can’t get there, look around: many other boat shows and festivals include skills demonstrations, too. One hour of listening can take all of the mythology and most of the fear out of something like spiling or cutting a stem rabbet. Also, there are lots of schools around these days that offer short courses in specific subjects, and WoodenBoat’s March/April edition always lists about 80 of them (including our own) on several continents. Spending time at boat show skills demonstrations or taking selected classes— or just talking with boatbuilders and asking questions—can save a great deal of time, and maybe even grief, later. The classes Gardner himself taught at Mystic Seaport as far back as the early 1970s were at the root of wooden boat building education, and no doubt he would have delighted in the forest of schools now branching out into specialties and widespread localities.
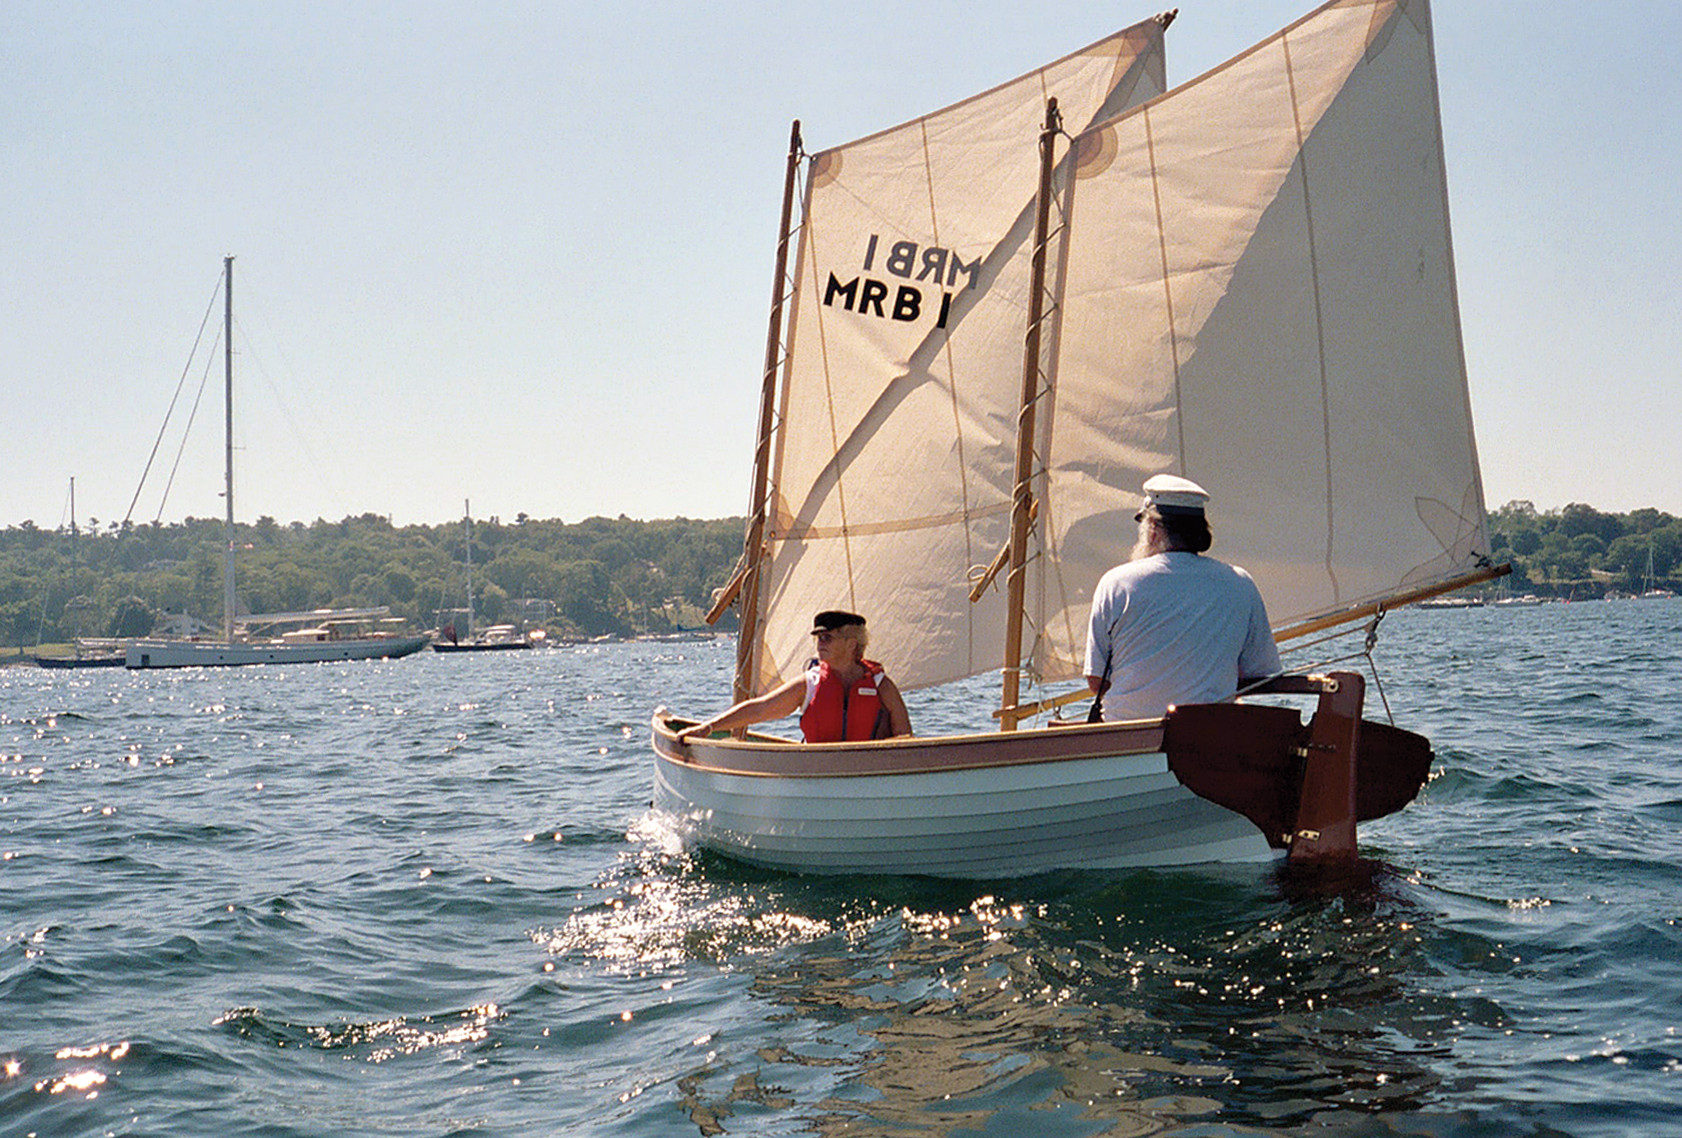
I had ample opportunities to watch the Moosabec Reach Boat under sail during WoodenBoat’s Small Reach Regatta (see page 20) in August 2007. For all-too-brief a time, I joined Rick Hayden and his friend, Sally Vernon, for a sail in fairly light airs on our final day. This boat is a centerboarder, so she comes about nicely even in a light breeze, but from all reports of her handling she can take quite a blow, as well. Hayden keeps the boat on what’s called a pond in Maine—a lake most other places—and his general feeling is that the boat could be rerigged to increase her sail area. In 15–20 knots of wind on our first day of sailing, Hayden found no reason to shorten sail, and the boat seemed comfortable with herself.
Photo by Peter Simpson
A modest sail plan makes the boat easy to handle, and in this boat any rig other than the original sprit-ketch might seem out of place.
The sprit-ketch rig is handsome and admirable. It simply looks right on this boat. Without the need for standing rigging, the setup and breakdown are easy. Brailing lines on both masts make sail control quick and simple. Coming in to a beach, you can get the centerboard up, brail the mizzen, then brail the main and ghost in on momentum. When the wind abandons you, the sails can be brailed up to clear the rig away and leave plenty of room to row. Hayden and Simpson favor having the forward oarsman face aft, as usual, and the helmsman face forward from the stern sheets and push on the oars. This gives good visibility all around—and it’s a sociable way to row, too. In a very high wind, one mast can be stowed and the other moved to a third maststep located in the forward thwart, aft of the forwardmost mast position, allowing good helm balance with the shortened rig.
The mainsail is loose-footed. The mizzen has a boom set fairly low, which can make moving from one side to the other a tight fit for the helmsman. But Simpson gave the tiller plenty of room to swing up out of the way, which saves the day. In any boat, the choreography involved in tacking or jibing takes only a few rehearsals to master.
Photo by Benjamin Mendlowitz
John Gardner of Mystic Seaport made a life study of traditional small craft, so when Andy Chase of Castine, Maine, brought him an original Moosabec Reach boat, he documented it knowing that someday later builders would carry on its rich traditions.
I love to row, but I didn’t have a chance to take the oars of the Moosabec Reach Boat during our outing. Everything about her hull form, though, with its transom stern tucking in to leave her waterline a nice, clean exit, points to easy and comfortable work on the oars. Gardner himself referred to the original boat as “surprisingly agile and easy to row,” which has been confirmed in this reconstruction.
I had never seen a Moosabec Reach Boat in the flesh before the Small Reach Regatta. This boat is the first that Hayden and Simpson had seen, too, and their sail number, MRB1, implies that there are no others, save the original. Is this possible? Can such a pretty hull and a practical boat have been overlooked for all these years despite Gardner’s high praise? If so, then the Hayden-Simpson collaboration has done John Gardner proud. May dozens more follow in her wake.
On a work-study project, Andy Chase documented his Moosabec Reach Boat for the Mystic Seaport Museum. The original boat may date to the 19th century.
Plans for the Moosabec Reach Boat are available in John Gardner’s Wooden Boats to Build and Use (Mystic Seaport, Connecticut, 1996).
Is there a boat you’d like to know more about? Have you built one that you think other Small Boats Magazine readers would enjoy? Please email us!
There’s something nearly archetypal about the Long Point skiff. This 15-footer has high sides and a flat bottom, and is driven by a small four-stroke outboard motor. “It used to be that everyone had one of these things,” said the designer, Tom Hill, as we skipped across a modest chop on Penobscot Bay in mid-August. “They ranged from Maine to the Chesapeake, and were called clamming or crabbing skiffs.”
Hill conceived his own version of such a skiff for fishing the waters around Provincetown, Massachusetts. He’d made frequent outings in an earlier, lighter skiff of his design. One day he found himself towing a big fish alongside that boat. The big fish attracted a school of sharks. The small skiff’s topsides were only 4mm thick, and the sharks were bumping the hull. That set Tom Hill to thinking about bigger boats. “To make a long story short,” he said, “we decided we needed a larger boat with higher sides.” (Hill all but defined lightweight boatbuilding in the 1980s. The cover of his book, Ultralight Boatbuilding, pictures him holding aloft a double-paddle canoe on the tips of the fingers of his right hand.)
Here’s how Hill describes the Long Point’s design brief on his web site: “I wanted a flat bottom skiff that would draw a minimum amount of water to allow us to negotiate the Pamet Harbor at low tide and also be good for fishing the flats and marshes. She also needed to be deep and have a high bow for trips offshore, 15 miles from home.”
Photo by Howard Mitchell
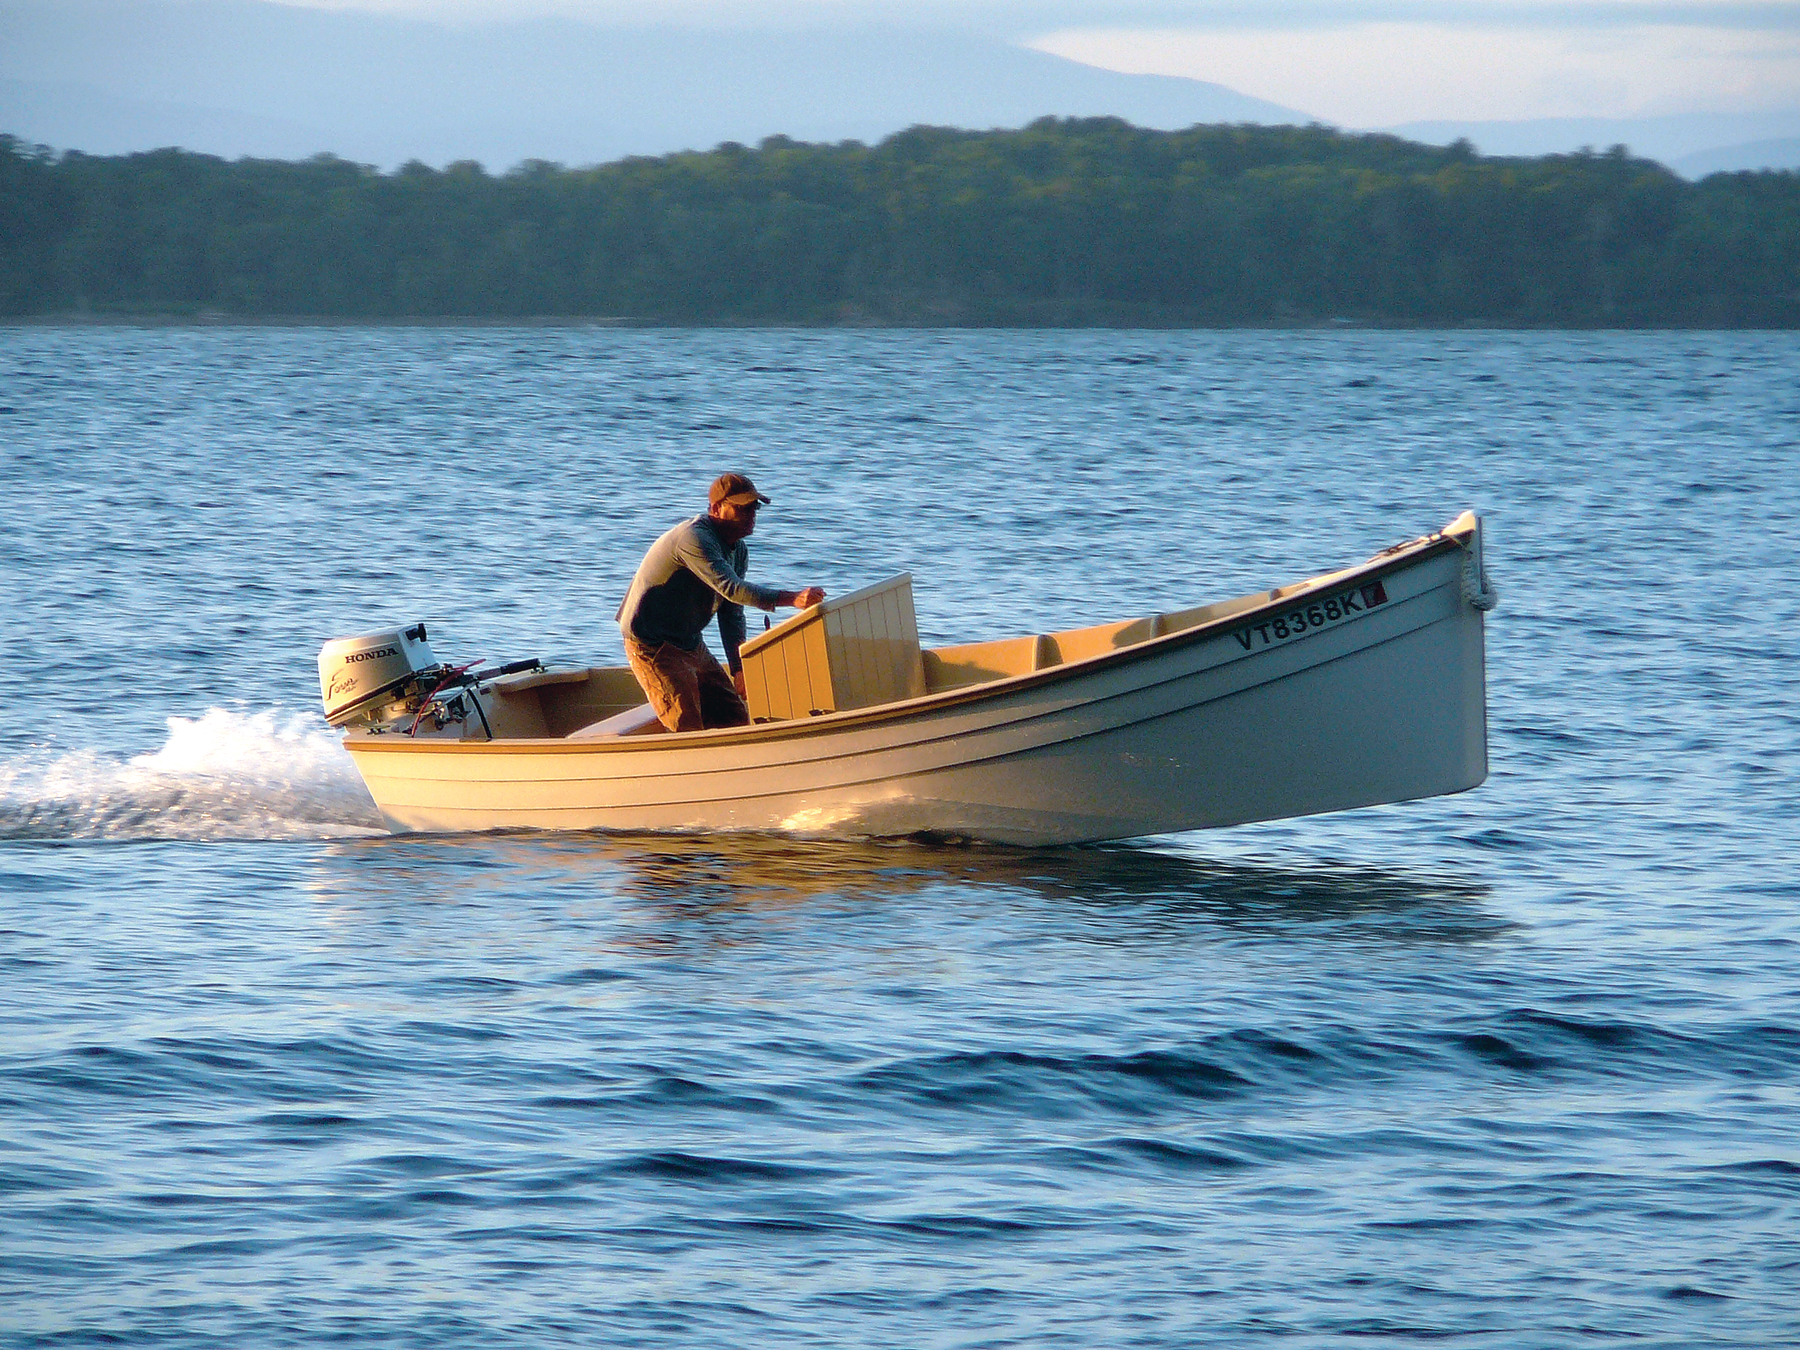
Tom Hill’s Long Point skiff is a robust derivative of once-ubiquitous working craft. With a flat, narrow bottom, she is both fast and efficient.
The designer-builder bought a used 15-hp Honda longshaft. “I couldn’t afford it, but Barbara [his partner] said she’d pay for the motor if I’d build a new boat. I knew I wanted a flat-bottomed boat because I wanted to go as fast as possible” with that minimal power, said Hill. Thus inspired, Hill made his first sketch of the boat in about 15 minutes. “Once I got the profile down, I wanted to keep the bottom as narrow as possible. And I wanted plenty of flare to keep it comfortable and dry. I then decided that I should change it—which is a mistake I often make.” He tweaked the lines and poked and prodded, but ultimately reverted back to the shape he’d developed in those first 15 minutes.
The skiff’s 11⁄2″ bottom is heavy and robust, and it feels like a sidewalk underfoot—especially in the choppy waters that are often the bane of flat-bottomed boats. The Long Point originally had a 3 ⁄ 4″ bottom. “I felt some oil-canning [deflection],” said Hill of his early trials in the boat. With that, he hauled the boat, removed the console, turned over the hull, and added another layer of 3⁄4″ plywood. He added a layer of 20-oz biaxial fiberglass cloth to this, making for a bullet—or beach—proof bottom.
“I wanted to be able to beach it,” said Hill. “We often beach for lunch. That’s another beauty of flat-bottomed boats: they beach bolt-upright.” The other beauties are speed and stability. The skiff’s ultra-heavy bottom acts as ballast. “You can step aboard standing on the rail,” said Hill.
Flat-bottomed boats are efficient, too. “I’m hard-pressed to use three gallons all day,” said Hill of a typical fishing expedition. He estimates that, with the throttle wide open, the 15-hp Honda on the Long Point skiff will burn one gallon per hour, with the boat (with just the driver) running at 20 knots. The highest speed Hill has recorded in the Long Point is 24.5 mph.
Photo by Howard Mitchell
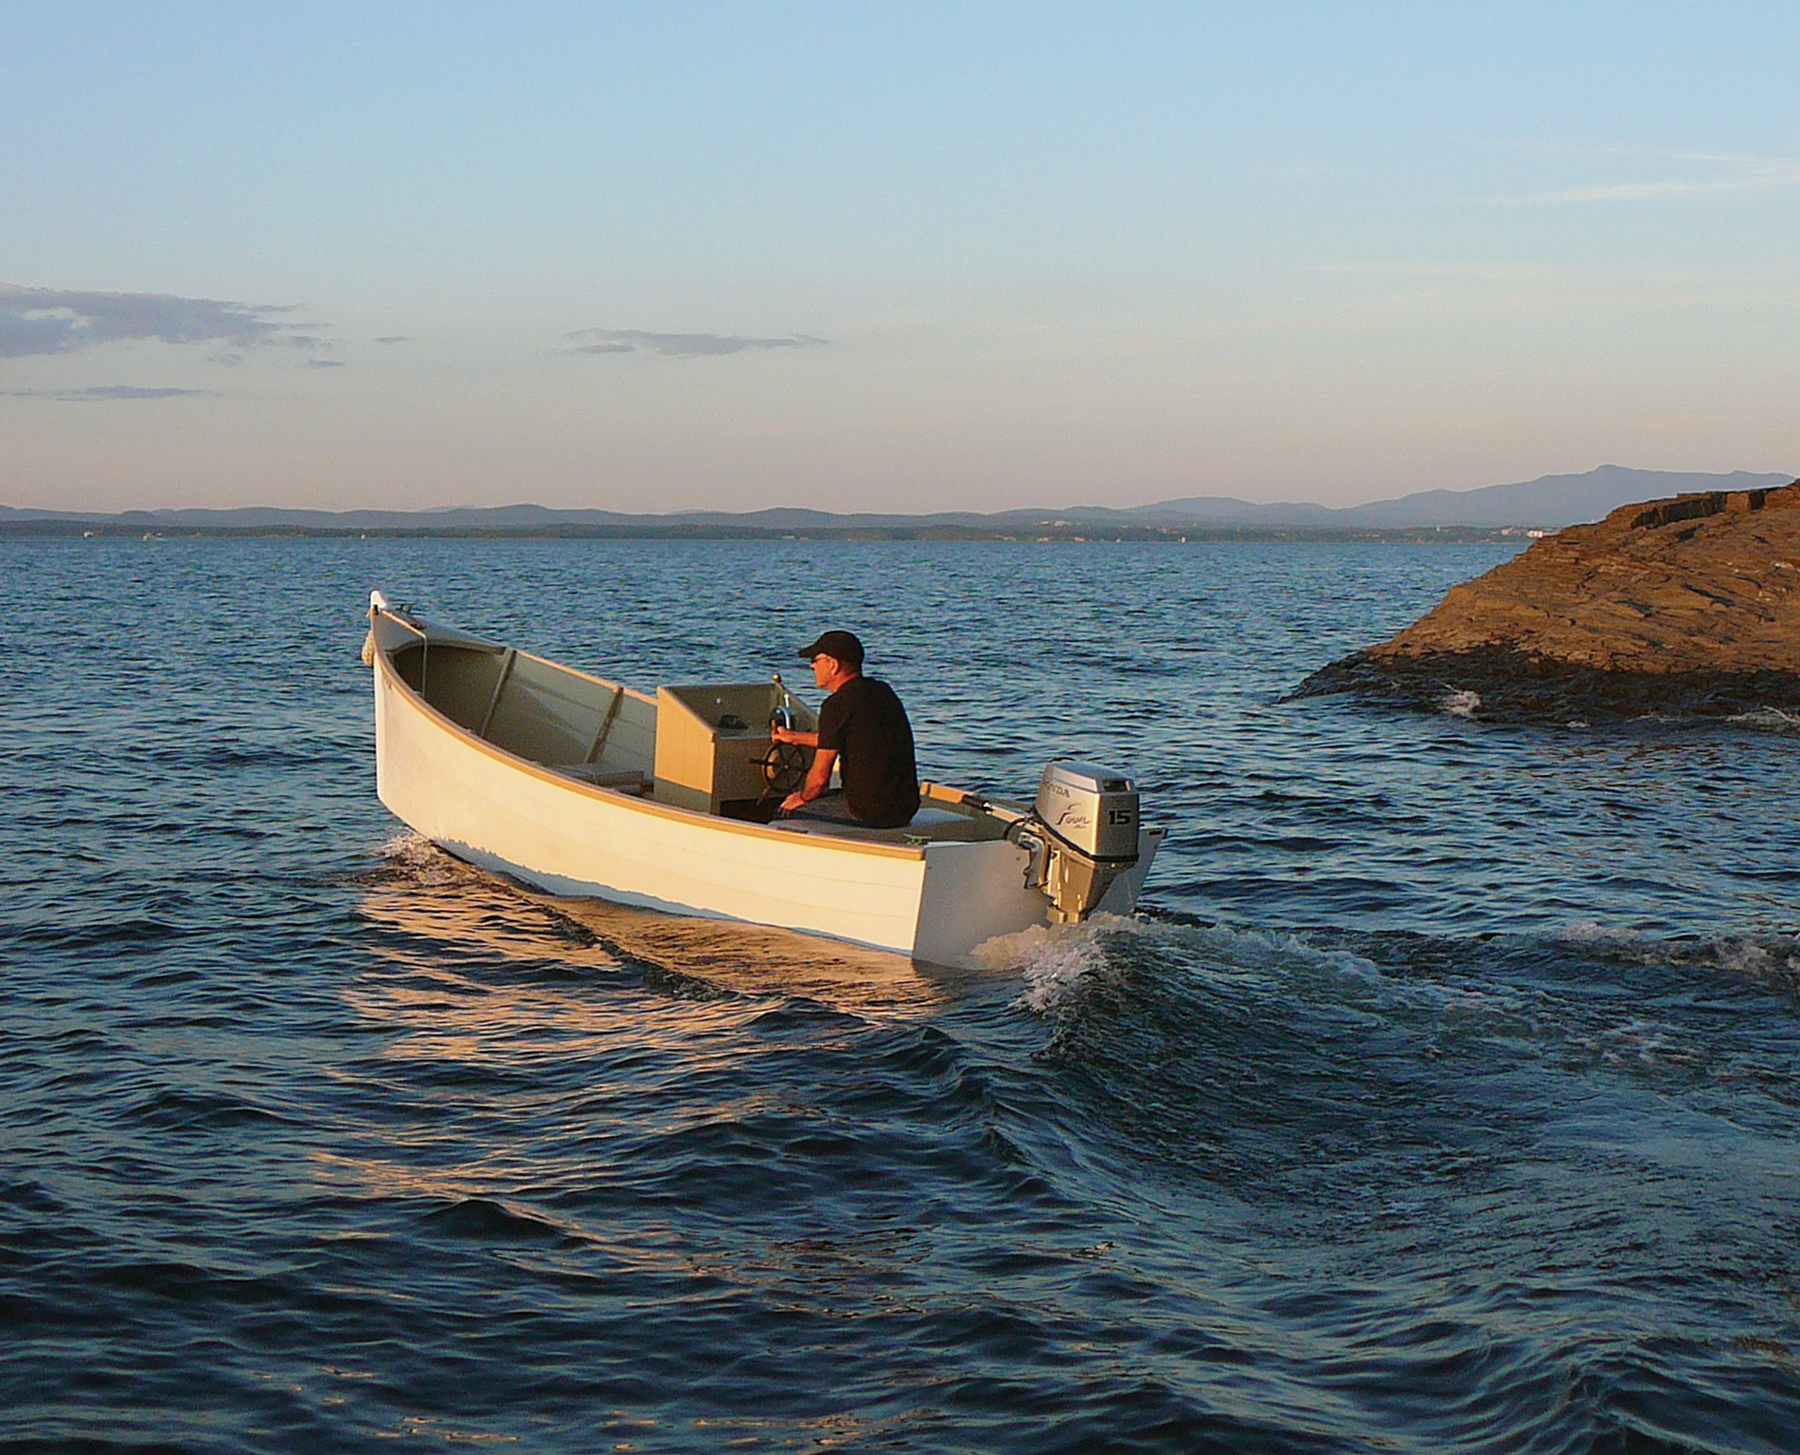
The Long Point was designed around her motor, an economical 15-hp four-stroke outboard. More power would be overkill on this boat.
The simplicity, fuel economy, and “beachability” of flat-bottomed boats comes at a cost. There’s no way around it: Such a hull pounds in a chop. But one Long Point builder reports that there is a way to sidestep this pounding— literally: Stand to one side of the console, heeling the boat a bit while under way. This presents the “V” shape of the chine, rather than the pan-flat bottom, to the waves, smoothing the ride a bit. The prudent operator, however, will also slow down in a chop, improving the comfort of the crew.
The topsides are of glued lapstrake plywood. The garboards (lowest planks) are quite wide, suggesting that the hull would come together quickly. Construction is fairly conventional. It begins with a ladder-frame strongback that’s set right on the shop floor, and molds and profiles (describing the stem and stern) are erected on this. Ribbands are bent around the molds to describe the planks, and the planking stock is hung on the boat and scribed directly from the inside; there’s no laborious transferring of offsets involved in getting the plank shapes. When the boat is planked, the chines and garboards are beveled to accept the 1 1⁄ 2″ of bottom planking, and then the bottom is fiberglassed as described above.
Photos by Matthew P. Murphy
The Long Point skiff’s layout is simple and functional. A bucket (a Coast Guard requirement) does double-duty as an anchor rode locker; the console (designer–builder Hill is at the helm) is built of V-match pine glued to a plywood backing.
Hill prefers to paint his boats while they’re still on their building jigs, and that’s what he does with the Long Point skiff. The boat is held rigid, for sanding, and it’s much easier to work on a bottom “downhanded,” rather than crawling underneath an upright boat and working overhead, like Michelangelo in the Sistine Chapel. Painting a hull while it’s still on the jig, however, will require considerable restraint of a first-time builder. There’s a near-universal urge for beginning builders to get their hulls off the molds and see them freestanding.
The completed, partially finished hull is then removed from the building jig and flipped over for framing and fitting out. The frames are installed only on the topsides, to add stiffness; the bottom is sufficiently robust to do without them. Hill used white pine for the frames of the boat we tested. The wood is lightweight and holds fastenings well. “Every ounce you can save is one less you have to drive through the water,” he said. Fitting out follows, and includes quarter knees, breasthooks, seats, console, controls, engine, tanks, etc. Building time can vary considerably, depending on the skill and pace of the builder, and level of finish.
In addition to his reputation for balancing canoes on his fingertips, Hill is known for exquisite detailing. The Long Point skiff that we trialed—the original boat, at age 11—is painted in marine enamel and looks like it just rolled out of the shop.
Hill is equally detailed in his cost estimating, and is quite confident in what one should budget for materials to build a Long Point skiff. This includes 3⁄ 4″ sapele plywood for the bottom, four sheets of similar 1⁄ 2″ material for the sides, trailer, engine, 12 coats of paint (and its associated sandpaper), controls, fuel tanks, masking tape, anchor, cushions, VHF radio, and compass. The figure is $13,000. Hill acknowledges that builders have reported substantially lower building costs, but he said that his calculation includes the finest materials and all bronze fittings and fastenings. And he questions whether those lower figures include things like masking tape and sandpaper—small items that can quietly add up.
As of the day we tested the boat, Hill had sold 123 sets of plans for the Long Point skiff. He’d sent them to all sorts of builders, but noted that the design was particularly popular with commercial fishermen, who use their skiffs as bait tenders and the like. One pair of New York City tugboat operators built one on the deck of a tug. Indeed, it’s a hardy-looking little hull, one right at home alongside its working forebears. “One of the great things,” said Hill of his experience with the design, “is the response you get from commercial boats.”
It’s been said that every boat is a compromise among speed, comfort, and efficiency. Tom Hill seems to have hit an ideal balancing point with the Long Point skiff. The boat fits her niche. “In my mind it’s perfect,” said Hill, “and I’ve had it for 11 years.”
Wide garboards and only two additional planks suggest that the hull would come together quickly. Careful attention to detail will make the boat stand out.
My penchant for Scandinavian boatbuilding techniques once prompted Matt Murphy at WoodenBoat to tell me that it seemed as though I was trying to “get in touch with my inner Viking.” But when I look around, I see that I am hardly alone. Some aesthetics—think of Japanese architecture, Italian stonework, New England barns—have universal appeal and compel respect, and the double-ended Norse boats are in that world-class league. The fact that thousand-year-old workboat designs are widely influential even for modern plywood glued-lapstrake small craft is a marvel to me. One of the very encouraging trends in this direction is that a company specializing in the production of kit boats—most of them kayaks—has turned to Scandinavia for inspiration, too.
The boat I’m thinking of is the Skerry design by John Harris at Chesapeake Light Craft. Like other companies offering prefabricated kits for lightly planked plywood boats, CLC got its start in another great boat inspired by antiquity—the kayak. The widespread success of kayaks is no surprise—no other boat gets more use, since they’re so easily transported on a cartop and can be quickly launched in a wide variety of settings. Fifteen minutes after getting home from work, you can be on the water. But even for diehard kayakers, there’s a certain appeal in having the ability to sit up in a boat and move around a bit or to carry another person and some gear that needs to be easily accessible during the trek. And, why not let the wind do the work sometimes?
Photo by Corinne Ricciardi
A simple rig and a pleasing hull shape inspired by Scandinavian types make the Chesapeake Light Craft Skerry an easy daysailer to take out for coastal explorations.
A lightweight 15′ double-ender, the Skerry fits the bill admirably for those who want such a craft but may not be confident in complex traditional construction. Builders with experience or confidence can work from plans to turn raw 6mm and 9mm plywood sheets into a boat. Others will choose to work from a CLC kit. Almost everything in the Skerry kit—exceptions being the rubrails and mast—is made of plywood shapes precut to fit neatly together in what CLC calls the LapStitch method, their variation on stitch-and-glue construction.
The result will be a boat that strikes a balance, as any boat must. This balance is between performance under sail and under oars. An excellent pulling boat rarely makes a great sailer, and a boat tricked out with sailing as its primary function rarely rows very well. The Skerry doesn’t go too far toward either extreme.
Photo by Corinne Ricciardi
Intersecting curves and planes of plywood, well filleted with epoxy, give the Skerry strength and stiffness and also provide built-in flotation forward and aft.
She has two rowing stations, so that the right fore-and-aft trim can be struck with the selection of a rowing station. With a passenger aft, the boat will behave just fine if the oarsman takes the forward rowing station. To use that thwart, however, the mast will have to be shipped. For a solo outing, the hull will balance best while rowing from the center thwart, and in that case the mast can remain stepped where it is. In light air, the boom and sprit can be pushed up to vertical, bundled with the mast, and wrapped a few times and then knotted with the sheet to get everything out of the way. In much of a breeze, it will be best to get it all down and tucked away in the boat.
In many traditional Scandinavian boat plans, the sails generally look small, and the Skerry’s spritsail follows suit. Like her forebears, she has a sail that is suitable for general conditions and is simple to use and inexpensive to install. Sail arrangements can look a bit deceptive in two-dimensional plans. The rig can look odd in the sail plan, but the sail looks better on the boat than it does in the drawings. For those who take their practicality with a liberal serving of aesthetics, CLC offers a gunter sloop option.
The Skerry sail is set quite high up the mast by design, leaving room to row even with the sail up. It’s a little too high for my eye, and I think it could come down substantially with no harm; I’d be inclined to install a brailing line (to help haul everything to vertical) to get the rig out of the way when rowing. One great advantage in flying the sail high, though, is that it offers really good visibility forward and on all sides on all points of sail. When you look at the sail plan, the sail can look too small, too, but it is big enough to drive this hull, and in much of a blow you wouldn’t want anything any bigger. There are no reefpoints on the sail, but one depowering method is to “scandalize,” or take the sprit right off and let the peak fall, making, in effect, a triangular sail. If it’s still too much power, it’s time to get the rig down.
Photo by Corinne Ricciardi
The daggerboard, tensioned with a shock cord to keep it down, is essential when sailing, but it has to be removed when rowing—and the slot plugged to avoid a wet seat. Disconnecting the very simple mainsheet leaves nothing in the way on the thwart when switching to rowing.
The Skerry’s rig is meant to be simple, and it is. There are only three lines to handle: a downhaul, a snotter, and a sheet. On the boat I sailed, the boom was fixed to the mast by a simple gooseneck. For the sprit—that wooden pole running diagonally from the mast up to the highest point, or peak, of the sail—CLC uses a simple dowel set crosswise through the sprit to form a cleat onto which a line from the peak of the sail can be made off. A similar dowel-cleat is fitted at the heel. The heel receives the “snotter,” the traditional term for a line that, in addition to providing no end of linguistic amusement, performs the critically important task of controlling the sprit’s tension. The sprit heel is slung in the snotter, which is hauled to increase tension or eased to decrease it. The downhaul provides a rudimentary way to increase or decrease luff tension a bit—sort of like a cunningham line. The sheet, of course, controls sail trim.
Anyone sailing a new Skerry for even a short length of time will probably very soon start looking for ways to improve the rig. This is one of the joys of any boat, whether built from a kit or otherwise—finding ways to take ownership of it, to make it suit your own ways. I would probably try to find some way to loosely cleat the sheet, for example—something that would allow very quick release. A cam swivel base of the type used by racing dinghies might work, as would a fairlead and a cam cleat set on the aft edge of the thwart, providing that the part of the line leading to the helmsman’s hand comes from the lower block—and remembering that the oarsman will have to work around the gear. Even a simple belaying pin might work, too—just enough to take a turn (but never belaying, and never letting your hand off the sheet) so you can give your arm some help on long, easy tacks. A pin could be easily removed when rowing. If I chose any such method, I’d strengthen the thwart where the sheet comes aboard.
Photo by Corinne Ricciardi
A small sprit rig is simple and fun to sail, with only three lines to tend: the sheet, which controls the sail trim; the snotter, which controls the tension on the sprit and therefore the relative fullness of the sail; and the downhaul, which tightens or loosens the leading edge.
If I spent most of my time solo-sailing, I would also find a way to lead the snotter—and probably the down-haul, too—aft to be within easy reach of the helmsman. The snotter, especially, is a line that demands fairly constant adjustment. Hard on the wind, it needs a lot of tension, and unless you’re willing to tolerate saggy-looking sails, it will need to be tightened with some regularity. Downwind, it will need to be eased to let the sail find its best shape. In either case, the adjustment involves a line made off to a cleat near the base of the mast. Unless you’ve got crew, you’ll have to leave the tiller to go forward to the mast to make these adjustments—or, more likely, just live with the sail shape as it is. The ability to make such adjustments without leaving the helm would greatly add to the enjoyment of solo-sailing the boat.
Ah, yes, about that tiller…. The tiller-and-yoke system, which this boat uses, is traditional to some kinds of Norse double-enders, and it’s commonly used in, for example, the Caledonia yawl and other Scandinavian-inspired boats with which Iain Oughtred has found such widespread design success. It can take some getting used to, but that is quickly accomplished. Its greatest advantage is in allowing the helmsman to find the right place for his weight, both athwartships and fore-and-aft, especially when solo-sailing and even more especially in light air. This is particularly important in a double-ender. Instead of a traditional tiller forcing you to sit one side or the other—which may put too much weight outboard in light air—you can move to the athwartships point where the boat likes it best for any given force of wind or point of sail. Steering with the yoke is simple, rather like walking arm-in-arm.
Photo by Corinne Ricciardi
The yoke tiller can seem awkward at first, but it becomes second nature after a little while.
I’d find some way to keep the tiller aboard, though. If you’re going forward to deal with that snotter, or if you’re shoving off stern-first from a beach, the tiller has a nasty habit of going overboard, and it can easily get fouled. A light line with a slippery knot loosely looped around the tiller could keep it inboard in such circumstances.
At 90 lbs, the Skerry is in the cartoppable range. Depending on the car, it could be a pretty high and awkward hoist for two people, and the rack will have to be a sturdy one. I’d much rather choose a light trailer, which would provide a great deal more freedom, especially for solo-sailing.
Harris says that by summer 2007 his company had sold about 300 Skerry kits. It’s easy to see why. It’s a pretty hull. It’s a pleasure to look especially at the curve of the stern, which I think is just right. There’s an old saying, which I’m told is of Scandinavian origin: “Line for duty; curve for beauty.” There’s a reason why I’m not alone in admiring these curves and hull forms, which are distinctly well suited to glued-lapstrake plywood construction. They look at home on the water because they are.
The original CLC Skerry rig, left, shows a fairly small sail set rather high on the mast. Its advantages are excellent visibility, only one sheet to tend in tacking, and plenty of headroom. For a more rakish-looking sailing rig, more sail area, two sheets to handle, and better windward performance—but at greater expense and a loss of simplicity—an alternative sliding gunter sloop rig, right, is available.
The Pacific Northwest is half a world away from Scandinavia, and the Vikings never reached it on their voyages to North America, but their influence on contemporary boatbuilders did. In the ‘80s, when I began to take an interest in boatbuilding, I admired the Norse-influenced boats built by two of the region’s local builders: Paul Schweiss, who had trained in Norway and was building traditional Bjorkedal boats, and David Jackson, who built the faering that my friends Ginger Cox and Tish Davis rowed the length of the Inside Passage in 1976. The current and most prolific practitioner of Norse boatbuilding here is Jay Smith, operating as Aspøya Boats in the forested fringe of Anacortes, Washington.
For the past several years, Jay has been working with the Friday Guild: Leah Kefgen, her brother Per Brekke, Matt Fahey, Vernon Lauridsen, and Torolf Torgersen. The group, which had built the geitbåt featured in our September 2016 article “Building on Tradition,” is now working on a 17′ Nordford faering. The boat was documented in The Inshore Craft of Norway, and when the drawings were made in 1943, the boat was reported to be over 100 years old. When the faering is finished, it will be Leah’s “company yacht” for Best Coast Canvas, the maker of the Verksted Apron I reviewed this past spring. I’ve been keeping up on the progress on the faering through Leah’s Patreon posts and emails, and when she and Jay invited me to see the boat, I paid a visit to the boatshop on the first Saturday in September—the Friday Guild now meets on Saturdays, but kept the name. While the crew was busy installing sections of the sheer planks, Jay gave me free rein to wander around the shops and sheds.
In a shed at the end of Jay’s driveway, an 18′ Nordfjord faering is taking shape. The workbenches on either side are built with diagonal braces that extend beyond the front edge of the top and have notches to hold planks on edge.
Leah Kefgen
The Friday Guild is composed of, from left, Torolf Torgersen, Jay Smith, Leah Kefgen, Vernon Lauridsen, Per Brekke, and, not present here, Matt Fahey.
The wool yarn that goes into the laps to make them waterproof is called siggj, pronounced soy-ch, the Faroese term that Jay picked up during his apprenticeship on the Faroe Islands. The yarn is called sisnor in Norwegian, “a loose string of animal hair, well tarred, inserted between strakes before riveting.” Leah’s mother, Kristi, spun the yarn from raw fleeces from an Oregon flock of Herdwick sheep, a breed native to northwest England, the ancestors of which may have been brought by Norse settlers in the 12th century.
Torolf applies hot bedding compound to the sheer plank section he had been working on. It’s a mix of Dolfinite, linseed oil, underwater seam compound, and pine tar. It’s heated up in its can on the hot plate. The warm mixture is easier to spread and bonds better with the wood.
The twisted wool yarn sticks to the bedding compound to be sandwiched in the lap to keep it watertight. The lap is drawn tight over the siggj with a hollow cove, cut with a special plane, called a siggjhøvil in Faroese.
Jay, left, and Friday Guild members Matt, Vern, and Torolf bring Torolf’s sheer plank to the hull to clamp and fasten it in place. Each section of planking is made by one member of the Friday Guild rather than shared among them. It’s a traditional way of doing the work: Leah mentioned that the planks of surviving Viking ships bear several different decorative treatments, called pynt, planed or scraped along the edges by the builder who made the piece.
The most hard-won shapes in the faering will be hidden when the floorboards are in place. The floor timbers here reveal the curves across the width of the garboards, carved from slabs of Alaskan yellow cedar 2″ to 3″ thick. And the top of the T-shaped keel is concave, offering the garboards parallel surfaces to better hold the rivets.
The sign on Jay’s shop door, carved by Torolf in Norwegian in runic-like characters reads: Aspøya Boats, F J Smith Boatbuilder.
The 1,000-square-foot shop is well-lit by windows along its northwest and northeast walls. There are tools, benches, and pieces of wood everywhere, but the paths around them are clear and nothing gets underfoot.
Norse boats are built upright without molds, so this device, called a båtlodd or båpasser is used to determine the lay of the planks. The small plumb bob indicates the angle, which is marked along the curved edge.
This traditional form of bailer, auskar, sitting in the shop was handsomely carved from Douglas-fir. The block it rests on has the pattern drawn on it.
The bench on the northwest wall has, among other tools, a half-dozen spokeshaves, nine marking gauges, five plumb bobs, three radius planes, 35 wooden planes, four metal planes, two back saws, and a dozen chisels and gouges. The photograph at the back of the bench is of Jay’s 37’ POLARIS, launched in 2017.
Under that bench there is a collection of cow horns. Rings cut from the open end of a horn are used with shroud needles, devices to tighten the standing rigging. The ends get used as containers for the tallow used to lubricate oar leathers.
Jay Smith
Here’s a ring of cow horn on one of the geitbåt’s shrouds.
Jay’s cluttered workbenches are not without order. Here, markers, pencils, drill bits, files, screwdrivers, bevel gauges, knives, awls, and squares are all neatly arranged. I got the feeling that there was a place for everything and in time I could find my way around the shop if I needed to find a tool. The framed picture at the back of the bench is of a street sign in western Norway, pointing the way to Aspøya, the island where Jay served as an apprentice to a master boatbuilder, Nils Ulset, in the late 1970s.
Jay made this benchmark plane during his apprenticeship in the Faroe Islands. The oak has been smoothed and polished by four decades of use.
Known in Norway as a pynthøvel (pynt=decoration; høvel=plane), the plane has a custom-made blade to cut the grooves that are the distinctive mark of boats that emerge from the Aspøya shop. The peg guides the plane along the plank edge and can be put on the other side of the blade to cut in the other direction.
The pynt can be scraped as well as planed. The tool in the foreground, a båtstrek, has the decorative pattern duplicated on either side of a central pin that follows the edge of the plank. The tool can be used in either direction to avoid creating tear-out by working against the grain.
Yet another tool for creating the plank-edge pynt is this spokeshave-like scraper. This one may be nearly a century old.
Jay found this plane at a yard sale, and didn’t know what it was designed for but couldn’t pass up buying it. The width of its sole was an exact match for the laps of the planks for VALKYRIE, his largest boatbuilding project, and with the plane’s ability to cut to the edge, it was perfect for working the gains. After a little poking around on the web, I identified the tool as a coachmaker’s plane, and this one with a narrow handle on a wider sole is a T-rabbet type.
Wooden planes that don’t have places on the workbench are nested together under them, gathering cobwebs and dust.
Wooden planking clamps and the parts to make them were scattered everywhere in the boatbuilding sheds and shop. The darker older clamp has a metal hinge; the new clamps use a leather strap instead. I didn’t see any of the cam-operated clamps that I’ve made for my shop, but I work with a small range of plank thicknesses, so the limited capacity of the cams isn’t an issue for me. Jay’s version with a threaded rod works as well on the faering’s planks as on his largest projects.
There were several old traditional oarlocks that Jay had collected in Norway. Called kjeip (or kjæppa in dialect), these are cut from a tree trunk and branch, with the trunk providing the near-vertical pin the oar pulls against and the branch fastened at the sheerline.
This kjeip or oarlock on the geitbåt, is fastened at the sheer with two trunnels that connect it to the sheer plank and the outwale. A third trunnel connects the kjeip with the sheer plank alone. The grommet holds the oar loom in place at the recovery of the stroke.
Jay’s 12″ x 7′ jointer was made by Moak Machine & Tool Company of Port Huron, Michigan. The company closed in 1992 after being in operation since 1915. The jointer was set in the east corner of the shop and long stock could be fed across the sill of the open door.
To the east of the shop is Aspøya’s biggest shed—The Pavilion. In it is VALKYRIE, a 56′ scaled-up reproduction of SKULDELEV 6, a 990-year-old 37′ fishing vessel from western Norway.
In many ways, working on the VALKYRIE is very much like working on the faering, but while it is three times longer than the Nordfjord faering, it is quite a different project because the weights involved go up by the cube of that linear scaling. The center section of the three-piece maststep, for example, is a trunk and limb from an oak tree and weighs 1,400 lbs. A similar piece, if it were part of the faering, would weigh less than 12 lbs.
The stems of VALKYRIE have “wings” that meet the broad hood ends of the planks. I carved this type of stem on my reproduction of the Gokstad faering. There were only three strakes to that boat and it took me two weeks just to figure out how to approach the stems and then the best part of a month to carve them.
The steambox at Aspøya is propane fired and feeds a large wooden box set in the midst of all of the boatbuilding shops.
I counted four sheds built to shelter the lumber milled onsite with a portable bandsaw mill.
Tucked away among cedar and fir trees, another shed protects stickered stacks of lumber.
In the shed above there were some wide planks of flawless Alaskan yellow cedar. I put the dollar bill there for scale.
Traditional boatbuilding often required grown crooks. Jay had oak crooks piled on pallets at the edge of the brambles.
The geitbåt built by the Friday Guild in 2016 rests on a trailer near the shop that housed the Nordfjord boat project.
The geitbåt’s Norwegian-style tiller is made with a right-angled crook. It has a round pin through the rudderhead to provide a vertical range of motion, while a joint on its forward end allows its lateral range.
If Jay’s stock of lumber and tools is any indication, Aspøya Boats will be producing beautiful Viking-inspired boats for a long time to come.
For several years I was a rowing coach in competitive sweep oar and sculling boats, with the simple objective of pursuing anything that would make the boat go faster. The long hours of training and intense competition finally took their toll despite the considerable rewards and enjoyment of such a robust and unique sport, but the fascination for rowing stayed with me. Now retired, with a lot more personal time available, I started a quest to find the ideal rowing expedition boat, which would take me to all of my favorite places on the water. My home town of Nelson, located at the top of the South Island of New Zealand, offers a wide variety of nearby row-cruising environments including mountain lakes, spectacular coastal bays and beaches, navigable rivers, and the nearby Marlborough Sounds.
Photographs by Lloyd Houghton
Even though the RowCruiser has protected sleeping quarters, it has a low profile, keeping windage to a minimum.
For the last three years, I have been rowing an Iain Oughtred–designed St. Ayles skiff as part of a crew of five on day outings and occasional overnight camping trips. It dawned that the ultimate touring boat would be a solo rowing boat with comfort, safety, and performance features that would allow me to take on the challenges, simplicity, and excitement of cruising on my own.
The RowCruiser from Angus Boats ticked all my boxes for a solo cruiser. Its designer, Colin Angus, knows row-cruising, having traveled thousands of miles under oars. The RowCruiser is available as plans—either full-sized paper patterns DXF files for cutting ply locally via a CNC cutter—or as a stitch-and-glue kit with pieces CNC-cut from European BS 1088 okoume plywood. Included is a 72-page manual illustrated with 29 drawings and 41 photographs, with the hours required for most of the major operations given at the start of each section. The total build time is about 80 to 100 hours.
With a draft of about 3-1/2″ at a displacement of 330 lbs, the RowCruiser can sneak into water too thin to row in.
The three pieces for the deck and the three hatch covers are cut from two sheets of 4mm plywood. The planking and the remaining parts are from six sheets of 6mm plywood. The plank sections in the kit are connected by finger joints; builders working from plans alone will butt-join sheets of plywood end-to-end before using the paper patterns. While the kit supplies all of the plywood pieces and the sheer clamps, additional pine, spruce, or fir lumber is required for the framing stringers, sliding seat, and foot brace. For the two pieces for the riggers, 3/4″ knot-free fir other “similarly strong” wood is recommended.
I bought my RowCruiser, so I don’t have first-hand knowledge of its construction, but I’ve spent many hours talking with those who have built theirs. The general consensus has been that it is a relatively easy boat to construct thanks to the excellent manuals, the simplicity of the design, and its tested and proven construction process.
The RowCruiser is an agile, roomy, safe touring boat for day tripping or serious multi-day cruising. The economy and simplicity of the design keeps all aspects of the boat and rig relatively uncomplicated. The boat has five separate flotation compartments. Inspection hatches in the side, rear, and forward compartments provide access to extra storage for small items.
The aft end of the cabin takes advantage of the widest part of the boat, providing good shoulder room for a tired rower.
The sleeping quarters in the cabin stretch over 8′ long and 4′ wide at its widest, with plenty of room for a larger-than-average crew, which I am, at 6′ 1″. Access is gained via a hatchway that can completely slide open over the foredeck. A sleeping bag, pillows, and a couple of self-inflating pads provide excellent sleeping comfort. There is plenty of space for hanging storage nets and any shelves you might choose to add. I’m presently fitting a small portable power station inside the cabin to run interior and navigation lights as well as to charge up my cell phone. Sleeping aboard initially presented some issues with condensation buildup, but the main hatch now has detachable hinges and can be wedged open to facilitate better air movement. While designed specifically as a solo boat, the RowCruiser serves equally well as a passenger-carrying day tripper, with ample room in the cabin’s open hatch area for a companion. The stern has a very large cargo compartment with a large waterproof hatch, which provides easy access to anything you might need while on the water.
The sliding seat is flanked by two of the boat’s five flotation compartments. The wooden outriggers are made of two pieces, joined with a half lap in the center.
The cockpit is equipped with a sliding seat that rolls smoothly on standard anodized aluminum tracks, which are mounted on the side buoyancy compartments. The rigger is secured to the gunwales by two machine screws with knobs. While the plans detail a simple foot brace with a 1/4″ plywood plate, slotted for straps over the toes, I made a custom stretcher with shoes that are comfortable for long periods on the water.
For transporting and launching the RowCruiser, I use a beach dolly in combination with a boat trailer. A simple pair of planked aluminum-track ramps that clip on to the flat deck facilitate the easy moving of the beach trailer on and off the road trailer.
The boat is impressively stable, even when sitting high in the water without a cruising load. It’s not at all twitchy when stepping aboard, either at the beach or from a dock, or when moving around while afloat. The boat is impressive under oars. Its speed holds up very well against other sculling boats of similar size, even much lighter wherries. A GPS gave my average cruising speed as 3 to 3.5 knots, with a “keen-to-get-there” effort achieving 4 to 4.5 knots. The boat has an overall low profile and negligible windage, helpful for holding a course with the wind on the beam. The 18′ 7″ of waterline and modest rocker provide excellent straight-line tracking, helped by the skeg-like effect created by the garboards’ fine exit and the nearly straight keel line aft. The boat maneuvers remarkably well, turning easily with little effort, while its long, straight keel keeps it tracking well and holding a tight course on long runs.
The generous freeboard of the lightly loaded boat here hints at its maximum touring load of 880 lbs.
Angus Boats offers several options for the RowCruiser. There is a high-performance ketch rig with rudder, daggerboard, and outriggers, an addition that can greatly extend the cruising range. For a rower who wants to add a bit more stability to the boat, a pair of 2’ stabilizing floats attach underneath the rowing riggers and may be helpful for rough-water rowing, and certainly helpful when hove-to and when cooking, eating, and sleeping aboard while at anchor. When not required they’ll fit in the cabin. The third option is a galley setup that accommodates a cooker and small wash basin, a deck-mounted water container, and a clamp-on dining tray for use in the cockpit. All items are of a size to be stowed below.
Overall, I have been thrilled with the Angus RowCruiser and the versatility it provides both as a roomy day tripper and multipurpose expedition boat. Quite simply it is a boat where there is a logical place for everything: sleeping, eating, gear storage, rowing, and sailing. Its enduring appeal to me is the means to explore new places on the water, landscapes and seascapes inaccessible on foot or on a larger vessel. The boat can truly inspire solo adventures.
Denis Moriarty of Nelson, New Zealand, made his career as a teacher of geography and outdoor education. Recently retired, he has a strong interest in a variety of outdoor pursuits, environmental education, and promoting the wilderness as a source of inspiration and challenge to people of all ages. He is now free to pursue his consuming interest in rowing and sailing, as well as renovating and building traditional and leading-edge small wooden boats that can be used for coastal cruising. He coaches sailing with Sailability, a community-run program for all ages of sailors with a disability and passion for sailing.
RowCruiser Particulars
[table]
Length/18’ 8.4”
Beam/44”
Volume/147.6 cu ft
Weight/125
Waterline Length/18′ 7 ”
Sprint speed/6 knots
Cruise Speed/4 knots
Maximum recommended touring load/880 lbs
[/table]
The manual and the plans for the RowCruiser are available from Angus Boats, for $149 USD for digital format with DXF files, and $189 for printed full-size patterns (for DXF files add $50). Kits are available from Small Craft Advisor for $1,999.
Is there a boat you’d like to know more about? Have you built one that you think other Small Boats Magazine readers would enjoy? Please email us!
After many years of sailing fiberglass boats, the thought of giving trees a new life in the form of a planked hull inspired me to build a wooden boat, one that would put me through the challenges of building in the traditional manner. It had to fit in my shed, and be trailerable and not too big for me to handle on my own yet still stout enough to bump off the occasional rocky shore. The workshop I had access to was limited in space—a 16-footer wouldn’t fit—so a 12-footer it was going to be.
My search on the web led me to Paul Gartside’s boats, and I quickly zoomed in on his 12′ Clinker Dinghy, Design #130, drawn for the Silva Bay Shipyard School in Gabriola, British Columbia, as an exercise in lapstrake planking. Its lines were inspiring and sweet and convinced me to buy the plans. The six pages of plans, available in hard and soft copy, include lines drawings with keel and stem details, offsets, construction drawings with scantlings and fastenings, stem lofting, construction details, and a sail plan. The skill level for building the boat, as indicated on the Gartside website, was “high,” but the plans were so detailed I wasn’t too worried. They proved to be perfect, with all the detail needed for the build, though the project requires good technical skills of both mind and hands. Whenever I had questions, advice was always available from Paul.
I had no previous boatbuilding experience, but, confident in my woodworking skills, I set to work. The lofting took six weeks and a sore back. The offsets were accurate and needed no corrections. I made the five molds from pine, sabersawed to shape.
Where possible I followed the plans’ timber recommendations, but local availability often dictated what I could use. Paul confirmed that my substitutions were acceptable but advised using his recommendations for the structural and load-bearing parts.
Photographs by Dick Bedell
Designed as an exercise in traditional lapstrake construction, the 12′ Dinghy isn’t going to be a quick build, but the richly detailed interior will never lose its appeal.
For the keel and deadwood, I used Douglas-fir as recommended. Red cedar was indicated for the planking, but I decided on mahogany for the first nine strakes—it was in good supply—with a Sitka spruce sheerstrake for contrast. The swirling grain of the mahogany tended to tear out when planing, but in the finished boat it would be tougher and will not bruise like red cedar or spruce. The thwart knees, quarter knees, and breasthook are called out in the plans as oak crooks or laminations. I laminated mine: mahogany for the thwart knees and oak for the others. The frames are steam-bent oak, 3/4″ x 7/16″ on 5-1/2″ centers, and copper-riveted. The remaining structural parts—mast bench, and ribs—were made from oak. The thwarts are specified as red cedar; I used mahogany. The 5/16″ red-cedar floorboards (mine are yellow pine) are made in removable panels. I made the transom from 1″x9″ tongue-and-groove mahogany in lieu of the splined oak called for.
While the stem, as drawn, is three pieces of oak, fastened with copper rod and calls for a grown knee, I made mine from 26 laminates of 4mm mahogany. After I initially tried to epoxy the whole 26 layers of 4mm mahogany for the stem in one go, and realized it was a mistake, Paul suggested gluing up batches of eight laminates. I had initially steamed the laminates to bend them over the form in small batches when they were dry and I tried to glue them together. My shop-made jig was deflecting and my clamps did not have the power to pull the laminates into shape. I laminated them with epoxy, successfully, in batches of eight.
The span at the locks of the aft rowing station will take a pair of 9′ oars, long enough to provide the boat with ample rowing power.
The transom and stem get pinned to the keel with 3/16″ copper rod peened over bronze washers. When the backbone is complete it is set right-side up on an elevated beam, and the five molds are braced over it, spaced 24” apart. There is a note on the plan for setting the molds on a ladder frame for building the hull upside down.
I bought mahogany for the planking in 15′ lengths of 9″ x 3/8″ stock. Trying to shape, fit, and rivet the garboards to the apron was difficult for me working alone, especially building the boat right way up and trying to keep the bucking iron flat against the rivet head while peening the other end. The first few strakes needed steaming to facilitate the twist for the planks’ forward ends to meet the stem rabbet.
Two options are offered for the gunwale: an inwale and outwale sandwiching the sheer planks and frame heads (my choice), and a single-piece gunwale, placed flat and steam-bent, and screwed inside the sheer planks above cut-down frame heads. The latter leaves the top of the sheerstrake unprotected, but includes an oak rubrail beneath it.
The dinghy trims nicely with the rower at the forward station and a passenger in the stern.
I made the mast, boom, and yard—all tapered and rounded—of pine. The balanced lug sail has a battened leech and two reefs. In correspondence from Paul, he mentioned that the sailing rig was a later addition to the design. The daggerboard now included in the plans is glued up from sections of vertical grain Douglas-fir and its trunk is braced by a 4-1/4″-wide piece of oak that connects it to the thwarts. Paul also recently noted: “If used as a sailing dinghy, it would be better with a pivoting centerboard rather than the daggerboard shown—daggerboards are not the easiest things to live with.”
After 22 months and 1,800 copper nails, my Clinker Dinghy, christened MAGGIE MAY, was finished and ready to be launched in the local canal. The unstayed mast and the balanced lug rig are very easy to set up, and it takes just 20 minutes to get ready to sail. The dinghy proved easy to launch by floating on and off the trailer on the slipway.
The boat has good stability and builds confidence. It makes a very good fly-fishing platform. The sternsheets and thwarts are more than enough for the crew with plenty of room to stretch your legs. The dinghy has a second rowing station for balancing the boat when taking a passenger in the sternsheets. I’ve rowed on lakes with good control and maneuverability, and the dinghy glides gracefully along with a whisper—a pleasant experience. Although they’re not in the plans, I’ll add foot braces for more powerful rowing. On a day with a wind at Force 2 to 3, I rowed out of harbor with the wind on the nose and surrounded by rocks. The boat plowed through a wave about 3′ high, which didn’t bother it at all—its weight ensures it can take a wave with ease and not lose a lot of speed—and the two of us on board remained dry.
The balanced lugsail has an area of 68 sq ft.
Performance under sail is excellent downwind, even in light airs. To weather, the dinghy will sail closehauled at about 45 degrees to the wind. It carries no weather helm and the rudder response is excellent, turning on an English sixpence.
While the use of an outboard motor is not noted in the plans, I fitted a transom bracket to port of the rudder for a short-shaft 2-hp, four-stroke outboard. It proved adequate to push it along, although extra crew or ballast is required to keep the bow down. Having the outboard along is comforting when I’m sailing offshore.
The sailing rig is well balanced, requiring only a light touch on the tiller.
Building the Clinker Dinghy was a little daunting at first and I wondered if I’d taken on more than I could chew, but I persevered and got the needed boost when the boat began to take shape and passers-by would remark on how good it looked. Ultimately, it was a satisfying build. While the skill set required is medium to high, the plans are easy to follow and well laid out with clear, instructive details—and under way, the dinghy just as satisfying and very relaxing. What better way is there to spend your time?
Patrick McGowan is retired and lives in Manchester, England. Most of his sailing with MAGGIE MAY is done on the Cumbrian lakes, with occasional trips out to sea along the Welsh coast.
For the past three decades that I’ve sailed, rowed, and paddled Seattle’s Salish Sea, Bainbridge Island has always been the far shore, an inconspicuous streak drained of color by distance and an easily overlooked divider between the gunmetal-gray waters of Puget Sound and the serrated skyline of the Olympic Mountains. I’d made the 4-1/2-mile crossing to the island a half dozen times, always to the same cove on the northern end, and the only glimpses I’d ever had of its west side were from a highway bridge crossing from the mainland.
I’d lost most of the summer, first to the pandemic and then to the miasma of wildfire smoke that blanketed Seattle, and didn’t want to let August slip away without at least a short cruise. I launched ALISON, the Caledonia Yawl I built in 2005, from the ramp at Shilshole Bay Marina. The tide was out and if there was a breeze blowing, it wasn’t dipping down over the breakwater and seawall. The dock was so low that any wind there might have been was skipping past. I didn’t bother setting the masts, but lowered the outboard into its well, assuming I’d make the crossing to Bainbridge under power.
With the outboard at an idle, I steered around the tide-blackened boulders at the end of the breakwater, throttled up, and steered for Port Madison on the north end of the island, which was 5 miles distant and only barely distinct from the paler blue-green wooded mainland beyond it. As I brought the outboard up to 2/3 throttle, the rattling in ALISON’s hull smoothed. A few hundred yards out from the breakwater, the water was only rippled, without a discernible pattern, so I stopped the motor and coasted to a stop. The breeze I had felt on my face was only the air I was moving through. A few hundred yards farther into the Sound, the water was darker, and the apparent wind had shifted slightly to port. I stopped again and the breeze remained as ALISON slowed.
Roger Siebert
.
I set the mizzen mast, with its sail wrapped around it, into its partner, and pushed the clew out with the sprit. Sheeted in tight, it pushed the stern away and brought the bow into the wind. I lifted the main mast, a solid 17′ stick of laminated spruce, until it stood like a caber in front of me, then lifted it over the foredeck and lowered it to its step. I unrolled the lugsail, tied the halyard to the yard and the downhaul to the boom, then hauled it up. Backwinded, the wall of white cloth pressed against my face. I cleated the halyard, snugged the downhaul and moved aft to push the boom out against the wind to force the bow over. ALISON surged forward. The outboard was still in the well, which was now noisy with sloshing water. The prop was still engaged and was being dragged through the water fast enough to crank the motor. I shifted to neutral and stopped the clicking coming from under the cowling. ALISON was sailing well with only an occasional touch on the tiller from me, so I lifted the outboard from its well. With that drag removed, I could feel the yawl accelerate and the water in the now empty well got noisier and spilled over the top and into the cockpit. I lowered the outboard into its chocks alongside the well. The plug for the well was close at hand under one of the removeable bench tops, and after I pressed it into position, ALISON stopped plowing up water.
Settled in at the helm, I was making good speed, 5.2 knots by the GPS. The shore I’d left was shrinking with distance, with the rows of white and pale gray masts behind the breakwater clustered together like the teeth of a comb. Seattle is a city of trees and hills, so on land I can never see very far into the distance. In the middle of the Sound, the land all around it bows low, and the sky fills the perimeter. People living in prairies might take seeing so much sky for granted. For me, being surrounded by a faraway horizon feels like being freed from a cage I didn’t know I was in.
The clouds overhead were all of a piece and lumpy like old cotton batting, with just a few bits of blue showing where it had been worn through. The daylight filtering through the clouds cast no shadows in the boat.
Photographs by the author
With a southerly blowing straight up the Sound, I had a good reaching breeze and broke out the mizzen staysail for the crossing.
With the big balanced lugsail on the downwind side of the mast, it was taking its best shape and drawing well, even as the wind faded until the boat was barely heeling. I pulled the mizzen staysail out its bag, hoisted its peak on the mizzen’s unused halyard, and pulled the pennant on the clew tight around the jamb cleat on the front of the ’midship bench. Settled in with her full hamper, ALISON picked up to 4-1/2 knots.
The mizzen is rather finicky about the wind, and behaves itself only on a beam reach, so I steered a course that would bring me to Bainbridge Island well south of Port Madison. A single dolphin passed by me heading east, showing only the tight curve of its pale gray back just once, and didn’t surface again within sight. When I got within a mile of the island, I dropped the mizzen, spread the main out to starboard, and ran northward.
With the bow aimed right at Point Monroe, the crossing is almost over.
Point Monroe, the northeast cusp of Bainbridge, is a curved sandspit bearing beach houses, crowded nearly eave-to-eave. Rounding a few dozen yards from shore, I lost most of the wind and ALISON crept along toward the turn south around the next point, a half-mile away. The sunlight found a gap in the clouds and in the still air, its heat stung my bare arms. I pulled my red-and-white umbrella out of the bow and hid in its shade.
The turn coming up would head me south into Agate Passage, the mile-long, 300-yard-wide connection between Port Madison, a bay actually, and Port Orchard, a 150-mile-long inlet. I’d have the flood tide in my favor, but the wind would likely be on the nose. Rather than risk tacking in a strong current, I set the outboard back in its well, started it up and got moving, letting the sails luff.
I approached the bridge at Agate Passage under power with the current in my favor. I passed under the bridge just 15 minutes before the peak of the flood, which would hit 5.8 knots.
The wind in the passage was fluky and I ducked under the boom as it bounced from side to side. Motoring at less than half throttle, but with the flood pushing, I closed the distance to the bridge quickly. I steered for the east side of the channel and raced by the concrete pillar where the water was humped up on its upstream edge. I passed through, uneventfully, 25 minutes after the projected peak flow of 5.9 knots.
While the water under the bridge was whorled but without waves, the racing current plowing under a southerly with a good 4 miles of fetch kicked a short, steep chop that sounded like a river tumbling over a rocky bed. I steered west to the smoother water along the Bainbridge Island shore. The wind was good, worth a beat to windward, so I pulled the outboard and plugged the well. I made good speed, but then I noticed the island was slipping by in the wrong direction. I was in a back eddy and moving north. I came about and over the bow saw the ink-blue current sweeping by carrying a string of marker buoys south, speeding in the direction I wanted to go. I connected the dots of the dozen or more buoys to a 20′ motor vessel with a red hull—a research vessel—retrieving buoys upstream from me. When ALISON plowed into the chop, she slipped sideways as fast as she was sailing forward. About ¾ mile from the bridge, the pilings and nets of a fish pen seemed to be motoring northward. The current occupied only a narrow swath and as soon as I sailed out of it into smoother water, the remaining buoys, riding the current, passed by me; coming about and reentering the chop I could catch up.
The current carried me almost two miles from the bridge. With the wind steady at around 12 knots I kept tacking; ALISON heeled, burying the leeward sheer plank until the outwale was just clear of the water. My chart and sunglasses slipped across the bench and dropped into the footwell. The top third of the mainsail was quivering forcefully, making the hull vibrate beneath me. The centerboard began to hum. My grip on the mainsheet was weakening, in spite of its twofold purchase, so I wrapped a turn around a tholepin on the windward rail.
I held a starboard tack and headed for Manzanita Bay. The wind eased in the lee of Arrow Point and I coasted across the mouth of the bay and into a narrow branch on its east side. ALISON ghosted around the first bend and when she ran out of wind, I crawled to the bow and paddled, with my toes nearly touching the water. Cedar and madrone leaned out from the banks and the branches of a maple brushed against the peak of the mainsail, spilling some brown, autumn-curled leaves into the water. Some of them fell so lightly on the water that they didn’t break the surface tension; the water curled up around them as a pillow does around a sleeper’s head.
The little arm of Manzanita Bay meanders inland for about a half mile. A few dozen yards beyond this bend, I was turned back by shallow water.
I paddled around another U-turn bend and when the bottom showed itself just beneath the water’s surface I turned around. When there was enough depth, I placed the outboard in the well and motored out. Where this winding inlet joined Manzanita Bay proper, houses were perched on the banks above me. One had a wooden deck with a railing; one of the posts had a whirligig on it with four toy catboats chasing each other in circles in the breeze, perpetually running, reaching, luffing, tacking, reaching, running.
While there was a bit of a breeze blowing from the head of the bay, it was time to call it a day and drop the anchor. I motored south to the glassy-smooth water at the end of the ¾-mile-long bay. I killed the motor and left the helm to get ready to anchor. There was no sign of any wind on the water, but the tall mainsail was evidently catching a breeze higher up, enough to start ALISON sailing in circles, running, reaching, luffing, tacking, reaching, running. Each loop was a few yards downwind from the last one; I held the depth sounder over the side and when I had 20′ of water, I lowered the anchor.
Not long after I got the canopy set up over the main cockpit, it began to rain in earnest.
A moment later the water was speckled with drops of a light rain, so I quickly pulled the dodger up off the forward part of the cockpit and set the two PVC-pipe hoops and the canopy over the aft part. ALISON was buttoned up just before a heavy, soaking rain began pelting the covers.
Buttoned up against the rain, the cockpit is ready for kitchen duty.
The galley box I’d built for the boat was in a storage unit, so I made a new smaller one around a compact butane/propane stove.
I set the galley box, which had been upside down and serving as a thwart during the day, in the main cockpit, opened it up and got the stove set up. For dinner I sautéed wild-caught shrimp with sliced celery and fingerling potatoes.
The dodger forward covers the forward end of the cockpit, creating a protected, if snug, sleeping space, but I prefer spreading out in the main cockpit.
To convert the cockpit from kitchen to bedroom, I lifted the floorboards and set them on ledges, even with the benches. That gave me a sleeping platform almost as big as a queen-size bed, with plenty of room for a large, 4″-thick, self-inflating sleeping pad. With one unzipped rectangular sleeping bag as a bottom sheet, two more for covers, and my pillow from home, I’d be as comfortable as I’d be in my own bed.
It didn’t take long to fall asleep. The water was perfectly still, so the masts weren’t thumping in their partners and there wasn’t even any gurgling from the laps at the waterline. I woke once in the middle of the night and peeked out. ALISON hadn’t moved. The two sailboats anchored in the middle of the bay had their masthead lights on, each reflected as a single bright dot on the water. I wagged the rudder to check for luminescence in the water. Pale-blue sparkles swirled from the blade like sparks from a dying campfire stirred with a stick.
I motored to the mouth of Manzanita Bay with the covers still up. I took them down before heading out into Port Orchard.
I was up a little after 6 a.m., well rested. I retrieved the anchor and, with the canopy and dodger still up in case I wanted to have breakfast early, motored to the mouth of the bay. Conditions on Port Orchard looked fair, without too much wind, so I took the covers down, tidied up, and got underway.
I stayed close to shore along evergreen woods from Agate Point to the driftwood-strewn spit of Battle Point. To the southwest, 1-1/4 miles across Port Orchard, was the marina at Brownsville. The wind was blowing from the south at 10 knots, so the crossing was a bit bouncy, but the waves were not yet whitecapping.
The ebb was pulling Burke Bay down, but the current flowing under the bridge wasn’t running too fast to motor through.
I circled around to the back of the marina to a concrete bridge that carried a road over the 30′-wide inlet to Burke Bay, a backwater that I’d noticed on the chart. The bridge might have been high enough for the mizzen mast to clear it, but not the main. I lowered both into the cockpit.
The ebb approaching the middle of a 12′ drop and the strong current under the bridge was more than I wanted to row against, so I set the motor in the well and powered through. The flow created a tongue of smooth water creased along its edges by the ripples bent around barnacle-covered rocks. I looked over the side as I passed under the bridge and saw more rocks, which would make the passage even narrower. I wouldn’t have much time in the bay.
I was ashore here in Burke Bay only a few minutes, but I could see the water level dropping.
The chart showed Burke would dry with the tide and with a minus 0.9 low, the water would be gone well before low slack. I gauged the depth by the slope of the exposed muddy banks on either side. Just shy of ¼ mile in, the color of the water turned suddenly from dark green to a mottled brown. I’d run out of depth and killed the motor to save the prop from hitting the bottom. I scrambled to the bow with the paddle and turned the boat around. I stopped at a muddy outcropping covered with broken bricks and stepped off the bow. At the water’s edge there was a bone—half a rib, turned the color of turmeric—and the top of a brown glass bottle with PUREX molded on it.
I shoved off into deep water and motored back to the bridge. It was clear that the water had dropped in the short time since I’d first passed through. There would have been enough room to row through then, but not now. I lined up on the middle of the swift-flowing water, twisted the throttle for a burst of speed, then killed the engine to protect the prop. ALISON sped under the bridge, missed two barely submerged piling stumps, and came through without a bump.
The entrance to Fletcher Bay is narrow and the ebb created a strong current. I arrived at about 9:30, halfway through a falling tide that would make the gap impassable.
I hadn’t had breakfast yet and thought Fletcher Bay, on the Bainbridge side of Port Orchard, would offer a quiet spot. The mile-long crossing, out of the lee south of Brownsville, was in waves taken on the beam, making ALISON roll uncomfortably. The water was smoother in the crease in of Bainbridge’s shoreline that led to the opening to the bay. The mouth of the bay is nearly closed off by a gravel spit, with steep banks rising 10’ above the water. Inside the bay I kept running into shell-strewn shoals, turning the motor off, and paddling from the cockpit until I found the channel running along the inside edge of the spit. The narrow bay was straight enough to see its half-mile length from one end to the other.
The inner reaches of Fletcher Bay were woodsy and quiet, and would have made a good place to stop for breakfast, but all of this water would soon be gone.
At the east end, the houses were estates, really, with sprawling groomed lawns and gardens, and the deeper I motored in, the more modest the houses were and surrounded by tangled stands of second growth red cedar, with those closest to the water leaning on curved trunks out over the muddy intertidal slopes. At the head of the bay, a willow, bright green against the dark conifers, had its hanging branches shorn off straight at the high-tide line. I peeked in the motorwell and saw broken clam shells just inches below the propeller. If I stayed even for a quick breakfast, I’d get trapped.
Bucking a stiff headwind running the length of Port Orchard, I was glad not to be sailing, and to have chosen the Caledonia Yawl for this trip. Neither of my other cruising boats are as well suited to plowing into a chop.
I made my way back out to Port Orchard and worked south along the shore in waves that had grown enough in the past few hours to cause ALISON to pound into the troughs and send white spray flying to either side. In the distance, about 4 miles away where the inlet veers to the west, a gray scrim of rain and mist fell to the water, concealing the land. The clouds above me were soon doing the same and before my clothes could get damp, I put on my cagoule. Covered from head to ankle against wind and water, I immediately felt warmer.
I finally stopped in the lee of the point at Crystal Springs and cooked a late breakfast of scrambled eggs. When I made the new galley box I hadn’t realized it was too small for my plastic plates, so I had to cut one down to size. When the galley was packed up with its lid on, I’d flip it upside down and use it as my seat for motoring.
Two miles from Fletcher I stopped in the lee of a small point at Crystal Springs. There were a half-dozen mooring buoys there, all unoccupied, so I slipped the painter through the eye of one and led the end back to the boat so I could make a quick departure if someone decided to chase me away. The rain had stopped and I took advantage of the break in the weather to take my cagoule off and make my late breakfast: sautéed purple potato slices and scrambled eggs with toasted banana bread for dessert. While I was eating I spotted a yellow kayak fighting to windward a quarter mile or more from shore. That worried me so I took a look with my binoculars. It was a tandem sit-on-top kayak and both paddlers were wearing PFDs. If they were to capsize, they wouldn’t have as hard a time rescuing themselves as they would have with a sit-inside kayak. Well beyond the kayak I saw a single white sail, moving quite fast, and guessed it might be a high-performance sailer like a Laser.
As FREE SPIRIT towed the capsized daysailer toward shore, I followed, picking up gear that floated free.
When I finished breakfast, I filled the outboard’s integral tank and headed out. The wind had strengthened to about 20 knots and the waves were about 2′ high. The little 2-1/2-horse outboard was doing well and I kept the speed low just to ease the pounding. I scanned the water for the kayakers and didn’t see them, but I did see a large sloop a quarter mile offshore, without any sails up, going nowhere. As I got closer I could see it had an inflatable dinghy in tow and there was a small capsized boat nearby with its centerboard and rudder sticking straight up. I veered away from shore and pounded through the waves to help.
The canoe-stern sailboat was FREE SPIRT, skippered by a man with a full gray beard and wearing a black watch cap. A man of about 40 was in the dinghy and I figured out he was the sailor. The sailboat, BUNNY WHALER, was a 17′ Boston Whaler Harpoon, now in tow, still bottom side up. I asked the FREE SPIRIT skipper if I could help. He said he would go as close to shore as he could, and I might be needed to take over from there.
I trailed BUNNY WHALER. A sail bag popped up behind her so I came alongside it to bring it aboard. With water in all of the folds of what appeared to be a spinnaker, it was far too heavy to pull out of the water without pushing ALISON’s rail dangerously close to the water, especially while broadside to the waves. I kept a steady pull on the bag until enough water drained out to bring it aboard. I motored back toward BUNNY WHALER, and picked up a coil of orange braided line that had drifted free.
FREE SPIRIT turned into the wind about 100′ from shore and her skipper dropped the anchor. The Harpoon sailor pulled his boat close and crawled across its bottom to the centerboard. The boat didn’t budge. He tried several times to right her without success while drifting downwind. To keep ALISON from wallowing in the trough, I motored in slow circles, gunning the motor each time I had to turn her bow into the wind.
After FREE SPIRIT anchored in water deep enough to be safe, the sailor tried to right his boat, but it wouldn’t budge. One of his neighbors came out in a dinghy to lend a hand.
BUNNY WHALER drifted close enough for its skipper to swim the painter to it and tie her off. He swam to shore and I delivered the flotsam I’d collected to a man who had launched a dinghy from the beach to help. The capsized boat would wait for whatever resources she’d need to be righted.
I rounded Point White and entered the narrowest part of Rich Passage just as a ferry was charging through.
I continued on my way south toward Point White, and the rain started again. Just after I put my cagoule back on, it came hammering down, hitting so hard that more drops of salt water splashed up for every raindrop that fell, turning the surface a glittering bright silver. The wooded hillside on the far shore of Rich Passage became an indistinct gray shadow behind the scrim of falling rain. I rounded the point just as a ferry, the 360′ CHIMACUM, emerged from the murk, crowding the narrowest part of Rich Passage. I hugged the north shore until it passed, then steered out to take its wake on before it steepened in the shallows.
The cloudburst was short-lived, but it had poured enough rain into the cockpit to rise above the floorboards. I pumped it out as I headed east, angling across the pass to Point Glover. There the engine quit. I was close enough to the south shore that I didn’t have to row to get clear of the ferry route, so I let ALISON drift as I tried to get the motor started again. There was still gas in the tank, but I topped it off, and kept pulling the starter cord. In the 15 years that I’d had the outboard, it had only failed once, after ethanol-laced gas gummed up the carburetor. After cleaning it, I fed it on ethanol-free fuel. The motor had served reliably for so many years that I wasn’t angry at its failure, just saddened that I might have asked too much of it for too long. I let it rest for a few minutes, pulled the cord again, and it coughed to life.
As I made the turn around the south end of Bainbridge, there was much more room on Puget Sound to share with the ferries.
I crossed back to the Bainbridge Island side of Rich Passage and rounded the south end of the island. Houses crowded the shoreline, set between a 200′-high, evergreen-covered bluff and the tide-bared foreshore, carpeted with seaweed in dark shades of green and brown.
From the entrance to Blakely Harbor, I got a good view of Seattle’s Space Needle rising beyond Blakely Rock. The first time I saw the Space Needle, I was 9 and visiting the World’s Fair with my family in 1962.
As I worked my way along the broad, mile-long, arc of Bainbridge’s south shore, the crenellated silhouette of Seattle’s downtown skyline, 8 miles distant, slipped out from behind the island’s blunt slope of trees and houses. At Restoration Point, I turned westward into Blakely Harbor, a mile-long notch flanked with gentle slopes patched with sand and shingle. I nosed ALISON ashore next to an arched steel footbridge the spanned an opening in what looked like a breakwater of piled boulders.
The concrete building at the west end of the inlet once was the power plant for a lumber mill that operated here.
The gap was flanked by masonry walls of irregular rectangular stones, stained black with age. The tops of the walls were left jagged by missing stones, but at one time must have supported a different bridge. At the end of the 19th century, Port Blakely was a very busy place, with the Hall Brothers Shipyard on the north shore producing scores of sailing ships that carried cargo along the country’s West Coast, and here where I’d come ashore was the Port Blakely Mill Company’s lumber mill, in its day the largest in the world. At that time, the gap between the stone walls led to the pond that kept the logs that would be dragged into the sawmill.
The last part of Blakely Harbor to be filled by the flood tide is a pond that was once used by the lumber mill to hold logs. When I arrived, I could have steeped across it on the stones.
The pond, at least as it was when I arrived, was a muddy basin about 200 yards wide, dotted with green patches of seaweed and with the stumps of pilings that had rotted down to within inches of the mud. Just beyond the beach where I tethered ALISON was a concrete building splashed from top to bottom with overlapping layers of graffiti.
The interior of the building is entirely covered with spray-painted graffiti. The concrete walls have been painted so many times that they are smooth and glossy.
The blocky structure had been built in 1907 to generate power for the lumber mill. I crawled into the building through an opening below floor level and pulled myself up into the interior. The walls were covered with spray paint in so many layers that the concrete had lost its texture and was slick and shiny. The mix of different styles, from illegible tags to works of skilled artists, was oddly appealing.
By the time I was ready to leave, the gap feeding the pond was a deep, fast-flowing stream.
I’d poked a stick in the sand at the water’s edge when I’d landed; it was now nearly submerged by 1’ of water. And where there had been a trickle of water sifting through the rocks under the footbridge there was now a surging uninterrupted stream flooding into the pond. It was too early in the day to stop for the night so I motored out of Blakely and headed north 1-1/2 miles to a second inlet, Eagle Harbor.
The entrance to the harbor is protected by a peninsula surrounded by a corrugated wall of interlocking steel-sheet pilings that makes it look like a fortress. The land it surrounds was the site of the Pacific Creosoting Company, established there in 1905. It treated logs with the coal-tar based preservative until 1988, when the Environmental Protection Agency forced its closure and eventually designated it as a Superfund cleanup site. There was a well-protected sand beach at the base of the steel wall on the harbor side of the peninsula, but I opted to pass it by.
Eagle Harbor is home to the Washington State Ferry Maintenance Facility and a half-dozen ferries were parked there.
A half mile farther into the harbor, a half-dozen white and green Washington State ferries were clustered around the maintenance facility on the north shore, and beyond them, recreational boats filled a crowded marina and swung on paid buoys in mid-channel. The south shore bristled with private piers and docks. I was worried that I wouldn’t find a quiet place where it would be OK for me to anchor for the night.
I followed a bend to the northwest to a second bend, to the southwest, where a marker buoy in mid-channel had a sign wrapped around it reading “Aquatic Conservancy No Motoring.” I pulled the outboard from its well, tapped two sets of thole pins in their sockets, and snapped the halves of my sectional oars together. The shores of Eagle Harbor’s western extremity were lined with low-lying brush and grass, and the few houses there were set back from the water. It would have been the perfect place to anchor, but I didn’t want to impose upon the sanctuary, so after a half mile of rowing brought me to the end, I turned around and retreated.
I discovered at breakfast that a whole portobello mushroom was more than I could eat at a single sitting.
I found a gap between private piers on the south side, less than a half mile outside of the conservancy area. A single-masted trimaran was already anchored here, a liveaboard, judging by the tender trailing from the stern and the tarps over the cockpit and bags of gear on the foredeck. I dropped my anchor between the trimaran and shore. It was only about 5 p.m., but I was getting hungry and set up the galley before covering the cockpit for the night. The sun was still bright, but lowering itself above the treetops at the crest of the land, and casting beveled shadows of ALISON’s sheer across the cockpit. For dinner I sautéed cubed mahi-mahi fillets with diced onions and purple potato slices. I hadn’t had lunch after my late breakfast and the meal went down well, served hot in a bowl that I’d turned from a locust windfall.
With the dodger and canopy up, I turned in early. I woke once in the night. The boat was still and I heard only the distant croak of a heron and the whisper of a car driving by on a road hidden behind the trees. The sky was black and starless but the motorwell provided a window on constellations of blinking bioluminescence.
It began to rain at exactly 5:33 a.m., the moment I picked up my phone to check the time. It had been utterly quiet up to that moment and the rain didn’t sneak in with a few soft taps on the canopy, but spilled out of the sky all at once. I sat up in bed and looked out over the bow through the gap between the canopy and the dodger. There was only the hint of dawn and the landscape was drawn in shades of ash and soot. There were eight pinpoints of light above the water, five on shore and two on mastheads high over the water. The nearest treetops were intricate silhouettes while those a small fraction of a mile away were so indistinct that I mistook the ridge they were on for the edge of an advancing fog bank. I laid back down, pulled the still warm sleeping bags over me, and listened to the quiet plinking of rainwater dripping from the canopy into the cove. The wind picked up, rippling the water and the wavelets striking the boat’s laps made sounds like water gurgling out of an upended bottle.
Worried about making the crossing back to the Seattle side, I listened to the weather radio. Winds would be light from the north, building in the afternoon. I didn’t want to take a chance on a rough crossing, so I got dressed and started packing gear for the trip home. I had about an hour before sunrise, so I cooked a quick breakfast of scrambled eggs with chopped onion and the cap of a portobello mushroom. I just swished the dishes in the motorwell before packing the galley box and flipping it over to rest between the benches.
After spending a quiet night anchored between the trimaran and the shoreside house, I headed for home.
The rain had stopped by the time I was ready to get underway, and I could take the covers down, retrieve the anchor, and get the motor warmed up. I took it slow past the marina in case anyone was sleeping aboard one of the anchored boats, and sped up when I reached the harbor mouth. A ferry from Seattle was arriving, following the channel from the south, so I veered from my westerly course to let it pass.
The rays of the morning sun framed the Seattle skyline as I motored out of Eagle Harbor.
There was no wind ruffling Puget Sound and the water was bright and alive with syrupy smooth ripples. The morning sun had risen over downtown Seattle, its position behind the clouds made evident by the shafts of light radiating from clearings over the city. The water to ALISON’s port side was silver with the reflections of the overcast sky and streaked with indigo where the backs of the waves were just steep enough to peer into the depths of the Sound. On the starboard side the water painted the sky’s broad palette of grays in crisp-edged concentric ovals that winked open and closed.
The morning calm provided the best opportunity to make the crossing back to the Seattle side, leaving Bainbridge Island astern.
The outboard purred smoothly, pushing ALISON north at over 5 knots along Bainbridge Island’s west coast. When I reached Yeomalt Point, I veered to the northeast and set the bow on West Point. Halfway into the 3 ¼-mile crossing I passed through an eddyline littered with driftwood and seaweed picked up off the beaches by the week’s exceptionally high spring tides. I felt the hull shake and the engine suddenly labored, dropping the pitch of its purring. I hit the kill switch and looked down into the motorwell. The motor shaft had T-boned a wrist-thick piece of driftwood dead center and had held it there. I pushed it away and it floated up on ALISON’s port side.
While I had been underway, I had been focused on getting back home and, if not for the driftwood, I would have missed taking in the view from the middle of the Sound. Before I got underway again, I stood up and looked at its thin perimeter of land, pressed flat against the horizon by its own weight. Standing in my boat, hovering between the buoyant water and the weightless sky, I felt so much lighter than I had all year.
Christopher Cunningham is the editor of Small Boats Magazine. He has been building and cruising in small boats since 1978.
If you have an interesting story to tell about your adventures with a small boat, please email us a brief outline and a few photos.
Those of us who have built boats know that boats are complex shapes and joining their various parts can be a tricky business. Back in 1981, I discovered a good way to make accurate fits in Roger Simpson’s article, “The Incredible Joggle Stick,” in WoodenBoat No. 39.
Simpson cut the device he called a joggle stick from 1/4″ plywood, giving one side a sawtooth edge with “teeth” about 2-1/2″ apart and the “gullets” numbered. To create a pattern for a cabin bulkhead that would fit the inside curve of the hull he’d built, he clamped a piece of plywood as a “tally board,” which would serve in a way similar to a spiling batten, to an overhead deckbeam. He pressed the joggle stick against it, positioned with its point in contact with the hull. He then traced both edges of the joggle stick on the tally board and wrote the number of the gullet at the corresponding spot on the tracing.
After tracing on the tally board as many locations as he required to define curves, straight lines, and corners, he set it on the plywood that would become the bulkhead. With the joggle stick positioned on the tally board in alignment with the tracings, he would make a pencil mark at its point. Connecting the dots plotted on the plywood provided the line he could cut to for a precise fit. Simpson noted the joggle stick was “fiendishly simple, revoltingly accurate, and beautifully fast.”
Photographs by the author
My copies of the joggle stick were challenging to use. Tracing each facet requires a separate action, often requiring switching the angle of the pencil. It’s a slow process that increases the likelihood of making the stick slip.
The method worked well for me, and I used it frequently for fitting thwarts and sternsheets. It was especially useful when working on thwarts that were notched to fit around sawn frames in dories. The multiple tracings and numbers on the tally board, even by Simpson’s own assessment, could get a bit confusing when a lot of them overlapped. I stopped tracing the straight side of the stick to eliminate some of the clutter. Later, I got frustrated tracing the sawtooth edge. Each facet required a separate stroke with the pencil, increasing the likelihood of the joggle stick slipping out of position.
Joggle sticks with freehand-cut curves were my first modification, just as accurate as the sawtooth type and much faster to trace.
I made new joggle sticks with one wavy edge. I could trace the edge with one quick pull of the pencil. Because the curves were cut freehand on the bandsaw, none of them were alike, so there was no need to number them. That made the “joggling” appreciably faster.
An article by Arch Davis in WoodenBoat No. 177, “Measuring Interior Joinery,” provided another variation on the patternmaking system with a straight-edged “tick stick.” Davis not only did away with tracing both sides, as I had, but also made the traced side straight. The edge had numbered marks, one of which was used to record the position of the stick with a pencil “tick” and the corresponding number next to the traced line.
My current tick sticks have straight edges with sets of shallow arcs to record their position. The top stick has a block taped on the end to account for the thickness of the story board. The story board has short dowels that can be inserted or removed as needed.
Shallow grooves without sharp corners are easy to trace with a single pass and aren’t prone to breaking the pencil lead.
I quickly traded my joggle sticks in for tick sticks. I preferred having some irregularity on the edge to register the stick without having to eyeball markings along a stick with a straight edge; a 1/2″ sanding drum on a Dremel tool made shallow grooves that would be traced along with the edge. Making a single groove, a pair of grooves, and a set of three grooves at intervals along the stick allowed me to use its full range on the tally board. And I can flip the stick over to change the side the point at the tip is on, and the little scallops on the traced line will indicate which way to place the stick.
If your tally board is sitting on a support that is on the same plane as the piece you’re making, you’ll need to bring the point of the tick stick down to that level. Having a block on both sides comes in handy if you need to flip the stick over.
Davis raised a good point about adding a block of wood under the tip of the tick stick if the reference surface secured in the boat is underneath the story board. Without it, a surface angled away from the story board would lead to an oversize piece and a poor fit. To meet angled surfaces, the new piece will need to have bevels cut. You can take the angles with a small bevel gauge using the tick stick to orient on leg of the gauge.
Pegs slip-fit into holes in the story board can help keep a tick stick in place when making the tracings and quickly locate the stick when it’s time to transfer the marks.
Even with these improvements, a tick stick, especially a long one, can easily slip when you’re drawing a pencil line along its edge, especially when the pencil is at a distance from the hand holding the stick. I added pegs along the edges of my story board. They not only help stabilize one end of the stick, but also organize the pencil lines as radii that don’t overlap. When the points recorded are being transferred to the piece to be cut, the peg holds one end of the tick stick in the proper position, so I only have to focus on the pencil line and the scalloped marks. Making fine adjustments there doesn’t move the end at the peg, speeding the process.
This story board is set crossing the thwart intended to set on this pair of sawn frames. One of the tick sticks is just long enough to span the frames so a line can be drawn between them. From it, the edges of the thwart can be drawn on the story board so it can be oriented on the plank to be cut.
I have a tick stick 24″ long and another 17″ long, and it only takes a few minutes to make another if the space I’m making a pattern for requires it. Simpson’s original joggle stick was indeed “fiendishly simple, revoltingly accurate, and beautifully fast,” and I’d like to think he’d find the quick tick stick is even more so.
Christopher Cunningham is the Editor of Small Boats Magazine.
You can share your tips and tricks of the trade with other Small Boats Magazine readers by sending us an email.
With our small armada of boats, kayaks and a canoe, we have quite a selection of synthetic fabric, webbing, and line that needs to be cut. Many of the synthetic fabrics used for boating and camping will unravel if the ends are not sealed as they are cut or afterward. In the past, we used the open flame of a pocket lighter to sear the ends of the various materials to keep them from fraying, but when we needed to neatly cut several strips of nylon webbing for a boat cover we decided to try the Edge Hotknife sold by Sailrite.
Kent and Audrey Lewis
The Edge Hotknife will reach its maximum temperature of 752 degrees Fahrenheit within 6 seconds of pressing the trigger.
We purchased the 110-volt Edge Hotknife in a package that included the R blade, cutting foot, wire brush, hex key, and a carrying case. The Hotknife itself weighs 2 lbs and has a nice 9-1/2″ power cord that reaches a lot of spots in the shop. The Hotknife is also available in a 220—240V version and an 18V cordless version powered by a rechargeable lithium-ion battery. The Sailrite website notes that the 110V model also works well with inverters, as it draws no more than 60 watts. That makes it useful aboard a boat with an electrical system. Our Jackery 160 portable power station, with its built-in inverter, also provided the power the Hotknife needed.
With a pull of the trigger, the blade heats up to 752° F in four to six seconds, and at that temperature a lot of material can be cut in a short period of time. The cutting blade is only heated when the trigger is pulled, so you can avoid producing an open flame or drips from overheating the material. The trigger should not be continuously held on while cutting; it can be manipulated on and off as needed to keep the blade heated to the appropriate temperature, as a red-hot blade is too hot. The instructions suggest 15 seconds on, then 3 seconds off.
We’ve used flashing, Formica, and even scrap wood for cutting surfaces and recently purchased Sailrite’s tempered cutting glass to use with the Hotknife. The glass has the advantage of not scorching and creating smoke. The R blade is the primary knife blade and its curved edge cuts both straight lines and curves. There is a cutting foot that can be used with the R blade that raises the material and the knife above the work surface below, allowing materials to be cut on regular surfaces without damaging them. The R blade can also be set just below the bottom of the cutting foot so the foot will hold material down and prevent the cut edges curling. The blade can then create a clean sealed edge and fewer black blobs or sharp points on the ends of synthetic materials.
The Edge Hotknife makes clean, quick work of cutting and sealing the edges of webbing, line, tape, fabric, and sailcloth. We have been pleased with the results and consider it far superior, much safer, more accurate, and easier to use than our low-tech lighters. We save a lot of time using it and get nice, repeatable results. It makes cutting synthetic materials an enjoyable experience.
Audrey and Kent Lewis mess about in small boats in the shoal waters of Northwest Florida, and chronicle their adventures at their blog, Small Boat Restoration.
I’ve been getting by without a hot knife since I started making my own camping gear back in 1970. For lightweight nylon fabrics, I sharpened the tips of soldering irons I used for electrical work. They weren’t at all suitable for thick fabrics like Sunbrella or for cordage. After reading the Lewis’ review, I wanted to see what else was on the market and found a few hot knives that were quite similar. I bought the Electric Hot Knife/Fabric & Rope Cutter by RoMech.
Christopher Cunningham
The RoMech hot knife performs well on synthetic webbing, rope, and fabric.
Like the Edge tool, the RoMech’s tip temperature is regulated by holding the trigger on for 15 seconds and releasing it for 3 seconds. I’ve using plywood, aluminum, and glass as cutting surfaces. Plywood works fairly well, though the hot blade sinks into the wood, making it hard to turn the blade to cut curves. On the aluminum, it’s best to pull the tool because the blade doesn’t slide across the metal when pushed. This makes it hard to follow fabric edges. Glass is by far the best surface for cutting. There’s virtually no friction, so the blade moves smoothly when pushed, making it easier to follow a line. The blade isn’t channeled in the glass so curves are effortless. I’ve only used single-strength window glass, the only piece I have, and the hot blade hasn’t cracked it yet.
The RoMech ($69 on Amazon) is listed as no longer available. An identical tool is available from Rongte ($65). A tool identical to the Edge is offered by DeVandy ($79).
Afterword
The RoMech hot knife I bought is made in China; I presume the identical Rongte is too. Sailrite’s Edge is also manufactured in China; and I would also presume the identical DeVandy is too. Author Kent Lewis checked with a Sailrite representative about the Edge and received this in reply:
“The Edge Hotknife is made in China. We were not able to find someone willing/with the capabilities to make it for us stateside, so were forced to source it. There are a lot of look-alikes but I can assure you ours is internally different. We wanted to design it in such a way that it would be possible to use it in a production environment.”
Ed.
Is there a product that might be useful for boatbuilding, cruising, or shore-side camping that you’d like us to review? Please email your suggestions.
Everyone who sails a small craft has, at some point, found that something they need is out of reach up at the bow or stowed in a locker. Many have also had the experience of a sore wrist or cramped hands from a full day of steering. Small boats don’t typically stay where they are pointed once you leave the helm, and a day underway on the water usually means a day stuck at the tiller.
While there are a few gadgets and techniques that address this with bits of string or bungee cords to hold the tiller, I have always found they take time to set up, and don’t engage and disengage quickly. I looked for other solutions and was delighted to find an often-overlooked traditional device, the tiller comb. Elegant in its simplicity, it can hold the tiller in place and be instantly disengaged by lifting the tiller slightly. I bought the Tiller Comb Stop from Victory Products, a chandlery in Vancouver, BC. The stainless-steel device includes a blade for the tiller and a hinged comb. One side of the comb bolts to the boat and the other, with a toothed edge, pivots upright to engage the blade and hold the tiller—it is folded down out of the way when not needed.
Photographs by the author
The Tiller Comb Stop has 21 slots. The range and fineness of the adjustments varies with the distance from the rudder’s pivot point.
Mounting the comb closer to the rudder will increase the arc of positions it will hold the tiller in; farther away offers a more fine-grained control of where the tiller stays. On my 19′ Lightning, I bolted the comb to the deck with the comb side standing against the cockpit coaming when up. This put it roughly 2′ forward of the rudder pivot point, and this position works extremely well.
Folding the hinged comb instantly puts it out of the way. The bracket on the tiller could use a more generous clearance above the coaming.
Hold the tiller to set the course you want to maintain, then set it down to engage the blade in the teeth. With proper trimming of the sails, the boat will hold a course relative to the wind with little intervention. To make an adjustment, just lift the tiller half an inch or so, bump it over, and drop it back down. The tiller stays where put yet is available at a moment’s notice. Sailing upwind for half an hour without touching the tiller has become common for me, and those frantic dashes to the bow and back are a thing of the past.
Robert Hodge lives aboard a 42′ sailboat in Seattle, and cruises Puget Sound on his wooden ’60s-era Lightning that has been restored and extensively modified. He works seasonally in commercial ship repair in local shipyards and in a marine retail store. He is a veteran of two first-leg Race to Alaska attempts and has plans to compete in the full R2AK in 2021.
The Tiller Comb Stop is available from Victory Products for $39.99 CAD and with easy shipping to the U.S.
Is there a product that might be useful for boatbuilding, cruising, or shore-side camping that you’d like us to review? Please email your suggestions.
Dave Reynell has lived in the South African coastal town of Knysna most of his life and worked there as a conservation forester, managing the rain forests. The town lies on the edge of the Knysna River estuary and Dave’s home is on Leisure Island, one of the town’s two causeway-connected islands.
Edward Reynell
Dave’s home is on Leisure Island, center, surrounded by the Knysna Estuary and just a short distance from the Southern Ocean, left. This photo was taken by son Edward while flying a glider.
Surrounded by water and with the Southern Ocean just a mile away through a narrow passage, known as the Knysna Heads for the tall rock prominences that loom over it, Dave naturally took to boating. For years he sailed a 12′ Extra dinghy, which could do 15 knots on a broad reach in a good breeze. Dave sold the Extra in the mid -’90s, and when he saw Maynard Bray’s article on Iain Oughtred’s Acorn Skiff in WoodenBoat No. 56, the 11′ 8″ lapstrake Whitehall type kindled in him a desire to build a boat. He ordered the plans but never got beyond that first step—he worried that the project was beyond his skill level—and filed the plans away.
Dave Reynell
Stripped for repair and refinishing, the dory needed new wood where the stem and transom rested on the ground and rotted. The boat was only 12 years old but badly aged by neglect.
Still, the desire to have a boat stayed with him. A few years went by and he got word that someone had left a small wooden boat at a local boatyard. The boat was in terrible shape, but Dave saw its potential, and bought it from the yard. The hull had been covered inside and out with a shoddy layer of fiberglass and polyester resin that had begun to peel away. To keep the boat from rotting away it all had to come off. Dave stripped the boat down to bare wood, and then suspended it from the ceiling of his garage to dry out. He left it there for four years, likely because it took him that long to let go of his aspirations to build the Acorn.
Dave Reynell
Repairs included patching the transom and the upper corners of the plywood sheer planks.
Dave learned that the boat had been built in Knysna by a well-respected family-run boatyard called Lucky Bean Marine. It was a 12′ dory designed in 1947 by Francis Kinney. Kinney is best known for revising Norman Skene’s 1904 classic, Elements of Yacht Design. Skene himself had revised the book several times, and Kinney continued the updating between 1962 to 1973. Kinney included the lines and offsets of his dory in the 8th edition of Elements.
Dave Reynell
Nearly finished, the hull awaits floorboards and a proper pair of oars.
The pedigree and caliber of construction of Dave’s dory had been masked by the clumsy work that the previous owner had done on it. Dave removed some graceless slabs of wood that had been stuck on the bow and quarters. Fortunately, the plywood hull was still sound and Dave sealed it with epoxy. He took his time with the restoration and enjoyed the work.
Dave Reynell
Rescued from a slow destruction by neglect, the dory has decades of useful life ahead.
Once seaworthy and afloat once again, the dory proved well worth saving and putting back to rights. With a borrowed pair of oars, Dave launched it and rowed across the estuary. “I could hardly believe how easy it was,” he writes. “She whizzed along doing at least 5 to 6 knots and was a dream to control. Her gentle rocker and a flat bottom enabled me to spin her around on a tickey—Americans would say ‘on a dime.’ I have also found her particularly stable in a following sea on the odd occasion that I have rowed her out of the Knysna Heads. Strictly a one-man boat, she is extremely tender, although at times I do row her tandem, having positioned two sets of rowlock-blocks on the gunwales.”
Dave Reynell
The transformed dory proved popular with the family. Here Edward is at the oars. Dave notes: “The price I paid for the dory was a lot for a little wooden rowing boat in very poor condition, but it had a good pedigree and was worth saving.”
The dory deserved a pair of well-made oars, but there were none to be had anywhere near Knysna, and sculpting spoon blades was not in the cards: “I can do a pretty neat job hand cutting and fitting dovetail joints but am clueless when it comes to using a drawknife or spokeshave.” Dave found Rich Shew’s article on making spoon-bladed oars in WoodenBoat No. 117, glued up the blanks according to the instructions, and then handed the project off to a professional cabinetmaker. The results exceeded Dave’s expectations; “He shaped the most perfect set of oars that I had ever laid eyes on.”
Dave Reynell
This beach lies on the edge of Knysna Heads, the 1/8-mile-wide passage that separates the lagoon, to the left, from the Southern Ocean, just beyond the headland to the right.
The oars and the beautiful work Dave did on the dory were well deserved by a boat that was almost lost.
Do you have a boat with an interesting story? Please email us. We’d like to hear about it and share it with other Small Boats Magazine readers.
In the early 1980s, I bought Phil Bolger’s plans for the 15′ 6″ LOA Gloucester Light Dory. I was living in an apartment at the time, and I was intending this boat to be my first built to an “official” design. I had built furniture in my living room, and in those single-man days my dining room table was a large Black & Decker Workmate with a cover thrown over it when domesticity required, which wasn’t very often. Of the triumvirate of components for boat construction, though—place, time, money—one always came up short.
While I bought tools and plans, sailboat racing and kayaking satisfied my waterlust. Eventually, projects other than the dory came along, most recently my own 18′ Interminable Project Boat. It’s senseless to live anyplace without a boat, and Maine is like other places, only more so. I could wait no longer. I went back to my plans bank to find something simple, something I could use while the other boat awaited my attention.
A Swampscott dory was a contender, but that sail would add cost and time. The dog ate the Kingston Lobsterboat plans, sparing me those lovely time-consuming curves. There were others, too, but in the Gloucester Light Dory I found what I was looking for. The boat has no rig, no outboard, no systems, no complexity. It’s a pure rowing machine. Besides, I already had the plans, so I was ahead $25.
Photo by Benjamin Mendlowitz
Phil Bolger’s Gloucester Light Dory design is at its very best for solo rowing, although it will also carry a surprising quantity of gear.
The things that first attracted me about the design still attracted me 20 years later. That sheerline is delightfully clean. The straight sides imply simple and fast construction. Complexity is delightful but costs time and money, and on that score my other project caused me to observe, as Meriwether Lewis and William Clark had after being chased by the first grizzly bear they encountered, that my “curiosity on the subject was pretty well satisfied.” Bolger provided an expanded, or “laid flat,” shape of the side panels, too. The preliminaries would take no time at all. I could start today. All I would have to do would be to ask the approval of the parliament of squirrels living in the shed.
I worked weekends on the construction over a couple of months, part of which involved just watching the thermometer. The most time-consuming part of the job was coaxing epoxy to kick and waiting for paint and varnish to dry in my unheated shop.
It’s just as much effort to make an ugly boat as a pretty one, so I made it pretty. Anyway, it’s difficult to make that shape ugly, although I’ve seen very serious attempts more than once. I had some lengths of Honduras mahogany left over from my “real” boat, just enough for varnished rubrails. I used short lengths of Philippine mahogany I had on hand for seats, also varnished.
I didn’t vary at all from the hull design. On the interior, though, I took some liberties. For one thing, I didn’t want the plywood thwarts called for in the plans. I used the wood I had available and carried the thwarts all the way to the stem and transom in the ends, leaving just enough room for drainage and ventilation. Now, I can throw my sweater or dry bag on the after thwart and it stays up off the bottom.
The plan shows ’midship limbers in all three frames, which support the thwarts. These make sense, but I added limbers at the chines and wouldn’t have it any other way. This boat is quite tender, so when you are moving around and flailing your arms—as in bailing—it is hard to keep it perfectly level. The easiest and best thing to do is to go ahead and heel it to one side, which is a much more stable position, and then bail from the chine. Mostly I bail rainwater. Only once have I shipped seawater, and then just a bit over the quarter when working downwind in a pretty heavy breeze.
Every year, I’ve added one little detail or another to make the dory just that much more convenient to use. For me, part of the fun is figuring out little improvements. Oarlock keepers came first. Then I added 6′ lines eye-spliced into holes bored in each of the ’midship frames to serve as trailer tie-downs. I’ve found these useful a dozen different ways—for example, for lashing things down or making off the painter of a boat under tow. When I turn the boat over ashore, I use one of these lines as a tag line to let it roll over gently. I added gunwale guards (see Currents, WoodenBoat 181), brass half-oval guards on the upper stem and the skeg, and an improved footrest. This year’s project has been the addition of a compass bracket. Last summer during a pestilential fog with darkness coming on, a small demon appeared at my shoulder, sneering in its Peter Lorre voice, “No, no, no, no, no! You need to go that way! That way!” A fitted, removable compass, which I promise not to leave ashore anymore, will silence that guy.
Photo by Tom Jackson
It may be best not to monkey with the designer’s specifications for the hull, but the builder’s own sense of function and aesthetics can roam fairly freely on the details and appointments of the interior.
I’ve found two things I would do differently. First, the vertical footrests shown in the plans are too close to the rowing stations. Better to wait until the thwart is fitted and the oarlock positions are fixed, then get in the boat and set the footrests for your own comfort. I also canted mine well aft, matching the angle of my foot at rest.
Second, I would greatly strengthen the frame-to-planking joints at the forward and after thwarts. After several seasons of hard use, the forward frame began to let go from the sides. It is held by screws that go through the plywood and into the frame’s end grain—never a really strong way to build anything—and even fortified with epoxy, that joint hasn’t held. Last year, I backed up the forward frame with a vertical wooden block, called a cleat, on the forward side, tucked out of sight under the thwart, well epoxied into place and also screw-fastened through the frame. If I were building again, I would strengthen all those joints from the outset, perhaps adding tapered frames running up the sides a little ways. Maybe that’ll be next year’s task.
The plans call for 1/2″ bottom planking and 3/8″ side planking, but I used 3/8″ meranti marine-grade plywood throughout, and it has been completely satisfactory. I repaint every year as needed, and take the thwart pieces off for revarnishing. A weekend or two of work fit in around rainsqualls and spring cleaning, and she’s good to go.
The only fiberglass-and-epoxy sheathing I used is on the outside bottom, extending just above the waterline. A couple of years back on a way-low tide, I had a Chariots of Fire rowing episode (for the unenlightened, that would be hard effort imagined in slow motion to capture every heroic grimace, and all set to a dramatic musical score), and I plowed straight into Quasimodo, my name for a great, hulking, green, ugly, hunchback of a rock. I fixed the forefoot with fiberglass cloth and epoxy. This year, I ran a half-oval down the lower stem, which someday I might be tempted to carry around the forefoot and a little ways onto the bottom.
There is absolutely no doubt that this boat is at its best for solo rowing. With two people at the oars, it trims down by the head and you can’t steer. With a third person aft— or a heavy weight, say about two curling stones or a full complement of camping gear—things balance out all right. But such a load makes the freeboard too low for really pleasant rowing, and you wouldn’t want to venture out in too much of a chop in that condition. I don’t have guests all that often, so I much prefer the benefits of solo performance. Somebody who likes this design but favors tandem rowing or a lot of company would do well to look at the 19′ version that Bolger worked up to answer this very issue, with four rowing positions to choose from so you can get the trim just right.
Photo by Benjamin Mendlowitz
Even obscured a bit by gunwale guards, the perfection of the Gloucester Light Dory’s sheerline is difficult to hide. A careful balance between rowing speed and seakindliness, she has plenty of speed to overcome modest currents, has a go-anywhere draft of 7”, and is seaworthy enough to explore islands and inlets.
The Light Dory’s sculling notch is pretty to look at. It’s pretty near useless for sculling, though. If I’m in a tight spot where sculling might work, it’s just a whole lot more effective to stand up and use one oar to paddle with a J-stroke. However, the notch has proven very handy for other purposes. When I’m towing another dinghy, as I often do, I bring its painter aboard in the notch. In rough weather, the line is apt to jump out of the notch, so I have rigged a short keeper line, which doubles as a tie-down for my dry bag when the wind pipes up. I often find myself in a position to set an anchor aft and a long painter off the bow to a pierhead, and the notch comes in handy there, too. And, finally, using both hands knuckle-to-knuckle, it’s easy to pick up the aft end by the notch, while someone else lifts the bow by the breasthook.
The construction details are easily understood in Bolger’s plans. One variation is a plywood butt joint Dynamite Payson wrote about in his how-to-build series in WoodenBoat Nos. 41, 42, and 43. But I stayed with Bolger’s original way of backing this joint with a butt strap, a flat-laid piece upon which the frame lands.
Some people say there’s no such thing as building this boat too light, but I can’t agree. When I’m out in some sloppy weather, which I’m not afraid to do, I like a boat that has what you might call “gravitas.” Anyway, the boat certainly has no trouble moving fast when you want it to.
I have two and only two tests for any boat. First, as I’m walking away, do I find myself continually turning around to evaluate it from one angle or another? Second, if I had the same conditions and criteria in mind, would I choose that design again? For me, the Gloucester Light Dory passes on both counts.
Phil Bolger’s sixth and final version of the Gloucester Light Dory offers all of the information needed for construction in one plan sheet. A supplement, which shows the fully expanded shape of the sides, makes getting the subtleties of her sheerline right just that much easier.
The Steve Killing–designed Endeavour 17, a kayak built of cedar strip planks and fiberglass, combines beauty, fast lines, load-carrying capacity, and relatively easy construction. Let’s have a look at each of these points—the last one, ease of construction, in some detail.
Photo by Darel Bridges
The Endeavour 17, a sea kayak built of cedar strip planking, fiberglass, and epoxy, is suitable for a wide range of paddlers. Sufficiently stable for a novice paddler, the boat also has performance characteristics to satisfy the more experienced. It’s a great kayak for skill development.
While the building of this boat has some challenging aspects, there’s nothing about it that should turn away a first-time boatbuilder possessing fundamental wood-working skills. Some processes — the bending and beveling of the stems, for example, or the trimming of the cockpit — might require the hand-holding of a good instructor, but we’re lucky in that regard: Ted Moores, one of the best builders of strip-planked small craft in North America, has written a book detailing the process of strip-kayak construction (KayakCraft, WoodenBoat Publications, 1999). The subject boat of that book is the Endeavour 17. (The book includes a gallery of designs, and all are of the Endeavour 17 family; the Endeavour is considered the patriarch.)
Construction, as with most (but not all) wooden boat building, begins with a series of molds that define the sectional shapes of the boat. These are set up at established intervals on a long, narrow table-like structure— a so-called “strongback.” The shapes of the molds can be determined by the laborious process of lofting—the drawing of the plans full-sized, from a set of numbers provided in Ted’s book. But we needn’t do that, for the plans include full-sized patterns. It’s best to use those, and to get on with the construction.
KayakCraft, by Ted Moores (WoodenBoat Publications, 1999), details the construction of a strip-planked sea kayak. The Endeavour 17 is the example used in the construction sequence, but several sister designs are also profiled in the book.
When it comes time to plank the boat, a first-time builder might find it best to purchase already-milled strips from one of several companies that specialize in producing these. Why? Because the milling of strips is a messy and mind-numbing job best left to shops equipped with power feeders, dust collection, and sharp power tools. Which isn’t to say that the home-based boatbuilder blessed with a good supply of rough-cut cedar should not do this. Rather, it’s to say that if he does, he should be prepared for a day or two of dust and noise and sweeping—not to mention a lot of pushing and feeding of stock through machines that require careful tuning.
One edge of each of the 1⁄ 4″ strips receives a concave profile (a “cove”), while the other receives a matching half round (a “bead.”) When these two profiles are put together, the result is a tight joint that can articulate around the sectional curve of the mold—sort of like a linear ball-and-socket joint. This eliminates the time-eating process of beveling the edges of the strips for a tight fit—something nobody in their right mind would do when building a boat like this. (Anymore. For that’s the way it was done in the early days of strip-planked canoes.)
The stems (the curved structural ends of the boat) are built from steam-bent laminates of ash or cherry. Steambending is often a daunting process to a first-timer, but it shouldn’t be. It’s fun. It’s easy. And with these small pieces, it can be accomplished with a stovetop teakettle and a rudimentary box. Ted Moores’s book will show you how.
The planked hull requires lots of sanding. Ted Moores has reduced this process to a series of steps which, if followed to the letter, will yield a flawless surface ready for fiberglass. A layer of ’glass on the inside and a layer on the outside completes the hull, though there’s still some filling and sanding to be done before varnish is applied.
The deck is built on a separate set of molds, in the same manner as the hull. When complete, this structure fits like the lid of a cookie jar onto the hull, and is glued in place, stiffening the whole considerably. Imagine a shoebox—a shoebox lacking a lid. Grab it in both hands and twist those ends in opposite directions. It’s flexible, isn’t it? Now put the lid on it. No more twist. The same mechanics apply to the Endeavour 17.
You can get fussy, or you can stay basic with the fitout of this boat. The choice depends both on your skill as a woodworker and on your intended use of the boat. If you’re a day paddler, you might not want to cut holes in the deck. If you’re going on an expedition, a couple of hatches, one forward and one aft, are in order. The average build time of an Endeavour 17 is about 150 hours. This varies, of course, depending on the builder’s skill and the boat’s level of detail.
Photo by Darel Bridges
The Endeavour can be configured for serious camping, with hatches in the forward and after decks.
The Endeavour is a good weekend expedition boat. Its payload range (paddler and gear) is 130 to 250 lbs, and its fine lines and stiff hull combine to make it a moderately fast boat. But is it durable? Yes, it is. Can you haul it up a sand beach and over rocks? No. Or, at least, you shouldn’t. There’s no doubt that one of the ubiquitous brightly-colored rotomolded plastic boats will serve a hardcore boat-dragger better than an Endeavour 17. But a kayak dolly, a strong back (not a strongback) or an extra set of hands will help to avoid such finish-marring behavior.
Is this boat heavy? Again, no. It weighs the same as an off-the-shelf fiberglass boat—perhaps just a little more. But for the title of this magazine, one might be tempted to describe the construction of an Endeavour as fiberglass with a cedar core. Cedar is a light wood. It is stiff and fatigue resistant, meaning you can bend it without weakening it. That’s not true of fiberglass alone, without a core. Bend that stuff a few times, and you’ve permanently weakened it. That’s the real beauty (besides the obvious eye-catching Beauty) of building a fiberglass-sheathed strip-planked boat. They’re durable. Wicked durable, the beach-dragging caveats above excepted. They’re stiff. And they’re a joy to look at.
The Endeavour 17 is among the best designs for strip-planked kayaks. If you’re an inexperienced paddler, it’s a boat to grow with: You won’t get bored with its performance as your skills develop. Ted Moores describes it as “mid-road between rock-solid platform for the beginner and a slim performance kayak.” He rightly says that “this hull suits just about everyone.”
The choice of kayak is quite personal: it depends on both the size and weight of the paddler, and the intended use of the boat. The Endeavour 17 fits a wide range of payloads and uses, but one of its sister designs, built using the same techniques as those employed in the Endeavour, may be better for some paddlers. Full-sized patterns for the construction molds are included in each plans package.
Few joys in life are simpler than a morning row. Oars over the shoulder, hollow footsteps along a wood-decked float, the boat quivering with the first step aboard, the sharp ring of the oarlocks as they slip into place, the soft purling of water against lapstrake planks as they leave the first wake of the day…all these seem to require stillness—all the better if it’s the perfect kind of stillness found on a lake just after dawn.
Time was, wooden pulling boats dedicated to such pleasures were common throughout the land. Lakeshore liveries—at least any with true boats in them—are largely and regrettably a thing of the past. One rare exception is The Center for Wooden Boats in Seattle, Washington, where a variety of boats can be used on Lake Union. Many of the boats in the CWB collections are of a type once common in liveries, and one in particular stands out as an exceptional lake boat. She is a light and lithe double-ender, a handsome 15-footer they call the Lake Oswego Boat.
Photo by Corinne Ricciardi
At just over 15′ long and with light scantlings (meaning small dimensions for each piece), the Lake Oswego Boat is a prime candidate for construction in a small home workshop.
Thought to be of Finnish descent, the original builder had the type as a stock offering in Portland, Oregon. His name is unknown, and so is the boat’s year of construction. Lines were taken in the early 1980s, and CWB students working under Eric Hvalsoe built a new one to the resulting plans. As the story goes, the builder produced the boat to a half model brought in by a customer, so its origins are obscure at best. The type became popular as a livery boat on Skunk Lake, which was later renamed Lake Oswego, a much more suitable name for what was destined to become a toney suburb of Portland.
Prevailing theory is that the first boat, built some 60 years ago, may have been loosely based on the Rangeley boats of Maine (see WB No. 39). But the differences—a flatter sheer, straighter stem and sternpost, and a much less pronounced turn of bilge—outweigh the similarities found in her dead-straight plank keel, use of an inner and outer stem assembly, and lightweight lapstrake planking fastened over closely spaced, light frames. To me, she looks like a cross between the Rangeleys and early double-paddle canoes.
She is a pleasure to row. She moves easily through the water and tracks well, and yet she’s easy to maneuver. Two can take to the oars, with room for a passenger or kibitzer aft. With my wife as passenger (and bailer; more about that in a minute), we explored some of the canals of Lake Union’s chic houseboat community, and once or twice I reverted to paddling. A canoe paddle would have served well in these tight quarters from the after thwart, which, together with her 4″ draft, bodes well for the boat’s ability to explore narrow channels at some remote lakehead. The original boat also shows a hole in the forward thwart for some sort of light sailing rig, but there is no sail plan. The CWB reconstruction is strictly for rowing, which makes sense to me for this type.
Photo by Corinne Ricciardi
Handsome lapstrake planking lines make the Lake Oswego Boat as much a pleasure to look at as it is to row. The sheerstrake’s width is neatly calculated so that after the installation of the rubrail, the remaining visible portion of the plank is well-proportioned in comparison with planks below it.
At the CWB, the boat is a true livery boat, and the center’s staff rotates boats in and out of service. She had been out of the water for some time before I asked to use her for a morning, and she hadn’t had enough time to take up well. A bilge pump was essential equipment.
With her long, lean shape and her easy entry and run, this would be a simple and pleasurable boat to plank. Either light copper rivets or clench nails would serve as fastenings for the plank laps and conceivably even for the plank-to-frame joints. It’s typical in a boat like this that the lapstrake seams don’t leak—water coming in is more than likely coming from the garboard seams and, especially, the hood ends. Extra care in fitting planks in those areas and carefully caulking the garboard seams should keep the water in its rightful place—out there in the lake with the rest of it.
For a builder who is contemplating a first foray into fully traditional construction, and with either some experience, a lot of confidence, or both, the Lake Oswego Boat would be an excellent choice. With no complicated hardware, no centerboard trunk, and scantlings that keep the materials cost on the low side, she’s all about the loveliness of planking, and she’d prepare such a builder very well for the next project up the scale of ambition.
Photo by Corinne Ricciardi
A linseed oil– based finish turns black over time but is easy to apply and reapply.
This boat’s appearance rests squarely on its planking lines. Careful attention should be paid to how fair the plank edges are, how evenly the ends are spaced at the stem and sternpost, how neatly the gains are shaped so that they come together flush at the rabbet forward and aft, and how fair the curves appear when viewed in profile and from all quarters. The right calls on these details will have everything to do with making this boat look its absolute best.
The plans are in one sheet, and they leave considerable room for interpretation. The boat will have to be lofted, no doubt about it, but the offsets are taken to the inside of the planking, which should ease the job of making station molds. Many decisions, perhaps starting with whether to build right-side up or upside down, will be left to the builder. Common sense will prevail, and somewhere along the line the boat will become personal.
On Lake Union, near dawn is the right time for this boat, before the seaplanes and powerboats awaken and while Interstate 5, with a little imagination, still sounds like a distant waterfall. The lake is a great place, don’t get me wrong, and urban gunkholing is as interesting as any— but while I was rowing this boat I found my mind wandering back to lakes I hadn’t seen in a long, long time.
Photo by Corinne Ricciardi
She’s just right for gunkholing, urban or otherwise.
She’d travel easily, probably best with a small trailer, making her range pretty well infinite. Someplace farther out and higher up, I thought. Someplace of solitude, where the end of the lake has a trace of a stream begging to be explored a little farther and remembered fondly. Someplace so pretty that it can only be improved with a boat as handsome as this one, and—if you’re rowing properly—left astern without leaving behind so much as a sound.
Lines taken off of an original Lake Oswego Boat are clear, but lofting will be necessary. The look of the boat will depend on how well the builder lines off the planking, taking into account the fact that from the exterior the top edge of each plank will be covered by perhaps 5/8”. The amount of plank lap is one of the details not explicitly spelled out in the plans, so keep that engineer’s ruler and a sense of judgment at the ready.
Plans for the Lake Oswego Boat are available from The Center for Wooden Boats.
Is there a boat you’d like to know more about? Have you built one that you think other Small Boats Magazine readers would enjoy? Please email us!
Harry Bryan, a boatbuilder and designer from New Brunswick, Canada, designed the Fiddlehead, a 10 1⁄2′ double-paddle canoe, in 1992 after his sister-in-law introduced him to her Wee Lassie. The Wee Lassie is a small double-paddle canoe designed by J. Henry Rushton around 1893. Bryan had always rowed small boats, rather than paddled them. He had “never faced forward in a boat,” because rowing requires that one face aft, looking at where he’s been rather than where he’s going. This paddling business was something of an epiphany for Harry Bryan, and his fertile mind was inspired to adapt the Wee Lassie to his preferred construction techniques. We’ll come to those in a moment. First, a word about the Wee Lassie.
J. Henry Rushton was a great designer and builder of boats and canoes one hundred years ago. He conceived the Wee Lassie to be an easily portaged solo canoe—a boat that could cross a lake and then be hoisted onto a shoulder and carried through the woods. Its popularity today continues to increase; it allows a paddler to get into thin, otherwise inaccessible waters and see wonderful things from a rare vantage point. Bryan is not the only builder to have taken inspiration from this design. Henry “Mac” McCarthy, formerly an instructor at WoodenBoat School, has coached uncounted builders through the construction of these boats to his own adaptation, which uses strip planks and epoxy. With the Fiddlehead, Bryan took things in a different direction.
Photo by Benjamin Mendlowitz
Inspired by a 100-year-old solo canoe design, Harry Bryan conceived Fiddlehead for “dory style” construction. While the boat is meant for one person, a passenger of appropriate size can be allowed.
Bryan builds boats from a home-based boatshop that uses no grid electricity. He has a foot-powered bandsaw, a jigsaw built from the remains of an old Singer sewing machine, and a drill press operated by hand crank. His lumber is cut and milled locally (and selectively), and his choice of woods for Fiddlehead reflects that. The boat is planked in cedar and framed in spruce, with bits of oak and locust here and there, where hardwood is required. “I wanted to use dory construction,” he says, “with a relatively flat bottom and strength in the planking.” Dories have no wood keels. Instead, their narrow bottoms are the keels. Or their wide keels are the bottoms, if you prefer. The point is that there is no complex structural joinery involved in the building of a dory bottom. A solid flat surface provides the foundation for the topside planking.
The topside planking is lapstrake. This means that its edges overlap each other, like clapboard siding on a house. They are fastened together with clenched (bent-over) nails, and are supported by widely spaced frames. While Fiddleheads are good looking and worthy performers, their essence is simplicity. That’s often a tough combination to achieve in a design; usually, you get one in exchange for the other. Here’s how Bryan describes the Fiddlehead concept and aesthetic in the introduction to a manual for building the boat:
“She is simple because she is small, has a modest number of parts, and is constructed with techniques worked out over centuries of small boat building. She is elegant not by any standard devised to measure such a quality (such a measurement is impossible), but because we have observed people’s reaction to her and we know that it is so.” That’s true. I’ve observed people’s reaction to her, too, at boat shows and in workshops. A Fiddlehead always swells a crowd of smiling admirers.
The design is so simple and so alluring that, for the past several years, seventh and eighth graders have built boats to it in an after-school boatbuilding program. The program begins in autumn, in the woods with live trees, draft horses, and a sawmill; it spends the winter in a wood -heated boatshop and ends in the spring on a pond on the WoodenBoat campus.
Photo by Benjamin Mendlowitz
Fiddlehead’s combination of good looks, local materials, and simplicity have made it an ideal candidate for a boatbuilding program for Brooklin, Maine, junior high school students. Here, two young builders paddle newly launched boats on a pond at WoodenBoat.
If you wanted a Fiddlehead of your own, you could order one from Harry Bryan, or you could buy a set of plans and a detailed instruction booklet from the builder and do the job yourself. If you went the latter route, you wouldn’t have to take to the woods with draft horses, but you might find yourself casting about for substitute woods, depending on where you live. The instruction booklet covers this topic: instead of cedar planking, you might use pine or spruce; instead of spruce frames, you might use ash or oak.
Many builders will wonder if the boat can be built from plywood, and Bryan notes that, indeed, it can. For planking, he says that 1⁄4″ should be about right; the bottom will want to be beefed up to 3⁄8″. The decks will be 1⁄8″, and the bulkheads 1⁄4″. There’ll still be a smattering of hardwood in a Fiddlehead built mostly of plywood.
Bryan says that his manual “assumes that you have some knowledge of woodworking tools and how to use them.” He advises a first-time builder to enlist the help of someone with experience for advice and instruction before embarking on an uncertain next step. The designer himself is available by mail or telephone for answers to technical questions.
Harry Bryan, and his wife, Martha, go camping in their Fiddleheads. There’s an elliptical opening in the bulkhead through which a tent will fit; this opening is sealed with a removable cover, to retain the watertight integrity of the bulkhead. There’s space behind the cockpit seat to fit a drybag’s worth of essentials.
The boat is self-rescuable; there are two watertight bulkheads, and these create flotation chambers forward and aft, so the boat will float high when rolled over. A person of average ability can dump a Fiddlehead and get back in from the water, and then paddle away. Bryan has done this on purpose, just to be sure. He was back in the boat, from the water, in 14 seconds, with just 1⁄2″ of water in the bottom. He did the test off of his home in New Brunswick, in the Bay of Fundy, whose cold waters provided ample motivation to speed things along.
“Because I know I can get back in the boat, I’ve gone to St. Andrews — five miles cross.” But he wouldn’t recommend such open-water venturing for everyone—only for experienced paddlers with a proven ability to rescue themselves in the event of a capsize. Besides, Bryan finds it much more fun to paddle close to shore, and observe the natural drama at the water’s edge.
Harry Bryan has tinkered with the Fiddlehead’s design over the years, and come up with two enlargements. The first, which appeared in 1995, is a 12-footer; next, in 2000, came a 14-footer. Each plans packet includes three pages of drawings (with full-sized patterns for the bulkheads and frames) and an instruction book.
Harry has also devised several Fiddlehead accessories over the years. The plans have always included instructions for building a paddle. (Heed these words from the manual: “You could purchase a carbon fiber paddle, but I think you’re missing what Fiddlehead is about if you do.”) There’s a spray skirt, too—but not of the tight-fitting, kayak variety. This one is more like a low-slung dodger that fits over the forward coaming. “It keeps all of the paddle drip off of you and makes a huge difference in September or October,” says Bryan. There’s a sail now, too. This sail, however, won’t be set in the usual way, on a fixed mast. Rather, the inverted triangle mounts on the end of the paddle and is held aloft to provide propulsion downwind. “All of us want to open our coats when paddling downwind,” Bryan says. We do, for sure. I recall a canoe trip on Maine’s Allagash River years ago, with a strong tailwind on the last day. There were four canoes carrying eight of us, and all were standing with slickers open, looking like a fleet of little clipper ships. Oh, but for a bunch of Fiddlehead sails!
This boat will take you into the golden years. In addition to the spray dodger, a paddle, and sail, Bryan has devised a “geriatric boarding aid”—a shop-built device to stabilize the boat when boarding and disembarking. What more could you ask for: a boat with a built-in retirement plan.
The original Fiddlehead, shown here, measures 10 1⁄2′. There are now also 12′ and 14′ models. Each plans package consists of three sheets of drawings and a detailed instruction book.
Plans for Fiddlehead are available from Bryan Boatbuilding.
Is there a boat you’d like to know more about? Have you built one that you think other Small Boats Magazine readers would enjoy? Please email us!
For many, 2020 has been a rough year. I’ve been very lucky, in that my main hardship was being largely confined to quarters through half the year, first by an invisible virus, then by a blinding pall of wildfire smoke that enveloped Seattle. I missed my chance to get out for a summer cruise, but I was able to make a brief restorative escape with my smallest boat.
My coracle, FAERIE, is just 54″ long and built to be a folding tender for HESPERIA, one of my camp-cruising boats. She was never meant to go far, just from HESPERIA at anchor to shore and back. She’s neither fast nor seaworthy, so to take her on a cruise of her own, I needed to find a placid body of water scaled to her diminutive dimensions. Through satellite images, I searched the area north of Seattle, and I knew all of the small lakes I found—none of them held much interest for me except for a pair of ponds I had never seen before even though the park they were in was less than five miles from my home. I had passed the park’s west side by bicycle and by car countless times and years ago watched my daughter play soccer on its east side. The ponds were so well hidden by the woods that I had never caught a glimpse of them.
On a cool, overcast Tuesday morning, I packed a lunch, put FAERIE in the back of the truck, and headed for the park.
The path that leads to the Twin Ponds begins in that dark gap in the woods between the fire hydrant and the tree trunk just to the left of my truck’s cab. The only signs marking the park are set well back from the sidewalk and dimmed by the shadow of a dying willow; the road here is a 35-mph arterial, so it’s easy to race by without even catching a glimpse of them. Assembled, FAERIE fits neatly in the truck bed. The folding frame of laminated spruce is varnished, but I’ve kept the Port Orford cedar thwart unfinished. Even though it has been eight years since I built the coracle, when the sun warms the thwart, it is still redolent with Port Orford’s lemony fragrance.
Coracles have always been meant to be carried. Mine weighs 27 lbs and I carry it as coracles have been carried in Ireland and Britain for centuries. With the seat set against my back, the rope hanging from it crosses my chest just below my shoulders and holds the coracle in place, leaving my hands free. The paddle, a dry bag holding my lunch, and my camera case hang from the painter behind the thwart.
The path swerves through the woods in gentle curves, so while its entrance and its end at the ponds are separated only by an eighth of a mile, the view ahead and behind is veiled by trees and brush in subtle variations of green. The sound of cars rushing past the trailhead was muffled into silence by the leaves until the crisp grating of gravel underfoot was the only sound. I knew from the satellite photos that residential streets run parallel to the path and there are houses only 50 yards away on either side of it, but they were hidden by a thick wall of cedars and salmonberry and as easily forgotten as if they had been miles away.
The trail led to the east side of the south pond at one of the few breaks in the brush at the water’s edge. Dead tree branches in the water with sharp broken ends kept me from trying to launch here. I continued my portage north and took the path along the 10’-wide strip of high ground that separates the ponds. I emerged from the woods and walked along the edge of the soccer field where my daughter had played some 15 years ago, then back into the woods on the east side of the north pond.
Thornton Creek trickles into the north pond after traveling from its source at Ronald Bog, a mile to the north, flowing through underground pipes for almost half of that distance. The creek approached the pond silently—its water so thin that it took the contours of the pebbles beneath it—and made its last bend around a Medusean tangle of soil-bare roots fanned out from a quadruple-trunked maple. I set FAERIE at the water’s edge and pulled her across the shallow of pale grey sand at the creek’s mouth.
I set out on my circumnavigation of the north pond on shallow water, careful to keep the tip of the paddle from fouling in the long strands of weeds on the bottom. The stroke I use is one I learned watching short movies filmed in Wales and Ireland in the 1930s. Instead of figure-eight sculling with the blade continually in the water, I slip the edge of the blade in from one side, pull it straight back, and then slip it out to the same side. With the blade slightly angled to create lift, the stroke provides propulsion through all three phases.
The shore of the north pond was crowded with lush plants either rising up from the still water or growing down into it. This web of pale-green willows dip into reflections made painterly by FAERIE’s wake.
At the south end of the north pond, I found the footbridge I’d crossed on my portage between the ponds. From the water side, its side fences were obscured by brush and the passage under it was blocked by a tangle of slender interlocked branches. To get to the south pond I’d have to portage.
There was no other break on the north pond’s perimeter, so I paddled FAERIE ashore on the same spot where I’d launched her. I made the portage around the north pond, completed a loop on foot, and continued on the path around the south pond. It was narrower and not so easily walked. Tree trunks were closer together and branches were lower; carrying the coracle, I took up almost as much room as a sheet of plywood and had to slip sideways and duck down to get through.
I found just one spot on the south pond where I could launch FAERIE. In between bracken ferns there was a 2′ drop-off where I could step into the water and lift FAERIE down after me.
Although the south pond is separated from its twin by a brushy berm no wider than a parking space, it had an entirely different character. The plants along the water’s edge were not growing in and out of one another, elbowing for space, as they were on the north pond, but distinct from one another, as if planted and tended to by a gardener. Cottonwood trees towered over the pond to the east and west, and its south end was spanned by a palisade of hemlocks with scaly grey-brown bark dusted with powdery green moss.
On the north side, long slender leaves of water iris rose in unfinished parabolic arches from patches of duckweed.
FAERIE, with her blunt square bow, can’t keep ahead of her own wake, and the silky corrugated ripples ahead of her turned the reflections of branches hanging over the water into patterns like those of combed marbled paper.
Blackberry brambles were in bloom and their berries were small and green, weeks away from turning crimson, a month from black. I doubt anyone has ever picked the berries here. By September they would have lost their firmness and their flavor and begin falling into the pond.
After I completed my loop of the south pond, I lifted the coracle to the clearing at the water’s edge and took a break for lunch. I’d only seen one person that morning, a woman jogging the path at the western entrance to the park, and my lunch was uninterrupted. Where I’m sitting in this photo is only 250 yards from the nine lanes of Interstate 5, the West Coast’s main thoroughfare. The noise of cars and trucks was so sifted by the woods around the ponds that I could easily imagine it as being the susurrus of a breeze shaking the leaves of the alders, cottonwoods, and willows. To my left, across the root-laced path, is a swamp that must have been the twins’ sibling until the press of plants surrounding tightened their perimeter and closed over it.
After lunch I packed up, strapped FAERIE to my back and threaded my way through the woods to my truck.
FAERIE and I didn’t travel far that morning, only a third of a mile on the water, and just shy of a mile if you add the portages, but, in a time when it is hard to escape the worrying news and devastating consequences of a world upended, it was far enough.
The faerings of western Scandinavia were the everyday workhorses that coastal people used for commuting, fishing, and carrying light cargo. Built by tradition and eye, the clinker-built double-enders were formed from three to four wide strakes supported by just a few frames. The narrow hulls rowed well, and the ample reserve buoyancy given by full and round midsections provided capacity for cargo and stability for sailing. The gracefully upswept bow and stern were necessary features along the rough seas of the North Atlantic coast.
When Australian-born, Scotland-based boat designer Iain Oughtred was commissioned to design a small faering based on a small scale model, he studied the type and designed a faering of his own. The end result was his Elf, a mini faering just 15′ long and designed for glued-lap plywood construction, with the most functional and yet simple of hull forms, a tribute to the hundreds of years of evolution of the traditional craft. Later came the stretched Elfyn. At 16′ 6″, it is more like the original faerings, long and lean.
Mats Vuorenjuuri
Elfyn is built upside down over plywood or MDF molds. With just three wide strakes, the hull takes shape quickly, and once the planking is done, the outer keel and stems are glued in place.
Last summer, my apprentice Kalle Pajusalo and I built an Elfyn. Having previously built an Elf, I found the building process straightforward and rewarding. The seven sheets of detailed plans include full-sized patterns for the molds in lieu of offsets—so there is no need to loft the hull—as well as for the stems, frames, rudder, and daggerboard. With the plans Iain provides some basic instructions on tools and build process and a full list of materials. The hull has only three wide strakes, which are supported by two laminated main frames and two smaller half-lapped fir frames, called rangs, set at an angle in the bow and the stern. The plans give three options for the planking plywood: 6mm mahogany, 7mm larch, or 9mm okoume. Lighter hardwoods—elm, Robinia (locust), or pitch pine—are recommended for the keel, stems, and frames. We chose to use okoume plywood for the planks and tight-grained Douglas-fir for the laminated frames and keel and local yellow pine for thwarts and, for the floorboards, pine cross-laminated timber (CLT), a material like plywood but with much thicker laminates.
Once the inner stems have been laminated, they are installed over the molds and glued to the keel. We chose to laminate the two main frames in place, clamped to blocks bolted to the molds. All but the garboard planks for an Elfyn need two scarfs to get the length required. We used narrow strips of fir screwed together to transfer forms from the hull on the plywood boards. The sides of the molds can be used as a guideline when beveling the planks. Once the planking begins, with just three wide strakes, the hull takes shape swiftly. The plank lands are beveled to accept the next strake, using the molds as guides to the amount of bevel required. The plans don’t mention fiberglass sheathing for the planking, and glued-lapstrake plywood construction generally creates a stiff-enough hull. When building an Elf for himself, Iain chose to use larch plywood imported from Germany and treated the finished hull with oil only. If you wish for a more maintenance-free surface, two or three coats of clear epoxy will protect the wood from the elements. After the epoxy coating, we covered the exterior with two layers of epoxy primer, followed by a two-part polyurethane paint for a relatively hard and abrasion-resistant surface. The epoxy-coated interior was sanded smooth and given three coats of Sikkens Cetol clear wood stain, which I have found to work well and to give proper and easily maintained protection against sunlight.
Rami Salle
Under oars, the Elfyn slides effortlessly with proper longitudinal trim. Rowing alone, some ballast, about 20 to 30 lbs, put where it’s needed, whether in the bow or stern, will keep the keel level.
It was only after turning the hull over that we truly realized we were building a boat significantly bigger than an Elf. The difference in length is only 1-1/2′ between an Elf and an Elfyn, but the beam and depth are also greater, more than enough to give the two boats different characteristics. Elf is small and handy, while Elfyn is a more substantial boat on shore and on the water. I think Elf is best suited for sailing or rowing solo or occasionally with a friend, while Elfyn is better for two, or occasionally three people. As Iain himself puts it, Elf is less of a handful.
Elfyn can be rigged with a sprit sail or balanced lug. We chose to use a 62-sq-ft lug sail. With the sprit rig, the plans call for a separate mast partner attached to the gunwales while with the balanced lug the partner is integrated in the forward thwart. There’s no mention of shrouds, but as the mast bury is quite small, 12″ for an 11′ mast, we decided to use a rope shroud on one side and the halyard on the other. The plans include an option for buoyancy compartments, enclosed under low decks in the bow and stern.
Rami Salle
The centerboard case is located a bit off-center, alongside the full-length keel. If you choose to install the daggerboard, its trunk will take up space in the middle of the boat. On the after edge of the forward thwart you can see the cleats we added, one for the rope shroud and the other for the halyard, doubling as the other shroud. Another wooden cleat was installed in the after edge of the center thwart for the sheet.
The leading edge of the rudder follows the curve of the stern and extends somewhat under the hull. The plans provide one option for traditional pintles and gudgeons and another for a long curved rod that the rudder fittings slide on, up for rowing—with the blade above the water—or down for sailing. We have used the traditional approach, but when installing the rudder gear, one should be careful not to have too much of the rudder surface in front of the turning axis, as this will make the rudder too balanced and provide limited feel. After sailing Elfyn the first time, I had to cut a small piece from the forward end of the rudder to make it less prone to turning by itself. The Norwegian push-pull tiller goes well with the character of these boats, and you also benefit from the possibility to steer even from the middle thwart, using the 5′ tiller.
On the water, Elfyn feels tender while boarding or moving about but is steady when you sit down for rowing or sailing. For sailing, sitting on the floorboards between the thwarts lowers the center of gravity, and then the boat is forgiving, heeling calmly once the wind picks up. The floorboards in the middle of the boat would be a sweet spot for the passenger, too, but the space is taken by the daggerboard case, which is installed a bit off center alongside the keel. Sitting in the forward thwart, the passenger has to duck under the boom during tacks and move swiftly to the windward side.
Rami Salle
For a sail-and-oar boat, the balanced lug rig is a simple and powerful choice. Reefing a lugsail is more convenient than the sprit rig and the performance upwind is better. Once you lower the sail, you have no sail dragging in the wind as you switch to rowing and, if you like, bringing the mast down is easy.
Elfyn sails very well without the daggerboard, even tacking into the wind. When returning to our launch ramp against a light headwind, I raised the daggerboard and Elfyn kept on going steady, with only a slight increase in leeway, and we had no trouble tacking upwind the last quarter of a mile. The faering’s moderate V-shaped hull and full-length, 2″-deep keel give it outstanding ability to sail even upwind.
Rowing an Elfyn singlehanded, you feel the bigger and heavier hull compared to an Elf, but still it is easy to get it up to speed and maintain 3 to 3.5 knots. The keel gives it excellent tracking and there is very little leeway while rowing with the wind on the beam. Turning will take some time and space, and you might need to back with the other oar in tighter spots. While an Elf could easily feel overpowered by two rowers, Elfyn benefits more from the help of a second rower. With both boats, pay attention to proper longitudinal trim; if the stern or bow is overloaded, you will immediately feel the extra drag.
Faerings have a good reputation for taking care of themselves when the going gets rough, borne out by Iain’s experiences rowing through surf and mine sailing an Elf in challenging conditions. In very strong winds, the extreme lightness and upsweeping bow and stern of Elfyn will have an effect on the boat and make rowing hard and unpleasant work. Some water-bag ballast or a load of cargo for cruising should help. The lightness has one drawback when sailing, too: sailing upwind in waves, the lack of momentum is bound to get you caught in irons if a wave hits the light hull during a tack. Downwind, lightness is a desirable feature and Elfyn will surf down the waves, occasionally exceeding hull speed.
Using inflatable beach rollers, it is fairly easy to get Elfyn rolled out of the water on a beach. For camp-cruising, hauling the boat ashore is a very practical feature; you do not have to worry about wind shifts or changing wave conditions. When sailing, the rollers are tied under the thwarts and serve as emergency buoyancy.
Iain’s faerings are easy to handle while launching and transporting and graceful, excellent performers under oar and sail. If you decide to build an Elfyn, you are in for some remarkable times on the water in a boat loaded with character.
Mats Vuorenjuuri is the father of three and an entrepreneur, making a living in graphic design, photography, and freelance writing. He is currently becoming a boatbuilder as well, offering boatbuilding and maintenance services through Nordic Craft. In recent years he has discovered the simplicity and joy of small boats after sailing various types including sail-training schooners. He wrote about cruising the Finnish coast in his Coquina in our May 2016 issue and about a Lakeland Row in January 2017.
Elfyn Particulars
Length: 16′ 6″
Beam: 4′ 9″
Sail area: 67 sq ft
Weight: 180 lbs
Construction time: 240 hours
Crew: 4
Plans for the Elfyn are available from The WoodenBoat Store for $225 USD and from Oughtred Boats for $244.39 AUS. For kits, see Oughtred Boats.
Is there a boat you’d like to know more about? Have you built one that you think other Small Boats Magazine readers would enjoy? Please email us!
The Guider, a new 18′ 7″ expedition boat from Chesapeake Light Craft (CLC), has been a development project for CLC’s designer, John Harris, and John Guider, a professional photographer and small-boat adventurer based in Nashville, Tennessee. The two have known each other now for 10 years and had previously collaborated on the Skerry Raid, a slightly beamier and partially decked version of CLC’s 15′ Skerry sail-and-oar boat. John G. used the prototype to travel the 6,500-mile “Great Loop” of the eastern United States. The Guider was designed and built for John Guider’s solo of the 2019 Race to Alaska (R2AK), a 750-mile human- and wind-powered race from Port Townsend, Washington, to Ketchikan, Alaska. Compared with the Skerry Raid, the Guider design features more storage space and comfortable sleeping accommodations, and has the seakeeping ability to push harder in rough and windy conditions.
Brian Forsyth
For approaching the beach, the centerboard is retracted and the rudder is lifted from its trunk.
To prepare for his summer 2020 expedition on Lake Superior, John G. brought his Guider to the CLC shop in Annapolis, Maryland, to be outfitted with a new cockpit tent arrangement. While the boat was in Annapolis, I was given the opportunity to sail it. A longtime beach cruiser and an aficionado of shallow-draft boats suitable for camp-cruising and sleeping aboard, I was delighted.
The Guider’s hull has fine ends and a relatively narrow waterline for easy rowing. The topside planks flare amidships to provide buoyancy and power under sail. The wherry-style plank keel is narrow but likely just wide enough to keep the boat upright on a beach or mudflat. The centerboard is a slightly profiled piece of 1/4″ aluminum plate, simple and tough. All spars are hollow and shorter than the boat for more compact trailering. The single balanced lugsail is 125 sq ft, about as big as a singlehander would want, providing plenty of oomph. Lazyjacks make sail handling manageable; the sail goes up and, more importantly, comes down in an instant. When lowered, the sail bundle is already mostly out of the way for rowing, and the lazyjacks can be snugged up to brail it completely out of the way, safely above head height. Two deep reefs are each set up with single-line reefing. All reefing lines and cleats are right where they should be on the starboard side of the boom, easy to use from a safe position amidships.
The Guider has decks fore and aft and side decks, making the boat significantly more seaworthy than a fully open boat. The side decks may look wide enough to hike out on, but with oars stored along the side decks in their locks and some purpose-made chocks, the decks are not available for sitting. This is an acceptable trade-off, as The Guider’s hull shape, beam, and intended stores and ballast should preclude the need to hike out. And the ready availability of the oars is the best I have seen on any sail-and-oar boat.
Brian Forsyth
The interior has room on either side of the centerboard trunk for two to sleep comfortably. The aft end of the trunk supports a racing-style rowing seat. The boat has a dozen storage compartments and as many hatches for access to gear.
The defining design feature of The Guider, though, is its interior layout, optimized with 12 waterproof buoyancy compartments, most of which double as stowage for expedition stores with large, easy-to-operate plywood hatches. (The foredeck hatch has a large oval rubber kayak hatch cover.) The cockpit area is mostly a level space with just a small footwell set under the tiller. This makes for a quick transition to camp/sleep mode. I have slept, and attempted to sleep, in a lot of different small boats, and for an open boat, The Guider is as good as it gets. There are two spacious 6′ 6″-long sleeping flats, separated by the centerboard trunk and footwell. Nothing needs to be moved or reconfigured for sleeping. It can be as simple as rolling out a pad and climbing into a bivy bag in under a minute. In a few minutes more, you could rig a cockpit tent or sun shade.
Brian Forsyth
The rudder is housed inboard so it can be accessed more safely than a rudder mounted on the stern. The rudder is retracted here and the cassette that occupies the trunk when it is in use is visible.
The Guider’s rudder and tiller assembly is an elegant solution to an old problem. Traditional rudders on double-enders use either an overly long tiller or a long steering stick loosely coupled to a yoke mounted on the rudderhead. In either case, these stern-mounted rudders are difficult to retract or deploy (a potentially unsafe exercise in any kind of sea), and the tillers always seem to be in the way when you want to move around in the boat. The Guider’s rugged, retractable rudder slips through a dedicated trunk aft of the footwell. Above the rudder blade, the cassette, which the rudderpost pivots in, fills the well when the rudder is extended beyond the hull. It’s easy to deploy and remove the rudder from the safety of the cockpit. The rudder can be set halfway, with half the blade projecting, and left fixed as a skeg, for rowing. And the tiller pops up out of the way and clear of the boom with a simple bungee cord loop. Very slick!
After completing the design, crew at CLC built John G.’s boat, Guider #1, in 22 days. Yes, it will take you longer to build one. CLC sells Guider kits and components under a new group of designs called ProKits, intended for more experienced builders who don’t require step-by-step instructions. The construction manual, developed by CLC designer Dillon Majoros, consists of 38 full-color, richly detailed, 11″ x 17″ sheets and assumes the builder already has the skills required for stitch-and-glue construction, working with epoxy, filleting, and fiberglass sheathing. This project is a lot more complex than a plywood kayak, and while it could be built in a one-car garage, it wouldn’t be any fun. I would consider a two-car garage or similarly sized shop space a minimum workspace.
Currently the only way to build The Guider is from one of CLC’s kits. A full plan set will be available soon and will include a roll of full-sized paper templates for every wood part, so you cut them out from plywood sheets. Having built plywood boats from both kits and patterns, the precut kits are a no-brainer choice. As much as I love my high-end jigsaw, there are a lot of wood parts in this design. Let the computer and CNC cutter do what they can truly do better, more accurately, and much faster than you can.
Launching The Guider from a standard galvanized two-bunk trailer was a cinch at a ramp on the Severn River near Annapolis, although the trailer wheels were completely submerged to float the boat off. Prior to launching I had stepped the 30-ish-lb mast myself without difficulty and set up the running rigging and sail in its lazyjacks. For cruising, I think The Guider could be beach-launched with inflatable beach rollers; a strong crew would be an asset.
Ryan Kramer
The Guider has a single rowing station, so the second crew member can rest or attend to chores during lulls in the wind.
In a word, my overall impression of the boat’s performance under way was: “Easy.” With 300 lbs of crew (my daughter and myself) and 200 lbs of foam-wrapped lead ballast (called for in the plans) in the amidships storage compartments, the boat had an easy motion and became even more stable with the centerboard down. The Guider is easy to row, easy to sail, easy to switch between the two, easy to reef, and easy to beach. And easy is what I would want in an expedition boat, where conserving one’s energy is an important consideration.
Ryan Kramer
The 125-sq-ft balanced-lug sail has two lines of reef points. Under sail, with the board down, The Guider draws 36″.
Easy does not mean slow. The Guider could hold a GPS-measured 5-plus knots on any point of sail in moderate 10-knot breezes. It is a fun boat to sail, nicely balanced and responsive. The 3:1 mainsheet tackle is essential but enough to handle the big lugsail. There is something special about the way that sail pulls the boat on anything higher than a beam reach in a good breeze, like being lifted by a hot-air balloon. I have felt this before in catboats occasionally, at least until the weather helm made me aware how much I was fighting the laws of physics. But The Guider’s helm has a balanced “on-rails” feeling I normally associate with keelboats. I could control the boat with one finger on the tiller.
This is a “sit-in” or rather a “sprawl-in” boat. Without the need to hike out, I always felt secure at the helm in the roomy, deep cockpit with my feet in the footwell. With my daughter at the helm, the cleverly designed removable rowing seat, held in place with a single bolt and hand-friendly knob, was my preferred seat for serving as crew under sail. I could sit facing forward and tend the mainsheet. The racing-shell-style seat provides a comfortable rowing perch, with the footwell’s aft bulkhead providing rock solid foot bracing. I’d consider bringing along one or two small, inexpensive vinyl beanbag chairs, a secret comfort weapon for many small-boat cruisers.
Beaching The Guider and getting under way again was a piece of cake. The boat is easy to move under oars from the rowing position, whether rowing forward or backward, another benefit of the double-ended hull design. Under sail again, the 1/4″ aluminum-plate centerboard is an effective depthsounder and takes care of itself in the shoals.
There is no provision to add any sort of motor to The Guider, and it would be challenging and counterproductive to try. Thoughtfully designed to be a purely sail and oar boat, The Guider is best employed and enjoyed motor-free. If you are looking for a fully realized expedition-worthy craft that’s also a hoot to sail, I would highly recommend The Guider.
Brian Forsyth learned to sail as a kid at Navy sailing clubs in the U.S. and overseas. After his own 20-year Navy career as an aviation maintenance officer and a second career as an information technology consultant, he is now free to mess about in boats as much as he wants. A former coastal-kayaking instructor and keelboat racer, he now sails, paddles, and builds small boats in Solomons, Maryland. He enjoys camp-cruising Chesapeake Bay with his sailing buddies, the Shallow Water Sailors, and is a member of the Patuxent Small Craft Guild, a group of volunteers who work in the boatshop at the Calvert Marine Museum.

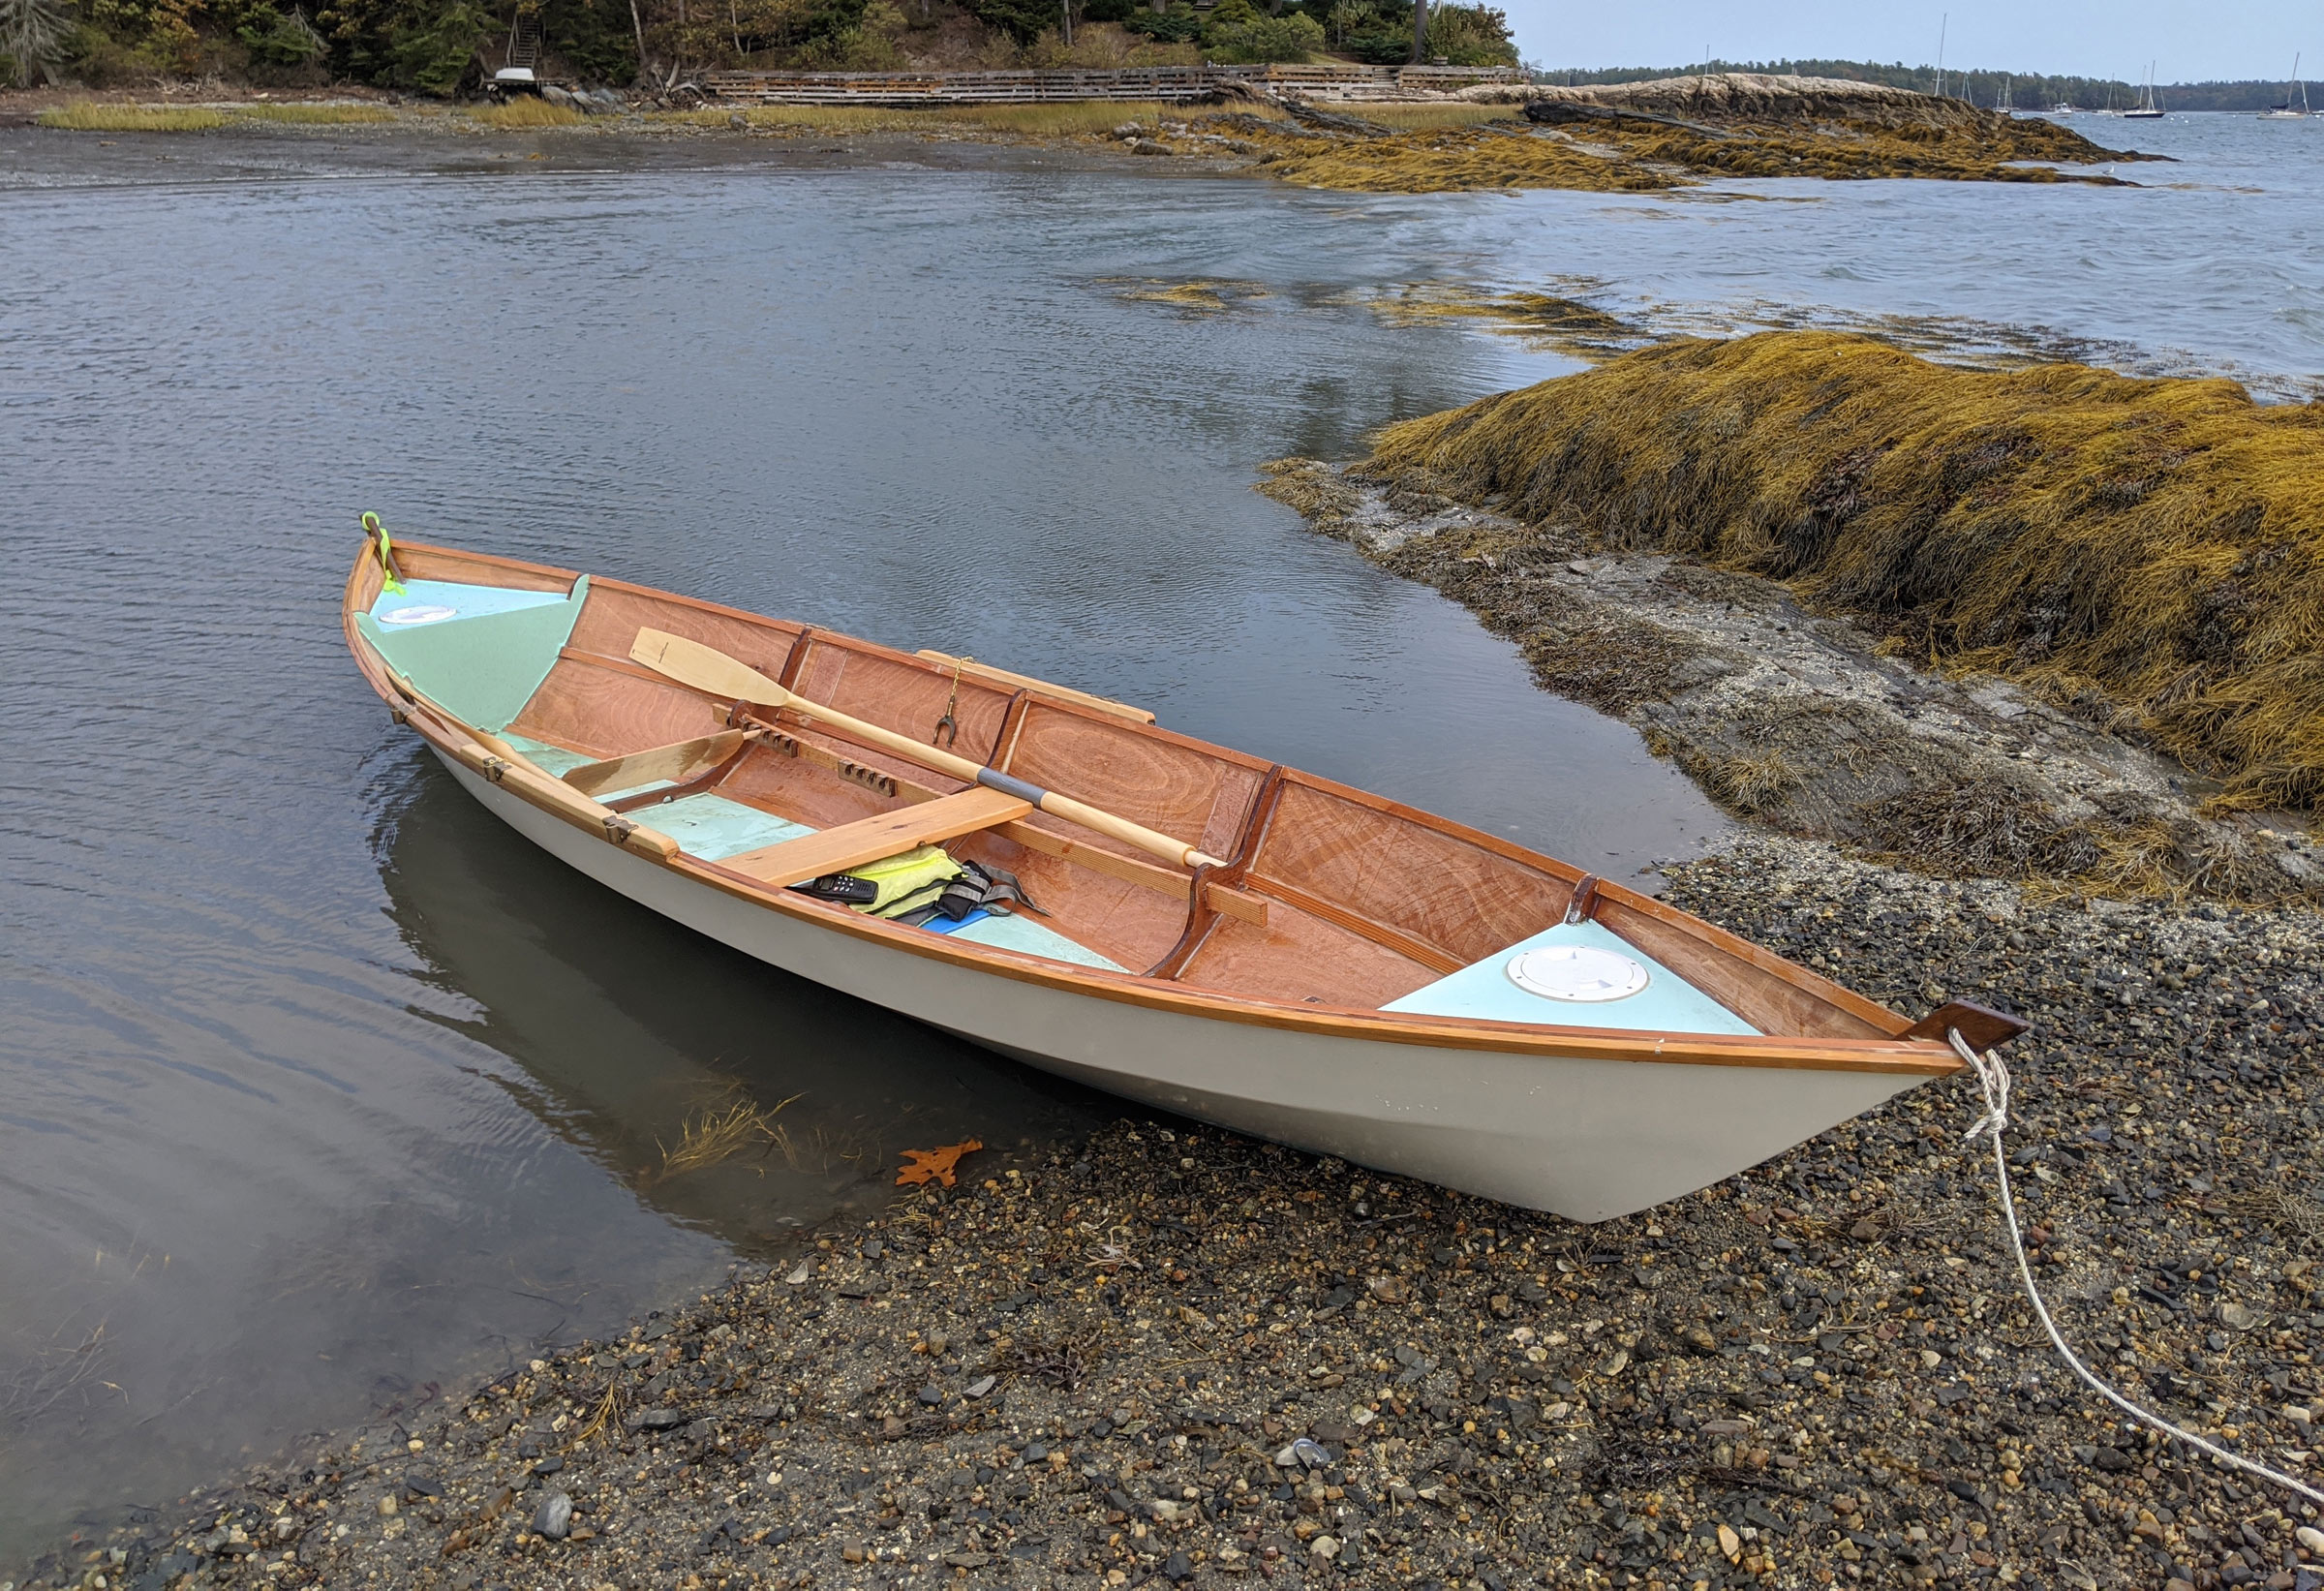 Christophe Matson
 Christophe Matson
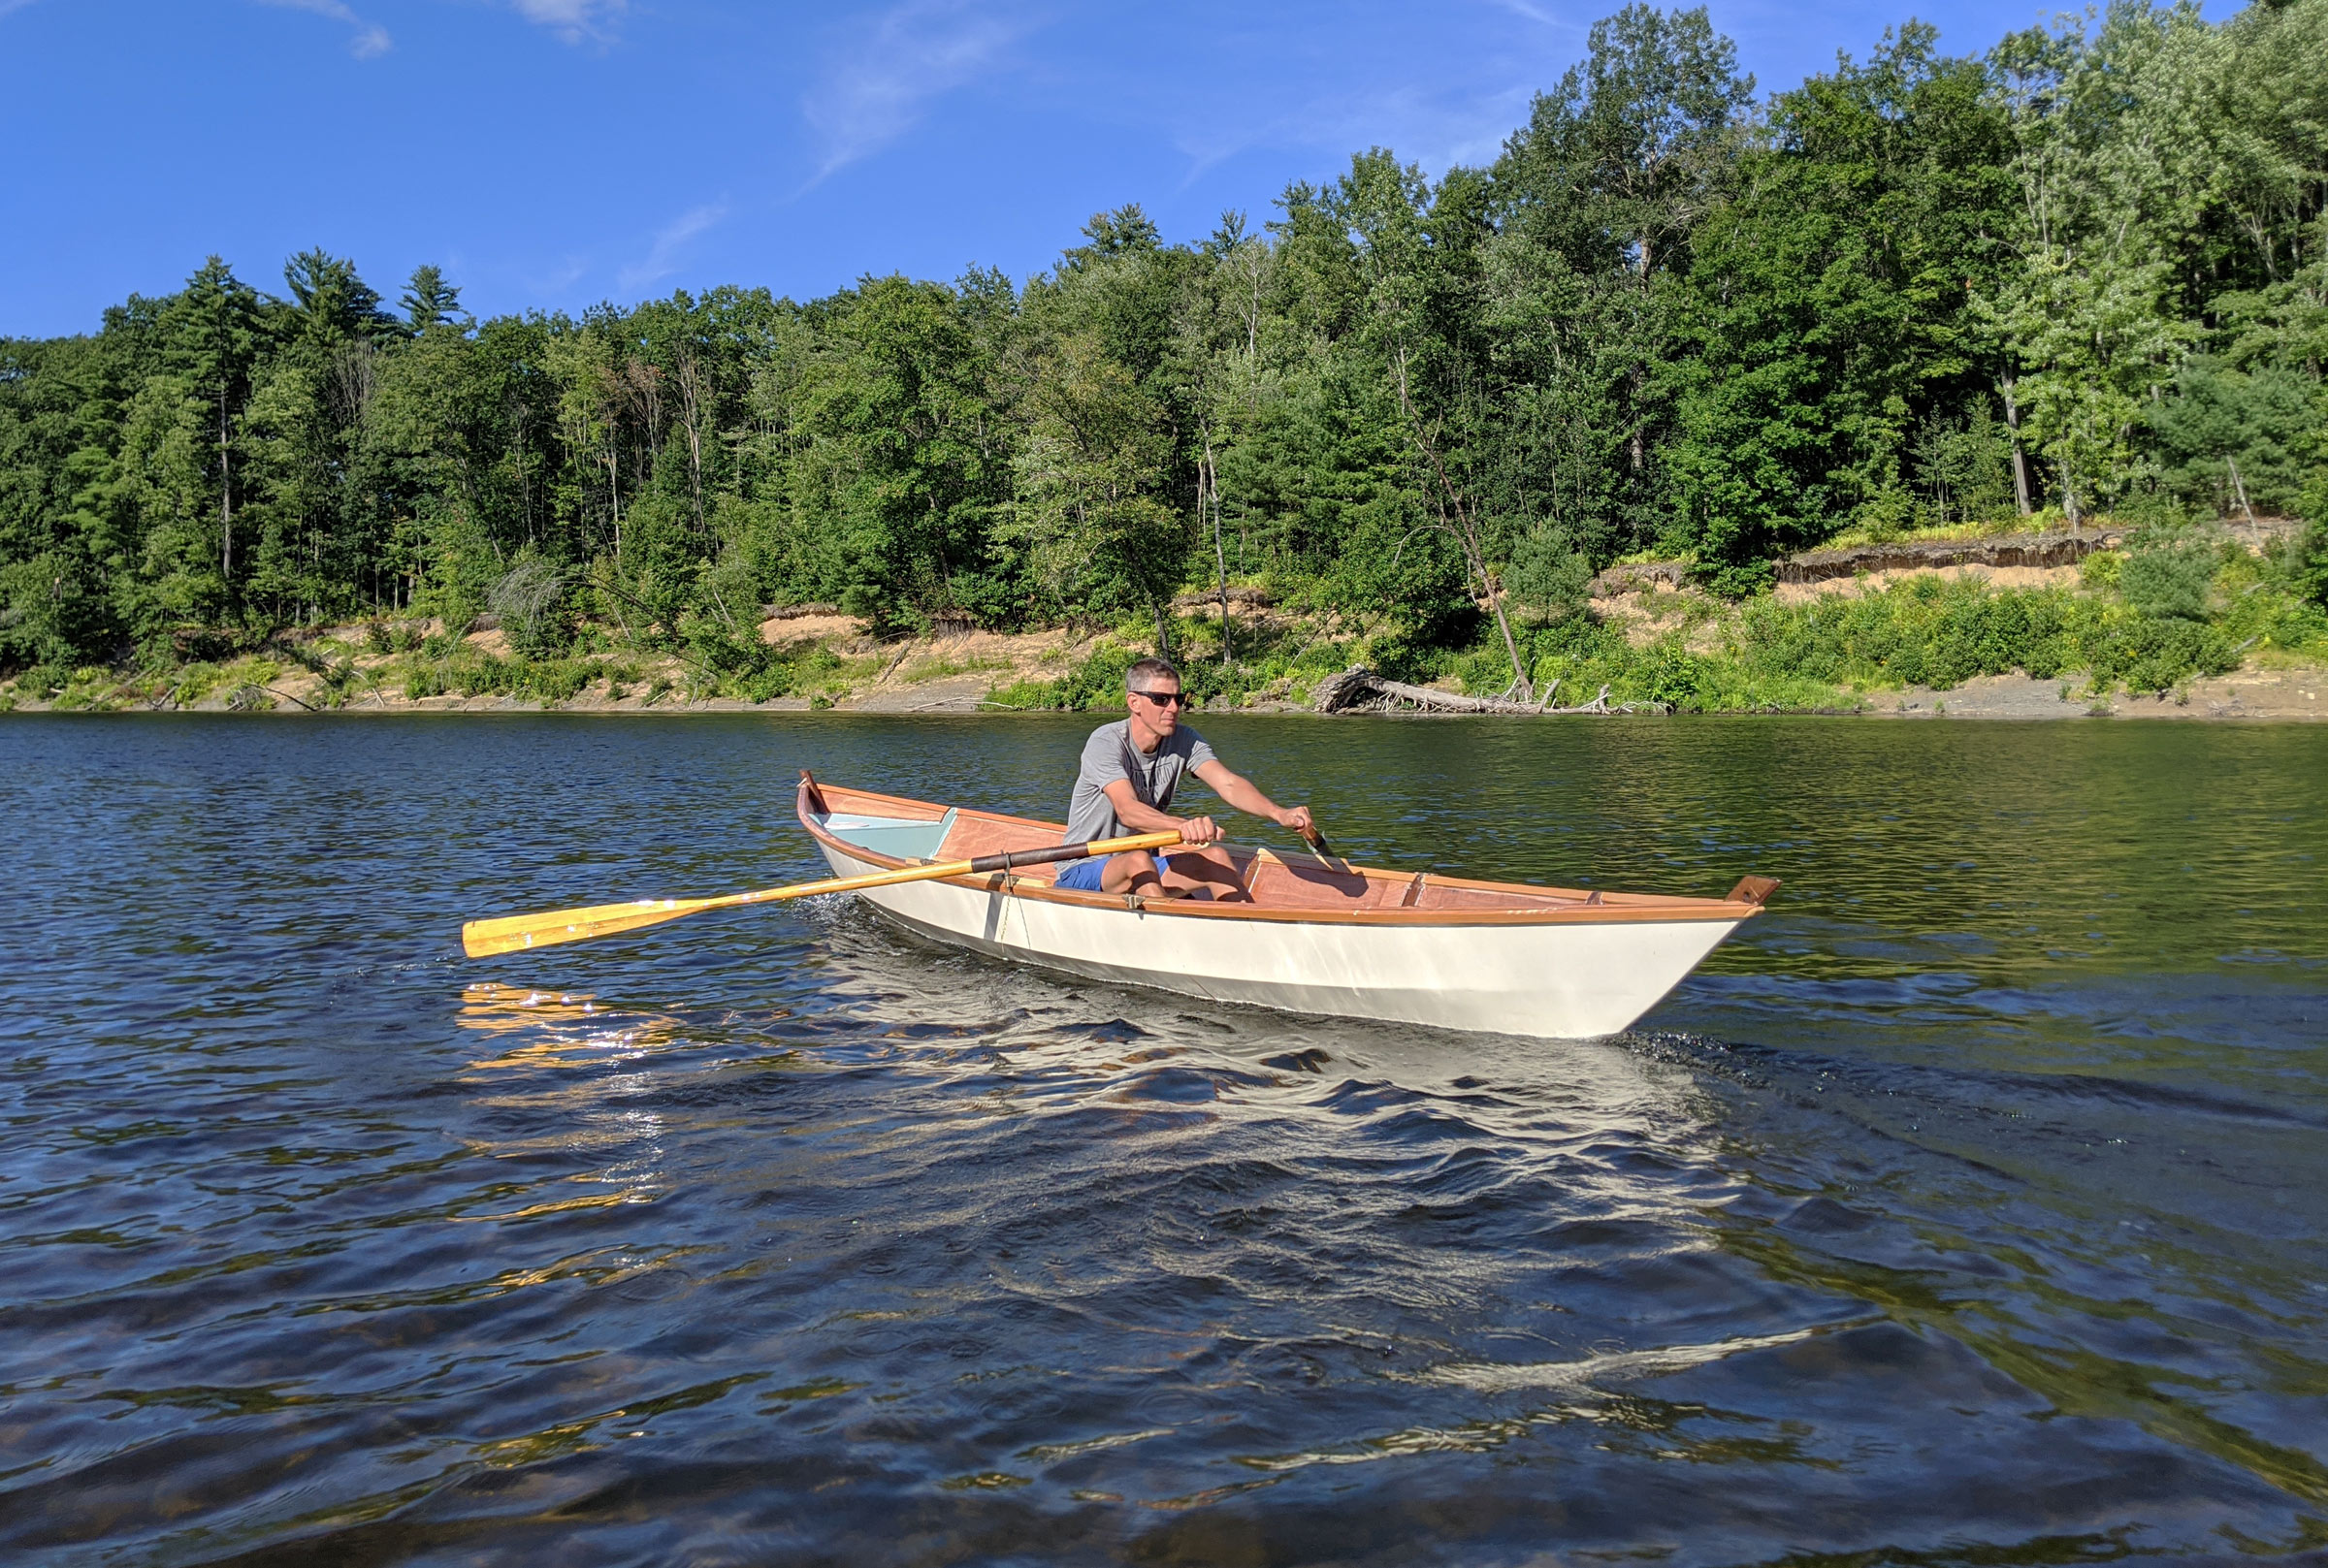 Allison Grappone
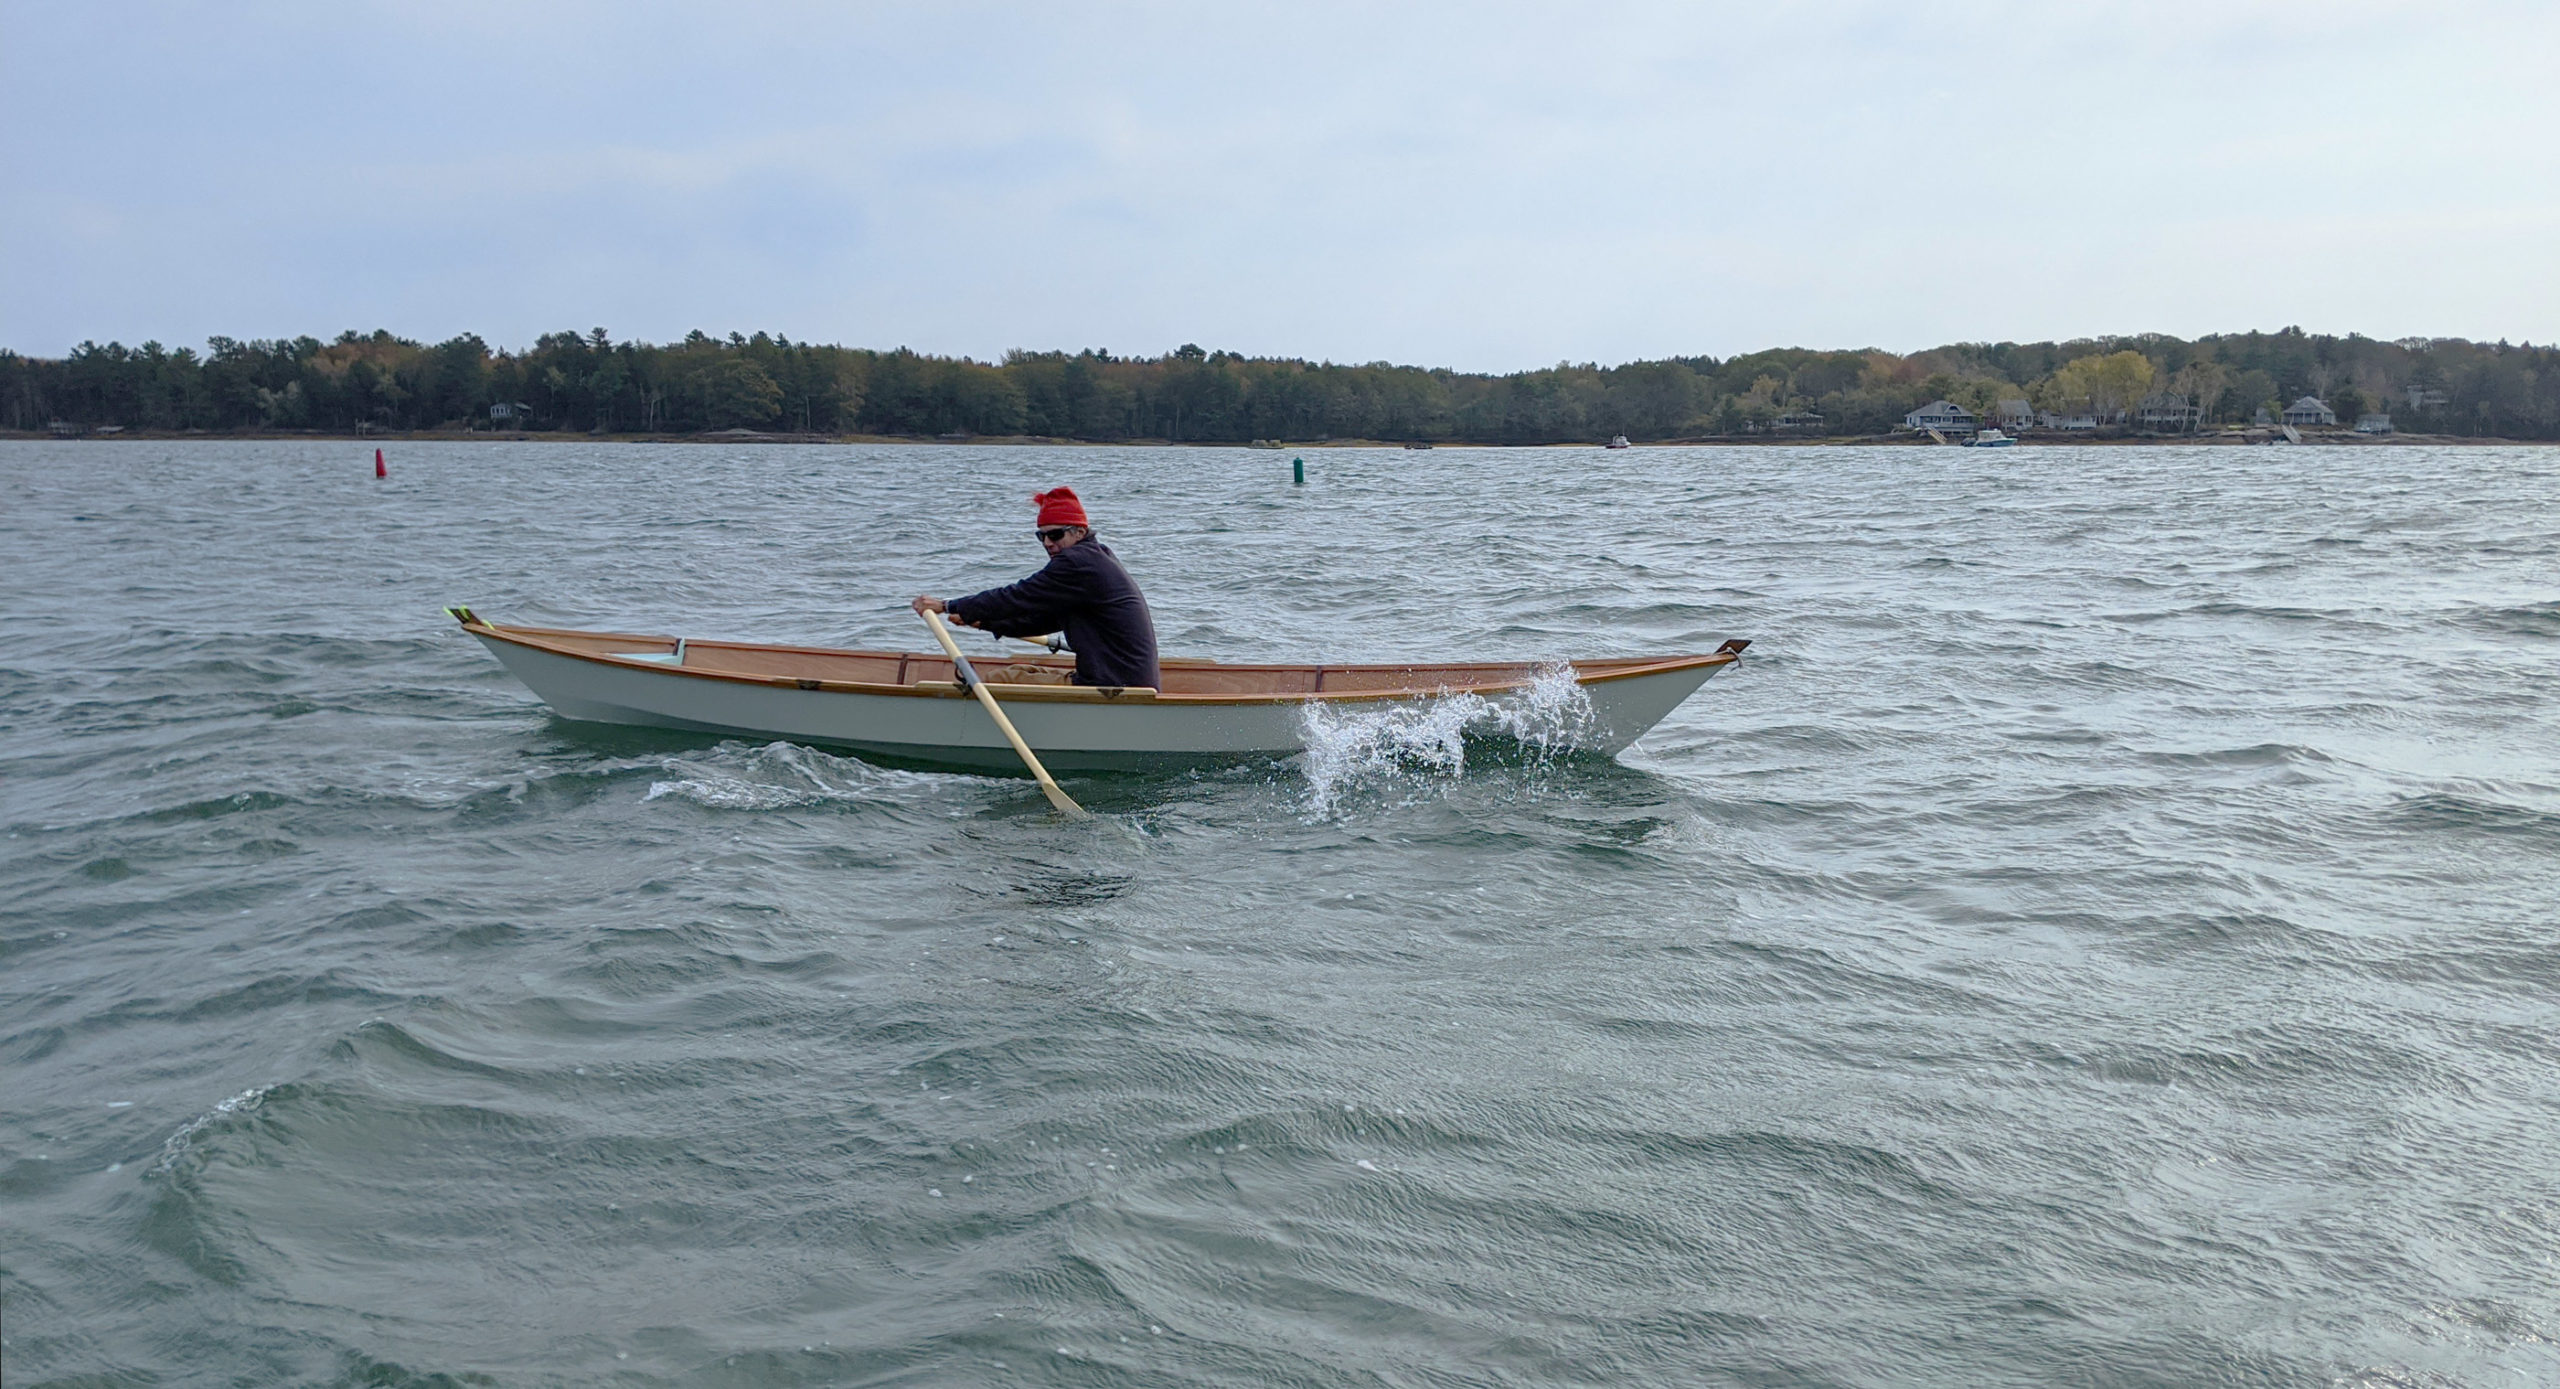 Allison Grappone
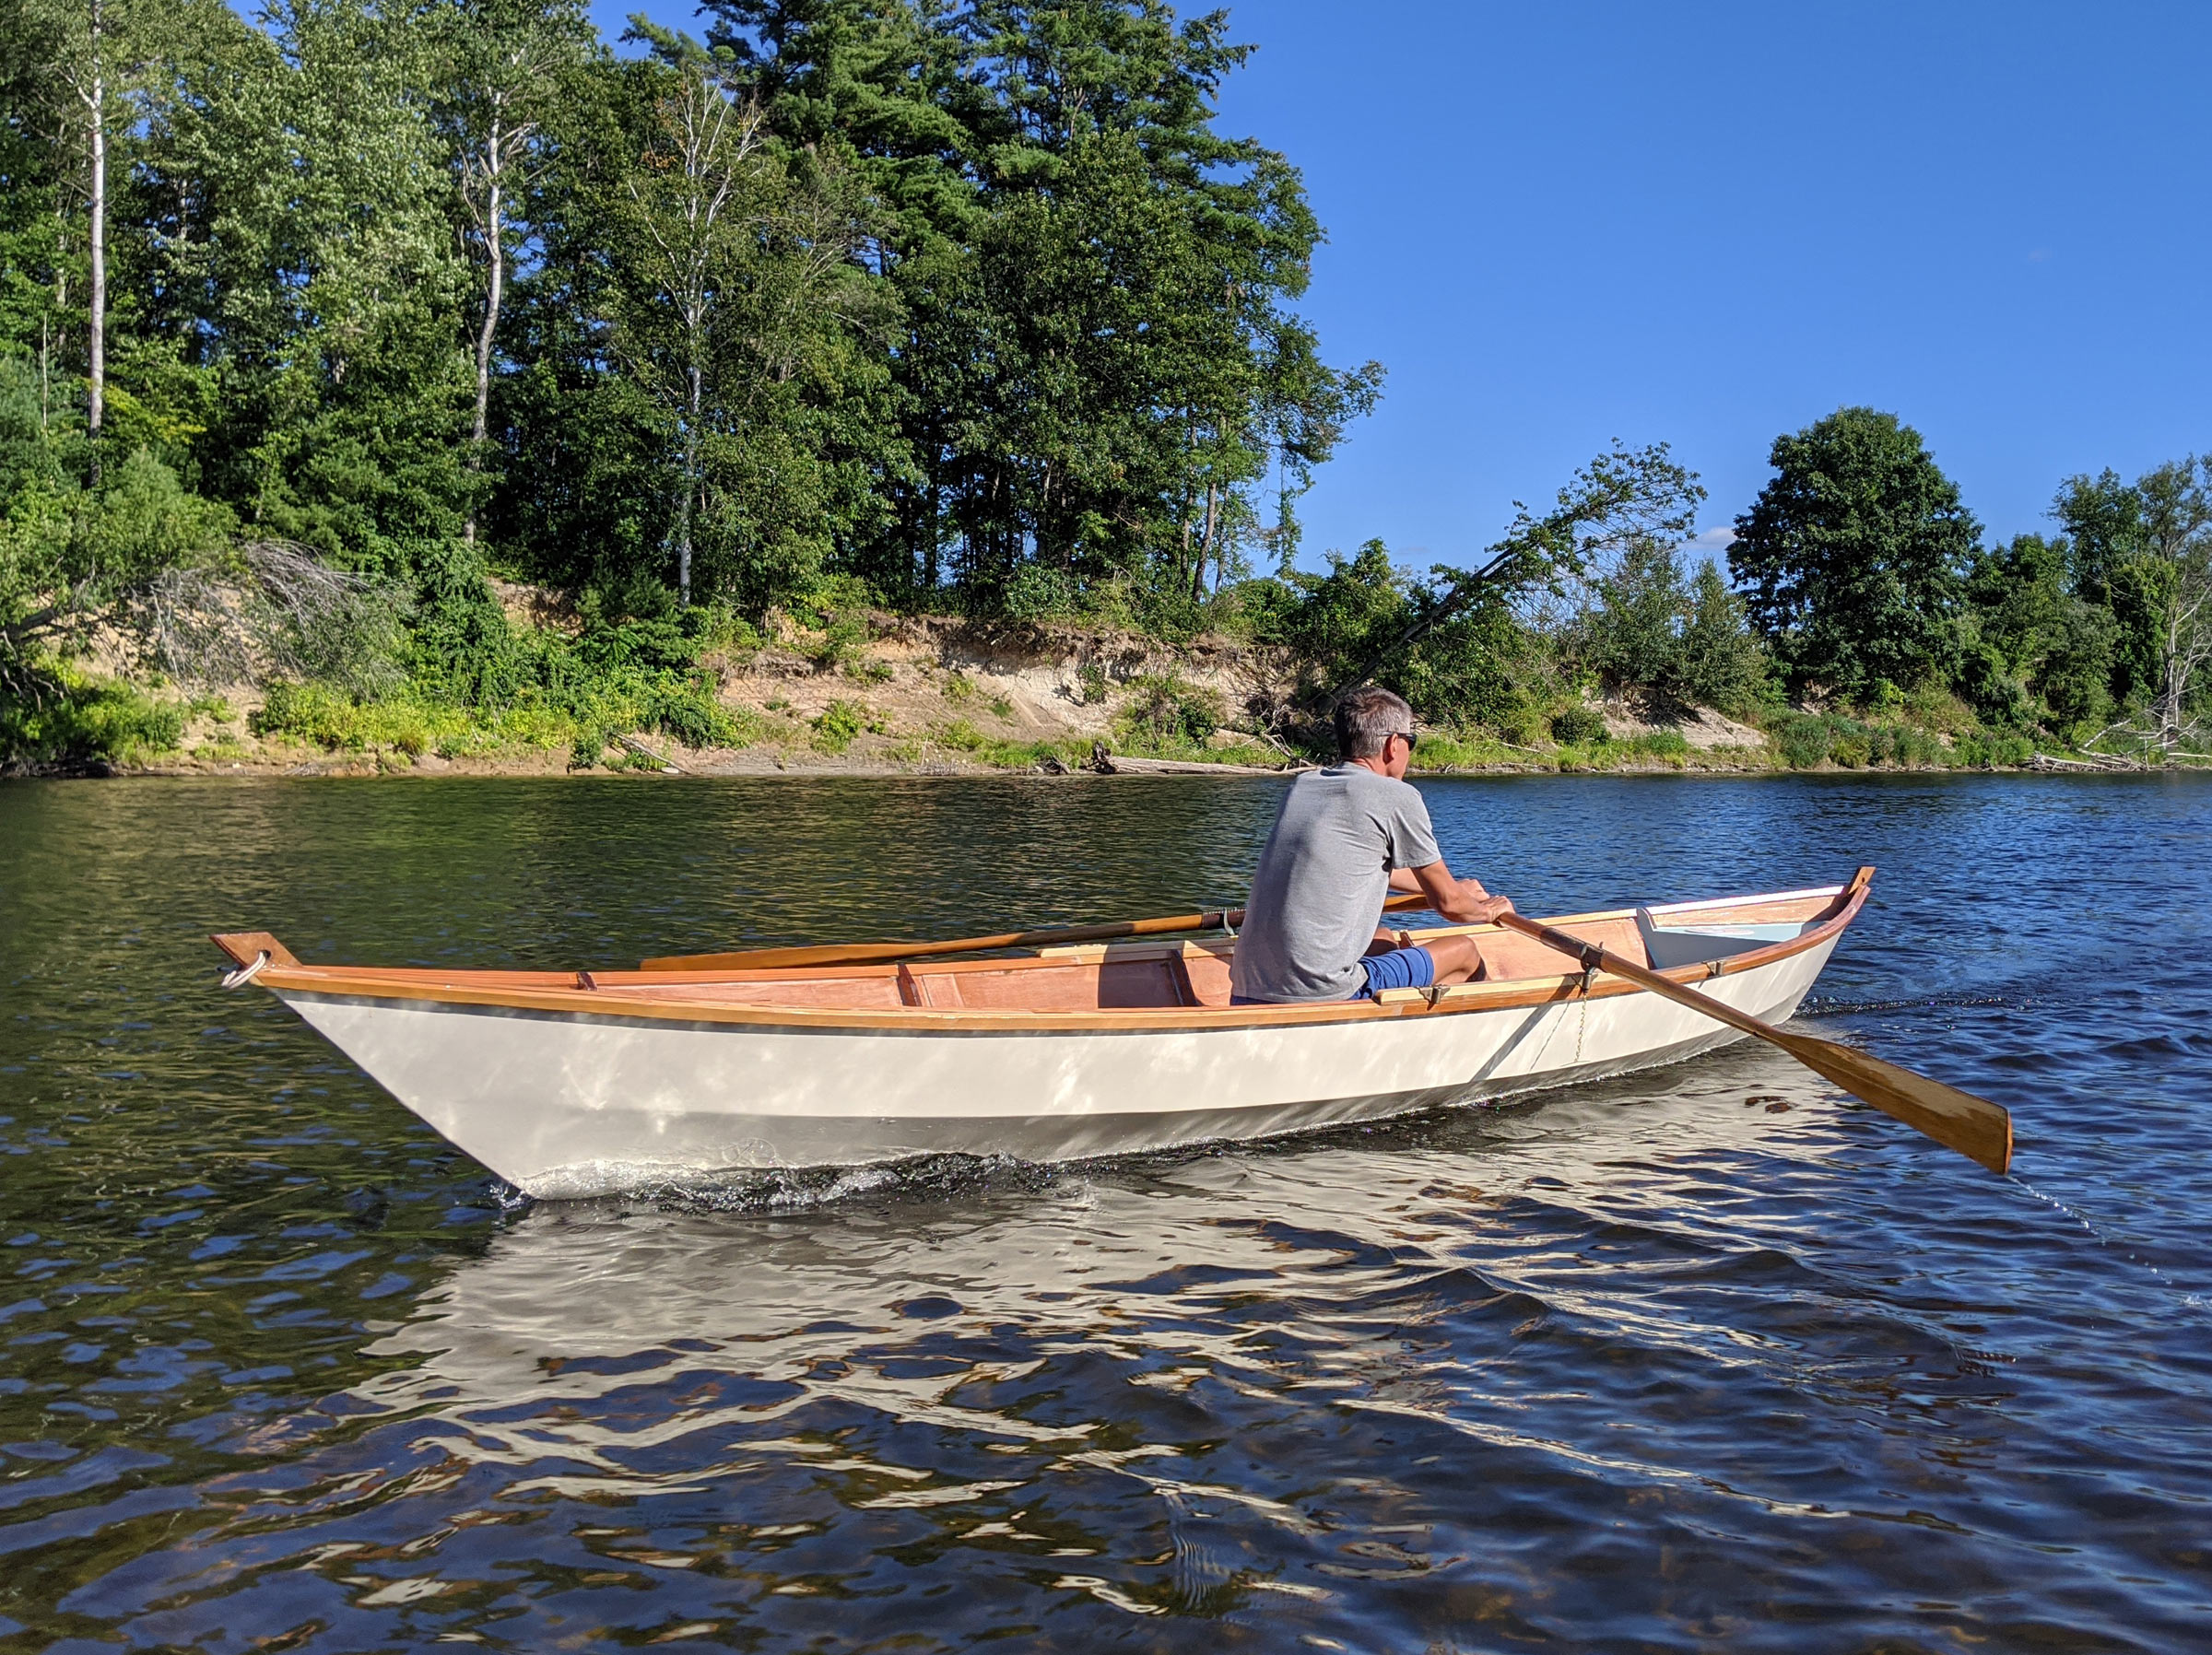 Allison Grappone