In 1953, German-born Hannes Lindemann had just begun practicing medicine in Liberia and had in mind to settle into a comfortable life as a doctor when he met Alain Bombard, a Frenchman and fellow physician, who had taken an interest in survival at sea. In the fall of the previous year, October 19 to December 23, Bombard sailed a 15′ Zodiac inflatable 2,700 miles from the Canary Islands to Barbados. Hoping to address issues that led to the poor survival rates of sailors who took to lifeboats during World War II, he intended to survive by living off what the sea provided and took few provisions. He had a net to gather plankton for food, and for drinking, he had a press for extracting water from the flesh of fish; he’d mix it with seawater to extend it. Lindemann, doubting some of the claims made by Bombard following his voyage, “decided to use my own body to experience the problems of the shipwrecked; problems of nourishment, keeping the body healthy, avoiding the dangers of the sea, and, ultimately, keeping the mind healthy.”
Lindemann’s first crossing of the Atlantic, made in 1955 in a 25′ dugout canoe, took 65 days, and while he had worked out solutions to many of the physical challenges, he had not solved the mental difficulties. “I had been in dire despair several times during the crossing. I had been on the verge of giving up, especially when I lost my rudder and the two sea-anchors. Consequently, I set out to prove that one can and must prepare mentally if one is to succeed in any extraordinary feat.”
The preparation for his experiment in survival included what he called Psycho-Hygiene Training to “anchor auto-suggestions deep in the subconscious so that they would automatically come to assist in difficult situations.” For six months he did mental exercises, reciting to himself: I’ll make it, Keep going west, and Never give up. “Thus, my subconscious was prepared to withstand all enticements of a more comfortable life.”
For a second crossing, Lindemann upped the ante by choosing an even smaller boat—a Klepper Aerius 17′ folding kayak—for the voyage. “I congratulated myself on having chosen a folding boat, for now, I would be able to relive exactly the feelings of a lonely castaway; I would share his sufferings, his hope and despair. I would, in fact, have to contend with even greater discomfort than a person afloat in a life raft of a plane or a ship’s lifeboat. By suffering to the utmost in the elements, I could test the durability of the human machine…”
Lindemann set out from the Canary Islands on October 20, 1956, in “a mood of complete self-confidence.” With his two sails raised and an outrigger providing additional stability, he had gone only 3 miles when a pilot boat approached him and ran over the kayak’s outrigger, breaking the paddle that supported the float. The long ordeal of preparing for the crossing had left him “limp, tired, and depleted,” but his inner voice began repeating “I’ll make it, I’ll make it” and rather than head back to the harbor to deal with the setback, he set his bow to the west and continued.
During his 72 days at sea in the cramped quarters of the kayak cockpit, Lindemann did indeed “suffer to the utmost.” Waves driven by a storm lasting several days capsized him twice. Both times he was rendered unconscious and only came to after he had surfaced. The first of those capsizes happened at night and he had to wait for the morning light to right the hull. For nine hours he clung to the upturned kayak in the dark, all the while being hammered by waves as high as 27’. “My spirit grew weak and seemed to want to leave my body, but…I’ll make it and Never give up broke through time and time again and enabled me to persist.”
On December 30, he reached St. Martin on the eastern edge of the Caribbean Sea, and stepped ashore on unsteady legs and weighing 54 lbs less than when he had started. He spent the night in a hotel, and the next morning got back into the kayak—Keep going west—to spend 50 hours sailing to St. Thomas in the U.S. Virgin Islands, where a group of his friends was waiting for him.
Dr. Lindemann signed the copy of LIFE that Peter Schwierzke gave me: “Chris from Hannes Sept. 3 Port Townsend”
Lindemann wrote about his two Atlantic crossings in Alone at Sea, which was first published in 1958 and republished in 1993. I was the editor of Sea Kayaker magazine at the time the book’s second volume was released, and I included a profile about Lindemann in the Fall 1993 issue. Shortly after that issue came out, I met Dr. Lindemann in 1993 at a sea-kayak symposium in Port Townsend, Washington. He was 71, a tall, slender figure in a black jacket, with his hair turning silver around the temples. I had with me a copy of his book and the July 22, 1957 LIFE magazine with his picture on the cover, both given to me by Peter Schwierzke, a Klepper importer and the friend of Lindeman who encouraged him to republish Alone at Sea. I introduced myself to him, and he kindly signed both the book and magazine. My time with him was brief, as he was walking to one of the lecture halls to give a presentation.
Peter Schwierzke
In 1993, while speaking at the sea-kayak symposium in Port Townsend, Dr. Lindemann was holding a copy of the Fall issue of Sea Kayaker magazine. We had given that issue to the attendees and in it was a profile about him.
Michael Collins, Sea Kayaker’s publisher, was more fortunate. He and a dozen other kayakers attending the symposium sat with Lindemann in an impromptu gathering and asked him questions about his crossings. Sea-kayak symposium goers are, as a rule, interested in equipment and techniques in the spirit of adventure, but he emphasized that neither of his crossings was a challenge simply for challenge’s sake, but motivated by a drive to learn things that might help people survive, to save lives. Michael had seen the LIFE article when he was a boy, and it was one of the influences that led him to build part of his career around sea kayaking. He recalls that meeting Lindemann almost 30 years after reading the article, and being in the presence of a man he had idolized from a young age did not leave him with a sense of awe, but rather with a feeling of calmness. To a person, everyone in that fortunate symposium group expressed the same feeling after meeting with Lindemann.
I spoke to Peter Schwierzke by phone recently about the time he spent with Lindemann. One of the first things he said when bringing up memories of his friend was, “when I think about talking to Hannes it calms me down.” Years ago, while he was in Sacramento, California, working as an importer and distributor of Klepper kayaks, he had a few quotations from Lindemann posted in his office where they would be regular reminders. One was Stress, eine selbst gewählte lebensform von leben oder leiden (Stress, a self-chosen way of life or suffering). “Hannes made a lifetime study of positive thinking,” Peter recalls. Lindemann wrote books on the topic: Autogenic Training (based on the method he used to prepare for his second crossing) in 1975, and two years later Anti-Stress Program: This is how you cope with everyday life.
Dr. Lindemann was once asked what was the most important thing he had aboard the kayak during his Atlantic ordeal. He didn’t hesitate to answer: “Optimism.” It’s a good piece of advice whether you’re crossing an ocean or just getting through your day.
Dr. Hannes Lindemann passed away on April 17, 2015 at the age of 92. The most recent edition of Alone at Sea, from Polner Verlag, is no longer in print but copies are available from internet sources. The full text of the 1958 edition is online at The Internet Archive.
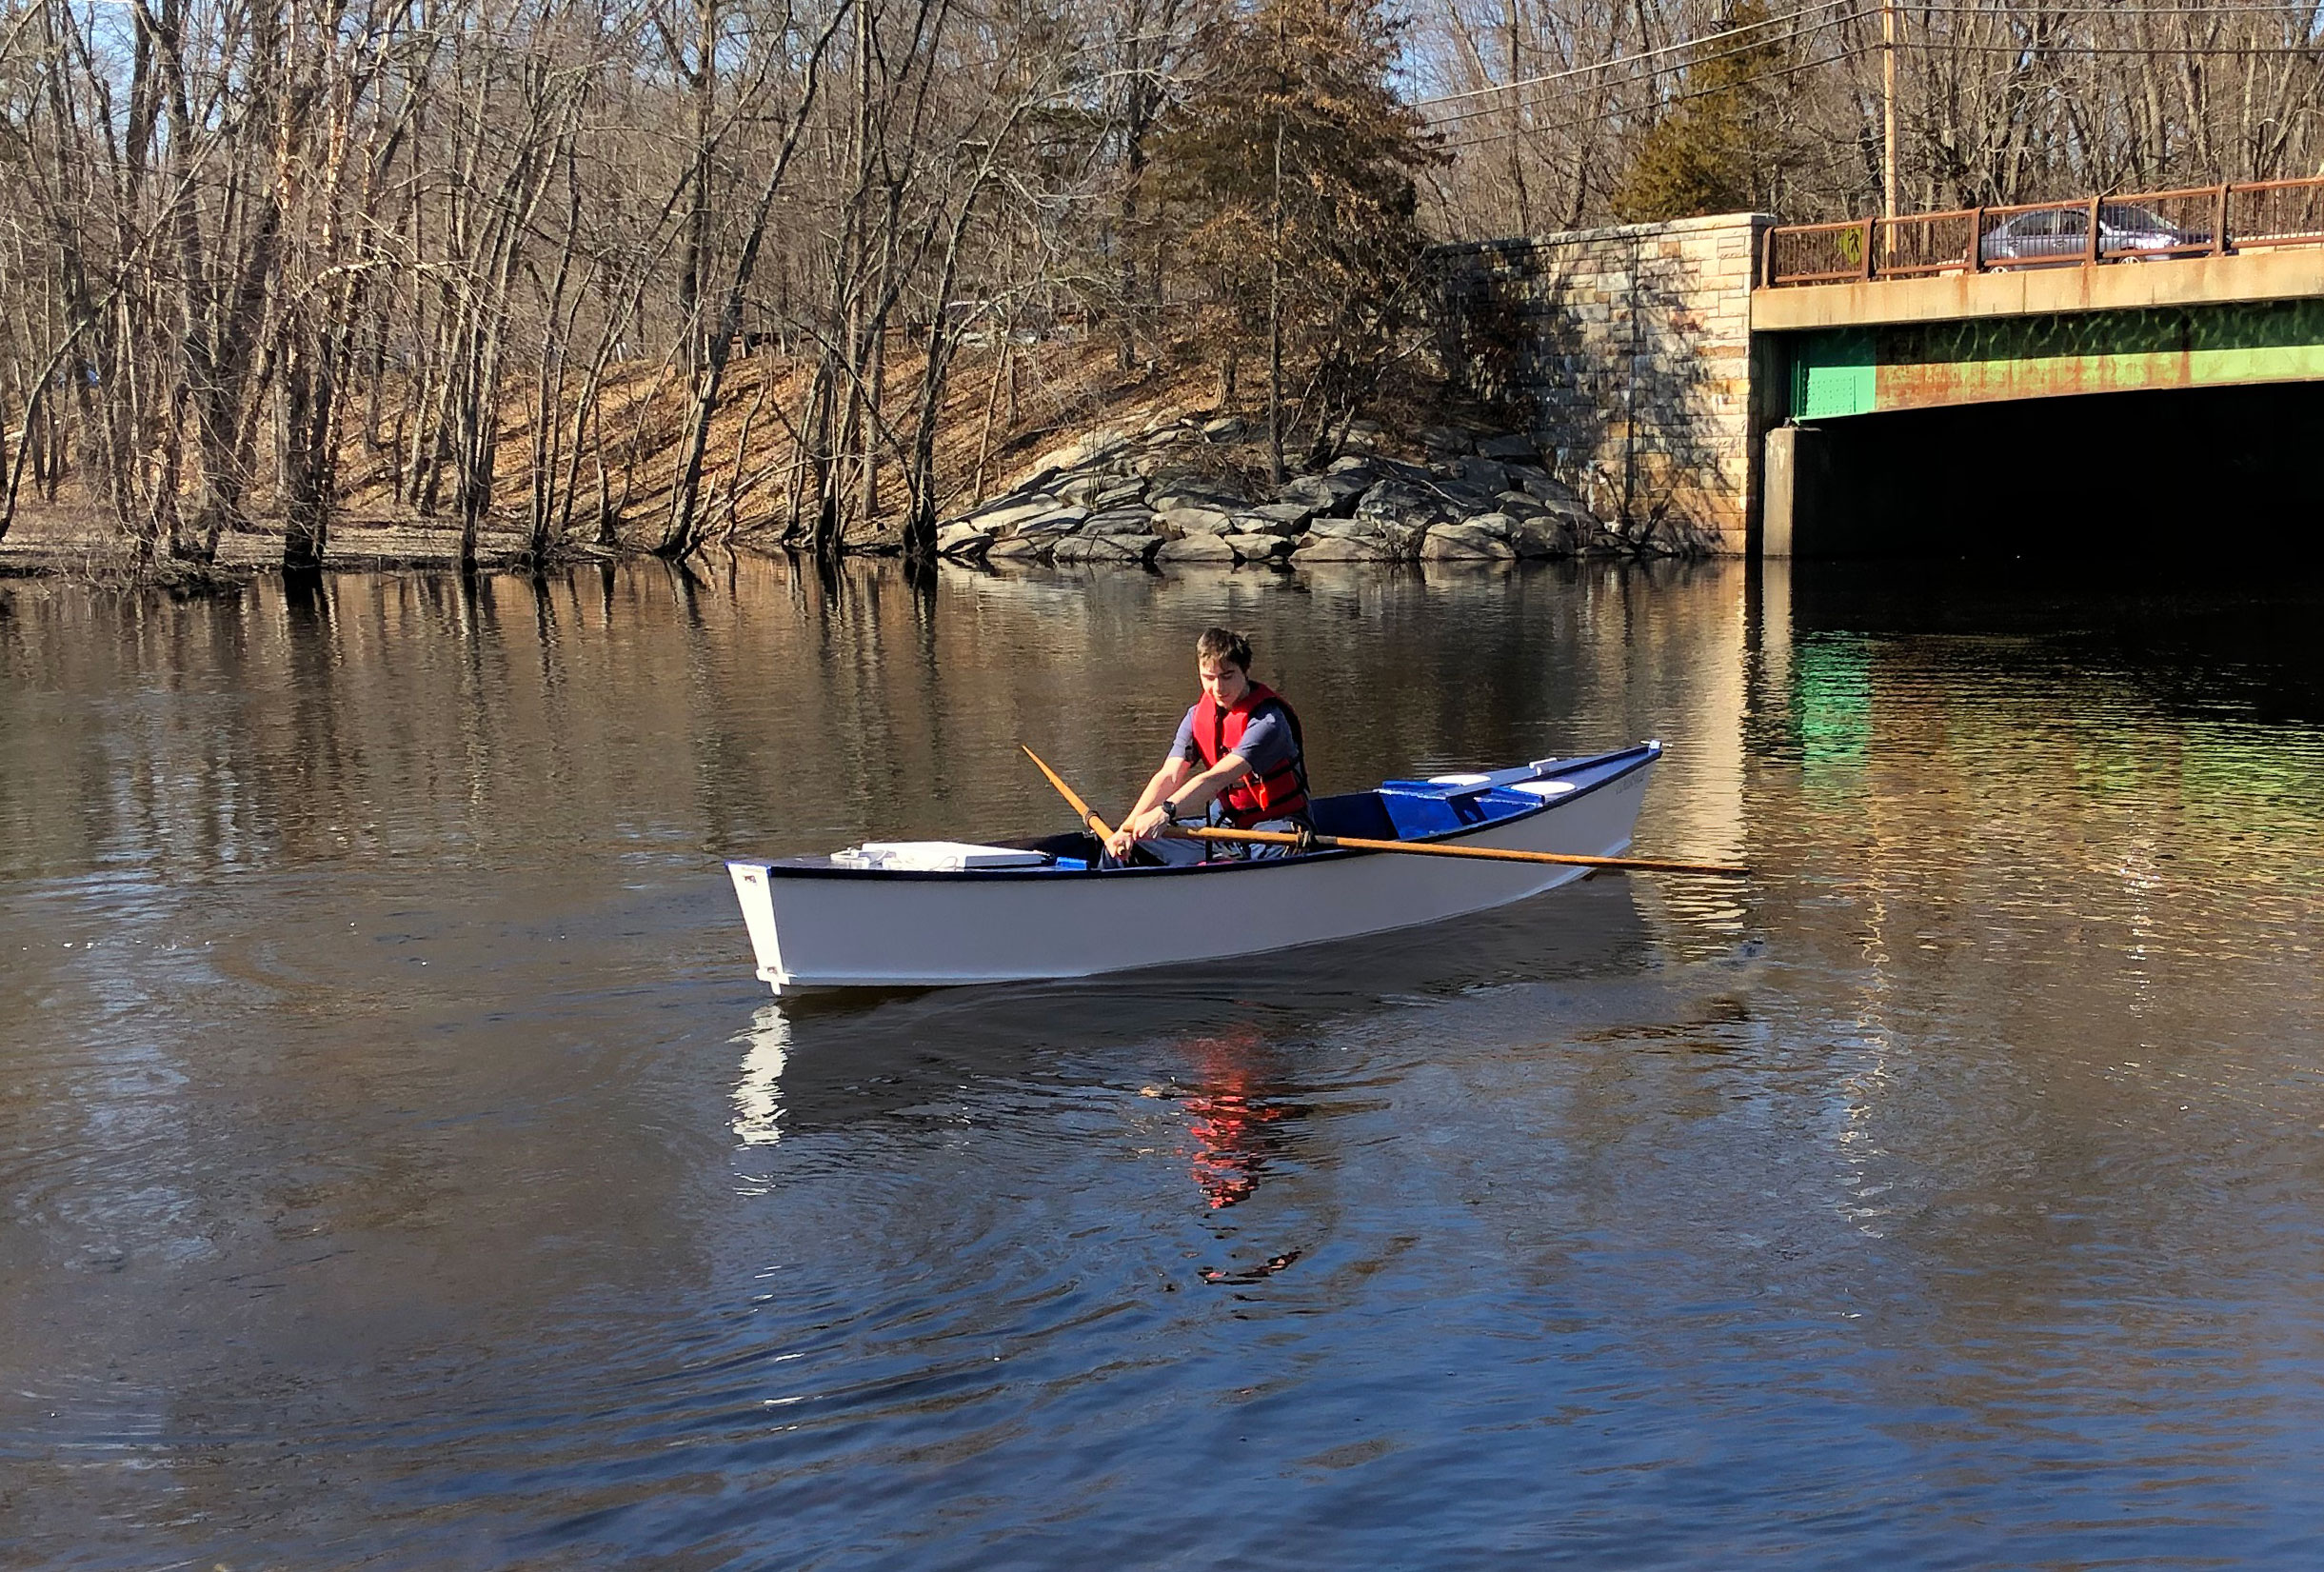
I was 17 in the spring of 2020 when I decided that I would build my first wooden sailboat. I had two major criteria for this summer vacation project: the boat had to be small enough to build and store in my garage, and it could cost no more than $1,000. I also hoped the boat would comfortably fit two adults, be easy to trailer, and serve as a light daysailer on protected waters, with oars as the auxiliary power.
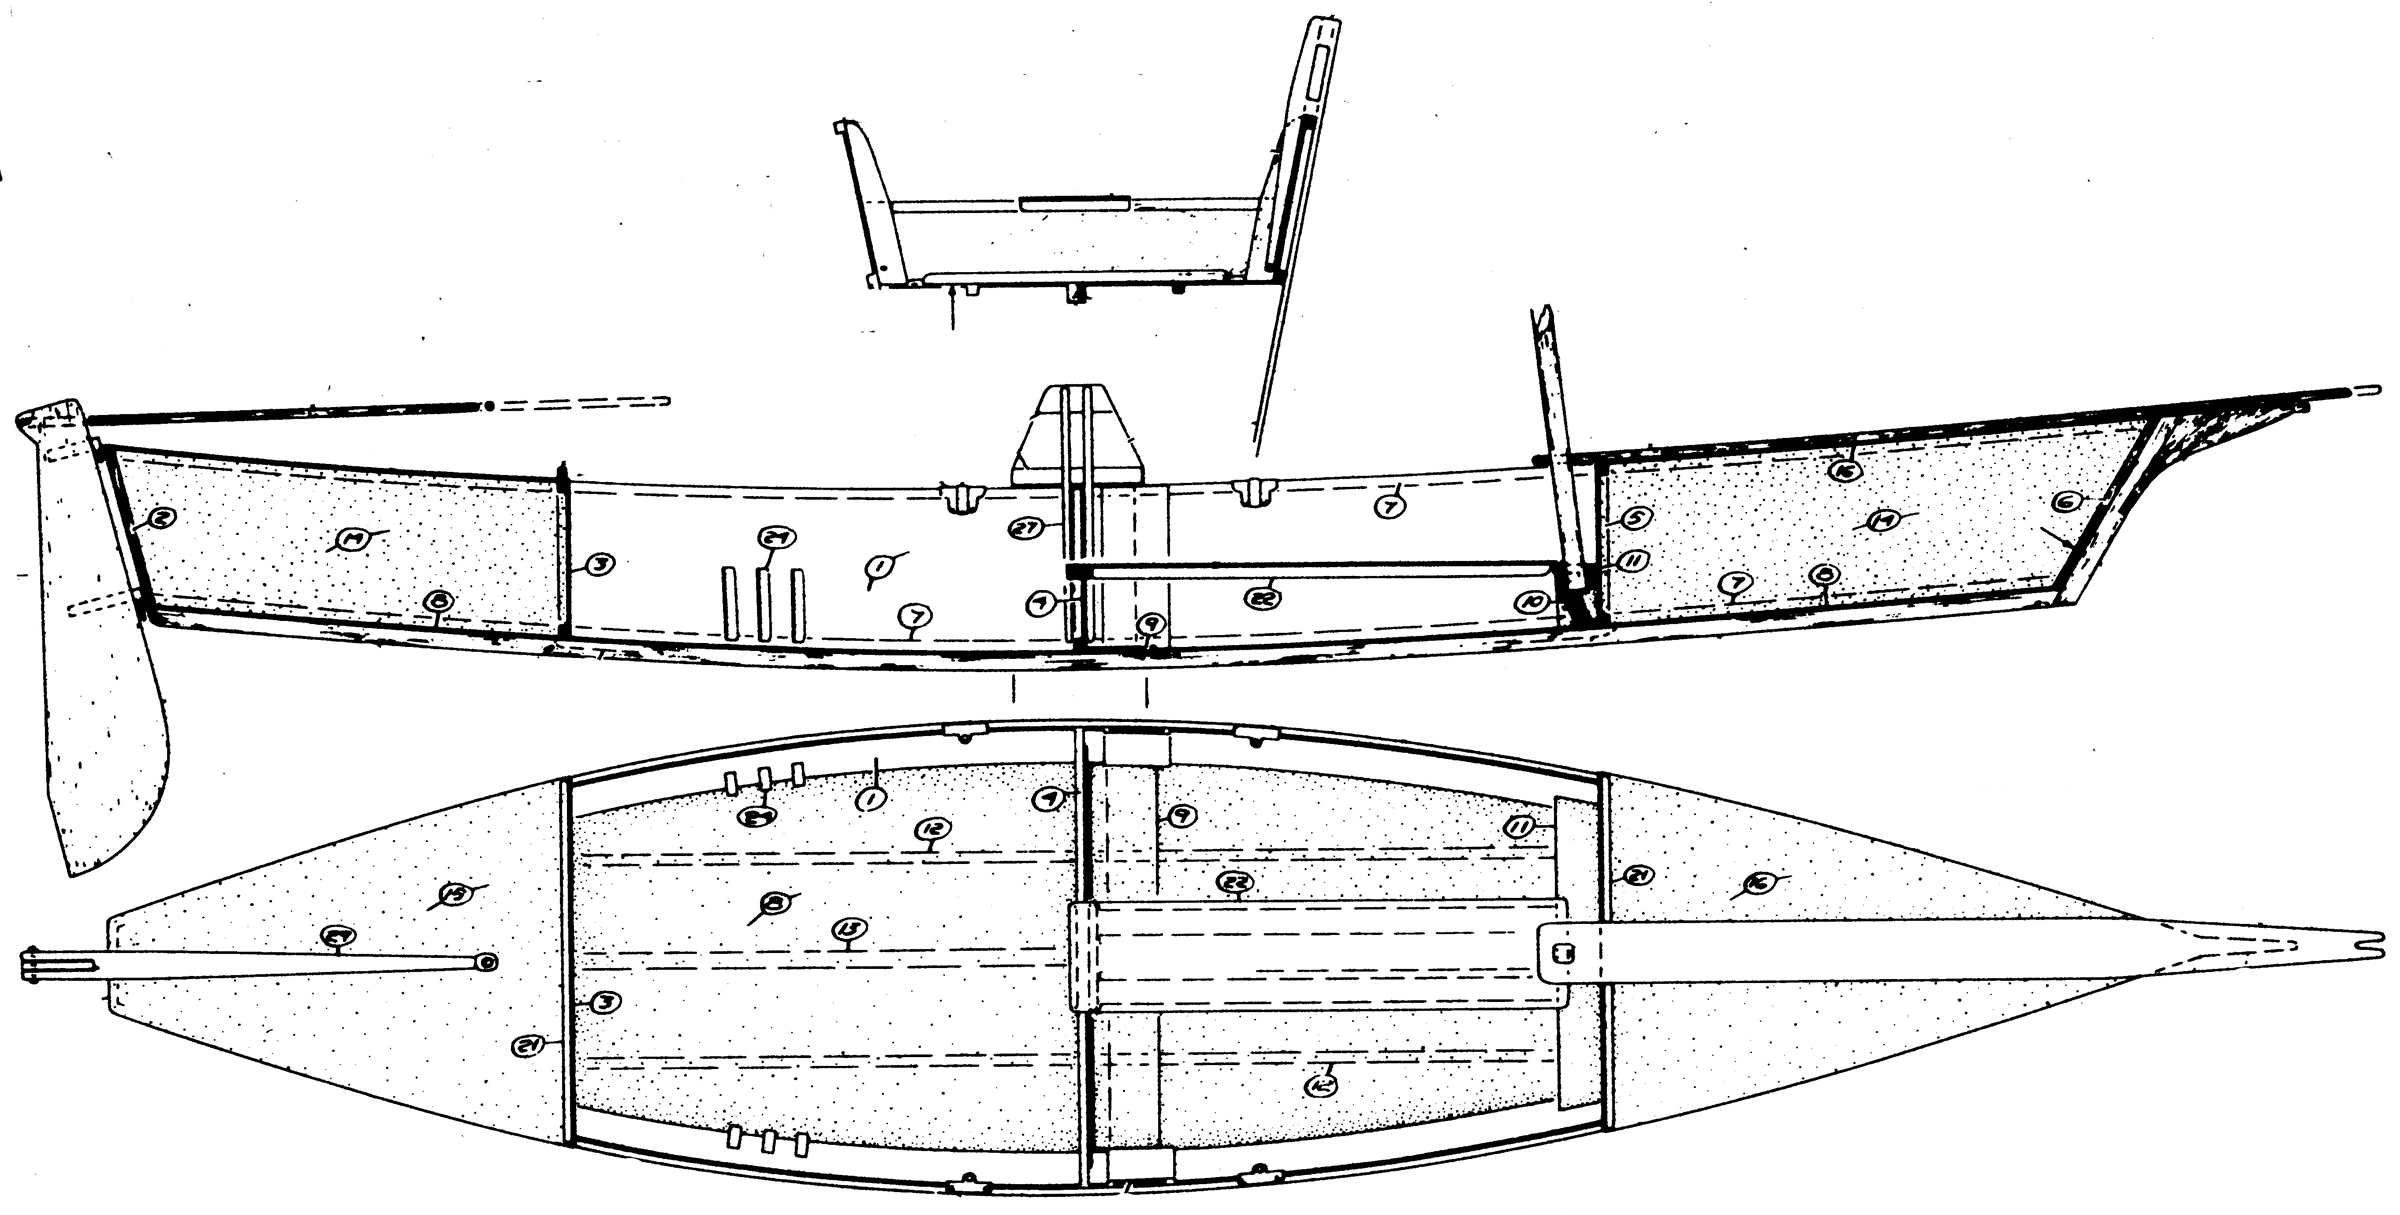
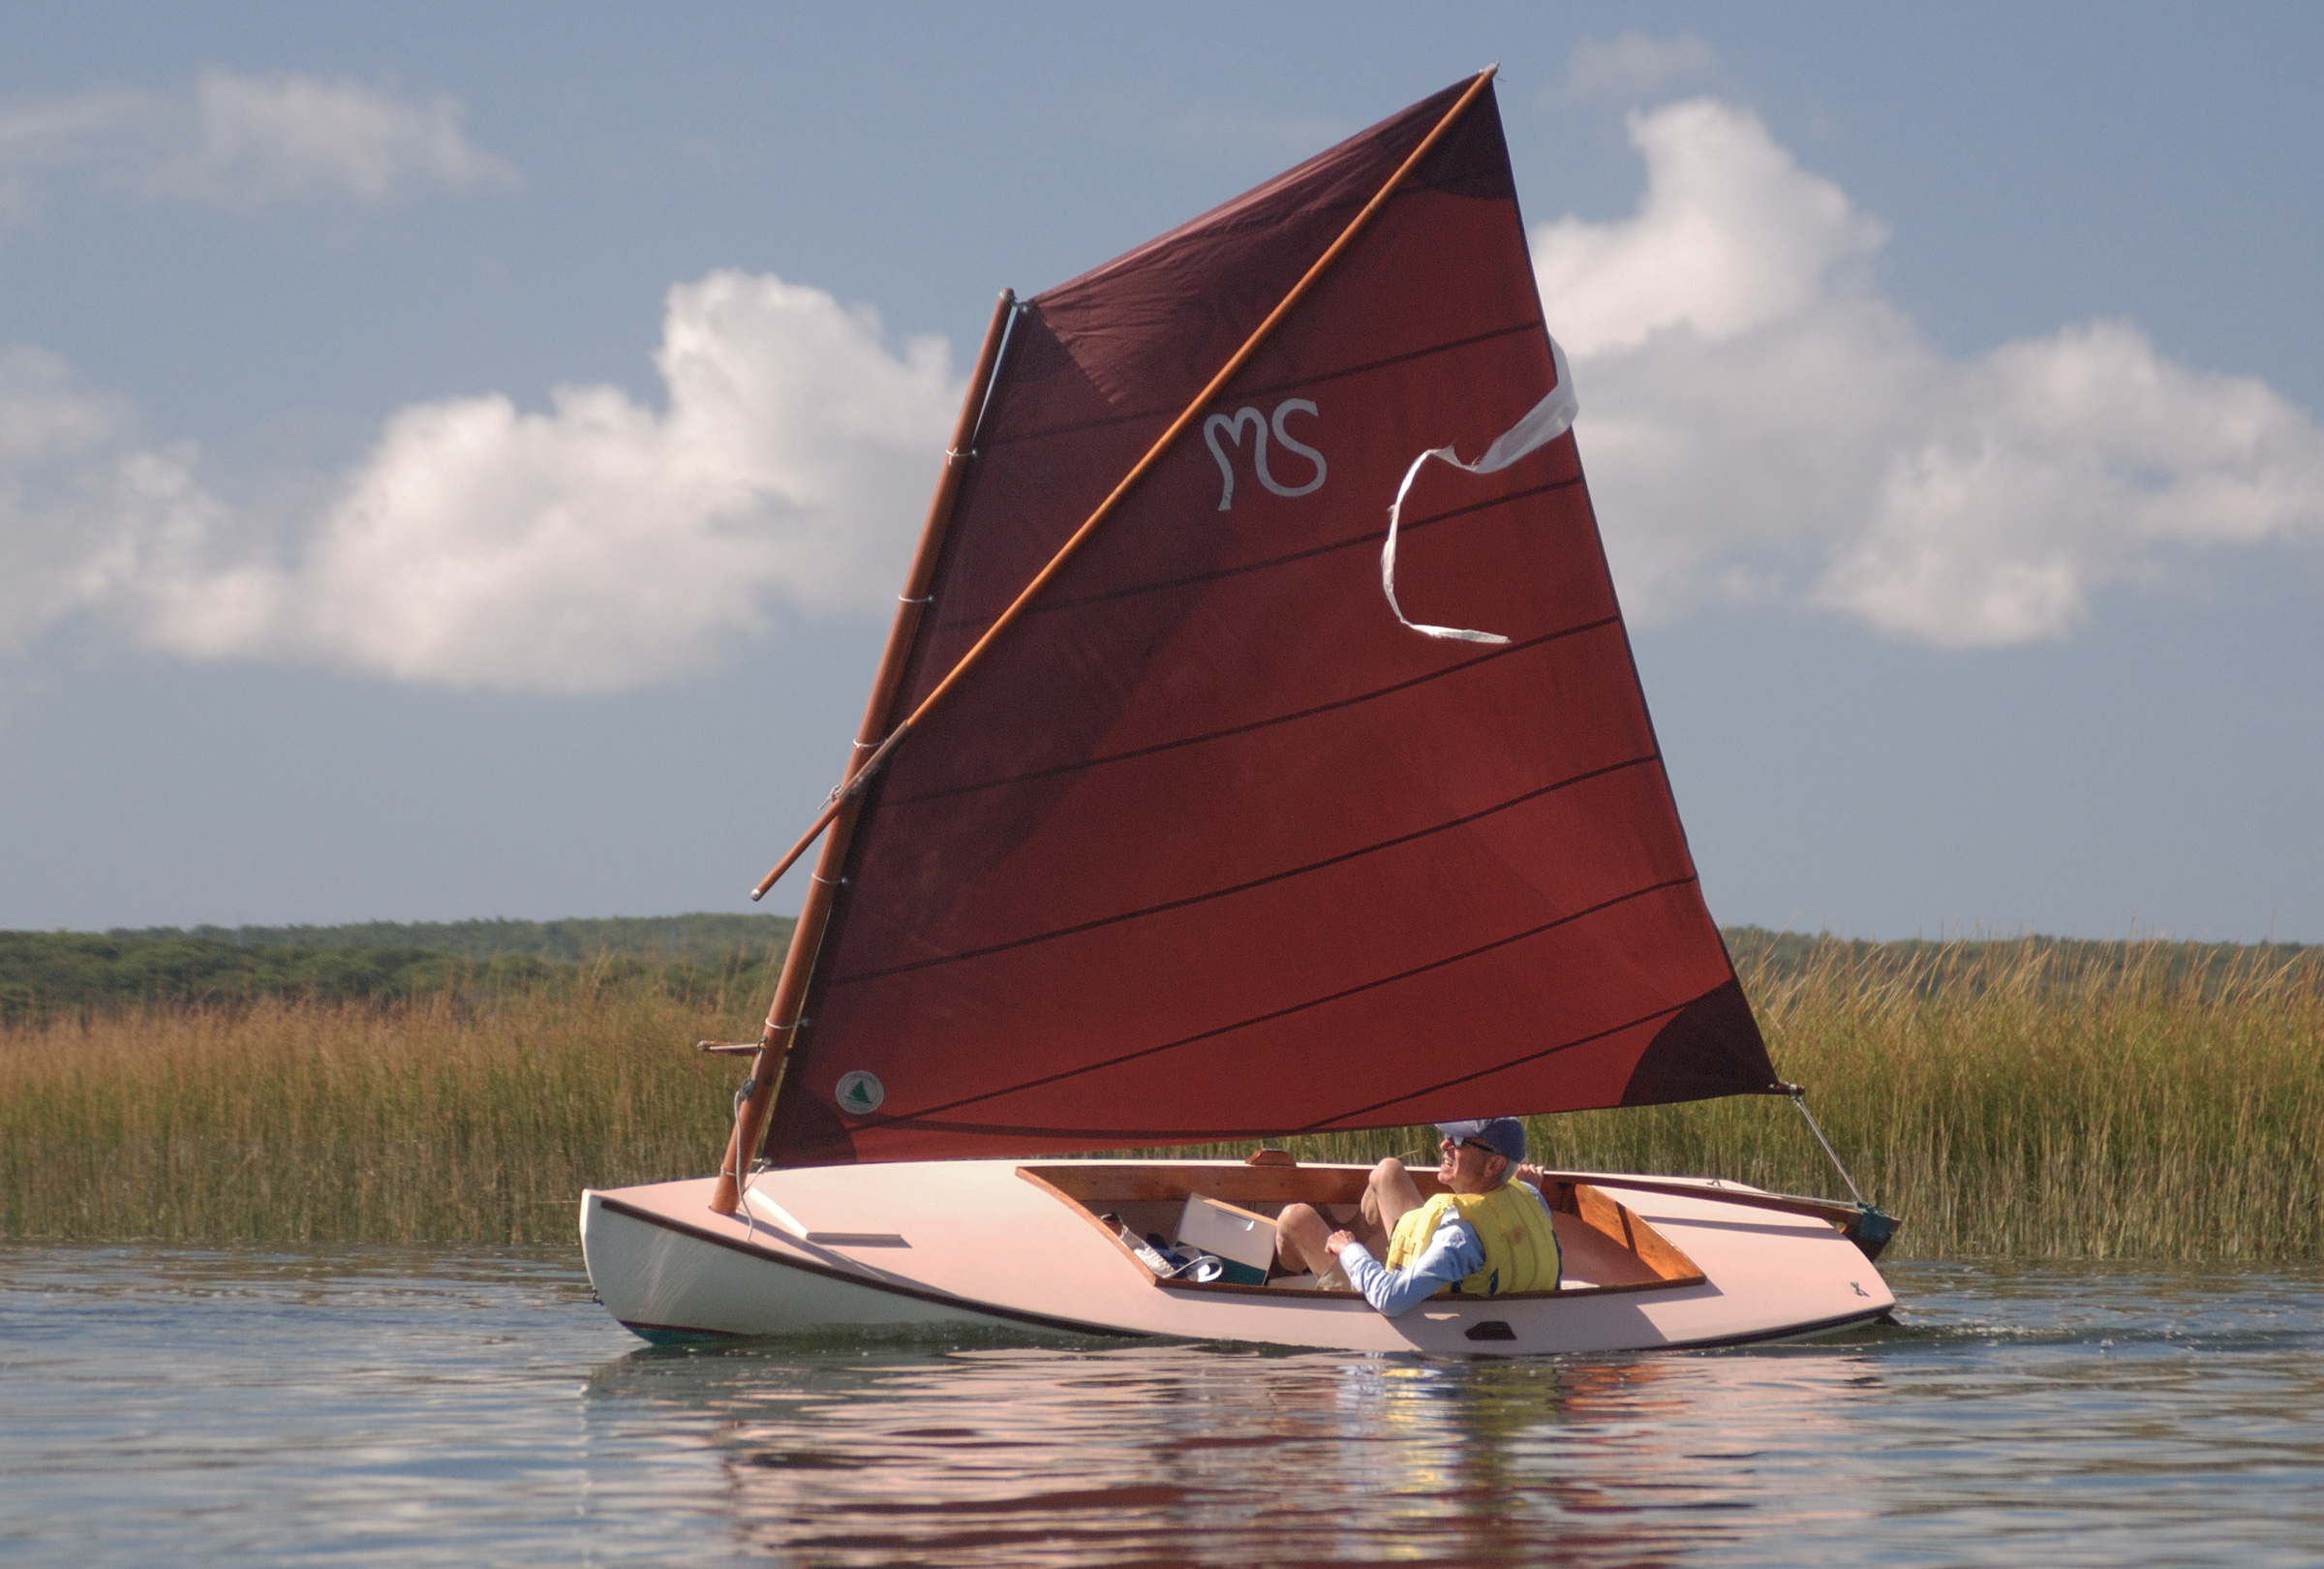
After reading a set of books loaned from a local boatbuilder, I decided on the 15-1/2′ Surf Crabskiff. Phil Bolger designed it as part of his first line of Instant Boats, and his intention was to create a design that a novice could build as a first boat. He began with his Elegant Punt design and extended its lines forward beyond the bow transom to a raked stem, and aft beyond the stern to a narrow, dory-style tombstone transom. The result, a 16′ cat-rigged sharpie, performs well under sail and oars, and can be built inexpensively by a complete beginner. The Surf was just what I was looking for, and I ordered the plans.
The plan set includes two 22″ x 34″ pages of drawings, and three pages of typed instructions, which are very explicit. Dynamite Payson’s book, Instant Boats, includes a step-by-step description of how to build a boat very similar to the Surf. There are also photographs of each step of the process—helpful for those of us who are just learning the vocabulary of boatbuilding.
The hull is designed for simplified chine-log construction, which eliminates the necessity for a strongback or jig. All the plywood parts except the rudder fit onto just four 4′ x 8′ sheets of 1/4″ plywood. The plans state that “marine grade” is preferred, but that high-quality exterior-grade plywood will serve. I used marine-grade okoume. For the lumber, the plans call for “almost any timber hard enough to hold nails and not too oily, acidic, etc. to hold glue.” I bought a single 10′ x 3/4″ x 12″ clear pine board, four SPF 2x4s, and used old, maple shelves for the rest. The small amount of wood, combined with the minimal epoxy compared to other types of construction, allows for economical construction, even with premium materials.
William Skelly
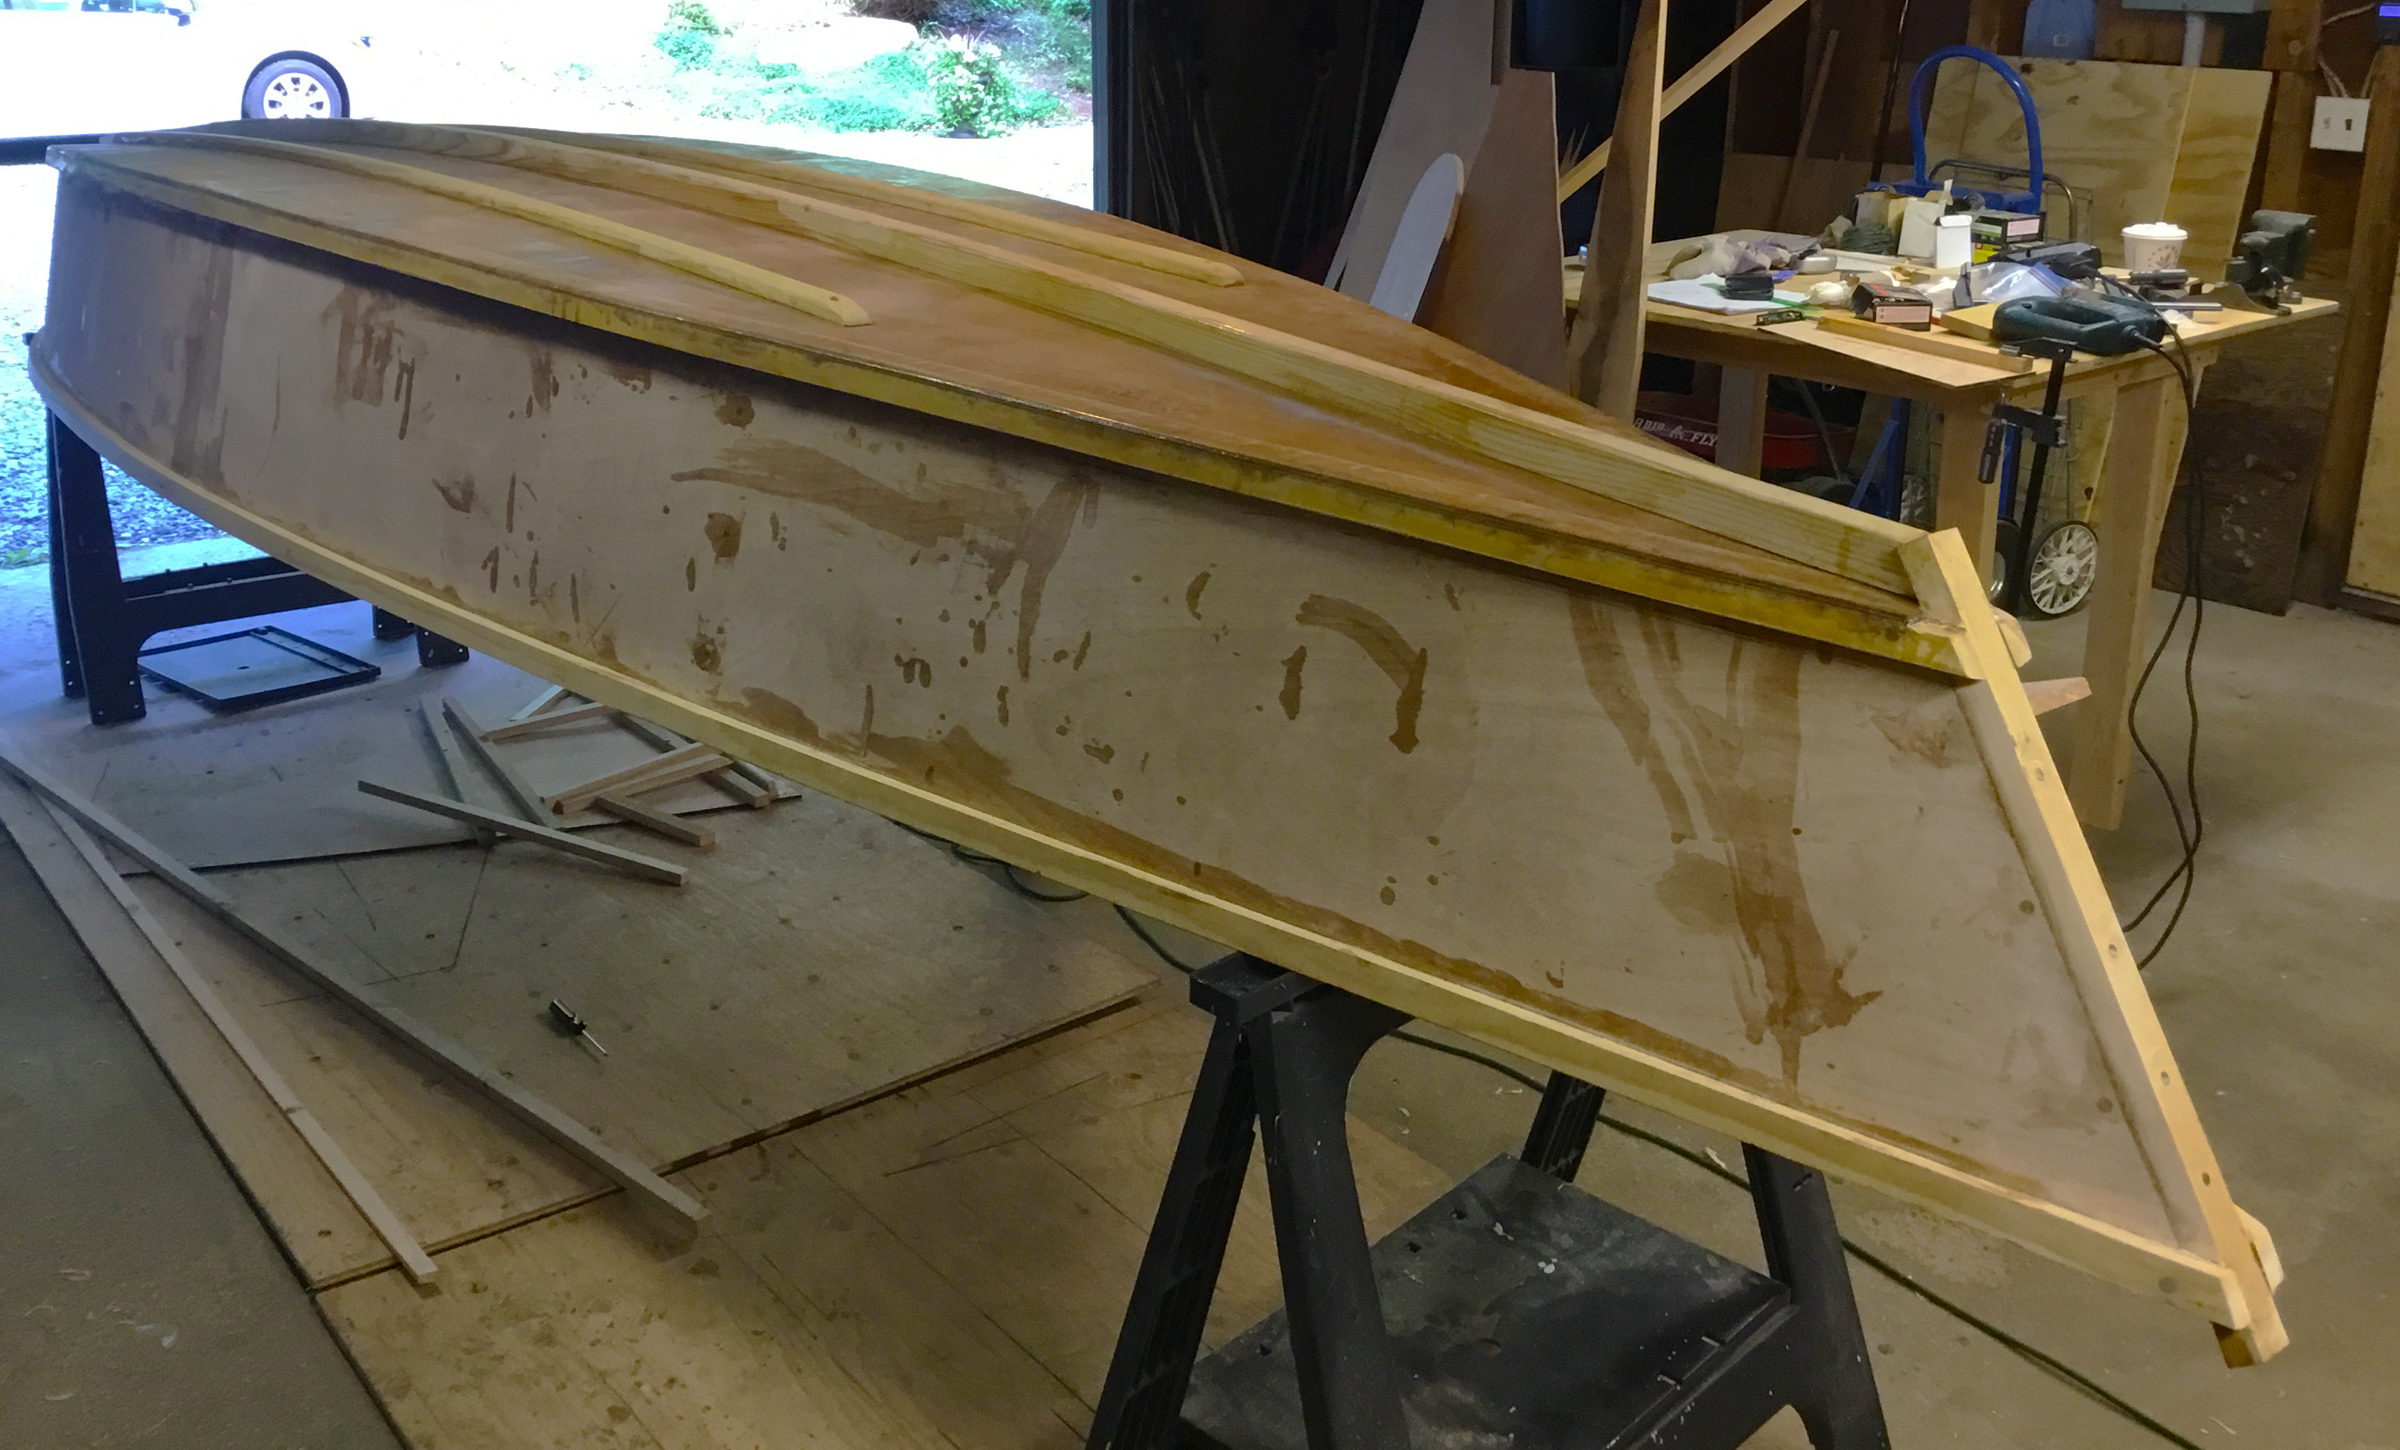
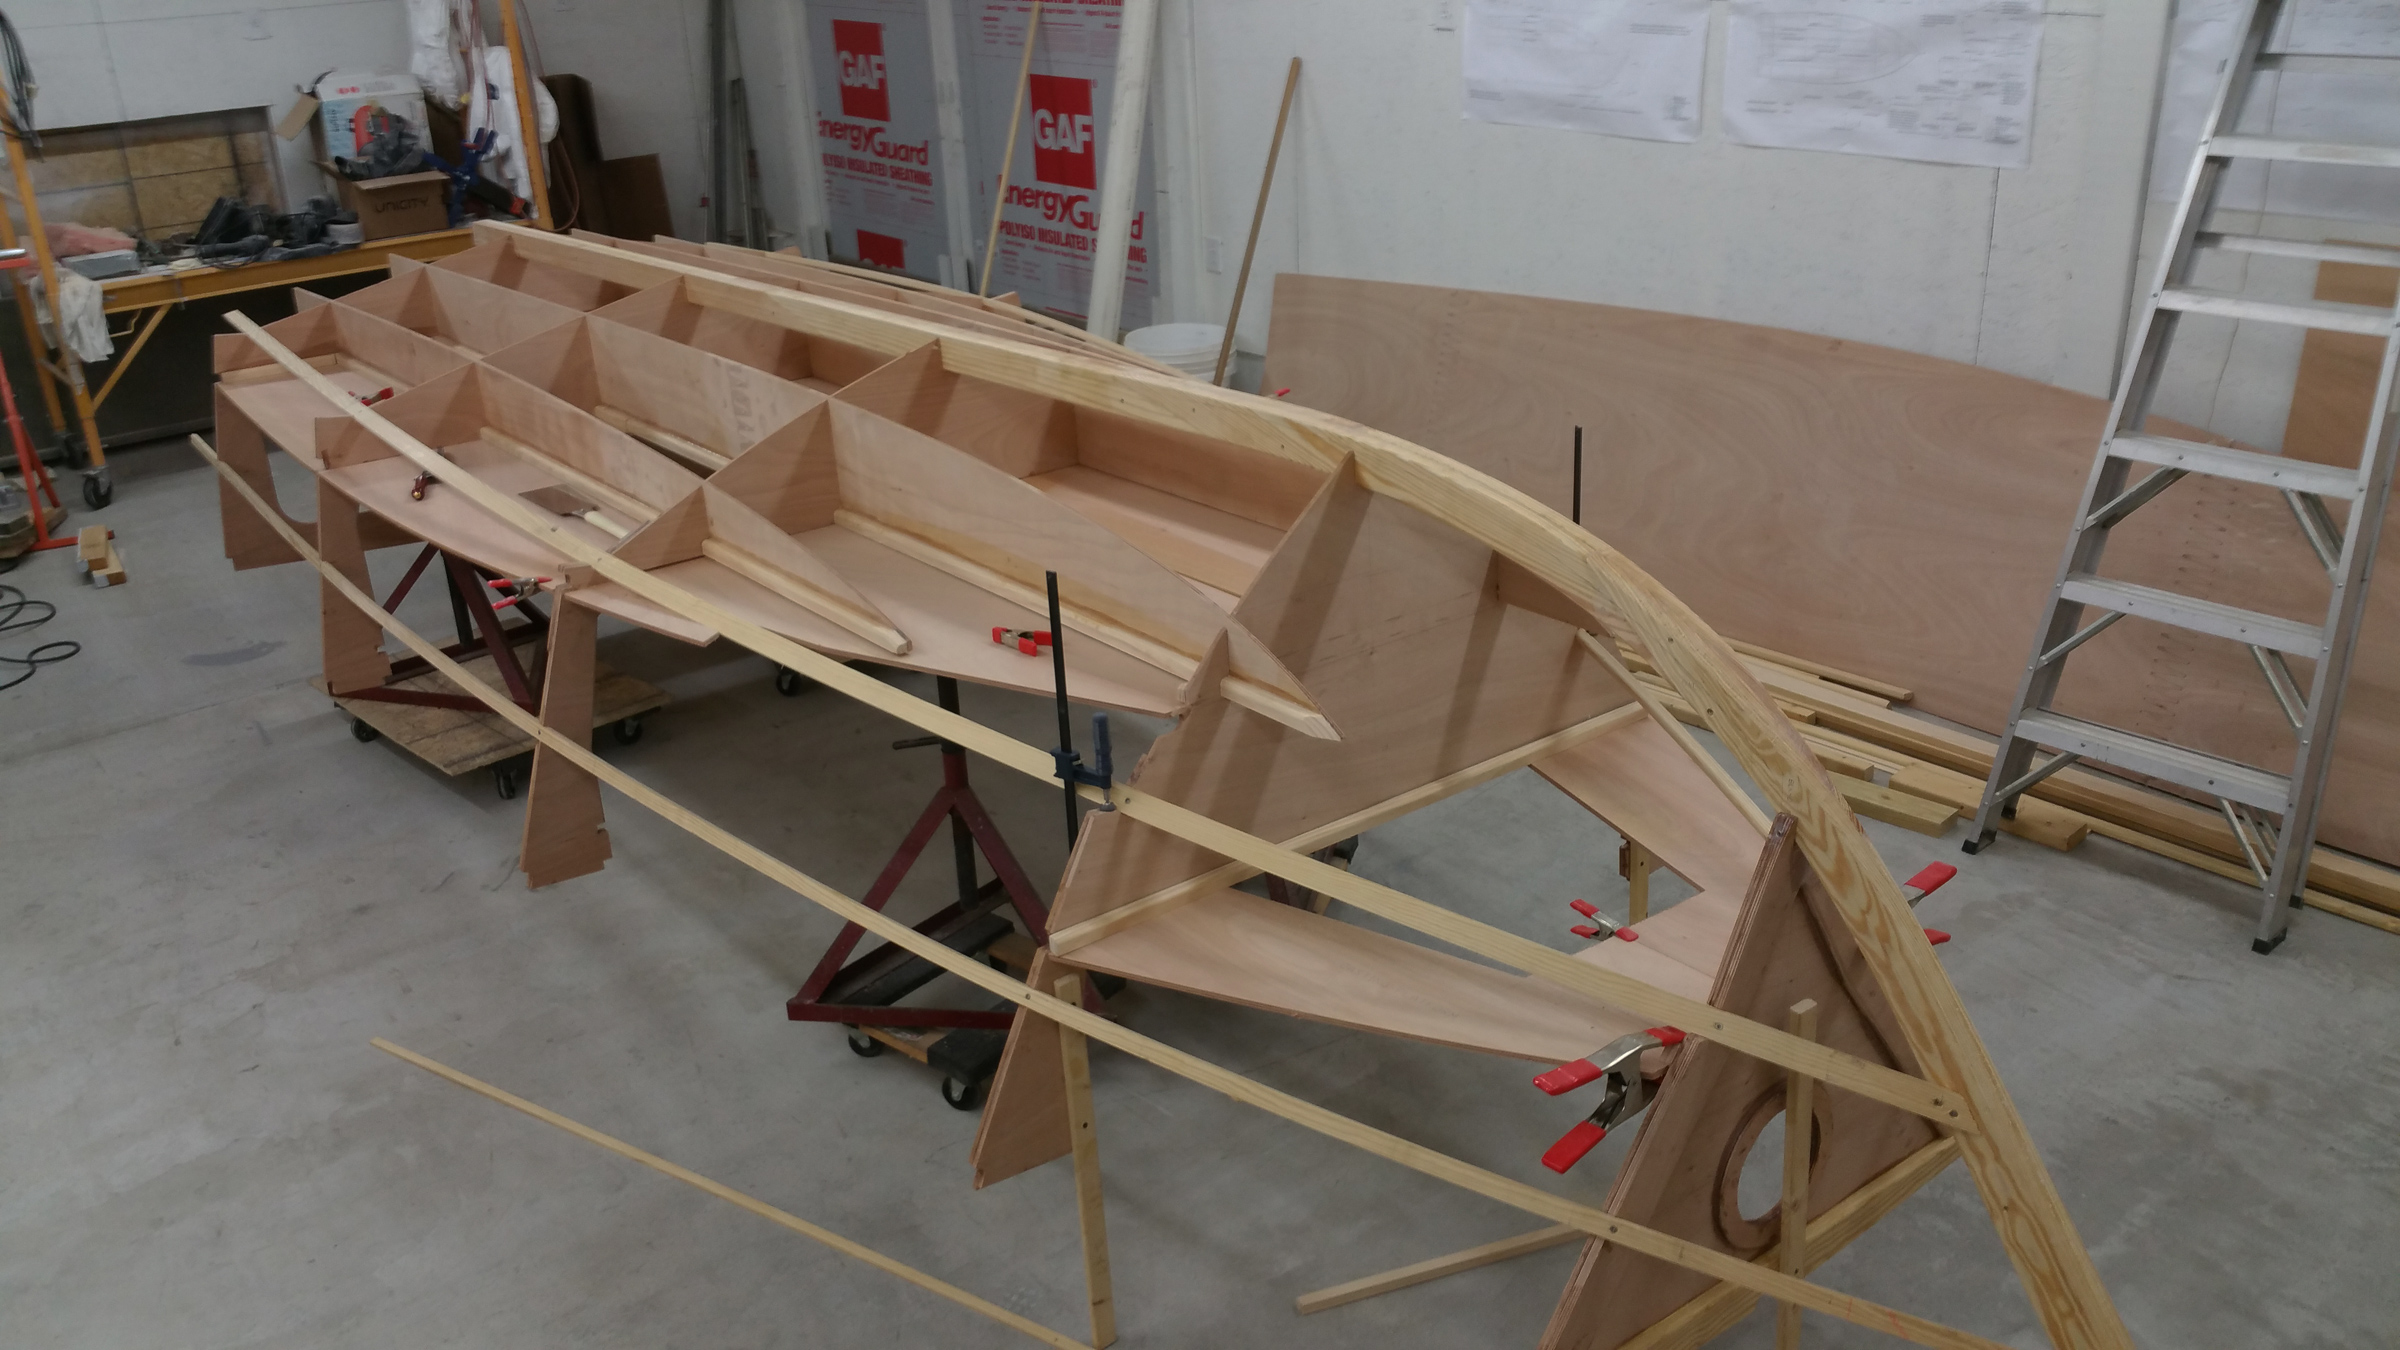
The external chines are quick to install and easy to bevel to accept the bottom panel.
The construction predates the shift Payson made to tack-and-tape in his later Instant Boat books, but I found it even more straightforward. The chine logs are external, making them exceptionally easy to install and then bevel to accept the bottom panel. All of the bevels in the boat are constant, not rolling, so they are easy to shape, and the epoxied joints between plywood pieces are reinforced with pine framing, eliminating the messy job of applying filets and fiberglass to the intersections.
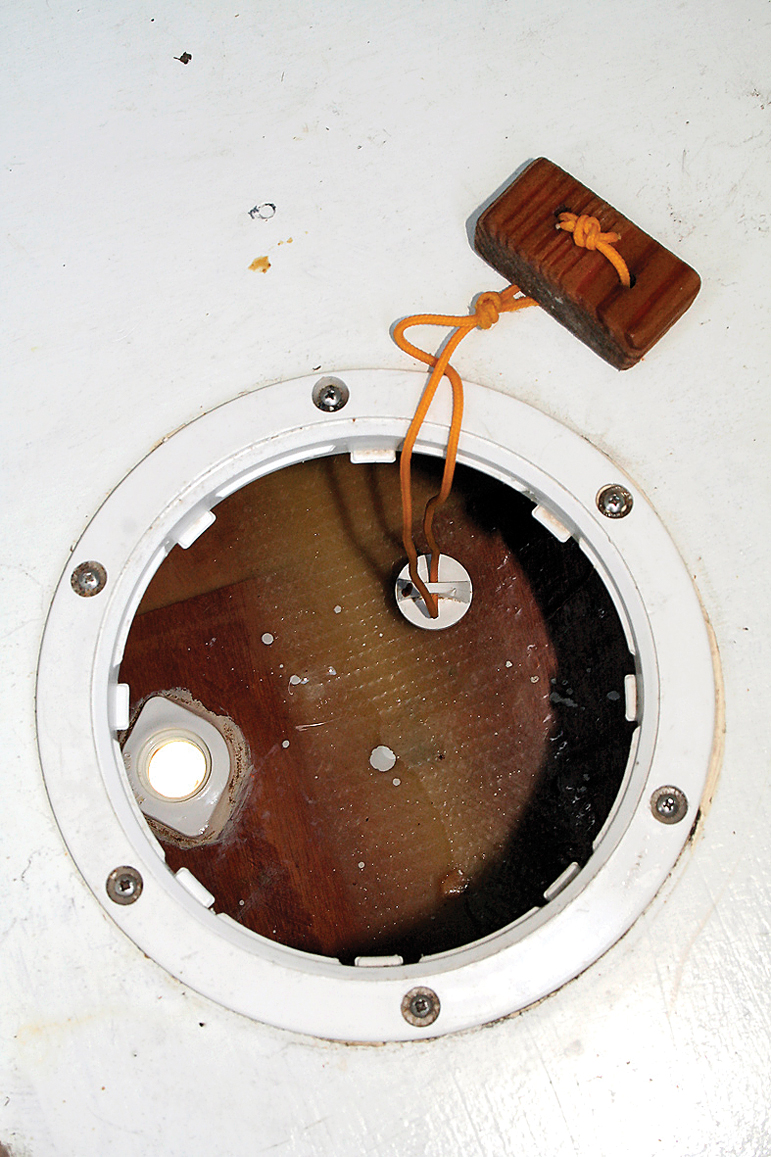
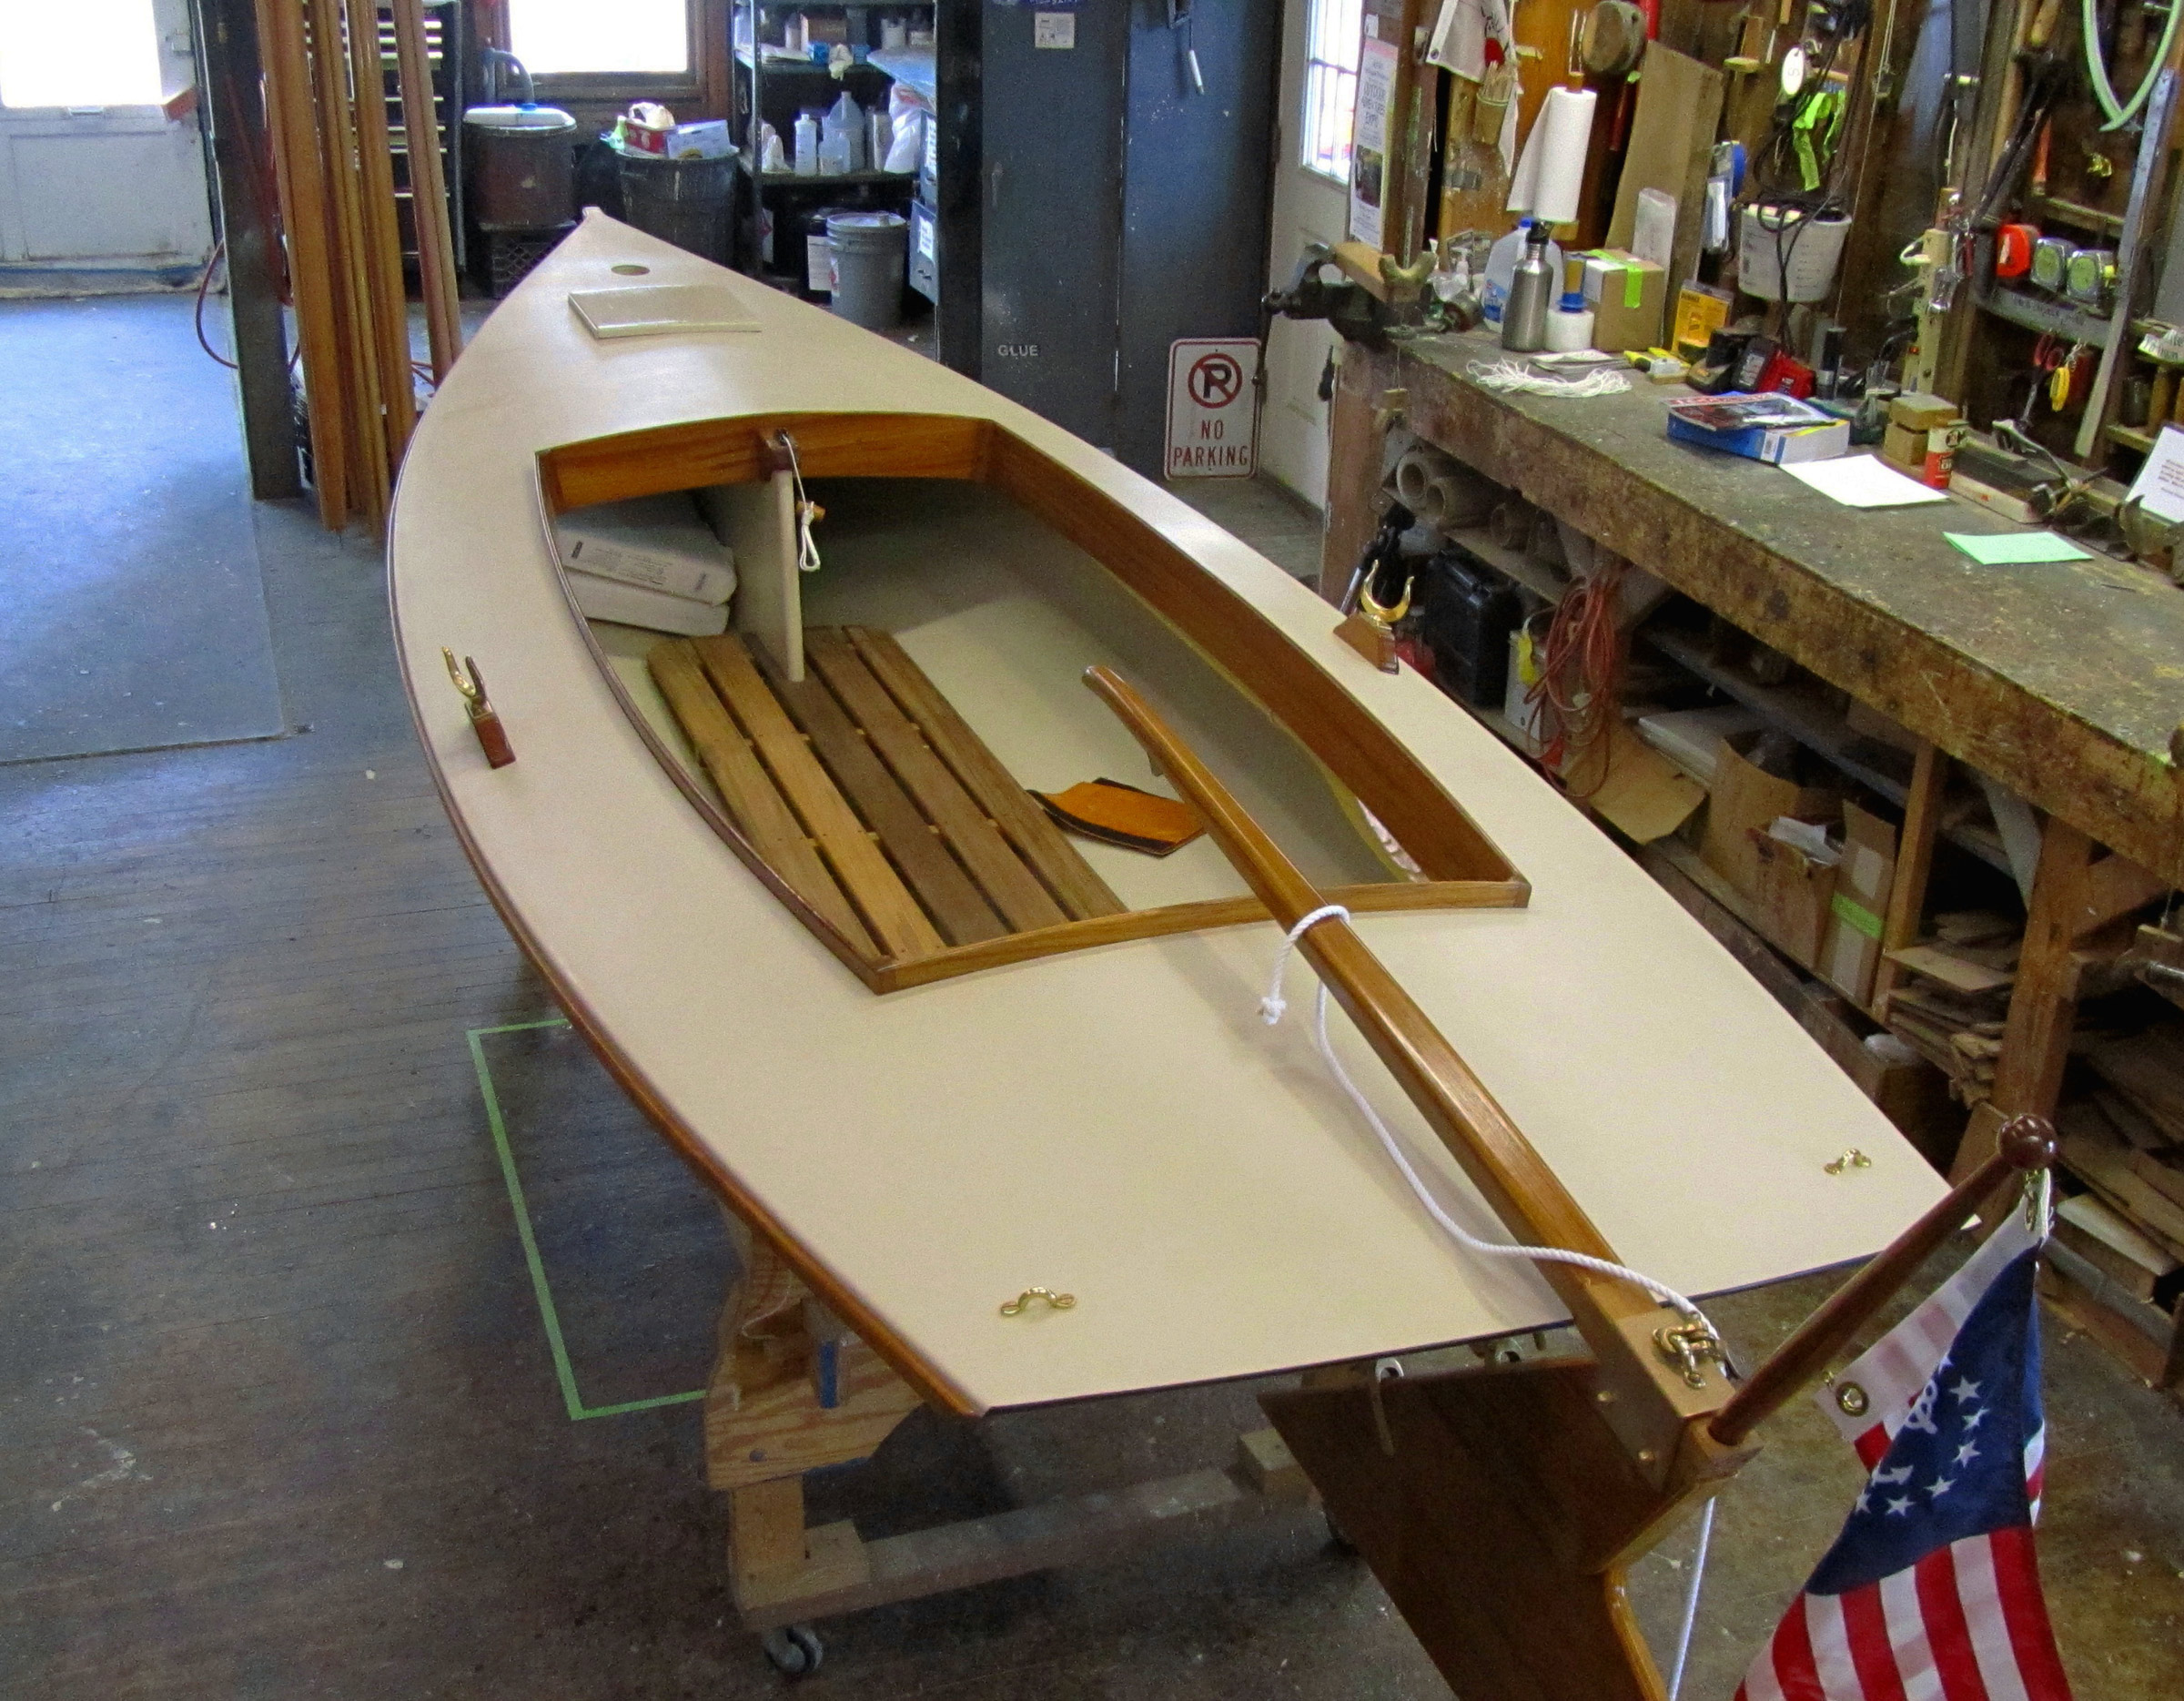
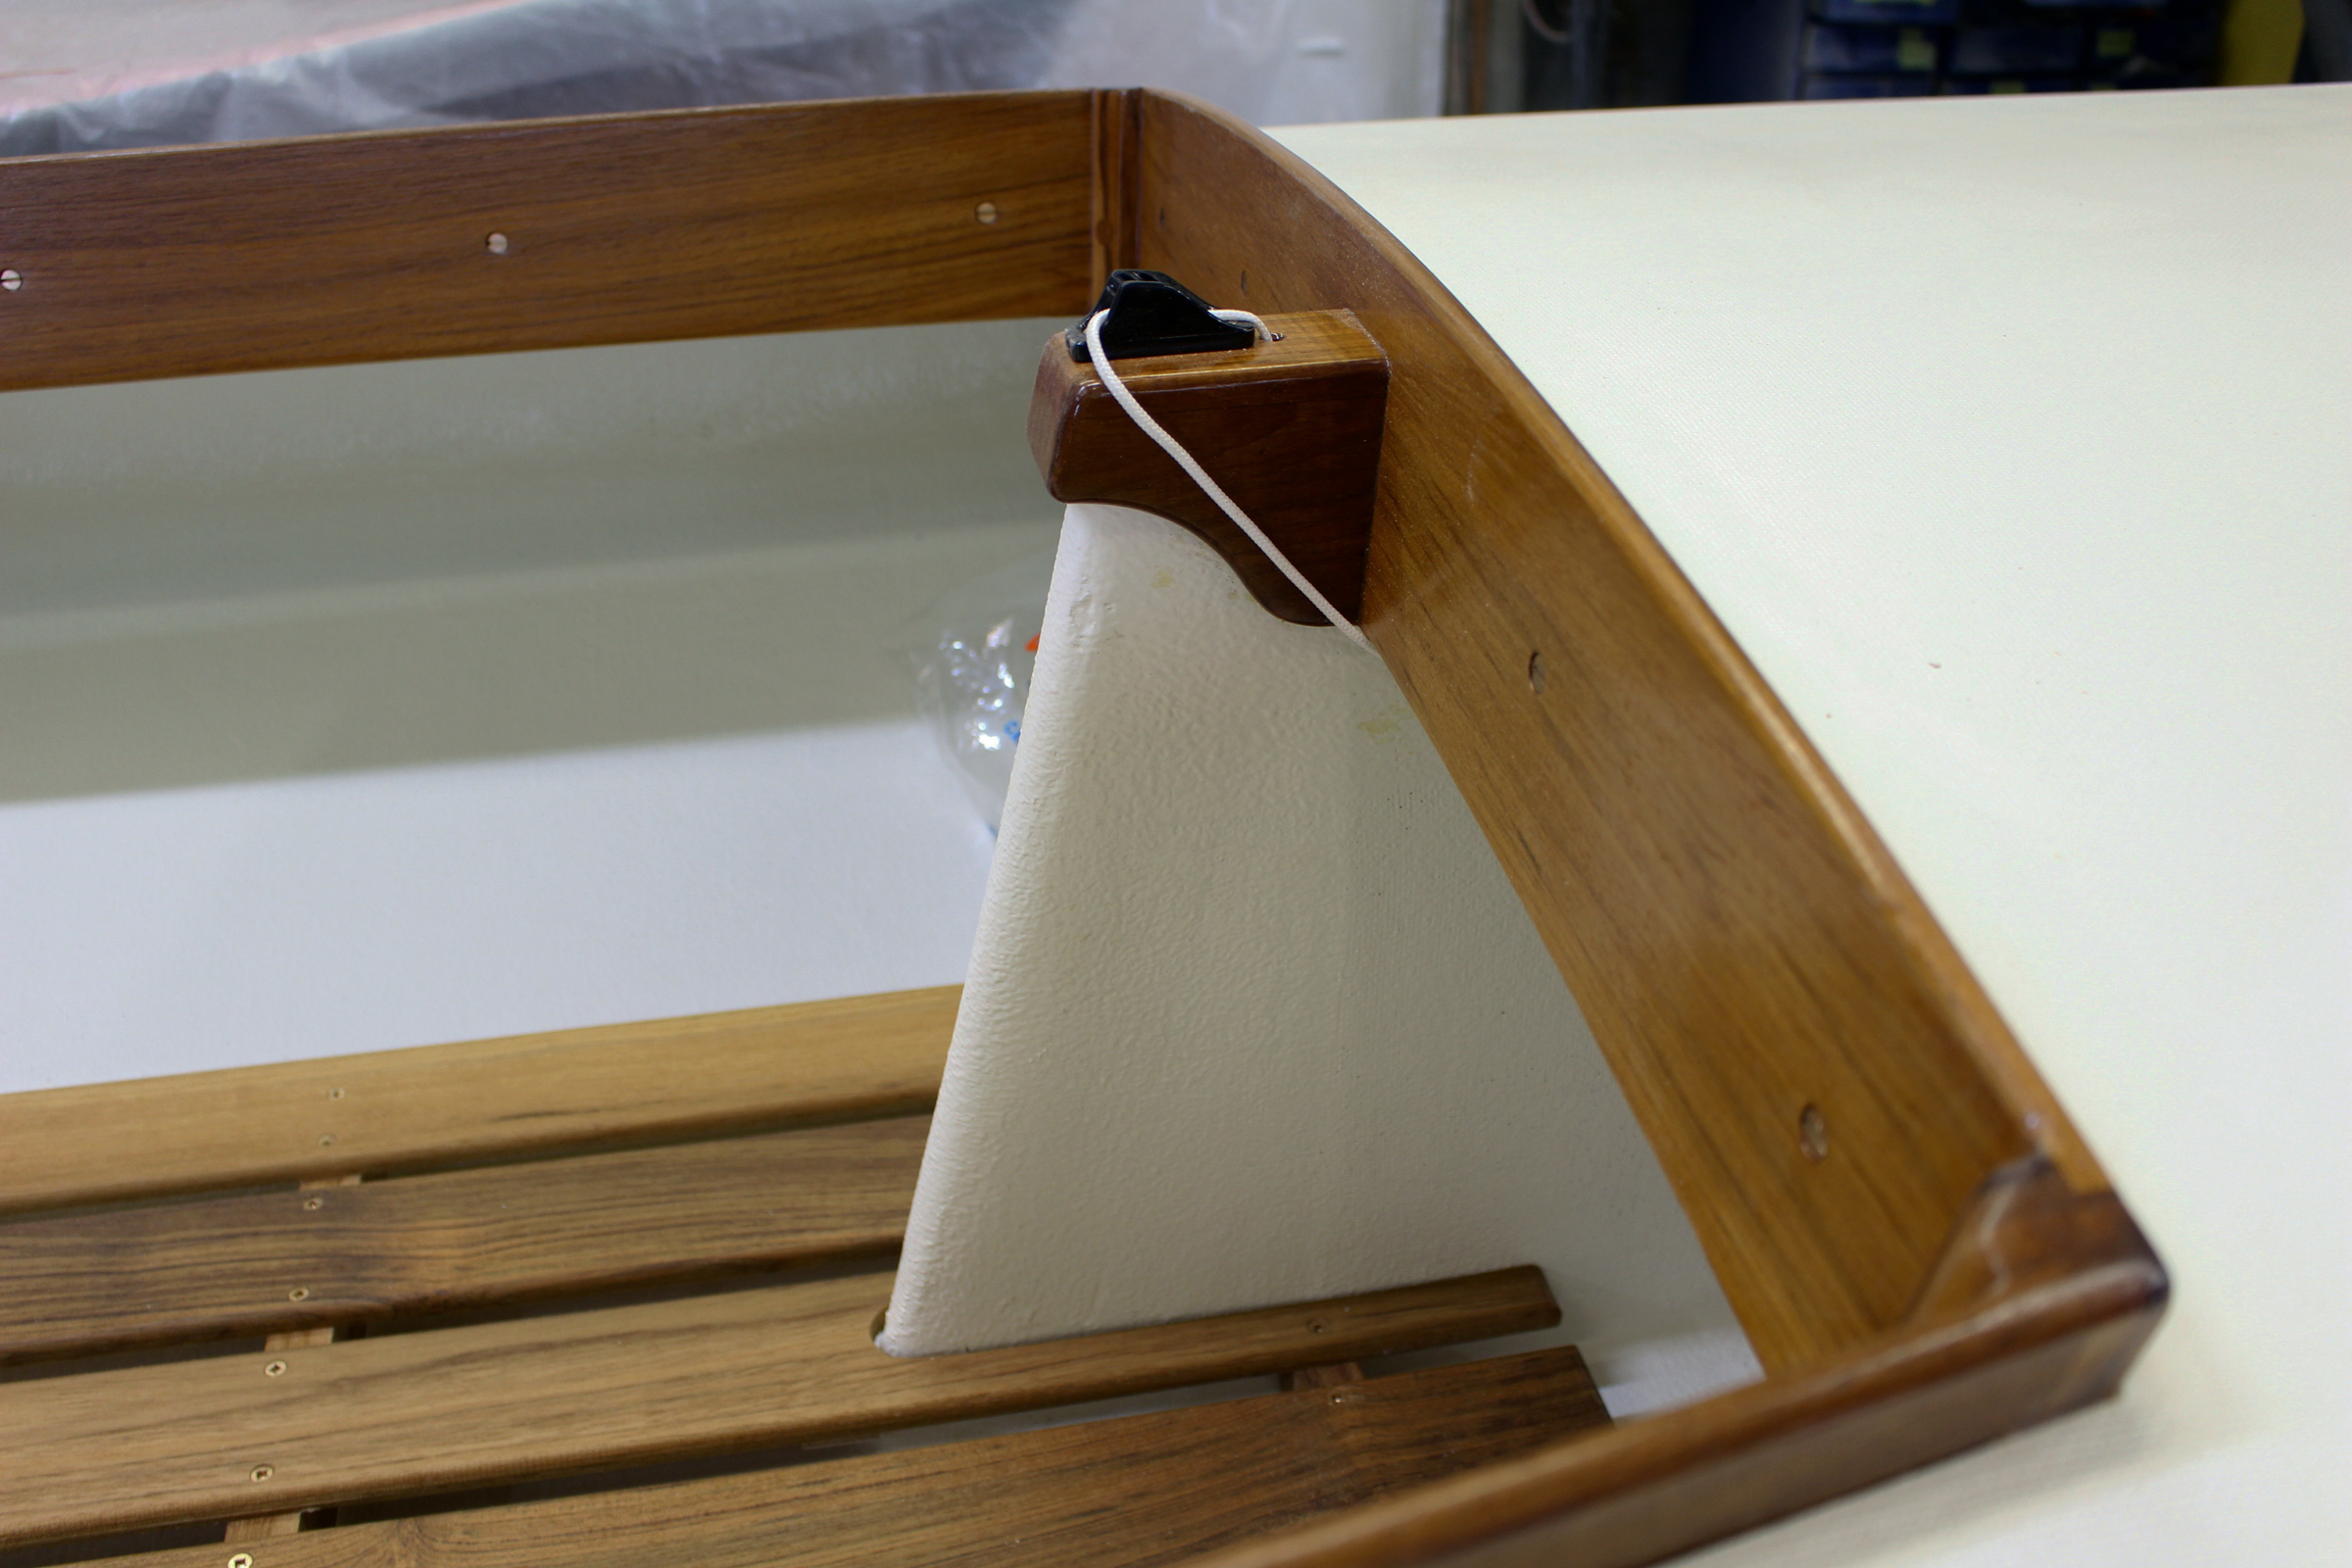
The Surf has two large flotation tanks—one in the bow and the other in the stern—which were designed to be fully enclosed by the decks and bulkheads. To put these spaces to good use, I installed watertight hatches. I installed a pair of 8″ deck plates in the foredeck and made a rectangular wooden hatch for the aft deck. I store a manual bilge pump, anchor, line, and other small items in the forward compartment; the aft compartment is large enough to fit a cooler. I also did away with the decorative gammon knee and bowsprit. The sailing rig doesn’t require them and they would have made the boat too long to fit in my garage.
I started my Surf in June 2020 and finished in November, working many full days during the summer, and otherwise on evenings and weekends. I went a tad over budget (I could have come under my projected $1,000 if I’d bought the inexpensive materials recommended in Instant Boats, but I opted for better plywood, a pricy two-part primer, and bronze fasteners throughout). The materials for the boat, including epoxy and hardware, cost me about $1,200.
The bare hull weighs in at about 120 lbs, so you might be able to cartop a Surf, but I built a trailer for mine. Since the boat is so light, even a small car will find it easy to tow, and two people can carry it from the trailer to the water, eliminating the challenge (for me at least) of backing the trailer into the water. To launch, I simply pull up next to the ramp and have a partner help me carry the hull to the water.
Tom Nallen Jr
The rudder, as designed, has a fixed blade, and can only be shipped when there’s water deep enough for it. Making the rudder with a kick-up blade will ease beach launches.
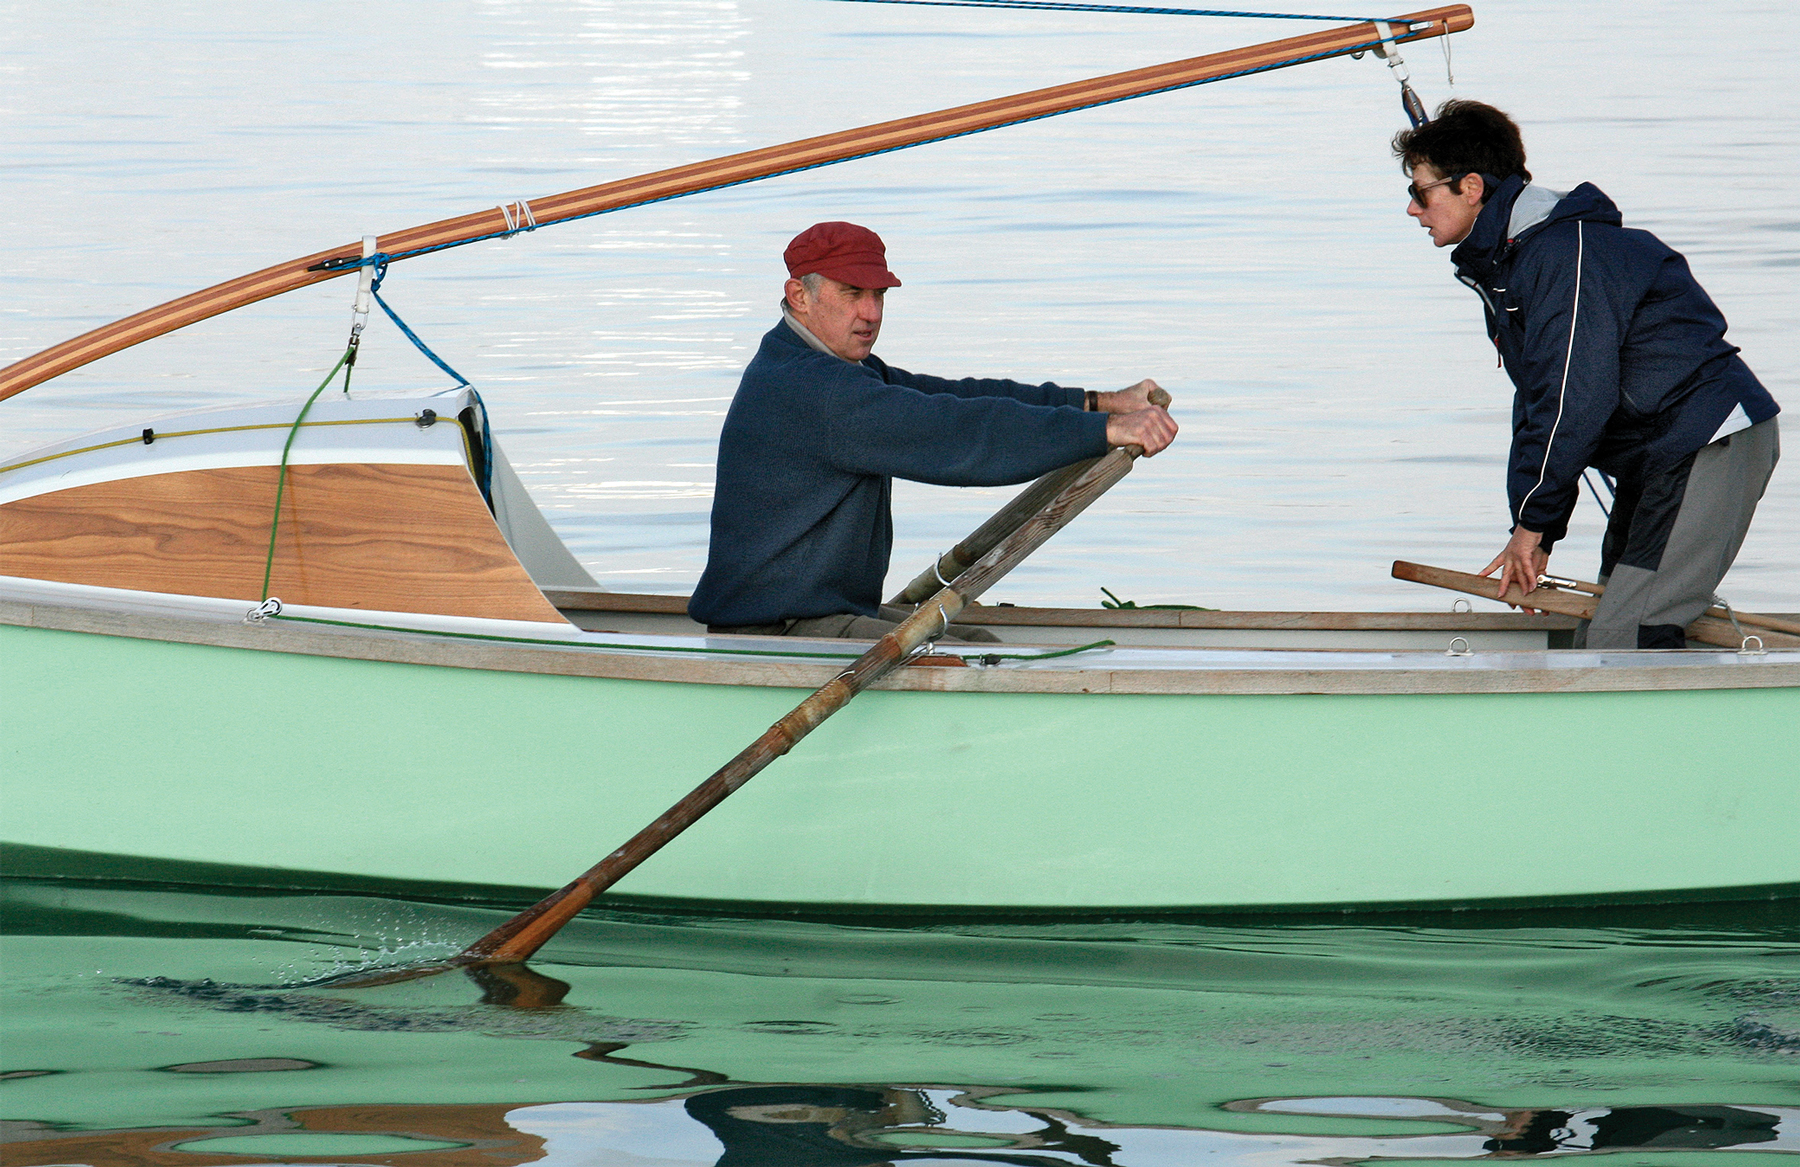
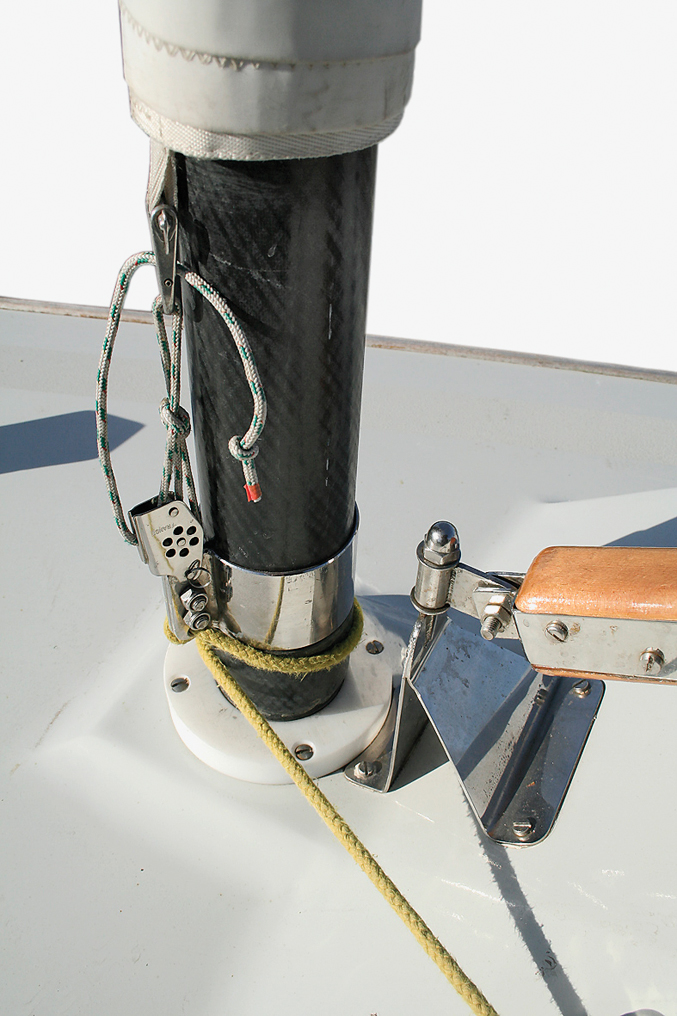
Stepping the mast, with the sail furled around it, is easy alongside a dock or at the water’s edge with the bow resting on the beach. The fixed-blade rudder, however, cannot be mounted at the beach. After I step the mast and put the gear in the boat, I row to deeper water where I can ship the rudder. The transom is so far from the cockpit that it’s a sprawl across the aft deck to attach the rudder. If you are planning for beach launches and landings, make the rudder with a kick-up blade. I am currently modifying a weighted kick-up rudder to fit my transom hardware. There is a single, fully removable leeboard that slips over the side amidships; it frees up space in the cockpit that would otherwise be taken up by a daggerboard trunk.
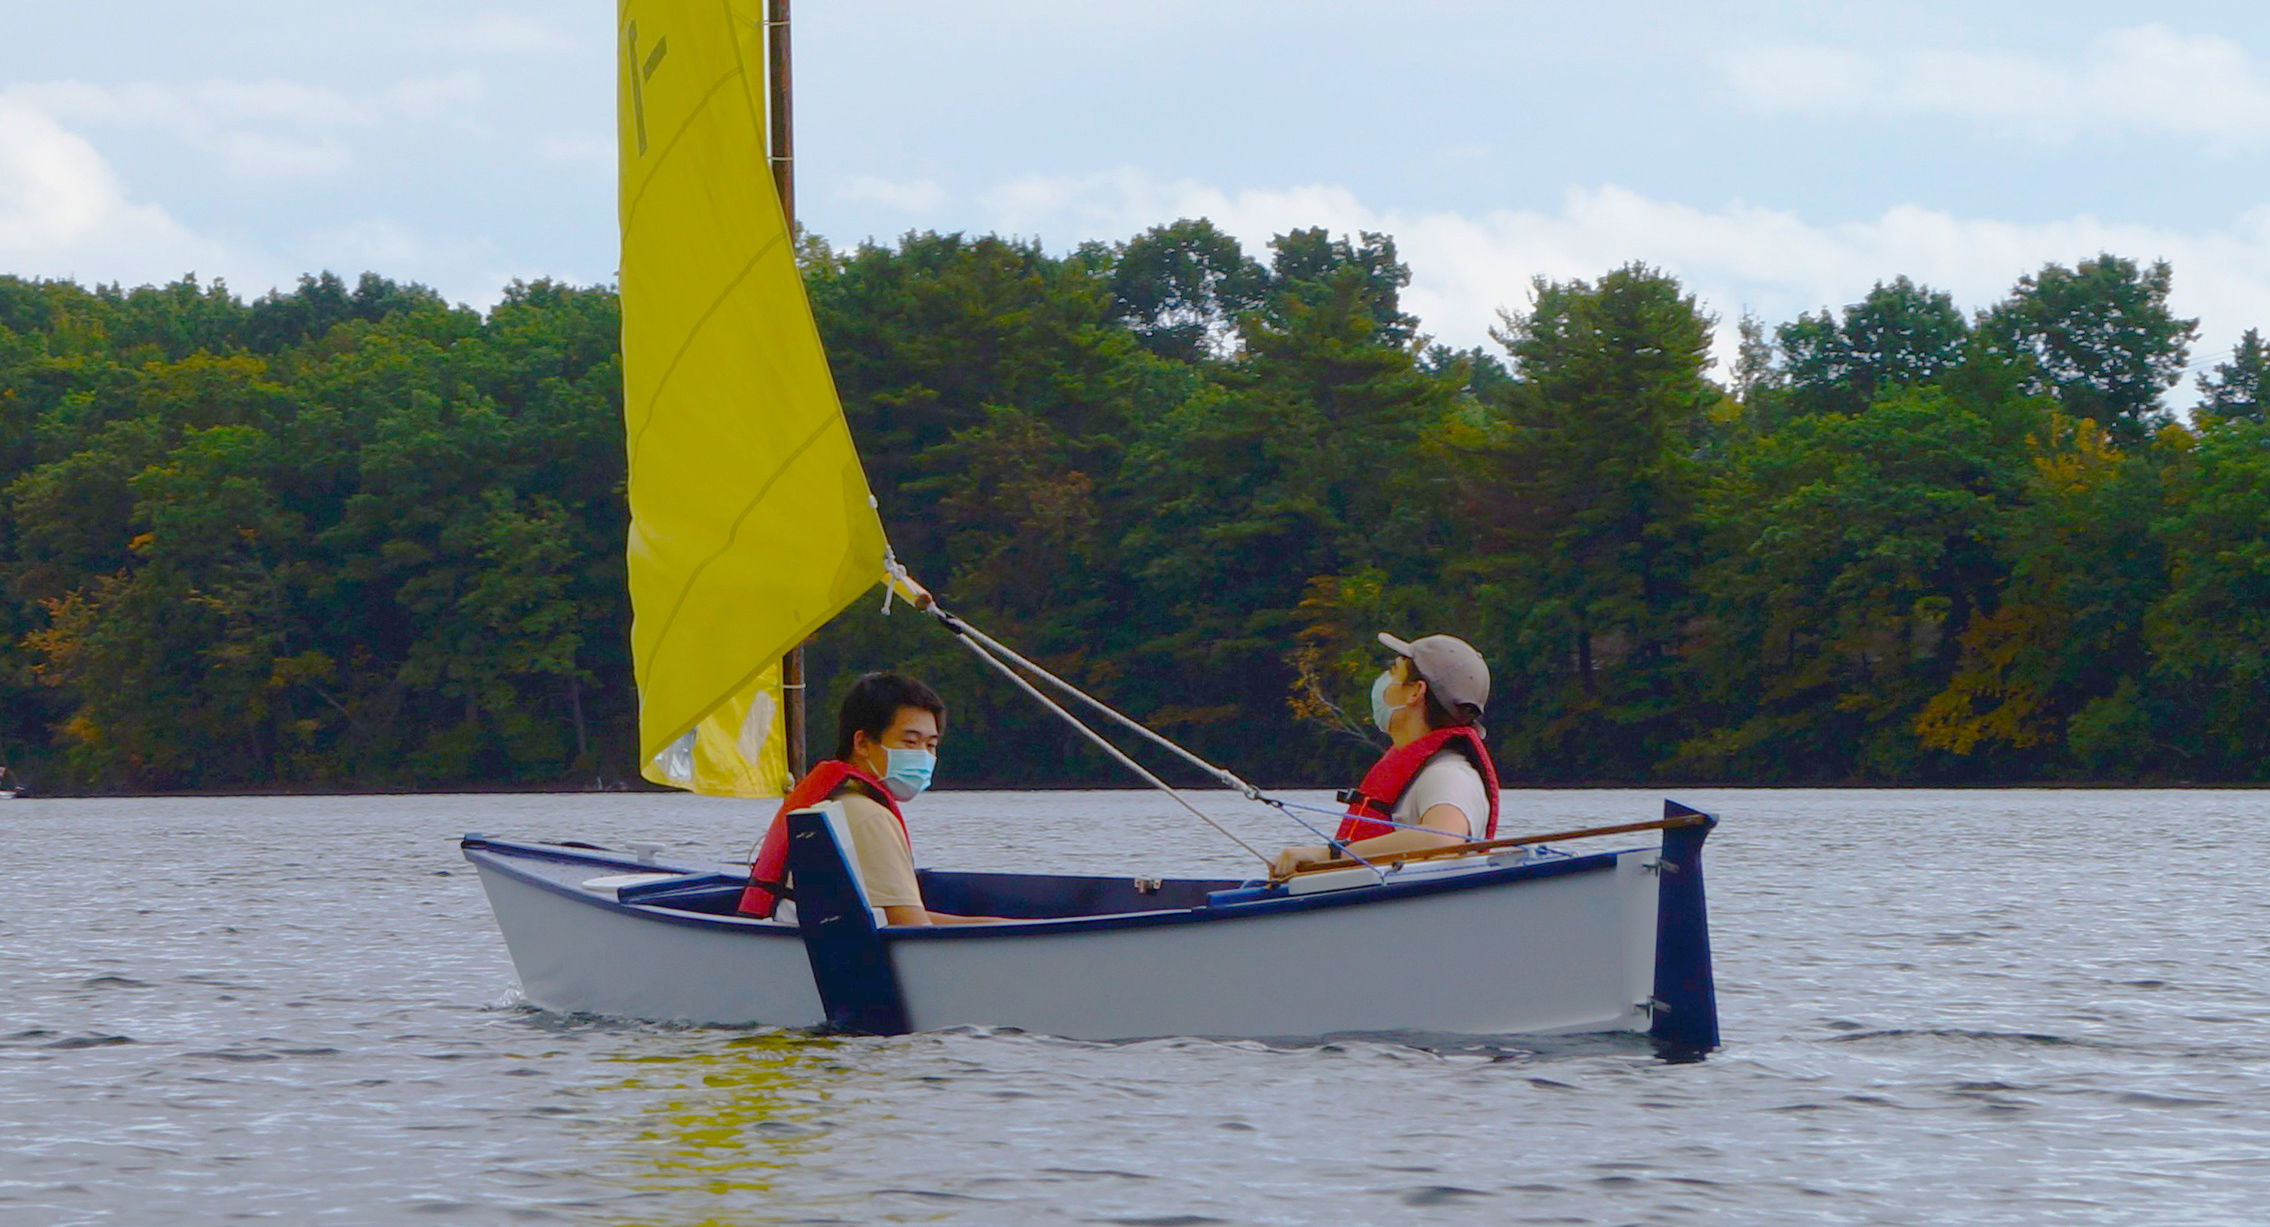
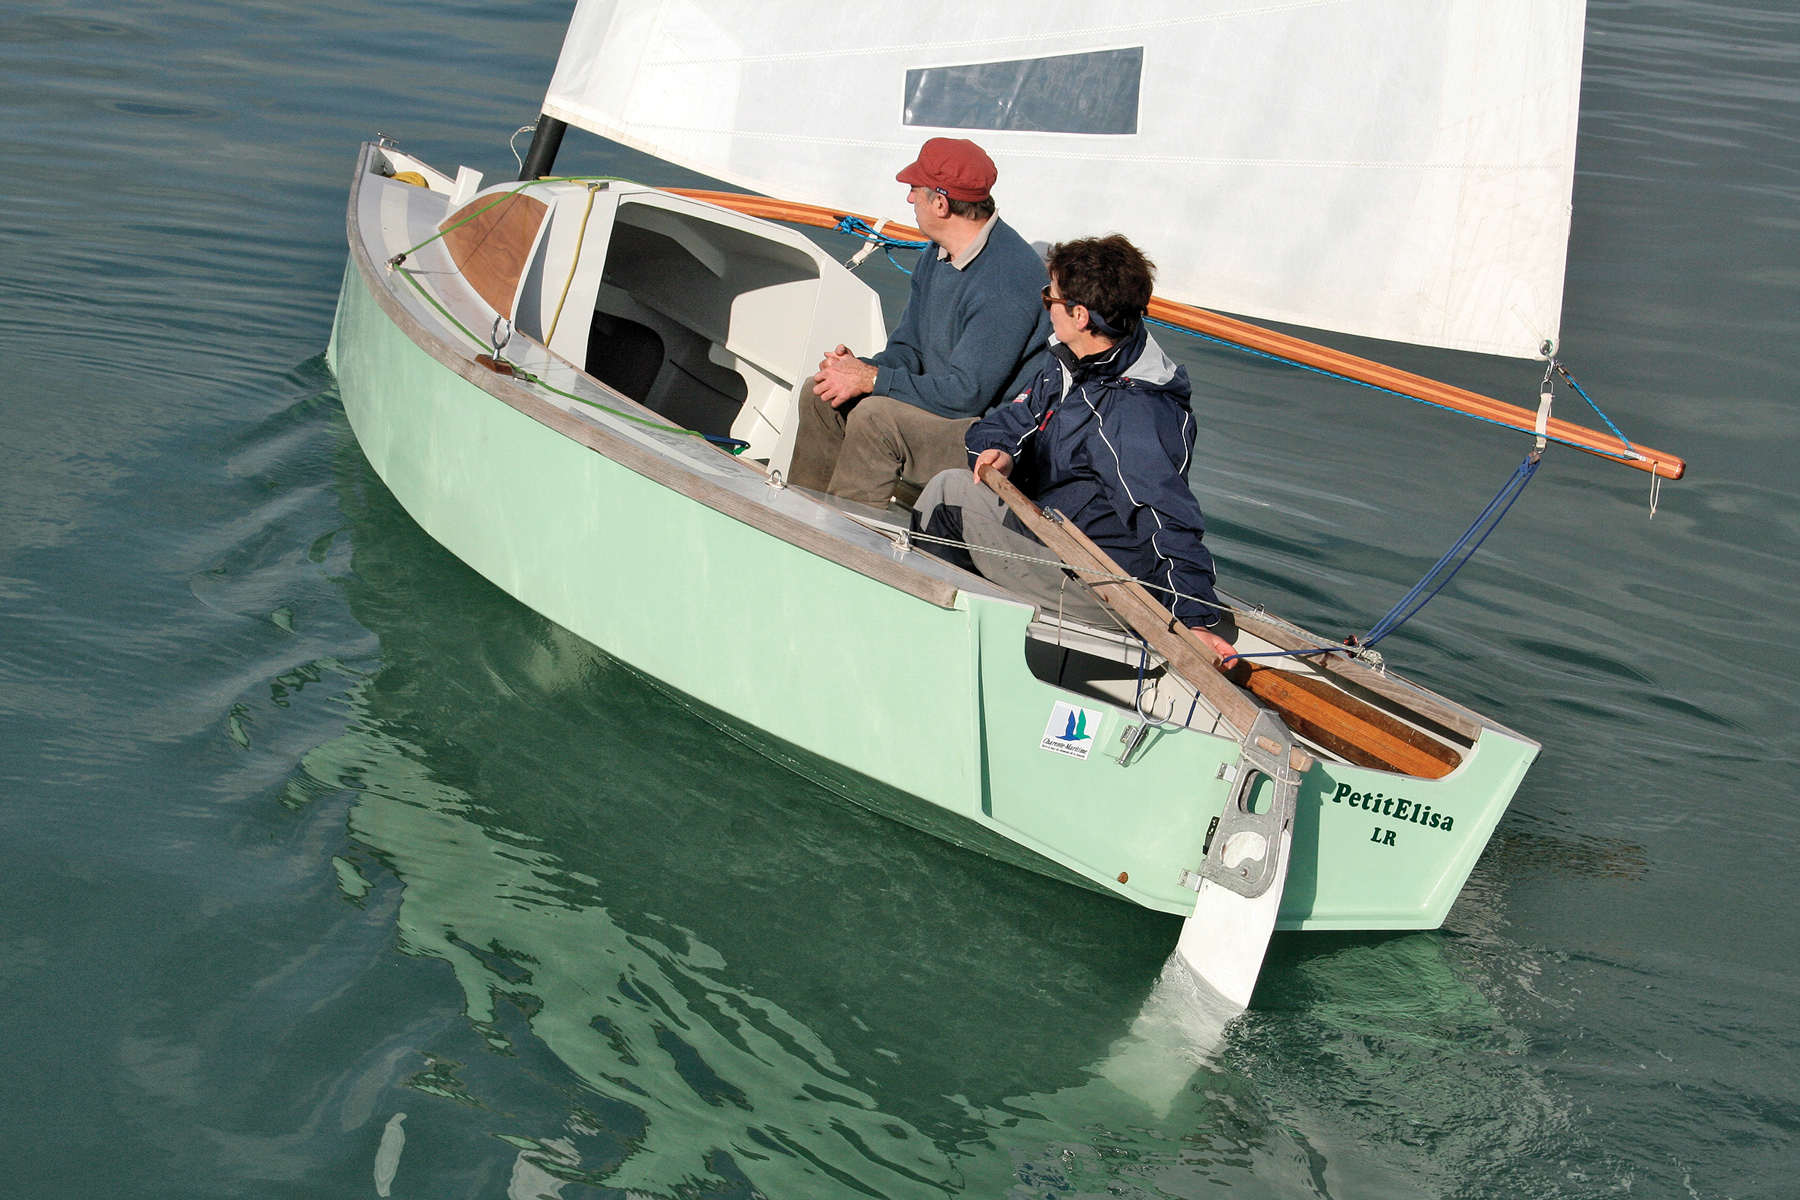
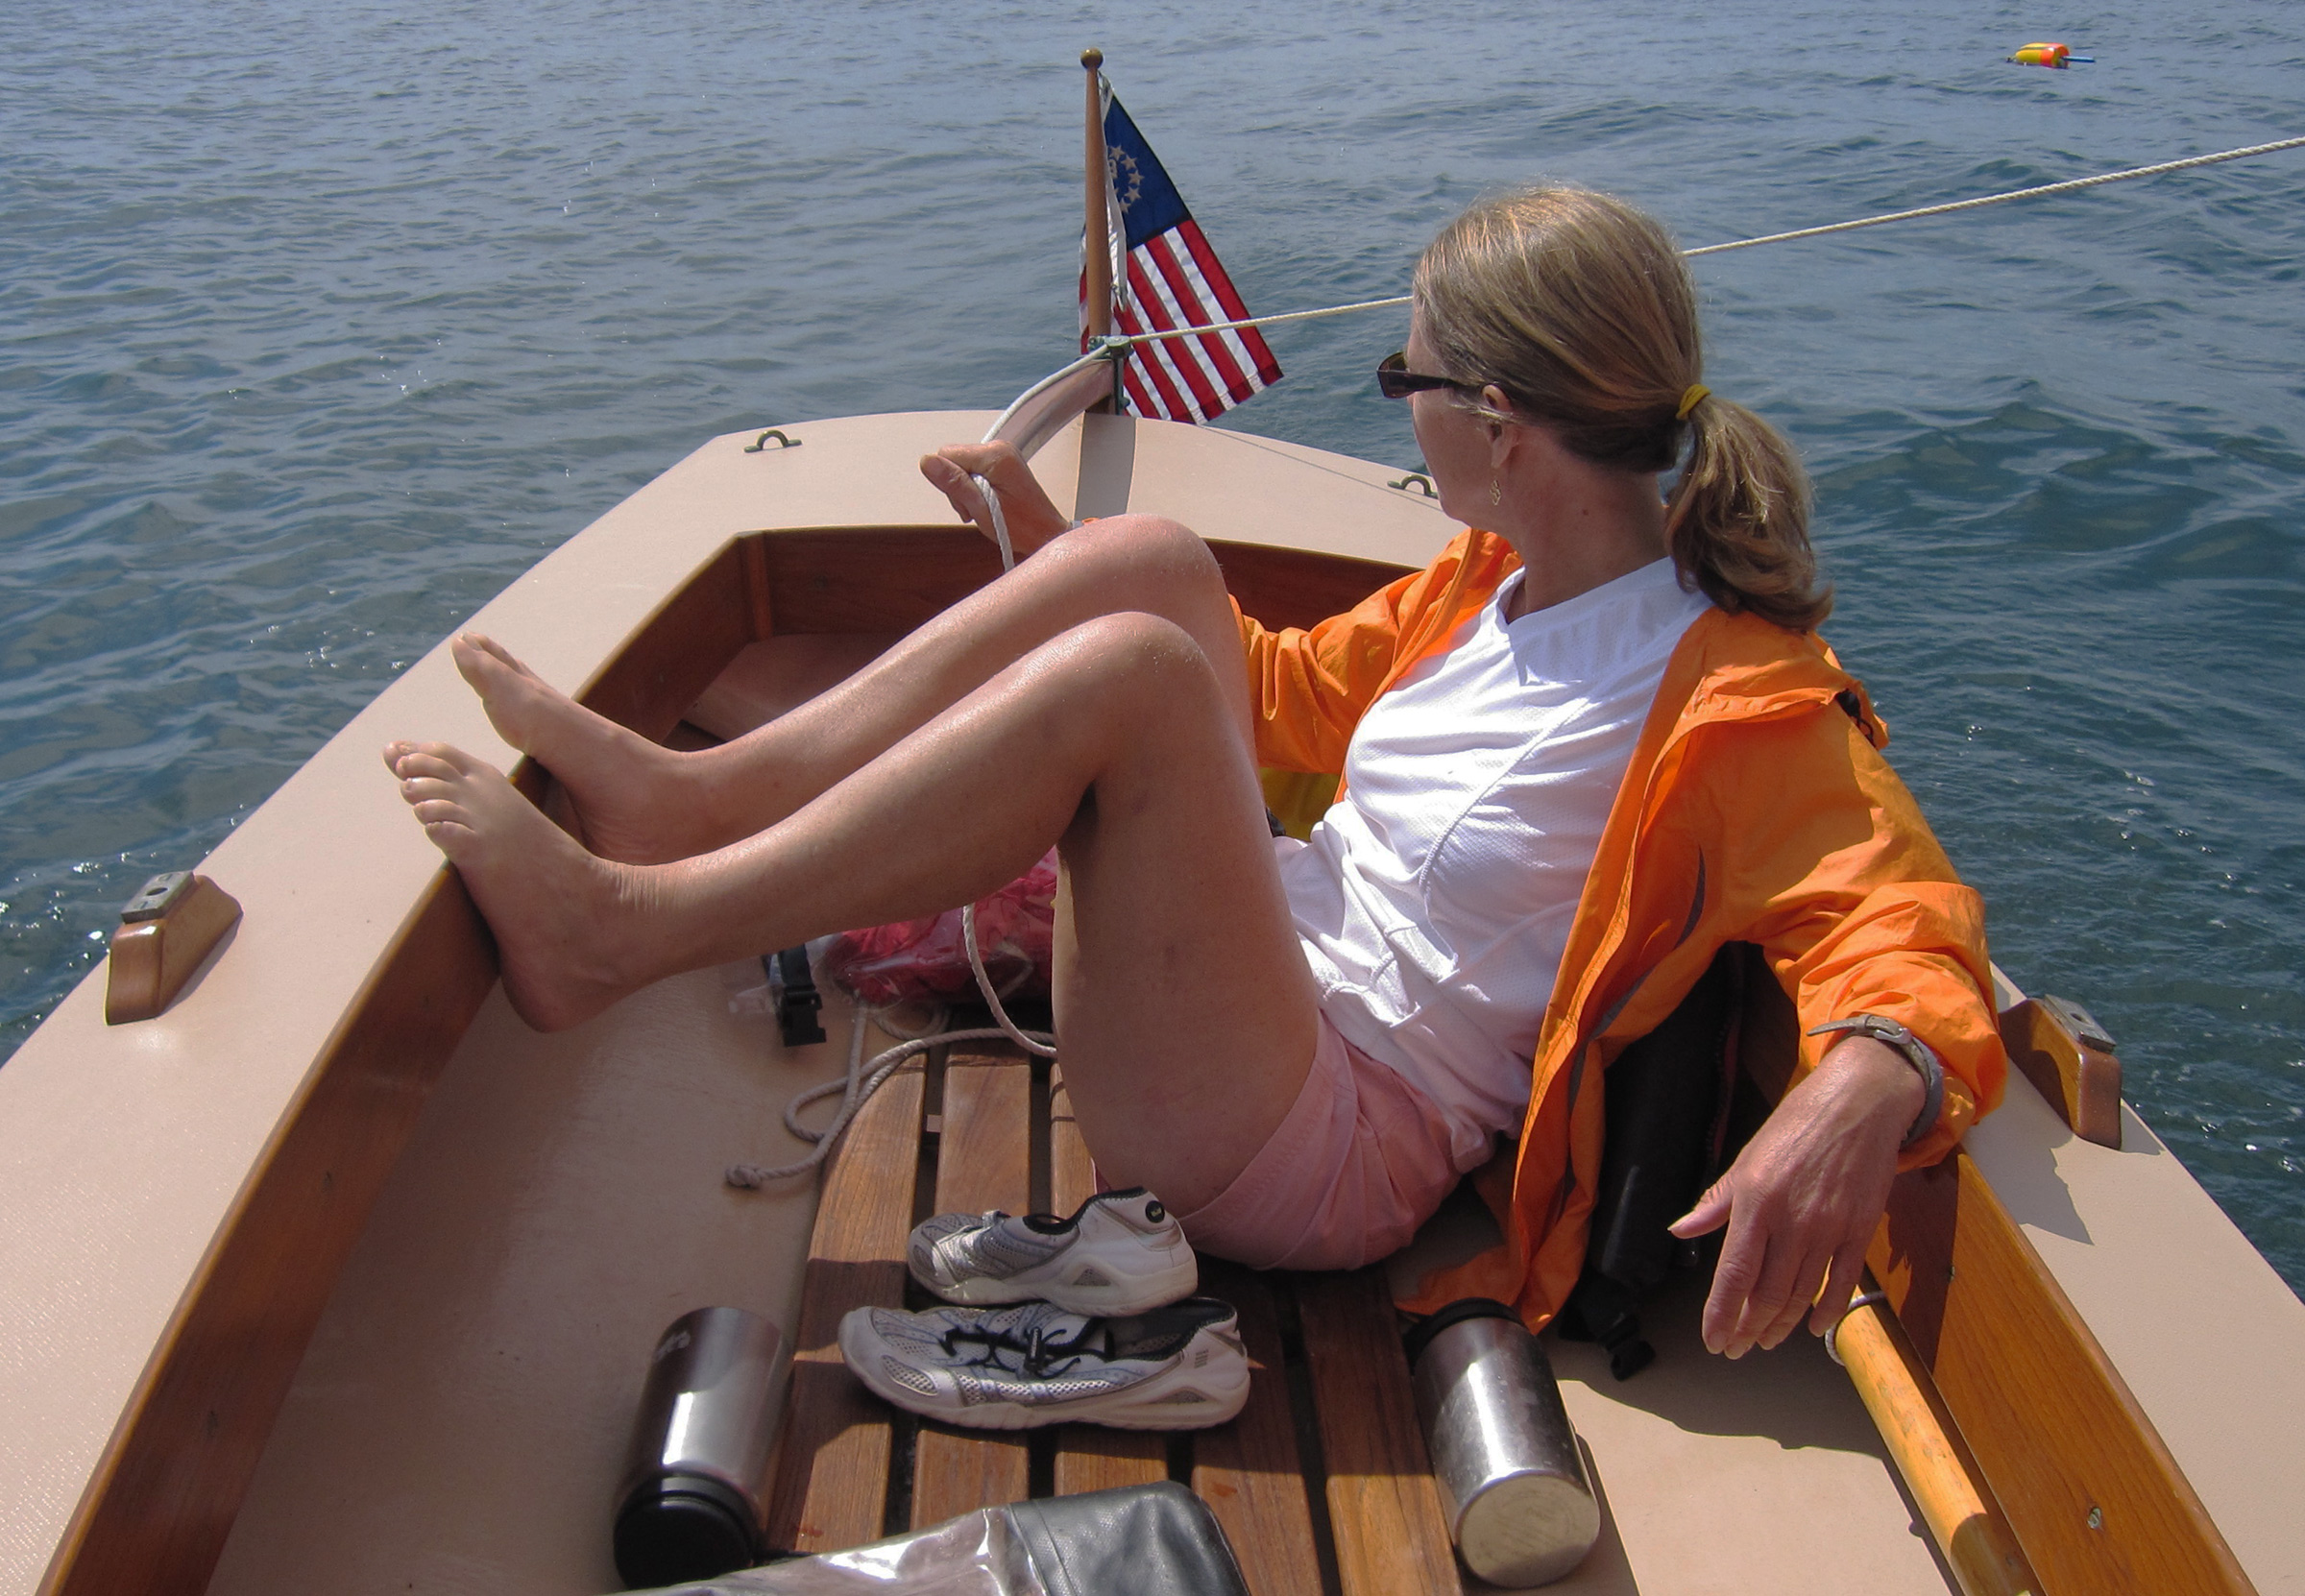
There is ample room for two adults. The cockpit is divided into two sections, with the ’midship frame and its half bulkhead as a partition. To sail, the occupants sit on the bottom of the boat, one in each partition. Moving from one side of the cockpit to the other, while tacking, is merely a matter of shifting one’s weight because of the narrow beam. The Surf is exceptionally stable, and I have been able to keep mine level even in a 15-knot wind with just one of the two occupants hiked out. The ride is dry, pushing through motorboat wakes at hull speed.
The Surf is a joy to sail. The plans call for a sheet that goes straight from the end of the boom to the skipper’s hand, but to ease the strain of holding it, I use a one-part tackle with the sheet led through a block on the boom end and eye-spliced to a brass swivel, which is clipped to a rope traveler. While the traveler limits the tiller to an overall arc of 60 degrees, I have found that’s plenty. With its light weight and rocker, the Surf responds instantly to the helm. Because the boat is so light, it doesn’t carry much way when tacking, so to avoid getting caught in irons, I bear off to pick up speed before coming about. When tacking, I choose to leave the leeboard in place instead of shifting it to the leeward side. The difference in performance is negligible, and it simplifies tacking.
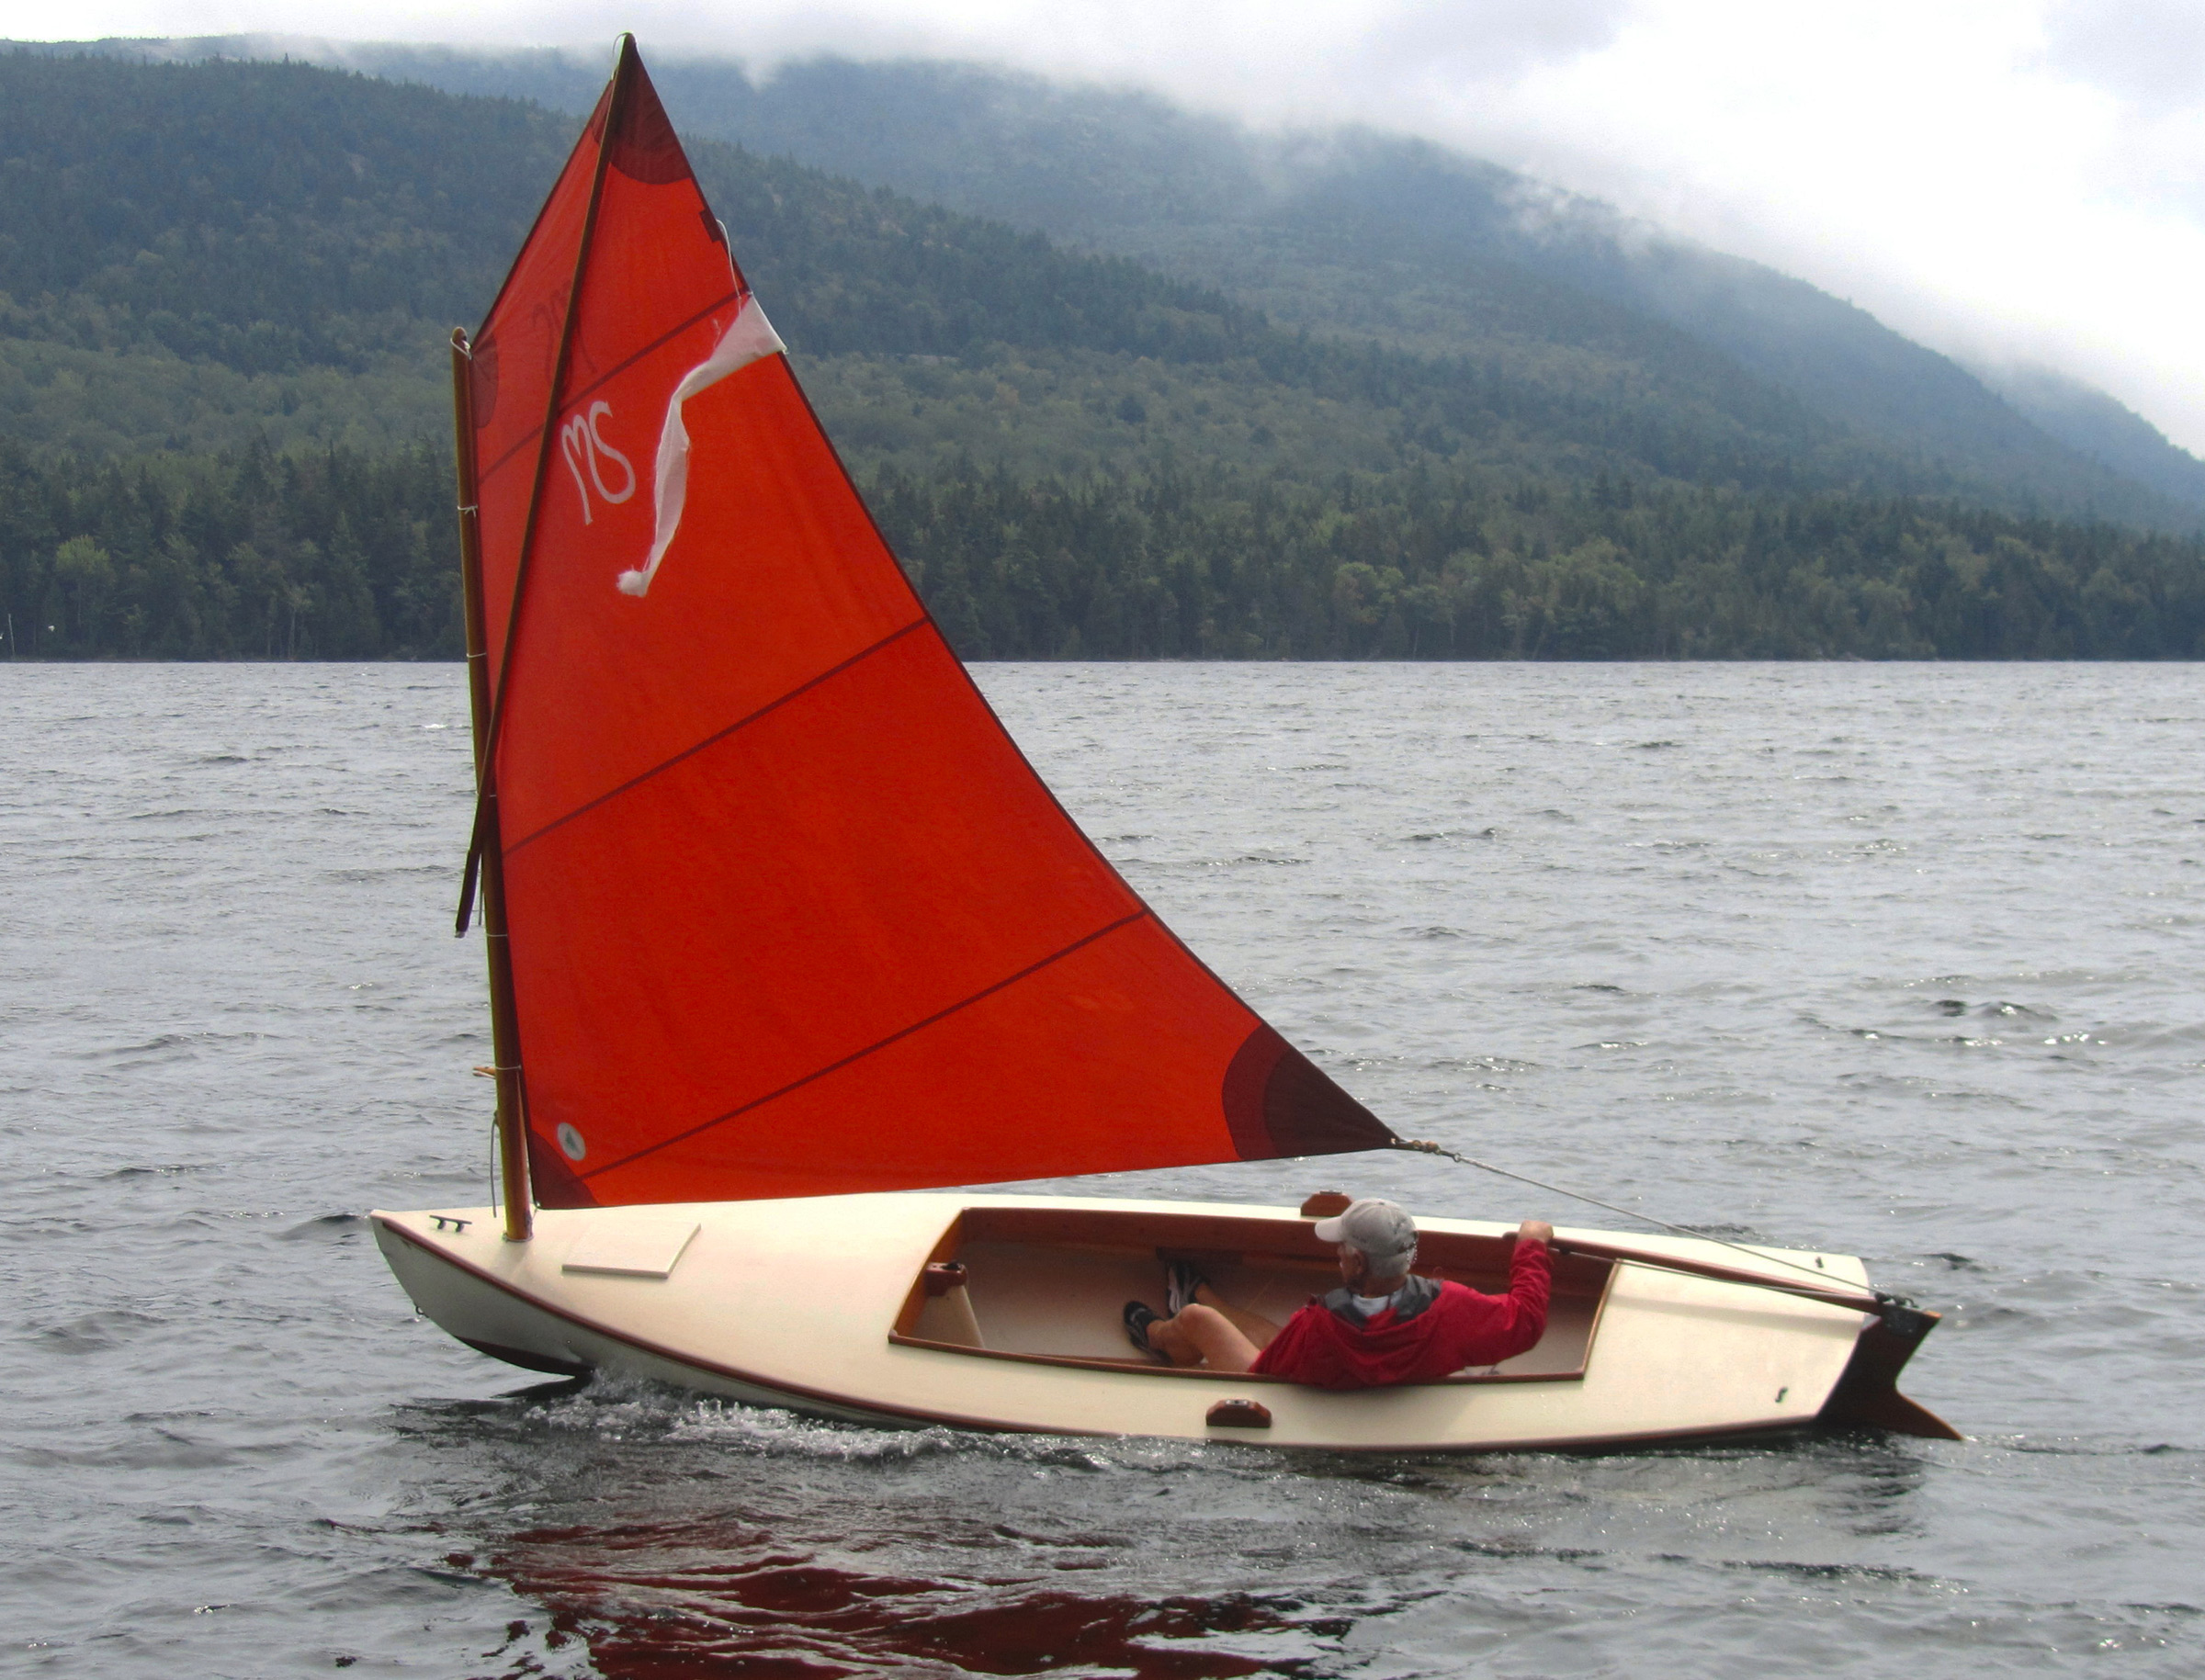
Downwind, the sprit boom keeps the sail flat, and lifting the leeboard off the gunwale and bringing it inboard helps to pick up some speed. Head-to-head against a Sunfish, the Surf (with a passenger) outperformed the solo-sailed Sunfish both upwind and downwind.
Tom Nallen Jr
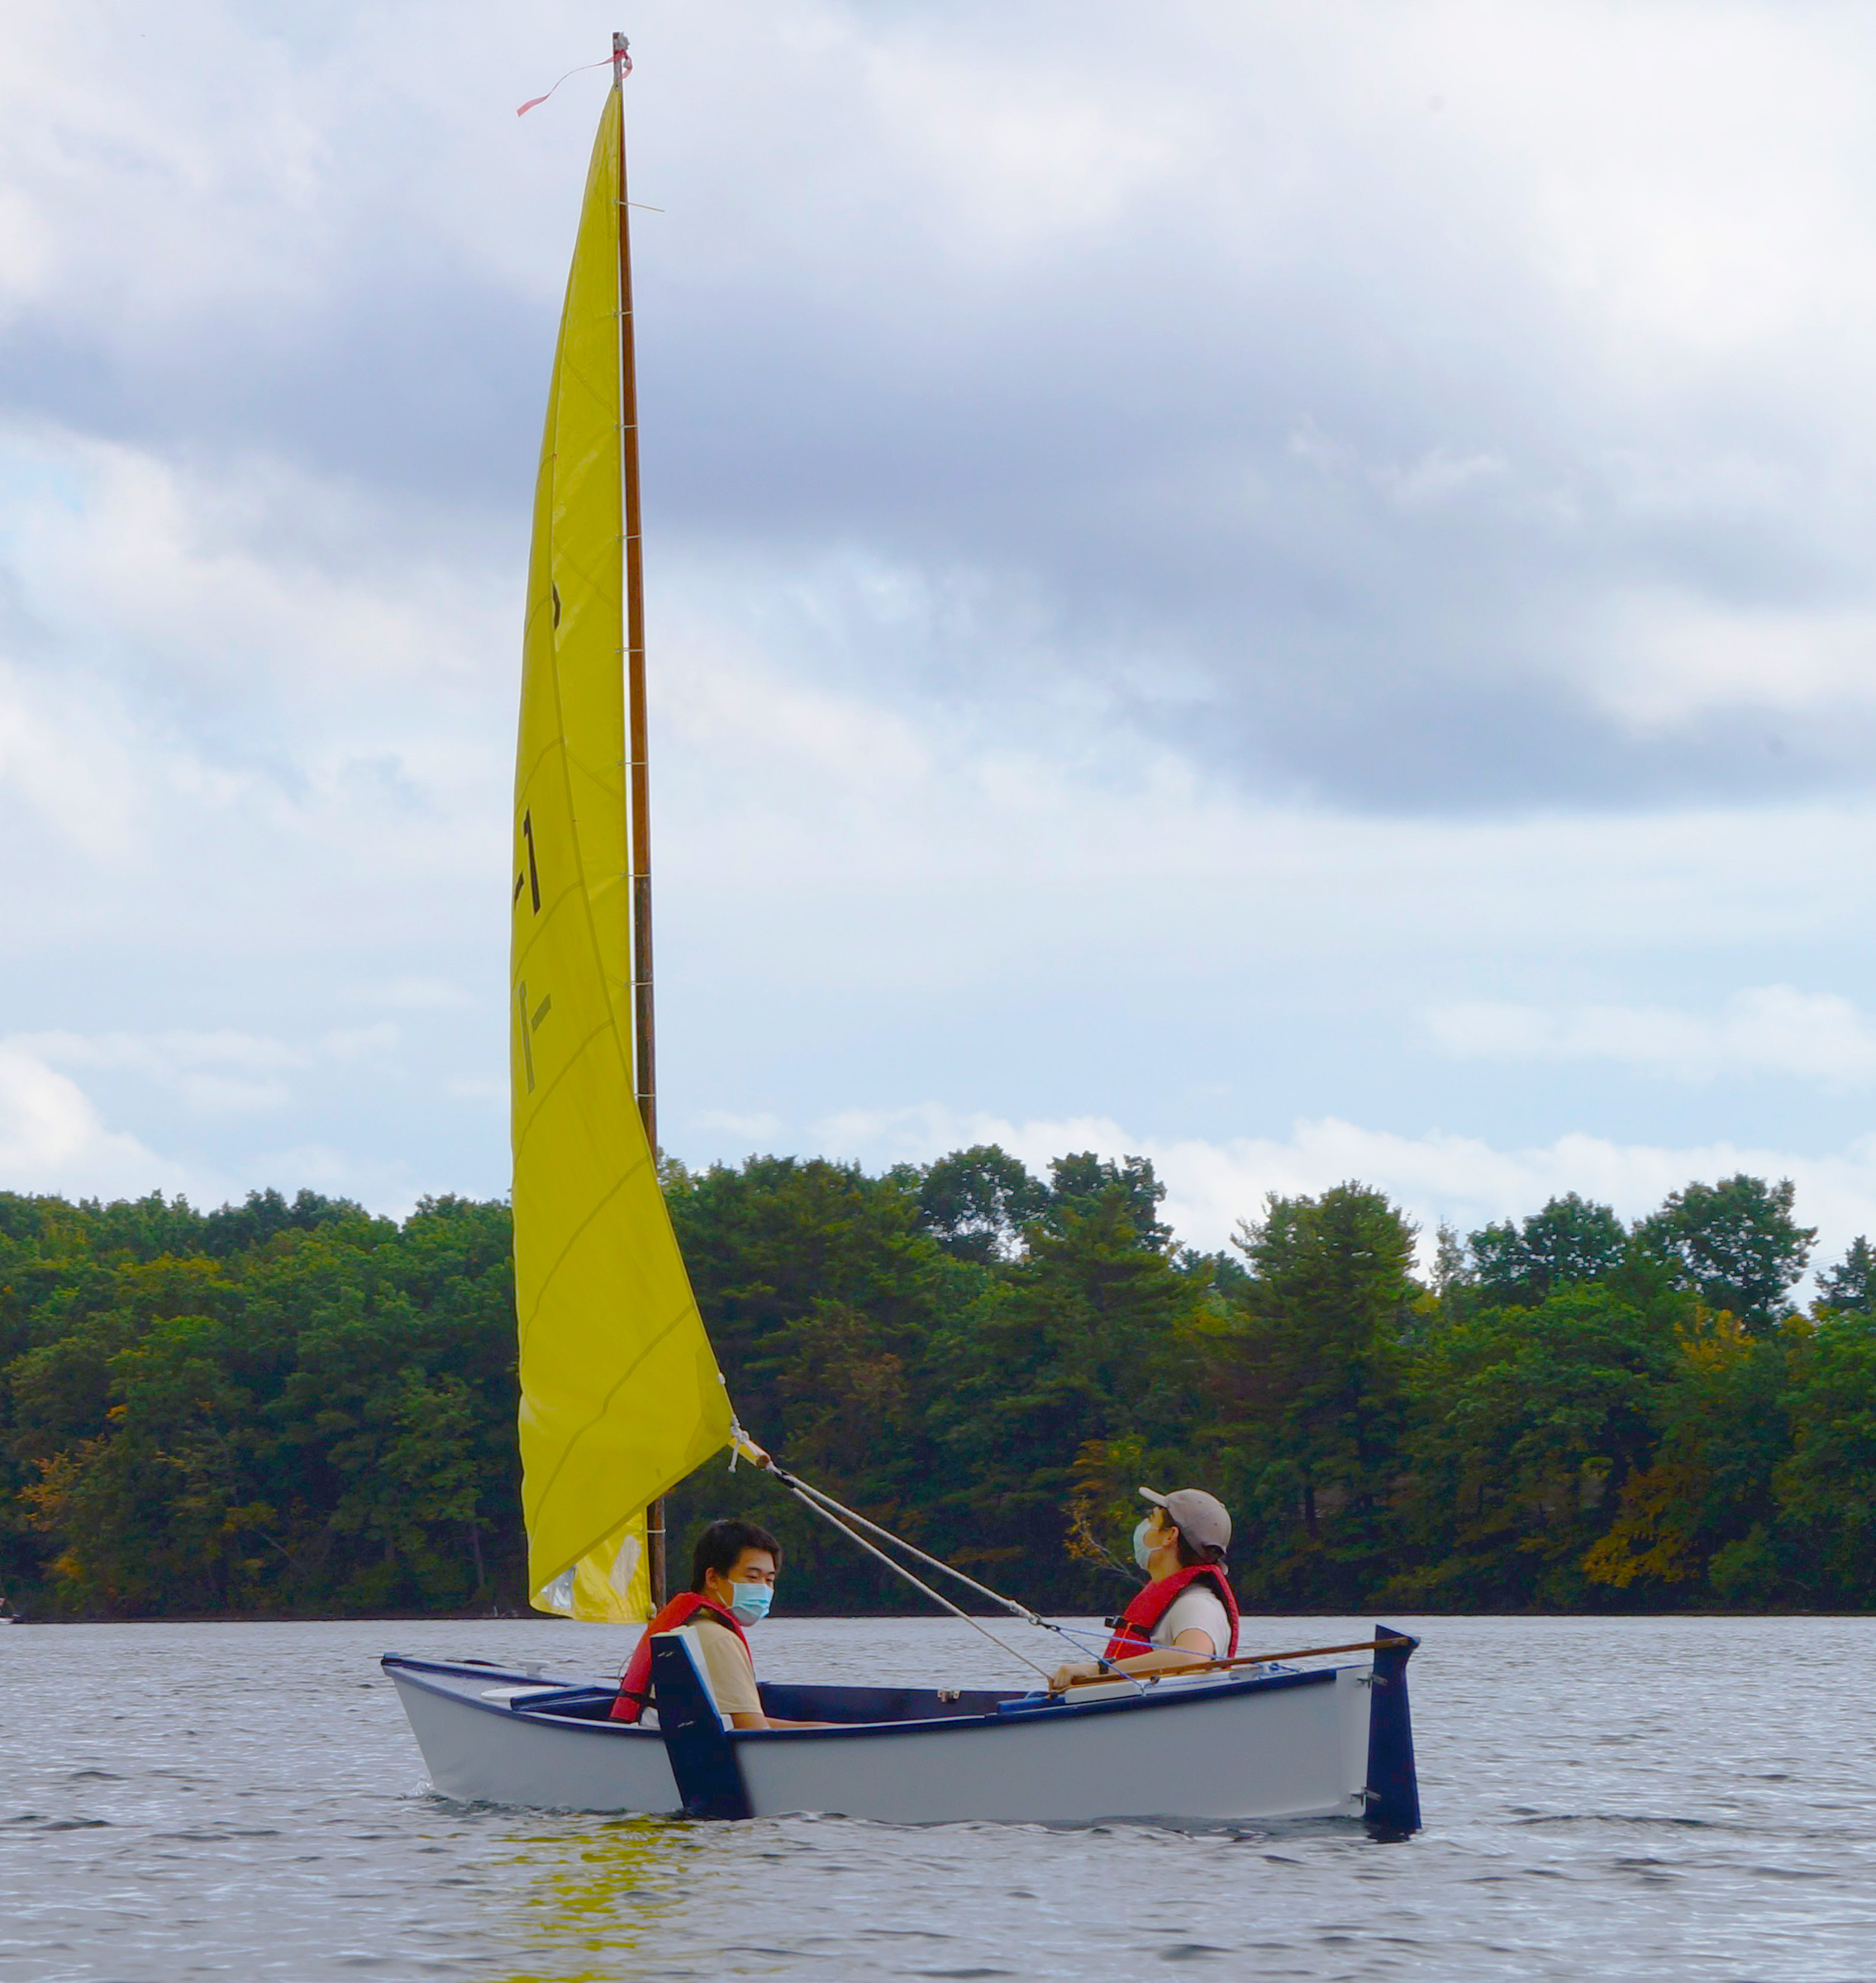
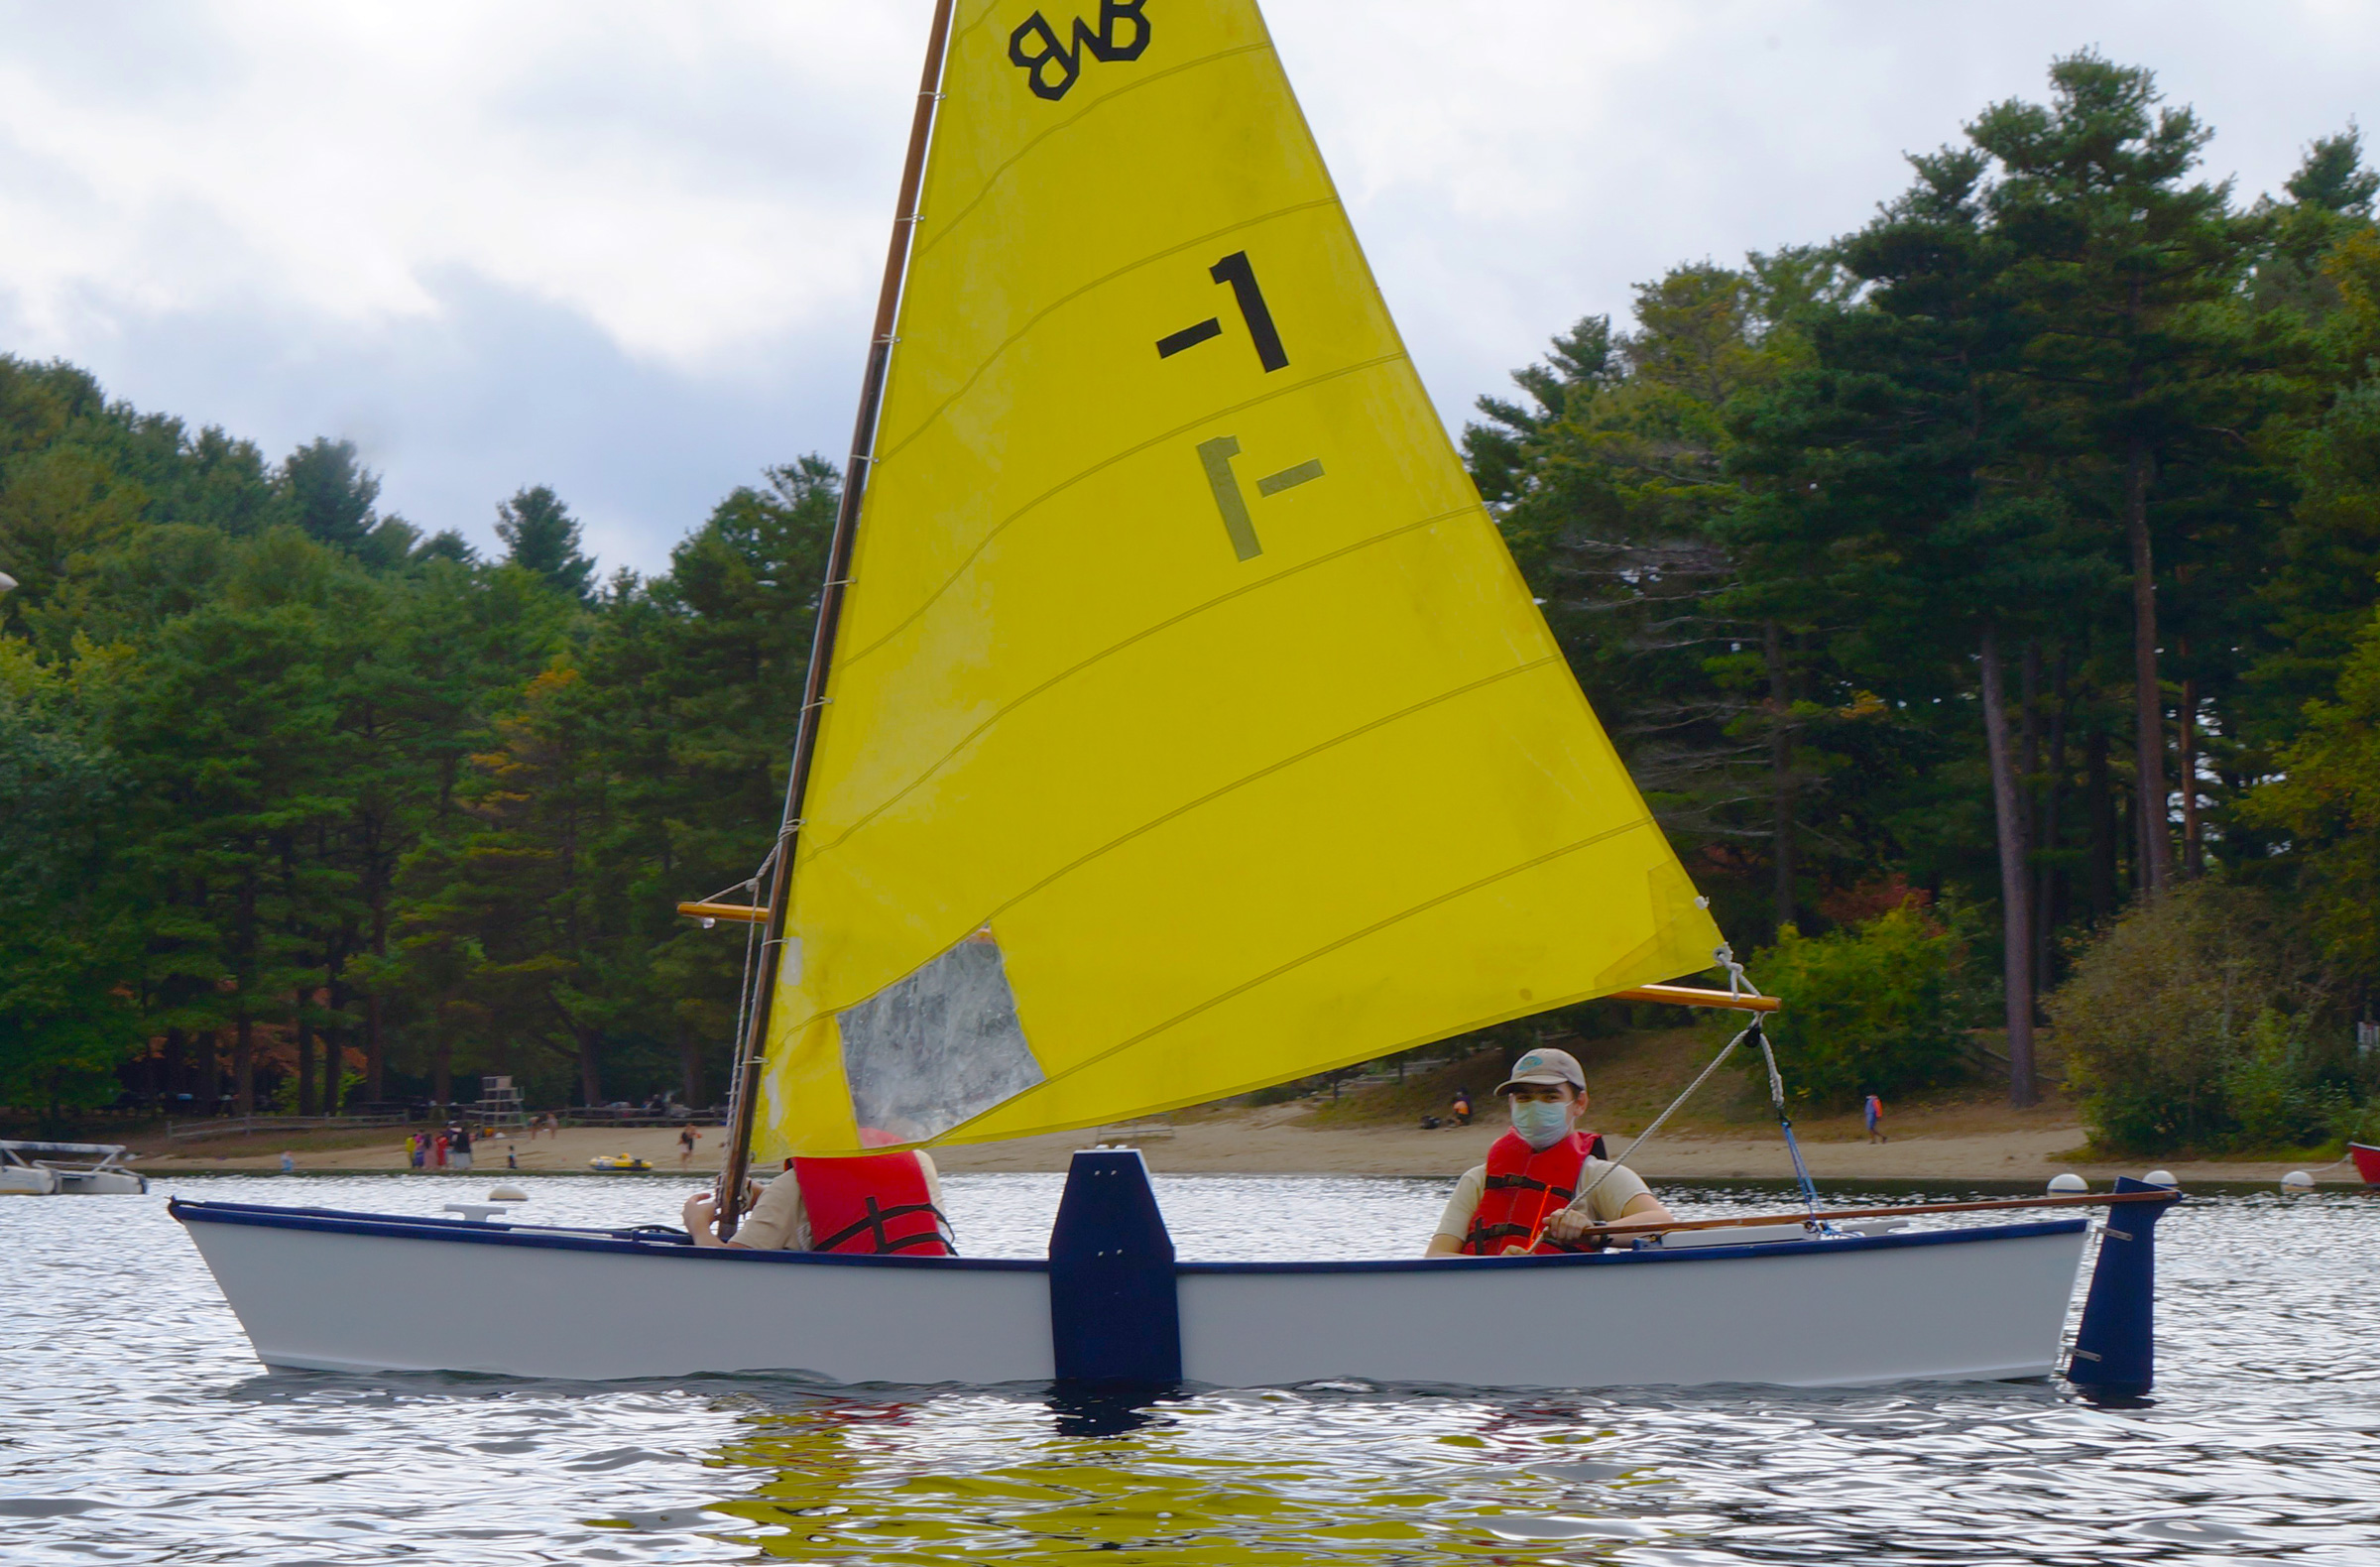
The sprit boom sits high above the heads of the seated crew, so it won’t hurt anyone during an unexpected jibe. The leeboard slips over the rail and in moderate breezes does just as well set to windward as to leeward.
The leg-o’-mutton sprit sail has only two controlling lines—the sheet and the boom’s snotter—which makes sailing the Surf very simple and fairly safe. The sprit boom stays above the heads of the crew while coming about. Even in 17 knots of wind, the only punishment for an uncontrolled jibe is a slap from some sailcloth. The tack is secured low, very close to the foredeck, so the foot of the sail obscures the view forward. My sail has a “window” to help me see what’s ahead. While the drawings for the sail do not include reefpoints, the unstayed wooden mast bends and spills air if there is too much wind. I estimate 15 knots is the border of what is too much wind for the Surf. I once went out in 17 knots, but felt that was pushing it. To furl while afloat, I undo the sprit, and bundle the sail around the mast. Held by a few sail-ties, this arrangement keeps the windage down enough to row back to the launching point.
George Skelly
For rowing while at the aft station, sets of cleats fastened to the sides of the boat provide a purchase for the feet. For a bit more power a footboard could be installed between the cleats on either side.
For rowing, there is a removable fore-and-aft bench for the forward compartment. There are two pairs of oarlocks: one aft for rowing without a passenger aboard and another forward to balance a guest sitting in the stern. The standard formula for oar length indicates 6′ 9″oars would be the match for the boat’s 41″ beam; the 7′ oars I’ve used have buttons on the leathers that make for a bit of extra overlap at the handles. That required a hand-over-hand rowing style I wasn’t yet used to. The Surf turns easily and carries its way well after each stroke, even against the wind. After gliding for about 1.5 boat lengths, the Surf would start to veer, but as long as I kept rowing and paid attention I could make the boat go straight. Putting a bit of weight in the stern should improve the tacking. I will note that I am not necessarily a good judge of rowing performance, and the only other boats I have rowed in my life were either rubber dinghies or fiberglass rectangles. In comparison to those boats, the Surf rowed wonderfully. It felt much easier, even though I have yet to get used to hand-over-hand rowing. I primarily sail my Surf, so all I personally need in terms of rowing performance is enough to get me back to the beach if the wind dies. The Surf exceeds this requirement.
George Skelly
The plans call for a rower’s bench that runs fore and aft along the centerline, making it easy to switch between the rowing stations while remaining seated.
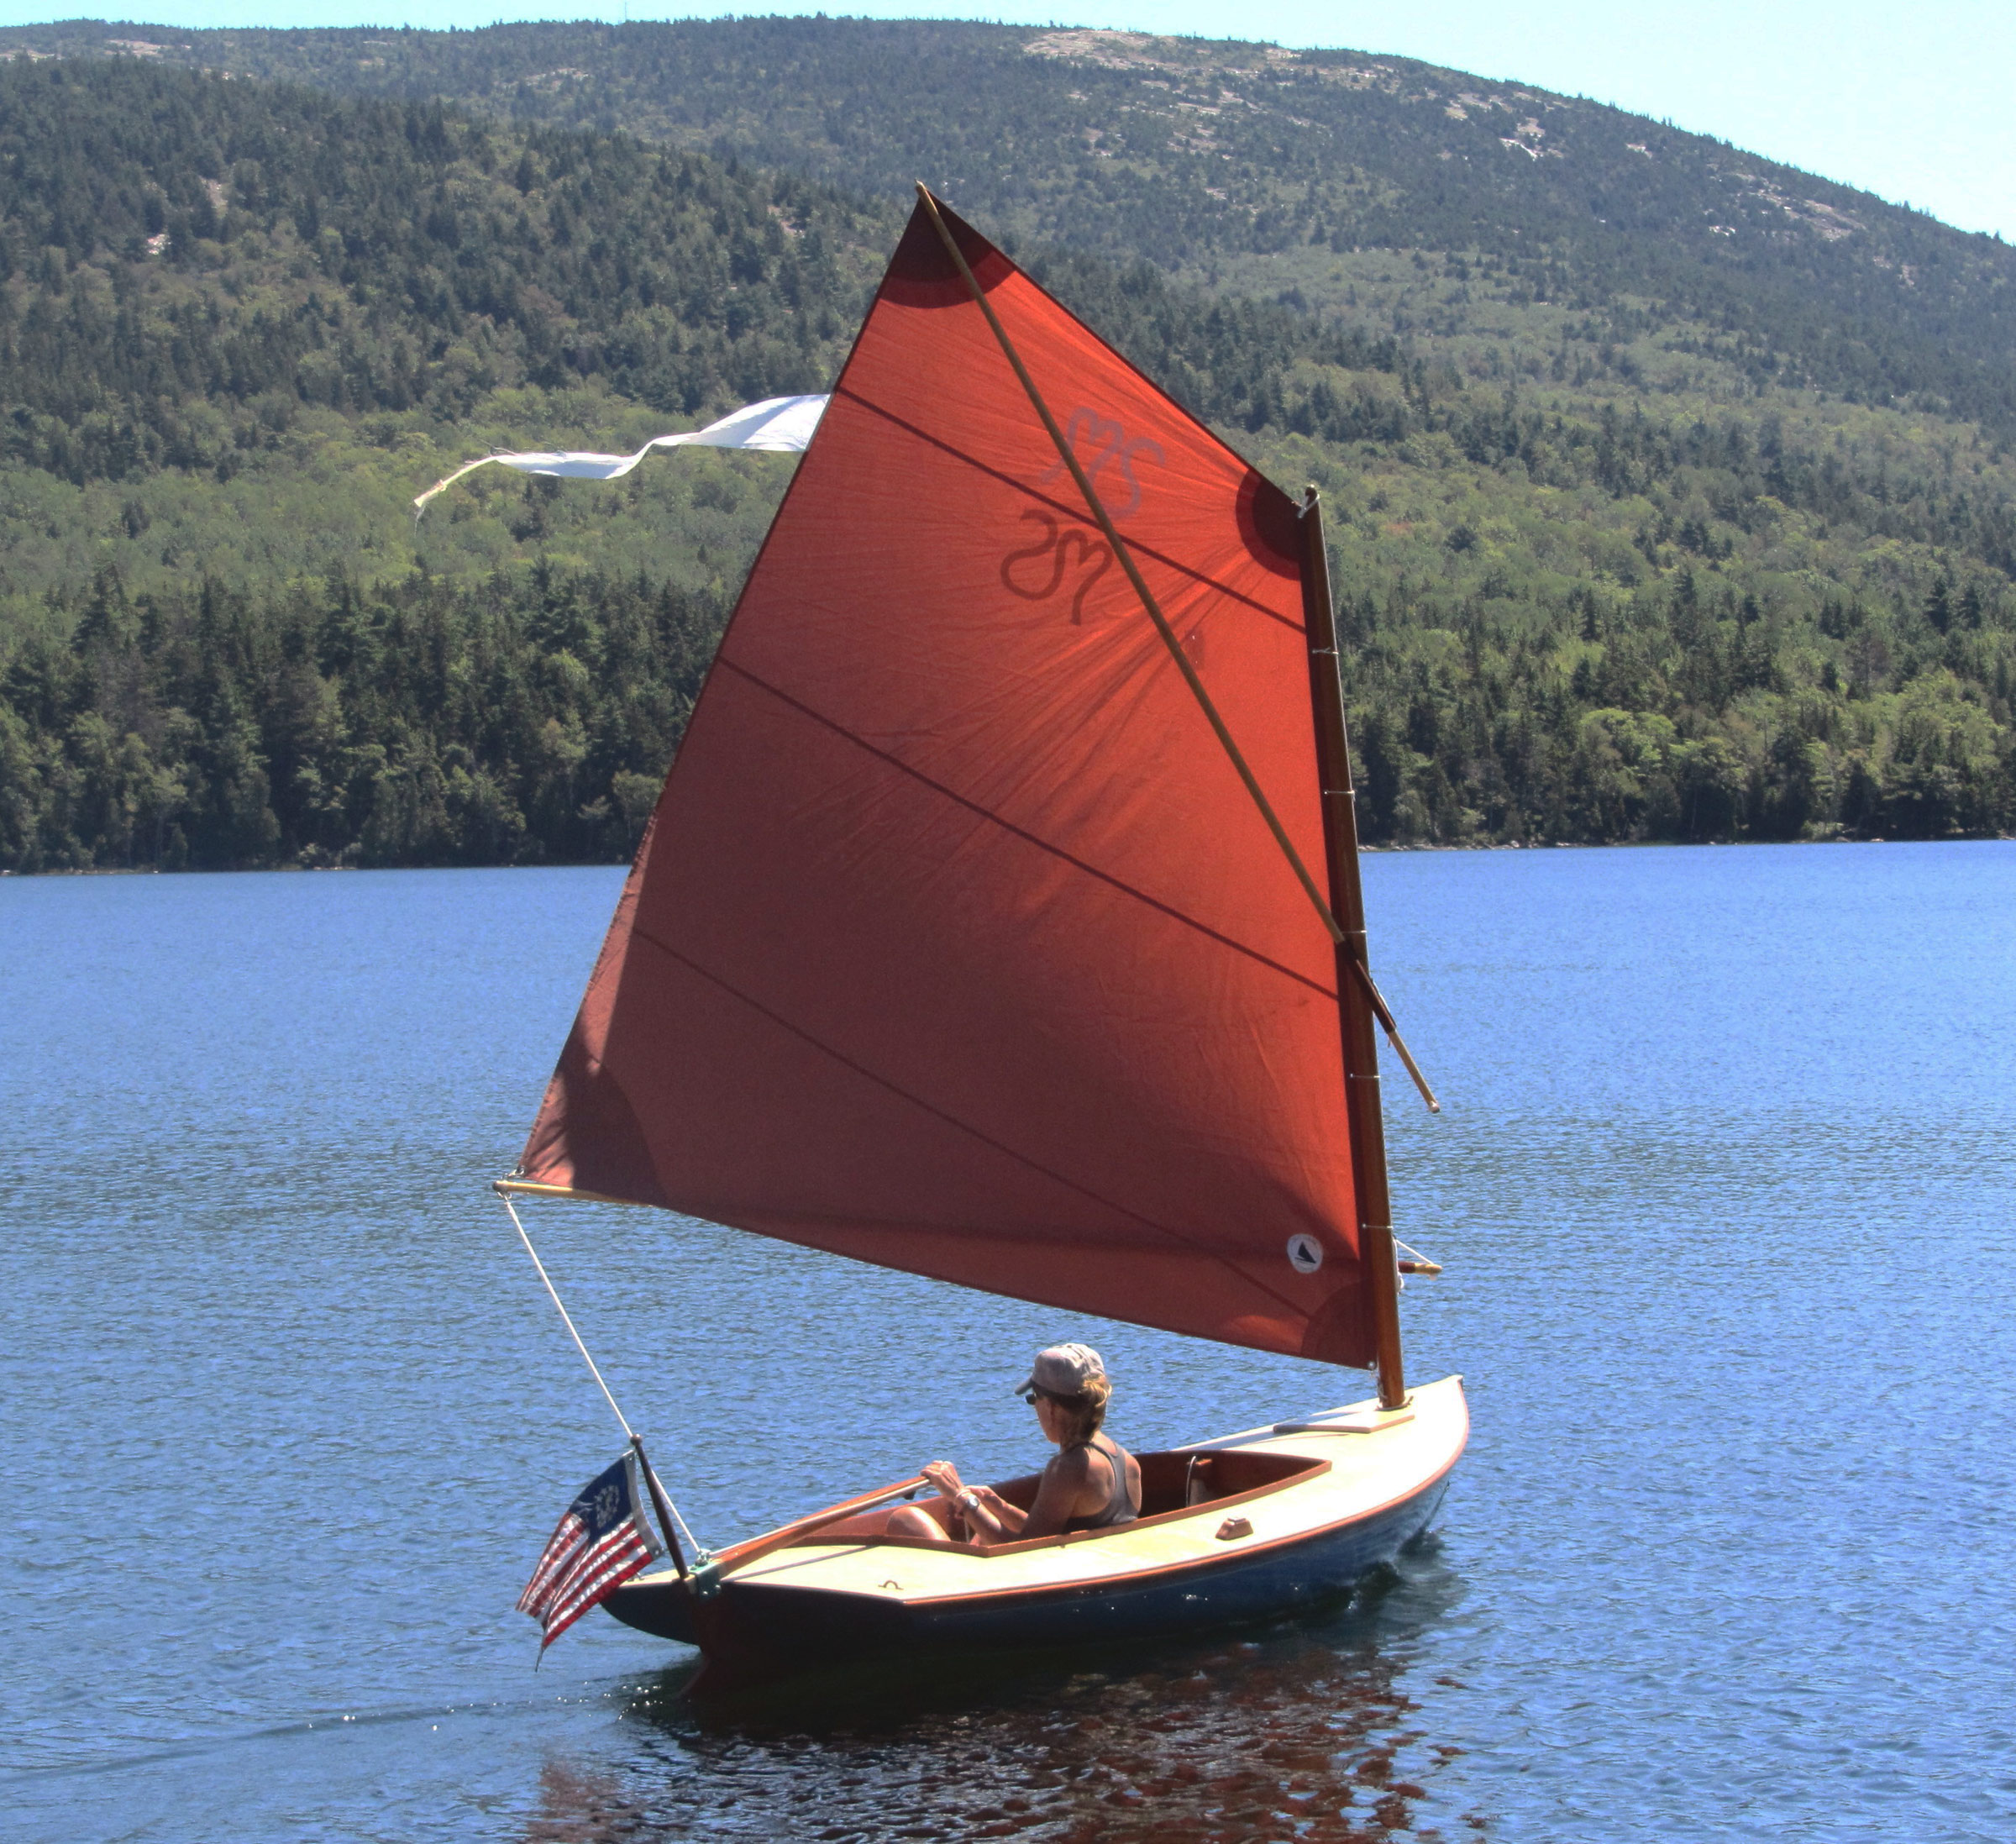
Although I have only sailed my Surf, christened COURAGE, for one season, the boat has already given me many adventures. Its performance suits my purpose nicely, but the Surf’s strongest point is that it is not demanding to own. A sailboat doesn’t have to trap you with yacht-club fees, endless maintenance, or a hefty price tag. The Surf is a boat that a novice, like myself, can build with little prior knowledge, then say, “Let’s go sailing,” hop in the car, and head off to another adventure. No fuss, no fees, just wind and water, wood and sailcloth.
William Skelly is an 18-year-old high-school student who lives in Carlisle, Massachusetts. He has been sailing since he was 14 when he took a “Learn to Sail” course on the Charles River at Community Boating in Boston. He has since continued his sailing education at Community Boating and elsewhere, and sails during the summers and on weekends during the sailing season.
Surf Crabskiff particulars
[table]
Length/15′ 6″
Beam/3′ 7″
Sail Area/59 sq. ft.
[/table]
Plans for the Surf Crabskiff are available from H.H. Payson & Company for $45. Harold “Dynamite” Payson’s Instant Boats, which details the type of construction used in the Surf, was published in 1979 and is out of print, though copies are available on the web. Payson’s Build the New Instant Boats has been in print since 2010, but it is an introduction to tack-and-tape construction, not the fasteners-and-glue approach used for the Surf.
Is there a boat you’d like to know more about? Have you built one that you think other Small Boats Magazine readers would enjoy? Please email us!
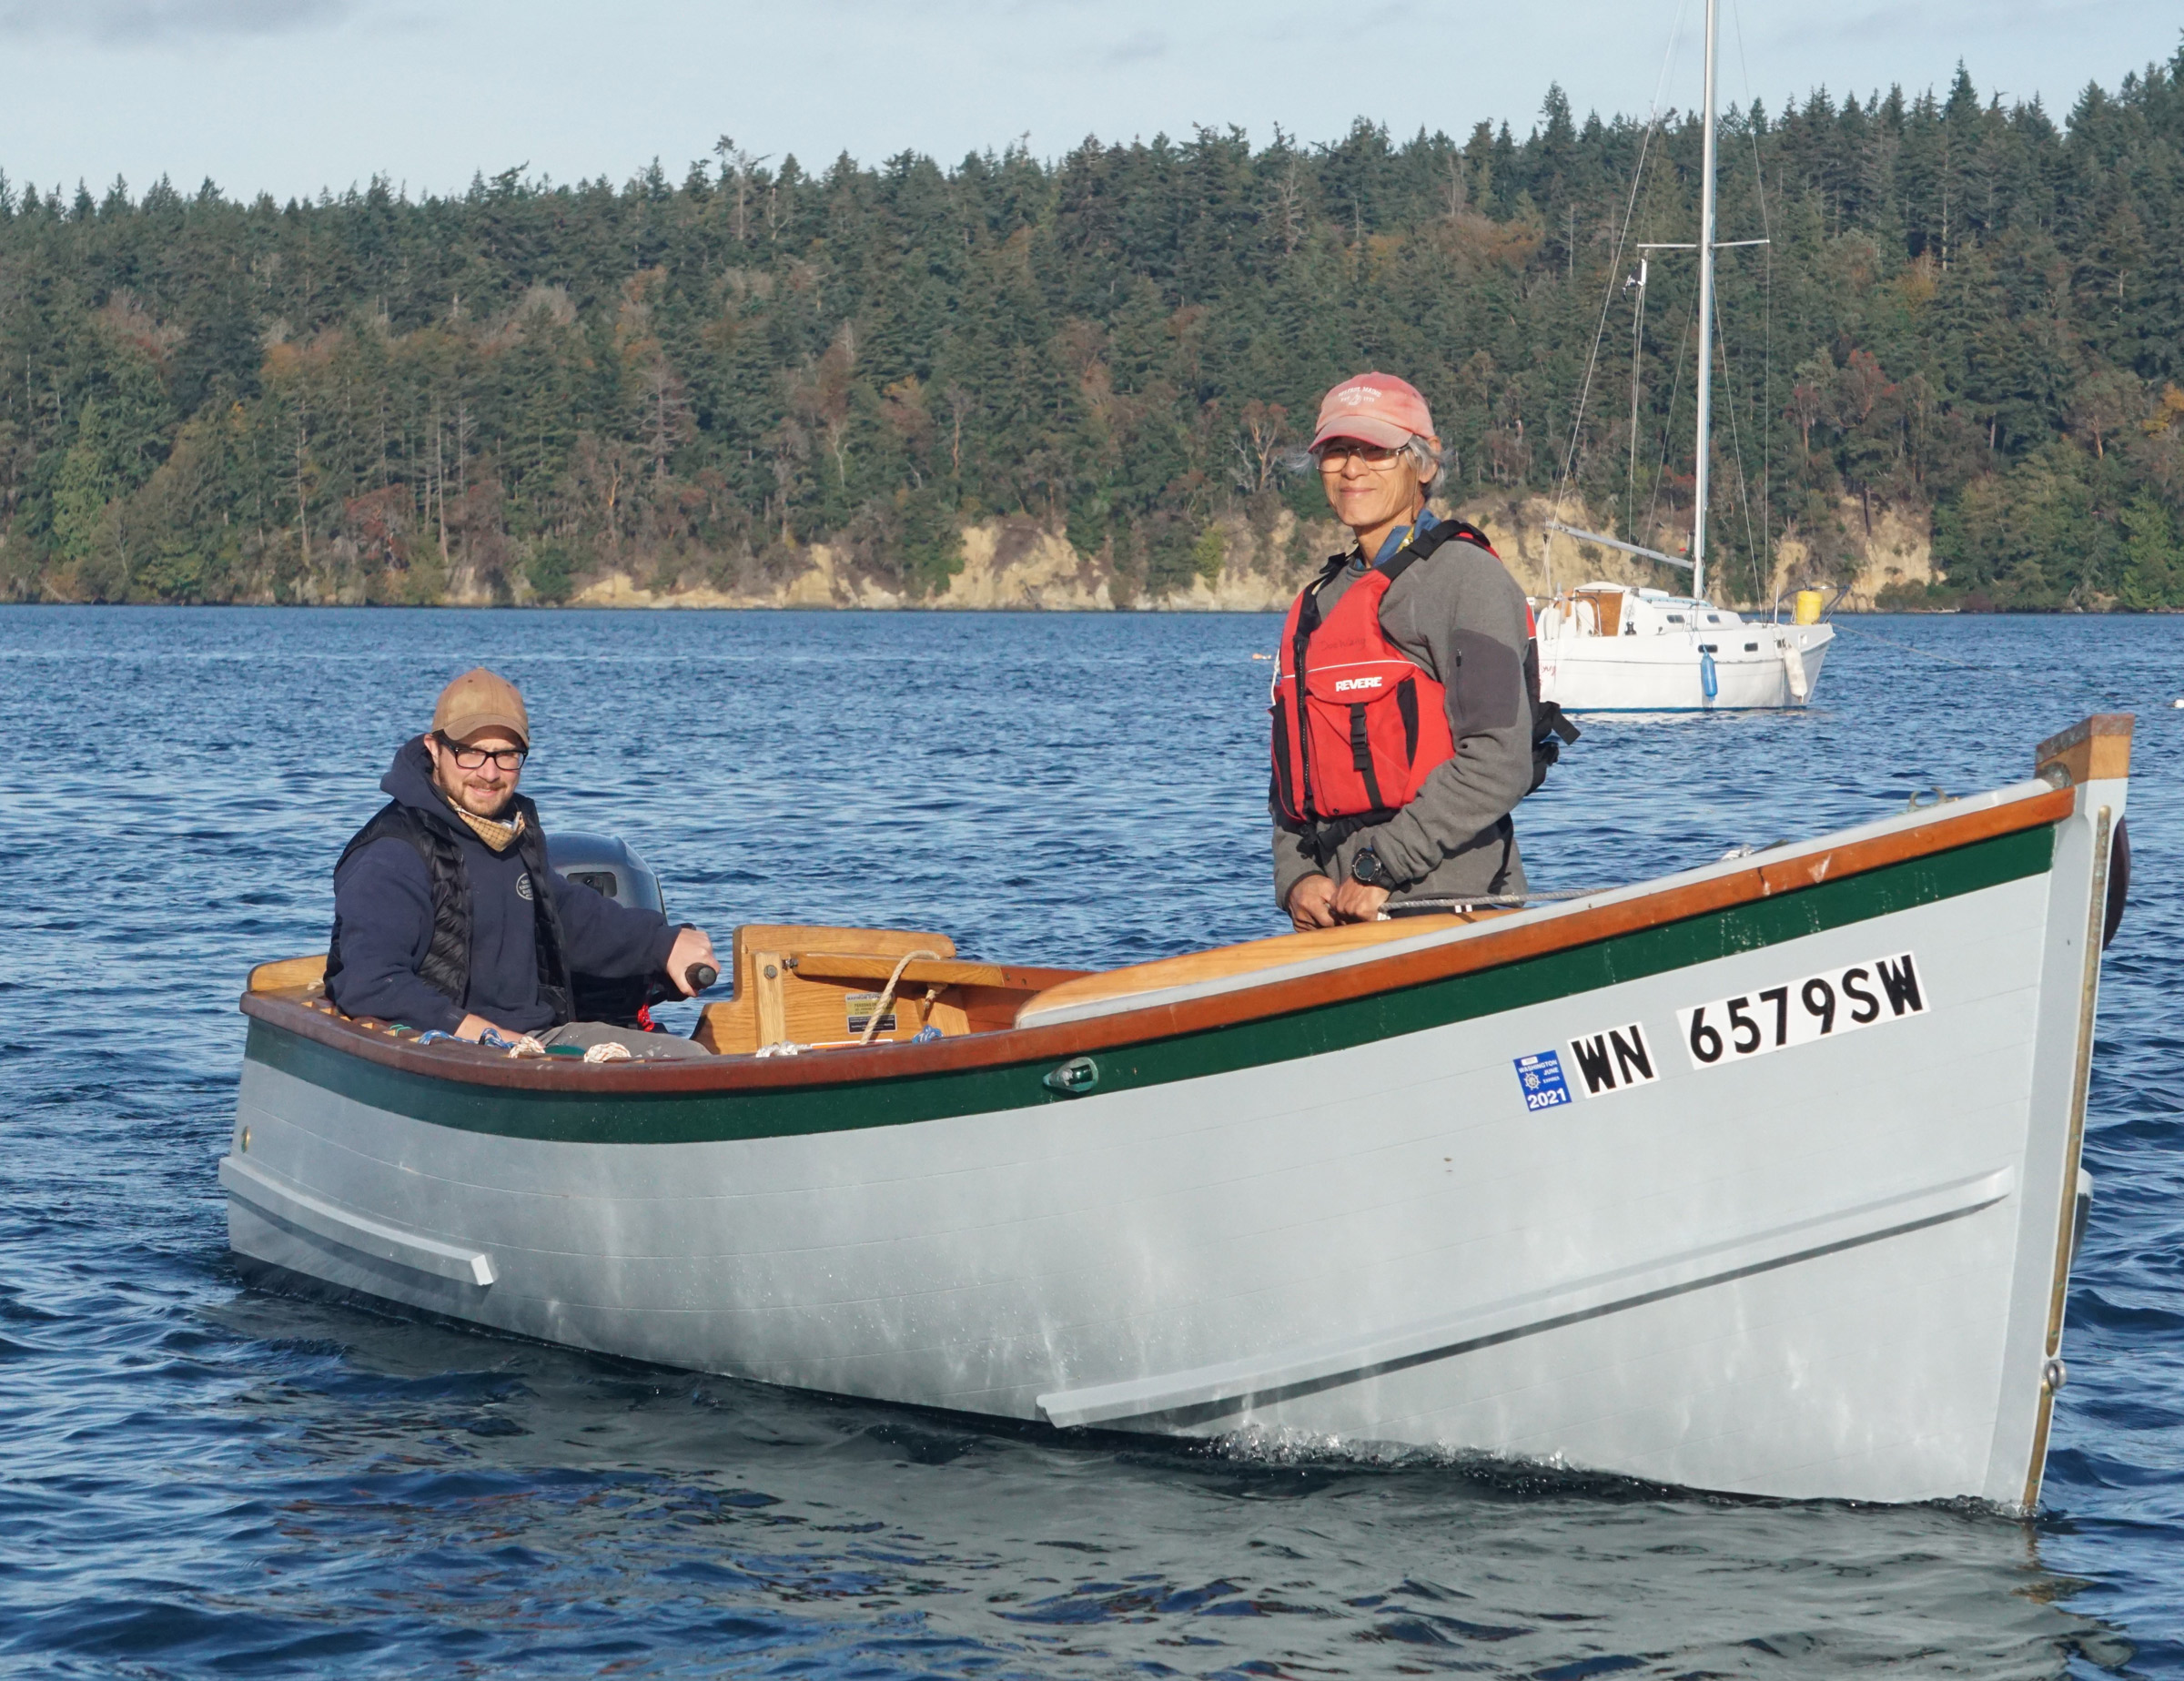
Although I had owned boats from 10′ to 34′ and captained boats up to 74’, I had never built one. I had experience fixing boats—mostly fiberglass repair, paint, gelcoat—and one day, I decided I was going to build. I began by researching designs and building techniques. Low maintenance and low cost of operation were my top priorities, followed by comfort, seaworthiness, and appearance. There were many designs that caught my eye, but I kept coming back to B&B Yacht Designs. Their boats all appeared to be well-thought-out, practical designs and not just something arbitrarily drawn in a computer program. It was clear to me that designer Graham Byrnes understood the dynamics and build-ability of wooden boats.
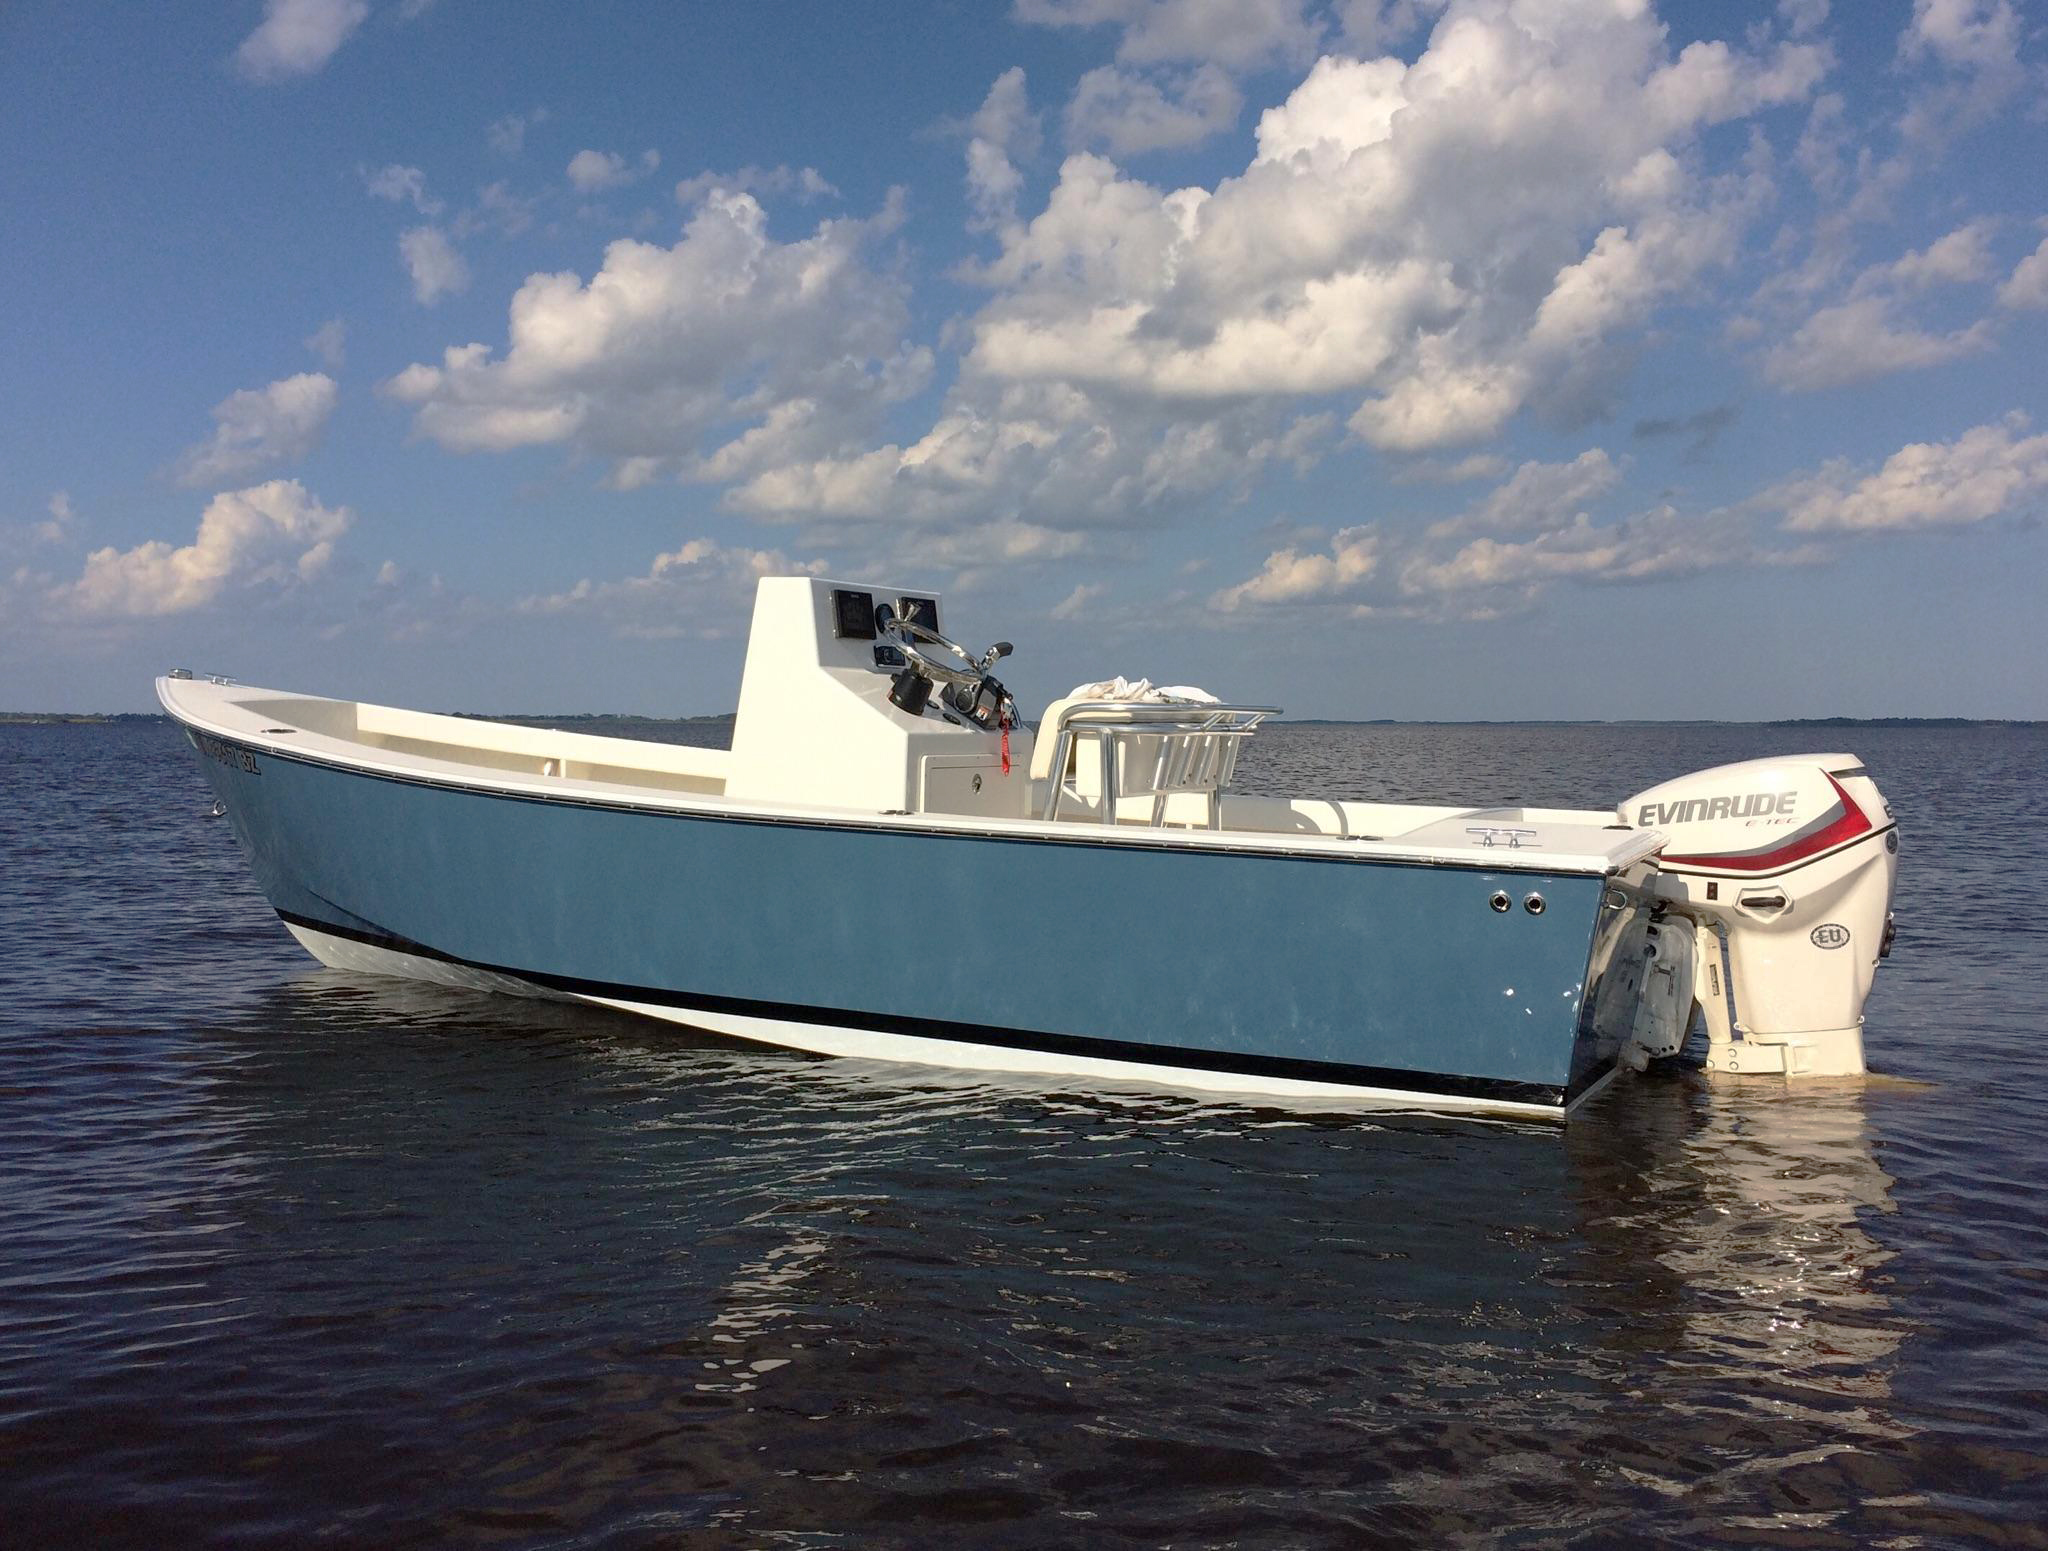
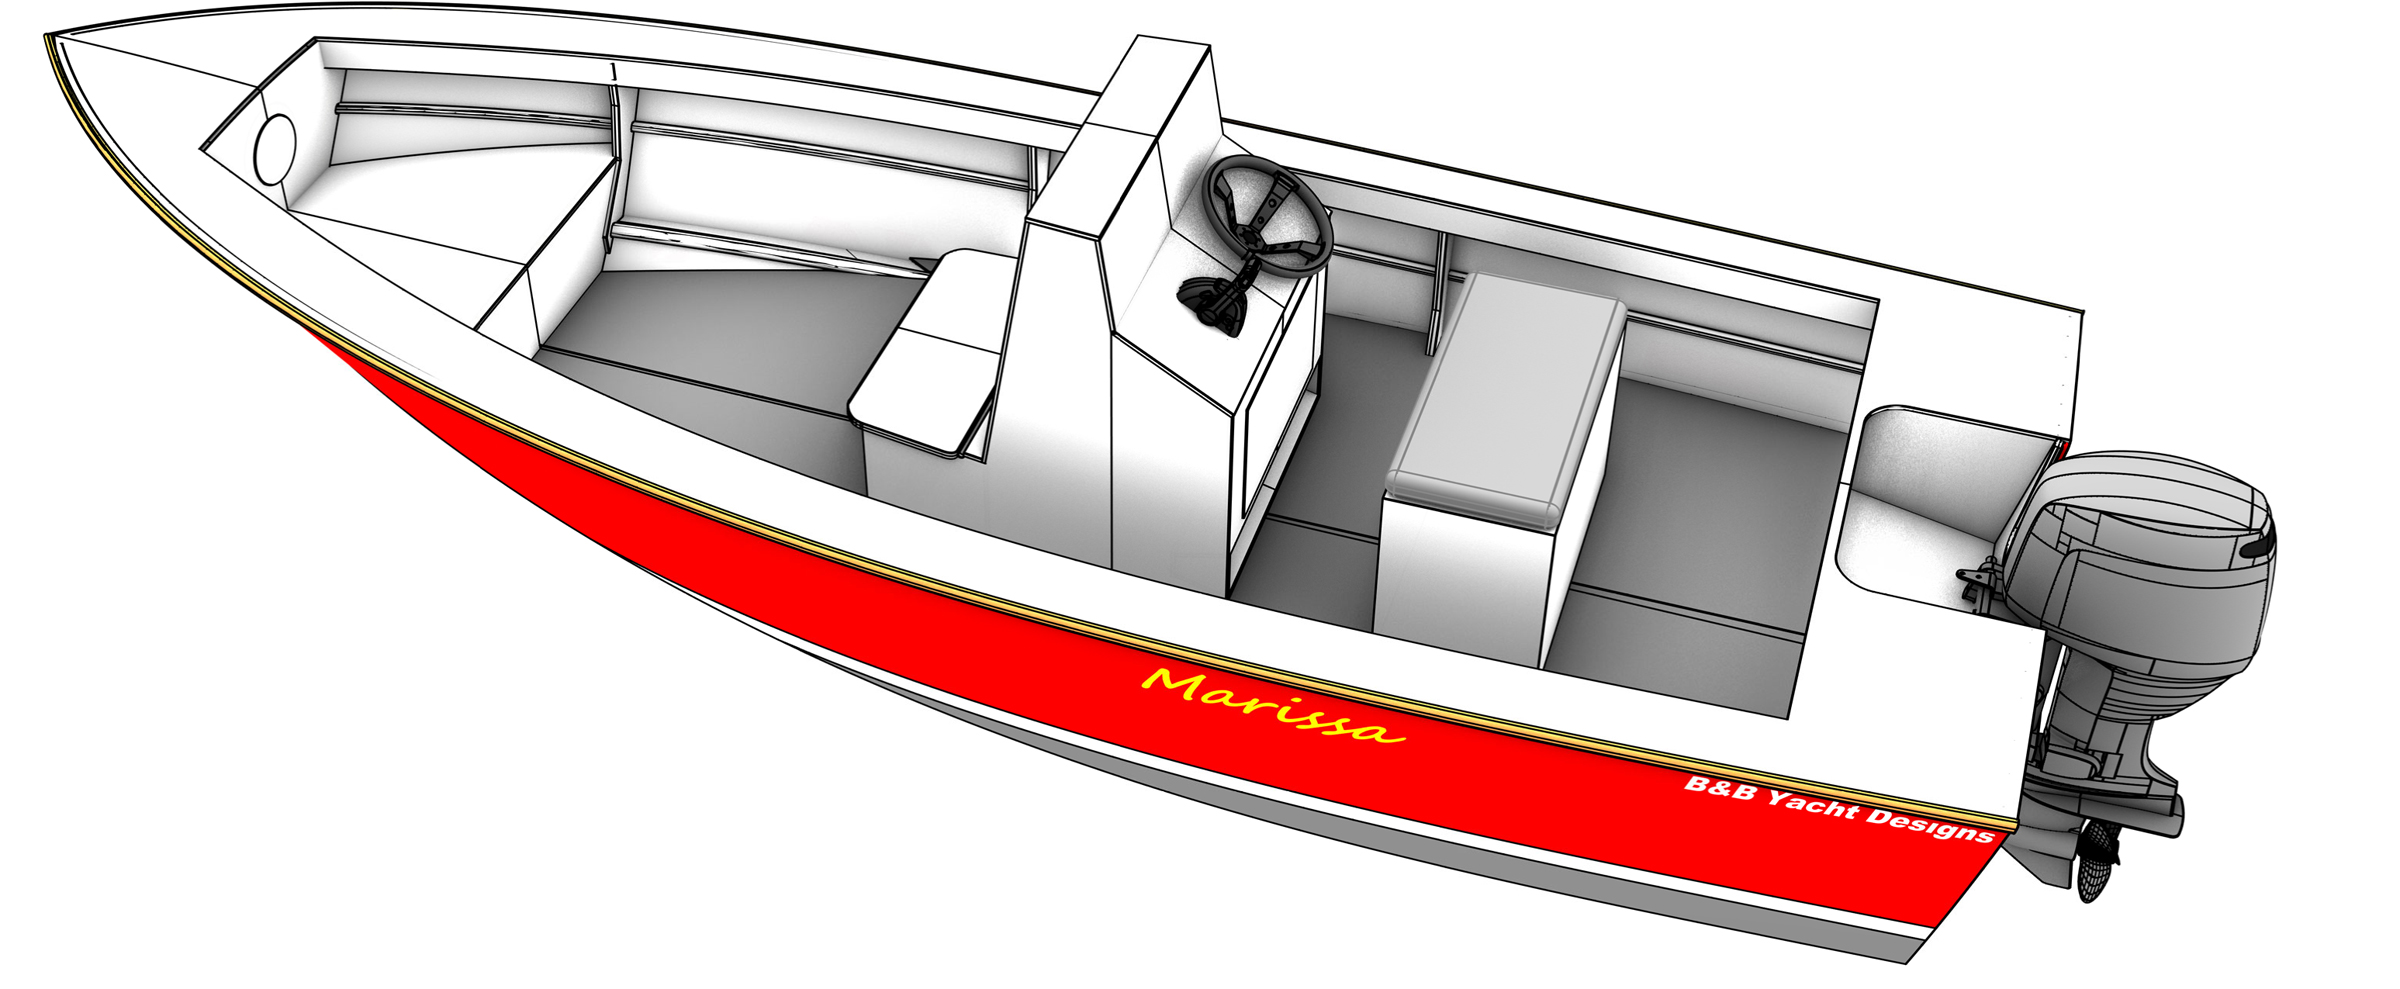
I came across an article in WoodenBoat No. 211, listing the five finalists in a design contest titled, “The Pursuit of Pleasure at Two Gallons per Hour.” The winner was Graham’s Marissa 18, an 18′ center-console skiff built in plywood. It was visually appealing and looked like it would be efficient, consuming just 2 gallons of fuel per hour and seaworthy enough for me to feel safe in 2′ to 3′ chop.
I contacted B&B Yacht Designs and purchased the CNC-cut kit. I went with the kit instead of building from the plans, not only for CNC accuracy but also to save time, as I would have a limited amount of it to complete the project.
When I drove to the B&B shop in Vandemere, North Carolina, to pick up the kit, I had a chance to meet with Graham and take a look at a finished Marissa. He was extremely helpful and answered the multitude of questions that can come from someone who has never built a boat before. He asked me what motor I planned on installing. When I told him it would be an Evinrude 60-hp E-TEC, he recommended moving the console forward as well as adding an extra layer of fiberglass, or starting the sheathing with a heavier single layer on the bottom. With such a powerful motor, at the top end of the recommended range of horsepower, the boat could be subject to heavy impacts while taking chop at top speed.
Trey Williams
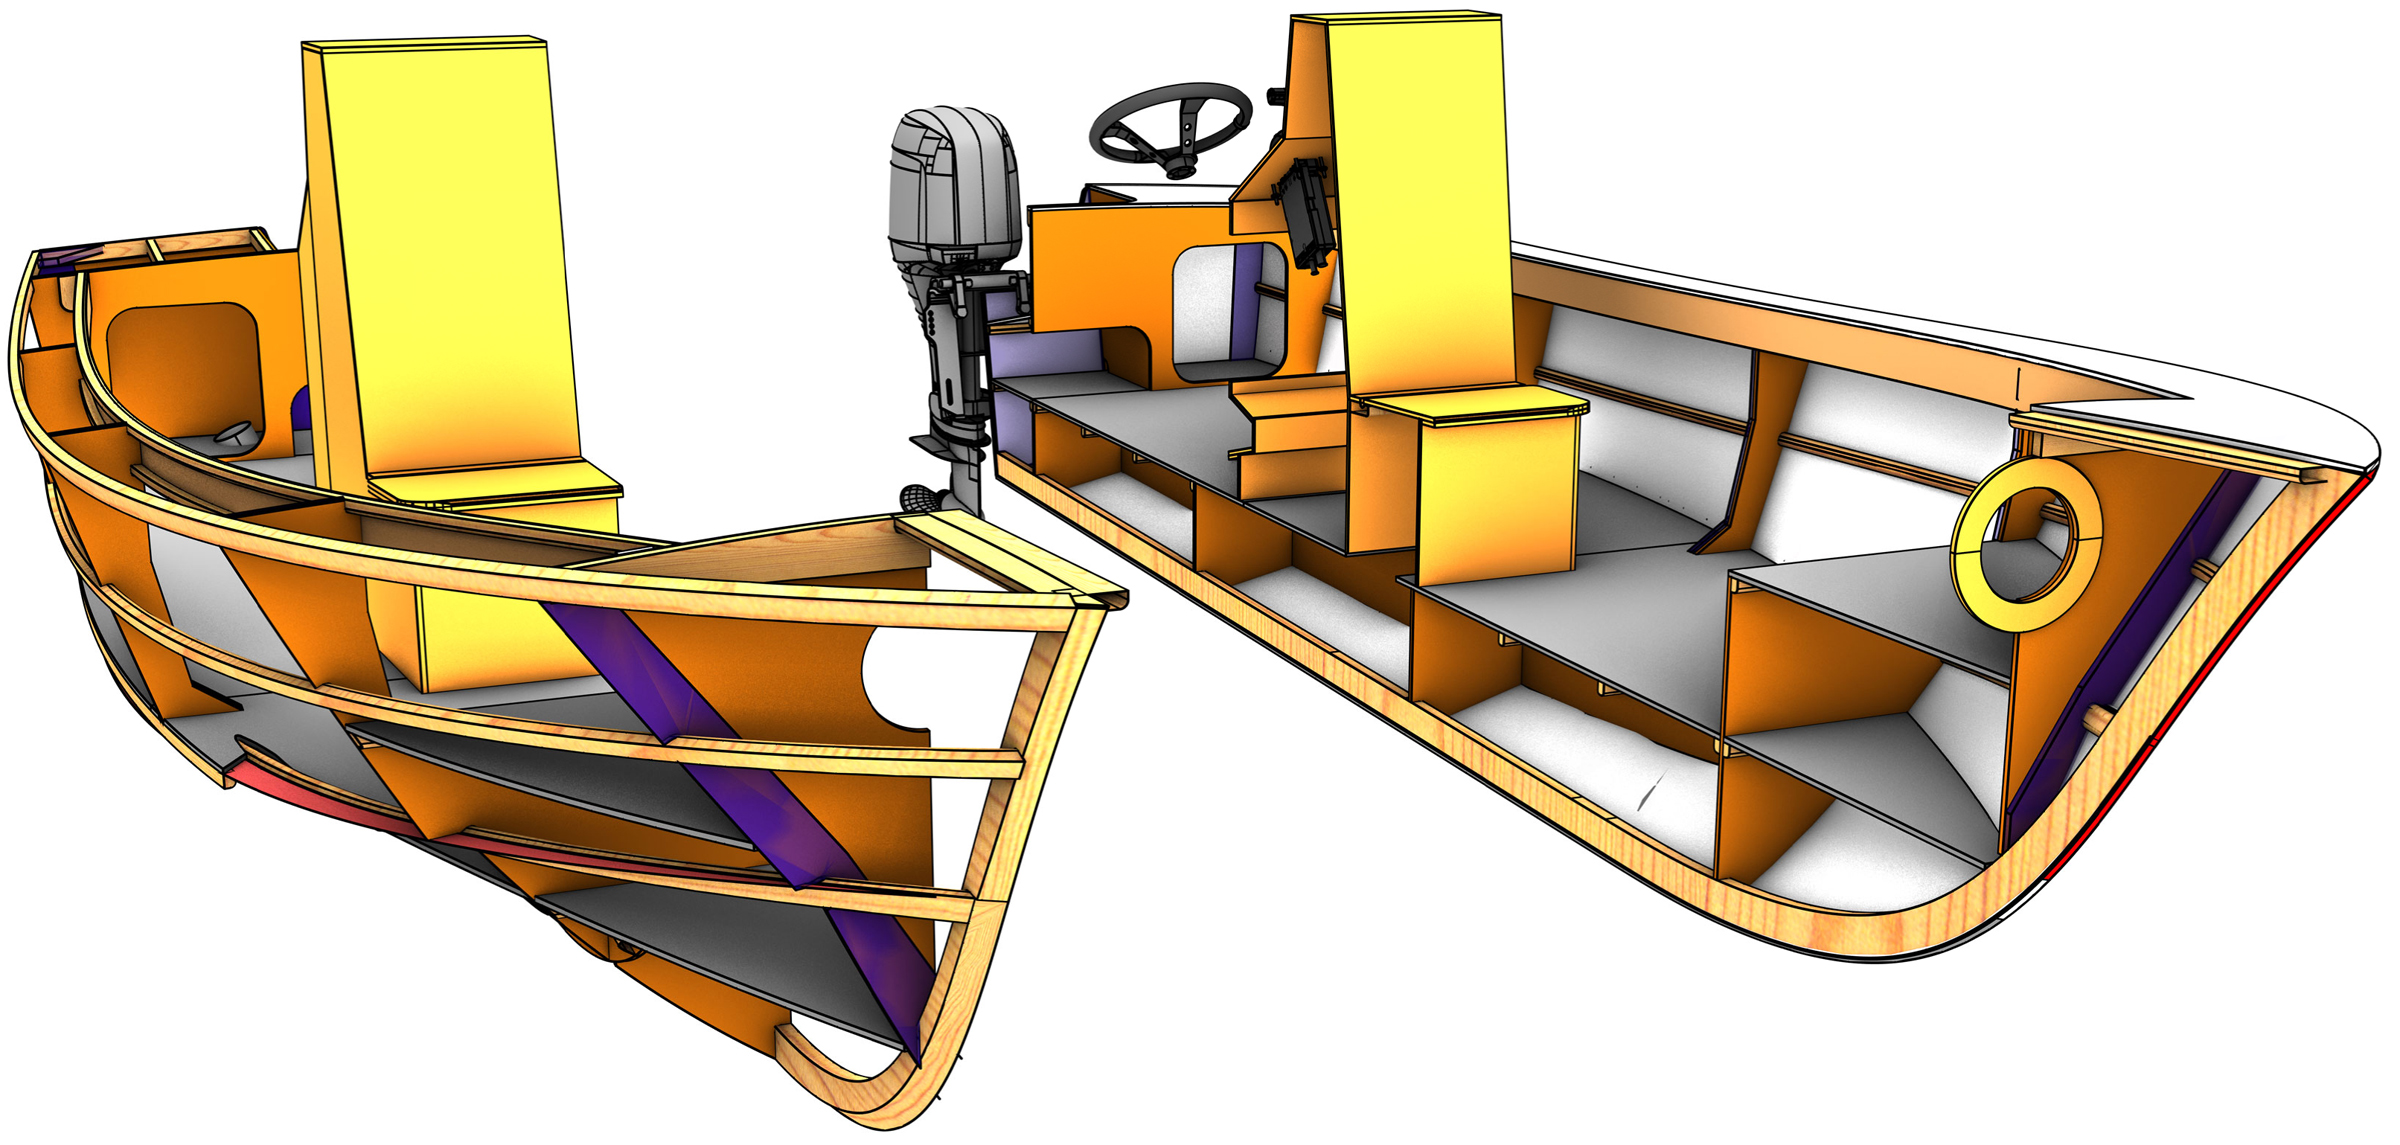
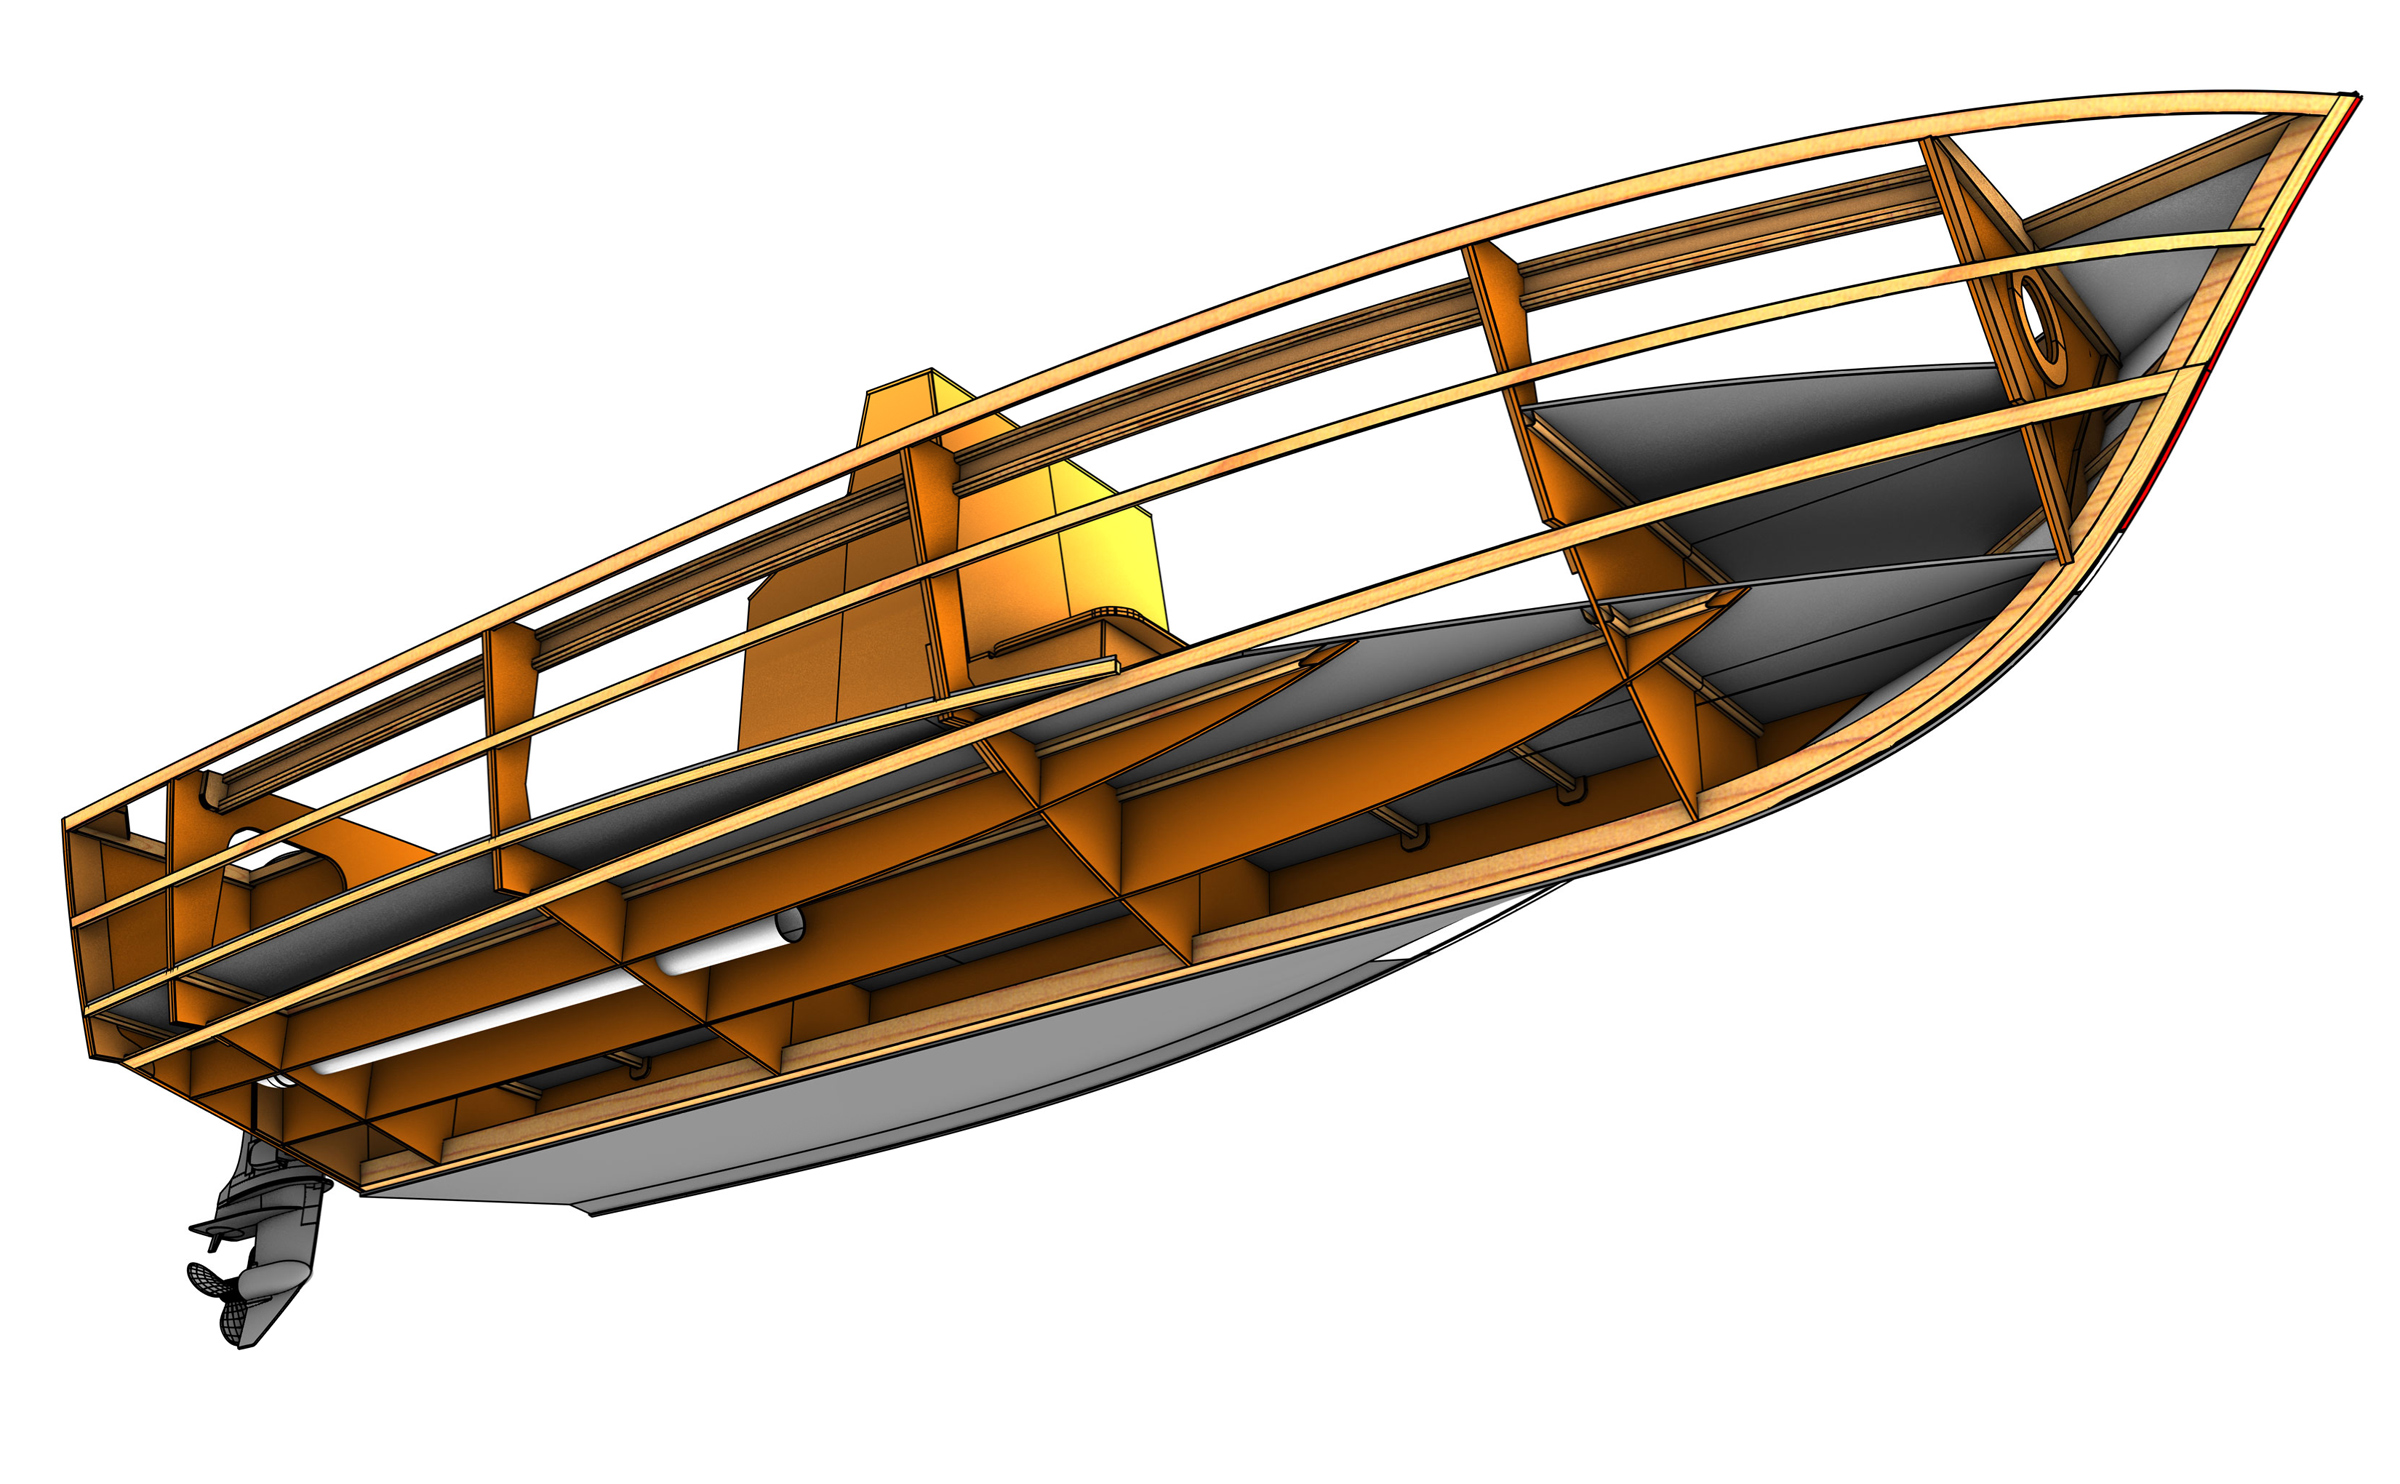
The egg-crate construction of the frames, stringers, and cockpit sole provides a solid base to build the hull on.
The plywood pieces in the kit are all high-quality BS1088 okoume, and the additional lumber, purchased separately, is straight-grained, knot-free southern yellow pine. Each side, bottom, and chine-flat panel is assembled from three pieces with precision-cut finger joints. The boat is built on a jig that uses the cockpit sole and an egg-crate grid of the frames and stringers that support it. The build is a bit different than a traditional strongback-and-mold setup; the sole rests on sawhorses and supports the three frames, two bulkheads and the stem, eliminating the need for any further temporary support structure. The hull side and bottom panels get glued and screwed to the transom, bulkheads, and stem and, after the epoxy cures, all screws are removed.
The build went as expected—exceptionally smoothly. All panels bent home exactly where they should have; I believe this is a result of the thoughtful design. After I assembled the hull, it ended up being remarkably fair.
I ended up moving the console forward 8” on both Graham’s recommendation and my own preference. I’ve had no problems with the way it is now, but if I were to do it again, I would consider moving it an additional 2” to 4”, just to have more cockpit space in the stern. After sea trials and much consideration on whether to sit or stand at the console, I opted to stand—it feels more natural to me and offers better visibility than sitting. I purchased an aluminum leaning post with built-in storage and rod holders. It is the perfect width for me and almost seems as if it were custom-made for the boat. It has space underneath to store a cooler and a pad on top for an elevated seat.
Also on Graham’s recommendation, I used heavy 1208 biaxial ’glass on the inside of the hull, bulkheads, and stringers—instead of just giving them a coat of epoxy to seal them. On the outside, I put 10-oz ’glass over a reinforcing layer of 1208 on the keel and chines.
Trey Williams
The chine flats are an effective means for keeping spray from getting into the boat when it’s on a plane.
After fairing, priming and painting, it was time to outfit and rig the boat. I installed hydraulic steering for the 60-hp Evinrude E-Tec. It was more expensive than a cable system but well worth it for the smoother feel and minimal steering effort. Finding the right prop took some time since the boat is relatively light compared to fiberglass production boats and the 60-hp E-Tec has a larger gear case and lower gear ratio.
Once everything was installed it was time to have the predelivery checks done on the motor and rigging and to see if it was watertight. I have the Marissa on an aluminum torsion-axle trailer with bunks cut to match hull rocker for full support. It tows with no issues and is easily launched and retrieved singlehanded.
Trey Williams
The author, preferring to stand at the helm rather than sit, equipped his Marissa with a so-called post to lean against.
The moment of truth came when the Marissa went into the water for the first time and sat exactly where the plans specified. Stability is good, but if two large adults stand on the same side, the hull will lean quite a bit; that is expected given the beam and the deadrise at the transom. After a few trips, dialing things in and getting used to actually being in a boat that I put together, it was time to move from a calm river and the Intracoastal Waterway to some more open water. My experience of crossing boat wakes gave me high hopes for the Marissa in some real waves. Once I got out in some light chop in open water, my hopes turned out to be well founded. The Marissa really did perform as expected. It cut through the waves at any angle, and the water is thrown down and away by the generous chine flats.
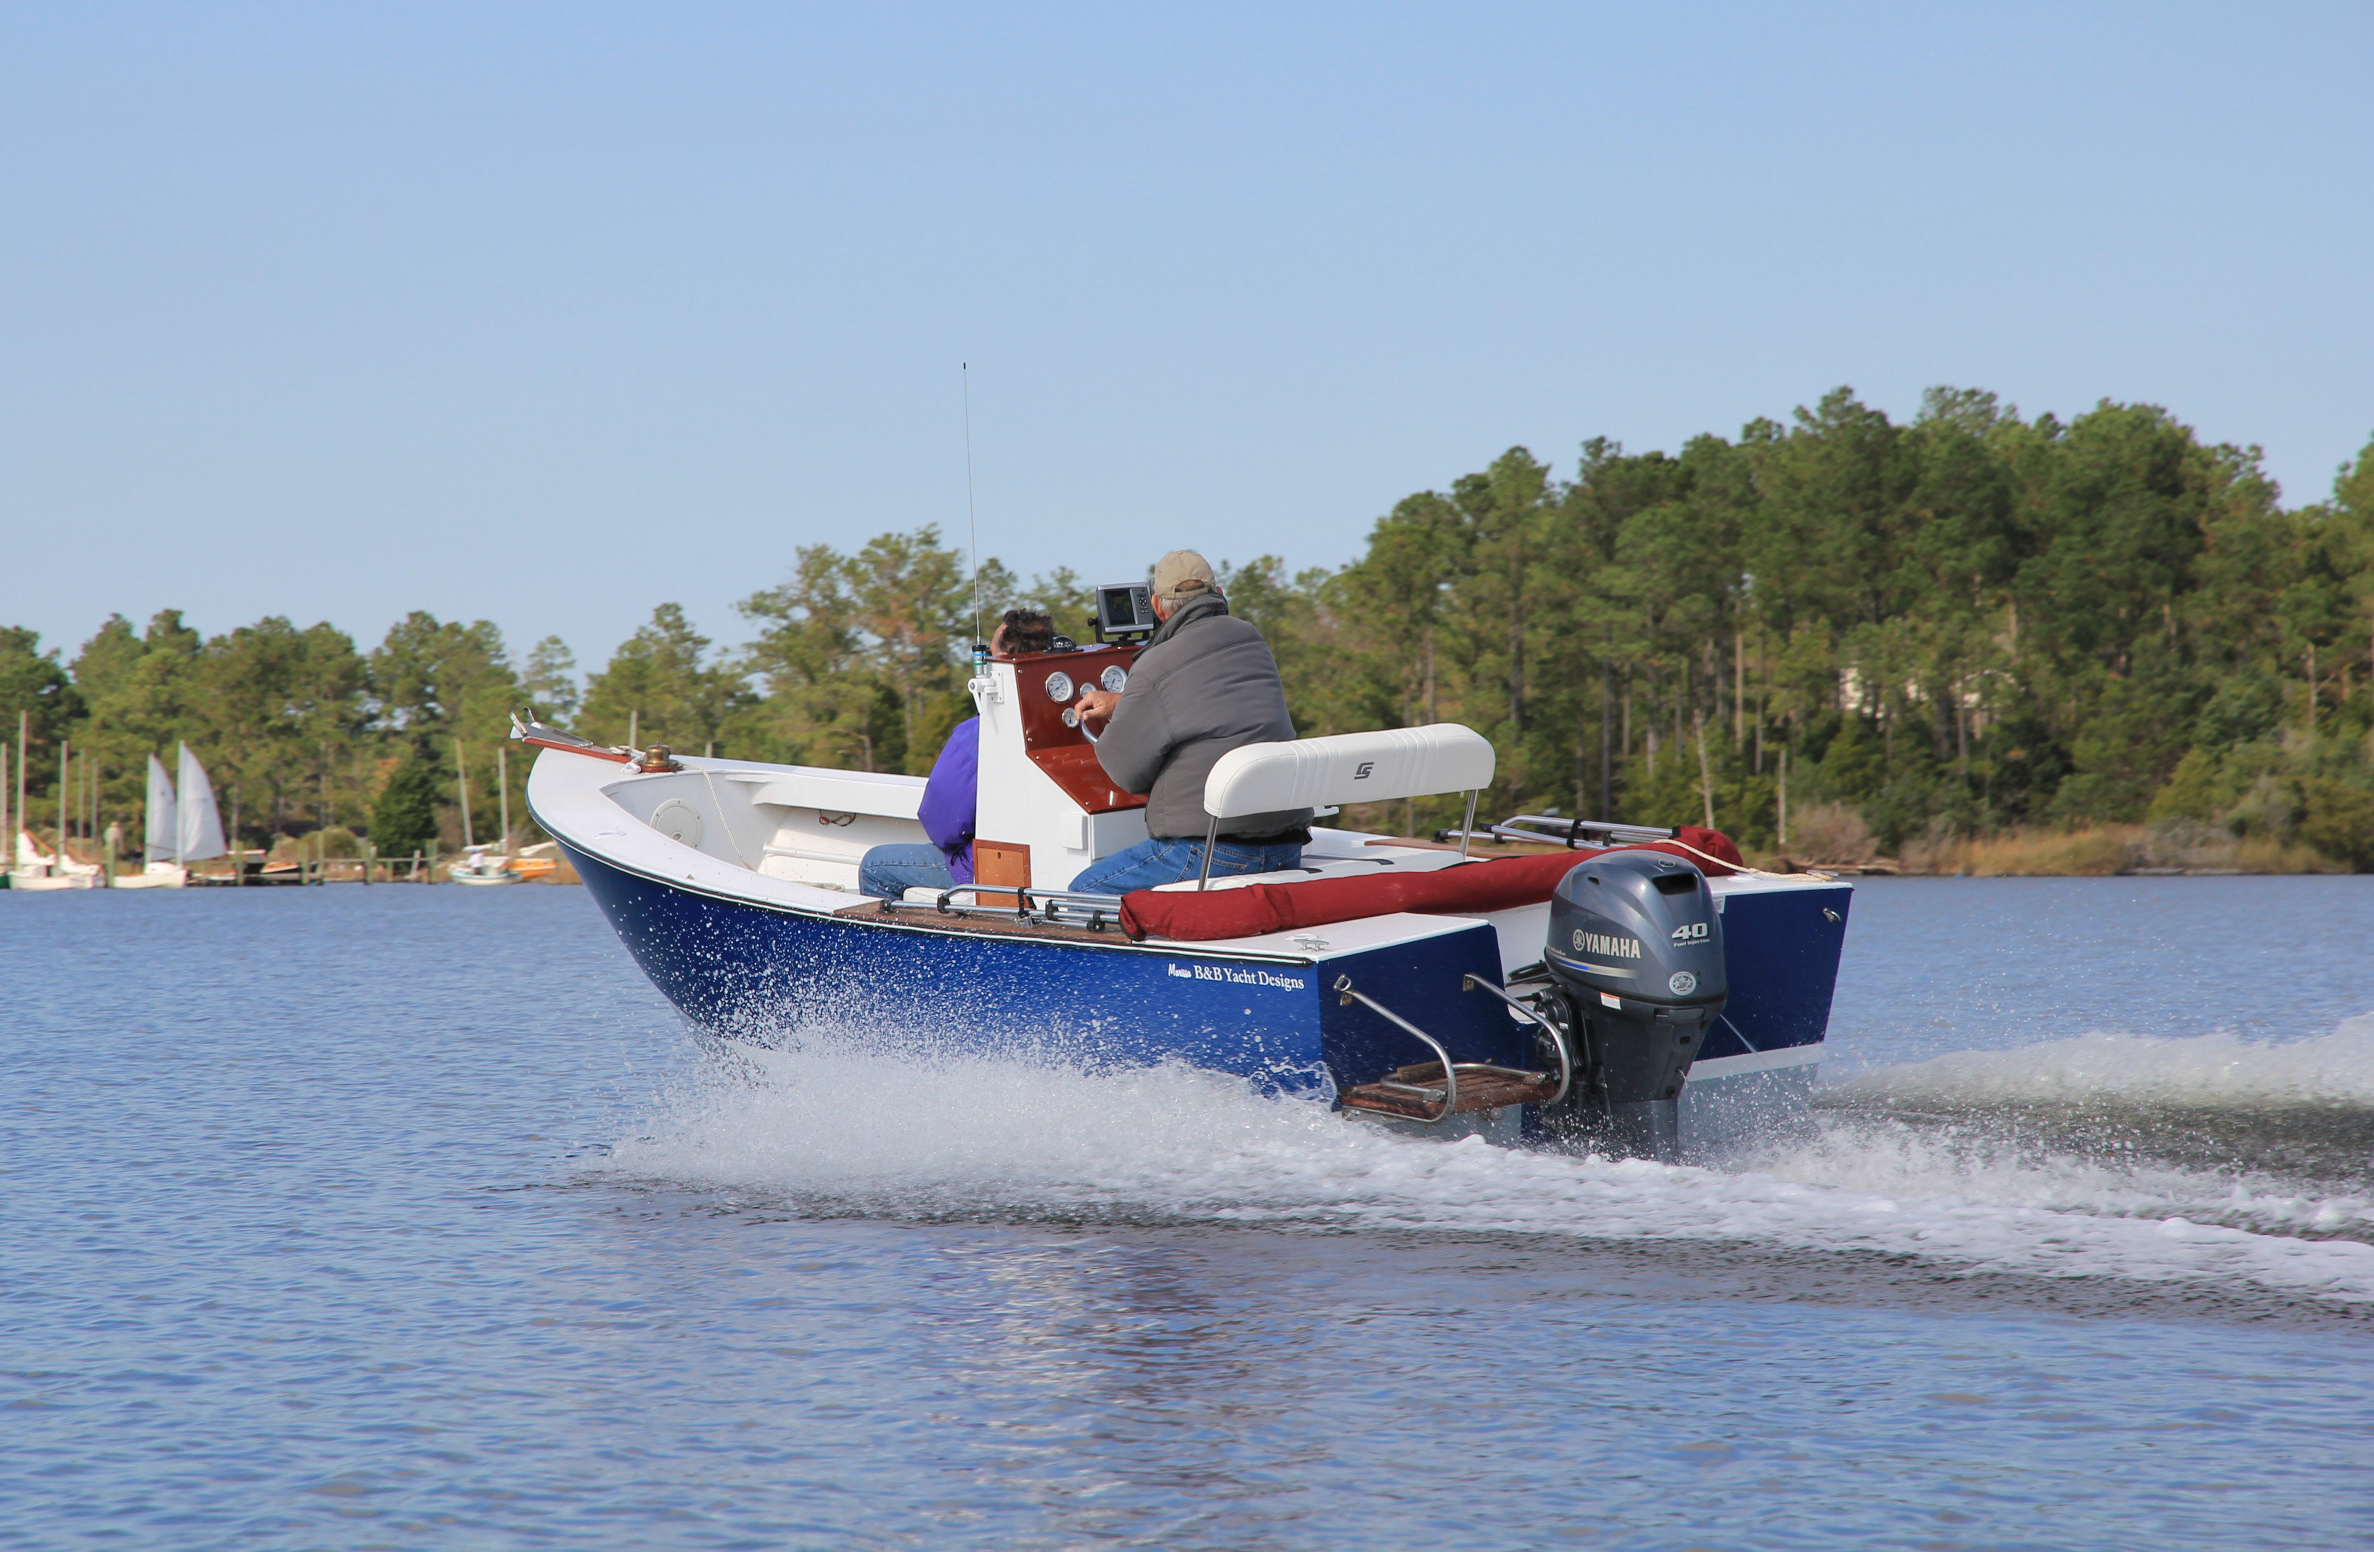
Courtesy of B & B Yacht Design
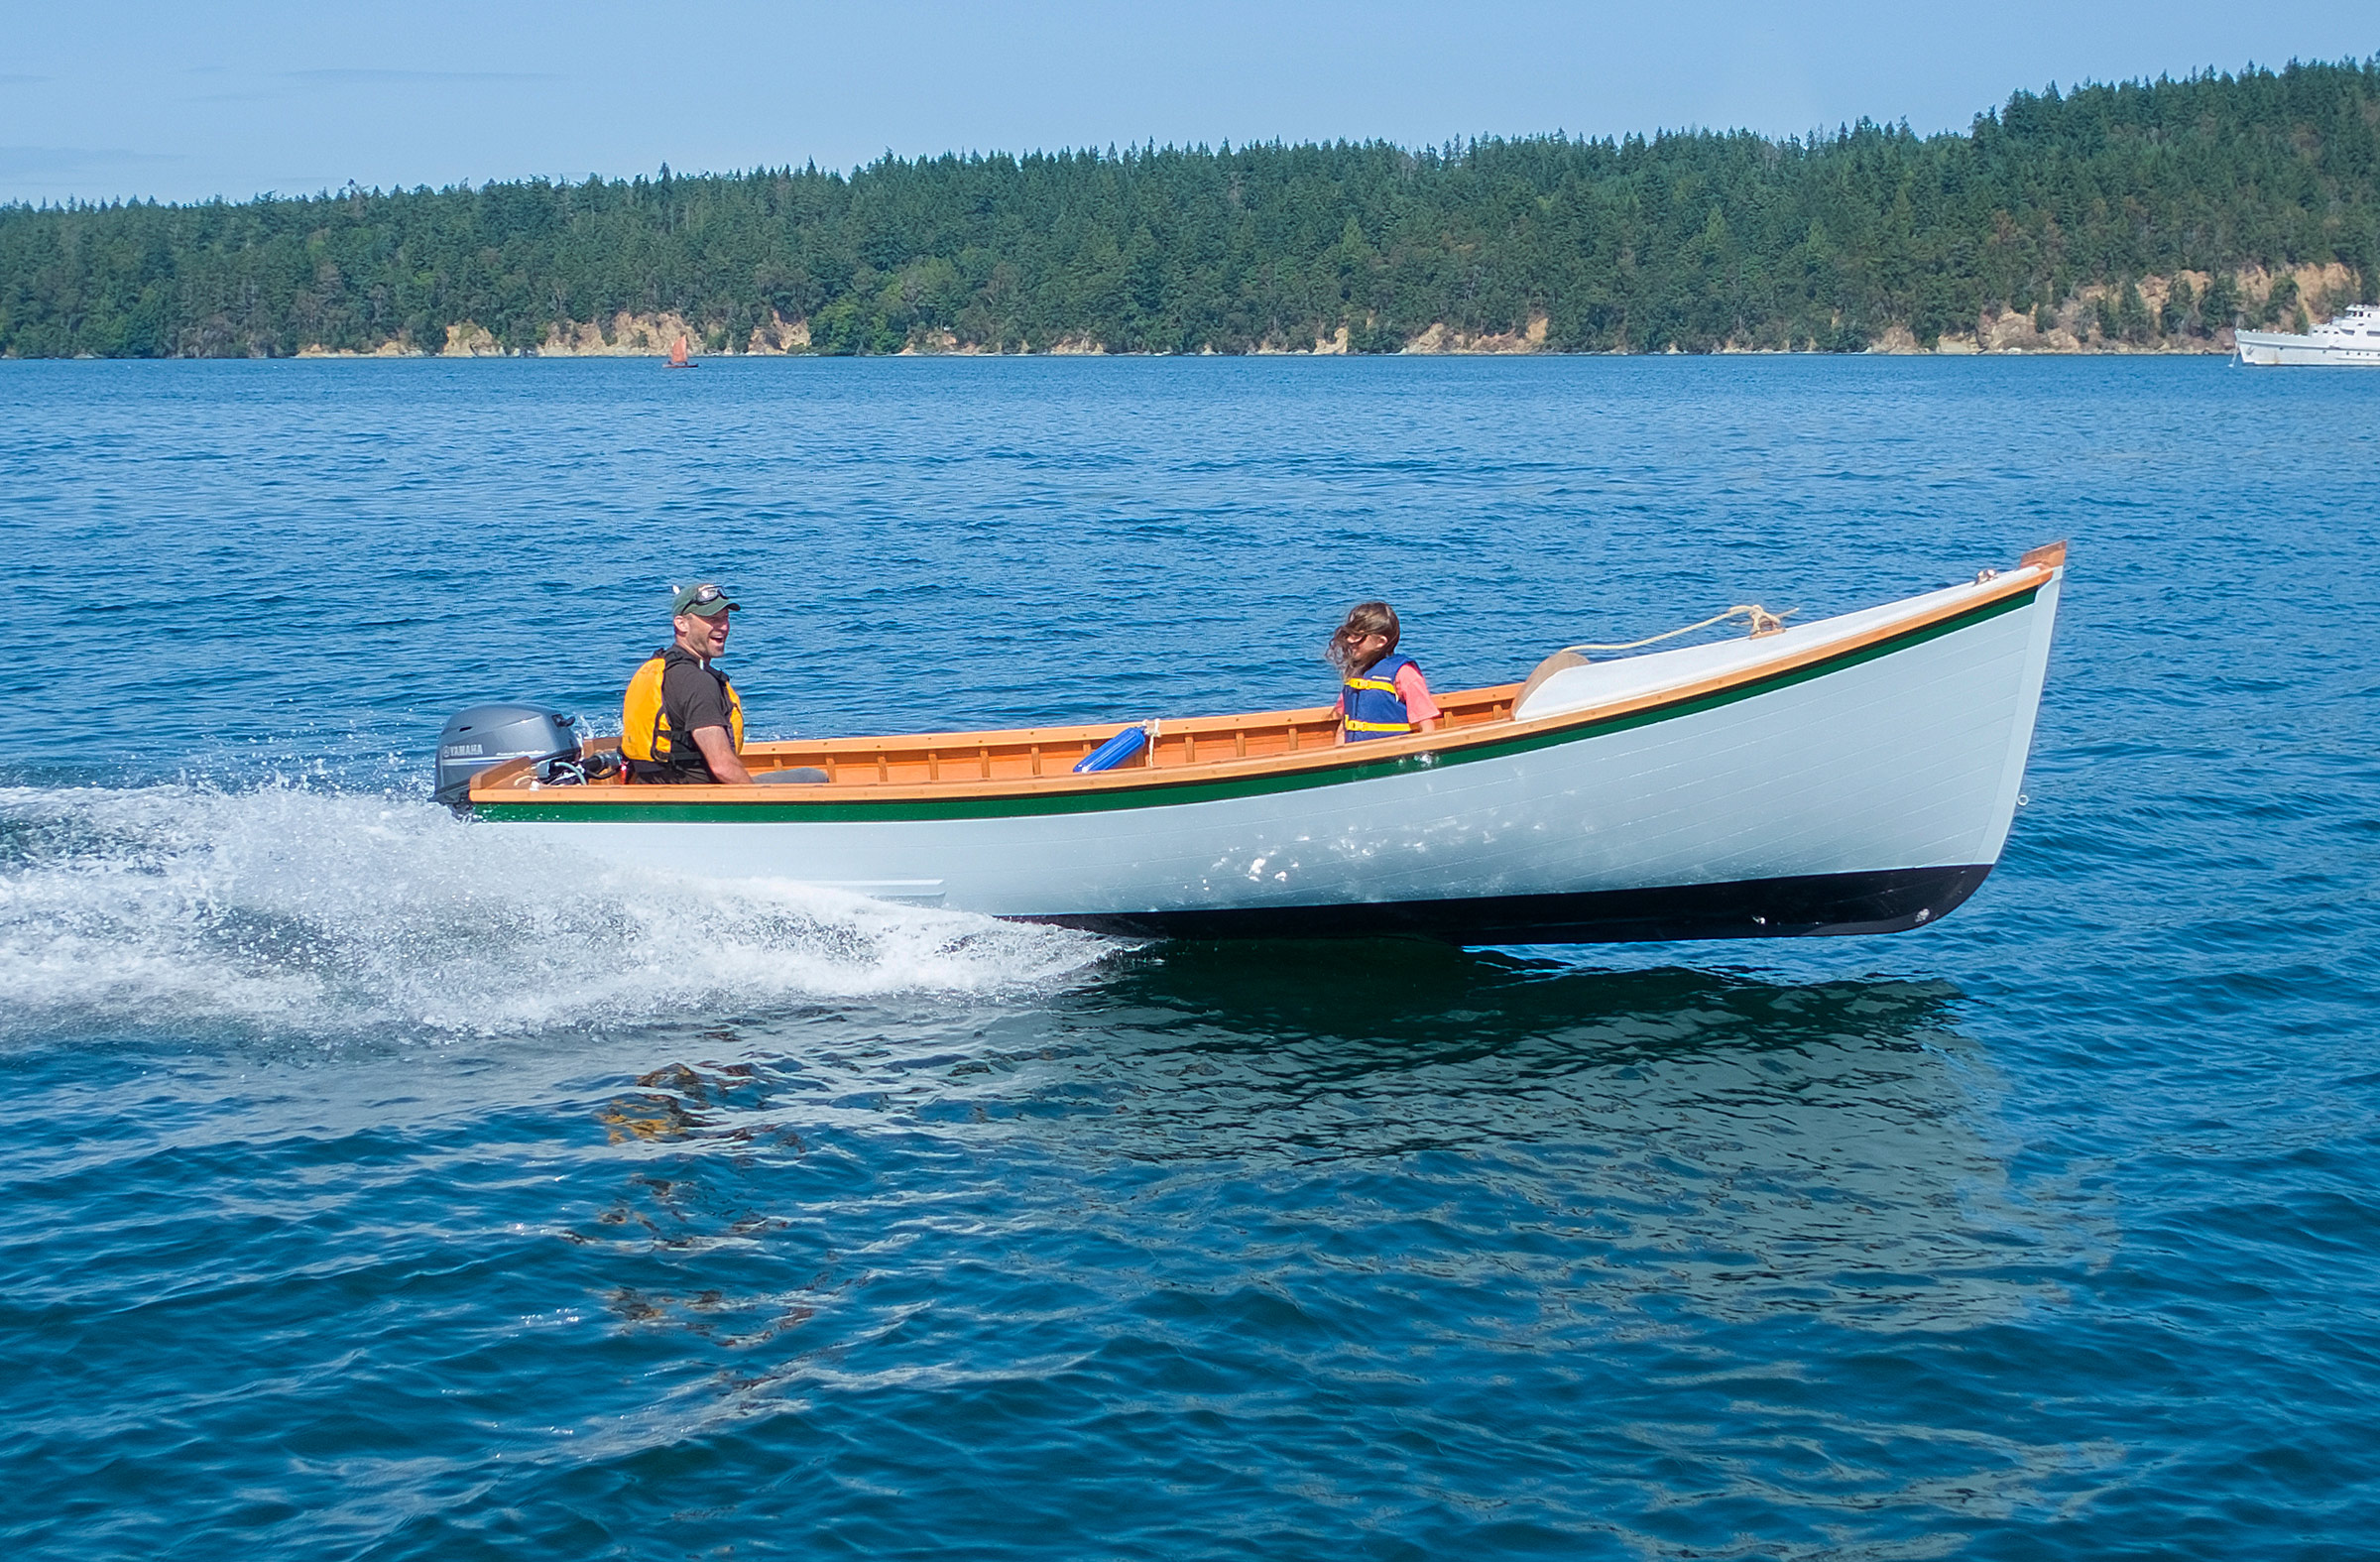
The Marissa is designed to take outboards from 25 hp to 60 hp. The boat here is running a 40hp motor.
The boat handles beautifully in most anything I’m comfortable taking on in an 18’ boat. It turns exceptionally well when I’m cruising winding rivers, and on hard turns at speed the boat just locks in and corners like it’s on rails. The first real trip I took was down and across North Carolina’s Currituck Sound, where it can be a slick calm one minute and steep chop the next. On the outbound crossing, the Sound was nice and calm, and the Marissa cruised easily at 20 knots burning just over 2 gallons of gas per hour. The return trip was a little different. The afternoon sea breeze had kicked up 2′ to 3′ chop, as it typically does in the summer. I didn’t know what to expect, but I wasn’t too concerned since I was pretty confident in the Marissa’s abilities. I thought it was a good test and yet it was a pleasingly uneventful return trip. With the boat cruising at 20 knots, the water just split and went down and out, no pounding of any sort (but that was expected as it was a following sea). Once I was farther from shore and among the largest waves it was time to see how it handled different angles. I was most surprised to see that the best angle was straight into the waves. They just split at the bow and were pushed away and down. Taking them on a bow quarter at 20 knots was a bit much for me. The ride wasn’t at all jarring, but there was a bit more movement than would be comfortable to me for long periods. Slowing to 15 to 17 knots, the excess movement head-on is almost gone.
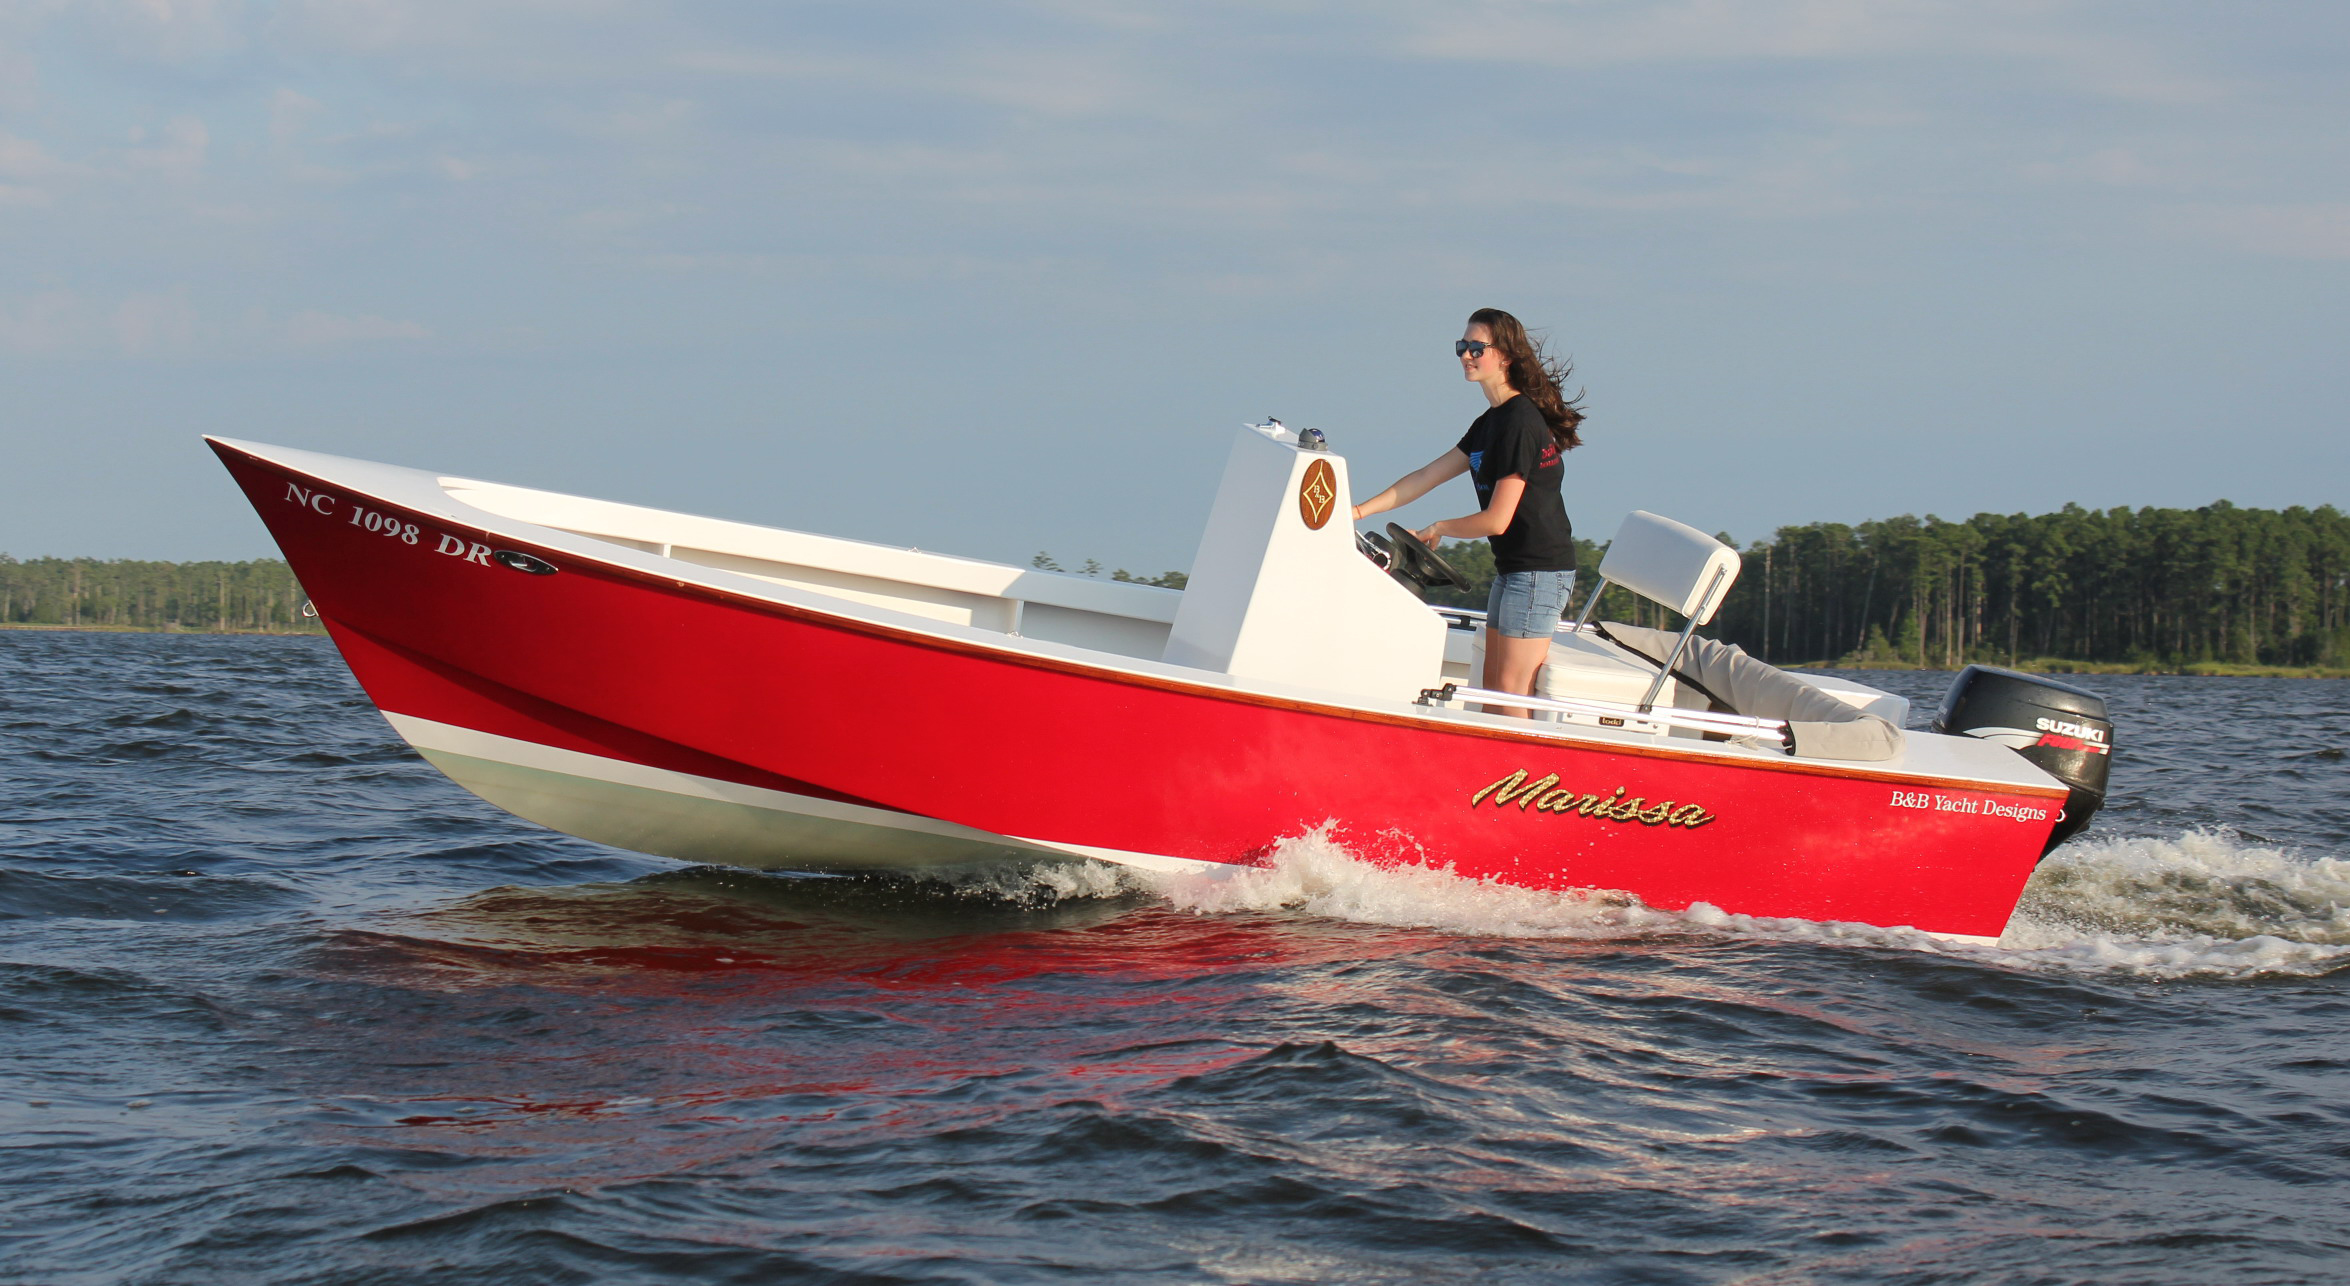
Courtesy of B & B Yacht Design
This Marissa 18 is outfitted with a seat instead of a post
The boat stayed remarkably dry in all angles to the waves. The only times I’ve noticed spray coming over the sides have been when the wind is at least 15 mph and on the beam and, even then, just a small amount would occasionally blow up. Overall, I think the Marissa is one of the driest boats of any size that I’ve owned. I can just squeeze out a top speed of 30 knots with only myself aboard and I feel that’s plenty fast. I spend most of my time cruising 4,000 to 4,500 rpm at about 19 to 23 knots and burning 2 to 2.5 gallons per hour, depending on how many people are aboard. An all-day fishing trip burns just 5 to 7 gallons of gas.
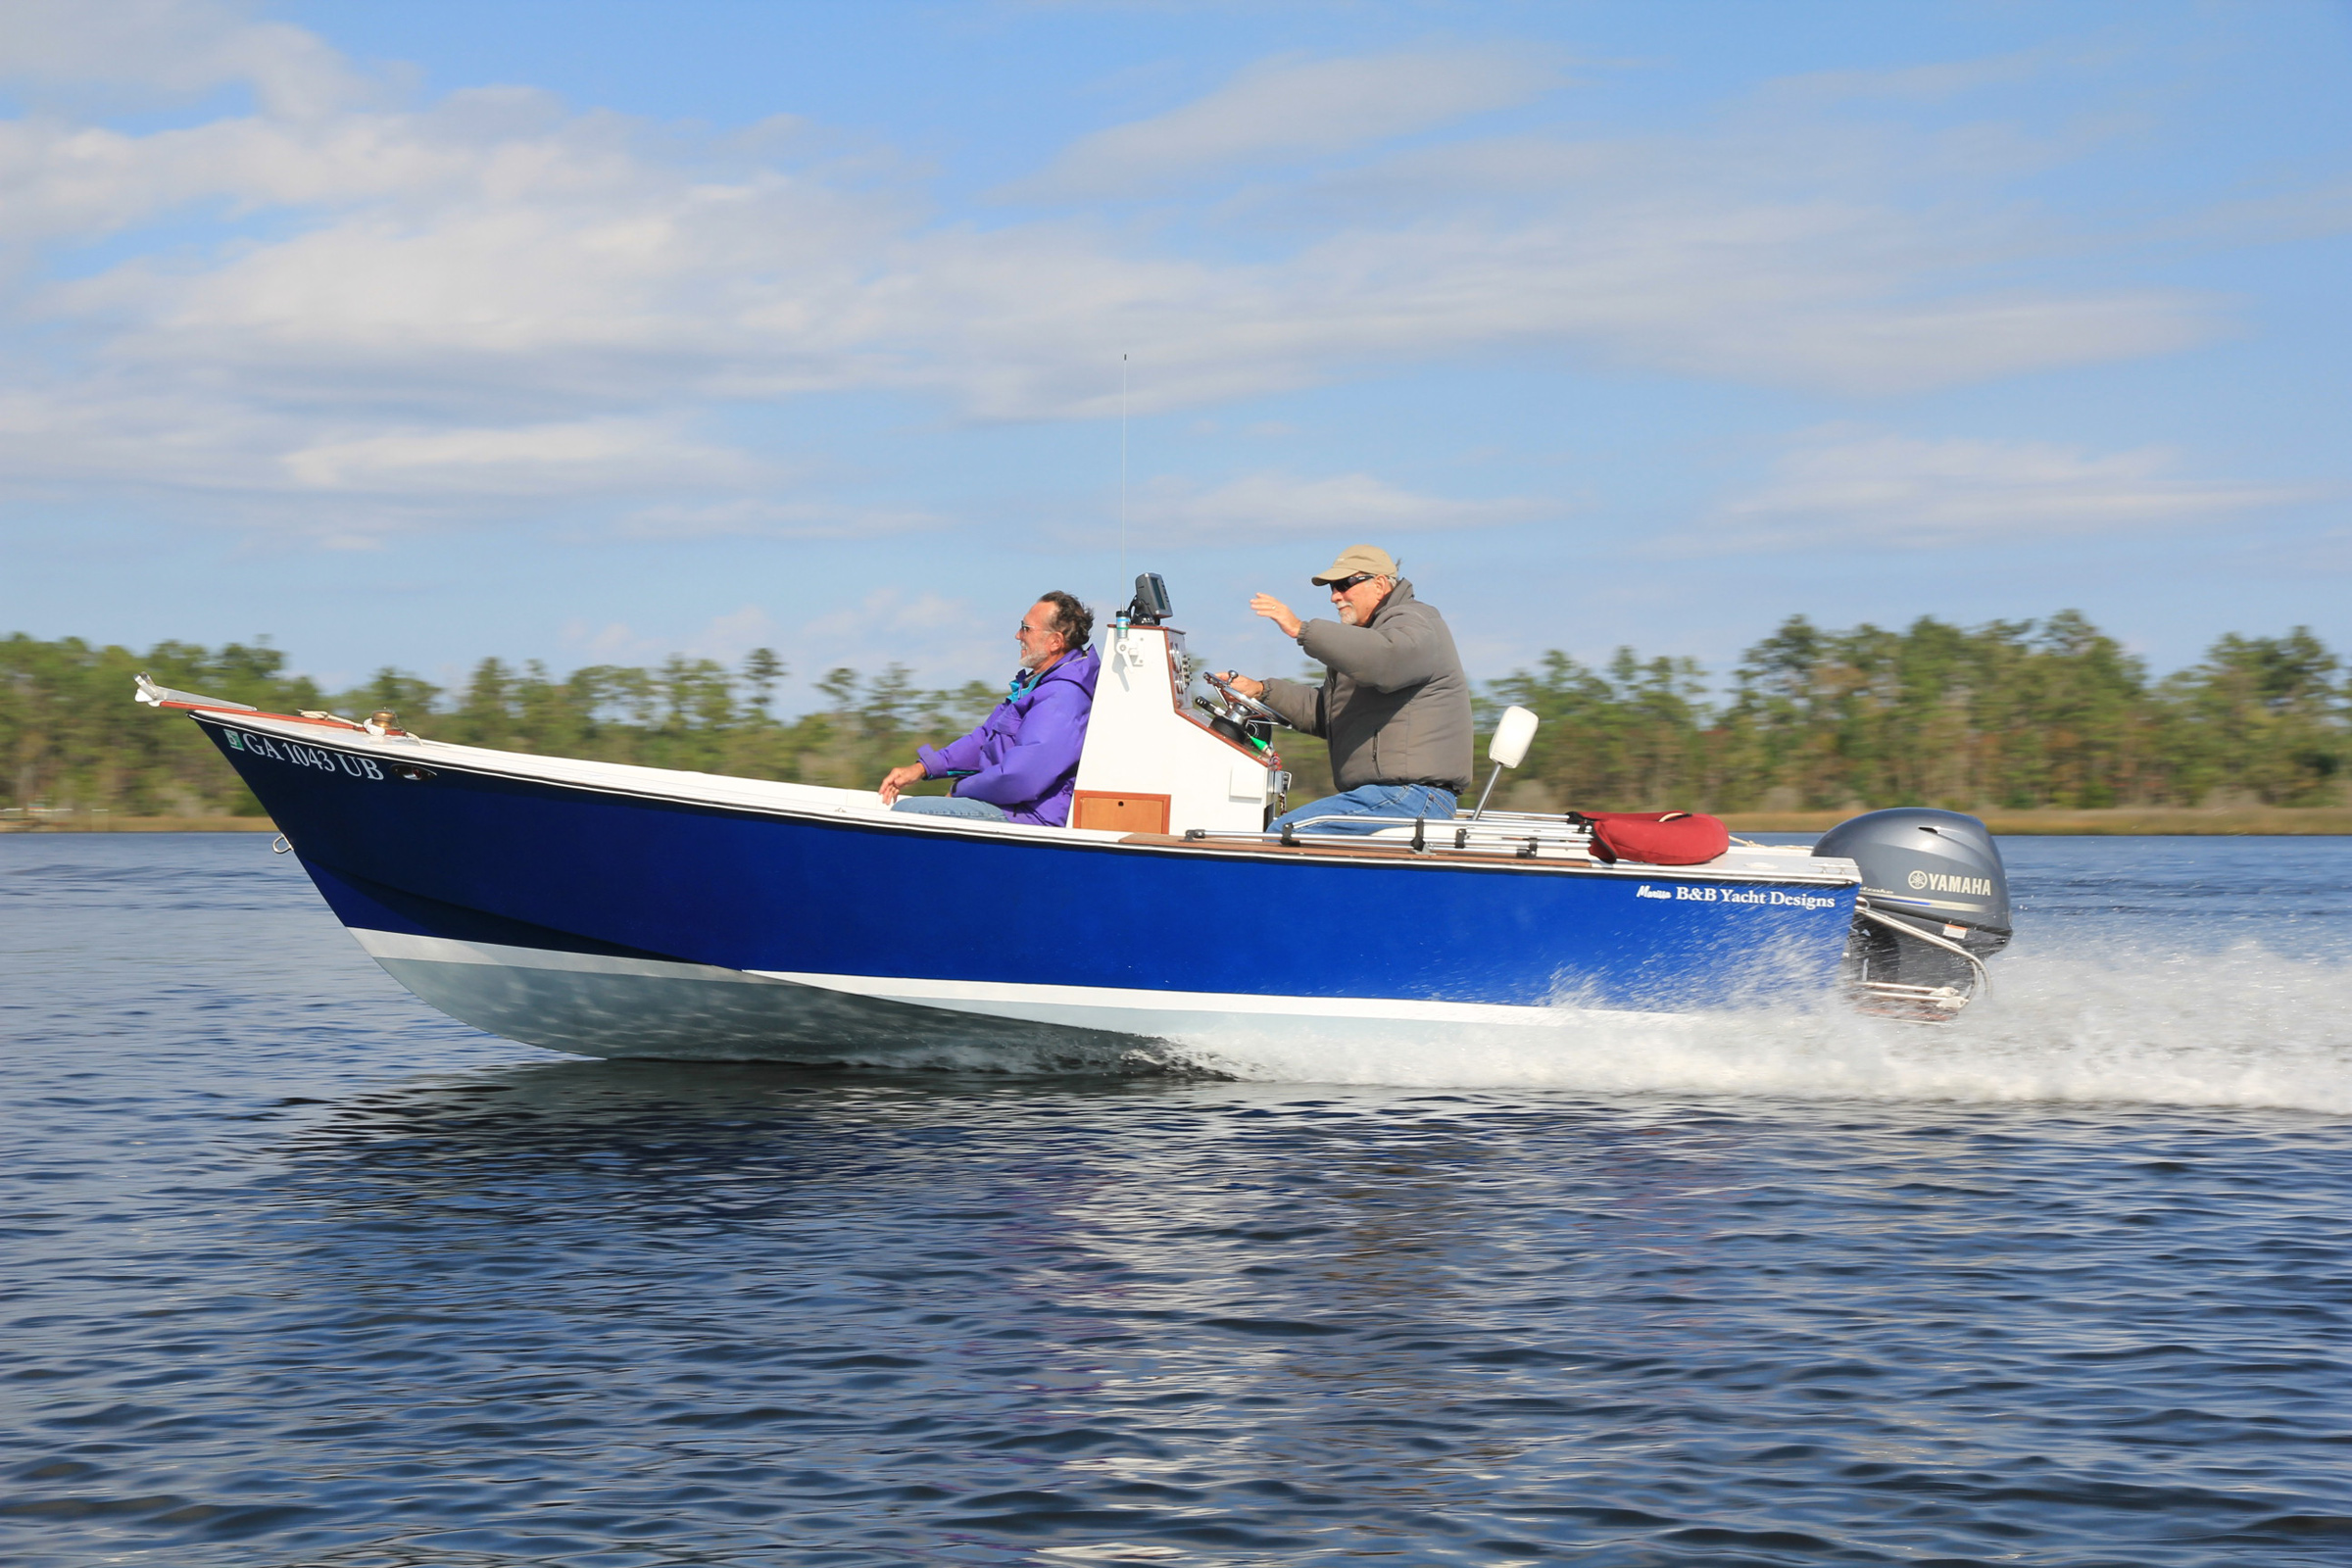
Courtesy of B & B Yacht Design
The seat built into the center console provides a good place for a passenger without obscuring the view forward from the helm.
So far, I’ve taken my Marissa from lower Chesapeake Bay down to Stuart, Florida, and a few places in between. Typically used in the lower Chesapeake Bay and Currituck, Albemarle, and Pamlico sounds, the skiff does exactly what I expected and even more.
The boat is well suited to my uses and perfect for my home waters. I smile every time I get aboard. I appreciate the performance and the affordability of operation, and enjoy the feeling of operating a boat that I built. I think a Marissa can be built by most anyone with a general understanding of working with wood, epoxy, and fiberglass. If you’re looking for a design that is efficient, looks good, and is safe and comfortable, this is a great option. I plan on building another, slightly larger, B&B design in the future to get back into fishing bigger waters and offshore.
The first boat Trey Williams learned to operate was a plywood skiff his grandfather had powered by an Evinrude 18-hp outboard on the Currituck Sound in North Carolina. He purchased his first boat, a 14’ flat-bottomed aluminum johnboat, before he could legally drive a car. Many boats came and went after that, eventually leading to getting his 100-ton masters license and running large boats for a few years. He doesn’t foresee a time when he doesn’t have some kind of boat. He lives in southeast Virginia and has his pick of many bodies of water within a short distance from home.
Marissa 18 Particulars
[table]
Length/18′ 0″
Load waterline/15′ 3″
Beam/6′ 10″
Draft/8.75″
Horsepower/25 to 60
Displacement/1680 lbs
[/table]
B&B Yacht Designs offers the Marissa 18 plans, with full-sized Mylar templates, in either metric or imperial, for $260. A kit of CNC-cut plywood parts and the required solid wood for the stem and keel is available for $3,620. Additional kits for epoxy and hardware are also available.
Editor’s note: We published a previous review of the Marissa 18 in Small Boats 2011. It was written by WoodenBoat Senior Editor, Tom Jackson, after Graham Byrnes paid a visit to the WoodenBoat waterfront with his Marissa 18. In the review here, Trey Williams provides his perspective as a builder and owner of a Marissa 18.
Is there a boat you’d like to know more about? Have you built one that you think other Small Boats Magazine readers would enjoy? Please email us!
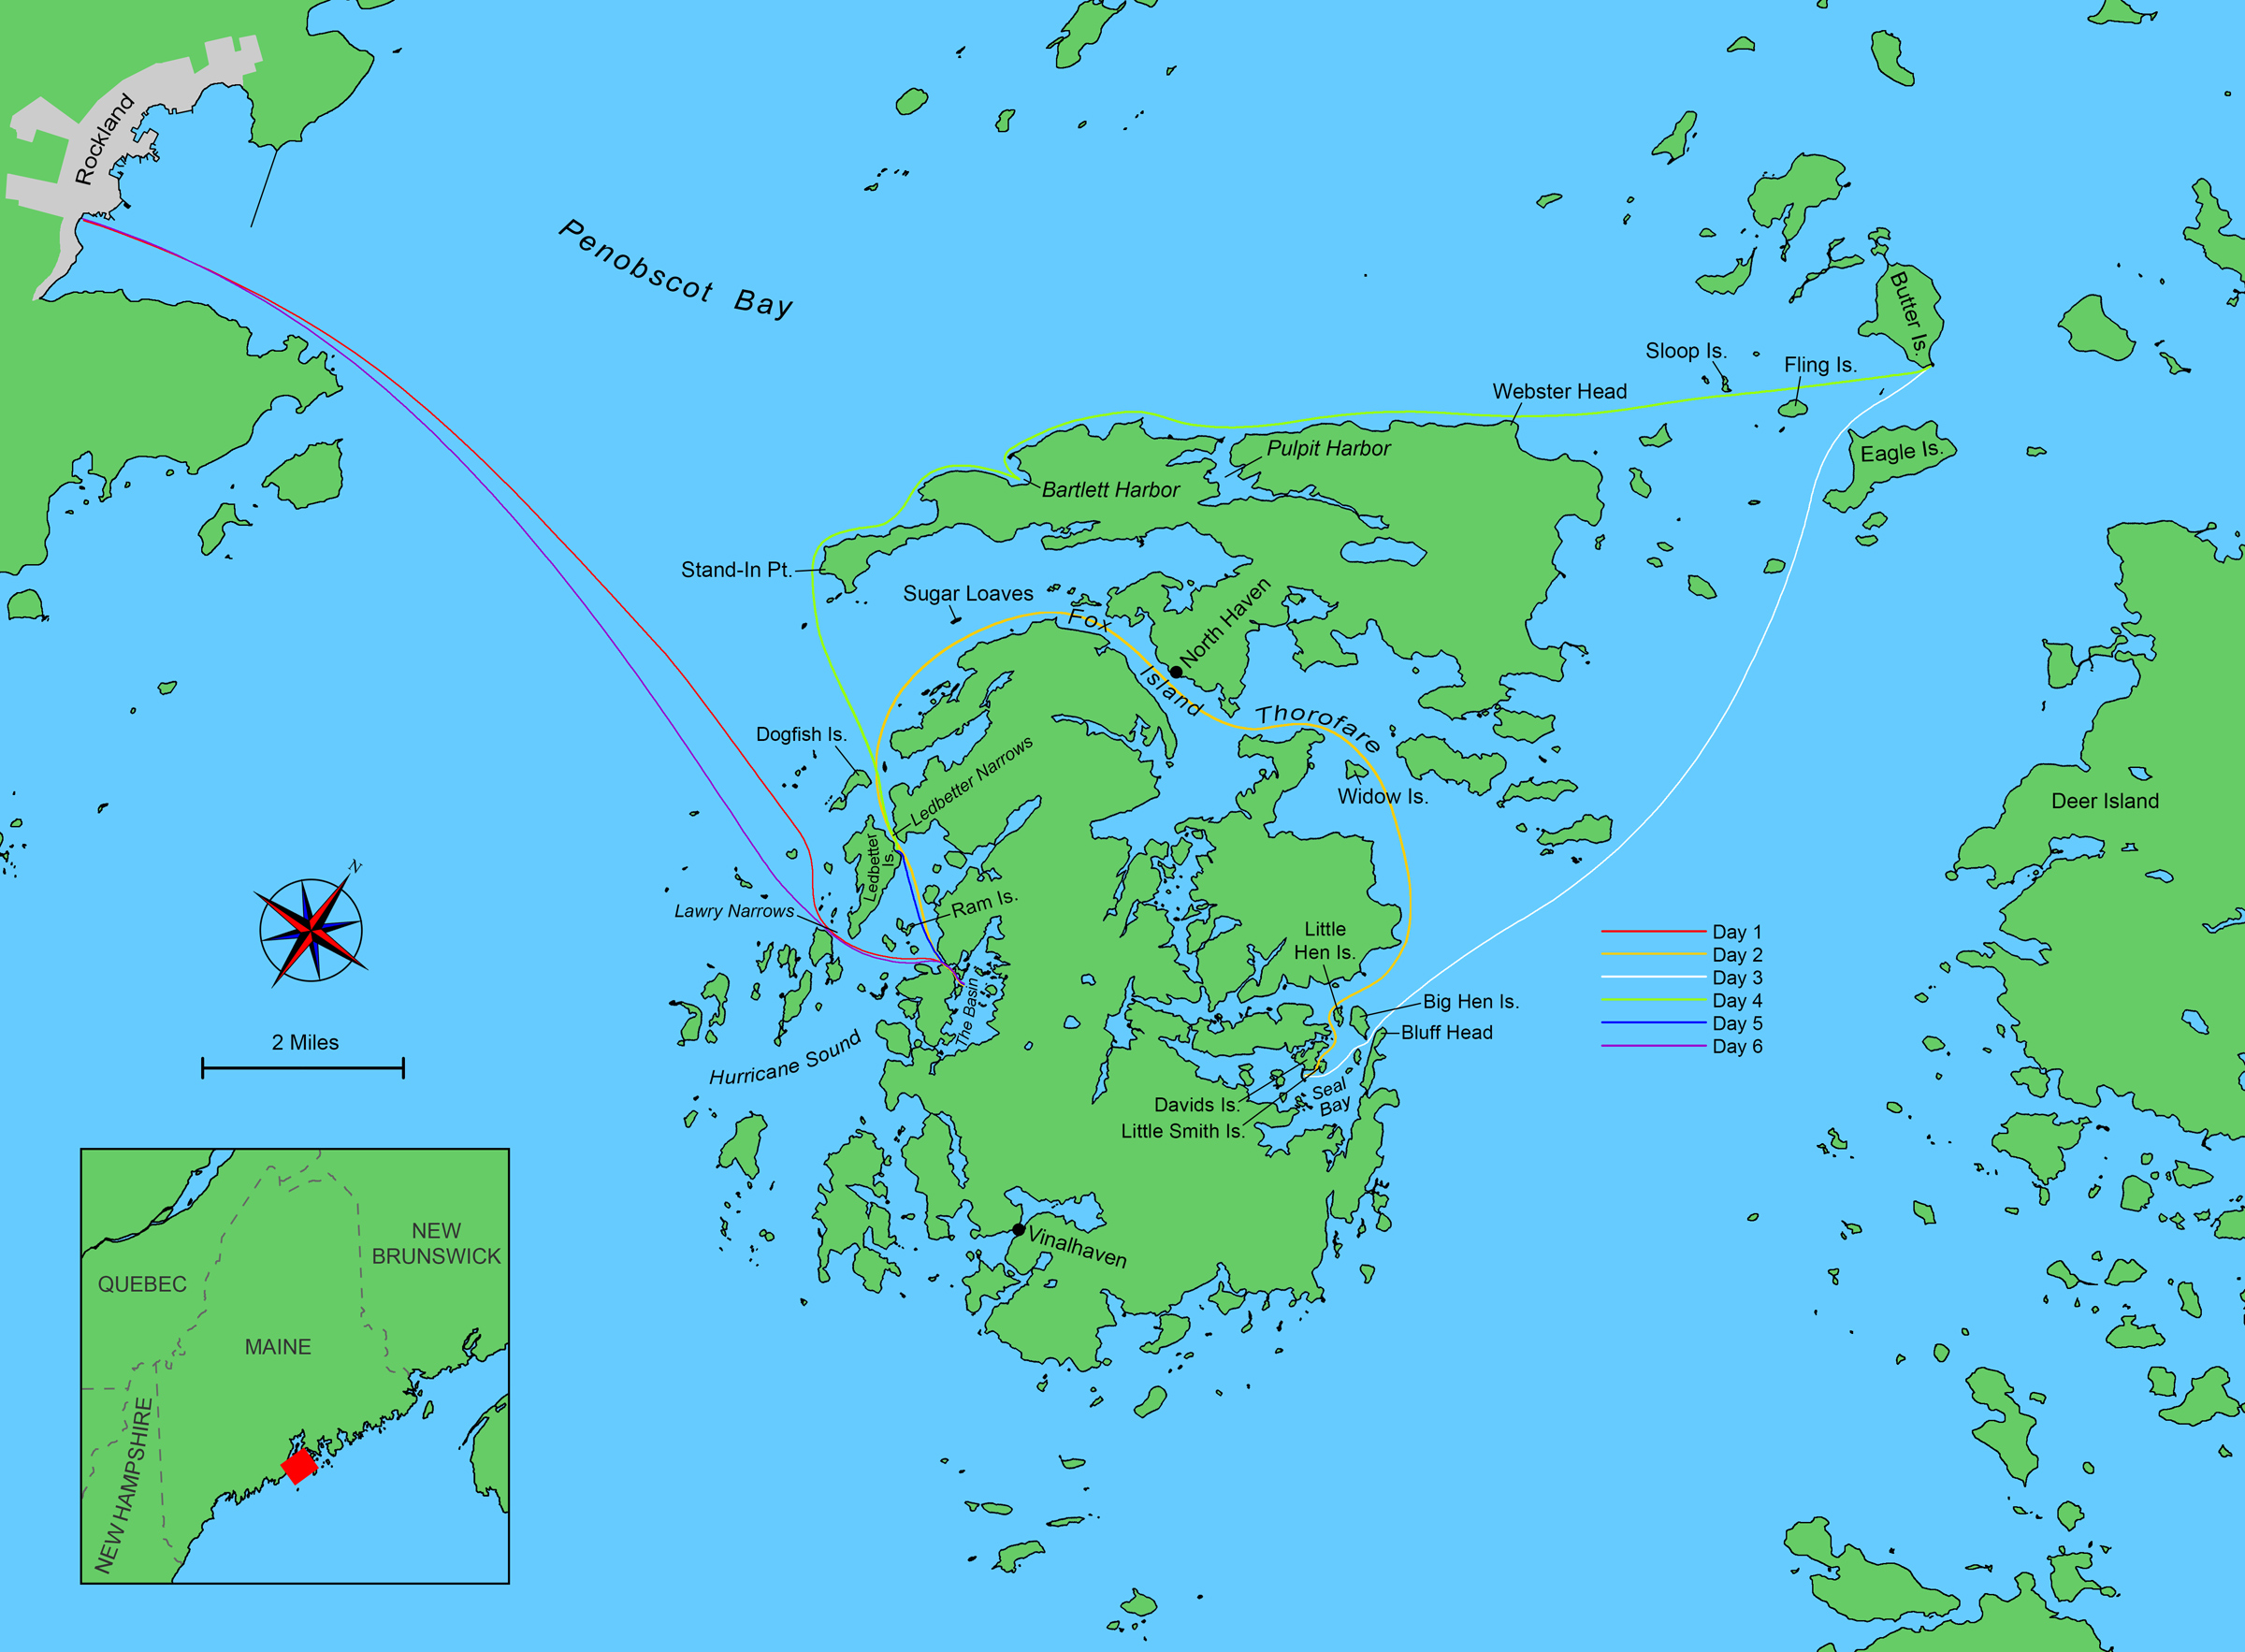
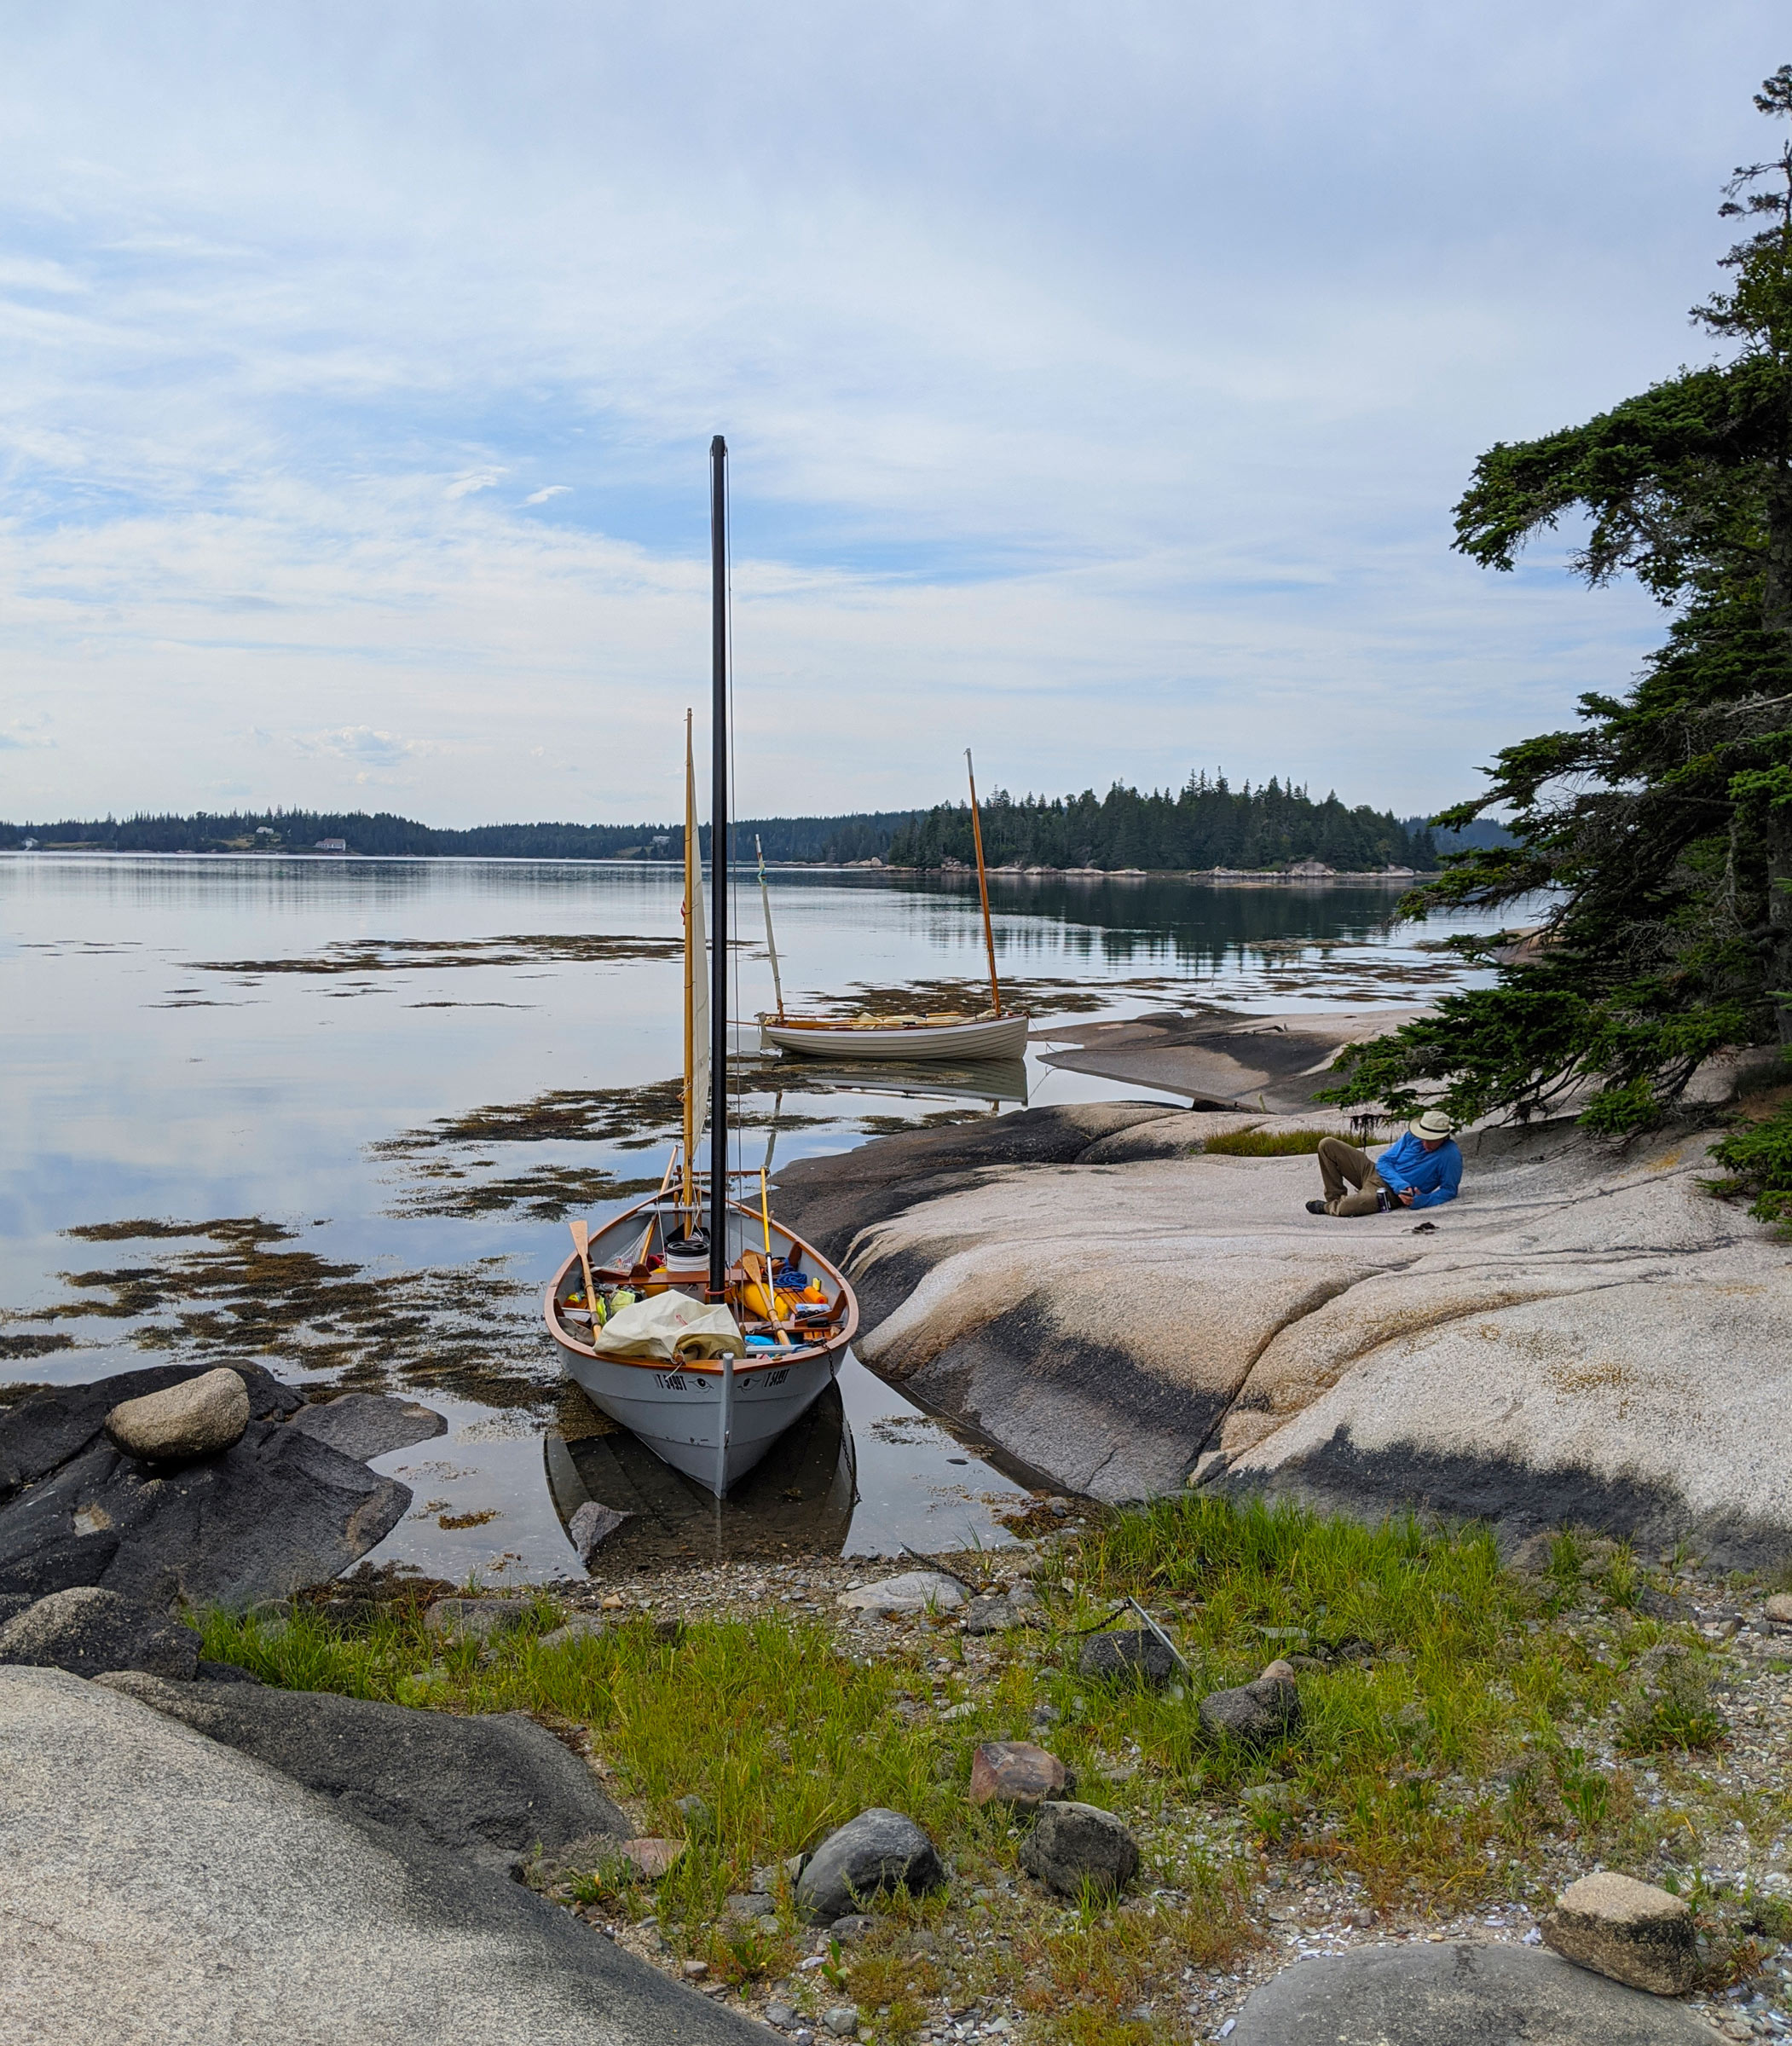
I set out, boat in tow, well before dawn to get from my home in New Hampshire to Rockland, Maine. John, coming from Vermont, had started his drive even earlier. We needed to be on the water by 10 in the morning to make the crossing of Lower Penobscot Bay and get to the narrow entrance of The Basin on Vinalhaven at slack tide. The forecast looked promising for the 10-nautical-mile crossing. With a wind out of the south at 12 knots, we could make good speed on a broad reach out of Rockland Harbor and across lower Penobscot Bay, a stretch of water that is known for foul weather and steep seas. This was the first challenge to overcome on our trip, which was to be a circumnavigation of North Haven Island, Vinalhaven’s northern sister and the smaller of the two Fox Islands. A few years prior, I had circled Vinalhaven from Rockland with my Sea Pearl and wanted to explore more of the area. John, after hearing about that first trip, was eager to do something like it with me.
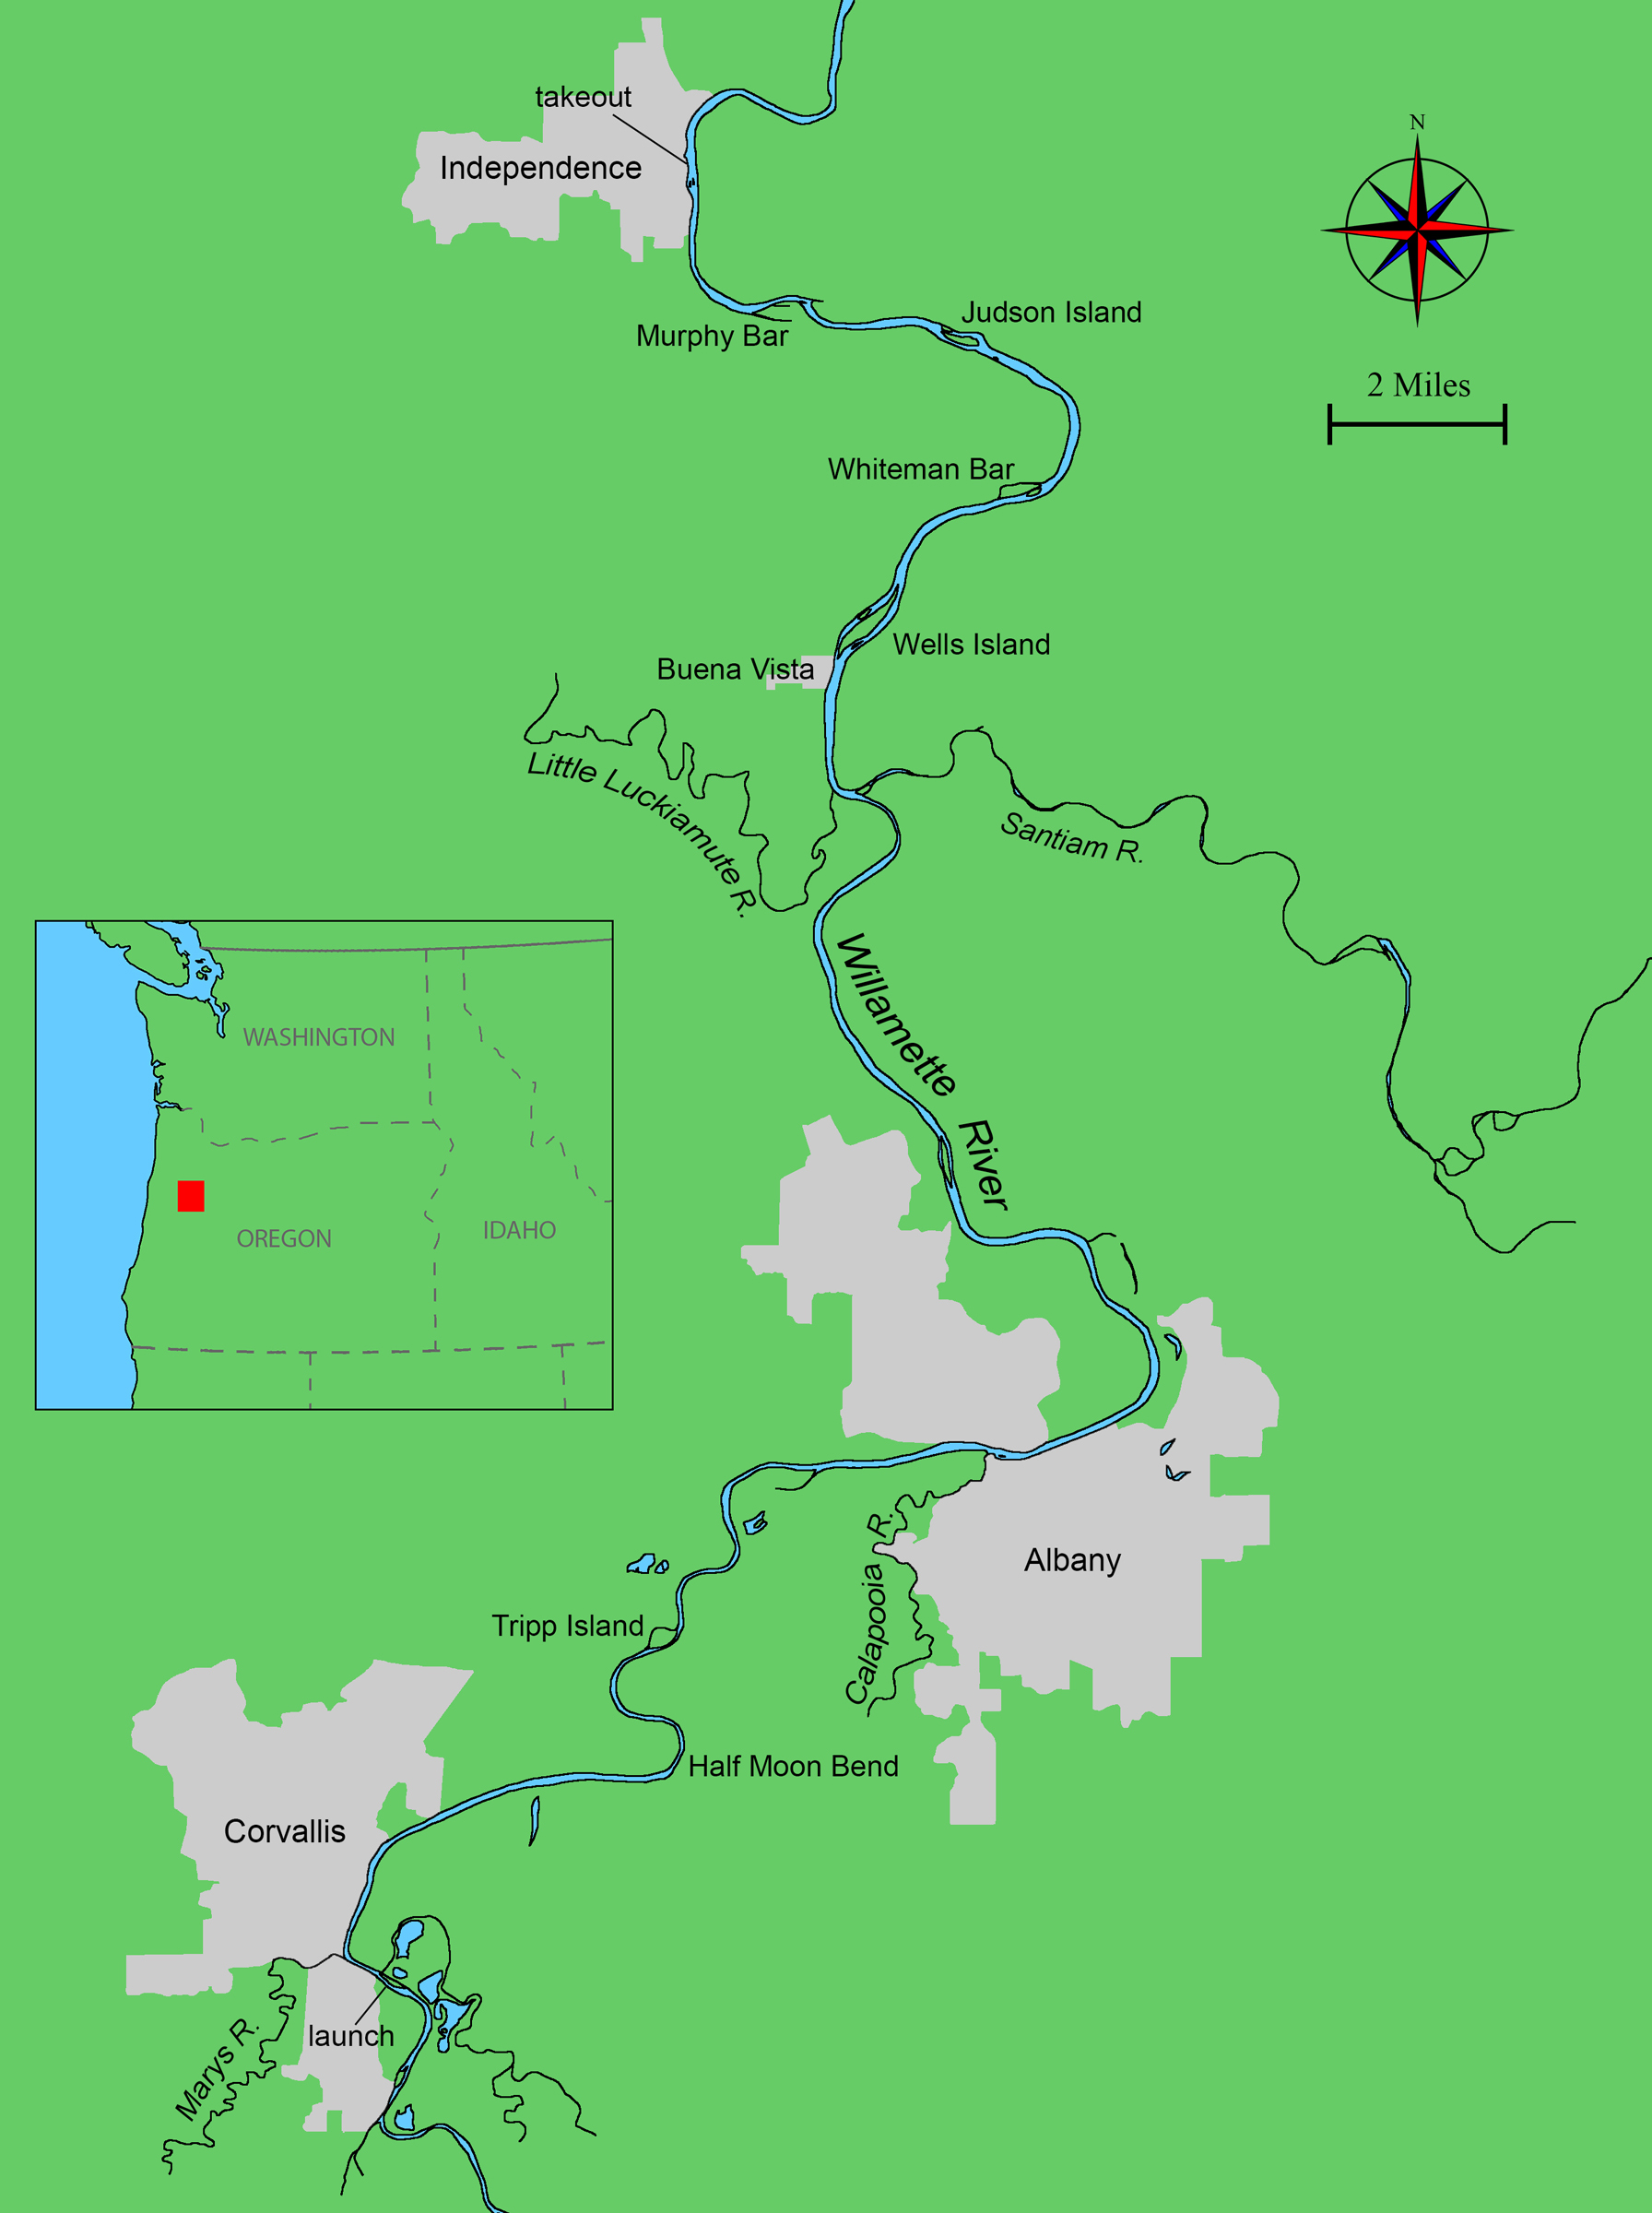
Roger Siebert
.
Rockland Harbor, 2 miles wide, didn’t have much wind. Across Penobscot Bay, Vinalhaven was made invisible by fog but for the motionless pearl-white blades of the island’s wind turbines stabbed skyward. Soon after we ghosted off the ramp with a weak southwestern breeze, the peak of John’s mainsail suddenly came undone. Sail and boom came crashing into the boat, and it took another 30 minutes to get sorted out. The current in Penobscot Bay was in a strong flood, flowing northward, and instead of the good sea breeze we expected there was a weak southeasterly wind. A straight shot across to Vinalhaven proved impossible and by the end of the crossing we were pressed to the ragged granite north end of 500-yard-long Dogfish Island, more than a mile and a half north of where we wanted to land with no time-efficient way to sail against the current. We hurriedly struck our rigs and rowed, frantically, the final 2.5 miles.
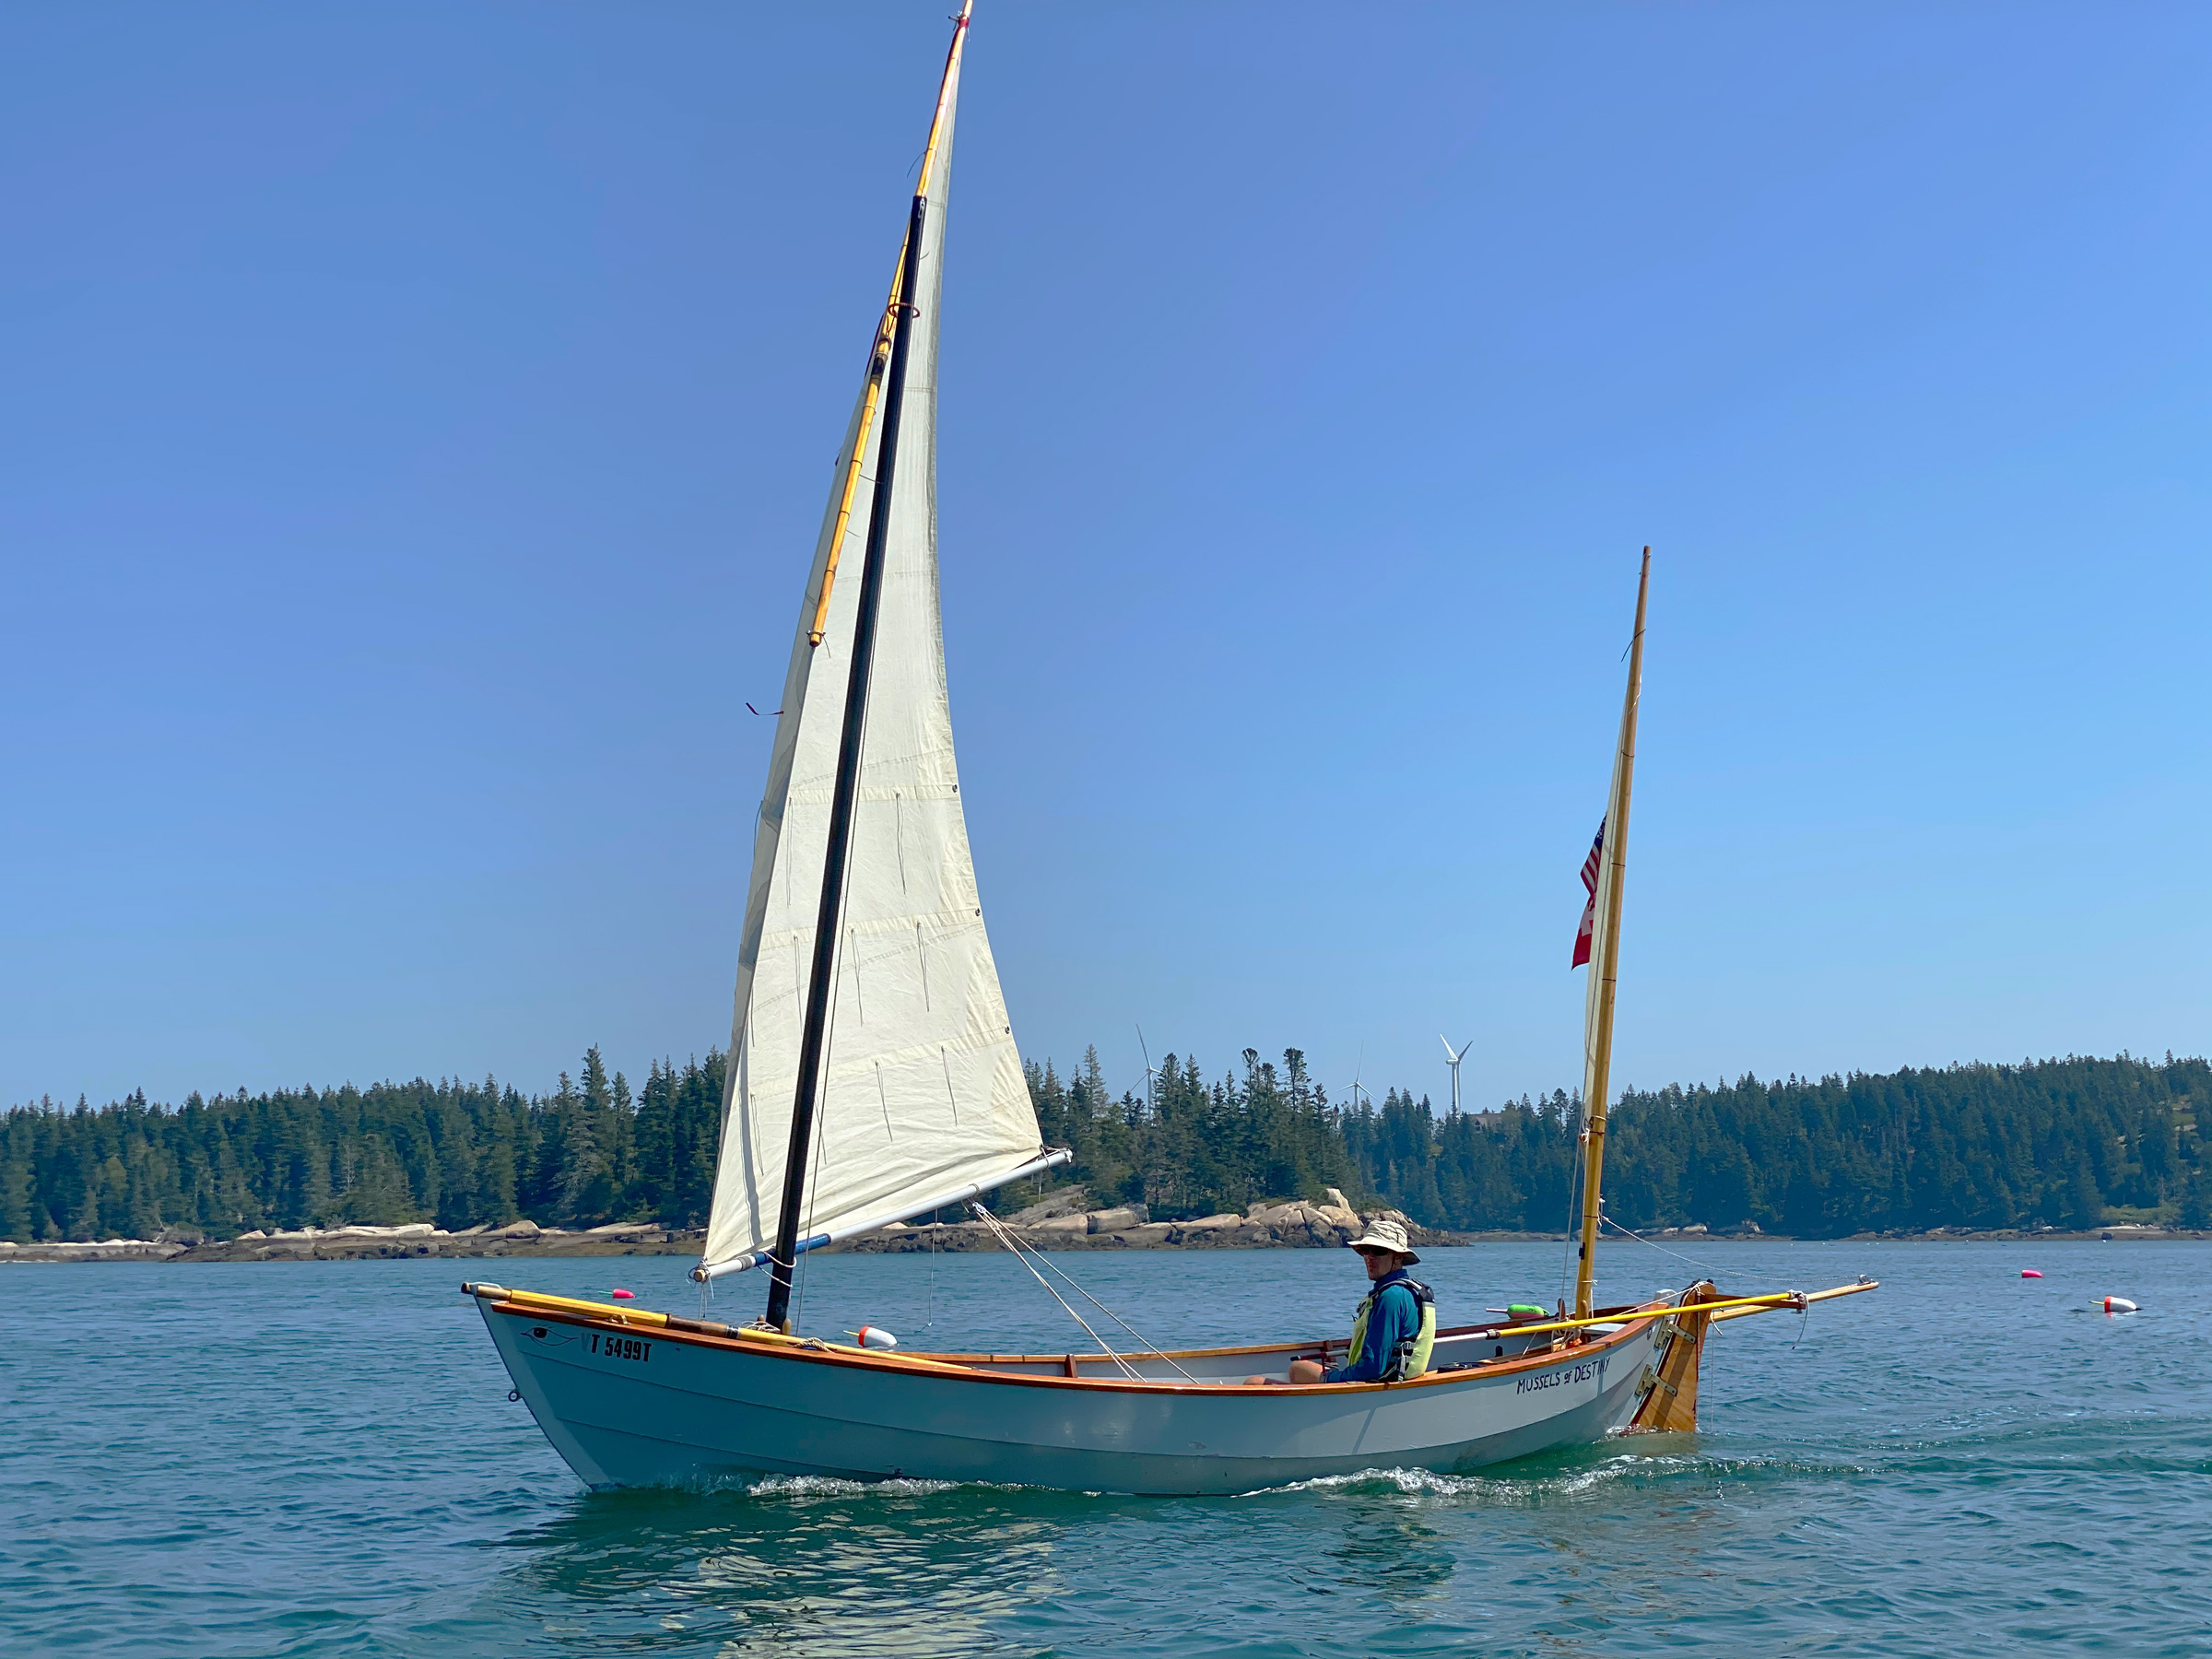
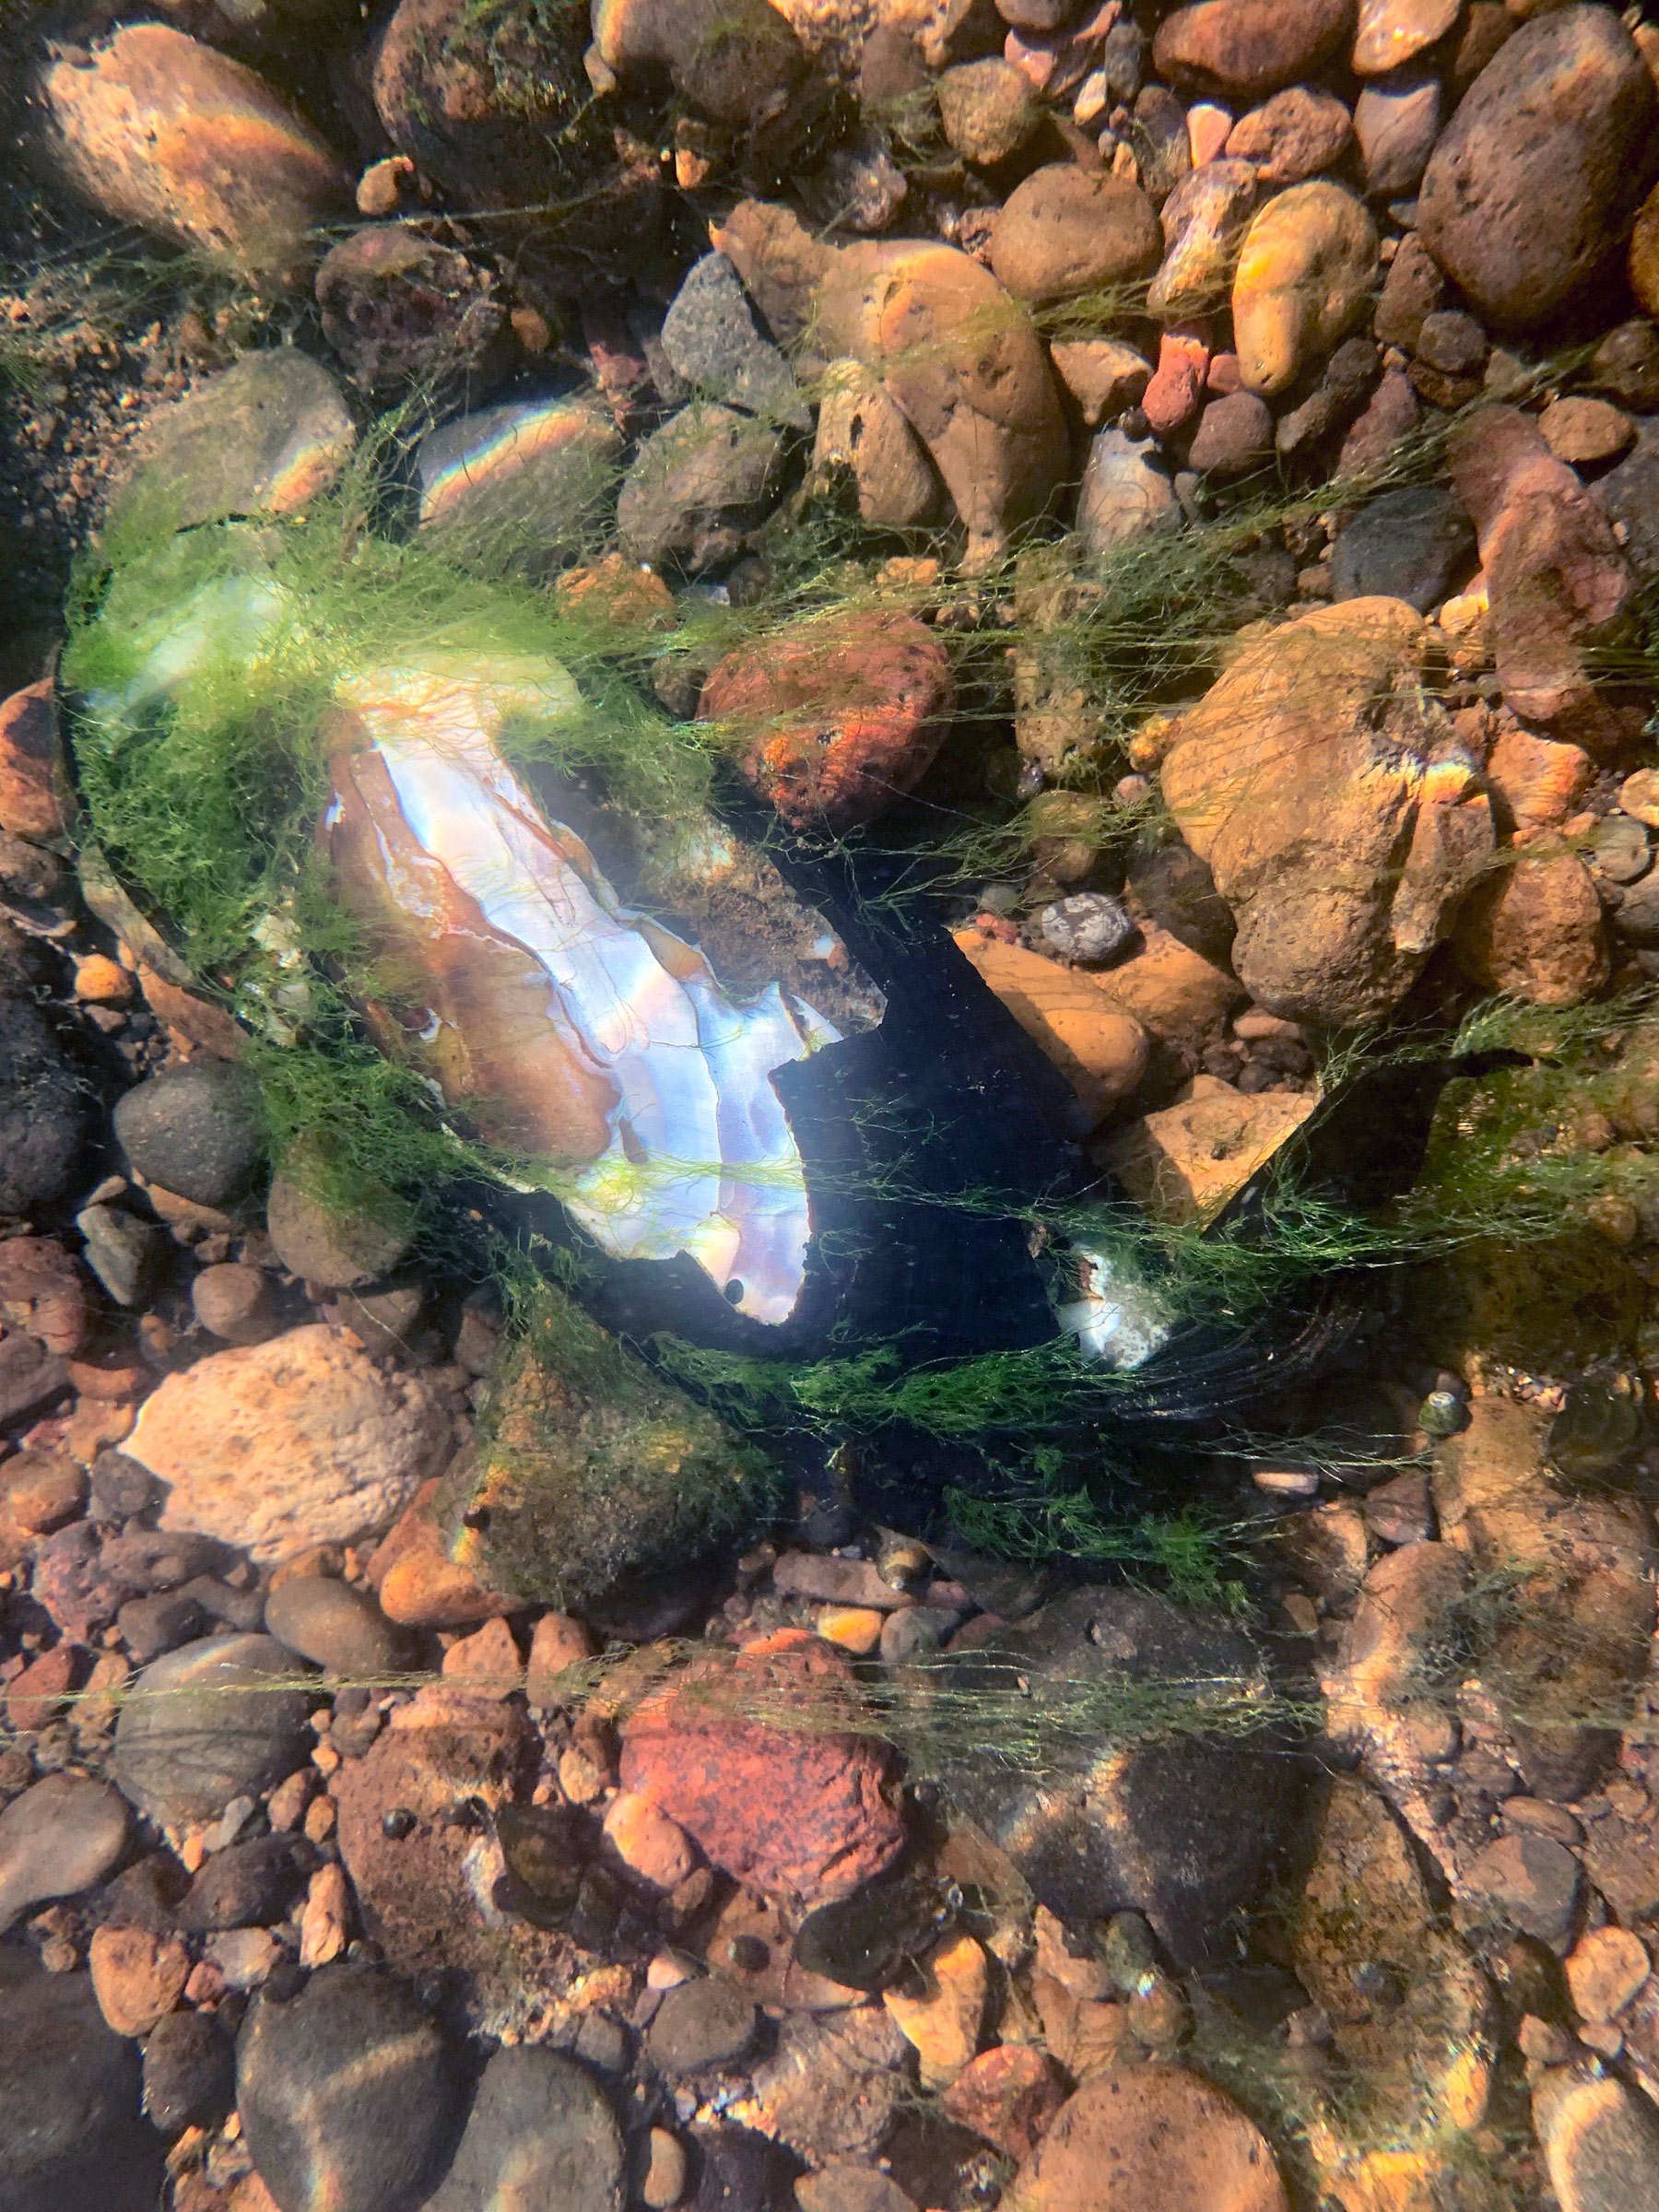
As I rowed around the forested southern point of Ledbetter Island, John, rowing his 14′ lug-yawl-rigged Ilur, WAXWING, was not far behind and just off my starboard quarter. As we pulled into Hurricane Sound I nervously glanced at my watch. The Basin, a 1-1/2-mile-long, forest-lined inland cove, is nearly a saltwater lake but for a current-swept 150’-wide entrance, with a bare bedrock outcrop blocking the middle third. It offers engineless mariners very short windows of slack tide to enter or exit. John and I had about 15 minutes until the top of the tide, and the gates into The Basin were just shy of a nautical mile away. I reckoned my boat, MUSSELS OF DESTINY, a 19’ Caledonia Yawl, was moving at about 2 knots. WAXWING, slightly faster under oars, passed on starboard. Either we rowed into The Basin at slack tide or we would be shut out for the night. Rowing against the swift outflowing current would be impossible.
We pulled closer to the narrow northern entrance channel with the outcrop rising from the water on one side and a 10′-high stone slab looming over the other. I had slammed my Sea Pearl 21 bow-first into that slab during a failed attempt to enter The Basin a few years earlier. I had lost control of the boat against the powerful current which had swept it aside as if it were dust.
As John and I drew near the channel we passed a lone lobster buoy tilted in our favor. The last of the flood tide split around the entrance’s 50′-wide guardian into two streams that would rejoin behind it and then, just 125 yards farther east, split again into two channels around a tree-capped islet—south to the main channel and north to a shallower one. Since it was high tide, I had suggested earlier to John to go south through the wider, more navigable pass around the outcrop, and then north around the islet.
John slowed his rowing tempo and WAXWING smoothly accelerated into the pass; soon MUSSELS was also in the grip of the current and pulled forward, sliding effortlessly past the slick, dark, seaweed-fringed outcrop and around the rocky islet with its few craggy trees.
Christophe Matson
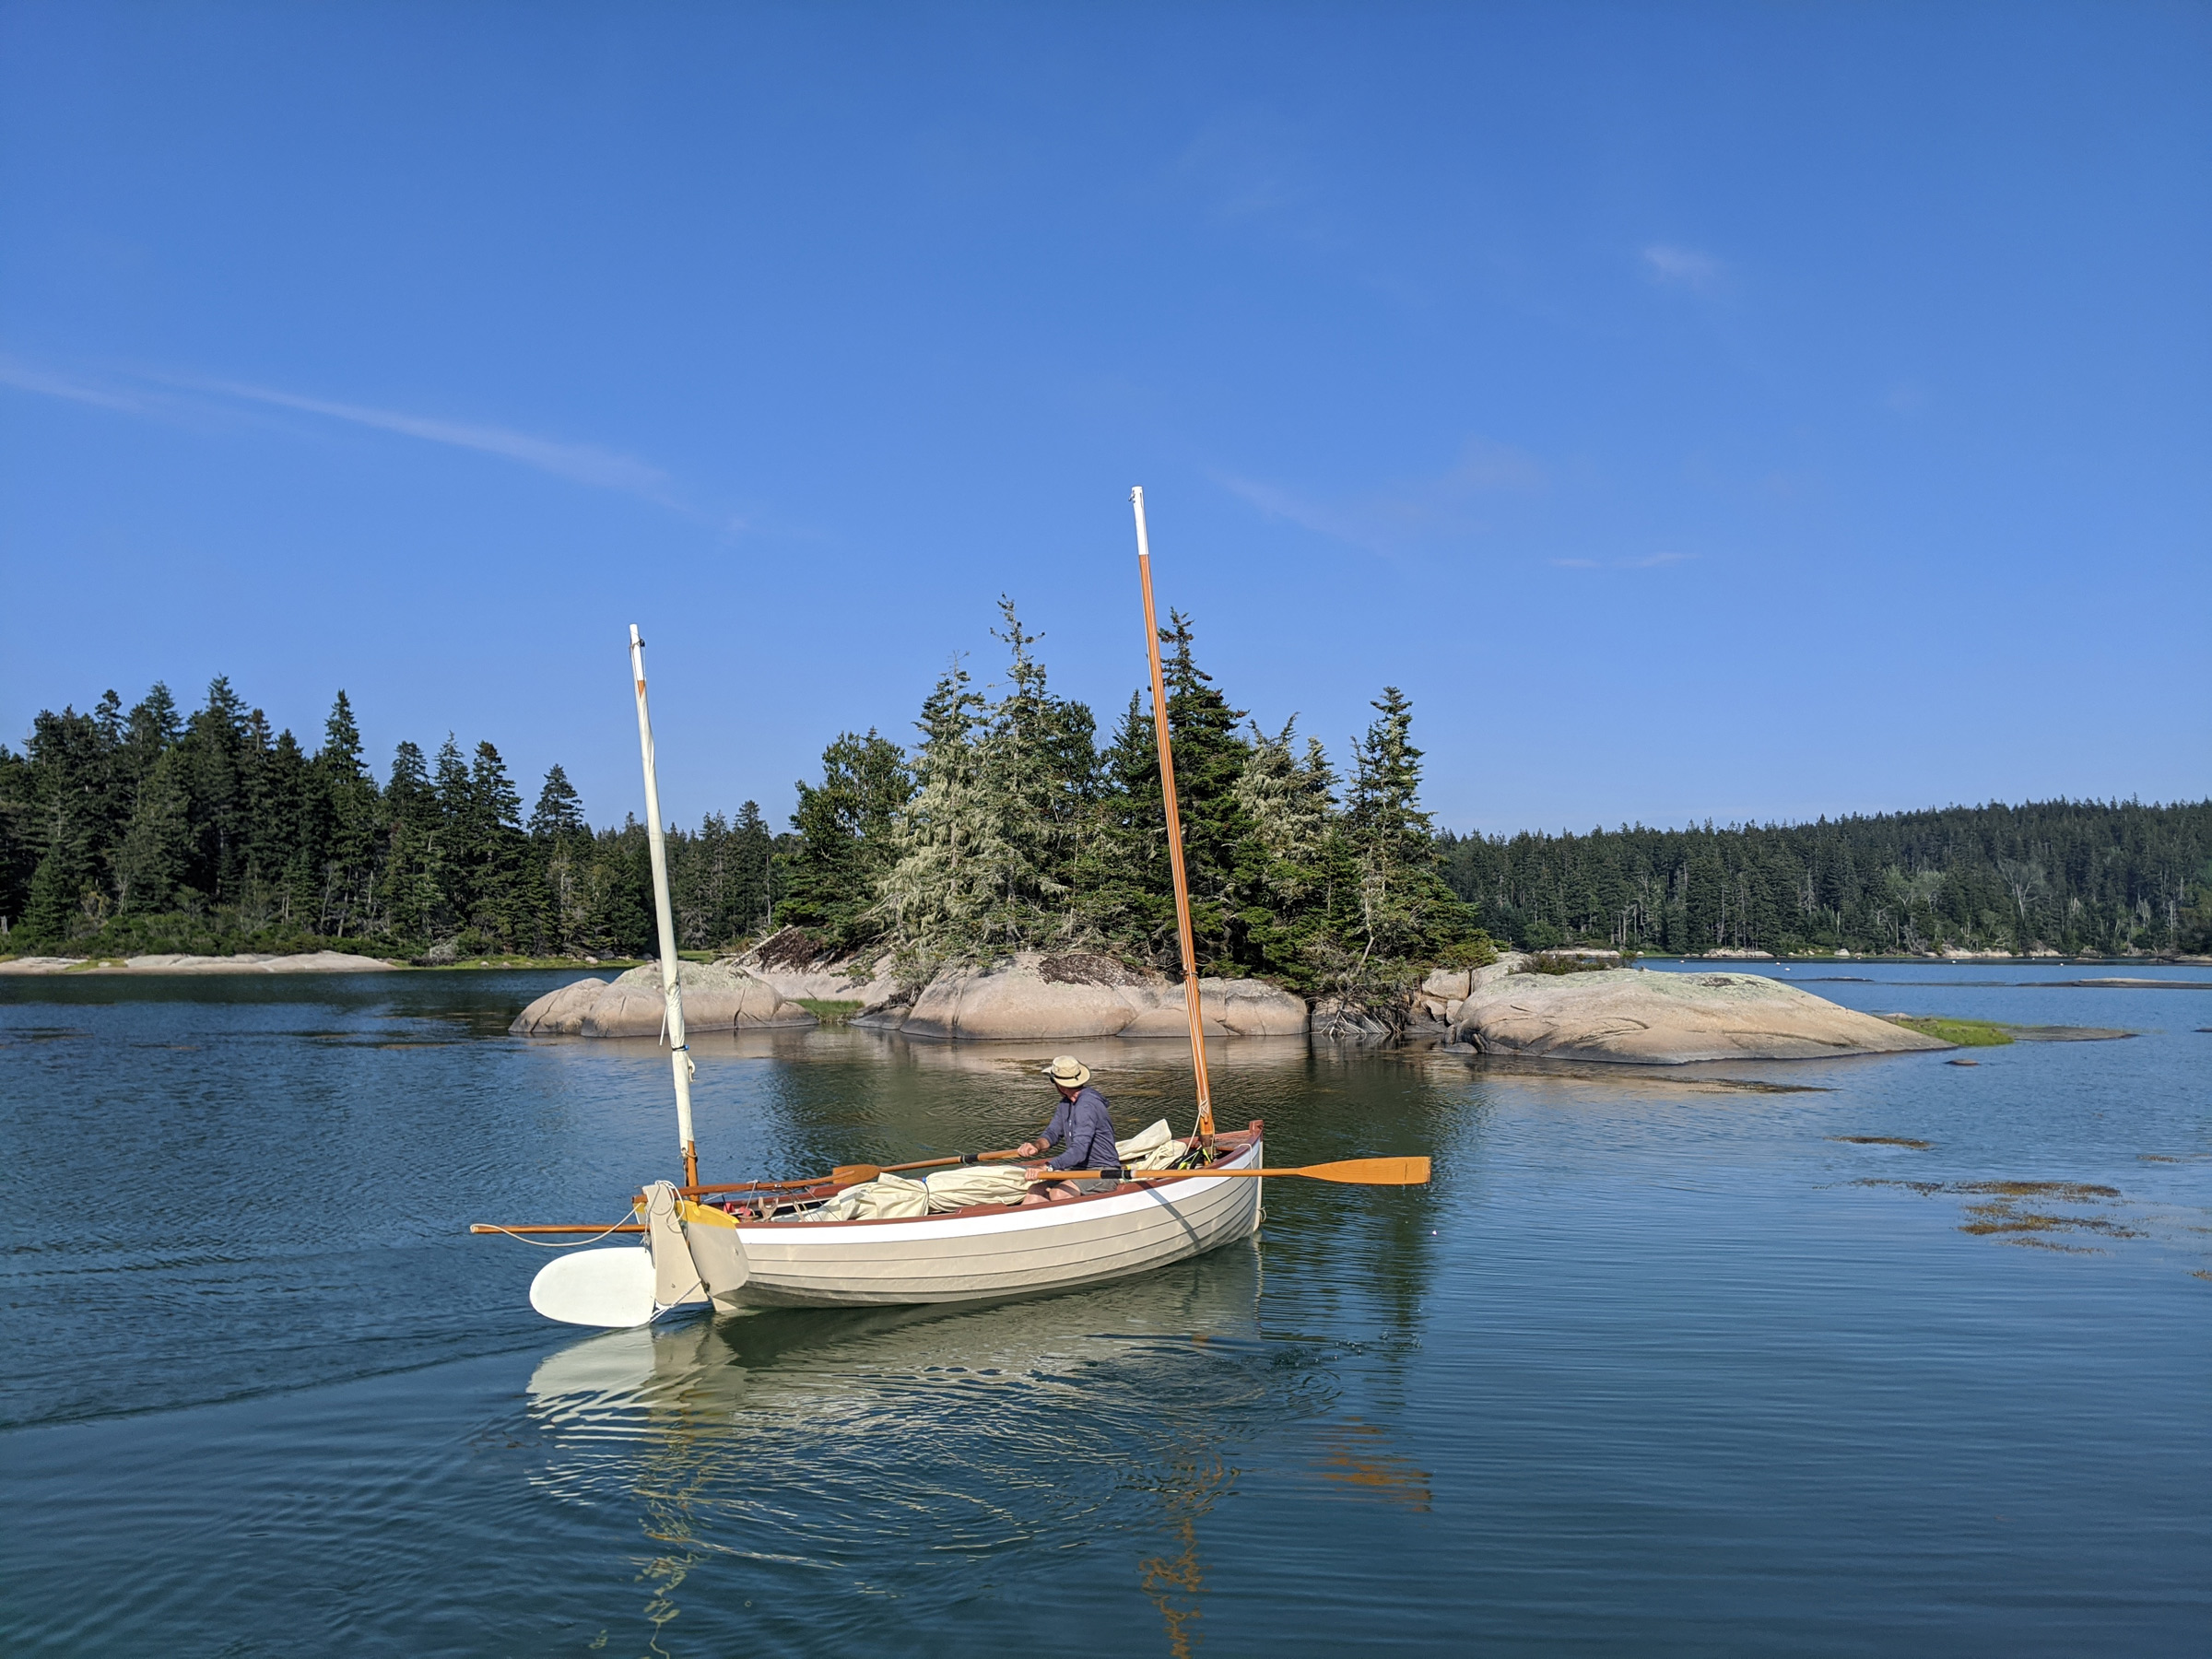
The fog rapidly cleared as we searched for a suitable anchorage in The Basin. It took a day of hard rowing to get to this place, but it was well worth the effort.
In a few moments, we were delivered from the close, damp confines of the entrance and into the expansive flat-calm embrace of the cove. The fog had cleared and sunlight poured onto us. We rowed another third of a mile to the east side of The Basin and dropped our hooks into 40′ of water about three boat-lengths north of an island just 400′ long and wide.
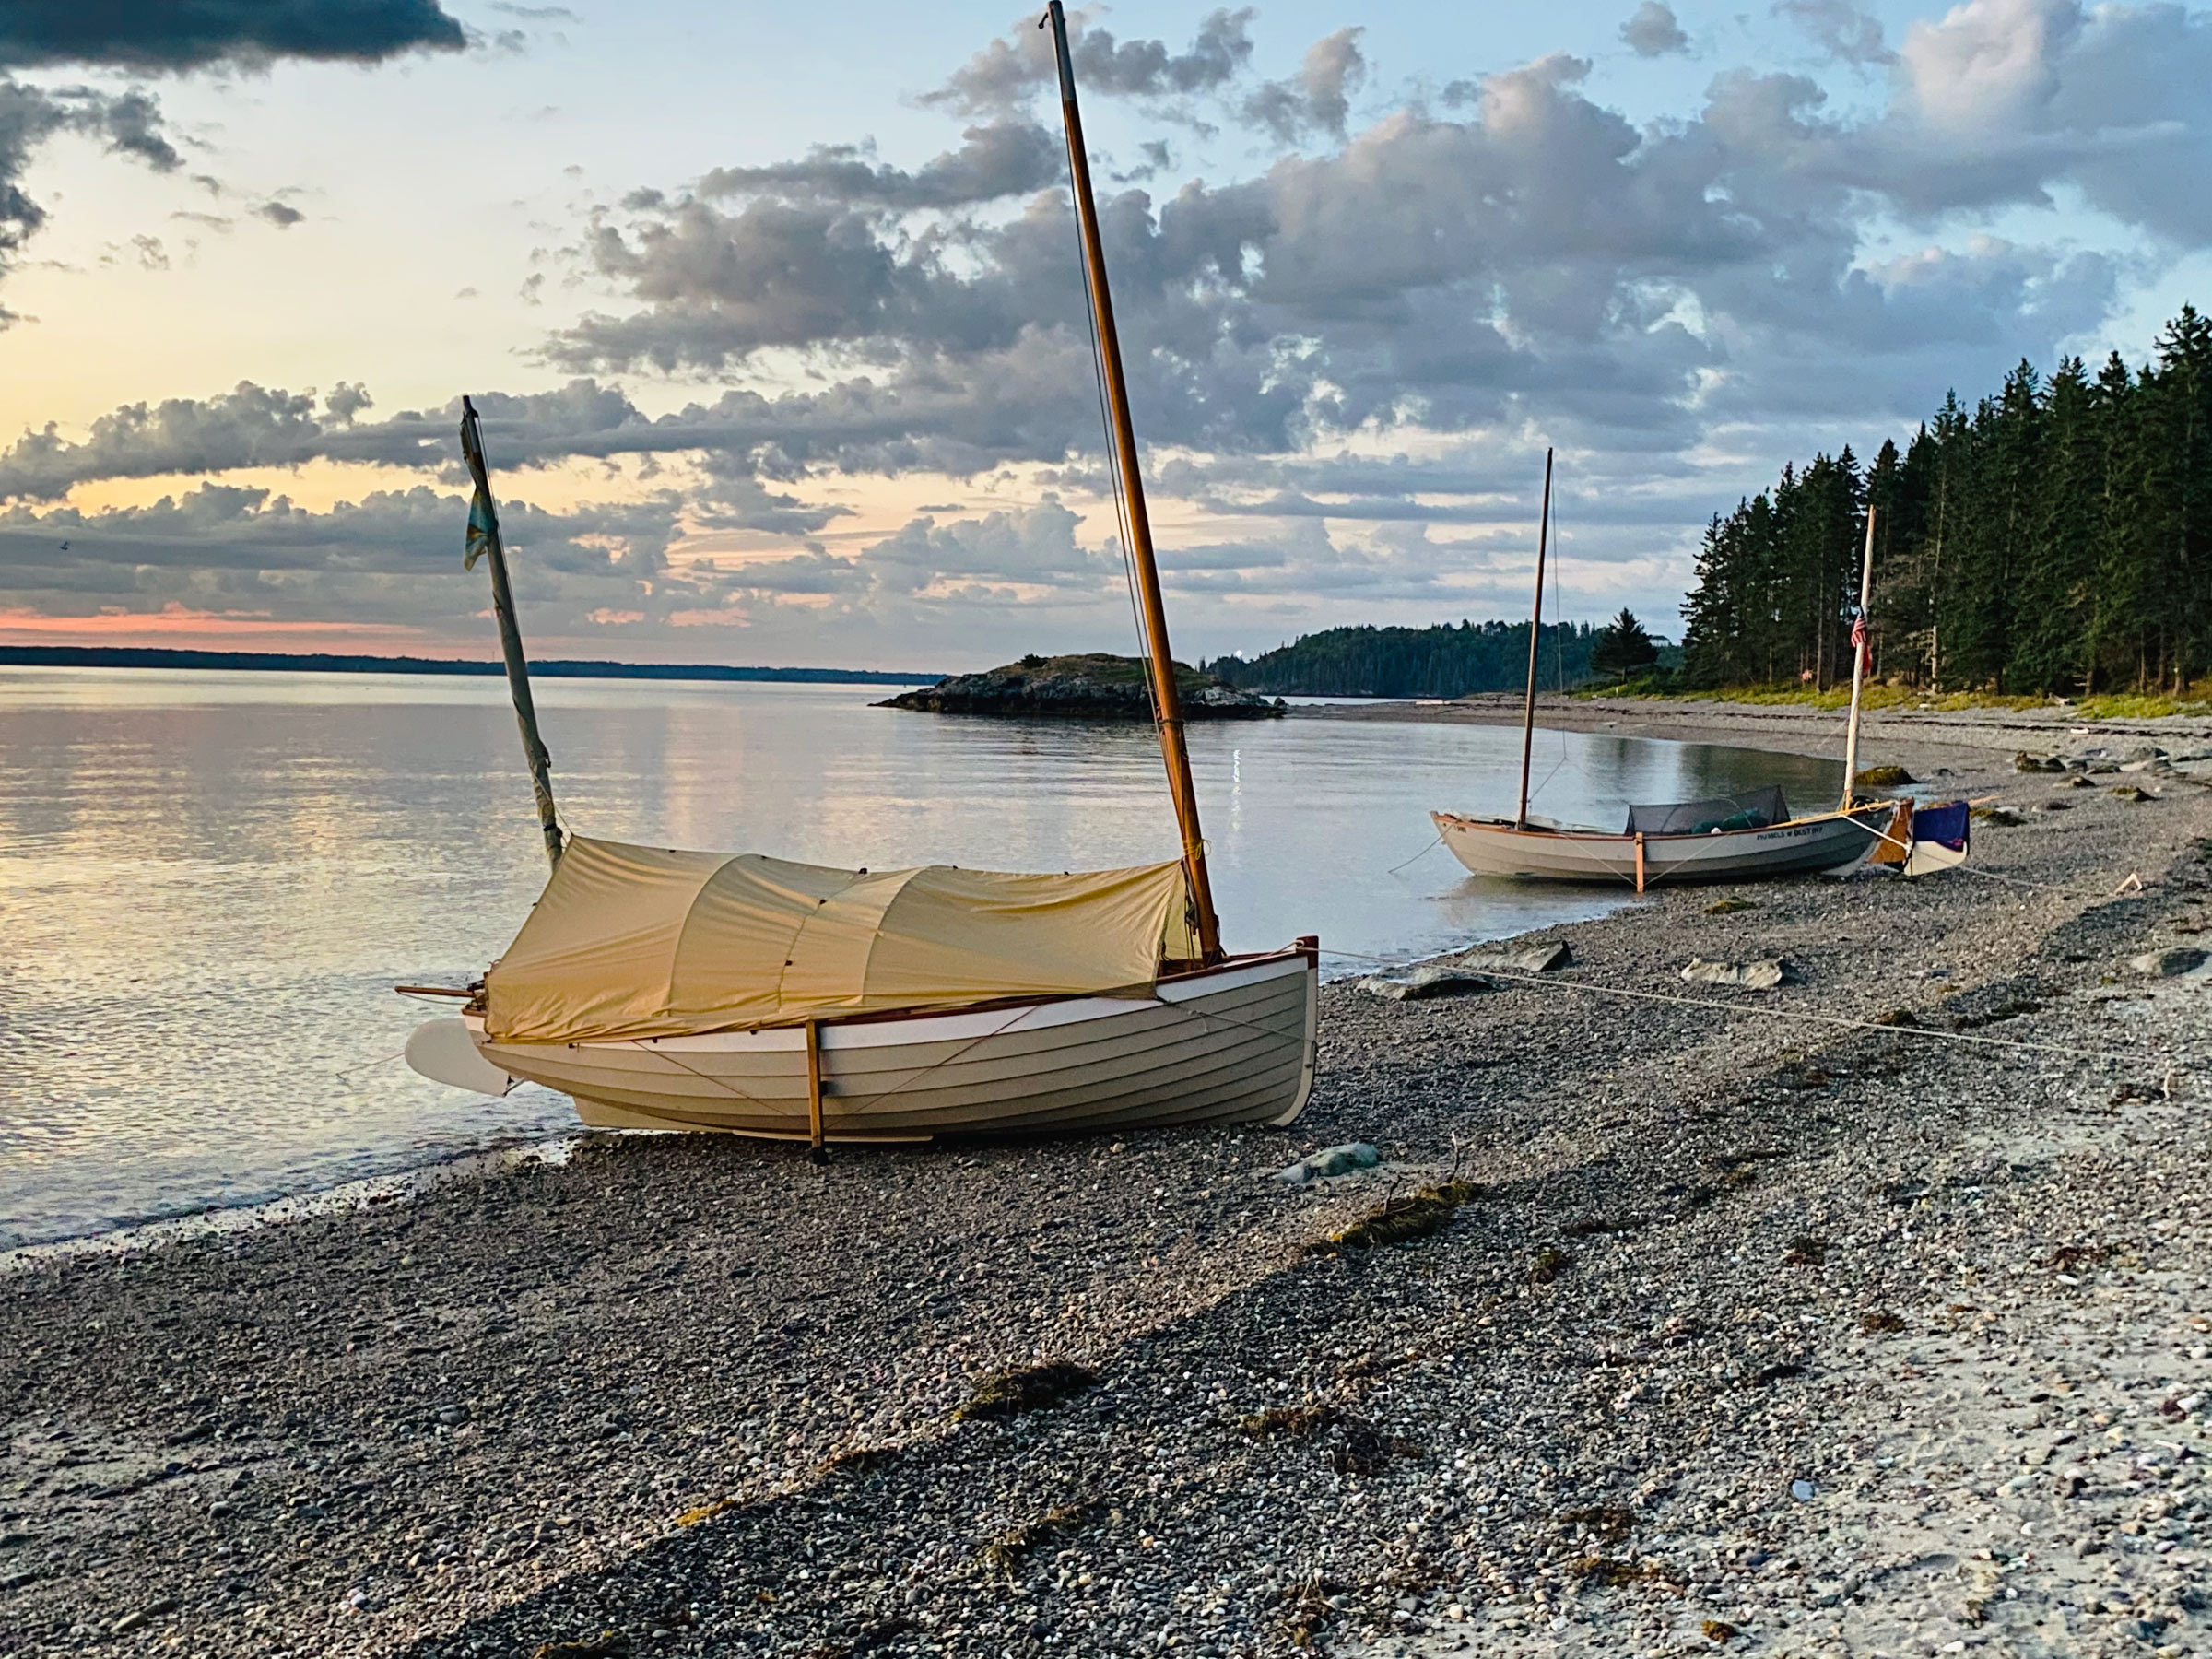
Christophe Matson
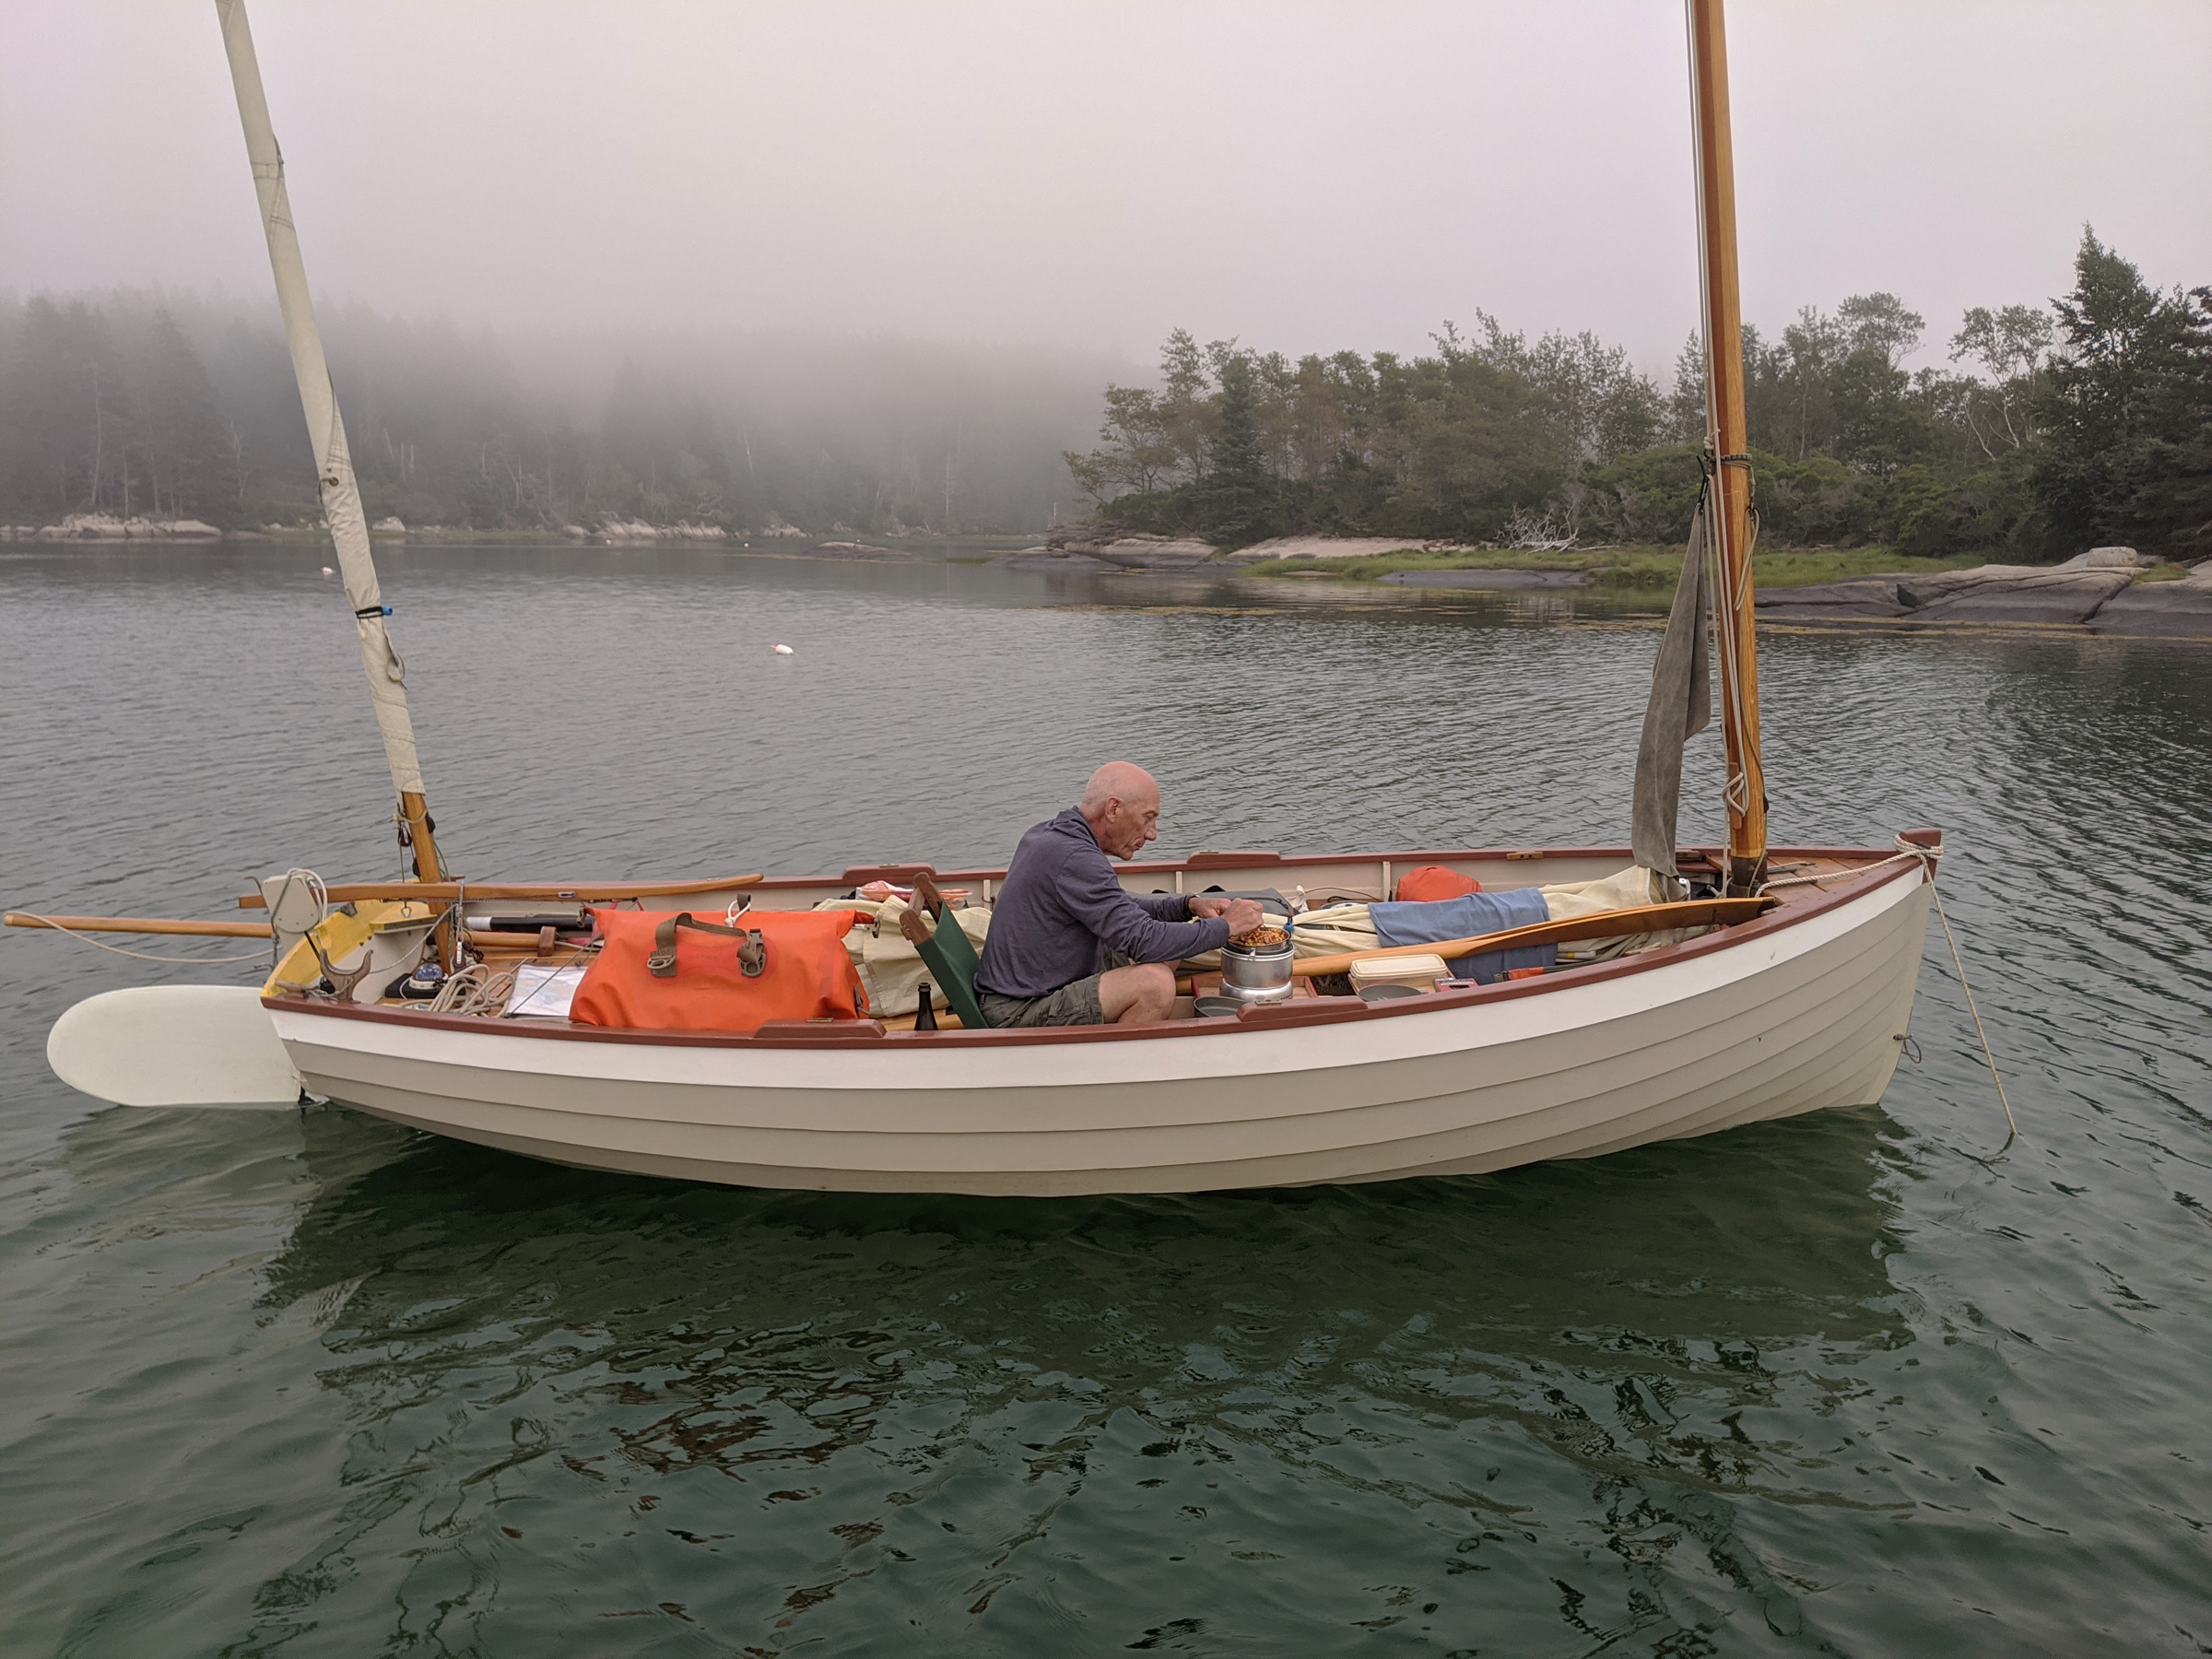
The nearly omnipresent fog rolled back over The Basin while John prepared his dinner in WAXWING. Surrounded by a wooded shoreline and as the only boats in The Basin, we were immersed in silence and total seclusion.
John transformed WAXWING from travel mode to camp mode while I settled onto the floorboards; a new, rapidly approaching bank of fog closed in around us and turned the sun silver as it settled lightly on the spruce tops.
Christophe Matson
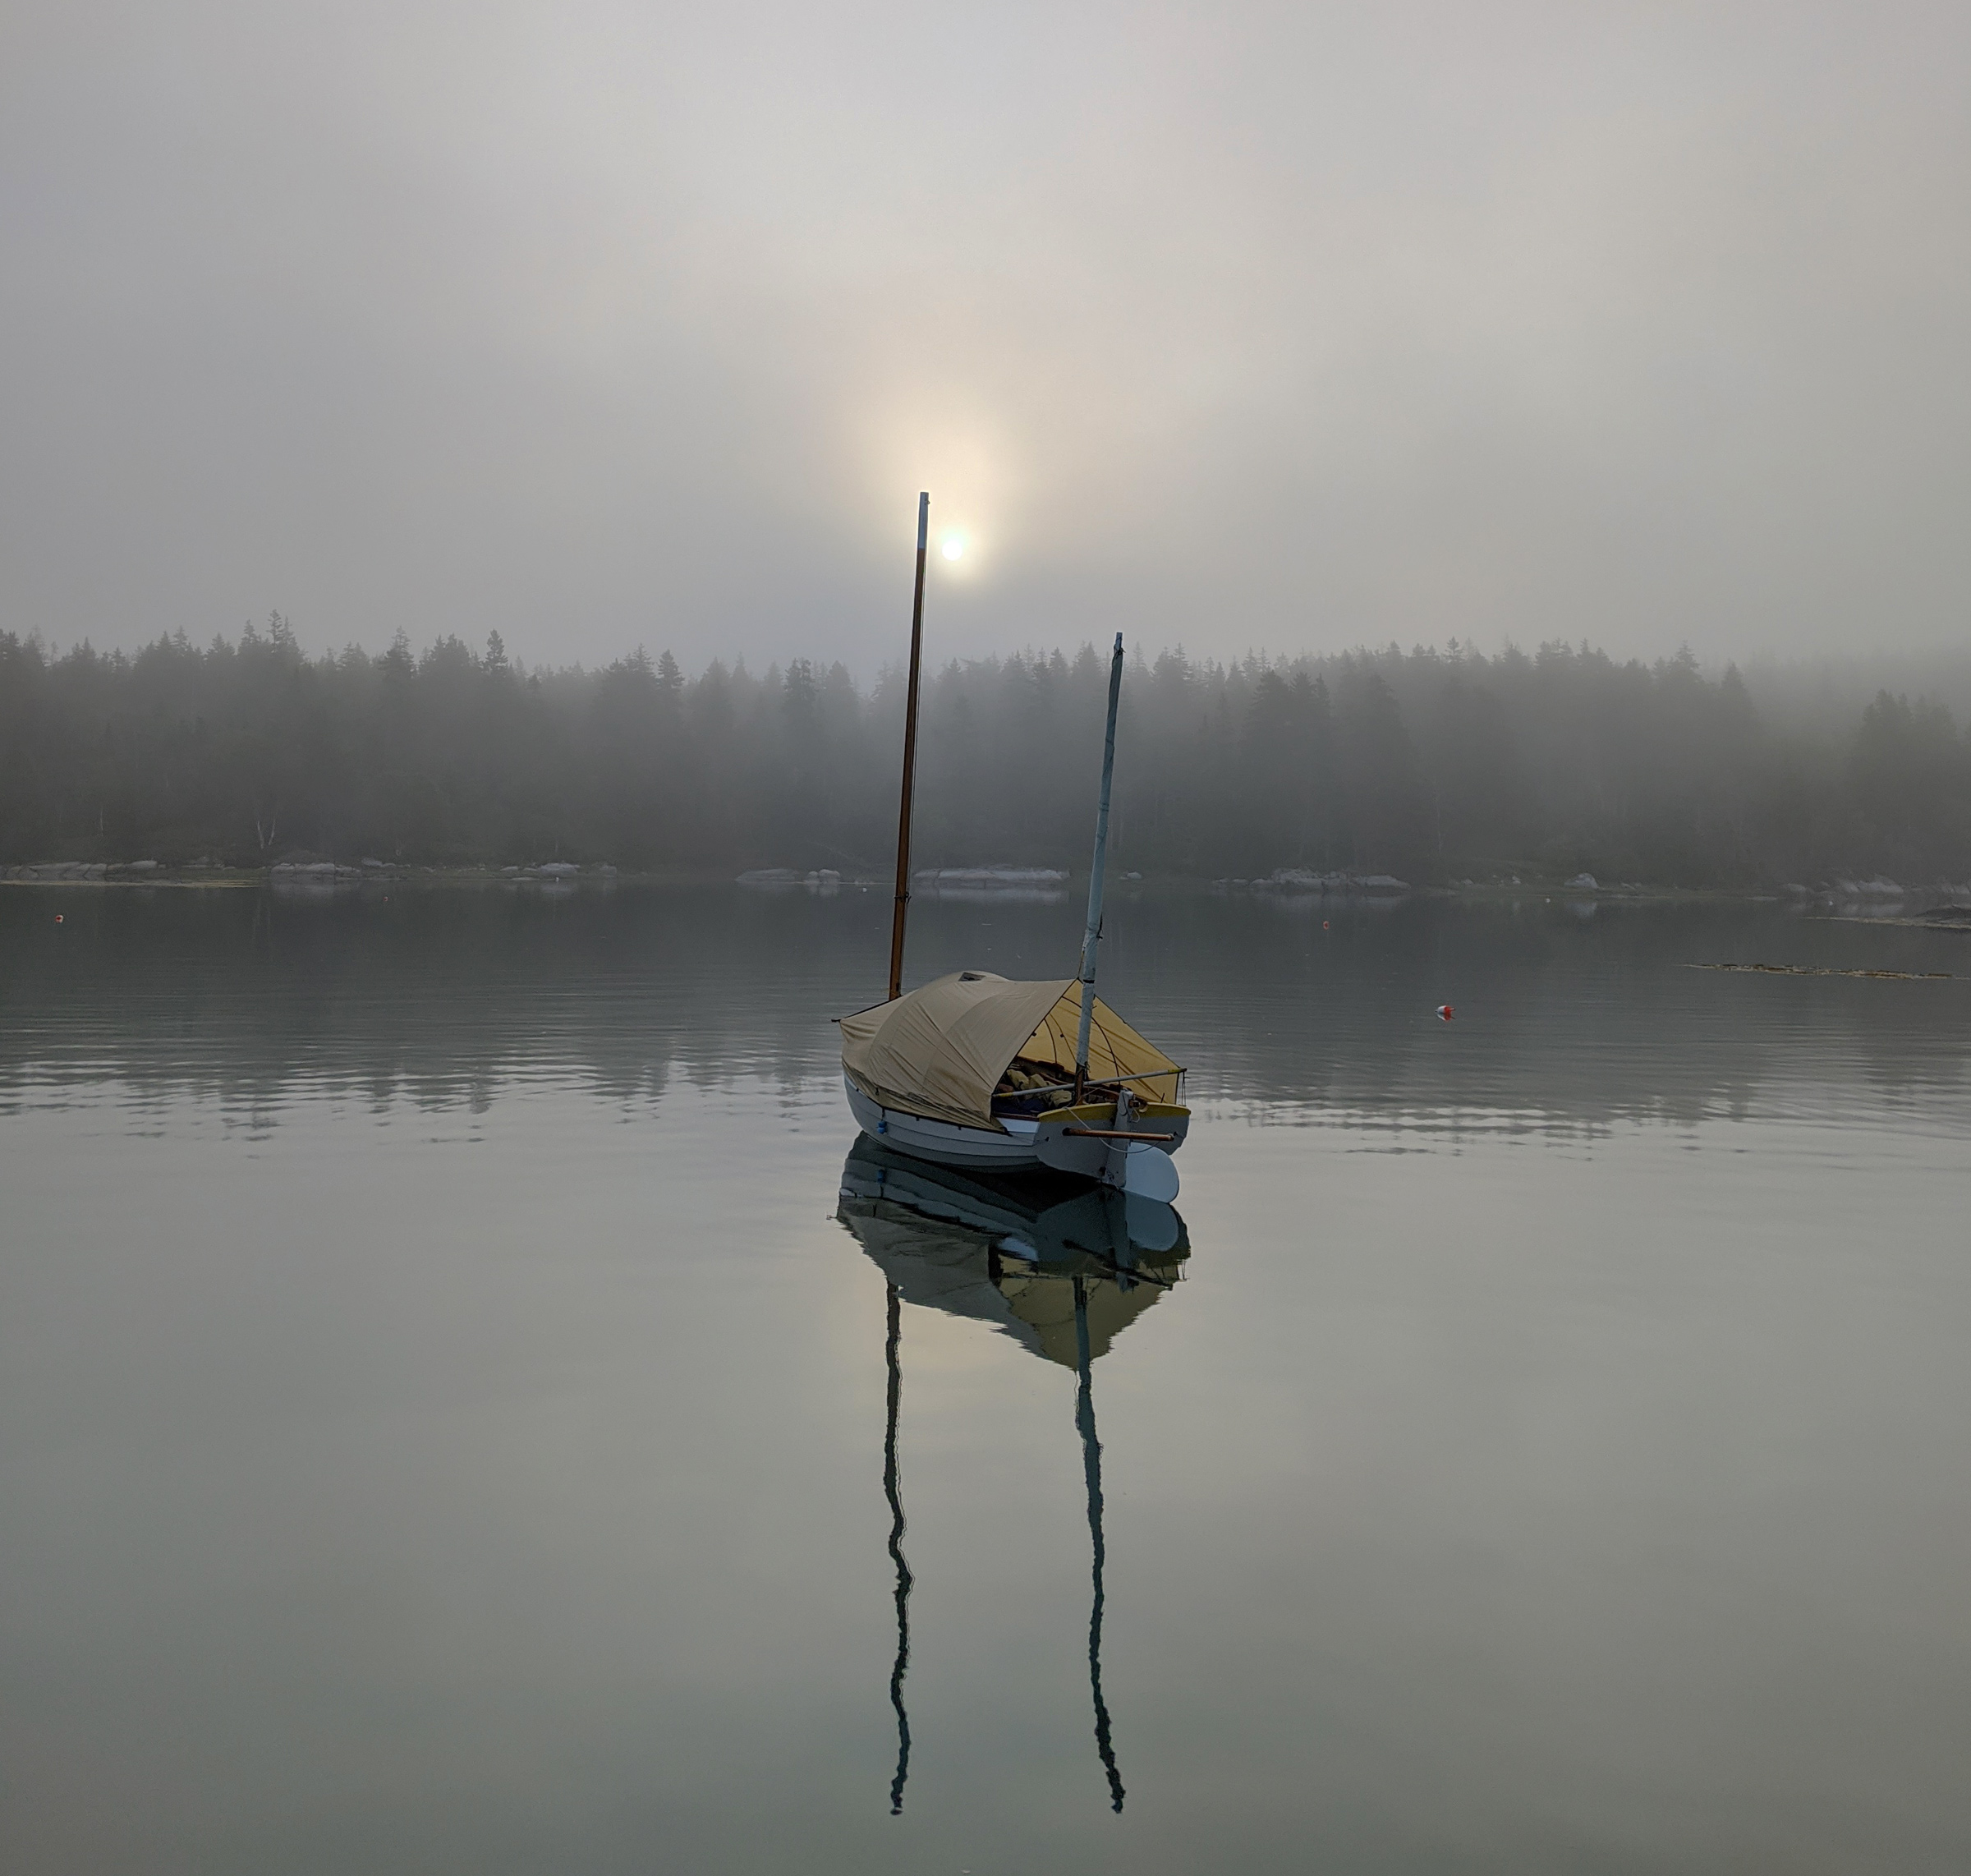
Sunrise on our first morning on the trip and the fog was already thin, a promising start to the day. John still had WAXWING buttoned up with his custom tent.
The next morning, we woke to the fog, which the rising sun rapidly burned off. We waited for the ebb to ride out of The Basin on the current and back into Hurricane Sound. The plan was to then head north, through the tight Ledbetter Narrows on the north end of the island of the same name, and then through Fox Islands Thorofare to the east side of Vinalhaven where we would overnight in Seal Bay.
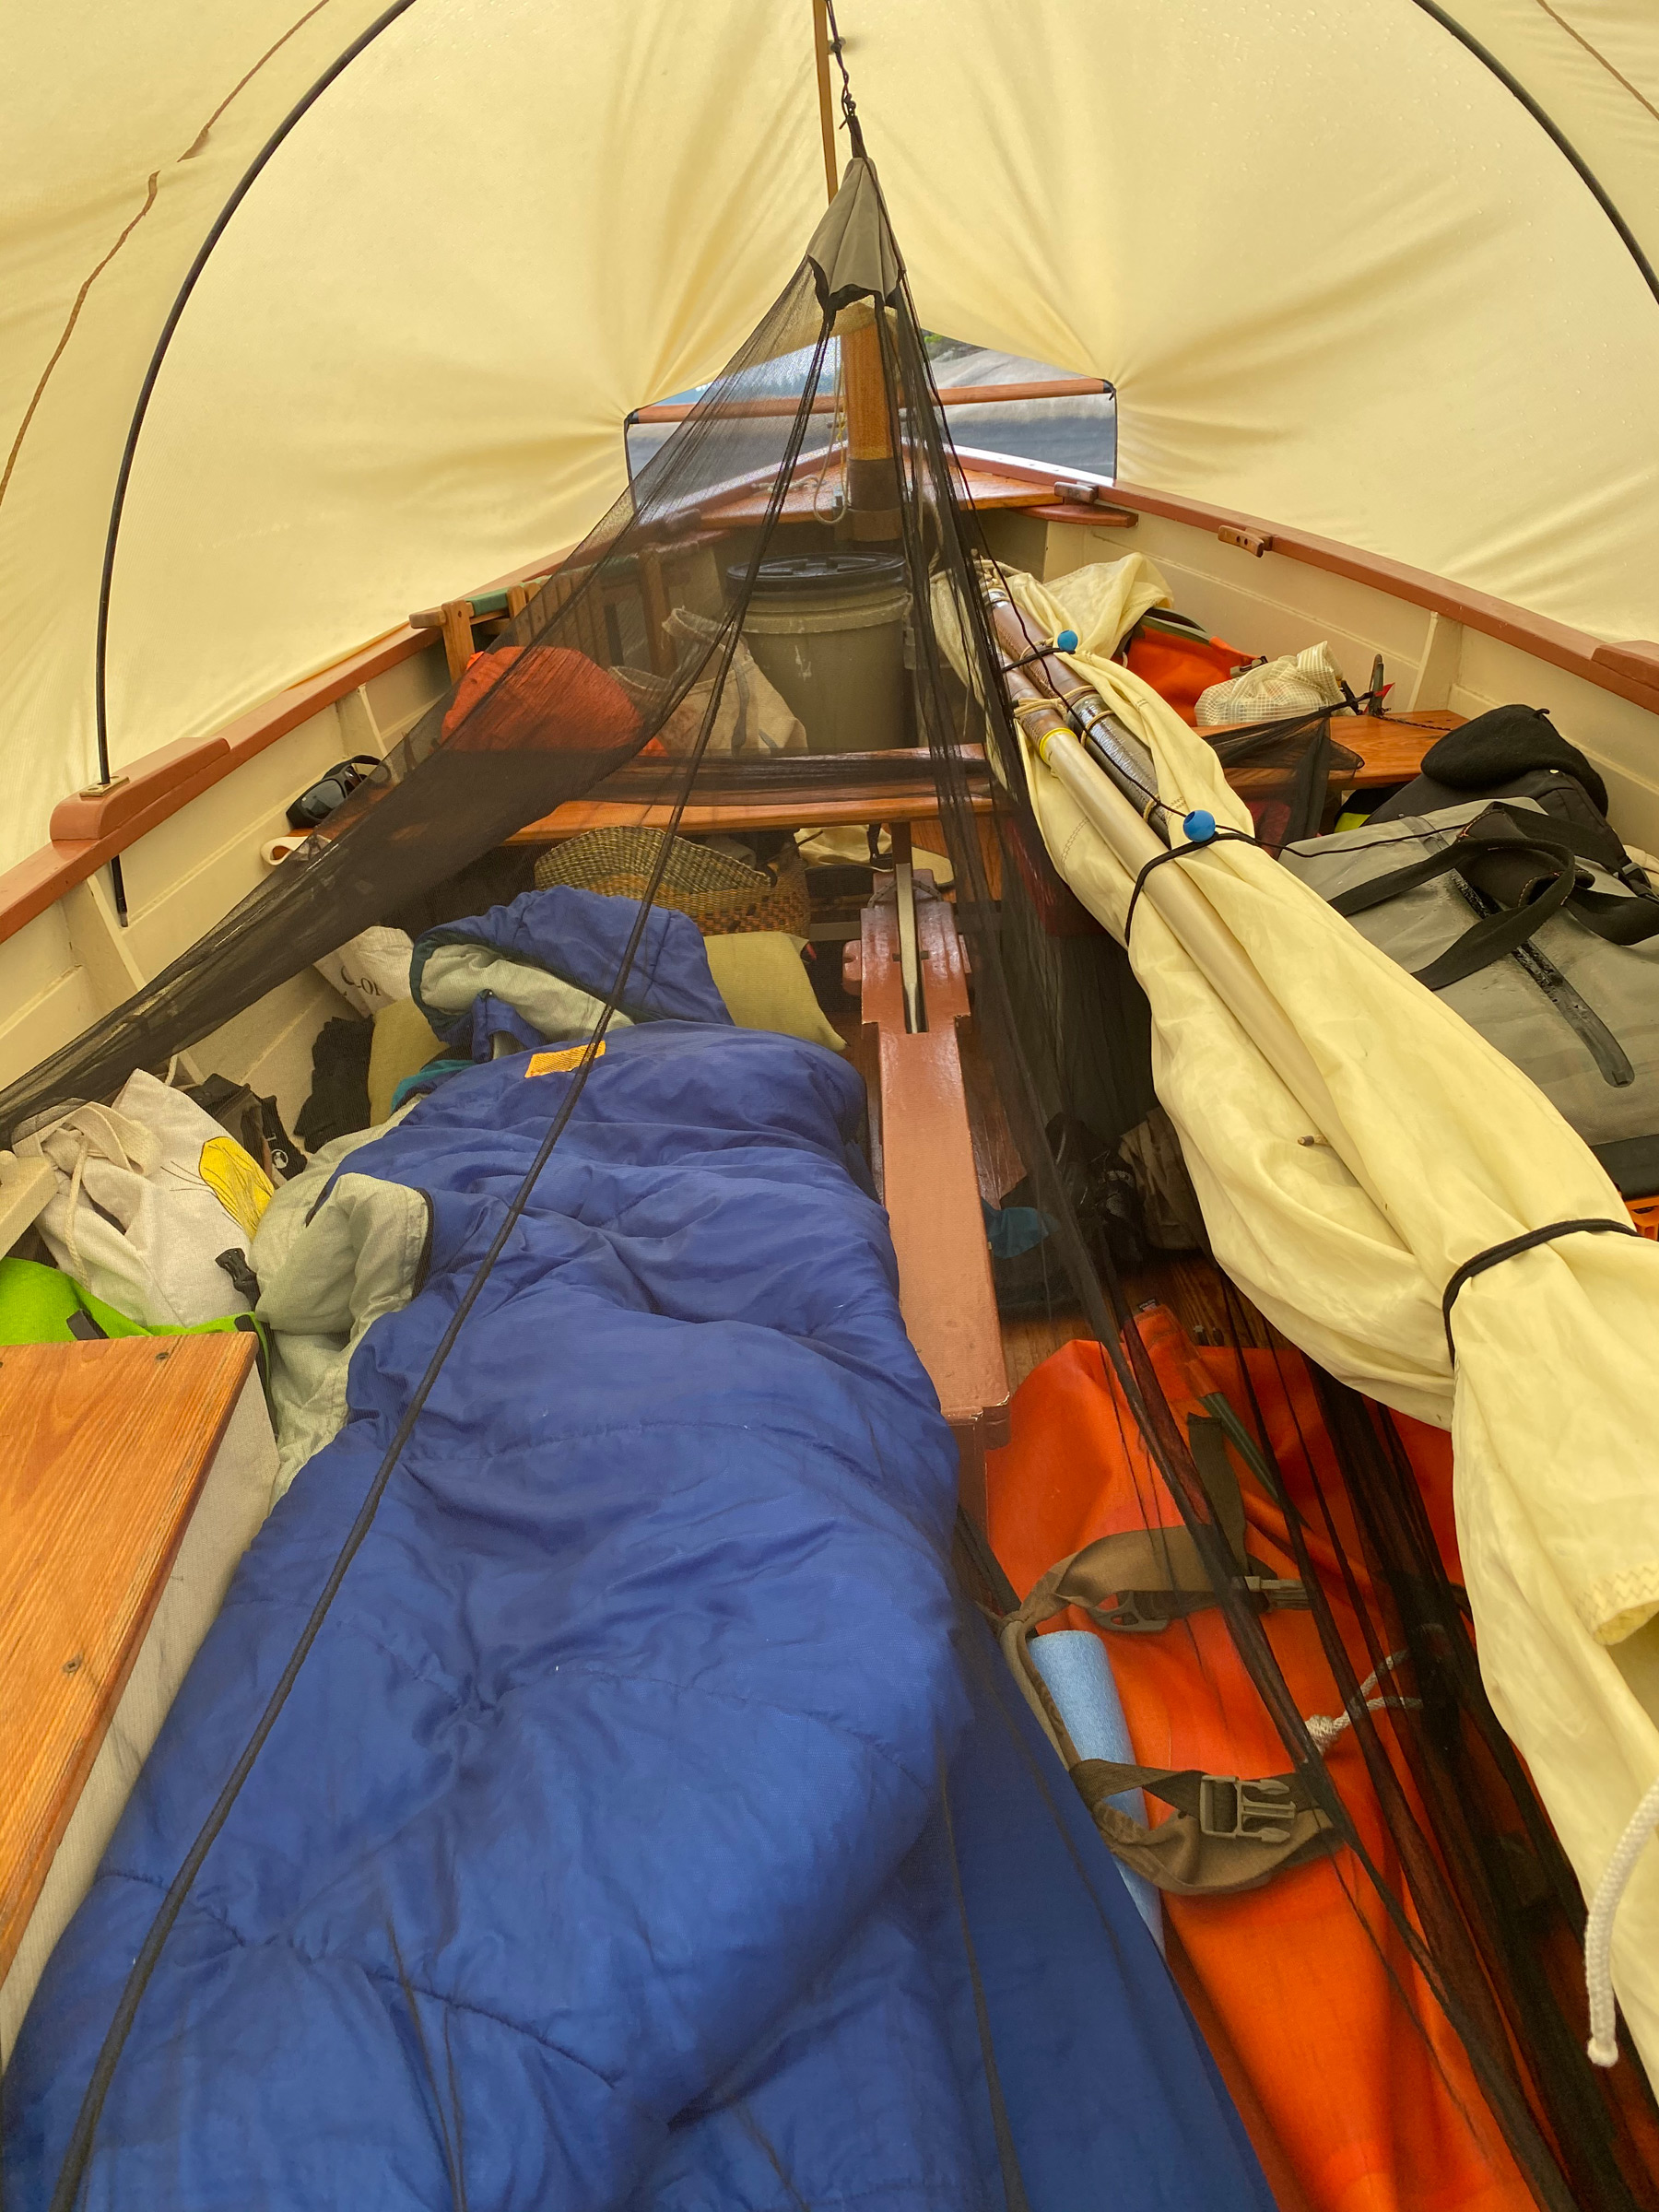
John Hartmann
The interior of WAXWING in camp mode is a crowded yet tidy arrangement with the wet gear and the sail bundle to starboard to keep clear of John’s sleeping quarters to port. A mosquito net helps ensure a good night’s sleep, uninterrupted by bugs.
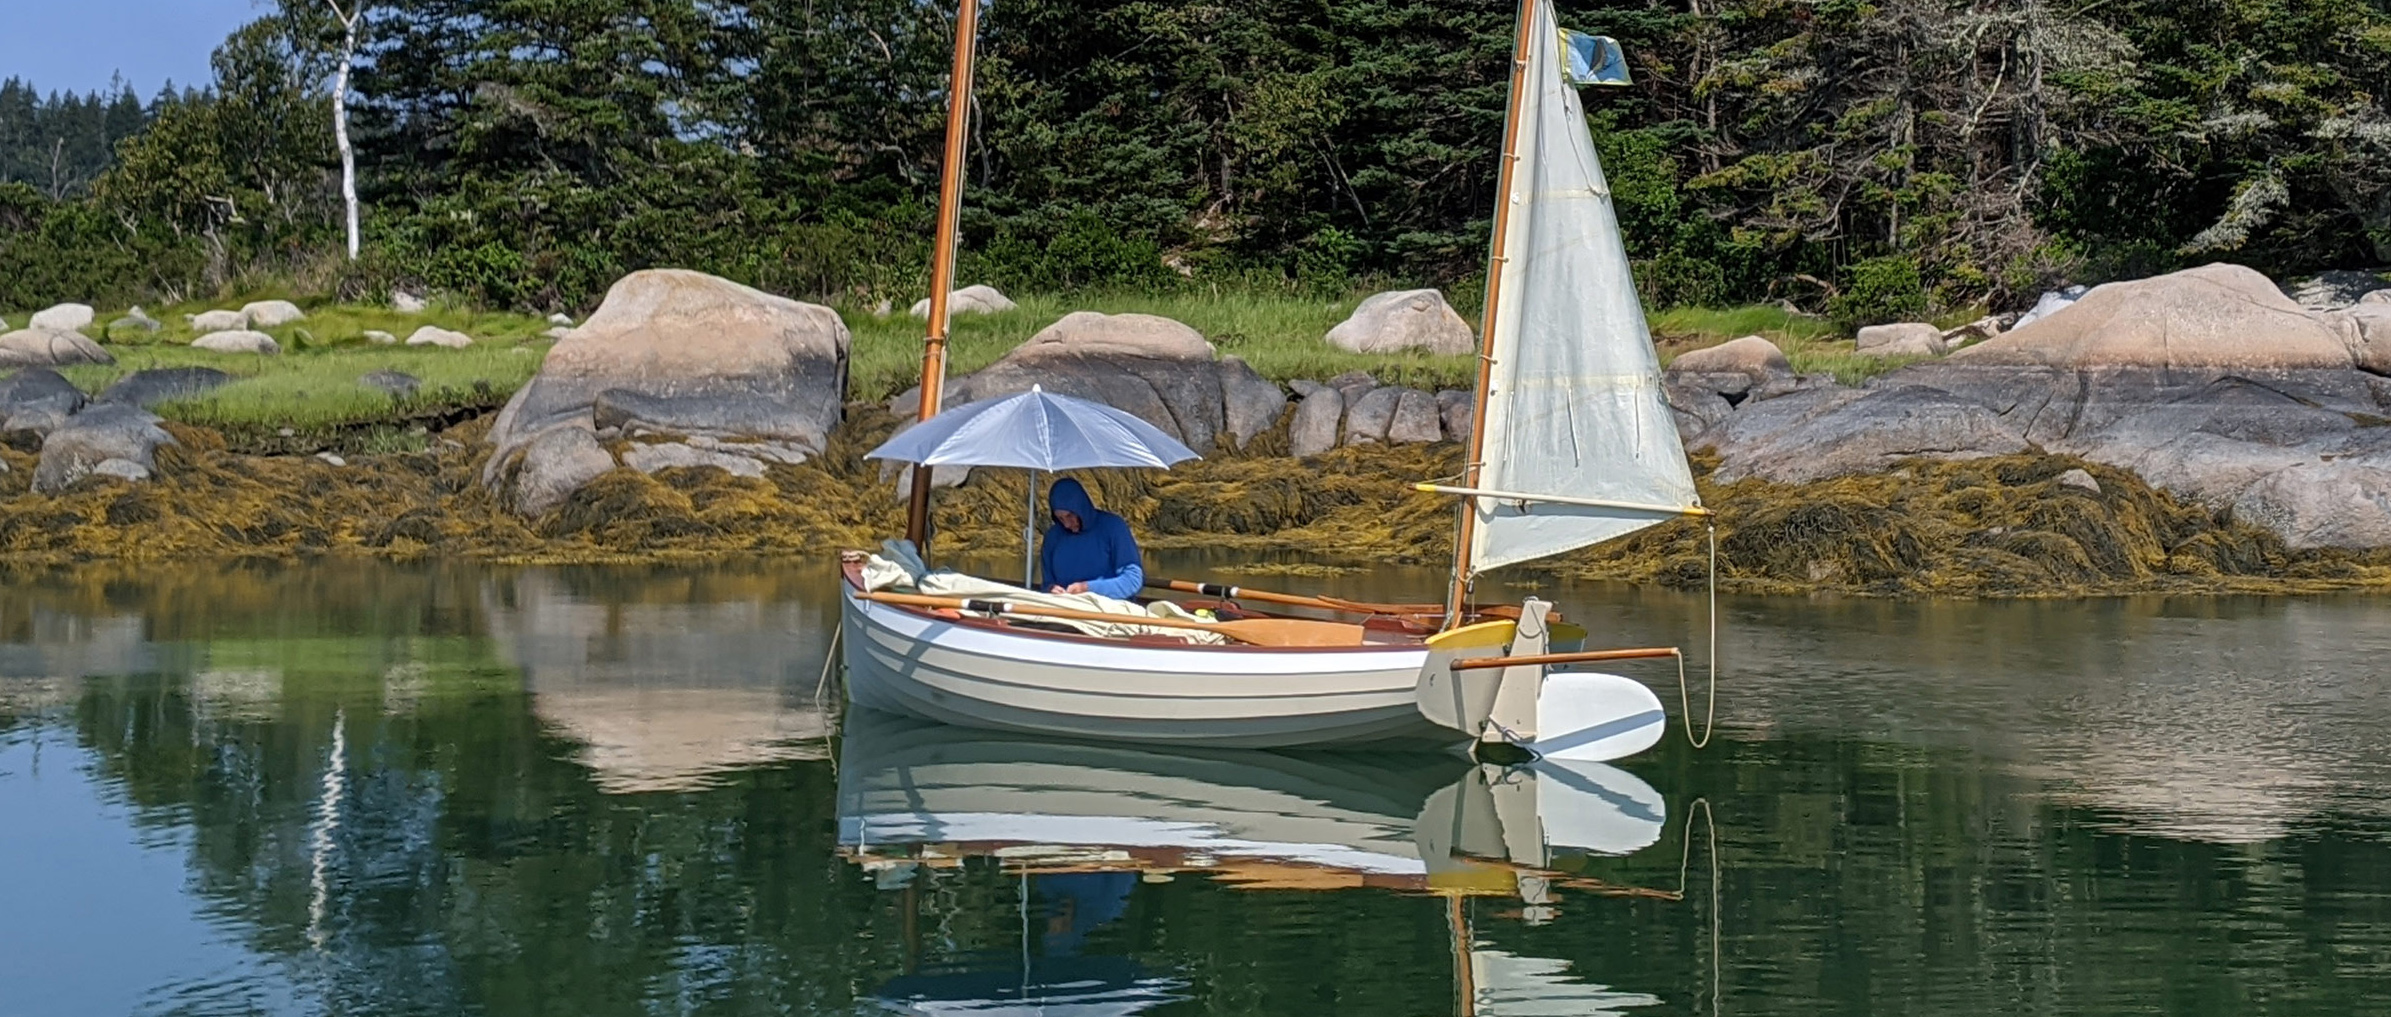
While we waited, I swam around seaweed-draped ledges and dried off in the brilliant sunshine while John puttered about WAXWING under his silver-colored sunshade umbrella. After an hour, the low sound of dashing water cascading out of The Basin faded. We donned our life jackets and rowed around the islet to the exit. We captured the last of the current and calmly zipped downhill out of the cove and back into Hurricane Sound.
Christophe Matson
The fog burned off as we waited for the tide to go slack so we could exit The Basin and start our circumnavigation of North Haven. John took refuge from UV rays under an easily deployed umbrella; I took advantage of the excellent swimming conditions.
In the Sound, we sailed north through Ledbetter Narrows, which are only 120 yards wide and brooded over by a two-story 19th-century farmhouse with brilliant white walls. A mile and a half beyond, we approached the Sugar Loaves, two conical, burnt-ochre towers of rock wispy with thin patches of faded, salt-burned grass and standing proud over the entrance of Fox Islands Thorofare. The wind continued to increase as the day warmed and, setting our sails wing-on-wing, we increased our speed. I sat in the bottom of MUSSELS and listened to the water chuckling on the lapstrake hull become a constant rush. Watercraft traffic started to pick up, with motorized pleasure craft outnumbering lobsterboats. As we came around the curve of the Thorofare, North Haven Harbor came into view.
John Hartmann
On a downwind run, MUSSELS made easy work of Fox Island Thorofare en route to the harbor at North Haven.
Cluttered with recreational and commercial boats alike, the village of North Haven seemed like a city. Zodiacs whined back and forth across the Thorofare, club sailboats were making sail, and larger boats making the east–west transit through the Havens were pushing rolling wakes. John and I stayed south from the main channel, held our tongues as one power cruiser steamed ahead in displacement trim and gave us a rocking, bantered with the sailors in the club sailboats, and soon left the harbor behind us with relief. On the east side of the Thorofare, the wind filled in from the east. We gradually sheeted in our sails until we were sailing upwind, tacking tightly around Widow Island, and headed southeast for Seal Bay, 2 miles away.
Christophe Matson
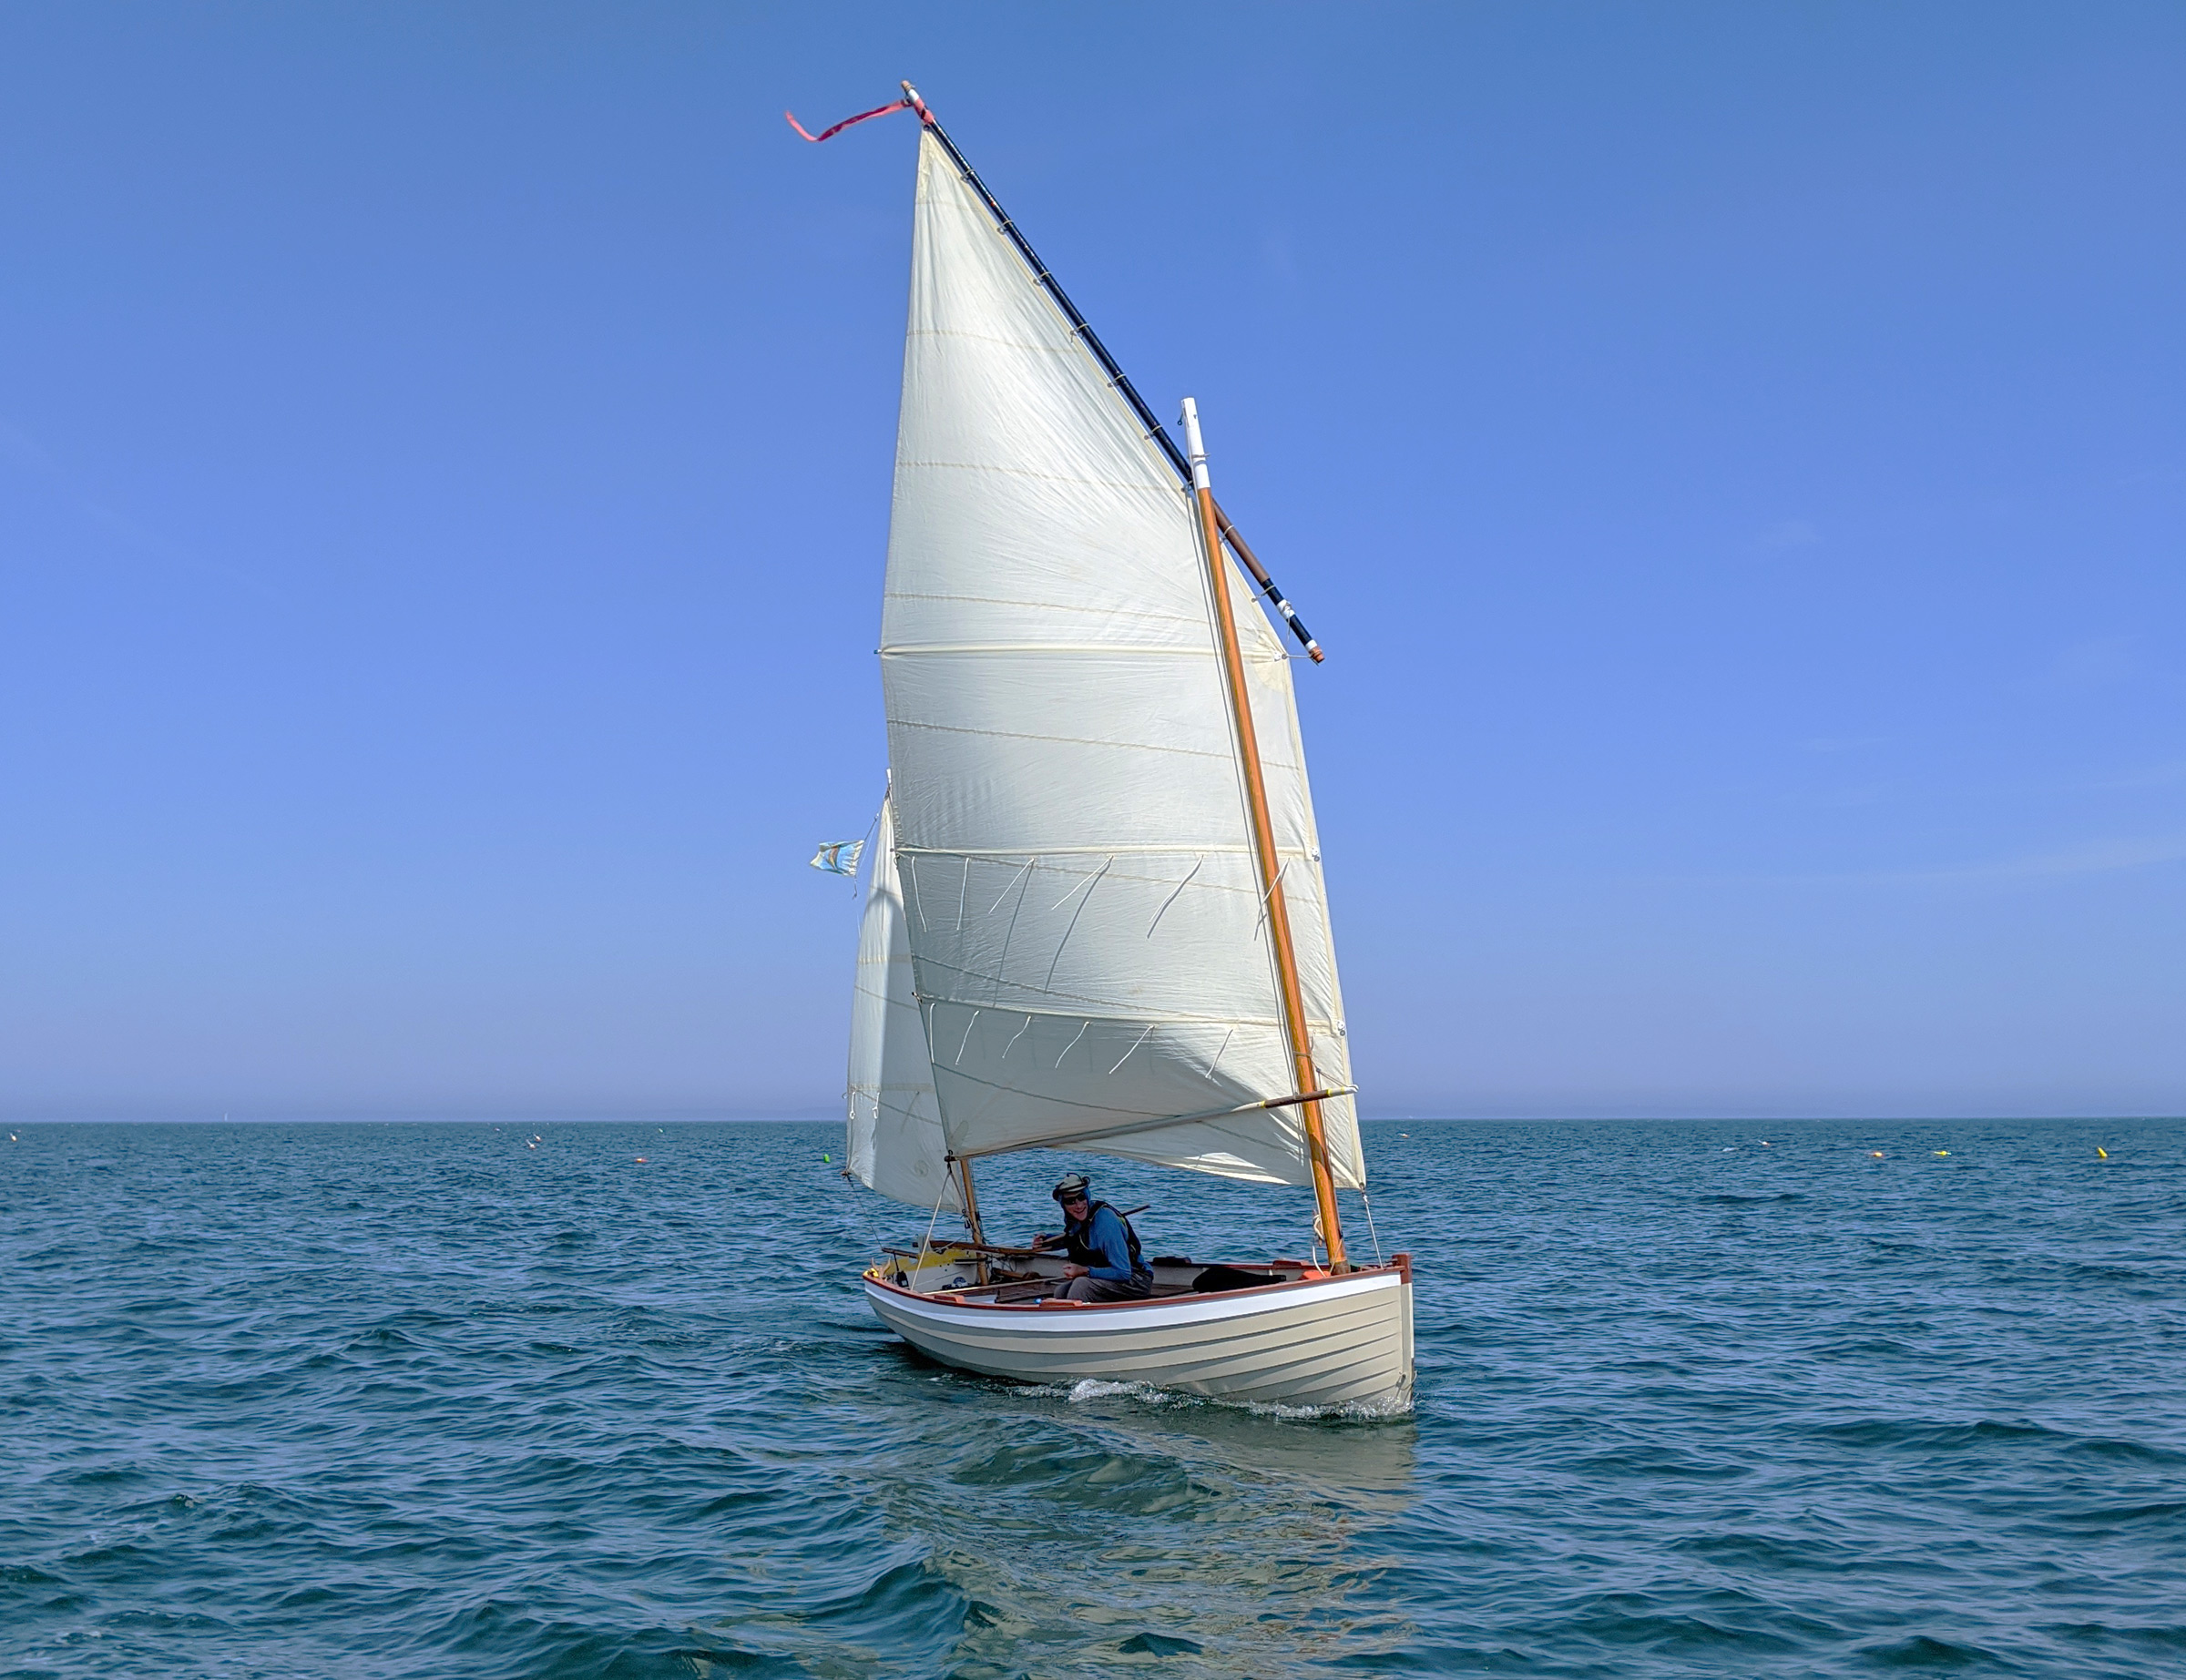
After our long ghosting through the east side of the Fox Island Thorofare, John and WAXWING sailed upwind toward Seal Bay in East Penobscot Bay in a welcome breeze.
Hen Islands, half a mile away, marked the east side of the only deepwater entrance into Seal Bay. Under full sail, MUSSELS’ gunwale was pressed against the surface of the water, but I decided to forgo reefing. John was behind me and an outboard skiff with a family aboard pulled alongside him. The two children clung to the sides of the skiff and watched John as he hiked out and clawed WAXWING upwind. Wings of gossamer spray erupted with every plunge of his bow into the water. The skipper of the skiff gave John a thumbs-up and peeled away toward North Haven.
It was now late afternoon, and the tide was almost high. A sandbar connects the small islands that make up the Little Hens, and in a pocket cove created by it we would be protected from the southerly and could stop for a much-needed snack. Every 10 minutes a sailboat or recreational trawler would enter Seal Bay through the deepwater entrance on the west side of Little Hen, all under power. In the midst of the traffic, John and I tacked back and forth along the channel attempting to make way to where we wanted to drop anchor. John was a few hundred yards behind me. On my last tack, I scraped around the boulder just north of the sandbar and pulled into the 100’-long anchorage. I dropped my anchor into the clear waters with the white shell bottom glowing brightly underneath.
The wind here was but a light touch on the cheek and the sun overcame whatever sea chill I had felt working to windward. I went for a quick swim, and John pulled in next to MUSSELS.
In a few hours, the place we had anchored would be all sand and mud flats and we wanted something less exposed and protected for the night. We decided on a nook on the east side of Davids Island, a third of a mile to the south. The shores of the island were steep, rocky, and backed by close stands of trees and the descending sun silhouetted the jagged profile of the forest. I sailed deeper into Seal Bay, and approached our anchorage from the south. Wing-on-wing she galloped north over the shallow mud bar that lay in the shadowed 30-yard-wide gap between Davids Island and Little Smith. John was waiting for me with cold beer in a well-protected anchorage ringed with tall sharp-tipped spruce trees that formed a wall around us. I set my anchor into 15’ of milky, jade-green water and caught the bottle that John lobbed from WAXWING. A dusky-blue wall of twilight rose up from the eastern horizon and night fell quickly. Through the dark, scattered gunshots and the staccato exhaust of ATVs somewhere in Vinalhaven’s backwoods rang out over the calm bay.
Up at dawn, we waited for the flood that would push us north. John was eager to show me Butter Island, a favorite location from his past journeys. It lay about 8 miles due north from our anchorage, and we were hoping for a good sea breeze to get us there, but after a tantalizing bit of sporty upwind sailing in 12 knots of breeze between Hen Island and the 20′-high cliffs of Bluff Head, the wind dropped to a whisper. We could still ghost along faster than we could row, so we settled down with towels draped over our legs and feet to protect them from the broiling sunlight.
The wind would fill the sails for a few minutes, fall away, then rise again. During a few of the moments of calm, I slipped over the rail to swim and escape the heat. Leaving MUSSELS to drift slowly, I dove down into the clear water stopping some 6′ from the surface to look up at the dark oval of my boat and the shimmering column of air bubbles I had trailed behind me. Over the course of three hours, in fits and starts, we made it to the pass between Fling Island—a ¼-mile-long oval of rock, meadows, and trees—and Eagle Island, its larger neighbor, ½ mile to the east. Finally, in the 1/2-mile-wide channel between Eagle and Butter islands, a steady breeze ruffled the water. At Butter’s southeast point, John and I were swept around The Nubble, a 50-yard-wide dome of pale granite rimmed with dark seaweed that looked like a medieval monk’s tonsure. We turned north into a cove sheltered by The Nubble and nudged the stems onto a ¼-mile-long crescent sandy beach studded with cobbles.
Butter is privately owned and to camp on the island requires permission, which we had not obtained; our plan was to spend the night at anchor just off the beach. Within minutes of our arrival we heard the soft sputter of an ATV in the woods lining the beach. A lanky man in a well-worn button-up shirt and sun hat strolled out from between the trees and introduced himself as the island steward. We asked if we could leave our boats on the high-tide line and sleep in them. He appreciated that we knew permission was required and granted our request. With that taken care of, he asked to take a look at our boats.
Christophe Matson
Looking south from the top of Monserrat Hill on Butter Island, John and I could see Eagle Island in the middle distance, Deer Isle on the horizon to the left, and, directly below, The Nubble and the beach where we anchored the boats, barely visible here. The expansive view was an abrupt shift from the previous three days of seeing everything from sea level.
We had two hours to high tide, so we set the boats on their anchors and then walked a soft, pine-needle-strewn island trail to Monserrat Hill, a 150′-tall, treeless point in the midst of golden grasslands dotted with low, gnarled shrubs. From the summit there was a commanding view over East Penobscot Bay. The undulating terrain of the islands filled Penobscot Bay to the west, with the Camden Hills poking out over the last wooded ridge. To the southeast, the 500′ summits of Isle au Haut were barely peeking over the top of Eagle Island, and North Haven was a wide, black band on the southern horizon. In the east, Deer Isle with its many coves lay its undulating flank open to us. At sea level, we had been focused on navigating from landing to lobster pot, cove to cliff, rock to bay, but here we were surrounded by sweeping perspectives of a coast studded with island jewels.
There is a memorial bench— a thick, curved slab of polished granite—dedicated to Thomas and Virginia Cabot, who bought the island in the 1940s to keep it available for public use. A bronze plaque, recessed in bare bedrock, bore a poem written by Thomas: “…I bid you sit and rest a bit, to count your share in worldly care…” Beyond the plaque, far below us, our two boats, tiny in the distance, lay at anchor, protected by The Nubble. After taking in the views, John and I headed down the trail to secure them on the high-tide line.
In the thick of the night, scattered lights glittered from between the trees on Deer Isle, 2 miles away across the bay, while the Milky Way carpeted the sky. I slept covered by my mosquito netting, without a fly cover, and through brief moments of wakefulness noted the drift of constellations across the sky. At some point deep in the night, I woke to a pair of voices, one high, one low, coming from what seemed miles away, singing an ethereal song that merged with the gentle lapping of the water on the cobbles. Hours later, when the sun rose blazing over Deer Isle, warming my face, I remembered nothing but fragments of a tune whispered on the breeze.
John Hartmann
John and I both deployed our beaching legs for the overnight stay on Butter Island. I decided to forgo the tent fly and only used my mosquito net. At sunrise, we woke to a rising tide.
John and I readied the boats to get underway and departed the beach on Butter Island for the longest leg of the journey—the 13 miles back to Hurricane Sound and the entrance to The Basin. This would complete the circumnavigation of North Haven and put us back in a comfortable anchorage for the night. There was a fresh morning breeze between Eagle and Butter islands, and we skimmed off on a broad reach for Sloop Island, a touch over 2 miles away. Low-slung and wave-swept with a pocket stone beach on the east side, Sloop, little more than a chain of three grass-topped rock outcroppings, appeared to be an inviting place for lunch on a nice day, but not much else, so we skirted around the island’s south end. We took a bearing for Webster Head, a tall prominence on the northern point of North Haven and at that moment, the wind died completely, and the water flattened as if suddenly gelled. We stowed our rigs and rowed for North Haven and continued southwest down its coast, a series of unremarkable nameless points that left us wondering how far we had come and how far we had to go. Granite-gray beaches, all about ¼-mile long, were divided by blunt angles of layered rocks capped by broken stretches of forest 10’ up. Every few hundred yards we would get a brief glimpse between the trees of a solitary house before it would disappear, and another would show itself.
Eight miles and two hours after leaving Sloop, we arrived at a 1/8-mile gap in the shoreline, the entrance to Pulpit Harbor. We paused by Pulpit Rock, a 15′-tall, guano-streaked, lava-black crag guarding the harbor’s entrance, and discussed the prospect of lunch. The harbor looked enticing, with the sun playing on the water between lobsterboats and pleasure craft, but we decided to press on another 2 miles to Bartlett Harbor. The passage went a bit faster with a current now pushing us along, and landmarks were easier to identify— distinctive headlands and, cupped between them, beaches in various sizes and shapes that were easily matched to the chart. At Bartlett’s oblique, 1/4-mile-wide entrance, I came around a rocky spit that lay uncovered by the low tide and anchored in tight alongside a solitary column of stone that lay just under the surface. I noticed other interesting rock formations in the clear water and took the opportunity to snorkel a bit.
I slipped over the side of MUSSELS and found some skittish ruddy-brown Jonah crabs, a multitude of urchins, and, between rock walls, a few canyons just wide enough to swim through. After my brief explorations and my teeth beginning to chatter; I pulled back over the gunwale.
John had started to row his way out of the harbor and around the corner. As I took a few minutes to set things straight in my boat, I noticed that the tide had come up a fair bit and MUSSELS had swung closer to the reef. She was now over the ledge that I had laid her next to. A swell started to enter the harbor around the point and the boat began to heave up and down. The rudder, which had its blade kicked up, landed heavily on the rock column, which was now directly underneath the stern. I made my way forward to take in the rode and pull MUSSELS away, but I was too late; the rudder came sliding up out of the gudgeons and flopped over into the water. I stepped back to the stern to retrieve it, and fortunately the haul-up line was still cleated to the boat so the rudder didn’t wander off. The long tiller extension was awkwardly wrapped under the port side of the boat and pinned between the skeg and the reef; I needed to get out of the boat to extricate it. I stepped carefully over the starboard side onto the narrow ledge and wrestled with the heavy rudder’s long and awkward appendage. I noticed that the nylon bushing that fits in the gudgeon was at my feet, in thigh-deep water. Without it, the rudder can bind and, while I had spares in my tool kit, I didn’t want to get back into the boat for a replacement bushing and leave the rudder afloat and unattended. The swells continued to increase and with one hand fending off the boat, I dropped the rudder and attempted to dive between my knees for the bushing, but the boat came at me and her boomkin swept me into the deeper water behind me. I grabbed at the gunwale to keep myself from plunging down between rock walls and planting my bare feet on those sea urchins lurking below. MUSSELS swung back into the harbor and I landed again on the rocky perch. I gave the boat a good push outward and grabbed for the bushing while simultaneously making a wild grab for the rudder. Successful, all that remained now was to hold the bushing in place, precisely align the two pintles to the gudgeons and install the rudder, all the while furiously tap-dancing to save my feet from the skeg, which repeatedly slammed down on the rock. I leaned against the boomkin to keep MUSSELS held off, secured my feet, and then lifted the rudder to vertical. The pintles dropped into both gudgeons simultaneously, an incredible stroke of good luck. I clambered into the boat and rushed to the bow to pull MUSSELS forward before we could be forced to go through the entire act a second time. I energetically rowed away from the spit and as I came around the corner, I saw WAXWING. John, with a look of exasperation on his face, was gesturing with upward palms. We rowed on.
Two miles later we rounded Stand-In Point at the southwest end of North Haven and faced a daunting 1-1/2-mile crossing of Fox Islands Thorofare before we could get back to Ledbetter Narrows and Hurricane Sound. The Thorofare, a 7-mile east–west passage between North Haven and Vinalhaven, was congested with ferries, commercial boats, barges, and pleasure craft and the water was tumultuous with their wakes. The wind, finally appearing, was rising from the southwest at a paltry 5 to 8 knots. We raised sail and started our march across the Thorofare. The chaotic waves slammed the spars against the masts and did little to help our forward progress. John mixed in a combination of sailing and rowing, dropping and raising his rig. I had slightly more success sailing, keeping my sail lightly tensioned and using my body weight to heel MUSSELS to leeward so the weight of the spars could keep the sail from slatting. Slowly and painfully, we made it behind Dogfish Island and from there, with the wind suddenly nonexistent, we rowed into Hurricane Sound and made for Ram Island just outside the entrance to The Basin.
We could hear the dull rumble of water surging into The Basin—high tide was still a few hours away. We did not have the energy or focus to attempt to challenge the strong current, so we anchored in a 70’-wide cove between Ram and the spruce-tipped islet to its west. The holding ground was good and the bar that develops at low tide would protect us from swells that can come in from the south.
Christophe Matson
At the end of our longest day—from Butter Island to Ram—John curled up with a drink on the warm ledge and checked the next day’s weather forecast. We were both spent and not up for anything but taking it easy.
John and I, exhausted by the rowing and rough crossing, climbed wearily onto the smooth, beige slabs of rock that ring the island and soaked in the warmth of the sunlight radiating from the stone. We cooked dinner together, a mix of Indian food and rice from a bag, and listened to the forecast for the following day. It called for light winds, not enough to assure an easy passage back to Rockland, and neither of us relished the idea of rowing the 11 miles, most of it an open-water passage, back to the mainland. We decided that we would wake early and ride the flood current into The Basin and take a day off, before sailing back to Rockland.
The next morning arrived bright and clear as we rowed effortlessly into The Basin at the end of the flood. Surprisingly, there was some nice early-morning wind inside the cove, and we raised sails and scooted around the islands on perfectly flat water. I looped some lazy-eights between two islands and then found a suitable anchorage between a ledge-lined island with round boulders scattered around it and islets that would be joined at low tide with jagged rocks. I dropped the hook in 20′ of water and choked the rode tight so MUSSELS wouldn’t swing too far and get high-sided when the tide went out. I made coffee and watched John in WAXWING poke around the cluster of islets and through narrow slots, cutting through the sun-speckled water.
John Hartmann
Before heading back home, we spent a long day relaxing back in The Basin. John set up WAXWING’s cockpit with a break-apart camp chair and an umbrella for a cozy reading nook and spent the day lounging.
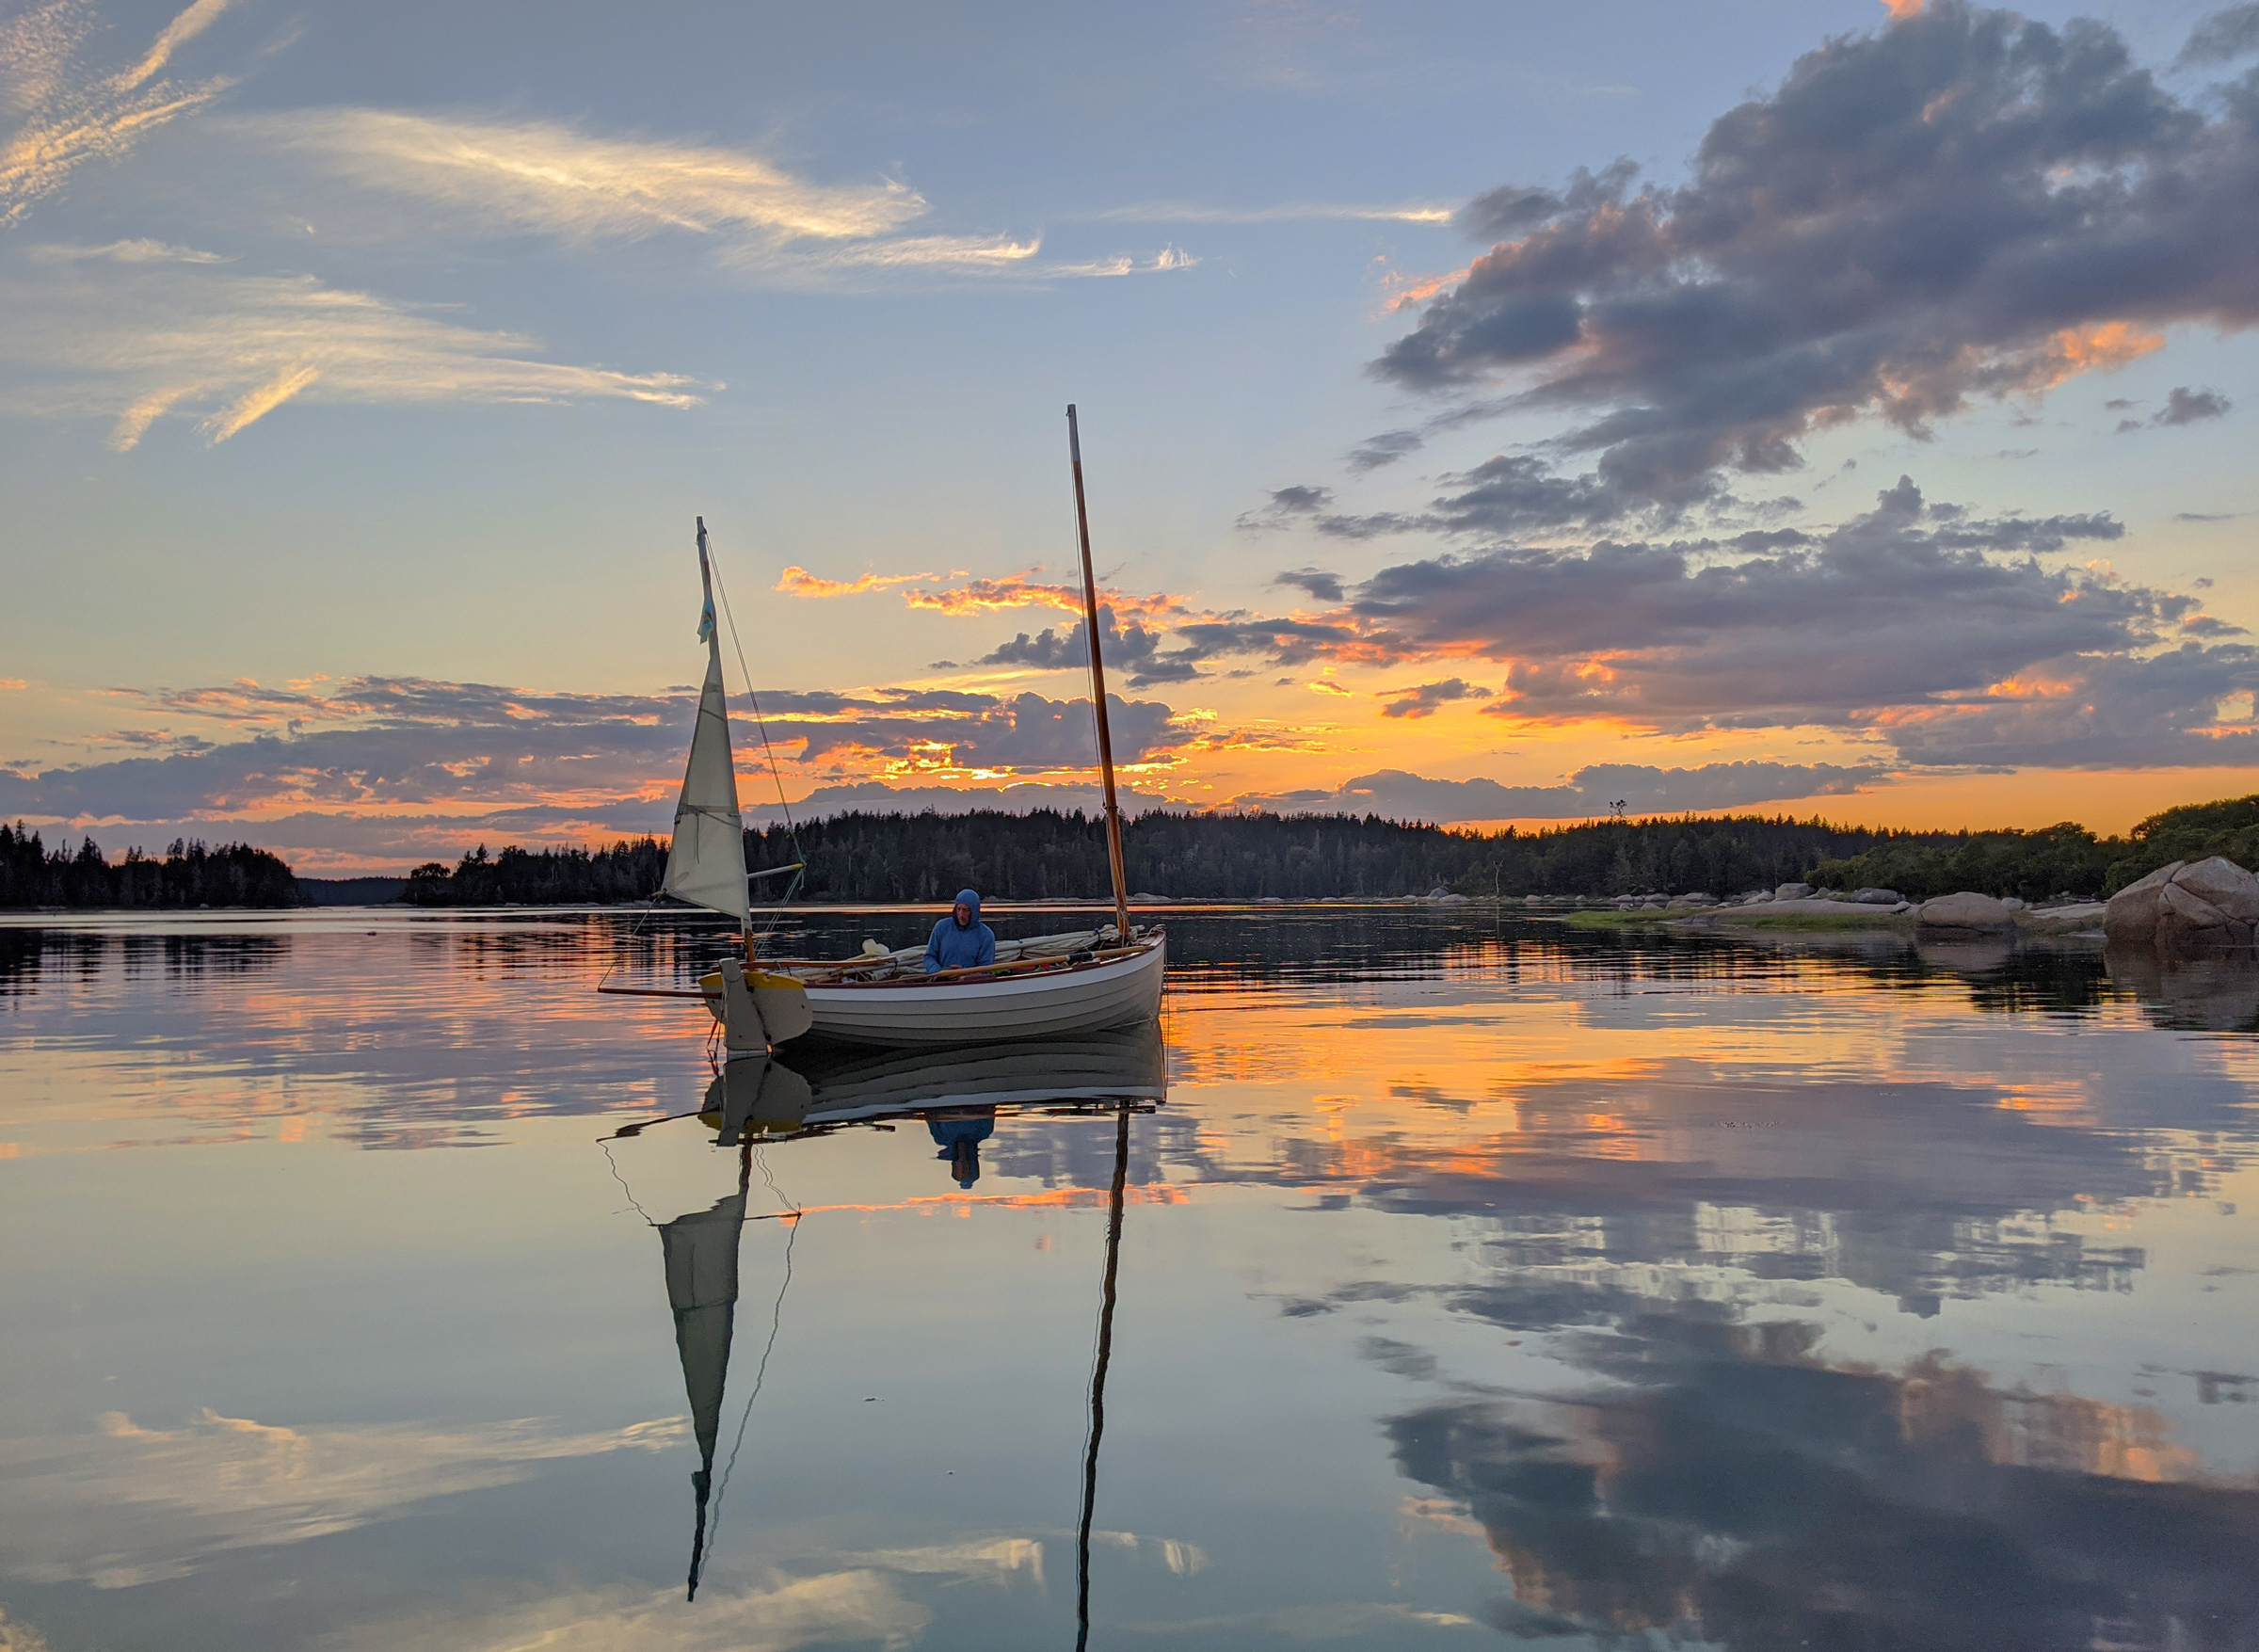
Soon, John dropped anchor nearby and settled into his morning routine. It was only 10 a.m. We idled away the day reading, sleeping, and swimming. John made some very welcome gin-and-tonics in the afternoon and we watched the sunset turn the ripple of clouds above our heads into brilliant gold and crimson that was reflected in the water around our boats.
Christophe Matson
WAXWING hovered in the reflection of a brilliant sunset before our return home the next day. That night brought overcast skies and hard wind from the east.
During the night a sudden wall of wind from the east hit our boats. It was an uncommon direction and MUSSELS strained at her rode. I got up and let out a few extra feet of scope. The stars were gone, masked by an overcast sky. My bunk, laid high across the thwarts, left me exposed to the wind and, wrapped in my sleeping bag, I felt it buffeting my face. I dragged my pad and bag into the bottom of the boat and contorted myself between the centerboard trunk and side-bench uprights. There I uncomfortably waited for the gray dawn.
When we had enough light, John and I moved rapidly to get to the entrance of The Basin for the end of the ebb. As it was, The Basin was already emptying far faster than it had been at any previous time we’d seen it during our trip. We cautiously entered the northern branch of the exit, and as we drew closer to the current speeding toward the outcrop in the middle of the gap, we deployed our anchors. The boats quickly took up the slack and hung tight to their rodes. We studied the way the water curled around the outcrop and John, once a river guide in times long gone, took careful notice of where the water raised and dipped, where the eddies were located, where the traps could be, and where we should enter the main flow. He detailed the strategy to get our boats through safely: we would enter high using the eddy just east of the islet to draw us south to the main flow, taking care to stay in the central portion of the flow and not get drawn into the eddies along the sides or behind the boulder. John went first, taking hard strokes, pausing, then swinging upstream. He pulled for the main current. WAXWING shot bow first into the gap, descended the sluice, and in an instant disappeared behind the islet. I cinched my life jacket tight and pulled MUSSELS into John’s route. The large eddy played with the retracted rudder, and the tiller pulled and pushed me while I fought to compensate as the bow was forcefully drawn toward the exit. I threw myself into the oars to enter the main channel bow first and watched The Basin disappear astern behind the closing gates of rocks and trees. MUSSELS was swept down the rapid and shoved out into Hurricane Sound.
We pulled for a quarter of a mile into less turbulent water and raised sails. MUSSELS spread her wings with a velvety pop and we ran downwind across Hurricane Sound, around Ledbetter Island, through the Lawry Narrows, and out into the open water of Penobscot Bay. I aimed the bow toward a tiny block on the mainland horizon—a concrete grain tower marking the ramp on Rockland’s waterfront. To the east, Vinalhaven receded into a dark streak on the horizon under a rolling charcoal sky.
Christophe Matson lives in New Hampshire. At a very young age he disobeyed his father and rowed the neighbor’s Dyer Dhow across the Connecticut River to the strange new lands on the other side. Ever since he has been hooked on the idea that a small boat offers the most freedom.
If you have an interesting story to tell about your adventures with a small boat, please email us a brief outline and a few photos.
I had never thought that stropping a newly sharpened edge on a cutting tool did much. A few swipes back and forth on a piece of leather would break off the tiny burr left by the stone and that was about it. I knew that when barbers used straight razors they stropped the blade before giving a customer a shave, but didn’t take the hint that stropping is the key to a truly sharp edge.
Leather, I’ve learned, contains silicates—mineral cousins to the silicates in garnet sandpaper—which serve as an abrasive for honing metal. Horsehide has a higher concentration of silicates than cowhide and was the material favored for straight-razor strops. The steel edge of a straight razor is so fine that shaving can distort it and a strop works not only by wearing away a bit of metal, but also by pressing wobbles straight and burnishing thick and thin areas to make the edge uniform again.
The blades of woodworking tools are sturdier and need the help of stropping compounds added to the leather to speed sharpening. Some of these abrasives come in wax bars with different grits, each with a different color. Two of the most common compounds are white—aluminum oxide, comparable to a 2,000-grit stone—and green—chromium oxide, comparable to 6,000 grit.
Photographs by the author
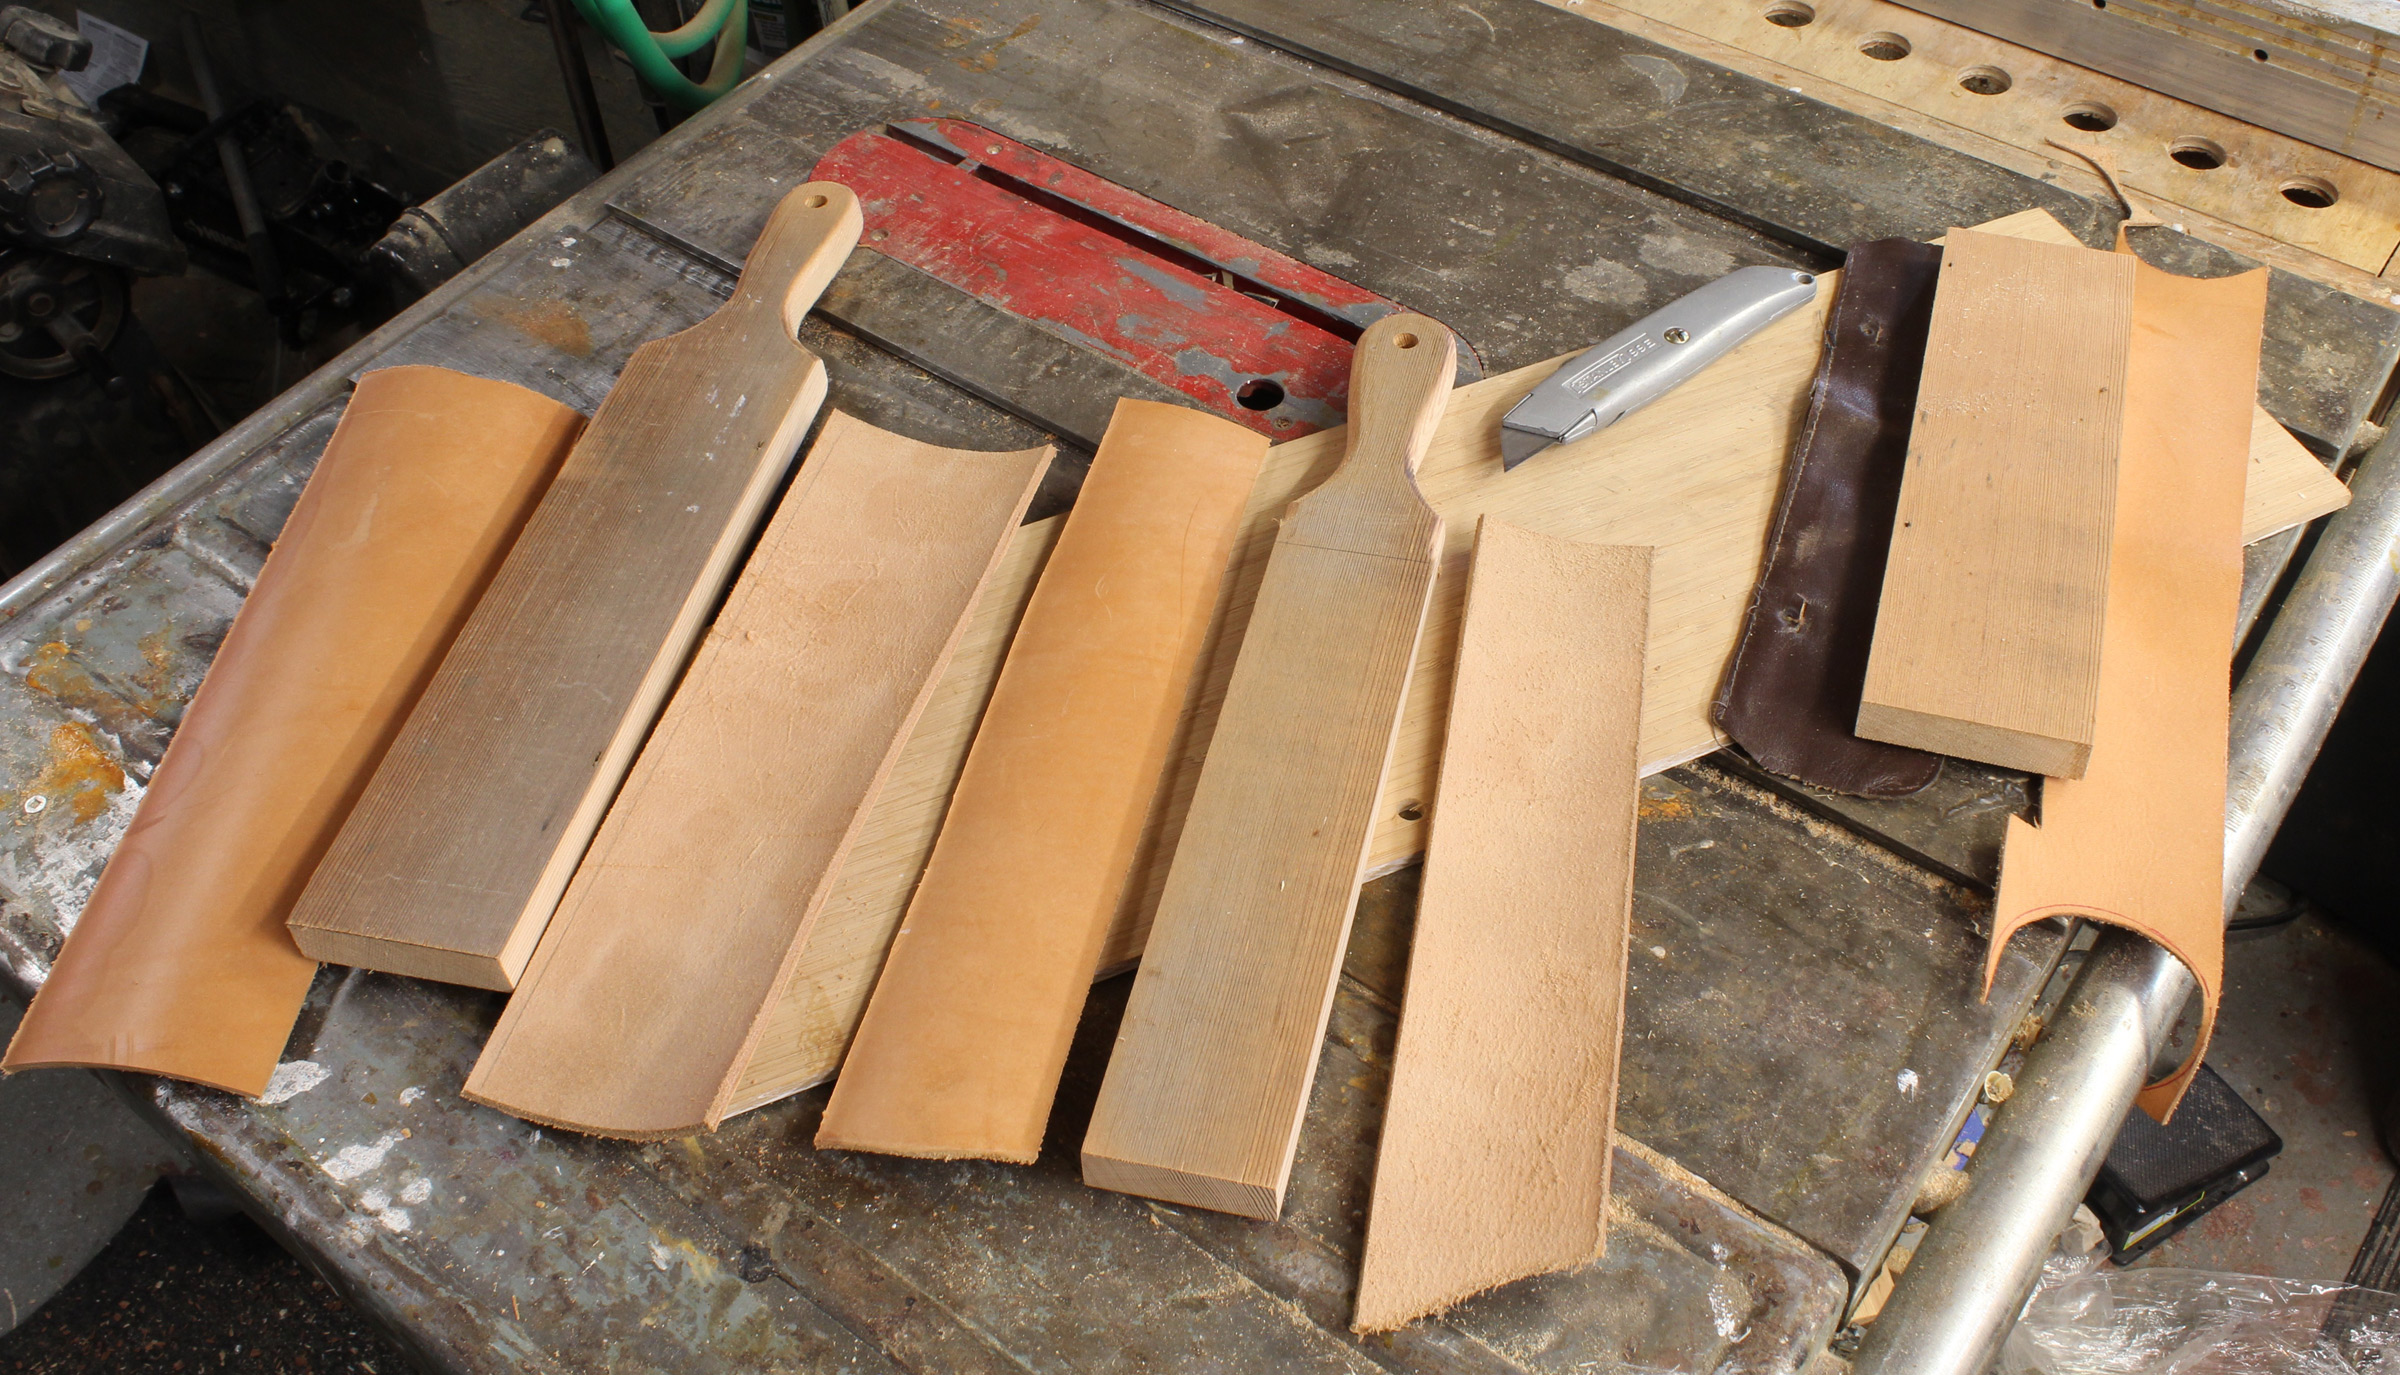
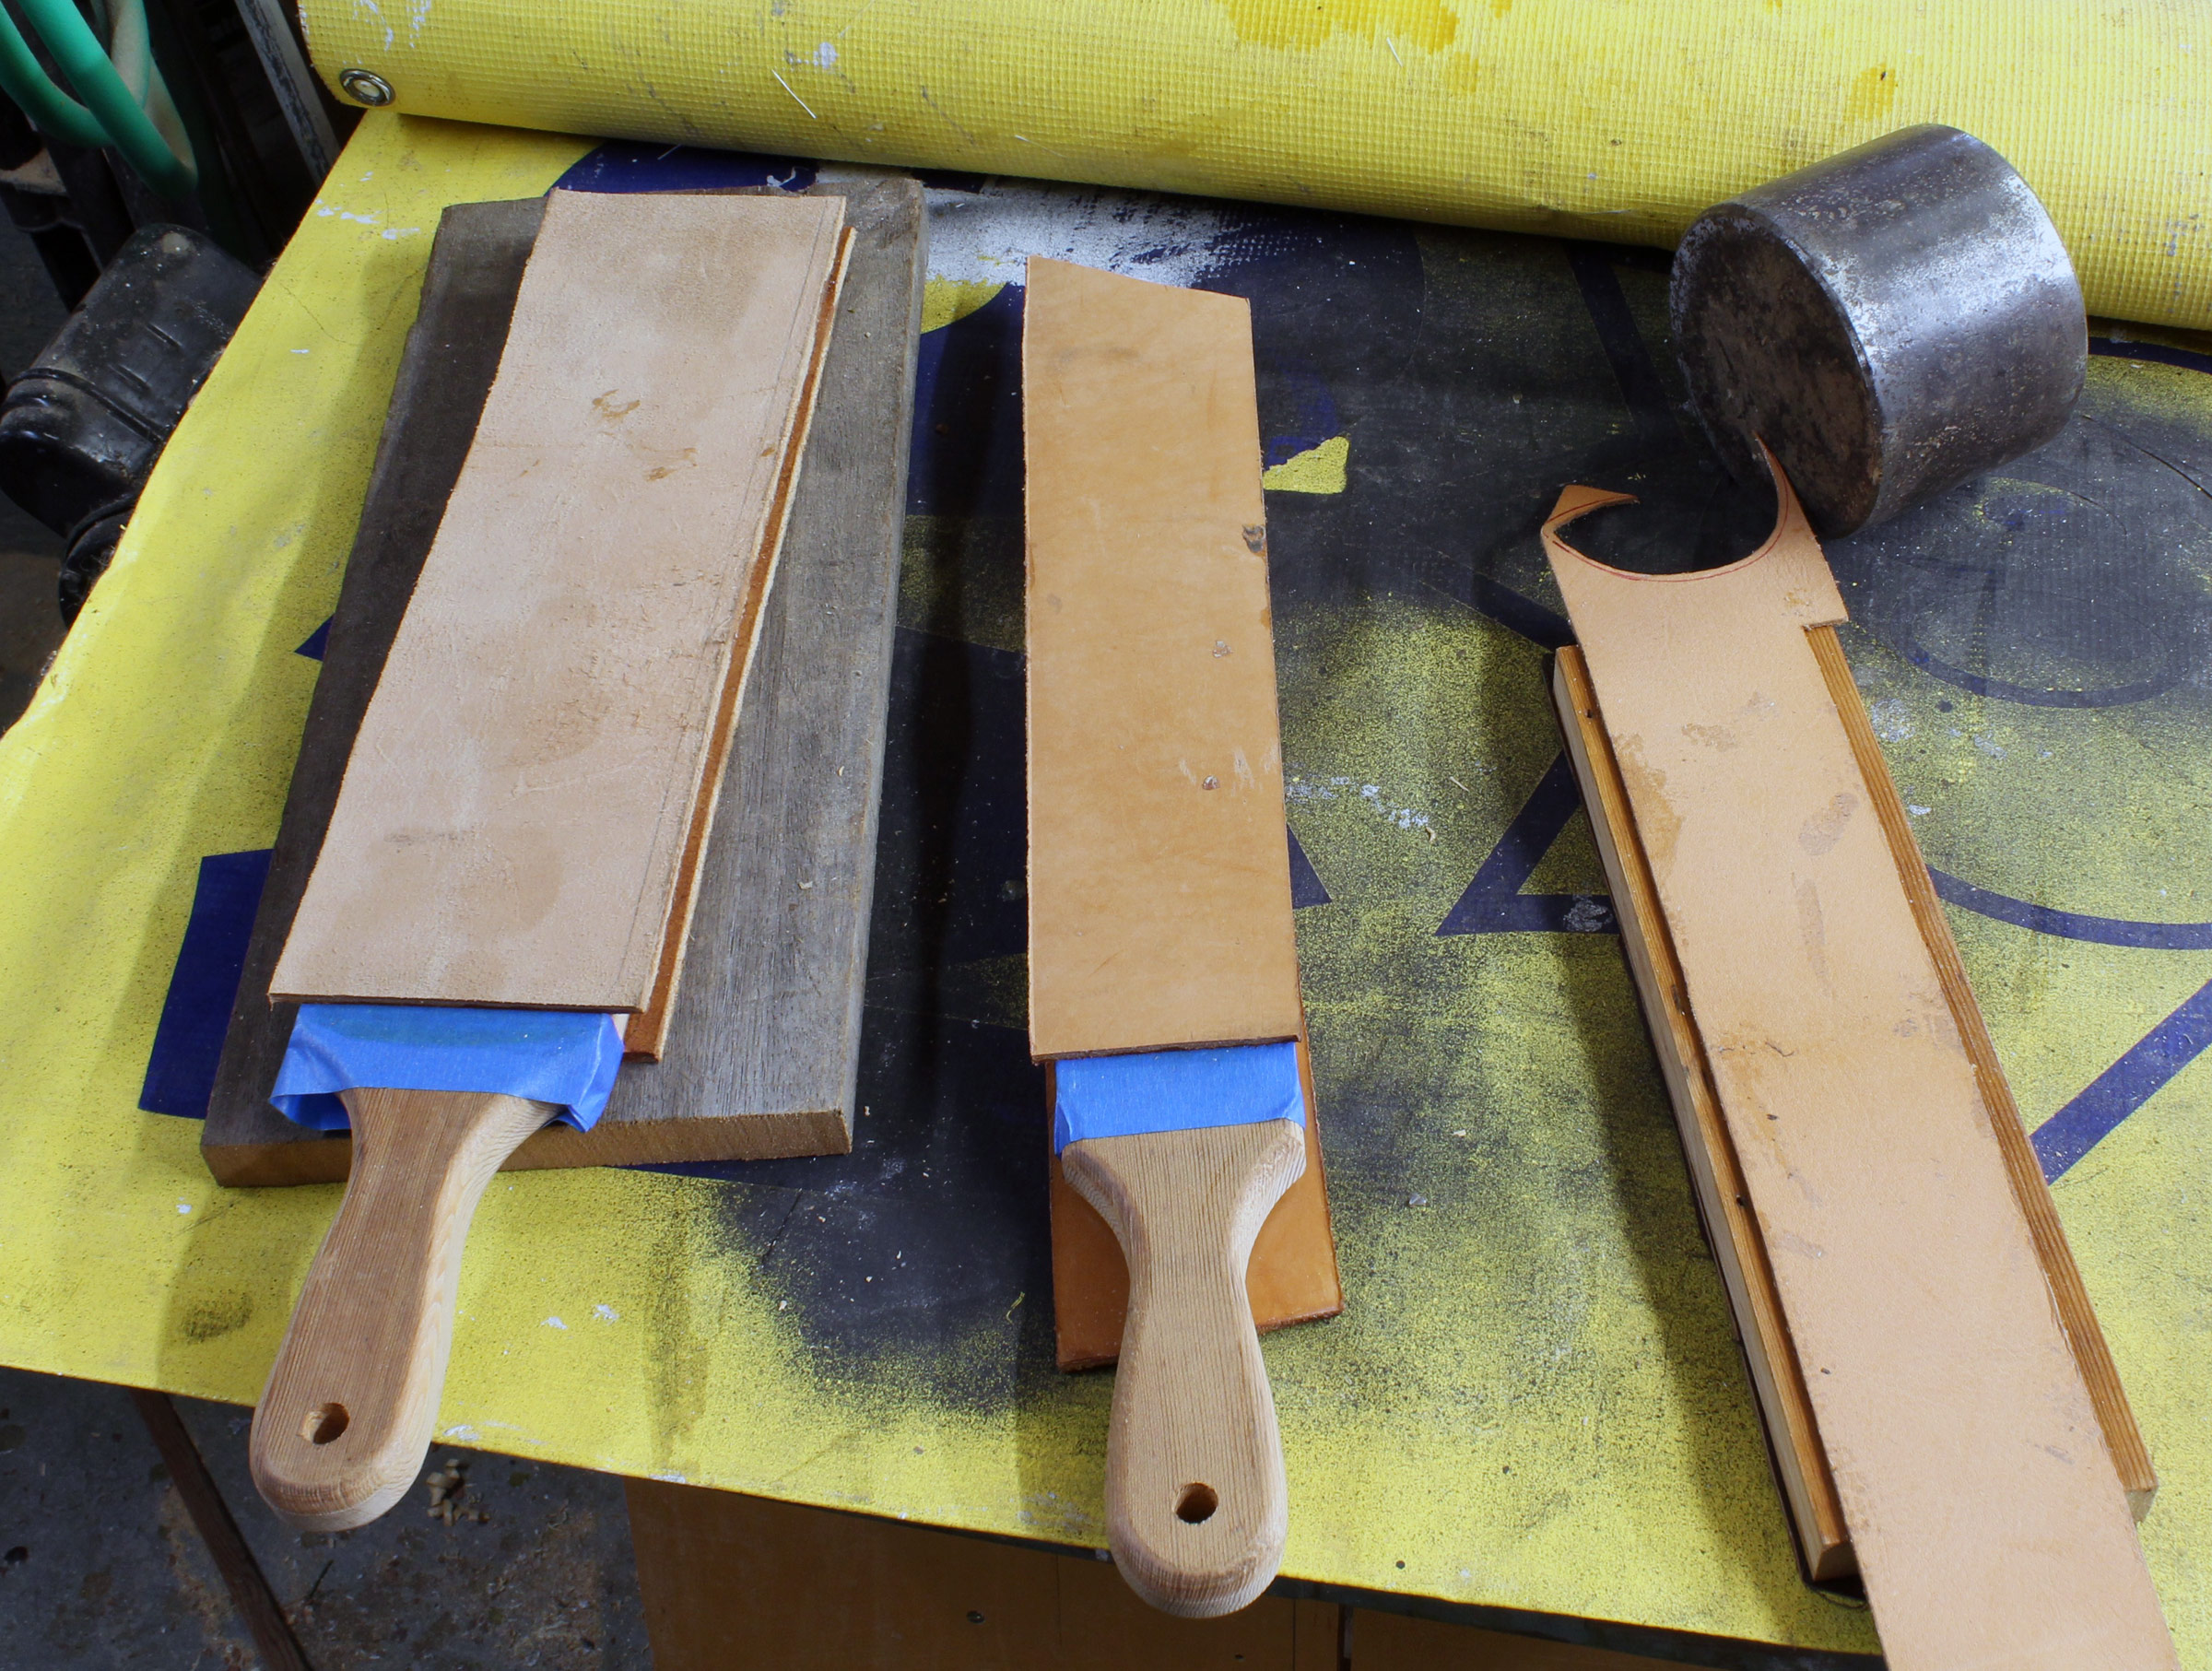
Each strop gets two pieces of leather with one side flesh side out and the other grain side out.
The strops used for woodworking tools are not loose straps like the barbers use, but stiff leather mounted on wood blocks, usually with one side having the finished surface (grain side) out, the other side with the rough surface (flesh side) out. Vegetable-tanned leather is often favored for strops because it has a high concentration of silicates, but any stiff leather will work when stropping compounds are used. If you have any latigo left over from putting leathers on your oars, it will work well as a strop. I had a roll of stiff 1/8″-thick vegetable-tanned leather—bought at a thrift store—and used it to make a few strops. For the blocks to support the leather I used scraps of 3/4″ vertical-grain Douglas-fir, then glued slightly oversized pieces of leather to them with contact cement and trimmed the leather with a sharp knife.
I glued the leather to the wooden bases with contact cement and used a heavy steel roller to assure good, uniform bonds.
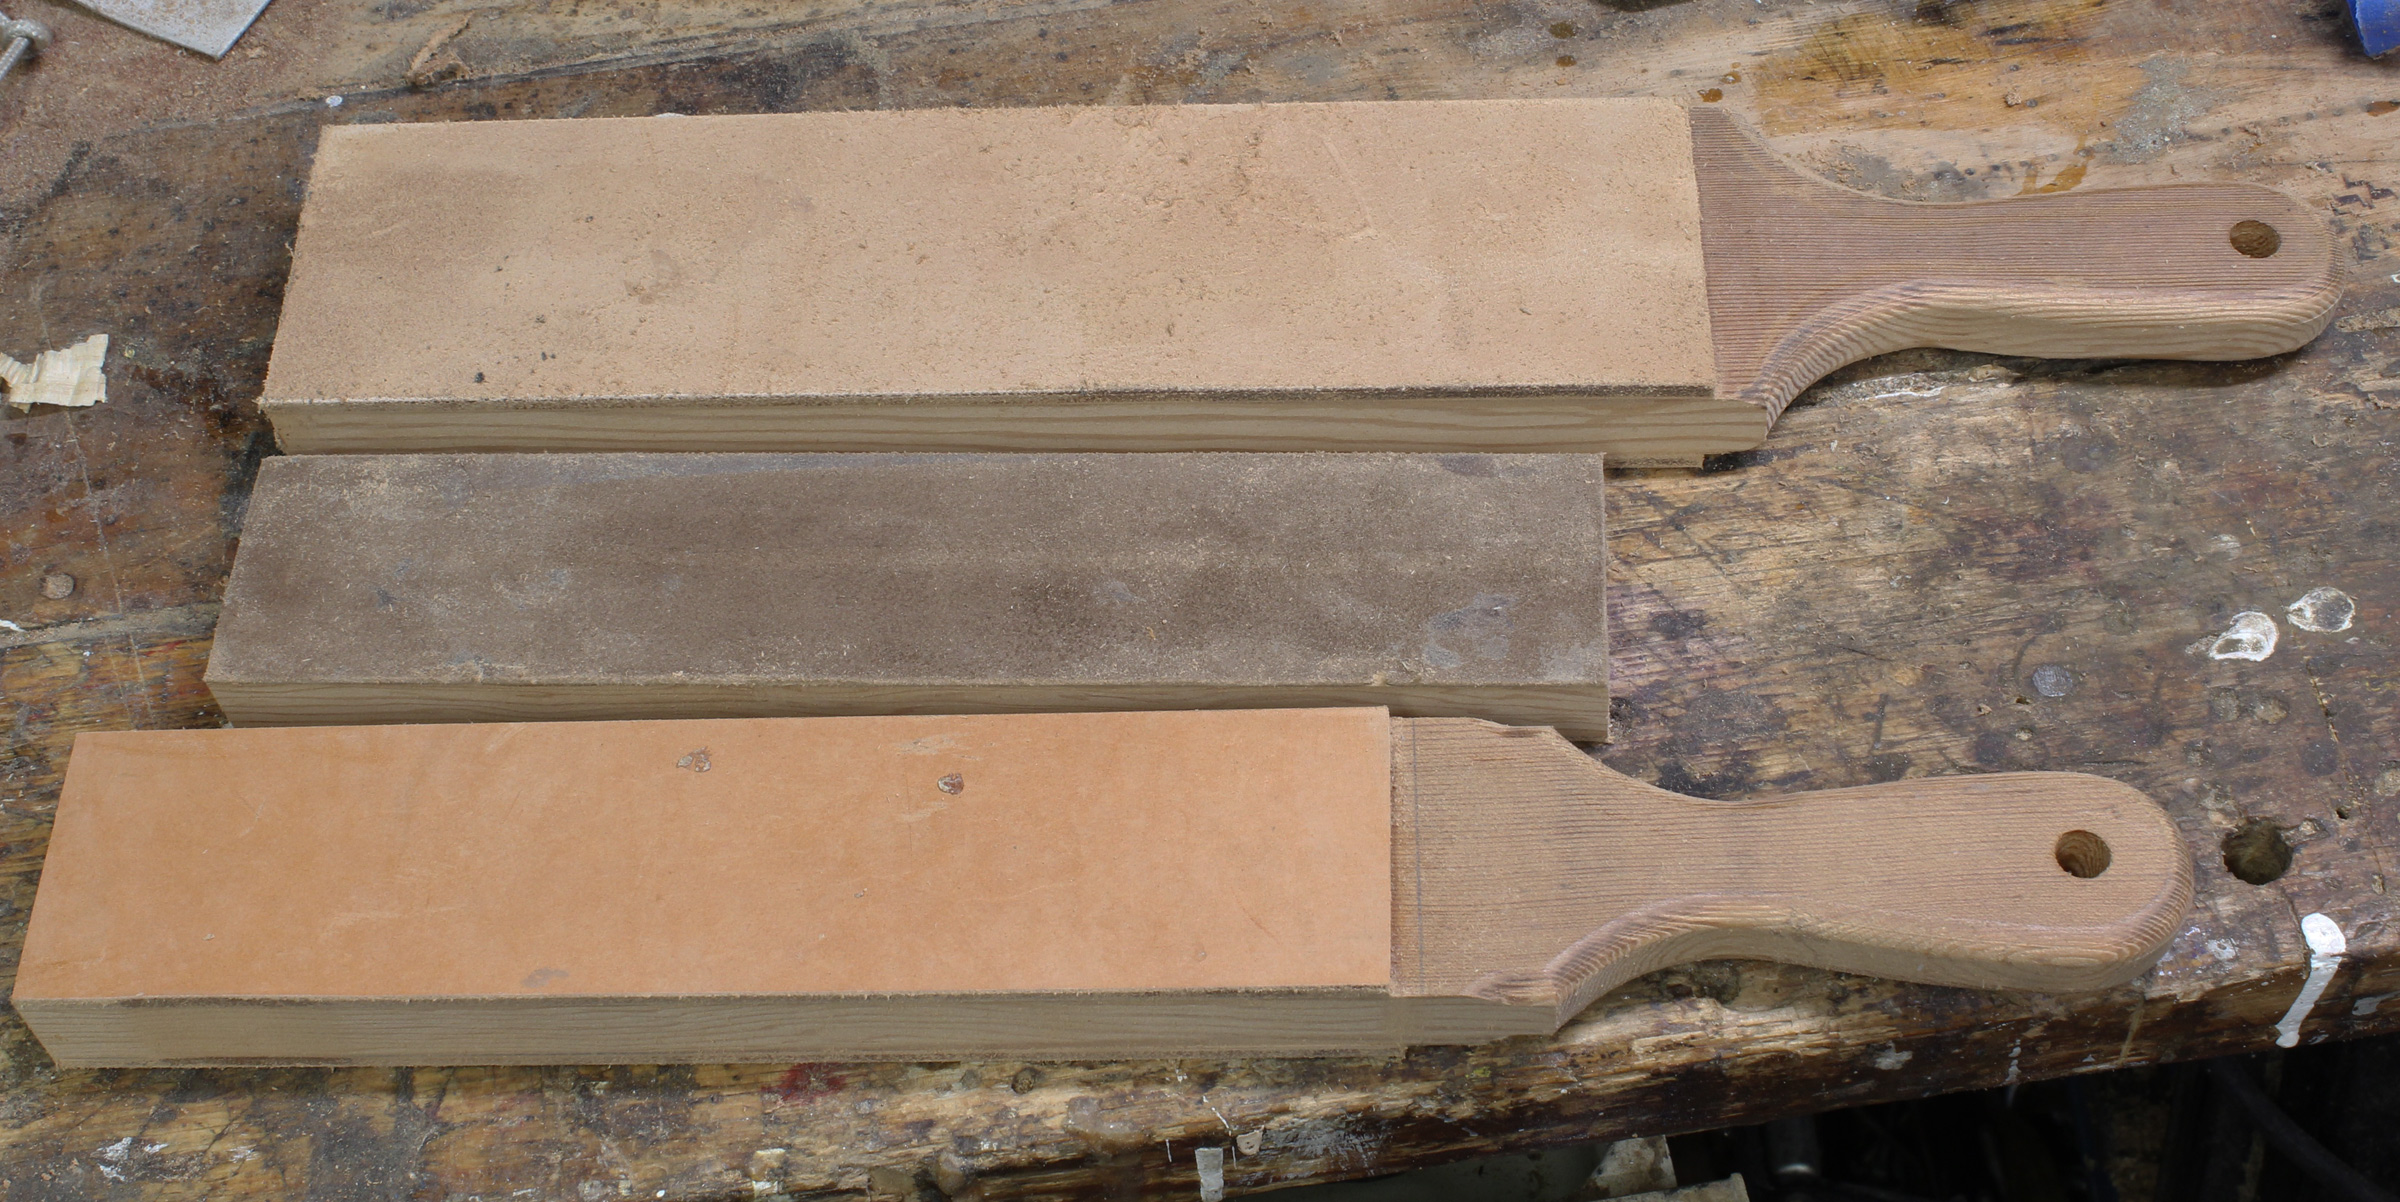
For most of my strops, the rough flesh-side gets an application of white compound and the grain side gets green. It doesn’t take much compound to charge the leather. Just rub the stick over the leather until the compound gives its color to the strop. If the compound begins to gather in lumps, warming it up (I used a heat gun) softens it and you can rub it smooth with your fingers.
My finished strops have been trimmed and are ready for use with or without compound.
Stropping is for honing an edge that has already been properly shaped with a sharpening stone. The strop will smooth the scoring left by the stone and make the edge noticeably sharper, and the edge can be maintained with the strop many times before it’s time to return to the sharpening stone. Since stropping removes very little steel, your blades will not age as quickly as they would if only sharpened by a stone.
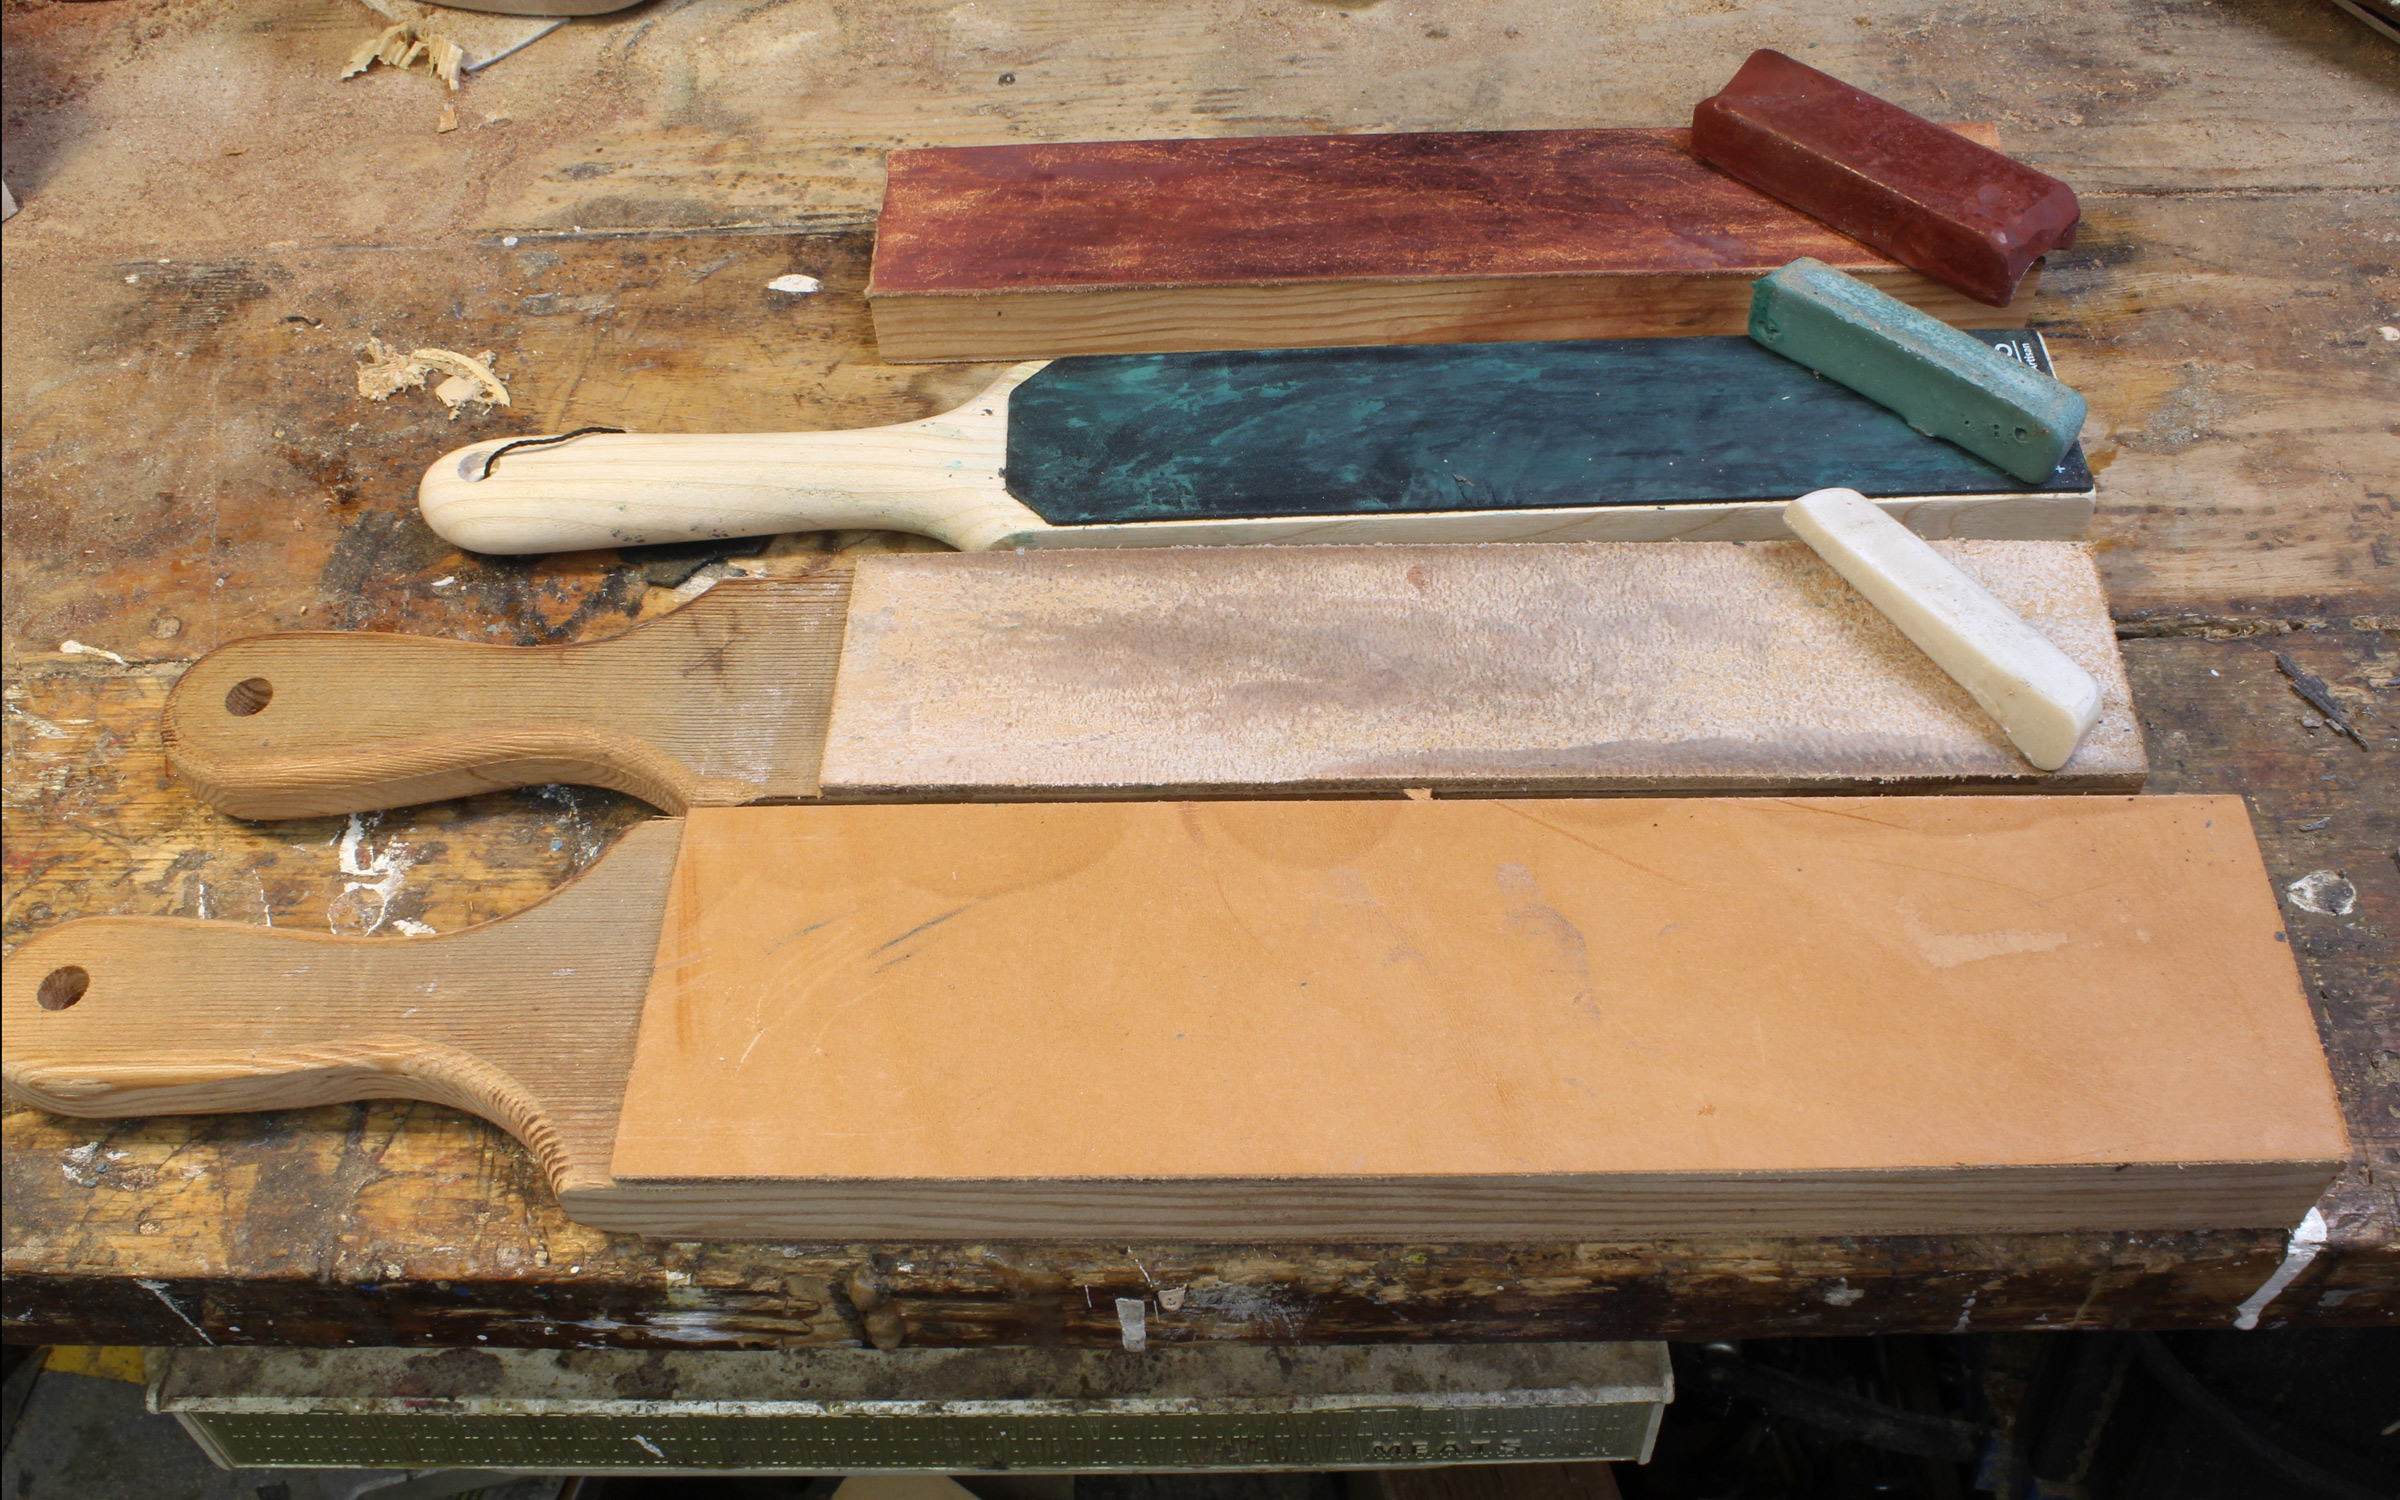
I got acquainted with stropping with these four strops. From the bottom, a large paddle strop with no compound, a medium paddle with white compound on the flesh side and green on the back, a small paddle made by Hutsuls with green and white compound. At the top a block strop with red rouge buffing compound on the grain side and emery on the flesh side
Blades are moved across the strop with the edge trailing, or, if you’re working with a large blade that’s better worked while stationary, the strop is pushed away from the edge. To do an initial stropping of a stone-sharpened blade, I start with the flesh side, charged with white compound, and do 30 strokes on one side of the blade, then 30 strokes on the other, then repeat the process on the grain side with the green compound. It is important to use a light touch and let the compound do the work. The leather is soft enough to make the surfaces of the micro-bevel along the edge slightly convex, making the edge stronger. Pressing the blade against the leather will exaggerate the effect, blunting the edge.
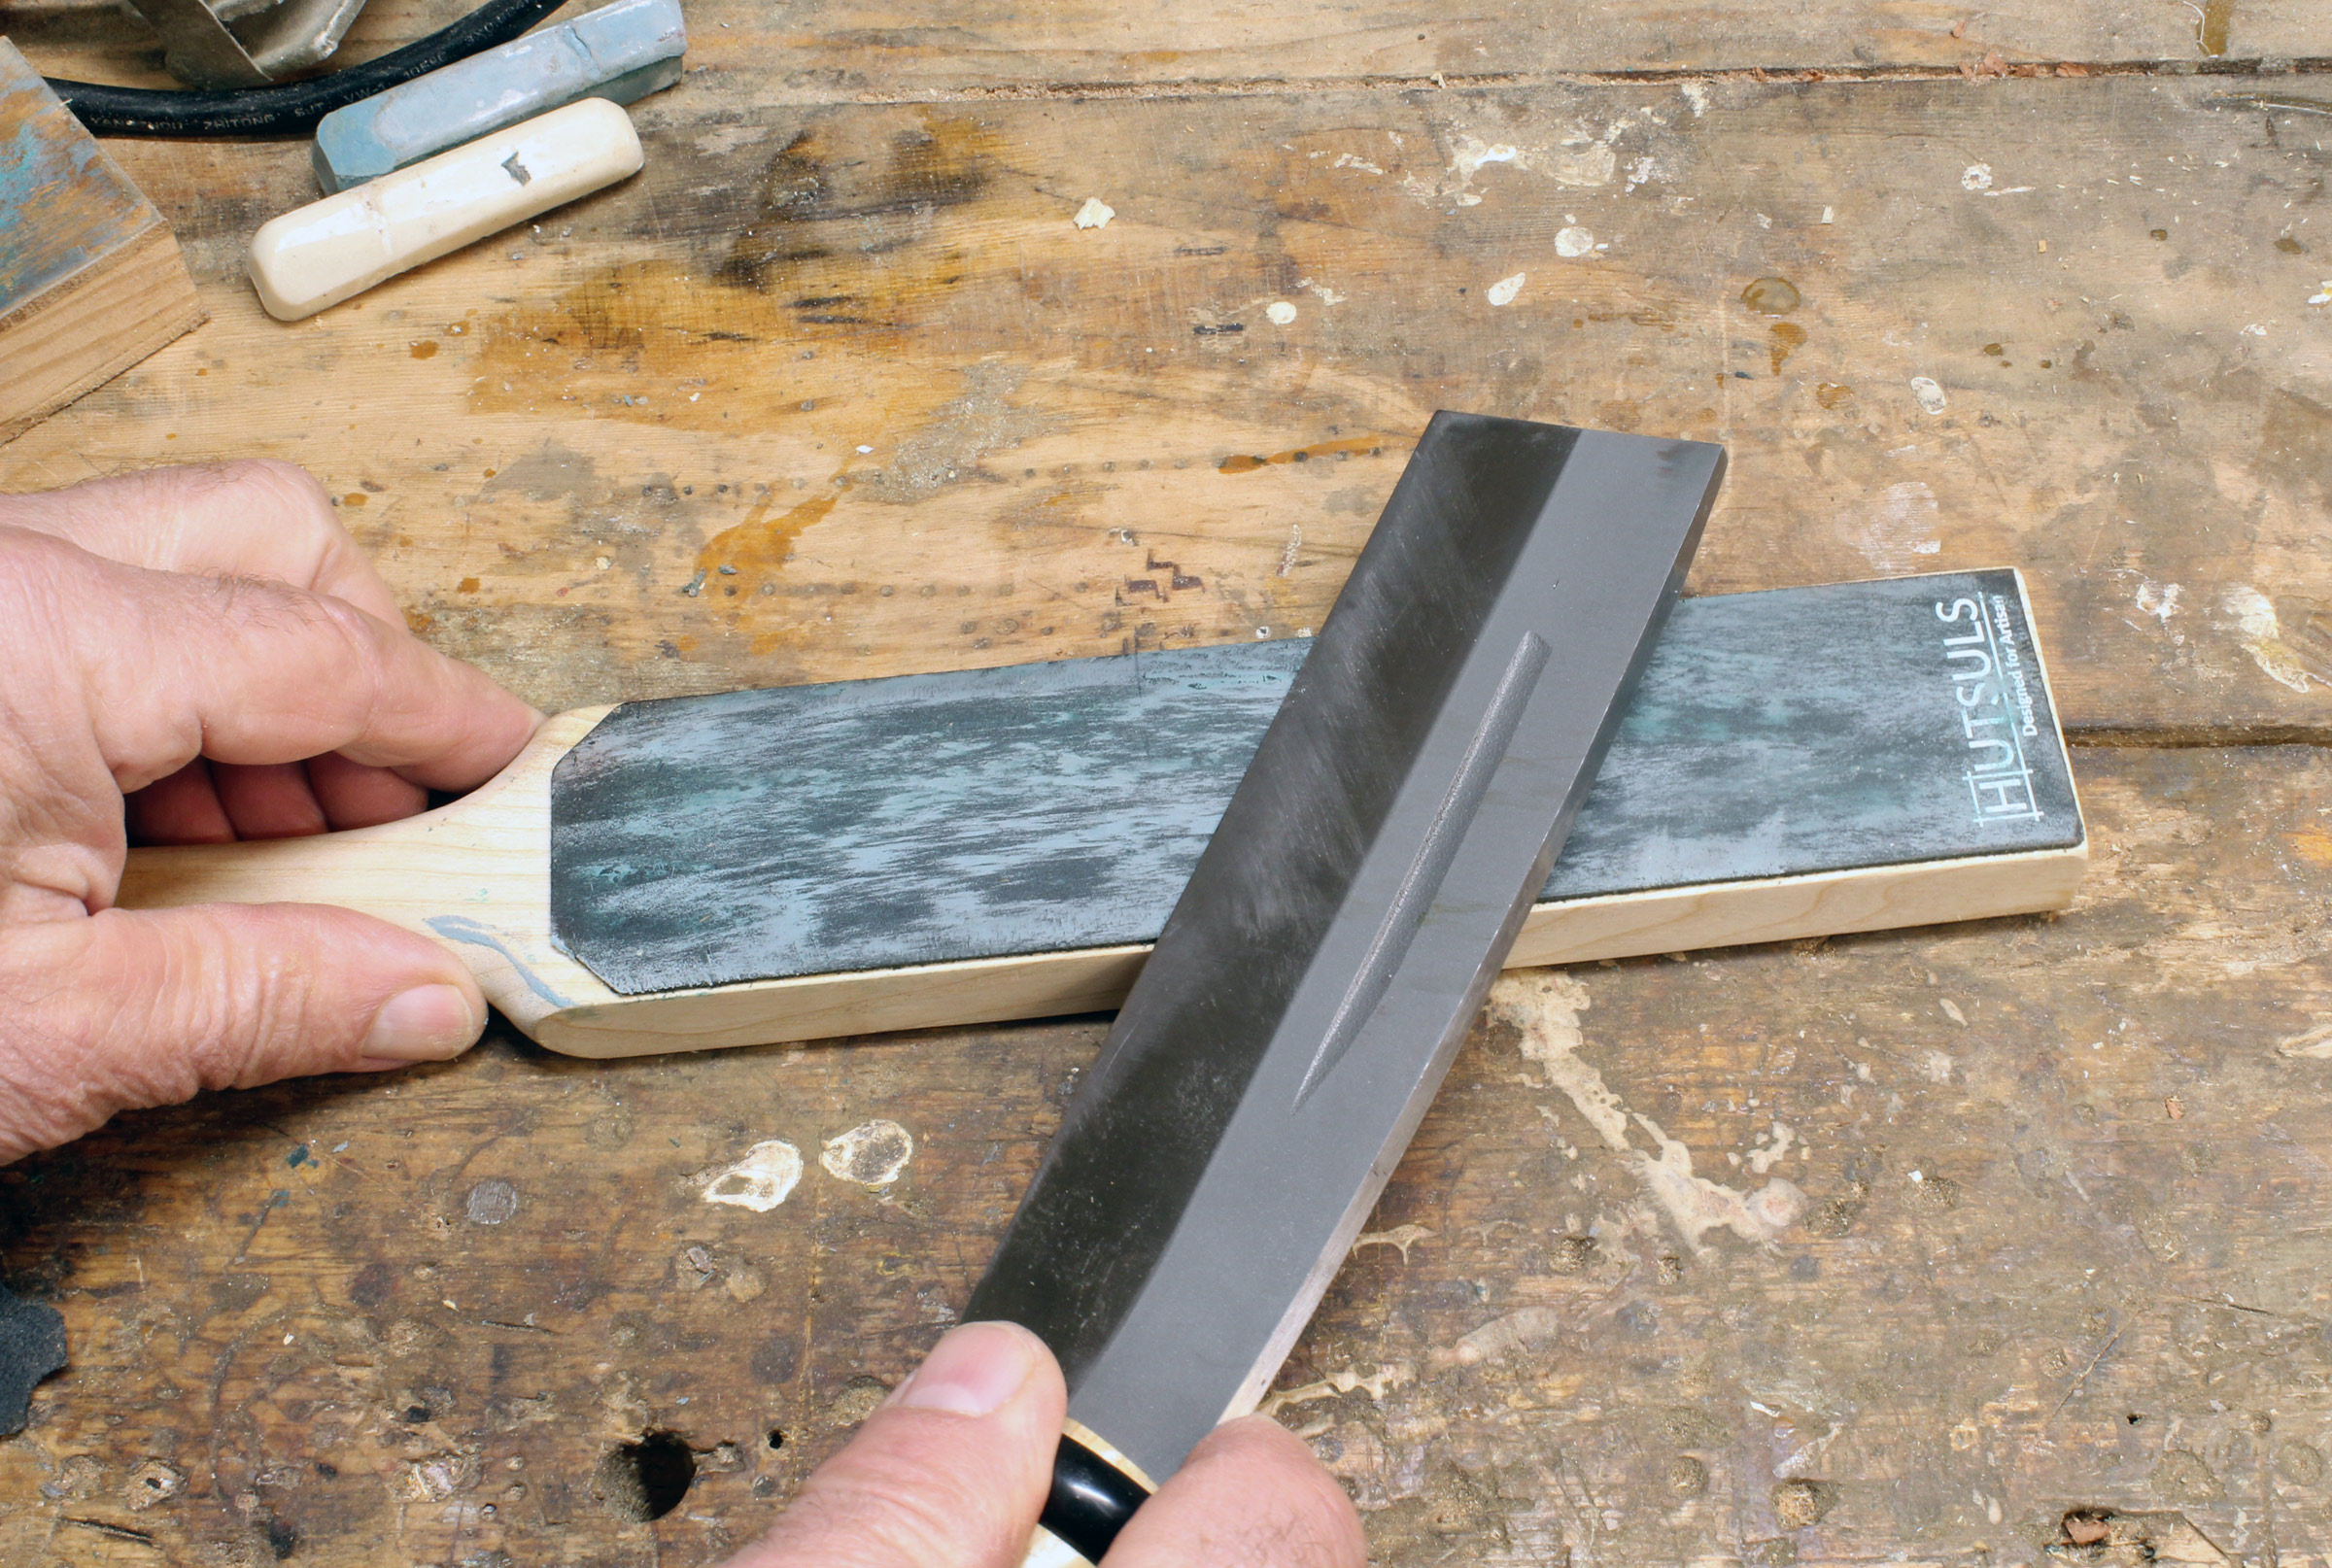
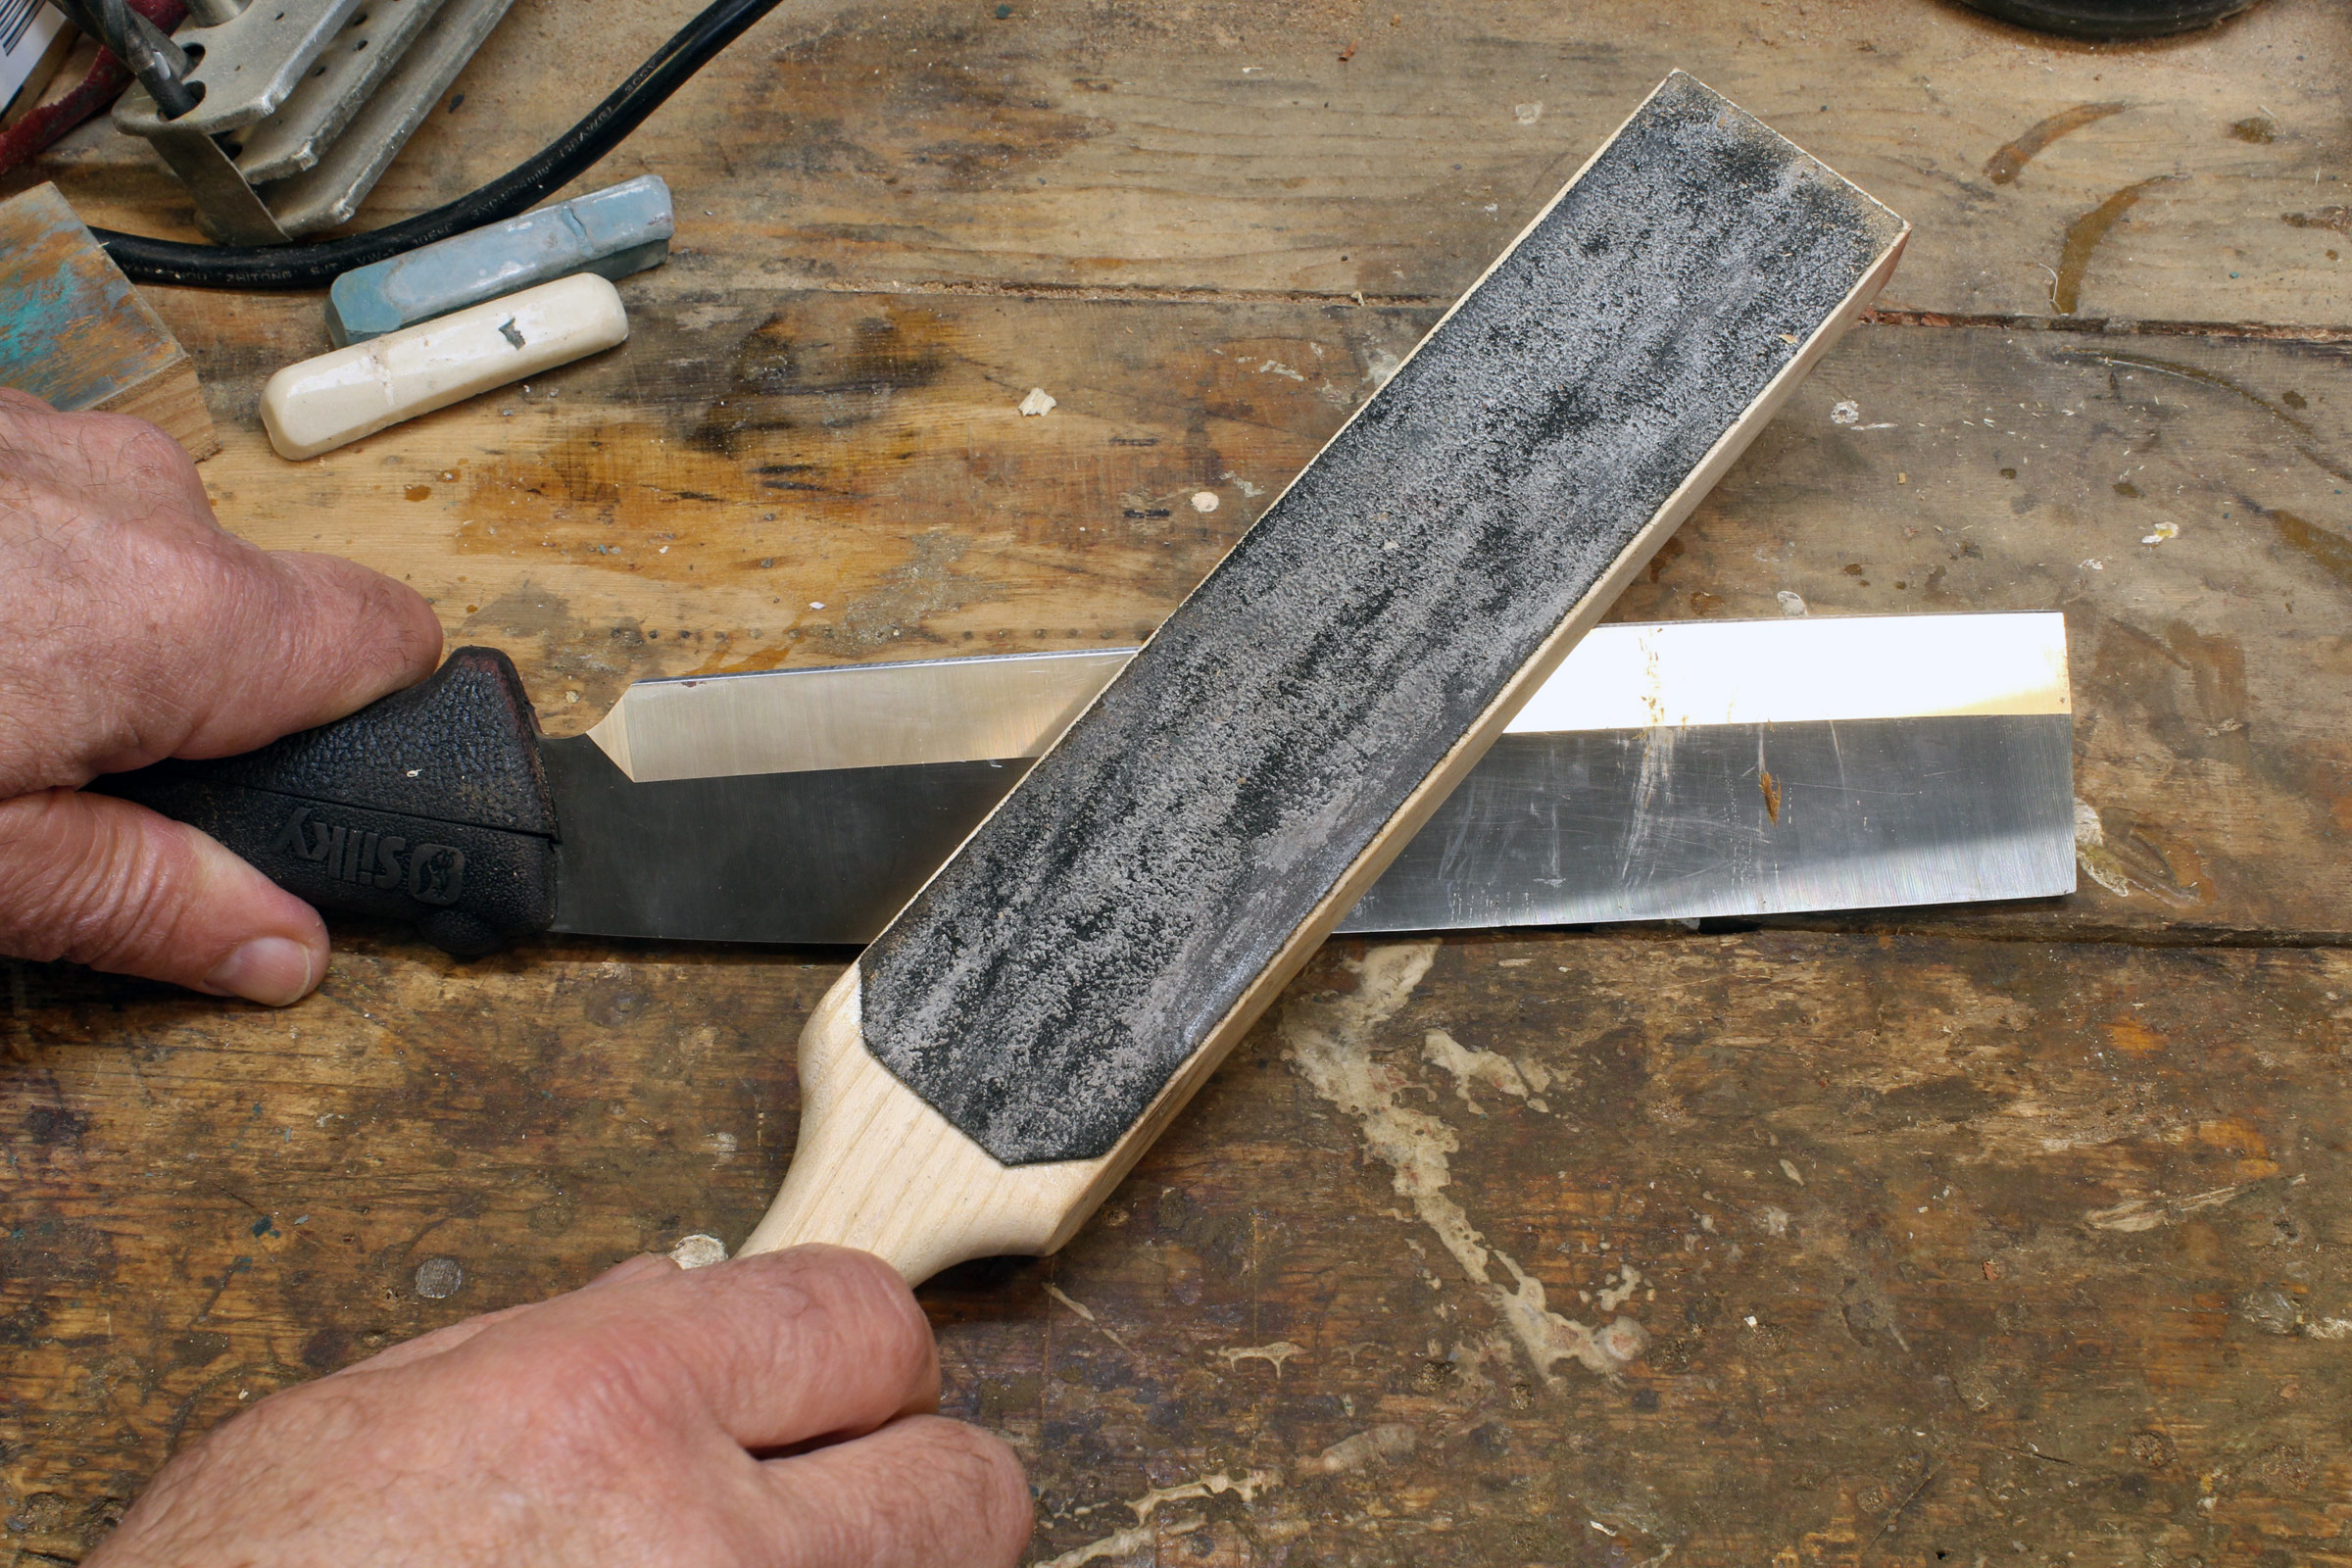
Small blades can be worked on the strop. This nata is being gently pulled from left to right, away from the cutting edge.
The work the strop does is right along the cutting edge, so you use the same angle as you would for the micro-bevels when finishing work with a stone. If you need a clear indication of where the strop is making contact, color the edge with a black permanent marker. The strop will uncover bright steel and alcohol will clean up the remaining dye when you’ve finished.
Stropping this large nata was easier moving the strop over the edge; it is being pushed to slide past the cutting edge.
The compound will turn black with the fine particles of steel it removes from the edge. It will continue to work through many sharpenings before it needs to be recharged. When the accumulation of compound needs to be removed, it can be scraped off. Alcohol works too, but may not be good for the leather. For scraping, I use a new replacement blade for a utility knife, held square across the strop and perpendicular to it.
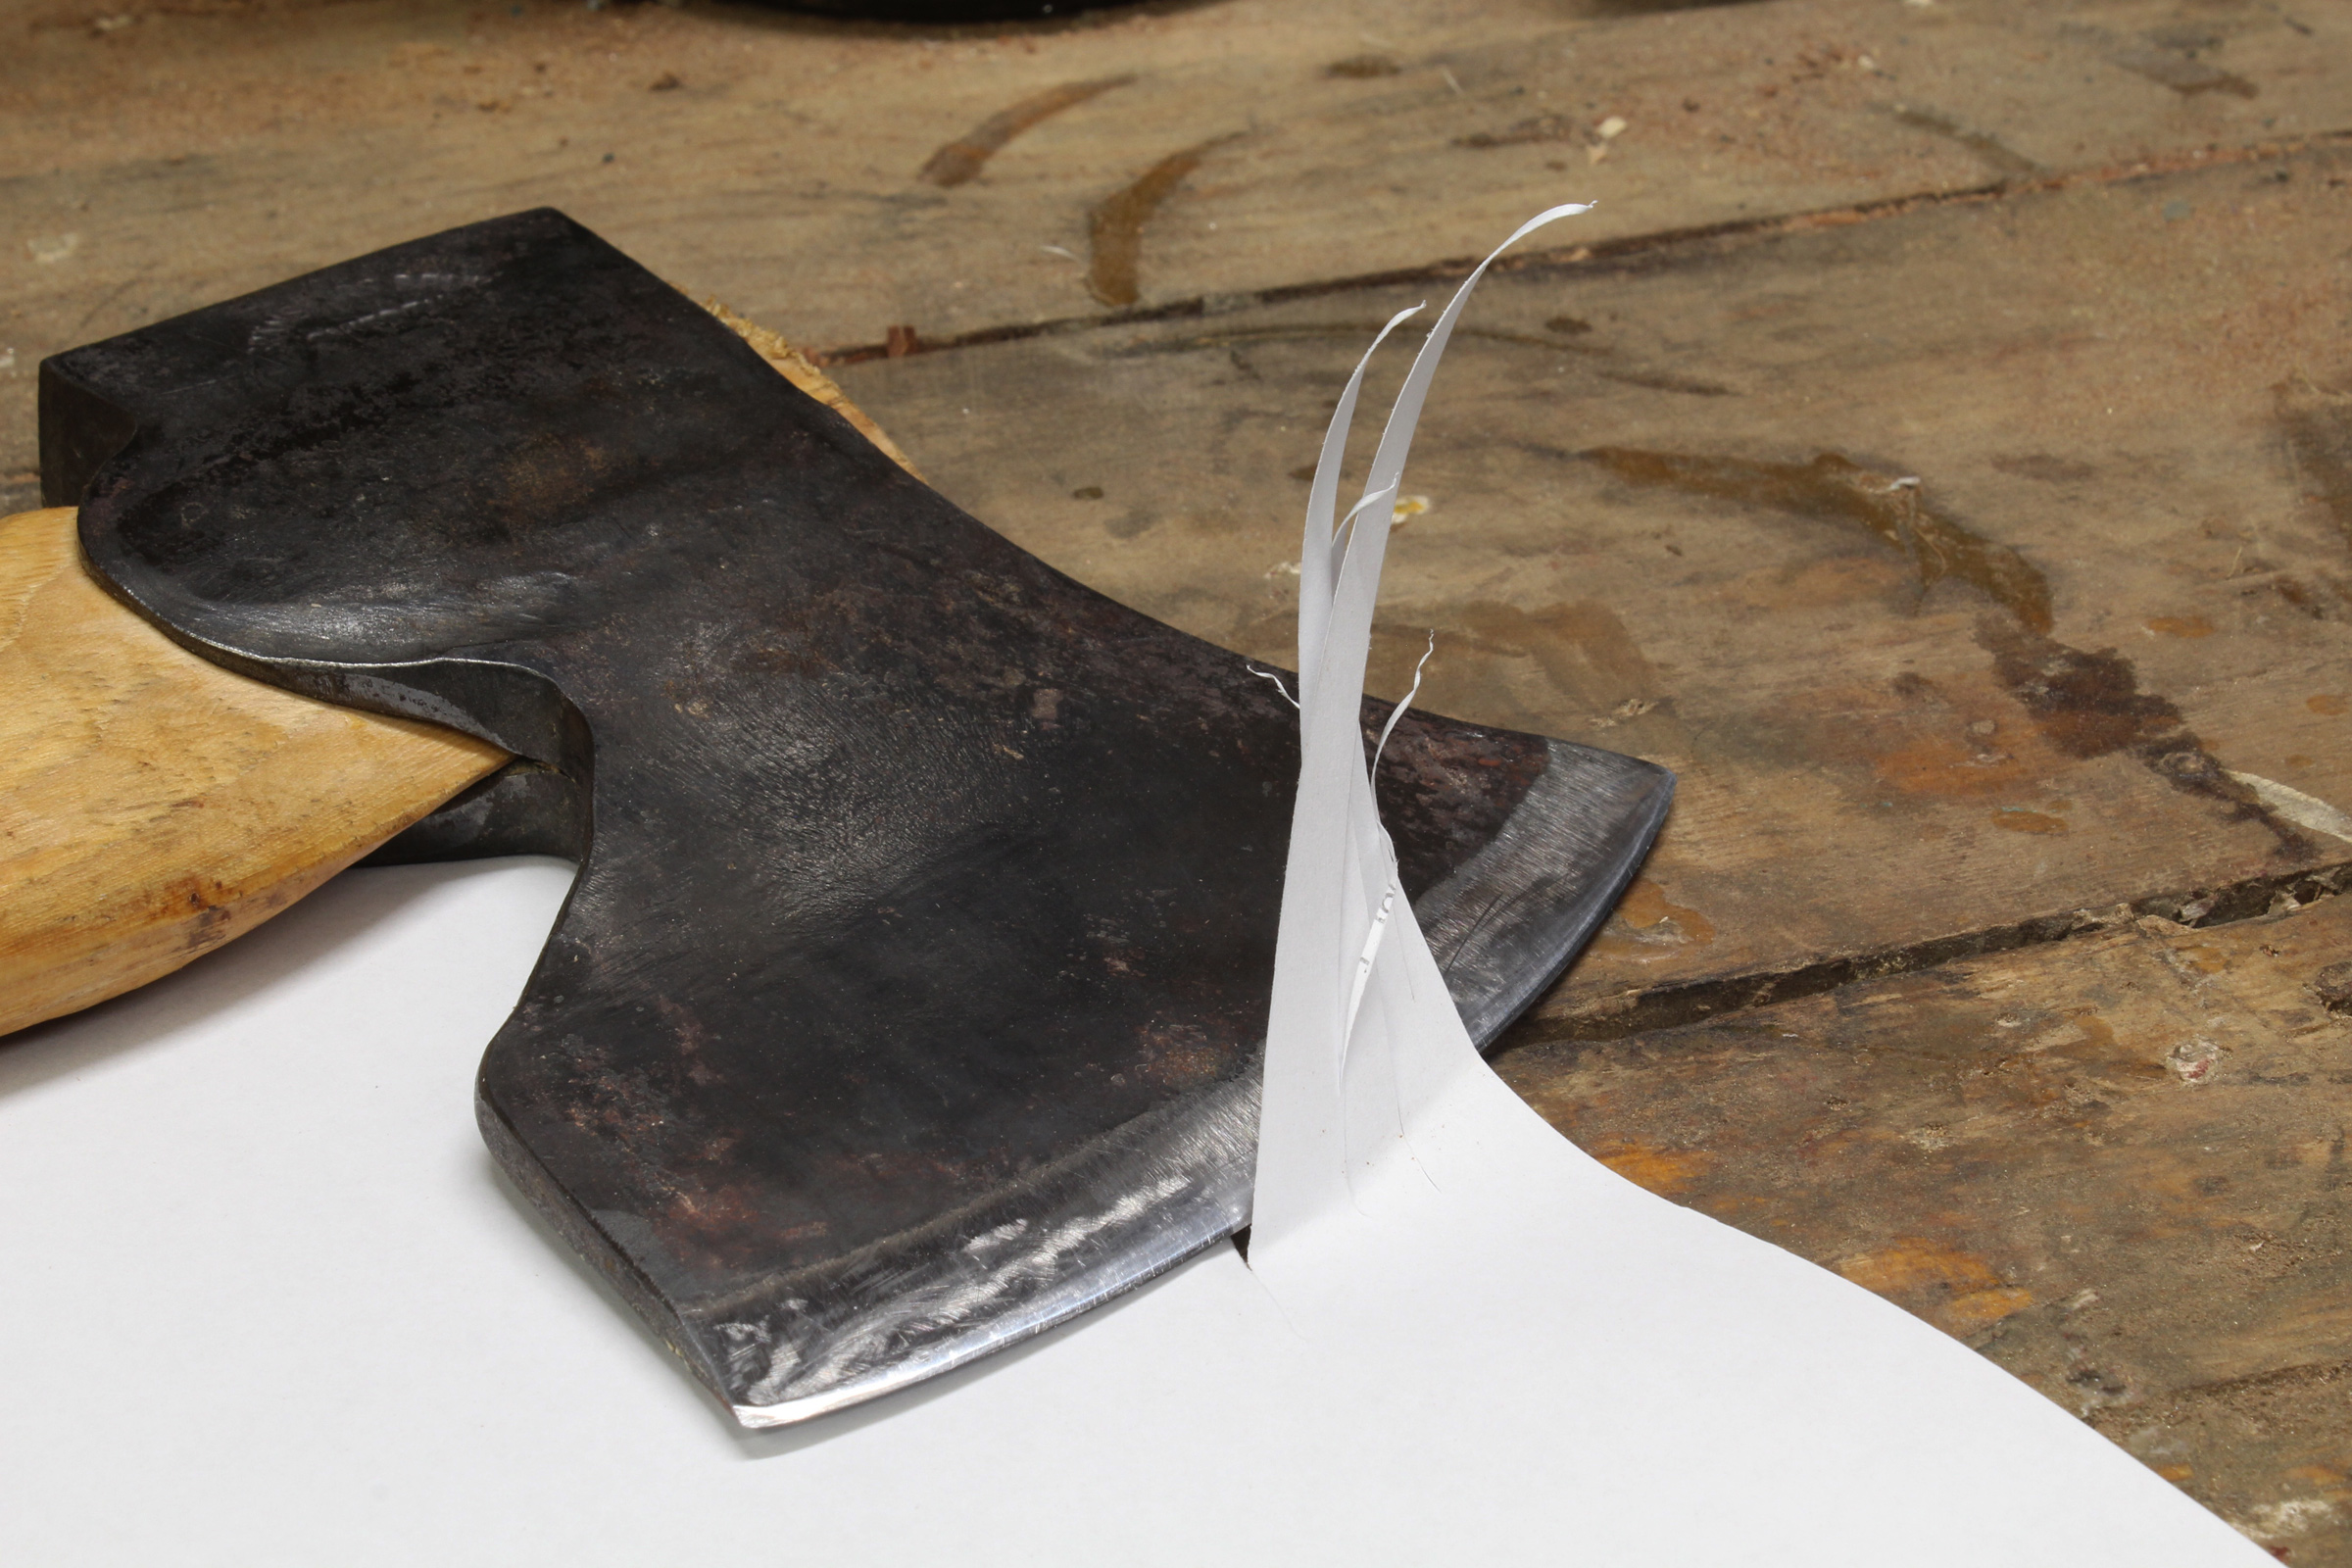
One test of a sharp edge is slicing into the edge of a piece of paper. Stropping brought this axe up to the challenge.
A good test of a truly sharp blade is holding the edge of a piece of paper in one hand and slicing into it with the blade with the other hand. A sharp edge will slice cleanly through. An edge that needs more work will leave a fuzzy edge, tear the paper, or not cut into it at all. A really sharp edge will shave arm hair.
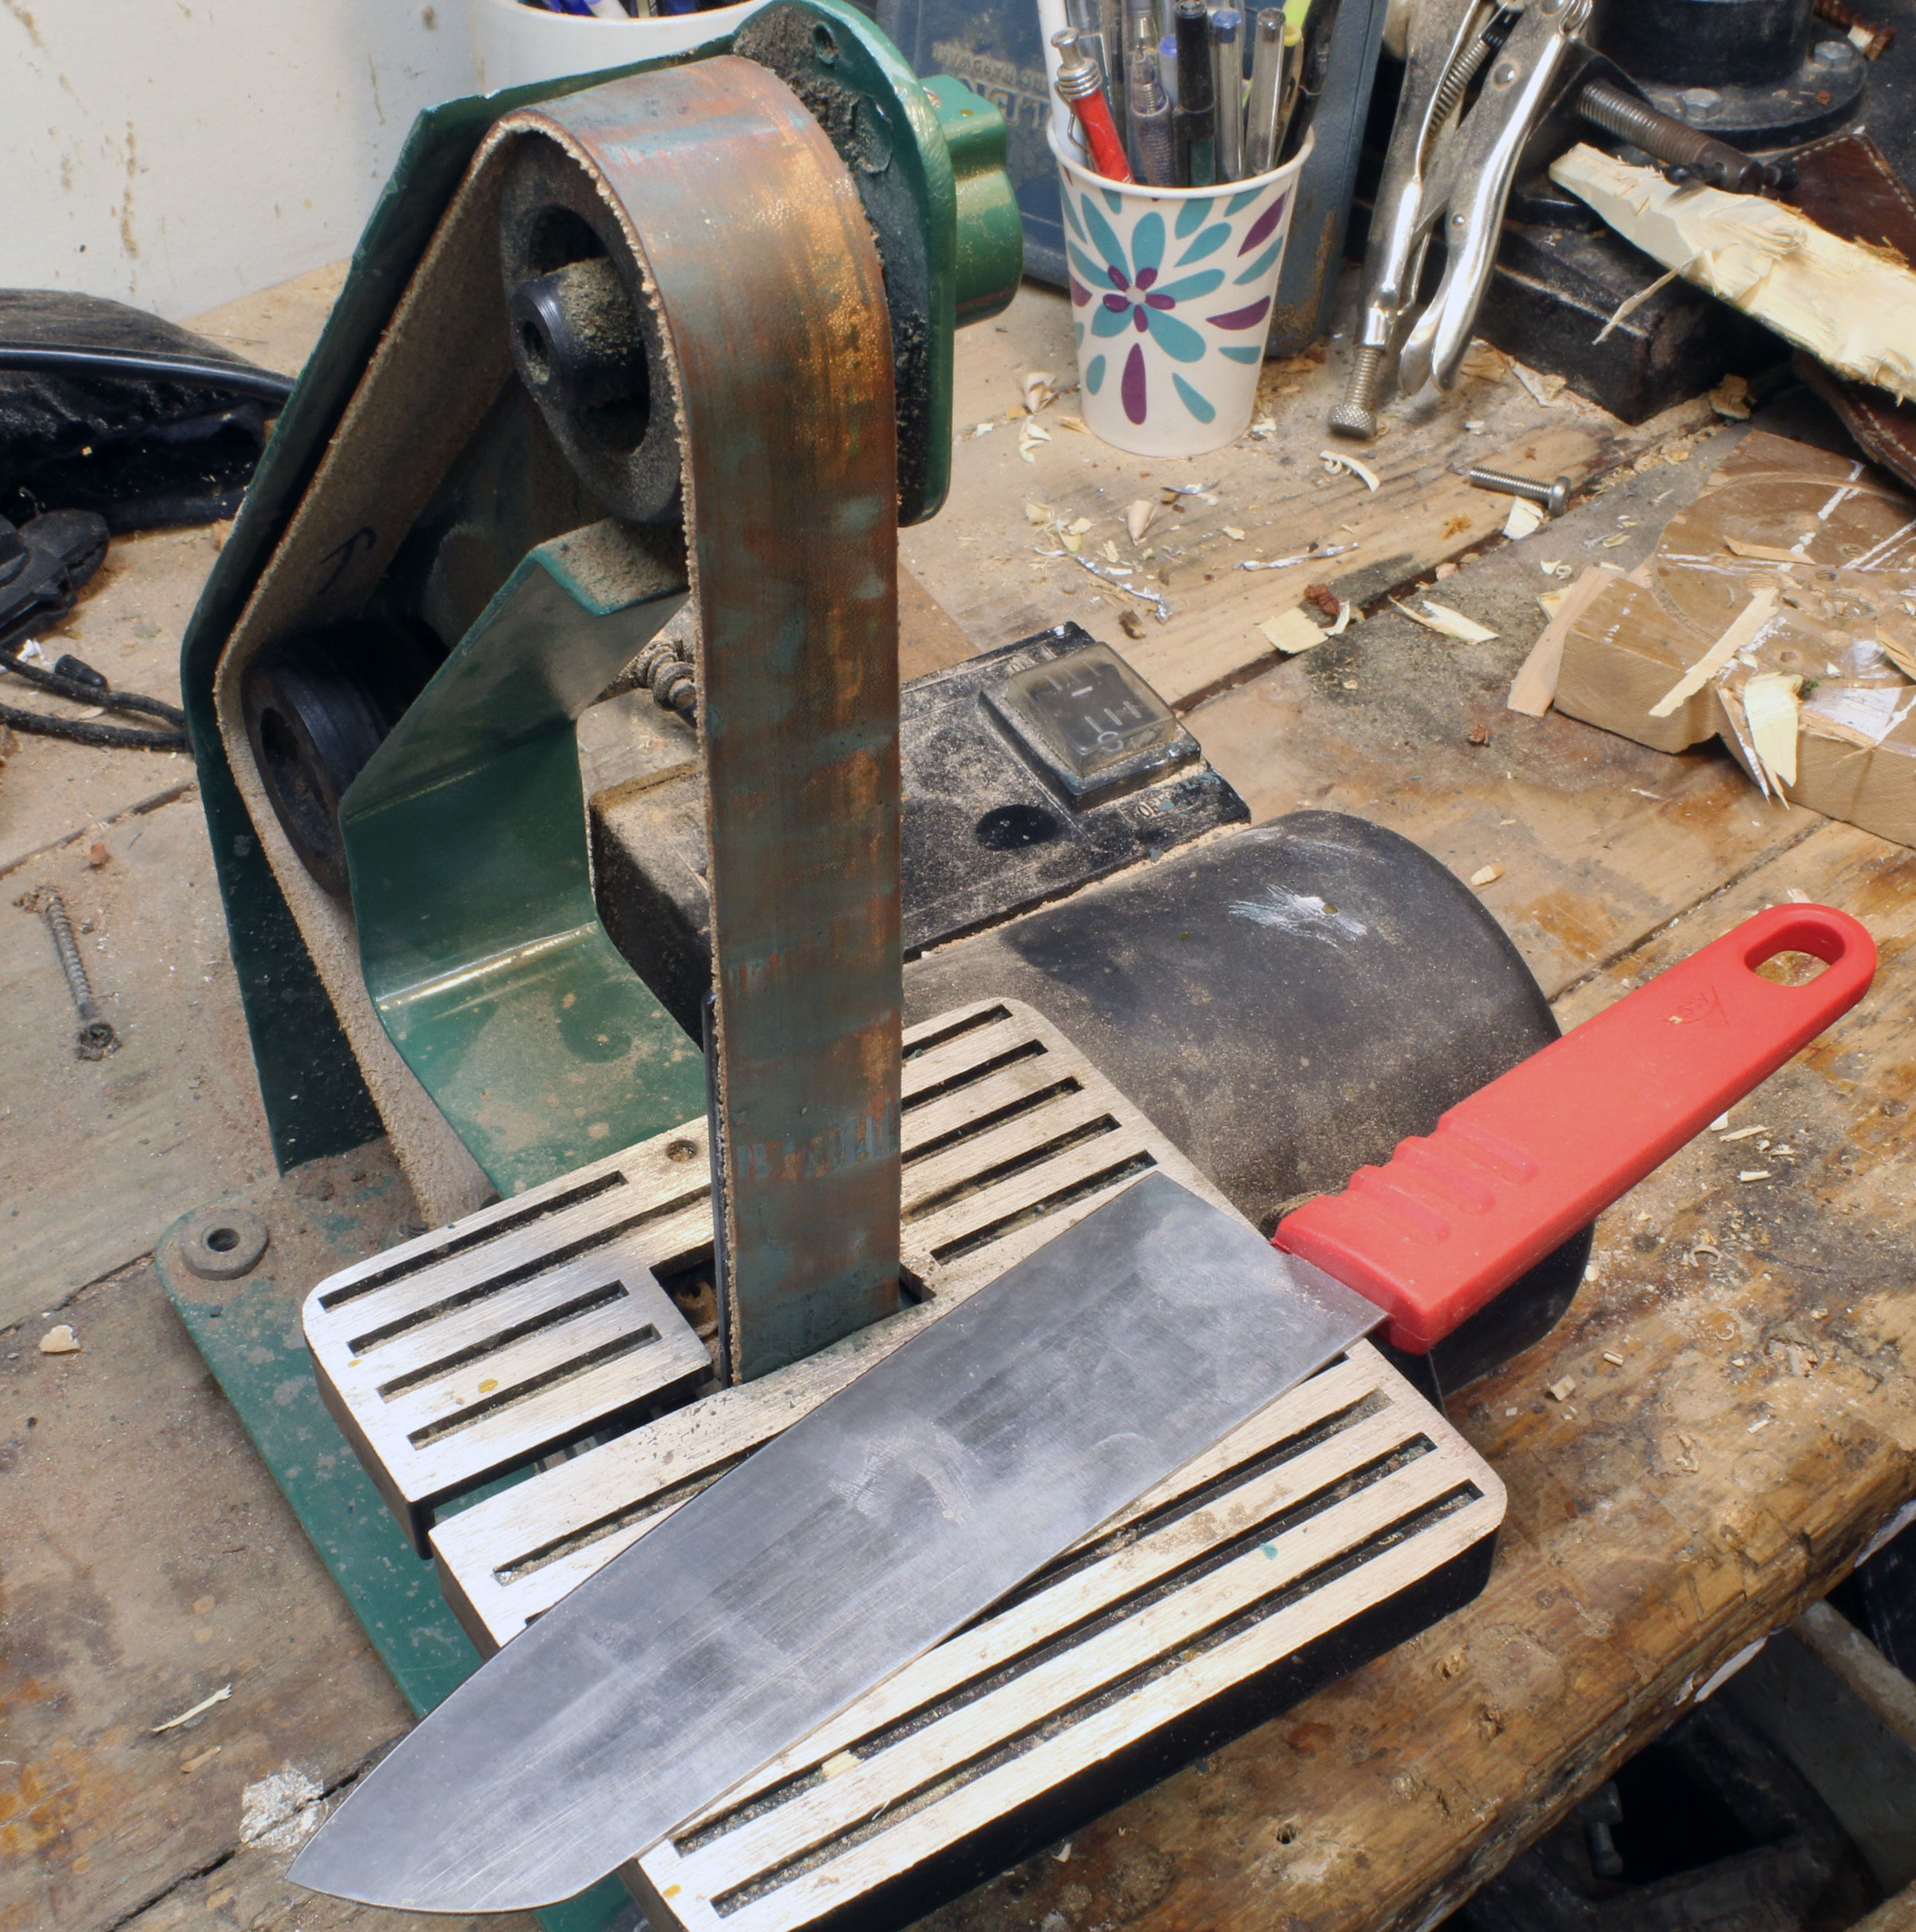
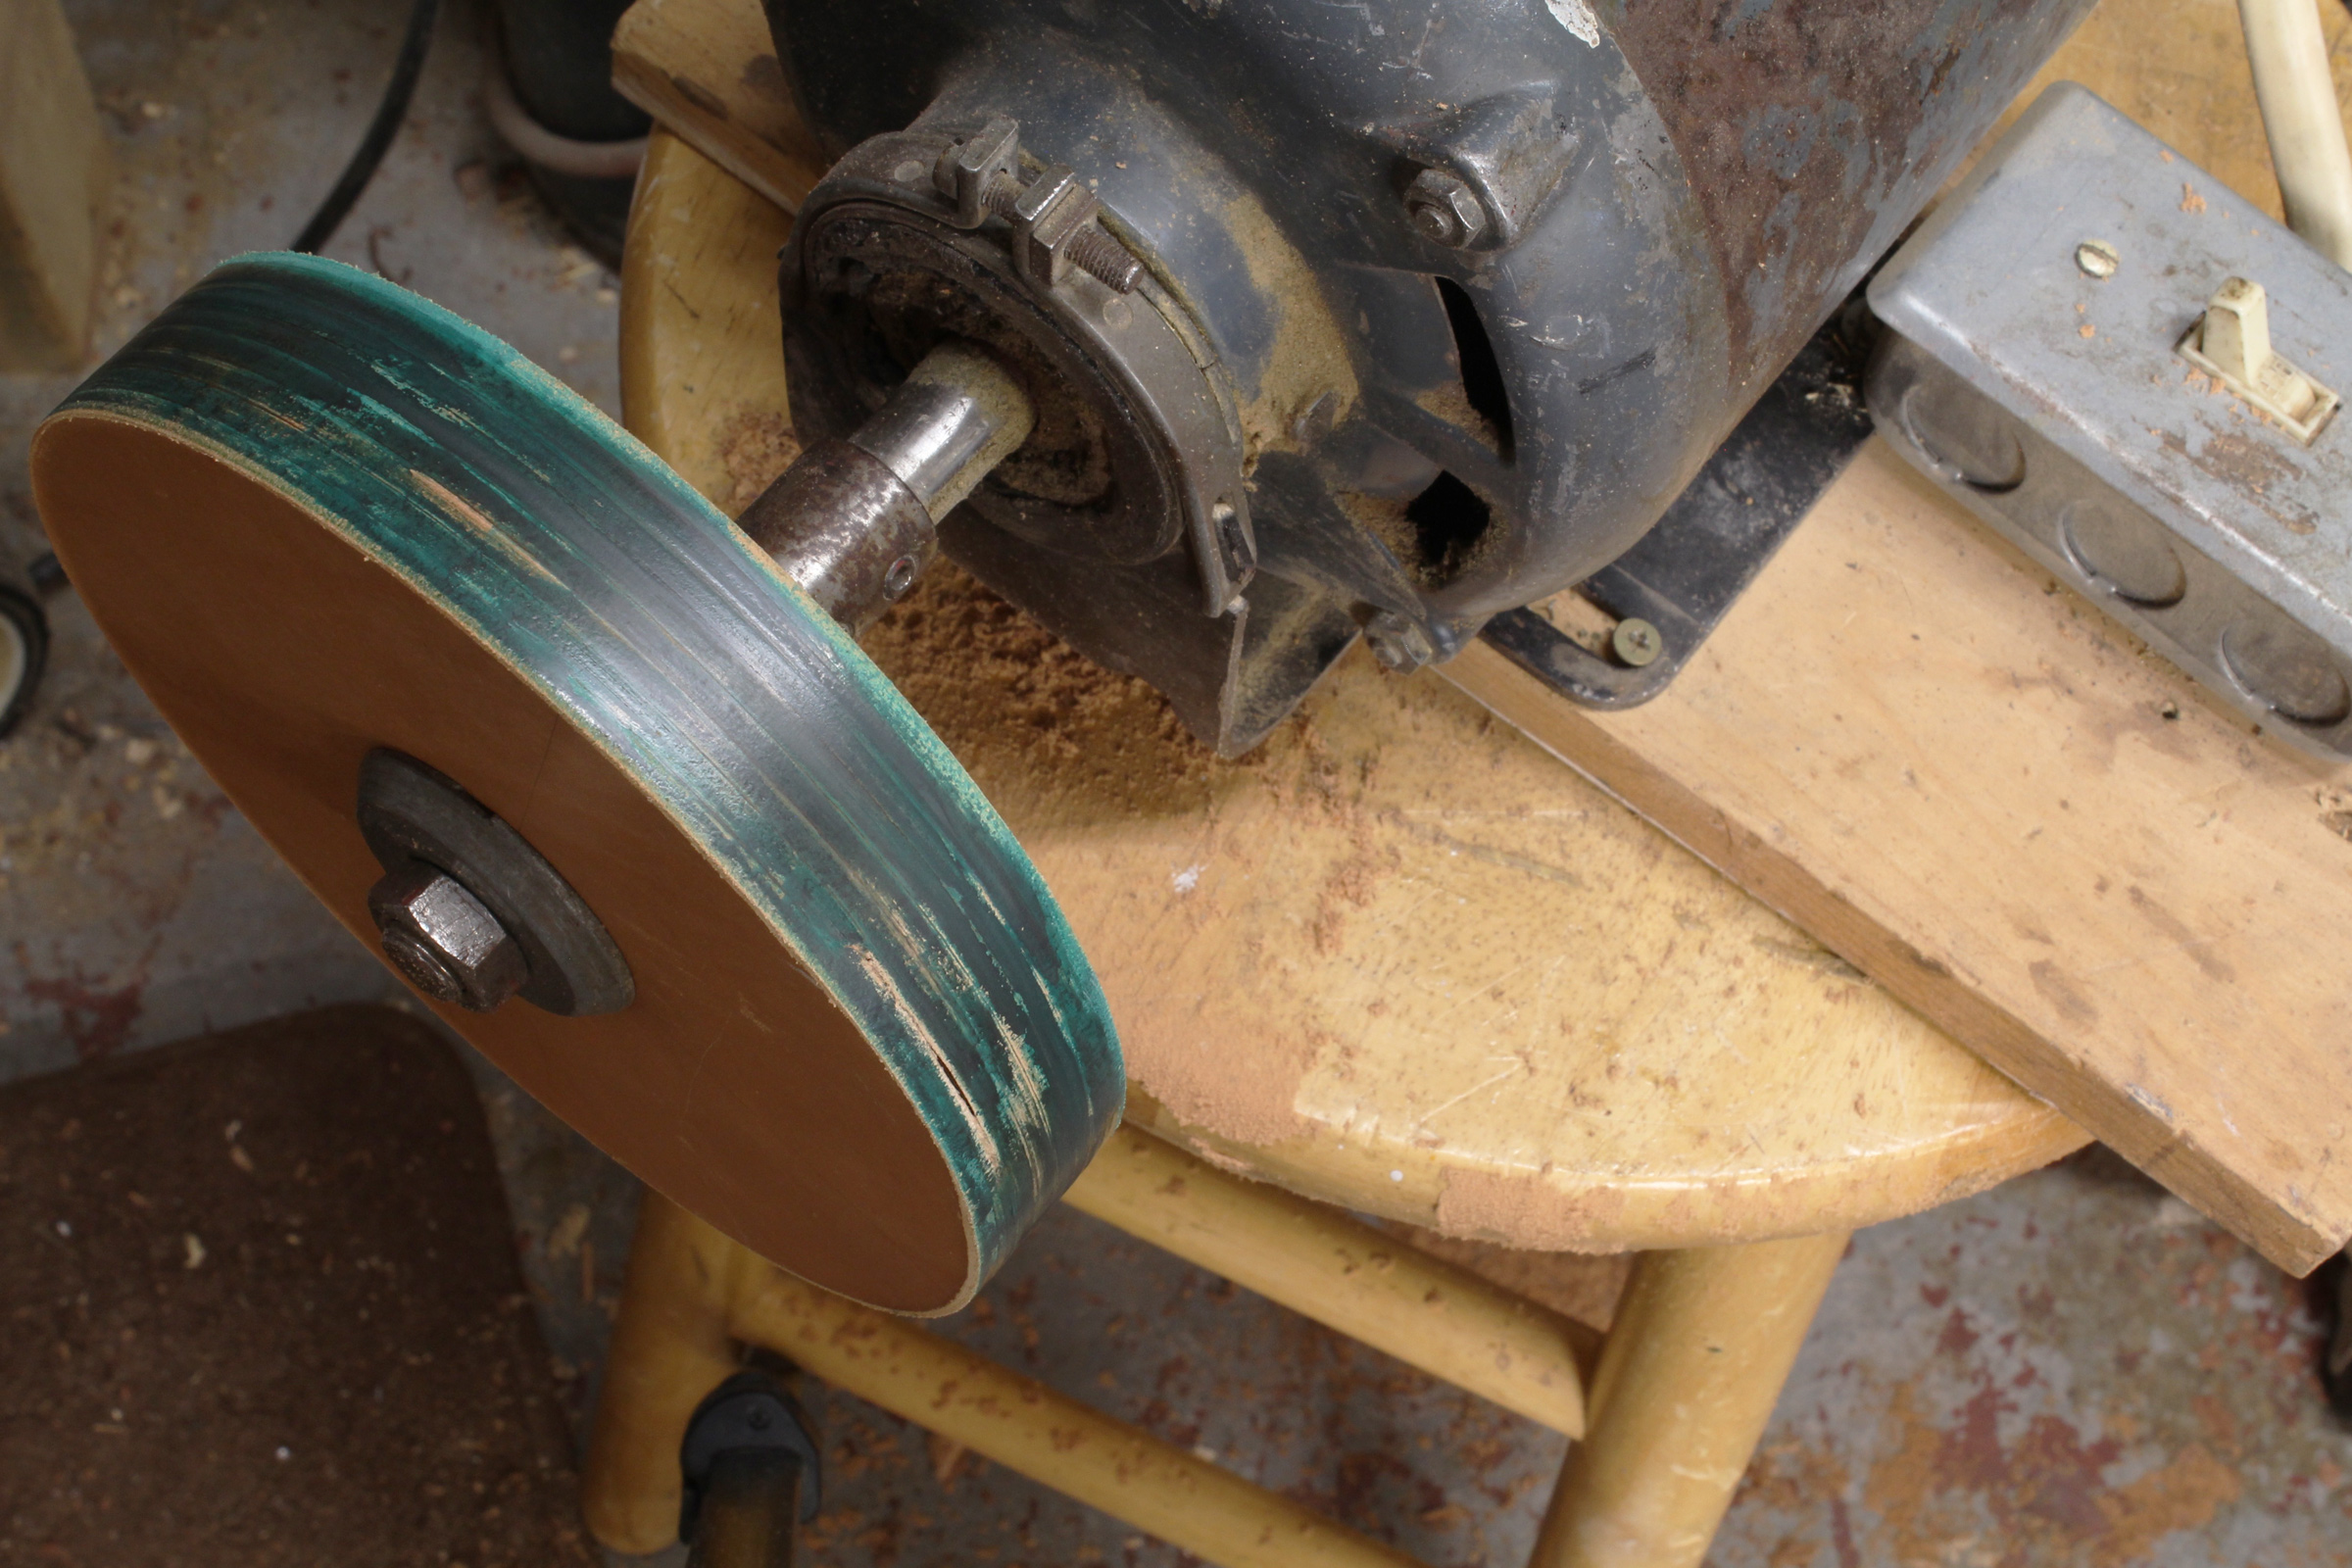
I did two trials with power stropping, one with a leather belt on a benchtop belt sander and the other with a 1″-thick wheel I made from eight layers of vegetable-tanned leather and mounted on a motor I use for a cotton buffing wheel. While both could bring a blade up to sharpness for the paper-cutting test, neither made the blade sharp enough to shave arm hair. That required finishing the edge with the handheld paddle strops.
A leather belt for my Harbor Freight 1 x 30 sander, charged with green compound, does a quick job of honing blades, but didn’t get them quite as sharp.
I glued circles of leather together with contact cement to make a 1″ stropping wheel. The edge of the wheel seems quite hard in comparison to the flat leather faces on my handheld strops. And the high speed didn’t seem to be a quick way to a sharp edge.
Leather strops and compound are now part of the sharpening arsenal in my shop and the system has helped me redefine what a sharp edge is. My woodworking is much the better for it.
Christopher Cunningham is the editor of Small Boats Magazine.
You can share your tips and tricks of the trade with other Small Boats Magazine readers by sending us an email.
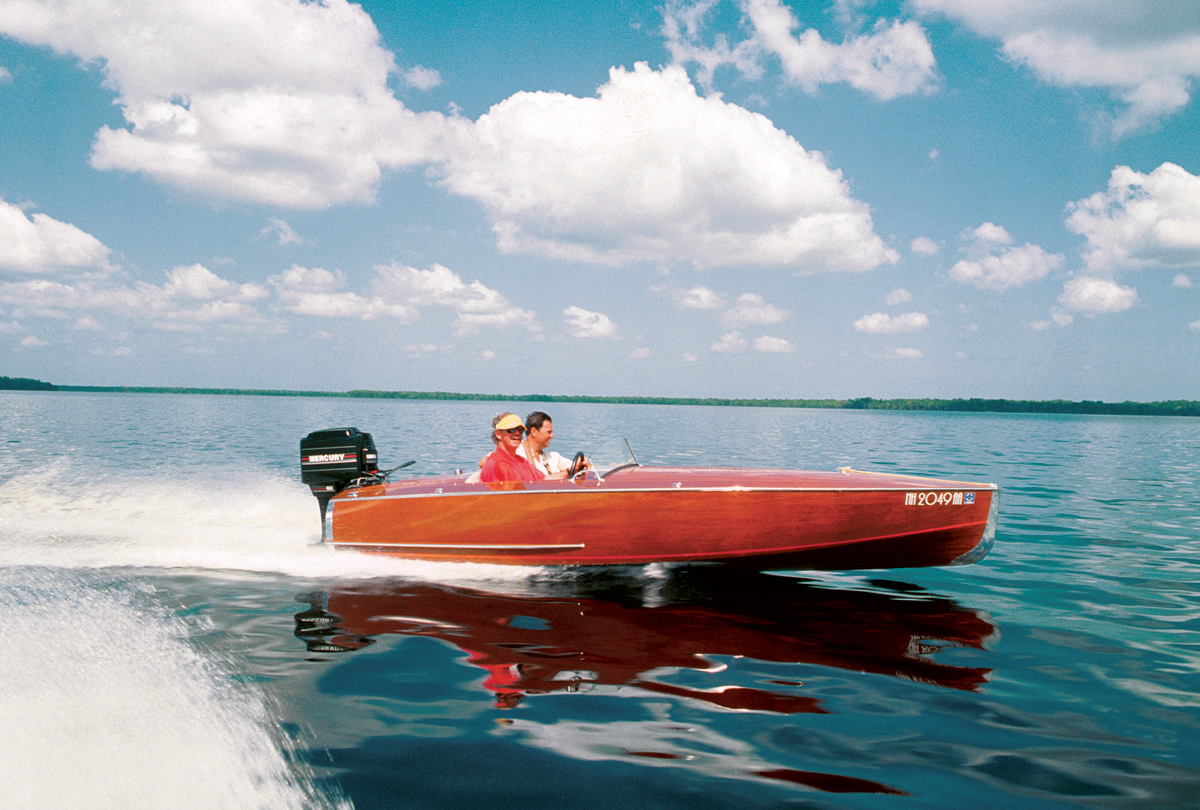
Over the years, we have used small marine batteries for trolling motors, cold-cranking our outboard motors, and powering onboard electrical systems. Our experience with basic battery chargers has been disappointing, with unexpectedly dead batteries leading to canceled or postponed trips. Recently, we switched to a smart, onboard, marine battery tender and have been very pleased with the reliable performance of our batteries.
Batteries for small boats may be used for just a few days and then stored for extended periods, so it is essential to have a system to maintain the batteries’ charge during storage. An ordinary battery charger charges at a high rate—whether the battery needs it or not—which can sometimes damage it. But a smart battery tender assesses the battery charge state and varies its charging modes to provide the proper level of charge. Most chargers are not designed to be used in the wet marine environment, which means charging the battery only when the boat is in dry storage or by removing the battery from the boat to charge it in a dry location. Some chargers are also large, generate excessive heat, and are not suitable to be kept aboard the boat and carried afloat, while well-designed battery tenders are compact and charge at a slower rate and lower temperature. Some chargers have to be disconnected when the battery is fully charged, then reconnected after the charge level drops while a good battery tender can be left connected for extended periods, and extend the life of expensive marine batteries.
Photographs by the authors
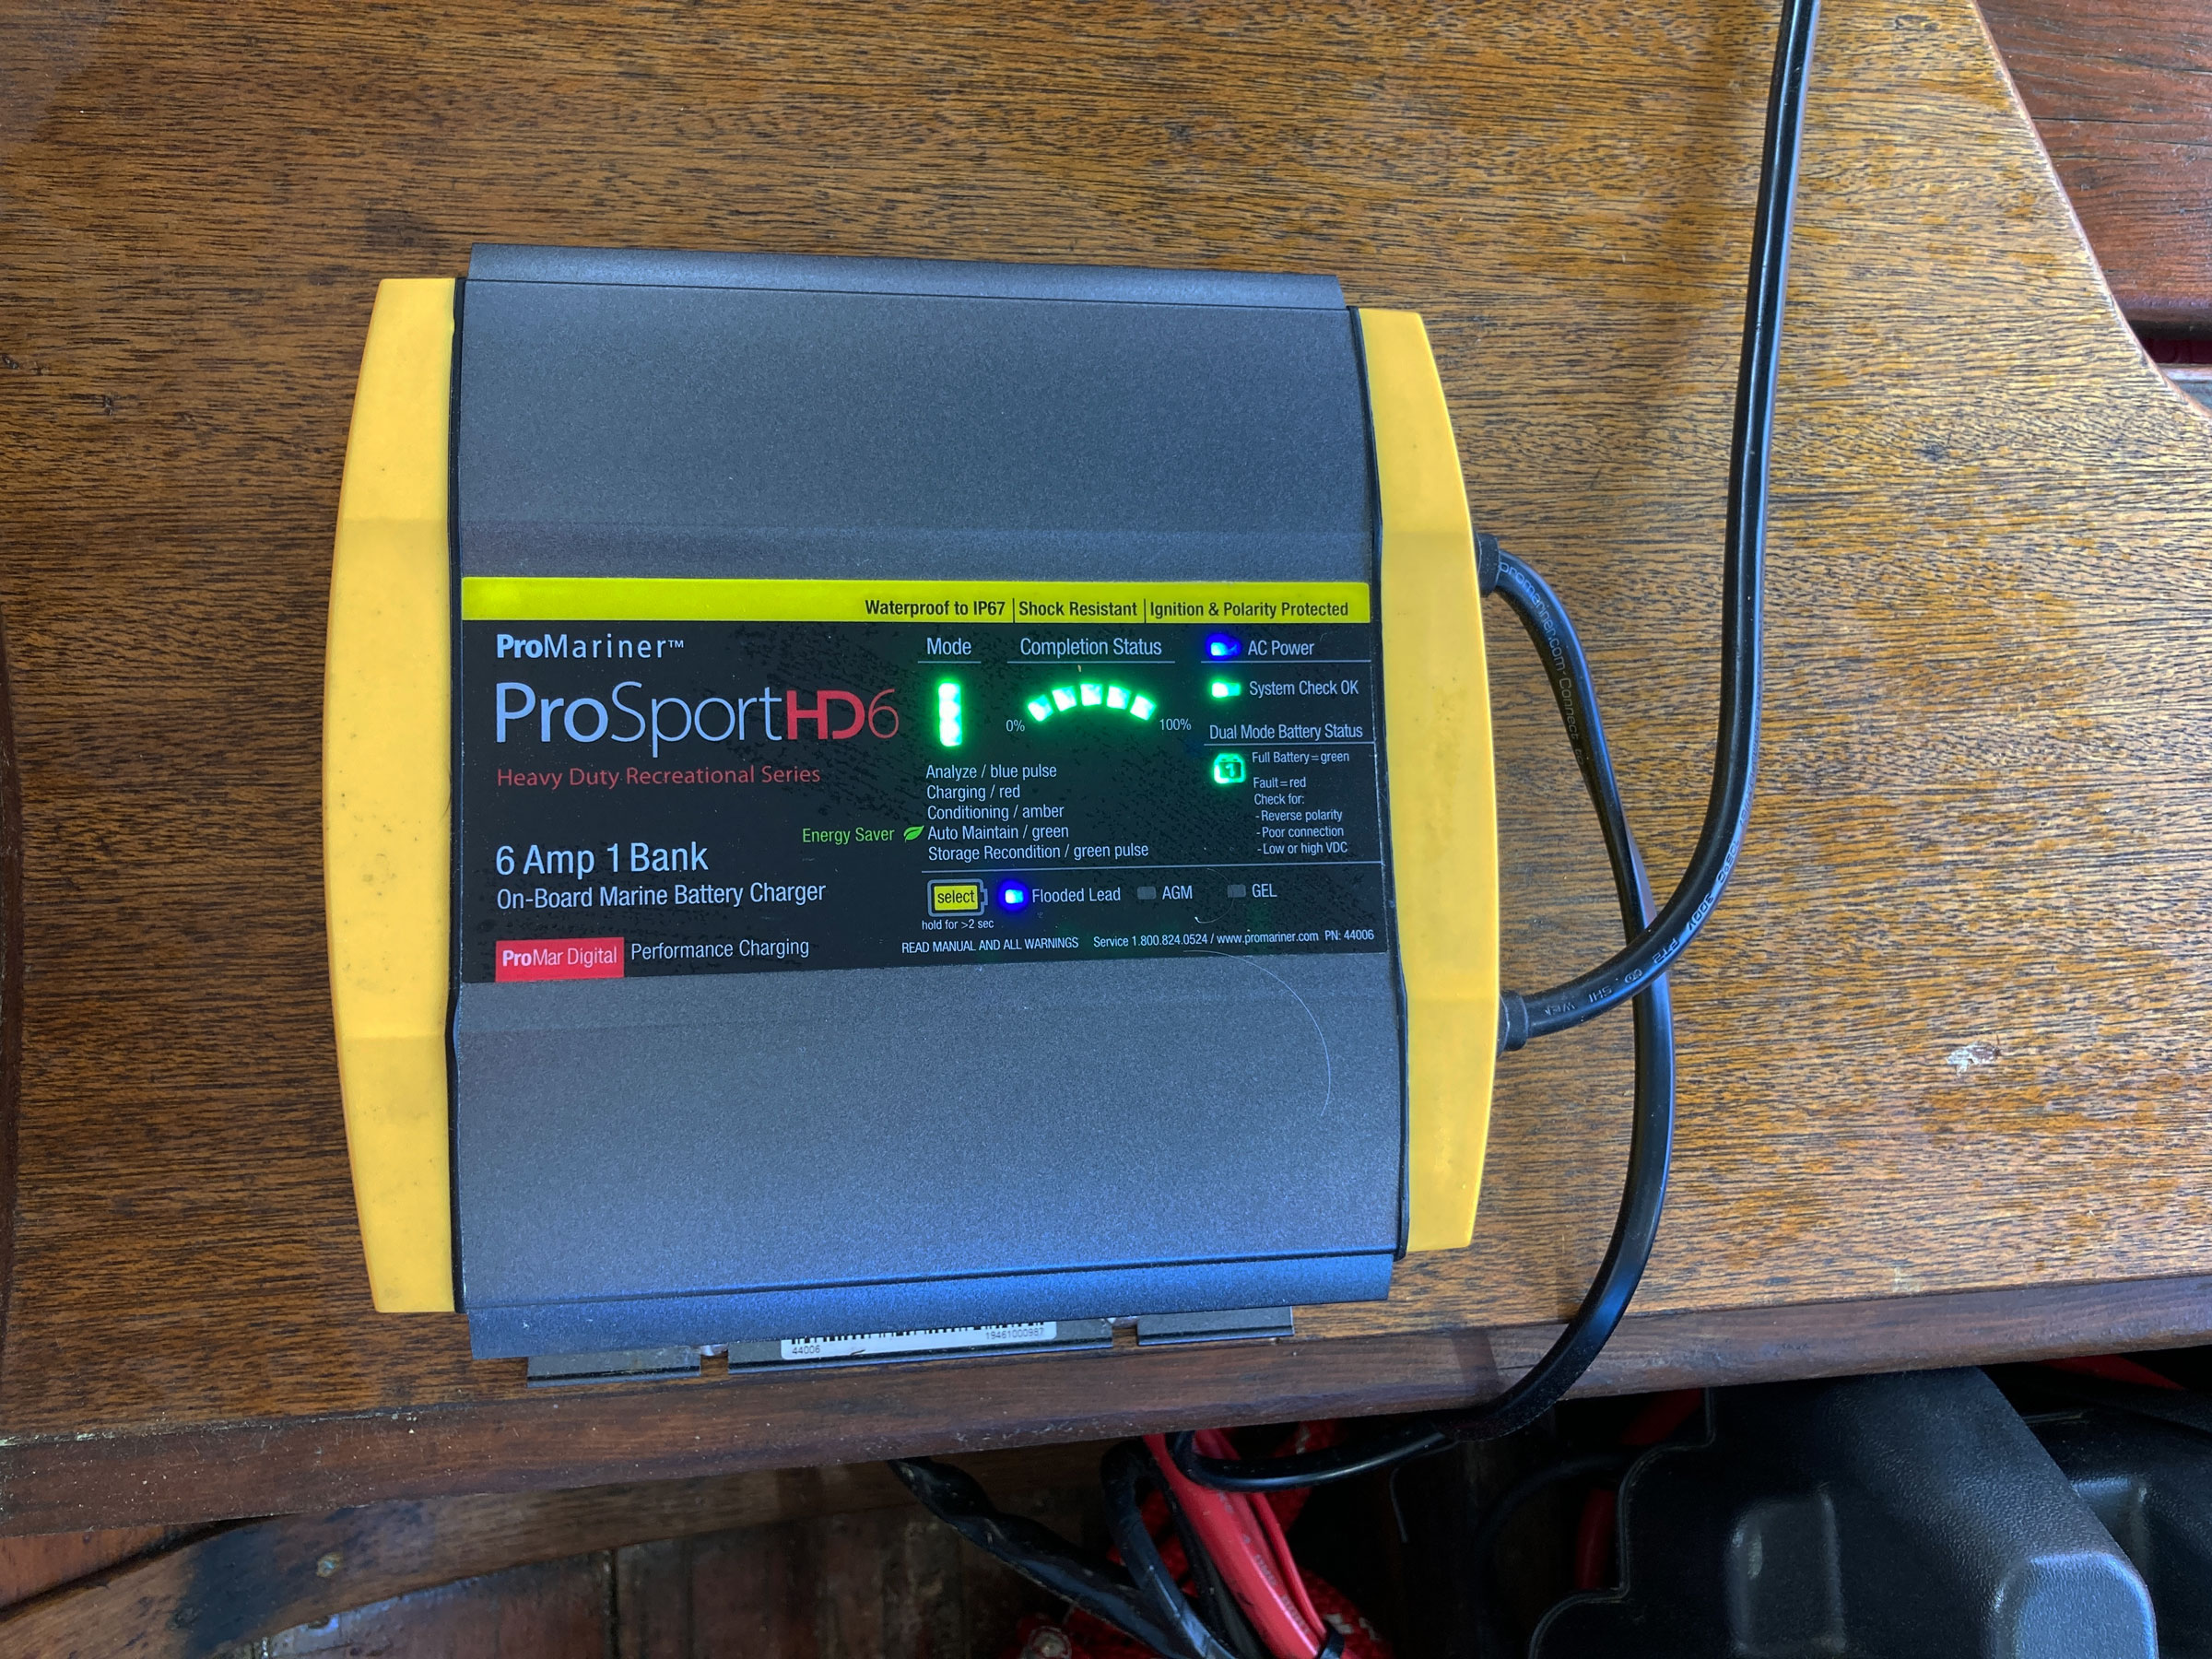
The tender’s indicators provide full status reports on the battery’s state of charge.
For the past year, we’ve had a ProMariner ProSport HD6 installed aboard our vintage Sorg 15 runabout to maintain the 12-volt battery we use for powering the electric start on the outboard, running lights, USB port, and automatic bilge pump. The ProSport HD6 is a heavy-duty 6-amp tender that will charge one 12-volt battery. There are also tenders available in ProMariner’s same series of chargers to manage a bank of batteries with a pair of charging wires for each battery whether they are separate, in series, or in parallel.
The HD6 has a button to select use with flooded-lead, absorbed-glass-mat (AGM), or gel batteries. It is compact, designed for onboard use in the marine environment, shock resistant, and waterproof to the IP67 standard: a 30-minute submersion at 1 meter. After a day on the water, we can plug the HD6 into the shore power on our dock and forget about it; the lower charge rates and tri-surface heat sinks minimize the concern we previously had about leaving a hot charger in a wooden boat.
We installed the tender on the back of the stern seat’s folding backrest. It stays with the boat and only needs to be plugged into shore power to take care of the battery.
The feature of our HD6 that we appreciate most is the LED display, which provides information on charging modes, battery status, and charge completion status. The digital tender operates through five stages of charging: analyzing battery status, charging and conditioning, auto-maintain, and a pulsed mode for storage recondition. These stages are indicated by mode lights on the tender: a blue pulse for Analyze, red for Charging, amber for Conditioning, green for Auto Maintain, and green pulse for Storage Recondition. The tender has a green light to indicate a full battery and a red light for a fault condition—reverse polarity, poor connections, or high or low voltage. Progress of charging is also shown in 20-percent increments. Two additional features are an AC input power light and System Check OK light.
The HD6 was easy to install and is intuitive to operate, and it has saved the purchase price of at least one replacement battery so far. It has reliably ensured that our battery was topped up and ready for use, even after our annual extended hurricane-season boat storage.
Audrey and Kent Lewis have changed homeports from Florida to Virginia, and are planning future messabouts in the Tidewater region in their armada of small boats, which includes their vintage 1959 Sorg 15 lapstrake runabout, WILLOW.
I bought my first Japanese tool in the late 1970s shortly after I started building boats. It was a kataba saw that I had purchased at Toshiro’s Hardware in Seattle’s International District. The store’s owner, Frank Toshiro, asked me what kind of woodworking I was doing—I told him boatbuilding—and if I had used Japanese saws before. When I said I hadn’t, he took from the display case a slender saw with a straight stick-like handle and a rectangular fine-toothed blade. He put a piece of 1×2 pine on top of the counter and sawed an inch off the end. I was already impressed by how quickly and cleanly the saw cut, but then he took the piece that he had just sawn off and pressed it back on the end of the 1×2. It stayed there. The two sides of the cut were so smooth that air couldn’t get between the pieces and a partial vacuum held them together. That sold me on the saw and, over the years that followed, I bought more saws, sharpening stones, and my favorite chisel, a Kote Nomi crank-neck with a laminated blade that took a razor-sharp edge.
Photographs by the author
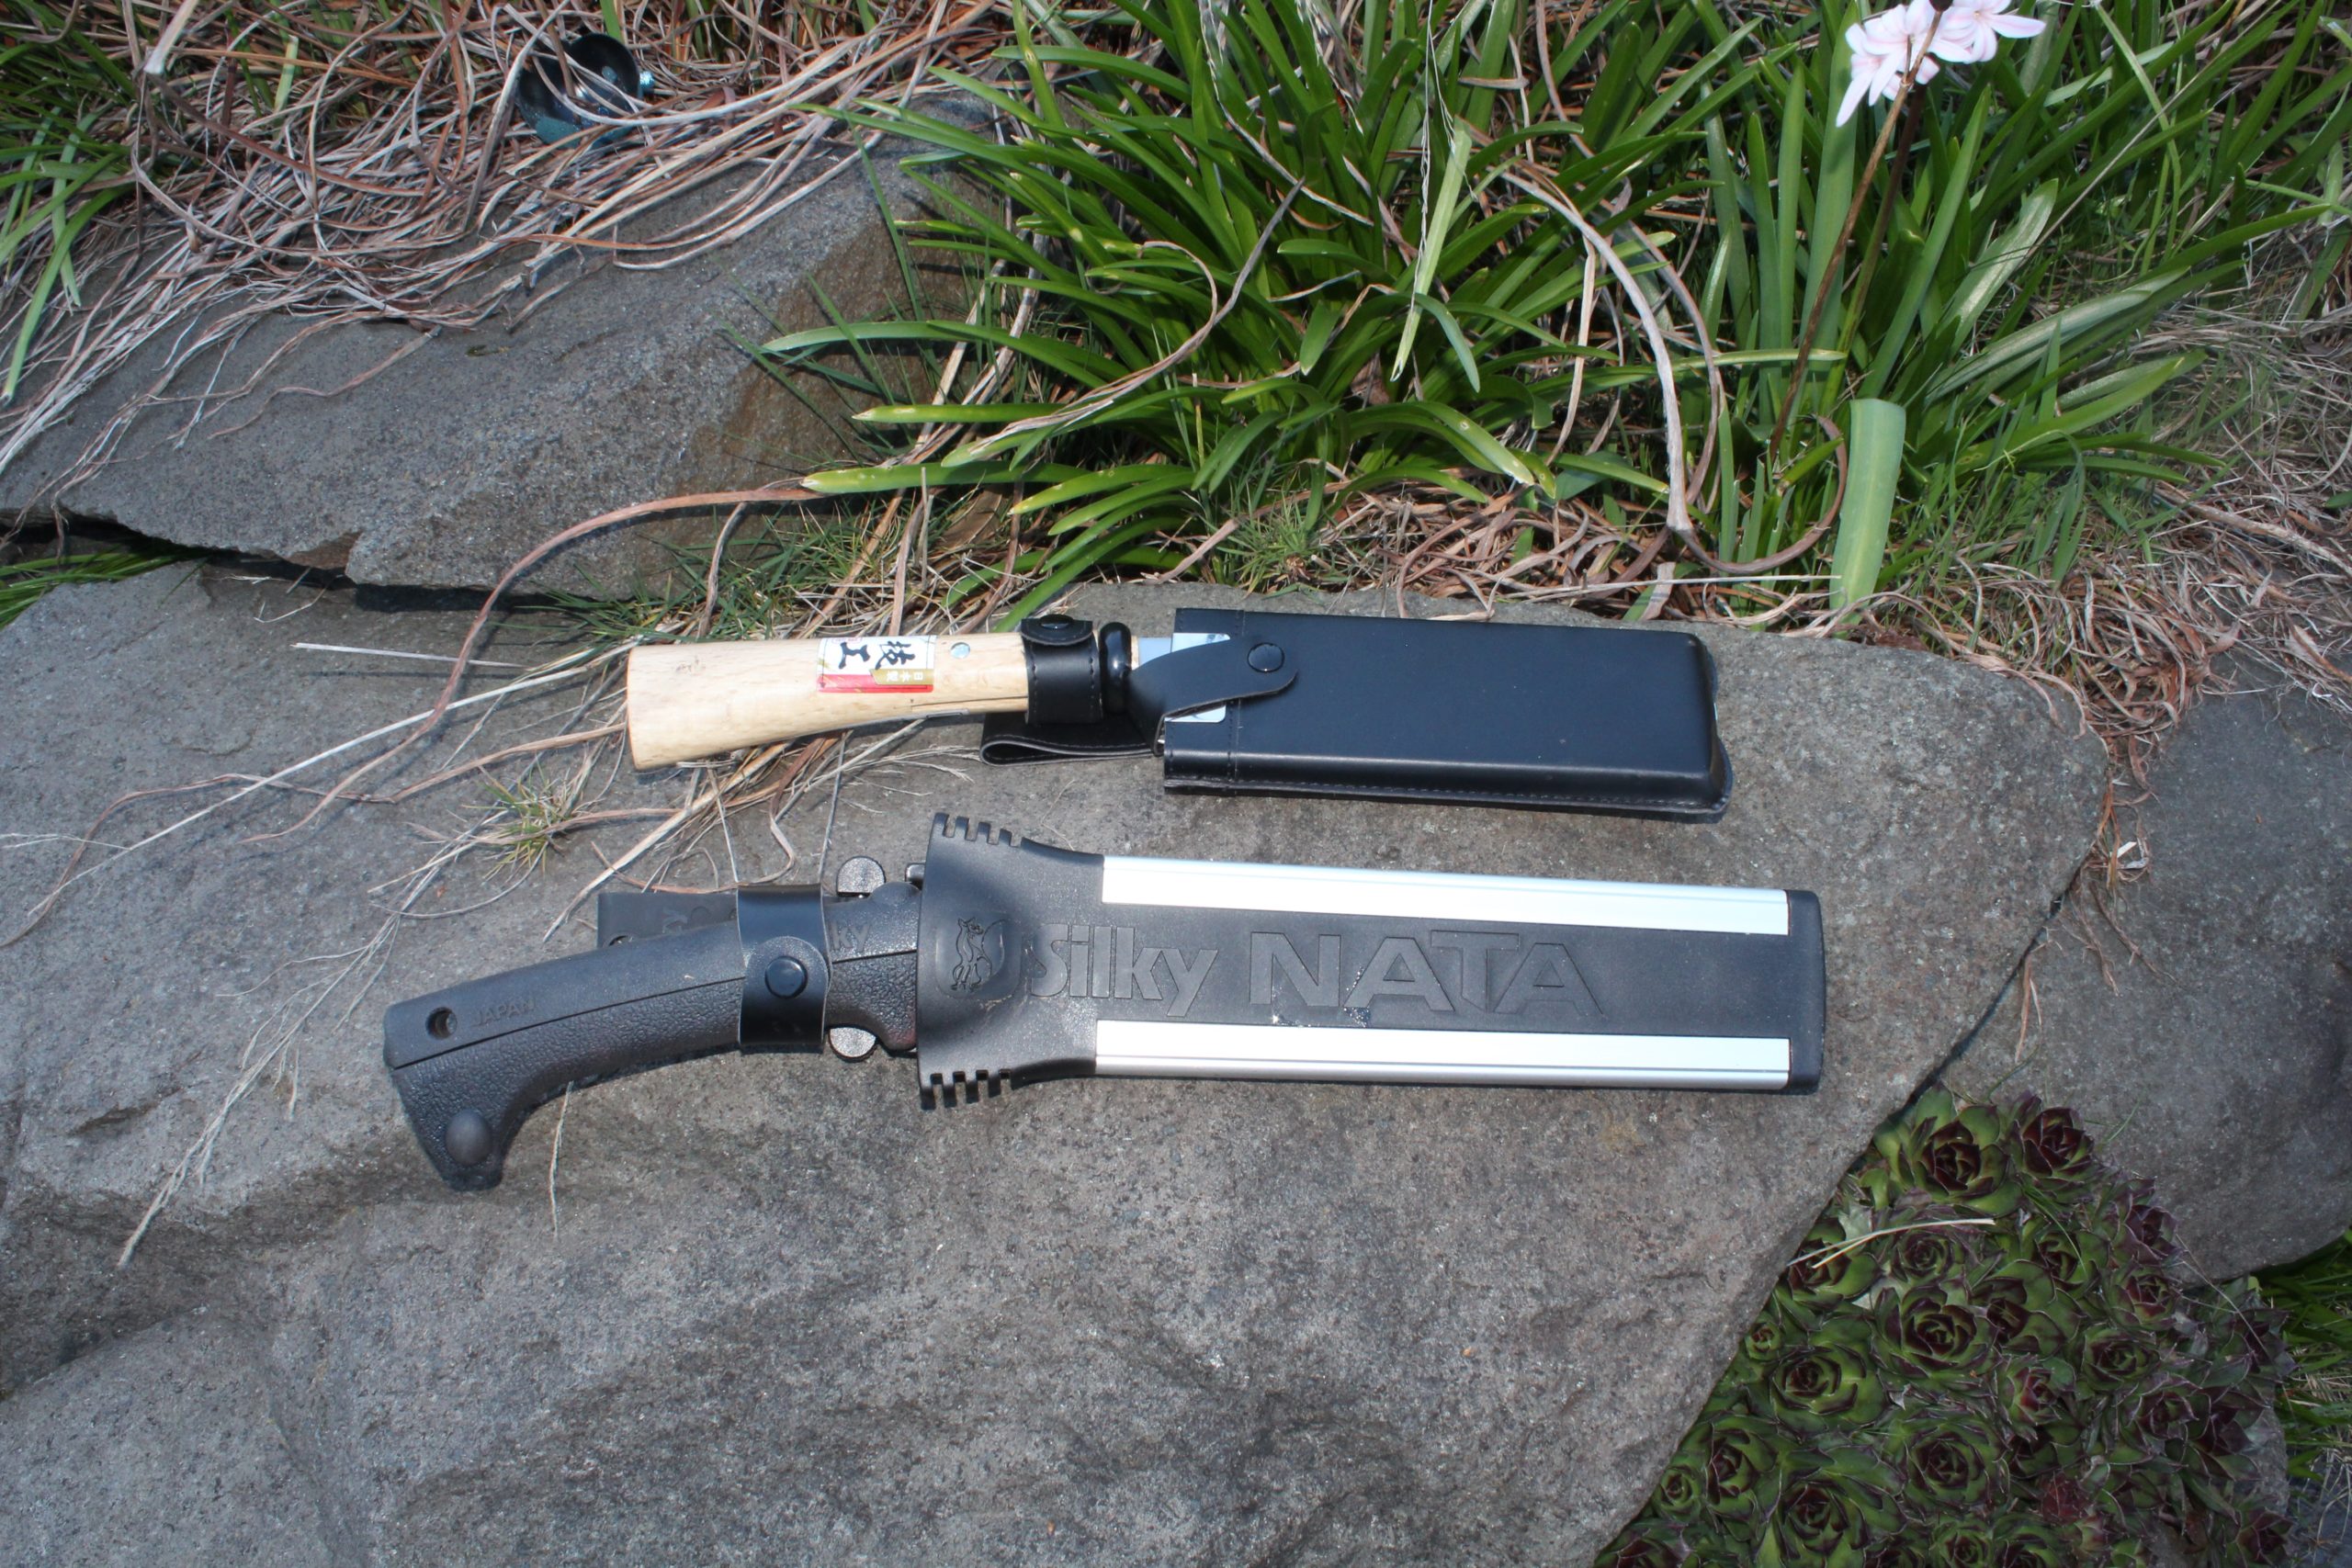
The Kakuri sheath (top), made of thin plywood and faux leather, protects the blade well, but is not made as well as the nata. I’d keep it in a backpack to make it last. The Silky sheath is quite sturdy and made of aluminum and tough plastic and will carry the nata in either orientation for left- or right-hand use. The belt loop clips into the back side, so the sheath can be removed without taking the loop off your belt. Both sheaths have a loose fit on the blade and rattle a bit when carried on a belt.
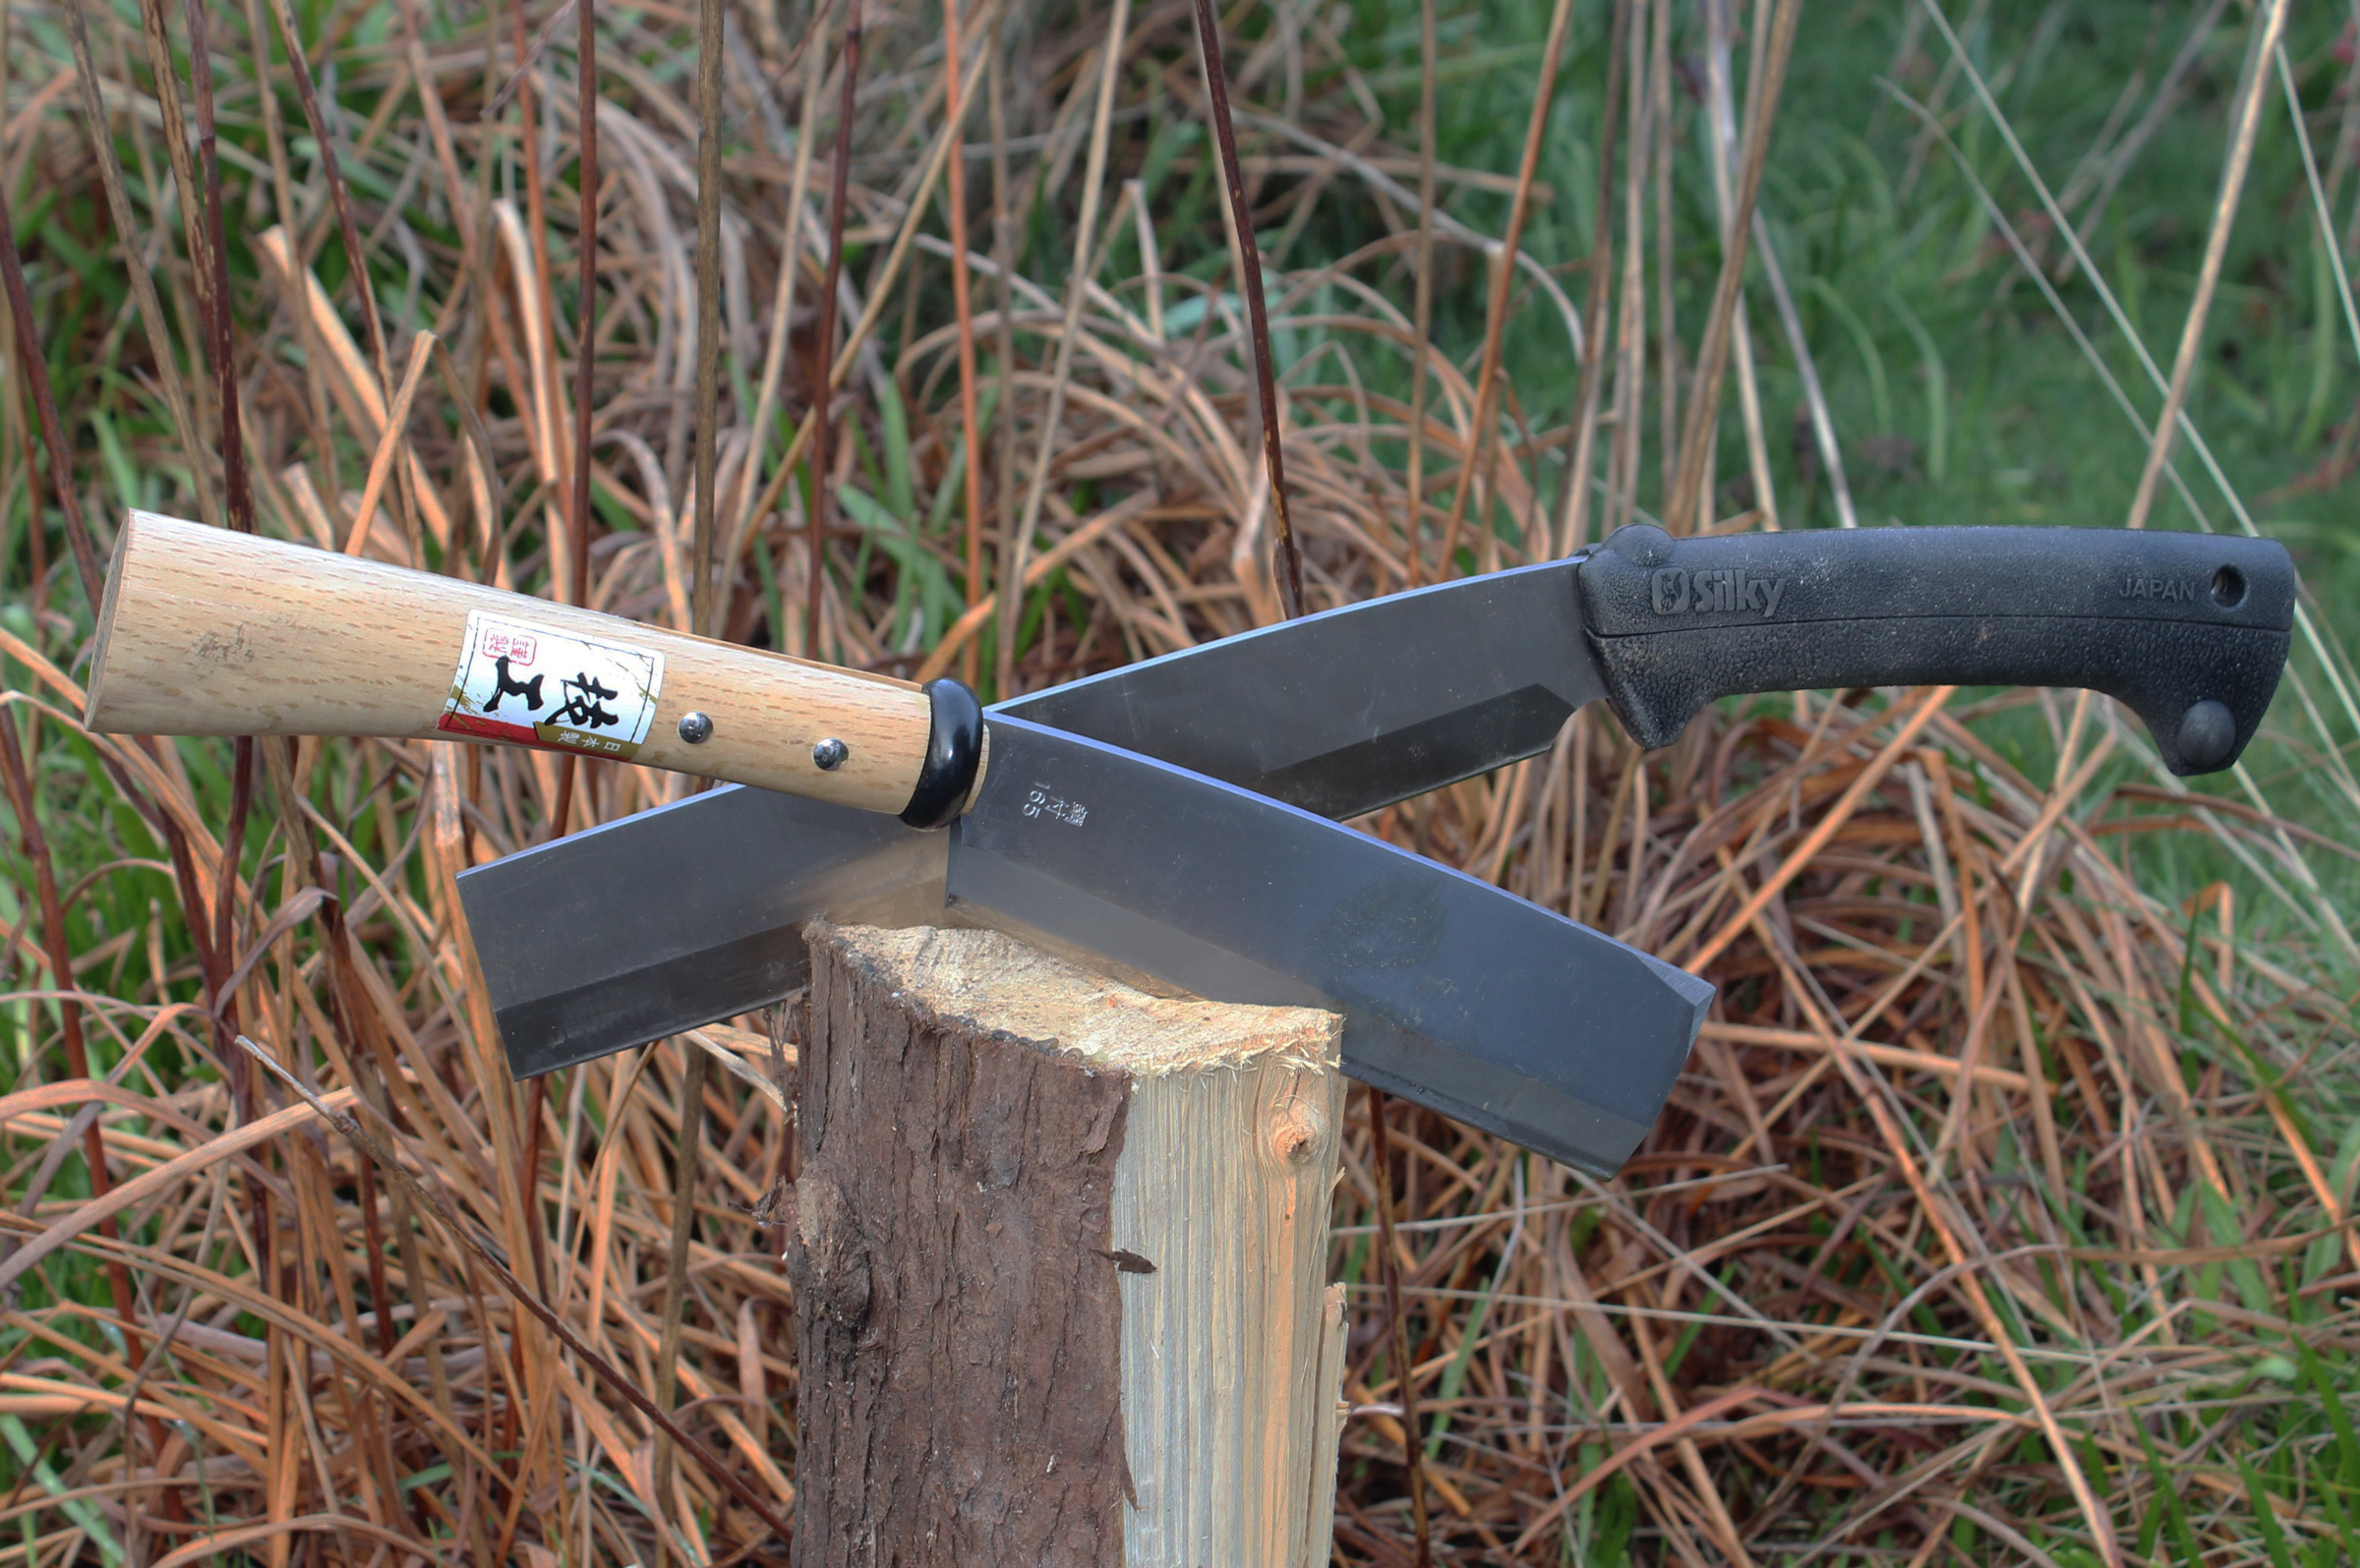
The Japanese tools looked different and often worked in different ways, but they always took very sharp edges and were easy to use. My two most recent purchases have been no exception. They are natas, outdoor tools that look like short machetes but are used as hatchets. I have a 165mm single-bevel nata from Kakuri and a 240mm double-bevel nata from Silky.
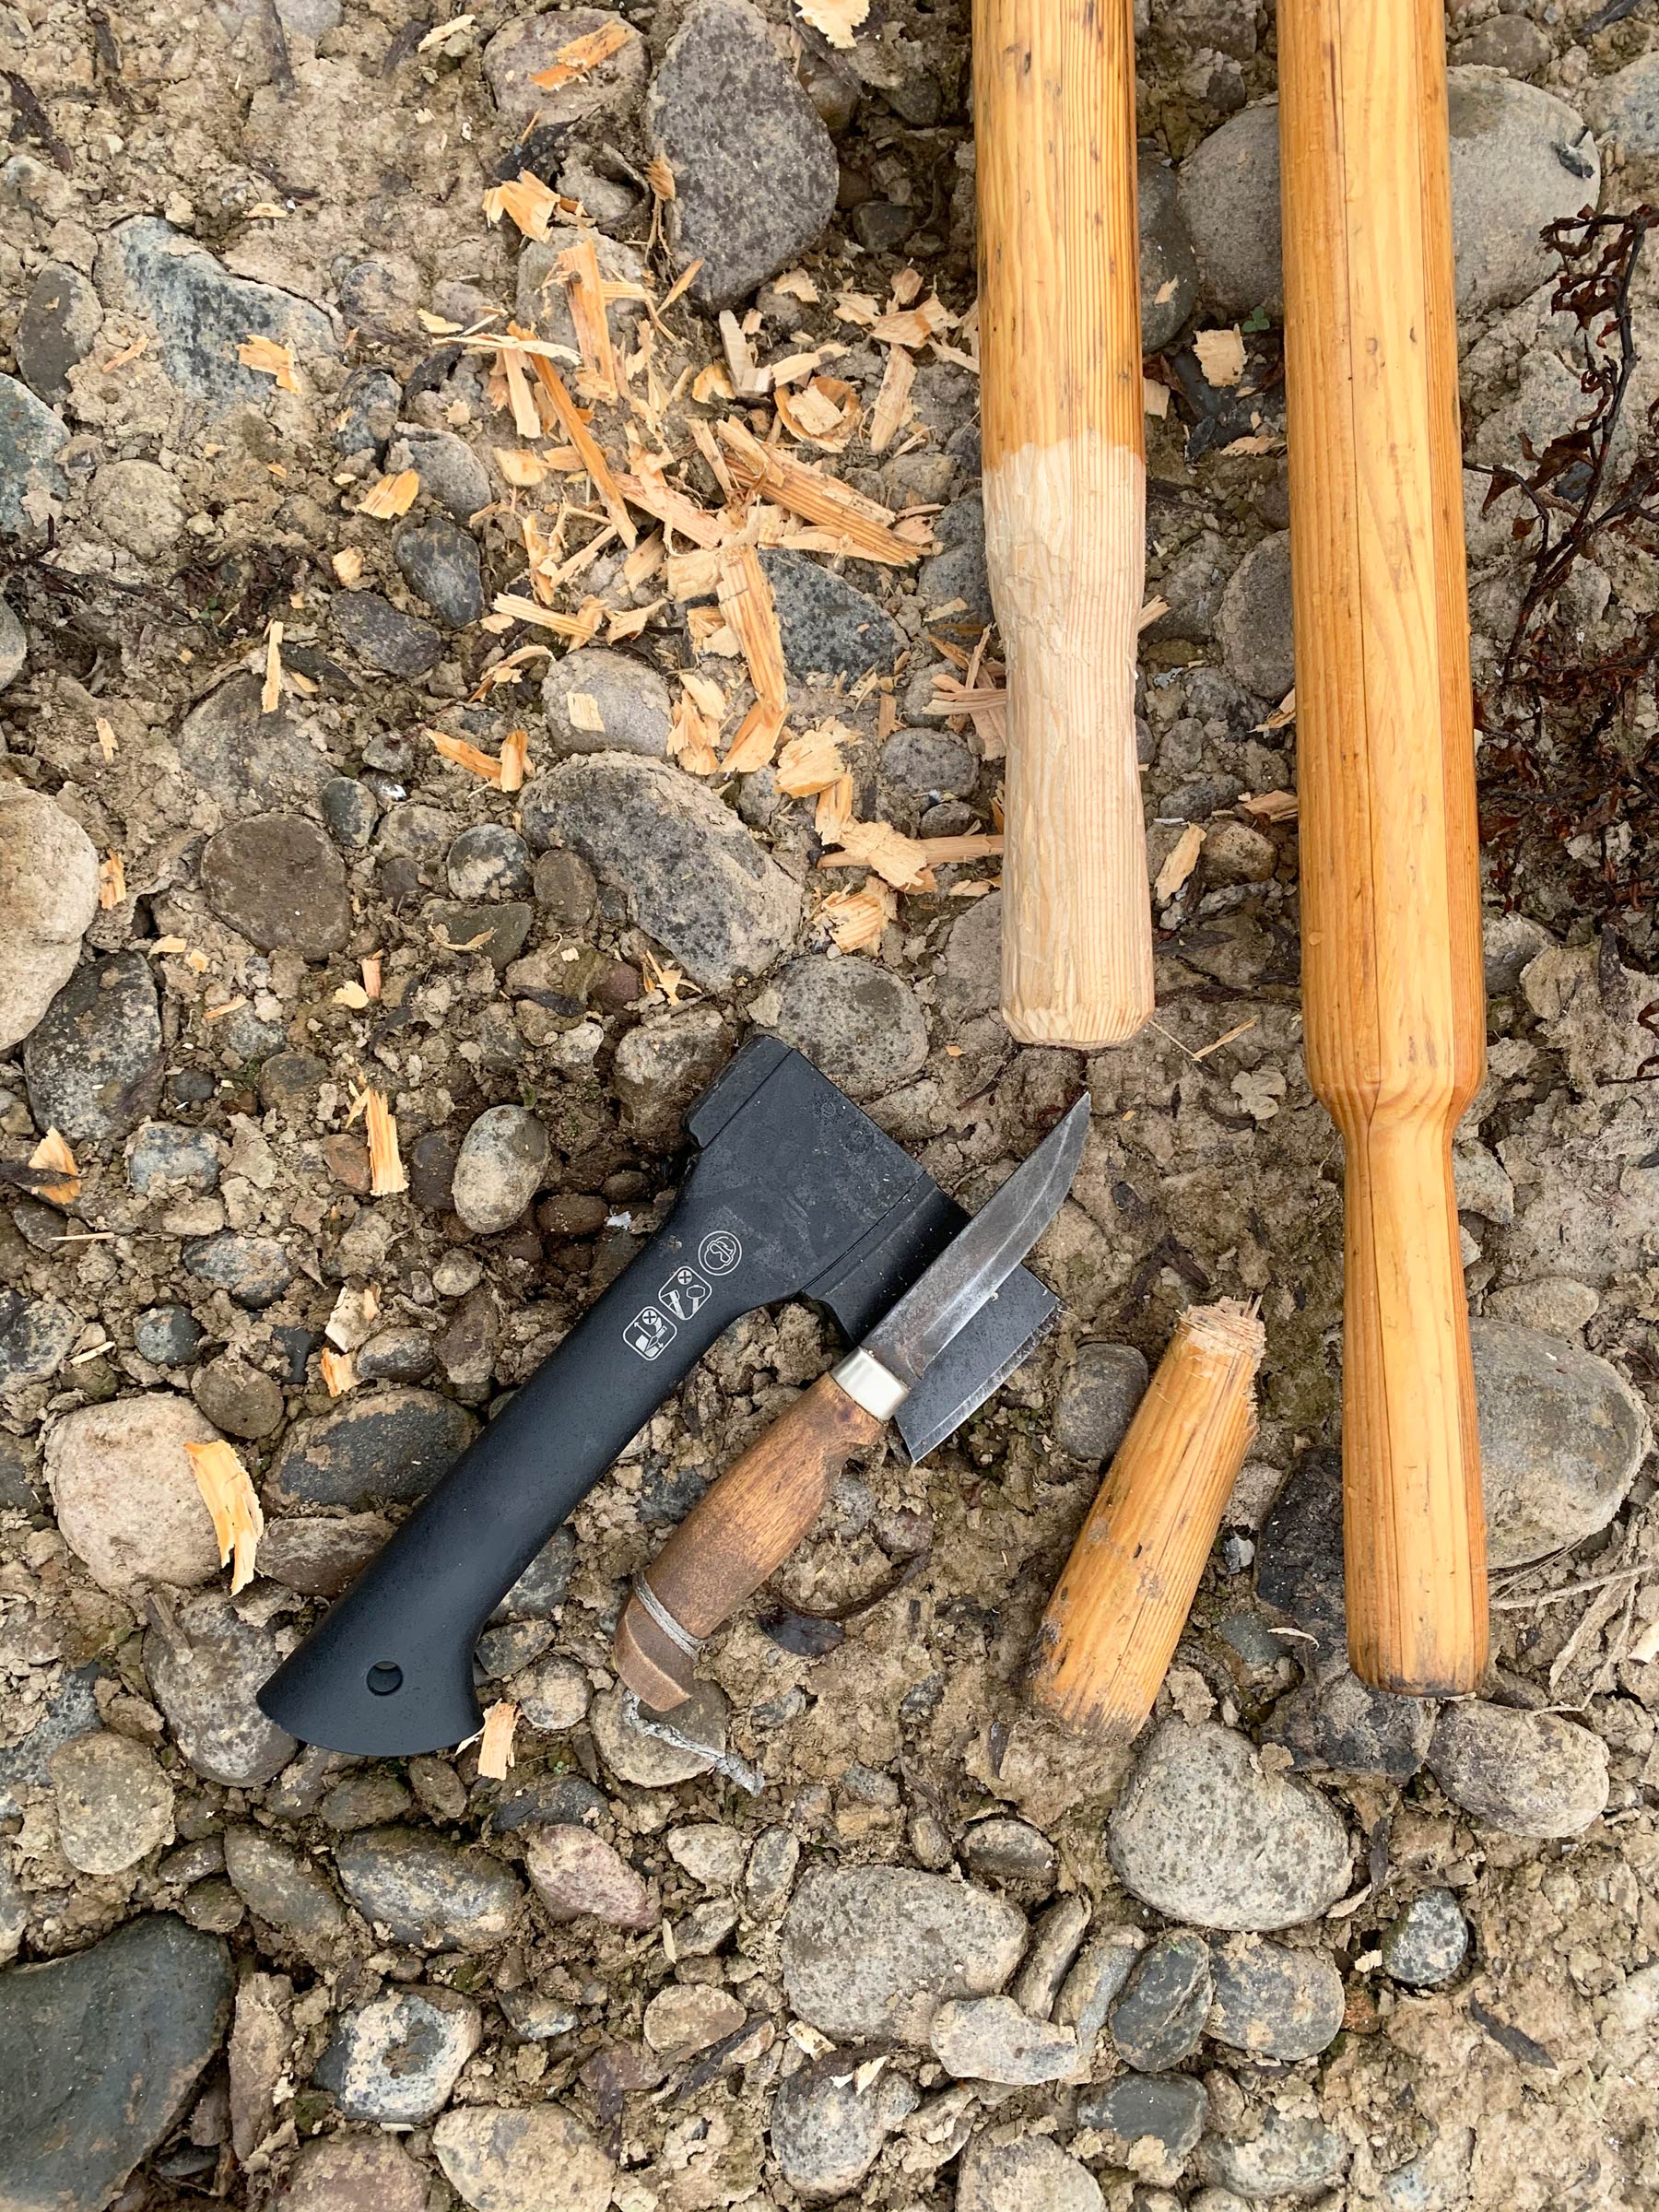
Both natas are very sharp and and can quickly whittle feather sticks for fire starting.
The Kakuri nata is made in the traditional form. It has a short tang pinned in a 7″ oak handle; a steel ring around the throat pinches the two parts together. The 165mm (6-1/2″) blade is made of 1/4″ steel, and the tool has an overall length of 14″ and weighs 1 lb 3.6 oz. It has a single bevel for a right-hander. The single bevel is favored by arborists, and used with the flat side next to the trunk when trimming branches. That worked quite well for doing a neat job pruning the pear trees in my yard, though I was interested in the single bevel for using the nata like a drawknife.
The Kakuri’s very sharp edge and 16-degree bevel make it a remarkably quick chopping tool.
The Kakuri’s single bevel makes it work just like a drawknife, though it requires care when holding the end of the blade.
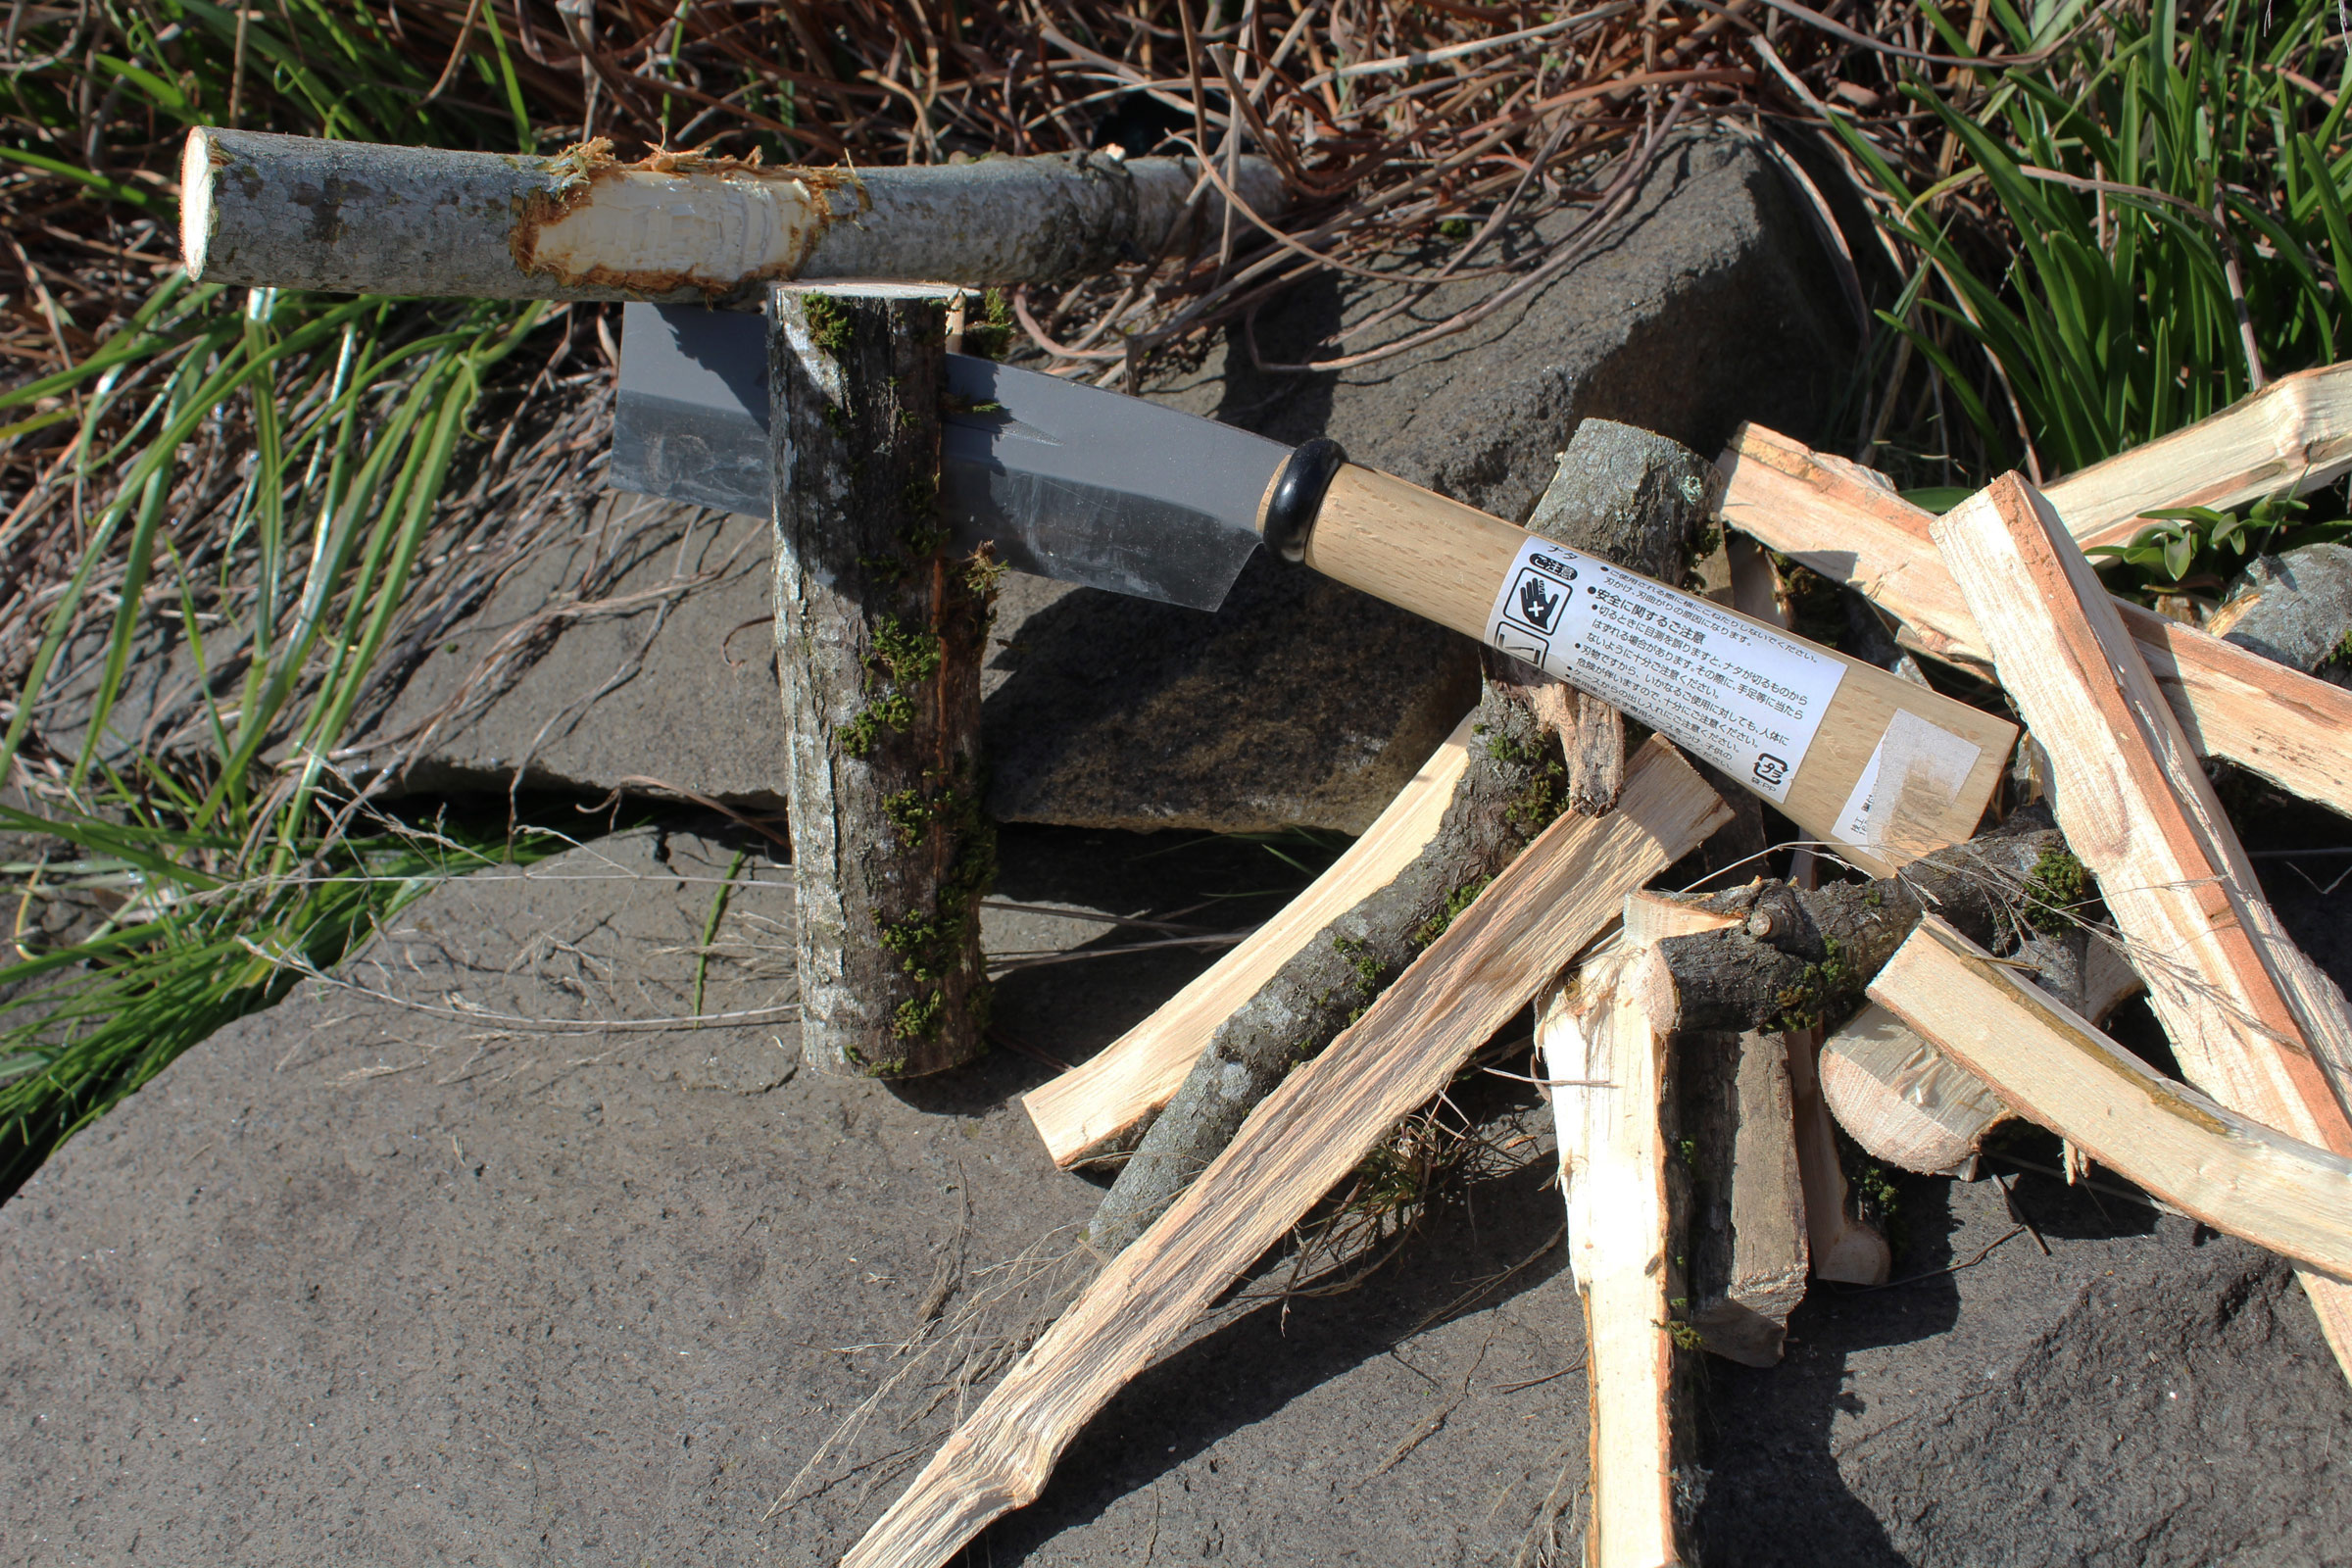
The Kakuri, with its single bevel, can veer a bit when starting a split with a baton, but it quickly works its way into the wood. (The rock isn’t where I did the splitting.)
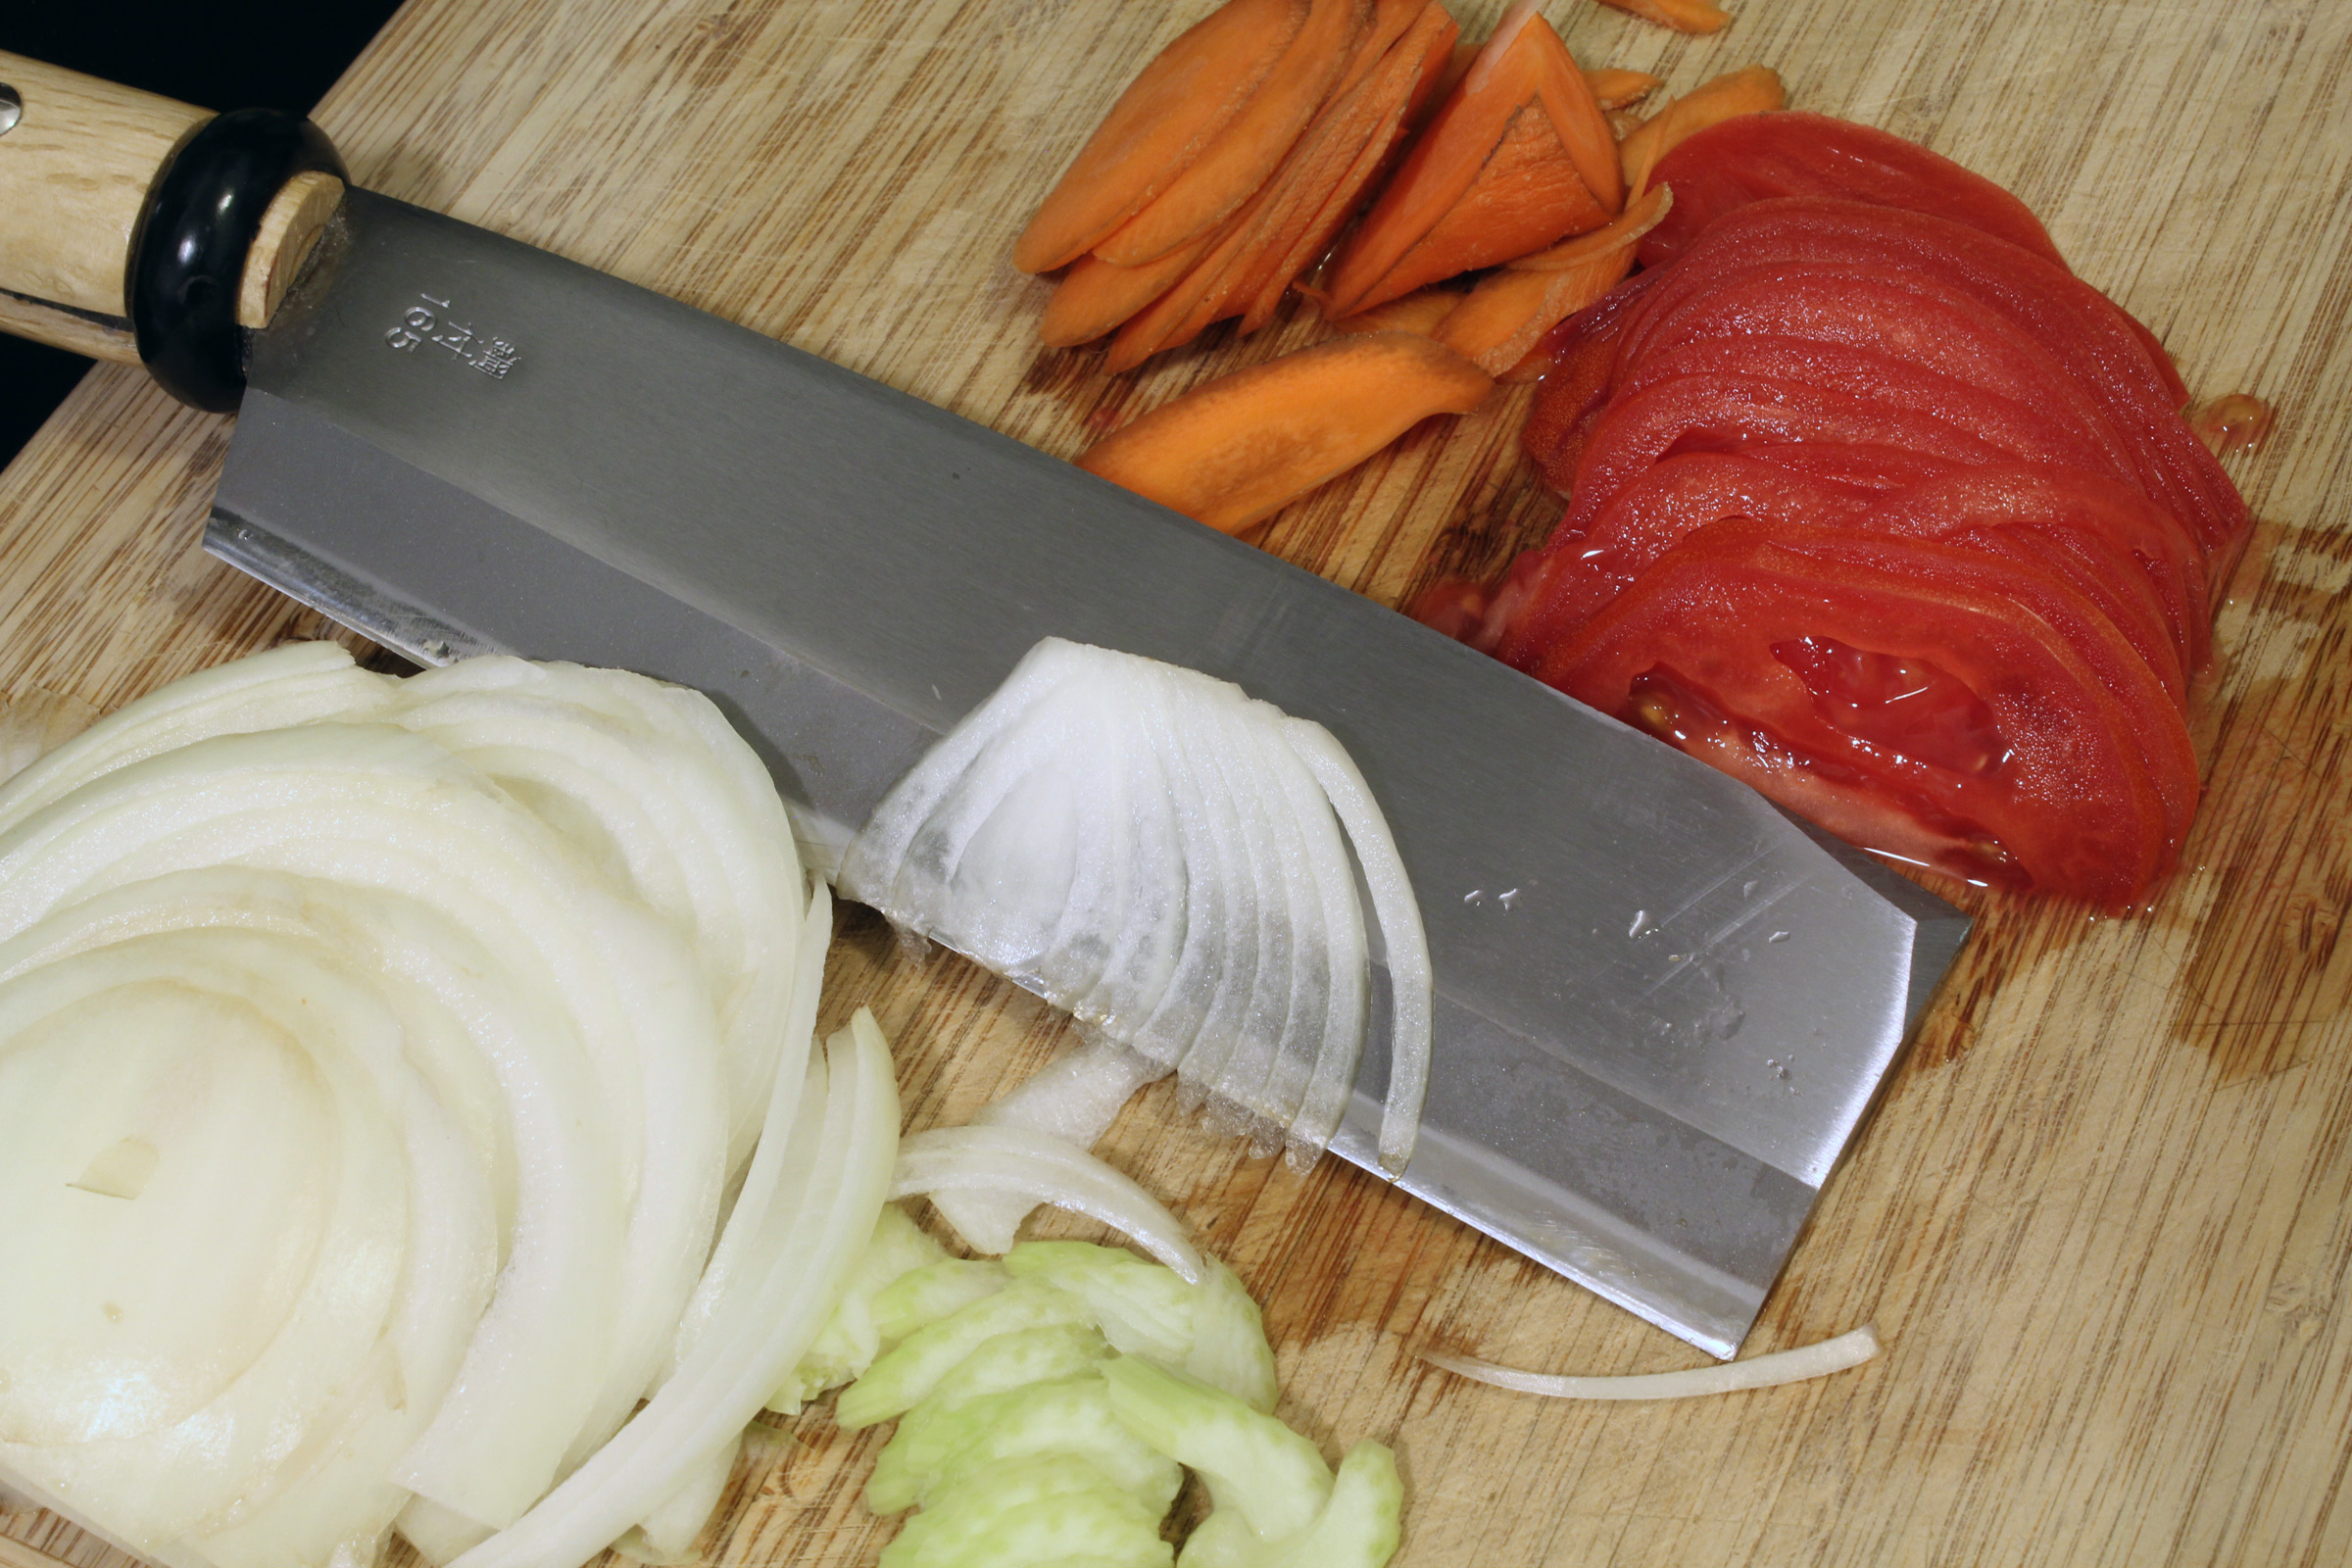
The Kakuri is rather heavy as a galley knife, but its sharp blade does fine work, even with a ripe tomato.
The listing on Amazon, where I bought the Kakuri, says only that the blade is made of “top grade Yasuki steel,” a reference to a city in Japan with a long history of producing steel from local iron sands, steel that was used for traditional Japanese swords. Faint lines on the nata’s blade suggested that it was laminated, with the edge ground into a different piece of steel measuring 1″ wide and 1/16″ thick. The only confirmation of a laminated blade are the characters stamped on the side—鋼付—hagane-tsuke or “with steel,” indicating that the mild-steel body of the blade has a high-grade steel for the edge. That steel can take a very sharp edge and hold it well. The Kakuri nata was quite sharp straight from the manufacturer, and a bit of stropping made it sharp enough to slice through paper held on edge. The steel was durable enough to stay that sharp after doing some chopping and splitting.
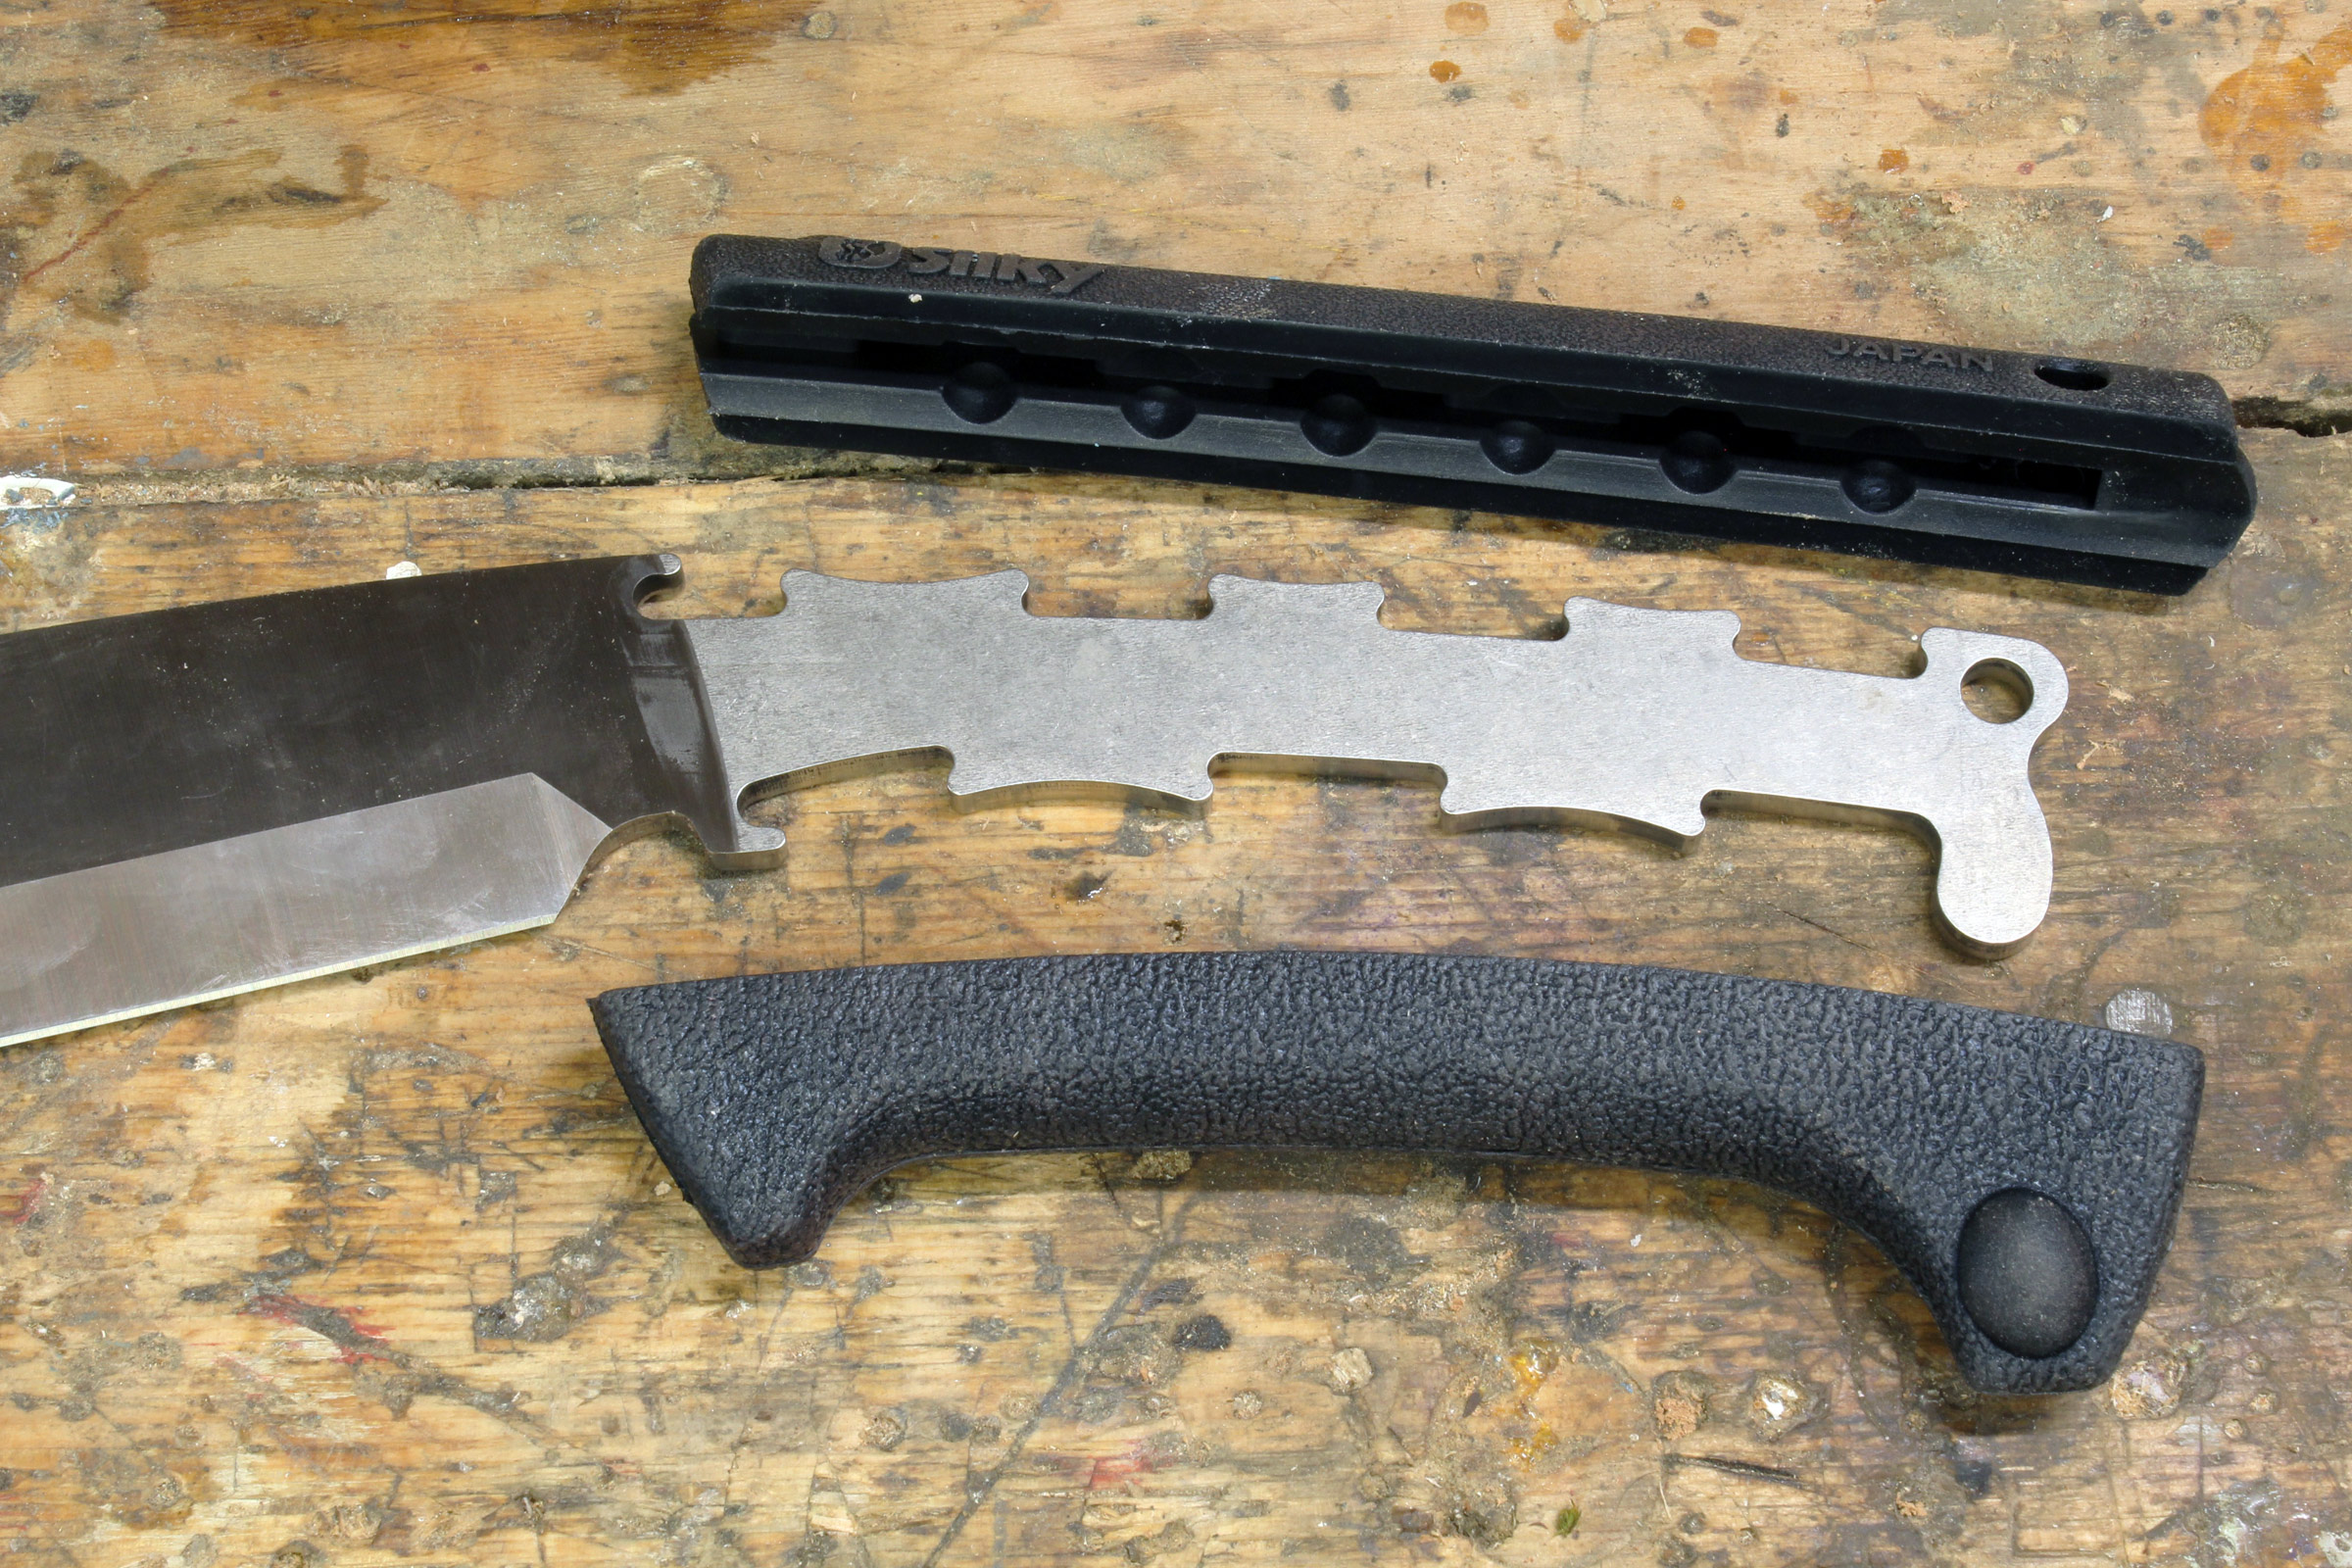
Silky’s Nata 240 is a contemporary tool with a 240mm (9-1/2″) blade of 7/32″ SKS-51 steel (listed as stainless but strongly magnetic); the overall length is 16-3/4″ and it weighs 1 lb 9.9 oz. Mine has a double bevel; a single right-hand bevel is available from some outlets, but Silky no longer makes it. The Silky has a full-tang handle with a two-piece rubber grip that is removable so the blade can be replaced without having to purchase a new handle and sheath.
The Silky got through this branch in four strokes. I inadvertently hit the thumb-like branch angled upward and cut through it as if it weren’t there.
The Silky is very effective when used as a drawknife. The large blade makes for a good hand grip on the end and the double bevel provides good control over the cut.
The Silky was especially good for baton-aided splitting. The long blade provides a good target for the baton and the rubber handle all but eliminates the shock to the hand.
The rubber handle is easily removed if the blade ever needs to be replaced.
The Silky comes with a sharp edge and can be stropped to pass a paper-cutting test. It still was able to cut paper on the edge after doing a bit of chopping and splitting, though not as cleanly.
I took both natas into the woods and used them on some maple and red cedar windfalls. They were impressive chopping tools. On one 2 ½” cedar branch, both got through with four strokes in a matter of seconds. Using the natas in drawknife fashion made it easy to strip bark; the Silky’s double-bevel blade worked just as well as the Kakuri’s single-bevel, whether bevel side up or down.
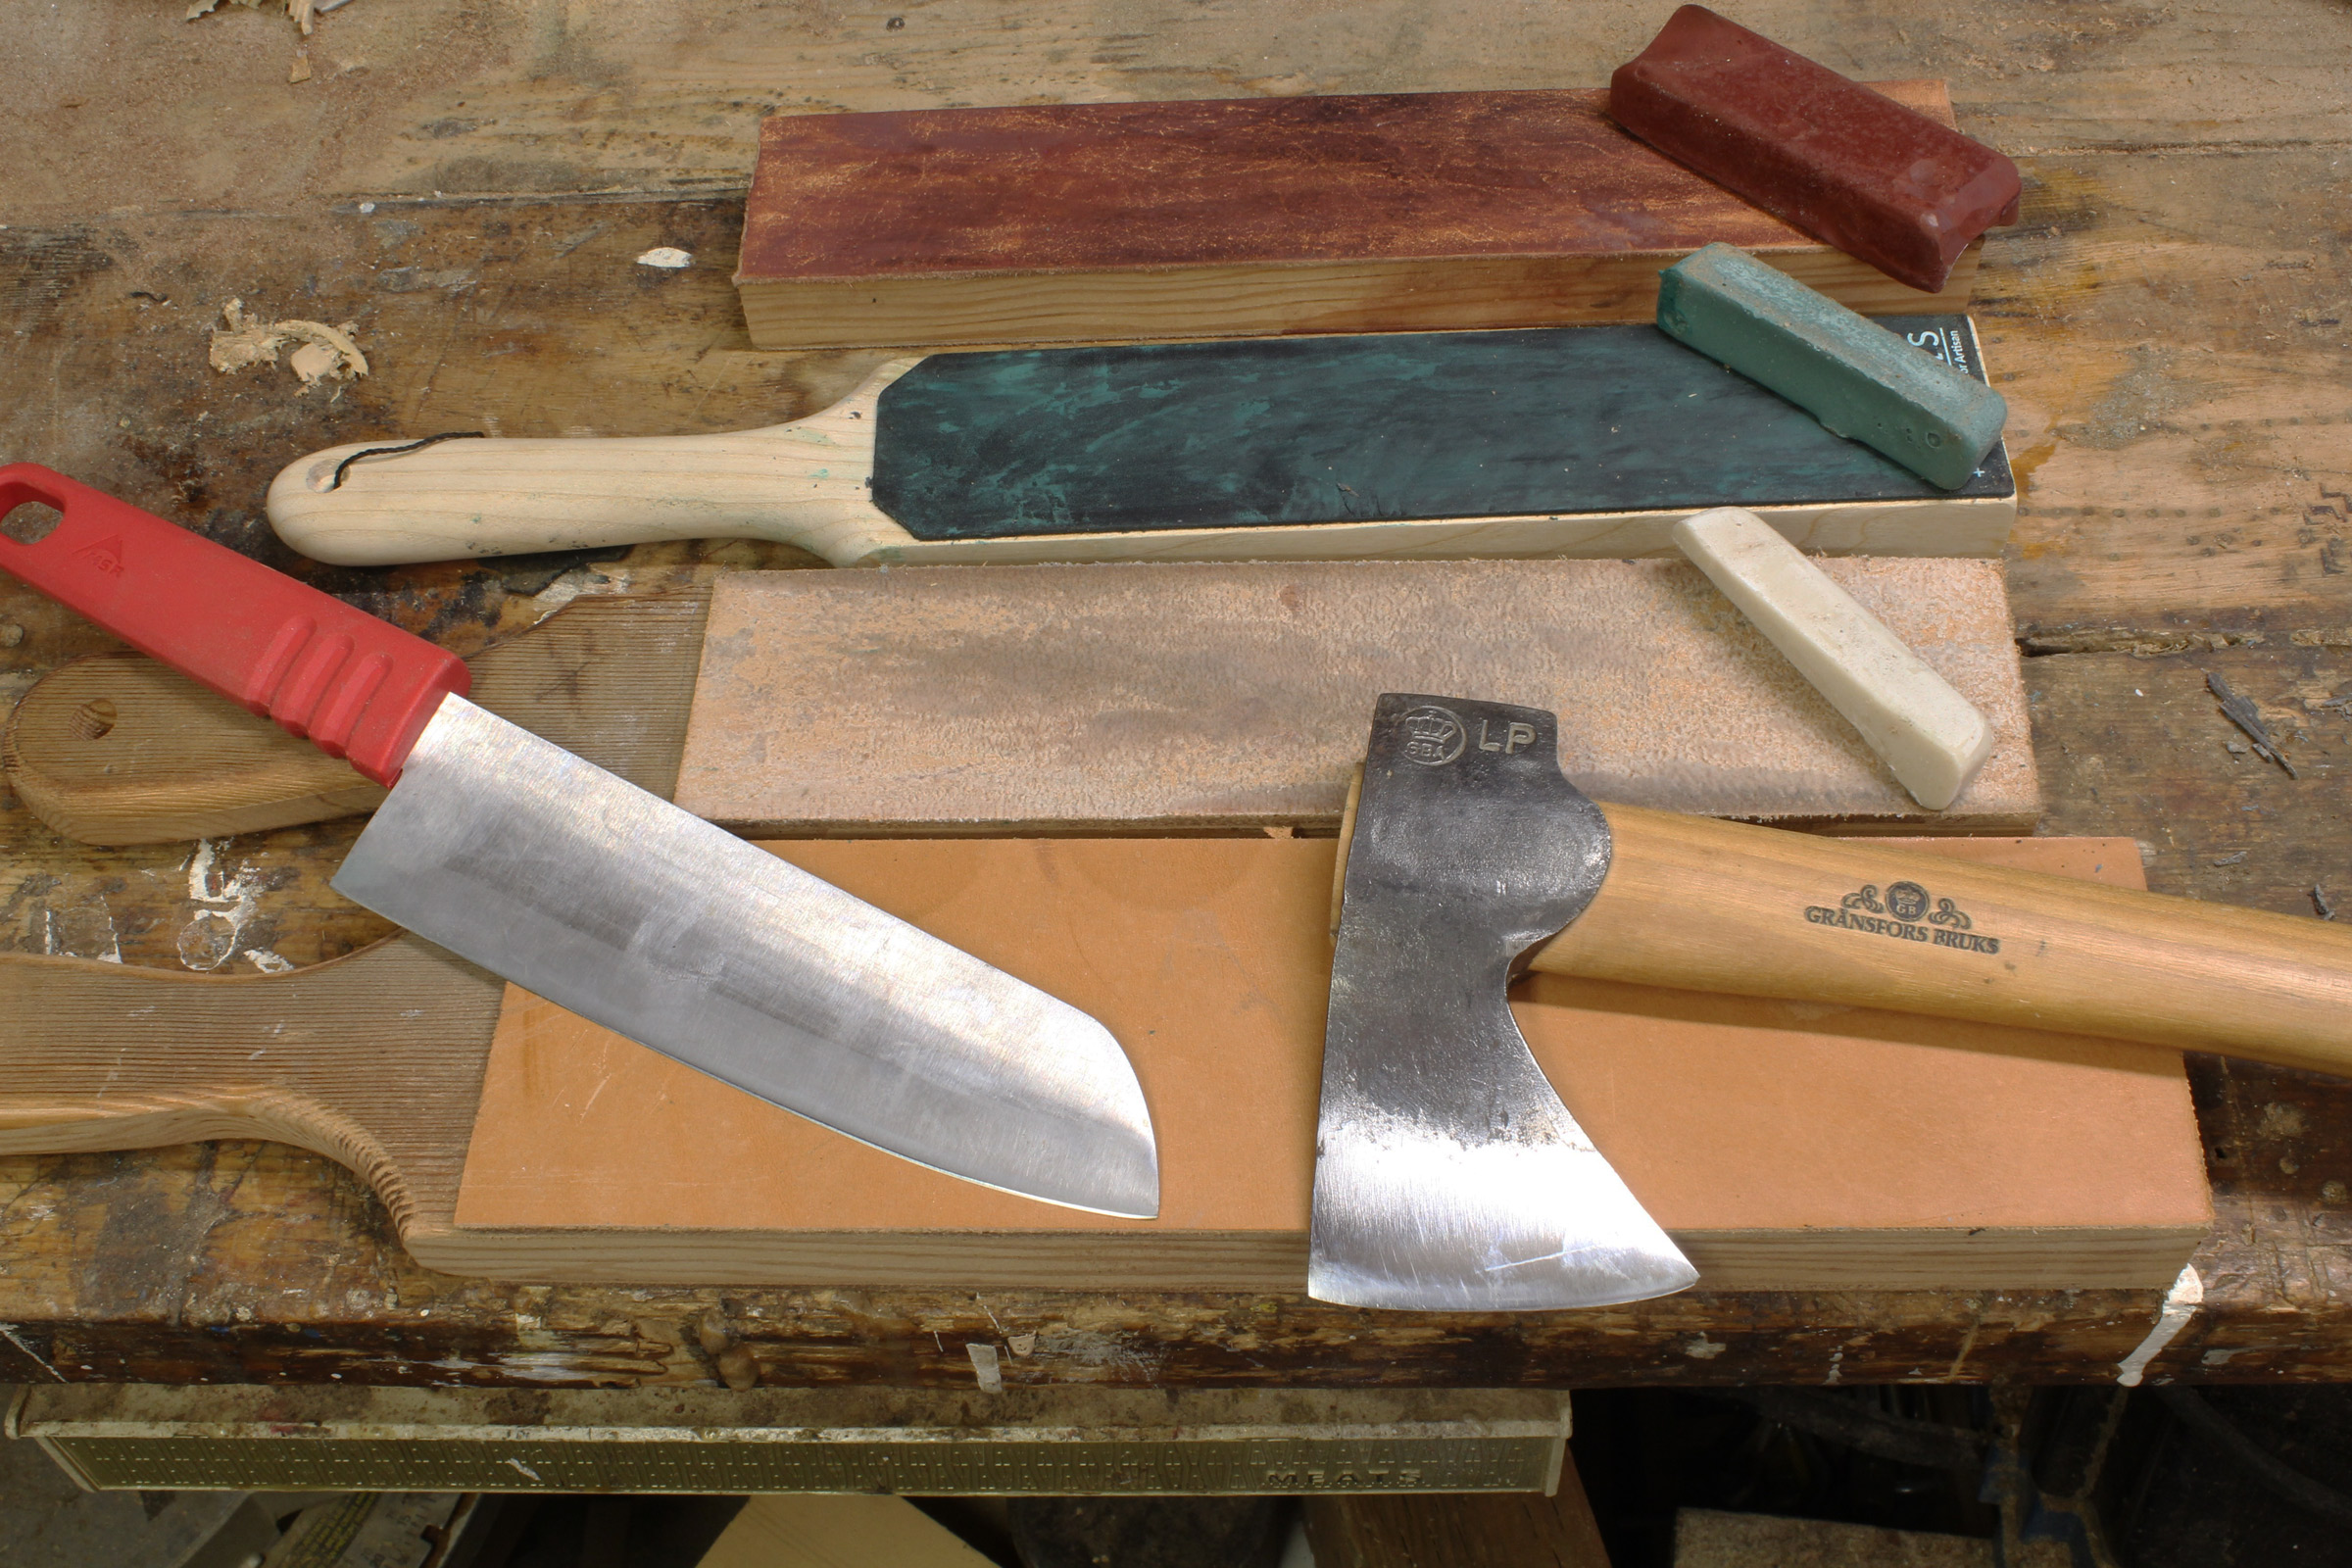
With a maple windfall as a test piece, I used, from left, the Kakuri and Silky natas, a Gränsfors Bruks hatchet, and a Silky Bigboy saw.
As a chopping test, I put the natas up against my Gränsfors Bruks carving axe on a 3-1/2″ maple windfall. The axe, which weighs 2 lbs 3 oz and has a 4-1/2″ blade, broke through with 30 strokes in 30 seconds. The Silky took 39 strokes and 41 seconds. I wasn’t expecting the Kakuri to measure up to the larger and heavier competition, but it cut through the maple with 34 strokes in 27 seconds. I think the Kakuri’s surprising performance might have been due to its fine 16-degree bevel. Both the Silky and the axe have a slightly blunter 20-degree angle. One of the online reviewers of the Silky nata mentioned that sawing is much more efficient than chopping, so I used my Silky Bigboy folding saw and got through the same piece of maple with 41 strokes in 20 seconds.
For splitting kindling, the natas are again very effective tools. With the long blades you don’t have to be quite so accurate as with the short blade of a hatchet, and both the Silky and the Kakuri have enough weight to make splits in small pieces of wood. For larger or knotty pieces of wood that don’t come apart in a single swing, striking the back of the blade will drive a nata through. An axe may bury itself before the wood splits, and you may have to raise both axe and wood to strike the chopping block to continue. The extra length of the nata can leave the tip of the blade sticking out from the wood, providing a place to strike with a baton to continue driving through.
Both the Kakuri 165 and the Silky Nata 240 are very effective tools for campcraft. And just as I was quick to convert from my western push saws to Japanese pull saws, I’ll make the switch from hatchet to the Japanese nata.
Christopher Cunningham is the editor of Small Boats Magazine.
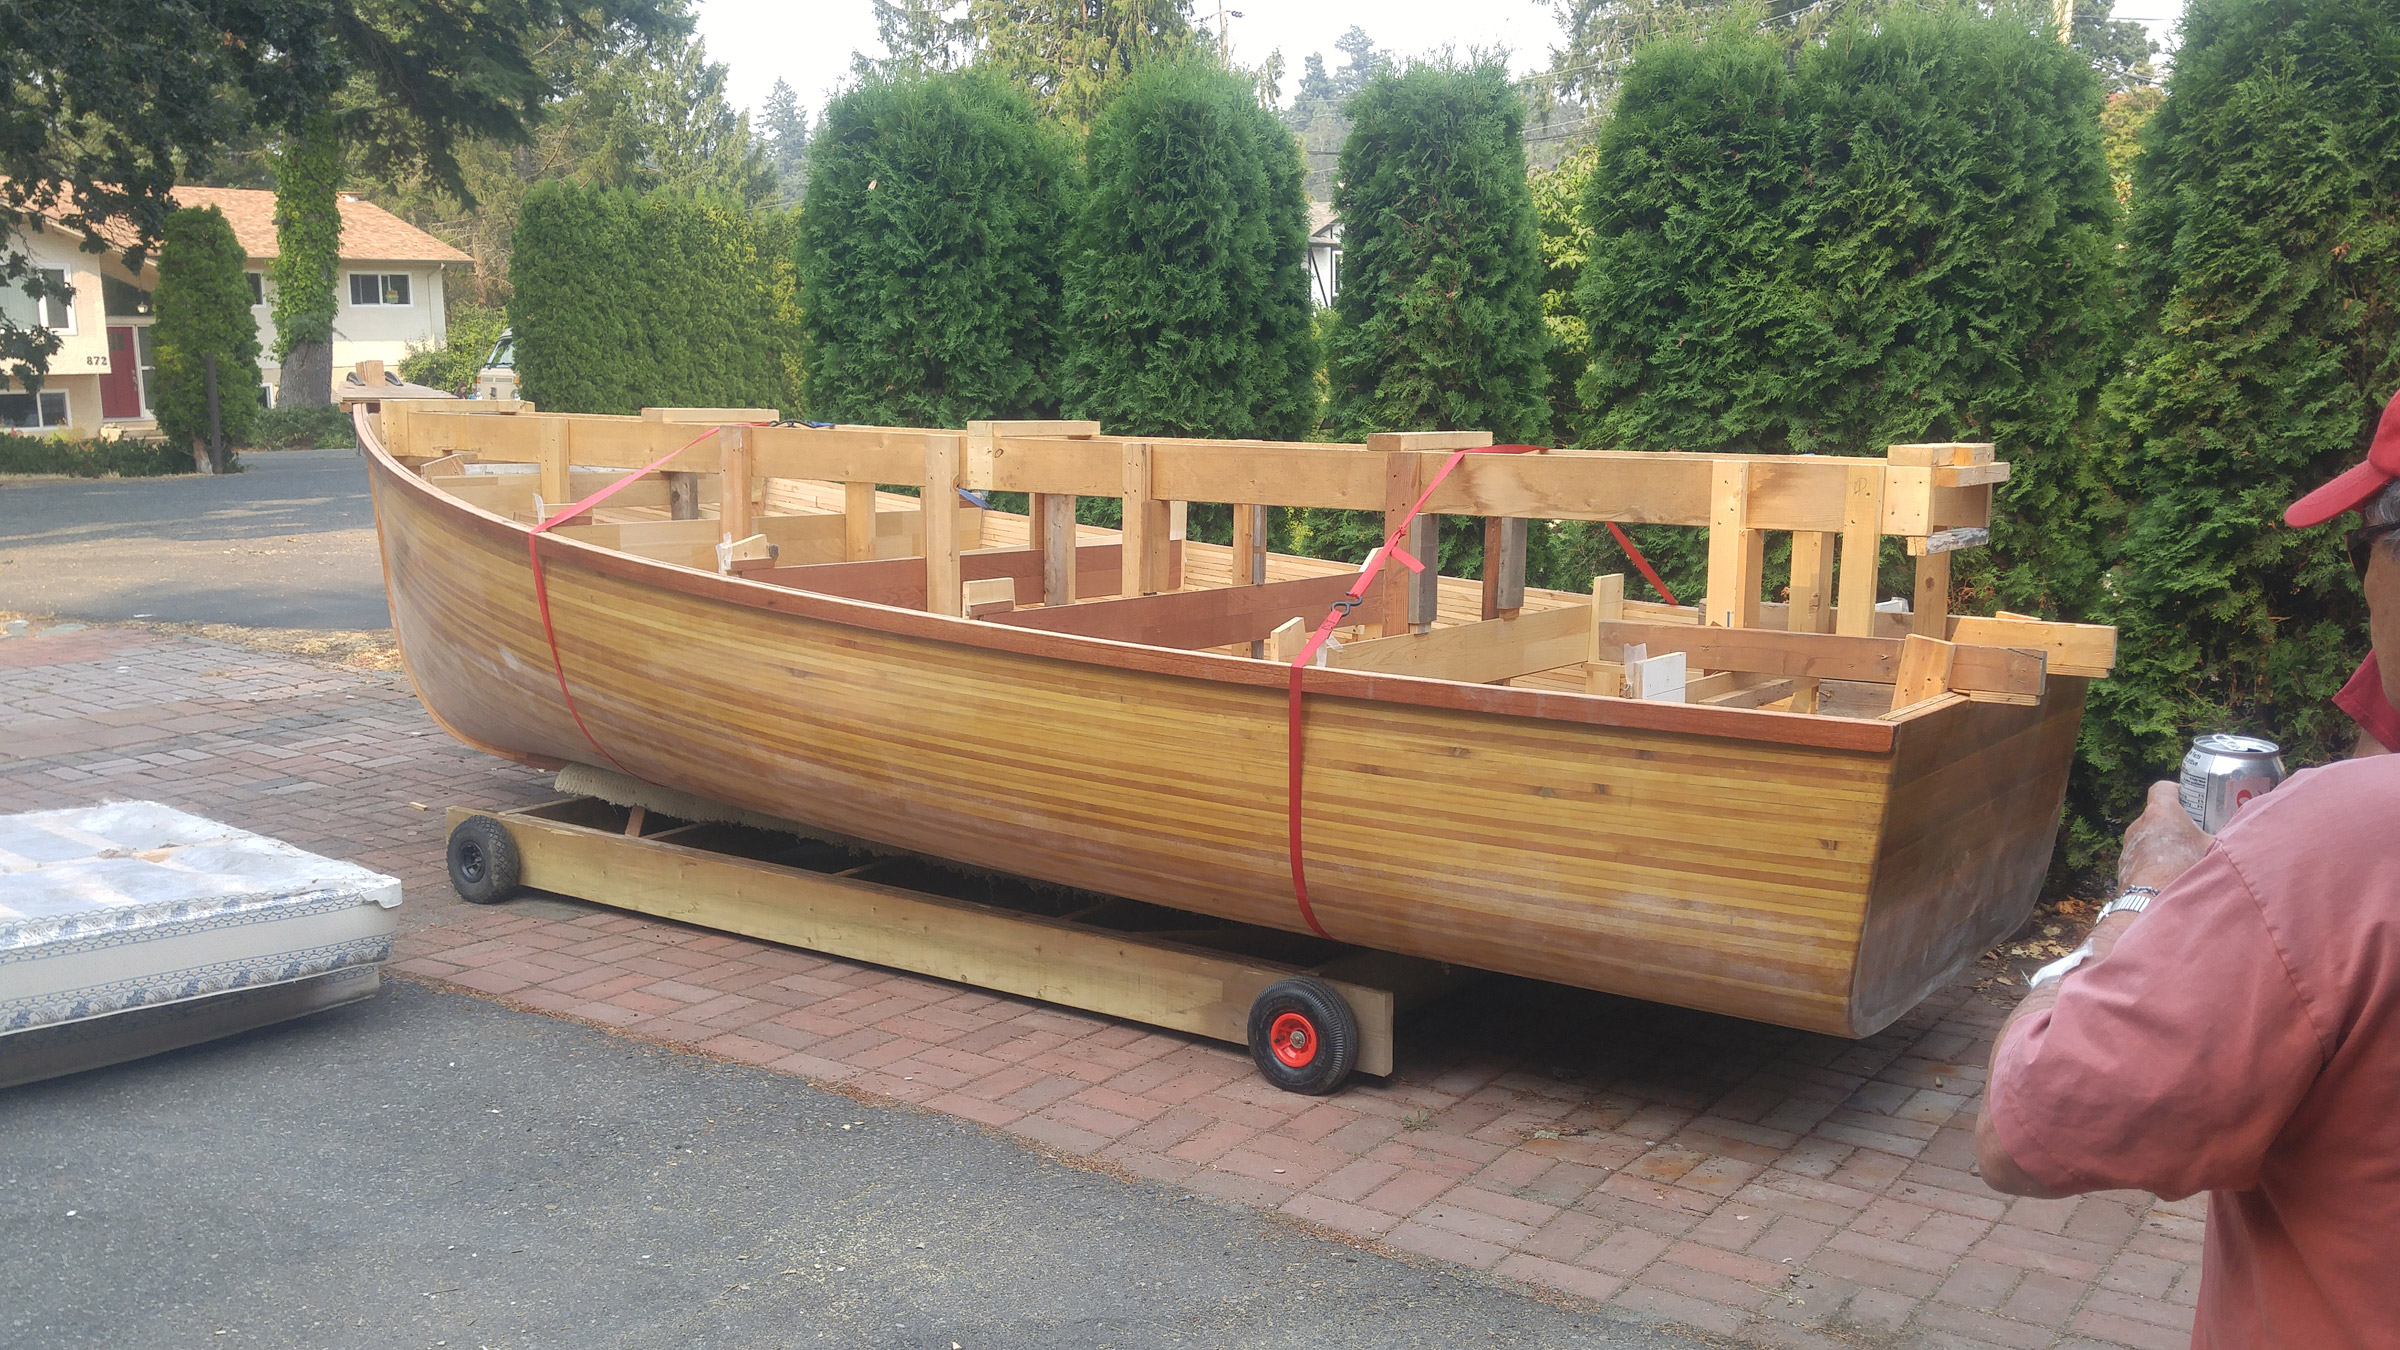
Barry Jensen built his first boat, a Sabot sailing dinghy, 55 years ago, when he was just 14 years old. As an adult, working as a librarian in Victoria, British Columbia, he built more boats: a 14′ plywood Petrel sailboat and a couple of cedar-strip kayaks, to name a few. And, while it was in him to retire after a 34-year career doing work that actually put food on the table, he hasn’t been able to shake his habit as a serial boatbuilder.
Photographs by Barry Jensen
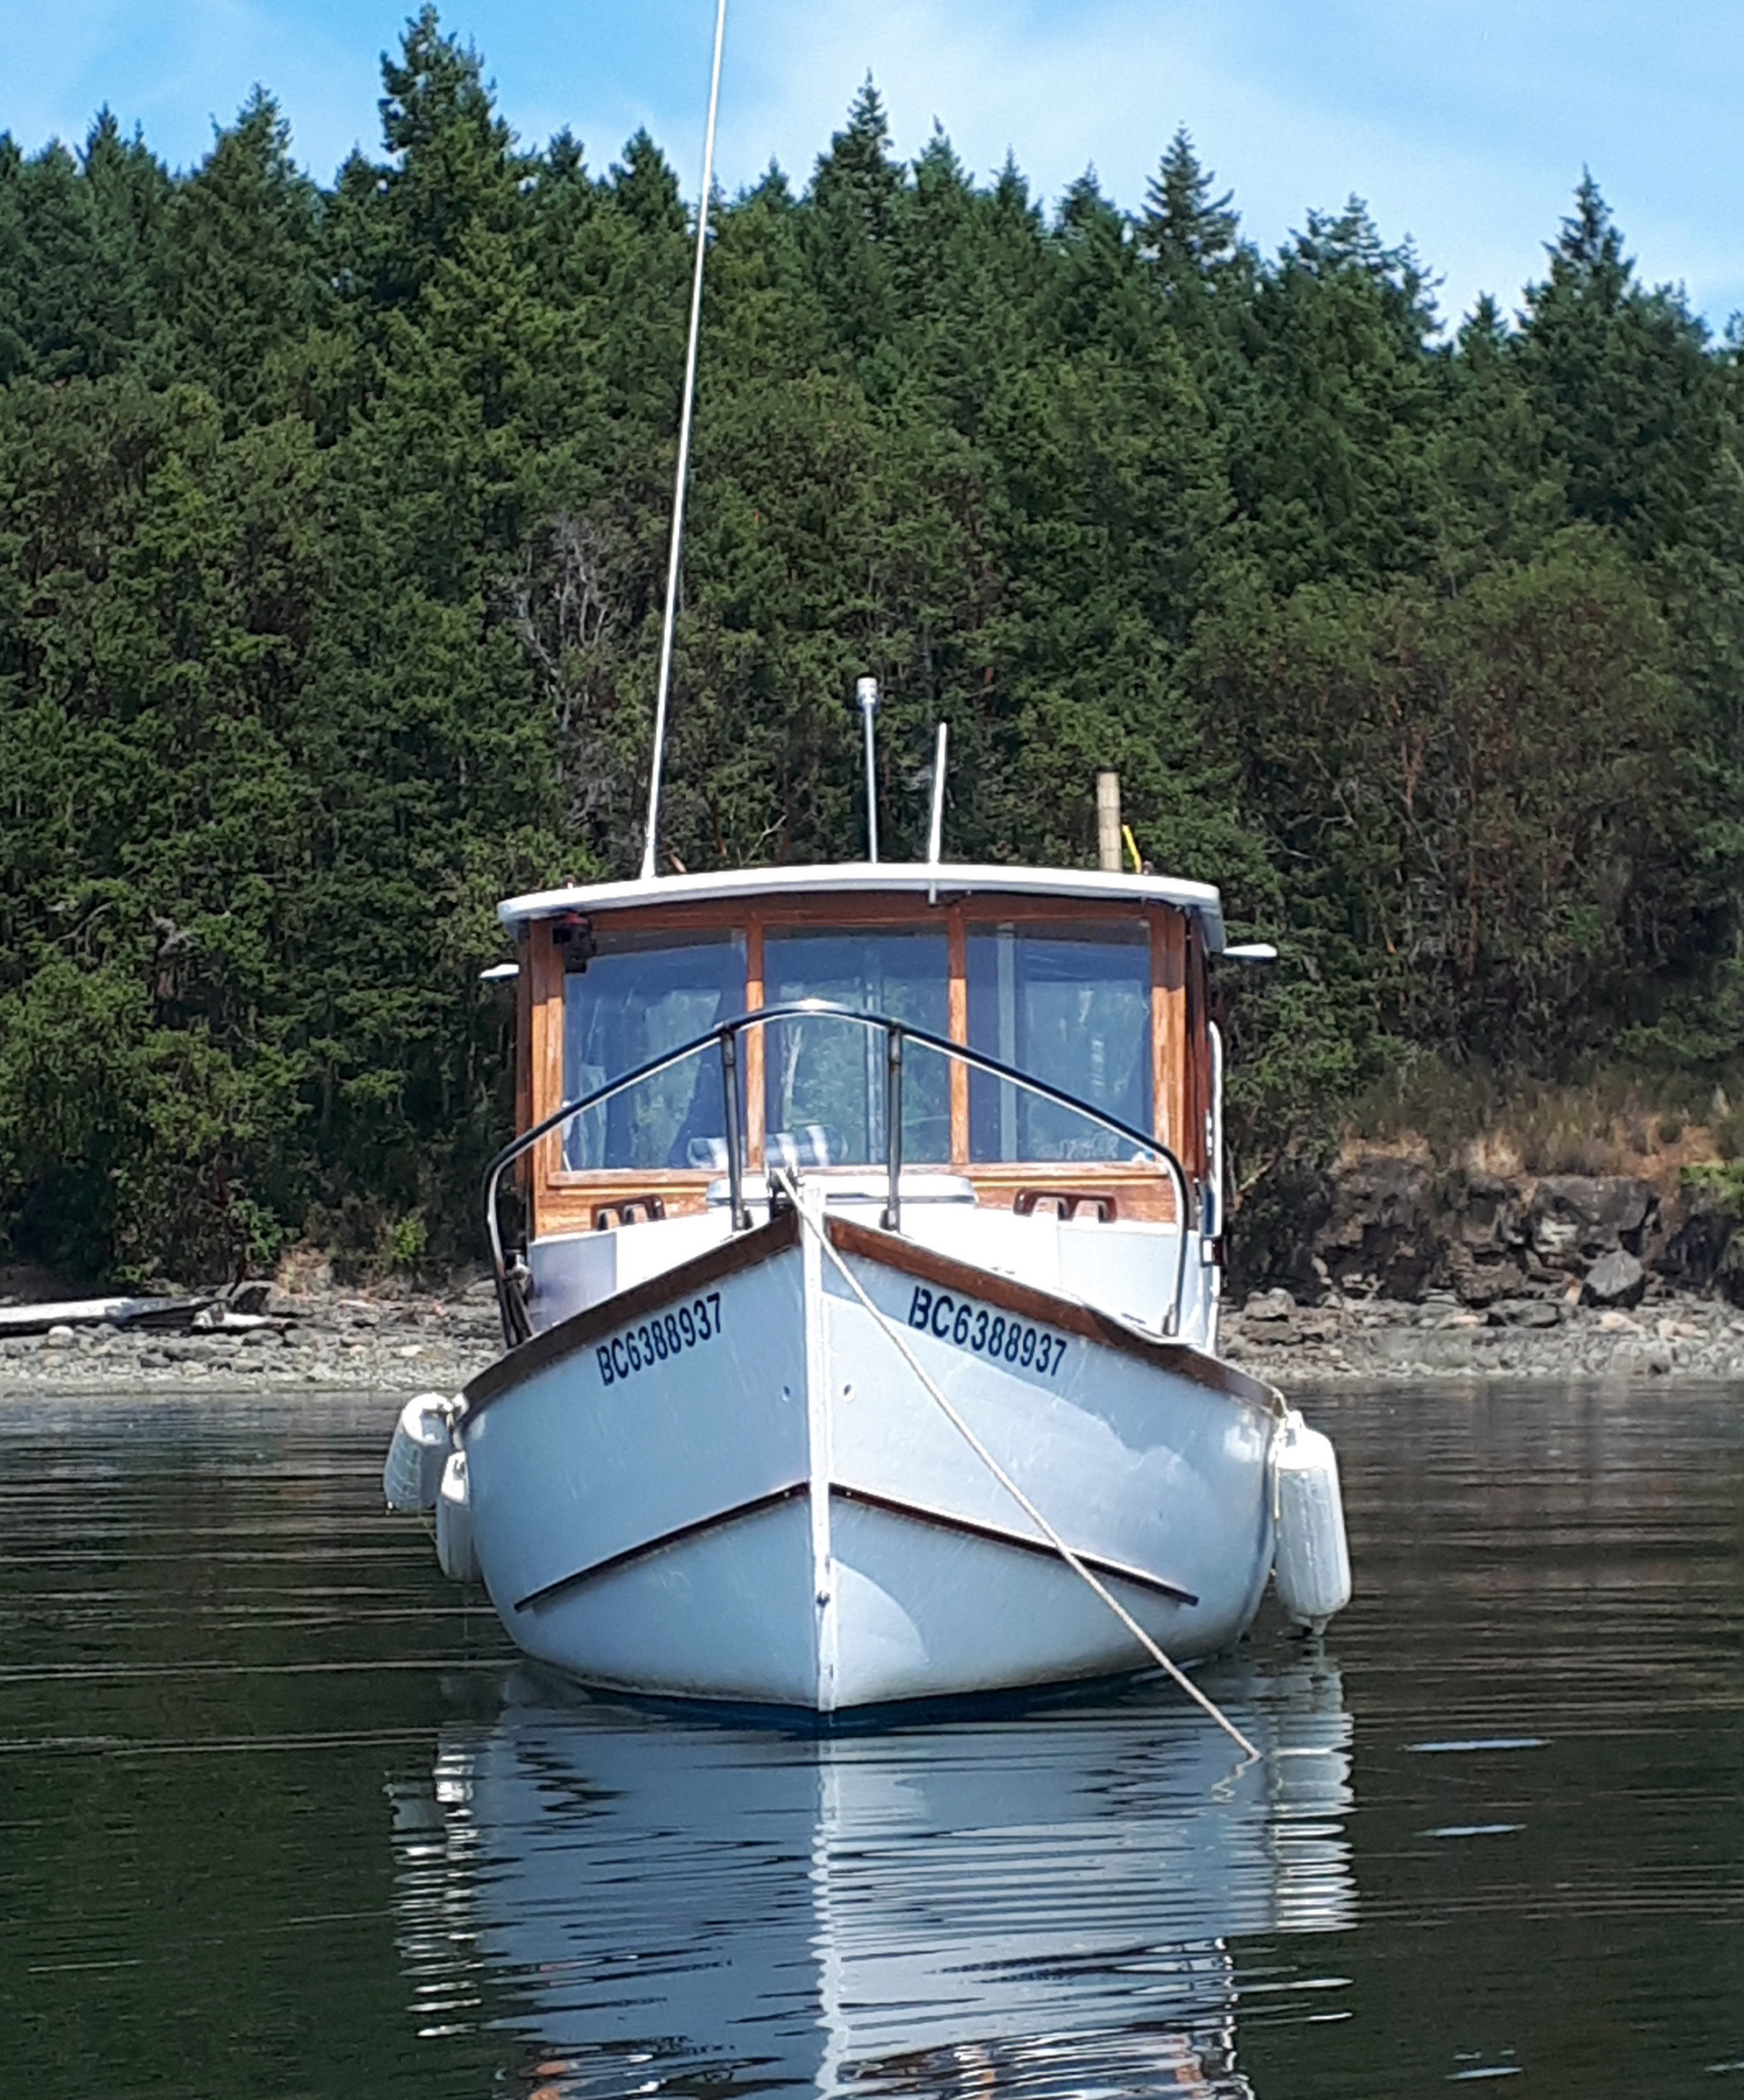
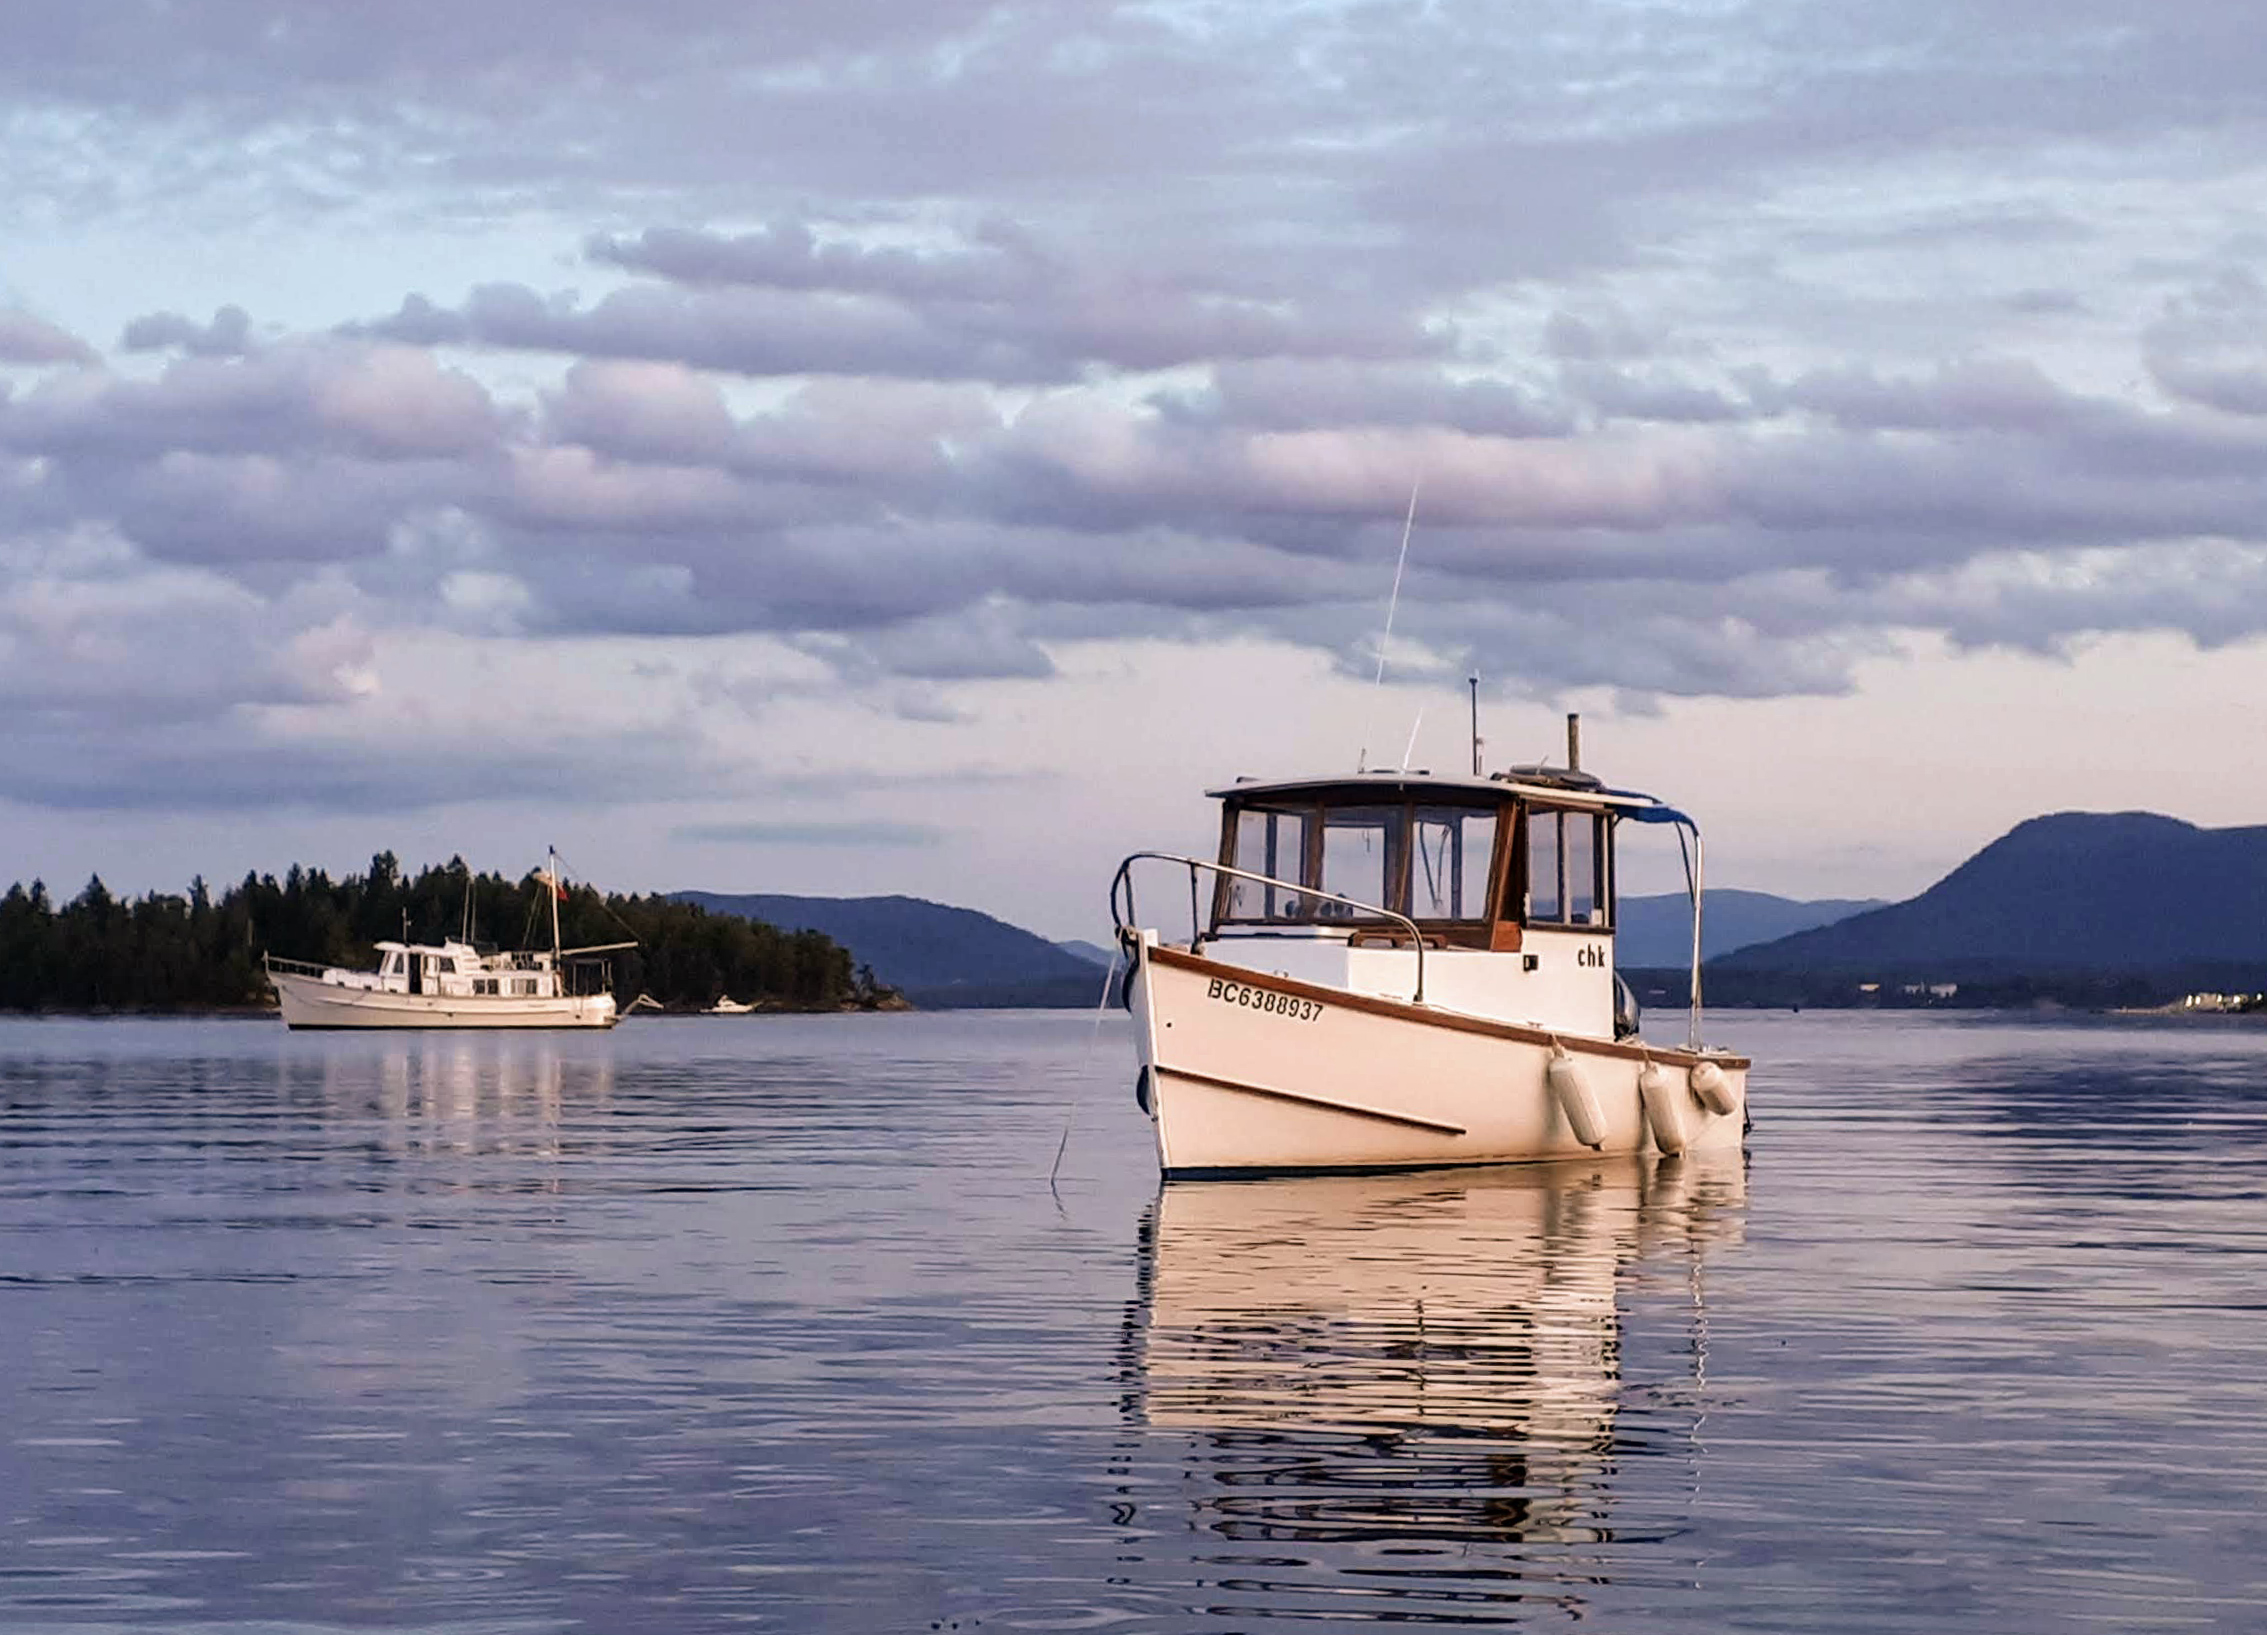
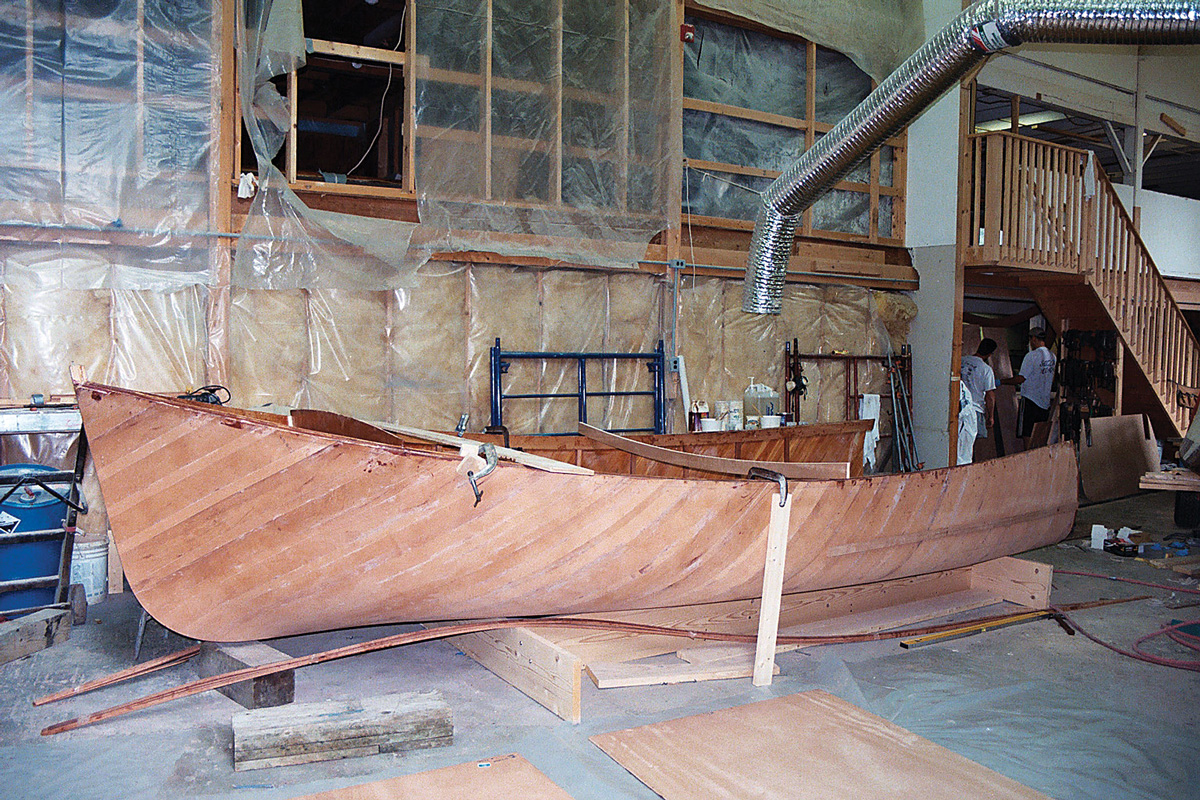
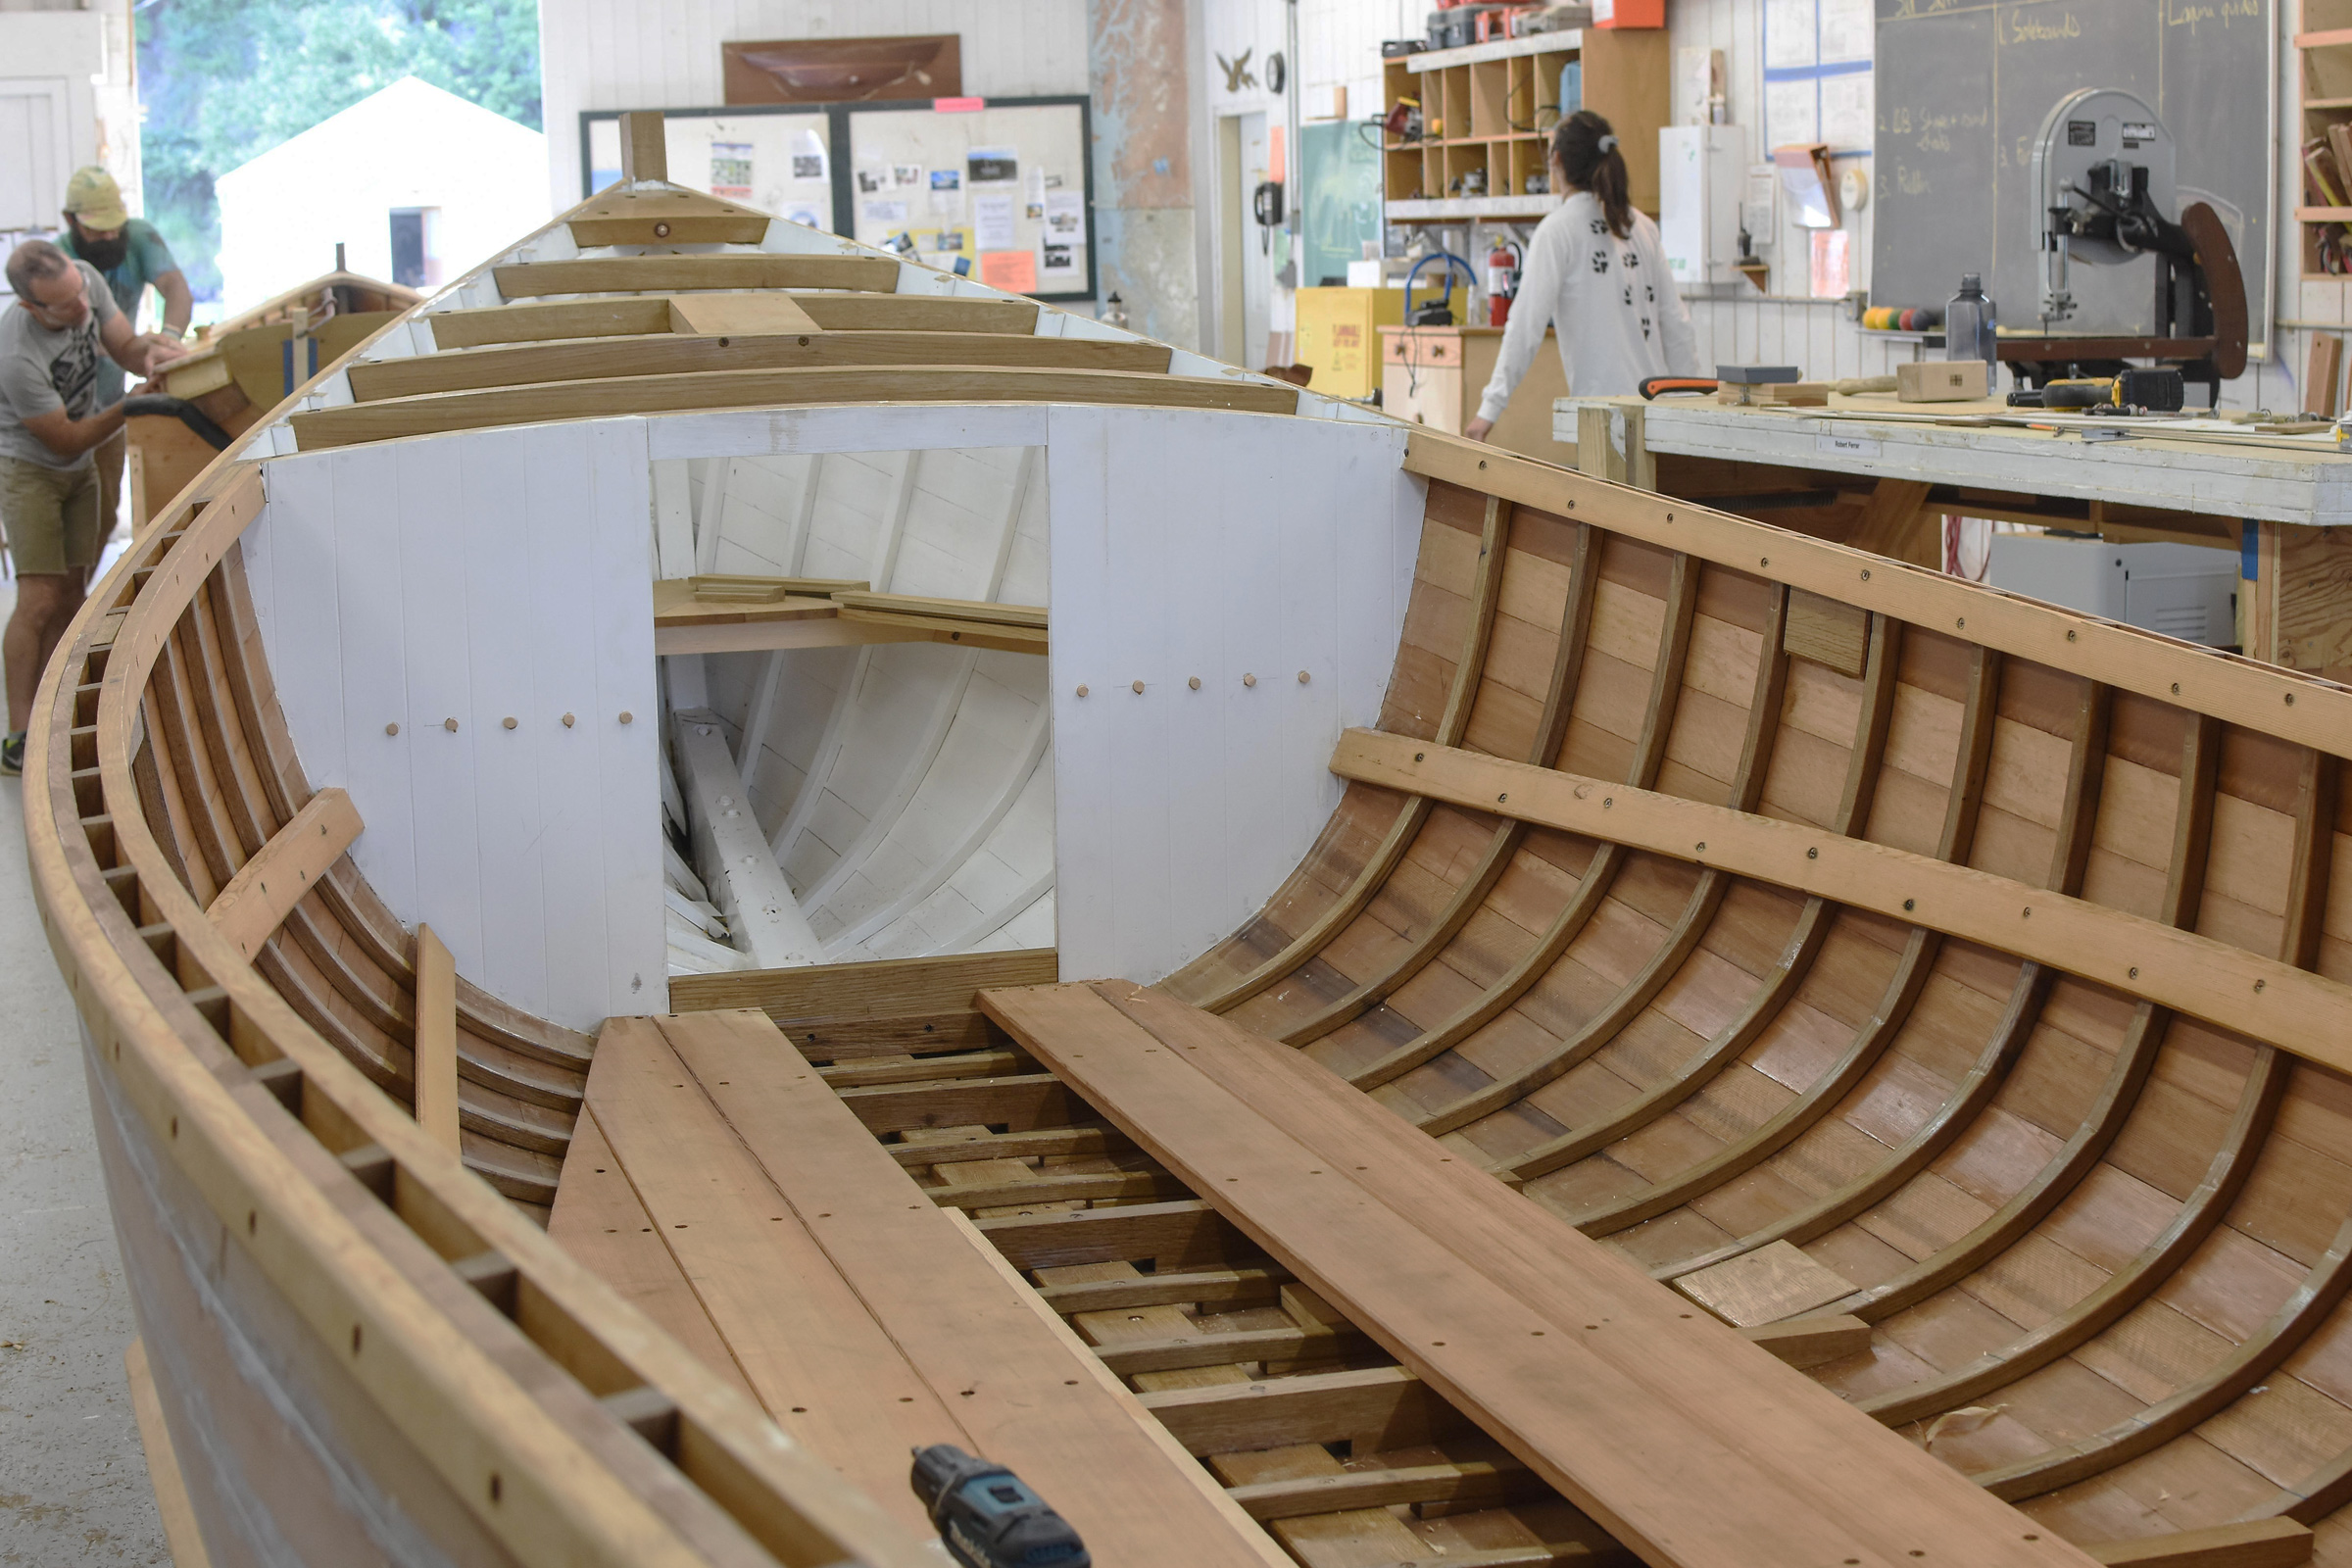
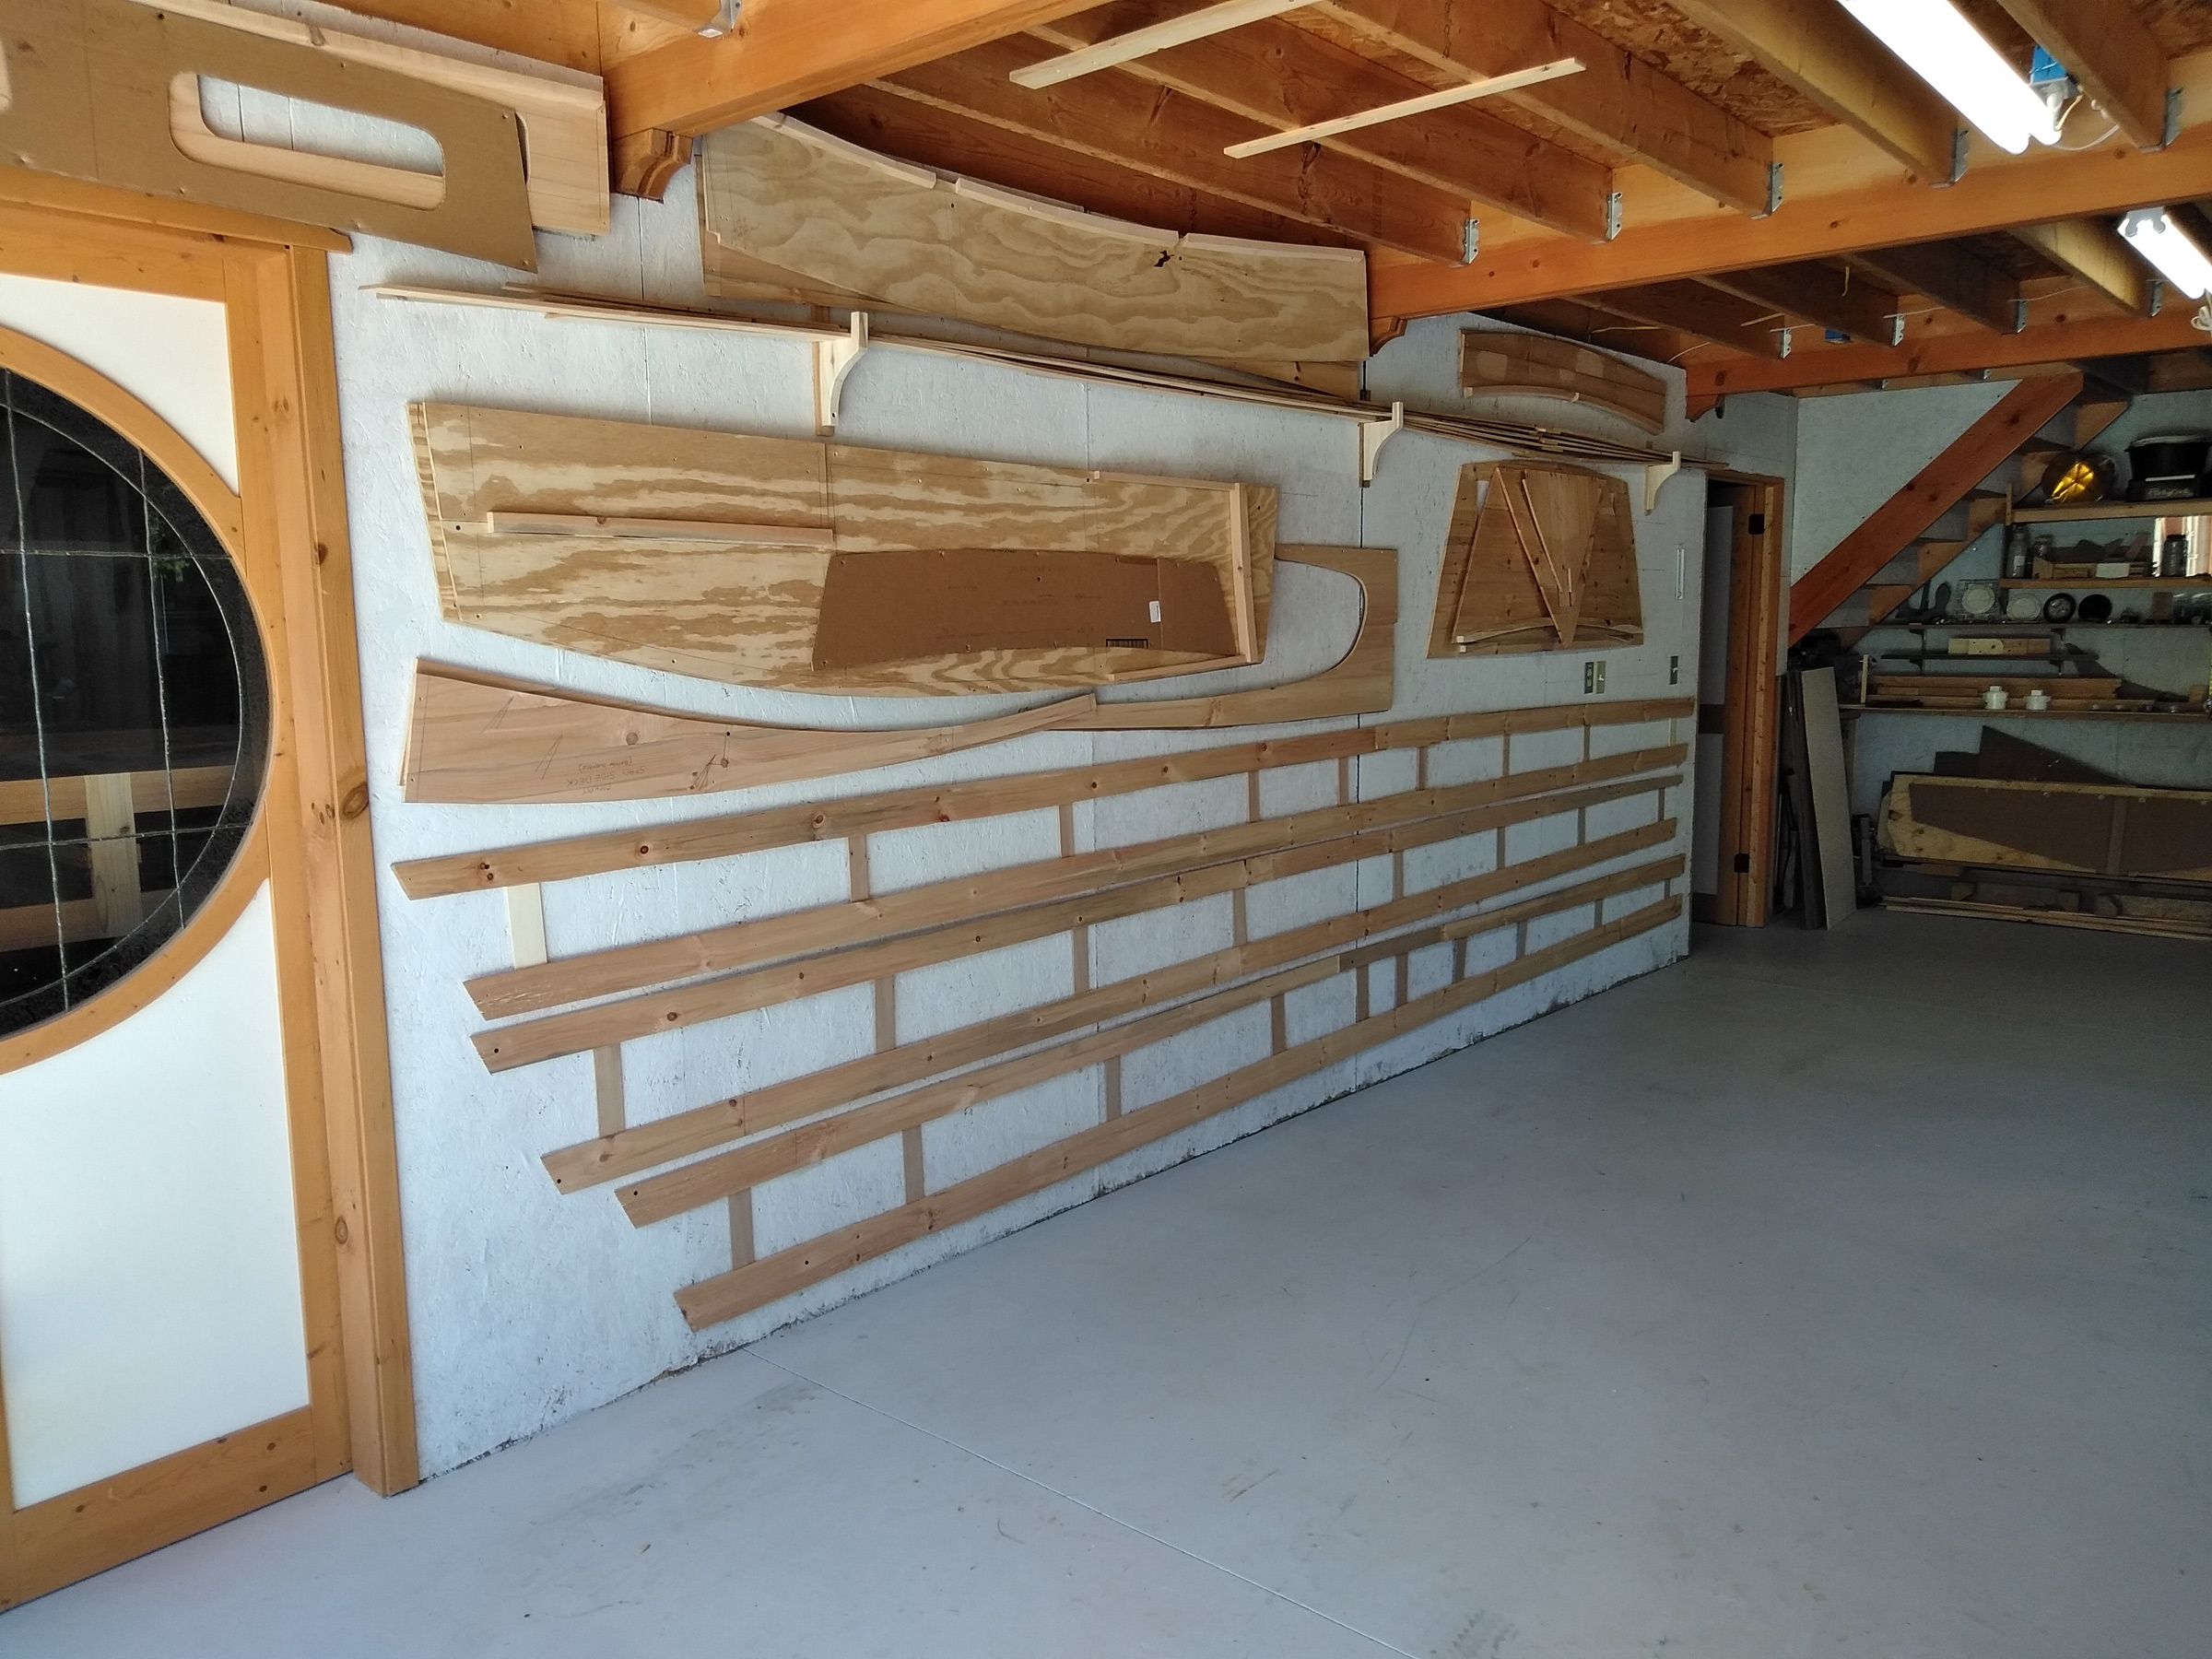
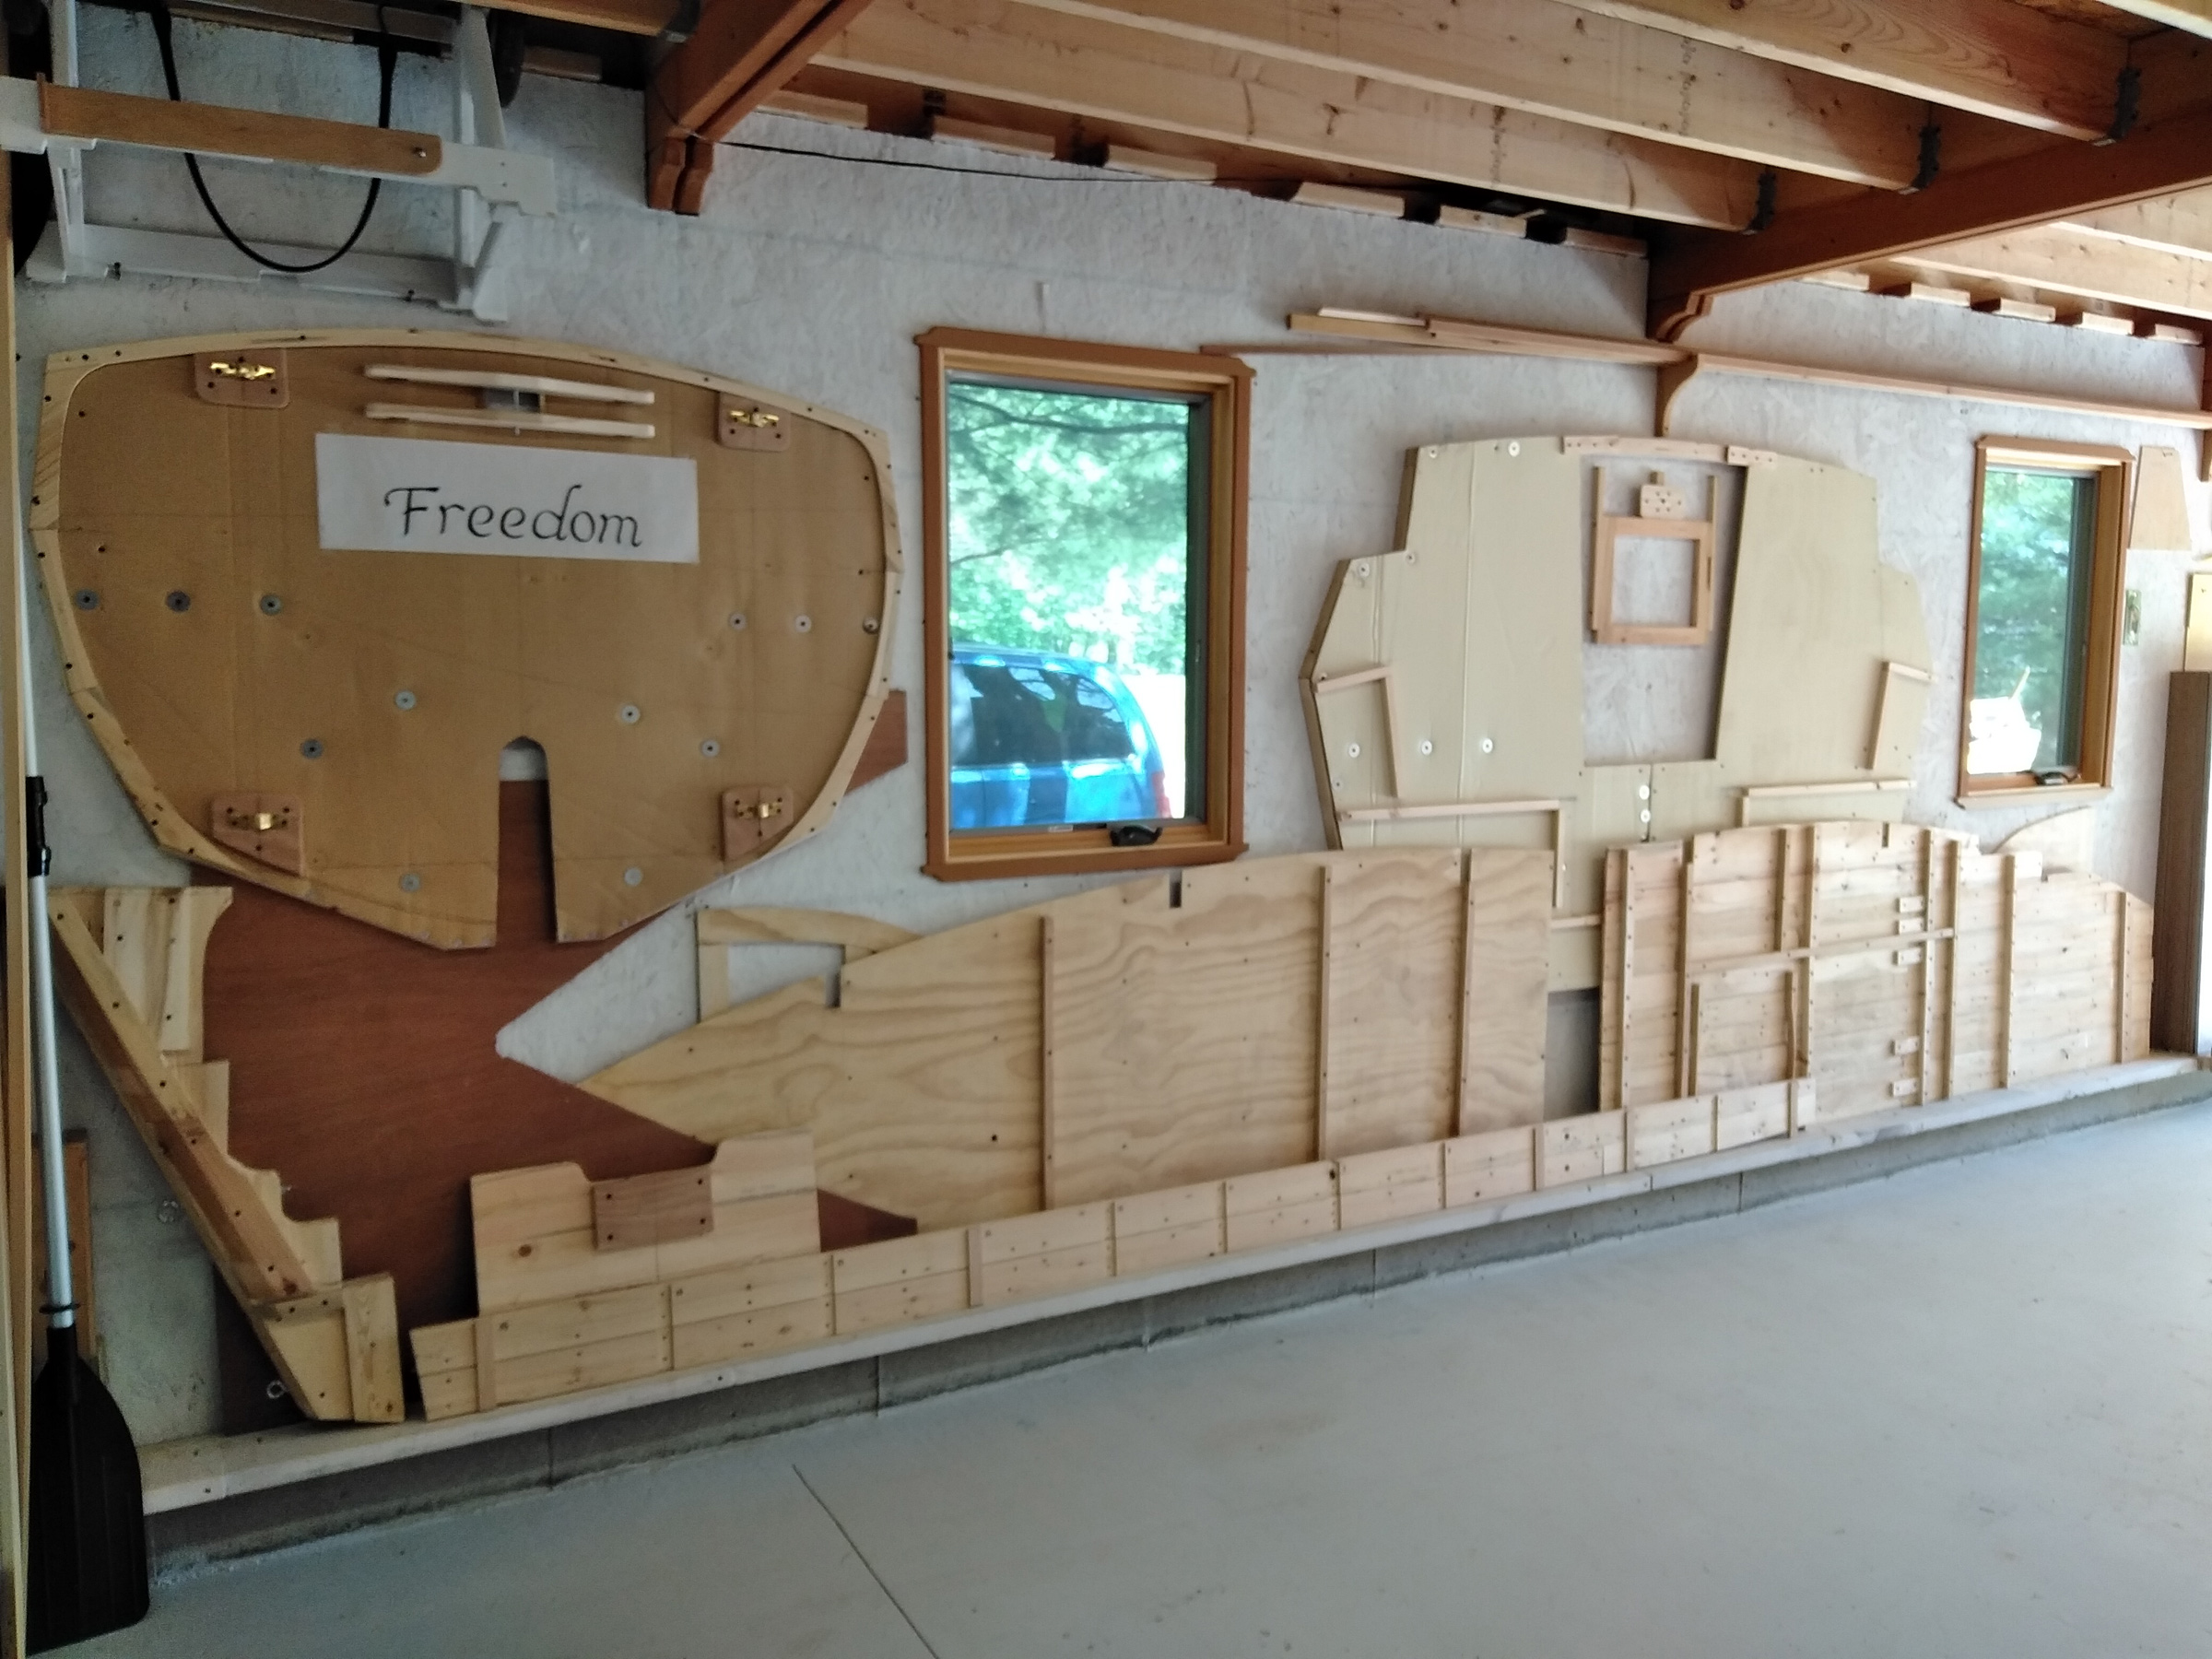
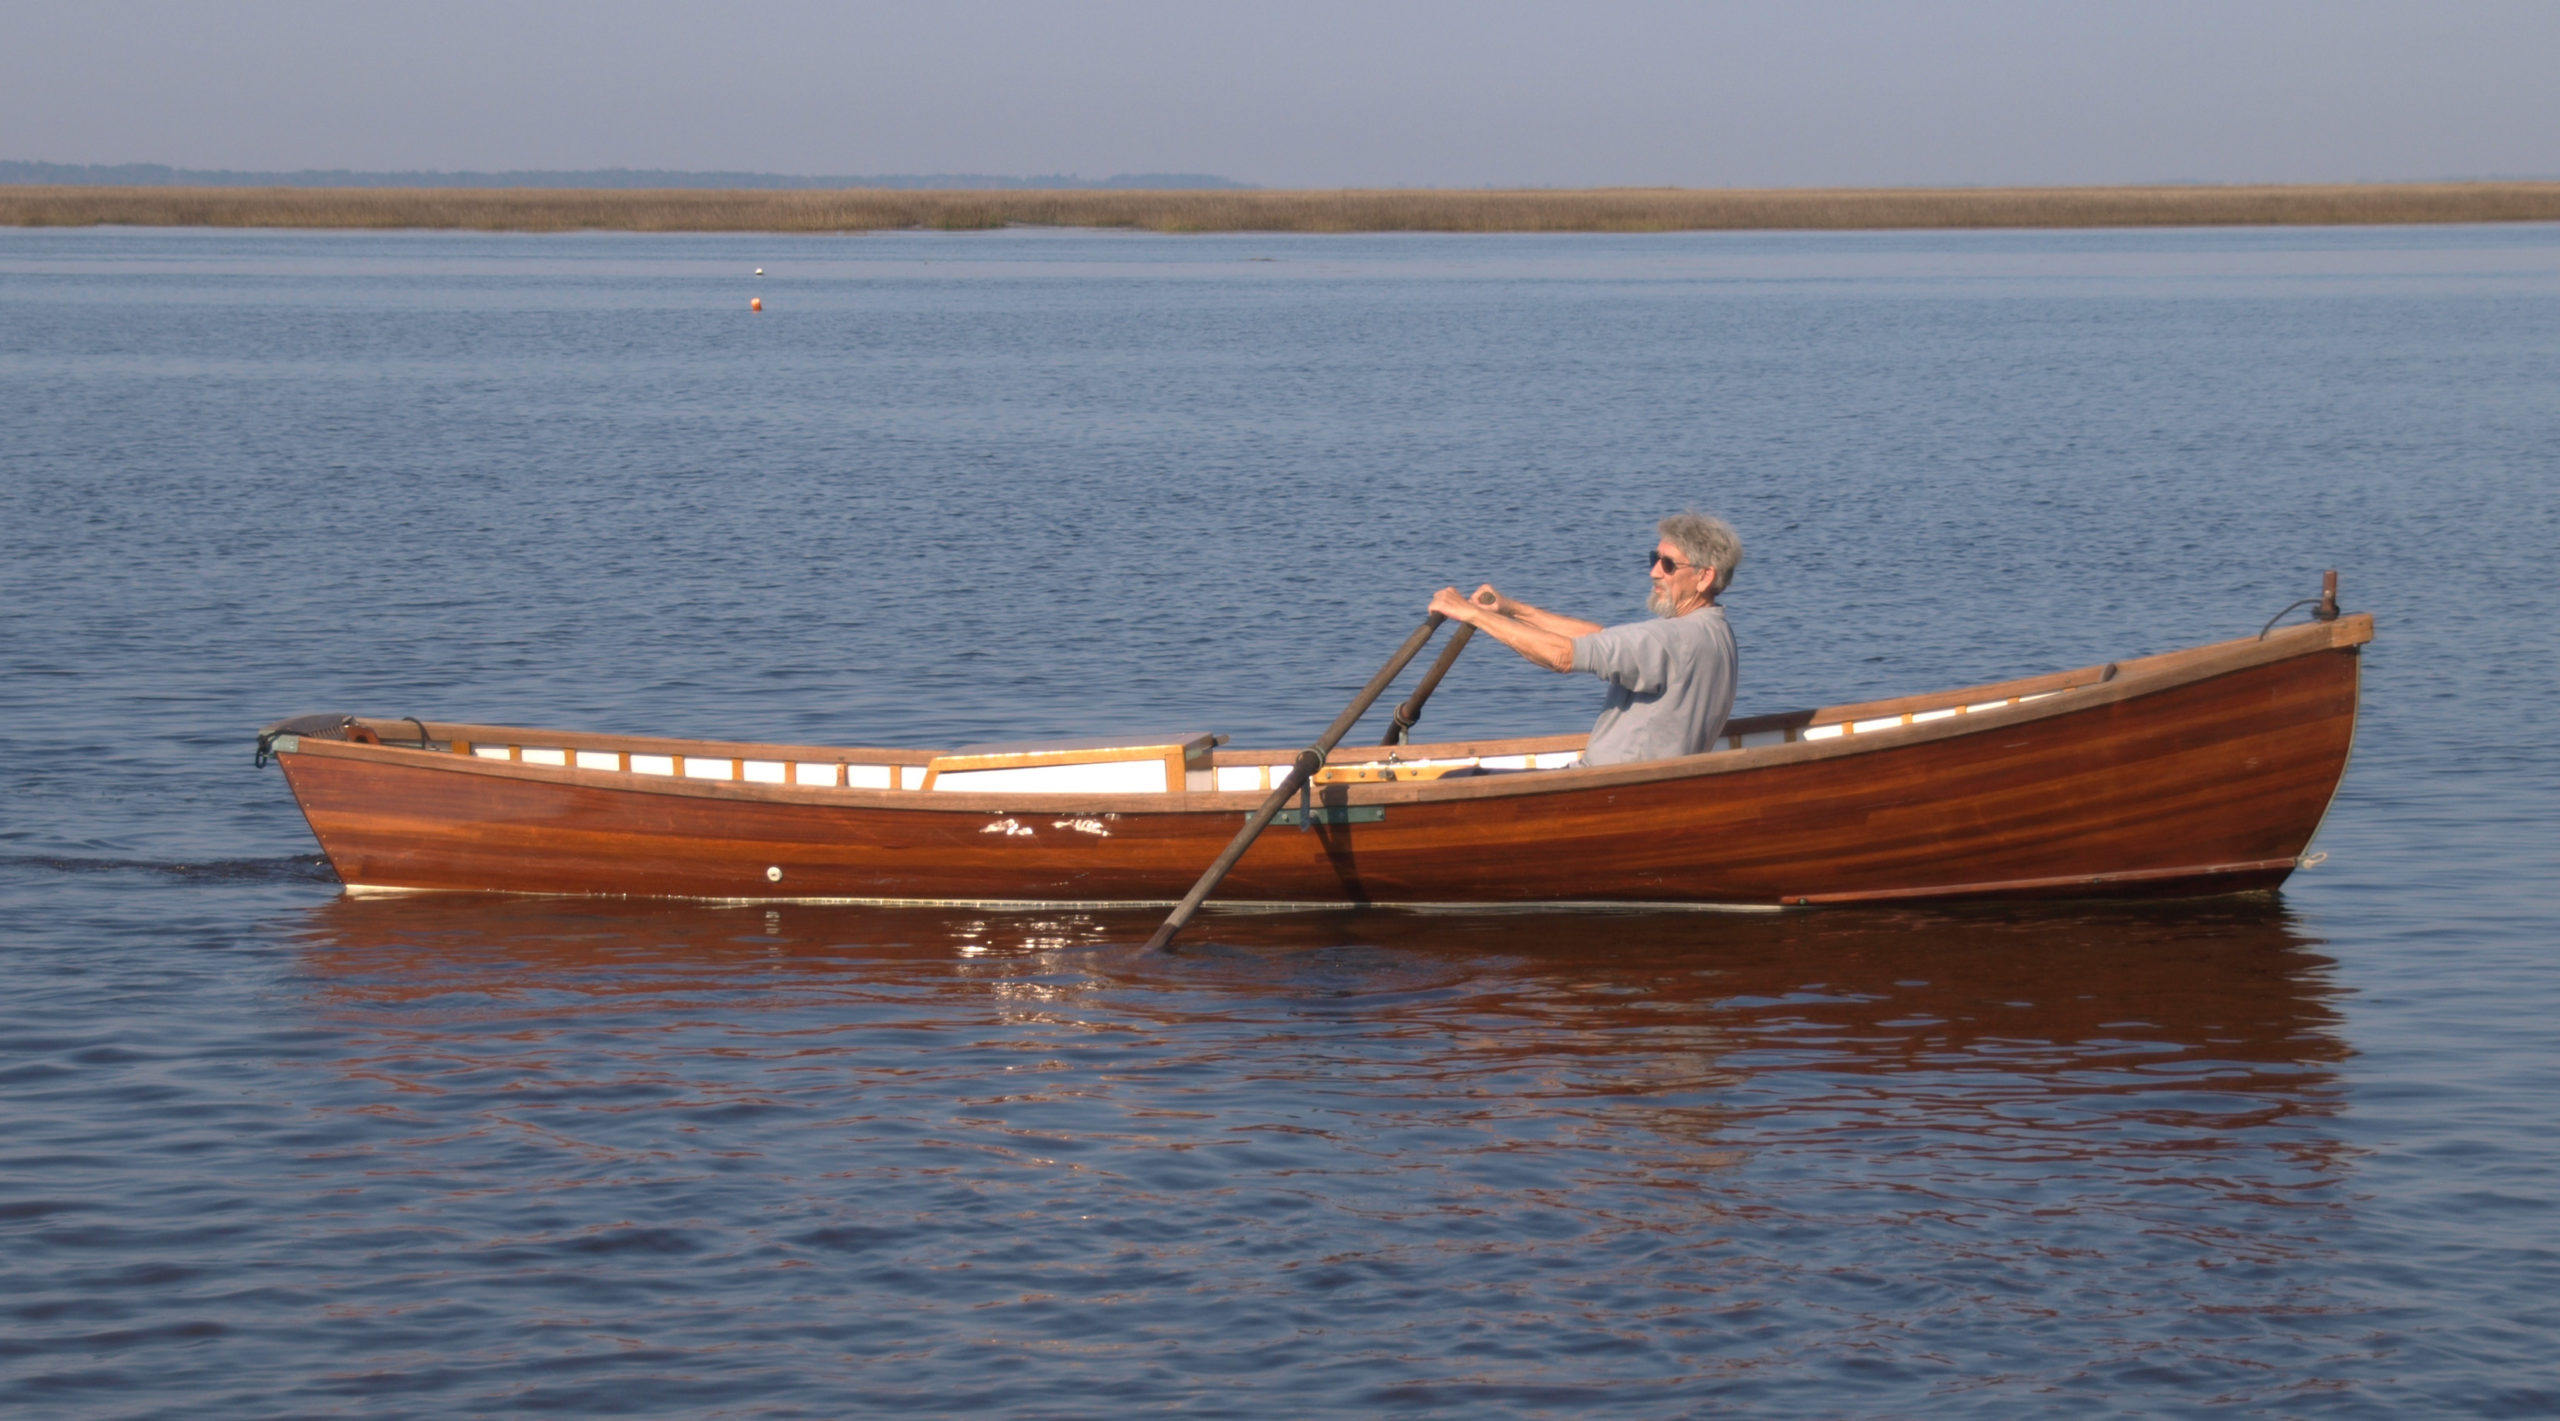
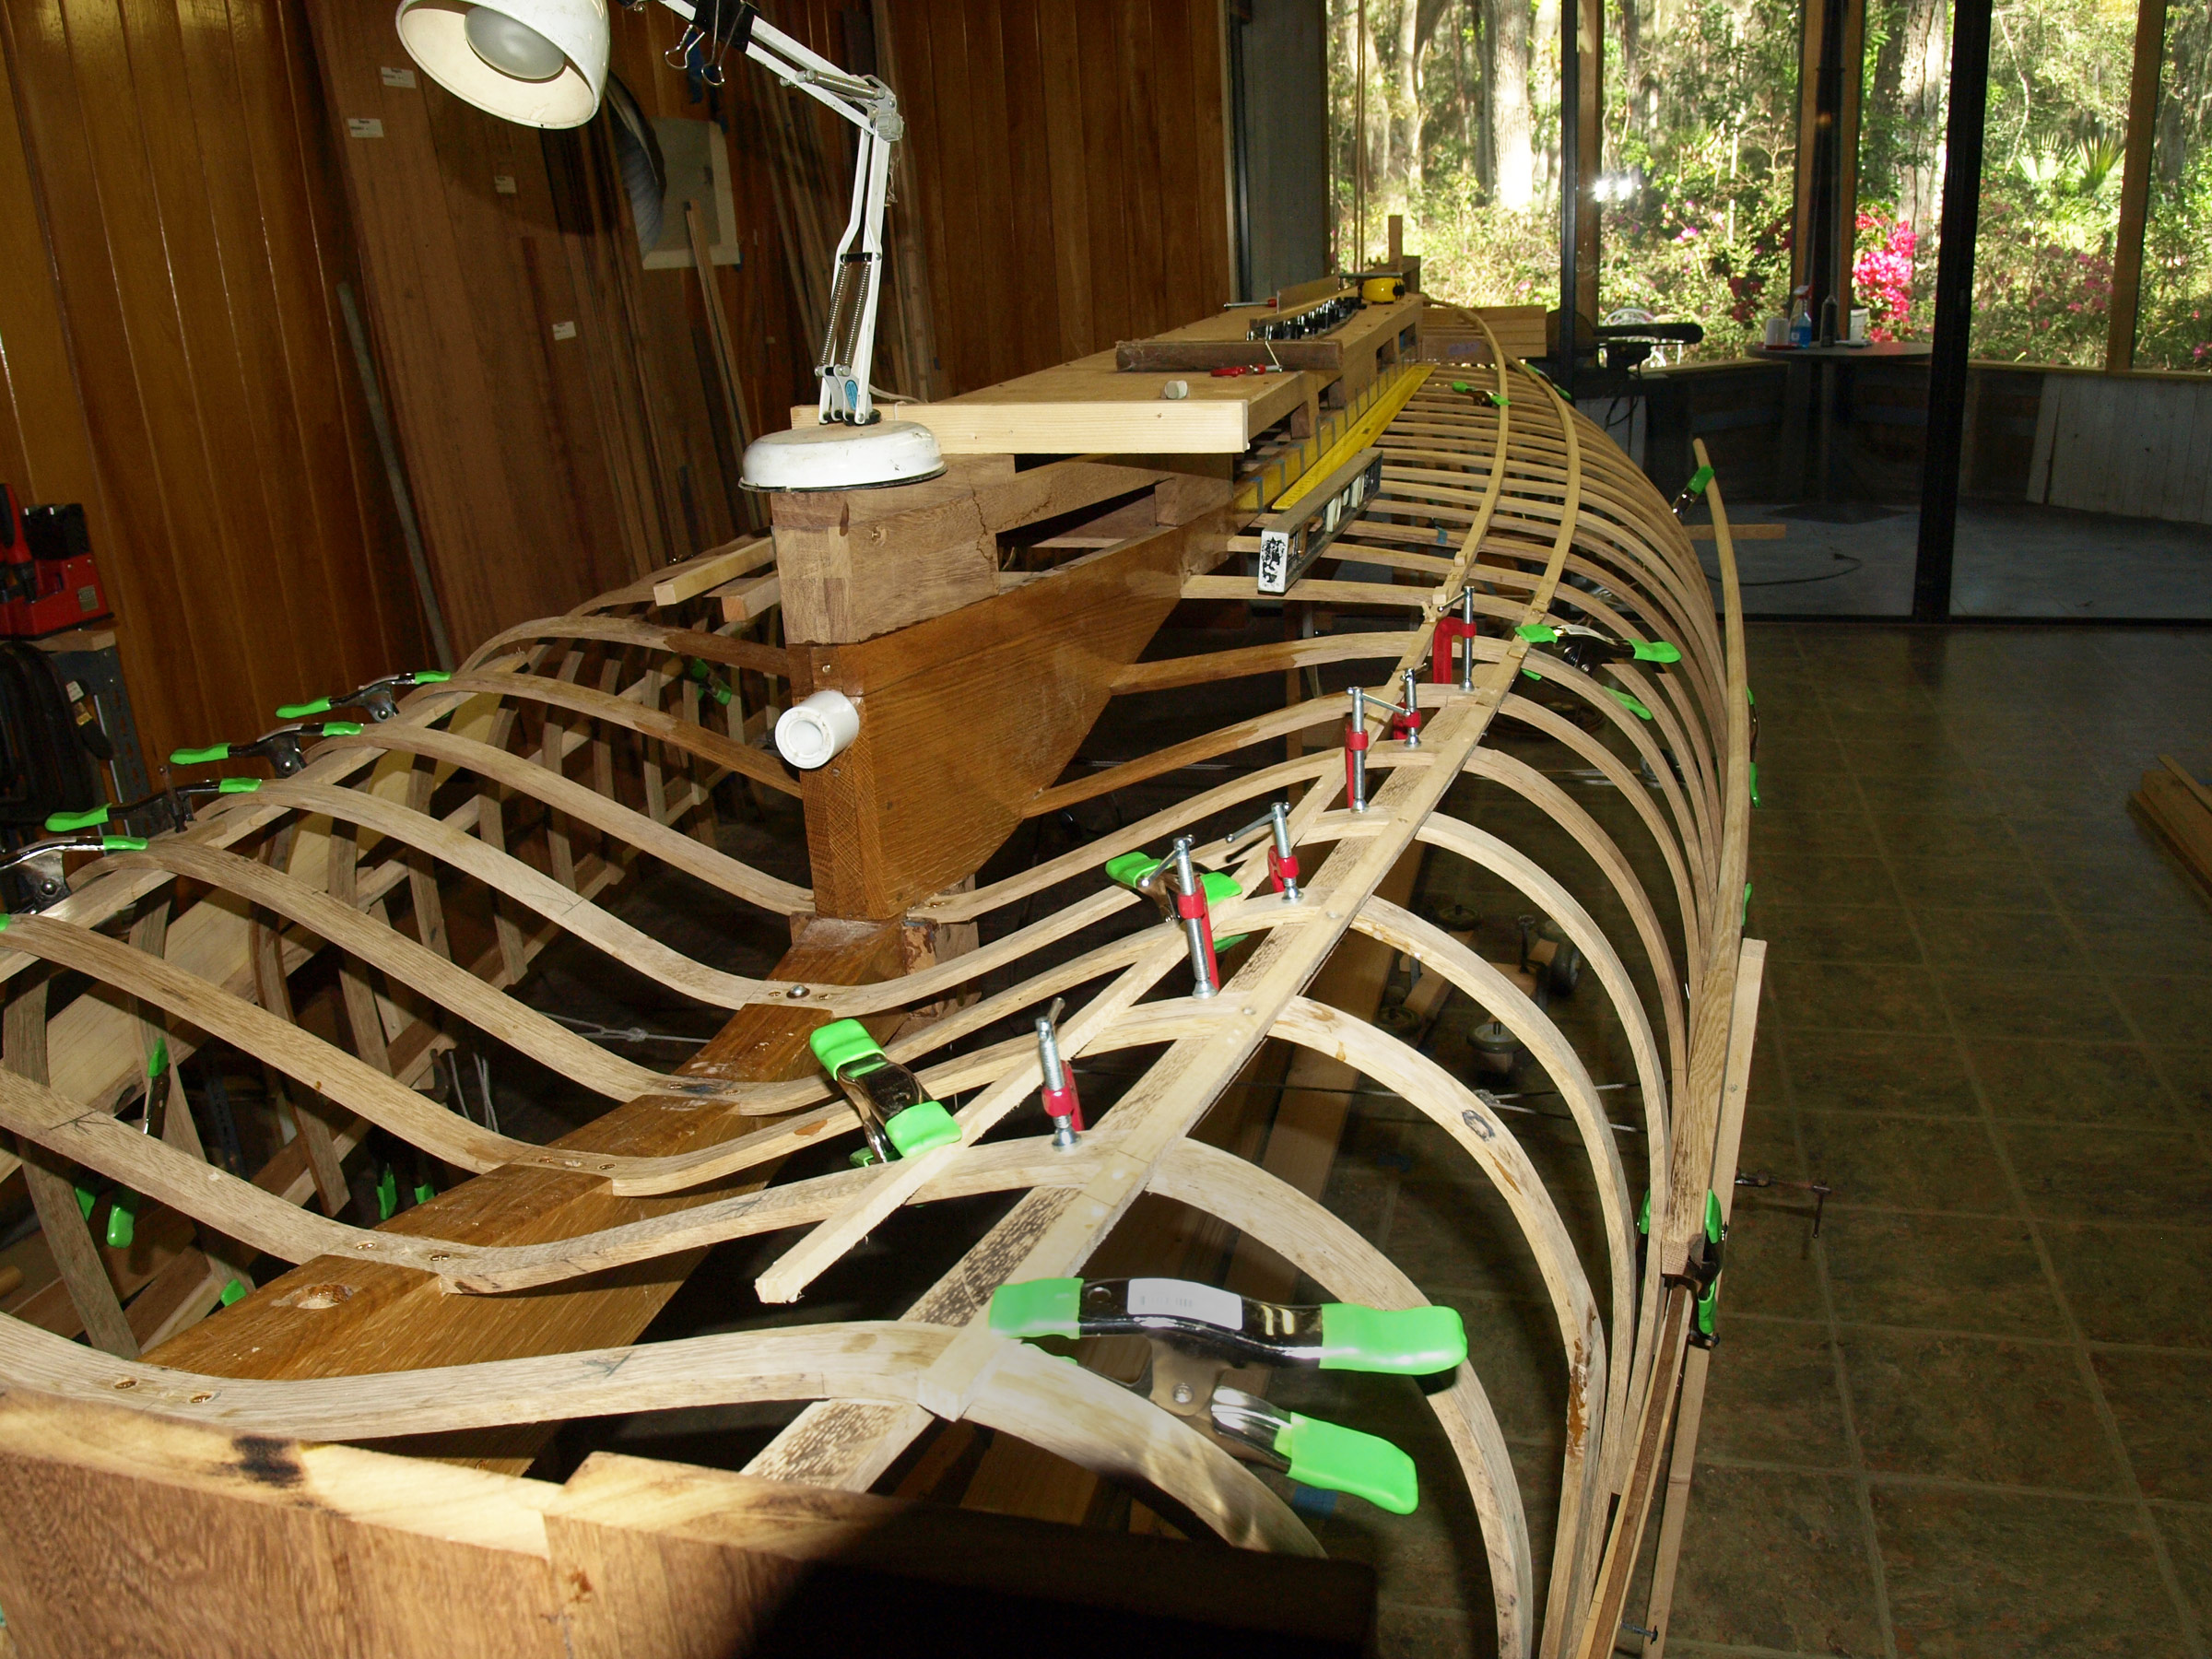
The workboat documented by John Gardner was carvel planked, but Barry decided that he’d strip plank the hull.
It would then come as no surprise that when he flew across Canada to see the sights of the country’s Atlantic seaboard, he came home with one lasting impression: lobsterboats. He turned, instinctively perhaps, to his home library and eventually found his way among the neatly ordered volumes to call number 623.8202 GAR V.2, Building Classic Small Craft, Volume 2, by John Gardner, and landed on chapter 7, page 91: “Down East Workboat.” The boat there was developed in Maine’s Washington County, right across the border from the Canadian province of New Brunswick, and was similar in form to the Canadian Cape Island lobsterboat, native to Cape Sable Island on the south coast of Nova Scotia.
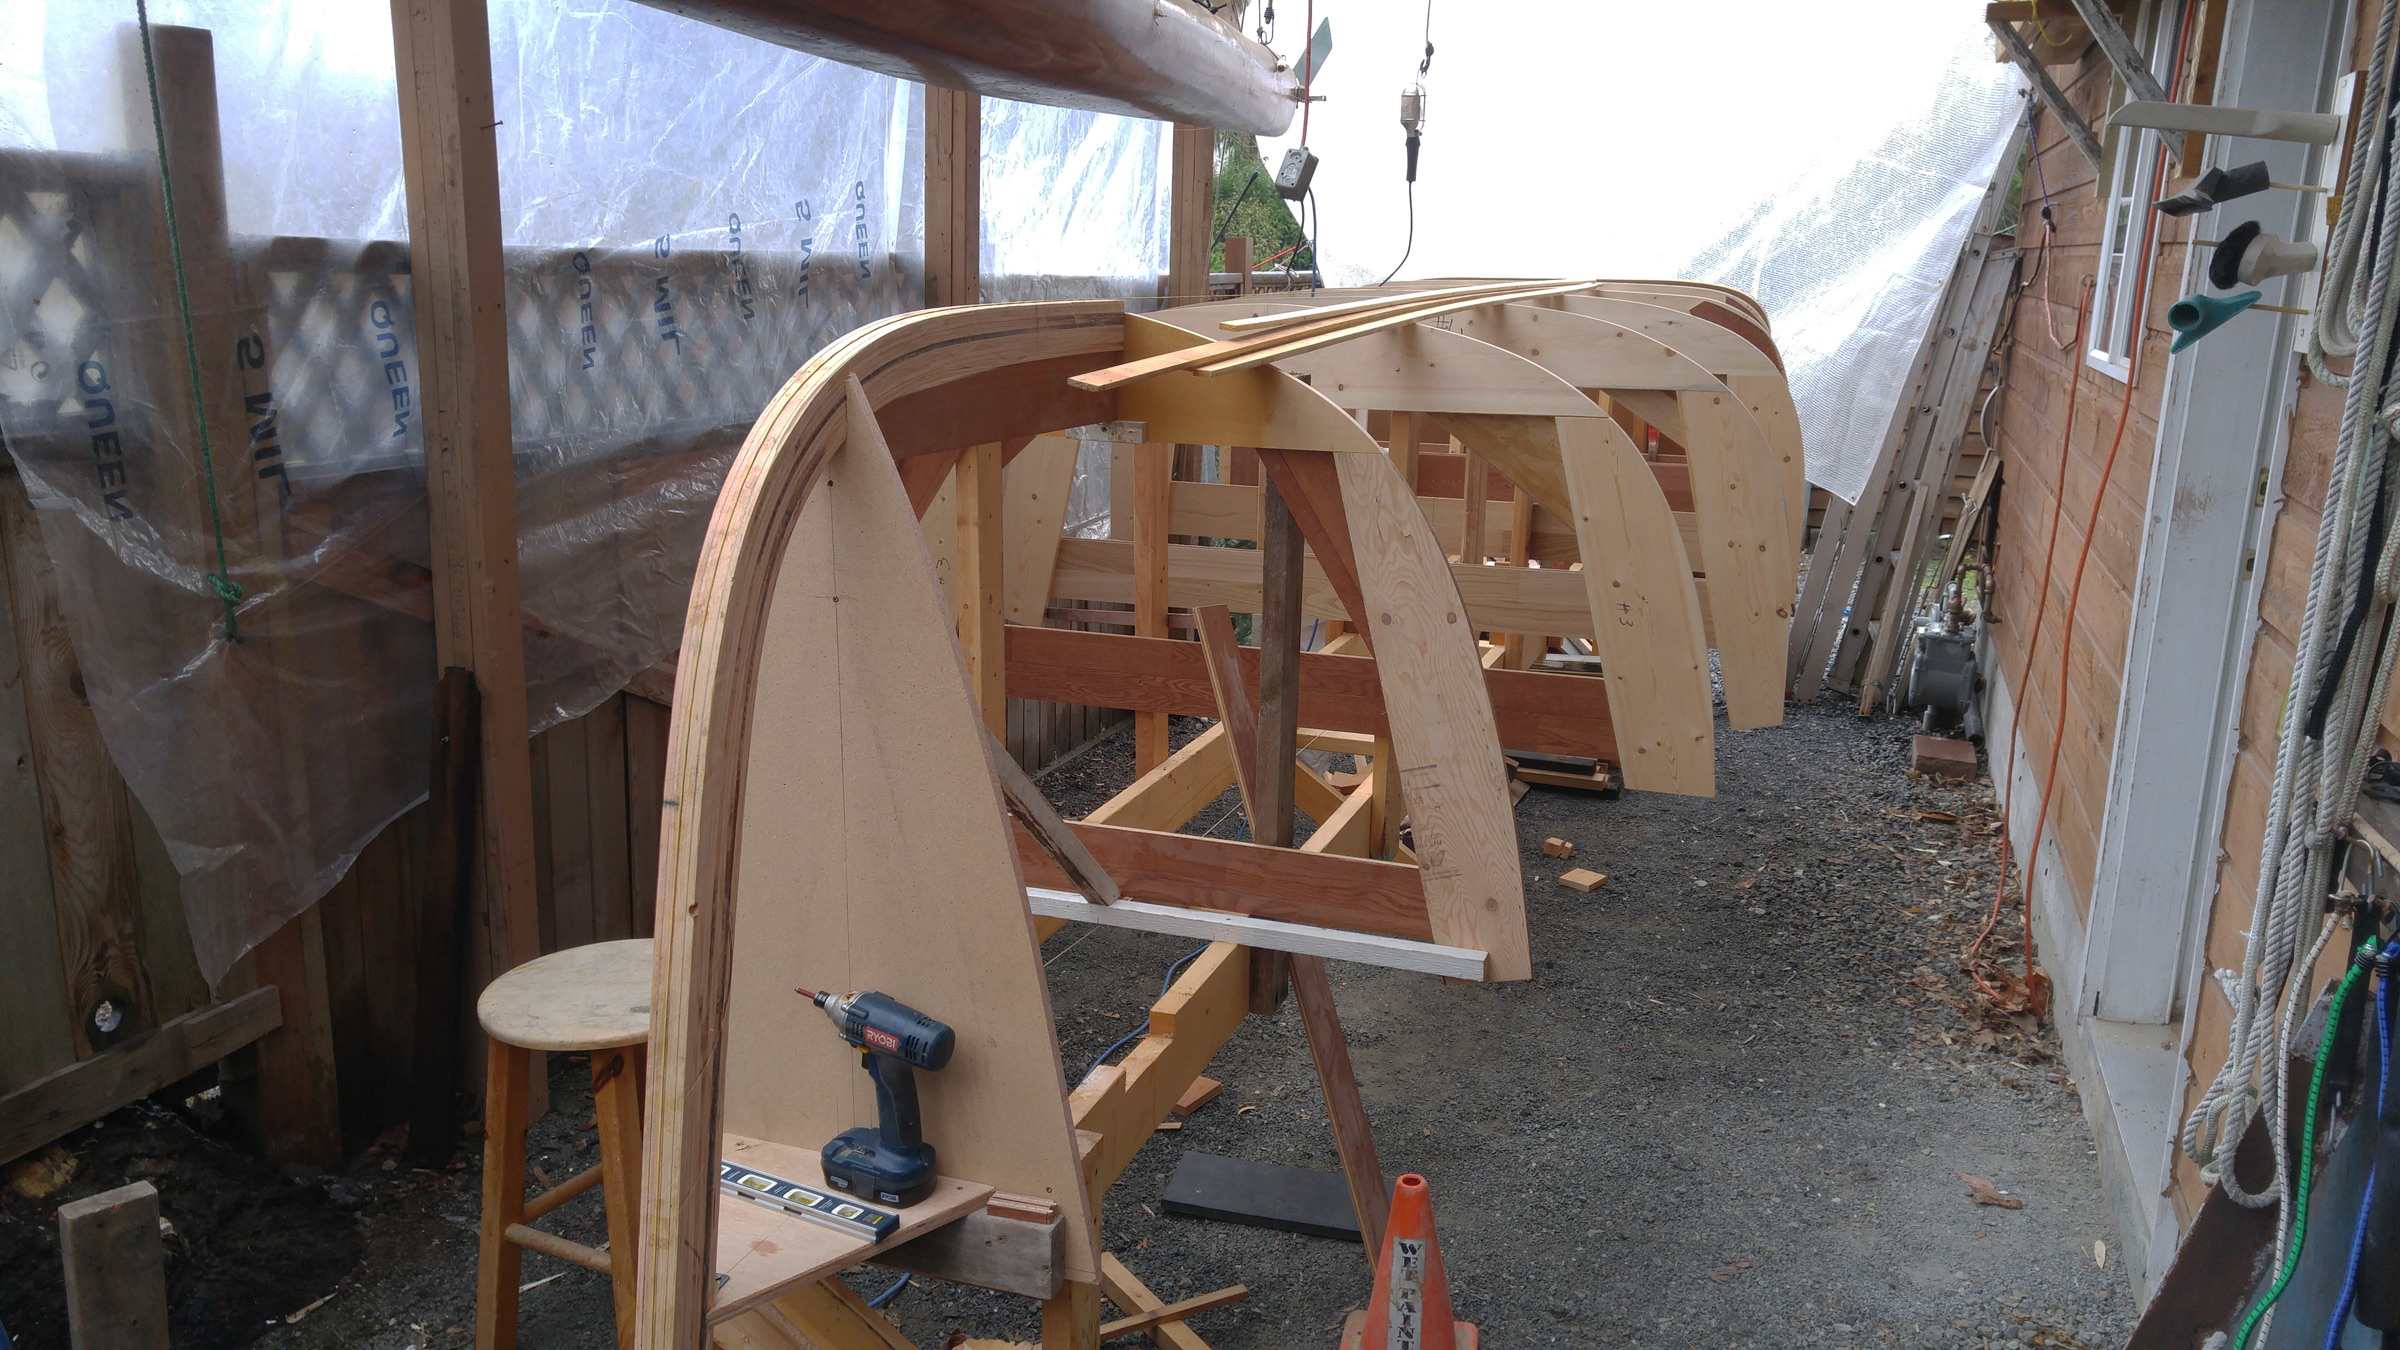
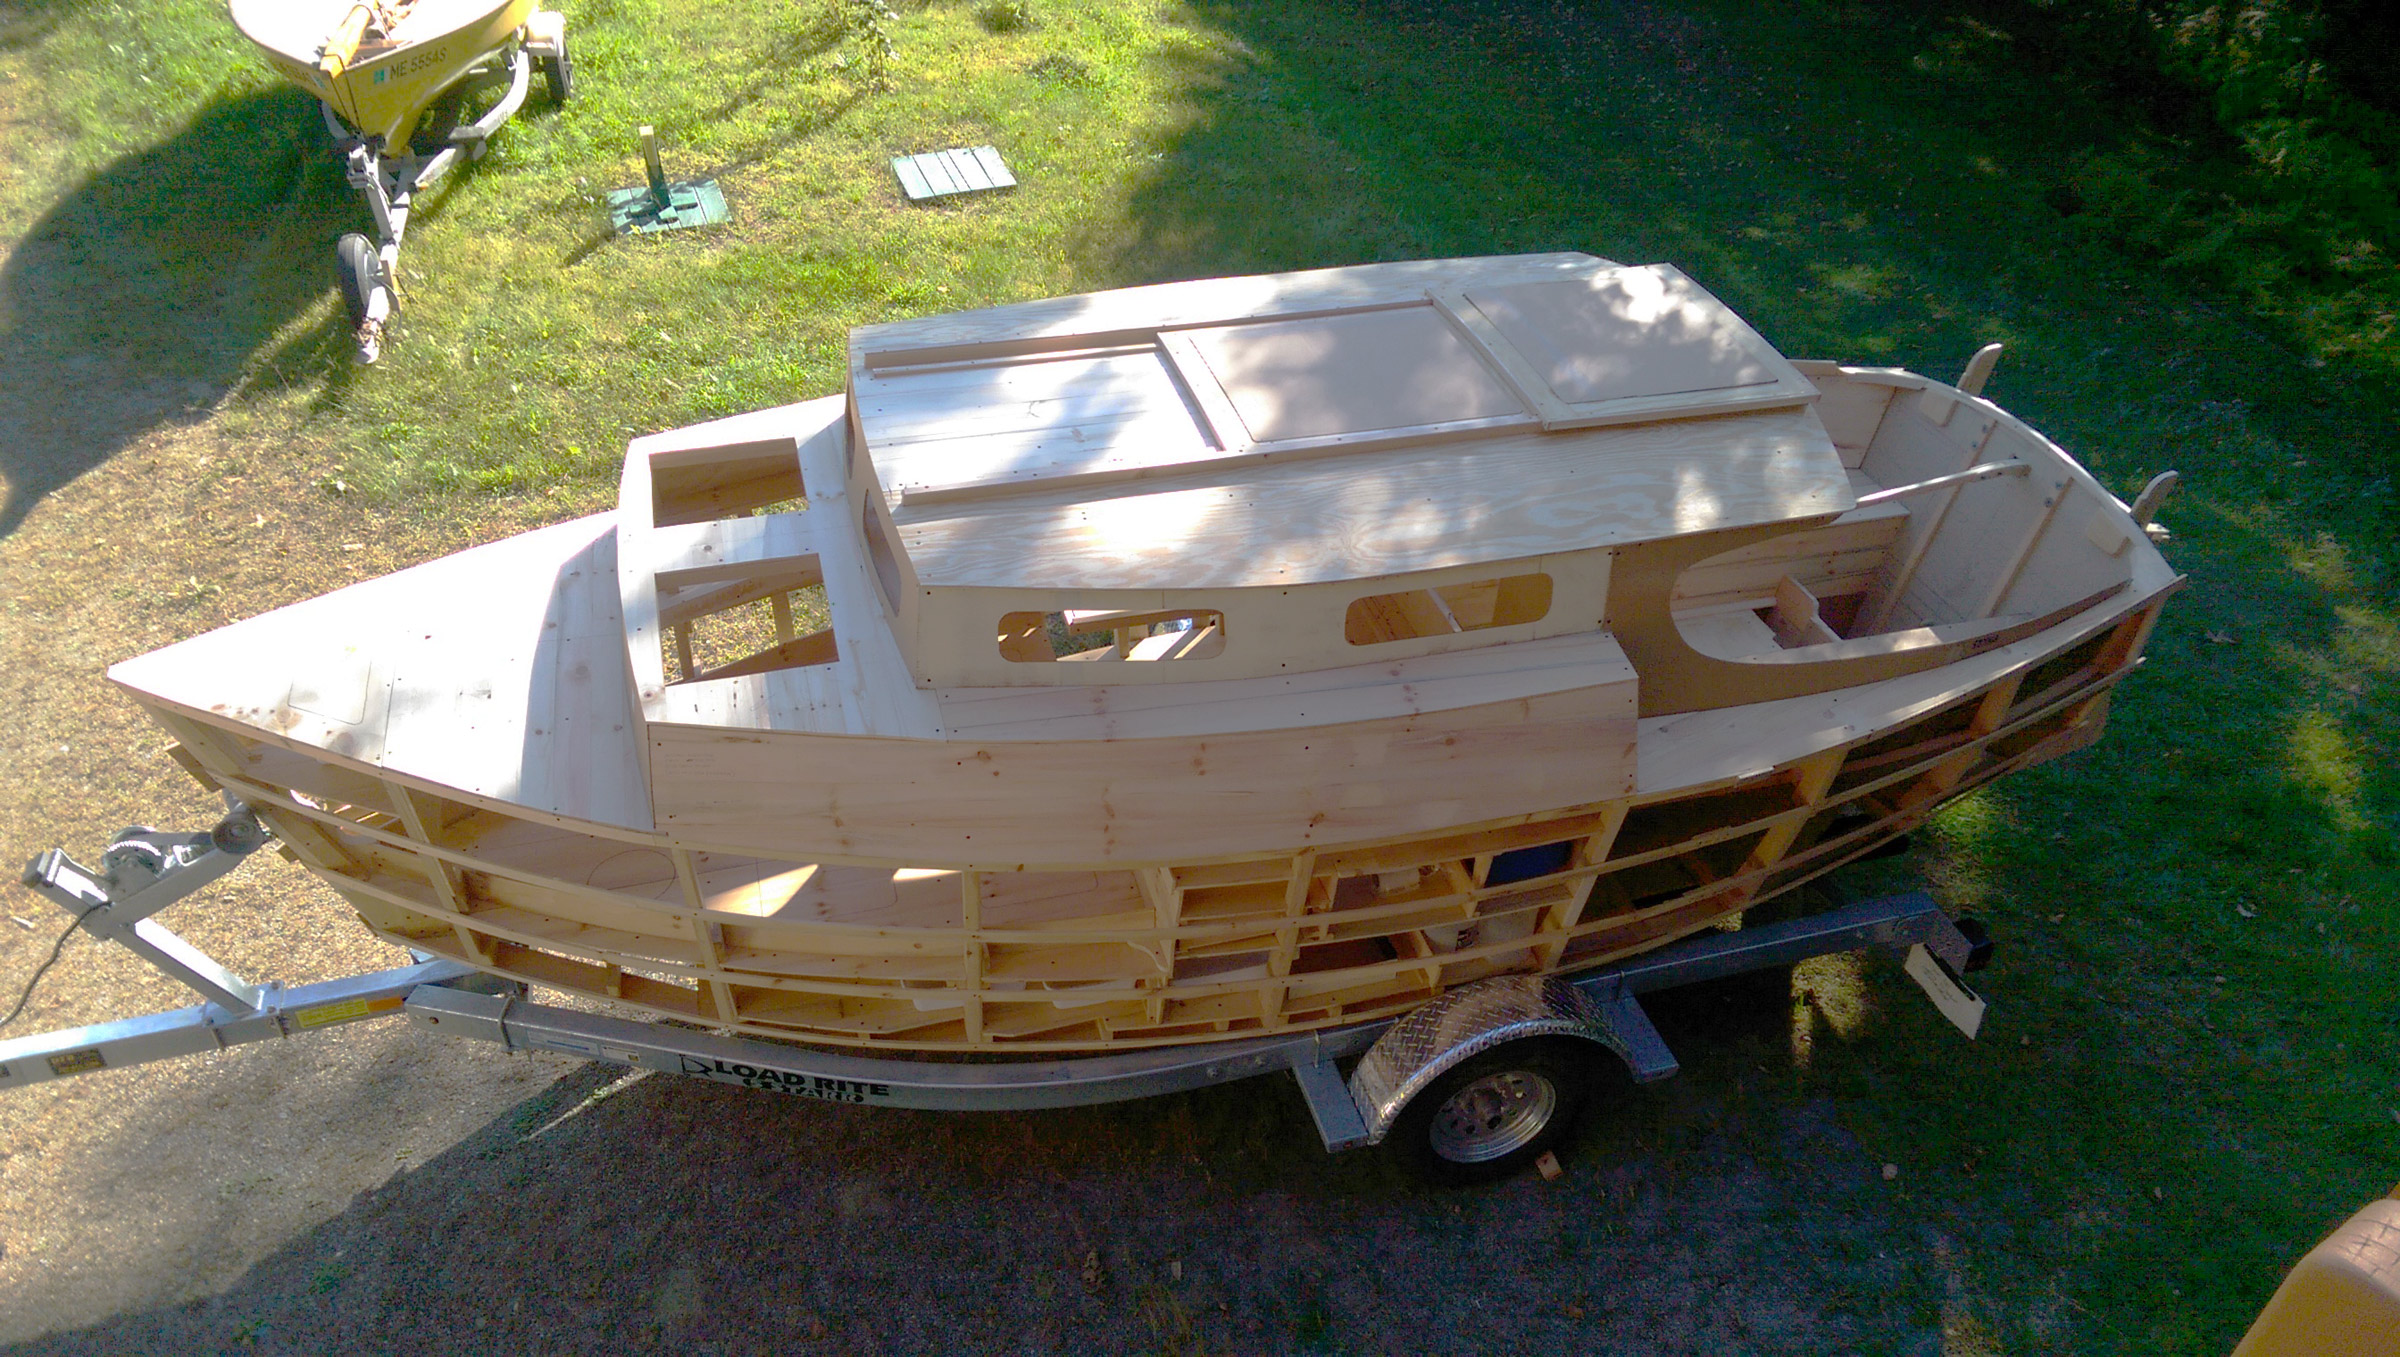
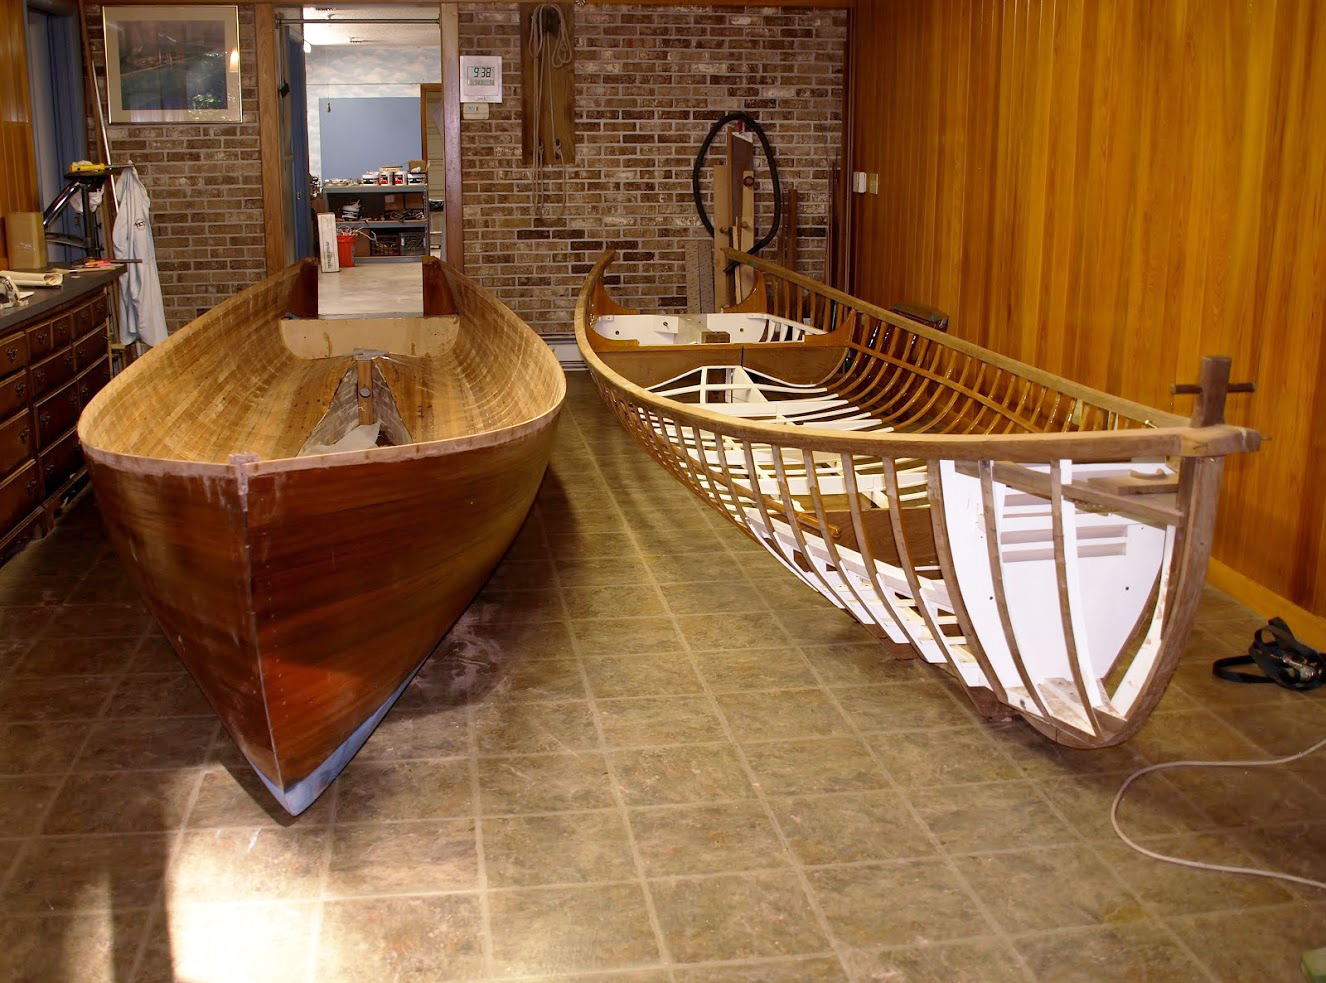
The newly rolled hull rests on the dolly that will trundle it back into the shop. The mattresses at left cushioned the hull for the operation.
While the provenance of the design appealed to Barry, the carvel planking did not—it was not a method he had tried—so he decided on cedar strip, a method he had used on his kayaks, a 7′ pram, and a hull to turn his soft-bottomed inflatable into a RIB.
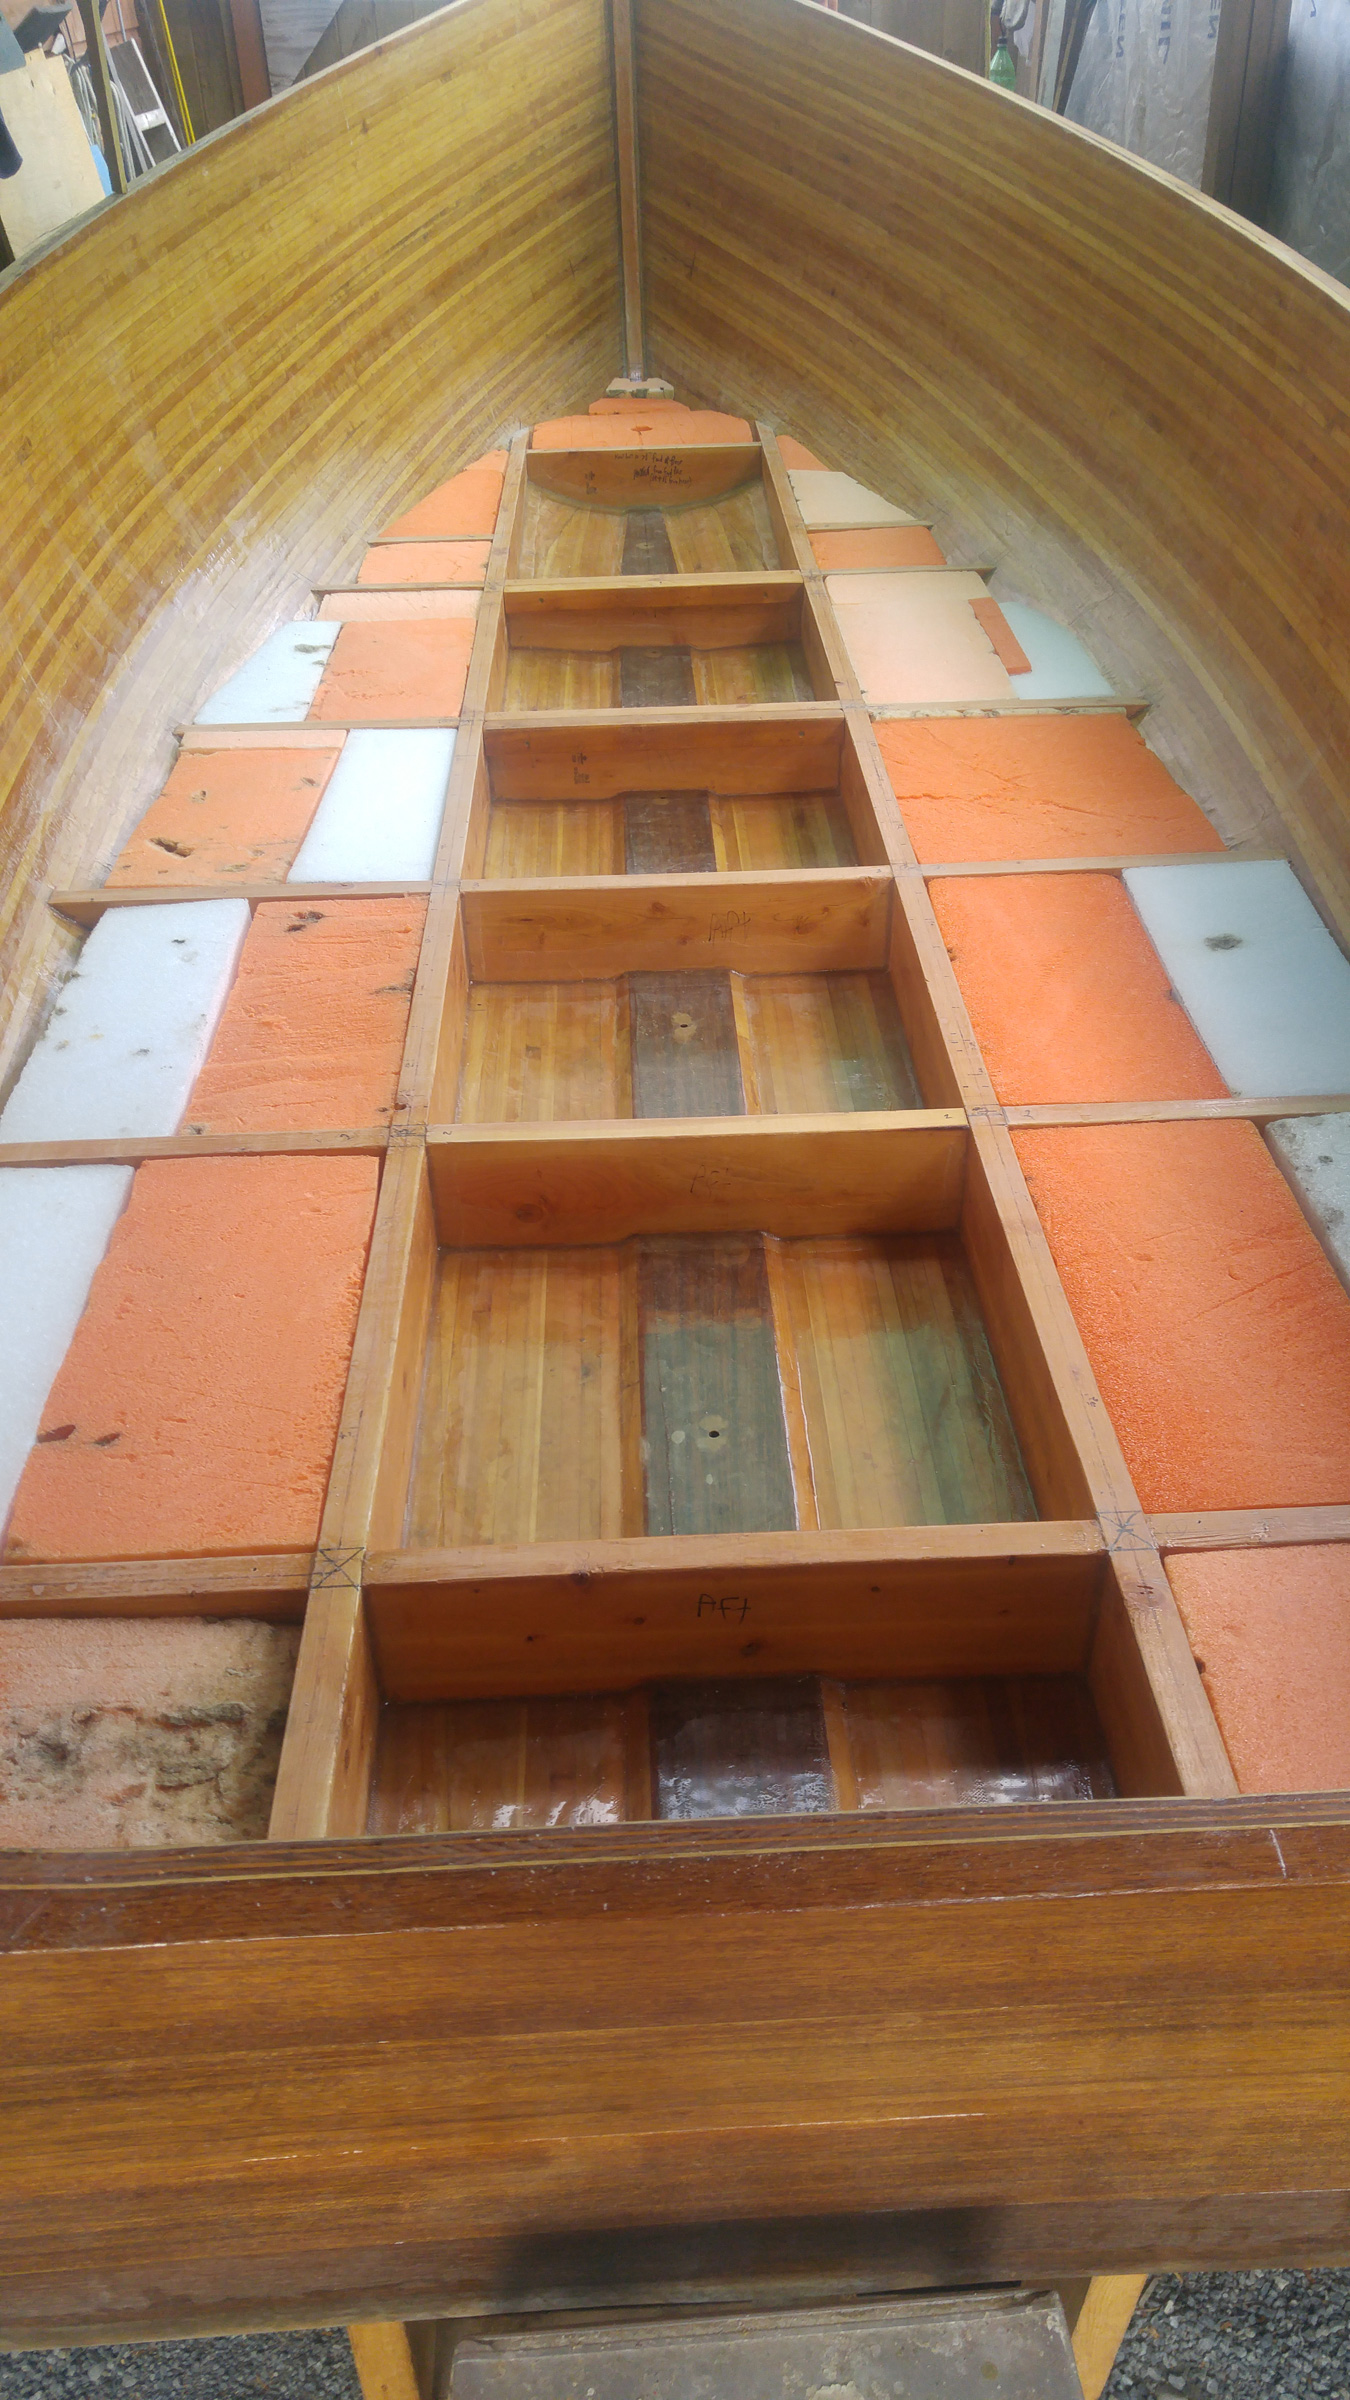
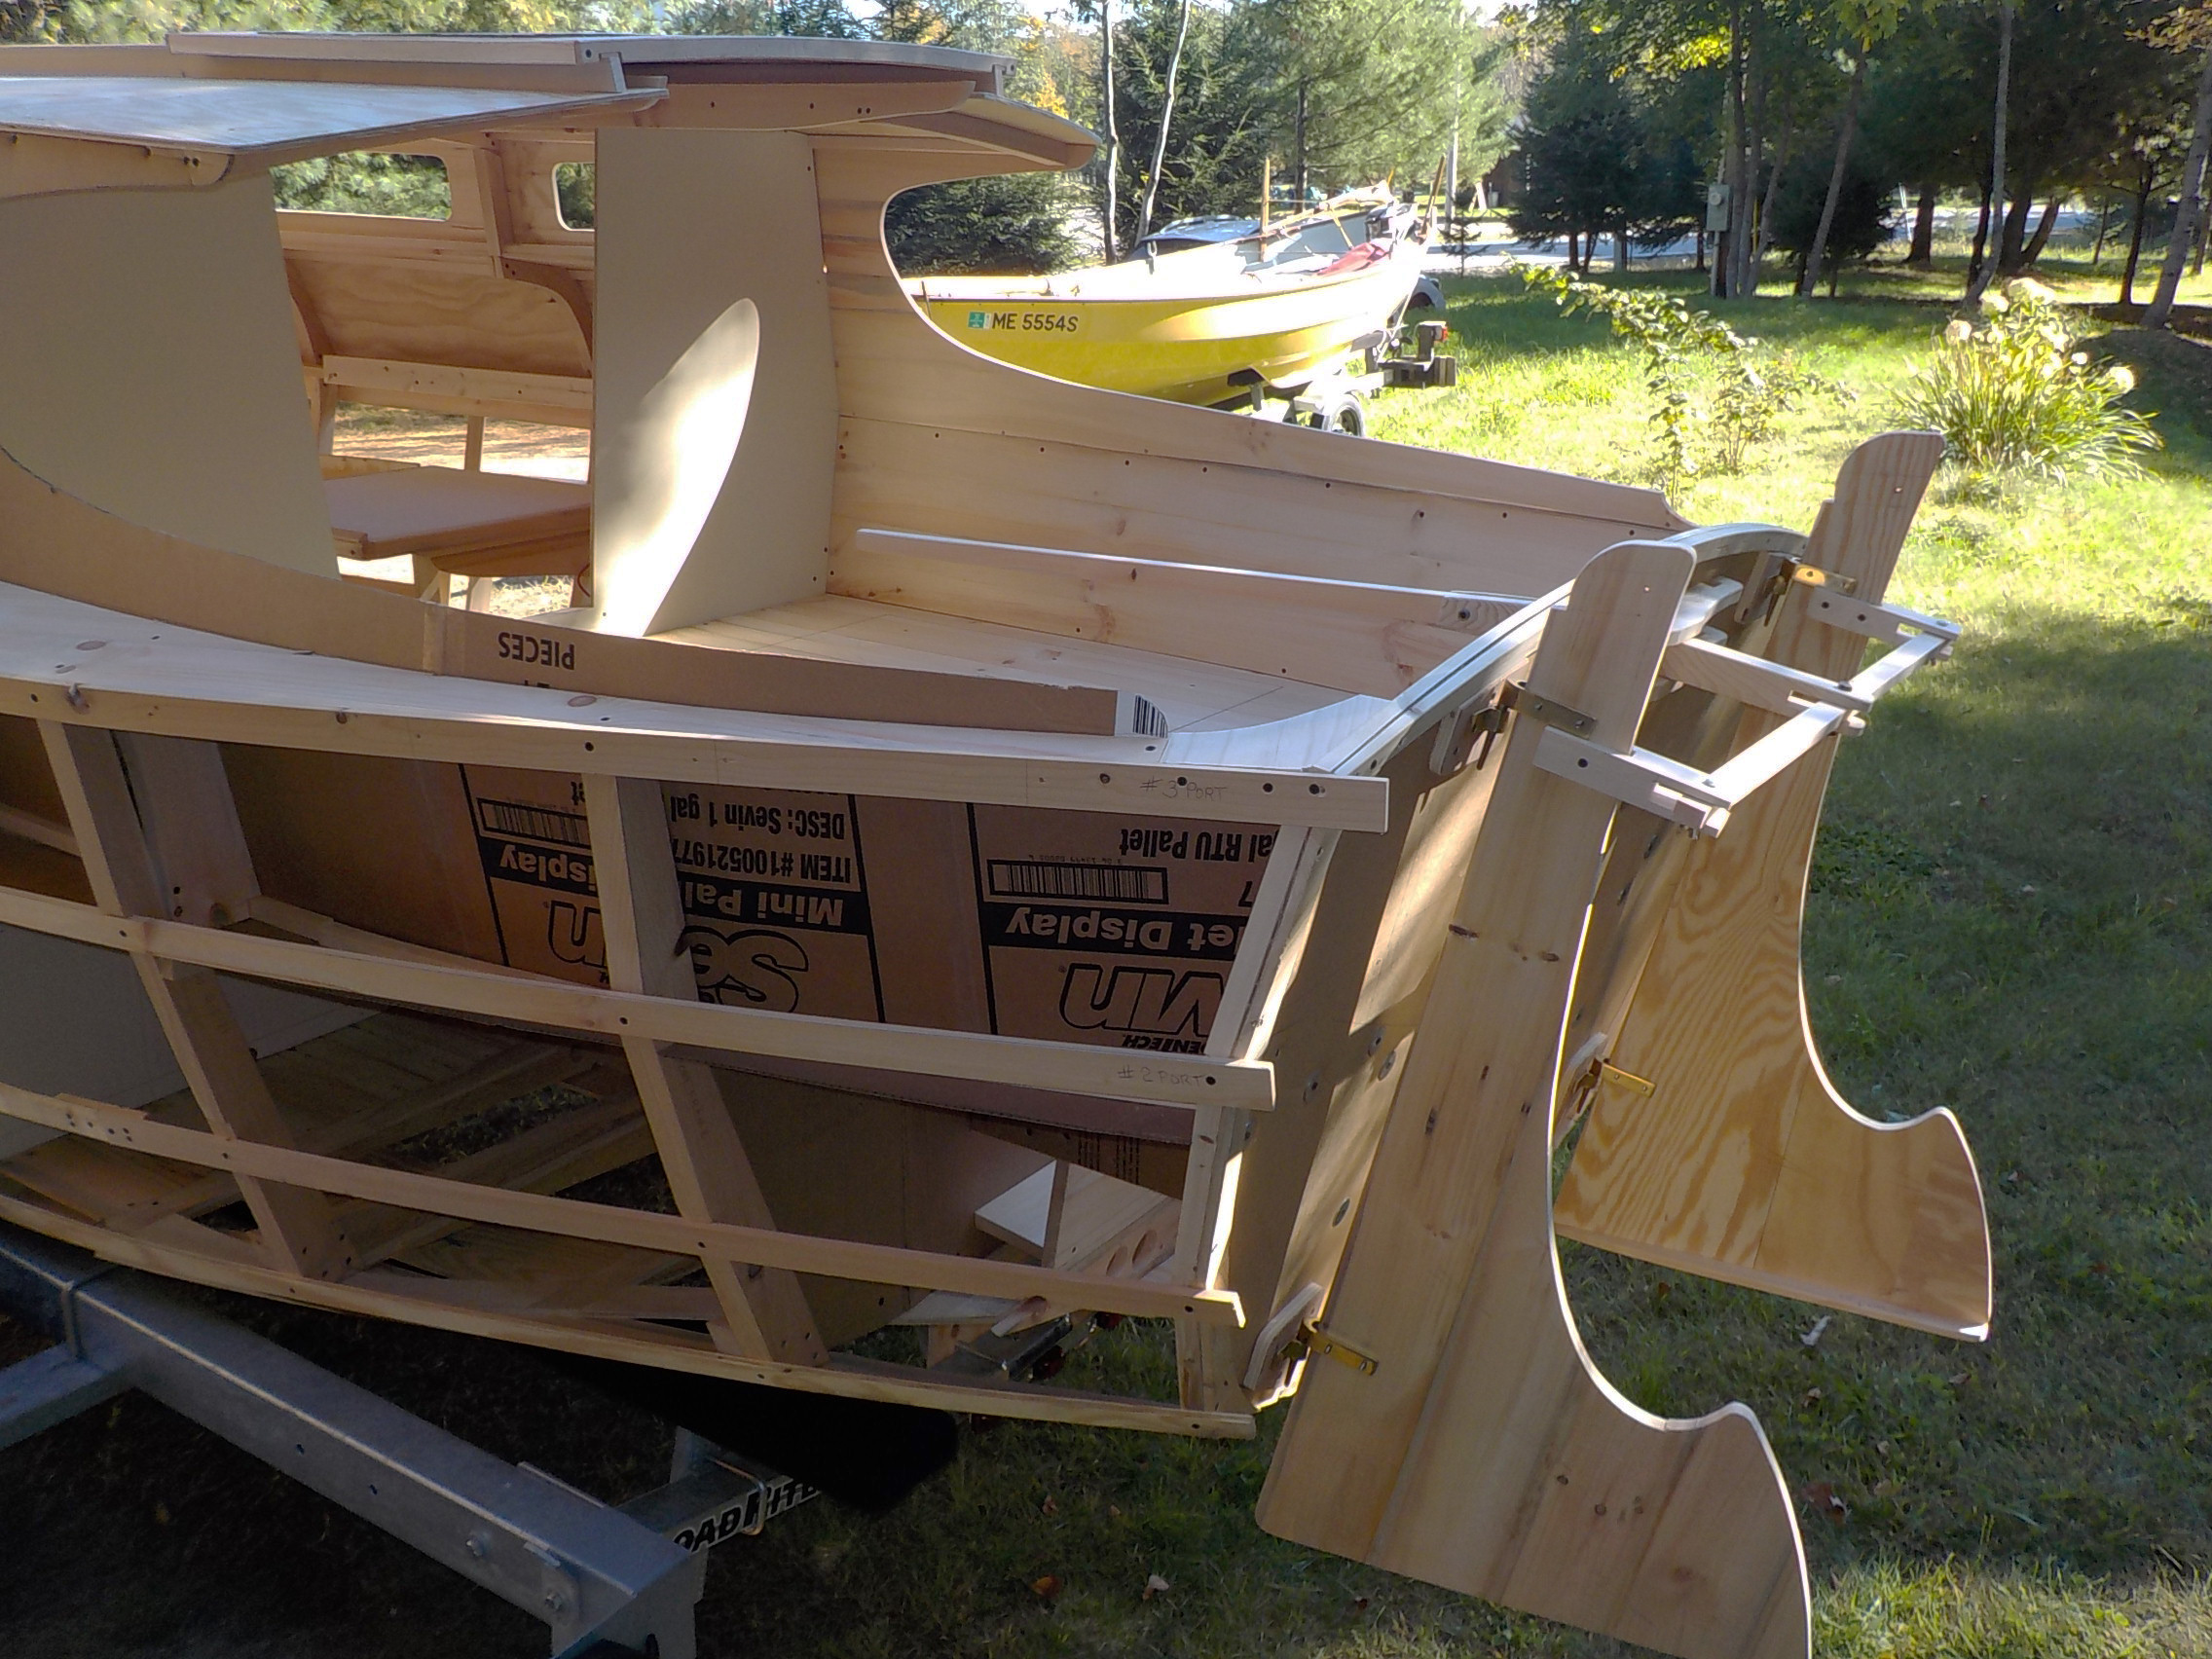
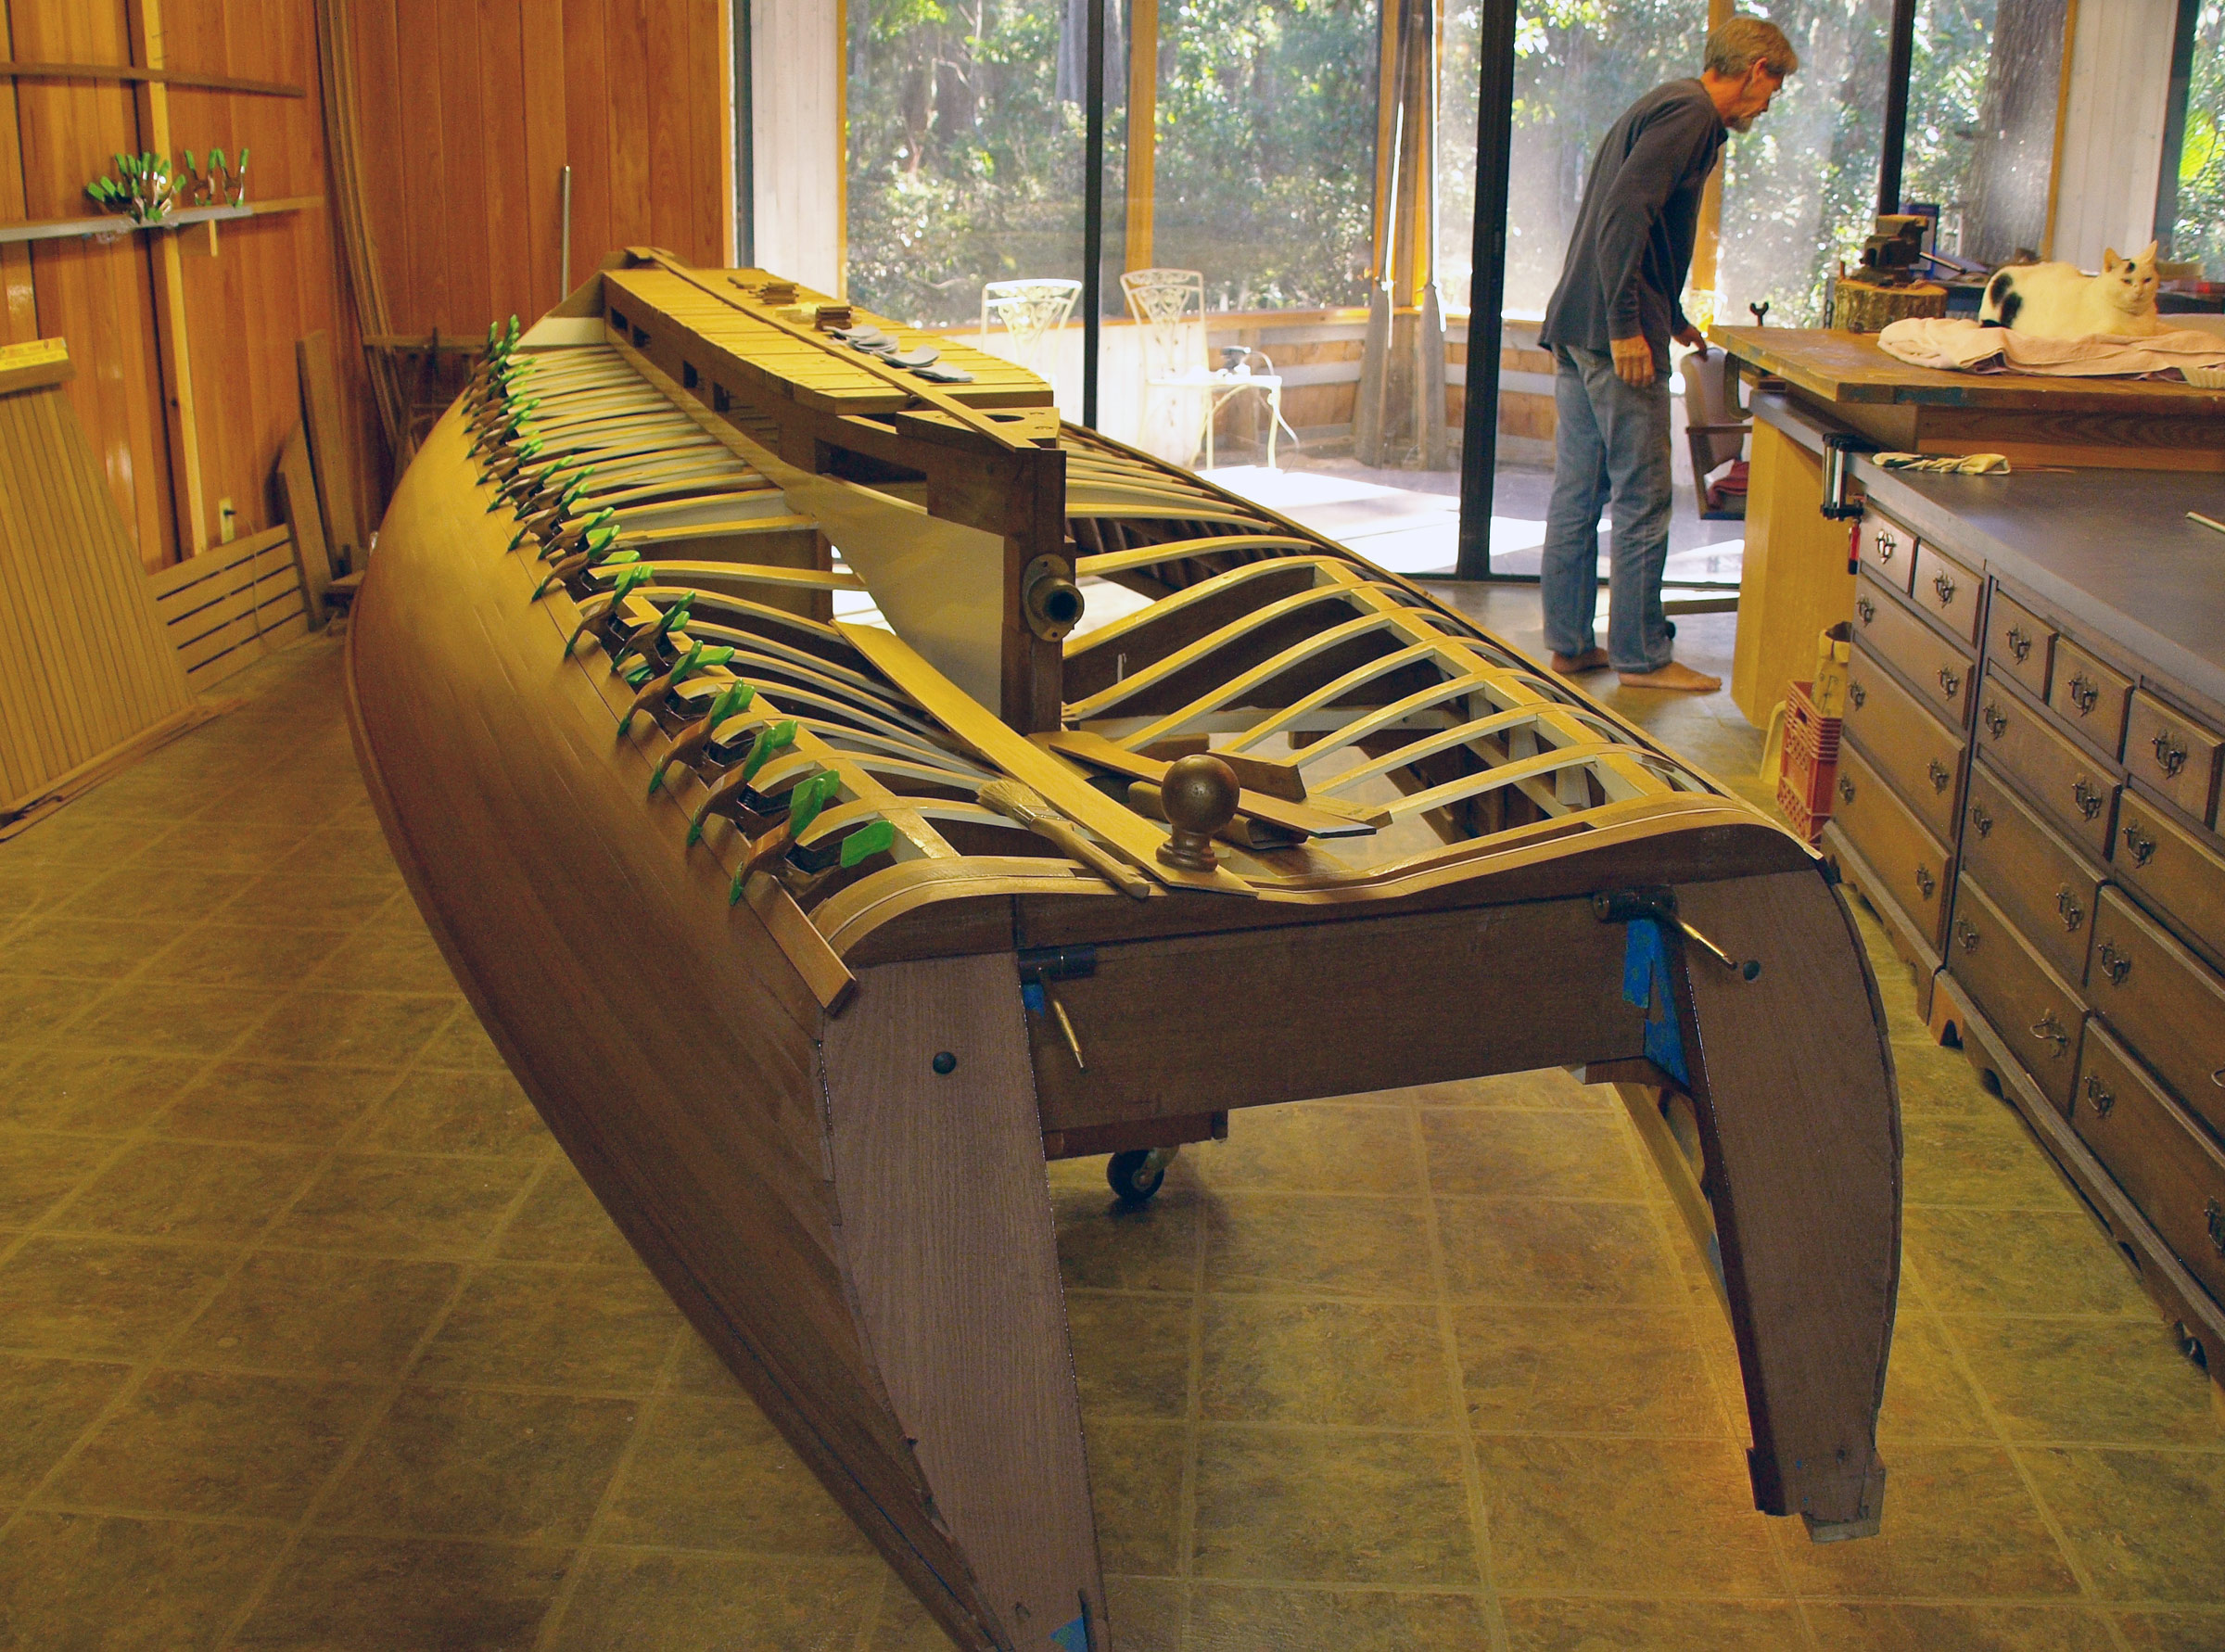
Foam for flotation filled the spaces between the framing members that would support the cockpit sole.
He bought 20′ 1×6 cedar boards from a local lumberyard, cut his own 1/2″ strips, set up the molds, and went to work. His son, Junichi, lives close by and is a good man to have on the job, not only because he works for the B.C. provincial government on building and safety standards, but also because he is a fine anecdotal argument for serial boatbuilding as a genetic condition. Junichi’s first boat, a 13′ strip-built peapod, was featured in a Disney movie filmed in British Columbia. More recently he rebuilt a 14’ cedar Peterborough runabout and converted a 16′ Atkin-designed rowboat that he’d built into a 12′ runabout.
Rather than work out the accommodations on paper, Barry decided on the dimensions and went straight to framing.
Barry and Junichi gave the fully planked workboat hull two layers of 6-oz ’glass and epoxy, and when the time came to flip the hull upright, Junichi arrived with an old mattress. Then father and son, with the help of several neighbors, rolled it from strongback to cradle.
With a bit of plywood defining the shapes of the cabin and pilothouse, the workboat begins to look like a lobsterboat.
After Barry ’glassed the interior, installed two 2×6 stringers, foam flotation, and the cockpit sole, he began to design the forecabin and pilothouse. He had read that there were many compelling arguments why he should not add a cabin and wheelhouse to an open boat, but he had one compelling argument why he could: “It’s my boat.” He set the length of the cabin at 6′ 6″, long enough for a comfortable berth, then mocked-up the pilothouse with 2x2s. When the roofs and walls were in place, Barry installed a solid door with a lock, sliding windows, seats, and the controls at the helm.
The addition of the cabin and pilothouse converted the workboat into a successful pleasure cruiser.
Launch day started with a celebration at the house, attended by family and neighbors, and then moved to the launch ramp at Brentwood Bay, a handful of miles (plus a few more digits in kilometers) north of Victoria. The boat was christened C H K, after the first initials of his three grandkids. A borrowed 20-hp two-stroke was the boat’s first outboard, and when Barry decided that wasn’t enough power, he bought a new 20-hp four-stroke.
C H K has cruised to Desolation Sound and will have plenty of British Columbia coast to explore in the future.
Barry and C H K are in the heart of beautiful cruising grounds. The summer before the pandemic, he cruised the B.C. coast north some 150 miles to Desolation Sound, and then kept closer to home last summer and meandered through the Gulf Islands. This coming summer, he hopes to travel farther, vaccinations permitting—and if he can put off building his next boat.
Do you have a boat with an interesting story? Please email us. We’d like to hear about it and share it with other Small Boats Magazine readers.
RASCAL sped across the riffled waters of Long Island Sound. Her mahogany foredeck glowed from the depths of its varnish, and her stainless-steel cutwater sparkled through drops of water streamlining into mist. Driver and passenger sat low on a simple rolled leather seat, legs stretched out nearly parallel to the cockpit sole. A tall person could reach over the side and touch the water as it rushed aft at better than 50 mph. Memories of my first ride in RASCAL still raise goose bumps after 15 years.
At 15′ in length and weighing about 1,000 lbs with a full fuel tank and cockpit, RASCAL is a cheeky little boat— “pleasantly mischievous” is one of the ways Merriam-Webster’s Unabridged Dictionary defines the name—powered by a 60-hp Mercury outboard. If Colin Chapman had designed and built boats instead of Lotus automobiles, a boat of RASCAL’s character surely would have been among them—the Lotus Super Seven of the waterways.
Photo by Polly Brown
Rascal, a 14’10” outboard runabout that you can build in the backyard, strives to capture the cachet of big mahogany speedboats—without their mechanical complications and great expense.
Designed and built by Kenny Bassett, Onion River Boat Works, RASCAL offers more bang for the buck than just about any other runabout a father and son could build over several hundred hours of nights and weekends. They will build her of plywood—4mm for the topsides and decks, 5mm for the bottom—ripped into strips 1″ wide and laid diagonally over frames and stringers. That’s the easy part. If they want to capture the gloss and romance of traditional mahogany runabouts, they’ll plank the topsides with 1⁄ 4″ solid mahogany, perfectly lined off and set in epoxy. Although this method taxes the skill and patience of an amateur builder, it’s far from impossible. In fact, Tom Donahue, an electrical engineer living in Connecticut, recently completed a Rascal. Before this project, he’d built nothing more demanding than a couple of birdhouses. Donahue knows, maybe better than anyone, that whoever builds a Rascal must let patience guide them throughout the project, especially during the varnishing. The finishwork will likely require as much, or more, time than the construction.
The final result, though, is worth the wait. RASCAL rides atop a shallow-V bottom. Her steep entry warps into a flat run and ends at the transom in a deadrise of about 7 degrees. A delta-shape pad keel from station No. 2 aft to the transom provides a perfect planing surface, allowing RASCAL to make the transition from displacement speed to full plane in a single heave—absent the “hump” we associate with deep-V hulls and their slightly shallower modified-V sisters. Chine flats emerge from the waterline at station No. 4, which corresponds with the forward edge of the cockpit. They rise gracefully and embrace the stem about halfway up the bow, forming a line that plays with light and shadow to create visual interest forward of the cockpit. These chines also deflect spray.
RASCAL’s exceptional proportions mask her size when she stands alone in the slip or speeds across the water. Only when she’s parked next to a larger boat does she reveal her compact dimensions. The outboard’s power head, like a welt on the forehead of Julianne Moore, may diminish our first impressions from exquisite to merely beautiful, but familiarity ought to heal the wound. Bassett was aware of this possibility, so he painted the cowling of the outboard on hull No.1. A lustrous solid black accented by the name RASCAL in chromed script made the power head an integral part of the design, further defining the boat’s character and purpose.
I’d met Bassett at the Riverside Yacht Club in the town of the same name located two train stops east of Greenwich, Connecticut. He’d traveled from New Hampshire to demonstrate the boat to a prospective buyer and invited me to join him for a test drive afterward. Bassett fired up the three-cylinder Mercury, which was still warm from his demo, engaged forward gear, and idled us into the channel.
Photo by Polly Brown
Powered by a 60-hp, Mercury outboard motor, RASCAL scoots along at better than 50 mph.
At rest and under slow way, RASCAL lightly tap-danced to the rhythm of cat’s-paws stirred by the breeze. This lateral motion is common to other runabouts I’ve driven and seems to be a characteristic of the bottom’s shape and the boat’s low center of gravity. I love this little dance, because it conveys a restless energy—the promise of speed. Most runabouts fulfill this promise, whether they are blindingly fast or simply pleasingly rapid.
Few powerboats involve us in their playfulness as completely as does a fine runabout, and RASCAL’s length and light weight intensify all of the sensations—save one: the rumble of an inboard engine, V-8, or straight-six barking epithets from the chrome tips of a through-transom exhaust. When I drove the original RASCAL, a 60-hp Mercury two-stroke outboard powered her, and I admit to being disenchanted by the ring, ding, ding voice coming from the transom. Sure, I knew better. I had road-raced two-stroke motorcycles in the late 1960s and early 1970s, and understood their potential to entertain the speed demon in all of us. I knew also that this lightweight outboard was the key to RASCAL’s personality.
Never mind Gar Wood’s neat 16′ Speedster inboard runabout or, to be more contemporary, Donzi’s lovely Sweet 16 sterndrive, only an outboard would give Bassett everything he wanted—simplicity of installation, ease of maintenance, purchase price, light weight and performance. Although outboard-powered classics never gained the cachet of their inboard sisters, they’ve written a richly colorful history for themselves in racing and more sedate forms of boating. In RASCAL, Bassett has combined the spirit of the all-conquering Switzer Craft hydroplanes and utilities with the look and presence of a Gold Cup raceboat.
After we cleared the mooring field and the no-wake zone, Bassett trimmed the outboard’s drive leg and pushed the throttle to the stops, sending us in a single rush to a speed of 50 mph. In the open water, RASCAL skimmed atop a foot or so of chop, doing her best imitation of a Lotus Super Seven tearing along a country lane in the north of England. Hard left, hard right, the little boat put her shoulder into the turns and carved perfect arcs. A tiny skid fin, at the leading edge of the planing surface and projecting to a depth of 2 3⁄4″ from the pad keel, helped RASCAL hold her line and speed in these turns. Without the fin, she would drift wide—her way of asking the driver to back off the throttle. We played until our faces ached with indelible grins and the electric tilt and trim on the outboard quit working.
Photo by Polly Brown
Designer-builder Ken Bassett drives RASCAL at speed. The playful runabout isn’t the easiest boat to build, but she rewards careful work with fine performance and head-turning appearance.
We met again later in the summer—this time on Candlewood Lake, near Danbury, Connecticut. This lake is an impoundment and is very narrow in many sections. Wind-blown waves and the wakes of powerboats bounce off the shorelines and march directly back toward the center of the lake. Picture the inside of a washing machine, the agitator of which moves rapidly up and down. Even during the week, motorboat traffic on Candlewood resembles the madness of I-95 between New Haven and Greenwich, so we looked for relatively quiet water to time her acceleration and top speed in fresh water. We recorded 2.7 seconds from 25 to 35 mph and a maximum speed of 52 mph.
My turn to drive. The cockpit is intimate, the steering wheel small, and the gauges are located in a panel at the center of the dashboard, similar to the arrangement in a 1952 Jaguar XK120. The seat is a paragon of simple design and construction, a pair of leather-covered foam cushions resting on nylon webbing. As drawn, the cockpit ought to accommodate a reasonable variety of human heights and widths. If I were going to build a Rascal, I’d figure out a way to make the seat adjustable fore-and-aft.
The unassisted cable-operated steering was quick, and RASCAL’s response nearly instantaneous. At first, the boat’s quickness startled me, so I eased back on the throttle until I got the feel of her handling. In those washing machine waters, she preferred staying on top of the conditions, so the faster we went, the smoother was her ride. RASCAL reacted predictably to changes in the outboard’s trim. Trimming in brought the bow down to engage the waves; trimming out raised the bow, transferring the load to her planing surface under the cockpit. She never porpoised, chine-walked, or tried to get airborne. One owner of a Rascal has clamped a heavily modified outboard onto the transom and regularly sees 70 mph. He has reported that she remains free of handling vices.
Like a pleasingly mischievous friend, RASCAL defies anyone to resist her charm, her playfulness, and friendly manners. She may not be the easiest boat to build, but rendering the two-dimensional drawings into all her wonderful three-dimensional shapes may make you as giddy as does driving her.
Ken Bassett retired and closed Onion River Boatworks in 2017; there are no plans available for RASCAL. The review is presented here as archival material.
Is there a boat you’d like to know more about? Have you built one that you think other Small Boats Magazine readers would enjoy? Please email us!
With his Stir Ven design, a 22′ LOA centerboarder, François Vivier took first place in the “neo-traditional” category of a 1997 design competition organized by the French magazine Le Chasse-Marée. His main design objective was to balance the aesthetics and appeal of a purely traditional sailboat with a modern hull’s efficiency of construction, maintenance, and overall performance. Nine years and twenty-five boats later, it seems that he has fully reached his initial aim.
Designed at first with amateur builders in mind, Stir Ven has been refined several times, and the design is now being built professionally by the north Brittany boatyard Grand Largue, which produces versions ranging from a do-it-yourself kit to a fully equipped, ready-to-sail boat. Vivier’s very detailed drawings and instructions do not mean that Stir Ven’s lapstrake plywood-and-epoxy hull is an easy one to build, especially for beginners. Previous experience with a smaller lapstrake project—a Tom Hill design could be a nice training project—is more than recommended.
Photo by François Vivier
Under a single reef, a boat built to François Vivier’s Stir Ven design bravely beats to windward in a good breeze of the type that usually prevails during the Rencontres du Morbihan, a yearly meeting of traditional boats in south Brittany, France.
The Stir Ven hull is 22′ long, 7′ 3″ wide, and has a 397-lb cast-iron centerboard. Her lapstrake planking is 3⁄8″-thick marine plywood, with 5⁄8″ bulkheads. The main structural elements, including the deck, floors, watertight compartments, and frames, are all constructed of 3⁄8″ plywood. Her cockpit sole, rudder, and rear hatch are slightly thicker, using 10mm plywood (about 7⁄16″) that is easily found in France but may be less standard elsewhere. The backbone is made of the hardwood sapele, with wood-epoxy technology used all over, fillet joints included. Long common in America, such composite construction techniques are making some inroads among the traditional wooden boat builders in France, where even today a majority favors mechanical fastenings and cotton caulking. In old countries, things change perhaps more slowly than they might….
The Stir Ven sail plan shows a powerful, gaff-rigged mainsail of 204 sq ft. Two halyards easily hoist the high-peaked gaff, which sets nearly vertical. Her 75-sq-ft genoa gives her an efficient total of 279 sq ft of sail area. For working downwind, an optional asymmetrical spinnaker can be fitted to the end of a small—but not very aesthetically pleasing—bowsprit.
Photo by François Vivier
The boat is intended more for sailing than for rowing, but two healthy guys, each with a long oar, can maneuver in harbors or protected waters. A transom-mounted outboard, which stows in a cockpit locker, can take over when they’ve had enough.
Once launched, Stir Ven is quickly and easily rigged. When trailering, the mast, which is both light and short, lies flat on deck, resting in the tabernacle with the shrouds and forestay lashed down. Once the mast heel is fitted in the tabernacle, the mast can be hoisted by one crew member hauling on the forestay, which attaches to the stemhead fitting. After the shrouds and forestay have been tensioned properly, the sails have been hanked on, and the rudder has been shipped, you are ready to go. The tiller swings under the afterdeck, leaving plenty of free space on deck for the mainsheet tackle and the horse traveler. It’s difficult to imagine a simpler operation. Two people can get the boat from trailer to sailing in less than half an hour. Before setting sail, however, you have to remember to lower the heavy centerboard.
Photo by François Vivier
An amidships winch is needed to raise and lower the 397-lb centerboard.
After her initial heel, Stir Ven stays firmly on her bilges and holds a perfect trim until the wind reaches about 12 knots. If the wind is heavier, the huge main has to be reefed to keep the helm in balance, but even at high angles of heel the centerboard is heavy enough to keep the boat steady in the gusts. For ultimate security, Vivier has designed enough buoyancy in enclosed compartments forward and on both sides of the cockpit to make Stir Ven unsinkable. Some real-world testing has since demonstrated the efficiency of the design. Her tiller is always light and responsive, without any tendency toward weather helm.
To a purist’s eye, the optional spinnaker may seem to be an incongruity in conjunction with a gaff rig, but it greatly improves downwind performance and is small enough to be easily mastered, even in a good breeze.
Stir Ven’s rig is set up in a way very similar to a big dinghy, and deck hardware has been kept to a minimum for simple handling. It will not scare newcomers. For the construction, however, parts such as the stemhead fitting, the mast tabernacle, and the main horse traveler may have to be professionally manufactured in bronze or galvanized steel. The small traveler adds a traditional touch on the after deck and improves the set of the mainsail. The main and jib halyards are made off to cleats mounted on the tabernacle, but it is also possible to lead them through turning blocks to cam cleats mounted on the cabin roof on each side of the companionway, so that all of the lines will be within easy reach of the cockpit.
Photo by François Vivier
The Stir Ven cockpit is designed for two people to sleep on the sole, and a huge cockpit tent with full headroom can make the design into a comfortable camp-cruiser.
The small, cambered cuddy cabin is very low and does not protrude too much above the sheerline. The cabin is big enough to accommodate two usable bunks but lacks locker space. An optional cockpit tent erected on hoops greatly adds to the crew’s comfort when camp-cruising, providing a sheltered living area with full 6′ standing headroom in the cockpit. At night, two berths can be made up on the cockpit sole. The cockpit is not self-bailing, however, so any water remaining from the day’s sail will have to be pumped out. The cockpit’s size and depth, on the other hand, help children and beginning sailors feel immediately at ease and protect them from spray.
All heavy gear—water cans, fenders, and so on—find their natural place in compartments under the cockpit gratings, but they are not protected from water. The mooring line and anchor can be conveniently stowed in a forward locker, closed by a flush-mounted hatch. A bigger box just aft of the rode locker can be used to store the outboard motor, together with its portable gas tank. Because they contain heavy gear, those two lockers have been judiciously located far from the ends of the boat. Another detail betrays Vivier’s care in design: rather than using a conventional—and ugly—outboard motor bracket, he has provided a simple and stylish transom cutout for the motor, which can be removed and stored in the locker when not in use.
Photo by François Vivier
Some fittings, notably the bronze stemhead casting and the fairlead for the anchor rode, may have to be professionally made.
“I have been sailing since my childhood in the ’60s, a time when boats were mainly built of wood, designed by a naval architect, and built by experienced craftsmen,” Vivier says. “My passion for boats comes from that era, now considered as prehistoric. Since then, I have been studying ship engineering and architecture, and worked a long time for the biggest French shipyards and maritime transportation companies of the Atlantic west coast. My career ended as IRCN director (Institut de Recherches en Construction Navales— the Research Institute for Ship Building) where I have gained through experience a deep technical and practical knowledge of all types of boats, for leisure, fishing, commercial, or military uses. But for 25 years, my ‘secret garden’ has always been traditional boating, sail-and-oar, and amateur small-boat building. This led me to design for my pleasure various sailing or rowing boats, all inspired by tradition, but easy to build with simple tools at home. In 1981, I was one of the founders of Le Chasse-Marée, a yachting magazine that right from its first issue was promoting a new sailing philosophy, summed up in a simple slogan: ‘Naviguez autrement,’ which translates as ‘sail in a different way.’
“Soon after Le Chasse-Marée’s founding, I designed l’Aven, the first French sail-and-oar stock design, 80 of which have since left the yard in Loctudy. In 1985, I drew l’Aber with home-builders in mind and developed a large range of various sailing and rowing small boats. Today, the now affordable CNC technology (computer numerically controlled cutting) and yacht design software are the best tools to develop new building kits. Their high level of precision greatly simplifies and shortens a lot of usually painful and boring boatbuilding tasks, and in order to answer to an increasing international demand, I am now translating my building instructions notebooks in English—but the measurement system is still metric.”
With a jib, a genoa, a high-peaked gaff mainsail, and an optional asymmetrical spinnaker tacked down to a stub bowsprit, Stir Ven offers the sailor lots of variations. The jib sheet reeves through a fairlead to a cam cleat, but the design indicates that once the centerboard is lowered, the amidships winch can be freed to trim the jib.
This Boat Profile was published in Small Boats 2007 and appears here as archival material. Plans for the Stir Ven 22 are available from Vivier Boats.
Is there a boat you’d like to know more about? Have you built one that you think other Small Boats Magazine readers would enjoy? Please email us!
In 1987, as Chip Miller was learning how to build wooden boats at the Maine Maritime Museum in Bath, he became interested in Alton Wallace’s design for an open skiff. Contacting Wallace, Miller arranged to have a look at one of his original hulls. He measured that hull, carved a half model, and—using the model in the traditional way and working with another student—built a full-scale version of Wallace’s skiff in the museum’s shop. He liked the result, and after a few years’ work in various Maine boatyards, he concluded it was time to build this seaworthy design again, using up-to-date techniques.
Where to begin? He still had his half model, and the Maine Maritime Museum still had the set of molds Miller had made and used there for his student project. “They didn’t want them,” he was told when he inquired about the molds. He promptly retrieved them, presumably saving these critical ingredients of his own boatbuilding dreams from the kindling pile or the dump.
Photo by Doug Wood
Six River Marine based this tough and shapely skiff on a highly regarded workboat designed and built by Alton Wallace. Chip Miller gave the new boat more freeboard, less flare, greater breadth, and slightly increased length.
Six River Marine, the company Miller formed with Scott Conrad in 1994, got its start as a mobile marine service. Miller and Conrad “packed their tools in a van and set about letting folks know of their services,” according to Six River’s informative web site. They had to work under some fairly miserable conditions during this time.
The West Pointer came into the picture about 10 years later, long after a roomy former chicken house in North Yarmouth, Maine, had replaced the van as Six River Marine’s principal place of business. Miller and Conrad had built up a storage, repair, and restoration operation that concentrated on boats built from the 1920s through the 1960s, some of which had won show honors for the quality of the restoration work. The student half model of the Wallace skiff lay in Miller’s office, reminding him daily of the handsome boat he had built nearly 20 years before.
The boat Miller built at the Maine Maritime Museum in 1987 was conventionally planked and a few inches shorter than the version he began building in the North Yarmouth shop. “More freeboard, less flare, increased beam, and increased length” is how he describes the result, which is 18′ 6″ overall, draws 7″ with its outboard motor up, and displaces 1,100 lbs.
Photos courtesy of Six River Marine
Unlike its strip-built workboat predecessor, the new Six River West Pointer is cold-molded with cedar, mahogany, and epoxy.
The big difference between the West Pointer 18 (20′ and 22′ versions are planned too) and its museum-built predecessor, however, is in the construction. Miller settled on cold-molded veneers over laminated mahogany frames, using two 1⁄8″ layers of cedar and one of mahogany, sheathed on the outside with resin-impregnated Dynel cloth and coated with a one-part urethane paint. The veneers are laid at right angles to each other in “planks” of varying widths, glued together with epoxy while being clamped with a vacuum-bag. He describes the result as “a rigid one-piece structure made completely of wood not fiberglass.”
The resulting hull, Miller asserts, is lighter in weight than its conventionally planked ancestor, and considerably easier to maintain. The company’s brochure for the West Pointer notes that the cedar and mahogany used for veneers is rot resistant and completely sealed with epoxy: “The result is a solid, impervious structure. With proper maintenance, rot won’t have a chance to get started.”
Photo courtesy of Six River Marine
Vacuum-bagging the hull as the epoxy cures results in a rigid one-piece structure that is free from voids.
The 18’6″ model that came out of the shop in 2005 is decked forward with a curved coaming running down both sides, from the foredeck all the way to the stern. Side decks are about 8″ wide, and the coaming looks low enough to permit a person to sit on the narrow deck for a while without discomfort. There is a center console equipped with a stainless-steel destroyer-type wheel and throttle and the usual gauges, plus convenient grabrails to port and starboard. The helmsman’s seat—gray-painted plywood—is positioned far enough aft to allow the skipper to stand or sit at the console (company photographs always show the helmsman standing, suggesting the West Pointer’s roots as a traditional workboat). There’s storage in the locker under the helmsman’s seat and under the foredeck.
This is a custom-built boat, and the configuration of hull No. 1 is only one of the possibilities. “In keeping with Six River Marine’s reputation as a custom boat builder, every hull is built to order,” states the company brochure. Alternate configurations might include a dodger, more decking, a windshield, additional rubrails, a different style of coaming, various seating arrangements, even a steering arrangement other than the center console. And, of course, the level of finish— less paint, more varnish—is up to the customer as well. Hull No. 1 is white with gray decks and interior, set off with a varnished coaming, grabrails, and console trim—very workmanlike, with just enough varnish to make it interesting.
The company recommends a 50-hp outboard, although at the customer’s request the first hull was equipped with a somewhat larger four-stroke Honda. A 50-hp motor, Miller says, will push this hull at 25 knots. It may be too early to know much about customer satisfaction, but the Maine buyer who commissioned hull No. 1 reportedly sold it to another buyer after a season and the boat is now with its second owner in Stuart, Florida. The original customer, meanwhile, has returned to Six River Marine and ordered a second West Pointer for himself.
Despite its curvaceous topsides, the West Pointer 18 shows an essentially flat bottom. The good-looking skiff has great initial stability, which can be useful for work and play.
This Boat Profile was published in Small Boats 2007 and appears here as archival material. For current information on the West Pointer 18, contact Six River Marine, 160 Royal Rd., North Yarmouth, ME 04097; 207–846–6675.
There is always an air of anticipation (and anxiety) when contemplating building a new design that you have never seen (much less been on board). Such was the case a few years back, when WoodenBoat School shop manager Jerry Cumbo and I were casting about for another boat to use as a shop project for the Fundamentals of Boatbuilding courses taught at the school. The design needed to be technically interesting, with plenty of different operations, yet not so complex that it would take forever to build. It had to be safe and handle well enough that it might be a candidate to join the school’s waterfront fleet, and at the same time be practical enough that a student might actually want to build one. And it wouldn’t hurt if it looked good, too. We already had the usual suspects on the floor—the dory types and East Coast carvel pulling boat types. We were ready for something new, but what?
That’s when Mike O’Brien, WoodenBoat’s senior editor and design guru, suggested Skylark by Paul Gartside. Mike had recently reviewed the boat for the magazine and liked the cut of her jib (and other parts, too). Skylark was designed for day-sailing in the sporty estuary and ocean waters off the Oregon coast. Gartside’s customer had a preference for the lug-rigged older British sailing dinghies, and that’s where the design began. The resulting plans looked great. With a 14′ length and a 5’8″ beam and tipping the scales at a beefy 550 lbs, Skylark is one big, little boat with plenty of freeboard and stability. A quick look at the design reveals hollow waterlines forward, an easy run of planks aft, and a broad transom that barely touches the water. She has lots of rocker so she would tack easily, and if need be, would be efficient enough to move decently with either oars or small outboard. Skylark reflects her British Isles heritage with robust construction featuring a heavy-duty skeg-type backbone, lapstrake…er, clinker (in the British parlance) planking fastened with square European-type rivets, a plethora of frames, and a profusion of reinforcing knees—at the transom, stern, and thwarts.
Photo by Benjamin Mendlowitz
Paul Gartside designed Skylark, a 14′ daysailer, in the tradition of the sailing dinghies of his native Britain. The boat is heavily built and robust, and is also a fine sailer. Rig options include the lugsail shown here, and a marconi sloop.
Paul also penned in a handsome sheerline—this being the top edge of the boat’s hull, in profile. It’s an important element in a boat’s shape. Get it wrong, and the boat’s looks will suffer considerably. Oftentimes, small, wide boats can have sheers that look powderhornish—meaning their sheers dip precipitously up forward. They can sometimes look outright dumpy, but in this case, the sheer is elegant and, in profile, evokes the look of a svelte yacht dinghy. Best of all was her practical, near workboat ambiance. There was nothing that demanded expensive wood and 14 coats of varnish. Nor did it request a blue blazer or an ascot. Instead, it said, “Just jump in with a few friends and go—and don’t forget to bring the dog.” We were sold.
We did, however make few East Coast modifications to Skylark’s specifications. To wit: We planked the hull with Maine white cedar rather than the Western red cedar, for a couple of reasons. First, the Maine cedar is a tougher wood that resists impact and stress better than the red. Second, we had a good supply of it. We also made the planking a bit heftier as added protection from the occasional rocky beach landing. The knees were to be made of local hackmatack root.
Also, originally the plans called for a galvanized-steel centerboard. To standardize the boat with the rest of the WoodenBoat fleet, we opted for a Dynel-covered plywood board (ballasted with a slug of lead) that could be hauled up with a simple lanyard and cleated off.
Then, there is the matter of which sail rig to use. Skylark can be built with a deluxe gunter jib and main rig (94 sq ft) or the basic standing lug (88 sq ft). Again, opting for simplicity, we went with the free-standing lug.
The result of our modifications is a boat that is possibly somewhat more heavily built than the original design, but the difference is nothing to write home to mother about. We didn’t log the time required to build ours, and it wouldn’t be a meaningful figure if we had, for it was built in a classroom setting. However, designer Gartside suggests that the boat will require 600 hours of a highly skilled boatbuilder’s time.
Fast-forwarding, the boat was built over a number of summers in classes taught by a few different instructors and fashioned by literally hundreds of hands of students and alumni and shop staff. The resulting boat was even better looking than we had hoped for. She’s elegant, in a practical way, with an easy-to-maintain finish. Her topsides are painted with marine enamel, and the interior has a bright, oiled finish. That oil, it should be noted, will not remain as bright over the years as it appears in the accompanying photographs. It will weather to black, but will be far easier to maintain than varnish.
And how does she sail? The waterfront staff have all given Skylark universally high marks. Her inviting accommodations are comfortable to be in and can easily sail with four adults aboard. With her standing lug rig with a single halyard, she is simple to get underway. Just jump aboard and drop the centerboard, and off you go. That’s what Al Fletcher, WoodenBoat’s waterfront manager, did at the end of last summer. His shakedown sail resulted in the usual tweaks to a new boat’s rig, but he had high praise for the design.
Photo by Benjamin Mendlowitz
Despite her weight—which is rather high compared with other boats of her size—Skylark will keep moving in tiny zephyrs. When the wind dies all together, you can lift the boom above head-height and break out the oars.
On an outing in 12 knots of breeze, Fletcher reported good offwind speed. Upwind performance that day suffered as a result of a too-short mast, which produced a rather severe wrinkle in the sail. He said, “The boat tacked without hesitation and we were never caught in stays, even with minimal forward movement.” Al’s conclusion? “This is a roomy, quick, and stable 14′ open dinghy that I believe will give an outstanding account of herself once we get the rig sorted out.”
By season’s end, WoodenBoat’s new Skylark had a longer mast, and she was well through her teething problems. It seems nobody can pass by her without stopping and commenting on her beauty and grace. She has proven herself fast, sailing well with a good turn of speed (even in light air due to her tall lug rig). She tacks well without hesitation, feels stable both at the dock and under sail, and has a delightful chortle as water travels over the laps. Like all centerboard hulls, Skylark can cruise where no deep-keeled daysailer would dare to venture. Her draft, board up, is but 10″; with it down, it is 3′ 4″. She beaches handily with the kick-up rudder. Notes one passenger of the boat, “It even smells good.”
Granted, a single design will not be the perfect choice for all. In fact, Al Fletcher notes that Skylark was brought into the WoodenBoat fleet specifically to fill the niche between a 17′ Fenwick Williams catboat and a 12′ Beetle Cat. Four adults looking for a fine afternoon on the water will find the elegant yet working-class Skylark to be a delight. She is just a lot of fun to sail.
Designer Paul Gartside draws his plans with an unusual level of detail and artistry. He’s well known for small, ocean-capable sailing cruisers based on the fishing vessels of the west coast of England, but his portfolio is much wider than that. His Skylark design is filled with traditional elements, and is not a simple boat to build. But she is a simple boat to sail.
Time passes and carries with it our memories of even the sweetest experiences. I admit to having forgotten a lot during the past 25 years, but every moment I’ve spent in the company of BLACKBIRD remains firmly burned onto the CD of my life in boats. She’s a nautical treasure and rubs up against the edges of perfection. She may be the most appealing example of her type, a minimalist outboard-powered cruiser for sheltered waters, and the reason (or reasons) she hasn’t spawned a single sibling remains one of the most baffling mysteries of our time.
Conceived in the early 1980s by Ken Bassett, Onion River Boat Works, and massaged into her final form by Phil Bolger, BLACKBIRD embodies the spirit of carefree mobility found in the lyrics of the Mort Dixon/Ray Henderson song “Bye Bye Blackbird,” “Pack up all my cares and woe, here I go, singin’ low, bye bye blackbird.” BLACKBIRD evolved on the image of the 40′ launch ESCORT, which Al Mason designed in about 1940 when he worked at Sparkman & Stephens. Bassett latched onto the notion of building a simple, lightweight variation of the theme, which ESCORT so beautifully represents, while he watched slides of a friend’s cruise on the Rideau Canal system in Ontario, Canada. His preliminary drawings showed a hardchined hull that Bassett planned to build from plywood. He sent the drawings to Bolger for completion. Bolger shared Bassett’s admiration for Mason’s graceful launch, and he drew plans for a round-bilged hull measuring 23′ 4″ long overall and 7′ 8″ maximum beam.
Photo by Benjamin Mendlowitz
Likely the most beautiful outboard cruiser ever designed, the shoal draft BLACKBIRD can cozy up to a secluded island beach and let her crew step ashore.
Approximately three times longer overall than she is wide and, on the waterline, only a few inches shy of her overall length, BLACKBIRD is all about curves—the shadows and highlights of which define her shape as she moves through the water or swings to her anchor. She’s beautiful from every angle, but her relatively short overall length pushes the aesthetic limits. If we chop off so much as a foot, retaining the beam as drawn, we’d be in danger of creating a caricature. If we scale down the design by a foot—which also requires narrowing the beam—we may cramp her interior volume beyond practical use.
On the other hand, scaling up or lengthening her on the same beam would add far more than the numbers indicate. She would be faster, roomier, more stable laterally and longitudinally, more elegant, and more expensive to build or have built. In spite of our preferences—as drawn or longer—we can’t ignore the sound reasoning that established BLACKBIRD’s final dimensions. A lightweight 24′ boat handles easily on the water, tows without protest, and readily cooperates during launching and retrieving. All of these characteristics extend her cruising grounds and enhance her usefulness. I’ve often imagined towing BLACKBIRD to some obscure body of water many miles from home and camping in her during rest stops along the road.
Belowdecks, BLACKBIRD serves up a cozy space for one or two adults. We’ll label the accommodations, which comprise a V-berth, enclosed head, and a galley opposite, luxurious camping. It certainly captivated me. BLACKBIRD and I met for the first time at a marina in Grand Isle, Vermont. I’d driven north from Connecticut to meet Bassett and spend an afternoon aboard the boat. Arriving early, I went aboard and crept into the cabin like a jewel thief slipping into madame’s boudoir. Bolger has referred to the layout as “shipshape.” I have to call the ambience magical. I went forward, collapsed onto the V-berth, closed my eyes, and let the boat’s polite motion lull me to sleep. Her original owner cruised the shallow waters of south Florida and lived aboard for a number of months. Before that, he and Bassett took the boat from The WoodenBoat Show in Newport to Grand Isle via the Hudson River and Champlain Canal. In the tropics or during the summer months farther north, we’d spend more time outside than in, lounging on a beach chair in the cockpit, a large umbrella sheltering us from the sun. We’d cook on a portable grill, sip espresso that we made on the stove in the galley, and then toast the sunset with a snifter of fine brandy.
In keeping with the theme of carefree mobility, Bassett specified outboard power for BLACKBIRD—originally a 50-hp Mercury. So equipped, the boat is easier to launch and retrieve, is lighter in weight, and doesn’t require all the plumbing and through-hull fittings that an inboard does. Installing an outboard also is orders of magnitude less intimidating to an amateur builder. Mounted in a watertight well, the motor doesn’t intrude on our peace as we cruise up the river, nor does it interfere with our appreciation of BLACKBIRD’s simple beauty.
Photo by Benjamin Mendlowitz
Requiring only moderate power, the 23′ 4″ hull efficiently slides through the clear water of Eggemoggin Reach near Brooklin, Maine.
Devoid of styling gimmicks, BLACKBIRD combines the purposeful look of a workboat with the grace of a gentleman’s launch. Although a cynic could argue that the complex shapes, especially in the trunk cabin, are hard to build and unnecessary to the boat’s function, she’d lose a lot of her emotional appeal if those shapes were eliminated—at least the love-at-first-sight part. The smitten enthusiast, emotions aside, could argue that the soft shapes allow the wind to flow more easily over the structure. He’d be correct. We’re not concerned with the aerodynamics of high-speed racing boats, but we are concerned with how the strong surface winds affect the boat’s directional stability in open waters and her maneuverability under slow way in close quarters. Rounded surfaces are slipperier than are flat ones.
The same idea applies to shapes below the waterline. BLACKBIRD’s barely plumb stem caps a sharp entry, which shows some hollow in the waterlines through station No. 2. Beyond station No. 2, the hull swells out, losing deadrise and gaining buoyancy as we trace the waterlines toward the transom. The run is flat, and the deadrise diminishes to zero degrees at the transom. Bolger worked magic in the flow lines, because the boat runs cleanly at all speeds, doesn’t need spray rails, doesn’t require more than 50 hp for a satisfying top speed (about 18 knots), and doesn’t roll enough to notice. Her light weight and flat run quicken the motion, but not uncomfortably so, as I discovered during a breezy day on Lake Champlain and in seas of about 2′.
Under way, BLACKBIRD happily slips along at any speed you select. At displacement speeds, her sharp entry splits the waves, letting her buoyant midsection ride gently over the remainder. She lifts to maximum speed in a deliberate rush, as though hurrying were beneath her dignity. At top speed, she carries her chin about 18″ above the surface of the water, waiting to engage the crest of another boat’s wake or a roguishly large wave that sneaked into the train. BLACKBIRD tracks well upwind and down but, like any lightweight boat, wanders a bit as she spars with the waves. Beam seas and wind nudge her this way and that, but not alarmingly so.
A fairly long skeg helps BLACKBIRD with her directional stability, in a straight line and in turns, but it limits the radius at which she takes a turn at the higher speeds in her range. The skeg robs the propeller of solid water; the engine revs, the boat slows, and the helmsman feels silly. BLACKBIRD isn’t a hot rod and should be treated accordingly.
Photo by Benjamin Mendlowitz
BLACKBIRD combines timeless design with modern cold-molded wood-epoxy construction. She looks fine even when standing still and should never leak a drop.
Bassett cold-molded BLACKBIRD of 1⁄8″ Western red cedar, the first three courses laid diagonally and the last longitudinally. He used Philippine mahogany for the keel, Honduras mahogany for the skeg, and ash for the stem. The method is well within the ability of amateur builders, and it produces a strong, stiff, and lightweight structure. Spiling—fitting the thin planks so they butt one another without gaps—and stapling to hold them in place while the epoxy resin sets require a great deal of patience. The bare hull, as Bassett and a handful of helpers lifted it off the molds, weighed about 500 lbs. The complete boat displaces 2,800 lbs.
Building the trunk cabin and windscreen taxes the craftsman’s eye and skills more than any other part of the boat. Bassett referred to the process as an exercise in free-form construction. The cabin’s delectable oval-shaped fascia rakes slightly aft, and its sides become perpendicular as they curve toward the cockpit. The coach roof slopes toward the bow and shows diminishing camber from the windscreen forward. Working in a relatively confined area, Bassett couldn’t get far enough away to really see the shape he was creating. “We would just put in a piece of wood and bend it until it looked like what we wanted,” he said.
Coaxing the many individual elements of a design into an engaging whole is the brass ring of design and construction. In BLACKBIRD’s case, the color scheme, working with the small riot of shapes, unifies the boat. “One thing becomes another,” Bassett said. “When you look at it, when you move around in it, when you steer it, you’re not just in a certain area—you’re in a whole boat.”
To meet BLACKBIRD is to love her, the way that strangers meet and, feeling as though they’ve known one another all their lives, stay friends forever.
Ken Bassett conceived the vision for BLACKBIRD based upon earlier work of Al Mason. Phil Bolger gave form to the idea on his drawing table, and Bassett brought the boat to life in his Vermont boatshop. The result: a truly classic design.
For plans contact:
Susanne Altenburger
Phil Bolger & Friends Inc.
66 Atlantic Street
Gloucester, MA 01930-1627 USA
(Contact information updated March 2022)
Ken Bassett retired and closed Onion River Boatworks in 2017.
Is there a boat you’d like to know more about? Have you built one that you think other Small Boats Magazine readers would enjoy? Please email us!
PETITELISA is a synthesis of Gilles Montaubin’s long experience with sail-and-oar boats. Unlike many boats of this type, she is not reminiscent of any traditional working boat type. Instead, she incorporates some very contemporary features. Montaubin, for example, has intensively tested the use of water ballast on many boat designs, and its use on PETITELISA allows her displacement to be adapted to varying conditions: whether propulsion is by sail or oar, whether her crew is solo or accompanied, and whether the sea state is flat or rough. Adding water ballast while rowing in choppy seas increases inertia and makes boat handling easier. Yet this varying ballast is accomplished without changing her overall trailering weight: emptying the ballast tanks is a snap.
Since his childhood, Montaubin has had an acute point of view on the world of boating, a world from which he has always stood aloof. During the 1960s, his father, an orthopedic surgeon, was an enthusiastic racing sailor and boatbuilding fanatic. At that time, the La Rochelle area had few yachtsmen, so everybody exchanged a lot of technical information gathered from the various boatyards and naval architects working in the surrounding area. Gilles served his boatbuilding apprenticeship accompanying his father and decided, after receiving a doctorate of sociology in 1972, to establish himself as a boat designer and builder in the backcountry.
He already had in mind some strong building and design principles: one-off units, simple, cheap, and fast, designed to suit specific needs and developed following his personal experience and that of his customers. Since then, Gilles has never broken his own rules. After a personal experience designing and building a 30′ plywood cruising monohull, his professional career really began, and in 1977 he designed a 40′ cruising catamaran, with which he cruised around Spain and Portugal. Then he began to design boats based on the local types surrounding his location in the heart of le Marais Poitevin, a famous French swamp area of the Atlantic coast. These boats were flatiron skiffs, which here are called plate, which is French for “flat.” But instead of following the tradition of building this type of boat with heavy hardwoods, he switched to concepts he learned from multihull ultra-light composite technology. In 1986, he entered a design competition organized by the French magazine Le Chasse-Marée with his own reading of a traditional plate, built in foam sandwich and weighing only 150 lbs, ready to sail.
Photo by Jean-Yves Poirier
PETITELISA’s powerful chine (the angle where her bottom and sides meet) is above the load waterline while rowing, making her, in effect, a narrow boat that moves easily with her two 9’ oars. She also has a movable thwart, allowing any rower to find an efficient position.
In 1992, he saw a nautical magazine that carried reproductions of postcards showing a misainier vendéen, a traditional cat-ketch lugger from the Vendée region. These images inspired him to create a modern interpretation of the type, which marked the beginning of a long line of cheap and fast sail-and-oar boats, all tested in various “Raids,” rowing and sailing races that have become popular throughout Europe, including Portugal, Scotland, Sweden, and Finland. In the 2006 Blekinge Archipelago Raid in Sweden (see WB No. 187), she placed first in her class. Such boats remain in accordance with Gilles’s way of life: discreet.
PETITELISA’s rig can be furled very quickly to adjust to the variable and ever-changing wind conditions of her coastal and inshore waters. Here, easy handling is the key for small-boat sailing security. She has also been designed to sail well to weather, for upwind efficiency is another important security feature on board sail-and-oar boats. At her owner’s request, PETITELISA has a centerboard, although Gilles usually favors the use of asymmetrical leeboards or a daggerboard angled in a trapezoidal well, a feature commonly found on racing dinghies.
Photo by Jean-Yves Poirier
Furling is easily done by rotating the carbonfiber mast using a 1⁄4” line fitted at deck-collar level.
The unstayed, carbon-fiber mast is built with two tube sections, the lower one 3 1⁄2″ in diameter and the upper one 2 1⁄2″. Some care is required to fit the mast in its step, because of its overall length of 26′ 3″. The two parts, however, can easily be taken apart for stowage in the cockpit while trailering. A screw in a notch interlocks the two sections of tubing for sail reduction, which is done by rotating the mast, just like a conventional roller-furling jib.
Weighing only about 26 lbs—including the sail—the rig is completed by a long boom. At first, Gilles designed a simple sprit, used only under full sail and stowed on deck if the sail is furled. Because he sails alone most of the time, the owner chose instead a curved laminated boom, with a gooseneck—which is a little bit awkward— fitted on deck behind the mast collar. Designed to reduce sail handling, the system works well but needs very long control lines and numerous cheek blocks.
The first time you climb aboard PETITELISA, you feel immediately secure because of her hull’s high initial stability. Based on a narrow sole with deep-V side panels, her double-chined plywood hull is much more sophisticated than it seems at first glance. The shape is a rather subtle and very efficient compromise, balancing low wetted surface, a long waterline length for rowing, and stability at first degrees of heel under sail. You can move around in the cockpit with the same kind of confidence you experience on board heavier and bigger boats.
Since the helmsman can reach all her lines, there is no need to walk on the foredeck, which is rather narrow due to the very fine entrance of her waterlines. This can lead to some difficulties for mooring or anchoring, although the samson post can be reached by leaning over the cuddy—and maybe a small hatch would improve the maneuver without adding too much weight.
The 17-gallon water ballast tank has been built into the bottom around the centerboard trunk. Its operation is more than simple: after launching PETITELISA, you open the small cockpit sole hatch close to the companionway, unscrew the drain plug, and wait for the tank to fill. A few minutes later, put the plug back in place and screw the deck plate back down. The plug can be removed again when hauling out to save some weight on the trailer. That’s all!
Photo by Jean-Yves Poirier
PETITELISA is ballasted by water, and filling the tank is very easy to do with a simple drain plug fitted under the cockpit sole. When hauling out, the plug is pulled again to let the water drain.
The small cuddy gives the crew a good chance to get out of the weather when necessary, but the designed cabin is too small to accommodate two usable bunks. It’s possible that moving the main bulkhead aft 4″ or so could improve things, but at the expense of cockpit space. Because the rowing thwarts are removable and the cockpit sole is perfectly flat, self-draining, and measuring about 8′ 6″ x 4′ 5″, two people could sleep there in good comfort under a boom tent. All cruising gear—and even a small galley—stows in the forward compartment. Because gear is not stored in compartments under the cockpit sole, the deck surface is kept perfectly watertight while sailing, but inspection ports allow some access to the flotation compartments.
Photo by Jean-Yves Poirier
The cuddy is nice for storage but too short to accommodate a properly sized bunk.
Firm on her chine, PETITELISA is a delight to sail, even in light air. Her high-aspect-ratio sail plan and low wetted surface area have something to do with this pleasant behavior. Closehauled, she points rather high to the wind, but, as usual with a catboat rig, it’s better to keep her off a little bit. Downwind, she is very stable because of the forward position of the rig, which literally pulls the boat as if it were on rails—but mind that boom!
Photo by Jean-Yves Poirier
Under sail, the chine adds stability at the first degrees of heel, and PETITELISA is wide at deck level to provide good ultimate stability.
No sail-and-oars boat is perfectly balanced between both propulsion modes, but PETITELISA seems to have reached a high level of equilibrium between usually contradictory requirements. Not bad for such a simple girl.
Gilles Montaubin designed PETITELISA to be the simplest possible boat but with good performance under sail and easy to row. Her unstayed carbonfiber mast is made of two pieces for light weight and easy stowage, and the only lines she has are her sheet, halyard, and furling line. The unusual boom rotates on a fitting on the cuddy roof, although a variation (shown in the accompanying photographs) has a curved boom rotating on a gooseneck forward of the cuddy, near the foot of the mast.
People are always drawn to the warmth and the visual texture of a varnished wood kayak, but the beauty of a plywood kayak can and should be more than skin deep. Not only do the sweeping curves of the Coho 17’s multichined hull and beveled deck offer up an elegance that sets a kayak like the Coho apart from mainstream composite and rotomolded plastic kayaks, but this stitch-and-glue kayak is also lighter and stiffer than fiberglass kayaks and plastic kayaks of similar size. Pygmy’s computer-generated panel shapes and laser-cut templates produce kit pieces that will come together in an exceptionally fair hull that will hold its shape for the life of the boat. [Update: Pygmy closed at the outset of the pandemic. —Ed.]
In Pygmy’s early kits, butt blocks were used to back up the joints required to make the full-length strakes. The blocks have been done away with, and the butt joints are now just glued and ’glassed. They are every bit as strong, a bit lighter, and make for a cleaner interior. The bottom of the Coho has a slight V through the midsection, enough of a crease to give the midsection plenty of stiffness. The triple-chined hull is lined off into four well-proportioned strakes. The deck has a central ridge that sheds water well and beveled side panels that keep the beam of the boat low and out of the way of the paddle.
At just under 40 lbs, the Coho is an easy lift and carry. You won’t find yourself muttering by the time you get it into the water. The cockpit opening was long enough for me (I’m a bit over 6′ tall) to get in seat-first. That can be an advantage over a small cockpit that requires you sit on the afterdeck and slide into the cockpit feet-first. If you bail out of the Coho after a capsize, you can crawl aboard, straddle the deck, and drop your weight into the seat. Most folks will have enough stability then to get their feet in without having to set up a paddle-float outrigger to stabilize the kayak.
Provided by Pygmy Boats
Striking from any angle, the Coho 17 kayak from Pygmy Boats weighs less than 40 lbs. The 17′ 6″ x 23″ boat will carry a paddler and his gear through rough water at good speed.
The self-inflating (Therm-a-Rest) seat pad is fairly comfortable initially, but the muscle tension required to keep the legs locked into the thigh braces can eventually lead to fatigue and numbness. The pad also makes for a slightly mushy connection to the boat. For one of my outings in the Coho, I replaced the pad with a minicell foam seat I’d sculpted for one of my own kayaks. My homemade seat is about 15″ long and about 3″ thick at its forward end. Its deep custom-fit contours are more comfortable in the long haul, and the support it provides under my legs keeps my feet from going numb. I also found that the solid connection of the sculpted seat made the Coho easier to control when edging the hull through turns or in surf. If you have rough-water paddling in your sights, carve your stern into a block of minicell.
Once afloat, I felt quite comfortable in the Coho. It has plenty of initial stability so I could set the paddle down and not have to think about keeping the boat upright. Even when the Coho and I were getting slapped around by waves breaking in the shallows, I was able to fiddle with my VHF radio while I had my paddle tucked under my elbow. The Coho has a strong righting moment when set on edge. Canting my hips, I could get the sheer submerged and still feel stable. Only when the coaming touched the water did I feel the stability taper off.
Underway, the Coho tracks well and the bow yaws very little between strokes. The long waterline and sharp ends that contribute to the Coho’s tracking ability will work against you when you try to turn, but a bit of edging will curve the waterline and lift the ends enough to get the hull to carve through a turn. Canting my hips to edge the Coho up to the limits of its stability allowed me to make respectably tight turns. At 17′ 6″ long, the Coho has an appropriate balance between tracking and maneuverability for performance touring. Pygmy offers a rudder as an option, but I don’t think the Coho needs one.
I did several speed trials in the still water using a GPS as a knotmeter. At a relaxed pace I could easily maintain 4.5 knots, a pretty brisk clip for not breaking a sweat. Taking my effort up a notch to an aerobic workout level, I could hold 5.5 knots. Going flat-out over about 50 yards, I could briefly bump up to 6.5 knots. That’s a good set of numbers for a kayak designed for cruising.
Provided by Pygmy Boats
This Coho enjoys a quiet day, but it will behave well in tough conditions. Should the worst happen, experienced kayakers can Eskimo-roll the boat. Solid stability and a relatively long (33″ ) cockpit allow for relatively easy re-entry if a paddler must take to the water.
On one outing I picked up a pretty good breeze, about 18 knots. Weathercocking is a common problem among sea kayaks. If you are paddling across the wind, the bow is pretty well locked in as it pushes forward into the water, but the stern, trailing in the turbulent water “softened up” by the passage of the hull, tends to get pushed downwind. The result is that the kayak veers into the wind. Rudders and skegs can easily neutralize this tendency by adding more lateral resistance at the stern. In a kayak that has neither, you can edge the boat to turn downwind or do sweep strokes to push the bow in line, but that can be tiring and annoying in moderate breezes, and dangerous in stronger winds if you can’t hold a course in the direction you need to go. Some kayaks are better balanced in the wind than others, and the Coho seemed to be among the former. The best test of weathercocking, oddly enough, is not out in open water where the waves have been kicked up, but in the lee of low-lying land where you’ll find wind without waves. In rough water the ends of the boat get lifted out of the water, and you can use these moments to make a quick sweep and a course correction. In flat water the entire waterline length is immersed and corrections are harder to come by. The Coho did very well in both circumstances, holding a course well with the wind on any quarter.
I moved out of the lee and into rough water, and the Coho was very steady and predictable in wind waves cresting at about 2′. I never had to slap down a brace for an unexpected loss of balance. In paddling around a point where crossing waves zippered over the shoals, throwing water well over my head, I often had so much water pouring over my eyes that I couldn’t see what was coming at me, but the Coho still stayed comfortably planted under me.
Provided by Pygmy Boats
Black elastic shock-cord deck rigging makes for quick and convenient storage of often-used or emergency gear. Note the red-and-gray bilge pump and the bright yellow paddle float tucked within easy reach on the after deck. Watertight hatch covers, each secured by three parallel straps, keep the large stowage compartments dry.
While I was paddling the edge of the shoal, a passing container ship threw its wake into the mix. The first wave to hit, the point’s shallow water pitched up behind me a steep 6–7′ feet. I didn’t get a perfect line down the face, so I surfed ahead at a bit of an angle. The Coho raced ahead of the wave and kept from skidding into a broach. At the end of the ride it was a bit of work to get the Coho turned around to head back out for more waves. It’s a lot of boat to spin around in the break zone. Once I got out for the next set of waves, the Coho accelerated very well so I didn’t have to work hard to catch good rides. In fact, I had so much fun surfing that when I saw a cruise ship coming up the shipping lane I stayed around to wait for its wake.
This latest version of the Coho has a recess in the after deck to bring the coaming down low. The extra clearance made it easier to do layback rolls. The Coho rolls easily but slowly—I think the sharp ends create a bit of drag to rotary motion. I did some wet-exit and re-entry drills. Dropping out of the capsized kayak was a cinch, and so was flipping the kayak upright and getting back aboard. Swinging my leg over the deck released some of the levers that tension the hatch-cover straps. You can easily remedy that by putting each lever in a vise and giving the end a solid whack of a hammer to put a bit of a bend in it.
The Coho is an easy boat to like. It looks good and is well-mannered in a wide range of conditions. The only quibbles I had with the Coho were with elements that the homebuilder can easily take care of when outfitting it. Give it the attention it deserves while you’re building it, and it’ll take good care of you.
The Coho assembles easily: Temporarily stitch together plywood panels with wire ties, then permanently “glue” the panels with fiberglass and epoxy.
Pygmy Boats has been closed since the outbreak of the pandemic and isn’t filling orders. The review is presented here as archival material drawn from the back issue of the print annual, Small Boats 2007.
Is there a boat you’d like to know more about? Have you built one that you think other Small Boats Magazine readers would enjoy? Please email us!
Every sailor has his own vision of the perfect daysailer. For many, this ideal boat is based on the Herreshoff 12 1⁄2, Nathanael G. Herreshoff’s iconic daysailer, which debuted in the summer of 1915. For others, it’s the larger Fish class or the still-larger Alerion—two more masterworks from the hand of Herreshoff. These boats have been the subject of imitation and interpretation ever since they hit the water over 100 years ago. The Flatfish, designed in the early 1990s, is Joel White’s version of Herreshoff’s Fish.
In 1992, I was looking for a boat to build for my parents, then in their late 60s. They weren’t going cruising anymore, so I was looking for their perfect daysailer. The boat had to be big enough so that they wouldn’t get physically knocked around, and it had to be trailerable. My folks wanted something they could sail on the Hudson and take to both Maine and the Chesapeake. As with any daysailer, the destination becomes less important while the experience of sailing grows. In other words, she had to look good and perform well.
Picking a boat is always a balance of beauty, performance, cost, and, in this case, opportunity. A conversation with Maynard Bray, WoodenBoat magazine’s technical editor, led to an offer to build the first Flatfish, a design project he was working on with Joel White. It was an offer I couldn’t refuse. The boat sounded perfect for my parents’ requirements, and I thought I could build it in a year of half-time work.
Photo by Alison Langley
Flatfish is Joel White’s adaptation of Nathanael G. Herreshoff’s century-old Fish-class sloop. The Fish class is a keelboat; the principal modification in the Flatfish is the addition of a centerboard—and the subtraction of some draft. The boat pictured above and on the opposite page was built by Chip Flanagan of Portland, Maine, who’s at the helm.
When I first spoke with him, Joel had just done the initial drawings. Joel’s objective was to make the Fish trailerable, while retaining all the wonderful qualities of the original. Designed toward the end of Joel’s career, the Flatfish incorporates his experience as a leading builder and designer, and “does no harm” to Herreshoff’s design. The result is a boat with elegant looks. Every curve is right. A few inches over 20′ long, she’s big enough to sail comfortably with six people, but small enough to be easily singlehanded. With a gaff main and a club jib, her simple sloop rig tacks with one move of the tiller and the change of a running backstay. The hull is heavy enough to stand up to a stiff breeze or to carry its way through flat spots and shoot directly into the wind up to a mooring. It’s also slippery enough to accelerate quickly and outpace most boats under 30′, and with the cockpit close to the water there’s a real feeling of speed.
The Flatfish is Joel White’s second direct interpretation of N.G. Herreshoff’s classic hull shape. The first, the Haven 12 1⁄2, has been built by hundreds of professional and amateur builders—my shop included. Shallower and broader than Herreshoff’s originals, both of White’s designs use a keel-centerboard arrangement to maintain performance while making the boats trailerable. There are differences between the Haven and the Flatfish, especially in accommodations, building time, and hull speed. The larger boat comfortably accommodates two more people, and the cuddy cabin allows for stowage and the possibility of a porta-potti. In use, the dockage and launching fees for the Flatfish will be higher. She’s trailerable, but not easily launched at a ramp. She really needs a lift to launch and some mechanical advantage to step the mast. Once rigged, both boats require the same work to get underway.
The building process of the two boats is almost identical and is well documented in Maynard Bray’s book Building the Haven 12 1⁄2. That said, the Flatfish is a lot more boat to build than the Haven. There’s more of everything— building molds, planks, frames, deckbeams. There’s also the cuddy cabin. Comparing the displacement of the hulls minus the ballast, one of White’s own cost-estimating techniques, provides a good indicator of the relative work involved in building the two boats. The Flatfish weighs 1,300 lbs compared to the Haven’s 800 lbs—a factor of 1.625. I found this ratio to be even a little low when applying it to building hours. The time required to build a Flatfish is closer to double that for a Haven, probably because the shorter boat can utilize more one-piece planks and smaller stock. Both the Haven and the Flatfish are designed to be built using the Herreshoff method, which involves one mold for each steamed frame. It’s a lot of work for a single boat, but it makes for a very fair hull and certainly works well for a production boat. It also makes a boat that lasts. There are many hundred-year-old Herreshoffs still sailing. This boat requires 22 molds for the Herreshoff method, while it probably take less than half that number for a conventionally planked carvel hull.
On the water the Haven is evenly matched with its sibling Herreshoff 12 1⁄2. Joel wasn’t able to achieve the same parity with the larger boats. The Flatfish is slightly faster than the Fish. We proved this by match-racing my folks’ Flatfish with an original Fish. Both had new sails and the better helmsman was in the Fish, yet the Flatfish just slightly outpaced the original. (I think the centerboard is the culprit, providing better windward ability.) The profiles of the boats are very similar; there’s a slight difference in the run aft. The real difference is the Flatfish’s broader beam. It’s especially noticeable when the two boats are side by side, on shore or in the water.
Another design goal was to make the boat trailerable for easy transport and storage. My parents’ boat has logged several thousand miles on its trailer. The hull seems no worse for the wear. She also has spent every winter stored in the backyard under a temporary garage. Having her at home allows for convenient maintenance and really makes the boat a part of the family.
Photo by Alison Langley
An original Herreshoff Fish, SHARK, near Noank, Connnecticut. The Fish is narrower and deeper than the Flatfish; the greater beam of the Flatfish compensates for the reduced stability caused by the newer design’s shallower keel.
The boat sails wonderfully well with its gaff rig. She points well, has real power on anything close to a reach, and has low heeling moment. White also drew a marconi rig, but I have no experience with it.
Almost ten years of sailing has exposed only one design flaw: We haven’t found a good way to add an outboard or other auxiliary power, aside from an oar. The transom rake is the main culprit. Electric motors can accommodate the rake, but they lack enough power to punch the boat into a real breeze. Side-mount brackets allow for a gas motor, but the motor swamps when the boat rolls. The stern-mount bracket used on the fiberglass 12 1⁄2 s built by Cape Cod Shipbuilding also tends to dunk the motor in any sort of sea. With all solutions, the motor needs to be removed for sailing and stored in the boat; otherwise, it fouls the mainsheets. Cutting an outboard well into the bottom planking has also been tried, but it’s very intrusive and it slows the boat. The best solution is just to sail off a mooring, plan well, and pay attention to wind and tide.
With the Flatfish design, Joel White followed the engineer’s maxim of not putting one extra piece of wood in the boat, and the designer’s rule of not placing one extra line on the drawing. The design does everything it’s supposed to do: It provides a sweet-lined, capable, transportable boat.
I’d certainly like to live in a house on a rock-lined coast with my boat on a mooring that I can see from my back window. I don’t. This boat’s combination of trailerability, good sailing qualities, and classic elegance (along with rental cottages) makes that world accessible. It’s a wonderful boat to sail off a mooring on the morning’s outgoing tide, take a picnic lunch, and catch the incoming tide as the breeze dies at the end of the day.
Aficionados of the Herrehsoff 12 1⁄2 and the Haven 12 1⁄2 will recognize these boats in the Flatfish’s lines and sailplan (just as the Flatfish is a modification of the original Herreshoff Fish, the smaller Haven is a modification of the 12 1⁄2 ). The Flatfish is trailerable, but most sailors will want to use a Travelift to move the boat onto a trailer.
This article appears here as archival material. Boat plans ere available from The WoodenBoat Store, but are currently out of stock as of August 2024.
Is there a boat you’d like to know more about? Have you built one that you think other Small Boats Magazine readers would enjoy? Please email us!
It’s easy to lose track of time in an attic. None of the things stored in all of the attics I’ve known are needed for daily life and only a few of them, like Christmas decorations, will ever get used. What makes the things stored in attics worth keeping are memories. During summer family vacations in Massachusetts, I spent a lot of time in my grandparents’ attic. Behind a door in one of the upstairs bedrooms was a steep flight of stairs, painted white, that led to what was to me, as a young boy, a cavernous room. It stretched the full length of the house and had a vaulted ceiling, intricate with rafters and collar ties. The stillness of the space and the angled shaft of sunlight from a narrow sash window setting the dusty air aglow made the attic seem like a cathedral. What I remember most about the things stored there was my grandfather’s Army uniform, especially the stiff leather puttees, molded to fit the shape of his calves. It was one of the first things in my life that gave me a sense of history and the value of things that came well before my time.
The attic in my house is not nearly as grand, just a low wedge of space tucked under the roof on the north side of the house. While it is lined with kraft-paper-backed insulation, it is just as much a repository of memorabilia. Many of the cardboard boxes there are filled with photographs—prints from my teens and twenties, and slides for the years since then. There are so many albums, trays, and sleeves full of slides that I keep a light box on the floor, butted against a windowless end wall.
A few days ago, I stooped through the chest-high attic door to find something, I don’t now remember what, and sat down next to the light box. It comes on when I flip the switch for the attic lights, and the clutter of slides on the table gleamed with patches of color, like a crude stained-glass window. I was drawn to a group of warm pale-blue rectangles, slides I had taken during a 2002 kayaking trip to Palau in the Western Pacific.
I set a loupe over one, and as I leaned close and peered in, the tropical island waters and a palm-fringed beach enveloped me, as if I had fallen, like Alice, through a looking glass. I went from slide to slide, then pulled a box of slide sleeves, looking through the hundreds of images I had taken during five days of kayaking there with my friend John. Each look at Palau’s luminous sky and water lifted the weight of this oppressive winter.
Despite its location in the tropics, Palau had its own season of darkness in the fall of 1944. The Japanese held the archipelago and had fortified the islands with artillery and extensive networks of caves. Despite the stronghold’s dubious strategic value in the Pacific Theater, the American Armed Forces launched an attack on the morning of September 15, 1944, the first wave of what became known as the Battle of Peleliu, after the island at the south end of the archipelago. It was supposed to be a quick fight, but it went on for 73 days and cost thousands of lives. The assault was codenamed, prophetically perhaps, Operation Stalemate.
John and I didn’t reach Peleliu, where the worst of the fighting took place, but there were traces of the battle scattered among the islands to the north.
A few hundred yards from one of the islands we camped on, a Japanese fighter plane—a Zero—rests on the Ngaremediu Reef in just 6′ of water. It is upright and the cockpit is open; I sat in the seat once occupied by the pilot when he was shot down.
An engine and propeller blade are all that is visible of another wrecked fighter plane. The tip of the blade was taken by a souvenir collector armed with a hacksaw.
On one of the islands, John and I hike a trail that led past what was once a gun emplacement. Two of the artillery barrels remain, half buried.
Along with the barrels there were several artillery shells.
The trail ended at a lighthouse at the top of the island. The concrete tower was cratered by scores of bullets and, at the top of the lighthouse, an upright on the guardrail had been hit. The steel rod was a thick as my thumb and plowed through as if it were clay. The path the bullet took was very nearly horizontal, so I imagined that an American fighter plane firing 50-caliber machine guns must have been skimming just above the treetops, coming straight for the top of the lighthouse.
A few yards from a well concealed concrete machine gun bunker, dozens of beer bottles were scattered along the trail through the forest. They had been left by the soldiers assigned to guard a narrow passage between islands and now many of the bottles were inextricably wrapped in tree roots.
During the battle, bombing, flamethrowers, and firefights stripped Peleliu bare of its forests, but Peleliu is now as it had been before the war as are all of Palau’s roughly 340 islands. In the half century that had passed by the time John and I visited, the artifacts of war—steel and concrete—had yielded to time and decay and were already being overrun by trees and brush, seaweed and coral. The islands were exceedingly beautiful and peaceful. In the middle of the Rock Islands, John and I landed on Eil Malk Island and hiked a winding trail through dark woods to Jellyfish Lake. Sea water circulates through the island’s porous limestone to refresh the lake and yet the bedrock has isolated the lake from the Pacific Ocean for 12,000 years. The species of jellyfish that now inhabit the lake, having no need to defend themselves, evolved to abandon stinging tentacles. John and I swam underwater surrounded by them, being careful not to disrupt them. The brush of their delicate watery bodies was so soft and smooth as to be almost undetectable.
There was so much to see in Palau from our kayaks, during walks in the woods, and while swimming. The days passed by much too quickly and to sleep seemed like a missed opportunity. I spent a few hours one night walking an exposed reef by moonlight.
John and I paddled two sit-on-top kayaks. This one that John is in was a double and used during passages between campsites to carry our supply of water and a cooler for our food.
Many of the islands we passed were made inaccessible by mushroom-like overhangs of sharp-edged limestone. Those that had beaches, like this one, provided beautiful places to stop.
In a salt-water pond encircled by one of the small islands we found mudskippers, fish that climb trees.
This school of fish made a swirling sumi ink painting in the shallows.
The underwater world was anything but quiet. A loud crackling noise, which sounded like a bowl of Rice Krispies right after milk is poured into the bowl, was made by pistol shrimp snapping their claws. They have one large claw that closes so fast that water cavitates around it. The sound comes from the water imploding back into that empty space. The resulting shock wave stuns their prey.
Fish and coral were almost everywhere in the waters of Palau. There was so much to be seen underwater that we spent almost as much time snorkeling with our kayaks in tow as we did paddling them.
I had come to Palau to write an article, so I always had a pencil and waterproof notebook aboard the kayak. As it became evident that there was so much to see underwater, I began taking notes while snorkeling.
With water as warm as bathwater, it was easy to get off the kayak and explore the shallows on foot.
Most of the mangroves are clustered close to shore with their roots intricately interwoven. These two are striking out on their own at the edge of a vast intertidal sand flat.
This beach where we camped was beautiful by day and even more interesting at night. I woke up to a full moon in the middle of the night, got dressed and walked well over 100 yards on a reef bared by the tide. Many of the tiny tide pools I passed held small fish captive.
“…and one pill makes you small.” In the woods I found these improbable plants that had leaves up to 3′ long, each on their own stalk, some rising well over 8′ tall.
The broad leaves had an intricate architecture to support them.
In the midst of the woods a single yellow flower grew from the the bark of a tree.
The aptly named St. Andrew’s Cross spiders are kind enough to mark their webs with a large white X, making it easy to avoid walking face first into an otherwise invisible web.
A brief downpour rinsed the salt from our skin and we could sip the cool rain as it trickled down our faces.
Two islets, each only a dozen yards across, were connected by a limestone arch less than 2′ above the water.
On our last day, a 5-mile passage across deep, open water to Carp Island, distance diminished all of the islands to streaks on the horizon. I put on my snorkeling gear, slipped off the kayak, and dove down until I could no longer see the surface, only the same bright blue in every direction, with nothing to indicate up, down, or distance.
The slides in my attic, aside from briefly transporting me to a different, exceptionally pleasant time and place in my own life, brought some comfort in a winter whose long shadows have been further darkened by a pandemic and political strife. A broader view of history, offered by the woods and waters of Palau, holds a promise that, in time, enemies can become allies and battlefields paradise.
This past summer, as I was returning from kayaking to the public ramp at Port Hadlock, Washington, I saw a friend of mine who was studying at the Northwest School of Wooden Boatbuilding (NSWB), which is situated right next to the ramp. He told me that I should see a boat that had just been put up for sale by the school. I wandered over to the boat, which was sitting on a trailer: it was a piece of Maine, a John Gardner-designed Down East Workboat. Just three years before, I had moved from coastal Maine to the Pacific Northwest, so I well knew the boat and its traditional hull shape. I had been looking for a small motor launch ever since moving to this northern area of Puget Sound, and here was, to my mind, the perfect boat for my needs and certainly a practical boat for anyone wanting a solid and seaworthy small boat for coastal waters.
E. T. Becker/Northwest School of Wooden Boatbuilding
The original workboat had unusual frames 5/8″ thick and 1-3/4″ wide, proportions that gave them the look of canoe frames, and the planks were fastened with clench nails, just as canoe planks are. The steam-bent frames in the new construction have a squarer cross section and provide sufficient thickness for the screws holding the planking.
Working boats with this hull shape have plied the coastal waters of Maine for over a century. This Gardner version is 18′ in length, but stretch it out a bit and it becomes a Pulsifer Hampton 22 center-console inboard. Stretch it out a bit further to 20′ or 30′ or more, put a cabin and pilothouse on, and you have the iconic Maine lobsterboat. This hull design has evolved over the years in the Maine waters and boatshops to handle highly variable and oftentimes challenging coastal conditions, so I knew that it would be just right for Puget Sound. If you’ve ever seen a lobsterboat race, when heavy workboats can be moving at over 50 knots, you know that this is a capable design! Needless to say, I soon bought the NSWB boat. I named her MOON LADY, an English translation of my mother’s Chinese name, and to follow the Maine tradition of naming working boats after wives, mothers, sweethearts, and daughters.
Gardner drew the design in 1981, basing it on old photographs and measurements of an 18′ workboat from Washington County, Maine. He described the design as a double wedge, the first wedge being the sharp high bow and the second a wedge turned flat for the stern. This creates a practical workboat that has a foundation of a broad stern set firmly in the water to support the weight of a powerful outboard for speed, along with a sharp entry and planing hull for maneuvering easily through chop and messy currents. Its 18′ length and 6′ 4″ beam help make the boat seaworthy for coastal waters and give it plenty of open work space. Gardner describes the build in detail in Chapter 7 of the second volume of his Building Classic Small Craft.
E. T. Becker/Northwest School of Wooden Boatbuilding
The full-length keel provides good tracking without impairing the boat’s ability to turn smartly.
The boat here, built by instructor Jody Boyle and his students at the NSWB, was constructed directly from Gardner’s instructions with few changes made to the design. It was lofted from his lines drawings and offset tables, then built upside down, with carvel-planked 5/8″ red cedar on flat, white-oak canoe frames 5/8” x 1-3/4″ on 8″ centers, as often used on the Washington County workboat. Gardner suggests that thicker, more typical frame stock could be used, and notes as well that the boat could be built lapstrake.
Denis Wang
Gardner’s plans do not include details for the interior outfitting. The new boat was given side benches from transom to forward bulkhead and a single thwart well aft of amidships.
While MOON LADY has a white-oak transom, which was Gardner’s preferred transom wood, it is 1/4″ thicker than the 1-1/2″ stock he listed. The stouter transom does well supporting my heavier, four-stroke outboard motor or, for that matter, any of today’s more powerful outboards. The transom also has large quarter knees as well as a keel knee.
Instead of the 3/8″ plywood specified by Gardner for the foredeck, MOON LADY has tongue-and-groove cedar planks covered in Irish felt and painted canvas. The same cedar planks replaced the 1/2″ plywood indicated for the forward bulkhead. All the interior wood is oiled and there are no varnished surfaces, whereas most traditional Maine workboats are painted. For safety and security, Gardner specified a removable watertight panel for access to the bow compartment, but this build has louvered frame-and-panel doors instead, which help to air out the enclosed space. Gardner’s book had no information on seating arrangements beyond a pine 7/8″ x 10″ thwart at station 6, so Jody created a layout consisting of a single thwart with side benches on both sides running the full length of the cockpit. The plans call for 5/8″ pine floorboards with the center one removable to provide access for bailing, and a ceiling of pine or cedar from the floorboards to the risers.
Denis Wang
The rubbing strip on the stern was part of the boat documented by Gardner; the spray rail forward was an addition made to the new boat after sea trials.
This Down East Workboat is Coast Guard rated for six passengers and a 45-hp outboard, but I’m using a 2020 25-hp, four-stroke Yamaha. With this engine, the boat planes easily at 12 knots at one-third throttle and has a top speed over calm water of 15 knots. As I had expected, the boat is adequately seaworthy for a traditional skiff designed for coastal waters. In chop and small waves, the boat holds its line very well due to its full-length keel yet can turn smoothly and sharply as needed with a high degree of primary and secondary stability due to the broad tumblehome stern. Spray over the bow isn’t a problem except when plowing at speed through steep chop or boat wakes and, even then, is only a light spray. The boat can hold the full capacity of six persons in comfort and with plenty of extra space for gear. I’ve also outfitted the open section with four large, inflatable beach rollers secured under the side benches for flotation. The ample storage compartment under the foredeck holds much of the gear needed on a small cruising boat: extra lines, anchor, flotation, fire extinguisher, manual pump, portable toilet, tools, cushions, and life jackets. A 12V battery for navigation lights and two small bilge pumps are secured in the bow compartment to help keep the bow down by countering the weight of the motor, gas tank, and skipper in the stern. One of the modifications I made is adding oarlocks for emergency rowing capability.
As one can imagine for a boat of this size, it is easily moved on the road with a 1,000-lb load of both boat and trailer. I keep the outboard in place during towing and in its nearly fully lowered (third notch) position without bracing and for good clearance above the road. I and one other person easily launch or load the boat on its EZ Loader trailer.
Steve Stanton
With a 25-hp four stroke, the Workboat has a top speed of 15 knots.
I’ll use MOON LADY as a coastal cruiser throughout Puget Sound and the rest of the Salish Sea, while overnighting aboard as needed at anchor or at marinas. It’s a practical and safe boat for crabbing and fishing, as well. During the frequent light-wind periods of the summer months in Puget Sound, MOON LADY will tow my sailboat, an 18′ L. Francis Herreshoff Carpenter, thus extending that boat’s range in the Sound, the San Juan Islands, and even Canada’s Gulf Islands. With the workboat’s speed and interior space, it will do well as one of the support chase boats during the Salish 100 small-boat cruise in the summer on Puget Sound.
I never thought that one day I would be exploring Puget Sound with a boat meant for Maine, but thanks to the Northwest School of Wooden Boatbuilding, I have a Down East Workboat and look forward to many miles of pleasurable cruising. I heartily recommend this well-founded Gardner design. It’s an affordable and capable boat for protected coastal waters.
Denis Wang lives in the Puget Sound coastal town of Port Hadlock, Washington, as a recent transplant from mid-coast Bayside, Maine. Now retired and actively engaged in small-craft boating and permaculture gardening as hobbies, he was a researcher in oceanography and marine ecology as well as a science department administrator and teacher at independent secondary schools in Colorado and on the East Coast. Denis has been an avid sailor in both large and small boats for most of his life and has been an officer in the Down East and Puget Sound chapters of the Traditional Small Craft Association. Recently, he has been a volunteer in helping to organize the Salish 100 cruises of the Northwest Maritime Center in Port Townsend.
Denis would like to thank the student builders at the Northwest School of Wooden Boatbuilding for their fine work: Bill Billingsley, Nick Dighiera, Brandon Adams, Sam Trocano, Alex Ashley, Gabriel Partridge, Bobby Ferrar, and K Woolfe. During the project, which spanned more than six months, four students, on average, were working on the boat at any given time.
Drawings, offsets, construction details, and descriptions were originally included as a nine-page chapter, “Down East Workboat,” in John Gardner’s Building Classic Small Craft, Volume 2, published in 1984 and now out of print. A more recent edition, Building Classic Small Craft: Complete Plans and Instructions for 47 Boats, combines Volume 1 and Volume 2, and is available from The WoodenBoat Store for $40.
Is there a boat you’d like to know more about? Have you built one that you think other Small Boats Magazine readers would enjoy? Please email us!
Many years ago, I was looking for a daysailer I could easily trailer, rig, and sail singlehanded. It had to look good, too, with some traditional aesthetics. Crawford Boat Building’s Melonseed Skiff fit the bill.
For over 30 years, Roger Crawford has been building his fiberglass version of the Melonseed Skiff in his small shop in Humarock, Massachusetts. He began when a decaying wooden boat, built to Chapelle’s lines in American Small Sailing Craft, was dropped off at his shop to be brought back to life. He restored the boat, took it sailing, and was so impressed that he wanted one of his own. He used the hull to make a mold he could build from, enlarged the cockpit, and increased the sail area. He has been busy building Melonseeds ever since, finishing them beautifully with teak rudder, tiller, rubrails, coaming, and floorboards, and varnished Douglas-fir spars. Anyone who has admired the lines in Chapelle’s book will recognize the low freeboard, hollow bow, curvaceous waterline, and enchanting tuck-up swooping from skeg to raked transom.
Courtesy of Crawford Boat Building
The spaces under the decks provide ample room for storing gear. A foredeck hatch facilitates access to items forward of the centerboard trunk.
Crawford builds his boats stout, with 1.5-oz mat, 0.5-oz mat, 32-oz stitched roving, and 10-oz cloth, doubled in the bottom, stem, and keel areas; the skeg receives 14 laminations. The deck is end-grain balsa core laminated between layers of 1.5-oz mat and biaxial stitched roving, with a nonskid finish that looks quite a lot like painted canvas. Solid fiberglass (without balsa core) in areas where there are through-deck fittings such as cleats, pad-eyes and oarlock sockets, assures peace of mind for years to come. The hull and deck are bonded together with epoxy, polyurethane adhesive, and stainless bolts and screws. Overlapped like the lid on a shoebox, the result is a strong, torsion-free unit.
Courtesy of Crawford Boat Building
The PVC centerboard will lower itself with its own weight; a cord and a clam cleat will control its depth and allow it to retract upon striking an underwater obstruction.
Crawford built his first 99 boats with the traditional scimitar-shaped teak daggerboard as recorded by Chapelle. Starting with number 100, the boats have a 1/2″-thick PVC centerboard raised and lowered by a simple pennant. He engineered the centerboard to have sailing characteristics as nearly identical to the daggerboard as possible. I have owned and sailed both versions and find a negligible difference between the two. The daggerboard trunk is entirely forward of the cockpit, whereas the centerboard trunk, at deck level, intrudes into the cockpit about 4″, an acceptable trade-off for the convenience of a board that self-stores, pivots when grounding, and offers infinite adjustment.
The shallow hull with a barn-door rudder that does not extend below the skeg makes this boat well suited to the shallows, and with a 6″ draft with the centerboard up, one can glide and slide over some very skinny water indeed—perfect for creek crawling.
Steve Siegert
There isn’t a thwart for rowing, so a couple of boat cushions will get the rower into a comfortable position high enough off the floorboards. The sail and all three spars for the sailing rig can be stowed below deck when they’re not needed.
Crawford has taken great pains to keep the boat as simple as possible, which makes getting on the water an easy proposition. Rigging is straightforward and the free-standing rig makes getting underway quick. The sail is kept furled around the mast and together they weigh about 15 lbs. Stepping the mast is a simple matter of inserting it through the partner on deck and into the step below. Hang the rudder on the gudgeons, insert the tiller, and reeve the single-part sheet through the block on the rudderhead. Unfurl the 62-sq-ft sail and insert the sprit end into the becket at the peak and push up to spread the sail. Cleat off the snotter with enough tension to give a crease between tack and peak (it will disappear when the sail fills). Clip the sprit-boom snap hook to the clew and tension and cleat the boom snotter. It’s customary to rig the sprits on opposite sides of the sail so that the asymmetry averages out. The sprit boom seems to cut into the set of the sail more than the sprit, making the favored tack the one with the sprit boom to windward.
When you board, either from the dock or the shallows, step toward the center floorboards. The boat can feel a bit tiddly until the firm bilge submerges. Once you’re seated on the floorboards, the boat is very stable.
Courtesy of Crawford Boat Building
The sheet is lead forward from a block on the rudderhead so the sailor can steer and hold the sheet with one hand. A cleat under the tiller can hold the sheet when it’s safe to secure it.
I find the ideal trim for singlehanding is to sit about even with the oarlock sockets, adjusting fore or aft according to conditions. The tiller comes naturally under your hand. Those accustomed to mid-boom sheeting will quickly adapt to the sheet running forward from the block on the rudderhead to your hand.
Once in the cockpit, there’s little need for moving about, other than changing to the windward side when tacking. This is not a boat that you stand up and walk about on. It wants your weight low and inside the cockpit. Setting sail is most easily done on the beach or the dock because the hollow bow and fine lines make it skittish if you go forward on the deck. I have done so many times, to furl or set the sail, or re-tension the snotter, but it does require good balance. If going forward is necessary, it’s safest to sit or kneel on the deck. Another person sitting aft in the cockpit will keep the stern down and help to steady the motion.
The cockpit is a little over 6′ long—big enough for two people and a picnic. There’s room up under the deck for a cooler, anchor, and other gear, and a 10″ x 10″ hatch gives access to the forepeak. The 7 -1/2′ oars store under the side decks. At 5′ 9″, I fit comfortably with my back against the coaming and feet in the lee bilge, with the reassuring sense that I’m down in the boat, not on it. Because seating is on the floorboards, knees, hips, and lower back need to be supple enough to tolerate that position. When sailing with a crew, the usual arrangement is to sit on opposite sides, facing in. This balances the boat nicely in most weather. In stronger wind, both skipper and crew sit on the windward side of the cockpit. The boat is very responsive to trim and weight distribution, so adding the weight of the crew to windward makes the boat stand up well to more vigorous breezes.
Courtesy of Crawford Boat Building
The Melonseed resists heeling well and often allows the sailor to sit on the downwind side in moderate breezes.
Despite the low-aspect, low-tech rig, the boat’s windward ability may surprise some folks. Although it doesn’t point like a Laser, it goes very well to weather. The spritsail doesn’t like to be strapped down too hard, and if it is, you’ll feel the stall. Give it a little room to breathe and the boat comes alive. It’s easy to find the sweet spot because the feedback from trim changes is immediate and obvious.
As the boat responds to a puff, the weather helm encourages it to head up, making it easy to naturally climb the lifts. Sailing fairly flat gives the best boat speed, but I find sitting out to windward in anything less than a Force 4 is unnecessary. In higher winds, sitting on the deck keeps the boat on its feet, reduces leeway, and maintains speed. When working to weather in a tie-your-hat-on breeze, you’ll need your foulies as spray sweeps the deck and cockpit and is tossed up into the sail. You’re plugged directly into the experience through the direct connection to sheet and tiller and the motion of the boat; the low freeboard and spray contribute to the sense of speed and adventure.
Because of the boat’s light weight, approximately 230 lbs all up, there’s little momentum to punch through steep chop hard on the wind. Easing the sheet and your course off the wind a bit will increase speed and deliver a palpable in-the-groove feeling. While it may require an extra couple of tacks, you will arrive at your windward goal far sooner than if you try to jam your way to weather.
When tacking, the natural weather helm does most of the work. I usually release the tiller with a slight nudge and let the rudder swing of its own accord. As the bow turns through the wind, I scoot over to the other side of the cockpit. By that time, the bow is falling on the new tack and I center the tiller and trim the sail. Coming about in a big chop requires that you sail through as opposed to relying on momentum to carry you.
Courtesy of Crawford Boat Building
The sail is not equipped with reef points as most owners don’t find them necessary. When the breeze stiffens, the peak of the sail gets twisted to leeward, spilling the wind. The twist reduces the effective sail area and lowers the center of effort, reducing the heeling force.
If you get caught in irons, you won’t be there long. Because the mast is in the eyes of the boat, you can easily back the sail to swing the bow off. If you raise the centerboard and back the sail, the boat will pivot in place, a useful tactic when maneuvering in tight spots.
This boat will spoil you for jibing. The sprit-boom keeps the foot from rising and the single-part sheet runs smoothly through the block as you ease the sheet at the end of the jibe. Jibing is a casual affair in moderate conditions and doesn’t require much sheet tending. Higher winds demand more prudence and control. In Force-5 conditions, I opt for the “chicken jibe,” looping to windward to bring the boom across, then falling off on the opposite downwind tack. One of the benefits of the free-standing, rotating mast is that the sail can be luffed out forward of the mast to flag out ahead of the boat in certain situations, like easing into a lee shore landing in mild conditions.
Control downwind is good, as the sprit-boom exerts its self-vanging effect to limit the twist in the sail. There is, however, a golden rule: To prevent the white-knuckle “death roll,” don’t allow the peak to go farther forward than perpendicular to the boat’s centerline. Leaving a bit of centerboard down helps maintain directional control, and I usually scoot aft a trifle to give the rudder a little more bite. The tucked-up quarters and raked transom prevent the stern from dragging.
The hull’s theoretical maximum speed for the 12’ waterline is 4.6 knots, and the boat seems to get up to hull speed easily. I can’t confirm this with GPS data, but I once sailed on one tack for 8 miles, closehauled, in a 12–15 mph breeze. I loosely timed the leg, and the resultant math showed a bit over 4 knots, which I thought impressive for sailing closehauled into a chop. The boat really struts its stuff on a reach, with the bow wave bubbling along the side deck. In the right conditions running before the wind, it’ll plane for short distances, and sometimes surf down the backs of the waves.
Crawford’s early boats were equipped with reef points. Reefing can be done, but it requires rigging a halyard and longer snotters which complicates the simple setup. In those early years, Crawford decided that the reefpoints were superfluous because the boat is so capable in such a wide range of wind speeds. No one was using them anyway. In reality, if you think the boat needs a reef, you probably shouldn’t be out there. Scandalizing the sail by dropping the sprit and letting the peak of the sail fold over is useful in a hard chance, but pointing ability will be compromised.
Bruce Gordon
The 62 sq ft sail has enough area to provide pleasant sailing in light air. The spars are Douglas-fir and the trim, tiller, and rudder are all teak.
A 10–15-mph breeze is magic, but the Melonseed will ghost in a whisper and tromp happily to windward throwing spray in 20. I have sailed in mid- to high-20s with gusts over 30 and the boat took it in stride.
Capsizes are rare, and all I know of were caused by a cleated sheet that wasn’t freed quickly enough in a gust. The small clam cleat on the tiller can be used to relieve your grip on the sheet, but the sheet should stay in hand in all but the mildest breeze, cleated or not. The full bilges do a good job of resisting heeling once submerged, and the peak of the sail tends to depower as it twists off a bit in the bigger puffs. Solid water creaming alongside the coaming is your cue to ease off. But there is a point of no return, when solid water over the coaming fills the cockpit and you wish you had eased the sheet. The boat has flotation under the decks and will float upright when swamped.
On those days when the breeze is elusive, I “power-sail” through the flat spots with a few strokes of the leeward oar. It’s also possible to row off a lee shore in moderate conditions with the sail set. You can leave the sheet unclipped to allow the sail to luff without the chance of it wrapping around the tiller. Be prepared for the foot of the sail to take a swipe at your hat.
Roger Rodibaugh
The boom and the sprit are set on opposite sides to even out their effect on port and starboard tacks. THREE CHEERS, shown here, is the author’s Melonseed, hull #463 .
Although you can row with the rig struck down inside the boat—the 10′ spars fit entirely under the decks—I prefer to leave the rig ashore if I’m rowing just for the pleasure of it. The boat carries well between strokes, tracks well, and isn’t knocked off course by a cross-chop. There is no thwart—sitting on a couple of cushions puts me at the right height. Crawford has an optional foot brace that bolts to the floorboards with wing nuts and can be positioned specifically to suit the rower.
Since I keep the boat in the garage and haul it to the water for each sail, ease of trailering is an important consideration. With the spars stowed in the boat alongside the centerboard trunk, the Melonseed makes a neat, streamlined package for towing. The boat and trailer total less than 500 lbs, so it’s an easy pull even for a compact car.
The combination of easy trailering, simple rigging, sure-footed wholesome performance, and traditional aesthetics have made Crawford’s Melonseed Skiff the perfect daysailer for me and has delivered decades of enjoyable, uncomplicated time on the water.
Roger Rodibaugh, despite living in landlocked central Indiana, has been sailing for 50 years. He credits the sailboat on top of his first birthday cake with starting it all. He recently retired from chiropractic practice and sails his Crawford Melonseed Skiff, THREE CHEERS, on Summit Lake and Prairie Creek Reservoir. He’s looking forward to the sailing season of 2021, which will be his 30th in a Melonseed.
The afternoon sun dipped behind a tight row of cottonwoods on the landing a mile up the Willamette River from downtown Corvallis, Oregon. It was the first weekend of October, and a few beams of light slipped through the leaves to reach the floating dock where I was packing CLARABELLE, my 17′ fiberglass Jersey Skiff. Despite the shade, my shirt was damp with sweat and stuck to my skin. I stowed two ice chests, a large sack of briquettes, a stove, a stovetop espresso maker, a few bottles of wine, oars, a sleeping bag, and a bivy sack. Jon and I would be well-stocked for our two-night, 37-mile row downriver to the town of Independence.
Roger Siebert
.
At the end of the dock, a lanky teen in a baseball cap and knee-length shorts cast his fishing line next to a tree that had fallen into the water, reaching a few leafy limbs and branches out over the river. Across the ramp from the dock, a rocky wing dam angled into the river to separate its swirling current from the still water at the foot of the boat ramp. A bare-chested man with graying brown hair waded in waist-deep water along dam, his arm draped over a blue and black water tube to steady himself over the uneven rocks. His companion, a woman in blue shorts and a white shirt, was sprawled over her tube, gazing into the water, her face inches from it, while spinning in the eddy at the edge of the river’s swift current.
Jon had left CLARABELLE’s trailer in the parking lot above the boat ramp, and again backed his jet-black panel van down the ramp. His boat, a 10′ plywood Union Bay Skiff he and his wife had built, was small enough to fit entirely inside the van. He had named it H2ONUS after the baseball Hall of Famer, Honus Wagner.
The stumpy skiff emerged already packed with oars, dry bags, axe, and a charcoal grill. We slid the boat into the water, Jon tossed me the painter, and I tied H2ONUS in front of CLARABELLE while he parked the van.
Photographs by the author
Jon, aboard H2ONUS, drifted away from the dock where CLARABELLE waits to follow. I’d row CLARABELLE solo until our rendezvous with our friend Hart in Albany.
Jon trotted down the gangway and climbed aboard H2ONUS. He pushed away, scraping his starboard oar across the dock. The skiff drifted toward the wing dam, and Jon took a few gentle strokes to spin the bow downriver. Once past the rip-rap, he reached aft to take a full stroke, and as he lifted his hands at the catch, his knuckles caught the lid of the charcoal grill. It flipped over the gunwale, landed in the water upside down, and floated in the eddy. With a laugh, he backed up and retrieved it, then with the long strokes from his sliding seat launched himself into the mid-river current.
The carbon-fiber sliding seat aboard H2ONUS would seem out of place in a 10′ skiff with some loose weathered lumber serving as a stretcher, but all three of us rowed for the University of Puget Sound crew and were devotees of sliding-seat rowing.
CLARABELLE’s gear was still a mess; I’d sort it out when the river began to carry me downstream. I clambered on the foredeck, kicked off the dock, and drove her stern-first through the eddy. I soon caught up with Jon, who had stopped rowing to secure the grill lid with a bit of cord.
Away from the riverbank’s shade, the slanting afternoon sunlight stung my bare arms. I unrolled my shirt sleeves down to my wrists and took a long drink from a six-liter water bag. Black cottonwood, white alder, and willow leaned out from the banks; their leaves ruffled in the light wind and muffled the sound of traffic on a highway leading to downtown Corvallis. Jon and I traded leads, but stayed close enough to carry on a conversation. The Willamette curved through a bend from northwest to northeast, at its apex taking us past the Marys River, a tributary flowing into the Willamette from the left bank, and then under the steel girder highway bridge set on four concrete pillars. Water roared as it rushed past the logs caught on their upriver edges. Cars sped by above us. Annoyed by the noise, I bent my oars to put the racket behind me.
Beyond the bridge, I caught glimpses of buildings in Corvallis through gaps in the trees and brush on the left bank. A mile beyond the last bridge, the river followed a sweeping turn east for several miles, and the hiss and rumble of the traffic faded astern. On river right floated the long dock and white twin-hulled coaching launches of the Oregon State University crew, and for the next 1-1/2 miles, between the trunks of the trees lining the bank, I watched golfers traipsing over rolling hills of close-cropped grass.
Just downstream from the Oregon State University boathouse, Jon rowed past a bit of graffiti to encourage the OSU Beavers crew. The lid to the grill is contemplating another leap overboard.
A single scull approached us and when Jon and I drew even with it, the sculler turned from his gaze over his slender shell’s stern. We waved. He acknowledged us with a nod, keeping his hands fixed on the oar handles. “Wanna race?” asked Jon, deadpan. “I’m just learning,” replied the young man, sounding apologetic, and missing Jon’s joke. Jon and I rowed across to the left bank to a shallow bar. Below us pebbles sparkled like gold as the light played through ripples in the water.
Well downriver, more white-hulled racing shells flocked around a motor launch where the coach barked something I guessed was a starting command. In a few minutes, a dozen sculls raced past us, the launch close behind.
Four miles of more or less straight river ended in a mile-long U-turn called Half Moon Bend. Dark green water carved the outside bank, baring the roots of the bushes that grew on top of it.
Even if Jon and I were to stop rowing and drift, the 3-mph current would still have us in Albany by sundown, well before our rendezvous to pick up our friend Hart the following day. I checked the satellite view on my phone’s Google Maps. A second mile-long U-turn, sending us eastward again, would take us to Tripp Island, and by the time we’d finished studying the map, the island was in view. We shipped our oars, rafted the boats together, sipped wine out of enamel cups, and let the river do the last of the day’s work.
We had pulled H2ONUS and CLARABELLE ashore to make camp on the upstream side of Tripp Island, and it would have been a perfect spot but for the sound of a gas engine pumping the river water into a farmer’s field.
We landed at the head of Tripp Island, a 1/3-mile-long, lens-shaped island that split the river. Set back from the shore uprooted trees were piled in a jumble a head higher than my 6′ 6″ frame. Long strips of bark hung from exposed trunks bleached white by the sun. Shrubs crowded the slender north channel, reducing it to an inlet. It would have been a fine spot to camp except for the roar of a gas-engine pump lifting river water to a field beyond the trees.
Our camp on the downstream side of Tripp Island was spare but quiet. Jon kept watch on the grill and took in the last few minutes of the evening light.
We drifted in the 90-yard-wide main channel to the downriver end of Tripp Island, where the only sounds were of rippling water. The downstream end of the filled-in north channel created a protected cove; our bows cut through its still water and then several feet into a mat of floating algae before grating on the gravel shore.
From a distance, these plants looked like a mat of algae. When I got close enough to examine them, I realized it was Azolla, also known as duckweed fern and mosquito fern.
I waded into the calf-deep water blanketed with thousands of greenish-yellow fernlike plants so small a half dozen could fit on a quarter. Their pale tips glowed pink in the setting sun.
For dinner, Jon cooked corn on the cob and enchiladas—the meal his mother taught him how to cook the summer before he went to college.
We had brought bivy sacks instead of tents, so making camp was easy. I scoured the bar for firewood while Jon poured briquettes into the grill and squirted a stream of lighter fluid over them. He pulled homemade enchiladas, green chile sauce, and golden-tasseled ears of corn from the cooler. All of it went on the grill. The enchiladas sizzled in a cast-iron pan, chile sauce bubbled in a stainless-steel pot, and the corn husks smoked over the glowing briquettes. After sundown, I mentioned that the only thing missing was something sweet. Jon opened the cooler and produced a half-gallon freezer bag stretched full of his wife’s homemade chocolate-chip cookies.
The afternoon we started our outing felt like summer, but we woke up to a river transitioning to fall. The yellow and orange bivy bags had been our quarters for the night.
I woke up long before morning. Pinholes of starlight pierced the sky, and the moon, not quite full, glowed through the clear cloudless night to shimmer on the water. At dawn, as I emerged from my sleeping bag, dew slid down the creases in my bivy bag. A blanket of fog blended the trees across the river into a single gray silhouette. I checked my phone for a message from our friend Hart. He had been on the road since 4 a.m. and was still a few hours away from meeting us in Albany. I made several rounds of coffee while Jon cooked eggs and bacon to put in between English muffins with cheese.
After breakfast, we slid CLARABELLE and H2ONUS into the fog. We passed a stretch of black basalt rip-rap along the river’s edge. A blue heron, disturbed by our approach, leaped downriver and did so several more times as Jon and I made our way downstream. Two kingfishers darted over us with a trill. As the fog ascended we pulled just hard enough to warm up without building up a sweat. Lost in the rhythm of the strokes, I put several hundred yards on Jon, then stopped to let him catch up. A silvery fish, larger than an oar blade, leaped from the river, twisted in the air, and slapped down with a splash.
Hart got up before 4 a.m. to drive through the fog to meet us near Albany on this sandy bar just south of the confluence of the Calapooia and Willamette rivers. He got there earlier than we did and had enough time to visit the local farmer’s market and pick up steak, strudel, and flowers for Jon’s birthday.
We approached the confluence with the Callapooia River where powerlines crossing the Willamette spanned slender lattice pylons built on top of massive, rusting, twin-column piers that once supported a bridge. Hart was standing on the sandbar and had with him a dry bag, sleeping bag, and paper grocery sack. Jon and I landed the boats and waded ashore. Hart showed us what he’d brought in the sack: steak, fresh German strudel, and a bouquet of gold, coral, yellow, and maroon dahlias from the farmer’s market in Albany. He handed the flowers to Jon and wished him a happy 40th birthday.
After five hours in the car, Hart was eager to take to the oars and row us out of the fog and into sunshine.
Since Hart would join me in CLARABELLE, I repacked the equipment and adjusted the sliding seats and stretchers so both of us could row. I had brought two seats, each equipped with eight roller-blade wheels. The seat I’d been using had been squeaking for the past few miles; a quick submersion always quiets it, so I dunked it in the water, but as I pulled it from the river one wheel was missing. It was underwater lying on the brown rocks in the middle of a sprinkle of white Teflon-rod bearings. I collected the pieces and looked at the seat. A worn-out nylon washer had let the wheel slip off the axle bolt. CLARABELLE would carry on with just one of us rowing.
There was plenty of time to cover the modest number of miles we had ahead, so we let the river carry the boats while we took it easy.
I plopped into the stern with my legs over the sheer and let my toes drag in the water. Hart took to the oars and rowed us under a pair of steel bridges that connect the tree-lined fields on the west side of the river with the wooded bluffs of Albany. The tops of old brick buildings poked up just above the treetops.
About an hour after we picked up Hart, the low clouds cleared and the bright sunlight falling on the dense green vegetation gave the river a subtropical look.
Downriver from town, the bank sank down into low farmland. At the cutbank of the first bend a tree had fallen into the river. Stripped of leaves, the branches waved up and down in the current, a ghostly greeting. We tied the boats together and let the Willamette weave us through the bottomlands at its own pace. The fog continued its ascent, and by the time we reached the first island, 6 miles downriver from Albany, the sun was high in a cloudless sky.
We rowed into sunshine just a few bends downriver from Albany. We landed for a quick exploration of this long, skinny island. Unlike a lot of the other islands, this one’s rocky bars were overgrown with grass and brush, turning them into small meadows.
Thick brush and prickly blackberry brambles covered the island, and we wandered around with a machete, looking for a path to the wooded center simply for exploration’s sake. We rowed to the south end, a skinny half-flooded meadow jutting into the river. The gentle current draped green wispy string algae over freshwater mussel shells as long as my finger. Their incandescent mother-of-pearl sparkled in the sun.
I didn’t know mussels also grew in fresh water until I was an adult. I see them now in many places and haven’t lost my fascination with them.
Jon was eager for me to try H2ONUS to see what I thought about his sliding-seat rowing rig. He hopped in CLARABELLE, and Hart moved to the stern. I planted myself on the carbon-fiber seat in H2ONUS and set my feet against the two pieces of lumber Jon used as a stretcher. It rested on a backpack in the stern and was otherwise unattached to the skiff. On the port side sat the charcoal grill. I took a few short strokes with the 9’ hand-me-down oars. The finish brought the handles in below my belly button and the blades just cleared the water on the recovery. I lengthened the strokes and at one catch, just as Jon had, I caught my knuckles on the edge of the grill lid and tipped it into the river. I retrieved it, rowed with short strokes to CLARABELLE, and tied the boats together. I asked Jon if he would let me shorten his oars and he agreed.
Even when we were rowing, we were in no hurry. Jon was alone at the oars while Hart relaxed in the stern and I took a tow in H2ONUS.
Jon rowed CLARABELLE with me in H2ONUS in tow until we reached the Willamette’s confluence with Santiam River. The satellite view on my phone app showed two sandbars that looked like they’d make a suitable campsite, but thicket covered half the island and ran right to the edge of the bar. Across the river from the bar was a rocky beach. We landed there and found the rocks covered with a layer of dusty gray silt. Across the river was a dark overgrown chute of the smaller Little Luckiamute River. We stayed only long enough for Hart to change positions with me. Jon continued to row.
The prettiest bluffs we saw were just upriver of Buena Vista. A lot of the other high points along the riverside were hidden by brush and trees but these were bare and all the layers of sediment were visible. Jon was in no rush to pass them by.
On river left, the bottomland rose to bluffs. Clumps of bushes sprouted where the bluff met the river, and layers of yellow and brown hard-packed soil rose 30′ or 40′ to a sagging cap of green ivy and blackberry with a crown of evergreens towering above us and shading most of the river. One of the trees leaned on the verge of falling into the river. We had floated in the shade for a half mile before the Buena Vista ferry came into view. It was squat boat with a low pilothouse painted white, yellow, and blue. Wires spanning the river supplied the power for the ferry’s electric motors, and a block rolling along a cable had a leash attached to the ferry to hold it against the current. Its only passenger was a black truck heading east. Once the ferry was clear of mid-river, Jon pulled hard to get us past the ferry while it unloaded. To the west we caught a brief glimpse of Buena Vista—a small scattering of buildings up a hill from the west ferry landing, backlit by the setting sun.
There has been a ferry crossing at Buena Vista since 1852. The current vessel is 10 years old and gets the power for its electric motors from one set of overhead cables that span the river, and is held against the current by another.
Just 100 yards downriver from the ferry, Wells Island stretched on for the better part of a mile. It had no visible campsites. A mile and a half farther we reached Whiteman Bar, a wooded island on the left bank with a choked-out channel between it and the mainland. Next to it was a mid-river rocky bar. There were two open channels either side: a short channel between it and the island and a longer one between the bar and a sweeping bluff, river right. The current pulled us to the short channel where several dead trees rested with roots reaching from the water like claws. Water rippling against rocks and branches broke the tranquility of the quiet river. I untied H2ONUS from CLARABELLE, and we shot single file through the gap between the fallen trees.
In the slower-moving water downstream from the channel, we pulled ashore to make camp on the bar. Baseball-sized rocks lining its shore made walking a challenge; the high ground was covered with sparsely leafed scrub. I scoured the 300-yard-long islet for driftwood for a campfire while Jon and Hart fired up the grill and cooked the steak Hart had bought. We ate it on a mound of rice and vegetables, finishing dinner at sunset. Long after we went to bed, a train woke me. Although the tracks were 1/2 mile away beyond the right bank, it sounded like it would roll right over us. After it passed, only the cries of an eagle reached across the river.
Hart Williams
On the second morning, Jon cooked breakfast while I took a hatchet to his oars to shorten them to a length appropriate for his little boat, H2ONUS.
On Sunday morning, I woke in my bivy bag to fog, again. Before I was fully awake, a canoe with two men waved a good morning as they paddled past in the silvery mist. Jon fired up the grill, and coffee and breakfast sandwiches soon followed. I double-checked that Jon would let me shorten his oars. He gave the okay, so I lopped off 6″ with an axe, then carved new handles.
It didn’t take too many tools to shorten Jon’s 9’ oars. A saw would have helped. After I tried the oars I thought I could have taken off at least 3″ more.
Independence was 6-1/2 miles away. Hart rowed CLARABELLE while I sat in the stern. A few beavers passed us with tiny wakes fanning out from their heads. A few miles in I asked Jon how he liked the oars. He wasn’t sure, but I was confident he’d grow to like their shortened length. A doe peered out from the brush on Judson Island, an eagle watched us from atop a telephone pole. The fog lifted to a low overcast.
Hart Williams
Our trip began in summer, and two mornings later ended with autumn. We pulled up to Independence in a light rain and bit of a chill.
After skirting the mile-long curve around Murphy Bar, the river swept to the right to run north to the town of Independence. A lone bridge with pale-green girders set on concrete piers made open with pointed Gothic arches spanned the river and a wide bar extended from the left bank. A few minutes after rowing under the bridge we passed a riverside park and pulled ashore at our haulout, a wide sandbar extending from the trees lining the riverbank. A light rain began to fall, leaving dark speckles on the sand. We had caught the last warm sigh of summer; the Willamette would flow without us into autumn.
Jordan Hanssen is the author of Rowing into the Son, his story about setting a Guinness World Record while winning a rowing race across the North Atlantic. Adventures by boat have taken him up and down the West Coast, down the Mississippi and Rio Grande, and to Alaska, Hawaii, and Panama. On one adventure he was briefly lost at sea. With his rowboat, CLARABELLE, he leads history and birdwatching tours on Seattle’s Lake Union. His pursuits are noted on his website.
If you have an interesting story to tell about your adventures with a small boat, please email us a brief outline and a few photos.
Creating a model of a boat before building it is a common procedure, and one I find very useful. For a 23′ boat, I chose to build a 1:4 scale model; this worked great since the 7′ 8″ model was big enough to use as a tender. For a nesting kayak that I designed, I started by building a full-sized model (also known as a mock-up) out of cardboard, to test for accuracy before cutting expensive plywood. The cardboard parts would be used for patterns.
Photographs by the author
The plywood panels for the V-berth could be built into the mock-up, fitting only straight edges and right angles. The curves of the perimeter can then be traced precisely with a batten bent fair around the frames.
My latest project is a 17′ pocket cruiser. The design challenge was to create accommodations for two with an acceptable level of comfort. Working with drawings and scale models was not going to definitively prove the success of the design or the many small construction details that would need to be considered when building the finished boat. My solution was to build a mock-up strong enough to climb aboard.
The transom was framed in wood yet has a cardboard face. The cutaways for the outboard could be easily made in the cardboard.
The twin rudders, hung from the pintles and gudgeons that will serve the finished boat, have an interesting mechanism that can get its first trials on the mock-up. Note the printed cardboard used for panels that just need to define space. The aft end of the port cockpit coaming has a convex shape while there is a concave treatment to starboard; changing features comes with a minimal investment in time and materials.
I made drawings and a half-hull model and then drew the frames full-scale. To begin the construction of the model, I gathered a supply of cardboard and scrap wood. As when building most boats, the keel and stem of my model were constructed first and then the frames set up on the keel. At this point, the mock-up departed from the traditional boatbuilding sequence. Instead of planking the hull, I constructed all of the interior components. The advantage was that none of the interior components had to be measured or scribed to fit the inside shape of the hull; they could be left to extend outside the hull between the frames and then marked for trimming using battens sprung around the frames.
All of the weight-bearing surfaces in the mockup were made of plywood so Tom and crew could not only check the accommodations for fit and comfort but also enjoy spending time in the mockup.
Rather than look for galley equipment to fit the cabinetry, Tom built the galley around the the things he already intended to use aboard the boat.
The mock-up made it possible to sit in the cockpit and cabin as well as work out the building sequence and many small construction details. The many changes and improvements I devised in the process made the mock-up well worth the effort. The original design had a flat bottom intended for navigating very shallow water. The final design was changed to a V bottom to provide better performance in choppy seas and move the ballast closer to the centerline.
Patterns for the planks were made only on the starboard side. They’d serve for the port side as well.
I purchased a trailer to fit the model, ensuring that there would be no surprises when the finished boat was loaded. Placing the model on the trailer revealed that there would not be enough clearance under the garage door to rig a hinged mast. The cabin roof was lowered as a result without much sacrifice in cabin headroom.
With the mockup, the trailer could be set up to a precise fit for the boat when it is ready to launch.
As the building progressed, the stem went through more changes than any other part of the mock-up. Seeing it full size, attached to the boat, and in three dimensions was a distinct advantage over drawings. I added a bowsprit to create more sail area forward and provide the more traditional look of a gaff-rigged sloop.
The three patterns for the planking, here at the bottom of a garage wall, were made on the starboard side only. They will serve as the patterns for the port side, too, when the boat is built.
The transom and other mock-up pieces cover the garage’s opposite wall, ready to speed the construction of the cruiser.
With most design and construction details worked out, I disassembled the mockup and set the parts aside to be used as patterns, which included truss-like patterns for the planks. The building of the actual boat is under way. The benefits of building a mock-up have provided invaluable experience. I’ve been able to proceed with confidence this second time around knowing that FREEDOM, as the boat will be christened, will meet all expectations. Only her sailing performance remains to be discovered.
Tom Hepp has spent most of his life around boats and water. He is a veteran of the U.S. Navy and Merchant Marine and has worked professionally as a boatbuilder for over 10 years. He spends summers on the coast of Maine and winters near the St Johns River in North East Florida. He designed, made cardboard mockups of, and built two take-apart pirogue-style boats (see “Nesting Boats”) to take in his van during summer vacations.
You can share your tips and tricks of the trade with other Small Boats Magazine readers by sending us an email.
Small boats often require a variety of sails, covers, ditty bags, straps, and other fabric accessories that have grommets—metal rings that protect holes in the material and whatever cordage runs through them. Plain metal grommets were introduced around 1830 to replace sewn eyelets, and in 1883 William Wilcox developed a new type, the spur grommet, which quickly became the standard for maritime use.
Spur grommets can be put under loads that would tear out plain grommets and can be set in sailcloth, canvas, leather, webbing, and many other materials. They have two parts: the grommet itself, which has the barrel that is inserted through the material, and the washer. Spur grommets are made of thicker metal than plain ones, and the barrel is longer to accommodate thicker material. The washers have small triangular teeth that puncture the material when the grommets are installed, and the grommet perimeter has a rolled rim that captures the washer spur tips as they are bent outward.
Photographs by the authors
Spur grommets are made of thicker metal than plain grommets and have rolled rims. The spurs of the washer, right, curl into the hollow of the rime of the grommet, left.
Plain grommets and spur grommets both come in numbered sizes, but for any given size, they have different shapes and dimensions so each type requires a dedicated die set. While plain grommets are designed for light-duty use on thin fabrics, spur grommets require a minimum thickness of material to take a tight set. The Sailrite website lists both the minimum and maximum capacities, expressed in decimal inches as well as layers of Sunbrella fabric required. In applications such as reefpoints, where there aren’t multiple layers of sailcloth, reinforcing panels should be added, both to strengthen the area and provide the three layers the grommet needs for a tight fit. Common spur-grommet sizes are #0 (1/4″), #1 (5/16″), #2 (3/8″), #3 (7/16″), and #4 (1/2″). The dimensions given in fractions of an inch are the inside diameters of the grommets before installation. That diameter is slightly larger after installation. For our small boats we use #0 for sail lacing rings on our Sunfish, #1 for reefpoints, and #4 for sail head, tack, and clew grommets as well as tie-down points for boat covers.
The tools for installing spur grommets are a hole punch, mallet or hammer, and a setting tool and its anvil.
We punch holes for our spur grommets with a hole cutter, set on a rubber cutting mat. We use our 3-lb Barry King nylon mallet to drive the setting tool of the die set and have, with practice, developed a feel for the force and number of strikes to set the grommet tight without overdoing it and making the outer ring cut the fabric. If you foresee a lot of grommet setting in your future, you might consider splurging for the W-1 C. S. Osborne hand press.
There are many applications for grommets in the gear used for boating, from sails to covers and gear bags. Spur grommets—and the dies to set them— cost more than plain grommets but are far more secure than plain grommets and just as easy to install.
Audrey and Kent Lewis mess about with their small boats in the shoal waters of Northwest Florida. Their boating adventures are logged at Small Boat Restoration.
Spur grommets and the tools needed to install them are available from Sailrite, C. S. Osborne, Stimson, and other suppliers
Is there a product that might be useful for boatbuilding, cruising, or shore-side camping that you’d like us to review? Please email your suggestions.
The best gear for small boats is compact and serves more than one purpose. My galley box, for example, stores my cooking supplies and shields my stove from the wind, serves as a slip thwart for rowing, and is part of the platform for sleeping. The Multi-Fuel Stove from nCamp is compact and has just one purpose, cooking, but does so using many different fuels, whether solid, liquid, or pressurized gas. Its versatility is a welcome addition to my outdoor adventure kit.
Photographs by the author
With the combustion chamber collapsed and the legs folded, the stove is quite compact.
The stove is made of aluminum and stainless steel, weighs 30.4 oz, and is well designed and sturdily built. Its top measures 9″ × 6 1⁄2″, it is 6 5⁄8″ tall when in use, and just 2″ tall folded. The aluminum legs provide a steady base that’s not prone to tipping over. A telescoping combustion chamber, made of six concentric stainless-steel rings, works like an upside-down version of the plastic drinking cup I had for backpacking when I was a kid. The bottom of the chamber is a circle of stainless steel, perforated for airflow. In its center is a 1⁄2″ hole to accept the burner head of an adapter to fuel the stove with a gas canister.
The valve and hose have a fitting designed to fit propane/isobutane canisters.
The adapter has a 12″ stainless-steel-clad hose that connects the burner head to a canister fitting, which is equipped with a valve. The threaded fitting is compatible with propane/isobutane canisters. That type of canister isn’t one that I have used with my other stoves or torches, and I wasn’t thrilled with the prospect of adding to the ever-growing collection of canisters I have for cookware and metalwork. Fortunately, there is a wide array of adapters that make it possible to connect almost any kind of gas stove to any kind of canister. I bought one for the propane cylinders I use for torches and stoves, and another for the butane cartridges that fuel my other camp stoves.
The butane adapter has a bracket to hold the cylinder in the correct position.
A 1-lb propane canister provides a lot of gas quickly and will boil water faster than any other fuel.
I did boil tests with the nCamp adapter’s valve wide open and timed how long it took to bring 16 oz of water to a rolling boil. The propane/isobutane cartridge that the stove is designed for took 3:30 (minutes:seconds), the butane was slower at 5:20, and the propane was faster at 2:45. The propane was notably louder and, I suspect, being delivered at a significantly higher pressure.
An alcohol burner made from a standard 12-oz aluminum can and shown here wedged in the opening, just fits into the top of the combustion chamber. The second stove is made of a tall 12-oz can.
The combustion chamber, with the burner head removed, will burn almost anything that will fit through the 2 5⁄8″ opening at the top of the stove. A DIY ultralight alcohol stove made from a standard 12-oz soda can will fit with just enough room to spare. I primed one of mine outside of the nCamp stove, blew it out, and set it in the stove while raising the bottom of the combustion chamber to receive it. The boiling time was a quick 2:40. (It was my first DIY alcohol stove and I had drilled burner holes much larger than the standard size, which are poked in with push pins.) The bottom of the chamber didn’t get hot, so it can be pushed up by hand for the flame to be blown out.
Wood burns cleanly with little smoke once the fire gets going and makes a small but pleasant contained “campfire” after dark.
Wood burns cleanly with little smoke once the fire gets going and makes a small but pleasant contained “campfire” after dark. With twigs and Port Orford cedar kindling fueling the stove, 16 oz of water boiled in 7:30. The combustion chamber goes through wood quickly and I fed the fire a couple of times as the water was heating up.
Putting a pot on for cooking slows the draft and the fire produces more smoke. The bottom of the pot here is streaked with bar soap to make it easier to clean the soot off.
The stovetop has six molded-in supports that elevate the cooking pot 3⁄8″ to give the fire room to breathe. With some of the fires I made in the stove, that didn’t seem to be quite enough and the fire went from burning cleanly without a pot in place, to producing a lot of smoke with the pot over the hole. And the pot bottom would get a coating of tarry soot, a sign of incomplete combustion. Rubbing bar soap over the bottom of the pot before use made any soot deposited easier to clean.
Unlike canister gas and alcohol, wood creates a lot of heat at the bottom of the stove, enough that the stainless-steel rings of the combustion chamber begin to glow a dark red. A good measure of that heat is radiated downward and will scorch whatever surface the stove is set on unless the legs are elevated or something heat-resistant is set under the combustion chamber.
While I was cooking breakfast—an omelet with mushrooms, leeks, and sugar snap pea pods—the opening of the combustion chamber created a hot spot on this thin stainless steel pot lid I used for a cooking pan. By moving it every so often I was able to avoid scorching the omelet.
The nCamp stove doesn’t have a built-in igniter, so you’ll need a sparker, matches, or a lighter to use it. But if you have a lighter with you, you can leave the fuel canisters and adapters in the boat or in camp, tuck the folded stove in a day pack, and have a hot meal and hot drinks anywhere there are dry twigs—and enjoy a small enclosed hand-warming fire when the stove isn’t being used for cooking.
Christopher Cunningham is the editor of Small Boats.
The Multi-Fuel Stove, with adapter, is available from nCamp for $69. It is also carried by online retailers.
Is there a product that might be useful for boatbuilding, cruising, or shore-side camping that you’d like us to review? Please email your suggestions.
John Carswell retired to Jekyll Island, a 7-1/2-mile-long barrier island on the coast of Georgia. With gentle slopes of white sand on its Atlantic coast and creek-laced salt marshes on its western side, Jekyll is surrounded by shallow water. When John and his wife Dorothy relocated there, they brought a boat with them, a Princess built in 1932 by the Thompson Brothers Boat Manufacturing Company of Peshtigo, Wisconsin.
Photographs by John and Dorothy Carswell
John began by carving a half model made of 38 vertical transverse lifts. The method is uncommon but is a direct route to a section drawing. The sections, somewhat loosely arranged here, are set on a separate horizontal piece for the box keel. He put each piece on a scanner and a print shop scaled the images up and printed them full size.
John had been rowing an aluminum johnboat for five years when he bought the aging Princess in 1985. It was far prettier than the johnboat even though the long-neglected cedar-on-oak hull had been sheathed outside with fiberglass, which was peeling away from the strip planking, taking the green paint with it. The interior varnish was cloudy and the oak frames were black along the punky keelson. John rowed GREEN HERON, as he named the boat, for five years on the lakes of central Florida and later, after a move to Washington, D.C., another 10 years on the Potomac River and its tributary, Piscataway Creek. John estimates he rowed GREEN HERON between 3,000 and 4,000 miles.
John cut the paper patterns out, traced the outlines onto ¼″ plywood, and cut them out to make molds. The time and money he saved on the flimsy plywood cost him many hours in the long run. It was a struggle to keep the molds from shifting as he built the hull’s framework over them. “I kept trying to make it work when I should have started over,” he commented. “The day I finally lifted the frame off the form and cut the 1/4″ plywood into little pieces was a day of relief and revenge.”
The boat was already hogged and leaking when he brought it to Jekyll Island and, in the five years he rowed her there, the hull deteriorated to the point where it required bailing four times for every mile traveled. After 80 years of service, GREEN HERON was beyond saving. In 2012, John armed himself with a saw but he couldn’t bring himself to put his old friend in the dumpster; it’s still under the eaves at the back of his house.
The structure of steam-bent oak frames was lifted from the molds and readied for planking. The tunnel for the propeller called for some frames bent to very unusual shapes that required a second steaming for the one half of the frame after the other side was secured in place. The box keel and the deadwood for the prop shaft were put in place after the frames were bent.
John wasn’t about to give up on rowing. For decades it had provided the conditioning he needed for a troublesome lower back. He decided that he would build his next boat. He had a shop and tools, but beyond working for a while framing houses, he had no real woodworking experience: “I just fixed old things,” he says, “I did not build new things. I was most definitely unprepared; I didn’t know how to sharpen a chisel.” And though he had fixed at least a dozen old boats, he was at a loss as to where a new one begins. He bought books, among them Building Classic Small Craft by John Gardner and started reading WoodenBoat. The study in itself was in some ways as therapeutic as rowing: “After a couple of years of retirement, my brain needed adventure as much as my body needed a rowboat.”
The 5/16″ sapele strip planks were glued only to each other and not attached to the frames. John applied only two strakes each day—the first in the morning, and the second in the evening after the epoxy had cured enough to hold the first in place.
He was drawn to the Whitehall type, imagining it as easily driven under oars as GREEN HERON, and likewise easily equipped with a sliding seat, but larger, capable of taking his son fishing. His recalled that his son suggested he should consider having a motor “because eventually I would get too old to row home.”
The hull’s strip-built shell and its framework were built as separate pieces. After removing the framework, John applied fiberglass to the inside of the shell.
Browsing through back issues of WoodenBoat, John was intrigued by Robb White’s 2006 article, “Rescue Minor: A shallow-draft motorboat.” White lived in south Georgia and, like John, needed a boat well suited to those shoal waters that extend south from Jekyll Island and into northern Florida. Photographs in the article show his 20′ adaptation of the original William Atkin design speeding along just a boat length from a sandbar in water so thin that the bottom is clearly visible. Another photo shows the boat with its box keel resting flat on the intertidal flats, with one blade of its propeller just visible above the sand, the other blades hidden by a hollow in the hull.
With the hull elevated with a hydraulic engine hoist, the protection the box keel and the tunnel provide for the propeller and rudder is clearly visible.
Atkin had designed the Rescue Minor for plywood construction and a hard-chined hull; White strip-built his version with complex curves instead, and incorporated a distinctive tumblehome stern. The plywood version would have been much easier to build, but John was taken by White’s curvaceous interpretation: “I did not worry much about the fact that Robb White had built dozens of boats and I had built zero.”
SKIMMER is quite at home in her thin south Georgia waters and rests between tides on her flat box keel. In the distance, over her stem, is the Sydney Lanier Bridge, which connects Jekyll Island to the mainland.
Rather than working from plans—they were available for the Atkin design, but not for the White—John started with a half model he carved, not with waterline lifts but with a horizontal stack of bread-slice sections.
The sliding seat is a shop stool. Its base, made of rock maple and hidden beneath the floorboards, rolls on 4″ wheels.
SKIMMER, being a lot of boat for a solo rower, isn’t fast under oars, but John rows to keep in shape, not to get from place to place.
The generous accommodations provide plenty of room for guests.
SKIMMER has two transoms: an inner one that gives the hull its watertight integrity, and an outer one built as a grating that drops down like a landing craft’s bow ramp. John used to slip over the side of GREEN HERON to go swimming on the Potomac, then clamber back aboard over the transom. That was 30 years ago; John opted to build SKIMMER with this easier way to get back aboard. Like GREEN HERON, SKIMMER was outfitted with a sliding seat—rolling, actually, on 4″ wheels—and oarlocks and 10′ ash oars salvaged from GREEN HERON.
After serving for two years as a rowing vessel, SKIMMER got her auxiliary power, a 13.5-hp diesel, neatly fit into a box that serves as the skipper’s seat.
John rowed SKIMMER for two years while he saved money for her inboard motor. When the time came, he bought a marinized Kubota 13-1/2 hp diesel and installed it under an engine cover that also serves as the driver’s seat. The instrument panel is neatly tucked away in the keel, and the starboard side of the engine box is equipped with a removable whipstaff for steering.
It was John’s son who thought that the boat John was going to build should have power as a backup to rowing. Skimming briskly along, John couldn’t help but be pleased with the suggestion.
John usually launches SKIMMER in the Jekyll River on the west side of the island and motors upwind or up current for a few miles and then rows back with the elements in his favor. SKIMMER isn’t fast; John can row about 2 miles per hour at 12 strokes per minute, but he’s out for exercise and the pleasures of the inland waters and the marsh. And while White’s Rescue Minor could do 22 knots, SKIMMER, heavier and with less power, will do just 10 knots, but as with his rowing, John is in no rush to get anywhere.
The drop-down grating transom is an elegant means of stepping aboard with dry feet.
The grating also provides a safe and easy way to climb back aboard after a swim. It easily supports John’s weight without pulling SKIMMER well out of trim.
John did very well for a first boat, especially for building one from scratch, and SKIMMER naturally draws compliments like “beautiful” and “a work of art.” But John isn’t inclined to let even the well-deserved praise go to his head: “It’s nice to hear, but I think it is mostly the varnish they see. It takes some education to appreciate the beauty of wooden boats, at least it did for me. The pleasure is in the fair curves, the scarf joints, the handles on the swim platform, that stout ipe post.” Building his first boat was neither easy nor quick. “I paid for my ignorance with a lot of hours,” John recalls. “I’ll have to live a long time to row SKIMMER for as many hours as I spent building it, but that’s okay.”
Do you have a boat with an interesting story? Please email us. We’d like to hear about it and share it with other Small Boats Magazine readers.
Comments:
We welcome your comments about this article. If you’d like to include a photo or a video with your comment, please email the file or link.
The Boothbay Harbor One-Design is a particularly handsome boat that has proven itself in the choppy waters off Boothbay and Pemaquid, Maine. It’s an easy boat to sail, while being both maneuverable and fast, and its design is the product of some of the best boat minds of the 1930s.
Shortly after the J-boat RAINBOW successfully defended the AMERICA’s Cup in 1934, her designer, W. Starling Burgess, moved to mid-coast Maine and hired Geerd Hendel as his chief draftsman. Their primary work, funded by Alcoa and loosely overseen by Bath Iron Works, involved designing high-speed military craft made of aluminum. For recreation, both men focused on the emerging fleet of Boothbay Harbor daysailers, with which Hendel was already deeply involved. Starting with lightly built, plumb-ended centerboarders much like those that raced on lakes back in his native Germany, Hendel was in the process of converting four of them to keel boats when Burgess arrived. (As centerboarders, they had proven not to be up to salt water’s more boisterous conditions.) Hendel’s experimentation led to SANDERLING, built by Norman Hodgdon for the summer of 1936. She was the Boothbay Harbor One-Design precursor—and the first sizable boat Norman Hodgdon built.
Photo by Maynard Bray
The Geerd Hendel–designed Boothbay Harbor One-Design is a sporty and seaworthy short-ended daysailer-racer. It was designed in the mid-1930s, when limited overhangs and long waterlines were that region’s rage. Several designs of these basic proportions came out around the same time.
The mid-1930s were the bleak Depression years when small boats rather than big ones were receiving attention—quality attention—from Boothbay region designers, builders, and sailors. Boats with long waterlines and short overhangs began dominating the Boothbay racing fleet in those days, and top-echelon designers took notice. A long waterline means a faster boat; boats of these proportions came not only from Hendel and Burgess, but also from Charles Hodgdon of East Boothbay’s Hodgdon Bros. Yard, and from L. Francis Herreshoff.
Hendel introduced a boat called LOON late in the 1937 season, and was then asked to work with the Boothbay Harbor Yacht Club, and particularly with its selection committee, in refining LOON’s plans to become a one-design class that would be cheap to build and fast to sail, and whose plans would be available to any builder—as these sailors intended to shop for the best price. The parameters echoed the fleet average of 21′ overall, about 19′ on the waterline, and carrying 200 sq ft of sail. After testing and massaging LOON, they agreed on what became known as the Boothbay Harbor One-Design (BHOD). It was an immediate hit, growing to 15 boats by its second season, 20 by the start of World War II, and 37 boats when wooden construction ended in 1966. (The final count came to 53, including the two subsequent batches of fiberglass boats.)
Geerd Hendel’s wooden BHODs were built upside down, then turned over and set atop their outside-ballasted fin keels—an efficient way to build any wooden boat whose design allows it. The BHODs’ flat transoms, as well, were an economy measure. The initial cost of these boats was in the neighborhood of $850.
The original planked construction of the BHODs has not held up especially well, as the boats have rather small frames and deep keels. However, the cost-cutting virtues of the original boats also make the BHOD an ideal candidate for the more robust and lower maintenance cold-molded construction. This technique involves the gluing together of multiple layers of diagonally laid veneer-like planking. It was this realization as well as a lifelong fondness for the BHODs that brought a kind of ad-hoc group together at Brooklin (Maine) Boat Yard, a long-standing leader in cold-molding. Besides designing and building new boats with cold-molded hulls, the yard had rejuvenated two aging BHODs belonging to Ted and Sandra Leonard—one of them nearly 20 years ago. Ted’s BLUE WITCH was detached from her fin and ballast, turned upside down, her hull sanded and faired to good wood, given a two-layer sheathing of 1⁄8″ diagonally laid veneers set in epoxy, faired and painted, then set upright again atop her original fin keel. Despite many seasons of sailing, her hull remains flawless and tight. Not surprisingly, Sandra’s boat, INDIA, received the same treatment a few years later.
Photo by Maynard Bray
The original plank-on-frame construction of the Boothbay Harbor One-Design did not stand the test of time. Two of these boats, BLUE WITCH and INDIA, owned by Ted and Sandra Leonard, received cold-molded overlays. Their hulls are much smoother than the dew-soaked topsides seen here suggest.
Based partly on this track record and partly on the yard’s expertise, Ted Leonard (who raced BHODs as a lad, as did his father) chose to sponsor a new BHOD of cold-molded construction. With input from Steve White (the yard’s owner), Bob Stephens (BBY ’s chief designer), and a little from Ted and me, the details were worked out and depicted on a new construction drawing by Bob. Instead of 1⁄2″ cedar planking, caulked, the new skin will consist of three layers glued together—the inner being 1⁄4″ thick running fore-and-aft over steam-bent frames, followed by two diagonally laid 1⁄8″ veneers running at right angles to each other.
As of this writing, finished drawings have been worked up and approved by the BHOD Association. The building jig has been completed, and over the winter the new hull will take shape. Ted’s goal is to share the information so that anyone can build one of these fine little daysailers using a method that has been proven. Finished boats will have strong and dimensionally stable skins, so you can store these BHODs in your garage or under a tarp with assurance that they’ll keep well and not leak when launched. The hulls will hold paint well because there’s no swelling and shrinking with changes in humidity—no seams to open, shed their paint, and ultimately leak. Fiberglass boats have some of these same advantages, but because that material isn’t self-fairing between supports the way wood is, fully faired and waxed female molds are necessary.
Since this boat weighs under 2,000 lbs, you’ll be able to tow it from place to place over the road behind the family sedan, expanding your sailing venue without damaging your boat. If the boat is equipped with a mast that swings in a tabernacle, stepping and unstepping should be a do-it-yourself operation.
Photo by Maynard Bray
Ted Leonard at the helm of BLUE WITCH. The success of this boat’s cold-molded overlay (it strengthened the hull enormously) has inspired the construction of a new BHOD, to be launched next summer. The new boat will have conventional steambent frames, like the originals, but will have a cold-molded, rather than planked, hull.
It’s a thrill to sail a BHOD, either singlehanded or with a friend or two. You tuck a cushion under your fanny and sprawl on the floorboards, where you’re out of the wind and much of the flying spray, yet you can see all around since your line of sight is under the boom and not obstructed by it or the mainsail. In tacking, the mainsail takes care of itself. Although the jib has to be let go and resheeted when changing tacks, it’s a small sail that blows across to the new lee side and sheets in easily once there—hardly needing the winch except in strong winds. With half her total weight at the bottom of her keel, the BHOD can be driven harder than a centerboarder of equal size. A reef is seldom needed and capsizing almost unheard of. Nevertheless, flotation chambers in the bow and stern will keep the boat from sinking should a catastrophic knockdown and swamping occur.
The resurgent interest in BHODs comes largely from a fleet roster developed by Association secretary Alden Reed—a listing that accounts for all 53 BHODs. Alden’s roots run as deep as his research in tracking down the boats. His grandfather Alden sponsored some of the early boats to get the class on its feet, and his father, Edgar, while a youngster, often crewed for Starling Burgess during the late 1930s.
If you do not plan to race, and are not constrained by the one-design parameters, the design invites such modifications as a reduced keel and separated rudder, curved transom, small cabin or boom tent, and tabernacle mast. The boats are small enough to store in the garage, yet big enough to give one the thrill of sailing fast—a perfect balance between manageability and performance.
There’s a newly chartered Boothbay Harbor One-Design Association, open to anyone interested in the boats. It organizes the racing, and publishes a comprehensive quarterly newsletter that covers restorations as well as recent race results. Ordering details for the new Boothbay Harbor One-Design Plans were being developed at the time of publication.
For a displacement hull, top speed is a function of waterline length. That’s the beauty of a Boothbay Harbor One-Design: The waterline length is nearly equal to the boat’s overall length. The short ends also reduce the boat’s tendency to pitch.
This Boat Profile was published in Small Boats 2007 and appears here as archival material. If you have more info about this boat, plan or design please let us know in the comment section.
Is there a boat you’d like to know more about? Have you built one that you think other Small Boats readers would enjoy? Please email us!
Continue Reading - Enter your email to log in or subscribe
New to Small Boats? Create a free account to get our weekly emails and two free articles each month.
Time to upgrade!
You've read all of your free content for the month. Upgrade to a paid subscription for unlimited access.

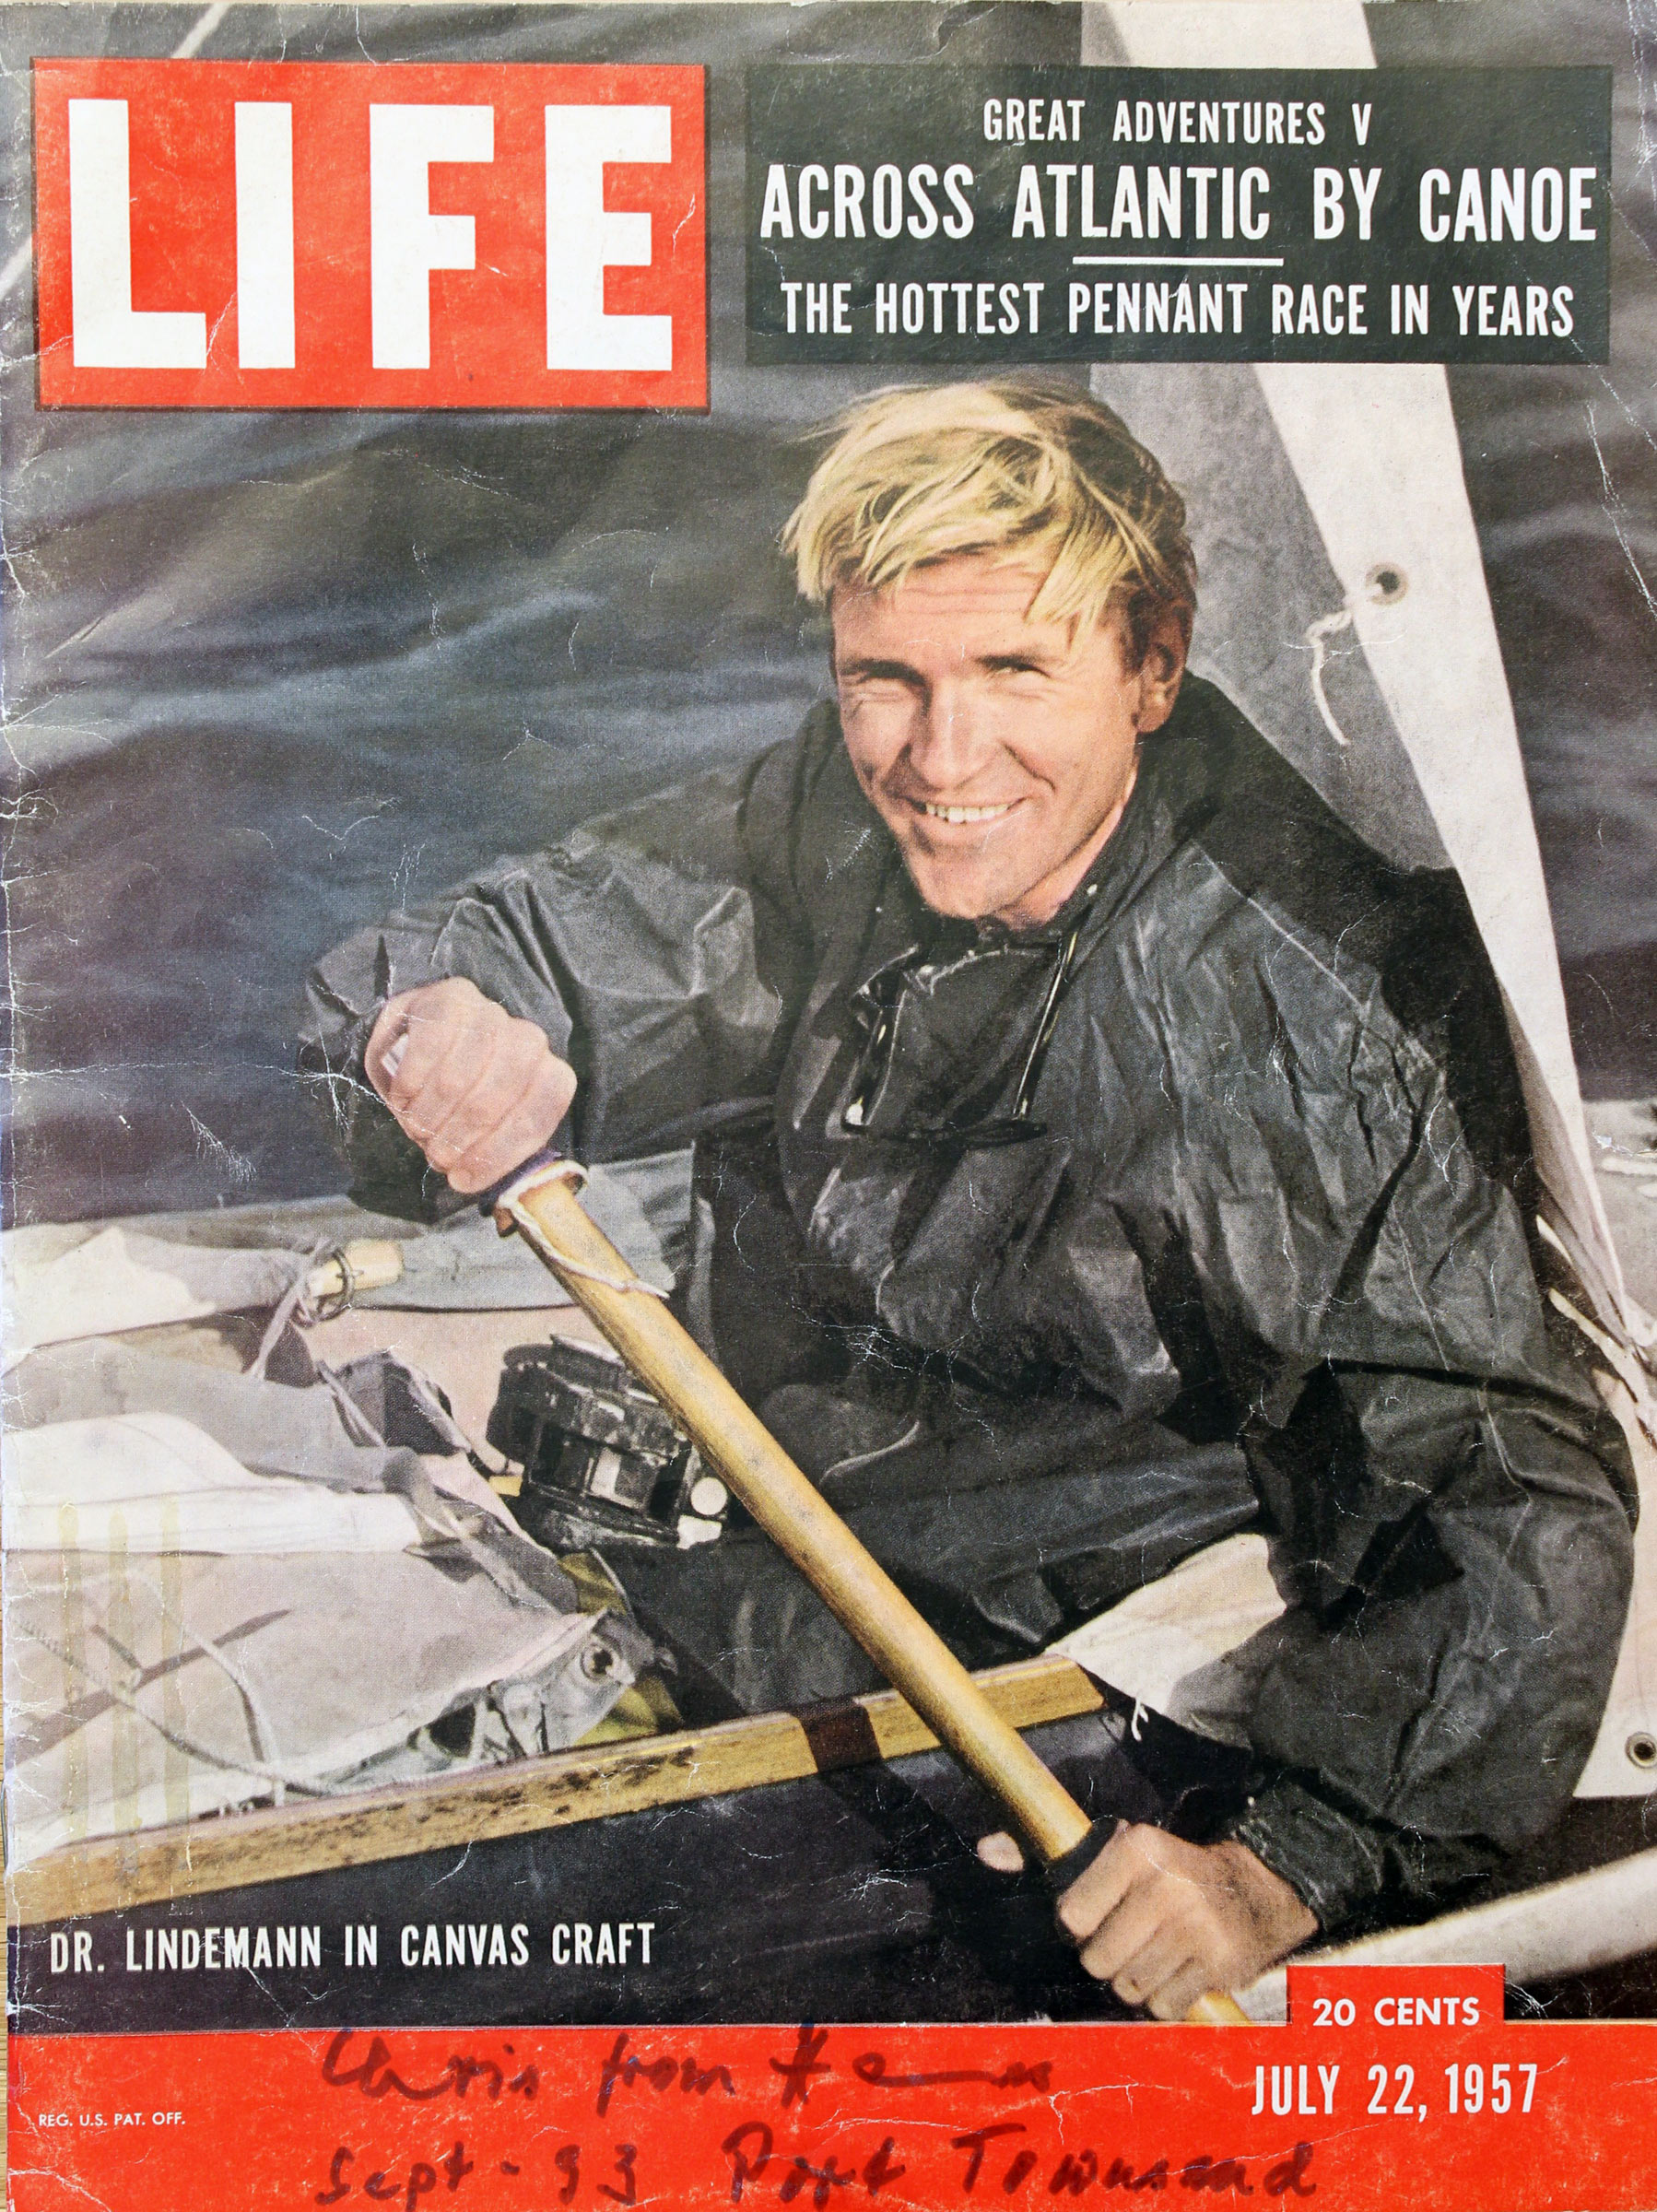
 Peter Schwierzke