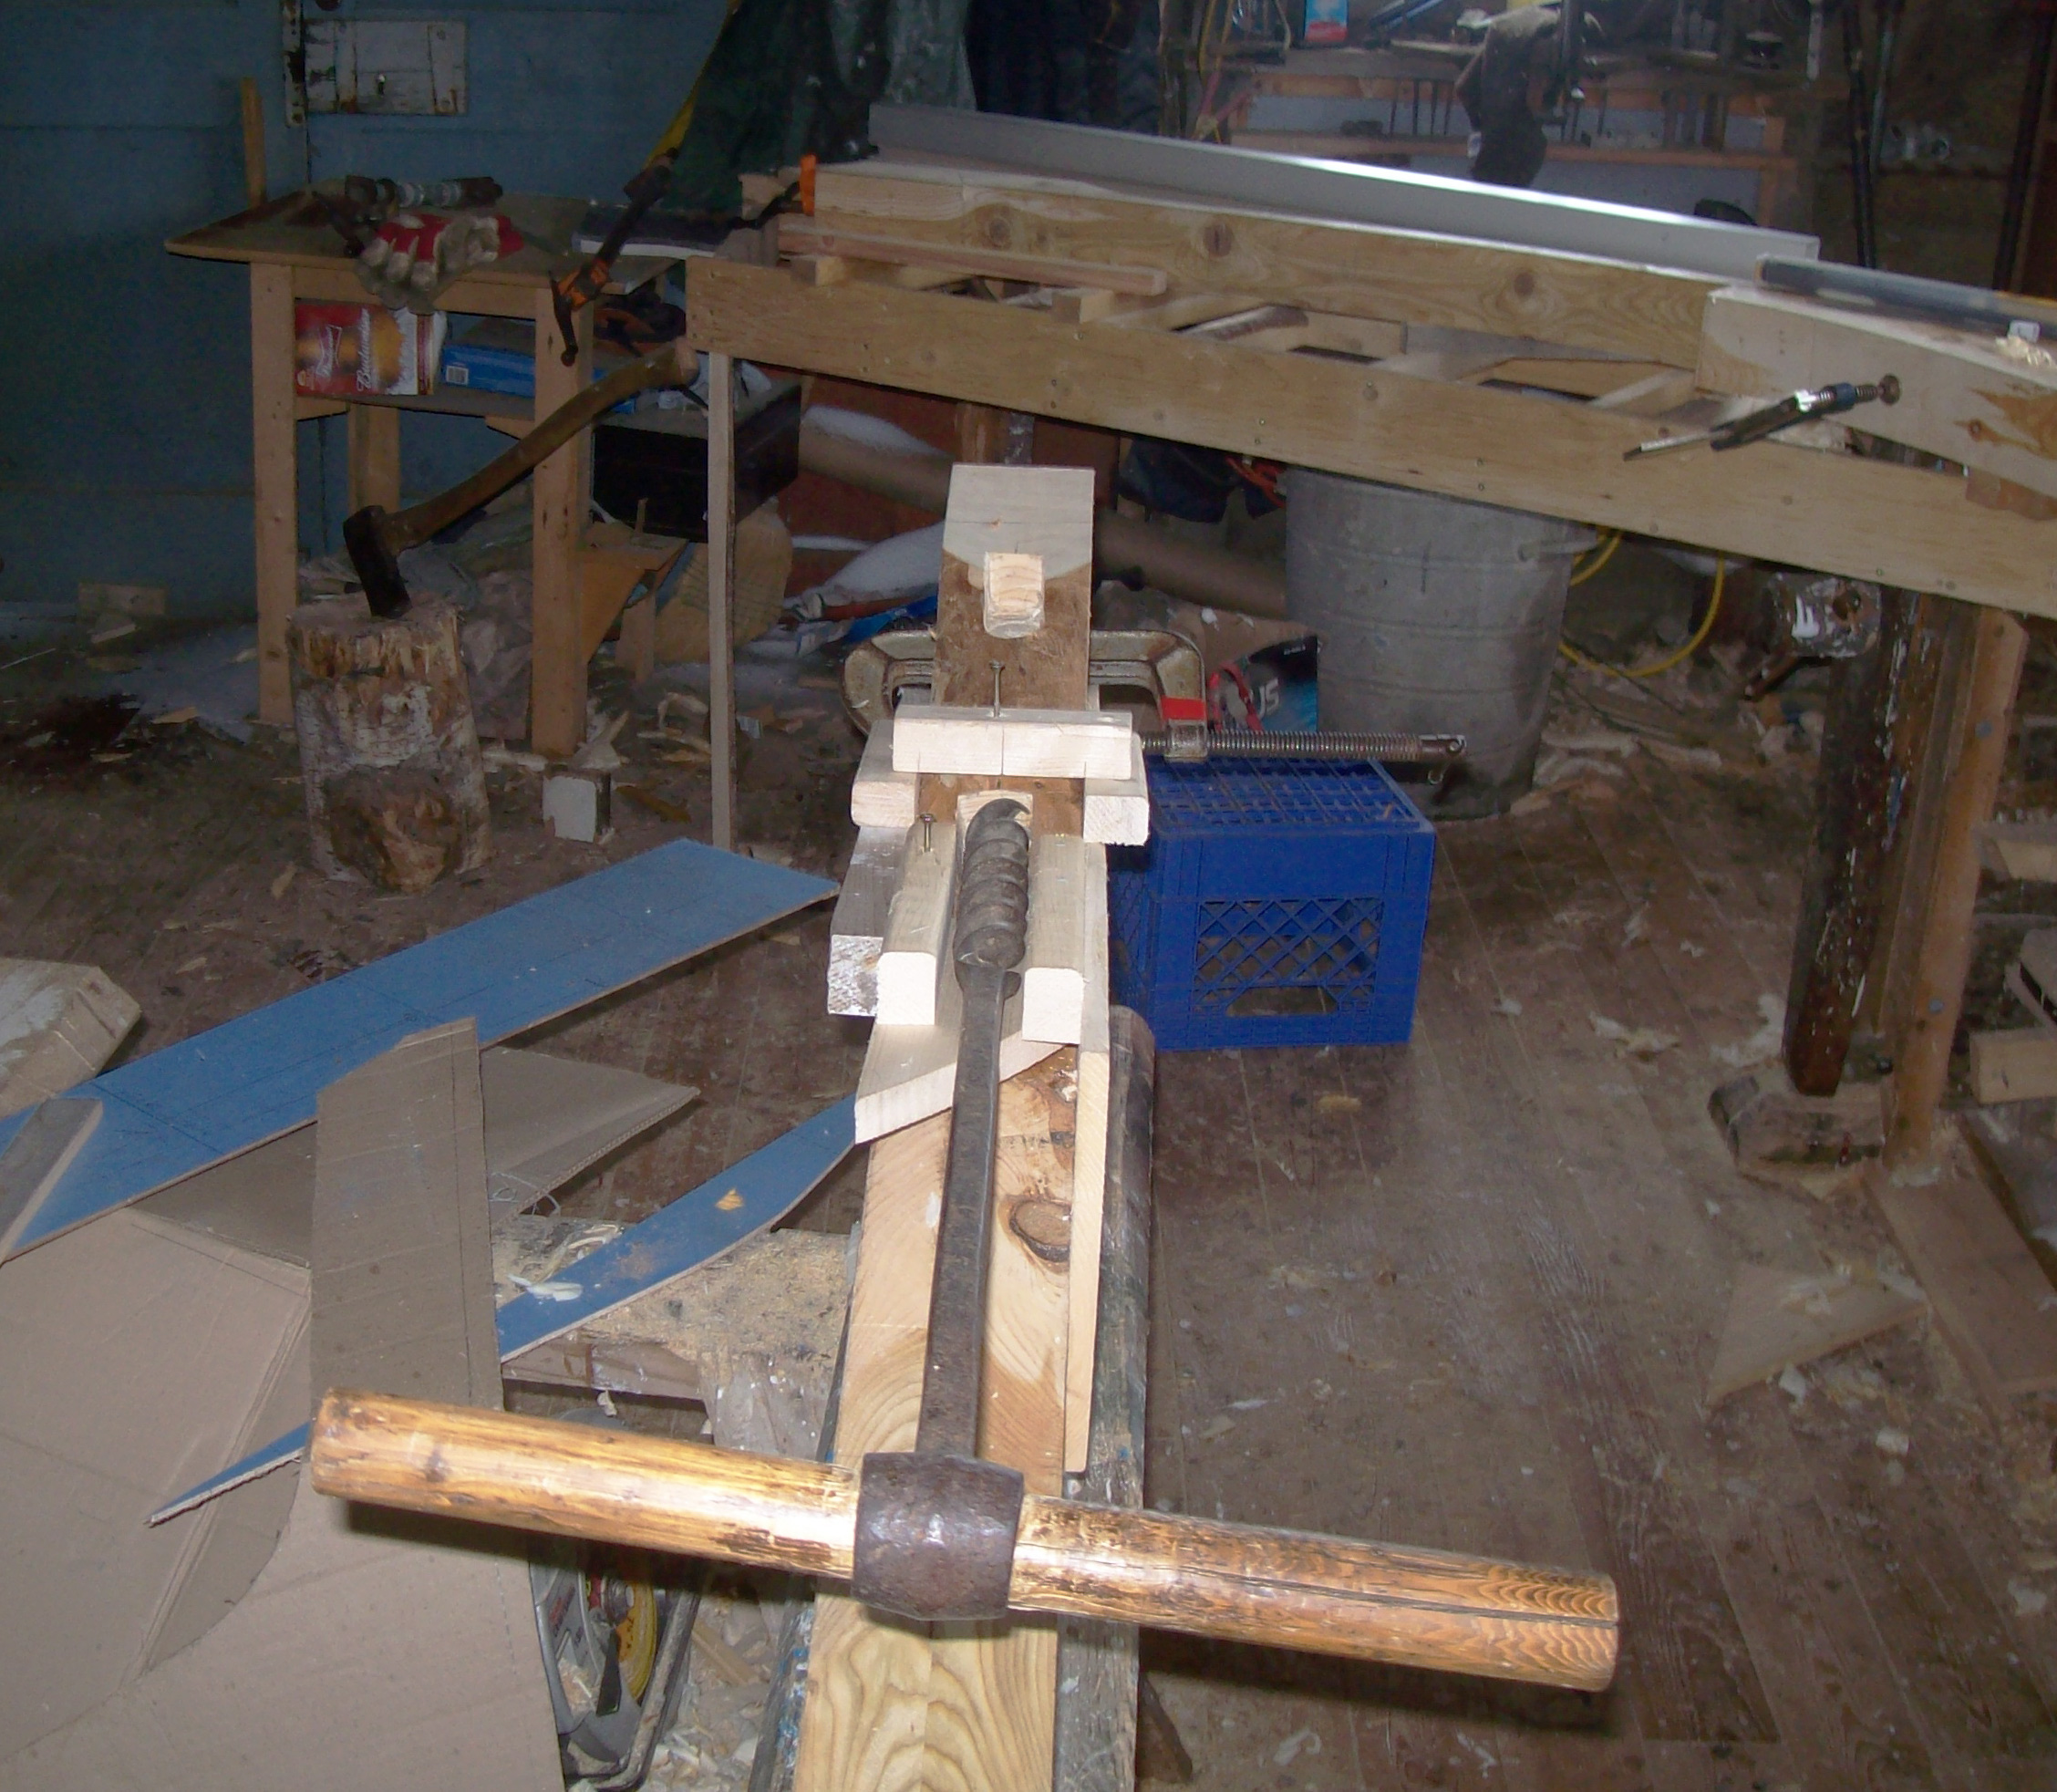
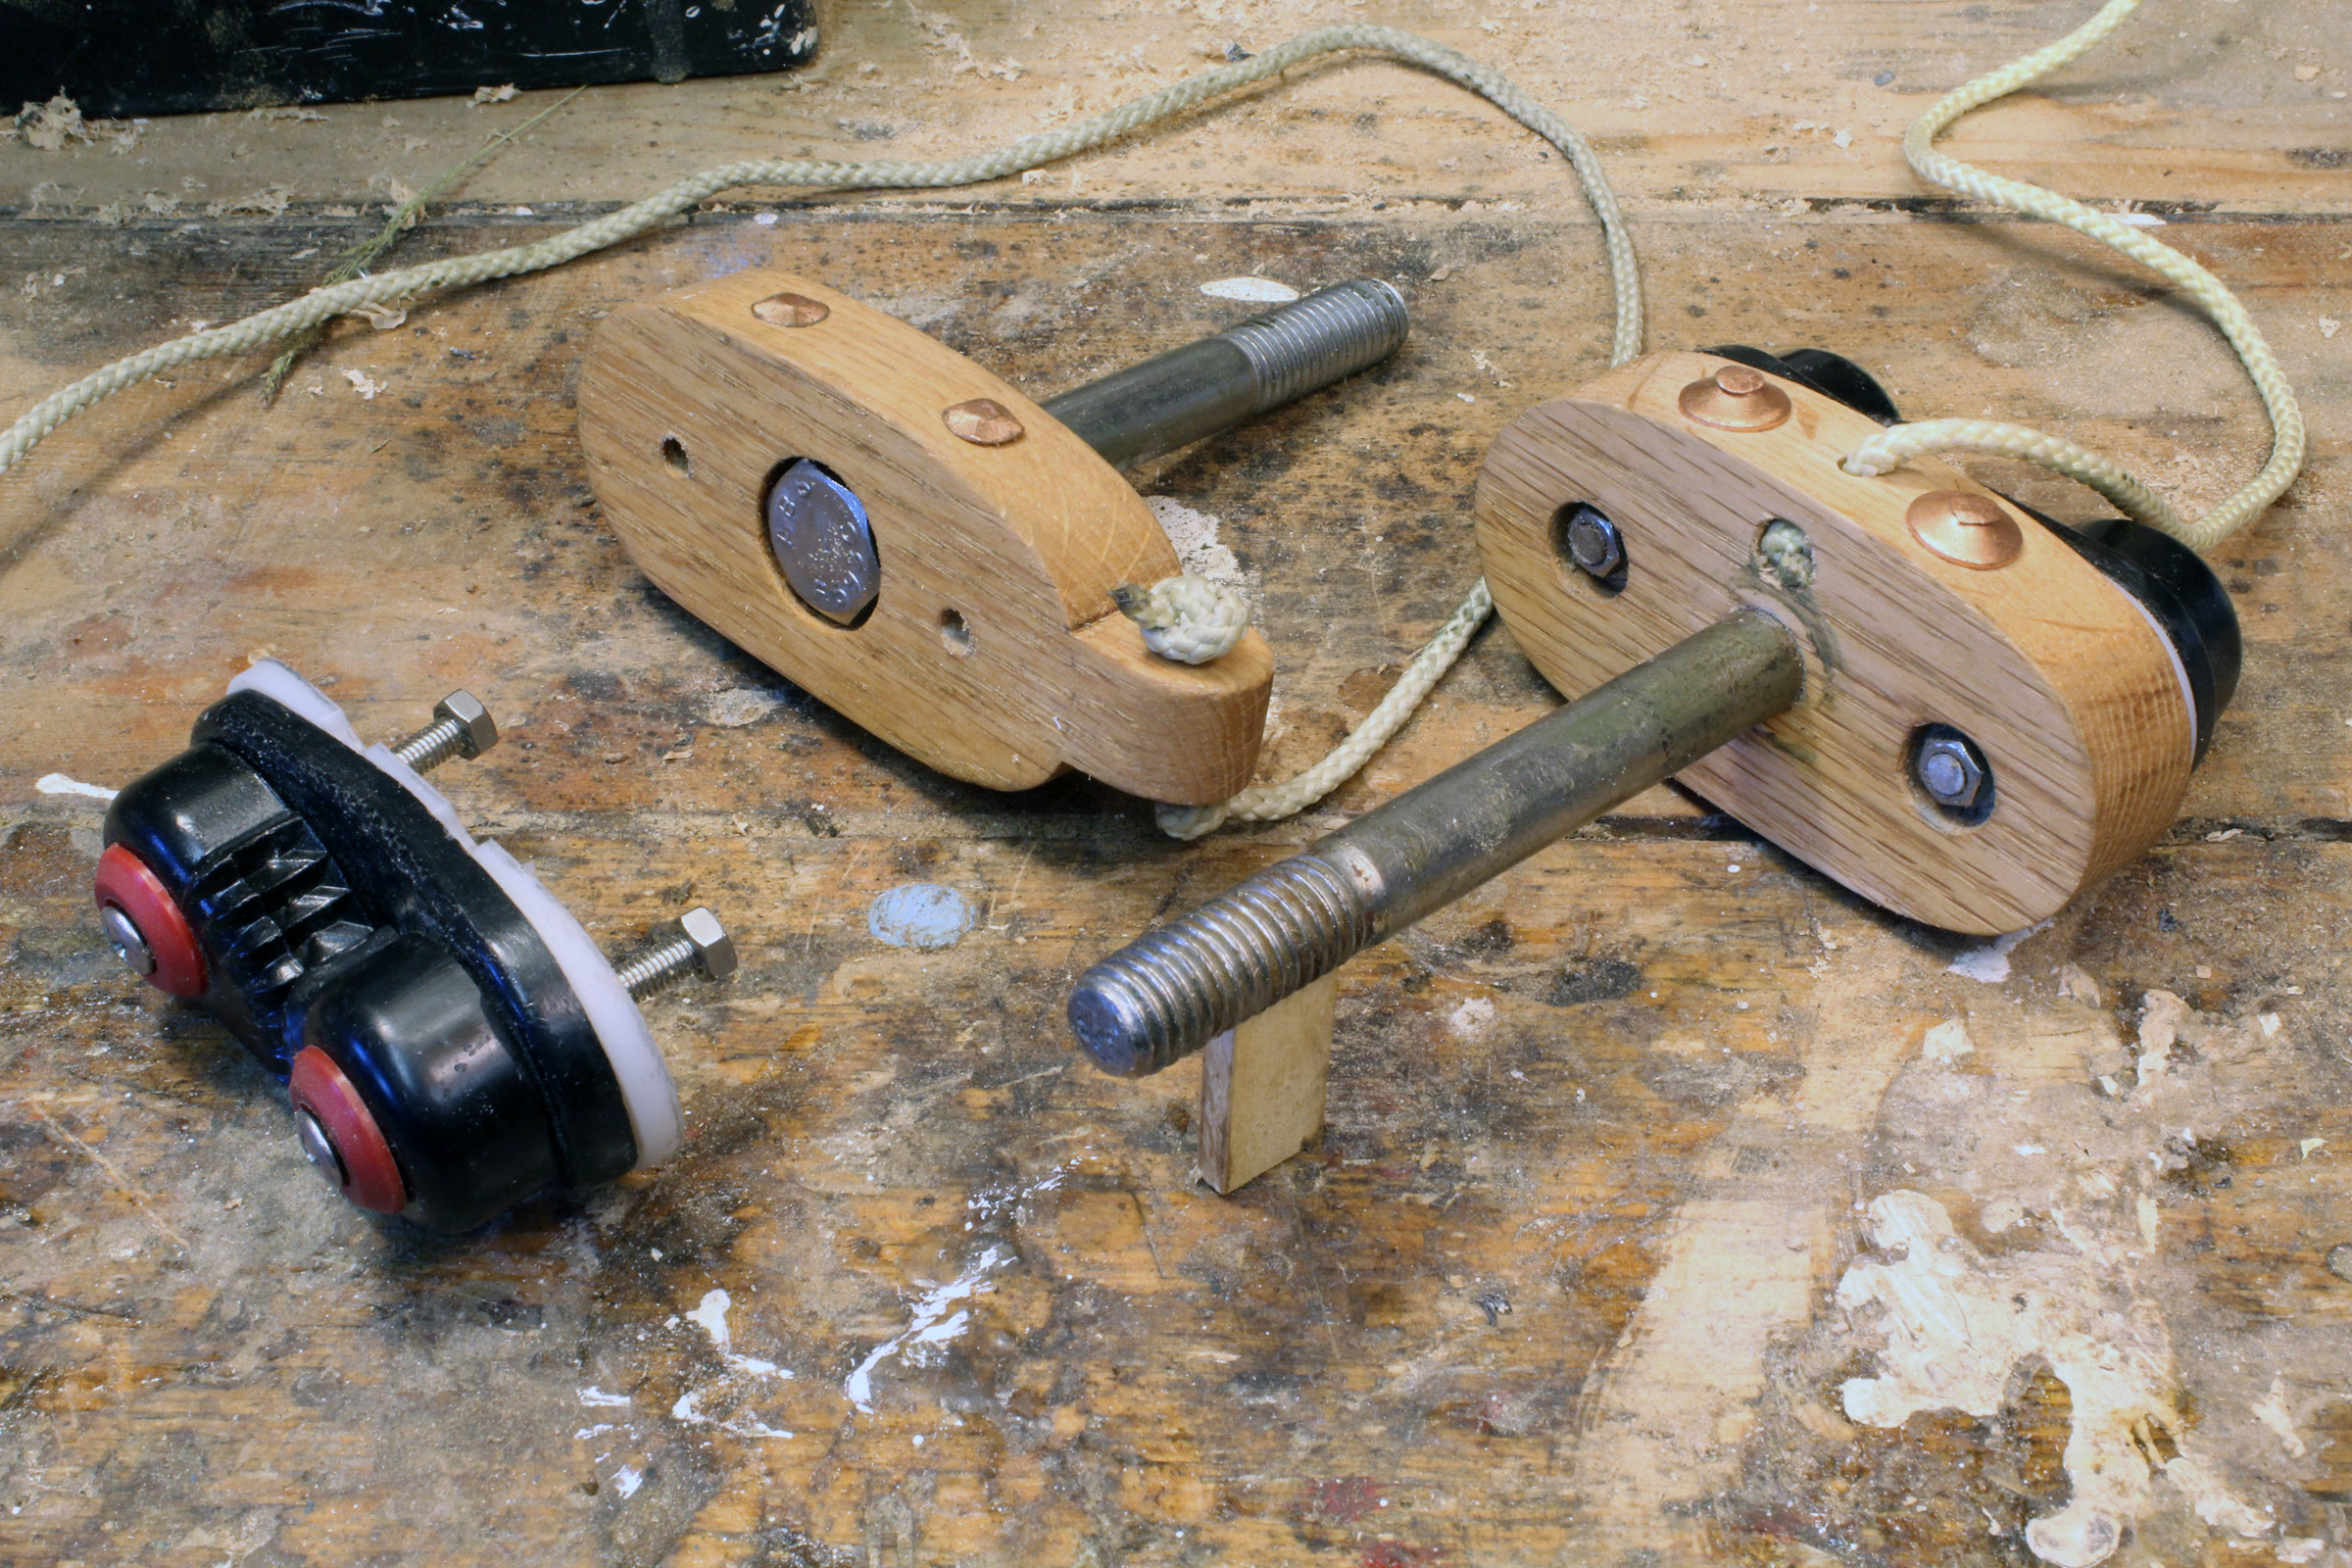
My new set of homemade clamps have a reach of 16″. Here one is applying enough pressure to keep the clamp from pivoting under its own cantilevered weight and resting on the edge of the plywood.
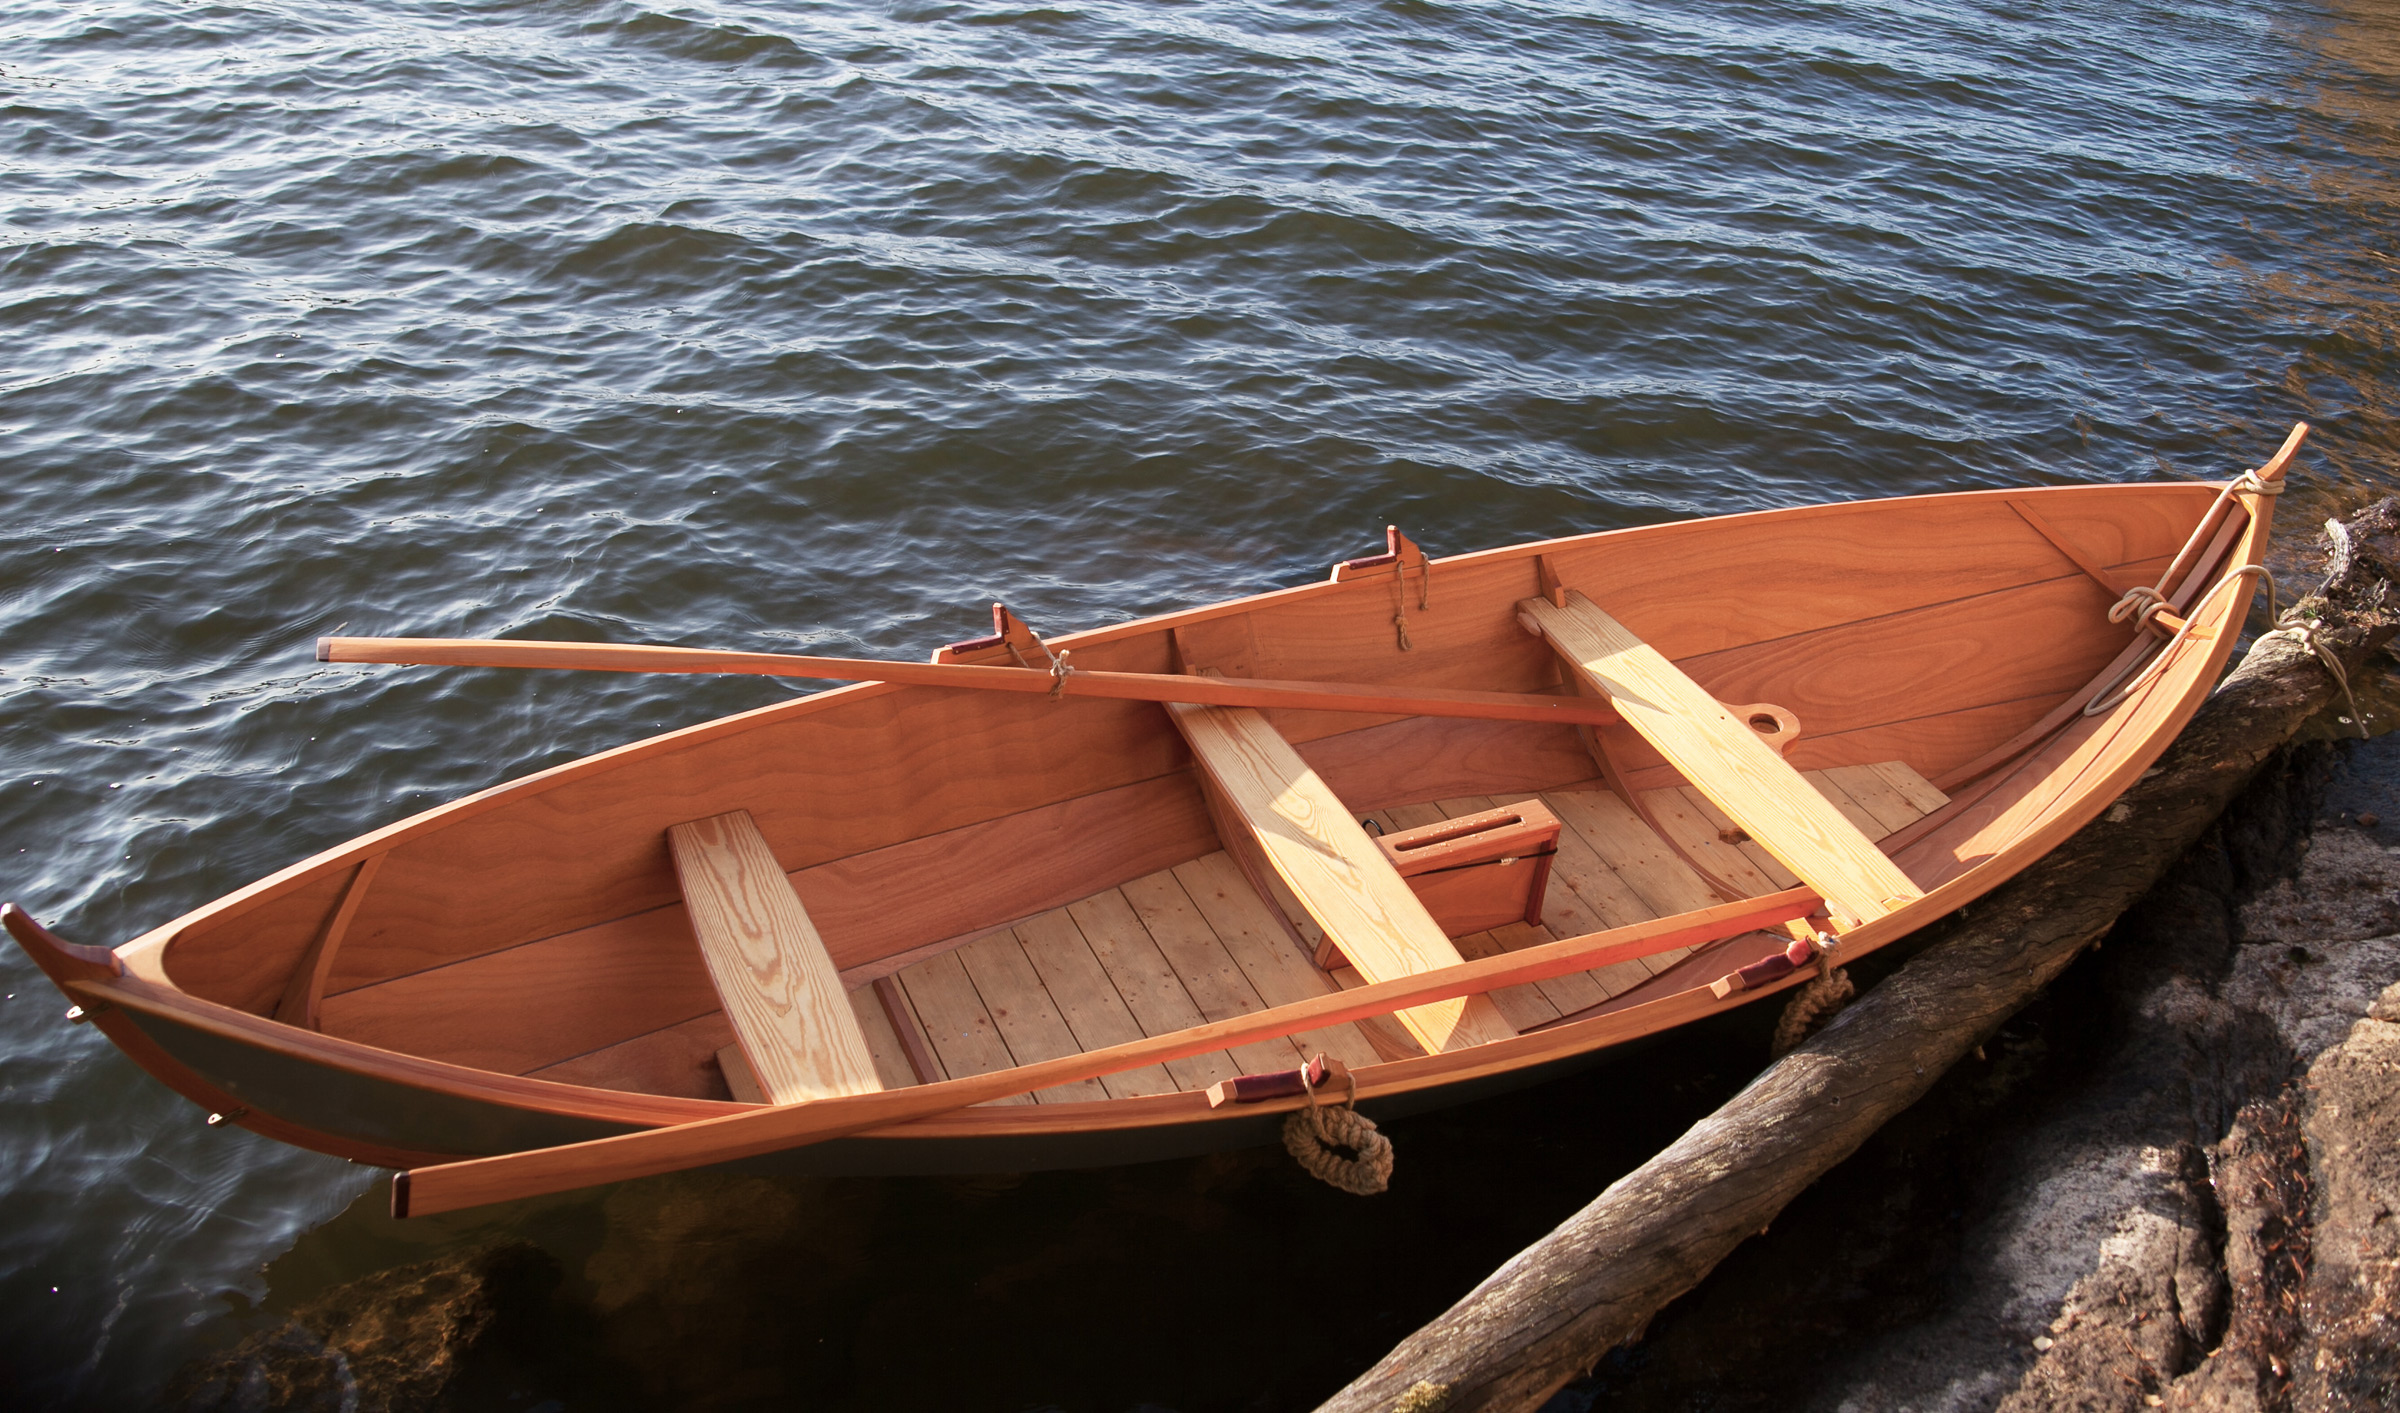
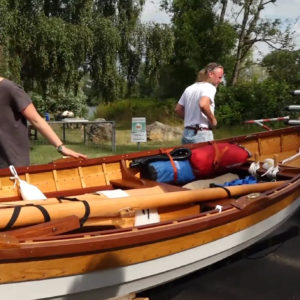
When I built a reproduction of the 9th century Gokstad faering, I encountered a number of challenges I hadn’t faced with any of the other boats I’d built; one was working with very wide planks. The faering has only three strakes, and the planks are 12″ to 14″ wide amidships. I had a collection of Brenne-style cam-lever planking clamps that had a 10″ reach, enough for even the rather wide planks on dories, but they couldn’t span the middle of the faering planks.
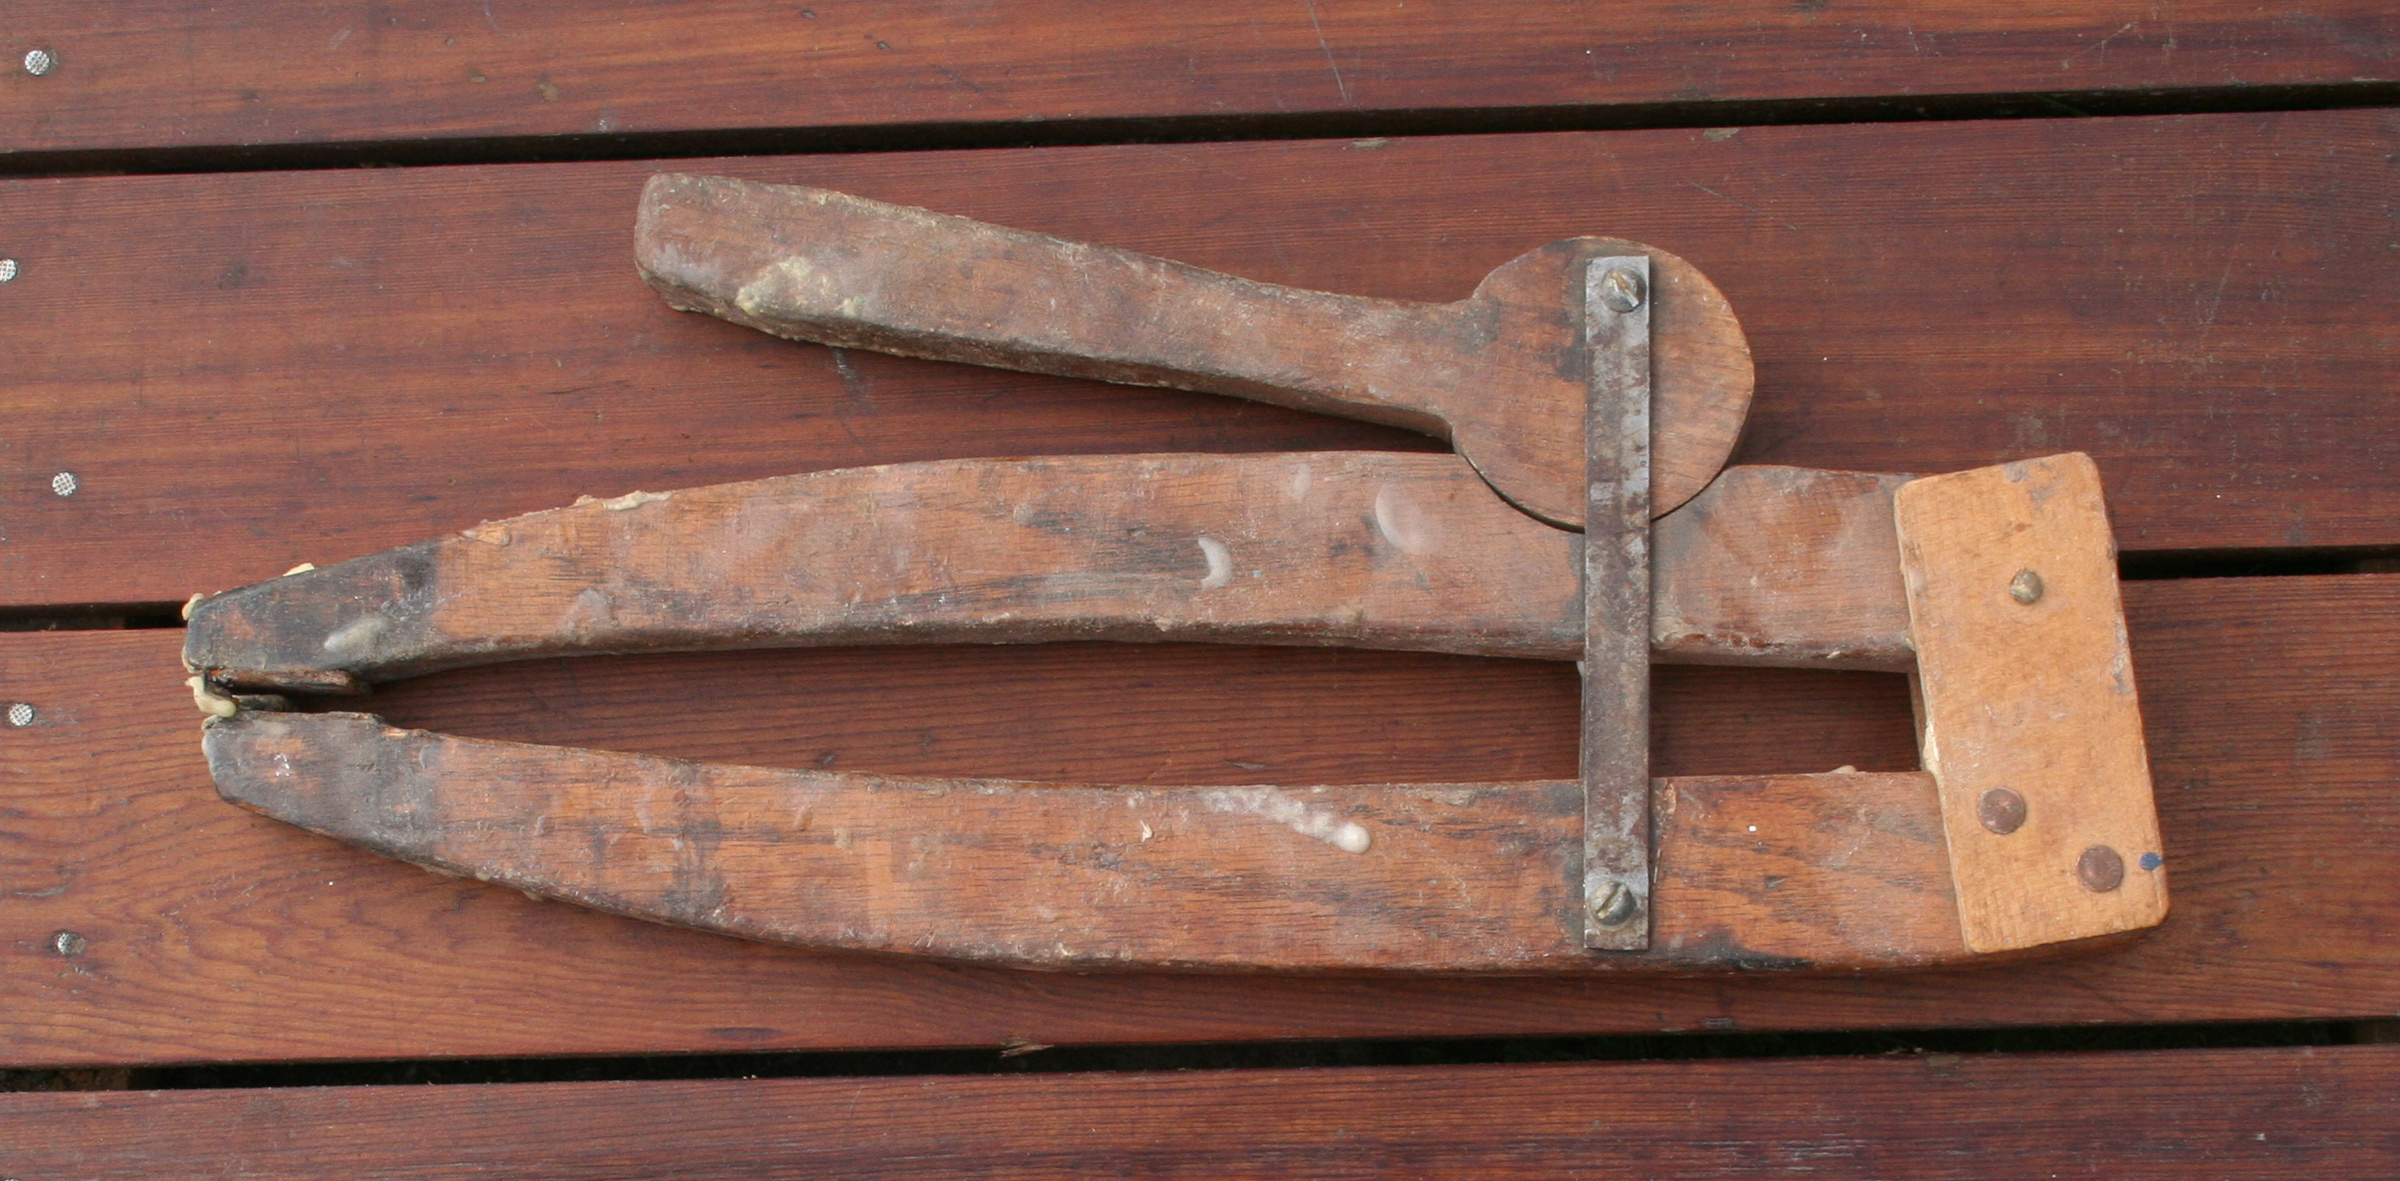
I made my first set of Brenne-style clamps in the late ’70s and they’ve see a lot of action, but there are some jobs that are just beyond their reach.
I made a set of three extra-long clamps for the job; I used my tap-and-die set for wood to make threaded dowels as the means to tighten them. They worked, but were unwieldy and much slower to operate than the cam-lever clamps.
A Brenne clamp, like the fist planking clamps I made, could easily be scaled up to provide more reach, but the cam and the metal straps connecting it to the clamp jaw opposite have a limited operating range. I’d made one of my earliest clamps in that style with longer straps that had additional holes, but adjusting it to fit the work at hand was never something I thought to do until I had a batch of epoxy mixed, and the clock was ticking.
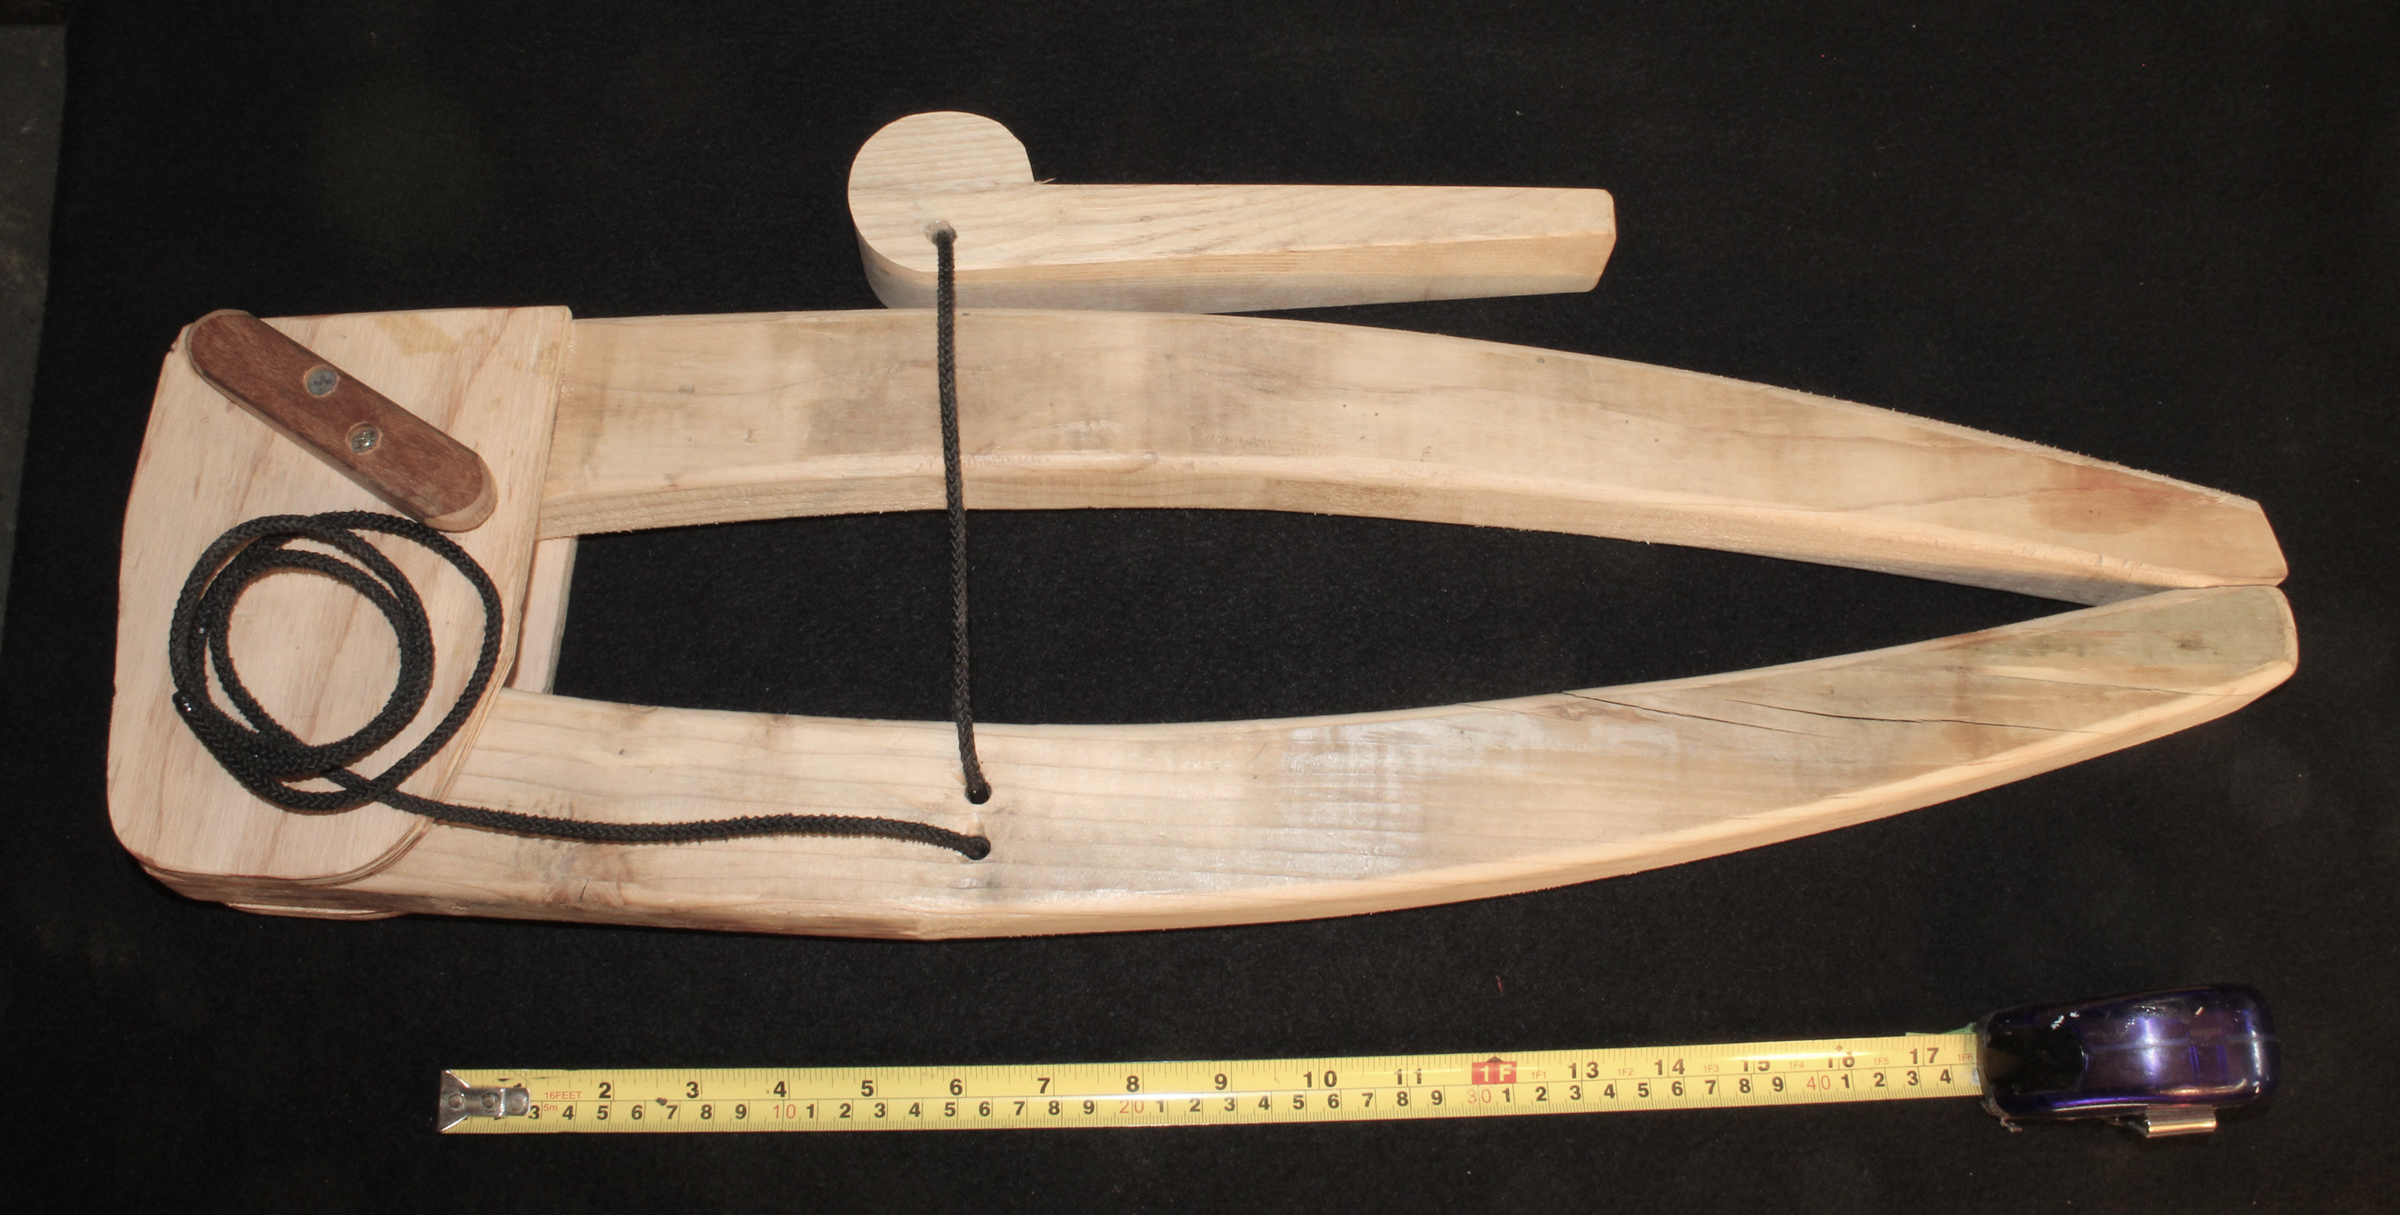
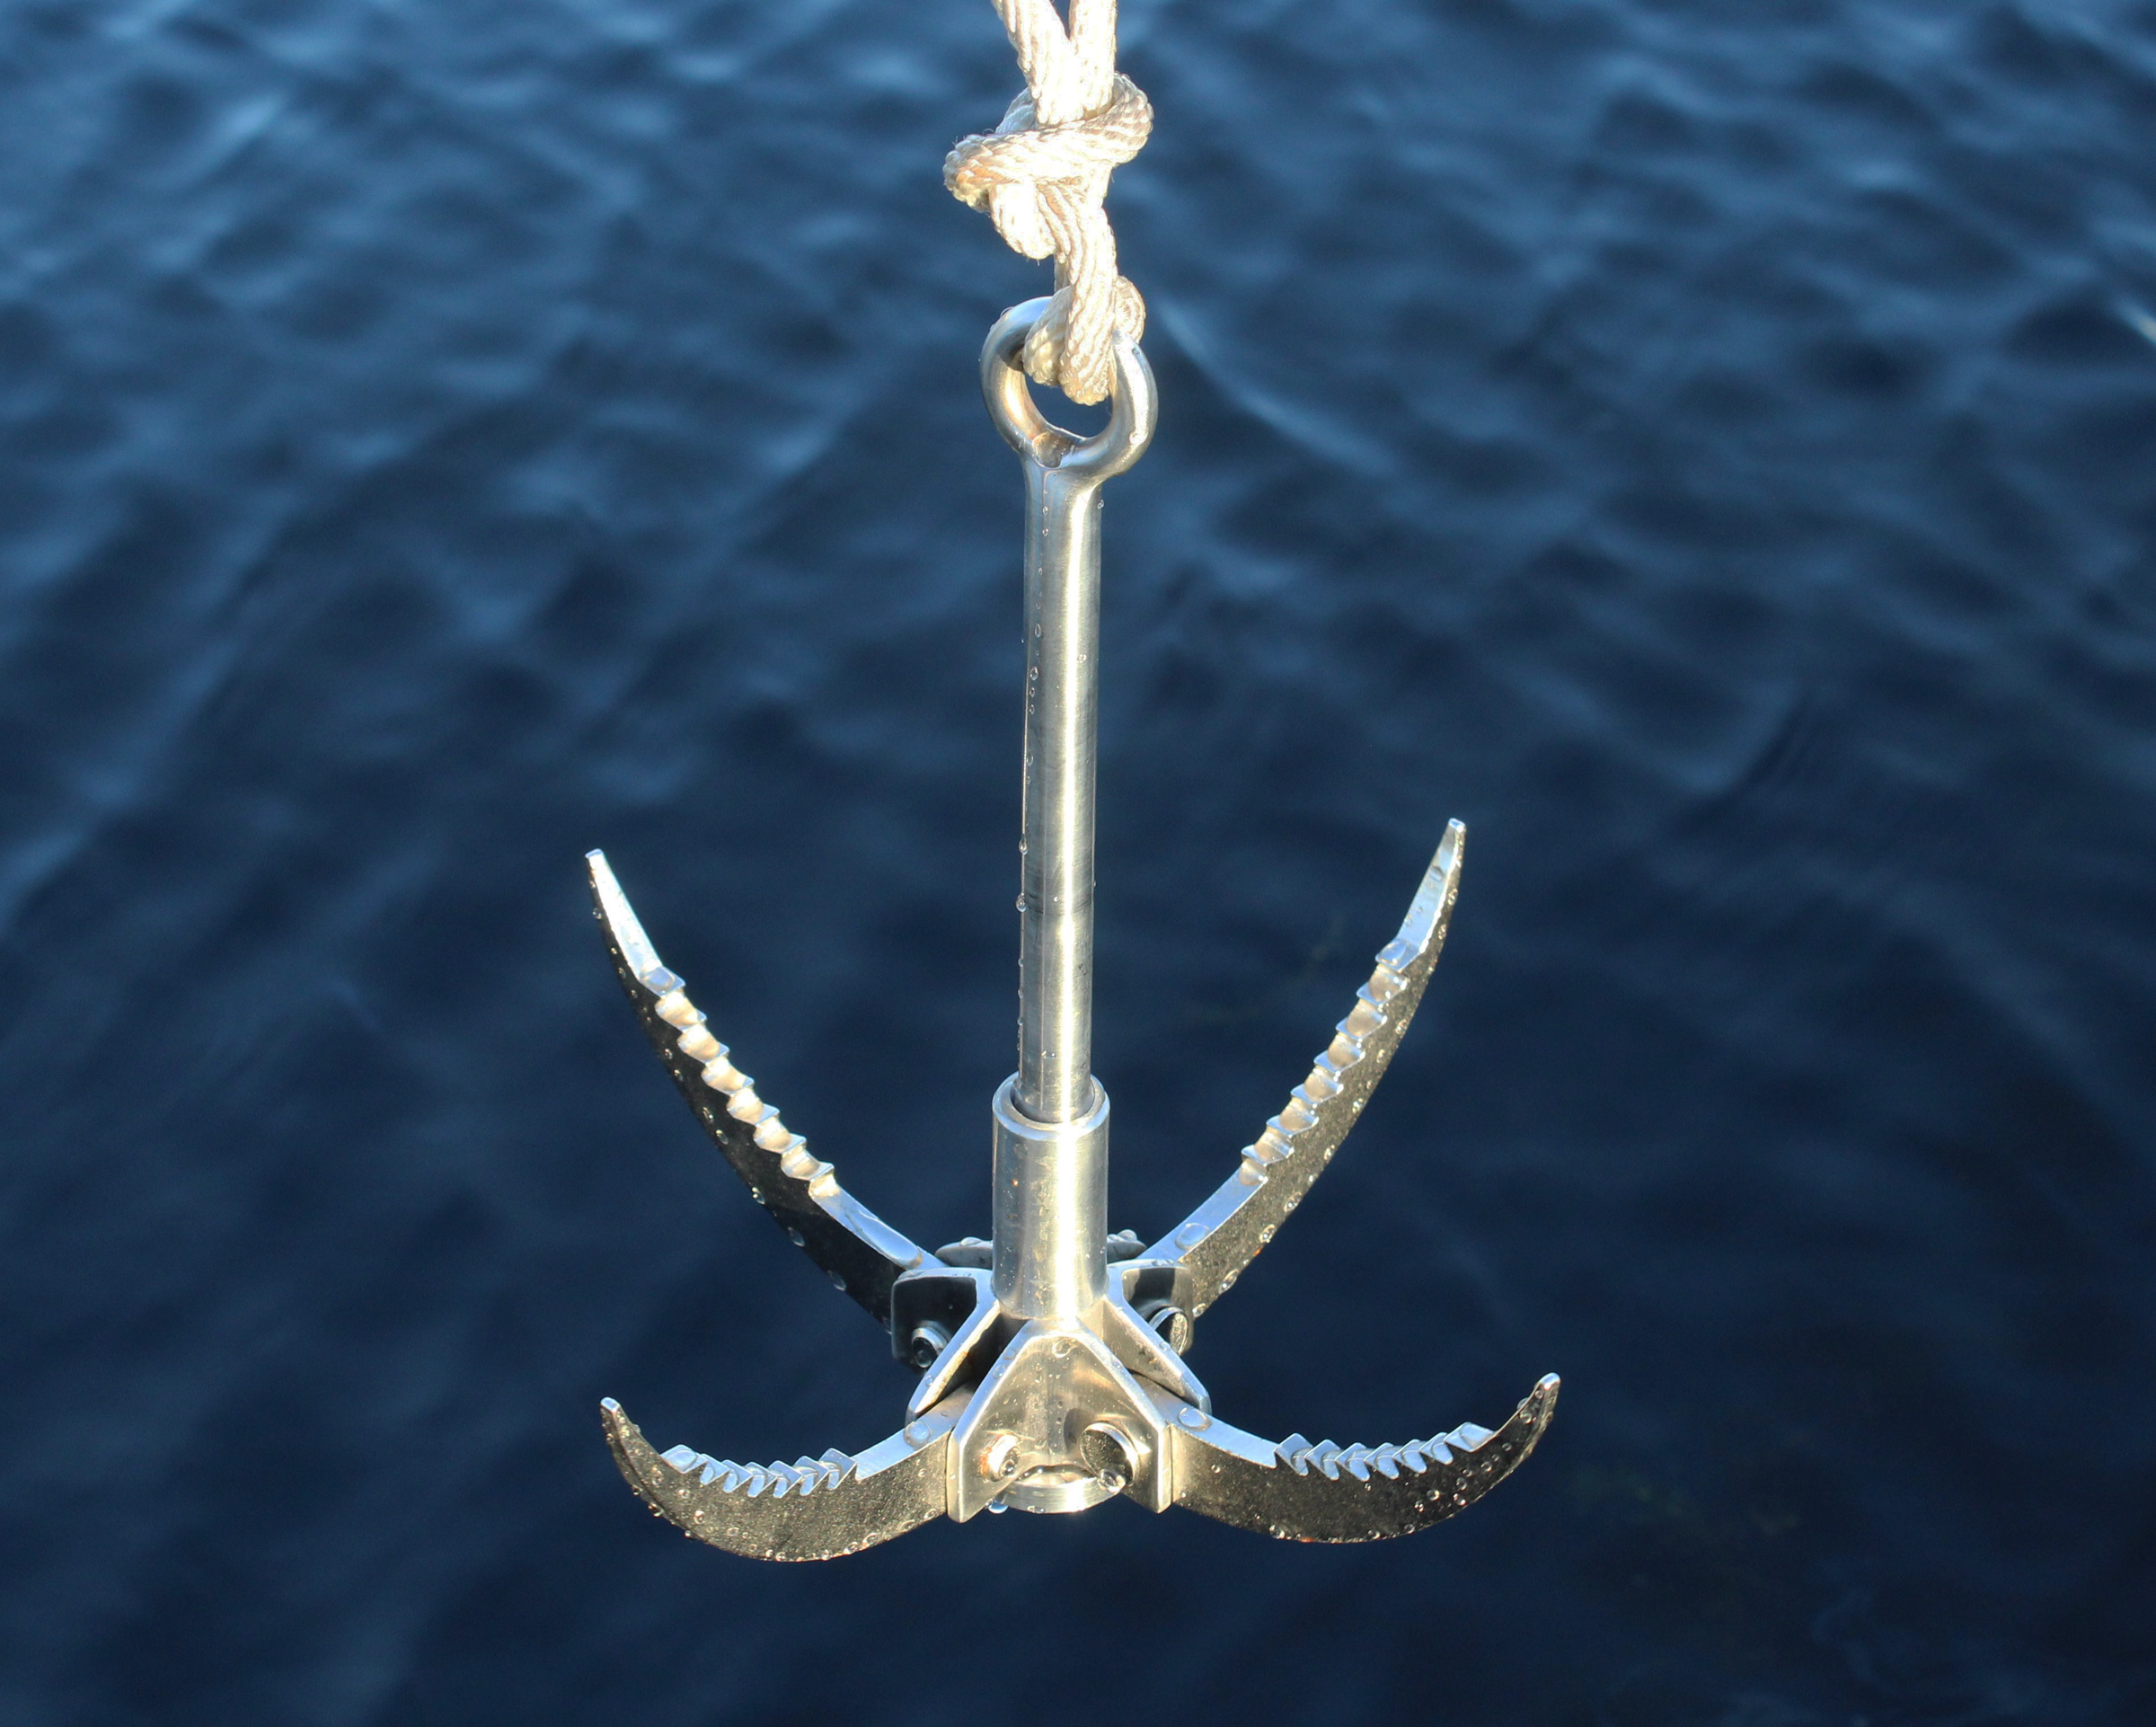
When I made a new set of long-reach clamps, I used the cam idea but did away with the metal straps and used a single length of cord instead. It allows instantly changing the clamp to fit jobs of different thicknesses. I didn’t bother with the semicircular notch for the cam that’s cut into the jaw; it’s the fussiest part of making Brenne clamp and unnecessary here. I went through a few iterations of the new design, with each less complicated than the one that preceded it and, as is often the case, the simplest solution, presented here, was the best solution.
The dimensions aren’t critical so you can build the clamp to suit your needs and available materials. The 2-1/2″ circle seems to be a good size for providing good clamping pressure.
For a clamp with a 16″ reach, I cut two 24″ jaws out of softwood 2x4s. The tips are about 1-1/4″ wide, the tails 3″, and in between, the jaws curve smoothly and taper gradually. I glued and nailed two 1/2″ plywood cheeks to one jaw, then set the other jaw between the cheeks, with a 1″ gap between the tails, and drilled a 5/16″ hole for a 1/4″ carriage bolt.
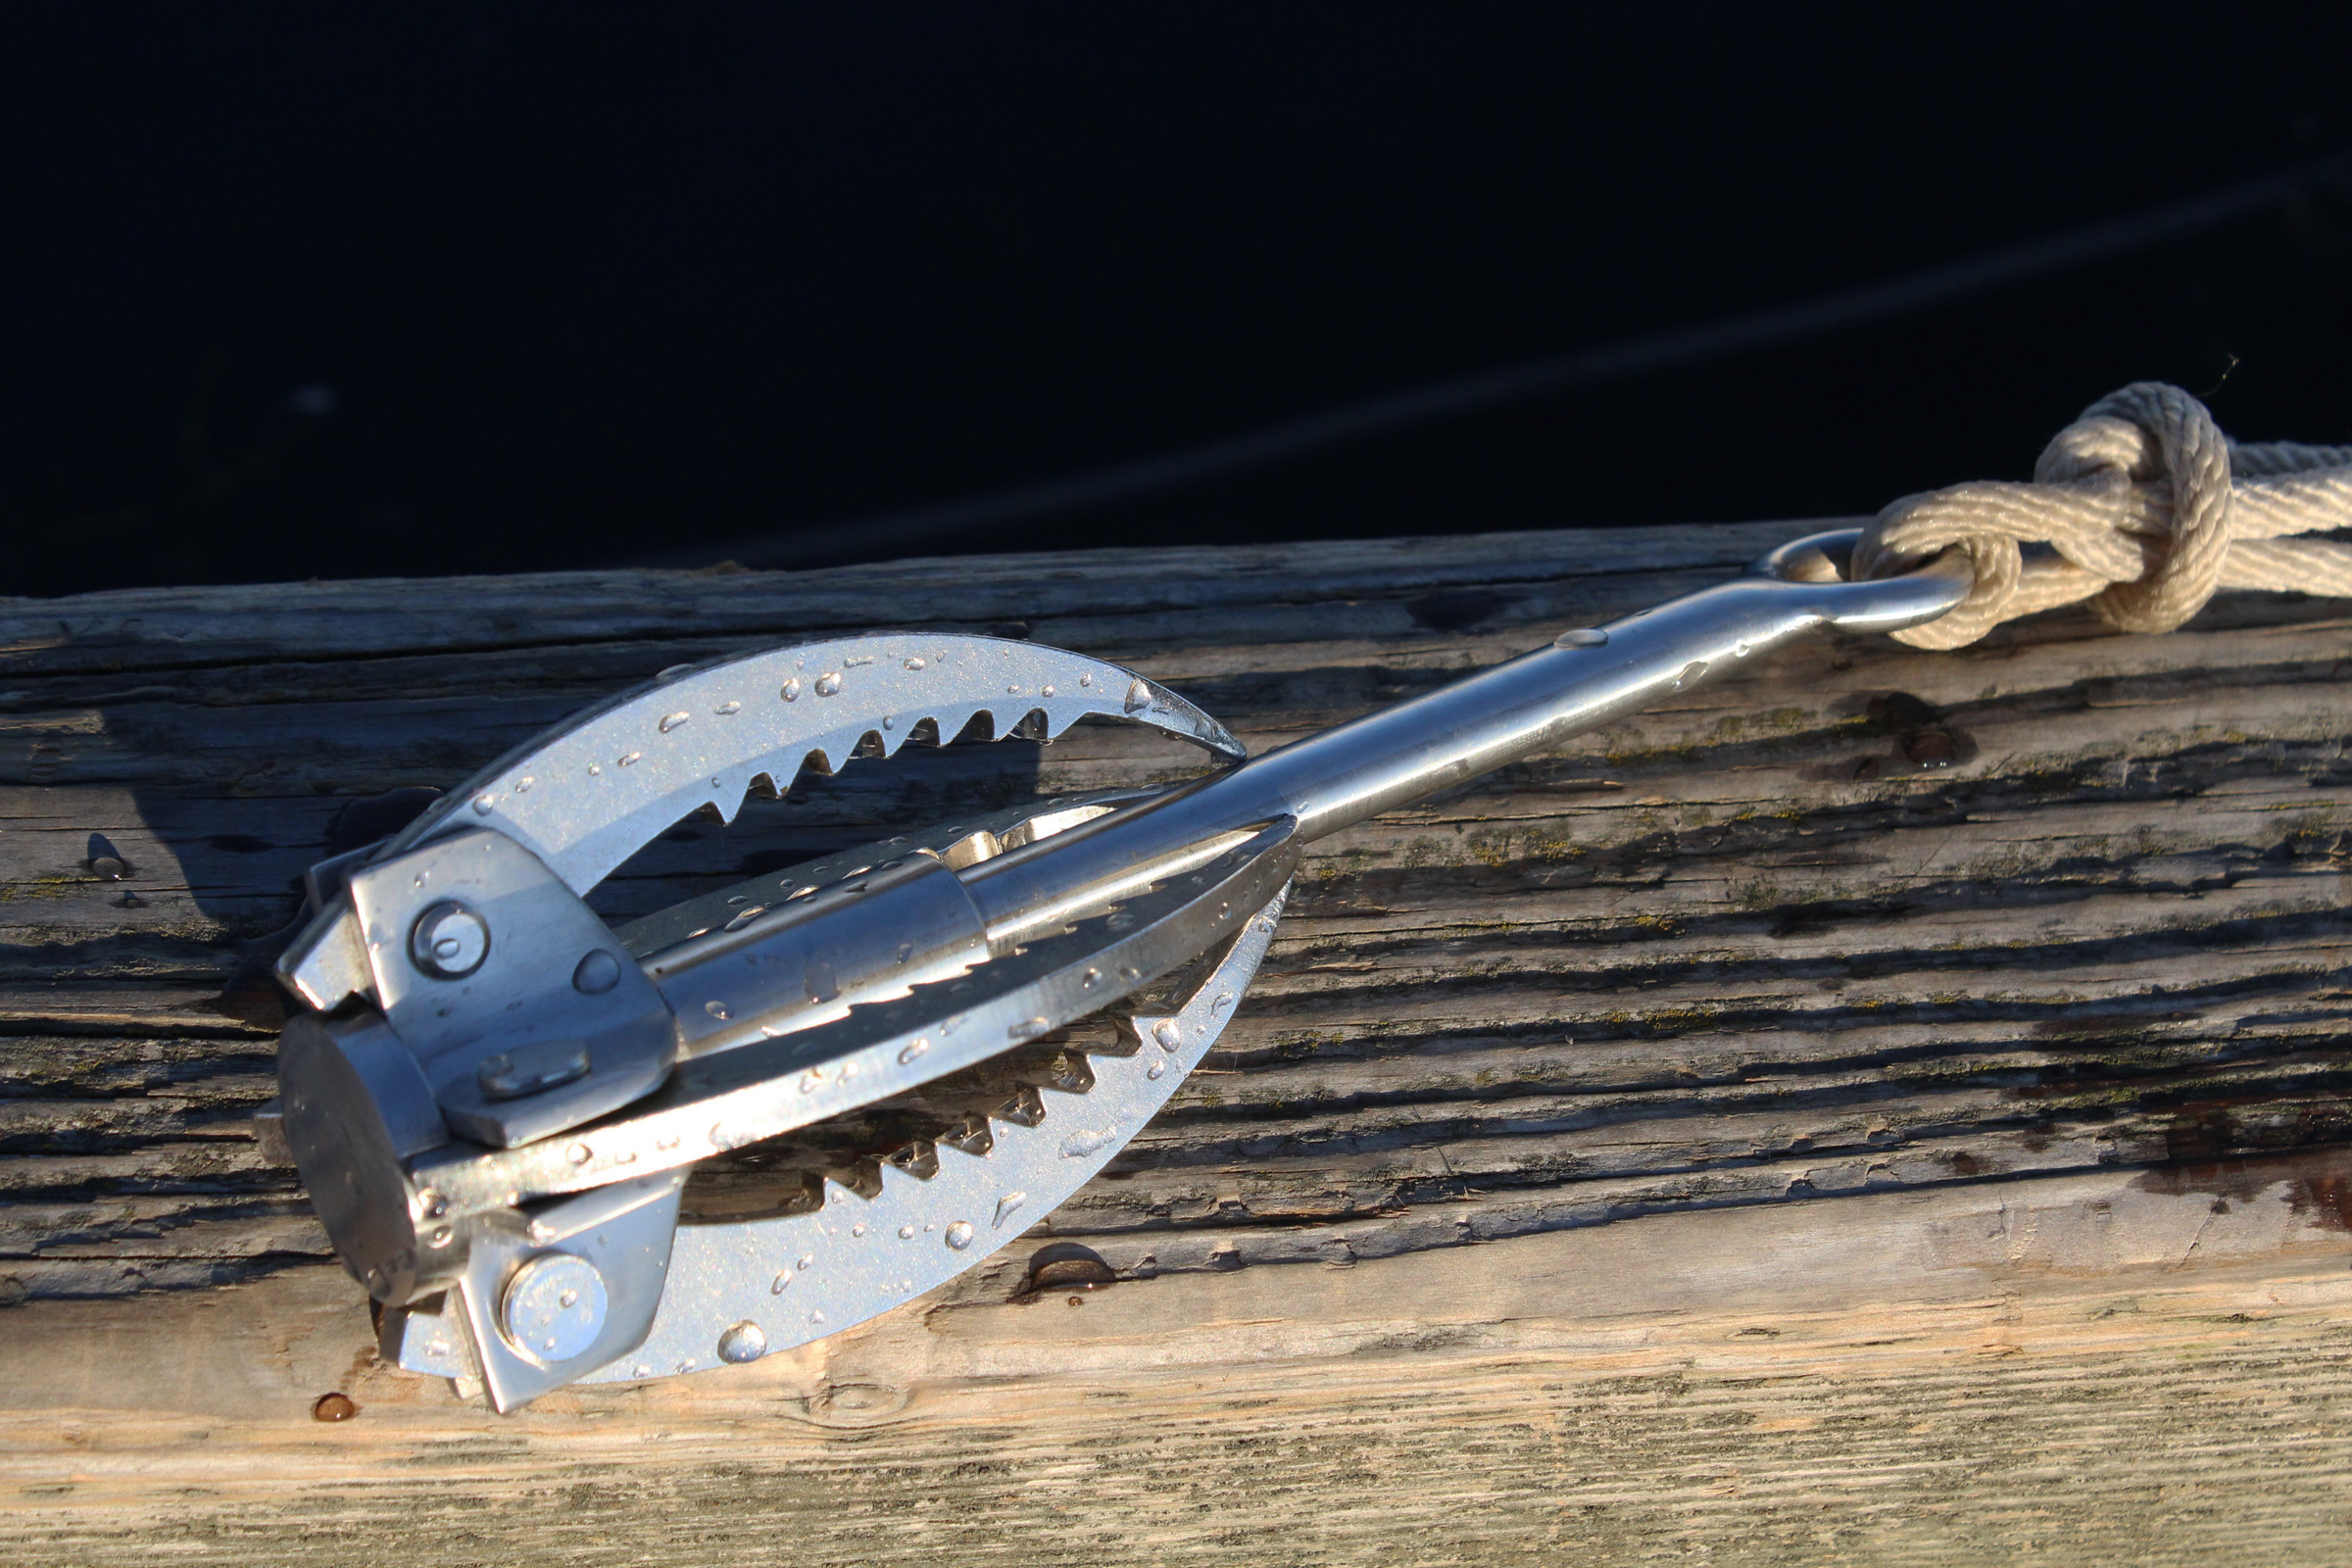
The jam cleat is just a piece of hardwood with shallow-angled cuts on the bottom. I didn’t sand those cuts smooth; I left them rough for a better grip.
Roughly 16″ in from the tip of the pivoting jaw I drilled two more holes, one above the other. I made a 4″-long hardwood jam cleat and screwed that to the plywood cheek over the fixed jaw. The fixed jaw will be on top during use, and because I’m right-handed, I put the cleat on the right side.
When I checked the clamping pressure on a bathroom scale, the results were around 50 lbs. I can get over 60 lbs if I apply the clamp, then flip the cam lever forward, tighten the cord to pull out the slack, and flip the lever back again. I couldn’t measure the clamping pressure of my Brenne clamps this way because they can’t function on an arrangement this thick.
For the cam lever, I used a piece of hardwood (ash); the lever is subject to a lot of pressure and hardwood is less apt to be crushed. It’s 9-1/2″ long, 1-1/2″ thick, and the circular end has a diameter of 2-1/2″. The hole drilled in it needs to be lined up with the circle’s center. Put a square on the side of the handle that meets the circle at a tangent, draw a line through the circle’s center, and drill the hole on that line.
I tied a stopper knot in a length of rather stiff 3/16″ kernmantle cord and threaded the cord through one hole on the lower jaw’s left side, through the hole in the cam lever, and finally through the other hole in the lower jaw.
In use, the cam lever is set on the top jaw with the handle facing away and the hole and cord set on the bottom. With the clamp’s tips set on the workpieces, the cord is drawn tight and wrapped around the jam cleat. The cam lever is flipped, raising the hole and adding tension to the cord. The cam will roll backward as the lever is brought down on the jaw and the lever will tend to rise and release the tension. Sliding the cam lever forward will change the angle of the cord and cause it to hold the lever down.
This version of the clamp applies the same amount of pressure, about 50 lbs.
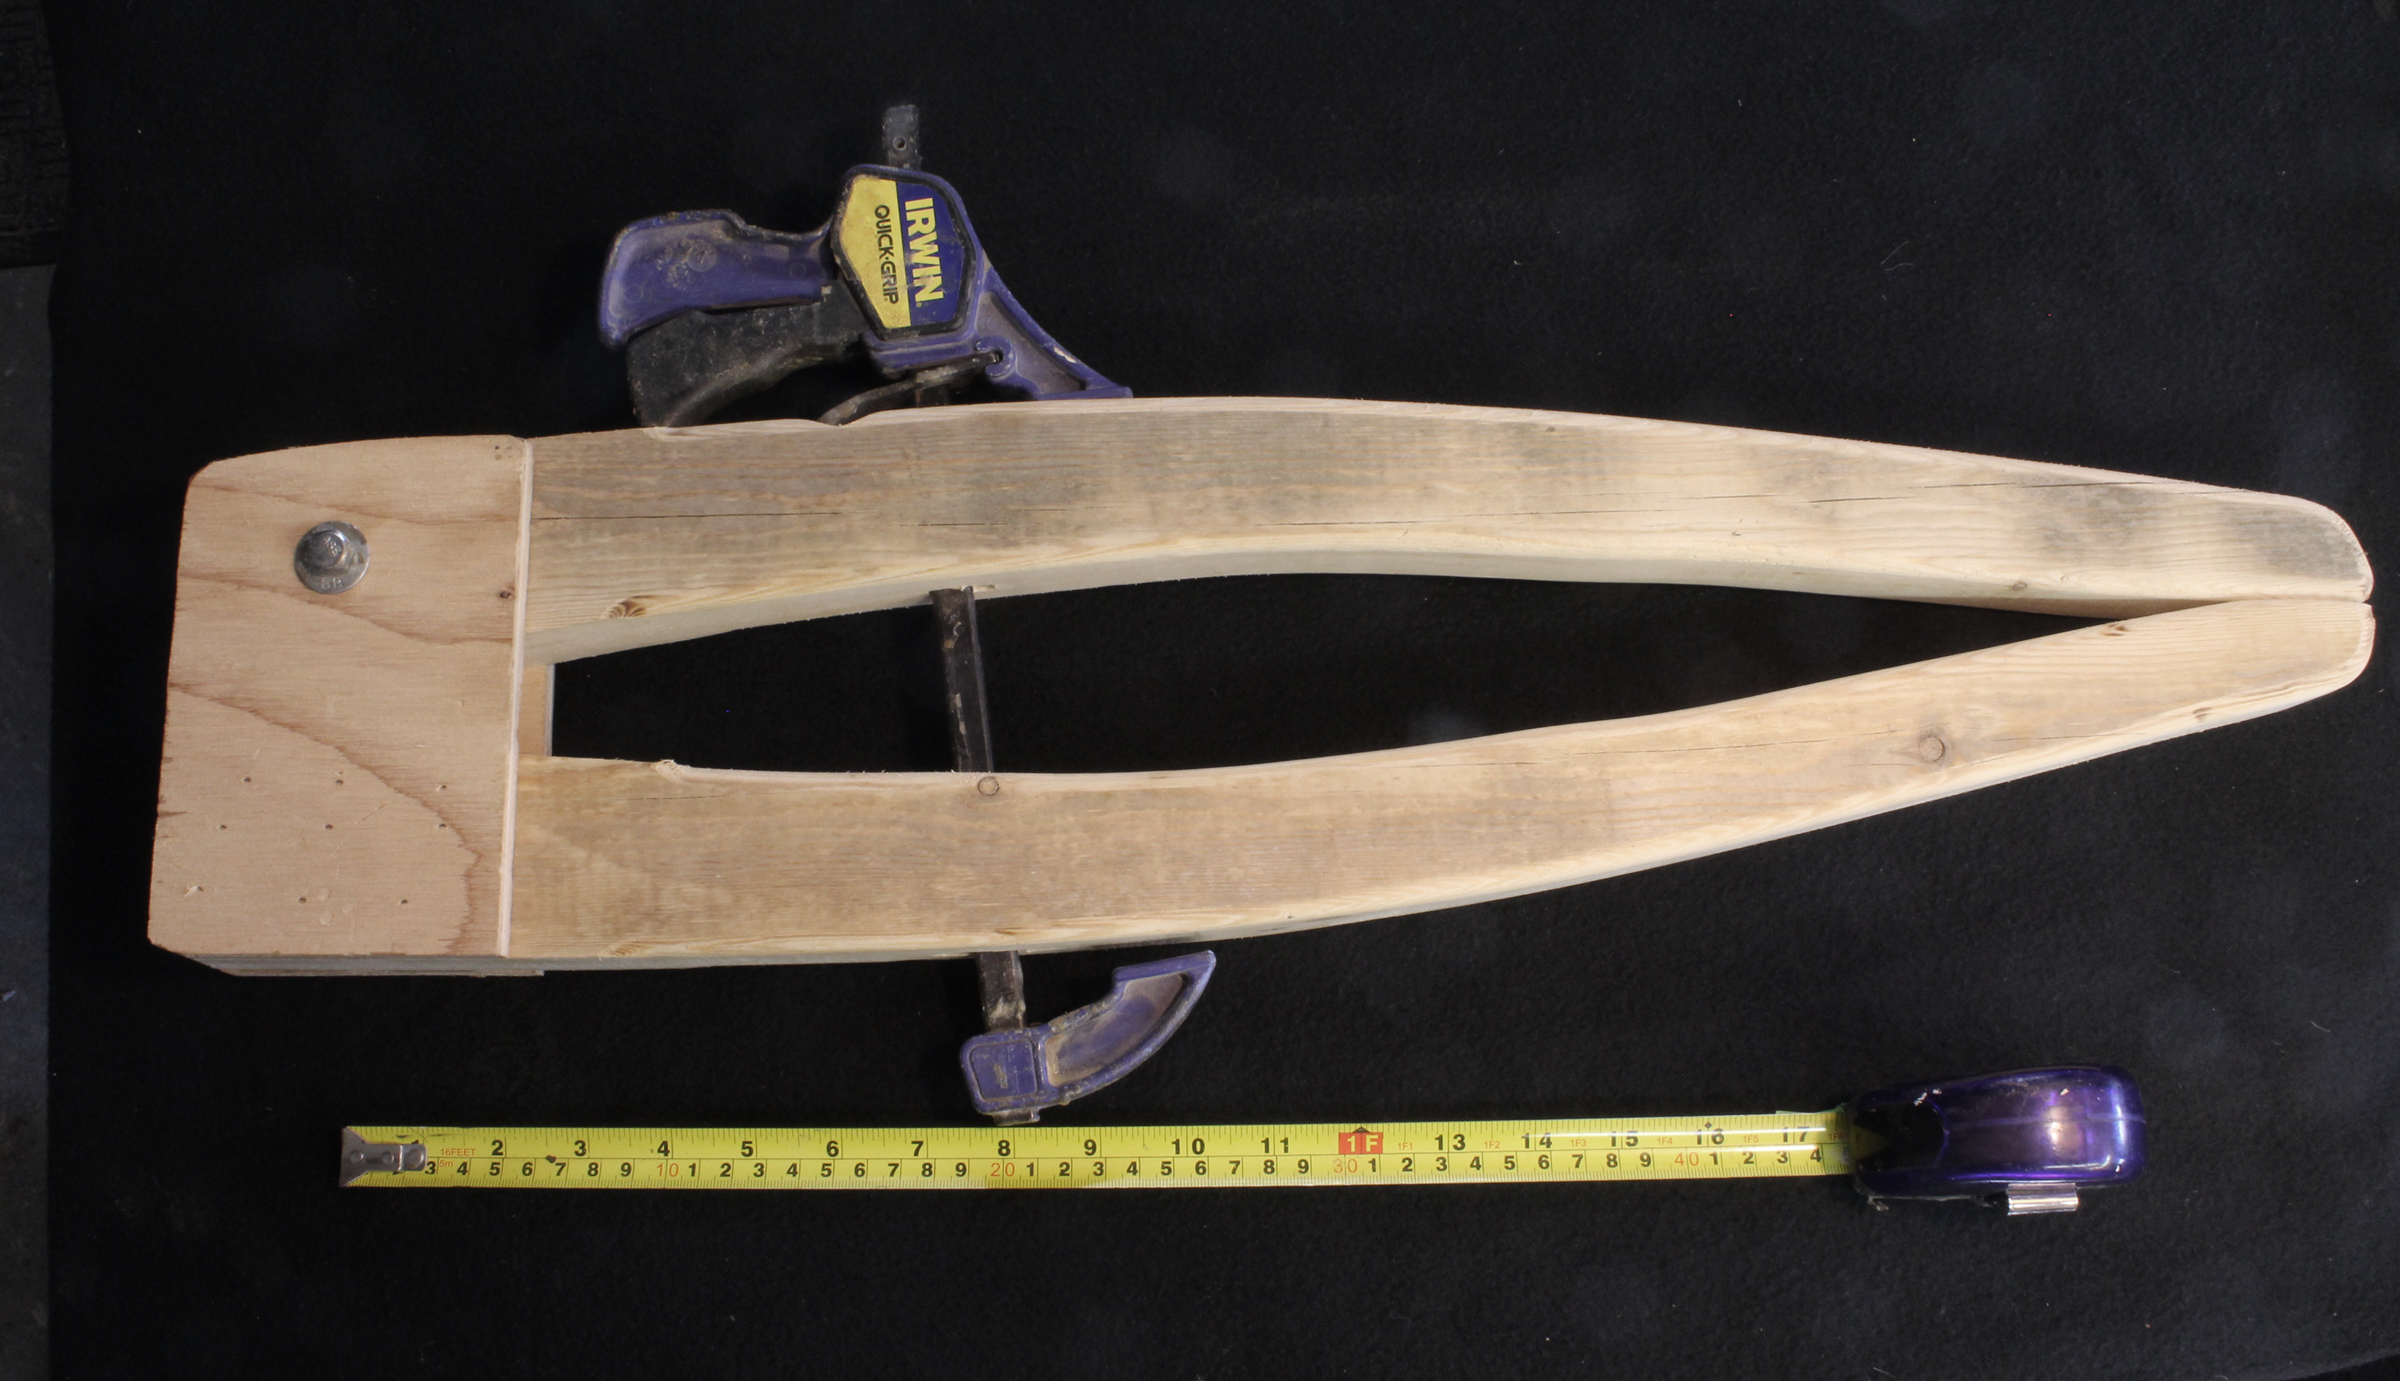
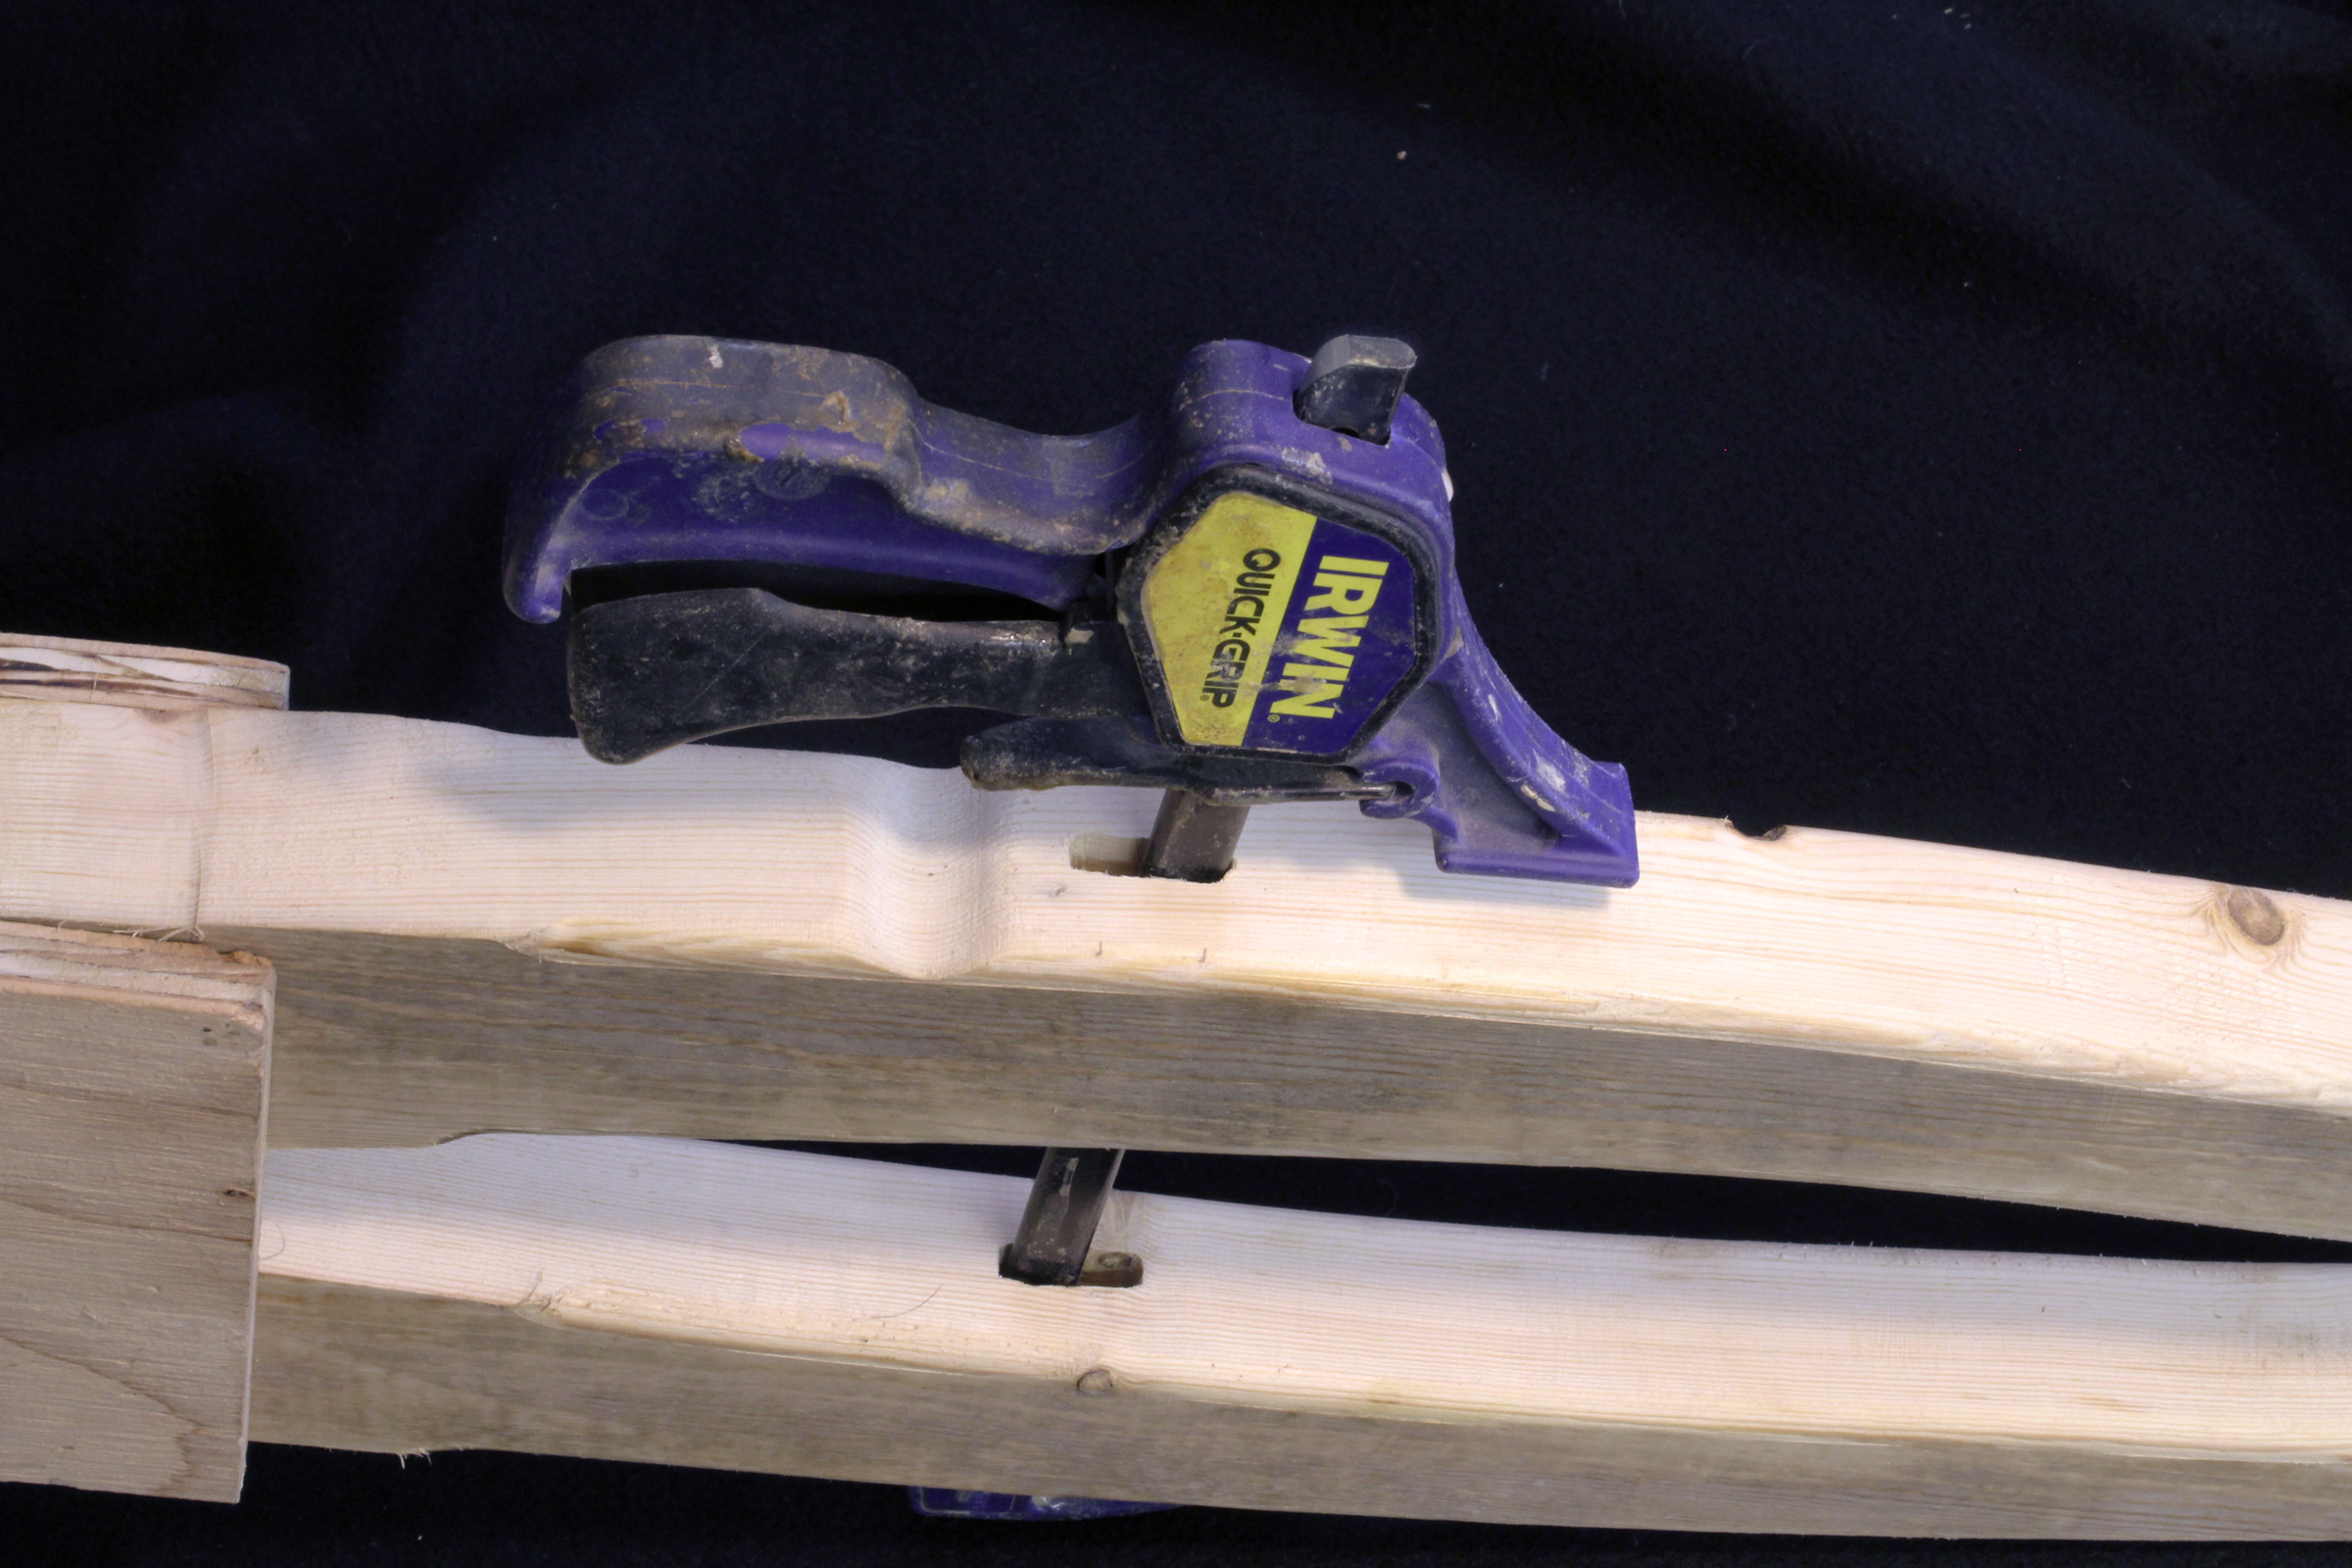
A long-reach clamp can also be built with a ratcheting bar clamp. Cut a slot in each jaw to give the bar a loose fit by drilling a row of holes and remove the wood remaining between them with a knife, chisel, or coarse file. The clamp will probably have a rolled steel pin in the end of the bar. Tap that out with a hammer. Remove the clamp’s sliding jaw, insert the bar through the slots in the jaws and replace the sliding jaw. It may help to grind or file a corner off the end of the bar to ease reinserting it past the inner workings of the ratchet mechanism. If the release trigger is too close to the jaw, cut a groove in the back of the jaw to make room to get a finger under the trigger.
Slots in the wooden jaws accommodate the bar of a ratcheting clamp. Note the shallow groove in the wooden jaw, which provides clearance for the release lever, and the rounded end of the bar, which eases reinserting the bar through the ratchet grip.
You can tap the rolled pin back in or leave it out to make it easier to switch back and forth between the ratchet clamp’s normal use and its place in the long-reach clamp. The clamp I built this way is the size of the cam-lever version above, and has the same reach and applies the same pressure.
Christopher Cunningham is the editor of Small Boats Magazine.
You can share your tips and tricks of the trade with other Small Boats Magazine readers by sending us an email.
When I finished our Penobscot 14 back in 2017, I intended to row it around the river inlets and shoreline of our bay. One of the pieces of gear that I was going to need was a nice pair of gloves to prevent blisters on my hands, as I didn’t row frequently enough to develop calluses. I had tried a few styles but was not happy with the fit or feel until I came across Gill’s Long Finger Deckhand Gloves.
Audrey and I do a bit of sailing and paddling in addition to rowing, so I also wanted gloves that were versatile, easy to put on and take off when wet, and that dried fast. The Deckhand Gloves have lightweight polyester-spandex shells with doubled synthetic suede Amara reinforcements and padding. None of these materials hold much water, so they dry fast. The elasticity of the shell makes it much easier to put on and take off than a leather glove. A side benefit is that the materials provide UV50+ protection, an important factor for us in Florida.
Photographs by Audrey Lewis
After a year in use, the gloves show little evidence of wear.
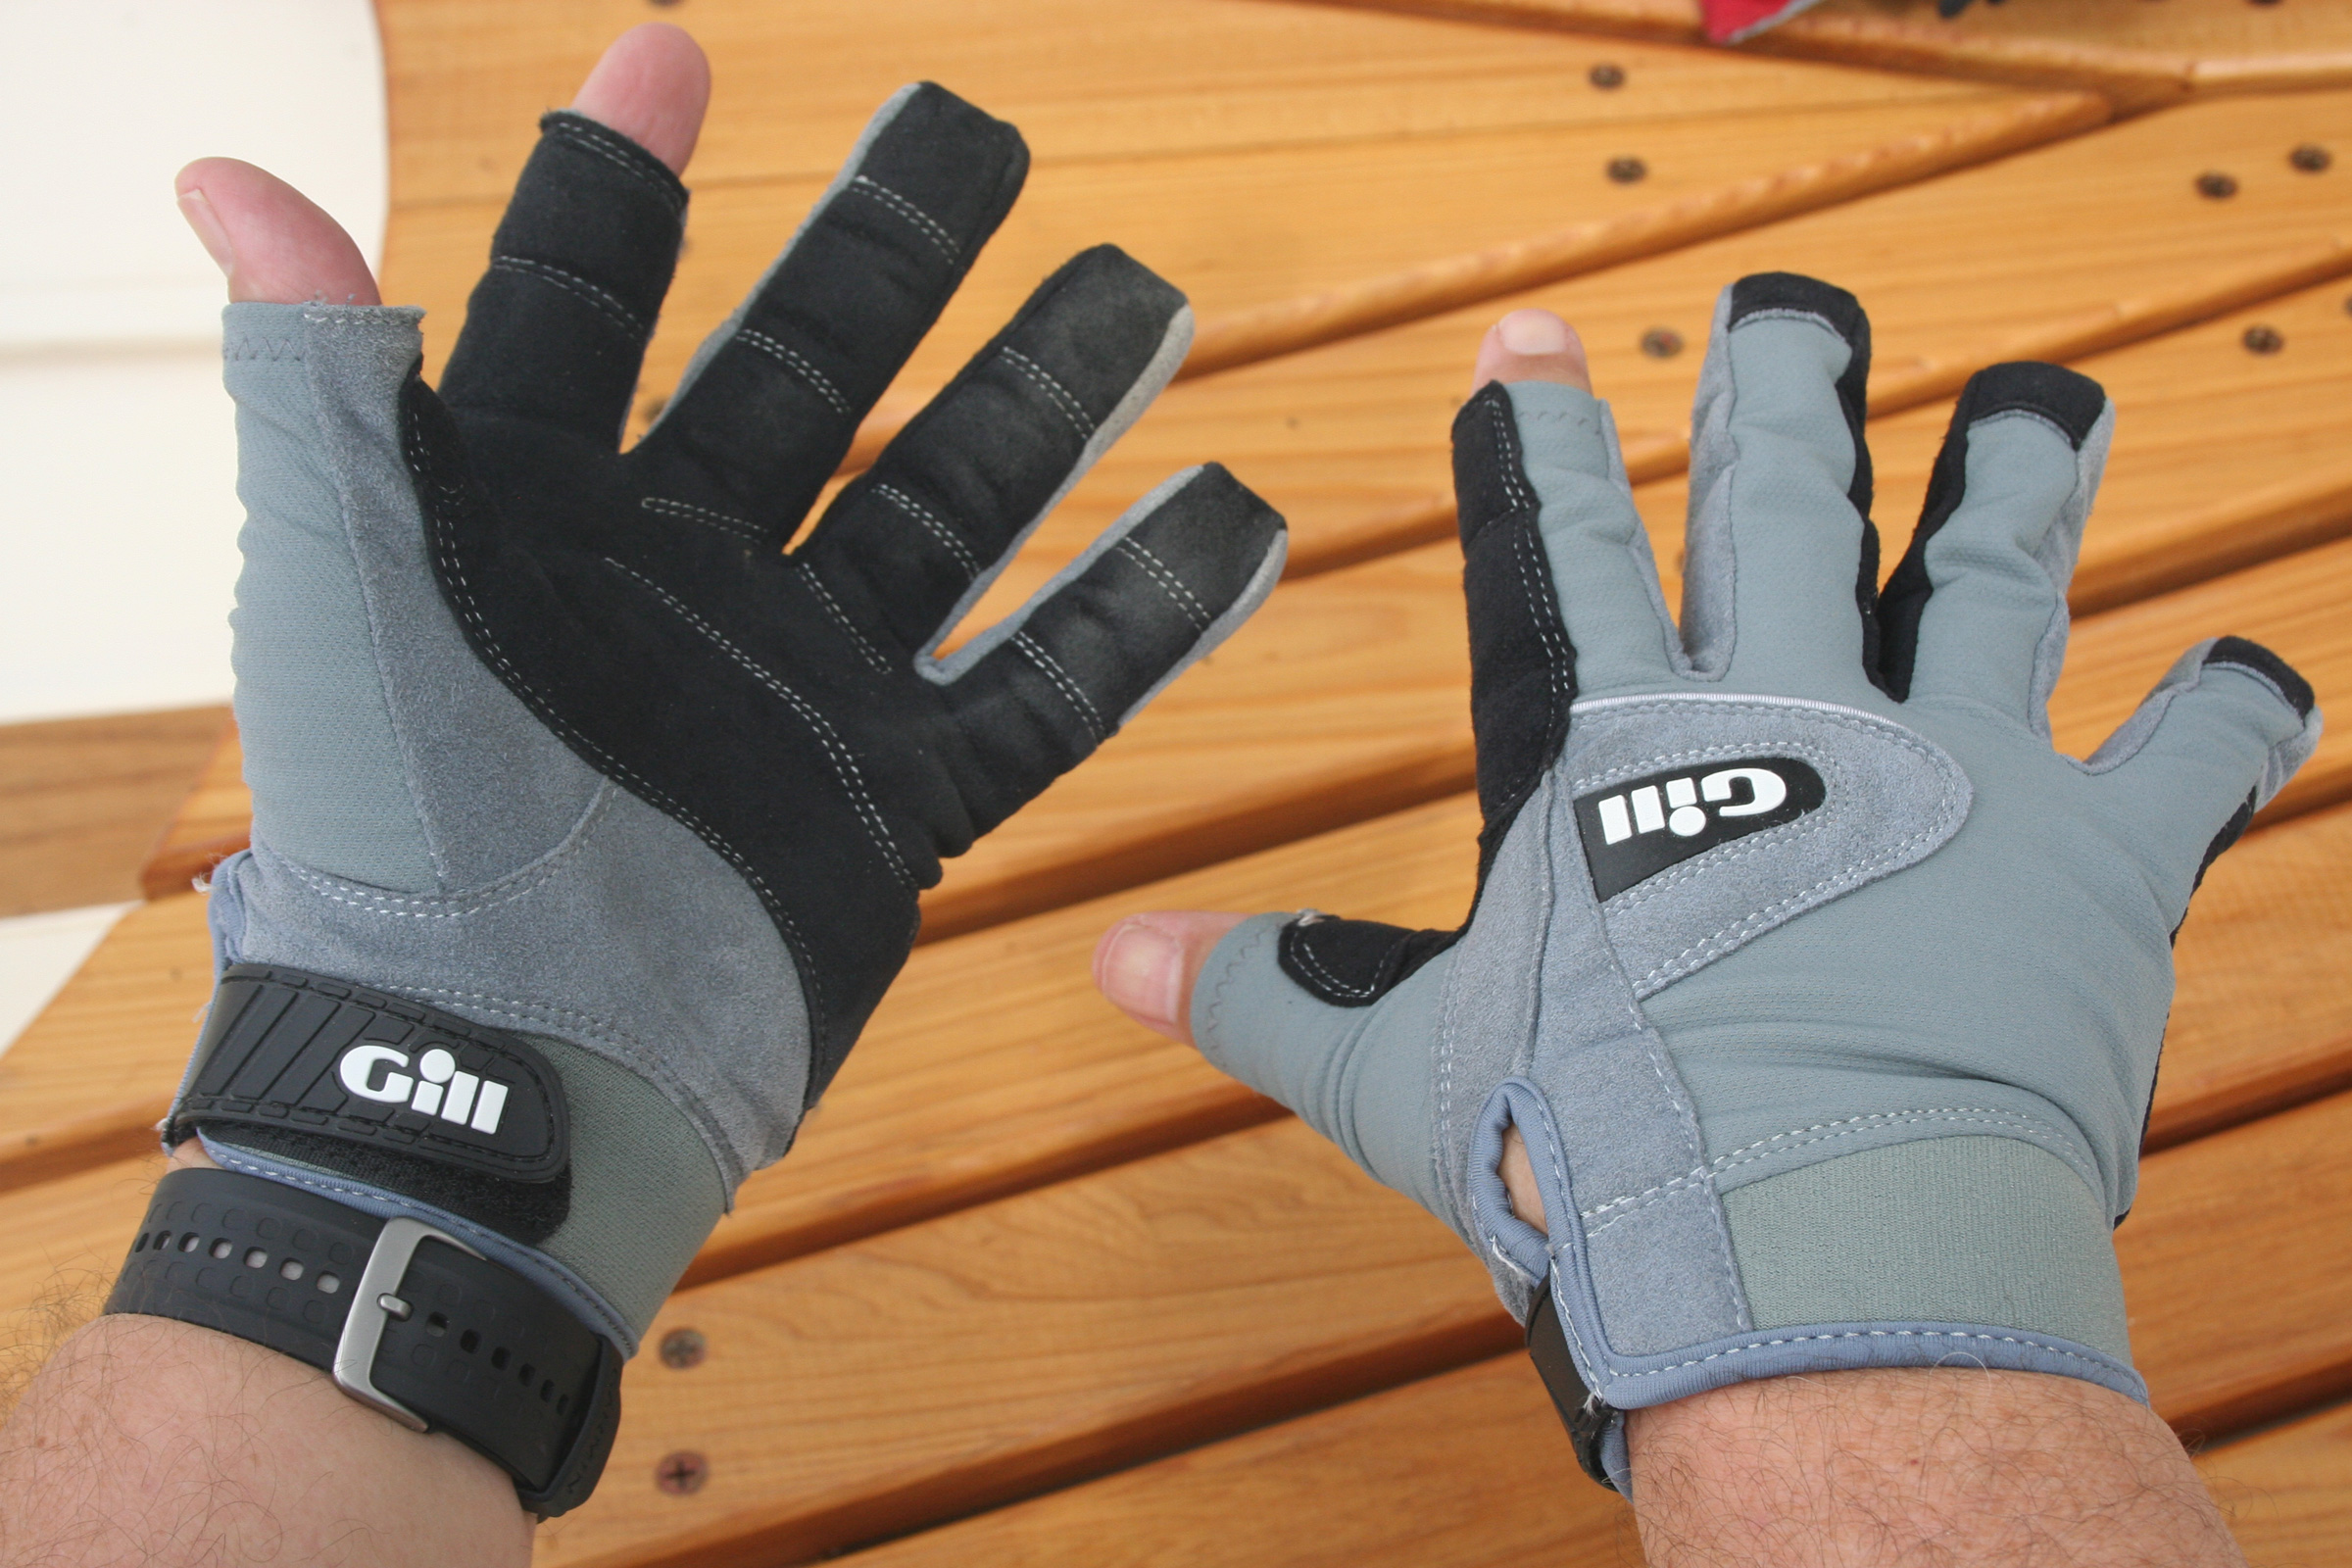
Audrey, a talented seamstress who has made gloves in the past and knows how they’re put together, looked the Deckhand Gloves over, inside and out. The fabric panels on the sides of the fingers, the fourchettes, are cut from synthetic suede for lightness and comfort and the tops and bottoms, the tranks, are cut from spandex. The palms and the insides of the fingers are reinforced with the Amara suede for better grip and padding; the suede is wrapped around the tips of the middle, ring, and pinky fingers, which places the seams on the backs of the fingers to keep from creating pressure points. The thumb and index-finger tips are open for an undiminished sense of touch. The suede also wraps around the side of the index finger and thumb, which makes a big difference when handling lines. The hook-and-loop closures at the wrists are easy to grip and adjust.
The open thumb and index-finger tips come in handy when manipulating small bits of hardware, using electronics, and fastening gear like PFD buckles and zippers. I also tried gloves with all of the fingertips open but found that I didn’t really need the tactile feel on the other three fingers for rowing and paddling. I prefer the protection of closed fingertips.
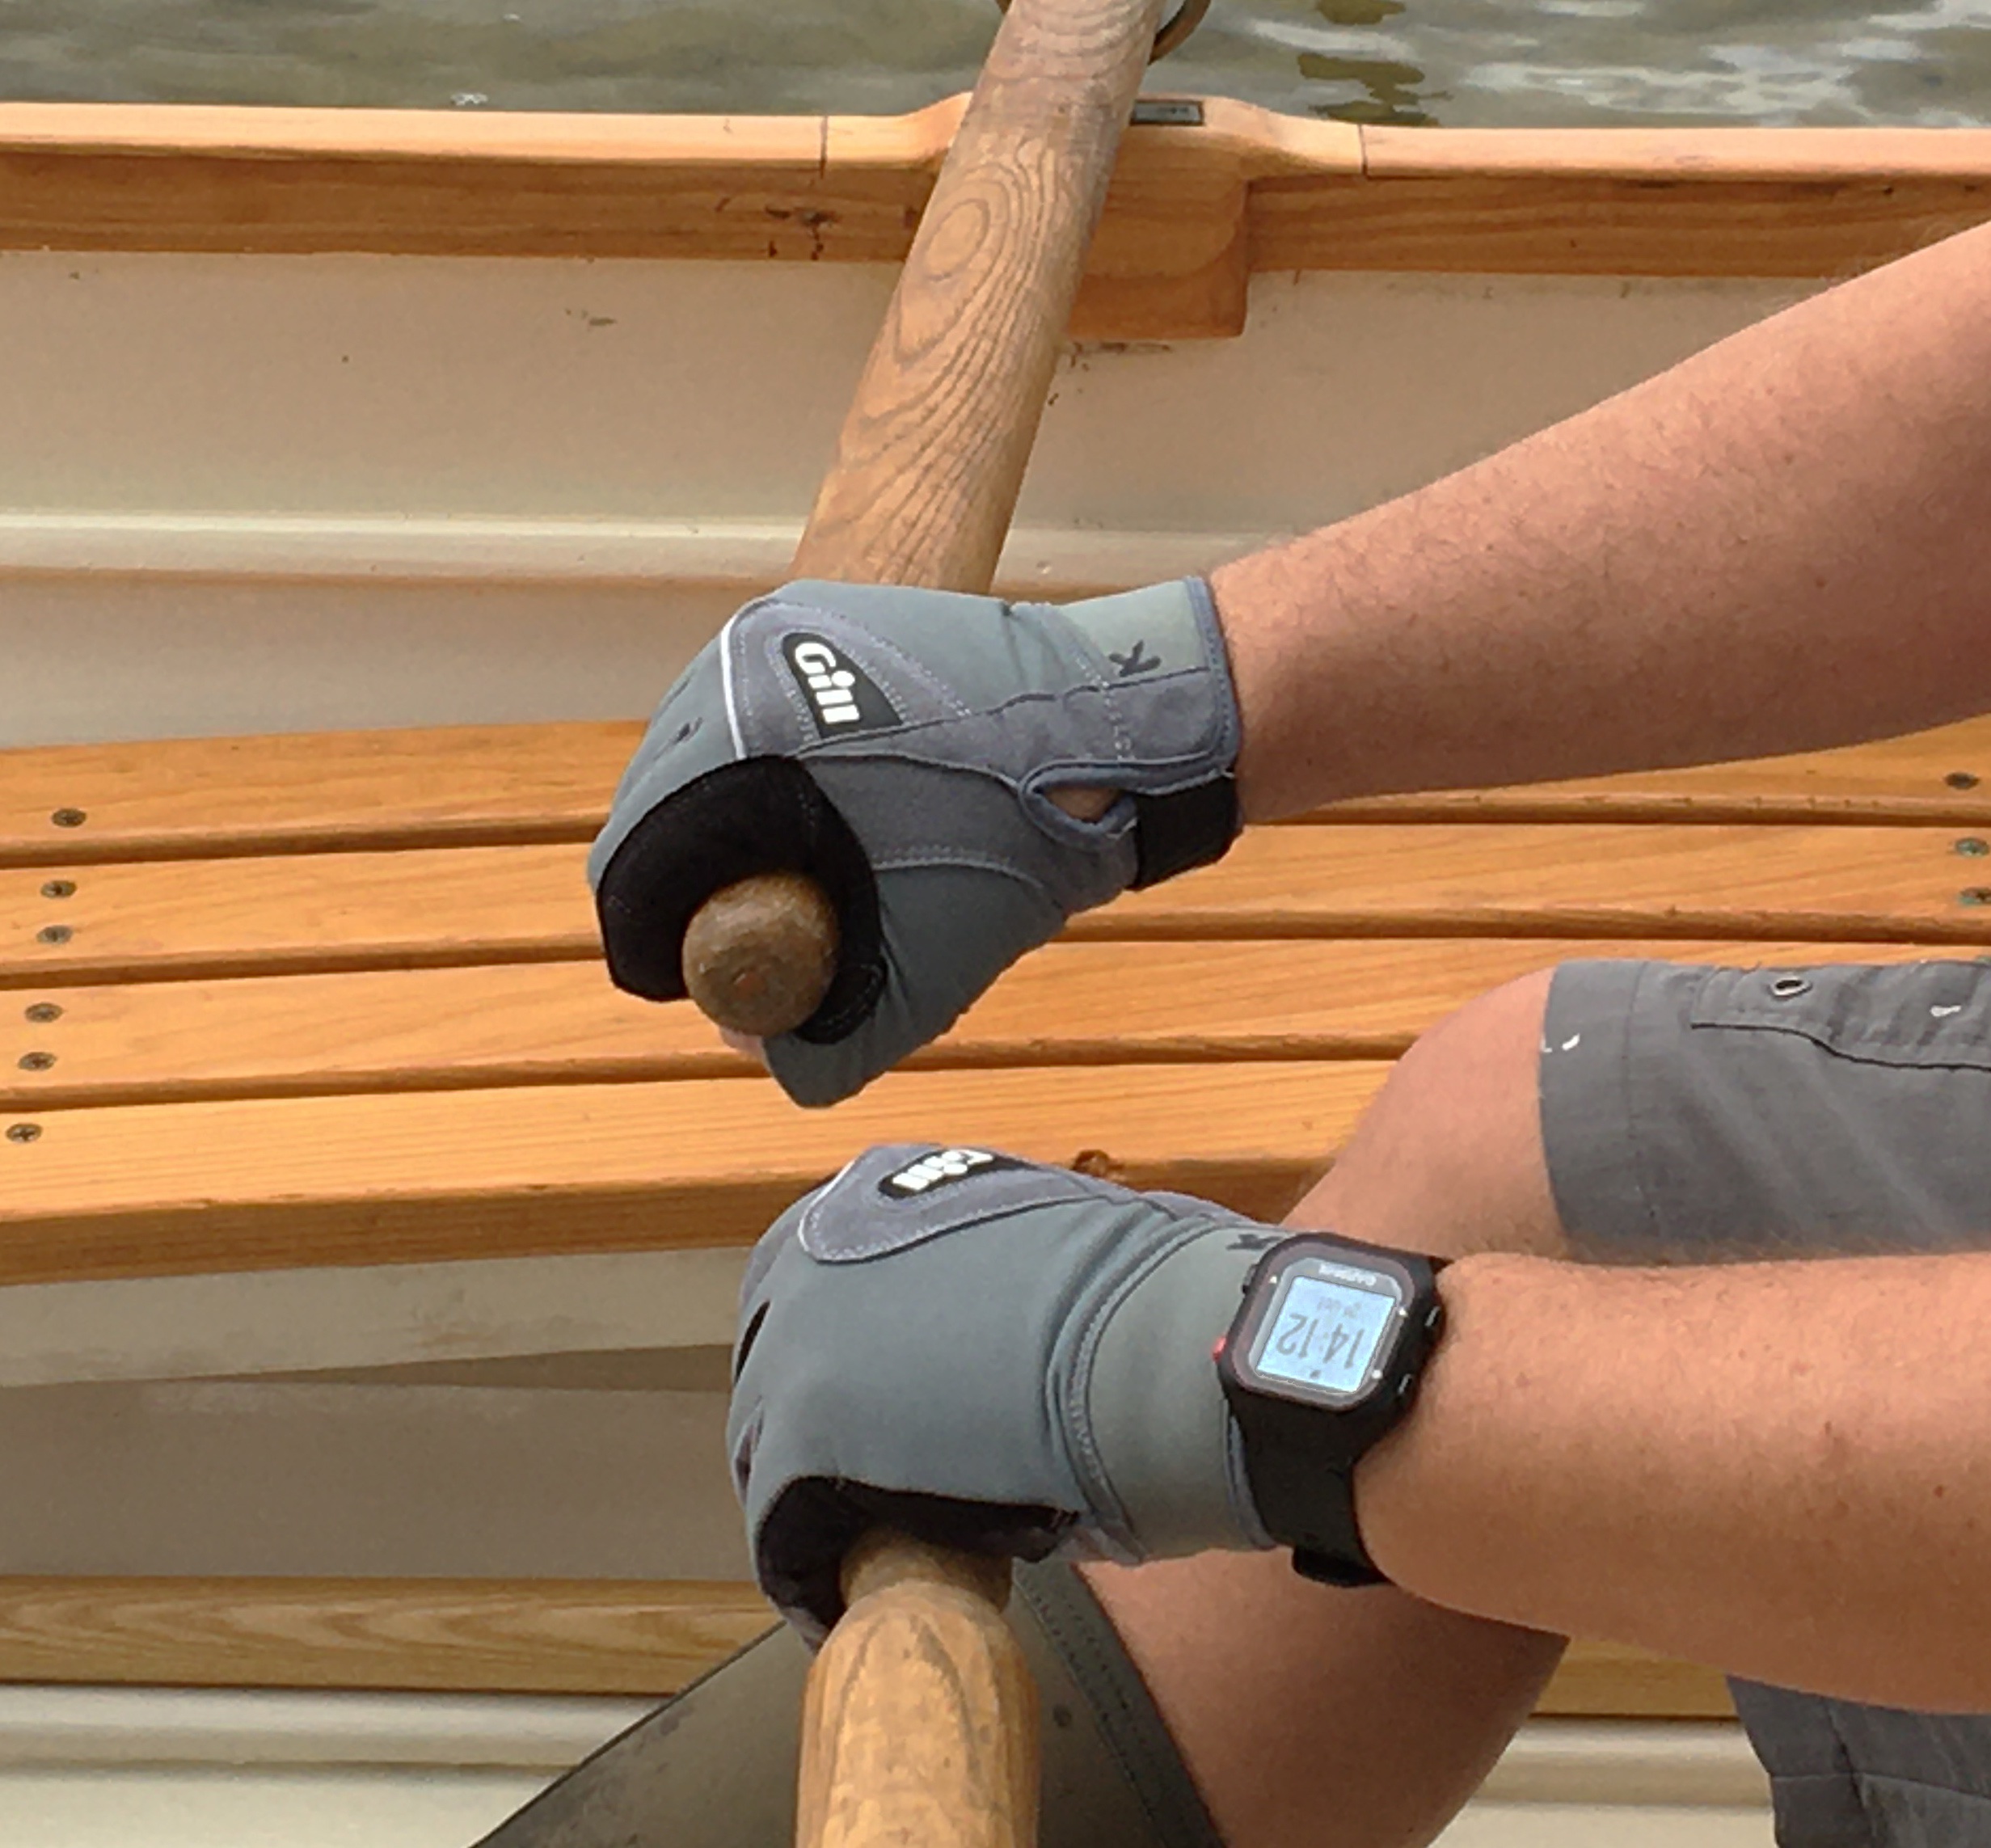
The fit of the gloves allows gripping oar handles without forming creases in the palm. The black suede material wraps around the thumb, over an area where the skin is prone to blistering during long rows.
As for sizing and fit, they gloves are snug, which is what prevents loose material bunching up in the palms while rowing. If you prefer a looser fit, I’d suggest ordering one size up. There three versions: Short Finger, Long Finger, and Junior Short Finger. The Long Finger version I have comes in five sizes, XS to XL. I’ve been using the Deckhands for a year now and, they have proven durable and comfortable. They are thoughtfully designed, sturdily made, and affordably priced.
Audrey and Kent Lewis mess about in an armada of small boats on the bays and rivers of the Florida Panhandle.
Gill products are available direct from the manufacturer and from retailers around the world. The Long Finger Deckhand gloves are priced at $28.95.
Is there a product that might be useful for boatbuilding, cruising, or shore-side camping that you’d like us to review? Please email your suggestions.
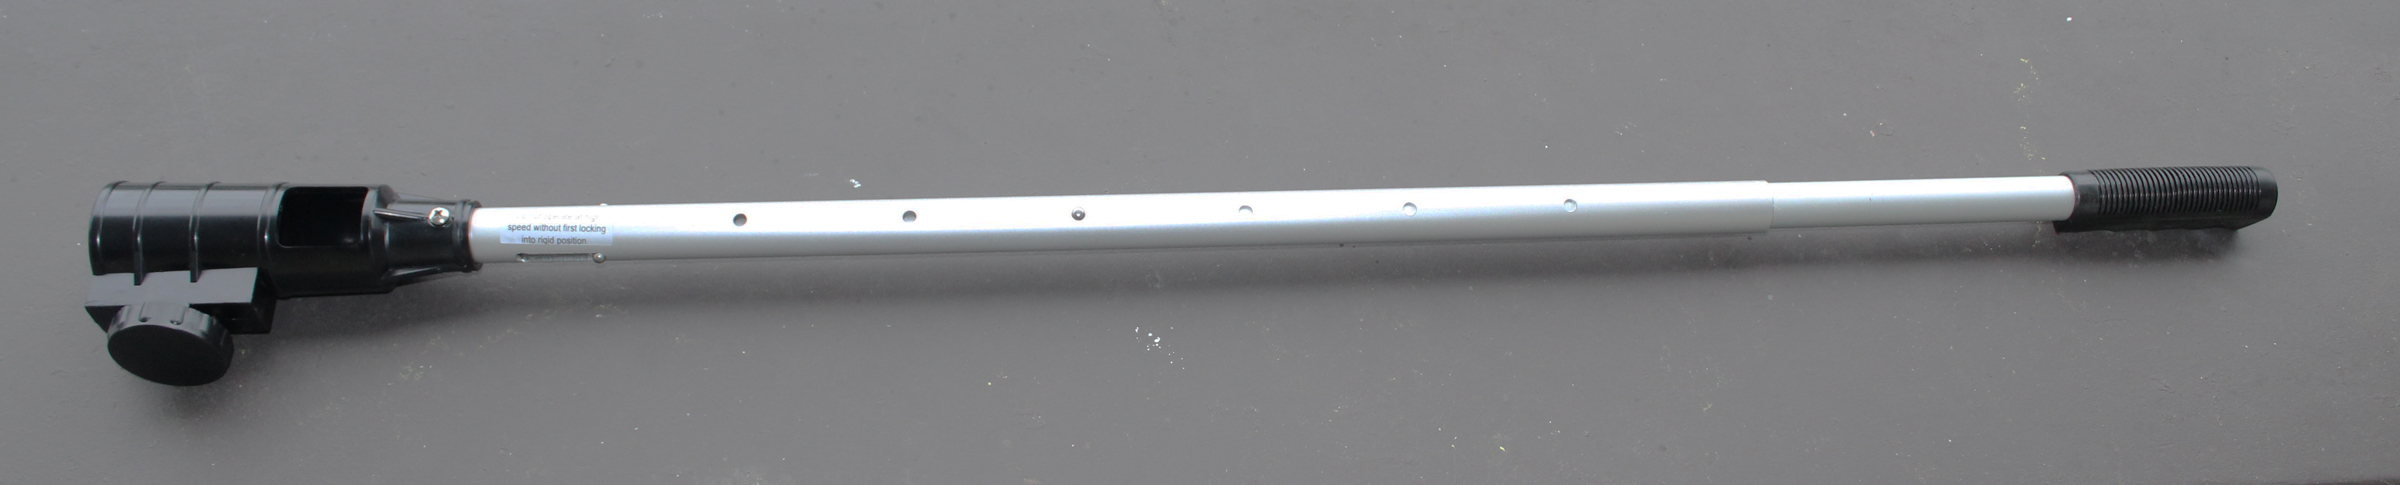
Extensions make it possible to get away from the motor while still steering and controlling the throttle.
Outboard motors are handy things on small boats, but they’re demanding devices. Hanging off the transom as they often do, they require a broad stern to support not just their weight, but the weight of the person stuck with holding the motor’s tiller.
Rigid extension handles make it possible to stand while at the helm and sit farther forward to lighten the burden in the stern, and articulated extensions, equipped universal joints, provide more options for where you plant yourself. I’d been using a plastic pipe as a rigid extension and thought I’d give an articulated extension a try. I found two: the Handi-Mate from Davis Instruments and the HelmsMate from Ironwood Pacific. They were both described in similar terms, so I thought one would be about as good as the other and bought the less-expensive Handi-Mate.
The Handi-Mate’s outer tube slides over the universal joint to switch from articulated to ridge.
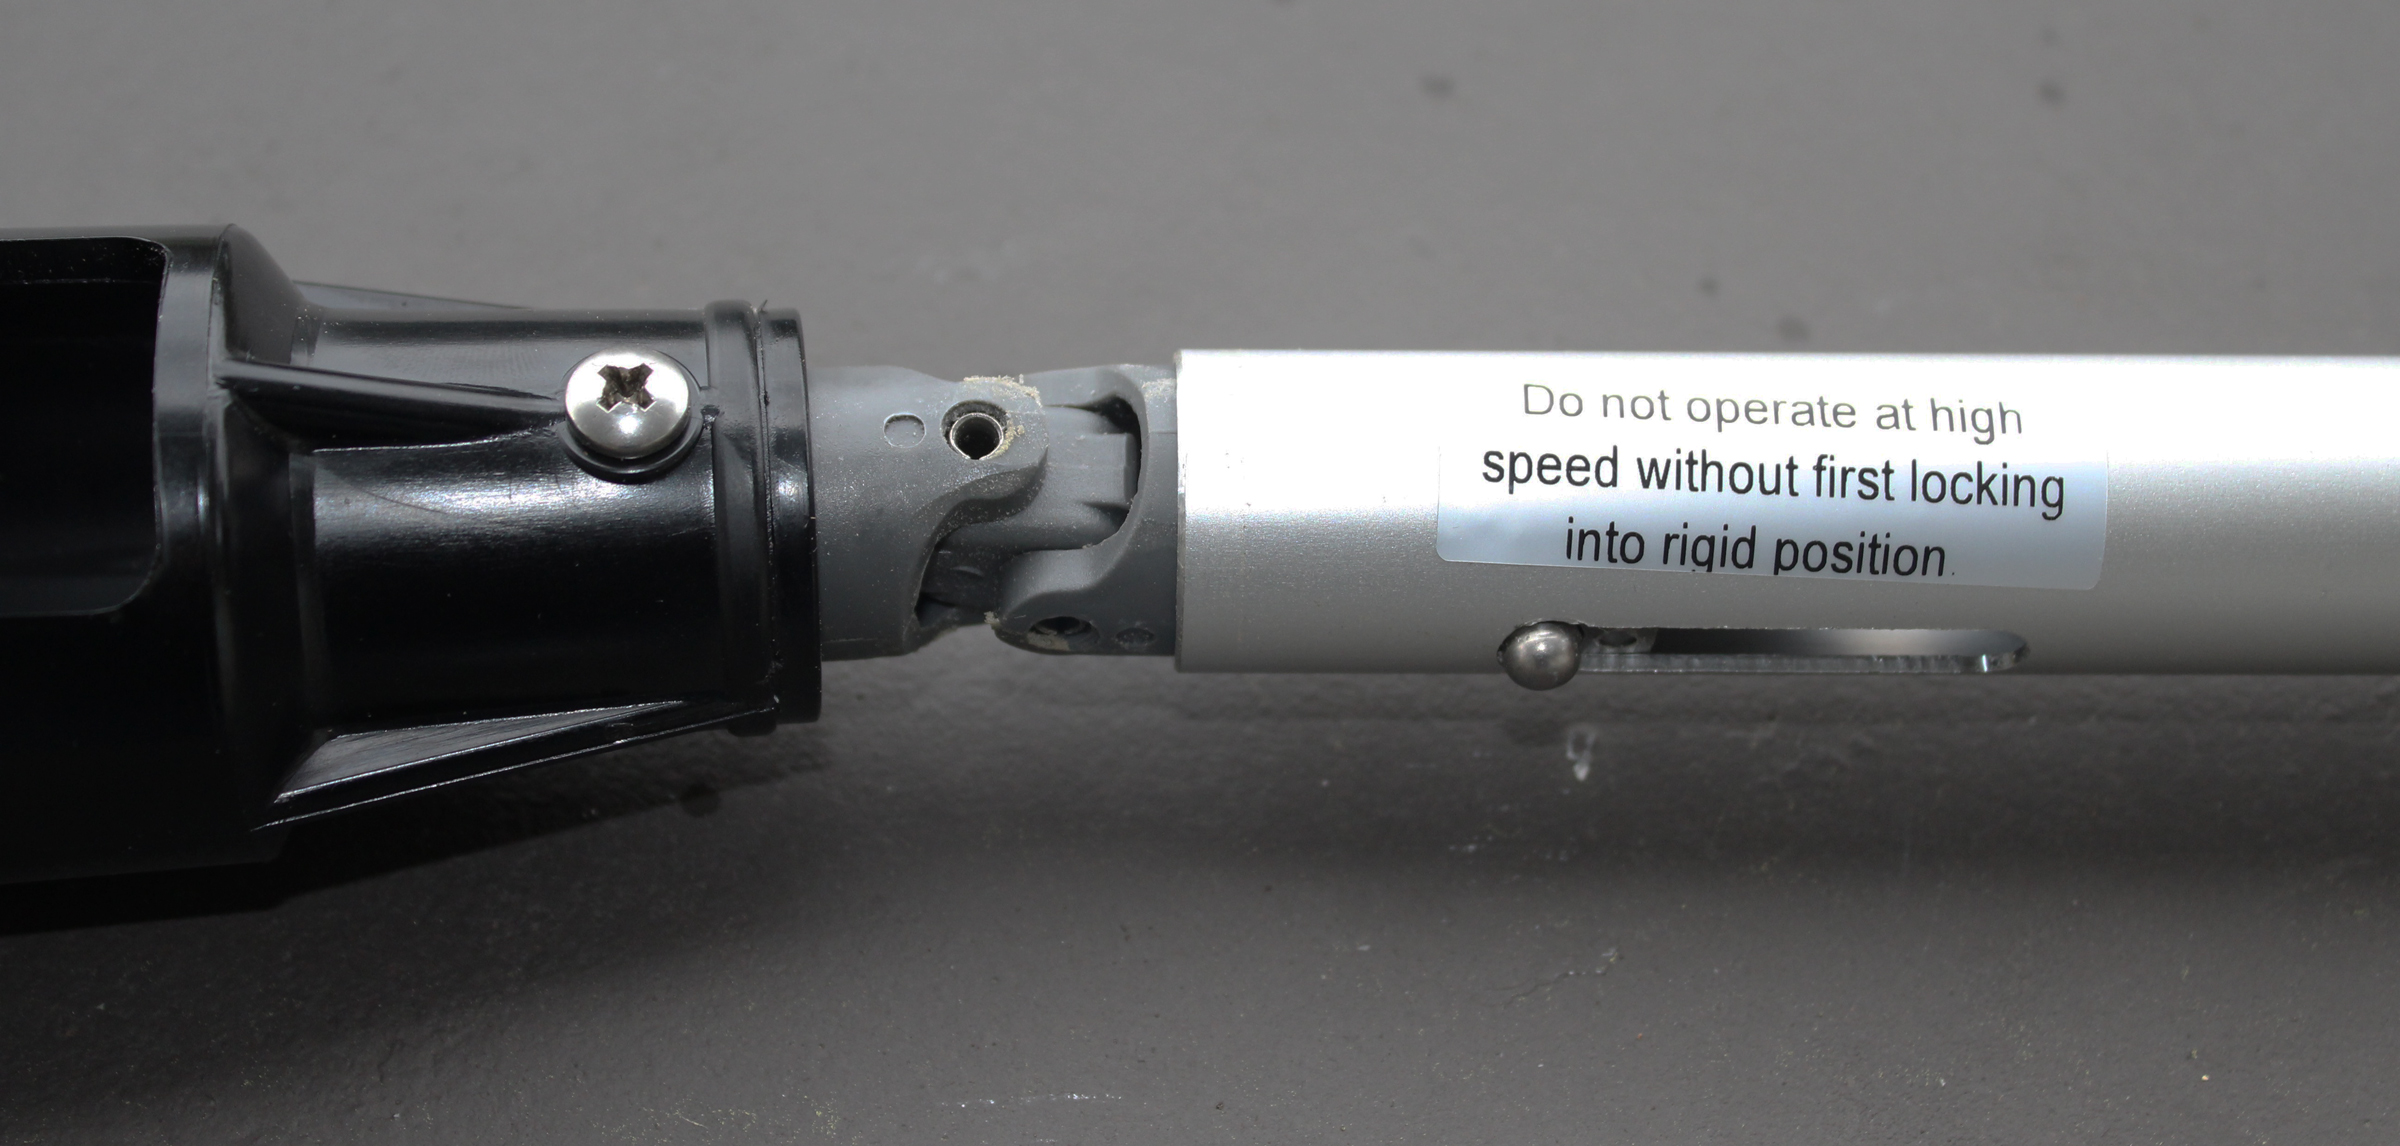
The Handi-Mate was packaged in clear plastic, and it looked okay until I got it home and was able to get a look at the universal joint. The handle is made of two nesting aluminum tubes; the inner tube slips out to provide the adjustable length and the outer tube slips over the U-joint to make the transition from articulated to fixed. The snap buttons for both tubes were small and difficult to operate. When I exposed the U-joint, I was disappointed to see that it was plastic and very small. The larger tube has a diameter of about 7/8″, and the U-joint had to fit its 3/4″ inside diameter.
The Handi-Mate’s U-joint is made of plastic and has to be small enough to fit inside the aluminum extension tube.
I slipped the Handi-Mate socket over the handle of one of my outboards, a 4-hp Yamaha four-stroke. Tightening the socket’s knob presses a bar against the handle’s rubber grip. It holds it in place, but the pressure is applied only on the underside of the bar and on the opposite side of the rigid socket, so I suspect the socket will shift in one axis on a small handle. More troubling were the stops molded into the U-joint. They limit the extension’s range of motion and could leave the handle hanging in midair when released, a very vulnerable position; given the great mechanical advantage of the handle over the U-joint, I thought any force applied to the suspended handle would destroy the joint. I’d seen enough and didn’t need to try it on the water. I put it back in its package and returned it to the store for a refund.
The HelmsMate impressed me from the start. It comes strapped on a cardboard panel with everything showing, including the stout, stainless-steel U-joint. The device to lock the joint is a 3-7/8″-long aluminum tube that fits over the outside extension tube, so the U-joint’s size is limited by the largest tube’s 1″ outside diameter instead of its inside diameter, as with the Handi-Mate. The locking device has a textured plastic grip and an ingenious diagonal slot that tightens the connection between the outboard tiller and the extension, making it quite rigid. The 5/16″ snap buttons are easy to operate.
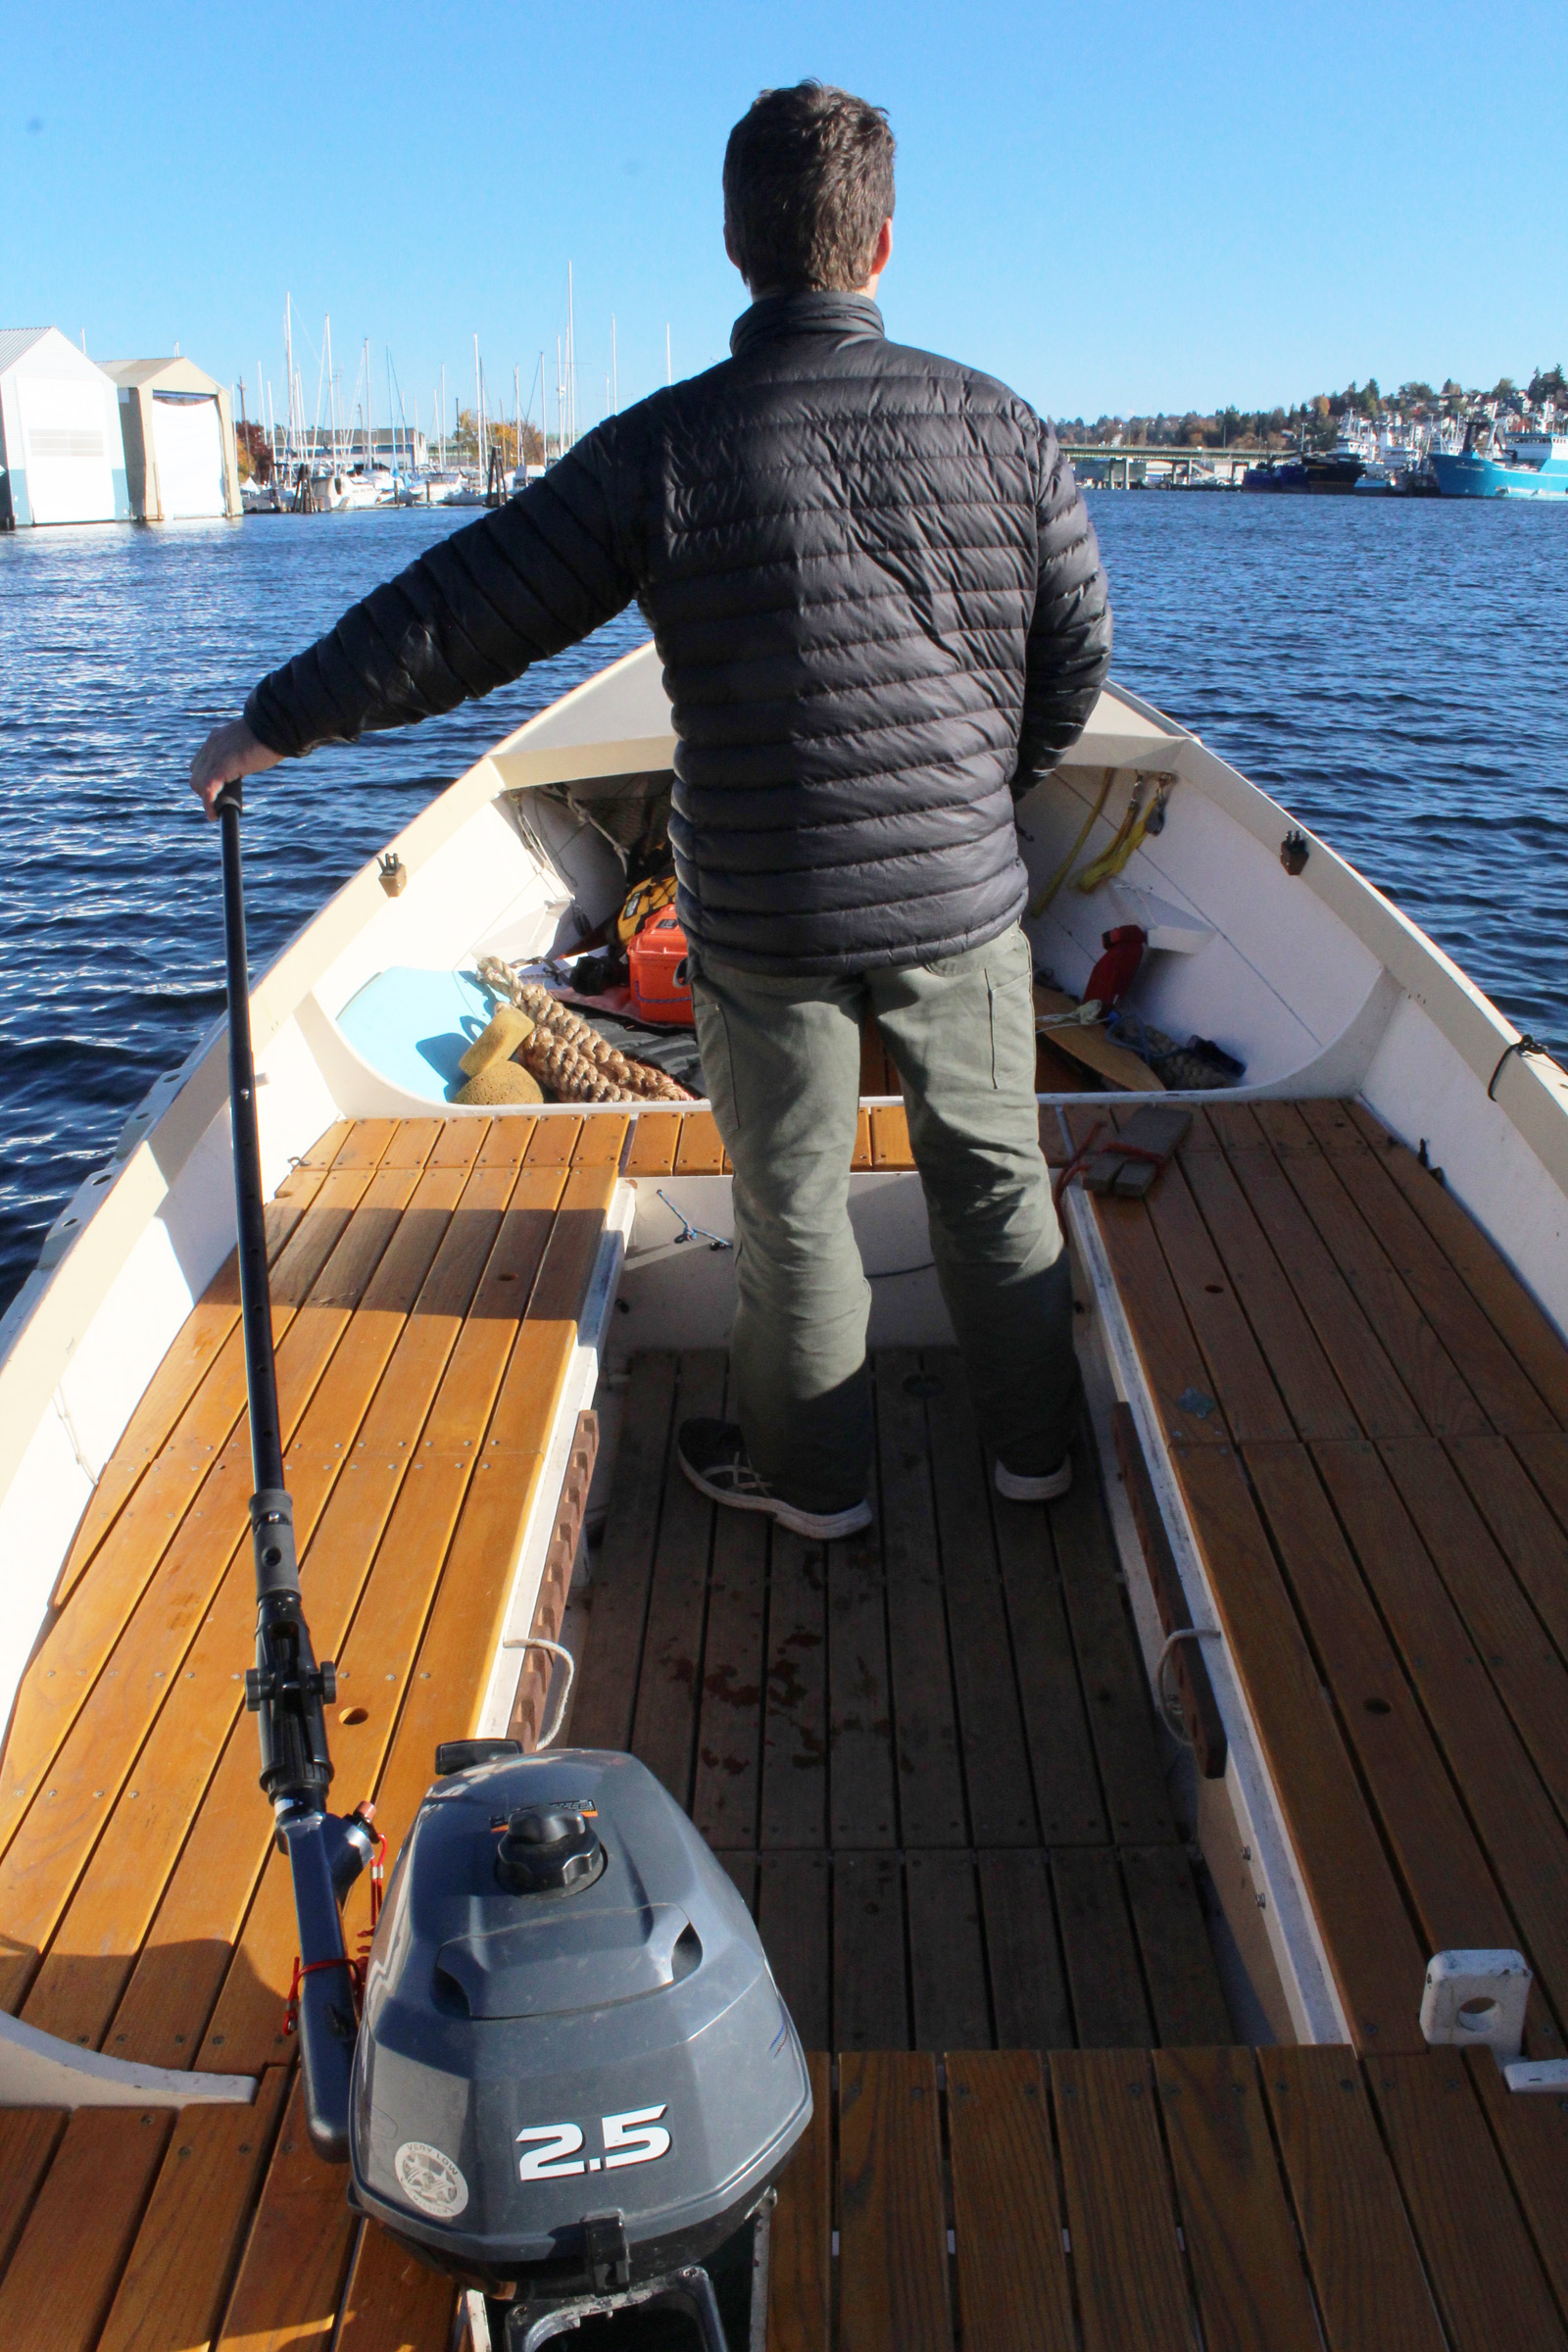
As a fixed extension, the HelmsMate provides a wiggle-free connection to the outboard’s tiller and throttle. The skipper can get their weight to the middle of the boat and stand for the best view forward.
The HelmsMate’s socket is slotted and the thumb screws that tighten it squeeze around the circumference of the outboard handle. The inboard end of the socket has two openings for access to those kill switches that are mounted on the tip of the outboard’s handle. (If you have an outboard with a tethered dead-man’s switch, you may need to add an extension to it to clip it on your person when you’re using the HelmsMate.)
The HelmsMate’s universal joint is stainless steel and fits the 1″ inside diameter of the locking device, at right.
The U-joint has a good range of motion that varies from 75 to 90 degrees depending on its rotation, enough to let the handle drop to the floorboards before the joint has to take the strain. The extension tubes add from 32″ to 48″ to the reach of the outboard’s handle in six 2-3/4″ increments.
The locking device has a rubber grip and a diagonal slot that engages a push button. When the device is twisted, the connection between the socket and the extension is quite solid.
Having the HelmsMate’s U-joint locked out provides positive control of the motor, and I was comfortable using even the full extension while the motor was at full throttle and pushing the boat at 5 knots. With the diagonal slot tightening the connection and the socket squeezed tight on the tiller handle, the only play is in the tiller’s connection to the motor head. I like motoring standing up, and the HelmsMate, locked straight, works very well for that.
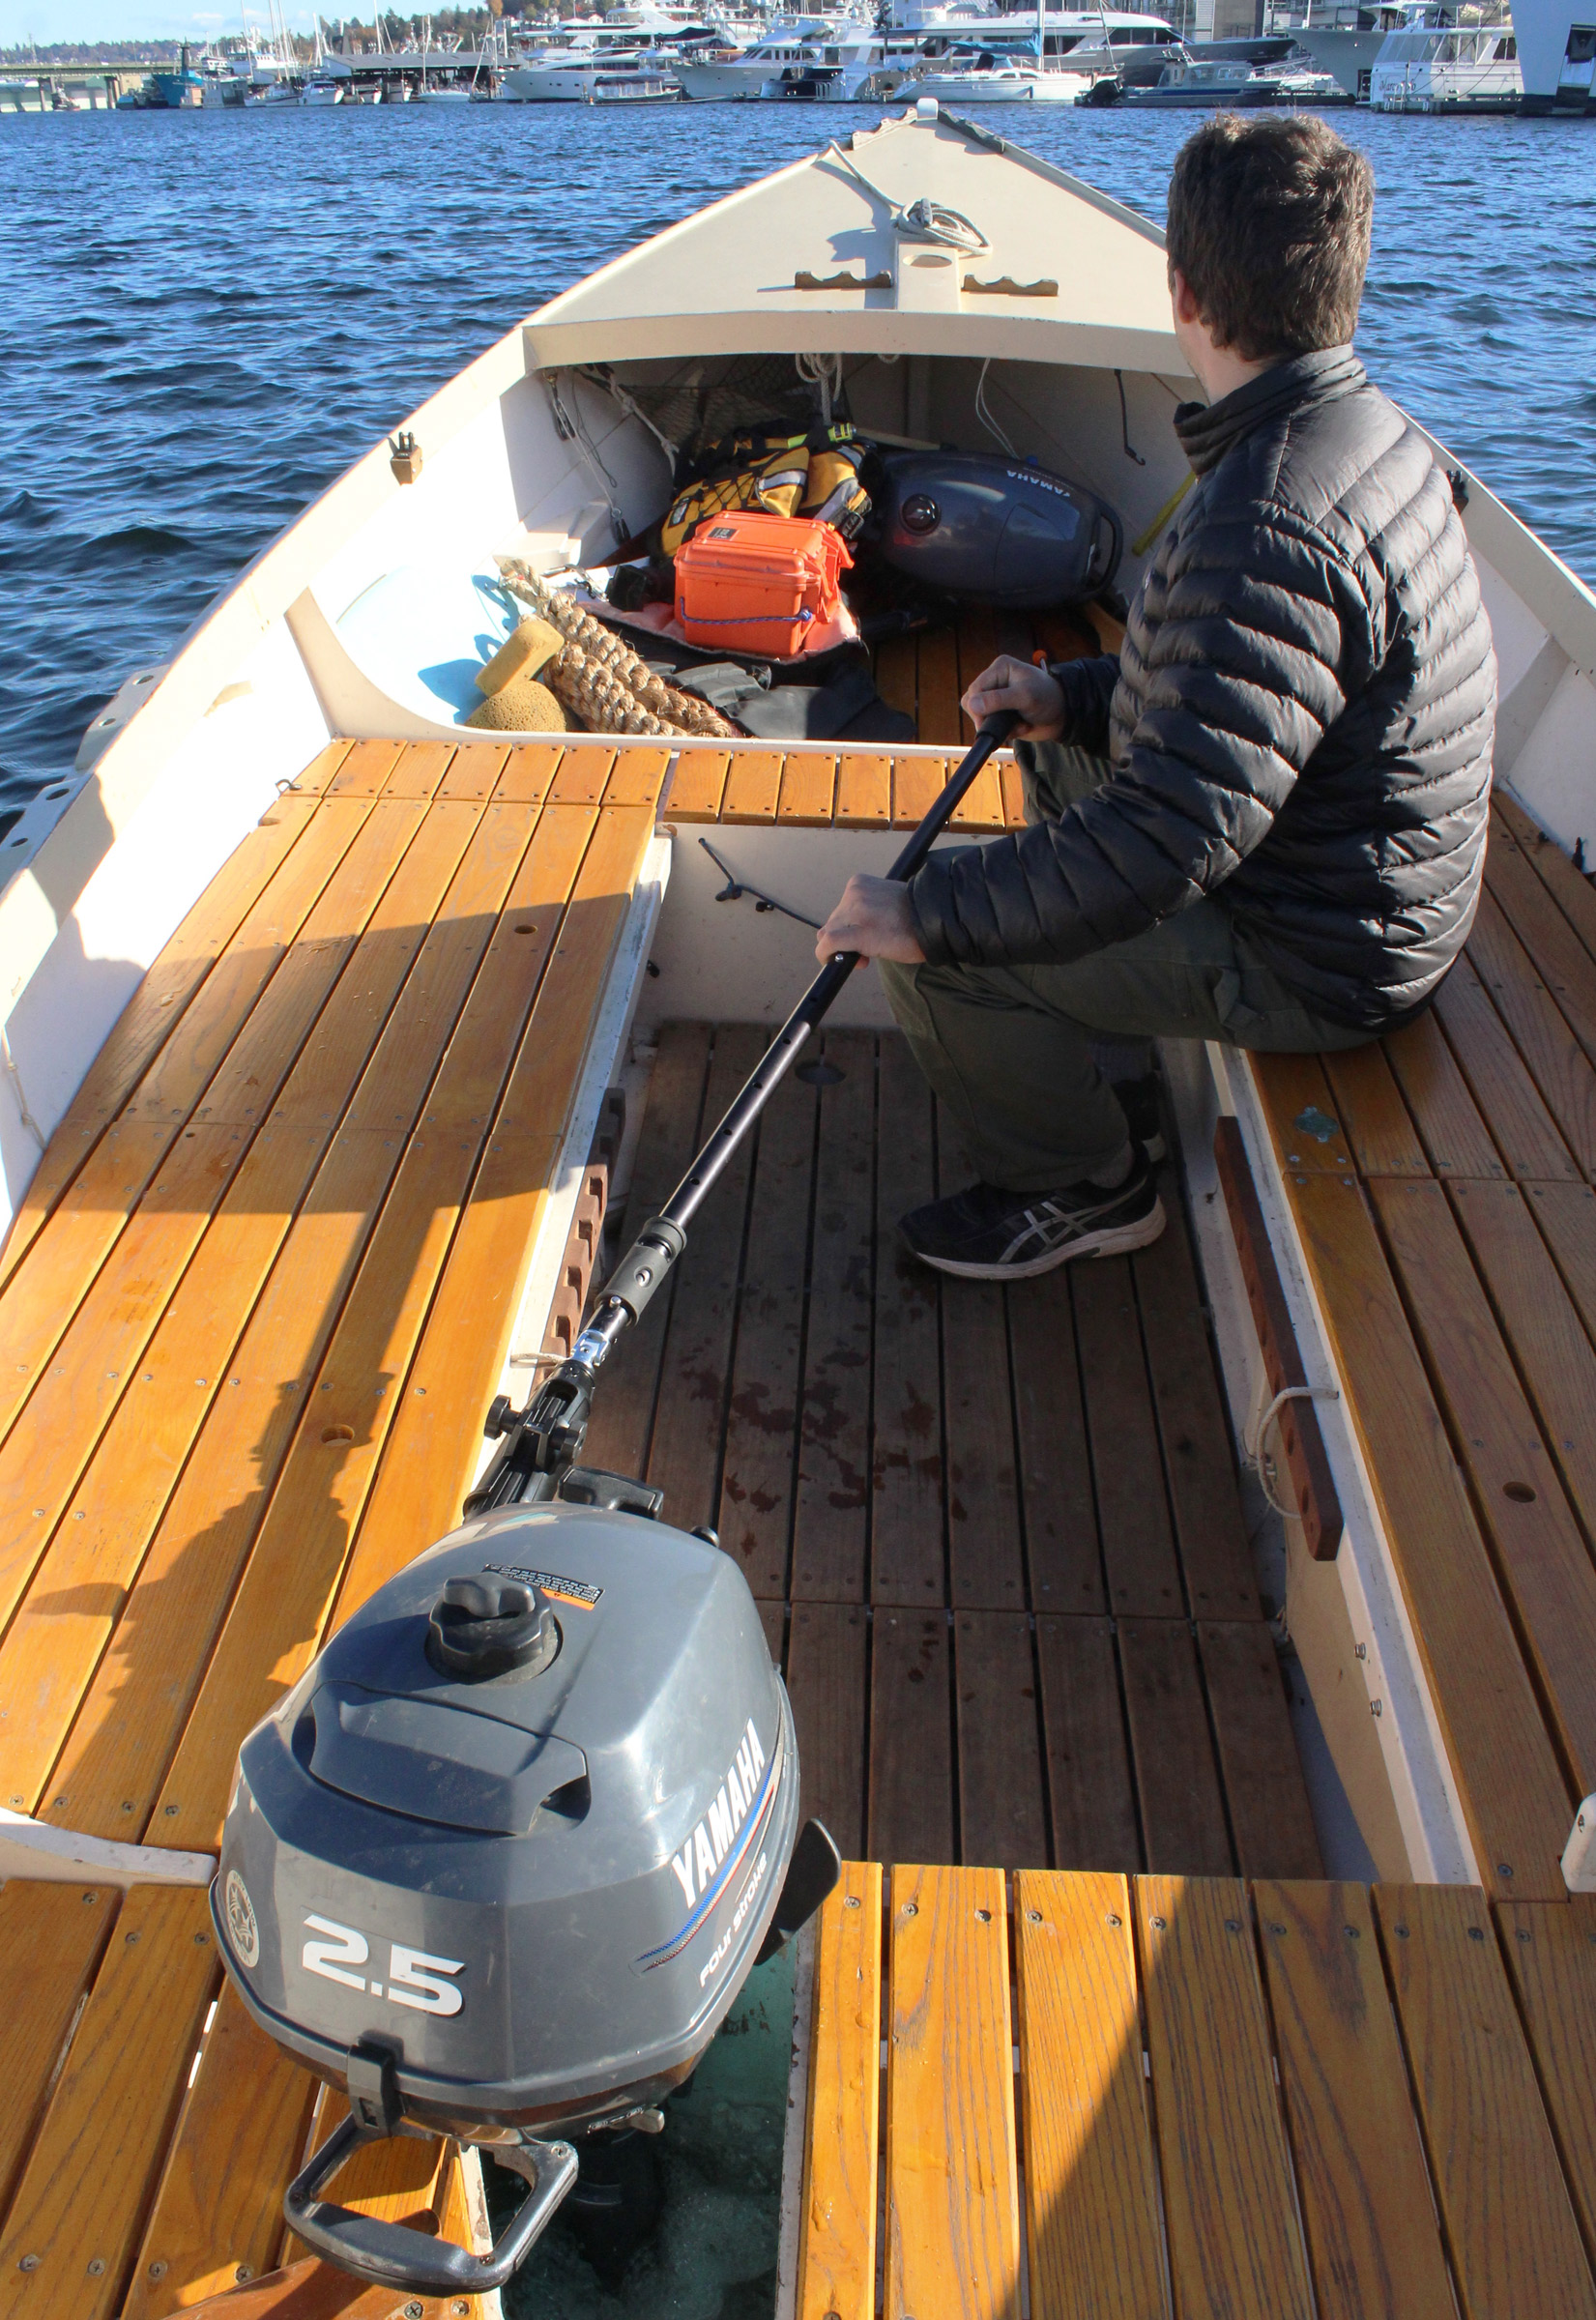
While the articulated extension looks like it might function like a Norwegian push-pull tiller, it does not. It takes two hands, not one, and a lateral sweeping motion instead of a push-pull.
When I tried the HelmsMate with the U-joint in play, I had the instructions provided for both it and the Handi-Mate in mind. The Handi-Mate’s instructions advised: “Steering with the swivel engaged should be limited to trolling speeds. Do not operate at high speed without first locking into rigid position.” The HelmsMate instructions read: “Intended only for use at trolling speeds. Do not use at higher speeds.” I’m not a fisherman, so I had to look up trolling speeds. There’s quite a range, from 1.7 knots for trout to 8.5 knots for marlin. With my boats and motors, I’m lucky to hit 5 knots, but it was easy enough to determine that the warnings applied to the lowest end of the trolling-speed scale.
When the U-joint is being used, turning the motor can align the extension and the motor’s tiller. It’s important to have two hands on the extension to control the motor.
I had thought that putting the U-joint in play would be very much like using a Norwegian push-pull tiller on a rudder, but I was quite wrong. The two arms of a Norwegian tiller are always at an angle, and never lined up with each other. You can manage it with one hand, like a push broom. An articulated outboard extension is like an upright broom; it takes both hands, especially when sweeping across the point where it lines up with the outboard’s tiller. That “top-dead-center” (TDC) point is more than just a weak point. The torque created by an outboard and its propeller tend to twist the motor into a turn, to port for most small outboards, and the boat doesn’t need to be going fast for this twist to happen. (For more information, see the afterword of this outboard review.) With the HelmsMate, my Yamaha 2.5-hp would snap through TDC only when turning to port; turning to starboard was fine. My son and I quickly learned to put both hands on the extension before initiating turns. Doing that while seated is easier than while standing.
The U-joint turned the throttle smoothly with the extension angled up to about 60 degrees from straight and beyond that it continues to work if the throttle is at a position that puts the square piece in the U-joint on a diagonal. If that piece is level, when the extension is beyond the 60 degrees, the U-joint won’t rotate. The limitations on the range of motion weren’t restrictive in our use of the extension. The positions we took up when using the extension happened to keep the HelmsMate away from angles that compromise the U-joint’s smooth operation.
The HelmsMate is sturdily built and is a cinch to use in its rigid configuration; it just needs a bit of practice and caution when used as an articulated extension. I won’t be taking it back for a refund.
Christopher Cunningham is the editor of Small Boats Magazine.
The Handi-Mate is available from some marine stores and online retailers, but the product has been, wisely I think, discontinued by Davis Instruments. The HelmsMate is available directly from Ironwood and from some online and conventional retailers.
Is there a product that might be useful for boatbuilding, cruising, or shore-side camping that you’d like us to review? Please email your suggestions.
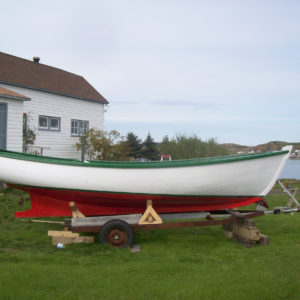
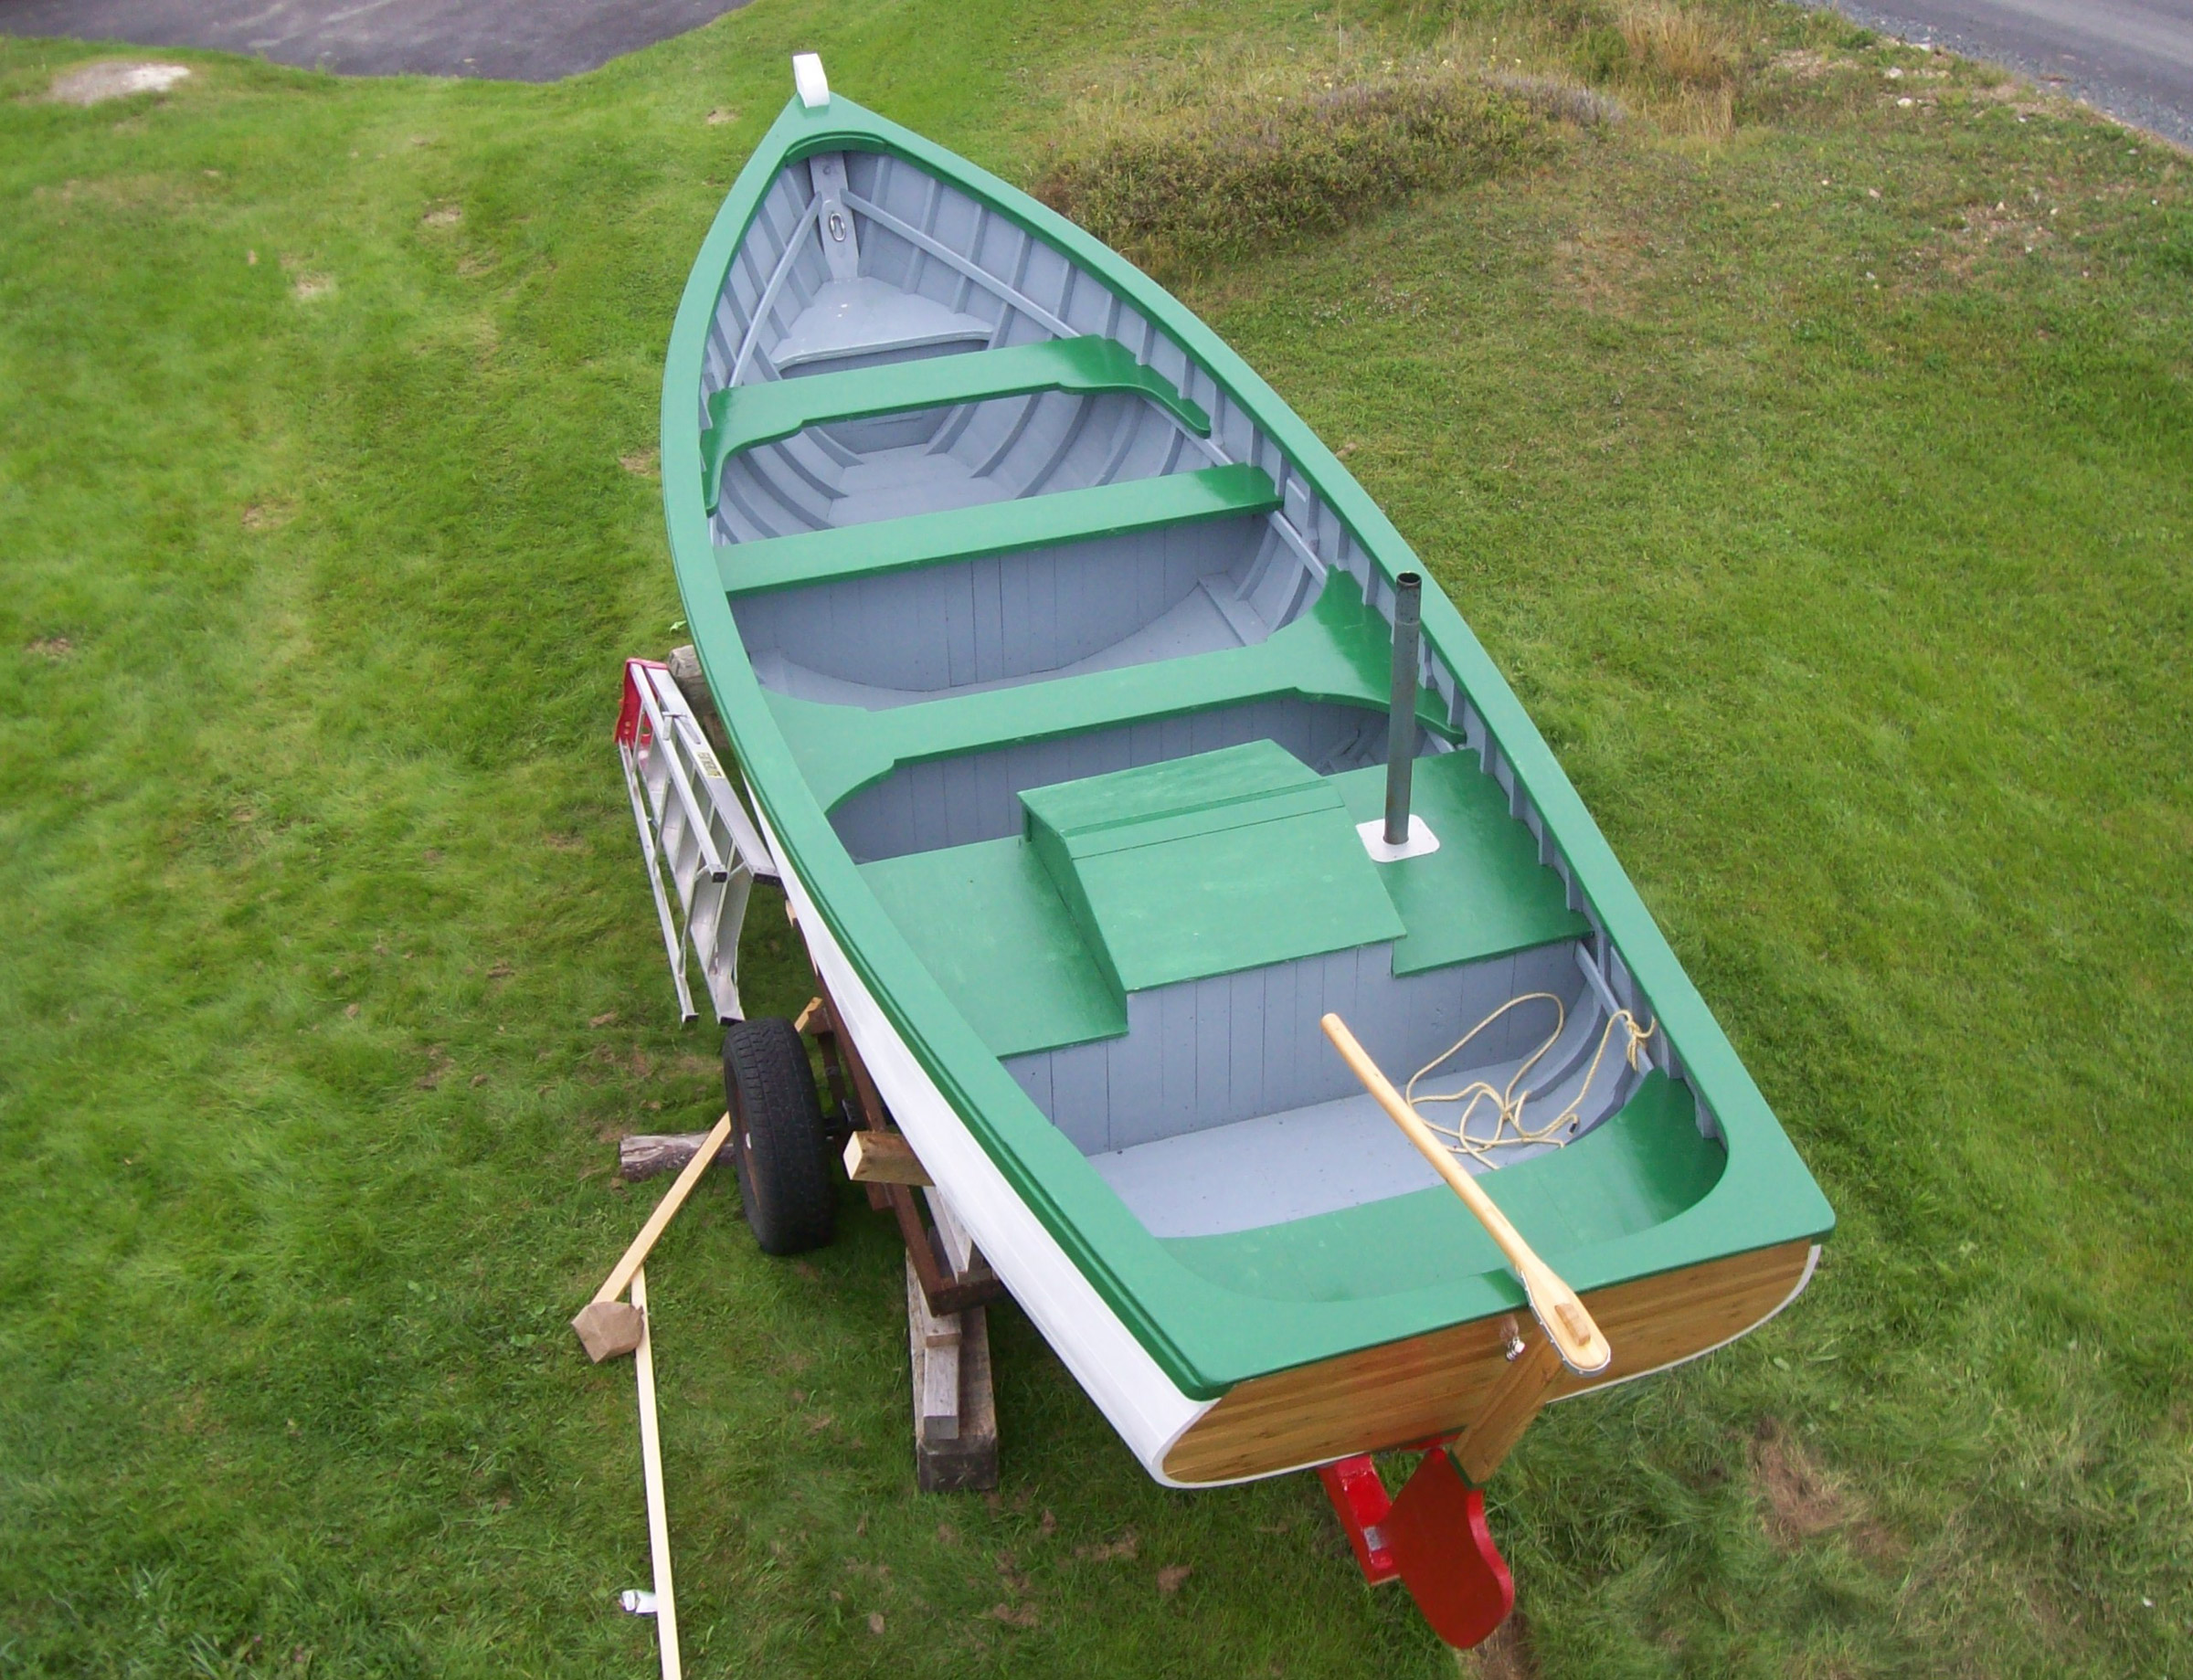
With his newly finished boat out of the shop, it’s easy to see why Alf was drawn to the trap skiffs of his youth.
Alf Manuel has deep roots in Twillingate, a small town on the northeast coast of Newfoundland. Seven generations of his family have made their home there, and it was only in Alf’s lifetime that a causeway and bridge, built in 1973, connected it by road to the rest of Newfoundland. Naturally, boats and boatbuilding are steeped in his bloodline.
Alf Manuel
An eye auger would be a curiosity or an antique to most, but to Alf, it’s a tool that hasn’t yet outlived its usefulness. The axe in the background to the left belonged to Alf’s father, but it is not the one Alf used to make toy boats.
As a boy, he would sneak an axe from his father’s shop and chop a boat out of a scrap of wood. There were a number of boatbuilders near his home, and he was inexorably drawn to their shops to watch them at work. At 19, he built his first boat, a plywood skiff, and “it worked out all right,” he says, so he went to a trade school to learn more. Now 80 years old, he works in the shop that had belonged to his father, grandfather, and great-grandfather. He has a long string of wooden boats, up to 56′ long, to his credit and is a highly regarded boatbuilder.
Alf Manuel
Alf used crooks to to a create a strong structure at the stern of the skiff. Against the back wall he has two ways of coping with the Newfoundland winter: a snow shovel and cross-country skis.
His most recent boat was inspired by the trap skiffs that he used to watch as they worked the Twillingate waters. They ranged from 28′ to 34′ long; the smaller ones, with a crew of two aboard, were also used for hand-lining cod in the fall when the lobstering season closed. The original skiffs were more boat than he needed, so he had in mind to build one 21′ long. There were neither surviving boats nor plans for the trap skiffs, so he started with a half model, carving the shape from memory. Lofting followed, and he drew full-sized lines for a skiff 21′ long with a beam of 6′6″. He gathered materials for the build. From a local sawmill he got live-edge Newfoundland black spruce for the planking and black spruce timbers for the keel; with the help of his son and grandson, he cut tamarack crooks for the stem and frames. Stainless-steel fastenings would be used throughout. Wanting to power the boat in the traditional way, Alf acquired a single-cylinder make-and-break engine.
Alf Manuel
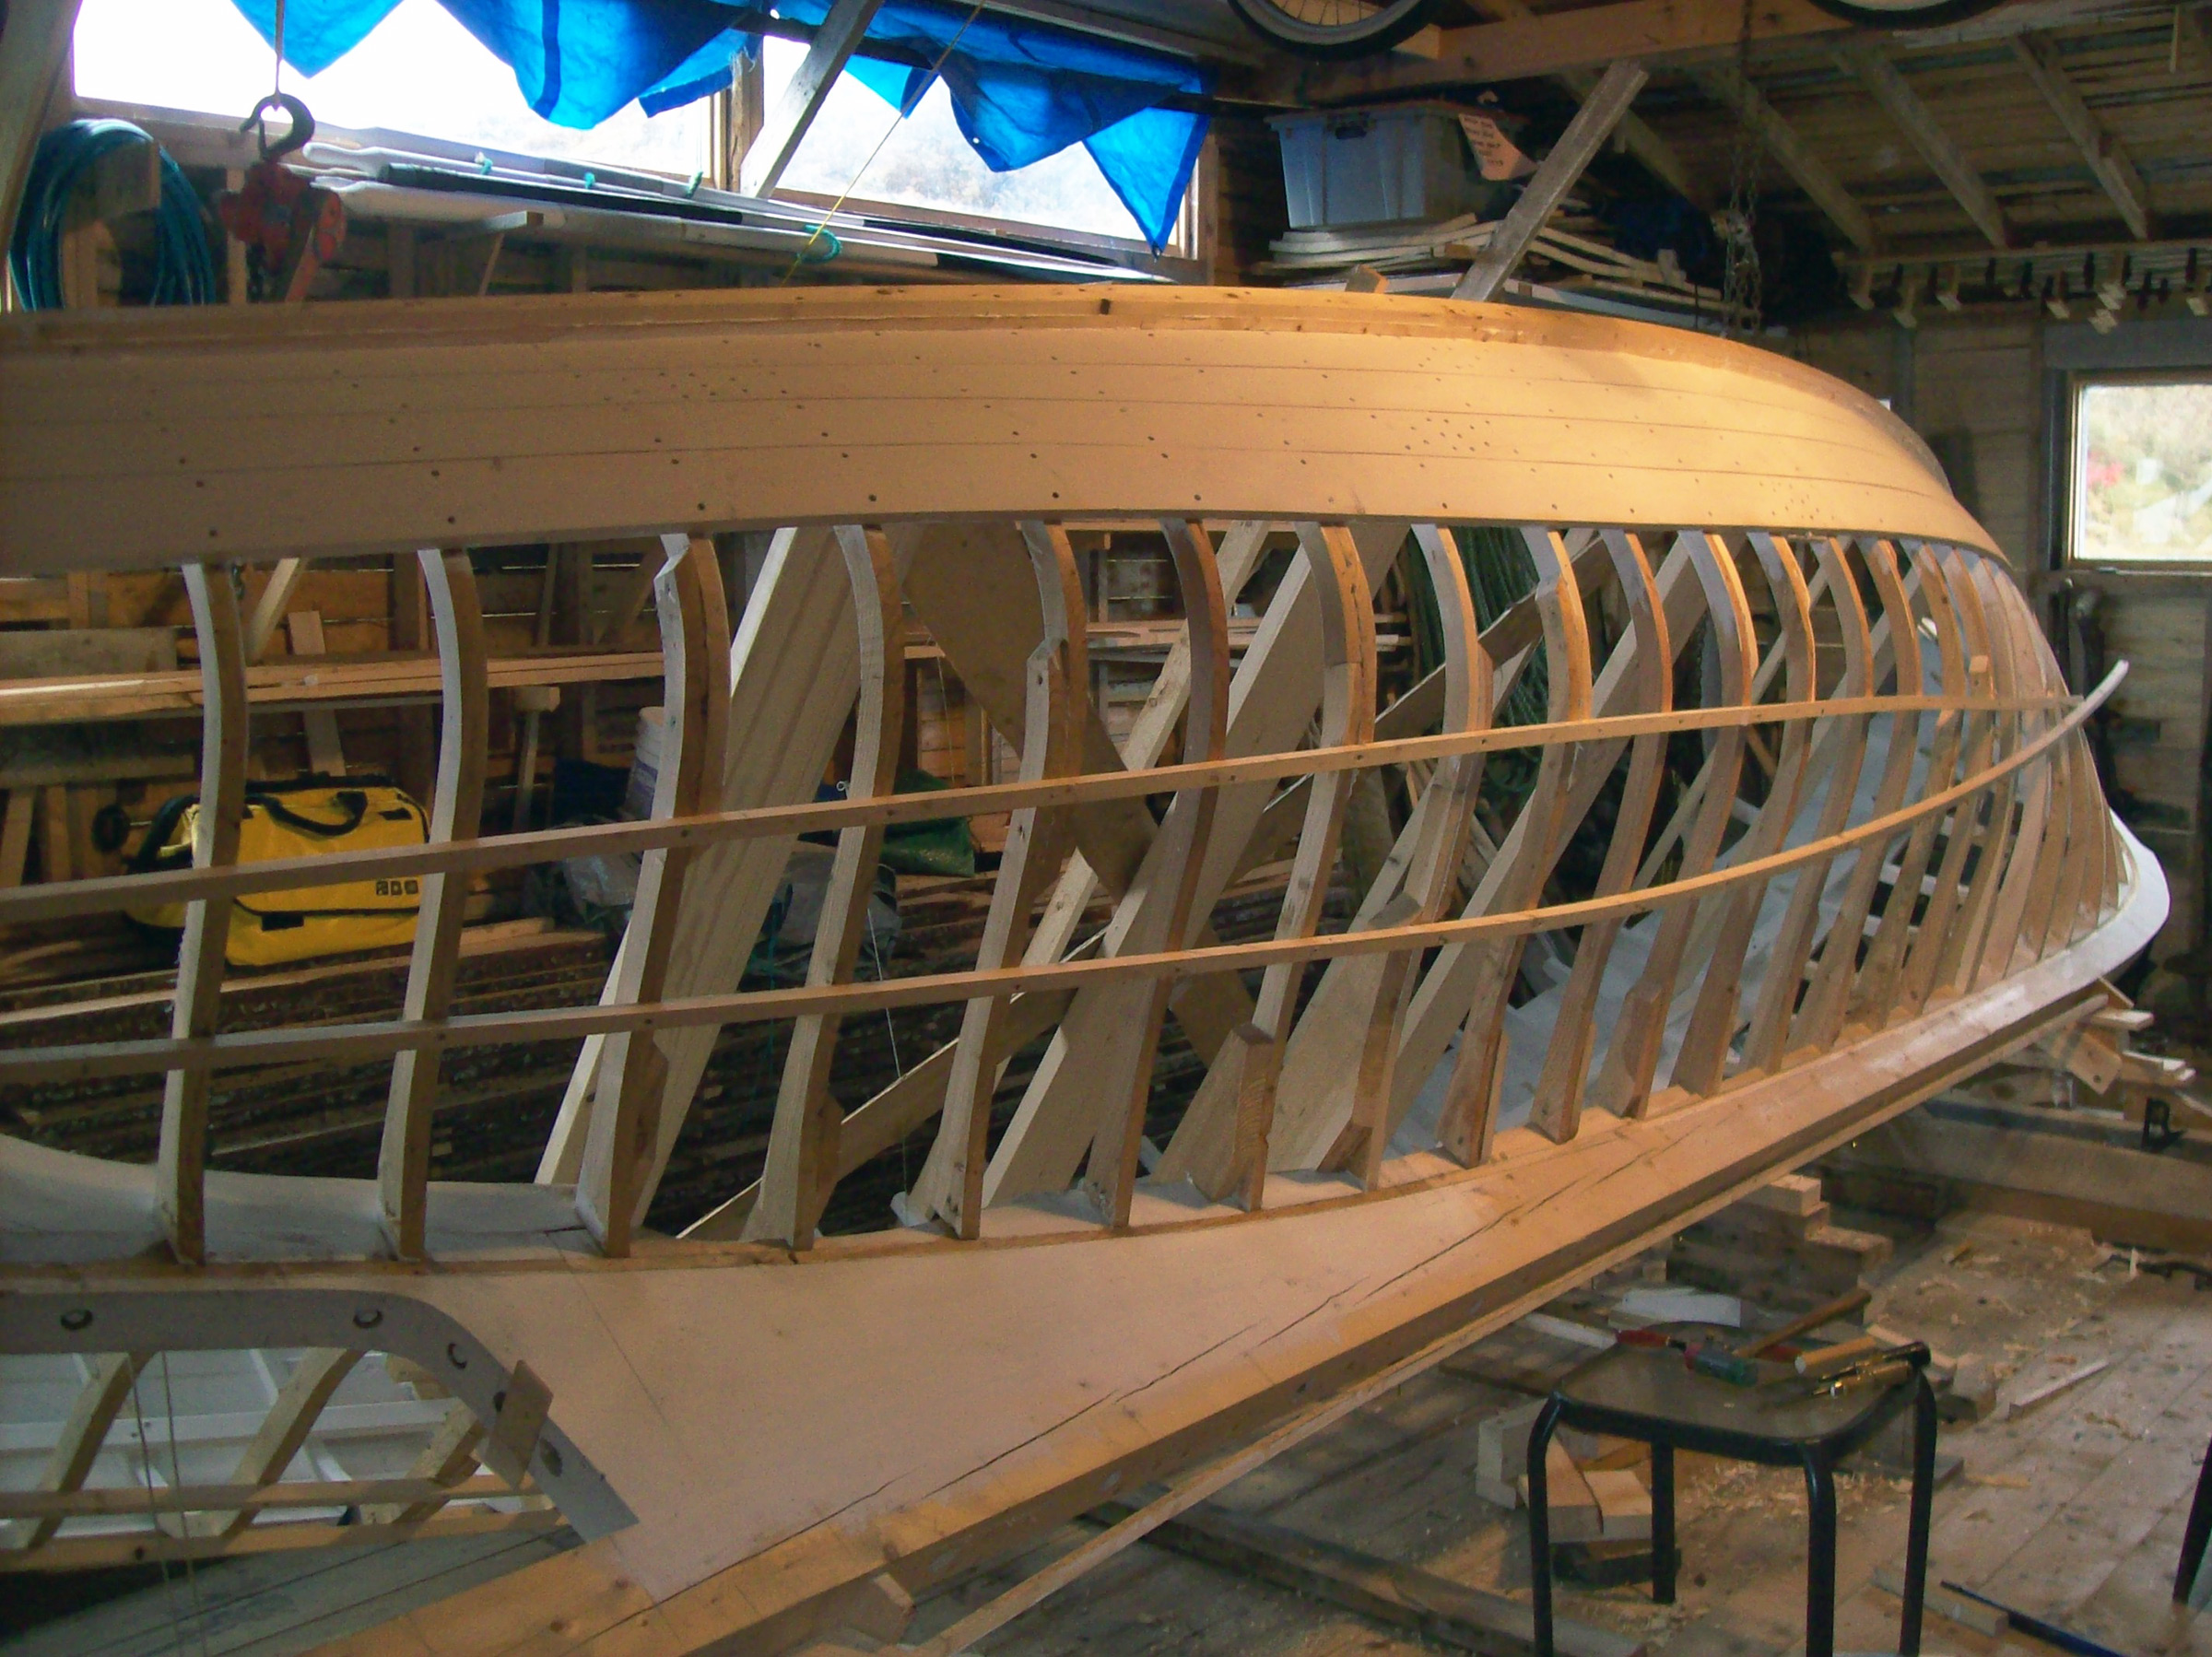
The hull, even as a lattice of sawn frames and temporary battens, already shows the handsome shape that began as a half-hull trap skiff carved from memory.
He built the skiff over the course of two years, working only during the winters, often wearing a heavy coat and wool gloves while tongues of wind-driven snow lapped at the floor beneath the shop doors. He assembled the keel and frames upright, and then as the planking proceeded, he tilted the nascent hull to angles convenient to the work he needed to do.
Alf Manuel
Rather than crawl under an upright hull to spile and install the garboards, Alf set it on its side. The first half-dozen planks from the sheer down hold the shape.
After Alf launched the boat, the 4-hp Acadia motor he had installed developed a number of problems, so he switched to a more reliable and more powerful 13-1/2-hp Volvo Penta two-cylinder diesel. It pushes the skiff along at about 5 knots.
Alf Manuel
The finished hull has lodging knees on two of the thwarts to stiffen the hull. The enclosure aft conceals the make-and-break engine initially installed; its vertical exhaust pipe is to starboard.
Alf does day cruises and some recreational cod fishing in the waters around Twillingate. Notre Dame Bay, which surrounds the North and South Twillingate islands, is cradled in Newfoundland’s ragged and island-speckled northeast coast and has no shortage of nooks and crannies to explore. In the late spring and early summer, the harbors and coves may be free of ice, but icebergs, spawned by Baffin Island and Greenland and carried south by the Labrador Current, are regular visitors, so numerous that Twillingate bills itself as the Iceberg Capital of the World. Verdant hills and wandering mountains of brilliant white ice make a spectacular seascape for Alf’s cruising.
Stephanie Manuel
Alf, his wife, son, and daughter-in-law motor out of Twillingate’s inner harbor. The make-and-break’s exhaust pipe is gone and the skiff is now powered with a diesel engine with a wet exhaust above the waterline on the starboard side.
Alf has spent a lifetime building and using wooden boats, but the boy who was often scolded by his mother when he came home with pant cuffs wet after wading from shore with his axe-hewn boats remains every bit as fascinated by them.
Do you have a boat with an interesting story? Please email us. We’d like to hear about it and share it with other Small Boats Magazine readers.
The Danube carries Finn and Tereza through Croatia to Serbia and a stop at Belgrade. Fall brings shorter days, nearly freezing nights, and rain. See how they’re holding up two months into the voyage.
Finn and Tereza make their way across Hungary, and visit the capital city of Budapest. There they pick up a crewmate, Karl, and carry on down the Danube. Get ready for some wild river sailing!
In Slovakia, Finn and Tereza have to get chaperoned by a cargo vessel to be allowed through one of the larger locks, but in the wider parts of the Danube they get some sea room and a breeze. Watch JILL spread her wings and fly.
The Danube’s gentle current carries Jill along and the miles come easily for Tereza and Finn. Check out the lush landscapes and elegant urban architecture of Germany and Austria in their latest video.
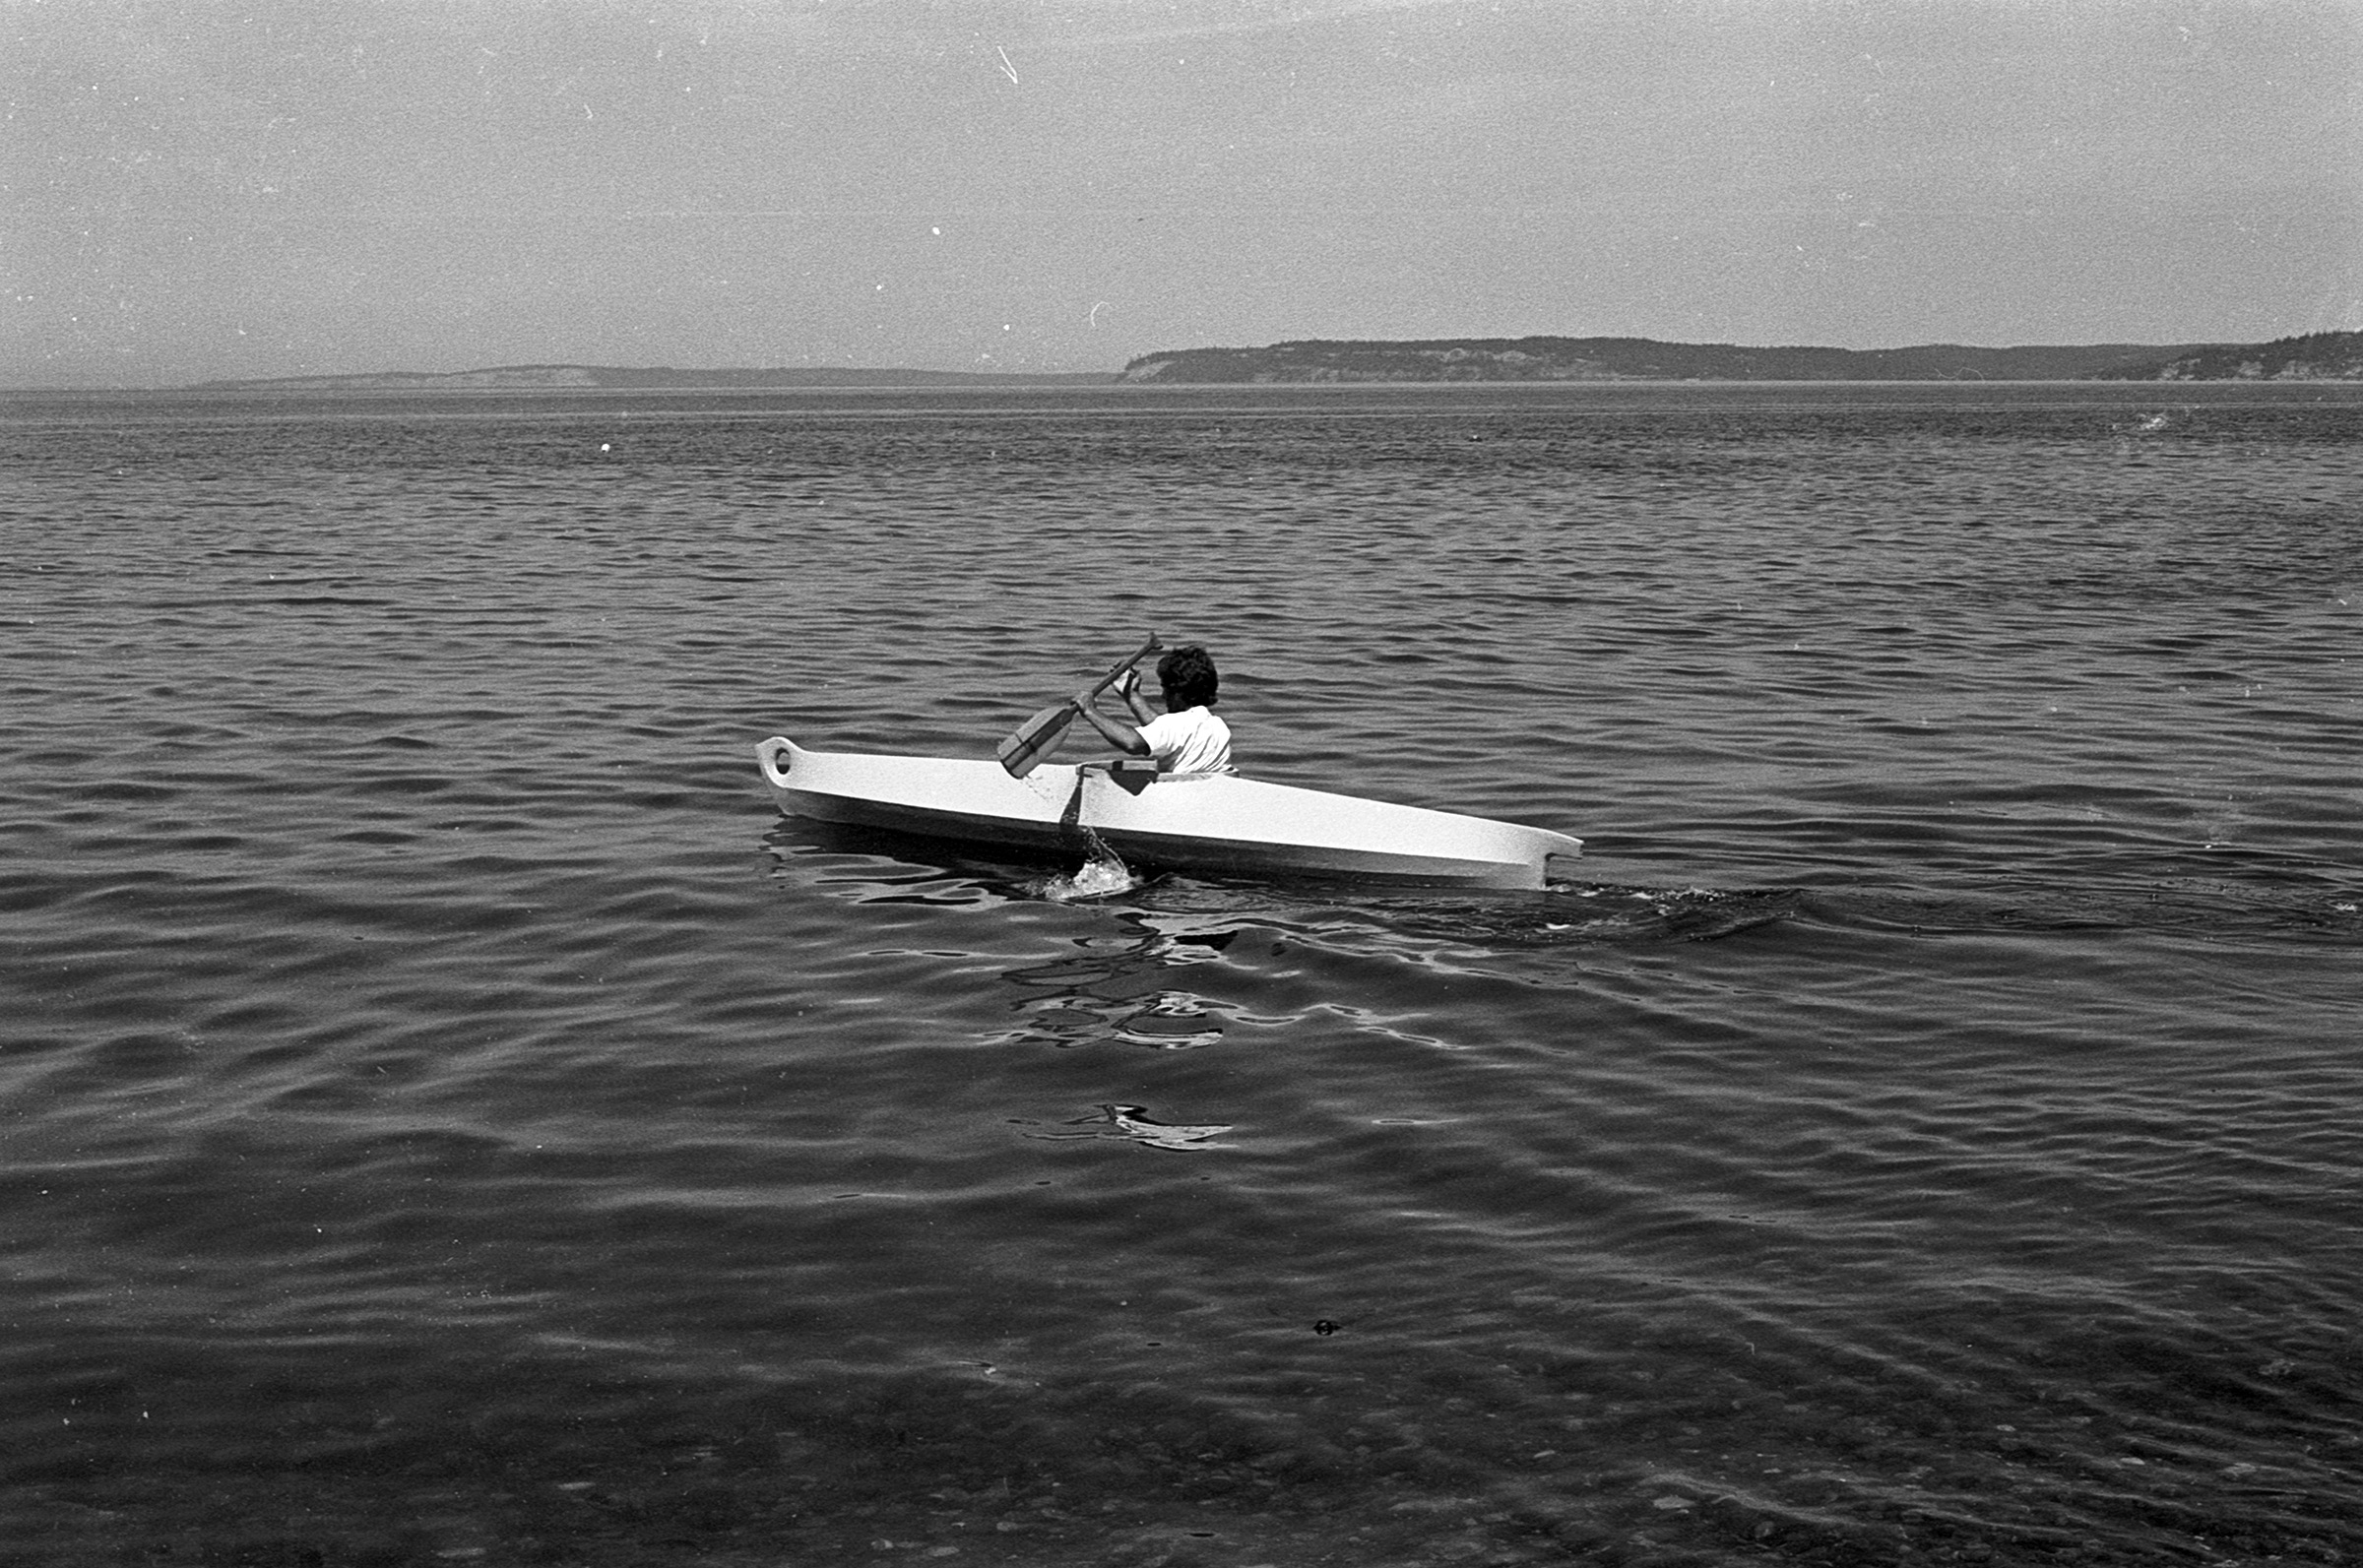
After an afternoon kayaking outing on one of the last warm summer afternoons of the year, I returned to the dock where I’d put in to pry myself out of the cockpit. There was a man in the water hanging on to the end of the dock. I asked him how the water was, thinking he was in there to cool off, but he made it clear that he wasn’t swimming for pleasure: “My girlfriend threw my pants in the water and all my money is in the pockets.”
I peered into the water that was in my shadow. On the bottom I could just make out a shopping cart and a green ride-share bike, but no pants. He said they were farther out, but on that side of my kayak there was only glare. I hauled myself up on the dock and wished him luck, as much for finding his pants as for finding a new girlfriend.
On the drive home I regretted not doing anything more to help, but he had a diving mask on, so if the pants were somewhere near the dock, he’d be able to see and retrieve them; the water there is only about 12′ deep.
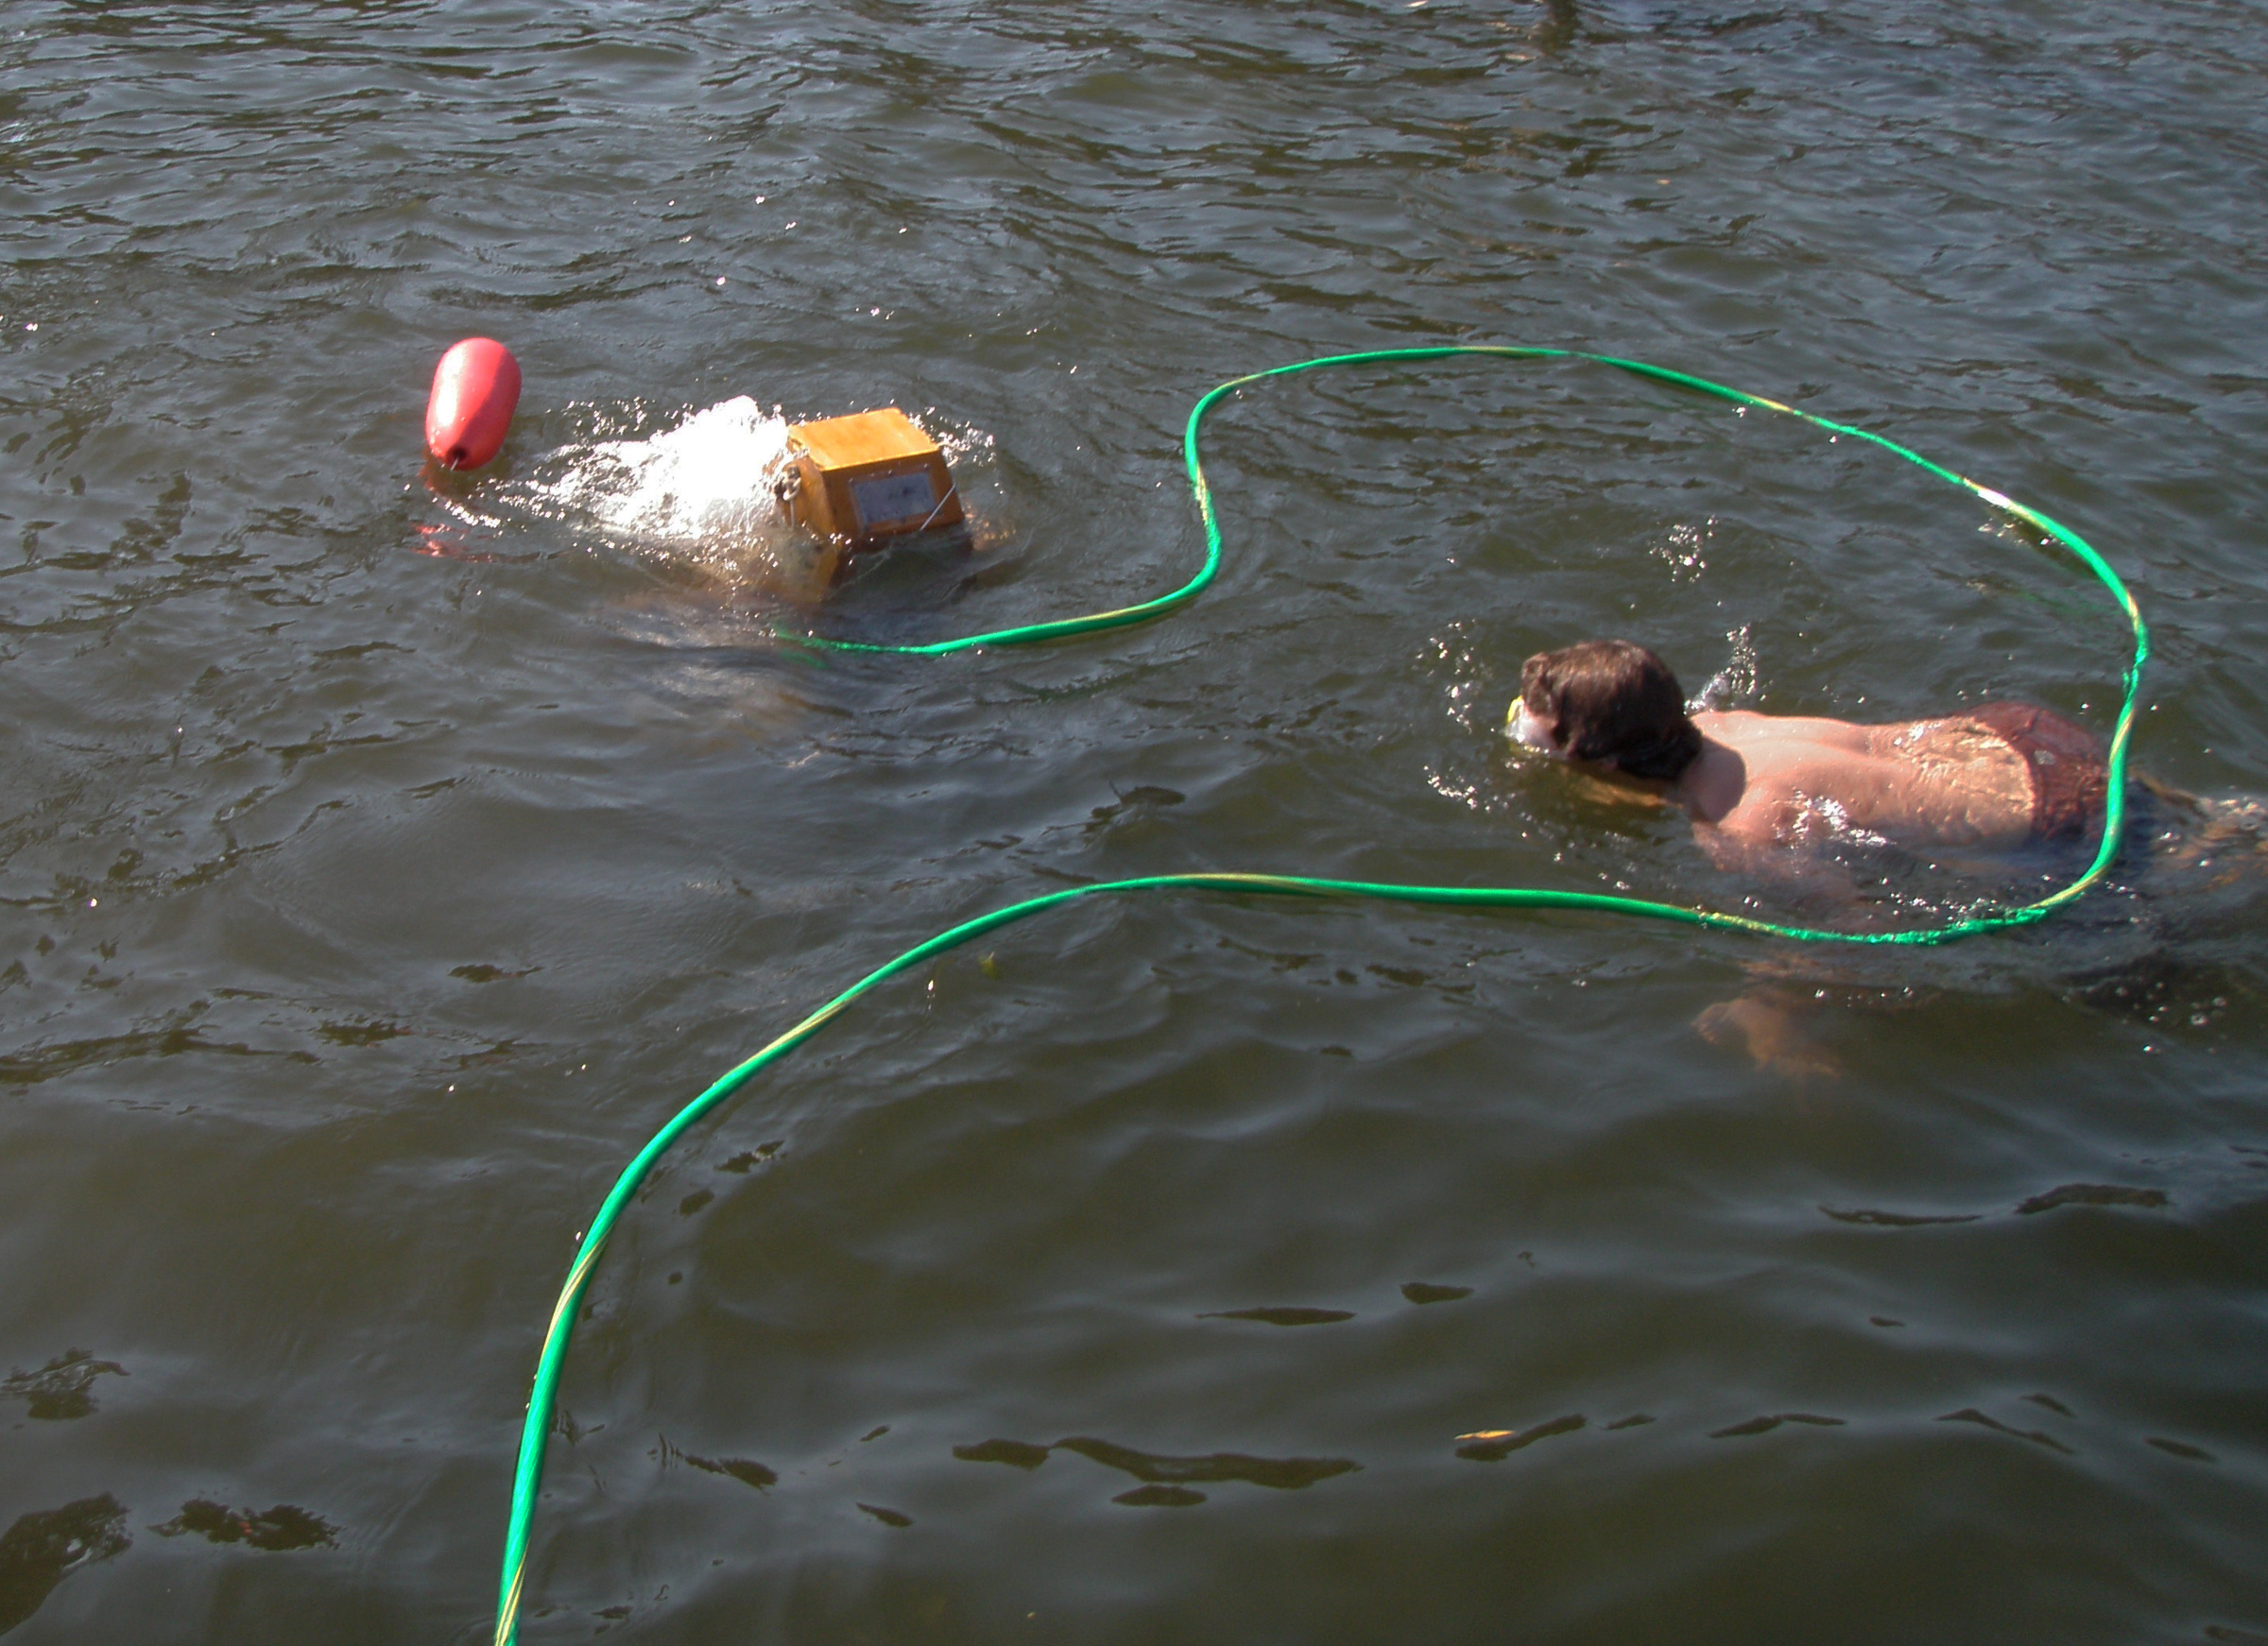
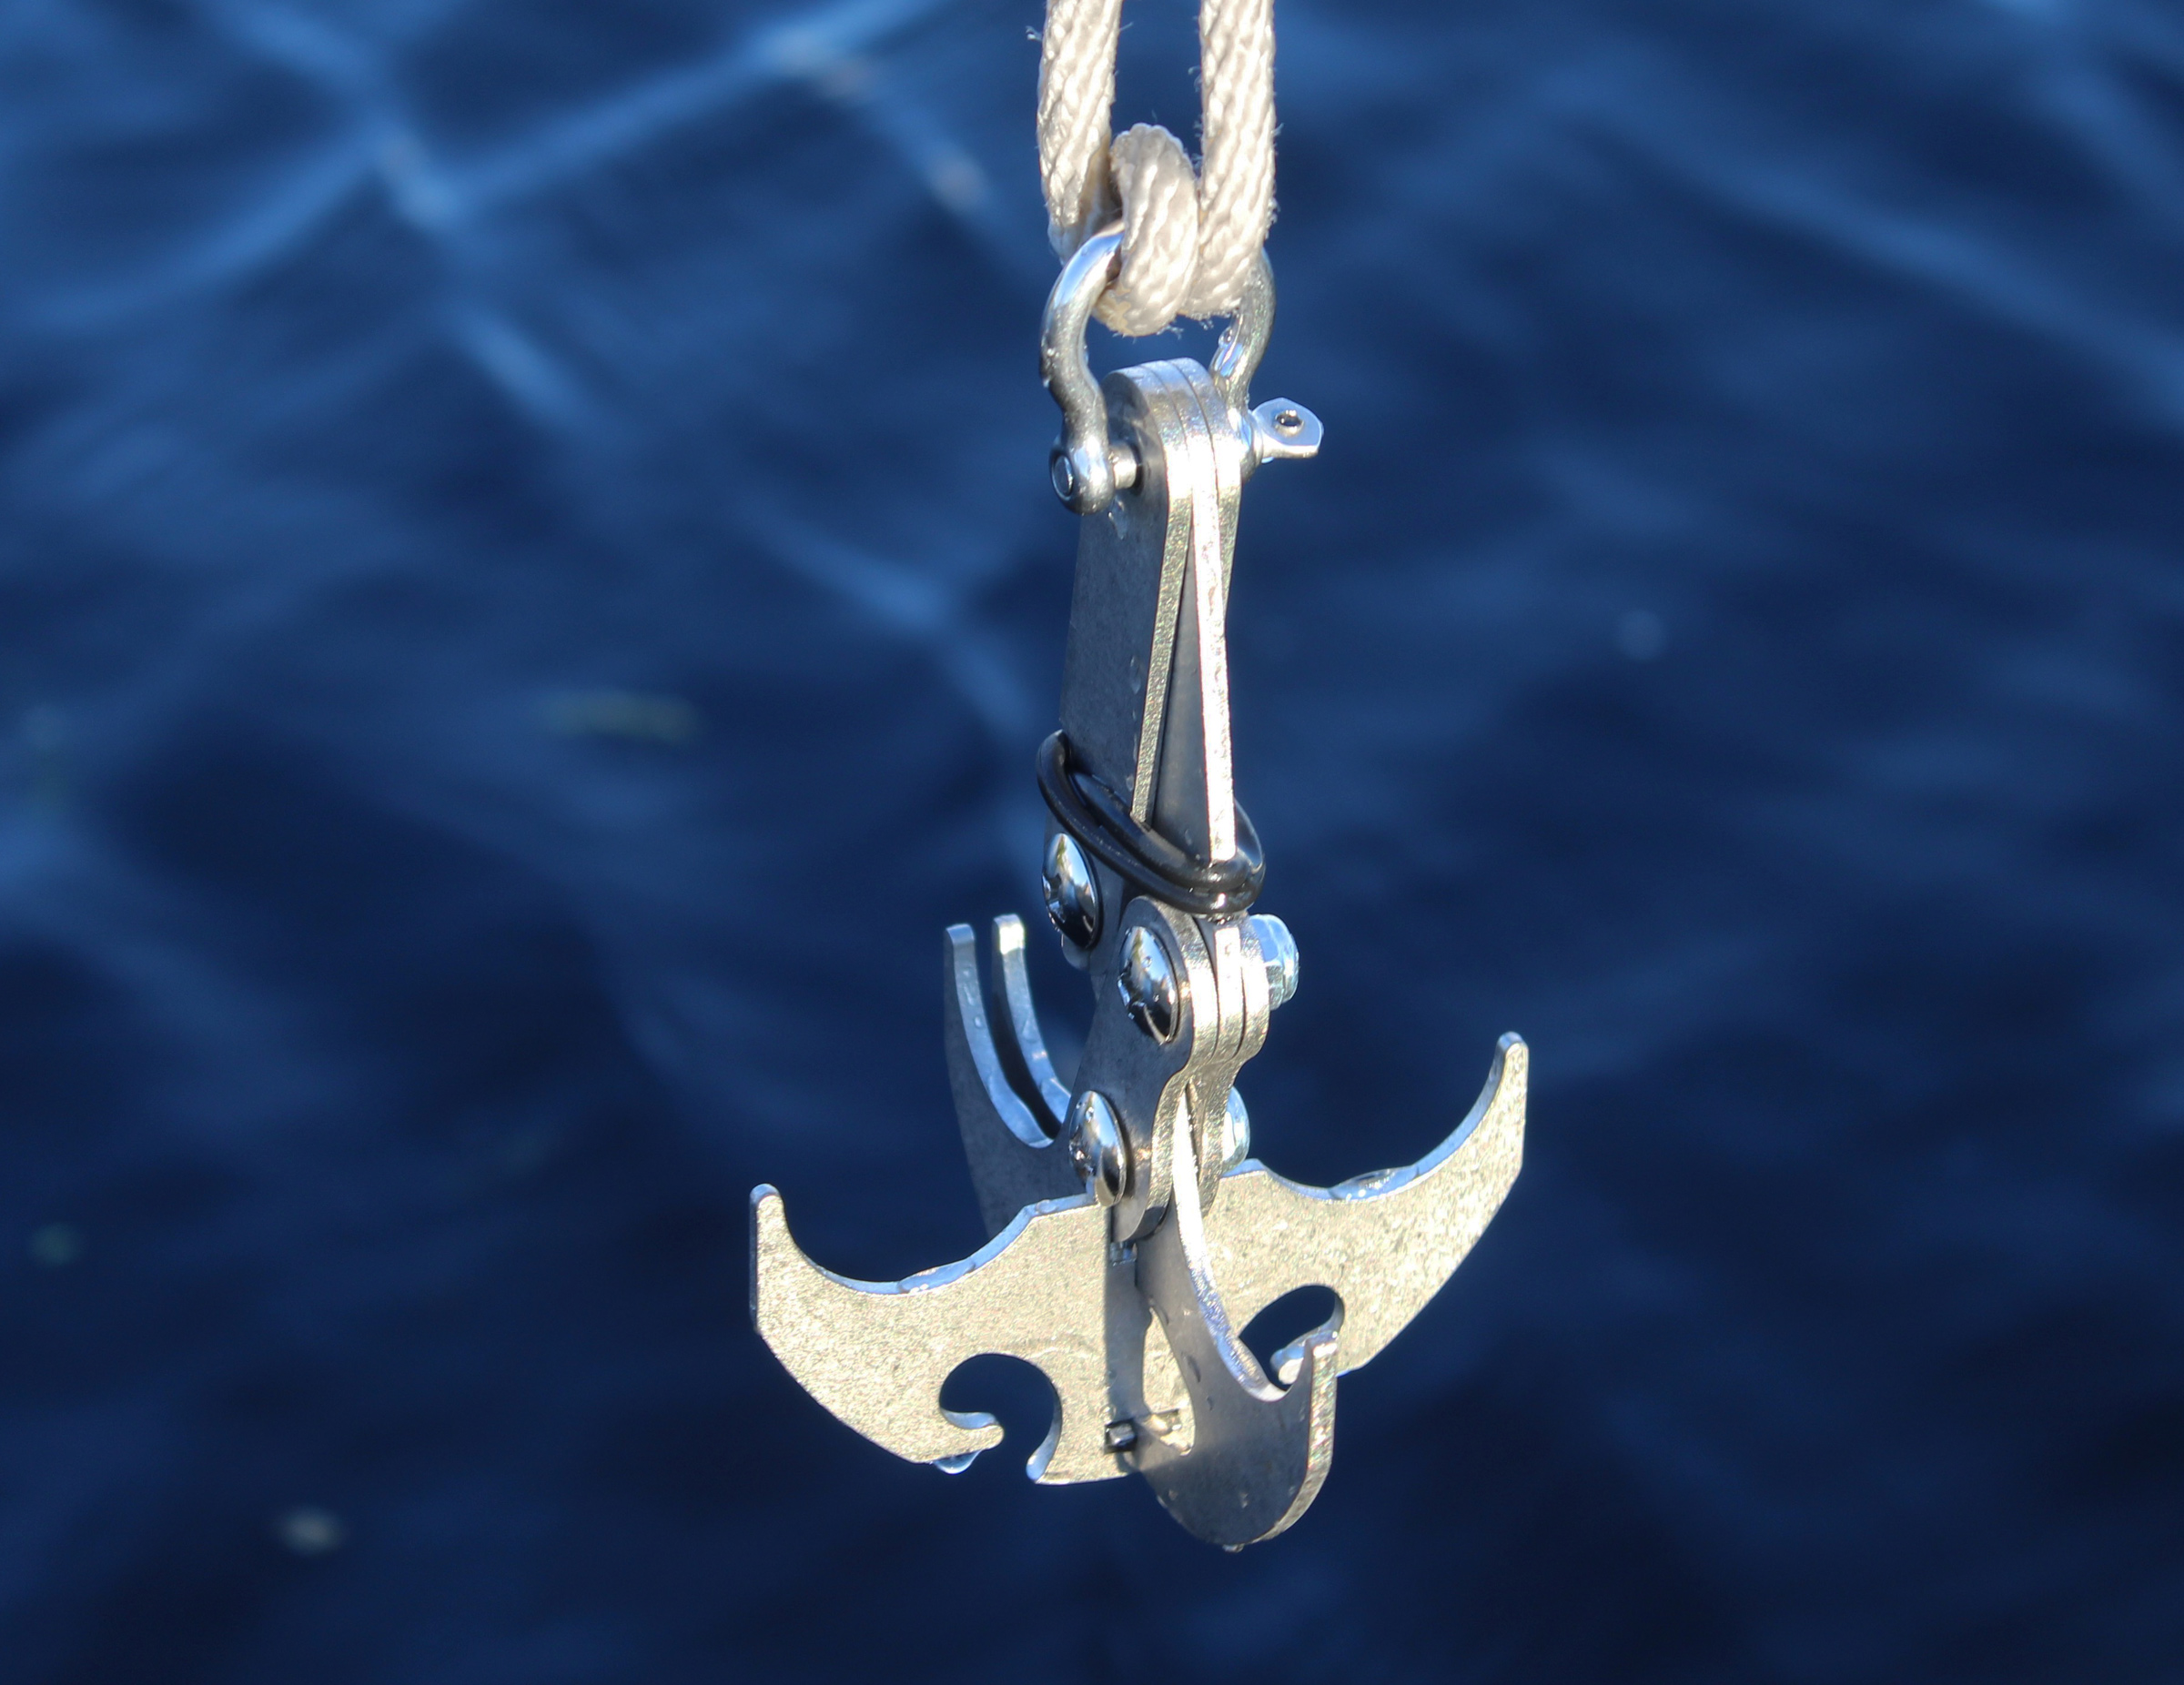
The incident got me thinking about being better prepared to recover something that has dropped in the water. About 100 yards from that same dock, the rudder for my gunning dory slipped free and has been on the bottom. I wasn’t prepared then to recover it, and now, 20 years later, I can’t remember just where it would be. Recovering the rudder might have been possible if I could have done two things: see it clearly through the surface, and get a line hooked on it.
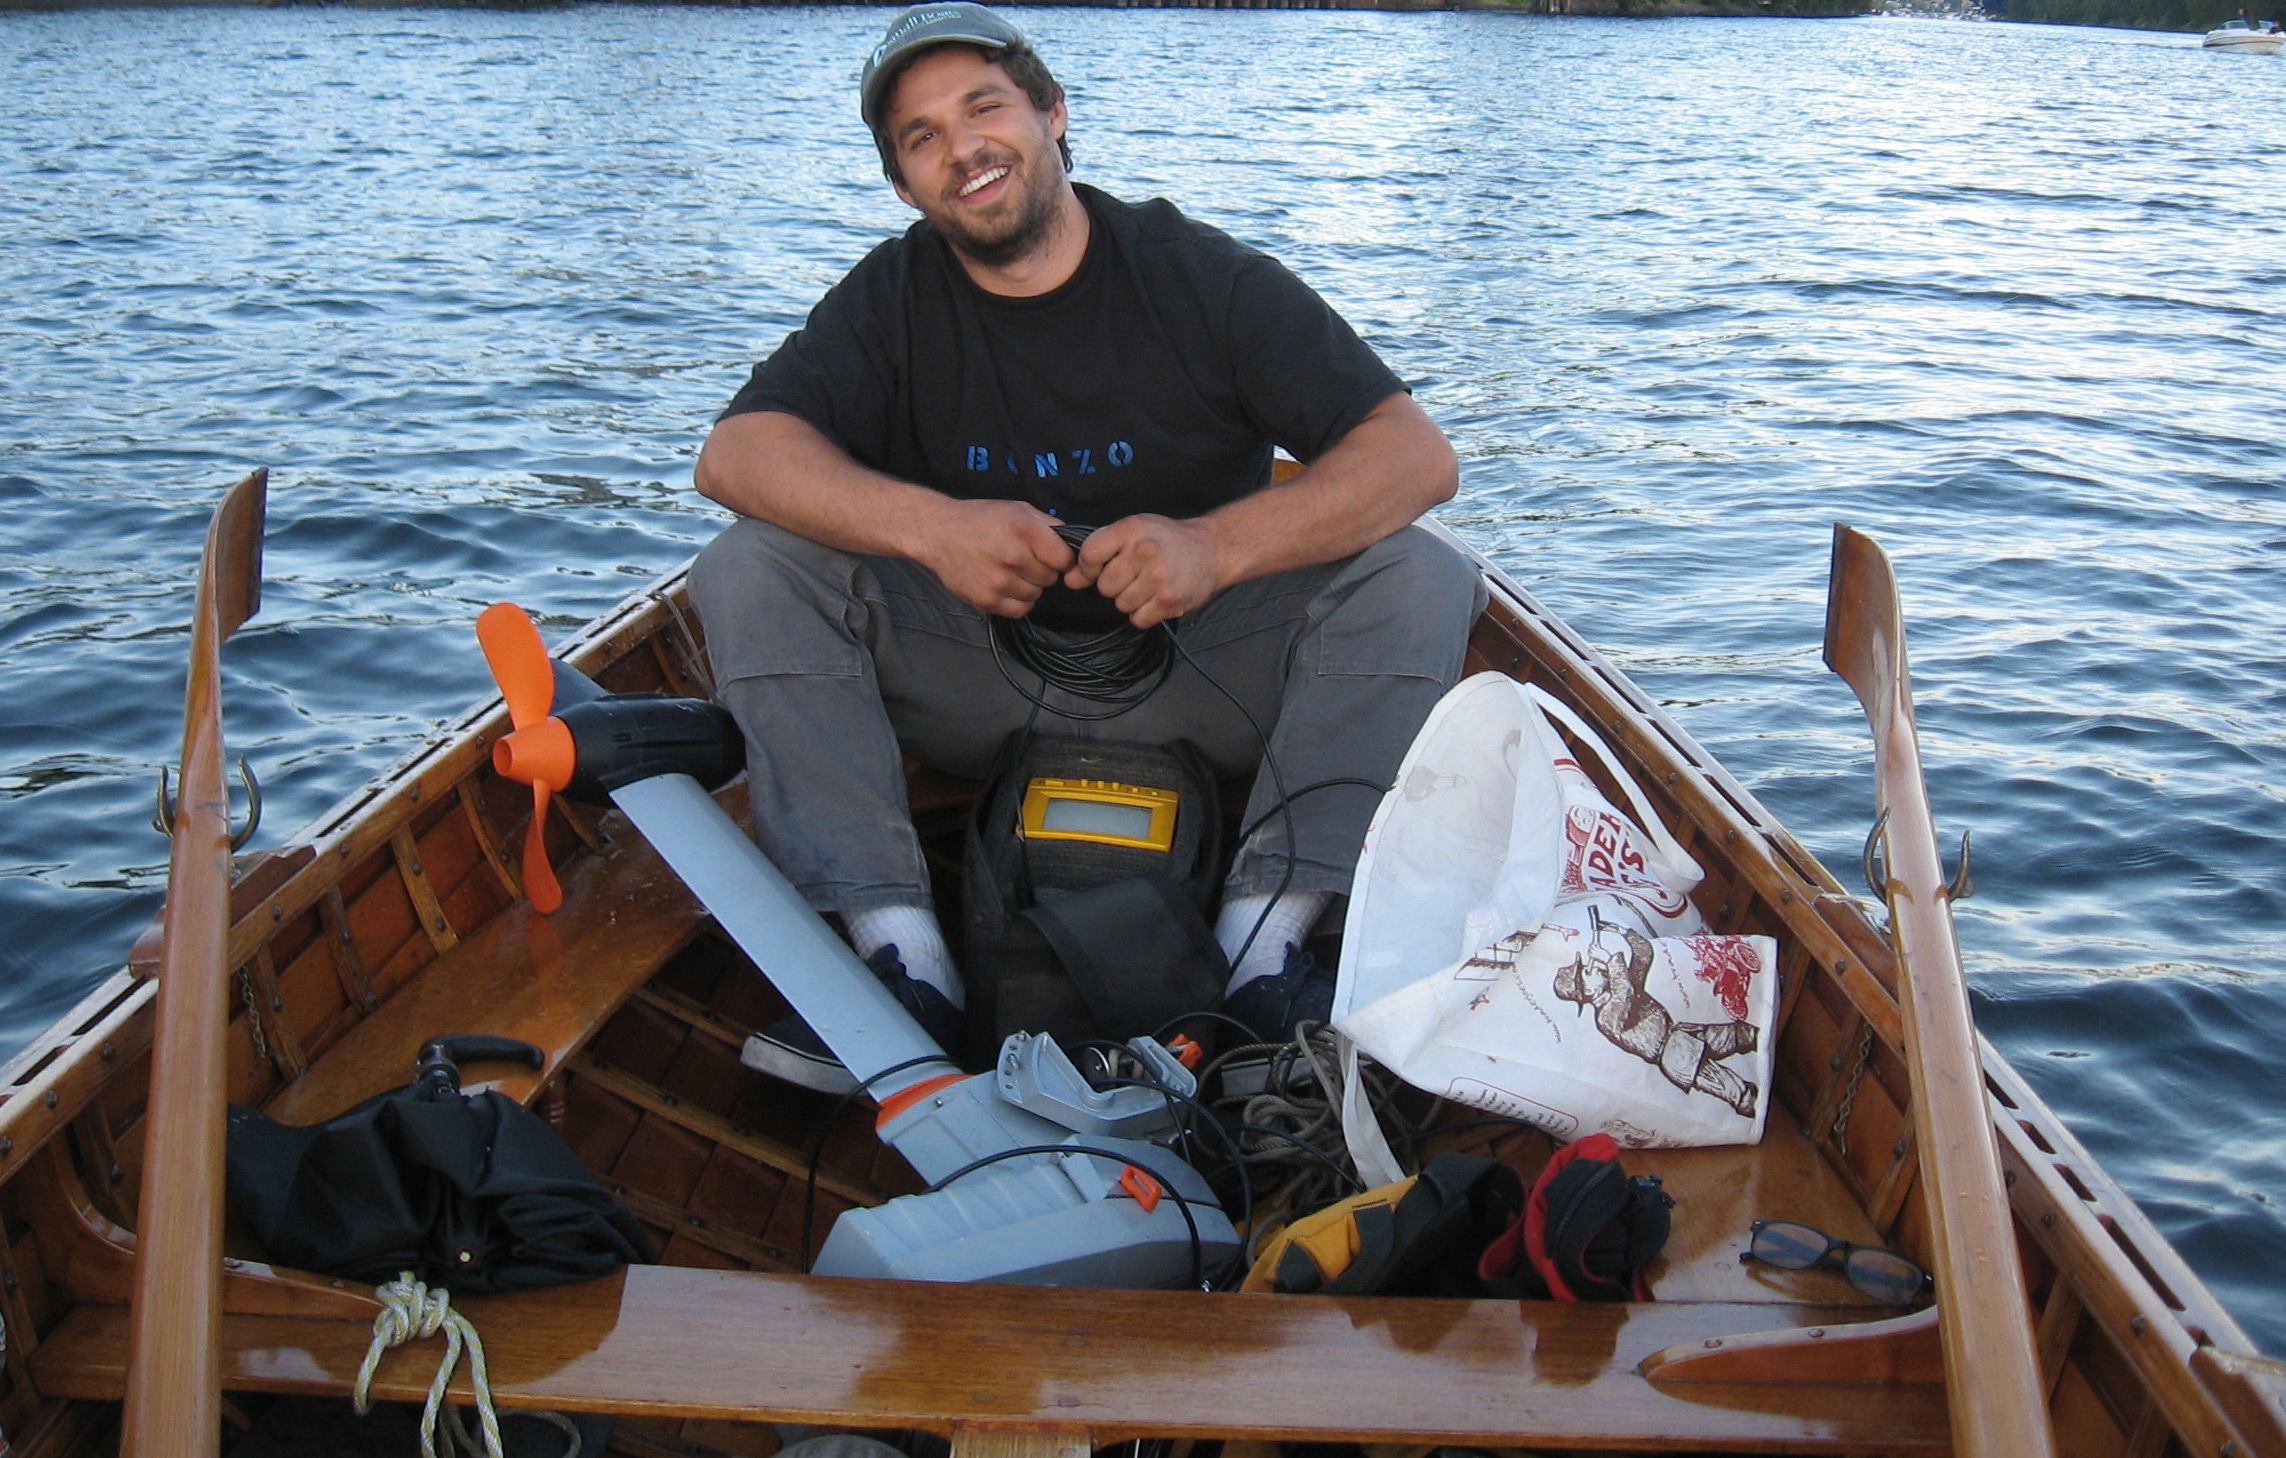
My son, Nate, used an underwater video system to retrieve this outboard that had gone AWOL three days earlier. The yellow video monitor is between his shins and he’s holding the 60′ cable that connects it to the underwater camera.
More recently, I was testing an electric outboard motor that suddenly pried its tiller from my hand, turned sideways, and wrenched itself off the transom. (It’s the very last time I used an outboard without having it tied to a safety line.) The motor went down in about 30′ of water in the middle of the shipping canal, too deep and too dangerous for me to look for it by free-diving. I went home, made a grappling hook out of steel rod, and connected it to a long line and my little underwater video camera. It took three outings at the canal to find the motor, and it was only with my son’s help manning the hook and watching the monitor while I rowed a search pattern and dodged boat traffic that we found and recovered the outboard.
The motorwell on the Caledonia yawl is located just to port of the skeg. The plug that fills the hole when the motor is not in use has a window. The box-like plug is also a handy place to toss my hat.
When I built my Caledonia yawl, I incorporated a simple device for seeing into the water. The plug that fills the motorwell while I’m rowing or sailing has a plexiglass bottom. It comes in handy when I’m sailing in shallow water and need to keep an eye on the bottom, but it has some limitations. When I was exploring the fringes of Yellow Island in Puget Sound’s San Juan archipelago, I got a brief glimpse of the tip of a submerged boulder just before it tore my rudder off.
My helmet required weights front and back—about 90 lbs altogether—to get it to sink the volume of air inside it.
I’ve had my best view of the underwater world with a hard-hat diving helmet I made out of plywood and plexiglass. A plastic pump for inflating rafts, manned by someone I can trust, supplies air through a 50’ length of garden hose. I made my first dive with it in a marina, and I was quite content to just sit on the bottom, 12’ down, looking out across the sandy wasteland under the docks. I could have stayed there for quite a while, but I could tell by the diminishing airflow that my pump man was getting tired.
With air pulsing through the garden hose, our friend Bobbie begins his descent while Nate looks on.
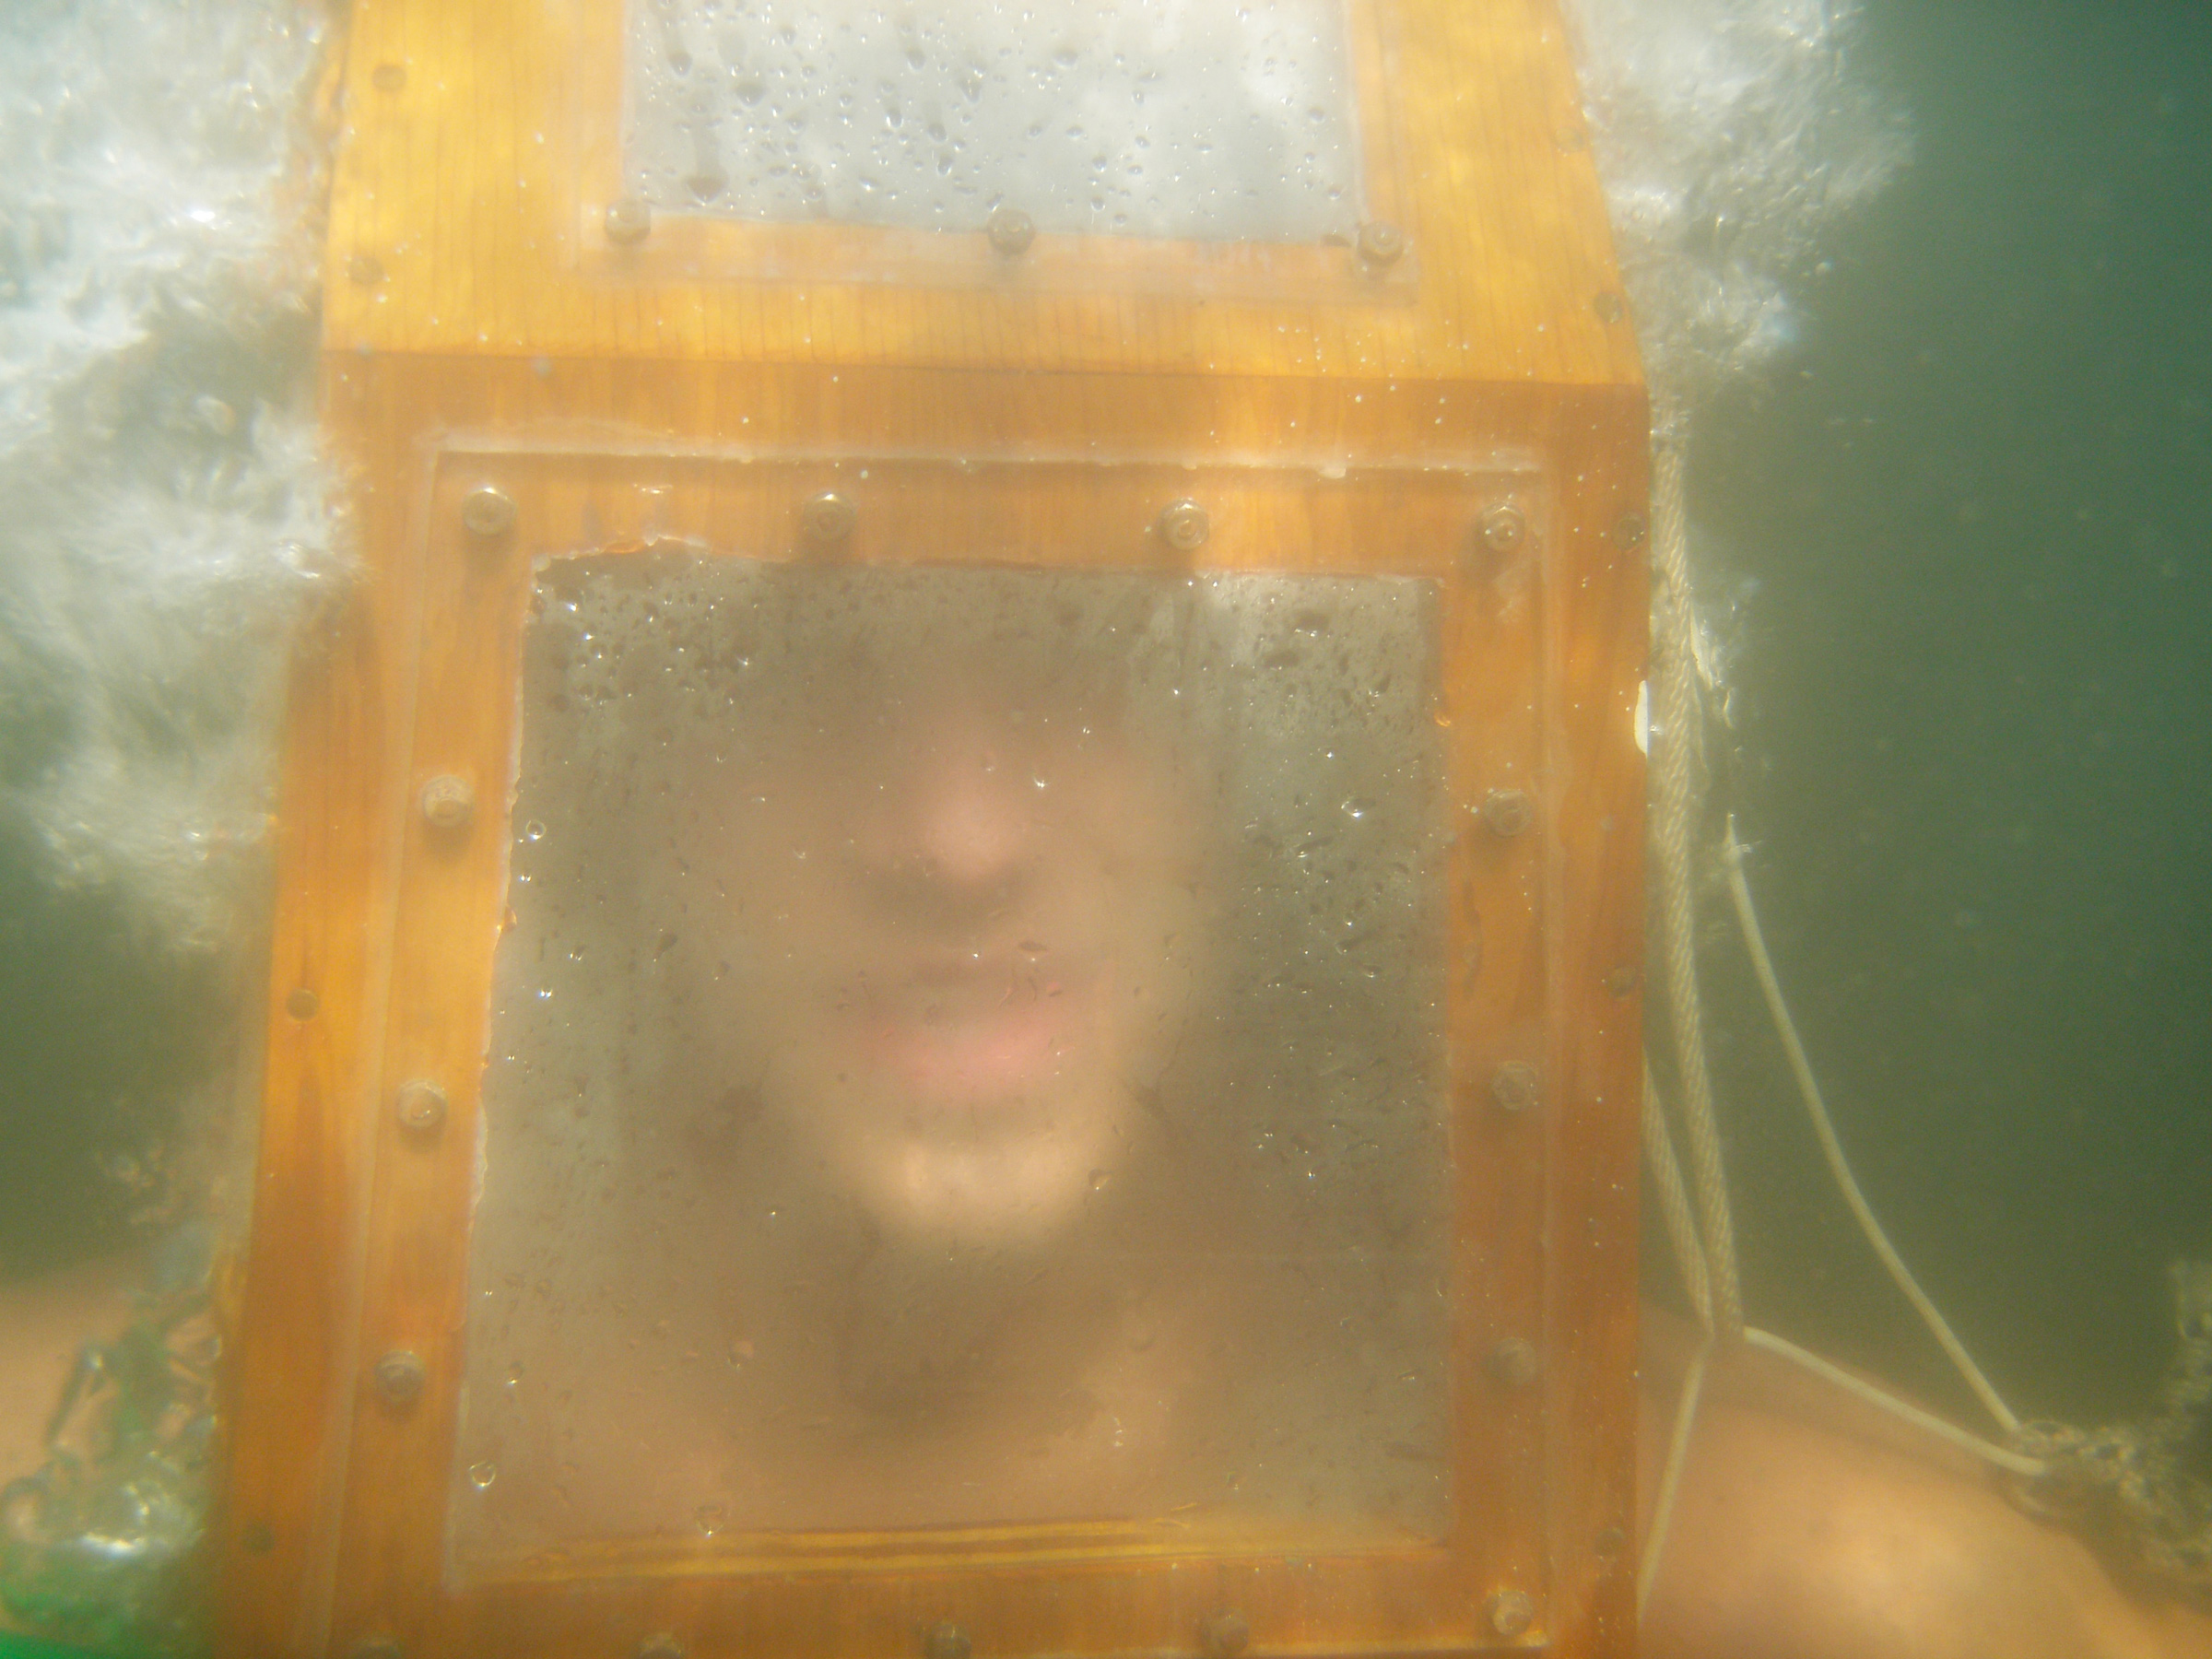
While the helmet’s four windows offer a good view of the underwater world, the noise of the bubbles in the helmet gets to be quite loud. It’s not exactly tranquil.
An easier way to see underwater is through a different kind of windowed plywood box, one used at the surface. On the south coast of Menorca in the Mediterranean, I saw fishermen wading in the shallows, bent over with their faces pressed into things that looked like oversized megaphones. They had openings at the top to fit around their eyes and windows on the bottom. I never found out what they were looking for, but I was intrigued by their devices, called bathyscopes or aquascopes. They’ve been around for quite a while, perhaps almost as long as window glass has been.
The contoured opening keeps light from getting into the bathyscope and making distracting reflections on the plexiglass window. I’ll add foam strips to the perimeter for comfort.
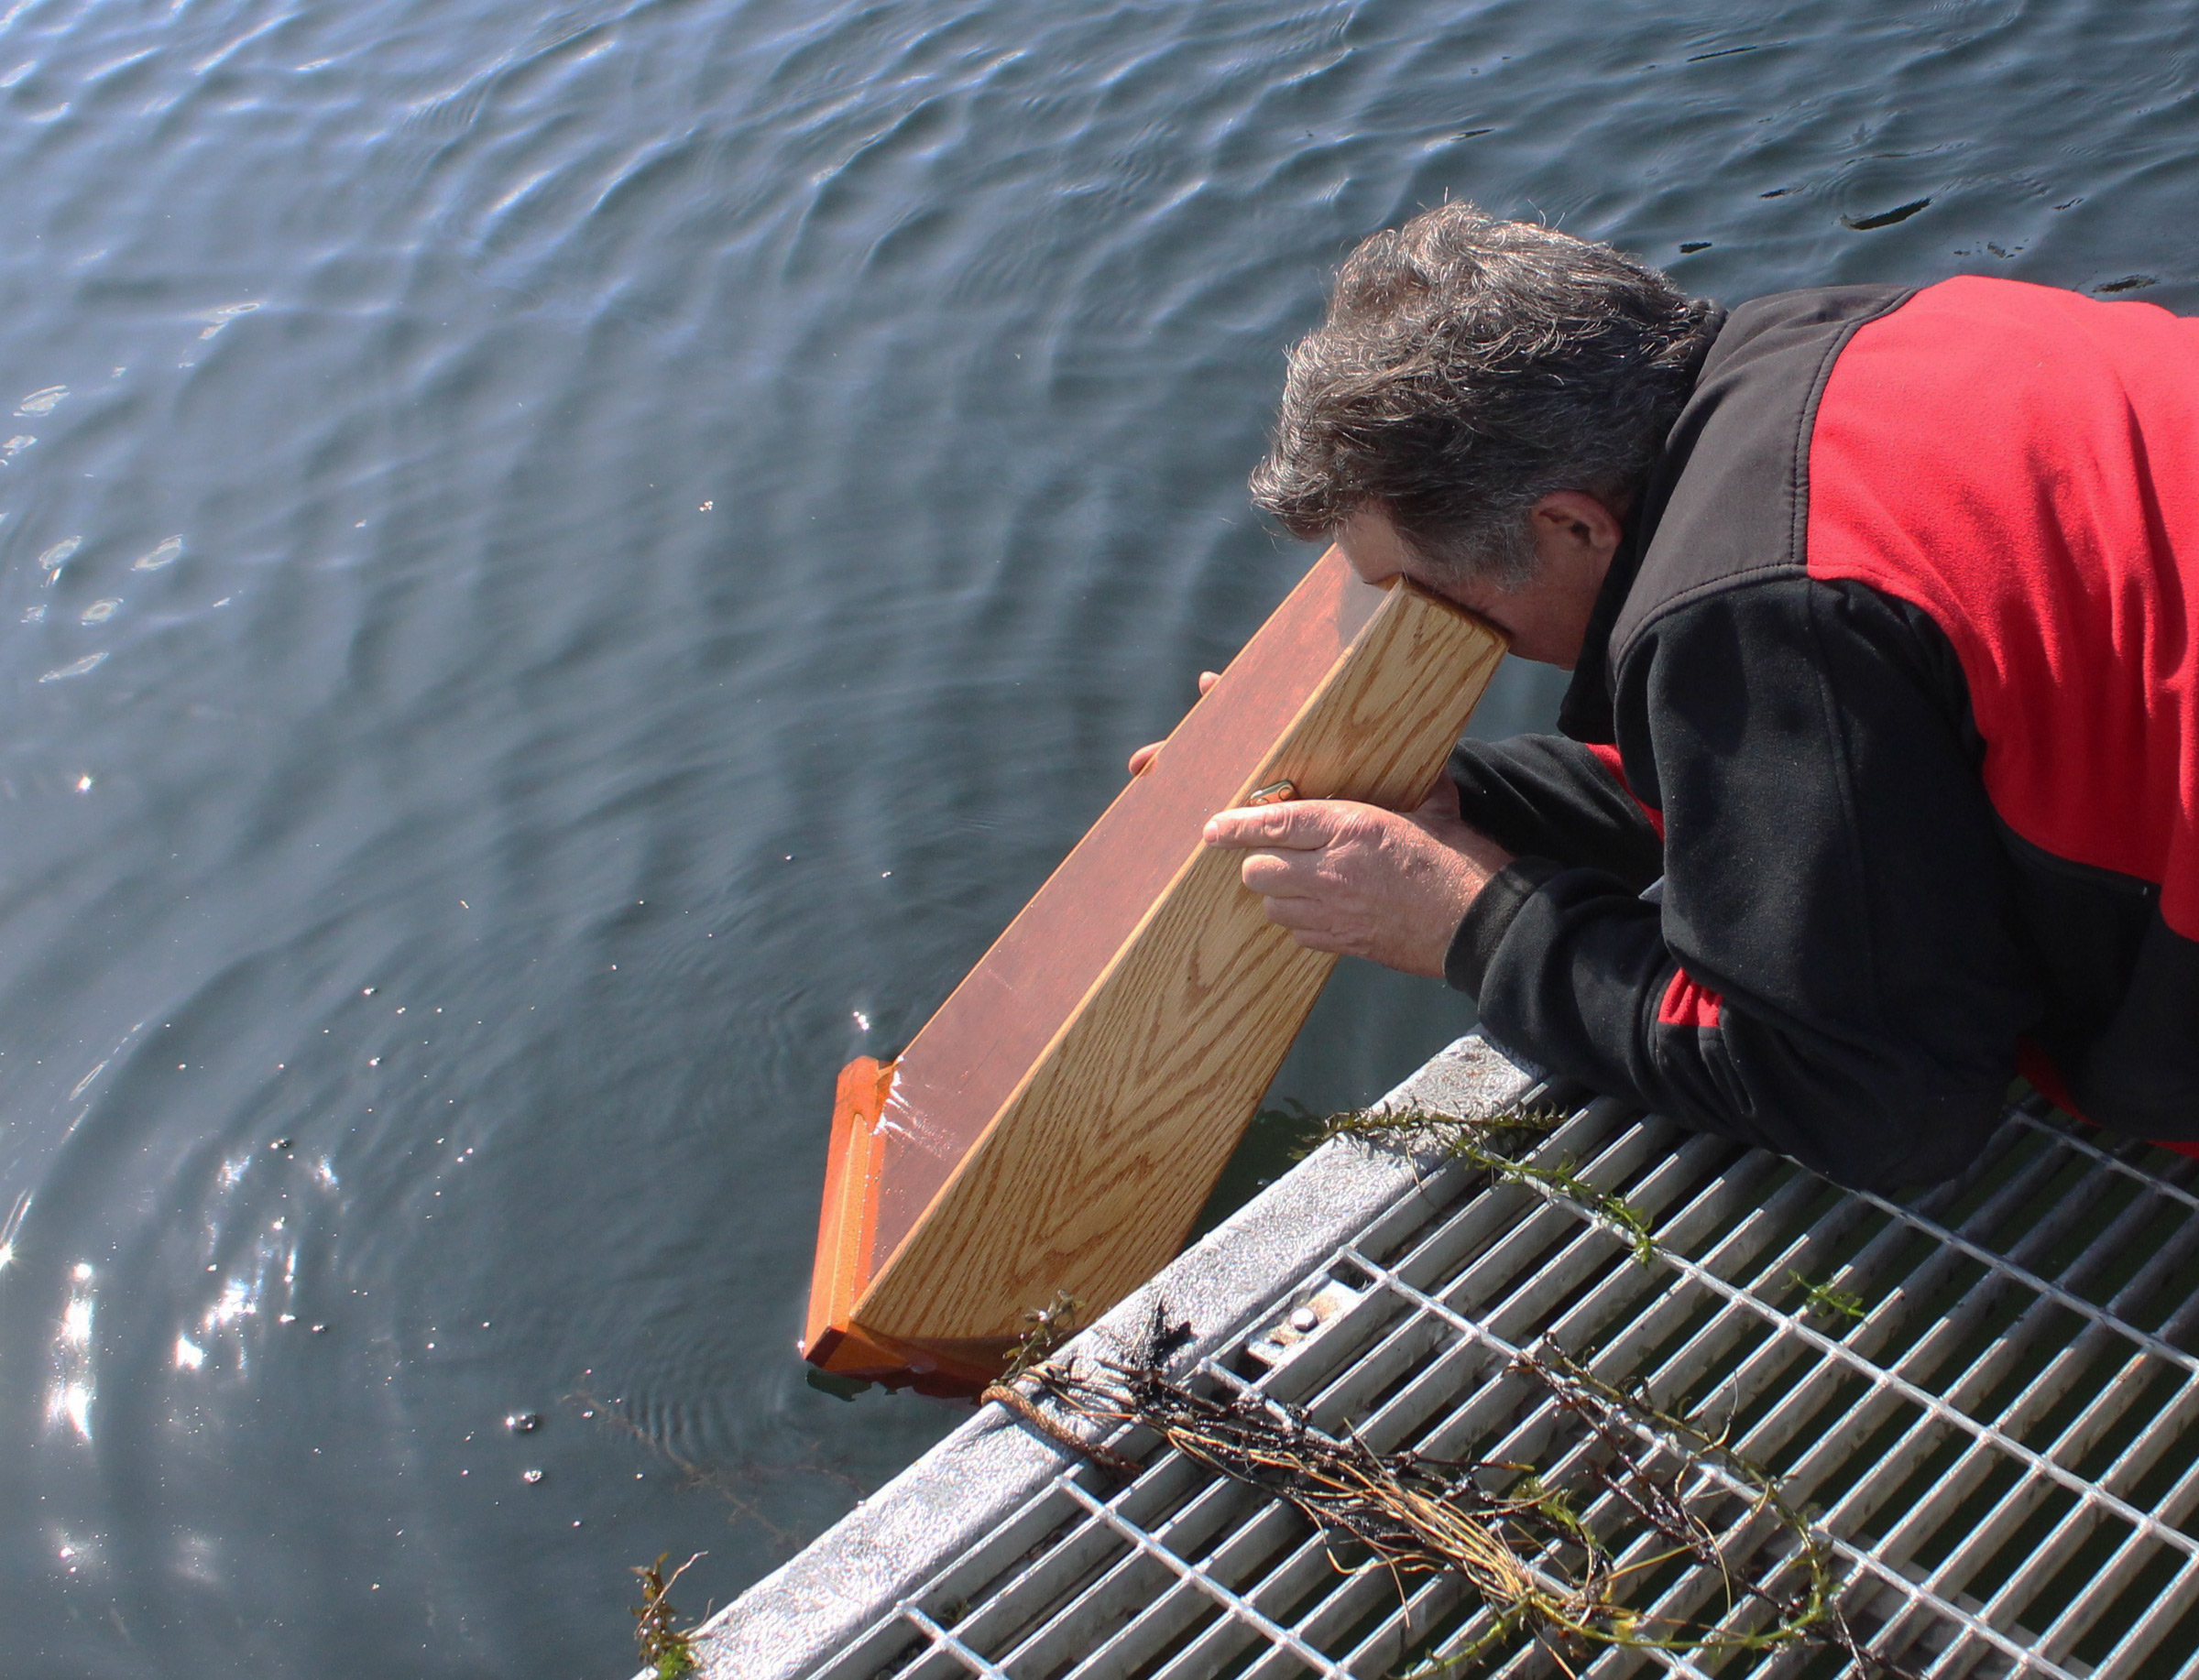
After worrying for a while about the unfortunate man who’d lost his pants, I made a bathyscope from stuff I had lying around the shop: some leftover mahogany plywood, oak from a desk I’d made years ago, a scrap of 1/4″ plexiglass, and a pair of brass window-sash handles. The top end is 3″ x 5-3/4″ with cutouts for my forehead and nose. I pressed a length of lead-free solder to my face to make a contoured pattern.
The 1/4″ plexiglass window sits in the recess created by the trim framing the bottom of the bathyscope. A thin bead of silicone caulking, applied only on the outside, makes a watertight seal that will allow easy removal of the plexiglass if it needs to be replaced.
Painting the interior flat black eliminates reflections and improves the view.
The window at the bottom is 7″ x 10″ and recessed in the trim pieces at the bottom so it won’t get scratched when set down. The interior is painted flat black to make the best of the underwater view. The handles are angled for a comfortable grip and offset from one another vertically to provide firmer control if the water’s a bit unsettled.
I had a clear view of the bottom off the end of the dock, but I saw no sign of the missing pants, just a shopping cart and a bicycle.
The bathyscope was ready a few days after I’d met the man looking for his pants, so when I returned to the dock with it and a grappling hook I didn’t have much hope of finding the pants, or reconnecting them with their owner if I did. I got a good look at the bike and the shopping cart, guided the hook to them, and hauled them up. There were no markings on the cart, so I’m stuck with that. I took the bike to a service center where the company repairs them. The technician there recognized it as an older model, so it had been missing for quite a long time.
While letting the boat drift at the end of its painter, Nate scanned the bottom for treasure.
With winter coming, the water here will be getting much clearer. I’m planning on rowing around the marina with my bathyscope, grappling hook, and a large magnet. I suspect the water there has been hiding all manner of treasures under its mask of ripples and reflections.
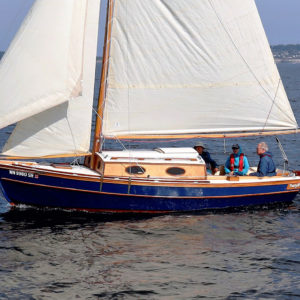
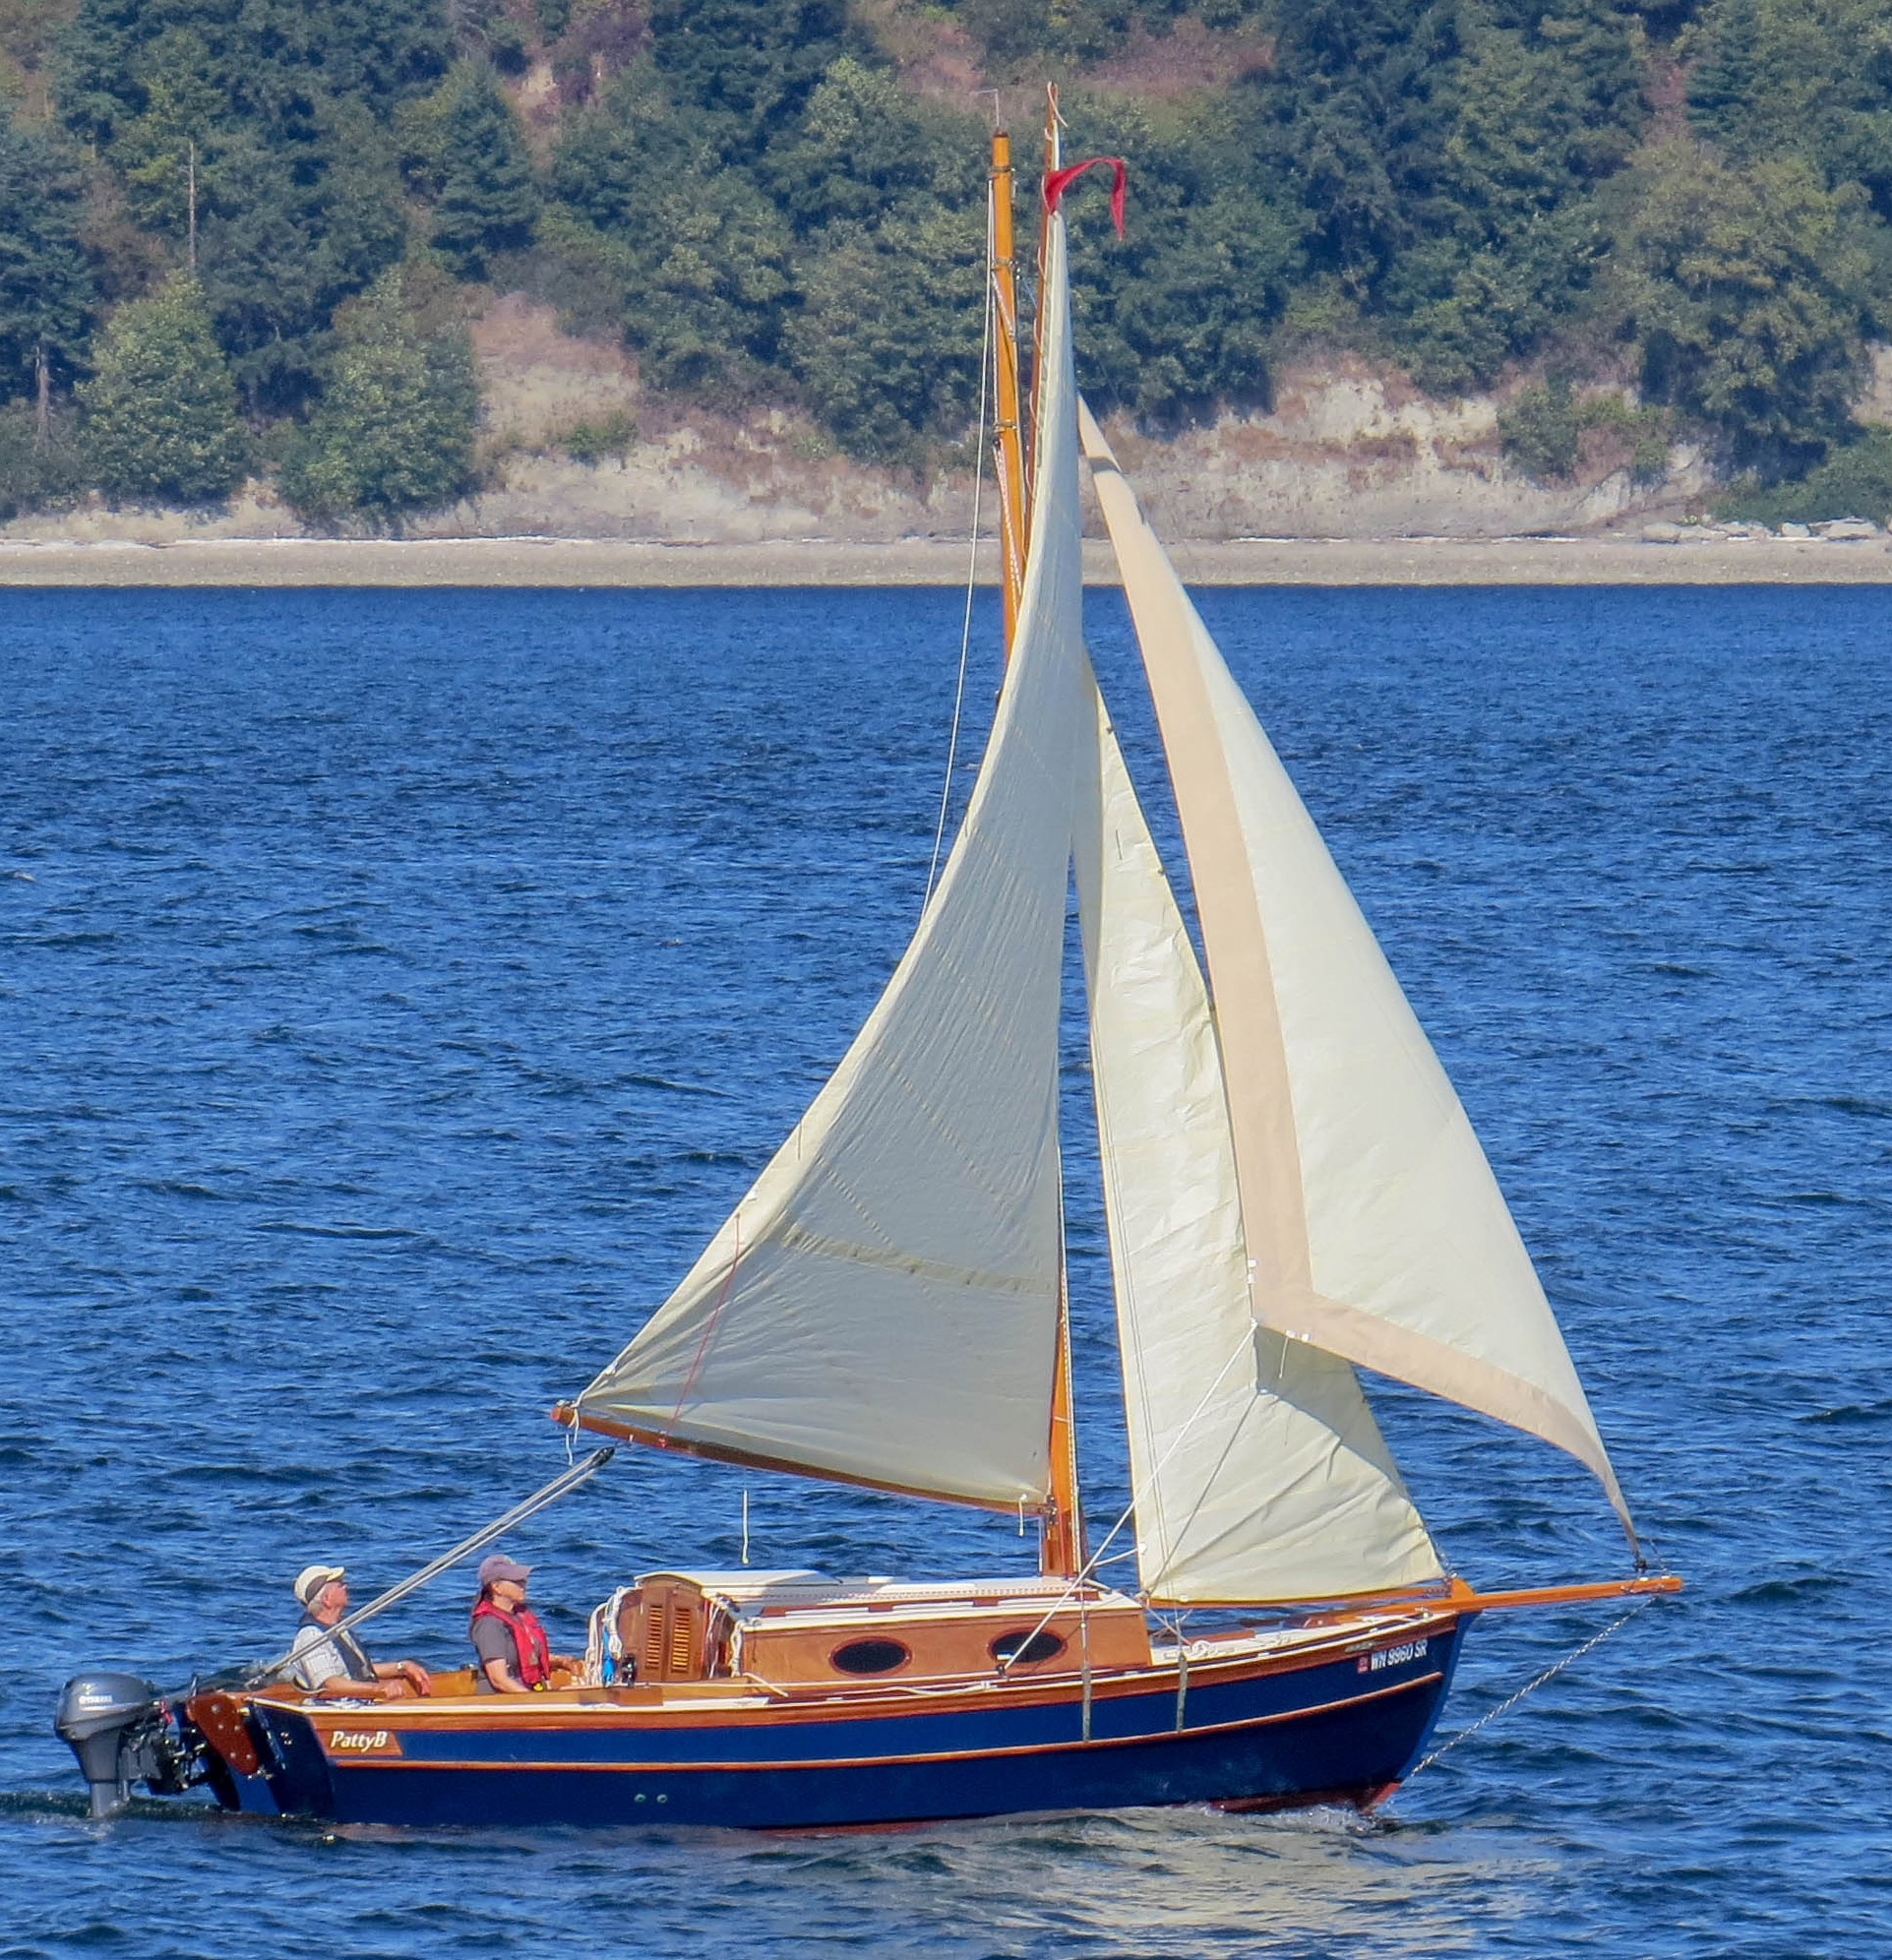
A cruising sailboat in the 20′ to 22′ range resides at the high end of the spectrum that most amateur boatbuilders can realistically aspire to. Go bigger and you need time, money, space and skills that few of us have. But there’s a delectable spread of choices at the level just below the impossible dream—plans by at least a half dozen highly regarded designers. Of these, Sam Devlin’s Song Wren 21, was, in the end, the most compelling. I had already built two smaller stitch-and-glue designs from Devlin Designing Boat Builders, so I felt comfortable with the process.
The Song Wren can be built with a shallow slotted keel and a centerboard for sailing thinner water and easier trailering and launching. I was drawn to the fixed-keel version for its ballasted-keel stability and cabin space unobstructed by a centerboard trunk. Its profile exuded the refined dignity of a much larger craft, and the gaff-cutter configuration offered the complexity I crave in a sailing rig. I love to stay busy, tinkering and tuning sail trim.
Devlin had drawn the Song Wren in 2011 as a commission, but nobody had yet built one, so no one could report on how it would sail, and if there were bugs in the design. I had budgeted up to $36,000 for parts and materials, a figure Devlin confirmed to be in the ballpark. Committing this pile of money to a boat that has never before existed, to be executed by an amateur who just barely knows what he’s doing, would seem edgy by any objective standard. But anyone who’s ever loved a boat, or a drawing of a boat, understands.
Dennis Ryerson
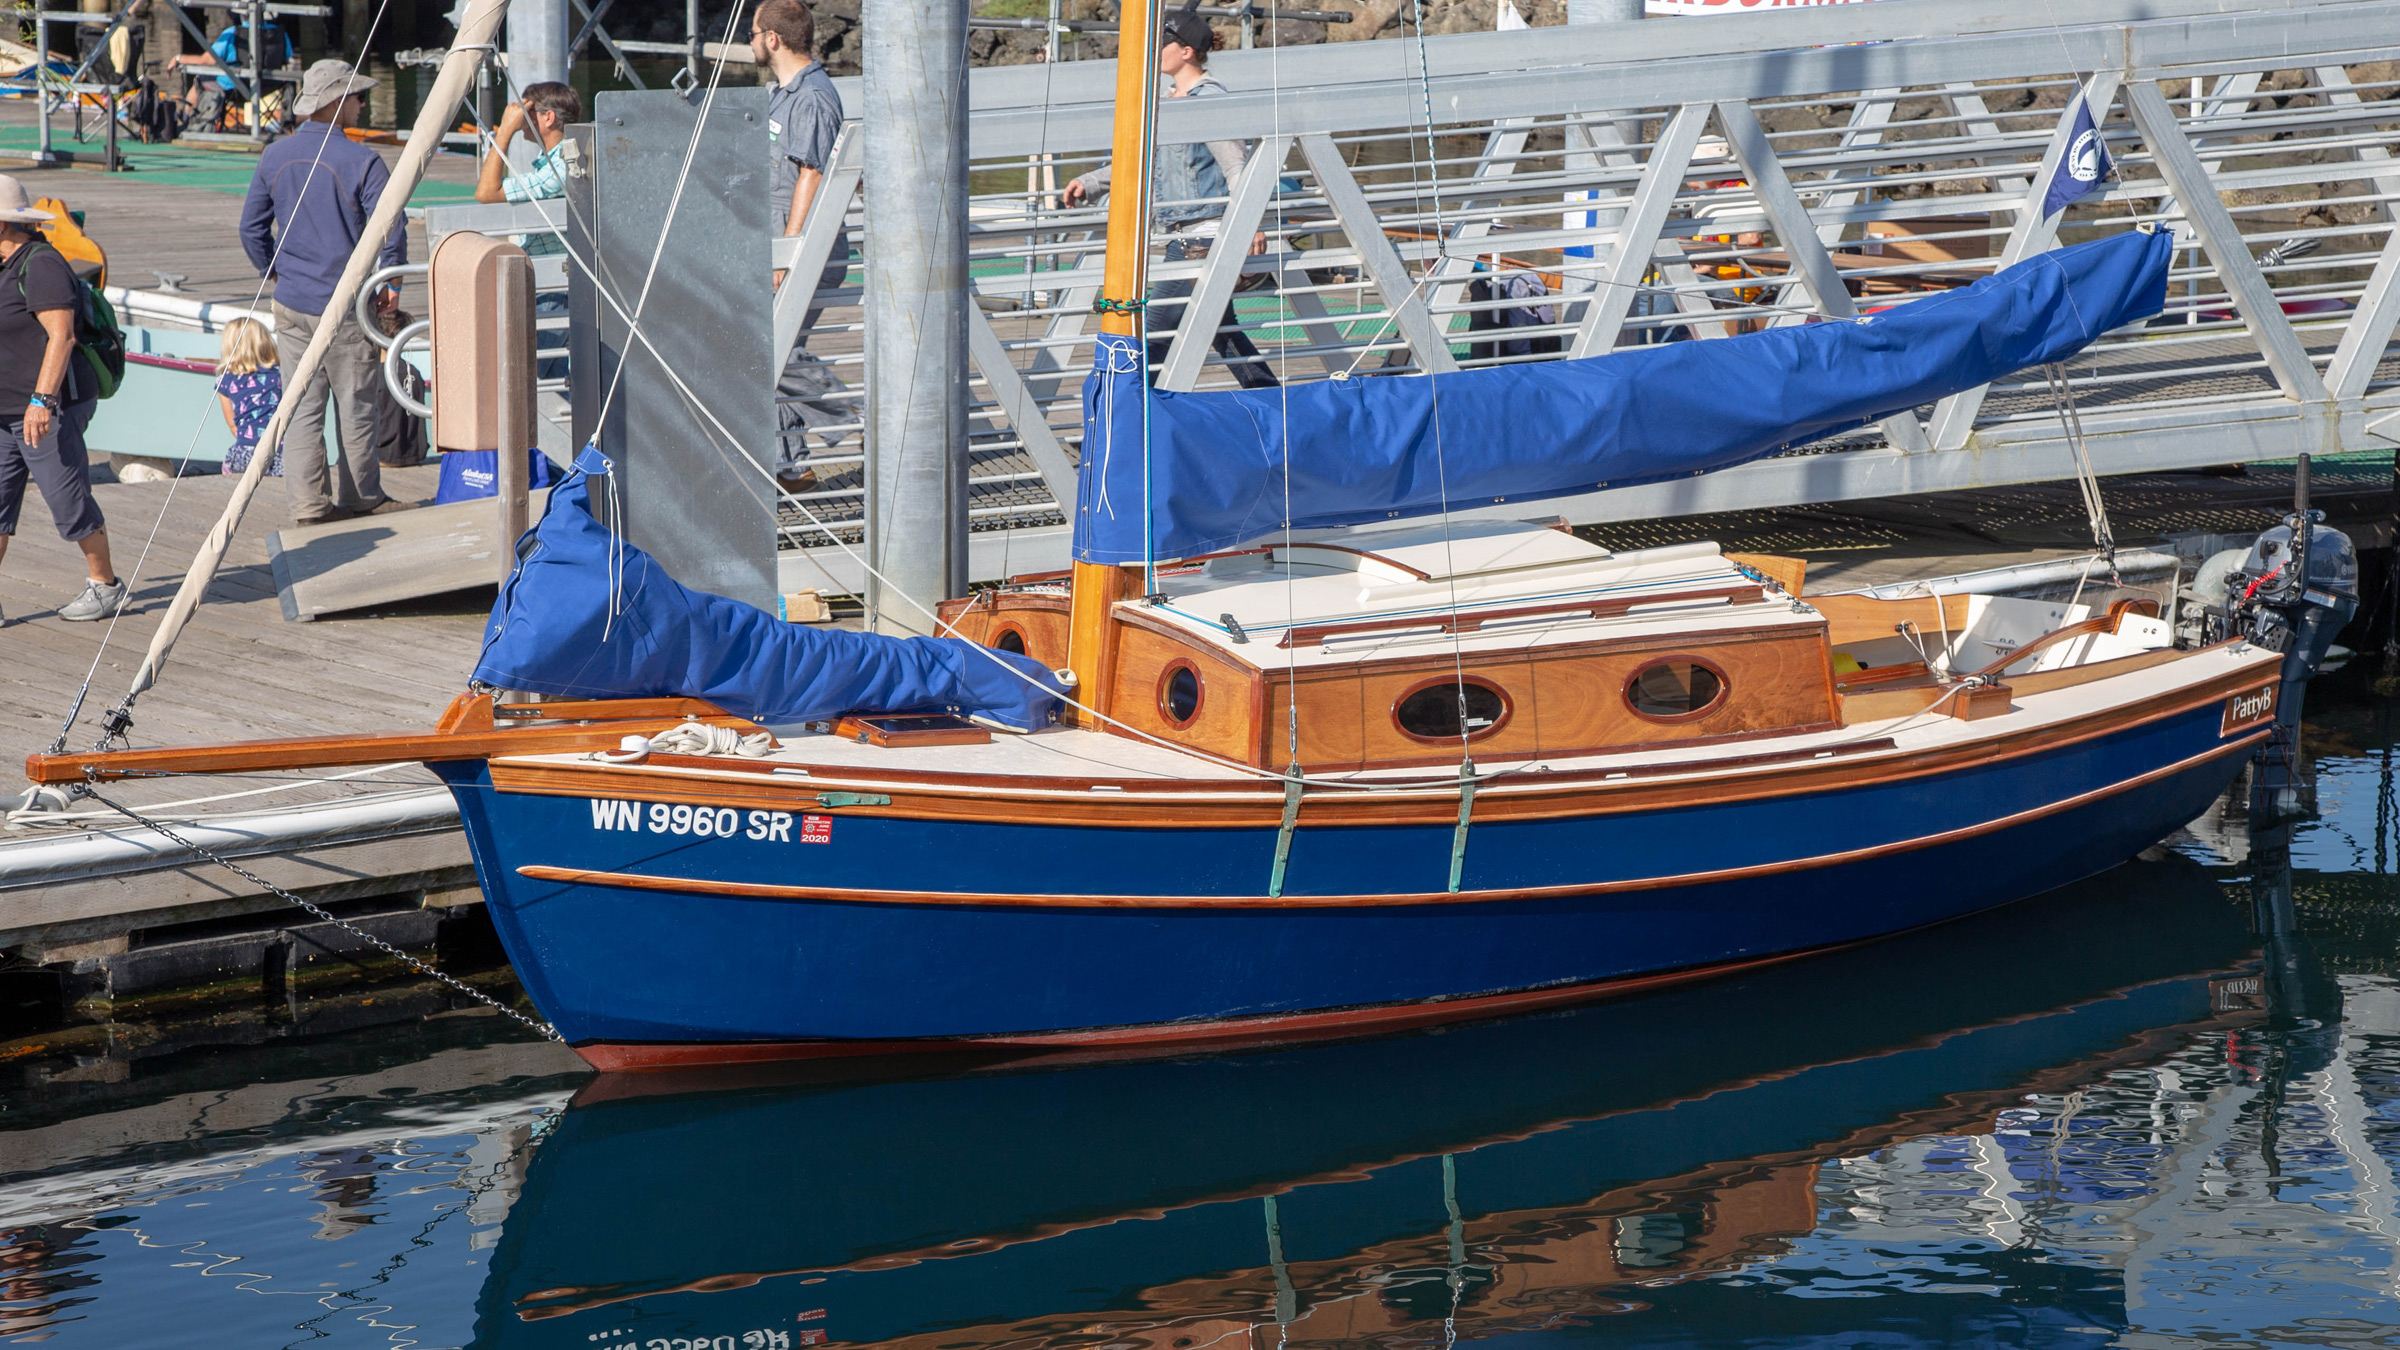
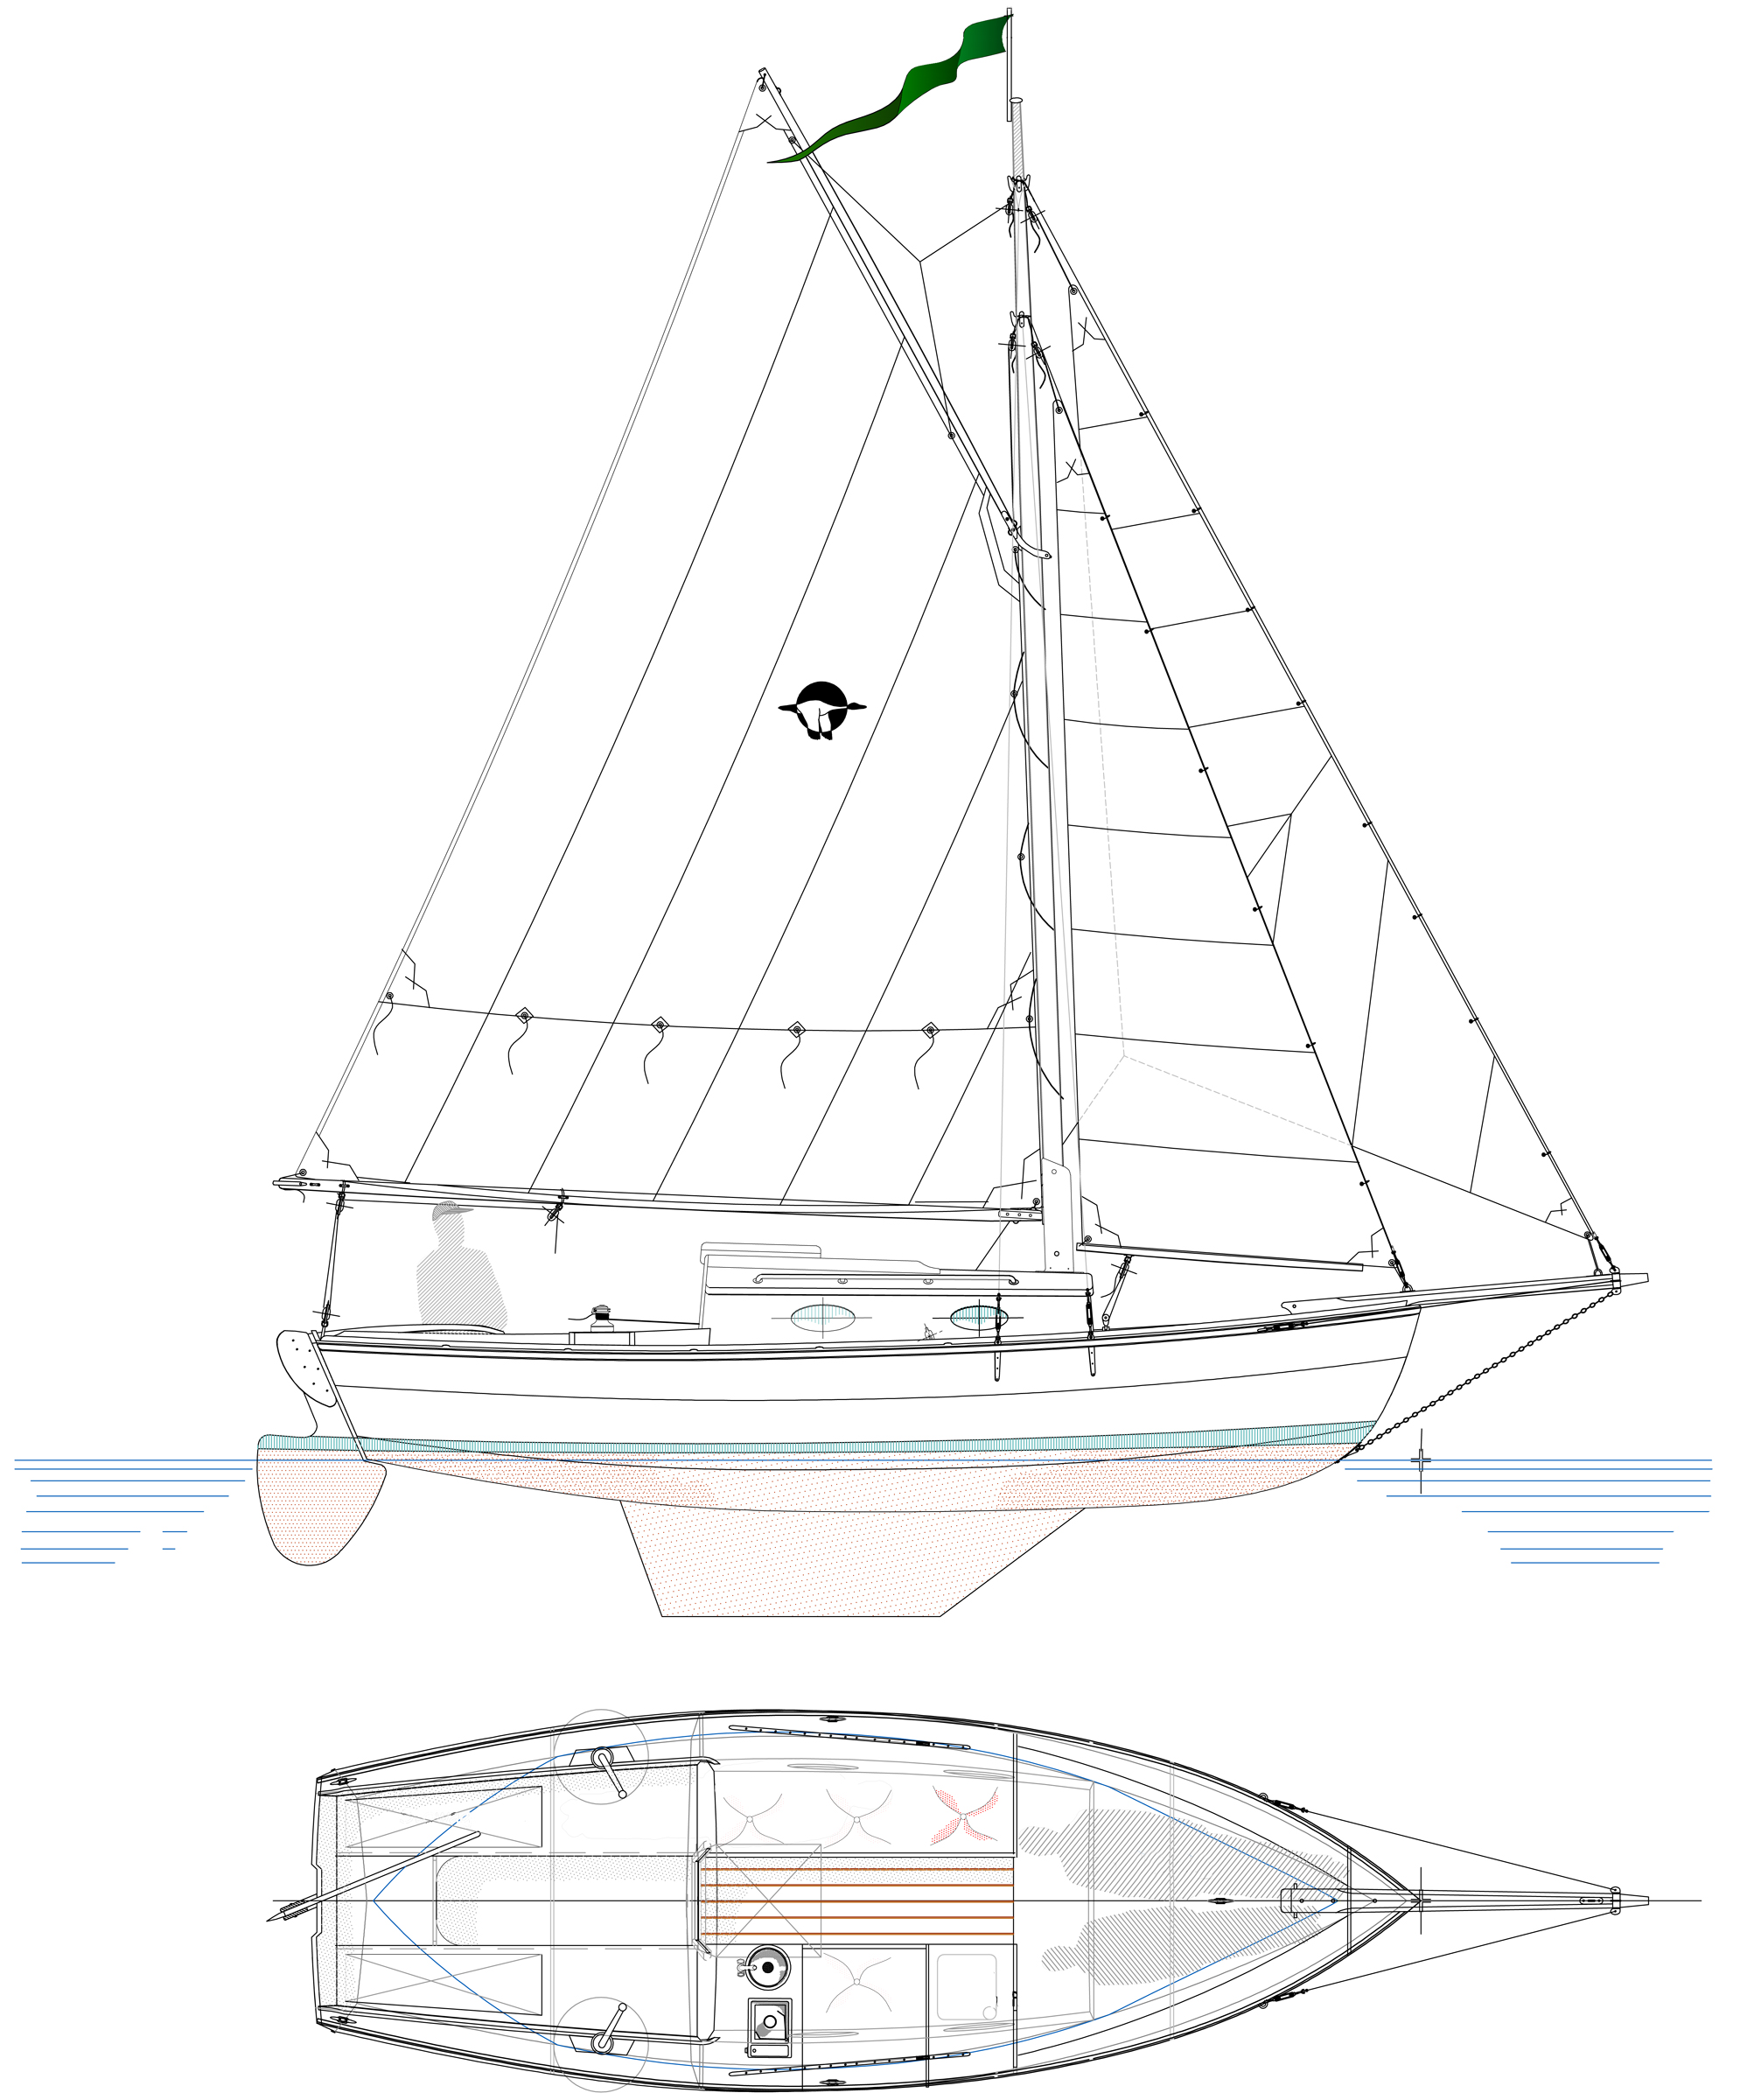
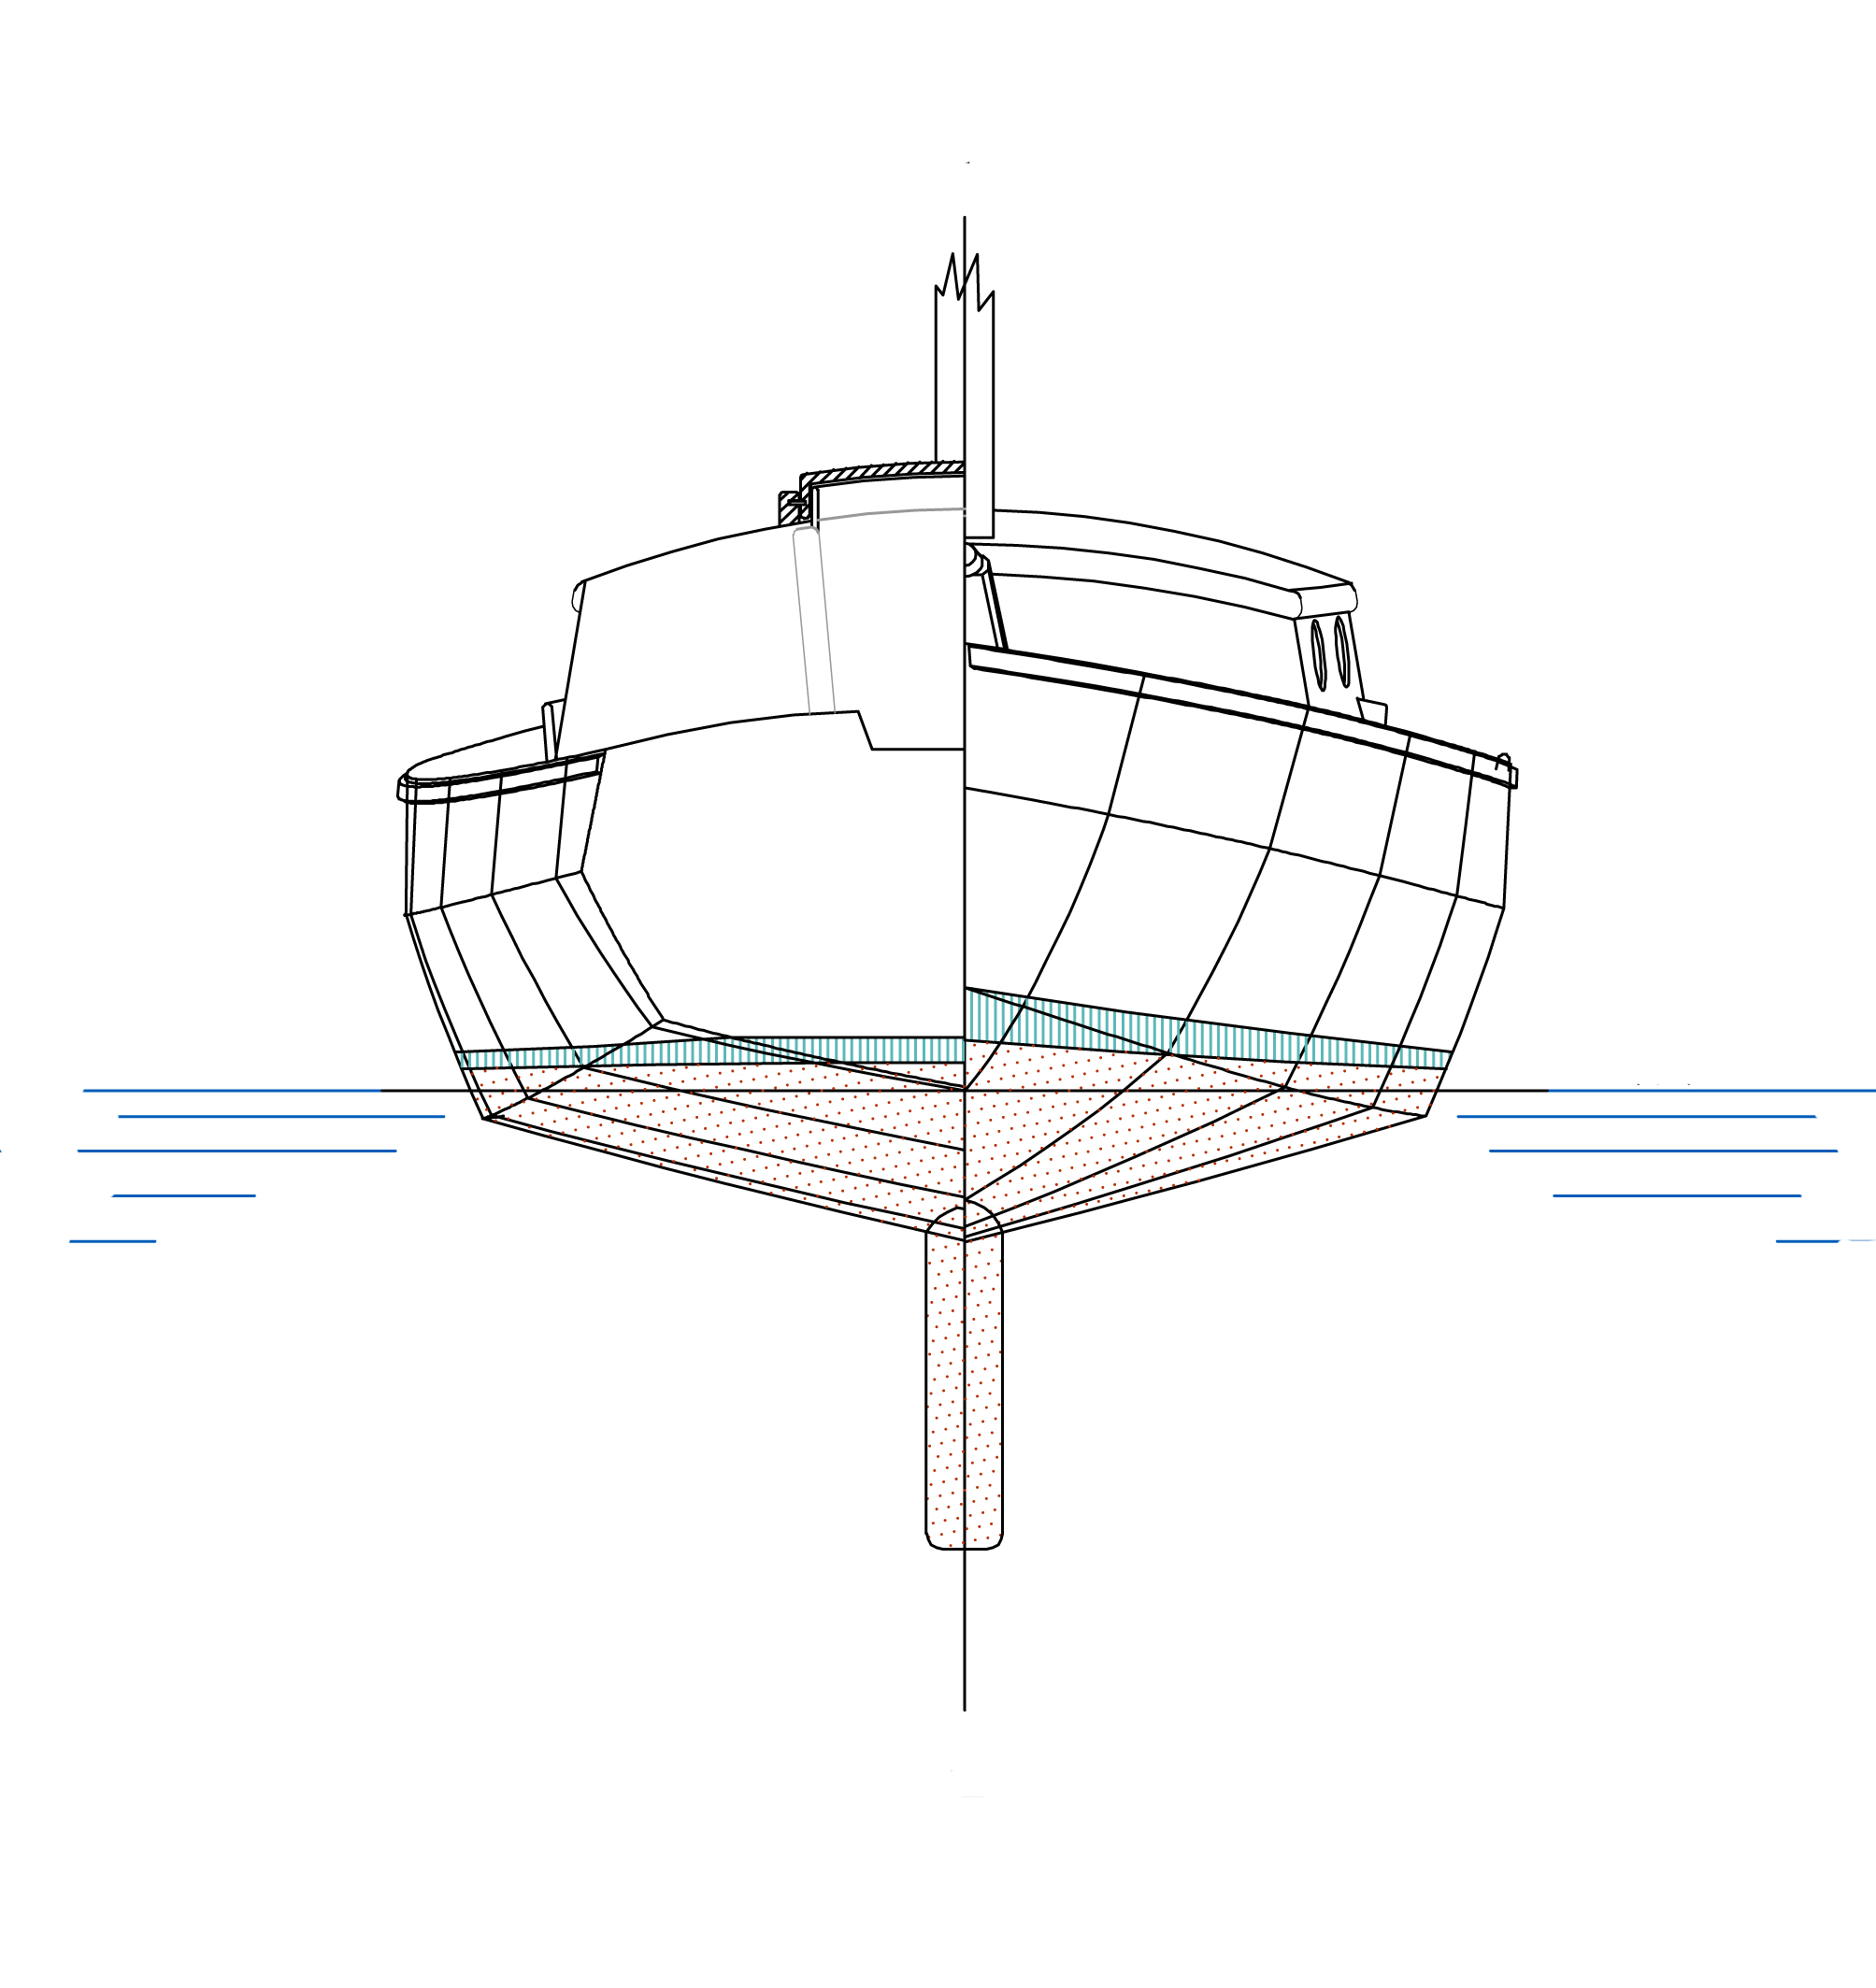
The Song Wren is the first of Devlin’s smaller sailboats to use double-chine construction, and the upper chine provides an opportunity to mount a rub strip the full length of the hull. This makes the hull appear longer and lower, giving it a more serious, big-boat look.
Devlin can supply a kit of CNC-cut okoume plywood panels for the hull and bulkheads, so I went with that option. Not only does it relieve the builder of the dismal job of scarfing plywood, it also provides a fiberboard building jig with slots that hold and align the Song Wren’s five bulkheads. This ensures that the hull will take form accurately, and that an insubordinate builder will not tinker with the basic design. There’ll be no sneaking in an extra 6″ of overall length, nor robbing from the cockpit to make more cabin. Amateur builders are probably better off with such temptations foreclosed.
The hull is built upside down on the jig, and the two-chine design (two side panels and one bottom half per side) made the handling of the big pieces manageable—with the help of one dedicated and capable friend. Topsides, I made one significant structural and aesthetic change, with Devlin’s approval. His plan called for a mast tabernacle to sprout from the cabintop with a steel compression post to carry the load to the keel. I planted the tabernacle on the deck instead and moved the cabin trunk’s front 6″ aft to lock into the tabernacle and buttress it. I added a beefy laminated deckbeam underneath, 2″ thick and 6″ wide, and supported it with the relocated compression post. The result is a terrifically strong foundation for the mast (which also enjoys six stays!) and, I think, an elegantly integrated design detail. It was a lot of additional work, but a project as ambitious as building a boat like Song Wren does not argue for taking the expedient path.
Dennis Ryerson
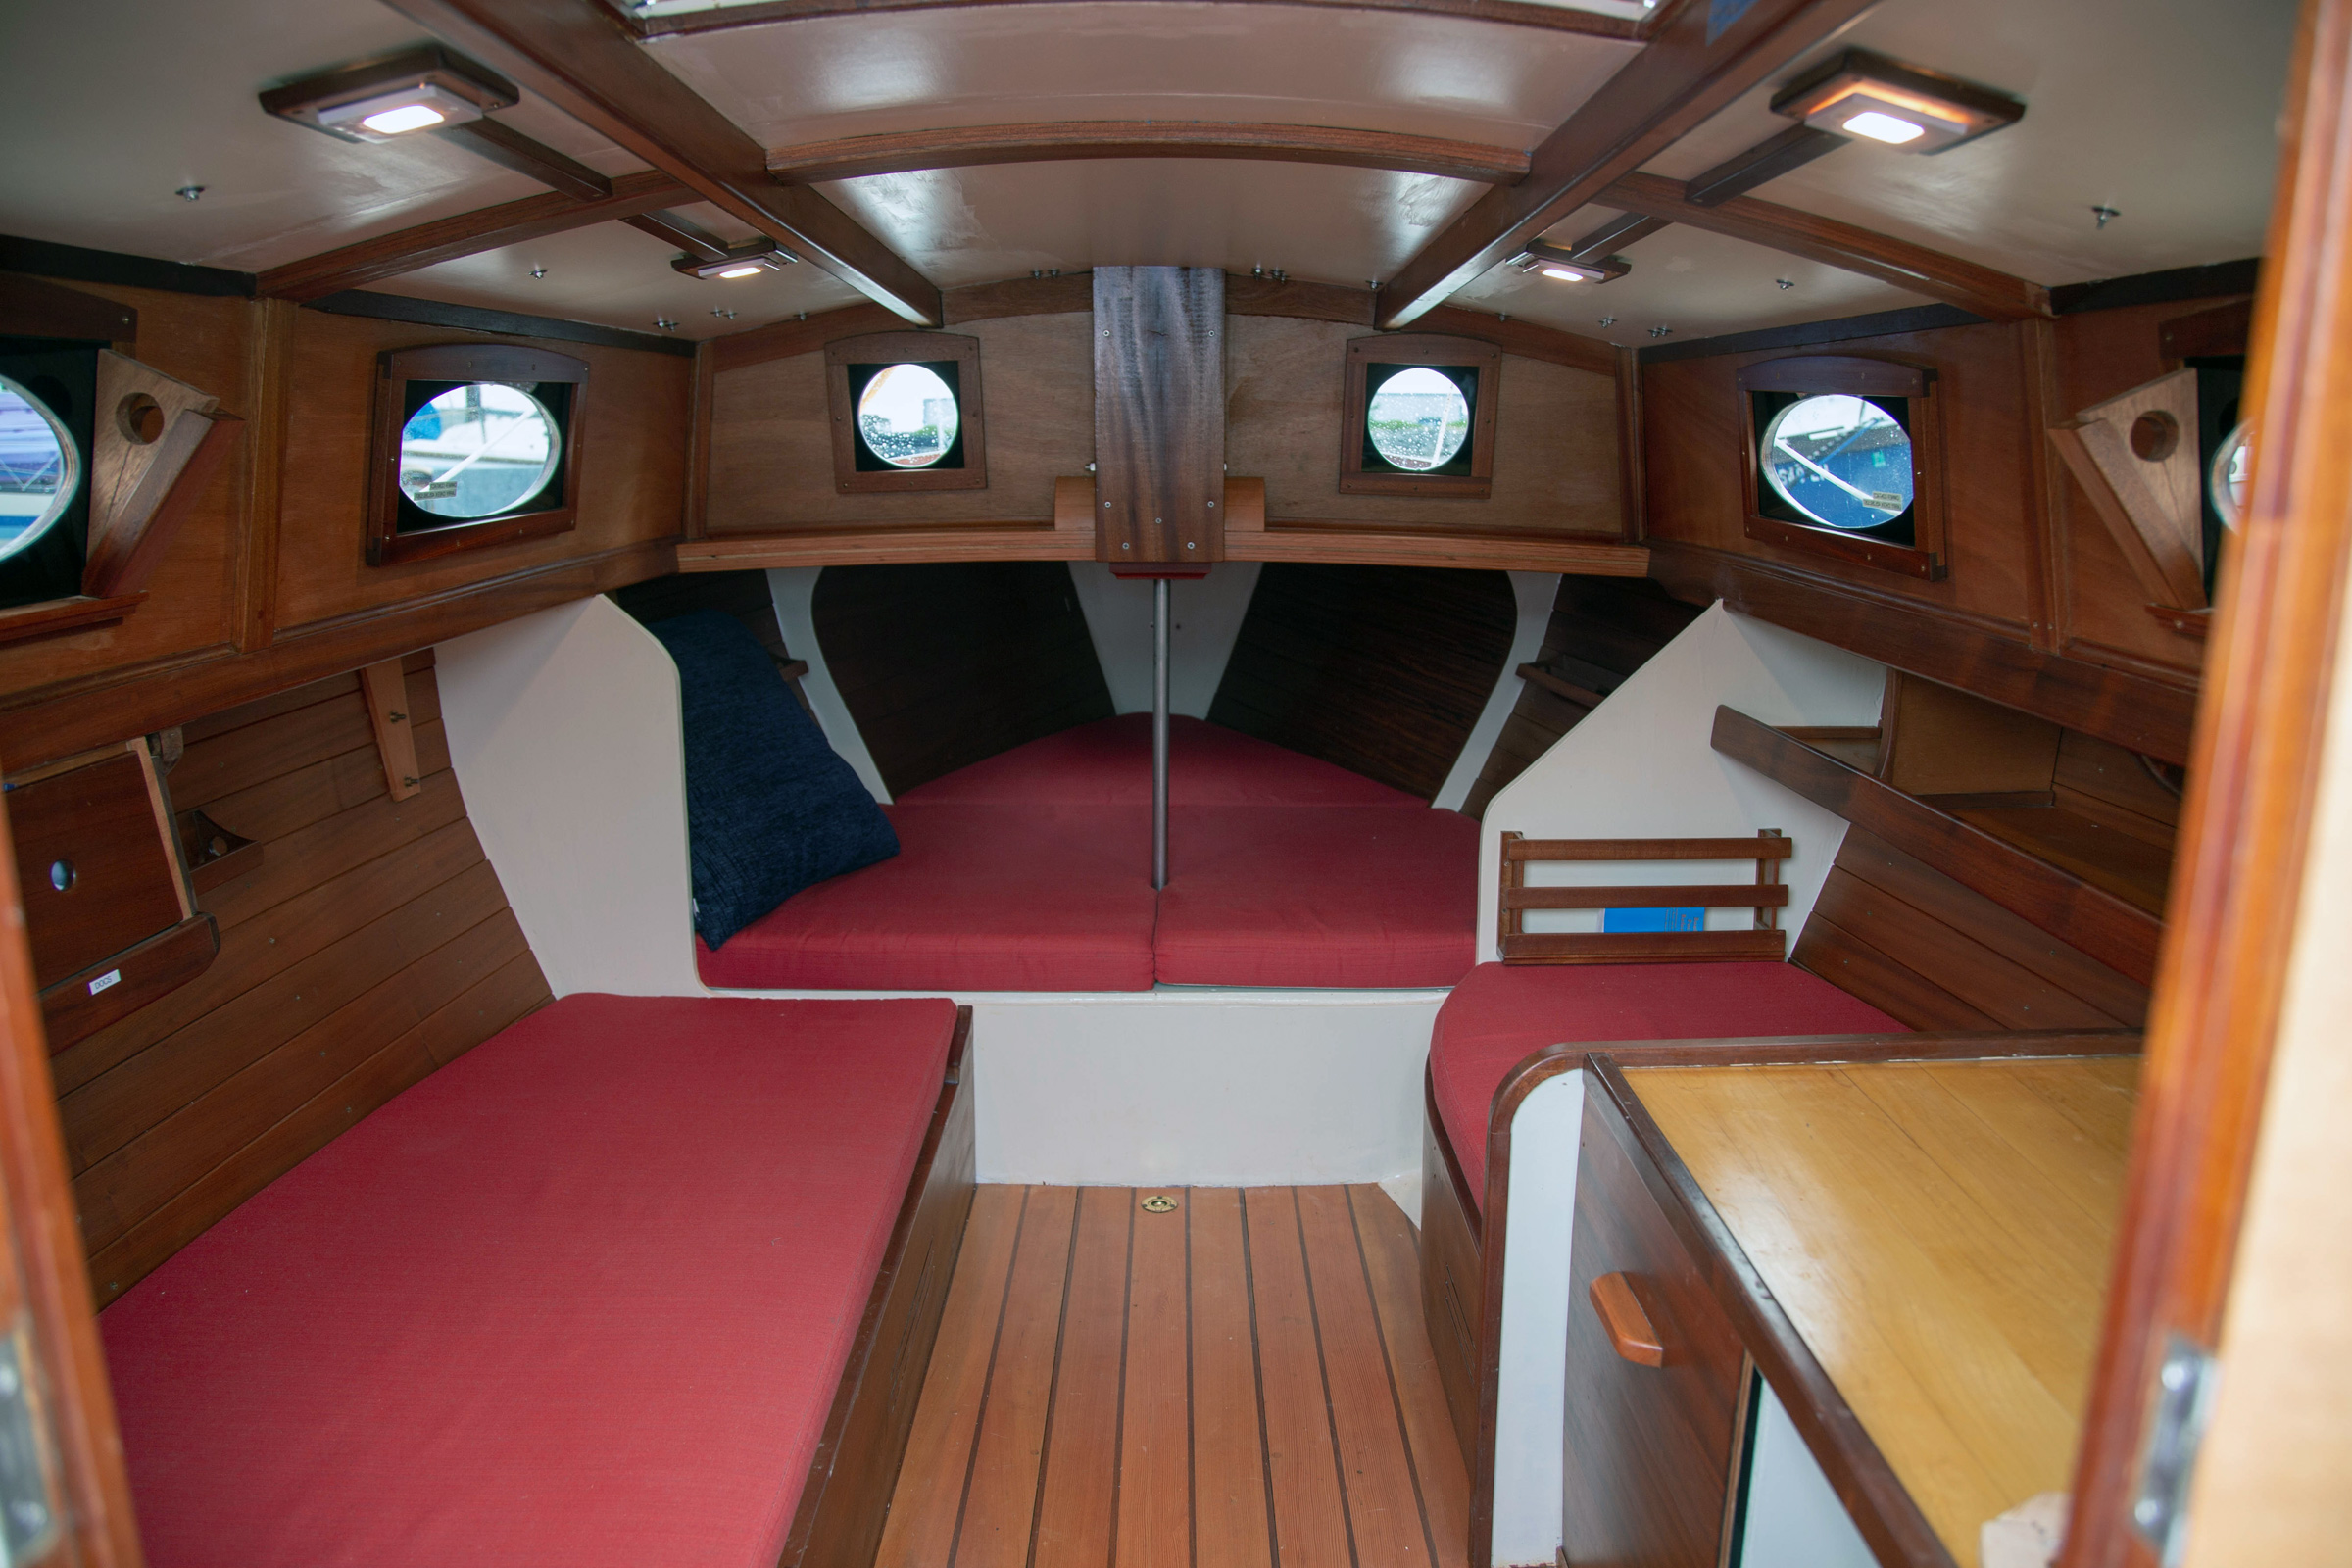
The maximum headroom of 51” is more than adequate for seated tall people. The surface at right doubles as chart table and galley counter; a cooler slides underneath. A portable head resides in the closed compartment under the seat forward of the counter.
Though cabin headroom is only 51″, I wanted to outfit the living quarters as elegantly as possible. My plan is to park the boat at a marina in Port Townsend, Washington, or the San Juan Islands and use it as an occasional summer cabin as well as a daysailer. I installed a ceiling of 79 varnished sapele planks, concealed all electrical wiring behind sapele trim or structural bits, and built in a total of 16 drawers, shelves, bins, and cubbies to corral the clutter that loves to overwhelm small-boat cruising.
The build consumed 4,500 hours, and the cost of parts and materials came in about $1,000 below that $36,000 budget. It was challenging, but the 14-page plans set is extraordinarily detailed, including such things as a precise assembly sequence for the keel and several drawings of the cabin’s sliding hatch. Still, I wouldn’t recommend this as a first boat for any amateur builder.
With 302 sq ft of sail, the Song Wren seems generously canvased to make the best of Puget Sound’s notoriously skinflint summer wind. Devlin estimates the dry weight at 2,800 lbs, but I haven’t yet weighed this first real-world iteration. It glides eerily through air that’s barely stirring. Two knots (verified with an anemometer) gets us moving. In 5 knots of true wind we’re seriously sailing. On a close reach we enjoy 4+ knots of boat speed with 7 knots of apparent wind. In 10 knots apparent we are approaching our theoretical hull speed of 5.8 knots. A close reach seems to be this boat’s best point of sail. In the best conditions, the Song Wren will sail up to about 40 degrees off the apparent wind and tack through 95 degrees—decently pointy in the gaff-rig universe. The jib slips easily past the staysail stay for tacking, though in very light air it helps to furl it halfway when beginning the tack, then release the furling line to finish.
In this first season since the May 2019 launch, my wife Patty and I have tried all possible combinations of sail—always fun and interesting when you’re blessed with more than the usual main and jib—and learned what works and what doesn’t. The best balance and performance come with all three sails flying. The staysail doesn’t provide much power—it adds no more than 0.2 knot in most situations—but it does help us crowd the wind more tightly, and it looks way cool. I had hoped the first reefing step would be to simply furl the jib, but this doesn’t work well. The Song Wren develops an unpleasantly heavy weather helm with only staysail and full main, and if the wind continues to rise, it’s impossible to heave-to for further reefing unless we unfurl the jib. So, we reef the main first, then roll up the jib as the second reef. The boat balances beautifully on staysail and reefed main, which gives 63 percent of the working sail area. I may add a second row of reefpoints in the main, which could be more effective than dropping both foresails.
Dennis Ryerson
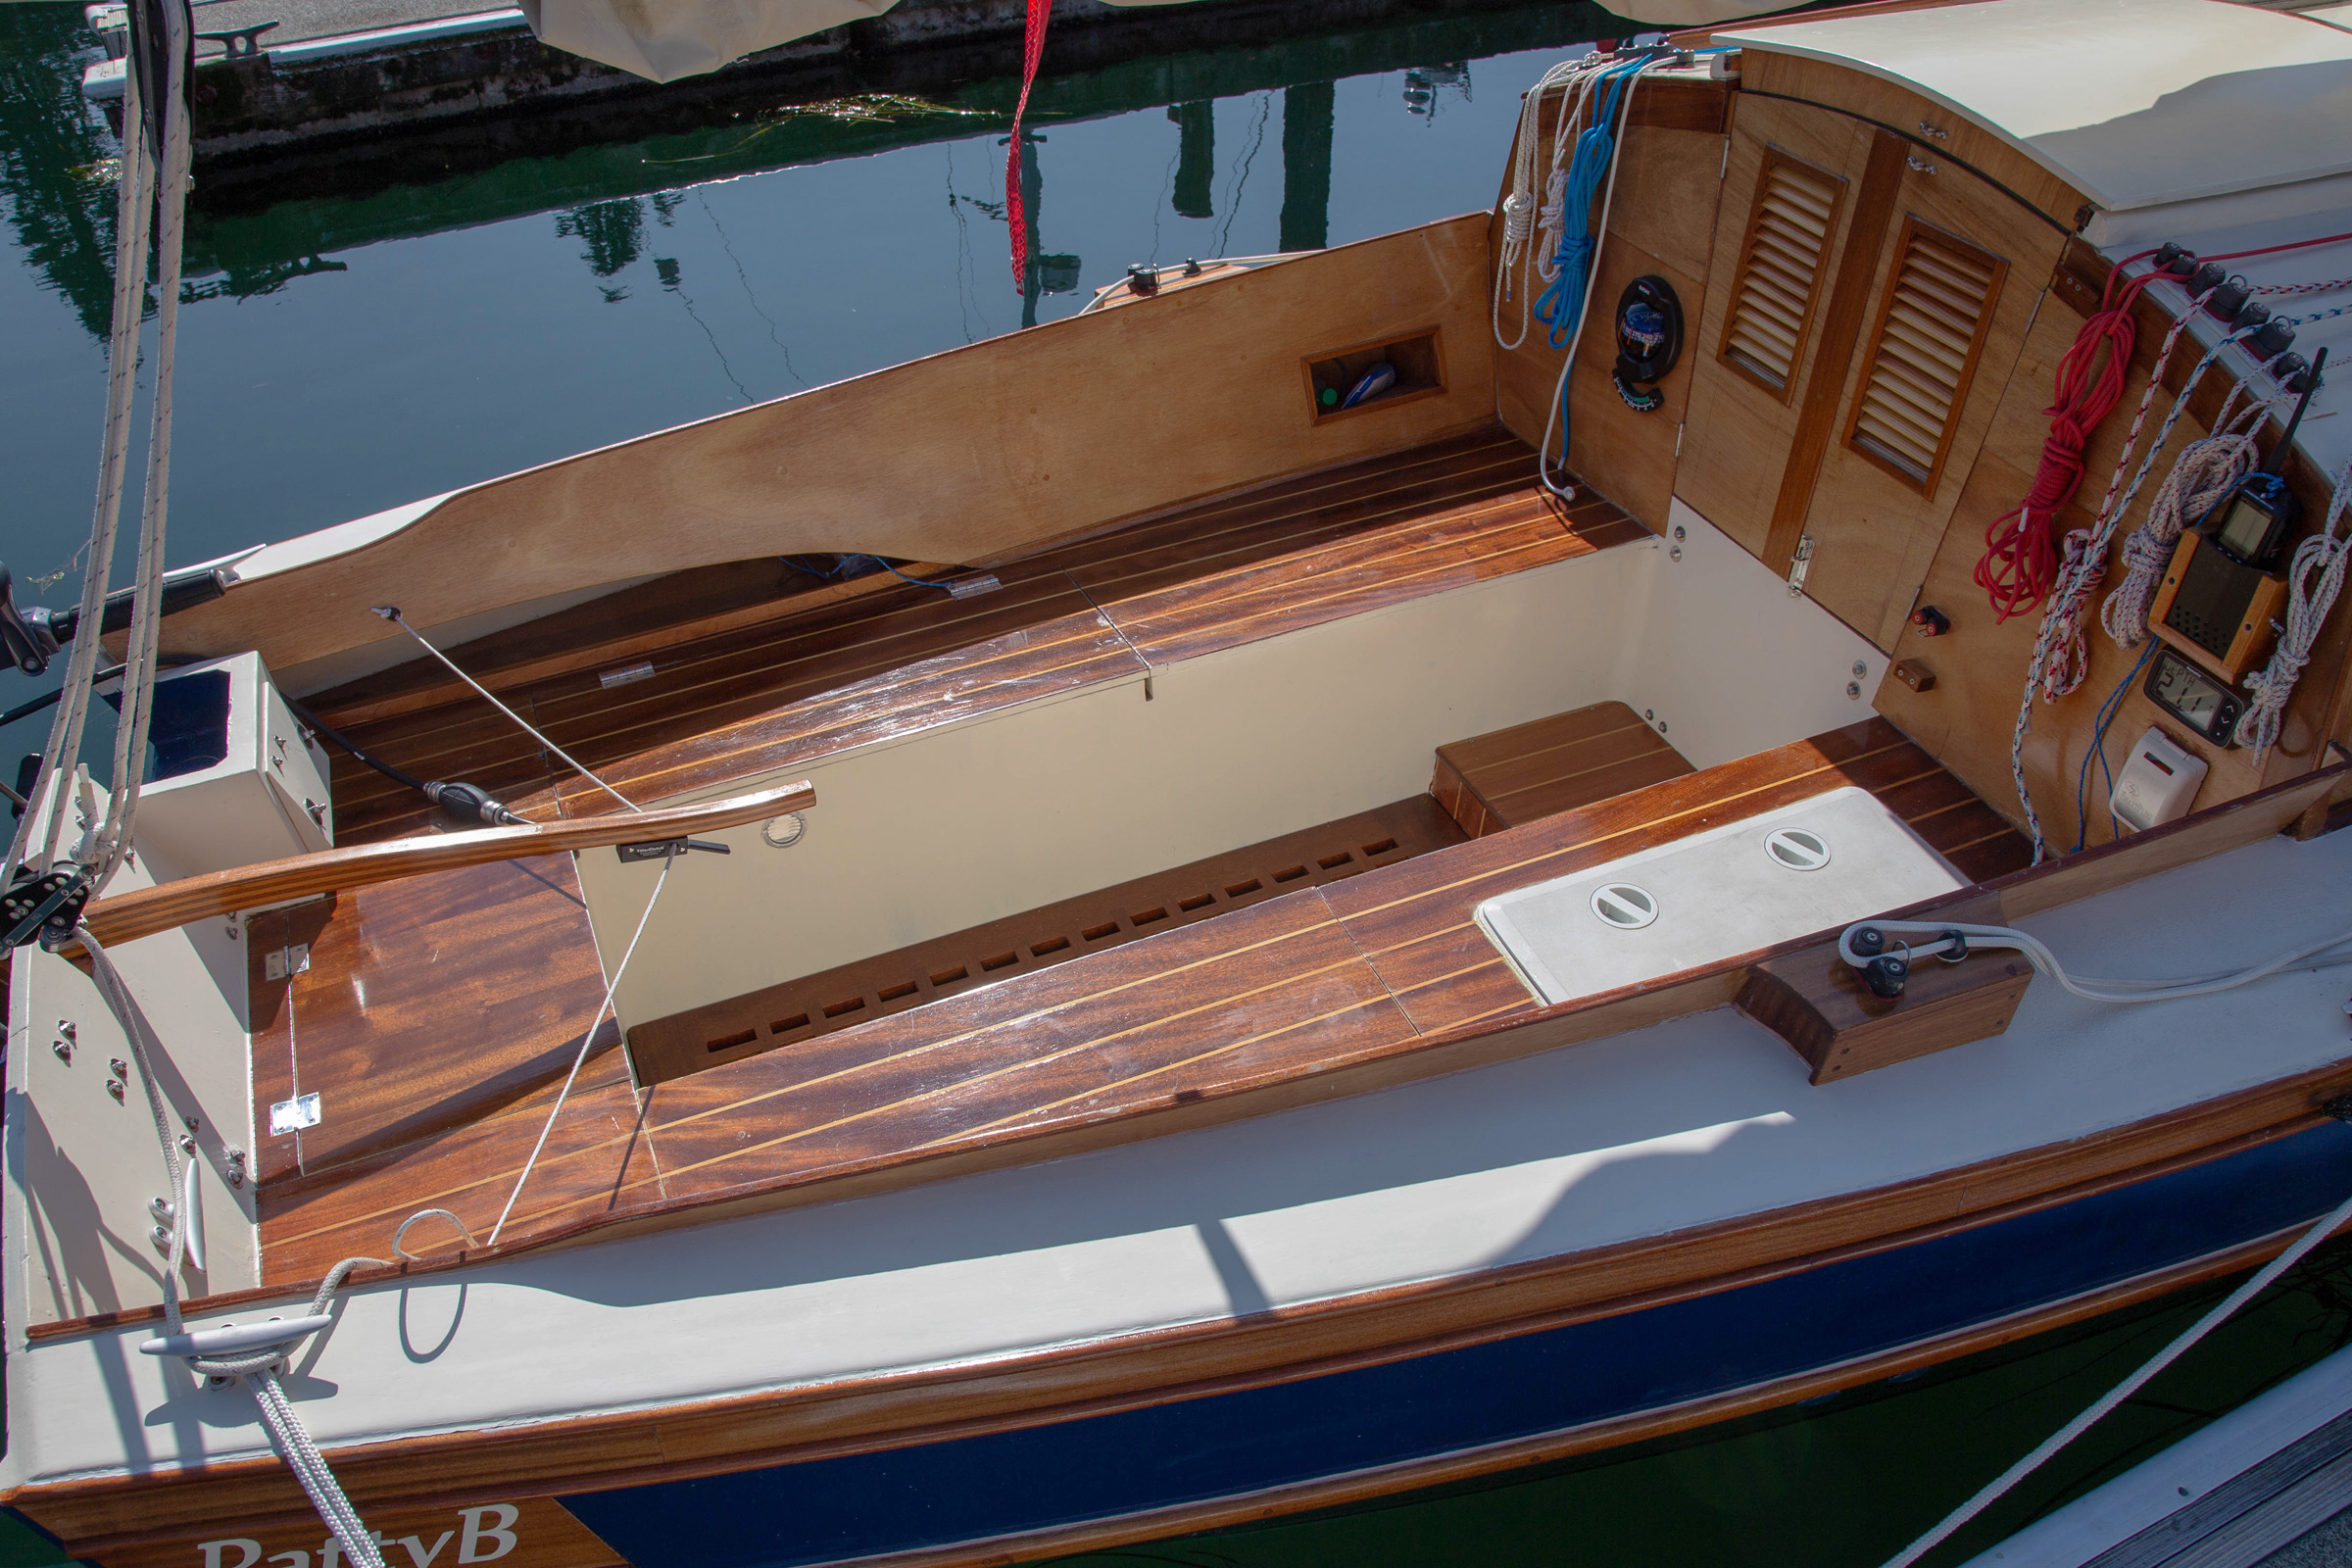
The Song Wren’s cockpit seats are 7’ long, providing plenty of space for daysailing with four adults. The seats are overlaid with a veneer of sapele planks with contrasting fir strips, and the battery, charger, and depth sounder reside under the watertight hatch on the starboard side.
The Song Wren’s sail controls all are accessible from the cockpit (there are 13 lines in all), so while there’s a lot that requires attention, it’s all in a safe place. I located cam-cleated lines on the cabin top for a preventer so it can be deployed in seconds for downwind runs.
Dennis Ryerson
The staysail is self-tending with a single sheet. Roller furling added to the jib makes it easily doused from the cockpit.
Some years back, I twice had to dock chartered boats under sail because of engine failures, so I always like to plan and test what I’ll do in case of that event. With the Song Wren, approaching a dock on staysail alone is a good idea since it provides a suitably poky pace and will drop instantly. It will not, however, claw upwind or tack, so a power-off docking still needs the jib’s aid until final approach.
Sam Devlin
The 302 square feet of sail take good advantage of light air.
For auxiliary power, I bought a new 8-hp Yamaha outboard. In all but one respect it was an excellent choice: reasonably quiet, smooth-running, powerful enough to push us to hull speed at half throttle, and incredibly economical—we’re averaging 12 nautical miles per gallon. The drawback is its weight. I tried to engineer an indented transom mount but failed, so I finally resorted to a commercial adjustable mount. Cantilevering 90 lbs out nearly 1’ behind the transom makes the engine hard to tilt up and causes the boat to squat low on its design waterline aft. The only mitigation at this point seems to be to plant more ballast forward. If I were starting over, I would consider sacrificing some cockpit locker space (there’s plenty) for an inboard motor well.
Sam Devlin
The sail controls all lead to the cockpit, so there’s no need to venture forward to tend to the jib and staysail.
Near the end of this first sailing season, the most remarkable thing about living with the Song Wren is its accommodations. For such a compact boat, both its cockpit and cabin seem incredibly spacious and comfortable. Four people easily daysail; three sleep inside as long as they’re close friends. The most rewarding thing is this boat’s jaw-dropping beauty—and Devlin deserves all the credit for it, not me. I have perhaps accentuated it by celebrating its woodiness with acres of brightwork (rub strips, toe rails, cabin sides, companionway doors, cockpit seats, and more), which I may regret when the time comes to sand and revarnish. Devlin implores builders to paint everything. But when you totally fall for a boat’s great looks, and its performance keeps you engaged and intrigued, you’re not afraid to look forward to a mountain of work in the relationship.
Lawrence W. Cheek is a journalist and serial boatbuilder (two kayaks and four sailboats to date) who writes frequently for WoodenBoat.
Song Wren 21 Particulars
Length on deck: 21′ 3″
Length overall: 26′ 7″
Beam: 7′ 5″
Draft, fixed keel: 36″
Draft, swing keel: board up 24″, down 47″
Displacement: 2,800 lbs
Sail area: 302 sq ft
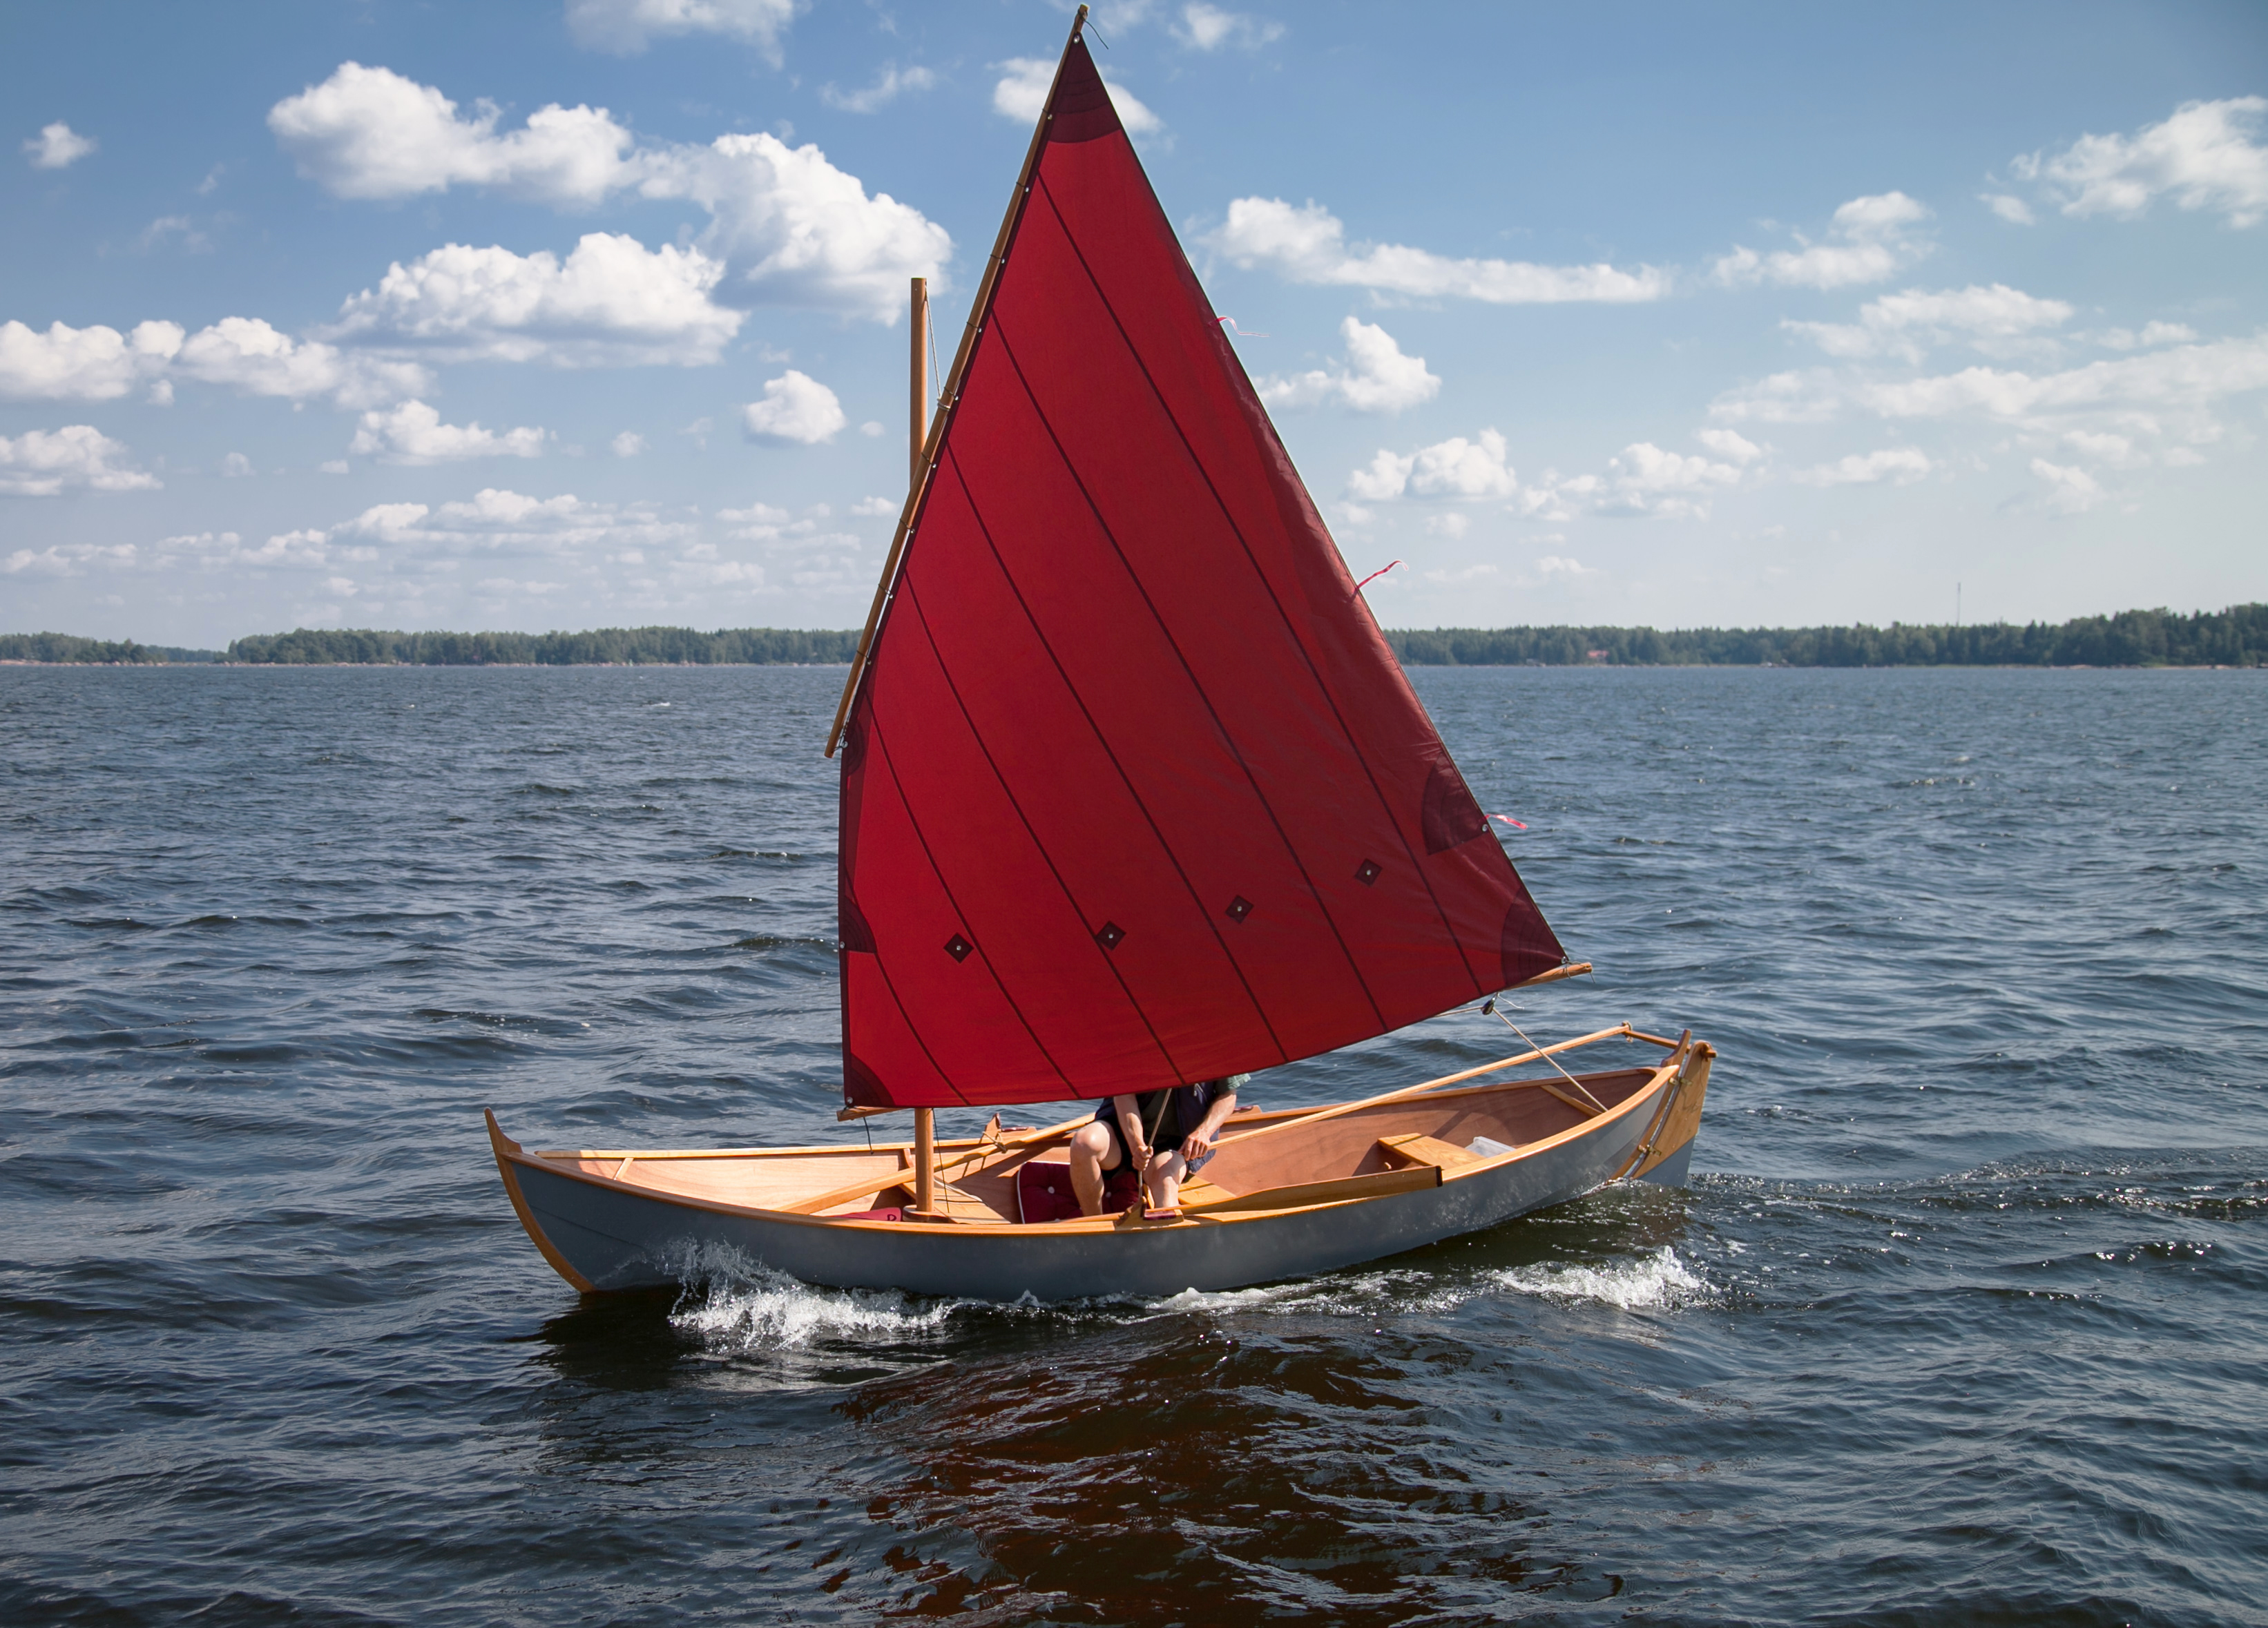
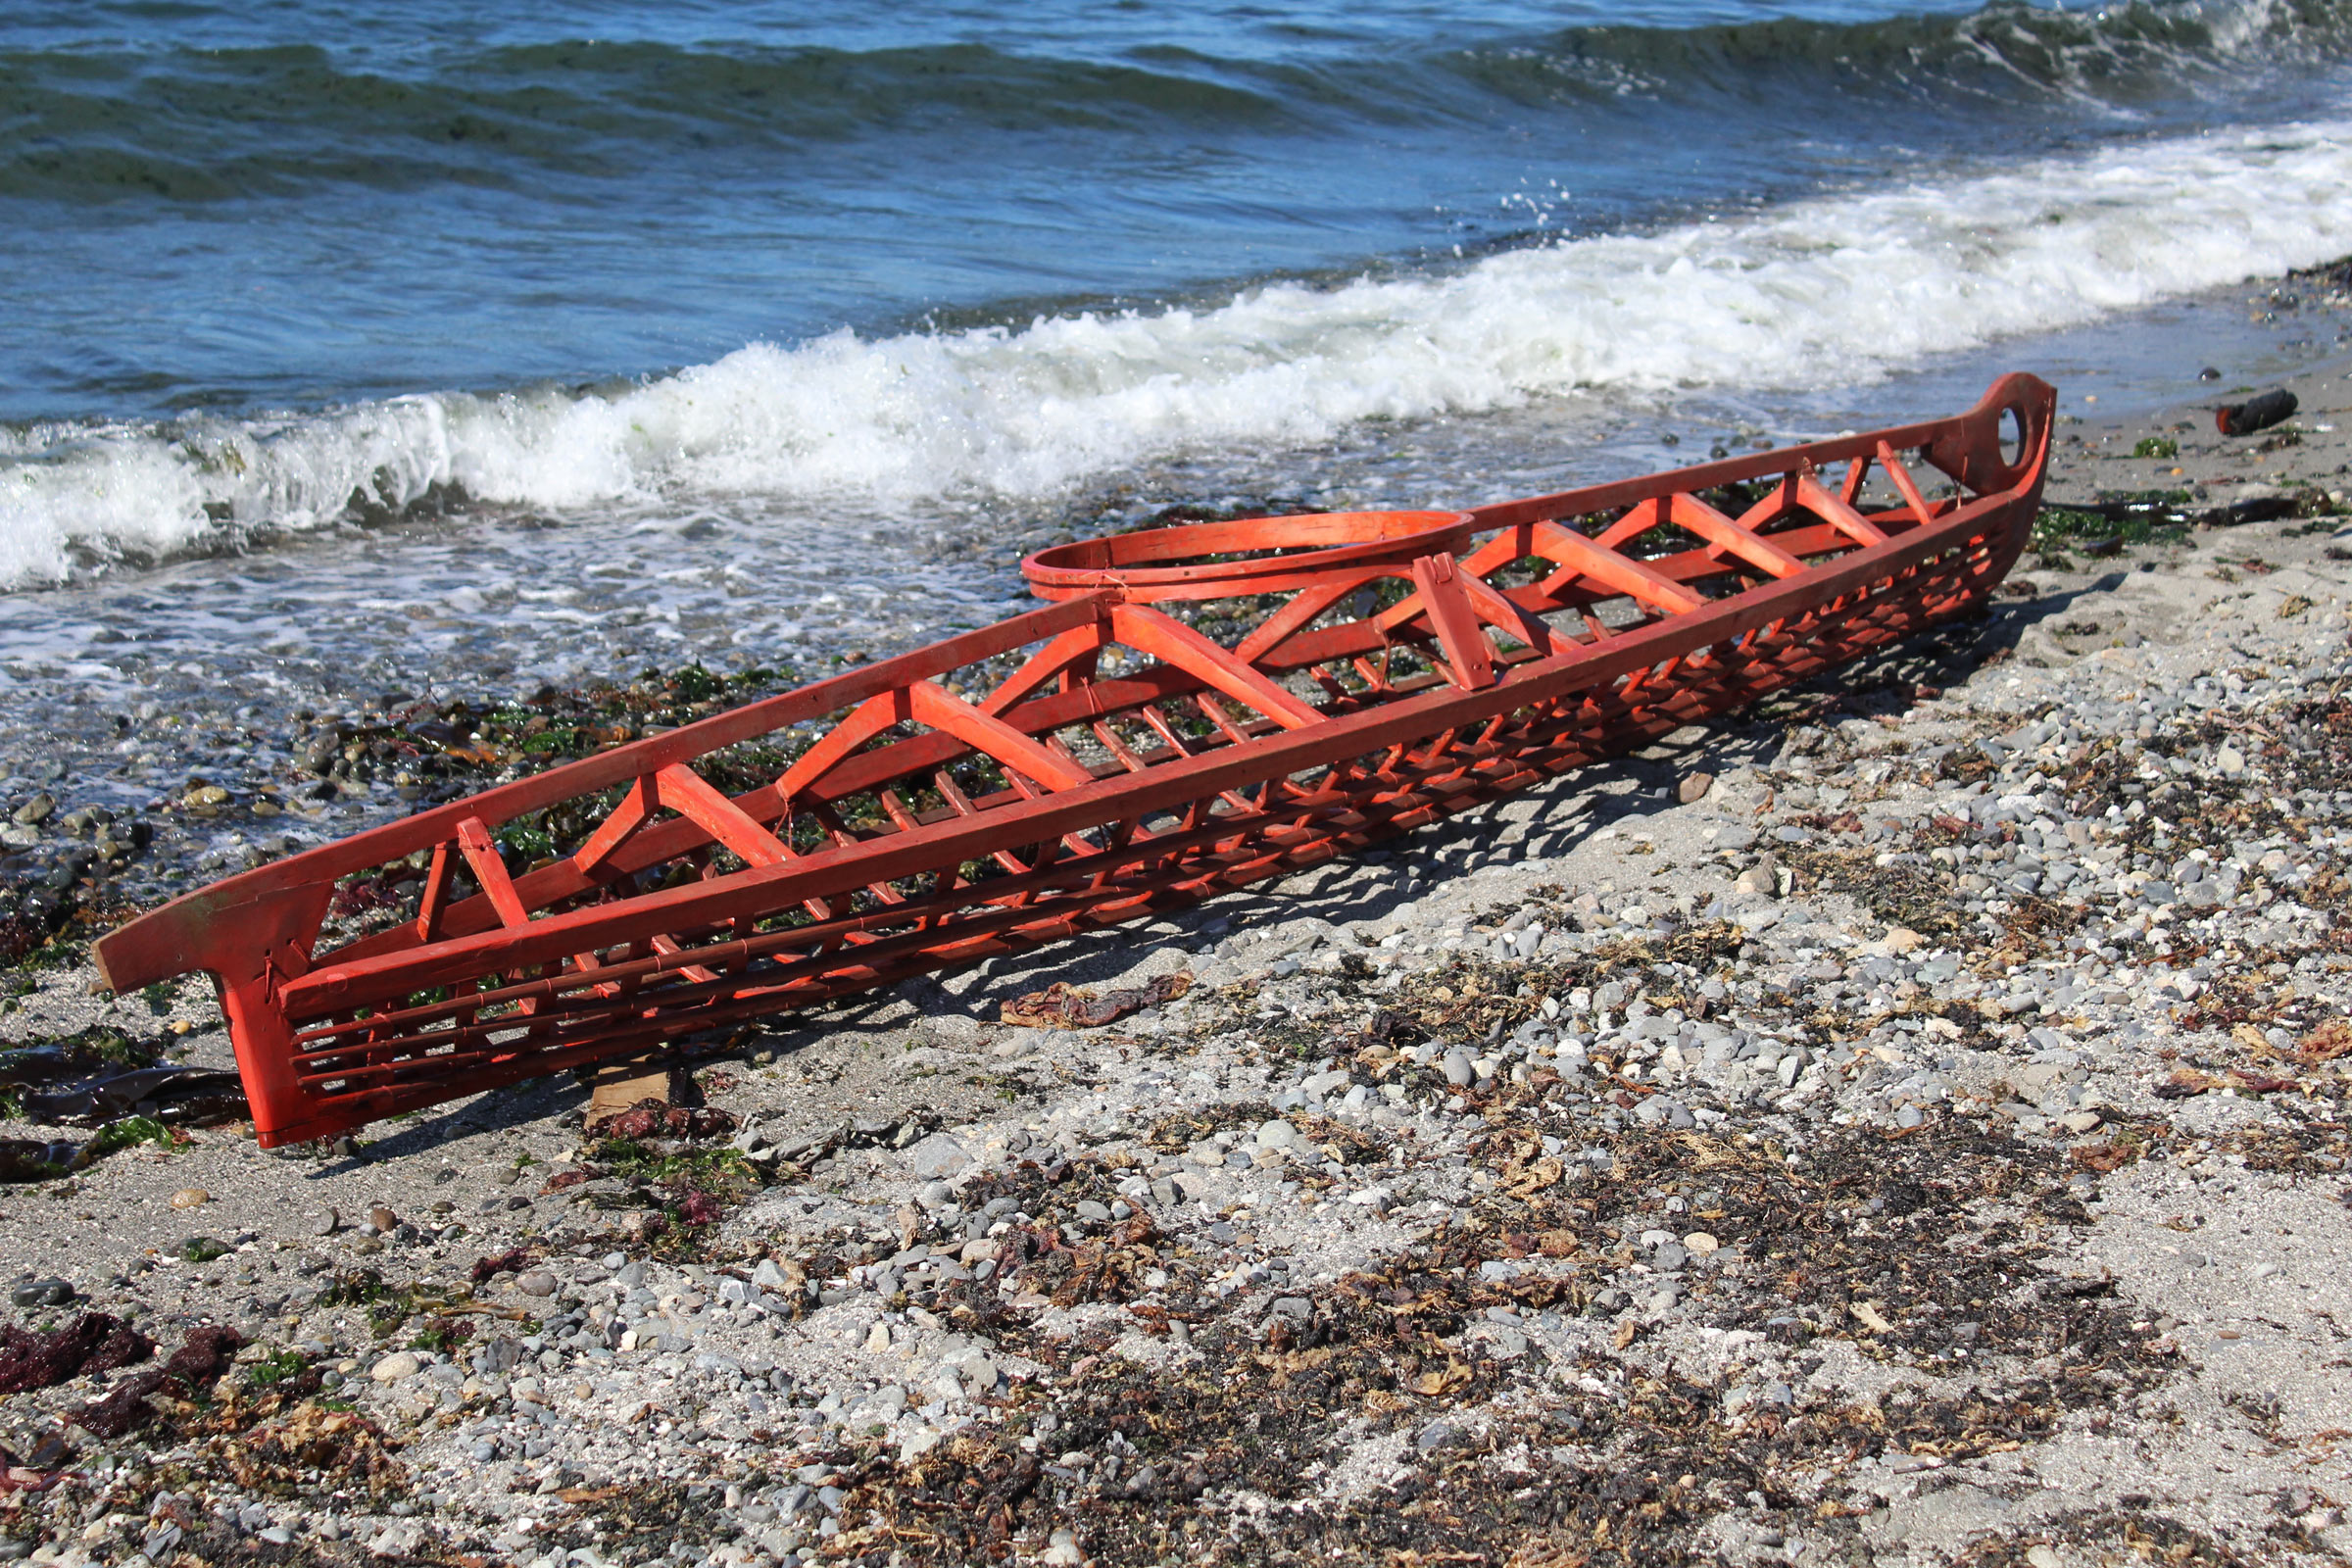
From all the refined creations of the designer Iain Oughtred presented in the intriguing biography A Life in Wooden Boats, written by Nic Compton, one particular boat, the 14′11″ Elf, caught my eye and imagination. Based on Norwegian faerings with roots in the Viking era, the small but intrepid-looking Elf is a fascinating adaptation of ancient design to modern construction. I had built a couple of glued lapstrake plywood canoes, so the Elf was a natural choice for me.
The original faerings were built by hand and eye, and had slowly evolved during hundreds of years to meet the local conditions and particular purposes. Iain carefully studied every design and photo he could find, realizing no two faerings were alike. He had a commission for a boat smaller than the original ones, and after absorbing all he could find on the subject, he began drafting his own interpretation of the faering, adapting the structure for glued-lapstrake plywood.
Mats Vuorenjuuri
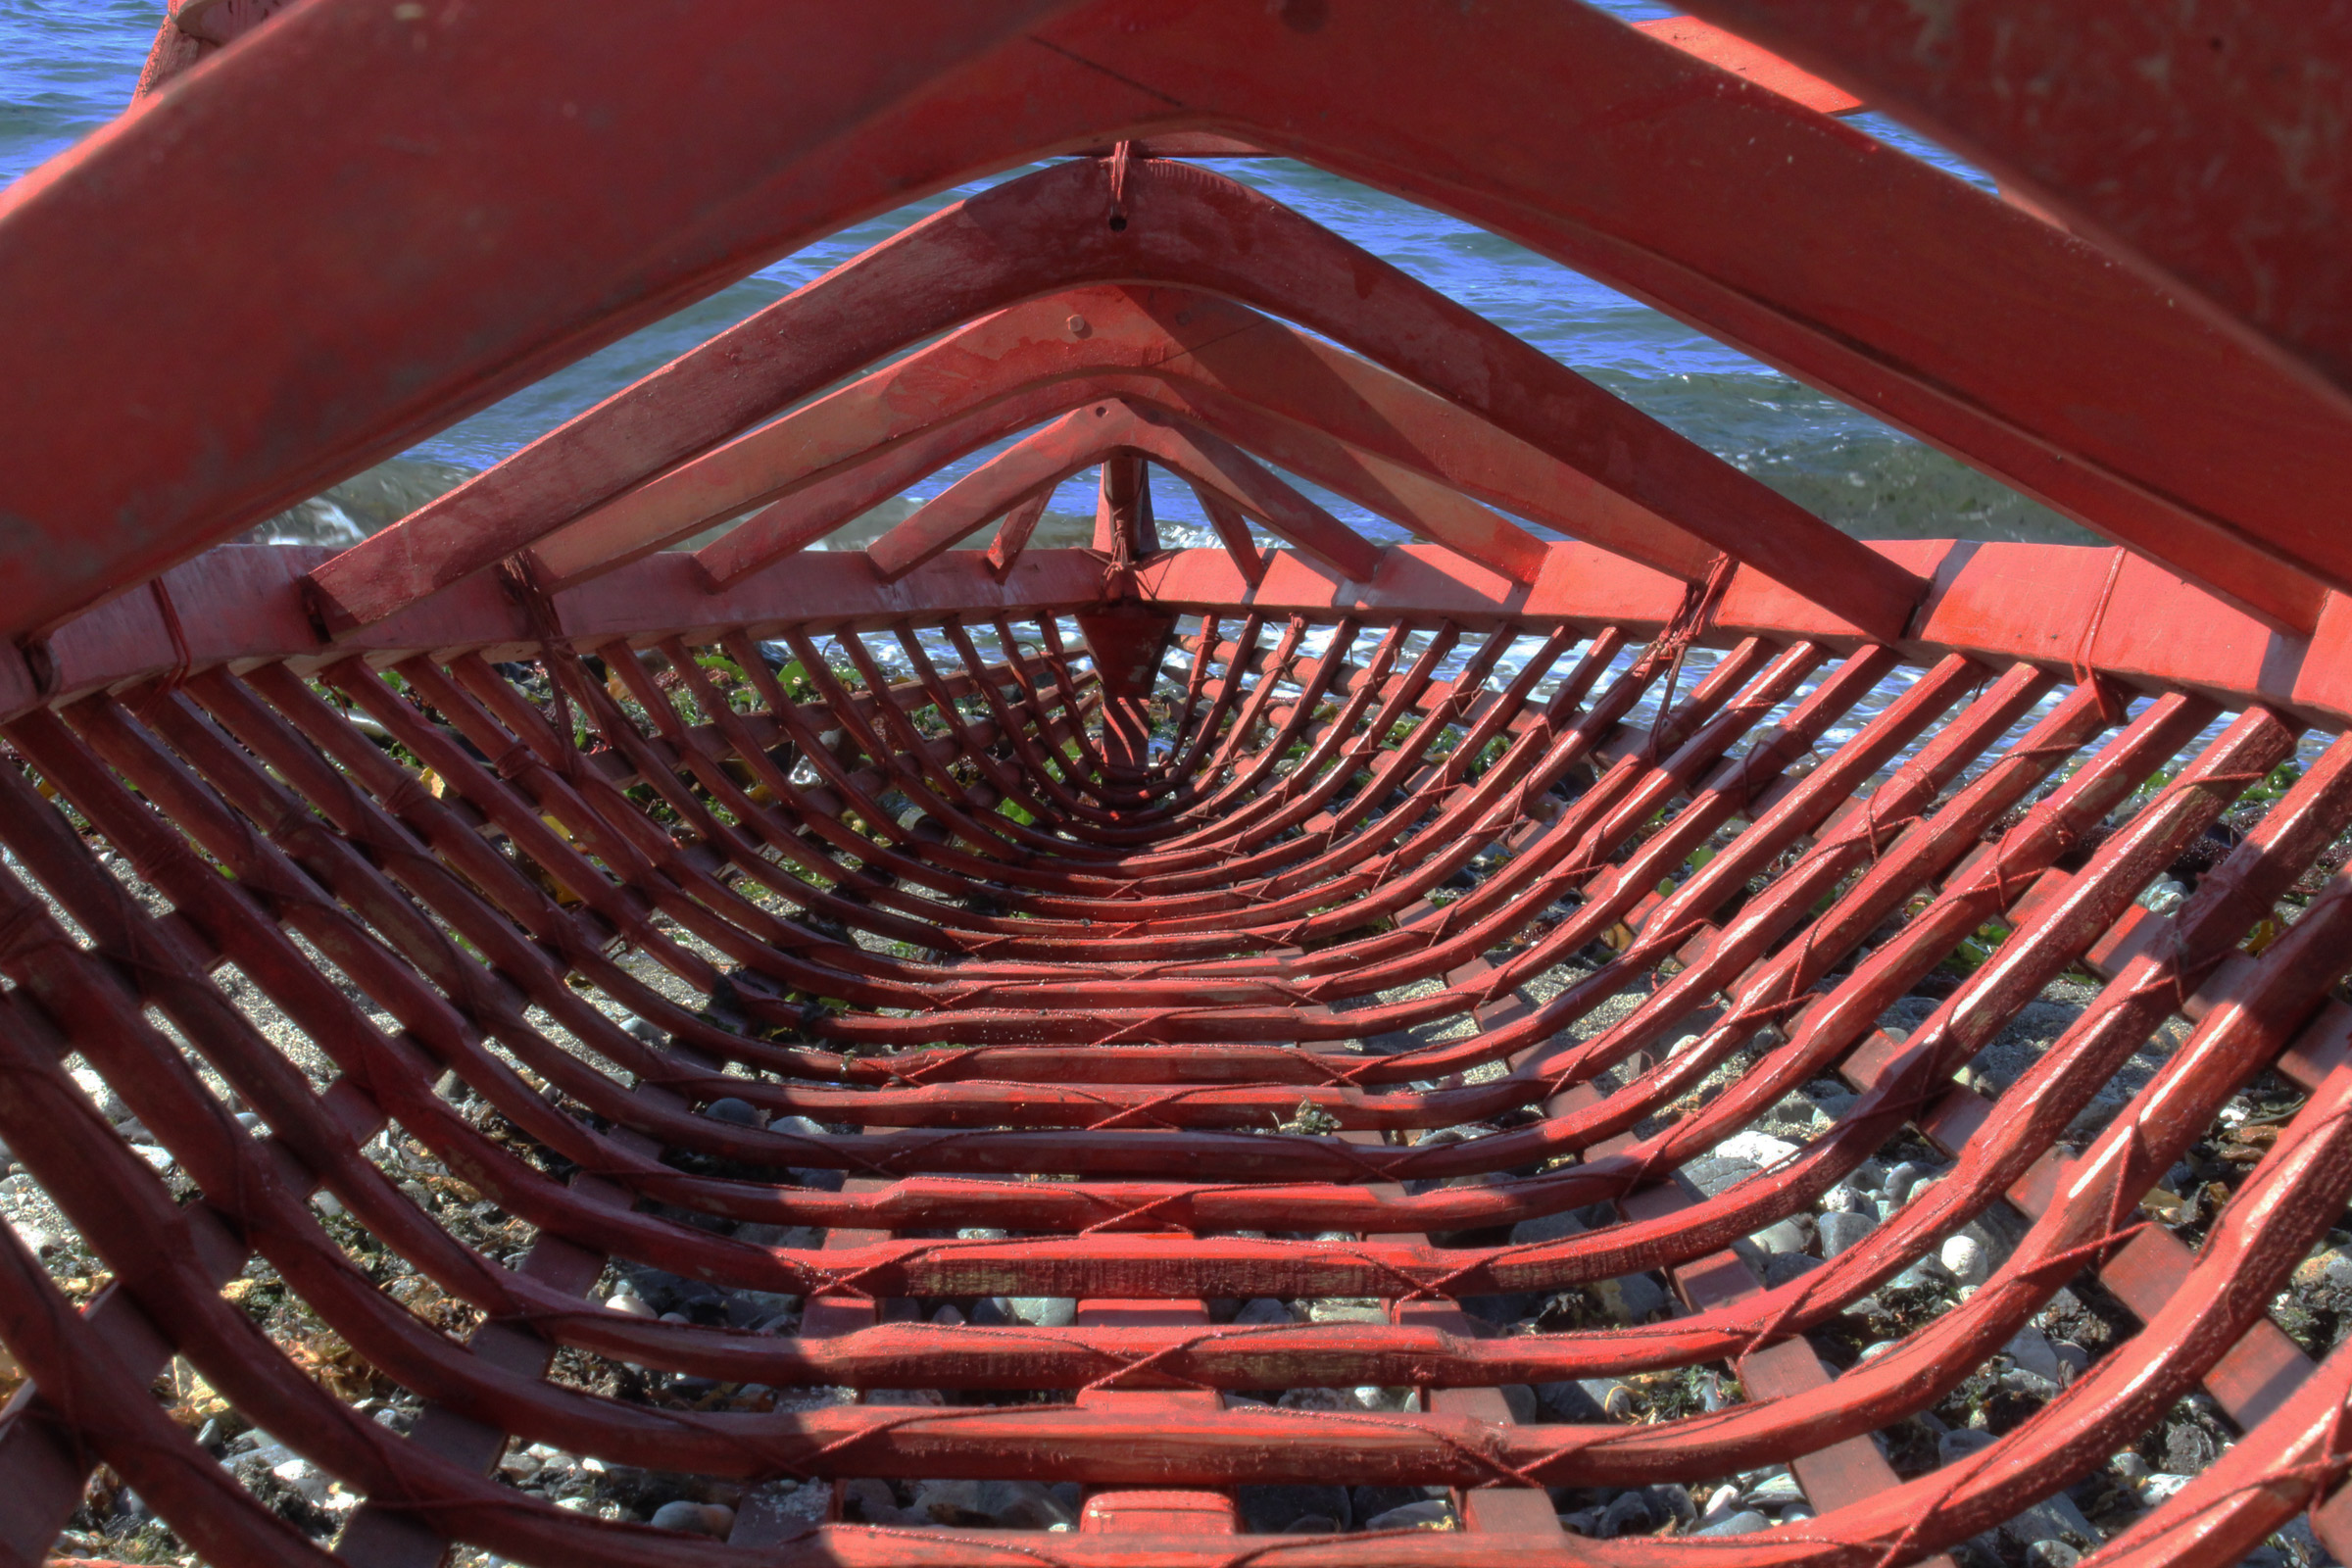
The Elf has many traditional elements—broad strakes, rangs (angled frames in the ends), kabes (wooden row locks)—and only the daggerboard trunk and the absence of lap rivets betray its modern construction. For rowing, a plug for the daggerboard case will keep water from splashing into the hull.
Iain’s plans are famous for their elegance and detail, and Elf makes no exception to this. The package includes full-sized templates for the building molds, frames, and stems plus lines plan, construction plan, detail patterns, materials list, and construction notes. Add Iain’s own informative book Clinker Plywood Boatbuilding Manual, and you should be good to go.
Iain recommends 9mm okoume or 7mm mahogany plywood for the hull and Douglas-fir, larch, or pitch pine for keel and frames. There are only two laminated frames in the center of the boat and smaller canted frames—rangs—aft and forward in the hull. The center and forward thwarts are installed aligned with the main frames further reinforcing the structure.
With basic woodworking skills, tools, and some practice in using epoxy, building Elf should not be too demanding. One critical step is to get fair and accurate lines on the three wide strakes of the hull. This can be achieved using plywood or bendy strips attached together to make patterns to transfer plank shapes from the molds.
In his book, Iain constantly uses various clamping methods to avoid the need for screws. Moving forward with the building process, I started to understand and appreciate this method more and more. The benefits of avoiding screws are less screw removal, fewer holes to be filled later, and perhaps a more elaborate structure. There are some stages where screws are necessary and unavoidable to get parts set correctly for gluing.
Sanna Virnes
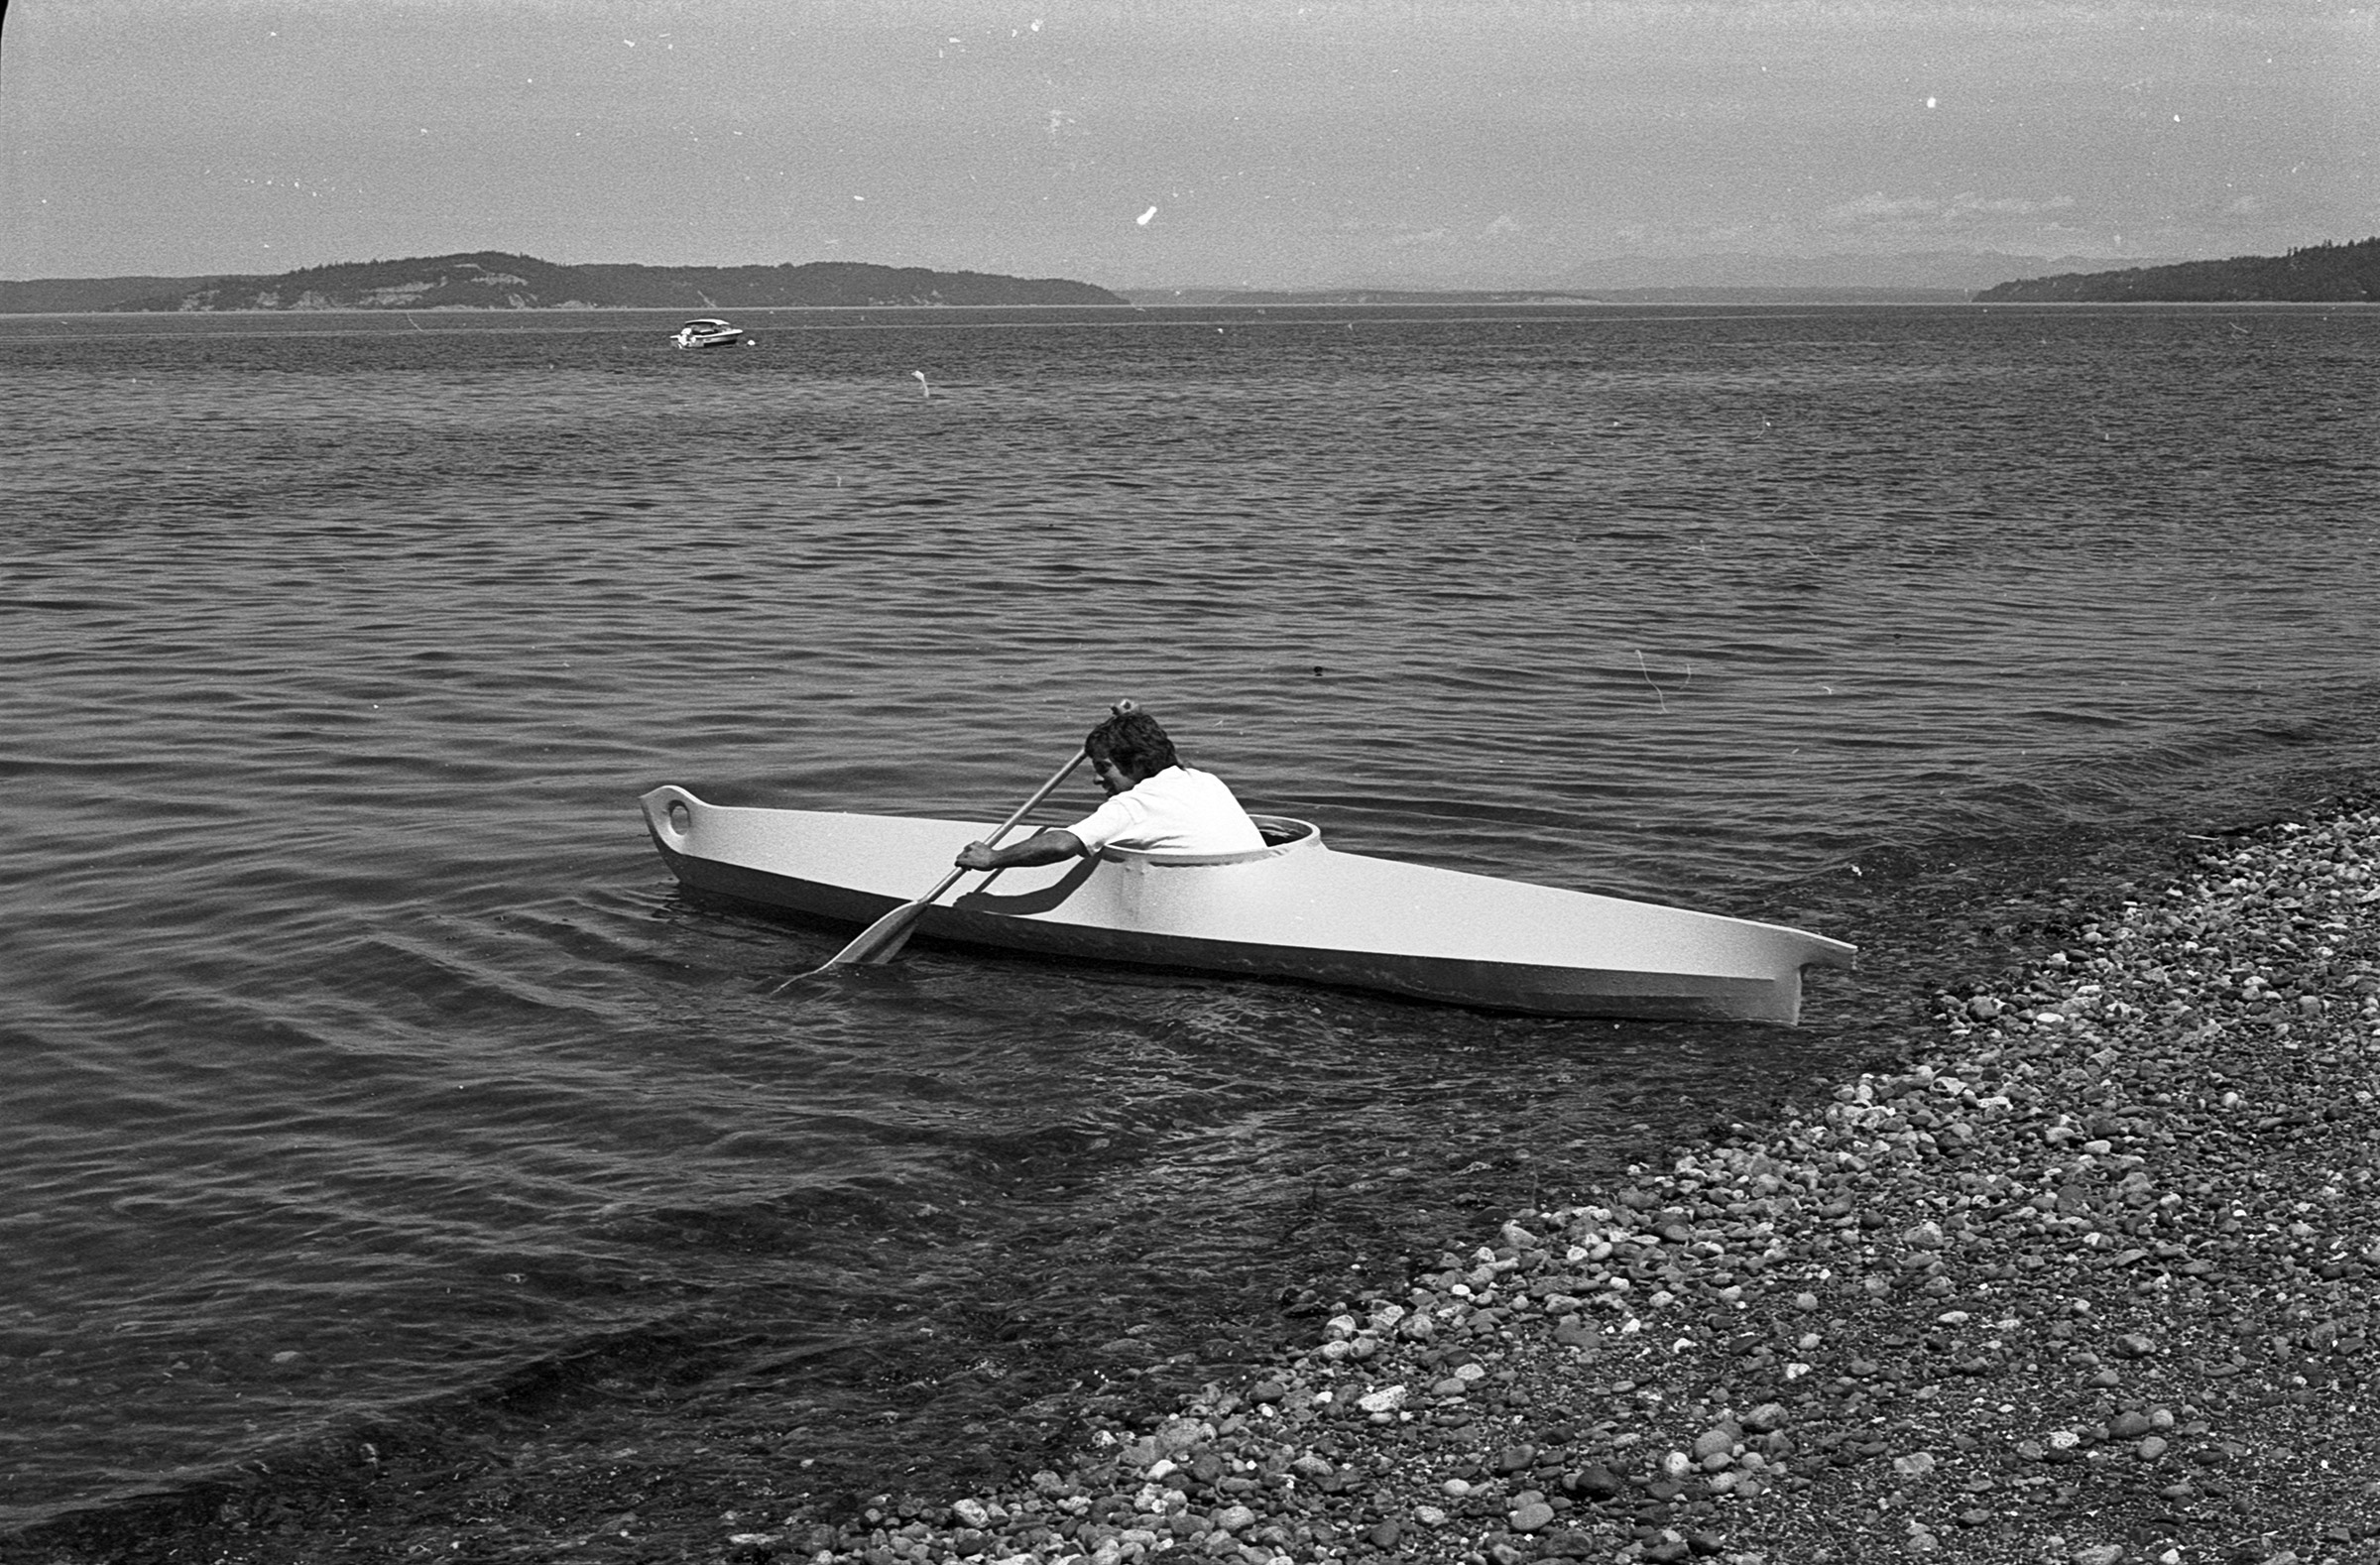
Elf is a joy to row, it moves effortlessly and tracks exceptionally well. The hull is quite full forward, so, for rowing alone the forward thwart is a good choice, especially when traveling downwind. Some gear or ballast aft, will help put the keel level.
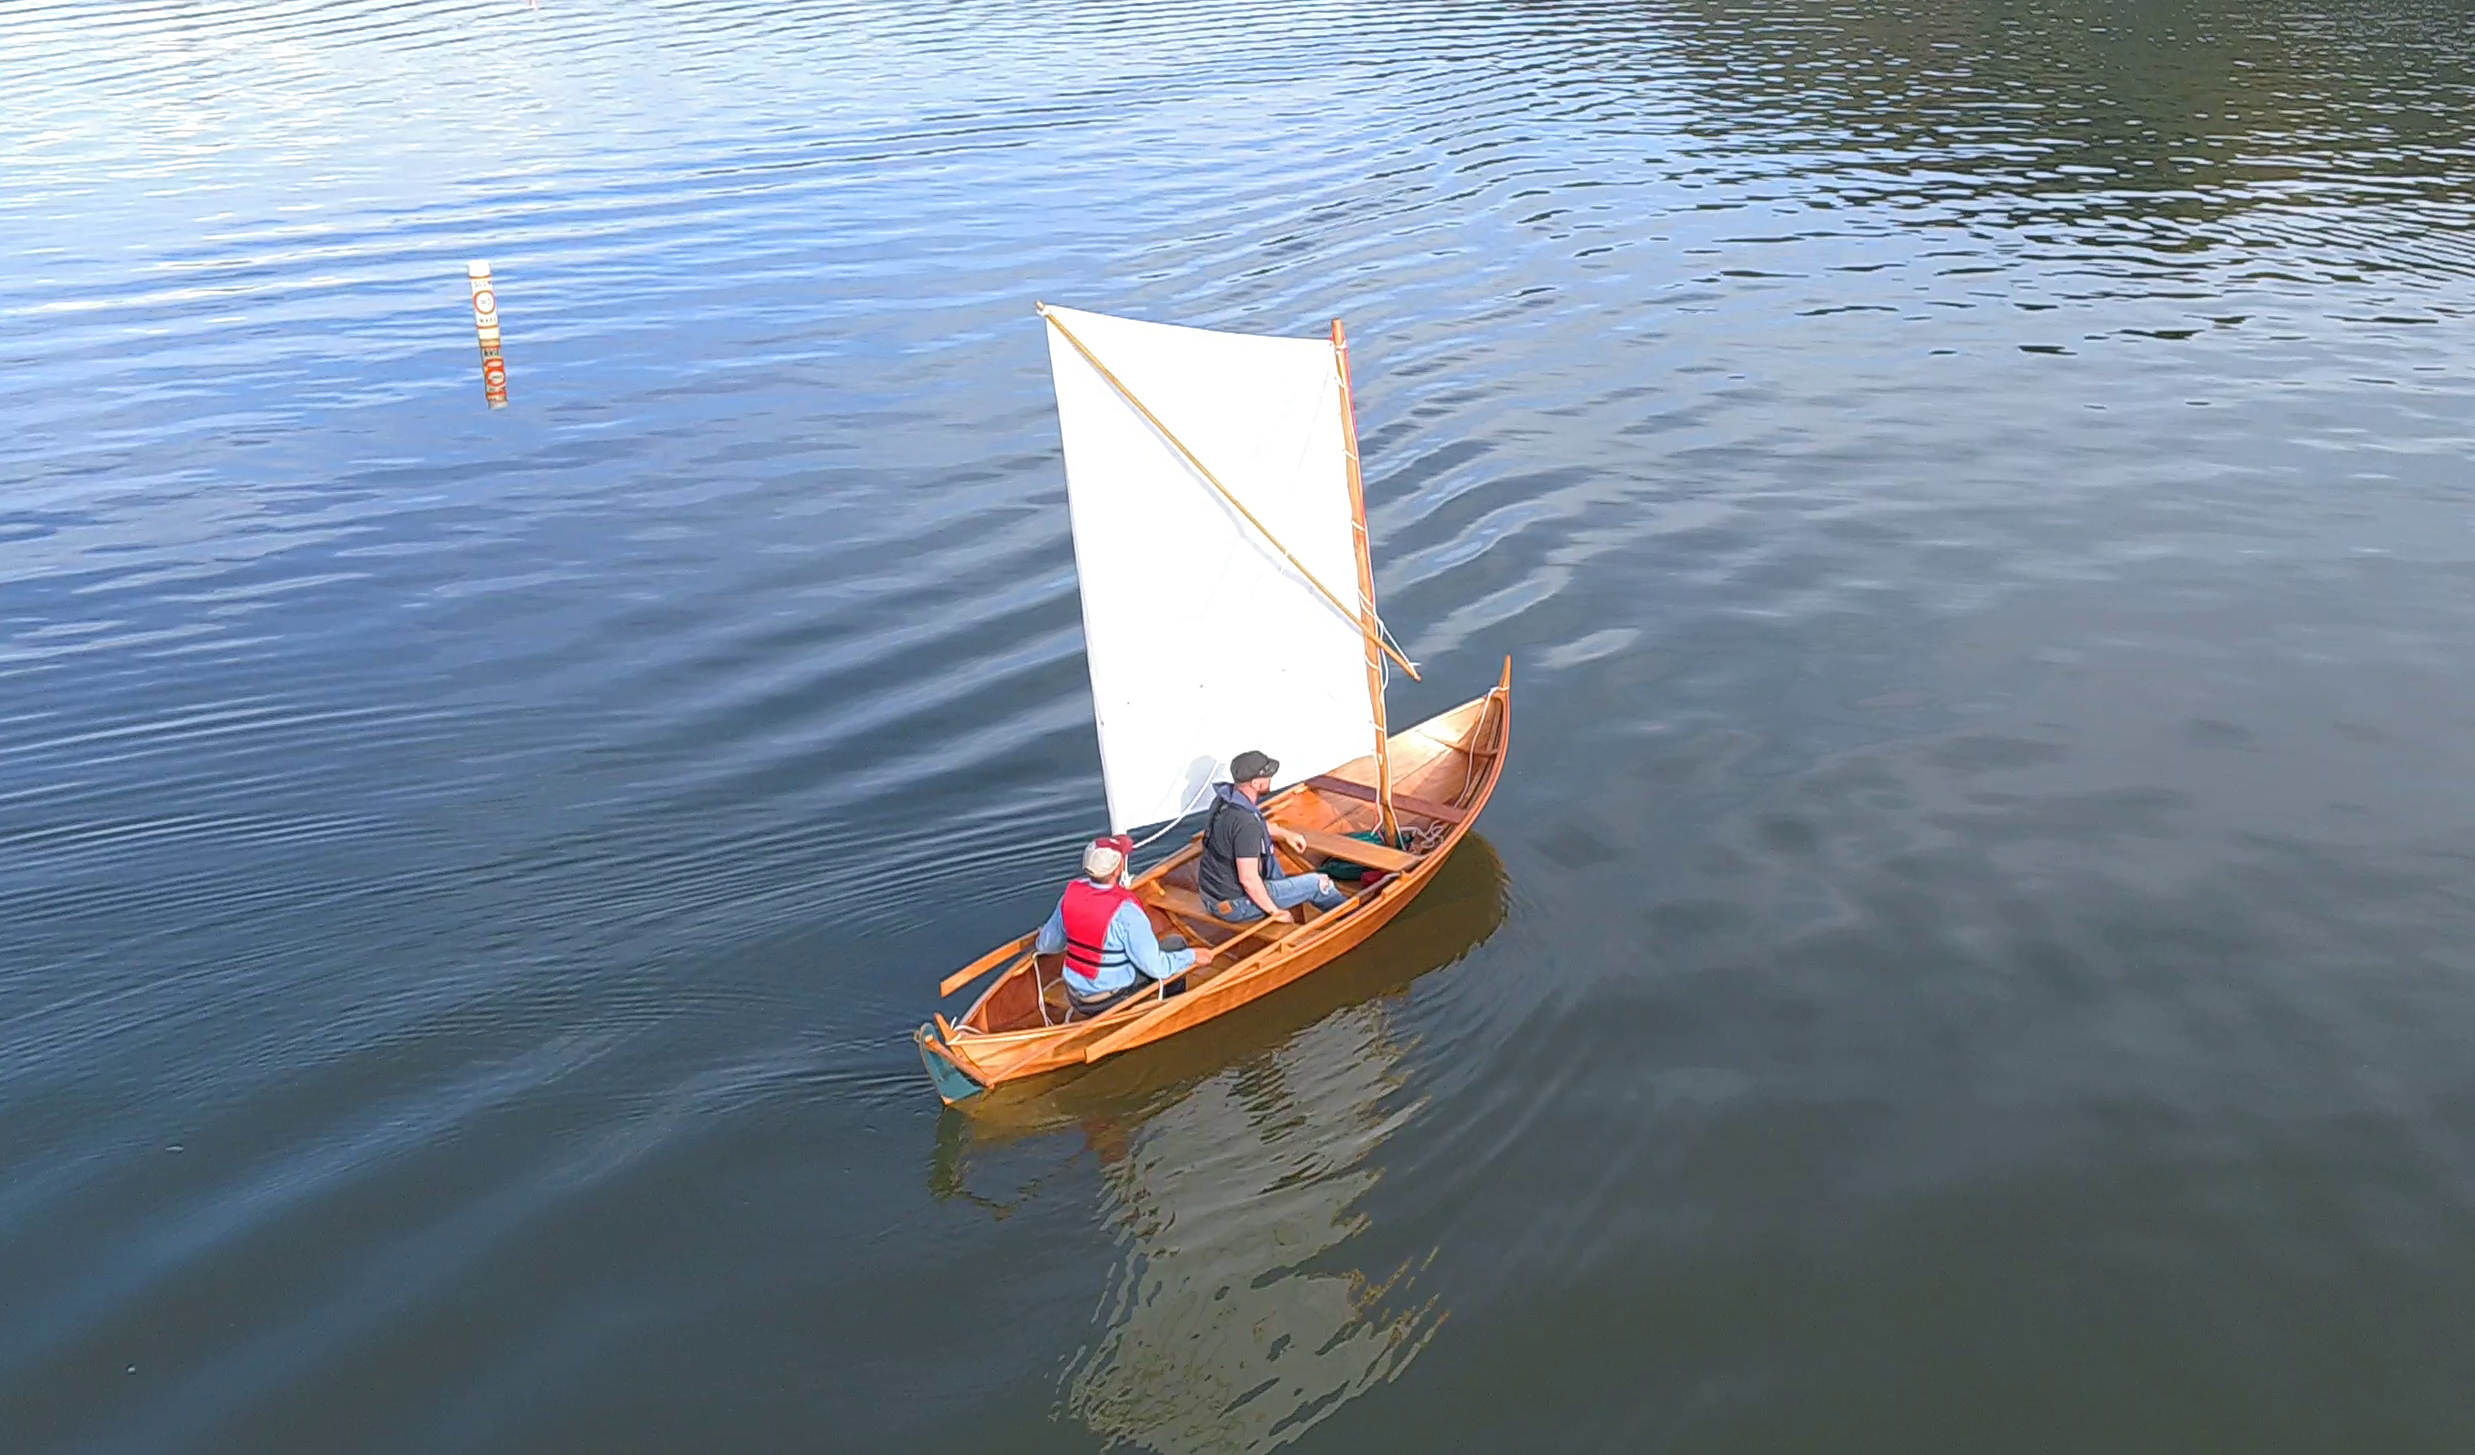
As the hull comes together, you really begin to admire the simple and functional structural design of the boat. Realizing the unadorned beauty of Elf, you will think very carefully before adding anything but the necessary fittings into the boat. It took a whole year before Iain dared to equip his own boat with sailing gear, and to that end, a slot for the daggerboard is cut to one side of the wooden, full-length keel and the daggerboard case is fitted forward of the center thwart. Iain has drawn a beautiful Norwegian-style rudder, and there are two options for rudder fittings. One has a long, curved rod held by two stem fittings that allows the rudder to be positioned high on the stem with the blade nearly clear of the water for rowing or beaching, or low with the blade fully submerged for sailing.
I chose a more conventional solution of common pintles and gudgeons and remove the rudder when I’m not sailing. With the 5′-long tiller, I can easily steer even while sitting in the middle of the boat.
The plans include drawings for oars and the traditional oarlocks called kabes. The oars are locked to kabes using rope loops. The loops need to be measured and spliced carefully for both a smooth rowing experience and to allow shipping the oars. The 9′ oars for the Elf have looms with flat backs and bottoms that fit the kabes and set the blades at the proper angle. The blades are long and narrow; their shape catches little wind while being effective.
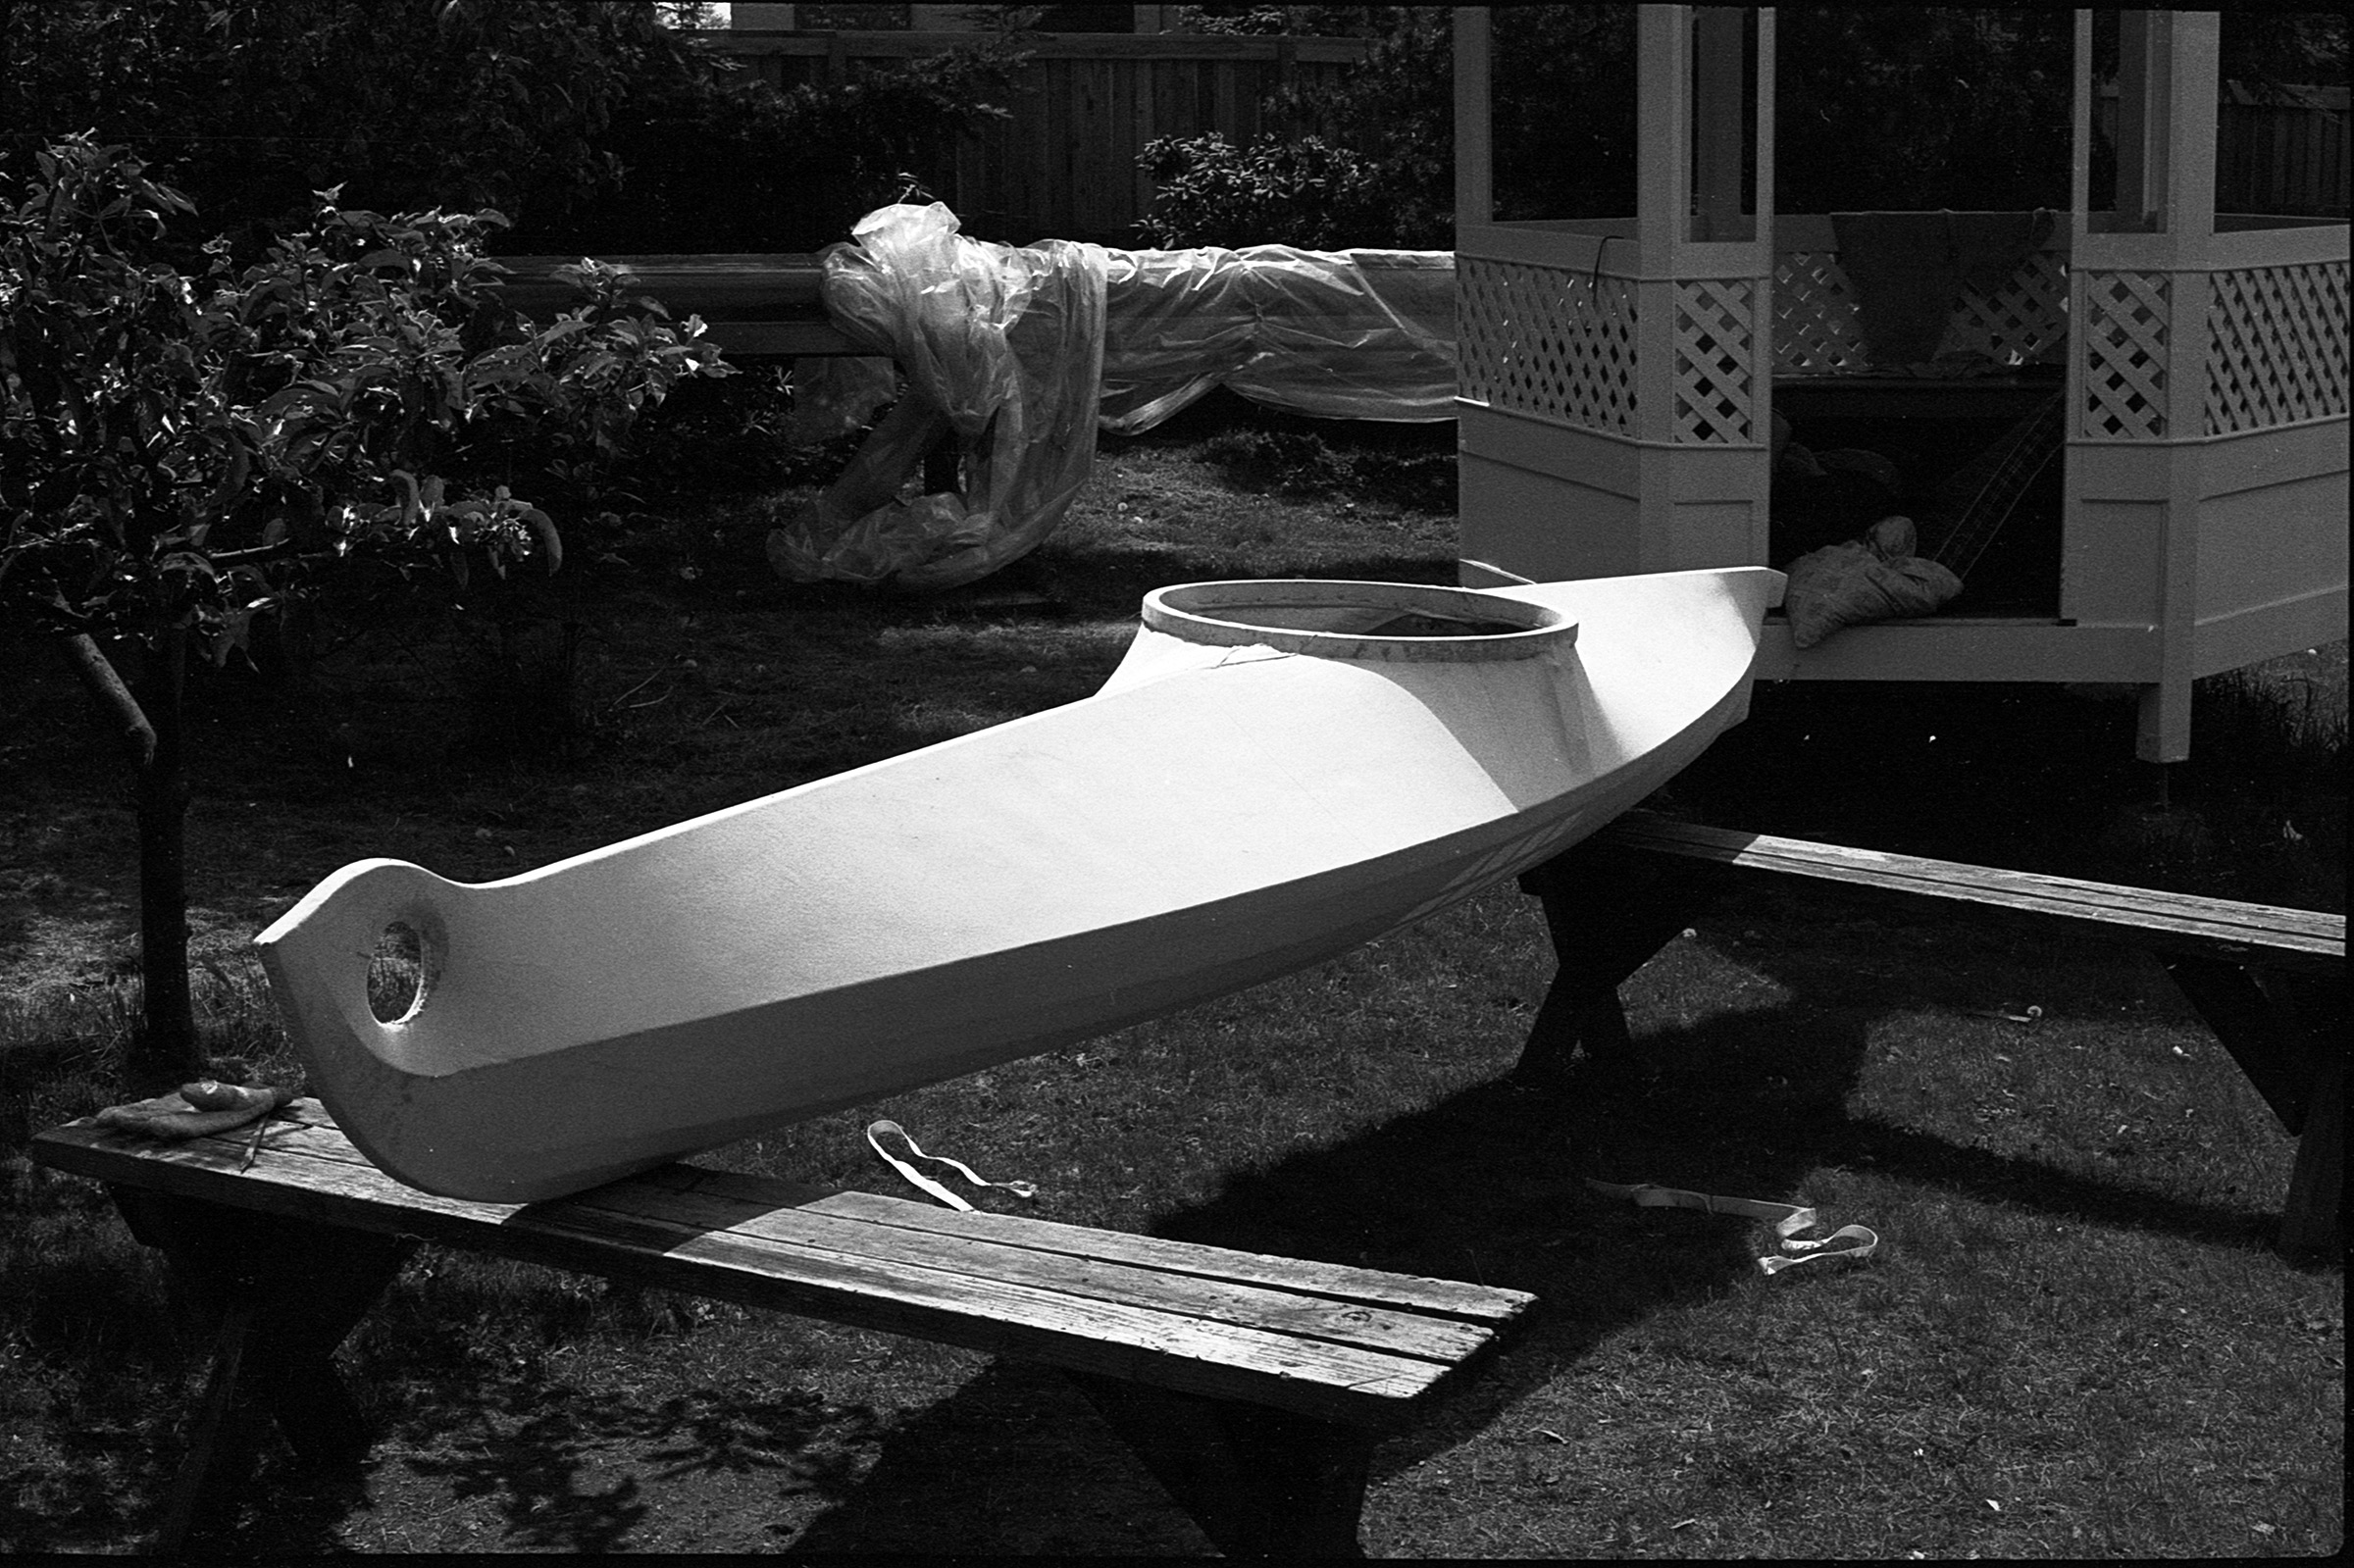
The Elf weighs only 143 lbs and can easily be pulled up on a beach or onto a trailer singlehandedly, and two people can carry it. I bought a pair of inflatable beach rollers for effortless and harmless beaching; they fit under the thwarts when not in use and serve as flotation.
Once you get the Elf in the water, it will feel tender at first, but stable when you get settled on the thwart. Then the very first strokes will put a smile on your face. The hull resistance in slow speeds is remarkably low, and the boat is very easily driven. A peaceful pace for this boat is 3 knots, and by adding some effort, a knot more can be achieved. This seems to be the hull speed. The full-length wooden keel provides excellent tracking, and she turns smoothly. Because the Elf’s bow is much fuller than its stern, the forward thwart is the best choice for rowing alone; putting some gear or ballast in the stern will achieve proper fore-and-aft trim. For solo rowing, when the wind is abeam, rowing from the aft station will help prevent the hull from turning into the wind.
Mats Vuorenjuuri
With two rowers, Elf balances up nicely and maintains good speed with little effort. The 3′ spacing between the rowing stations is just enough for two well-synchronized rowers.
Because the span between the aft station’s kabes is 4″ less than the span at the forward station, you will lose some leverage rowing aft. For tandem rowing, the space between the two rowing positions is just enough.
The extreme lightness of the Elf has its virtues and drawbacks. It takes very little to move it, whether under oar power or sails. Lightly loaded, the hull sits high on water, and the upswept bow and stern add to windage. Although the hull can handle rough wave conditions, rowing against even a moderate breeze can be hard work. Waves also have an effect on the light hull, and its lack of momentum while tacking can lead to getting caught in irons. After you steer through the eye of the wind the Elf will start flying; off the wind it will accelerate quickly to surf down waves, occasionally exceeding hull speed.
Once you step into the Elf you are more than doubling its displacement, making it sensitive to both longitudinal and transverse trim. This can be disconcerting to a novice, at least to begin with, but very useful to an expert sailor accustomed to trimming and ballasting a sailing dinghy. The magic of faerings is in a narrow waterline beam for fast rowing, and a ’midships flare for ample reserve buoyancy to resist heeling while under sail.
Pasi Ehrola
Elf is well mannered under sail. Once the ample flare in the midsection hits the water, the hull stiffens up considerably.
Elf sails quite well even without the daggerboard. Before I installed the daggerboard case, sitting on the floor in the center of the boat was a sweet spot when sailing alone. The push-pull tiller rests conveniently on the center thwart, and I had unobscured views under the sail. When the wind picks up, you get more leverage from body weight by sitting on the thwart, or by hiking out on the gunwale. Sailing with a family of three aboard was also comfortable—my daughter would sit in front of the mast on the floor, I steered while sitting between center and aft thwarts, and our third crew sat between the center and forward thwarts. Loaded this way, Elf is very forgiving and stable.
Adding the daggerboard resulted in faster tacks and better windward performance. If you have camp-cruising in mind, I would seriously consider dispensing with the daggerboard and case to get good use of the stowage space in the center of the boat.
Gene Williams
This Elf, built by Duane Mathes, carries the sprit rig that is detailed in Oughtred’s plans.
I deviated from the plans for the sailing rig. The plans call for a 53-sq-ft sprit sail, but I opted for a lugsail of similar size; lugsail is also a choice of preference by Oughtred for Elf’s big sister, the 16′ 6″ Elfyn. As designed, Elf’s mast is supported by an extra partner fastened at the sheer. I wanted to minimize the structures and have unobstructed access to the bow, so I used the forward thwart as the partner. With this arrangement, the mast bury is quite small, so I stayed the mast using the halyard as one stay, and a dedicated line as the other. Eventually, finding the right tweaks for the lug sail, balance was good. The area of the balanced lug sail that sets forward of the mast compensates for moving the mast location a little bit aft, so the center of the sail’s overall area is very nearly the same as that of the spritsail.
As Iain remarked about the Elf: “Getting such functional efficiency in such a simple shape is astonishing.” Build an Elf for rowing, sailing, or wandering solo with a light load of camping gear, you can hardly go wrong. Elf is packed with character. Give it time and opportunities, and it will eventually charm your eye and steal your heart.
Mats Vuorenjuuri is the father of three and an entrepreneur, making a living in graphic design, photography, and freelance writing. He is currently becoming a boatbuilder as well, offering boatbuilding and maintenance services through Nordic Craft. In recent years he has discovered the simplicity and joy of small boats after sailing various types including sail-training schooners. He wrote about cruising the Finnish coast in his Coquina in our May 2016 issue and about a Lakeland Row in January 2017.
Elf Particulars
[table]
Length/14′11″
Beam/4′4″
Sail area, lug/52.72 sq ft
Weight/143 lbs
[/table]
Plans for the Elf are available from the WoodenBoat Store for $204 USD (study plans are 99 cents) and from Oughtred Boats for $224.44 AUS.
Is there a boat you’d like to know more about? Have you built one that you think other Small Boats Magazine readers would enjoy? Please email us!
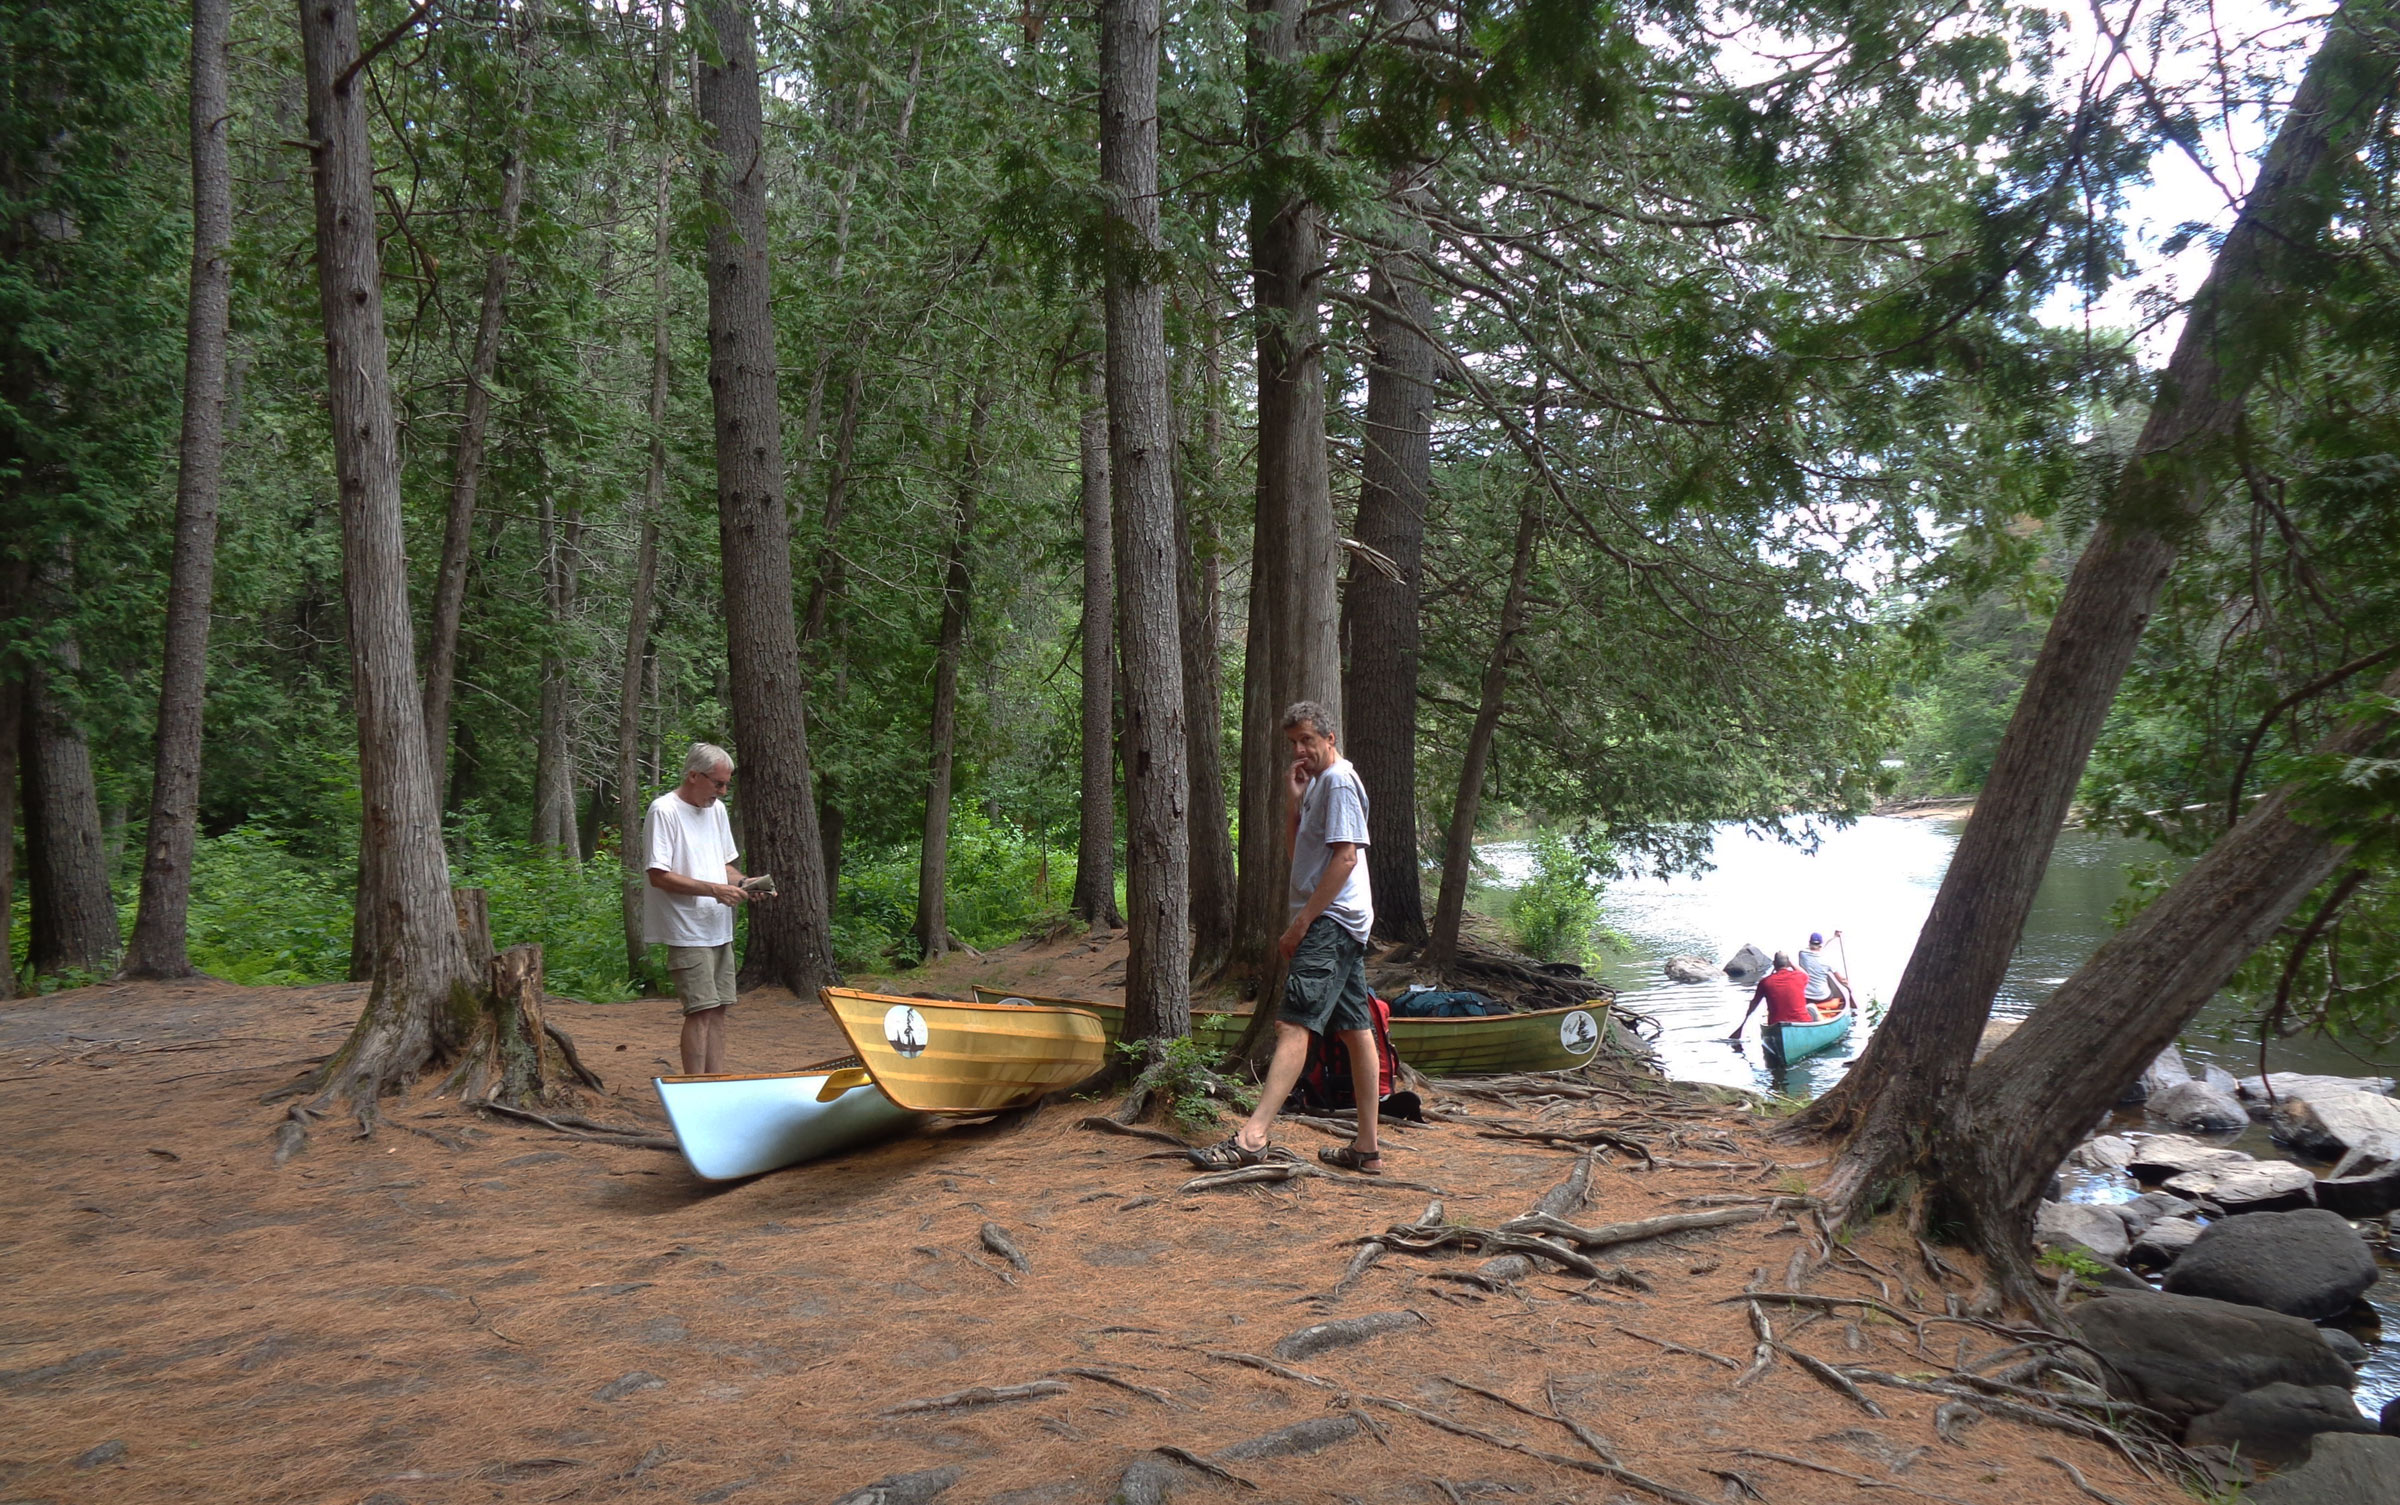
We descended the steep trail from the parking lot into the Barron River valley and came into a grove of pine trees with waist-thick trunks; their roots fanned out more than 20′ and intertwined above the shallow soil. At the river’s edge was a clearing carpeted in russet pine needles. The banks were lined with rounded barrel-sized boulders, and rocks just below the surface of the water had a copper-colored glow. Where the 50′-wide river was deepest it ran black.
Photographs by the author
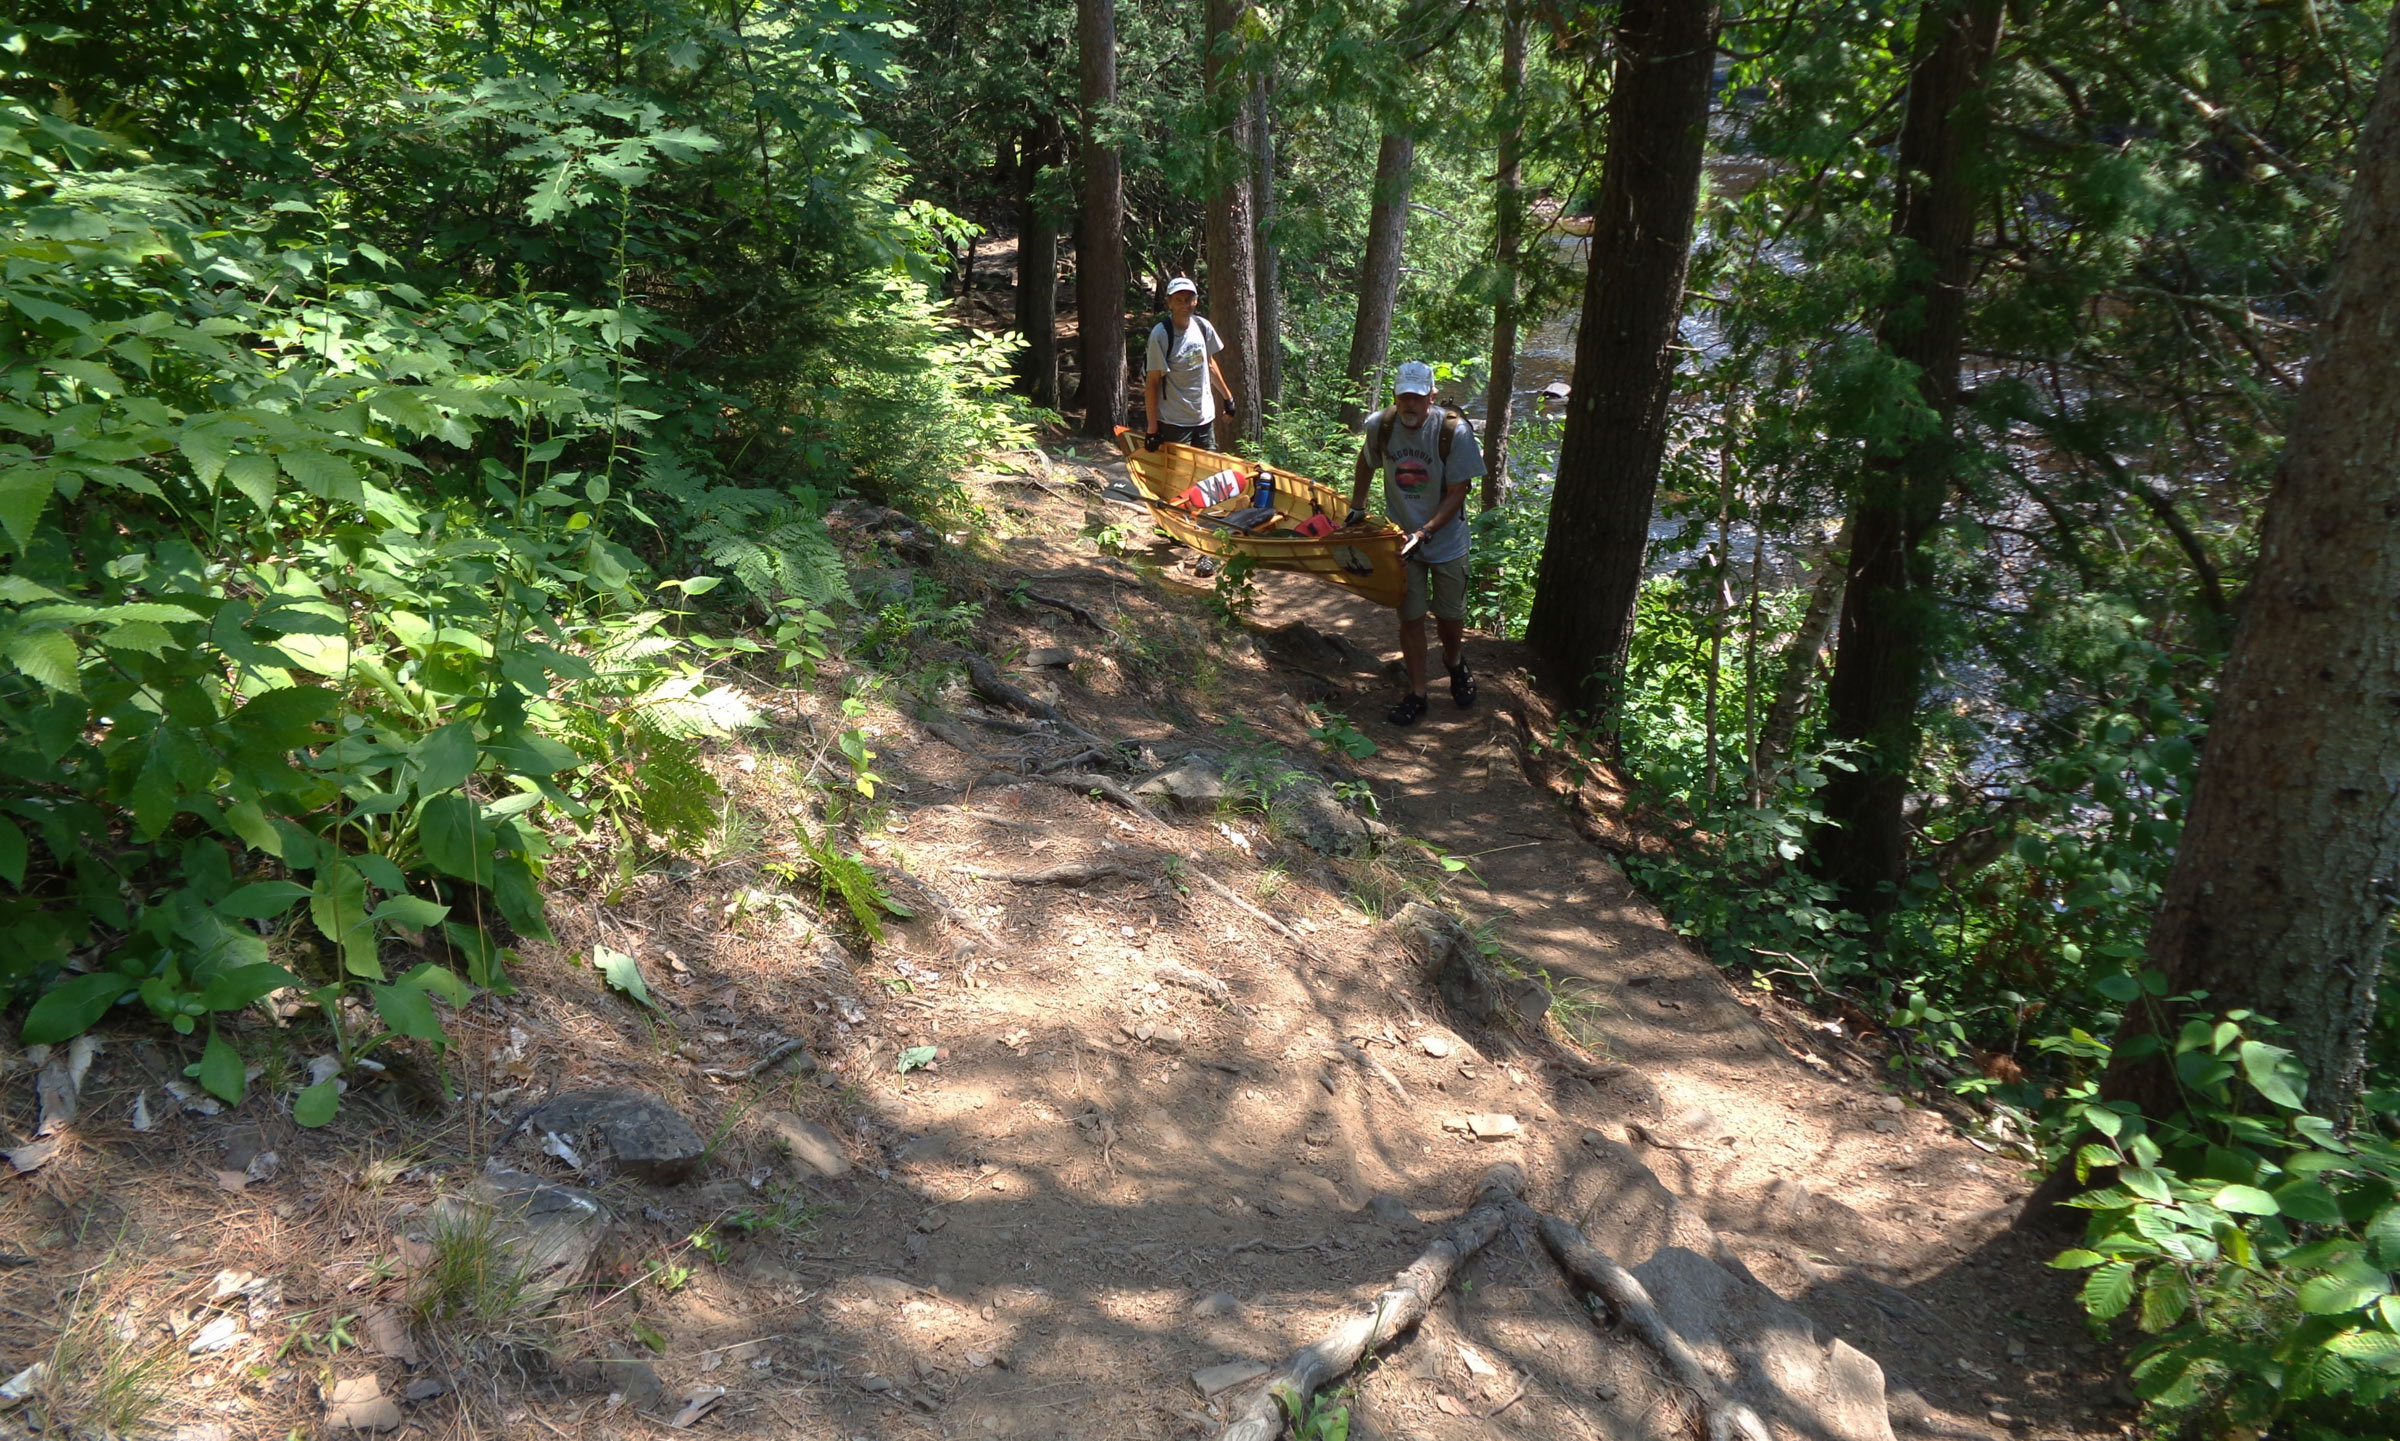
After carrying the canoes down from the long, steep path from the Brigham Lake parking lot, Phil and Rob paused for a rest before launching onto the Barron River. Two paddlers who preceded us are just getting underway.
The sun was high overhead and the heat of the day was peaking. Sweat beaded on my brow, but waiting for us was a soothing breeze on the Barron River. I was headed, with Rob and Phil, my canoe buddies for many years, to a part of Ontario’s Algonquin Provincial Park known as Barron Canyon, where granite cliffs stretch 300’ above the river.
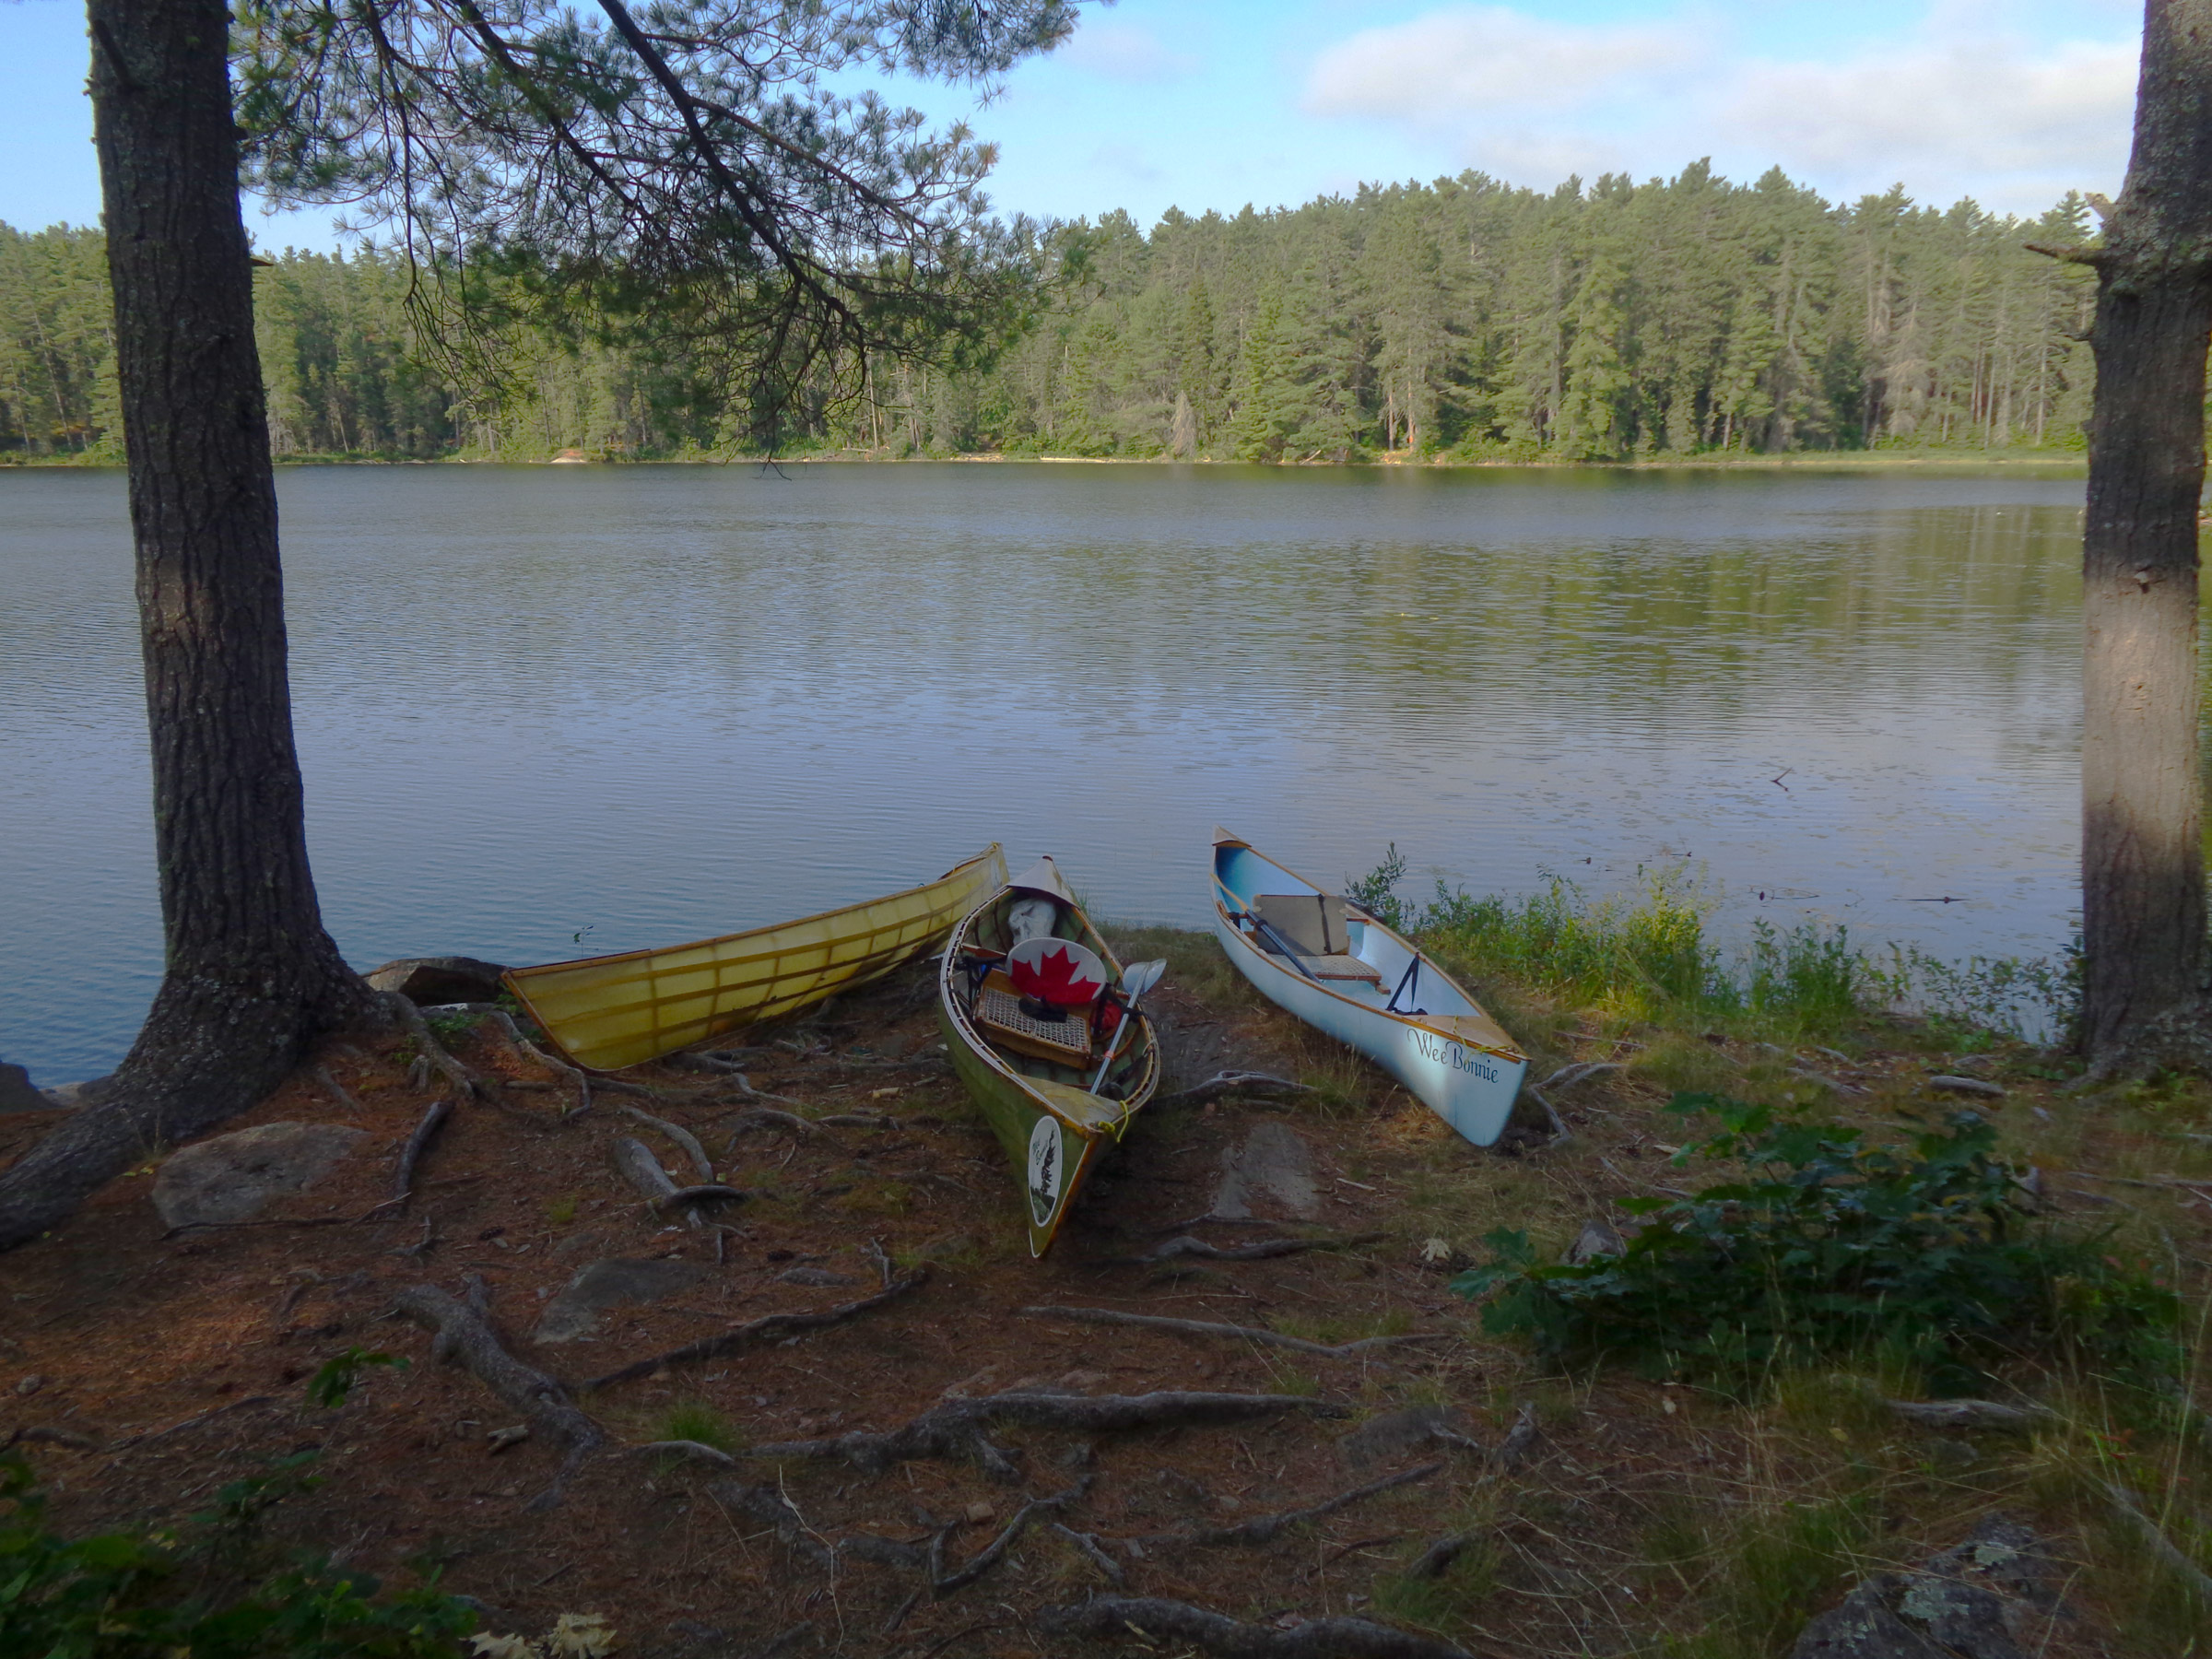
All of us, now in our 60s, preferred to use my lightweight solo canoes (30 lbs) that I call Wee Bonnies. Rob and I used the skin-on-frame versions, while Phil always has dibs on the one I strip-built using light blue insulation foam.
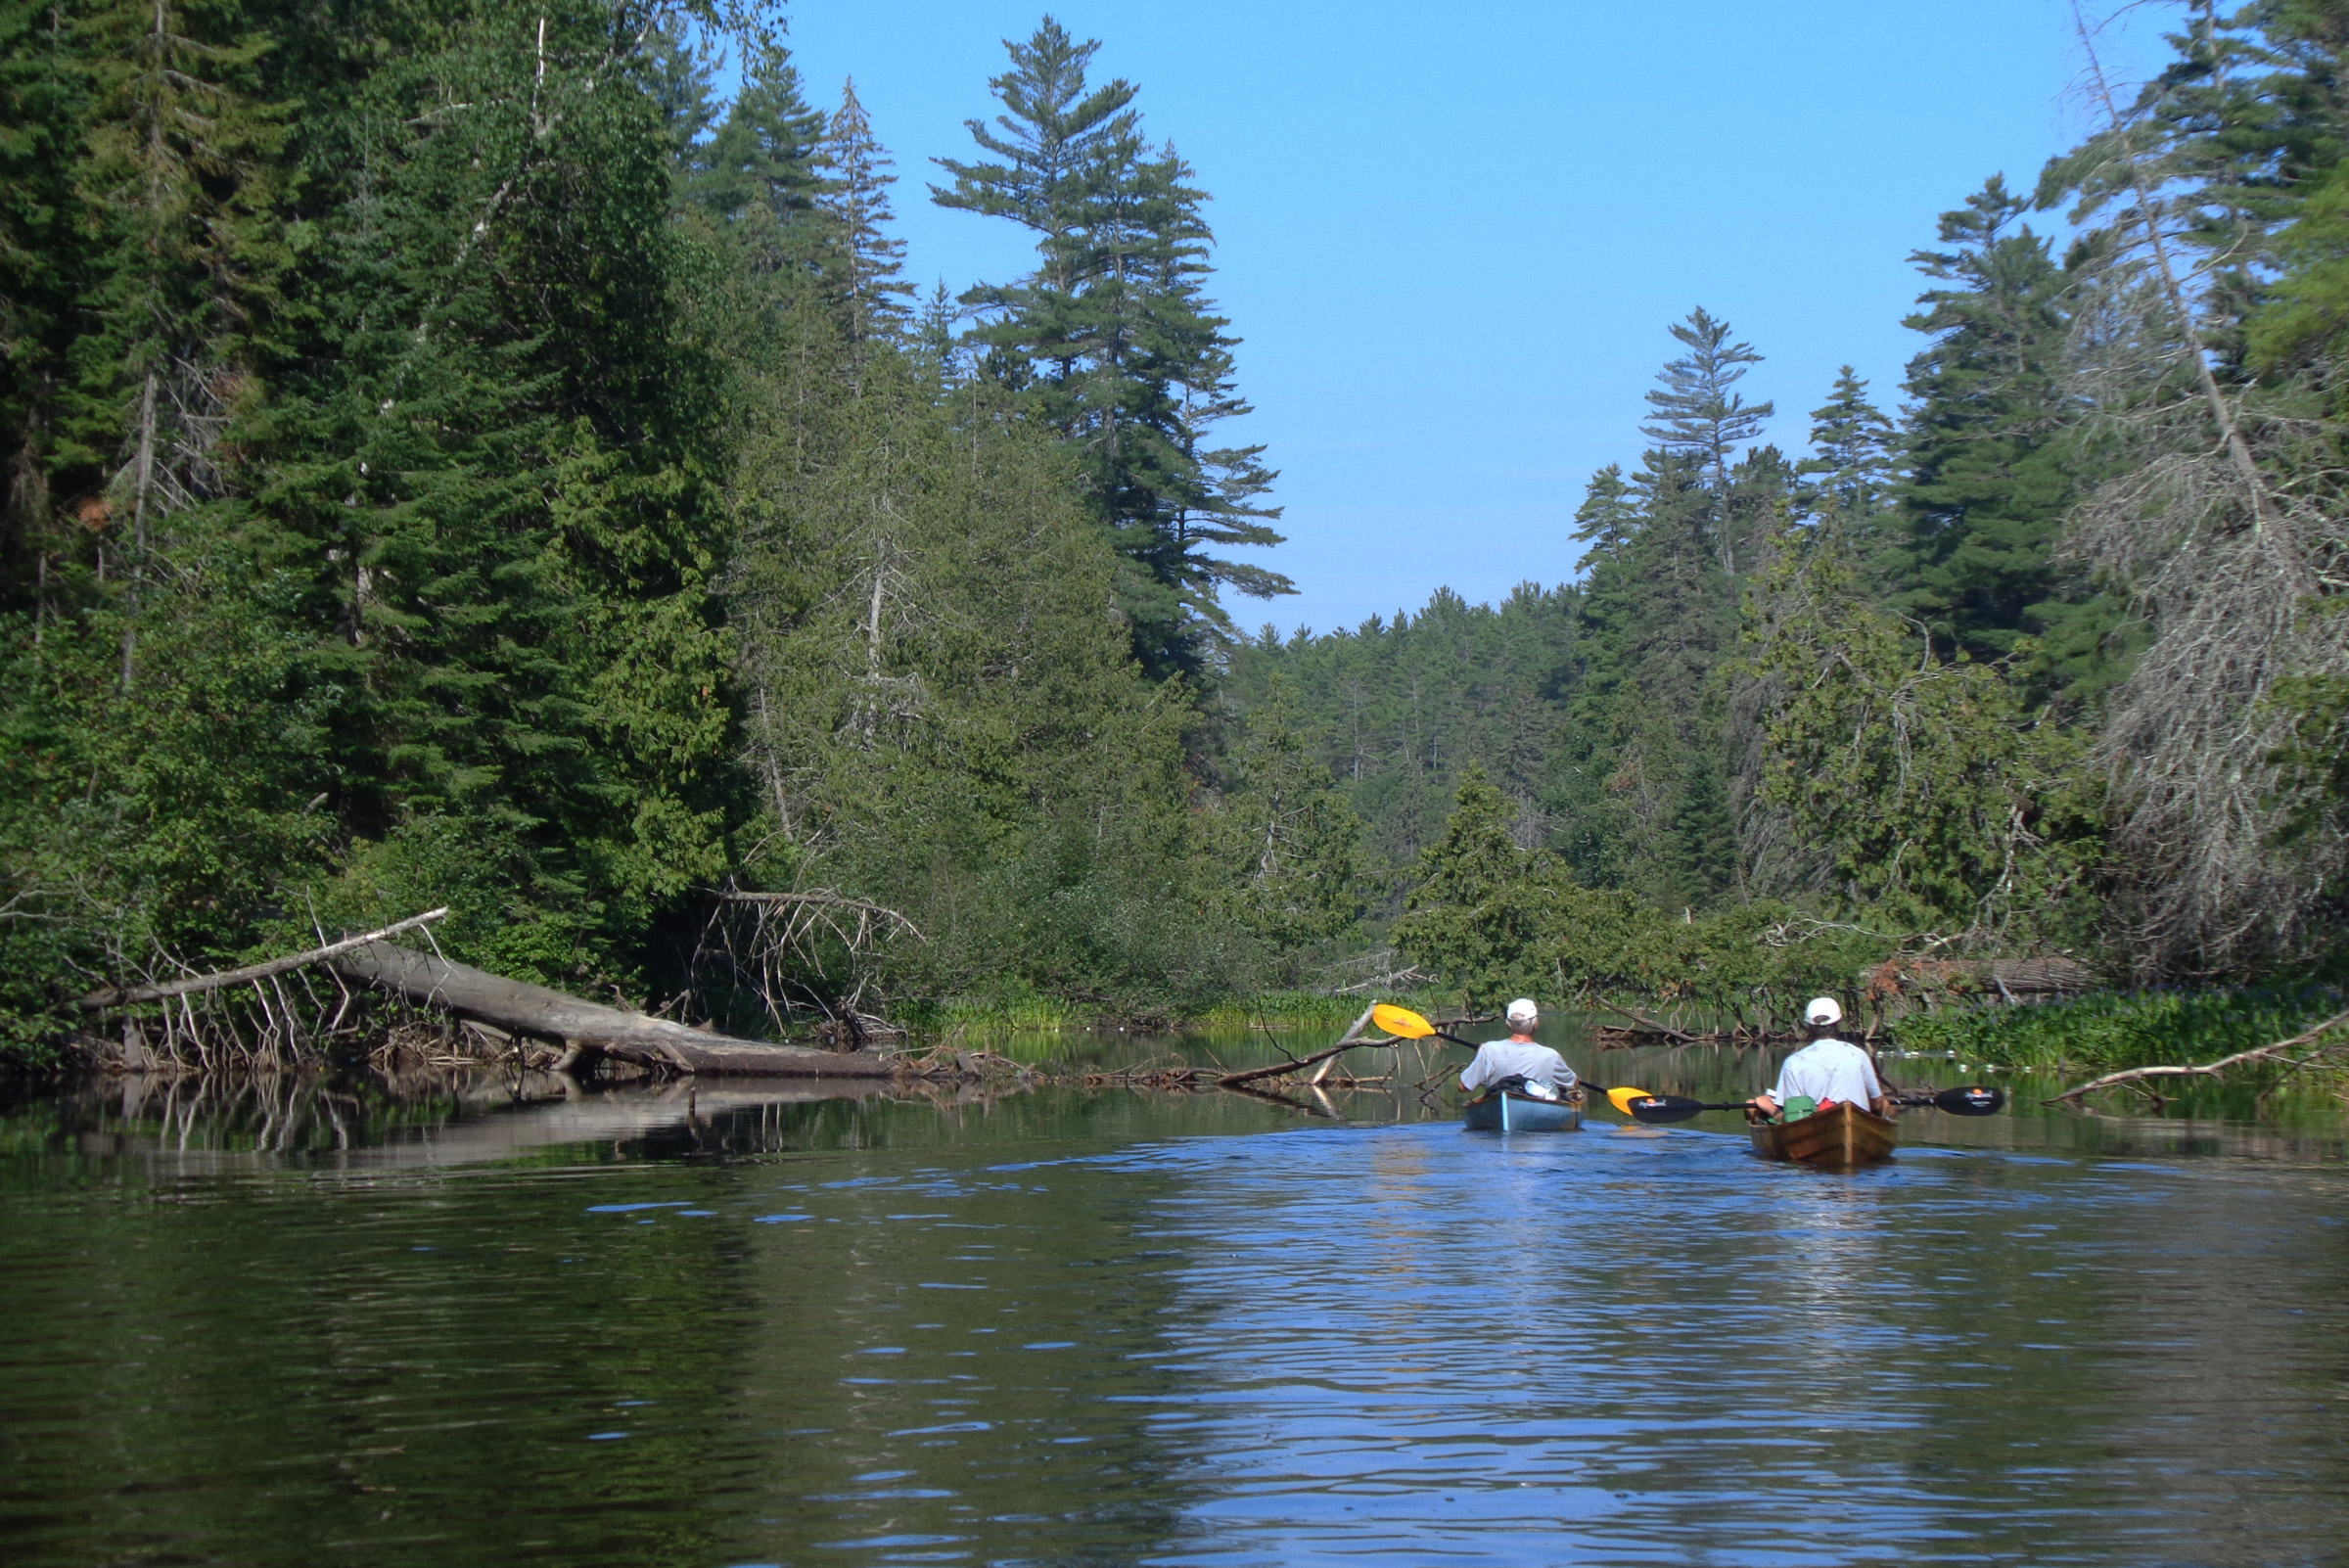
Launching into the shallow, gentle current of the Barron River, we slid slowly downstream in clear, cool water over black, white, and orange granite stones the size of golf balls.
As we headed downstream over a shallow stretch of the river, we had to be careful to watch for submerged log debris and rocks lurking just below the surface.
Phil took the lead, Rob followed, and I was at the end, making sure to avoid any sunken logs or boulders that were just under the surface of the shallow river here. The banks were high and thick with white and red pine, and as the land rose up around us, we paddled by sections of crumbled cliffs and boulders separated by stands of trees. Pickerelweed with its spikes of purple flowers was thick along both sides of the river, and log debris was everywhere.
The river widened abruptly at the entrance to a small lake, and the rippled sand beneath us dimmed as the water gradually deepened. Brigham Lake is 200 yards across and twice as long and surrounded with pine and fir. We paddled to the south side of the lake and carefully picked our way through barely submerged shoreside rocks to a clearing in the woods.
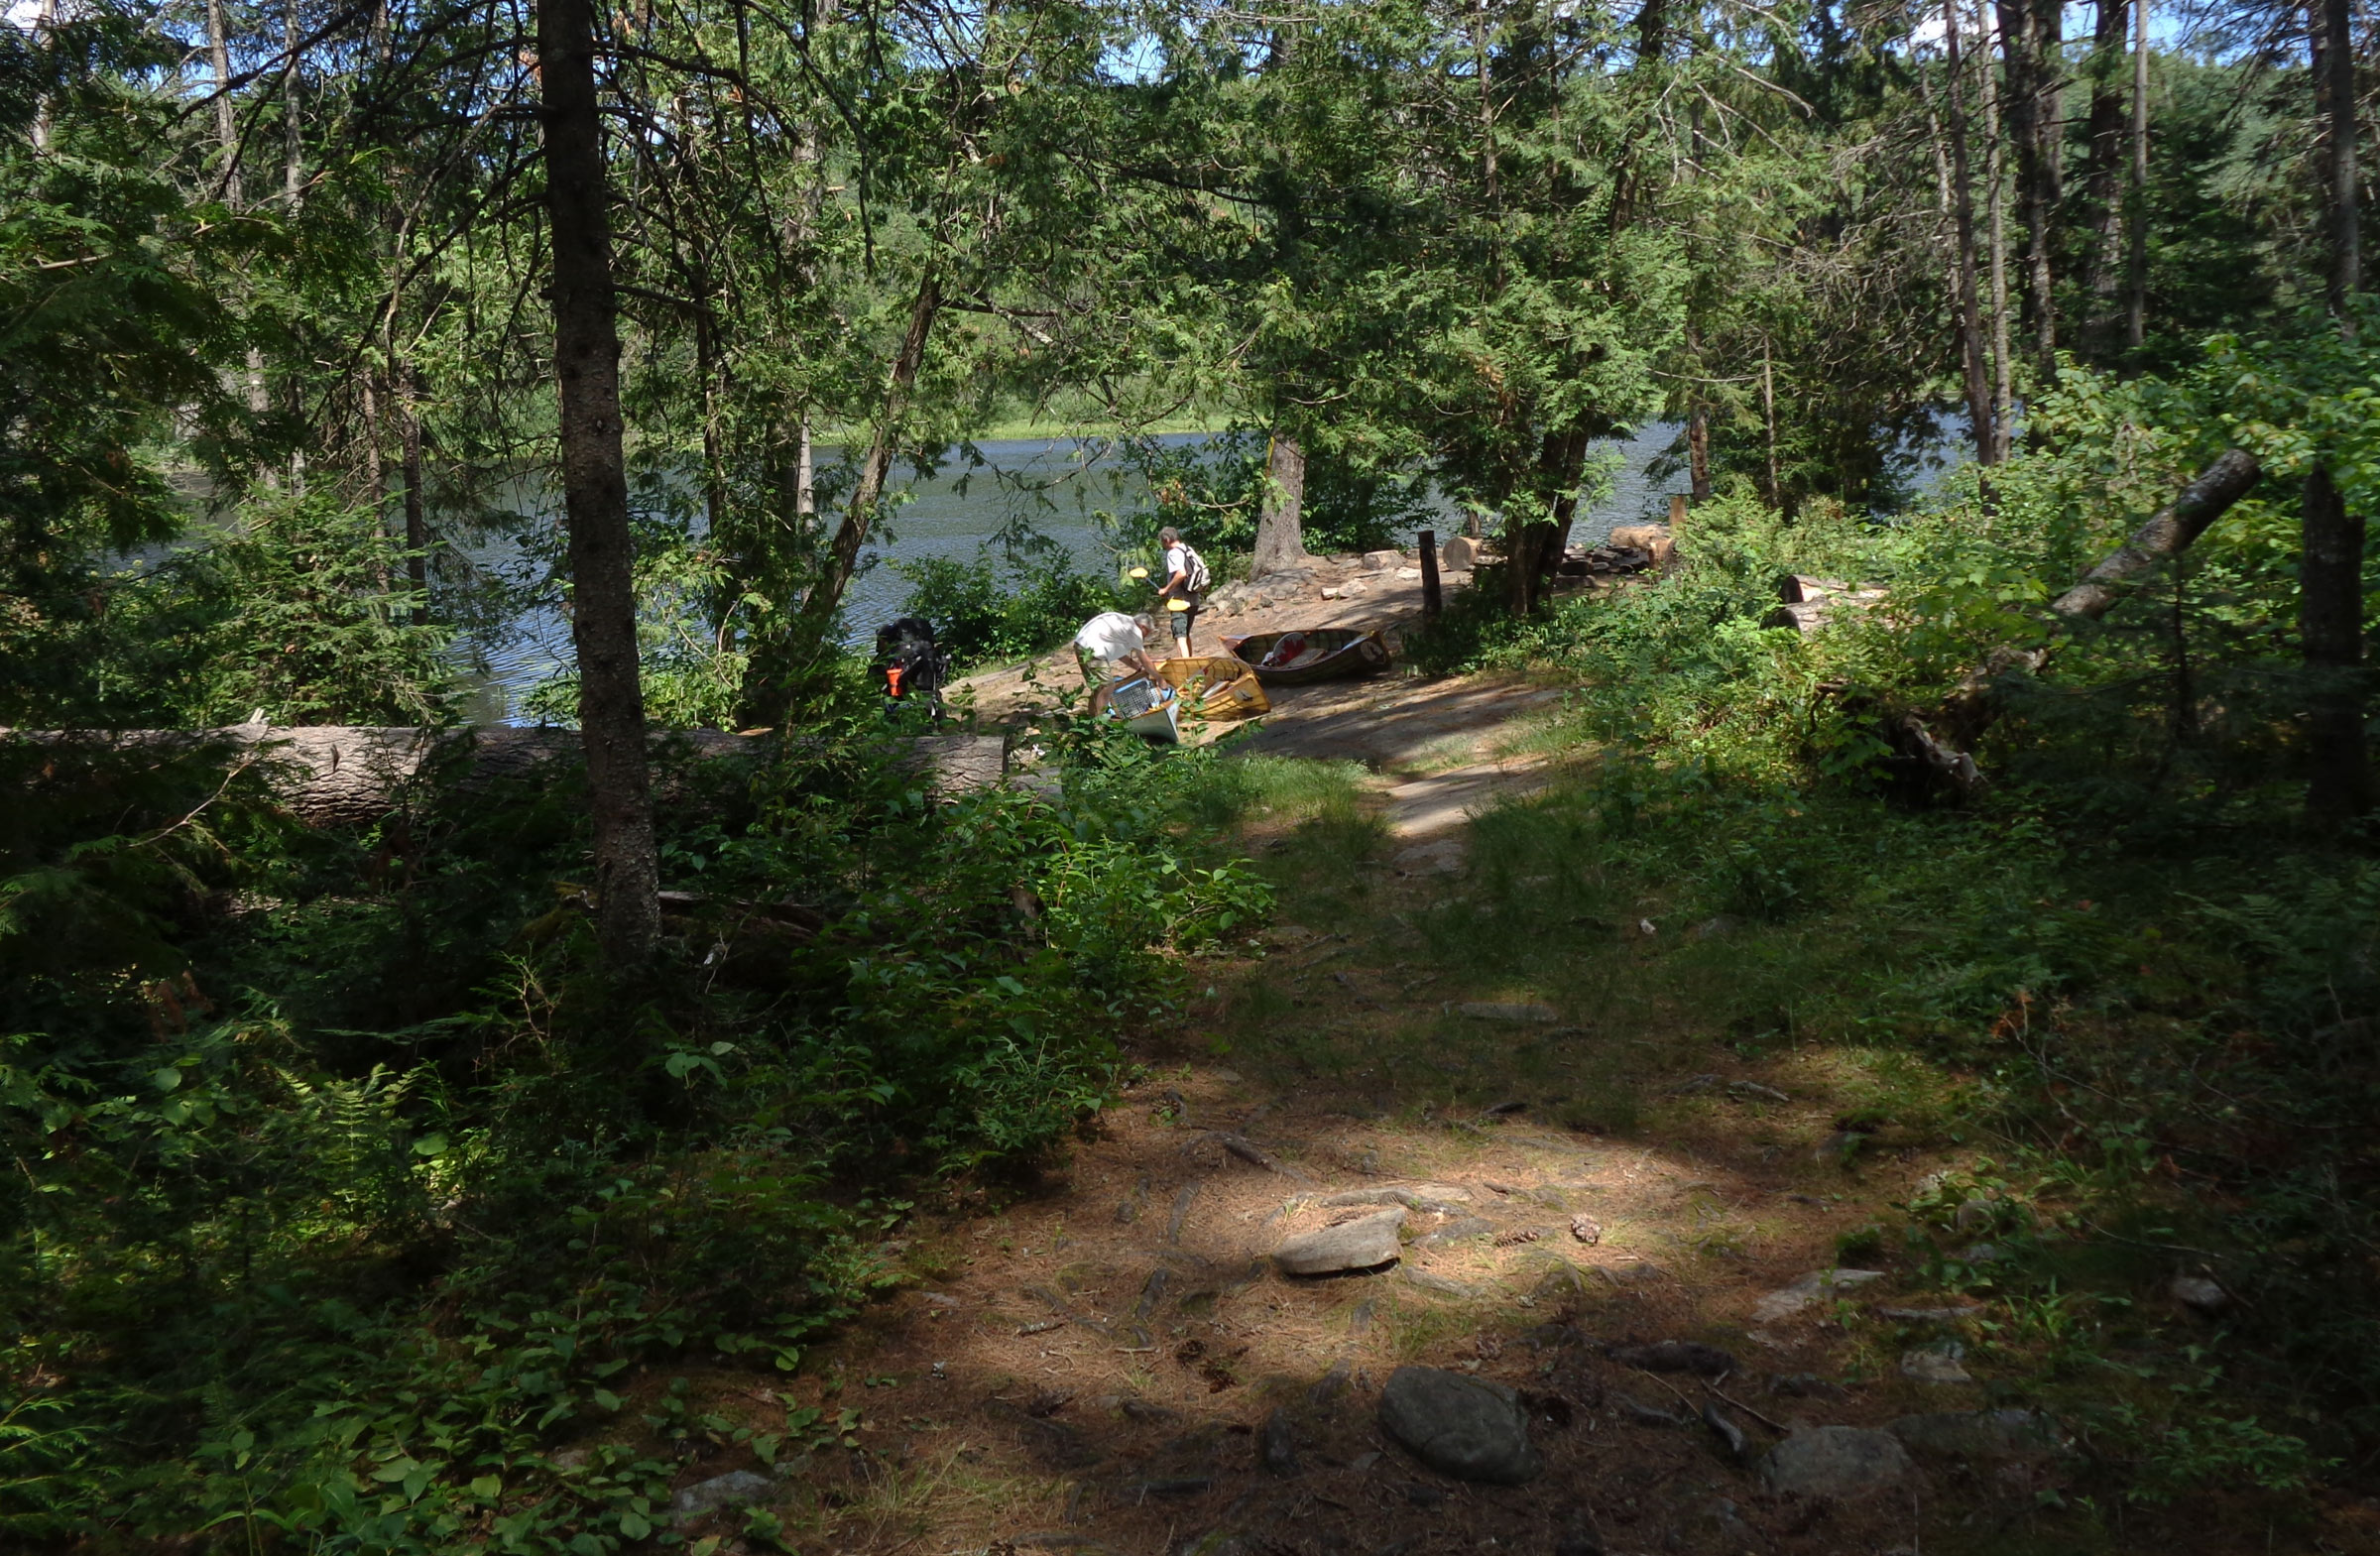
To prepare the canoes for portaging from Brigham Lake to Opalescence Lake we flipped the seats up so the yokes on the ends of the seats were ready for the carry. The trail was steep and rocky so we carried the canoes and packs in separate trips.
A campsite there had a stone-ring fire pit and log rounds for seats, but we were here not to stay but to portage to Opalescent Lake. The carry would be a challenge, as it rose about 150 feet over a distance of 800 yards. The path was well defined and easy to follow but strewn with ankle-twisting rocks and roots. It crossed steep-sided valleys and skirted steep rocky drop-offs, so we decided to carry our gear and canoes in two trips. If the portage was less rough, we would have chosen to do a single carry. We had plenty of time, so two trips it was.
The three of us picked up our packs and set off on the first crossing along the sun-dappled path, winding through the thick bush of pine. While I could see clearly ahead over 50’, I kept my focus downward, and stepped gingerly over rocks and roots, sometimes hidden by a thick layer of dried pine needles. We maneuvered down some rock steps, being careful not to lose our footing on the uneven ground and tumble down a rocky granite slope. We passed through a valley and crossed a small creek on a narrow bridge made of four long, springy 2x6s. In the lowlands around the creek, swarms of mosquitoes attacked us and we picked up our pace. As we got close to the end of the portage, we could see the sun sparkling on the water through the trees. It was a welcome sight because our packs, fully laden with gear and provisions for four days, were at their heaviest.
Roger Siebert
.
I set my pack down at the end of the portage, scratched my legs and arms, and then reached into the front pouch of my pack to pull out a bottle of bug spray. I hadn’t applied enough repellent to deter the little blood-sucking pests; I’d be better protected for the return trip.
Phil and Rob had already headed back and I could hear them in the distance, cursing the mosquitoes. Well slathered with spray, I hurried back over the rocky trail to catch up. Back at the Brigham Lake clearing, Rob flipped his canoe onto his shoulders and took the lead, with Phil close behind him. I brought up the rear again, hoping the mosquitoes would have had their fill from them and leave me be.
The third walk on the trail was easier because the canoes were lighter than our packed gear, and the mosquitoes left me alone, but the trickles of sweat running down my face seemed to attract deerflies. There was no cooling breeze making its way through the thick bush of pine, spruce, and fir, and the back of my T-shirt was drenched and sticking to my skin.
We set up our base at the Opalescence Lake camp site where we would stay for the next two days and do day trips. There was still some unpacking to do but but a refreshing swim came first.
I rejoined Phil and Rob at the end of the portage, and gently swung my canoe down on a patch of the hard-packed ground cushioned with pine needles. A soft cool breeze skimming across Opalescent Lake provided some relief on that hot day in July. The irregular chain of rocks that had dotted the portage carried on into the lake, making it difficult to find enough space to launch our canoes. The clear water, its dark-blue surface dotted with bright green lily pads, was breathtakingly beautiful and indeed opalescent.
The narrow lake, running ¾ mile from east to west, was hemmed in by red and white pine, cedar and spruce, and scattered maples and birch. We walked out onto a low rock ledge at the edge of the lake and set our canoes in the still water. After loading the packs aboard, we eased into our seats and pushed off.
Just around a bend from the launch, we glided up to a granite ledge on a blunt point of land where pale, shin-high grass surrounded bald outcroppings of bedrock. Working together, the three of us quickly carried the canoes up past the ledge and set them on a tracery of roots covering the nearly flat ground. In 2013 we had camped here in the sun-drenched clearing, a dozen yards wide. Since then a tree that had provided shade had been snapped in half, perhaps in a heavy wind storm a few years ago.
Rob pointed out to me that his canoe’s seat had started to split, as the synthetic cane weaving had finally succumbed to the sunlight after four years of use. I would do some patching later.
Since we’d been here before, I knew just where to hang my hammock and Phil and Rob knew where to pitch their tent. The bedrock, of course, made it impossible to set tent pegs, so we weighted them down with rocks. My hammock was strung between two large pines where the bank started to slope down to the lake, so I’d have a good view of both the lake and sky.
With our camp set up, we could take advantage of the clear lake water just a few yards away. We dove off the rock ledge, swam out about a quarter of the way across the lake, and bobbed around, enjoying the refreshing feel of cool water below the warm surface layer.
As we climbed out of the water, Phil noticed blueberry bushes at the edge of the clearing. The berries were so sweet, it was hard to save some for breakfast.
Rob, Phil, and I have a tradition of having steak for dinner on our first night at camp. We had brought a frozen, precooked meal of steak, potatoes, and veggies. It had thawed during the day and all we had to do was to warm it up on our camp stove. For dessert, I’d brought a bar of dark chocolate.
With supper over, dishes done, we needed to pack all the food in a bag and hang it in a secure location outside our camp beyond the reach of mice, chipmunks, raccoons, and bears. We found a tall dead tree about 100’ to the east and Phil and I took turns trying to throw the rope, with a small rock tied to one end, up over the branch about 20′ up. I missed, but Phil did it on his second try. We hoisted the bag and headed back to camp. We made a small fire in the campsite’s fire pit, a ring of flat granite rocks piled in several tiers. Flickering flames spread easily across the dry dead branches Rob had gathered. Watching the flames was calming, and, tuckered out, we soon headed for our sleeping bags. Stargazing would have to wait. We were in bed by 10 o’clock, but I couldn’t fall asleep. Bullfrogs seemed intent on singing all night, and one was just 10′ from my hammock. Every 40 seconds he let out about four or five deep “ribbits.” I fell asleep at about 2 a.m., only to be awakened by two loons three hours later. Their haunting calls echoed off the far shore, making it sound like there were more of them.
After a breakfast of oatmeal and coffee, I worked on the seat on Rob’s canoe. I always carry some 1/8″ nylon cord and it worked for reweaving the damaged half of the seat. With a foam cushion added, it would be almost as good as new, but feeling somewhat guilty that I hadn’t replaced that old cane in the spring, I let Rob use my green skin-on-frame canoe and I would take his.
A light morning breeze ruffled the lake just before we launched for our day trip to explore Cork Lake.
Our plan was to go for a day trip to Cork Lake, east of Opalescent Lake via a 750-yard portage. We paddled slowly down the far shore of Opalescent Lake, taking our time, paddling as close to shore as possible to peer into the woods and enjoy the scenery. We passed a campsite on a rocky point; some trees there had been toppled by a small tornado that had passed through in July 2013. Massive pines lay on their sides, root structures upright like a giant saucer on edge.
The portage to Cork Lake was as reasonable as a portage through the bush could be, and we were carrying only light daypacks with our canoes so we only had to walk it once. It didn’t take us long to reach the shore of the lake.
Cork Lake had only three campsites, and only one was occupied that morning. The water was crystal clear, but the decaying debris on the bottom made it look an inky black. We hugged the shore and saw a few loons. The shallows along the shore were cluttered with underwater logs and a lot of rock ledges, but the water was so clear they were easily seen and avoided. One ledge was a massive dome of bright, gold-colored granite that loomed just 6″ under the water.
We took our time, circled some boulders, and squeezed our canoes in behind others.
When we stopped for lunch on Cork Lake, I pulled into a shallow, very slippery rock cove and let the north wind hold my canoe in place while we ate.
Heading north along the eastern shore, we stopped about halfway for lunch at a flat, scrub-covered rock ledge protruding out from shore. Phil and Rob pulled their canoes out of the water to keep the northerly, now steady breeze from sweeping the canoes away. I circled around to a cove on the north side of the landing, where the wind would hold my canoe mostly afloat over a smooth shelf of rock. We sat in silence, taking in the warm sun and eating lunch. Rob and I dove into the cool, clear water, swam well out from shore, and just floated, taking relief from another hot and humid day.
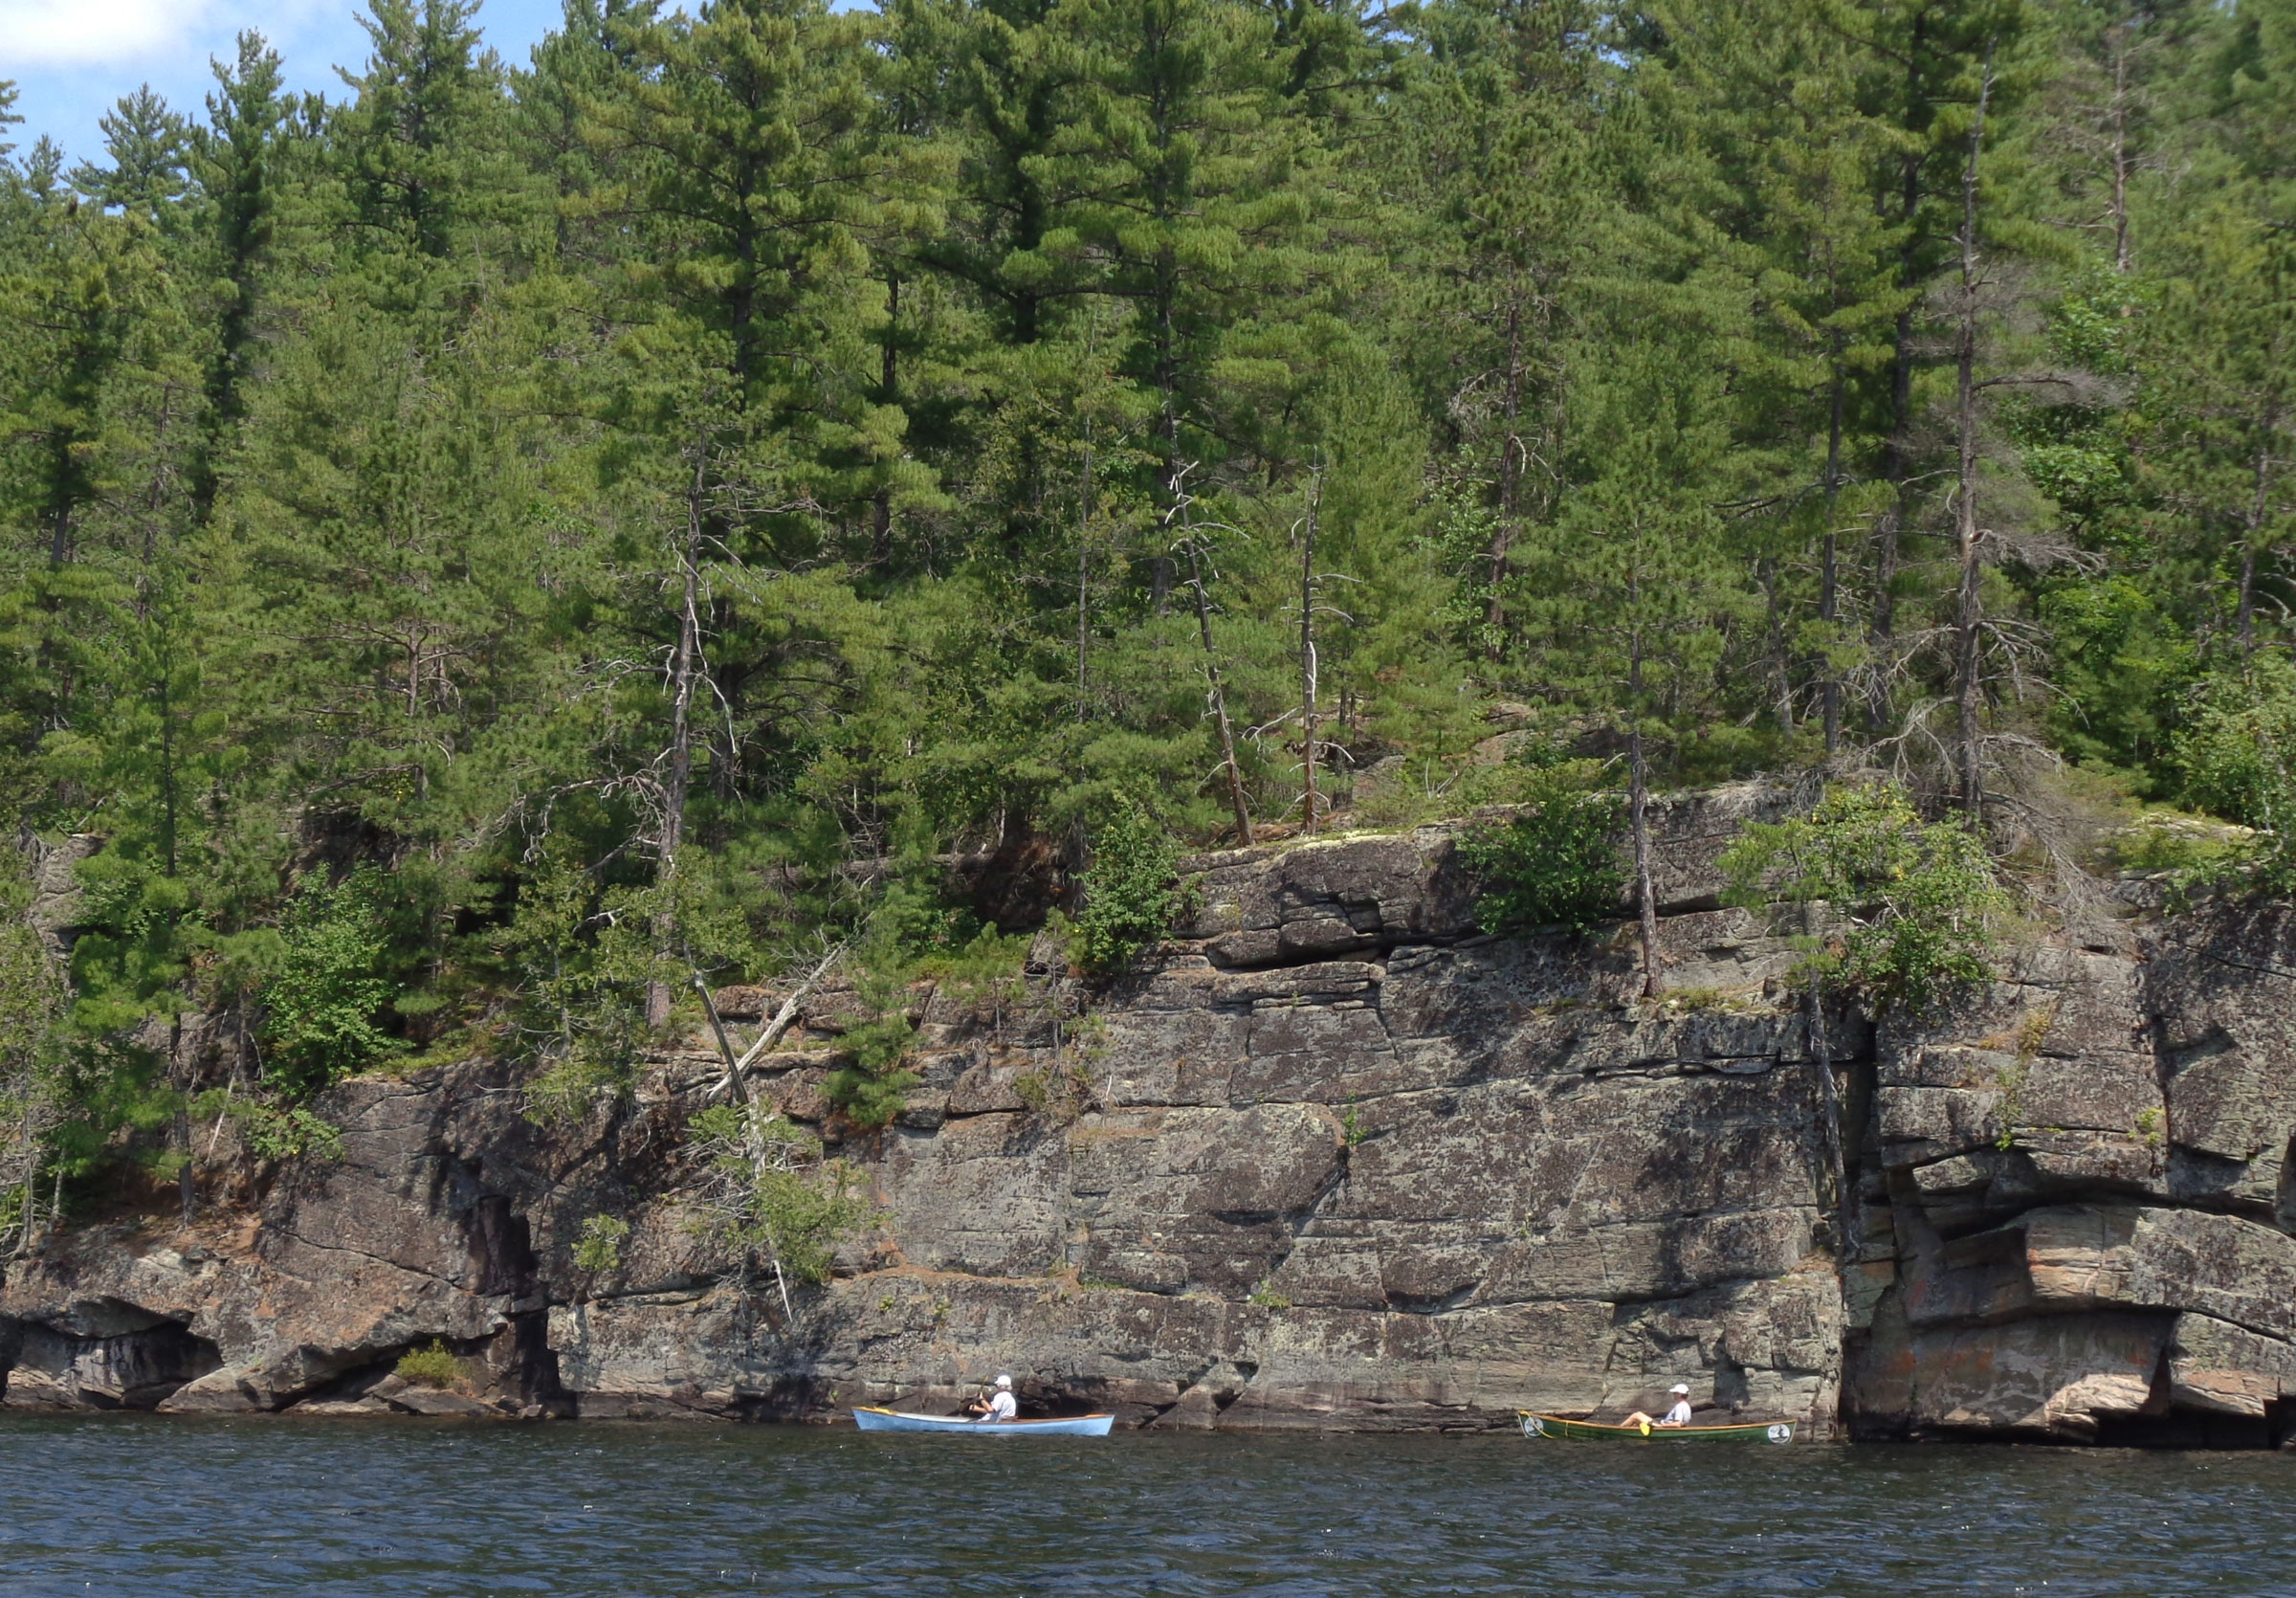
Phil and Rob paddled close enough to touch the cliff that bordered the east shore of Cork Lake. The vertical rock face extended well under water.
We continued our loop of the lake and paddled up the east side to massive cliffs of multicolored granite that towered over it. Orange lichen made the cliffs look as if they were spray-painted.
We made the carry back to Opalescent Lake and just as I stepped into my canoe, I slipped and dropped right on the back rest, snapping it from the thwart. I couldn’t paddle with my back up against the thwart, so I used a water sandal as a cushion and paddled gently back to camp. I rummaged through my pack to see what odds and ends I could use for repairs. I had thrown in a couple of bicycle inner-tube strips as general-purpose bungee cords. It wasn’t a pretty repair, but it worked to hold the seat back on the thwart.
Back at the Opalescent Lake camp after a day of paddling, Phil, at left, gazed at the small fire in the fire pit. Rob, center, and I relaxed with a cool drink.
As the evening dimmed the perfectly clear sky, Venus appeared, followed by the brightest stars one by one. Soon the sky was filled with constellations and streaked by shooting stars traced by satellites. When we hit the hay, it was nearly midnight with so many bullfrogs croaking that it sounded like white noise. Loons again woke me up early.
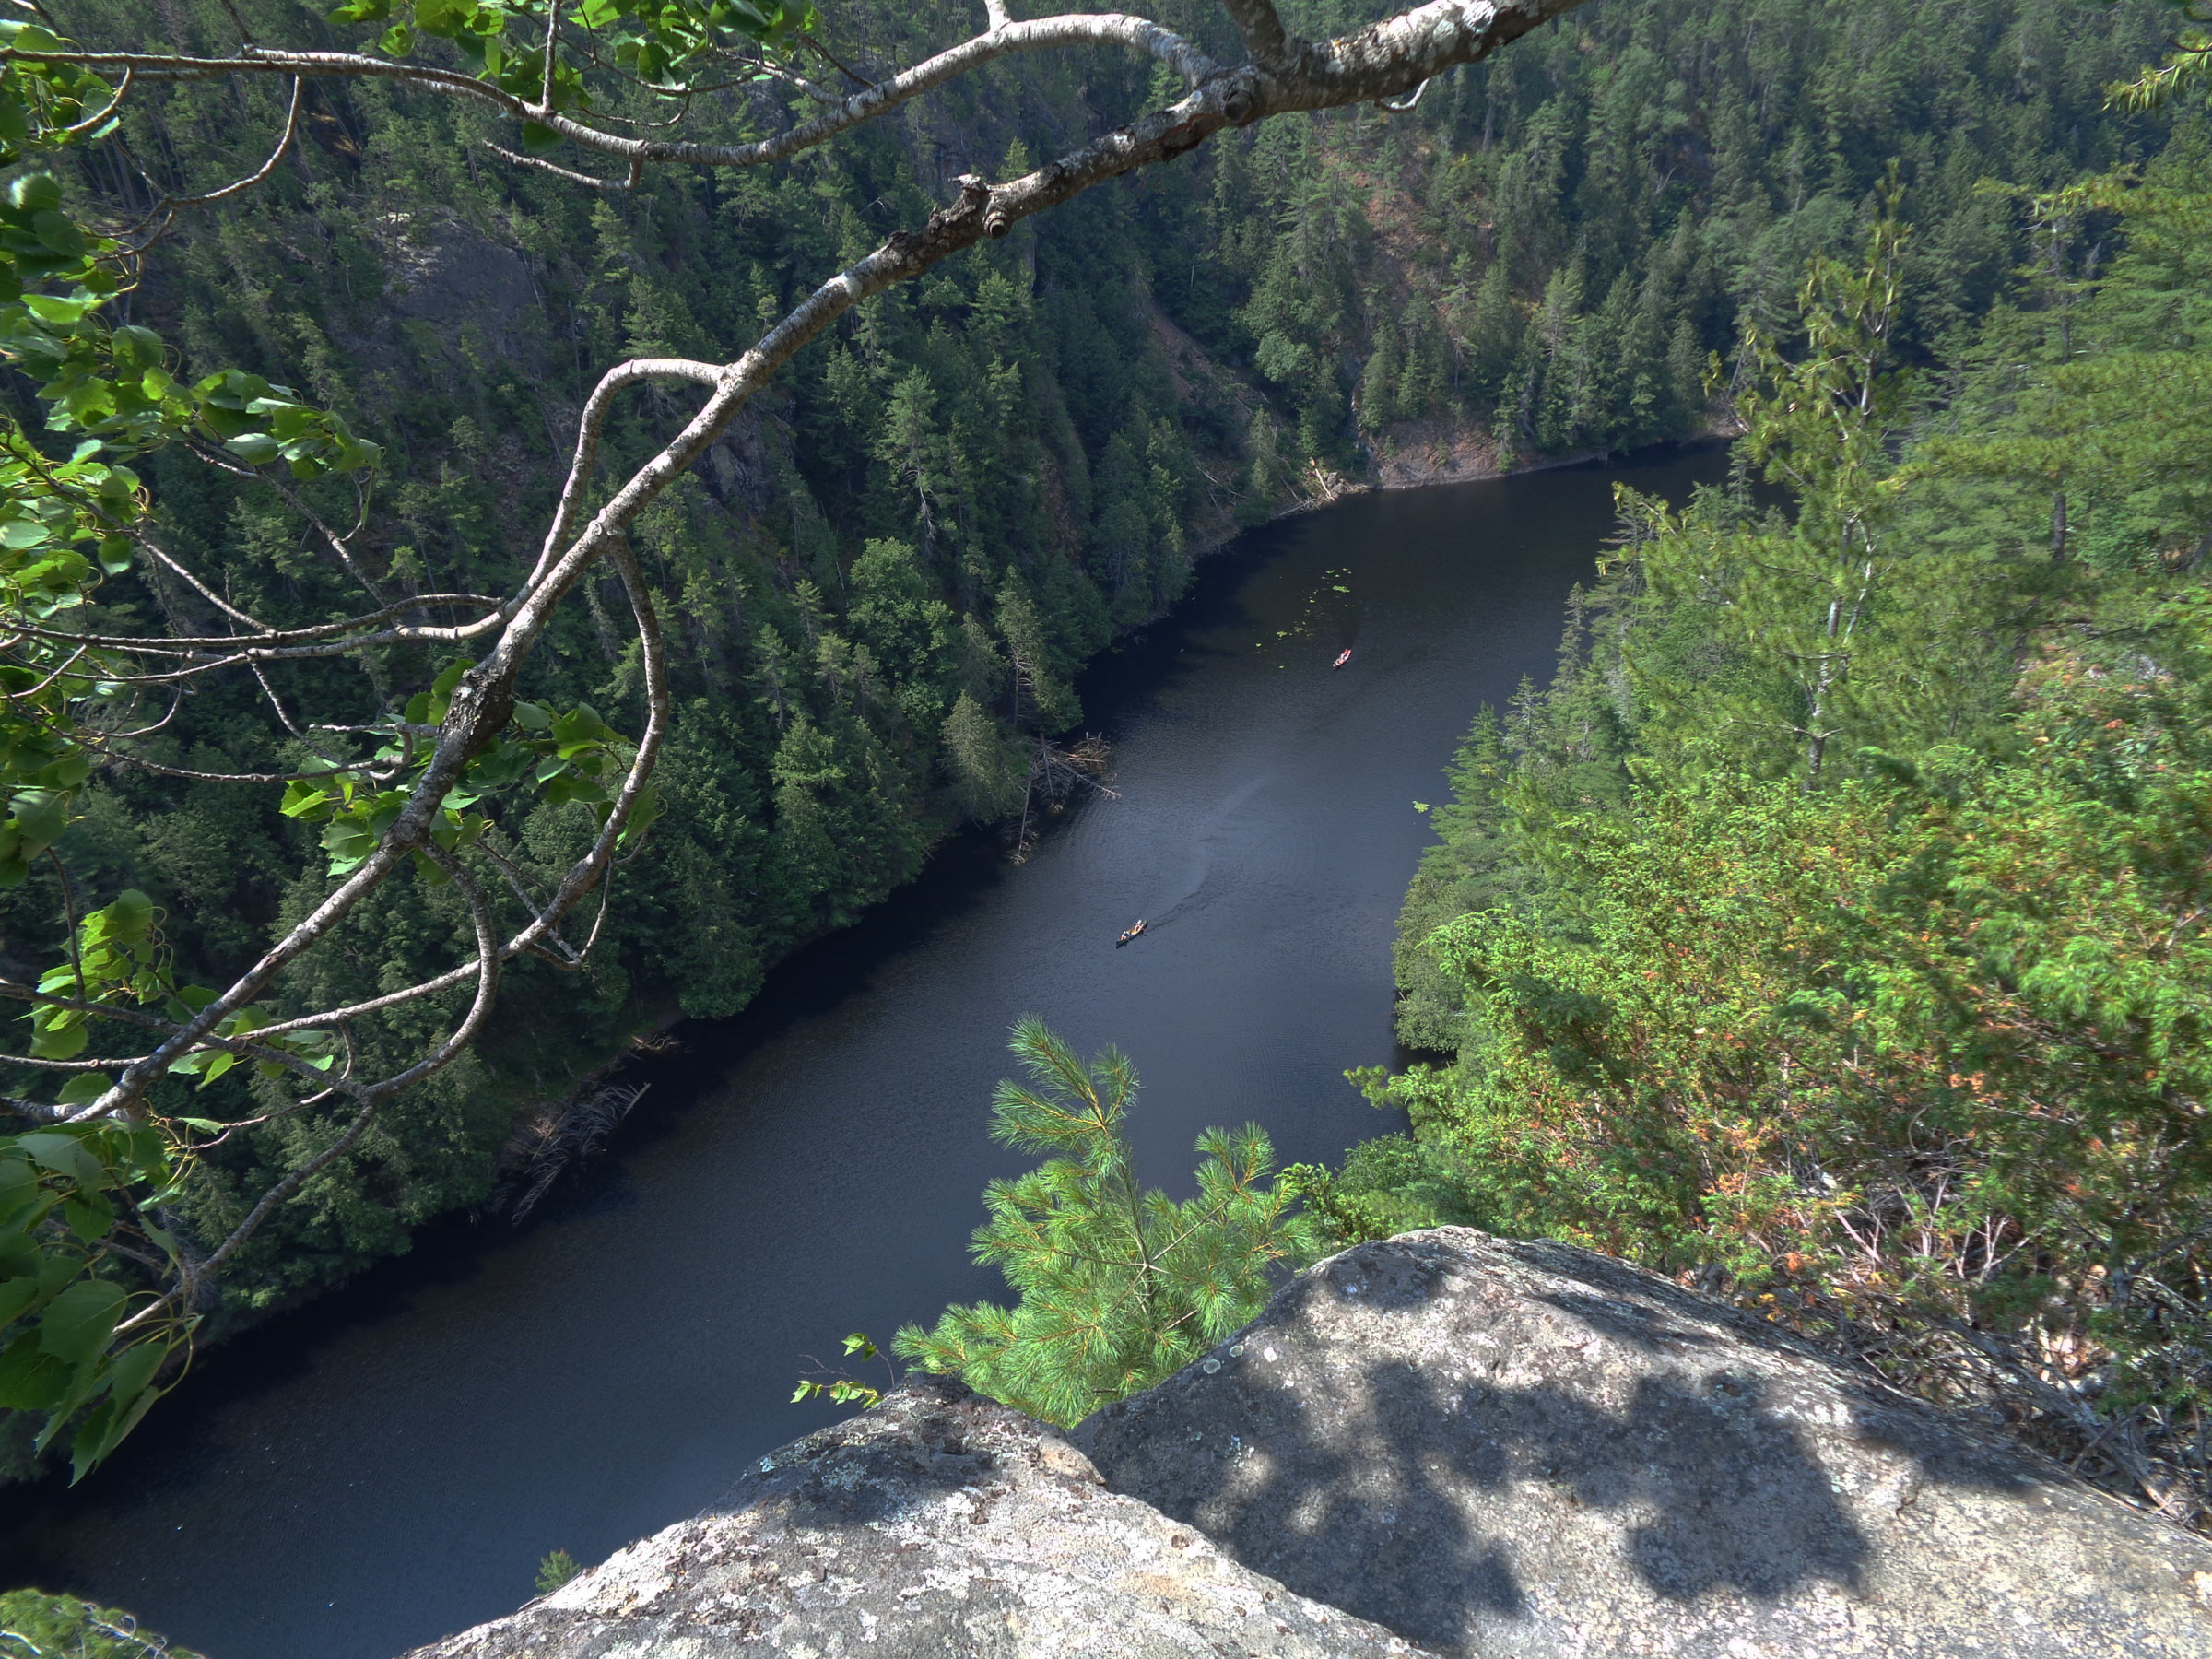
The morning was hot and humid even as we were getting our daypacks ready; we launched and set out to explore Barron Canyon. Three shadow-dappled portages through the woods, a 350-yard paddle across tiny Brigham Lake, and we were back at the Barron River 650 yards downstream from where we’d first launched two days before and very close to the canyon’s west upstream end. We launched the canoes into the clear shallow water where the river was running fast over a bed of tumbled granite stones. We slowly traveled downstream—sometimes lightly paddling, sometimes just drifting—and as the embankments flanking the river rose over us, the water deepened and the current slowed. Hemmed in by rough boulders, the river flowed past the stands of white pine, then towering cliffs where trees had taken root in small crevices in the rock and grown tall with their backs up against the vertical sides of the canyon walls. The cliffs rose over 300’ high and were streaked chalky white and sooty black with minerals leached by rainwater, and the rest of the rock was stained cinnamon brown or draped with moss; only a few places showed the rock’s real color. We paddled beneath outcroppings of granite that were cantilevered over the river.
Phil got ready to step into his Wee Bonnie for the final leg into the Barron Canyon. The water was so clear it made the canoe look as if it were floating in air.
About a mile or two downriver—I’d lost track of how far we had come—we found what seemed to be the only accessible spot to pull up our canoes and have a bit of lunch. We climbed up into a secluded grove of widely spaced slender red pines, then sat and looked out at the slightly rippled narrow river and at the pine-covered steep rocky embankments. A few other canoeists paddled by.
Rob gazed up at one of the massive multi-colored granite cliffs that stretch up over 300’ high. Hikers could peer back down from a trail at the top.
It was time to start the long trip back, so we launched and headed slowly upstream the mile or so back to the portage we had come through a couple of hours ago. A great blue heron flew ahead of us, landed a short distance away, only to fly ahead again at our approach. A beaver swam across the river in front of us; the heron landed once again and finally just waited for us to get by.
As the water grew shallow approaching the portage, we got out of our canoes and walked over the pebbled bottom, with the cool water lightly flowing over our feet. We pulled the boats upstream 60′ or so. A couple of hikers were moseying along the river bed in the ankle-deep water as if they were strolling in the park.
Phil and Rob shared the carry of one of the canoes as they hiked up the steep, rocky portage trail as we headed back toward Brigham Lake
The portage was short and would now be a little easier with our lightened packs, though rough with lots of roots and rocks to carefully step over. We carried up the initial steep slope of the portage one canoe at a time. Once at the top the path was now level but high up from the river bed. I chose to carry my own canoe with my lunch bag strapped to the thwart. Phil and Rob chose to carry both their canoes parallel to each other, holding their daypacks, with one person at the front and one at the back. We stepped along a steep and narrow path with the Barron River to our left and barely visible through the trees. Halfway along the portage, we took a short break at the narrow falls and rapids known as the Brigham Chute. The water there crashed down over a small waterfall and swirled around in side-streams to get through all the rocks.
Stopping for a break at the Brigham Chute, Rob decided to climb down and sit out in the center of the stream. Phil and I thought the climb down to be too precarious and remained up on the embankment.
From the Chute it was only a short walk to the river, where we launched, paddled a short distance, then made the100-yard portage back to Brigham Lake. Then the longer 800-yard portage uphill put us back into Opalescent Lake, and a paddle around the corner put us back in camp.
That night we were beat and all in bed before 9:30. The evening was hot and humid, and I had the fly of my hammock flipped back to catch whatever breeze there might be. I gazed up through the bug netting at the evening sky. I could clearly see the stars and even the glowing band of the Milky Way, and soon slipped into a deep sleep.
Heading back up stream on the Barron River, we approached our launching point from a few days prior. The solo canoes could easily maneuver in and around any debris we encountered.
We were up the final morning shortly after 6 a.m. We had our breakfast, took a quick swim, and then broke camp and retraced the route we had come three days earlier via a short paddle, again the 800-yard portage into Brigham Lake, and back into the Barron River, but this time heading northwest upstream 3/4 mile, with a final carry up the hill to the parking lot. It took us a couple of hours to get back to the cars and packed up for home.
Gazing down from a dizzying height on top of the Barron Canyon trail we watched canoes coming down stream through the canyon.
It was still early in the day, so we drove the short distance to the Barron Canyon Trail, parked, and hiked up the steep, well-worn trail leading to the top of the canyon. I looked down over the edge at the meandering river. In the distance, three canoes, almost invisibly small, traveled downstream and vanished around a wooded bend.
Phil Boyer retired in 2017 after working 38 years in R&D in the telecommunications industry. He now keeps busy teaching karate at two local clubs and building boats. He has been around boats his whole life, starting with paddling as a kid. At age 11 he built a sailing pram with a bit of help from his father. In 2006 he began building solo canoes and now has four of them, featured in the August 2019 issue. Phil’s interest turned to building SOL CANADA, his solar-electric boat, in 2015. His next build will be a solar-electric version of the Power Cat he read about in the March 2016 issue of Small Boats Magazine.
If you have an interesting story to tell about your adventures with a small boat, please email us a brief outline and a few photos.
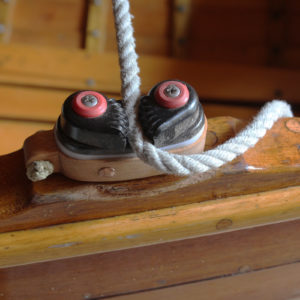
"Never cleat the main” is often taught to beginning small-boat sailors. A cleated main can turn you over. A friend of mine, Barry Thomas, solved this when he built a Seabright skiff for his young son, David. There were no blocks in the mainsheet and no cleats on it, so Barry let his son sail whenever he wanted. David wasn’t strong enough to hang onto the mainsheet if the wind was strong enough to capsize the boat, so he couldn’t help but spill wind from the main.
But sometimes there are not enough hands to hold the main, steer the boat, and do something else; sometimes you just get tired and it’s a relief to have a cleat to hold the sheet. Dinghy racers are well familiar with this, and for many years have used various forms of quick-release jam and cam cleats. But sailors who haven’t grown up with them may not be fast enough to free the sheet, and so sometimes wind up taking a swim.
Ben Fuller
With a turn around a short pin protruding from the underside of the thwart, a slipped hitch holds the main sheet.
A traditional way to secure a sheet is with a slipped hitch on a half pin. The Ashley Book of Knots describes the Slippery Hitch, #1619: “…in small boats, especially boats that are easily capsizable, the hitch is indispensable. A whaleboat’s halyards as well as sheets are always secured with them, since a Slipped Knot admits of casting off without first removing the load.”
The slippery hitch is anchored by a pin that extends below a thwart, a rail, or some other part of the boat; a line under tension is looped around the pin, and a bight in the tail end is tucked behind the working end, using the tension in the line to pinch it into place. My faering has two pins protruding beneath the thwart just ahead of the helm, one for the halyard and one for the foot downhaul. The sail is pulled up, and the working end of the halyard is looped behind the half pin, turned into a bight, and the halyard pinches it against the thwart. A yank on the free end drops the sail.
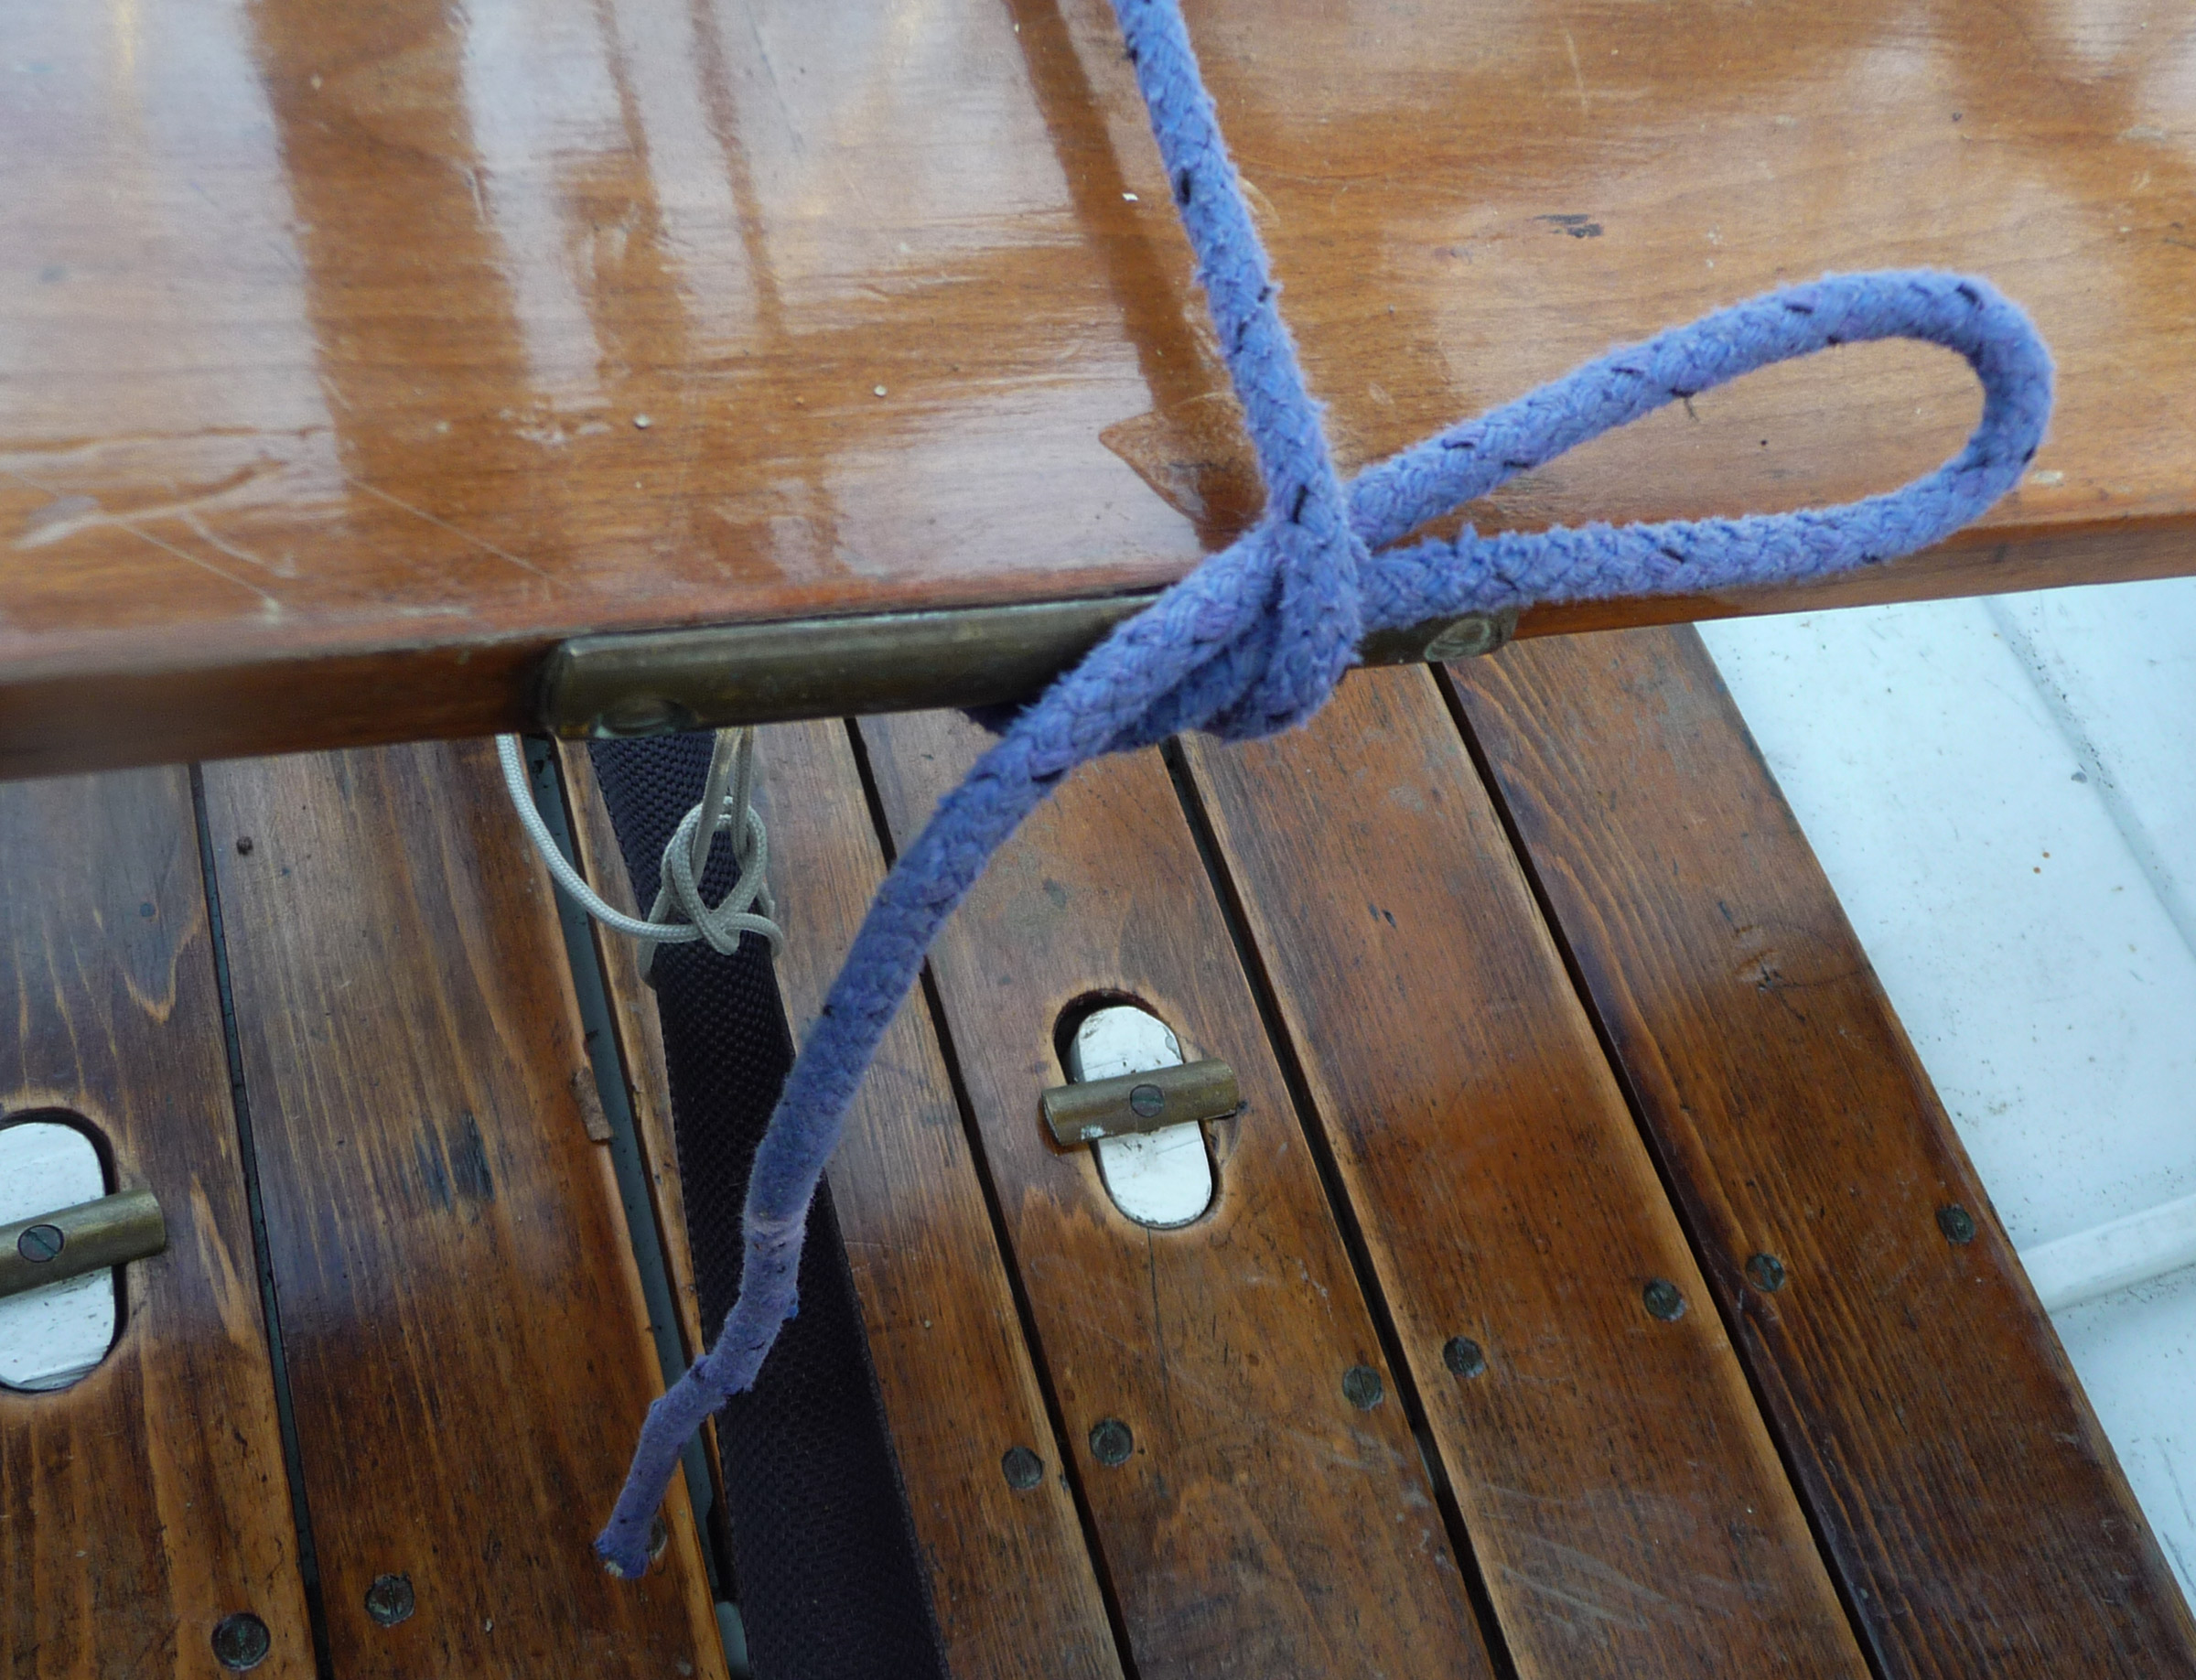
On my Harrier, RAN TAN, I also have a pin on the center thwart, which is just a bit of 1/2″ oak dowel glued into a hole in the underside of the thwart near its aft edge. I added a bit of brass half-round to the thwart edge to minimize chafing. I use the pin and the slippery hitch to make my mainsheet fast, but also easy to release with a yank. If the sheet goes slack it will release itself, a disadvantage of this system.
When I rigged my Good Little Skiff for the hitch, the thwart had to be drilled from the top, so I turned a 1/2″ pin with a 1″ cap and drilled a countersunk hole for it in the thwart. It isn’t quite flush but is just a bump sitting on it.
SBM photograph
The cam-cleat arrangement is a good fit for this 14′ New York Whitehall, especially as the breeze picks up.
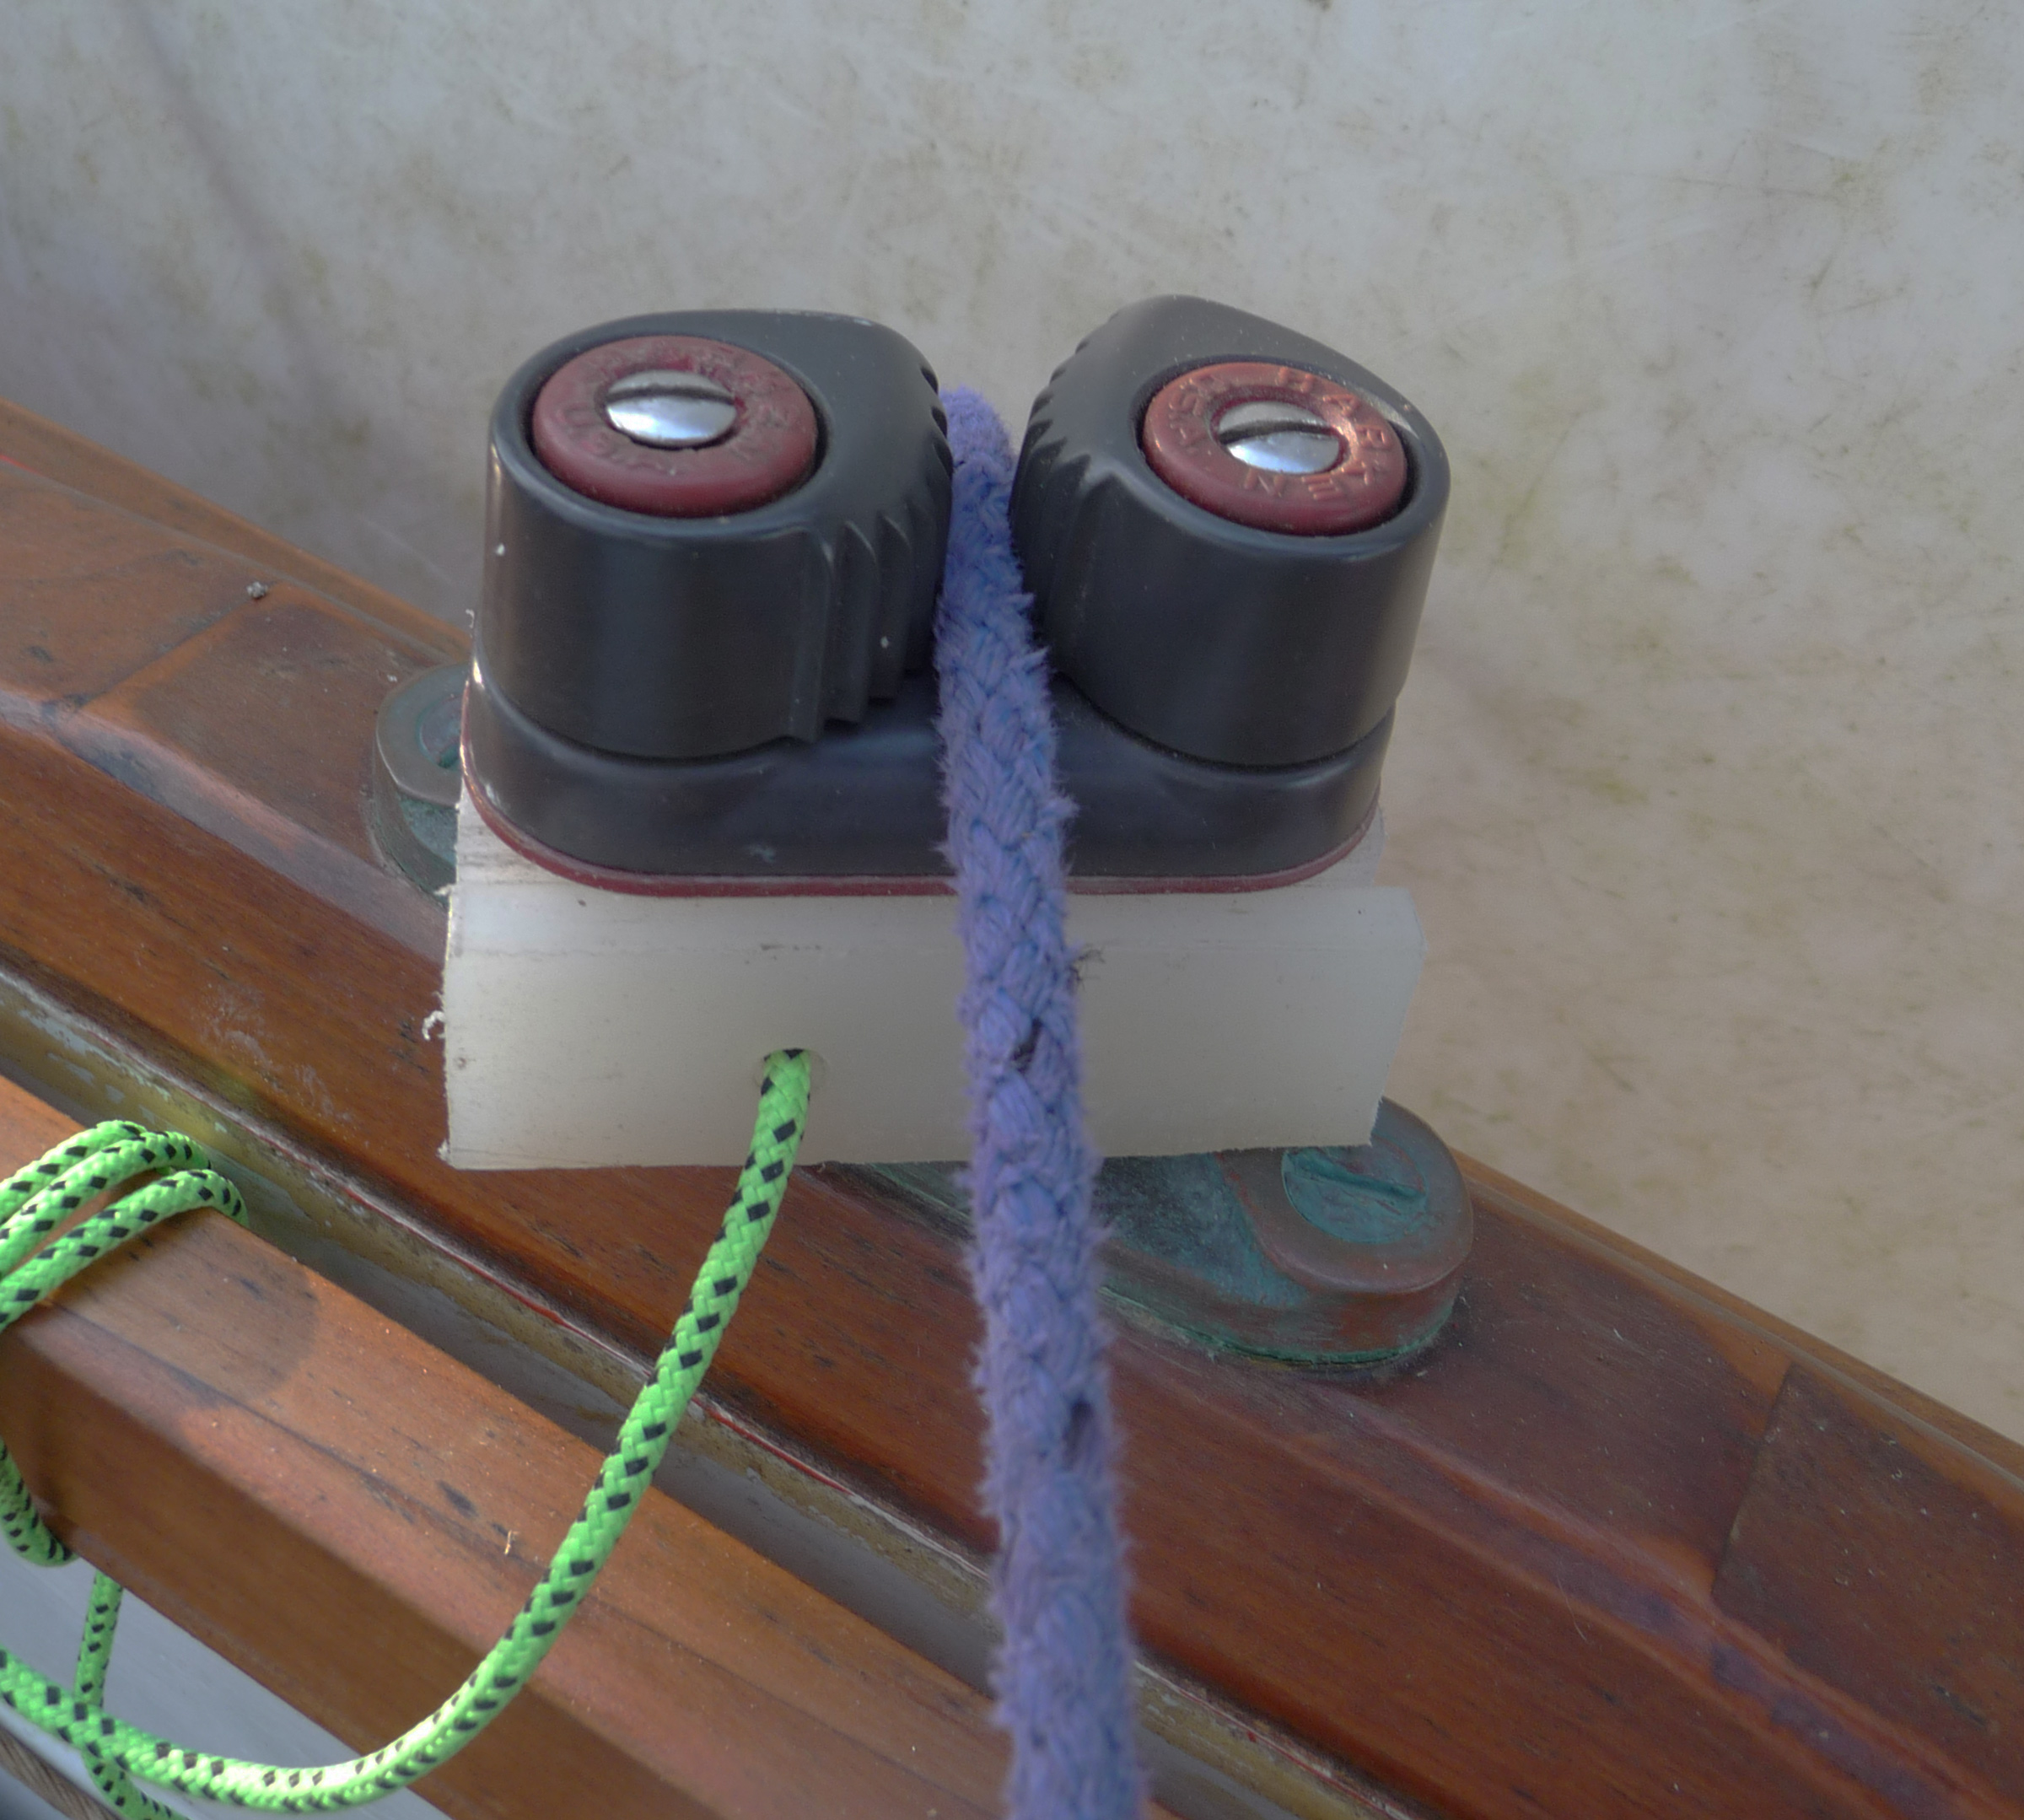
I have the pins for the slippery hitches close to the boat’s centerline, and while that’s fine for light breezes, it’s not handy when I need to have my weight to windward. For RAN TAN I added a quick-release mainsheet cleat that I could reach sitting on the rail or a side bench. I took advantage of the oarlock sockets by using a 1/2″ stainless-steel carriage bolt (which fits the socket) and a piece of Delrin to hold a cam cleat.
Ben Fuller
The author’s arrangement uses a Delrin block to connect the 1/2″ bolt to the cam cleat.
SBM photograph
The editor’s disassembled cleat on the left shows the countersink for the head of the 1/2″ bolt; his assembled cleat on the right shows the countersinks for the cleat-jaw bolts. The jaws of the cleat are angled down toward one another, so using the cleat as a guide for drilling the holes for the bolts made sure they fit. Pairs of copper rivets across the oak blocks are guards against the wood splitting under strain.
If you don’t have Delrin, you could use anything that won’t split under a load on the cleat. Cut it to match the base of the cam cleat, and drill holes and countersinks for the cleat’s bolts and the 1/2″ bolt. To make the cleat easily removable for rowing, I drilled a small hole in the Delrin for a lanyard.
SBM photograph
A tether keeps the cam cleat from going astray when it’s removed to free the oarlock for rowing.
These cleats go into the oarlock sockets when it’s breezing up. I then can place the sheet into the cleat with a little tug and an upward pull instantly releases it.
Both of these systems can easily be retrofitted into most small boats and make sailing much easier by holding the sheet to free up a hand, with the ability to let it run with a single pull.
Ben Fuller, curator of the Penobscot Marine Museum in Searsport, Maine, has been messing about in small boats for a very long time. He is owned by a dozen or more boats ranging from an International canoe to a faering.
You can share your tips and tricks of the trade with other Small Boats Magazine readers by sending us an email.
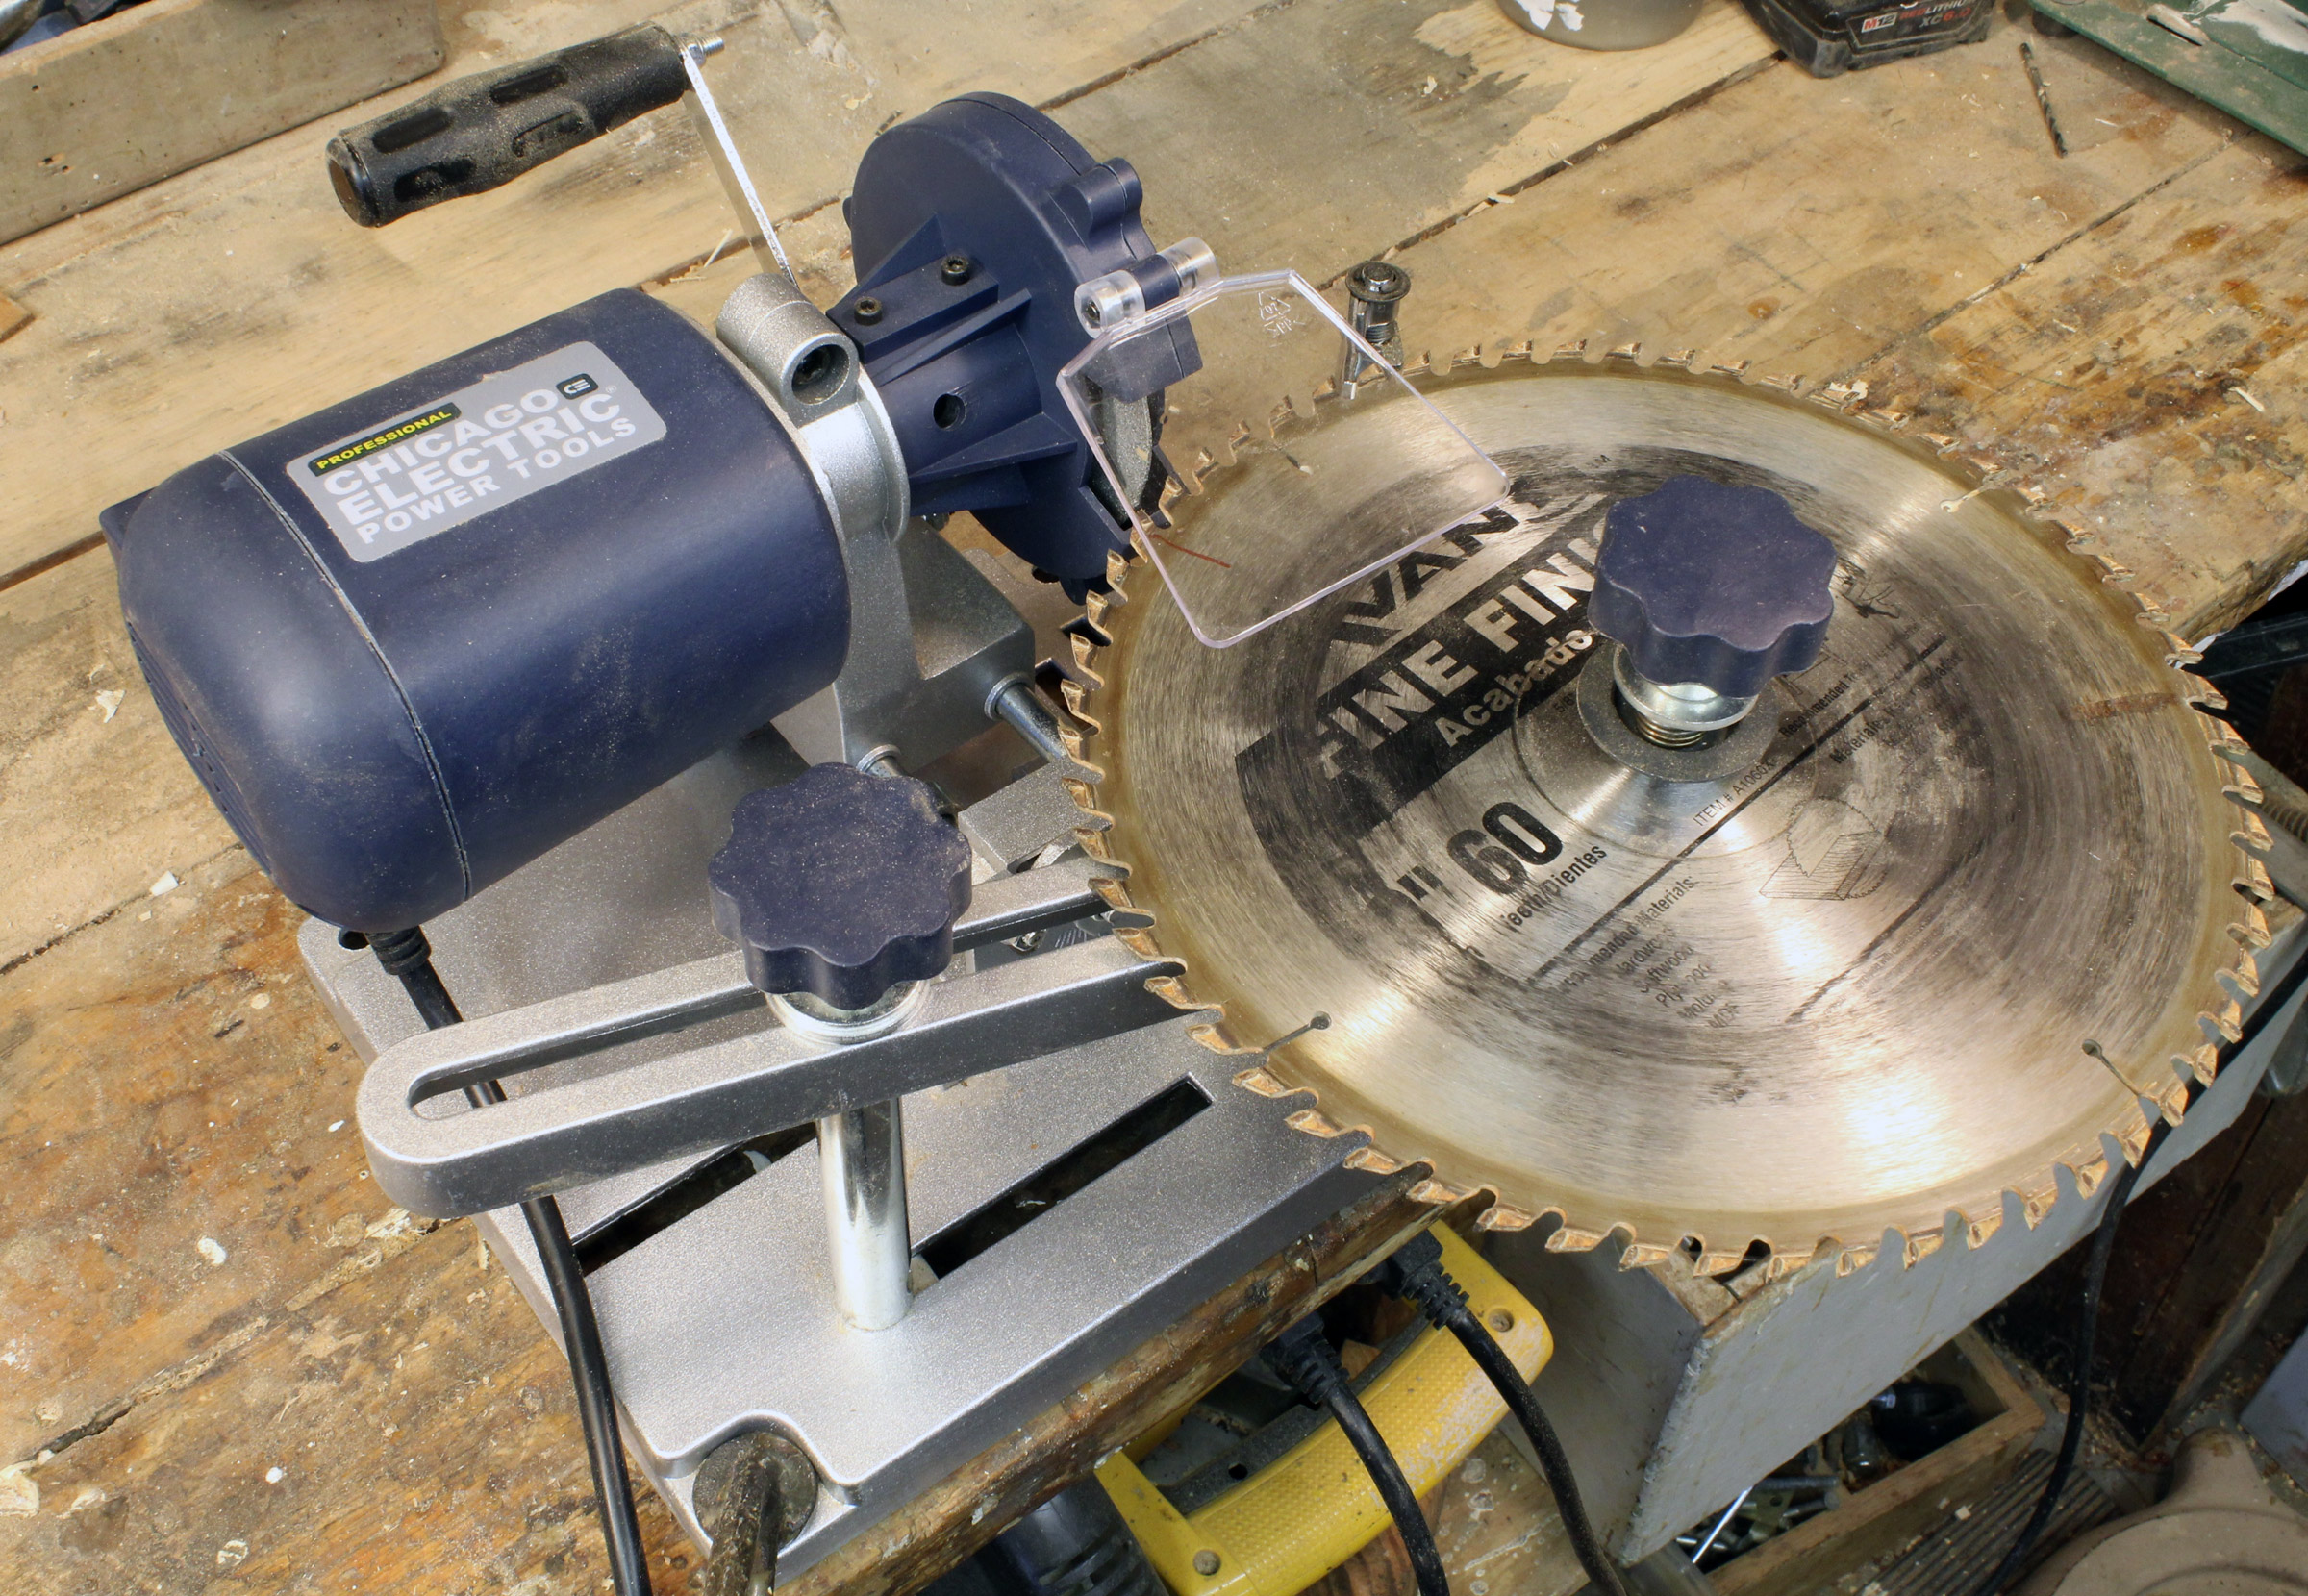
After it was set up for this 10″ blade, the sharpener got through all 60 carbide teeth in less than 3 minutes. I was impressed until I took a very close look at the results.
Not long after I bought Harbor Freight’s 1 x 30 belt sander, I returned to the store for their circular saw blade sharpener. The belt sander needed a little bit of work to make it run smoothly, but it has become one of my most frequently used tool, so I had high hopes for the sharpener—a little bit of fussing to get it tuned up and then it might do a respectable job.
The reviews on the Harbor Freight web site for the sander and the sharpener were about the same, 4-1/4 stars for the former and 4 for the latter. Several noted that setting up a blade for sharpening was time consuming, so I wasn’t surprised that it took a half hour to set the spring-loaded pawl in the right position on the blade. I eventually was satisfied that the 4″ diamond-abrasive wheel would just kiss each carbide-tooth face and shave it down to a new clean surface with a sharp cutting edge. Making fine adjustments to the pawl’s support was quite difficult because when the bolt holding it to the base was loosened, the post tended to move much more than I wanted it to. A screw adjustment device would have made a world of difference. The kit included a 10 mm wrench for turning the bolt head, and it worked for a while, but soon started slipping. The bolt’s hex corners were a bit rounded from the get-go and even before I had made adjustments for the first saw blade, the wrench no longer worked. Fortunately, a 3/8″ box-end wrench was a tight, functional fit. I was okay with that and decided I’d replace the bolt with a thumb screw that wouldn’t require a wrench.
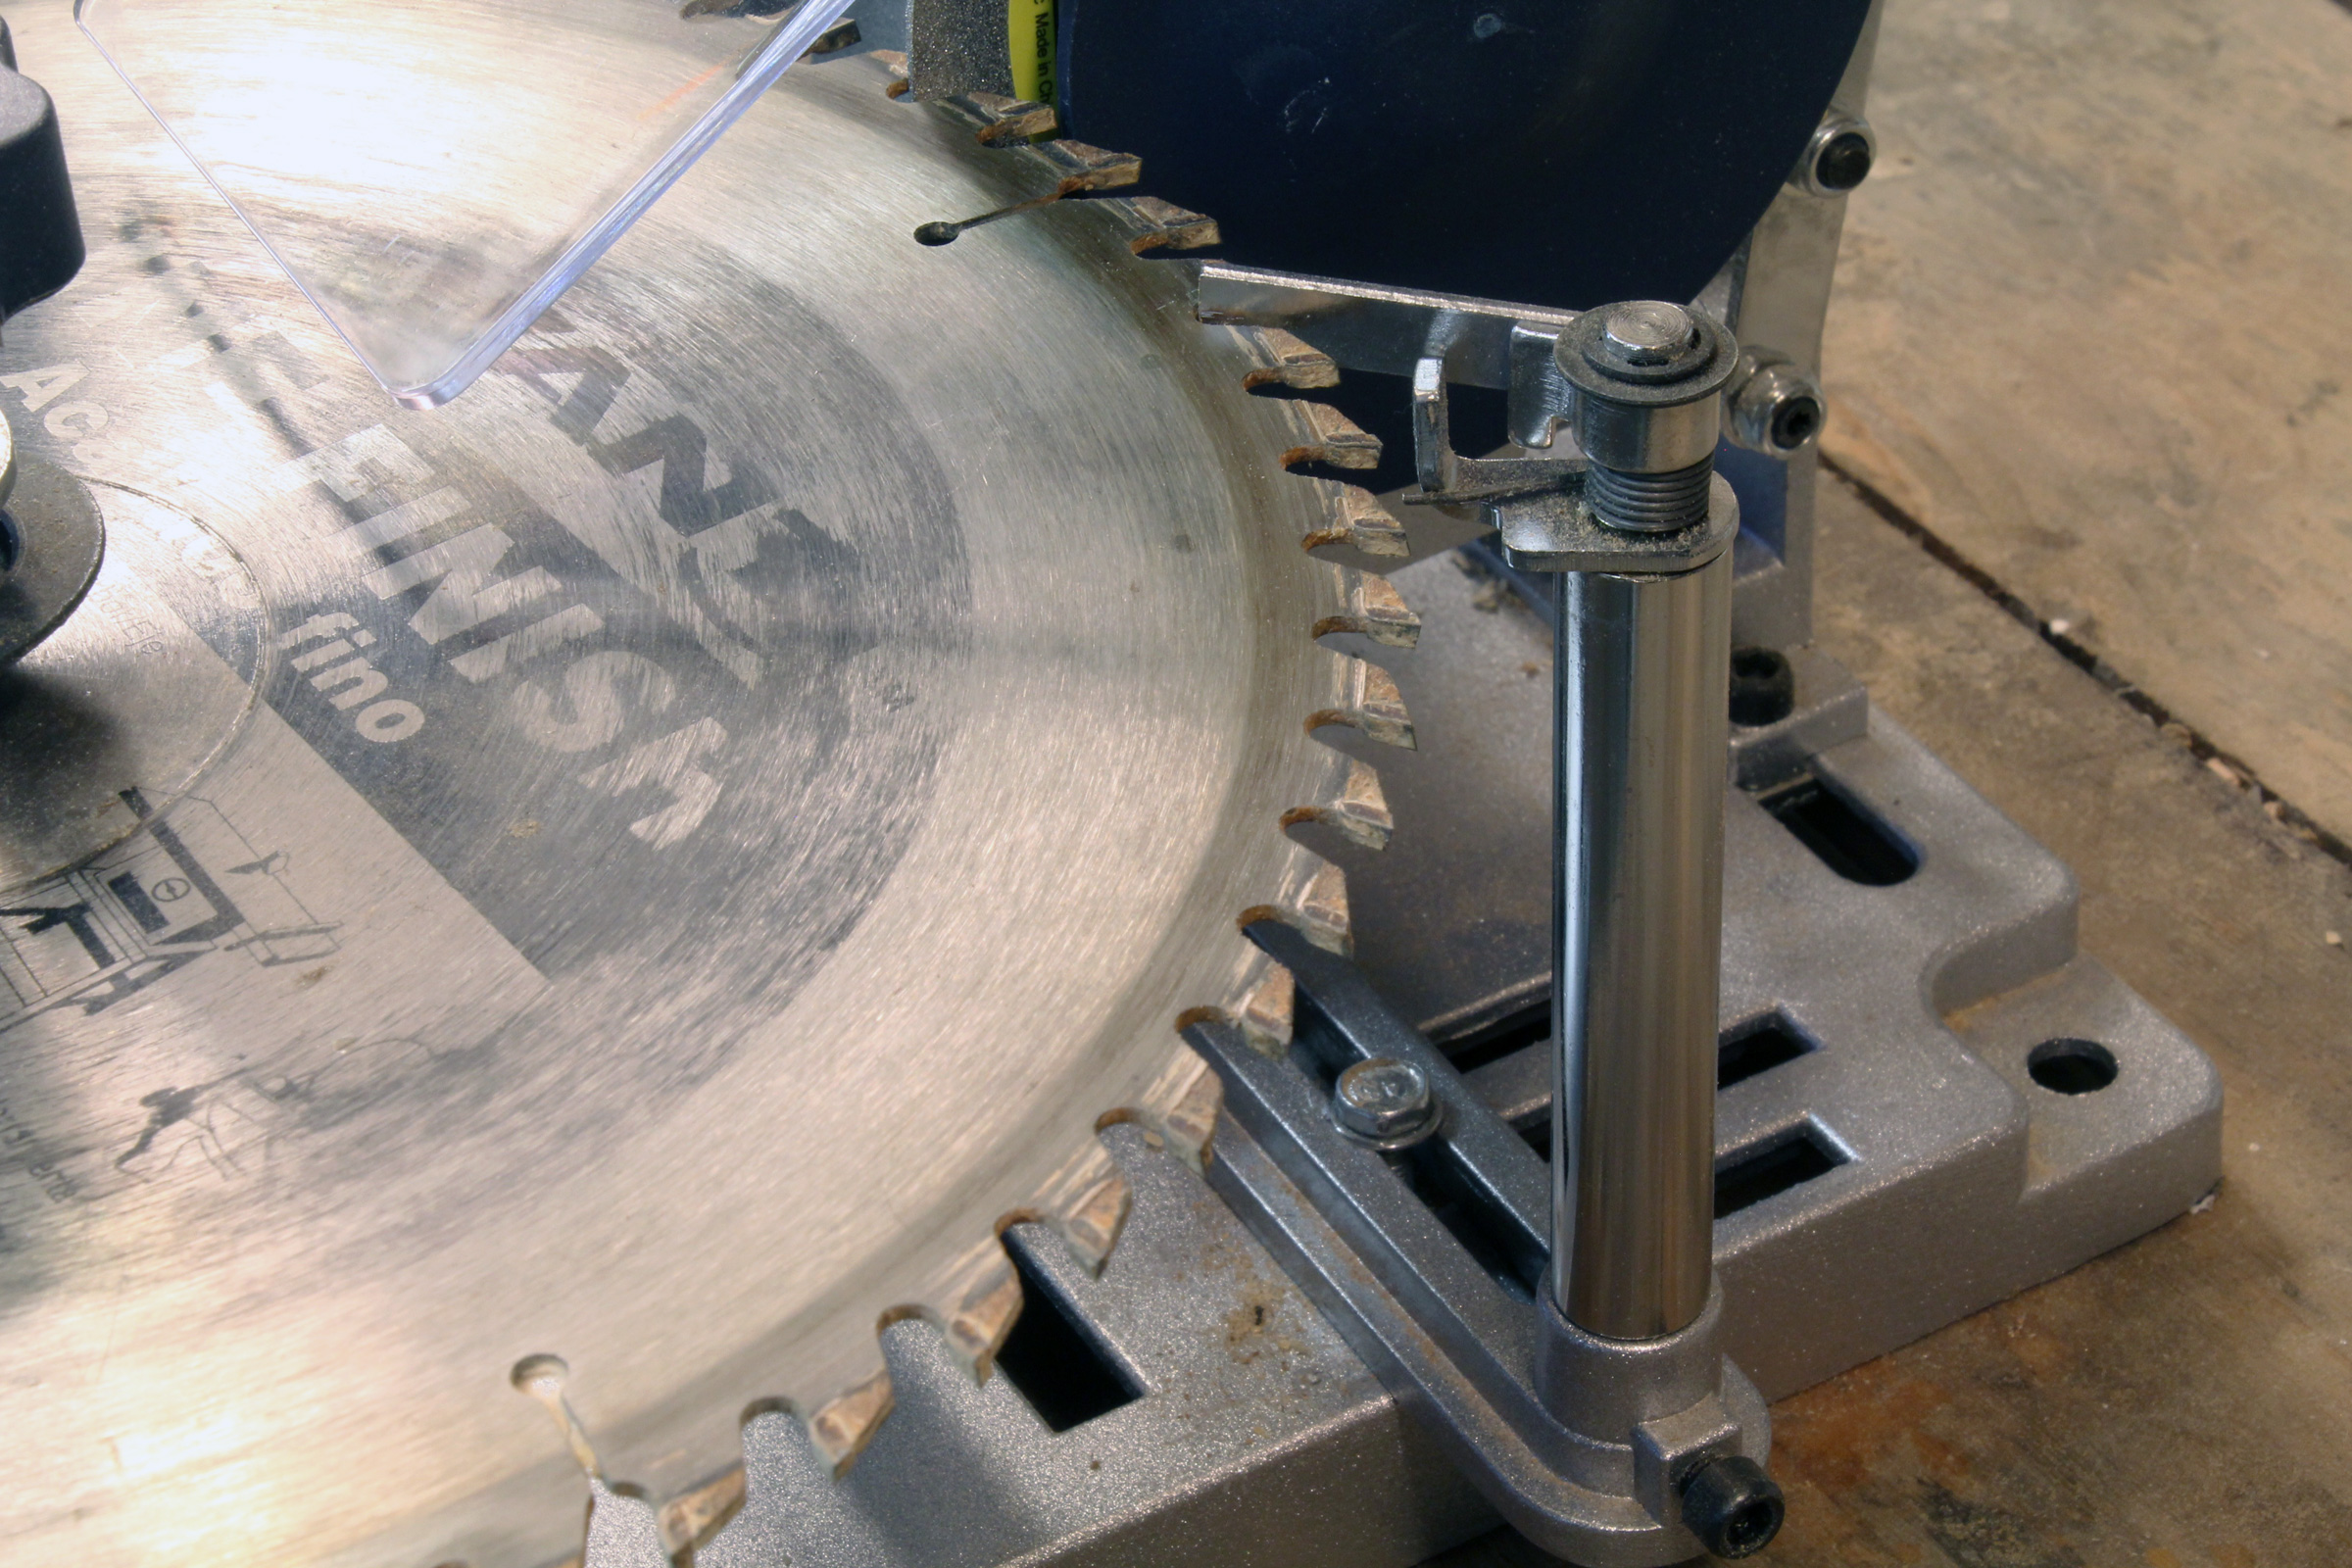
The spring-loaded pawl at the top of this post sets the teeth at the right position for the diamond-coated blade, just visible at top center with the yellow label. Setting the pawl is done by loosening the hex bolt in the slot of the posts’s base. It’s difficult to adjust, but not the fatal flaw.
The motor and wheel ride on an adjustable carriage that tilts 25 degrees either direction from square. The indicator was set at 0 degrees, but the wheel was hitting just one side of the first tooth. A few small adjustments got the wheel to make full contact. A screw adjustment device would be an improvement here too, but all of the carbide-tipped blades have teeth square to the blade, so this initial adjustment might be the only one I’d need to make.
With the adjustments made for a 60-tooth blade, I sharpened all of the teeth in under 3 minutes. The pawl did not set the teeth precisely. There was some play in the sharpener and I could apply a bit of pressure on the blade to get a consistent sound as the diamond abrasive worked on the carbide.
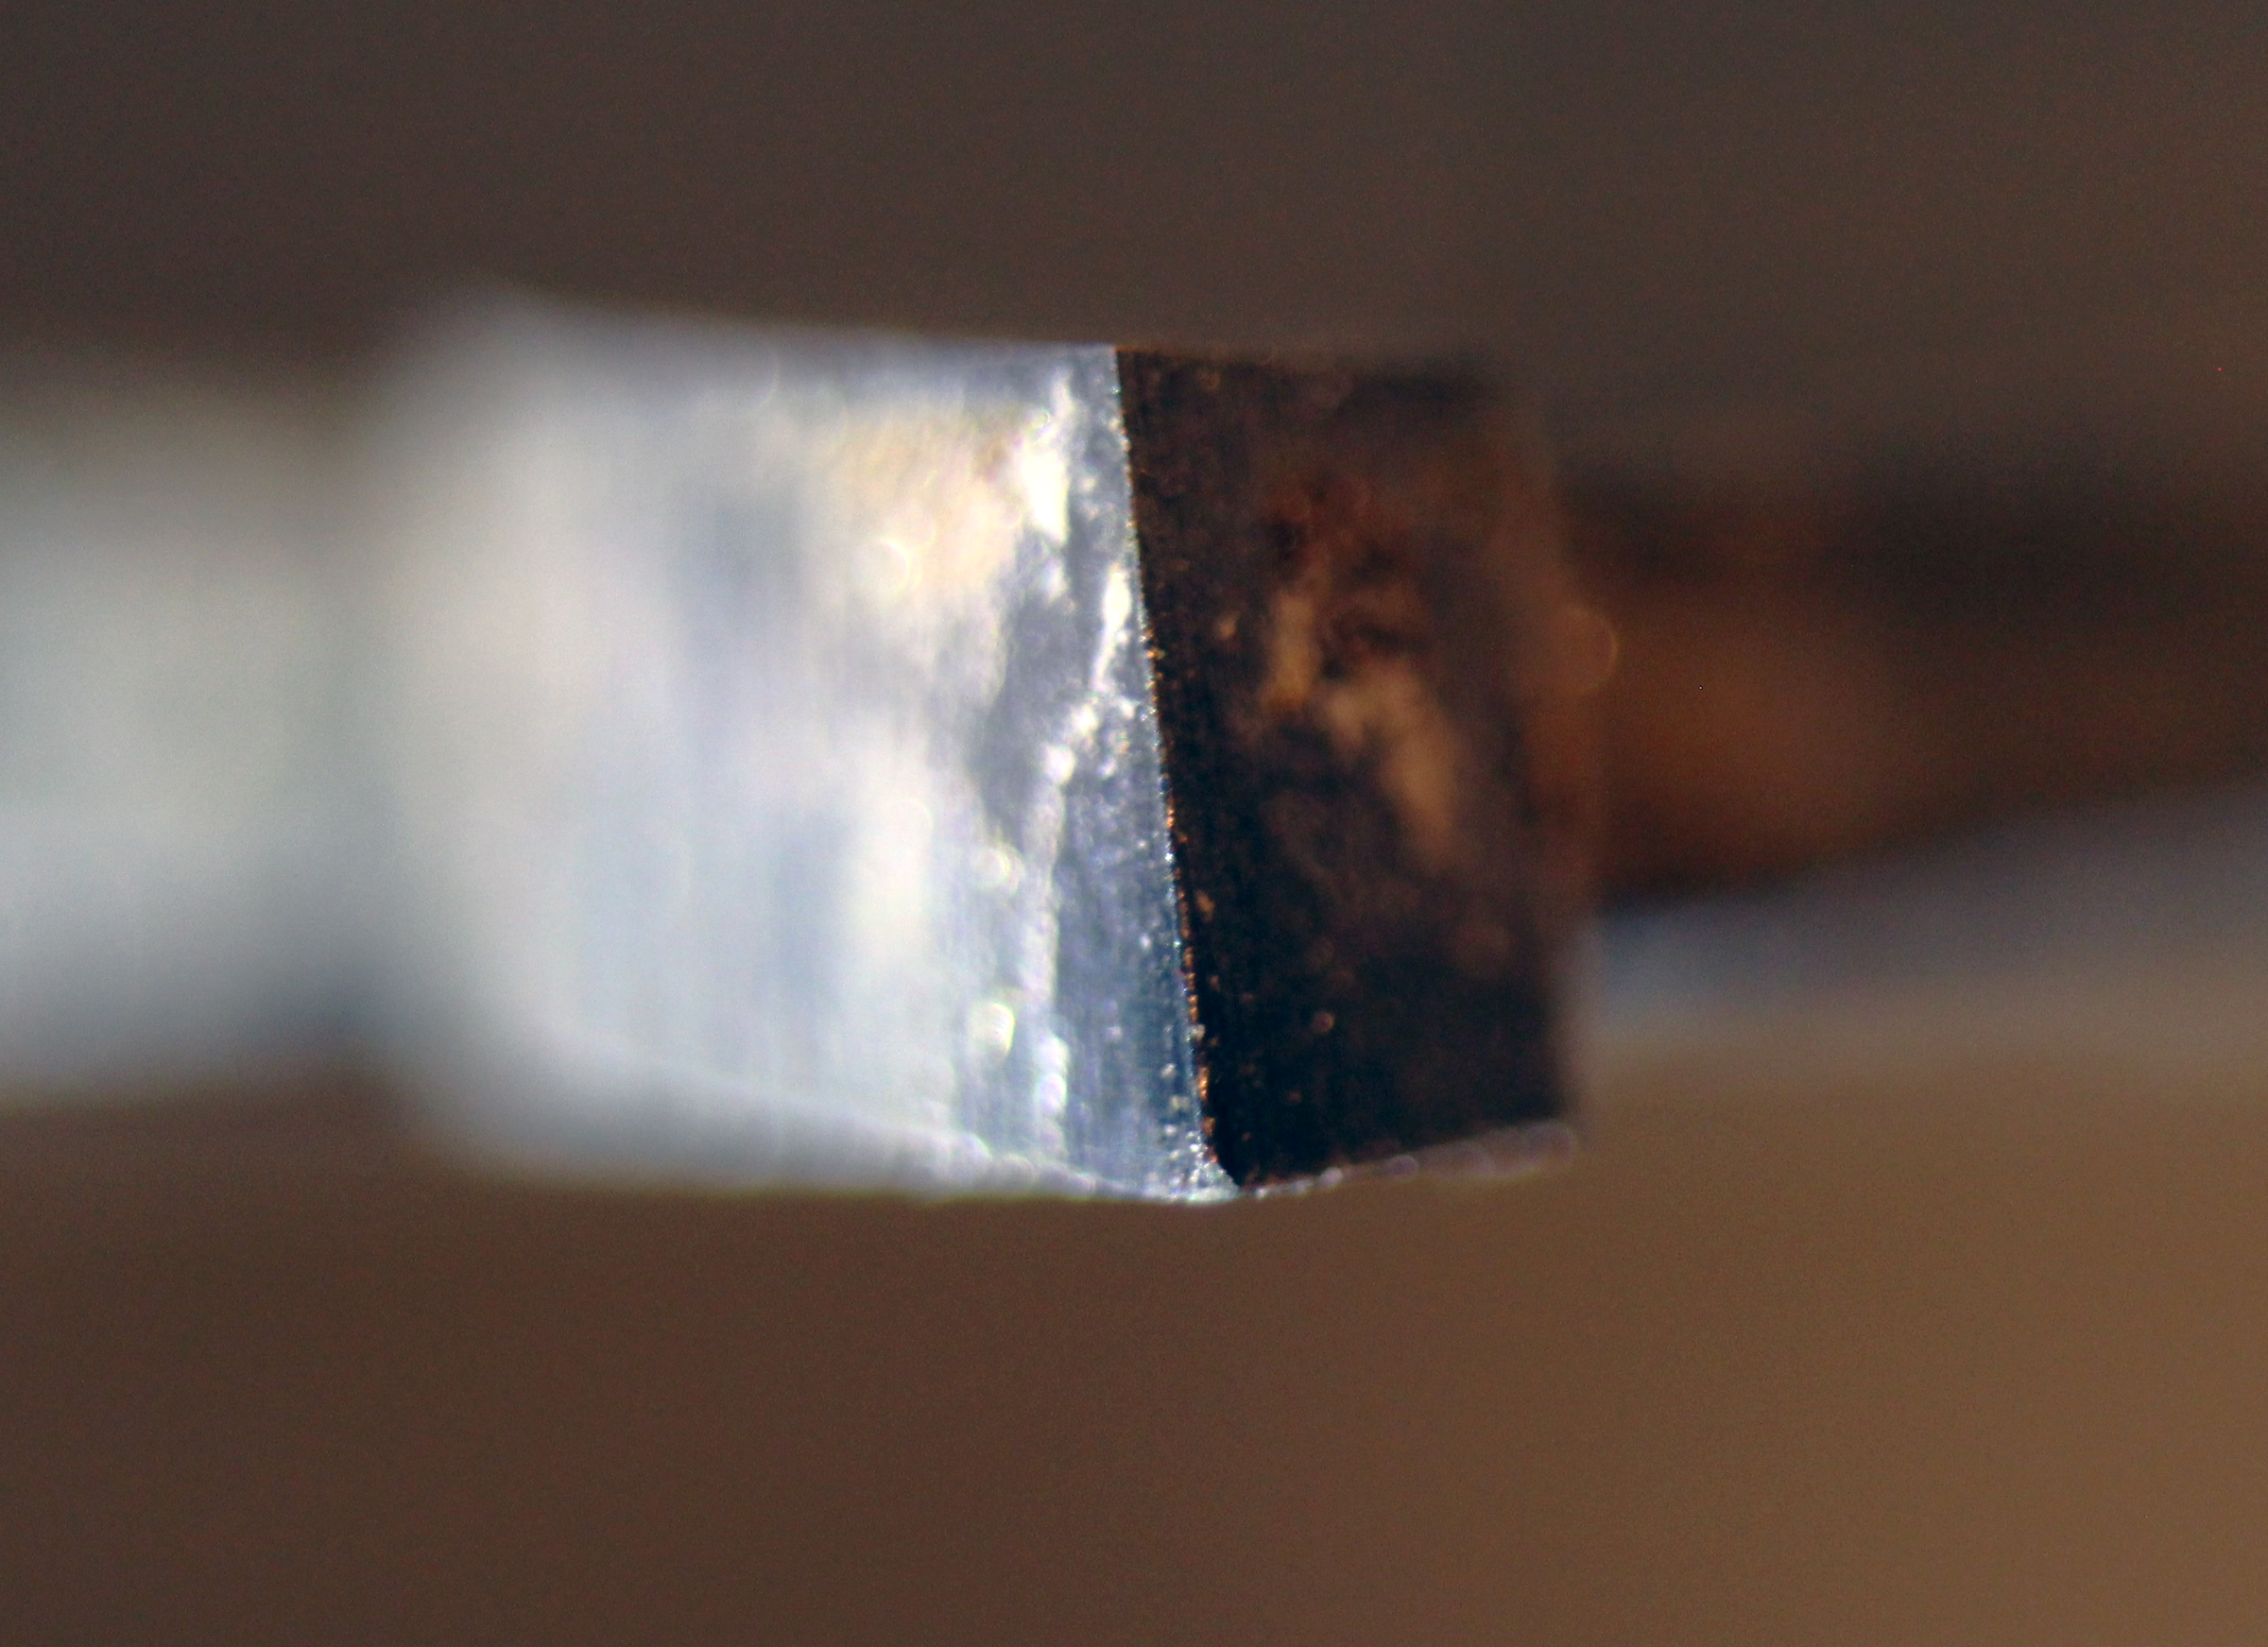
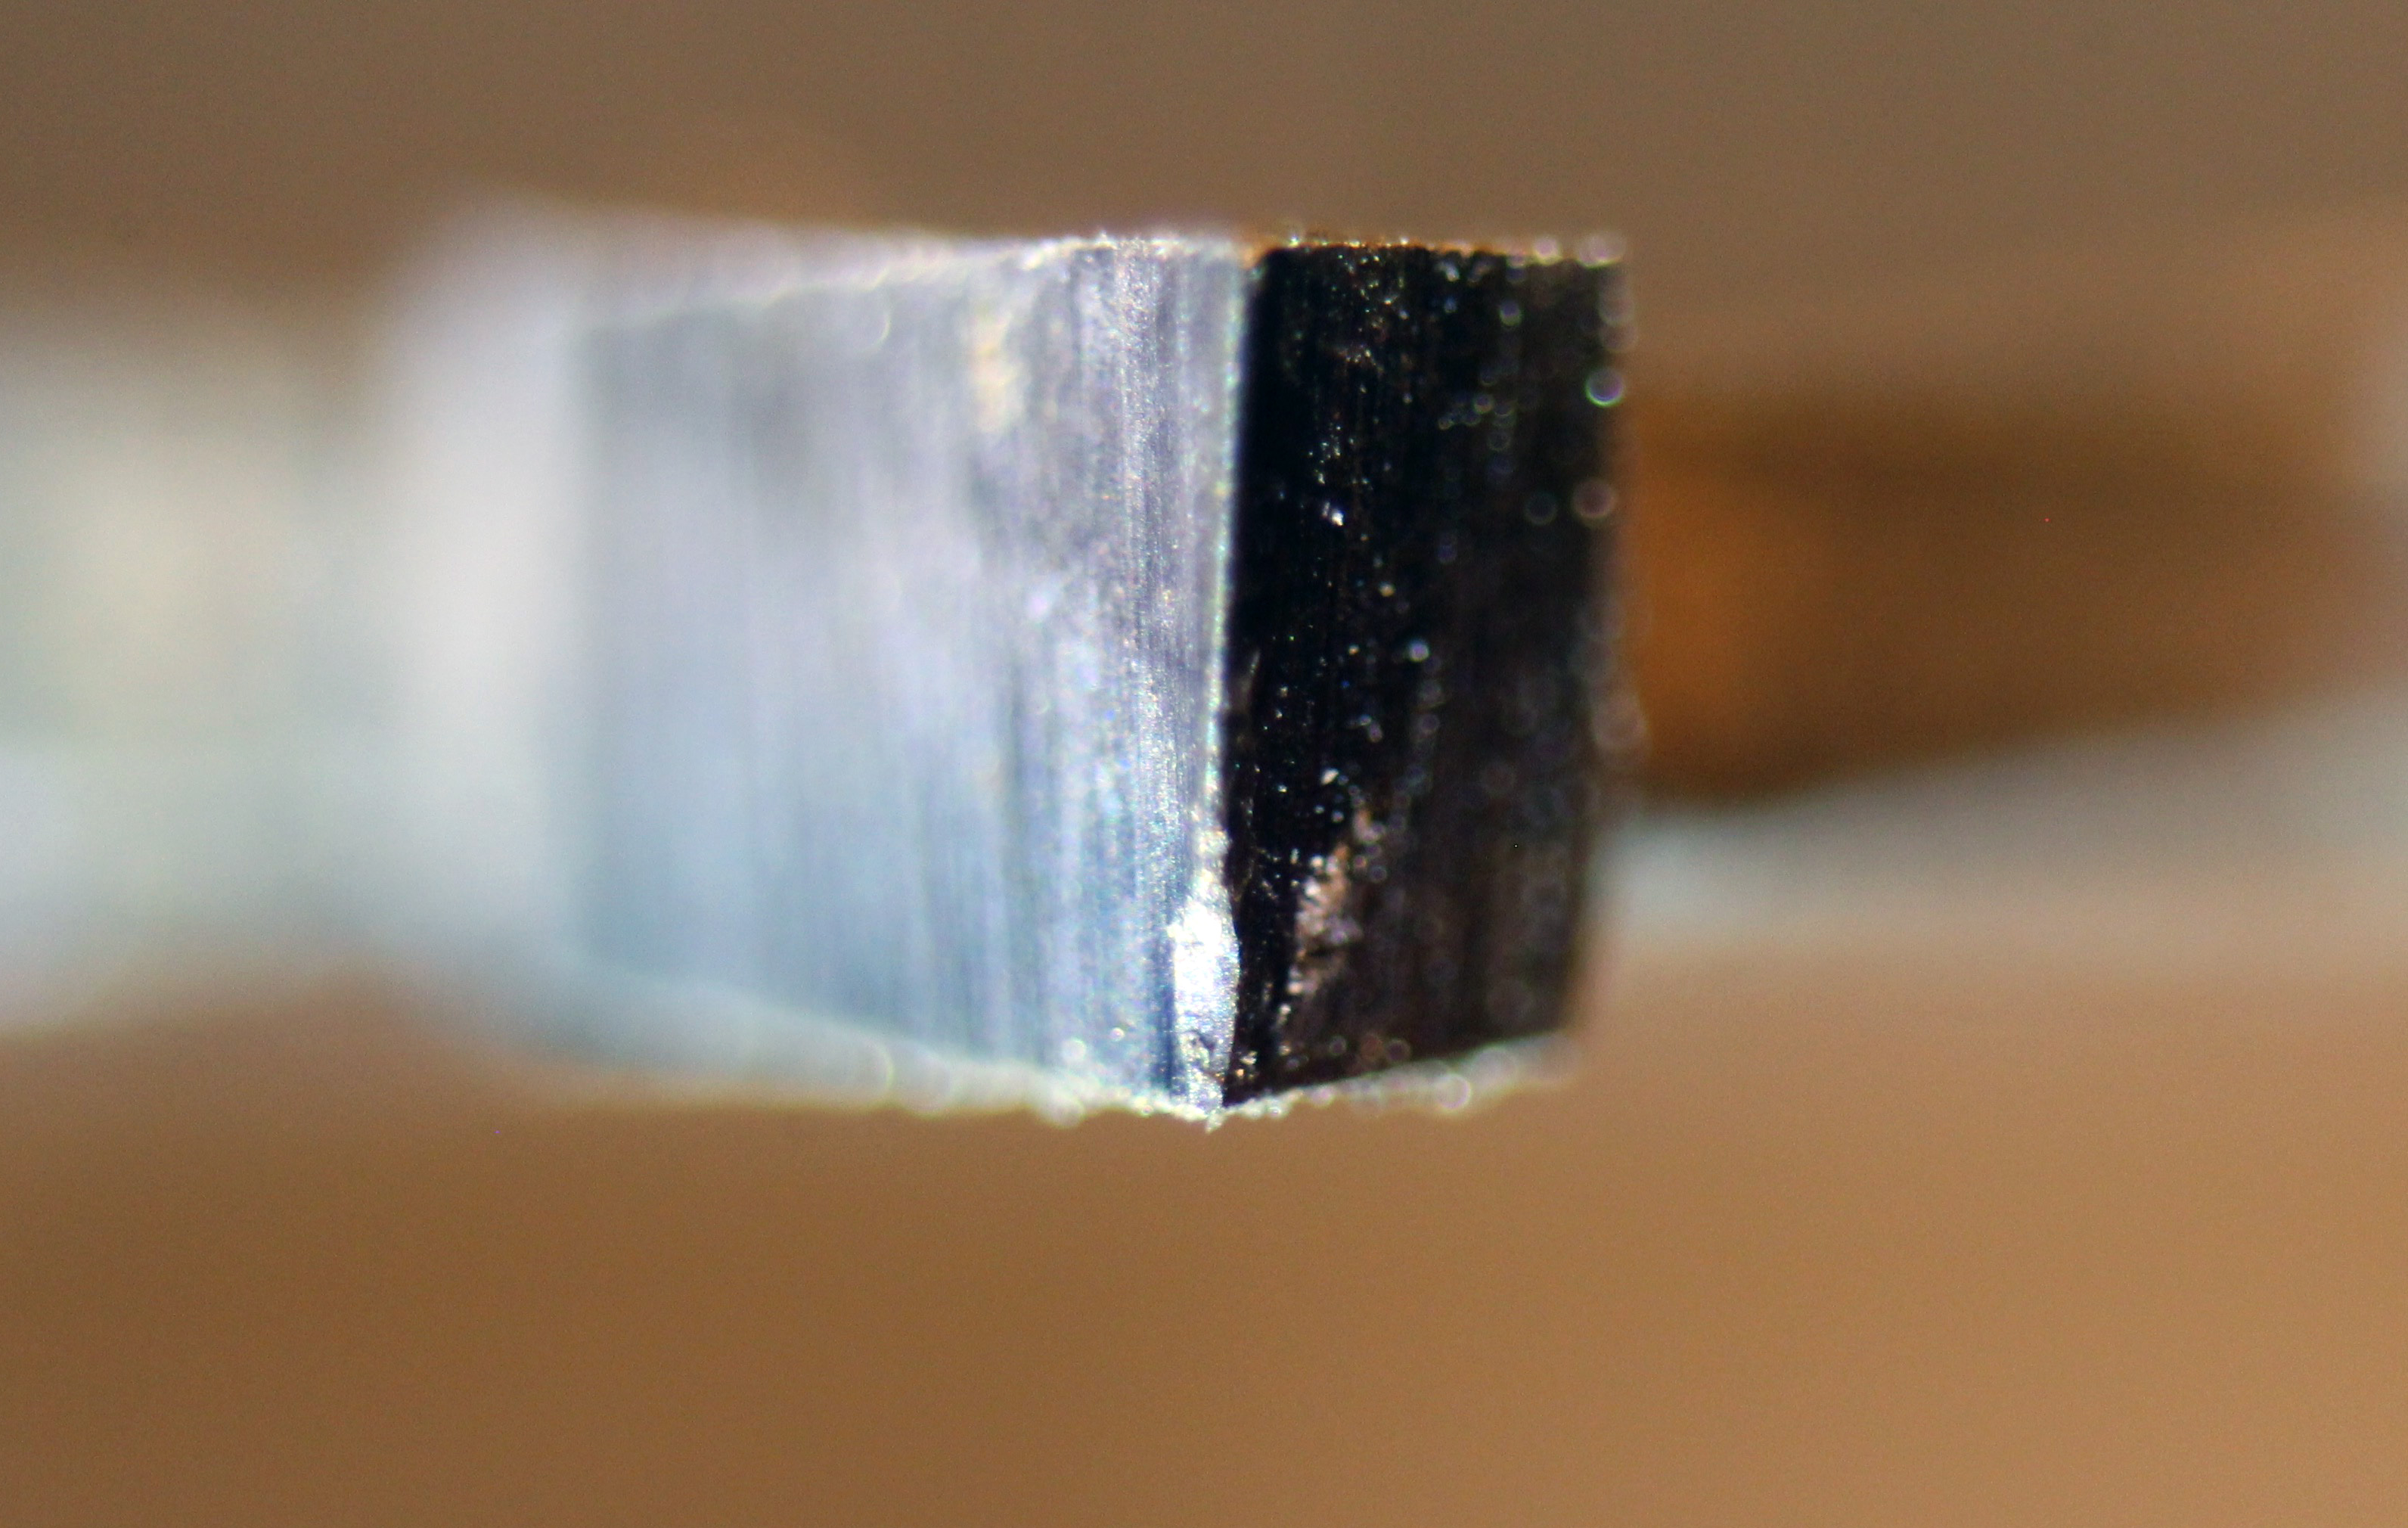
This carbide tooth wound up with a ragged cutting edge and a chipped corner. Before the “sharpening,” the edge was smooth and straight, and only just a bit softened.
And this tooth took a real beating in the sharpener and lost a quarter of its edge to the diamond wheel.
When I was finished, all of the tooth faces had a new shiny surface, which I took as an indication that the cutting edges would be sharp. It wasn’t until I took a powerful magnifier to the teeth that I saw what the sharpener had done. The diamonds left tracks across the carbide; under magnification it looked like the work of a garden rake. That was bad enough, but the worst damage was at the edges and corners of the teeth. Carbide had been chipped away on very tooth. I didn’t bother putting the blade back on the table saw. It was ruined.
I went to the Harbor Freight web site and closely read all 37 of the one-star reviews, the ones I’d dismissed as being in the minority. Among them were two that matched my results:
Everything posted about how hard this is to setup it true. However, with a little patience, this tool can be used to sharpen circular saw blades. However, the real problem is with the available grinding wheels. The diamond wheel is just too coarse.
When finished, I looked at the top cutting edge of each tooth. Every one had carbide grains chipped out instead of a sharp edge.
If Harbor Freight would offer wheels with finer grit, there’d be hope for the sharpener, but the 180-grit wheels that are supplied with the machine and available as replacements are brutal on carbide saw teeth. I have two diamond sharpeners from EZE-Lap Diamond Products with four grades of diamonds on aluminum handles about the size of tongue depressors. The grits are rated from 250 to 1200, and the 250 grit is designated as “coarse.” That puts the 180-grit wheel on Harbor Freight’s circular saw sharpener into the proper perspective—coarser than coarse.
Harbor Freight has a 90-day return policy. Unfortunately, that opportunity for a return went by 4 months ago. I’m reminded of a billboard I used to drive by back in the 1960s: “Only the rich can afford poor quality.”
Christoper Cunningham is editor of Small Boats Magazine.
Afterword
When the Harbor Freight sharpener failed to live up to its promise, I kept looking for ways and devices to sharpen carbide-toothed saw blades. In the comments following one DIY sharpening video, someone mentioned that carbide dust created by sharpening is a health hazard. I did a bit of research and found the Washington State Department of Labor & Industries confirmed the risk in a 1995 article titled “Carbide tips create heath problems”:
Workers who file saw blades or those who machine tools with tungsten carbide (or other “hard metal”) tips may be exposed to toxic levels of cadmium, a cancer-causing agent, and cobalt, a suspected cancer-causing agent.
A lot of the jobs I do in my shop create dust, some more evident than others, so a dust mask is always warranted, but, for me, the health risks of creating carbide dust outweigh the benefits of sharpening my circular saw blades myself.
Is there a product that might be useful for boatbuilding, cruising, or shore-side camping that you’d like us to review? Please email your suggestions.
The Zhike Gravity Hook, left, and the Lixada 4-Claw Hook work in different ways and both performed well.
The grappling hook (also known as a grappling iron or grapnel) that I made a while back from some stainless-steel rod and a few cable ties worked well enough, but it was an awkward and dangerous thing to keep in a small boat. It rested with one claw always pointing straight up, like a caltrop, an ancient and wicked device of war that wounded anyone unlucky enough to step on it. Modern grappling hooks aren’t so hazardous. I found two different types, both welcome to stay aboard waiting for the opportunity to retrieve something underwater.
Lixada 4-Claw Hook
Opened up, the Lixada’s claws span 8-1/2″.
The Lixada 4-Claw Hook is 9″ long, has a span of 8-1/2″ between the tips of opposing claws, and weighs 26.3 oz. The central shaft is stainless steel and the claws, my magnet tells me, are some sort of steel alloy. The claws spin around the shaft on an internal threaded rod that pushes the round cap at the bottom out so the claws can pivot outward or fold against the shaft. Spinning the claws in the opposite direction locks them either in or out. The folding design makes the 4-Claw Hook quite compact and prevents the claws from digging into woodwork or the bottoms of my feet when stowed. The device is rated to 860 lbs, more than I could imagine ever subjecting it to, and the serrated claws keep whatever has been hooked from slipping away. It’s an elegant design with an aggressive grip.
The large round disk at left moves in and out on a threaded rod. Here it keeps the claw tips safely up next to the shaft.
The Lixada was quick to snag this 60-lb ride-share bike and held on to it during the lift to the dock.
Zhike Gravity Hook
On contact with something, the Gravity Hook’s jaws open up. The single plate on the jaw at left will slip about 1/4″ into the space between the double plates on the right, preventing slender items from slipping out.
The Zhike Gravity Hook is 5-3/8″ long, 3-1/2″ wide, and weighs 8.9 oz. The device is made of stainless steel except for the nuts and bolts—the magnet says they’re steel. The four pivot points allow the jaws at the bottom to open upon contact with something, then close when the Gravity Hook is pulled upward. For use as a grappling hook, a separate cross piece is set between the articulated jaws and two O-rings are rolled into a pair of notches to keep the device from opening and dropping the cross piece. The hook is rated to 772 lbs, more than enough for retrieving anything from a small boat.
When the cross-plate is installed, two O-rings roll down into a pair of notches and keep it securely held in place.
In its grappling hook configuration, you can cast about and drag for lost items, and it will snag line and chain, the wire basket and tubing of a shopping cart, but not anything with a diameter over 1-1/2″. For retrieving small objects like glasses and key rings, the Gravity Hook’s ability to grasp things make it better suited than an ordinary grappling hook. Using the opening jaws is best done when you can see what you’re fishing for. If you don’t have clear, undisturbed water, a face mask or a bathyscope will be helpful. The jaws have to be set directly upon whatever you’re after, so you need to be directly above it; and they have to be crossing the object, not parallel to it, so you have to be able to see what you’re doing. That said, we were able to grab a lost bright orange cinch cord on the first try.
The Gravity Hook got a hold on this sunken cinch cord on the first try. The milfoil came up on one of the hooks.
With both devices, it’s possible to get hooked on some immoveable object and join the ranks of items stuck on the bottom. Neither has an attachment point for a retrieval line, the kind used to retrieve a snagged anchor, but you could tie one on if you decide to go fishing blindly, or dive for it if the conditions and your ability allow.
The promotional copy for both devices suggests you can use them for climbing, just as Batman did with his grappling hook in the 1960s TV series. But if you’re going to throw the hook up to the top of a building or over a tree branch, you may not be able to get the grappling hook back if you can’t climb up to it. The Lixada and Zhike devices both supported my 220 lbs, but climbing is risky business, especially if what’s holding you up can get dislodged.
Both of these devices have the ability to save the day if something valuable is lost overboard in shallow water; they also can provide great entertainment fishing for the treasures that accumulate around the docks at marinas and launch ramps.
Christopher Cunningham is editor of Small Boats Magazine.
When we first heard from Richard Nissen, in June 2017, he shared one of the boats he had built and added to his small fleet at his home west of London on the River Thames. It was a s’ciopon, a Venetian boat rowed standing up and facing forward. With his newest boat, he’s still facing forward, but he’s taken a seat. It’s a skin-on-frame kayak, built to the plans and instructions in George Putz’s 1990 book, Wood and Canvas Kayak Building. Putz took his inspiration from a how-to article by about the Walrus kayak by Norman Skene in the June 1923 issue of the now defunct magazine, The Rudder. And Skene took his inspiration from a Southwest Greenland kayak he measured in 1921 in the Peabody Museum in Salem, Massachusetts. Howard Chapelle drew the lines for that kayak and included it in his chapter of Bark Canoes andSkin Boats of North America.
Richard Nissen
The frame’s many elements are screwed and glued together. When it was finished, Richard had to decide what to skin it with.
The kayak has undergone quite a few changes from its origin as a sealskin-covered driftwood frame to Skene’s adaptation. To simplify construction for readers of The Rudder, Skene did away with steam-bent frames and lashings and switched to a frame made of sawn pieces, glued and screwed together. He felt at liberty to assume that his readers had tools and woodworking experience; his article occupied two-and-a-half pages of the magazine. Putz, publishing in 1990, took 124 pages to coach readers through the build.
For lumber, Richard had some old planks on hand, nearly free of knots, but not long enough to make the longitudinals in one piece, so he had to cut and glue a lot of scarf joints to make the keel, stringers, chines, and gunwales. He repurposed a discarded Windsor chair back for the deck beam at the aft end of the cockpit—a more comfortable piece to lean against—and cut the curved stems from a similarly curved driftwood branch he found in the river.
Richard Nissen
The heavy-duty, fiber reinforced polyethylene tarp made a lovely skin, allowing the intricate frame to show through.
The construction of the frame was straightforward and didn’t bog Richard down, but deciding what material to use for the fabric covering did. He was set on keeping the expenses to a minimum and steered away from canvas, even if it were easy to come by. Back in 1990, Putz himself acknowledged that a suitable piece of 10-oz canvas would be pricey—about $130. Richard settled on a fiber-reinforced polyethylene tarp as the source of his covering material. “It looks magnificent,” he notes, but admits in hindsight “that this choice was a bad one as it is not as strong as it should be.” It stretched over the frame easily enough and with bright-finished sheer guards covering the material’s edges and the staples anchoring them, the semi-transparent skin looks quite hi-tech.
Richard Nissen
At the Thames riverside, the kayak, ready to launch, rests in the company of two of Richard’s other boats.
The keel strip, which is to guard the skin from wear, was itself the cause of damaging it. When the kayak went out for its first trials, where each screw holding the guard passed through the skin there was a pathway for water to get aboard. “This made the first paddle extremely exciting as the kayak effectively leaked like a sieve. So, it was a dash for home not to sink completely.” The solution was clear silicone caulking, dabbed over each screw head and run along the junction of the skin and the keel guard.
Richard and his son report that, leaks nearly eliminated, the kayak performs well and “is a joy to use, so the design works.” Setting the kayak over strips of toilet paper helps locate leaks that have yet to be fixed, and chasing leaks remains an ongoing project. Richard isn’t willing to replace the skin. “It may be easier to start again from scratch to resolve the difficulties with a new solution for the skin. The frame is a very beautiful object in its own right and perhaps it will end up on display stripped of its skin.”
Juliet Nissen
Richard has the perfect place for “messing about in boats.” His stretch of the Thames winds through the countryside that Kenneth Grahame used as the setting for “Wind in the Willows.”
For now, he hopes to get all of the leaks stopped and enjoy paddling the Thames. “There are no rocks or other things in the river to rip or destroy the boat—the Thames is very sheltered and gentle environment.” Kenneth Grahame, author of Wind in the Willows,” lived very close to where Richard has his houseboat, so he paddles were Ratty and Mole enjoyed picnic outings and messing about in boats. He has yet to cross paths with them.
Do you have a boat with an interesting story? Please email us. We’d like to hear about it and share it with other Small Boats Magazine readers.
Finn and Teresa continue eastward on the Main-Donau Canal, taking lock aft lock the geographical high point of the voyage. While it was all “downhill” from there to the Danube, their video conveys a grand adventure.
At Würzberg, Finn and Tereza are joined by Lorenzo, a staffer from their alma mater, the Brockwood Park School. Watch this video to see how our adventurers solve a few problems on their way to the city of Bamberg and the entrance to the canal that will carry them to the Danube river.
Averaging about 17 miles a day, Finn and Tereza work their way up the Main River and reached Würzberg. They still have many more miles of the Main ahead of them before they reach the first canal along the route to Russia. Watch this video and see how our young travelers are getting into their groove.
Their destination, Sochi, Russia, was 1,500 miles away as the jet airliner flies, but Finn and Tereza are in no hurry and determined to travel in a manner that’s kind to the environment. They have been underway for a week now. Watch this video to see the beauty and adversity they discover in the first week of their journey, which lands them in the Bavarian city of Aschaffenburg, about 50 miles from their start at Mainz.
With no car, Finn and Tereza have to figure out how to get their boat to Mainz, Germany. With all their supplies (and a guitar) aboard JILL, their 16’ Matinicus double ender, their goal was to get her in the water and spend their first night under the open sky. Watch this video to see how they fared!
JILL, the boat Finn and Tereza have been building for their journey across Europe to Russia, is still not finished. Watch this video to see the challenges finishing JILL and the final stages of the pre-trip preparations.
Students at Brockwood Park School in Hampshire, UK, Finn Cameron-Turner and Tereza Deminova, both 17, built a 16’ Matinicus double-ender. They had some help from a mentor and other students during the construction at the international school located in England’s Hampshire countryside, but it will be up to the two of them to row and sail the boat over 1,500 miles from Mainz, Germany, to Sochi, Russia, Tereza’s home town.
They’ll cross Europe on inland waterways, the last of which, the Danube, will deliver them to the Black Sea for the final leg along an exposed coast. For Finn and Tereza, the voyage is more than a summer vacation. They’ll continue their education by learning about navigation, sailing, and different languages and cultures. The state of the global environment is of great concern to them and they hope to demonstrate that travel, even for Tereza to get from school to her home in Sochi, can be done with a minimum of ecological impact. We’ll follow along on the adventure with regular installments of videos from Finn and Tereza. Watch this video to get to know the two adventurers.
I recently parted with my Hooper Bay kayak, the only remaining relic of my first efforts as a boatbuilder 40 years ago. It was my second kayak, the first being one I designed after poring over my father’s copy of Adney and Chapelle’s The Bark Canoes and Skin Boats of North America. That kayak was an awkward platypus of elements I’d seen in the book and turned out to be a bland dilution of whatever qualities the original kayaks might have possessed.
That kayak got me afloat, but I gained a new appreciation for the traditional forms I’d appropriated for it when I met David Zimmerly in 1978 at Port Townsend’s Wooden Boat Festival. He gave a talk there on the Hooper Bay kayak, which I recognized as the same style as the Nunivak Island kayak included in Skin Boats.
Nunivak is about 75 miles due south of Hooper Bay, and both are inhabited by the Yupik people of Alaska’s west coast. I was taken in by David’s detailed description of the Hooper Bay and the work of Yupik master kayak builder Dick Bunyan. David kindled my interest by giving me a photocopy of his draft of his then yet-to-be-published book, Hooper Bay Kayak Construction.
The Hooper Bay design was thoroughly and beautifully documented in David Zimmerly’s book, “Hooper Bay Kayak Construction.” The book is out of print now, but there are some old copies available from online used-book outlets.
It included detailed drawings of every piece, photographs of every step of the process from collecting driftwood to paddling the finished kayak. All that fall after the festival, I gathered driftwood, something I’d been doing since I was a youngster, helping my dad collect red cedar for fencing our yard. The beaches near home also had a bit of Alaska yellow cedar—straight stock for steam-bent frames and the coaming hoops; crooks for deckbeams the curved lower stempiece.
I learned a lot building the Hooper Bay: cutting straight and hooked scarf joints, half-lap joints, and mortises and tenons on compound bevels; working with crooks, carving stempieces, and steam-bending frames and coamings. Aside from the practical experience, I gained a better understanding of the sophistication of traditional designs and the centuries of experience and knowledge that went into them.
The Hooper Bay was meant for hunting seals in the Arctic and occasionally for ferrying people short distances across protected water, with as many as six aboard: two back-to-back in the cockpit, one on each deck, and one inside each end. It was only 15’ long, quite short compared to a modern touring kayak, but with a beam of 30”, a depth of 18” and weighing over 70 lbs, it was a big vessel. As deep as it was, the coaming came up to my armpits. I made a single-blade paddle of the type used for the Hooper Bay and paddled it like a canoe, alternating sides. It made for a slow, meandering course, so I never traveled far.
When it still had its canvas skin and was seaworthy, the Hooper Bay was a restful place to lie in with its decks for a cathedral ceiling and its cockpit opening for a skylight.
On summer days I would paddle a mile offshore, stow the paddle inside, and slide into the kayak and let the afternoon’s land breeze carry me back to the beach. Sometimes I’d take a book and read. Twice I took a cassette recorder and made spoken letters for my great aunt in Boston. She was in her 90s and nearly blind, and the sound of the water gurgling against the canvas hull took her back to her childhood, canoeing at summer camp. Most of the time I’d lie on my back looking up through the cockpit at the circle of sky rimmed by the coaming, listening to that same sound. When a cool northwesterly was blowing, the air inside the Hooper Bay was still and warm, and redolent with cedar and linseed oil. The rocking of the hull would hold me cradled between wakefulness and sleep.
Over the following decades, I continued to build reproductions of Arctic kayaks. I was drawn to the sleeker and faster Greenland types, learned how to roll them a dozen different ways, and enjoyed paddling them in storms with water washing thick across the decks the deafening roar of the wind in my ears. The Hooper Bay sat under the eaves of my parents’ house for years, dusted green with the pollen of the cedar trees. When I had a house of my own, I kept the Hooper Bay alongside the garage. The canvas covering grew speckled with mildew, and the paint cracked. Eventually I removed the skin, leaving the lashed latticework frame bare.
An artist friend liked the frame and offered to keep it in her studio. The cedar had weathered and turned gray, so before taking it to her I brushed it with linseed oil mixed with vermilion pigment.
The frame stayed suspended above a belt sander and an electric kiln for quite a long time—through a dark decade of divorce, from a time when I kissed my young children goodnight to times when they were grown and I’d go to bed in an empty house; through the death of my mother and chill sea of long-forgotten deadlines and appointments.
I brought the Hooper Bay home when my friend moved out of town, and it lay hidden alongside the house under a black tarp. With the coming of each spring, bracken ferns pierced between its ribs and morning glory spiraled around its chines. I often thought about giving the Hooper Bay a new skin, to paddle away from shore, lie down in the cocoon of wood and canvas, and let the waves rock me into that peaceful half sleep of 40 years ago.
Two summers ago, I took some pictures of the frame set in front of an ivy-covered fence—the vermilion was vibrant against the dark green shingled leaves. I had planned to post the photos with a for-sale ad on Craigslist, but I let month after month slip by. I let the kayak’s color fade. I posted the ad a couple of weeks ago and I got just one response. A few days later the Craigslist buyer arrived and we strapped the Hooper Bay on his roof rack. The frame is gone now, but the best of that kayak remains with me.
It all started during the summer of 2015 when I decided that it was time to part ways with MAGIC, my 1962 Alberg 35′ glass sloop. I had spent four years and countless hours restoring MAGIC to her former glory, but two years after re-launching I needed a change. While she was not a big boat by today’s standards, the amount of time and money spent just keeping the boat in the water and in good condition was exhausting. The fact that I lived in central New Hampshire and kept the boat 150 miles away in southeastern Massachusetts only made things worse.
I found myself spending more and more time on a beat-up old O’Day Daysailer that had been following me around since college. My family and I romped around the local lakes and estuaries, sailing hard and often. The only money I spent on her was gas for the car and beer for the cooler. At some point that summer, I realized that I was having as much fun on the O’Day as I was on MAGIC, but with none of the stress. Sure, MAGIC was a comfortable boat that could take somebody sailing for weeks at a time, but I was mostly going out for day sails with an occasional overnighter. I could be doing the same thing on a much smaller boat.
At about the same time, I heard about the Small Reach Regatta, organized by the Downeast Chapter of the Traditional Small Craft Association in Maine. It’s not a race, but a gathering of small, traditional sailing and rowing craft. I have always been drawn to the look of classic boats and when I saw the boat lineup on the Small Reach Regatta website, I knew I had to check it out.
I showed up on the first morning of the event and was able to sail on Mike Duncan’s FRISKY LADY (a Chamberlin 15′ 6″ gaff sloop) and on Geoff Kerr’s NED LUDD, an Oughtred 19′ 6″ Caledonia yawl. I fell in love with the Caledonia but it was a bigger boat than I needed. However, the seed had been planted, and I spent the rest of the summer researching the perfect small boat in the range of 15′ to 18′.
The boat had to be pretty and, while I prefer the look of lapstrake, there is a lot of additional setup and framing required that takes a fair amount of time, so I was looking for a stitch-and-glue design that didn’t require a strongback and associated framing. I also like the classic look of a balanced lug-rigged yawl; and with unstayed spars, balanced lug rigs are really easy to set up for launching. The mizzen makes for easy handling. In spite of the appeal of classic boats, I wanted a fast boat, and a planing hull makes this possible.
The Apple 16, a five-strake stitch-and-glue balanced lug yawl designed by Thomas Dunderdale of Campion Sail and Design, came closest to being everything I wanted. The classic lines and balanced lug yawl were just what I was looking for and the somewhat flat aft section of the hull allows the boat to get up on a plane. I’m a sucker for a plumb bow, so as soon as I saw pictures of the Apple 16, I knew it was for me.
Photographs by Jacob Bowser
The plans detail several interior layouts, and provide the option for decked ends . The author designed his own interior with flotation tanks and a removable center thwart.
After several conversations with the designer, I purchased plans and began the build. Thomas was very helpful, answering all of my questions via email or phone.
I didn’t want to wait for a shipment of full-sized printed plans mailed from England; I opted for digital files and took them to a local copy shop and had them enlarged for about $30. I was really happy with the amount of thought and detail that went into the plans; they came with a general construction narrative, a detailed 30-page keyed construction index and at least a dozen schematics for the boat, parts, and interior layout options. For a first-time boat builder, everything provided should be easy to follow.
The included materials list calls for four sheets of 6mm marine plywood scarfed lengthwise for the hull, two sheets of 6mm for bulkheads and interior framing, and one sheet of 9mm for the rudder and additional components.
With a solo skipper aboard, the Apple 16 can, in spite of its traditional appearance and rig, get on plane in a moderate breeze.
While Campion does not currently offer files for a CNC mill, someone savvy with a CAD system should be able to digitize the planking measurements and send them off for cutting to save time. I don’t have easy access to a CNC mill, so I opted to plot the strakes on the scarfed panels and cut them out myself. The plans package provides both a table of offsets and a visual diagram for plank measurements that is very intuitive.
Probably the best thing about building a stitch-and-glue boat is how fast you can make visible progress. Once you cut the strakes from the scarfed plywood panels, assembling the hull is a simple matter of drilling out holes for wire or zip ties (I opted for zip ties) and stitching the panels together. In a single, albeit long, afternoon you can go from a pile of flat plywood pieces to a structure that resembles a boat.
The author could comfortably row the Apple 16 at around 3 knots. His sectional oars, with carbon-fiber ferrules, stow neatly out of the way while sailing.
Of course, it’s not all a piece of cake. Until you get the bulkheads tied in, the entire structure is a bit of a wobbly mess. I cut cradles to steady and align it while I tied everything together. This helps immensely when one is working alone.
The job of taping the inside and outside seams, followed by a layer of 6-oz ’glass on the outside of the hull is rather monotonous. If you’re careful, cleanup should be a relatively minor job and once complete, you can move on to fitting out the interior.
The plans provide layouts for several interiors ranging from a spartan setup of three thwarts, with two doing double duty as mast partners, to a more extravagant layout with decks fore and aft. I deviated from the plans and designed my own interior with built-in flotation compartments and a center thwart that’s removable for camp-cruising.
The boat is quite light, and a solo sailor could add some ballast to stiffen the hull against the press of the sails. The designer recommends adding between 110 to 275 lbs if ballast is needed.
The plans call for a long, open daggerboard trunk to accommodate multiple mizzen sail plans (the larger plan changes the center of effort and requires the daggerboard to be located further aft). Since I was only building the version with the smaller sail plan, I shortened the daggerboard trunk after consulting with Campion.
I also increased the thickness of the daggerboard from 25mm to 33mm so I could build a NACA 0012 foil. I’ve had several opportunities to test performance against other similar designs with balanced lugs and I believe that the foil helps with upwind performance.
All told, the build took me about eight months of working 10–15 hours per week, and I couldn’t be happier with the way it turned out. A single rower with 9.5’ oars can propel the boat at 3 knots when rowing at a comfortable pace, and her sailing ability has exceeded my expectations. Trailering with my four-cylinder Rav 4 is easy.
I’ve had the boat out for dozens of times in a variety of wind conditions, and the boat is really amazing to sail. Having no prior experience with balanced lug rigs, I spent a lot of time researching balanced lug sail tuning and after a bit of trial and error, I opted to go with 6:1 downhaul and 4:1 mainsheet tackle. I used Dyneema line for the downhaul and main halyard to maximize luff tensioning ability.
The Norwegian tiller may take a bit of getting used to if you haven’t used one before, but it is the simplest arrangement for getting around a mizzen mast and has a number of advantages over a conventional tiller.
With the rigging configuration sorted out and making sure the downhaul tension is drum tight, I found that the pointing ability was quite good. Combined with the foil daggerboard, which should theoretically increase lift, the Apple 16 is not far off the pointing angles that a similarly sized Bermuda-rigged boat can achieve. When soloing, I regularly get up on a plane on a reach and hit 8.5 to 9 knots in less than 15 knots wind. Over 15 knots and I put in a single reef, and have sailed in conditions up to 23 knots without being terrified.
We have had four adults out for a sail, and while it is manageable, two of the crew need to sit in the well on either side of the daggerboard trunk forward of the thwart. The 250-lb boat is really best suited for one or two, and each additional crew member reduces the boat’s ability to plane. I have yet to be able to get the boat on a plane with more than two crew on board; I suspect that it would have to be pretty windy to do so. With that said, the boat sails well even with four on board.
The boat is as well-mannered as a light boat can be and is reasonably dry in most conditions. Beating close-hauled into chop over 2’, predictably, tends to be the wettest point of sail. The yawl rig contributes to a very balanced helm on all points with just enough weather helm on the Norwegian push-pull tiller to take any of the play out of the system and allow you to make subtle course corrections.
The Campion Apple is a well-thought-out small boat that is lively to sail and will turn heads in any harbor. It’s a good choice for a first-time boatbuilder with woodworking skills who doesn’t want to spend years building a boat that looks and sails great.
Matt Bowser, a software engineer living in Canterbury, New Hampshire, can’t remember a time when he wasn’t obsessed with boats. He grew up sailing the coast of New England from Rhode Island to Maine and is enamored with the simplicity, ease, and low maintenance of small boats. When he isn’t sailing, building, or fiddling with various boat bits, he’s mountain biking in the forests of New Hampshire and Vermont or trying to get his teenage children to hang out with him.
Apple 16 Particulars
[table]
Length/15′ 10″
Waterline length/14′ 4-1/2″
Beam/5′ 3″
Draft, board down/3′ 9″
Sail Area/123 sq ft
Ballast, if used/110 lbs to 275 lbs
[/table]
Plans for the Apple 16 are available from Campion Sail and Design, based in the UK. Prices are in Pounds Sterling: £65 (approx. $79 USD) for PDF, and £120 (approx. $146 USD).
Is there a boat you’d like to know more about? Have you built one that you think other Small Boats Magazine readers would enjoy? Please email us!
Continue Reading - Enter your email to log in or subscribe
New to Small Boats? Create a free account to get our weekly emails and two free articles each month.
Time to upgrade!
You've read all of your free content for the month. Upgrade to a paid subscription for unlimited access.

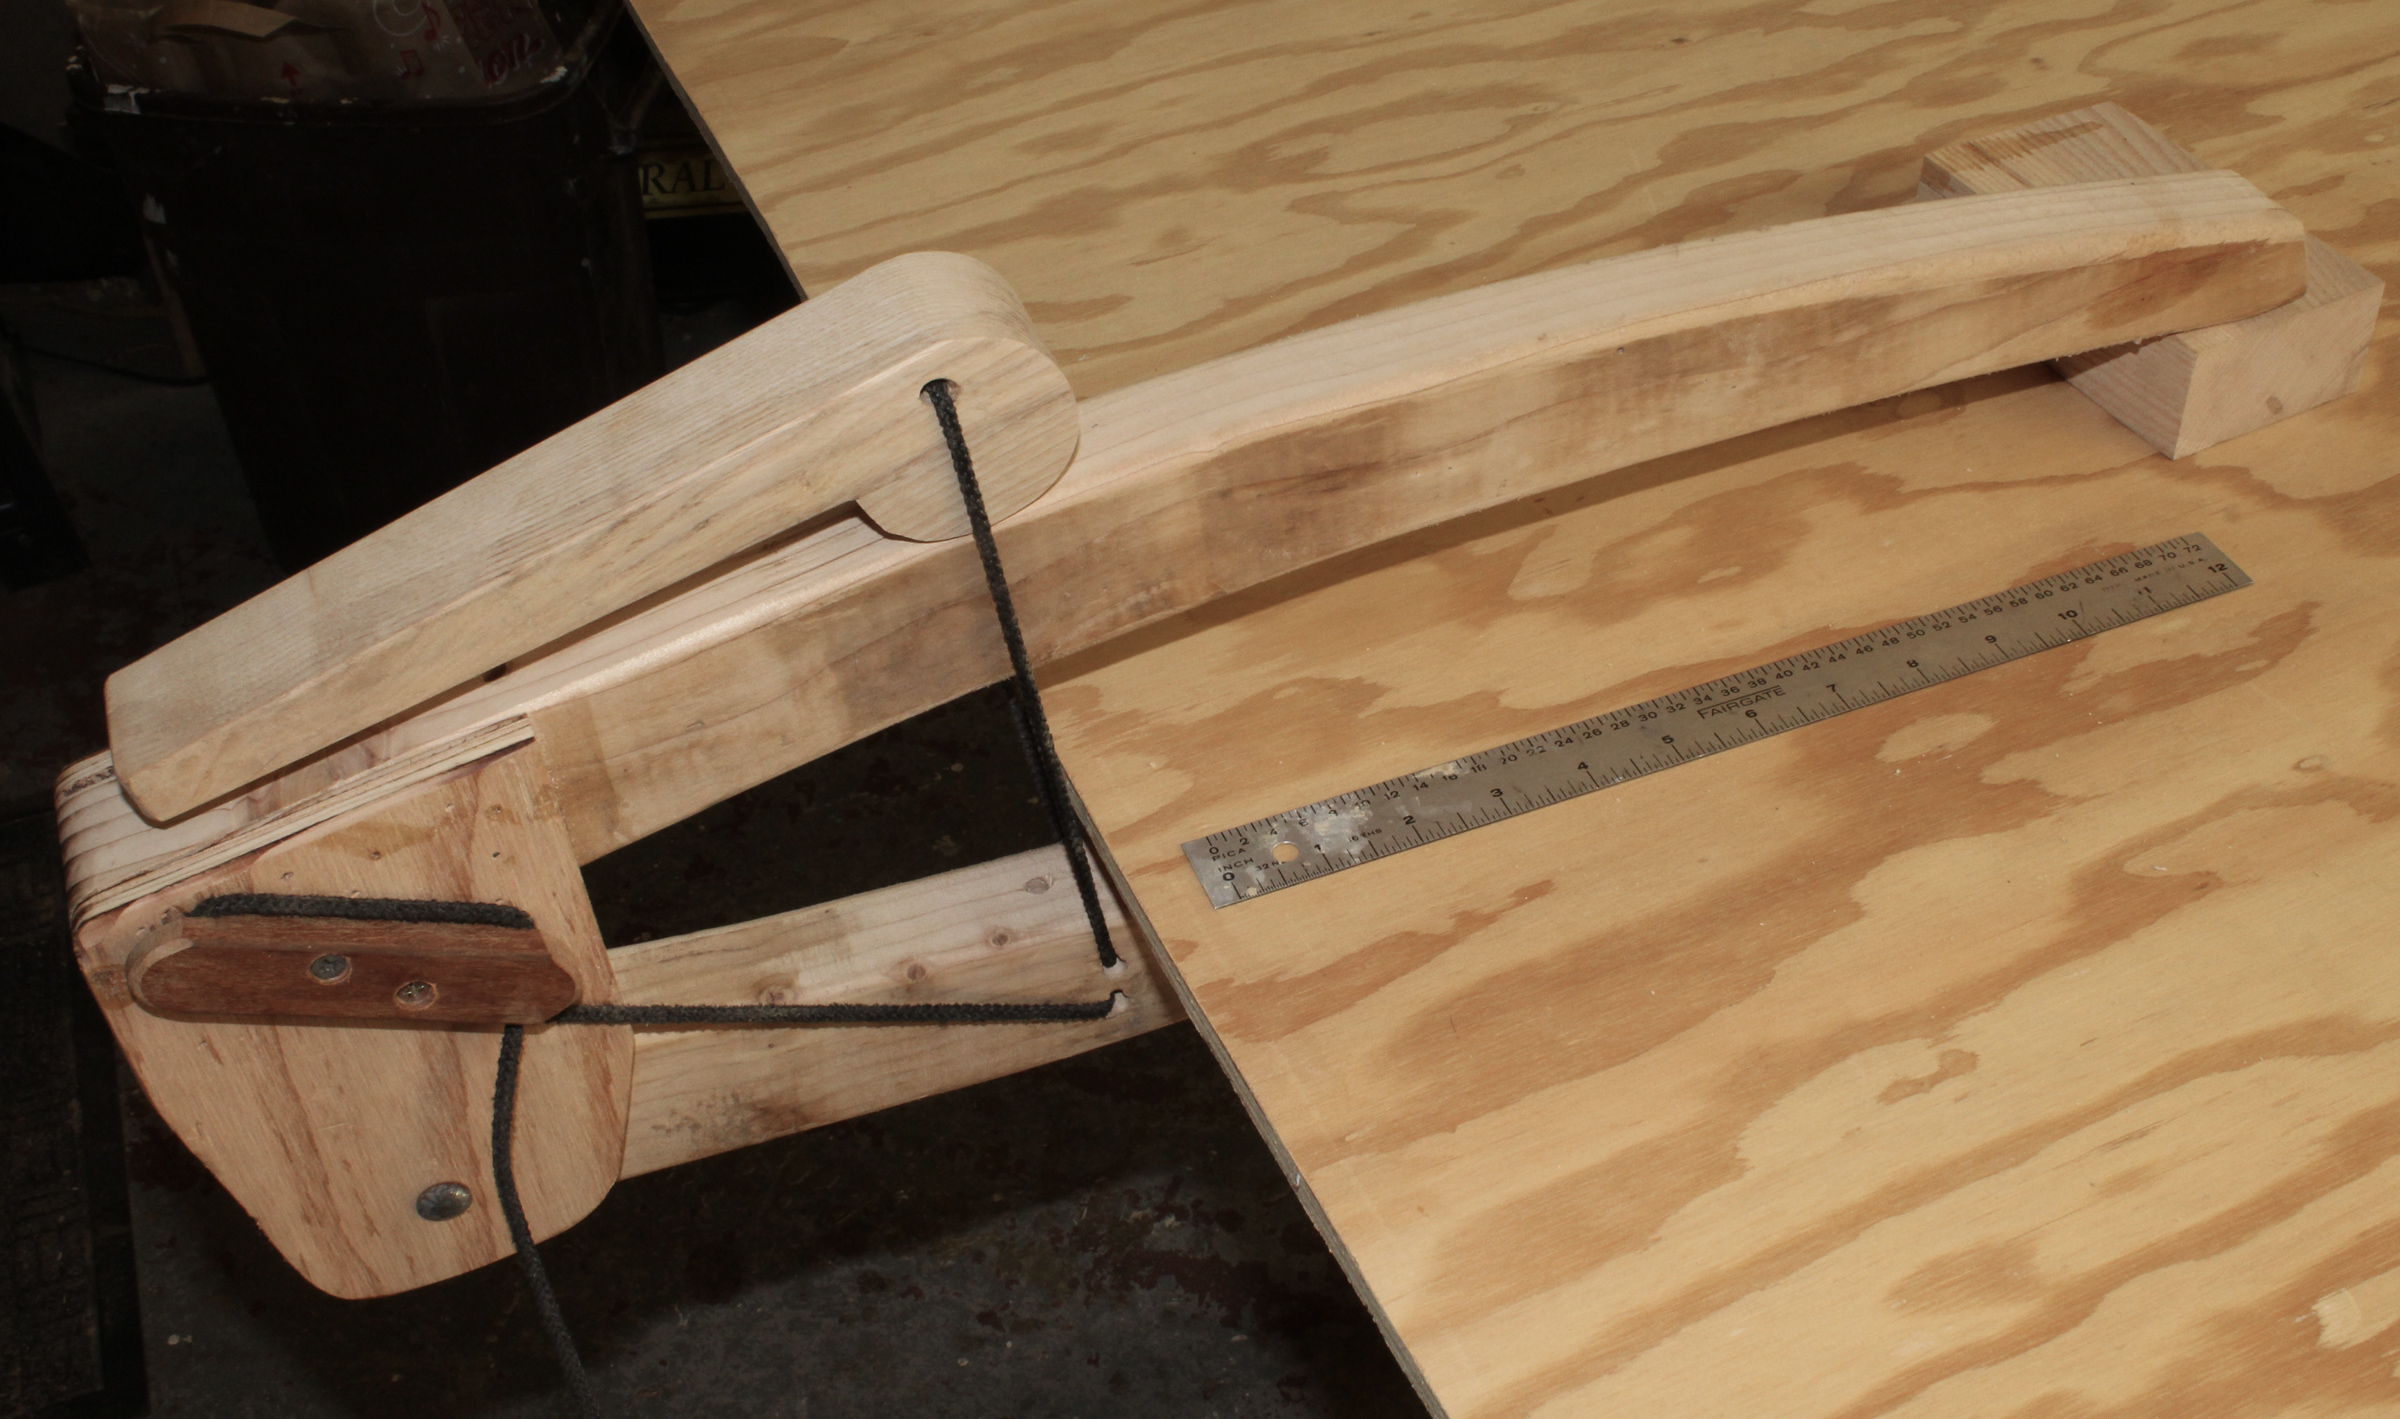 Photographs by the author