Humble but hyper-handy, hook scrapers have been part of virtually every boat project I’ve done over the last 45 years. Unfortunately, this essential tool has been given a bad rap thanks to junky knock-off paint scrapers that can’t hold an edge properly or feel comfortable in the hand.
Ken Textor
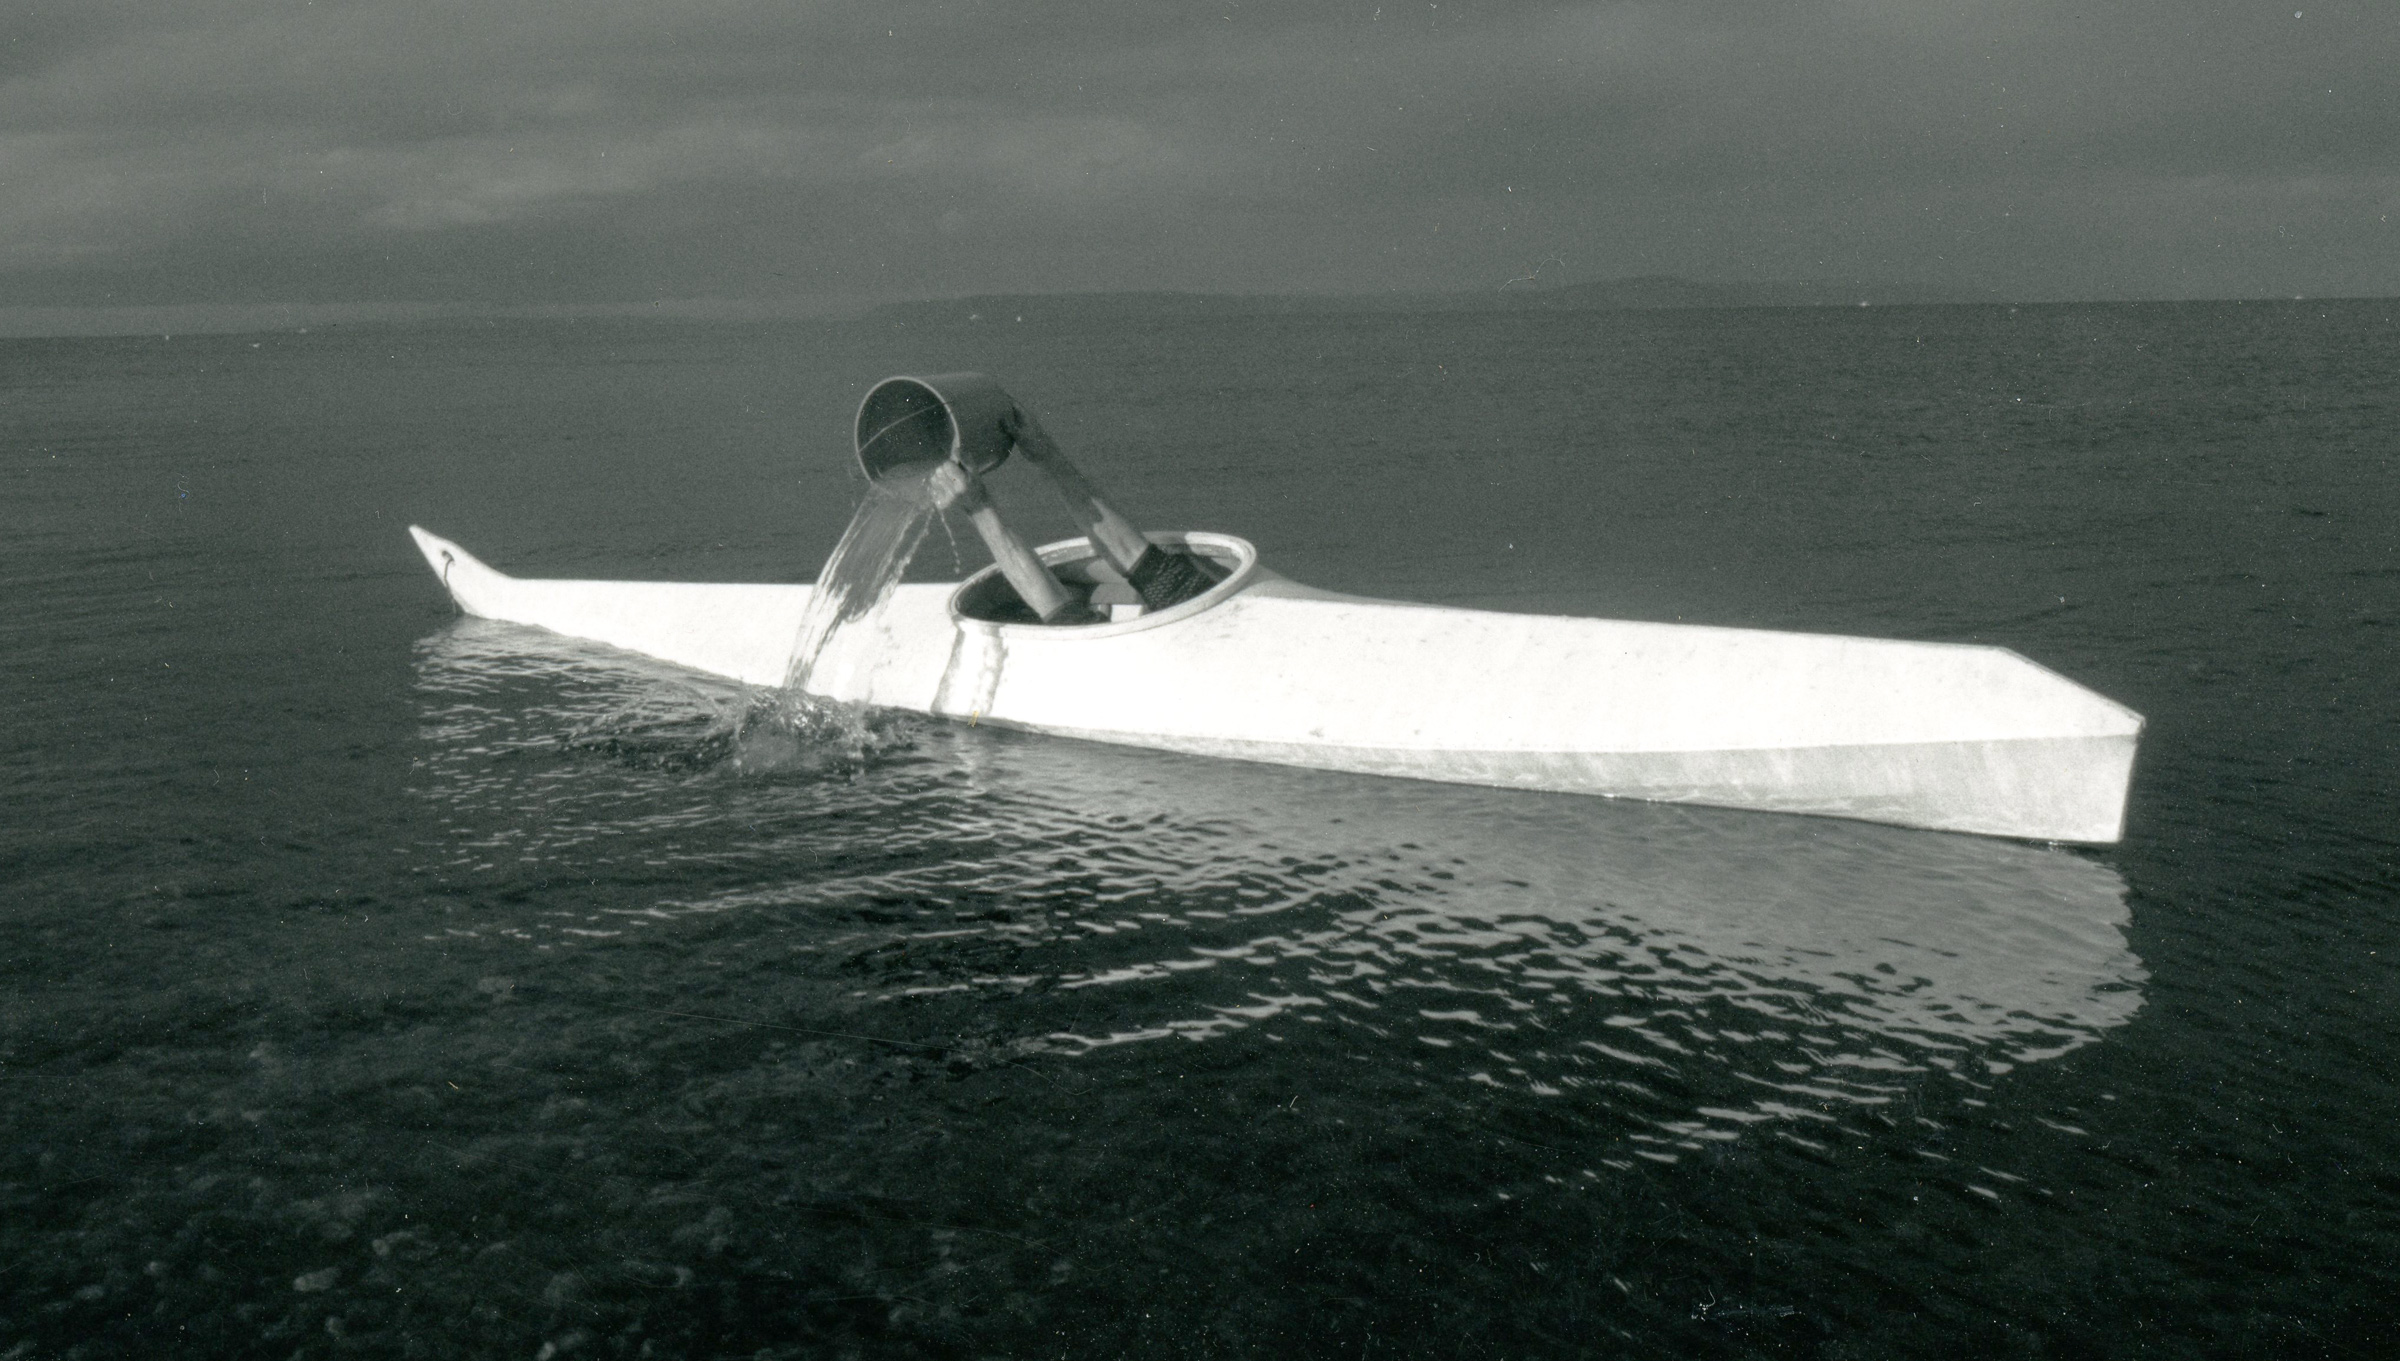
The author’s collection, which includes some garage-sale finds and very old scrapers, has made itself useful through 45 years of building boats.
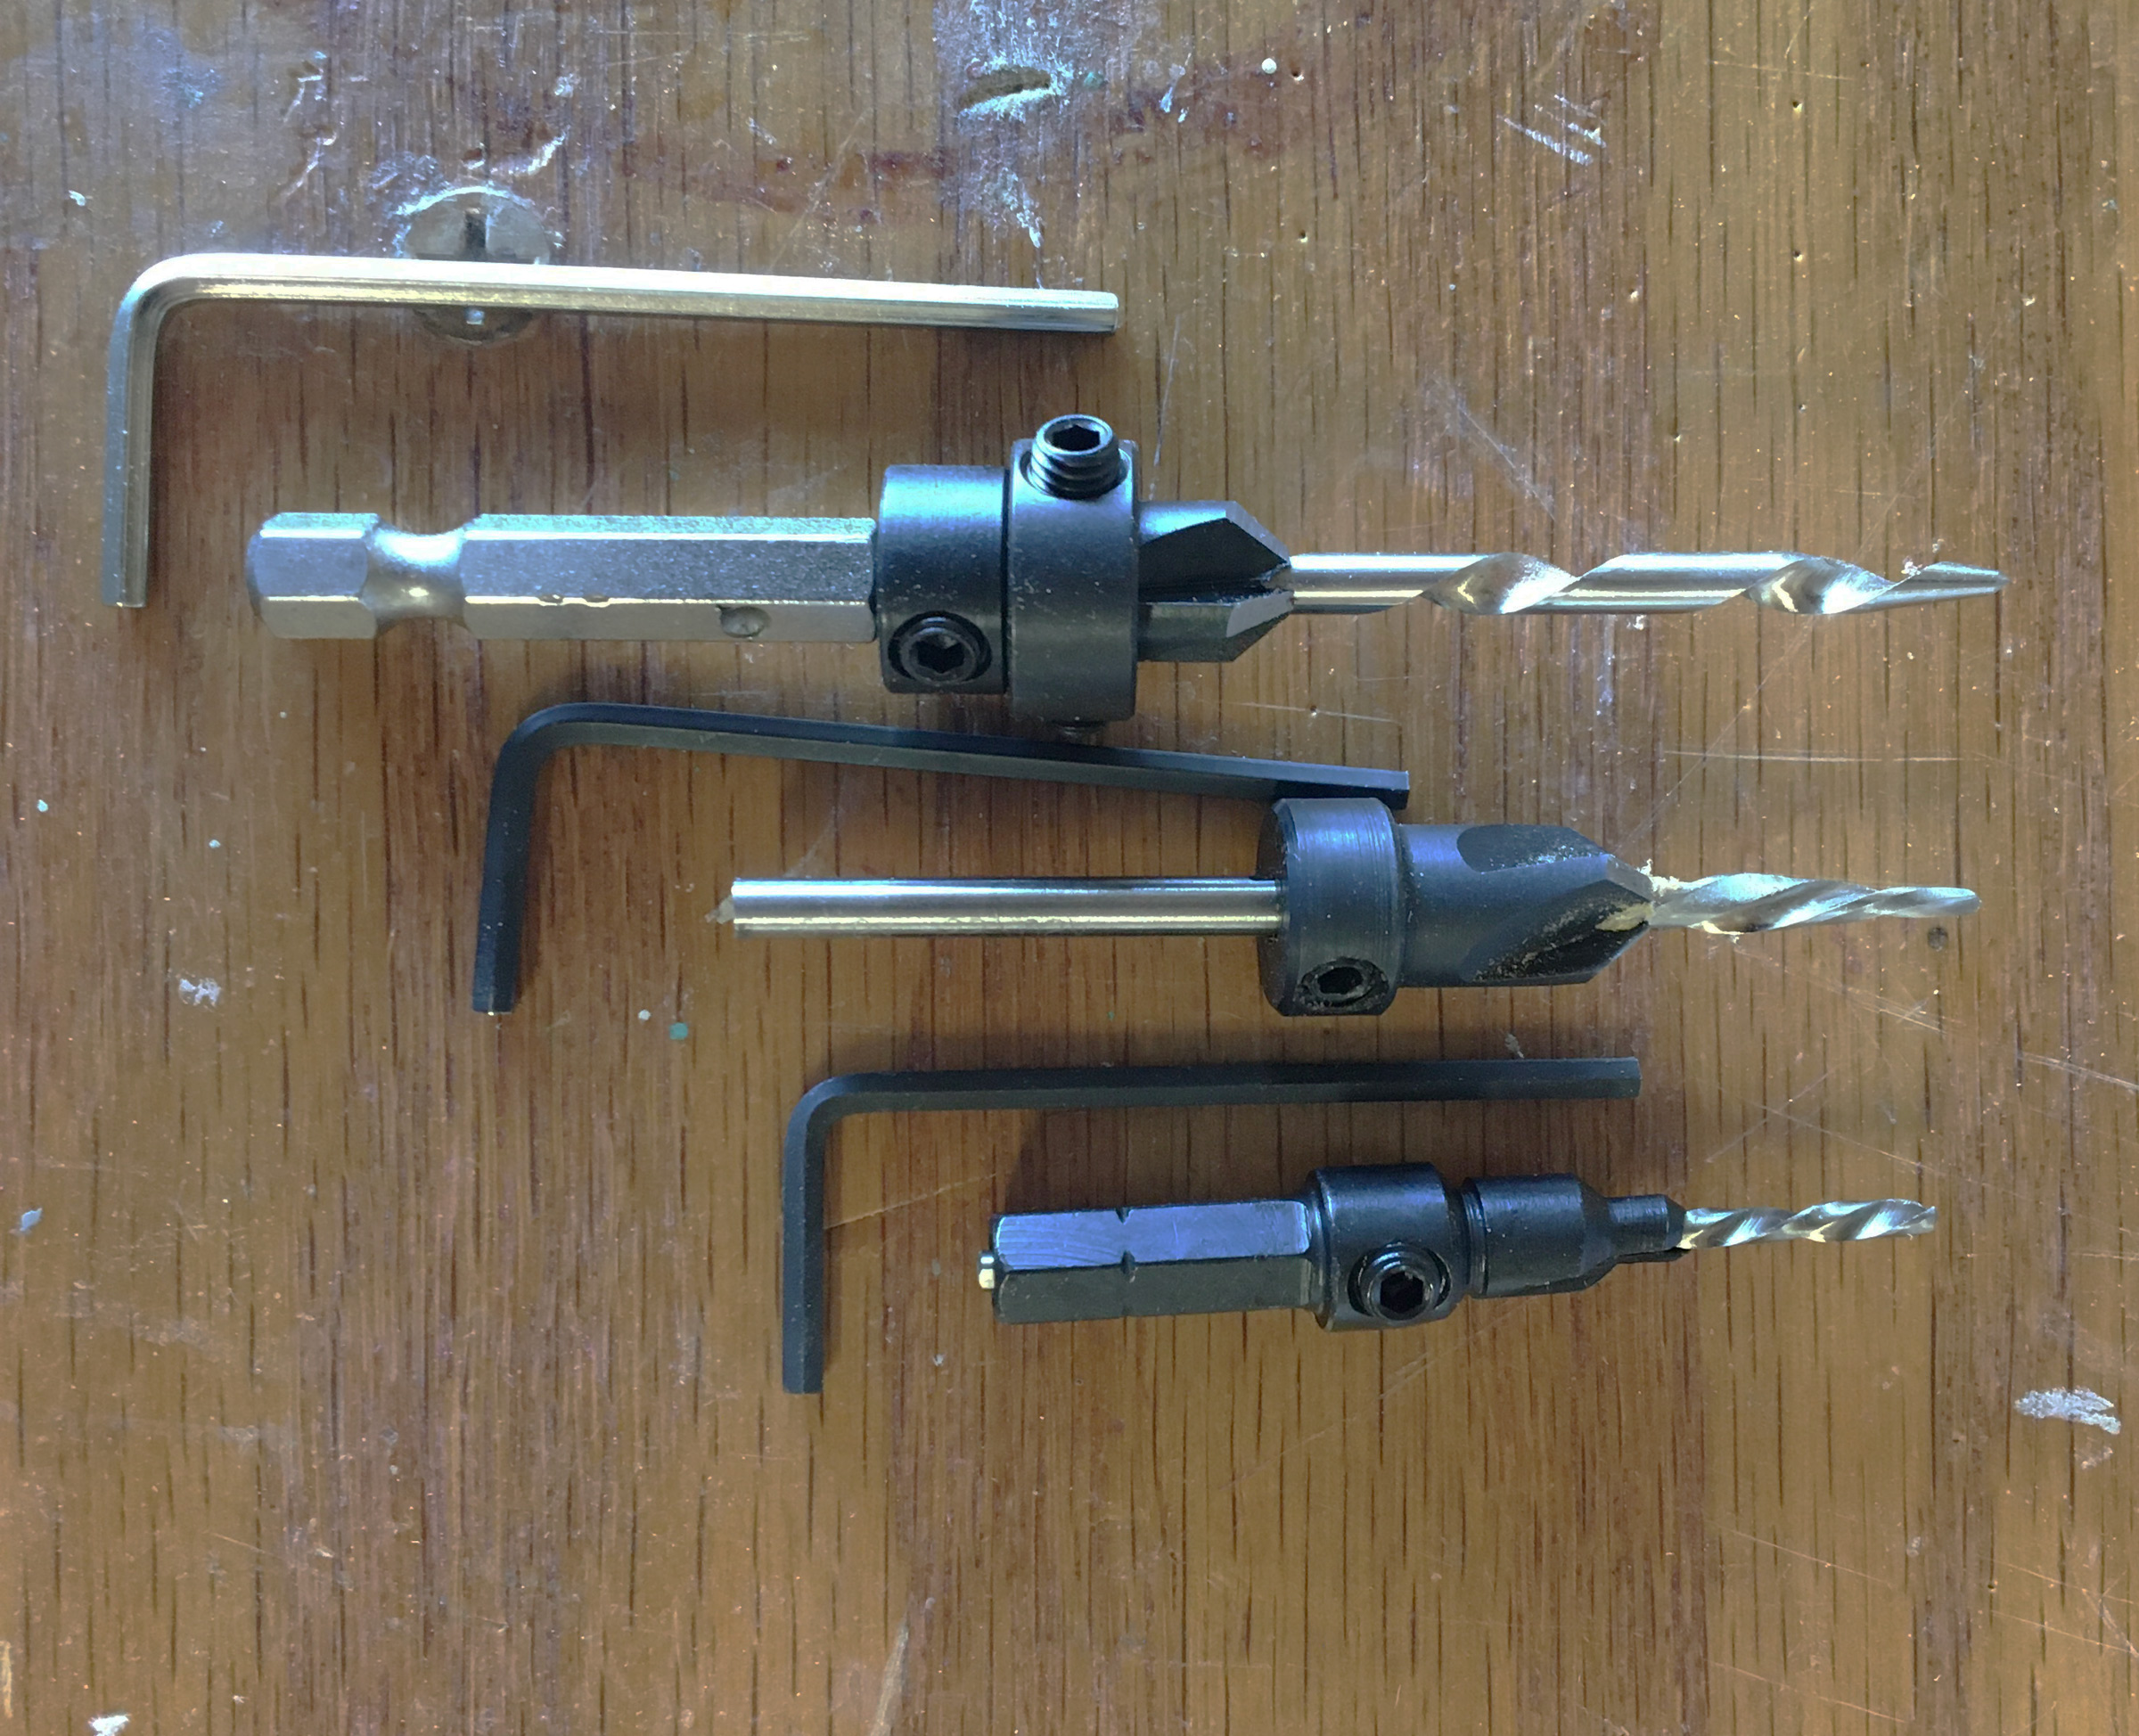
Good scrapers will last a lifetime and more. I have yard-sale scrapers from the 1940s and ’50s that are still serviceable—although replacement blades are tough to find. Fortunately, Red Devil and Hyde still make reliable and durable hook scrapers. The 1″ version from either brand has a blade with a single edge. Hyde’s 1-1/2″ scraper also has a single-edge blade, while Red Devil’s 1-1/2″ has two blades, back to back, so both can be used just by flipping the tool over.
Small Boats Magazine
Three scrapers with good high-carbon-steel blades (from top): the Hyde 10540 2-1/2″ four-edge scraper, the Red Devil 3040 1-1/2″ double-edge scraper, and the Red Devil 3010 1″ single-edge scraper
Four-edge scrapers using wider blades are heftier, two-handed tools for more aggressive work. Many, like Hyde’s, have a knob over the blade end for applying pressure with one hand while pulling with the other. The blades have two edges for fine work and two for rough work. The former are 2-1/2″ long and have a gentle curve; the latter are 2-1/8″ long and have a deeper curve, focusing the pressure on a smaller part of the edge.
Small Boats Magazine
Four-edge scrapers have blades for coarse and fine work. The double-edge scraper has twin blades that fit back-to-back in the handle. Single blades for the 1″ scraper simply slide sideways in and out. Replacement blades for all of these models cost only a few dollars.
While you’ll usually find these hook scrapers among others in the paint departments of home-improvement stores, they are also good woodworking tools, especially when jobs call for removing minute amounts of wood without marring nearby surfaces. With a little practice, you can trim countersink plugs flush with the surrounding wood, remove planer tears in wood with twisted grain, or radius sharp corners to better accept and hold paint or varnish.
Ken Textor
With a freshly filed edge, this old 1″ scraper with a wooden handle can smooth a softwood screw plug flush faster than sanding and without the chipping often caused by chisels.
Paint and varnish removal, however, is the primary job for hook scrapers and, for that, the 1″ or 1-1/2″ size is a good place to start your collection. These are among the smallest scrapers, but a wider blade doesn’t always mean quicker results. A 3″ blade requires two hands to create enough pressure for effective scraping. That means you can’t use a heat gun simultaneously to help remove the paint, so a 1” blade in one hand, leaving the other free for the heat gun, might actually work more quickly than a 3″ blade.
A sharp blade is essential for quick and satisfactory paint removal and woodworking. I usually hold the blade in a vise while I make a few passes along the length of the scraper edge with a high-quality mill bastard file, maintaining the roughly 45-degree angle of the scraper’s cutting-edge bevel. It doesn’t take much filing to put a fine edge on the high-carbon steel in good scraper blades.
A sharp hook scraper is a ticket to professional results when finishing wood and other semi-hard materials, like gelcoat, epoxy, and other fillers. Along with hammers and screwdrivers, they’re versatile tools you should never be without.
Ken Textor has been writing about, working on, restoring, building, and living on boats since 1977. He lives in Arrowsic, Maine.
Hook scrapers are available from a wide range of hardware stores and online resources.
Is there a product that might be useful for boatbuilding, cruising, or shore-side camping that you’d like us to review? Please email your suggestions.
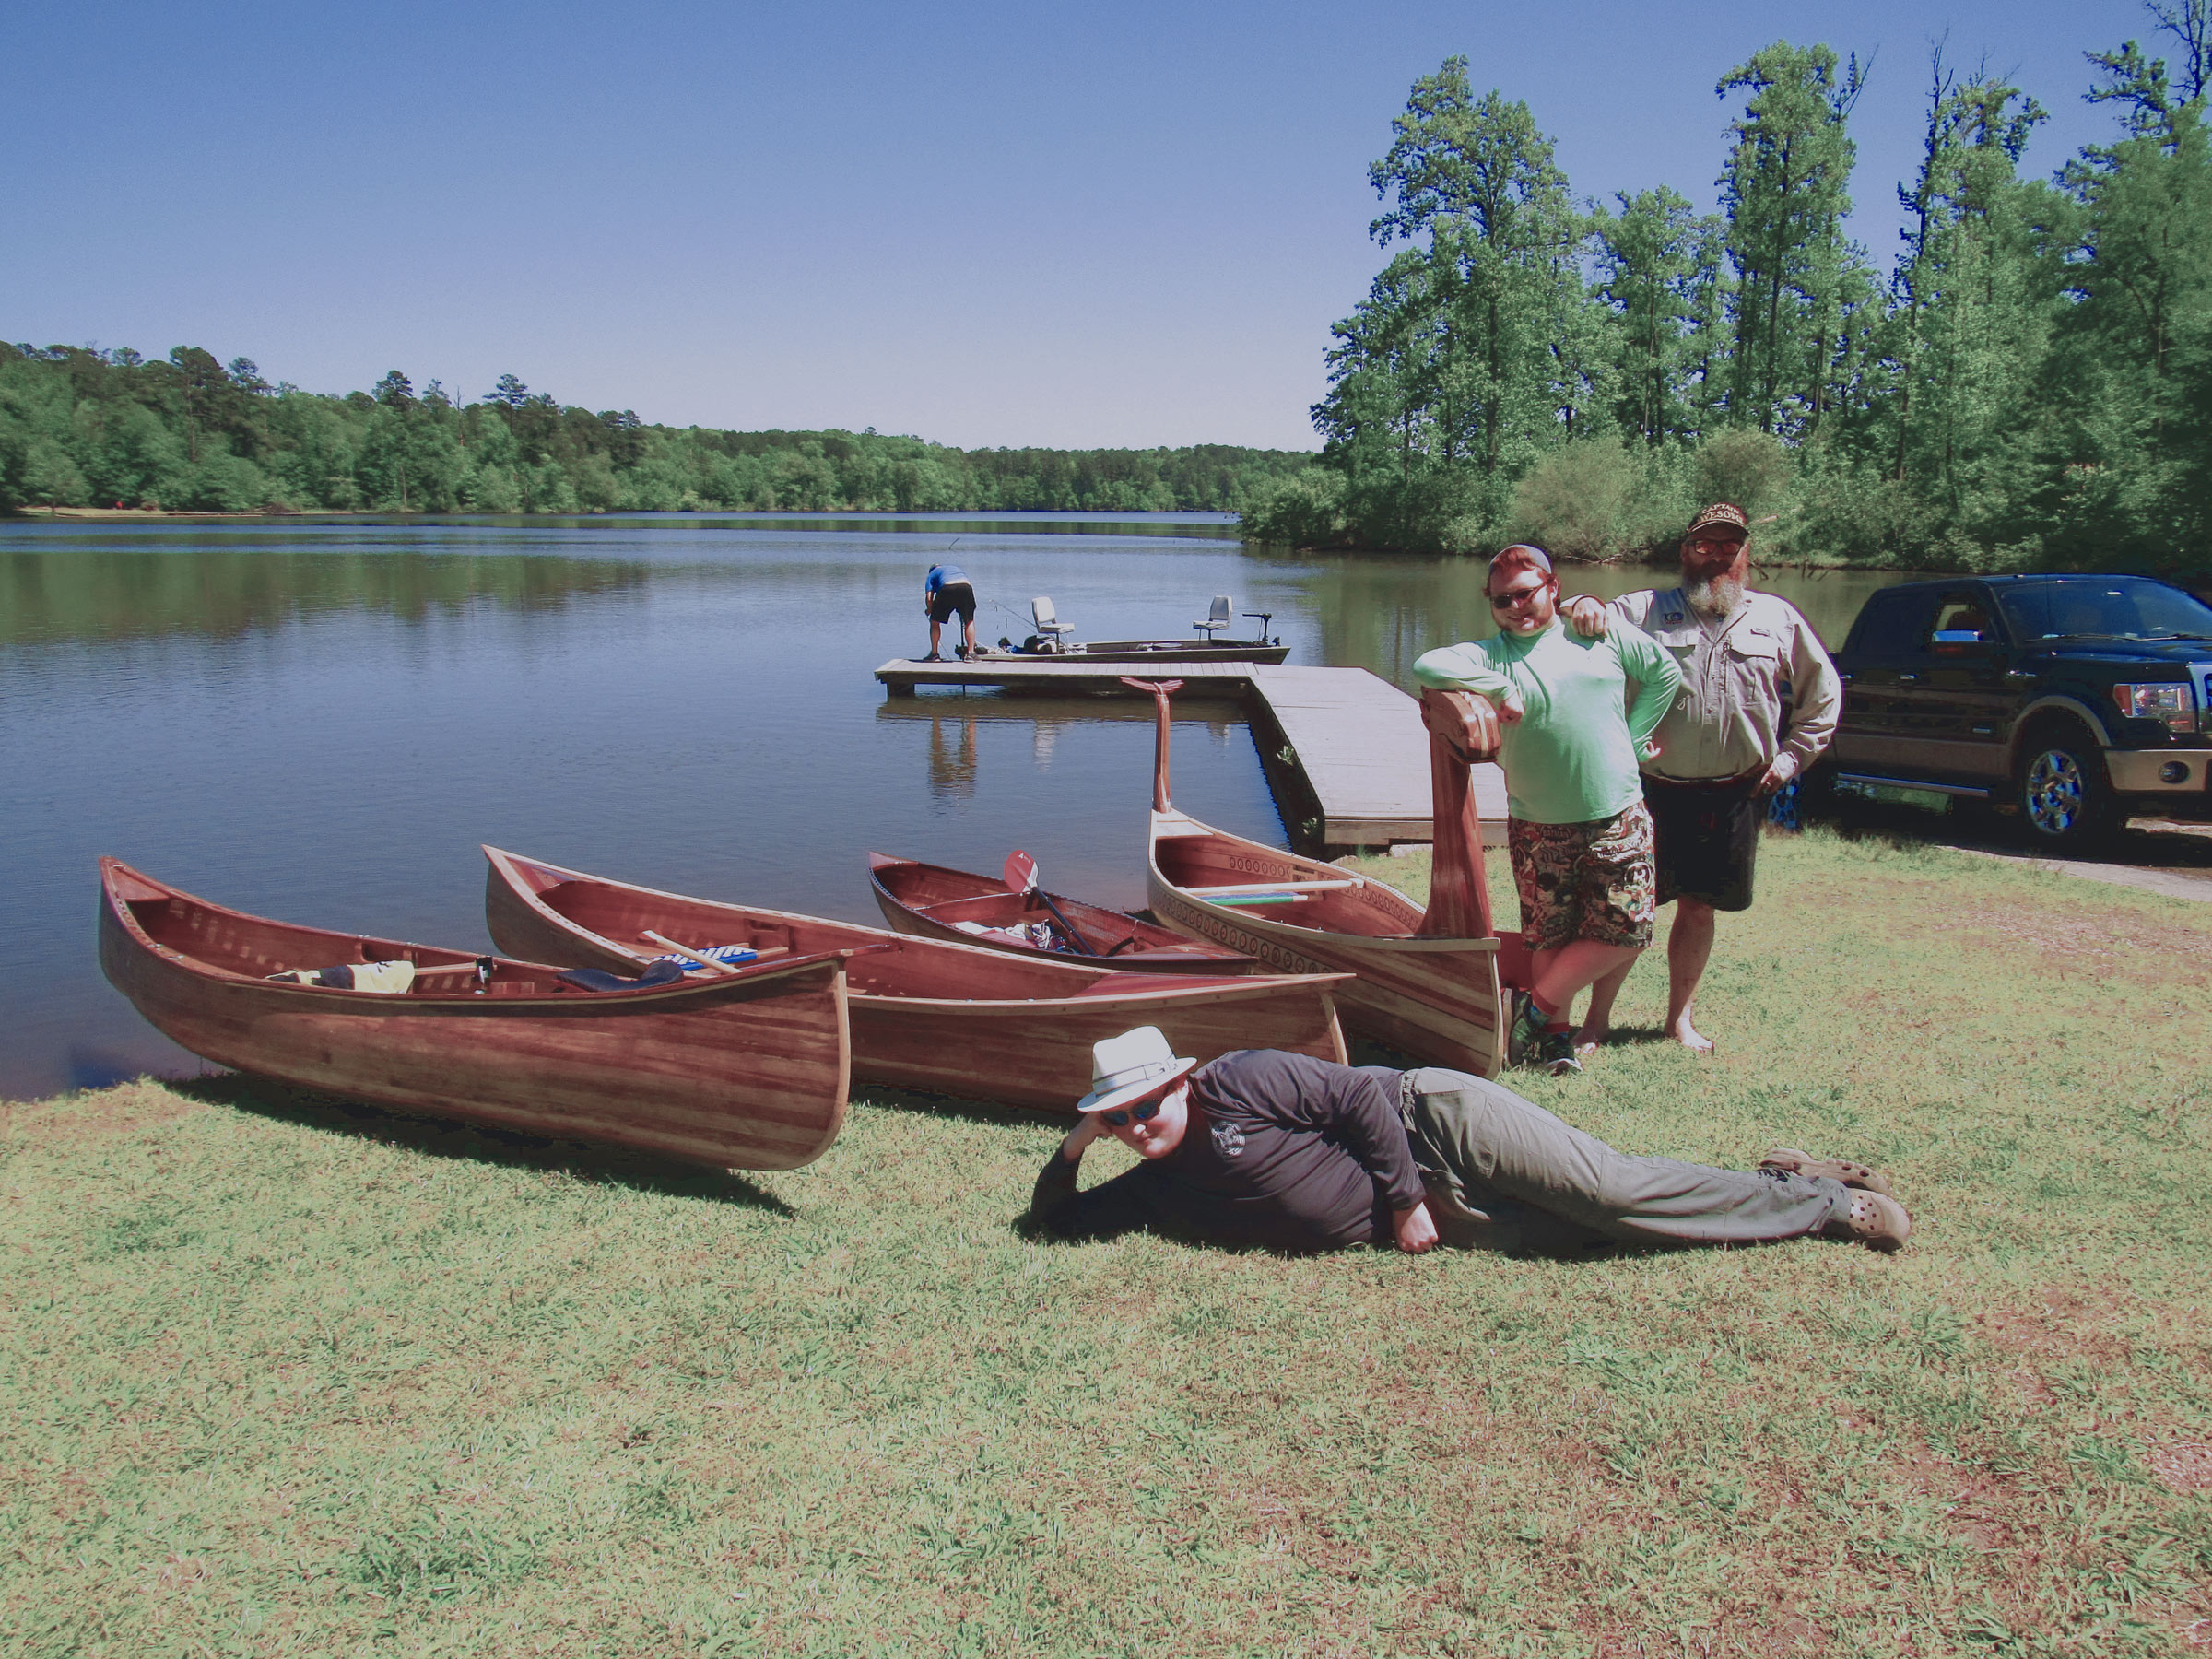
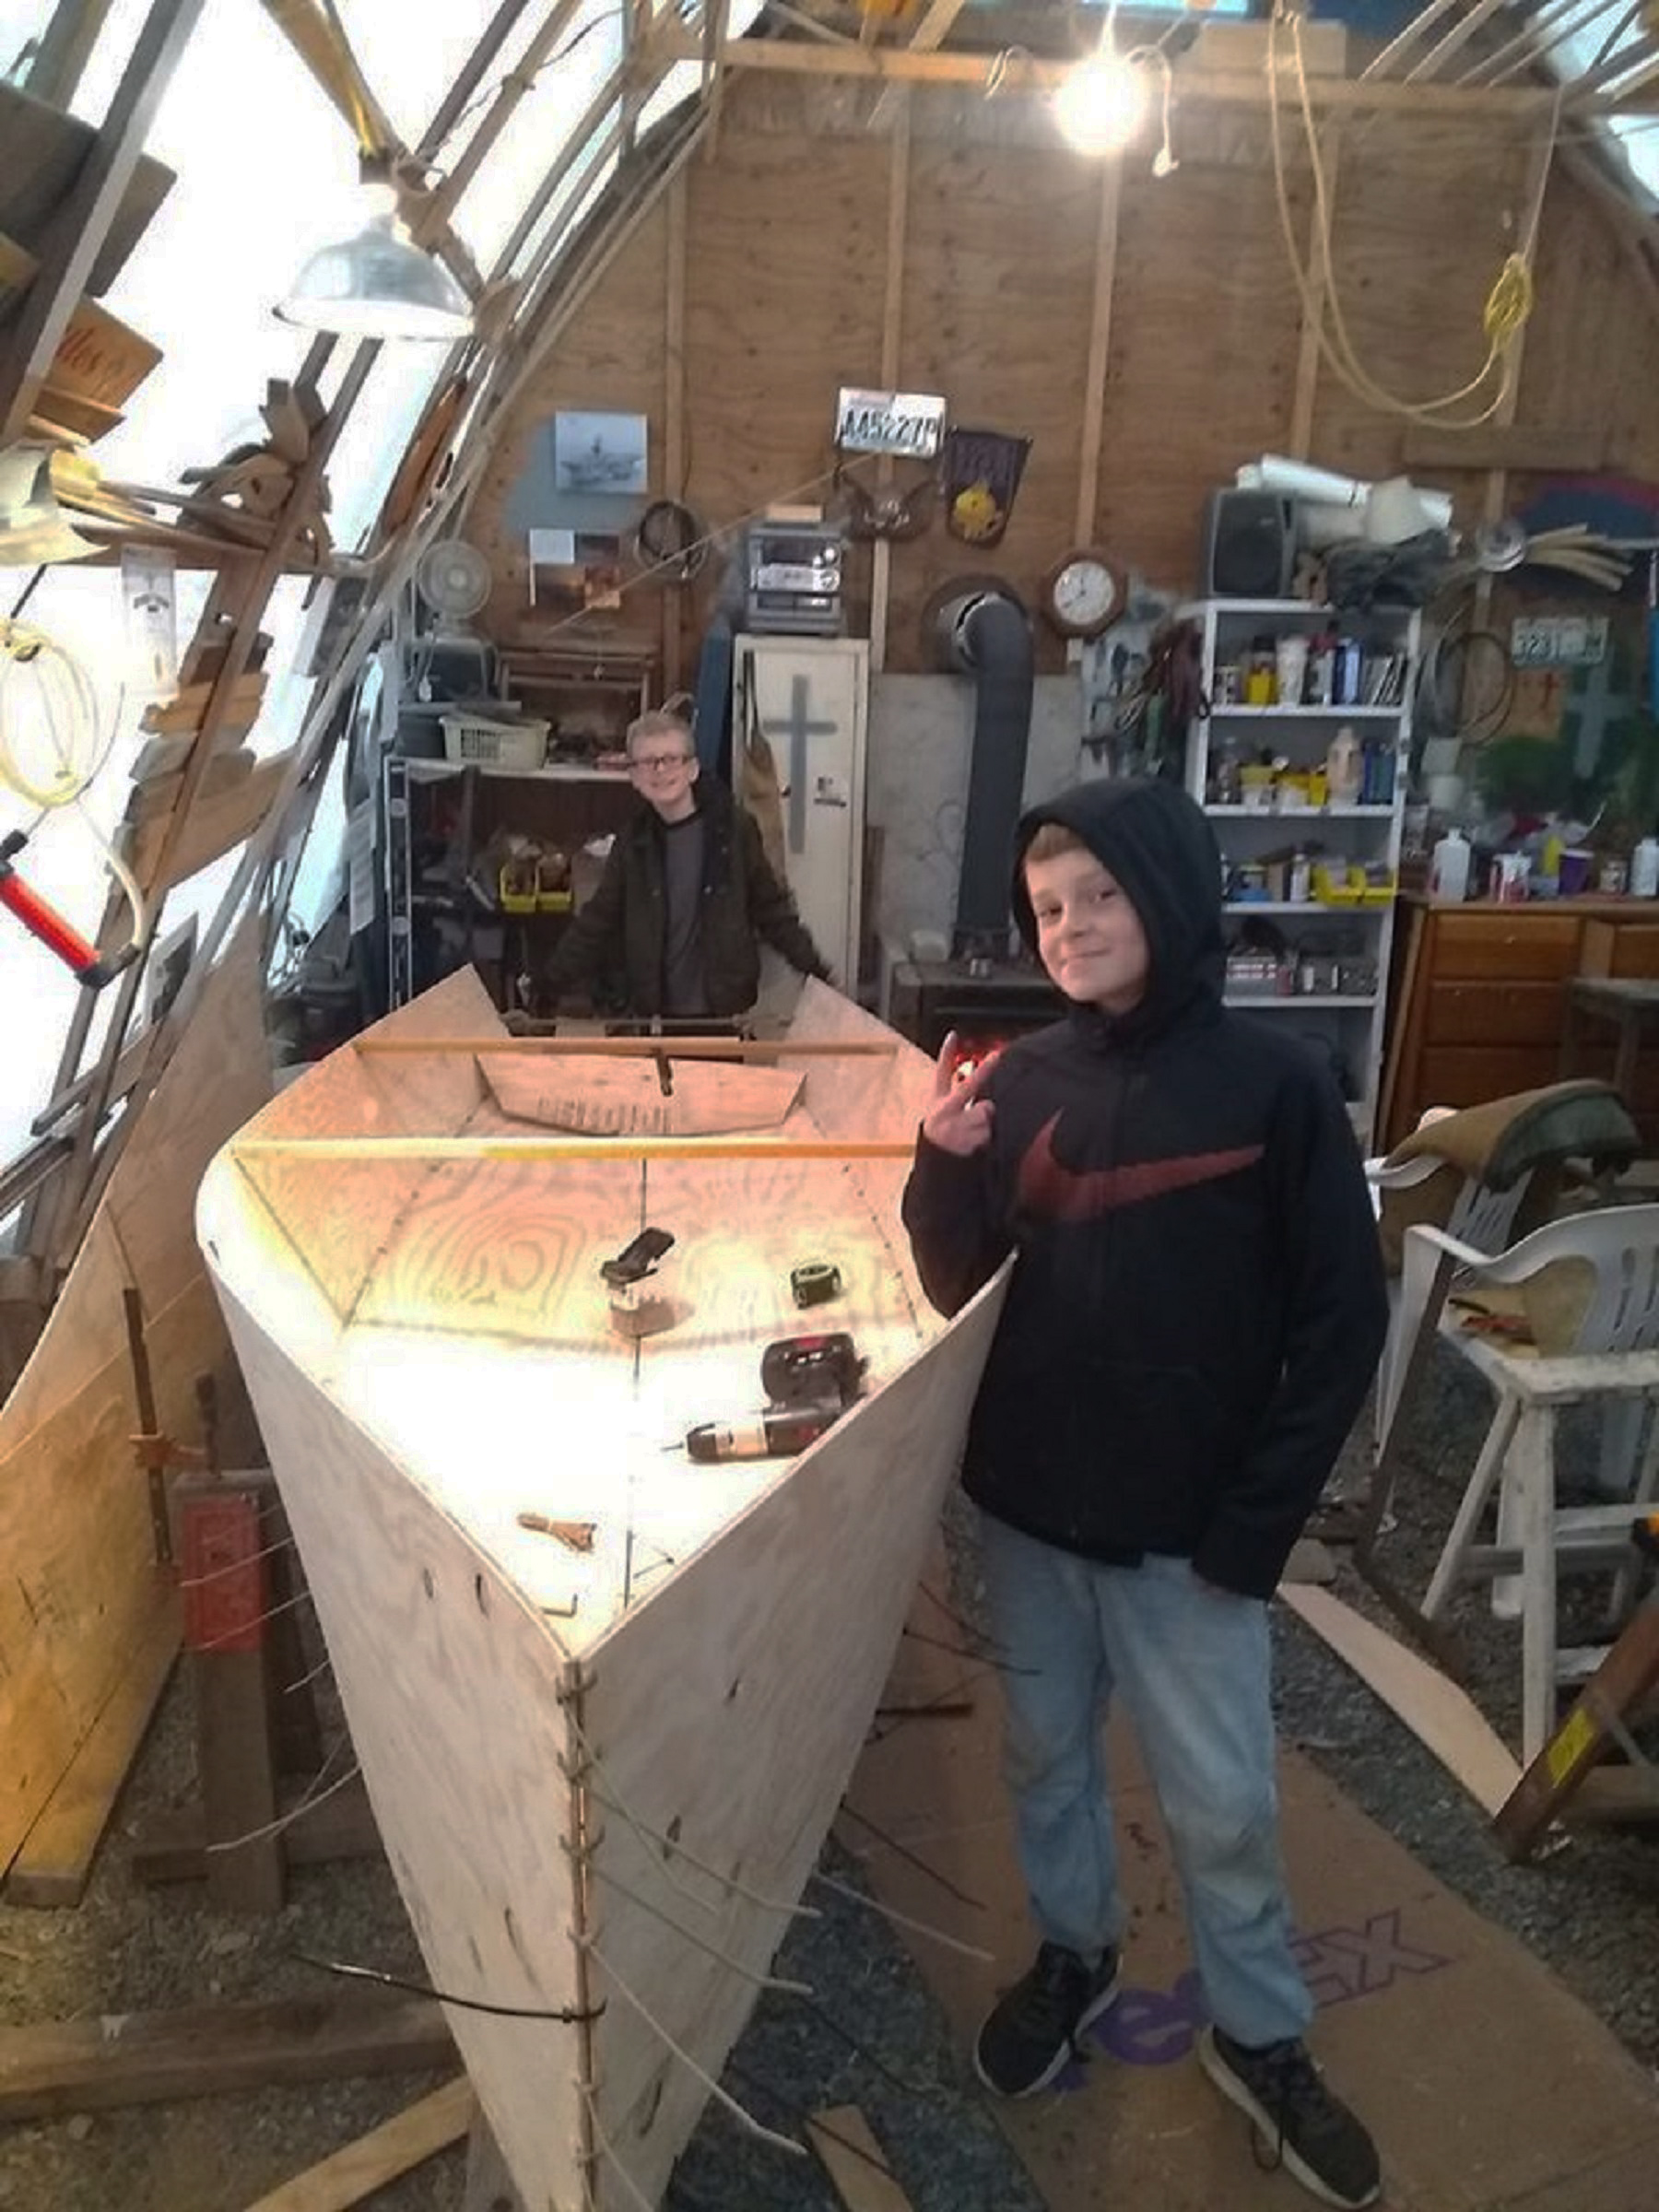
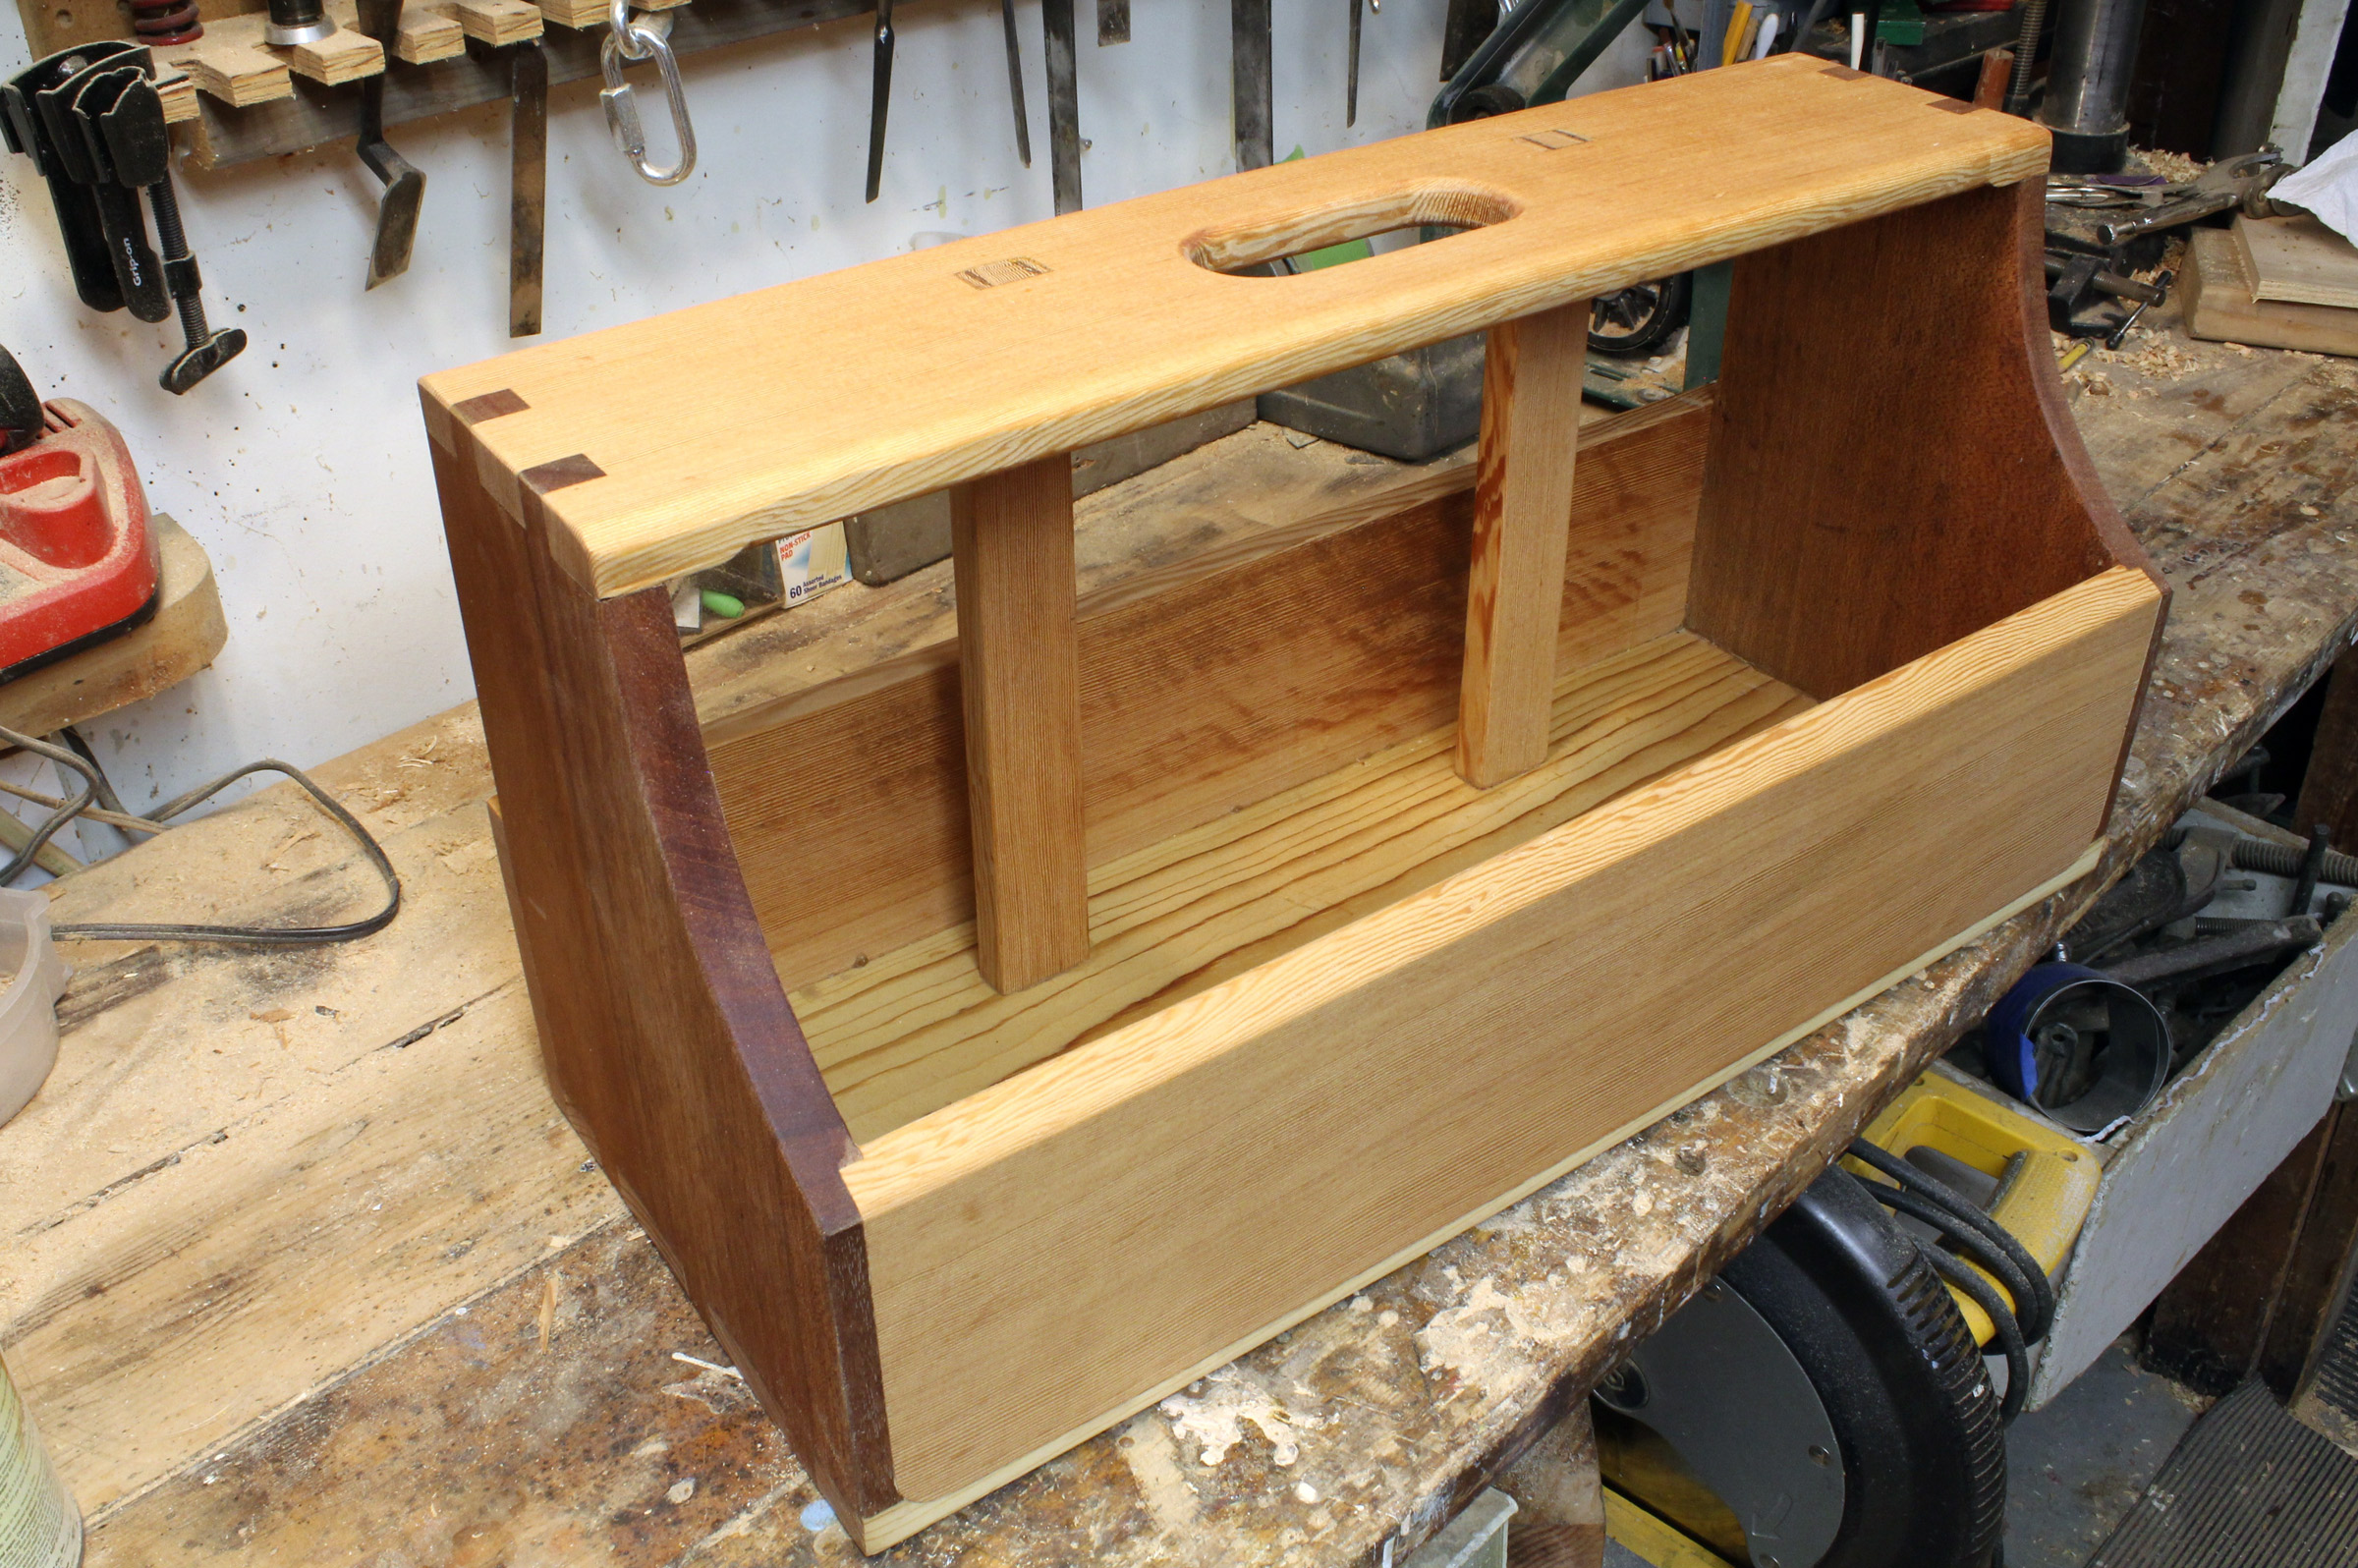
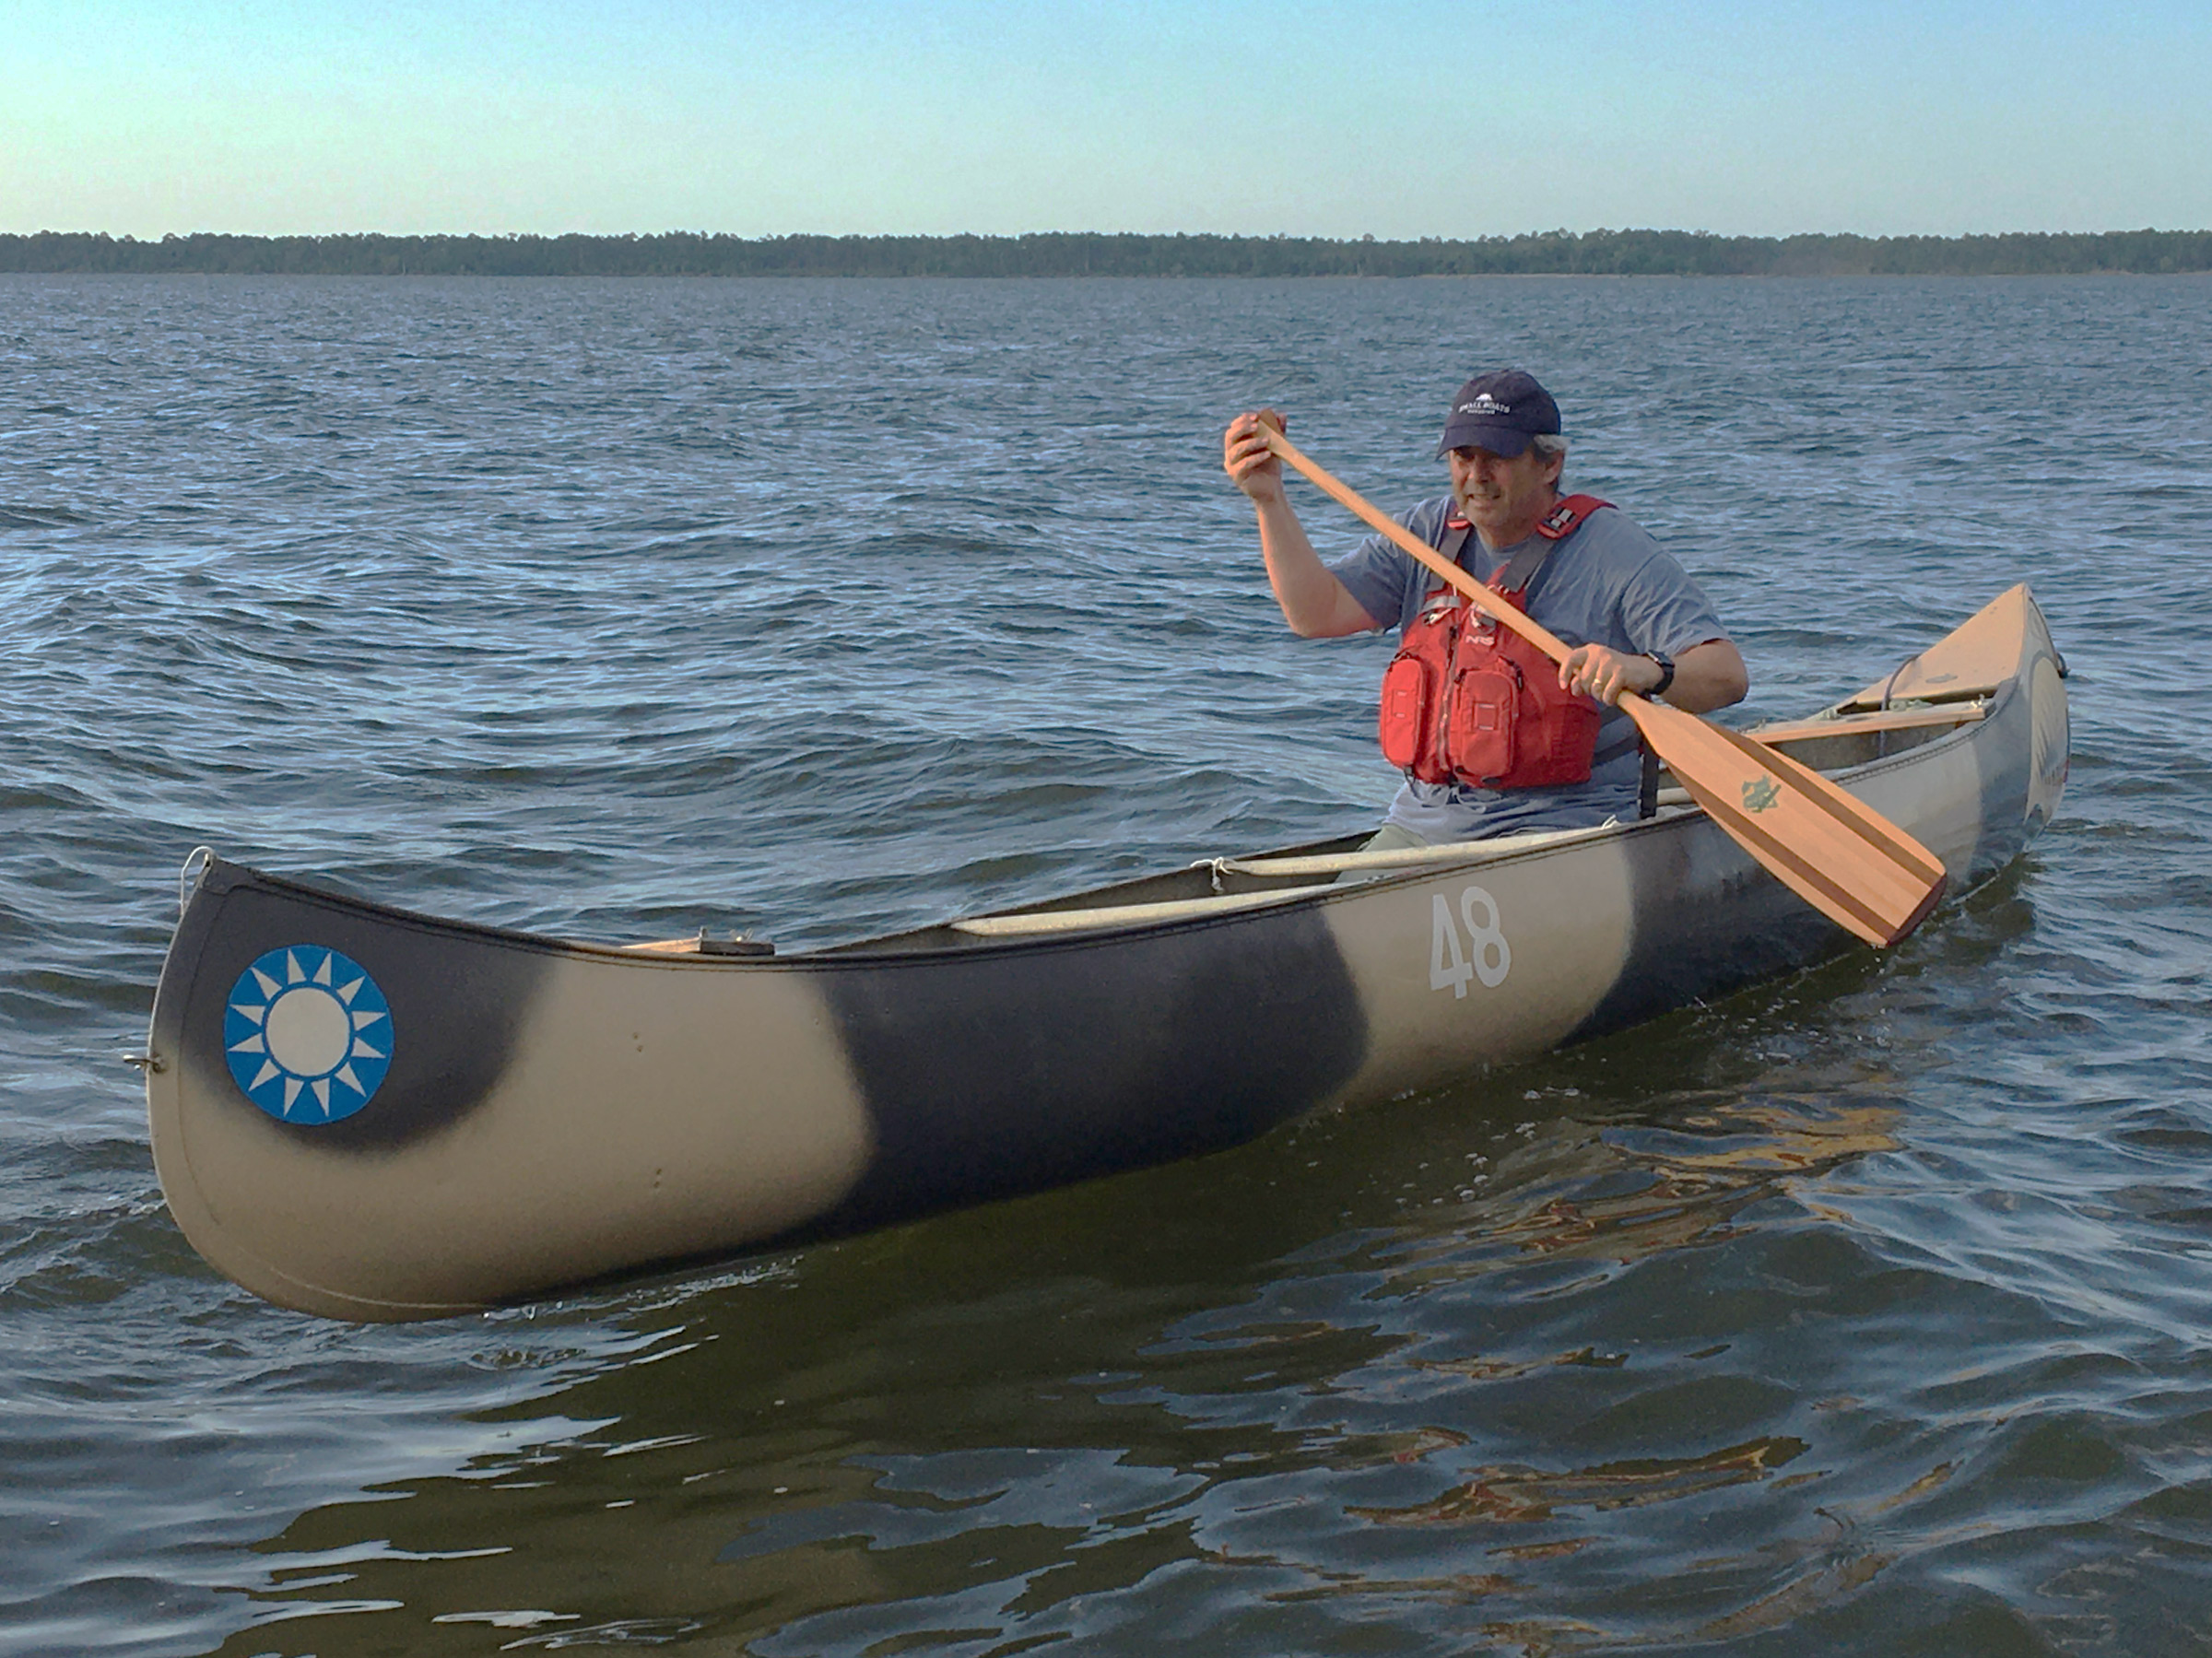
Frank Turner and his family—wife Rena and sons Daniel and John—live in Savannah, Georgia, where he is a petroleum dispensing systems technician (he keeps gas pumps in working order) and an avid and prolific woodworker. Over the years, he had built a lot of furniture, but, he says, “there are only so many coffee tables and bookshelves you can stuff into one house.” He had grown tired of furniture making, all straight lines and right angles, and thought making a canoe would provide new and engaging challenges and produce something his whole family could enjoy.
In May 2014, Frank began work on a 16′ Prospector from Bear Mountain Boats. He bought the plans rather than a kit, eager to try his hand at milling the strips, and picked up cedar from the lumber yard. Building the canoe from boards to boat took 18 months, working in the garage shop on and off; it was christened THE BEAST.
Photographs courtesy of the Turner family
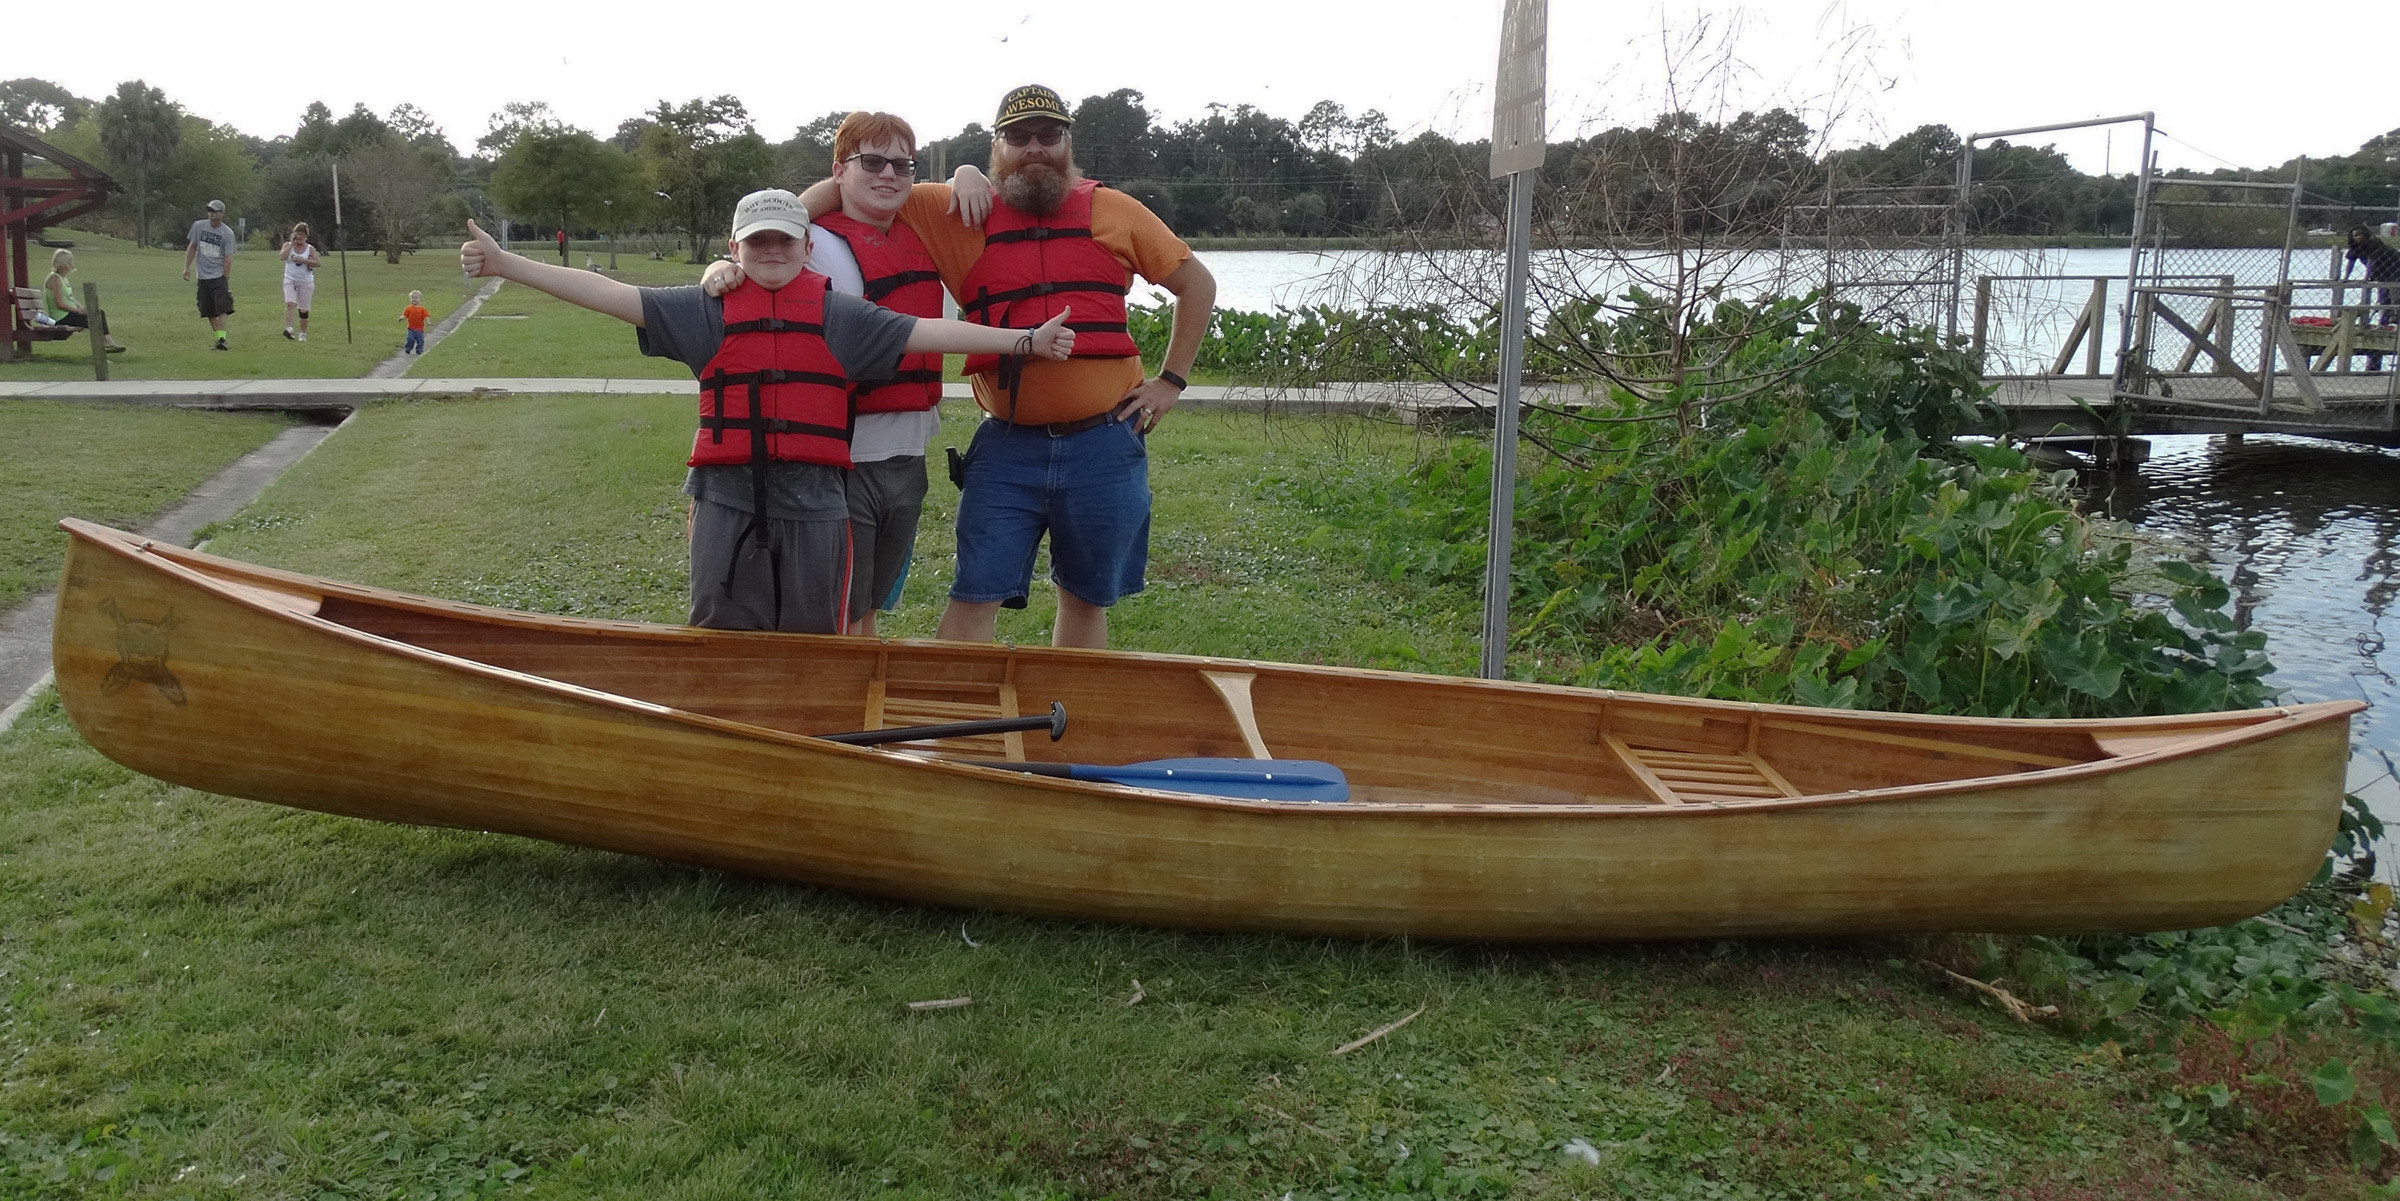
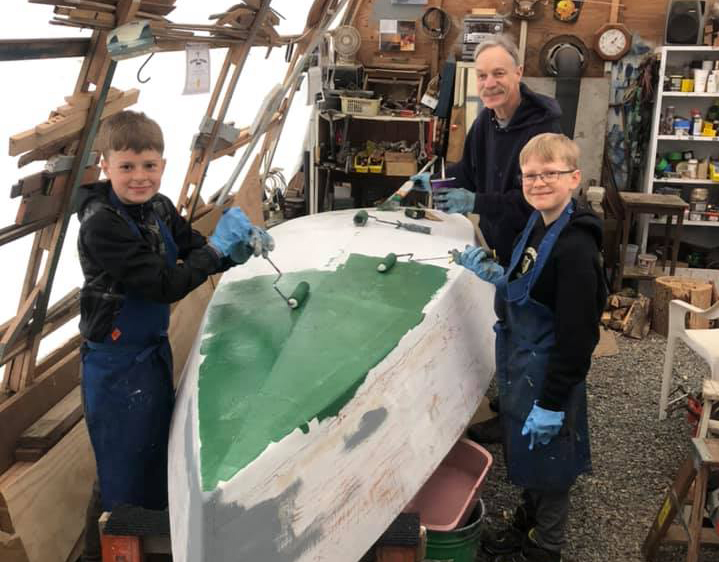
John, Daniel, and Frank (left to right) pose proudly with THE BEAST, the first of Frank’s canoes. A skull over crossed paddles adorns the bow of an otherwise undecorated hull. Each subsequent canoe would get fancier.
Frank and THE BEAST joined Daniel and John, both Boy Scouts, for paddling outings with their Scout troop. After paddling stretches of the Savannah and Ogeechee rivers, Daniel and John took quite an interest in canoeing. Paddling down a river was much easier than lugging a backpack up a mountain.
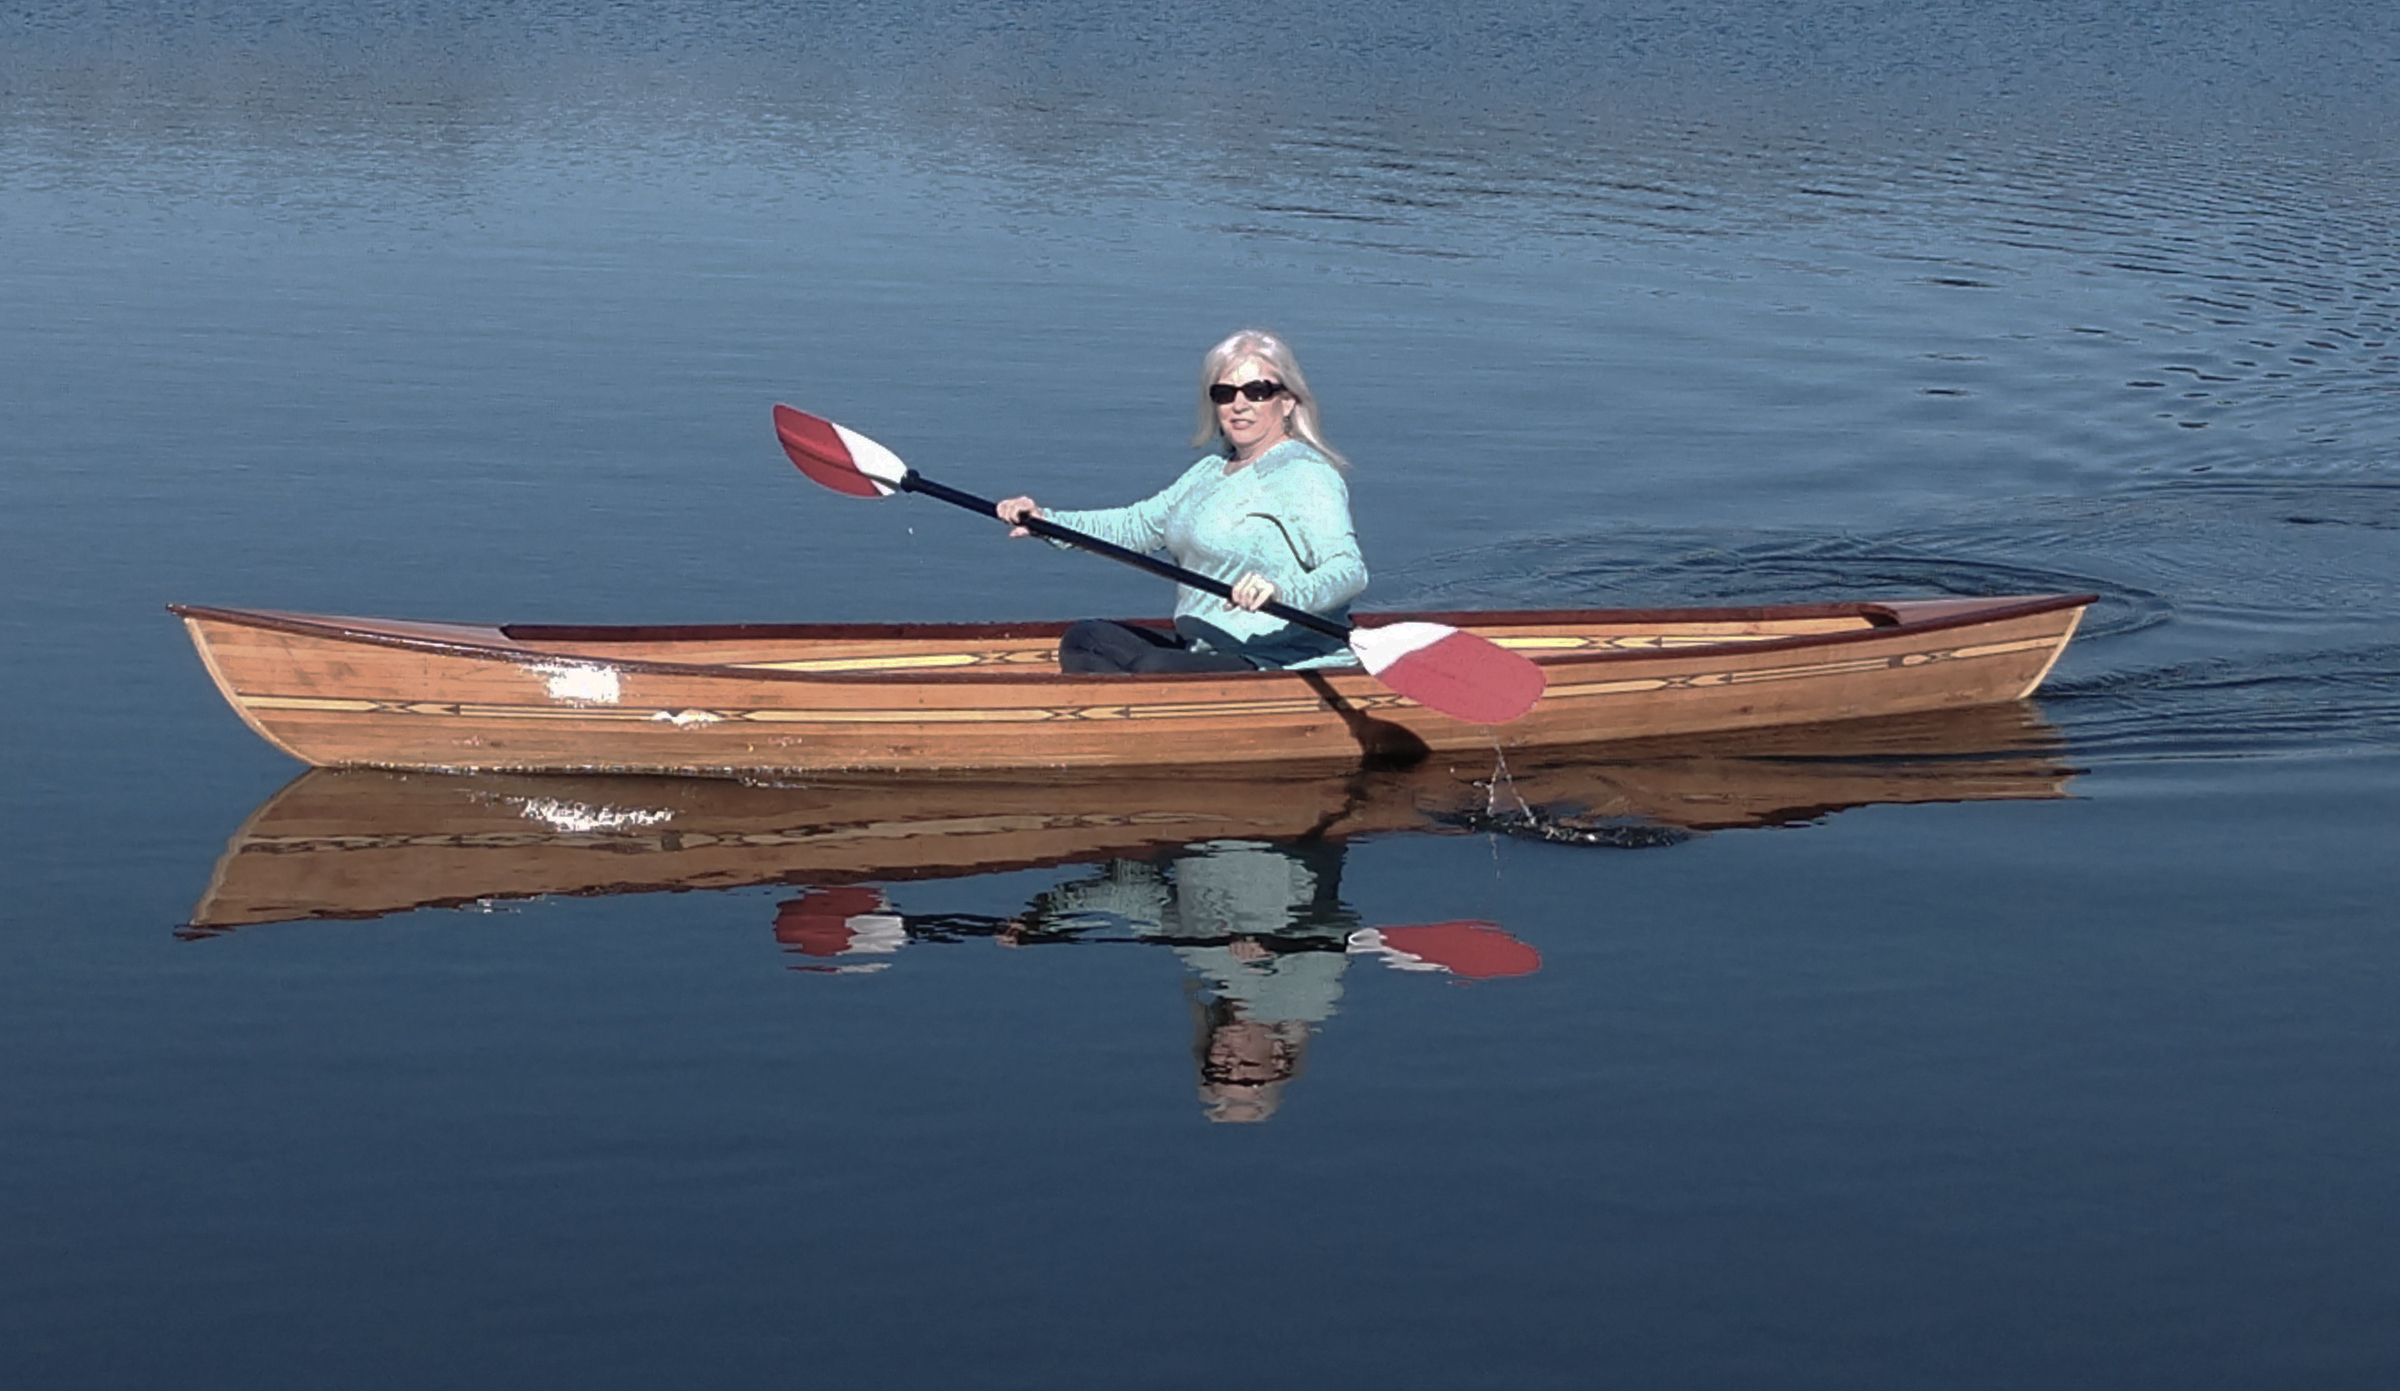
Rena’s canoe, a Rob Roy, was built with a decorative stripe composed of hardwoods that were given to her by one of her patients, a British WW II merchant mariner.
In 2017, Frank and Rena bought plans for Bear Mountain’s 13′ Rob Roy Solo canoe. The smaller canoe, with two sharing the work and Frank having one canoe’s worth of experience to his credit, was a much less daunting project, so they decided to up the ante and take a stab at some decorative inlay. They were given some interesting woods to work with by Harold Dove, one of Rena’s pulmonary rehab patients. During World War II, Harold had served with the British Merchant Navy and in his retirement was building models of all the ships he had served on. As he got older, he found it more difficult to do the fine work and worried about being able to use power tools safely. During one of his sessions with Rena, after she mentioned her sons were Boy Scouts and enjoying canoeing, he suggested his treasure trove of hardwoods and fine plywood could be put to good use by the Turners’ growing fleet of canoes.
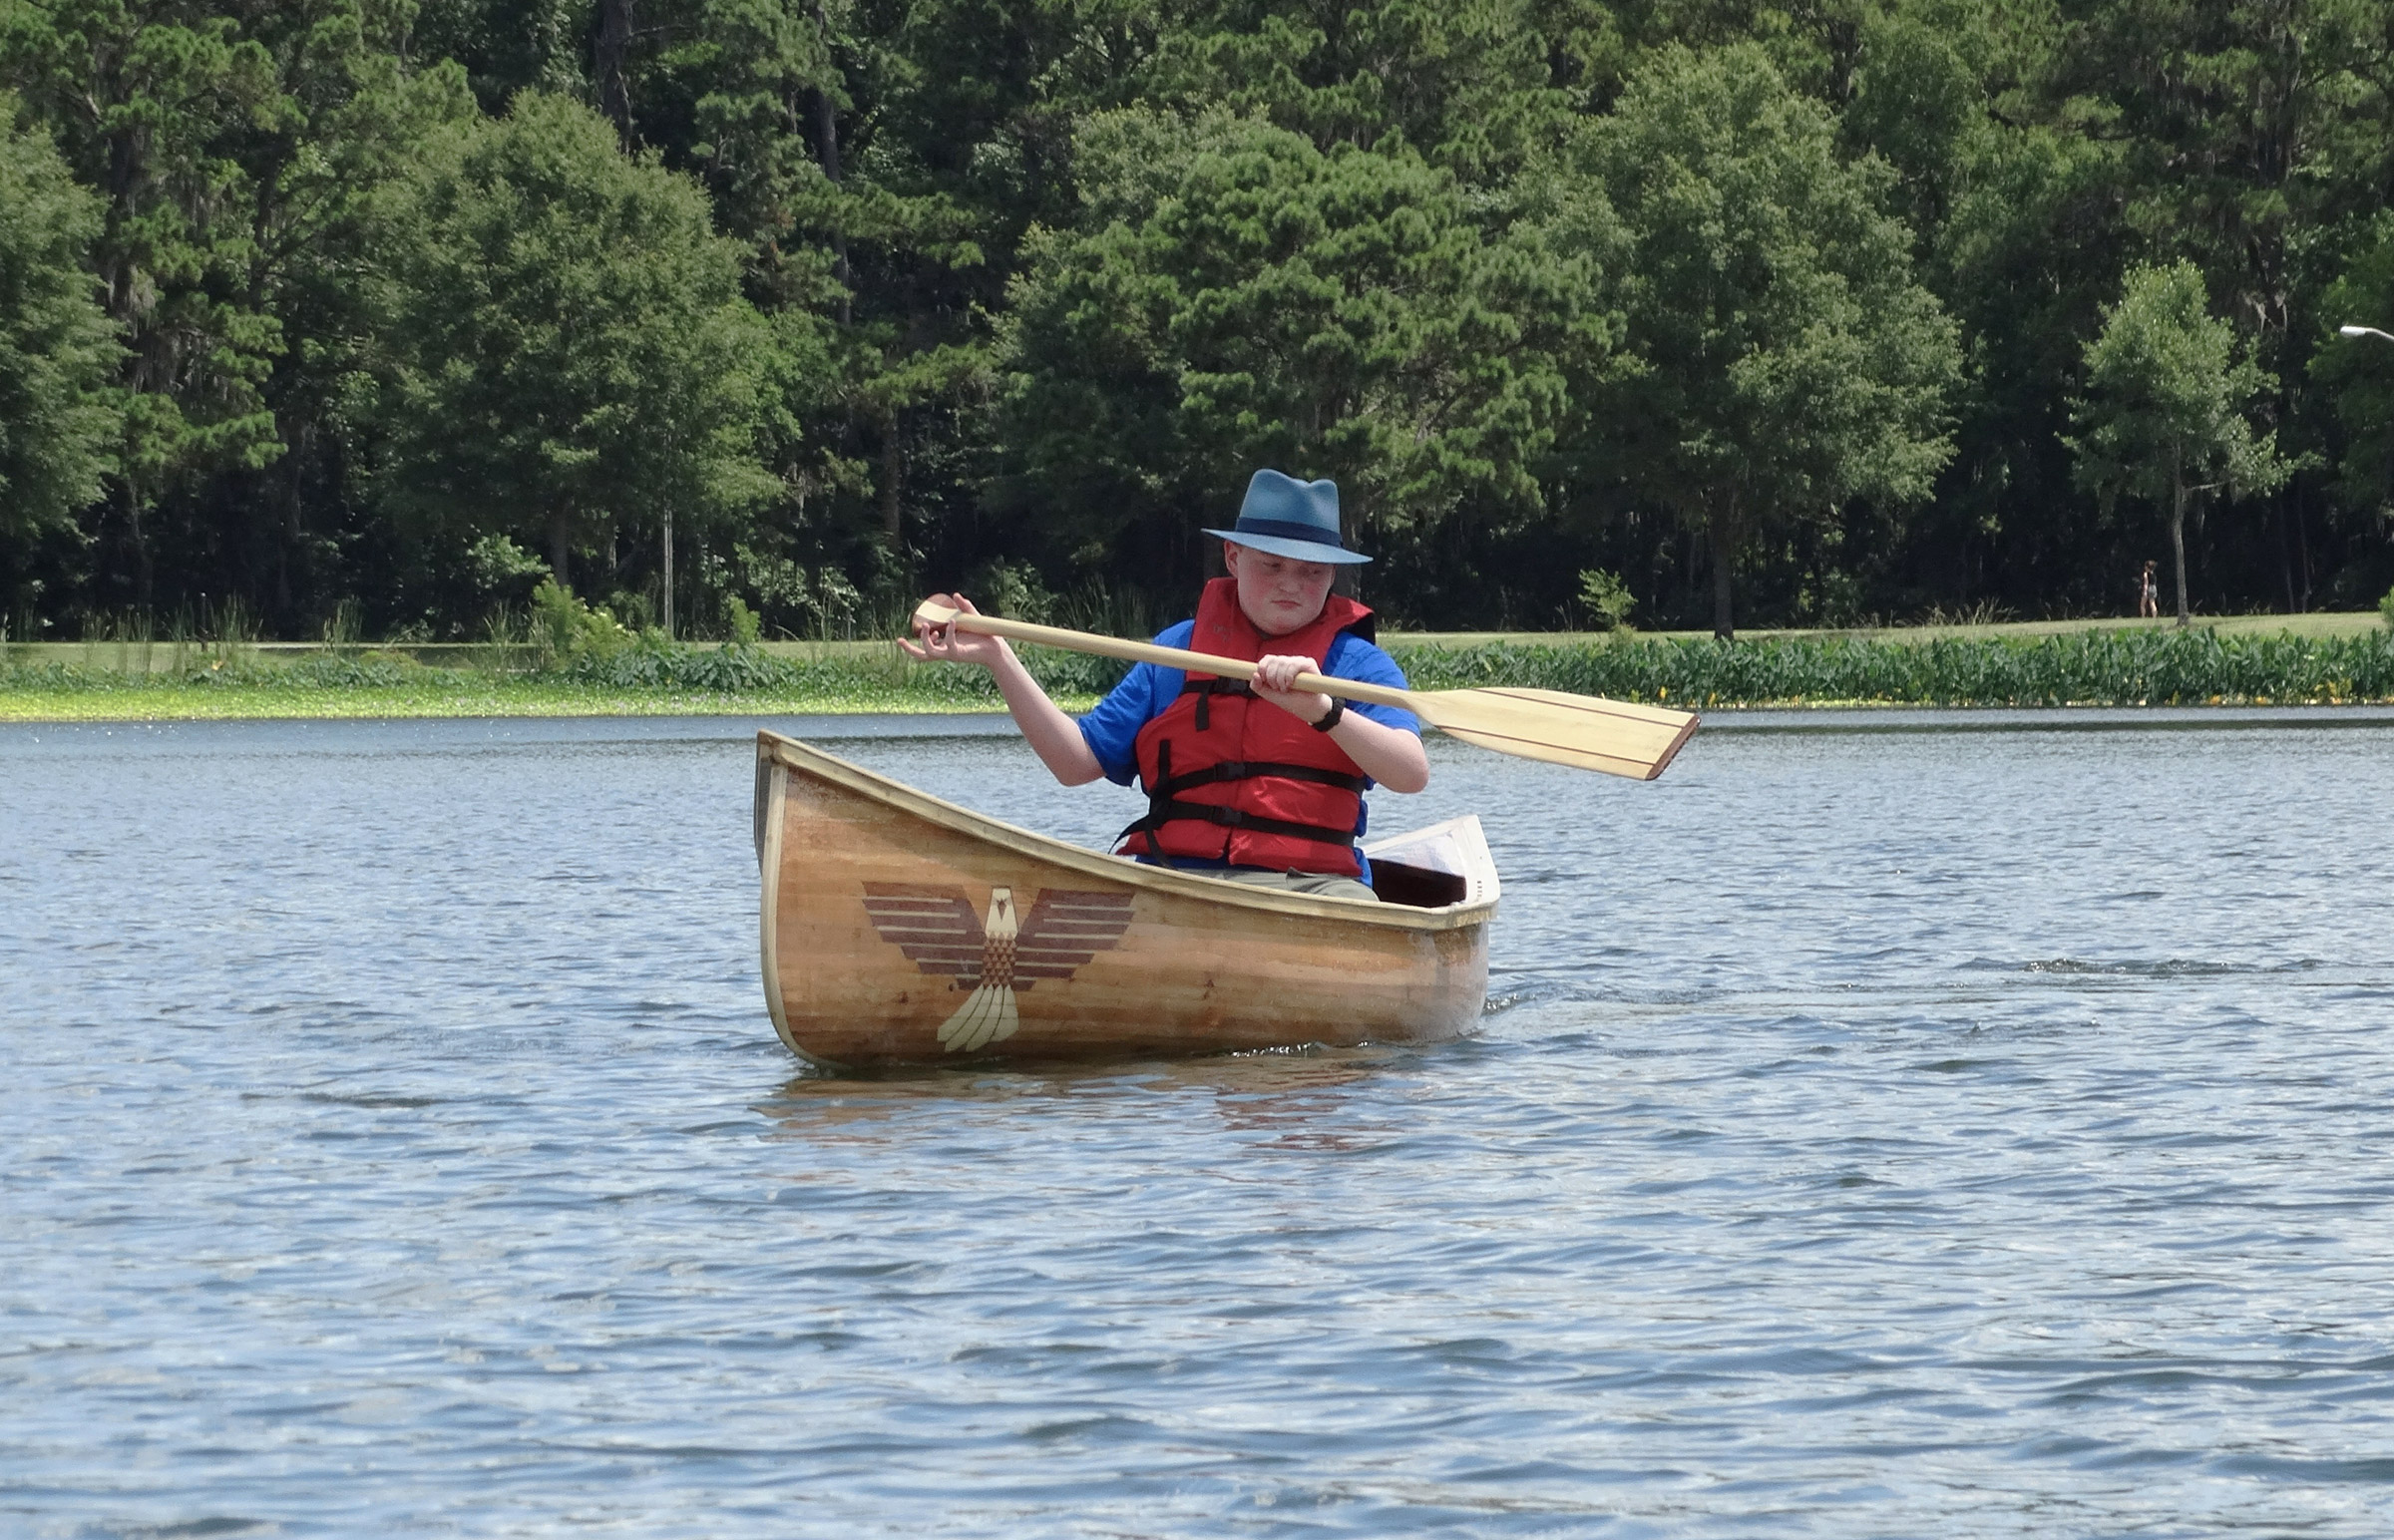
John, looking very dapper in his fedora, opted for a pair of eagles to set his canoe apart.
The third canoe, for John, was another Bear Mountain design: a 15-footer, Bob’s Special. It also got a decorative treatment, a fearsome-looking eagle with outstretched wings, and eyes made of sections of a pencil, with the lead as pupils. John christened it SKIPPER.
During the summer of 2019, the Turners joined the Scout troop and took their three canoes to the Suwanee River in Florida for a week-long, 50-mile cruise from the confluence with the Santa Fe River to Manatee Springs. The fleet consisted of 14 canoes and 26 paddlers.
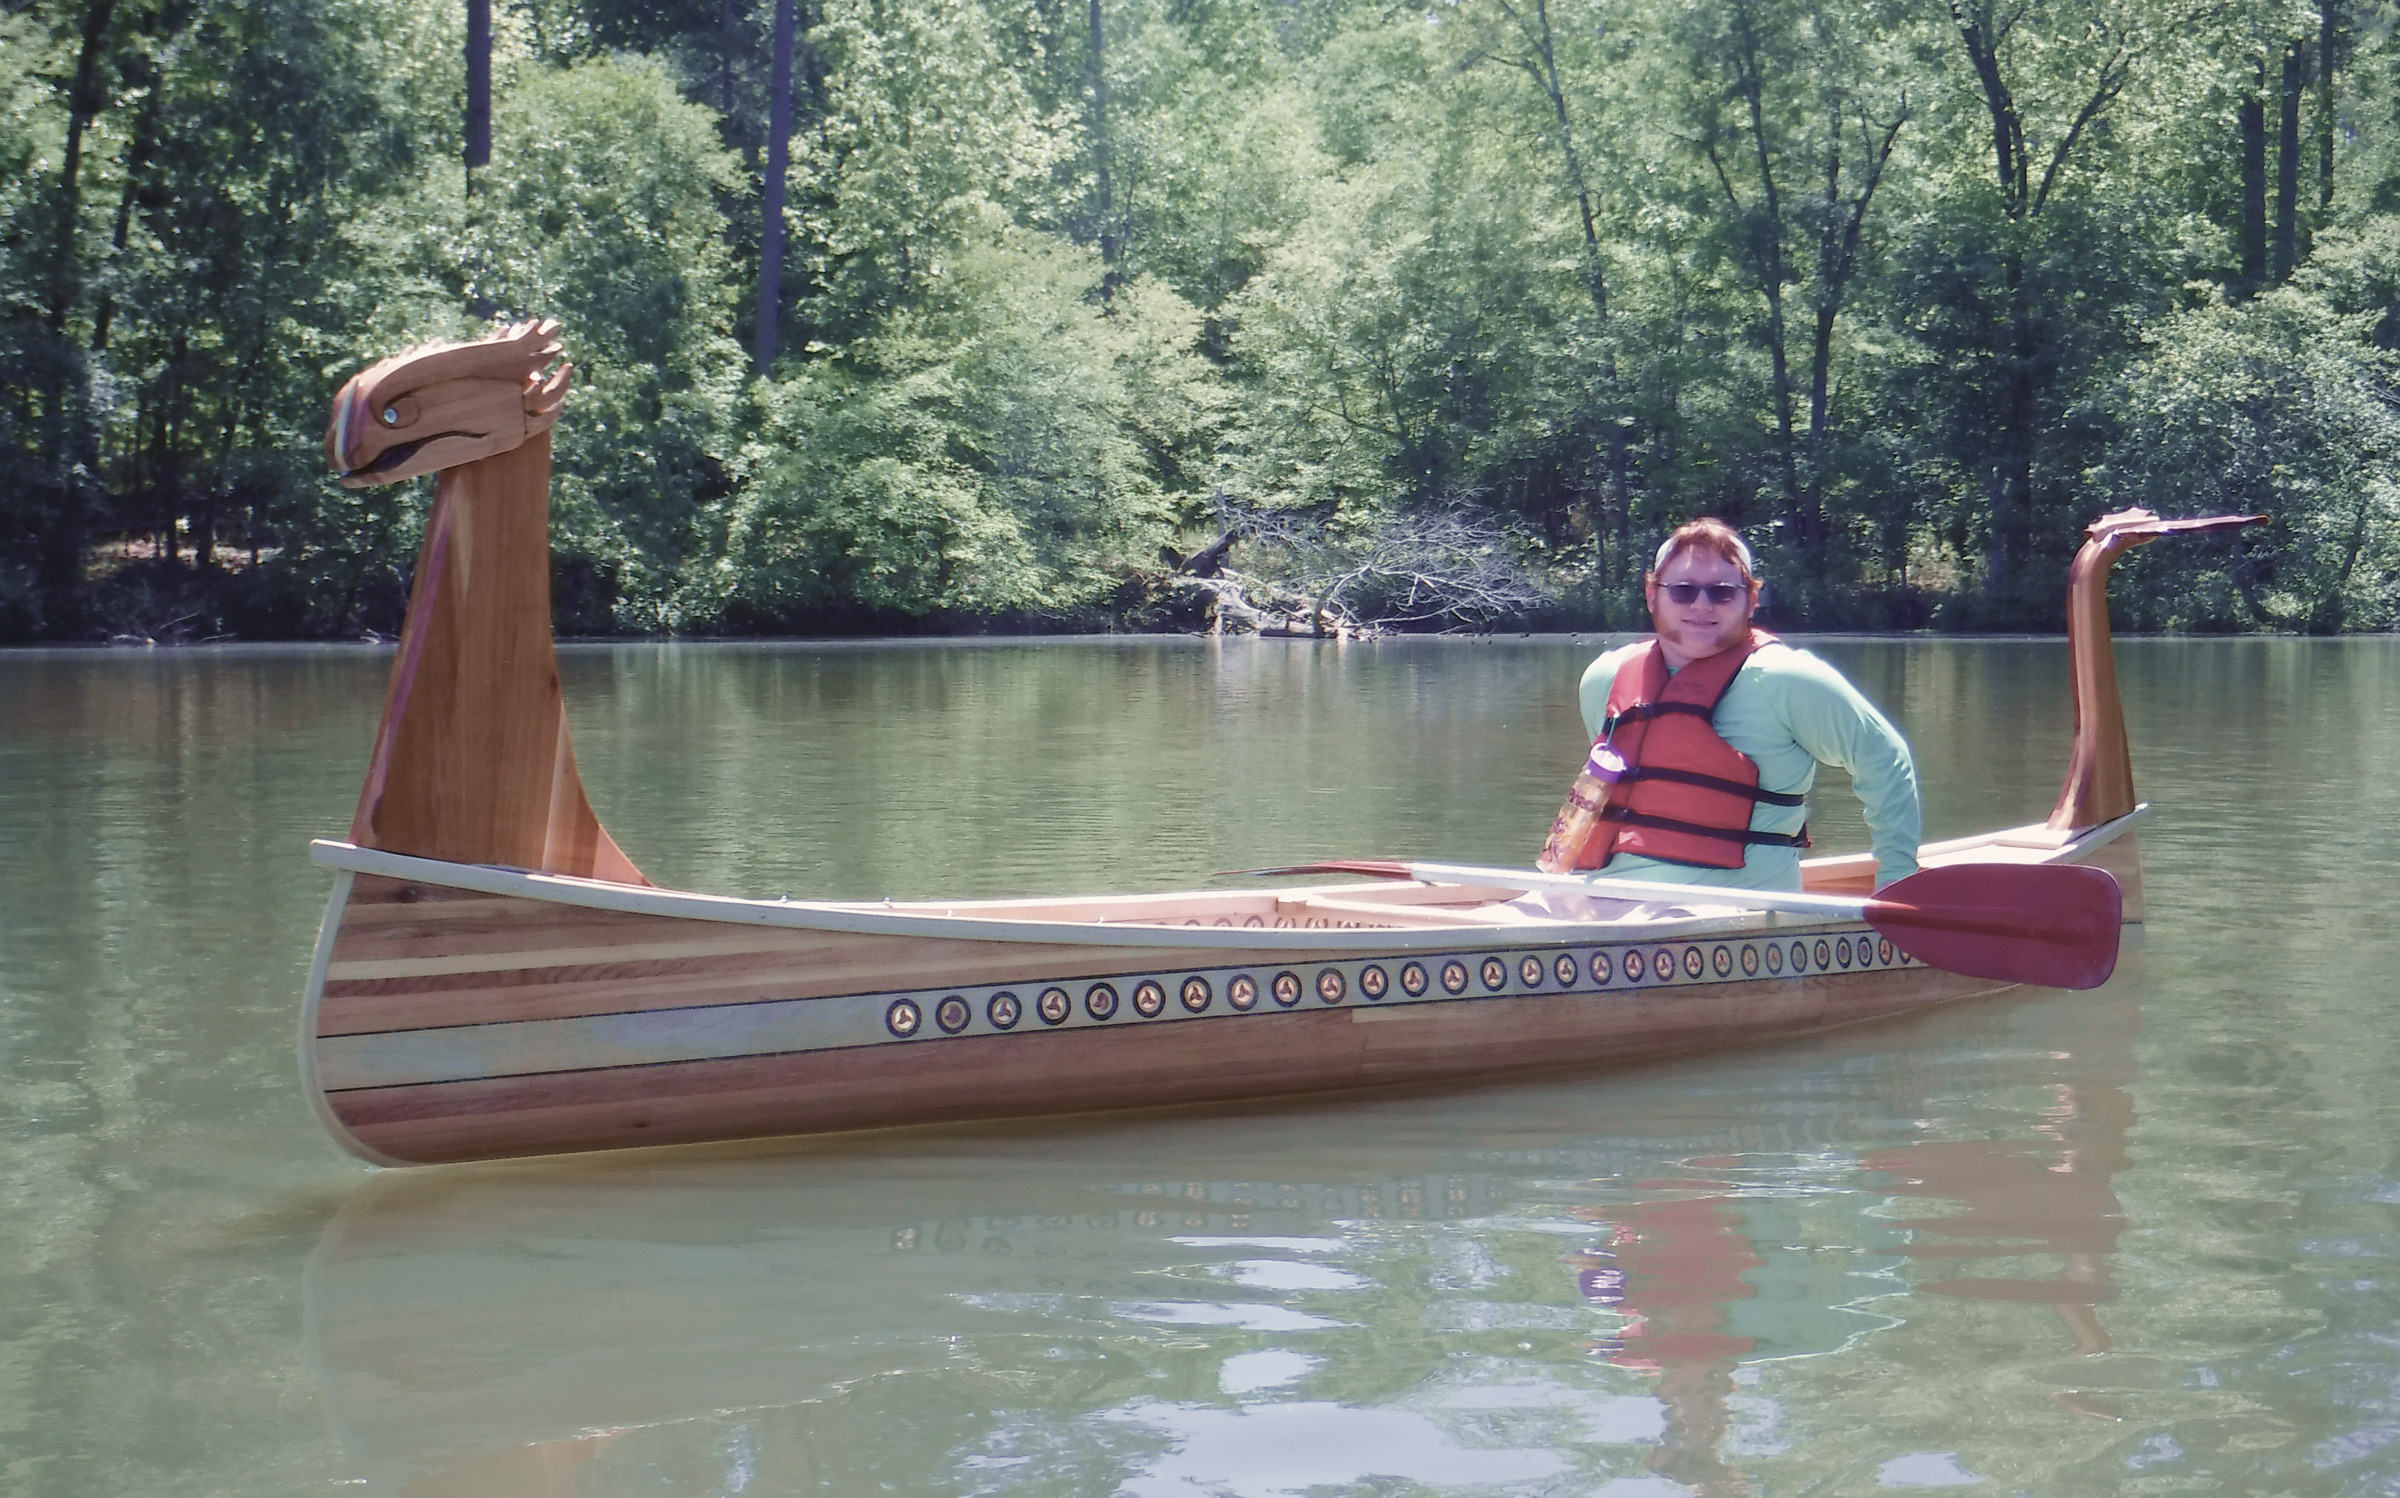
Daniel’s canoe got the deluxe treatment, with a dramatic Viking theme: a dragon’s head and tail and an inlaid stripe with scores of battle shields patterned after Hot Wheels car wheels.
The launch of SKIPPER left Daniel as the only one in the family without a canoe of his own. Frank set out to take care of that in October 2019. At that time, Daniel was an Eagle Scout (as his younger brother would be, too) and he had rebuilt his school’s educational garden as his Eagle project. Daniel wasn’t especially enthusiastic about canoeing and, being on the autistic spectrum, required something extra to get him excited about the build. Hot Wheels cars and the movie series How to Train Your Dragon are his two favorite things, so Frank came up with a way to combine both in a modified Bob’s Special. It would be a Viking longboat with Viking shields. All 64 shields, inlaid below the sheer, were made, at Daniel’s suggestion, to look like the wheels of Hot Wheels cars. The ends of the canoe had a dragon’s head and tail modeled after Toothless, the leading dragon in the movie. They were mounted on the canoe decks with powerful magnets, simplifying hauling and storage, as well as making it possible to swap them end-for-end when switching between solo and tandem paddling.
During the building of his canoe, Daniel didn’t like the noise created by the power tools in the shop, so he stayed away when his father was working, but visited every evening to check on the progress. He was quite excited to see the dragon head and tail take shape.
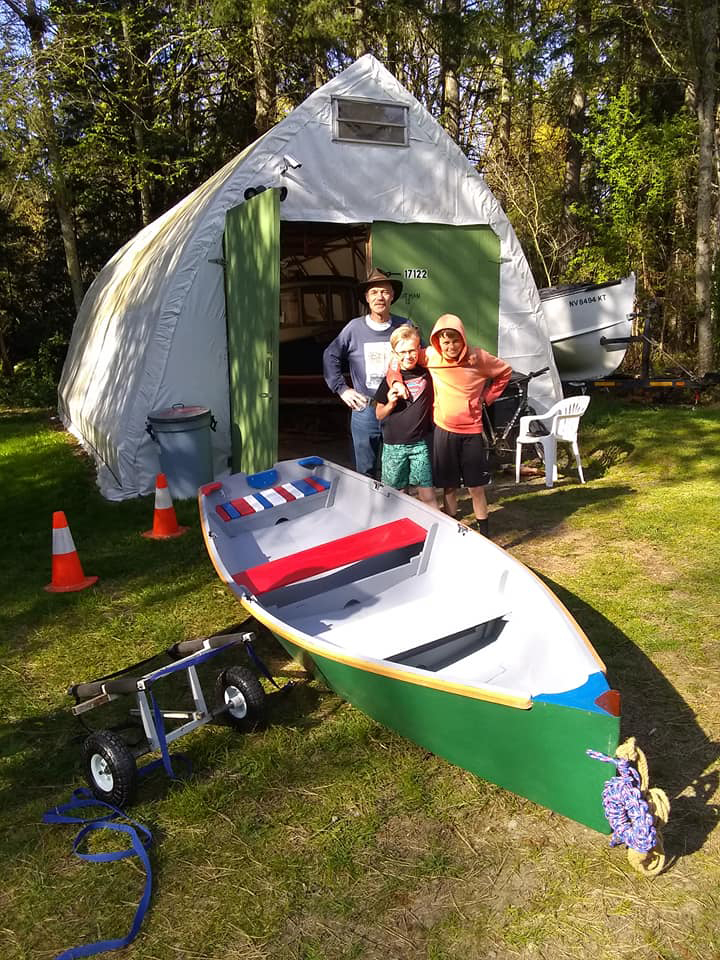
Six years in the making, the Turner fleet has a canoe to suit every member of the family.
In May, when Daniel’s canoe was finished, the Turner fleet was complete: with four canoes loaded on the scout-troop trailer, the family launched on Lake Rutledge, set in the woods 175 miles northwest of Savannah. The sun was out and the four canoes, lined up on the water’s edge, drew a lot of attention. Daniel was more than happy to talk about his dragon to anyone who took an interest in it. And that was everyone who saw it.
Do you have a boat with an interesting story? Please email us. We’d like to hear about it and share it with other Small Boats Magazine readers.
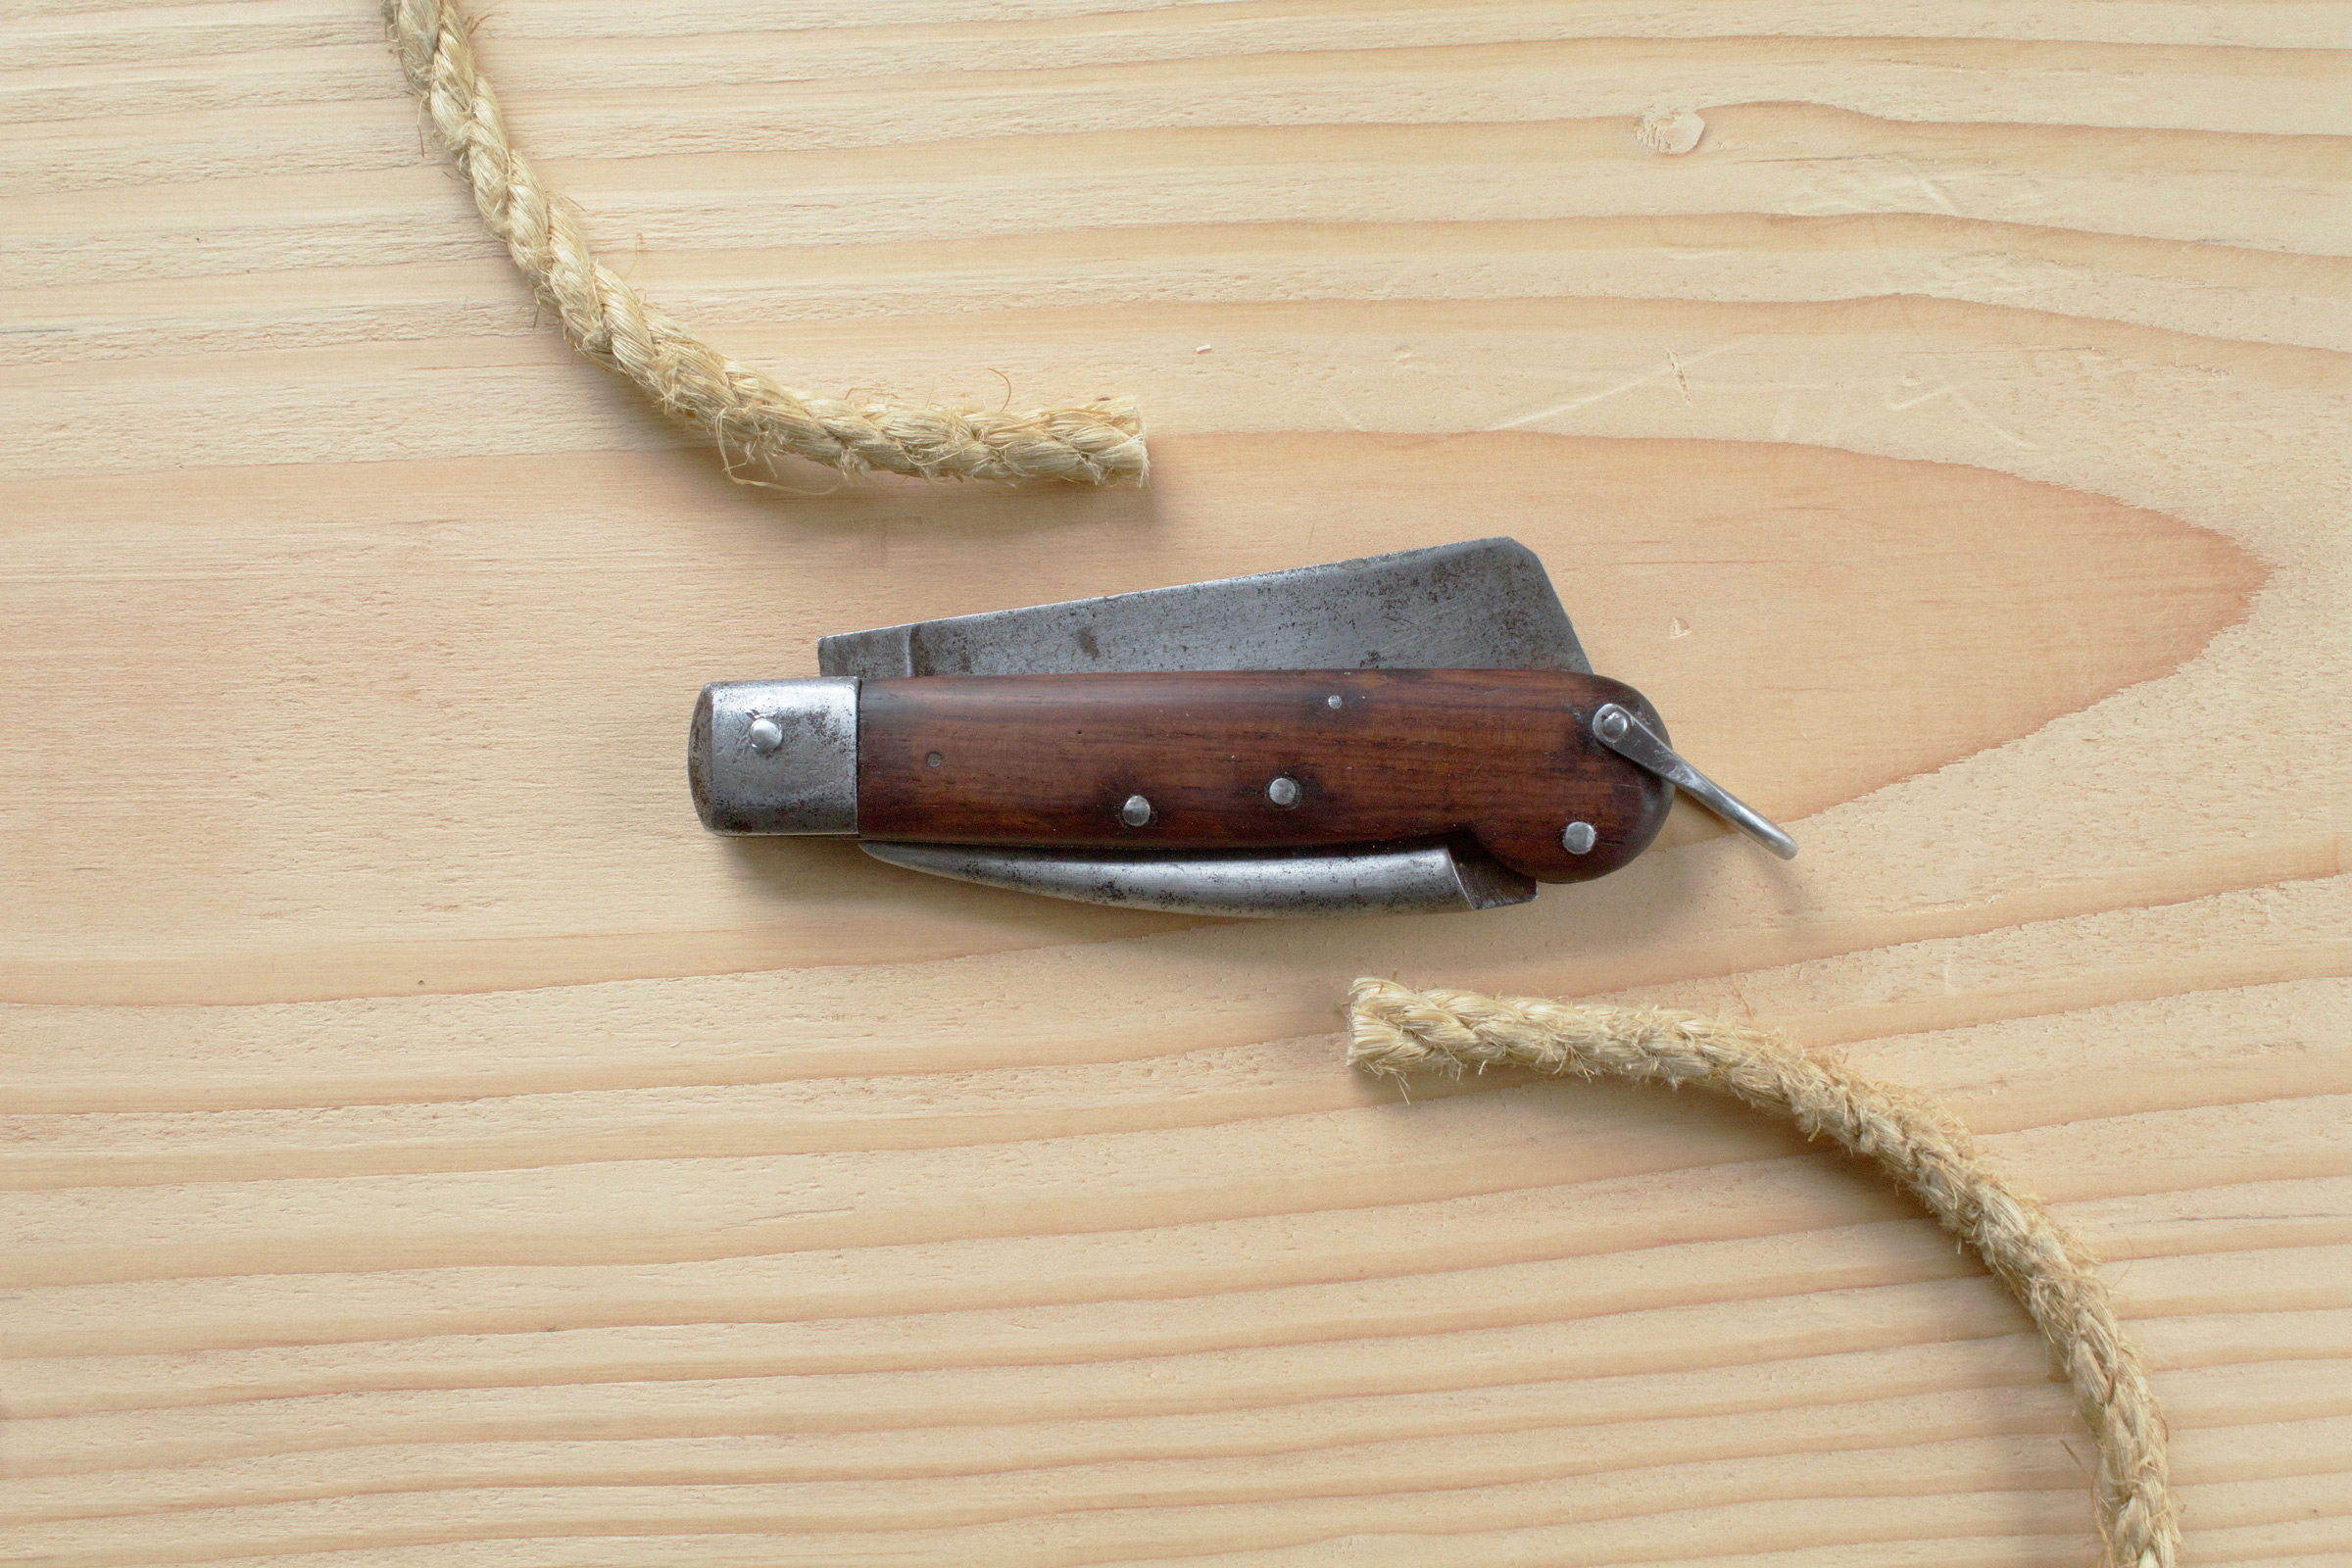
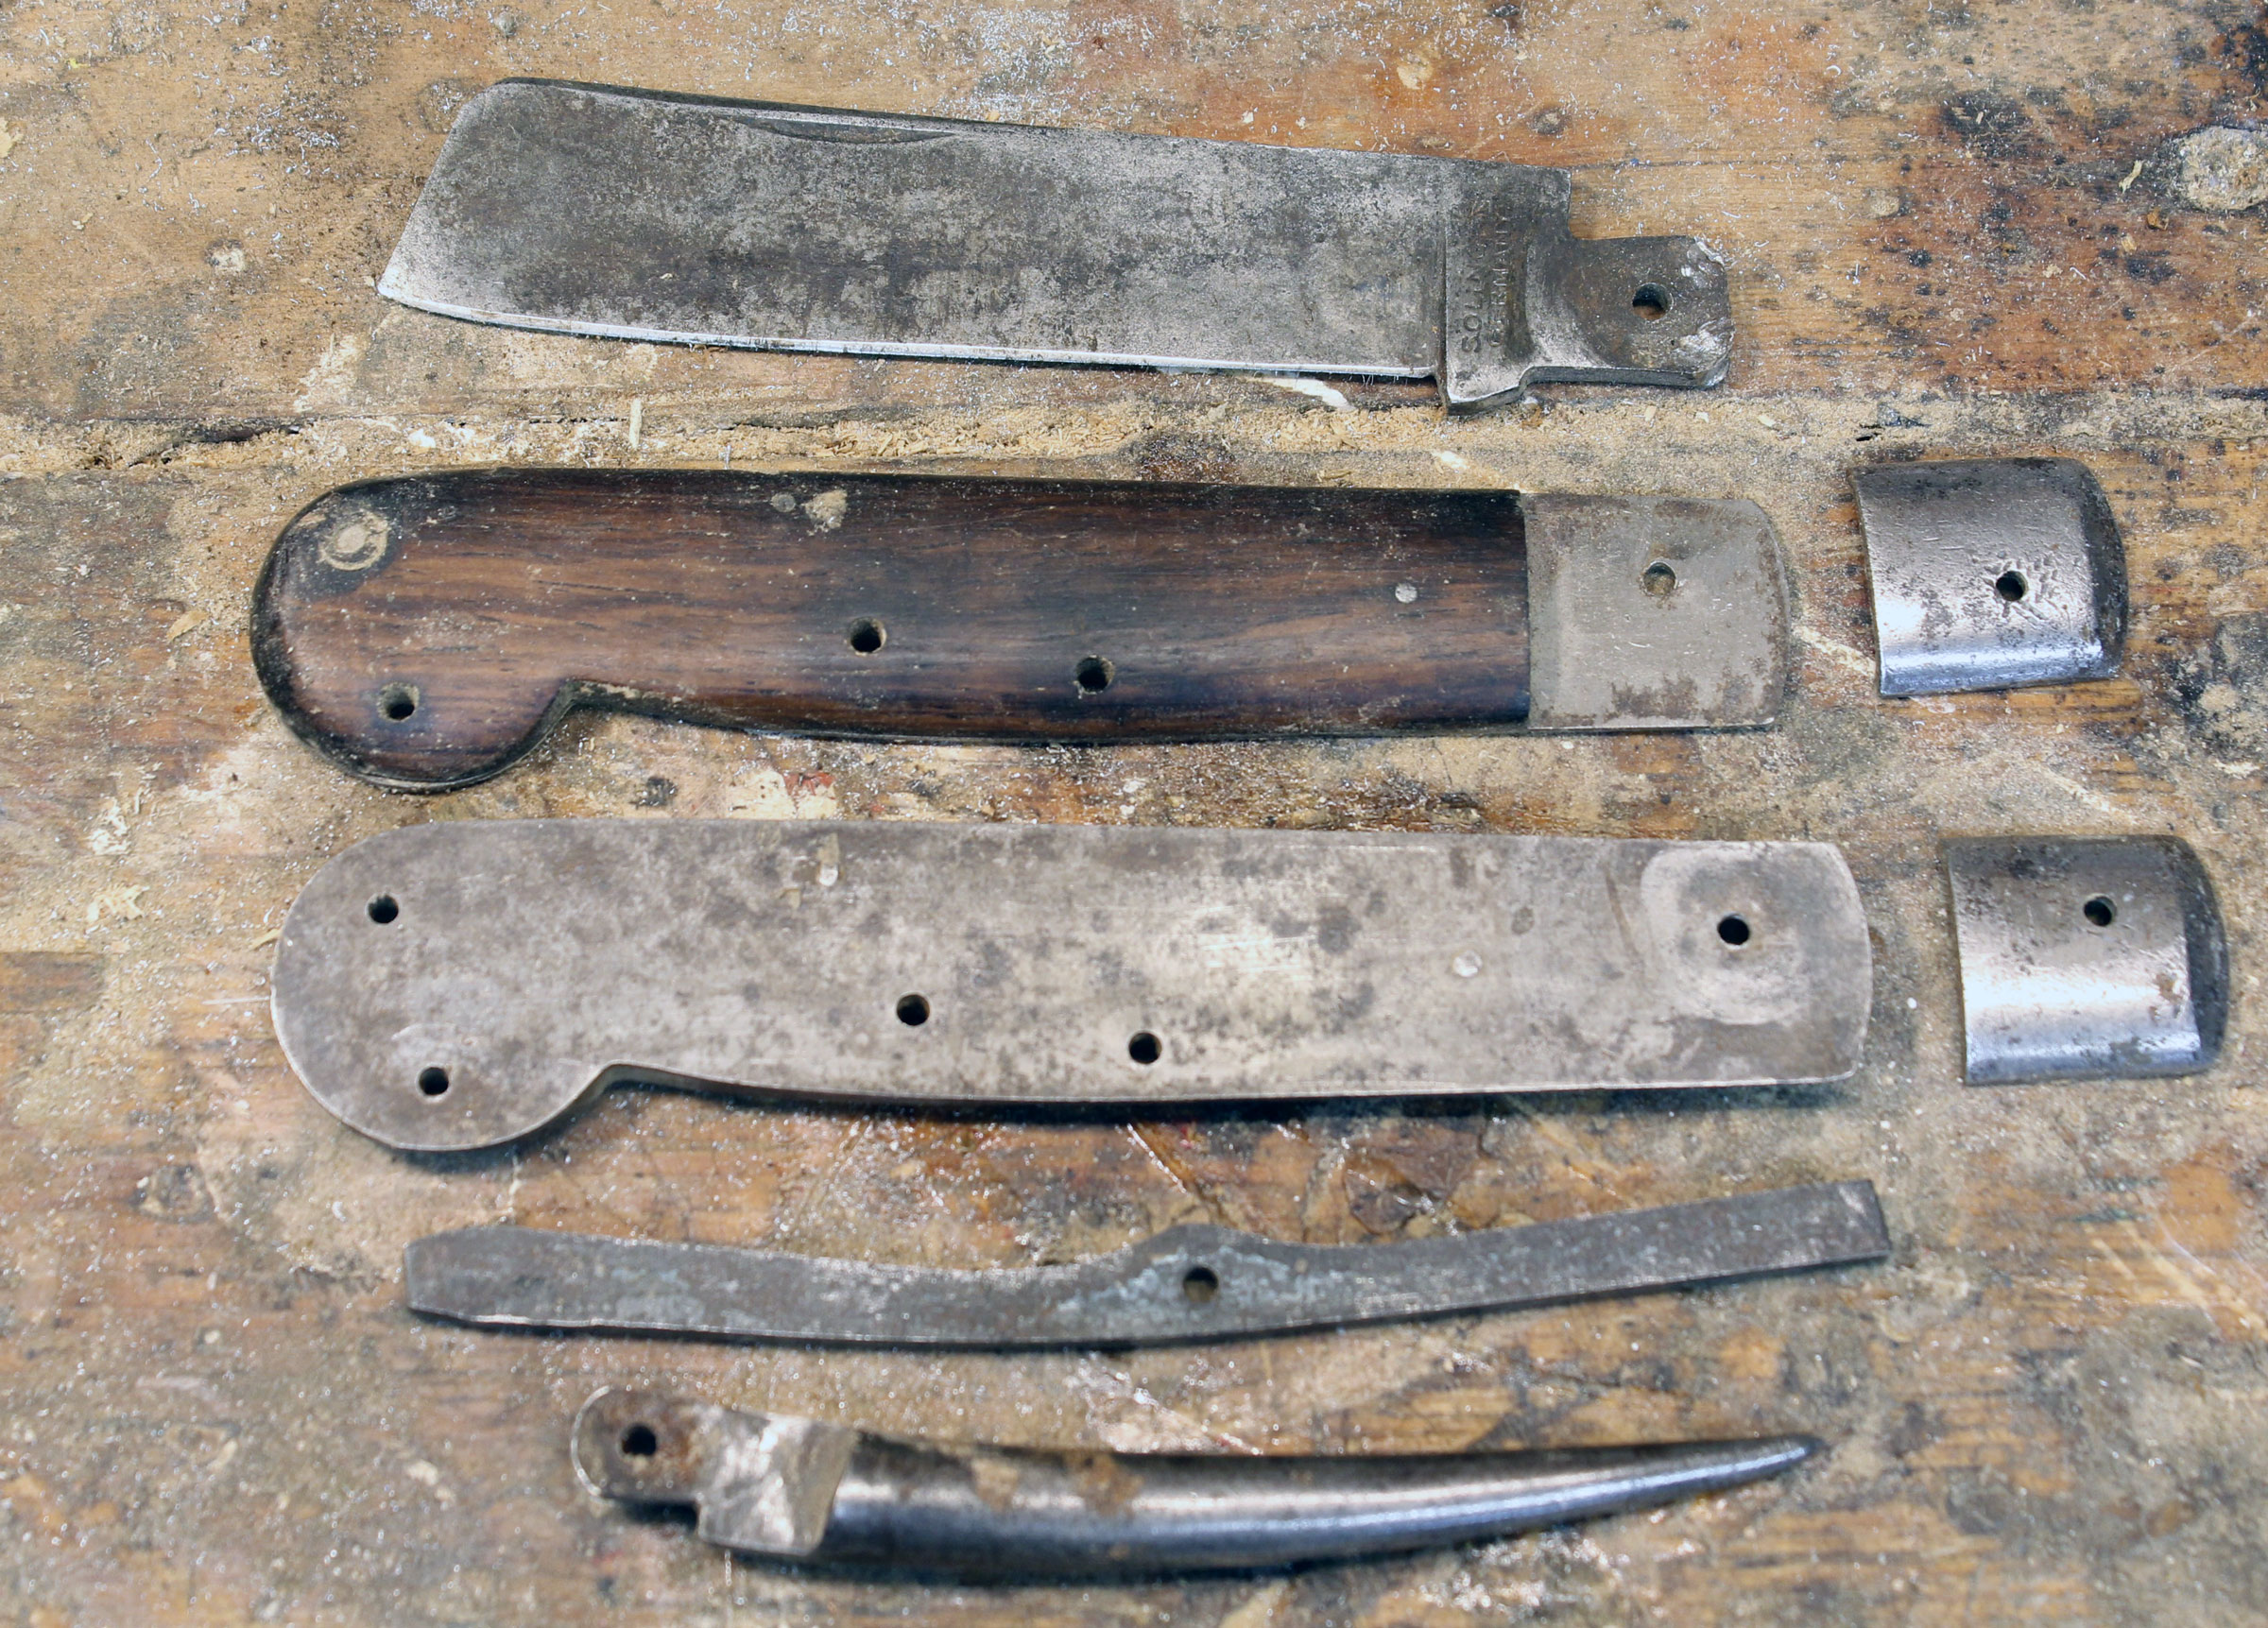
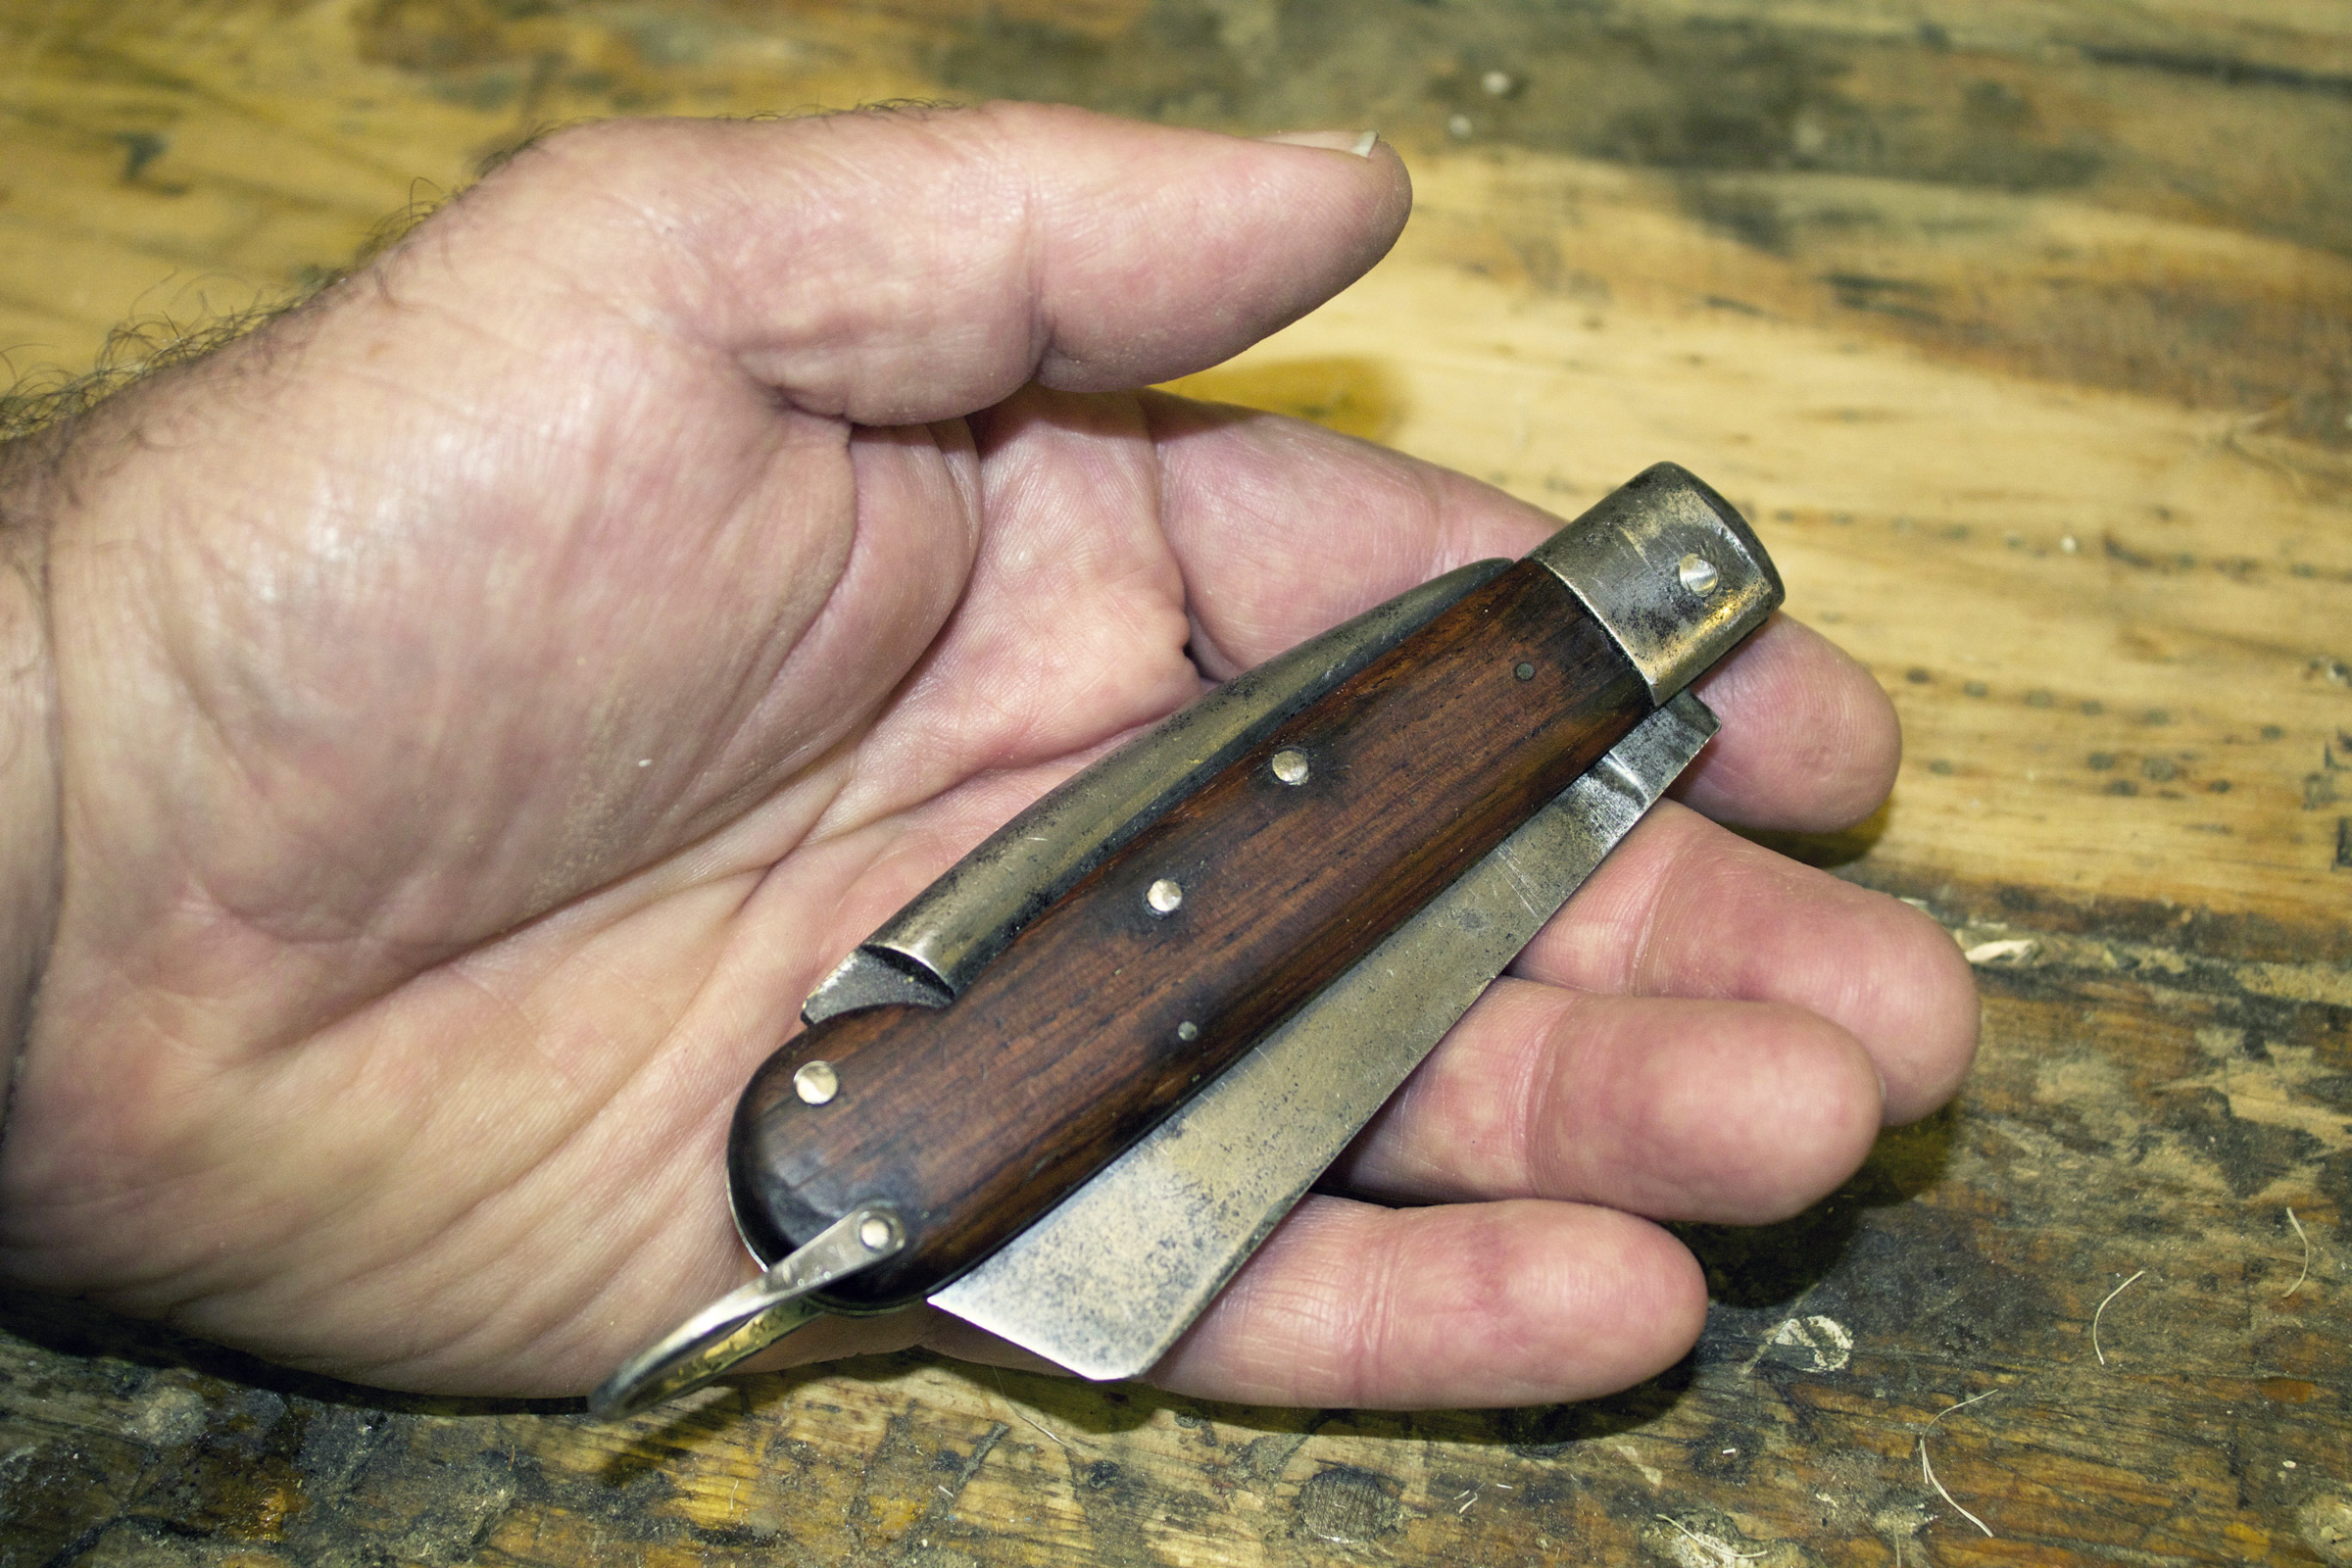
I have a shelf in the corner of my shop where I pile my collection of tape measures. They frequently fall off the shelf, and this past week I finally got tired enough of picking them up off the floor that I put them in order. In the process, I noticed a drawer in a small parts organizer that the tapes had been hiding. The drawer was marked “Knives.” The handwriting, in black Sharpie, was mine, but I didn’t remember putting any knives in that organizer. When I pulled the drawer out I immediately recognized one of the knives in it. “Oh, there you are,” I said out loud as one does when finding a member of the family in an unusual place in the house. It was my marlinespike knife, which had been missing for over ten years. The last time I’d seen it, I had taken it apart to replace the pins holding it together—they had loosened considerably with age. The knife had once belonged to my grandfather, Francis Cunningham, Sr.
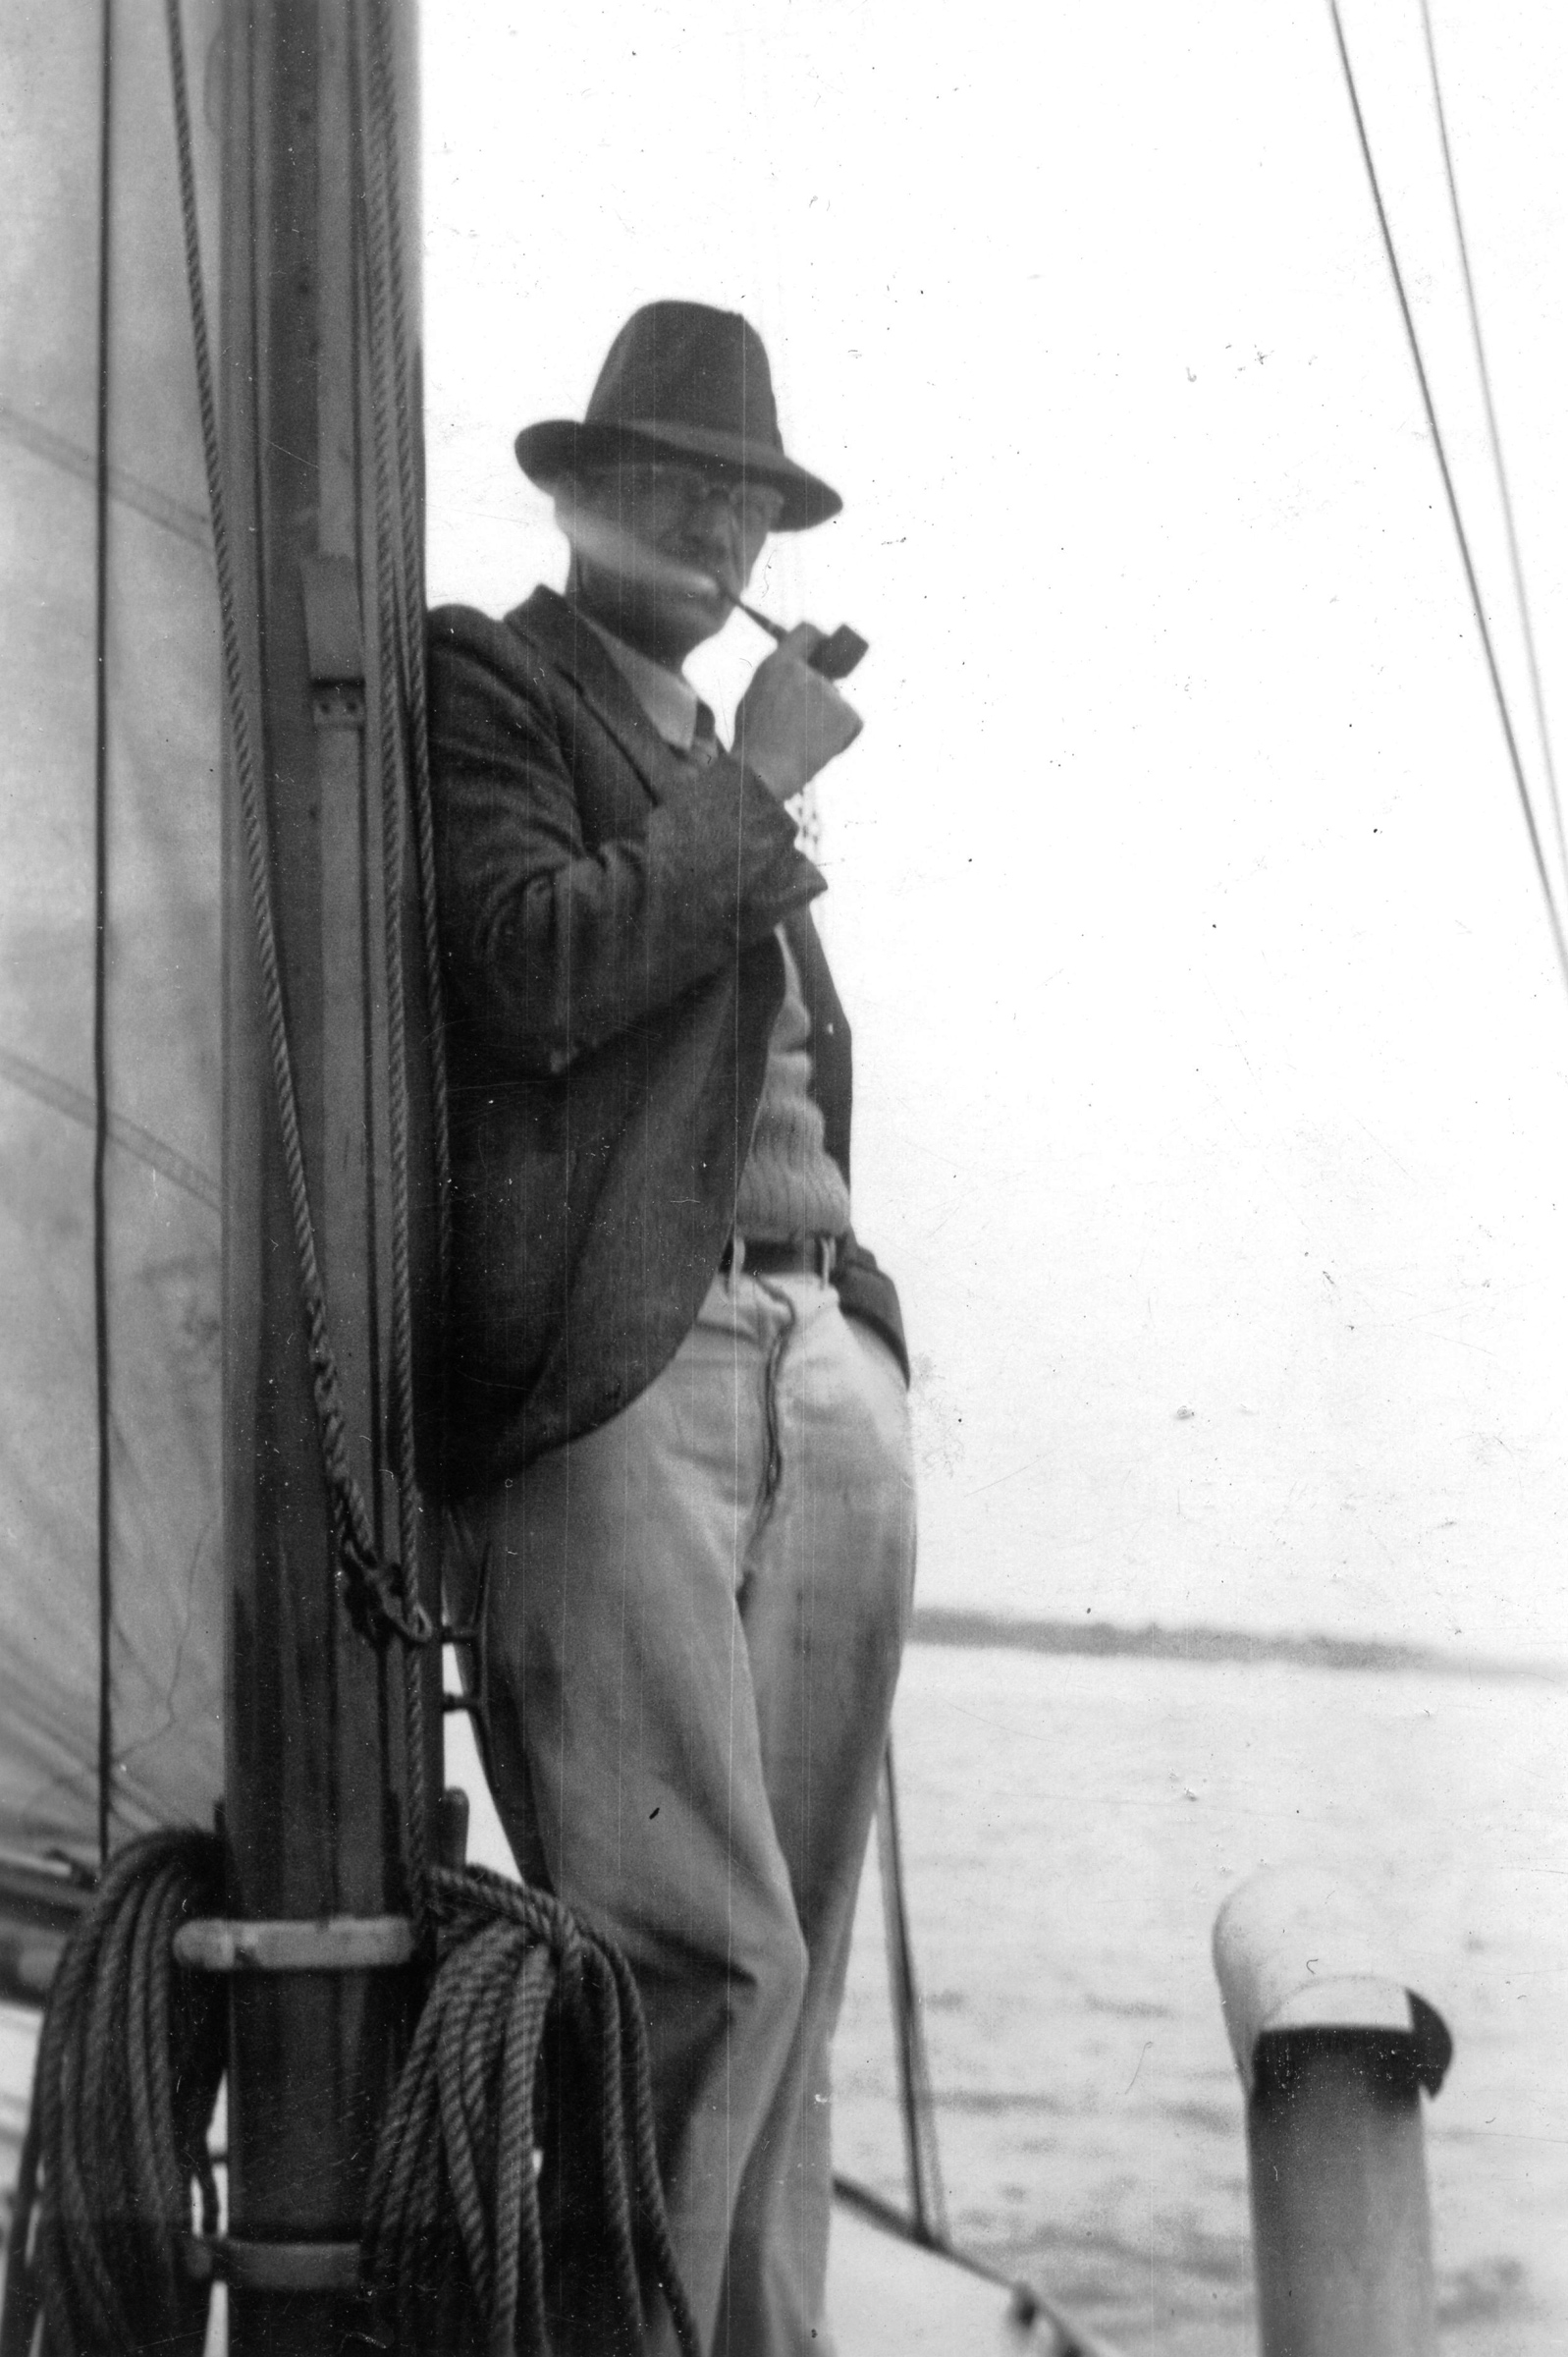
My grandfather, Francis Cunningham, Sr., dressed for sailing in an outfit that was at once natty and ratty.
My father, Francis Jr., was born and raised in Lowell, Massachusetts. Every two or three years we spent our summers in Massachusetts, splitting our time between my grandparents’ home in Lowell and a rented summer house in Marblehead, a harbor town just down the coast from Boston. On one of our stays back east we took a trip to New York City. I think it was in 1960; I was just seven years old then, so my memories of the trip are quite dim. I remember going shopping with my father for a birthday present for my grandfather, Papa, as my sisters and I called him. We went to Abercrombie and Fitch. It wasn’t at all like it is now, a source of trendy, upscale fashions for those who can afford to show a bit of midriff. It was the store for adventurers outfitting safaris and expeditions. I recall a high-ceilinged showroom with dark, wood-paneled walls covered with the mounted heads of African wildlife. Dad bought a folding marlinespike knife for Papa. We then visited FAO Schwarz, and Dad picked out a toy sailboat with a bright royal blue hull and a sloop rig. I liked it, and in my young mind I saw no reason that my 71-year-old grandfather wouldn’t like it too, as one of his birthday presents. As we were leaving, Dad asked me which gift Papa would like most; I could have the other one. I picked the knife for Papa and the sailboat was mine.
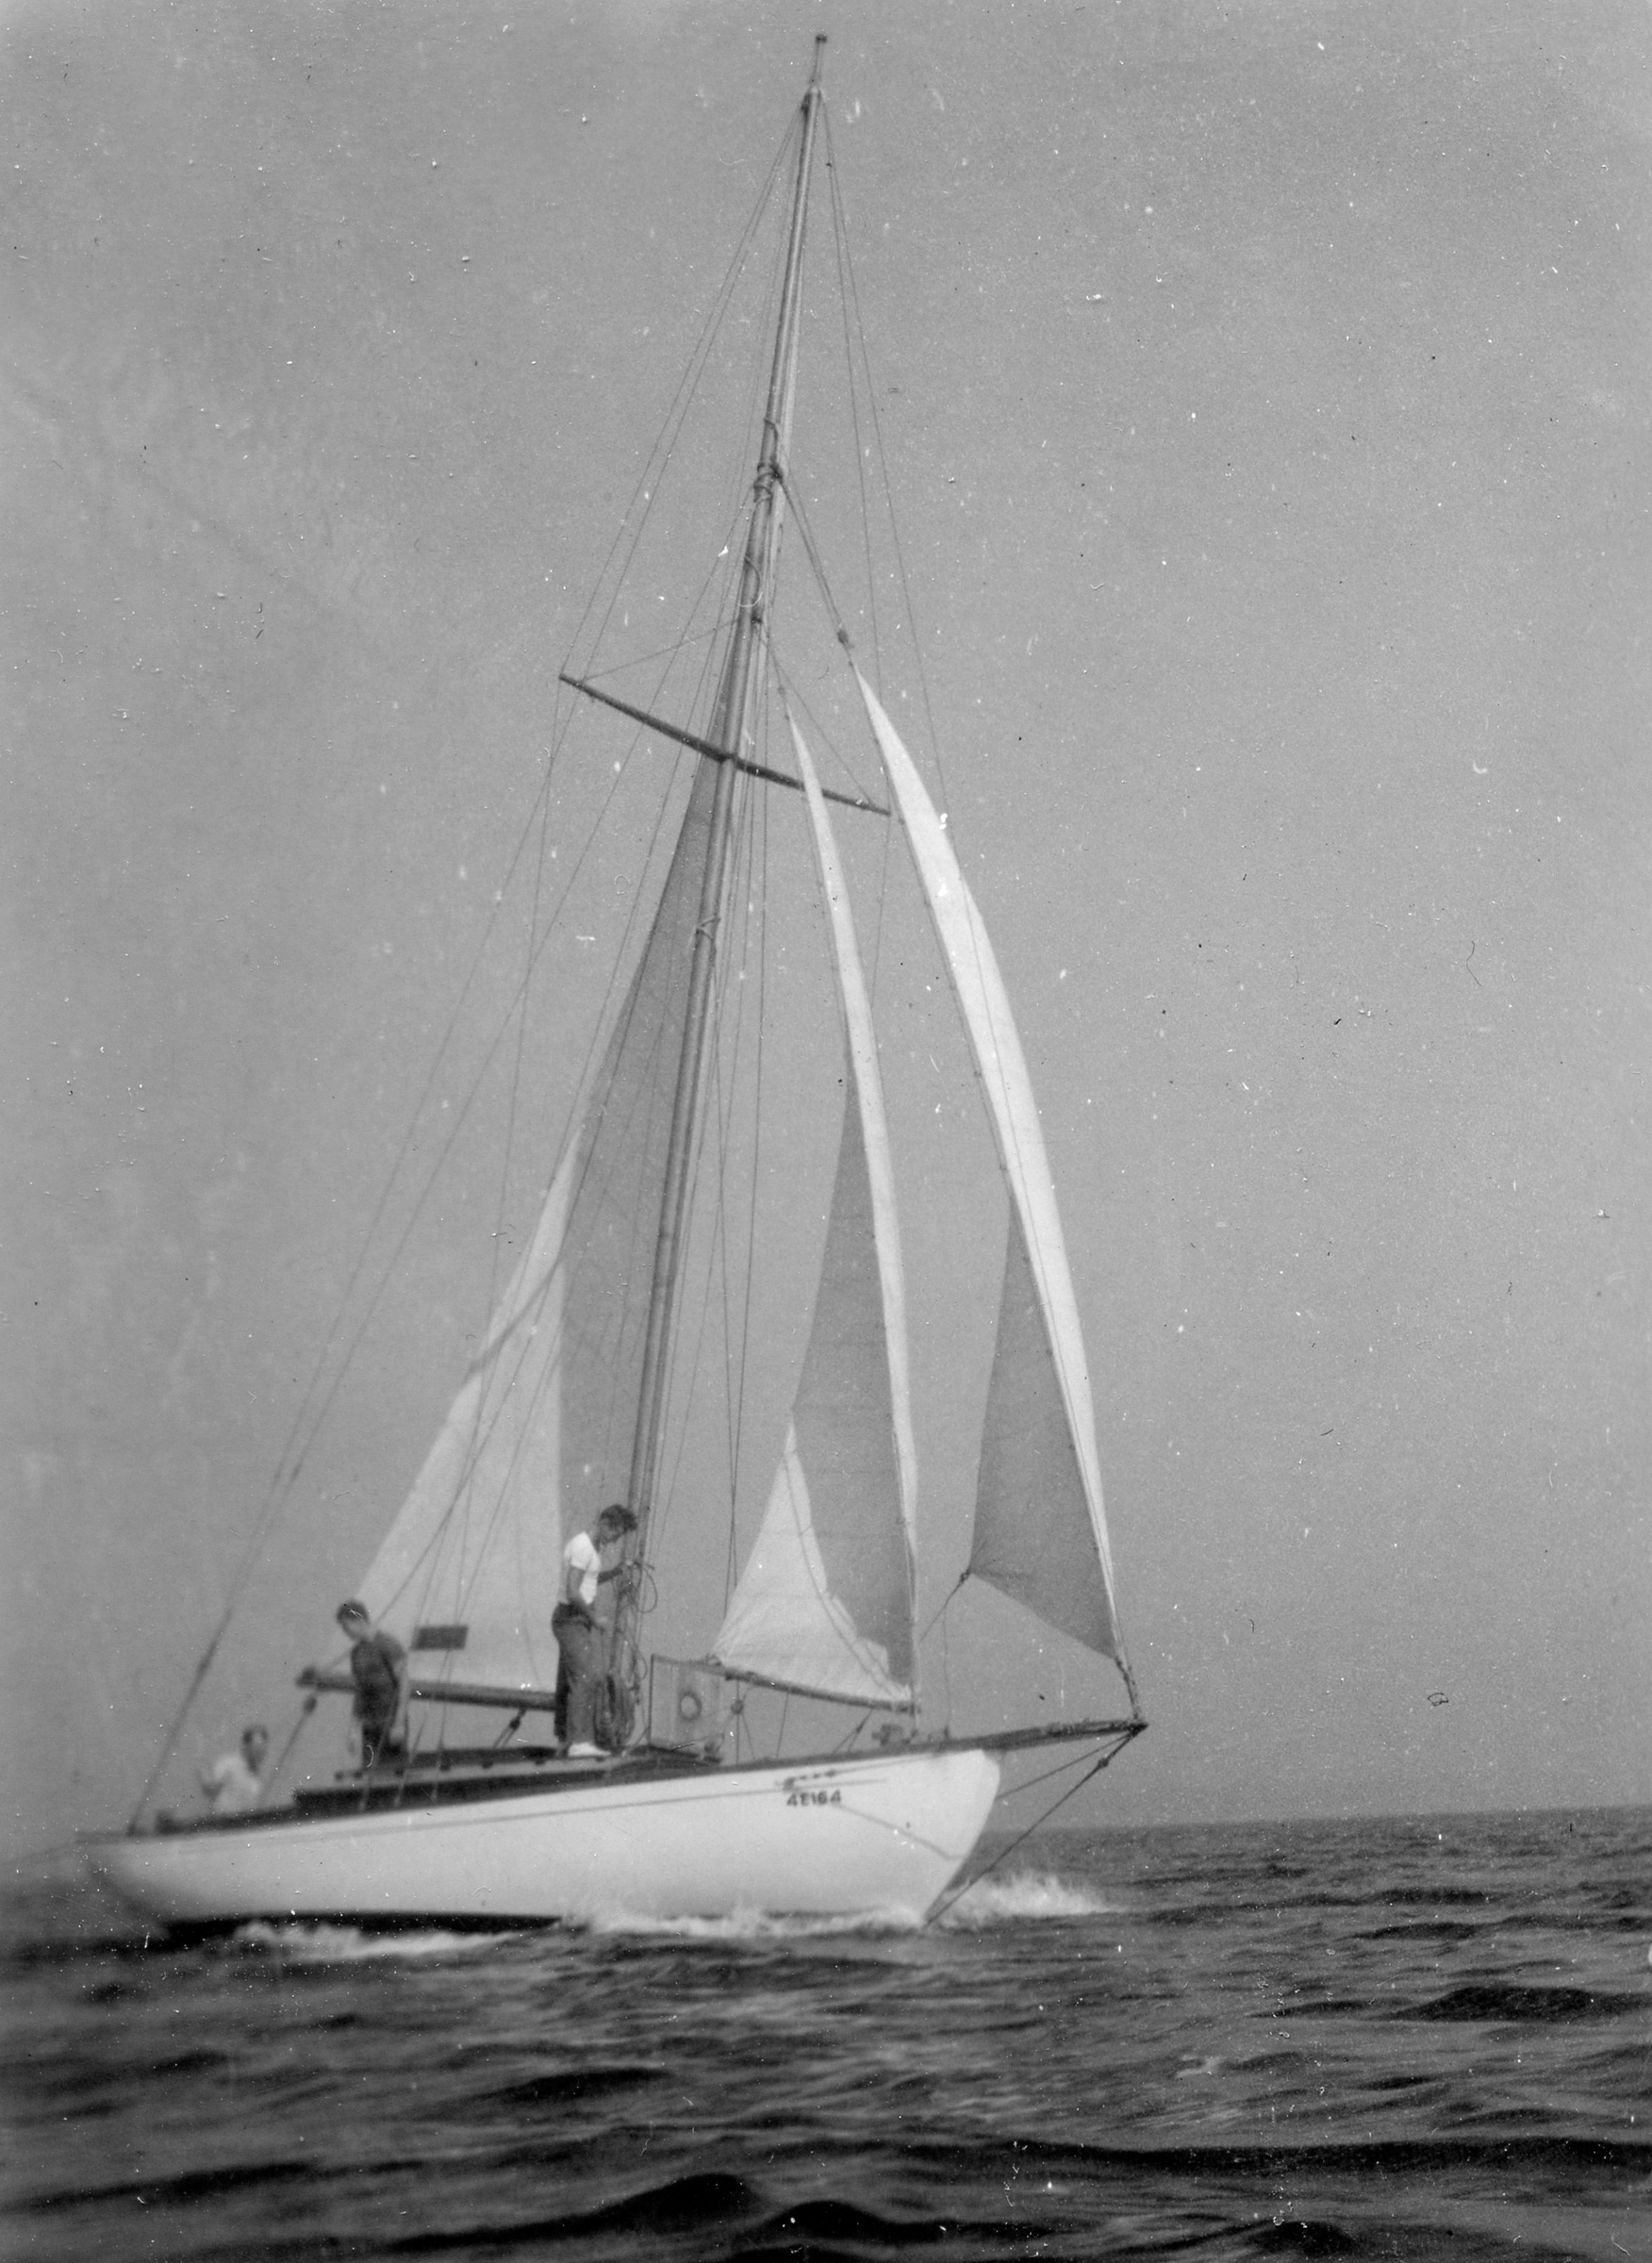
My grandfather’s boat, MOLLY MAY, was a 31′ auxiliary cutter designed by Wilder B. Harris in 1931. On hot summer days with light wind, Papa would trail a line from the stern so I could jump in the water and get towed behind the boat.
Papa would have used the knife for working on MOLLY MAY, the 31′ cutter he kept in Marblehead Harbor. After my grandfather died in 1965, Dad brought the knife home with him and used it working on his 27′ Tumlare sloop. In the ’60s, when I took an interest in maritime skills, Dad gave the marlinespike knife to me. Its blade held a good edge and was the best I’d ever used for cutting rope.
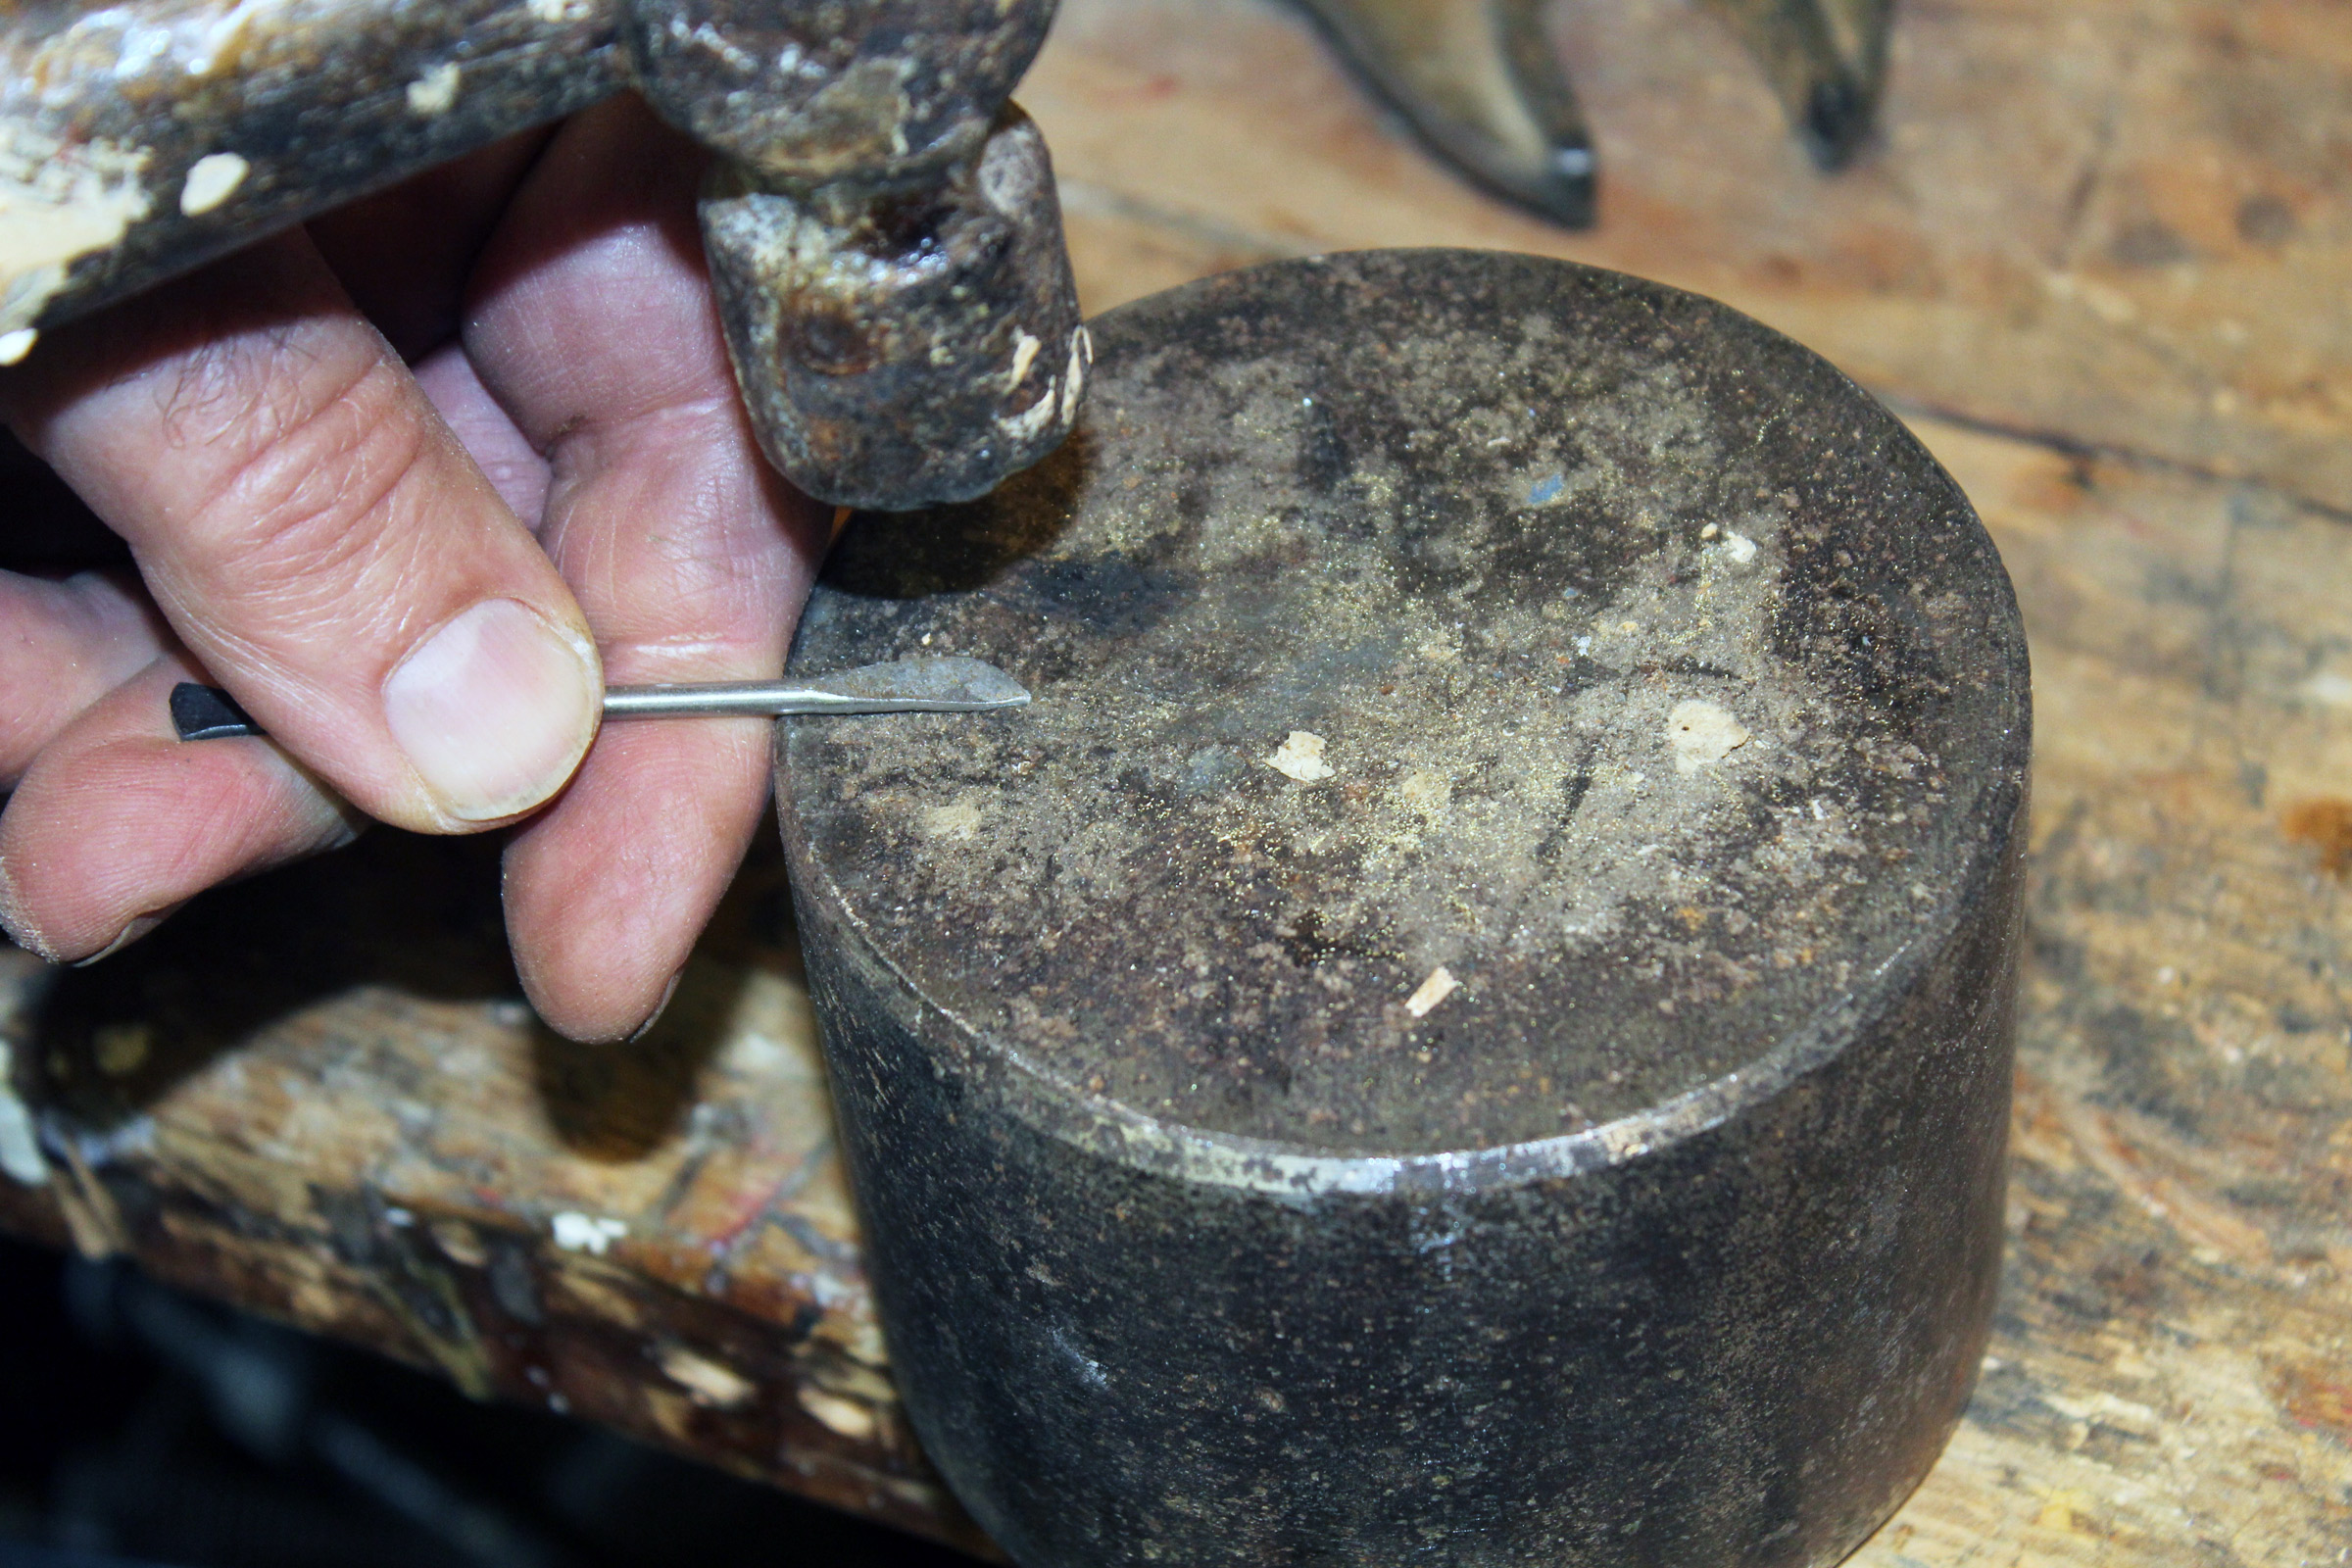
Eventually the knife got a bit loose and the marlinespike wouldn’t snap open and stay steady, so I took the knife apart, intending to fix it. I was at a loss for how to go about the repair and I put the knife away, in pieces. As it often is with important things put away carefully so they won’t get lost, I forgot where I put it. Having the knife once again in my hand, I straightaway set to putting it back in working order, using common nails to make new pins and replace the missing bail.
I sharpened the blade and, just as I remembered, it cut through rope with ease. I haven’t seen Papa for more than 55 years, but when I look at the knife, I imagine it held in the hand of my grandfather and think, “Oh, there you are.”
Putting the knife back together
The pins holding the wood covers to the liners hadn’t loosened so I had left those parts together. My goal was to make the knife functional again, not make it look like new. The knife had never rusted, so the steel had no pits and I could keep the patina of age.
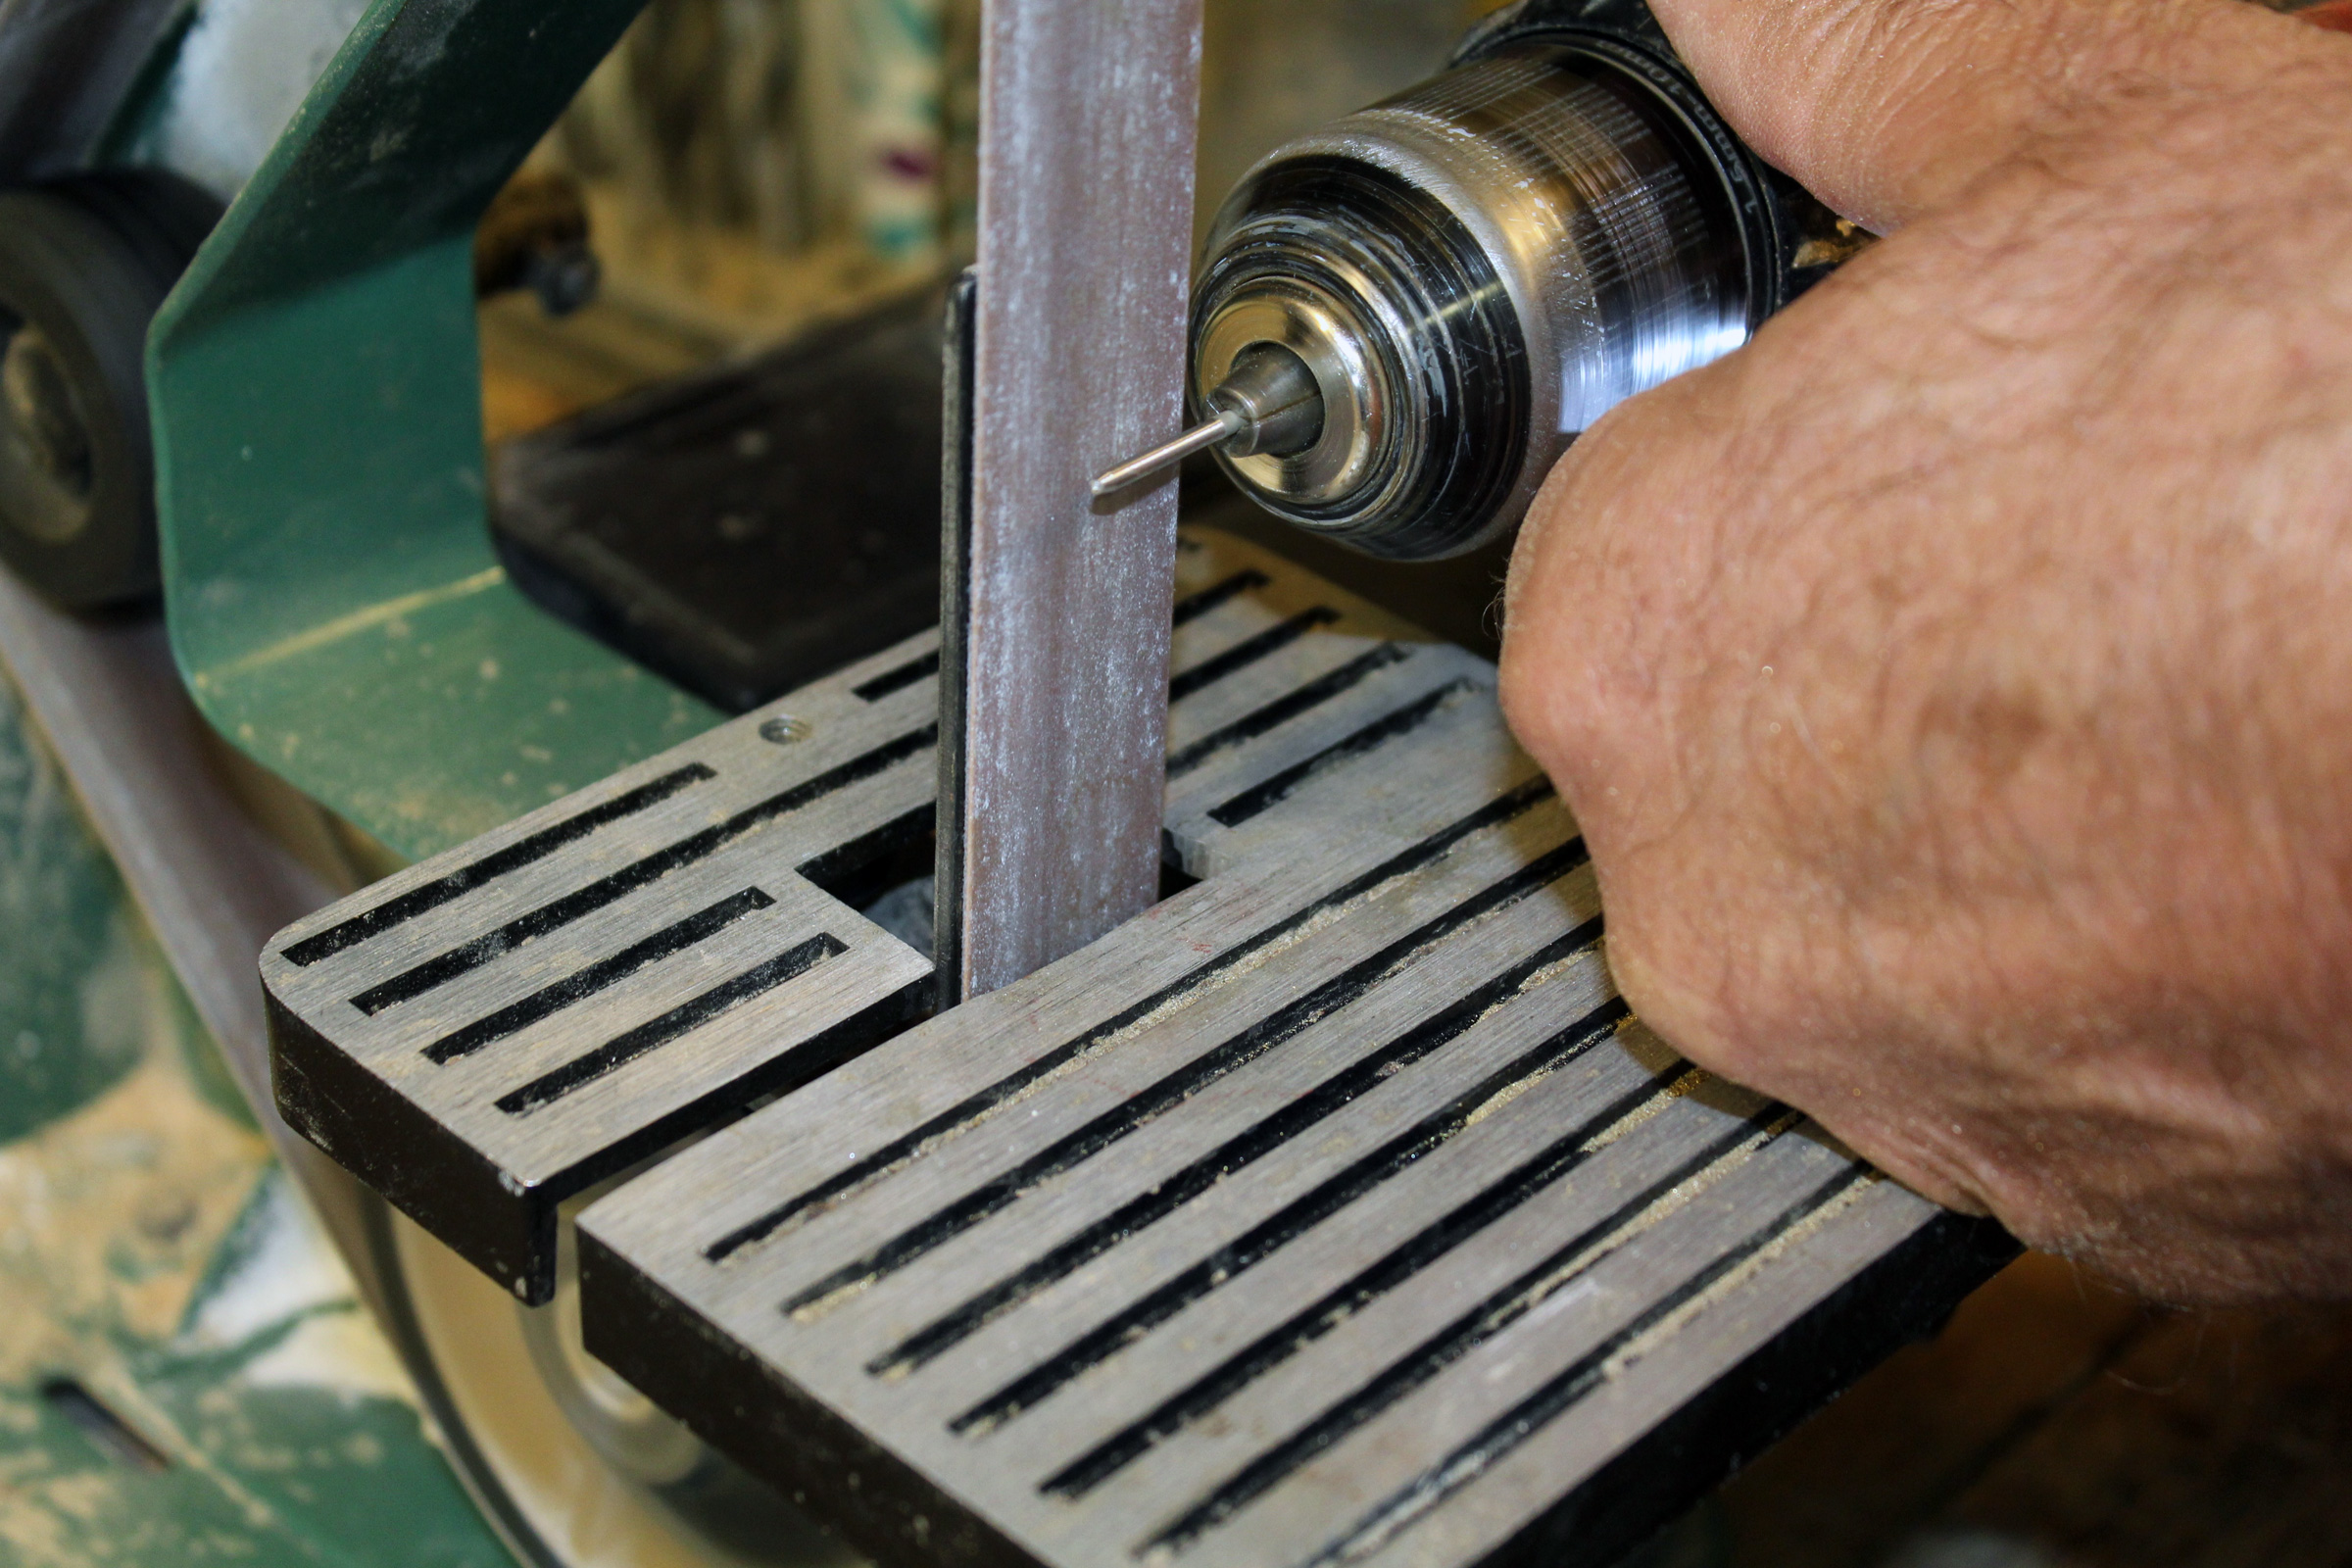
I used two sizes of nails to make new pins for the knife. They were oversize, so I chucked them in a cordless drill and spun them against a fine sanding belt to get them to fit the holes in the liners.
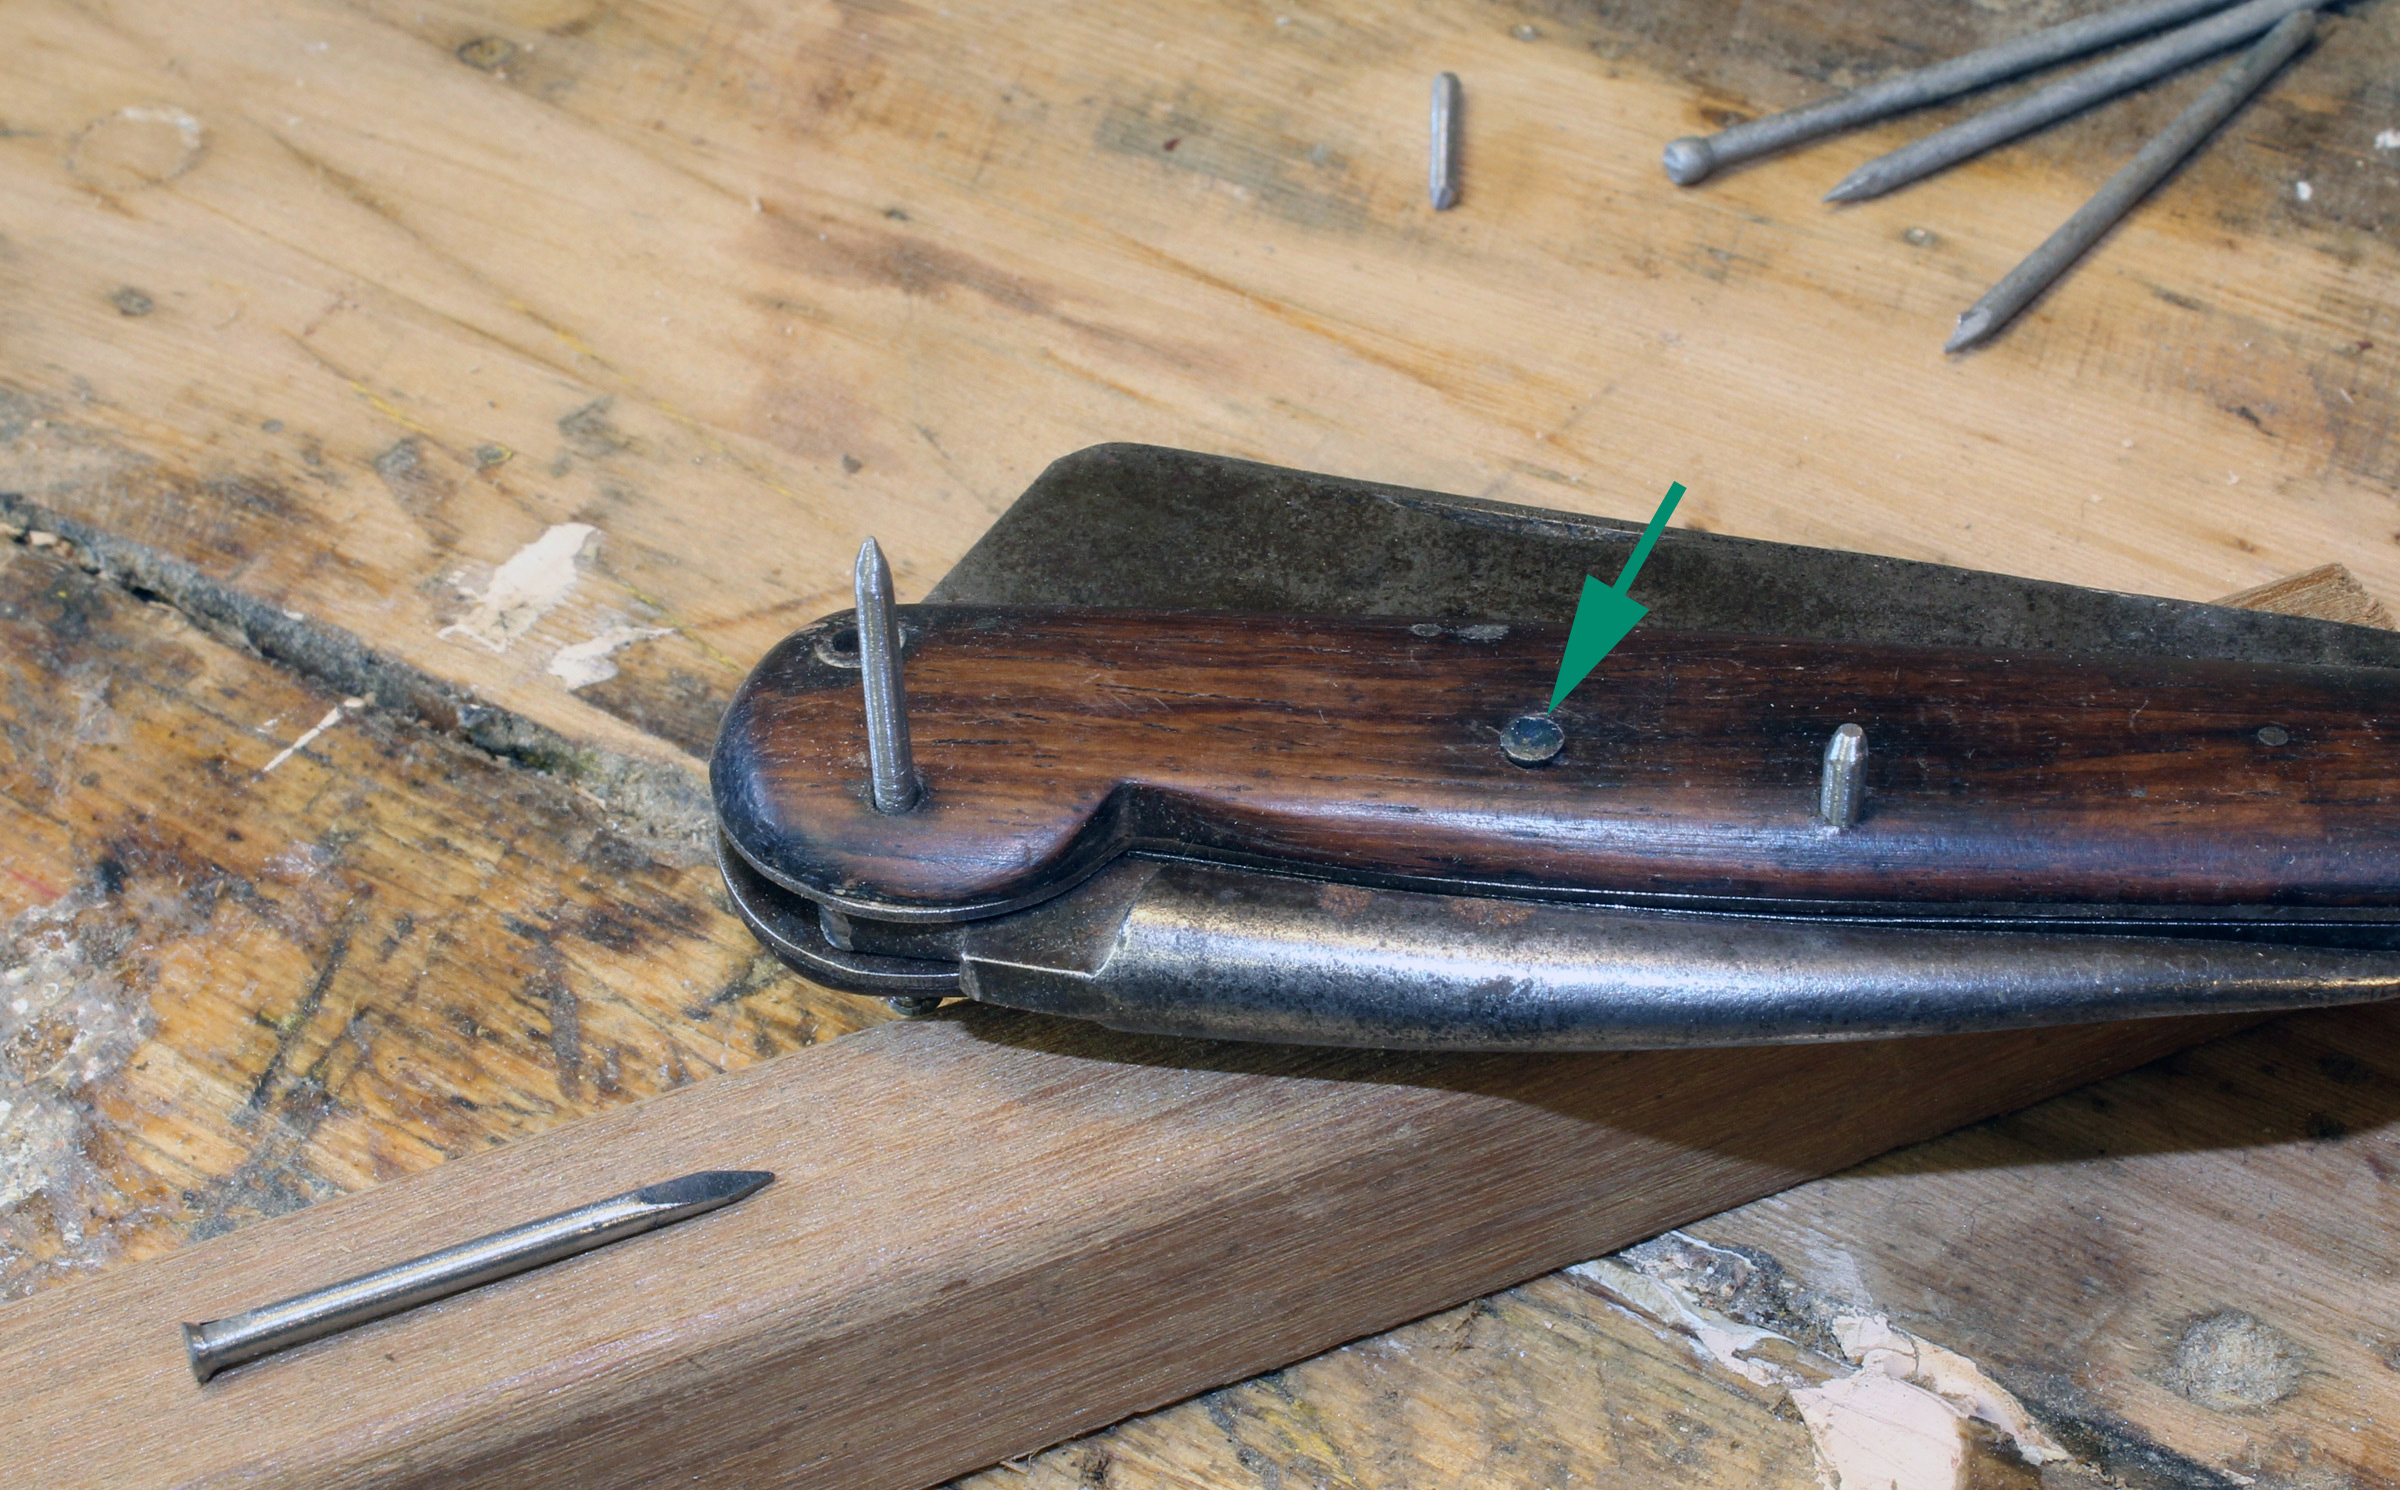
The nail marked with the arrow presses against the two-ended spring to tension it. I couldn’t reassemble the knife with it in place, so I set it aside while I joined the liner and cover with the other pins.
With the pieces assembled, the pin that tensions the spring is driven in. It’s already seated here, marked by the arrow, with its point in a hole in the piece of wood under the knife. An extra tensioning pin, at left, shows the point beveled on one side. It functions a bit like a drawbore pin in a mortise-and-tenon joint, creating tension between the pieces being joined as it’s tapped in.
The beveled end of the tensioning pin is visible below the knife. With all of the pins in place, they can be trimmed and peened.
I kept the heads on the finishing nails I used for the new pins. That saved me from having to flare both ends of each pin. The belt sander took the extra metal off both ends of the pin. I left enough metal on the cut ends to flare them when peened.
The reason the knife loosened up in the first place was that the peened ends of the pin were pressing against wood, not metal (except for the blade’s pivot, run through metal bolsters on either side). I flared the pins wider than the originals had been to have a longer-lasting hold on the wood. My anvil is, I believe, a train car’s roller bearing, which I found by railroad tracks.
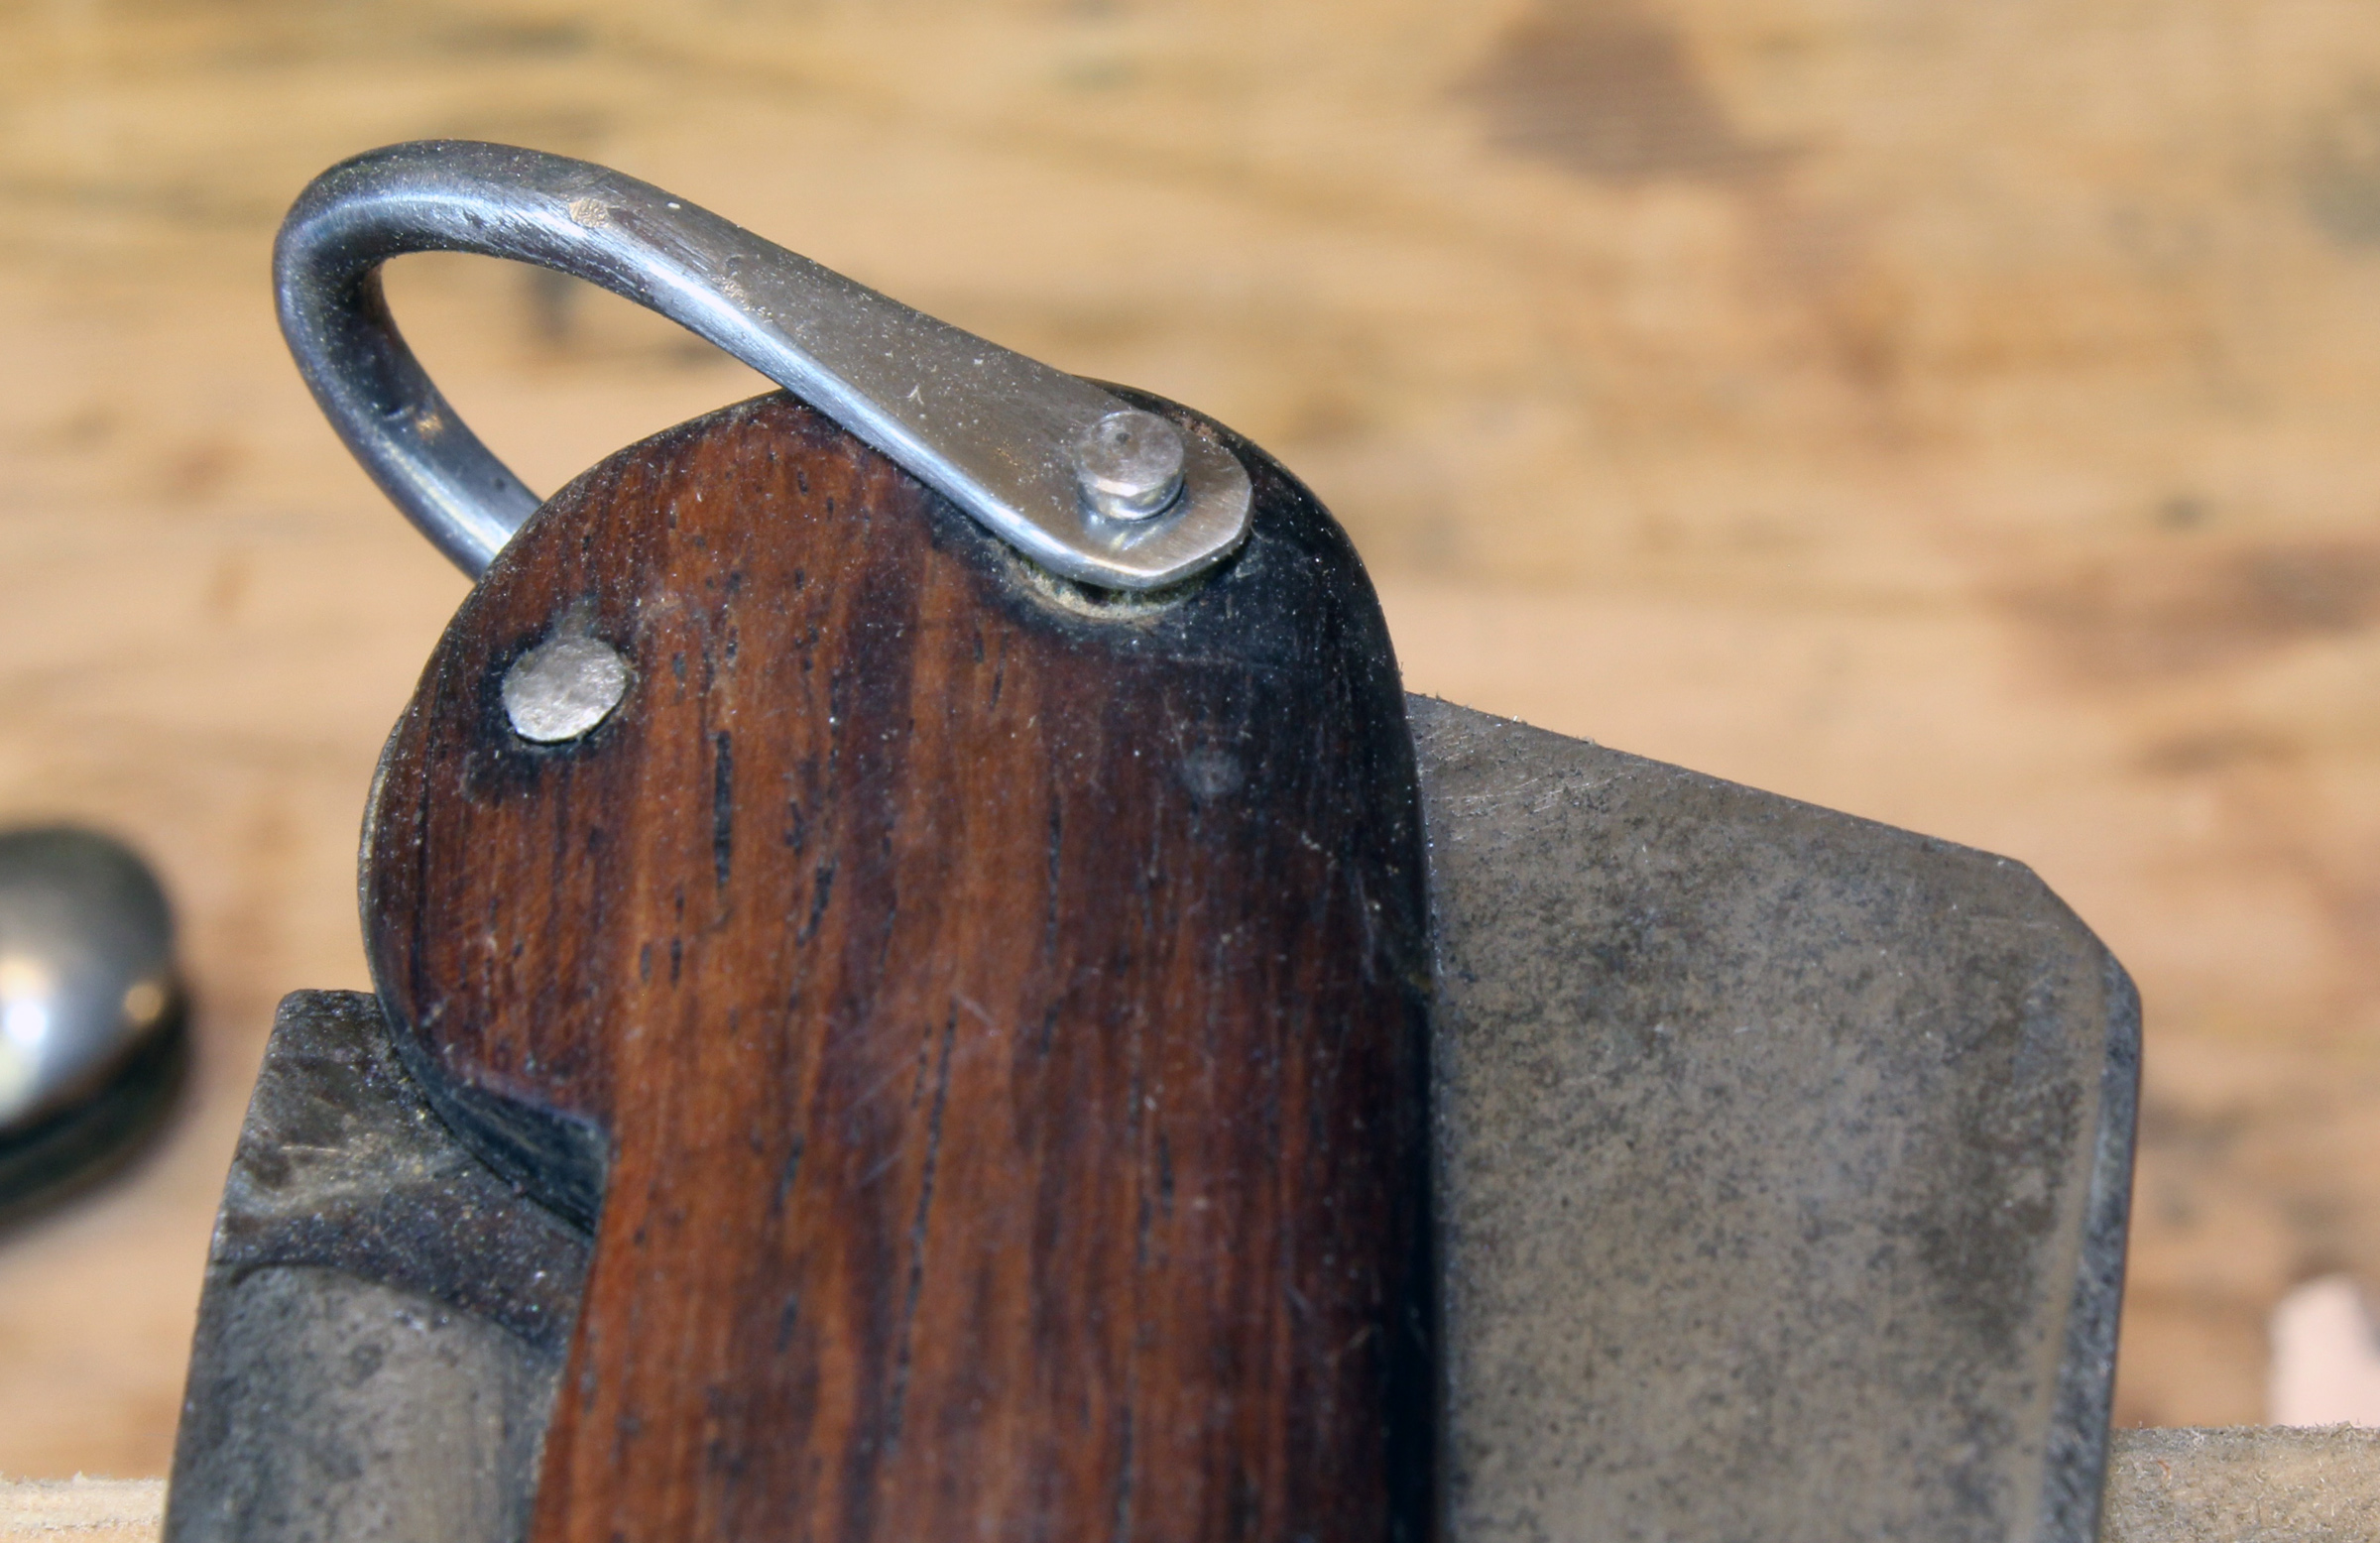
I used another nail to make a new bail. The original had been lost quite some time ago. The nail’s steel was soft enough to hammer cold to make the ends flat and wide.
After years of sharpening, the tip of the blade was no longer buried in the handle.
The projection on the blade’s tang is called the kick. It keeps the sharp edge of the blade from making contact with metal inside the handle. Trimming the kick on the belt sander will allow the blade to sit a bit deeper.
With the kick shortened, the blade is fully buried in the handle.
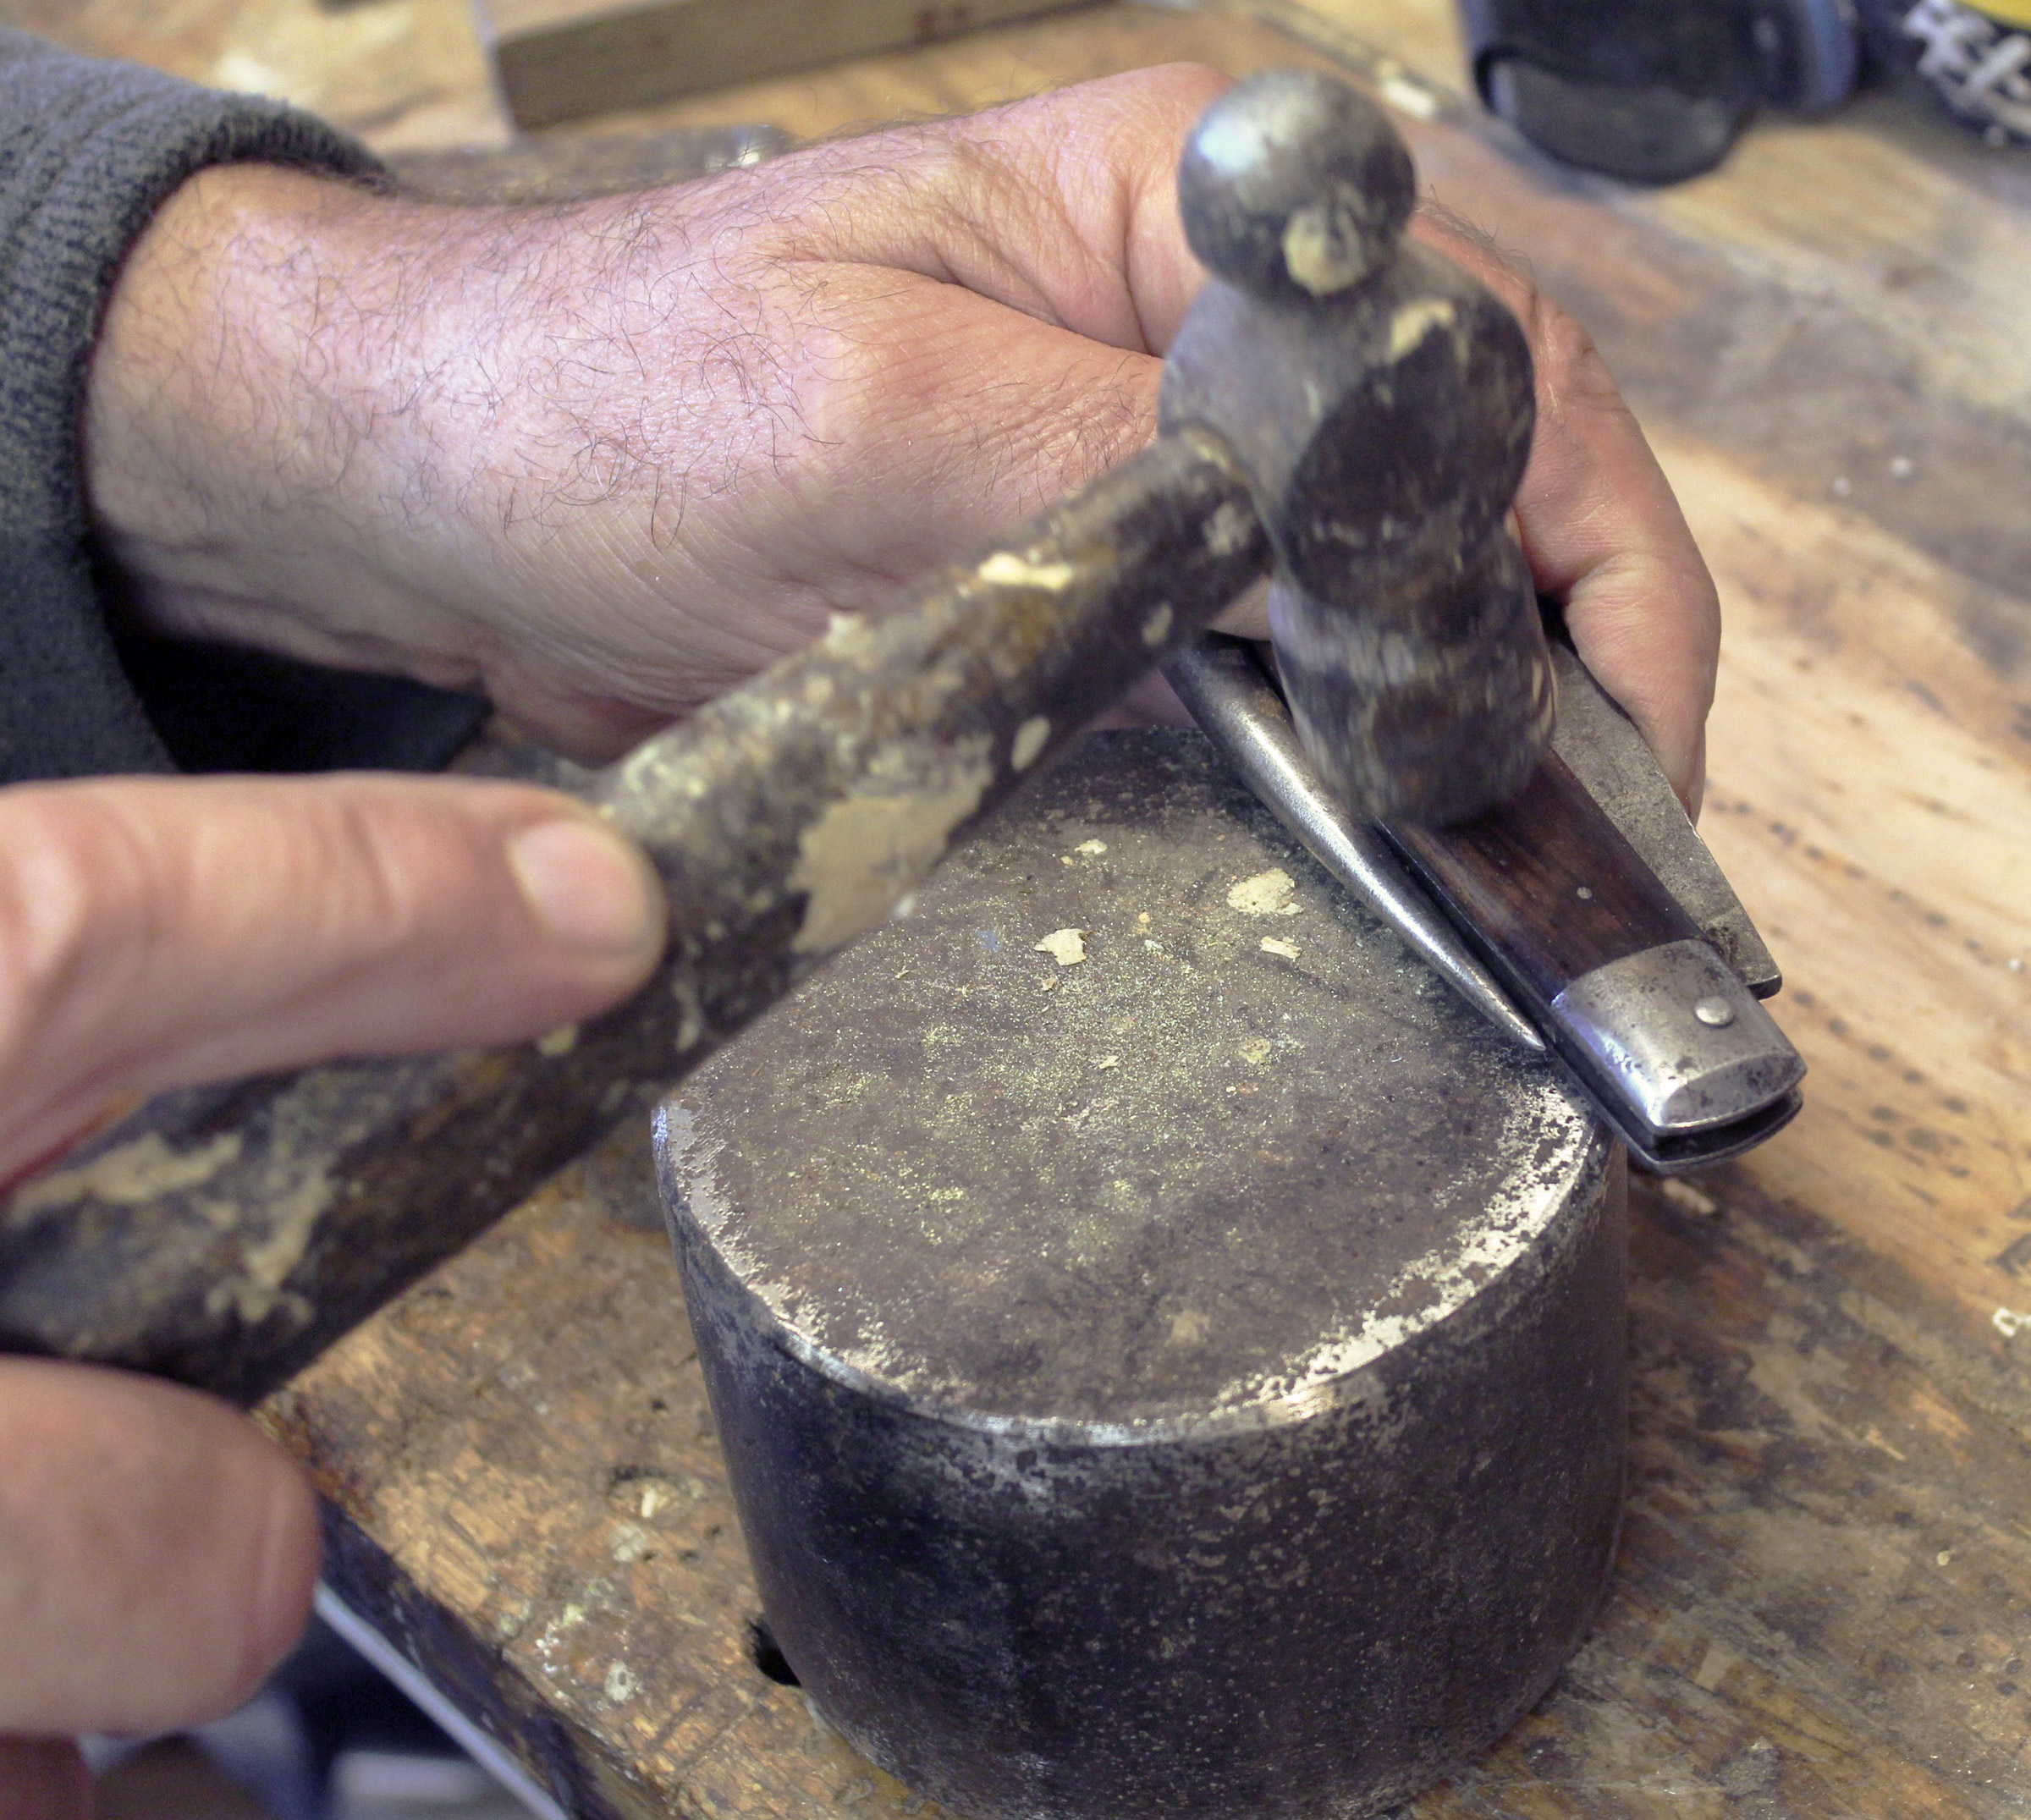
Peening the pin ends flared them, but they were shaped like the bells of trumpets and had sharp, proud edges. To roll the edges down and create mushroom-shaped ends, I used a diamond Dremel bit to shape a concave end on a pin punch.
A few taps of the modified pin punch rounded the rivet heads.
Back in good working order after serving the family for 60 years, my marlinespike knife is ready for future generations.
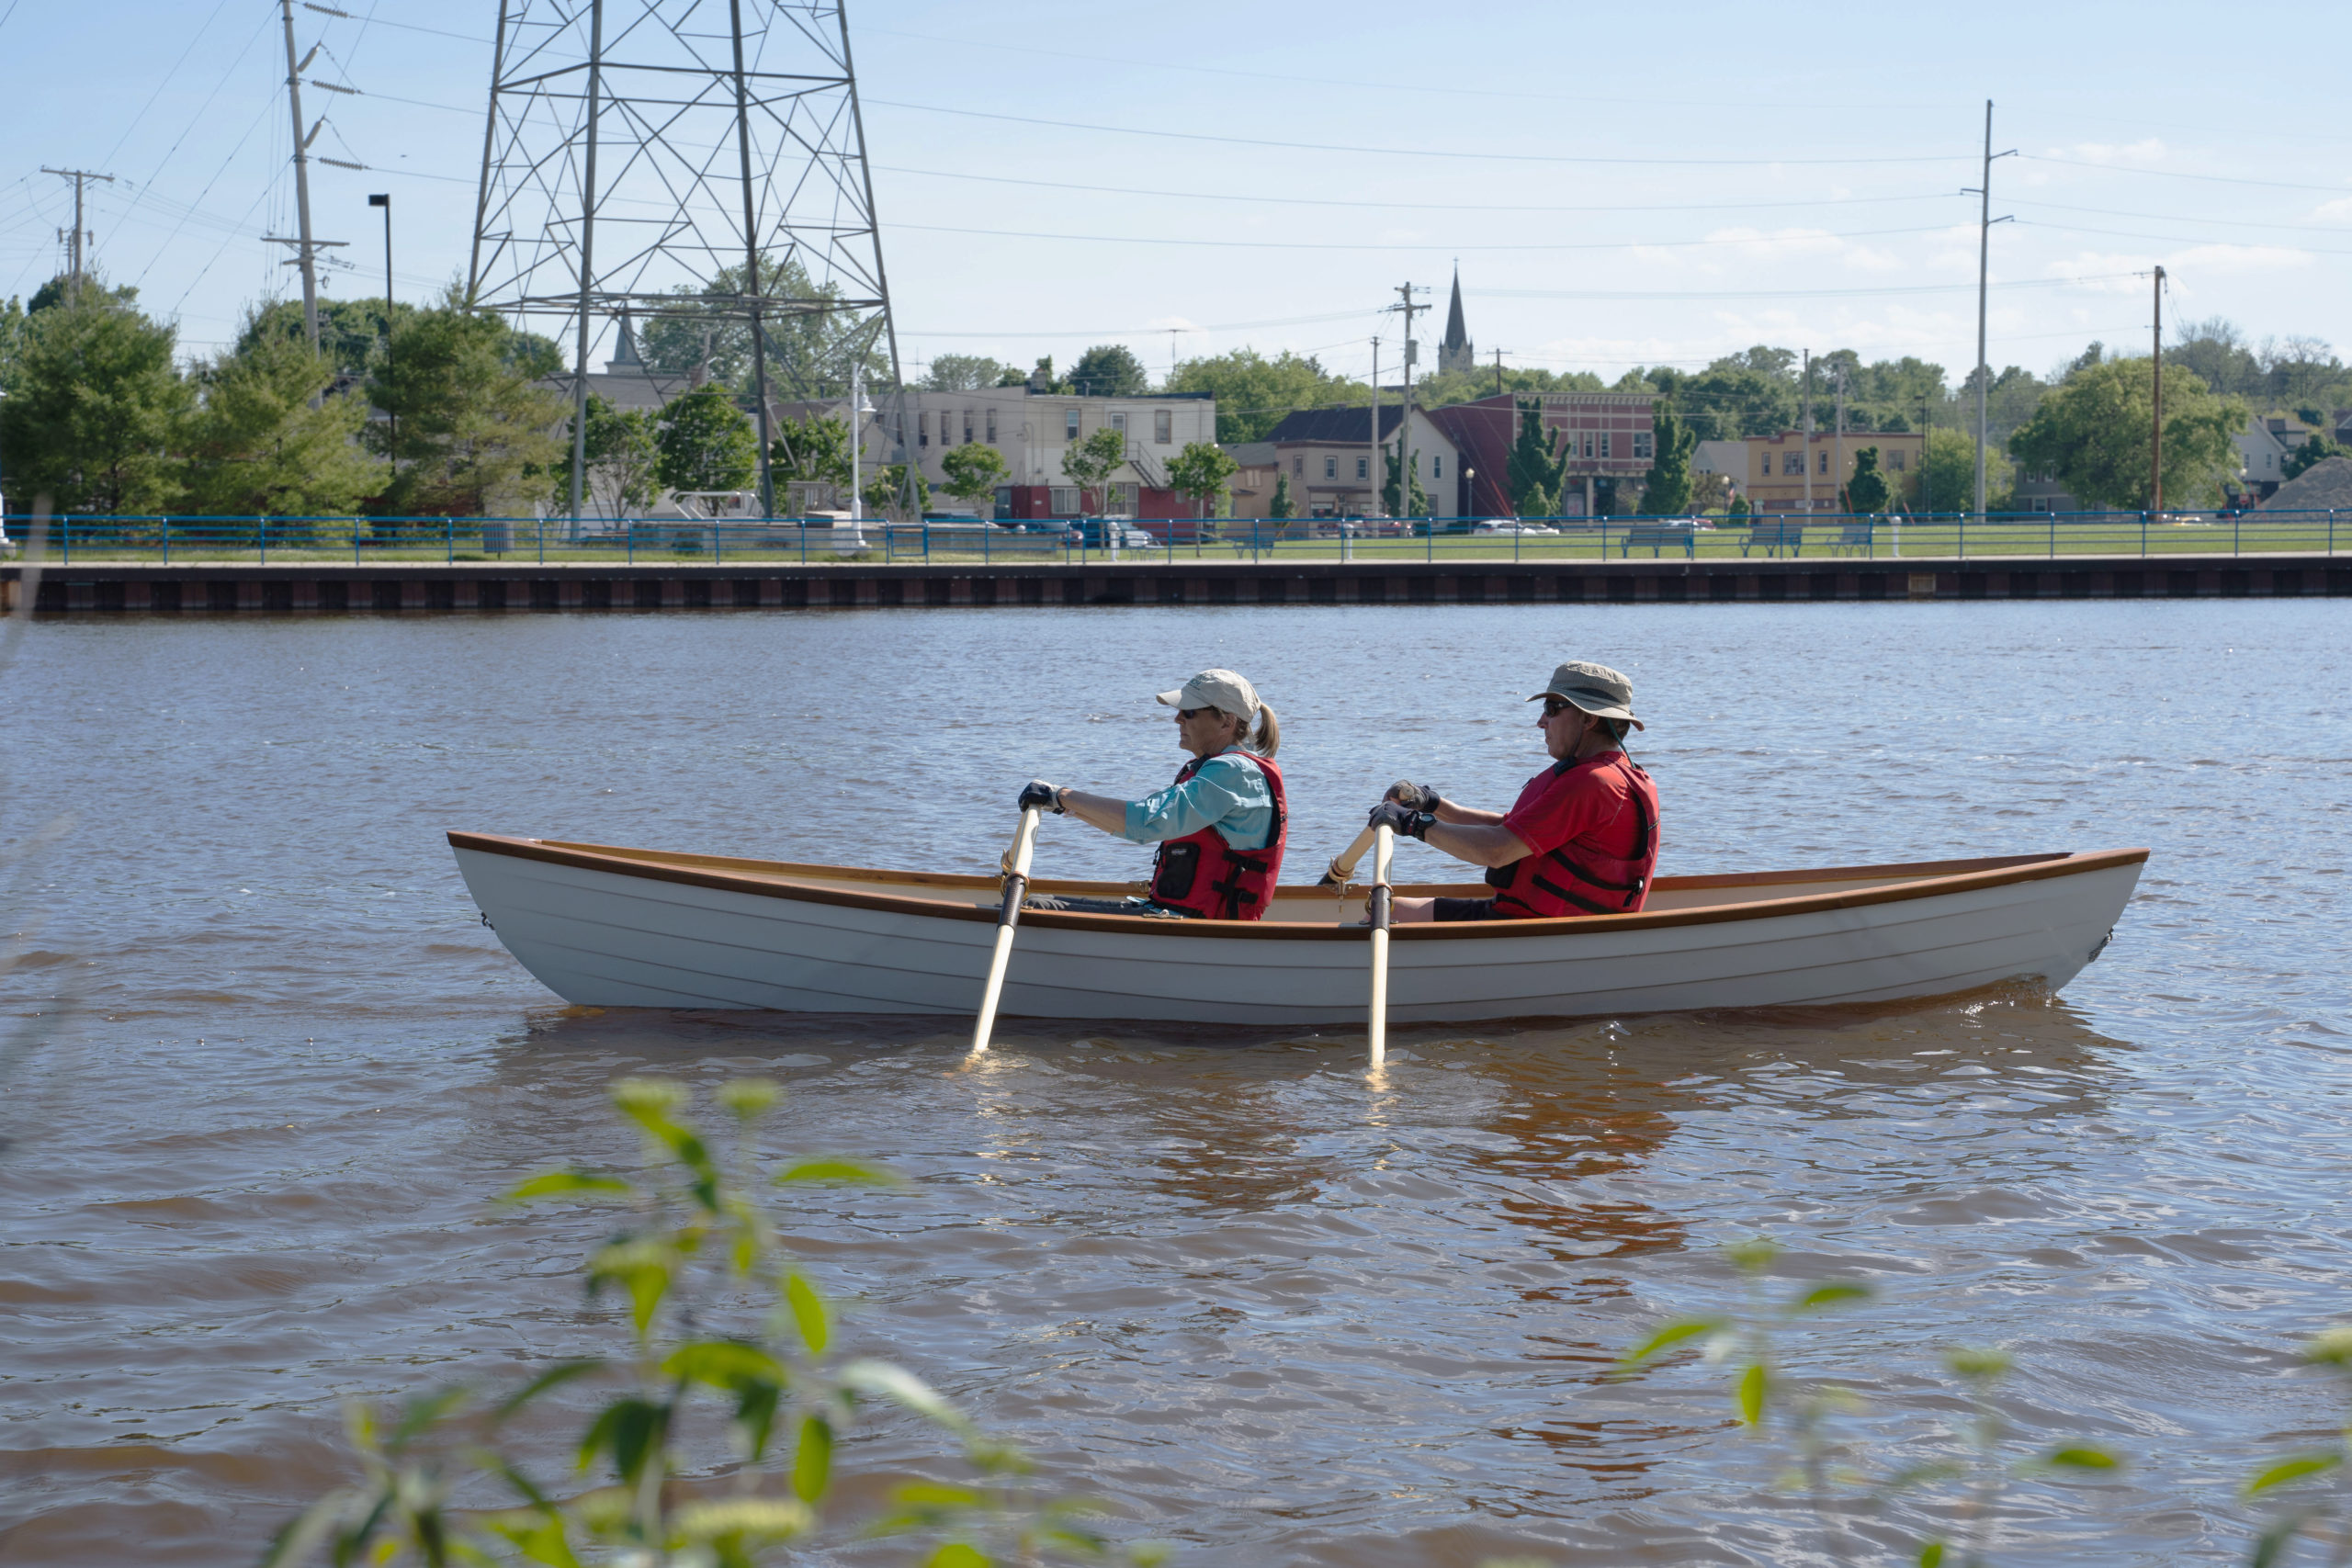
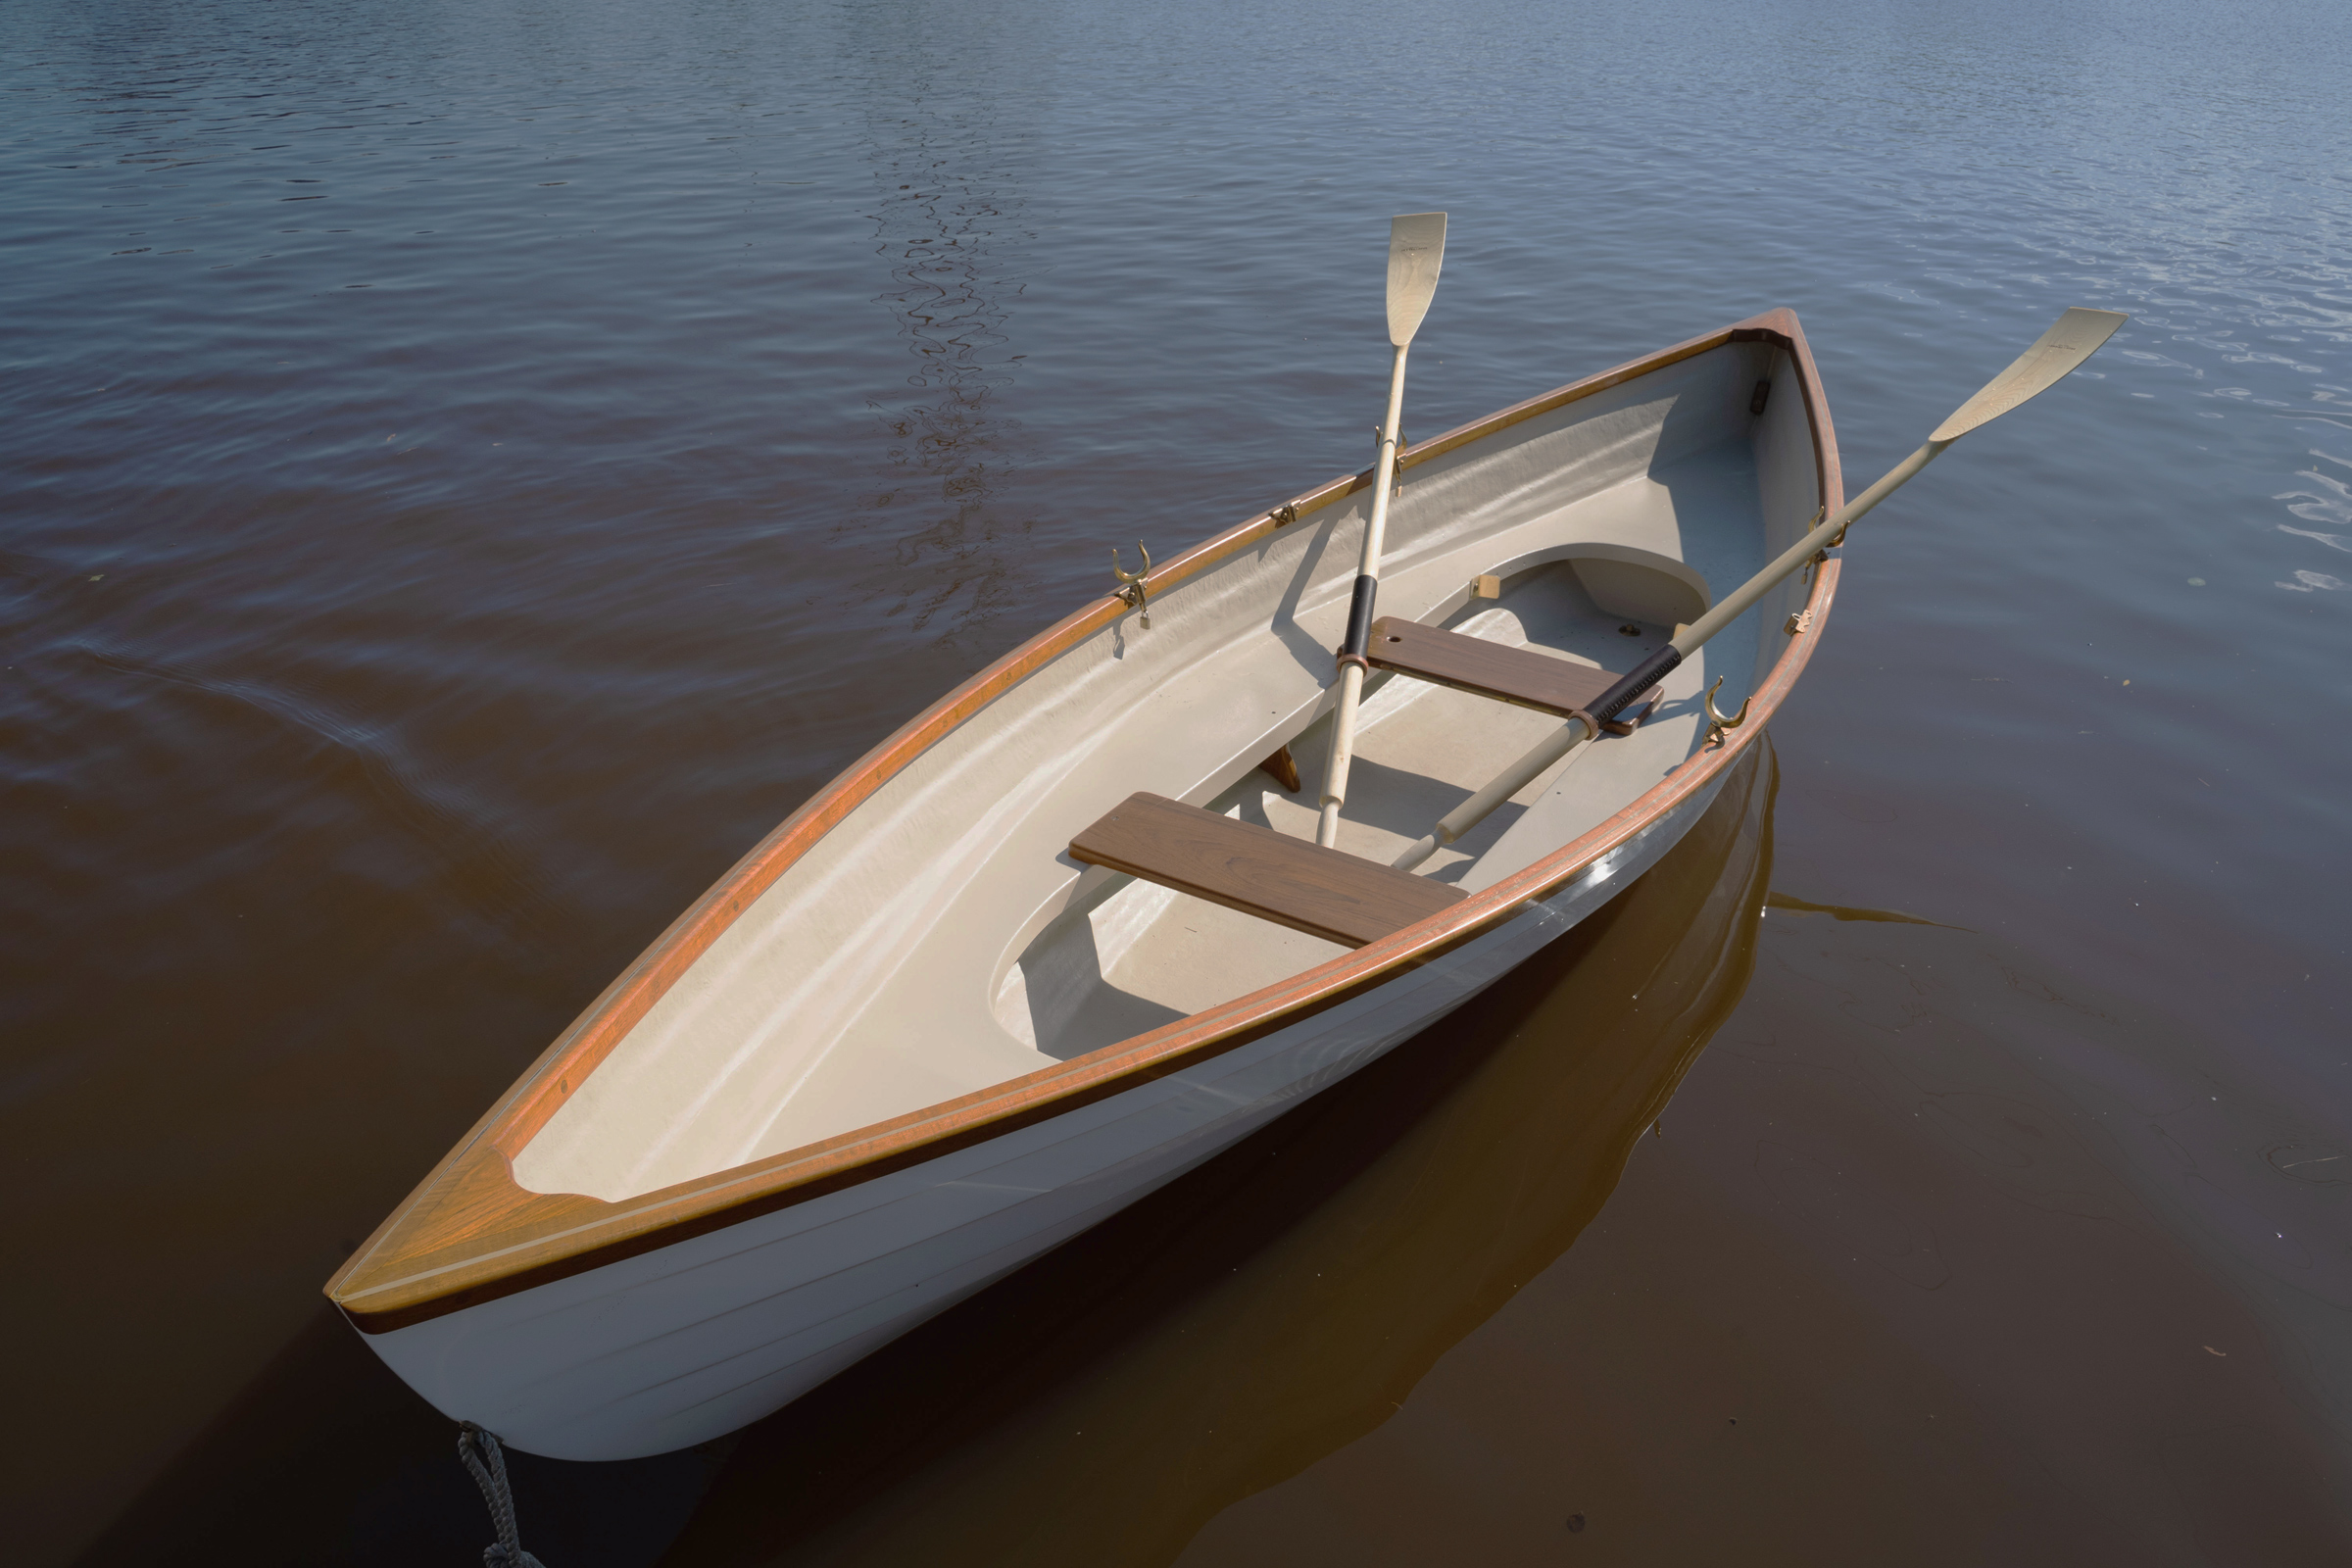
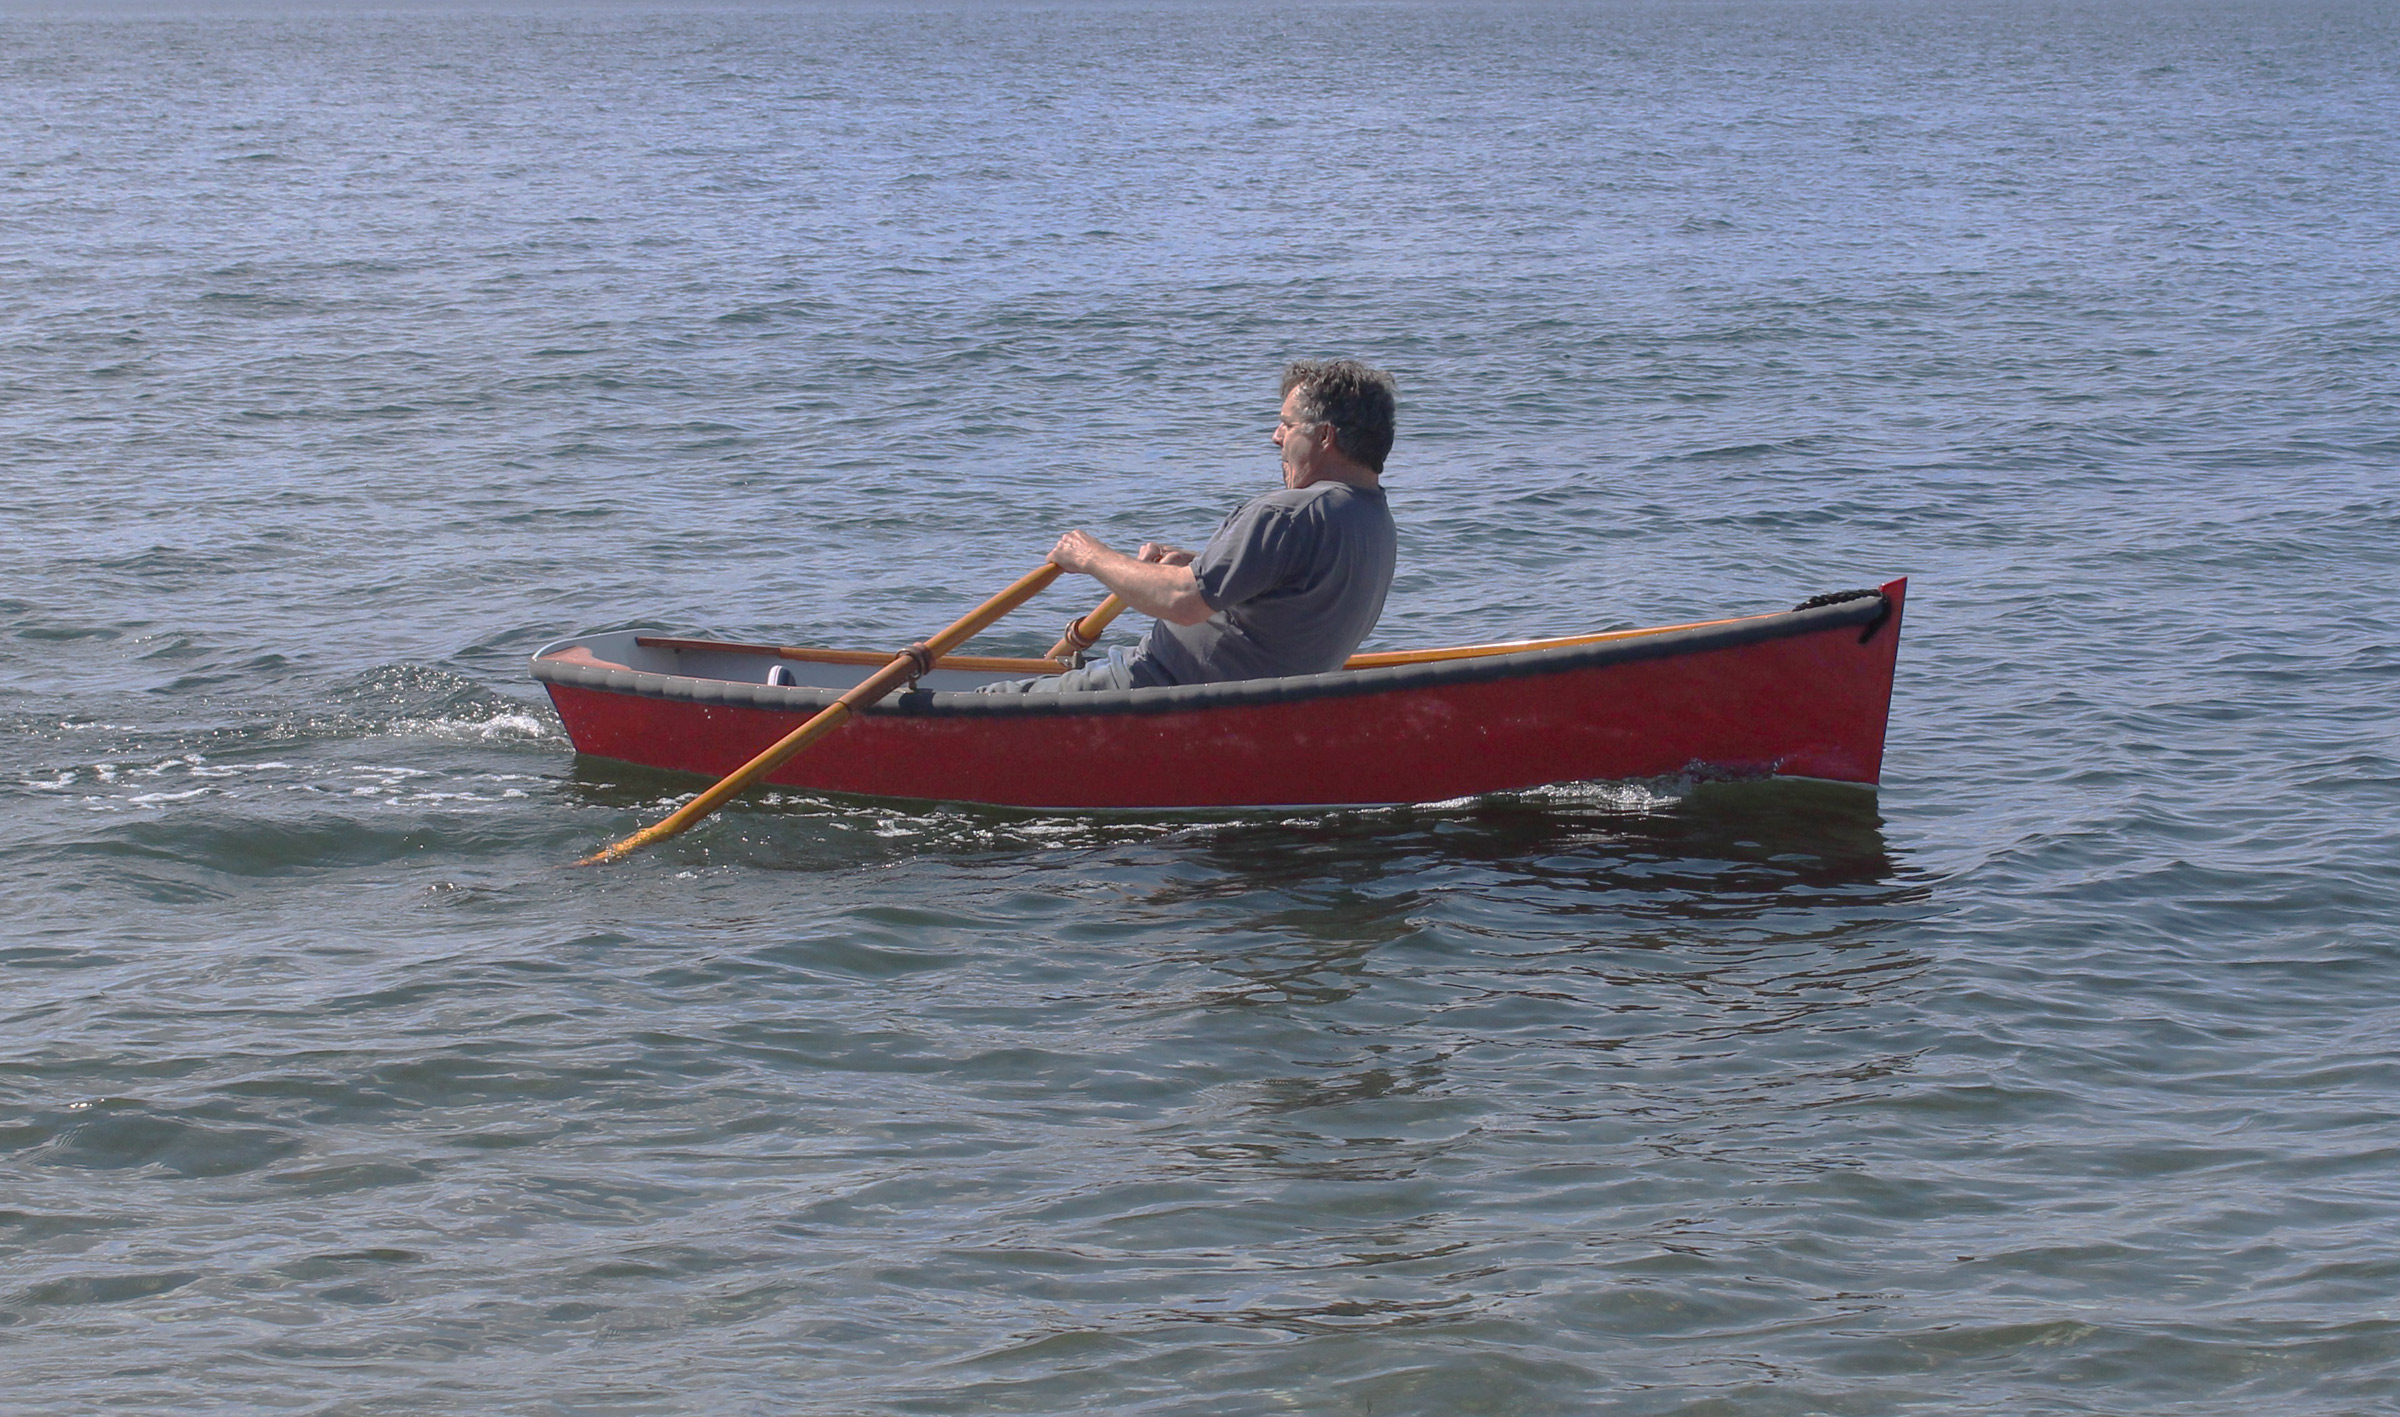
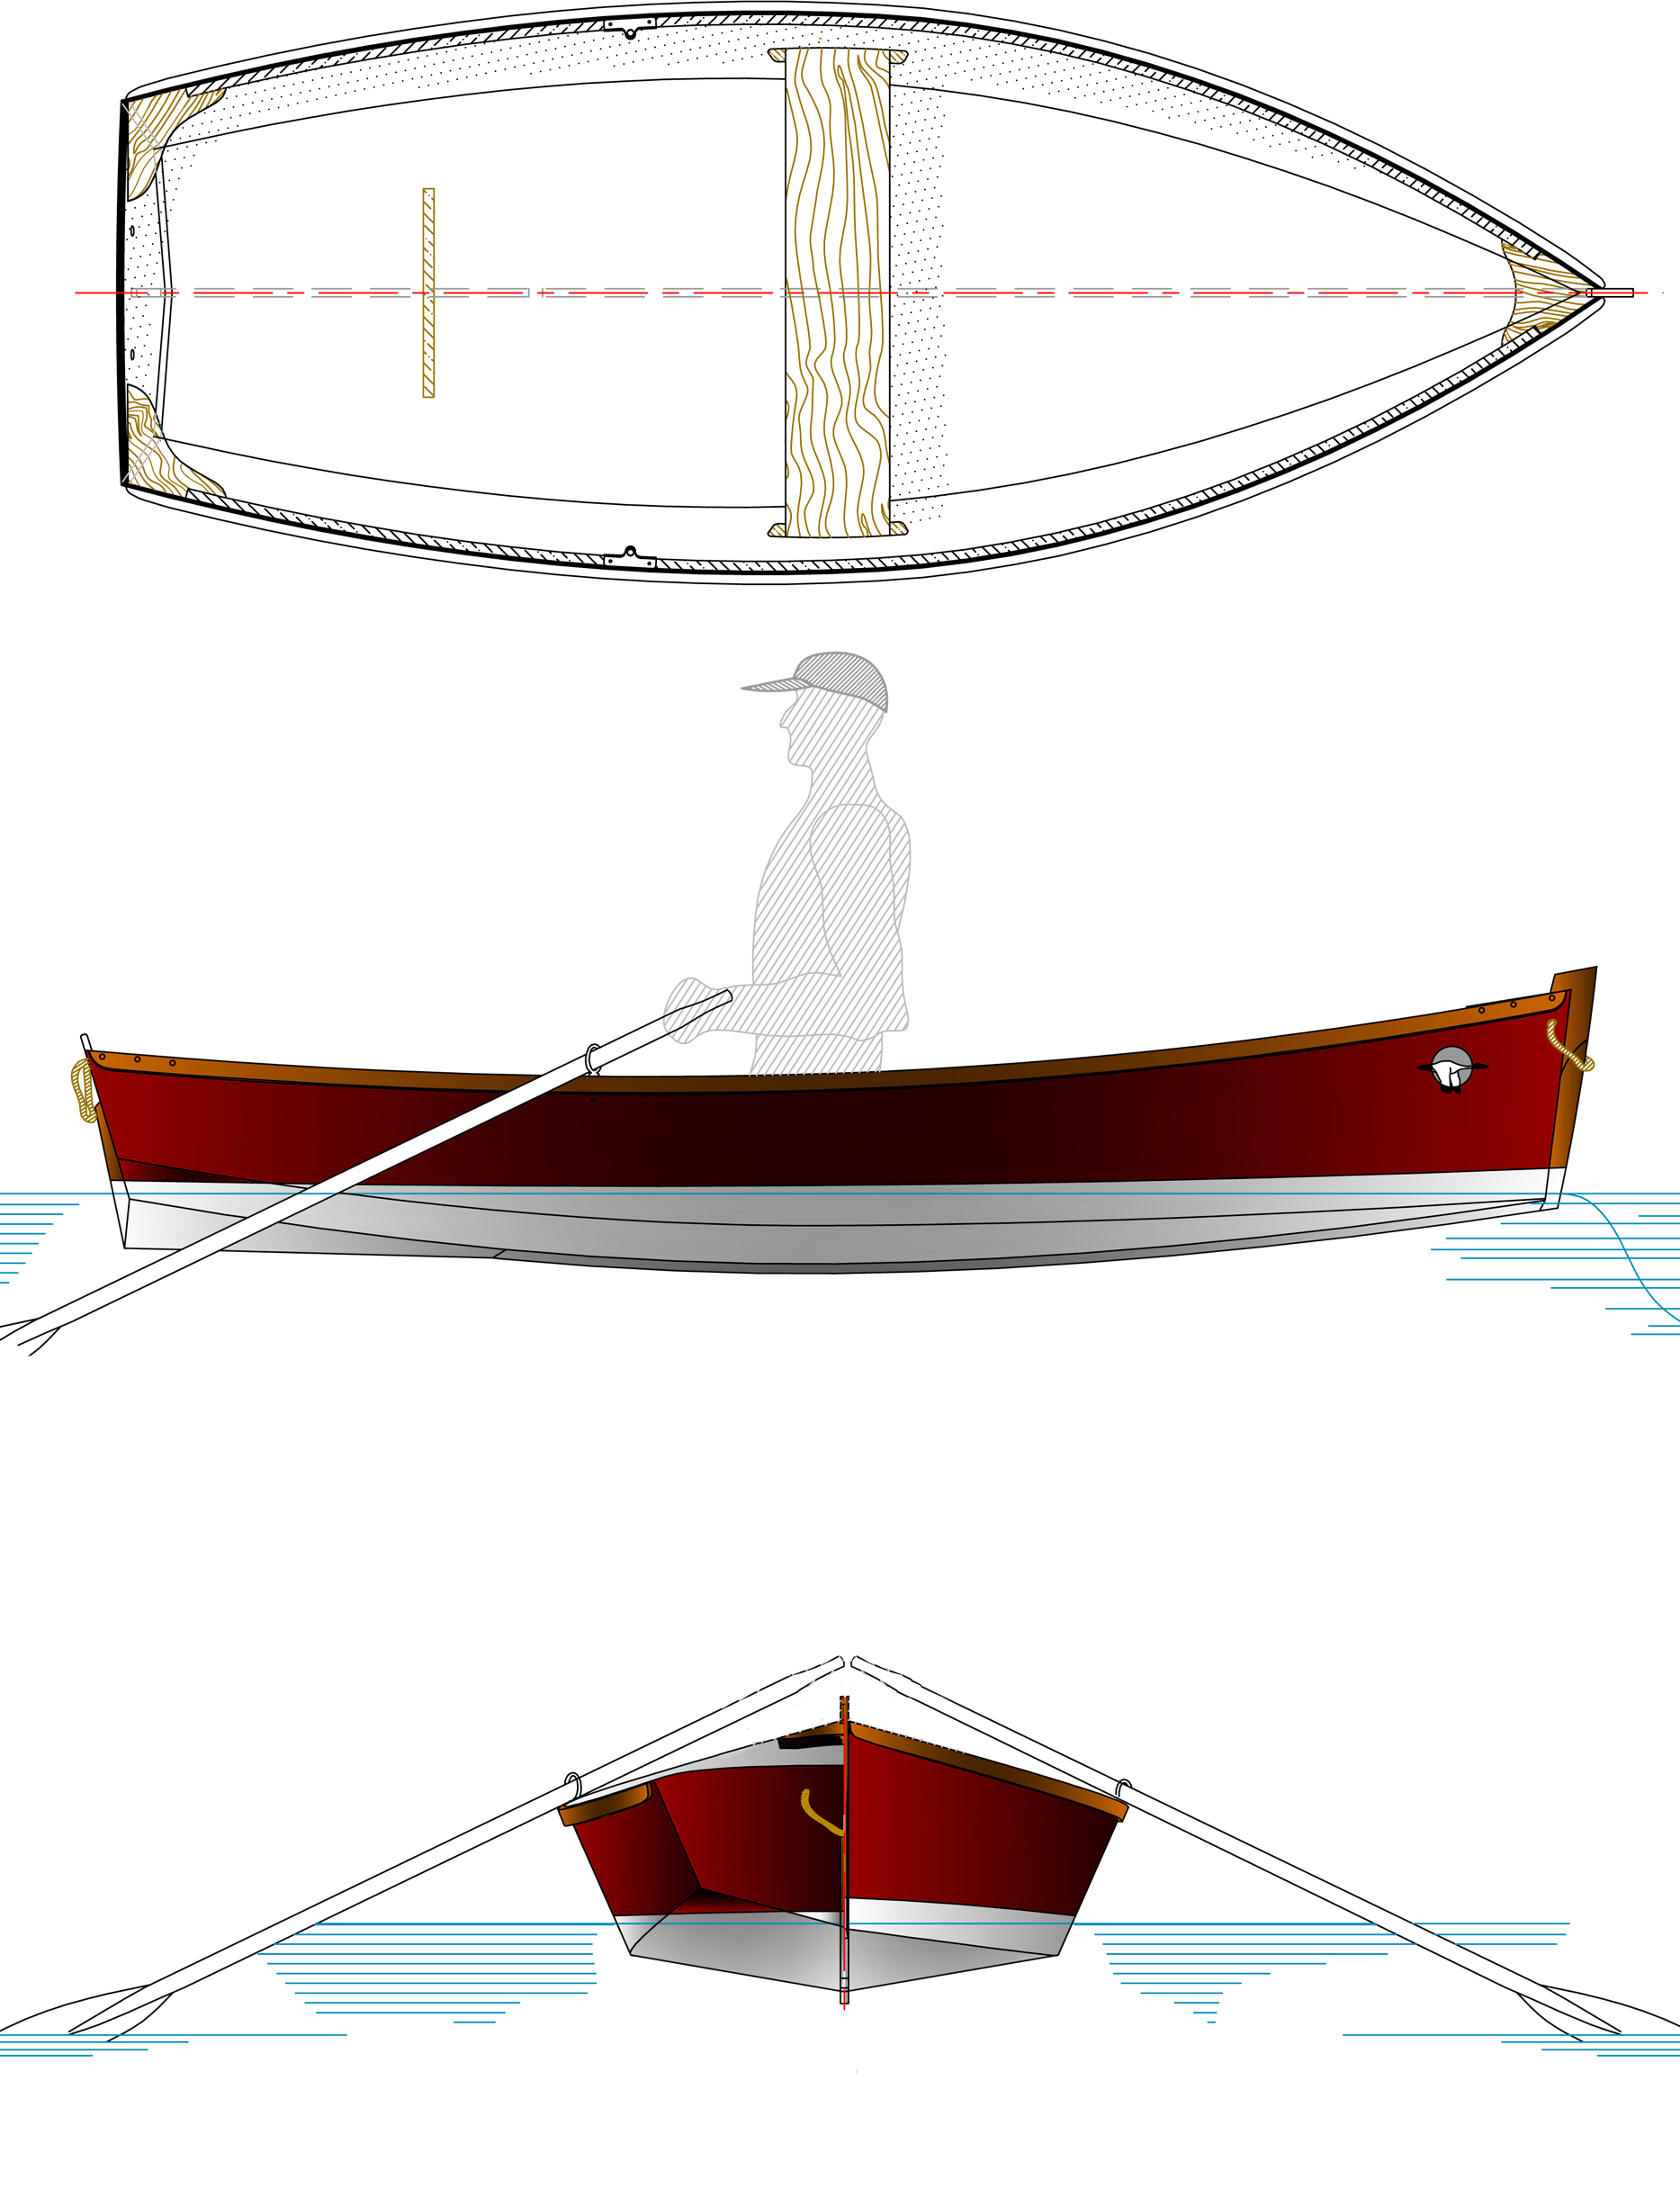
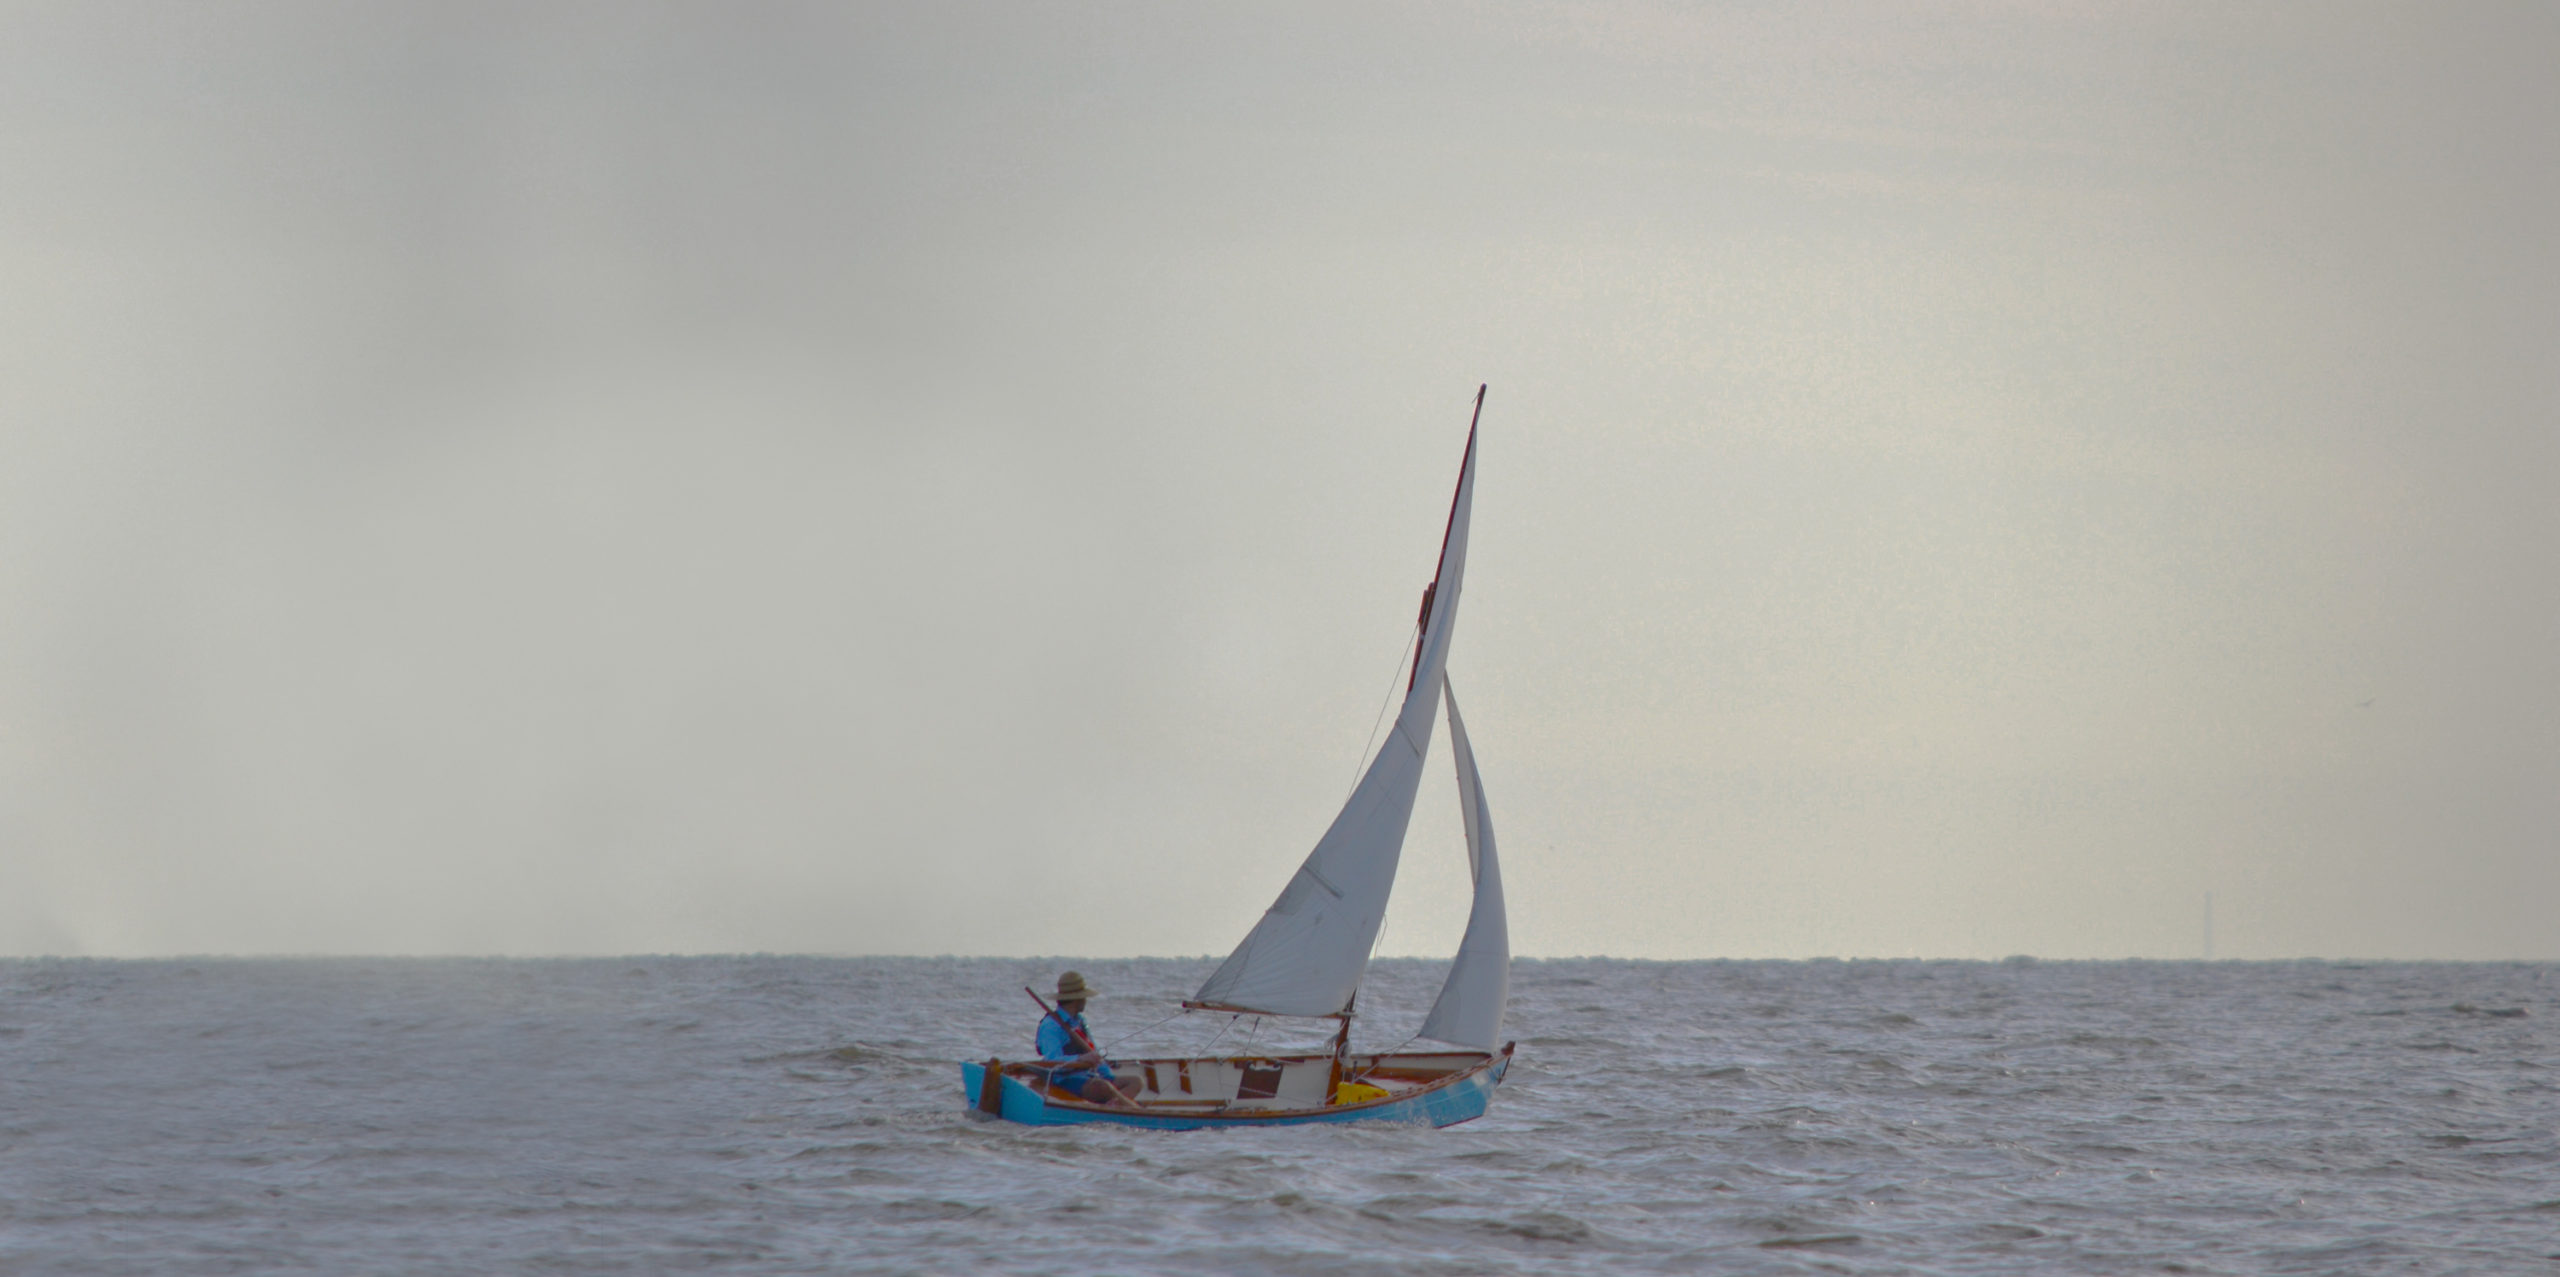
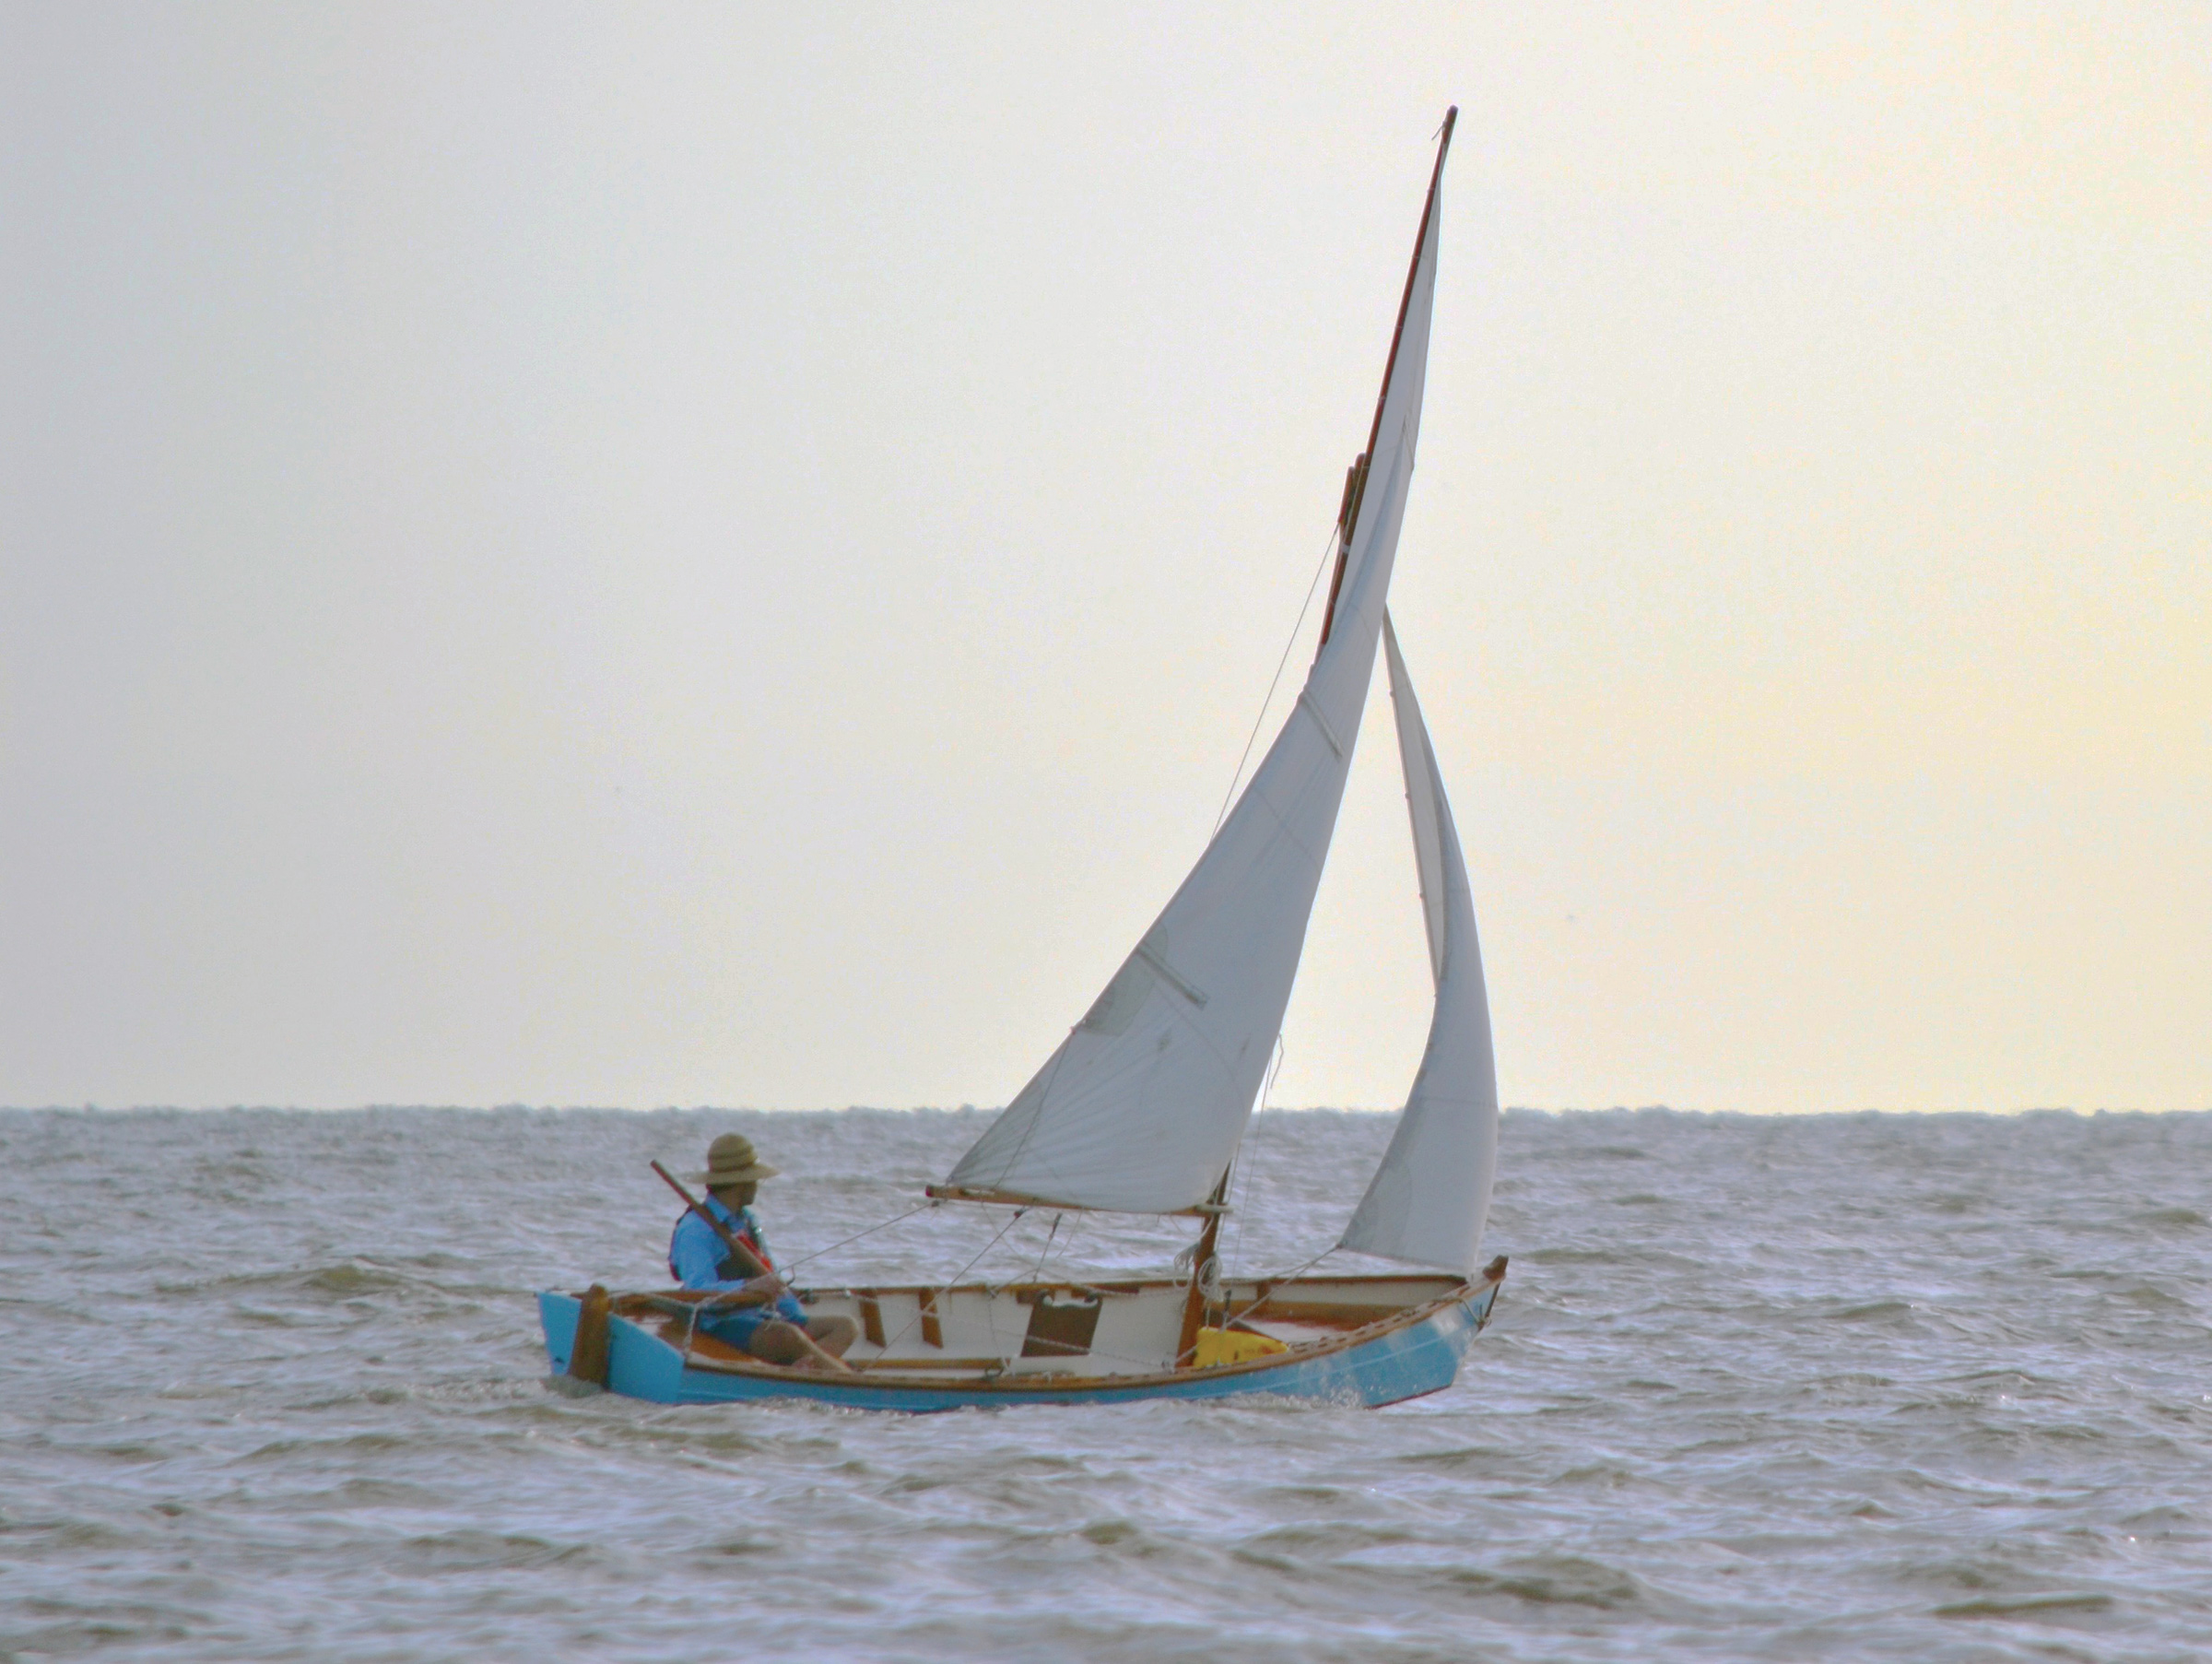
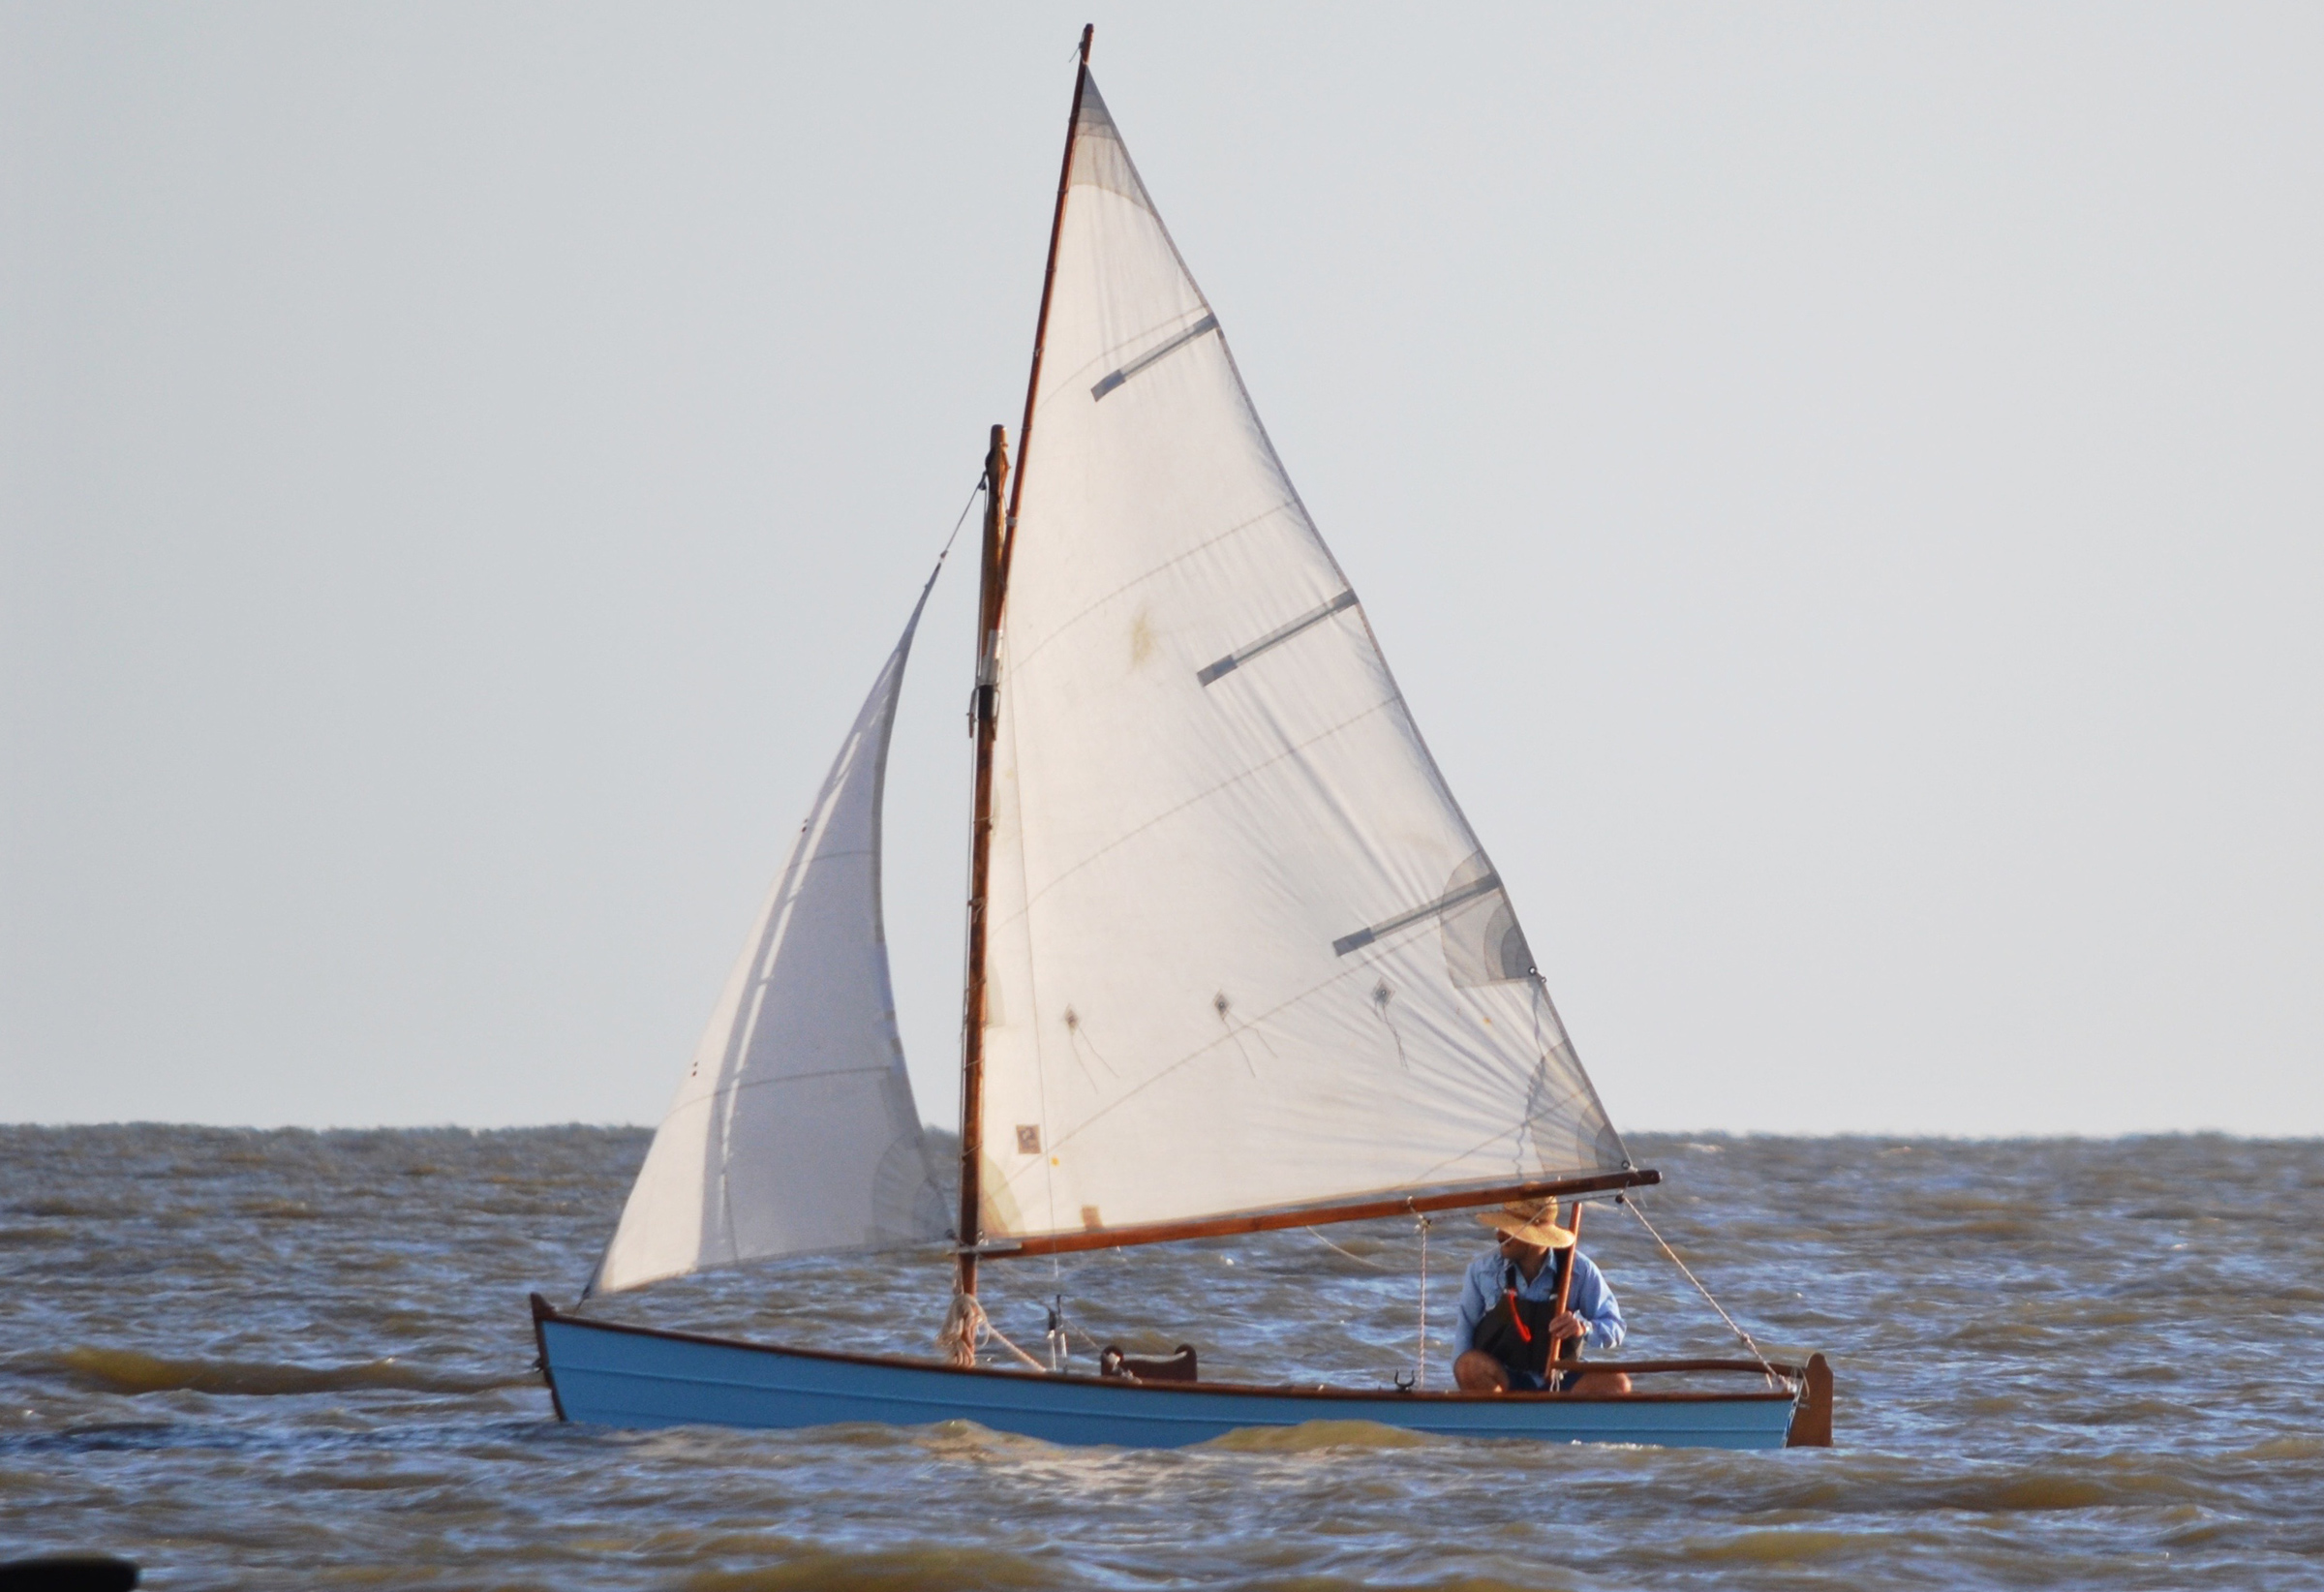
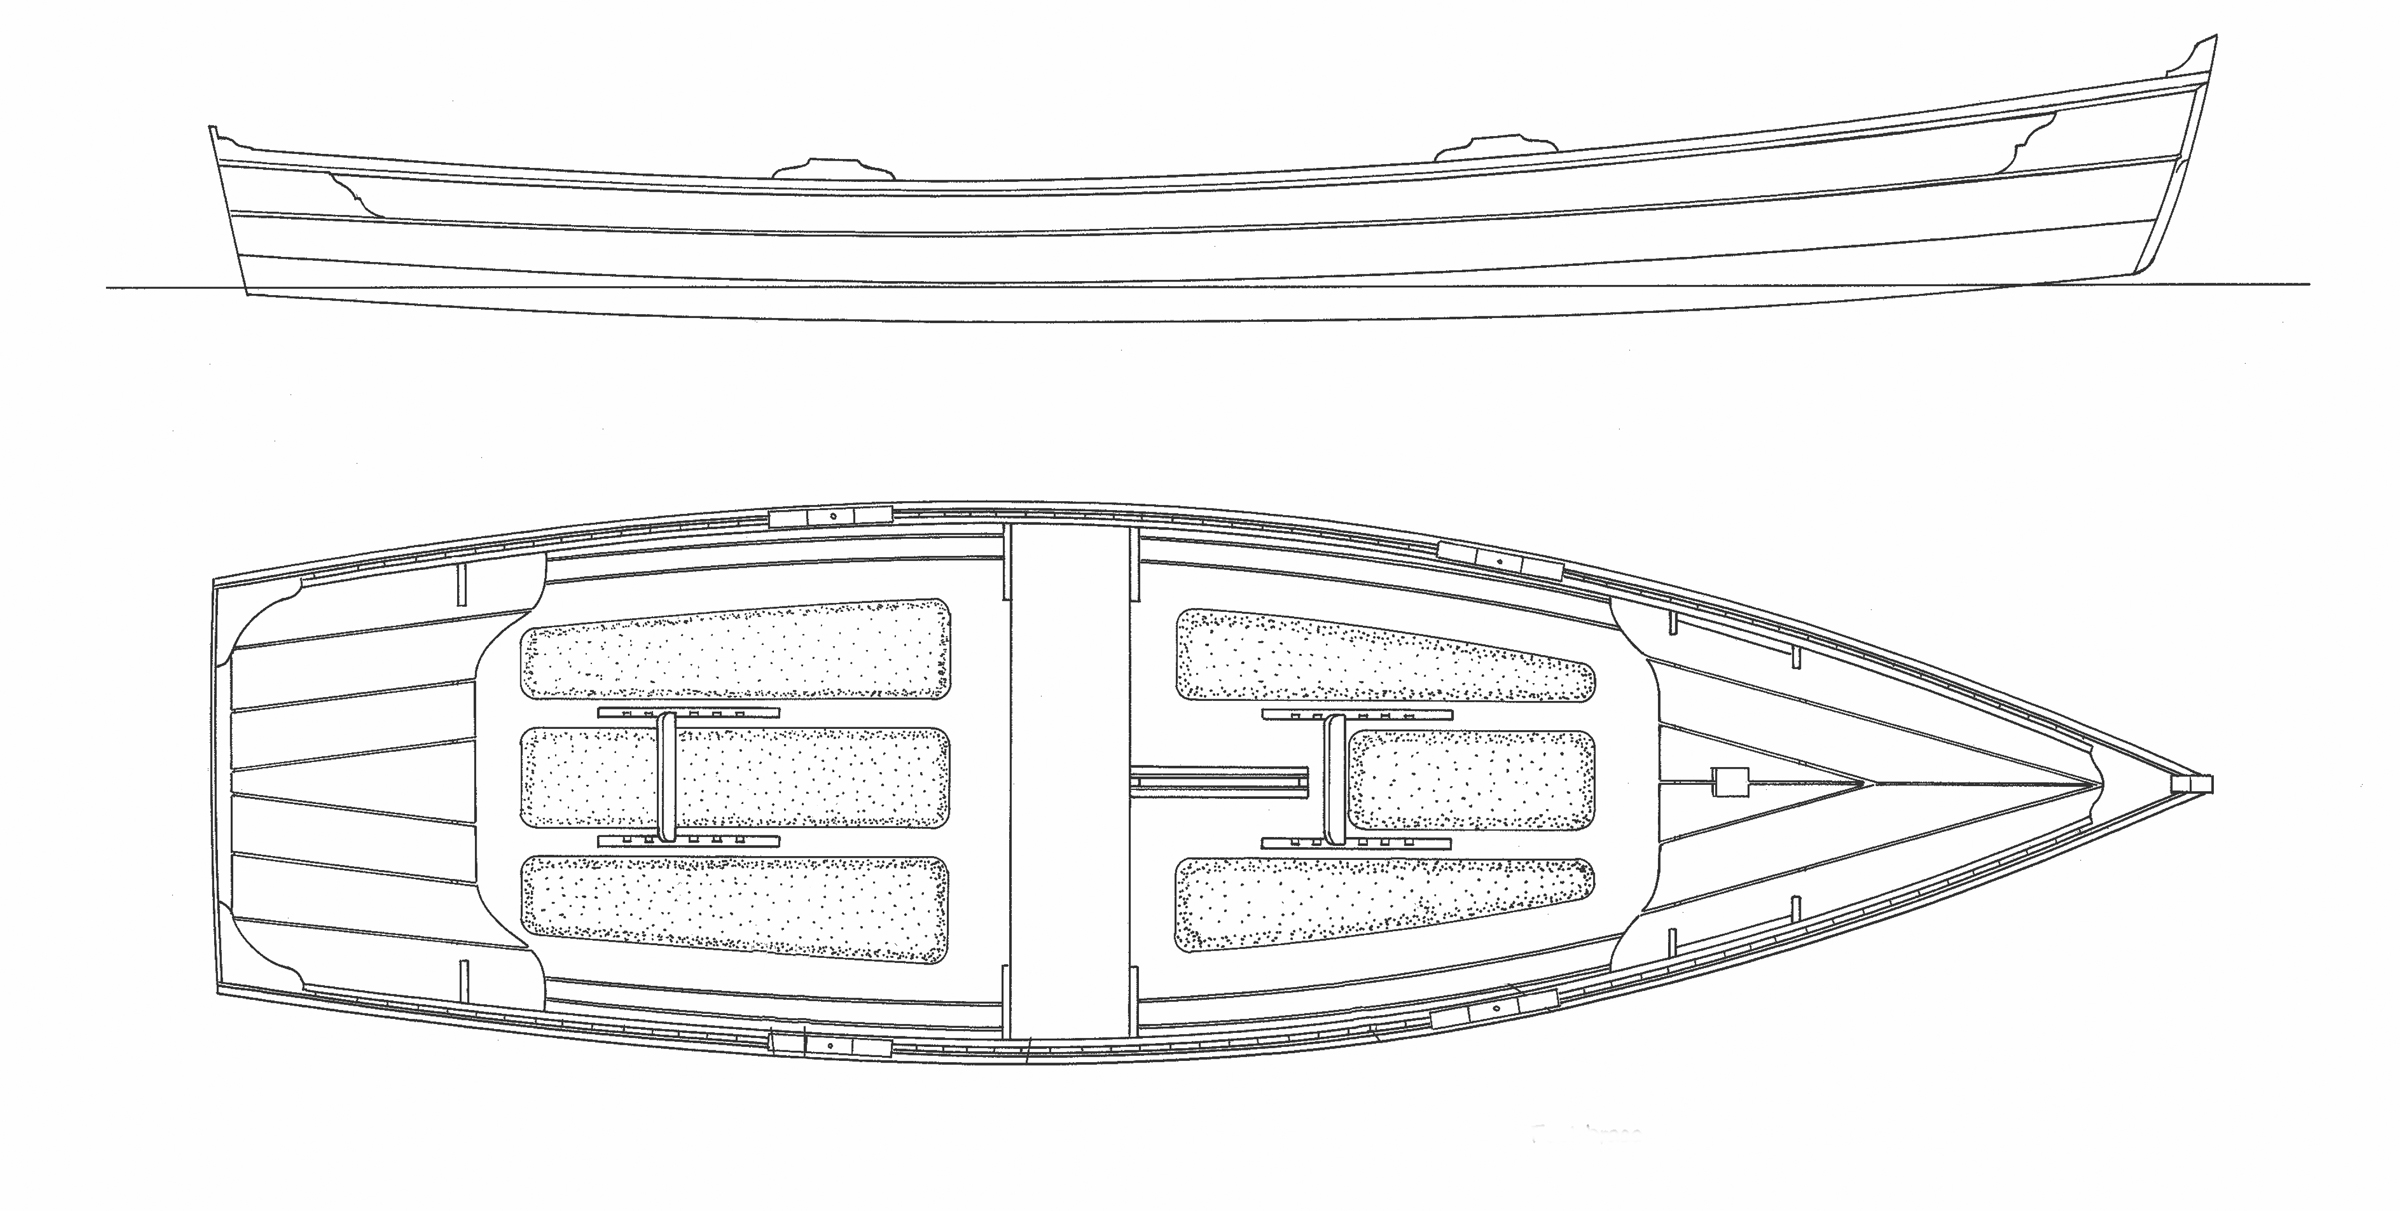
In his classic The Dory Book, John Gardner wrote, “The handsomest of all pulling dories is unquestionably the long, slim, but richly curving double-ender that originally came out of the Orne Street boat shop of William Henry Chamberlain of Marblehead.” Designed to take one or two hunters, or a hunter and his dog, to the offshore islands and marshes along the New England coast, the gunning dory had to be reasonably fast under oars, and capable of handling the sort of blustery fall weather that a duck hunter might encounter.
Photographs by Matthew Norman
The parallel sides of the deck opening allow the slip thwarts to be placed wherever they’re needed for rowing.
My home waters of Sheboygan, Wisconsin, are halfway up the west coast of Lake Michigan. Within minutes of launching, you’re outside of the Sheboygan breakwaters, and out in the waves and winds fetching up from the shores of Chicago, 150 miles to the south. It can really rock out there; the sailors love it. I wanted a boat capable of being rowed by one or two, offshore, in any sort of reasonable weather. Having grown up on the shores of Lake Superior in Duluth, and having worked in the Merchant Marine on the Great Lakes as a young man, I’m very aware of the power of the water. Seaworthiness was at the top of my list of requirements. And, well, the boat had to be beautiful.
My search for a boat led me to Crawford Boat Building, in Marshfield, Massachusetts. I had read of the well-known Crawford Melonseed, and I discovered that Roger Crawford also offers a Gunning Dory. The 15′ double-ender met my specifications: fiberglass, with enough wood trim to highlight the lovely lines of the hull, and the heritage of an open-water dory. Roger responded enthusiastically to my email query and, in autumn of 2019, he agreed to build me a Gunning Dory.
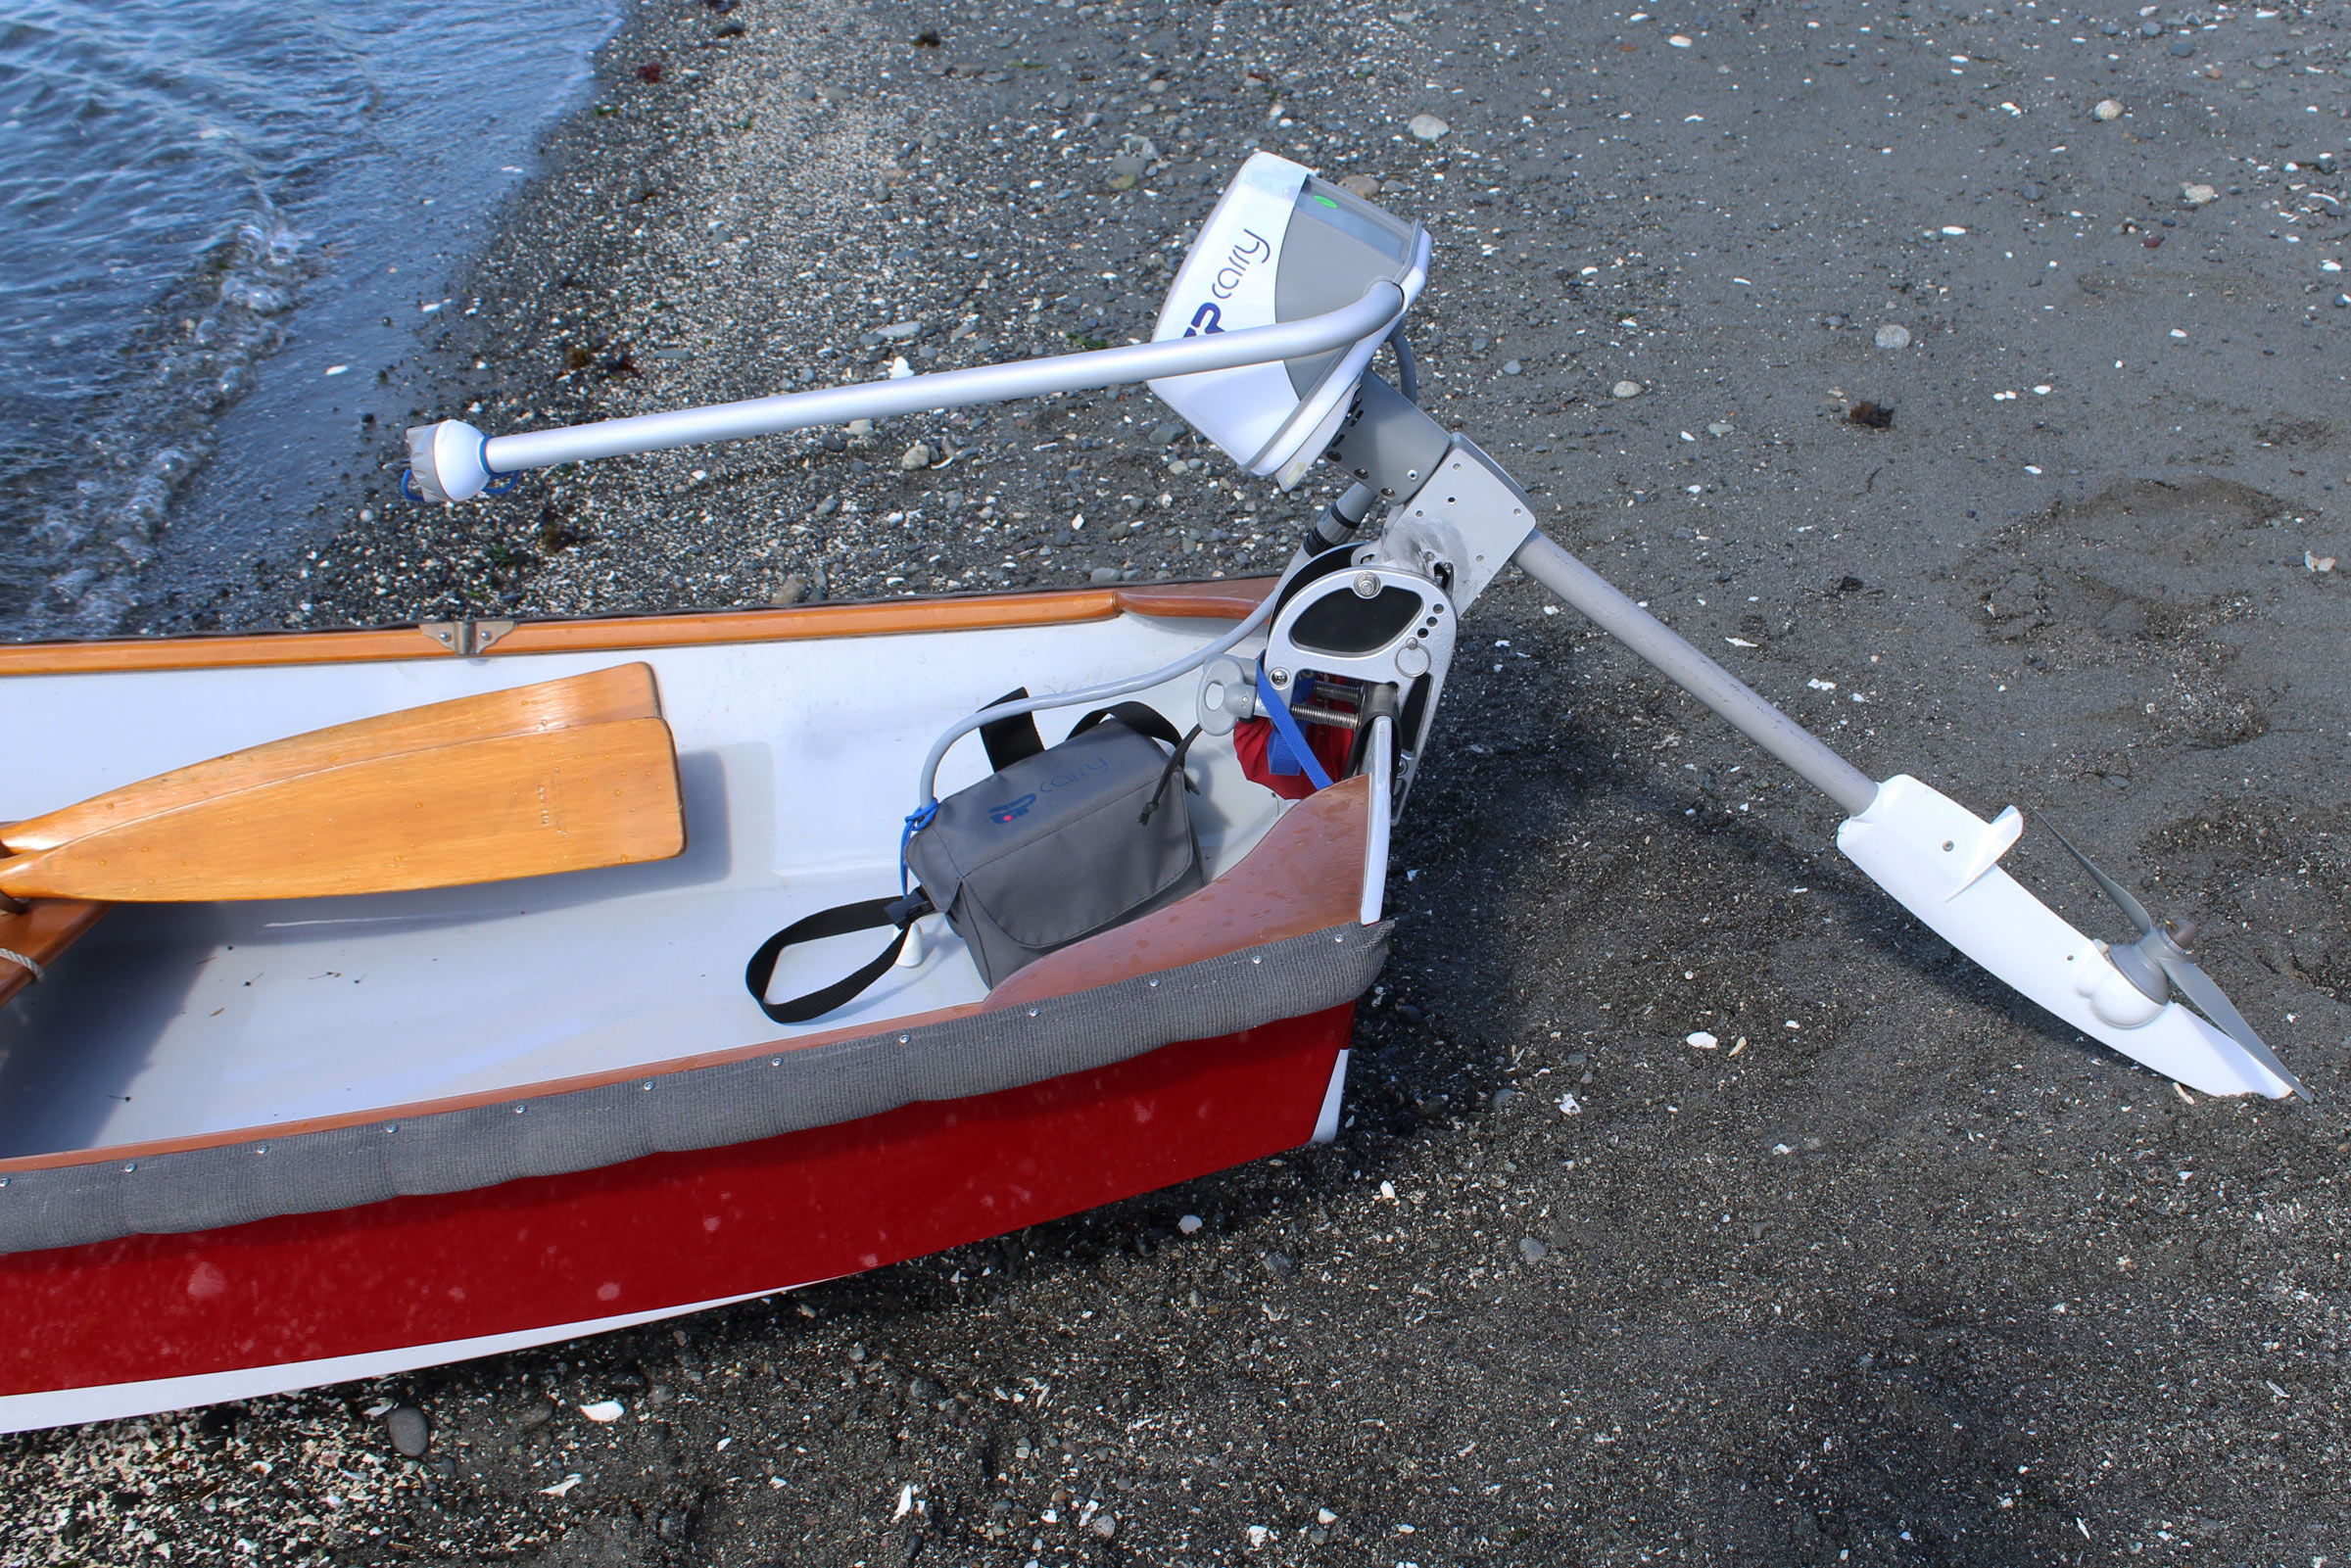
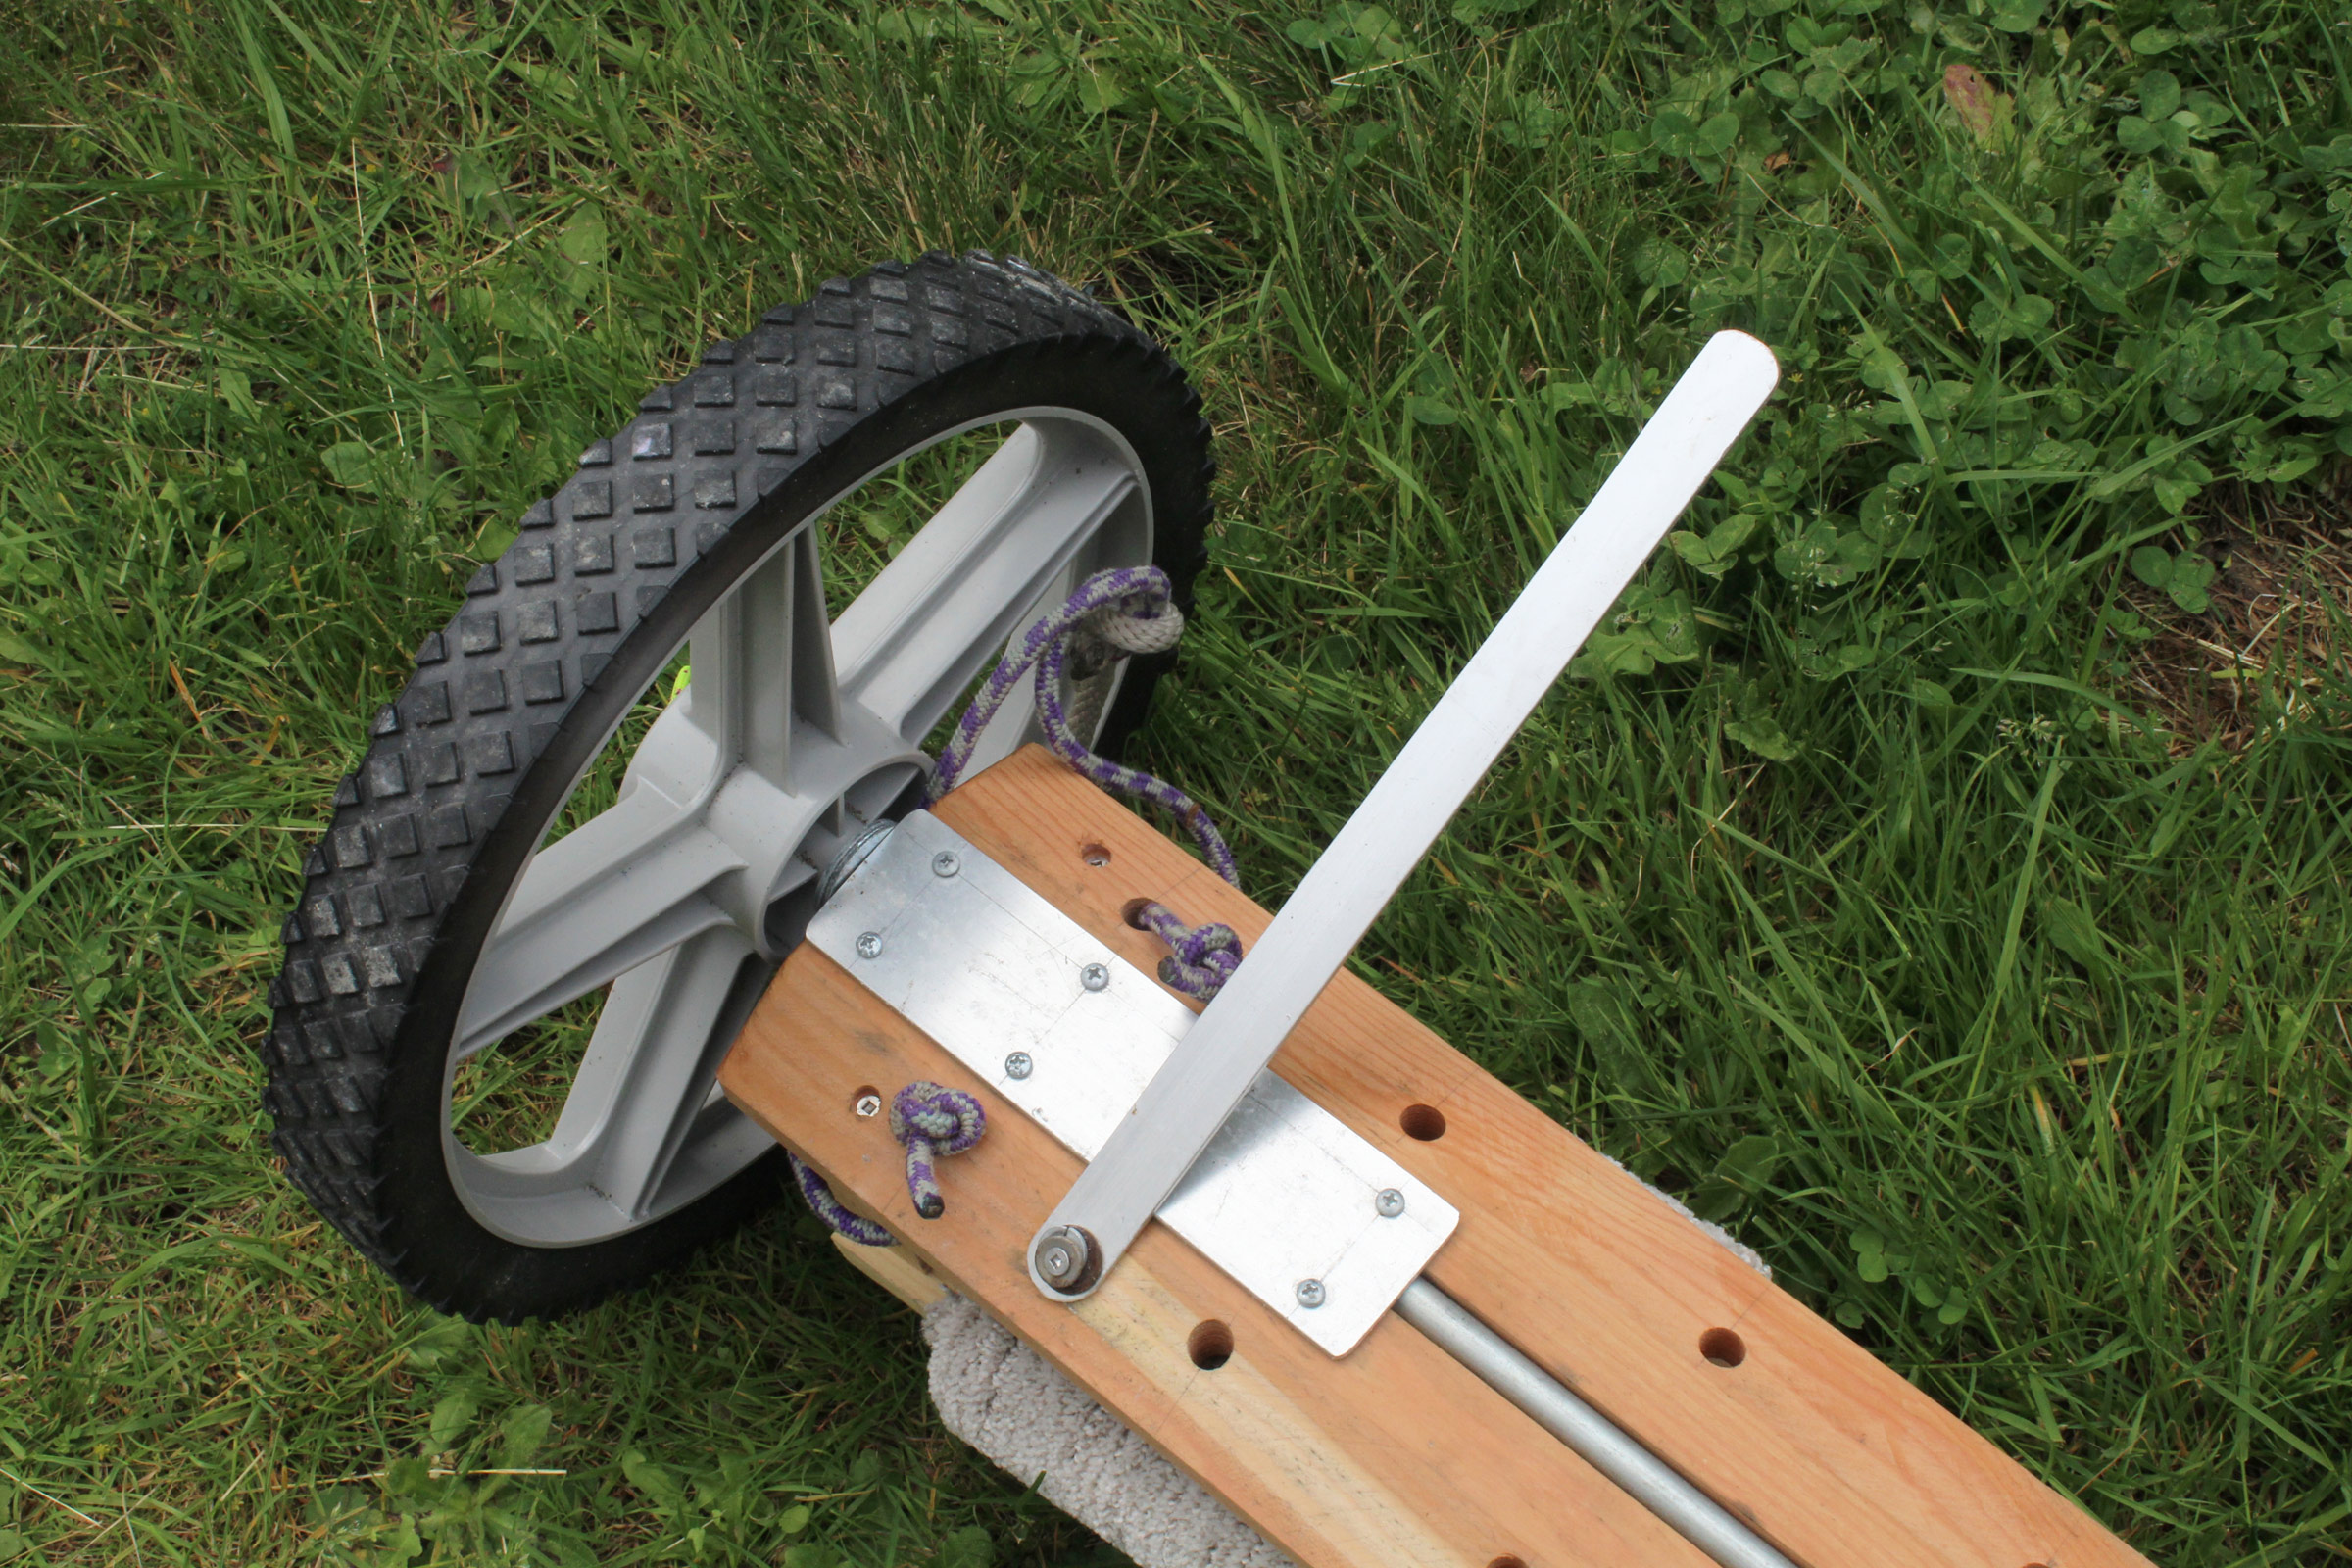
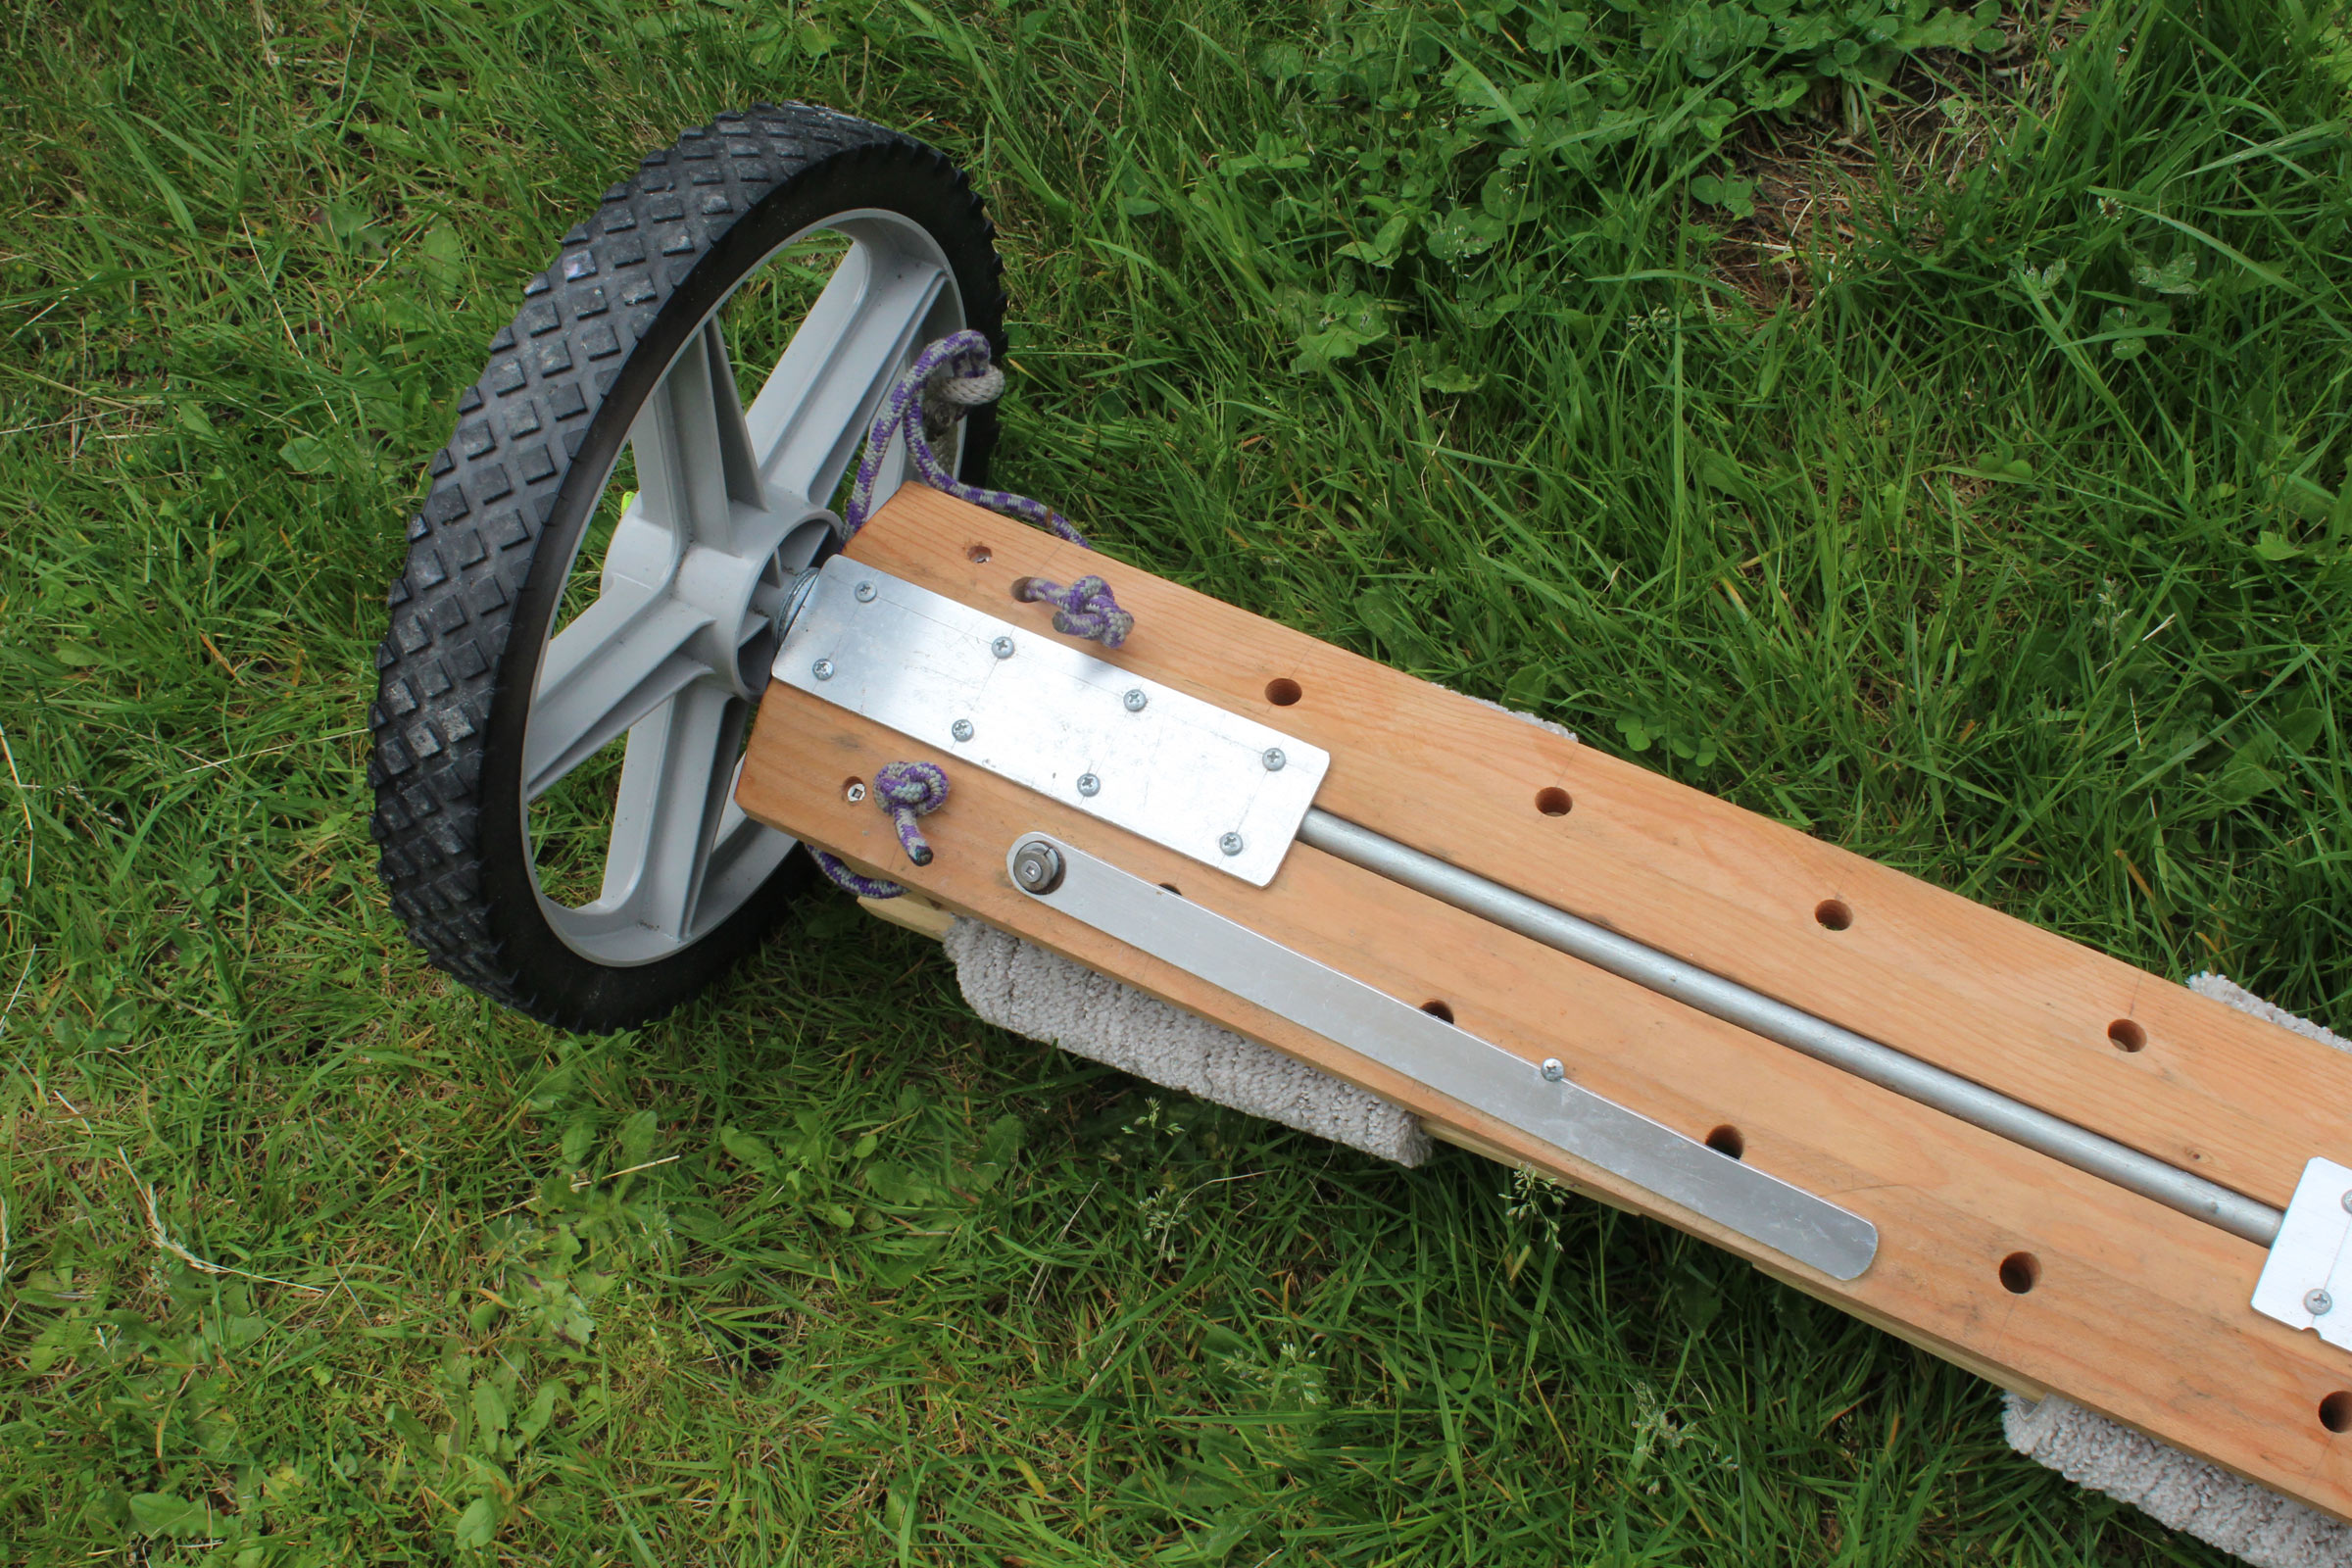
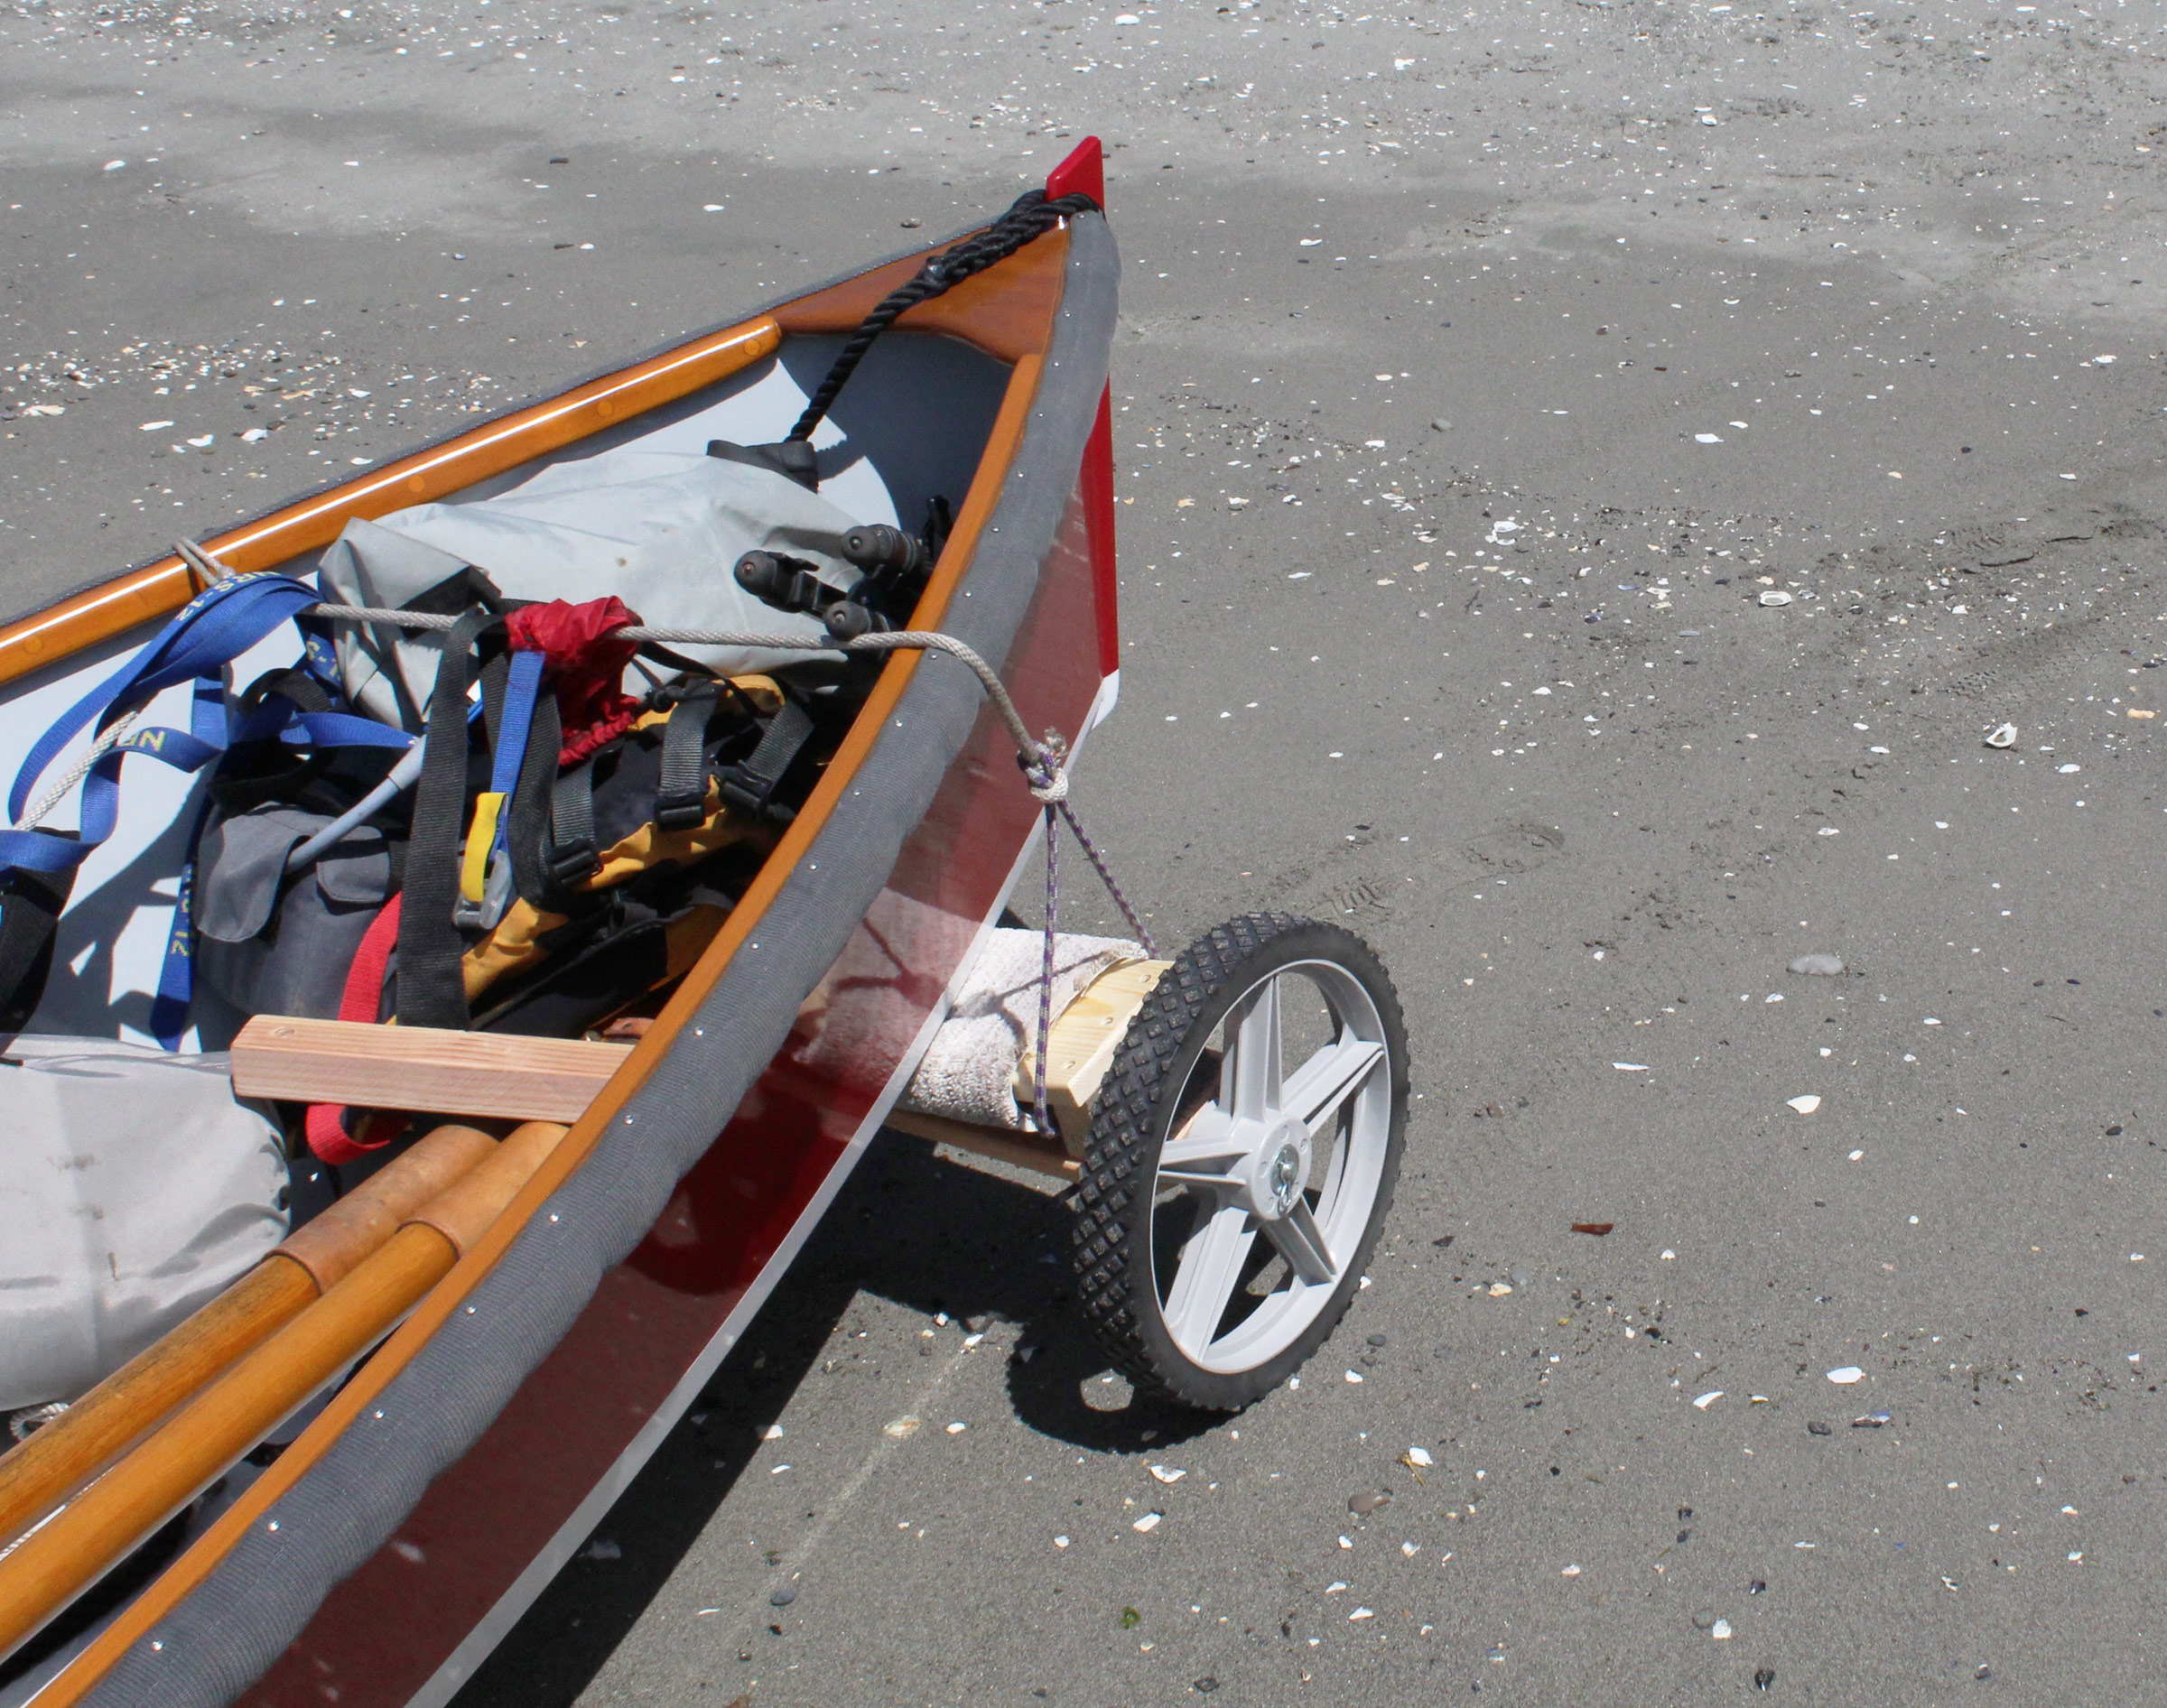
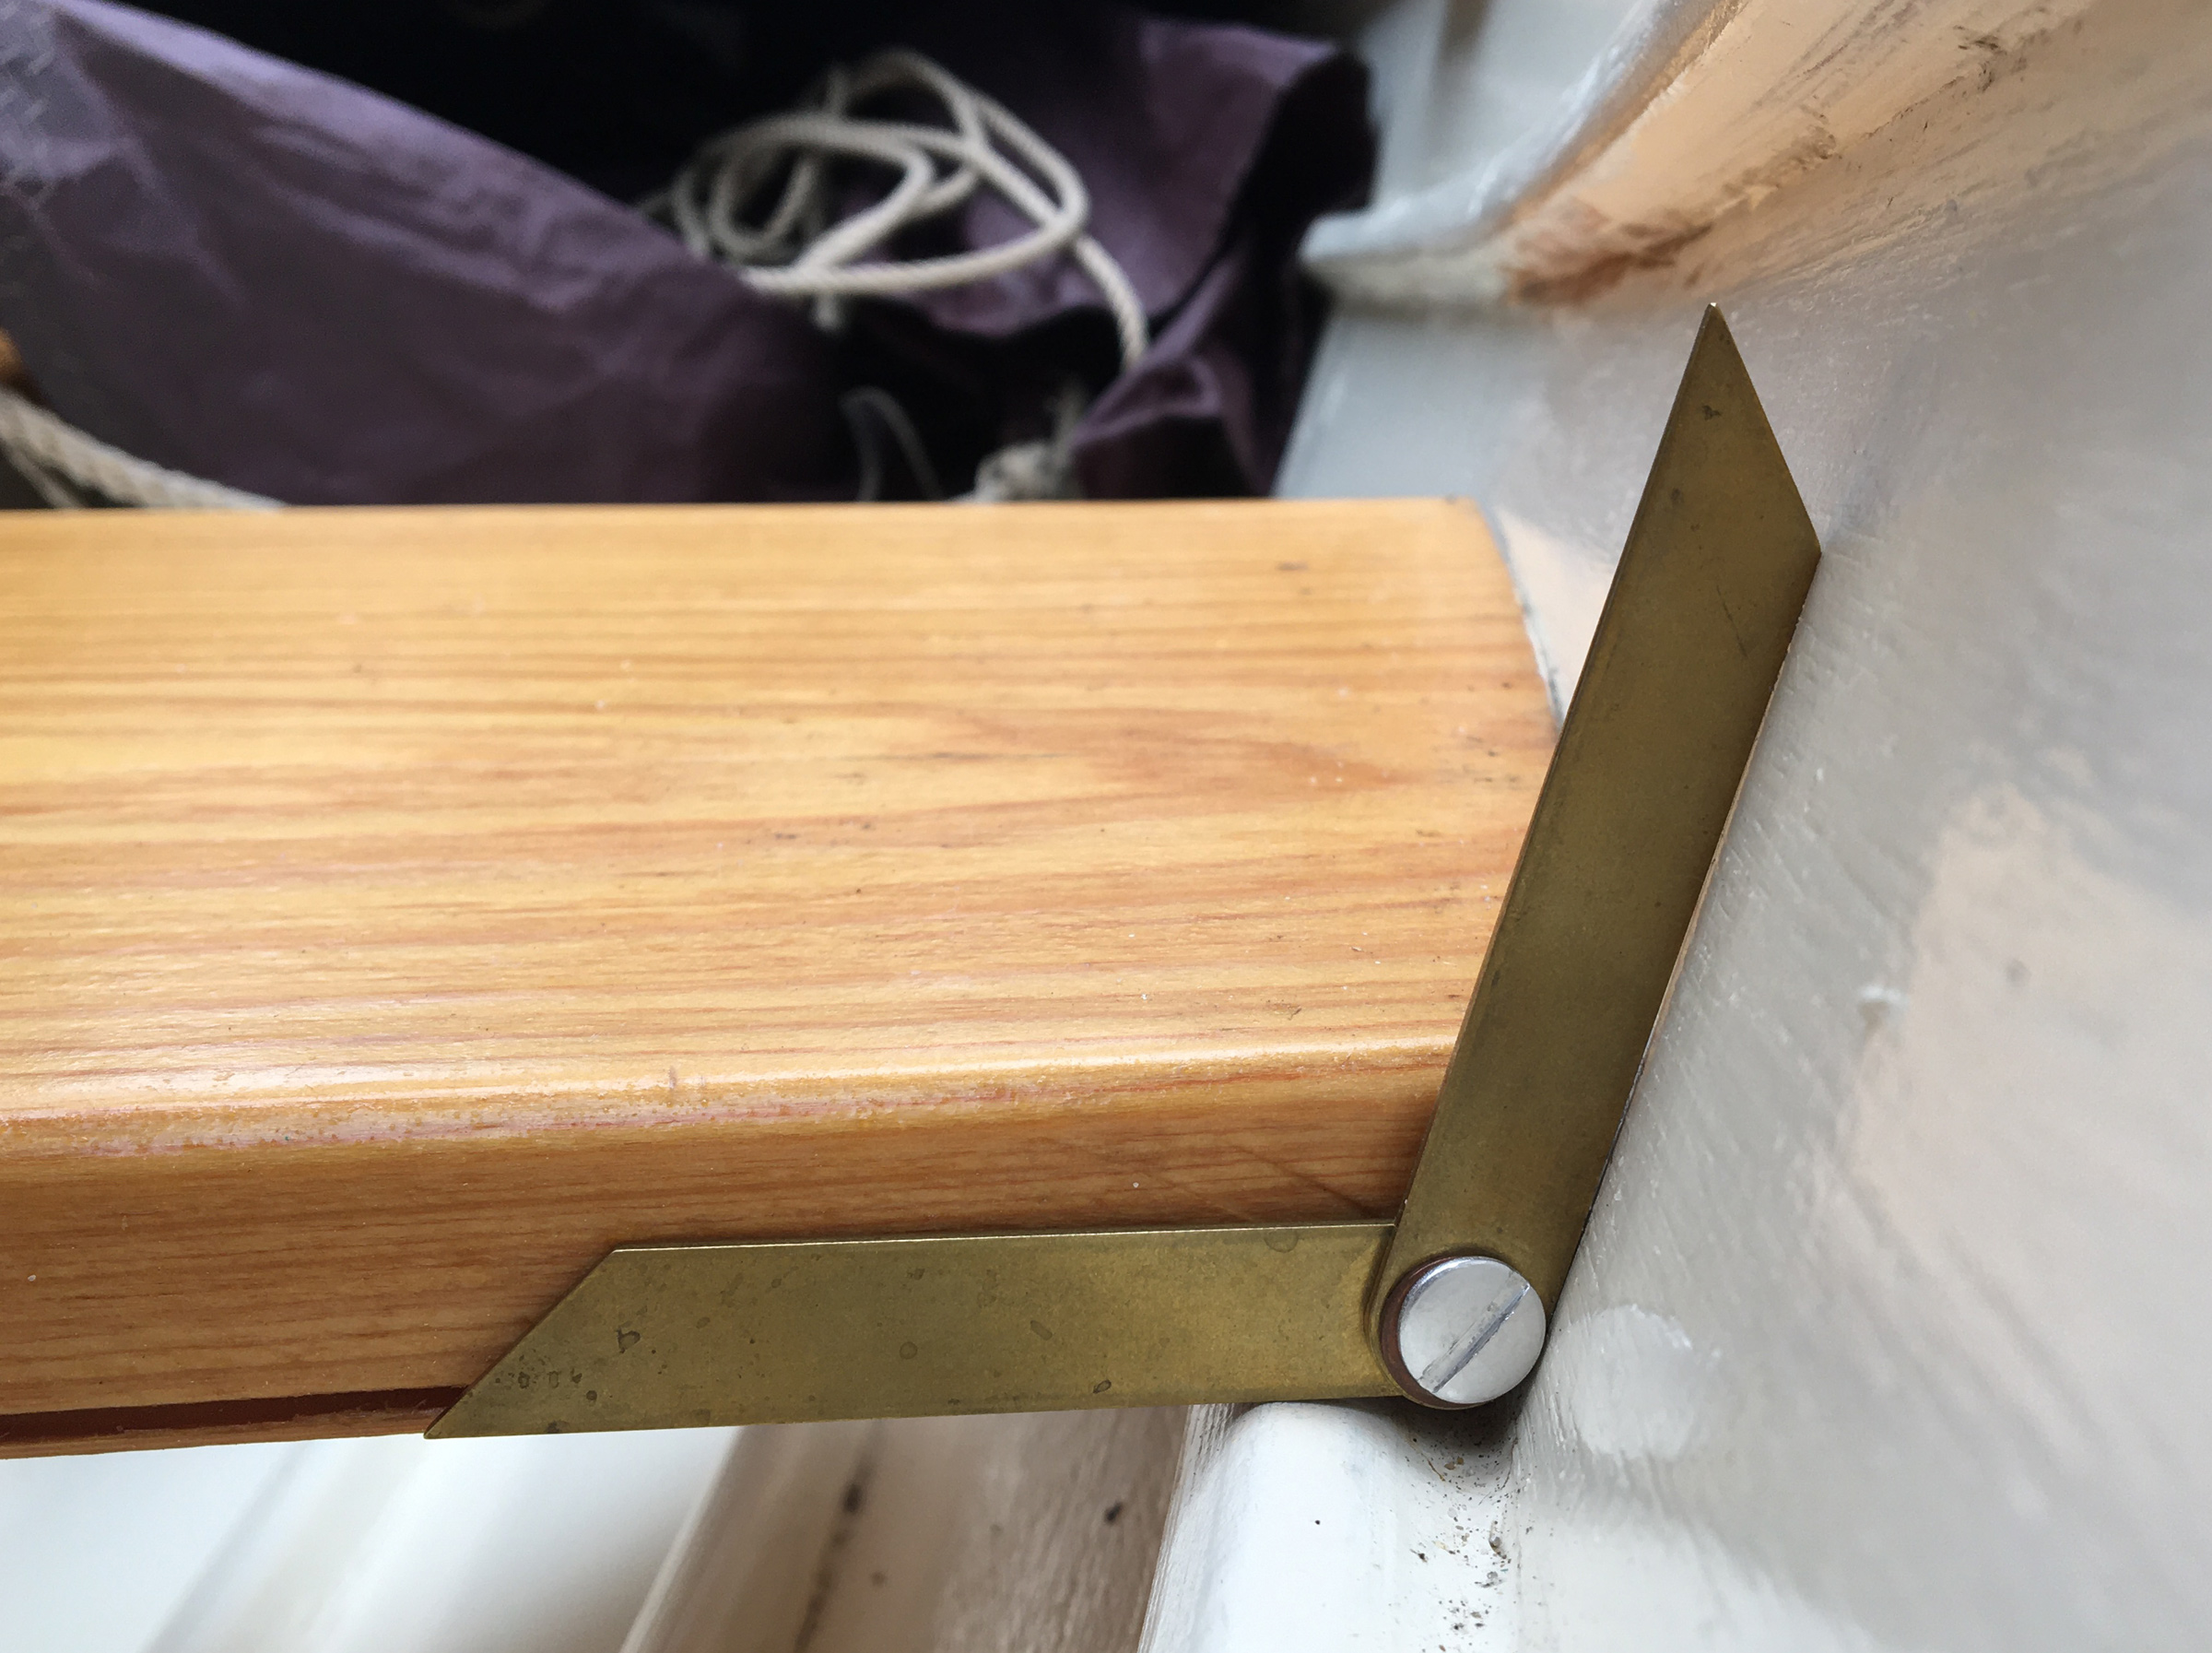
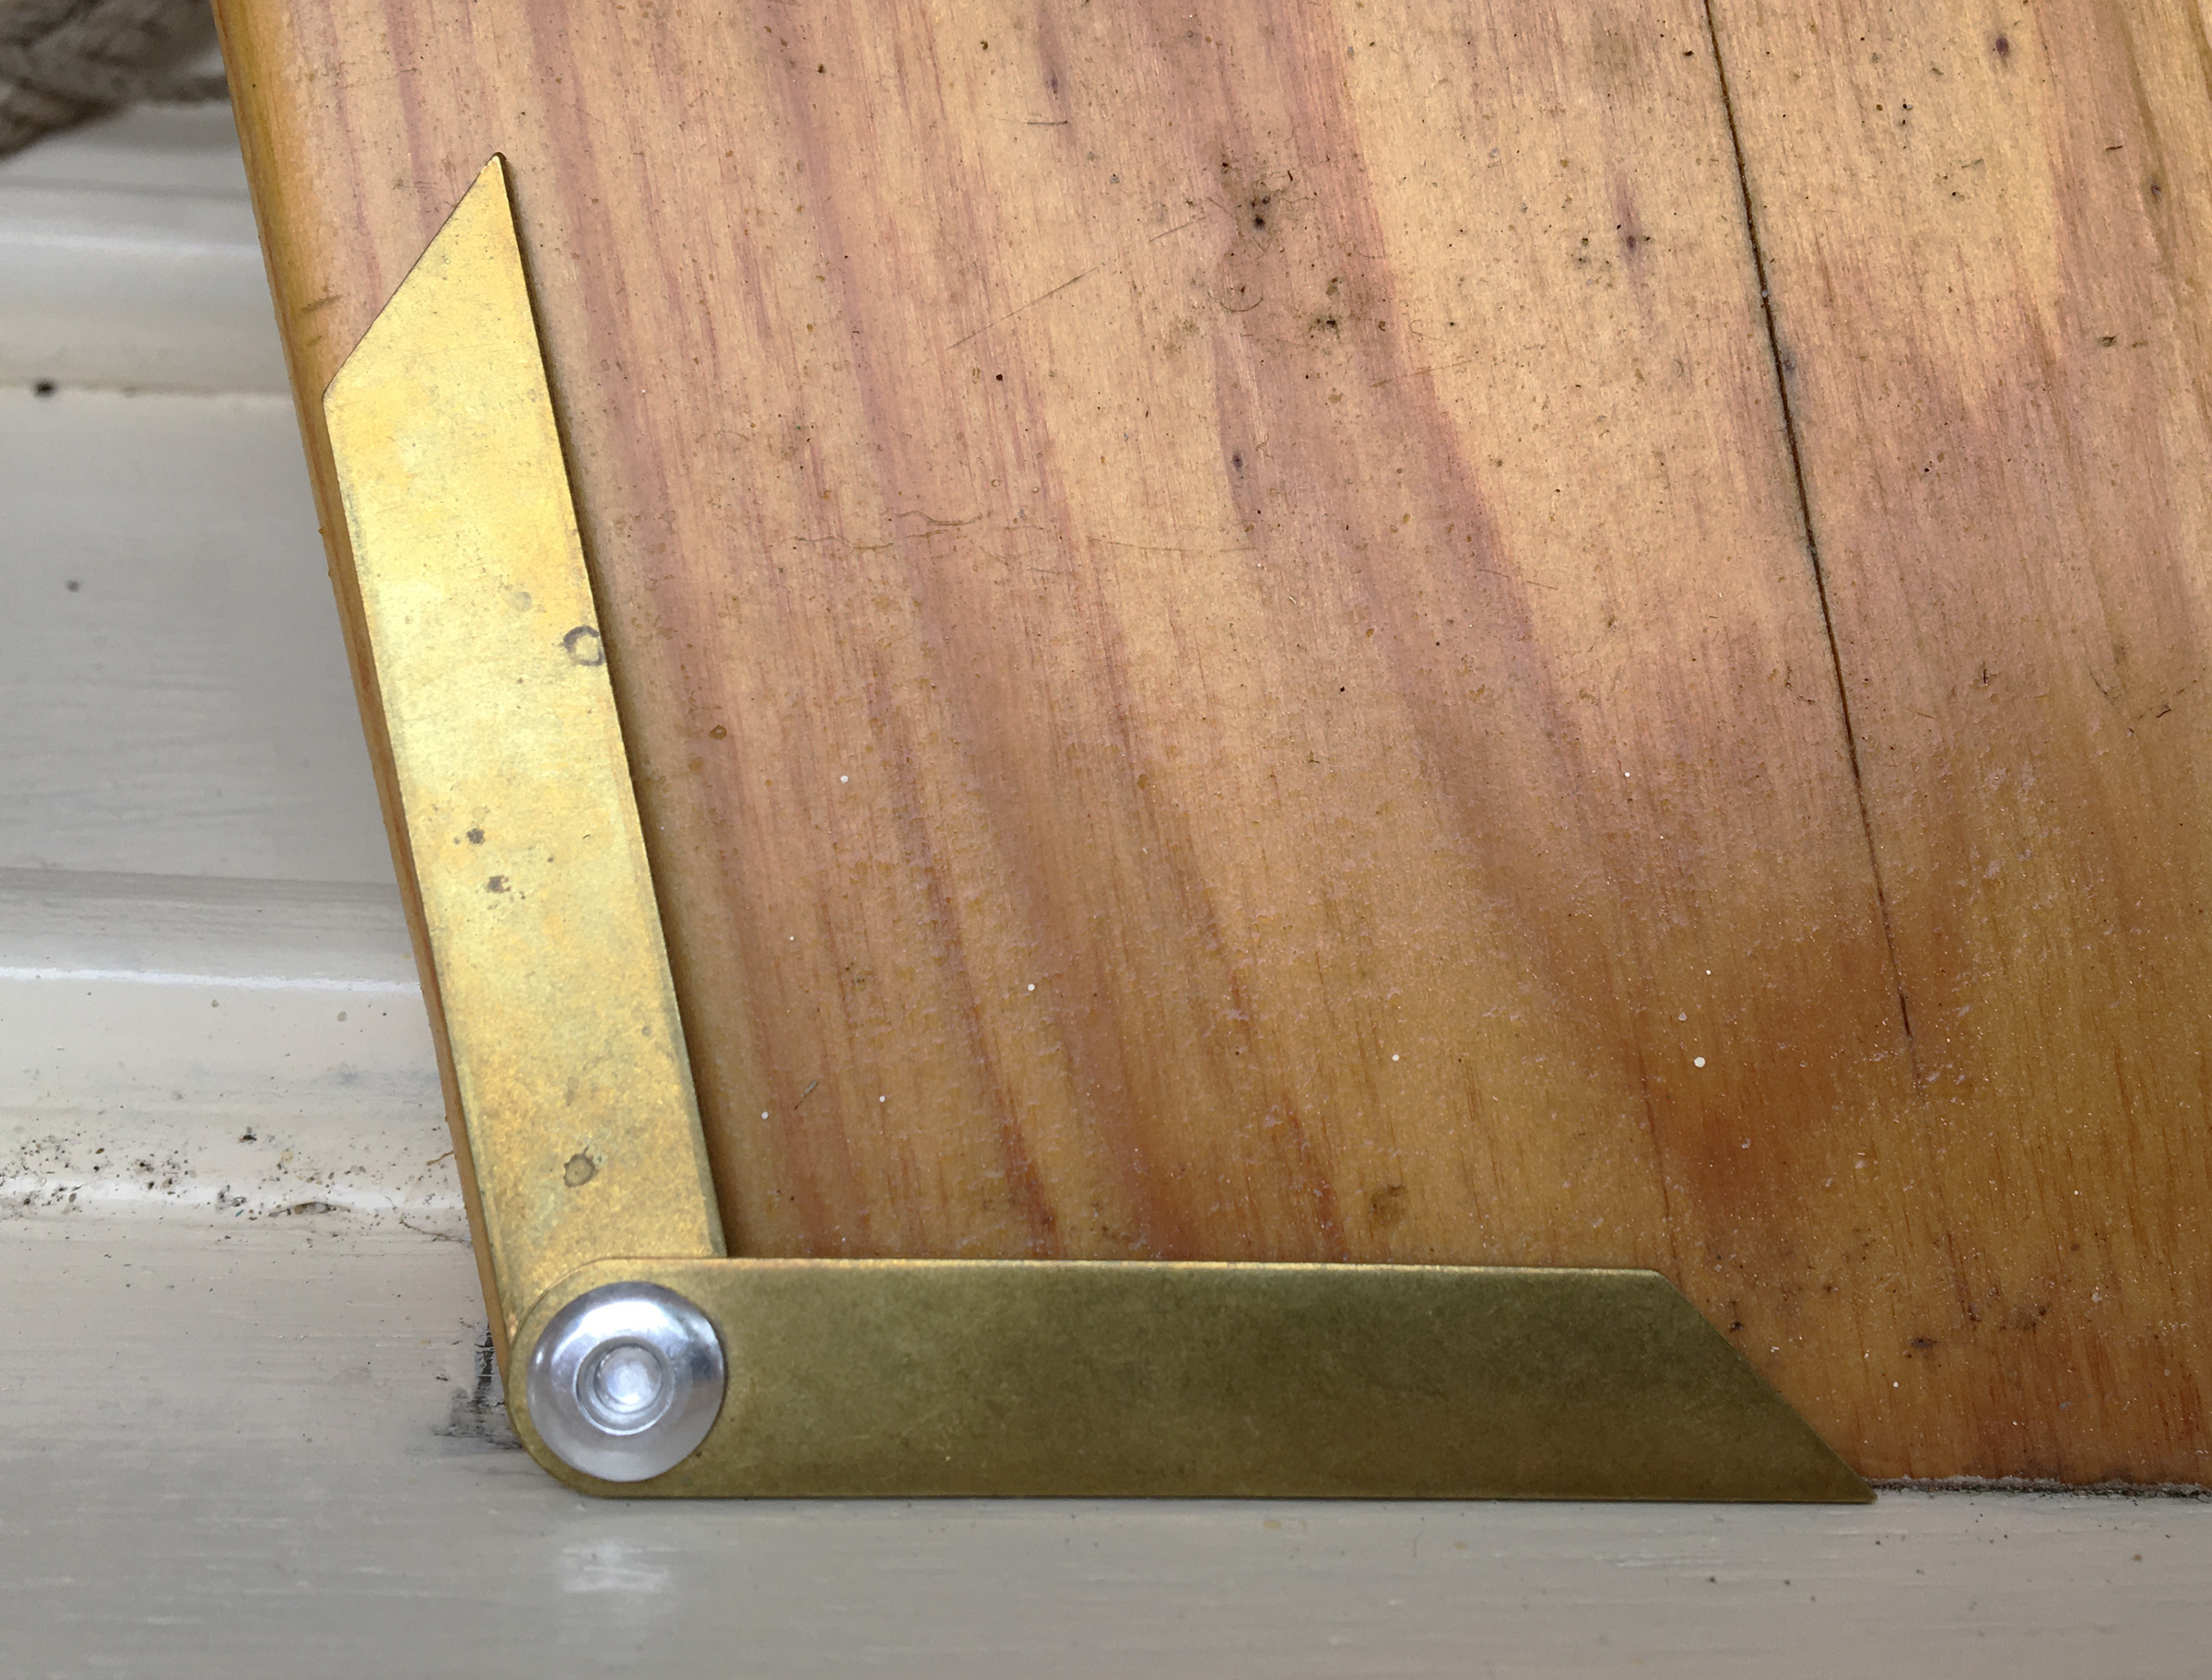
A solo rower uses brackets on the inside edge of the deck to brace the feet.
Roger builds his boats one at a time. The Gunning Dory is hand-laid fiberglass starting with rolled-on gelcoat. The layup for the bottom includes biaxial fiberglass cloth, a 1/2″ foam core, and two layers of 1.5 oz ’glass mat. The sides get 10-oz ’glass cloth, biaxial cloth, and a layer of 1.5-oz mat. Reinforcement is added at the ends where wear is likely and polyester resin is used throughout. The hull is molded with a lapstrake appearance, and the five faux strakes accentuate the hull’s curves and make the layup stronger and stiffer. Foam-filled buoyancy chambers in the bow and stern add to the flotation provided by the foam core in the bottom and foam panels under the deck. The dory’s interior fiberglass has a long racetrack-oval opening; the parallel sides allow the two slip thwarts to rest anywhere along the sides’ length. The construction gives the hull incredible stiffness; nothing flexes as you row. All trim and the seats are solid teak.
There are only a few options available for the dory. I upgraded from the oil to a Cetol finish on the teak after talking with Roger, who convinced me that the Cetol would look better in the long run, and be easier to keep up if I tended to it properly. I also ordered two brass fittings that each allow you to lock a pair of oars to the seats to keep them from being stolen.
The double-ended hull tracks well without the addition of a skeg.
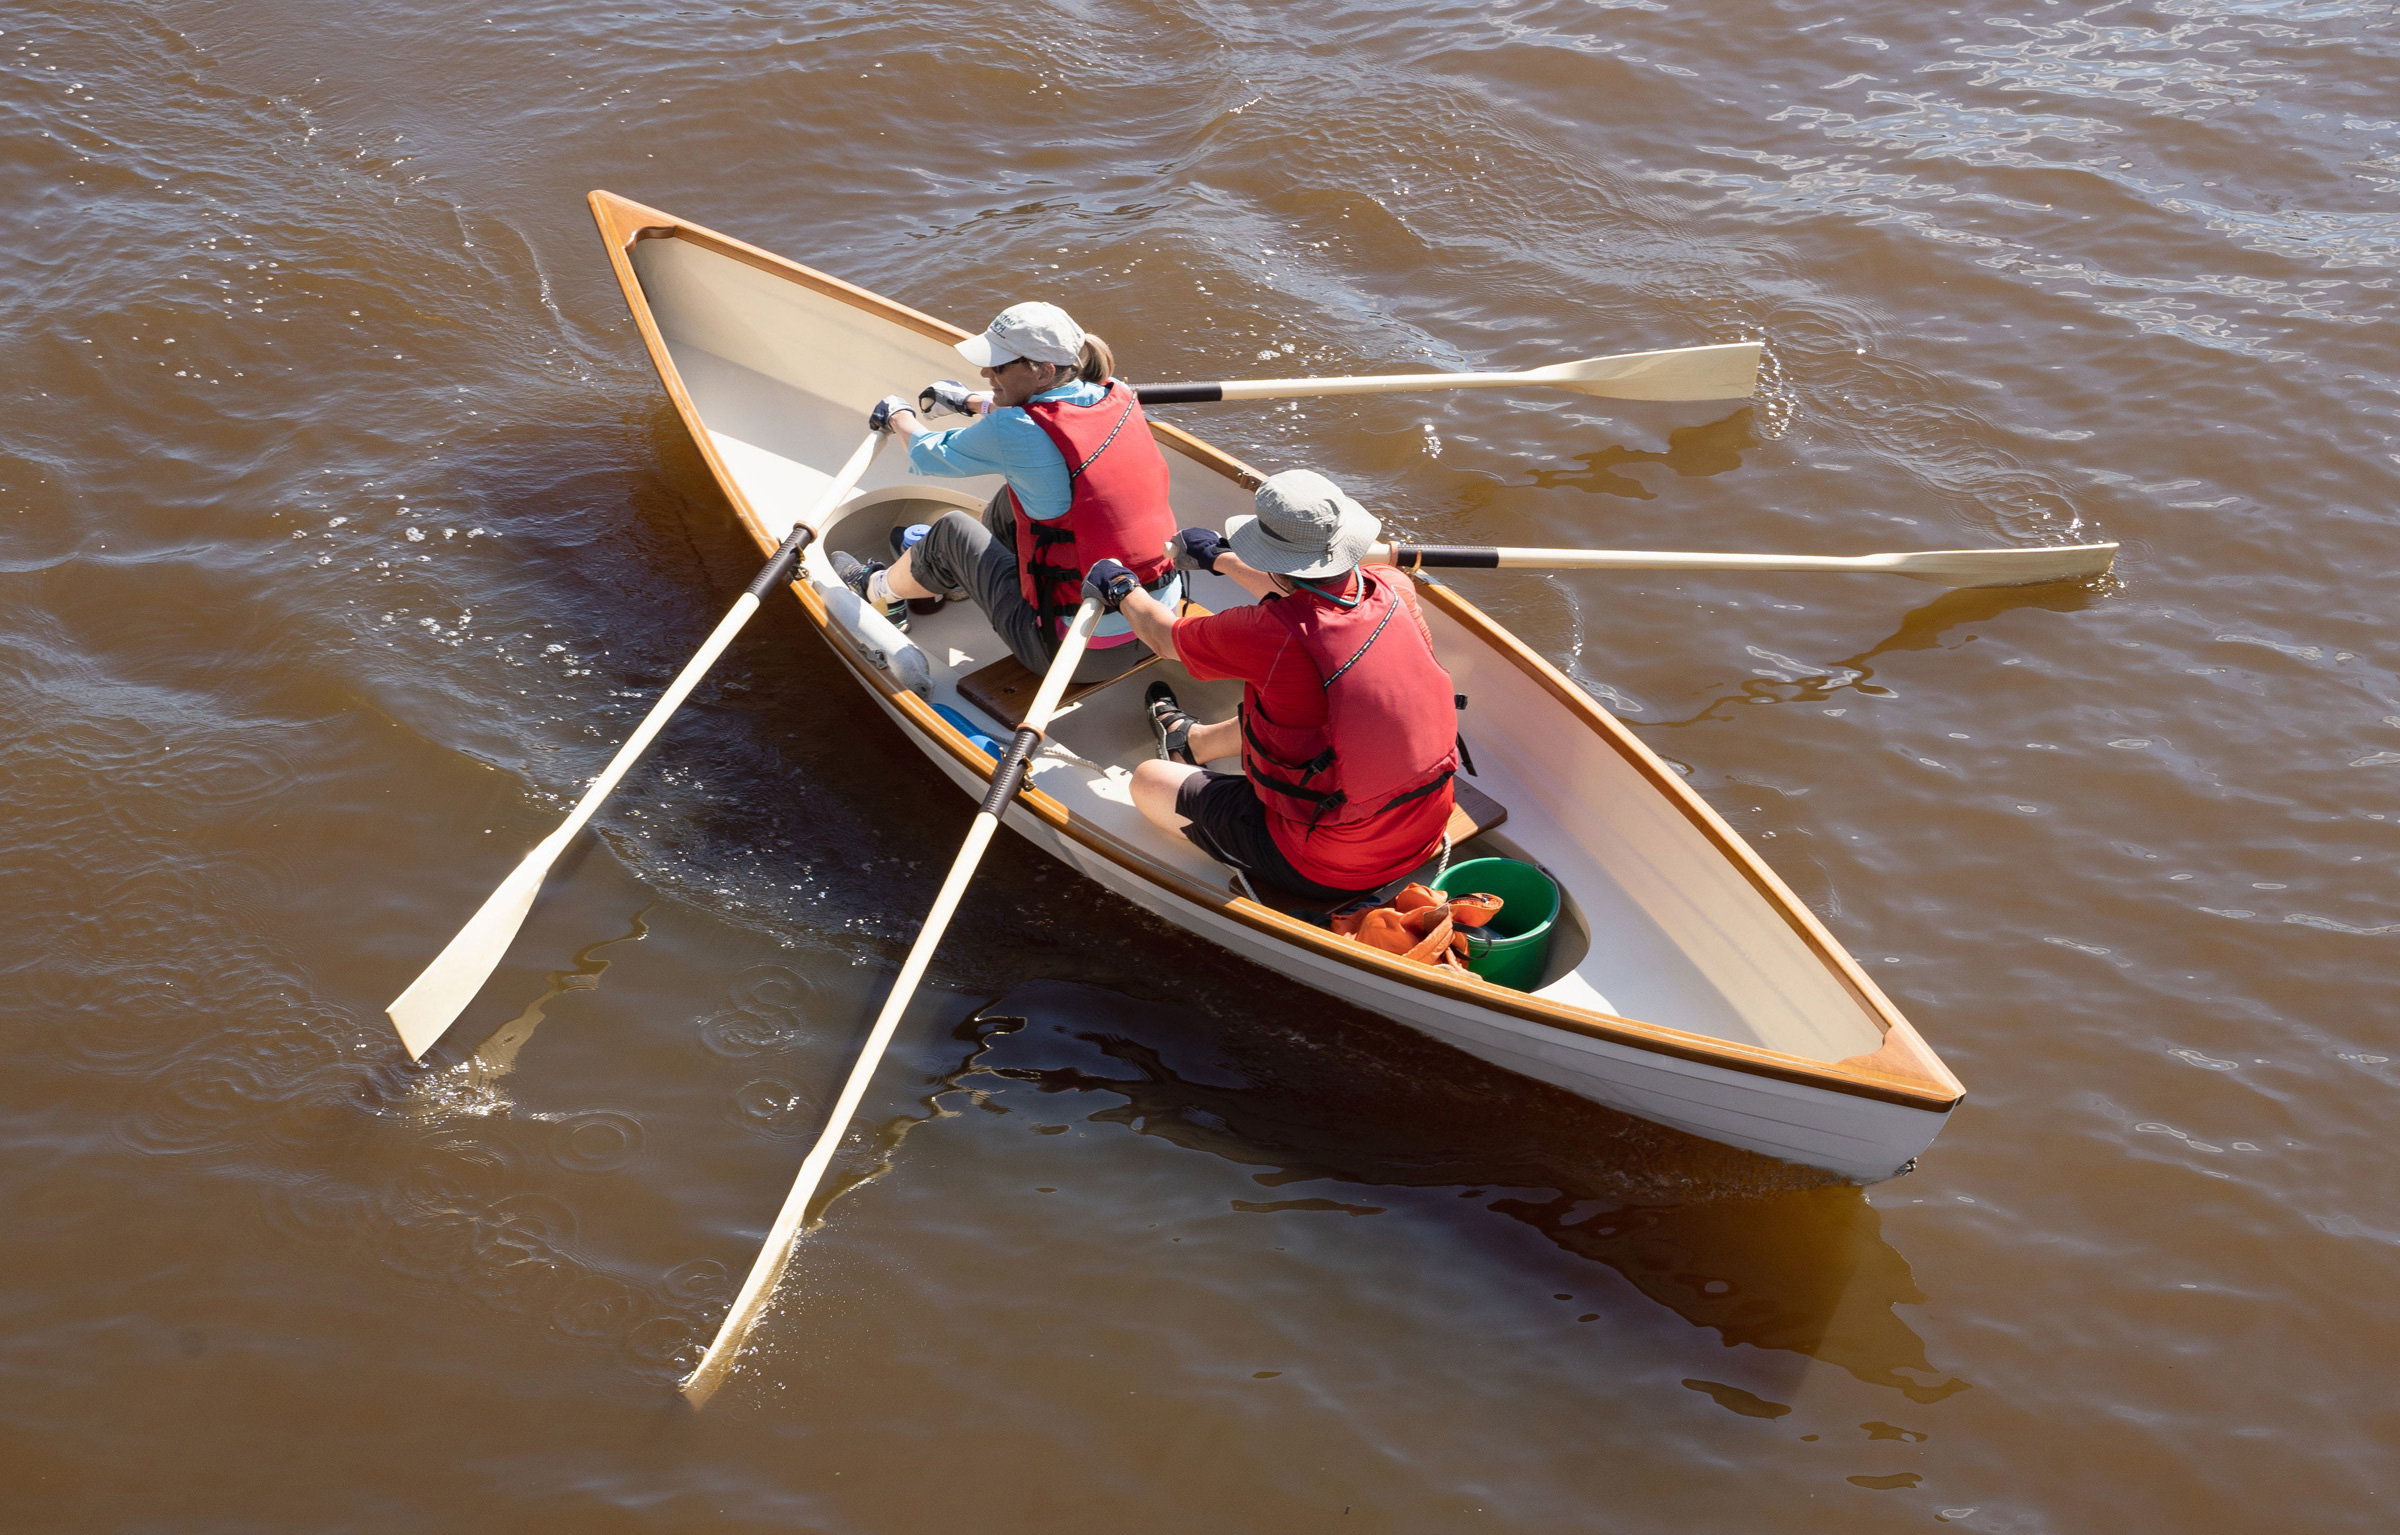
The boat has three rowing stations, and the two teak seats can be set up for solo rowing, double rowing, or rowing with one to two passengers. The boat comes with three sets of rowlock sockets, and two sets of bronze oarlocks. Changing the seat positions to move between rowing stations is quick, using brass thumb-screws. When rowing double, the forward rower can brace his feet against the forward edge of the aft seat, where Roger places a brass half-oval for your feet to brace against without marring the finish in the wood. Footrests for a solo rower amidships, or the aft rower of a crew of two, consist of fiberglass L-brackets secured with brass thumb-screws to the inner face of the cockpit opening. They can easily be moved fore and aft to accommodate different leg lengths. I prefer having my feet closer together; a bar spanning the brackets would achieve that.
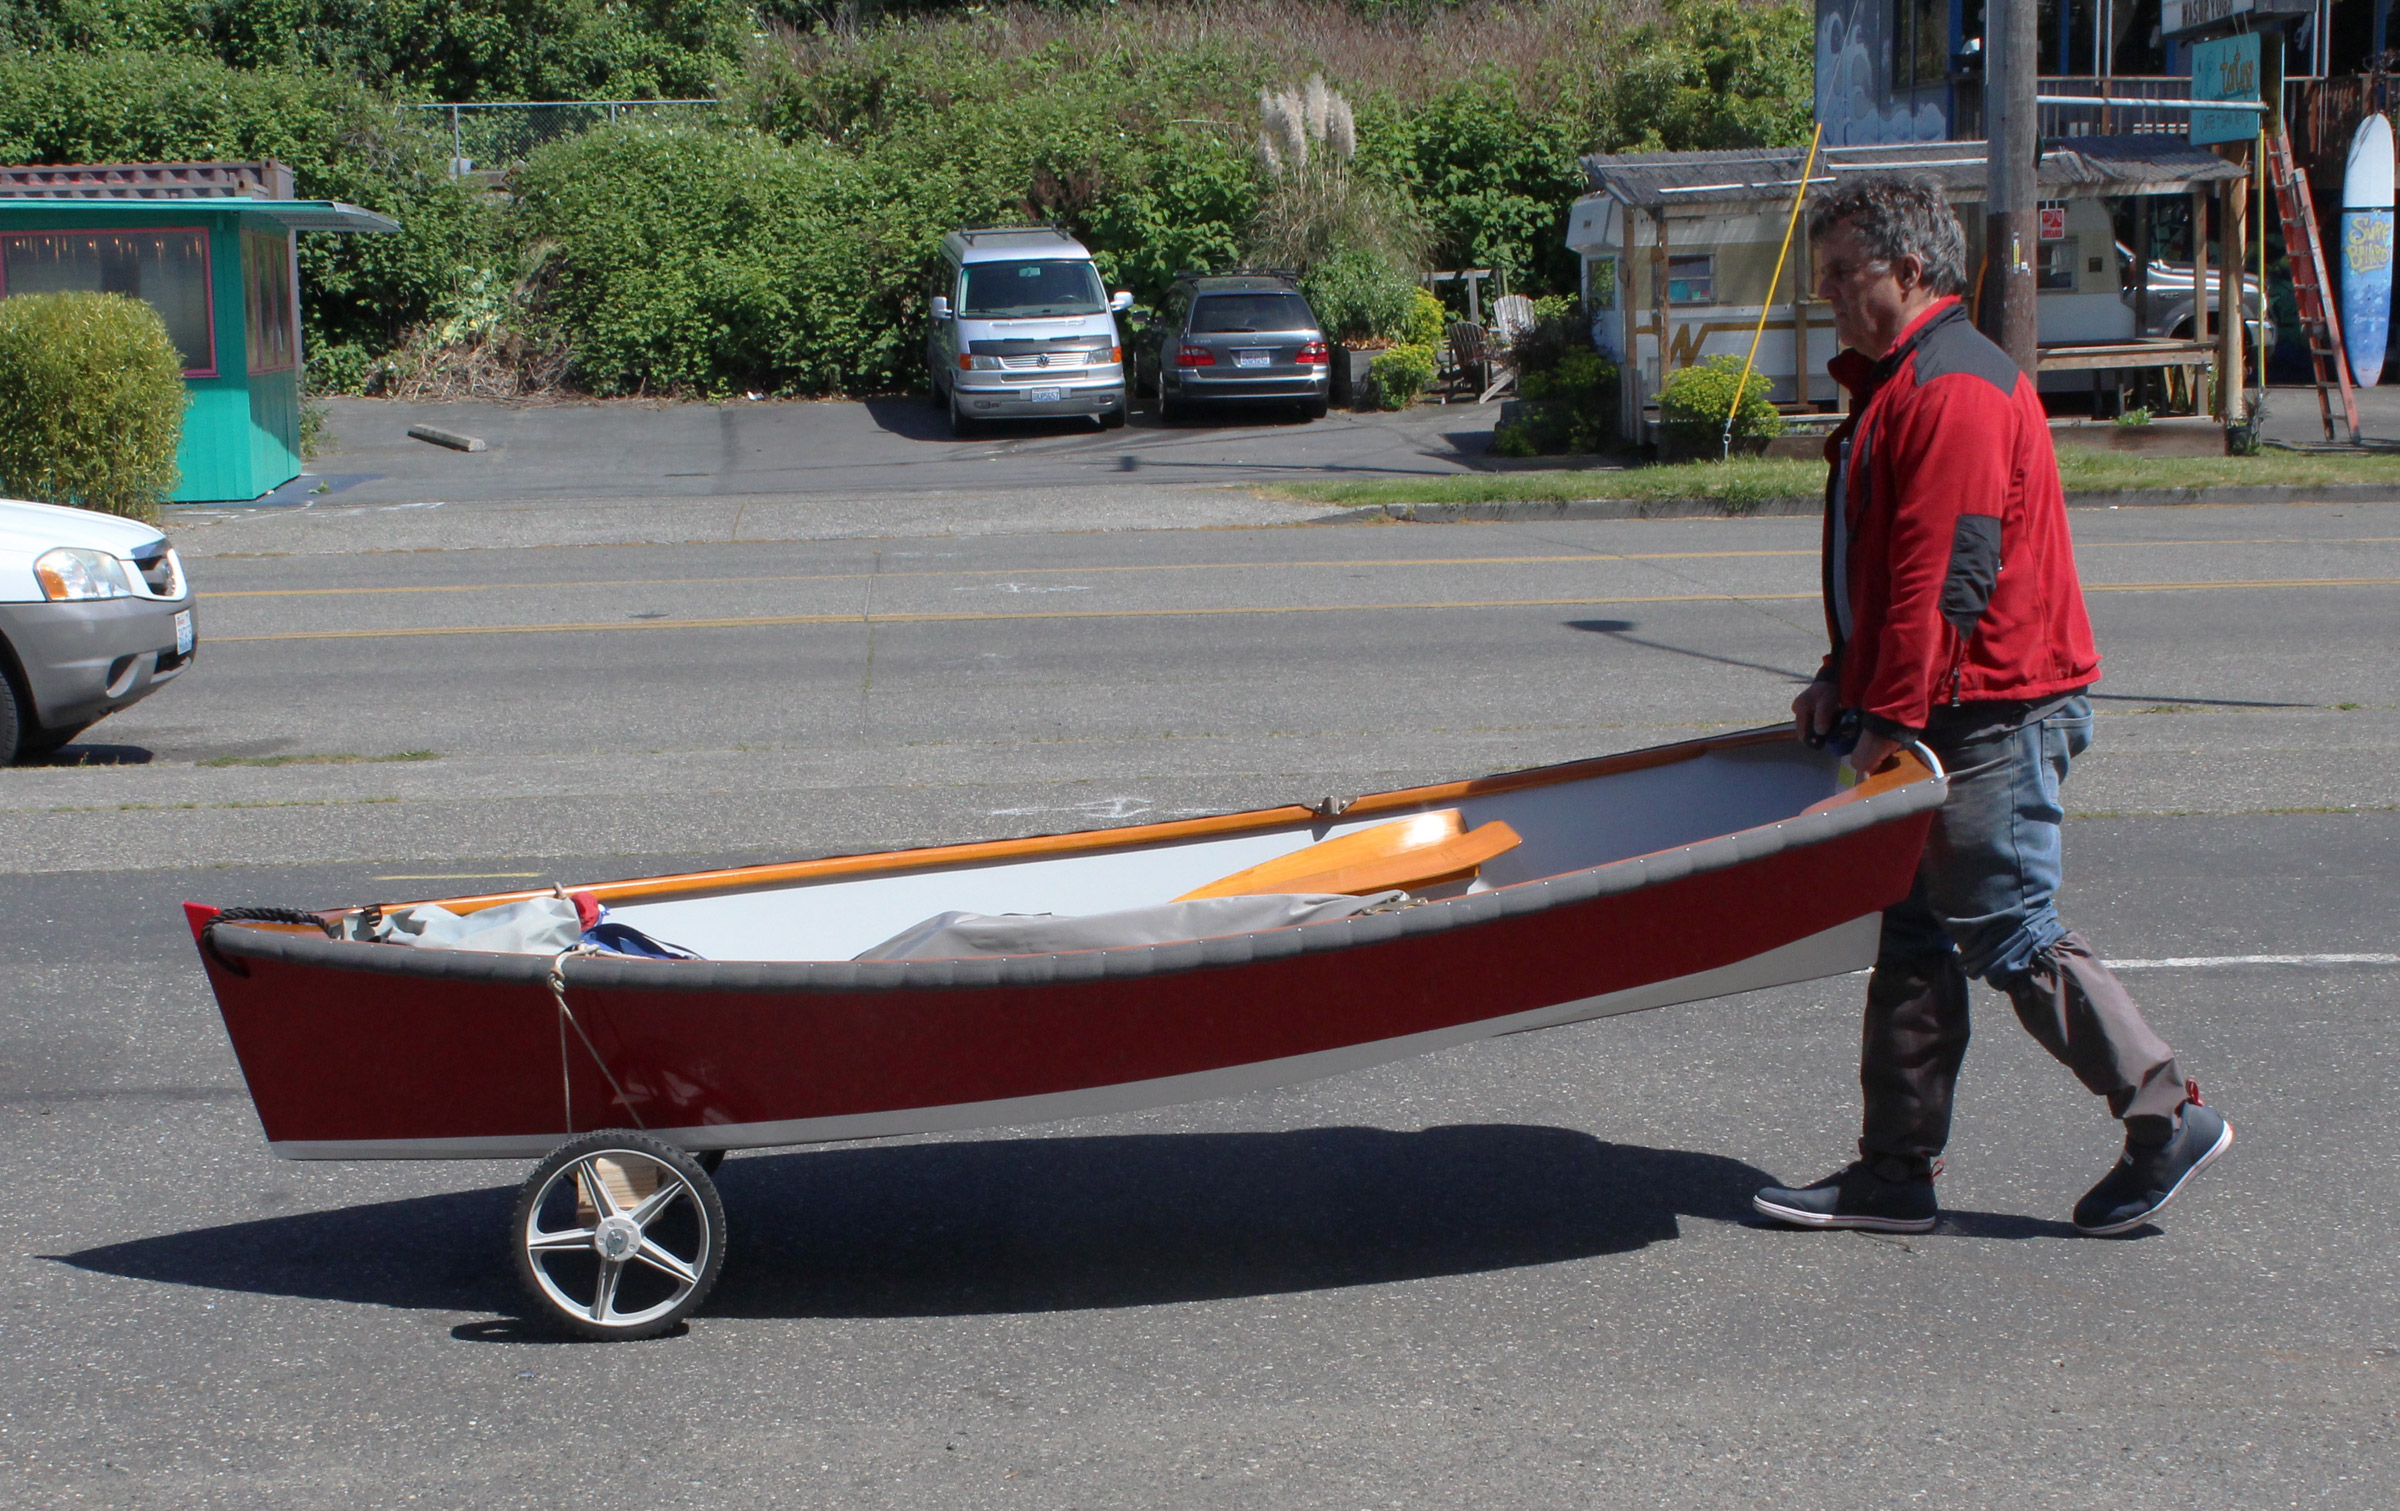
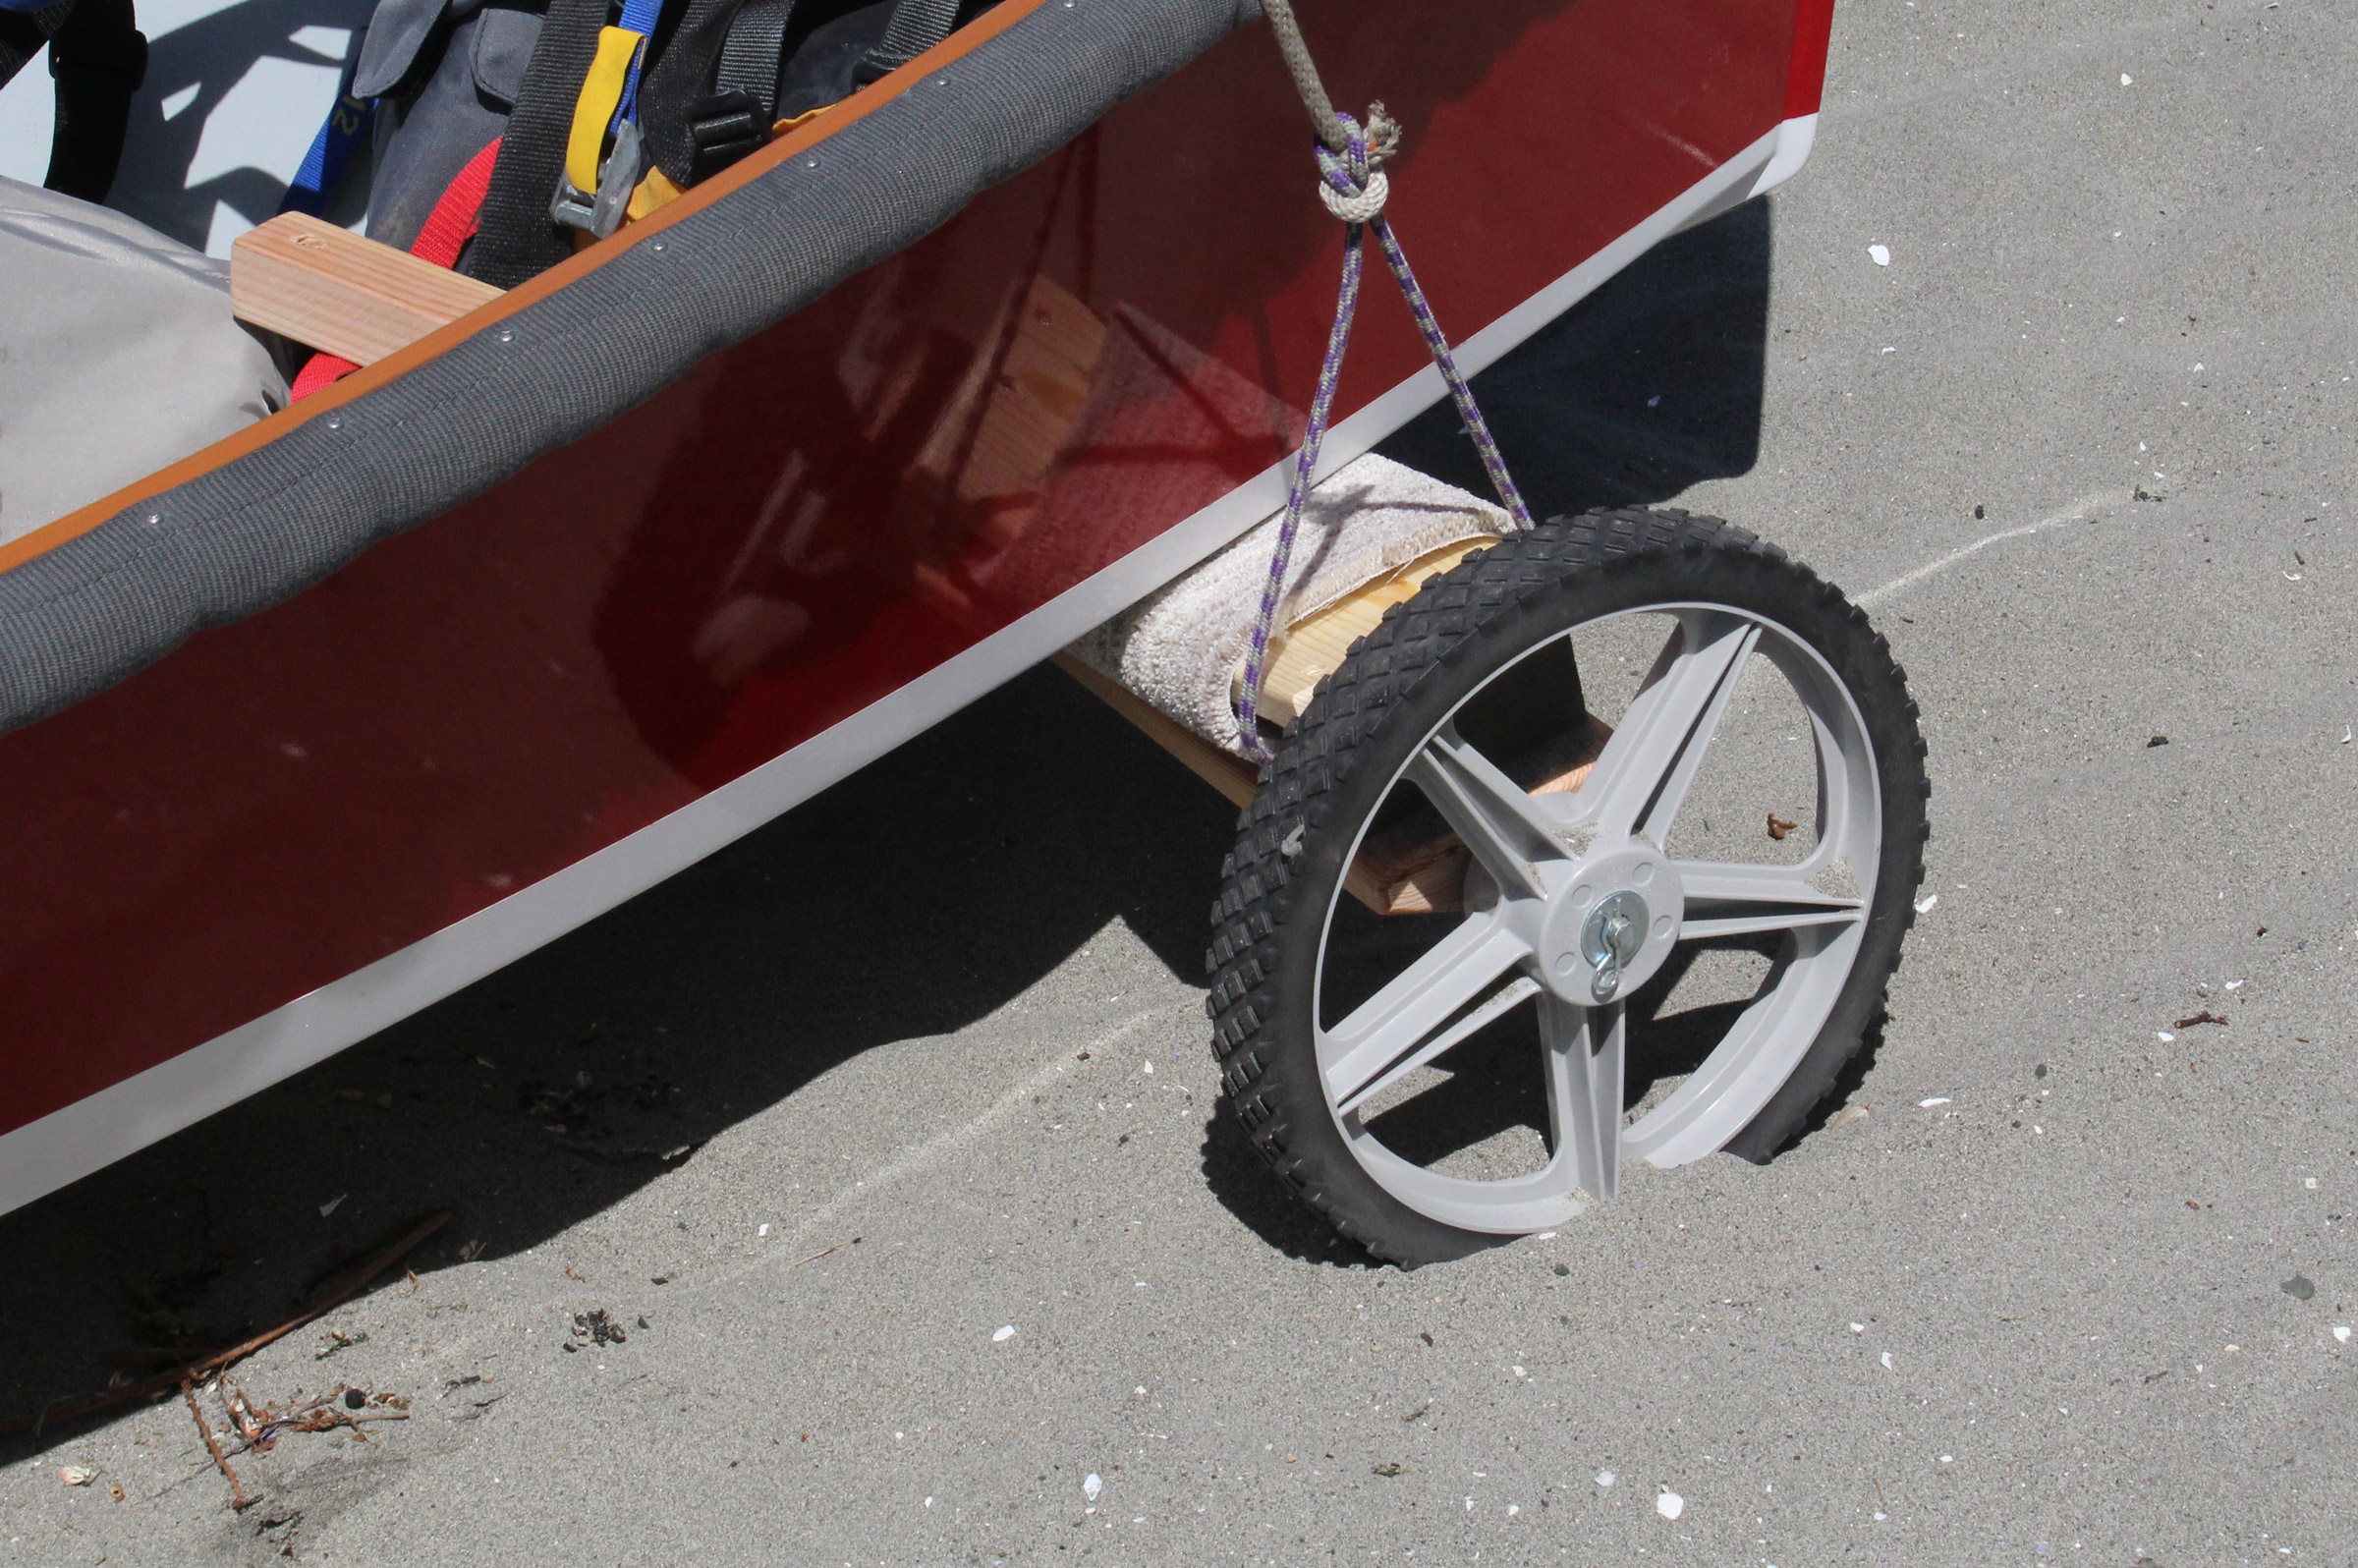
I purchased a light Load Rite trailer from the Crawford shop, and Roger set it up for the boat. Because the boat and trailer are so light, the rig can be pulled by almost any vehicle. The light weight makes launching the 160-lb boat easy. I can move the dory on and off the trailer even when the trailer is stopped with its hubs and bearings above the water level.
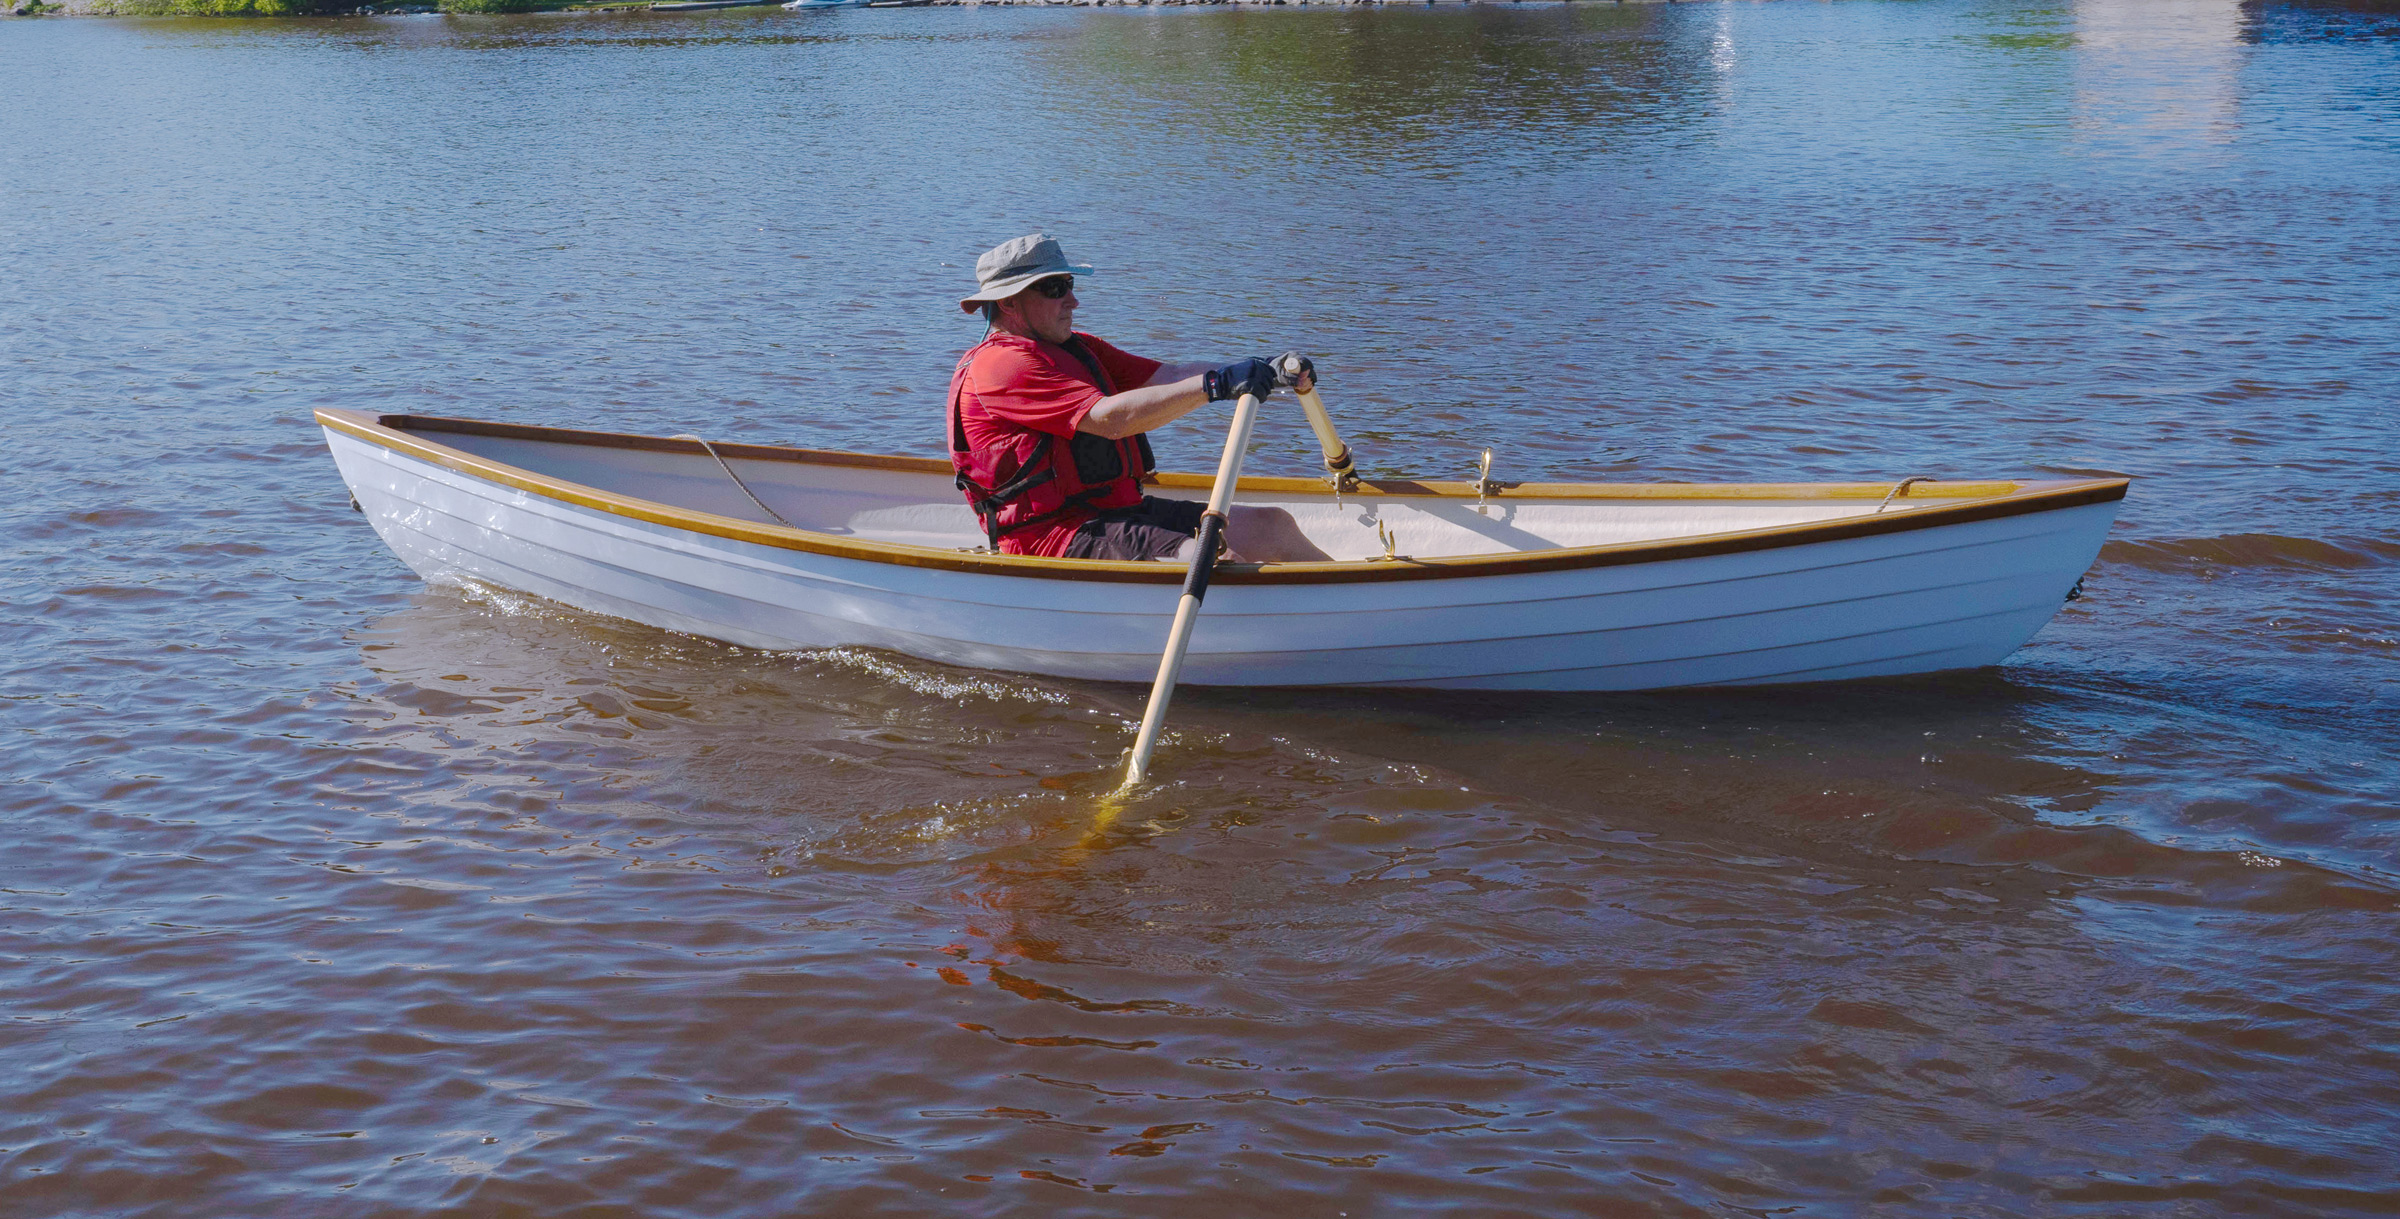
The sole of the cockpit is level, and offers good footing as you step aboard. The flat bottom allows the boat to sit upright when beached. Despite the narrow flat bottom, the gunning dory is close to being round-bottomed. Stepping aboard, it’s important to keep your weight centered. Once you’re seated, the boat feels solid underneath you. A pair of 7-1/2′ oars is a good fit for the middle or forward stations; the aft station, with a narrower span between the locks, takes 7′ oars.
The stroke uses 7′ oars; the bow rower, with a greater span between the locks, uses 7-1/2′ oars.
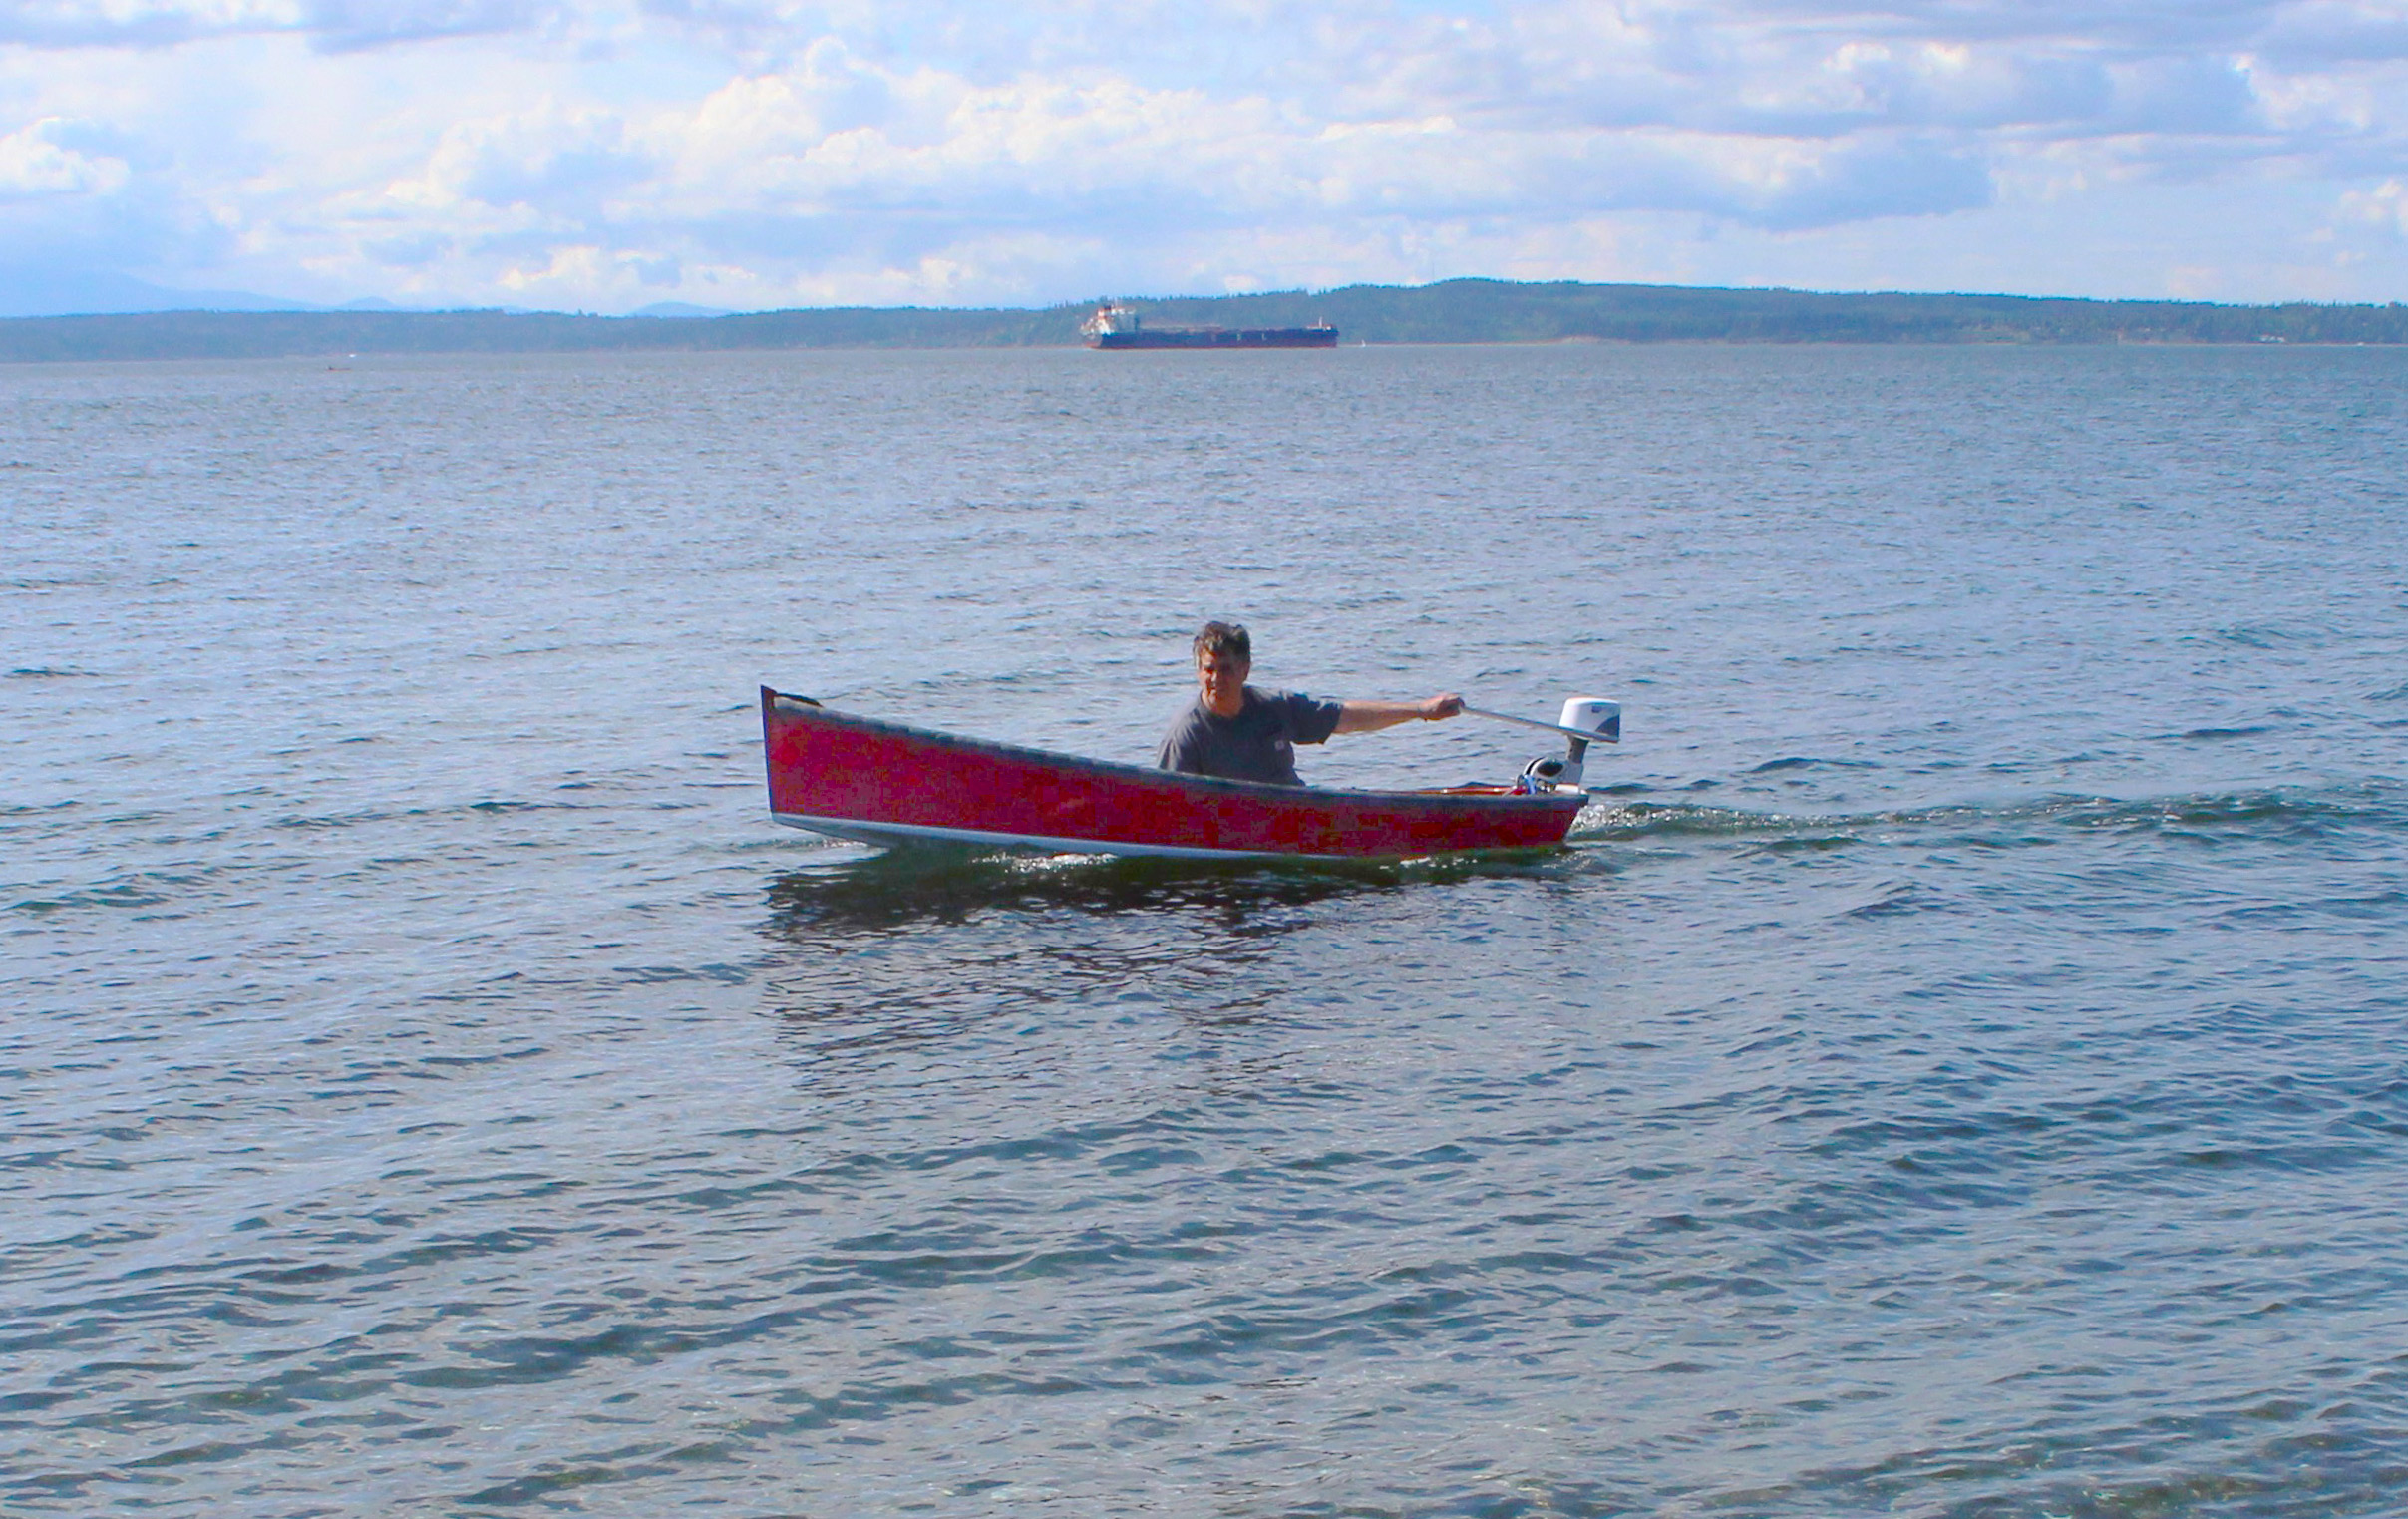
Rowing the Gunning Dory is a pleasure. The boat has neither skeg nor skids, but it tracks very well, even with a cross breeze or in waves. It tracks dead straight in calmer water and requires minimal correction when the wind is blowing or the waves are hitting at an angle. For a boat that tracks so well, the dory spins easily when one oar is pulled and the other backed. It floats up and over larger waves without hesitation, and rowing into a headwind is a smooth roller coaster ride as you bob up and over the oncoming waves. I have yet to see a drop of spray come aboard.
The Gunning Dory is responsive to even slight corrections with the oars and, despite being light for its size, it carries well between strokes. Rowing the Gunning Dory is so effortless that it is easy to get lost in the rhythm of my rowing. My rowing so far has been local. Down the last mile of the Sheboygan River, then out the breakwaters, and upwind along the shore for an hour. Then, a break: oars stowed, water bottle and snack at hand, I just sit and feel the waves under the boat while watching the shore and the birds. The boat feels stable and I can imagine using it used for hunting, with a dog or two being lifted in or out after retrieving a duck.
The Gunning Dory responds well to two rowers and carries its speed between strokes.
The Crawford Gunning Dory is a gorgeous boat. The beauty of the wood gunwales, breasthook, and seats is mesmerizing. The workmanship is flawless; everything looks Bristol. Roger’s take on this traditional type meets my criteria for seaworthiness and beauty and is a well-engineered, well-built vessel that is a pleasure to row.
Dan Knoedler works as a Community Mental Health Service psychiatrist in Sheboygan, Wisconsin, where he lives with his wife, Suzanne. He has spent most of his life living in the Great Lakes Basin, on the shores of either Lake Superior or Lake Michigan. His fleet of boats over the years has ranged from a used, homemade 12′ Bolger Old Shoe sailboat, which tried to sink to the bottom the first time he took it out, to a 28′ Bolger-designed Edey & Duff Shearwater Yawl. His children have set their sails to Chicago, Austin, Palo Alto, and Auckland, New Zealand, leaving him plenty of time to pursue his passions. He anticipates rowing, sailing, paddling, and otherwise involved with boats to be the great theme of his free time as he eases into retirement.
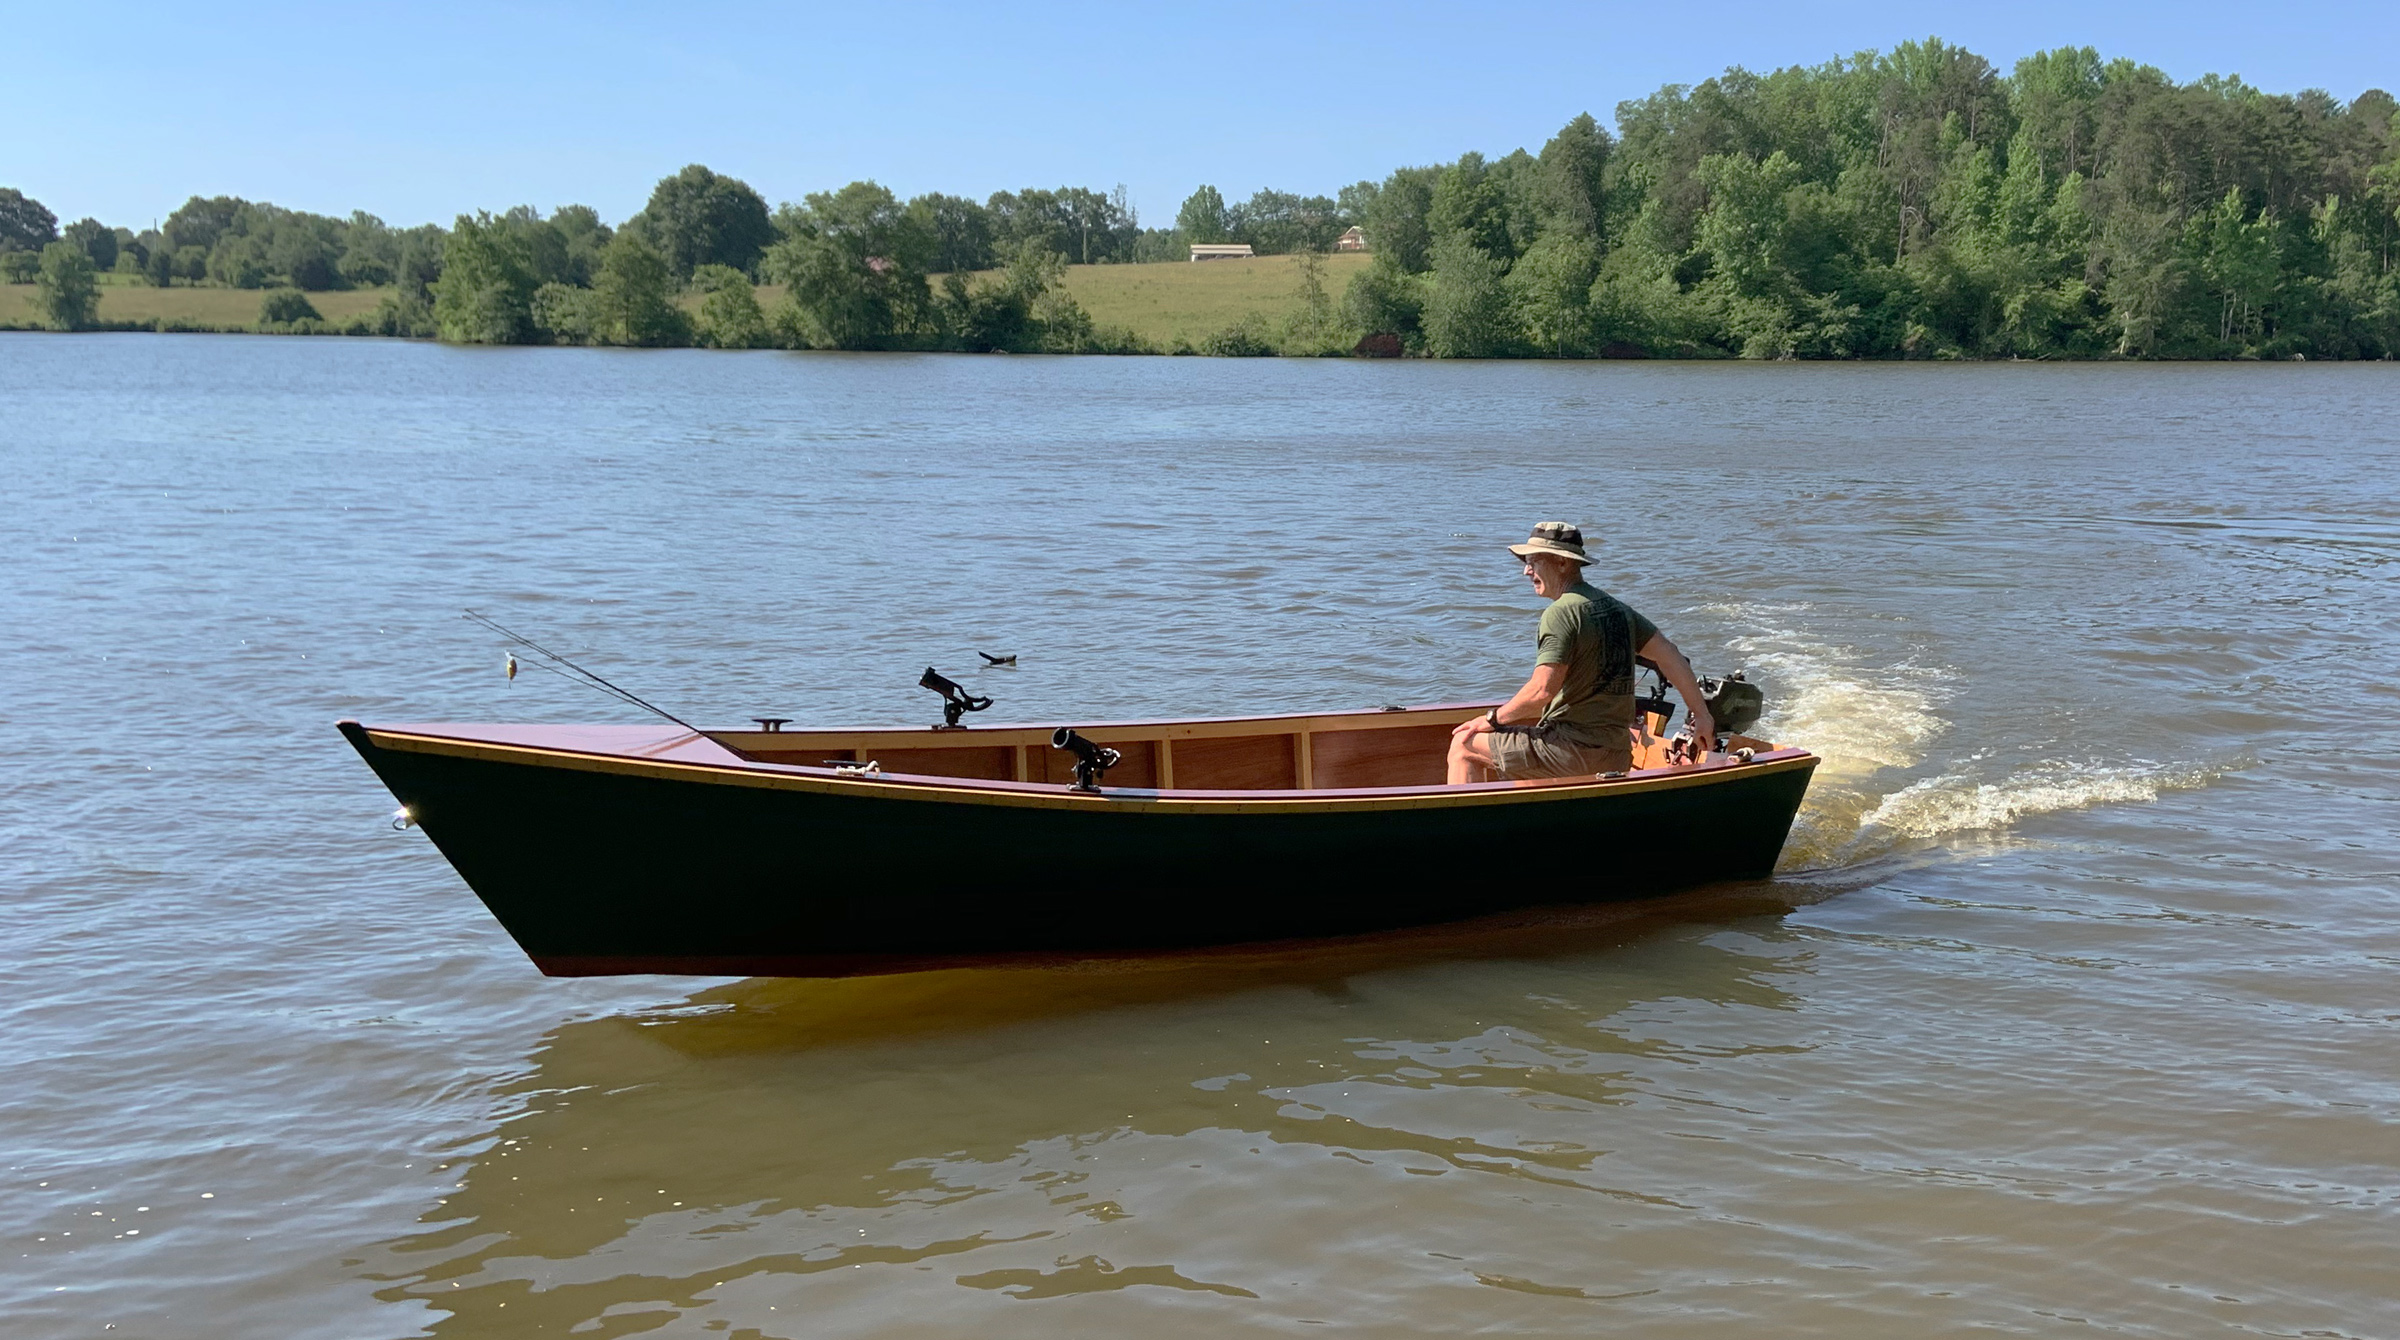
As a child growing up in south Florida with a canal in my backyard, I always wanted to build a boat. I had drawn several designs as a young boy, but I never fulfilled my dream of building one. I recently moved to South Carolina and, living near a wonderful lake now, I needed a boat. It had to be sturdy, have an open floor plan for fishing, and be stable enough for two adults moving about. To build the boat, it had to fit in my garage and still leave room for my truck. After looking at hundreds of boats online and in person I came across Spira International’s 15′ Hudson skiff. Designer Jeff Spira specializes in boats that can be built by amateur builders with basic woodworking skills and limited budgets. I ordered the print version of the Hudson plans: four 24″ x 18″ sheets and a well-written 50-page workbook with detailed instructions, drawings, and color photographs that are easy for the first-time builder to follow.
The plans call for inexpensive common dimensional lumber and plywood. While the frames are intended to be cut from 2x3s, the quality of the 2x3s that were available were not to my liking, so I bought 2x4s and cut them down to size. Surfacing the lumber with my jointer and thickness planer provided flat and true surfaces, making construction easier. The six frames are each made of three pieces, lap-joined at the corners and secured with 2″ #8 stainless-steel deck screws and PL Premium construction adhesive, as per the designer’s recommendations. The manual also specifies epoxy as a suitable adhesive. The bottoms of the frames have notches to set the keelson flush, with extra width to provide limbers on either side.
The transom is framed with 2x4s, which I also surfaced, reducing their size just a bit, but not significantly diminishing their strength. The manual indicates these frame members can be butted together and held by adhesive. The joints will get the strength they need when the transom’s plywood face and gusset are applied. I half-lapped the transom frame members, which took a bit more time but provided some extra strength. The stem is a straight 38-3/8″ length of 1×6, which gets beveled after the chine logs and sheer clamps are installed.
Photos by and courtesy of the author
The framework for the skiff is assembled over a 2×6 strongback. The half-lapped joints in the transom framing are this builder’s option.
The frames are supported over a 2×6 strongback by scrap-wood pillars at specified heights and spacing for each frame. The locations provided are precise and assure fair curves on the sides and bottom. The transom is set at 15 degrees and the stem at 36 degrees by matching bevels on the ends of the strongback and temporarily held in place with sheetrock screws.
The plans specify a 1×6 for the keelson, and 1x2s for the chine logs and sheer clamps. To get the length needed for the logs and clamps, I scarfed two pieces together for each of the longitudinals. Following the designer’s recommendations, I secured the keelson to the frames using PL Premium and four 2″ #8 deck screws. A framing square assured the frames were square to the keelson.
The chine logs and sheer clamps are set in notches in the frames, transom frame, and stem. The manual suggests a backsaw for cutting the notches, but I used a multi-tool. Fine-tuning can be done with a rasp or file. I installed the chine logs and sheer clamps, fastening them to each frame with 2″ #8 screws. The chines and sheer clamps are let into the stem, establishing the bevel for the forward edge. With the skeleton of the hull complete, the frames, stem, transom, chine logs, and sheer clamps are all planed fair to meet the plywood sides and bottom.
Spira designs typically leave the interior arrangements up to the builder. The decks and bench meet this builder’s needs. Floorboards will be added later to separate the occupants from water in the bilge and address the possibility of tripping on the frames.
The manual recommends using marine plywood if the hull is not going to be sheathed with fiberglass and epoxy, and ABX plywood if it is. I wanted to have a bright-finished interior, so after contacting Jeff and discussing different types of plywood, I went with marine-grade plywood with meranti faces.
The plans call for two 4×8 sheets of 1/4″ plywood for the sides and two sheets of 3/8″ plywood for the bottom. The transom gets 1/2″ plywood on the outside and a 3/8″ plywood gusset in the inside. The shapes for the plywood aren’t provided in the plans, avoiding any problems created by variations in individual boats, but taken directly from the assembled framework. To fit the plywood to the transom, sides, and bottom, I first dry-fit each sheet of plywood, clamping it in place, pre-drilling all the screw holes, and tracing the framework edges on the plywood. I then removed the plywood and rough-cut it to size using a jigsaw. Before installing the plywood permanently, I sealed the inside faces of the plywood, and any framing members that contact the plywood, with two coats of epoxy. I applied Thixo thickened epoxy to the frames just prior to assembly, to assure a better bond between frame and plywood. I used a lot of clamps to hold the plywood in place, then drove 1-1/4″ #6 deck screws every 2″.
Steven Paci
The builder added the foredeck to provide a covered storage space and side decks to support fishing-rod holders. The trolling motor is his preferred choice of power for the lake he frequents.
To cover the hull’s full length, the 8′ sheets of plywood are butted together in place on the frame and the seams are backed by plywood butt blocks, screwed and glued. After the plywood is all attached and the epoxy has cured, the proud edges of the plywood are planed flush with the chine logs and sheer clamps.
The plans do not call out a keel or skids on the bottom, but through my research I found that it was common practice for protecting the bottom and improving tracking and steering, so I followed suit.
The broad stern can support the weight of a small outboard and its operator.
To finish the exterior, I applied two coats of epoxy, four coats of a two-part epoxy primer to the bottom and two coats to the sides, then two coats of bottom paint and two coats of topsides paint. After the outside of the boat was complete, it was time to flip the hull over. It wasn’t heavy, so three friends and I easily lifted the hull off the strongback and righted it.
At this point, typical of the Spira plans, the arrangement of the interior is left up to the builder. I added a short foredeck to make a small storage space in the bow and installed inwales and railcaps for mounting cleats and rod holders. For seating, I made a fore-and-aft bench/storage box that allows easy access to the motor and still gives me easy access to the space of the open boat. I have not added any floorboards but intend to do so in the future. Although this boat can be rowed, I did not make any provisions for oars, since my mode of power will be an outboard and trolling motor.
The designer recommends a 7.5 hp outboard for the skiff. The motor here is a 3.5 hp.
I have a full-sized pickup truck, so trailering the lightweight skiff is not at all difficult. Launching at the ramp is similarly not a problem; Hudson floated right off the trailer. Once in the water, it was perfectly balanced. The flat bottom makes the boat very stable, easy to move about in, and provides a comfortable platform for standing and casting. To be expected of a small boat, it will list whenever you move to the side, but only slightly. The plans recommend a 7.5-hp outboard for the Hudson, and set the maximum outboard size at 15 hp. I live on a lake that does not have rough seas or pounding surf, so I use a Minn Kota 30-lb thrust trolling motor for the skiff. A 9.9-hp outboard would likely get the boat on plane, but such a motor would cost twice what I spent on building the boat. I go out on the lake for enjoyment and relaxation so the trolling motor is easy to manage, quiet, and serves my needs. It has enough power to move the boat with three adults aboard even against a 15-mph headwind. With a 3.5-hp outboard, the boat clips along at a fair pace, though not on plane. With just me aboard, sitting well aft at the helm, a bit of the bow is out of the water and the waves could slap against the flat bottom. The skids I added seem to provide good directional stability for the boat; it tracks true. With the outboard’s tiller hard over, the Hudson turns on a dime.
I am so pleased that the Hudson skiff gave me exactly what I wanted. It was a straightforward, frustration-free boatbuilding project, and in the water it’s an easy-to-handle, lightweight boat that makes a perfect fishing platform.
Steven Paci’s career spans many different fields—cabinet making, construction, machine design—but his bread and butter has always been industrial machine maintenance. He grew up near the water in Florida and later on the Great South Bay in Long Island, New York. He cared for an 18’ Thompson wooden boat and made a lot of furniture, so building a boat seemed the next thing to tackle. He now lives in South Carolina across the street from Lake Cunningham and was moved to fulfill his childhood dream of building a boat. He’ll use the skiff, christened BARBARA JANE, for fishing and spending days on the lake with his grandchildren.
Hudson Skiff Particulars
[table]
Length/15′ 8.9″
Beam/4′ 10″
Hull weight/140 lbs
Maximum Displacement/1,220 lbs
Recommended power/7.5 hp
Maximum power/15 hp
[/table]
Update: Jeff Spira passed away unexpectedly in the spring of 2022. His website is no longer operating and it is presumed that his boat plans are no longer available.
Is there a boat you’d like to know more about? Have you built one that you think other Small Boats Magazine readers would enjoy? Please email us!
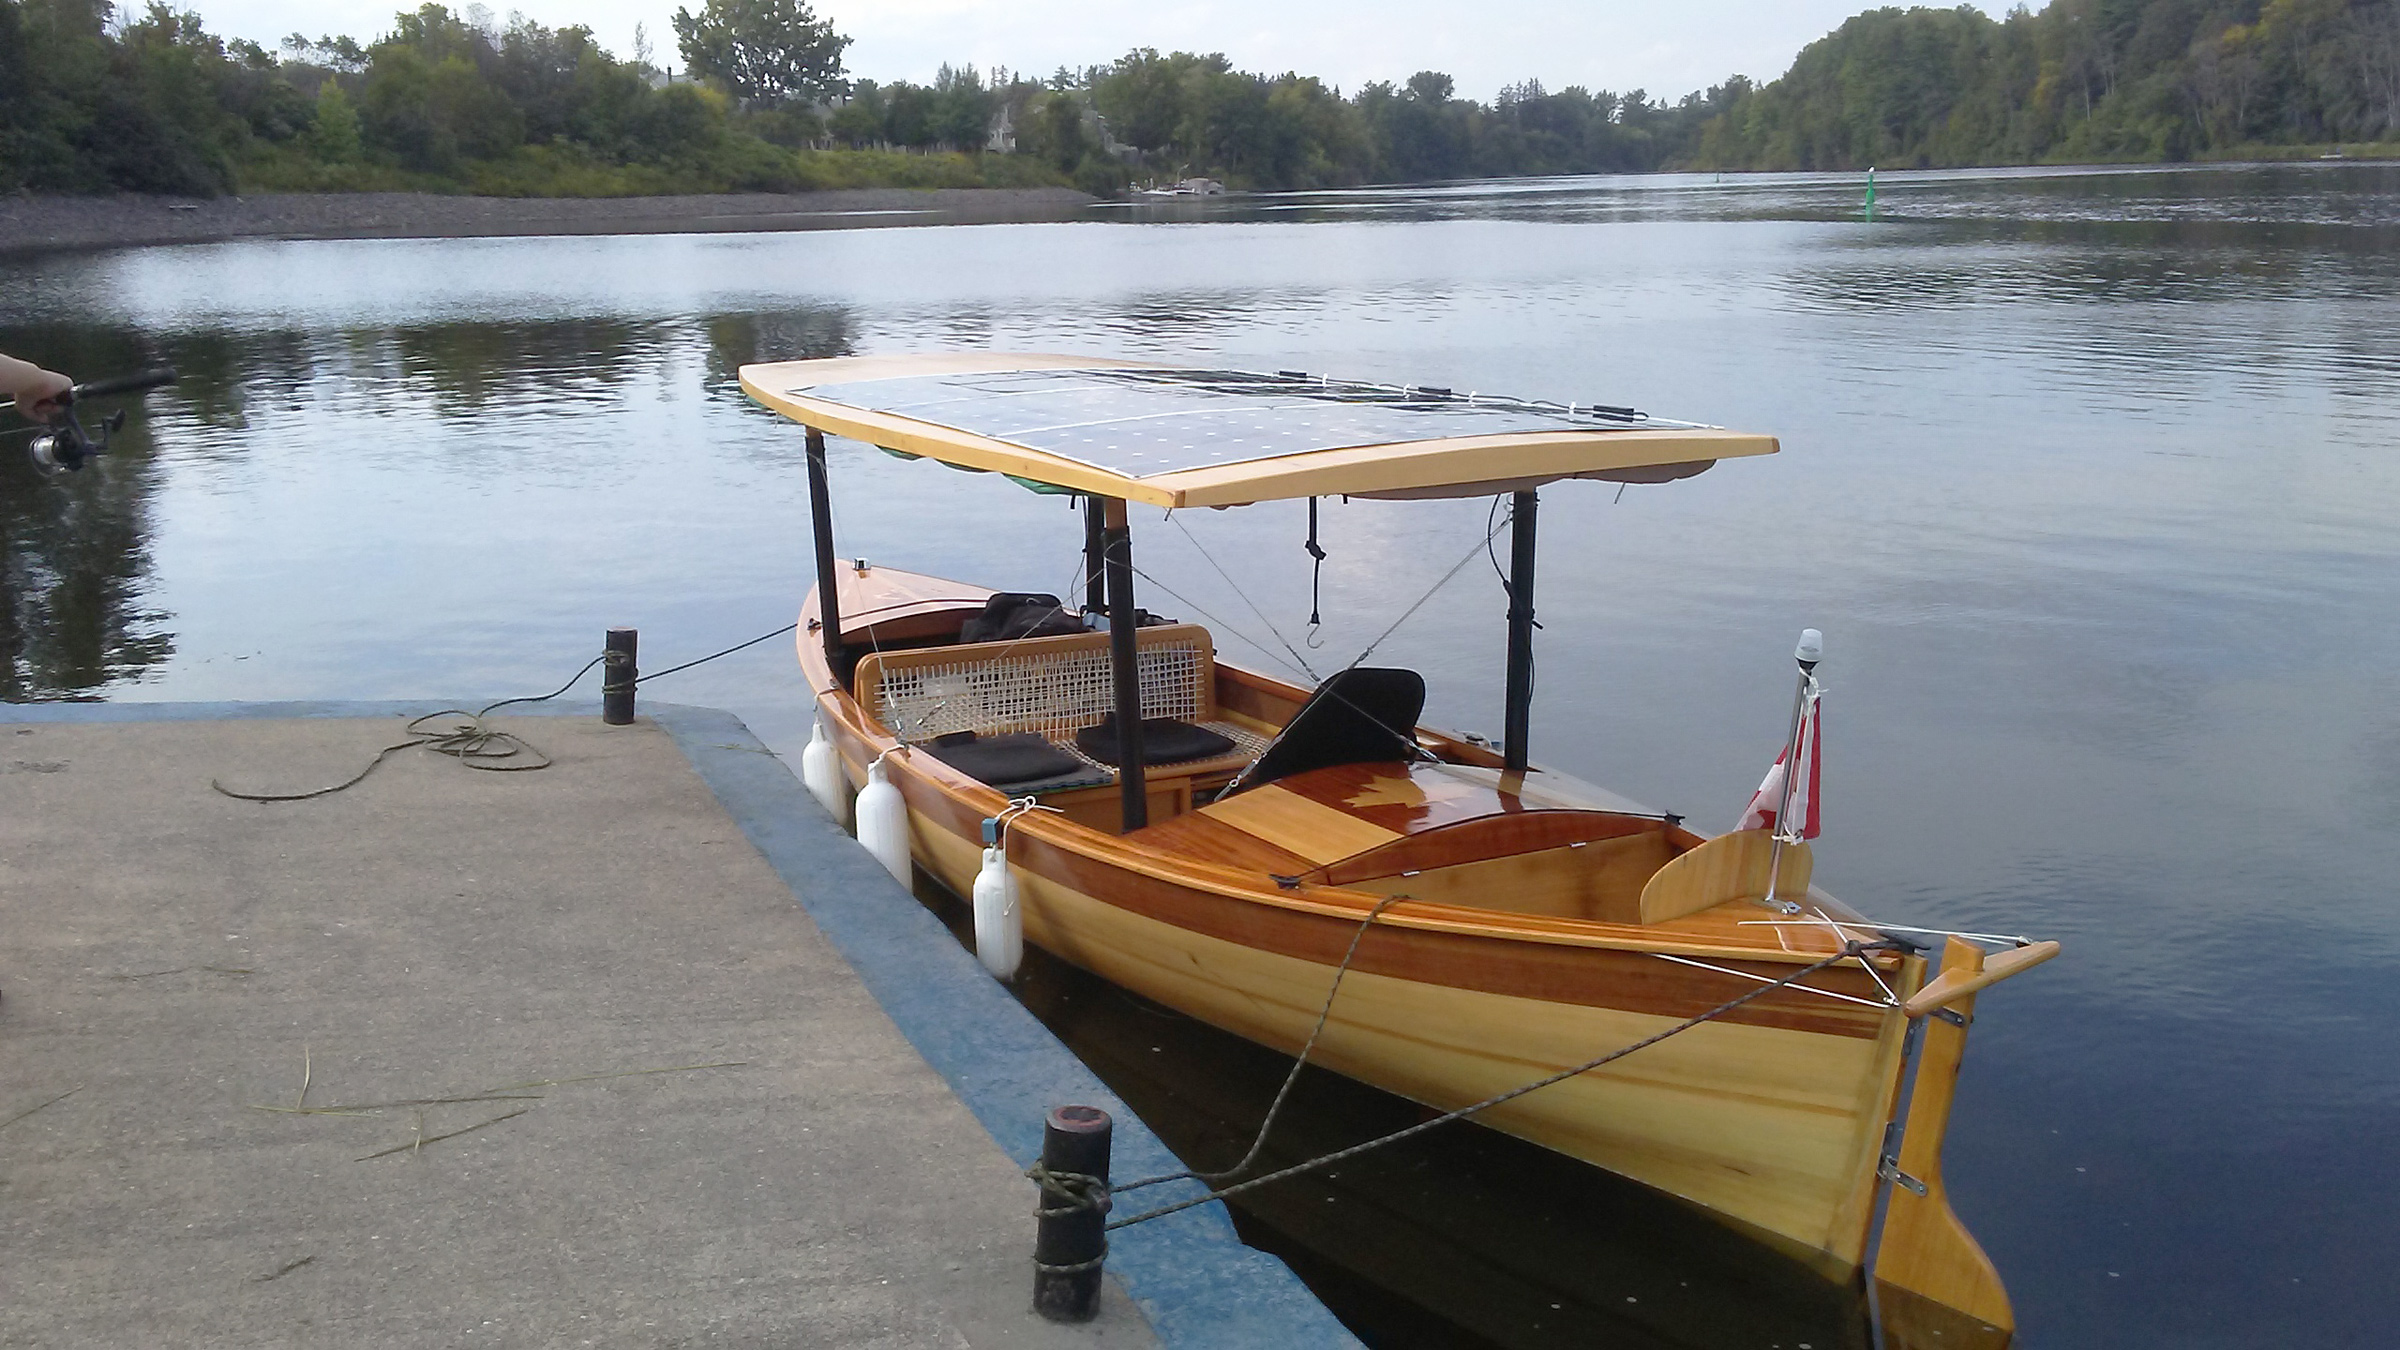
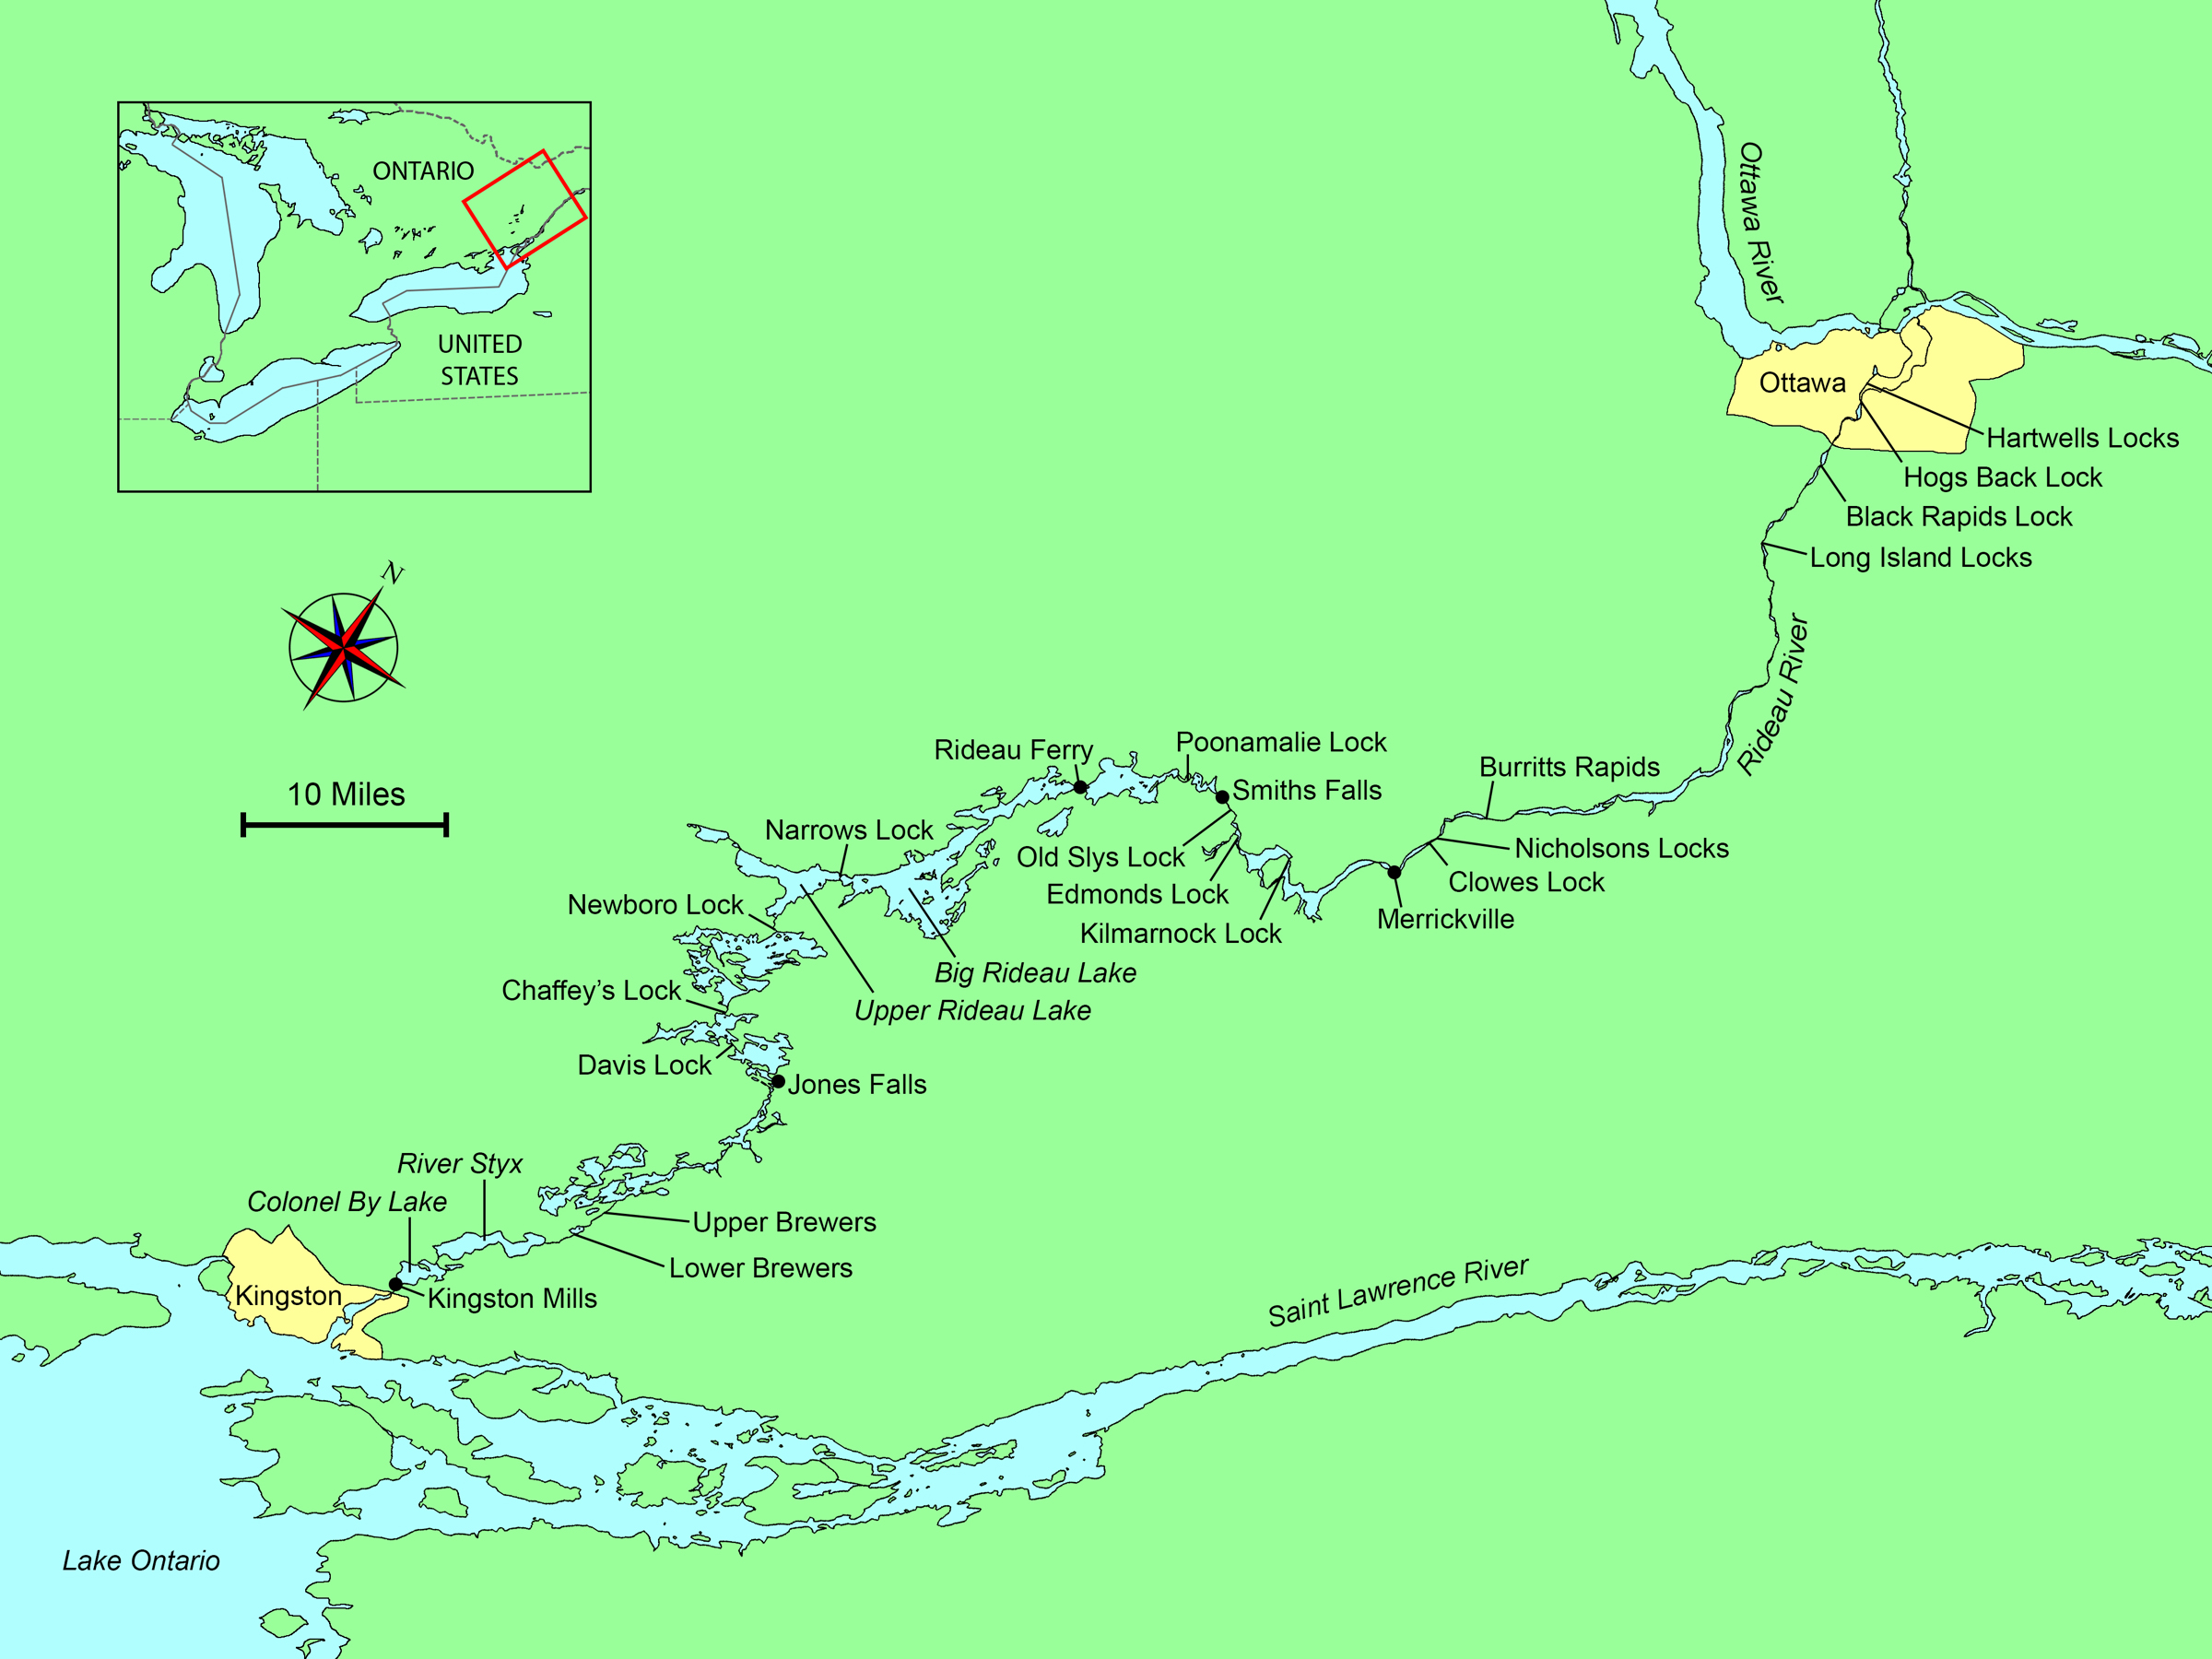
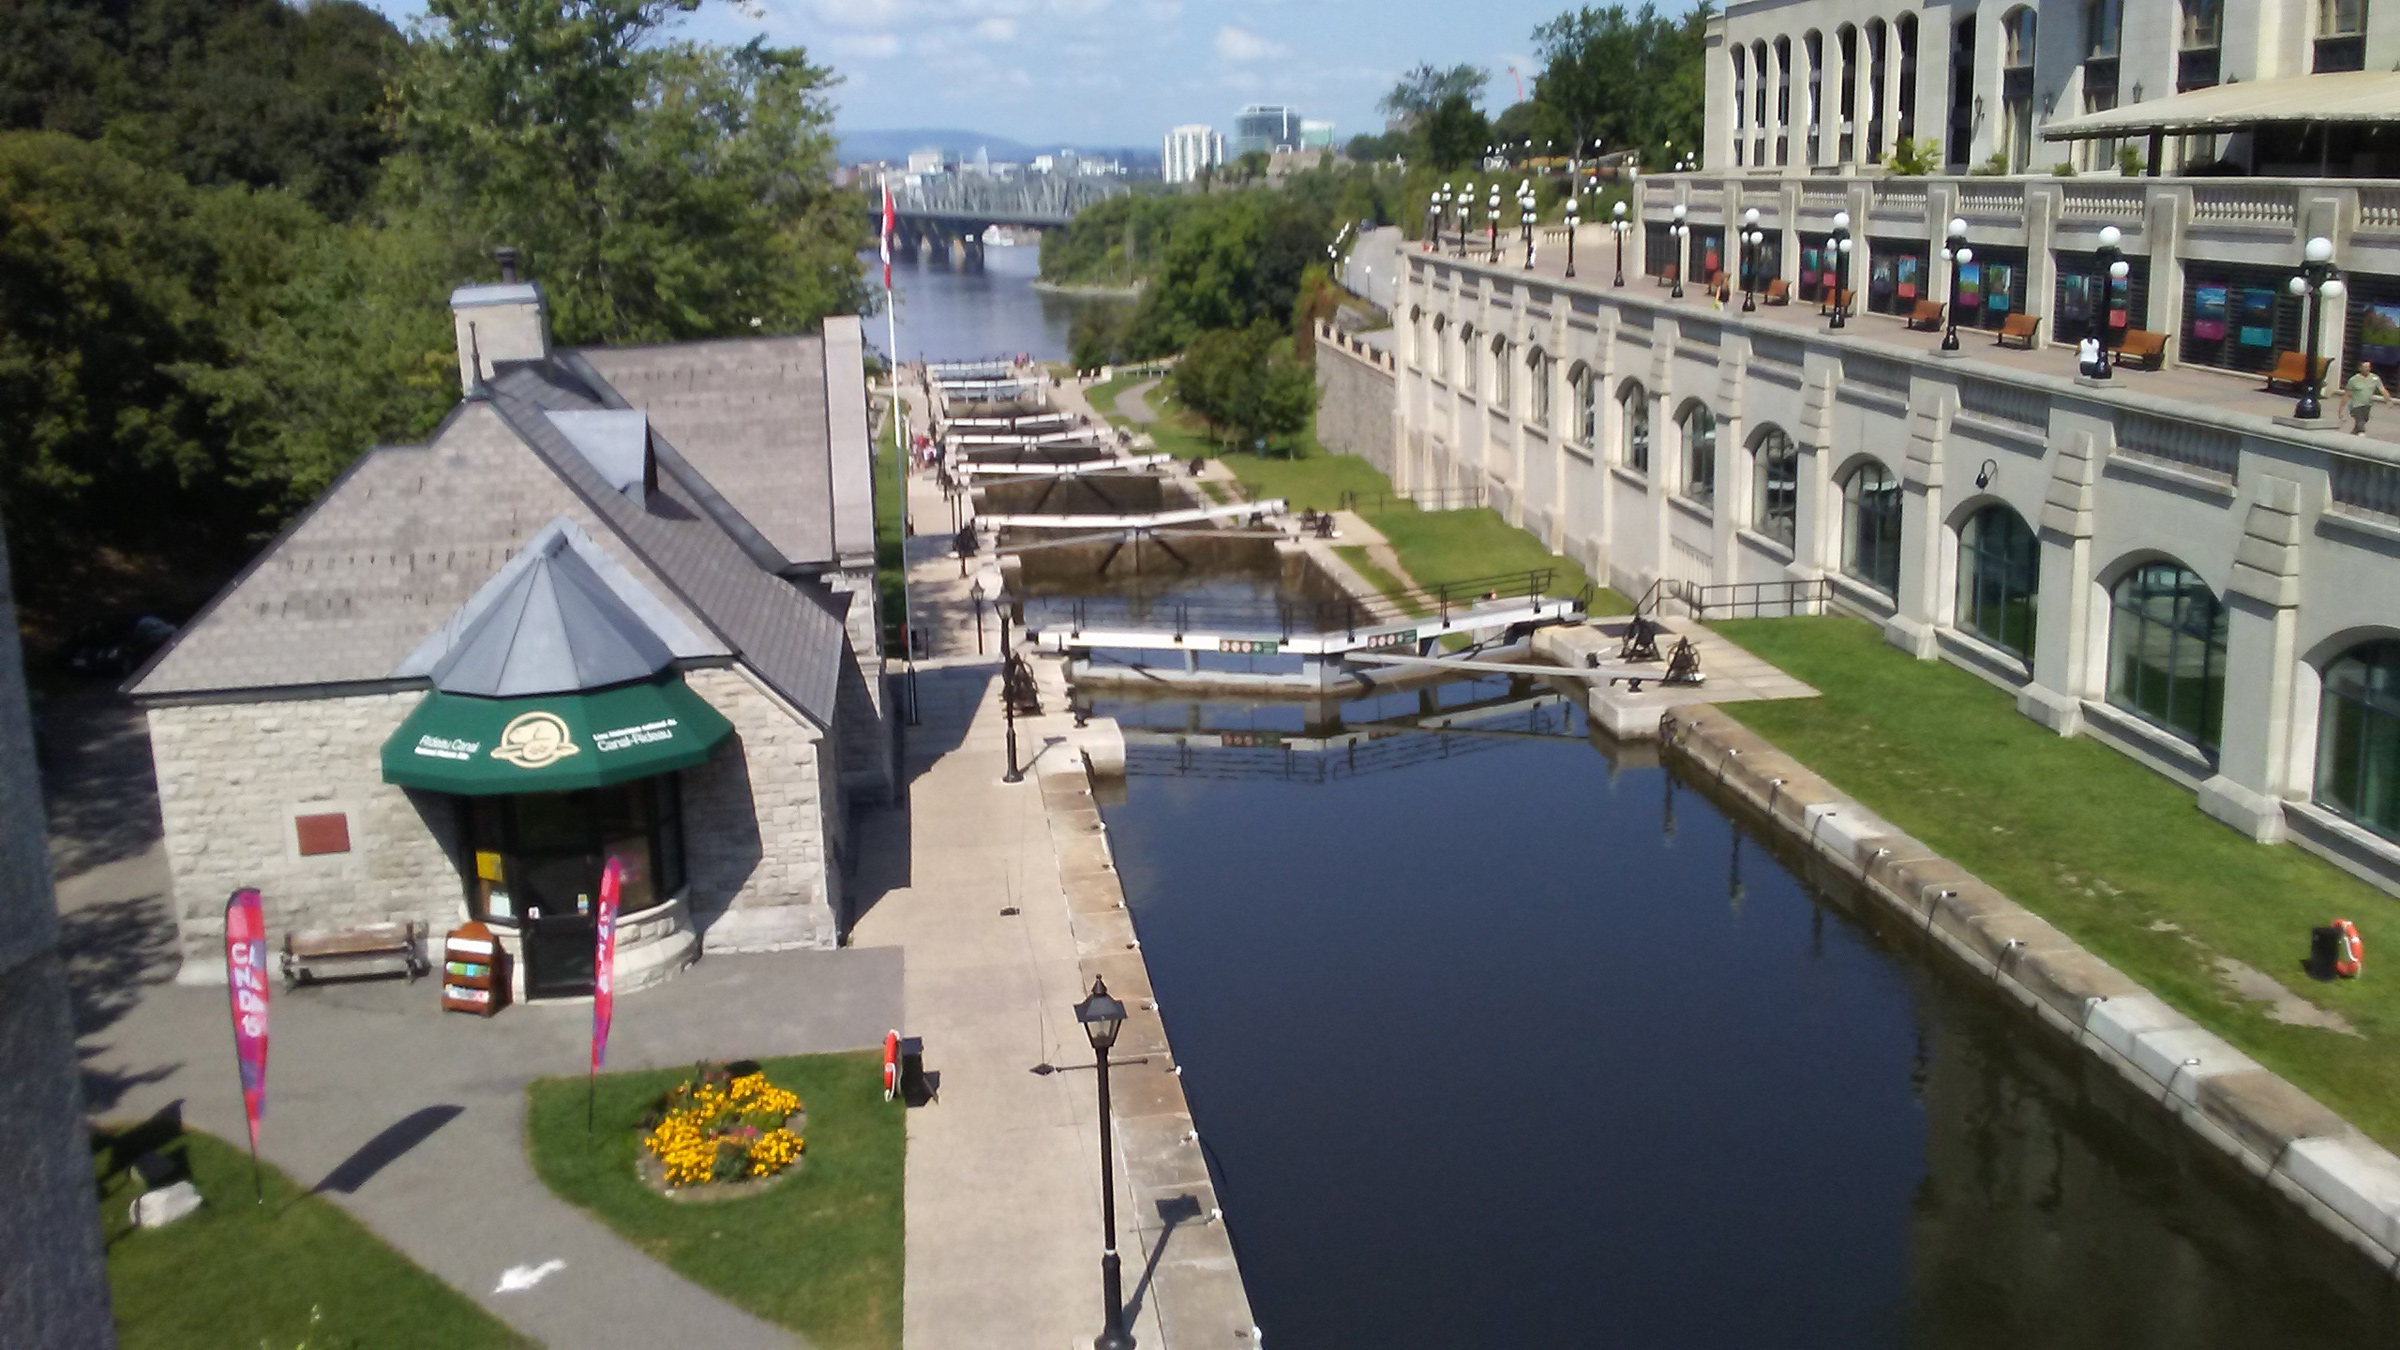
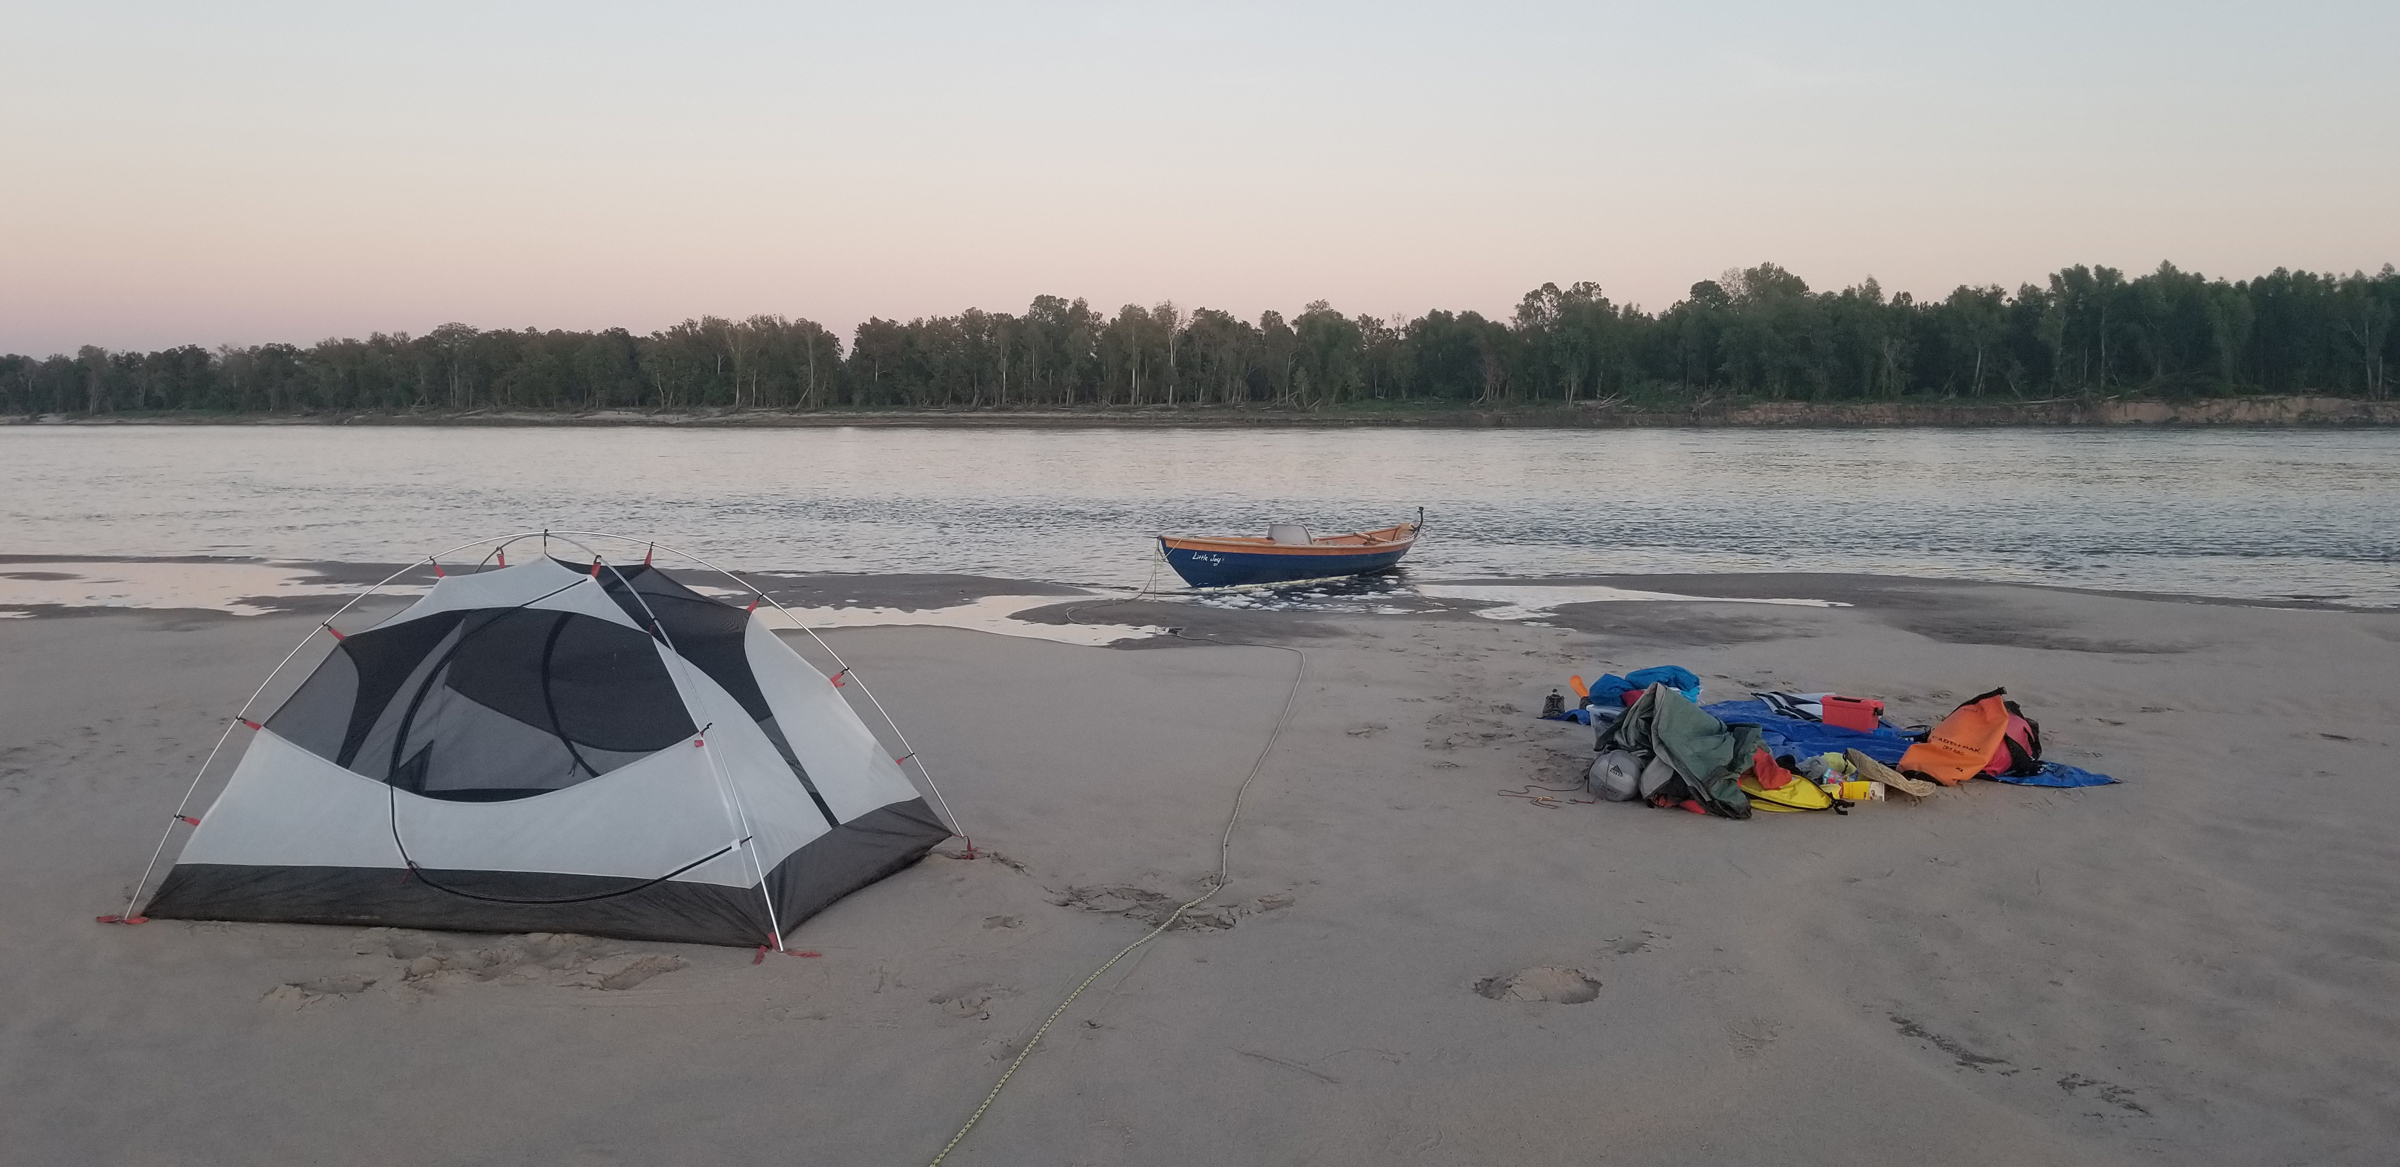
I stood on the old planked dock gazing out from the Kingston, Ontario, shore onto the Cataraqui River. The sky was clear and blue but for a few cumulus clouds, the late morning was a comfortable temperature for late August, and the light breeze made a few ripples on the river’s dark blue surface. The far shore seemed quite distant but was in fact less than a half-mile away. I could plainly see the trees lining the shore with the few apartment buildings peeking out. Not wall-to-wall buildings as you would expect in a city, but very rural with a wooded shoreline. To my right, downstream, I could see under the Kingston-LaSalle Causeway to the city harbor and beyond it out into Lake Ontario. I was at the south end of the Rideau Canal system, a 125-mile-long series of interconnecting lakes, rivers, locks, and hand-dug canals that has connected Lake Ontario to the capital city of Ottawa since 1832.
Photographs by the author
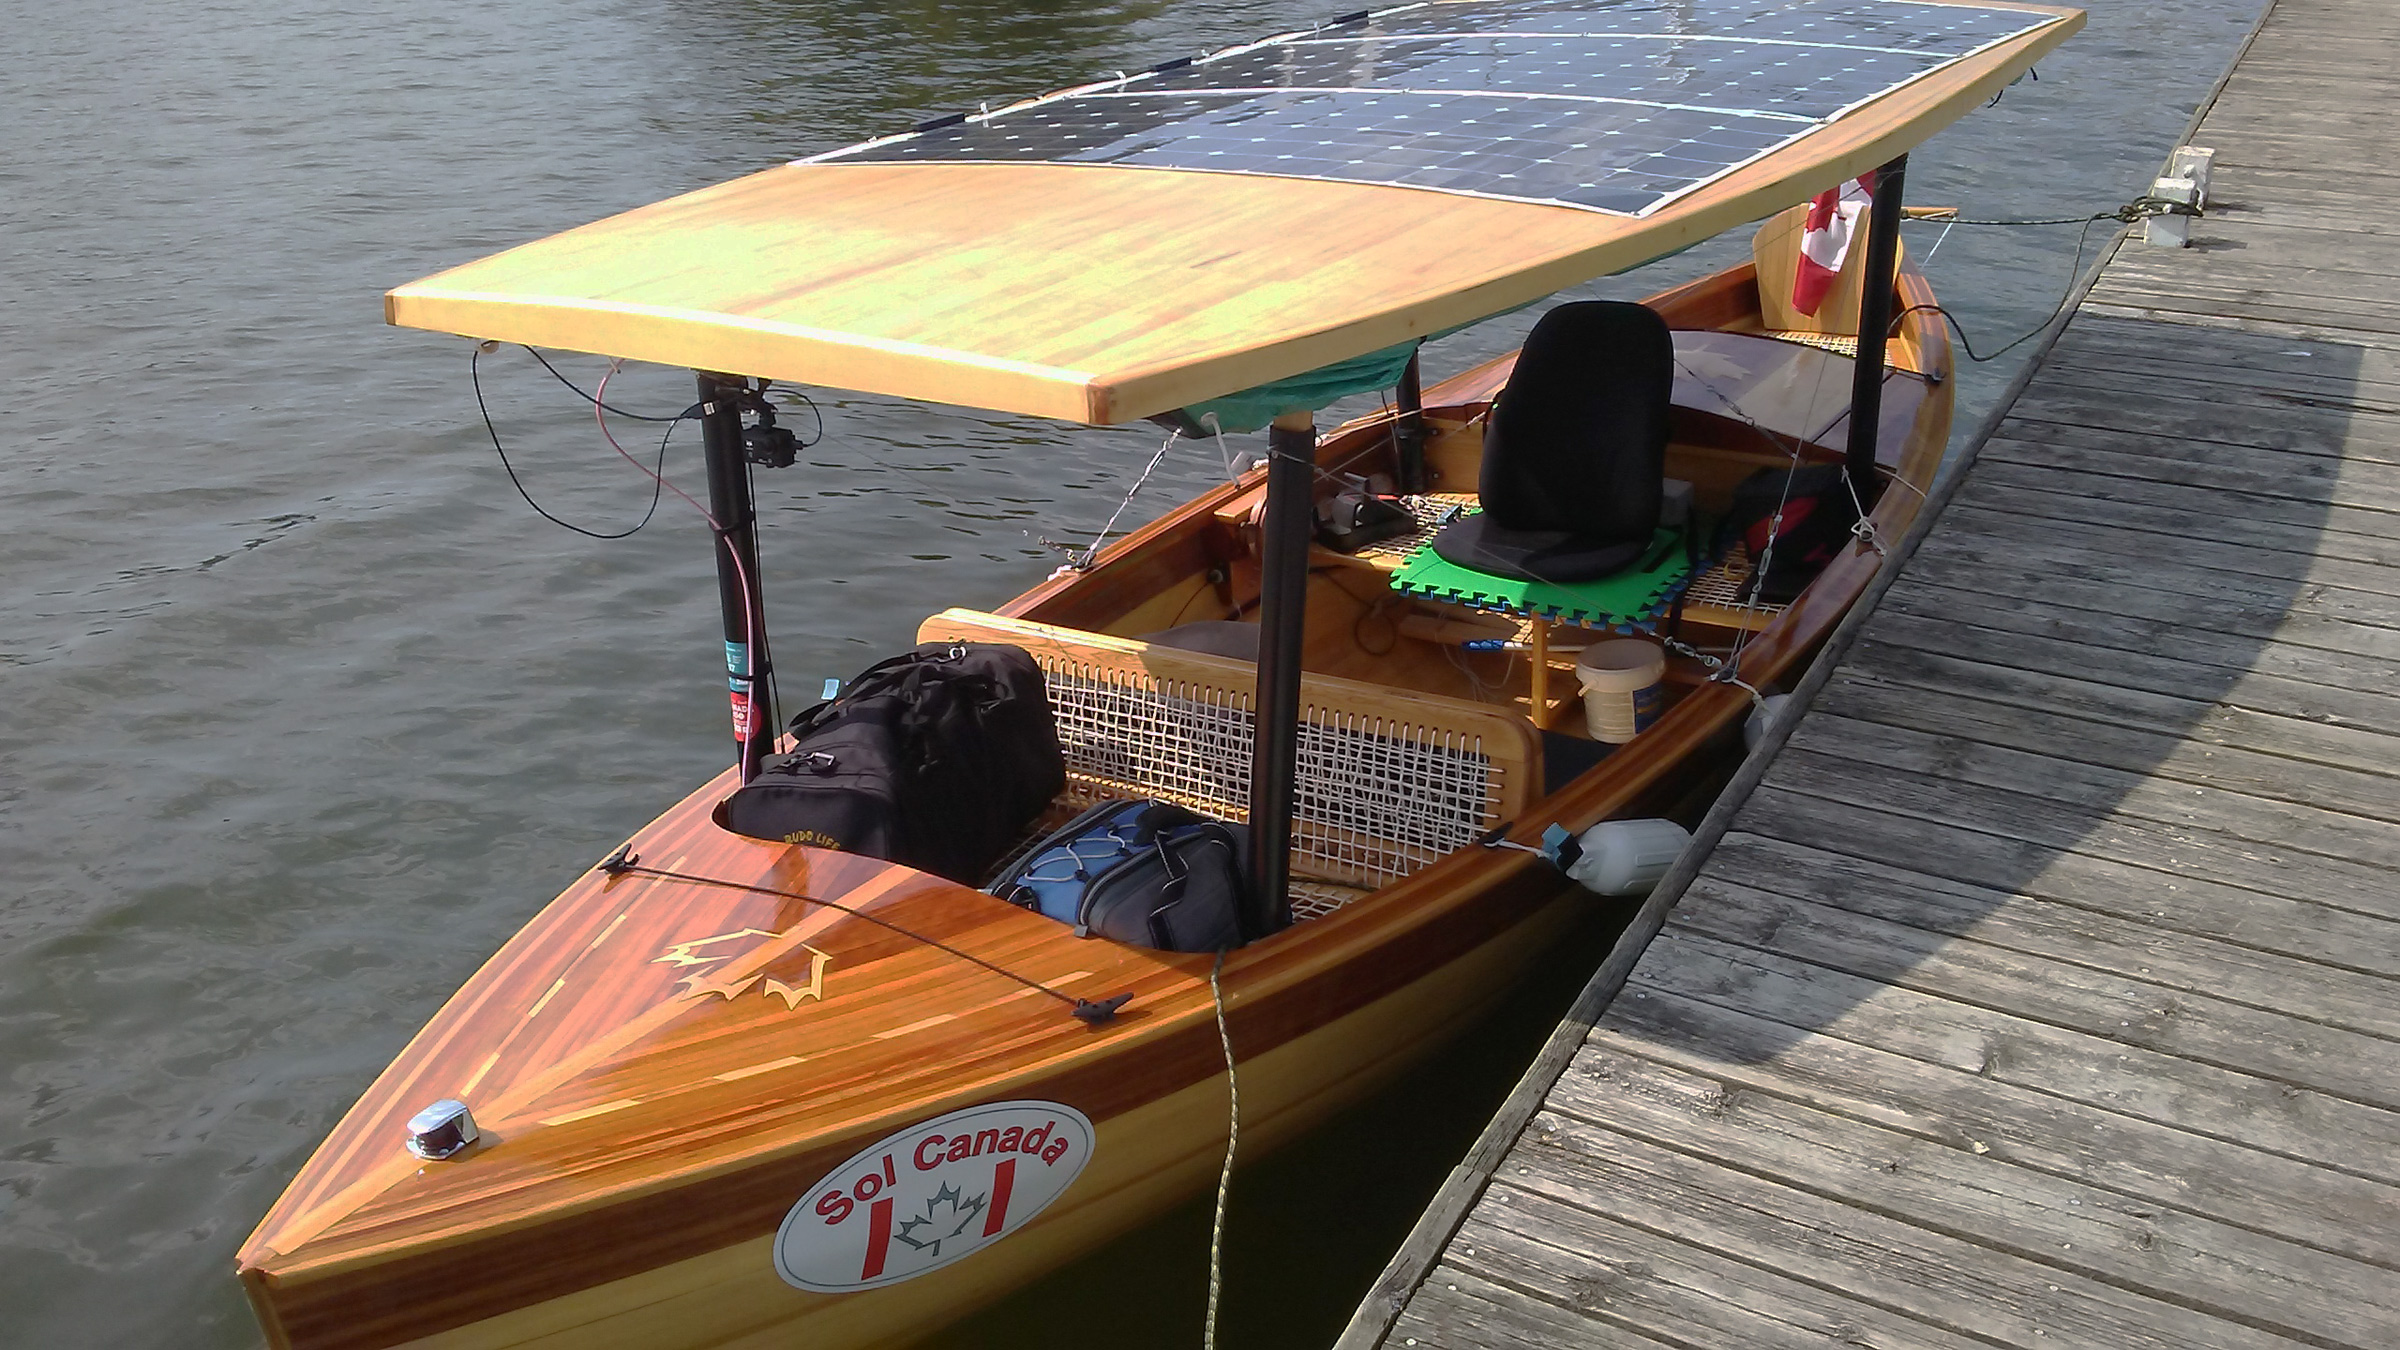
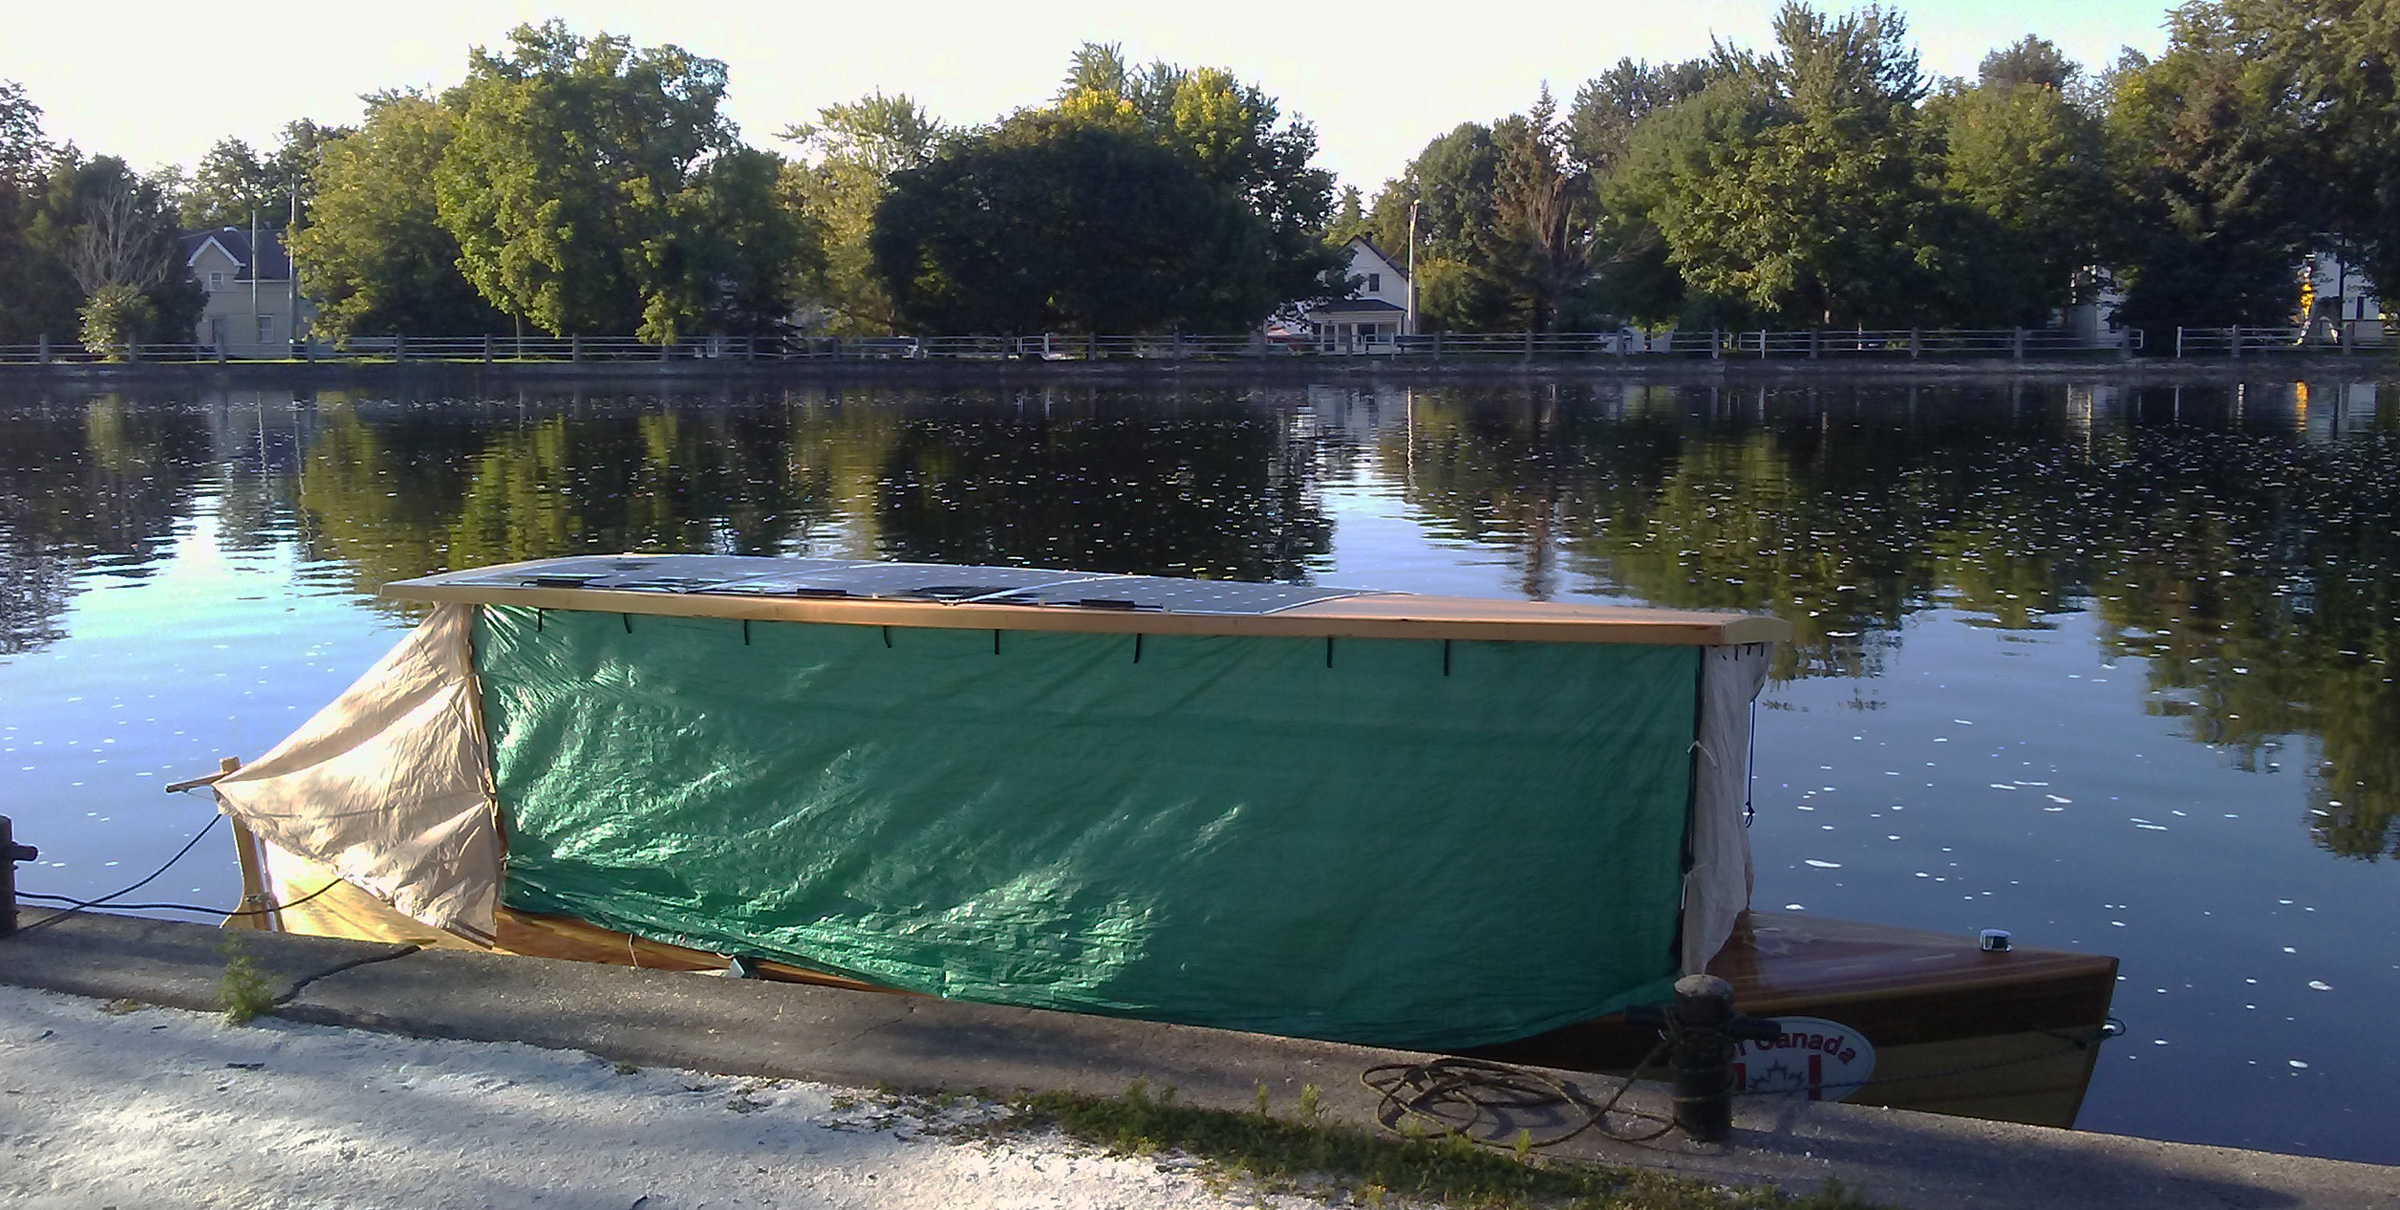
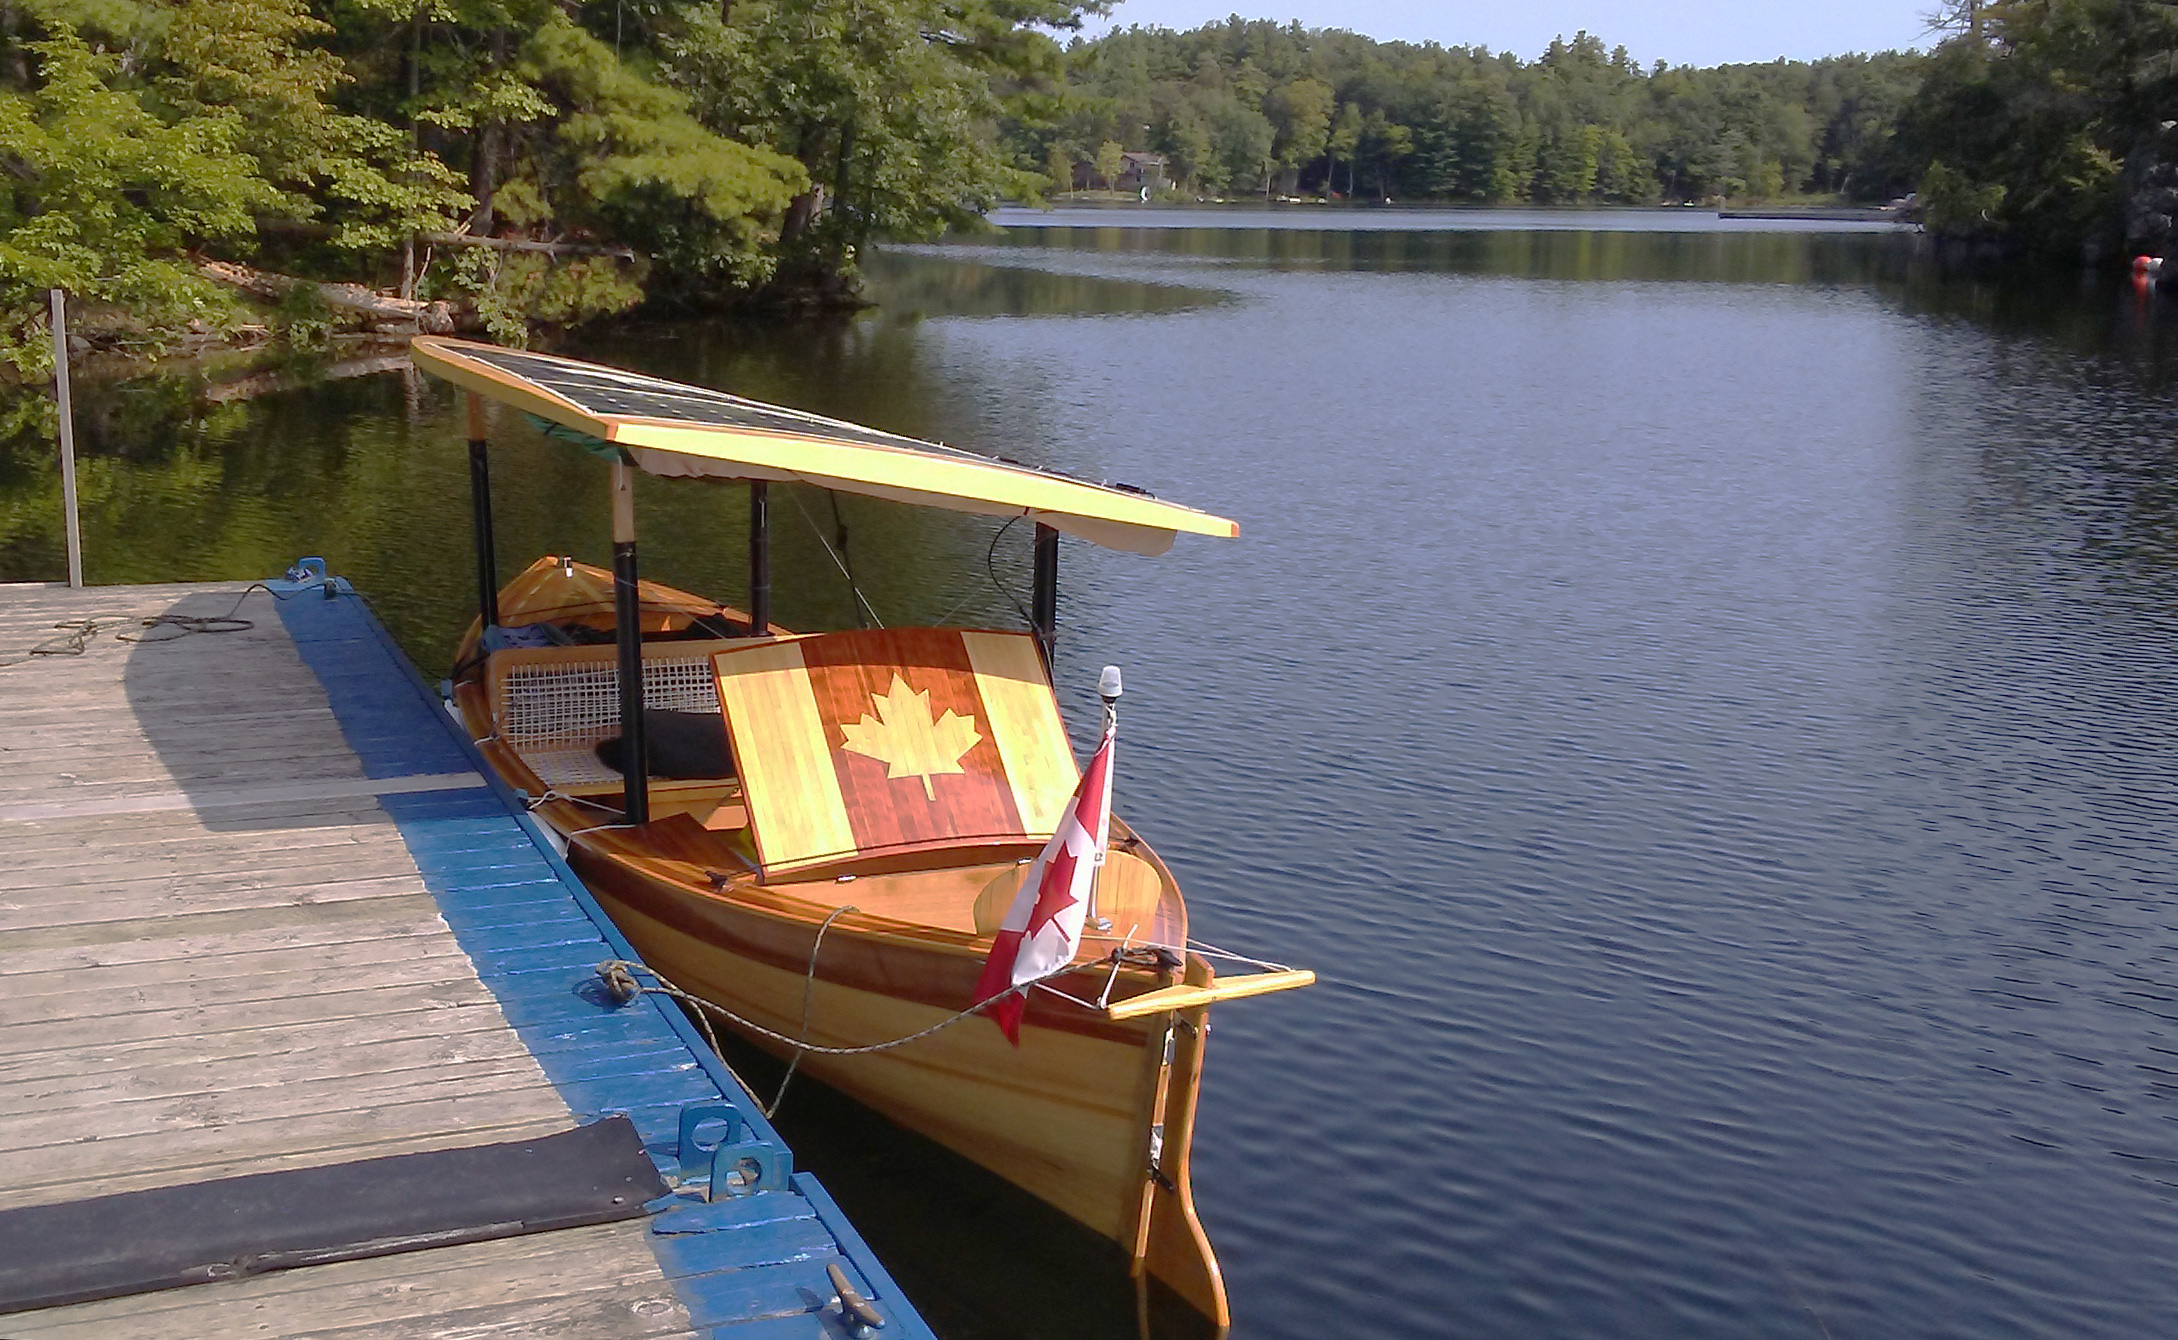
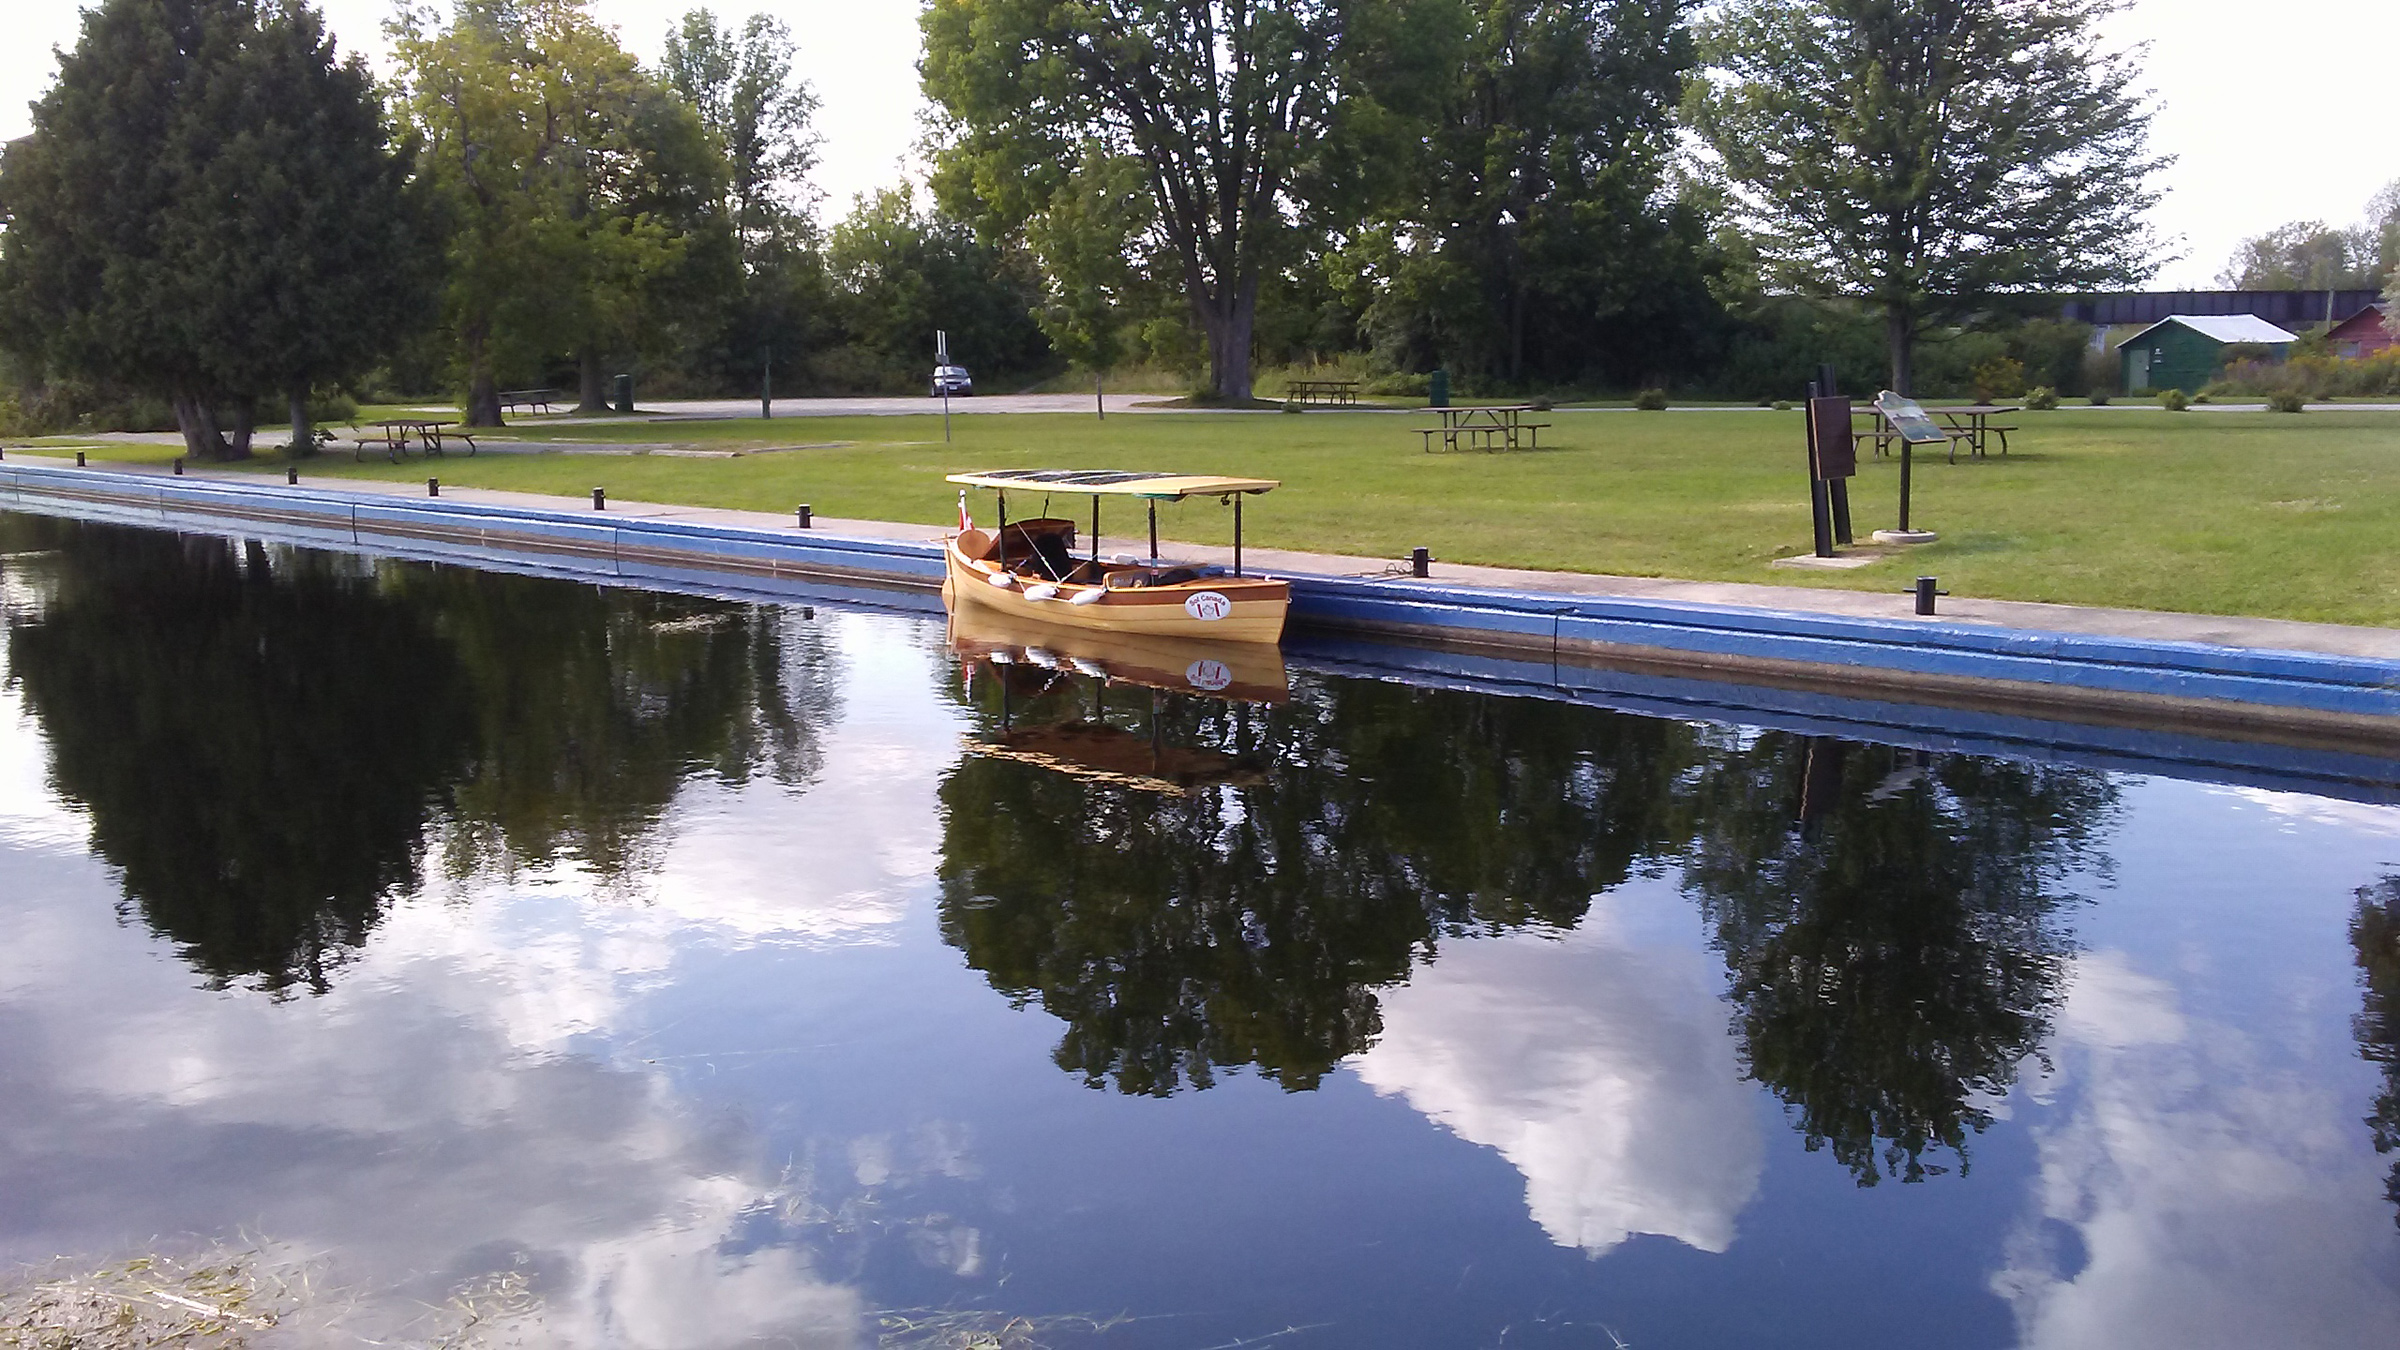
It was getting late in the morning but SOL CANADA, the 18 1/2′ solar-powered cruiser I built, was finally ready to depart from the Kingston Marina’s dock, beginning my journey up the Rideau Canal system. I’d rely on the solar panels on the canopy to supply the only power I’d use to cover the 125 miles to Ottawa.
With SOL CANADA, my 18 1/2′ wooden, hand-built, solar-electric boat tied to the dock and now loaded with my supplies, I aimed to make it to Ottawa and back using only solar electric power. This has never been done before; at least that is the conclusion I arrived at from my research.
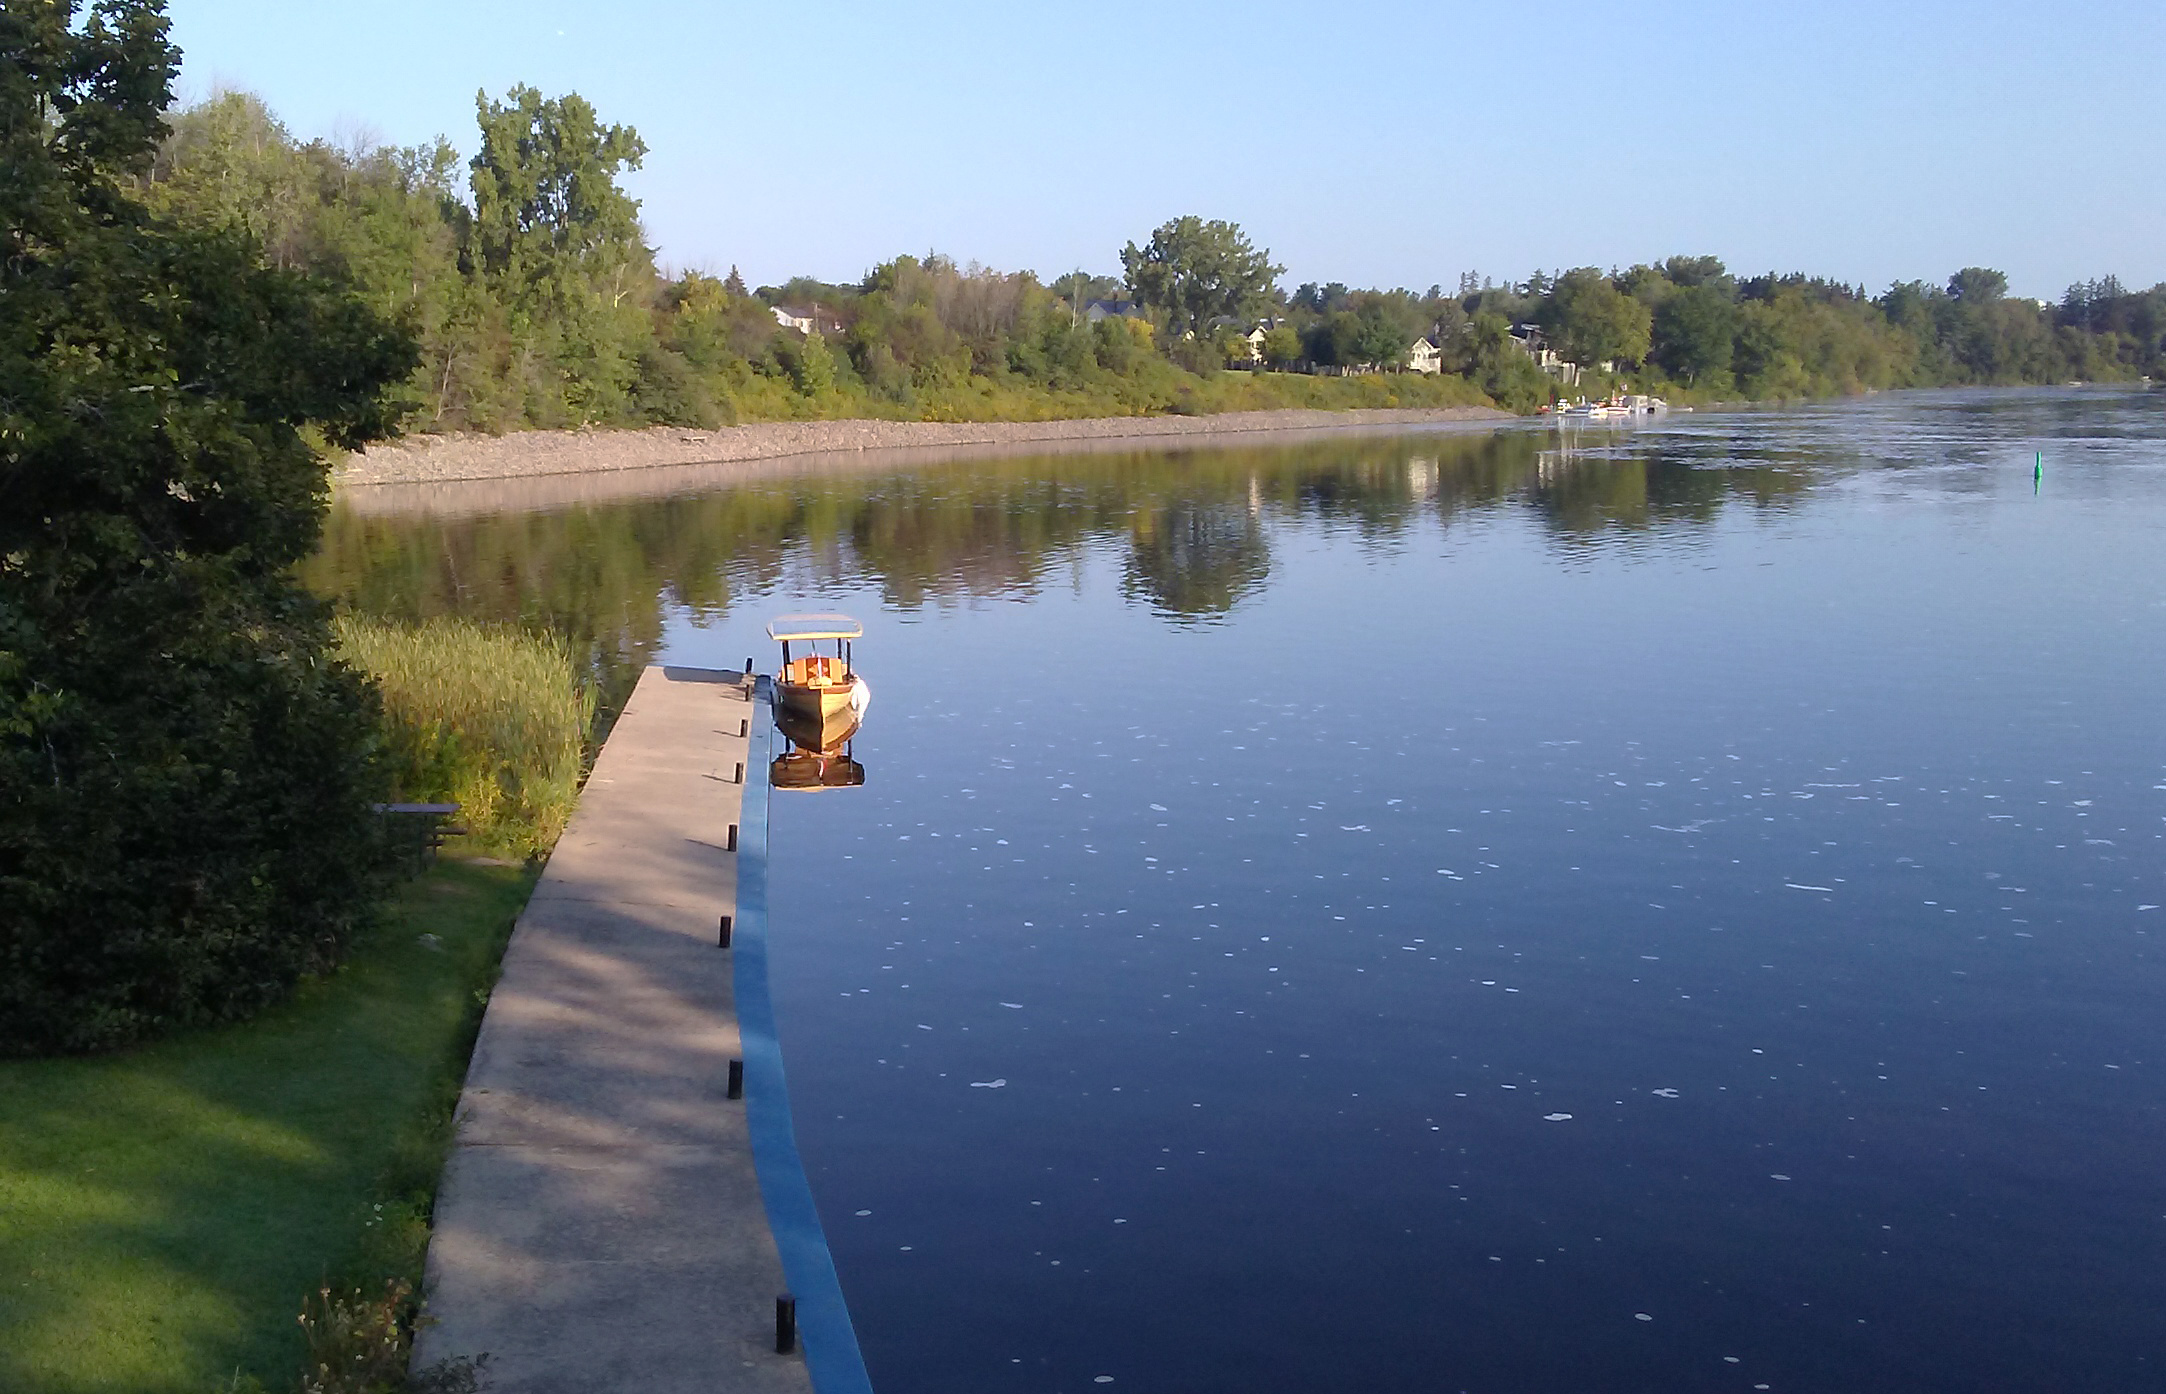
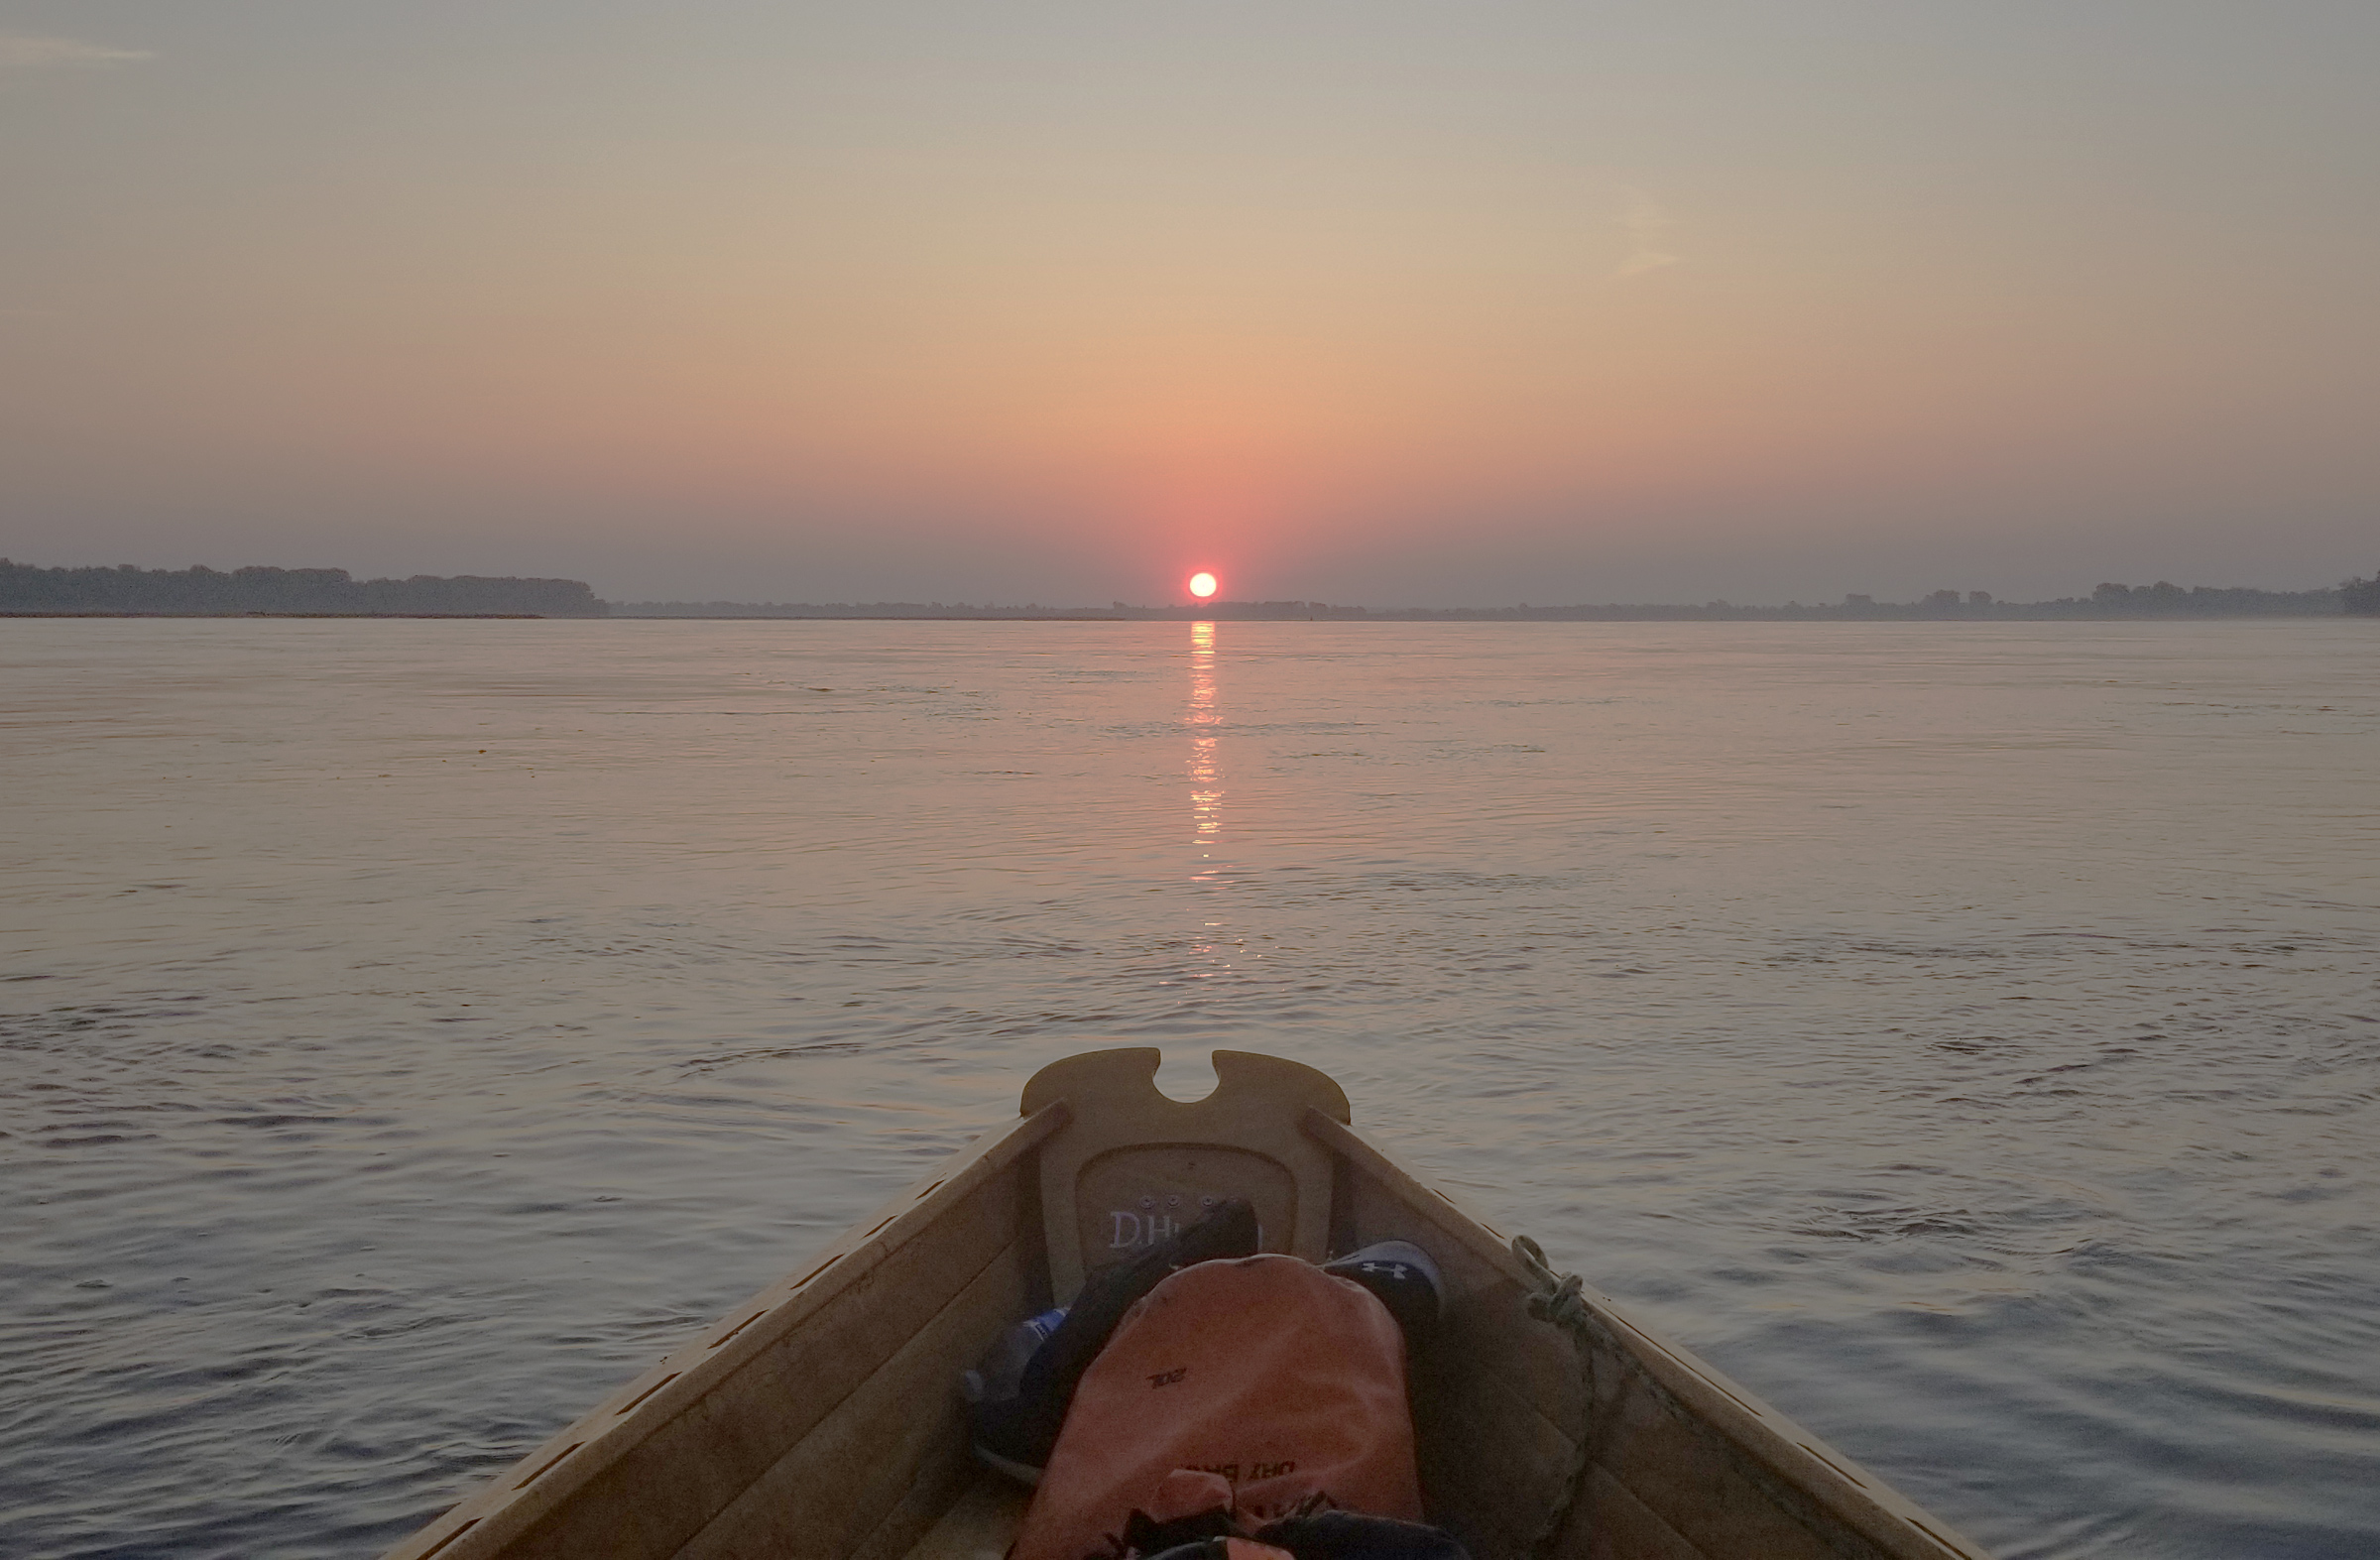
I shoved off at 11:30, made my way carefully out to the channel, passed by a few moored sailboats, and steered away from prop-fouling weed beds.
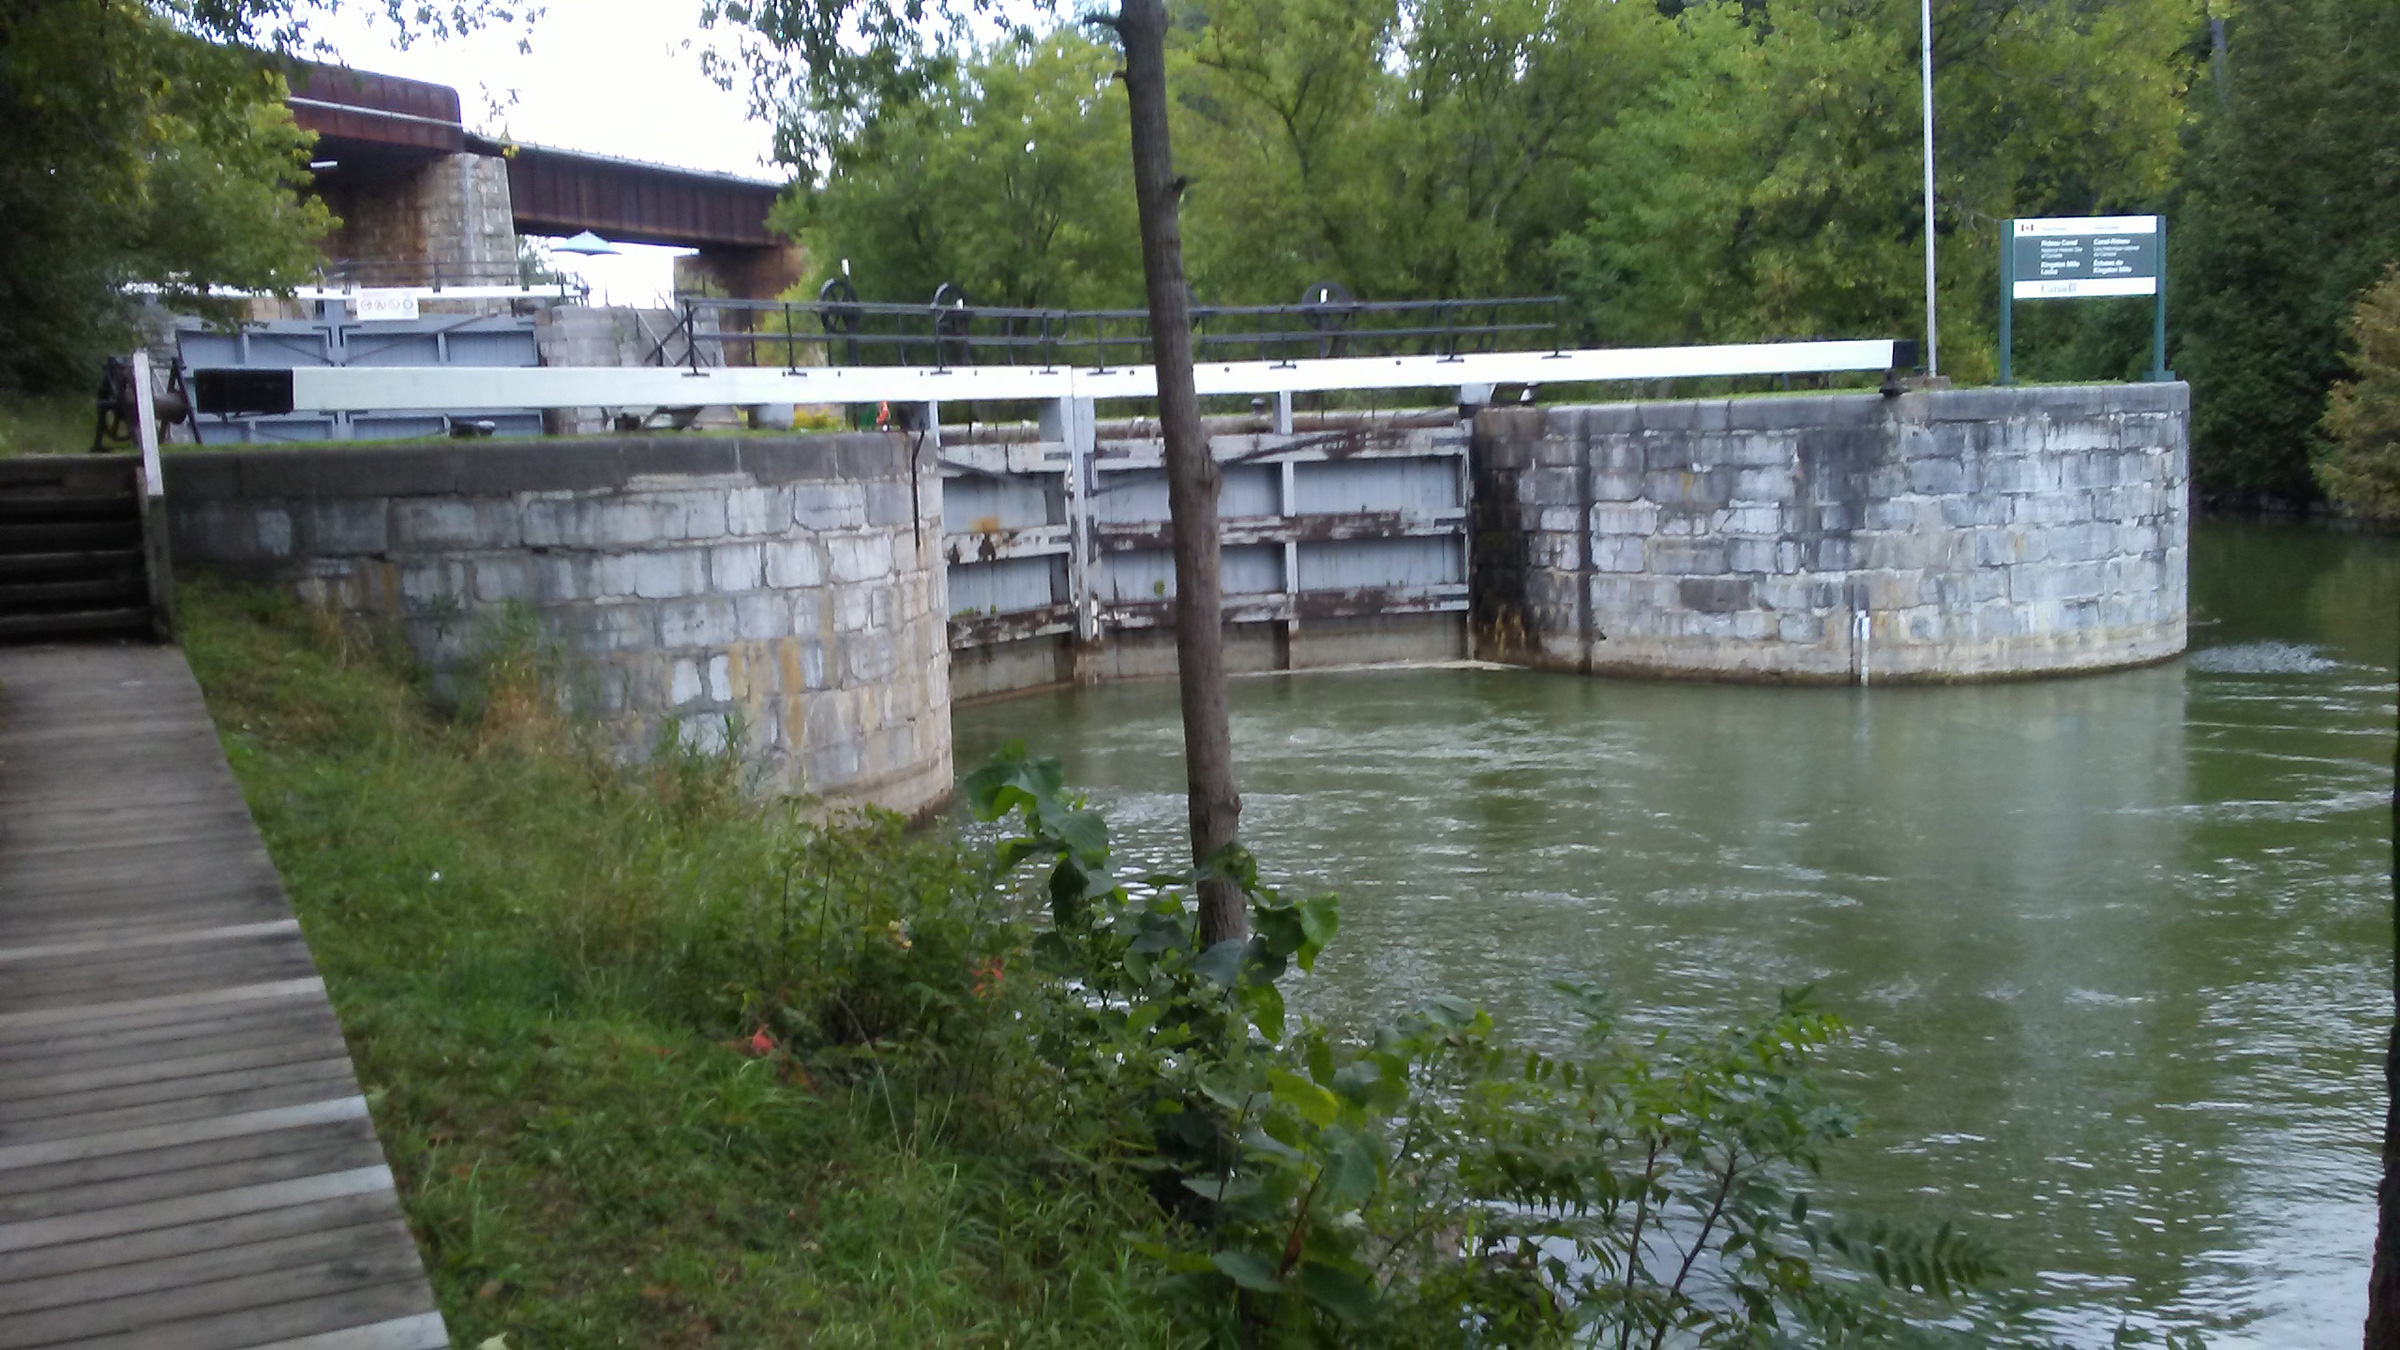
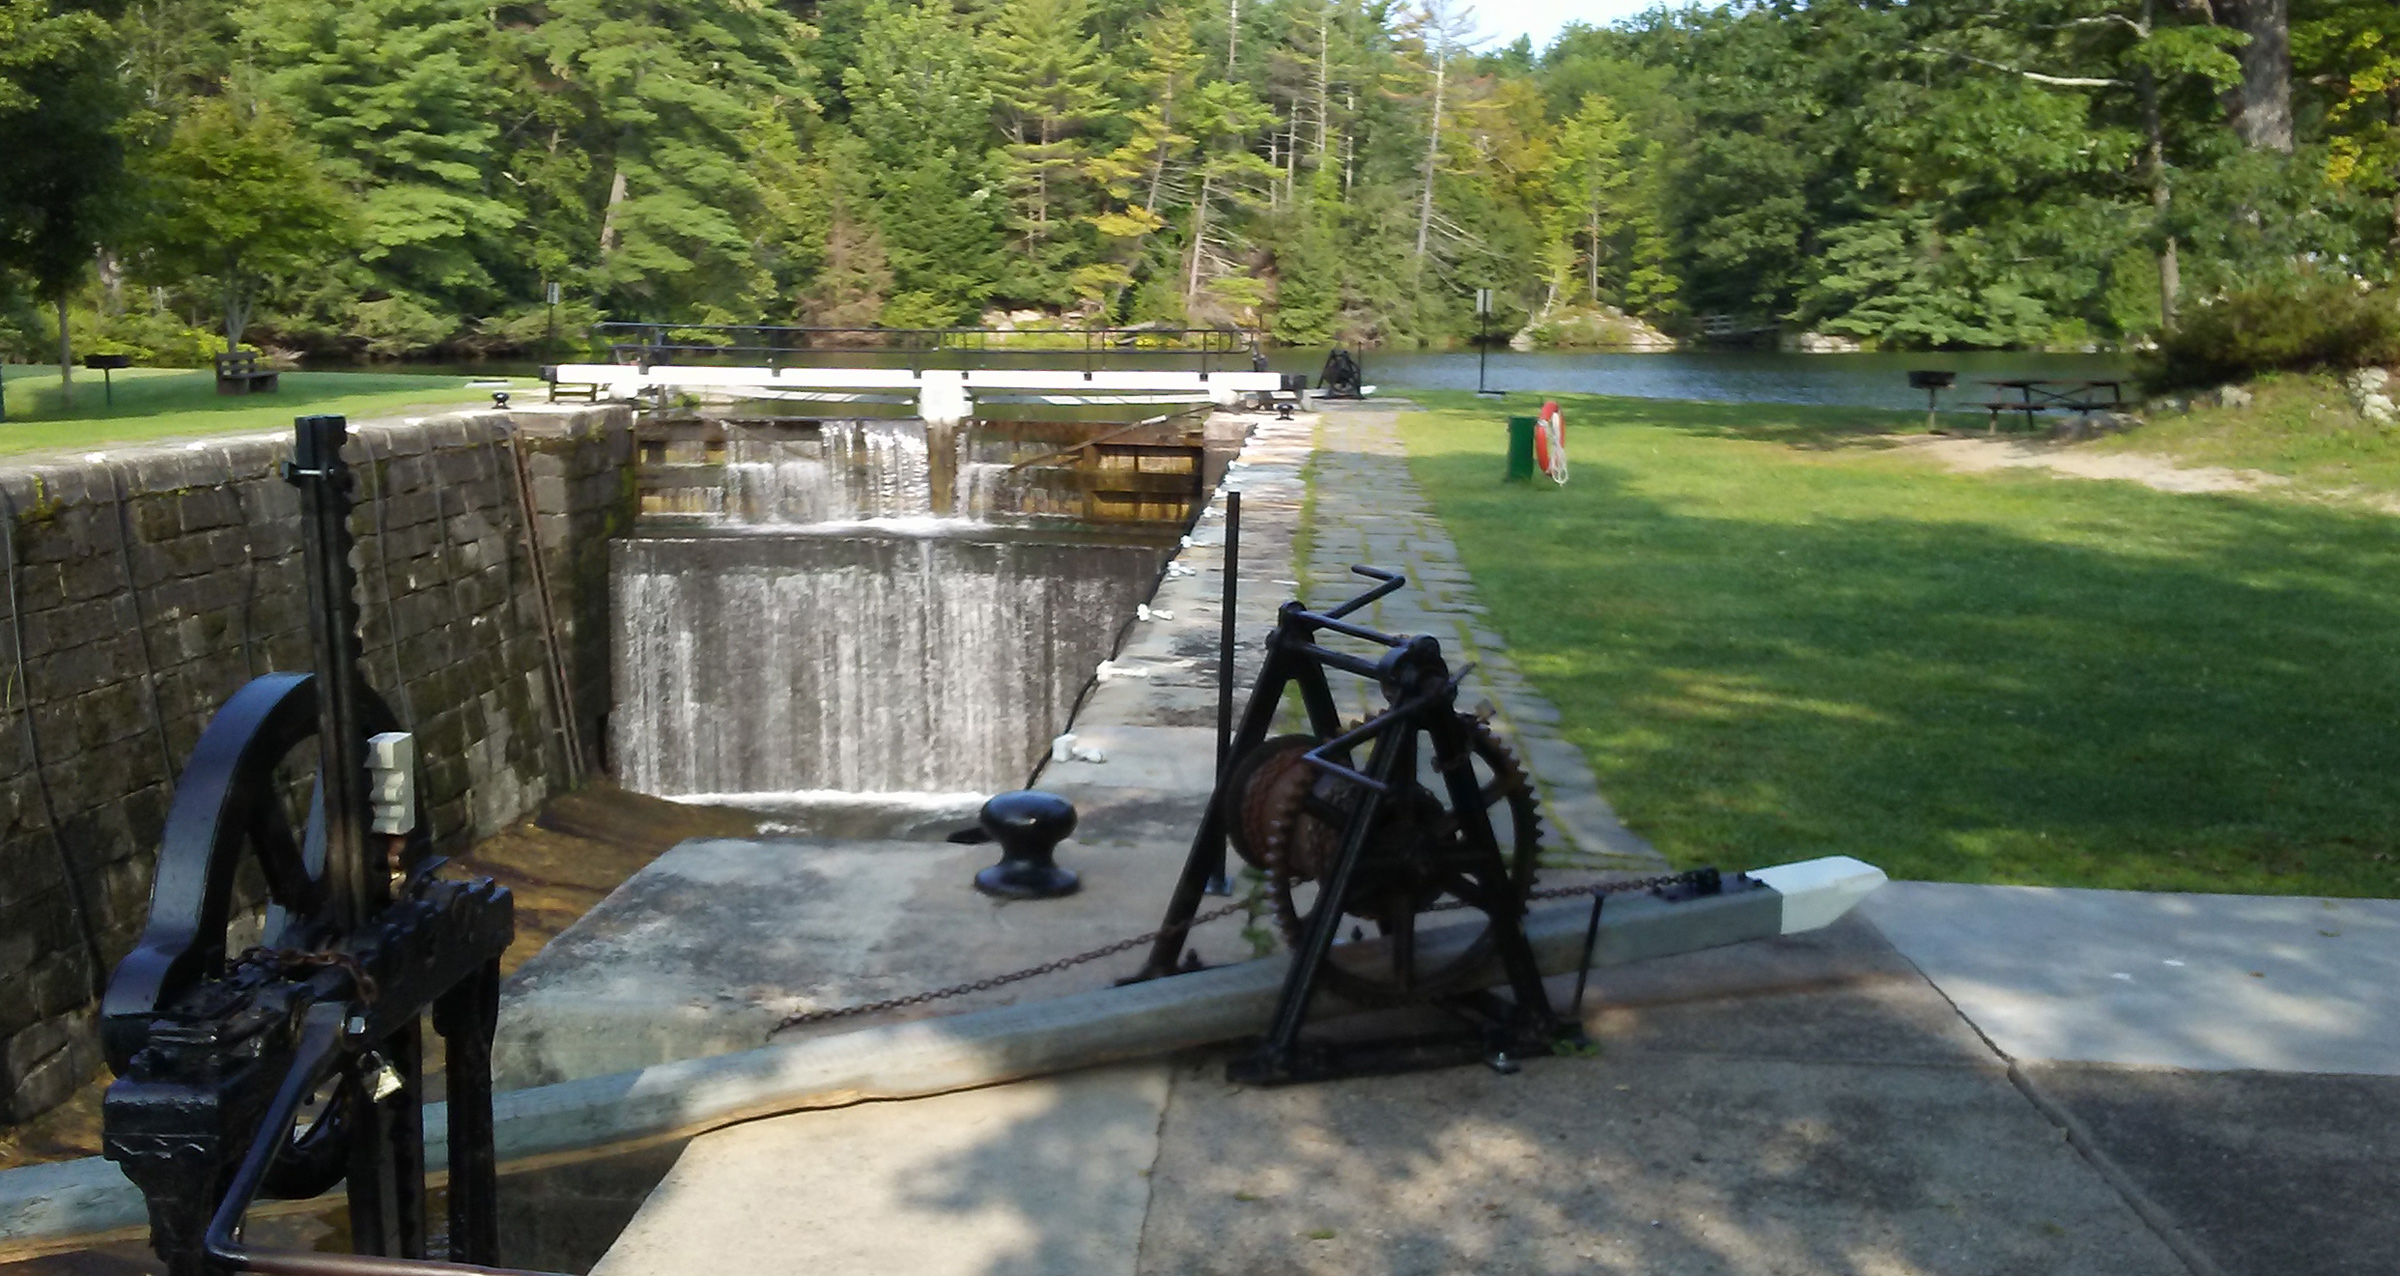
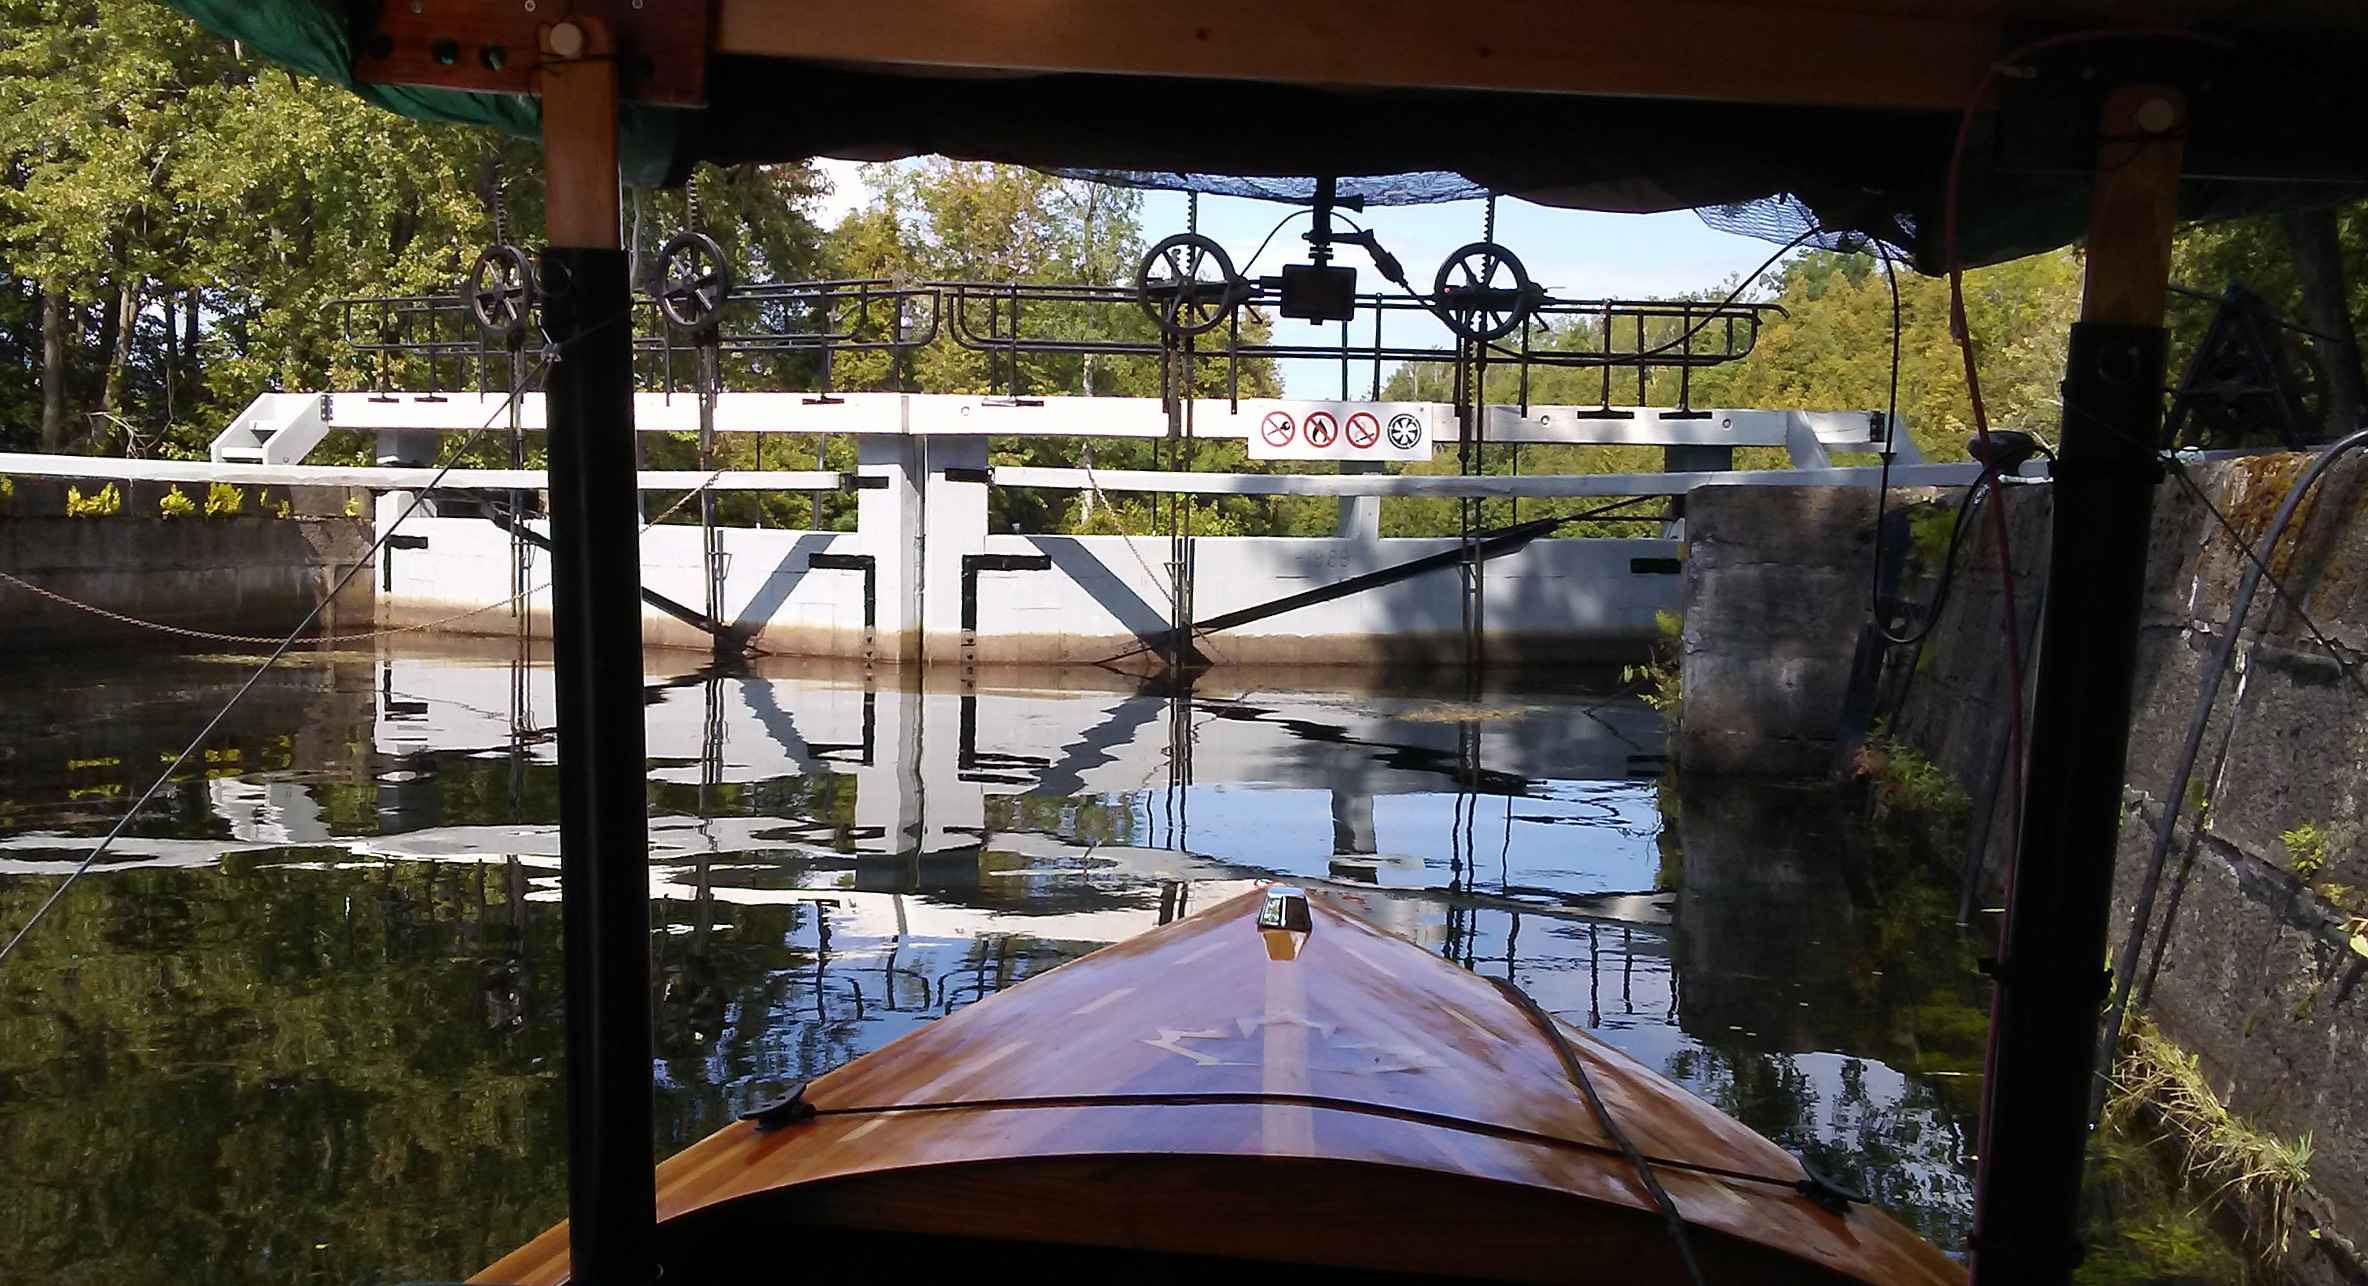
I made it into the channel and headed north. The current flowing against me slowed the boat to 3.7 miles per hour, a pace slower than I had planned for. The distance to the first lock was just under 5 miles upstream at Kingston Mills, and I could expect to arrive there in about an hour and a half. Within minutes of traveling up the channel, the city skyline vanished behind the riverside marshlands, acres of cattails, and grasses that are home to turtles, ducks, cormorants, Canada geese, mute swans, and seagulls. SOL CANADA was the only boat heading upstream. I soon passed under a busy overpass where thundering traffic disrupted the stillness. The banks grew higher and the river was soon flanked with high rocky shores covered with dense brush of pine and cedar. The river narrowed as if cutting through a gorge and stirred up algae, turning the water an emerald green. I followed a bend to the right and suddenly, over the bow, loomed the towering stone structure of the Kingston Mills Lock, like a medieval castle with round turrets of stone blocks flanking the lock gates. The flight of four locks would raise SOL CANADA 45′ in about an hour.
The Kingston Mills Lock on the downstream side is typical of all the locks on the Rideau with huge stone-block columns and wooden gates. This is how they were made in the 1830s and they’re still working almost two centuries later.
I did not have to wait very long before the lock gates opened to let a few downstream boats exit. A lock tender waved me in to take the left side of the lock. I motored slowly forward and looped the painter around one of the vertical mooring cables. The grayed walls were chipped in some places and covered in slippery algae in others, and in the mortared seams between the blocks grew tufts of weeds and moss. As I waited in shade of the walls, the aroma of the lock reminded me of an old damp, musty basement.
Ascending in the locks was often a turbulent ride as water poured in from upstream. When I passed the apex of the Rideau and entered the descending locks, the water would be quite still as it drained.
The lock tenders cranked open the sluice valve and water rushed in, bouncing my small boat around. I used my boathook to push away from the walls to keep the canopy and the solar panels that covered it from being damaged. I slipped into the sunshine as the water level rose and soon the gates slowly opened as the tenders cranked the large winch handles by hand. SOL CANADA was the only boat in the lock, so I proceeded alone into the second chamber to repeat the process and then moved to the third chamber. I crossed a 75-yard-wide mill pond before entering the fourth lock.
After I motored out of the final lock, I stopped at the wood-planked mooring dock to get out and stretch my legs. The sky was still mostly clear but the clouds were starting to creep in from the horizon and would eventually affect the output of the solar panels.
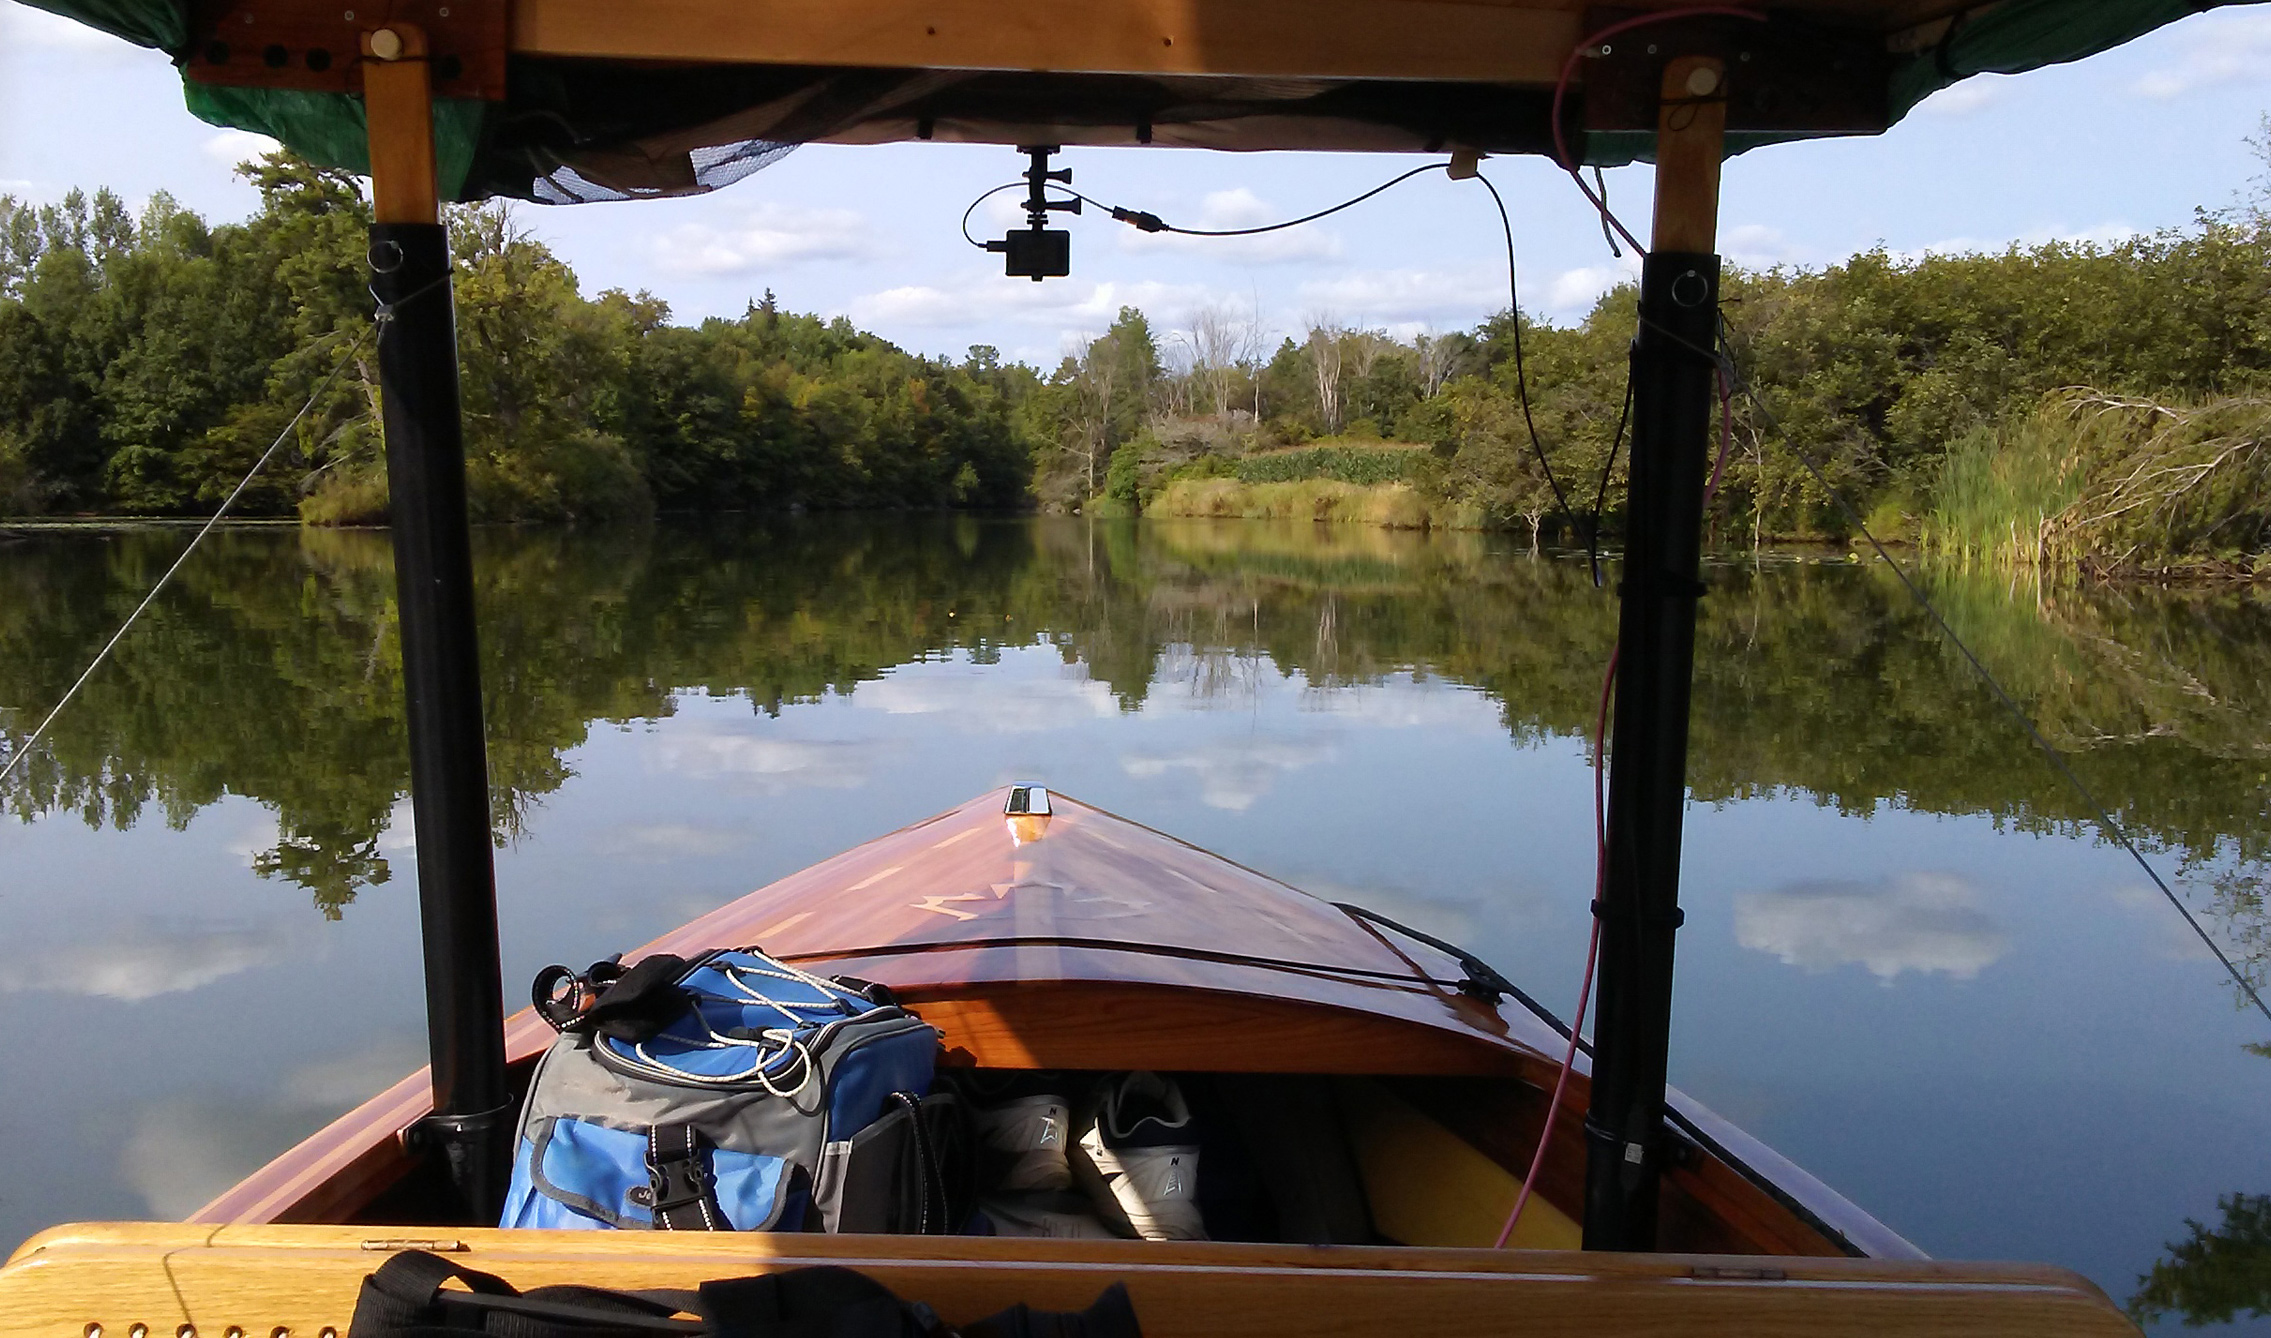
The river widened into Colonel By Lake, which stretched 3 miles north where it again narrowed through a dog-leg channel into the River Styx, another wide stretch of water where the shores were lined by marshes and dotted with widely scattered farm buildings. After covering 5 miles at cruising speed, I steered SOL CANADA into a 50-yard-wide riverway that gently weaves through farmland and marsh for more than a mile leading to the Lower Brewers Lock. On the right bank, a great blue heron waded along the shore on stilt-like legs, intent on the water, and ready to strike at any small fish with its long-pointed beak. How catching a fish could be possible was beyond me as the water here was a very murky bright green and nothing below the surface was visible.
Between Lower Brewers Lock and Upper Brewers Locks the canal enters and meanders through peaceful wetlands where only the wildlife broke the stillness. The water here was bright green.
On both sides of the stream, maple and willow trees arched their branches over the banks. There were no other boats at Lower Brewers when I arrived, and the lock gates opened almost as if by magic. Ten minutes later, SOL CANADA had gained another 13′ of elevation.
It was 4 p.m. I had planned to make it to Jones Falls by day’s end, more than 12 miles away upstream, but first I would have a half hour’s journey of 1-3/4 miles to Upper Brewers Locks, which has two chambers to pass through. I could have stayed the night at Upper Brewers, but that would have put me behind on my schedule. My average speed seemed to have settled on about 4.5 miles per hour, very good for SOL CANADA. The sun had stayed out most of the time, and the solar panels had held the charge on my battery bank at 95 percent; I was in good shape to continue.
Upon reaching Upper Brewers Locks, the gates again were open for me and I was able to pass right in without stopping. The Parks Canada staffers always monitor the traffic and ask you how far you will be going so they can notify the next lock about boats in transit.
SOL CANADA had been performing fairly well, but about once an hour the motor would just stop. I could get it going again by putting the throttle neutral for a few seconds and then I could put it back in gear. This was happening more frequently, and by the time I left the lock, it was occurring about every 10 to 15 minutes. The 11-mile run to Jones Falls should take two hours and 20 minutes, but the delays caused by the motor would add to that. I decided to push on. After 4 p.m. in late August, the solar production diminishes quickly, so I’d have to rely on the batteries as the day wore on.
The route took me through three lakes—Cranberry, Little Cranberry, and Whitefish—and the meandering channels between them. The landscape was marked with bare granite outcroppings and dense forests of cedar and pine. Cottages took the place of farmhouses, and the water was clear—a deep, dark blue.
The intermittent motor outages continued until I reached Jones Falls at 7 p.m., 40 minutes behind schedule and too late to be let into the locks.
To keep wind, rain, and prying eyes out I enclose the cockpit with tarps. During the day, they’re rolled up and secured to the canopy.
I moored the boat at the downstream wharf and got my boat into camping mode. I rolled canvas panels down from the perimeter of the canopy and fastened them to the gunwale. I folded the seats down to make the sleeping platform and set my inflated air mattress and sleeping bag on it. For dinner, I heated up some spaghetti for a quick bite to eat.
Before turning in, I walked through the locks to see what the Rideau Canal had in store for me in the morning. Jones Falls is a four-lock flight secluded from any towns but it has a resort a hundred yards down from the lock. I could have walked across the boardwalk and enjoyed a nice meal, but I was thinking about the motor, concerned that I could not continue the trip if it continued to cut out. I phoned my son-in-law to see if he would be available to drive my trailer to me if I decided to terminate the trip. While talking with him, I thought perhaps it was a thermal issue and that I would try traveling the following day with the hatch open to allow for better cooling. We decided that I would at least continue for one more day after I had a good night’s sleep.
Early in the morning of the second day, I waited for the Jones Falls lock tenders to begin their day’s work. Beyond the upper gate is a mill pond I’d cross to get to the final lock in the flight of four.
The night sky was starry but the air was very cold, and I woke several times shivering. With my jacket draped over the sleeping bag, I slept okay but was wide awake and up by about 6:30 a.m. The sky was clear and blue and a morning mist rolled across the 100-yard-wide bay at the base of the locks. The water was mirror-like, adding symmetry to the beautiful patterns of white and green made by the pale stone blocks powerhouse at the base of the dam and the wooded banks that surrounded them.
The previous day I had run the battery bank down at 80 percent, which concerned me as the boat’s lead-acid batteries shouldn’t ever carry less than half of a full charge. This was my first strictly solar-powered trip, and I was not sure if I was being too conservative or not. My goal was to have the battery bank back to near 100 percent at the end of each day to avoid depleting the batteries.
At the mooring dock just beyond the final Jones Falls lock, I decided to give the boat a couple of hours of sunshine and tilted the canopy to more quickly charge the batteries. I had depleted them to an 80-percent state of charge.
At 9 a.m. the lock staff arrived and opened the first chamber for me. I was once again the only boat going through, which made going through all four chambers of the first flight a quick process. I was through to the mooring dock in about 45 minutes. I moored at the upstream dock to boost the charge on the batteries. To maximize the charging, I angled the canopy on its adjustable posts to face the sun. While the boat was sitting there in the bright morning sun, I crossed the lock on the white painted walkway on top of the gates. Peering over the black painted steel railing and looking down into the lock basin made me a bit dizzy.
Up the hilly pathway was a small stone building approximately 30′ by 20′. The blocks that composed the walls were of assorted sizes and colors—mostly variations of beige and gray, others rusty red. Two windows, each composed of 24 small panes of glass, flanked the entry to this restored lockmaster’s home. Inside were heavy wooden shutters that could close off the windows and small rectangular slotted holes in the walls were gunports the first British lockmasters and staff could use to defend the house if Americans were to attack. The Rideau Canal was built by the British Navy after the War of 1812 as a military route to bypass the Saint Lawrence in case another conflict with the Americans occurred.
The footpath crossed a weir used to divert excess water to keep it from overwhelming the dam downstream. Water tumbled down in a thundering torrent of foam.
When I returned to the boat, I re-leveled the canopy and checked the state of charge. It was now at 90 percent. That was enough to allow me to continue cruising, though I’d have to travel at a reduced speed of 3 miles per hour to ease the draw on the batteries. The solar panels could then supply the power to the motor while trickle charging the battery bank.
Roger Siebert
.
Working my way through the curving waterways that connected pond-like lakes I had to round the bends cautiously, keeping watch for oncoming traffic in the very narrow channels. This went on for about 3/4 mile before opening up to a series of lakes, channels, and locks. During the afternoon, bright sunshine fell upon the solar cells, but a haze of overcast moved across the sky as I made my way through Davies, Chaffey’s, and Newboro locks. I kept the motor hatch half open to allow a good amount of airflow to the motorwell, and that helped keep the motor running. It shut down only twice.
The lakes had high granite shores and forests of large maple and white pine trees. The dark blue water was clean, deep, and cool. Cottages and docks were scattered along the shores and on the islands and there was considerably more boat traffic. At one point I was swarmed by fishing boats flying by flat out, racing back for a fishing derby weigh-in. Even at my decidedly slower pace I was making good progress along the circuitous 18 miles of the route to the Narrows Lock.
The Narrows joins Upper Rideau Lake with its much larger sister, Big Rideau Lake. Upper Rideau is the summit of the Rideau Canal system, so the lock would be the start of the 275′ descent to the Ottawa River. A causeway at the Narrows carries a backcountry highway to a swing bridge that crosses the locks. The bridge is low, so before boats can pass though the lock, a gate with flashing lights blocks traffic while the bridge is raised and the lock gates are opened.
By the time I passed through the lock after a drop of just 3′, it was getting close to 6 p.m., so I swung around to the back side of the long extended wooden pier and moored about 40′ behind a large yacht. In the protected cove between the pier and the causeway, I’d have good shelter from the wind. A picnic table on the pier right next to the boat was where I settled in for dinner.
As morning broke I climbed out onto the dock and found Big Rideau Lake perfectly still, with mist hanging in the air right next to the water. The trees were separated from their mirror images by an indistinct white boundary that looked like a smudged line of chalk.
I approached the bridge at Rideau Ferry, which separates Big Rideau Lake from Lower Rideau Lake. The name of the place recalls the ferryboat that crossed the channel before the bridge was built.
Big Rideau is the largest of the lakes on the canal system. It is 13 miles long and its perimeter is dotted with as many elegant homes as humble cottages. I got off to a late start and made my way up the lake, following a course just 100′ from the west shore in case the wind came up and I needed a lee. The lake stayed calm, barely rippled, except by the wakes of boats that appeared as the morning wore on. I reached the top of Big Rideau Lake where Rideau Ferry, a 150-yard-wide channel, divided Big Rideau from Lower Rideau Lake. The gap is spanned by a 26’-tall cement bridge, high enough to let boats pass beneath it.
Crossing under the bridge I checked my batteries’ charge. They were at 94 percent, so even with the skies becoming more overcast I was in a good position to cross Lower Rideau Lake to a narrow winding section of the Rideau River.
After passing through Lower Rideau Lake, I entered the Poonamalie Lock and was now headed downstream. The experience in the descending locks was quite different and much easier. Draining the lock and descending is no more turbulent than pulling the plug in a bath tub.
The low banks were dense with cedar and brush, the water was glass calm; the ride was so peaceful, unspoiled by the quiet running of my electric motor. After making my way along a channel that took me through the Poonamalie Lock, the waterway opened to wide marshlands. Around a third bend in the river I saw an old bascule railway bridge, abandoned and left in a permanent 45-degree angle. It marked the entrance to the locks at Smith Falls. The first lock lowered SOL CANADA into a large manicured basin in the middle of a park in the heart of the town. I passed through to the second lock and moored on the downriver side so I could leave at my own leisure in the morning rather than wait for the lock. I walked into town for a restaurant meal.
At the first lock at the town of Smith Falls, I had to wait for a few boats before we entered the lock. The lock tenders are always aware of what boats should be approaching and will wait until everyone is at the lock before opening it.
I left Smith Falls early the next morning. I had been traveling for three days and had passed the halfway point. I had my battery management down pat and knew how far I could travel given the amount of sunshine a day would provide. This waterway weaved through low terrain with large marshy bays thick with cattails. I was careful to remain in the channel as the river and bays were clogged with weeds.
The day was warm and sunny and I would have seven locks to go through to travel the 20 miles to Burritt’s Rapids. The current was in my favor and SOL CANADA made 5 mph over the bottom as my battery bank gained enough charge to reach and stay at 100 percent while underway. I covered the first 6 miles with ease and passed through Old Sly, Edmonds, and Kilmarnock locks. Rarely did I see another boat. There were no cottages; the unspoiled terrain was inhabited instead by turtles, ducks, and geese.
I arrived at a very narrow channel that led me into the first of three locks in the town of Merrickville. The bright sun made the buildings around the lock glisten. Just yards away stood the Merrickville United Church. Opened in 1890, it is built of rough-hewn blocks of limestone and has a square bell tower with narrow arch-capped windows. Beyond the church were three-story commercial buildings all made of radiant limestone.
The lock gates closed, we descended, and as the downstream gates opened a steel swing bridge in front of us slowly opened as all the cars driving to and from town waited. The group of boats proceeded to a second and third lock, both flanked by trees and well-manicured lawn. When the gate of the last lock opened, I put the power to the motor and jumped out in front of the pack of boats to get a bit of a lead on the way to the next lock, Clowes, 2 miles downstream. The lockmaster there would wait for all the boats to gather before closing the gates, and I did not want to be the straggler who kept everyone waiting. The other boats all soon overtook me and the wakes of a few, hitting the port quarter, tossed SOL CANADA around, forcing me to pull back on the throttle. Even so, I was not too late to enter the lock.
A short distance past Clowes was a half-mile of channel that was hand dug, mostly through limestone, over 187 years ago. The passageway was narrow—at places only 40′ across—and bordered on the west by a line of limestone blocks arranged to create a level walkway.
Three miles downstream, the river splits with two channels, creating a long, narrow island. The right channel led me pass the town of Burritts Rapids, which sits in the broad middle of the island. After passing through the lock at the tail end of the island, I secured SOL CANADA for the night to a long dock away from the main channel.
The following morning was looking to be a good day for keeping the batteries charged, but I had some concerns that wisps of clouds might cover the sun later in the day. I had to travel 25 miles to get to the next lock and SOL CANADA had never traveled that far in one day. If bad weather closed in, I could be in a bit of a pickle if I had to stop for the night short of the lock.
It was a beautiful morning at Black Rapids Lock as I got ready for a final push to reach downtown Ottawa. While this area is within the city limits of Ottawa, it is quite pastoral.
I motored through about 7 miles of the Rideau River hemmed in by farmlands; beyond them, the suburbs of Ottawa crowded the banks. I cruised under a couple of noisy, heavily trafficked bridges and passed several marinas before I reached Long Island’s flight of three locks. The weather had held and remained mostly sunny, so I was thrilled to see the batteries at 94 percent. It was still early enough in the day to push another 5 miles to Black Rapids. The river was lined with homes and cottages and busy with boat traffic.
I finished the fifth day at the downstream side of Black Rapids Lock. This is a popular spot for fishermen and I had to anticipate having company in the morning and be ready to cast off to get out of their way.
I passed through the Black Rapids Lock and tied up for the evening. I had traveled 30 miles in one day on solar-electric power, the farthest I have ever gone, and my battery bank was still at 94 percent.
I woke to a beautiful morning, excited to make my final push to Ottawa. The air was a bit cool, but there was neither a cloud in the sky nor a breeze on the water.
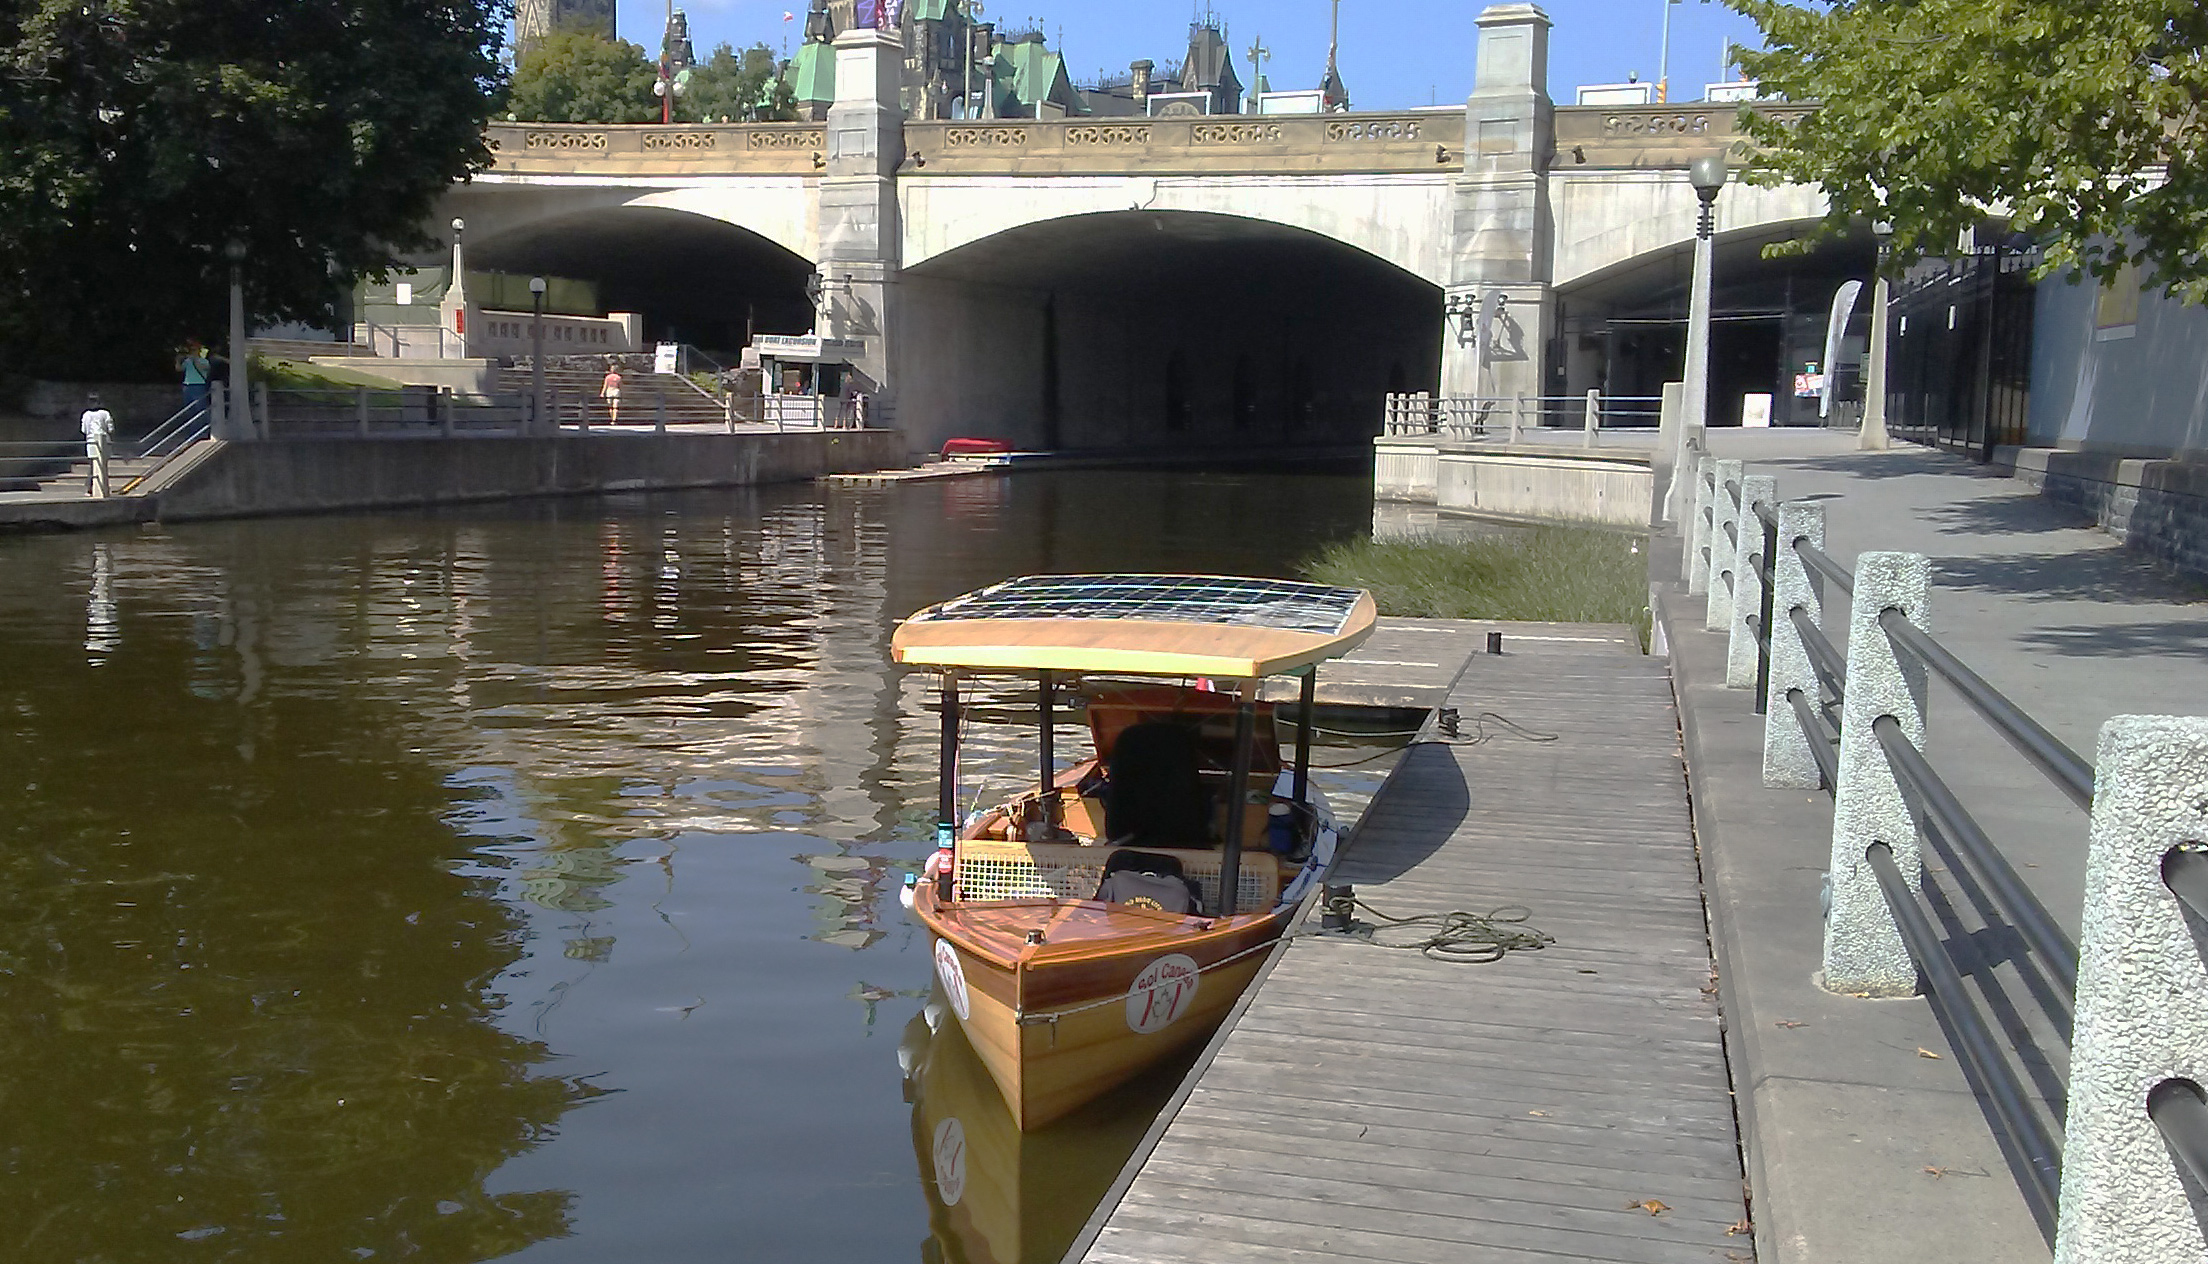
The dock in downtown Ottawa was my final destination of the trip. Through the dark passage under the Wellington Street bridge is the top lock of the flight of eight locks that descends to the Ottawa River. The intricate building looming above the bridge is the East Block, one of the three buildings of the Canadian Parliament.
I started downriver, passing a rock berm all along the shore for a few hundred feet and then a mix of trees and homes so well blended that it seemed more country than city. As I approached Hogs Back Lock I passed Mooney’s Bay, usually crowded with beachgoers, swimmers and rowers, but there was not a soul to be seen this chilly day. At the north end of the bay the river splits. To the left is the lock at the entrance to the canal to downtown Ottawa, and on the right the Rideau River parts company to tumble over the dam above Hogs Back Falls on its final descent to the Ottawa River. A mile downstream along the canal, beyond a row of mansions, I passed through Hartwells Lock adjacent to the modern blocky buildings of Carleton University.
The canal narrowed to about 150′—all along the banks it was well-kept park land, bike paths, and busy streets—then made an abrupt 90-degree left turn and narrowed to 90′. Down this straight 3/4-mile-long final stretch I could see the castle-like Chateau Laurier hotel and the limestone buildings of Parliament with their green-patinaed copper roofs. I came to my final moorage, a pier running along the canal beneath a row of large ornamental street lights. Just a short distance beyond were the final eight locks that drop 79′ to the Ottawa River. It could take at least 1-1/2 hours to travel the last 1,000′ of the Rideau Canal system, so I made my final destination the top of the locks and counted that as the first ever 100-percent solar-powered voyage from Kingston to Ottawa. I walked the short quarter mile to the Parliament building. It was lunch hour and the lawn there was full of people in a yoga class.
The descent to the Ottawa River, seen in the distance, traverses the eight locks of the Ottawa flight and can take hours, so I decided not to go down them.
After lunch I was back to my boat. I had a schedule to keep, and that was to start the journey back along the Rideau Canal to Kingston where I had started six days ago. The trip from Ottawa to Kingston by solar-electric boat had never been done either, and I intended to be the first.
Phil Boyer retired in 2017 after working 38 years in R&D in the telecommunications industry. He now keeps busy teaching karate at two local clubs and building boats. He has been around boats his whole life, starting with paddling as a kid. At age 11 he built a sailing pram with a bit of help from his father. In 2006 he began building solo canoes and now has four of them, featured in the August 2019 issue. Phil’s interest turned to building SOL CANADA, his solar-electric boat, in 2015. His next build will be a solar-electric version of the Power Cat he read about in the March 2016 issue of Small Boats Magazine.
If you have an interesting story to tell about your adventures with a small boat, please email us a brief outline and a few photos.
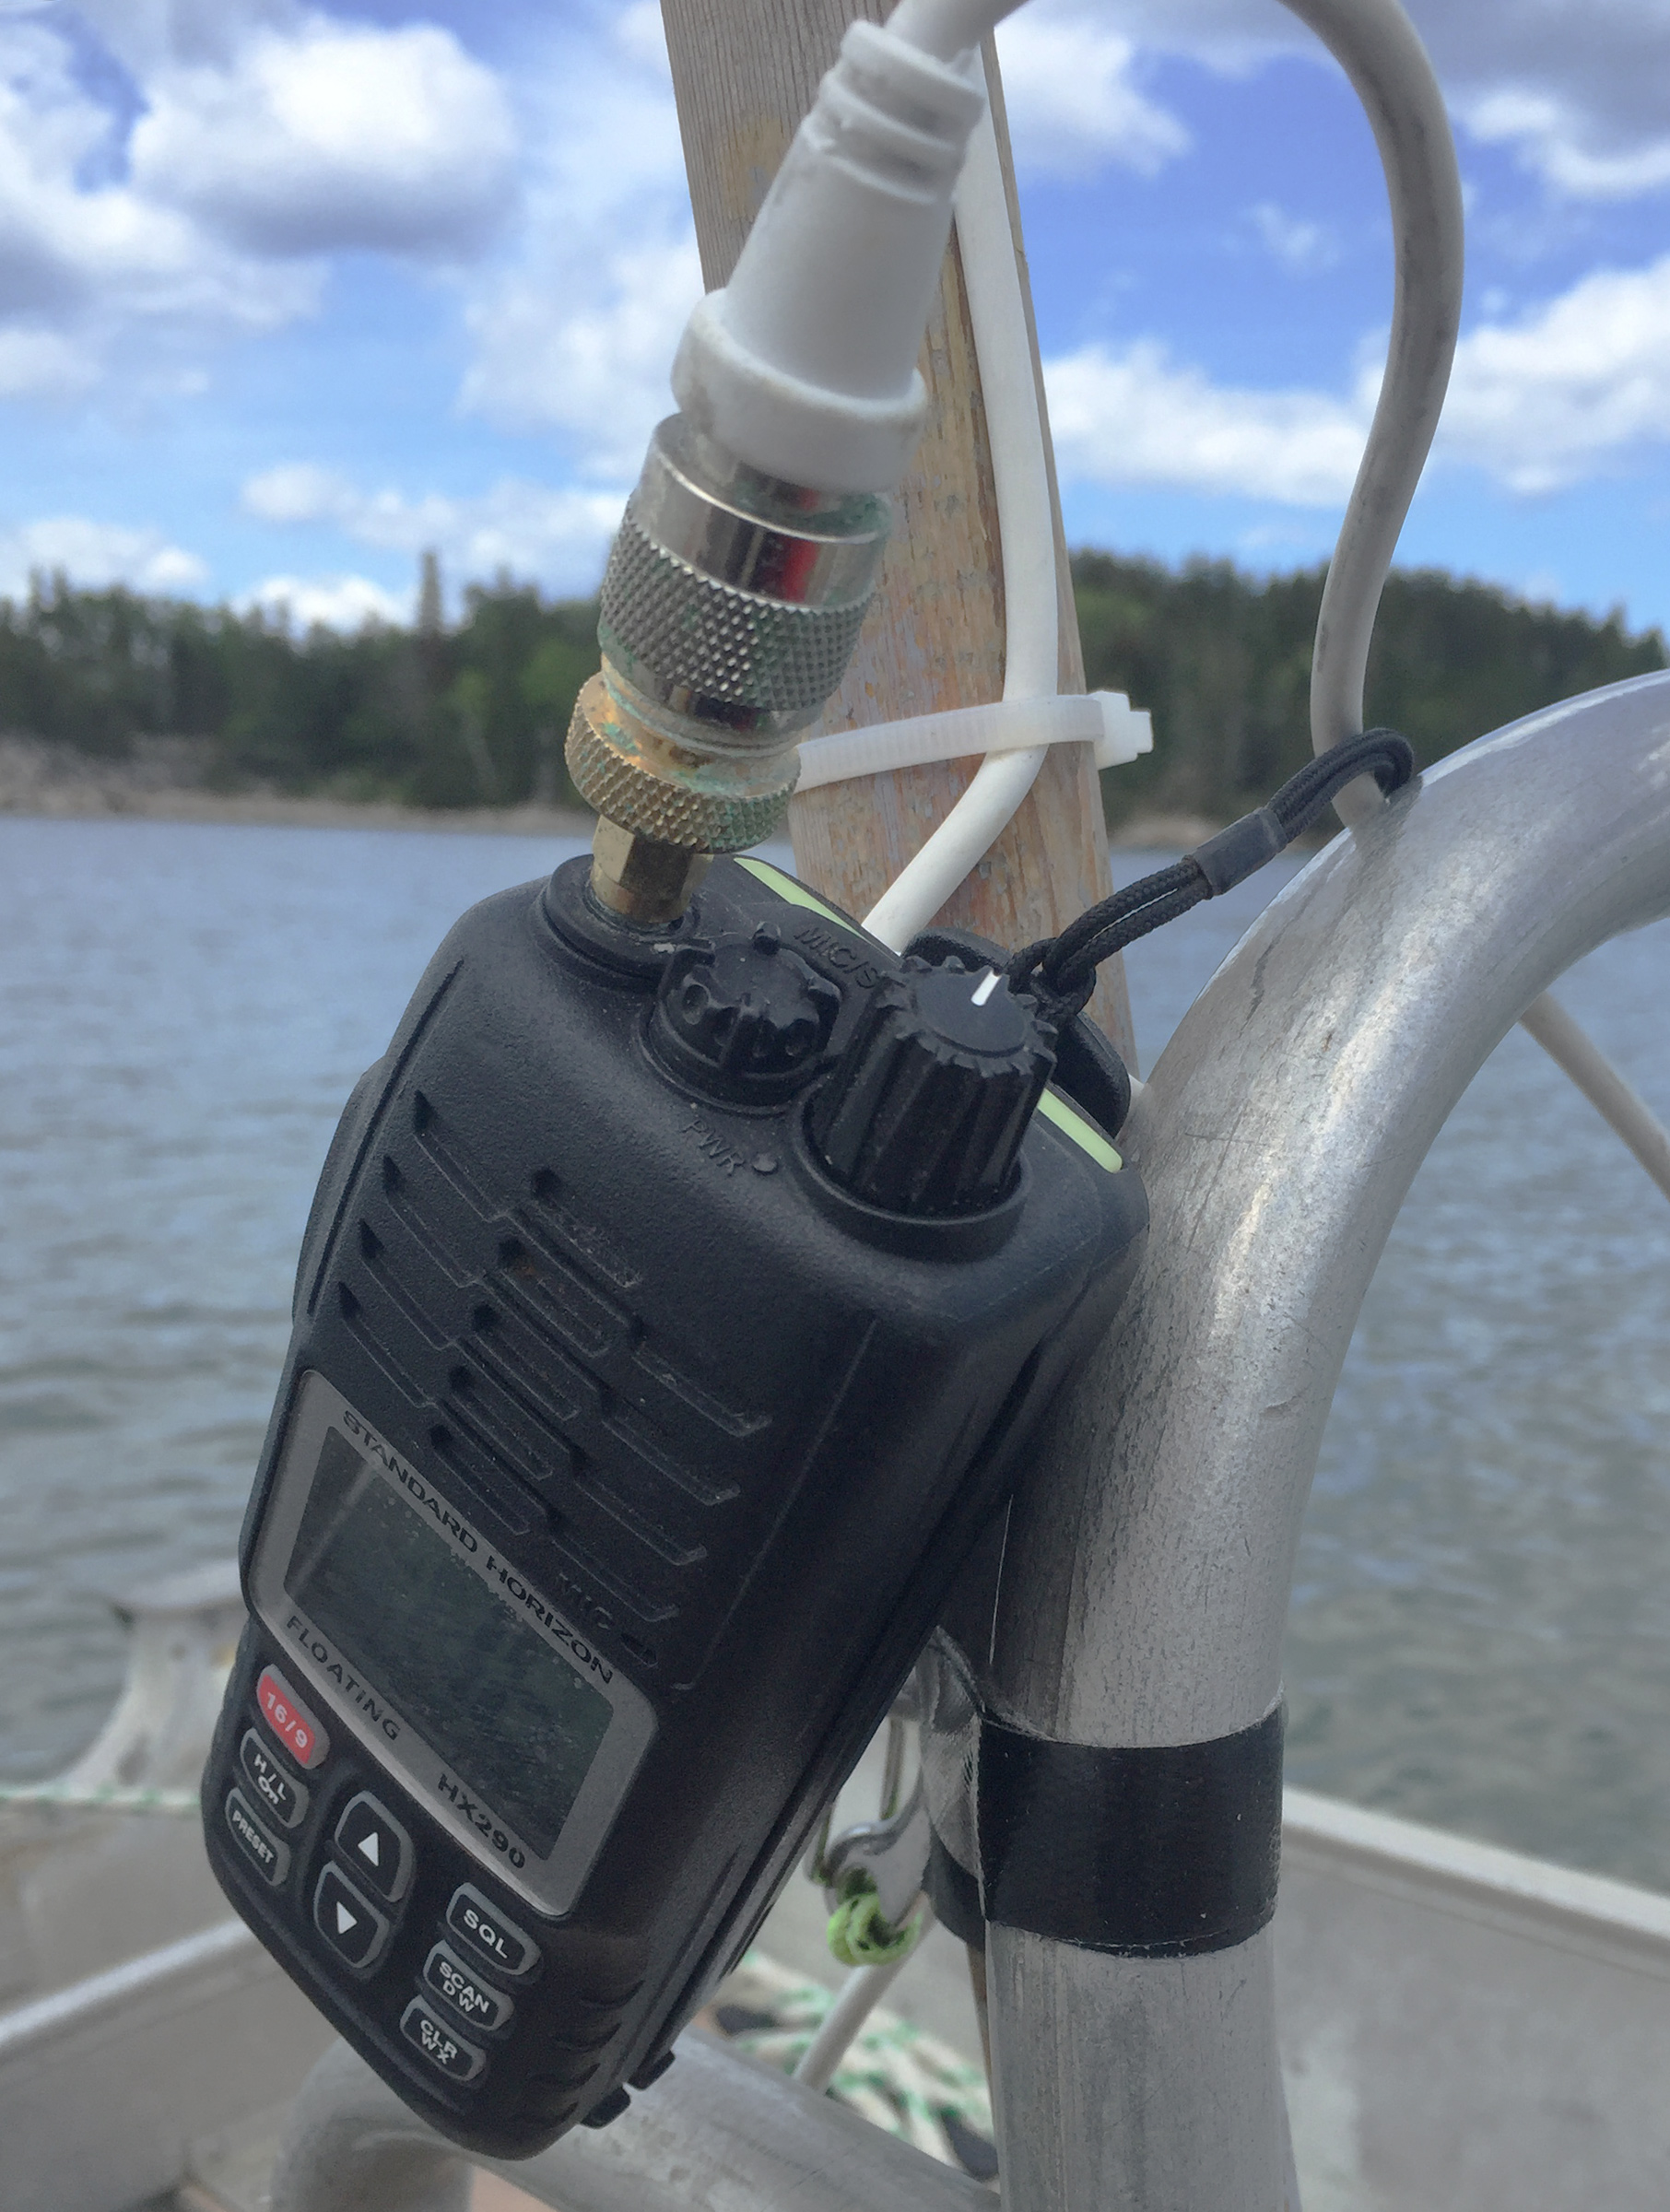
At the Small Reach Regatta in Maine, we host some 70 oar-and-sail boats, and have a number of support boats, all in an area well away from Coast Guard or other emergency support. So, we require everyone to carry a VHF. The boats range from 13′ to 20′, have a wide variety of sailing rigs, and don’t all get underway at the same time, so the fleet spreads out over many miles. It has been a challenge to communicate with everyone and to get a message from the front of the fleet to the rear.
VHF radios, like cell phones, are limited to line of sight. The Coast Guard sets its antennas up as high as possible, often in spots remote from their base, to cover a wide area. The range, or “radio horizon,” for a handheld VHF in a small boat could be as little as 2.5 miles if the user is seated, with the radio only about 4′ off the water. If you are trying to communicate with another handheld, 5 miles might be your outer limit.
A second limit is set by the way we use VHFs. In simple terms, your signal radiates out in a plane perpendicular to the antenna. If you angle your VHF, that signal plane tilts too, and may be over some recipients or fall short of others. It may be degraded further if your recipient’s plane is not aligned with yours. So, handheld VHFs work better held vertically.
Photographs by the author
This MITA work skiff, used as a regatta chase boat, is rigged with an antenna on a pole to better reach all of the boats in the event fleet.
Larger boats put antennas on top of deckhouses or masts to increase their VHF range: a height of 9’ would reach someone 7 miles away with a handheld VHF in a small boat; 16′ would reach them 9 miles away. As a sometimes driver of a Maine Island Trail Association (MITA) chase boat, I started thinking about how to connect a taller antenna to my handheld VHF. It was pretty simple. I had a handy 8′ pole, and bought a simple whip antenna which promised a 3Db gain, doubling my effective output power. A length of coaxial connects the antenna to the radio.
The handheld VHF, with its antenna removed, accepts an adapter to the coaxial cable that is connected to the elevated antenna.
Only some handheld VHFs will connect to coaxial cable. You can tell if yours can when you unscrew the antenna and find a small coaxial fitting. To connect the cable to the radio, you will need an adapter—one end to fit your VHF and the other to fit a PL-259 plug on the end of an RG-58 coaxial cable. I bought a cable long enough to run down the pole and allow me to operate the VHF while at the helm or pass it to a crew member.
The MITA skiff uses a pole secured to the console to raise the accessory antenna.
With the antenna up at 9′, I could be at the front or the rear of the widespread regatta fleet and everyone could hear me. Problem solved.
If you are in areas frequented by other boaters, the antenna on your handheld will be fine. Your communications will improve if you can stand and hold the unit upright. But if you are off the beaten path, a fixed antenna, elevated on a mast or a dedicated pole, could help.
Ben Fuller, curator of the Penobscot Marine Museum in Searsport, Maine, has been messing about in small boats for a very long time. He is owned by a dozen or more boats ranging from an International Canoe to a faering.
You can share your tips and tricks of the trade with other Small Boats Magazine readers by sending us an email.
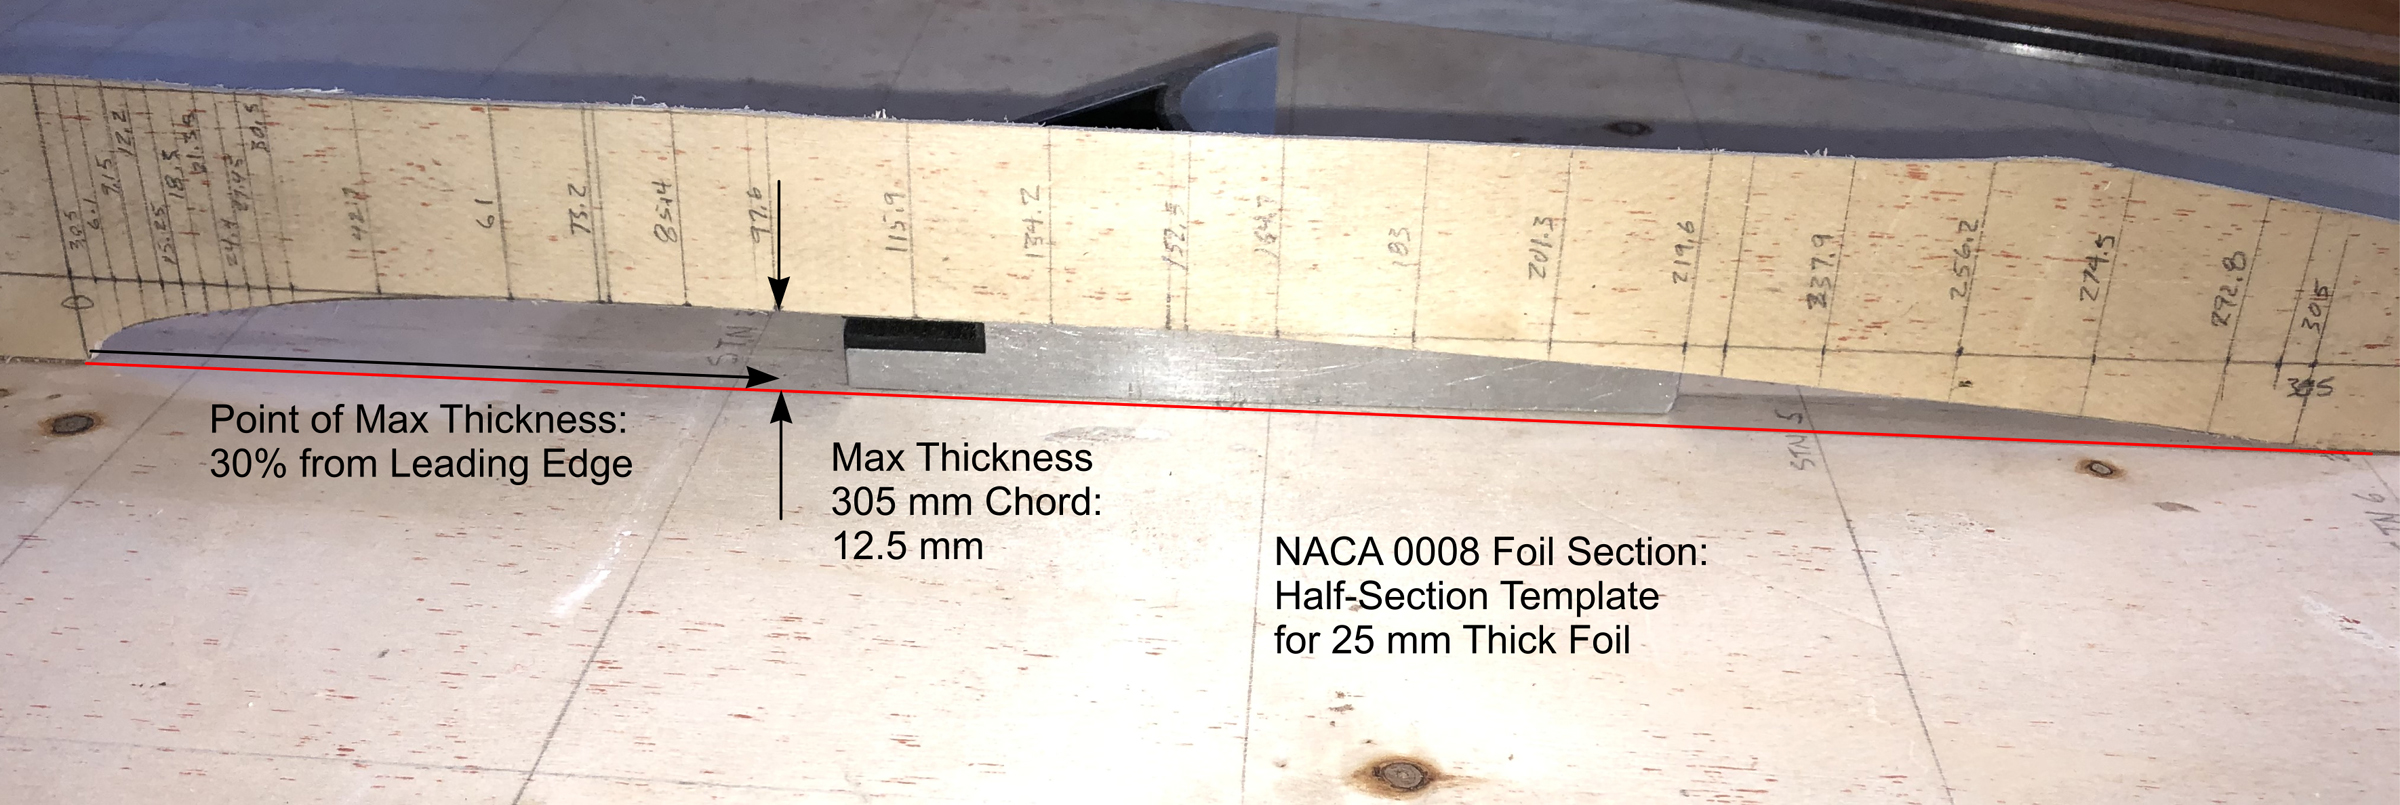
While it’s generally accepted that the right sails and sail trim will determine how close you can sail to the apparent wind, a sailboat’s progress to windward also depends on the lift and drag generated by the centerboard and rudder. How much difference does proper foil shape make over a simple rounded leading edge and tapered trailing edge, anyway? Foils operating in fluids, whether air or water, are a well-studied topic. C.A. Marchaj, in his book, Sailing Theory and Practice, discusses the theory and gives the results of actual tests of differences in foil planform (side view), cross-section shape, size, and aspect ratio (AR – length to width). Lacking other constraints, an ideal centerboard, daggerboard, or rudder blade should have a reasonably high AR (greater than 2) planform with a streamlined cross-section that has a parabolic leading edge and a thickness of somewhere near 10 percent of the chord width (the distance from leading edge to trailing edge). A thickness of 8 percent produces less drag but stalls sooner; 12 percent has a higher stall angle but produces more drag.
Exactly where the point of maximum thickness should be located is a matter of some debate. Marchaj suggests it should be at 50 percent of the chord width, halfway between the leading edge and trailing edge, but provides no data to back that up. Other sources suggest that the NACA (National Advisory Committee on Aeronautics) symmetric foil sections, originally developed during aircraft research, are actually a good fit for boat foils operating at low speeds in water. A NACA 0010 foil, for example, has a maximum thickness of 10 percent of the width of the foil, located at 30 percent from the leading edge.
Of course, there are many practical reasons why not all keels, centerboards, and rudders have high AR planforms, but the cross section for a foil of any planform should be streamlined. My personal experience of doing it wrong on one boat, and getting it right on another boat, has convinced me that the NACA sections and guidelines above provide good performance.
HORNPIPE, my first sail-and-oar boat, was an 18’ Kurylko Alaska with a standing-lug ketch rig, and sailed well enough to windward in flat water, but lost 10 to 15 degrees of pointing ability as soon as the water got choppy. I knew it wasn’t poor sail trim. Eventually I got looking at the daggerboard and analyzed it. It was only about 2.5 percent of the sail area and its thickness was only about 6 percent of the chord width, neither big enough or thick enough in my view, and in rough water it lost laminar flow and lift. When I designed my 18′ lug-yawl cruiser, FIRE-DRAKE, I gave it a thicker centerboard with a greater fraction of the sail area, about 4 percent. I also gave it a straight quarter chord line (think of the shape of the wing of a Spitfire aircraft) and a moderately high aspect ratio of about 3:1 for the planform area. To get the daggerboard foil shaped accurately and quickly I opted to have it cut on a computer numerical control (CNC) machine. All that was left for me to do was sand, seal and paint, and make an epoxy-lined hole for the pivot pin.
The results have been what I had hoped for. FIRE-DRAKE sails quite well to windward and maintains its performance in rough water. I sailed in the company of a similar boat—with the same length and beam, the same weight, and the same sail plan—along the south half of the Inside Passage, and that boat’s centerboard was shaped by eye. When sailing to windward, FIRE-DRAKE would consistently point higher and walk away in speed. My centerboard even let me continue sailing to windward when my partner gave up and took to the oars.
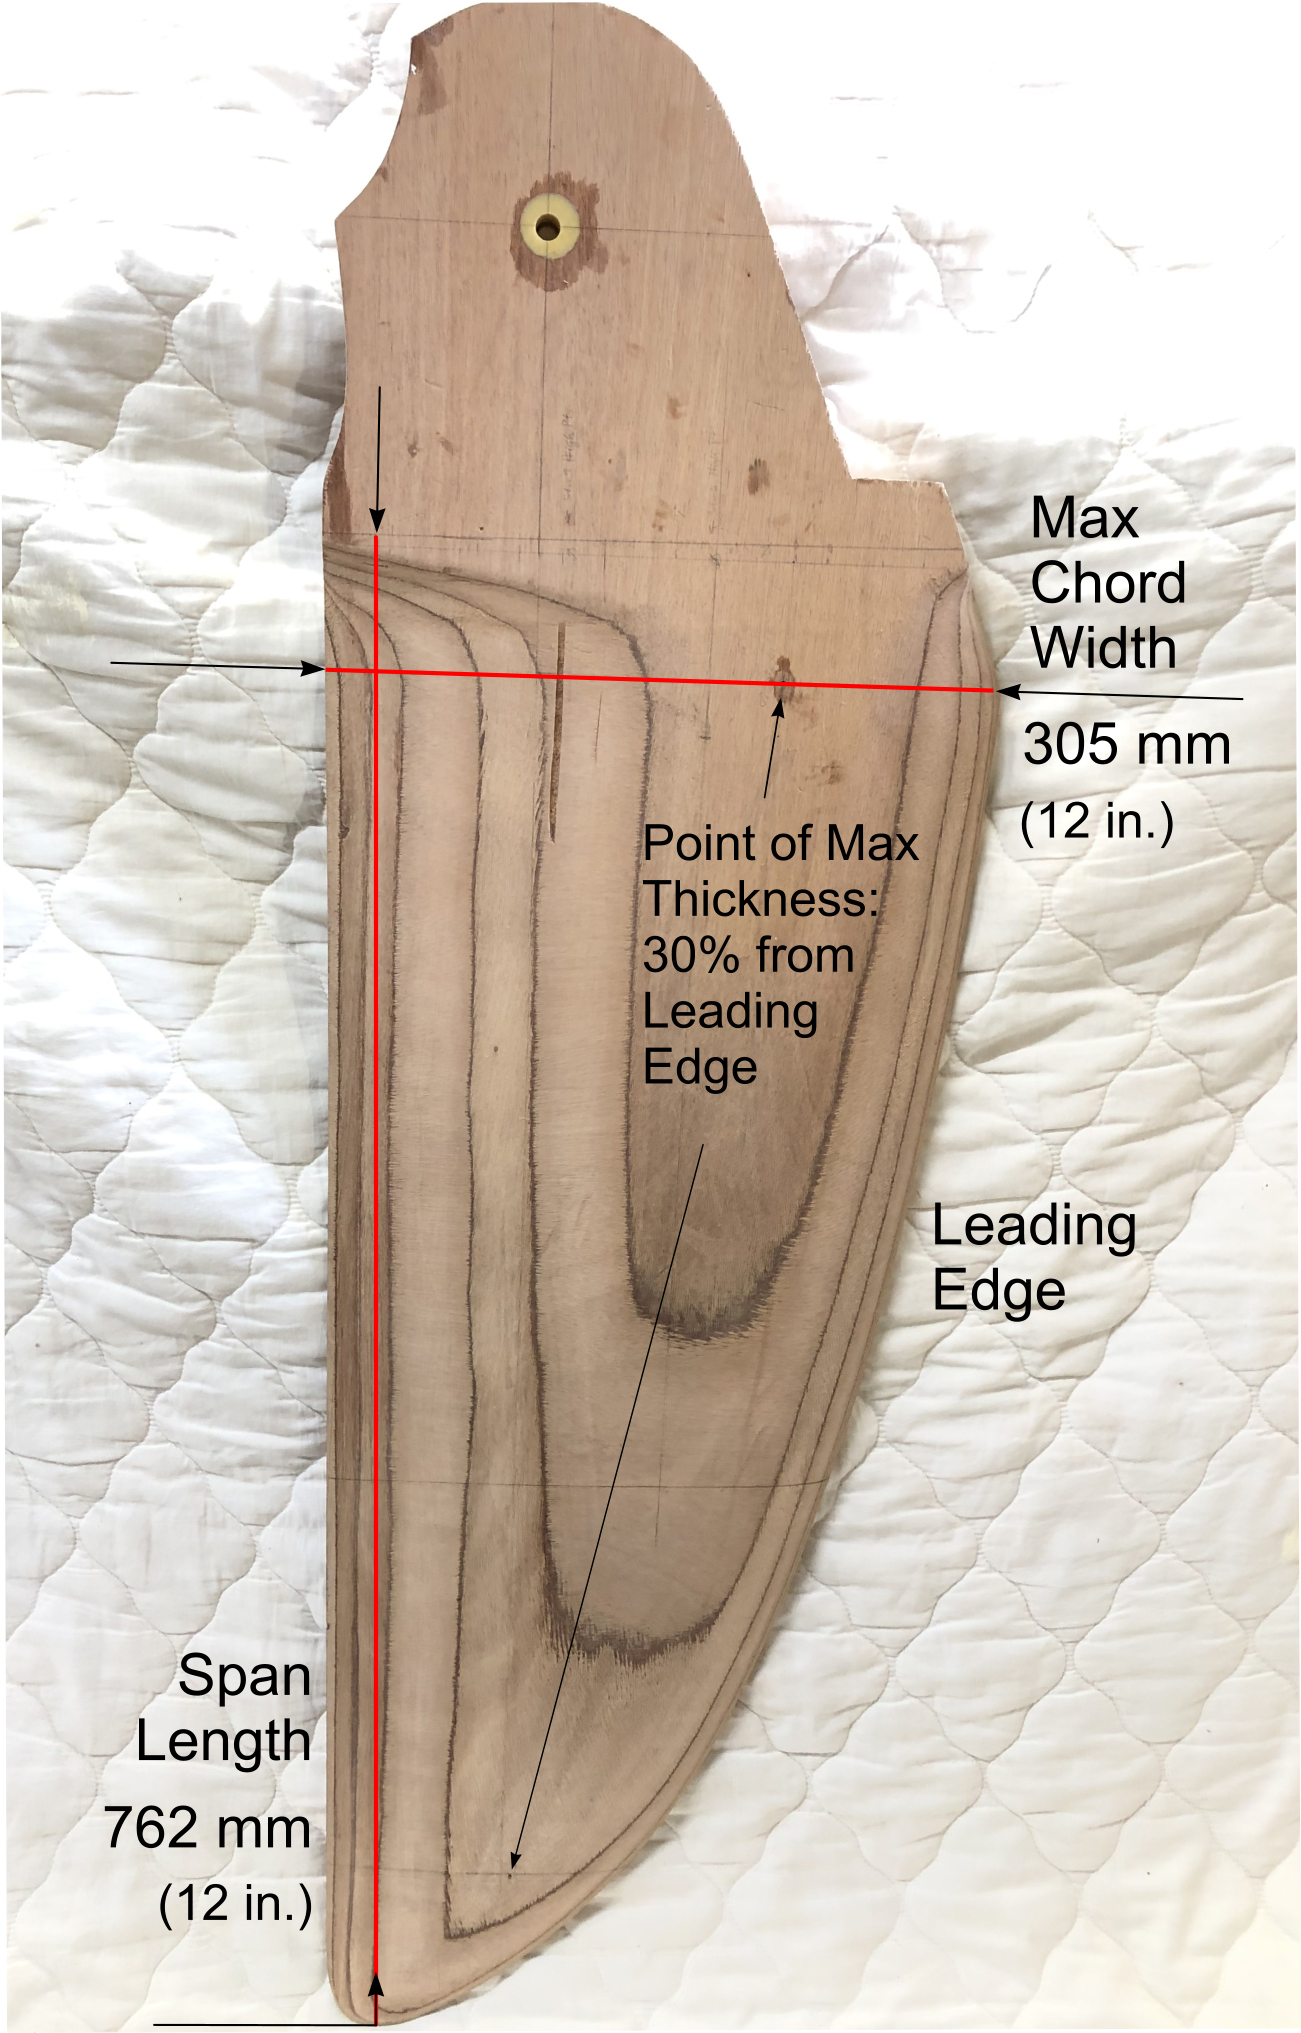
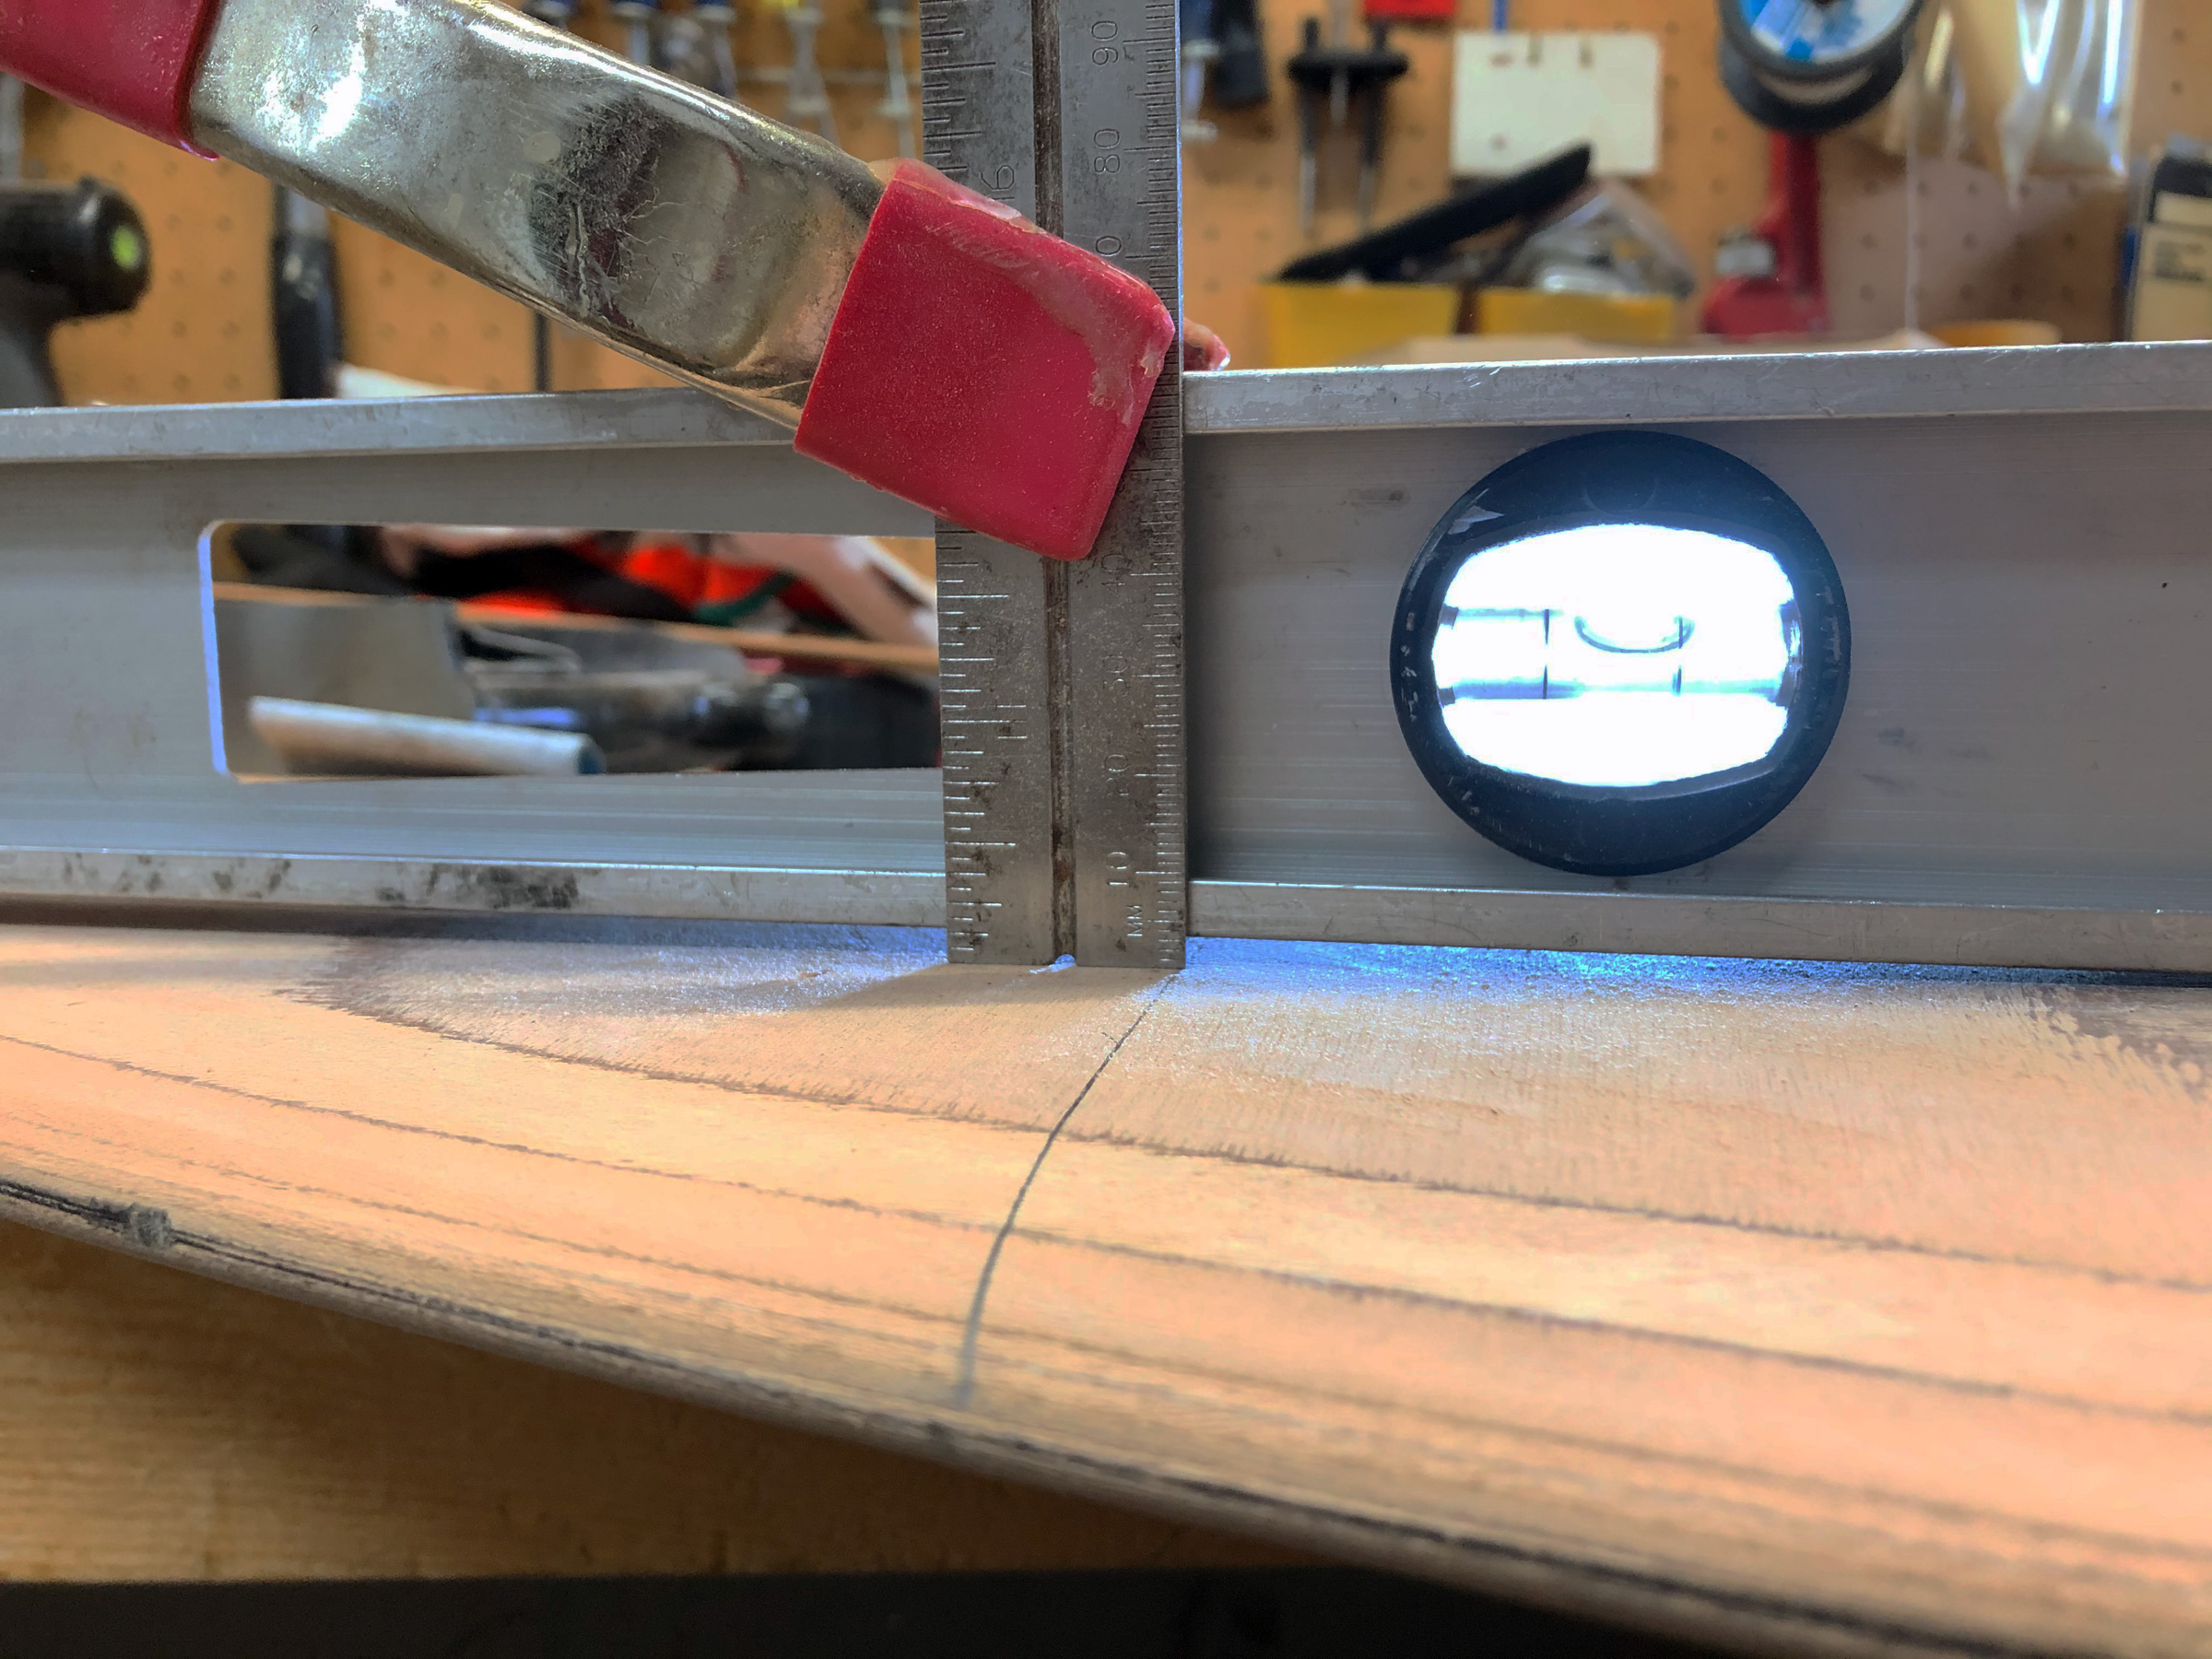
Although I had the daggerboard shaped with a CNC router, it is possible to shape a high aspect ratio, fully streamlined foil in the home shop. I’ll walk you through my second project, a kick-up rudder blade that I made at home to replace the original one I built for FIRE-DRAKE. I settled on a planform that is one-quarter of an ellipse with an elliptical leading edge and a straight trailing edge. (The shape would move the center of lateral resistance of the boat aft a few inches, and is intended to lighten the weather helm I’d experienced with the original rubber blade.) I drew the new blade with an aspect ratio of 2.5:1, with a length of 30″ (762 mm) and a maximum chord width of 12″ (305 mm), which would increase the lift and reduce the tip vortex drag.
To draw the planform shape of the quarter ellipse you can use an online graphing tool such as Desmos for a full ellipse. If you center the ellipse at zero, you can drag the two axes out until you get the aspect ratio you want. Since the graph has a grid in the background, you can then print out a screen capture of a quarter of the resulting ellipse and scale up the printed image to the actual dimensions required. If you are comfortable with computers, you can download and run Freeship (available for Windows only) which has a “keel and rudder wizard” that accurately generates several different planforms.
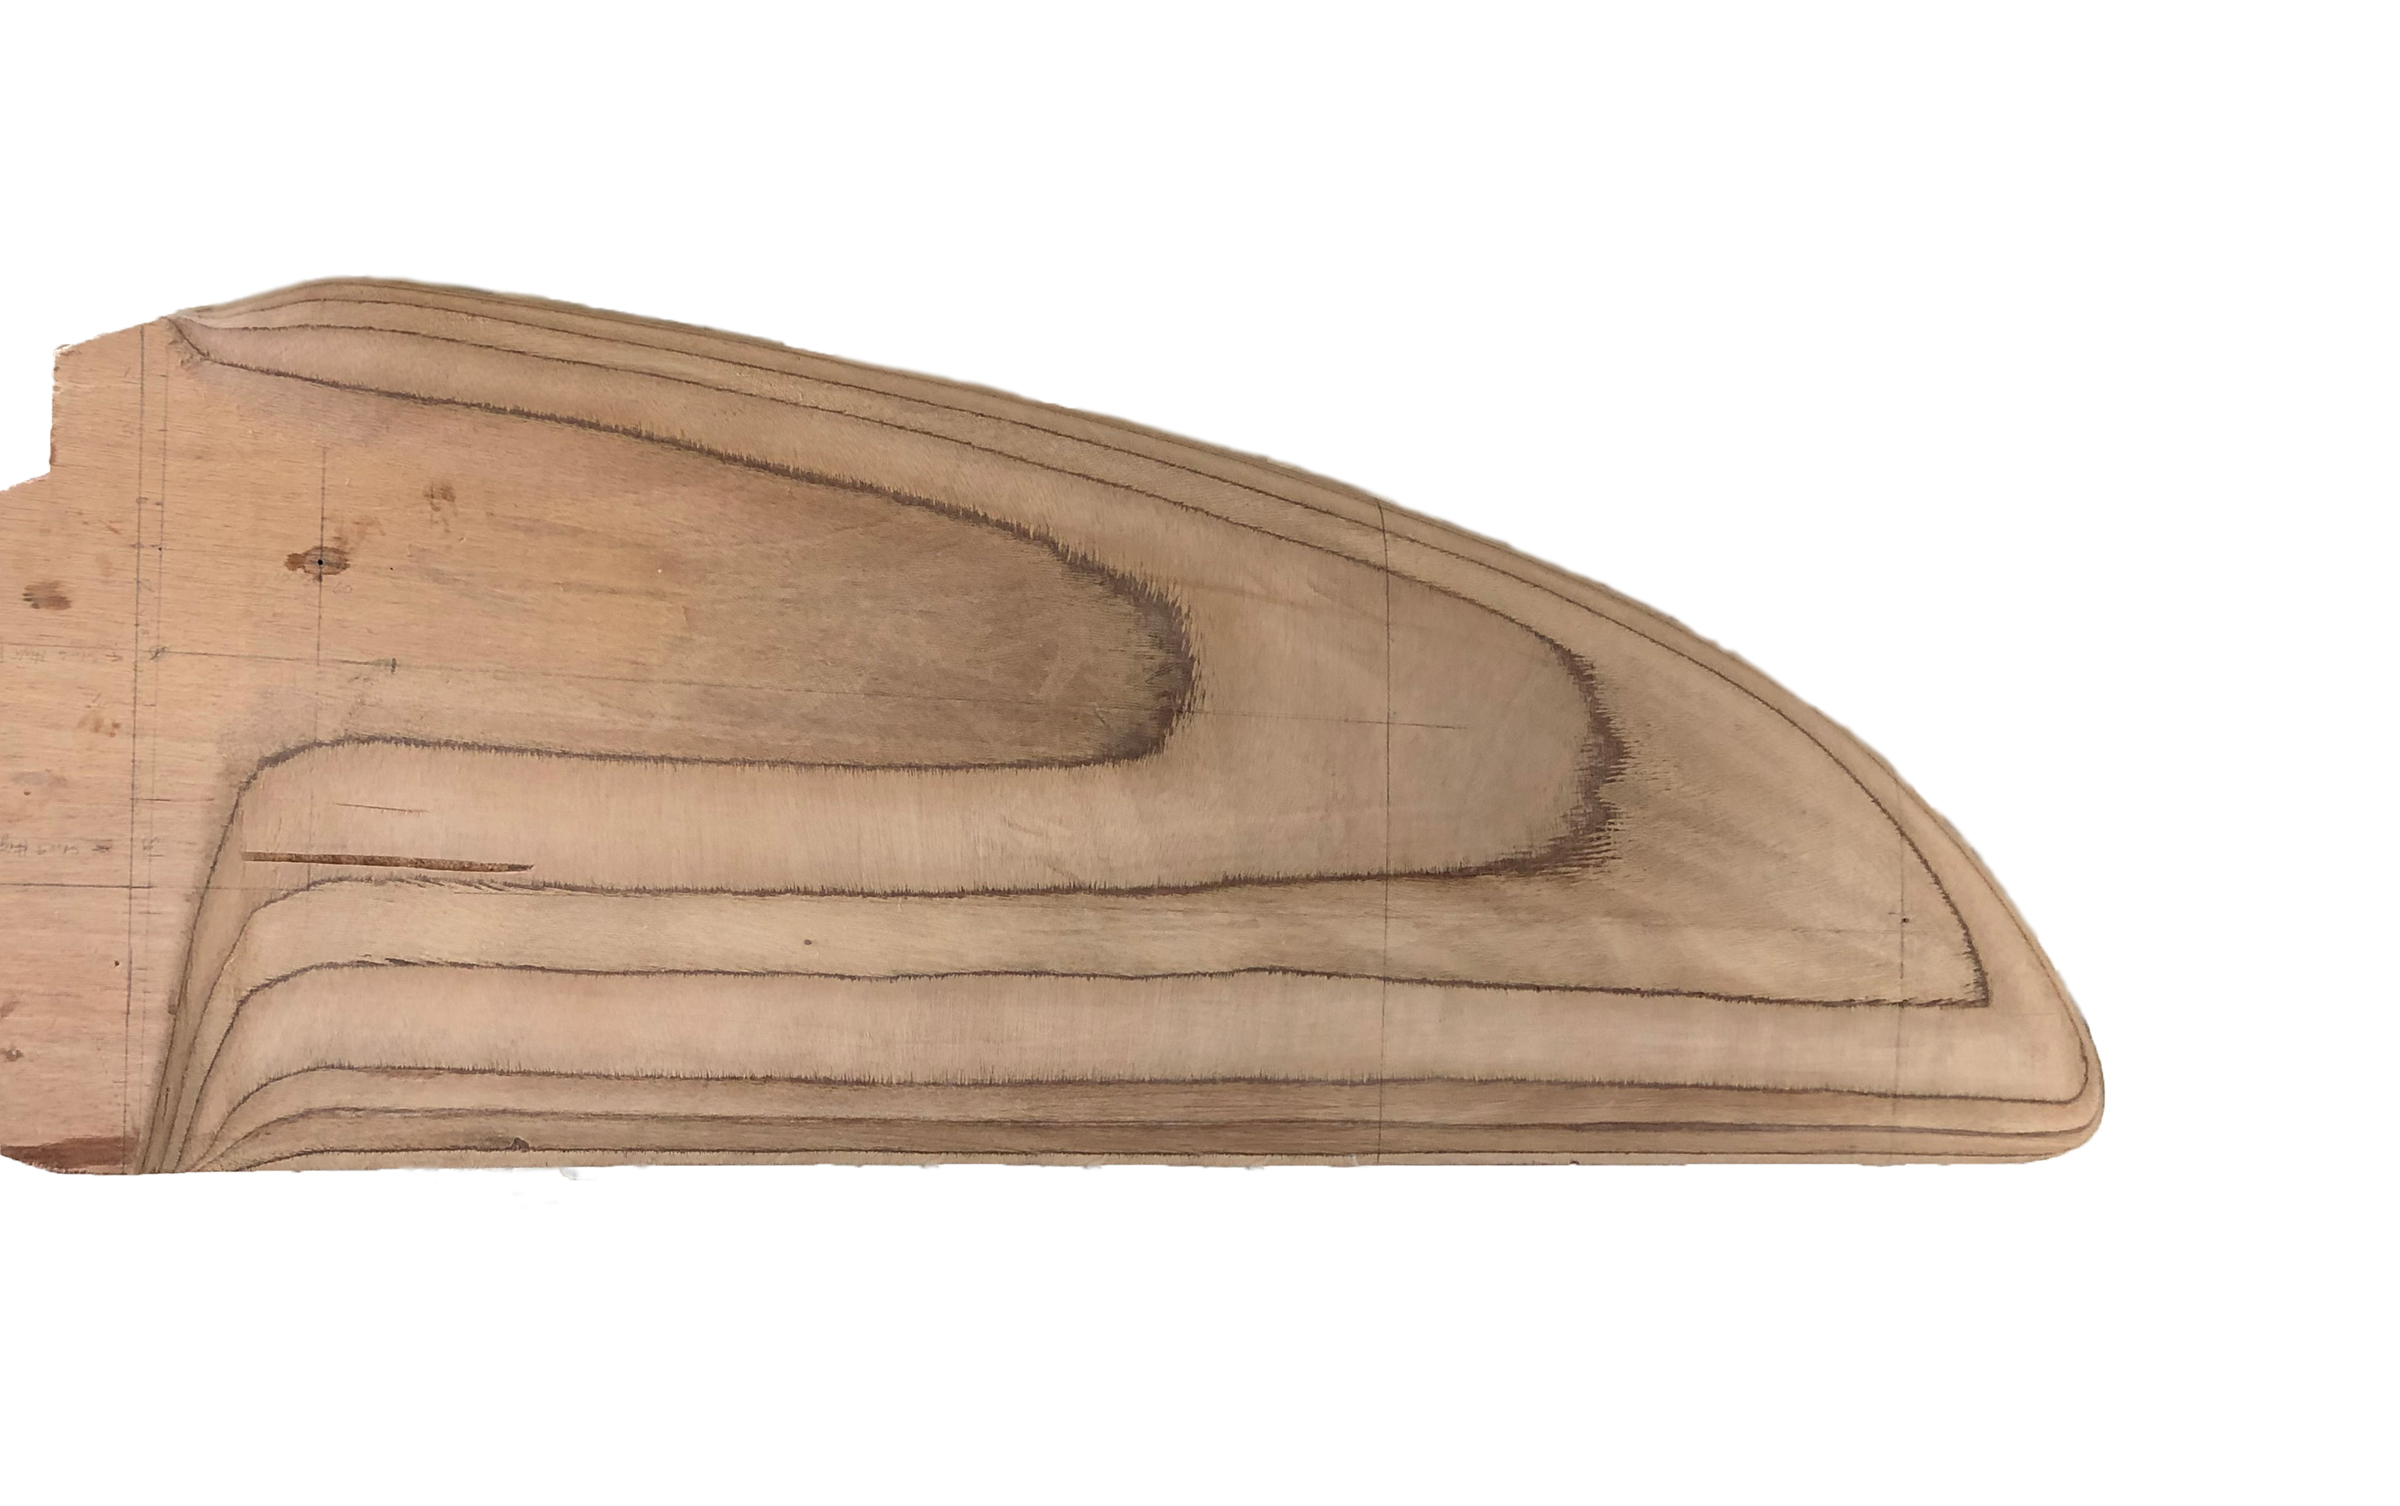
The new rudder blade for FIRE-DRAKE has a quarter-ellipse planform. The plywood’s glue lines show the contours that help with shaping the foil.
Obtaining the cross-section profile of a chord of a given width is best left to a computer. For any of the NACA foils, like the 0010 foil I mentioned above, Competition Composites Inc. (CCI) has a very simple and handy calculator. You need enter only the chord width and the maximum thickness and it will generate a table of X-Y coordinates that you can copy and print out. They’ll be your offsets for drawing a pattern for the foil cross-section. If you intend to sheathe your foil with ’glass and epoxy, for example, you can also enter the skin thickness and it will calculate the coordinates for the plywood core.
Now, here’s the tricky bit. If you have a rectangular foil planform, you only have one chord width and therefore one section profile for the entire length of the foil. However, if you have any other planform (e.g., half-ellipse, quarter-ellipse, trapezoidal, straight-chord-quarter-line, etc.), the thickness, which will be one-tenth of the chord width, changes along the length of the foil because the chord width changes.
I used the CCI calculator to generate profile coordinates for three different points along the length of the rudder blade: at the root, at about two-thirds of the way along and at about 90 percent of the way to the end. I chose those points because the chord width for my quarter ellipse planform doesn’t change much for the first half of its length, but it changes more quickly toward the tip. The idea is to shape the foil to these profiles at these points and then taper the foil evenly between them. You can lay out your foil plan directly on to the ply or you can use something thin, like doorskin, to make and fine-tune a template, which is what I did.
I made a blank for my rudder by gluing layers of marine ply with epoxy to the required 1″ thickness. I have found that the plywood, in spite of its cross-grain plies, has sufficient strength for the size of small-boat foils that I have built (though the cross-grain would weaken a long thin foil). Plywood does not warp and has the added advantage over solid wood in that the plies create a kind of contour map that give you graphic visual feedback as to the evenness of your surface once you start shaping the foil. You can make a foil with solid wood or even foam plus a ’glass-and-epoxy skin, but without the plywood laminates as guides, you would have to make more section profile templates to ensure a smooth and accurate shape.
Clamping a 4′ level to the flat part of the rudder blade provides a reference line to gauge how much wood to remove to achieve the foil’s taper.
The next step is to taper the thickness of the laminated foil blank along its full length. Knowing the required thickness at your chosen points, you can draw a pattern for the curve of the taper and half the thickness of the blade stock and measure how much wood you have to remove at each point. I clamped my 4′ aluminum I-beam level to the flat part of the rudder blade above the shaped part, and used a ruler to measure the depth I had to cut to. To remove the wood for this part of the project, I used my #4 Stanley plane. While I have a power hand planer, I didn’t trust myself with it to not take too much off too quickly.
Photographs by the author
The female half-section template for a given chord for a foil gets its shape from the X-Y coordinates generated by a foil calculator.
I made three female half-section profile templates, one for each of the three points noted above, by plotting out the generated X-Y coordinates on pieces of doorskin and carefully cutting them out. One thing to note is that the CCI calculator generates a profile that has a trailing edge of zero thickness. Obviously, this is not practical to build in wood, and a knife edge is not that critical anyway. I adjusted the trailing edges so that the finished edge would end up about 1/3″ (4mm) thick.
Applying the template to the foil in the works shows the high and low spots as the shaping continues.
Next, I used the profile templates to shape the foil at my three chosen points. I shaped the plywood with a Shinto rasp, regular rasps, and coarse sandpaper. It’s a process of taking some wood off, placing the template, and repeating until you get the section of wood shaped to the templates. Once that is done, I could go to work taking down the wood between the sections, using the ply layers as a guide. I used my block plane, Shinto rasp, and sandpaper for this task. I eyeballed a smooth transition around the tip from the leading edge to the trailing edge.
I sealed the surface of the shaped foil with a couple of coats of epoxy to provide a smooth, hard surface to accept a finish coat of marine epoxy enamel.
I’ve finished the rudder blade, installed it, and have taken it out for its first sea trial. The new foil definitely seems more responsive. It doesn’t require as much tiller movement to turn the boat as the old blade did and tacking seemed quicker. The effort to make the rudder blade and daggerboard with proper NACA foils has paid off with improved performance under sail.
Alex Zimmerman is a semi-retired mechanical technologist and former executive. His first boat was an abandoned Chestnut canoe that he fixed up as a teenager and paddled on the waterways of eastern Manitoba and northwestern Ontario. He started his professional career as a maritime engineer in the Canadian Navy, and that triggered his interest in sailing. He didn’t get back into boatbuilding until he moved back to Vancouver Island in the ’90s, where he built a number of sea kayaks that he used to explore the coast. He built his first sail-and-oar boat in the early 2000s and completed his most recent one in 2016. He says he can stop building boats anytime. He is the author of the recently published book, Becoming Coastal.
For further reading on the pros and cons of the variables in foil design, Competition Composites (CCI) has a good discussion. For those of you who want to go into the math, Paul Zander has a good presentation from nearly 20 years ago, and also, for those inclined that way, an updated discussion with a lot more math.
You can share your tips and tricks of the trade with other Small Boats Magazine readers by sending us an email.
Back in 2016, while we were restoring an 1880s Mississippi River skiff, we needed a second cordless drill/driver, so we could have one to drill pilot holes, and the other to drive screws. When I went to purchase the second drill/driver, I found a combo package from Kobalt that included a 24-volt impact driver. We were not sure exactly what it was used for, but when we found it could drive screws even better than the drill/driver, we were extremely pleased, and it has driven countless screws in the four years since then.
With the drill/driver we had been using to drive silicon-bronze screws into the skiff’s cypress, the driver bits tended to “cam out”—that is, strip out—and damage the soft bronze Frearson slots with disturbing regularity and at other times shear the screw’s shaft. We tried a variety of fixes, like waxing or greasing the screw, with poor results. Sometimes the drill drove screws right through a plank. Setting the clutch helped a bit, but variations in wood grain and density made for unpredictable results.
The impact driver spins the bit first; then when the resistance increases, a rotating weight inside the driver slips, stores energy in a spring, and then releases, creating an impact that rotates the driver bit and pushes it forward. The forward motion into the screw head greatly reduces the tendency of the bit to cam out of the screw slots. The mechanism gives the impact drive much more force, but doesn’t transfer any torque to the user, so it is easier to use for long periods of use. Impact drivers are loud when they switch to the impact mode, so be prepared for that and wear hearing protection.
While the impact driver has lots of power, more than enough to shear screws, the variable-speed trigger provides the operator with very good control for the depth of the screw. Our impact driver had the finesse to drive #6 and #8 marine stainless screws on 1/4″ (6mm) planks, where exact depth setting was critical. The impact driver also had the powerful yet controlled torque we needed when using long temporary screws with fender washers to pull plank sections together for scarfing or to set Dutchman patches tight for gluing.
Kent and Audrey Lewis
Both the 24-volt Kobalt and the 20-volt DeWalt impact drivers have efficient brushless motors.
Recently we bought the DeWalt’s DCF787 20V impact driver, which is lighter and smaller than the Kobalt. Both tools have brushless motors, which are more efficient and use less power than brush-equipped motors, so our batteries last almost twice as long. Skipper likes the smaller DeWalt which weighs in at 2.1 lbs; it has nice balance and weight and it will fit into small spaces. The LED light on the head of the driver is also handy in remote corners. The DeWalt driver has a no-load speed of up to 2,800 rpm and drives screws with up to 3,200 impacts per minute and a maximum torque of 1,500 inch-pounds. It is a “smart tool” that senses reduced loads on soft materials and decreases demand on the motor, and provides only the required power.
The Kobalt has a “finish” function that shuts down the driver after the impact mode has been activated (for one second in order to prevent overdriving the screw), but we found this reduces our control of the tool. The Kobalt has a no-load speed up to 2,700 rpm and can deliver 3,500 impacts per minute and 1,800 inch-pounds.
Impact drivers are useful additions to the tool kit for boatbuilding, woodworking, and household jobs. They offer power and control and, by stripping fewer screws, they’ll reduce the need to resort to salty language.
Audrey and Kent Lewis mess about with their fleet of small boats in the shoal waters of Northwest Florida. Their adventure log can be found at Small Boat Restoration.
Editor’s Notes
This Milwaukee 12-volt impact driver has a brushed motor.
I had never used an impact driver until I had edited this article and bought one. Actually I thought I’d bought one, but it was just a driver that looked like an impact driver but without the impact. It was a good complement to my drill driver, so I didn’t send it back. Paying a little more attention to my shopping, I did buy an impact driver, tool only, that used the 12-volt batteries and charger that I have for my Milwaukee drill/driver. The Milwaukee 12-volt impact driver won’t provide the power that the Lewises have with their brushless 20- and 24-volt impact drivers. They put the power to good use driving screws through 500 square feet of 2×6 decking along their waterfront bulkhead, but I’m content having a lighter-duty impact driver. A brushed-motor version is much less expensive, and while it isn’t said to be as efficient or as long lasting as a brushless motor, my first cordless tool, a Makita drill/driver, had a brushed motor and did all I asked of it and lasted around 20 years.
Even my less powerful Milwaukee makes a lot of noise and I won’t use it without hearing protection. The noise suggests that an impact driver is a brutal tool, but I was surprised by how much control it offered and impressed how well seated the driver bits stayed. My drill driver has cammed out of a lot of screws and ruined their slots in the process. The impact driver hasn’t done that yet, even when driving a 2″ brass #7 screw without a pilot hole. It won’t stop driving automatically because it doesn’t have a clutch, but I can watch the screw head come home and stop when it’s where it belongs. It’s going to be a very useful, often-used tool. Keeping up with the Lewises hasn’t disappointed me yet.
All of the impact drivers here are available from home-improvement centers and online retailers.
Is there a product that might be useful for boatbuilding, cruising, or shore-side camping that you’d like us to review? Please email your suggestions.
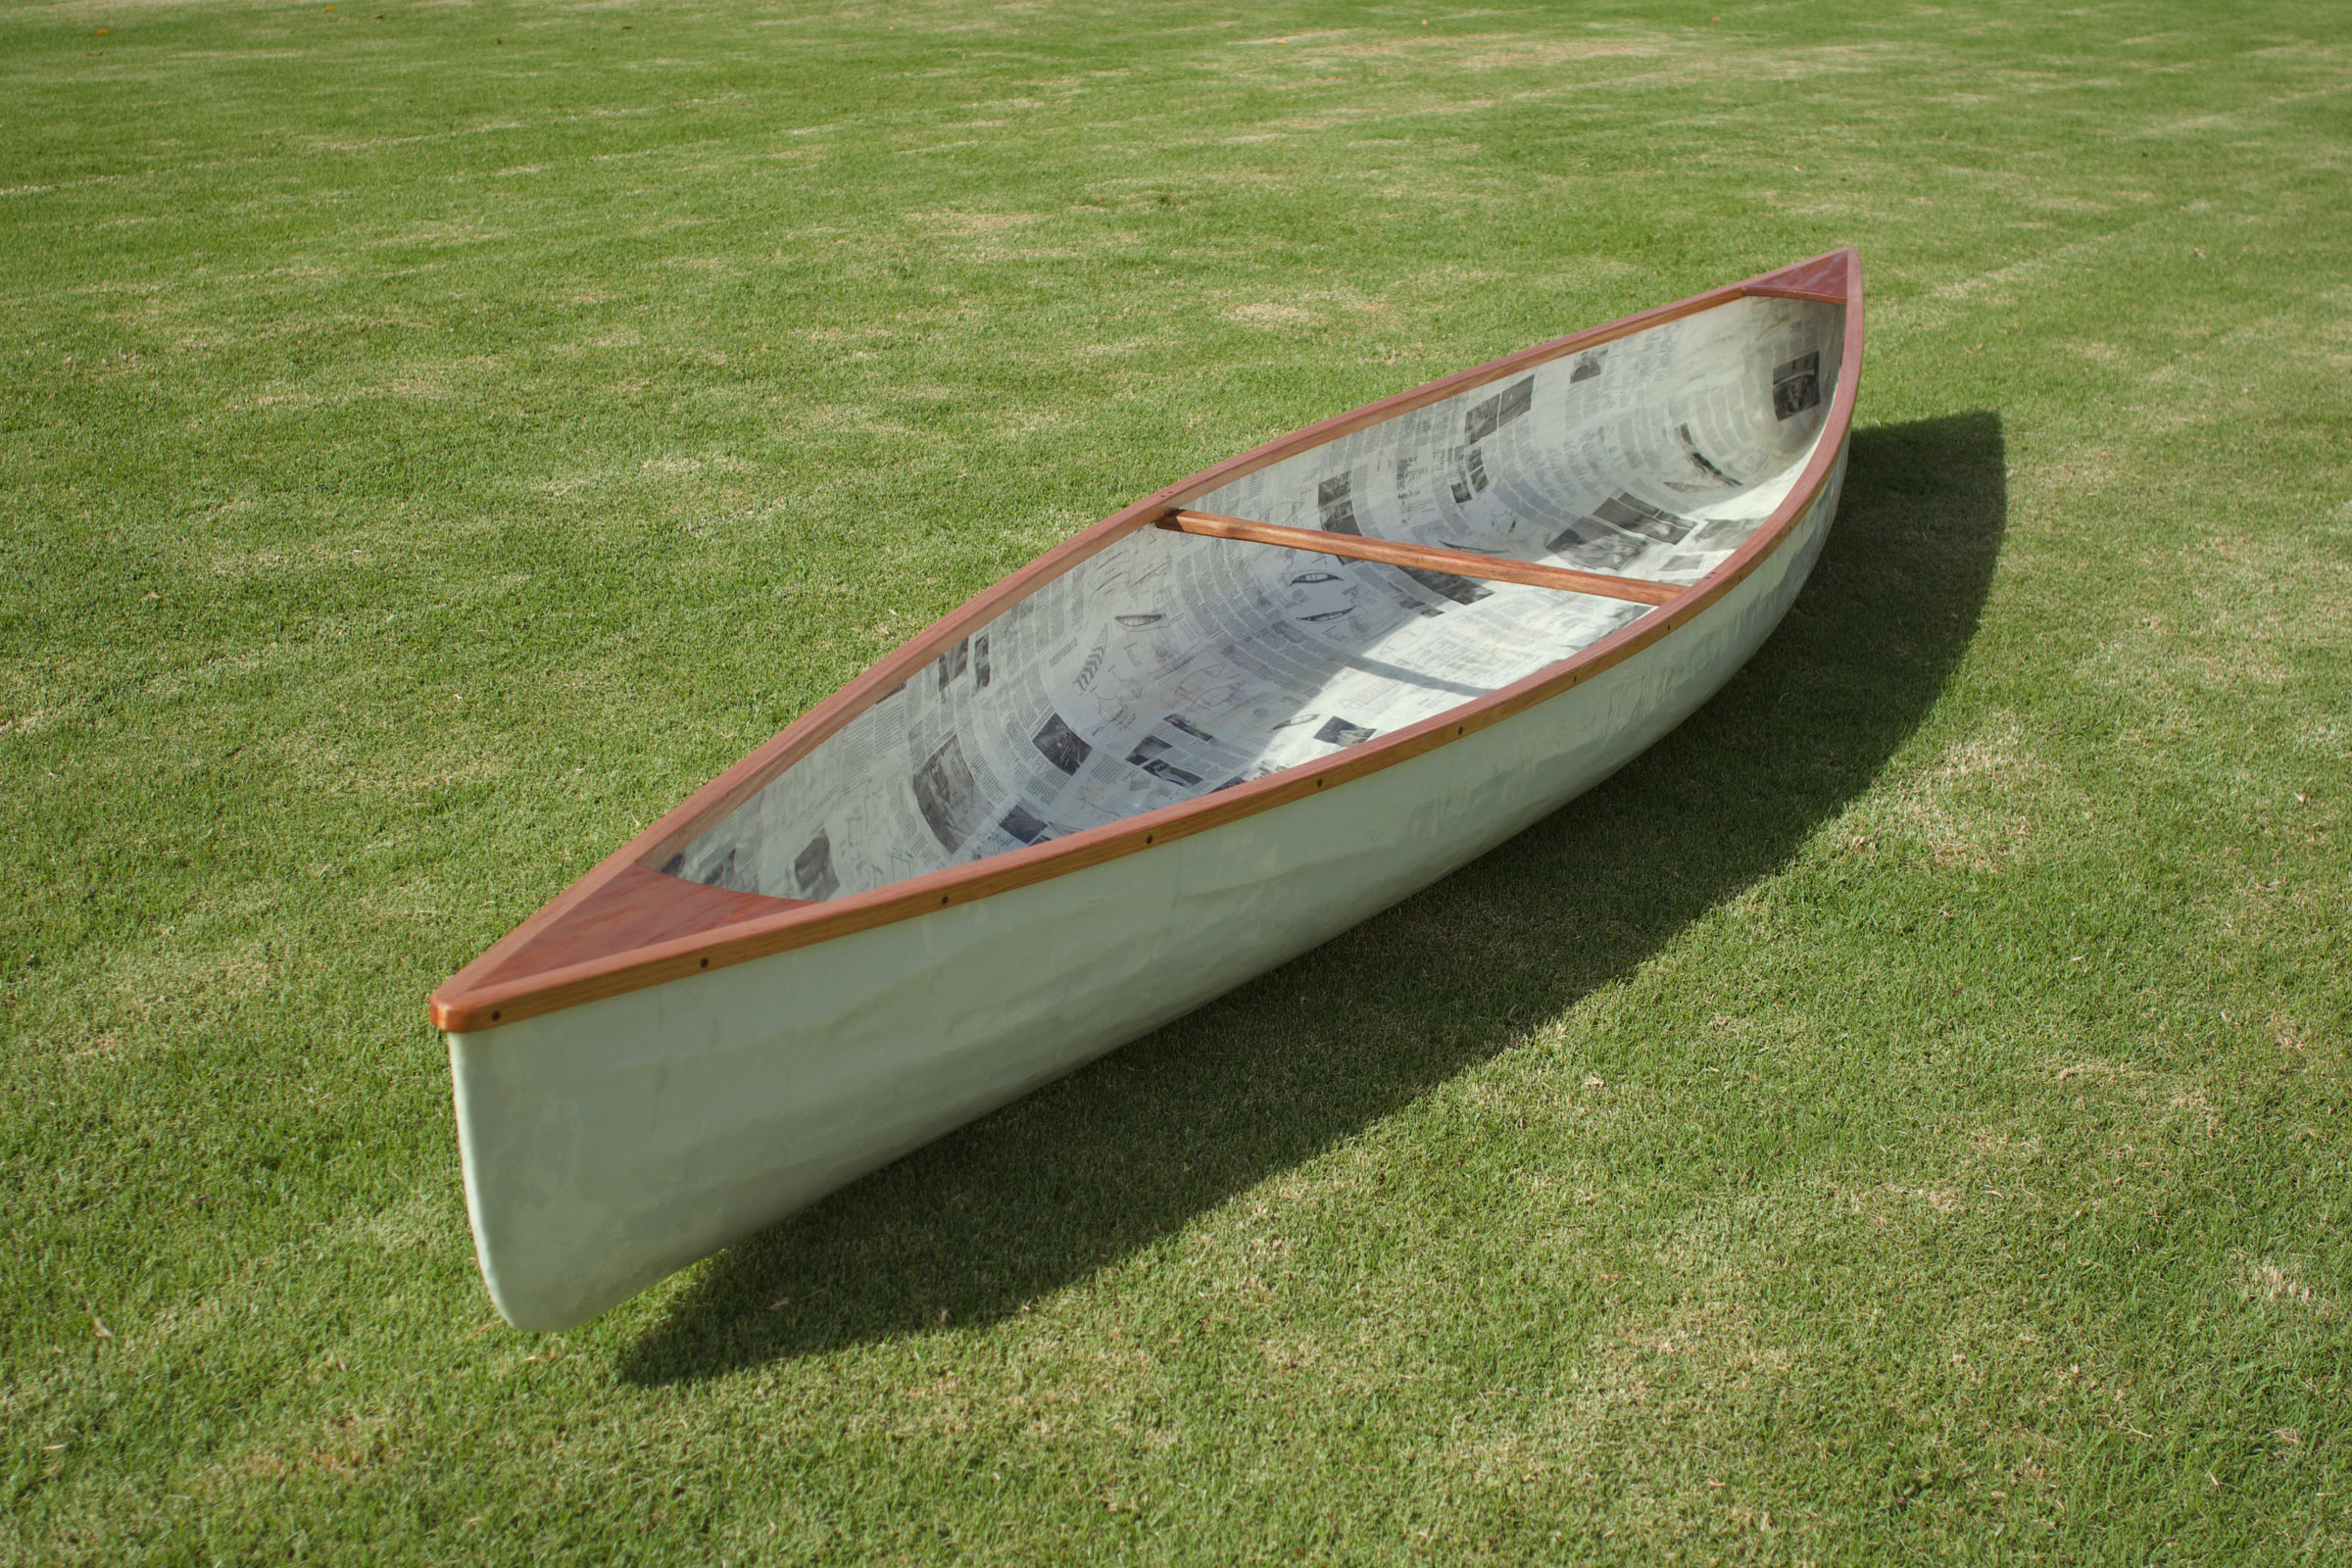
David Parker isn’t one to sit idle. He’s a woodworker, a cook, a musician, a luthier, and a knife-maker, so when the pandemic kept him from going to his job at a musical-instrument wholesaler and confined him to quarters, he wasn’t going to let hours slip by binge-watching his DVD collection of Gilmore Girls. With more time to spend in his shop at home in Oratia, a suburb of Auckland, New Zealand, David made a paper canoe. Using an unconventional material wasn’t new to him. Last year he made a bicycle frame out of wood.
David Parker
The paper canoe was molded over a wood-strip canoe while it was still on the molds.
Laminating paper to make a boat isn’t a new idea. In the 1860s, Elisha Waters of Troy, New York, had a lucrative business making paper boxes, and then in 1867, his teenaged son, George, came to the factory to take advantage of the paper and paste there to make a mask for a masquerade party. At the time, George was also repairing a wooden racing shell, and the proximity of the two projects led him to try using paper and shellac as materials to repair the shell. That worked so well that he considered the possibility of making an entire racing shell that way.
George and Elisha molded paper over a racing shell and created a new hull that was seamless, leakproof, light, and strong. They made three more hulls and realized they were onto something, and patented the idea. The following year, Elisha got out of the box business and his factory became the home of E. Waters & Sons, Paper Boat Builders. The company produced racing shells, revolutionary monocoque hulls that dominated collegiate regattas.
David Parker
The canoe’s wooden elements—gunwales, decks and thwart—give the hull stiffness, just as they do in ordinary canoes.
The Waters company also made paper observatory domes and paper cruising boats, including the canoe made famous by Nathaniel Holmes Bishop in his book, Voyage of the Paper Canoe, published in 1878. The company continued in business until 1901, when George accidentally started a devastating fire in the factory while working with a blowtorch. He died the following year, followed by the death of Elisha in 1904. Their technology went with them and the exact combination of paper and adhesive they used remains unknown.
In recent times, many amateur boatbuilders have made paper canoes using available materials. I gave it a shot many years ago and tried kraft paper, brown paper towels, Handi-wipes, Weldwood glue, carpenter’s glue, polyester resin, and epoxy.
David’s path to building a paper canoe began in 2013 when he took an interest in woodworking. He borrowed tools from his brother to build a lap steel guitar. He enjoyed the woodworking, started to set up a shop in his garage, and built more guitars.
David Parker
If the scenery doesn’t capture David’s attention, he can brush up on strip-building from the pages of the book, Canoecraft, which make up the inner layer of the canoe.
Parks and Recreation was another of his favorite TV series, and he stumbled upon a YouTube video featuring one of the show’s stars, Nick Offerman. In the video, Offerman was building a Bear Mountain Boats strip-built canoe. David had no interest in paddling a canoe, let alone building one, but he liked the idea of building something larger than a guitar and was intrigued by the aesthetic possibilities offered by strip construction. He ordered a Prospector 16 kit from Bear Mountain Boats in Ontario and finished building it in 2017. Not long after he got it afloat, he discovered that he loved paddling.
This year he ordered plans for a Freedom 15 from Bear Mountain and bought his materials from local sources. He discovered that the fiberglass he had purchased was too narrow to cover the canoe, so he placed an order for the right size and used that to sheathe the hull. Rather than let the first order of fiberglass go to waste, he decided to use it in the building of another canoe. He had seen a paper canoe on Instagram and was intrigued by the construction, thinking that paper could serve as a core between layers of ’glass, just as cedar strips do.
Jane Parker
While David is waiting for bolts to hang a canoe seat from the gunwales, he paddles the canoe kneeling.
The lockdown in New Zealand began on March 23 and David stayed home to do his part in slowing the spread of COVID-19. He focused on his canoe projects and covered the Freedom 15 with plastic sheet to use the unfinished canoe, still on its building form, as a male mold for a paper canoe. The canoe he’d seen on Instagram was made of newspaper, and that’s what he decided to use for his canoe. The first layer to go on the mold would be the one visible in the interior of the finished canoe, so David decided he’d pay tribute to Ted Moores’ Canoecraft, the book that introduced him to canoeing. Using water-diluted white PVA glue to saturate and bond the paper, David followed the layer of pages cut from a copy of the book with a layer of white paper, eight layers of newspaper, and a final layer of white paper. The 6-oz fiberglass that led to the project, set in epoxy, completed the layup inside and out. David used Victorian ash from Australia for the gunwales and reclaimed New Zealand kauri pine for the decks and thwart.
David is waiting on bolts so he can install a seat, but he has been out for a few test paddles, paddling while kneeling. The hull is a bit rippled and not as fair as he would have liked, but there’s a lot of good reading inside.
Do you have a boat with an interesting story? Please email us. We’d like to hear about it and share it with other Small Boats Magazine readers.
While I was working with John Leyde on this issue’s Reader Built Boat story about building a skiff with his grandsons, I was particularly struck by why he had come up with his plan for the skiff in the first place. As he put it in an email to me: “With winter coming on, I found I was projectless.” There’s no question that building a boat with his grandsons was an inspired idea that would strengthen the family bonds and give the boys something to remember for the rest of their lives. But what surprised me was the sense of anxiety suggested by facing the future projectless. When I write “projectless” on my computer, the word gets a jagged red underline from the spellchecker, and Google won’t turn up a definition for it, but it is, in fact, a word. When I searched for it on the web, I came across the full text of an impenetrable academic treatise on creativity, which had, squirreled away on page 137, this lovely phrase: “the precariousness of projectlessness.” That scholarly affirmation that the impulse to take up projects could be linked to anxiety made me wonder about my own history of filling my time with boatbuilding projects that often go on for months.
With the gunning dory, Dad and I did a lot more sailing than we did with his 27′ sloop. Here I’m sailing with my sisters: Ellyn by the main, Laurie by the mizzen.
I do recall that anxiety played a role in building a boat for my father. Not long after I’d built a dory skiff for myself, I convinced him to let me build a gunning dory for him. For several years he had owned and maintained a 27′ Tumlaren sloop, but he didn’t want to split his time between two boats, so he sold it for the sake of the gunning dory. The summer I started building it was the summer I had planned to row and sail the Inside Passage in the skiff I had built, but I was fearful about taking that ambitious voyage. It would be my first solo cruise ever, and I had never done anything but daysailing. Building the gunning dory was an ostensibly face-saving way of backing out of it. I could immerse myself in the gunning dory project and avoid spending an idle summer nagged by thoughts of what I had intended to be doing. (By the time I had finished the gunning dory the following spring, I’d spent enough time sailing my skiff to feel more confident in its abilities and mine and embarked on the Inside Passage adventure.)
I used poles to catamaran Nate’s kayak with one of mine. I also equipped his kayak with fenders as outriggers so he could paddle solo. Here, he’s offering to share his cookie with me.
When my kids were young, much younger than John’s grandsons, I built a small Greenland kayak for each of them, even though they certainly didn’t need kayaks and had never expressed any interest in either boatbuilding or paddling. In spite of that, I felt a strong urge to build the kayaks. I should mention that Nate was then just 3-1/2 years old and not to be trusted with edge tools, and Ali was just 9 months old and preoccupied with language acquisition. I had my hands full with working a full-time job and being a father, but I stole precious time to build a 7′ Greenland kayak for Nate and a 5′ kayak for Ali.
This is as close as Ali ever got to paddling the kayak I built for her. I made rockers for it so she could ride the waves at home.
It’s clear now that I built their kayaks as much, if not more, for myself than for them. I was new to child-rearing and a lot of it was difficult. Some was even scary. When Nate was an infant, he came down with croup and one evening struggled to breathe. I was terrified and raced him to the ER running red lights, tears streaming down my face. Worry and uncertainty just came with the parenting territory. I had been building boats on and off for 12 years then and always felt at ease and competent in the shop, even with the most challenging projects. I wouldn’t go so far as to say that building those two little kayaks for Nate and Ali was an avoidance strategy, in the way building the gunning dory had been, but I think it was a way of restoring my confidence and peace of mind. (By the way, my kids, now 26 and 29, turned out just fine.)
The rack I made in the back yard of my old house had four of my early Greenland kayaks. The one on the bottom was the first and very fast, especially in rough water and wind. The top kayak is a duplicate of it. The two middle kayaks are nearly identical except for the skeg on the lower one. I built the little skiff when Nate was not yet two years old. While I worked on it, I often had him in a carrier strapped to my chest where he could drool on my hands and tools. The boat is now his bookcase.
I currently have 15 boats that I’ve built scattered in and around the house. Many of them haven’t been used in years but I can remember why I built each of them. Perhaps it’s more accurate to say I can remember the intentions I had for them.
My reproduction of a King Island kayak was a lovely boat, and one I intended to use for camp-cruising, but I never spent enough time with it to have confidence in it.
I built a King Island kayak thinking I’d cruise the San Juan Islands with it. I paddled it a few times and then put it on a rack under the eaves where it gathered dust and cedar pollen. I built a decked tandem lapstrake canoe to paddle down the Missouri River. I drove past the river’s headwaters without the canoe and collected a bottle of water as a reminder, but I never returned with the canoe to paddle the river. Even with many of the dreams I had for my boats unfulfilled, I have no regrets about building any of them and don’t the time spent on as time wasted.
I don’t consider myself an anxious person and I think having a steady stream of projects for my entire adult life has played part in that. The news has been especially troubling these past few months and it only seems to get worse. I don’t have a boat in the works but I’ve been able to take refuge from current events by making a spinnaker. While I’m under the soothing spell of thinking about it, cutting out the pieces, and sewing it together, I’m safe from the precariousness of projectlessness.
I have been a member of the RiversWest Small Craft Center, a small boatbuilding club in Portland, Oregon, and upon my retirement, I decided I would like to build myself a small boat to row and sail. I wanted to have a boat that would be easier to move about in because of my aging knees, one of them recently replaced.
One of the club members, a retired boatbuilder, suggested I check the designs in The Dory Book by John Gardner. Being a transplant from the Northeast, I decided on the Swampscott dory design. I had rowed an original at Mystic Seaport some years ago and liked the feel on the water. I didn’t have the confidence to build my first boat from the somewhat sparse information in the book, so I bought a plan set for Iain Oughtred’s John Dory. It included full-sized templates, so I could avoid the unappealing task of getting on my knees to loft from a series of offsets. For those who’d like to start with offsets, they’re provided on the plan and profile drawings.
The plans consist of six pages of drawings and include full-sized patterns for the frames, stem, and transom. While the drawings have a wealth of details, they are not a step-by-step guide to construction. Oughtred’s book Clinker Plywood Boatbuilding Manual will provide instructions for those who need guidance.
My home has a basement with a rather large window that’s level with my front yard. After making a few scale drawings, I decided I had enough room for the building frame and a path to remove the boat upon completion. This indoor location afforded me pleasant and practical temperatures for building in both winter and summer.
Photographs by Russell and Sharyn Smith
The dory slips along easily with a solo rower. At the bow, four strakes are evident; the plans provide an option for three, with the garboard and first broad strake combined.
I decided after seeing a completed John Dory that I would use the two-plank garboard option that shows on the plan. I liked the look of having four strakes. I also decided to make all the planks of 9mm thick plywood instead of 6mm for the top two planks as called out on the plan.
I made the five permanent frames and stem out of Douglas-fir and the transom from 5/4 mahogany. The frames were cut in pieces and spliced together using 1/4″ plywood splines and thickened epoxy. The two temporary frames—one close to each end—can be made of inexpensive softwood. Once all the frames, inner stem, and transom were installed plumb and centered I used a block plane and a batten to bevel the flats of frames so they would make full contact with the planks.
The bottom was cut from 5/8″ (15mm) plywood slightly oversize, trimmed and beveled to match the angle at each frame for the garboard plank. Although the plans did not specify fastenings, I drove two #10 bronze screws through the bottom into each of the permanent frames in addition to thickened epoxy.
Next was the sheer clamp, a 5/8″-thick by 1-1/2″-wide piece of Douglas-fir that extends from stem to transom passing through notches in each of the frame tops. I found that because the frames were made of vertical-grained fir, the pressure of the sheer clamps caused cracks in the frame notches. I chalk this error up to inexperience; I should have used the hardwood specified in the plans. Adding 1/4″ x 6″ plywood gussets to the top of each frame with thickened epoxy allowed the sheer clamps to be installed without any further problems. I also made up two knees of mahogany, one at the stem and the other at the transom, just to reinforce the bottom connection to both of these junctions, although they’re not called out on the plan.
In order to avoid mistakes with the expensive 9mm marine plywood, I made plank templates out of 1/4″ underlayment. I made a spiling template out of the same material in articulated sections about 4’ long. Each section was connected to the other with a 10″-long connector with a pivot hole in each section. Once the template was positioned correctly, screws driven through the connector maintained the section alignment after removal from the frames. After spiling and cutting the patterns, I tested their fit on the frames. When they looked acceptable, I traced their outlines on the permanent plank stock.
Coming from Scottish lineage, I hate to waste expensive wood. Rather than scarf plywood panels into full-length sheets and cut planks from them, I cut my plywood into strips slightly larger than the pattern and cut the scarfs at an angle to match the curve of the pattern.
Upon completion of the planking, I sealed the outside of the hull with epoxy, and then applied epoxy and 6-oz fiberglass over the bottom and around the corners of the garboards. I then added the 32″ skeg noted in the plans.
The frames have knees rather than gussets or clips often used in dory construction. The floorboards have yet to be installed. Note the flotation compartment and its white access hatch in the stern.
The hull gets turned over for finishing, including installing the breasthook, gunwales, and outer stem. A thwart riser of 5/8″ x 2″ Douglas-fir was added inside the frames on both sides. These pieces had to be steamed and installed hot in order to get them to bend to meet the frames.
A combination seat/flotation compartment in the stern has a top made of 1/4″ plywood supported by a centerline kingplank and crowned deckbeams made of 5/16” plywood laminations. While the plans include details for a shop-built wooden hatch for access to the compartment, I installed a plastic screw-in hatch in the bulkhead. The plans also include drawings for a second watertight compartment in the bow, but I chose the open option from the plans and installed a simple mast-partner beam. Both options have gated partners to ease raising the 12′ 6″ lug-rig mast. The plans include an option for a gated partner located farther aft for builders who choose one of the two sloop rigs for the dory.
The centerboard trunk is sided with 9mm plywood and secured to the bottom where it divides two frames. The top of the case is braced by the forward and middle thwarts. I chose the simplified version of the centerboard and trunk, which is flush with the tops of the thwarts. The other option in the plans is a trunk that peaks between the thwarts and houses a centerboard with more surface area and lateral resistance when deployed. The dory has removable floorboards built in sections that drop in between the frames and alongside the centerboard trunk. I used western red cedar for the slats.
The kick-up version of the rudder will be equipped with lines to retract and deploy the pivoting blade. The plans include drawings for a traditional one-piece rudder.
The plans offer options for a fixed-blade rudder and a retractable one as well as a tiller and a yoke. I chose the kick-up style. It uses 1/2″ (12mm) plywood for the cheeks and 7/8″ plywood or hardwood for the rudder blade. The blade is raised and lowered with 1/8″ lines.
The plans offer six sail rigs: gunter, gunter sloop, balanced lug, sprit, small sprit, and spritsail sloop. Being a novice sailor, I decided to use the balanced lug. I repurposed an orphaned mast for the boat and made up a new yard and boom of Douglas-fir laminations, tapered according to the plans, and rounded with a spar gauge and spokeshave. The sail I purchased from a Portland area sailmaker was sewn to the dimensions called out in the plans.
All of the spars fit inside the boat for transport. I made two racks that clamp to the thwarts and hold the sail, yard, and boom bundled together as well as the mast, tiller, and oars, all retained with bungee cords. With a hull weight under 200 lbs, the dory isn’t a burden for trailering or for solo launching and retrieval at the ramp.
The glued-lap-plywood construction brings the dory’s weight in at about 200 lbs, half the weight of a traditionally built Swampscott, making it easier to accelerate.
For rowing, I have a pair of 9′ Alaska-yellow-cedar oars that I made several years before building the dory. The standard formula for oar length would suggests 8-1/2′ oars would be the best fit for the middle and forward rowing station and 7-1/2′ oars for the aft station. I’m finishing a set of 8-footers and will add those to the John Dory quiver.
Afloat, the John Dory feels tender while I’m getting aboard, but the more the hull tips, the more the secondary stability becomes evident and keeps the boat from feeling uncomfortably tippy. After I’ve taken my seat on the center thwart, the boat feels steady; I can slide my weight of 200 lbs over to the gunwale and look down into the water and still have one plank width above the water.
The boat is very easy to row solo. I used a temporary foot brace prior to making my floorboards last year and found it considerably helped applying power. The skeg assures the boat tracks very nicely. When I’ve taken a passenger along, seated on the stern flotation compartment deck, I rowed from the forward station. The dory was still easy to row and steer with company aboard. I didn’t take the rudder along on those outings, but I could have had the passenger take over the steering so I wouldn’t have to look over my shoulder to navigate. When the rudder is equipped with the tiller, the passenger would have to sit on the aft thwart to steer. A yoke, also detailed in the plans, would allow the passenger to steer from the stern bench, facing forward with a tiller line over each shoulder.
The plans include six drawings for different sailing rigs. This dory carries the balanced-lug rig. The author initially rigged the rudder with the Norwegian tiller seen here, but later opted to use the standard tiller with an extension, as shown in the plans. A yoke with tiller lines is also detailed in the plans.
The lug rig goes up quickly. With the sail already attached to the yard and boom, all there is to do is tie the halyard and downhaul on, rig the sheet, and you’re ready to raise the sail. I had initially rigged the rudder with a Norwegian push-pull tiller but, being a novice sailor, I had trouble making precise clean tacks in light air. I decided to switch to the straight tiller arm as shown in the plans and found it worked better for me. The boat does move well in the light air I’ve had for sailing thus far, but it can be challenging to make a clean tack. This may have more to do with my limited experience than the boat. In heavier winds, I expect the dory’s good secondary stability will give me confidence.
While waiting out the pandemic lockdown this year, I’ll scarf an additional 14″ to the mast so I can raise the rig a little higher for more clearance. I’m 6′ 2″ tall and had some problems getting the boom to clear my head. The plans have a provision for a motorwell, and I have been thinking about adding one in hopes that I may use the boat more often.
From the building to the rowing and sailing, the John Dory has been an enjoyable and educational experience. I am happy with the way it turned out and have had some very nice comments about it from many people who know boats. My interest in small wooden boats will always be with me. I am not sure if I will build another boat, but I will always take pride in my John Dory.
Russell Smith, 75, was born and raised in New Jersey. His first exposure to boats was in high school when he worked as a deckhand on party fishing boats on the Jersey shore. He was an Outside Machinist at Electric Boat in Groton, Connecticut. Drafted into the U.S. Army, he trained as diesel mechanic on amphibious vehicles and after his service worked as a diesel truck mechanic for various fleets for 28 years. More recently, he worked for the past 16 years doing field service for a company that sold thrusters and roll stabilizers for yachts. He has long been a member of RiversWest Small Craft Center, a community woodworking and boatbuilding shop in Portland, Oregon. Russ started building boats in 2003 with a sea kayak built from plans. He started work on the John Dory about 6 years ago.
John Dory Particulars
[table]
Length/18′ 3″
Beam/4′ 8.5″
Depth amidships/1′ 6.75″
Draft/6″
Hull weight/ around 200 lbs
[/table]
Plans for the John Dory are available from The WoodenBoat Store, printed plans only, for $183. Plans can also be purchased from Oughtred’s Boats.
Is there a boat you’d like to know more about? Have you built one that you think other Small Boats Magazine readers would enjoy? Please email us!
The Bella 10, Sam Devlin’s jaunty 9′ 9″ rowing skiff, started out being called the 5×10 skiff because all of the plywood it required could be cut from a single 5′ x 10’ sheet. When Sam was teaching boatbuilding classes, the 5×10 sheets saved him the time it took to scarf 4×8 sheets together to get the length needed for a small yet able rowing boat. There are a number of boats designed for a single 4×8 sheet of plywood, and while they are interesting as design challenges, they don’t have the length to be pleasing to row or the freeboard to carry an adult safely in a bit of a chop. The Bella 10 has both.
Photographs by the author
The interior is simple and spare, keeping the weight down. The foot brace called for in the plans, absent here, is essential for rowing.
Designed for stitch-and-glue construction, the Bella 10 can be built from plans or a kit. The plans consist of four pages of drawings that include the cutting schedules for a 5′ x 10′ sheet of 1/4″ (6mm) BS1088 plywood as well as for two sheets of 4′ x 8′ plywood scarfed together end to end. One marine-plywood supplier sells the 5×10 sheet of five-ply okoume for about $133 and the two sheets of 4×8 that would be required for $146, so you’d save a bit of money as well as the time required to scarf the two sheets together.
Devlin Designing Boat Builders
.
The shapes for the side and bottom panels are determined by offsets measured from the edge of the plywood sheet, so the pieces all nest together and produce minimal waste. The transom gets two pieces cut, and they will be sandwiched together with epoxy at the start of construction. The drawings include a 24-step list of the building sequence, and an 80-page manual detailing stitch-and-glue processes is included with the plans. The book Sam wrote 25 years ago—Devlin’s Boat Building—is a good companion for those who like to study up before they build.
In the included manual, Sam details an alternative to the drilled holes and twisted wires in the stitches of stitch-and-glue: stapling the panel edges together. A pneumatic stapler with stainless-steel staples of the right length and gauge can speed the job of putting the panels together and have the added benefit of leaving virtually invisible holes after the seams are glued and the staples removed. Sam had students in one of his boatbuilding classes staple three Bella 10 hulls together; it took 25 minutes for the first, 20 minutes for the second, and 10-1/2 minutes for the third.
After the panels are stitched or stapled together, the hull is opened up to its proper shape with three spreaders while the seams are epoxy-tacked, have the stitches removed, and then get filleted and ’glassed. The exterior gets a layer of 6-oz fiberglass and epoxy to protect and strengthen the plywood. The remaining work is with 3/4″ hardwood lumber: 1-1/4″ inwales and outwales to stiffen the sheer, knees and a breasthook in the corners, an 8″-wide thwart and cleats to support it, and a low, glued-in foot brace. Flotation is provided by closed-cell foam blocks, easily obtained and cut from a throwable boat cushion, then screwed to the bottom of the thwart.
The Bella 10 I used for my trials was built by Devlin Designing Boat Builders as a showroom boat and impeccably finished. The foot brace and foam flotation were absent, and the sheer had the addition of a canvas-covered padded guard. At 52 lbs, the boat was light enough for me to carry it as I would portage a canoe. I rolled it over on the lawn, lifted the bow, and backed in to rest the thwart on my shoulders. Pulling the bow down raised the transom off the ground, and I could then easily walk with the boat. For transporting the boat with its oars and other gear aboard, my cart was a better option.
Hauling the skiff with a compact pickup truck is a simple affair, with no trailer to fuss with and no lifting to a roof rack.
The Bella 10 fit nicely stern-first into the bed of my half-ton pickup truck. The hull slipped between the wheel wells with a bit of room to spare, even with the bed-liner insert taking up some space. Not having to fuss with a trailer or lift the boat up to a set of roof racks was a welcome change.
The 52-lb Bella isn’t too heavy to cartop. Loading the boat is best done lifting one end at a time.
I could lift the boat to the racks on my Chevy Blazer, but it was an awkward lift approaching the racks from the side. The thwart is just above the boat’s center of gravity, so it makes a good handle for lifting and controlling the boat, but the boat’s beam makes it awkward when you’re on your own. It would have been easier to approach the back end of the car with the boat in canoe-portage mode, rest the bow on the back rack and the transom on the pavement, then lift the stern and slide the boat forward. I didn’t give that a try because I didn’t want to rasp the transom on the pavement or grate the canvas gunwale guard across my wooden roof-rack cross bars.
When I had the boat afloat, I first climbed aboard over the transom and later found it easier to step in and out over the side. About 8″ of water was enough to keep the boat from touching bottom when embarking.
With a beam of 3′ 8-3/4″, the boat was a bit nervous while I moved about, but settled down to be very steady once I got seated. I could slide on the thwart to about 6” from the side of the boat and look straight down into the water. That put the gunwale guard right at the water, as far as I could safely push the secondary stability.
A pair of 7′ oars is the perfect match for the Bella 10. They have just the right gearing and keep the stroke low.
For rowing, the thwart is in a good position relative to the oarlocks. I could sit well forward and keep my tailbone from pressing uncomfortably against the wood. With the foot brace omitted from this boat, I cobbled one together with a stick of wood, some rope, and a strap so I could row the boat properly and with full power. Once underway, I really liked the boat’s rowing geometry and the fit of the 7′ spoon-bladed oars. The handles had a 2″ overlap, right on target. On the drive, I could pull them straight at my solar plexus and have enough clearance over my legs on the recovery to avoid clipping wave crests. It was a nice compact and powerful stroke, far from the windmilling that small rowboats often seem to encourage.
Even though the Bella is just shy of 10′ long, it has a good turn of speed and is well suited to rowing for exercise.
The Bella 10 carried its way very well between strokes, easing the load at the catches, and it took very little effort to make 3 knots. At an aerobic-exercise pace I could sustain close to 4 knots and an all-out effort in a short sprint peaked just shy of 4-3/4 knots. I could row stern-first at 3 knots; and the transom didn’t seem to be bulldozing a big wave ahead of it.
The skeg does a good job keeping the Bella 10 on track without restricting maneuverability. The boat spins like a top and can do a 360-degree spin in just six push-pull strokes. In 1’ wind-driven waves taken on the quarter, the bow will occasionally veer, but the instant response to a corrective stroke sets the boat back on course. Rowing hard into an 8’-knot wind and waves just beginning to curdle before whitecapping, the forward end slapped some of the smaller waves, sending spray to the sides, but not causing the hull to shudder or slow down.
The Bella isn’t designed for use with an outboard—aside from the lack of buoyancy compartments that would be required, I suspect that my 2-1/2 hp four-stroke would be too much weight for the stern to support—but Sam and I agreed that an electric motor would be worth a try.
While the Bella 10 isn’t designed for power, the compact and lightweight EP Carry provided a satisfying push without overwhelming the boat with weight or excess power.
I borrowed an EP Carry from PropEle Electric Boat Motors, which I thought would be a very good match for the Bella 10 because it weighs just 21 lbs, including the battery. With the motor running at full throttle, the speed reading on the GPS wavered between 3-1/2 and 3-3/4 knots. Because I had to keep my hand on the motor’s tiller, I couldn’t get as far forward as I should have been to get the boat at its best trim, but I wasn’t doing the work, so it didn’t matter much.
I put my weight as far forward as I could and still reach the tiller. An extension would help get the bow down.
A tiller extension (built to accommodate the EP Carry’s atypical tiller) would have allowed me to sit comfortably on the thwart. Getting the bow down into the water would also help with steering. With it slightly airborne, the wind would hamper upwind turns. The boat has a Coast Guard plate on the transom noting that the boat has a maximum capacity of “2 persons or 300 lbs,” so having a passenger in the bow would allow a helmsman to be comfortably seated on the bottom aft of the thwart.
The Bella 10 is a splendid little boat that is inexpensive (it’s Devlin Designing Boat Builders’ most affordable kit), easy to build and transport, and an able boat on the water. It would serve well as a tender, a family boat for training young rowers, or an easily portable vessel for exploration and exercise.
Christopher Cunningham is the editor of Small Boats Magazine.
Bella 10 Particulars
Length/9′ 8.5″
Beam/3′ 8.75″
Draft/6.1″
Displacement/305 lbs
Hull dry weight/52 lbs
The plans for the Bella 10 are available from Devlin Designing Boat Builders for $27.50, downloaded, and $63.75, printed. The basic kit sells for $499 [6/25/20 on sale for 15% off, $424.15].
Is there a boat you’d like to know more about? Have you built one that you think other Small Boats Magazine readers would enjoy? Please email us!
"Are you going all the way?” asked the voice from above. “I’m going to try,” I replied, looking up at the sole of a work boot at the lip of the concrete and above that a bearded face hanging over the railing. The immense tub of the lock engulfed me as I held onto a line dangling from 20’ above. The gray concrete walls stretched 1,200’ alongside my 17’ dory LITTLE JOY, and had long, heavy scrapes down their length, the scars left by the barges that pass through this lock around the clock. Sealed in on each end by battleship-gray steel gates, the water drained, dropping me another 11’. The Mel Price lock and dam, just downstream from Alton, Illinois, is the newest, busiest, and longest lock on the Mississippi River. More importantly to me, it is the last lock on the river.
The blast of an air horn made me jump as it echoed down the chamber–the all-clear signal. I rowed past the downriver gates and out into the churning river just below the dam and spillway. After a quick survey to get my bearings and check for river traffic, I pointed LITTLE JOY south. I was now free, like the river, to make my way to the Gulf of Mexico.
I had put LITTLE JOY in the river just a mile and a half above the lock and dam at the Alton marina, the very same place where I had taken out one year before when I rowed LITTLE JOY 650 miles from Minneapolis down to Alton (see “Downriver, Part 1” ).
Even though I was free of the last lock on the Mississippi, I still had a big first day ahead of me. I crossed the river from east to west and within 5 miles I reached the confluence with the Missouri River. Its muddy milk-chocolate-colored water, laden with sediment, violently shoves its way into the clearer blue-green waters of the Mississippi; whirlpools 25′ across appear quickly and then just as suddenly disappear. Water pushed up from below rose in big bubbles that splashed loud enough to make me look. I drifted through the confluence, once allowing a whirlpool to spin me completely around. After a half mile I was through the worst and prepared for the Chain of Rocks, 5 miles downriver, the last remaining natural obstacle to navigation on the Mississippi River.
The Chain of Rocks is a series of limestone ledges that stretch for 7 miles above St. Louis. The Army Corps of Engineers built an 8-mile-long canal that commercial vessels must use to bypass the ledges. In normal water levels small boats can pass through the 7 miles on the river. There is just a small set of rapids and a low dam to cross.
Three hundred yards upstream from the first ledge, I passed under the rusted steel trusses of the Old Chain of Rocks bridge and aimed for a stone tower standing alone in the river. The tower, the size of a small house but built like a castle with stone-arch windows and a round turret with a conical powder-green copper roof, was an old water intake for the city of St. Louis. The river parted and rushed around the stacked gray and white stone blocks of the tower base. It stood 40’ above me with water stains halfway up showing previous flood levels. Riding the current, I passed close enough to the base to brush it with an oar.
The boat was pulled by the current over a ledge, a foot or two high, and then carried through a couple of hundred feet of choppy whitecapping waves, and then it was over. The Chain of Rocks had been one of my big concerns of the trip and, thanks to the above-average water level and a river-worthy boat, I passed through easily and unharmed.
Photographs by David and Xiaole Hudson
After I passed by the Gateway Arch in downtown St. Louis I had 179 miles to go to get to the confluence with the Ohio River, and 950 miles beyond that to the finish of my voyage at the Mississippi River delta.
Ahead lay the first of St. Louis’s seven bridges; beyond them, on the west bank, I saw the unmistakable silhouette of St. Louis’s Gateway Arch. I passed under the Stan Musial Bridge, a slender roadway supported by scores of white-painted cables fanning out from twin towers, then under the 146-year-old Eads Bridge, three arches of black steel latticework resting on sturdy granite piers.
I passed by the riverfront without stopping, trying to get past St. Louis by end of the day. The Gateway Arch, the iconic symbol of St. Louis, towered above the right riverbank, its stainless-steel cladding shining in the afternoon sun. I passed close by a paddle-wheel boat at a landing with tourists at its rail, waiting to debark. A woman yelled down to me, “Where are you going?” “New Orleans,” I replied. “Oh my!” she exclaimed, then I heard the husband say, “See, I told you.” I sat a little straighter and hoped I didn’t run into anything with an audience watching.
During the first days of the trip I was fortunate to find small protected beaches where I could camp for the night without hauling the boat completely out of the water. I’d set my tent close by on high ground where I could keep an eye on the boat and have a view of the river.
And there were things to run into. Downstream from the city riverfront, both sides of the river were lined with barges and industrial docks for as far as I could see. Towboats, the river tugs designed to push the barges, bolted around, moving, adjusting the barges along the banks. Rafts of barges three across and five long made their way up and down the main channel. I weaved my way down the west bank for 10 miles, stopping and scooting past the working boats.
As the industrial landscape slowly gave way to a more wooded one, I found a tiny beach protected by a small point. I set up camp, cooked up some rice and eggs, and watched the sunset over the river. I had covered 34 miles for the first day—1,230 miles to go to the Gulf.
At Ste. Genevieve, Missouri, I had a quiet night camped in a protective cove. As the sun rose over the levee, the calm remained over the water.
I was back on the river at sunrise and made it to the small town of Ste. Genevieve, Missouri, late in the day. Like many of the towns along the Mississippi, it is set back from the river, so there’s little evidence of it from my low vantage point. Adjacent to it, a limestone quarry was a dusty white scar that stretched for three-quarters of a mile along the right bank
Flood walls like this one at Cape Girardeau also protect other river towns like Caruthersville, Missouri, and Vicksburg, Mississippi. Murals painted along the length of this flood wall depict the history of Cape Girardeau. The trompe-l’oeil stone work is part of the painting on the town’s side of the concrete barrier. Marks on the end post show the high-water mark of the many floods. At the top are the years 2016 and 1993.
The next day, I stopped for a hot meal in Cape Girardeau, Missouri, a city that hides behind a 20′-high, 6,000′-long concrete flood wall. I camped not far downstream, on a bend in the river surrounded by woods. The following morning, I stopped at Chester, Illinois, a town that took the high ground, a mile inland, and left the waterfront views to the inmates in the long rows of buildings of a state penitentiary.
About 110 miles downstream, I worked my way along the west bank as the Mississippi approached the confluence with the Ohio River. I pulled ashore on a sandy point at the end of the Illinois peninsula that separates the two rivers. With two empty gallon jugs in hand, I walked up the hill to Fort Defiance Park looking for water. Wearing a sun-bleached, wide soft-brimmed hat, a neck buff, and long-sleeved shirt and pants to protect myself from the sun in the 95-degree heat, I was sweat soaked. I was also wearing the dirt and smell of the past four days it took me to get there from St Louis. I took refuge under the shade of a broad-limbed oak tree. Two young women, better dressed for the day in shorts and sleeveless tops, came over to me, apparently undisturbed by my clothing choice of head-to-toe coverage. “Do you know which one is the Mississippi?” one asked. I explained to them that the Upper Mississippi was the river on our right and the larger, busy river on our left was the Ohio, which was coming down from Pittsburgh. Directly in front of us was the confluence, and beyond that the combined rivers are referred to as the Lower Mississippi. “Thanks for the geography lesson,” they said sincerely but with a laugh. They walked back to their car and I was tempted to ask them if I could sit in their air conditioning for just a couple of minutes.
For the Lower Mississippi, I switched to a new set of maps, which are produced by the Army Corps of Engineers and used by commercial traffic for navigation. They show detail of the entire river, mile by mile. Where I stood was 953 river miles to the Gulf of Mexico.
Hundreds of steel buoys mark the 9’-deep navigation channel that runs from St. Paul, Minnesota, to the Gulf of Mexico. For a little excitement, I sometimes tried to see how close I could get to one as it raced by.
I returned to LITTLE JOY and rowed on a course directly straight down the middle where the two rivers became one, and quickly realized that I’d made a mistake. The confluence is over a mile wide and for 2 miles beyond Fort Defiance, the water was choppy and swift. The shipping channels of the Upper Mississippi and the Ohio, marked by red and green steel buoys, converged right ahead of me and I was headed right down the middle of the main channel of the Lower Mississippi. Tows, consisting of a single towboat pushing a raft of 15 or 20 steel barges tied together and covering an area larger than one-and-a-half football fields, had been regularly passing in every direction, and I had to stay well clear of them. I headed west to the Missouri shore and out of the main channel, but still stayed alert for traffic.
It was a different river now, more than three-quarters of a mile wide, half again as wide as the Upper Mississippi that I’d just left. It seemed swifter too, and although I had no way of measuring its speed, I made about 4-1/2 mph the rest of the day.
I had set up camp on a large, barren sandbar about 10 miles below the confluence along the Kentucky shore. The water lapped at the sand as I stretched out and took deep breaths. Across the river, the setting sun, glowing a flaming orange, lit the cloudless sky with yellow, red, and purple streaks. On the eastern horizon, a brilliant white full moon rose big and bold.
On many evenings, I took time to get much-needed rest time before setting up camp. Here I am studying the Corps of Engineers river navigational maps to see what’s ahead in the coming days.
I set my tent on the sandbar’s high ground, which was just 2′ above the water’s level, enough, I hoped, to accommodate an overnight rise. My kitchen was a poly tarp spread on the hard sand and anchored with dry bags and food containers on it. For dinner, I cooked up a pot of rice with two foil packs of tuna stirred in. It was a simple meal, but comforting as I dined propped against a dry bag and looking out over the river. In what was left of the fading evening light I studied the river maps to get a sense of what was in store for me tomorrow. When the sun set and the air grew still, the mosquitoes came out and chased me into the tent. The clear sky promised no chance of rain, so I left the rain fly off and lay on top of my sleeping bag, watching the rising full moon through the tent’s screen roof until I drifted off to sleep.
The alarm on my phone went off at 5 a.m. In the still-dark tent, I went through a routine of lower back stretches. My trip down the Mississippi last year was cut short at St. Louis by severe lower back pain. I was determined to not have that happen on this one.
The moon, now setting on the western horizon, illuminated the dark waters of the river as I finished packing the boat and shoving off. I stayed away from the main channel and worked my way close to shore. The heavily wooded banks were cast in a long soot-black silhouette as a faint yellow light appeared in the eastern sky behind them.
My simple camp on a sandbar was usually my tent, an area to eat and rest, and the boat with the anchor line far on shore just in case.
With the sun finally rising over the tree line, I pulled in the oars and let the current carry me. With the sun came the heat, and I slathered sunblock as thick as house paint on my face, hands, and bare feet. As the morning burned on I rowed hard enough to keep moving with the current but never have to pull with all my might. I made almost 5 mph. I chugged water, hot and tasting of plastic, straight from a one-gallon jug.
The Mississippi piles up debris on the upriver points of mid-river islands. Among the tree trunks deposited by the great flood of the spring of 2019 you can see, at the left of the pile, a green channel buoy, a full 8’ in length, carried here by the current. It is just one of many buoys that get moved out of position or tossed ashore with each flood.
After making my way around a hairpin turn in the river, I found myself with the morning sun on my left shoulder, an unsettling feeling because I was heading north. I had just entered the 20-mile-long New Madrid Bend, the only place on the Mississippi where it turns completely back on itself. I continued downriver, north, for 10 miles and approached the town of New Madrid at the top of the horseshoe.
A black bassboat with an oversized outboard approached me slowly and carefully. I stopped rowing. “What y’all doin’?” one of the two burly, bearded men asked in a thick drawl. “Rowing the Mississippi. What are you guys doing?” I asked. “Catfishin’,” they told me, and then asked if I needed anything. I thanked them and told them I was going into town for supplies.
The riverfront of New Madrid, Missouri, has an uninviting mile-and-a-half-long levee of boulders, stones, and gravel 30′ high with a stone-block flood wall 10′ high on top of that. A sign on the concrete wall says “Welcome to New Madrid.” The only access to town is a long boat ramp leading to an opening in the wall at its downstream end. I approached the ramp quickly, ready to tie off to a small steel floating dock. I would have one chance. There was no going back upriver against the swift current.
Just behind the levee at the upstream end of the flood wall was a small brick building with twin glass doors, the New Madrid Historical Museum. I walked in and a cold blast of an air conditioner washed over my sweat-soaked shirt. I was soon shivering. “Are you one of my paddlers?” asked a lean man with wire-rim glasses. I told him I was in a rowboat, not in a canoe. “Oh, that’s why you’re not as dirty as the other guys.” He pointed out the restroom and mentioned a hose out front to fill water jugs, and told me I could hang out as long as I wanted. “New Madrid is known for two things,” he told me, “the battle, and of course, earthquakes.” Earthquakes?
I was the only one in the museum. I strolled through looking at iron, lead, and steel artifacts from the Battle of Island Number Ten, a 40-day-long Civil War battle fought here in 1862, and scientific instruments, charts, and maps of earthquakes that occurred here in 1811 and 1812. A poster-sized engraving depicted the three-week bombardment by Union gunboats of the fortified Confederate island, and I try to imagine what that must have been like, occurring just outside these doors on the river. The curator told me about the three massive earthquakes that shook New Madrid. They were felt across the central and eastern U.S., and the shaking caused church bells to ring as far away as Philadelphia and Boston. During one of the first tremors the earth under the Mississippi rose and made the river briefly flow backward.
I walked a half mile out to the highway for a café meal, stopped at a store for bread, tuna, and ice tea, picked up a couple of sandwiches, and had a warm walk back to the boat, a walk that I repeated when I realized I had left my phone charger at the café.
Eighteen miles downriver from New Madrid, I camped on a sandbar in mid-river. Memphis, Tennessee, was only 135 miles away and I decided if I put in some extra effort, I could be there in two-and-a-half days. In the next two days I stayed on the river for 10 hours each day and covered 100 miles.
I was often on the river and rowing at dawn. I experienced a sunrise like this for four days in a row, but it never lost its effect on me.
At my camp 35 miles upstream from Memphis, I woke after daybreak with light suffusing my tent. With only 35 miles left to reach Memphis, I took some extra time in the morning to rest—the heat of the past nine days had been taking a toll. I packed up and got on the river.
As I got closer to the city, a 300′-tall glass-sided pyramid loomed over the trees lining the riverbank and dominated the other buildings in the Memphis skyline. With the city now crowding the banks next to me, I passed under the pale-green twin arches of the Hernando de Soto Bridge and rowed three-quarters of a mile to the downstream end of Mud Island and rowed into Wolf River Harbor.
The marina there was full of activity. Two cruisers, heading to the Gulf, were taking on hundreds of dollars of fuel. Other boats were heading out to the river to fish. In the marina office I was told all the slips were full because there was a catfish contest going on. A man in a wrinkled button-down fishing shirt and cargo shorts came over, pointed to a black steel dock, and said I could tie up there. When I asked what I owed him, he said, “We don’t charge you guys anything. Only I can’t let you camp here. The city will chase you off.” No problem. I had been planning on getting a hotel for two nights to rest.
In the shade of an awning, it was an oppressive 99 degrees. I walked into the city, checked into a hotel and, in my room high above the city, I turned the air conditioner as low as it went and lay down in a cool, clean bed. On my two days off, I took meandering walks around Memphis.
The view from high ground helps illustrate the size of the tows that ply the Lower Mississippi. This one has just 11 barges; imagine a tow with 30.
Well rested, I set out on the river again and, after rowing for three days, I beached LITTLE JOY on a bend in the river 121 miles from Memphis. The current was racing by, so I kept a hand on the bow line to keep the boat from being pulled off the shore and swept downstream. There was a tow a quarter mile away downriver. Tows on the Lower Mississippi are not restricted in size by locks, and I saw a few with more than 30 barges, covering an area greater than three-and-a-half football fields. I couldn’t tell if this tow was moving, but I didn’t want to take the risk of having my boat ashore if it passed by, leaving me to contend with its wake. I decided not to wait, and shoved off and let the current take me.
Whenever I pulled LITTLE JOY ashore near the navigation channel, I had to keep an eye out for vessel traffic. This tow was churning upriver and dragging a large wake, so I’d have to tend to my boat before the wake reached shore. Only when I pulled her on the beach or found a protected place to leave her could I turn my back on LITTLE JOY.
Another tow of six barges appeared farther downstream, churning toward me. It was too late for me to stop. The first tow I’d seen was parked with the tug’s props turning, pushing a lead barge into the bank to hold the tow fast; I waved my hat, hoping the pilot would see me and would stay put as I rowed by. The tow bound upriver was drawing near. I just kept LITTLE JOY’s bow pointed downriver and hugged close to the parked tow and flew by in the narrow channel, buffeted by the passing tow’s wake.
In the next 2 miles, on a long, straight stretch of the river, I counted 13 tows parked at an angle as if on an old-fashioned Main Street, their bows pushed into the banks of both sides. I didn’t know what to make of it and, unsure what to do, I went right down the middle of the river.
Two long blasts of a horn made me turn to look over the bow. A small tow was coming upriver and, even though I was out of the channel, I guessed he was letting me know he was coming. It was an Army Corps of Engineers barge loaded with a crane and construction equipment. A second one soon followed. It was the last moving towboat I saw for the rest of the day. I don’t know what happened to cause the commercial traffic to halt, but I took advantage of it and rowed until sunset, covering 60 miles in 12-1/2 hours on the river.
Several cruise ships passed me on the river, some more than once. This stern-wheeler, AMERICAN QUEEN, launched in 1995 with a length of 418’, may be the longest river steamboat ever built. She came in the night up the Yazoo River to stop at Vicksburg.
When I arrived at Vicksburg, Mississippi, I had to row one-and-a-half miles upstream along a tributary, the Yazoo River, to get to town. Vicksburg used to be on the Mississippi, but on April 26, 1876, the river cut across a peninsula on the Louisiana side, and left Vicksburg high and dry. It was land-bound for 27 years; in 1903 a diversion canal rerouted the Yazoo River to run by the city’s landing and reestablished Vicksburg as a Mississippi River port.
I spent two nights in Vicksburg and had no place safe to leave the boat, so I pulled LITTLE JOY out of the water and left her at this very busy boat ramp on the Yazoo River. In the morning I was surprised to find AMERICAN QUEEN, with its 222 staterooms, dropping off passengers for tours of the town.
My row from Memphis to Vicksburg covered 300 miles and took seven days, seven gallons of drinking water, two gallons of iced tea, and was without a single town visit. I stayed two nights at a hotel next to the boat ramp to take a break, do laundry, buy supplies, and pay a visit to the Civil War battlefield park.
These bridges at Vicksburg are two of the 130 bridges, both auto and railroad, that span the Mississippi. The view here is upstream as I’m leaving town. Beneath the central spans, at right, is a sprawling casino/hotel complex. The town of Vicksburg is in the distance at left. Bridges were fewer and farther apart the farther south I traveled.
Back underway, I dunked my hat and neck buff in the river and put them back on. The cold water soaked my shoulders and back. Even though it was October, the weather was sweltering. I had been on the river 23 days and had not seen a drop of rain nor a day when the temperature did not reach 90 degrees.
A 2″-long dragonfly landed on the thwart in front of me. Its multifaceted iridescent eyes and electric blue and green body glowed on the muted earth tones of the wood. Its wings, all but invisible save for their black veins, blurred suddenly and the dragonfly took off. Moments later another took its place.
Herons and cormorants gathered on the beaches and in the trees. A flock of cranes flew high above me, their long necks extended ahead and their legs trailing behind with toes pointed. As I approached a wooded, mid-river island with a sandy beach, I jumped in my seat when an Asian carp, easily 2’ long, jumped over my port oar, bounced off the top of it, and came down with a splash. The Asian carp, an invasive species, always jumped at my approach in the shallows.
Standing on the bank of the island, I bathed with a jug of cold river water. While it was not muddy and appeared clean, I used it carefully. I knew from my pre-trip research that the Mississippi is the second most polluted river in the United States. The cooling effect of the bath didn’t last long. After I set up my tent I was once again dripping with sweat, and lay down to sleep, waiting for the sun to set and the barely perceptible cool of the damp river air.
In Baton Rouge, I pulled LITTLE JOY on this beach where she was just a speck behind the USS KIDD, a 376’ destroyer. I only stayed a couple of hours before heading out for the most dangerous part of the trip—Baton Rouge to New Orleans—where I’d have to make my way through heavy commercial vessel traffic.
Baton Rouge, Louisiana, lay only a half mile away, but I could not get there. I was on the wrong side of the river and as I waited to cross, tow after tow churned up and down the main channel of the river. I stopped 75 yards upriver of a string of anchored barges and waited for my chance. The black steel bows loomed over me and I thought it would be scary if they started moving. A deckhand came walking down the length of barges. “Hey,” he said casually, “could you move out of the way?” Without replying I scooted quickly off to the side where I could see smoke and the ripples of heat rising from the towboat behind the barges. “Attention in the rowboat,” said a voice over a PA speaker. “Are you alone?” I looked up and nodded my head but I could not see anything behind the reflective glass on the bridge. “I thought I saw two of you,” the booming voice said. This time I stood up and raised one arm over my head to indicate I was indeed alone. The Captain must have understood because the engines revved to a high whine and the tow moved out into the channel. I crossed right behind and stopped in Baton Rouge for a couple of hours.
There were several ship anchorages like this one below Baton Rouge. I would look at the ships for an anchor chain or exhaust from the stack. I could pass by anchored ships in relative safety, sometimes even close enough to touch them, but I stayed well clear of ships with their engines running, whether they were underway or not.
The 105-mile stretch between Baton Rouge and New Orleans is one continuous deepwater port and one of the busiest in the world. The barge captains call this stretch Suicide Alley because of the amount of traffic.
For the 11 hours and 47 miles that followed leaving Baton Rouge, I was puckered up tight, dodging barges, shuttle boats, tugboats, piers, and docks. The ship anchorage was something new to me: large ocean-going cargo ships were anchored in line out in the river. I passed by them peacefully, but I stayed alert for the many fast shuttle boats bringing supplies or crews back and forth.
I took this self-portrait to commemorate a 60-mile day. I wasted no time setting up my camp on the sandbar so I could crawl into my tent to rest.
As I rowed downriver I spotted a large pipe stretched halfway across the river to a three-story-tall barge. It was a dredging operation. As I approached, a horn made three long blasts. My pucker got tighter. Was that for me? A fast boat from the Army Corps came out and instructed me to pass by near the bank and then took off in a blur.
I camped behind a barge anchorage with towboats shuttling barges back and forth all night to a noisy, dusty loading pier right next to me. I didn’t care. It was safe and I hadn’t seen a better place to camp all day.
I repeated the same scenario the next day but found a nicer beach for camping on the west bank at the end of a barge anchorage just above the city of New Orleans.
I enjoyed camping on the many sandbars on the Lower Mississippi. I made this camp far from the shore on what little high ground there was. I was unsure if the river would rise during the night and cover the sandbar.
I was up before daybreak and ready to go. Barges passed by as they had all night. I waited and ate Pop-Tarts until sunrise, when I’d have a better chance to see and be seen.
The sun was up as I passed under the Hale Boggs Bridge, a cable-stayed span over the half-mile width of the river. There would be no stopping; I wanted to get past New Orleans by the end of the day.
I reached the Huey Long Bridge, the first New Orleans landmark, at 11 a.m. I crossed the river there from right to left, holding my breath as I rowed as hard as I could, slipping in between the tows going up and down the river. At noon I reached Butterfly Riverview Park on the east side of the city. People walking the footpath along the river were enjoying their Saturday, looking out over the river and at me. I waved. Two long blasts of a horn deafened me. A barge, which I thought was anchored, was now moving along the bank. It honked at me even though I was all the way over near the shore. It passed me just as I was right in front of a group of 10 people, now gathered by the sound of the horn, to watch me get run over. I gave them a friendly wave.
Five miles downriver from the park, with the Crescent City Connection bridges right in front of me and downtown New Orleans crowds on the left bank, I had to wait under the bridges for a few minutes as the stern-wheel steamboat NATCHEZ made a U-turn right in front of me. I was next to the river cruise ship AMERICAN HARMONY and saw a uniformed officer out on a balcony. “You guys passed me four times in the past two weeks!” I said to him. “Yep,” was his only reply.
I made my way slowly past the New Orleans downtown riverfront. Most of it is set on pilings 15′ above the river, and I couldn’t see anything except the high-rise hotels and people leaning on the rail above. I rowed close to the pilings, and some people looking down at me waved, some took pics, and some just ignored me. I passed by the NATCHEZ, now tied up to the pier, as its steam-whistle calliope was playing “New York, New York.” After I rowed around Algiers Point on the right bank, the wind picked up and I put New Orleans behind me. I pushed on another 13 miles and made camp on a sandy, willow-covered bank right next to the 81-mile river marker.
It rained on and off for the last two days of the voyage. I stopped here at a small hidden public boat ramp for a brief rest and to reunite with my wife. Over the last 60 miles of the river’s course to the Gulf of Mexico the banks were either stone levees or marsh or mud with few protected places to stop.
The first rain of the trip arrived the next morning along with strong winds and I only made 31 miles before I stopped and camped in a small grove of trees on a muddy bank.
It was pitch black as I stared out at the river in the wee hours of the morning, debating whether to go or not. My wife, Xiaole, had flown in to New Orleans the night before and would meet me in Venice, just 40 miles downriver and the last community on the river accessible by road. I had to finish today. I pushed LITTLE JOY off the mud and got aboard. As I rowed close to the bank, I looked over my shoulder much more than usual since I couldn’t see obstacles in the river any farther than 100 yards ahead. Shortly after my start, at Pointe à la Hache, a rural riverside neighborhood, I stopped just upstream of the ferry dock and waited for a ferry, loaded with a half-dozen cars, to leave for its half-mile crossing of the river. It was 5:30 a.m. when I scooted by.
With 15 miles to go to the finish I set out between storms. I was exhausted by this point and made the last few miles only on the adrenaline generated by the excitement of finishing.
The blue-gray wall of a storm was coming at me from the east, and flashes of lightning pushed back the dark. I stayed right next to the left bank and took refuge from the driving rain and the frequent lightning under some small trees.
When the rain eased, I crossed the river to shave off some distance as I approached a blind bend in the river. I only needed 15 minutes to cross, but I could not see up or down the river far enough to see oceangoing cruise ships and giant container ships. They were passing about every half hour and moving fast so I kept a close watch on the river. I crossed the river several times that day without incident.
Later that morning, a second storm rolled over me bringing thunder, lightning, and high winds. On the river, the thunder seemed much louder than on land and it was so close that I could feel it in my chest.
The rain continued on and off through the afternoon as I approached the take-out in the town of Venice. “David!” I heard Xiaole’s voice over the wind. She was standing by the edge of the river at a small, nearly hidden boat ramp. It was the first time I’d seen her in a month and in her orange raincoat she was looking as beautiful as ever. I rowed ashore and got out and kissed her briefly. I was exhausted from the wind and the rain and the waves and, with 13 miles still left to row and unsure if I could reach Venice, I’d save a long hug for the finish.
The rain stopped and I set back out, but immediately the wind picked up and the waves battered the boat as a third storm from the east rolled in, the fiercest yet. I found a protective cove behind a jetty and held on tight to a willow bush. I turned my back to the rain and waited.
With just a few more miles left to row, I was exultant at seeing Xiaole on the riverbank.
As the storm passed, patches of blue sky shone through. It was only 3 o’clock as I set out for the last 12 miles. Channel markers counted down the remaining miles. The wind eased and came around from the northeast, helping me along. There were still 5 miles to go. My hands ached, but I rowed hard, without stopping. Now 3 miles. I saw a couple of fishing boats coming upriver from the Gulf heading into the channel that would take them up to Venice. I rowed even harder and stopped only when I reached that channel. Hunched over to catch my breath I heard yelling from the shore. Xiaole was jumping up and down on top of the levee. I stood in the boat, facing her, and raised my arms.
I still had 2 miles to row down the channel to reach the Venice Marina. I rowed at an easy pace as 40′ sport-fishing boats with four outboards passed by, some slowing, some not. I really didn’t care.
At the marina, the manager said, “We never ask you guys for anything.” He gave me a small, out-of-the way slip where I could leave the boat for a few days as I got ready to take LITTLE JOY home. Xiaole found me on the dock, and this time I hugged her tight and held on.
David Hudson is a happy corporate refugee. As a teenager, he spent countless summer days rowing a 10′ aluminum pram around a small New Jersey lake. Later he cruised the Atlantic and Mediterranean atop the deck of a U.S. Naval helicopter carrier. Downsizing since the Navy, he has spent time exploring the rivers and lakes of New Jersey, New York, and Ontario in a canoe. Putting his woodworking skills to a test, he built his 17′ dory, LITTLE JOY, and can be found, along with his wife Xiaole, rowing it up and down the Schuylkill River outside of Philadelphia.
If you have an interesting story to tell about your adventures with a small boat, please email us a brief outline and a few photos.
A few months ago, an iceboat followed me home. At 75 lbs, it’s too heavy to carry, so to get it from the roof rack or trailer to the ice, I needed to make a cart. Iceboaters typically make light, sturdy carts with wheels big enough to take the hard pushing and pulling required to get over the high icy ridges that form on the shore. I thought I could also use the cart to roll my sea kayak down a root-rutted trail to my usual launch.
I started with shopping for wheels. Inflatable tires don’t perform well when it is very cold, so I bought two 14″ plastic wheels, each rated at 50 lbs, with solid tires and roller bearings that would fit a 1⁄2″ axle. I had some steel tubing that I could use for an axle. It would go under a wood plank, a 24″ by 3 1⁄2″ piece of 4/4 ash that I had on hand. The cart could be made wider to take larger boats as long as the weight on the wheels is within their load rating.
Photographs by the author
The first arrangement for carrying kayaks used commercial roof-rack cradles. Disassembled, all of the cart parts fit through the kayak hatch seen here.
I used pad-eyes to fasten the axle to the wood—they would be stronger than the other option, eye straps. The pad-eyes were through-bolted to the plank, as I was concerned that wood screws could work loose. I needed spacers on the axle to bear against the pad-eyes and keep the axle centered. I tried using 1⁄2″ PVC pipe, which was slightly too tight, but 1⁄2″ copper pipe was just right.
An allowance is needed for washers on the inboard side, between the wheel and the tubing spacers, and on the outboard side, where easily removable spring clips hold the wheels on.
With a foam saddle for a kayak taped to the axle side of the wooden beam, the weight of the wood assures the saddle is always facing up, ready for the kayak.
To accommodate the kayak, I first bolted on a cradle that is part of my roof-rack system. These are a little expensive and I often need mine on the roof rack, so I replaced it with foam V block, taped in place. The cart is easy to take apart, and all of the pieces even fit through the large oval hatch in the stern of my kayak. Padding slipped over the axle ends keeps them from doing any damage.
I use a webbing strap to hold the kayak on the cart. That works fine on its own for pushing the cart; for pulling, an additional light piece of line hooked over the rear hatch coaming keeps the cart from slipping off.
The rigid wheels may not be as good in soft sand as some of the wide inflatable wheels, but their 14″ diameter makes it easy to run over the rough terrain I built it for. For about $50, I had a cart that is the equal of any of the expensive commercial ones and much sturdier than the various do-it-yourself PVC-pipe ones I’ve seen.
Ben Fuller, curator of the Penobscot Marine Museum in Searsport, Maine, has been messing about in small boats for a very long time. He is owned by a dozen or more boats ranging from an International Canoe to a faering.
Editor’s notes
For quite some time, I’ve needed a good cart for my canoe. The first one I made had small wheels that couldn’t manage sand. The second one had a large frame with bicycle wheels and wouldn’t fit in the canoe. The third used a boat fender as a roller and worked great until the pressure of the axle tore a hole in it. When I saw Ben’s cart, I gave it a try and it has worked well.
I made a general-purpose cradle for my cart. The carpet pads are just wrapped around the cradle board and can easily be removed. With the axle located underneath the wooden deck and cradle, the cart needs a kickstand to keep the cradle upright.
The kickstand is a flat piece of 1⁄8″ aluminum secured by a screw to the beveled underside of the crossbeam.
The kickstand pivots out of the way and a partially driven screw serves as a stop in case the pivot screw doesn’t provide enough friction.
While the cart is wide enough to be placed in the middle of a kayak and take all of its weight, it could fit only the bow of this skiff (the Bella 10 reviewed in this issue) and take about half of the load.
The 14″ wheels don’t get entirely bogged down by dry sand, but they do get slowed down.
On damp hard sand, the wheels roll as easily as on pavement.
.
You can share your tips and tricks of the trade with other Small Boats readers by sending us an email.
During our build of our Penobscot 14, ST. JACQUES, and the restoration of the 1880s Mississippi River skiff, BARBASHELA, we drilled a lot of pilot and countersink holes for stainless-steel and silicon-bronze wood screws. White oak, southern yellow pine, okoume, and cypress were the targets. These holes can be drilled separately with drill bits and a countersink, but we purchased a set of Fuller bits that combine countersinks with tapered drill bits, and it has saved us many hours of switching bits. There were drill bit shapes for different wood screws, so we set up to compare the Fuller set with pilot bits from Carbide & Diamond and Bosch.
Photographs by the authors
The three pilot bits tested include, from top to bottom, the Carbide & Diamond, the Fuller, and the Bosch.
The Fuller set has bits for #6, #8, #10, and #12 screws. The bit is adjusted to match the length of the screw, and a stop collar can be added to set the countersink’s depth. Matching plug cutters for 3/8″ and 1/2″ countersinks are included. Our set had drill bits with round shanks; other available sets have quick-change hex shanks, which we would highly recommend.
The Carbide & Diamond pilot bits are sold individually and come with hex shanks, countersink depth-adjustment collars, and tapered drill bits. The Bosch pilot bits, sold in a set of four bits for #6, #8, #10, and #12 screws, have hex shanks and the drill bits are not tapered, which may work better for some screws. The drill bit depth is adjustable on the Bosch bit, but there is no collar for depth adjustment for the countersink.
We tested the bits by drilling holes for #6, #8, and #10 silicon-bronze screws with Frearson heads. We simulated planking stock with 1/4” okoume plywood with the screws driven, heads flush, into samples of ash, Douglas-fir, red oak, and locust for one test and, for the other, 1/2” pine with the screw head countersunk 1/4″. We also drove some stainless-steel wood screws and deck screws into samples of pine and oak plywood.
These screws show the grip they had on pilot holes drilled in ash. From left, the Bosch pilot bit has a straight drill and the screw threads fully engage with the wood for a very secure grip but harder driving. The C&D hole is oversized and engaged only the threads at the screw’s tip. The tapered Fuller drill bit engages about half of the threads—the wood screw itself is not tapered.
The Bosch and C&D bits were easy to swap out of the drill with the hex shanks, and the bits stayed secure. The Bosch bits had the smallest holes and, with their straight sides, they had the tightest fit and were the hardest to drive screws into. A few screws sheared mid-shank when I tried to remove them from the red oak and locust. The C&D bit holes were very big, and only one or two of the screw threads cut into the wood at the bottom of the pilot hole. It seemed that the bits were labeled off by at least one screw size. I drilled a hole with a #6 bit and got a good fit for a #8 screw.
The Fuller bits had shallow thread cuts in half of the pilot hole and the rest was shaft clearance, and there was still a tight fit for the screw. The Fuller bits could spin in the drill chuck, and the countersinks could spin on the drill bit periodically if I did not fully tighten the drill chuck and the set screw.
The C&D and Fuller bits both had adjustable counterbore collars that were easy to set, and they made consistent countersink holes with minimum tearout. The Bosch bits had no countersink stop collar, so countersink depth was a guess.
For the most secure fit, I’d use Bosch. The Bosch bits were not as sharp as the others and tended to burn the harder locust and red oak. The C&D bits had hex shanks and nice sharp bits, but the hole diameters were too big for the stated screw sizes. The Fuller boxed set is our all-around favorite; we have put in hundreds, if not thousands, of screws with them. The Fuller bits have the best balance of thread cut and shaft clearance for wood screws that do not have fully threaded shanks.
Audrey and Kent Lewis mess about in the tidal waters of Northwest Florida in their fleet of small boats, and are serial restorers of nautical craft. Their adventures are chronicled at their blog, Small Boat Restoration.
Almost every boatbuilder has had to contend with a broken screw that must be removed. This recently happened to me when my #6 self-drilling Torx screws had set firm while temporarily securing a 6mm panel to a thin Douglas-fir seam batten while the epoxy cured. Fueled by coffee and enthusiasm, I broke seven screw heads off. I should have stopped after the first one and used my soldering iron to heat the screws to loosen the rest, but that moment had passed. The screws were not stainless and their points protruded through the seam batten on the interior of the boat. They had to go.
Photographs by the author
The Unscrew-Um has started work on this screw that has lost its head. Guided by the screw shaft, the Unscrew-Um removes only a minimum of wood to extract the screw.
The conical left-hand-threaded screw-extractors that you might find in a hardware store are designed to bore into the head of a screw that has been damaged by a driver bit and then back it out. These tools can also work on a bolt or a screw with a substantial shank, but not on the thin shank of the #6 screw. For extracting broken screws, as well as those with stripped heads, there’s a tool called the Unscrew-Um.
In the 1980s, Tom Jannke, the Unscrew-Um’s inventor, was a boatbuilder helping to refurbish MAH JONG, an elegant Sparkman & Stephens yawl. The project manager had soberly lectured Tom to “make no mistakes” and set him to removing a teak ceiling. Unfortunately, the screw heads were breaking off and Tom was not allowed to split the teak, remove the screws, and make new strips. Out of necessity, he experimented with bored-out drill rods and split pins, and then inserted them around the screw. They would grip the outside of the screw and he could turn them out. Finding success with these homemade devices, Tom set about perfecting his invention and established his company, T & L Tools.
The Unscrew-Um has a saw-toothed tip to cut into wood and untempered metal and a slotted shaft to pinch and twist the screw.
An Unscrew-Um is a hardened-steel tube with an expansion slot on one side and cutting teeth on the end. Used with a power drill run in reverse, it descends over the broken screw, grips it, and backs it out. The key to success is to use the correct Unscrew-Um for the screw. A sizing chart provides a guide to the 11 different Unscrew-Ums and screw sizes from #2 to #20. The chart indicates how to select the right tool for a screw with a stripped slot, a head broken off, or a shank separated from the threaded end of the screw. The Unscrew-Um’s slot allows it to expand slightly as it descends around the remnants of the screw, locks onto it, and backs it out on its threads. There is little damage to the surrounding wood.
Many cheap multi-material screws now offered in hardware stores are hardened, as I unwittingly found my Torx screws to be. The threads are rolled onto the shank, not cut from it, so they can be equal to or greater than the shank diameter. The sizing chart notes that the Unscrew-Um to use on these screws is two sizes bigger than what is needed for a standard screw. The Unscrew-Um must cut outside of the screw, avoiding contact with the hardened metal, which will dull the tool’s teeth. The Unscrew-Um will slightly expand over the threads until the friction overcomes the grip of the threads, and the screw backs out.
For hardened screws seized in place with epoxy, which was my issue, use an Unscrew-Um large enough to pass completely around the threads of the hardened screw and core it out of the wood, leaving a small clean hole. Using the 1/4″ Unscrew-Um on the #6 Torx screws, I removed the remaining screws in a matter of minutes. The teeth bit right through the wood while the screw shank guided the Unscrew-Um down its length. A small pick pushed the plug from the Unscrew-Um. The ease of removing these screws in this fashion was impressive. A small, clean hole remained, which I filled with thickened epoxy. I was relieved that I did not have to resort to more complicated surgery.
Small boats often require a lot of small screws, whether expensive stainless-steel and bronze permanent fasteners or cheap temporary screws to hold epoxied connections, and sometimes screws strip or break. That’s when the Unscrew-Ums are good partners to have close at hand.
Christophe Matson lives in New Hampshire. At a very young age he disobeyed his father and rowed the neighbor’s Dyer Dhow across the Connecticut River to the strange new lands on the other side. Ever since he has been hooked on the idea that a small boat offers the most freedom.
Unscrew-Ums are available individually, at $8, and in sets, starting at $40, directly from the manufacturer, T & L Tools.
Is there a product that might be useful for boatbuilding, cruising, or shore-side camping that you’d like us to review? Please email your suggestions.
John Leyde built his home on the hillside just above a small lake in Arlington, Washington, so he can’t be faulted for thinking about boats. If you were to visit him, you’d be thinking about boats too, because his long, tree-shadowed driveway will take you past his bow-roof shop and a boat or two before you even get to his front door. And if you were to come by boat, you’d find two rowing skiffs on one side of his dock and an electric launch in a shed on the other side.
Photos by and courtesy of Pat and John Leyde
As work begins, Valor zooms in with a magnifying lens, while River seems a bit less interested and gives in to a yawn, even though it’s almost noon according to the clock on the back wall.
John has been building boats for decades, among them the steam launch E. SCOTT HAMMOND, which he shared with us in 2018. Of course, he already has more boats than he needs, so has to rely on his friends and his family to provide the “necessity” to build another one. A few years ago, John’s friend Gary let slip that he wanted to build a boat, an Adirondack guideboat, and in no time at all John cleared a space in his shop. Then every Tuesday for 16 months, the two got together to build ATNA.
With the wood stove softening winter’s chill, Grampy (in red hat at rear) and grandsons start marking the panel shapes on an extended sheet of 1/4″ plywood.
Last fall, John was getting anxious about winter coming on. He had put his steamboat to bed for the winter and was without a project to carry him through the cold months that he likes to spend puttering in his woodstove-heated shop. His grandsons, 11-year-old River and 9-year-old Valor, came to mind. How could two young boys not want to have a boat of their own? Getting the okay from their parents was easy. They recognized the educational value of the project and the value of spending time with Grampy. The boys just wanted the boat to be able to accommodate their golden doodle, Winston. John’s patient wife, Pat, drove the hardest bargain: If another boat was going to be built on the property, one of the others had to go. Exit one plywood sailing pram.
The assembly of the hull starts with the two bottom panels getting stitched together.
The boys lived less than a half mile across the lake and John envisioned them rowing over to visit, so he looked around for designs for small, easy-to-build rowing boats. Sam Devlin’s Bella 12, the bigger sister of the Bella 10, fit the bill, and John ordered the plans. The boat is available as a kit, but he rightly decided that building from scratch would teach his grandsons more and give them a greater sense of accomplishment, turning a pile of plywood and lumber into a working vessel. He was proven right on the first count as soon as the project got started in late December. Marking the shapes for the bottom, side, and transom pieces on the plywood required working with fractions, a topic they were studying in school.
Unfolding the bottom was a milestone worth celebrating. It’s unclear what Valor’s club hammer and River’s splitting maul have to do with the job at hand.
River and Valor were only available on Saturdays, once their weekends had been freed up by the close of the soccer season, so during the rest of the week John did much of the power-tool work, like cutting out the plywood shapes, for safety’s sake as much as to keep himself happily occupied in his shop.
With spreaders holding the partially stitched hull open, the boys get their first glimpse of something that is beginning to look like a boat.
The trio stitched the pieces together with plastic cable ties instead of wire, assuring the edge tools would stay sharp if segments of stitches remained hiding in the joints. The boys were introduced to working with epoxy when “spot welds” were applied between the cable ties, and again after the ties were removed and the seams were taped with fiberglass.
River, left, and Valor are all smiles as John gets them started on painting, the final stage and their favorite.
The string of Saturdays stretched from December and finished in the middle of April. The boys told John that the best part of building the boat was the painting, probably because it didn’t involve fractions or sanding hardened epoxy, and that the best part of the whole project was spending time with Grampy—music to a grandfather’s ears.
On a sunny April day, the Bella 12 and crew emerge from John’s workshop.
The boat was launched on the lake and christened FORTNITE, not because a time span of two weeks had any significance, but because it is the name of a video game that River and Valor enjoy. Neither of the boys had done any rowing to speak of, but they quickly took to it. John can see that given a summer with the boat, they’ll be on their way to becoming adept watermen.
When Valor and River both take to the oars, they can get FORTNITE scooting along.
River and Valor are still occupied with school, continuing their education through the pandemic with a distance-learning program. While they’re doing homework, their father, Michael (John’s son), slips from shore aboard FORTNITE to do a bit of fishing. John also “borrows” his grandsons’ boat to go rowing.
SBM
John and Pat can invoke grandparental privilege and take the skiff out on the lake.
Come next winter, John may have to decide which boat currently in his fleet will have to go. River and Valor, taking after their grandfather, have decided they want to build another boat.
Do you have a boat with an interesting story? Please email us. We’d like to hear about it and share it with other Small Boats Magazine readers.
Like many of you, I’ve been spending a lot more time at home during the pandemic. I count myself very lucky to have a job that I enjoy and do from home, so for me, life hasn’t been upended as it has been for so many. I also have a basement with the space and tools to keep myself occupied during the recent spate of additional time at home. In the last few months, I’ve been taking on some projects that I’ve been too busy to make time for and some that I’ve just been curious about. The five presented below fit nicely in Webster’s definition of puttering around: “doing small jobs and other things that are not very important.” I don’t really need any of the things that I’ve built lately—what I need is a haircut—so my aim has been to fill the time I’d ordinarily be with my family, friends, and community with projects that provide some relief from the sad and disturbing news that has inundated us all.
Tool Tote
Making a fancier version of Joe’s tool tote didn’t improve upon its usefulness, but the more complex joinery let me spend more time in my shop.
I was intrigued by the tool tote Ben Fuller presents in this issue. I have something similar in my shop that serves the same purpose. I sent a photo of it to Ben and he thought that it was a caulker’s bench.
My old step stool/tool tote has seen decades of action with boatbuilding and home improvements. Like Ben Fuller’s version, it has simple joinery and is just held together with screws, and should last another generation, but I wasn’t going to let the absence of need get in the way of an engaging project.
So, while I didn’t need another tote, Ben’s mention that Joe Liener would have built a fancier version of the tote with rabbeted joints was all I needed to decide to build one. To comply with the Stay Home order from the Washington State governor, I avoided going shopping for lumber by looking around the house for wood I could use.
I cut the finger joints on my tables saw using a sled to hold the workpieces upright. I considered dovetails, but they are a bit too fussy for me and I wanted to keep the project in my comfort zone.
I cut the rabbets in the ends and sides with a router and opted to keep the radiused corner rather than chisel it square.
I didn’t rabbet the back into the sides, but secured it with pegs and glue.
For a tighter fit in the mortises, I kerfed and wedged the tenons—a bit of lily gilding, perhaps. Glue would suffice.
The widest board I found was a 24″ 1×12 pine shelf I had in my shop’s storage room. I cleared everything off of it and repurposed it for the tote’s bottom. I had mahogany scraps for the ends, and a Douglas-fir plank, once a bookshelf in the house I grew up in, for the sides and top. Making a fancier version of the tote suited me just fine. The more time and thought it required, the more time it would fill during the Stay Home order.
Viking Chair
This take-apart chair is surprisingly comfortable. A pad on the seat would help for long periods of sitting, but the back feels great. If you’re tending a camp fire or stove and need to reach it, you can lean forward, bringing the chair with you until the back is vertical. The seat takes the weight and your feet keep you stable. The two holes in the back are deep countersinks for the rope handle’s knots.
While scanning the web for other DIY projects I found a lot of sites about a Viking take-apart chair. (The design may actually be of African origin.) This version is made of two 3′ lengths of 2×10 and as simple as a woodworking project can be. One of the planks gets a mortise 11″ from one end and the other gets a 4-3/4″-wide tenon for all but 11″ of its length. I had some left over 8′ 2x10s in the garage and used the one with the fewest knots. It was cupped, so I ran it through the thickness planer to get both faces flat and then sized the mortise to match the reduced thickness.
The chair is so simple that the finished pieces are blank canvases for decorative touches.
A rope handle makes it easy to carry the chair and provides a way to hang it up out of the way.
The mortise should have a slightly loose fit to make assembly and disassembly easy. After I finished the chair, I found the two planks awkward to carry so I added a rope handle to the seat back. The tenon slips into the loop and rests its shoulders on it. There’s enough slack in the rope to get a comfortable grip on it. The Viking chair worked out well and we’ll be using it aboard our canal boat.
Jigsaw Table
Jig-saw blades rarely stay square to the workpiece, so a guide to keep it from drifting is essential for accurate work. I had initially had the overhead arm fixed in place and intended to make an adjustable hold-down close to the blade, but the simplest arrangement turned out to be making the arm itself adjustable, held by a clamp, to serve as the hold-down. I can reach the saw’s trigger through the opening in the front. The circular hole in the front panel provides a view for changing blades.
One of the projects I’ve been meaning to do for a few years was a jigsaw table with a blade guide. I’d made a jigsaw table once before, little more than a piece of plywood with two holes to screw the jigsaw base to it and another hole for the blade. I liked being able to work small parts with the table, something that a jigsaw can’t do without a table, but I didn’t like the way the blade tended to lean to one side or the other through curved cuts and how the work piece could jump suddenly with the blade’s upstroke. One of the variations I saw on the web had an overhead arm with ball-bearing blade guides. I’m always eager to put ball bearings to use—I have a bunch of them left over from years of roller-blading—so the project interested me.
Two countersunk machine screws hold the jig saw under the table. The the vertical 2×2 supporting the foot of the clamp is screwed to the table side and serves as a guide for the overhead arm.
The hardwood block is ipe, cut from a scrap of porch decking. It is very dense and resists heat. The screws are undersized for the holes in the bearings, allowing them to be shifted to contact the blade and hold it square to the table.
The overhead arm has a finger joint, glued and pinned with an air nailer. The two bearings keep the blade vertical, and a piece of ipe, a very dense and durable hardwood, backs it up. The arm is clamped to the table so its height can be adjusted. Set lightly on the workpiece, it serves as a hold-down.
The 4″ jigsaw blades I usually use are too short for the table and guides, but 5-1/4″ blades work and will cut wood up to 1-1/2″ thick. I have three bandsaws and keep a small blade on one of them for small jobs. I didn’t have a pressing need for this jigsaw table, so it fit right in with puttering’s unimportant jobs. I just wanted to see how it worked and I’ve been happy with it so far.
Spinnaker
The larger of the two plastic-sheet prototypes I made is still rather small as spinnakers go, but I didn’t make it for catching light winds when I’d be better off rowing. The idea was to sail moderate breezes where I could sail at least at fast as I could row.
When I took my Whitehall out for a row in March, I was musing about having a small sail for the downwind leg of that outing. I’ve never had a proper spinnaker for any of my boats—I occasionally used a nylon tarp with its top end gathered as one—and thought I’d try my hand at making one. I did a search online for a spinnaker pattern suitable for a small boat and found just one that seemed workable. It was part of a page reproduced from an article on spinnakers originally published in Model Yachting Monthly in June 1945. It was about 4′ tall and could be made with three or four vertical panels for a width of 33″ or 44″. I cut four 6mm plastic sheet panels to that pattern and used Gorilla tape to assemble them. It turned out to be much too small for the Whitehall, although it might be the right size for a kayak. It should have occurred to me that a 14′ boat isn’t a size any model sailboat sailor would consider. I scaled the pattern up 150 percent, cut another four plastic panels and taped them together. That seemed to be about the right size for the Whitehall and worked well in a short trial on the Seattle ship canal. I have some spinnaker cloth and in the weeks ahead I’ll sew up the real thing.
Rudder Yoke
The Norwegian tiller works great for sailing when I have to be in the aft half of the cockpit to tend to the sheets.
My Caledonia yawl has the Norwegian tiller it was designed with, and the adjustable painter’s pole that serves as its extension allows me to sit almost anywhere I need to be while sailing. But when I’m using the boat under power, I occasionally like to steer from the forward end of the cockpit or from the removable cabin when I have it in place. I had devised a rope-steering system that worked with the Norwegian tiller, but its extension made it awkward and required having the boomkin in place.
The yoke that I made to fit the rudder-head mortise will give me the option to steer from wherever I like. I’ll use it while motoring and take an extension of the deadman’s switch forward with the tiller lines.
A yoke would make for a tidier system that’s easier to set up, so I made a replacement for the tiller arm with a similar tusk tenon and wedge to lock it in place, but extend the tenon as far to port as the tiller-side arm would extend to starboard. The woodworking on that project is done. I just need to varnish the two pieces.
I will keep working with these projects until they are all finished and, along the way, start thinking about new ones. As long as the pandemic has me on a short leash, I’ll stay home as much as possible to keep myself and those around me healthy and look to puttering about to pass the time pleasantly and productively.
Audrey’s family always had a canoe either around the house, on top of the car, or splashing down into many lakes and ponds from Texas all the way up to Illinois. That canoe was acquired in the mid-1960s and it is still around 55 years later, often resting on the shoreline of her brother’s pond in Southeast Texas. That canoe is aluminum and a Grumman.
We set out a few years back to find another Grumman 17′ Double-Ender; we knew they were a good size for two to four people and some picnic snacks, and Grumman canoes have a well-deserved reputation for versatility and durability.
Photographs by the Lewis family
The authors’ 17′ Double Ender sports a new paint job, on the outside and aside from the facelift, is as good as new more than 60 years after leaving the factory.
Grumman Aircraft Engineering Corporation was founded in 1929 and manufactured Navy fighter planes during World War II. One of the company vice presidents, William Hoffman, after portaging a heavy wood-and-canvas canoe on a fishing trip, had the idea to make an aluminum canoe that would be 25 to 50 percent lighter. After the war, Grumman branched out into canoes and johnboats, with their first canoes coming out of the aircraft plant in Bethpage, New York. The first canoe produced in 1945 was a 13-footer, and five more models followed by the end of the war. The canoes are made of the same high-strength and quality materials that their famous Navy fighter aircraft and seaplanes were made from, with the same exceptional levels of workmanship. Grumman opened a second plant in Marathon, New York, in the 1950s, dedicated solely to construction of recreational watercraft, and it is still producing boats today.
The same tooling and jigs that were developed for postwar production of the canoes are still in use in Marathon. The canoes are handcrafted and begin with hull halves formed on a cold die press from an aluminum alloy sheet, then heat-hardened to a T-6 temper to increase mechanical strength and reduce the metal’s susceptibility to intergranular corrosion. The halves are joined to an extruded aluminum inner and outer keel, die-formed ribs, gunwales, stem and stern caps with T-6 Alumilite rivets that were specifically designed for the Grumman process. Close rivet spacing ensures maximum strength along the keel and ribs. Templates are used to establish uniform spacing for the rivets. The canoes are still riveted by hand. The inner and outer extruded keels sandwich a neoprene gasket with the hull halves for a watertight seal; flush rivet heads reduce drag. The standard 17′ Double-Ender has a T-shaped keel that helps the canoe track straight and reduces leeway, which we can attest is very helpful on open water. For whitewater use, a flatter keel with a lower 3/8″ profile, is available.
The bow paddler’s seat is shown here. Note the tight spacing of the rivets along the keel.
Our 17’ Double-Ender, built in the mid-1950s, is made from 0.051”-thick aluminum alloy. Grumman also offered a Light Weight model with hull thickness of 0.032″ for canoeists who did a lot of portaging. The Light Weight models had extra ribs to offset the thinner hull material. The standard 17′ Double-Ender weighs 75 lbs and the Light Weight, 60 lbs. The newer Marathon boats have hulls that are 0.060″ thick and, as a result, weigh in at 81 lbs.
We found our latest Double-Ender on Craigslist in 2013. The canoe trailers easily and can be singlehandedly cartopped by raising one end and then the other onto a roof rack. Secure the upside-down canoe over the passenger’s side. This provides better visibility for the driver. The canoe thwarts to be secured to the side of the rack, in addition to two top straps. Straps from the tow shackles down to the bumper are also advisable.
The bow and stern caps have rolled edges that make comfortable handholds when dragging or carrying the canoe. These rolled plates also serve as covers for the flotation compartments, which are filled with closed-cell foam to keep the canoe afloat. There is a small gap around the compartment edge that allows for ventilation and drainage, a great attribute because closed compartments often take in water and retain it. Our 17′ Double-Ender has a rated carrying capacity of five people (weighing a total of up to 750 lbs) and 805 lbs total capacity. The current Marathon canoe capacity, subject to the more stringent requirements established in 1972, is a little lower at 755 lbs total (660 lbs people weight).
The solid extruded T-6 gunwales provide rigidity and are bolt-fastened to the thwarts. The stem caps are also heat-treated for strength, close-riveted with flush rivets to reduce drag below the waterline, as is the outer keelson. The ends also have sealed holes for shackles to take painters.
The 17′ Double-Ender is designed for tandem paddling and trims nicely with two aboard and with a rated capacity of 805 lbs, can carry plenty of camping cargo.
Once we slide the canoe down to the water it behaves well, and the wide bottom and full ends offer excellent stability. I can easily get aboard over the side. With the long waterline and keel the Double-Ender tracks straight and makes paddling easy; we have seen up to 3 knots without really trying. The canoe tracks straight until the wind picks up; it will start drifting to leeward when the wind abeam is more than 8 knots or so. With higher winds, trim becomes an issue.
For a solo paddler to get reasonable trim, a good option is to sit backward on the forward thwart and paddle stern first. The new bow is slightly elevated.
A single paddler can then kneel forward of the stern seat or place some form of ballast up front to lower the bow. Another trick for a solo paddler is to row the canoe stern-first from the bow seat to help get the balance closer to amidships. However, a bit of bow-up trim can be helpful to take advantage of a stern breeze. In choppy water the canoe rides dry, and in small following waves never once have we felt that the canoe was in danger of broaching. Our canoe has capsized only once, when Audrey’s father mistimed jumping aboard during a beach launch.
For better trim while paddling solo, kneeling close to the center thwart works well. The bow here is over a trough; in flat water, it would be in contact with the water.
The canoe is well laid out with thoughtfully placed bow and stern seats. The seats are at a good height for the average adult, but the leg room gets a little tight up in the bow. It paddles well with tandem crew. There is a thwart amidships and one farther back which make do as seats for solo paddling.
We have had three adults on board without issue, and the canoe is most at home with an adult in the stern and a junior paddler on the bow seat. With an enormous amount of room for gear, the canoe is a true utility watercraft that can be paddled, sailed, motored, or rowed. Motor brackets and rowing rigs are available from Marathon. With our 24-lb-thrust trolling motor we cruised for an hour, and had a top speed of just under 3 knots. Used sail rigs can be found online—either a 65-sq-ft gunter or a 45-sq-ft lateen—but not currently offered by Marathon.
The canoe’s overall design, construction, and material are outstanding; as a former aviation mechanic, I am impressed with the craftsmanship. Grumman is confident with their craftsmanship also—to the original owner they offer a lifetime guarantee for hull punctures and a five-year warranty against defects in workmanship.
Grumman canoes are virtually maintenance free, save for a periodic freshwater rinse. The manufacturer advises that a good-quality paste wax can be used to maintain the aluminum’s shine. We leave our canoe by the shoreline of our saltwater bay in Florida through most of the year and have seen some expected surface corrosion.
The 17′ Double-Ender is a versatile, stable canoe with enormous capacity for people and cargo, but still easy to paddle and control. The safety features are top-notch, and the canoe is self-righting and unsinkable, features built in even before the imposition of federal requirements. It can fill up with water and still float you to shore. Our canoe, now well over 60 years old, is a testament to the 17′ Double-Ender’s longevity and durability: easy to paddle, comfortable, confidence-inspiring, and we know it won’t let us down.
Kent and Audrey (aka Skipper) Lewis paddle their Grumman canoe around the shorelines of northwest Florida and ponder why canoeing is not as popular today as it was in its heyday in the ’70s and ’80s. They painted shark’s teeth on their canoe, SCOUT, to replicate a paint job that Audrey’s father had done on the family Grumman in the 1960s. They went a step further by incorporating the teeth into a Flying Tigers scheme, as a tribute to the First American Volunteer Group that flew in defense of China, 1941–42. Number 48 was the aircraft assigned to Flying Tigers Triple Ace “Tex” Hill.
Grumman 17′ Double-Ender Particulars
Length: 17′
Beam: 36 1⁄8″
Depth amidships: 13 1⁄8″
Outboard: 5 hp max
Capacity: 755 lbs max, 655 lbs persons
The Laughing Gull is a 15′ 9″ gunter-rigged sharpie sloop designed by Arch Davis. Early sharpies were used by oystermen in Long Island Sound in the latter part of the 1800s for sailing shallow waters, including skimming over sandbar shoals to get their hauls quickly to market. They had flat bottoms, single hard chines, and very shallow draft. Ralph Munroe, yacht designer and jack-of-all-trades in Coconut Grove, Florida, further refined the design in the late 19th and early 20th century. His most notable design was a 28-footer, EGRET.
I began building my Laughing Gull in the summer after my junior year in college. I had admired Arch Davis’s designs since middle school, and called him about building a boat. He sized up my interests and skill level—only birdhouses and bookshelves at that point—and recommended the Laughing Gull. He had designed the boat with young people like me in mind. It would be simple to build, thrilling for a youthful crew hiked out on the rail as the skiff leapt up on a plane downwind, and forgiving when capsized.
I soon had the 110-page building manual and plans in hand. Shortly thereafter, my shipment of marine plywood arrived. Mr. Davis generously made himself available for free phone consultation, but his written instructions were so thorough, I hardly needed to call. Only basic carpentry tools were required. I did not own a tablesaw, so I borrowed one from friends. The only things I did not make myself on the boat were the sails and hardware.
Photographs by Ashley and Casey McMann
The cockpit sole is elevated to create a self-bailing cockpit and a voluminous flotation chamber spanning the entire bottom of the hull. Its perimeter lands just below the middle of the sides.
Construction begins, interestingly, with the cockpit sole. It forms a watertight compartment with the hull bottom and drains unwelcome water through above-the-waterline scuppers. The sole is cut from 1/4″ plywood, and frames are fitted along the sides. Longitudinal stringers with horizontal supports and the stem are then glued and screwed in place to the sole; the bottom is then similarly attached to the stringers. I used red cedar for the stringers, frames, and stem to save weight, but in retrospect Douglas-fir, which was also a recommended option, would have provided better strength.
The 1/2″ plywood transom is attached to the angled ends of the stringers, sole, and hull bottom. The lapstrake sides, cut from 1/4″ plywood, are glued and clamped along their length, and screwed to the frames, transom, and stem. The gunwale is stiffened with a rubrail and sheer clamps, for which I used heart pine. I used Douglas-fir for the spars and pine for the rudder. The daggerboard was initially a composite of pine and cedar, but it fractured after hitting an underwater obstruction. It is now made of an African hardwood. The interior is fitted out with seats and rigging. All surfaces have two coats of epoxy.
In the cockpit, the mainsheet runs to a block in the center, mounted on a small pad of oak. The jibsheets run to cam cleats on the inboard side of the gunnels. There are seats fore and aft with storage beneath.
The center thwart has been left out of this Laughing Gull. Its place would be just aft of the daggerboard trunk supported by the two closely spaced frames.
I did deviate slightly from the plans during construction. Intending to use the boat almost exclusively for sailing, I did not make the oarlock risers because I thought these might make sitting on the rail uncomfortable. I omitted the center bench and rowing footrests to keep the cockpit clear. I added hiking straps for the skipper and one crew. I added hinges to the seats for better access to storage space beneath.
The plans specify a hollow mast but, regrettably, I was too eager to launch to take the time to carve out the insides. My mast is solid and therefore heavier than it would be otherwise.
I christened the boat CAROLINA ROSEO after my great-grandmother who emigrated from Italy to New York by herself when she was just 15. The boat has beautiful lines and gets compliments everywhere I go. This is most amusing in Miami, where this little sailing skiff often steals the show from the superyachts.
Quite soon after launching, a friend and I took it on an eight-day camping trip along the north Florida Gulf Coast. When I moved to Coconut Grove, I sailed almost weekly for four years and went on several overnight sailing-camping trips throughout Biscayne Bay, Florida Bay, and the Keys. I now sail out of New Orleans, and my Laughing Gull is more than 10 years old.
The author reports he has “comfortably sailed the Laughing Gull in up to 25 knots off the wind.”
I have sailed the hell out of this boat and send updates to Mr. Davis, often to his chagrin. He frequently reminds me that I sail in conditions the boat is not designed for. That said, I can tell you that my Laughing Gull positively screams downwind in 35 knots of breeze (caught in a squall, somewhat on purpose). It easily makes 12 knots surfing down the Atlantic swell off Miami on a broad reach with 20 knots of wind. I once sailed the 15 miles from Ragged Keys back to Coconut Grove on a broad reach, and averaged 9 knots. The boat is also content ghosting along in inches of water in Florida Bay with her board and rudder up, steering by sails alone.
The Laughing Gull’s light weight (225 lbs) and ample sail area make it sensitive to every variation in the wind. The most remarkable thing about the skiff is how readily it planes on anything between a close reach and a broad reach. At the first sight of whitecaps, it will leap on top of the water and soar.
As speed increases when sailing a beam or broad reach in high winds, a phenomenon curious for a monohull occurs: the windward telltales on the jib gyrate and the main luff flutters. You trim the sails and it happens again. Soon, you find yourself in the paradox of sailing a broad reach with sails trimmed as if on a close reach! Recognizing variations in apparent wind is an important factor in sailing this boat well.
In Miami, I sailed out of the U.S. Sailing Center and so was surrounded by world-class sailors (which I absolutely do not count myself among!) in racing dinghies. On many occasions while returning to the harbor, the Laughing Gull would keep pace with Stars and 420s.
Another testament to its speed: The Barnacle Society of Coconut Grove, Florida, holds an annual classic boat regatta at The Barnacle Historic State Park that was once the home of Ralph Munroe. I entered CAROLINA ROSEO in the race for four years, and won my division in three of them—much more a credit to the design than to my racing skills. The boat is fast!
The Laughing Gull’s gunter rig points quite well but, given its large sail area, adequate weight on board to keep the boat balanced is critical. It is stable on a run with a slight windward heel, cutting a handsome figure wing-on-wing.
A reef is prudent when sailing alone in 15 knots or in 20 knots with crew. I’ve comfortably sailed in up to 25 knots off the wind, but after that things get unwieldy, and I risk ending up in the drink.
There are 70 sq ft of sail in the gunter main and 25 sq ft in the jib. The plans offer a sprit rig with and 82 sq ft main and a cat rig with 83 sq ft.
Recovering following capsize is easy. Best is to hop over the gunwale and recover the boat dry, which I have done successfully on several occasions. When that opportunity has passed, the skiff still comes back up without too much effort. The raised deck makes the boat somewhat tender when swamped, so waiting for the scuppers, which are above the waterline, to do a bit of their work before getting back on board, is wise.
The boat does tend to be a wet ride; quite a bit of spray is kicked up primarily when hitting waves while on a plane. The scuppers also let in some water when heeling.
The Gull is nimble, and easily makes a 180-degree turn in a boat length. With the flat bottom, the boat is a bit tender initially at the dock, but is stable once under sail.
Though tight, the cockpit allows for storage of bare essentials for warm-weather onshore camping for two. On a four-day solo trip from Miami to Big Pine Key (just shy of Key West), I slept on board, tucked away in shallow mangrove coves. I could stand outside the boat to work on things and get situated. It was like sleeping on a canoe. However, as Mr. Davis would point out, the boat is not designed for this kind of use.
I have made several modifications to strengthen the boat for sailing in high winds. The rudder has been a bit of a problem for me over the years. I first broke the gudgeon launching from the beach for the north Gulf Coast trip mentioned above. The rudder caught in the sand and the gudgeon pulled out. The gudgeon was attached with screws, per the plans. I made the repair with through-bolts, and would recommend this approach for maximum strength. I also recommend securing the pintles to the rudderstock with bolts rather than screws.
Sometimes the gaff jaw doesn’t rotate well in a tack, leaving the gaff at an awkward orientation. Wrapping that section of the mast with copper sheathing and using a metal bail to secure the gaff around the mast has been an improvement. A related issue is an occasional crease in the sail, which appears when the peak halyard is not right against the mast, or the gaff is twisted. I think that a slightly greater angle between the gaff and mast would address both the crease and the restricted gaff jaw rotation. Designer Arch Davis notes: “I am aware of the issue of the gaff jaws not rotating easily. I also have copper sheathing where the gaff jaws bear on the mast. Rubbing paraffin wax on the sheathing and jaws helps the jaws rotate more easily. Some time ago I changed the shape of the sail a little, so that the gaff is not so nearly vertical. This has been helpful and the sail should be stretched tightly along the gaff. In any case, it’s certainly good practice to experiment with the attachment point of the peak halyard, and the tension of both halyards. Obviously, they need to be eased or tightened, depending on wind strength.”
To strengthen the gaff and boom jaws for high-wind sailing, I found a metalworker who made two custom aluminum jaws, which have stood up to every condition I’ve thrown at them.
The above issues are the result of heavy use in tough conditions. I mention them here for folks interested in experiencing the thrill of sailing this boat in high winds.
The boat is designed with two rowing stations. The author preferred to keep the cockpit unobstructed by a rowing thwart and rows while seated on the cockpit sole. It works, but is not as effective as having the thwart and foot brace. Note that the transom has two scuppers, which make it self-bailing.
I do have one pair of oarlock sockets which are set directly into the gunwale rather than as blocks added on top. However, since I usually launch where the distance from ramp to open water is not far, a short canoe paddle is more than adequate for auxiliary power to get to the wind. On overnight trips, I do bring a set of oars to get into unfamiliar marinas or tidal creeks. Without the oarlock risers, center bench, and footrests that are specified in the plan, but not installed on my boat, rowing in open water is unsurprisingly unwieldy. For best performance under oars, stick with the design. In spite of my omissions to the rowing arrangements, the skiff is quite speedy when propelled by oars and can easily outpace a kayak.
The Laughing Gull is easily hauled on a johnboat trailer with flat bunks, and its light weight makes it easy to handle at the ramp. It takes me about 45 minutes to rig and launch.
I adore this boat. It is elegant and super fast. The Laughing Gull is perfect for someone young with a taste for adventure or anyone with an appreciation for a beautiful craft. It was a joy to build. Mr. Davis has been a great support, and continues to provide helpful advice. Building the Laughing Gull and sailing it hard remains my proudest accomplishment.
Peter Sawyer is a general surgery resident in New Orleans, Louisiana. He learned to sail when he was 11 years old at Camp Sea Gull, a seafaring summer camp on the North Carolina coast. He has been at it ever since. He thanks Art Ballard, the Miami-based metalworker who made the aluminum jaws.
Laughing Gull Particulars
[table]
Length/15′ 9″
Beam/4′ 5″
Draft, board up/5″
Draft, board down/2′ 9″
Weight/225 lbs
[/table]
Plans for the Laughing Gull include ten 24″ x 36″ sheets of drawings, full size patterns, and an illustrated building manual. are available for $200 from Arch Davis Designs. Pre-cut kits cost $1,450 and include: stem, transom, frames, bottom and deck panels, topsides planking, plan, and DVD.
Is there a boat you’d like to know more about? Have you built one that you think other Small Boats Magazine readers would enjoy? Please email us!
Comments:
We welcome your comments about this article. If you’d like to include a photo or a video with your comment, please email the file or link.
Credit Notes:
A colleague, Ashley McMann, kindly took some photos for me, which I have uploaded to the Dropbox folder. They are under the Sawyer Sailing folder. Her husband, Casey McMann took the photos in the Casey McMann photos folder. I tried to make named photos for Ashley’s work but it won’t let me do it.
It was 5 a.m. and Thor Belle and I were late. The first beams of light were already slicing through the clouds of a gray Washington morning as the crunch of gravel under our truck tires marked our arrival to the Port Townsend boat launch. When we stepped out of the truck, we heard halyards smacking masts in the adjacent harbor. Just offshore, sailboats tacked back and forth behind the starting line like greyhounds nervous to leap onto the racetrack.
For days, there had been speculation about what the early-June weather would do, and big conditions seemed likely. Most of the teams gathered here for the 2019 Race to Alaska (R2AK) were already on the water, and only a handful of smaller craft like ours were still in the final preparations to launch. The pier next to the Northwest Maritime Center was crowded with spectators and race-tracker junkies who had turned out to support the 50-odd teams of crazies. The race, on paper, is straightforward enough: Navigate a boat without a motor and with no outside support from Port Townsend, Washington, to Ketchikan, Alaska. Simple, right?
Photographs by and courtesy of Thor Belle
The dory, LOOK FAR, was built in 1978 in Anacortes, Washington, by David Jackson of Freya Boatworks. David, now a marine surveyor, says he built the Hammond 16′ Swampscott dory to plans in the Dory Book, but with a few tweaks. Thor, pictured here, found the boat in the bushes down by the Columbia River, where it had been sitting for the last ten years or so, half-heartedly covered and just waiting for some fools to come along and give it a second life. The owner agreed to sell it to Thor for a dollar after hearing a long story about wanting to raise money to help the ocean by restoring an old wooden boat and going on a crazy adventure with it. The hull had two major cracks, one of which had been repaired with chopsticks, dental floss, and spray foam.
Two of our most loyal supporters, Emiliano and Sue, came to see me and Thor off. After a rushed greeting, they ceremoniously circled our Swampscott dory, LOOK FAR, singing blessings and adorning her with feathers and sprigs of cedar. Emiliano had sewn the original sails for LOOK FAR when she was built in 1978 and, as an avid dory lover himself, was fully invested in our success. The Soviet National Anthem, the official starting “gun,” suddenly rang out over the race organizers’ PA system, and the race was on.
As the fleet charged across the starting line, we were still stuffing the space under the dodger tight with dry bags full of food, gear, and tools. When the gear was all stowed, the only living space that remained for us, both 6′ tall, was a ludicrously small 4′ x 4′ section of seats. Before backing the boat off the trailer, we thanked and hugged our small group of loyalists. The long road that had brought us to the boat launch had been full of unforeseen circumstances, among them a recent automobile accident that had cracked our centerboard and dislocated Thor’s shoulder. We were just happy to be at the start.
I stepped into the ocean and felt the chilly water squeeze the dry suit tight around my calves. Pebbles shifted grittily under my feet as I eased the boat into the water and pivoted the bow around for launching. The gleaming amber varnish contrasted with the gray and muted blues of early morning, and the 41-year-old boat’s beauty made me think that it belonged in a museum rather than the R2AK.
Roger Siebert
.
I steadied the gunwale, which rested only 6″ above the water, while Thor hopped aboard on the opposite side. The boat careened as I made my own entry, betraying the tenderness of its 4-1/2′ beam. Thor tucked himself into the aft rowing station and rowed us away from shore while I set to work raising the mainsail, securing the halyard to the oak cleat at the bottom of the mast. Thor took the helm and pointed the bow into the wind as I raised the jib. The wind caught our sails and as the boat gained way, I crouched beneath the boom and struggled to organize the mess of lines. A cry of “Go Team Funky Dory!” rang out from the pier, and I was shocked to see just how many people were watching us. The slosh of water at my feet snapped my attention immediately back to the boat.
LOOK FAR had been out of the water for weeks while we sanded, varnished, drilled, glued, and puzzled over how to turn a 16’ Swampscott dory built in 1978 into an expedition race boat. Nine months earlier, Thor had found her under a tangle of blackberry bushes by the Columbia River, rotting away from neglect and exposure. Her path to recovery and improvement had continued until the very night before the race as we spliced shrouds by headlamp. Now, as water trickled in through imperceptible and unrepaired cracks in the planks, 1,000 hours of work were being eclipsed by our failure to get the boat in the water early enough to swell up.
Within minutes, the water inside was above the floorboards. On top of the steady trickles coming from below the waterline, every time the boat heeled, water seeped in at the sides through cracks that had formed around the lap rivets. For bailing, we had a gallon milk jug and a small electric bilge pump. Unfortunately, we hadn’t had time to wire the pump and it was in a dry bag stuffed in the bow; the milk jug was our only option. Balancing our weight in tandem, Thor and I alternately leaned in and out of the boat to allow me to reach the bilgewater without swamping us. I hurled jugful after jugful over the side.
We immediately fell even farther behind the fleet. The larger boats quickly disappeared around Point Wilson, soon followed by the smaller craft. A short time after we passed the Point Wilson lighthouse, the lone stand-up paddleboarder passed us by taking advantage of an eddy along the shore. As he went by he shouted out an overly optimistic “See you in Alaska!” Steaming in frustration over our poor speed under sail, we changed course and landed on a boulder-strewn beach near McCurdy Point, just 5 miles from the start. As Thor lifted the rudder off the transom, I hopped out into waist-deep water, grabbed the painter, and threaded the boat between the submerged boulders to a patch of sand. Thor dropped the sails and I set up the rowing stations for tandem rowing. With the boom detached, we lifted the mast out of the center thwart, wrapped it and the boom in the sail, then tucked one end of the bundle under the aft thwart. The rolled-up spars stuck out haphazardly beyond the stern. A quick handful of beef jerky and we launched back into the gentle surf.
One of the greatest advantages of our 16′ boat was the possibility to pull her up on land. Whether that was for boat work, avoiding a questionable anchorage, or just to stretch and feel solid ground, I grew to greatly appreciate the dory’s versatility. It almost made up for its slow hull speed and inability to keep above some wave crests. Almost.
We were not able to row for long. I had dislocated my elbow ten weeks before the race, and Thor had dislocated his shoulder just six weeks before. The wind picked up swiftly and my elbow burned with the effort of pulling the oars to plow LOOK FAR through the chop. Exhausted and in pain, we once again retreated to land, this time through crashing surf to a pebble beach not a quarter mile beyond the previous stop. We hopped into neck-high water and manhandled the dory up onto the beach. We raised the sail rig again and launched back into the waves. After hauling the boat out past the break line, we counterbalanced each other and crawled aboard simultaneously.
I raised the main as Thor went to drop the centerboard; it refused to move. We pushed our fingers and various objects into the hole atop the case to push the board down, but it would not budge. In our haste to pull the boat above the surf, it seemed pebbles had lodged inside the case, firmly jamming the board in place. Defeated, we returned to the pebble beach. It seemed that our months of working on LOOK FAR had produced a boat scarcely capable of a 7-mile journey. We pulled her up as high as we could on the narrow beach, our optimism in the boat seeping out of it as quickly as the water had leaked in.
We took stock of our situation and decided we could not continue in our present state. It was already late afternoon and we had serious problems. We had intended to make it to Dungeness Spit, 10 miles to the west, but this was clearly out of the question. Just 2 miles away, the siren of Protection Island glimmered in the white gold of a bright afternoon sun. While the rest of the race fleet was likely within striking distance of Victoria, we were stuck looking at Protection Island. If we were going to attempt a crossing of the Strait of Juan de Fuca, we would have to wait until tomorrow.
Unable to sail, we set to work repairing things. Thor and I pulled everything out of the boat, removed the top of the centerboard case, and rolled the boat on its side. We used long pieces of driftwood and bits of line to pry the pebbles out of the case one by one. We reassembled the centerboard case, pushed seam compound into the larger cracks to slow the leaking, and set the boat high on the beach for the night. Tasks finished, we rewarded ourselves with a hearty mac-n-cheese dinner and lingered in the beauty of a tangerine sunset. The stars were soon above us and we huddled between driftwood logs in our bivy bags. Gale-force winds howled around us on the exposed beach and surf crashed just a few yards away.
Our first day in, things didn’t exactly go to plan. Someone once told me: “When everything goes wrong, all you really can control is your attitude and how you handle it.” So here we are taking a selfie and making the most out of our leaking failure of a first day. A selfie for the moms, thumbs down for the boat.
We were up at 4 a.m. the following morning. Thor set to work with pliers, a beach pebble, and a butane lighter to wire the bilge pump into the battery box. I prepared coffee and oatmeal for a quick breakfast, and we launched at first light.
Conditions were ideal to start, and our little boat surged quickly out into the Strait of Juan de Fuca for the 25-nautical-mile crossing to Victoria. Our work on the leaking cracks had greatly diminished the flow of water into the boat, and we watched as Protection Island shrank rapidly behind us. We sailed northwest for Vancouver Island as a westerly wind ripped across a powerful spring tide approaching maximum ebb. An hour offshore, lines of whitecapped tidal races pulsed with the pull of the ebb. Spray blew over the dory’s dodger and into our faces. I clipped the race-tracker beacon to my life jacket and Thor clipped an EPIRB to his, our sober acknowledgement of the gravity of the conditions.
Cresting waves were coming at us from several directions, each one capable of swamping us if hit at the wrong angle. The electric bilge pump was working, but it couldn’t keep pace with the water sloshing over the gunwales. I began to bail and kept at it non-stop, easily filling the milk jug with each plunge into the bilge. We treated each wave as a unique obstacle, shifting our weight and easing and tightening sheets. We ran this gauntlet for hours, so singularly concentrated on survival that we were in disbelief when the buildings of Victoria came into view. Slack tide provided us the brief opportunity to drink some water, eat a protein bar, and pee, activities which were not possible during the six-hour crossing.
A mere 1/4 mile from Victoria Harbor, conditions deteriorated in the span of just a few minutes. Winds gusted to 30 knots, and Thor and I hiked out as far as we were able to, cursing our failure to reef. We passed the first channel marker and found ourselves in the path of an outbound ferry, COHO. We tried to tack out of the way, but the jibsheet snagged on a cleat on the mast mid-tack, pitching us sideways. One wave was all it took –water rushed over the side and in seconds we were under. Still sitting in the boat but in chest-high water, my hands shaking, I grabbed the few loose items that were about to float away. Thor shouted at me to hold on to the sheets.
Astonishingly, as the sinking dory stabilized with the gunwales several inches below the waterline, our mast, boom, and sails remained proud above the water and continued to propel us forward. I looked to Thor in bewilderment as we held on for dear life, the heavy air pulling us out of the path of the COHO and across the harbor entrance into the cruise-ship terminal.
Once inside the sheltered waters of the terminal, we dropped the sails and I hopped into the water, swimming and hauling the boat by the painter over to the 6’-diameter rubber bumpers along the wall. Climbing out onto an algae-coated bumper, I used an oar and my foot to stave off the dory from smacking into the bumper as Thor used our 5-gallon two-handled emergency bathroom bucket to bail. With my weight out of the boat, Thor made good progress. Unfortunately, the bumper was not a friendly place for the dory in the yet choppy waters, and we elected to try anchoring in the terminal instead. Beneath an ironic “Welcome to Victoria” sign, our anchor held and we were able to finish self-rescuing. It took us a good 30 minutes to restore our boat to our standard several gallons of water in the bilge.
With adrenaline wearing off, we stowed the sails, set up the aft rowing station, and proceeded the final nautical mile through the harbor. Our survival was now guaranteed, and the realization sank in that we might actually make the 5 p.m. cutoff; the dock bearing the bell marking the end of Stage 1 of the R2AK came into view with 15 minutes of the allowed time left. Pulling into the dock, we were welcomed with two cans of warm beer and hearty congratulations. Hungry, exhausted, and relieved, Thor and I walked over to the bell, and cracked the beers. Although the skipper conventionally takes the honors, Thor did not stick to tradition. We cheered and rang the bell together to mark our arrival.
The city of Victoria was kind to us. Our fear that our battery and electrical system had been ruined during the swamping proved unfounded and the Canadian Coast Guard returned our dry bag of safety gear which had been found floating in the harbor. During our rest day, friends from Team Sail Like a Girl helped us get supplies to modify our snotter and reefing system and install a boom vang. With our gear and projects strewn across the dock, racers, race fans, journalists, and the general public stopped by to pepper us with questions and show support. Most seemed as surprised as we were that we had made it across in time.
Our work took us late into the evening and ultimately just the two of us remained on the docks. Katherine, a journalist covering the race, generously offered us the use of the pullout couch in her hotel room. Happy to have one final night of comfortable sleep, we walked the deserted streets of Victoria to her hotel at 1 a.m., our way illuminated by thousands of city lights. Once in bed at the hotel, I savored the crisp sheets and soft pillow, trying to burn the sensation into my memory to recall in the days to come.
At noon the next day, Thor and I stood sweating in our dry suits as the bell went off signaling the Le Mans start of the roughly 700-mile-long second leg of the race to Alaska. We were going to be slower on the water than almost all of the other teams, and there was no sense in fighting it, so we walked rather than ran to our boat. As underdogs, racing for a participation award seemed as much as LOOK FAR and our injured bodies could expect. Once outside of the harbor, the rough waters to the south that we had battled over the two previous days were now flat as a pancake all the way back to the Olympic Peninsula, where the sun was reflecting off the snowy peaks.
Pictured here is LOOK FAR’s version of motorsailing and our sail displaying the many lovely people and businesses who supported us and made the journey possible. We received incredible community support and would not have been able to even get on the water without the help of others. The R2AK pulls together an extraordinary community of individuals who are passionate about the environment and the spirit of adventure.
We commenced “motorsailing.” Thor held the boom away from my head while I rowed. I did a one-hour stint and then we switched. We only made 2 or 3 knots with this technique, but dropping the sailing rig seemed risky given the cumulus clouds to the south. Two hours later, we were sailing downwind at 5 knots along the Strait of Georgia under clouded skies. I happily watched the last islands of familiar land fall away behind us.
That night, we tucked into a small bay off Prevost Island, a more than hospitable place to spend our first night sleeping aboard. We stacked dry bags on the floorboards, followed by sleeping pads and bivy bags stuffed with mummy bags—there was just enough room for two. Exhaustion and the calm waters lapping lightly against the hull pushed out any misgivings I’d had about sleeping in a boat with only 6” of freeboard.
Pushed gently along by a southerly up the south side of Galiano Island, we passed beneath the bows of tankers on anchor in Nanaimo (at right on the horizon). While in their presence we debated the trade-offs of globalization and the conflict of industry and nature. Confronted by the beauty of the Inside Passage, it’s difficult to feel moved to take the side of industry, and we were eager to put distance between us and the larger vessels.
As we rowed north toward Nanaimo, industry pressed in along the shore where I had expected we’d find wilderness. Towering above our dory, oil tankers at anchor were steel giants intruding on the soft-edged beauty of the Gulf Islands. Log booms lined the shoreline for miles and houses occupied the remaining waterfront.
Squeezing in among the fishing boats of Port Nanaimo, we left LOOK FAR to restock on provisions. Stripping off our dry suits was liberating, and in the hot sun we indulged in a pint of Häagen Dazs each before resuming our slog north. It’s the small rewards that keep you focused in an endurance race, and few things are more motivating to Thor and me than a pint of ice cream.
Our search for wilderness continued. When we pushed through the seething boils of a dying flood tide in Seymour Narrows and settled into the glacial views from Plumper Bay, it seemed we had finally found it. Eagles swooped down to catch fish in the dying twilight, and we began arranging the boat for an evening on anchor. Out in Discovery Passage, seven cruise ships invaded our quiet wilderness with blasts of their horns and large clouds of smoke, parading through the narrow tidal gate at Seymour, one right after the other. Left in a cloud of diesel exhaust, the dying light refracted gold through the remaining haze and I couldn’t help but feel ashamed by what civilization has done to these waters.
Sleeping in the dory at anchor was surprisingly comfortable, but most certainly an exercise in trust. I could drop a hand over the edge and touch the water without putting my wrist below the gunwales. Combine that with wave action and being zipped into a mummy bag that’s stuffed inside a bivy sack, and stress dreams inevitably disturbed my slumber. Thor, on the other hand, appeared unfazed and snored his way through most nights on anchor.
In Discovery Passage, the morning flood tide ripped through the mile-wide channel, forcing us to row into the back eddies with our oar blades a mere 1’ away from the barnacle-encrusted granite cliffs. We craned our heads over our shoulders, keeping watch for lurking boulders in the dark water. Sea lions and a solitary minke whale passed us on our way, and the sun kept us warm and smiling despite slow progress north up the passage to Johnstone Strait.
As we rounded the corner into the strait and began to head west, the afternoon turn of the tide arrived with a series of strong gusts of wind. Thor was taking a light snooze and I shook him awake to the rapid change in conditions.
“Dry suits on,” I said. “Something is about to go down out here.”
Within five minutes, what had been a glassy-smooth sea was seething in whitecaps. With no time to reef and the wind too strong to pause, we were vulnerable. We rode a single tack north across Johnstone to the only sheltered beach in sight. By the time we reached the lee of the headland protecting the beach, the water inside the boat was just two planks below the gunwale.
We landed and while I emptied out water and lashed our supplies in, Thor put a double reef in the main. We were determined to make miles and headed back out. Rounding back into Johnstone, the full force of the wind heeled us over immediately and we resumed bailing steadily. The current had strengthened, forming messy patches of standing waves and large whirlpools. Driftwood logs spun in place as the wakes of freighters headed south ricocheted off each other.
Johnstone Strait is full of tiny, secluded, charming coves. In many spots, the sandy bottoms and good sunlight can almost fool you into thinking you’re in the Caribbean. Until you stick your hand in the water. Ocean temperature aside, these bays made excellent spots for a quick snack and a moment to appreciate our progress through the ever-changing landscape. We were moving just slow enough to observe the subtle changes in geology, wildlife, and climate as we headed north.
Occupied more by bailing than by sailing, we decided to make for the only sign of safety, an unnervingly short little fingernail of a beach. With no other option, we were forced to gamble that the high tide wouldn’t flood the beach we’d have to land on. We unloaded all of our gear and pulled the boat up as high as possible, the bow nosed into the forest and tied off. We pitched our bivies on the forest floor. There were piles of bear scat not 20′ away. Spooned around our only can of bear mace, I slept fitfully.
After an adrenaline- pumping day in Queen Charlotte Strait and a wavy approach to the beach, we emptied LOOK FAR and pulled her high up onto the logs to spend the night. We were lucky to find a plentiful supply of dry wood and used my hammocking tarp to keep us dry and warm through most of the rainy night. In the dark, with rain pelting down on the tarp above, I wondered how many souls had spent a night on this unnamed beach in a cove with an entrance just wide enough for a boat our size.
When I awoke to the shadowy light of dawn, the trees were heaving in the wind, and Johnstone Strait remained too dangerous to sail or row. I was secretly happy for a guilt-free excuse to make some much-needed repairs during the day and enjoy a full night’s rest.
We left the beach at sunrise on the second day and made our way up the Strait with the sea state still on the edge of precarious. Around 10 in the morning, the winds again peaked and forced us to pull off at Sayward, a once vibrant logging town that’s now a sleepy settlement with only a few hundred residents.
At first glance, it appeared to be a ghost town. There were trucks and RVs parked next to the community pier, but not a soul was to be seen. The wind howling, it seemed eerily deserted. It felt good to stretch my legs and we headed toward the pier where we found a small gift shop which wouldn’t open until 11 a.m. Next door was a place marked “Al’s Room.” It was evidently designed for people like us, wayward souls with no shelter in need of a warm, quiet space. Its doors never locked and anyone was welcome to enjoy its microwave oven and selection of steamy romance novels. What luxury!
At 11, a bubbly woman stuck her head in the door. Sue, the gift-shop manager and mayor’s wife, informed us we were welcome to stay in Al’s Room for as long as we needed. After spending the day watching the water and hoping for a break in wind—which never came—she convinced us to join her family for dinner at her house. Sitting around the table, the luxury of a cold beer and a home-cooked meal made it easy to forget how slow a race we were running.
Johnstone Strait was a particularly trying part of our journey. For days on end, as the tidal currents of up to 5 knots switched directions in the late morning, opposing northwest winds gusting up to 35 would kick up and make forward progress in the dory impossible. We spent many hours on land watching the whitecaps froth and listening to the winds howl through the trees around us, as clouds blew over the snowcapped peaks in the distance. Forced to remain ashore while other larger craft such as this seiner headed north weathered the storm, we were grateful for the enthralling views.
At first light we left Sayward and resumed our slog up the Strait. It took several more days of dancing on and off the water to make it out of the erratic conditions of Johnstone. By this point, we began to see R2AK boats that had already finished the race and were heading back home from Ketchikan. It became apparent that we would be knocked out of the race by the Grim Sweeper, a delightfully named sweep boat and “rolling disqualifier” for those who don’t reach Ketchikan before it.
After a 16-hour day of rowing, we stretched out our aching bodies on the docks of Port McNeil and evaluated our position. We were not yet halfway to Ketchikan and about to enter unbroken wilderness, but our bodies were failing. The ache in my elbow had transformed into ominous pangs of acute pain that would radiate up my arm while I was rowing. Thor was struggling with his shoulder and needed to take longer breaks from rowing more frequently.
There wasn’t much choice in the matter—we had to withdraw from the race. We sent word out for Thor’s girlfriend to meet us with a trailer in Bella Bella. Bella Bella wasn’t quite Alaska but it was the section of British Columbia coastline that we were most excited to see. We had come too far and worked too hard to call it quits on Vancouver Island at Port Hardy. This left us with two challenges remaining: navigating Queen Charlotte Strait and rounding Cape Caution.
Queen Charlotte Strait is a dangerous area. The swell of the Pacific Ocean rolls in to meet the powerful tidal surges of Johnstone Strait and the outflow of several glacier-fed rivers. The confluence of the waters and the wind can be tame at times or lethal. The advice from the locals was to hug Vancouver Island until we can safely cross to God’s Pocket, an aptly named island chain of exceptional beauty. We’d spend the night there and wake up before first light; if there is any wind, we don’t go. If it’s clear, we row like hell. Conditions are known to deteriorate rapidly over the course of a day, making rounding Cape Caution risky. Even large boats take the Cape seriously.
Sailing in flat water is a rare treat along the Inside Passage and was truly a wonderful experience in LOOK FAR. No water came in over the sides, and Thor and I weren’t forced to bump into each other as we tried to balance the boat. Our momentum wasn’t swallowed by every wave trough, and the laps of the planks happily displaced the small wavelets in its path. These conditions made Thor and me smile from ear to ear whenever we came across them.
We entered the sheltered area of the Sound by midafternoon, happily sailing past Port Hardy, and aiming for God’s Pocket. God, it turned out, had other plans for us than the safety of his pocket. Dark clouds appeared to the west, menacing us with a sound that most resembled a freight train approaching.
“Is that the wind?” Thor asked in disbelief.
“I think we need to turn around,” I responded.
We did, and less than a minute later the choice was validated as the right one while we hurtled back toward Port Hardy, taking on water at an unsustainable rate. We wouldn’t make the town so we instead tucked into the bay at its edge, a small cove host to an off-grid fishing lodge.
Prior to the R2AK, I had never really seen a log boom up close and personal. Rowing up next to one, Thor was eager to climb out and take a picture. A tanker wake passed by not a moment after this photo, forcing Thor to make a leap back into the boat as I quickly rowed us out from the impact zone with the logs. There were many moments of near calamity on our journey, and this was an early reminder to always keep our wits about us.
As we tacked back and forth along the entrance to the cove, a man in the interior dragged logs erratically by motorboat to create a barrier. No communication was made despite our obvious distress.
After ten minutes, the man finally shouted out “Y’all screwed up or what?”
The humor was not lost on us. We yelled back, “We’ve been better!”
“Well, you better come land. I’m Dave and this is my lodge.”
He escorted us in between the logs and instructed us to land on his dock. It hadn’t taken him long to evaluate our situation. To the motoring fisherman, our journey was reckless and bordered on absurd. He gave us each an apple, a cup of coffee, and a floor to sleep on inside a small unfinished cabin that had a roof but no windows. Dave entertained us with tales of humpbacks burping up seagulls and orcas cornering pods of dolphin in his bay. He was unpolished and proud, generous, and strangely charming. His stories were hilarious and the following morning, as we departed for Cape Caution, he sent us off with some frozen salmon for the rough day ahead.
We sailed north through two glimmering island chains and at the opening of Queen Charlotte Strait we encountered the Pacific swell. It gently lifted and dropped us several yards, bringing Cape Caution in and out of view. By the time we reached the exposed headland, intensifying afternoon squalls were chunking up the water. There are very few hospitable beaches near the Cape, and the swell makes a surf landing and launching dangerous. We were forced to sail 2 nautical miles back away from the cape before finding a bay with enough protection from the swell to attempt a beach landing. When we came ashore we spotted fresh wolf and bear paw prints below the high-tide line; the patter of rain spurred us to action. Under a tarp supported by driftwood, we set our bivies on the wet sand and built a large fire. We kept it alive until morning to deter the predators from coming too close.
The rough conditions persisted the next morning, but we elected to go anyway. Explosive waves around the Cape made it safer for us to sail miles out to sea, coming about only when we were positive the port tack would clear the point. Our two-man balancing and bailing act kept us afloat as we endured the open ocean slapping us around. North of the cape, spray blew up around us from a series of hidden rocks and ledges. Not daring to stop even to eat, we pushed on until sunset. The golden rays of another day gone by ushered us into the protective cedar-draped shores of Milbrook Cove, 10 miles north of the Cape. We were happy to have the company of throngs of bald eagles and a sea otter happily hunting in the kelp beds.
It took us three more days of continuous rowing to reach the village of Bella Bella. The tidal exchanges were large and each low tide exposed a rich world of color. Magenta and ochre sea stars and crimson sea urchins dotted the yellow rocks, vying for space in the intertidal zone. Despite the bone spur I could feel growing on my elbow, my brain began playing tricks on me, challenging my decision to stop and encouraging me to ignore the pain. Who needs a left arm after all?
When we were within sight of Bella Bella, everything inside of me was fighting our logical, safe choice to withdraw from the race. But for better or worse, it had already been decided, as the wheels were literally in motion to bring us home. Our loved ones with a truck and trailer were headed up Vancouver Island at that very moment. We approached the public dock and tied up among the fishing vessels.
Without needing to do any work on the boat and our contact in Bella Bella busy until the evening, we took our free moment and sought out a consolation prize of cold beer. Thirty minutes and two tallboys later, Thor and I were seated on a concrete slab adorned in graffiti, gazing out on the harbor.
Thor and I had sought out the Race to Alaska as a venue to share our passion for the ocean and boats with kindred spirits and raise money for Pacific Wild, a nonprofit dedicated to pushing for wildlife protection and environmental rights in British Columbia. For me, visiting their headquarters in Bella Bella was a personal victory despite the failure to finish the race. The race structure had brought my ego into the forefront: pushing myself both physically and mentally. Failure freed me from that and returned my focus to the ocean, to its many lessons and gifts, to peace and gratitude for my experience. Our journey to Alaska, for now, was finished.
Pax Templeton was born in 1992 and grew up exploring the woods and beaches of Maine and the desert of New Mexico. For the last several years, he has lived seasonally between Utah winters and Washington summers, kayak guiding, skiing, and commercial fishing. Always up for an adventure, Pax has a deep love and appreciation for the ocean and the ability to go by boat where no roads lead. He became exposed to the world of sailboats through his friendship with Thor and learned most of what he knows regarding their operation, upkeep, and repair from him. The R2AK was a steep learning curve and bestowed tremendous respect for the Port Townsend and R2AK community, wooden boat builders, the sheer power and beauty of the ocean, and the capabilities of a 16′ Swampscott dory.
Thor Belle had a boat well before a car and grew up poking around tidepools in Maine and spending as much time as possible in, on, and around the Atlantic Ocean. Thor is happiest when it’s cold out. He has adventured all over the world and has many years of experience on the open ocean delivering sailboats in the North Atlantic, teaching environmental education and big-boat sailing, and working for commercial sail charter businesses. He firmly believes in boats as a way to connect people to their environment and hopes to devote his life to doing just that.
If you have an interesting story to tell about your adventures with a small boat, please email us a brief outline and a few photos.
189A few years ago, I needed to take some hand woodworking tools along to a boatbuilding project. My tools live on shelves in the cellar or in tool bags. My tool bags weren’t big enough to carry everything; I needed a tool tote that could carry handsaws, long chisels, and bar clamps. Most of the totes that I had seen were too small, and their joiner work was well beyond my skill level.
Then I remembered one of Joe Liener’s totes. A master builder, Joe ran the Philadelphia Naval Yard’s small-boat shop before its conversion to fiberglass work. He had a complete shop in his basement, which included his massive tool chest, big enough that it took two to carry or steal it. From it, he’d pull the tools needed to do a day’s job and load them into one of his totes. One of them had two features that I remembered well and have not seen on totes now common: You could use it as a low sawhorse, a step stool to reach things overhead, and a seat when working underneath a boat or stopping for lunch. It also had a wide board for the top, offset, with a handle hole cut in the center. The box is long enough to take handsaws; they get stowed under the top. Smaller tools go on the other side, where the access is unhampered.
Ben Fuller
The pillars separate the saws from other tools and support the top when it is used as a step or a stool.
Joe’s totes would have had much nicer joinery than anything I could come up with, built of carefully selected materials. I built out of what I had handy, so it would be butt joints, glue and screws, with no planing or finishing. Four mortise-and-tenon joints are needed for weight-bearing pillars.
Ben Fuller
The tool tote can be built quickly with hand tools and assembled simply with screws and glue.
I had a nice 1×10 (nominal) pine board which made the ends and the bottom, and a 1×6 board for the sides and the top. I made the ends 11-1/4″ tall for an overall height of 12″. The bottom is 32″ long and the top is 33 1/2″. The pillars that support the top and separate the saws from the other tools are made from 1×4. I kept the construction of the tote simple, something that could be done with just handsaws and a chisel. If you have a better-equipped shop than I do, you might do a simple box joint or a dovetail joint between the ends and the bottom. (I’m pretty sure that Joe would have hidden the end-grain—that would have been neater. With a wider bottom and ends you could cut rabbets to set the sides in and have their end-grain covered.)
Christopher Cunningham, Editor
The tote can also be as fancy as you like. Joe most likely would have kept dovetail or finger joints simple and covered end grain with rabbeted joints. This box is just 24″ long.
Everything was fit dry. Then the bottom, ends, pillars, and top were glued together using bar clamps. The sides go on in a second gluing operation.
My 1×10 provides an interior width of 9-1/4″, and a length of 32″, which is ample room for a 2′ level, a handsaw, and some quick-release bar clamps. I’ve kept my tote open so I can use it for different tools for different projects. For painting jobs, the plain interior accommodates several quarts of paint, thinner, brushes, and brush-cleaning cans.
Making your own version of Joe Liener’s tool tote could be a good project for passing the time during social distancing. You can make it simple, as I did, or make a nicer one with dividers to separate tools and racks for small stuff like pencils and small chisels.
Ben Fuller, curator of the Penobscot Marine Museum in Searsport, Maine, has been messing about in small boats for a very long time. He is owned by a dozen or more boats ranging from an International Canoe to a faering.
You can share your tips and tricks of the trade with other Small Boats Magazine readers by sending us an email.
The apron I’ve had in my shop for as long as I can remember isn’t good for much. It’s made of denim and has a single flat chest pocket, a neck strap, a waist strap, and “Zabar’s” written across the front. I usually put it on only before I do some painting or gluing and I’m too lazy to change into my work clothes. My low opinion of aprons for woodworking changed when the Verksted apron I’d ordered from Leah Kefgen at Best Coast Canvas (BCC) arrived in the mail. Even before I put it to use, I liked the look and feel of the waxed 24-oz canvas, which is dyed oak brown and neatly sewn with a very heavy-duty thread.
If tying knots behind your back isn’t in your skill set, the brass trigger snap is a useful feature. The weight of the apron and tools is taken by the shoulders, much better than by the back of the neck.
The soft rope shoulder ties are finished with wall-and-crown knots in the front and connected with a double sheet bend to the waist ties, which are fastened at the back with an eye splice and a brass trigger snap. These are all familiar nautical elements, by design, evidently, as the BCC web site notes that the apron was “originally designed for shipwrights and woodworkers.”
All photographs by the author
The apron made a noticeable difference in the projects I’ve done while wearing it. Having my combination square, safety glasses, center punch, pencil, and measuring tape on me saved time and allowed me to work without the annoying interruptions caused by stray tools.
There are ten pockets on the apron. The flat pocket at the top is divided into four compartments: one that fits a pair of glasses, and three I use for pencils and a spring-loaded center punch. The shortest of those three is 3″ deep, so oft-sharpened pencils nearing the end of their useful life won’t get buried in the pocket. The pencil spaces accommodate carpenter’s pencils as well as common round or hexagonal pencils. The fabric is stiff enough to keep them from slipping out accidentally.
Safety glasses, a center punch, and pencils occupy the top pocket. The tape measure spends almost all it’s time clipped to the apron, even when the tape is pulled out. The pilot drill and the driver bit are held by magnets I attached to the apron.
I have a 12′ measuring tape clipped to the bias binding to the left of the top pocket. The tape feeds out from the bottom so I pull it out for most jobs without unclipping the housing from the apron. On the other side of the pocket I added some magnets to hold driver and drill bits.
The middle row of pockets is sewn flat on the apron and 4-3/4″ deep. The two pockets on the sides are 2-1/2″ wide; the adjacent pockets are 5-1/2″ wide. The three pockets in the middle are 1-1/2″ wide. The regular occupants of this row are my calipers and notepad.
The Verksted apron has 16 separate places for tools and two loops for hammers. Even with only a half dozen spots occupied, the apron earns its keep.
The bottom row of packets is 6″ deep and has three 5-1/4″ wide pleated pockets flanked by two 2-3/4″ flat pockets. There are loops for hammers copper riveted over the side pockets. The pleated pockets can be filled to suit the job and hold fastenings or tools like palm planes and large tape measures. I keep a combination square in the flat pocket on the right, and a utility knife in the pocket on the left. To keep the knife from sinking too deep to get a hold of it, I shaped a wooden plug to fit in the bottom of the pocket.
I bought the long version of the apron; it extends 8″ below the pockets and covers me just about to my kneecaps. The short version ends with the bottom of the pockets.
I’ve worn the Verksted apron to do a bit of gluing with Titebond III and got a few drips on it, but the dried glue could be picked off the waxed canvas. I’ve seen what epoxy does to a good pair of pants, so I’ll let Zabar’s handle that mess and spare the Verksted that indignity.
When I first started wearing the Verksted apron, it took a while to break some old habits. I’d catch myself scanning the workbench for my pencil or combination square, unused to the idea that I didn’t need to look. Soon enough I could get to the tools on the vest by touch alone and, with less time wasted searching, my work went noticeably faster.
I think of the Verksted apron as my workshop PFD. I have a lot of tools and machinery crowded into a one-car garage—it can be a hostile environment that tries my patience every time it swallows up tools and pencils as surely as if they’ve been dropped overboard. The apron keeps my enthusiasm afloat and keeps the tools I need on me.
Christopher Cunningham is the editor of Small Boats Magazine.
The Verksted apron is handmade and sold by Best Coast Canvas. The long version, featured here, is priced at $179, the short at $165. There is a version sized for children. The aprons are individually made to order; allow 4 to 6 weeks between placing an order and shipping.
Is there a product that might be useful for boatbuilding, cruising, or shore-side camping that you’d like us to review? Please email your suggestions.
Bevel gauges are handy tools when building boats; they can be used to measure, mark, and transfer angles from one work surface to another. They can also be used to directly set accurate blade angles on cutting tools, versus transferring measurements from a larger bevel to a protractor and then to a saw’s bevel gauge. We used a 9″ sliding bevel gauge when building our Penobscot 14 and while restoring an 1880s Mississippi River skiff, but it was too big to take angles in small spaces, made an awkward fit in a pocket, and kept getting left in a variety of hiding places. A few years ago, I began looking for a smaller, handier bevel gauge, and found the aptly named 3-inch Bevel Gauge.
Photographs by the author
The gauge lies nearly flat, so taking and marking angles can be done more accurately than they can with a common sliding bevel gauge.
The gauge is made of brass strips that are 1/16″ thick and 1/2″ wide, and has angled points at the ends. For safety’s sake, the points are not sharp, and the edges are softened to be kind to hands and workpieces. The large aluminum screw is easy to adjust and set the right amount of friction between the blades. The screw’s low profile ensures that it does not snag inside a pocket. The ends of the blades at the screw are evenly rounded and their pointed ends line up accurately. The bevel gauge has a nice weight to it, indicative of a well-made tool and, most importantly for me, it slips easily in and out of a pocket.
Getting the angle for the bevel at the end of this boat’s thwart requires a gauge that can fit between the chine stringers.
The small gauge is simple to use; the tightness of the blades can be adjusted to slip smoothly to a setting and then hold it. The blades can also rotate 360 degrees, an advantage over sliding bevel gauges that can’t take small angles without having the blade extend beyond the pivot. The short 3″ blades allow the tool to be placed in small places where larger bevels can’t fit, and take more accurate angles where a curved surface is involved. Settings can be taken from the boat and quickly transferred to the workpiece. The gauge is thin, just 1/8″, so it is better suited for picking up angles from a lofting than is a traditional sliding bevel with a thick wooden body, which elevates the blade above the lines. And the bright brass makes the gauge easy to see when the bevel is placed in a dark area of the boat.
The 3-Inch Bevel Gauge is useful, simple, small, portable, and reasonably priced. I’ll hang on to mine and give them as gifts to my boatbuilding friends.
Kent Lewis repurposes wood into boats under the watchful eye of his wife, Audrey, commodore of their Small Boat Armada. They are designing a 16′ diamond-bottomed catboat, based on personal histories of Pascagoula, Mississippi, sailors who raced them in the 1950s.
The 3-Inch Bevel Gauge is available from The WoodenBoat Store for $14.95.
Is there a product that might be useful for boatbuilding, cruising, or shore-side camping that you’d like us to review? Please email your suggestions.
Continue Reading - Enter your email to log in or subscribe
New to Small Boats? Create a free account to get our weekly emails and two free articles each month.
Time to upgrade!
You've read all of your free content for the month. Upgrade to a paid subscription for unlimited access.
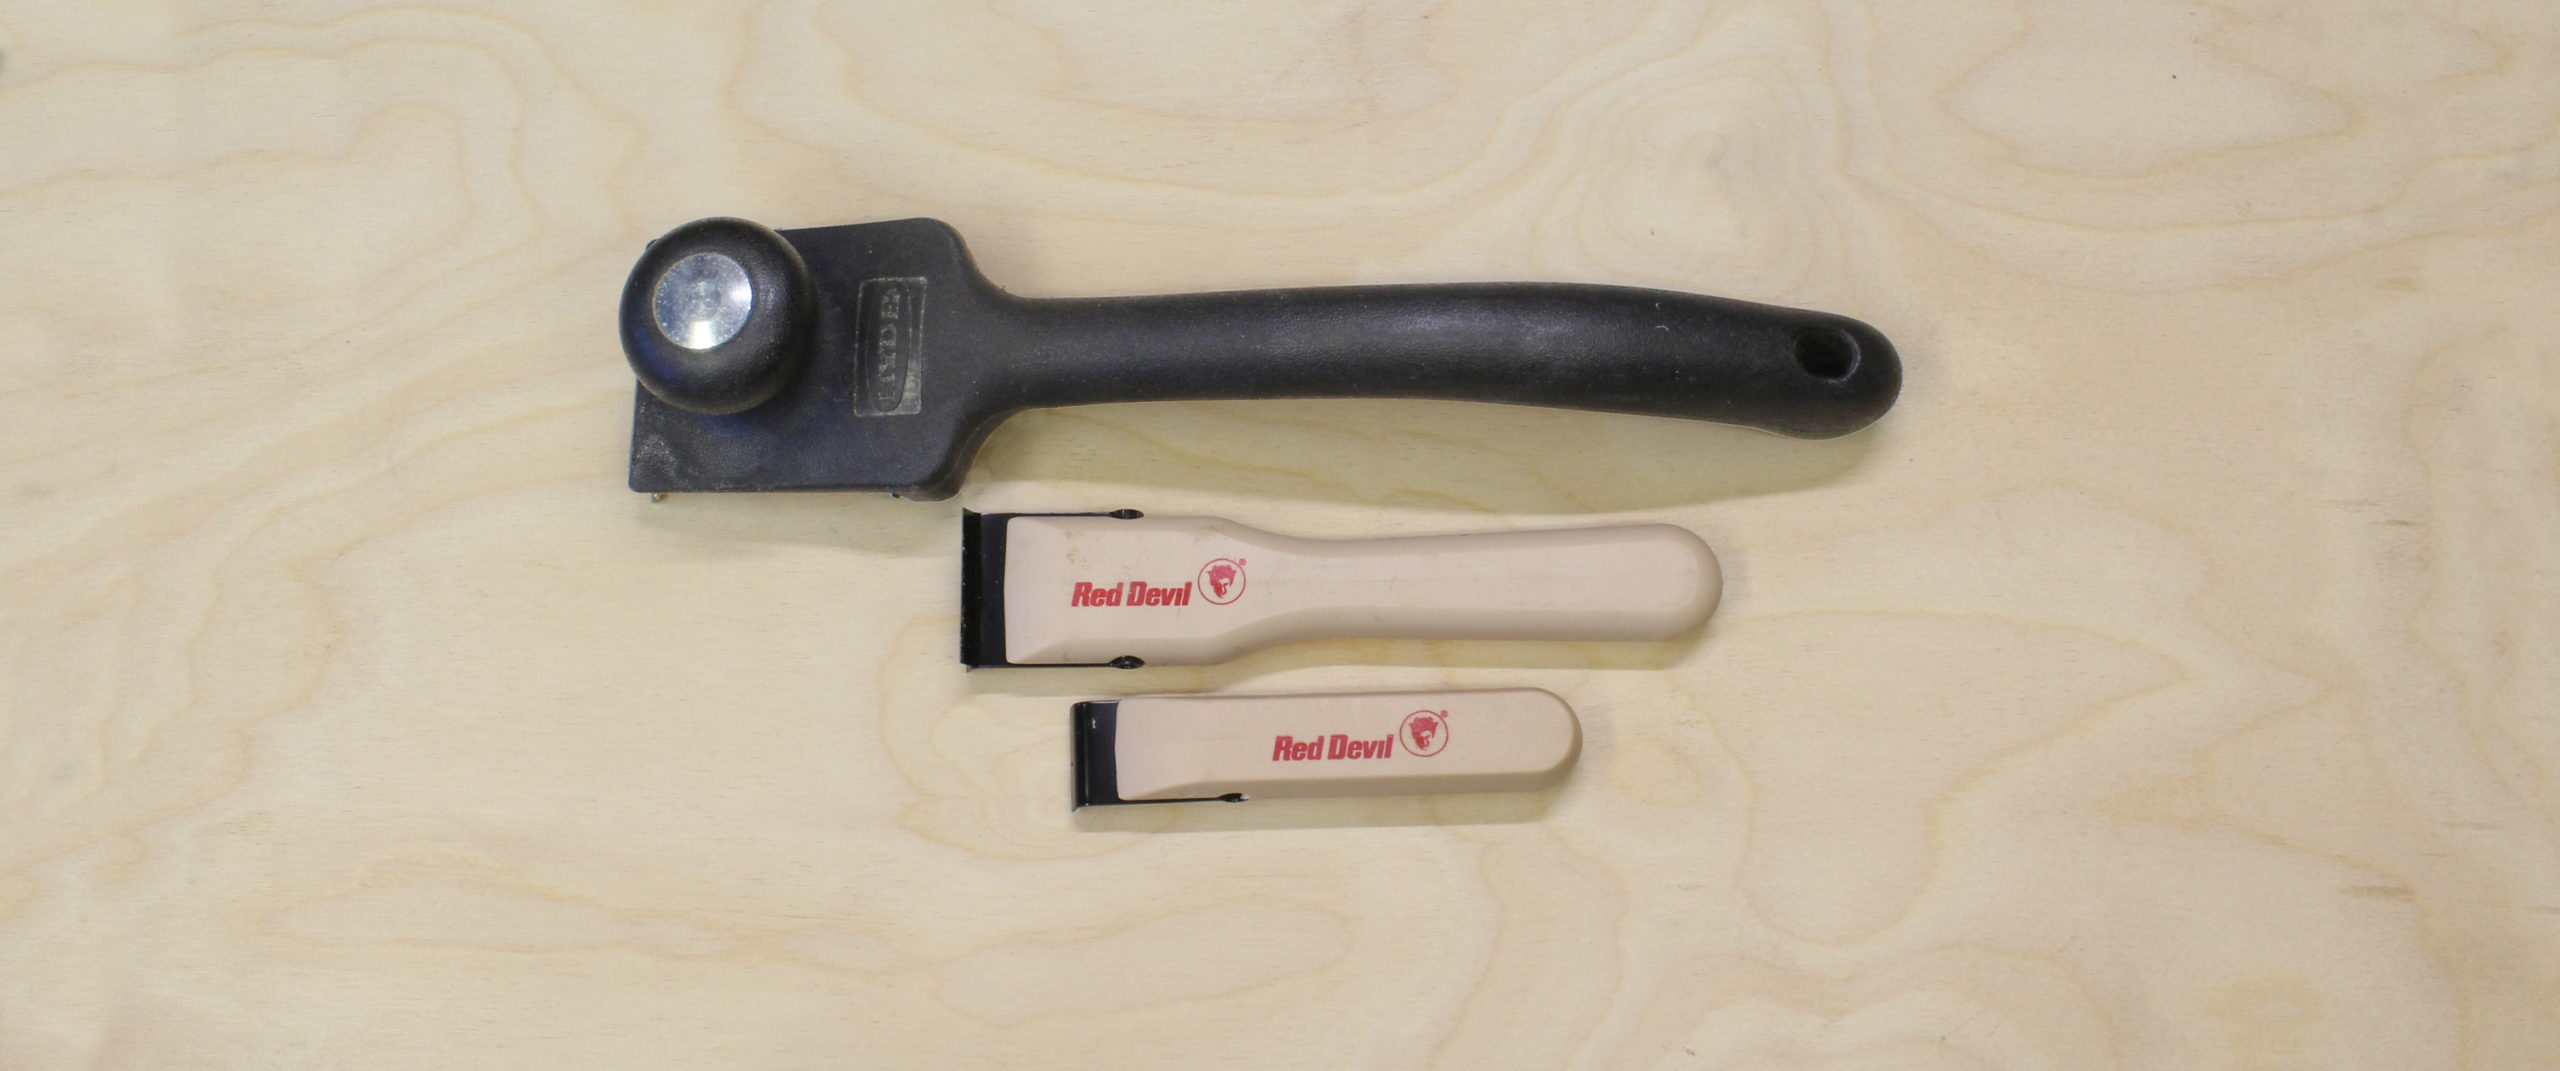
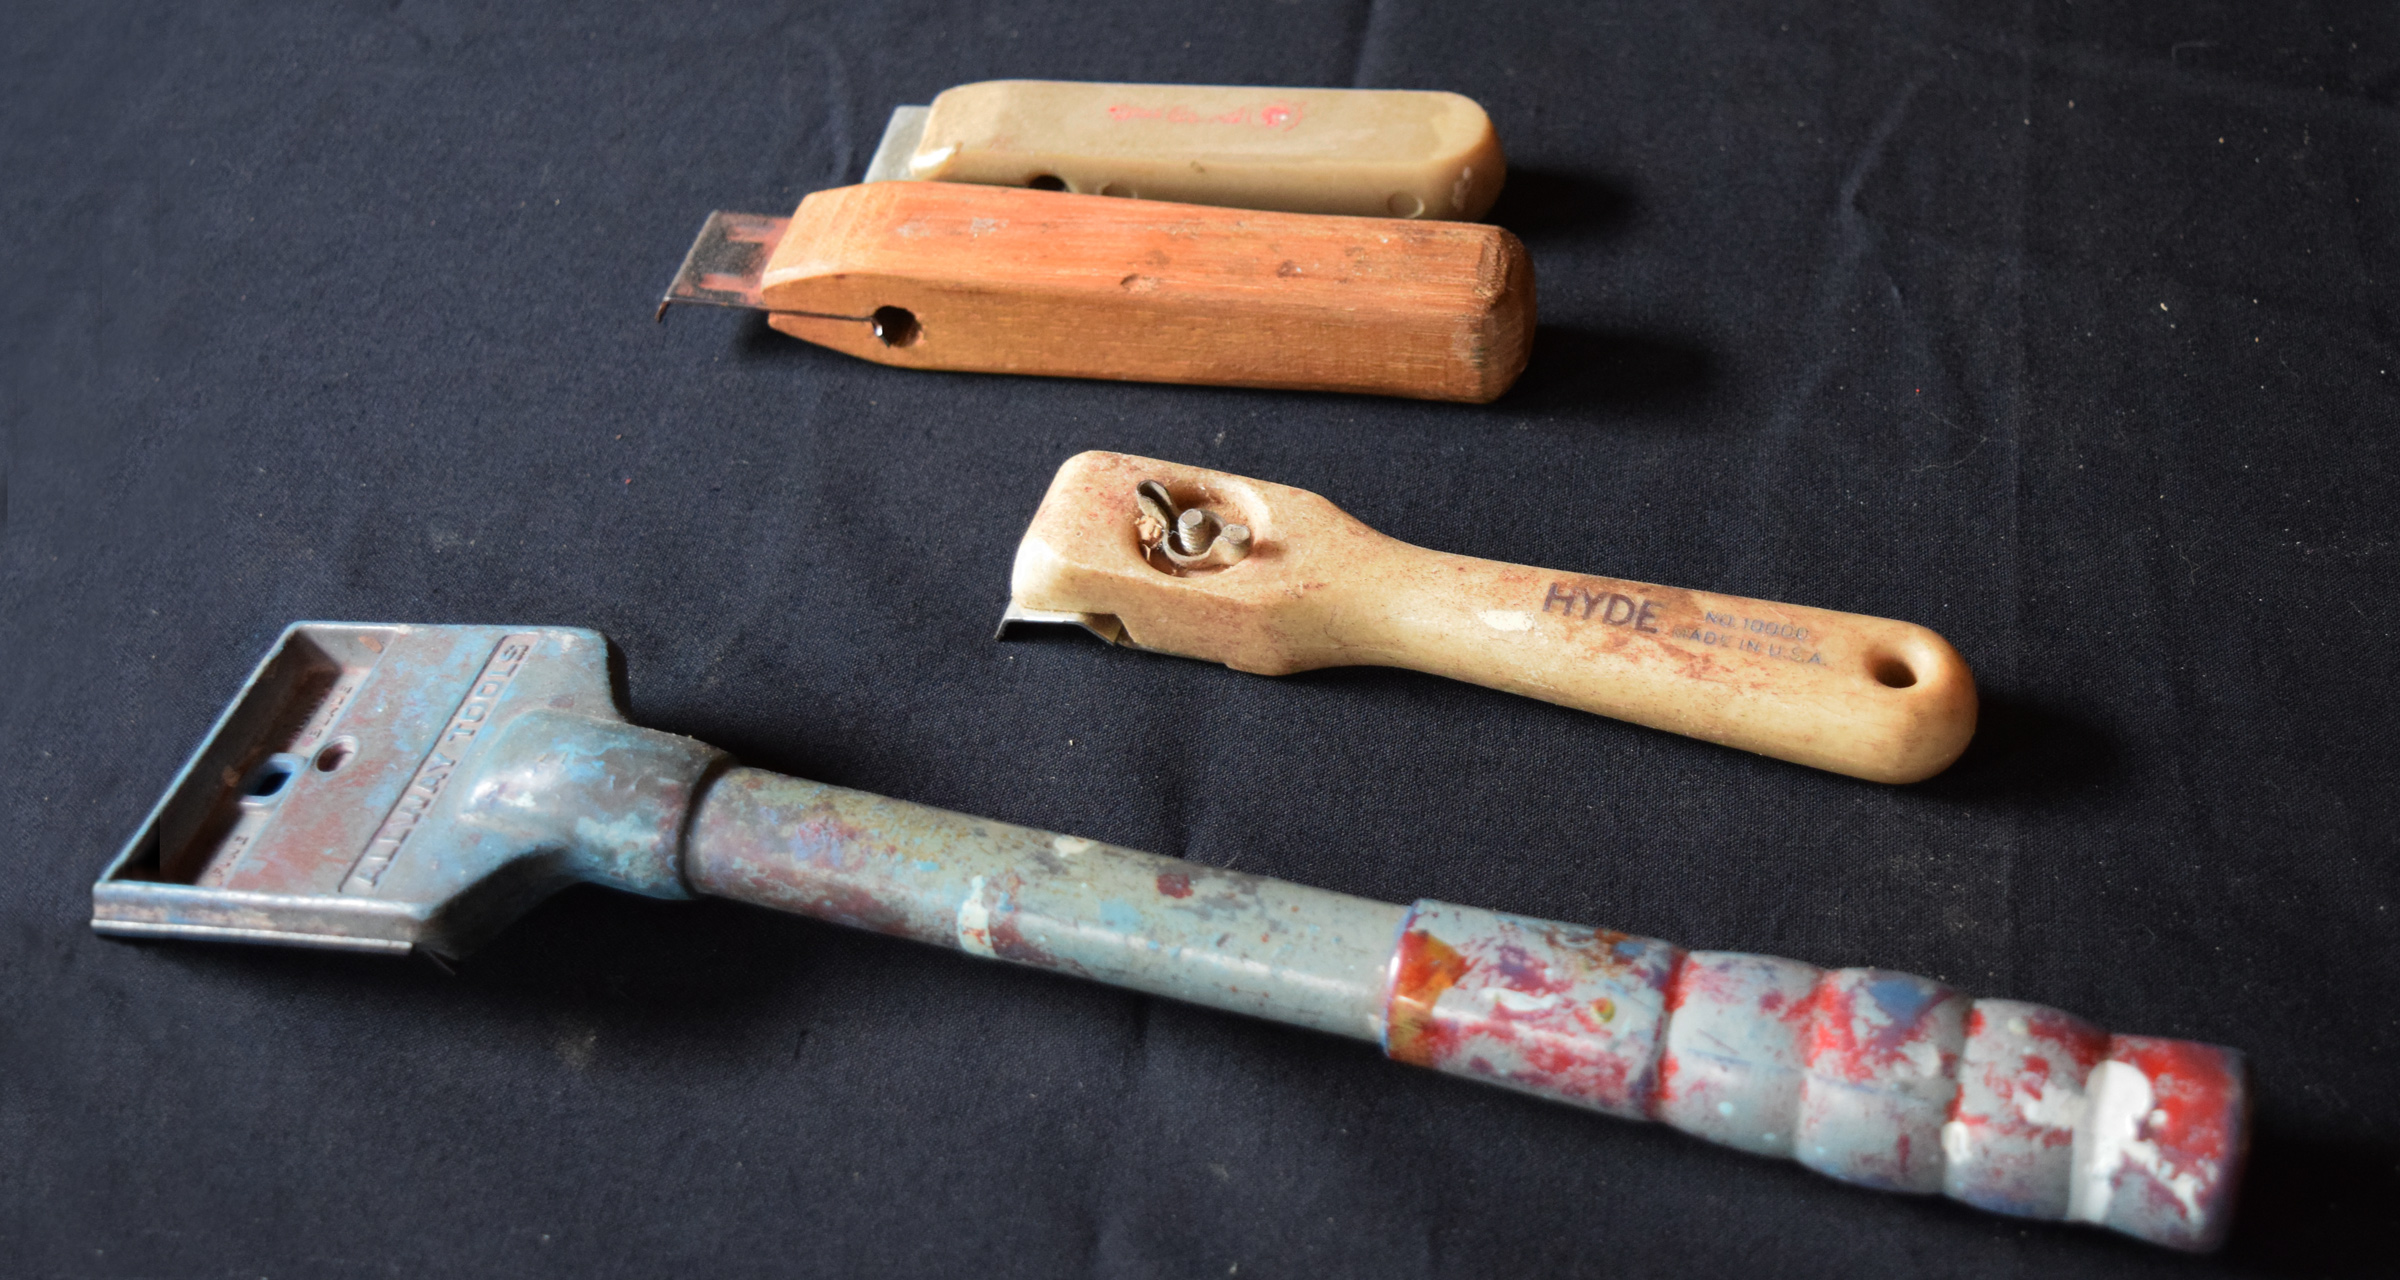 Ken Textor
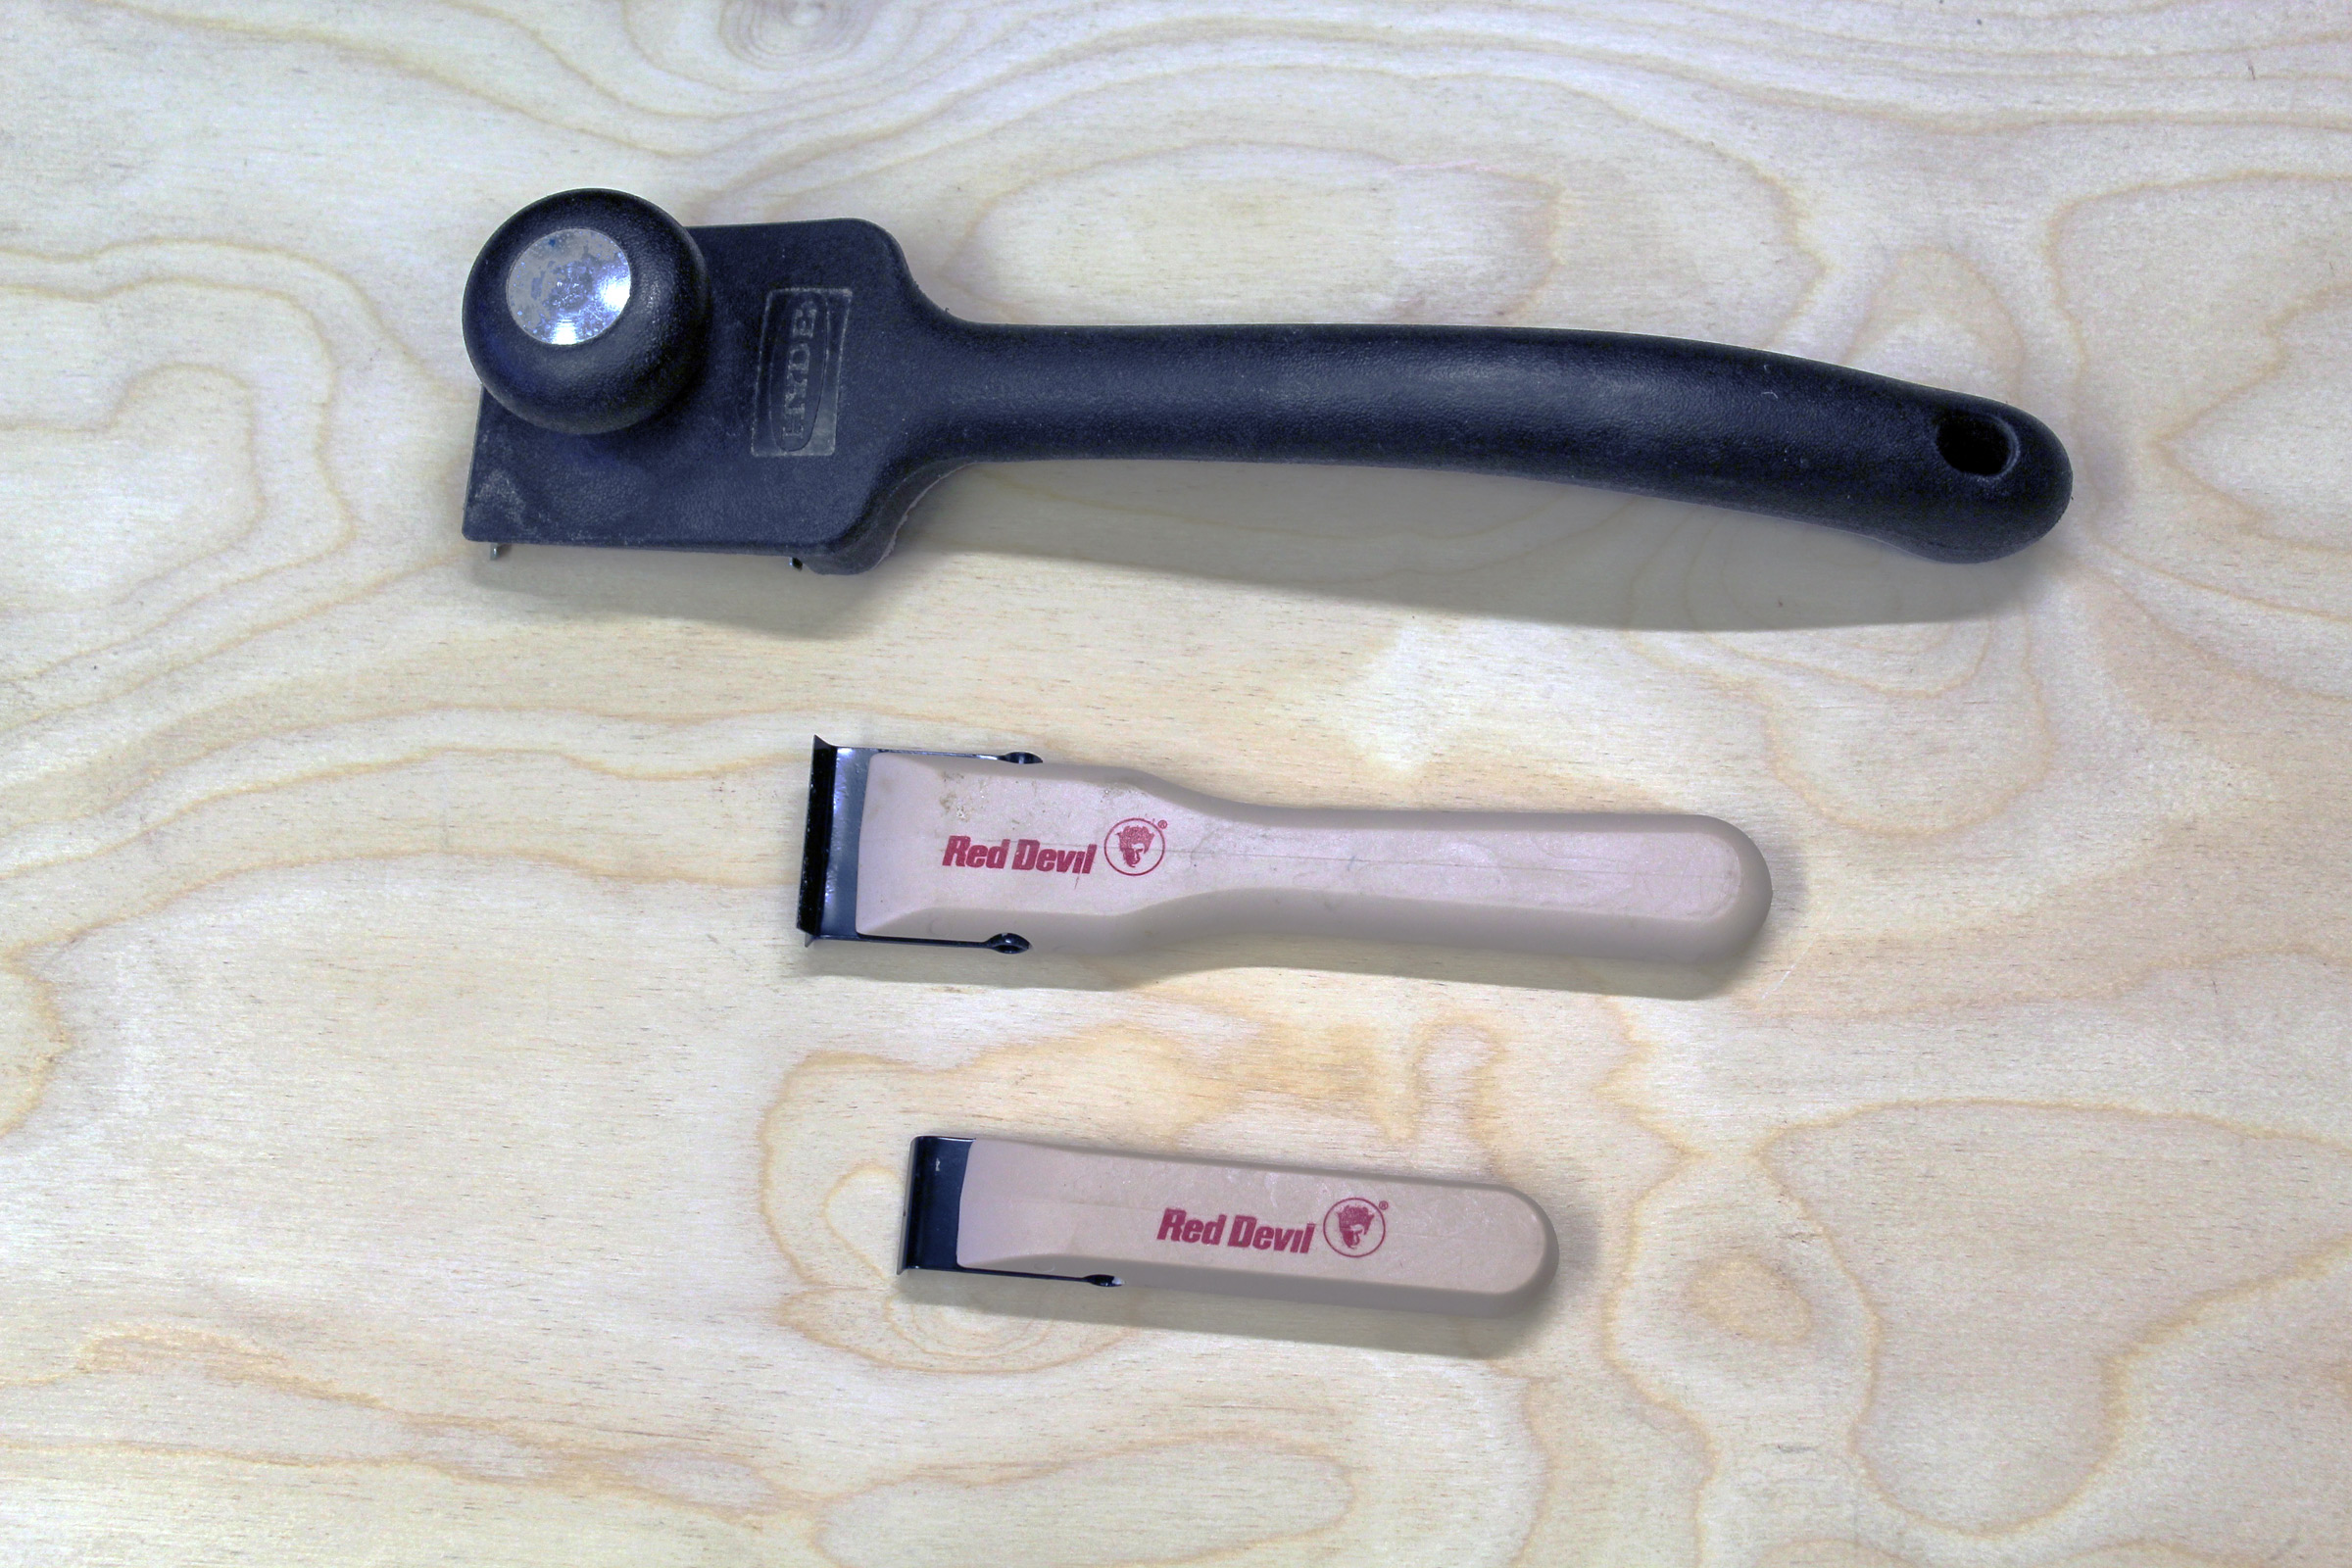 Small Boats Magazine
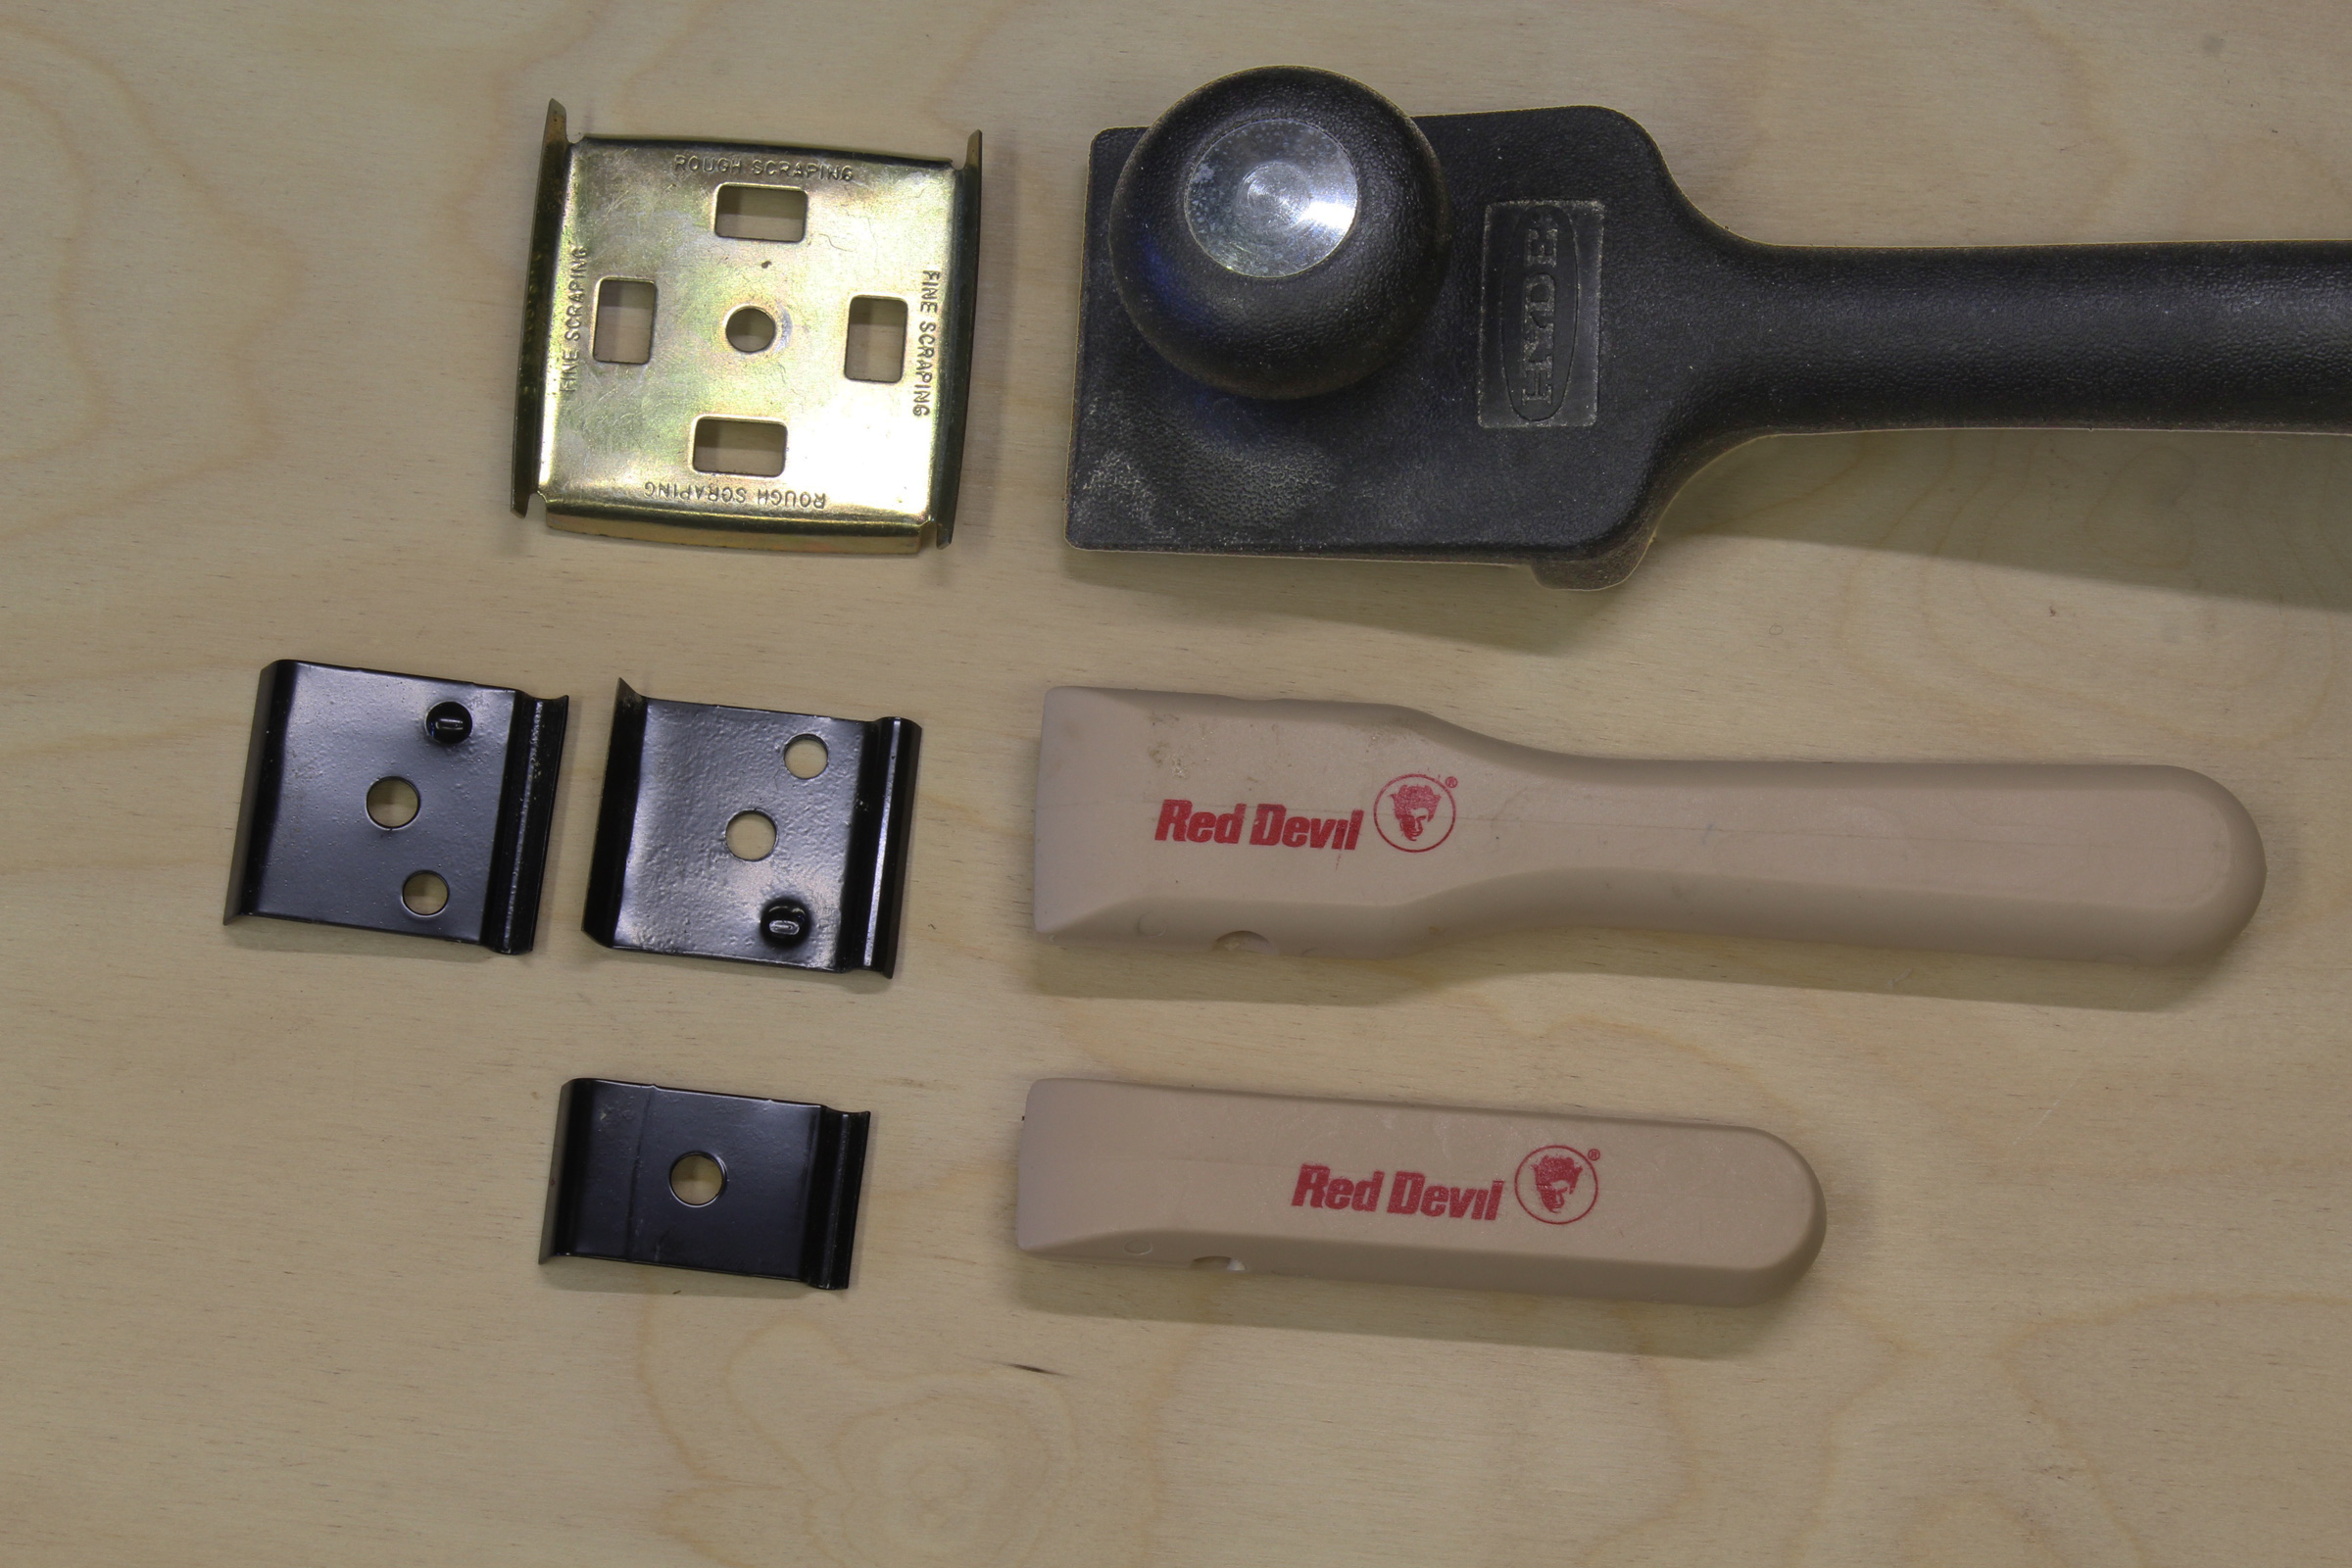 Small Boats Magazine
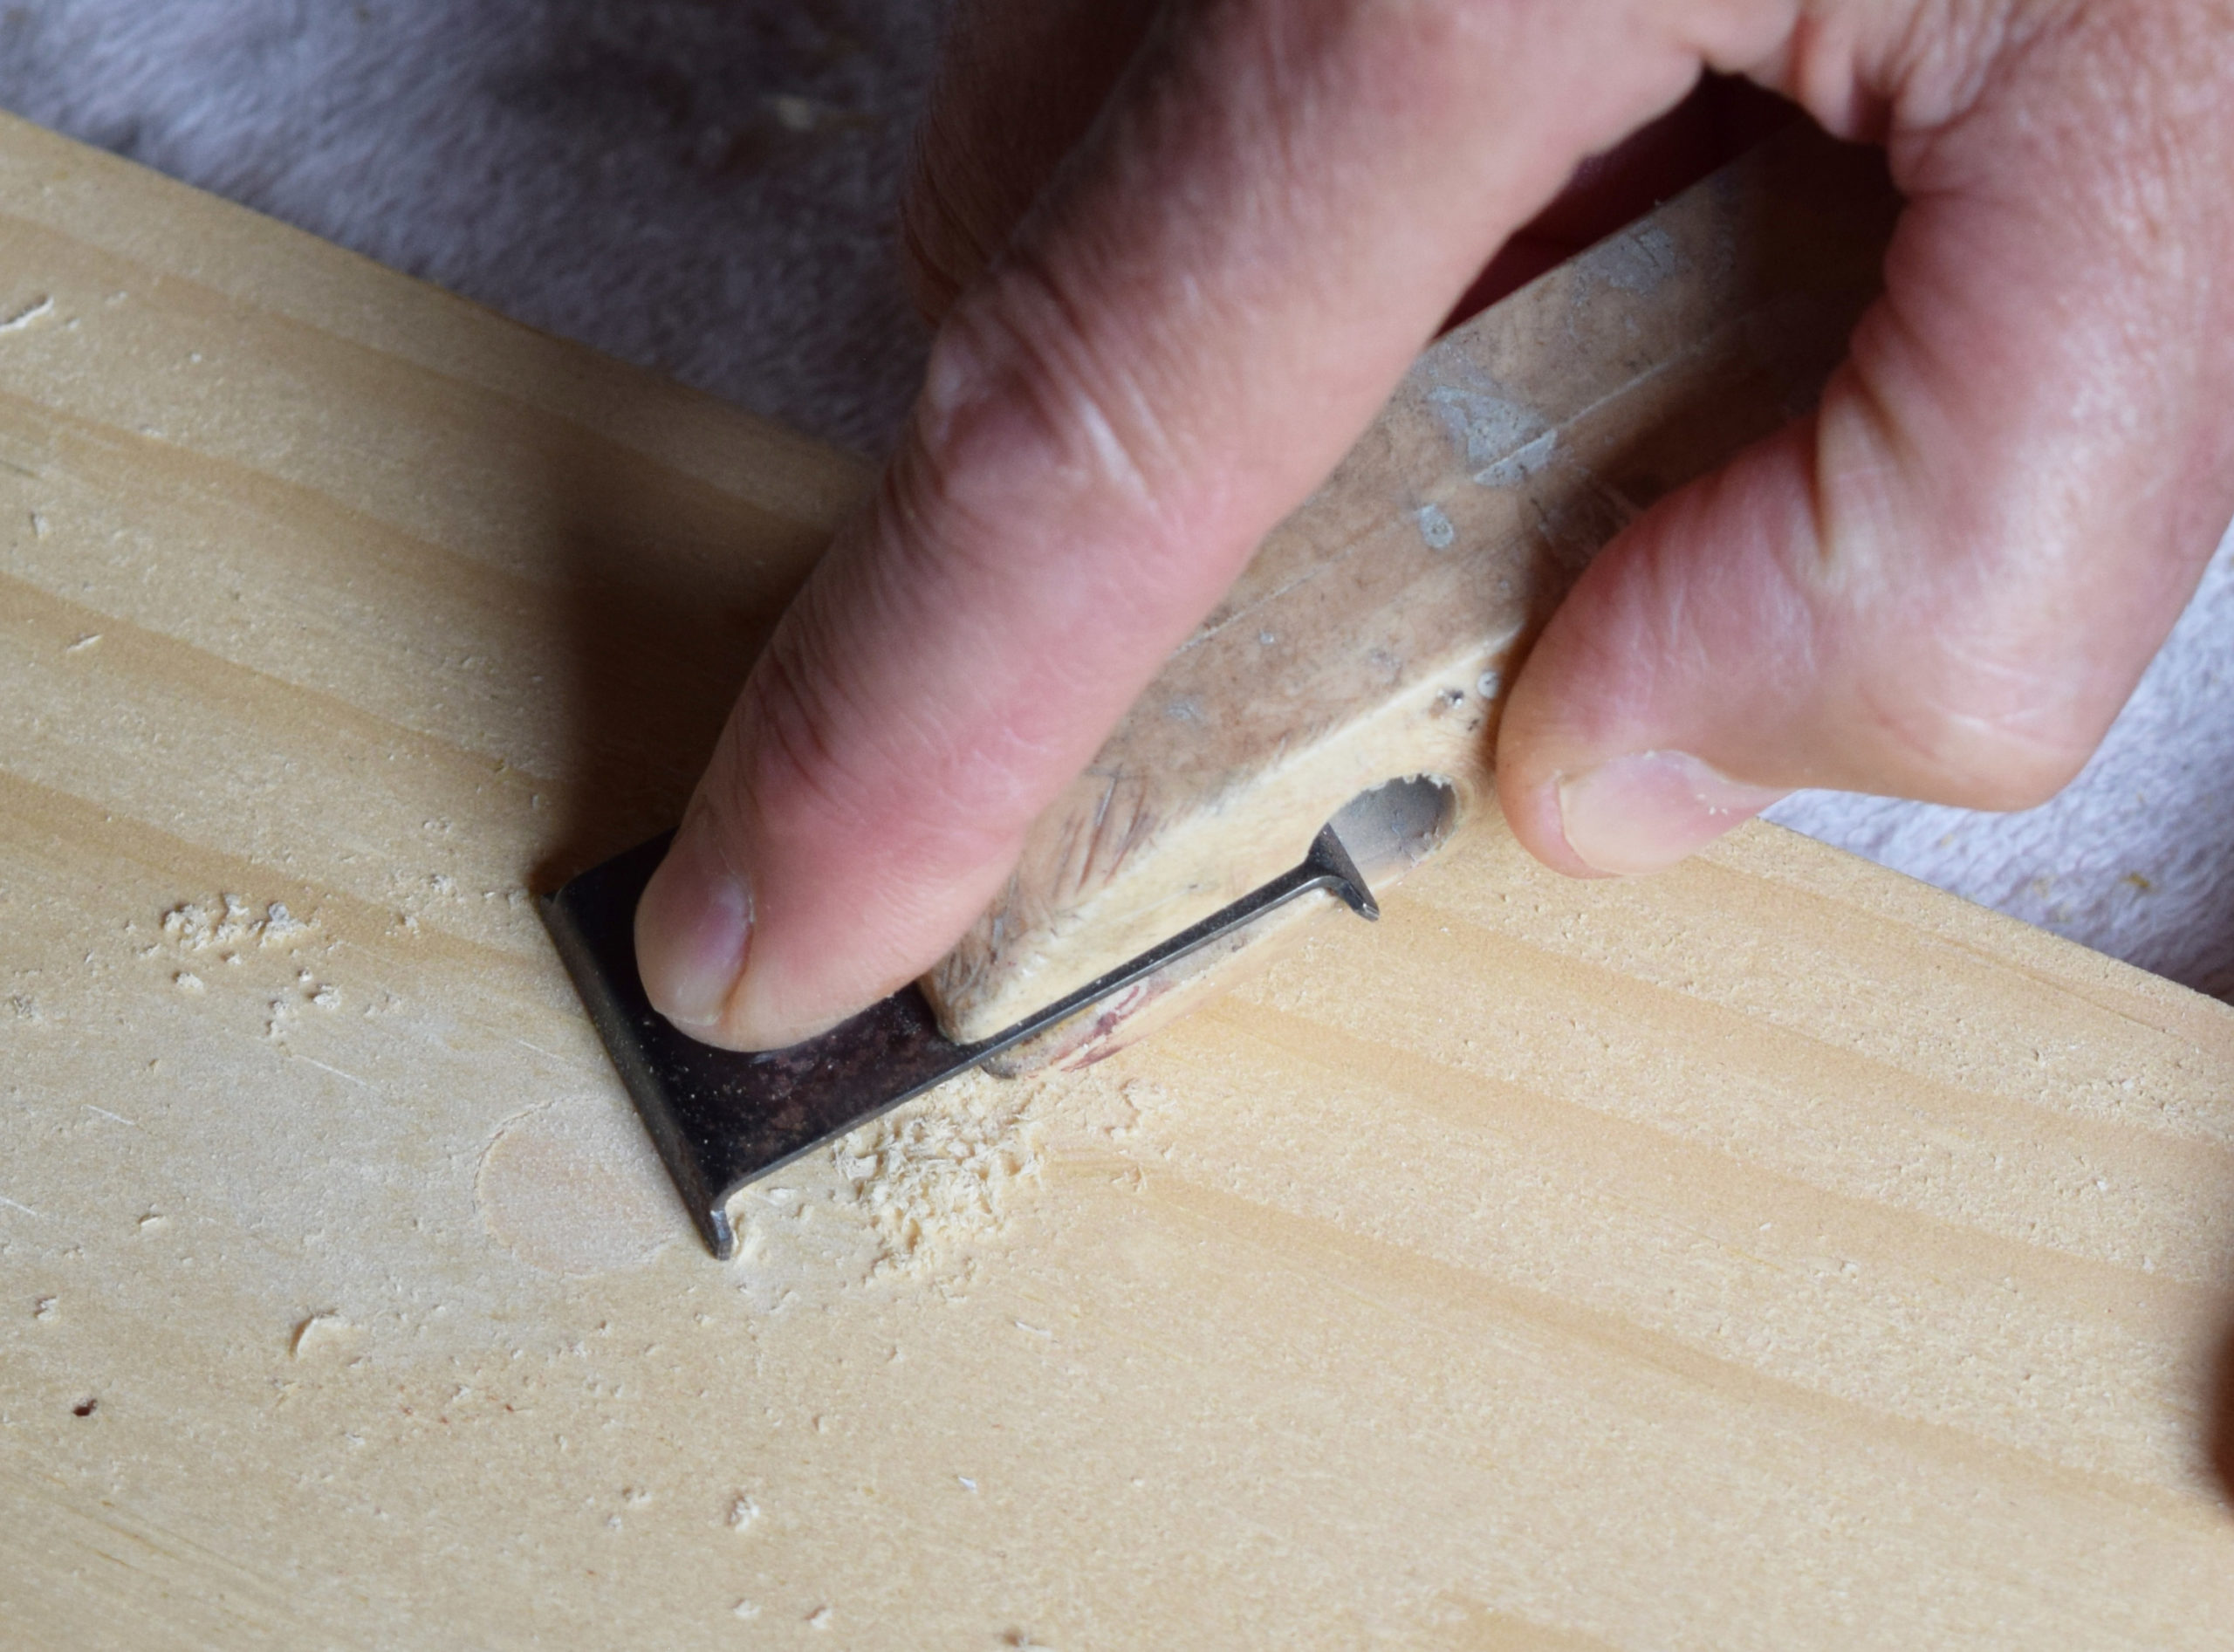 Ken Textor