About five years ago, when I needed to make room for another boat in the garage, I moved one of my Greenland kayaks out and tucked it under the eaves on the north side of my house. It wouldn’t be as well protected there as it had been in the garage, but it would be out of the sun and only occasionally subject to rain. Perched with its bow resting on a downspout and the aft deck on a bracket clamped to the power meter’s conduit, the kayak’s cockpit crossed the windows of my study and its stern hung over the back door. While it was never out of view, it was soon out of mind.
Photographs by the author
Protected by the eaves above, the kayak hung in plain sight and yet sadly out of mind. Over time the neglect began to show.
While I “saw” the kayak several times a day, I’ve been blindered by routine and paid no more attention to it than I did the gutter above it. One dim gray afternoon this winter, a patch of color caught my eye and I finally took notice of the kayak. Half of its starboard side was no longer white but a mottled olive green where it had been hit by the rain. In that moment, I was struck by an ache for how forlorn the kayak looked. In The Wind in the Willows, when Mole first saw Rat’s boat, his “whole heart went out to it at once,” but while Mole had been moved by a boat’s beauty, I felt sadness for the kayak’s sorry state. Perhaps there is something inherent in a boat, no matter its state, that can evoke feelings normally reserved for living beings.
Beneath the kayak, in the meager shelter of the same eave, lie a snow shovel, a spade, leaf and garden rakes, and a lawn edger. They are all showing the effects of exposure to the weather—rust, peeling varnish, wood turned leaden gray—but “forlorn” has never come to mind when I see them. While I can let my yard and garden tools deteriorate to the point where I’d discard them and buy new ones, I couldn’t let that happen to the kayak. Even though I had no use for the kayak, as I did for the tools languishing on the walkway below it, to let all that work done with care by hand come to an end through neglect was unconscionable.
Where the butyrate-dope covered canvas skin was exposed to the rain, it had torn itself apart.
I set up a ladder and climbed up to take a closer look at the kayak. Along the sheer the canvas skin had pulled apart in a jagged 18″ tear, revealing the still-blond spruce gunwale beneath it. When I peeked into the hull through the cockpit opening, I expected to find a bird’s nest but saw instead a paper-wasp nest the size of a cantelope hanging from the keelson in the stern. I counted that as lucky—the wasps hadn’t made a mess of the kayak as nesting birds surely would have.
If I had been more observant, I would have seen wasps flying in and out of the kayak cockpit. Their nests are only used once; I don’t know how many years this one has been in the kayak. Even if this one is recent, it’s empty during the winter and I’ll be able to remove it.
The frame was in very good shape, and the warm scents of oak and spruce filled the hull’s interior even in the cold winter air. The mortise-and-tenon joints between the deckbeams and the gunwales were as snug as they had been when I’d made them, and even the pencil marks I had made on the gunwale at those joints were still dark and sharp.
The kayak’s canvas skin and braided seine-twine lashings were materials I had stopped using decades ago when I switched to nylon and artificial sinew. Seeing the seine twine, I found I couldn’t remember building or paddling the kayak. I went to my study and checked some 30-year-old photos of kayaks I’d built, but the one under the eave didn’t appear in any of them. All of my other boats have histories that deepen my connections to them, but the absence of that connection didn’t diminish the feeling I had that this kayak deserved better.
The interior of the kayak was in good shape. Indeed, the framework of oak and spruce frame and the braided seine-twine lashings looked almost as good as new. The deck beam in the foreground is the foot brace and it shows little wear, an indication that I hadn’t paddled the kayak often.
I’d once had the same feeling for a boat that wasn’t even mine. A few years ago, a handsome 14′ cedar-on-oak lapstrake rowing skiff sat strapped to a trailer parked on the street a block from my home. It had no cover, and through the fall and winter rains it often filled with so much water that I feared the weight would tear the hull apart. That boat certainly deserved better. After a spell of rain, I’d walk to the boat with a 10′ length of garden hose and set it up as a siphon to empty it. The skiff survived the winter and disappeared in the spring. I never knew who built it or who rowed it.
While people may feel affection for inanimate objects—cabins, cars, furniture, works of art—what designers and builders put into boats make them unique. On the water, a boat gives back what it is given on land. And for boaters, being on the water requires trust of a kind that isn’t required of anything on land; it is easier, perhaps, to put that trust in something we feel is more than a senseless object.
The kayak will come down from the eaves and get the care it deserves. New Year’s Day is a celebration of what lies ahead, and my kayak has served as a reminder for me to see without blinders and to give attention to those easily overlooked, forgotten, and left behind.
Our house overlooks Irondequoit Bay, which opens into Lake Ontario near the city of Rochester, New York, and for a couple of years my wife, Carol, had been expressing a desire to have a powerboat. We already had five boats of various sizes—two sailboats, two canoes, and a kayak—that I had built over the previous 16 years, but they were all too small to be kept in the water and required time and effort to haul to a launch ramp and set up for an outing. There is a small marina below us on the bay, and Carol’s dream was to have a powerboat we could keep moored there so that any time we wanted, we could walk down to the boat, climb in, and go for a ride. She was quite happy to buy something, but I, of course, said, “Oh, we don’t need to do that, I’ll build you one.” That rash offer led to a three-year project.
My choice of design was determined by the size of my basement workshop and its French doors. I decided on the Nexus 21′ Planing Dory, designed by David Roberts of Nexus Marine in Everett, Washington, which was the largest boat that I could get out of my basement. I ordered the plans, which include drawings for the dory with a cabin and a transom-mounted outboard, and for the open boat with a motorwell. A construction drawing is numbered and cross-referenced with a 12-page construction guide. A table of offsets is available—in feet-inches-eighths, Imperial decimal, and metric—for builders who’d like to do the lofting. Those who’d like to skip the lofting can order full-sized Mylar patterns for the frames, stem, and other small parts. A person with some boatbuilding experience should be able to build this power dory with this comprehensive plan set.
Andrew Kitchen
Construction of the straight-sided Planing Dory is not complicated, although the framing does require some skills that first-time builders may find unfamiliar. The plans give detailed instructions for the build, especially regarding the substantial framing from which the dory gets its strength. However, the interior layout is less specific, allowing builders to make their own design choices.
The boat has slab sides of 9mm plywood and a flat 12mm bottom, so in many ways it’s a straightforward job, not much more demanding than carpentry. Unlike the boats I’ve built before, this one depends on substantial framing for its strength. The frames need to be beveled, something I didn’t have to worry about with my other boats, which had all been built around molds. I lofted the hull before starting the build, so I was able to lift the bevels directly off the lofted lines and pre-bevel all the frames before assembling them and setting them up on a ladder frame. The beveling was simple because with a slab-sided hull there is not an appreciable change in the angle along each limb of the frames, and the minor variations can be dealt with once the frames are in place on the building form.
The plans suggest 1-1⁄2” vertical-grain Douglas-fir for the framing, but it is hard to come by in good quality here in upstate New York. I chose sapele because it was locally available, affordable, and takes epoxy well. Mahogany was too expensive, and I was leery of using white oak—I had read warnings about using standard epoxies with it. I was happy with sapele but, like many hardwoods, it will bind and snap screws if the holes are not carefully prepared and the screws lubricated. All fastenings in this project were 316 stainless steel, as suggested in the guide.
The recommendations in the plans for construction are well thought out. I was particularly impressed by the measures taken to eliminate opportunities for rot to develop in the finished boat. For example: each frame consists of three straight futtocks butted together with epoxy and reinforced with 12mm-plywood gussets screwed and glued to both sides of each joint. The gussets bridge the inside corners of the frame, and the pockets created are filled with carefully shaped wedges of hardwood, eliminating a place where water would be prone to collect.
Andrew Kitchen
The small cabin allows passengers privacy when changing and, with its semi-V-berth, somewhere cozy and comfortable to relax. A head may be installed at a later date.
The boat is built upside-down on a ladder frame. The construction is straightforward. The only challenge I found as a solo builder is the sheer weight of the bottom. I used 1⁄2″ sapele plywood as recommended by the plans, and this involved three 4′ × 8′ sheets. Luckily, two I-beams run across the ceiling of my workshop, allowing me to install two chain hoists; they made lifting and positioning the bottom easy.
I covered the exterior of the hull with 6-oz fiberglass cloth and epoxy. The plans call for a 1-3⁄4″ x 2″ oak skeg and 3⁄4″× 1-3⁄8″ oak skids bedded with 3M 5200 sealant and screwed through to the frames. I painted the hull before turning it over, starting with a two-part epoxy primer, followed by a linear polyurethane topcoat and a water-based bottom paint to minimize vapors (my workshop is directly under our bedroom). Over the last four summers the topcoat has held up well. I scrape down the bottom paint and refresh it each season. Our local waters are not the cleanest and the dory’s waterline acquires a thick layer of scum, but otherwise the bottom stays remarkably clean.
Once the boat was right-side up, I cleaned the inside, put fillets of epoxy along every seam, and spread two coats of epoxy over the interior. Up to this point I had followed the design to a T. The Planing Dory was designed as a versatile craft that would adapt well to many uses on the Washington State coast. Some builders finish the dory as an open boat with the outboard either mounted in a well or on the transom. Others add the cabin and windscreen detailed in the plans to protect the crew. My goal was to build a boat for use motoring to a beach for swimming or to a waterside restaurant on our local bay on New York’s Lake Ontario shore, so I made some modifications to the design. I reduced the height of the cabin and gave the windshield a more streamlined look. I also added a deck and coaming around the cockpit to soften the lines and protect passengers from spray.
After framing the cabin and side decks, I painted the interior before adding the 3⁄8″ okoume plywood cabin walls and 1⁄4″ okoume decking. With the major construction finished, the trim, windshield, and cockpit furniture remained. This part was challenging but fun. I had free rein as far as design was concerned: the plans leave interior organization to the builder, recognizing that the uses to which the basic hull can be put are as diverse as the people who choose to build it.
My aim was to build a versatile day boat. The cabin has an upholstered semi-V-berth, with room for someone to change into a bathing suit in private. No head or porta-potti has been installed at this point. The cockpit provides seating for six people. The accommodations were finished bright with a water-based TotalBoat Halcyon Marine Varnish.
Andrew Kitchen
At 21′ LOA even the cabin-version of the Planing Dory has a roomy cockpit, spacious enough for six people. With lockers beneath the bench seats and the open cubbies under the two forward seats there’s plenty of storage.
It had taken me just a couple of months shy of three years to get the boat essentially finished. I still had to install the steering mechanism and an electrical system—a new experience for me. I left the installation of the 40-hp Honda outboard to the dealer.
Carol Kitchen
With the cabin, the dory can be a comfortable cruiser. The plans include drawings for the dory as an open boat with the motor moved forward into a well, a workboat option suitable for fishing, scuba diving, or hauling.
Early in the spring of 2018 the boat was finished, and ready for the engine installation. That summer we were off to Mystic, Connecticut, for The WoodenBoat Show and a vacation on Masons Island, south of Mystic. After some maiden trips north on the Mystic River and south to Fishers Island Sound, our little craft now sits in the marina below our home.
Owning a powerboat has been a new experience for me—my previous experience had been exclusively with oars, paddles, and sails. Learning to dock the boat was the steepest part of the learning curve. Fortunately, the dory is a sturdy little craft and has handled the punishment with aplomb. The flat bottom provides reassuring stability, a benefit when it comes to carrying people with little experience of boating. I have recently added a bimini, which provides shelter as well as a handhold when coming aboard.
With the usual complement of just the two of us aboard, the dory’s performance is quite lively and remains so with four aboard. I’ve taken as many as five passengers; with six of us aboard, acceleration and top speed are predictably reduced. The flat bottom does pound in a chop, particularly in water disturbed by the crossing wakes of high-speed powerboats. Carol and I are not into speed, so we usually take the dory out in the evening when the traffic has thinned and slowed and the bay is peaceful. When driven hard, the boat does throw up a bit of spray, but not an excessive amount. It carves a turn well and doesn’t skid; in our confused waters I don’t push too hard to avoid the risk of the boat tripping over its outside chine.
Carol Kitchen
The author’s dory is powered by a 40-hp outboard, well within the range of 25 to 50 hp recommended for the design. The top speed listed is 25 knots.
Flat-bottomed boats can lack directional stability in a head- or crosswind until they have some way on. There is not much lateral resistance up forward to hold the boat on course, especially with a cabin in the bow adding to the tendency to weathercock. We get stiff breezes in our area, and a couple of times the bow has pivoted downwind as I was leaving my slip. Backing into the wind provides the maneuverability required at low speeds in tight quarters until I have enough space to turn and get up to speed.
The Nexus Planing Dory has expanded our boating horizons and provided some wonderful experiences for Carol and me, our family, and friends.
Andrew Kitchen grew up in England in the 1940s and ’50s when the only boats he knew were wooden ones. He used to devour his grandfather’s yachting magazines; his favorite parts were the centerfolds featuring the lines of the latest ocean racer or cruiser. He didn’t understand them completely, but they held him mesmerized. In his teens Andrew sailed on the Norfolk Broads with a school sailing club and day-sailed in the English Channel with his family. A half-century later he retired from a career in teaching mathematics and computer science. His first project was to build Iain Oughtred’s J II Yawl, the forerunner of the Arctic Tern. He then averaged one new boat every three years. His current project is Doug Hylan’s Siri, an 18′ canoe yawl. It’s a version of the Iris, which first caught Andrew’s eye 12 years ago when he saw its drawings in W.P. Stephens’s 1898 book Canoe and Boatbuilding.
Originally used as a beach-launched fishing boat, the No Mans Land Boat, named after an island near Martha’s Vineyard, Massachusetts, is a seaworthy double-ender. Several have been documented, and this one, built by the author, is based on a Beetle builder’s half-model from the 1880s.
As s working-sail fleets faded after the turn of the 20th century, astute observers in numerous corners of the world recorded their last remnants. The old way of building—carving a half model and then measuring it—was still very common, so without photography and field documentation, many boat types simply would have been lost. The No Mans Land Boat was certainly one of these.
In the 1930s, these double-ended cod-fishing boats caught the attention of historians Howard I. Chapelle, M.V. Brewington, and others. The Smithsonian Institution, where Chapelle became a curator, has a rigged model built by a No Mans Land veteran. In the 1950s, another historian, Robert Baker, found an 1880s boat and restored it for his own use; that boat and another now reside at Mystic Seaport Museum, and Baker documented both. So plans for the type exist, and they are as enticing today as ever.
The hulls are extraordinary. In the best of them, the sheerline has a lovely upward sweep forward and aft, and the section lines aft have shapely reverse curves culminating in a steeply raked sternpost. They are commodious, inviting the imagination to wander.
Martha’s Vineyard cod fishermen used them at nearby No Mans Land Island and praised their seaworthiness. They were drawn ashore at day’s end, and their sharp sterns facilitated relaunching stern-first into the surf. At season’s end, most were left ashore when the families moved home. They were well-built by capable craftsmen, including Joshua Delano of Fairhaven, who is said to have built 50 or 60 of them, and by the Beetle family of New Bedford, renowned whaleboat builders.
Jonathan Taggart
Having the foresail tack made off to the stemhead is efficient and powerful, but best reserved for long tacks.
They had straight keels with a lot of drag. Centerboards were offset, running through the garboard and alongside the keel. This preserved the integrity of the vertical keel and made beach stones less prone to jamming the slot. They were two-masted—using the parlance “foresail” and “mainsail,” as in schooner practice, not “mainsail” and “mizzen,” as in ketches, despite the diminished size of the after sail—and they were sprit-rigged, though some carried gaff foresails. In the March 1932 Yachting, William H. Taylor has a quotation—maddeningly unattributed—calling the type “almighty able, and they’d claw out to windward through anything that blew.”
With good looks and a solid reputation among seasoned mariners, these boats naturally have caught the attention of modern boatbuilders. But this is not the boatbuilding project for a beginner. Experience is essential and a good deal of determination highly advisable.
To begin, all the plans present problems. Two of the finest-looking hulls have no construction plans at all. One, a hulk by an unknown builder, was documented by Frederick H. Huntington and published in the April 1932 Yachting. The other was drawn from an 1880s Beetle half model documented by Chapelle, published in American Small Sailing Craft (W.W. Norton, 1951). The Huntington boat, which Roger Taylor wrote about in Good Boats (International Marine, 1977), has a sail plan that invites change (more on that below), and the Beetle has no sail plan.
Rosemary Wyman
FAR & AWAY is rigged with a dipping-lug foresail, ordinarily with its tack made off to the stemhead. But with its tack made off to a belaying pin at the mast gate, it can sail as a standing-lug, simplifying tacking in tight quarters.
The Huntington boat is handsome, no doubt. But far and away my preference—for the boat eventually launched as FAR & AWAY—is the Beetle. Chapelle captioned the drawing with this: “No Mans Land boat of the more powerful type designed to sail well.” He had me right there.
Construction takes a lot of thought and a lot of decision-making. A builder who is adept at the drawing board could develop a full construction plan. I did not: I started building, making decisions only as I needed to. If you are lost without a construction plan, it would be best to develop one or get a boat designer involved. Otherwise, look to Mystic Seaport’s plans catalog. The two boats in the collections there were both fully documented by Baker; although I don’t think either has as fine a shape as the Huntington or the Beetle, one of them, ORCA, a Delano construction from 1882, has great potential. However, she was batten-seam planked, which is uncommon these days. And, as always, workboat interiors might not suit modern purposes.
In construction, be faithful to the hull form. The challenge will come primarily in steaming and bending the planking aft, where the lovely and enticing reverse curves can be alarming while shaping and hanging lap-strake planks. Careful lining off and patient work pays.
Having the centerboard offset to one side not only prevents jamming—as valid today as it was a century ago—but also makes the boat trailer well. The long, straight keel settles nicely into rollers. A tongue extension may be needed for launching, though, depending on the ramp’s slope. The straight sternpost makes shipping the rudder easy.
Robin Jettinghoff
A straight, raked sternpost makes shipping the rudder easy. The author cast all his own bronze fittings, including pintles and gudgeons.
The large, open cockpit is commodious—on my boat, which is a little less than 18′, I’ve had six aboard quite easily, and four in comfort routinely.
The Beetle boat has a one-sheet plan showing lines, details of the centerboard (which I altered in everything but length and placement), stem profile, rudder profile, maststep locations, mast diameters (which I increased), and mast rake (which I did not change). This plan leaves a great deal to the imagination. I used a Scandinavian-inspired style of sawn-frame construction, and because each frame has rolling bevels and is joggled, or given something like a lightning-bolt shape to fit to the inside of the lapstrake planking, the process is a bit like fitting 50 or 60 breasthooks. I built that way because I wanted the challenge of doing it—and, rest assured, it was a challenge. I also wanted a stout boat. I used a deck and coaming layout, plus a mast gate style, derived from Bristol Bay sailing gill-netters. I set my seat riser height by getting in the boat and seeing what was comfortable, with a mocked-up coaming and long oar. I put in side seats but stopped them short of the forward thwart so that rowing two-abreast would be easier. My floorboards are athwartships, a style I noted in Sweden. My sails adopted some French practices.
Like most workboats, No Mans Land Boats were designed to carry a load. They also carried inside ballast, some of which could be discarded as the catch came aboard. Published sources mention sandbag ballast, stone ballast, or “a couple of hundred pounds of ‘handle iron’ pigs,” in the case of the March 1932 Yachting article. Today’s drive toward ever-lighter plywood construction and very light scantlings supported by tenacious glues might not work well here. My boat is built heavily, but I nevertheless added 150 lbs of internal ballast to get her down on her lines, and she might take a little more. She’s a bear to row—not unlike, say, a large Norwegian faering. I often row alone, and in a flat calm I’ve hit 3 knots. But instead of rowing solo into the teeth of a blow, I’ve set the hook and waited more than once. She’s primarily a sailer. Built exceptionally light, she’d need quite a load of ballast, which could make her quite stiff and a very different kind of performer. In my view, extremely light construction is overrated for a sea boat.
The existing sail plans, too, need revision. The original rigs made it easy to work amidships while hauling a catch. More sail—with easy reefing—makes more sense today. Maynard Bray, WoodenBoat magazine’s technical editor, owns MIRTH, a boat built to the Huntington design in the early 1970s, and he feels that her foresail should be larger. His advice helped when I was developing the sail plans for FAR & AWAY (see WB No. 202). I chose a dipping-lug foresail that would probably never be his cup of tea, but such variation is what taking on a challenge like this is all about. Experiment. Play. Try something, and if you don’t like the way it works, try something else.
The authentic sail plan also has a mainsail “club,” a baseball-bat-sized boom laced to the after third of the foot of the sail—which most of us today wouldn’t want flailing about overhead. Note also that a gaff rig like MIRTH’s requires at least a headstay and perhaps one shroud per side. To my thinking, that negates the advantages of an unstayed rig, which is easy to strike when necessary, for example when she’s on a mooring and a gale is forecast. In use, I find I make my foresail a kind of hybrid: when short-tacking, I take its tack aft to the mast gate to make it a standing lug sail. On long boards, I gain a half a knot or more by dipping the sail and setting the tack to the stemhead. My mainsail is boomed and so is MIRTH’s; it’s the best way to gain an effective sheet lead on a double-ender. A rope traveler gets the sheet over the tiller.
Benjamin Mendlowitz
MIRTH, owned by WoodenBoat technical editor Maynard Bray, was built by Arno Day and Joel White to the Frederick Huntington plans published in Yachting magazine in the 1930s. Her gaff rig requires a forestay and one shroud per side.
FAR & AWAY surprises me, and others, above all by her speed under sail. Sailing to weather in company with a friend’s modified Herreshoff H28, I better than matched him tack-for-tack. In the Small Reach Regatta and elsewhere, this heavy old fish boat holds her own and then some against other displacement hulls. I think that has everything to do with her hull shape and her ability to carry a large rig.
In tacking, I free the foresail sheet, put the helm down, and haul the mainsail simultaneously. As she comes through the eye, I free the mainsail and sheet in the foresail. This works in all but the heaviest weather—in gusts up to 30 knots, I’ve had trouble tacking, partly because I was towing a dory and partly because I had struck the main to reduce sail and couldn’t use it for balance. I might try a small triangular storm foresail or build in a balance reef—a diagonal reefpoint from the upper reef line on the leech to the heel of the yard. But that’s just another of a long line of pleasant puzzles presented by a boat that is teaching me a new way of looking at everything I thought I knew.
Beetle boat plans are available from Smithsonian Institution, National Museum of American History, Ships Plans. Frederick Huntington’s plans were published in the April 1932 Yachting and in Roger Taylor’s Good Boats (International Marine, 1977).
Tom Jackson
The one-sheet plan for the Beetle No Mans Land Boat, published as Plate 63 in Chapelle’s American Small Sailing Craft, has lines, offsets, and details (not shown) of the rudder and centerboard. Without construction plans or a sail plan, building the boat calls for judgment and experience. The sail plan shown is the final choice of several developed by the author.
Smithsonian Institution
No Mans Land Boat Particulars: LOA 17′ 8″, LWL 16′ 5 ½”, Beam 6′, Draft (board up) 1′ 6 ½”, Sail area 194 sq ft (as shown)
On December 2, 1875, Nathaniel Holmes Bishop launched his sneakbox, CENTENNIAL REPUBLIC, on the Monongahela River and rowed along the south shore of Pittsburgh, Pennsylvania, into the headwaters of the Ohio River. On November 9, 1985, I launched my sneakbox, LUNA, on the Allegheny River and rowed along Pittsburgh’s north shore to the confluence with the Monongahela, that same Mile 0 of the Ohio. Bishop spent the next four months traveling 2,600 miles to reach Cedar Key on Florida’s Gulf Coast. I’d follow the route he detailed in his book, Four Months in a Sneak Box.
from "Four Months in a Sneak Box" by Nathaniel Holmes Bishop, 1879
This illustration from Four Months in a Sneak Box convinced me to get on the Ohio River a month earlier in the year than Nathaniel Bishop had so I could avoid getting blocked by ice.
Photographs by the author
On November 9, 1985, I entered the Ohio River at the confluence of the Allegheny River, flowing under the bridges at left, and the Monongahela, merging from the right at Pittsburgh Point. On December 2, 1875, Nathaniel Bishop had been blocked at this spot by ice that had flowed from the Allegheny.
Six miles downstream from the confluence, I arrived at the first of the Ohio River’s 20 dams and locks, but I had to head ashore so I could walk up to the lock office to get someone’s attention. The entrance to the lock was jammed with debris. I had no radio—handheld VHFs weren’t practical for small boats then—the recreational boating season was long over, and my 13-1⁄2′ boat easily escaped notice.
When I pulled the boat up on the mud, which was more a greasy ooze than wet dirt, I lost my footing and struck the bow with my shin. The cold-molded hull resonated with a sound like a splitting maul hitting a wedge with its handle. A pink bruise swelled up in seconds and looked like an extra kneecap.
In Verona, on the day before I launched, I spread all of my gear out on the floor of the Sylvan Canoe Club’s meeting room. Neatly packed, it would all fit in the sneakbox without having to carry any excess gear on deck.
I got through the first lock, and then the second one 7 miles downstream, before pulling ashore at a riverside park. I set myself up for the night in a picnic shelter with a table for my bed. Driving 2,500 miles from the Seattle area to Pittsburgh, a distance equal to the cruise that I had ahead of me, and getting equipped to launch from the Sylvan Canoe Club in Verona had worn me out. After the first day’s 27 miles of rowing, I was exhausted. Not long after I crawled into my sleeping bag, a heavy rain slanted into the shelter on a stiff breeze. I lay there cold and utterly dispirited until exhaustion turned to sleep.
This new adventure was my second following in Bishop’s wake. In 1983, inspired by his book, Voyage of the Paper Canoe, I’d paddled a paper cruising canoe I’d made from Québec to Cedar Key, a distance of about 2,500 miles that took four months to cover. I had travelled with a partner then, but for the sneakbox voyage I was eager to go it alone. Doing the trip in the winter, as Bishop did, would be a better test of my skills and endurance. I just hadn’t expected to be put to the test on the first night.
I had built my sneakbox, LUNA, to plans in Howard Chapelle’s American Small Sailing Craft. The original boat had been built in 1880 and was described as “an old professional gunner’s sneakbox of a superior model.” It was 12′ 2/3″ long with a beam of 44″. Bishop’s sneakbox, CENTENNIAL REPUBLIC was 12′ long, 46″ in beam, and weighed 200 lbs. I wanted a longer, lighter boat and stretched Chapelle’s sneakbox to 13′ 6″ and cold-molded it with western red cedar. Bishop’s daggerboard trunk was centered and forward of the cockpit; the Chapelle design has it set to starboard just outside the cockpit coaming. The offset board had no effect on sailing performance and made the space under the foredeck more easily accessed.
I couldn’t bring myself to get up at first light though I had been awake in the dark of early morning. I loaded the boat and set out without eating breakfast. As soon as I was on the water it started raining lightly, covering the river with interlocking concentric rings like chain mail. There were a lot of factories lining the river, but only a few had lights on. On the left bank, two nuclear power plants with five 500′-tall concrete cooling towers billowed sugar-white clouds of steam.
I was soon out of Pennsylvania and in between Ohio and West Virginia looking for a place to go ashore. In Chester, I rowed up to the East Liverpool Yacht Club and set the nose of the sneakbox on the launch ramp. As I walked into town, I passed a couple who looked at me with the intensity of residents checking out a stranger in the neighborhood. After I found a pay phone to call home, I passed the same couple on my way back to the boat, and the man asked, “When’s the last time you had pizza, Chris?” George and Gladys had seen the article about my voyage in The Pittsburgh Press, had recognized my boat on the ramp, and had just left a bag of food for me there. They offered me the use of the East Liverpool Yacht Club for the night. It was near 4 p.m. and sunset was just an hour away, so I took them up on it. They helped haul my stuff into the clubhouse and after they left, I ate the ham sandwich, fried chicken, corn chips, and Cheetos they’d given me.
The following day, I covered 46 miles, a remarkable distance considering I averaged 25 miles per day on the Inside Passage where I didn’t have the advantage of a steady current in my favor. I stopped at Wheeling, West Virginia, and hauled LUNA out on a broad park lawn on Wheeling Island. I spent the night in the boat and woke to lightning and thunder at 3:30 in the morning. Soon the rain was hammering on the hatch cover with the sound of lead shot spilled down a staircase. I tried to sleep, but the lightning flashing tail light red through my eyelids and the crack and rumble of thunder kept me awake.
Roger Siebert
.
At 6 a.m. I started getting dressed, in the boat, a particularly painful process. To slip into my pants I had to lift myself by pressing my spine onto the edge of the cockpit coaming thereby lifting my hips. Getting my shirt and rain shell on was not too difficult, but once I had slipped into my life jacket, it took another three or four minutes just to get into my slicker. Getting fully dressed took almost half an hour.
I never saw any other recreational boats in the 28 days I was on the Ohio and barge traffic was light, so light that I always had lock chambers to myself. At the entrance to some of the locks there were pull chains that small boats could use to signal the lock keepers of their arrival. However, most had been disabled. Thus, if a lock keeper didn’t happen to catch a glimpse of me, which was usually the case in the fog, I’d have to land on the riverbank upstream, secure LUNA, and walk up to the lock keeper’s station. They were often surprised to see me arrive on foot, but always quick to open the gates. There were two locks at every dam, both 110′ wide. The smaller locks are 600′ long and the larger are 1,200′, which accommodates a tow with up to 15 barges.
The river had risen 1′ or so overnight and the sneakbox was nearly afloat. The daylight seeping through the fog was beginning to fill in the dark around the lights of the city. I passed under two bridges in Wheeling as a hard rain began to fall; crystalline stalks of water rebounded with each rain drop catching the morning light while the river glowed a fluorescent white.
Downriver I stopped at Powhatan Point to buy postage stamps. There was a pumpkin floating downstream as I pulled up Captina Creek along the edge of town. High water had pushed the banks of the creek up into the lawn of the park that bordered upon it. I rowed into a small pool cupped between two hills on the rolling lawn and tied the painter to the trunk of a mop-headed willow. I idled in town by shopping for food and buying stamps and post cards.
A mile from the point I caught up with the pumpkin, spinning idly in a back eddy behind a line of riprap sticking out from the right bank. As the river level continued to rise over the first two weeks of my month on the Ohio, the type of river trash changed. At first there was driftwood swept from riverbanks, then yards and playfields were stripped of basketballs, tennis balls, baseballs, a set of football shoulder pads, and an aluminum baseball bat which floated upright like a spar buoy. It would not be long before the turbid water breached porches and pilfered coolers, toys, and furniture.
Tired and hungry after rowing upwind for a long straight stretch of the river, I looped the painter around a large driftwood branch and let it tow me upwind as it drifted downstream.
There had not been much traffic on the river and by the time I reached the Hannibal Locks at mile 124, the gates hadn’t been opened for a while to let tows and debris pass through. I worked past stumps with their roots fanned out over the water, empty wooden cable spools, felt-tip pens, light bulbs, and plastic spoons. The small pink hand of a doll reached up through a dark brown patch of crumbled tree bark. One of the lock keepers had been watching me from high up on the lock wall. “Seen any West Virginians out there?” he asked. “I heard on the news that 53 of them got swept away and may be coming downriver. Keep an eye out for ‘em.”
When too much debris accumulated at a lock entrance, the lock keepers would open the upstream and downstream gates at the same time and let the river flow unimpeded through the chamber. After the logjam broke up and passed through, the gates were closed again.
The flooding was not uncommon for this time of year. Bishop wrote: “The water had risen two feet and a half in ten hours, and the broad river was in places covered from shore to shore with drift stuff; which made my course a devious one, and the little duck-boat had many a narrow escape in my attempts to avoid the floating mass.”
At the entrance to this lock, a logjam prevented me from rowing into the chamber. I tied the tail end of my 33′-long heaving line to my painter, swung the golf-ball-weighted monkey’s fist around my head and let fly. The two lock keepers could then drag me across the debris into the lock chamber.
The signal light changed green but I was stuck in a tightly packed raft of wood 20 yards from the opened lock doors. “Can I throw you a line?” I called up to the two lock keepers now watching me. They nodded. I tied the painter into the tail of my 33′ heaving line and slung the monkey’s fist up at the wall side. The rope-wrapped golf ball zipped by the head of one of the lock tenders at eye level and draped the line over the shoulders of the other. The one who wound up with an armful of line smiled at the accuracy of my throw, the other was wide-eyed at nearly being cold-cocked. They hauled away along the wall of the lock and LUNA skidded up over the drift and into the lock while I kept her away from the rough concrete walls with the butt of an oar. From the downriver end of the lock I rowed a quick mile to New Martinsville and spent the night at the Magnolia Yacht Club.
I was in no hurry to be on the water at first light the next morning. It had been a rainy night and at 3 a.m. I’d had to get out of my warm bed, and pull on my cold, wet boots and pants to check the boat. The river was up another foot, so I jockeyed the boat up the mud enough to give me the rest of the morning to sleep.
At midday I stopped at Sistersville, a town with two boat ramps on the river. I hauled out in the middle of the upstream ramp that looked less like a ferry dock. I bought some post cards at an old soda fountain in town. The ceiling was high and its lighting dim. The proprietor, a man in his 70s, was smoking a cigar. Two men, his contemporaries and, I suspect, his loyal customers, were seated on pedestal stools talking quietly but looking at me. I still had my life jacket on over my bright yellow slicker and under my bib front rain pants, looking not a far cry from a circus act.
I walked to the city hall to take advantage of the restrooms and on my way back to the boat, I stopped in at the office of The Tyler Star-News, the town newspaper, to offer them my story. A little press had always been helpful on my long cruises. The editor called in a young cub reporter and the two of us stood squared off to one side of the editor’s desk.
He asked me why I was making this trip. I answered: “A man named Bishop traveled this same route in 1875.” It had the sound of an answer and people often accepted it as one, but I really expected someone to say, “So what?” I suppose a more honest answer would be that I like finding solutions to problems, but I didn’t set out from Pittsburgh looking for trouble.
“Well,” said the cub, “I guess it wouldn’t hurt if we took some pictures.” We drove down to the ramp and after posing for two photos I rolled the boat down the ramp on my collection of boat fenders and pushed out into the current. While newspaper articles had been helpful during my paper-canoe adventure—we were often warmly received by readers who saw us paddling by—I was traveling twice as fast with the current’s help beyond a newspaper’s reach by the time an article would come out. I stopped dropping by newspaper offices.
Bishop writes of the origin of the sneakbox: “Captain Hazelton Seaman, of West Creek village, New Jersey, a boat-builder and an expert shooter of wild-fowl, about the year 1836, conceived the idea of constructing a boat for his own use a low-decked boat in which, when its deck was covered with sedge, he could secrete himself from wild-fowl while gunning. Seaman named the result of his first effort the Devil’s Coffin.” The sleeping accommodations aboard LUNA were snug for a living being. Without lilies for my open-casket tableau, I had to settle for bananas.
I stopped for the day in the woods on the left bank just upstream from the town of St. Mary’s and took a sponge bath that evening. Lacking a sponge (except the one to soak up bilge water), I used a bandana to both wash and partially dry myself. The rest of my drying I did in my clothes. I didn’t wash my hair. No matter how it may have looked, it felt pretty good after being rinsed incidentally almost daily by rainwater.
The mud on the river banks was deep, as thick as shortening, and as slippery as grease. The two dark-blue shapes at the lower left are my socks. The mud had created so much suction that it pulled my boots and socks off when I got stuck and I couldn’t move except by stepping out with bare feet.
My clothes needed washing, especially my wool pants, and the pair of socks I had worn continuously for five days and four nights. Mud got on everything I wore and everything in the boat. It had even climbed from my boots up the inside of the legs of my rain pants. After I crossed a muddy ditch to get to a supermarket on the Kentucky side of the river, I had wiped my boots thoroughly on the mat at the entrance, but the pant legs sprinkled muddy outlines of my boot heels on the floor. Only when I got to the checkout counter did I see that I had left a path on every aisle I’d walked.
Shortly after noon, I left St. Mary’s under thinning clouds through which I could see a well-filtered outline of the sun. I took advantage of the warm breeze to air out my boots and socks. Though I was rowing into the wind, the odors of whatever I stowed on the afterdeck or in the cockpit circulated up to my face. The smell of my bare feet, socks, and boots were like the breath of an old dog in poor health. It only went away when I put my socks and boots back on.
At the Willow Island Locks, the lock keeper shouted at me to tie up on the bollard, the one recessed in a slot in the lock wall that floated down with the water. I was sitting in the middle, away from the walls, where I preferred to be. I threw a line up over the bollard and held it in one hand while I made a sandwich with the other. The day went well, 37 miles, a short distance, as I got off the water early in Waverly at 4 p.m.
I hadn’t brought a spoon and it wasn’t pleasant eating Grape-Nuts with milk, a favorite breakfast, without one. Necessity drove me to make a spoon out of one of my film canisters.
As at most of the places along the river, the docks had been hauled up on the bank for winter, but I found a ramp and a park picnic shelter with a roof, a table, and a chair. I badly wanted Grape-Nuts for dinner. Two days earlier, I had bought a box and was looking forward to having that crunchy cereal for breakfast, but I hadn’t packed a spoon. I’d been improvising with a sail batten but while that worked for rice pilaf, it let all the milk run out of the Grape-Nuts. I tried to slide the cereal from the cup with a ball-point pen, and then with my fingers, but fared no better. That had been getting my days off to a bad start and when I got to Waverly, I was on the verge of knocking on doors to beg for a spoon. On the picnic table where I’d scattered my gear, I had an empty Kodak film canister. I went to work with my pocketknife, turned it into a spoon, and that evening finally had my Grape-Nuts with milk in every mouthful. That small pleasure had an outsized impact on my frame of mind.
I started the trip rowing with the ends of my fingers, the way I usually row, but after a while my fingertips were sore and blistered. I shifted to the middles of my fingers until they wore out and then moved on to my palms. They each developed hot spots, but my fingertips were then ready to use again.
During this break-in period, I took hold of the oar handles with the same care that a shot-putter uses to settle the shot in hand, twiddling my fingers to sit on the oar squarely so that there was only compression pressing the layers of skin together, not the shear that would pull them apart. After a few strokes the stinging went away, and I could pull. The blisters I got started out white, especially when the skin was wet, and with time turned a bit yellow, then brown when the separated layers of skin fused back together.
I was on the water at 7 a.m. from Waverly and it started raining five minutes later. Heading toward Reno, I ran into a thick fog being swept upriver by the wind. There was not much to see in Reno, except a sign saying “George Washington Slept Here,” and all I saw of Marietta from the river was a McDonald’s sign rising over a mound of tires heaped on the bank.
I bought a spoon in Belpre and then rowed across the river to Parkersburg, an uninviting city walled in against the floodwaters, where I met Harry, who was working on a sternwheeler he had been building for seven years. He gave me a ride to the post office and back so I could collect letters sent to me via general delivery.
The Ohio took a sharp turn around Belpre from south to west and then divided on either side of 3-1/3-mile-long Blennerhassett Island. The river arced south again around a mile-long bend crowded with factories that made the air smell like plastic. A southerly was making a steep chop on the next gentle curves of the river and I kept close to the shore where there was less wind.
I pulled into Hockingport, walked to the general store—the only store in town—and picked up some cookies, bread, and canned soup. In the next few miles downstream, I ate the whole package of the cookies.
The box I used as a seat in the sneakbox also served as a seat ashore. It had a watertight door for access to the frequently used gear that I kept inside it. I knew from previous long cruises that my memories didn’t always paint a complete and accurate picture of the experience, so I made a point of taking pictures of myself on days when I was feeling worn out.
At the Belleville locks, no one responded to the recreational-craft buzzer, and once again I had to tie up the sneakbox and walk to the operations building where I met lock keepers Tom, Bob, and Aaron. Tom and Bob showed me around the lock control system, which bristled with a lot of lights, dials, and buttons. They gave me access to a shower and after I toweled the steam off the mirror over the bathroom sink I was surprised by how terrible I looked. My eyes were bloodshot, unshaven I looked like a fugitive, and my neck was chafed cherry red by the collar of my raincoat, getting scraped every time I turned my head to see where I was going.
Tom offered to put me up for the night, so I secured the boat up away from the water on a small beach strewn with rock and wood debris. I was tired and thought I had put in a full day of rowing, but it was only 2 p.m.. We drove to the 75′ mobile home where he introduced me to his wife, Regina. Their schedule wasn’t governed by nightfall, and it was near midnight before I got to bed. I heard the furnace come on twice during the night and all the heat made me sweat and gave me nightmares.
In the morning Tom woke me at 7, gave me a bowl of cereal, showed me his motorcycles—all 20 of them–and took me back to my boat. He stayed to watch me row off. Having someone to say goodbye to made it a better morning than most.
The wind had shifted north and brought the cold. With a long stretch of south-flowing river, I considered sailing all morning and looked for places to put in and get the sailing gear out of the boat.
During a break of blue sky, sunshine, and warm air, I took my socks and boots off to air out my feet. The soles of my feet and my toes were black with sloughed-off rubber. I pulled into Ravenswood to find new boots. I bought new socks and boots, 1-1/2″ taller, clean, and sweet smelling.
The high water flooded the mouth of Sandy Creek where it flowed into the swirling Ohio River. A railroad bridge made of timbers black with creosote spanned the tributary. I set my camera and tripod up midspan, returned to the boat and triggered the camera with a radio-controlled remote.
I rowed to the downstream end of town and pulled LUNA up on a lawn alongside the railroad bridge that crossed Sandy Creek. Before heading back out on the river I set the camera on the bridge to snap a picture of myself rowing out to the Ohio.
Since this was already turning out to be a short day, I took the time to extract the mast, sprit, boom, centerboard, and rudder. Before the sails were even up, they were spotted with mud and black grease from the oars. There was barely enough wind to push me out of the creek into the Ohio but a bit of a breeze came up as I headed toward an upriver tow. I inched to windward as it went by then fell off to sail through its wake.
I’d put an access port in the transom that allowed me to carry LUNA’s mast, sprit, and boom below decks. The spars were out of the way there but setting the rig up took a long time. I sailed a few times but bends in the river made it impractical and the spars would spend most of their time stowed until I got to the Gulf of Mexico.
Two miles downriver I gave up on sailing and dropped the sail, sprit, and boom before rowing to a stretch of the riverbank called Hughes Eddy. The still-standing mast was flailed by a few branches before the hull hit the mud. I swung one leg out and sank in mud to within an inch of the top of the boot. I shifted my weight back in the boat and had to curl my toes upward to help release the boot out of the mud. I rowed downstream and found a dirt ramp where the mud was only 10″ deep. Every step I took was still a struggle and as greasy mud spread everywhere I struggled to keep my frustration and anger in check.
Afloat again, I wiped the mud from the decks, boots, and cockpit as LUNA drifted. As the boat came back into shape, I recomposed myself. I rowed hard enough to burn up some energy, but not so hard that I would tear up my hands. At Letart, the river turned north, into the wind, and I pulled a slow 2 miles into the Racine locks.
There wasn’t any turbulence when locking downstream, so I took advantage of my time in the chamber by having a bite to eat. I braced my feet against the floating bollard and held LUNA in place with a loop of red line connecting an oar, tucked under my legs, to the bollard. The usual fare was a cheese sandwich with mustard and sliced tomatoes or cucumber. The wool pant legs that served as my kitchen counter couldn’t be sponged clean so they stayed speckled with dried tomato seeds and mustard.
I locked down with a loop of line around the floating bollard and an oar under my legs, leaving both hands free for sandwich making. The light was fading as I got out of the locks, so I looked for a place to get off the water. I found a small dirt ramp near two empty houses and a house trailer with a broken window. I set up my blue tarp on one of the porches and put my sleeping bag and pad under it. Cold and tired, I was eager to sleep and put the day behind me.
During the night a bright light flashed repeatedly on the tarp. I worried that it might be someone wondering what I was doing on private property, but realized tows were sweeping spotlights across the river looking for the reflective channel markers.
As usual, it had rained in the middle of the night and again as I was loading the boat. A week of rowing had loosened the bronze oarlocks. I had lubricated them with Vaseline, but rain washed it out. The only two moving parts in the boat were slowly turning each other into a black paste of powdered bronze. Hearing the locks knocking all day long quickly got annoying. I made stops at Pomeroy, a one-street town squeezed between the river and a row of 250′ hills, and at Point Pleasant, a walled-in town with room to spread upstream from the Ohio’s confluence with the Kanawha River, but had no luck finding grease for the locks.
It started raining again as I passed under the bridge at Point Pleasant. I was to the point that I tried to ignore it and didn’t put my slicker on. Maybe it would stop. I sang a lot during the day to keep myself company. I didn’t know all the verses to “Poor Wandering One” from Gilbert and Sullivan’s Pirates of Penzance, but there was no one to complain about my singing what I did know over and over.
Most of the boats in marinas were hauled out for the winter and empty covered slips were great places to spend the night. I took advantage of a laundromat near this marina to wash my clothes.
I rowed along the Gallipolis riverfront and up Chickamauga Creek to the Gallipolis Boat Club and stopped for the day around 3. All but five boats had been hauled for the winter and even the covered slips were empty. I coasted into one with a shag-carpeted floor. The door was locked by a hasp on the outside, but I managed to lift the nail out of the hasp with a piece of electrical wire. I walked into town and did the laundry and some shopping. It felt good to get into clean clothes; I’d been wearing the same things for a week. Back at the slip I cooked leek soup with rice and walnuts, pulled wet gear out of the boat to dry, and sponged the cockpit clean.
Some heavy downpours had rattled the corrugated metal roofing soon after I settled in after my walk into town, making me especially glad to be clean, warm, and dry, but at dusk the sky cleared to reveal a bright crescent moon—even its dark side was visible—and its sharp upper cusp pointed at a bright pinpoint of yellow light, Jupiter or Saturn. The only things this camp lacked were running hot water and company. My recent conversations had been incidental and short.
My hands had become callused enough to make rowing comfortable, and my feet had stayed dry in the new boots, but I needed a break in the weather and a chance to visit some people to renew my energy. The rain made everything harder, washed the scenery to a dull monotonous gray, and kept people indoors.
It was a cold night. The chilly wet air settled over the creek and seeped into my sleeping bag. I lit the stove and heated up a pot of water to pour into my screw-top water bottle, slipped it into a sock, and pushed it to the bottom of the sleeping bag. I pressed my feet around it but its warmth only made the rest of me feel colder.
At dawn, I rowed out of Chickamauga in a thick fog. An upriver breeze poured its cold around the back of my neck and seeped into the gap left by a short-tailed shirt. I couldn’t row hard enough to generate any heat and the faster LUNA moved, the colder the air felt. I took one of my pogies (gloves made to fit over hands and oar handles) off one hand and tucked it under my hat to hang like the tails on a French Legionnaire’s cap then tucked a spare sock in my collar.
In the trees there were several great blue herons, balanced improbably on legs as slender as pool cues. Smaller birds perched nearby with their feet clenched like burls around the branches. The mist made the air heavy, and I could feel its resistance as if I were snowshoeing in powder snow. Visibility was poor; I listened for the hiss of lead barges in tows and the sound of water tearing at snags projecting from the bank. I slipped by Racoon Creek where the muddy Ohio swirled its silted water in the creek’s translucent green pool like cream stirred into coffee.
I rowed into a new chart and discovered I was just 2 miles upriver from the Gallipolis dam and on the wrong side to enter its lock. I crossed over, listening to the sounds sifting through the thick fog. There was the rumble of a tow’s distant engine. I turned my head from side to side to silence the wind’s whisper in my ears. The rumble of a tug’s diesel engines comes from the rear of a tow and the bows of the lead barge can be more than 550′ from the engine noise. Beneath a lead barge’s long overhang there is only a quiet hiss of water being pushed under. That’s what I was listening for.
I had been warned about staying too close to the banks here when a big tow comes through. If barges are locked through it in two sections, the tow will push the first section into the bank and leave it parked there. I saw chains with links as big as footballs and hooks for barge hawsers, but I slipped by without having to evade any barges.
The industrial area around Huntington and Ashland thinned out as I went down river. The limbs of flooded trees combed plastic bottles and jugs from the water. The hills eased back from the river, leaving wide bottoms beyond the banks. As it grew quieter, I heard what I thought might be the air mattress squeezing out air or the stove leaking fuel. I crawled into the cockpit headfirst to find the source of the sound and realized the hiss was the sound of the current sweeping gravel along the river bottom resonating in the hull.
I spent the night in a marina in Ironton, where I was given permission to sleep on the docks. I met Carl, who had been hanging out in his boat. He borrowed my cookpot to boil up a couple of steaks in plastic bags and when he returned the pot, he brought me a beef stew meal in a bag. On his way home he brought me an electric blanket and two extension cords. I plugged into the shore power and tucked the blanket into my sleeping bag. It was heavenly.
When the sun came out and the air temperature was pleasantly warm, I was eager to get out of clothes that I had been wearing day and night. During one long cold spell I slept in the same clothes I wore during the day for more than a week. My pants got so sticky that I had to pull them away from my legs in order to sit down.
The morning sky cleared, and the south wind brought warm air. After a stop in Sciotoville, I spread all my clothes on the afterdeck to dry and rowed undressed to dry my skin a bit. Four miles downriver, I passed by Portsmouth at what I thought was a discreet distance, but I think I unsettled an old couple out for a stroll along the river. If they had been naked that certainly would have been evident to me, so they must have seen that I was. I waved. They didn’t wave back.
The floodwaters gave me access to places that would be high and dry at normal water levels. I didn’t press far into this cornfield, but it looked like I could have rowed a mile or more before reaching high ground.
Coming up on the Scioto River at the west end of town I had to keep tight to the Ohio’s bank to allow room for a huge tow to pass. The Scioto runs through a wide valley where the hills on the Ohio side are set well back from the river. A flooded cornfield stretched almost two miles from the river to the hills. I rowed into it and set the boat among the stalks for the coziness of it.
For several chart pages there were no towns marked, only river navigation lights, day markers, and creeks. Tangled gossamer threads drifted across the river. A butterfly flew by over the stern. It could have been summer, but there were no leaves on the trees and the ash-colored contours of the ridges of the landscape were clearly visible under the latticework of trunks and branches. By the afternoon the warm air was rippling the horizon.
I stopped for the night at the riverfront home of the Bowden family. Timmy, 10, gave me permission to spend the night in his treehouse.
Fifty miles of rowing from Ironton put me in Vanceburg. I got dressed for landing. Tucked in a dent in the shoreline where the water spun debris in an eddy, a lawn sloped into the water. Fifteen feet from the water’s edge was a treehouse. I landed and asked at the house farther up the bank if I could pull off the river for the night. A Mrs. Bowden said that would be fine. Her son Timmy trotted to the door to have a look at me. “Is this the man in charge of the tree house?” I asked him. “Would it be all right if I camped in it tonight?” Timmy was beaming with the honor of hosting a stranger.
As I was tossing gear up into the house, a 6′ by 5′ platform, with one wall, a roof, and a roll-down shade, 10-year-old Timmy came down with hot chili, a can of Sprite, a cup with ice, and crackers wrapped in tin-foil. I’d done 159 miles in the past three days, without making myself miserable. The weather had been good, the river fast, and I’d been happy to spend whole days on the water. Things were looking up.
At 6:45 a.m. the next morning, Timmy walked me to a café to buy me breakfast. He ordered biscuit and sausage for $1. I ordered three pancakes, hash browns, and orange juice. His dad joined us and after breakfast the two of them saw me off. I pulled through the half-submerged leafless brush, through the back eddy, and into the driftwood-crowded Ohio.
The day was remarkably warm. Even the cheese was sweating. After 55 miles of rowing, I stopped at Big Locust Creek. Along the banks were two small docks in front of trailer homes all locked up for winter. I set up to sleep on the porch attached to one of the trailers. On its door was a sticker: “The owner of this property is armed. There is nothing inside worth risking your life for.” I took a chance on sleeping with his porch roof over me. I wouldn’t be inside, and it was going to rain again.
The accommodations at Ninemile Creek were meager and it was just as cold inside as outside.
I had a short day’s row, just 22 miles to Ninemile Creek where I found an abandoned shanty that had so many gaps in its walls of weathered boards that it was little better than sleeping out on open ground. The temperature dropped to about 25 degrees, and while I slept well enough, getting up was painful. My whole body ached with cold and my hands stung. The river had dropped about 3′ overnight; to get afloat I had to drag my boat down the bank past signs that said Danger, No Fishing, No Swimming, Sewer Effluent.
I was on the water by 7:30 and rowed hard to warm up. As the sun rose behind a bank of high clouds there was a thin vapor on the water. The breeze spun columns of mist 10′ tall and carried them like undulating towers of dishes across the river.
I ferried across to Brent where Harlan and Anna Hubbard built the shantyboat made famous by his book, Shantyboat. I put ashore at a ramp leading through a tunnel under a single railroad line. There were two old houses there; one had a light on. I rang the bell and an elderly lady came to the door. She remembered the Hubbards and said they were living downriver in some hollow. As I walked back to the boat, I remembered Payne Hollow and found on the chart two creek valleys where they might be. The Hubbards were two days away.
Cincinnati, surrounded by bridges, was striking in the morning sun, but no place for a small boat. Fourteen miles downriver at North Bend, I was headed south with a good breeze behind me. I deliberated over taking the time to get the spars out but put the mainsail up near Petersburgh and sailed to the next chart where the river takes a 90-degree turn. I ran about 3 miles making 8 mph over the bottom. I crossed the 500-mile mark and at dusk arrived at Rising Sun. I was again tired to the point where I would stand for long spells trying to remember what I was supposed to be doing. After I bedded down I slept well.
In the morning the light coming through the clouds turned water and land gunmetal blue. About 9 a.m., I pulled into Patriot and picked up some food in a well-stocked general store where the shelving leaned toward me as I walked by on the creaking wooden floor.
I hammered away at the headwind through the middle of the day. My right hand was sore, and the middle finger numb. The ramp at Warsaw was blocked by logs and I finally got off at Craig’s Creek. There I met Dan and his wife, Marsha. They knew of Harlan Hubbard and called up a friend, Carl, an Ohio River historian. Carl told me where I’d find Payne Hollow.
The next lock was just 1-1⁄4 miles downstream. I pushed on past Vevay and Ghent, stopped for food and water in Carrollton, and arrived at Brooksburg at sunset under a wash of color in the sky that ranged from peach at the horizon to lavender above. The gibbous moon spattered on the water with mercurial reflections. I rowed by moonlight to Indian Kentuck Creek where I found a float with an aluminum skiff resting upside down on it. I shoved the skiff to one side and suspended my tarp over it and my tripod.
My feet were cold as I cooked dinner and never warmed up. When I slipped into my sleeping bag, I couldn’t sleep. At midnight I put on more clothes and put my pogies on over my feet. If I stayed motionless, I could keep a veneer of warmth around me, but I still couldn’t sleep. I waited for sunrise.
I had never spent a night so cold as the one I spent on this raft. My sleeping bag had a silvery coating on the inside to reflect heat, but it had worn off after a week and turned itself into a summer-rated bag. I slept in my clothes, but that did little to fend off the cold that settled into this inlet just a few dozen yards from the river. As the frost settled during the night I didn’t sleep at all. I just waited for first light so I could break camp and start rowing to warm up.
In the morning, everything was white with a bristling fur of frost. It took 15 minutes to get up the nerve to unzip the sleeping bag and let my envelope of lukewarm air drift away. As I got dressed, the tarp dropped mica-like flakes of ice on me. To keep my gloves from getting wet I stuffed the tarp into its sack bare-handed. My fingers quickly turned stiff and red. I was under way by 8 a.m. and by 9, the morning sun was dimmed by a zinc-gray membrane of high haze. In the muted light I rowed past a Kentucky shore that had a metallic gleam of frost as if the entire landscape had been electroplated in silver.
Payne Hollow was just 17 miles downriver. When I arrived, the only thing marking the place was an aluminum johnboat pulled up on the sand in a thicket of leafless saplings. As I rowed ashore, LUNA grated over a rock and I knew from the sound that there would be some damage. I pulled ashore, lifted the gunwale to check the hull, and found a deep gouge that had torn through the fiberglass and into the red cedar planking.
I found Harlan and Anna at home and introduced myself. They were both in their 80s, white-haired and soft-spoken. They invited me in. There was a grand piano in the living room and objects that they had made were everywhere. A kerosene lantern had as its chimney a Mason jar with its bottom removed and its lampshade was made from paper and baling wire. Resting on the pole rafters overhead was a popcorn popper made from wire door screen and a can that once held ham.
With all of my gear in the Hubbard’s johnboat, I could work on LUNA and repair the damage a submerged rock had caused when I came ashore.
I mentioned that I had damaged my boat as I arrived and asked if I could repair the boat, camp overnight, and leave the next morning. They insisted I stay as their guest and Harlan showed me the room where I’d sleep. It had a sink in a drawer that slid out like a flour bin with a drain to send the wastewater through pipes to the garden. The doors were hung at an angle so they would swing close. Harlan explained that the furnace in the cellar pumped heat up through a grating in the floor and circulated hot water in a convection system that “warms the cold corners of the house” with two air-conditioner tube-and-vane radiators.
In the afternoon, I emptied the sneakbox, set it on edge, and put a fiberglass-and-epoxy patch over the damaged area. That evening, after dinner with Harlan and Anna, I washed up in my room. The kerosene lanterns in the living room went out one by one. I heard the two of them saying goodnight to each other and the house fell quiet. It had been a long time since I’d slept in a bed, and to be doing so under the Hubbards’ roof was something I never could have dreamed of.
After an early breakfast, I began packing while it was still dark. Harlan came down to the shore to see me off and, with one last shove, LUNA slid down the mud as I crawled on her foredeck. The trees were bare: their leaves had fallen and blanketed the hillside with the color and texture of rust. White sycamore trunks at the water’s edge stood out against the dark-barked maple and locust. As tows appeared, pilothouses, barges, and wakes serrated the Ohio River horizon.
Sunday in Westport was quiet. Two men and a boy in full camouflage costumes drifted downstream from the launch ramp while the men took turns pulling the starter cord of a reluctant camo-painted outboard. The store was not open, so I dropped two letters in a mailbox and left. Four miles downriver, where the river swells to over a half-mile-wide at Grassy Flats, the outboard was still drifting and one of the men was still pulling the starter cord.
Thirty-five miles downriver, I approached Louisville. I was tired and my right hand hurt. I kept to the Kentucky shore looking for a place to stay for the night. Behind Towhead Island, I rowed into a marina and drifted by a large twin-hulled cruiser and a man aboard asked if there was anything I needed. I introduced myself to Wayne and told him I was looking for a place to get off the water. He motioned me to I tie up by the office barge. Joe, the harbormaster, said the charge was $8 for one night. I was about to leave and camp in the mud on Towhead Island for free when Joe said Wayne had taken care of my bill. Wayne offered me the use of his boat and after I loaded my gear in his boat a short, bearded man named Gabby appeared and gave me a bit of beef stew. He and his wife and Joe visited on and off that evening. Joe said that when he first saw me, he thought I was “just another nut. This summer two guys paddling a canoe upriver asked to stop and rest at the harbor. They was going to Scruffy’s, it’s a fish-and-shrimp place, dontcha know. Hell, those two guys got a Scruffy’s right in town where they was a-comin’ from. I looked at you and thought ‘here’s another guy headed for Scruffy’s.’” While it was well past my usual bedtime when my last visitors left, I used the marina’s pay phone and had a pizza delivered. I had a very late dinner and stayed up until 1:30 a.m.
I was up at 8:30 and once on the water I headed for the lock in Louisville. The small-craft horn was too feeble to be heard by the lock keeper, so I had to walk to the station. He wasn’t keen on letting me enter the lock. It wasn’t the first time that I’d had to make an appeal to a lock keeper who had seemingly forgotten there is no turbulence in the lock lowering downriver traffic. He asked how much freeboard I had. I explained that the sneakbox was fully decked and he gave me the OK.
Taking a break from the river, I rowed facing forward into Mosquito Creek. If I’d arrived closer to quitting time, I might have stayed. I had no run-ins with mosquitos here or anywhere on the Ohio River, one of the advantages of cold-weather travel.
I stopped at West Point for groceries, got back on the river about 4, and continued rowing into the evening. Mosquito Creek was the sort of place I was looking for, a deep creek wide enough to row up, deep enough that a drop in the river wouldn’t leave me stranded in the mud, but I gambled that there was still enough light left to add to the day’s mileage and find another creek farther downstream. Otter Creek had a railroad bridge over the ravine and a few signs posted on the trees that I couldn’t quite make out but looked like unwelcoming warnings.
At Rock Haven Bend there had been a train derailment that left eight gondolas piled up at the riverbank at the foot of a black avalanche of coal. I drifted by in the last of the daylight and got my flashlight. The chart showed two more creeks 3-1/2 miles downriver. I found the draw where the first one should have been but no water leading away from the river. Rock Run, by flashlight, appeared too small and clogged with brush.
I kept going well past dark. I ferry-glided across to the Kentucky side where there was a distant streetlamp and crept along the bank and found that Doe Run was a creek wide enough for LUNA but there were two nearly submerged trees blocking the entrance. I could have slid over them but a drop in the river overnight would have blocked me in.
I made another 1⁄4-mile crossing of the river to look for Flippins Run but couldn’t find it, either. The lights of Brandenburg on the Kentucky side provided enough light to spot the mouth of Buck Creek. I tied LUNA into a line strung between two trees and cooked dinner on the afterdeck. I settled into the cockpit for the night with the spray skirt cinched over me and held up by the tripod. It started raining and the spray skirt proved to be a leaky roof. I was a bit wet but managed to fall asleep. I slept late and didn’t get on the river until 8. There was a heavy overcast and reports of heavy rain and thundershowers.
My food supplies were getting low and I thought I could shop at Mauckport, just a mile downriver from Buck Creek, but it wasn’t visible from the river. A southerly was with me, and I made good speed to New Amsterdam, but it was also hidden from view.
About halfway down the Ohio, the tendons in my right wrist were inflamed, which made it too painful to row. I taped my hand to the oar handle so I could pull without having to grip it. I rowed like this for three days and that gave my wrist time to heal. When I was hobbled like this I was careful to avoid getting into situations where I might quickly need both hands.
My right hand had continued to bother me; the tendons deep in my palm and forearm ached and my middle finger would often go numb. To take the strain off my hand I taped it to the oar. It seemed to work but only a few dozen strokes later it began to rain. I had to untape my hand to put on my cagoule.
I wanted to get into Leavenworth, but its ramp was too steep and the wakes of tows were swirling around it. I rowed another 1⁄2 mile to a small muddy creek and walked back to town. There were no stores, but I found a café where I ordered a fish sandwich. When I got back to the boat and taped my hand to the oar I was feeling terrible while pounding into the chop of a headwind. After the day’s 31 miles of rowing I stopped in Alton and tucked into a 50-yard-wide tributary mouth for the night.
Leaving Alton, my hand was still sore and weak, and I was not looking forward to rowing, but taped up I managed to get 22 miles downriver to Rome, a cluster of a few dozen houses scattered among cornfields. I crossed the river to Stephensport and set up for the night on the banks of Sinking Creek in the shadow of a tall brick chimney that was all that remained of a house that had burned down.
I slept well, woke dry and warm, and didn’t get up early. I started loading the boat at 7:15; pretty lazy. The river was up 1′ overnight. I took a short paddle up the creek around high-banked bends. Woodpeckers rattled trees all around the hollow. I made a quick stop in Cloverport to picked up Grape-Nuts and Gatorade. As I locked down at Cannelton I met Rosemary and Chauncey as they peered into the chamber. They offered to treat me to a Thanksgiving dinner, so I secured the boat out of the way at the downstream end of the lock. They drove me to Tell City, where they watched as I took advantage of an all-you-can-eat buffet.
The reports I listened to on my weather radio included information about the river levels, and I had to set the sneakbox up to allow for the Ohio rising or falling a couple of feet overnight. Here at Muddy Gut at mile 732, the river was on the rise, which was much less concerning than a falling level, which could leave me stranded in the mud.
At Troy I rowed across the river into Muddy Gut. Its banks were steep, so I decided to sleep in the boat rather than trudge gear up to flat ground. I ran a line between two trees on opposite sides of the creek, tied the boat in under it, and drew a tarp over the line and around the boat. I had more room than I would with just the cockpit tent set. I was settled in at 6 p.m. I would be in this footlocker-sized cockpit for the next 12 hours. The weather reports predicted flooding for the next five days with temperatures dropping into the 20s.
The river rose about 2-1⁄2′ overnight and by morning the line supporting the tarp was just 9″ above the deck. I got underway early, 6:45 by my clock, but I suspected that I might have passed into another time zone; my evenings were seeming a little out of sync. With the river picking up speed, and my right hand healed, I made pretty good time. The biggest tow I’d seen yet went by, 35 barges, five abreast and seven end to end. The land had flattened out considerably and as the water level rose, sky and river were separated by a thin band of land, often bristling with mown cornstalks. On some reaches, the stern of my boat occupied more space than all the land I could see.
By Owensboro I had already covered 24 miles and it was looking like I would have a long day’s run. Along the banks in these lowlands, there were all sorts of summer dwellings elevated on stilts 10′ above ground level as protection against flooding. Even trailers, camper-converted city and church buses, and mobile homes had their wheels hanging in air. Houses with a ground-level floor had a sacrificial look to the lower half, either concrete block or screened-in porches that could be submerged without damage.
The Newburgh locks quickly lowered LUNA 10′ and before 3 p.m. I already had 50 miles for the day behind me. I pulled hard and timed my passage between day markers as LUNA’s wake caught the light and sparkled. I did 2.7 miles in 21.5 minutes—7.7 mph over the bottom. The river gets credit for some of that.
I was hoping to pick up mail in Evansville, but when I rounded the bend 3 miles upstream, my heart sank. I saw skyscrapers and church spires rising above a concrete wall, not a place well suited to LUNA. I rowed past a partially submerged wharf and coasted by some “Diagonal Parking Only” signs up to their necks in the floodwaters and pulled the boat on my throw cushion to keep it off the concrete waterfront access road. I trotted into town. I asked seven people for directions to the post office and never got the same answer. I ran, dodging cars and ignoring stop lights, and made my way deep into town where I found the post office. I got my general delivery mail and ran back to the river and was relieved to find the boat untouched. Sweat was splattered all over the front of my life vest and I was wheezing and coughing.
I carried a dome tent for camping ashore, but there was rarely firm, dry, level ground where I could set it up. I regularly slept in the sneakbox under an improvised shelter from wind and rain. Here, I set my nylon tarp over an oar supported by my camera tripod.
It was time to call it a day, so I headed straight across the river to a vast undeveloped shore and landed 61 miles downstream from my last camp. On the beach I cooked up a can of beef stew then set LUNA up for the night with the blade of one oar propped up with the tripod and the tarp oar to shelter the cockpit.
The following day I rowed 50 miles to a point of land across the river from Uniontown. I made camp on a raft that had been pulled into a grassy field. It blew hard all night, and I didn’t get much sleep. In the morning a front pushed through with rain, lightning, and thunder. I was warm under the tarp but getting wet as the rain drove underneath it, so I got up and started to break camp. The wind-lashed river was very rough, I wasn’t going far (if anywhere at all), but I needed a better place to stay. As I was beginning to break camp, I saw a lone barge coming downriver, obviously adrift. A towboat was chasing after it. With the wind blowing hard across the river the barge was headed straight for my camp. I checked LUNA, she was 15′ from the water’s edge and protected by maple trees standing in a few feet of water.
A storm brought winds so high that a barge was torn away from its moorings on the Kentucky side. It plowed ashore on the Illinois side where I had camped. Its overhanging bow pushed over a tree that came down to one side of the raft where I made a shelter under my blue tarp. The sneakbox, with its red dodger showing here, missed being crushed by a few yards. A tugboat, its wheelhouse and port running light showing behind the barge, had chased after it and took control of it only after it had ground to a stop.
The barge would have to get through them first to get to LUNA. Unloaded and sitting very high in the water, the barge was an impressive mass of steel moving at the pace of a fast walk. The bow nosed into a stand of maples. They shuddered and bent. The top of one came down before the barge eased to a stop. The towboat, the WALLY ROLLER, approached the barge to get a line on it. The 138′ towboat throbbed with the 4,200 horsepower of its two diesels. I stood on the riverbank only 20′ away from it, watching the deck hands muscle a hawser onto the barge. The captain on the PA told them “Get on with it!” as the ROLLER was drifting into the branches. I moved back in case any more treetops might break off. The tow pulled the barge into open water, secured it, and took it back to the dock at Uniontown.
I took all the drama as a sign that I should stay off the river. I walked downstream looking for a better place to camp. I came upon a school bus turned camper, and its owner, Bill. We talked for a bit looking out at the water, which was a real mess. He had a shanty a little farther downriver and said I was welcome to stay in it. During a lull in the wind, I rowed to it and Kenny, another regular at the camp, met me there. He and Bill were going to move the bus and Kenny’s trailer to high ground before the rising river cut the road off.
While we were in the shanty, I happened to look out to the south and said, “Wow, look at that dark cloud!” In that moment, the river below it turned white, as wind shredded the wave tops into spray. I was out the door in an instant to pull LUNA farther from the water. Just before I got to the sneakbox, I heard a loud crack above me as the top 15′ of a tall maple snapped off. I made a quick detour to keep from getting hit by it and it crashed to the ground 20′ from me. I started dragging the boat and, with Kenny and Bill helping, got it under a porch roof to protect it from other windfalls.
I’d been given permission to use this fishing camp while waiting out a dangerous wind storm. The wood stove gave me a chance to dry out all my gear and get a good warm night’s sleep.
The wind had shifted from south to west in the span of a single minute. It was 11:40 and the air was suddenly colder and the temperature would continue to drop into the teens. Kenny drove into Mount Vernon to get some groceries and when we got back the wind was still strong, the water frighteningly rough, and the river still rising. He and Bill left, leaving me with the shanty for myself. It warmed up with a fire in the stove and I had a sponge bath and some soup. The rising water had slowed down, but if I were to be flooded out, I could row over the fields to the north to high ground. The weather radio report was for more high wind so I might have another day here, if the water didn’t run me off first. By 8 p.m. I was very tired after the last night’s lack of sleep.
The fishing camp I was staying in had plenty of firewood but nothing with which to split it for kindling. Before the river had risen, I had seen a hatchet in one of the other camps. I feared the advancing water would be higher than my boot tops so I tied a milk crate to one boot and a child’s classroom chair to the other. I made the trip to the camp and back without getting my feet wet.
It blew hard all night, and I had another day waiting out the wind. It finally dropped after 36 hours of making a mess of the river. It was still very cold—in the 20s with a drop to 10 degrees expected that night. The water was still rising, though not as fast as during the last few days. In the shanty I caught up with some eating, writing, and sleeping.
The entrance to Cave-in-Rock was flooded, so the only access to it was by boat. The gap in the stratum at water level was where I rowed in. If I had stood up in LUNA there, my head would have been even with that shelf of limestone.
The weather had settled down by the morning of my third day across the river from Uniontown. I rowed the 38 miles to Cave-In-Rock where the access to the cave by land was cut off by the high water. The entry, a narrow slot at the bottom of the 50′-high opening, had enough water to float LUNA but not enough width for the oars. All through the 19th century, the cave had been a base of operations for river pirates and a refuge for boatless miscreants. A natural opening in the roof of the cave provided light and served as a natural chimney. It would have been a wonderful place to camp, but it’s a state park and I was more inclined to abide by the rules than had its former occupants.
Cave-in-Rock is 50′ tall, 40′ wide, and 120′ from its entrance to the back wall. A hole in the top provides light.
From Cave-In-Rock, the mouth of the Ohio River was an even 100 miles away. At the confluence, I’d turn south on the Lower Mississippi and speed south away from the advance of winter. I kept moving.
The following day, I passed through the busy port of Paducah, another city best bypassed, and stopped at Joppa on the Illinois side of the river. I didn’t need a ramp to land there. The town’s waterfront park was flooded, and I could just haul out anywhere on the lawn.
Joppa’s riverside parks had been flooded by high water, but the water level was below my boot tops, so the picnic tables worked for me.
The high water had come within a few inches of the picnic-table seats. Square barbecues, their steel dark with rust and soot, stood like channel markers among the trees. The levee that separated the town from the river was capped by a single line of railroad tracks that led to a second bridge that had burned and collapsed into the water.
At the near edge of town, patches of a two-story building’s gray paint had peeled away from equally gray wood. Its twin screen doors’ frames held the last of a screen mottled with rust and as delicate as a camp-lantern mantle. Over the door was a chalky metal sign, “Hop on in for Bunny Bread,” but not much was hopping in Joppa. Across the street a hand-painted sign misspelled “Notory Public” in letters that would have more appropriately spelled out “Clubhouse, no girls.”
Three blocks into town I was wrapped in an eye-watering stench of fermenting manure that wafted from a trailered agriculture implement, a long barrel open along its length on top. Inside was an axle with lengths of chain to flail a load of soupy cow manure and send it flying in all directions. I had to squeeze my nostrils closed. I crossed the street to the grocery store and picked up a can of beef stew. On a shelf of breakfast cereals, an orange box of Wheaties caught my eye with its picture of Olympic-champion gymnast Mary Lou Retton, fists thrust above her head, her smile wide and radiant. I caught myself staring and suddenly her radiance and enthusiasm made me uncomfortably conscious of my grubby appearance and my fatigue. Having that box of cereal in the boat would only make me feel worse.
At the end of my last full day on the Ohio, the only place I found to get off the river was a wide-open flooded field. I wore my cagoule to shield me from a bitterly cold wind.
I’d made a cover that was supported by the cockpit hatch and a pair of struts. It was effective in keeping me warm and dry when it was the best choice for a cold and windy last night on the Ohio, but it offered very little space for moving around. In the morning, the water covering the field here had iced over.
On my last day on the Ohio River, I had reached the 980-mile mark on my charts and could see the Mississippi sweeping the horizon on the far shore opposite the Ohio. I pulled ashore in Cairo with my empty two-liter soda bottle to get some water before pushing LUNA’s bow into the river that would carry us 870 miles to New Orleans. I found a tavern that I thought would let me have some water and walked in. The moment I stepped inside conversations stopped and everyone turned to look at me. I hadn’t brushed my hair or shaved for several days and was wearing my faded PFD and my mustard-speckled wool pants. As the bartender kindly filled my water bottle, a man at the bar wearing brown and green camouflage looked me up and down:
“What the hell you been doin’?”
“Rowing.”
“Is that all?”
I told him that I had rowed from Pittsburgh and was next headed for New Orleans. He looked away across the bar top.
“I feel sorry for you on that damn Mississippi.”
Coming in the February issue: The Lower Mississippi River; March issue: The Gulf of Mexico.
Christopher Cunningham is the editor of Small Boats Magazine.
If you have an interesting story to tell about your adventures with a small boat, please email us a brief outline and a few photos.
After years of building and sailing open camp-cruiser sailboats, my wife, Anne, and I had become less enchanted with crawling around under a tent at anchor. We were also noticing that over the course of our 30 years of sailing, conditions had changed: Canadian summers were hotter and midday winds were undeniably stronger. Spending time in our smaller open boats was no longer the simple, easy fun it once was and, while it might be hard to admit, we were no longer two sprightly 30-year-olds. It was time to look for a bigger boat.
Gunkholers at heart, we didn’t want to give up sailing in the shallows. So, we were not looking for a fixed-keel boat. We were looking for a boat that could stay on a home mooring most of the time, but we still wanted to be able to trailer it for short trips away. Finally, we wanted a boat with a low-aspect rig and a comfortable cabin.
Matt Singer
Distinctly British in appearance with its wide lapstrake planking, straight stem, mild tumblehome, and traditional gaff-cutter rig, the Cape Henry 21 is nevertheless all-American as its title—it was named after the headland at the southern end of the mouth of Chesapeake Bay.
Years ago, we had come across drawings of Dudley Dix’s gaff cutters, the Cape Henry 21 and the Cape Cutter 19. We remembered them now and, digging them out again, still liked what we saw. More research revealed both to be solid sailboats, self-righting and self-bailing, shoal-draft yet capable of coastal cruising. We were sold. We decided on the larger Cape Henry (CH21) and commissioned Keith Nelder at Big Pond Boat Shop, Mahone Bay, Nova Scotia, to build the basic hull. We would take care of all the spars, hatches, paint, varnish, and finishing ourselves. The partnership worked perfectly: Keith delivered the bare hull in nine months—on time and on budget—and six weeks later we launched ELVEE into our home waters of Mahone Bay.
The CH21 can be built by an experienced amateur builder. The plans are very detailed, but I would highly recommend getting a CNC-cut kit. Such a step will make little difference to the overall cost of the boat, but the precision-cut panels make assembly much faster and easier. Even with the kit, I would put the required skill level for building the CH21 at “above beginner.” At the very least a builder will need good woodworking skills and confidence in reading plans.
The hull, four strakes of 10mm plywood, is built upside down on a form with stringers that will reinforce the laps. Diagonal kerfs cut halfway through the plywood on the inside faces of the garboards ease the twisting at their forward ends. Thickened epoxy later fills the kerfs. The result is a strong, light boat. The plans list all the hardware required including the tabernacle, chainplates, motor mount, centerboard, winch, and other odds and ends. Internal ballast consisting of 816 lbs of lead-shot ballast set in epoxy either side of the centerline provides additional stability.
Ryerson Clark
The Cape Henry 21 has a reputation for being a good performer in most wind conditions, especially in light airs when it will ghost along while other, larger boats struggle to make headway.
The CH21 is a remarkable sailer. Dudley has said that it will sail in wind that won’t even move smoke, and we have experienced just that. Often, our Cape Henry will be making slow but steady headway while bigger boats are drifting to and fro with the tide. It is a dry boat. We seldom get water or spray aboard, and with its fine entry it cuts through waves and wakes with ease. The powerful high-peaked gaff rig and headsails make the CH21 easy to balance, and much of the time it steers itself with just a light touch to the tiller if a correction is needed.
There are two headsail options: staysail with genoa or staysail with yankee jib. With the genoa the CH21 is considered a sloop, with the yankee a cutter, but in either option it is designed to set two headsails at once, except when reaching. We have used both options and are unable to state a preference. We don’t change them out on a day-to-day basis; instead, we set one combination for a whole season and leave it at that. Both genoa and yankee are tacked to the end of the 4½′ bowsprit, while the staysail is rigged inboard on the forestay. In a light to moderate wind, we will use either genoa or yankee, but when the wind becomes stronger or gusty, we will furl the larger headsail and bring out the staysail. As the wind builds further, we reef the main as needed and the boat remains perfectly balanced under staysail and the main with two reefs.
As drawn, the CH21 carries a 6-hp outboard in a motorwell where it is out of the way and beneath the tiller. We have used both a 2.3-hp and a 4-hp gas outboard but have recently converted to an ePropulsion 3-hp (equivalent) electric outboard. Each of the three engines moves the boat effortlessly, and the hull slips through the water with ease. We also scull with our version of a yuloh, a Chinese sculling oar, which we store in the cabin for backup propulsion. Unhindered by wind or current we can scull along at just under 2 knots.
Ryerson Clark
The cockpit is spacious and comfortable for two adults and a sleeping dog. The sole grating is a later addition to keep feet dry when water comes into the cockpit from the outboard well. The electric outboard has replaced the 6-hp gas outboard recommended by the designer and has proved more than adequate when called upon.
We have been happy with the outboard-well arrangement. It keeps the engine easy to handle and does away with the need to hang out over the transom. The cockpit self-drains into the well, although we have found that when heeled and going hard to windward, the well can scoop seawater into the cockpit, but never more than just enough to wet the bottoms of our feet. We have resolved this issue by building a cockpit grating that not only looks nice and “shippy” but also keeps our feet dry.
The cockpit is large enough for four adults when daysailing, and for a crew of two there is enough space to really stretch out on the long, wide seats—a comfortable spot for an afternoon nap. We made a screened tent that hangs from the boom and covers the cockpit; it gives us an additional mosquito-free living area when at anchor.
Ryerson Clark
Two quarter berths stretch aft beneath the cockpit. In the main cabin the berths double as comfortable seating. The centerboard trunk divides the main cabin but does not make the space feel cramped. However, a bilge keel version of the Cape Henry 21 is available.
Down below there are two large quarter berths that extend aft beneath the cockpit seats. At 7′ 3″ by 24″ they are long enough for even the tallest of sailors, and wide enough that you don’t feel jammed in. The berths run forward into the main cabin area and offer extremely comfortable seating for two; four friendly adults can sit without feeling too crowded.
Ryerson Clark
In the galley area there is space for a sink, stove, and plenty of locker space. Forward, the V-berth has more storage beneath and, to starboard, a composting toilet. The flush-decked cabin has full sitting headroom out to the sides.
There is space for a built-in stove on one side of the cabin and a sink on the other, with storage above and below. But this is a flexible space that can be arranged in various configurations and, if preferred, owners can forgo the fitted stove and cook in the cockpit on a portable stove instead. Up forward, the V-berth is 6′ 3″ wide and 7′ 3″ long and has ample storage space beneath for extra gear. We have a composting head beneath the V-berth to starboard.
The cabin is flush-decked, providing full sitting headroom right out to the sides of the cabin. We have found living in the cabin for weeklong trips is easy, comfortable, and roomy. Indeed, guests are always surprised by the spaciousness down below. The only alterations we have made have been slight adjustments to the storage and berth arrangements.
We have daysailed our Cape Henry 21, christened ELVEE, in sheltered harbors and bays, shallow coves and inlets, and have used her for extended coastal trips along Nova Scotia’s rugged coast. We are pleased with her performance and happy that, thanks to her, we have surely extended our sailing for many years to come.
A founding member of the The Small Wooden Boat Association of Nova Scotia, Ryerson Clark and his wife, Anne, have built 20 wooden boats, ranging from kayaks to small sailboats, while also helping countless other people get started on their own boatbuilding projects. During the sailing season Ryerson, Anne, and their dog, Maggie, can be found aboard ELVEE, exploring Mahone Bay and along Nova Scotia’s coast.
Our family of five has a fleet of sea kayaks in Maine that we transport a few hundred yards down the road and through a lupine field to reach the harbor. In the beginning, we carried them by hand. Then a kayaker friend loaned us a couple of stern-mounted carts with small wheels. They were an improvement over carrying the boats and were okay going down the road, but in the meadow the wheels tripped and dragged, and could pull themselves off. Even on pavement, we still had to lift the bulk of the weight of each kayak at the bow.
It also bothered me that those carts could only carry one kayak at a time. Since we often paddled with four or five of us, I longed to be able to transport several at a time so we could spend our time paddling, not walking back and forth transporting boats.
Photographs by Jim and Elizabeth Root
When not carrying boats, the cart looks and functions like any other simple yard cart, appreciated by all the family.
I pondered the idea of adapting a garden-cart to carry boats. I was put off by the price of the ready-made versions, and having a good stack of scrap wood left from old projects, I decided to figure out my own kayak carrier. My kids have always laughed at my frugal inclinations and love to say that our family motto should be: “We don’t need to buy that, we can make it.”
I started with what I thought would be a working prototype, so I didn’t try to get fancy. I thought I’d refine my design with something more elegant but, 15 years later, it’s still working perfectly, and I have yet to make it look nicer or to change anything: it just works. For most of the construction, everything was simply fastened together with drywall screws. I used a little glue where I thought some extra strength might be good. The cart looks crude enough that I don’t worry about leaving it out in public while we’re out for the day paddling: it’s always been there waiting patiently for us when we return.
Jim Root
.
My thinking was essentially to have a box of 1⁄2″ plywood with a steel rod for an axle attached underneath with two U-bolts. The large wheels, like those on garden carts, would easily roll over soft ground, bumps, and tall grass. Set on top of the box would be two crossbars long enough to carry two kayaks side by side. I had a couple of pine 2×6s that were about 5′ to 6′ long, which would drop into slots on either side of the box. Angled cutouts would cradle two kayak hulls and prevent them from rocking or sliding sideways. Cutouts on the bottoms of the crossbars provide extra clearance for gear heaped in the cart. Strips of old rubber doormat on the tops of the crossbars protect the hulls from scratches. Each crossbar also has two little scraps of wood nailed to each side, just inside the box sides, that keep the crossbar itself from shifting from side to side on the box. The plywood box is 48″ long, 25″ wide, and 12″ deep but the dimensions can be adjusted to one’s particular needs.
At the end of each crossbar is a small screw eye which anchors a bungee to hold a kayak in place. The other end of the bungee is stuck in a 1⁄4″ hole in the center of the crossbar. I wouldn’t pull kayaks down a highway in this way, but for walking in our quiet village, the arrangement for securing them is more than adequate.
The 20″ wheels are available as replacements for garden carts. I found a pair of nylon wheels with pneumatic tires on sale for $15. I liked the idea of the nylon because we’d be using the cart around salt water. There are many online sources for similar nylon wheels, some pneumatic, others non-pneumatic. A pair costs about $60. I bought a 3′ length of 5⁄8″ plain steel rod (to match the 5⁄8″ wheel bearings) from a hardware store to serve as the axle. After the rod is cut to length, a small hole is drilled through each end of the axle hitch pins to hold the wheels, with washers on both sides of them.
I made the tongue and a vertical stand to support it with lengths of 2×2; a pair of gussets of 3⁄4″ pine join the two pieces. Another piece of 3⁄4″ pine, inside the cart and set parallel with the stand, provides a backing for the screws that fasten the brace-and-tongue assembly. Set in a mortise at the forward end of the tongue is a piece of walnut that serves as a handle. Rounded off and sanded smooth for comfort, it is the only nice wood on the entire cart. The finished cart weighs about 35 lbs.
It’s not just boats that make use of the cart, sometimes it’s the living passengers that take priority.
When we set out for the shore, we put all our gear—PFDs, dry bags with cameras, clothes and extra gear, water bottles, lunch cooler, and the rest—in the cart’s box and then we load the kayaks on the crossbars.
The kayaks are best positioned on the cart with their weight slightly forward of the axle: if they are too far back, the whole cart wants to tip backward and will not rest on its kickstand; too far forward, and you’re going to work too hard lifting while pulling. With just a slight amount of the weight shifted to the front, lifting and pulling the cart requires practically no effort at all. The kayaks can also be pushed from the rear when paddling companions lend a hand on uphill stretches. Compared to every other means we’ve tried, transporting boats on the cart requires only a fraction of the effort.
Transporting kayaks between the house and the water used to require multiple trips and a good deal of effort. Now, up to five kayaks can be carried together and with little more effort than a gentle push from behind and minimal pull from ahead.
Two kayaks can be easily transported by just one of us. I don’t use the cart’s handle as it gets buried in between the boats—I grab the bow toggles and use them, instead. If we want to transport a third kayak, we lay a couple of PFDs across the two bottom kayaks as padding and center the additional kayak on top. The most we’ve ever carried is five kayaks.
I’ve imagined making a variation of the tongue that could attach to a bike. Given flat enough terrain, one could likely pull a couple of kayaks or a small boat a long way with ease
Although designed and built with kayaks in mind the cart is also used to transport a Nutshell Pram (and grandchildren). A notch cut into the rear end panel of the cart holds the boat upright and stable.
The cart is also perfect for walking our Nutshell Pram the 1⁄4 mile to the town landing. A narrow slot cut in the back wall of the cart holds the skeg, the pram’s painter is tied to the cart tongue, and the dinghy stays solidly in place even while going over the bumps along the way. Again, properly balanced, there is almost no effort to pulling the loaded cart; any boat that can be lifted by two people could balance on it. Our 20′ × 30″ triple sea kayak rests very comfortably on the cart, as does our canoe. I haven’t made a second, wider set of crossbars, but with them the cart could carry two or more canoes.
In winter the crosspieces are removed, the cart is cleaned out, and it’s stored on end in a corner of the boatshed.
With each season, this humble cart has more than proved its worth. With the crossbars removed, it is a handy and functional multi-use cart. It’s great for garden and yard work, for carrying boating gear or loads of firewood, and for taking grandkids and dogs for rides. We put it away standing on end in the boat shed, tucked into a small space. The crossbars simply hang on the wall on a couple of nails, bungee cords dangling until our kayaks need to get out on the water again.
Jim Root splits his time between a home in Barrington Hills, Illinois, and Round Pond in mid-coast Maine. He is now retired after a career in communications and advertising. He finds subjects in Maine for his passion for painting landscapes and boats. You can see his paintings on his website.
You can share your tips and tricks of the trade with other Small Boats Magazine readers by sending us an email.
Skipper and I have been towing boat trailers for several decades, and almost all the vehicles we’ve used to get to the water were equipped with 2″ frame-mounted receiver hitches and drawbars.
Whether the trailer is being towed loaded or unloaded, a drawbar can knock and rattle inside the receiver, which not only makes a lot of annoying noise while driving but also causes wear on both the receiver and drawbar. This is especially true with light boats, light trailers, and light tongue weights where the drawbar isn’t consistently pressed tight in the receiver. The dents and scratches caused by the movement of the drawbar can lead to corrosion and a reduction in the integrity of the hitch system.
Photographs by the authors
Ball mounts, like the one at top, have a very loose fit in the towing vehicle’s receiver. An ordinary hitch pin and spring clip will hold the receiver and mount together, but only loosely. The Silent Hitch Pin, below, not only eliminates the play between them, it also serves as a theft deterrent.
We recently found a device that reduces that wear and eliminates the noise, the Silent Hitch Pin by Let’s Go Aero. It installs easily in minutes. The hitch pin has a heavy-duty steel block with a threaded hole and an attached spring. When inserted into the receiver, the spring is compressed and holds the block in place once it is aligned with the holes in the sides of the receiver. A 5⁄8″ partially threaded steel pin with heavy-duty flat washer and lock washer is inserted through the holes and, with its threads engaged, pulls the steel block and the drawbar snug against the inside of the receiver tube. The pin’s hex head is tightened with a 5⁄8″ wrench (not provided) to 30 foot-pounds, which prevents the drawbar from moving or vibrating inside the receiver. The washers allow the pin to be tightened without scratching the side of the receiver. A steel 5⁄8″ sleeve, inserted through the other side of the receiver and the spring inside it, captures the pin, reinforces it, and reduces its potential for movement.
The threaded block has a spring to hold it in place inside the ball mount, aligned with the holes for the pin. When the ball mount is inserted into the receiver (not shown here) on the towing vehicle, the holes for the block, the ball mount, and the receiver can all be aligned to allow the pin to be inserted.
To finish things off, a 90-degree swivel lock snaps on without requiring its key, easing installation. The lock adds extra security for the hitch, the trailer, or any other racks that are receiver mounted, like our canoe loader. The lock has a nylon cover and weather-resistant dust cap. We recommend a squirt of dry lubricant for the lock and threaded block to limit corrosion. Drawbars should be removed when not towing to limit corrosion inside the receiver and eliminate the whacking of shins.
The Silent Hitch Pin is rated for Class IV towing—up to 12,000 lbs gross trailer weight (GTW) and 1,200 lbs tongue weight. While this is overkill for the Class III receivers on our two tow vehicles, which are rated for 3,500 lbs GTW and 350 lbs tongue weight, the pin offers additional peace of mind when a trailer is rattled by railroad crossings or hammered by potholes. We also tow with a higher-rated drawbar and hitch ball, but always keep the gross trailer weight well below our receiver’s limit. Safe, secure, and quiet—that’s how we like our towing.
Audrey (Skipper) and Kent Lewis have trailered the nation from California to Virginia, and from the Gulf of Mexico to Niagara Falls since 1969. The current number of trailers for Skipper’s armada is six, with one being a multi-role utility trailer.
For years I have been looking for the “perfect” life jacket for the small-boat sailor. I mostly daysail in my John Welsford Navigator, but have been on a few extended sailing adventures, often in water that’s cold and deep, as in Lake Superior. Before embarking on more singlehanded camping adventures in remote areas, I needed to find a life jacket that had all the features I consider most important.
First, I wanted a life jacket with inherent flotation. In most self-inflating jackets, the majority of the flotation is in the front, which impedes reboarding from the water. Also, they typically have little, if any, storage, even for small items. Some may see pockets as nonessential, but if I end up in the water in an emergency situation, I want to have a radio, knife, or even a small flashlight with me.
I was in search of a life jacket with a built-in harness. My greatest fear when sailing alone is tripping and falling into the water, only to watch my near-perfectly balanced boat sail away from me. I also think a leg strap is essential. My body shape is apparently incompatible with most life jackets: when I’m in the water in any position other than floating on my back, life jackets work their way up my body, becoming not only uncomfortable but also less effective.
And then, there’s the comfort factor. If I’m wearing a life jacket for long stretches of time, it has to be comfortable!
Photographs by the author
The Salus Coastal comes with built-in harness—two D-rings attached to a webbing belt. The optional leg strap is equipped with a swivel snap hook that clips to one of the D-rings. The attention to detail—multiple storage pockets, fleece-lined handwarmers, mesh shoulders, and neoprene collar—results in a life jacket that is both comfortable and effective.
After a good deal of research, I have found the Salus Coastal Vest with Safety Harness, which seems to meet all my requirements. With 15.5 lbs of flotation, it keeps me comfortably afloat and with the optional leg strap I can float high, in a vertical position, and the jacket does not ride up. It is comfortable, with a small neoprene collar, mesh over the shoulders, and padding in the back, which is pleasant when leaning against the coaming. There is a spacious zippered pocket on each side of the jacket front (the zippers are tucked under a tab, so they won’t get caught on things), and two fleece-lined handwarming pockets. On the left side there is an additional pocket with a smaller opening and an elastic closure that comfortably holds my VHF radio, and below the left shoulder a utility tab that can be used for a knife or beacon. Finally, there is a built-in safety harness.
Happily, I haven’t yet had to rely on the Coastal in an emergency situation, but I have tested it while underway. With the boat sailing well, I clipped on the harness and dropped into the water. My brother was onboard but under instruction to do nothing unless needed. As expected, my Navigator sailed on, but the harness kept me securely attached and I was able to pull myself back to the boat and climb on board.
The optional leg strap prevents the life jacket from riding up when the wearer is in the water and the pocket on the left side is large enough to accommodate a hand-held VHF.
The jacket is comfortable to wear for lengthy periods and has become my preferred PFD. It is manufactured in Canada and certified by Transport Canada, but is not U.S. Coast Guard approved. To be legal in U.S. waters, I keep a USCG-approved life jacket on board. It’s a concession to regulations that I’m happy to make if it means having a PFD that is both a pleasure to wear and has the features I need to help keep me safe.
Tim Ingersoll is a middle school special education teacher from Superior, Wisconsin, who enjoys exploring the local waters in his self-built Welsford Navigator. He has more than a decade of experience as a small-boat and basic-keelboat instructor, and has spent a lifetime enjoying time on the water canoeing and sailing.
In the late 1980s, Gavin Watson built a boat. It wasn’t his first—he had previously built a plywood dinghy and a 16′ fiberglass sailboat of his own design, but it was his largest to-date: a 30′ cold-molded Stratus 927, a racing/cruising sloop designed by the late Alan Warwick. Gavin was living in Connecticut at the time, and during the long construction project, he met Andrea, his wife-to-be, at a country dance. When she learned he was building a boat, Andrea mentioned that she had previously worked as an interpreter at the Small Boat Shop at Mystic Seaport. Gavin’s interest level went up several notches. When the 30-footer was complete, the couple moved aboard.
For a year, they lived a life afloat, but after experiencing the cold Connecticut winter, and dealing with the necessarily limited space, they concluded that they were not meant to be permanent liveaboards, and moved ashore and into a small apartment, which, as Gavin recalls, “seemed absolutely vast.”
When they started a mobile boat-repair business the apartment became unworkable and they moved to a lakeside cottage in Ridgefield, Connecticut. The 30′ sloop was sold, but over the years, other boats were built, including two 22′ trimarans and a 27′ carbon-fiber double kayak.
The Watsons summered on North Haven Island in Maine and, for several years, Gavin, Andrea, and their two children sailed in an F27 trimaran, and later a Maine Cat 30. They explored the local waters and islands of Penobscot Bay and ventured on longer voyages along the coast from Maine to Connecticut.
Photographs courtesy of Gavin Watson
Adding a mizzen to the Guider’s sail plan gave Gavin the ability to heave-to effectively, a valuable advantage for singlehanded sailing.
Time passed and, as is the way with families, the children grew up, left home, and established their own independent lives. The Maine Cat 30 was sold, and Gavin found himself facing a new reality: “Nobody,” he recalls, “was interested in cruising anymore.” Nobody but him.
As he contemplated other pastimes and browsed the internet looking for inspiration, he happened upon the dinghy-cruising videos of British adventurer, Roger Barnes. He was captivated. “It seemed like a pretty cool way to go,” he says. “If nobody else wanted to do overnights with me, I didn’t really need a big boat. Exploring the nooks and crannies and being able to pull the boat up on a beach looked like a cool idea.” Gavin had found the next step in his boating evolution—he would become a small-boat cruiser.
The coast of Maine is a magical playground for small-boat sailors. According to the National Oceanic and Atmospheric Administration (NOAA), Maine’s coastline is the fourth longest in the country, with almost 3,500 miles of bays, inlets, and island shorelines to explore. In summer, the days are long, the nights cool, and the breezes predictable. For the boat with a shallow draft, there are almost endless numbers of sheltered anchorages and beaches for overnight stays. Gavin was in the right place…all he needed now was the right boat.
Gavin put two collars on each oar. The inboard collars are placed in the locks for rowing in the conventional manner: seated and facing aft. The outboard collars set the oars at a higher angle for rowing standing up and facing forward, a better method for navigating tight spaces.
Building the PERIWINKLE Sail-and-Oar Cruiser
He settled on the Guider, a lugsail sail-and-oar cruiser from Chesapeake Light Craft (CLC). At 18′ 9″ LOA with a 6′ beam and minimum draft of 9″, the design seemed ideal for the singlehanded coastal cruising Gavin had in mind. He ordered the kit.
Despite all his previous building experience, Gavin had never before built a kit boat and was unsure how long it would take. He planned to build it through the winter in his two-car garage in Connecticut. But when the kit arrived in early April he couldn’t resist and began “casually working on it.” He was amazed to see it come together with speed. So much so that he soon realized if he continued he would have nothing to occupy the coming winter months. He downed tools and walked away…until October when he began working in earnest.
The Guider is designed to be built stitch-and-glue and CLC recommends the kit to “builders who are already comfortable with epoxy, fiberglass, and stitch-and-glue boatbuilding.” They describe the finished boat as being specifically designed for camp cruising and say that, while the boat is “fast and handy under sail and oar, there’s an emphasis on safety and camp-cruising comfort.”
As designed, the Guider is essentially an open boat with a 6′ 6″-long cockpit. But, perhaps inevitably for someone with as much on-water experience as Gavin, he introduced some modifications.
Enamored by the sails of the Norwegian Færder snekker, Gavin opted not to go with the lugsail designed for the Guider, but instead created a roller-furling version of the snekke sail with a flexible fiberglass diagonal batten in lieu of a snekke’s sprit and a similar vertical batten to shape the sail when reefed.
First came the cabin. Influenced by his earlier years of cruising in larger boats, Gavin wanted to be able to “easily crawl in under cover if I arrived in a harbor and the weather was unpleasant. I do have a boom tent, which gives me sitting headroom in the cockpit, but if I want to stay dry, I don’t have to set up the tent.” The cabin addition significantly reduced the size of the cockpit but, says Gavin, there is plenty of room for two adults to sit without getting in each other’s way. The raised cockpit coamings—which he added for protection against water running in off the deck—“are extremely comfortable and the spacing is perfect for bracing my foot against the opposite seatback.” He did raise the seats 4″ to accommodate additional buoyancy.
Other modifications included replacing the ¼″ aluminum centerboard with a larger 165-lb, ½″ stainless-steel one, which increases the boat’s righting moment. He also added 240 lbs of internal lead ballast. CLC recommends 200 lbs (or more if sailing lightly loaded). Gavin kept the general design of the rudder, which, as described by CLC, is “doubtless one of the more controversial features of the new design. Although it complicates the build slightly, designer John C. Harris likes the trunk-rudder for its efficiency and good looks. But most of all, to avoid having to grope awkwardly over the pointed stern to adjust the more typical kick-up rudder.” Gavin increased the rudder’s depth by 3″ and “beefed it up structurally.” He also gave the leading edge a more pronounced angle to encourage “lobster trap lines to slide off”—a significant consideration in Maine waters.
The mizzen’s roller-reefing system is evident here. The boom tent has several battens that create more headroom for sitting on the side benches.
But perhaps the most immediately obvious of Gavin’s alterations was to the rig. In March 2015, Small Boats had published an article on the Færder snekke, a traditional racing workboat from Norway. The class carries a distinctive boomless spritsail and Gavin was impressed by its simplicity, large relative area, and general appearance. For his Guider, he settled on a yawl rig, but the mainsail is a modern interpretation of the sprit rig. “The Færder-snekker rig inspired the shape of my mainsail,” says Gavin. “But I wanted something I could furl very quickly.” Thus, Gavin dispensed with the sprit but gave the sail its highly distinctive shape by introducing two full-length vertical fiberglass battens. The mizzen is a more conventional boomed leg-o’-mutton. Both sails have pocket luffs, slipped over carbon-fiber masts stepped into tubes. The masts rotate on nylon and Teflon bushings, allowing the sails to furl around them.
PERIWINKLE was launched in late June at Pulpit Harbor, a well-protected anchorage on the northwest side of North Haven. Gavin made the maiden outing and sea trials on Penobscot Bay. “I did tests in some rough weather to see how it handled, and I was pleased with it.” The trials also included sleeping aboard. “The first time, it took a bit of getting used to the boat listing to the side I was sleeping on. I am not used to sleeping on a slope, but I eventually got comfortable with it. The second time, I deliberately chose a cold night just to test out what it would be like inside. With the canvas cover on the cabin opening zipped up it was quite comfortable temperature-wise.”
Last fall, Gavin trailered PERIWINKLE sail-and-oar cruiser back home to Ridgefield and made a few improvements based on the sea trials. He’ll relaunch PERIWINKLE this spring and his new chapter as a solo small-boat cruiser will begin.
Do you have a boat with an interesting story? Please email us. We’d like to hear about it and share it with other Small Boats Magazine readers.
The small city of Rockland, Maine, has a big harbor with a strong working tradition. Although the unmistakable aroma of the fish-processing plant at the harbor’s north end is long gone, Rockland is still home to a handful of gritty commercial fish piers, some lobsterboats, herring trawlers, a few working boatyards, a Coast Guard station, a seaweed processing plant, the Maine State Ferry Service terminal, some day-charter boats, and a fleet of traditionally rigged windjammers. A harbor that can embrace all that activity is also big enough to be plagued by a significant chop that can build up inside the breakwater. Predictably and practically, the working boats there run to the large size.
An exception to that rule is the new black work skiff that’s attending the fleet at the Apprenticeshop, a Rockland-based school for traditional boatbuilding and home to the Rockland Community Sailing program. Designed by accomplished local yacht designer Mark Fitzgerald and built by apprentices in the shop, the 17′ skiff is one of the better small yard boats I’ve operated. To start with, it feels like a workboat: heavy, stable, and predictable. While these aren’t characteristics I necessarily look for in a light recreational runabout of similar size, they are welcome in a workboat that I would normally think of as a bit undersized, especially to operate in the chop of Rockland Harbor.
With a 5′ 6″ beam, the boat appears narrow, and I feared that she’d be tender. But her mild deadrise of just 12 degrees at the transom means there’s a lot of buoyancy down in the chine, blessing her with admirable initial stability, even with my 200 lbs climbing over the narrow side deck. The boat has a designed displacement of 1,600 lbs.
When I visited Rockland in July, the Apprenticeshop crew was just launching an engineless 30′ one-design Haj-class sloop for the season, and director Eric Stockinger generously invited me to run the new skiff. I was already late to meet them at the shop’s launch ramp, so had little time to familiarize myself with the boat. There was no need to. It’s an advantage for a workboat that will be used by many different operators to be dead simple, and this boat is. I traced the fuel from the portable tank through a filter to the 20-hp outboard. There was no fuel shutoff or keyed ignition to worry about. I pumped the inline fuel bulb a couple of times, set the tiller throttle to start, and fired up the engine with a single pull of the start cord.
The Apprenticeshop
The AS-17’s framework is of white oak. Planking is of white cedar—two layers of 3⁄8” on the bottom, and 5 ⁄8” lapstrake on the topsides.
The Apprenticeshop
The deck’s rugged framing, which shows in this photograph, will soon be sheathed in plywood. The load on the heavy towing bitt is transferred to the keel via heavy knees.
Running over to the ramp at displacement speed, the boat tracked superbly, and I could rummage briefly for some lines to make fast to the Haj once I got alongside. While thus engaged, I couldn’t help but appreciate that the boat is uncluttered by thwarts, bulkheads, or a console. While that spare interior may not be ideal for most recreational vessels, it’s exactly what I want in a workboat where lines shouldn’t snag and line handlers shouldn’t stub toes or bark shins on furniture that’s just in the way.
As I nudged alongside the sailboat’s port quarter, the well-fendered work skiff didn’t bounce off as a lighter vessel (especially an inflatable) would. I stepped forward and made lines off, one to a stout galvanized cleat on the side deck (Stockinger noted bronze would look better, but economy is a necessary virtue in these times) and one to a sturdy samson post set in the short foredeck and running down to the keel deadwood for support. We backed away from the ramp, turned on the Haj’s short keel, and headed to the dock without fuss.
The beefy coaming around the long cockpit allows for lines to be handled from anywhere in the boat and run clear of obstructions. The only exception is the intentionally oversized oak towing bitt, supported by a natural hackmatack knee installed amidships. A line from even halfway up its height leading to a tow aft clears the low-profile outboard and allows the skiff to turn unimpeded without unhooking.
The Apprenticeshop
The AS-17 in its element: Tending to a Haj-class sloop that’s just been launched for the season.
The AS 17 Work Skiff was born of necessity as the Apprenticeshop’s need for a rugged utility boat grew to a critical point in 2011. The 40-year-old school and sailing center has an extensive series of floating docks to maintain as well as an ever-changing fleet of traditional boats and the community sailing fleet.
“We needed another workboat,” Stockinger said. “We didn’t want plywood, and we wanted something as open as possible.” At the same time they needed a boat that would be quick enough to serve as a tender for the youth sailing program, so a strictly displacement hull was out of the question. “A pretty little launch with fine lines and varnish just wouldn’t do it,” Stockinger said.
The quest for an appropriate model led not to a particular boat but to local yacht designer Mark Fitzgerald, best known for creating imaginative new powerboats with traditional aesthetic qualities for composite construction. The thinking was that the new workboat should look traditional but have the capacity to perform at high speeds, and this was a combination Fitzgerald had achieved many times before. The trick would be having him design it to be built with traditional heavy plank-on-frame construction.
Aaron Porter
While designer Mark Fitzgerald specifies a top-end horsepower of 90, the Apprenticeshop’s new AS-17 is driven by a modest 20-hp Yamaha—an adequate amount of power for a boat meant to work around the waterfront.
“They’re so steeped in tradition,” the designer said. “I was honored when they asked me.” So Fitzgerald met with the apprentices and instructors who would be build-ing and using the boat to explain his ideas and gather more of theirs. Another consideration for the Apprenticeshop was the desire to have a model that they might offer for sale to potential clients. To that end Fitzgerald presented them with two models of the AS-17: a work skiff and an island commuter. The latter is essentially the same boat with 4″ additional freeboard to allow for safer, drier travel among Maine’s coastal islands.
Second-year apprentices Matt Dirr, Sophie Meltzer, Duncan MacFarlane, and Jeff Steele built the work skiff in the winter of 2011–12. Stockinger said they had to remind Fitzgerald that they wanted to build things “the hard way” incorporating labor-intensive details such as notched stringers that are valuable lessons, not hindrances, to efficient building. The boat was built upside down using the white oak frames as molds. In an effort to dispense with any athwartship support from bulkheads or thwarts, the sawn frames were made particularly heavy and gusseted with plywood at the chine and keel intersections. The keel and stem are of solid white oak, the bottom is two layers of 3⁄8″ white cedar planks laid longitudinally with the seams staggered and a coat of thick old paint spread between the layers, and the topsides are lapped 5⁄8″ cedar planks. The narrow decks required apprentices to build a complex supporting structure of deckbeams before applying a plywood deck. Fastenings were bronze screws, and copper rivets in the lapped topsides. A thick oak coaming and rubrail finished the deck edges.
Aaron Porter
A bow pudding made of 1/2” manila line makes the new AS-17 a real pushboat, and adds an elegant touch.
“We were planning on hitting things with this,” Stockinger said by way of explanation after listing the robust materials and scantlings. That expectation informed the boat’s finish as well. Inside, the frames, planking, and Douglas-fir sole are simply oiled. They’ll weather with age, and the dings of dropped tools and flung gear will just add to her working character. The topsides are painted in one of my favorite practical finishes: Rustoleum flat black, a paint that hides the scrapes and gouges a working boat can’t avoid, and can be touched up with the scuff of a scouring pad and a dab of paint from a chip brush. As a finishing workboat touch, two apprentices artfully hitched a charmingly accurate bow pudding—a fender—of ½” manila line.
Running at speed with the 20-hp engine, the AS-17 Work Skiff makes 15 knots with the confidence-inspiring stability of a much larger boat. Fitzgerald said the new boat could handle 70 to 90 hp easily, and that’s the sort of power he’d suggest for the recreational version. As an able coastal runabout with real seakeeping ability and speed potential, this boat could be a slightly smaller rival to the Albury Runabout profiled by Maynard Bray in Small Boats 2010. As a versatile small work-boat, this model is hard to beat.
Mark Fitzgerald generously donated his designs for both models to the Apprenticeshop. For questions about commissioning either, contact Shop Director Kevin Carney at [email protected].
The AS-17 is a stoutly framed and beefy small skiff. Her diminutive size and 5’6” beam suggest a tender boat, but deep chines and 12-degree deadrise at the transom make her surprisingly stable. While conceived to be a workboat, she’d also make a great recreational runabout.
On Monday, September 1, 2014, the first issue of Small Boats Monthly was released. That issue’s six articles profiled a sailing outrigger canoe and an outboard skiff, reviewed a flashlight and an anchoring bungee, and featured an Alaskan sail-and-oar cruise and a family-built skiff. The next issue added the Technique feature articles to the mix, and the editorials followed just over a year later. In 2018, we branched out from covering only wooden boats to including aluminum, fiberglass, and inflatable boats. Our Series section began the following year with a video series and Boat Profiles originally published from 2007 to 2013 in the print-only Small Boats annual, which preceded web-based Small Boats Magazine.
#96 to #47
There are now more than 900 articles on the Small Boats Magazine website, all of them available to every subscriber, and all of them made possible by our contributors and readers. While those of us who produce Small Boats take pride in reaching this 100-issue milestone, we’re simply one nexus between those who have a passion for small boats and those who wish to offer something about them.
#48 to #1
For Nick Grumbles, builder of our Reader Built Boat in this issue, the nexus was the 2019 Port Townsend Wooden Boat Festival. There he met Larry Cheek, a Small Boats contributor and a serial boatbuilder with several boats to his credit. Nick had no experience with rowing and sailing, let alone boatbuilding, but he was eager to learn. Larry had started out in the same way, driven by an inchoate passion for boats and undaunted by a lack of knowledge and experience.
In 1978, when I attended the first of those festivals in Port Townsend, I had already built my first boat, a skin-on-frame kayak that I had designed, and its chief virtue was pointing out how little I knew about boats. At that festival, I attended a presentation given by David Zimmerly about traditional Alaskan kayak construction. I talked to him afterward and he must have sensed the fascination he’d awakened in me and gave me a photocopied draft of his then-unpublished book, Hooper Bay Kayak Construction. It filled me with an appreciation for traditional boatbuilding and was such a clearly written and illustrated guide that I wasted little time in building a Hooper Bay for myself.
While my connection with Zimmerly gave me the benefit of his knowledge, it was John Gardner, known to many as the dean of American small craft, who gave me the encouragement that those new to boats need to keep discouragement at bay through the inevitable challenges that arise. In the late ’70s he was the technical editor for National Fisherman, a tabloid that my father subscribed to. I eagerly read the column Gardner wrote because it often included photos of amateur-built boats. I mailed him prints of my Hooper Bay and the Marblehead skiff I’d built soon after the kayak. He published both in National Fisherman with this in the caption: “Chris has taken to boatbuilding like fish to water.”
Over the more than four decades since then, I’ve moved through the nexus that joins those in the boating community with enthusiasm to those with experience. Wooden boat festivals, tabloids like National Fisherman, magazines like WoodenBoat and the now long-defunct Small Boat Journal, and books by the likes of John Gardner, Howard Chapelle, and Pete Culler have enriched my life and obliged me to return the favor, just as Larry felt compelled to pass on his knowledge to Nick.
Small Boats is meant to serve in the same capacity, a nexus that provides encouragement and experience to anyone with an interest in small boats. With this 100th issue our thanks go out to the contributors and subscribers who have given us a place in this community.
Afterword
Following the launch of the 100th issue, my son, Nate, presented me with a peanut-butter jar filled with 100 red-cedar Whitehalls he had carved and painted.
In November 2019, my husband Fredrik and I were looking for a small boat for a long expedition in remote areas of Alaska. We needed a boat we could row, sail, and beach. We began our search by visiting Gig Harbor Boat Works, where the Salish Voyager was still in the design stage. We rowed their Jersey Skiff, which has the same hull shape, and liked it. As we were about to leave, Falk Bock, the production manager, mentioned that a cruising version of the skiff, the Salish Voyager, was in the works and might fit our needs perfectly.
The Jersey Skiff and the Salish Voyager are both modern interpretations of boats from the late 1800s—small rowing and sailing vessels for fishing off the New Jersey shore. The story goes that these seaworthy little craft, which could be launched and recovered through the surf, were also used for rescuing shipwrecked sailors and salvaging their cargo.
Safety was the prime consideration in the design and building of what was to be an expedition boat. In August 2020, Hull #1 of the Salish Voyager had its first sea trial and became Gig Harbor Boat Works’ demonstration boat. Our boat is Hull #2.
In June 2021, we met our new boat in Haines, Alaska, and began putting it and ourselves through our paces. We did a 10-day shakedown before embarking on our 14-month, 1,500-mile maiden voyage.
The Voyager, built of hand-laid fiberglass and reinforced with a variety of core materials, was easy to load and unload from a trailer and, with a little practice, we could rig the boat with its simple balance lugsail, in 15 minutes.
We were able to roll the 440-lb boat above the high tide line by pushing it over two inflatable beach rollers—although three would have been easier. For steeper beaches, we rigged a system with a long rope and two pulleys set up with a three-to-one mechanical purchase. We were to be sailing in a region that has a 20′-plus tidal range, and it was critical to have a boat that could go dry conveniently in a variety of situations. Because the Voyager has a box keel, it rests upright on the beach. For extra protection on rocky beaches, we took advantage of the optional stainless-steel keel rub strips. Despite the relative ease of beaching, we discovered that anchoring off was even easier: on all but the stormiest of nights, we used 300′ of rope to create an outhaul system to hold the boat offshore while we camped.
When we boarded the unloaded boat for the first time, the initial stability felt a bit unnerving but, when we tried to capsize it, the secondary stability turned out to be amazing. Walking the gunwales was easy; tipping the boat over for capsize-recovery practice was not. I finally managed to capsize the boat by standing on a gunwale and pulling on the mast. The aluminum mast and boom are hollow and airtight and prevent the boat from turning turtle. The ample flotation in the hull’s multiple compartments ensure that the hull sits high in the water when on its side. Climbing onto the daggerboard allowed me to quickly right the boat. A rather non-athletic scissors kick brought me back on board over the side.
Our capsize practice was done in calm water with the boat unloaded, but it left me with a sense of confidence. The cockpit, which is self-bailing, didn’t take on much water. Pulling the plug in the recessed scupper let the majority of the water drain out. When loaded for an expedition, the boat would float considerably lower, and more water could remain in the cockpit. However, it would still float high enough to recover from a capsize with a manageable amount of bailing.
Photographs by Fredrik Norrsell
When seen from above the ample storage and uncluttered cockpit are apparent. Storage beneath the side benches and foredeck is accessed via the large circular hatches. The cockpit’s raised floor keeps feet and gear dry. The aft sliding seat allows a second crewmember to either row while facing aft, or steer facing forward.
Our Salish Voyager carried everything we needed for well over six weeks at a time—food, camping gear, cameras, and an extensive collection of books, maps, fishing, and crabbing gear. The cruise-laden boat had the stability we needed to be able to stand up, change clothes, and move about the boat. This proved key to our comfort during our long journey.
The hatch in the cockpit floor gives access to a shallow compartment for storing extra fuel, canned goods, and beach rollers. The pry-out hatches on the side benches have a low profile and don’t interfere with seating. During this downwind run, the daggerboard is set forward of the mast and a plug is put into its trunk to keep water from splashing into the cockpit.
We had a round 10″ hatch in the bow, four 8″-diameter hatches on the side seats, and one long, shallow, 10″ × 20″ hatch in the floor that we used for extra fuel, canned goods, and beach rollers. Gig Harbor Boat Works offers several different hatch-cover types and arrangements. We were happy with the larger Beckson pry-out deck plates we chose for the side benches, because they were nearly flush and didn’t interrupt the seating surfaces as the raised flanges with rubber lids would. We installed a few tie-down points on the deck to help secure larger items, such as the tent, sleeping bags, and cooler.
When furled the sail, boom, and yard are raised above head height while the daggerboard is stowed forward of the mast. The bow and stern rowing stations have plenty of room between them but the rowers still have to focus on rowing in synch to avoid clashing oars.
The Salish Voyager has three sets of oarlocks and tracks on the parallel-sided benches support the sliding seats. The boat can be set up for either one rower in a center position or two rowers fore and aft. We didn’t experiment much with the center position as there were almost always two of us in the boat. Being able to keep moving while one person attended to making lunch, changing clothes, looking ahead on the chart, or simply taking a coffee break was helpful. If only one person was rowing, the forward position was the most powerful. When rowing, it was important to keep cadence with each other. If we were too far out of sync, we could—and did—occasionally clash oars. During our cruise, one of us could row at about 2 1⁄2 knots in calm water with a negligible current. The two of us together could row at 3 1⁄2 knots and keep it up all day. If wind or current were against us, having two rowers made the difference between hard work and attaining an enjoyable glide.
We always rowed with the mast in place and the bundled boom, yard, and sail suspended above head level and well out of the way. To minimize windage, we kept our bundle tidy and tight with four quick-release straps, but some weathercocking was inevitable. On one occasion we had the opportunity to row into a cave. It took us only ten minutes to remove the mast and sail and leave it on the beach. (It is not possible to row with the mast and/or the sail bundle inside the boat.)
Fully laden, the Voyager drew about 8″. As former kayakers, being able to row in shallow water close to shore was important to us. We were glad to discover that our minimal draft allowed us to maneuver around icebergs and through tricky reefs. For especially tight situations, one person looking forward and manning the tiller while the other rowed worked well.
The Salish Voyager is as suited to light breezes as it is to stiff blows. The single balance lugsail, generously sized at 100 sq ft, is easily rigged and controlled when singlehanded. The two sets of reefpoints allow the boat to be sailed comfortably as the wind pipes up.
With its 100 sq ft balance lugsail, the Salish Voyager performs well in a light wind. While we could often make way faster under oars than under sail, some days it just felt good to be lazy. One of my favorite ways of making way was “motorsailing.” With a mild headwind, one of us would take to the oars and the other the tiller. The oars felt exceptionally light as we flew along at 3 knots, about the same speed as if both people were rowing. Plus, with the extra speed the rowing provided, we could point higher upwind with the sail.
Over the course of two summers, we had about a 70/30 rowing-to-sailing split, which is considered good for our area. Our average sailing speed was between 3 and 4 knots. Top speeds were close to 5 knots, the theoretical hull speed.
The wineglass transom, deep skeg, and fine entry all enhance the Salish Voyager’s performance under oar. When sailing, the oars can be stowed up on the side decks, captured in their oarlocks. This keeps them both out of the way and also readily to hand if needed. Here the lugsail has its first reef tucked in.
The Salish Voyager has two sets of reefpoints, which allow for reducing the sail by 25 and 50 percent. This helped keep high winds from overpowering the boat. In a 10- to 15-knot tailwind, we sailed downwind in a following sea, double-reefed, at a manageable 4 1⁄2 knots. Both Fredrik and I are conservative by nature and reef early but even so, on a long trip it was inevitable that we would get caught out in winds that were stronger and gustier than we may have wished. At these times, we kept the sail tightly bundled. We put one person on the tiller and the other on the oars. Rowing provided more momentum than the bare mast could provide, and improved steerage, until we could find a lee or a safe haven.
When Gig Harbor Boat Works was designing the Salish Voyager they heard from several people who were looking for a beach cruiser that they could sleep aboard. For one person, sleeping aboard the Salish Voyager is easy, just lie down on the floor—there is 6′4″ of space between the daggerboard case and the aft bulkhead. As a couple, we experimented with making a platform at seat level. While this worked well and felt completely stable, we didn’t devise a good way to keep out the rain and bugs, so we chose to camp ashore in a tent.
In maritime endeavors we are kept safe by a balance of judgment, skill, and a good seaworthy vessel. The Salish Voyager proved a great choice for our expedition. It held up well in tough conditions for 14 months straight. It is a boat that a novice can handle, yet even after more than a year, I consider it a better sailer than I am a sailor. We can, and will, continue to grow into its capabilities for quite some time.
Fredrik’s life as a nature photographer, and Nancy’s work as a writer and author of Riding Into the Heart of Patagonia, blend well together. They are currently working on the book Going Wild: A Summer of Paddling, Living, and Eating Wild. Small, self-propelled boats have always been part of their life as lifelong wilderness guides and outdoor educators.
Fifty years ago, the Maine Maritime Museum added a 16′ dory to its collection. It apparently had been brought from Massachusetts to Maine by a summer resident of Boothbay who rowed it for many summers. The dory probably had been built around 1900 somewhere on the North Shore of Massachusetts, the center of the state’s dory-building community. That area once provided thousands of slab-sided Banks dories for fishing schooners, and hundreds of “Swampscott” round-sided dories for inshore fishing and recreation. No builders or other documentation came to the museum with the boat, so it was dubbed a North Shore dory.
Ben Fuller
The original 16′ dory from the North Shore of Massachusetts, circa 1900, is now on display at the Maine Maritime Museum in Bath, Maine.
In shape, it marries the flat sides of the Banks fishing dory with the knuckles found on Swampscott dories: in the North Shore’s three strakes, the lower two have straight sections, with a knuckle in the frame at the bottom of the vertical sheerstrake.
The North Shore dory has details not found in working dories. There are beaded-edge floorboards in each section between the frames. Seat edges, inboard tops of each plank, and bottoms of the outboard planks are also beaded. The bottom has 3 1⁄2″-wide curved guard strips—called “shoes” on the drawings—beveled to meet the bottom edges of the garboards and running around the outboard edge of the bottom planking with a sturdy wide piece at each end. And it has stretched circular designs painted on each seat as well as on the removable seats at each end. These match the gray of the hull, whereas the sheerstrake and interior are white. This detail was not uncommon among recreational dories, as evidenced by several in the Mystic Seaport Museum collection, where the design’s color matches the sheerstrake. These designs may be pure decoration but also remind users to sit in the center of the boat.
Some features indicate that the dory may have been skidded into the water from a float or boathouse. There is no antifouling or other bottom paint, and the original paint inside and out is quite thin with no evidence of refinishing. The middle floorboard has worn paint. There are bits of sheet copper tacked to the base of the stem and sternpost, which would prevent wear when sliding off and onto a float.
David Dillion drew a fine set of North Shore dory plans for an article about dories in WoodenBoat No. 36, September/October 1980. The plans consist of two sheets and include lines, offsets, and construction details with a list of parts with wood types and dimensions. As part of an exhibit at the Peabody Museum (now the Peabody Essex Museum), a reconstruction of the North Shore dory was built as a hands-on demonstration. As far as I know, my dory, TIPSY, is the only other one that has been built to the plans.
About 2010, Kevin Carney, head boat instructor at the Apprenticeshop in Rockland, Maine, had some very wide pine planks with straight grain. Not wanting to waste them by cutting them into pieces, he deemed the planks perfect for replicating the North Shore dory. The challenge this dory poses is that its garboard is 16″ wide at the bow, requiring planks at least 24″ wide. When these are found, the ’Shop saves them for appropriate projects. The original had natural crook frames, which Kevin had replicated with riveted half-lap frames. Like the original, it is bronze fastened. The ’Shop built the boat on speculation, and after it was finished it spent a year or two gathering dust.
Ben Fuller
Unlike most working dories, the author’s North Shore dory has floorboards between the frames. He has removed the forward two panels, partly because he has found them unnecessary but also because it makes it easier to bail rainwater.
I needed a tender capable of carrying four or five crew for the Tancook whaler VERNON LANGILLE. The Apprenticeshop’s North Shore dory seemed like it would suit the purpose. We rigged it with tie-downs for the removable seats, thwarts, and floorboards so that they wouldn’t get lost in a capsize or a swamping. I added stringers under the thwarts to prevent them from flexing. As a tender, the dory didn’t do so well. It could take the weight easily but became uncomfortably unstable if the passengers rode on the seats in the bow and stern. They needed to be down on the floorboards. And, while the dory rows nicely from the stern and bow thwarts, a passenger on the center thwart keeps a bow rower from taking a full stroke.
I let go of the VERNON but I kept the dory, and row it in Camden Harbor in winter and in my cove on the St. George River in summer. With the launch ramp only 2 miles away, it often goes on a trailer for expeditions as far away as Mystic, Connecticut.
If I were building the dory as a trailer boat, I’d make the bottom and garboards of plywood. Indeed, plywood would make it possible to build this dory without access to wide pine. I’d keep the plywood as close as possible to the original scantlings, and I’d think about ’glassing the bottom and leaving off the shoes.
In the 10 years I’ve had the North Shore dory, I’ve learned a lot about it. With a waterline of about 13′, it’s hard to get it above 3 knots—it isn’t a race boat—but it’ll go all day just under 3. Without a skeg, it likes to turn. A pull on an oar can spin you past 90 degrees. This can be problematic in a crosswind but is a blessing when working the boat through a whitecapping chop.
While it is nice rowing on a flat calm day, where the dory shines is when conditions are a bit more demanding. As maneuverable as it is, it can easily work the waves in a chop. Going to windward, if the bow comes out of a crest over a trough and slaps down, the boat loses momentum. Rowing upwind, a little tacking helps prevent slapping and losing speed. Downwind in a breeze, I might row from the stern thwart and time my strokes to get little down-wave rides with each pull. Days when it is blowing 20 knots or so I call “half-boat days”: going to windward I aim to get a half boat length per stroke. On a course across the wind, a puff will catch the side of the dory and heel it a little.
The slab sides mean that the dory has less initial stability than a round-bottomed Swampscott or peapod. While you can kneel below the rubrail without taking on water, it isn’t especially stable when you’re moving about. This tippiness lets you steer some by leaning, with the dory turning away from the side you lean on. Rowing across wind on a windy day I can heel a bit to the windward or shift my weight a few inches to windward and hold a straight line.
Marti Wolfe
The dory trims well with a single rower aboard. Carrying a full water bag as adjustable ballast makes it possible to get the best boat trim for holding a course in windy conditions. A pair of 8′ oars works well when rowing amidships, allowing the hands to be comfortably separated and only slightly crossed when rowing in the forward station. However, at the aft station, where the oarlock span is narrower, 7′6″ oars are a better fit.
Trim ballast is an essential part to holding a straight course in a crosswind. I keep a full 5-gallon water bag, weighing about 40 lbs, in the bottom, which I can move forward or aft as needed to trim the boat to an appropriate angle to the wind. The bag in the stern, ahead of the tombstone transom, helps control nicely a tendency to turn into the wind—weathercocking—when the wind’s abeam. Sinking the stern with ballast raises the bow, letting it swing downwind. Then the stern acts a bit like a skeg. Going upwind, when I sometimes row from the forward thwart, I can control precisely how much bow is in the water, and the stern, with less weight, will swing downwind.
The dory works well with 8′ oars, used amidships with a hand span of space between handles or from the forward bench with a little overlap. The narrower span of the oarlocks at the stern station wants 7 1⁄2 footers, which are also useful with a shorter stroke when it’s rough and whitecapping makes it a little hard to get the oar blades out of the water.
With the notch for sculling in the tombstone transom, I can scull if I have a passenger forward or tuck the trim ballast right under the forward seat, as far forward as I can get it, to counter my weight in the stern.
Marti Wolfe
The working dories of the 1900s had no foot braces; instead, rowers pushed against the frames. The author added his own adjustable foot braces and a removable short sliding seat. Combined, these allow him to maintain a 3-knot speed even into a stiff headwind.
The original North Shore dory, like working dories of its time, had no foot braces; the frames served that purpose. I got tired of bracing against the frames, so I made some adjustable foot braces to attach to the floorboards, which make pulling much more powerful. What has really made a difference in rowing performance is adding a short sliding seat. It makes it easier to stay in the 3-knot range, but where it most helps is in my endurance and in being able to add power when rowing into a stiff headwind. It’s like having a second rower.
With its flat bottom, the dory is easy to trailer. I made a trailer-width shallow-V roller out of some PVC pipe which helps center the boat coming on. Beaching, of course, isn’t a problem, and if the tide has gone out, leaving the dory high and dry some distance to the water, the rocker in the bottom and the absence of a skeg make it easy to slip a roller or fender under the stern to facilitate getting back to the water. The oak shoes (rub strips) soak up the dings and dents, inevitable when landing on a rocky coast. In 10 years of serious use, I’ve not needed to replace the shoes and the garboard edges are unmarred. If I wanted better rowing performance, I’d take them off and replace them with a pair of straight bottom strips paralleling the 3″-wide strip secured to the centerline, which might help with tracking, but they wouldn’t protect the edges of the planks as well. A full false bottom, like that used on many dory types, would fully protect the garboards without increasing drag but would add to the weight of the boat.
John Williams
Having a second rower certainly increases the power and speed but it also makes the dory less stable. To counteract this the author has added not only a 40-lb water bag, but also two 25-lb bags of shot. These can be moved around as needed for the perfect trim.
Lately, I’ve done some more rowing of the dory as a double. Two large people definitely make the dory feel unstable because the combined center of gravity of boat and crew goes higher. So, I’ve added more ballast. Besides the 40 lbs or so in my water bag, I set two 25-lb bags of shot in the bottom. Together, they have made the boat considerably stiffer and can fine-tune trim. It’s made me appreciate that heavily laden flat-sided dories shine when settled low in the water. The addition of ballast is really noticeable when pulling as a pair downwind in a breeze when the boat wants to dig its bow in and slew around into the wind.
The North Shore dory is solid as long as you stay low. I trust the dory’s stability and sea-keeping abilities enough to row year-round, though in winter I pick my days carefully. There are many fine light-wind days when there may be a big old swell running from a recent blow. The dory rides those like a duck. It’s easy to feel and look like the fisherman in his dory in Winslow Homer’s famous painting, The Fog Warning.
Is the North Shore dory for you? First, you have to like rowing. If you want more speed or only are out on relatively calm days, there are better boats. It isn’t great carrying a load of people unless you add ballast. Building the dory light with plywood would take care of the wide garboards, but the lighter construction wouldn’t add to the dory’s performance and indeed may increase the need for ballast. Adjusting the fore-and-aft trim makes a huge difference in performance when the breeze pipes up. It is a fine boat for big rollers. But if you like to dance with your boat, wiggle up and down through a chop, the North Shore dory is hard to beat.
Ben Fuller, curator emeritus of the Penobscot Marine Museum in Searsport, Maine, has been messing about in small boats for a very long time. He is owned by a dozen or more boats ranging from an International Canoe to a færing.
Dave and I launched his folding kayak and my decked skin-on-frame rowboat from Alder Bay on the northeast coast of British Columbia’s Vancouver Island for the 1 1⁄2-mile crossing of Johnstone Strait. Our destination for this first day was the Broughton Archipelago 10 miles east, so we headed north toward Weynton Passage, the 2 3⁄4-nautical-mile-wide gap between the Pearse and Plumper islands, but a strong ebb current pushed us to the west end of the Pearse group as we crossed. Rounding the largest island into Pearse Passage, we took the first of the channels heading northeast. We fought the current in which tips of rippling fronds of bull kelp pointed directly at us. Still, my GPS said we were making 2 knots and that seemed better than going around the long way, so we continued.
Dark green, densely forested islands rose on each side of us, indented by small coves filled with seaweed and barnacle-covered boulders. Beds of bull kelp blocked our path, sometimes making it difficult to drop an oar into the water through the thickly overlapping olive-green blades. We inched up the channel; three sailboats anchored in the deeper water in the middle of the channel swayed back and forth in the current.
Staying to the north bank, we made good progress up to the sailboats, but I could see a narrows ahead split by a fast-flowing river of foamy seawater heading our way. We stopped in an eddy to assess the situation. We had a long day ahead and really did not want to backtrack. Seeing another eddy on the opposite shore, I pushed my bow out and pulled hard for the other side. As my bow entered the current, it was yanked forcefully to starboard, nearly tipping me from the boat, and propelling me rapidly downstream toward the sailboats. That made the decision for us. After Dave managed a more careful turnaround, we went back the way we had come and, staying outside of all the narrow channels, continued to the east.
I had planned a 12-day, one-way journey from Alder Bay to the Vancouver Island city of Campbell River. Before the pandemic, I had been trying to complete a multi-year journey down the Inside Passage from Juneau, Alaska, to Seattle, Washington. Dave and I had paddled an Alaska section together in 2018, and I finished Alaska on a solo trip in 2019. Dave is from Maine and I’m from Colorado. We share a unique bond as adventure partners: his son is married to my daughter and we share two granddaughters. In the last couple of years, I had developed arthritis in a shoulder that made paddling a kayak painful, so we decided to skip the British Columbia Central Coast section of the Inside Passage and do a more protected section to Campbell River. Rowing didn’t hurt my shoulder, so I built the skin-on-frame rowboat to use on the journey and rigged it for forward-facing rowing. I brought my red Feathercraft folding kayak for Dave to paddle.
Roger Siebert
.
We continued past the Pearse group, crossed Weynton Passage uneventfully, and stayed north of the small islands of the Plumper group just northwest of 4-mile-long Hanson Island. Coasting eastward around the Plumpers, we heard a whale blow to the north, then saw the pale mist of the blow hanging in the air over the dark water.
Blackfish Sound, our next crossing, was only 1 1⁄2 miles wide but known for heavy traffic, from small boats plying the waters around the Broughtons to cruise ships and barge tows passing to and from Alaska. The water was rippled from a light but building westerly breeze. Swanson Island, about 3 miles long, was straight ahead and we pointed our bows toward the center of the island, expecting to hold that heading and let the breeze move us eastward toward our goal of tiny, 150-yard-wide Flower Island at Swanson’s southeast corner. We heard a whale blow again, saw the mist in the air, and beyond the whale a dark-hulled cruise ship in the distance. Cruise ships can move fast, so we began the crossing, but watched carefully to allow the ship to pass ahead of us before continuing into the middle of the Sound. Moments later, we heard more whale blows off our stern starboard quarter from a pod of orcas swimming between us and Hanson Island. The whales disappeared just before the ship passed in front of us and the way was clear to continue the crossing. The ship, bearing a big Mickey Mouse on the stack, moved slowly past, and the music of the Disney tune “It’s a Small World” faded away with it into the distance.
As we approached Swanson Island, the wind picked up and moved us rapidly to the east toward Flower Island. Small whitecapped waves followed us, causing my bow to pull to port and making me work extra hard with the oar on what was my weak side. On the shore of Swanson Island to port, we saw a cabin and what appeared to be a hot tub, then just past that a sandy beach with a fleet of kayaks, signaling a likely guided kayak tour group. We pulled out on a small beach on the east side of Flower Island, chatted with a group of kayakers who were just leaving, and after 14 miles we called it a day. Dave and I each set up our tents on soft carpets of fallen pine needles in separate small clearings carved out of the trees just above the beach. Stout tree limbs stretched out nearly horizontal over the beach, and after making camp, we lifted our boats to set them on the limbs to ensure they were above that night’s high tide.
David Mention
We left our first campsite at Flower Island under a cloudy sky and headed to a meeting with my friends Tim and Kelli at Farewell Harbour Lodge. The islets in the picture are just two of hundreds of similar islets in the Broughton Archipelago.
Fresh from a restful night, we rose to calm winds, high clouds, and the prospect of a long day in the boats. After coffee and breakfast, we moved the boats down to the water and reloaded them with our gear. Some friends of mine, Tim and Kelli, ran a lodge on Berry Island and I’d made arrangements to pay them a visit. We climbed into our boats and pushed off, heading east through a cluster of a half-dozen islets, and tied up to the lodge’s dock. Tim and Kelli had purchased Farewell Harbour Lodge, a former fishing lodge, a few years before and had substantially renovated and expanded it. Kelli welcomed us into a cedar-lined high-ceilinged dining room, offered us hot coffee and freshly baked scones, and gave us a tour of the lodge.
After we refilled our water containers from their freshwater tank using a hose near the dock, Dave and I headed north and wound our way through the archipelago. There were densely wooded islands everywhere, some no more than an acre and some covering square miles, all interspersed with rocky ledge islets and separated by channels of calm water. A rhinoceros auklet with the distinctive horn on top of its short apricot-colored beak surfaced directly ahead of me and took off running over the water. A few minutes later the fin and back of a harbor porpoise quietly broke the surface a couple of times before disappearing again. We passed by pigeon guillemots, numerous murrelets, and, at each landfall, two to three soaring bald eagles, and too many Pacific crows and ravens to count.
David Mention
Tired and hungry, we stopped at a cove on the north shore of Hunter Island where my chart showed a campsite. Unfortunately, the beach was covered with downed trees, there were almost no clearings in the forest, and mosquitoes were swarming us as we scouted.
We crossed from Crease Island north to Owl Island and landed in a rectangular cove with a small sandy beach on the island’s south shore for a welcome lunch break of ham and cheese wraps and cookies. There was a nice campsite here, but we had miles to go before the end of the day. During the stop, Dave said that his wrist was hurting and that he was concerned that we were putting in too many miles too fast. We agreed to head to a campsite shown on my chart on Hudson Island a few more miles to the north.
We arrived at a shallow cove on the north shore of Hudson Island and beached the boats. The campsite there was not promising. The beach was shallow and did not appear to have much space for the boats above the overnight high tide. Downed trees littered most of the beach making it difficult to even reach the forest for fear of tripping, even if we weren’t carrying our gear. The forest had no tent clearings, and the ground beneath the trees was littered with fallen branches. Mosquitoes swarmed us as we scouted. Our chart indicated there was a campsite on Insect Island 3 miles farther north. We had been told it was quite nice, so we returned to our boats and headed back out. As we started, I added insult to injury to our long day and headed the wrong way in the labyrinth of islands, going nearly half a mile before I realized my error and turned us around.
David Mention
Our campsite in the Burdwood group was at a former First Nations site that has been a popular small-boat camp in recent years. Much of the brush had been cleared from the shore surrounding the beaches and tent sites were numerous. Here, Dave set up his tent to catch a westerly breeze to dry out from that day’s wet and foggy morning.
We continued north. I was tiring and was pretty sure that Dave was, too; we had stopped talking. After another hour, we landed on a white sand beach on Insect Island. A sign on the beach announced that the site was within the traditional territory of a First Nations group and asked visitors to respect the land. Above the sign was a 20′-high cliff of dirt embedded with shell fragments.
We had seen another paddling group at the site when we landed, so Dave climbed the cliff using a knotted rope fixed on its face and went off to check in with the other group and to scout for tent sites. While he was gone, I began unloading my boat. Dave came back with a positive report and I began the arduous process of hauling my gear up the cliff to the campsite, a large area among tall cedars cleared of brush. Everywhere, shell fragments were embedded in the dirt—an indication that the site had been occupied for centuries. After setting up camp, we pulled our boats up above the high-tide line, just under the cliff and horizontal to the beach, then tied them up for the night. We had gone 17 miles that day and were bone-tired, so after a quick dinner, we both retired to our tents.
David Mention
We packed up to leave the Burdwoods on the shell beach that was formed from many generations of First Nations shellfish gathering. The white of similar beaches above the tide was often visible for miles and the relative lack of boulders and rocks made for easy landings and launches.
That night it rained lightly, and in the morning a dense fog filled the forest, wetting every surface. We ate breakfast, packed our gear, and made the difficult haul of gear back down to the beach. Twice, I nearly lost my balance on the steep slope, but avoided a painful fall. The beach of fine shell fragments made moving the boats and loading easy and we were soon on our way, heading east for the seven small islands and numerous rocky islets of the Burdwood Group at the entrance to Tribune Channel on the north side of Gilford Island.
Paralleling the north shore of Baker Island, we took a lunch break before the short crossing of Cramer Passage to the deeply contoured west coast of Gilford Island. To the south was Echo Bay, a marina and lodge on the site of the former First Nations village of Ḵ̓waxwalawadi. Once across the passage, we stopped at a freshwater stream on Gilford to replenish our water supply; all the islands in the Burdwoods would be too small to have any fresh water.
Roger Voeller
After a lunch stop on Gilford’s north shore, we headed back out into Tribune Passage. The steep rock-faced peaks of the north shore of the passage fell to Lacey Falls visible in the distance beyond Dave’s boat.
We headed north toward the islands, which are about 1 1⁄2 miles across the entrance to Tribune Channel. On its north side, the mainland foothills all but blocked the British Columbia Coast range but a few snow-covered peaks appeared in the gaps. The sky began to clear as we crossed, and a light westerly breeze followed us as we headed for a campsite known to have another shell-midden beach on a small island right in the middle of the group. Despite the wind, the ebb set us slightly to the west and we rounded the west side of a half-mile-long unnamed island toward the southeast end of the group. Once around, the cove we were looking for was directly ahead and gleaming like snow in the sunshine.
David Mention
The steep shores of Gilford Island afforded few places to camp, so we knew we had another long day. With several miles left, we pulled out briefly for a snack break at Clam Point before crossing Wahkana Bay and turning south. To the east was the mainland inlet, Bond Sound, overlooked by snow-capped peaks of the Pacific Coast Range.
We landed by the west side of a narrow south-pointing peninsula on a beach that continued for 100 yards along the south side of the island. The island had clearly been used for camping for years. Nestled among cedars and hemlocks there were many patches of flat needle-blanketed ground for setting our tents. Not far from the beach was a one-room cabin not yet weathered silver-gray with the same sign we had seen at Insect Island asking visitors to “Respect our Land.” Dave set up his tent and laid his damp sleeping bag over the tent to dry in the sun and breeze.
After I set up my tent, I walked a trail densely lined with salal—a berry-producing shrub native to the Pacific Northwest—that led up a forested hill above the cabin. The trees were almost all cedar, with some massive stumps scattered among smaller, younger trees. On the way back down, I took a wrong turn in the salal on a trail that dead-ended at a red cedar tree with a 30′ high, narrow, tapering scar where the bark had been harvested long ago. This was one of the culturally modified trees common in the area. First Nations people removed the bark in a manner that would not kill the tree, then peeled out the inner bark to make clothing, blankets, and cordage. I found my way back down to the cabin, and discovered ripe huckleberries on a bush right behind it. Dave and I spent the afternoon relaxing in the sunshine.
David Mention
Most of the campsites in the Broughtons themselves had tent sites that were expansive and obviously frequently used. Once we moved east around Gilford Island, campsites were few and small and good tent sites were not always very flat, forcing close quarters for the tents.
The next day we continued east along the north shore of Gilford Island. Gilford is more than 20 miles long east to west and a dozen miles wide in places. Its shore is densely lined with cedar and hemlock, draped from steep hills and scarred in places from logging both in the distant past and still ongoing in spots. Beaches were few and rocky where they existed at all. After 5 miles we stopped for lunch and to refill our water containers. Just as we landed, four sharply hooked fins, with a curve of slate-gray on the leading edges and dusty gray behind, surged out of the water barely yards to port, followed by the arched back of what were clearly dolphins. The area is known for Pacific white-sided dolphins. They raced about in the cove, evidently hunting, before speeding away back into the channel.
Roger Voeller
Once we decided not to go all the way to Campbell River, we could do shorter days. We spent two nights in a cove on the eastern edge of Gilford Island just behind Kumlah Island and facing the Coast Range on the mainland across the channel. Logging scars on the hillsides in the picture were a common sight throughout our days around Gilford Island.
Before getting underway again, Dave and I discussed his sore wrist and decided to scrap the plan to make it to Campbell River, and to circumnavigate Gilford Island instead, returning through the Broughtons to our car at Alder Bay. For the next six days the weather remained dry and even more sunny as we rounded Gilford. To the east and the north, high peaks rose above the steep forested hills that flanked the mile-wide inlets carved deeply into the mainland. Far to the north rose the Coast Range, its highest peaks flecked white with snowfields.
David Mention
We crossed over Tribune Channel to the mainland and into Sargeaunt Passage for a protected route toward our crossing of Knight Inlet. The narrow passage has little wave action, no real beaches, and a steep shore, so we camped on rough cobble just above our estimated high tide. I stayed up late until I was sure our tents weren’t going to be flooded, then entered my tent where my sleeping pad did a great job of smoothing out the rocks under me.
As we approached the southeast corner of Gilford, we veered east away from the island to enter Sargeaunt Passage and go due south along the narrow 2 1⁄2-mile passage between Viscount Island and the mainland. At its end we began the crossing of the 1 3⁄4-mile-wide entrance to Knight Inlet, a steep-sided fjord that reaches a crooked 50 miles inland. In the open water we hit wind of about 15 knots and 2′ seas, the first challenging conditions of our trip, though we were under clear skies and the whitecaps in the middle of the channel sparkled with sunlight. We weathered the crossing and I was pleased that my home-built decked rowboat handled the breaking waves well. Its cockpit stayed generally dry, although I endured the occasional splash when an oar caught the top of a wave.
David Mention
After crossing Knight Inlet, we continued back west toward the Broughtons and camped one night on the northeast corner of Harbledown Island. Once again, a steep shore behind us forced us to the beach, which this time was sand, but quite small. We were just able to fit two tents and the boats into the available space above high tide.
With just a few days left, we headed west down Knight Inlet and passed Village Island where thimbleberry bushes above a 250-yard-long shell beach surrounded the site of ’Mimkwamlis, a historic native village. In a clearing between two houses clad in weathered clapboards and shingles stood two thick posts supporting a massive log as a crossbeam, the centuries-old remnants of a traditional longhouse of the ancient village.
David Mention
We knew competition for campsites could sometimes be fierce once back in the Broughtons. Our mornings were now sunny and we pulled hard down rock-and-islet-strewn Beware Passage, past Village Island with its ancient First Nations ruins, to nab a campsite on the west side of Pearl Island back in the marine park.
We camped for the night on a small island to the west of Village Island and continued the next day past Berry Island and beyond to land on Flower Island where we hoped to camp as we had on the first night, but every site was taken. We took a break for lunch, then returned to the boats, and set off under a cloudless sky for a campsite at Red Point on Harbledown Island about 1 1⁄2 miles away. Weather reports had suggested afternoon winds up to 25 knots, but there was only a light breeze rippling the water, which made for easy rowing. We had gone less than a quarter mile when a whale spouted a few hundred yards to starboard; as its glistening black back gently fell, the water folded over it.
David Mention
Our favorite campsite during the trip was on Harbledown Island’s Red Point. The sandy beach faced west toward Hanson Island and the setting sun, and there were numerous tent sites in the forest above. I spent the night in a perfectly flat tent site floored with soft hemlock needles, waking frequently during the night to hear whales just off the beach in Blackfish Sound.
We passed Red Point’s steep rocky shore, and 1⁄4 mile farther along the prominence’s south side, arrived at a 100-yard-wide crescent beach of gray gravel and sand—a welcome break from the barnacle-encrusted boulders or cobble we’d had to contend with at many of our previous camps. At the edge of the woods, yellow alders stretched their limbs over the sand. After landing and unloading the boats, we carried them up the beach, set them in the sand, and tied their painters to the roots of fallen trees clinging to the undercut soil above the beach. Our tide tables said the midnight high was going to be 15′, but the line of dark brown dry seaweed left by an earlier high tide indicated the tide would not reach the boats. In the clearing above the beach, we set up our tents on ground cushioned with a mat of fallen hemlock needles. Overhead, the branches of towering hemlock and cedar trees knit together and allowed only speckles of sky to show through.
After setting up camp, we sat in the soft sand. Silvery trickles of fresh water crossed the rocks at the south end of the beach. In wetter weather, these would have provided ample water, but it had not rained for 10 days. Fortunately, we had filled our water containers at a bigger stream the day before. To the west, Blackfish Sound was a thoroughfare for marine traffic. Sportfishing boats, water taxis, and kayak-shuttle boats sped back and forth between Vancouver Island and the islands of the Broughton Archipelago. A couple of Alaska cruise ships went by with bright white hulls perforated with rows of portholes and topped with layer upon layer of cabin balconies. Long after they had disappeared, their wakes reached our beach and broke the silence with 2’-high cresting waves. A tug towing a barge stacked with green shipping containers crept southeast toward Blackney Passage and Johnstone Strait.
Humpback whales crossed back and forth in the Sound; their blows were followed by the mist from their breath hanging for seconds in the still air, often followed by an arc of a black back and a small dorsal fin, barely breaking the surface. One whale raised its flukes high in the air before sliding vertically beneath the surface.
For a few minutes a pod of 10 orcas passed from south to north on the Hanson Island side of the Sound. They were mostly females—evident by their curved 2′- to 3′-tall dorsal fins—accompanied by at least two males, with fins straight and twice as tall. Their raspy exhalations carried to us across a half-mile of water. Three adult and four juvenile bald eagles joined a swarm of gulls feeding at an eddy line caused by opposing currents a couple of hundred yards off the beach. The eagles glided low across the water and struck at the water with outstretched talons, but none of them caught anything; eventually, a white-headed-and-tailed adult and mottled brown juvenile eagle flew our way and rested 50′ above us in the limbs of a hemlock tree.
By nine o’clock, the sun was down. It was still a bright twilight, but I was tired and retreated to my tent and was soon asleep. During the night I woke several times to near silence, but I could always hear the whales’ breathing, which sounded different than during the day—sometimes a deep echoing bellow, occasionally a grumble.
Early in the pre-dawn morning—my watch said 5:15—a thunderous crash came from the water, close enough that a few seconds later I heard waves tumble on the beach. Apparently, in the dark, a whale had breached. A few minutes later, there were loud slapping sounds, likely a humpback slapping the water with its tail or a pectoral fin.
When Dave and I stepped out of our tents that morning, Blackfish Sound was almost completely still—no wind, no waves, and no boats. A thin layer of fog lay over the water, but the sky was clear above and Hanson Island rose above the fog on the other side of the Sound. As we drank our coffee and ate a pancake breakfast, the whales continued to blow and swim by. After breakfast, Dave did the dishes at the water’s edge, while I packed up the camp kitchen. We took down our tents and hauled dry bags from the woods to the beach. The low tide had been at 7 a.m. and was rising again as we brought the boats down to the water’s edge and packed them. Even at low tide, there were few large rocks on the beach, making it easy to carry the boats and move the gear. As we packed, the rising tide floated the boats, making for a straightforward launch. We headed out to cross the Sound for Hanson Island and after one more pleasant night in camp, crossed back over to Vancouver Island where, in a heat wave, we packed up the car and began the journey home. The Campbell River leg of my Inside Passage journey would have to wait.
Roger Voeller is a retired environmental consultant. After discovering sea kayaks while living in Massachusetts, he worked part-time as a sea-kayaking instructor for the National Outdoor Leadership School for 15 years, paddling the waters of Alaska, British Columbia, and Baja California. The boat used in the article is the fourth he has built. He currently lives in Colorado.
If you have an interesting story to tell about your adventures with a small boat, please email us a brief outline and a few photos.
Audrey and I have a stable of 16 small boats, and we often need to move them off and on trailers for maintenance and repairs. Audrey has a background in theater-set construction where the crews avoided lifting anything when a lever, dolly, line, or block-and-tackle would do, and after watching me struggle while moving boats, she designed a simple sling lift to reduce wear on me as well as the boats.
Photographs by the authors
Each sling in the authors’ pergola has a cleat (left) to secure the working end and a single block (top) secured to an overhead beam with a pad eye. The stationary end of the line is secured to another pad eye. Here the author’s 1965 Alcort Catfish is being lifted from its trailer for some hull repairs.
The lift’s two slings are made up of items from our hardware and rigging boxes: two retired 25′, 5⁄16″ mainsheets; an eye-strap for the end of each line; two blocks; and two cleats. We have a pergola that provides a suitable structure for the lift, but slings can also be easily installed on shed rafters, garage joists, or a free-standing, purpose-built frame. Our pergola’s 2×6 beams easily bear the weight of our boats; our previous sling lift was hung from 2×4s and they, too, were strong enough.
With the trailer pulled out from under the boat, there is easy access for any work that needs to be done. With fully exposed support beams like those in the pergola, the ends of the slings and the pulleys could be tied in place without the need for pad eyes.
The slings provide a bit of mechanical advantage—the boat itself is the moving block of a gun tackle system—and to date we’ve used the lift to hoist boats up to 200 lbs, but it could lift heavier boats. We attached the hardware with marine-grade screws or bolts, because our lift is exposed to the weather, and spaced the two slings about 8′ apart. This setup works for all of our boats, which range in length from 12′ to 14′.
Supported by the two slings, the boat can be set at an angle to make it easier to work on.
To lift a boat, we slip a sling under each end. The well-worn mainsheets’ soft braided covers were easy on the hands when they were used for sailing and are just as gentle on varnished or painted wood. We avoided using hard braided line or coarse twisted line, which could leave scars. We’ll use padding if we think even our soft mainsheets might mar a fine finish or paint that is not fully cured. We use old bath towels and pool noodles for padding; pipe insulation would work, too.
For work on the bottom of the catamaran, it has been rotated 180 degrees. Towels rolled and taped around the slings are one means of protecting finishes that might be marred by direct contact with the sling.
I can use one sling at a time to move boats up and down by myself, but when Audrey and I team up, we still lift a boat off its trailer one end at a time, because it reduces the effort required. After lifting an end, one of us cleats off the line and then we do the lift with the other sling on the other end. The boat will roll as the sling raises it, which is useful if there’s work to be done on the bottom and we intend to flip the boat over. If the boat is to remain upright, we cleat both slings and lift the low gunwale to bring the boat back to level or tipped beyond level in anticipation of another lift. Once a boat is hoisted, it is a simple matter to gently roll it in the sling to work on the bottom.
With our 16 boats, six trailers, and six dollies, we use our sling lift whether getting a boat off its trailer to gain easier access to it while working on the bottom, or shifting boats between trailers.
Audrey (aka Skipper) and (aka Clark)Kent Lewis blog about their boat shuffling at Small Boat Restoration.
You can share your tips and tricks of the trade with other Small Boats Magazine readers by sending us an email.
Having recently finished building our 7′ 7″ Nutshell Pram, we moved on to outfitting it for sail. For the rudder we chose a bronze-and-brass split-gudgeon fitting, as specified by the Nutshell’s designer, Joel White. The split-gudgeon hardware is also specified for White’s Shellback and Catspaw dinghies as well as his Pooduck Skiff but would work well on almost any dinghy transom. An Arch Davis Penobscot 17 that we once owned had the same rudder hardware, so we were confident it would work well on the Nutshell.
The gudgeon straps will straddle a rudder-blade thickness of just under 7⁄8″; the upper strap arms are 4″ long, and the lower strap arms are 5 1⁄4″. Both can be trimmed to length as needed, which was the case for the lower strap for the 7′7″ version of the Nutshell. The kit comes with all mounting hardware.
Photo by Audrey and Kent Lewis
With the rudder held horizontally the rudder’s lower gudgeon can engage on the pintle, just below the its upper transom fitting.
The Nutshell, like the Penobscot, has a raked transom, which poses a challenge whether you’re in the boat or standing in the shallows and peering down into the water to line up standard gudgeons and pintles. The split gudgeon solves this problem by employing a single 11 7⁄8″-long brass pintle and placing both gudgeons on the rudder. The split gudgeon has overlapping top and bottom bronze “hooks,” similar in shape to open fairleads. To hang the rudder, it is turned horizontal so that the split gudgeon hooks go either side of the pintle. This can happen high on the pintle, just below the upper gudgeon so you don’t have to hang over the transom if you are in the boat. The rudder is then swung to vertical, and the hooks grab hold of the pintle. The rudder slides down until the upper gudgeon slides over the top of the pintle.
Photo by Audrey and Kent Lewis
By bringing the rudder to vertical, the hooks of the lower gudgeon will capture the pintle. The rudder can be slid down until the upper, conventional gudgeon engages the top of the pintle.
This rudder hardware makes it a simple matter to row off a beach, sit on the aft thwart, clip the lower gudgeon to the transom, slide it down, engage the upper gudgeon, attach the tiller, and get underway.
Once both gudgeons are on the pintle, the rudder is securely hung in place.
The continuous pintle, described as a “hanger” by White, gets secured to the transom by two bronze plates with three screws apiece. The gudgeons fit snugly to the pintle, so the rudder does not come loose while under sail. However, if an underwater obstacle is struck, the rudder may slide up and pop off the top gudgeon, while the lower gudgeon will remain attached to the pintle. A retaining clip, like those used with standard rudder hardware to keep a rudder from going adrift, will ensure the top gudgeon on this system stays put.
We like things that are simple, work well, and look great. This split-gudgeon rudder hardware meets all those criteria.
Audrey and Kent Lewis mess about with boat lumber in the Hampton Roads area of Virginia. Their small-boat adventures are logged at their blog, Small Boat Restoration.
Decades ago, when I was into cruising long distances under oar, sail, and paddle, I accepted roughing it as a necessary part of the wilderness experience. In recent years I’ve shifted my focus from making miles to enjoying shorter adventures in comfort. And rather than carrying food merely as fuel to provide the calories I need with as little time and effort as possible spent in cooking, I now indulge in meals I make onboard that are often better than those I make at home. A good food-preparation knife and a cutting board have become part of my standard boating kit.
The new folding knives from nCamp have elevated my standards for what makes a good galley knife. The knives are available with Santoku and Chef blades in two grades—Premium and Elite. Each of the four models has wooden scales forming the grips on either side of the handle, three triangular holes that make it possible to open the knife with a thumb, and liner locks to hold the blade open. The handles are offset from the cutting edges to provide clearance for the knuckles above the cutting surface. I’ve been using the Premium Chef and the Elite Santoku and, right out of the box, both easily pass the usual sharpness test—slicing cleanly into the edge of a sheet of paper.
Photographs by the author
The Premium knives, like the Chef at top, come with a nylon bag. The Elite models, like the Santoku at bottom, come with a leather case.
The Premium Chef is nCamp’s more economical version of the Chef. It has beechwood scales on the handle and a blade made of a high-carbon stainless steel (9Cr18MoV) with chromium for high corrosion resistance and molybdenum for strength. It is 10 3⁄4″ long when open with a 5″-long blade. Closed, it is 5 3⁄4″ long. It weighs 5.8 oz. The blade has a 1⁄2″-wide hollow grind along the cutting edge and a 1⁄32″ microbevel. The Premium knives come with a nylon bag equipped with a drawcord and spring-loaded lock.
The Damascus steel used for the Elite knives (top) gets etched with acid to bring out the patterns created by the layers of different steel. The scalloped part of the blade keeps food from sticking. The Premier blades (bottom) are hollow ground. This Premier is the Chef model, which has a blade with a more pronounced curve than the Santoku type above it.
nCamp’s top-of-the-line Elite version of the Santoku has a walnut handle and the same dimensions as the Chef but is 0.1 oz lighter. Its blade has an inner laminate of high-carbon, high-chromium stainless steel (10Cr15MoV) for corrosion resistance and strength, sandwiched between Damascus steel layers for toughness. The multiple laminates within the Damascus are visible as parallel stripes of different shades of gray; they don’t have the intricate patterns associated with fancier decorative versions of Damascus steel. On each side of the blade a series of 10 scallops set 1⁄4″ away from the cutting edge reduces drag while slicing. The blade has a hollow grind that’s 7⁄16″ wide and about half as deep as the Chef’s with a similar microbevel. The Elite knife comes with a sturdy leather case with a belt loop.
Both the Chef and the Santoku can be opened and closed with one hand by pressing the thumb into one of the triangular holes. Using the hole closest to the pivot can open the blade completely in one motion, though it takes a bit of practice and effort. It takes less effort to pinch the hole farthest from the pivot with the thumb and middle finger to swing the blade partially out of the handle and then fully extend it by holding the blade’s tip on a cutting board. The liner locks are easy to operate when closing the knives. The pivot of each knife operates smoothly without being too stiff and when the blade is fully extended and locked it has a solid, immobile connection with the handle.
The steel at the cutting edges of both knives can take a very sharp edge and easily sliced vegetables thin enough to see through.
The handles provide a comfortable, secure grip even for my extra-large hands, and both blades have made quick work of cutting everything from chicken breasts, cucumbers, and russet potatoes to tomatoes and broccoli. The nCamps outperform the best chef knives I keep in my kitchen and take an edge that’s the equal of my 50-year-old high-carbon-steel Chinese cleaver, the sharpest food-prep implement I’ve ever owned.
I was pleasantly surprised by the Elite Santoku while I was cutting broccoli—the blade seemed to glide through the stalks with little effort on my part. When I tried the same cuts with the Premium Chef and two of my kitchen paring knives, the difference was easy to feel. Compared to the Santoko, the Chef took a little more effort and the paring knives seemed to take twice as much. The scallops on the sides of the Elite blade, as intended, significantly reduced the drag of the blade while cutting. I found the same effect with everything else I cut with it except butter.
The nCamp knives, especially the Elite Santoku, start an enjoyable meal by making its preparation quick and pleasurable.
With folding blades that protect the edges—and me—the Chef and the Santoku take up little room in my galley box, but they won’t take up permanent residence there. It’s such a pleasure to use them that they’ll spend their time between cruises in my kitchen.
Christopher Cunningham is the editor of Small Boats Magazine. He has been taking notes while cruising since 1980.
The Chef and Santoku knives are available from nCamp. The Premium versions cost $75 and the Elites cost $150. Small Boats readers can use discount Code BOAT35, and get 35% off the list prices. Offer ends May 31, 2023.
Is there a product that might be useful for boatbuilding, cruising, or shore-side camping that you’d like us to review? Please email your suggestions.
Larry Cheek’s memoir, The Year of the Boat, tells the story of building his first wooden boat, a Sam Devlin–designed Zephyr 14, a modest sprit-rigged daysailer. His work, he wrote, was “incomprehensibly slow, stumbling, often incompetent, plagued by doubt, and at the same time infected by too much pride to ask for help.” Even though he had embarked on the project knowing he was “fully unqualified to build a boat,” he pressed on for 18 months “buoyed by the belief that every first-time boatbuilder is unqualified, by definition.” When launched in April 2007, and christened FAR FROM PERFECT, Larry’s boat sailed well and became a source of pride.
Photographs courtesy of Nick Grumbles, Anna Lee Haag, and Larry and Patty Cheek
With all the plywood parts for the boat and the strongback precut by a CNC machine, Nick and Larry, both graduates of Texas Tech, got the Ilur boatbuilding project off to a quick start in Larry’s spacious shop. Here, they’ve just finished the stem. Beyond the boat’s stern is Larry’s Inspiration Wall where he has quotations posted with blue masking tape: Michael Ruhlman—“All great accomplishments are composed entirely of interlocking details.” Richard Todd—“The problem of insistence on a pure vision is that so much life exists within the impurities.”
Through the years that followed, Larry became a self-described, serial boatbuilder. He built two kayaks, three more sailboats, and eventually PATTY B, a 21′3″ Devlin-designed gaff cutter. In 2019, he and his wife, Patty, took PATTY B to the Port Townsend Wooden Boat Festival. While sitting in the cockpit, they invited dozens of admiring festival attendees aboard; among them was a young couple, Nick Grumbles and Anna Lee Haag.
Anna Lee, Nick, Larry, and Patty toast the completion of the planking. Next, the hull will be removed from the jig and turned right side up, but Larry, ever the realist, impressed upon Nick and Anna Lee that until it hit the water it was simply a “boat-shaped-object.”
As the four of them sat and chatted aboard PATTY B, they discovered that, despite an age difference of more than 40 years, they had much in common: they were all from Texas, had all graduated from Texas Tech, and Nick, like Larry, had dreamed of building his own boat. He even had a name picked out, TURN AGAIN, after an Alaskan inlet south of Anchorage that had impressed him with its beauty when he and his family had visited it in 2006.
Much of the painting and varnish has been done and the hull has most of its fittings installed. The hollow bird’s-mouth mast awaits final shaping and finishing.
Before the day was out, Larry and Patty had invited Nick and Anna Lee to their home on Whidbey Island. A couple of weeks later, the older couple took Nick and Anna Lee sailing and gave them an introductory lesson. A few weeks after that, Nick asked if he could help build the 28′ schooner Larry had spoken longingly of during a few earlier conversations. Larry explained that the boat really was little more than an idle dream, but then made a “spur-of-the-moment counter-offer: we could build a boat together, their boat, in my workshop.”
The Ilur was launched as a rowing vessel at Lone Lake on Whidbey Island. With the christening of MEASURE AGAIN, another milestone was toasted.
Larry suggested to Nick and Anna Lee several boats that he thought would be appropriate for them, but “Nick fell for the Vivier Ilur. He just responded to its looks on an emotional level.” Larry understood the power of that impulse; he had once been sorely tempted to buy a 45′ wooden sloop as a liveaboard, not because it was at all practical—he didn’t then know how to sail or even if he liked sailing—but because it was “breathtakingly beautiful.”
The first row; as Nick pulls away from the Lone Lake launch ramp, the smile says it all. The hole in the port side of the transom will accommodate the boomkin, and the notch to starboard of the rudder will hold a sculling oar. Both features are familiar on the traditional Breton boats that were the inspiration for the Ilur design.
With delivery of a CNC-cut kit of the Ilur’s plywood pieces, Nick and Anna Lee became first-time boatbuilders. Over the course of the next 22 months, under Larry’s instruction and guidance, they built the Ilur—a 14′ lugsail dinghy designed by French naval architect François Vivier with inspiration drawn from traditional small craft of Brittany.
Nick, Larry, and Anna Lee join forces on a second attempt to make accommodations for the mizzen mast, which Anna Lee has tucked by her shoulder.
At the outset, Nick and Anna Lee were equipped with little more than Nick’s dream and passion. Neither of them knew much about using hand tools or power tools, “but that just reminded me of me 15 years earlier,” recalls Larry. The young tyros inevitably made mistakes along the way but, as Larry told them, boatbuilding is not about preventing mistakes, it’s about solving the mistakes you make.
As launching day neared, Nick and Anna bent on the sails. The driveway gave the space needed to lay the sails out flat, but tarps were put down to protect the sailcloth and spars from any grit or dirt.
Larry became teacher and mentor, coaching Nick and Anna Lee until they gained the skill and confidence to work on their own. They both were, he says, attentive and focused and while they were working “no blood was spilled. We started in the fall of 2020, and by spring of 2022 I had receded mostly to the role of advisor rather than boatbuilder.”
With the mizzen mast in place with its sail laced on, the focus of the work moved forward to the main-mast partner.
Most weekends, the young Seattle-based couple would drive to Mukilteo and take the ferry to Whidbey Island. They stayed in the Cheeks’ second bedroom and as the weeks became months, the pieces of wood in the garage slowly but surely transformed into what Larry called a “boat-shaped-object,” inching toward the moment it would first float and become a boat.
Larry and Patty, Nick and Anna Lee became friends. “We don’t have children or grandchildren,” says Larry, “so we feel like we’ve adopted Nick and Anna Lee as honoraries. They’re as good as—no, probably better than—any we could have designed and produced ourselves: smart, responsible, unfailingly helpful, and always fun to have around.” Along the way the two couples did more than build a boat; they shared ideas about relationships, careers…even music. “In the mornings,” says Larry, “I would stream all five Beethoven piano concertos, then Anna Lee would respond with a cavalcade of Eurovision bands through the afternoon. We each began to appreciate the other’s music…at least a little.”
During the build, Larry noticed that one side of the hull was 1cm shorter than the other and the transom was not quite square to the centerline. The three builders did what they could to minimize the impact of the misalignment and, in the end, no one else would notice it. Larry assured Nick and Anna Lee that the goal wasn’t perfection, but “finding a level of imperfection that seems reasonable and comfortable.”
It was an image like this that made Nick fall in love with the Ilur. Larry knows well how such a feeling can carry a novice through the challenges of boatbuilding, even when using a boat of any kind will also be completely new territory. Mole, of TheWind in the Willows, was also struck by his first vision of a boat: “Mole’s whole heart went out to it at once, even though he did not yet fully understand its uses.”
The Ilur was launched in July 2022. Instead of being named TURN AGAIN, the boat was christened MEASURE AGAIN, a name that Anna Lee had suggested when the short side of the boat was discovered. It was offered in jest, but the name stuck. Larry and Patty watched from the shore as Nick and Anna Lee pulled away for the first time. Larry, who had initially been unsure that the Ilur was the best choice for a first-time project, could see that it was a boat that would “take care of you when you misjudge and get out in conditions a bit over your head.” He believes MEASURE AGAIN is “a boat that Nick and Anna Lee can grow into and enjoy.”
The chance meeting at the Port Townsend Wooden Boat Festival, Larry notes, “has become a wonderful friendship, even better than the boat we built together.” Nick and Anna Lee also grew closer together as they built their first boat. Two months after they launched MEASURE AGAIN, they were engaged.
Do you have a boat with an interesting story? Please email us. We’d like to hear about it and share it with other Small Boats Magazine readers.
Much like Nesbitt sodas and Odell Hair Trainer products, Lyman powerboats were everywhere in the 1950s. Thousands of consumer products were sold, used, admired, and then, eventually, cast aside. Tastes and styles changed, and that was pretty much that. Moreover, because they were all so common, nobody paid much attention to any of them, and—with the Lymans as one exception—nobody is much interested in bringing them back into modern use.
Fortunately, though, some people do care about the classic lines and good basic construction of the Lyman Boat Works’ line of powerboats, which included everything from small, zippy runabouts to family cruisers up to 35′ or so. And, as is the case with the 1950s cars of big fender fins, hood scoops, and lots of American-made steel, Lymans are still worth having for both their iconic status and for what they can still do in the environment for which they were designed. So that’s where Jonathan Taggart and Anne Witty started some 10 years ago when they began looking for a salvageable Lyman runabout for use in their waters of Georgetown, Maine.
“I was particularly interested in a clinker-built boat, one small enough for an outboard,” Taggart recalls. Several runabout brands from the ’50s combined lapstrake, or “clinker,” construction techniques with marine plywood and highly durable caulking concoctions, resulting in reliably watertight boats. “It didn’t really have to be a Lyman,” Taggart says, noting Penn Yan as just one other example of a company that produced clinker-built outboard runabouts with a rock-solid combination of plywood and caulking. But Lyman lapstrakes were what Witty and Taggart were most familiar with. “Plus I wanted a boat that chuckles,” says Witty, describing the trademark sound of small wavelets bouncing off the hull of a lapstrake boat.
Living in Maine, they began their search and quickly ran into a problem. Taggart quotes a veteran Lyman restorer as saying, “Don’t even bother looking in the Northeast. The ones worth having are so overpriced you can’t afford them. And the rest aren’t worth having at any price.” Taggart and Witty soon found this counsel painfully accurate—so they cast their nets ever wider.
Jonathan Taggart
With a no-frills functional layout, the runabout is easy to handle and to care for.
“Not surprisingly, we started finding more Lymans available in the Midwest,” says Witty. The birthplace of all Lymans was Sandusky, Ohio, a small city on the shores of Lake Erie noted for its recreational uses of that ideal location. With such a prime piece of real estate at hand, the brothers Bernard and Herman Lyman began a small boatbuilding business in the 1870s. Starting in Cleveland, the company eventually moved to Sandusky, where it grew on a reputation of using the best materials—white-oak keels and frames, white-cedar planking (plywood planking came later), nonferrous fastenings—while employing craftsmen who didn’t mind slowing the production line down a bit to get a fit or finish just right. From the start, Midwesterners gravitated to this type of proven, durable product in droves, while East Coast customers caught on later in the 20th century.
Eventually, Taggart and Witty found their 161/2′ runabout in a barn in Charlevoix, Michigan—although the “find” was actually in the modern sense of finding an item via relentless Internet searches. “I didn’t mind buying it sight-unseen,” says Taggart, who telephoned the owner and was told about all of the 1958 runabout’s deficiencies, which included rot in the stem and part of the keel, as well as general neglect from sitting in a barn for years. Returning overland from a business trip to Oregon and Montana, Taggart “swung by” Michigan’s Lower Peninsula on his way back to Maine. Finding the boat as described, including a trailer for the trip home, he paid the $2,000 and set to work.
From the beginning, we knew this wasn’t going to be a restoration to museum standards,” says Witty, who has spent much of her adult life as a museum curator—as has Taggart, a fine arts conservator. “We looked at it (the boat) as history, telling the story of its owners and its uses over time. We said, ‘Now we’re going to be part of its history, too.’”
So the curators began a non-curatorial process that started with repairing the stem and keel. “It was surprisingly easy,” Taggart says. The rot only extended into the false stem and false keel. The rest of the true backbone of the boat was still as sound as a 1958 silver dollar. Even better, the resorcinol glue in the laps in between planks was still solid, which isn’t always the case with Lymans. Hard use over many years sometimes rattles that glue free, and the bronze nails at the overlapping planks can’t fully compensate. Many elderly Lymans lack reliably watertight planks at every launching. But with Taggart’s Lyman, the planking was still very tight. So far, so good.
Being a boat built for an outboard, however, it was tough to tell exactly what size engine would be appropriate for a low-riding vessel with pronounced tumblehome aft. Weight would clearly be an issue, as it was in 1958. The boat itself is only 650 lbs dry weight and has room for four passengers. The U.S. Coast Guard ratings for such a boat have long been lost, but it seemed to Taggart that an engine much over 150 lbs might push the top of the boat’s transom perilously close to the waterline, especially when someone stood aft. In 1958, that meant you might be limited to an engine only up to the 25-hp range—older outboards generally having a higher weight-to-horsepower ratio than modern outboards. Additionally, Taggart and Witty wanted a quieter, more fuel-efficient solution provided by a modern four-stroke outboard—with some added get-up-and-go to it.
Settling on a 223-lb, 50-hp Honda outboard meant Taggart had to raise the transom’s upper edge by about 3″. “They still make that stain,” Taggart the conservator says, pointing at the nearly-invisible line where the top of the original mahogany transom meets the new filler piece. The stain to which he was referring comes from Sandusky Paint Co. (www.sanpaco.com), the Ohio-based company that has been supplying Lyman owners with specialty paints and stains since 1927. Taggart also stuck with the color known as “Lyman Sand Tan” for floorboards and other assorted pieces.
Jonathan Taggart
Small enough to reside on its trailer, and with plywood lapstrake planking that doesn’t need to “take up” after launching, this Lyman allows its owners to access their sailboat’s mooring regularly from a public boat launch.
But that’s about where the curatorial inclinations ended. “We’ve been concentrating on protection, not perfection,” Taggart says of his other paint and varnish efforts, which might earn him a B-minus at Varnish University. “We bought the boat intending to use it, to bang around in it, run it up on the beach, that sort of thing,” he says, adding, “you know: much like the original owners of Lymans.”
To that end, Witty and Taggart agreed to change the original Lyman cable-and-pulley steering system ransom’s upper edge by about 3″. “They still make that stain,” Taggart the conservator says, pointing at the nearly-invisible line where the top of the original mahogany transom meets the new filler piece. The stain to which he was referring comes from Sandusky Paint Co. (www.sanpaco.com), the Ohio-based company that has been supplying Lyman owners with specialty paints and stains since 1927. Taggart also stuck with the color known as “Lyman Sand Tan” for floorboards and other assorted pieces.
But that’s about where the curatorial inclinations ended. “We’ve been concentrating on protection, not perfection,” Taggart says of his other paint and varnish efforts, which might earn him a B-minus at Varnish University. “We bought the boat intending to use it, to bang around in it, run it up on the beach, that sort of thing,” he says, adding, “you know: much like the original owners of Lymans.” To that end, Witty and Taggart agreed to change the original Lyman cable-and-pulley steering system.
Jonathan Taggart
The current owner modified this boat’s transom, raising it and neatly matching the original finish, to accommodate a quiet and efficient four-stroke outboard.
And speed and reliability is what we got when we took little DEIOPEA, named for one of the Nereids of Greek mythology, out for a spin. Even after weeks in the owners’ barn on a trailer, the boat didn’t leak a drop as it hit the water and floated free of its trailer. Better still, with three adults aboard, the boat quickly got up on plane, roughly at half of the top-end rpms. Proper adjustment of the trim took a little time to figure out, but that’s common on any runabout, modern or otherwise.
Running at about 25 to 30 knots, the boat responded well in the smooth waters of our testing cove in Georgetown, Maine. In tight turns, her stern skidded a bit but didn’t feel too squirrelly. Taggart says he has considered installing skegs just above the waterline to minimize the skidding. But he and Witty are especially pleased with how the boat responds to wakes, tending to cut through the waves without pounding, as you would expect from a wooden boat.
Heading back to the gravel beach where we launched DEIOPEA, I noticed Taggart still had high-enough regard for the Lyman folks of yore to remove the company logo from the old steering wheel and epoxy it to the center of the modern wheel. “I don’t mind running her up on the beach,” Taggart said as we did just that. “But I am glad it’s a Lyman.” Some things from the 1950s are indeed worth keeping operational, if not outright restored.
Lyman runabouts are commonly found on the used-boat market. For a good source of information about the type, contact the Lyman Boat Owners Association, P.O. Box 40052, Cleveland, OH 44140; 440–241–4290; www.lboa.net.
In 1958, Lyman advertised a full range of outboard runabouts, from 13’ to 18’. Its largest inboard-powered boat at that time was 23’, though in later years the company built boats as large as 30’. The company’s claim of durability has been proven by the fact that many Lymans are still in use today and are highly regarded by their owners.
DEIOPEA Particulars: LOA 16’6″, Beam 5’10”, Depth amidships 2’3″, Weight 650 lbs, Motor 50-hp outboard
The story of the ELSON PERRY dates back to the late 19th century when Elson Perry, a lighthouse keeper, boatbuilder, and fisherman living in the coastal community of Port Medway, Nova Scotia, built a boat—a 20′ workboat carrying a handful of spars. It is believed that he built this boat for his own use and kept it for the rest of his life. It appears that a descendant kept the boat until 1929, when it was hauled up out of the water one last time and stored in a fish shack. There it rested until the 1960s when the house and land that included the fish shack were sold to the writer Calvin Trillin. Trillin donated that old boat to the Maritime Museum of the Atlantic in Halifax, where it has been preserved to this day (See WB No. 163).
When the museum decided to build a boat to celebrate the millennium, they chose to build a new version of that old Port Medway boat. This new boat is the ELSON PERRY. She’s proven to be a very shapely and able craft built by the museum’s resident boatbuilder, Eamonn Doorly, and launched on Canada Day—July 1, 2000.
In the 19th-century Nova Scotia in which Perry lived, a fellow did any number of things to piece together a living, and in many ways Perry’s life and his Port Medway boat are reflective of that diversity. One of the unique mysteries of the boat is that there are three mast partners, one on each of the forward three thwarts, suggesting that she could be rigged in a variety of ways, perhaps for different uses. Sometimes the boat was used for hand-lining, other times for scallop raking, and with a boat so pretty I would hope that she sailed for the pure pleasure of it as well.
There are signs of influences from other boats in her design and construction, but the overriding truth is that she is unique and very much the product of one builder in one place and one time in history. Although Doorly was building a new boat, he was tethered to the history of that old Port Medway boat. The replica is proof that, although there have been many advances in design and construction in the past century, a simple well-thought-out and built boat is still a great pleasure to observe and use—and is every bit as capable today as it was when it was first built perhaps 140 years ago.
To state that Doorly was the builder is a little misleading; more accurately, one should say he was the lead builder, with every single employee of the museum contributing some of his or her time. The hours in the shop are now looked back on fondly, and with the boat in the water each summer in front of the museum, she is a source of pride for the staff.
Michael Higgins
The ELSON PERRY has mast partners at each of her three forward thwarts. The storage compartments under the thwart were not in the original boat.
The boat was lofted from lines recorded from the original Port Medway boat by Ed Porter. This provided patterns for the stem, keel, and transom as well as for the building molds. These molds still exist and are in storage at the museum. All of these components were assembled right-side up and faired before the boat was planked. Like most lapstrake boats, she was planked—seven strakes a side—before frames were bent into the boat. There is a lot of shape in this hull, particularly aft. As a result, much care should be taken in lining-off the planking to ensure that one does not try to force too much shape into a single plank.
The stem and keel assembly is made of oak, as are the frames, and the planking is pine. No doubt another builder of this boat might choose other suitable woods available locally to them. Perry simply did what all good boatbuilders of that time did: He used woods readily available to him. Doorly did the same but was able to stray a little from his historical predecessor by using mahogany for the sheerstrake, which has added to the resilience and stiffness of this boat. The boat’s narrow side decks and long coaming also add greatly to her stiffness and aid considerably in keeping the ocean out. She has four thwarts supported by plenty of grown knees, and above the sole boards there is a partial ceiling—all adding up to a strong little ship.
The rig is full of traditional details, such as boom jaws and table. Much pleasure and pride will be found in splicing the standing and running rigging. No one piece of the ELSON PERRY is too big; this is a fully realized boat, but on a manageable size. There are ample opportunities to stitch leather on chafe points, and to fabricate your own vintage ironwork. The six spars would provide a chance for experimenting with different construction methods. A few could be solid, others laminated hollow with “bird’s-mouth joints” or tapered staves. For a builder with sailmaking skills or a desire to learn them, a suit of handmade sails would be just the thing to complete the project.
Michael Higgins
There are enough lines aboard to keep three people busy sailing the ELSON PERRY; four is better in windy weather.
This is not an instant boat; she will not be built in a few weekends over a winter, and she will require a depth of commitment. Few things are as disheartening as having an incomplete boat hanging around for years. On the other hand, if you have a suitable space, some basic tools, and perhaps 800 or 1,000 hours with which to work—not to mention several thousand dollars—you could build a boat that will turn heads and hearts wherever you may sail.
Now, I suspect that none of us is going to build an ELSON PERRY today for the inshore fishery or scalloping, so we need to think a little about what sort of sailing we are apt to do, and what sort of sailing the PERRY is up to. Port Medway is a sheltered body of water, and this being an unballasted, open boat, we would want to use her in coastal waters with an eye on the weather. But, that being said, she is an able and responsive boat, capable of impressive speed, particularly given the age of her design.
On a breezy day, the ELSON PERRY would sail best with a crew of four or so, not just because there are a lot of fun pieces of rope to pull on, but she could also use the weight to help keep her upright. She has plenty of power, and on a gusty and blustery day one needs to be agile to keep her leeward rail out of the drink. The reward is a very enjoyable ride indeed. Doorly reports, “Sailing the ELSON PERRY as a ketch is the most fun way to sail; she is very responsive, fast, and requires at least three people to sail, four in windier weather. Her purpose at the museum is to familiarize staff with the basics of sailing, so keeping staff busy and engaged while sailing is very important. I’ve tried other rigs on her, but she seems to come into her own when sailed as a ketch.”
Michael Higgins
At 20’ long, the ELSON PERRY is plenty big enough for camp-cruising, but also fast and lively enough for daysailing.
I can see us now deciding if we are going to be the Swallows or the Amazons. The ELSON PERRY is exactly the sort of boat that would appeal to Arthur Ransome. (Please, if you have not read Swallows and Amazons, do yourself a favor and find a nice old copy in a used bookstore, or get it new at The WoodenBoat Store, and settle in for a tale that will inspire you to build a boat and sail about your neck of the world with a renewed sense of wonderment and imagination.) If you would ike to explore a tidal estuary full of islands or inland lakes such as the Norfolk Broads in timeless style and grace, then the ELSON PERRY is a boat for you.
Endless days could be spent in pursuit of privateers, or on the run from custom agents with a contraband cargo of cheese, crackers, and cold lemonade. For fun, or to disguise your boat, you might leave the mizzen ashore, move the mainmast back a thwart to the next maststep, and rig her as a sloop. The mystery of the extra maststep will probably never be solved, but it would be very interesting to see how many different ways you could rig her. She is big enough at 20′ LOA and 5′ 5″ beam to carry the gear required for a weekend on the island, but small enough to trailer to another destination next week.
This is a timeless boat, and as such she is limited only by your imagination. She is at home along with her sister, the original Port Medway boat, at the Maritime Museum of the Atlantic but would also fit right in at any gathering of wooden boats today. The ELSON PERRY is the boat in which we wish our grandparents had taught us to sail and row, and the boat in which we might teach our own children to sail and row.
The Maritime Museum of the Atlantic no longer offers plans for the ELSON PERRY. The review appears here as archival material.
The ELSON PERRY carries six spars, making possible a variety of rigs. Ketch, cat ketch, sloop, and cutter rigs are all possible. These plans were drawn by Ed Porter and taken from the original boat owned by Elson Perry. The museum’s new version has a few modifications not shown here.
ELSON PERRY Particulars: LOA 20′, LWL 18’1″, Beam 5’5″, Draft 1’2″ board up 3’6″ board down, Sail area 210 sq ft
Under oars or sail, the Heritage 23 is a bewitching sight. The ketch-rigged double-ender, 23′ LOA, is English designer Richard Pierce’s contemporary interpretation of a classic Great Lakes Mackinaw boat, with a sweeping sheer, plumb stem, and raked sternpost. She is the prototype for a comely new one-design class intended to promote rowing and sailing along Michigan’s Sunrise Coast, bordering Lake Huron.
The idea for the Heritage 23 was conceived at East Tawas, Michigan, in 2011. A small cadre led by David Wentworth founded Heritage Coast Rowing and Sailing, Inc., a nonprofit organization. The group’s mission, inspired by the success of the St. Ayles skiff program in Scotland (see Small Boats 2012), is to encourage community boatbuilding, preserve classic regional boat designs, and encourage rowing and sailing. The group commissioned Pierce to adapt a traditional 19th-century Great Lakes boat design to a kit-buildable craft, using marine plywood and epoxy resins. Several boats were considered—among them the Collingwood, Huron, Tawas Bay One-Design, and Bateau—but in the end, the Mackinaw was selected.
Mackinaw boats originated on the Upper Great Lakes sometime in the 1800s, but exactly when has been in dispute for decades. The American Fur Company used Mackinaws on Lake Superior as early as the 1830s. Fishermen on Isle Royale near the lake’s North Shore worked aboard 20′ to 30′ versions of the boat from the 1850s to early 1900s. These Mackinaws were robustly built and heavily ballasted for operating in open waters. Early models, which primarily featured pointed bows and sterns, varied greatly in style, depending on the builder.
Once commissioned by the Heritage group, Pierce studied various plans, including Nelson Zimmer’s 20th-century version of the Mackinaw boat, in preparation for completing his design. Although based on historical Mackinaw lines, the Heritage 23 is designed to be constructed with lightweight modern materials. It weighs just 350 lbs and carries no ballast. With four rowing stations, each for an oarsman handling a single oar, and a coxswain seat, the boat is ideal for competitive coastal racing under oars. As a sailboat, she is best suited for protected waters. Overall, she performs like a large dinghy, rather than a deepwater workboat.
George D. Jepson
Rowing is a particular emphasis of Heritage Coast Rowing and Sailing, and the teamwork involved in having four oars and a coxswain will serve the goal of building community interest in boats and boatbuilding.
After the Heritage 23 plans were drawn, Pierce turned to Alec Jordan at Jordan Boats in Fife, Scotland, to design the prototype kit, as well as the boat’s interior layout, which favors the rowing configuration. Jordan already had a longstanding relationship with Hewes and Company in Blue Hill, Maine, to produce boat kits in North America, and the Heritage 23 has been added to the lineup.
Last April, six amateur boatwrights, regulars who would see the project through to completion, gathered with Jordan in a small building near the East Tawas waterfront. They constructed the Heritage 23 mold, glued garboards to the keel, and the modern Mackinaw began to take shape. During the course of the project, at least two dozen volunteers contributed to the building effort. Four experienced wooden boat builders dropped by almost daily to offer guidance.
As a warmer-than-usual spring hinted at the coming summer, the shop buzzed with activity. The team worked steadily to hang 9-mm okoume marine plywood planks, 12 to a side, gluing the laps with epoxy. “To have consistently hung two pairs of planks a day with a team who mostly had not been involved in building boats is a fantastic achievement,” Jordan said. When the sheer-strake—the “whiskey plank”—was fitted and glued, Jordan and the boatwrights celebrated with “a wee dram” of single-malt Scotch. Although there was much work ahead, it was a major milestone for the boatwrights and their mentor.
In addition to planking, bulkheads, thwarts, and flotation tanks were fashioned from CNC-machine-cut okoume. White oak was used for the keel, keelson, stem, sternpost, inwale, gunwale, tiller, rudder, steering yoke used when rowing, and bowsprit. The centerboard trunk was constructed with a white oak frame, an okoume body, and a sassafras cap. Spars, which included masts, yards, and booms for the standing-lug fore and main sails, were shaped from Douglas fir. The centerboard was cut from 3/4″ aluminum. The boat-builders cut cleats from a white-oak-and-carbon-fiber sandwich that they had laminated.
The Heritage 23 has a traditional-looking finish. The topsides are coated with white epoxy paint. The sheerstrake, thwarts, centerboard trunk, foredeck, spars, yoke, tiller, and rudder are finished bright. The boat is fitted out with off-the-shelf stainless-steel hardware, except for the pintles and gudgeons, which were custom-made locally from aircraft aluminum. Doyle Sails of St. Clair Shores, Michigan, cut Heritage 23’s white Dacron sails.
Raising the Heritage 23’s standing-lug rig is a rather simple matter, and even a novice can do it in about 20 minutes. The two identical unstayed masts (fore and main), with halyards attached, can be seated in their maststeps by one person. Preparing the yards to be sent aloft, the halyard is attached with a rolling hitch. The jib snaps quickly to the bowsprit and the halyard. Connecting the two downhauls, one forward and one just aft of the foremast, and threading the sheets through blocks completes the setup. Breaking down the rig takes even less time. The boat is easily towed or stored on its custom trailer, which Pierce also designed.
George D. Jepson
When the Heritage 23 is under oars, the tiller is removed and a rudderhead yoke with steering lines is installed to permit the coxswain to sit amidships all the way aft.
By late July, the Heritage 23 was ready to launch Pierce arrived in East Tawas from his home on an island off the coast of Scotland six weeks earlier to shepherd the project through its final steps; Alec Jordan returned to his business in Scotland. On an early August morning, a leaden sky darkened Tawas Bay, while a stiff 15-mph southeasterly breeze whipped the seas into a lively chop. The Heritage 23, with Pierce at the helm and three crew aboard, sliced across the bay under full sail. Emerging from the gloom, she was an apparition from somewhere in time. Turning into the wind, the crew lowered the mizzen, a precaution against potential damage. Even under reduced sail, the boat charged across the cresting waves, heeling to the wind but keeping her lee rail out of the water.
Returning to the harbor behind the protective breakwater, the Heritage 23 glided into her slip. There was water in the bilge and the crew was damp from the spray of the choppy seas. A bit of bailing set things right, while the sailing rig was stowed. Pierce suggested adding a canvas bucket to the regular gear list.
At high noon, the Mackinaw was rigged for rowing, with a steering yoke fixed atop the rudder in place of the tiller. A five-man crew was aboard, including a coxswain. The rowers each grasped a stout 12′ oar. With a word from the coxswain, the pulling began, while he steered by pulling ropes attached to either end of the yoke. Clearly, the pulling crew will need training to achieve a competitive edge, but for the moment they were pleased—along with Pierce—that the hull slid smoothly through the water.
George D. Jepson
The Heritage 23 draws on the famous Mackinaw boat of the Great Lakes, with its straight and plump stem, its shapely lapstrake hull, and its two-masted rig with plank bowsprit. The design requirement for glued-plywood kit construction, however, necessitated developing new plans from the bottom up.
By early afternoon, the wind moderated. Once again, Pierce rigged the Heritage 23 with just the jib and foresail, in yet another test of the boat’s capabilities, this time in a light breeze. Clearing the pierhead, we set off on a starboard reach. Tawas Point Lighthouse was visible off the port bow. The designer, still at the helm, was delighted with the boat’s response. In these conditions, a two-person crew could easily handle the Mackinaw for a leisurely daysail. In a heavier blow, with three sails aloft, at least one more hand, if not two, would be preferable.
Taking the tiller from Pierce, I found the helm responsive to my touch. In the light air, there was no weather helm. Pierce remarked that this was also his experience in heavy winds earlier in the day. Coming about, the boat is sluggish due to the long, straight keel that helps her track well under oars. Gaining speed once again, we sailed through the wind and headed off on a port tack. Pierce suggested that I let go of the tiller. Surprisingly, we continued sailing in a straight line, a display of the craft’s tracking ability.
Under sail, the helmsman must sit aft on either the port or starboard bench, just forward of the coxswain’s seat. In this boat, these side seats narrow significantly near the stern, leaving the helmsman with precious little room to comfortably perch. The layout is understandable for rowing purposes, but perhaps a removable thwart would answer.
Heritage Coast plans to build a second Mackinaw this winter, offering an opportunity for a new group of amateur builders to become involved. Along the Sunrise Coast, at least four other community groups are interested in building Heritage 23s.
As more Mackinaws are christened, windows will open to the past—a poignant reminder of the sailors and fishermen who plied these inland seas in small boats a century and more ago.
The Heritage 23 is an international effort: English yacht designer Richard Pierce paid homage to the Mackinaw boat heritage, but worked in modern elements such as an easy-to-handle standing lug rig, then worked with the Scottish kit-boat developer Jordan Boats to work up specifications for parts cut by Hewes and Company in Maine for a sailing and rowing association based in Michigan.
Heritage 23 Particulars: LOA 23′, Beam 5’6″, Draft (db/cb up) 1’2″, (db/cb down) 3′, Weight 350 lbs, Sail area 233 sq ft
In 2009, I kayaked the 25-mile-long south coast of Menorca, the northernmost of Spain’s Balearic Islands. I had intended to circumnavigate the island but there was a strong northwest wind, called the Tramontana, crashing waves up to 15′ into the north coast and raking across the west and east coasts. I spent three days waiting for the Tramontana to weaken. With my time running out, my hosts, Maria Teresa and Carlos of Menorca en Kayak, turned me loose at Biniancolla, a coastal town on the southeast corner of the island. Trading the circumnavigation for an unhurried cruise in the sheltered south coast was the best thing that could have happened. That coast is entirely composed of eggshell-white marés limestone, a much more malleable stone than the dark gray and red crags that fortify much of the north coast. The shoreline I’d be paddling is riddled with caves carved either by the Mediterranean Sea or by hand as far back as the Bronze Age.
The launch ramp in Biniancolla was at the north end of a narrow, well protected cove but the Tramontana sweeping over the low landscape on the east end of the island swirled around the buildings and buffeted the water. When I left the cove and paddled west along the coast, I kept close to shore in a band of still water only a dozen yards wide.
Four miles from the launch, I found a cove with an entrance no more than 100 yards wide and its end concealed by a dogleg bend to the west. A quarter mile in, I pulled ashore here at Cala de Biniparratx, a beach nestled in a valley at the foot of a 50′-tall limestone cliff. I walked to the base of the cliff and below the largest opening here, left of center, I found steps cut into the stone that led to a cave hidden by the trees. There was a rope hanging from the largest opening that I could climb to get into that cave. There was plenty of light left for the day and I went back to the kayak and paddled 1/2 mile west to the next cove. It wasn’t nearly as interesting, so I returned to Biniparratx.
These carved steps led to the cave where I made camp. In my right hand is the rope I used to climb to the large cave higher up on the cliff face.
The cave had plenty of room and a flat floor, making it a good place to sleep, though I didn’t know at the time that the cave and those above it were burial chambers carved out of solid rock in 1st Century B.C.
There were many other ancient caves carved from the cliffs looking out over the Mediterranean. Some of them, like these, were accessible only from the high ground beyond the tops of the cliffs.
Some caves, like the one pictured here—barely visible just above the bow; also seen in the next photo— were just below sea level and repeatedly filled with water pushed in by the low swell rolling in from the south. Air trapped inside would get compressed…
…and explode outward in a plume of spray. Other semi-submerged caves had wider openings and the air pushed out sounded like a deep sigh. Two of them led to long chambers that echoed the sound of waves rolling in, which created an unnerving sound as if someone trapped inside was moaning.
I made my second camp at Cala Sant Lorenç, a cove with sides so high and steep that my SPOT satellite messenger couldn’t get a signal out. There was an abandoned stone-walled boathouse at one end of the beach. It was filled with rubble and was rank with animal droppings, so I made my camp several yards away with my hammock stretched between two head-high rocks. Partway up the flanks of the hill to the south, I spotted two goats silhouetted at the edge of the woods; there appeared to be another cave right behind them.
In the morning I climbed the slope to where the goats had been grazing and found this cave. Inside there was a mattress, some cooking supplies, and a handle-less broom made of twigs lashed together.
I paddled into just about every sea-level cave that was safe to enter, mindful that if there were unusually high swells that I’d need plenty of headroom to ride them out while I was in the cave. I found grottoes like this that were lit from above by gaps in the cliff and from below by light striking a white-sand bottom.
There were some caves that wove intricate paths under the cliffs and I found places where the only light came from sunlight angling under the cave walls, illuminating the white limestone sand below. I had never seen color like this before anywhere in the natural world; the only other place I’ve seen anything remotely like it is in the beads of light-blue flame that form around each hole in a butane camp-stove burner head. To be floating in that light was mesmerizing.
The stairway built on the side of this cliff had 186 steps and railings of olive wood polished smooth and shiny by countless hands. After I climbed to the top, I descended and crept through the pile of boulders at the base of the stairs with a grapefruit-size rock in hand. Large blocks of Menorca limestone ring like bells when struck. The pitch of the tone coming from a boulder wasn’t related to its size, but each had a note so clear that the slope of boulders could be set up as a musical instrument.
At Calas Coves there were scores of caves, some prehistoric, some with inscriptions carved into the stone in Latin. Many of the caves were for burials; Calas Coves is Menorca’s largest necropolis. I found a few caves on the east side of the inlet that were clearly living quarters with separate carved chambers for sleeping and cooking.
I landed on the west side of Calas Coves and hiked to the top of the cliffs. On my way up, I saw this series of carved-stone troughs, each with a recess in the top edges of the walls between them. I believe it was built to treat water. If a heavy rain picks up dirt and litter as it flows downhill, each of the troughs would let sediment settle before the water flowed into the next trough. At the end of the line, the water would be clear and the process would be faster than accumulating all the water in one container and waiting for it to become still enough for the sediment to gather at the bottom.
There was an old quarry a short walk from one of the beaches I visited. Limestone had been cut by hand for building material on Menorca since Neolithic times, but using machinery to do the job lasted only from 1960 to 1994. This quarry had three flat 35′-high vertical walls that showed marks where the cables had made precise straight cuts in the stone.
I hadn’t paddled far into this towering cave before I realized I’d need a better flashlight before continuing. I backed out and paddled west to the town of Cala Galdana to get one. With better light I paddled deeper into the cave, well past the bend in the passageway that blocked all light from the entrance.
I estimated that I had paddled about 100 yards before I came to the end of the cave. The ceiling had lowered but was still high enough, a bit over 10′, to be safe if a swell pushed in. The limestone took on beautiful colors from dusty pink and purple just above the waterline to pale verdigris green overhead. The final chamber was about 25′ in diameter, large enough for me to get the kayak turned around, and when I turned the flashlight off and let the darkness envelop me, the echoes made the space sound like an empty gymnasium.
When I reached the west end of Menorca’s south coast, the Tramontana was still blowing hard and large waves were racing past the lighthouse at Cap d’Artrutx. I paddled into the harbor in the town of Cale en Bosc to wait for Carlos to pick me up. In the five days I’d had to paddle Menorca, I’d seen much more than I had ever hoped to see even if I had kayaked around the entire island.
Skimming across Copper Harbor, the Manitou 18 summons memories of lazy summer days in the 1950s on waterfronts across America. Built for coastal running on the Great Lakes and the region’s large inland waters, the eye-catching runabout—18′ LOA, with a 6′ 7″ beam—features a deep-V hull, substantial deadrise, and a sweeping sheer. Based on the Downeaster 18 by Charles W. Wittholz, the boat is a contemporary rendition by Copper Harbor Boat Works, a small shop on the tip of Michigan’s Keweenaw Peninsula, which juts into Lake Superior.
After building two small runabouts, the Boat Works sought a design that was better suited for the often choppy waters along the Lake Superior shoreline. Research led the shop’s founder, Ray Chamberlain, to the Wittholz runabout. In 1986, WoodenBoat Publications commissioned Graham Ero to build a Downeaster 18 (see WB Nos. 73, 74, and 75). Contacting Ero in Still Pond, Maryland, Copper Harbor boatwright Jeff Coltas inquired about the boat’s performance and solicited suggestions regarding its construction. Satisfied with the design and Ero’s feedback, Chamberlain decided to move ahead with the Manitou 18 project.
On a blustery midwinter day, with snow swirling in the north woods near the Lake Superior shore, the three-man crew commenced lofting the Manitou 18 in the shop’s snug confines, a small barn warmed by a fire crackling in the wood-burning stove. Lofting proved to be the most difficult step in the process, according to Chamberlain. The plans contained a table of offsets, but no patterns, requiring full-sized plywood templates to be fully developed for each part. While working straight from offsets may seem daunting to some, a builder with intermediate skills or an amateur who is very dedicated can build this boat. Of course, familiarity with lofting is also a good idea.
George D. Jepson
A storage compartment separates the two stern seats providing space for the fuel tank.
With Wittholz’s plans to guide them, the team began the hull’s plank-on-frame construction. Frames sawn from 3⁄4″ marine plywood and secured to the strongback hinted at the hull’s eventual shape. The frames were paired with pieces of red oak, providing a better surface on which to fasten the planks. The builders cut the 13⁄8″ keel and the keelson from mahogany, the stem from ash, and the sternpost from red oak. While white oak is generally accepted as a better boatbuilding wood than red oak, because of red oak’s known porousness, Chamberlain reasoned that encapsulating the wood in epoxy should provide sufficient protection against decay. Some builders will feel safer using white oak instead. They laminated two layers of 3⁄4″ mahogany plywood to form the transom.
Coltas reported that the Downeaster 18’s hull had a tendency to flex with the 9mm plywood planks specified in the plans. To strengthen the hull, the crew added one more frame and hung thicker, 12mm okoume side and bottom planks. Two additional Sitka-spruce stringers—six in total—further stiffened the bottom. Turning the hull upright, they noticed that the bow was a little high, but Coltas and crew liked the look, so rather than cutting it back they simply put a little more sweep in the sheer than was called for in the plans.
George D. Jepson
The runabout handles Lake Superior nicely, providing a dry, comfortable ride.
Once work began on the interior, the builders adjusted the seating plan. Moving the forward bench aft a few inches provided greater legroom and comfort for the helmsman and a passenger. Two stern seats, separated by a storage cabinet, completed the arrangement. Outboard fuel tanks are stored under the seats, which were fabricated from mahogany plywood. Most internal parts, including the seats, are fastened with stainless-steel screws, making them easy to remove. The sole is attached with bronze screws. This simple helm-forward plan provides ample space and storage for one to six on a daylong cruise.
The Manitou 18’s elegant interior and decking are among its most stunning features. Pinstriped fore and aft decks, built with 1⁄4″ bird’s-eye maple over 6mm okoume, add to the boat’s charm. The builders made the ceiling from quartersawn red oak and the sole from black walnut and red oak, and framed the windshield in maple.
The Boat Works sealed everything in epoxy before finishing, and paid careful attention to details when they applied the finish. They gave the entire boat—inside and out—two to three coats of clear epoxy, then painted the topsides with four coats of pale yellow, two-part polyurethane. Below the waterline, they applied four coats of white Teflon bottom paint. Interior surfaces and the decks were finished bright, with at least five coats of varnish. The team expended over 700 hours on this project.
In addition to the helm-forward layout, the boat is also available with a center-console configuration. The versa tile design accommodates multiple power options. This particular boat is driven by a 90-hp Evinrude E-Tec outboard, but was designed for 40- to 100-hp outboard motors. Other alternatives include an inboard/outboard or jet drive, as well as an inboard engine. Instrumentation includes a speedometer, tachometer, fuel gauge, and ammeter.
The seating and propulsion options will meet a variety of boating needs, from coastal cruising to pulling water skiers to picking up groceries at the local marina market. Easily trailered and simple to launch at public ramps, the Manitou 18 can be kept dry and under cover on its custom trailer—a good idea for any fine boat—or moored in front of the family cottage.
George D. Jepson
The Manitou’s attractive lines should earn some second looks at the launching ramp.
On a late-summer morning, I drove northeast on U.S. 41 toward Copper Harbor, a small, picturesque town. Under a brilliant clear-blue sky trees already displayed splashes of color, a sure sign that the boating season on Superior—called the “Big Lake” by those living near its shores—was nearing an end. At Copper Harbor Boat Works, the Manitou 18 sat on her trailer near the boat ramp. Less than five minutes after I saw her, she slid into the crystal water, reflecting her lustrous natural woods under the northern sun.
This is a charming little showboat, displaying impeccable workmanship from stem to stern. Chamberlain chose to trim the Manitou 18 with these special woods and the bright finish, but, in my opinion, she would also look comely with less brightwork and a painted finish. The latter option would hold up better against heavy use, too.
As we stepped aboard the runabout at the Boat Works dock, a light zephyr rippled across the water’s surface. Otherwise, all was still in the vast harbor, which stretches for nearly 3 miles and opens into Lake Superior. The Manitou 18’s chrome wheel and steering knob are throwbacks to the days of rock-and-roll and hot wheels, from customized roadsters to the early muscle cars, and reflect Chamberlain’s passions for speed and music with a classic ’50s beat.
As I edged the throttle forward, the boat literally flew over the water, streaming a clean wake. Momentarily, my mind drifted back to the late ’50s and early ’60s. Strains of Doo Wop tunes played in my subconscious, recalling endless summers on the water, pulling skiers or cruising along the beach. I was at the wheel of our old family runabout again, with the wind in my hair and Superior’s blue water spread before me.
The ride was smooth, even as we approached 40 mph. The boat and motor were relatively quiet. Powering into turns, the Manitou 18 responded with ease. As we accelerated on the straightaway, the stern barely squatted and the boat once again rose up on plane. It sliced through a building chop with minimal buffeting. At cruising speeds, the Manitou 18 is level and balanced. Chamberlain plans to add trim tabs to further balance the relatively light boat when there is just one person aboard.
Conditions were nearly perfect on this day, hardly challenging the Manitou’s capabilities. During earlier sea trials, the boat proved her mettle, powering through 2′ to 3′ seas in Lake Superior with her V-bow. The boat’s narrow entry makes her a bit tender side-to-side, but that’s the trade off we make for speed. The runabout is well suited for coastal waterways, whether fresh or salty. She handles Lake Superior nicely, providing a dry, comfortable ride.
George D. Jepson
The Manitou is rated for 40- to 100-hp outboard motors. With a 90-hp Evinrude E-Tec outboard, she flew across the water, giving a smooth ride at speeds up to 40 mph.
Overall, the Manitou 18 is simple to operate and is roomy enough to fit two additional seats just aft of the forward bench seats. Custom-made seat and back cushions give added creature comfort to the helmsman and passengers. Storage cabinets behind the forward seats are handy and suitable for towels or extra gear, such as binoculars. The boat is an extremely versatile modern classic, offering years of enjoyment with minimal maintenance.
Whether viewing the Manitou 18 moored dockside or sweeping through a sharp turn, boaters with a touch of gray will recall the time a half century ago when vintage wooden runabouts turned heads on waterfronts from coast to coast.
Plans for the Downeaster 18 can be ordered from The WoodenBoat Store.
Copper Harbor Boat Works is no longer in business.
These plans by Charles Wittholz appeared in WoodenBoat No. 73 as the first part of a three-part article by Graham Ero called “Building the Downeaster 18.” Copper Harbor’s modifications included raising the sheerline at the bow, using 12mm planking, and installing two additional stringers and one more frame. Particulars: LOA 18′, Beam 6’7″, Draft 1’1 1/2″, Displacement 1765 lbs (dry), Power 40-100 hp
When I was in Sea Scouts in high school, I got to sail a Lightning, and it became the standard by which I have since measured all small sailboats. I have always wanted a small sailboat of my own but, as awesome as a Lightning is, it is too big and heavy for me to manage on my own. I had grown to hate dealing with trailers and stayed masts, and wanted something I could transport on top of the car. For many years, I searched for the perfect boat, keeping a growing file of likely designs.
I found some promising candidates in Reuel Parker’s The Sharpie Book and Howard Chapelle’s American Small Sailing Craft, but I discovered the boat of my dreams when I saw the lovely Drake 13 Sharpie from Selway Fisher.
There are three Drake sharpies: an 11-footer, an 18-footer, and (for my needs) the “just right” 13′ boat. I ordered plans and they arrived from England, folded in a packet. While the four pages of drawings and eight pages of instructions are clear and well-detailed, it proved very helpful for me to have built a few boats: a Bolger Cartopper rowboat and a 13′ Pete Culler Butternut double-paddle canoe.
I studied the Drake 13 plans carefully and decided on a few changes. I would want to sit on the bottom of the boat, which meant changing the centerboard shown in the drawings to a daggerboard for its shorter trunk. I also preferred a balance lugsail to the standing lug in the plans because the balance lug is so tunable and maybe more importantly, I think it looks cooler. The sail plan I drew has about 7 sq ft more sail area, an increase of about 10 percent. Douglas Fowler made the sail to the drawings I provided.
Photographs by Buddy Levy
The plans offer options for building plywood-on-frame or stitch-and-glue. While the original design calls for two thwarts and a centerboard, this boat has a stool for rowing and a daggerboard for sailing. Sealed compartments in the ends provide flotation.
Paul Fisher, the designer, assured me that the modifications I had sketched would work but, just in case, I made the daggerboard slot longer than necessary so that I could adjust the center of lateral resistance if I got the sailing balance of the boat wrong. That, and the adjustability of the balance lugsail position, would also give me the ability to fine-tune the balance. I shaped a piece of closed-cell foam that fits in the daggerboard slot vertically to hold the daggerboard in place and then fits into the trunk horizontally to fill the slot when rowing.
The plans offer two construction methods: plywood planking over frames and stringers or stitch-and-glue. I opted for stitch-and-glue because I know the system well and it creates a very strong hull that’s light in weight and provides a clean, smooth interior that’s easily maintained.
The instructions provided with the drawings note that plywood can be either marine or exterior grade, but I didn’t want to use fir exterior plywood as it checks badly unless covered with fiberglass. I ordered five sheets of Joubert okoume plywood.
I butt-jointed the plywood pieces with ’glass on both sides instead of using butt straps or cutting scarf joints, as shown in the drawings. On the lengthened sheets, I laid out the panel shapes with a series of penciled tick marks according to the measured drawings. I connected those points into fair curves using a flexible batten and then cut out the panels. Stitching the four panels together—bottom, two sides, and transom—rapidly turned them into something resembling a beautiful little boat.
The 4′ 6″ beam provides a good oarlock span for 8′ oars.
The hull’s side and bottom panels are 6mm (1/4″) plywood; the transom, rudder, and daggerboard trunk are 9mm (3/8″). I designed and added some 9mm frames and I also added some 3″-wide chine-to-chine transverse strips flat on the bottom to stiffen it up a little bit and provide some depth for screws to mount my foam-pad tiedowns. The daggerboard is doubled 9mm plywood with carbon-fiber inserts to stiffen it.
I applied fiberglass tape to the joints but did not cover the entire surface of the interior or the exterior with ’glass cloth. This has worked well, and the plywood is still in good shape after three seasons of use. I think I saved about 8 to 10 lbs of weight this way as well as a lot of labor.
Spruce spars are specified in the instructions, but I used fir from the lumberyard. I picked through the pieces carefully and then hung them from the ceiling of my shop for a few months to let them air dry. I tested the spars by shaping them and then jumping on them with 6″ blocks holding up each end. I managed to break one of them. Better to fail in the shop than while out sailing!
I spent about three months, full-time, building the Drake 13 and launched it on a cool spring afternoon. At 105 lbs (stripped of oars, spars, and rigging), it’s fairly easy to get it on top of the car and to drag it across a sandy beach to the water. I use two 3′ x 8′ pieces of carpet to protect the bottom from abrasion while dragging the boat over the ground.
The rudder has a fixed blade with a horizontal bottom edge aligned with that of the skeg. For a better purchase on the water, the plans provide an option for adding a drop-down blade and the author added the horizontal wings seen here.
It takes about 30 to 40 minutes from cartop to sailing. That may seem somewhat slow, but that’s a result of being cartopped: the hull is transported bare, and everything needed on the boat must be packed in the car. Trailering would significantly shorten the preparation time at the ramp.
The oar length for the Drake is not specified in the plans. Mine are 8’ long and I use Gaco oarlocks, which are strong and smooth working. With moderate aerobic effort, I can row the Drake at about a 2-1/2-knot reading on the GPS. Ramping up to 80 percent effort increases speed to about 3 knots, and an all-out sprint might see 3-1/2 or a bit more.
On my first outing with the Drake, christened GREBE after the diving birds I see where I do most of my sailing, there was a sprightly wind. Once I got out on the water and all the various lines were adjusted, I sheeted in on a beam reach and the Drake leapt forward, soon sending spray over the gunwales and making that go-fast hum sailors love. The overall sensation was one of lightness, nimbleness, and speed. The Drake is quick and fun under sail, and I’ve seen a top speed of about 6 knots sail-surfing down a motorboat wake. Windward performance is satisfactory—the Drake tacks through 80 to 90 degrees. Cranking on the downhaul helps shape the sail well for windward work.
When sailing, kneeling on the bottom makes it easier to look forward while having a hand on the tiller.
During my first season of sailing GREBE, I found coming about difficult and often stalled halfway through a tack. To address the tacking performance, I added an endplate to the rudder to make it more effective without anything extending below the level of the skeg. (The instructions include details for a steel or aluminum drop-plate rudder blade that would give the rudder a deeper grip.) The endplate helped a lot. Falling off a little before the turn to build a little momentum and backwinding the sail are also very helpful in getting through a tack.
That flat bottom pays off when the boat is beached and sits nice and flat on the shore, but it can pound in waves. While sailing, I can shift my weight to settle one of the hard chines down into the water and lessen the impact with waves. Sailing on a run is a joy and jibing is made considerably more pleasant by the natural cushioning effect of the yard and boom squeezing together, allowing the boom to come across without a bang. In light air, I can center the tiller, lock it, and steer the boat by shifting my weight gently from side to side—pretty cool!
The plans call for a 65-sq-ft standing lug rig with the tack set to the mast. The author opted for a balance lug where the tack sets forward.
On one blustery day I had an opportunity to practice a capsize recovery. An unintentional jibe put the boat over with the mast and sail resting on the water’s surface. The boat righted easily—a little pull on the end of the daggerboard was enough. The aft flotation compartment supported me while I crawled back in over the transom. The sail should have come down to lessen the chances of the boat capsizing again. Although the stern and bow flotation compartments kept the gunwales above the water’s surface, the daggerboard trunk needed the board and the foam filler in place to prevent the ingress of water while bailing. About 15 minutes of adrenaline-fueled work with a large bailer removed enough water from the cockpit to ready the boat for rowing to shore. The longer centerboard trunk in the plans would need some similar way to seal its opening.
Selway-Fisher’s 13′ sharpie is a big boat in a small package and accommodates all the gear I need for overnight camping trips; I could probably pack enough in GREBE for a weeklong trip. Building a Drake 13 would be a straightforward project for an experienced builder and a suitable first boat for those with some woodworking experience. This little sharpie is easy to store and move, even by cartop. I have had so much fun daysailing and camp-cruising this pretty sail-and-oar boat.
John Larkin recently retired from a career designing bicycle helmets and returned to his first loves: painting, drawing, building boats, and sailing. He lives in Moscow, Idaho, and sails primarily on Cascade Lake, a reservoir in central Idaho.
I have owned several sailboats and loved the romance of sailing, but as I’ve aged it was requiring more work and scampering about than I enjoyed. When my friend George took my wife Donna and me on a short motor cruise of the western end of New York State’s Erie Canal, I found it to be a relaxing and beautiful experience, quite different from sailing on the turbulent waters of Lake Erie. I decided to build a boat for cruising the canal.
Donna Harris
The L’Ark is built upside down with the posts on the transom and bulkhead sides extended to a common baseline. The extra length gets cut off after the hull is rolled over.
We wanted a relatively small trailerable boat that was suitable for overnight travel. It had to have a galley, a head, and berths for at least two. I also wanted a boat that had a traditional appearance and used readily available materials, not exotic and costly tropical hardwood. And, it had to be possible to build it in my double garage with the tools that I had on hand and with my limited boatbuilding skills. When I came across Philip Thiel’s Escargot, it seemed to fit the bill except for its lack of standing headroom. I noticed that the Escargot plans include four pages of supplemental drawings for a modified version, L’Ark, with the same 18′ 6″ length. This four-berth plywood canal cruiser has 6’ standing headroom, a 6″ greater beam than the Escargot’s 6′, and steeply sloped cabintop sides. It looked perfect. I ordered the plans and built a scale model to give me a clear understanding of how the hull was constructed (it is a lot less expensive to make a mistake in balsa than in marine plywood).
Roger Allen
The L’Ark is drawn with a centered motor mount for an outboard to provide power and steering. The offset mount and centered rudder were borrowed from the Escargot plans but the arrangement proved more difficult to operate than the outboard-only setup.
I started construction of our L’Ark on the Fourth of July, 2016. I laid out and put together the seven frames on an 8′ x 8′ level plywood platform. To keep the frame pieces from shifting during construction, I added some cleats to make sure everything lined up and stayed put. I used good quality 1/2″ Douglas-fir marine-grade plywood. The plans call for 3/8″ plywood transoms and sides, but I found the 1/2″ to be less expensive and locally available. For the timbers, I was fortunate enough to have a lumberyard that would allow me to sort through the common 2x12s, which I ripped down into clear pieces. I used silicon-bronze fastenings as recommended in the plans; stainless and galvanized fastenings are listed among the options.
Roger Allen
Ordinarily the L’Ark would have an uninterrupted aft deck instead of a footwell. To compensate for the loss of height the author stands on a box to get a better view over the cabintop.
The seven completed frames were set up, upside down and squared to a leveled strongback. The plywood sides, previously made up of three sections and joined by plywood butt straps, were then glued and fastened to the frames, followed by the bottom panels, made up of five sections, also butt-strapped. I covered the bottom below the waterline with fiberglass cloth and sealed everything inside and out with two applications of epoxy. After two coats of antifouling paint, the boat was ready to turn right-side up.
David Harris
Standing headroom makes it much easier to prepare meals in the galley. As designed, the bottom of the door leading to the cockpit would be about level with the countertop and a three-step ladder would be fitted in the cabin.
The hull at this time weighed about 700 to 800 lbs and was ready to flip right-side up. The instructions recommend having 10 people, five on each side, to roll the 500-lb Escargot. I sent out an open invitation to a boat-flipping party and almost 30 people showed up. All went well and, with the hull right-side up and set on appliance dollies, I was able to move the boat around in my garage if I wanted to make room for a car or to make it easier to work on all sides.
David Harris
The author added floorboards that are not included in the plans. Setting the boards across the tops of the frames reduced headroom by a few inches but eliminated potential trip hazards while moving around the cabin. The ladder between the two forward berths leads to the foredeck.
Before putting the cabintop on, I built and installed cabinets for the head and galley. I wanted the boat to have a traditional look inside and out, so I opted for 3/4″ tongue-and-groove knotty pine for the ceiling instead of the 1/4″ plywood called for. The pine added significant strength, stiffness, and aesthetic appeal.
David Harris
There are two 24″-wide compartments between the saloon and the forward berths. The plans indicate one is for a head. The curtains here provide a measure of privacy.
During the long cold winter, a small space heater in the cabin made it possible for me to work on the boat’s interior in comfort but I kept tripping over the frames, so I installed 5/4 pressure-treated yellow pine floorboards over them. This reduced the headroom to 5′ 10″ (fortunately, still an inch taller than my height). The pine also added the more traditional appearance that I was looking for and would keep things dry, even if a little water found its way into the bilge.
David Harris
The compartment opposite the head is for storage.
The plans called for sliding windows and hatches. This looked complicated to build and only half of each window opens, so I built simpler hinged awning windows. This has worked out well. I also made hinged hatches instead of sliding hatches to free up the flat area of the cabintop for seating and storage. The companionway hatches also act as air scoops and provide plentiful airflow while underway and at the dock.
Roger Allen
While the plans call for a fixed table in L’Ark, Escargot’s table can be lowered to create a berth or bench. On L’Ark, the aft berths (not shown here) are accommodated on the aft seats and flats that extend beneath the aft deck.
L’Ark, as designed, has a flat deck at either end, each built over the foot ends of a pair of berths. A bench made of 1/2″ galvanized pipe is meant to be installed in the stern, but I didn’t like the way it looked and instead made the rear deck like the cockpit of a sailboat with a bench on either side and a self-draining footwell in the middle. Under one side bench is a ventilated compartment for batteries and an open area for gas tanks. Enclosed under the other bench is one of the remaining berths, which extends into the cabin. My cockpit footwell also allowed for a taller entry into the cabin. For the forward companionway, I opted to make it like a sailboat’s with a pair of removable plywood hatchboards. This proved to be a mistake, because they were awkward to remove and took up valuable space to store when not in place; I plan to install a split, hinged door.
David Harris
Beneath the forward berths there is lots of storage space accessed via removable plywood panels under the cushions. The ladder is easily removed and, with the addition of another plywood panel and cushion, a king-sized berth is created.
I covered the tongue-and-groove pine ceiling with 1/4″ plywood, taped the seams with fiberglass, and coated the whole thing with epoxy followed by paint. This was certainly leakproof, but it looked merely okay; I considered corrugated metal for a finished roof but decided on red-cedar shakes, which added a lot of character to the boat.
The plans for the L’Ark indicate a centered outboard bracket; the outboard motor would be used for steering. I built and installed the rudder and tiller and installed a motor to one side, as shown for the Escargot. While the tiller/rudder added a traditional look, the tiller took up too much space in the cockpit, and handling the tiller and motor at the same time proved awkward when docking. I decided to eliminate the rudder and mounted the motor in the center as per L’Ark’s plans. I found a 6-hp sailboat outboard with an extra-long shaft that fit perfectly on the transom without the need for a bracket. It also had a modified prop that was designed not for speed but to move a heavy boat.
Roger Allen
The foredeck has space for two folding chairs; passengers can escape the noise of the outboard and enjoy the view in comfort.
In 2021, after five years of work, my dreamboat was ready to launch. I was concerned that it might sit low in the water because I’d built the boat significantly heavier than designed, but it floated level and the waterline was perfect.
The designer’s statement recommends an outboard of between 2 and 5 hp “for a sensible 4-mph cruising speed.” With the 6-hp outboard, our L’Ark handles nicely. Even with a headwind, we can easily cruise at 6 to 7 knots, which is just right for the Erie Canal. Considering the high profile and shallow draft—about 12″—our L’Ark tracks and handles better than I expected. Docking can be a little challenging if there is a strong wind and current, but it’s a small boat so there is little chance of damage.
For an 18-1/2′ by 6-1/2′ boat, the L’Ark is surprisingly roomy inside. The forward berth is almost as large as a queen-size bed and is as comfortable to sleep on as in any boat that I’ve been on. There are two smaller berths, as well: one converts when the table is dropped down and the other is a small quarter berth half tucked under the rear cockpit bench. These are both just 24″ wide so they are best for children (or a guest that you don’t want to stay too long). In the galley, I installed a single-burner alcohol stove, a small copper sink, and a large glass water barrel with its spigot over the sink. In between the forward berths and galley there is a water closet with a pump-out toilet to starboard and a cabinet with drawers and a medicine cabinet to port. The three separate “rooms” have curtains to provide some privacy. There is plenty of storage under the seats and berth. The awning windows work well, don’t leak, and provide plenty of ventilation while keeping rain out. I daydream about someday sitting at the galley table and fishing out the window. The modified rear cockpit has worked out well, although to get a good view forward I have to stand to steer or sit on a small folding stool. The forward deck is large enough for two folding deck chairs and far enough from the motor for quiet conversation.
Roger Allen
With a 6-hp outboard, the author’s L’Ark can cruise at 6 to 7 knots.
My wife and I have enjoyed several cruises with our L’Ark, TERRAPIN, on the Erie Canal, staying at the marinas that almost every small canal town has. While tied up, our boat attracts plenty of attention. For day trips it can comfortably carry four to six people, and if the weather turns bad, there is plenty of room in the cabin; on one trip we saw an Escargot, the L’Ark’s little sister, and I suspect its crew was envious of our standing headroom. The boat is simple to construct and easy to modify to suit individual needs. It can be very simple as designed or dressed up (as I did with our L’Ark). I’m quite happy with the design and would recommend it to anyone who wants to build a tiny houseboat.
David Harris grew up in Tonawanda, New York, where the Erie Canal meets the Niagara River and halfway between lakes Erie and Ontario. At 21, he enlisted in the Coast Guard and served in Jonesport, Maine, first at a small boat station and later on an 82′ cutter. While serving Down East in the 1970s he got to know local lobstermen who were still building and using wooden boats. While in his 40s, he and his father built Bolger’s June Bug, a small sailing skiff. Several years later, David restored a run-down Catalina 30 and earned his captain’s papers to run sightseeing tours on it. He went back to college to study fine arts and design and enrolled in a class in boatbuilding at the Buffalo Maritime Center; he built a small skiff and learned how to work with fiberglass. He has owned several sailboats as well as a classic Chris-Craft cabin cruiser. After sailing for years on the turbulent waters of Lake Erie and wanting something traditional and more easily handled, he sold his last sailboat and went to work on his L’Ark canal boat, TERRAPIN.
L’Ark Particulars
[table]
Length/18′ 6″
Beam/6′ 6.75″
Height/6′ 5″
[/table]
Plans for the Escargot and the L’Ark consist of 12 pages for Escargot plus 4 pages of L’Ark modifications for the hull and cabin. The full set is available from The WoodenBoat Store for $75, print or digital format.
Is there a boat you’d like to know more about? Have you built one that you think other Small Boats Magazine readers would enjoy? Please email us!
Subscribe For Full Access
Flipbooks are available to paid subscribers only. Subscribe now or log in for access.
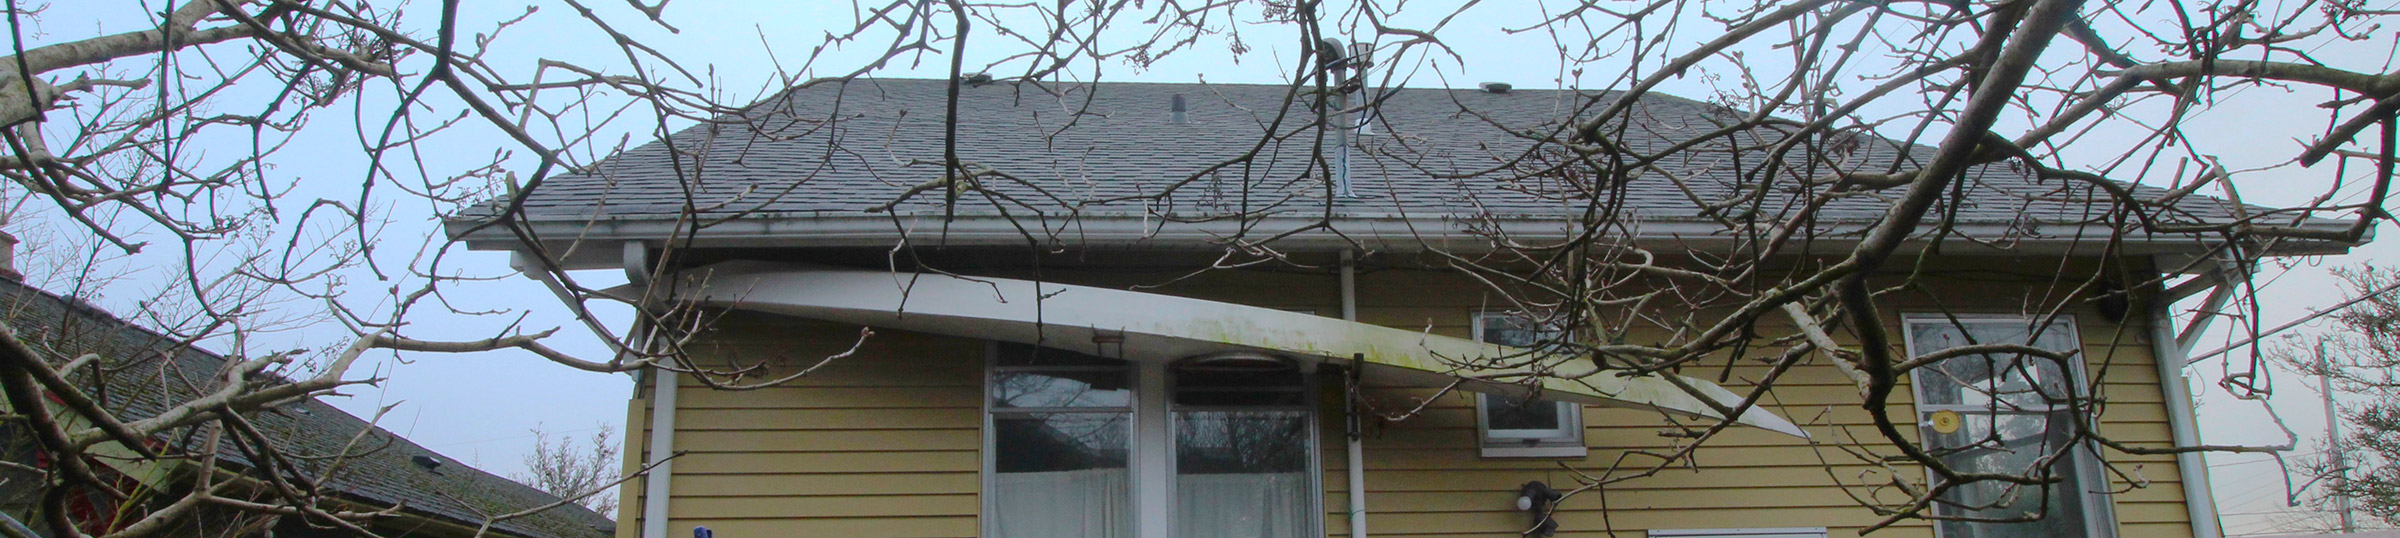
 Photographs by the author
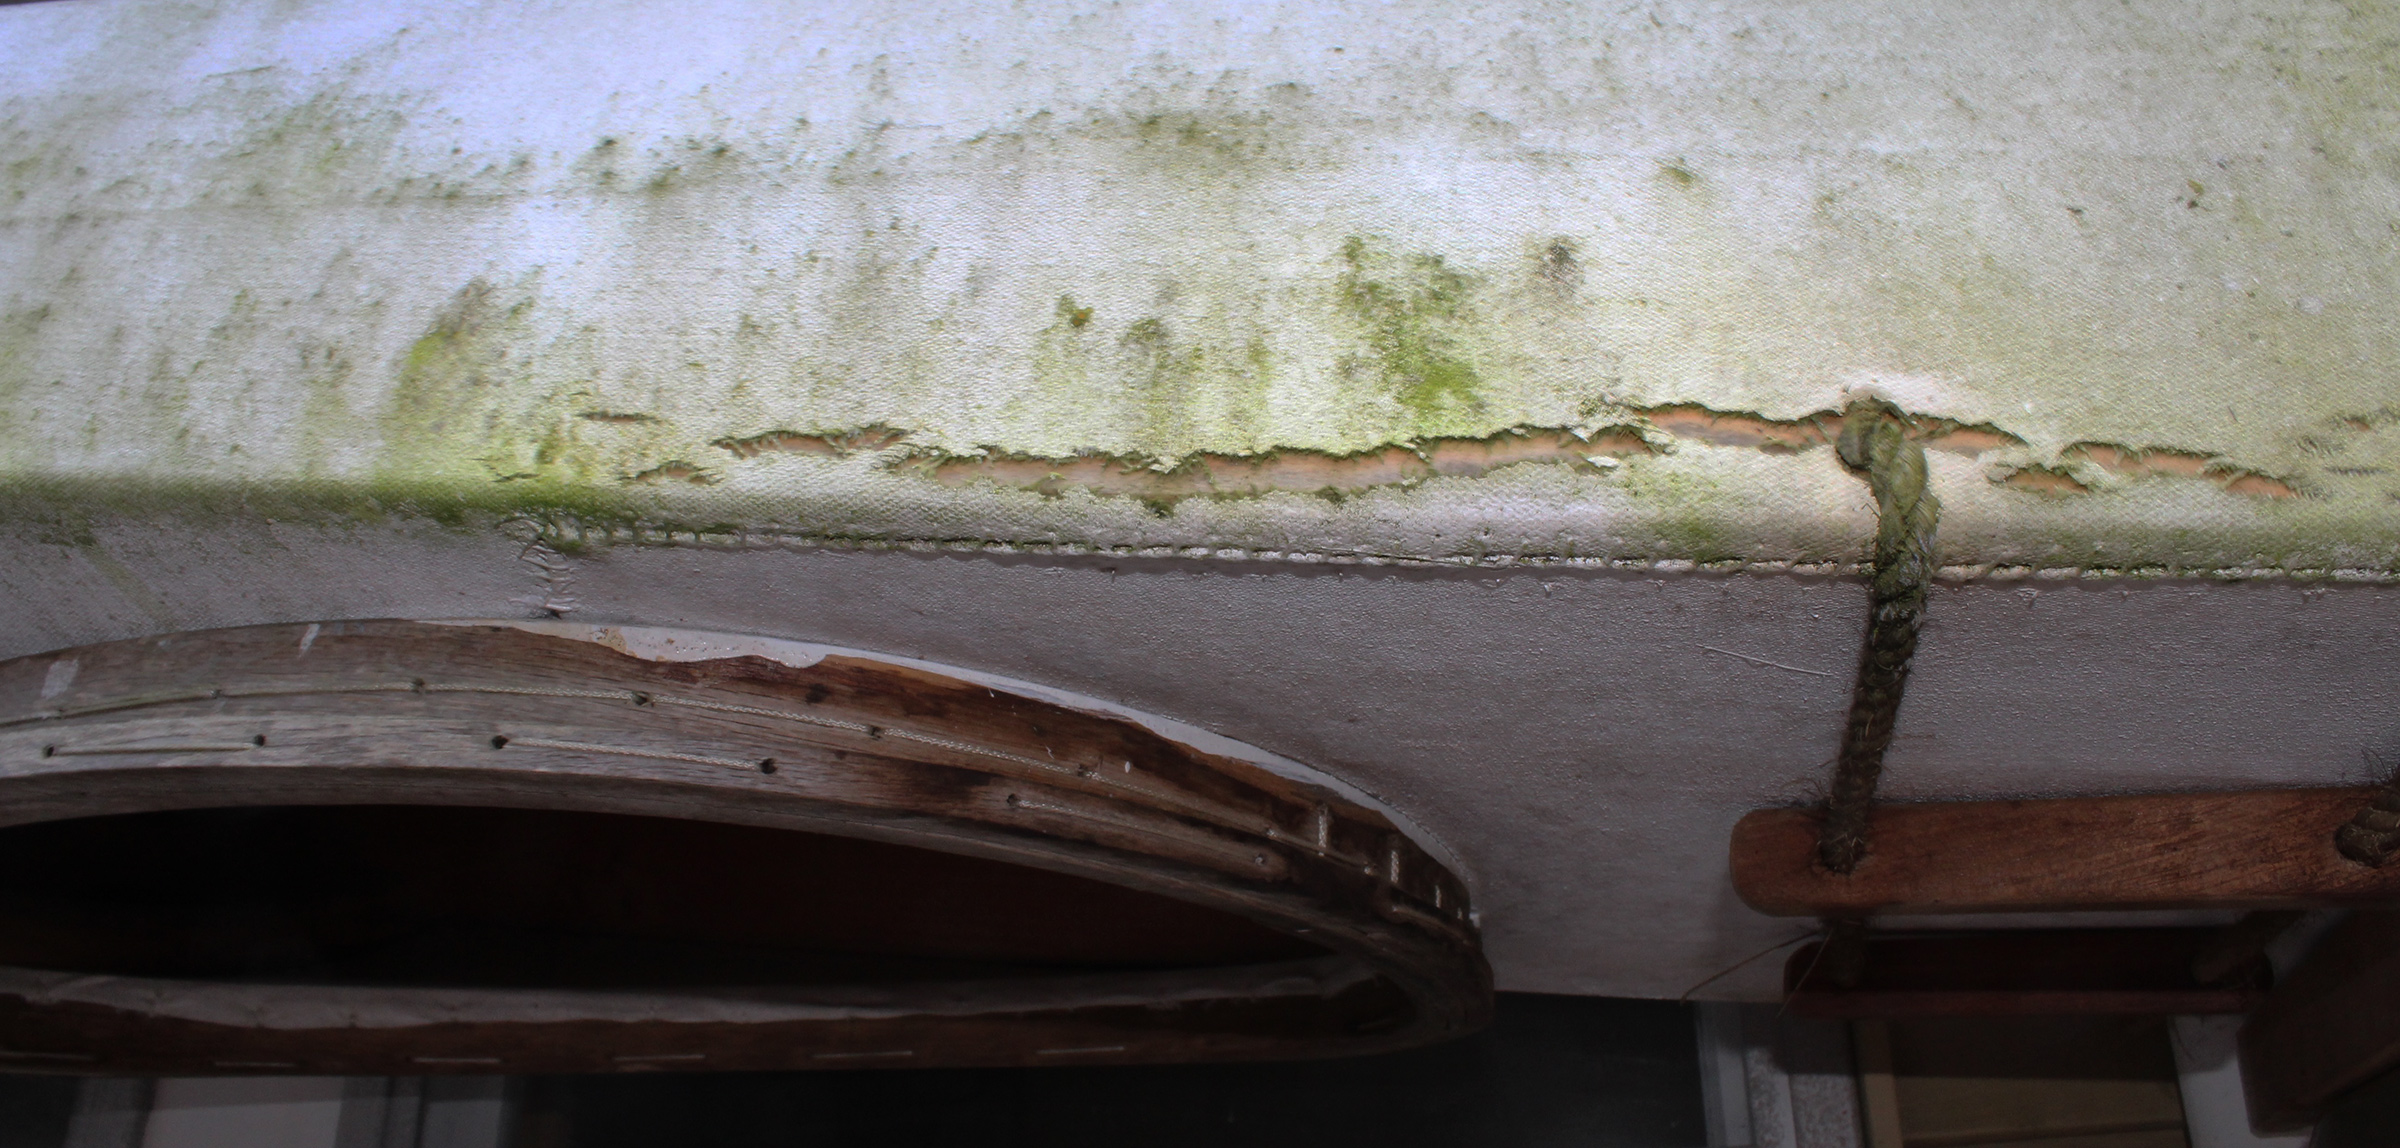
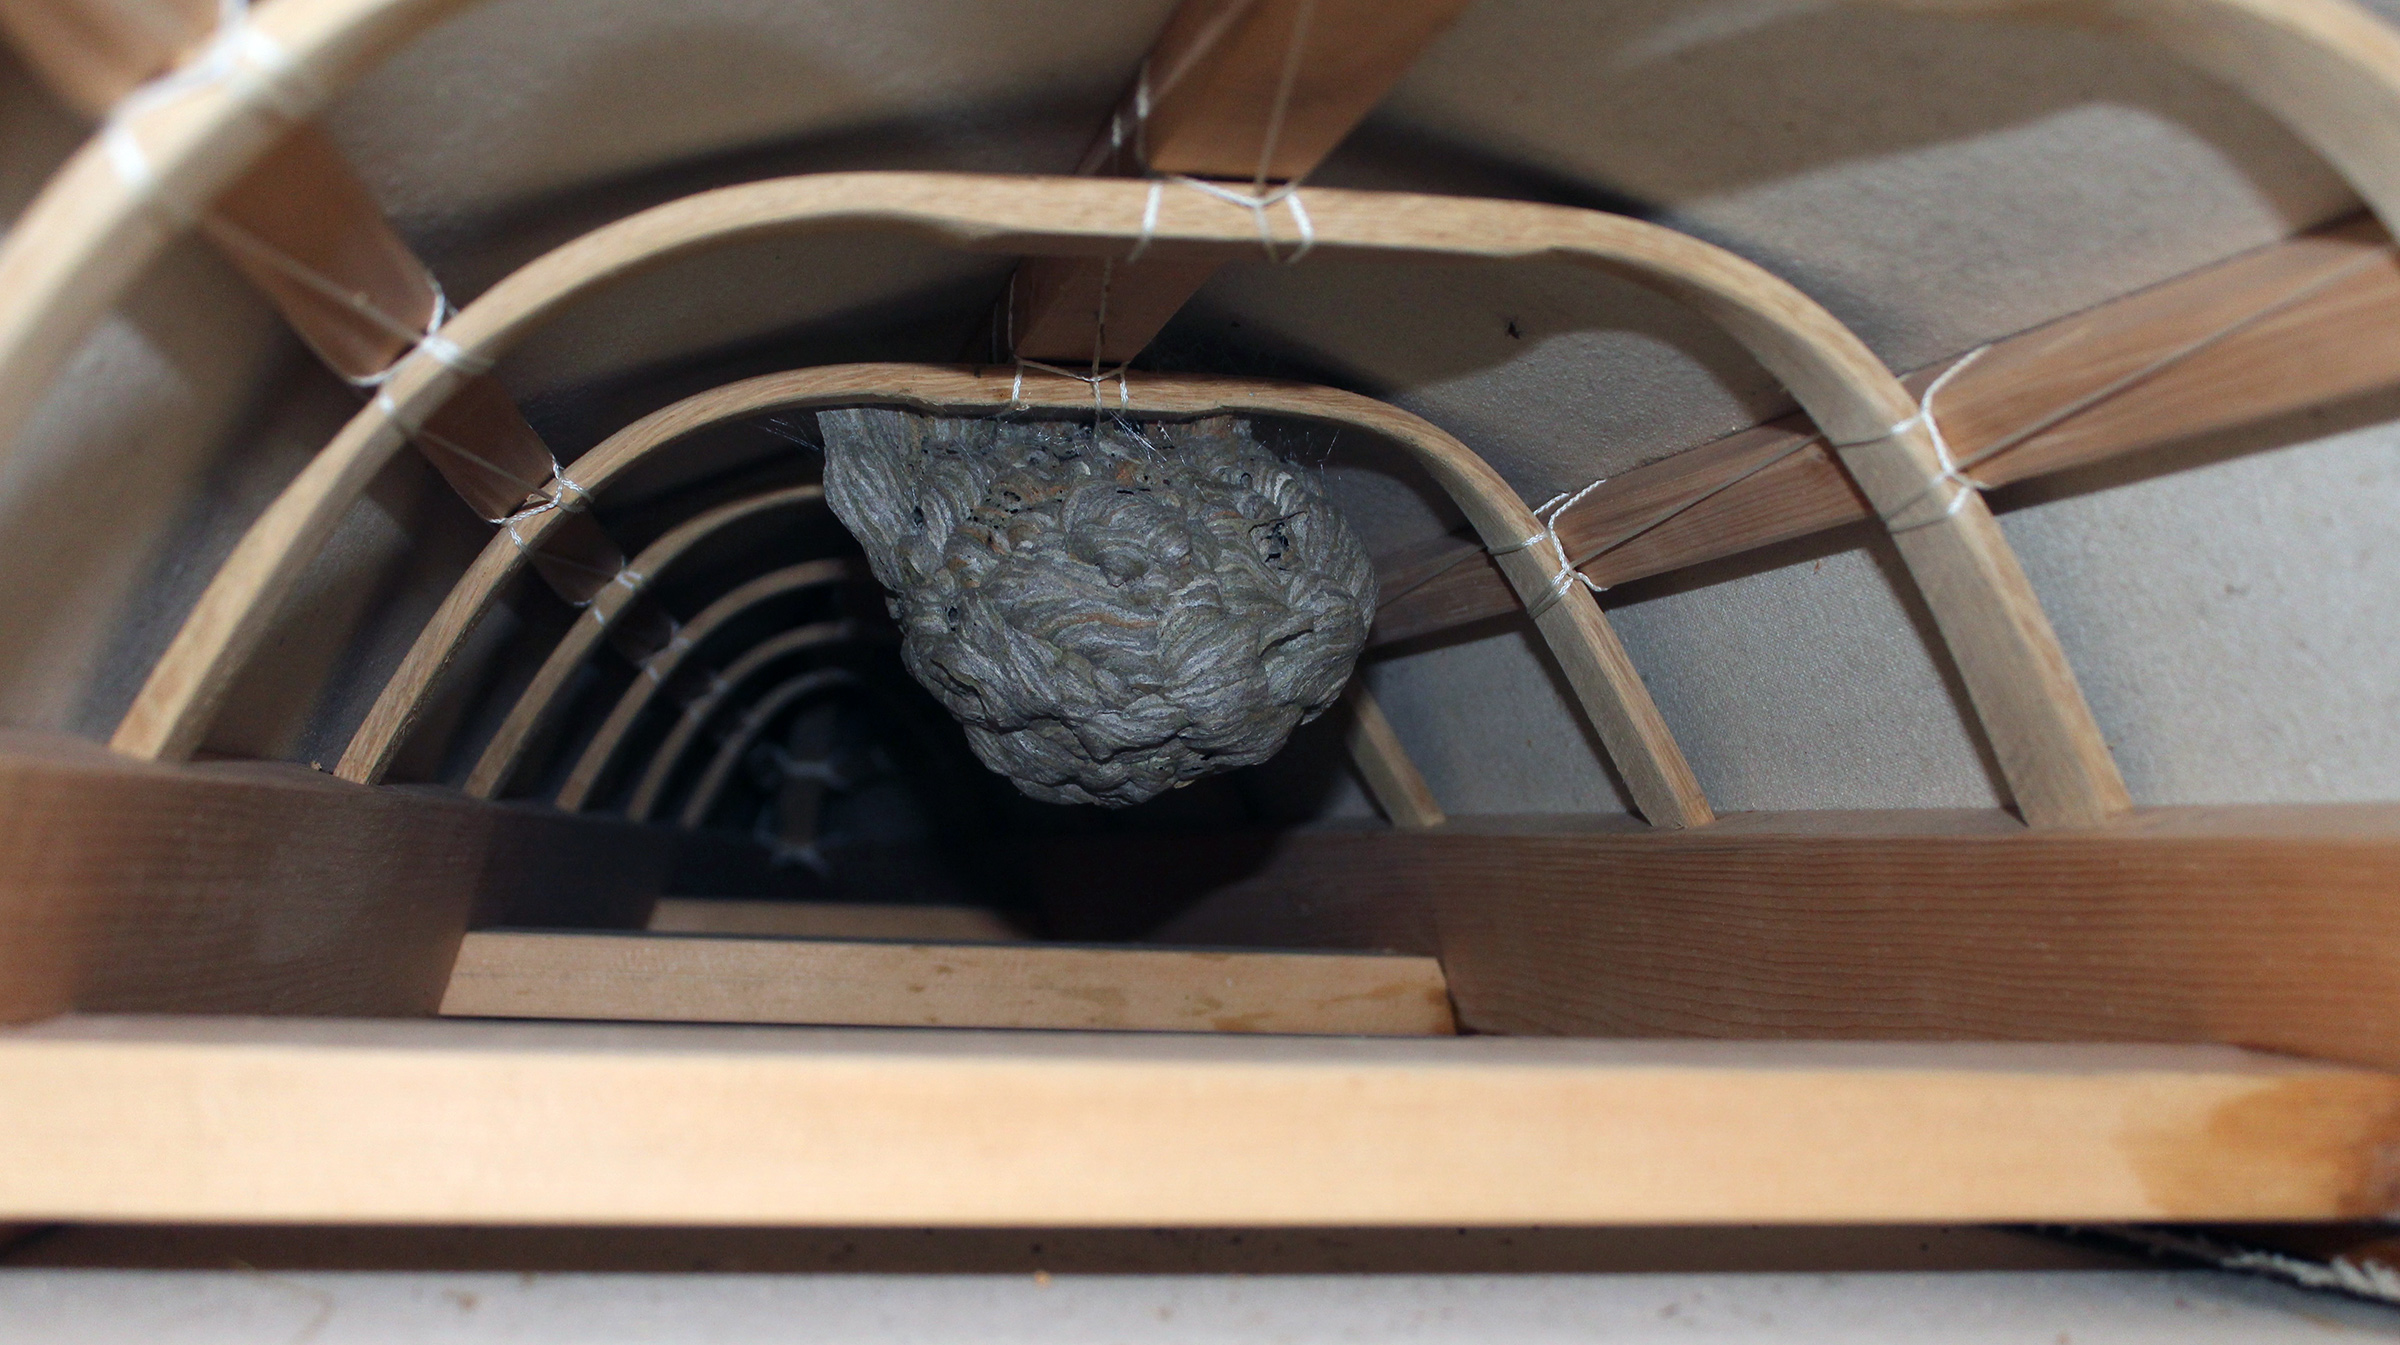
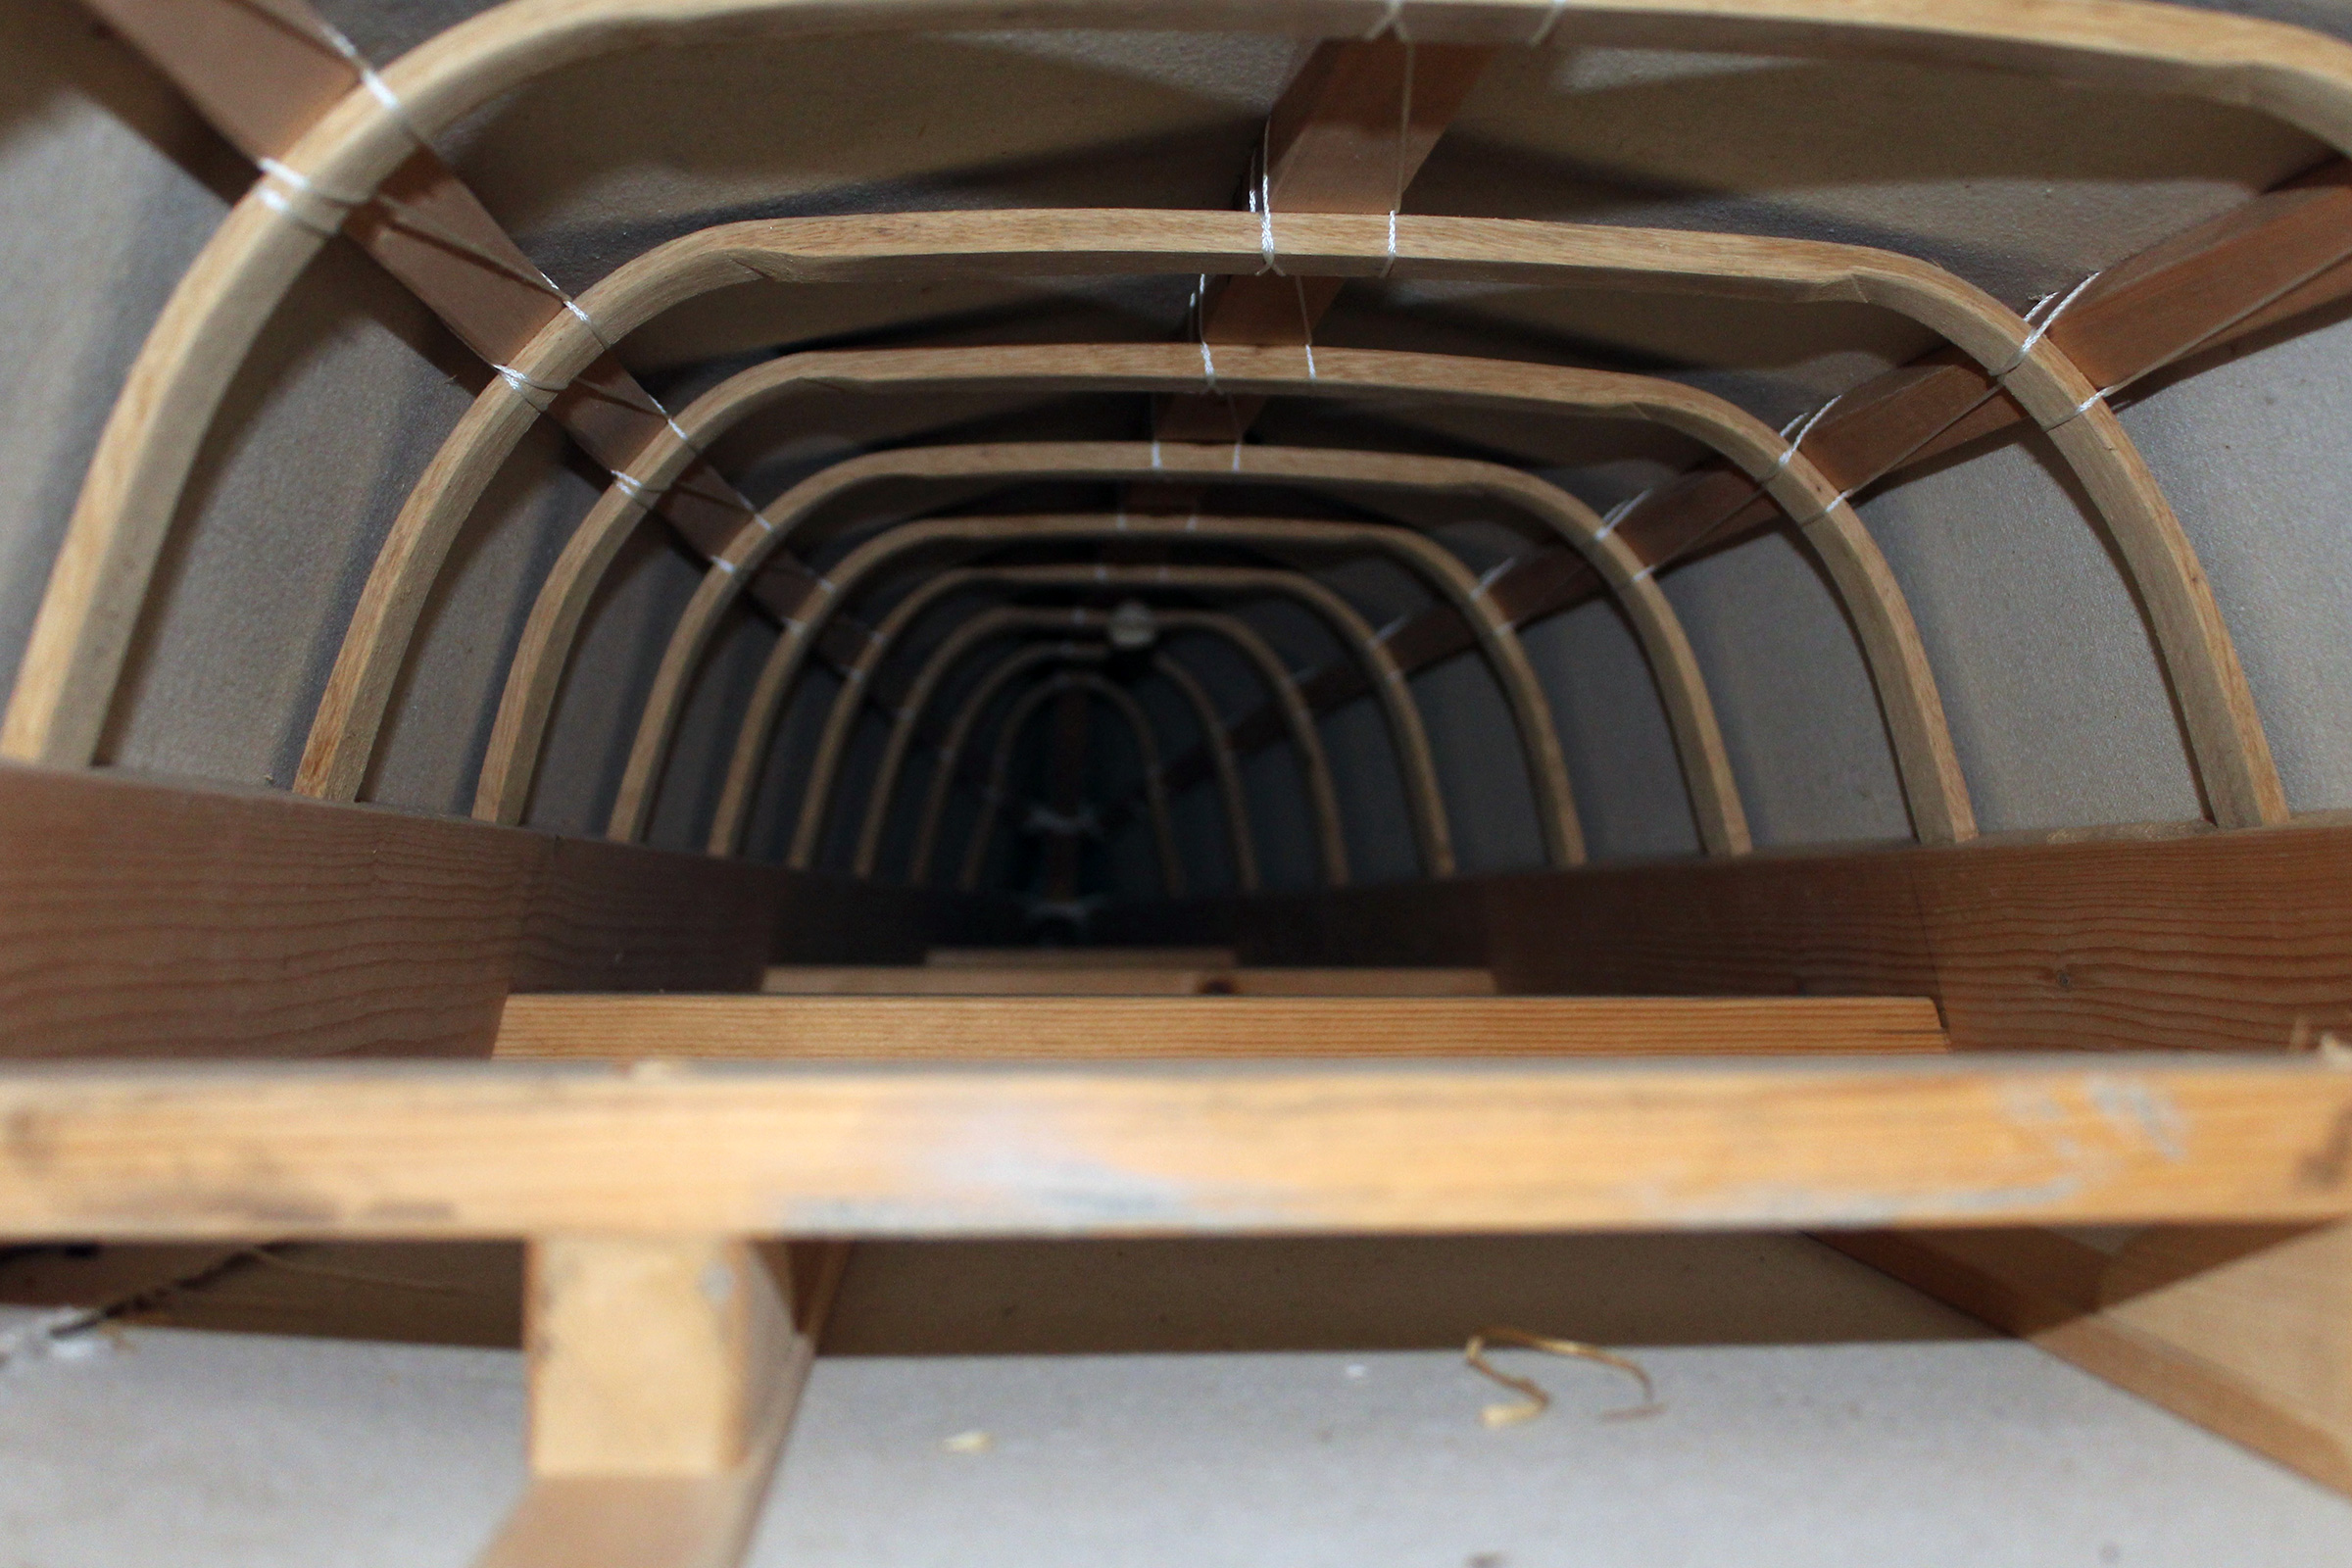

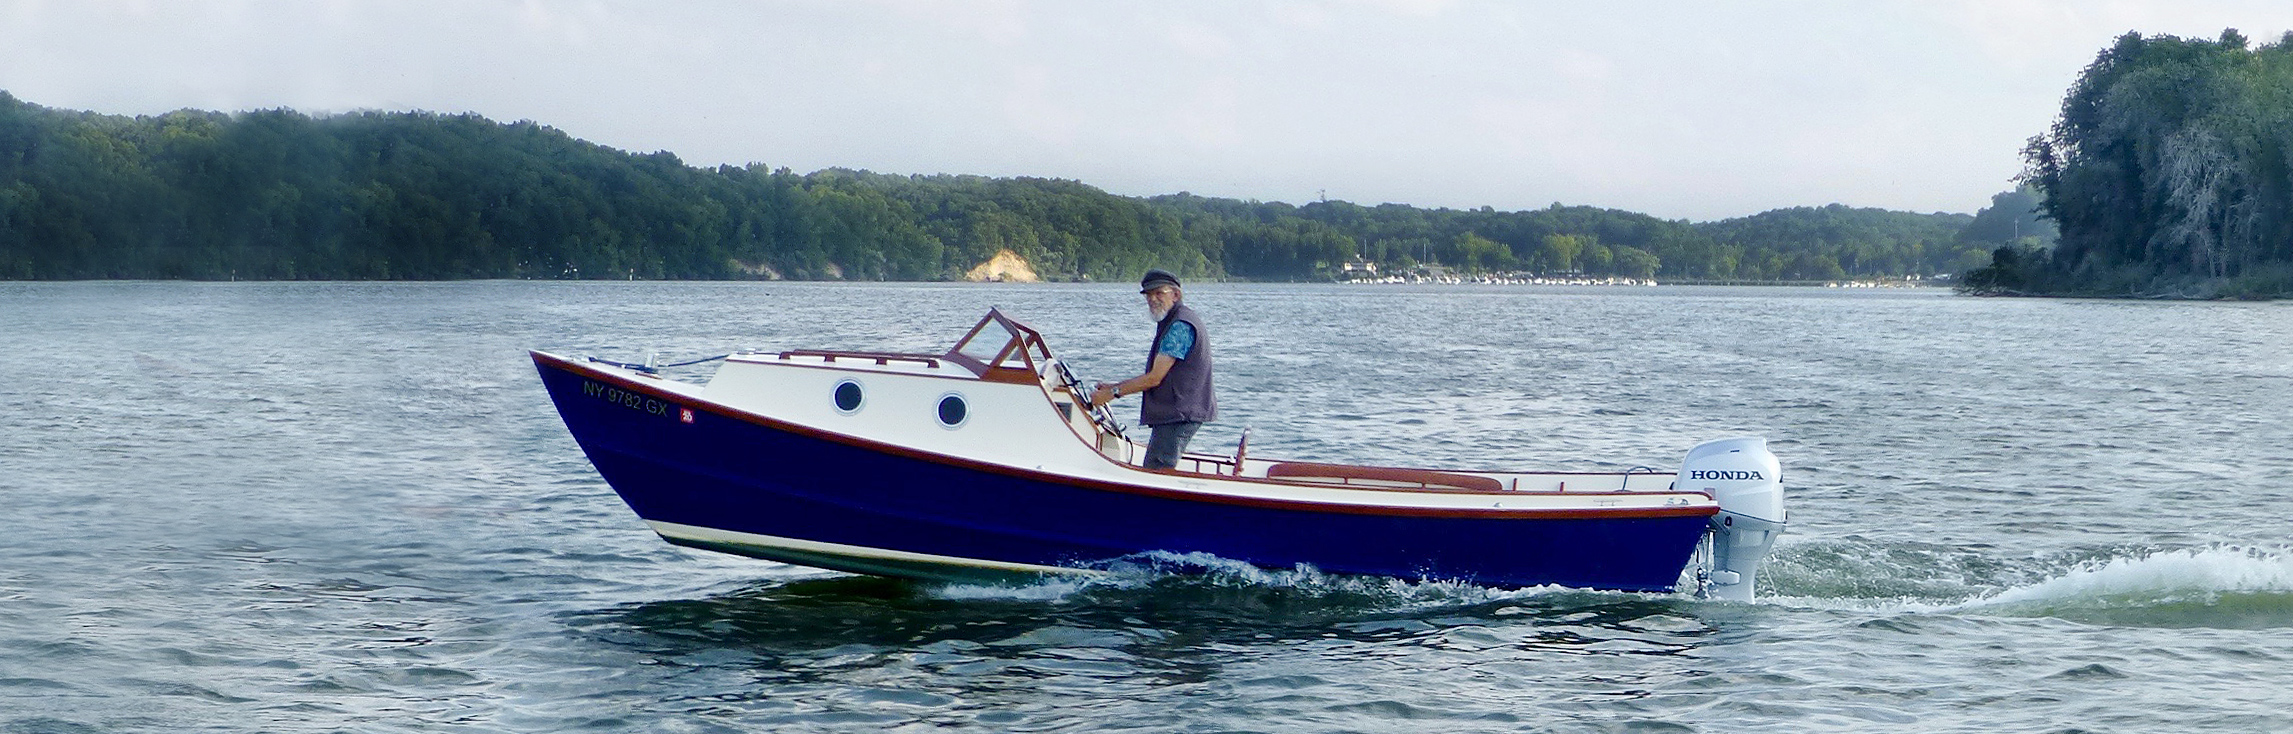


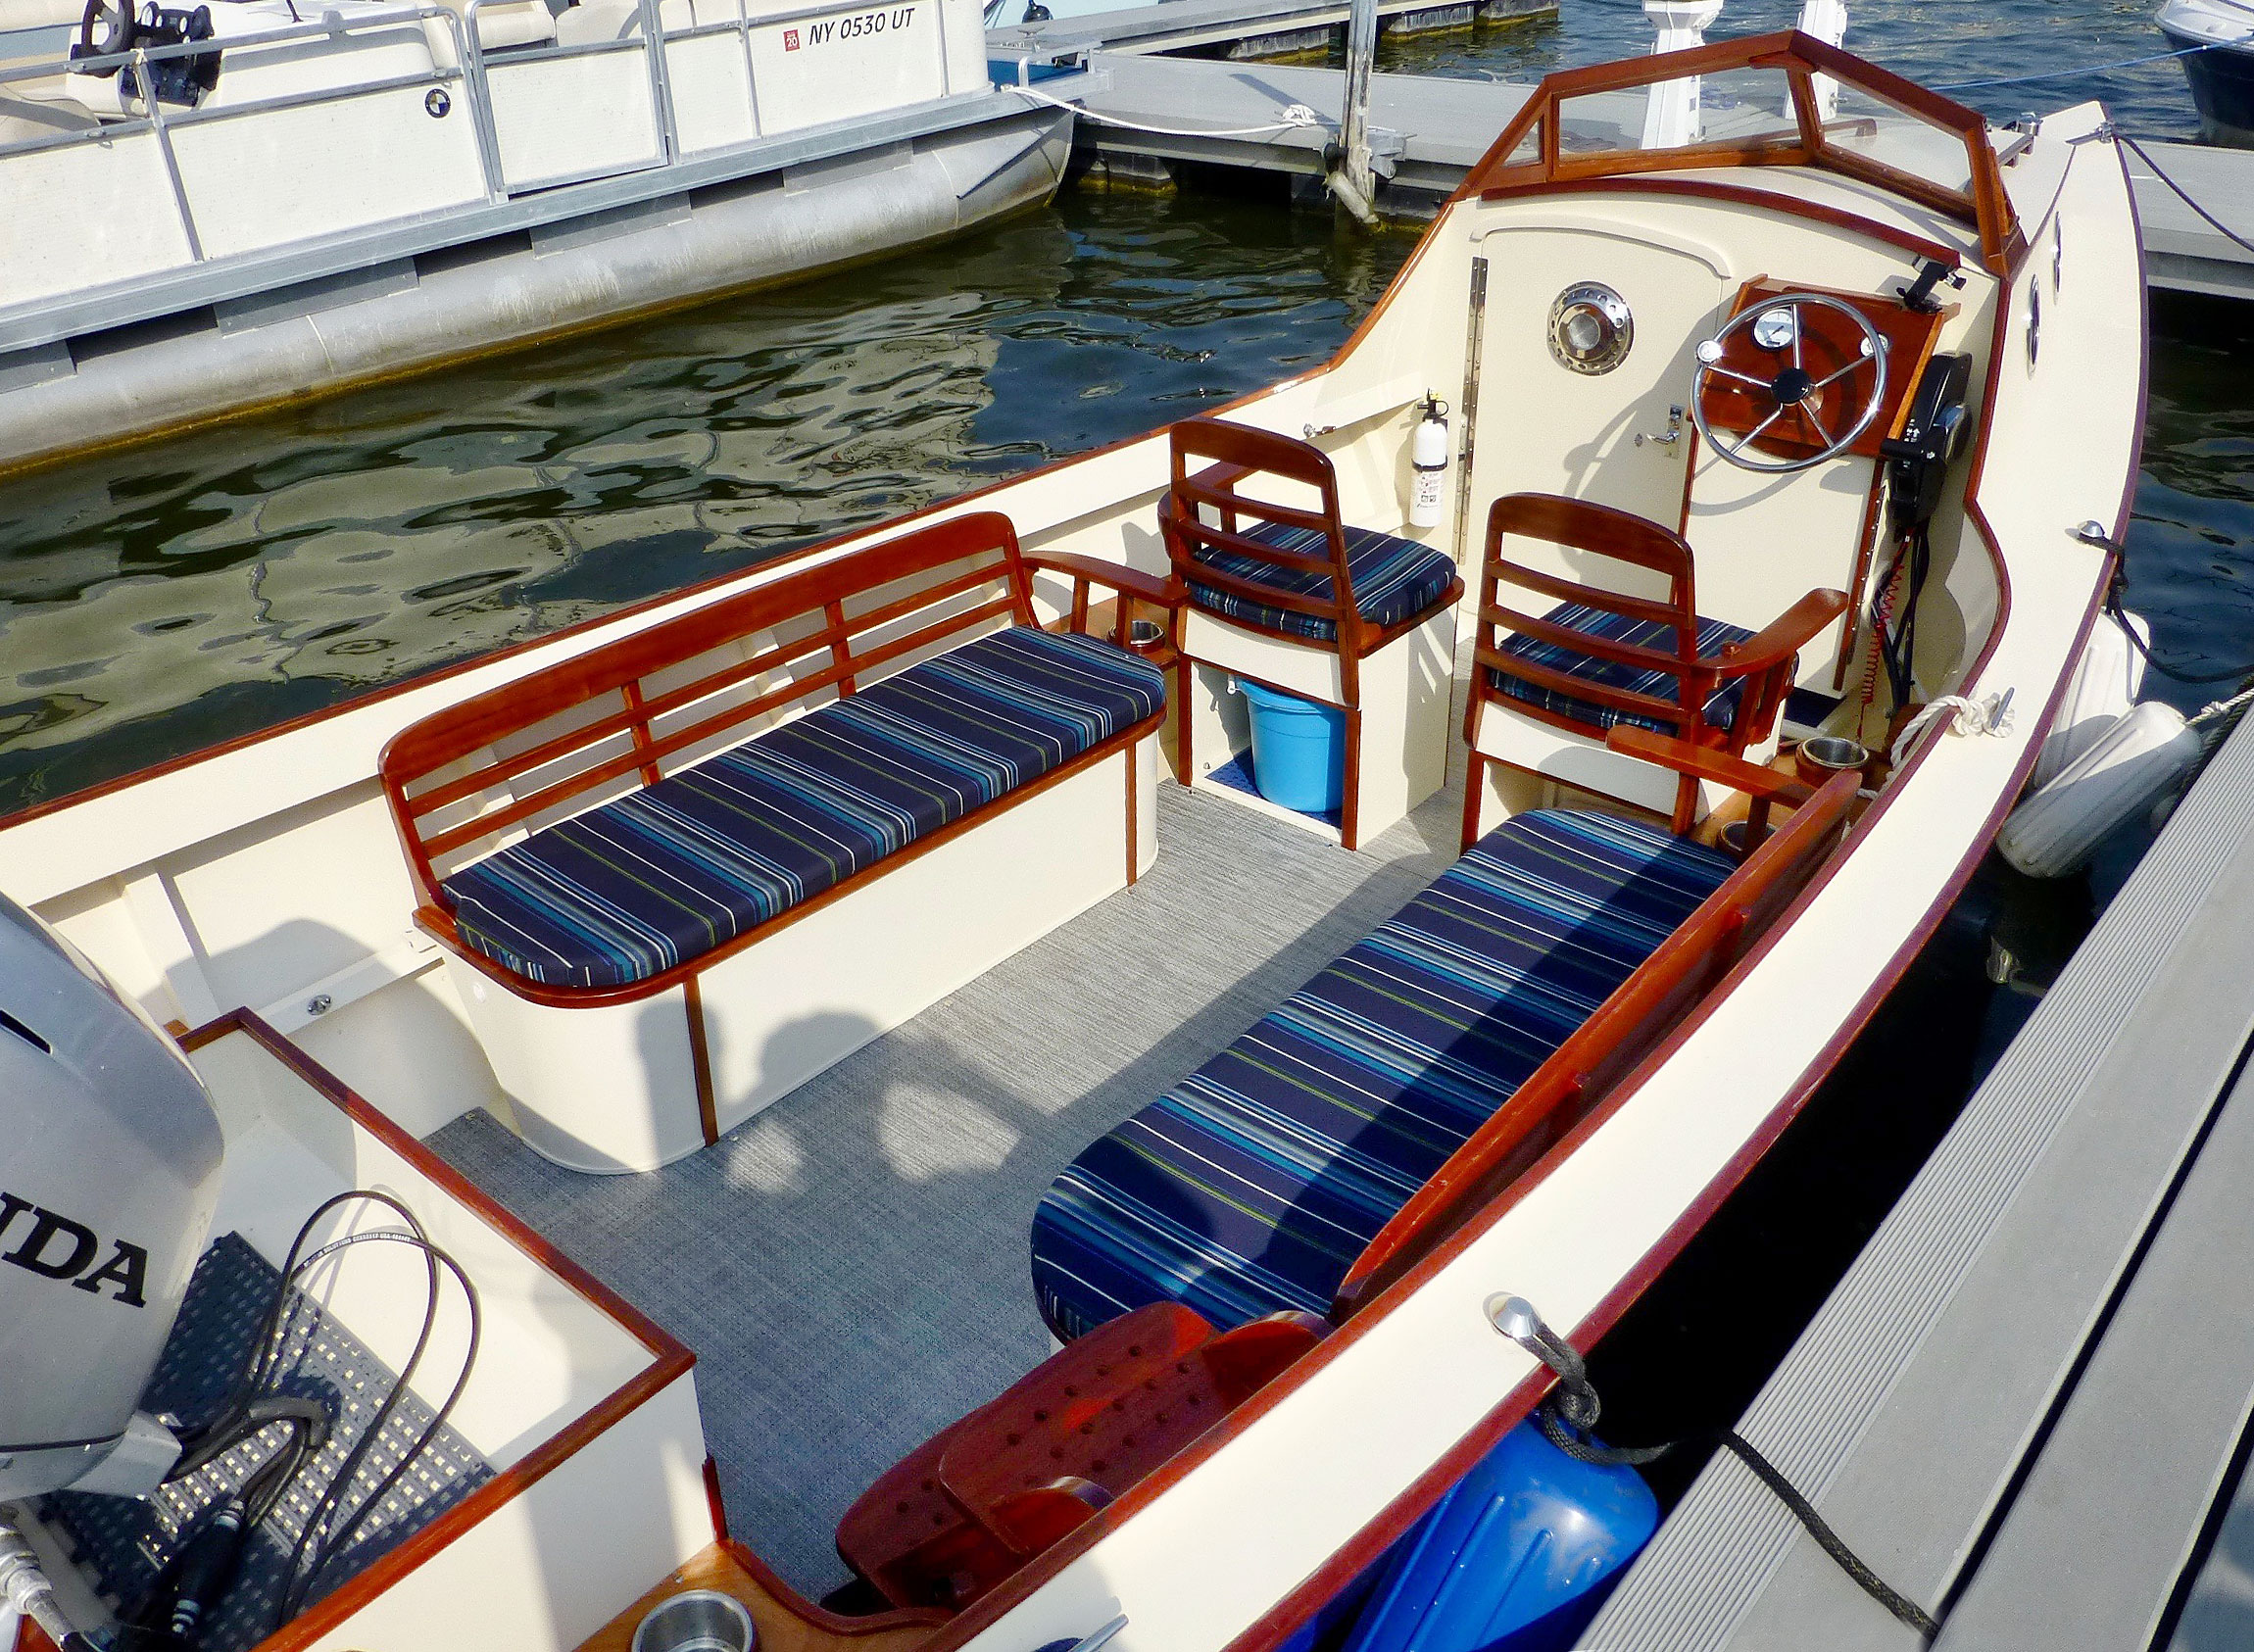
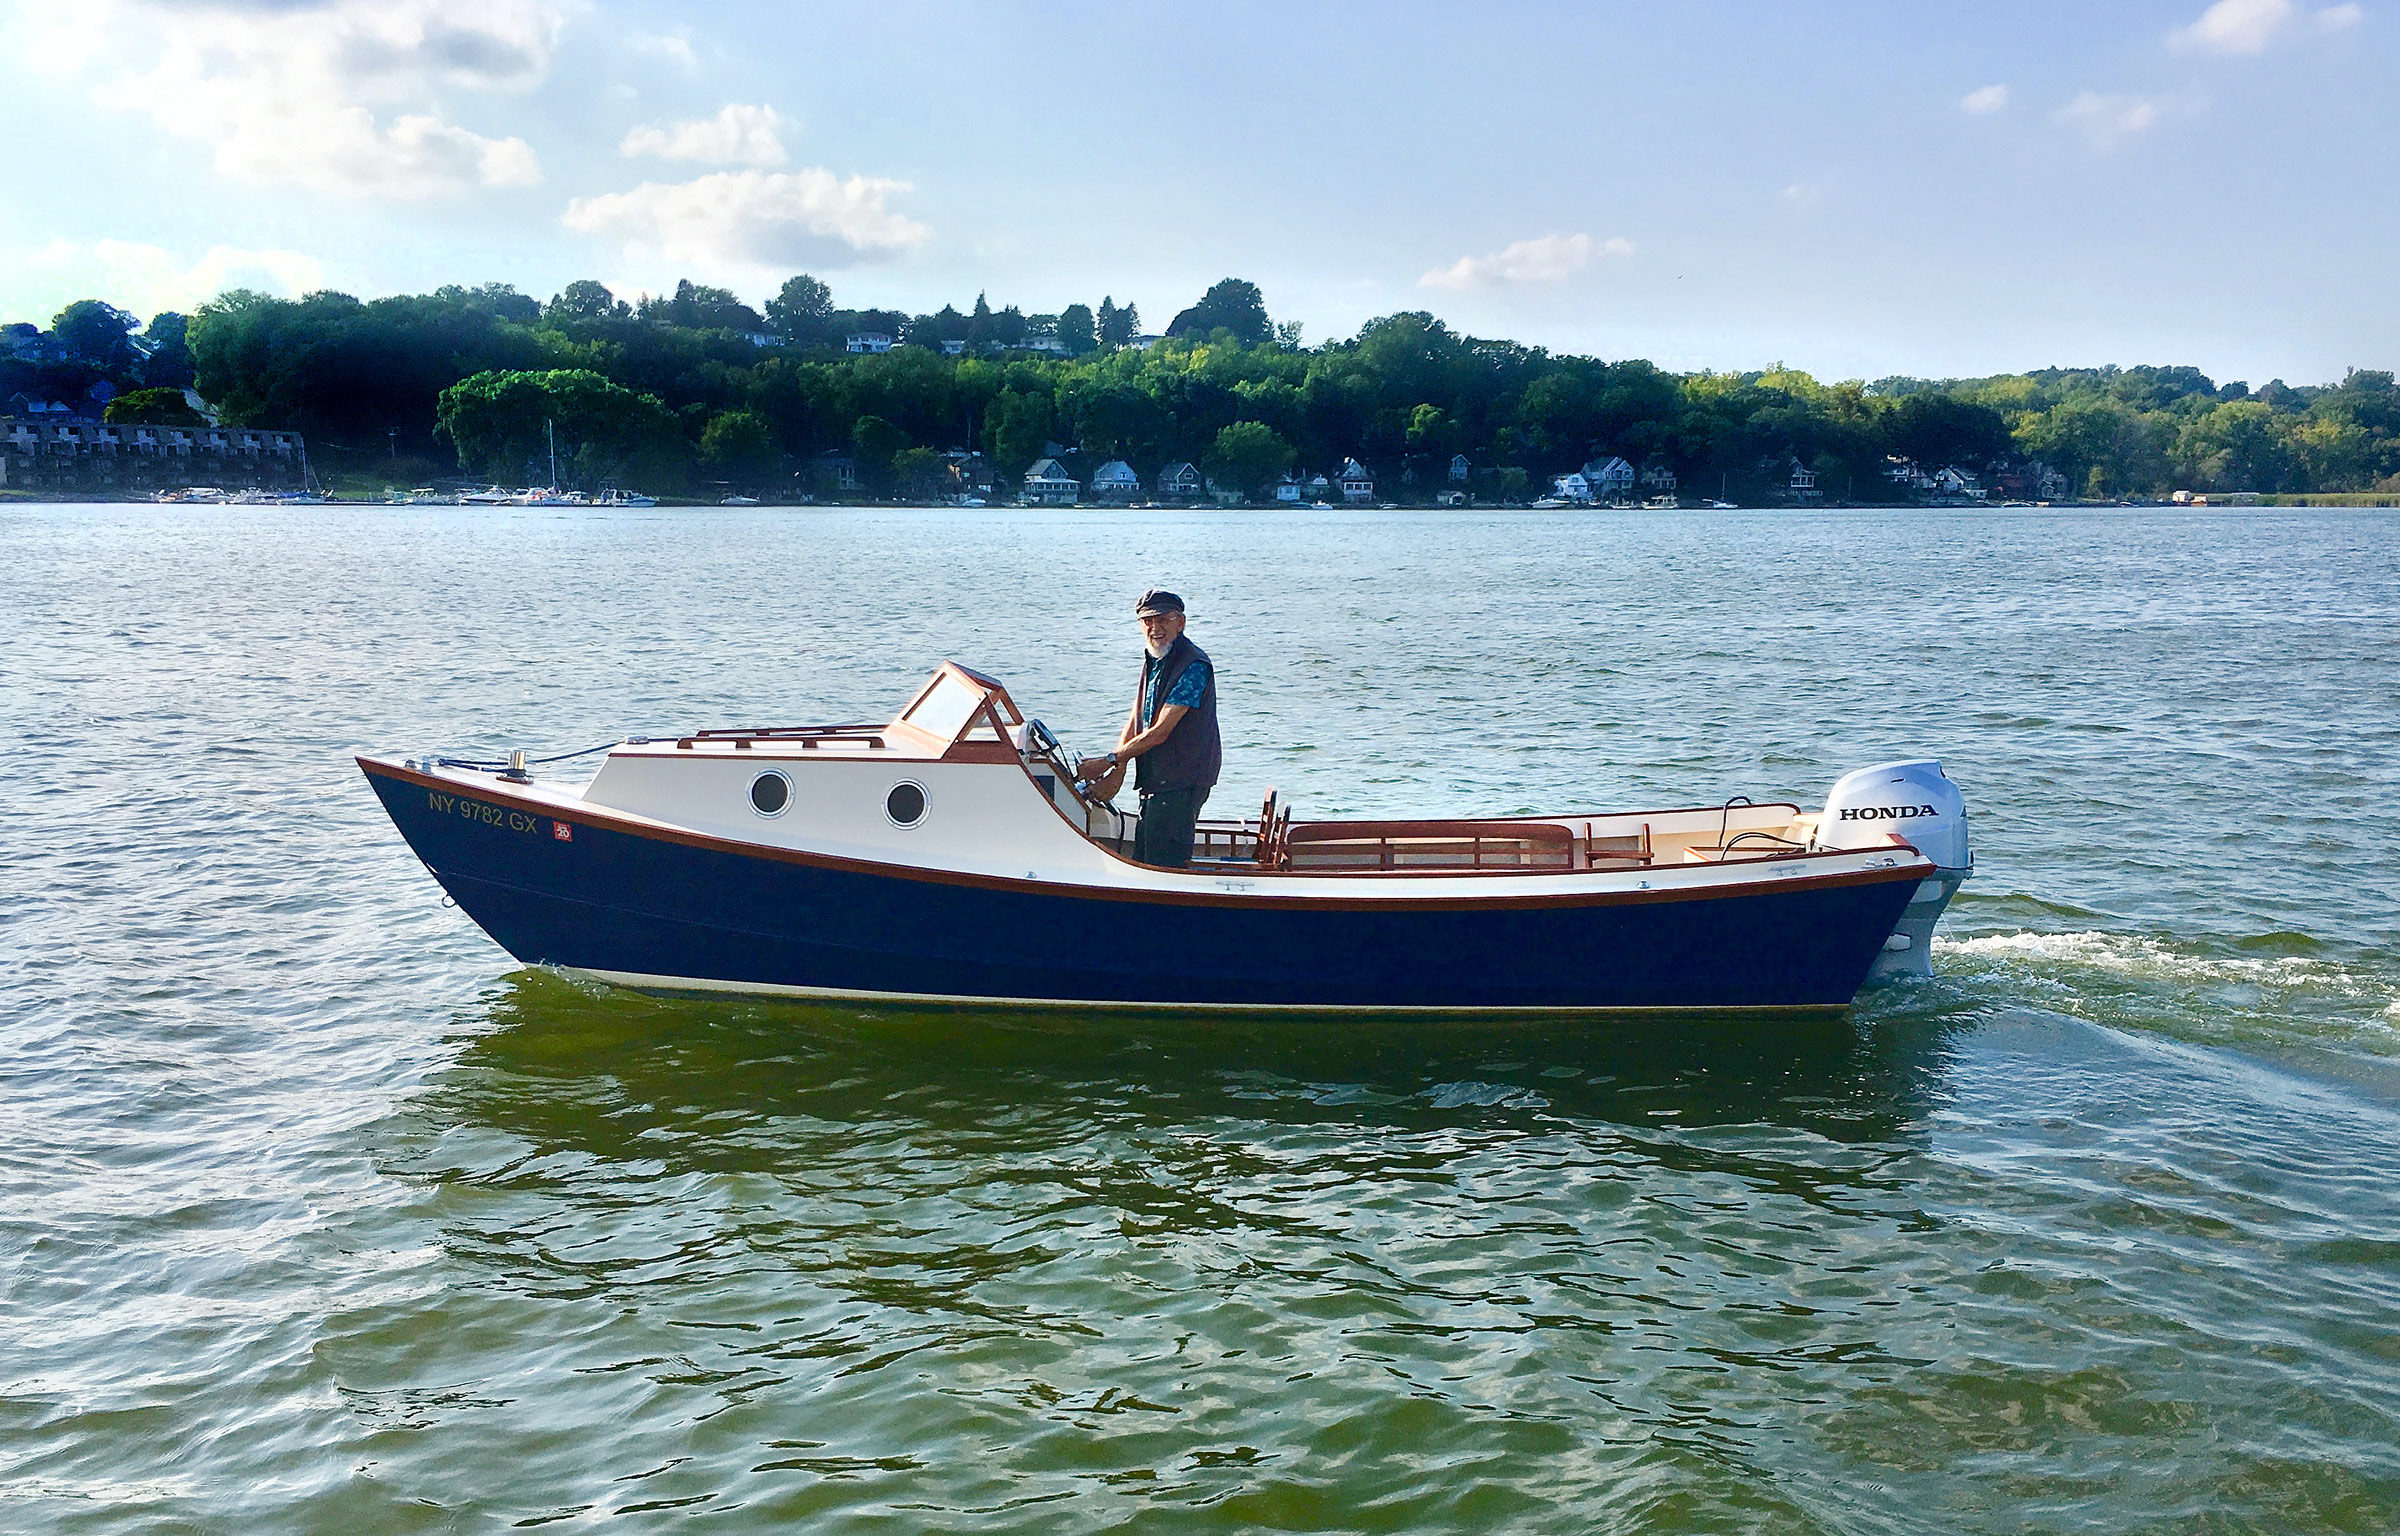
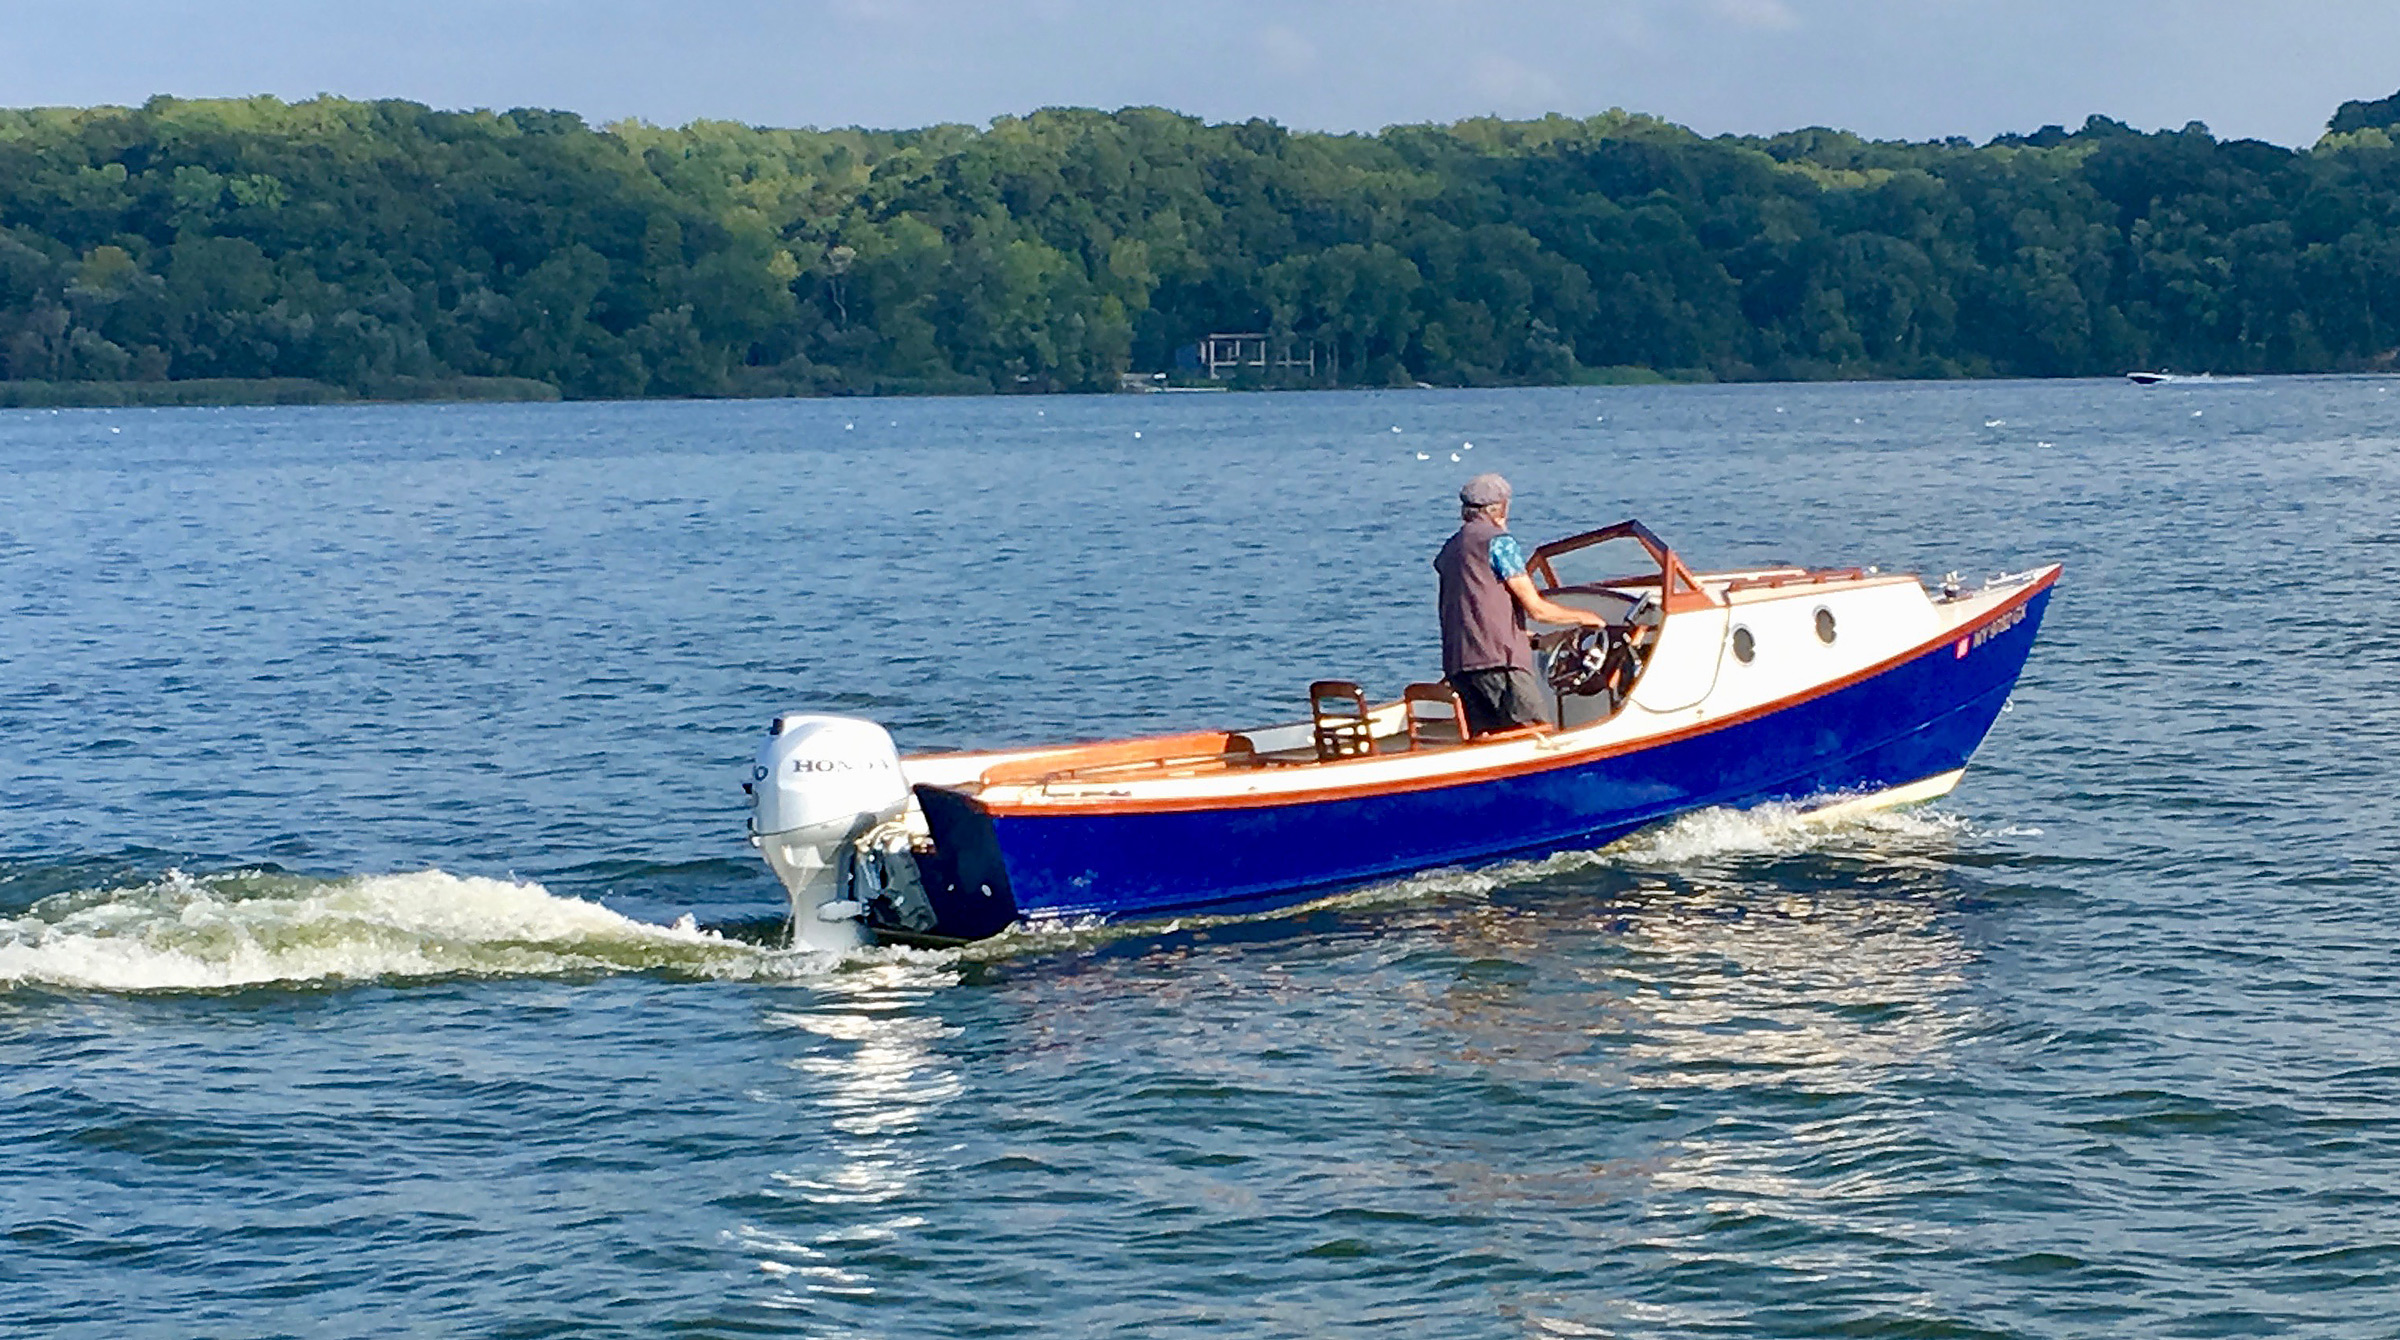
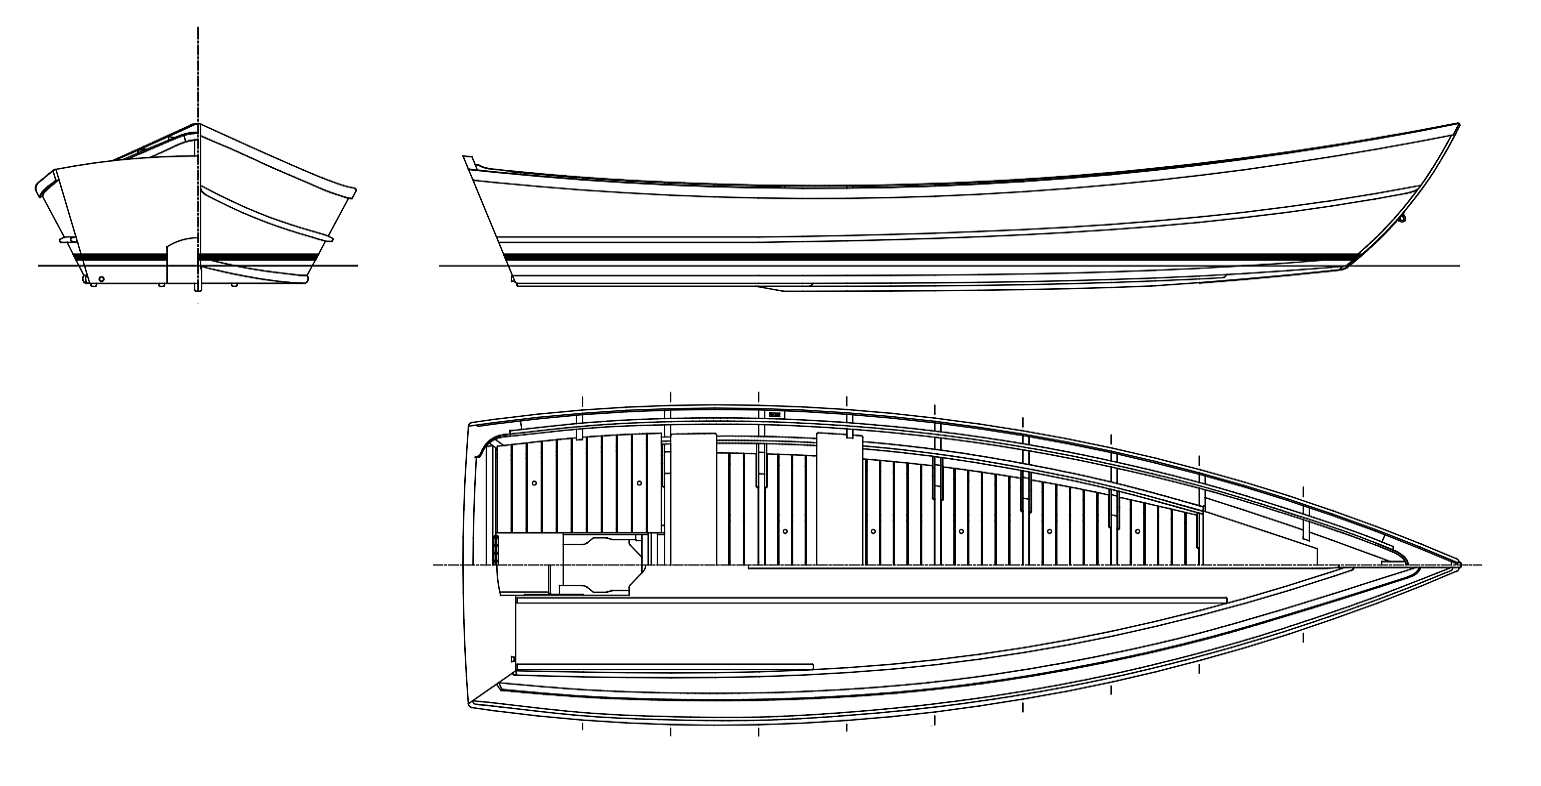
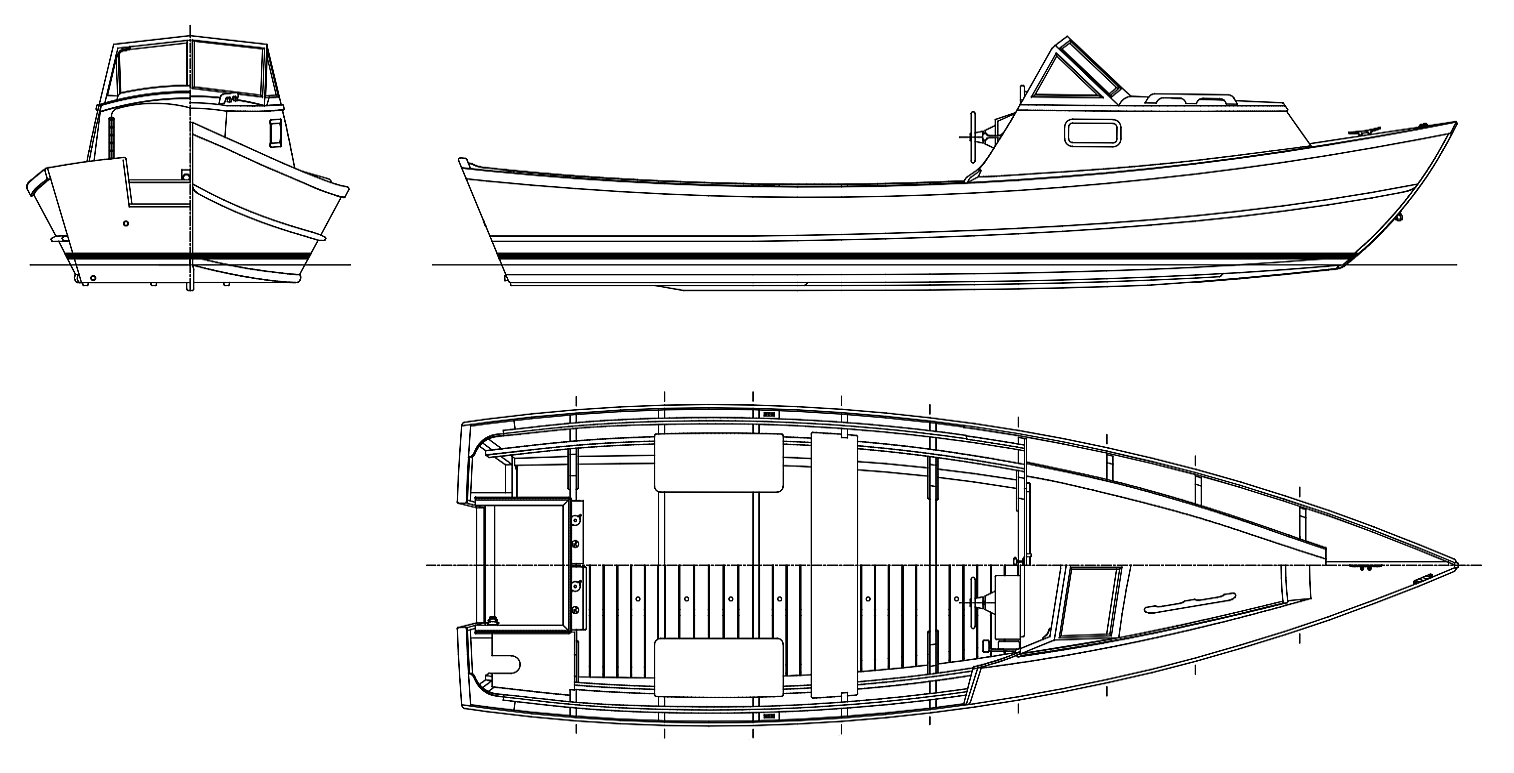
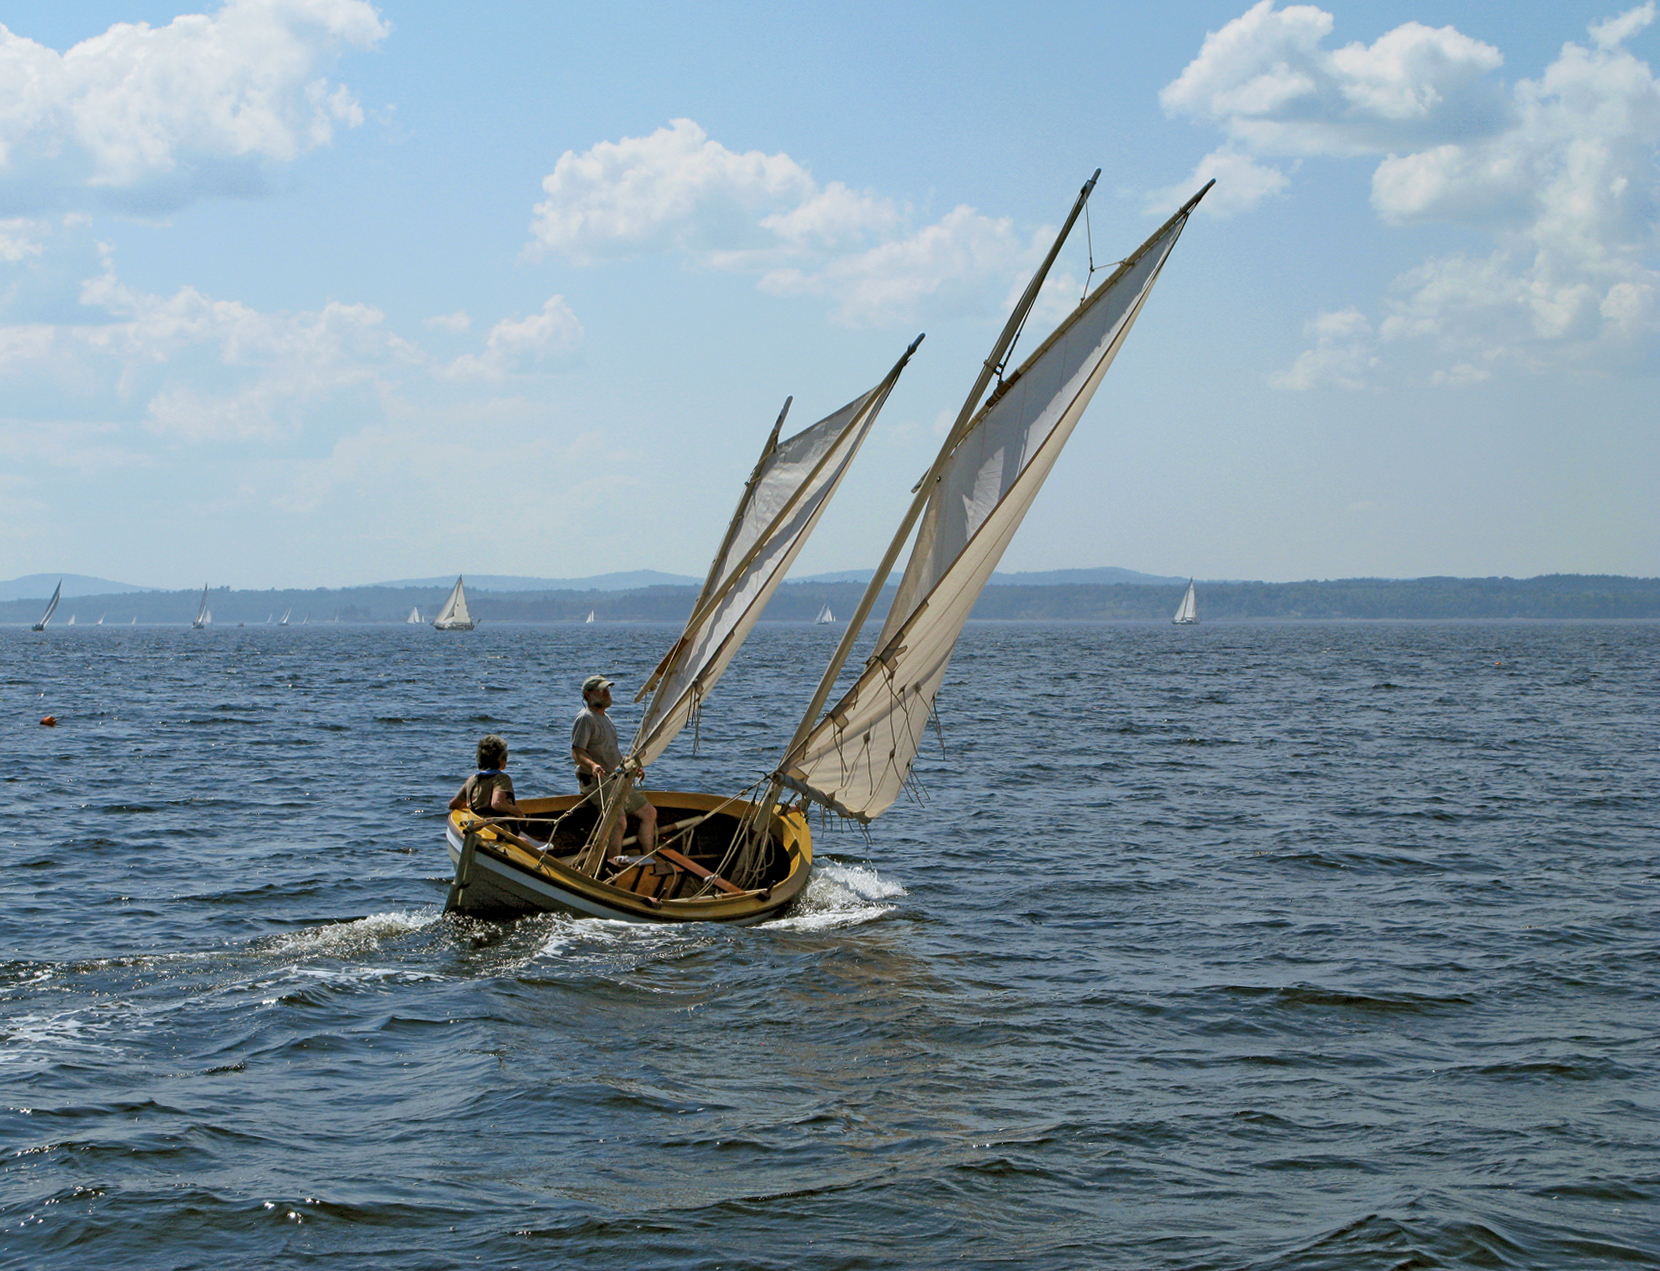
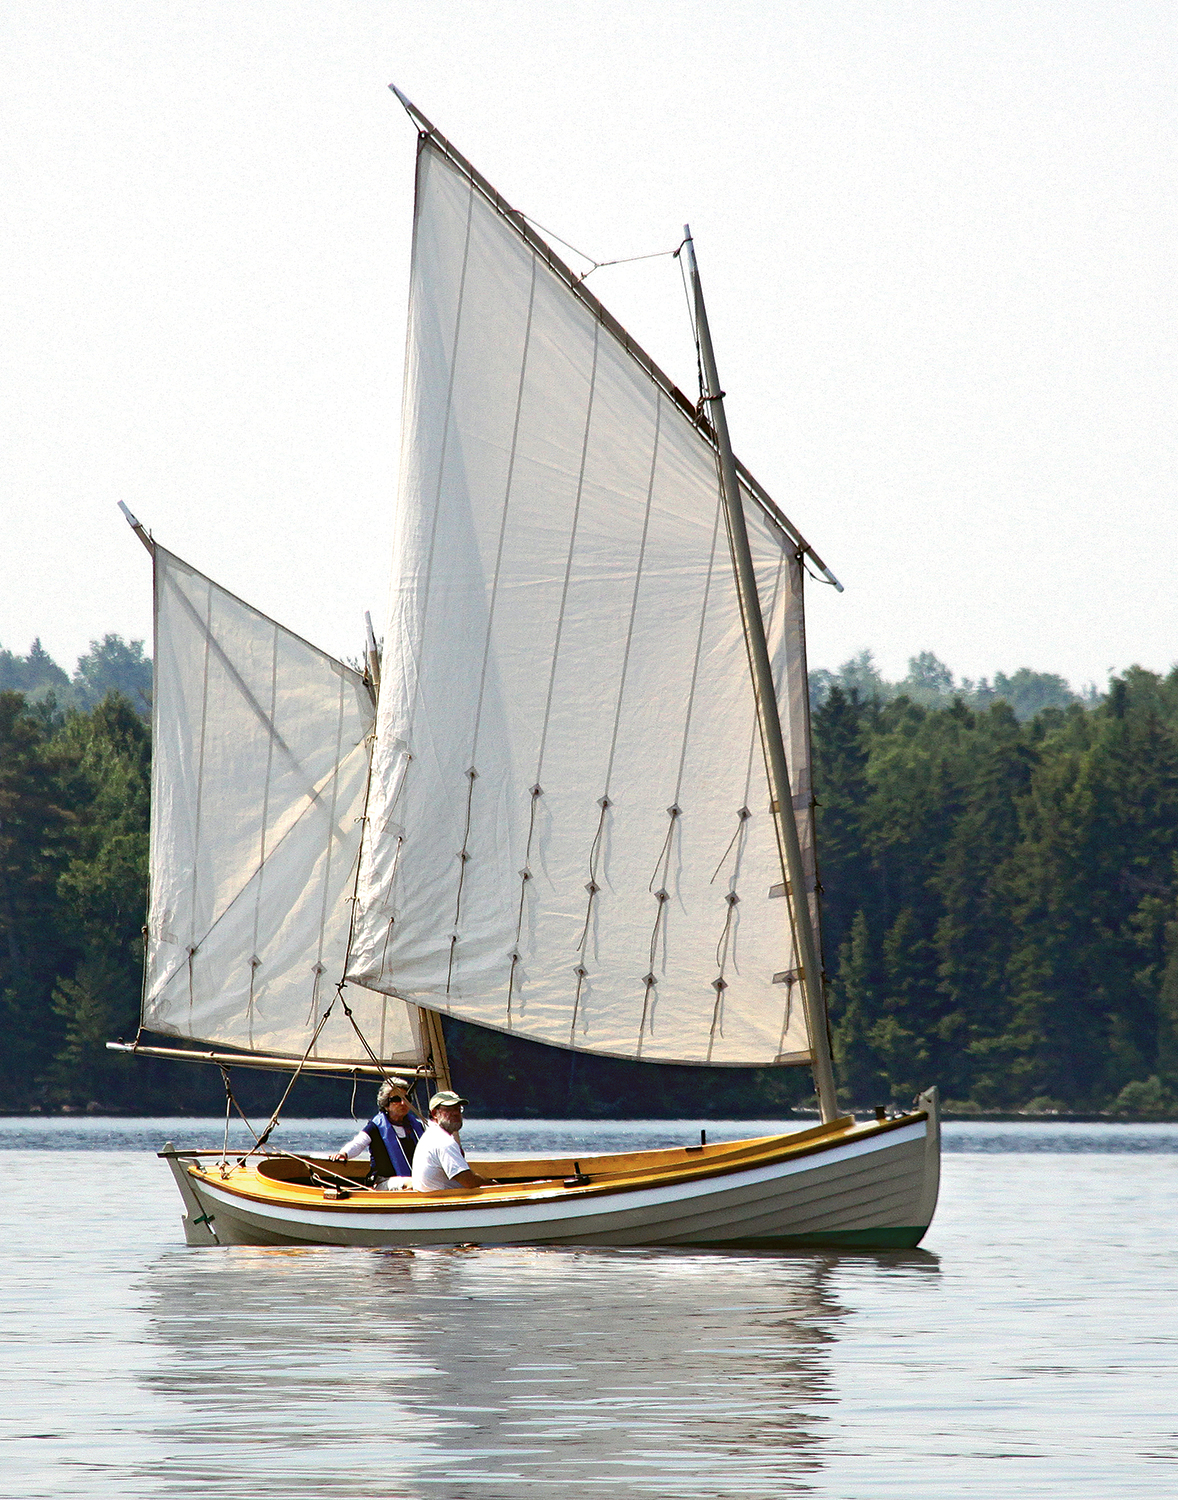
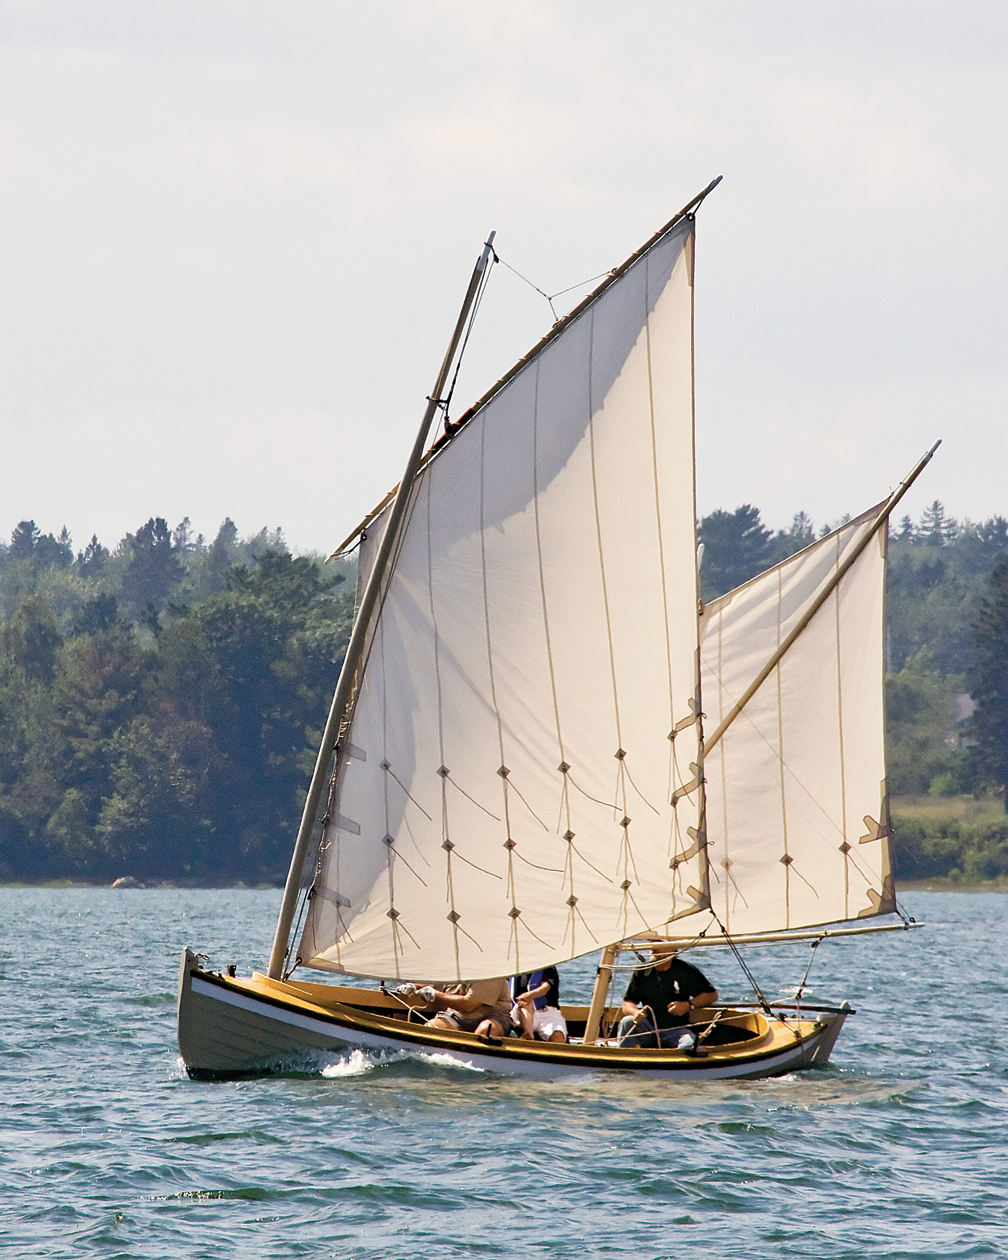
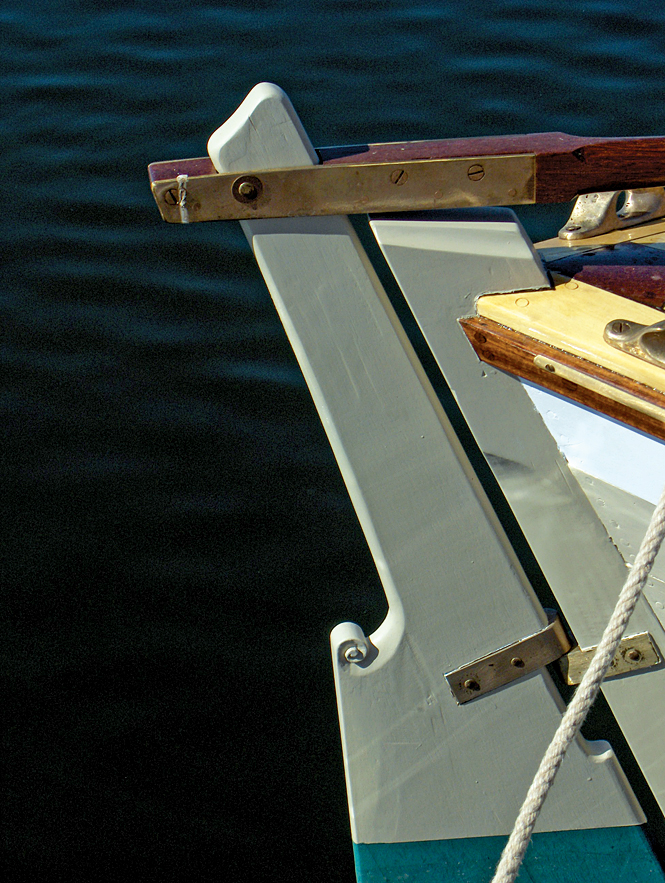

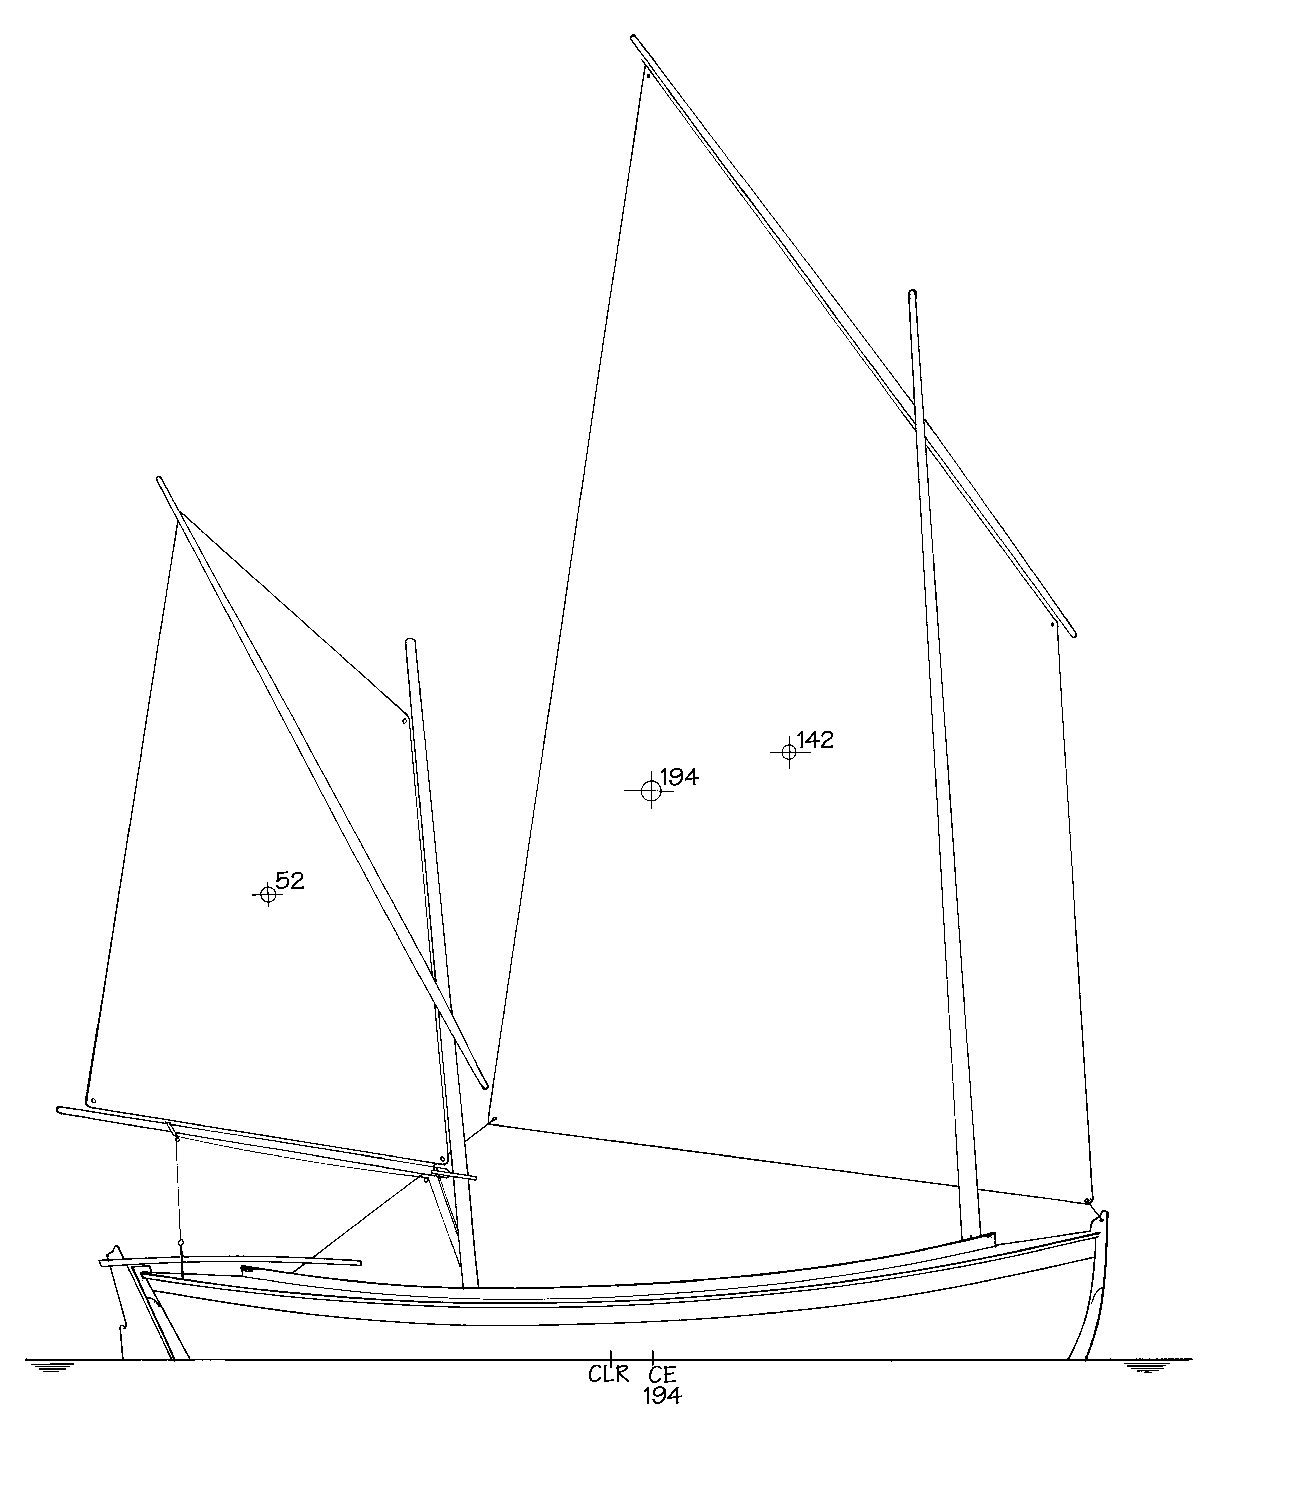
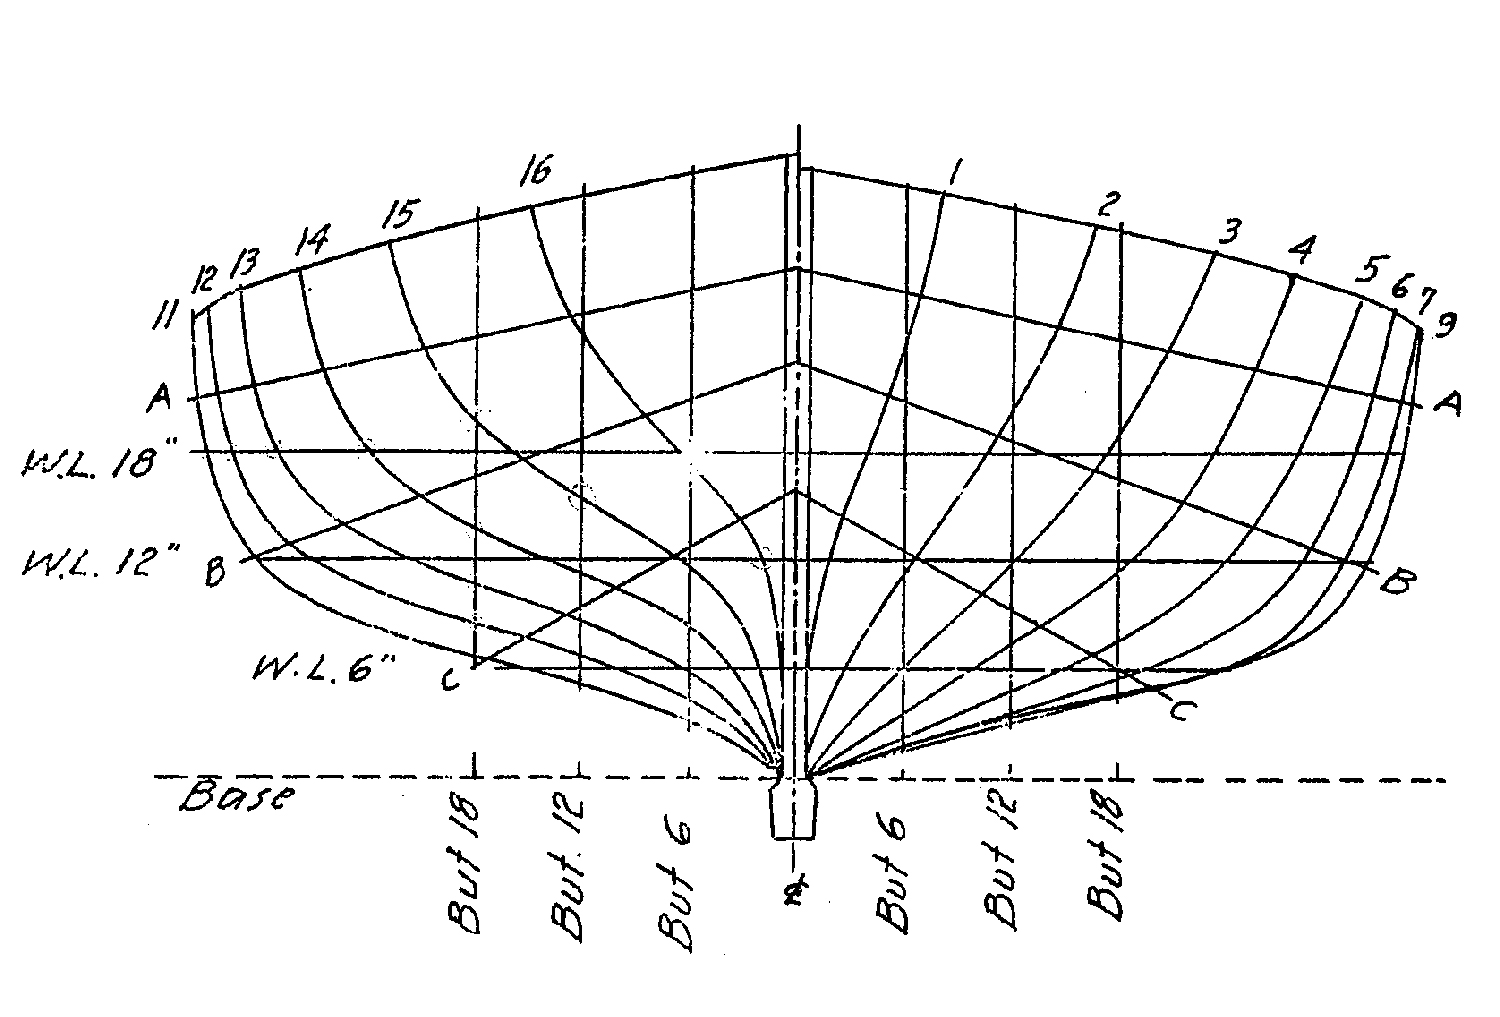
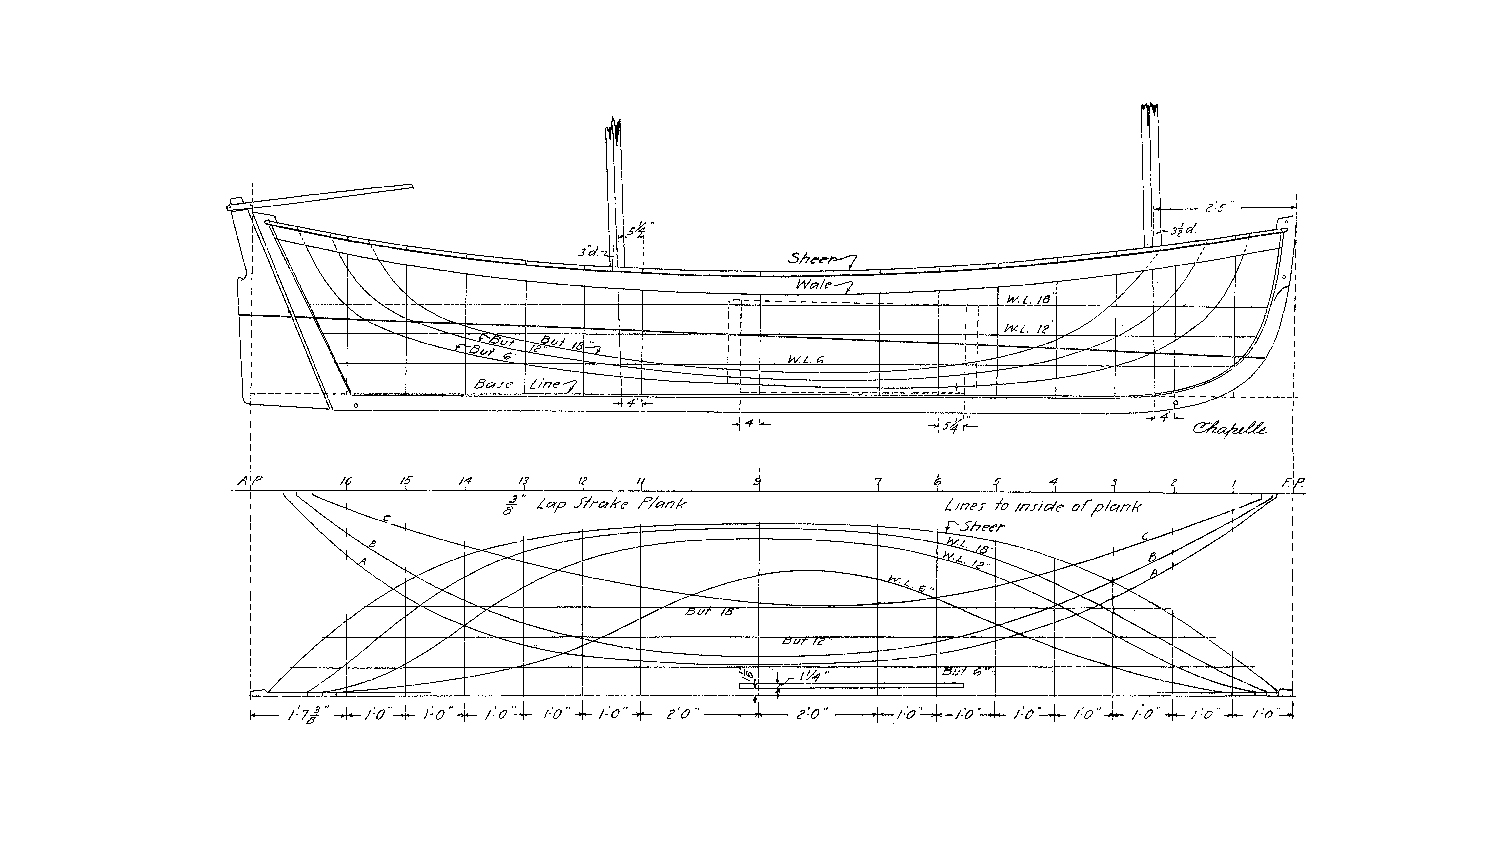
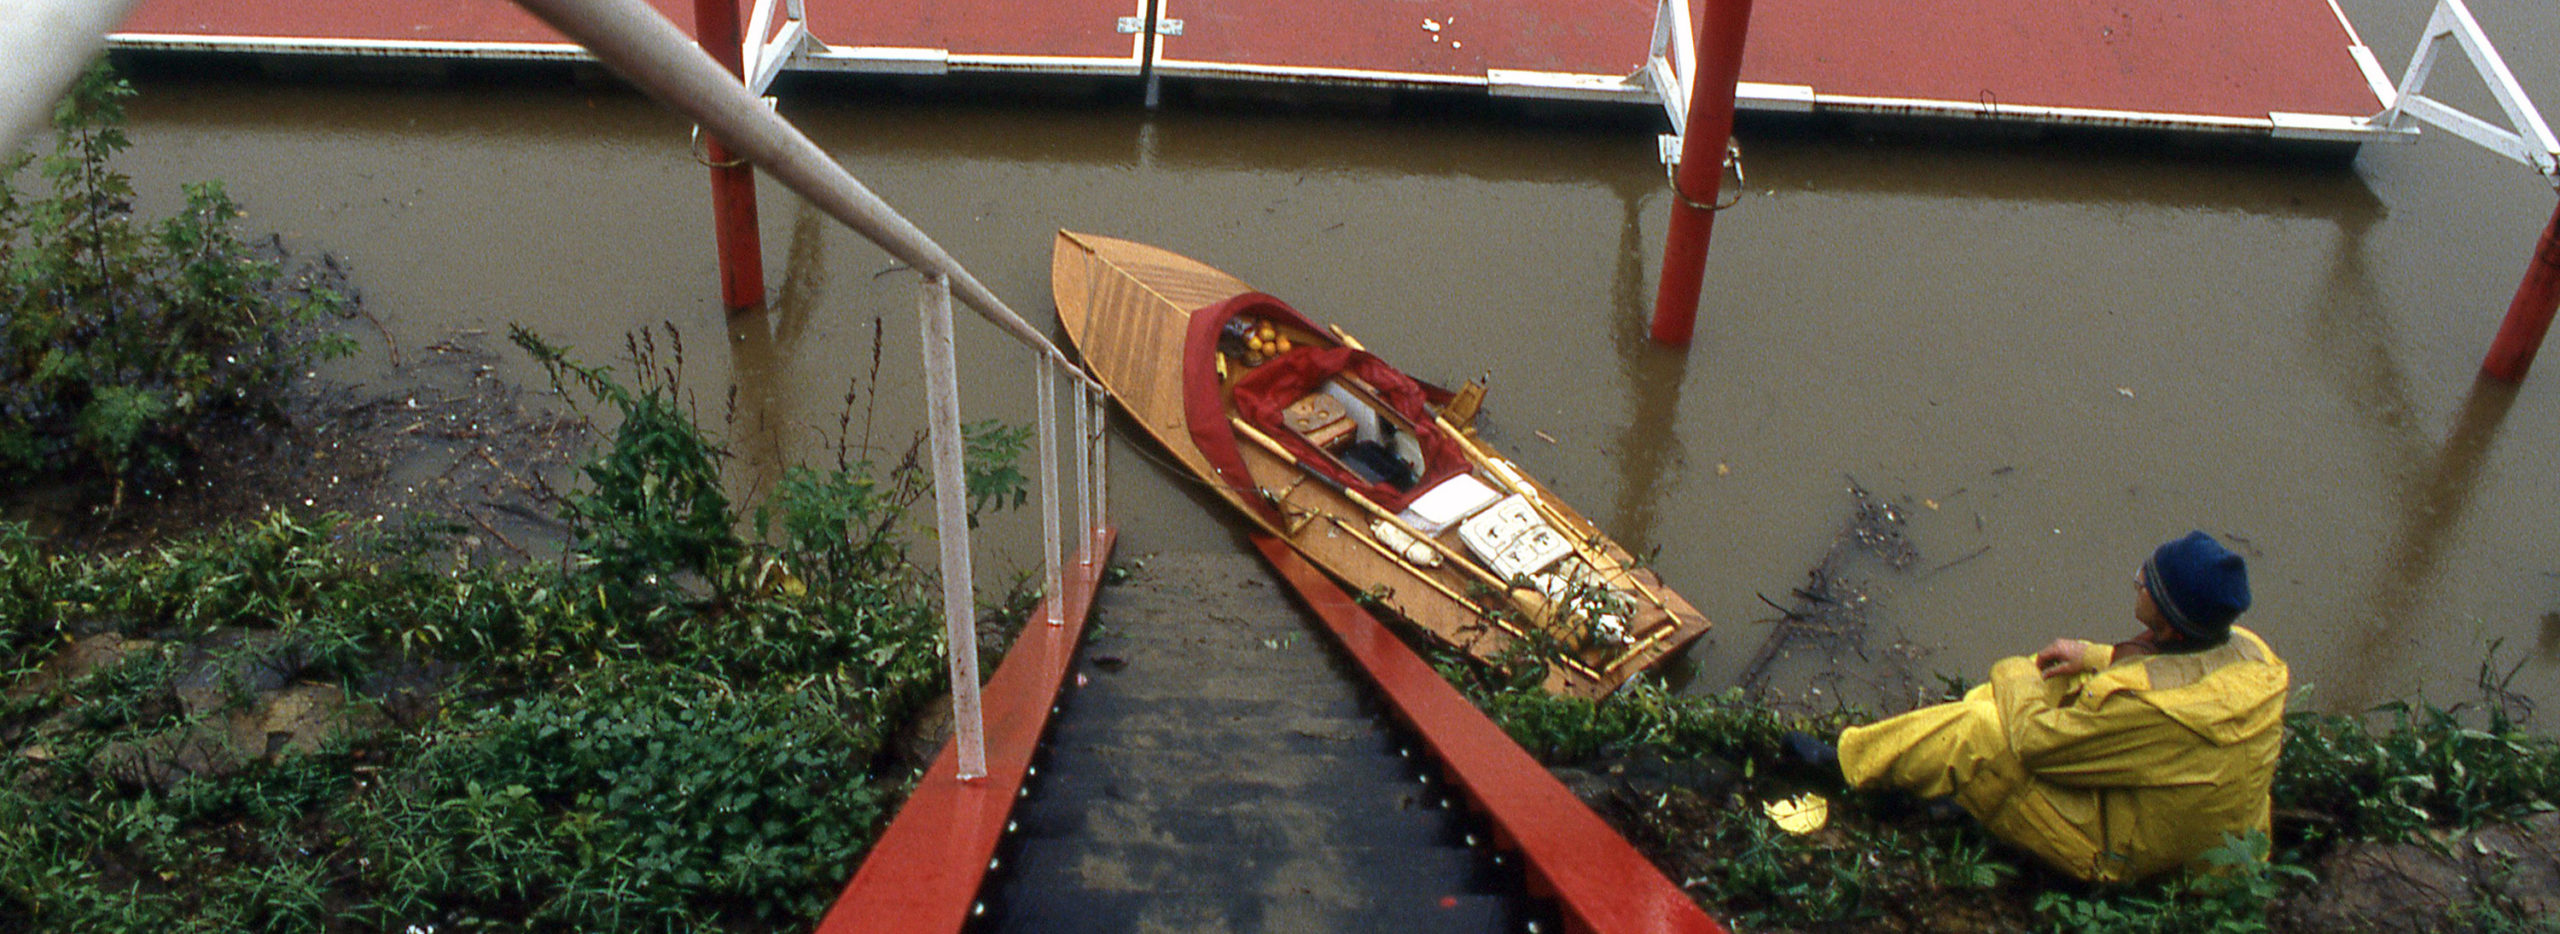

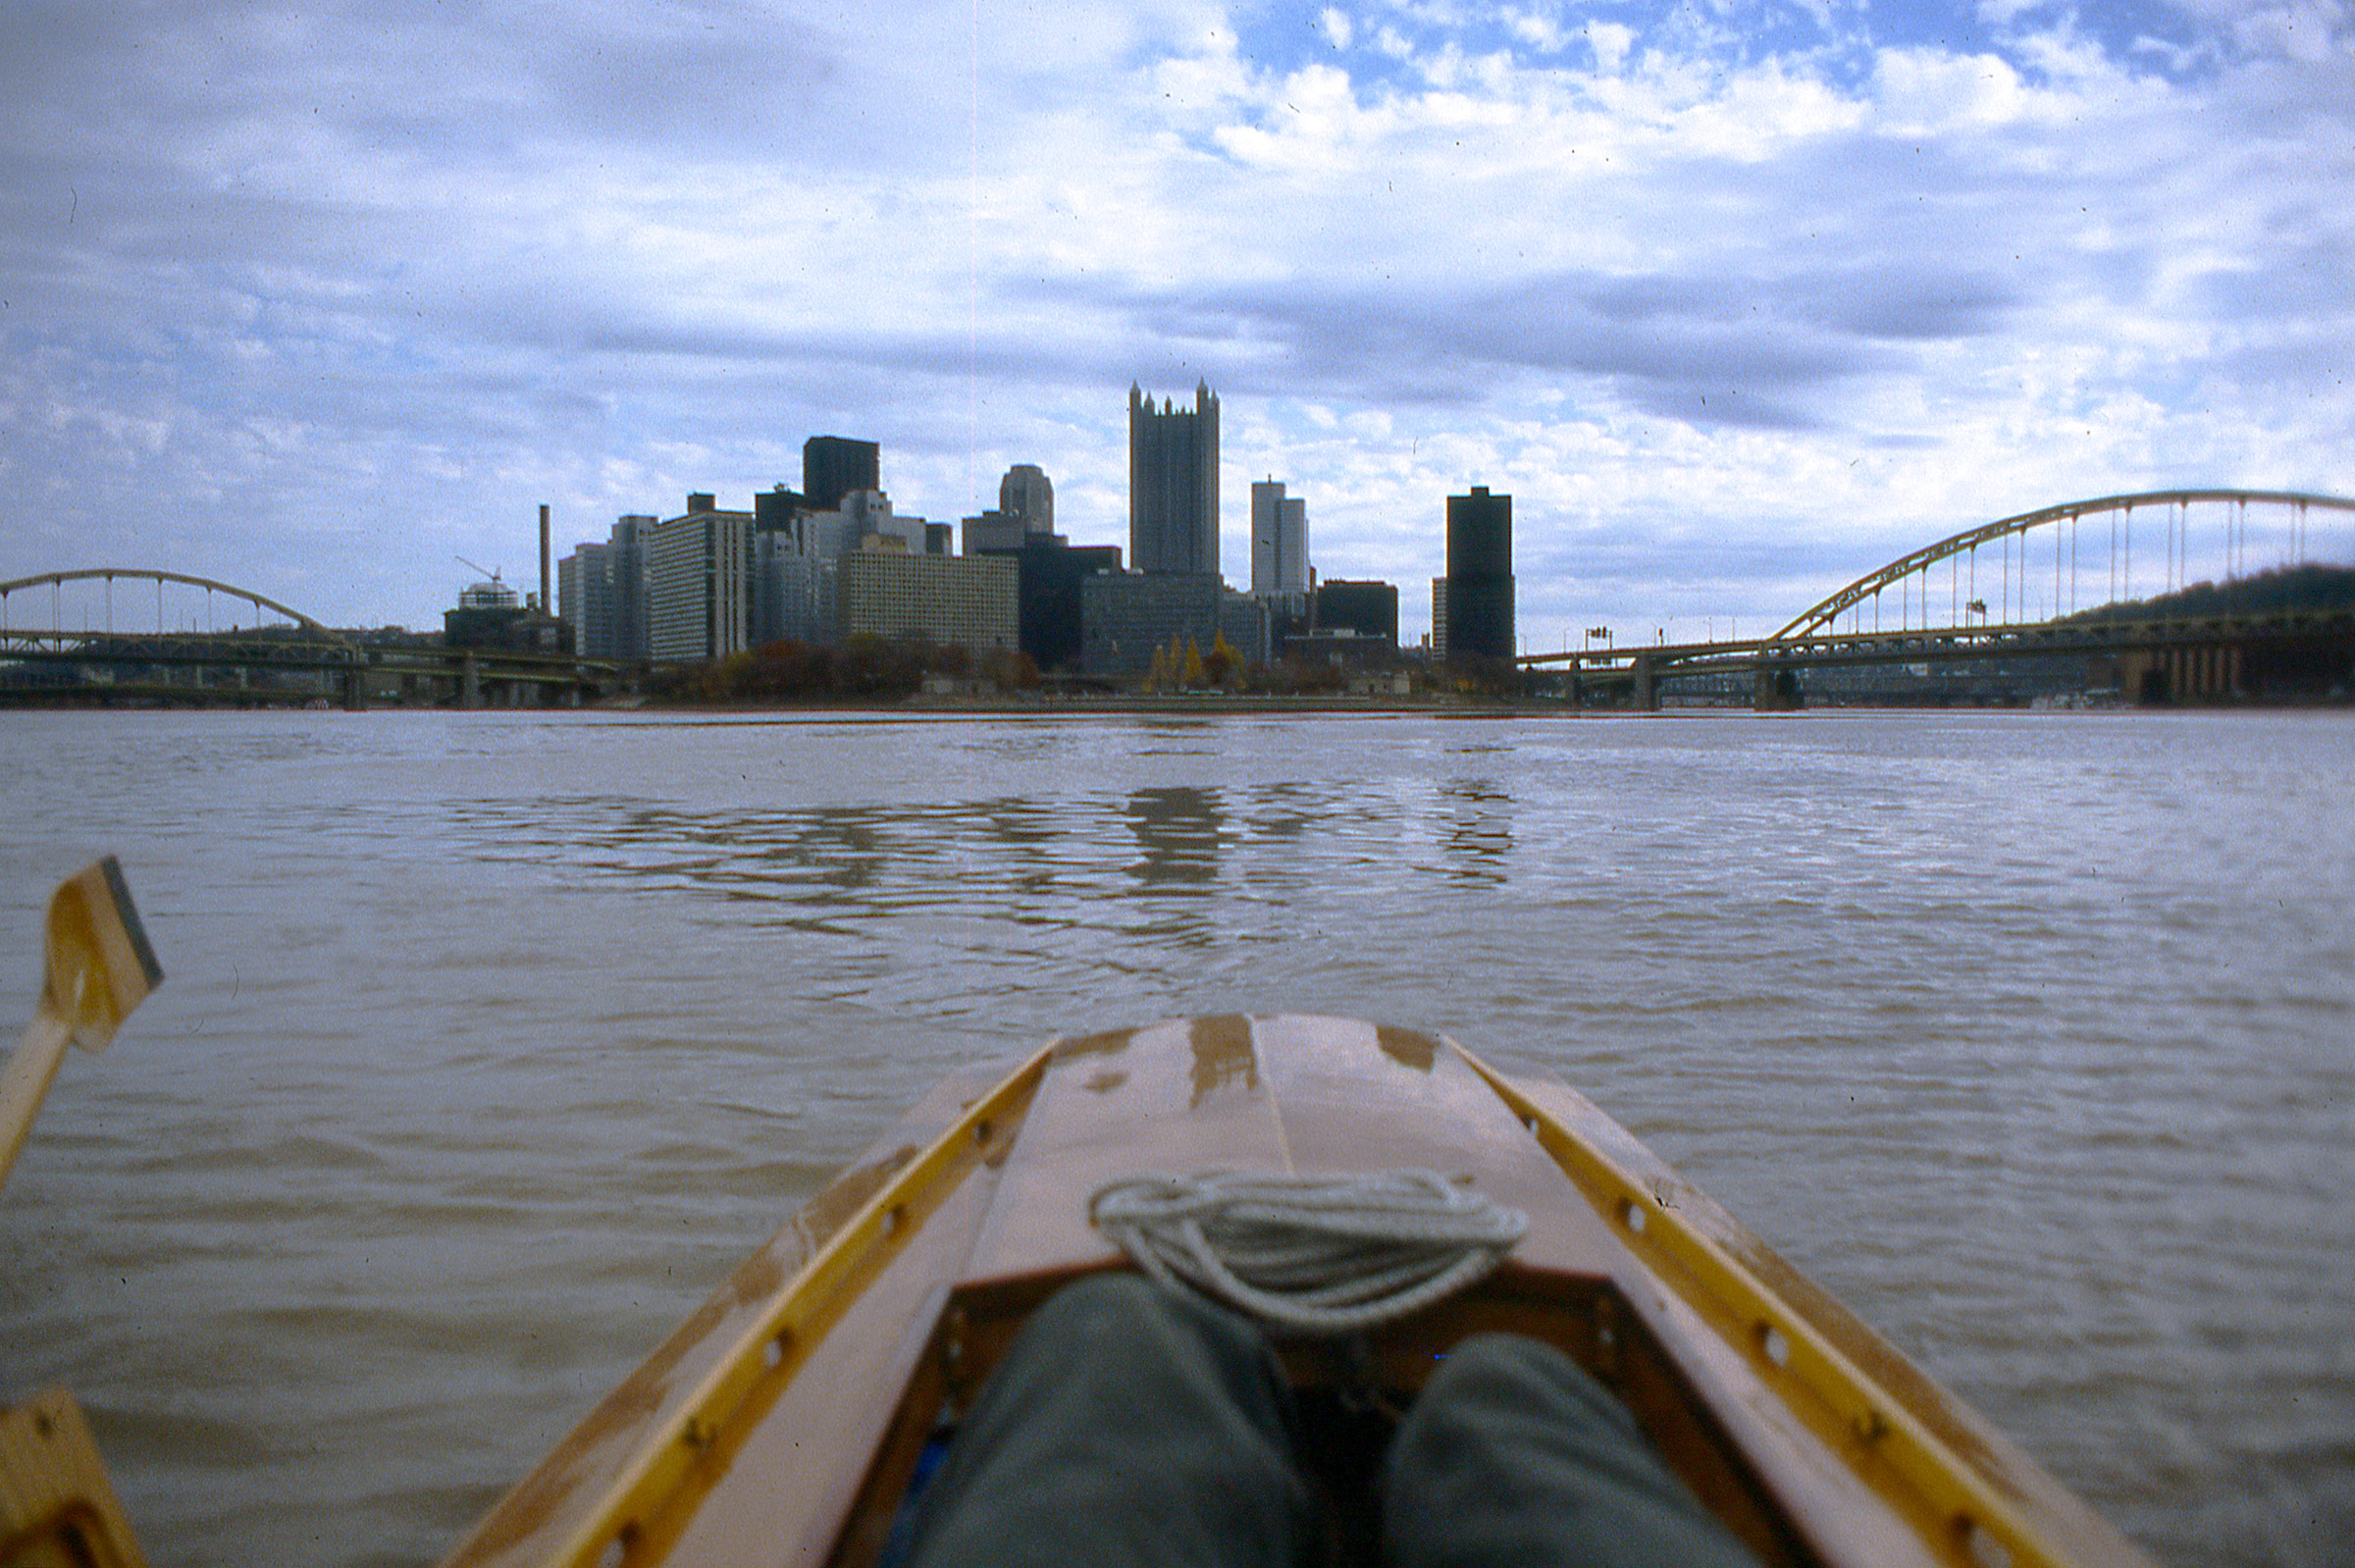
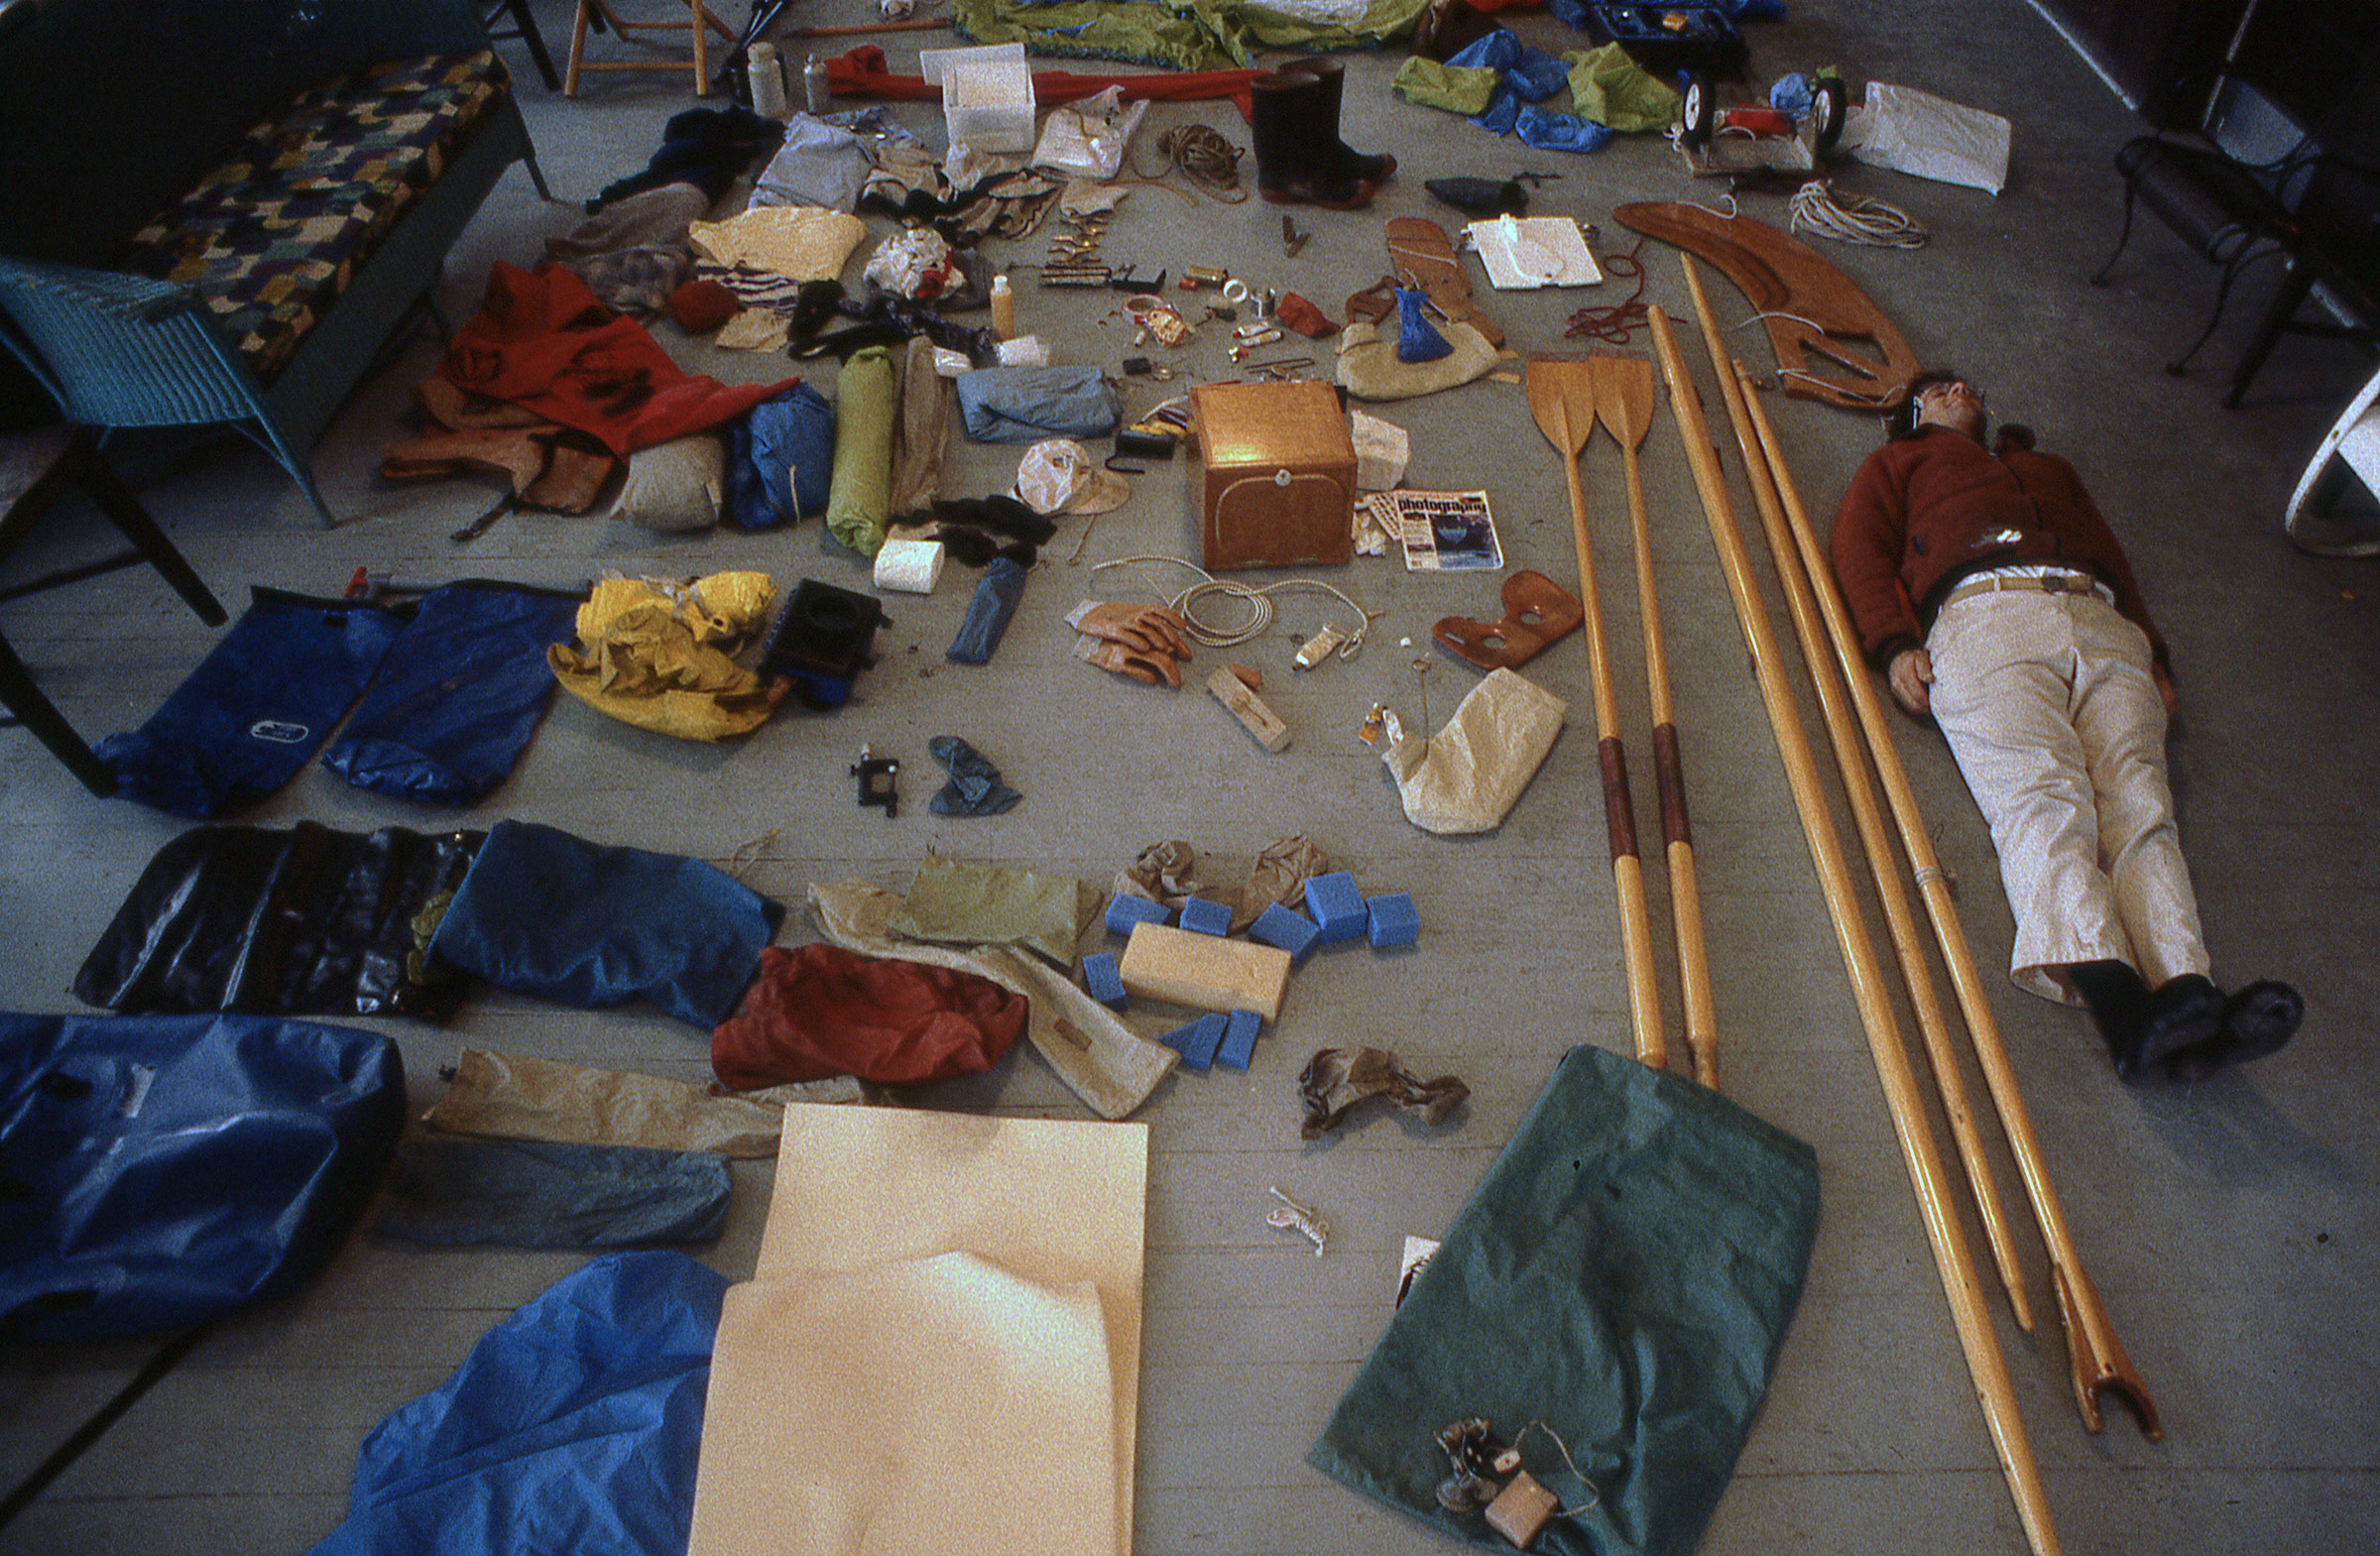
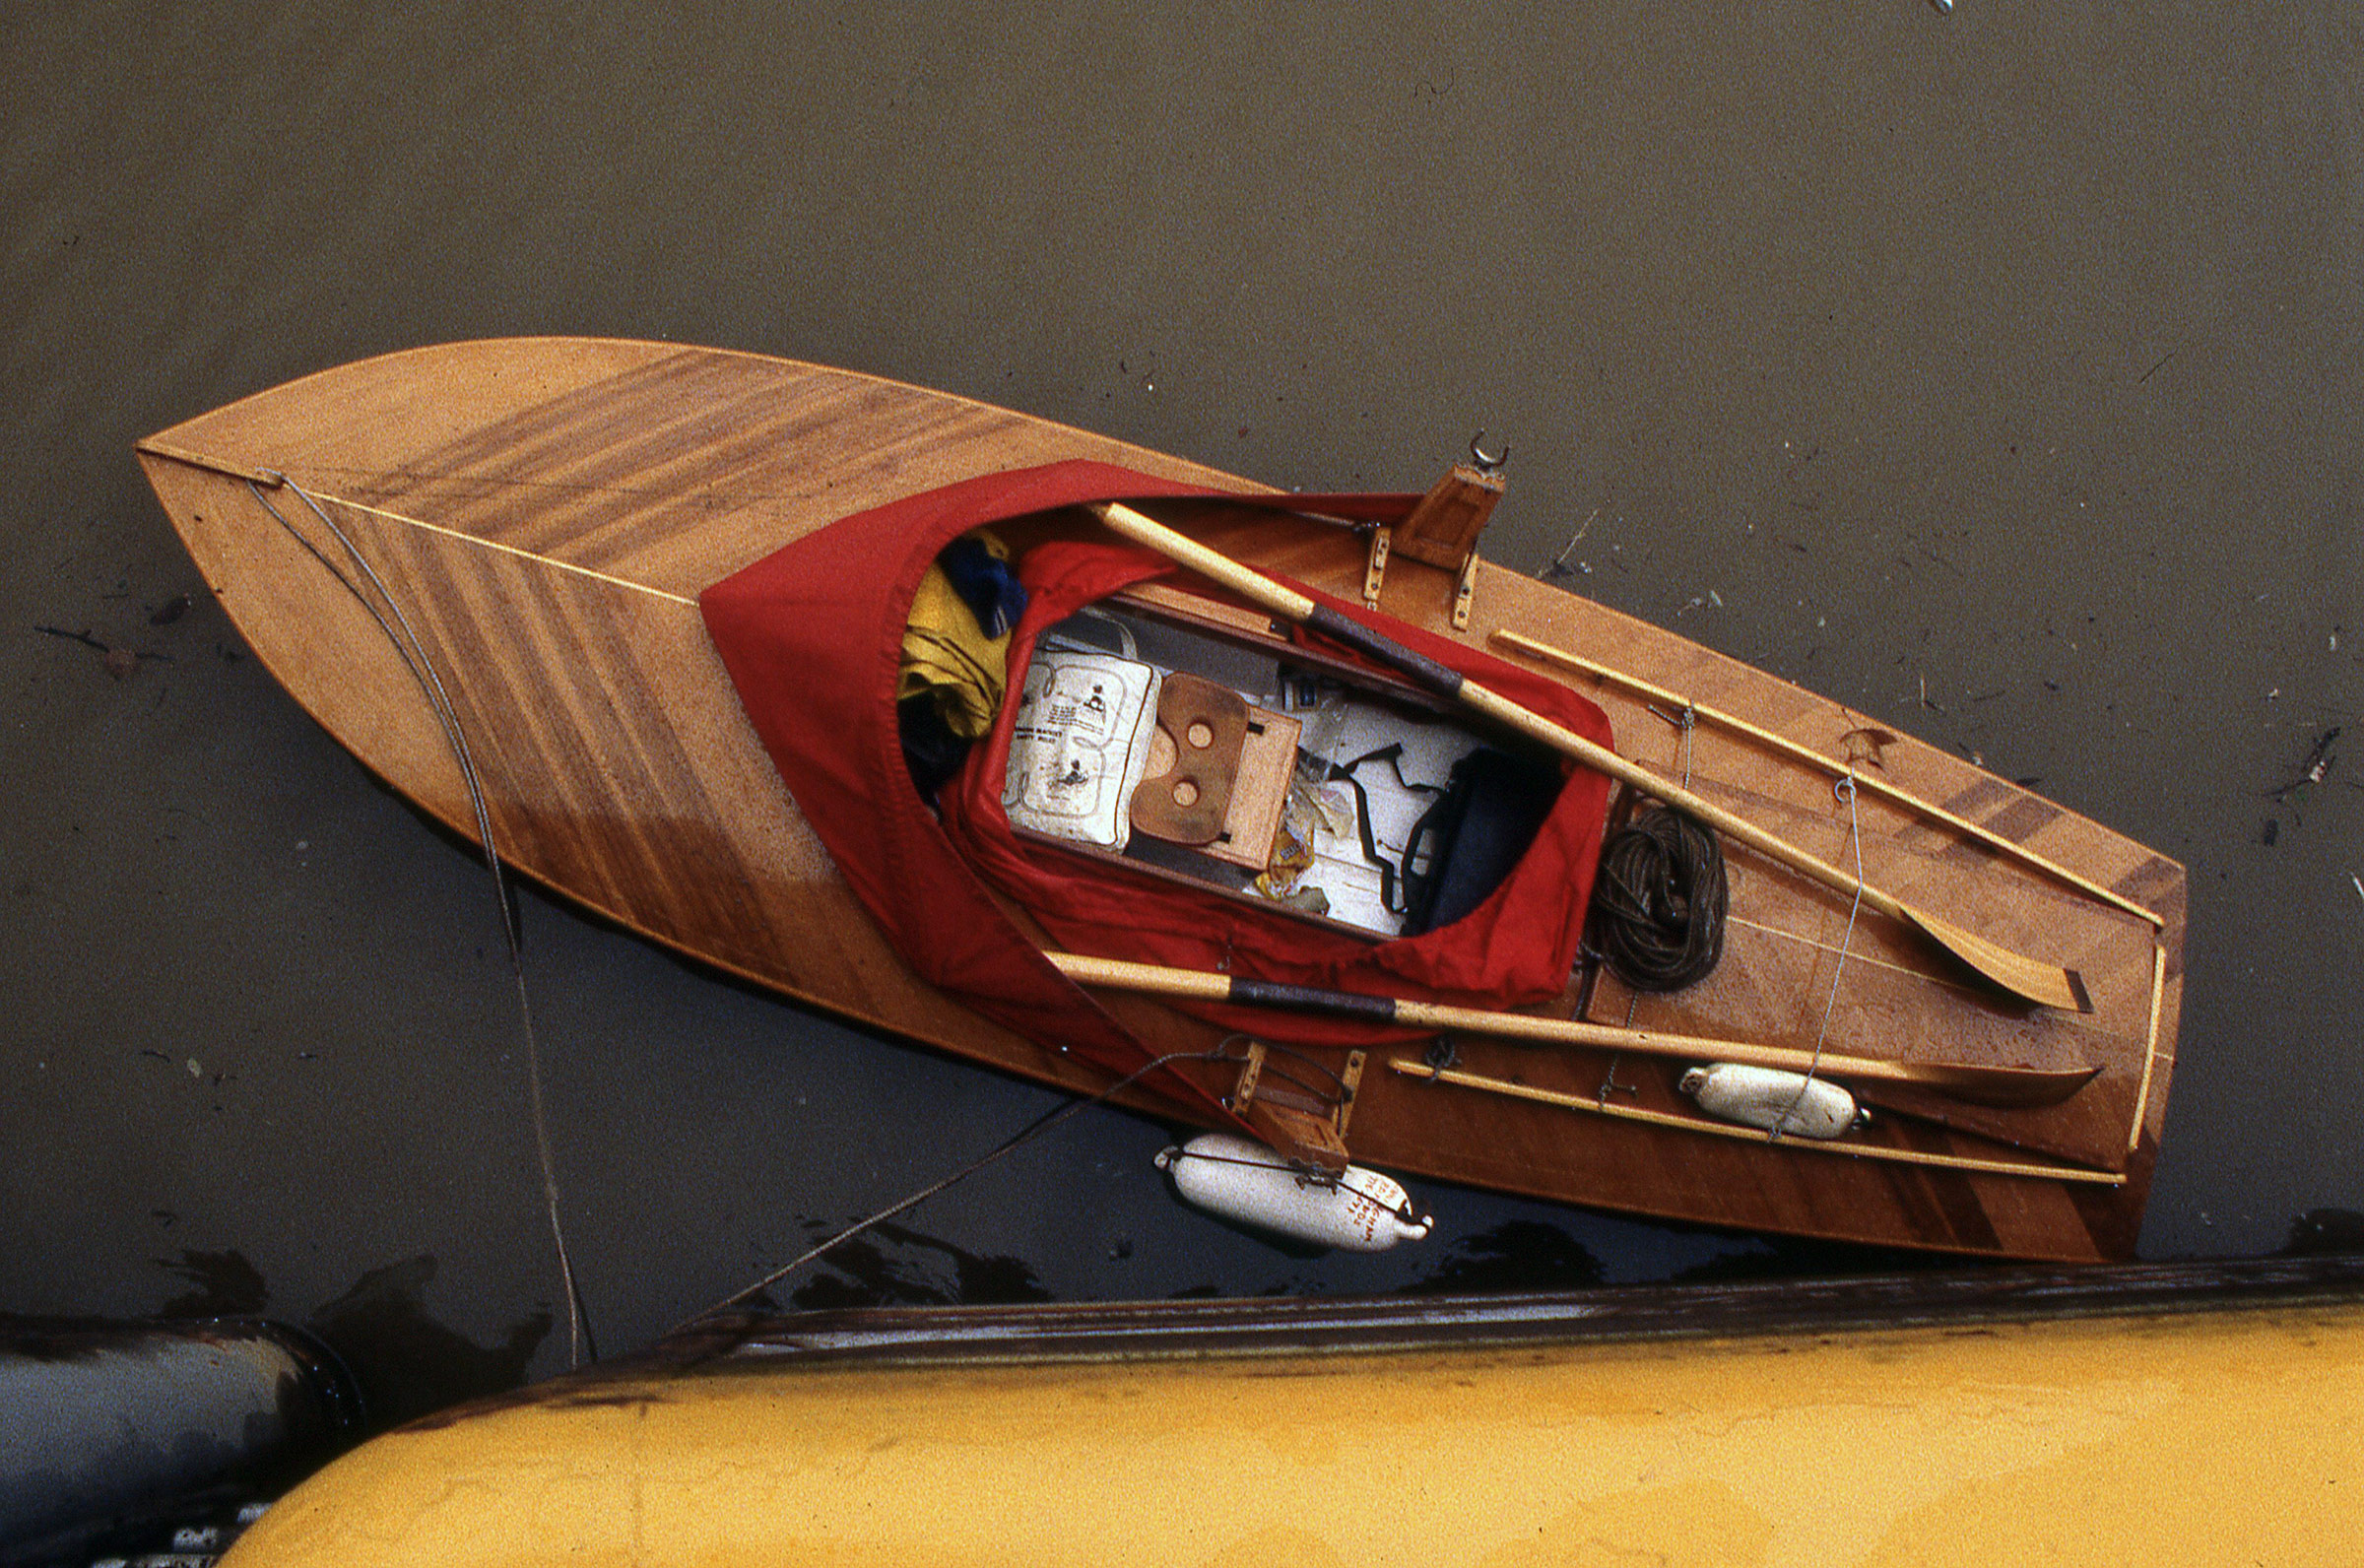
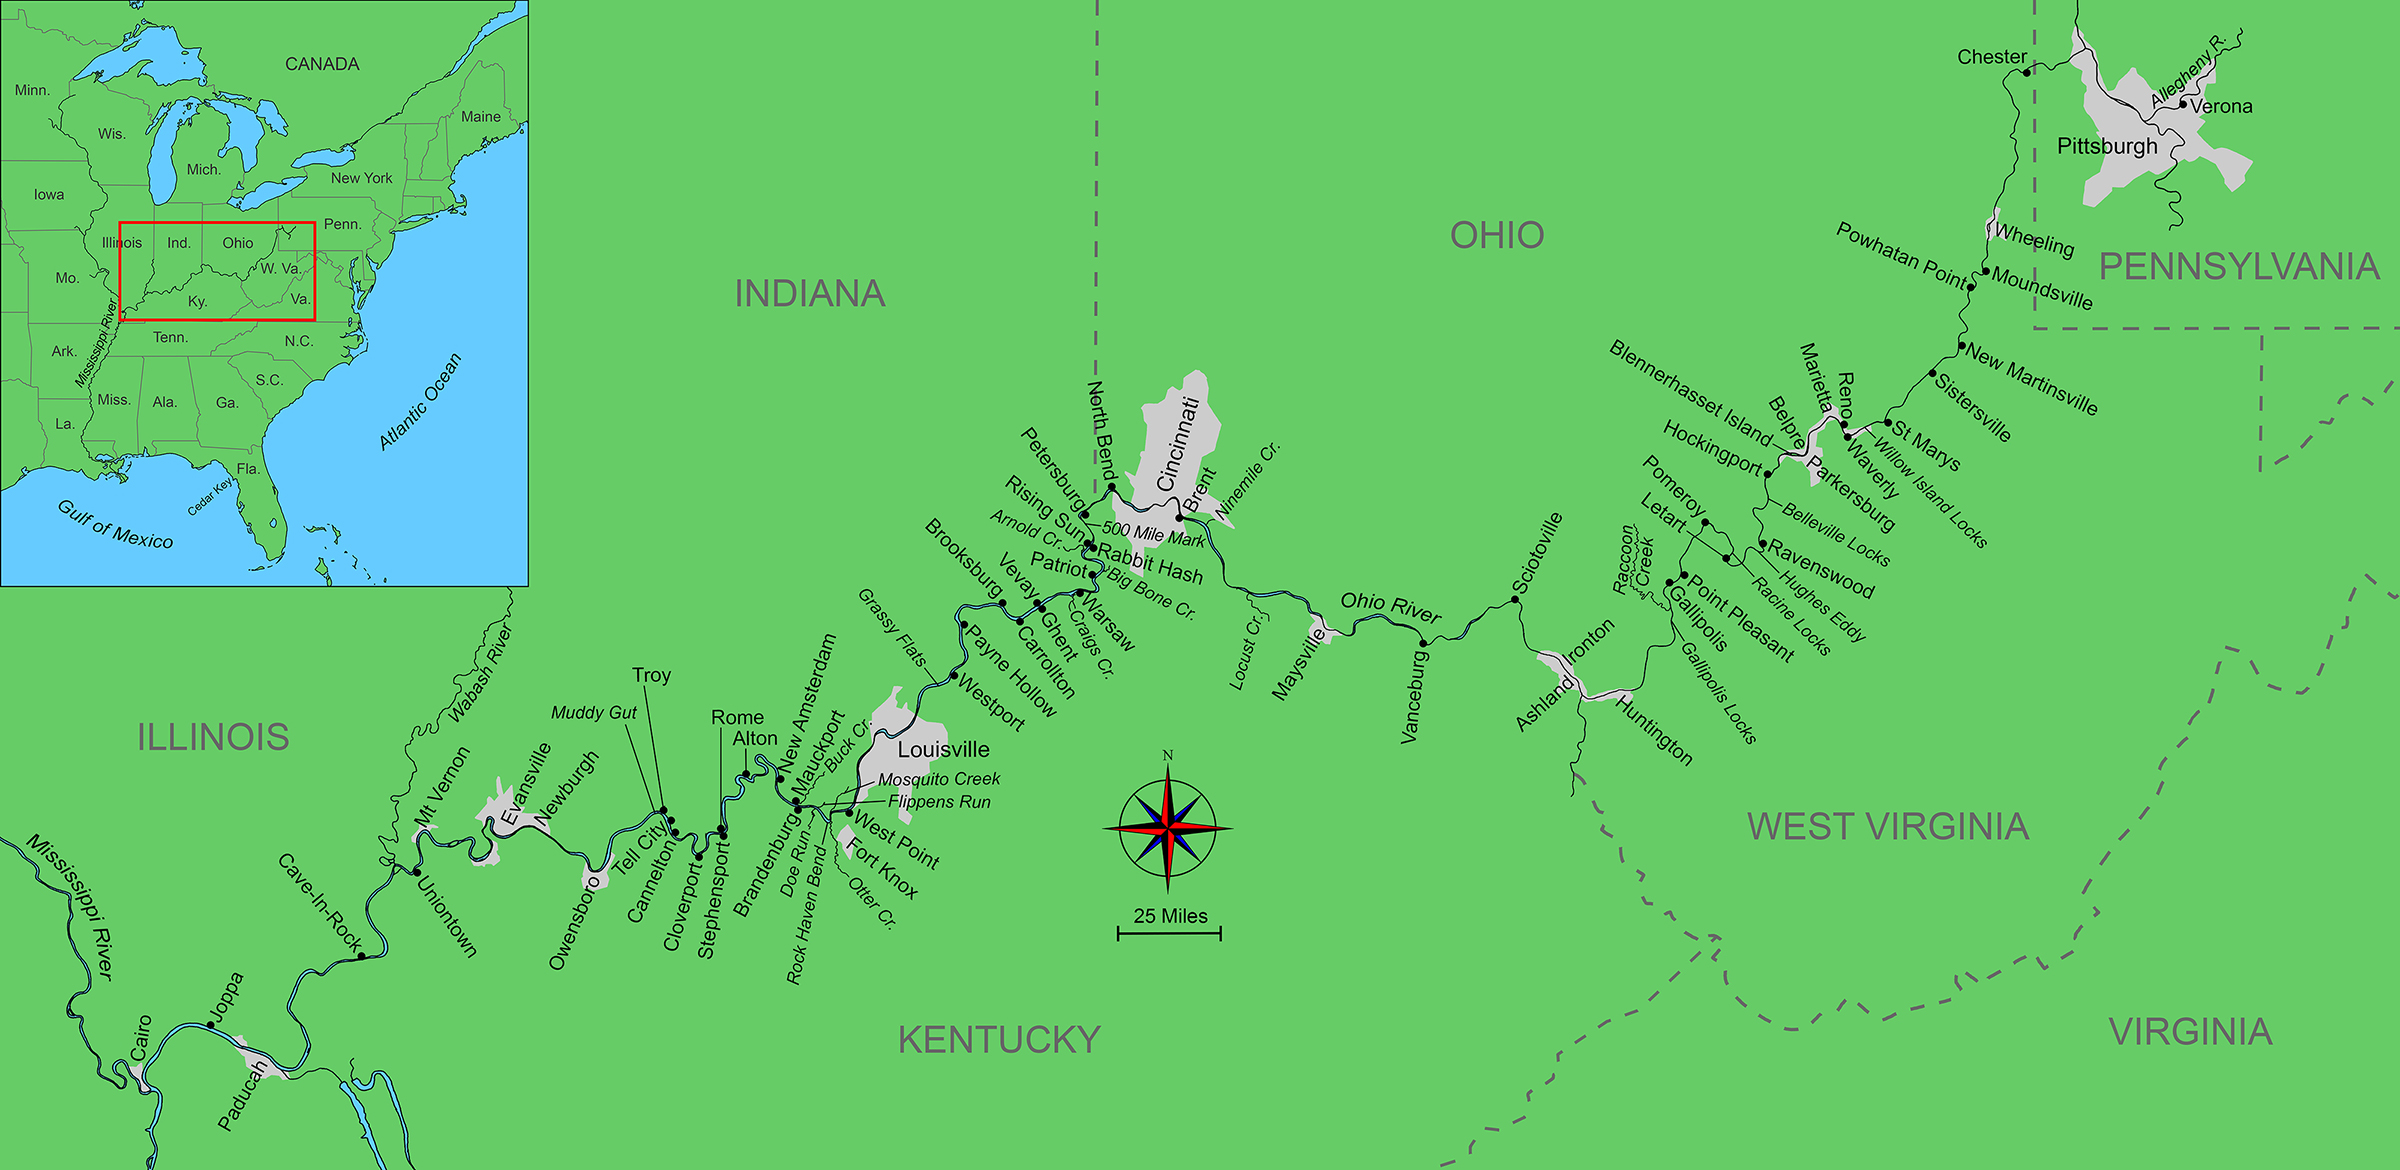
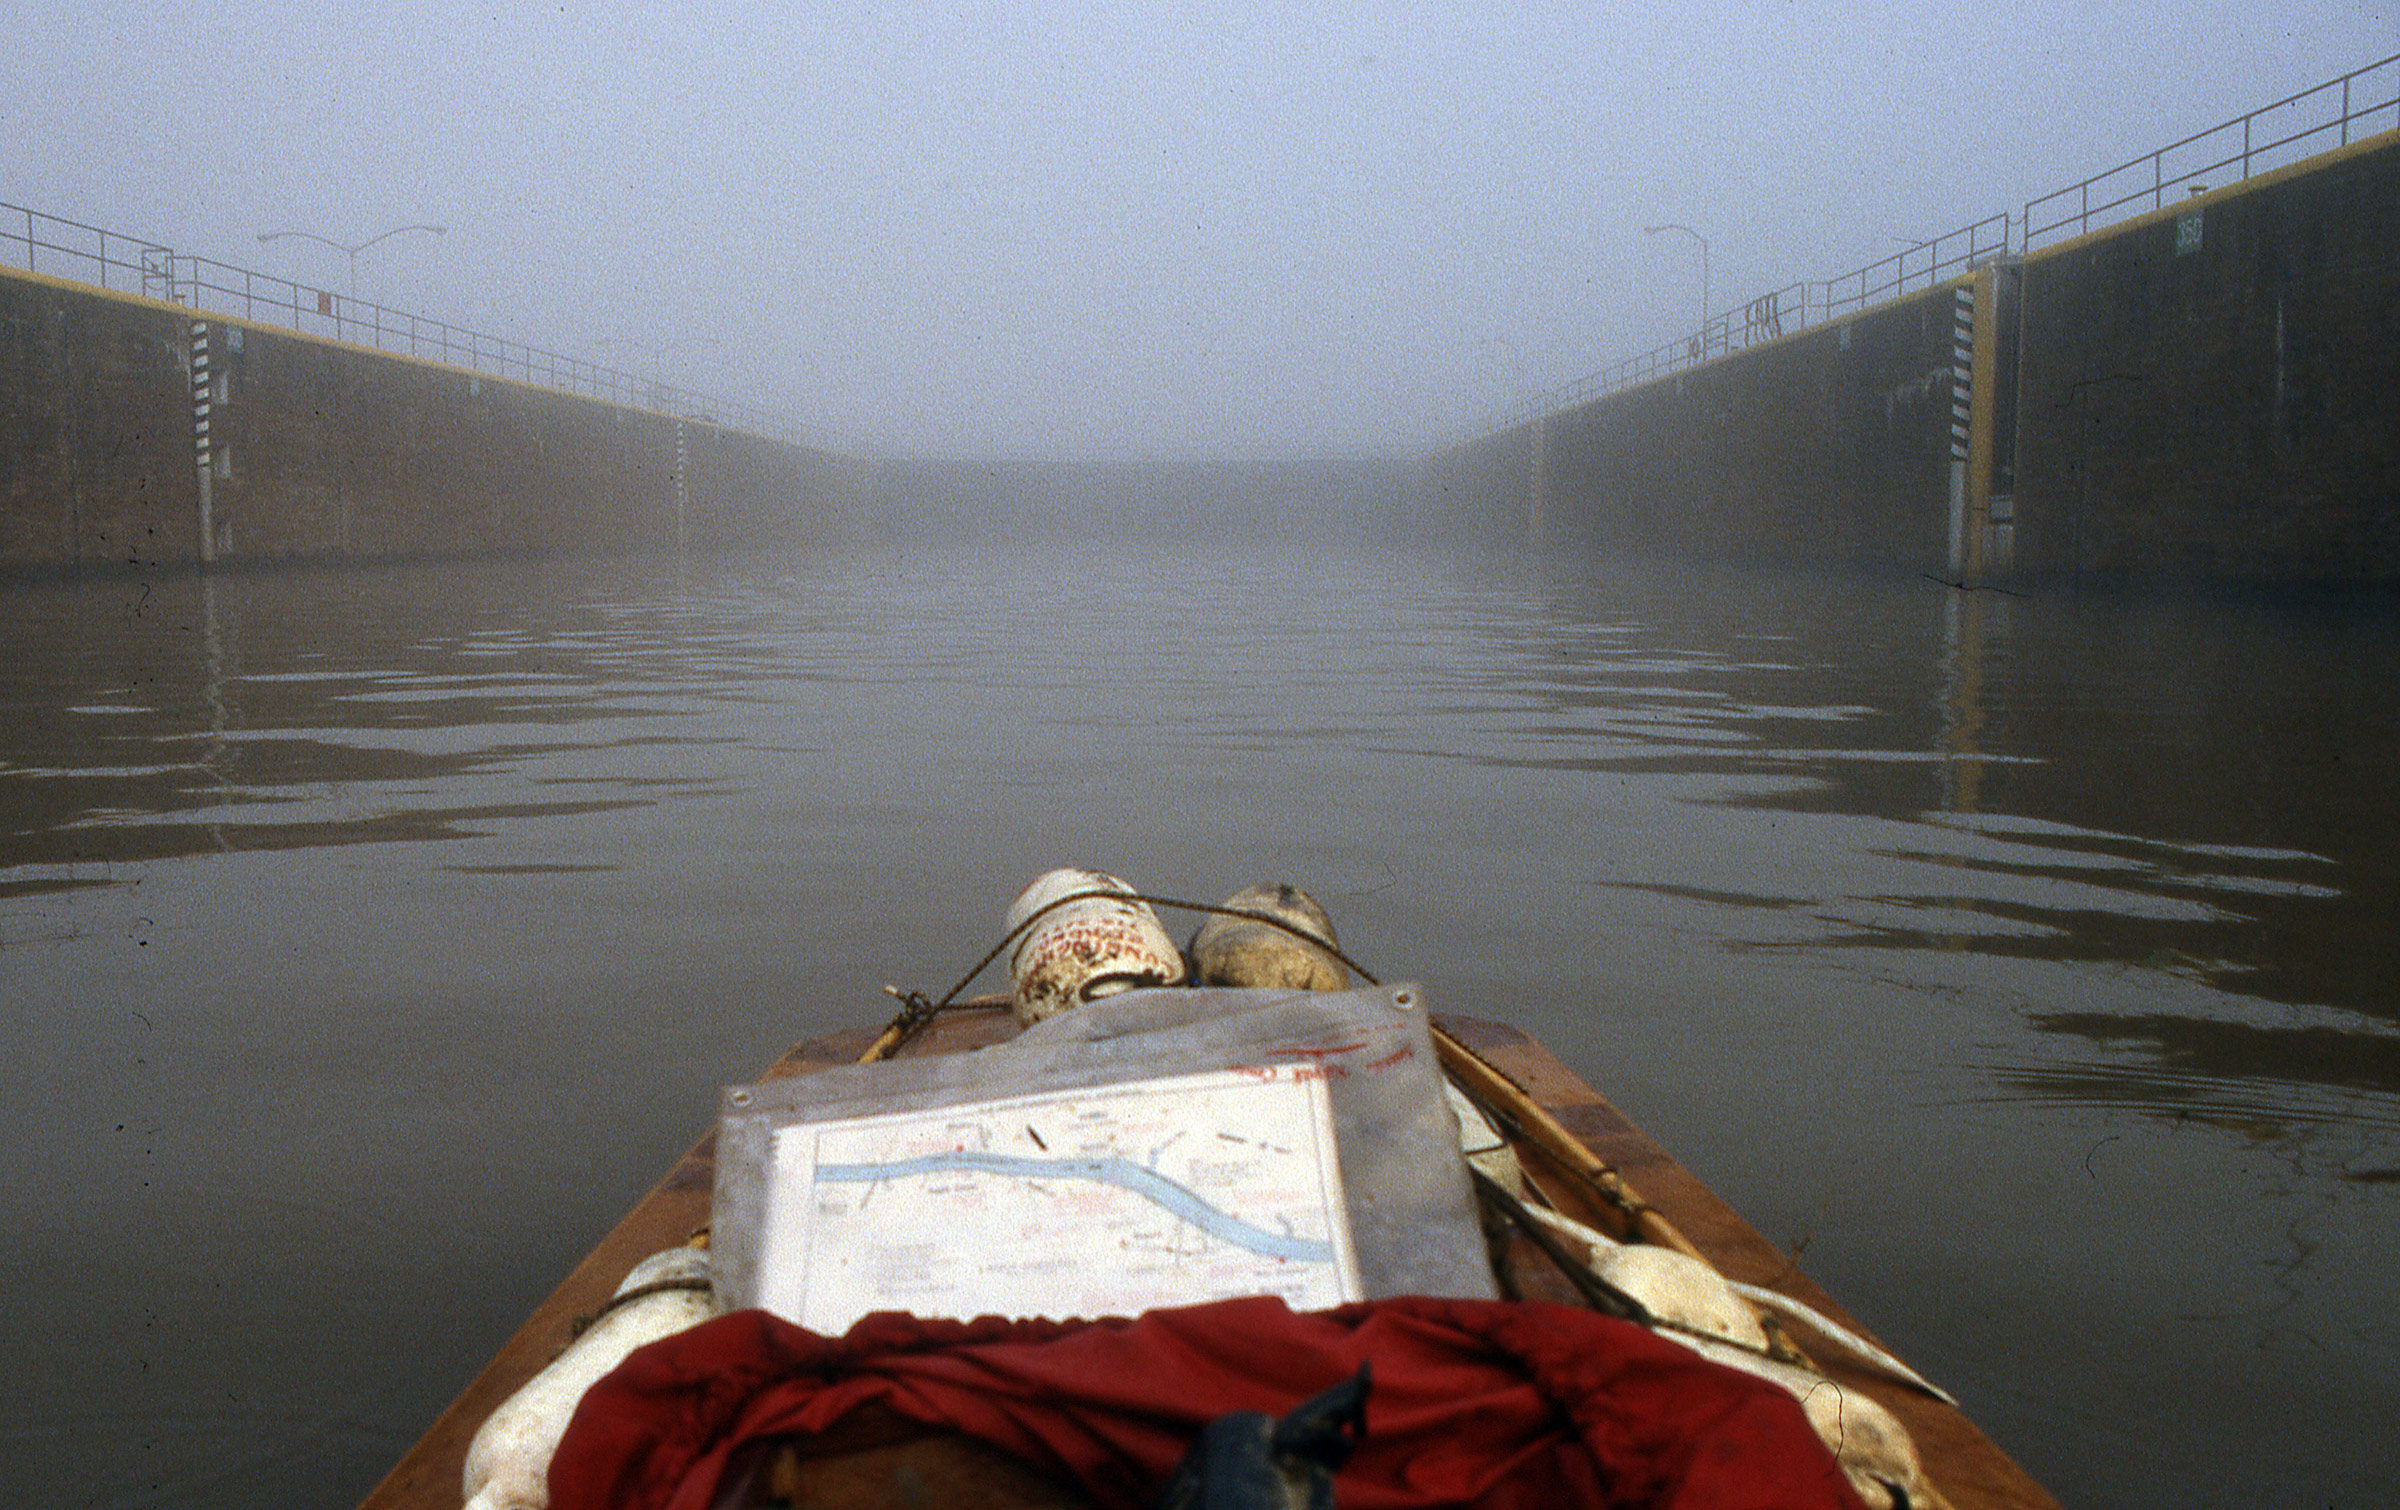
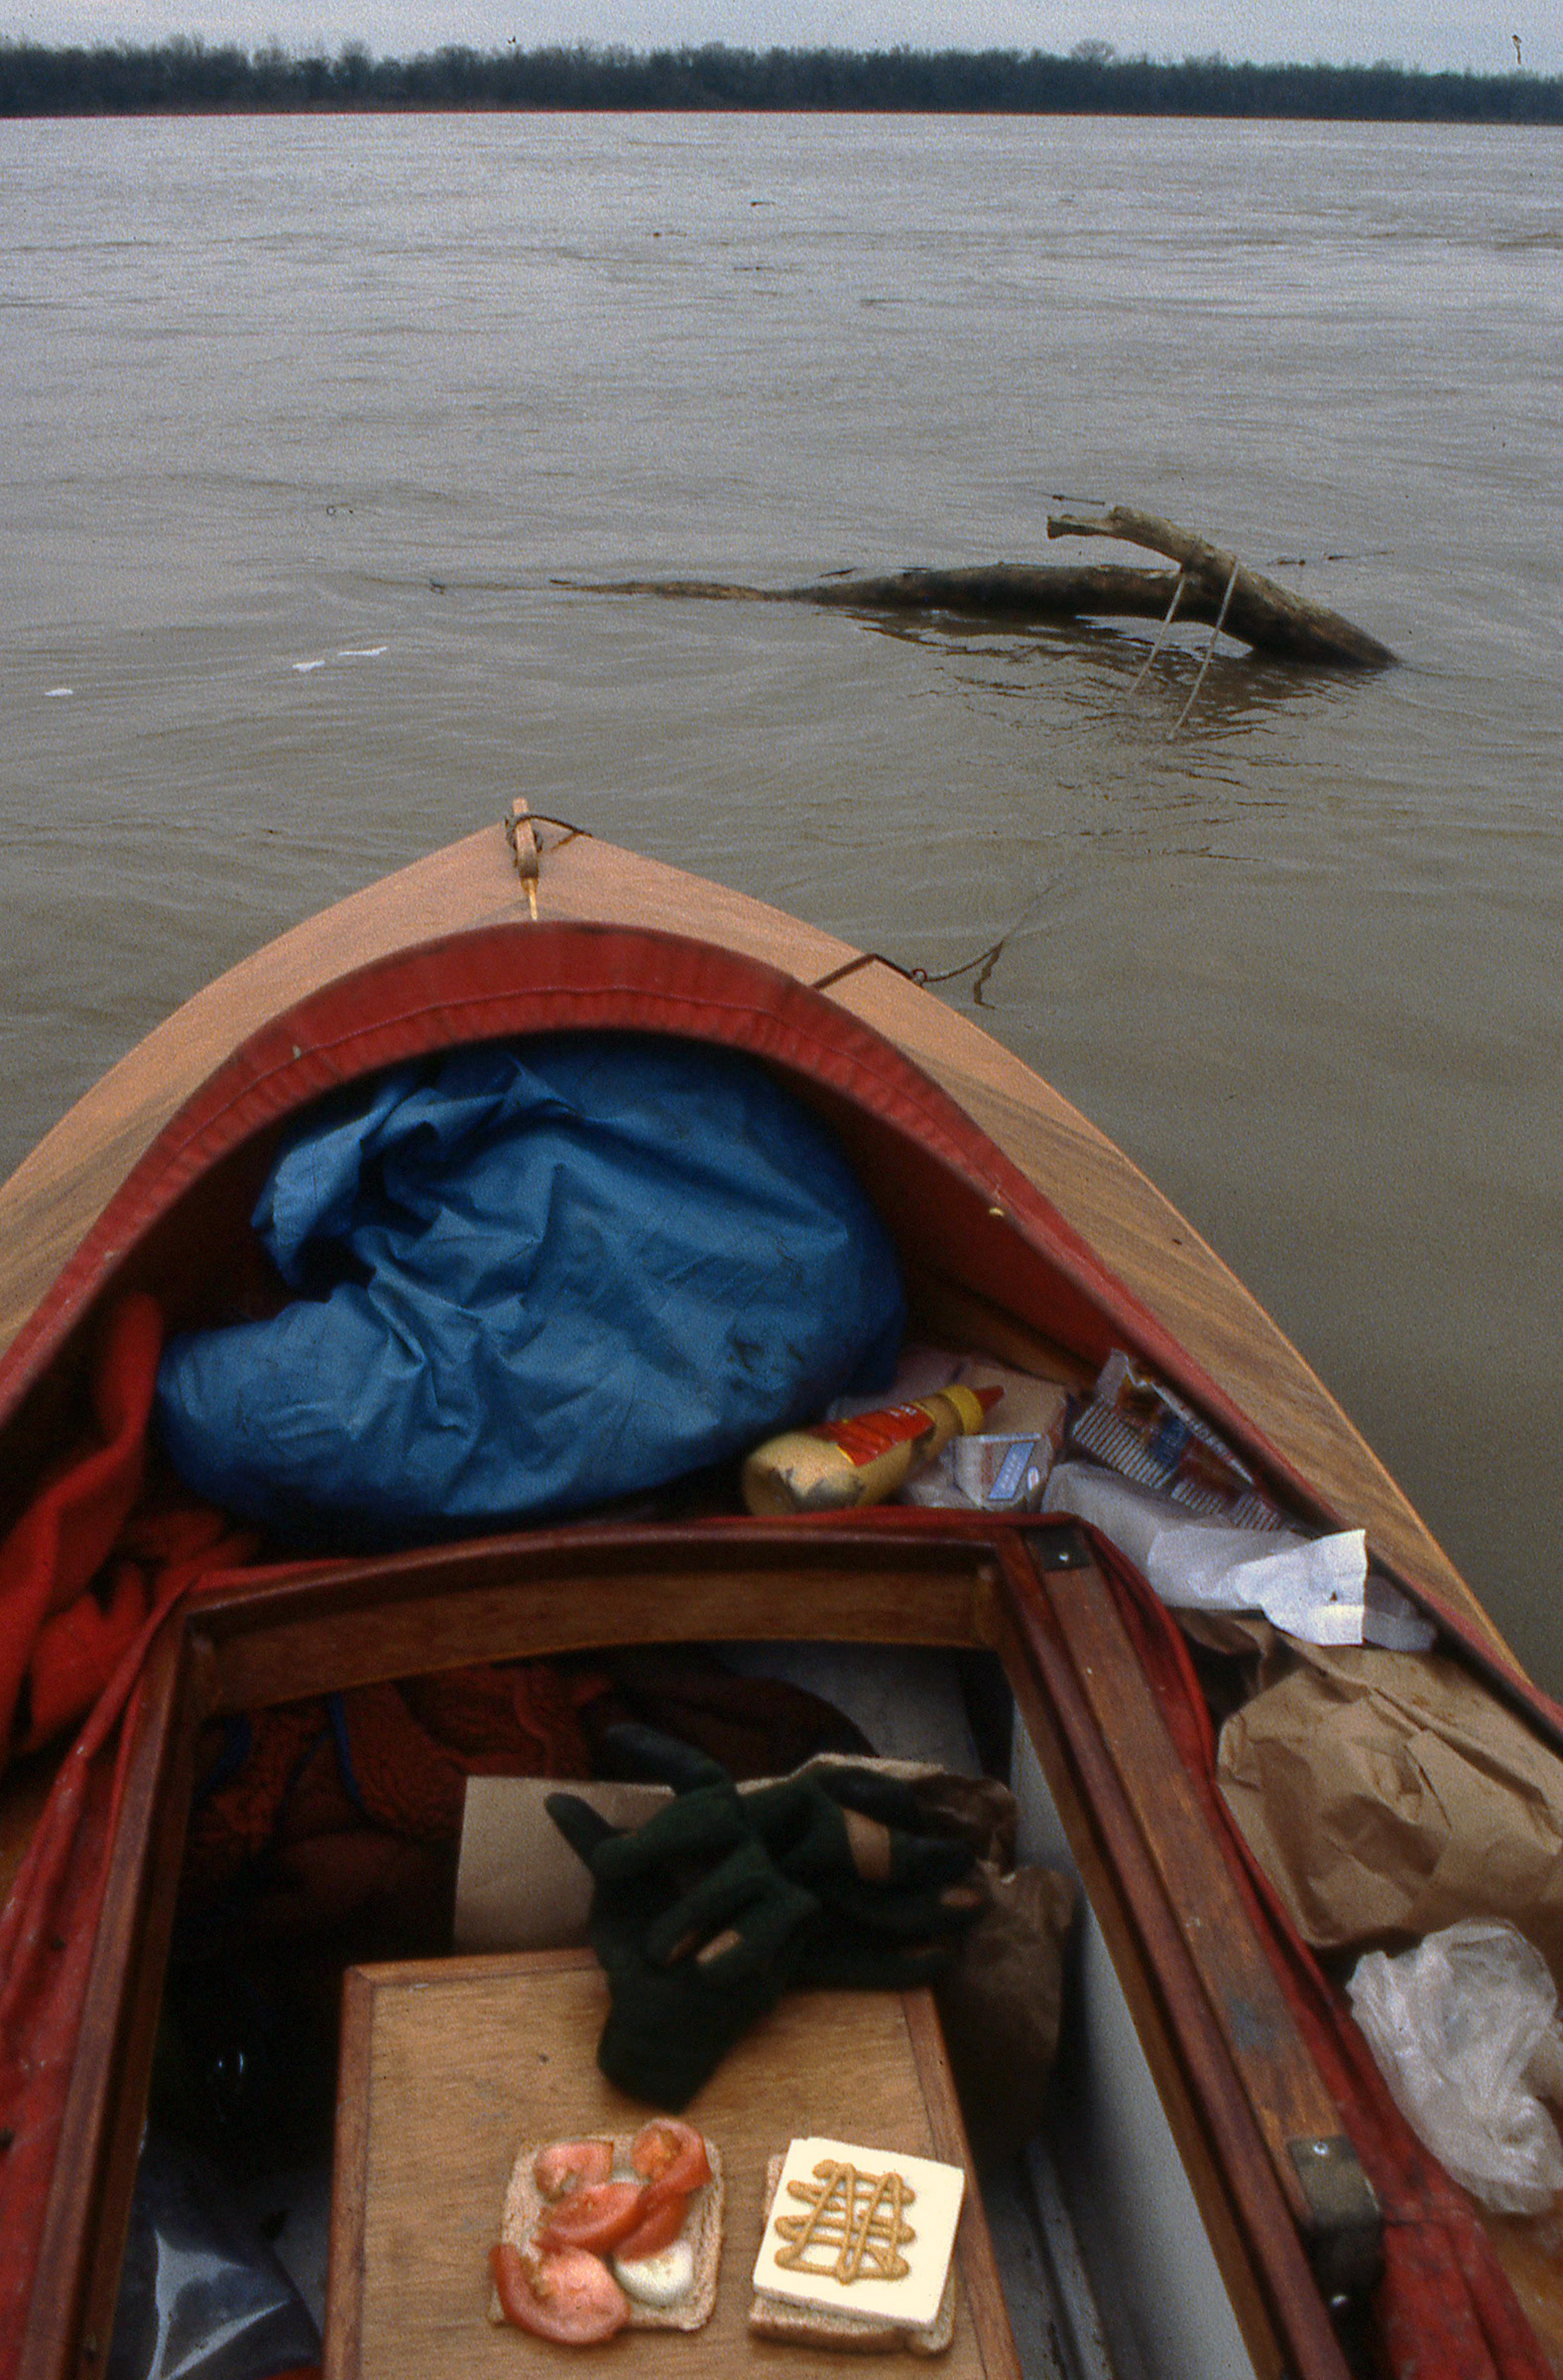
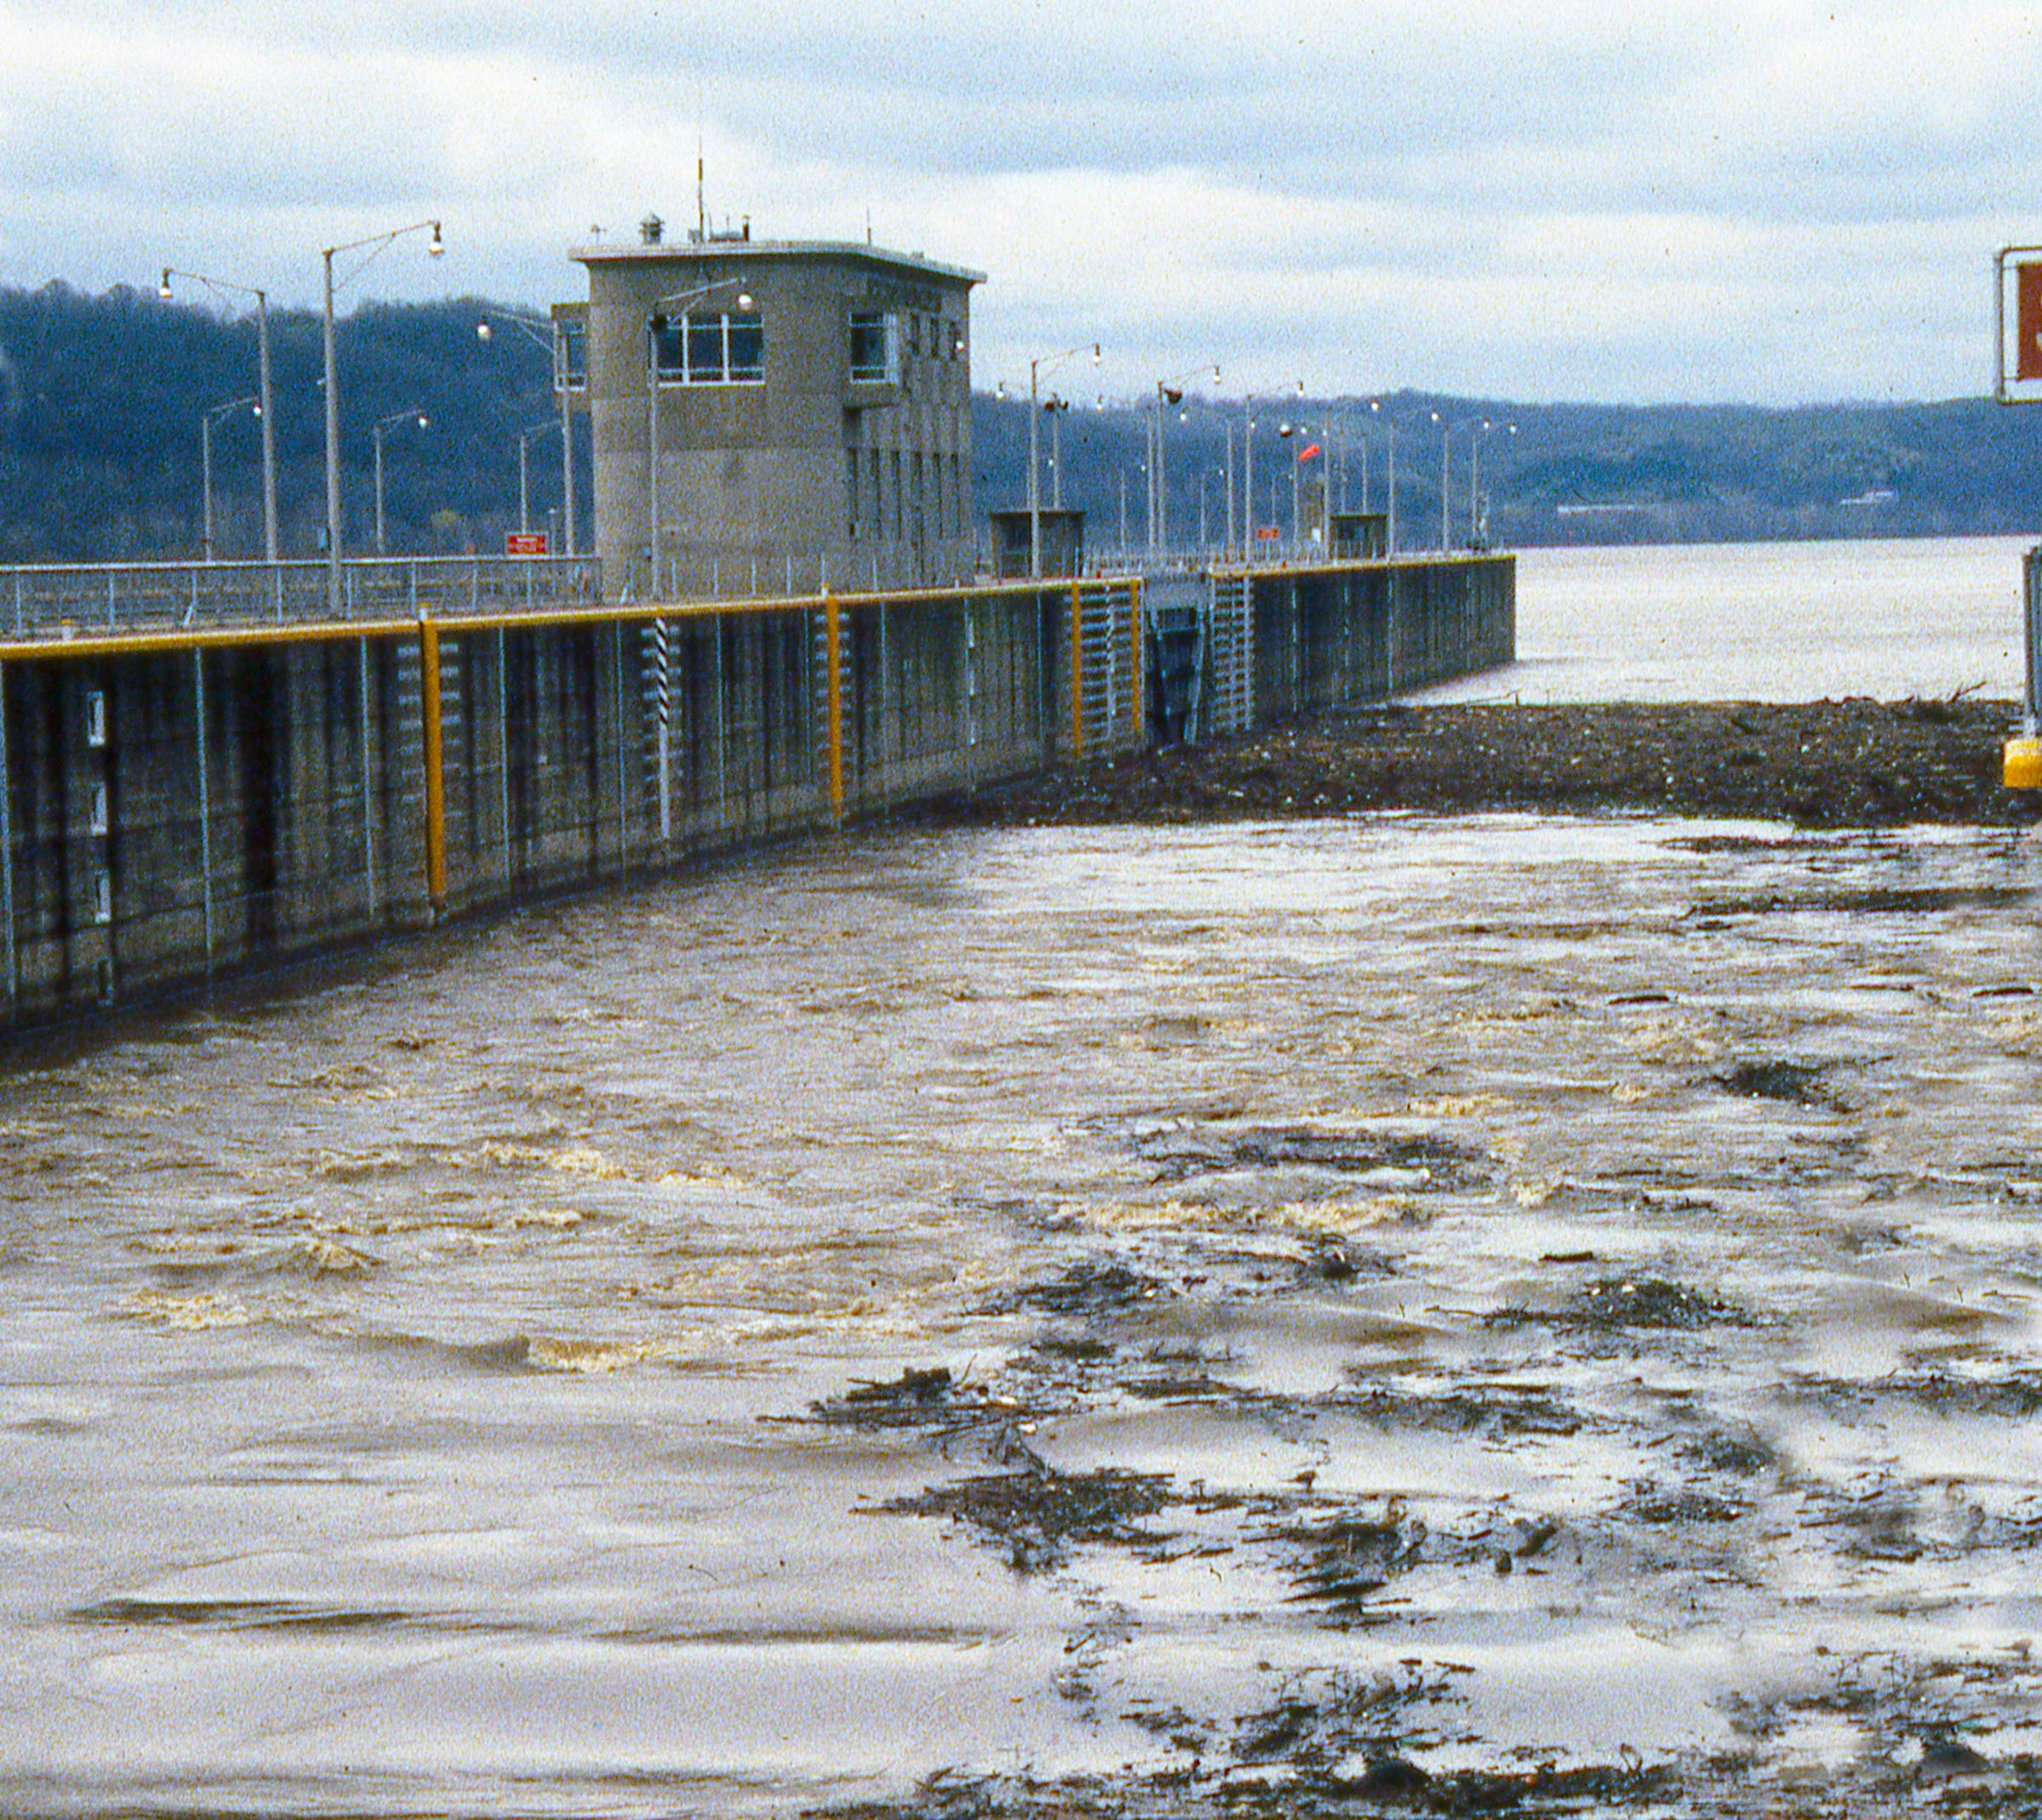
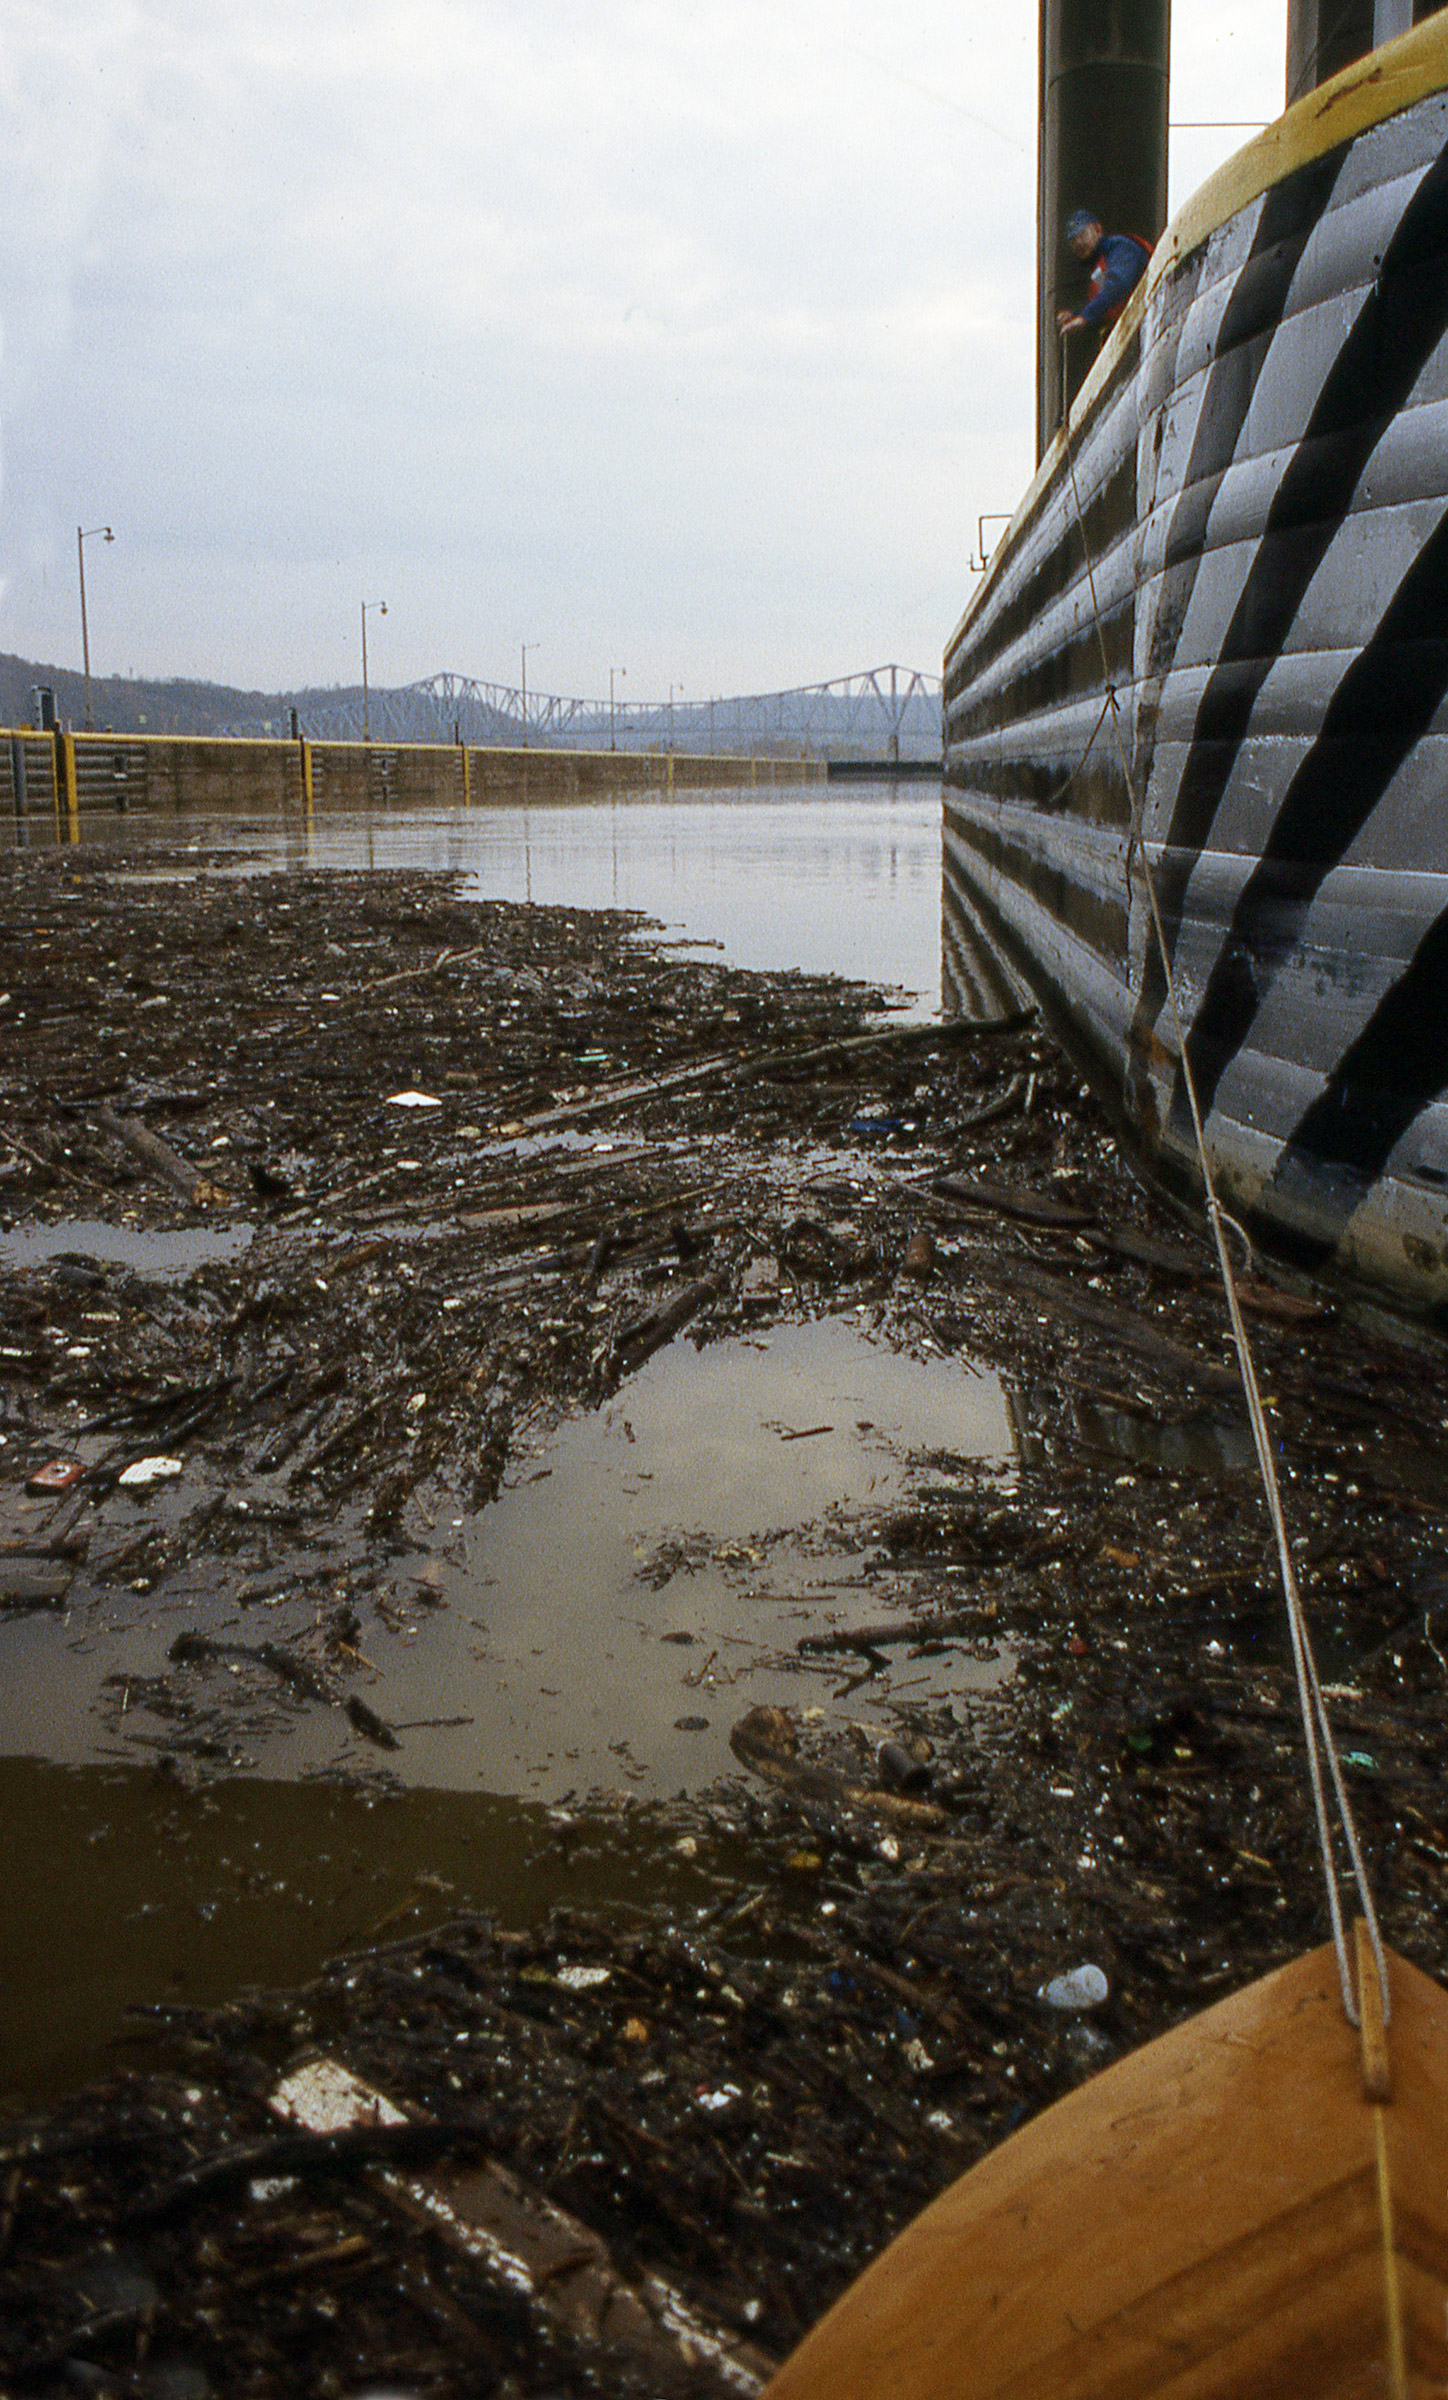
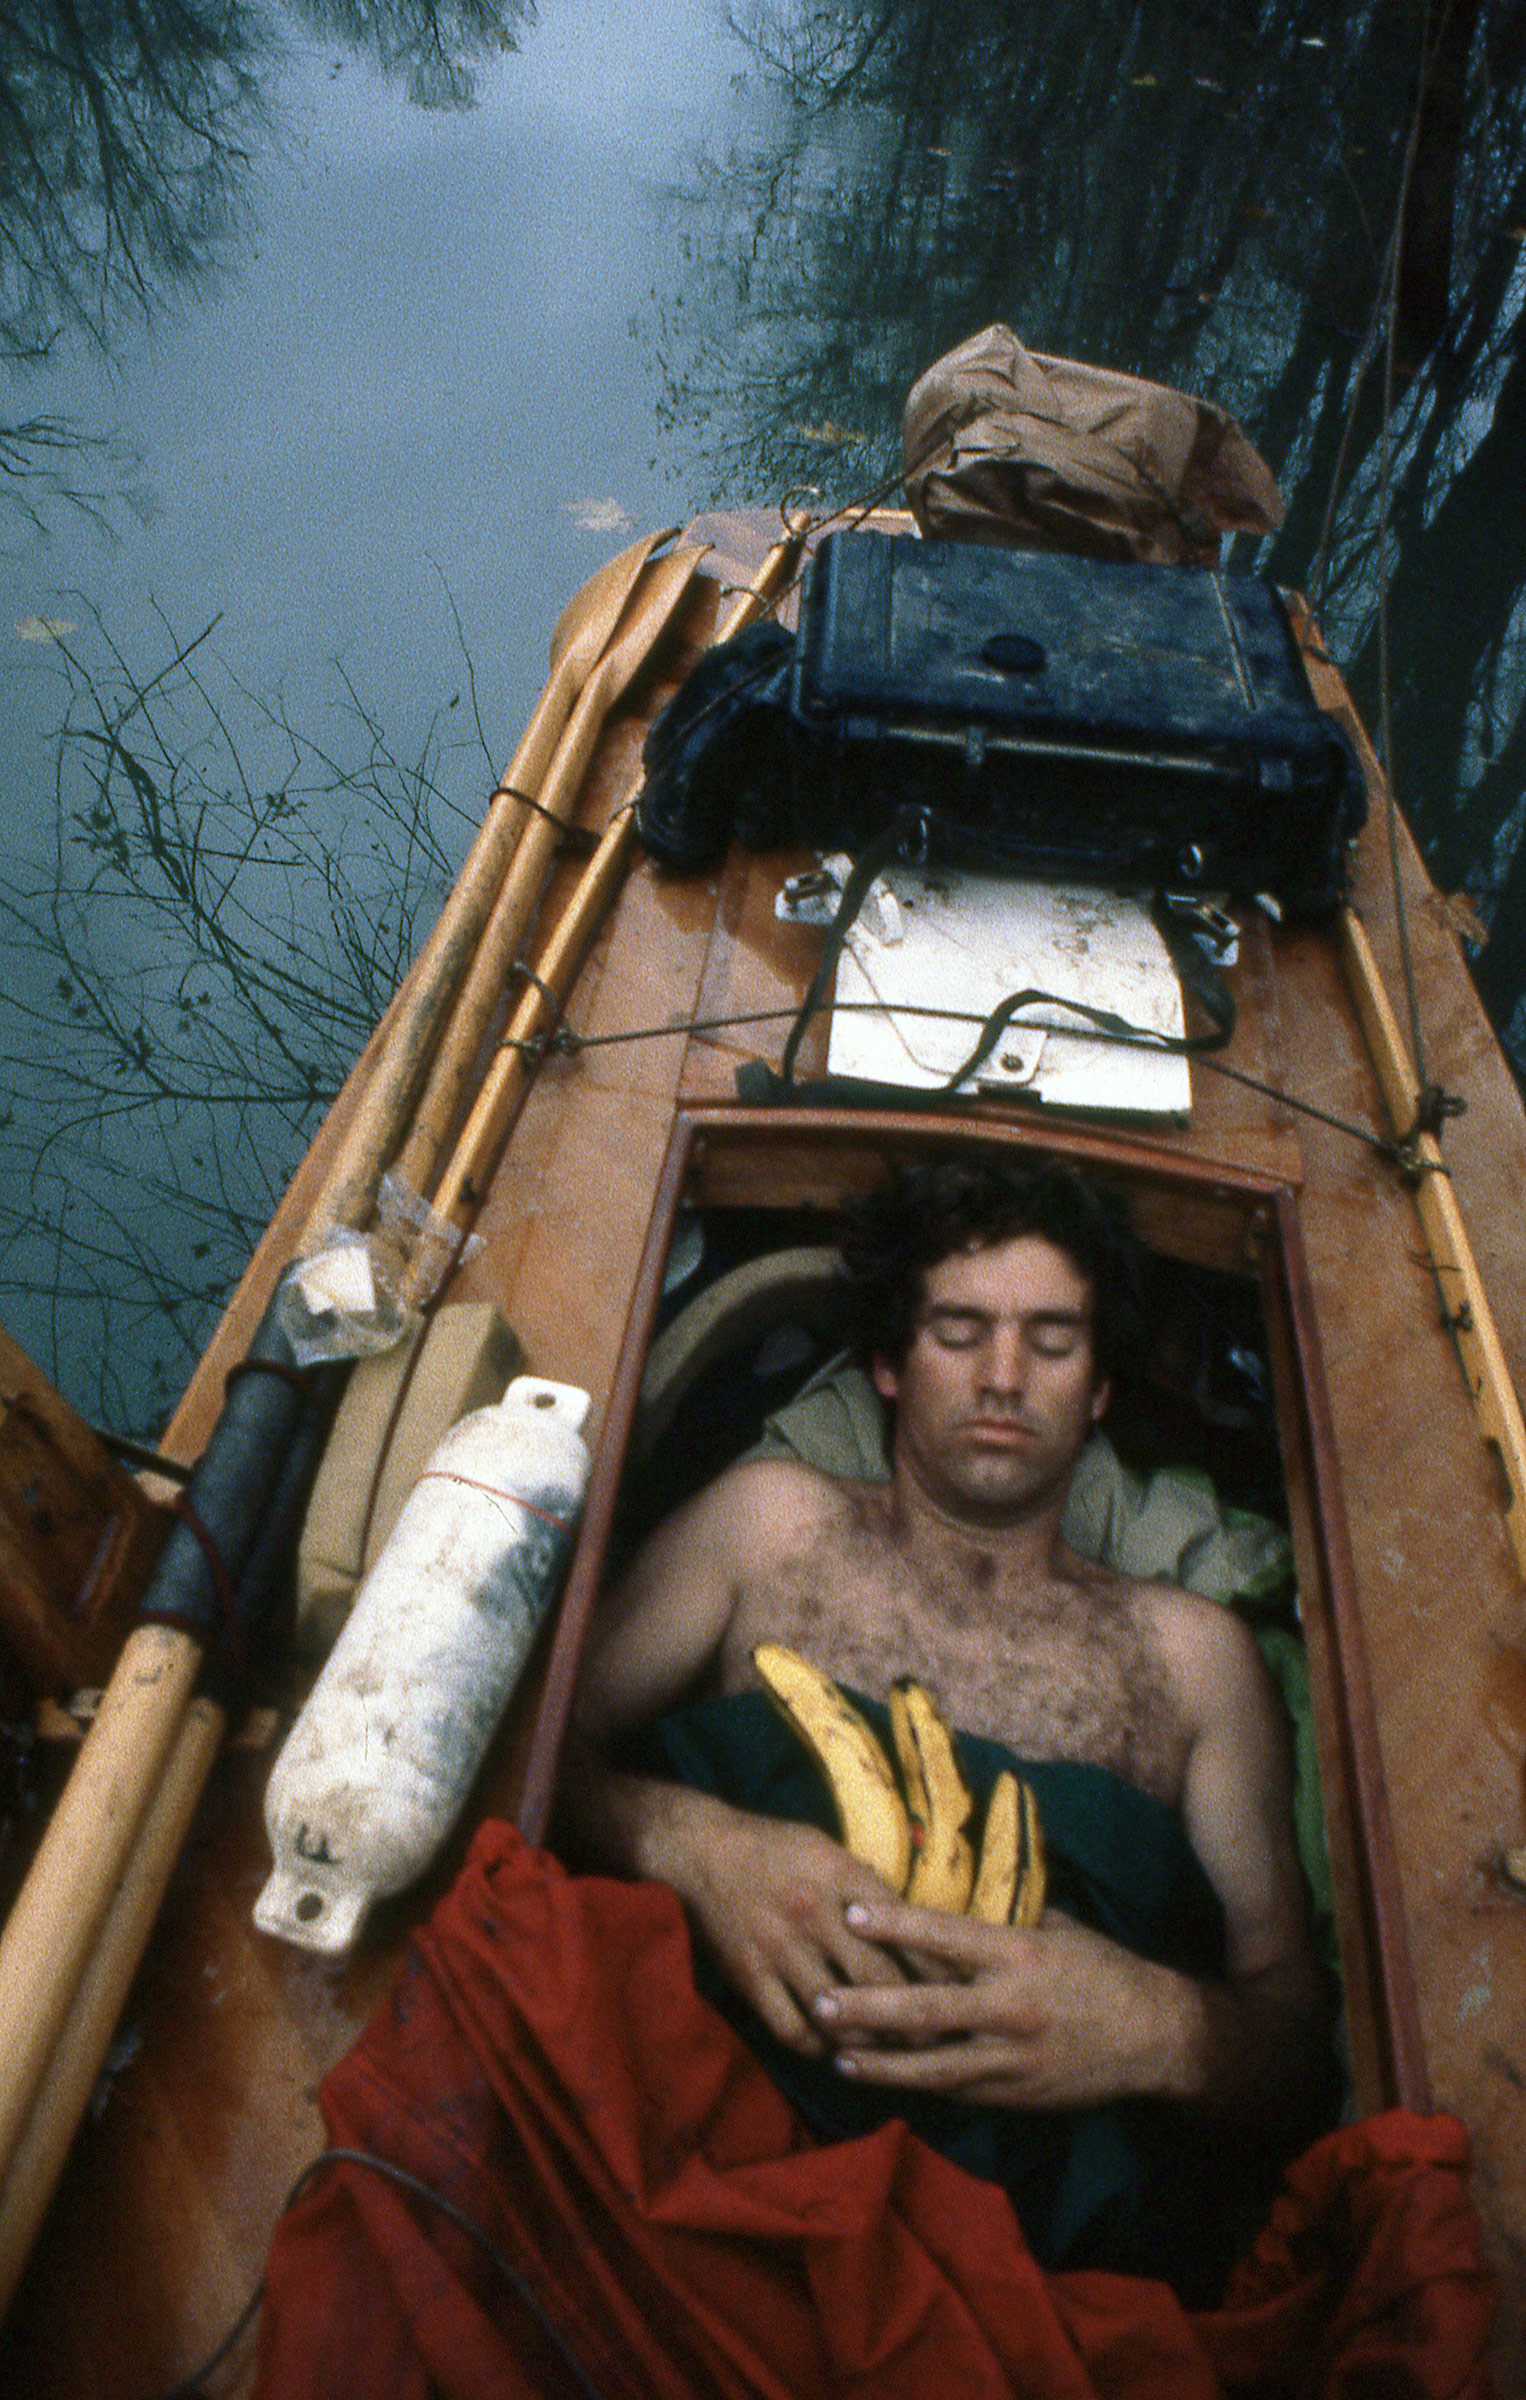
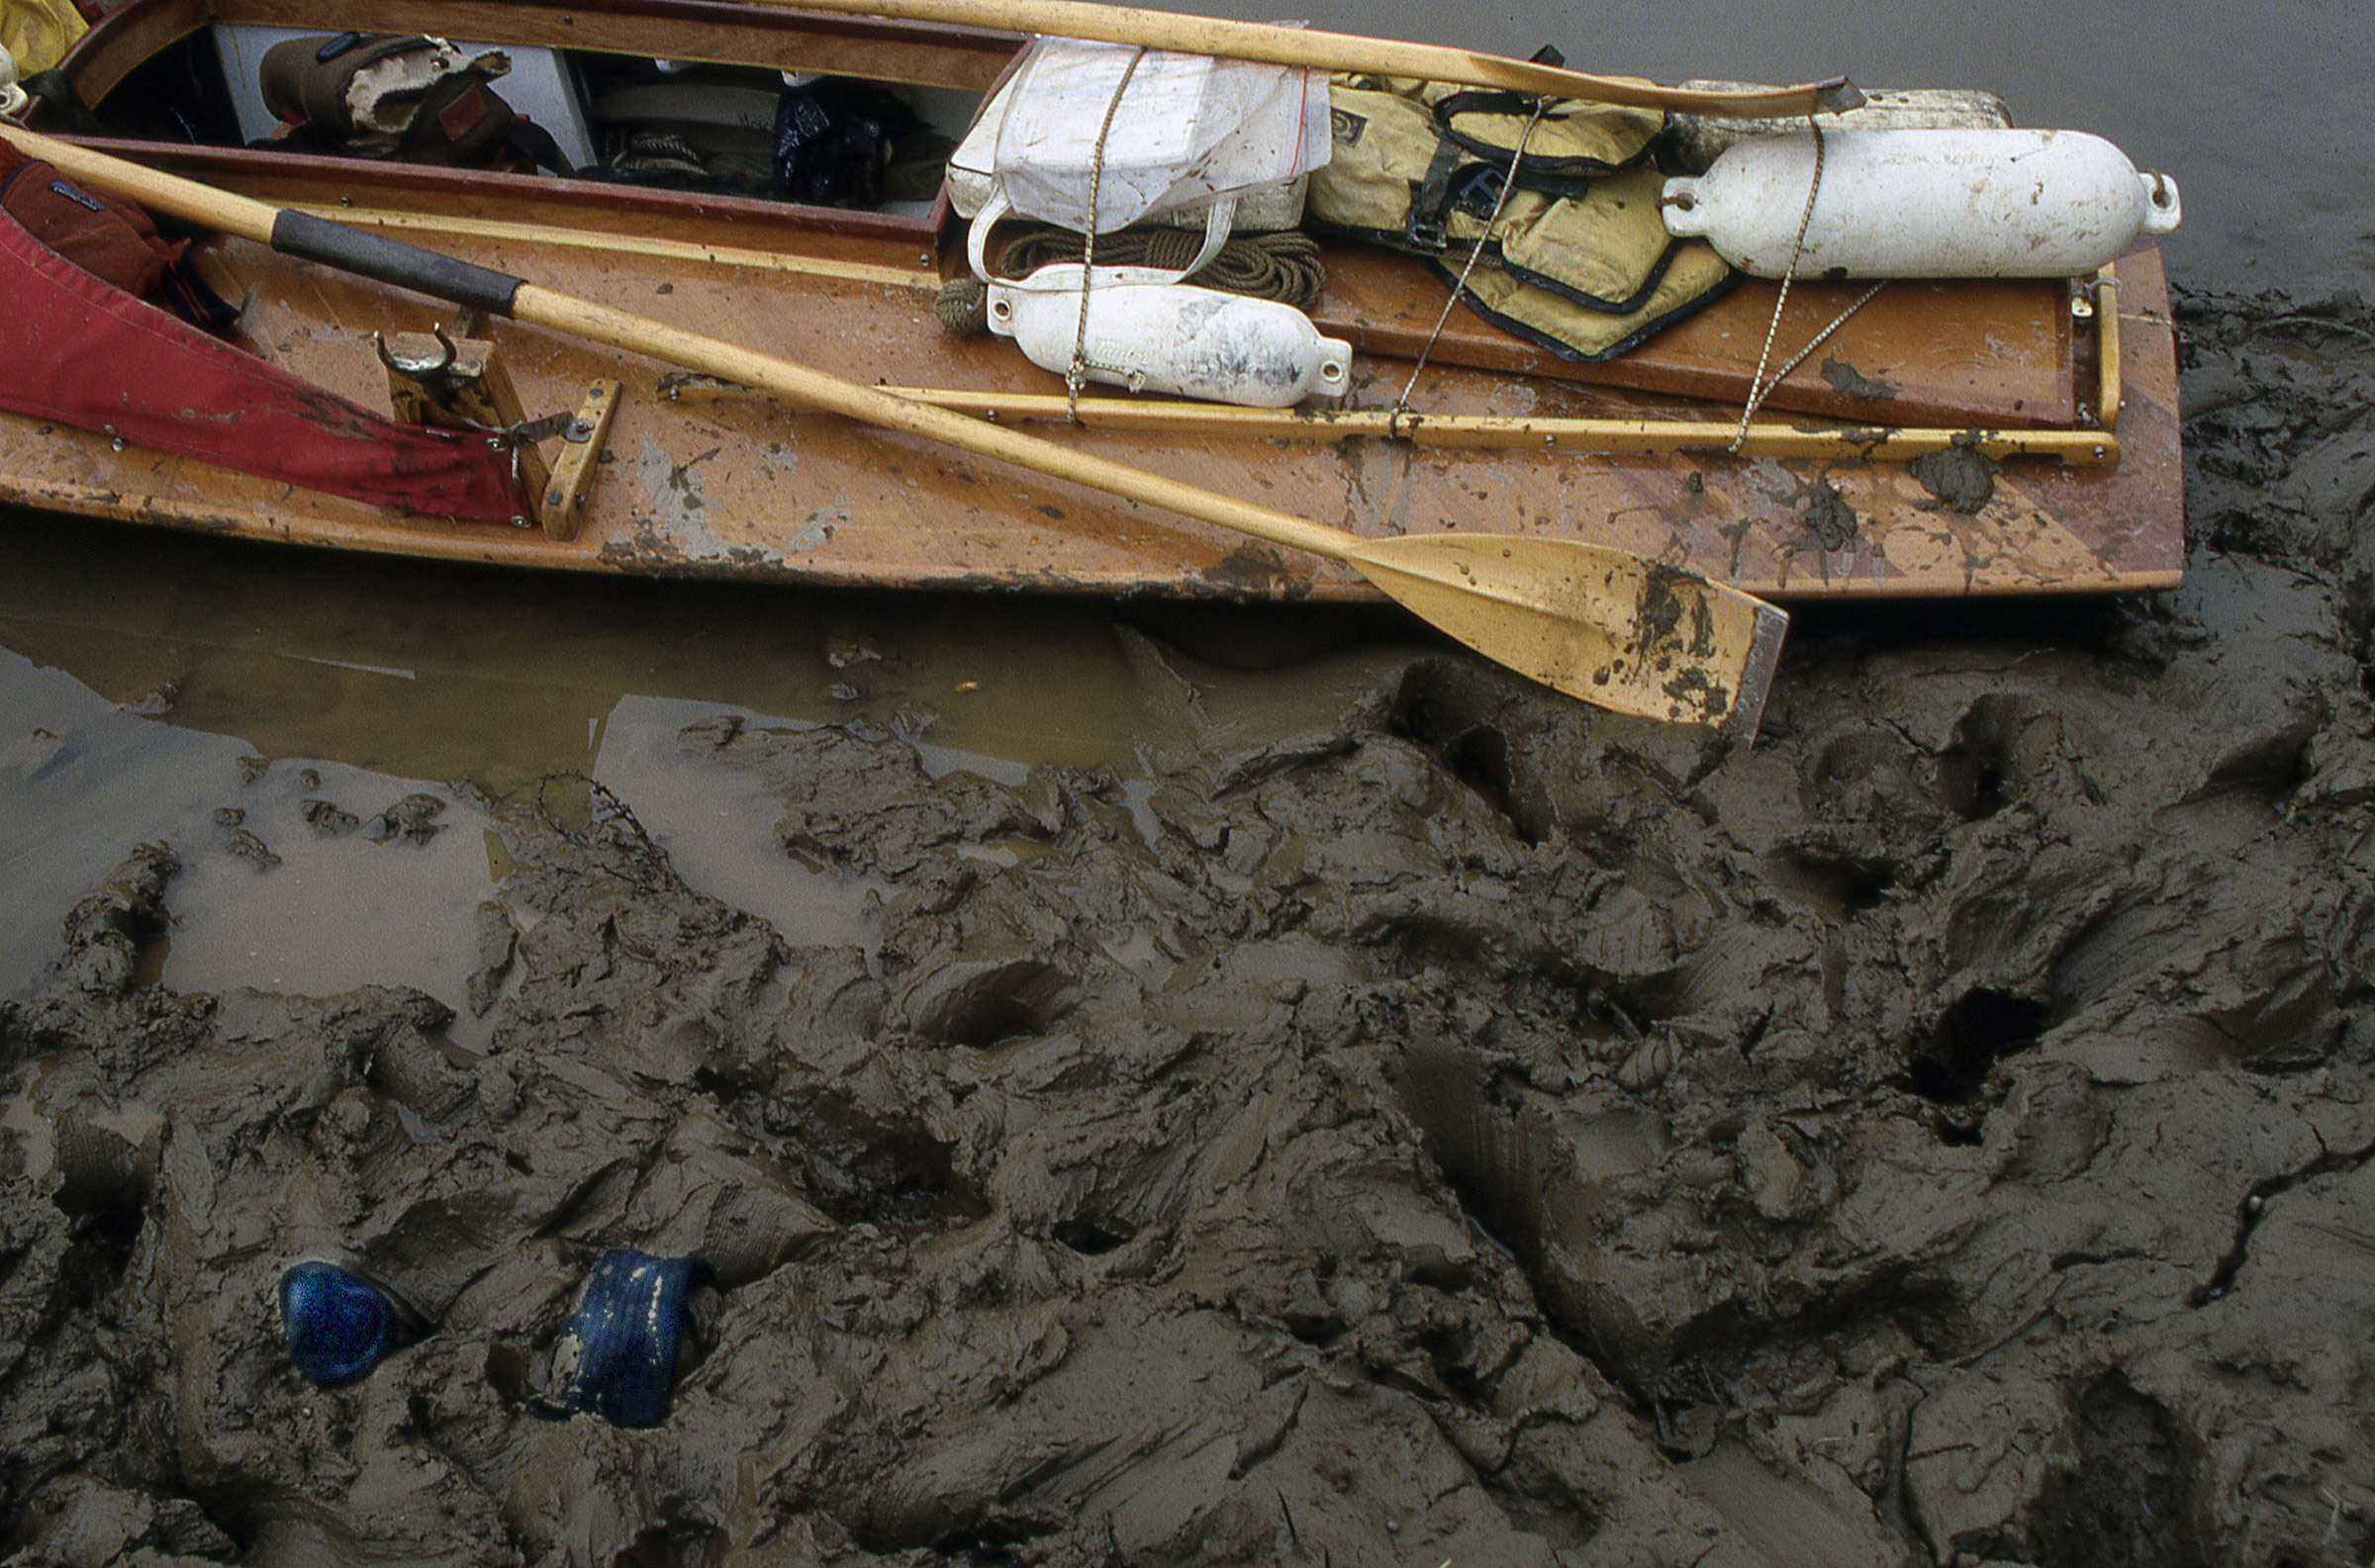

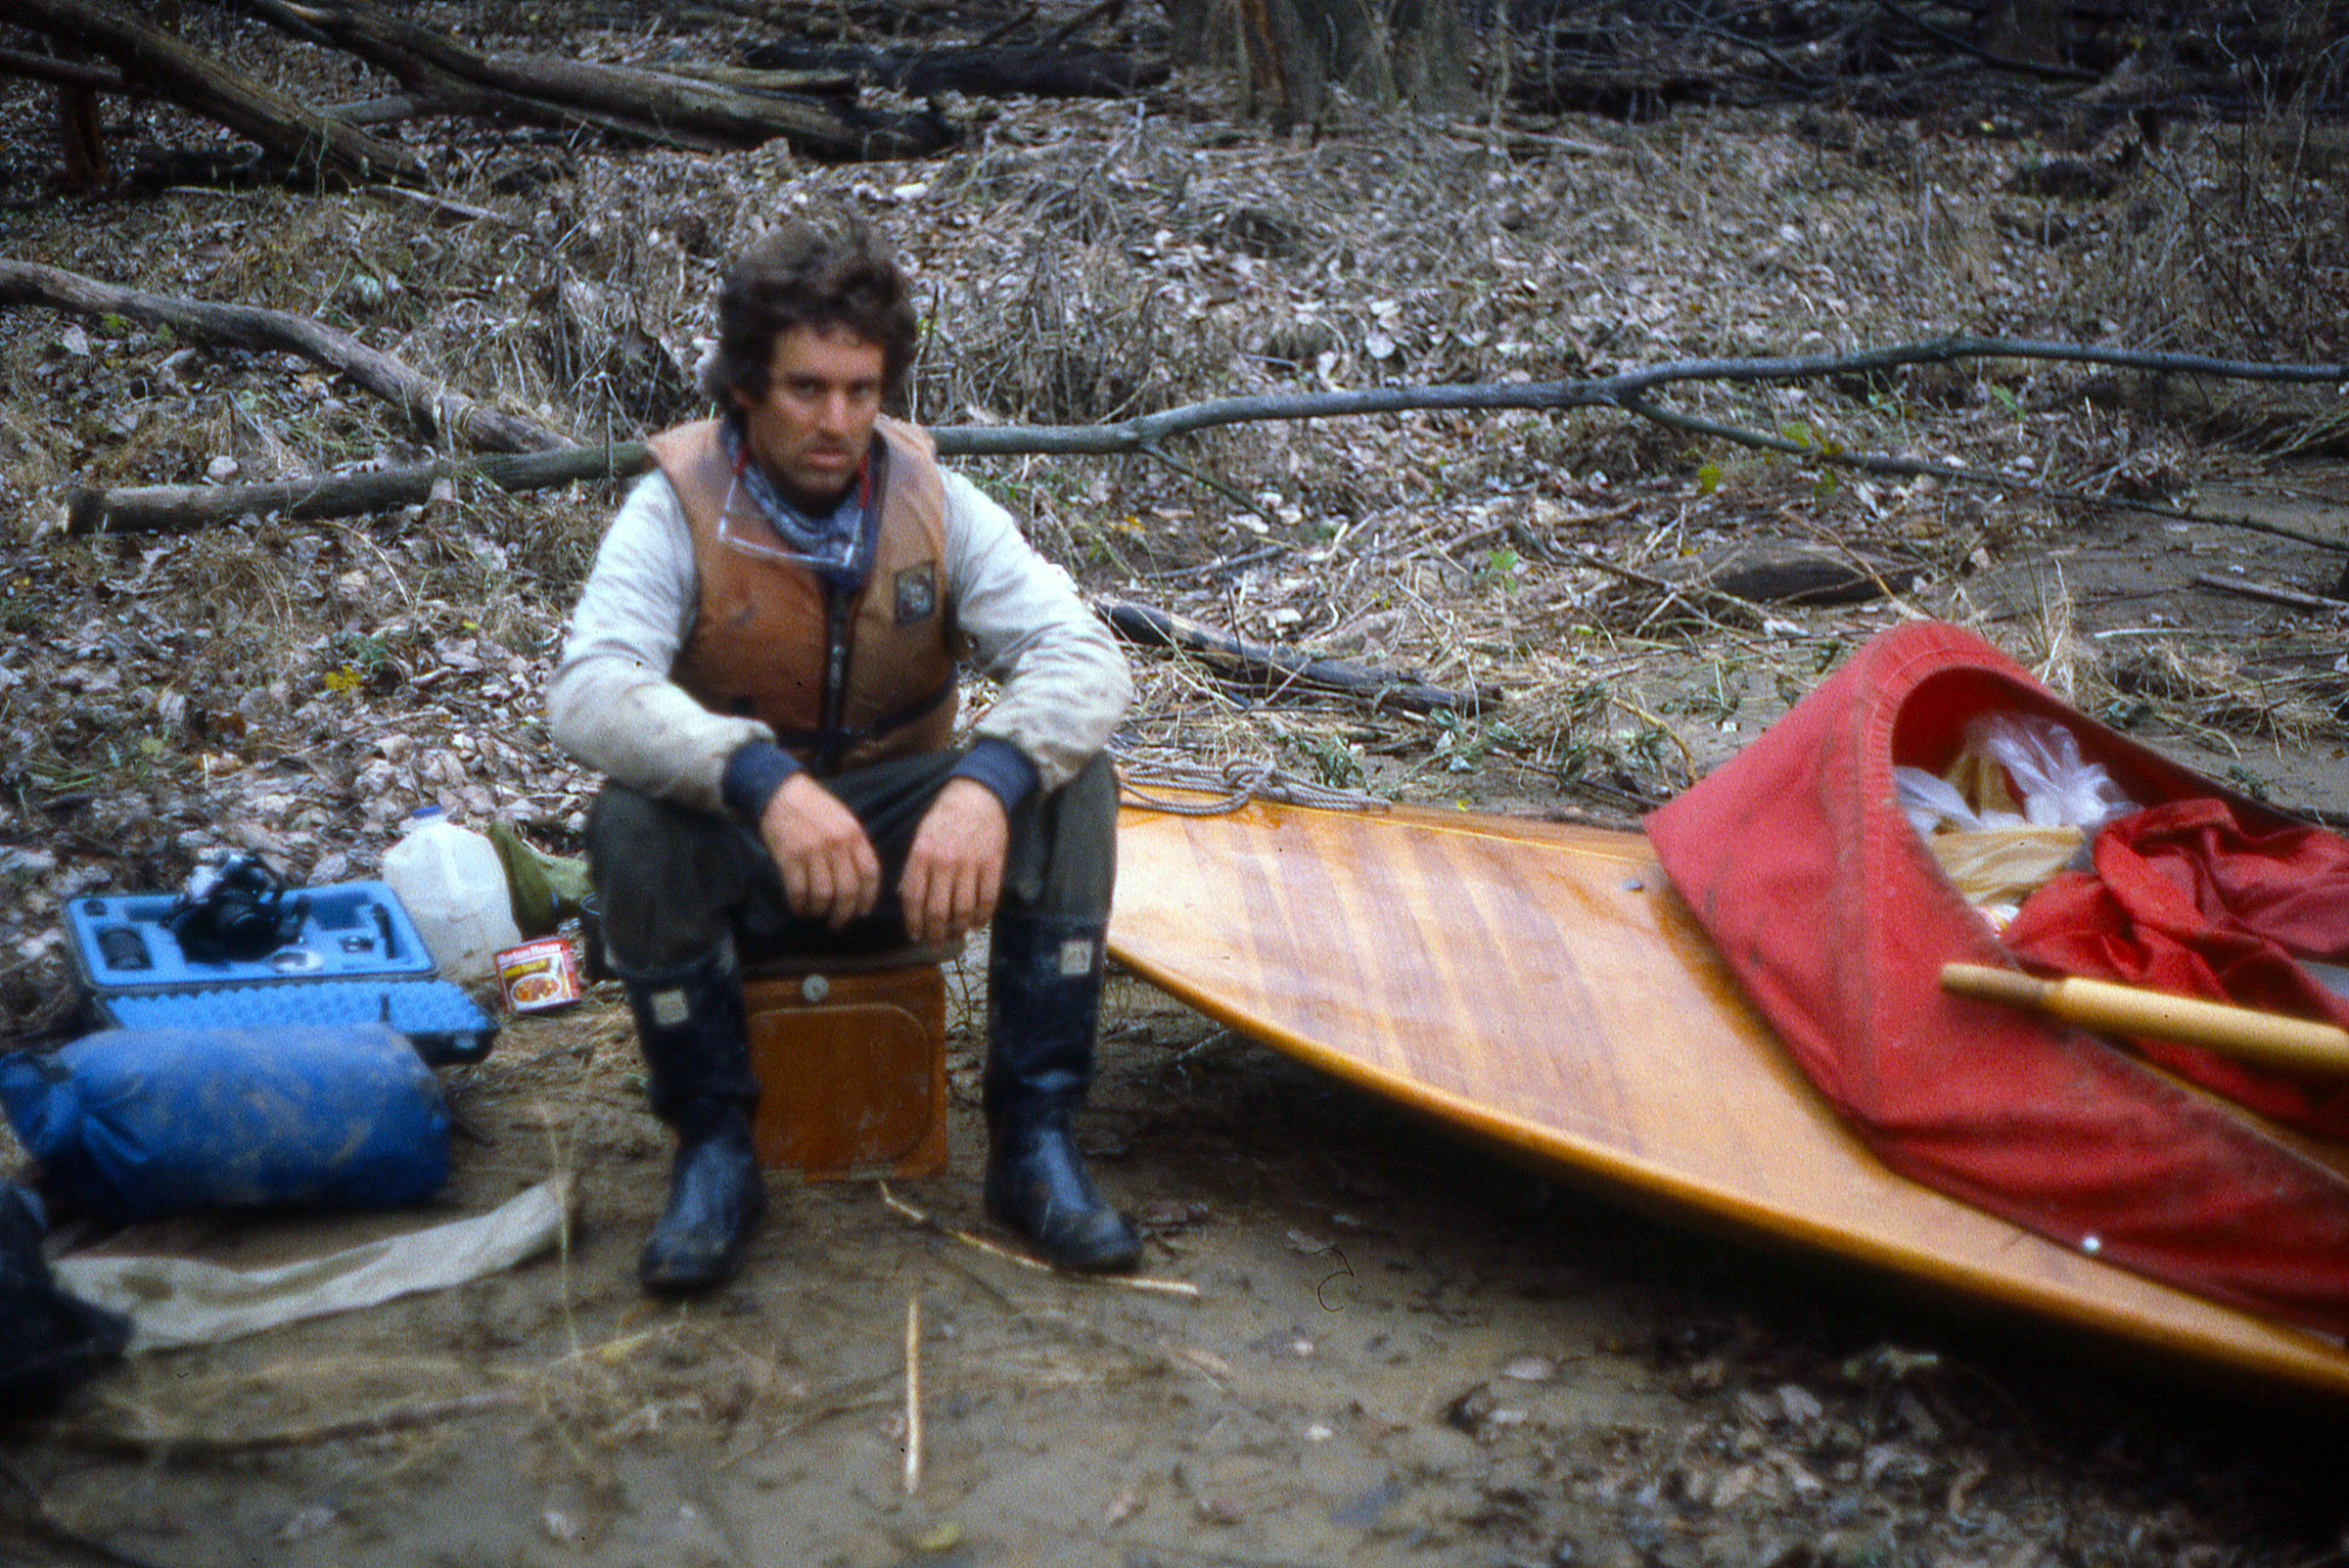
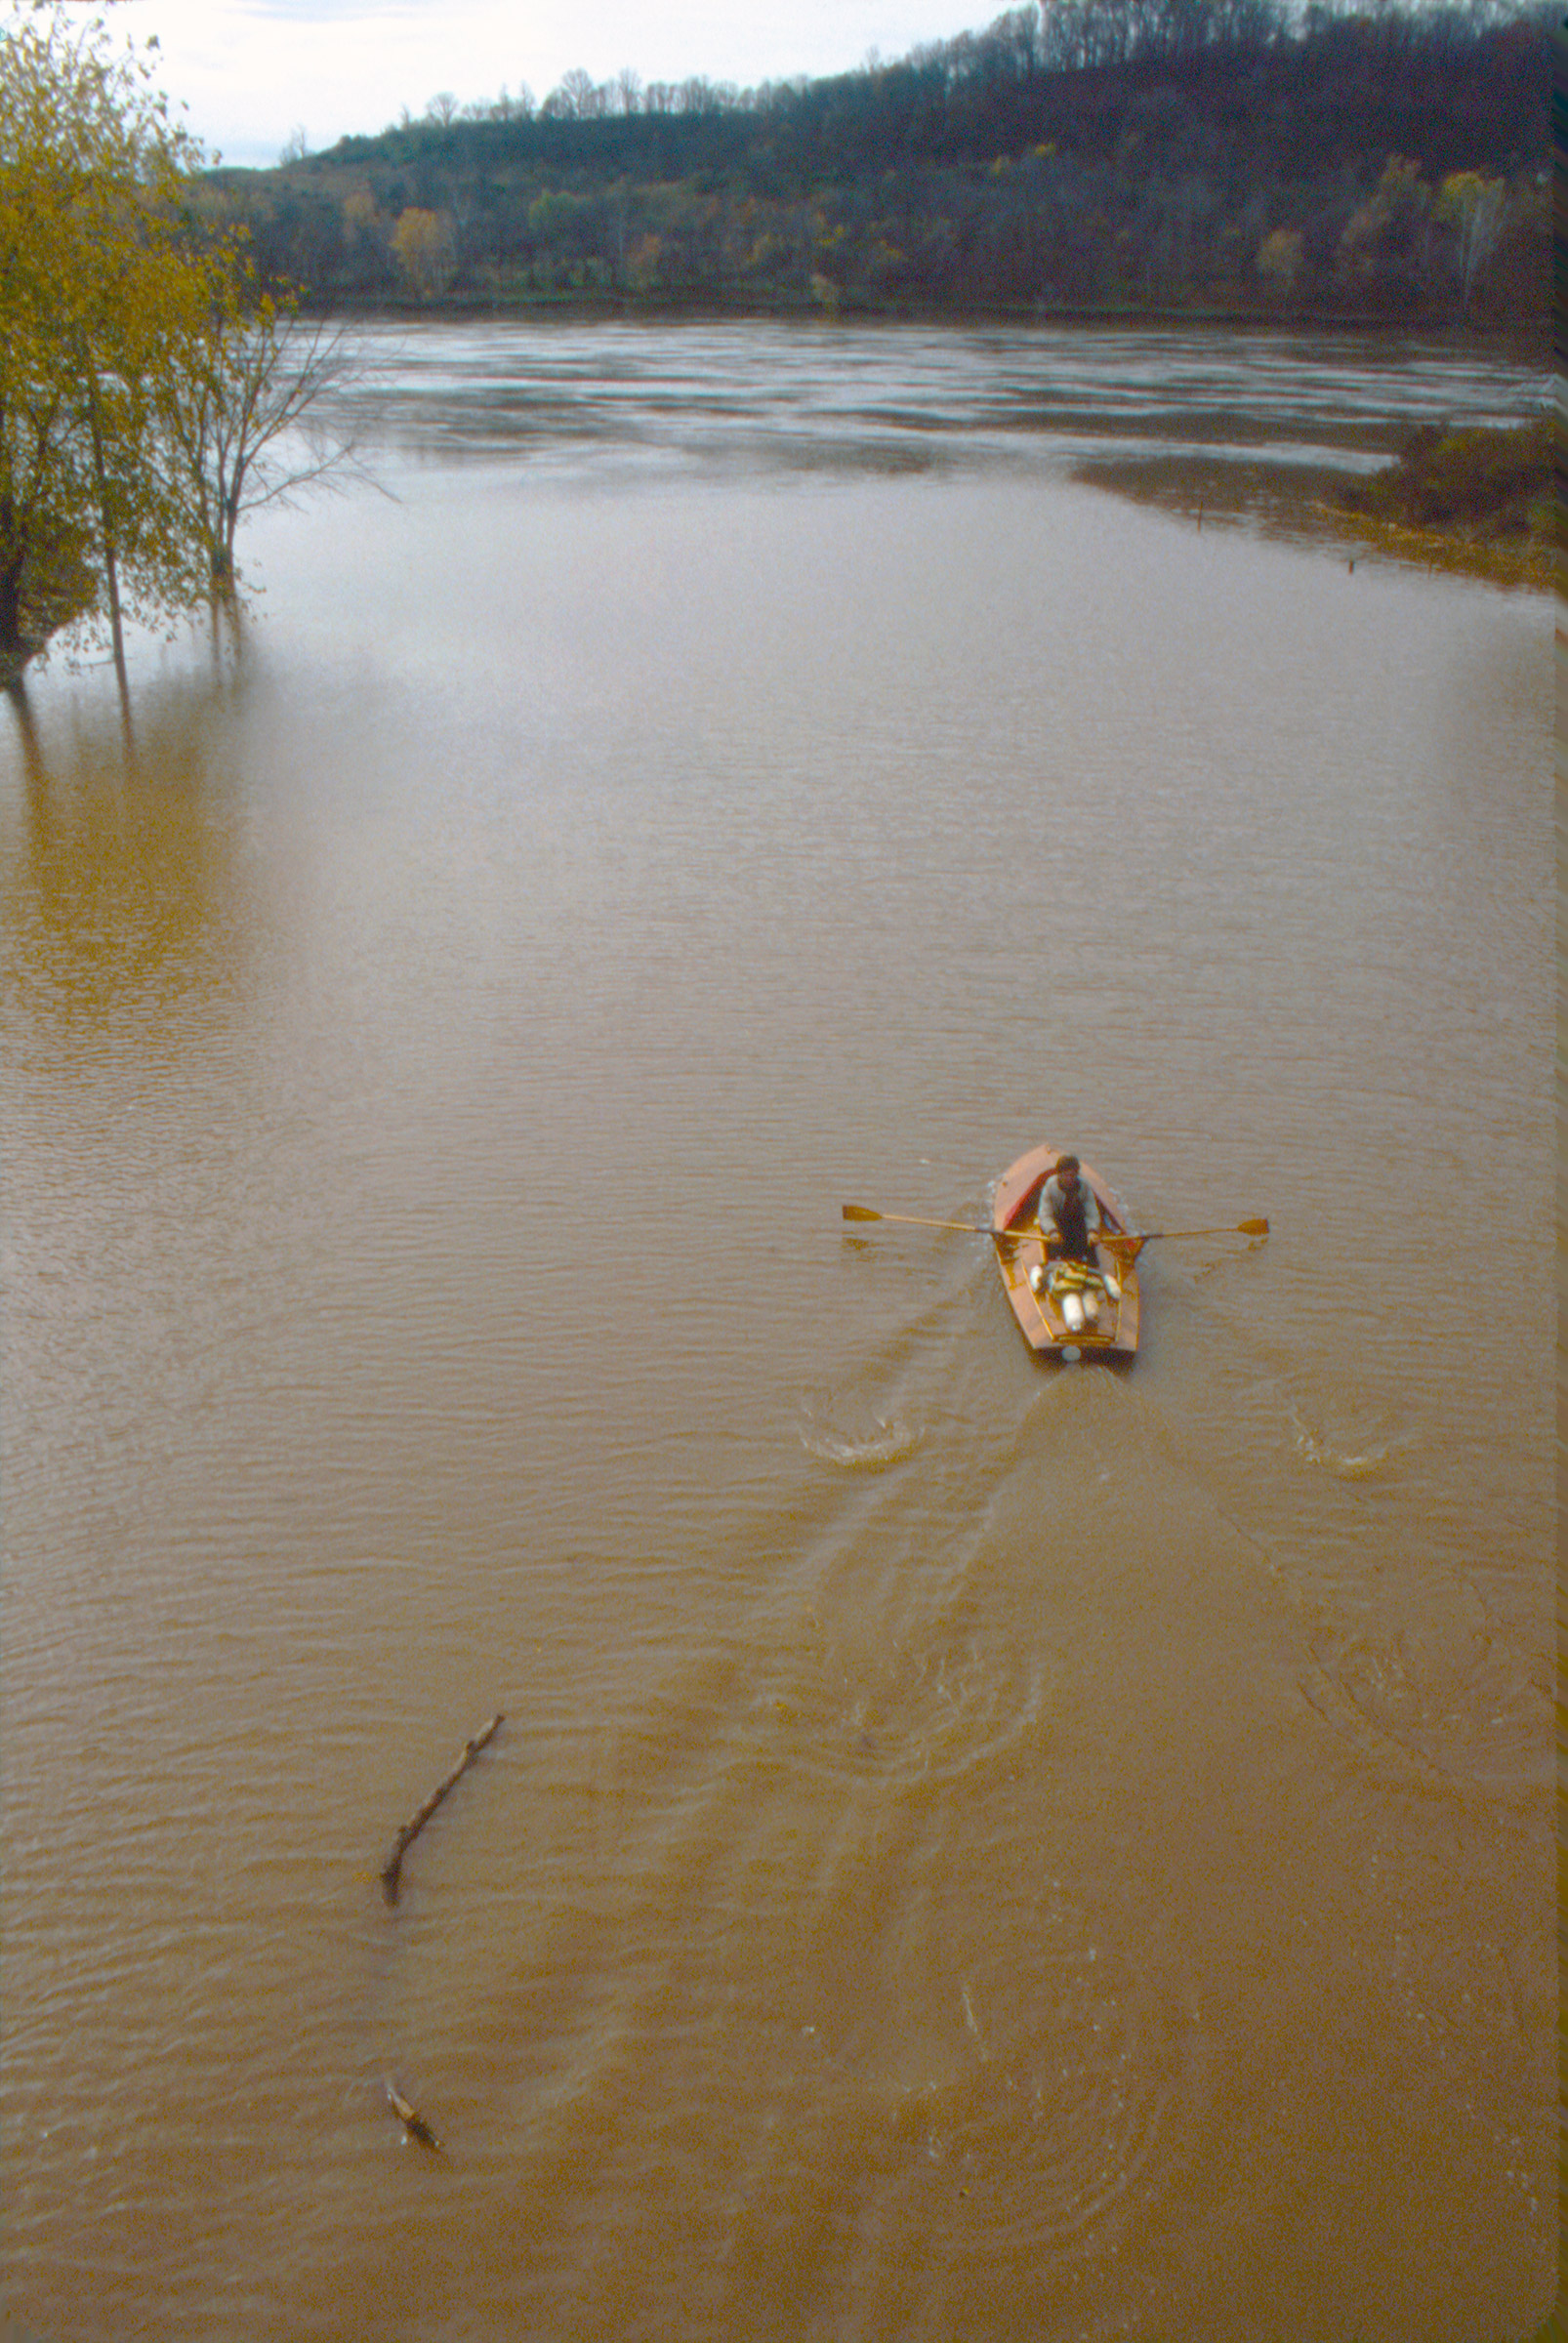

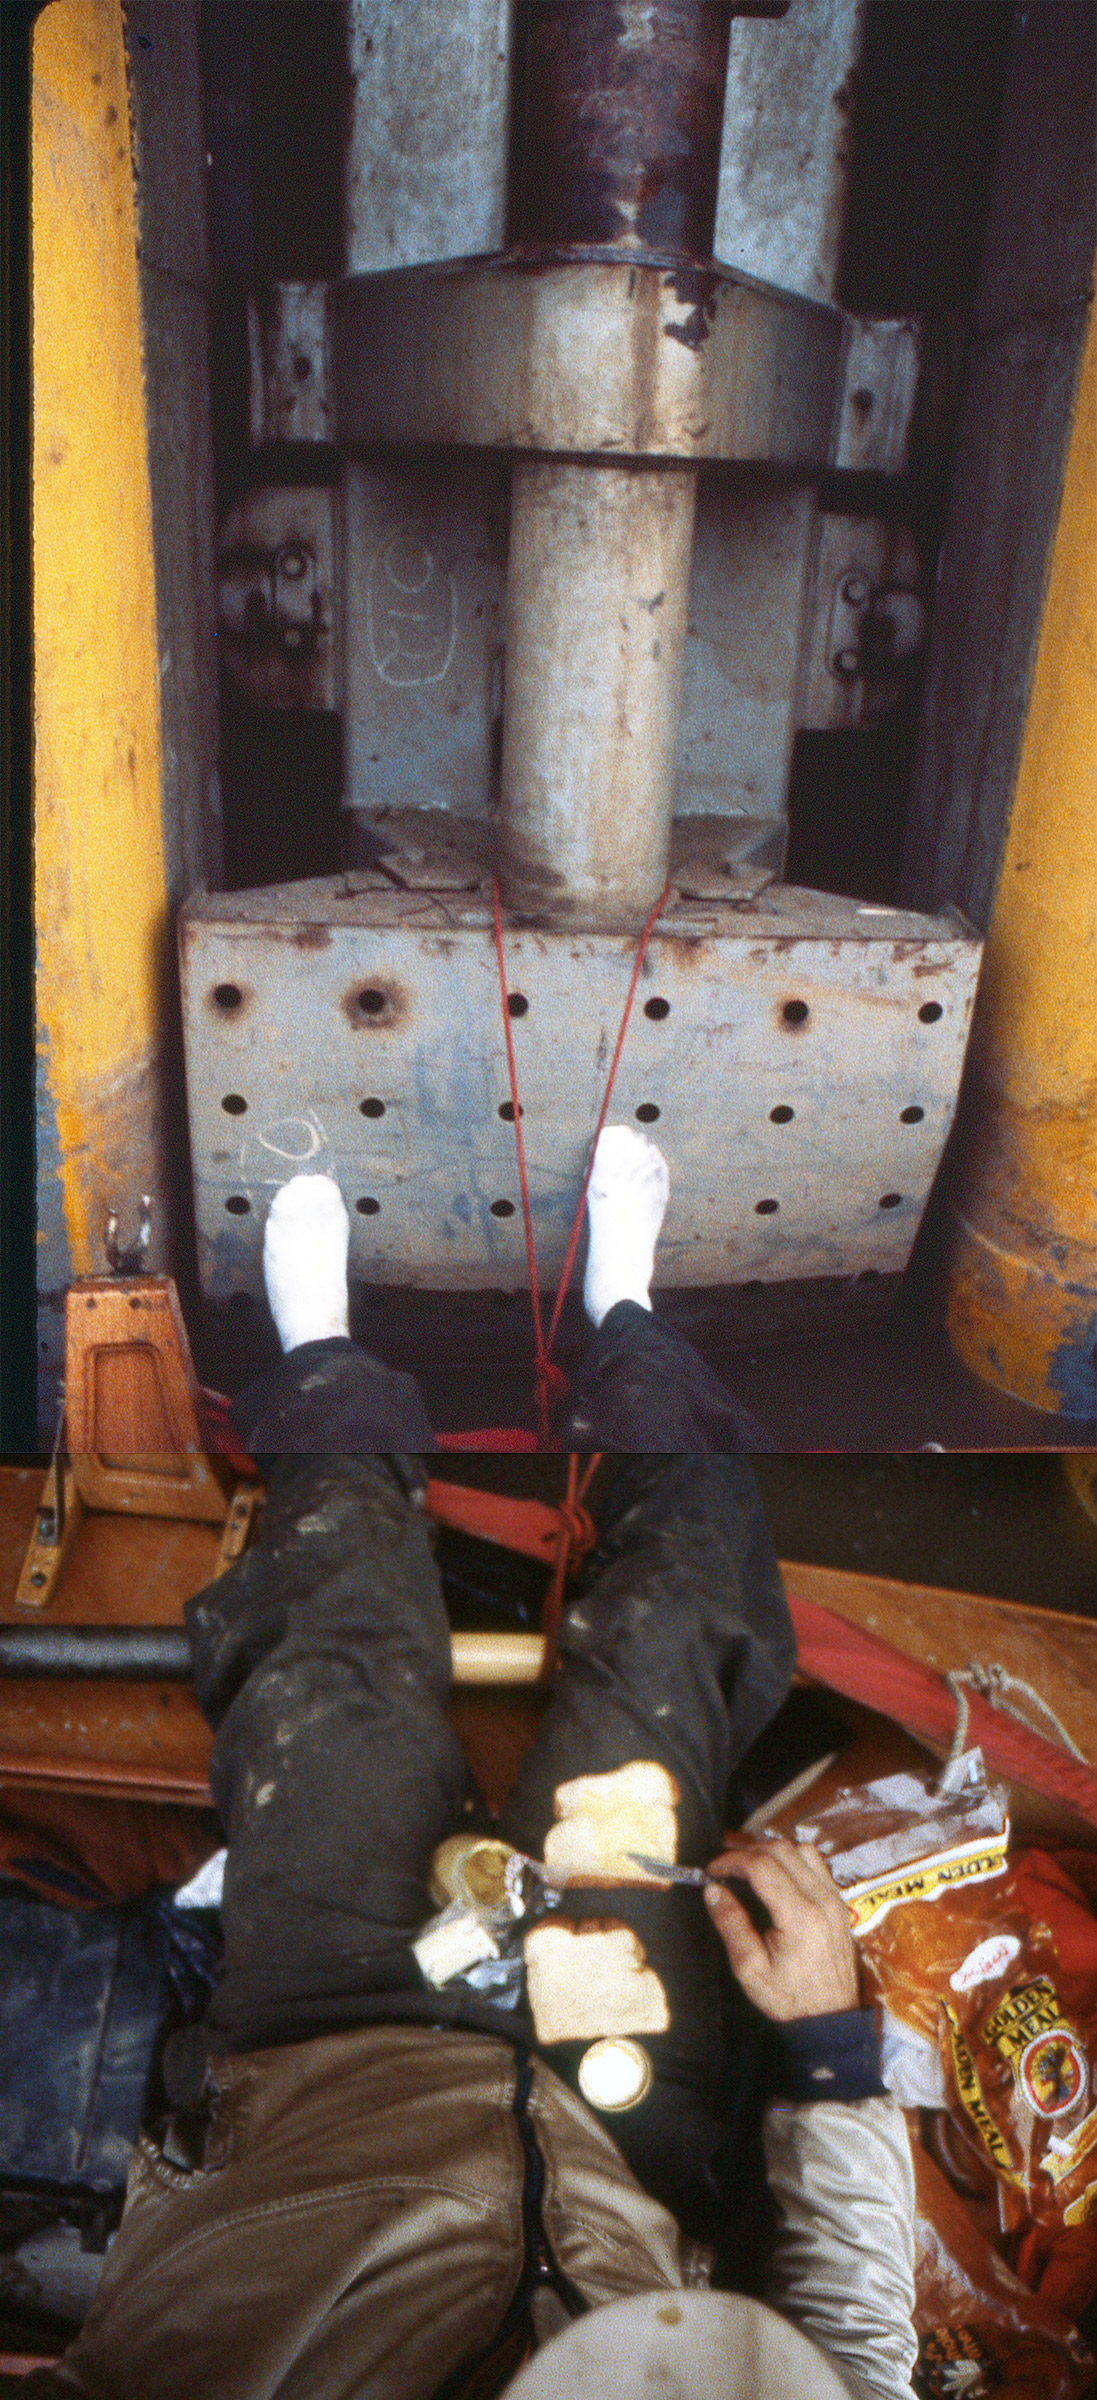
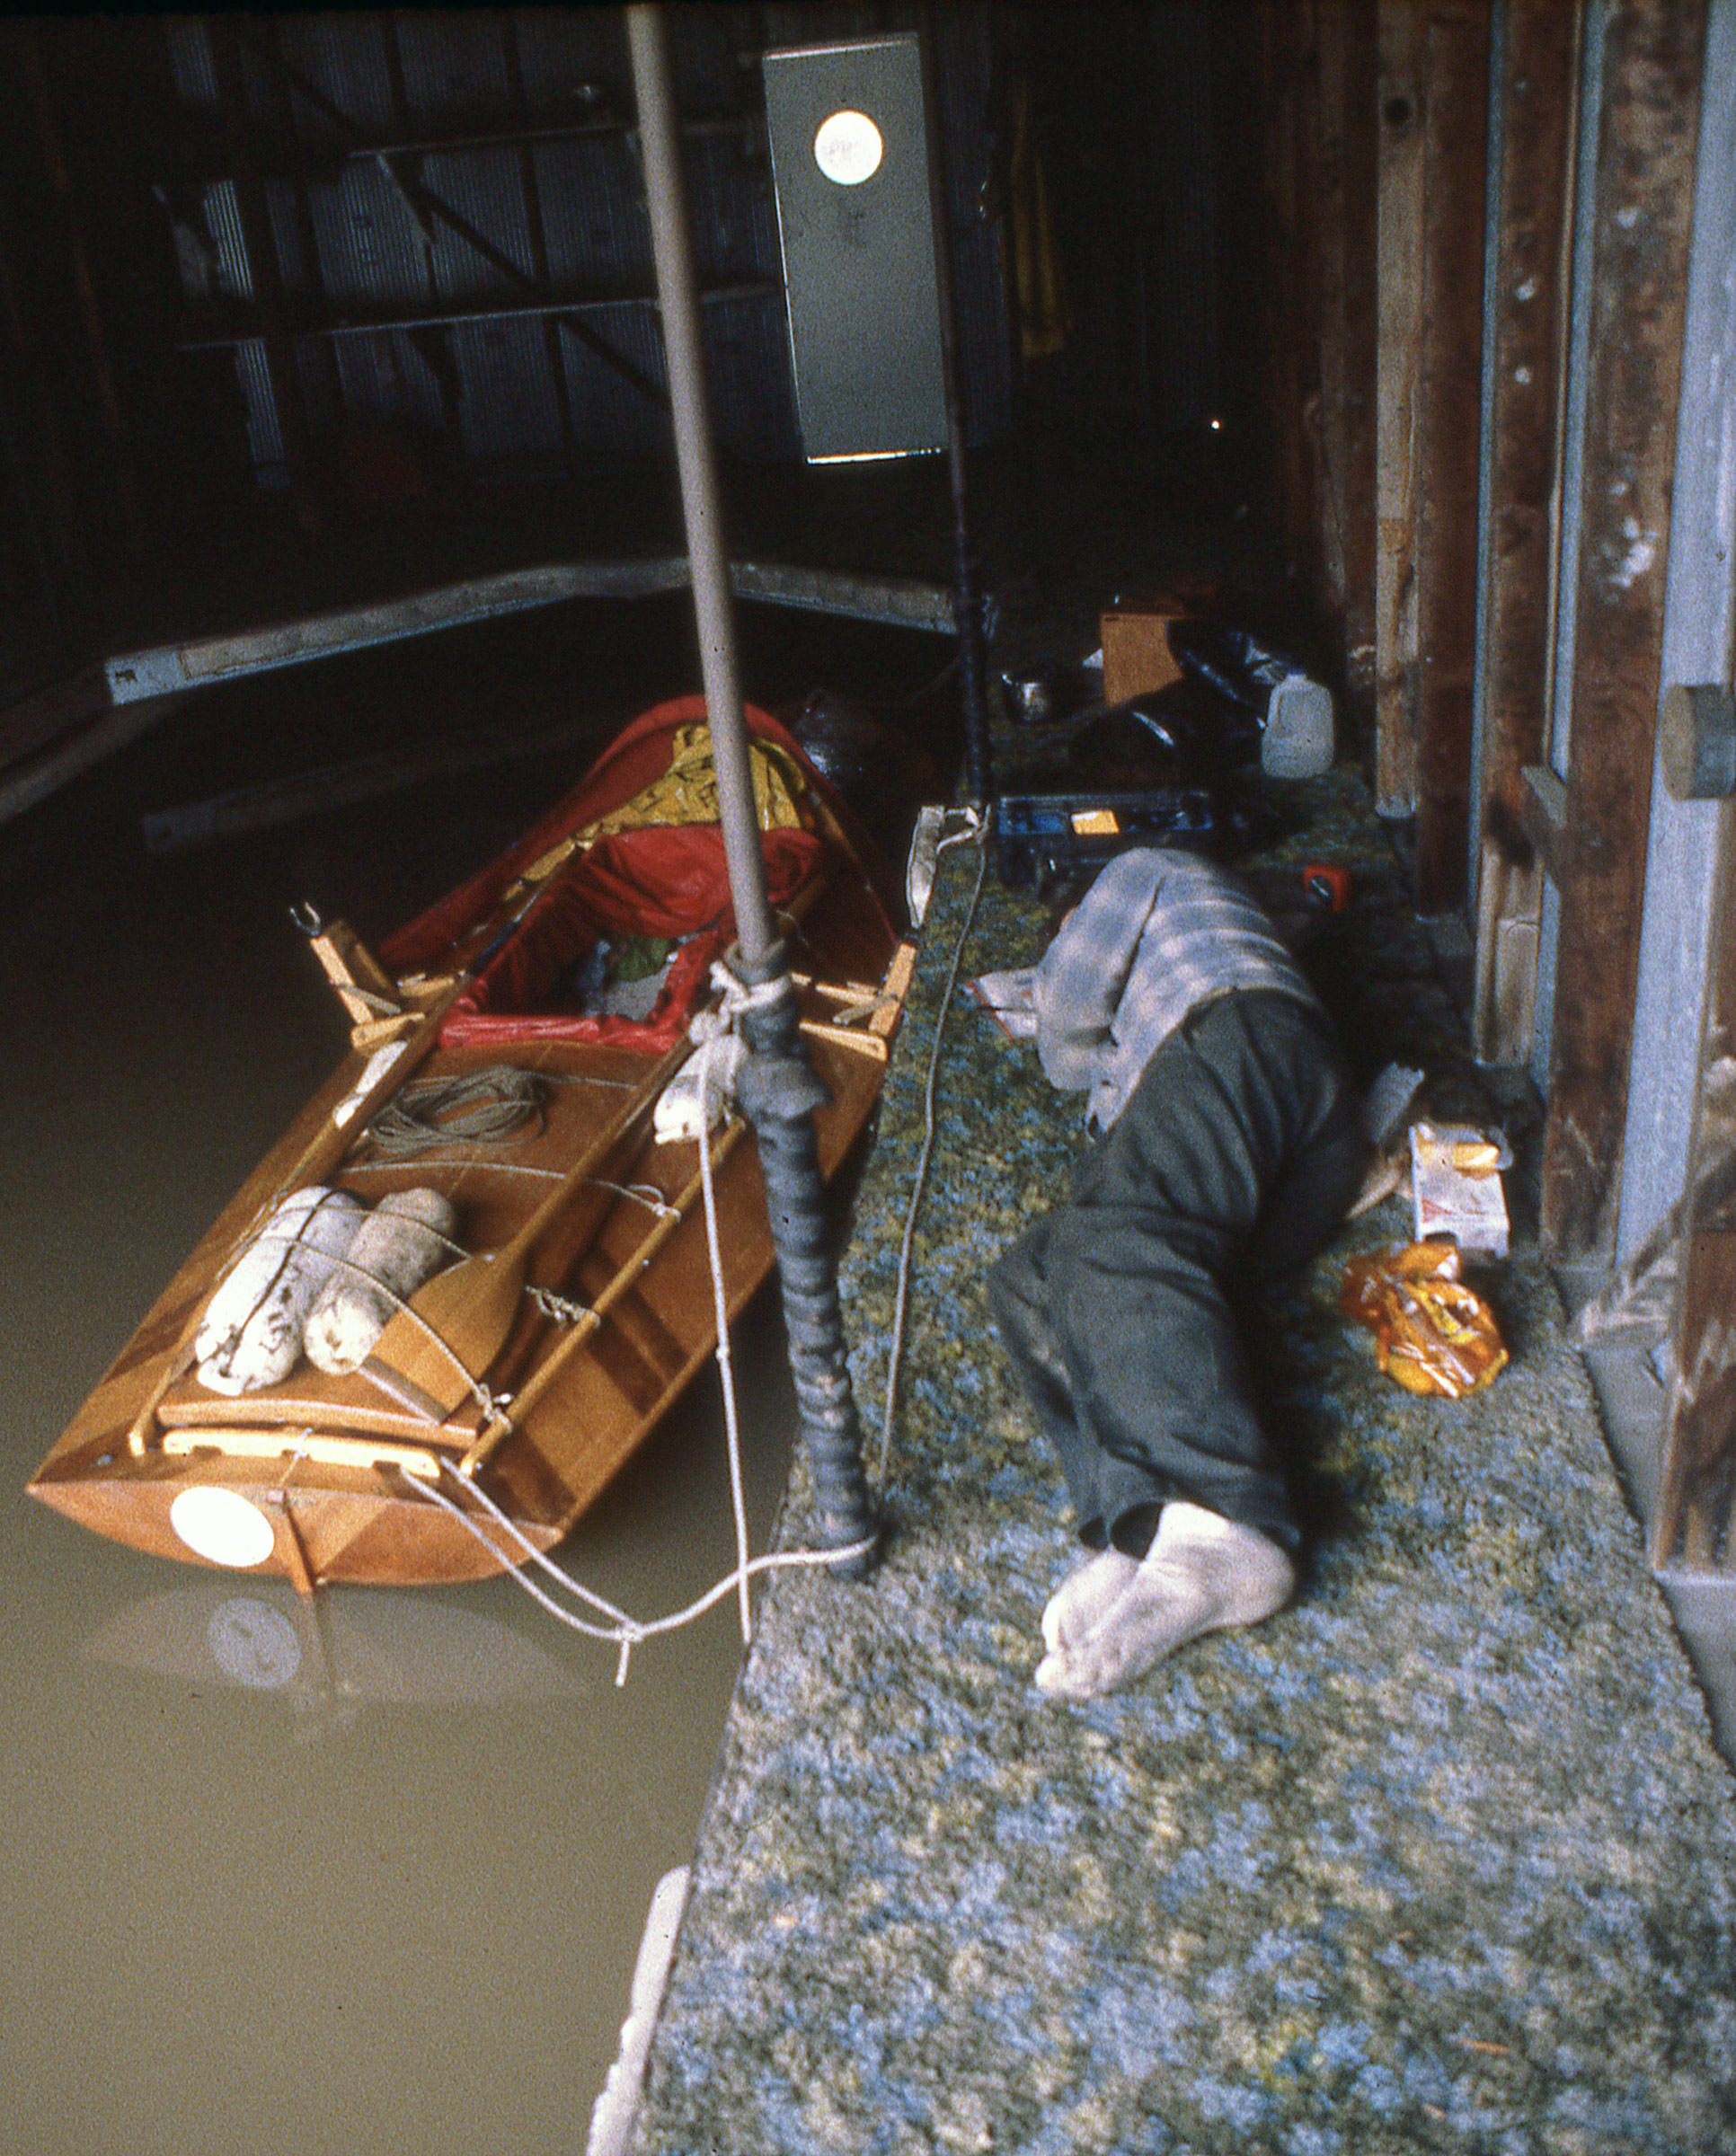

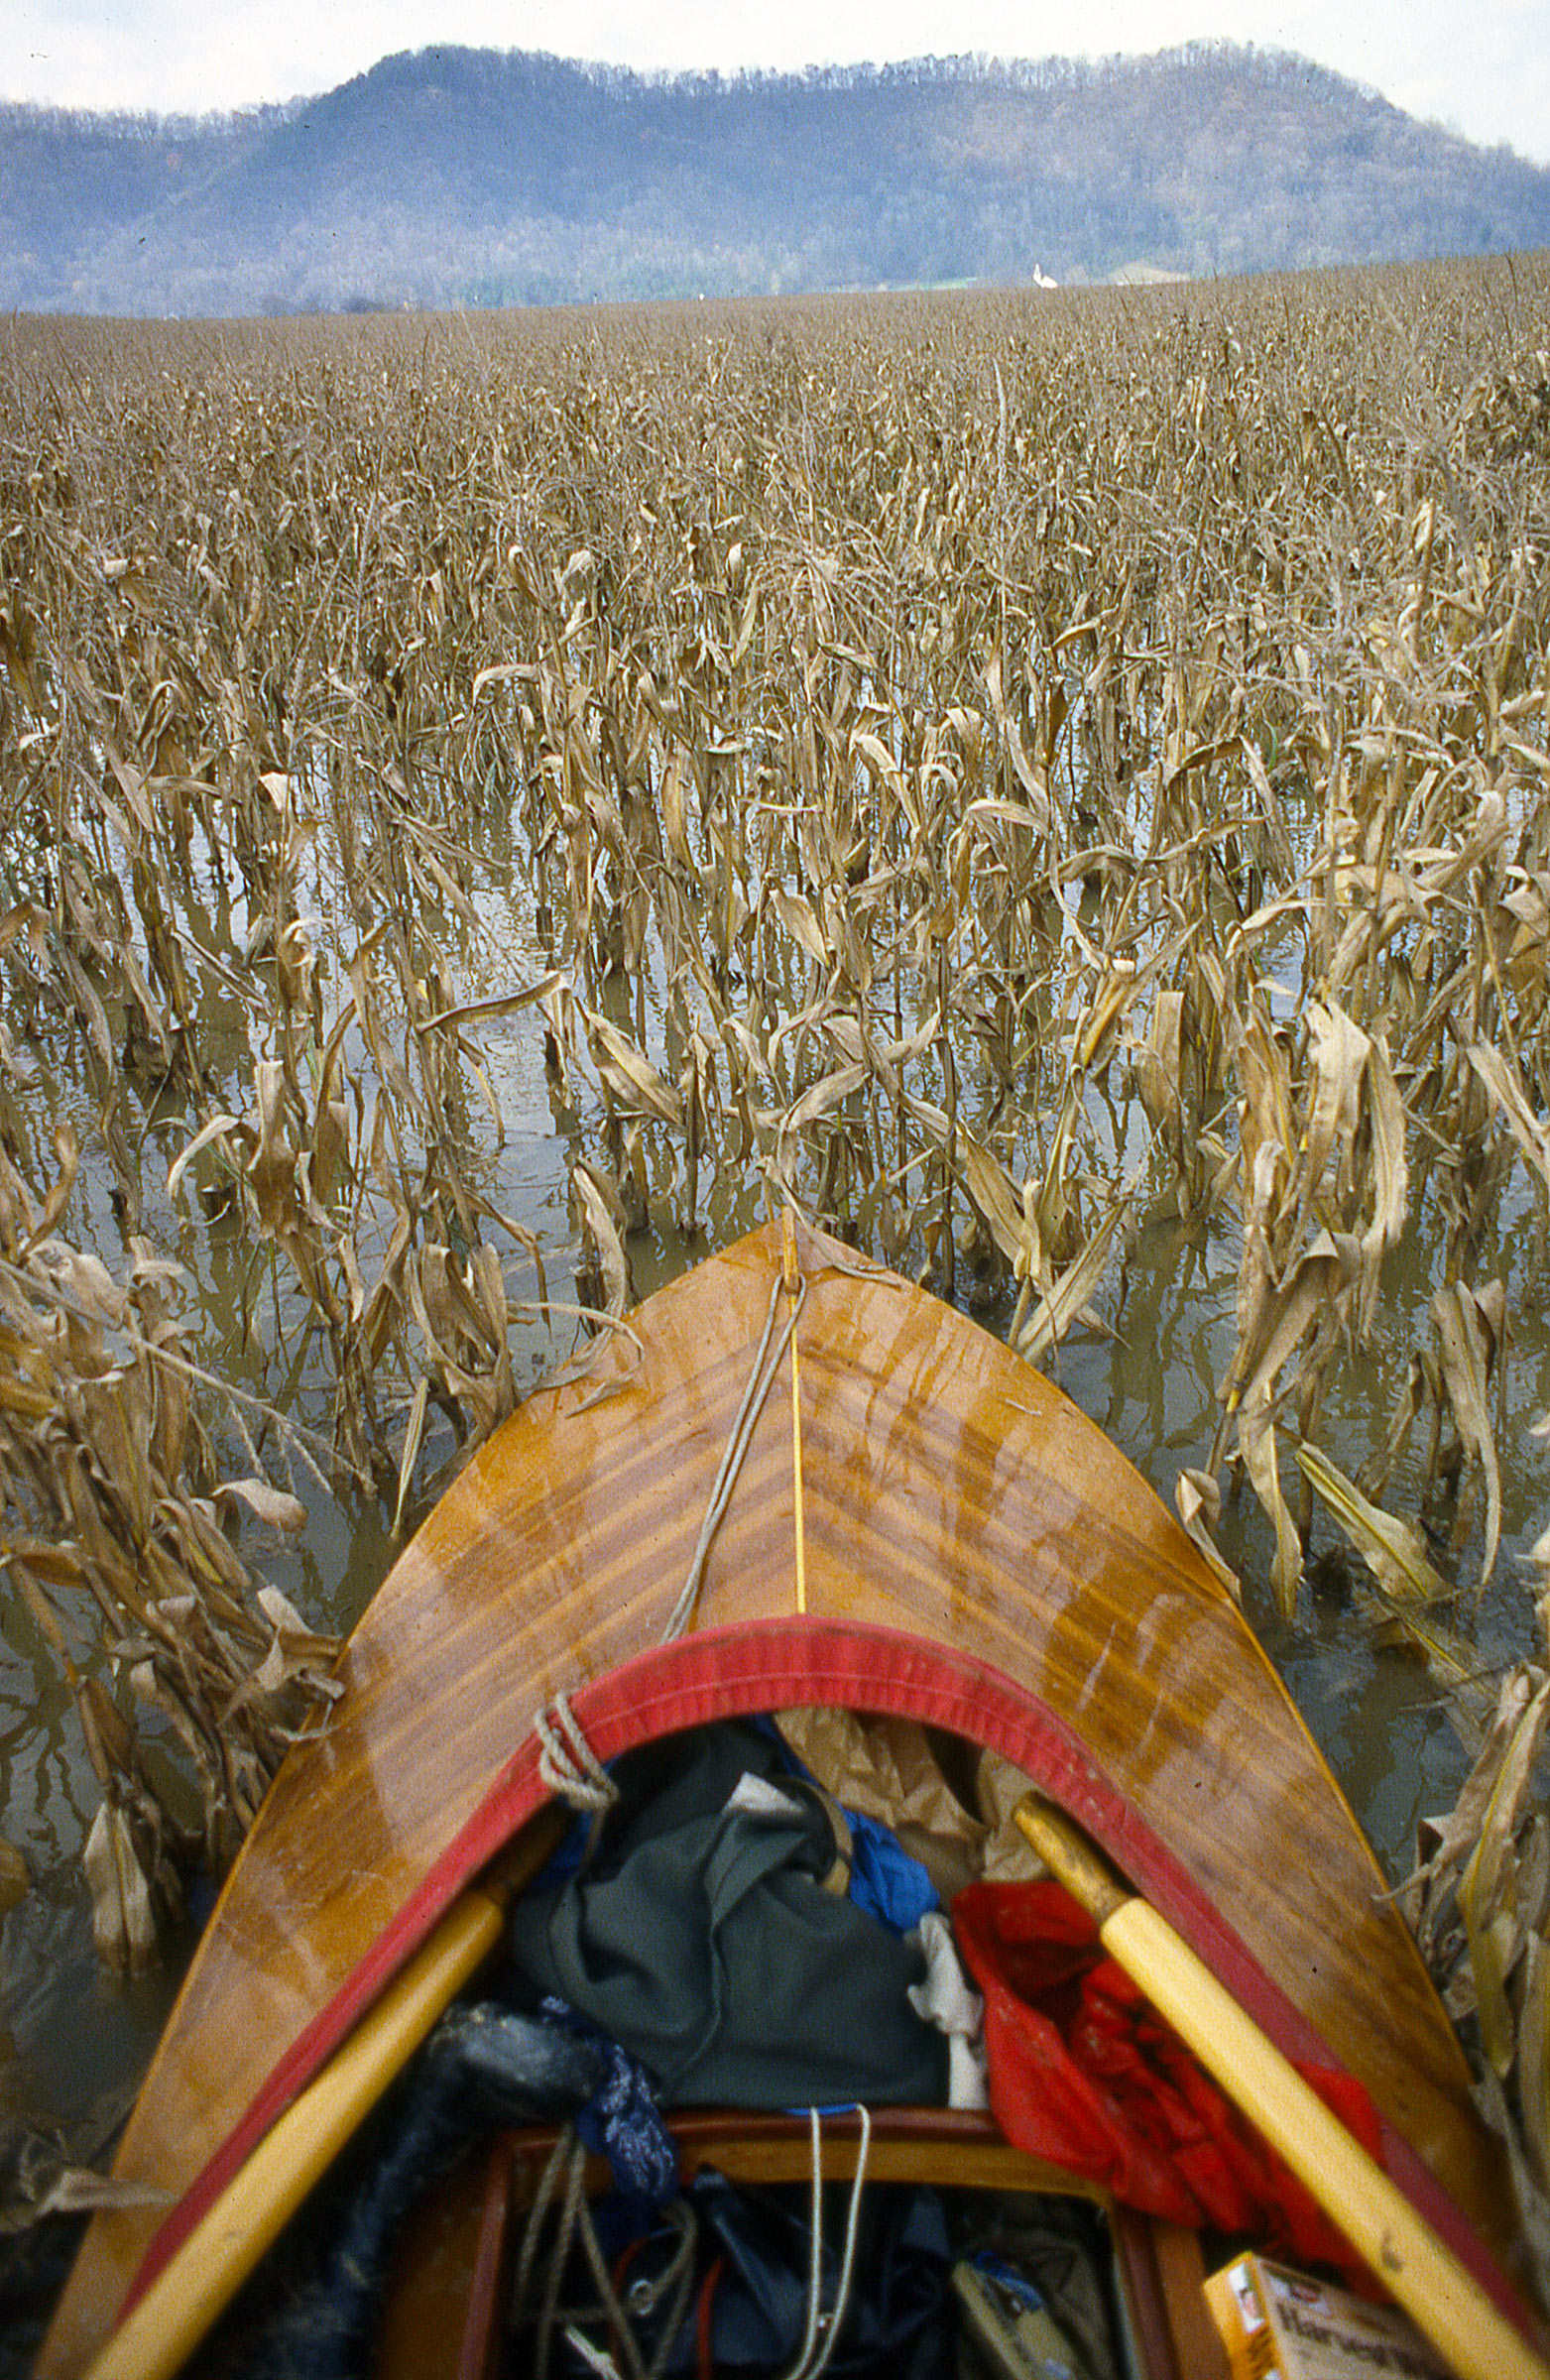
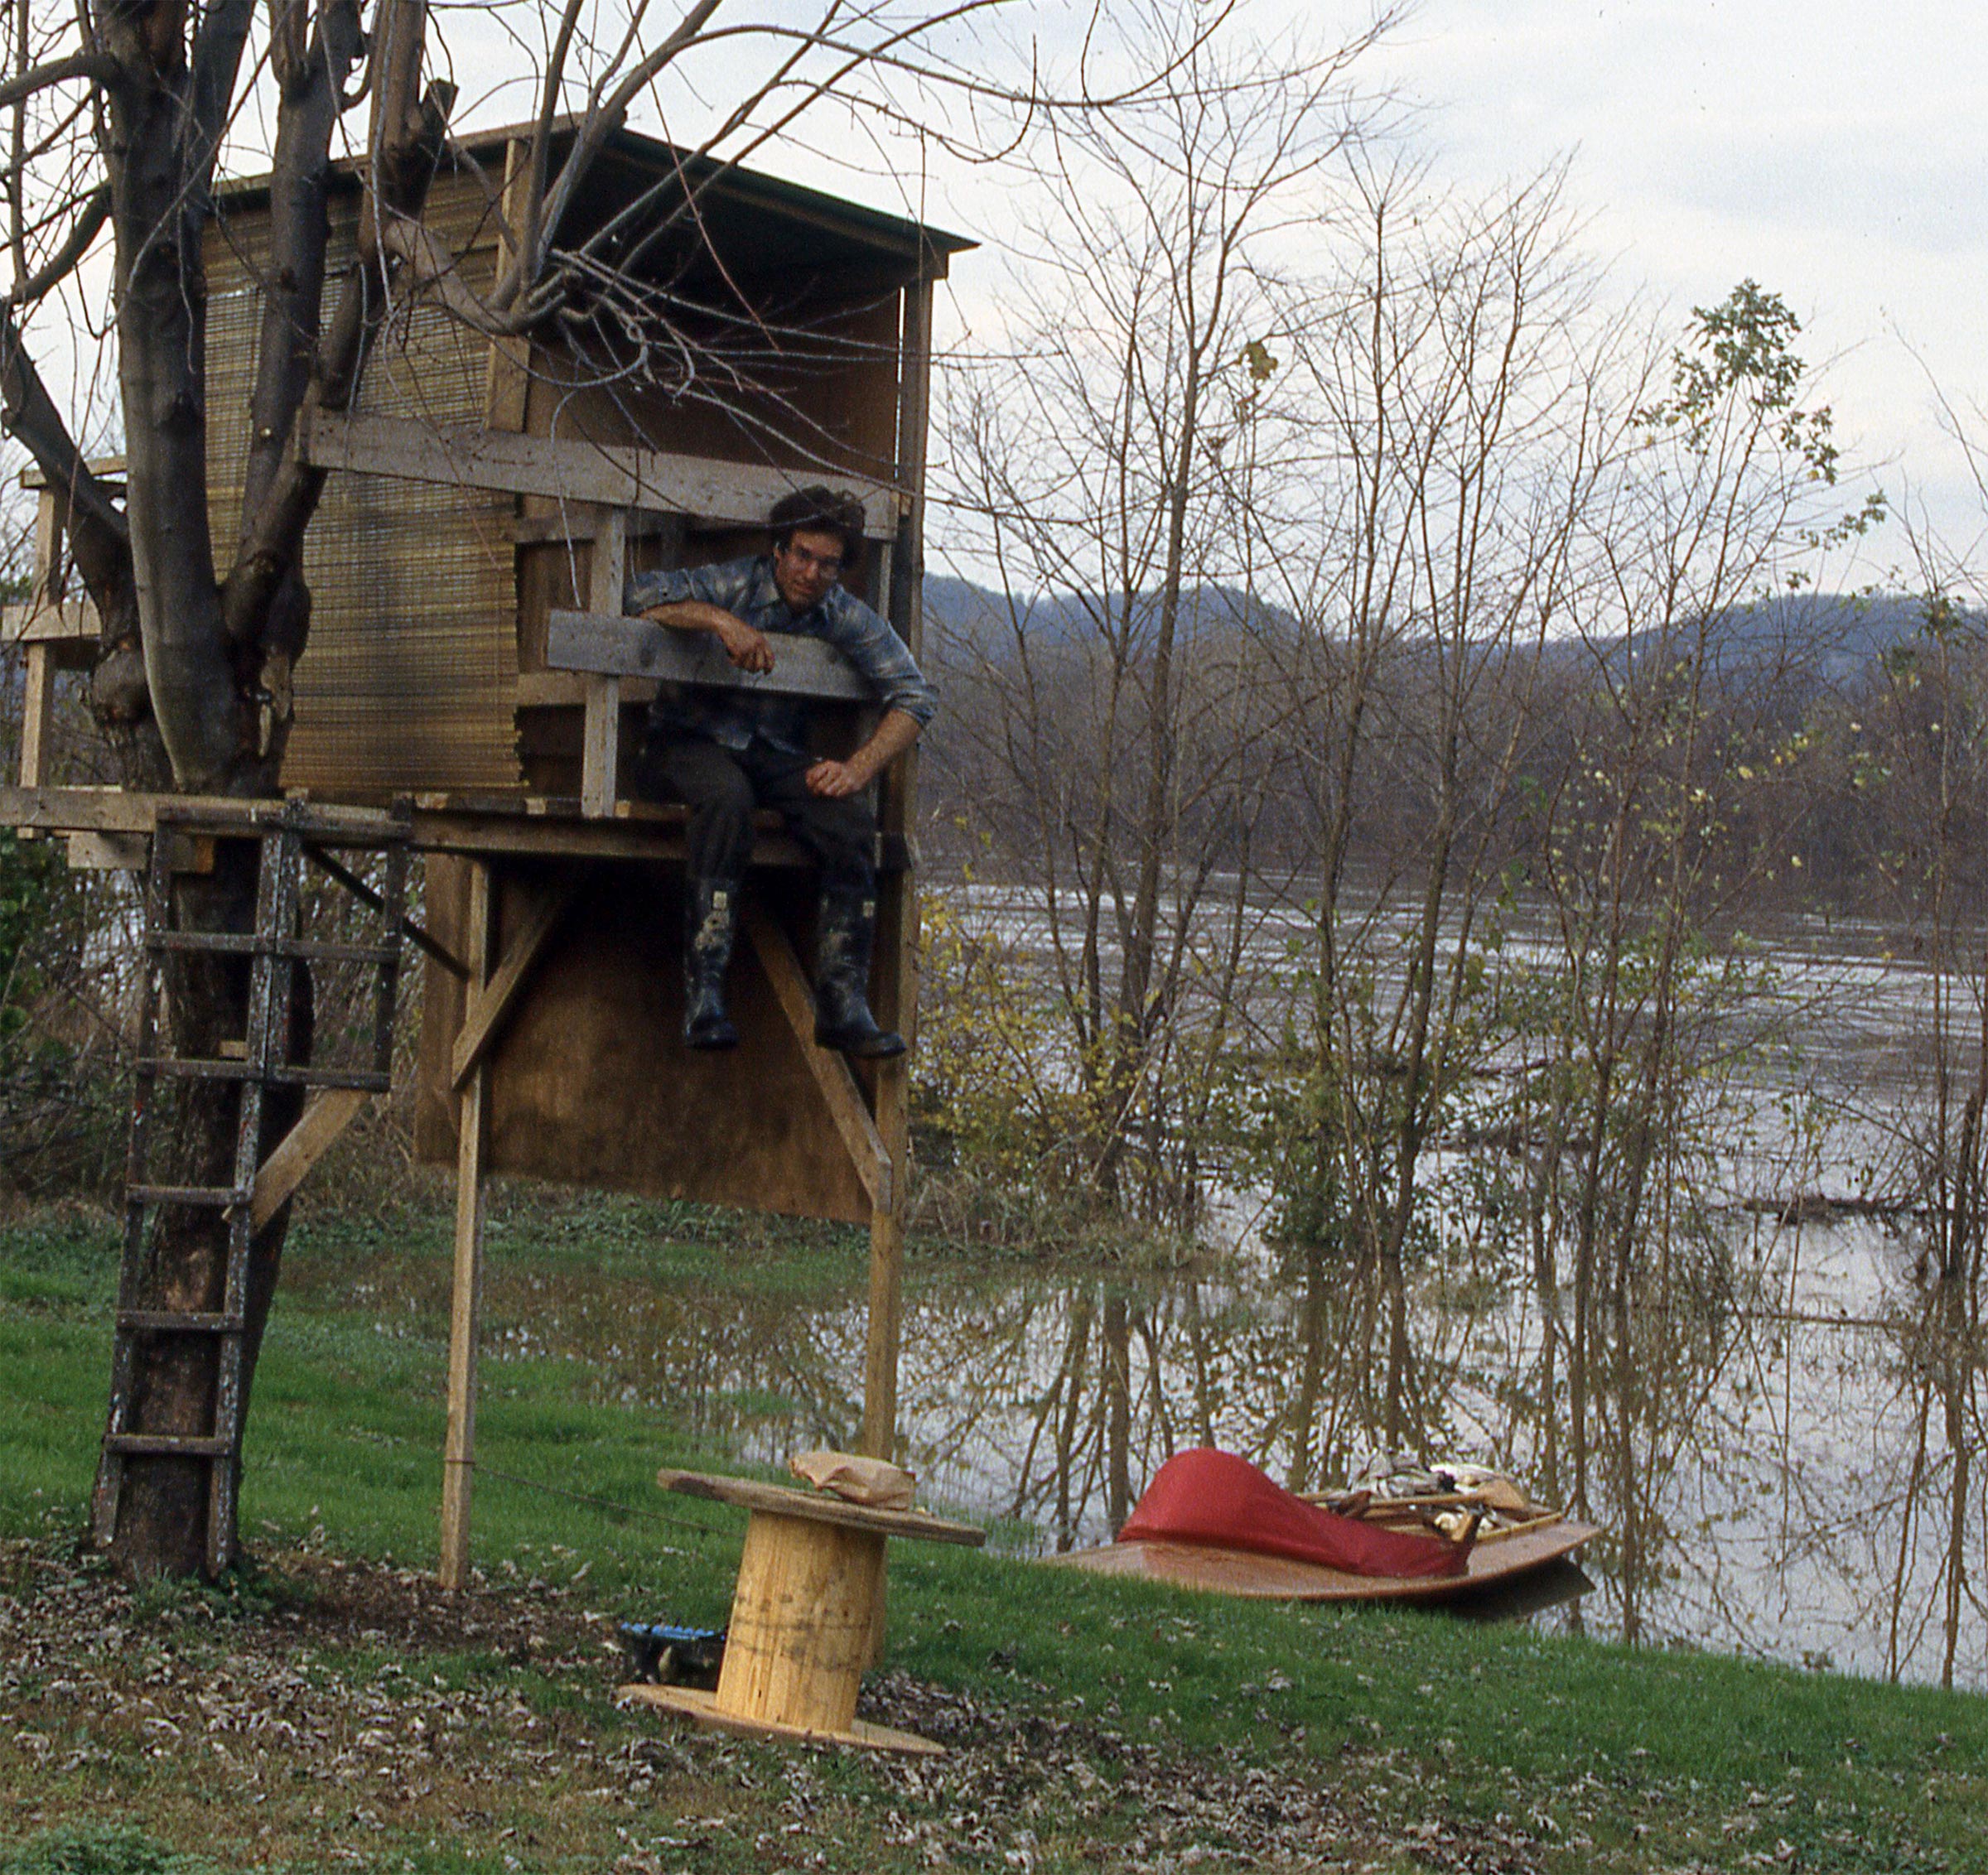

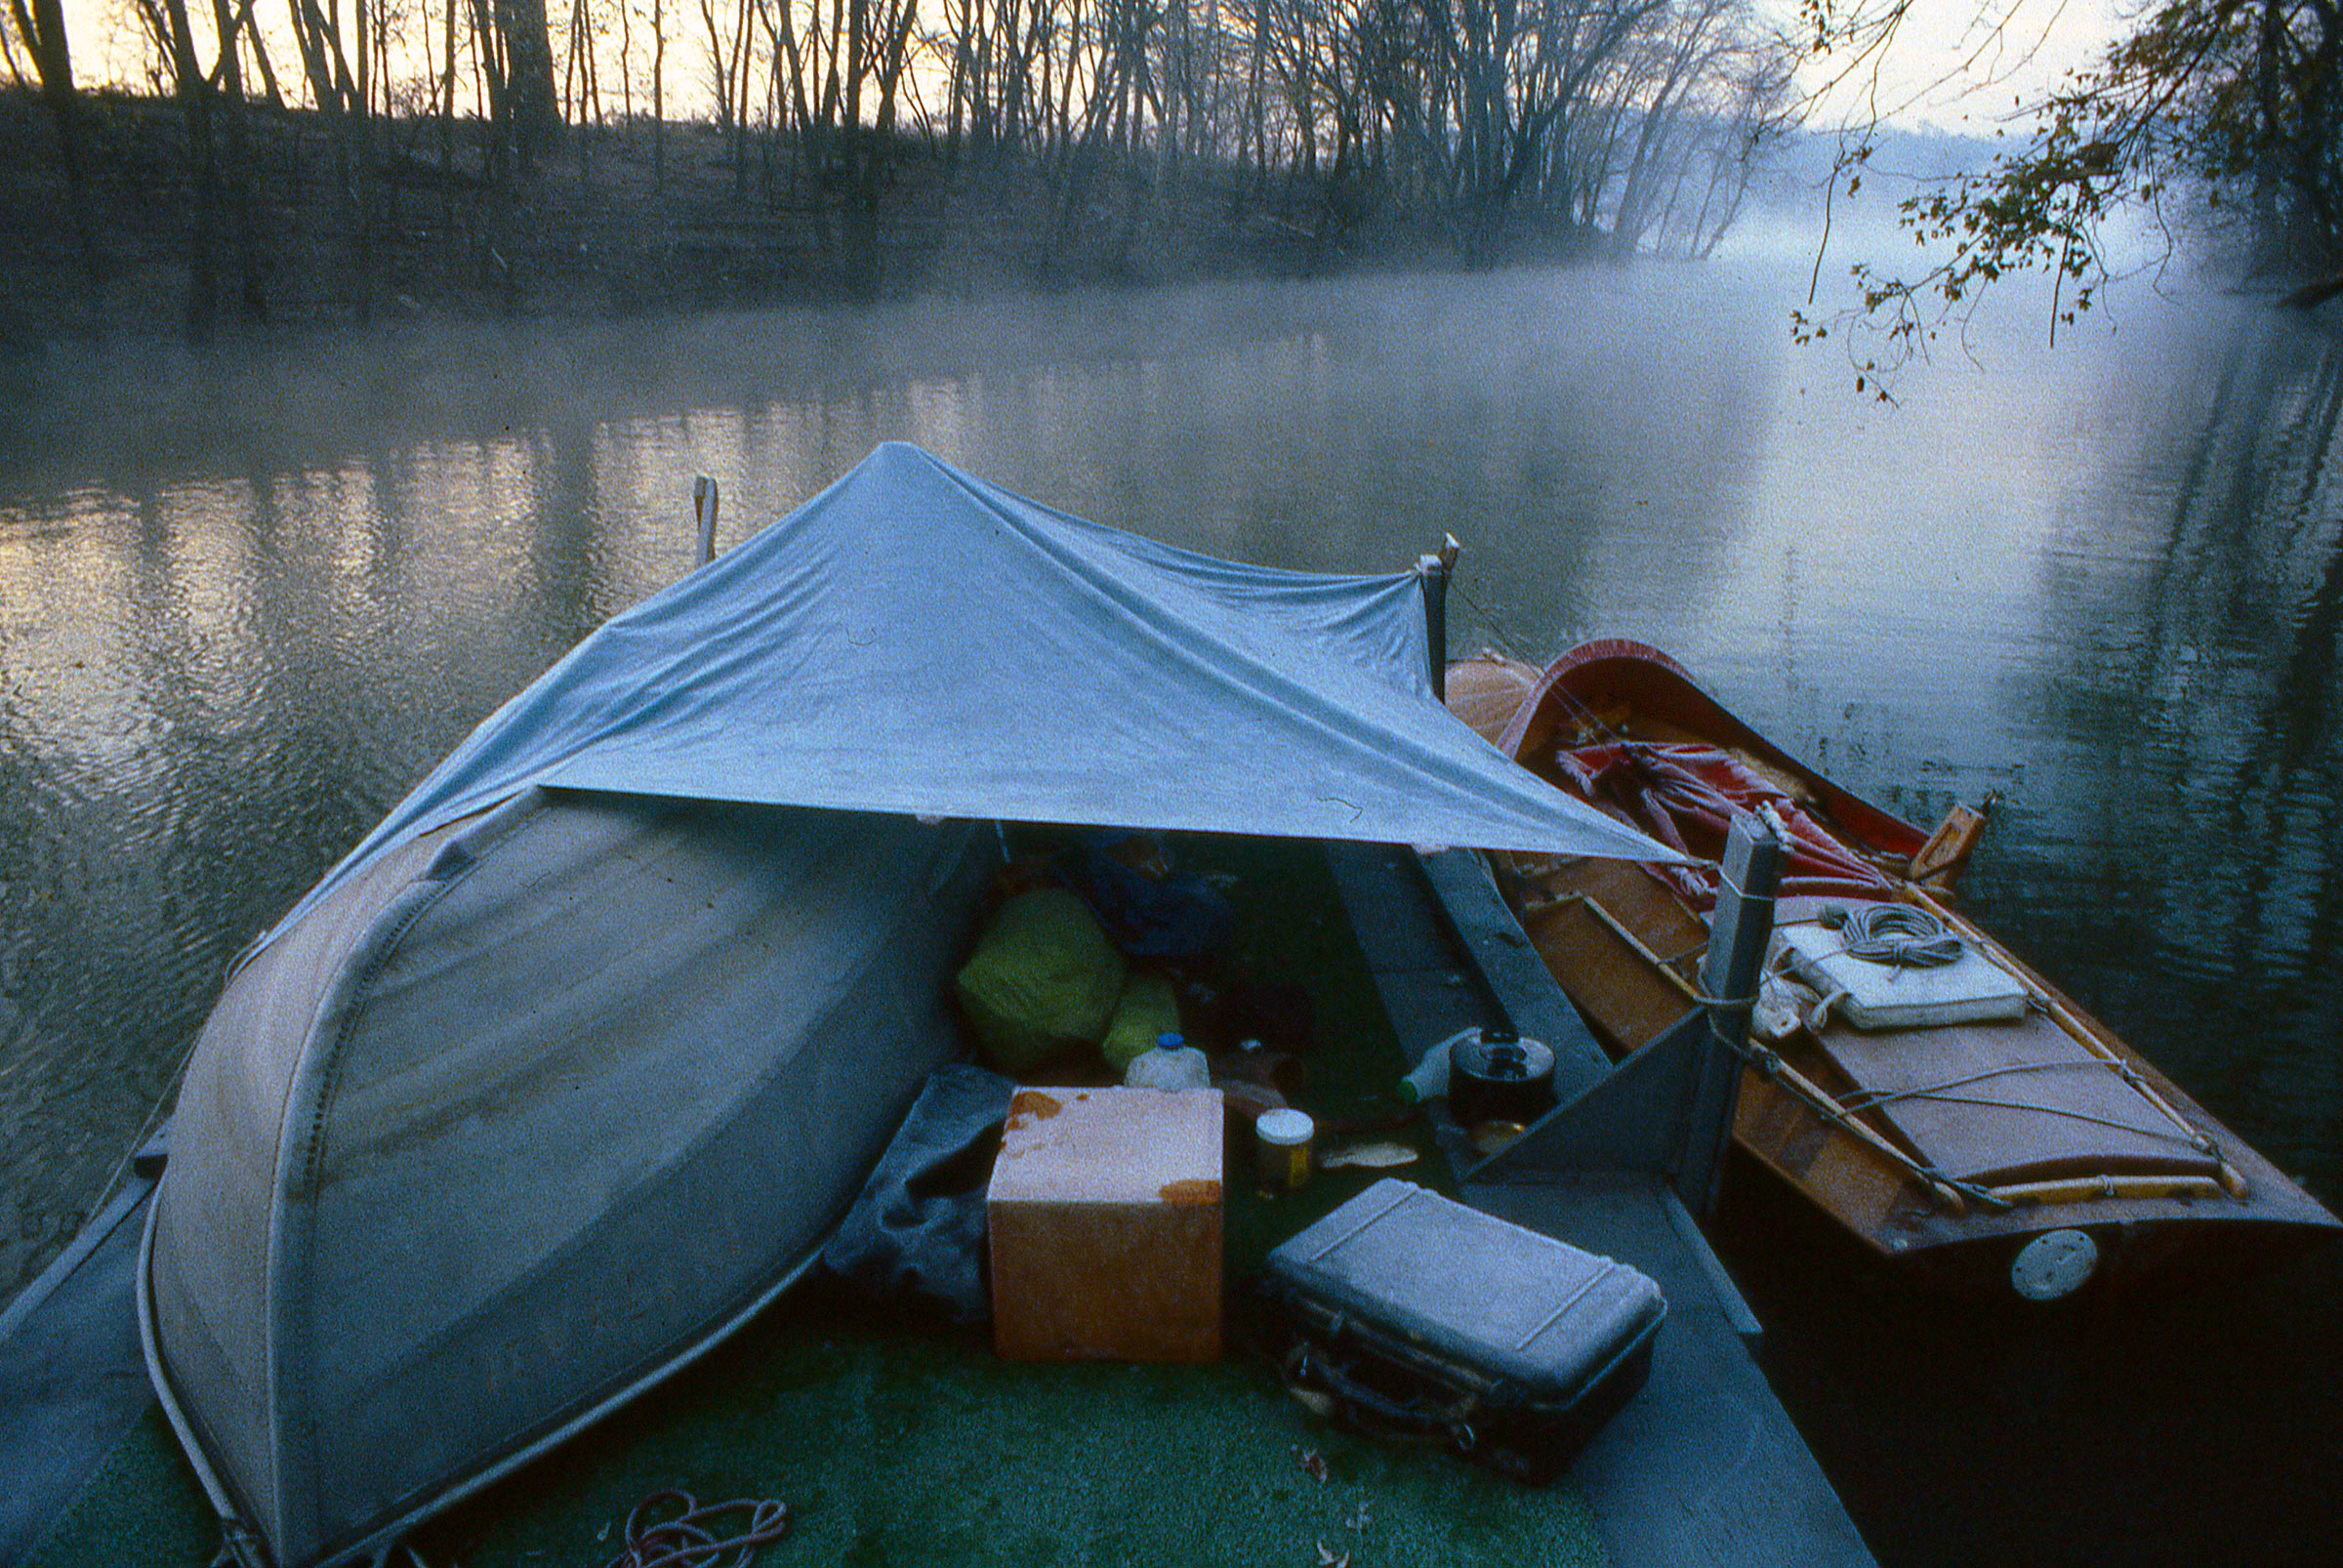

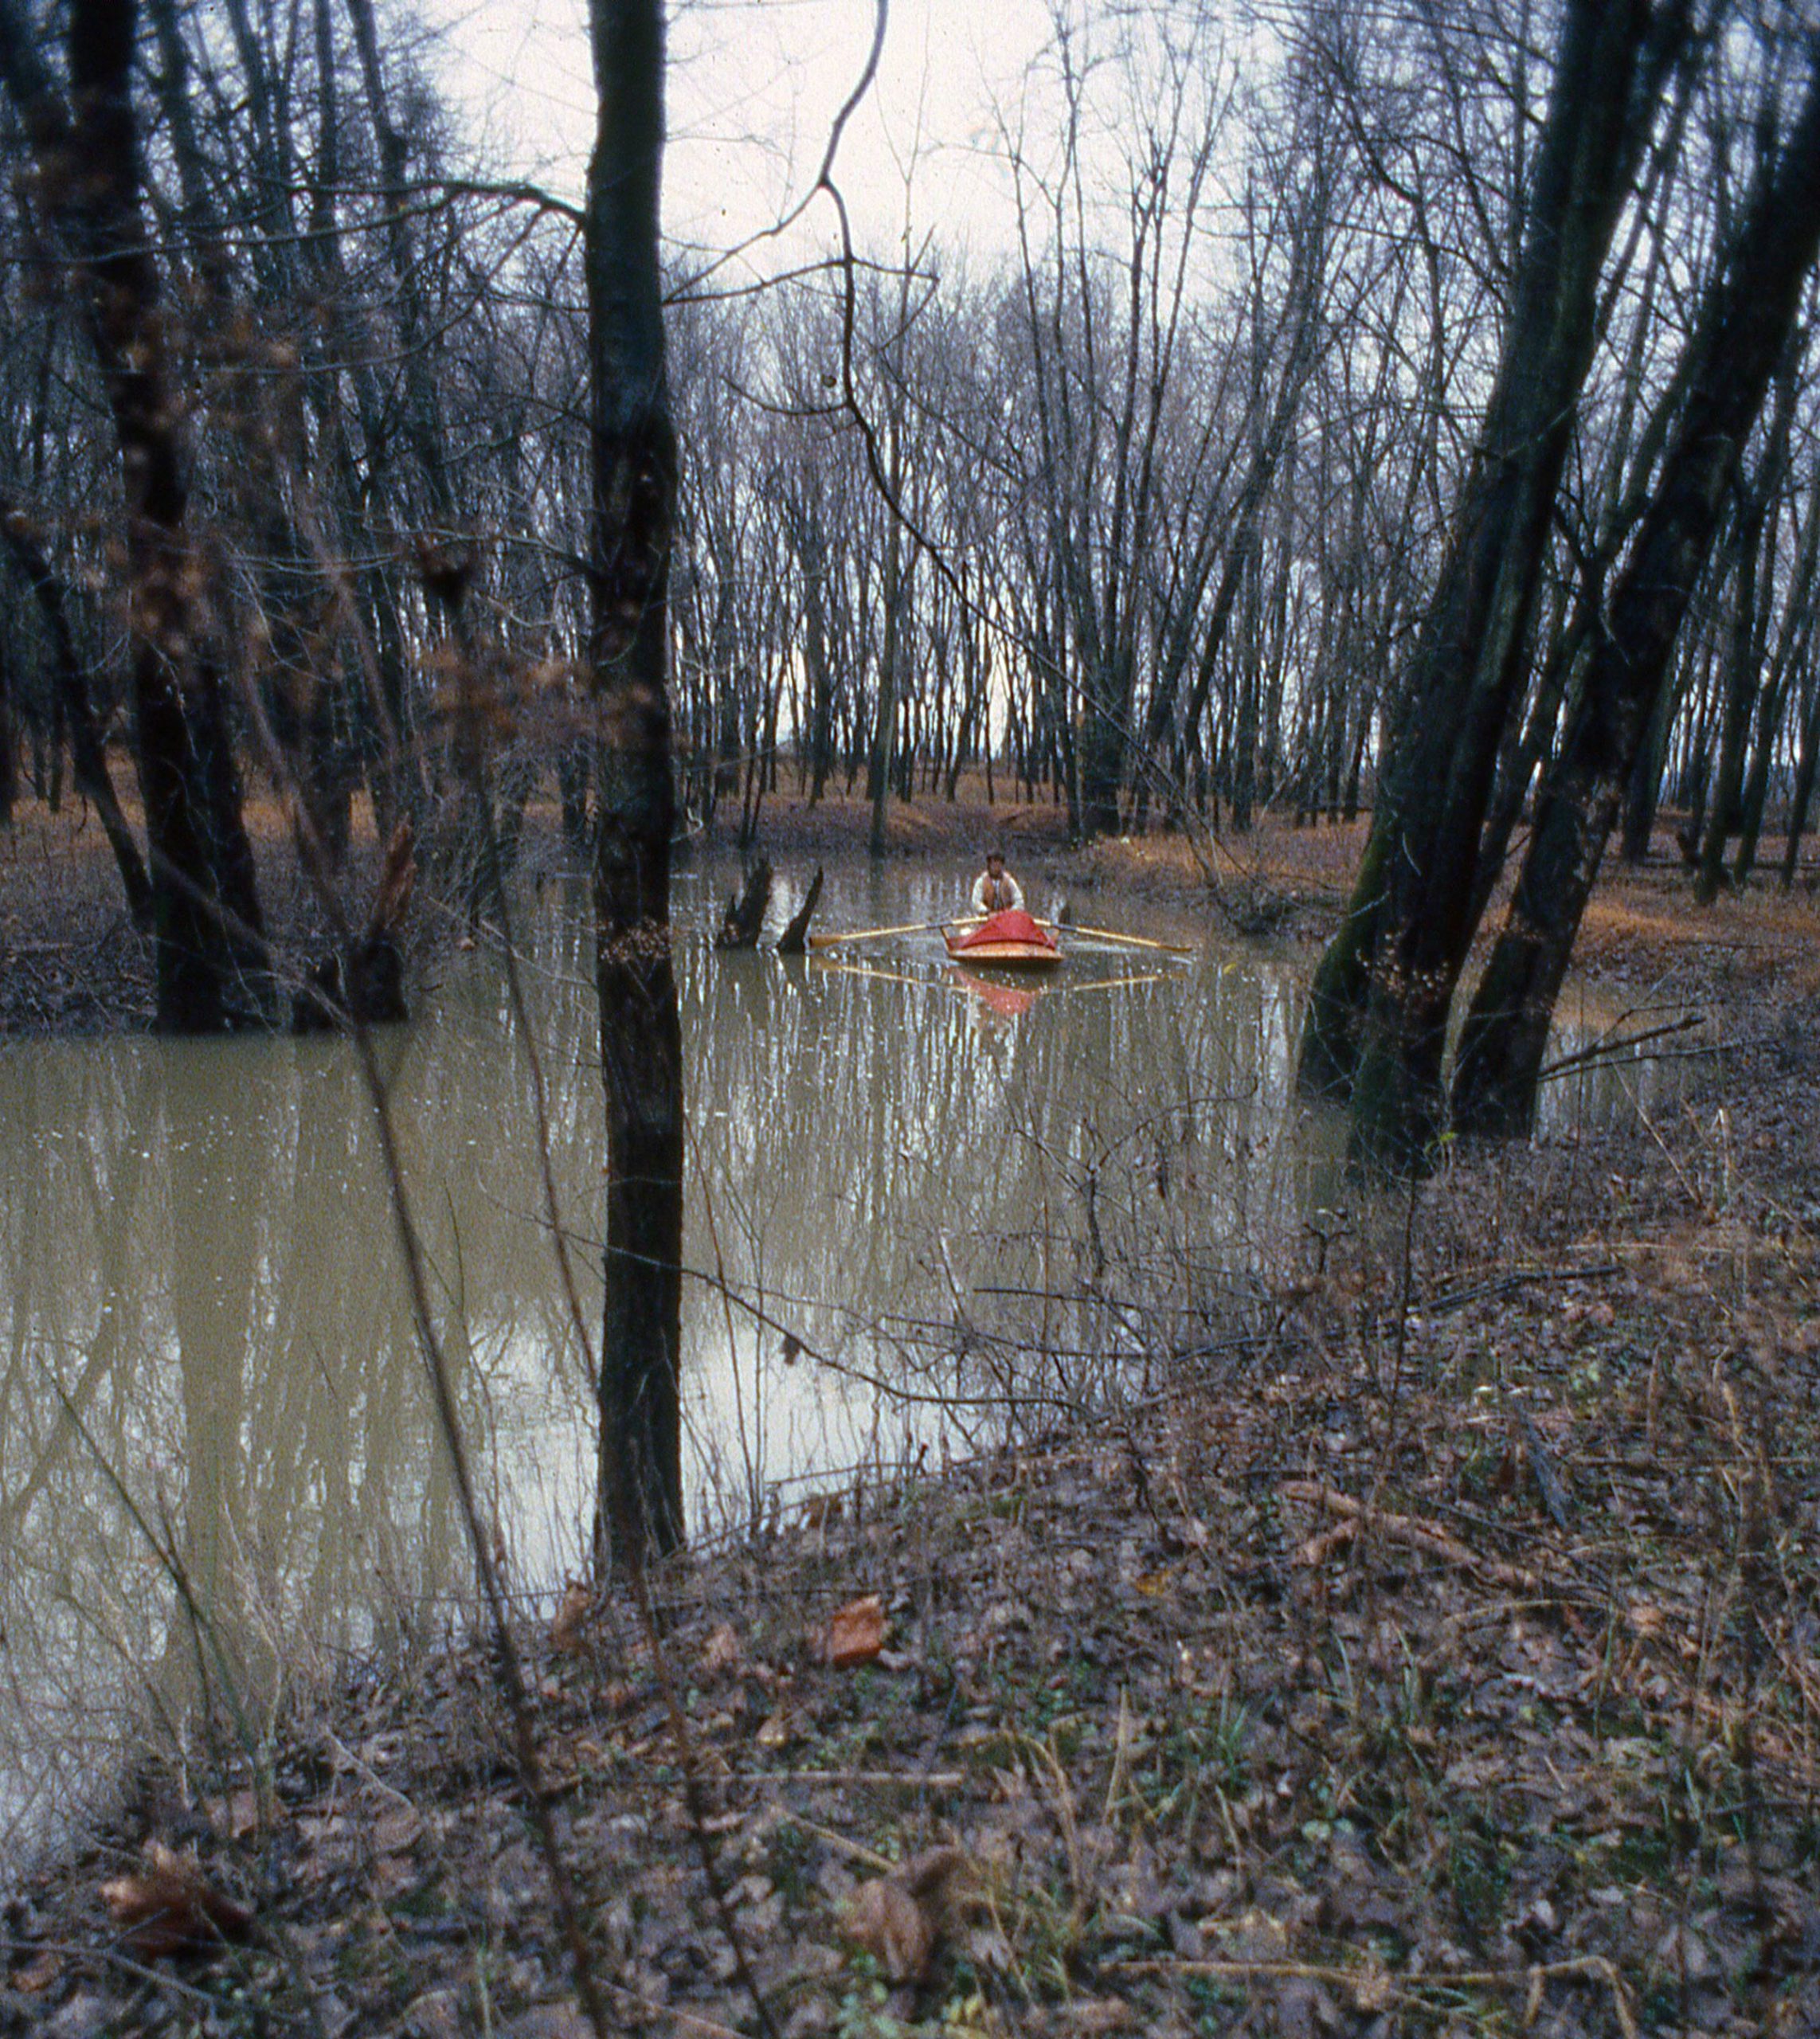
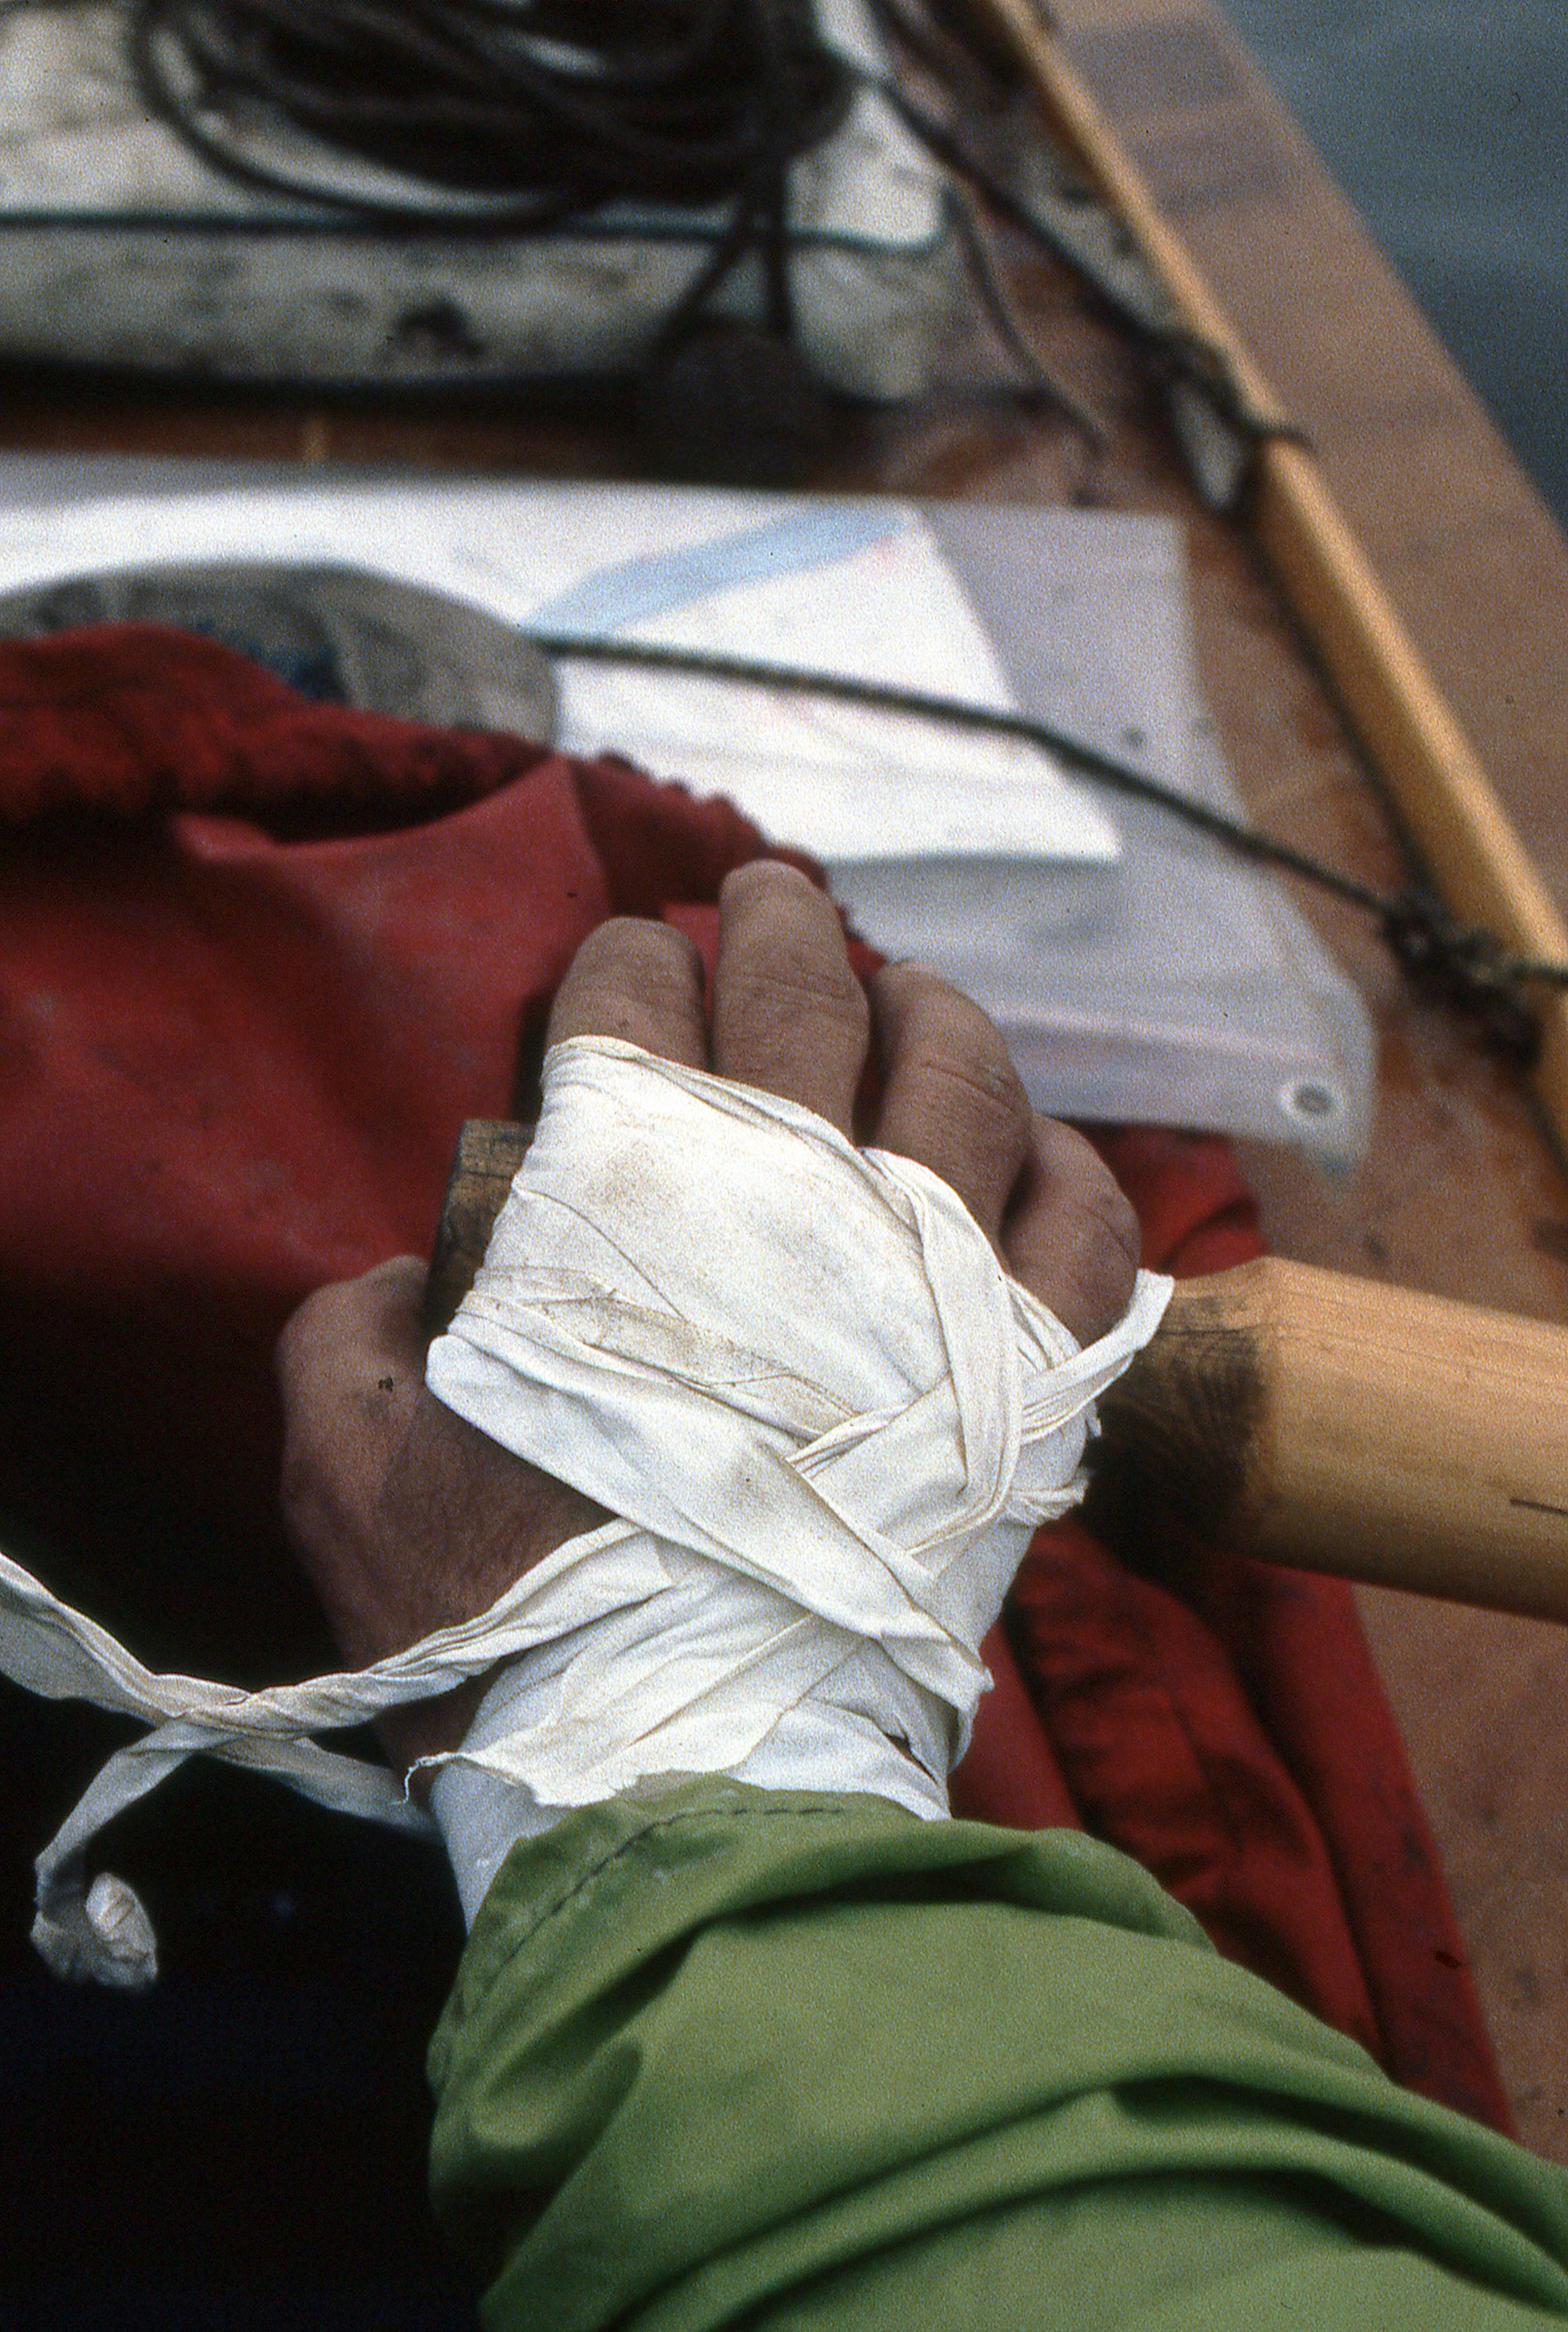
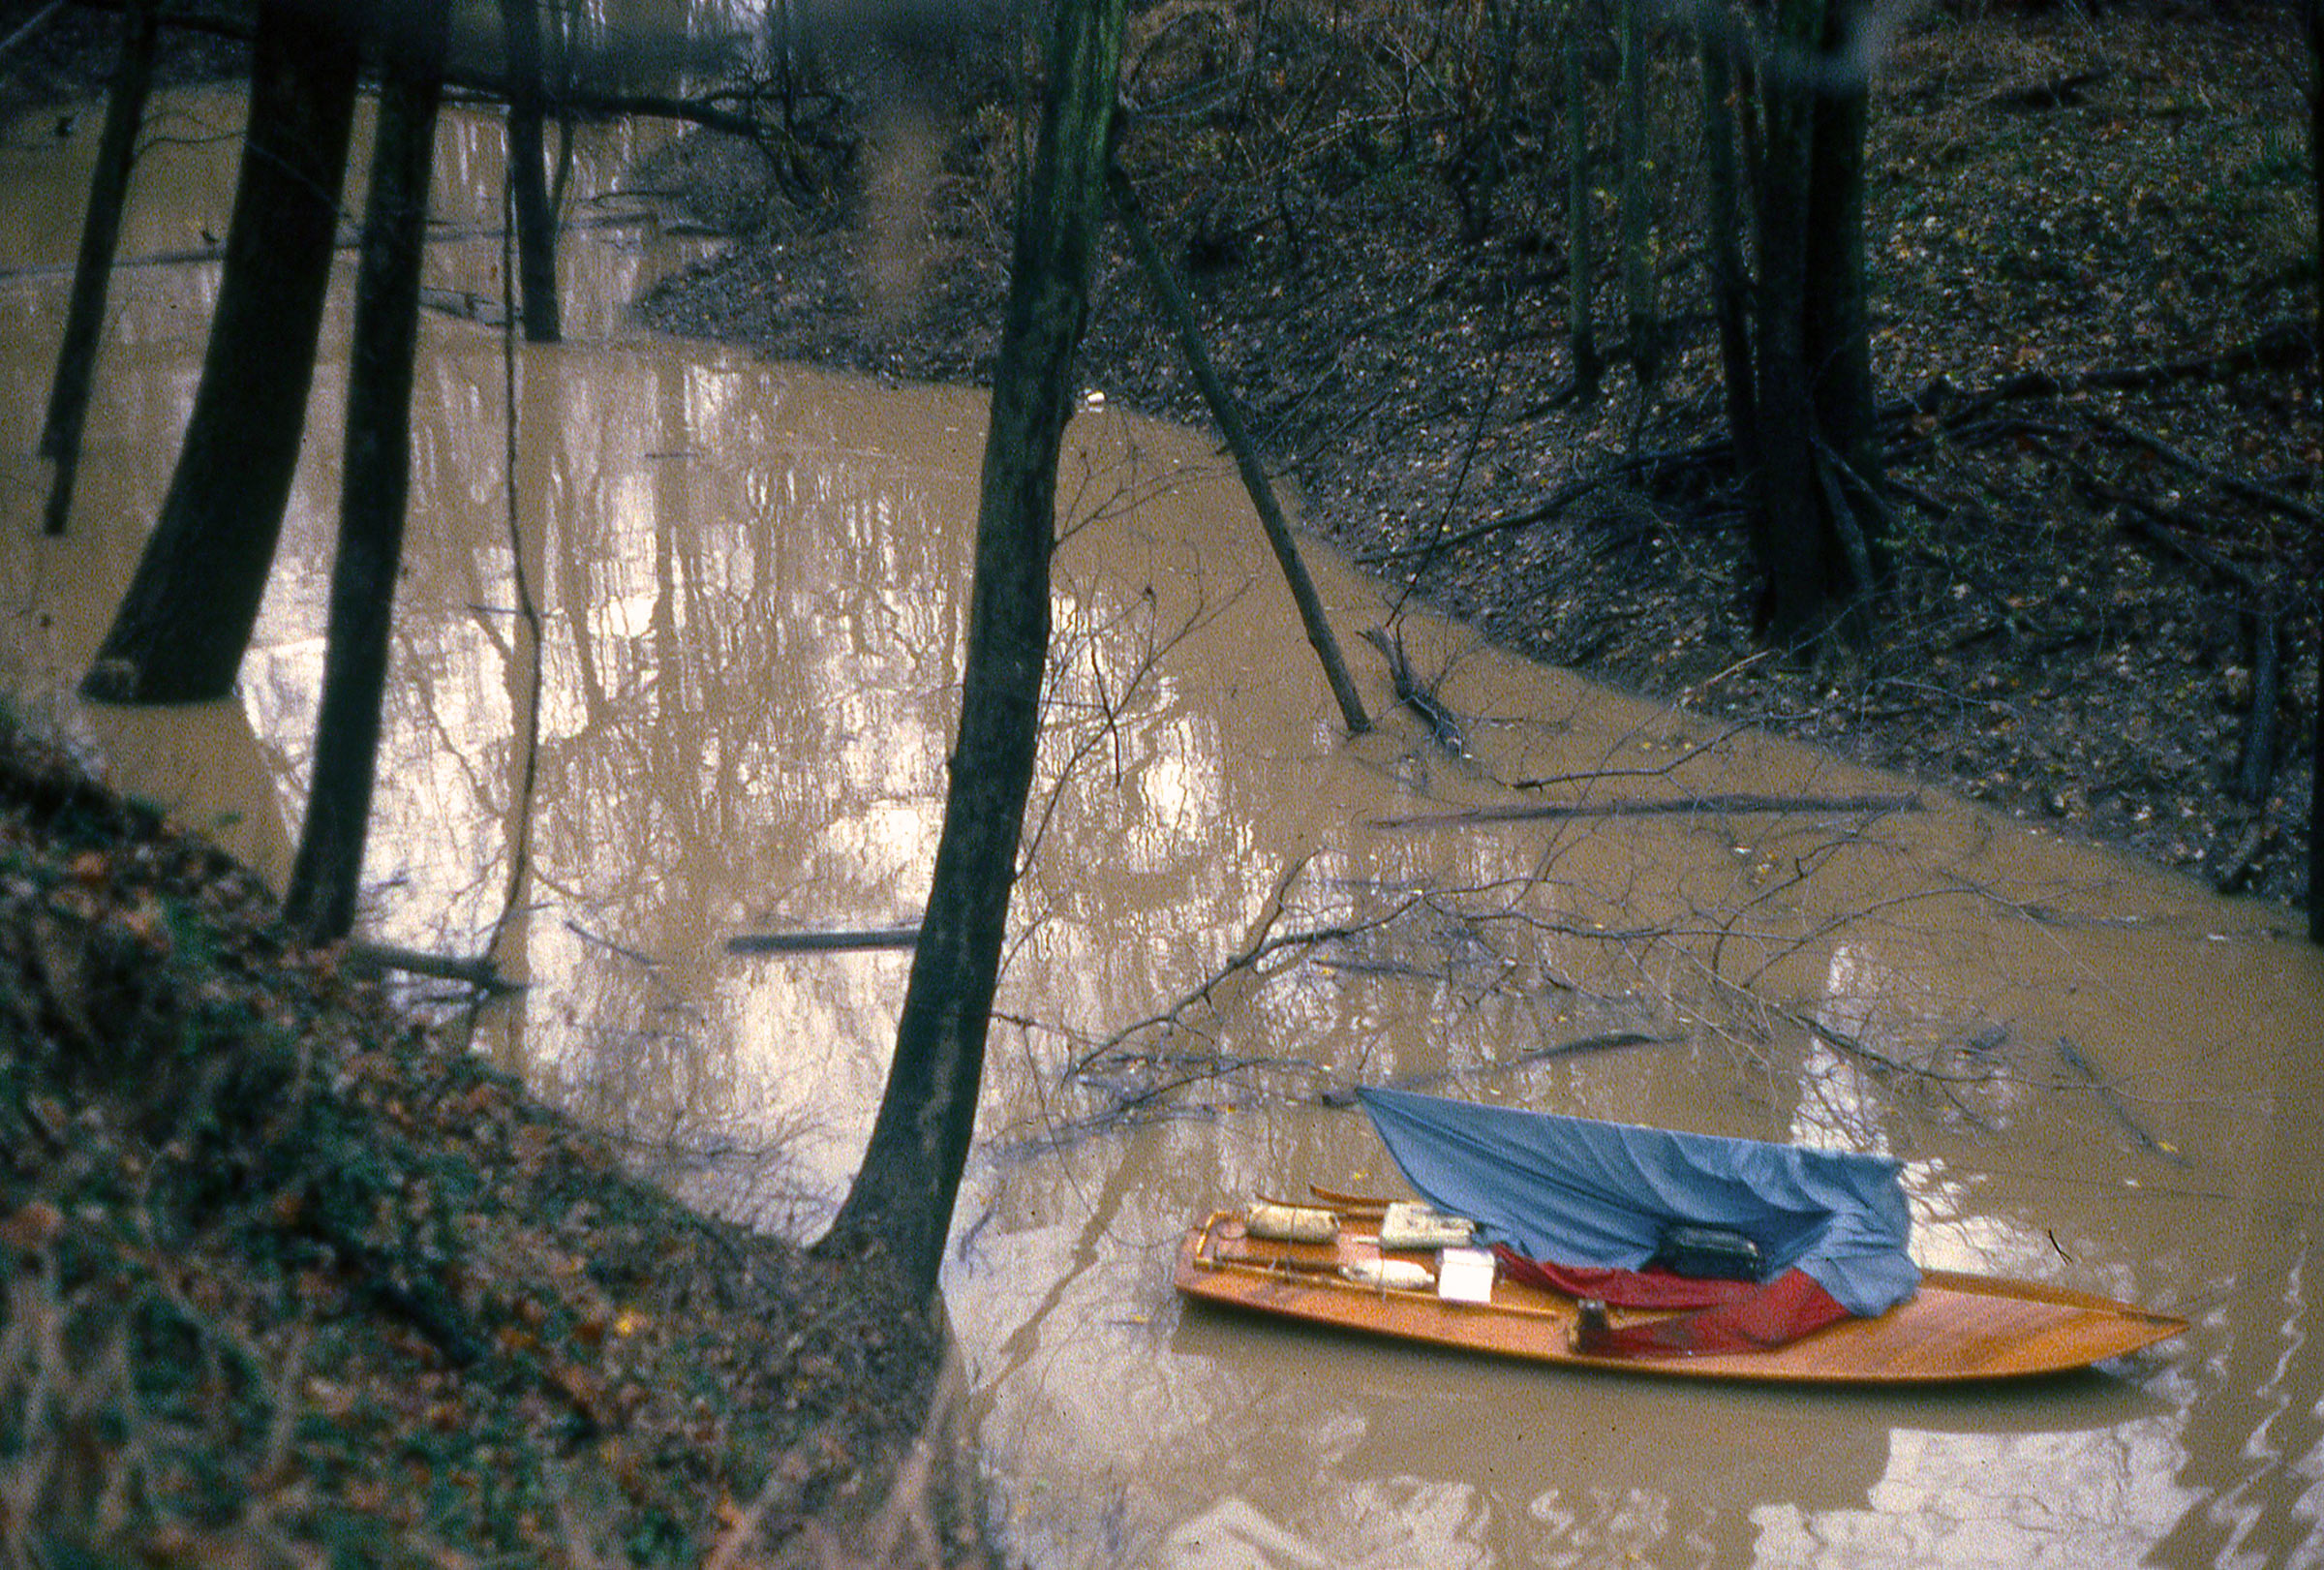
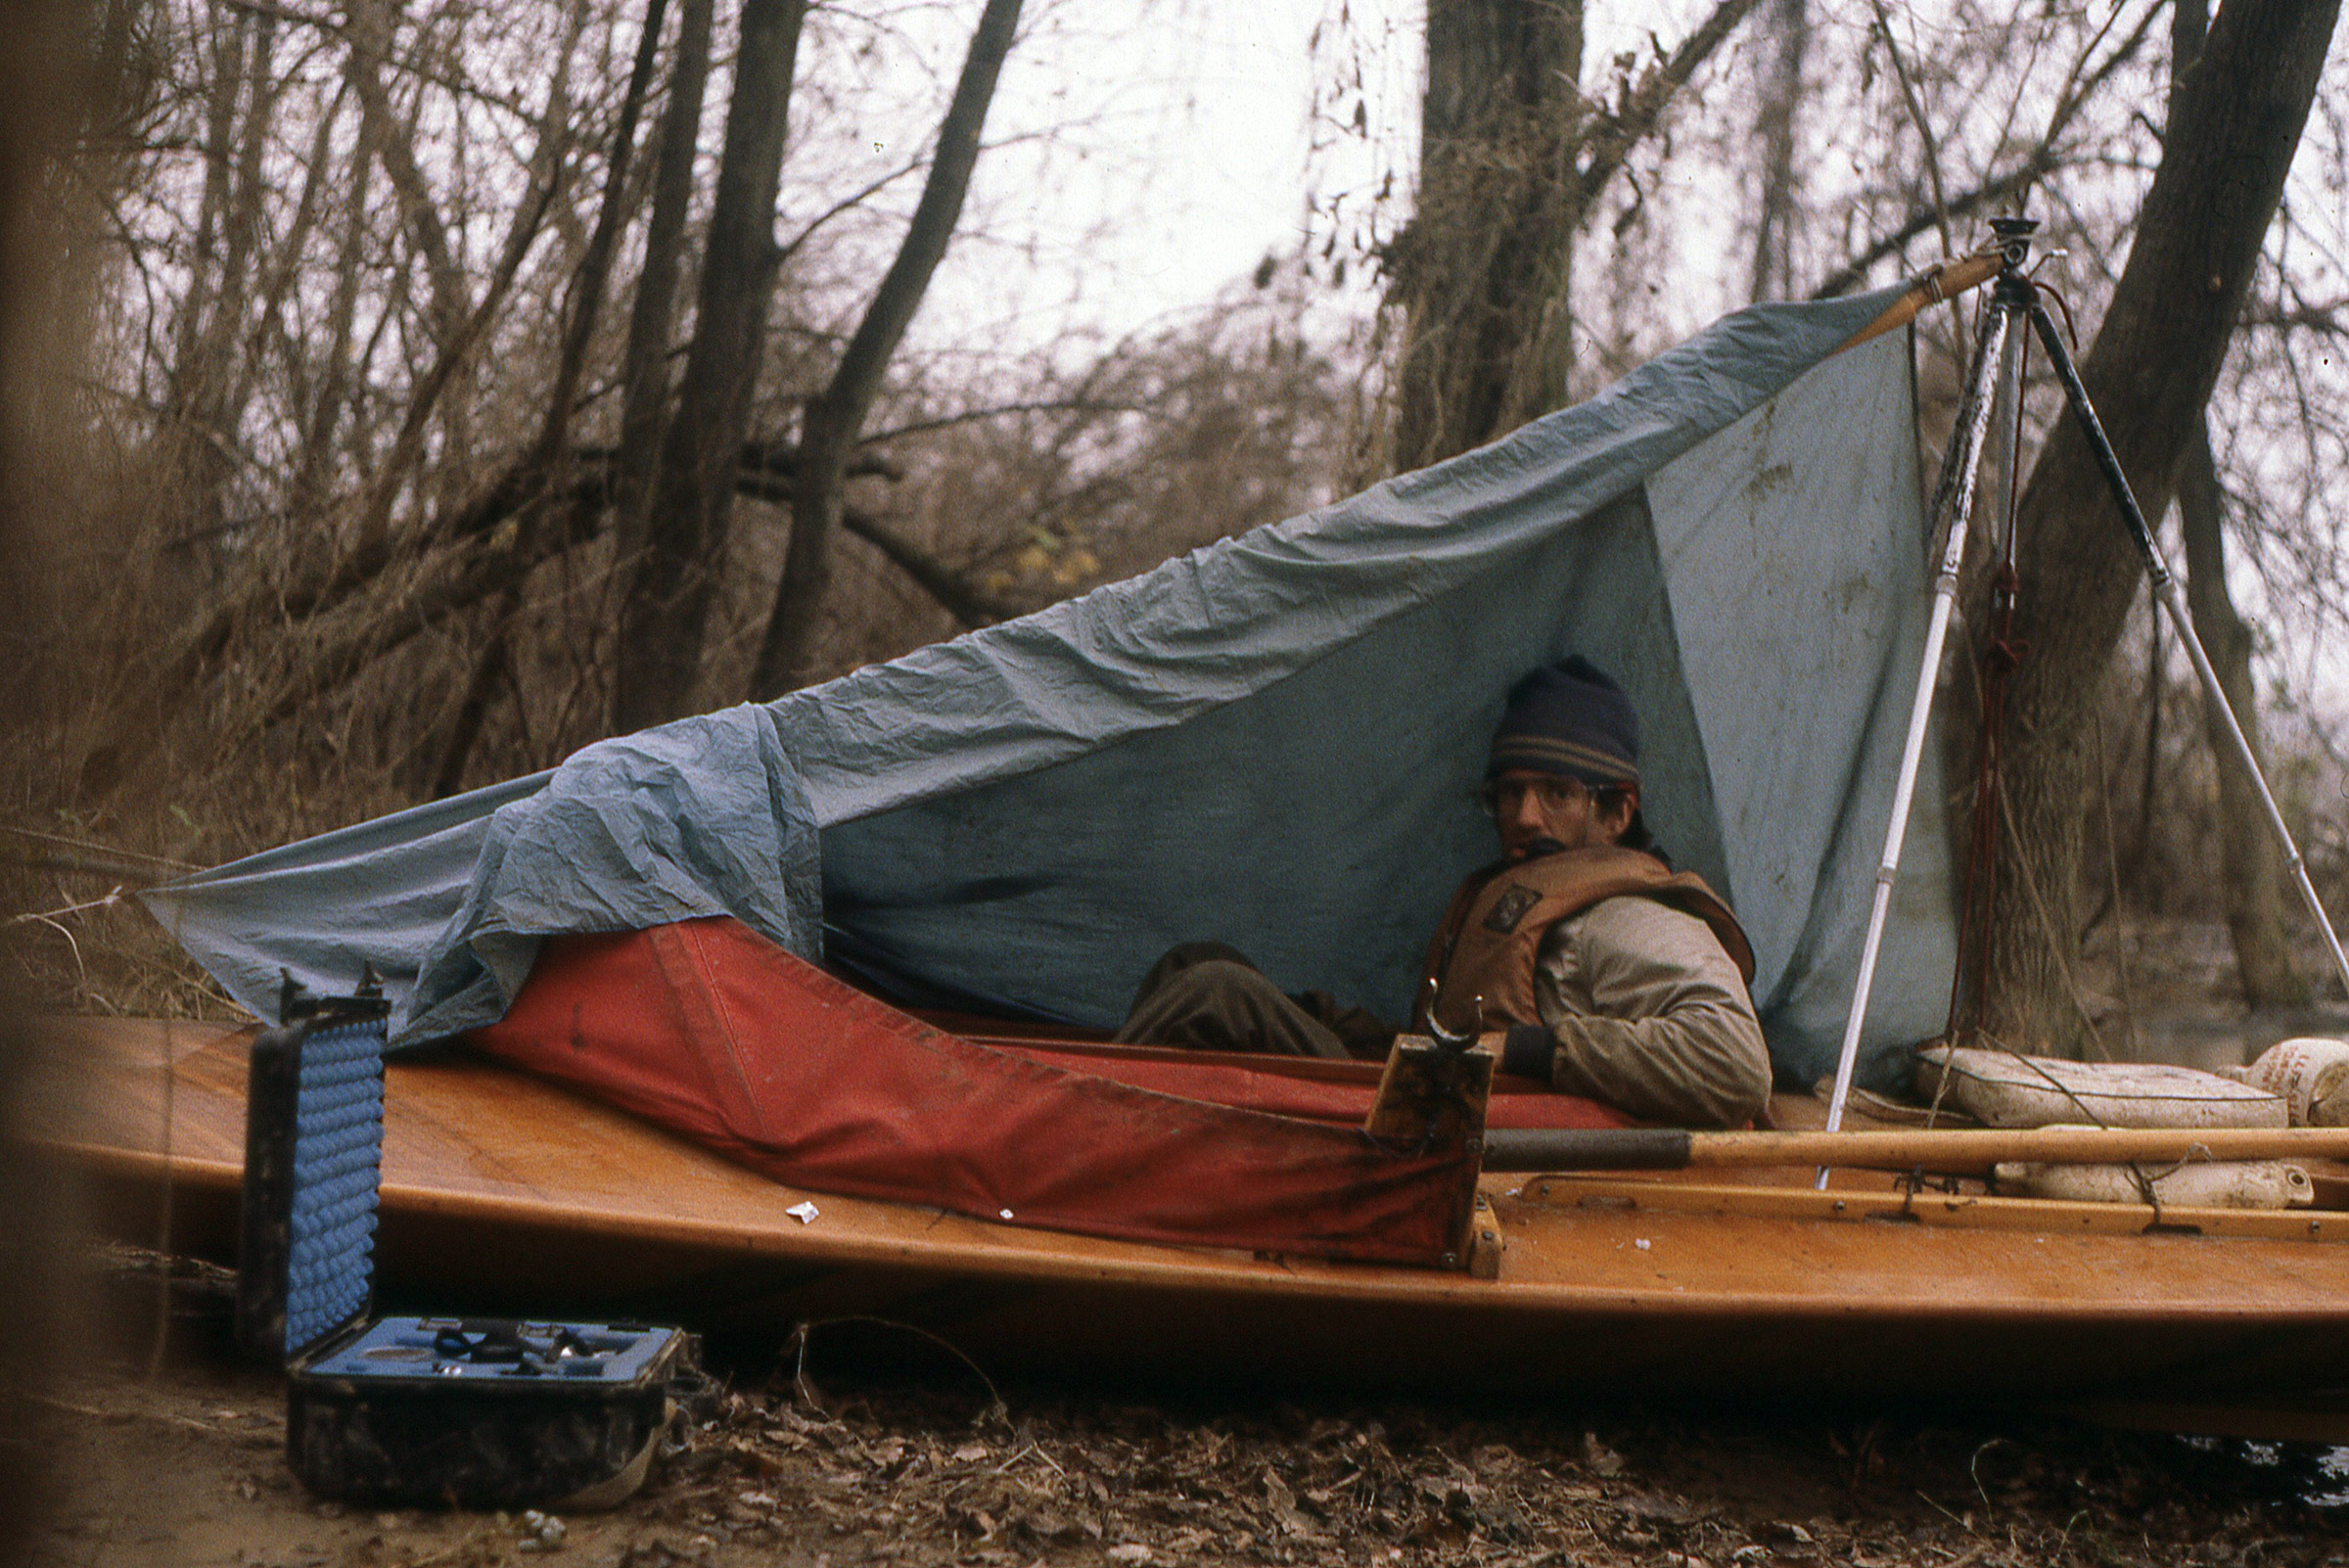

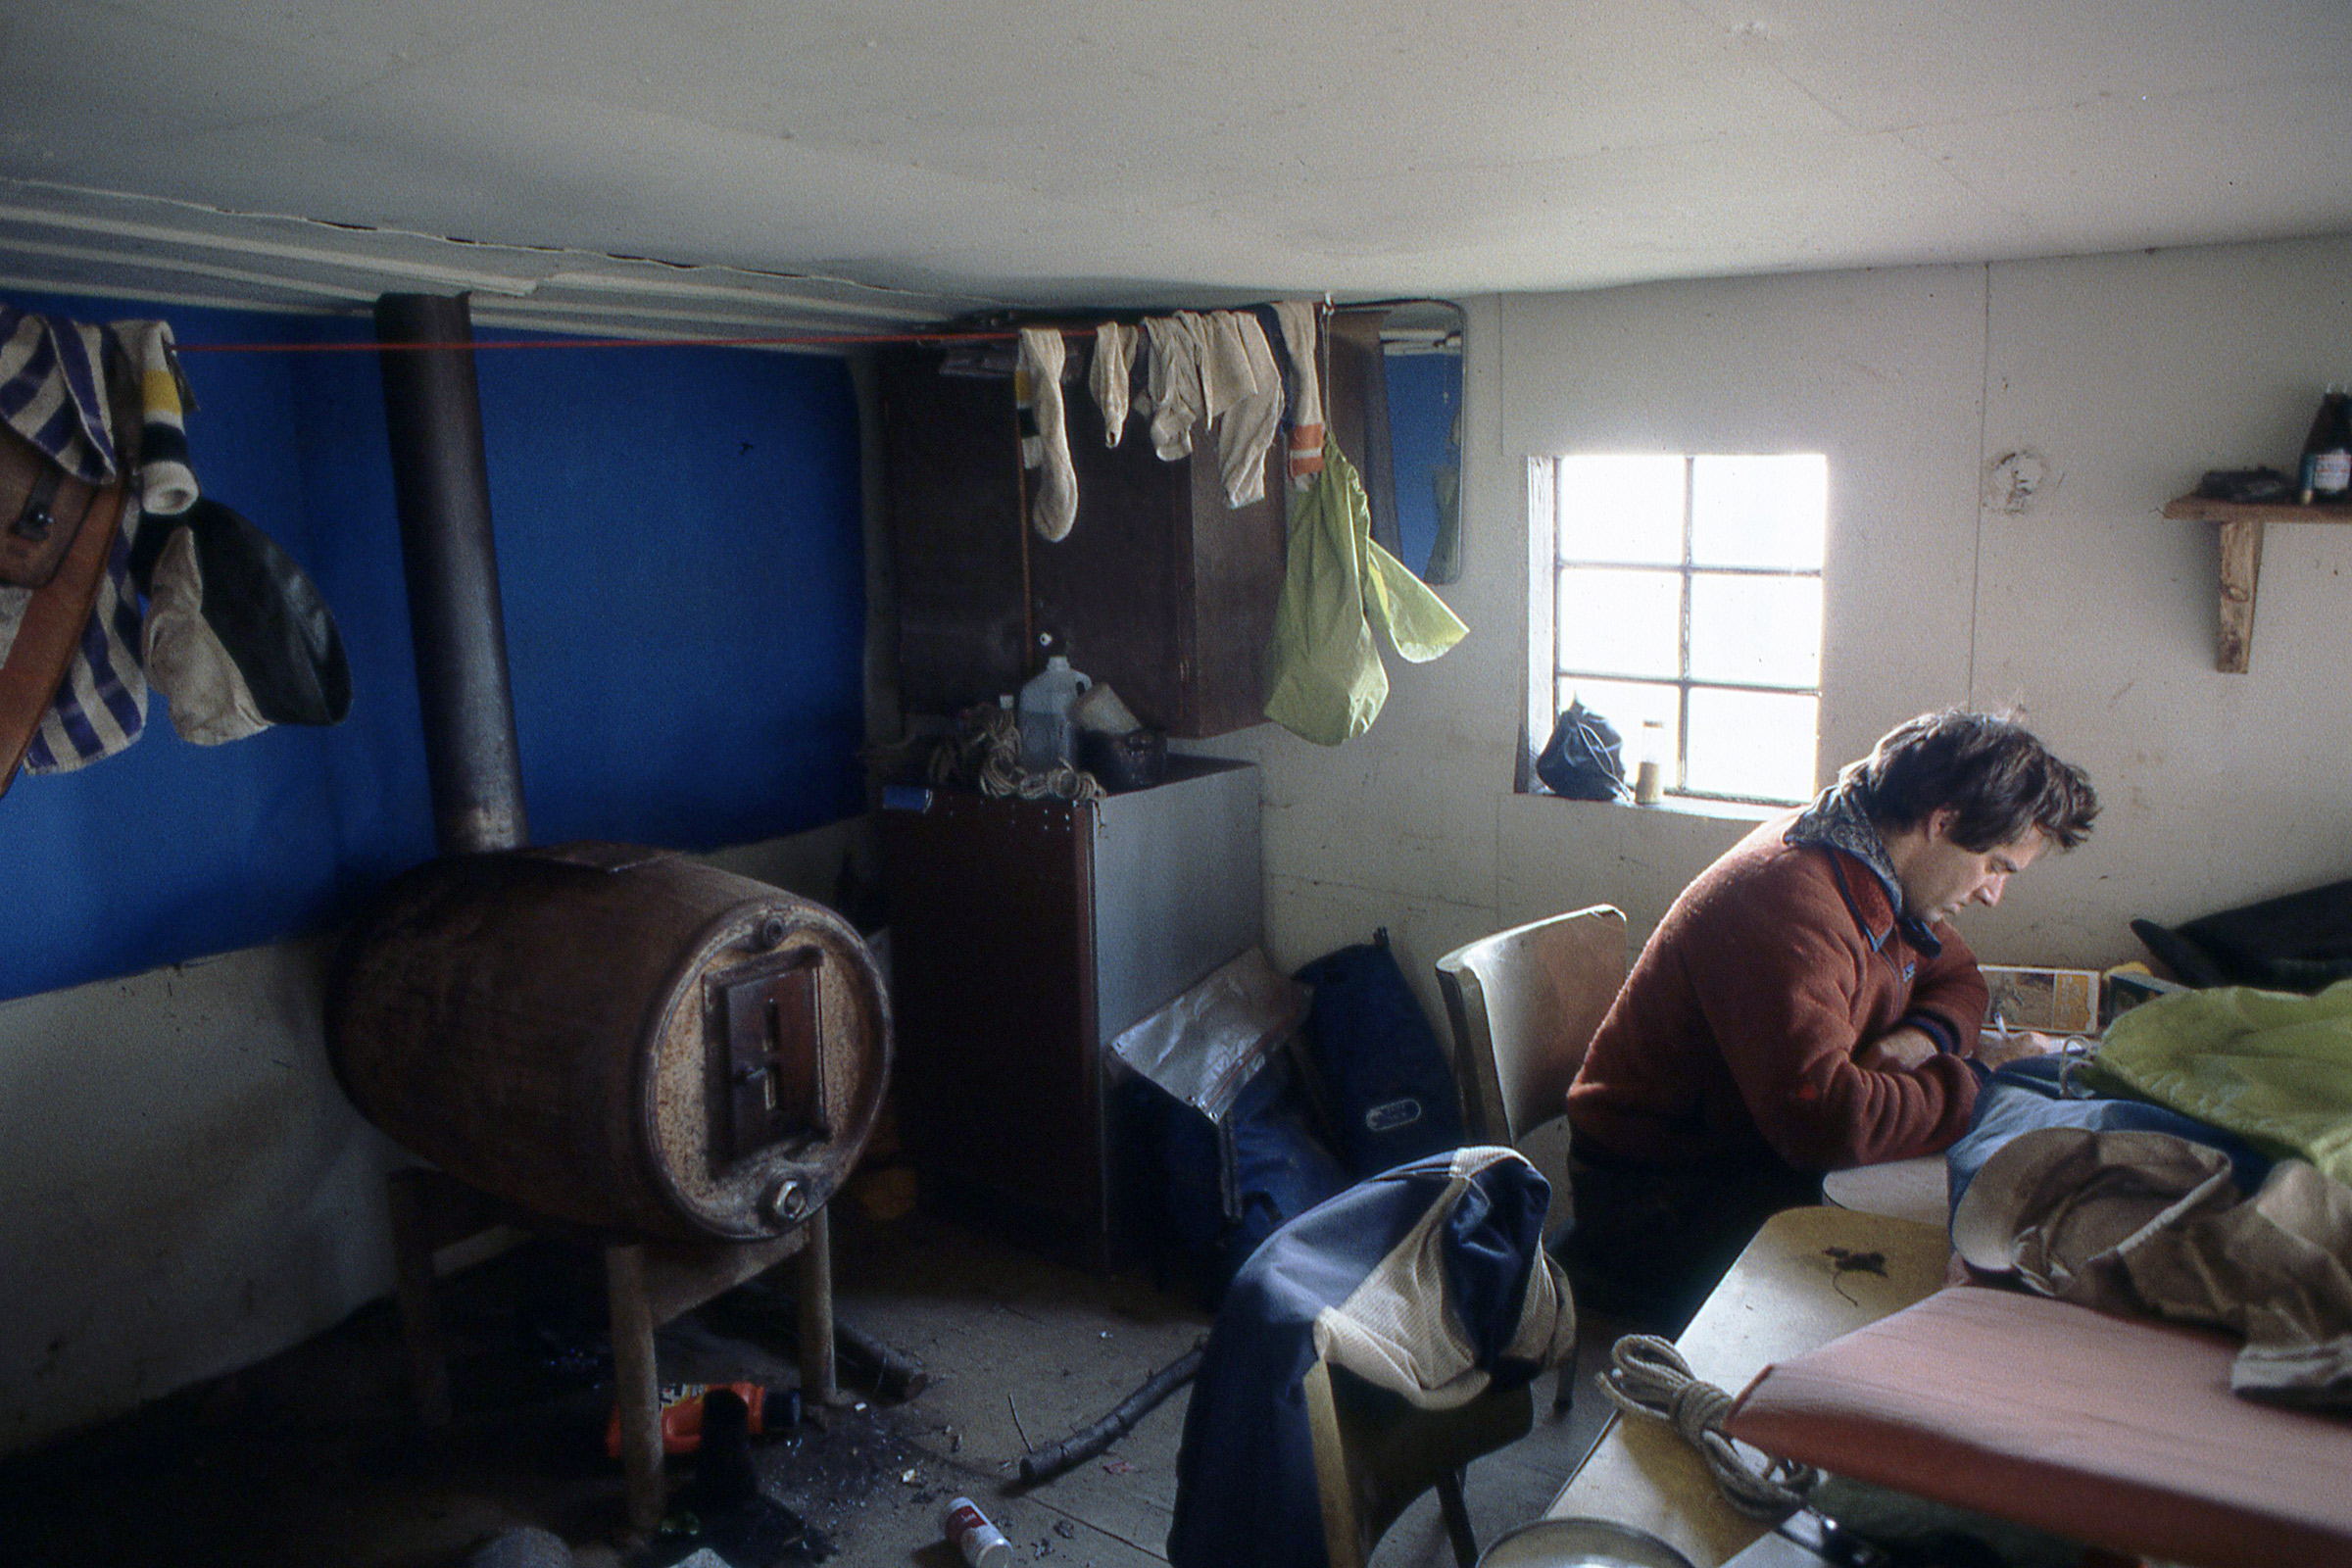
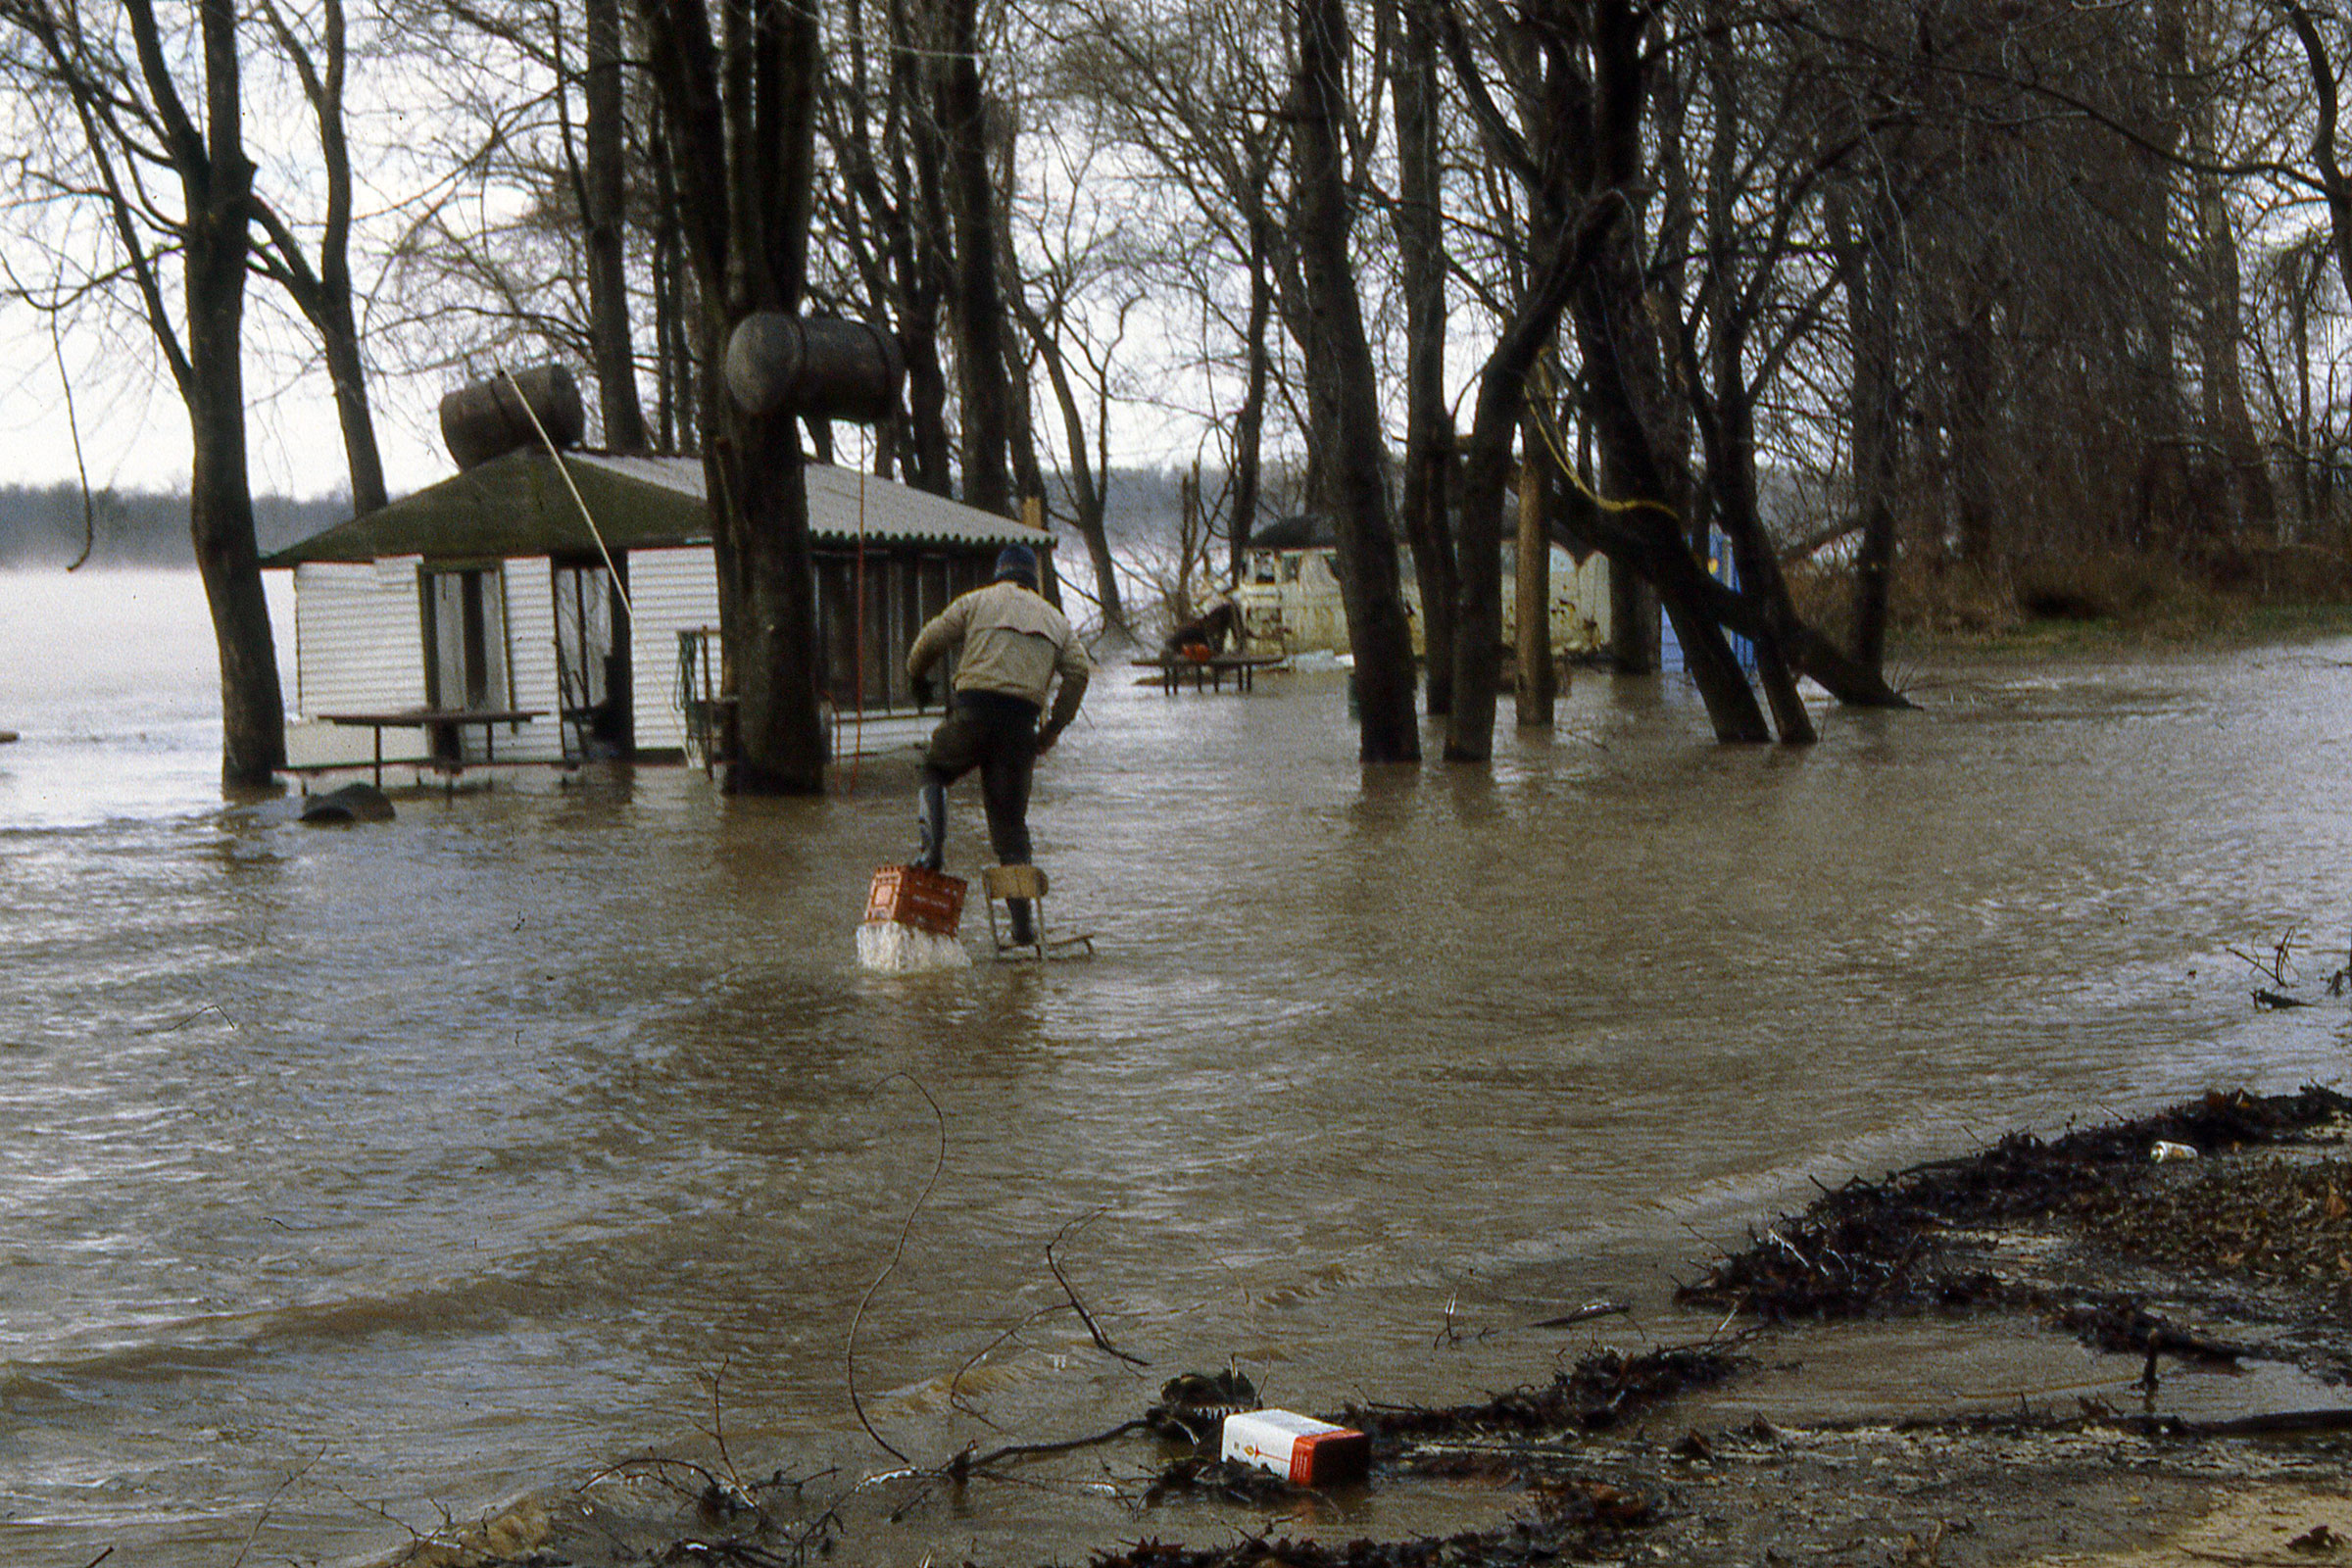


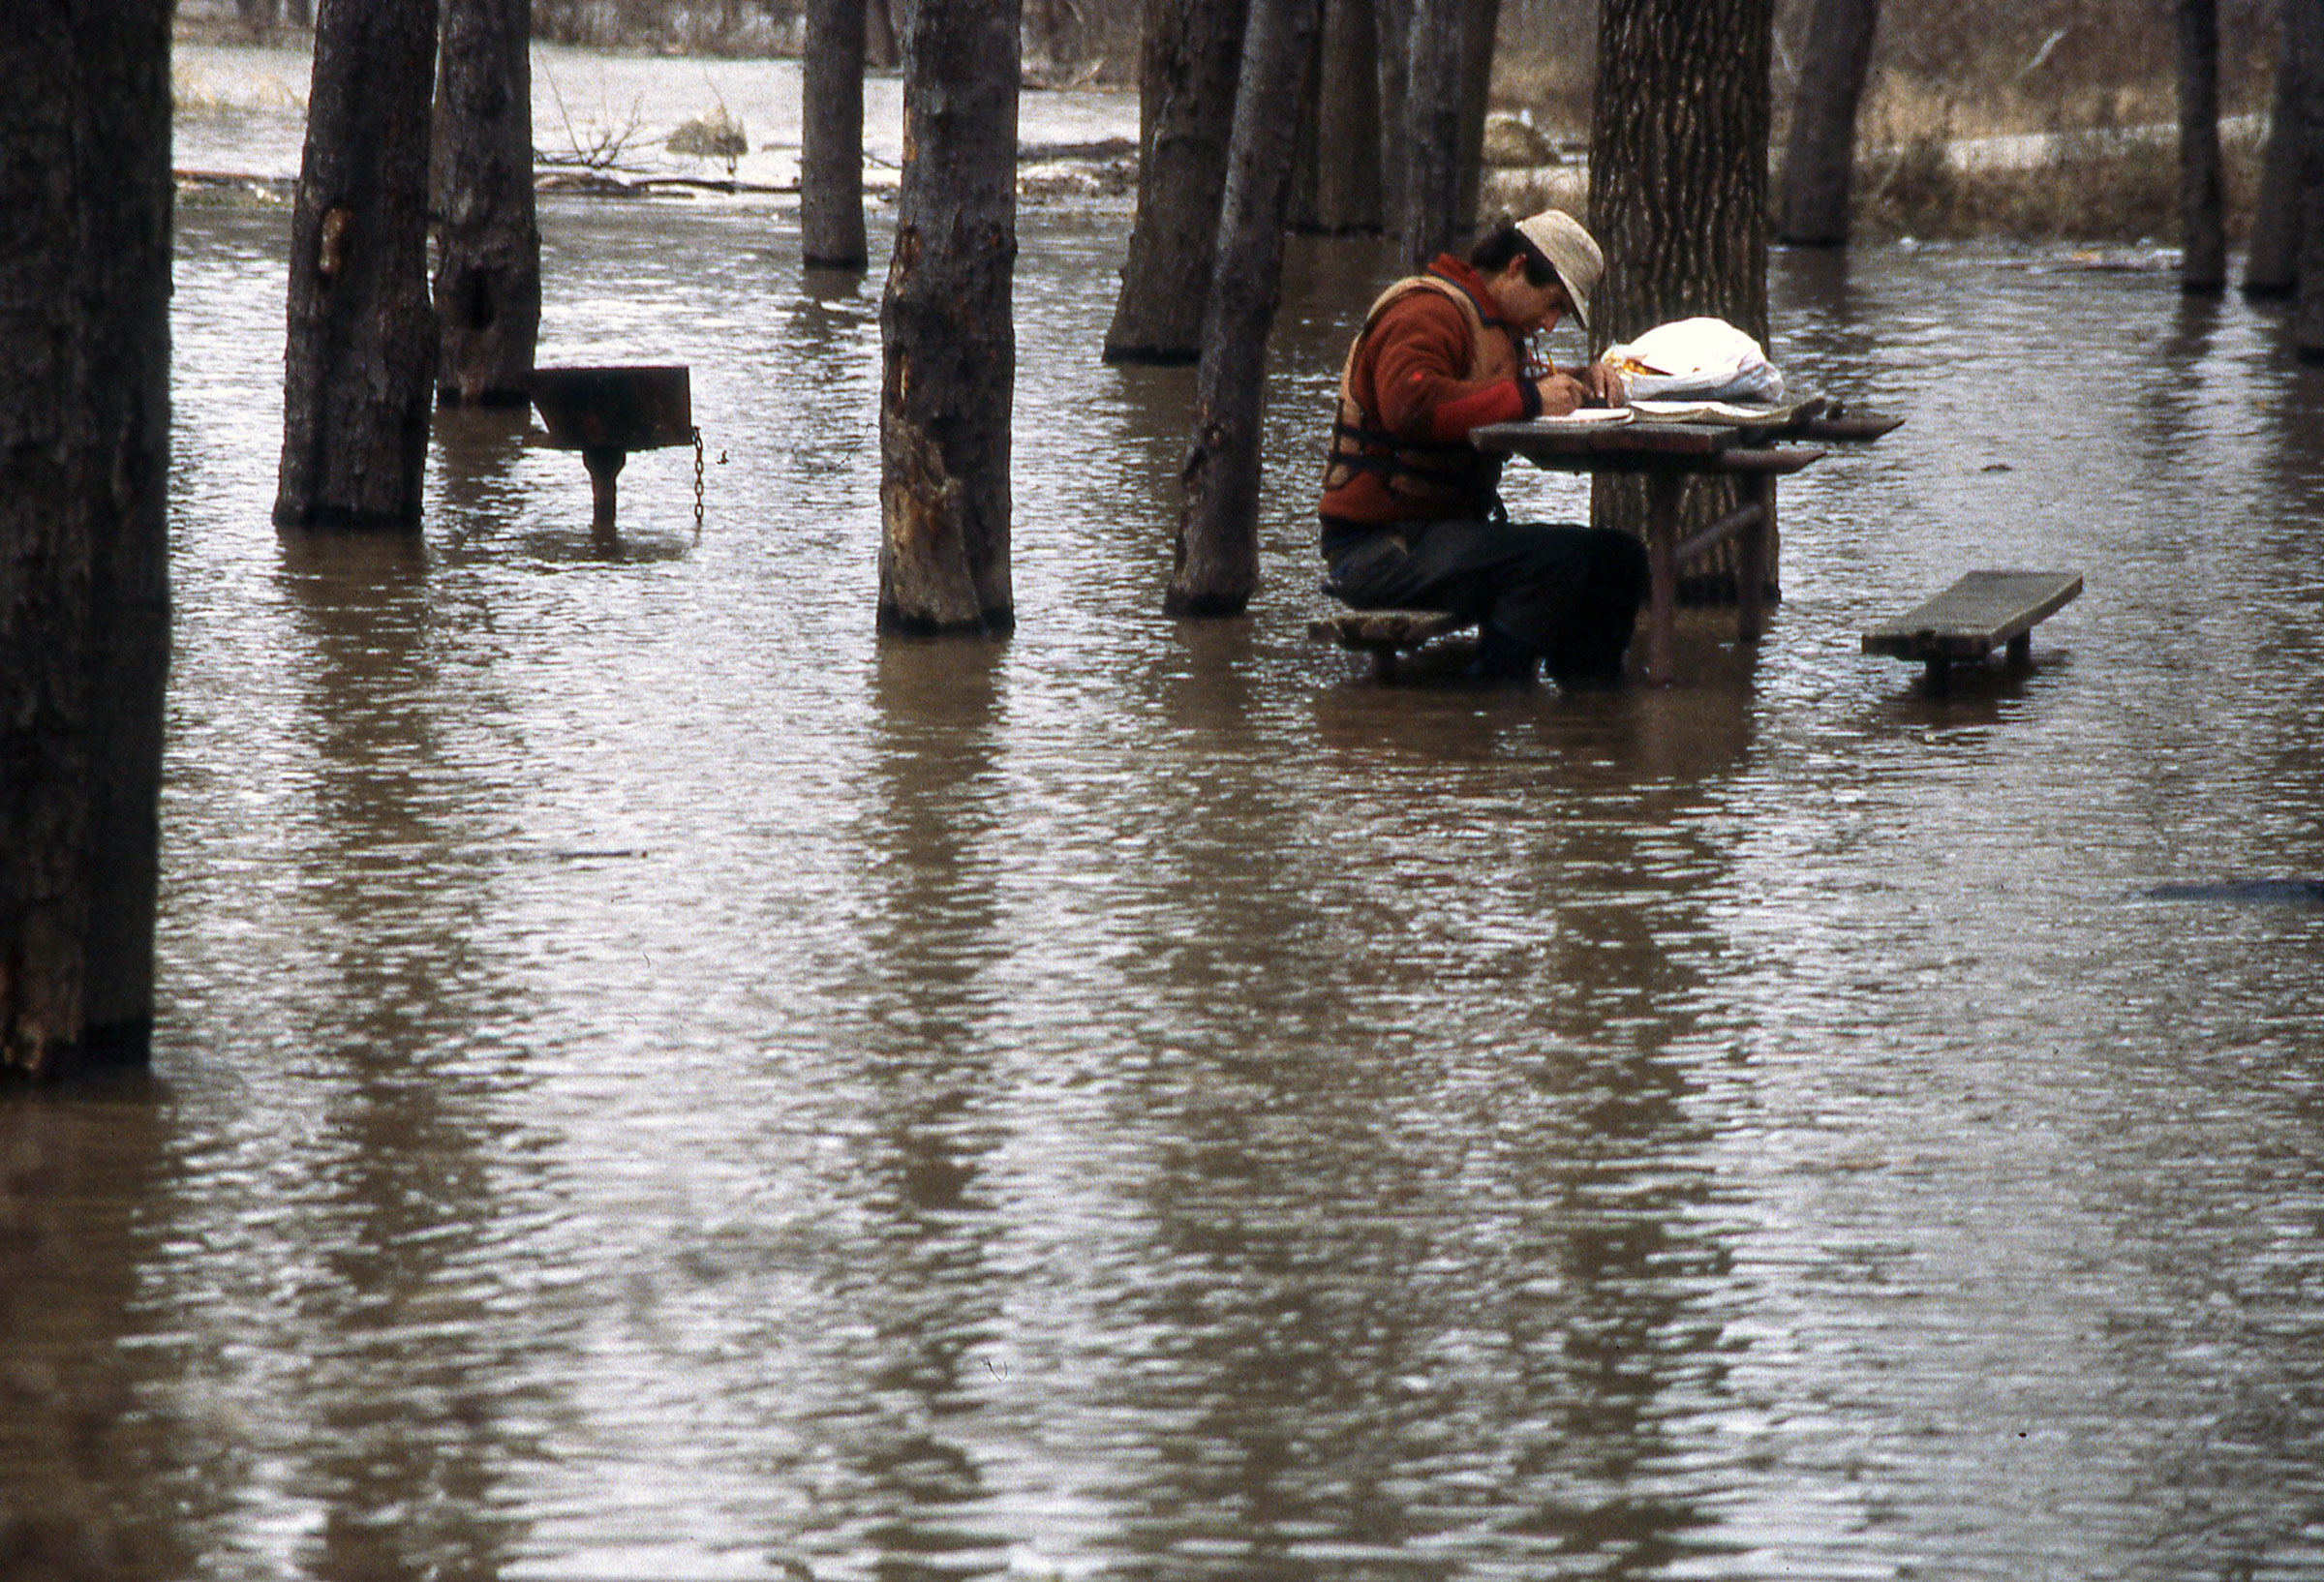
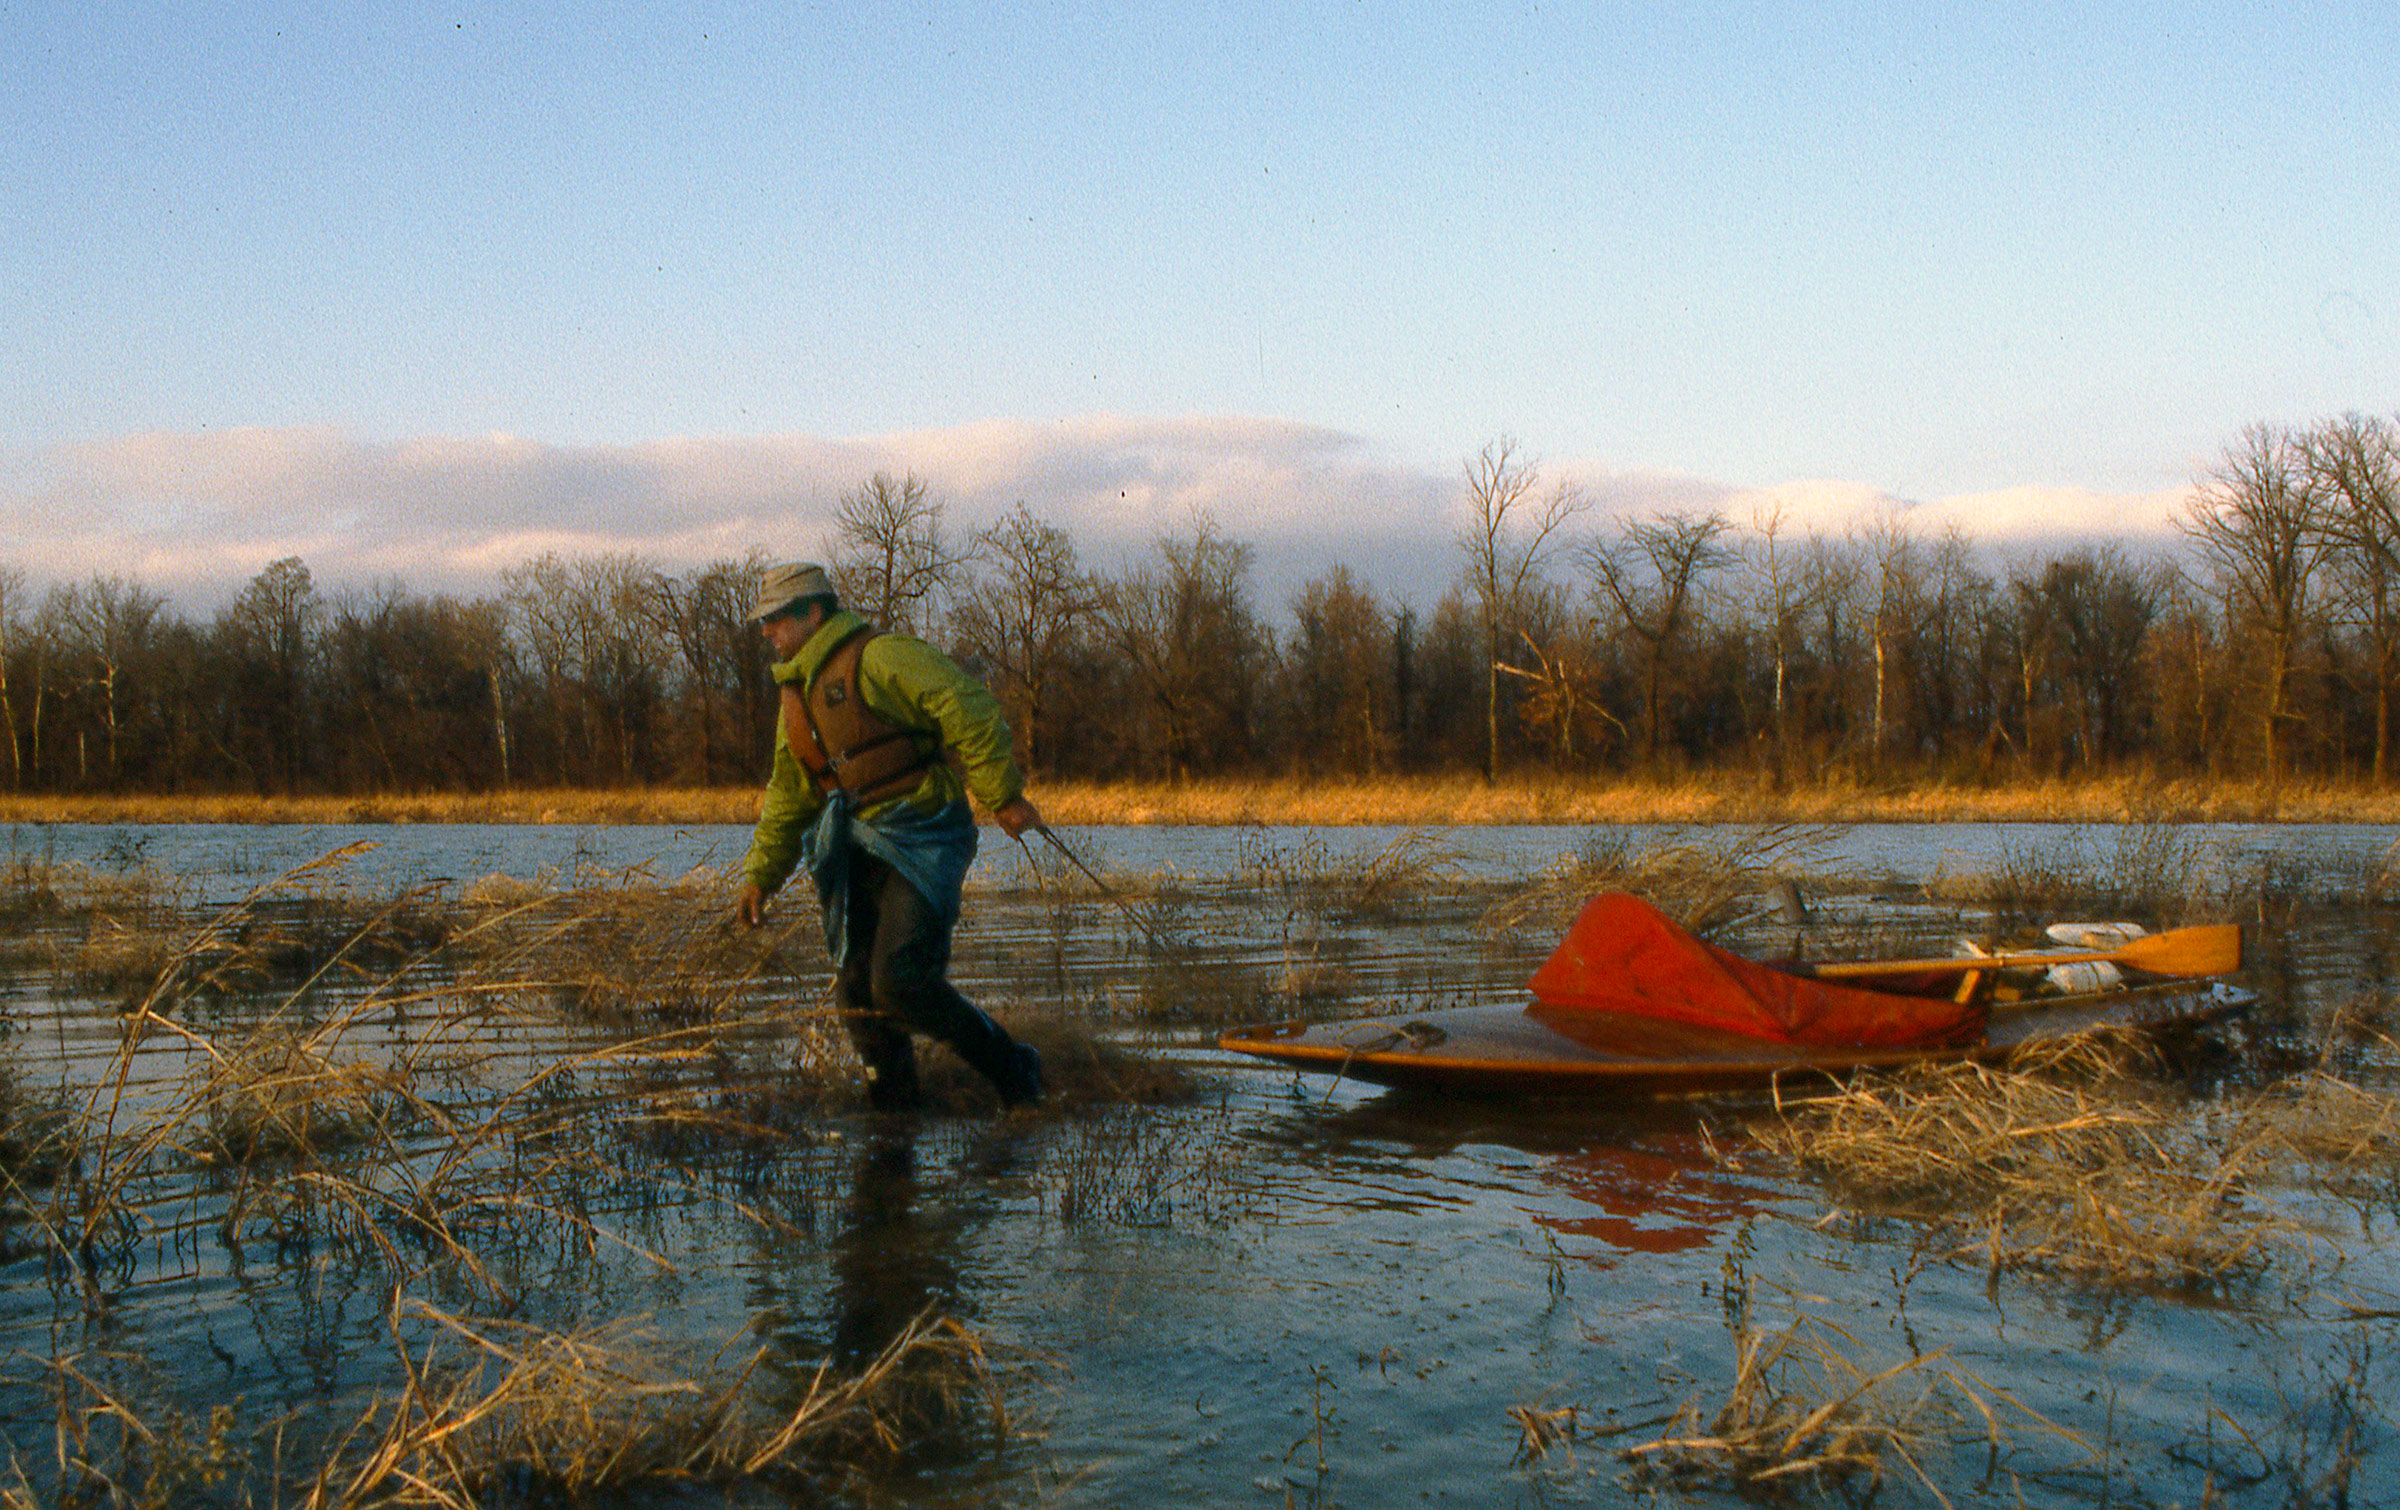
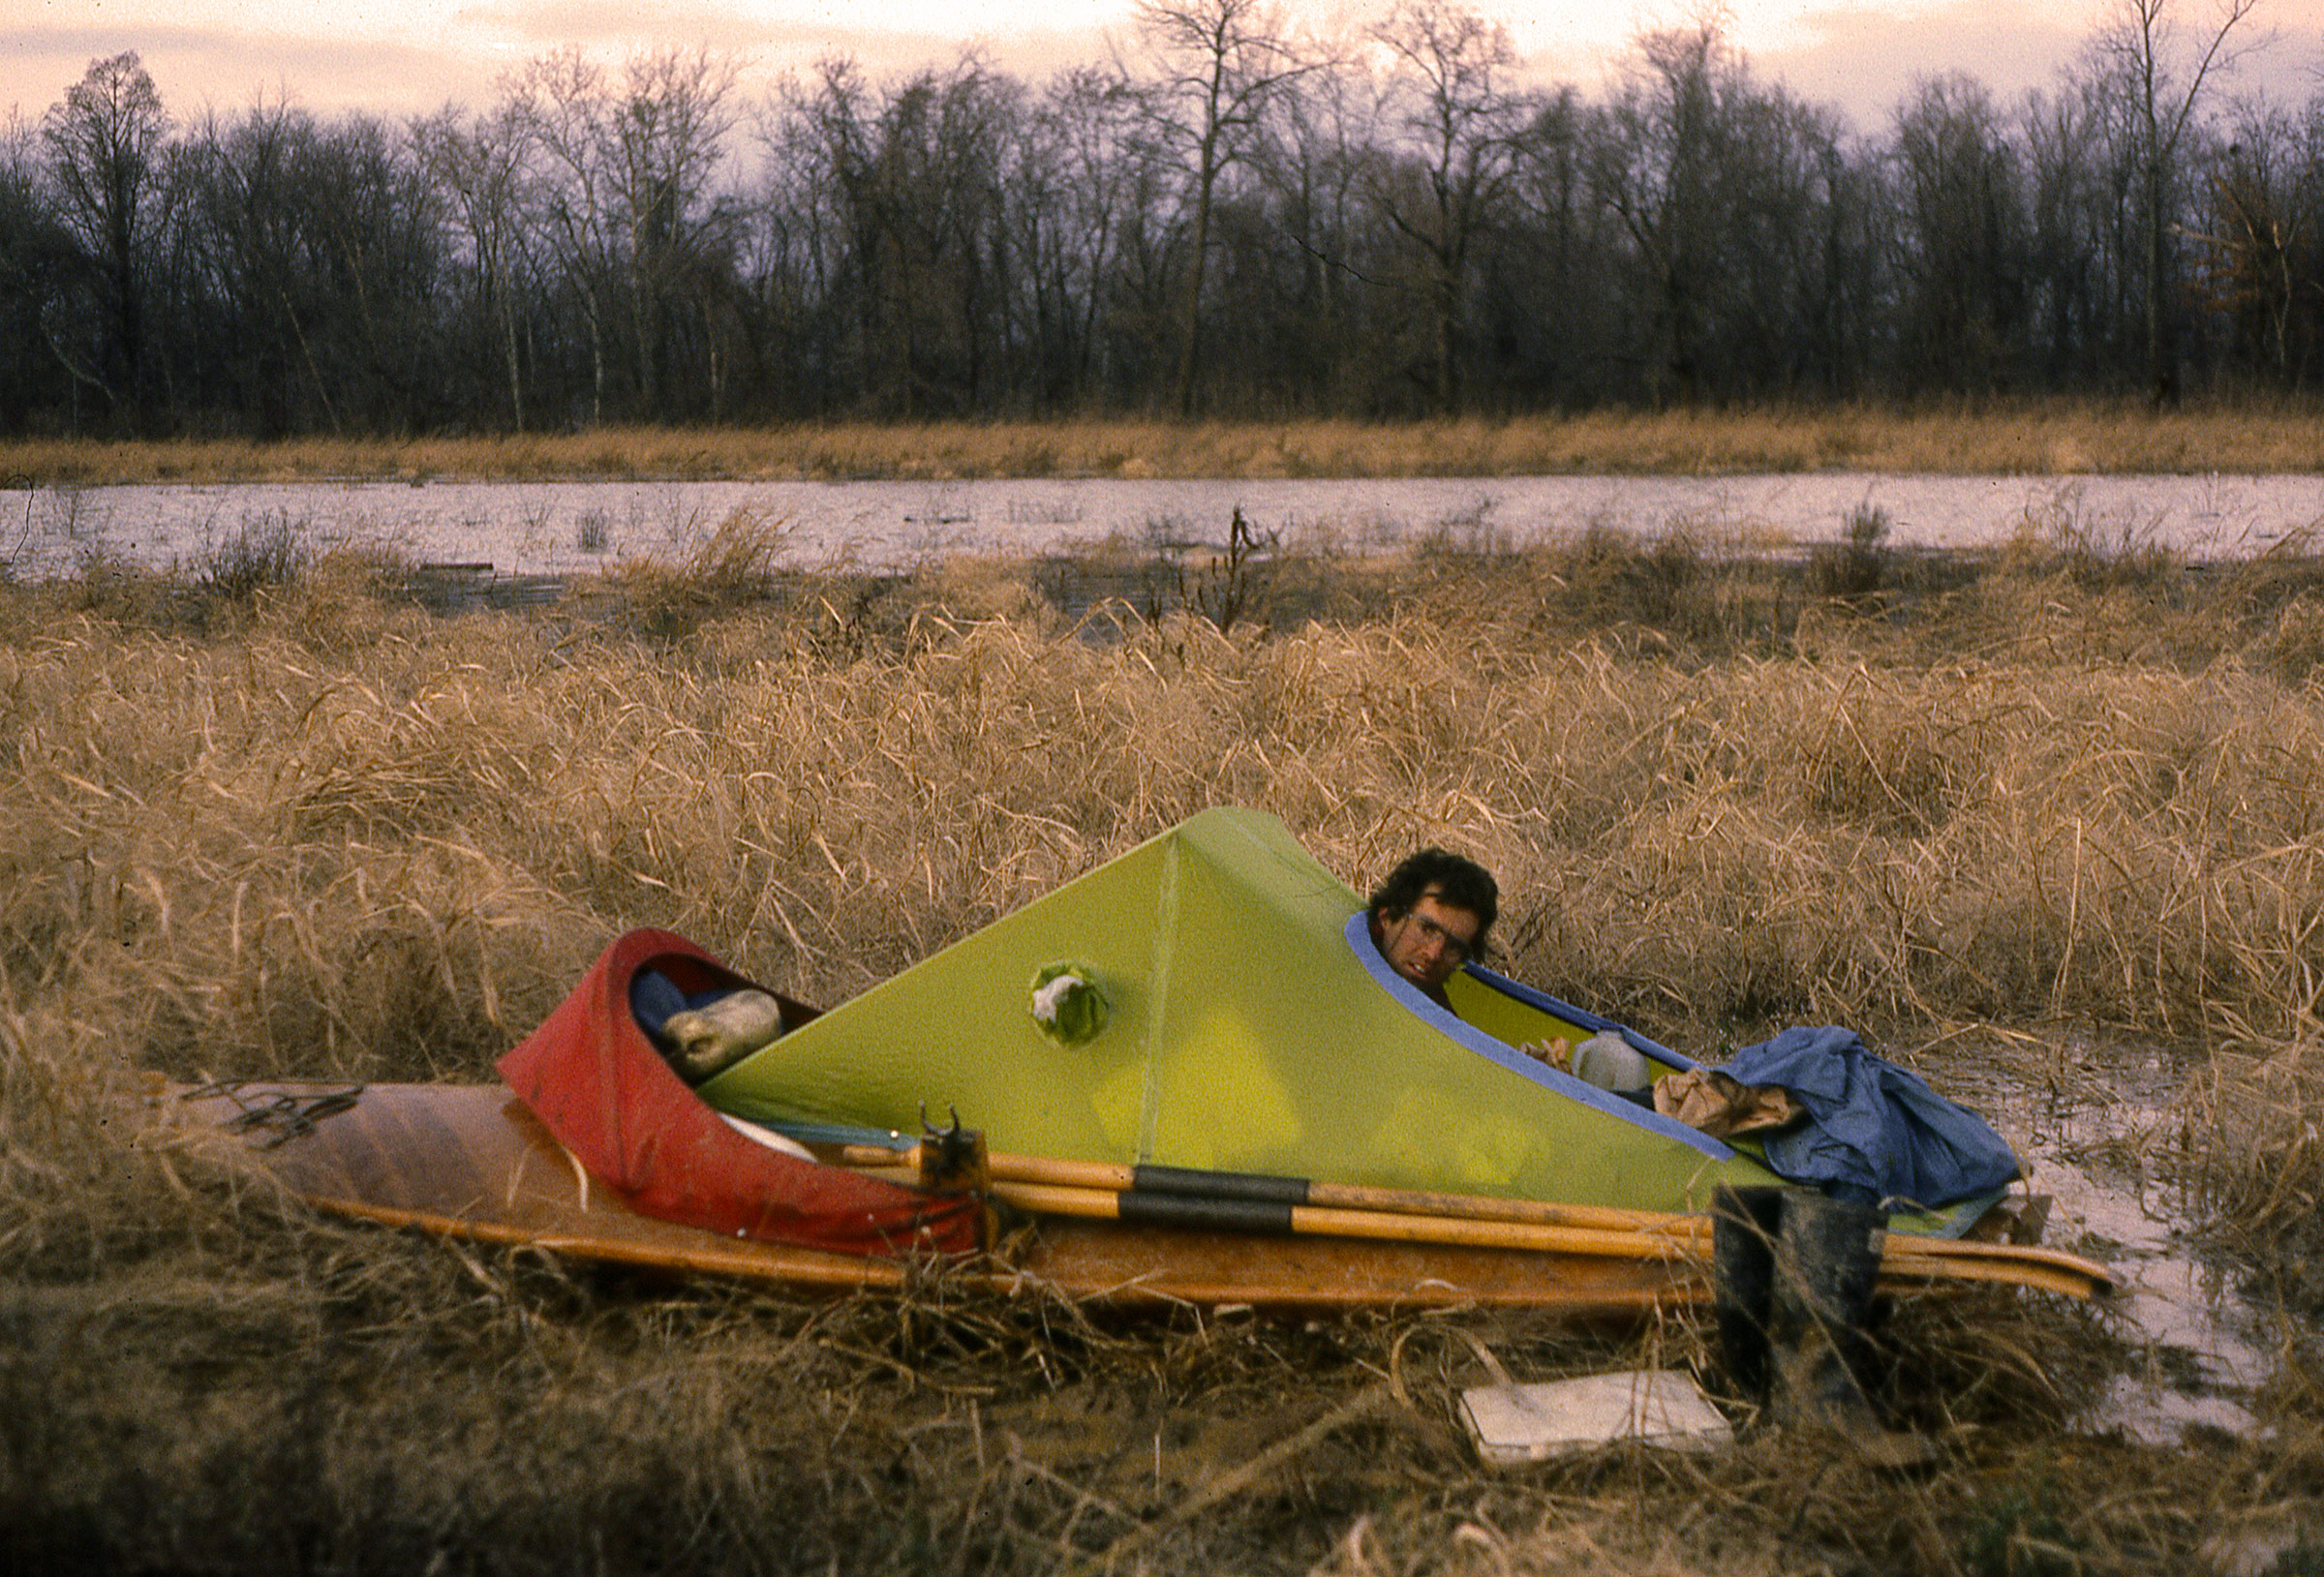

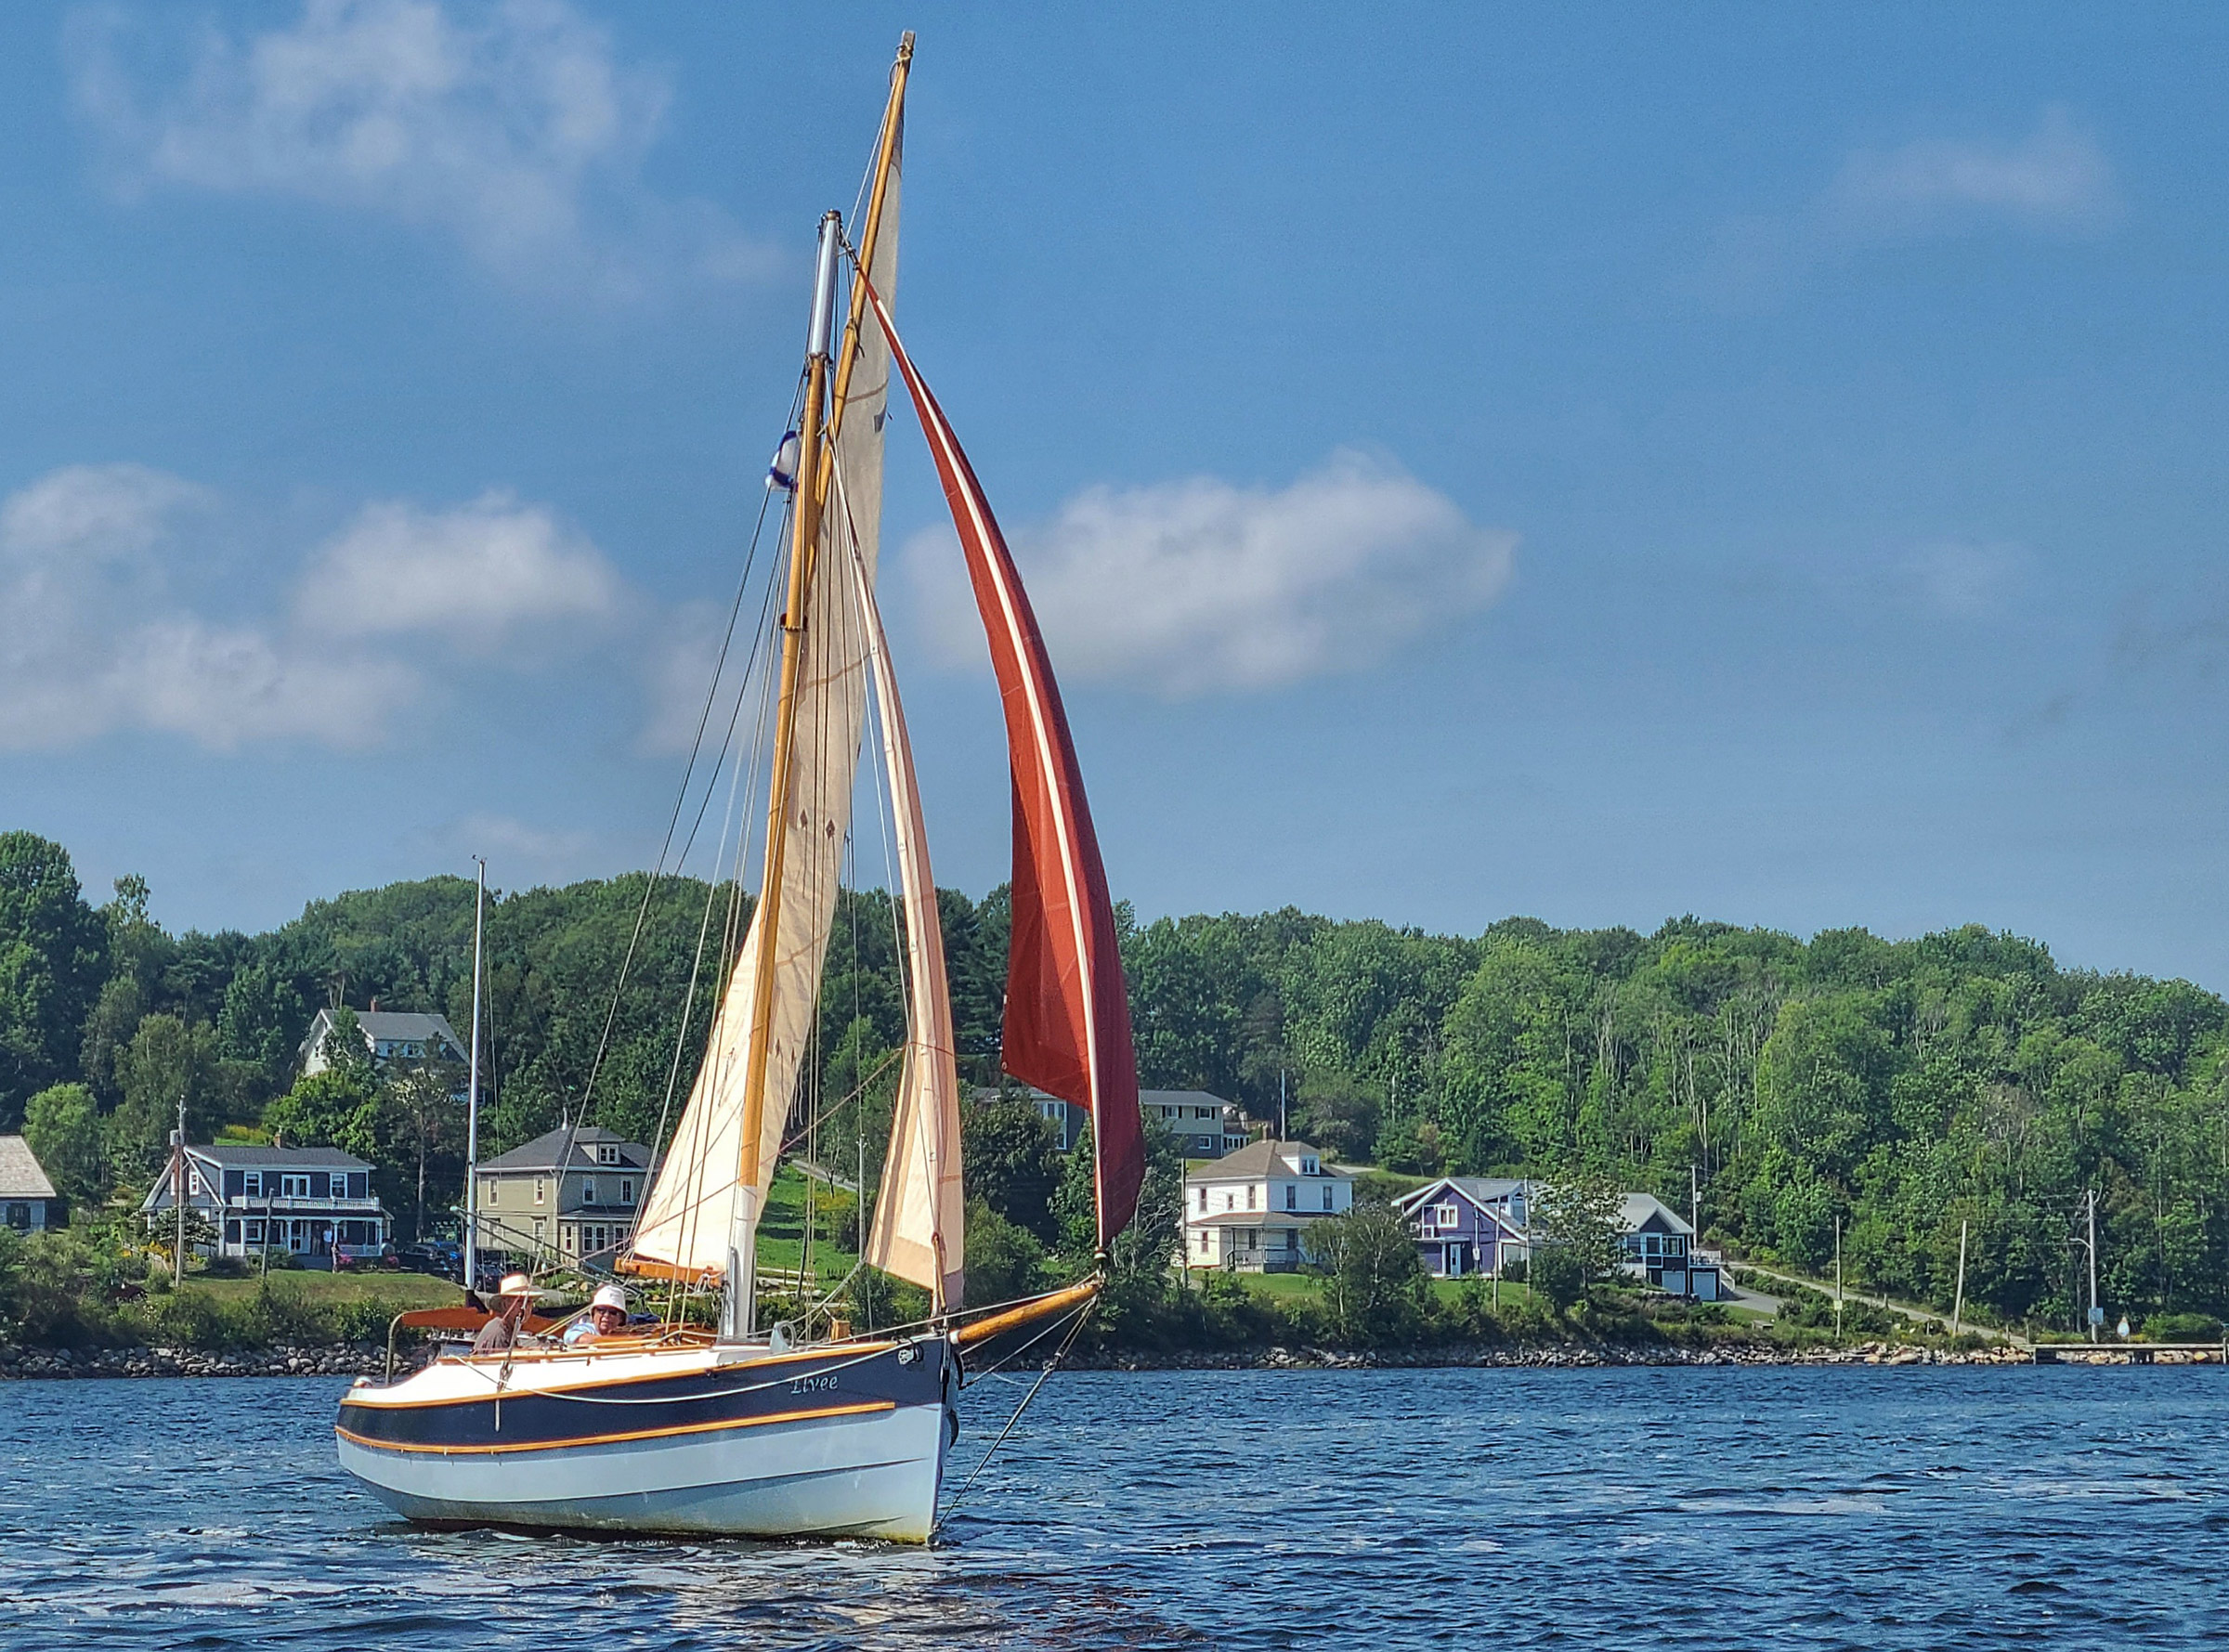
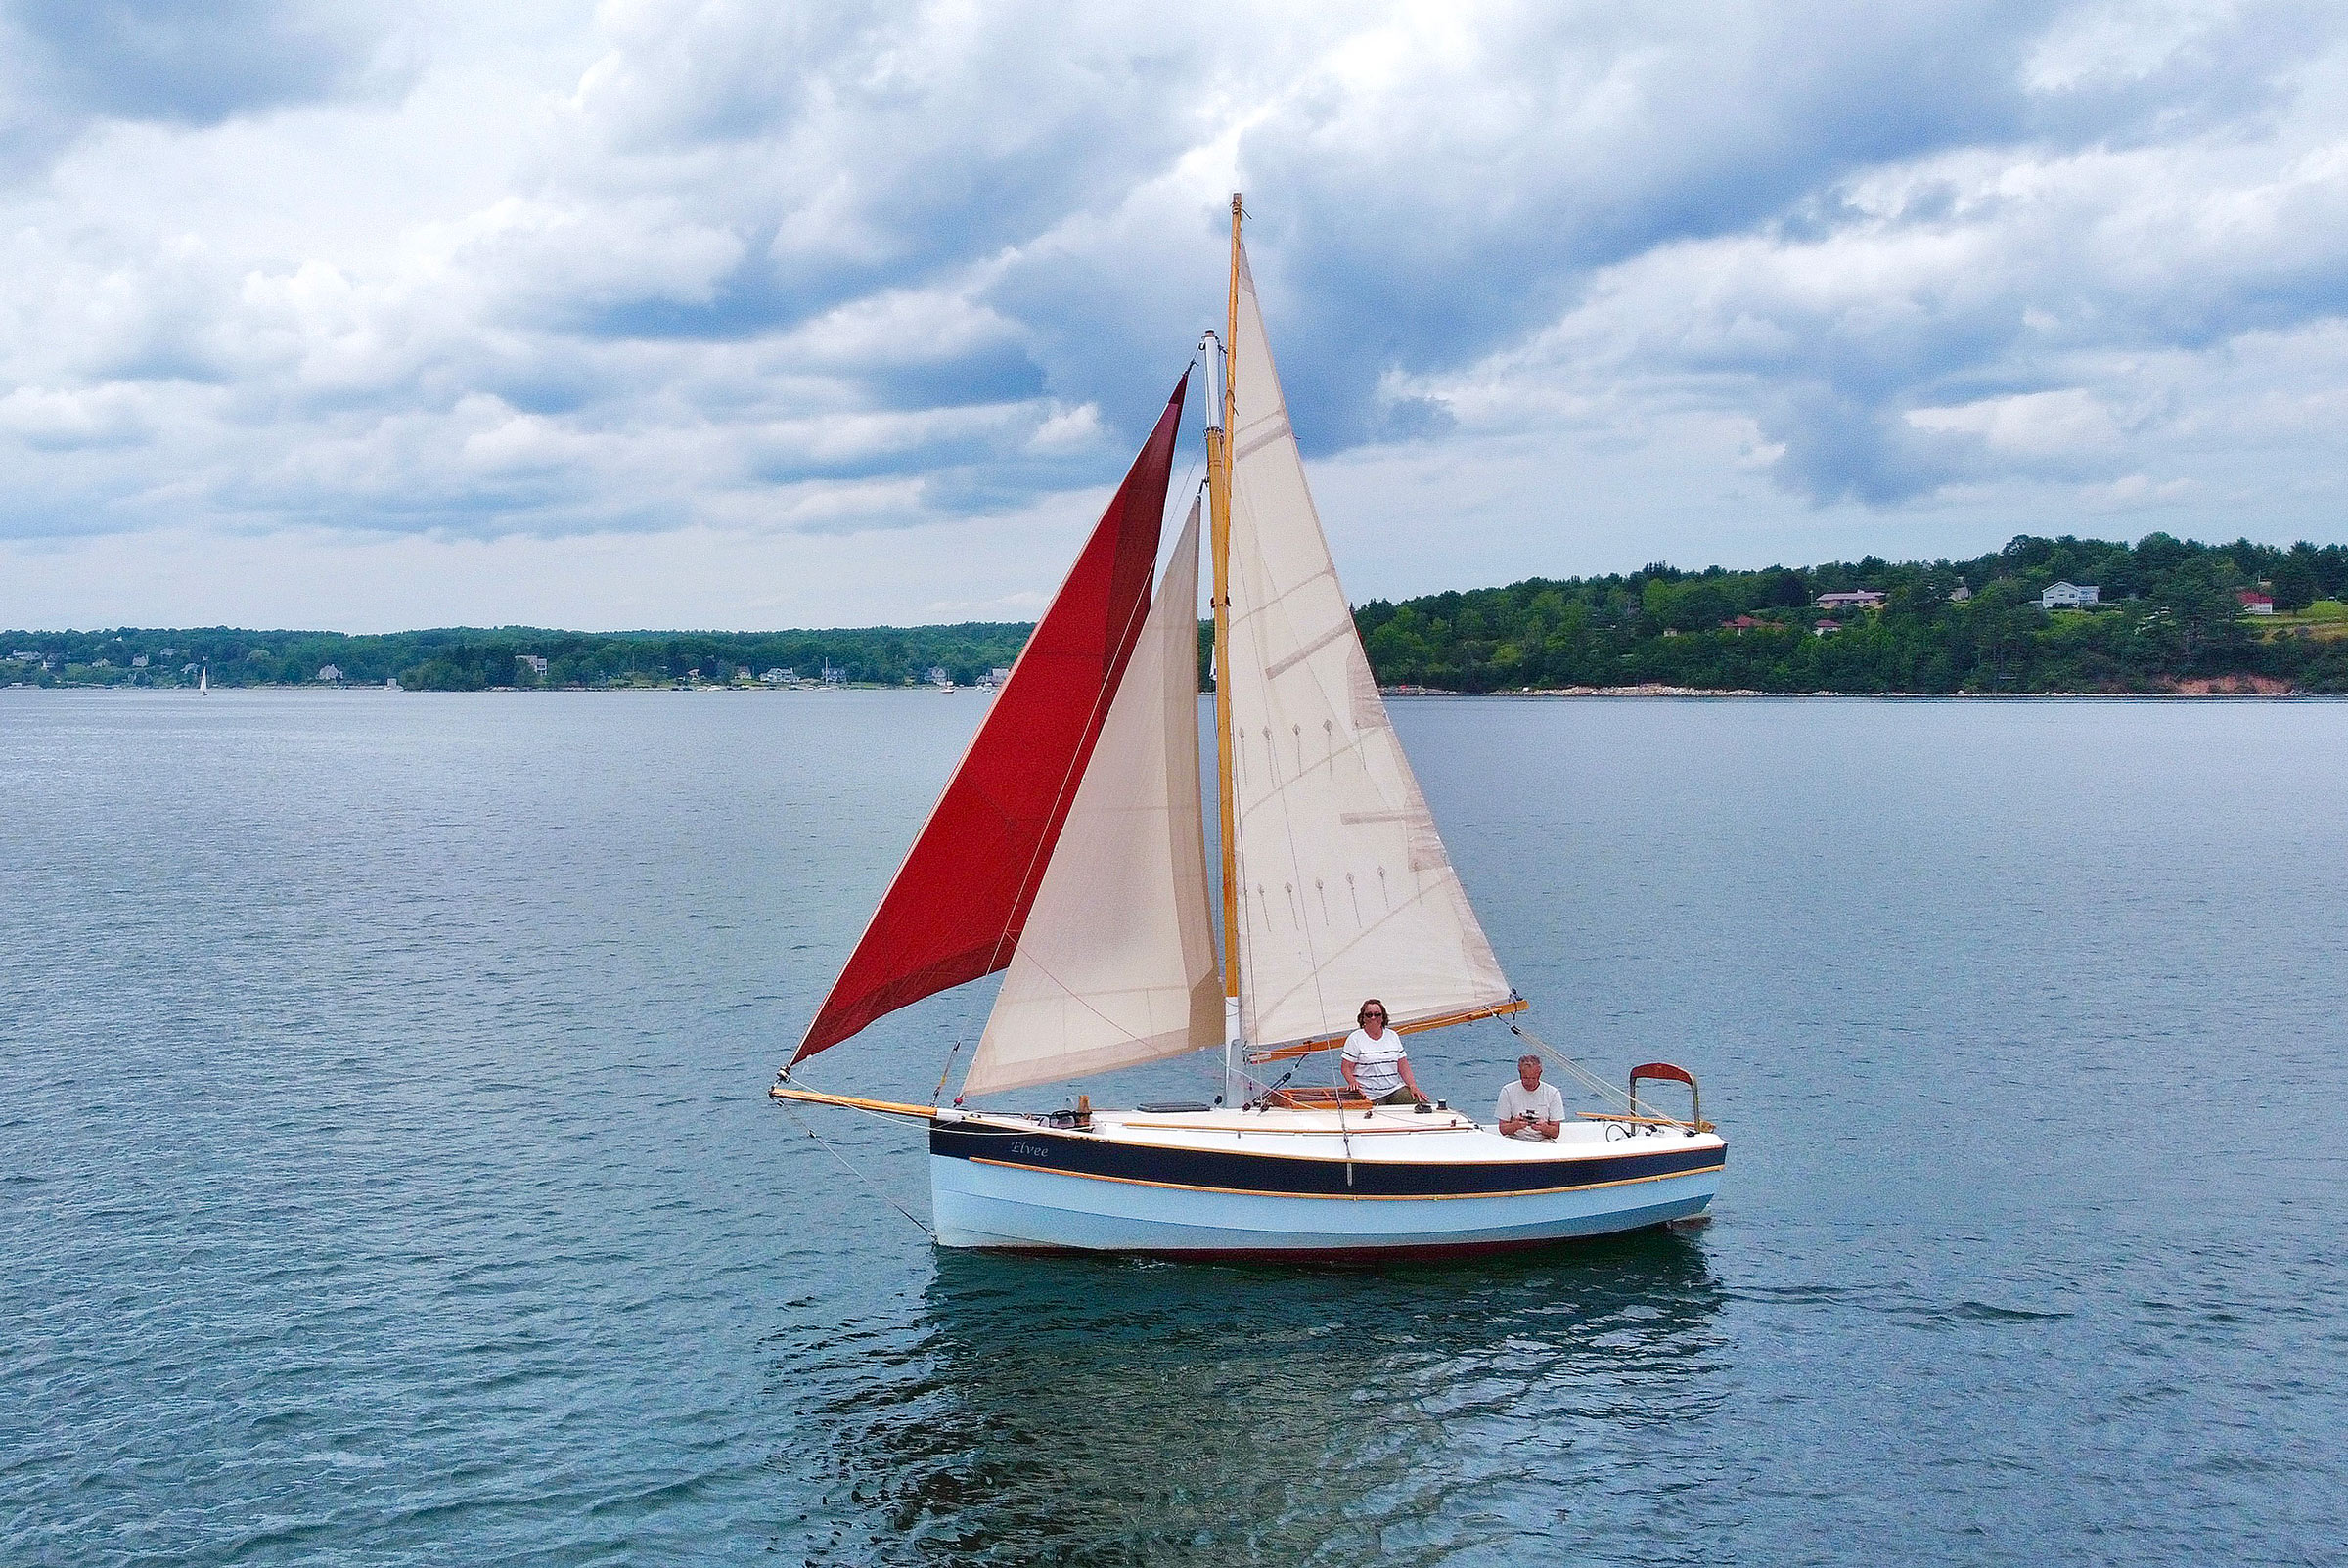
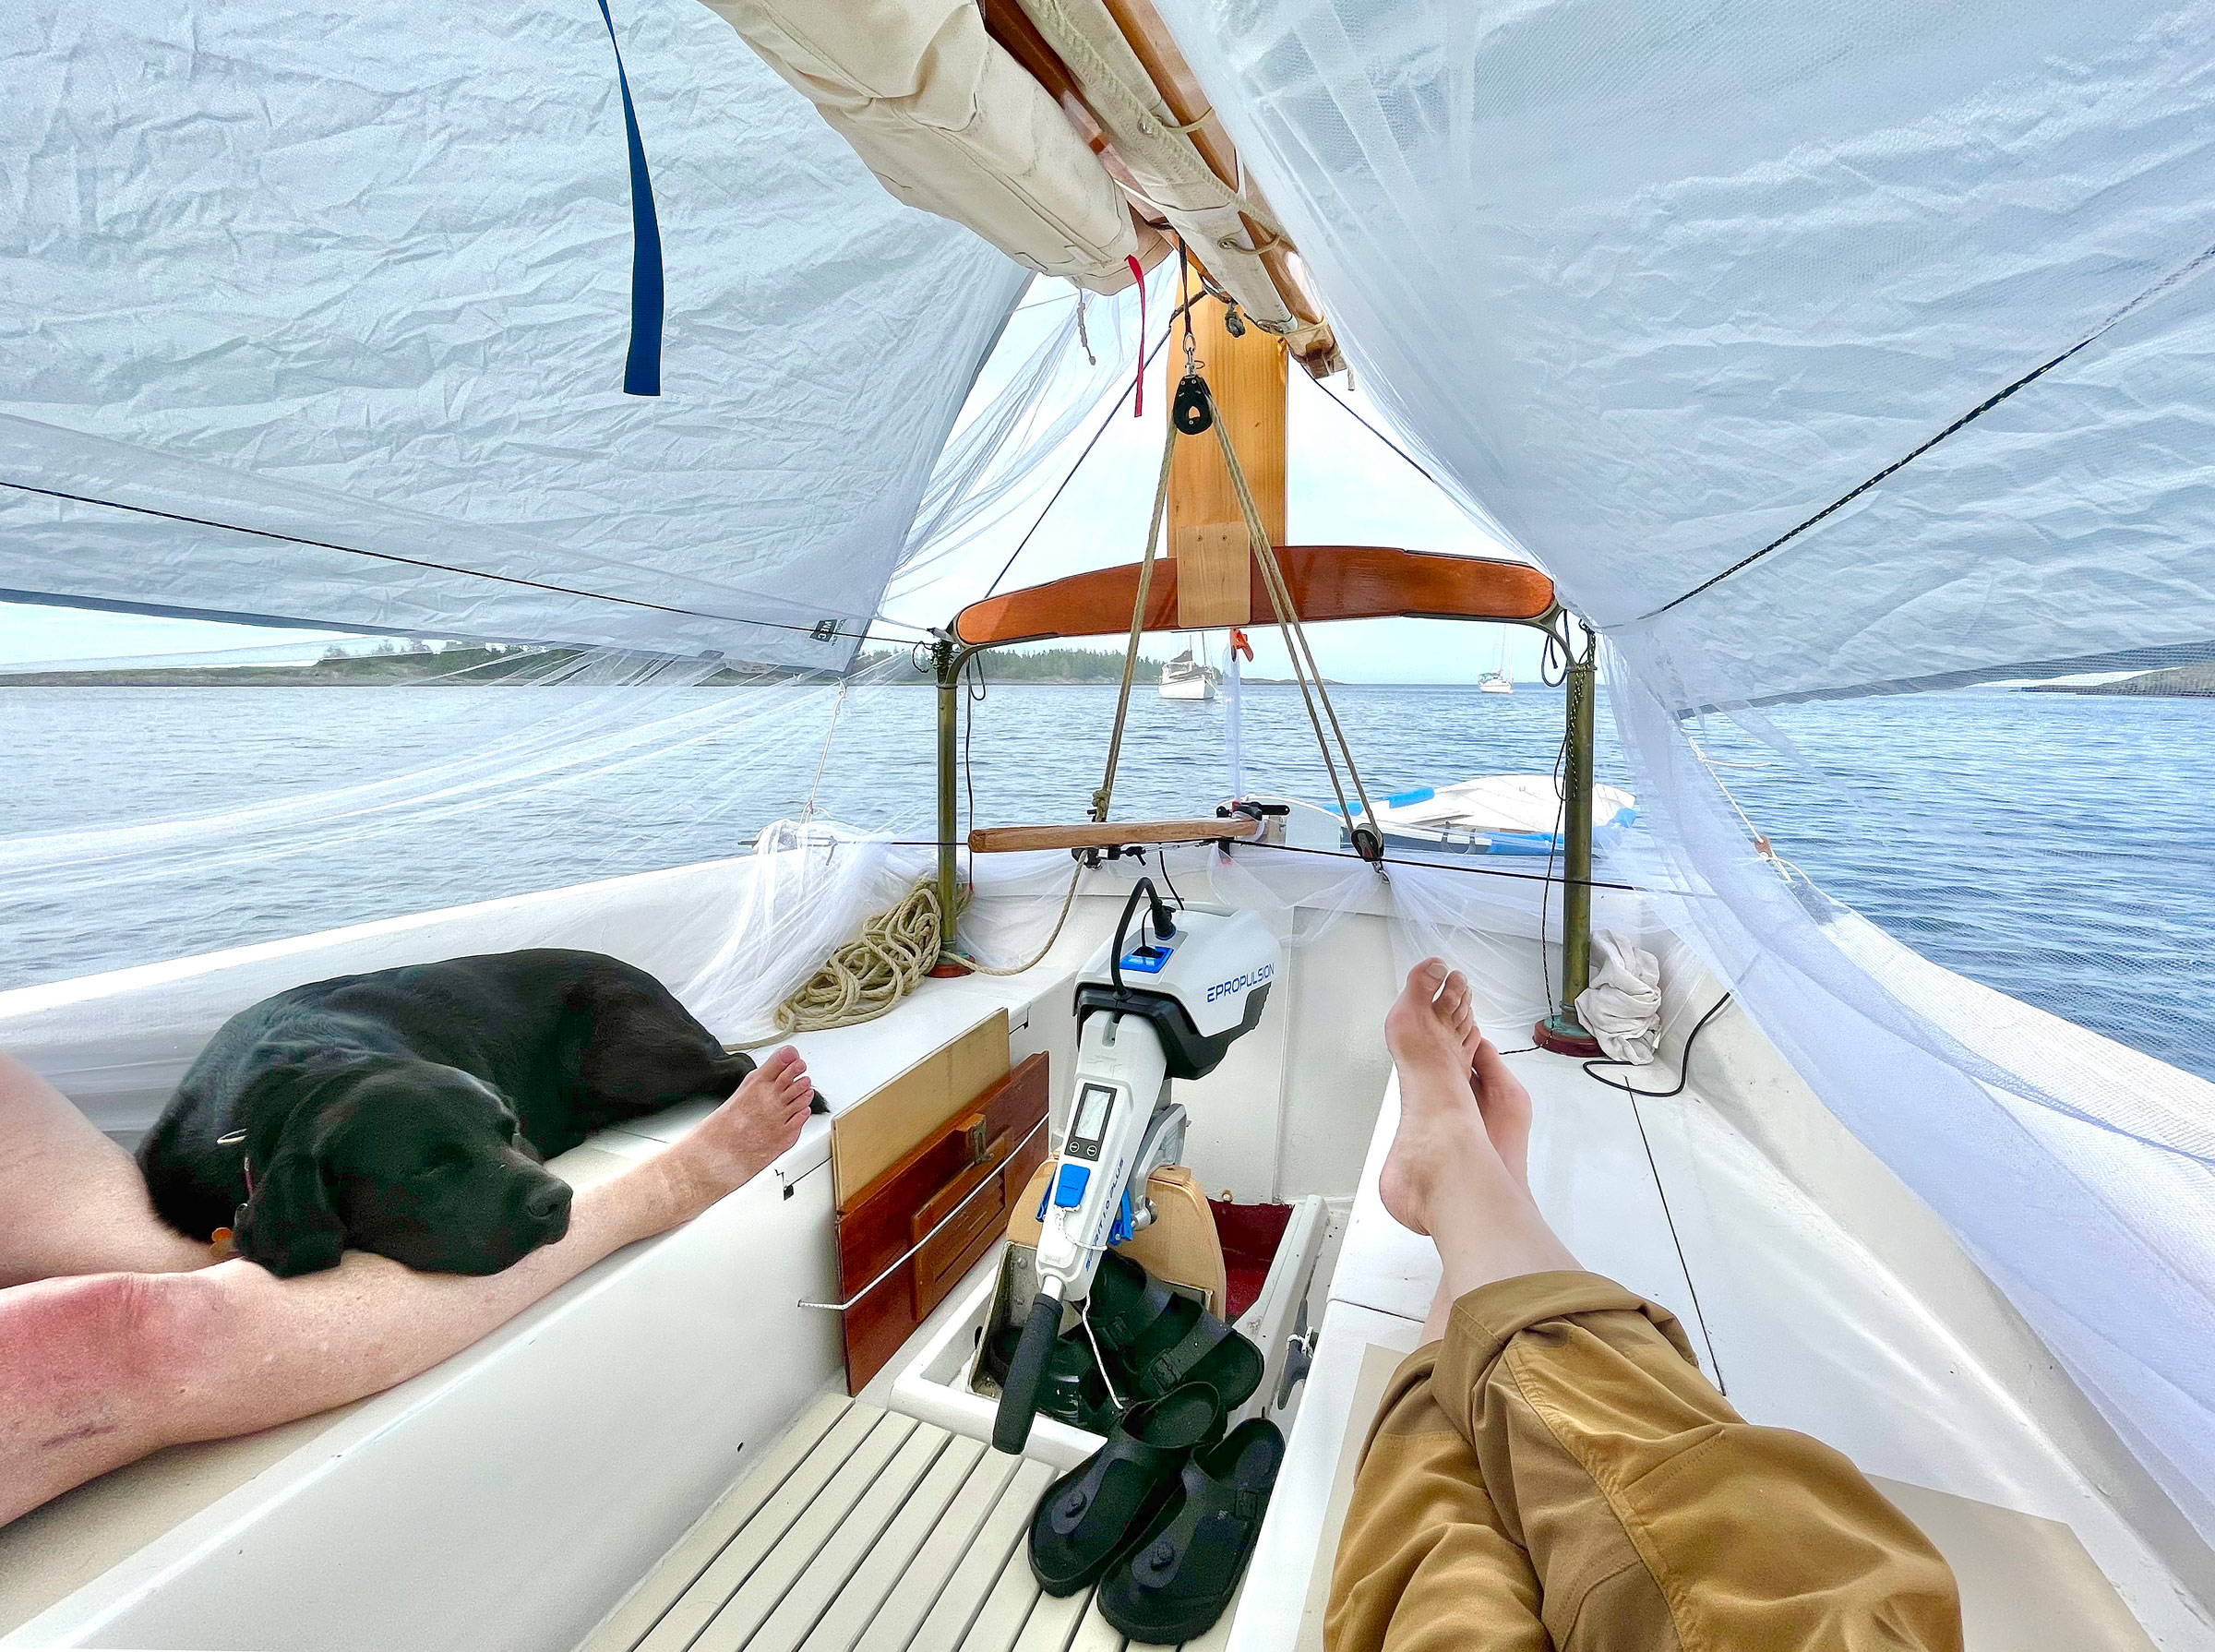
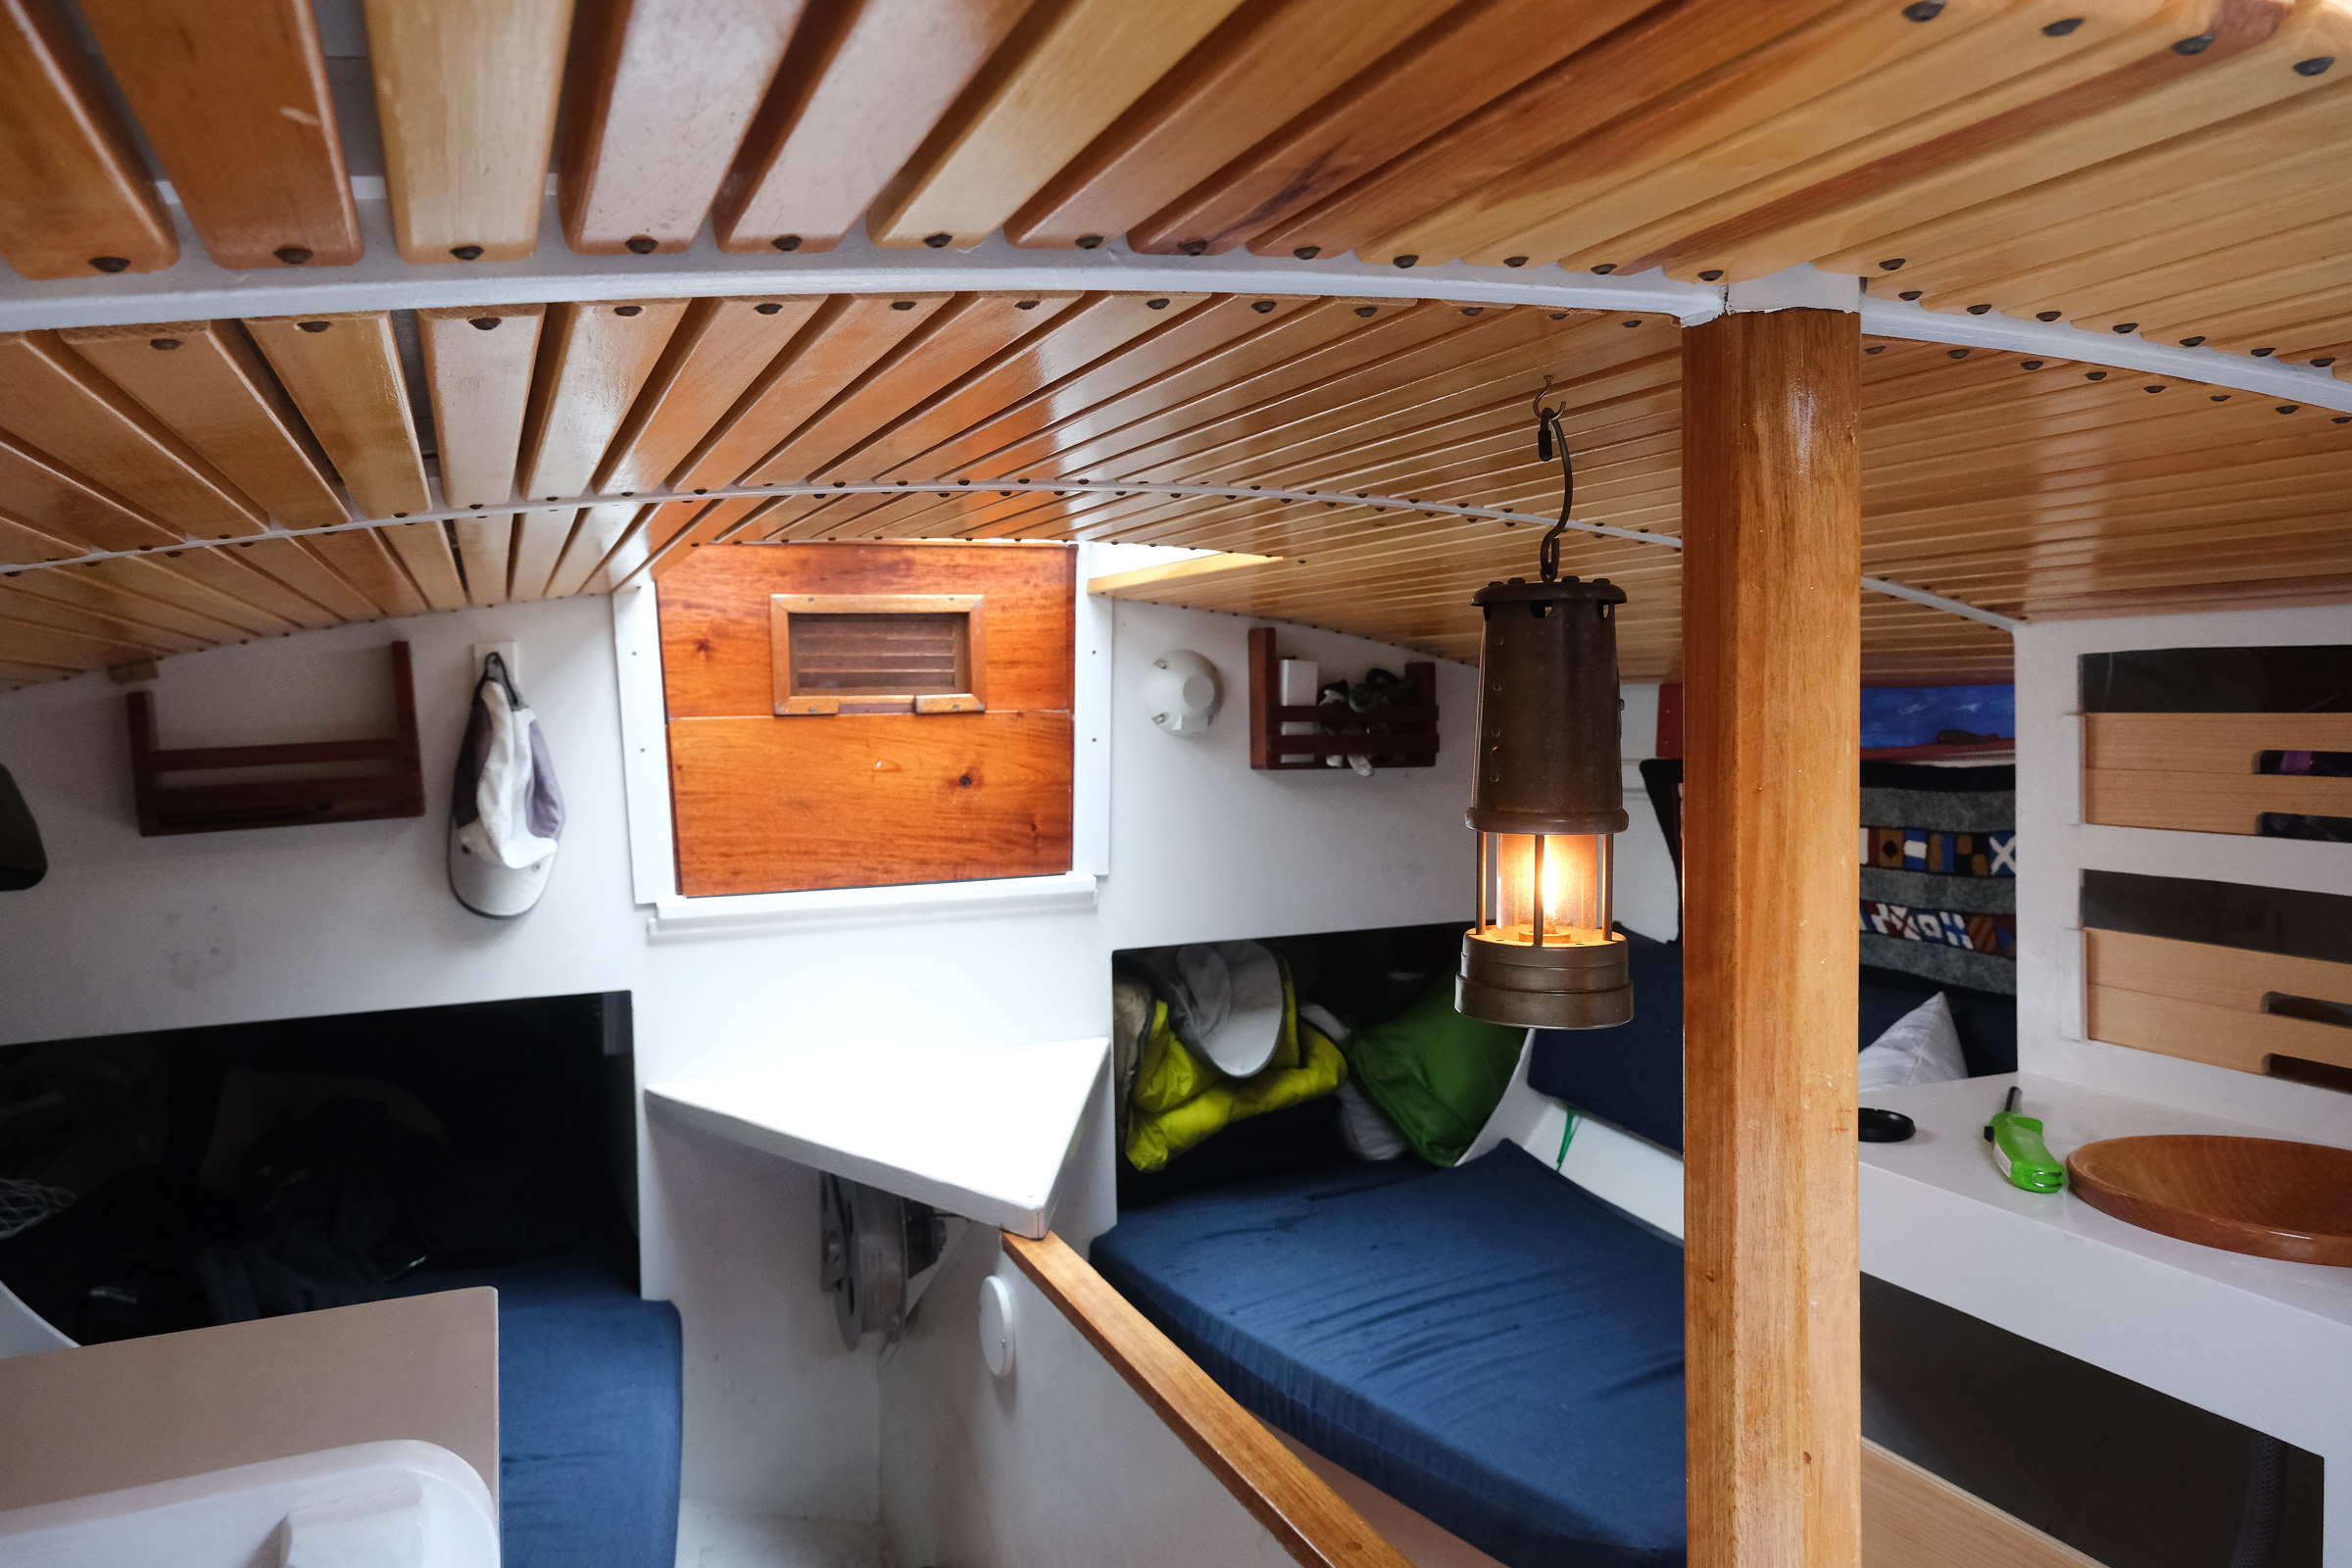
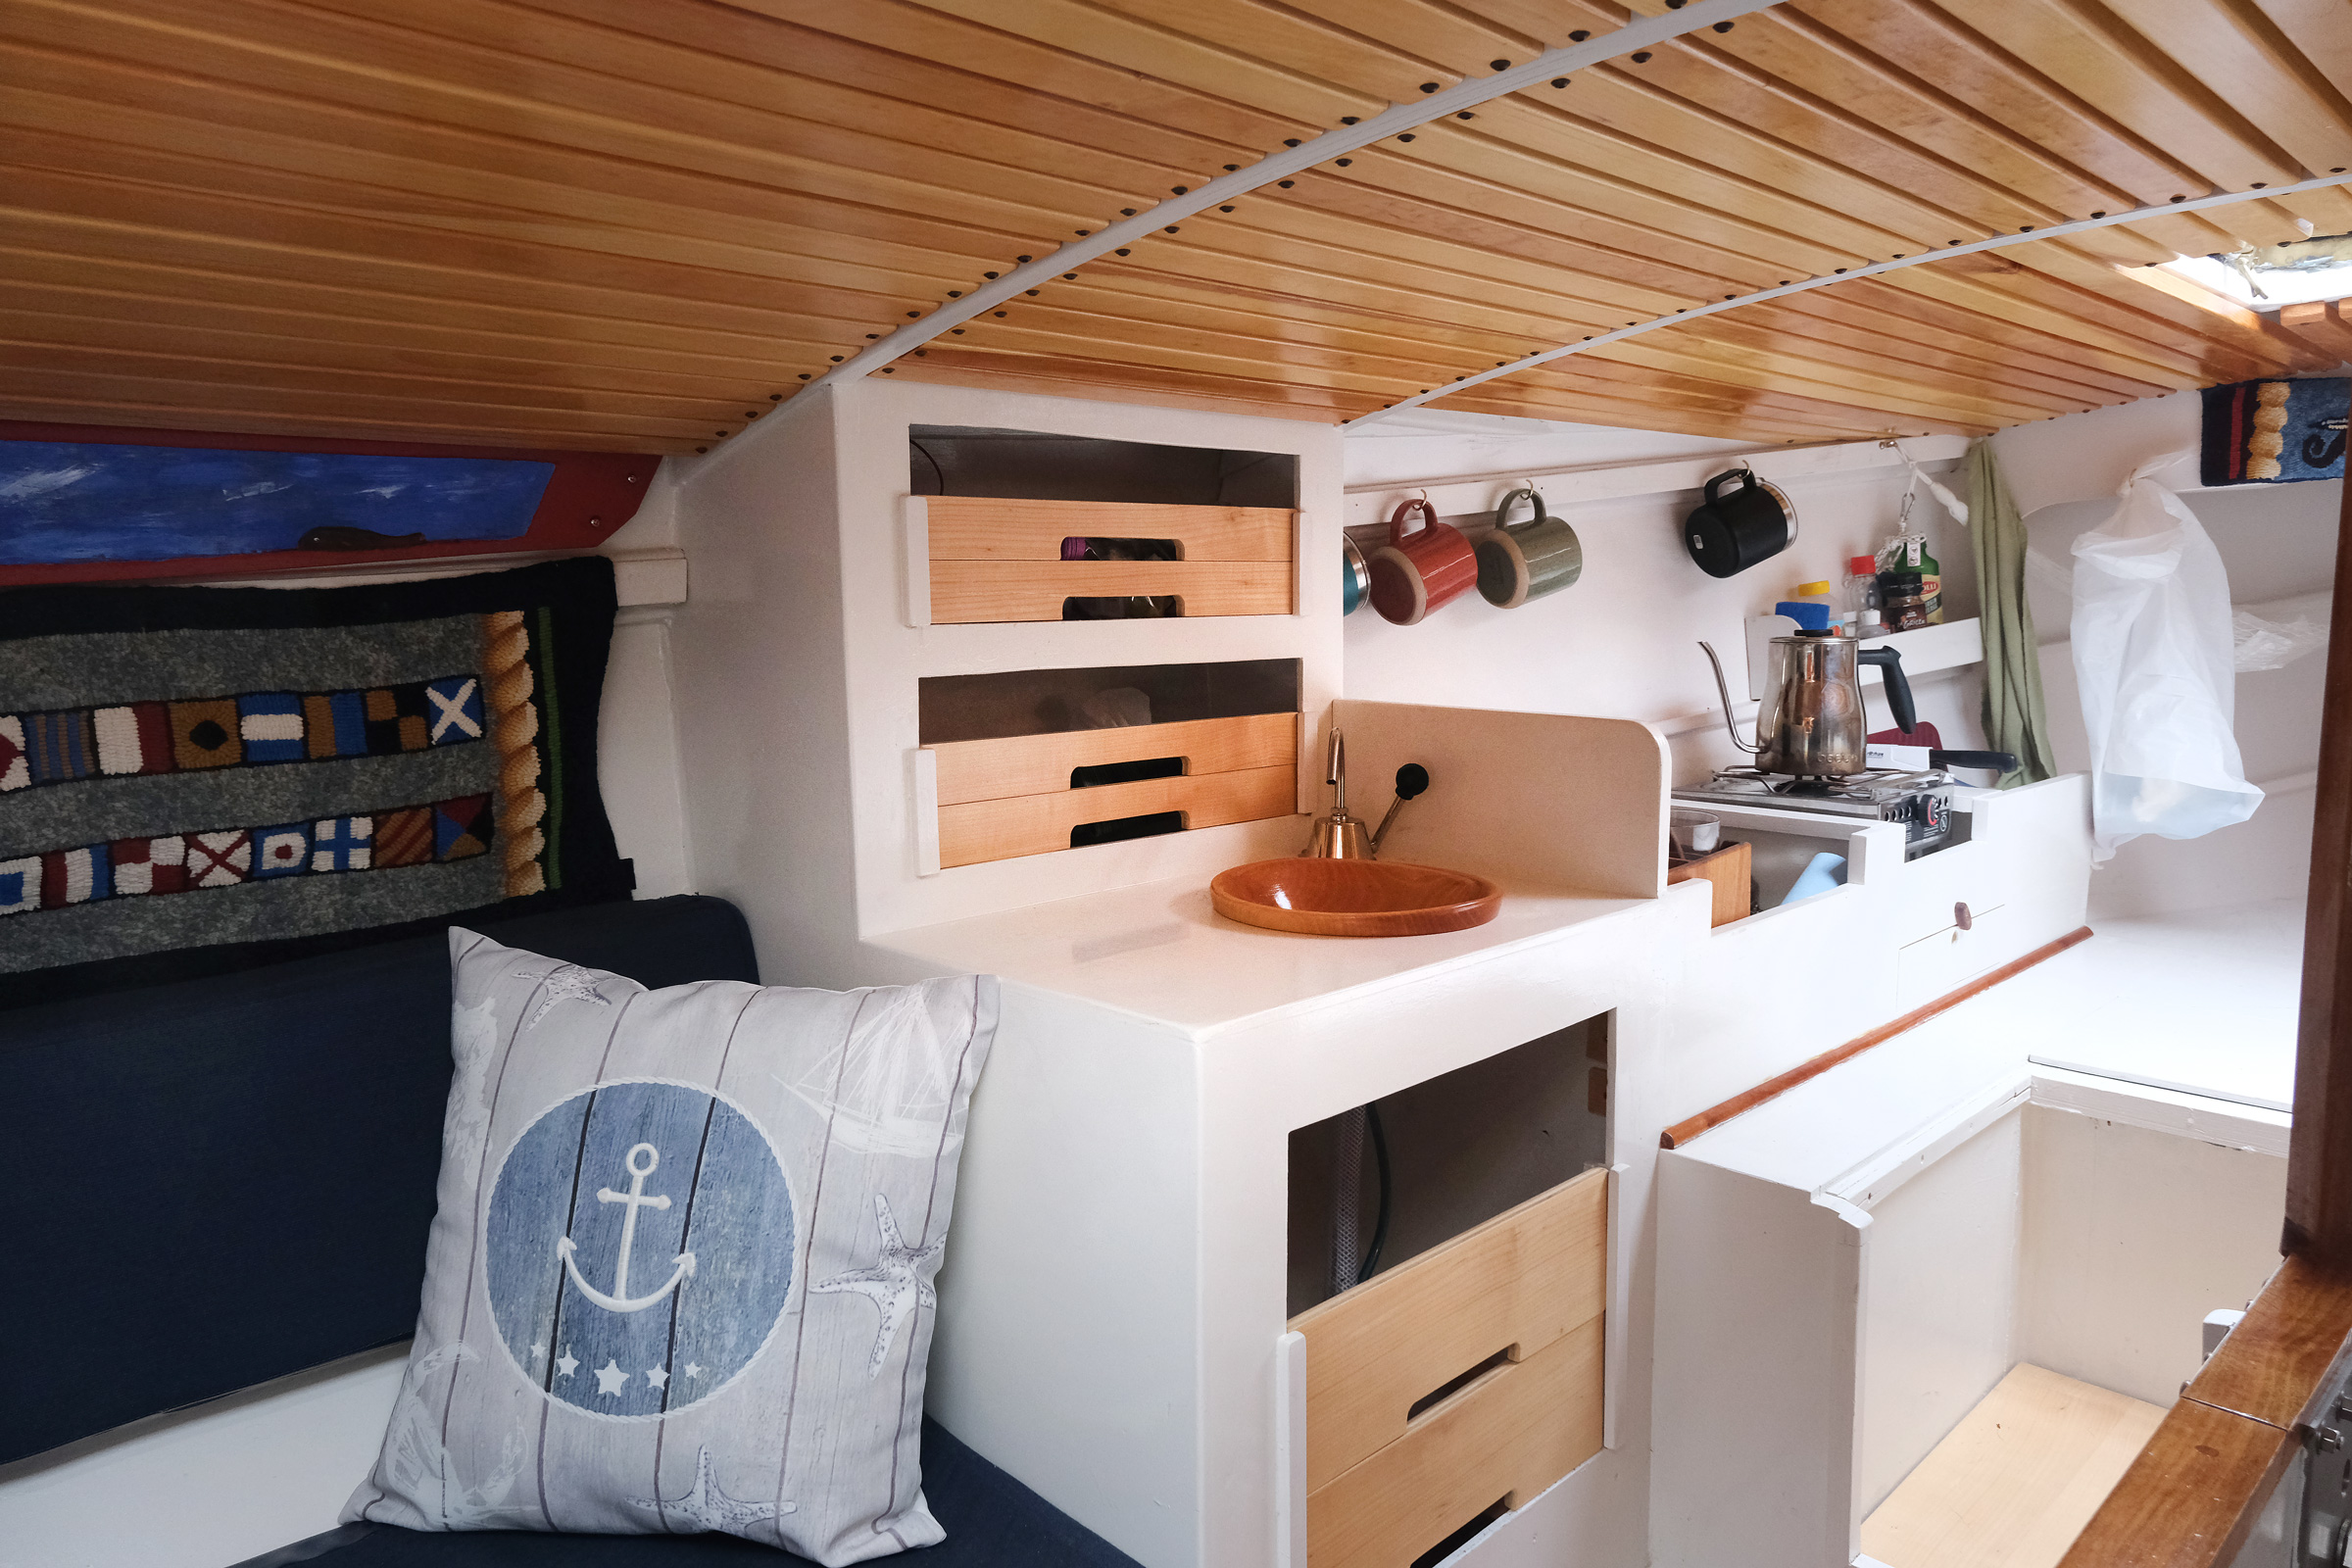
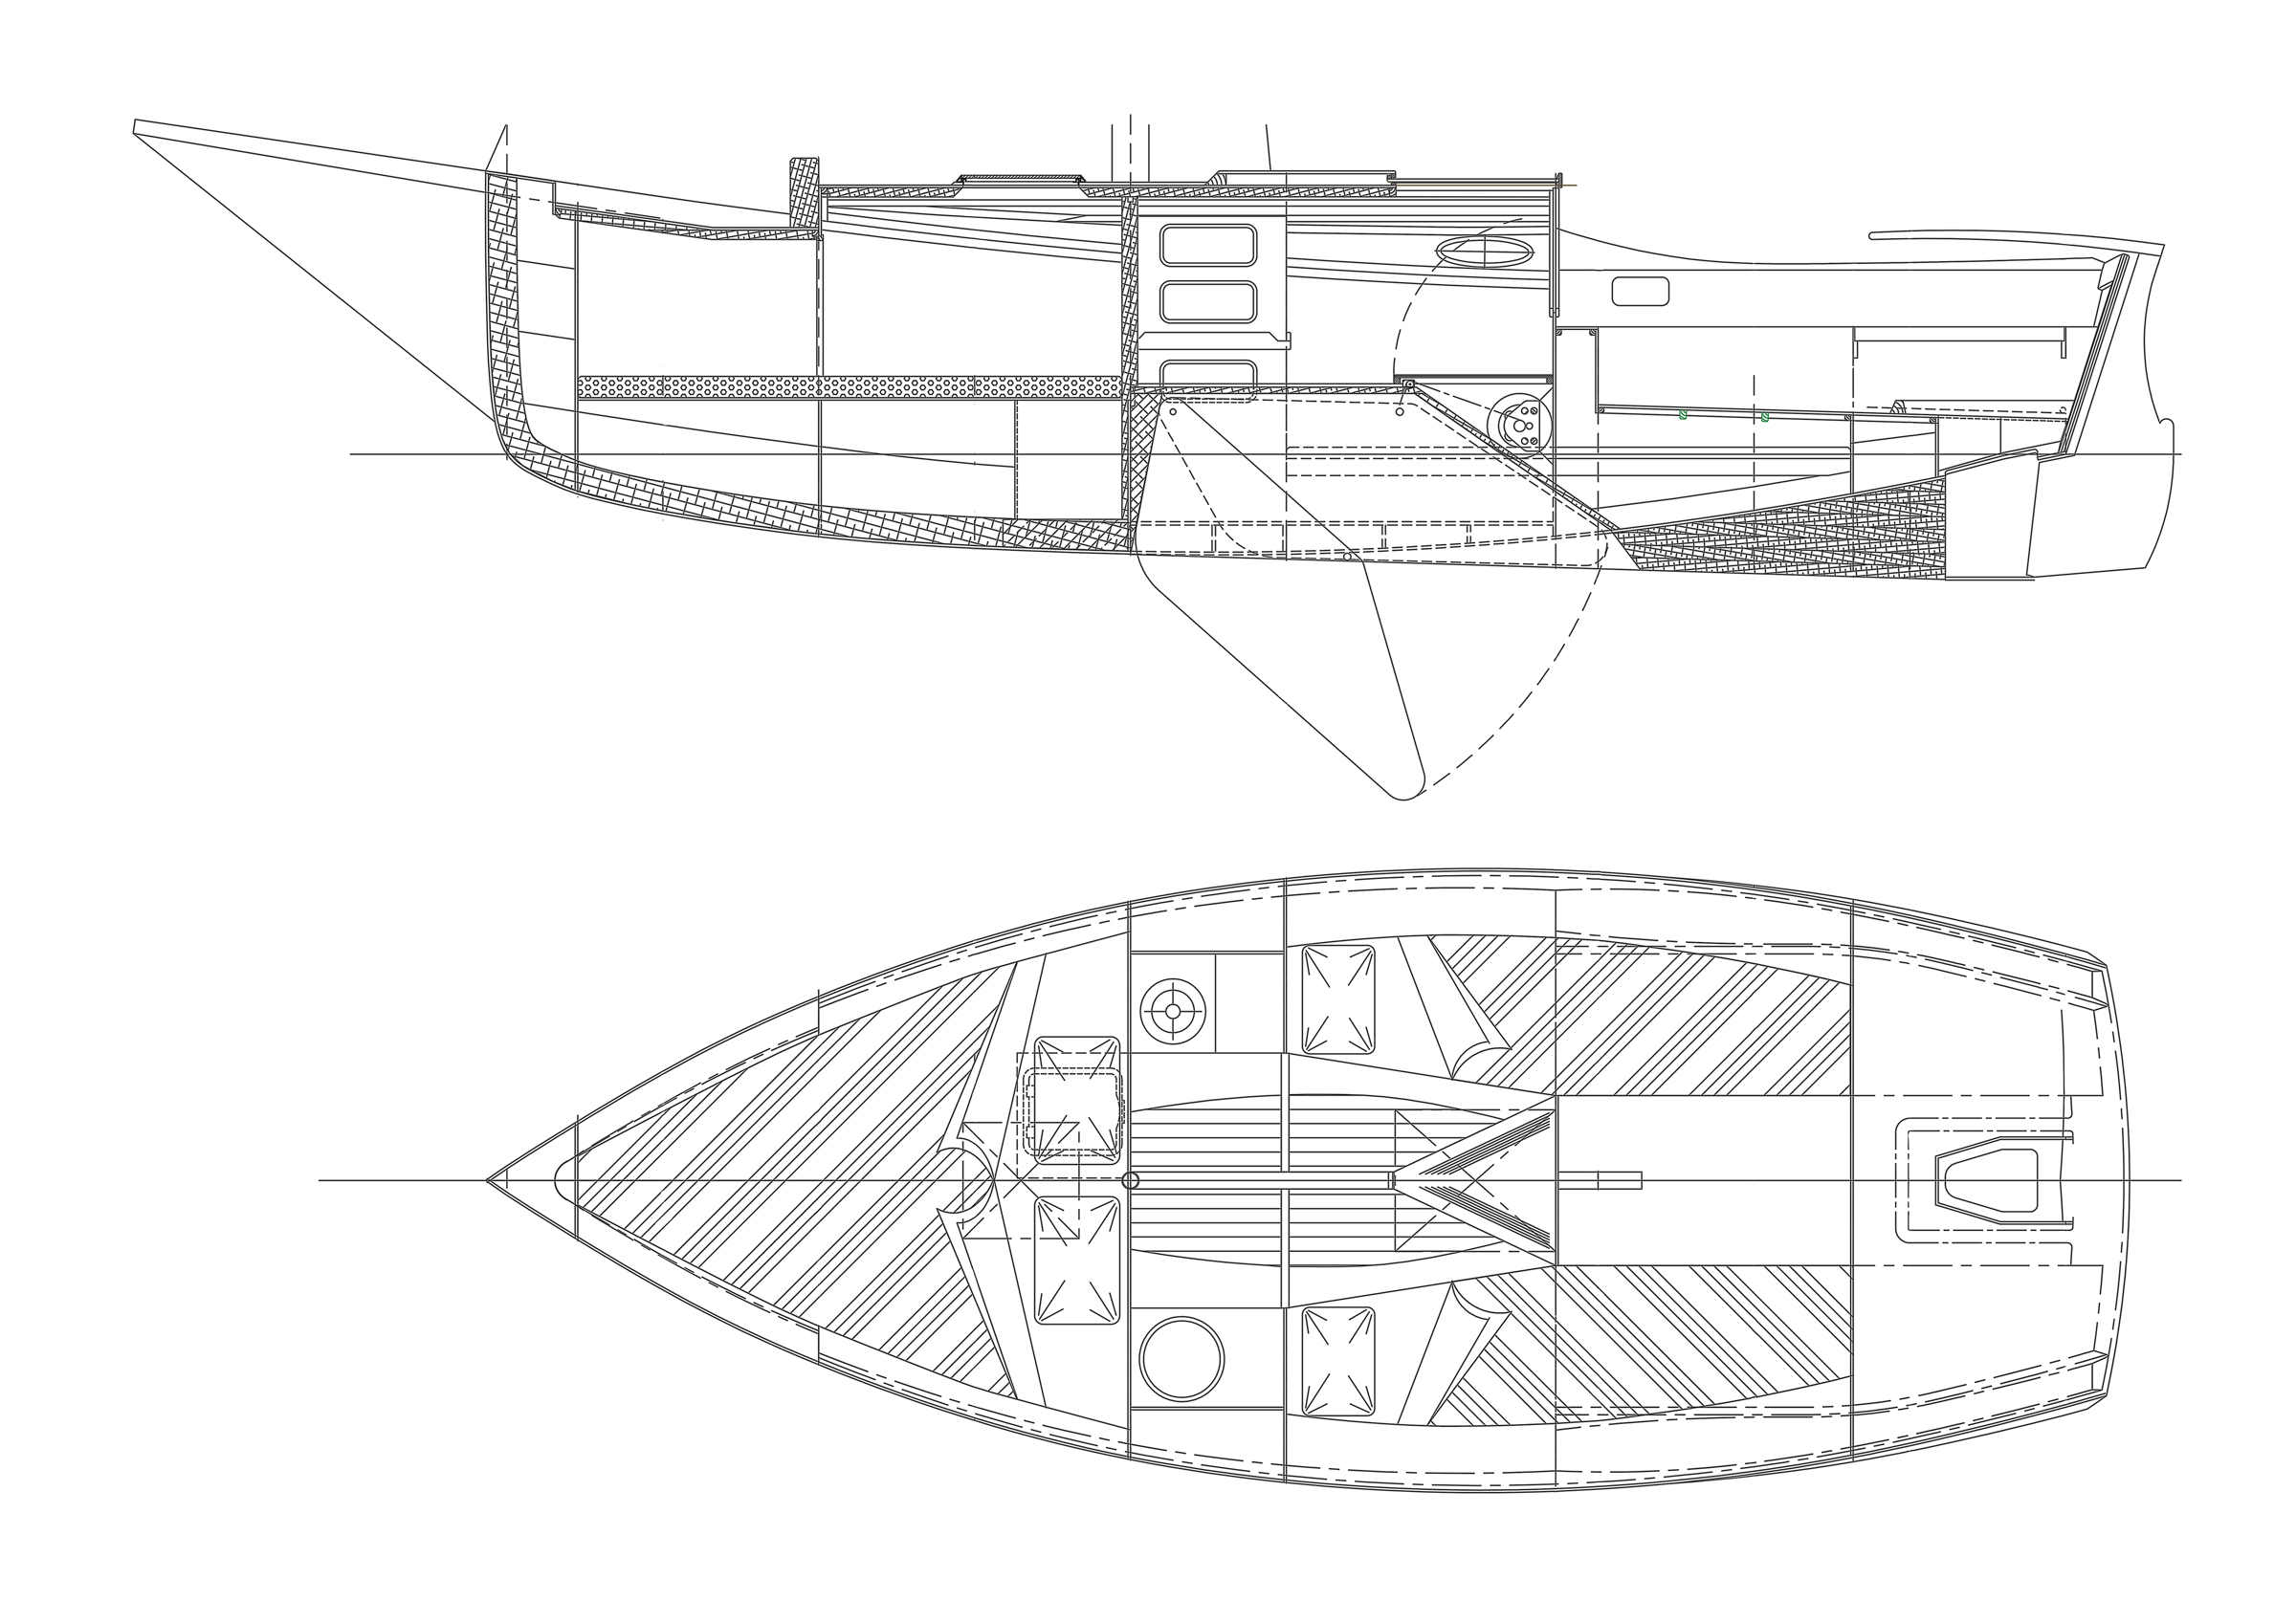

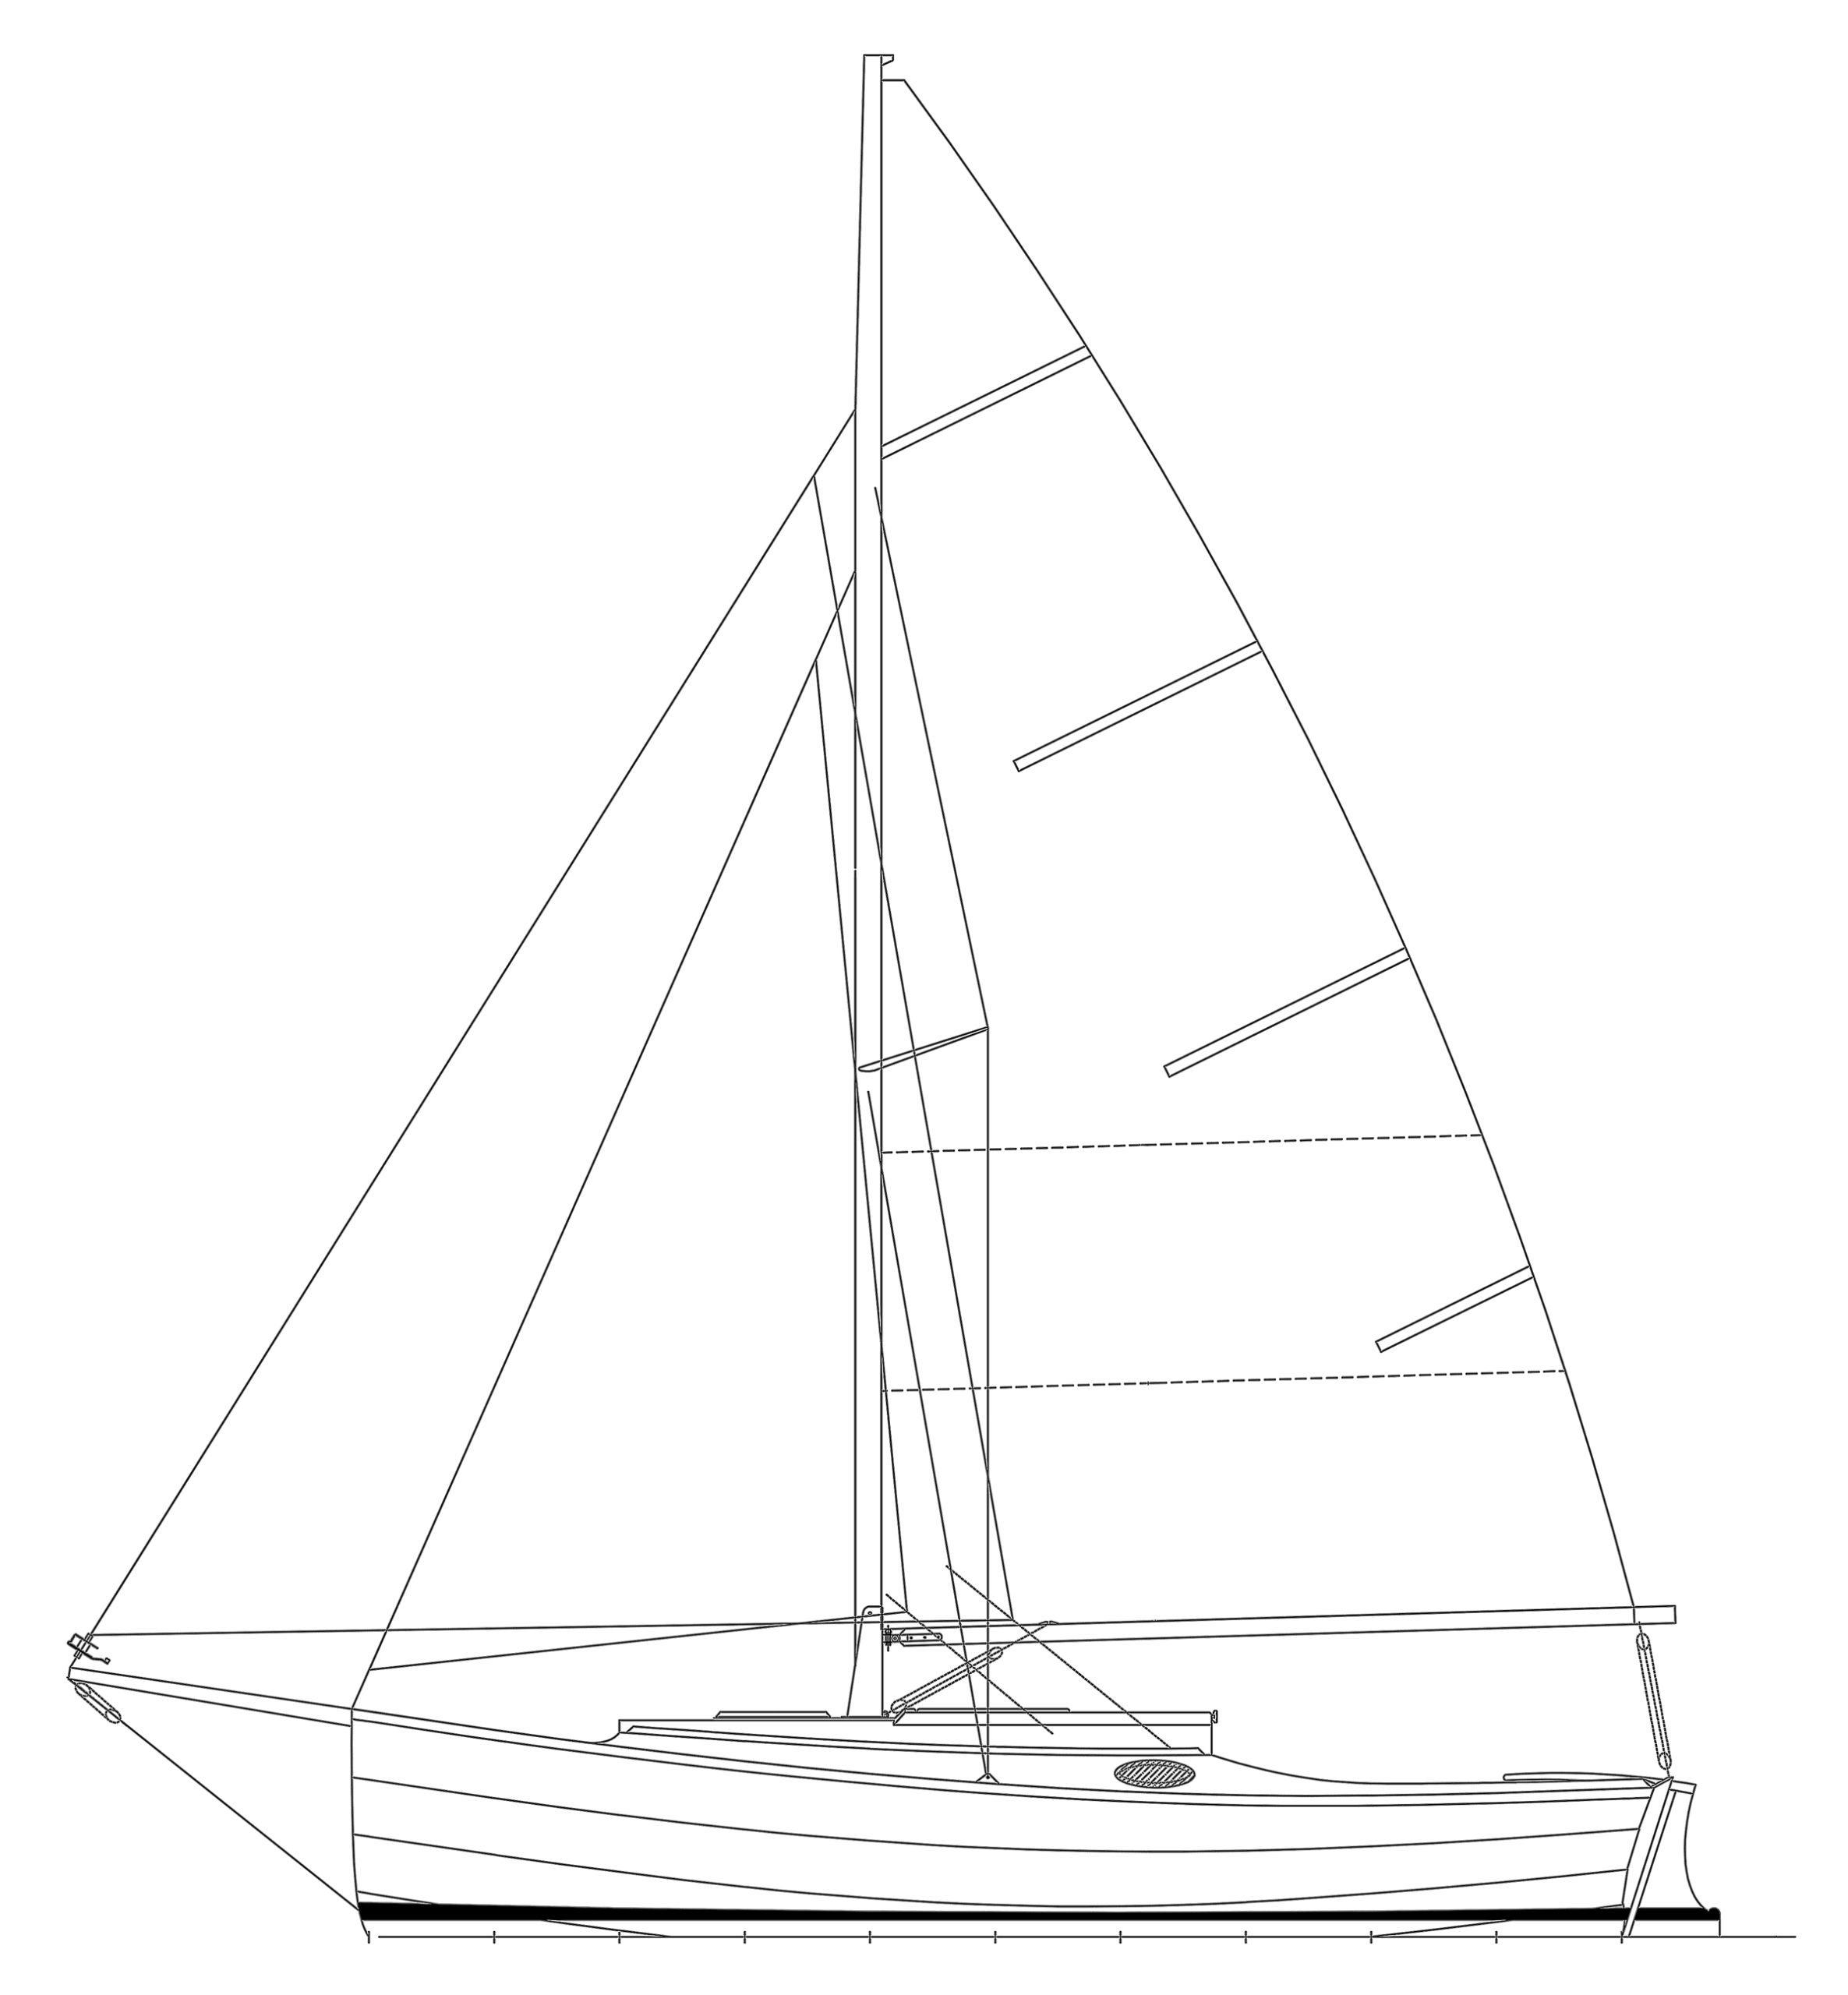


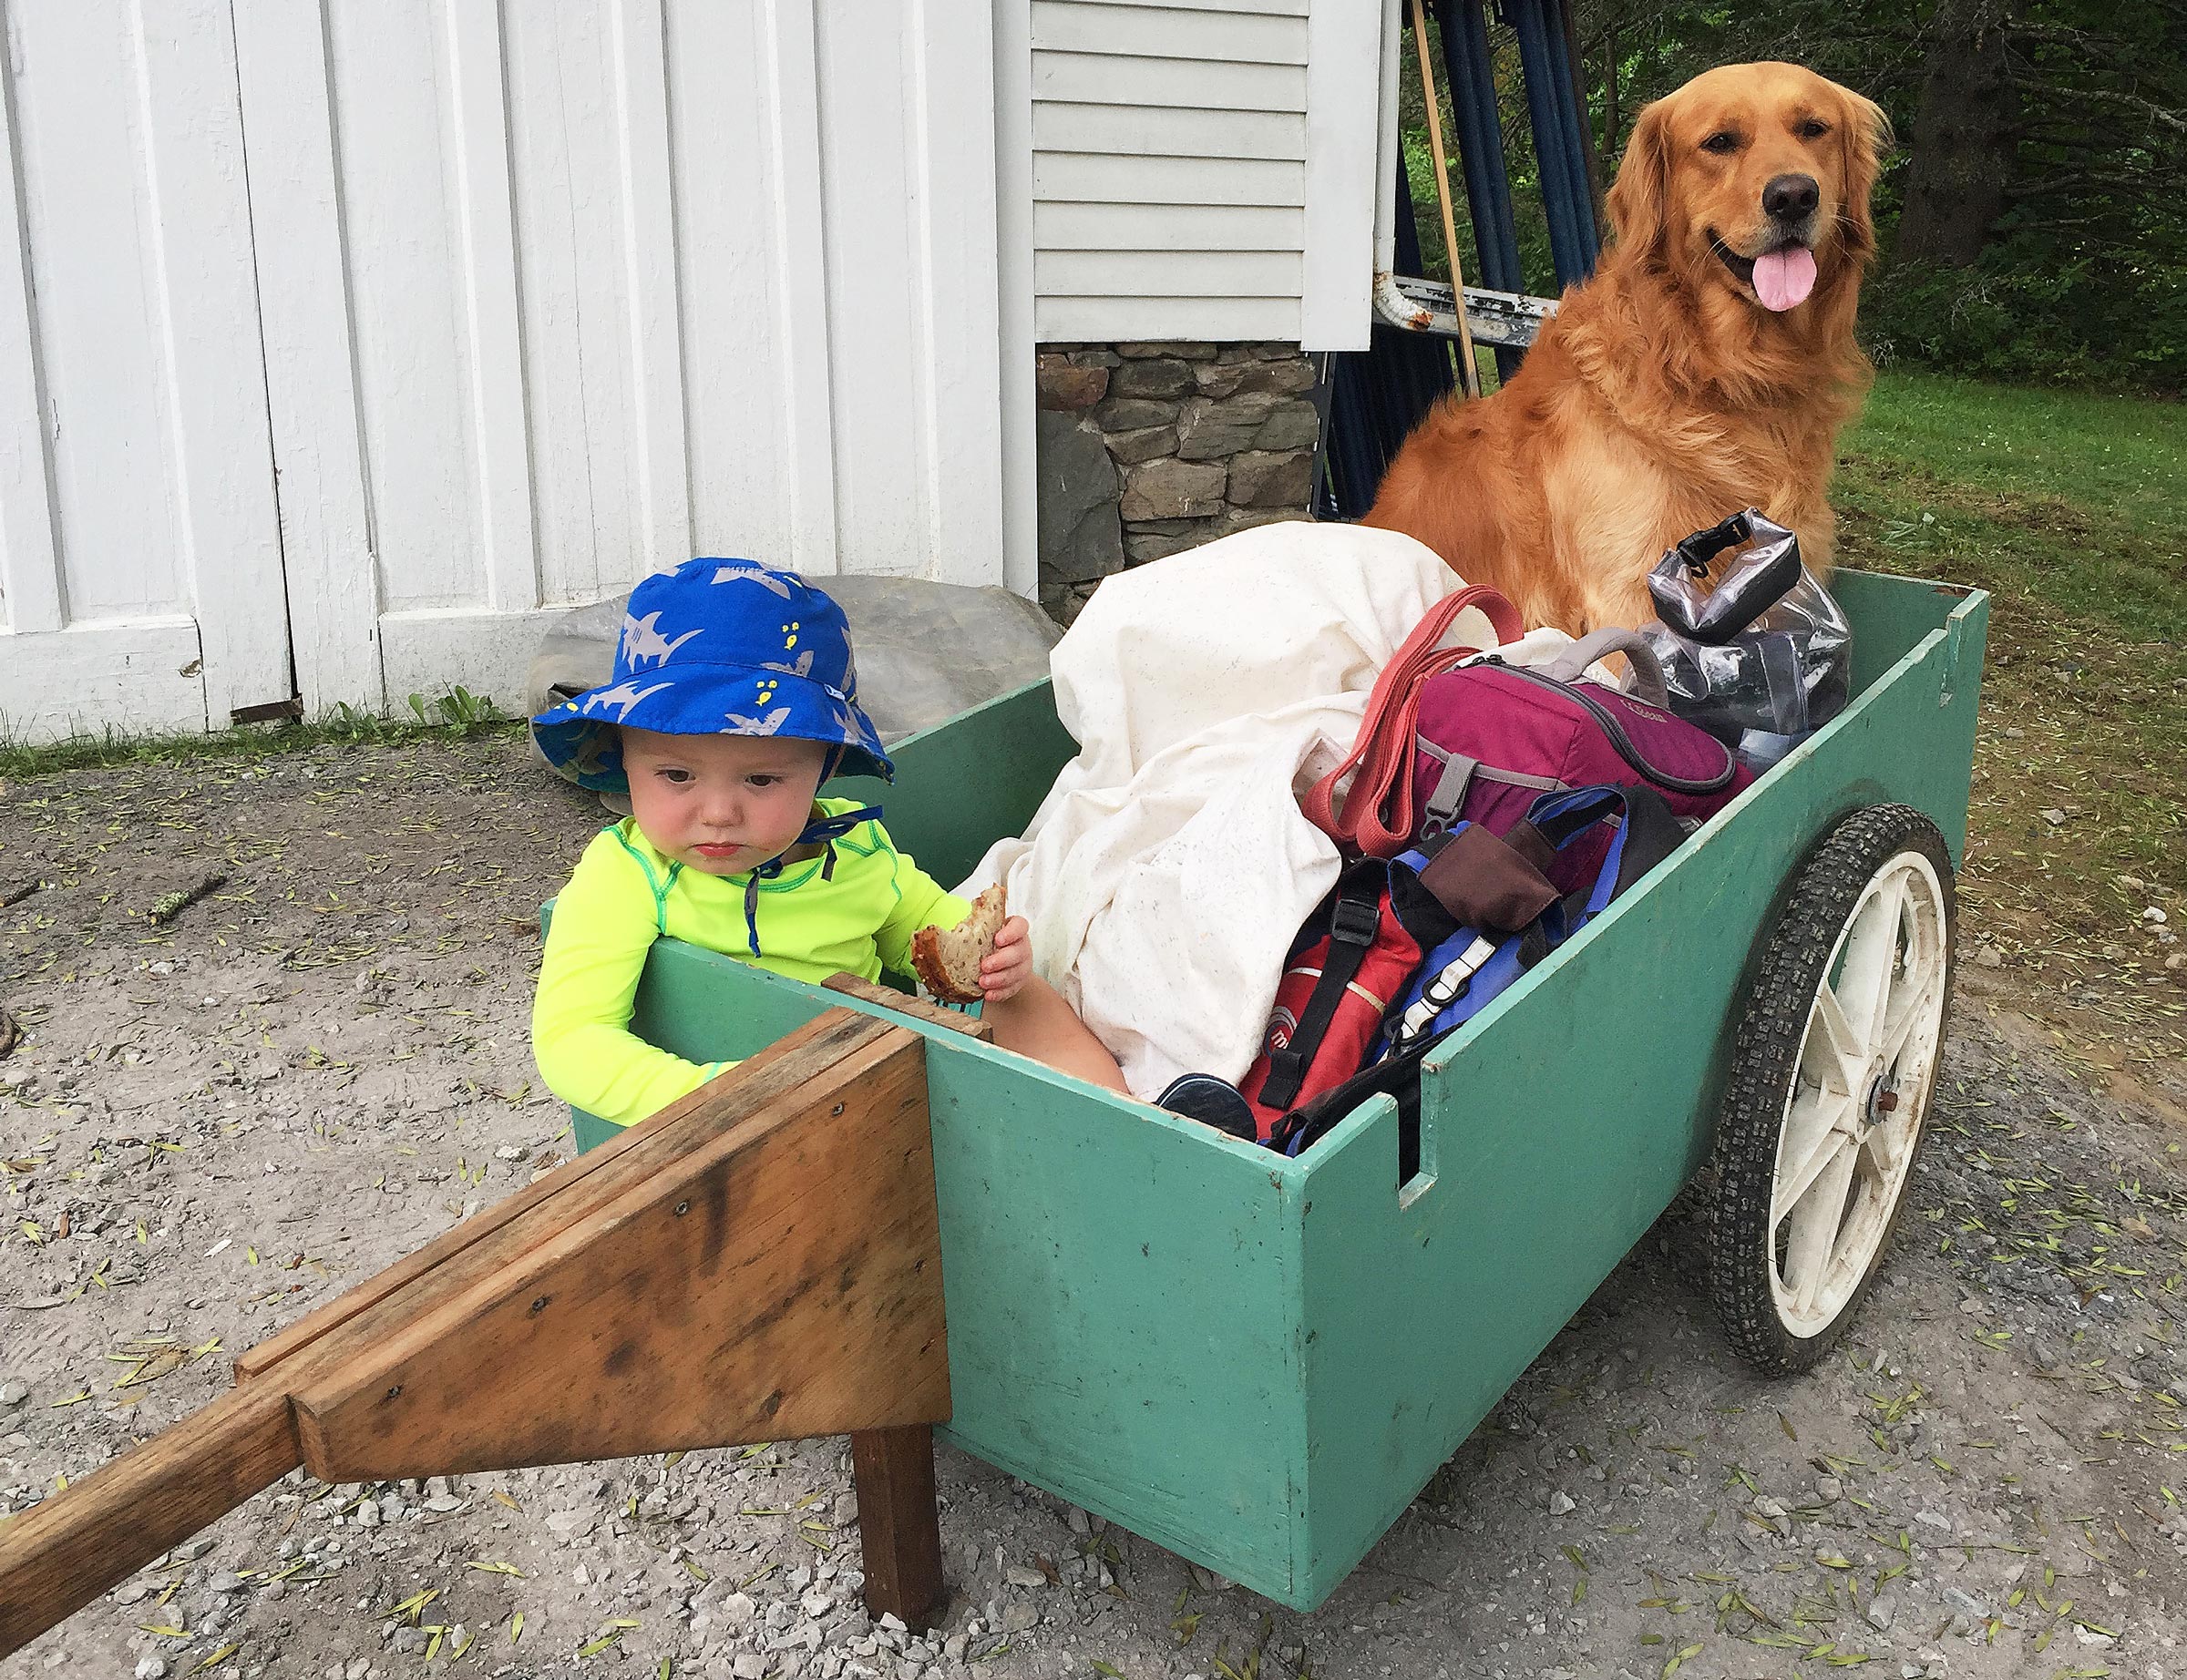
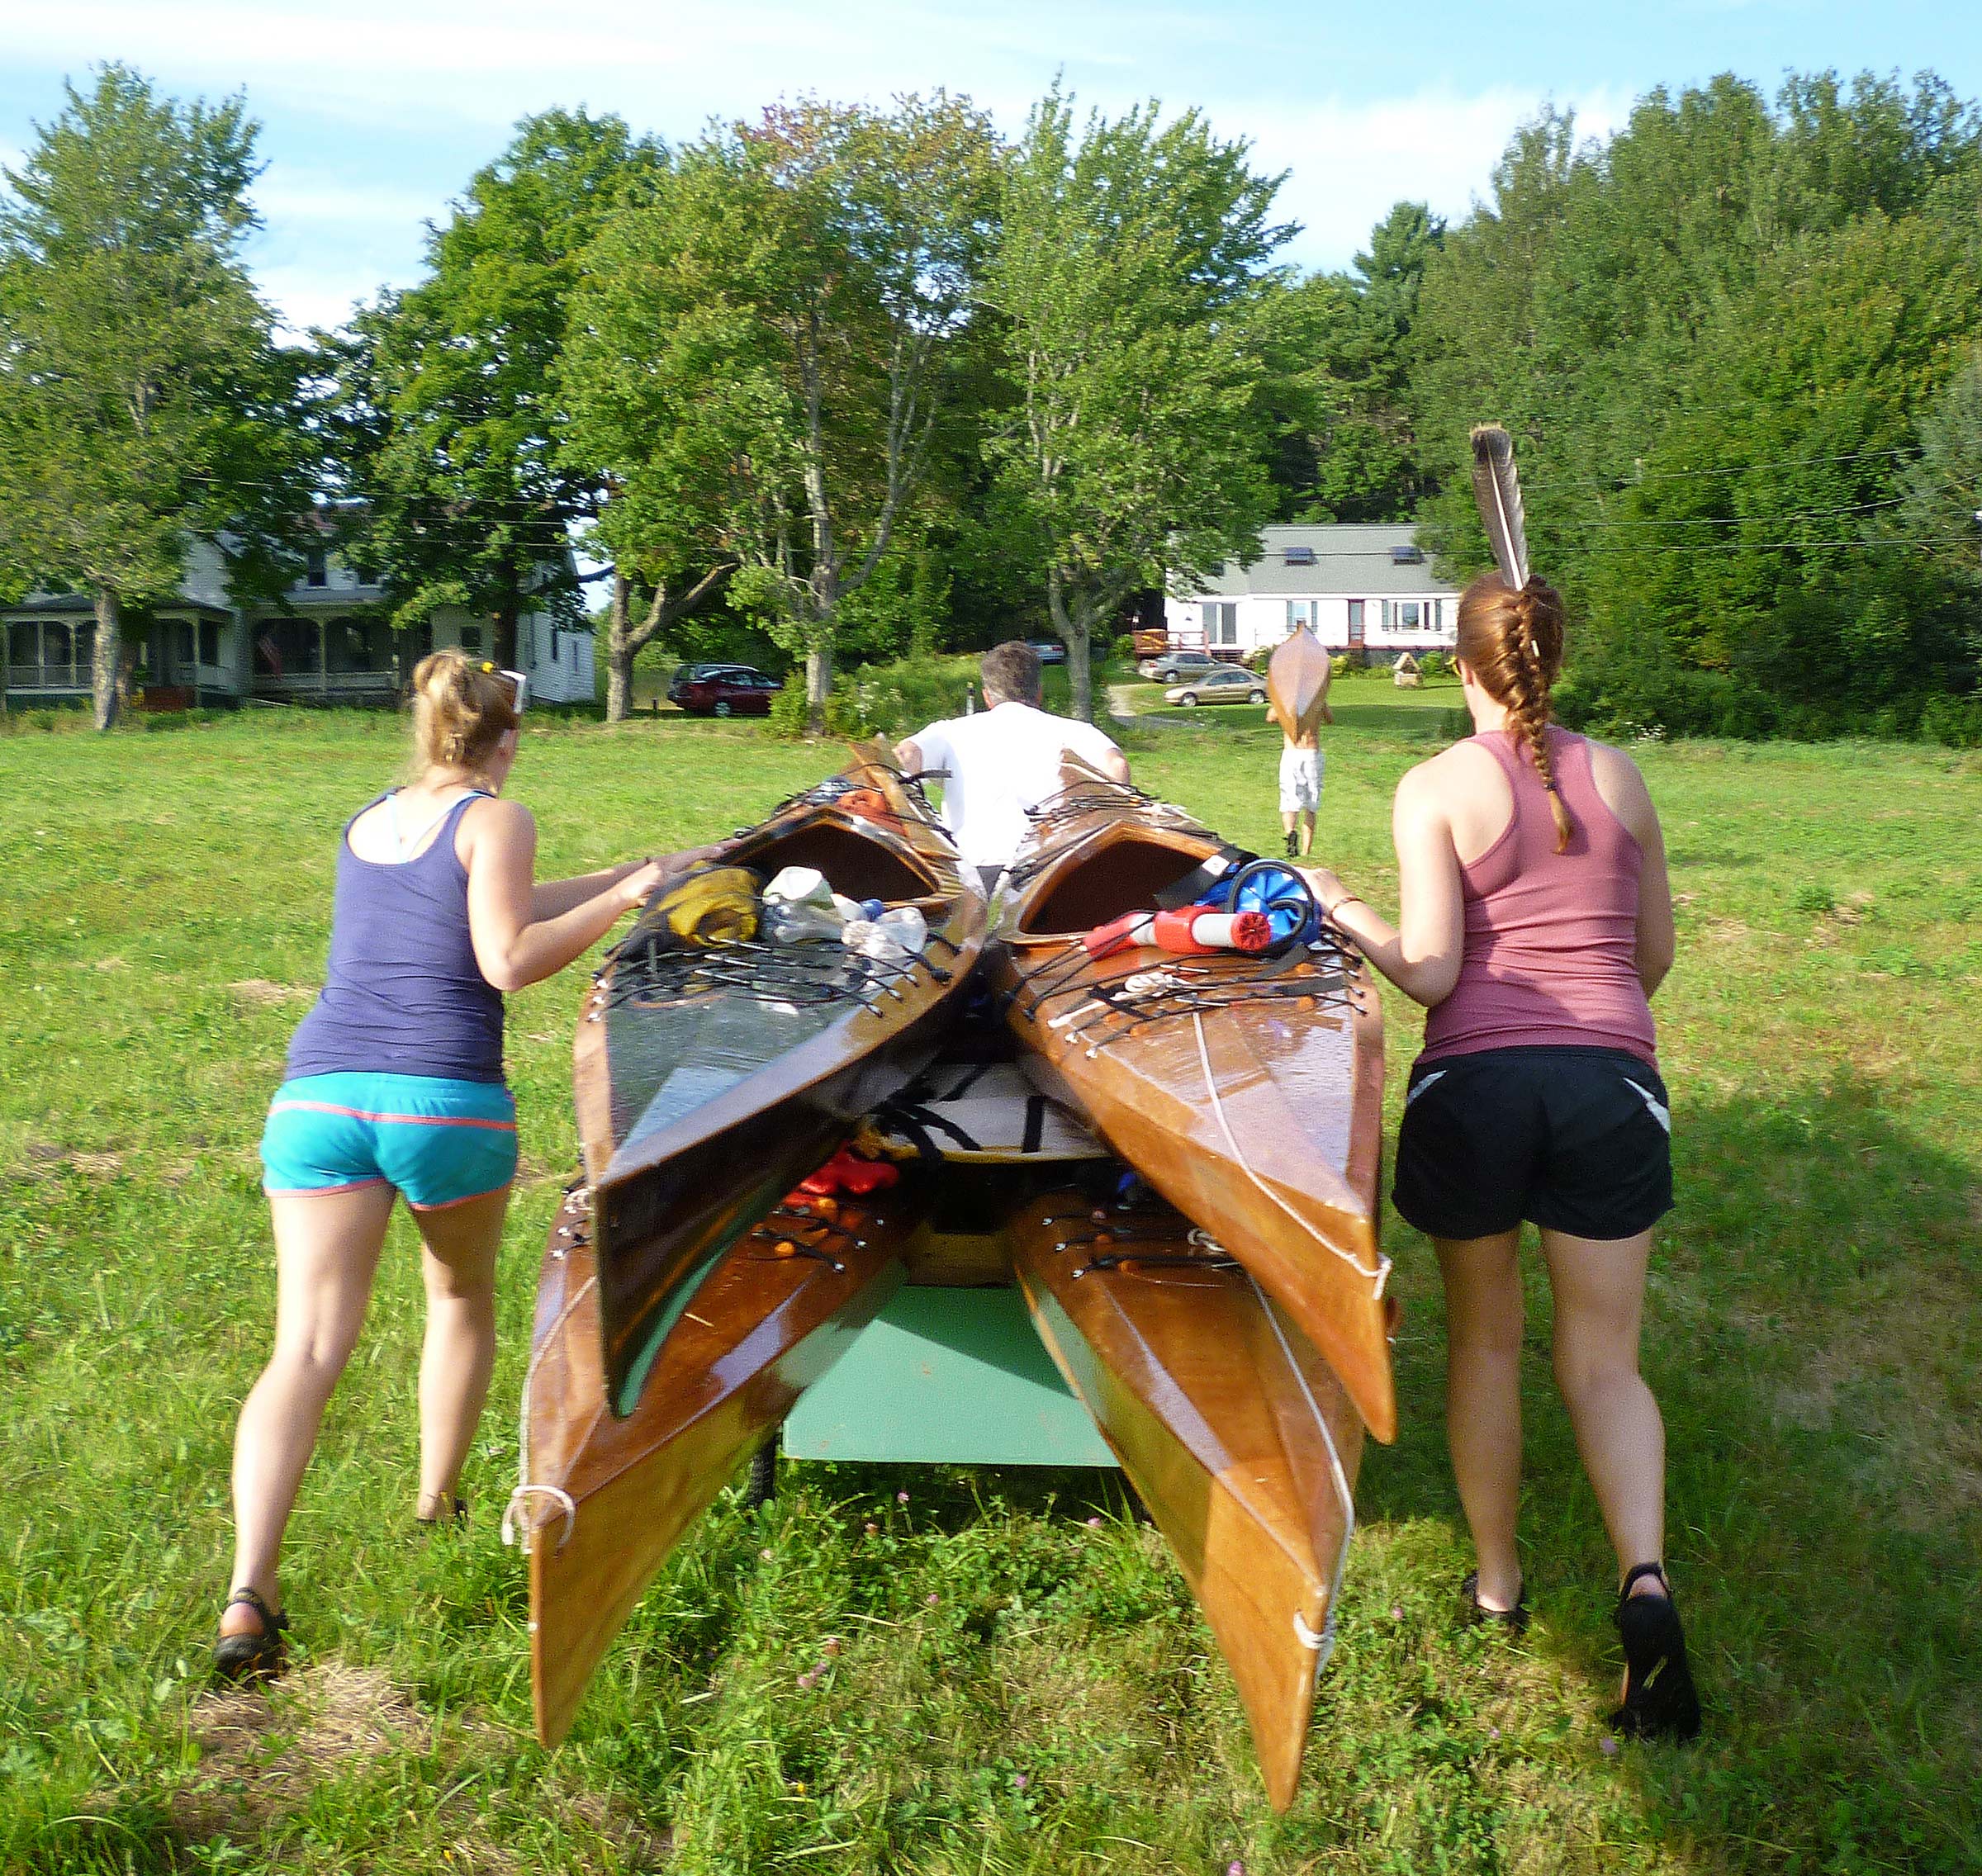
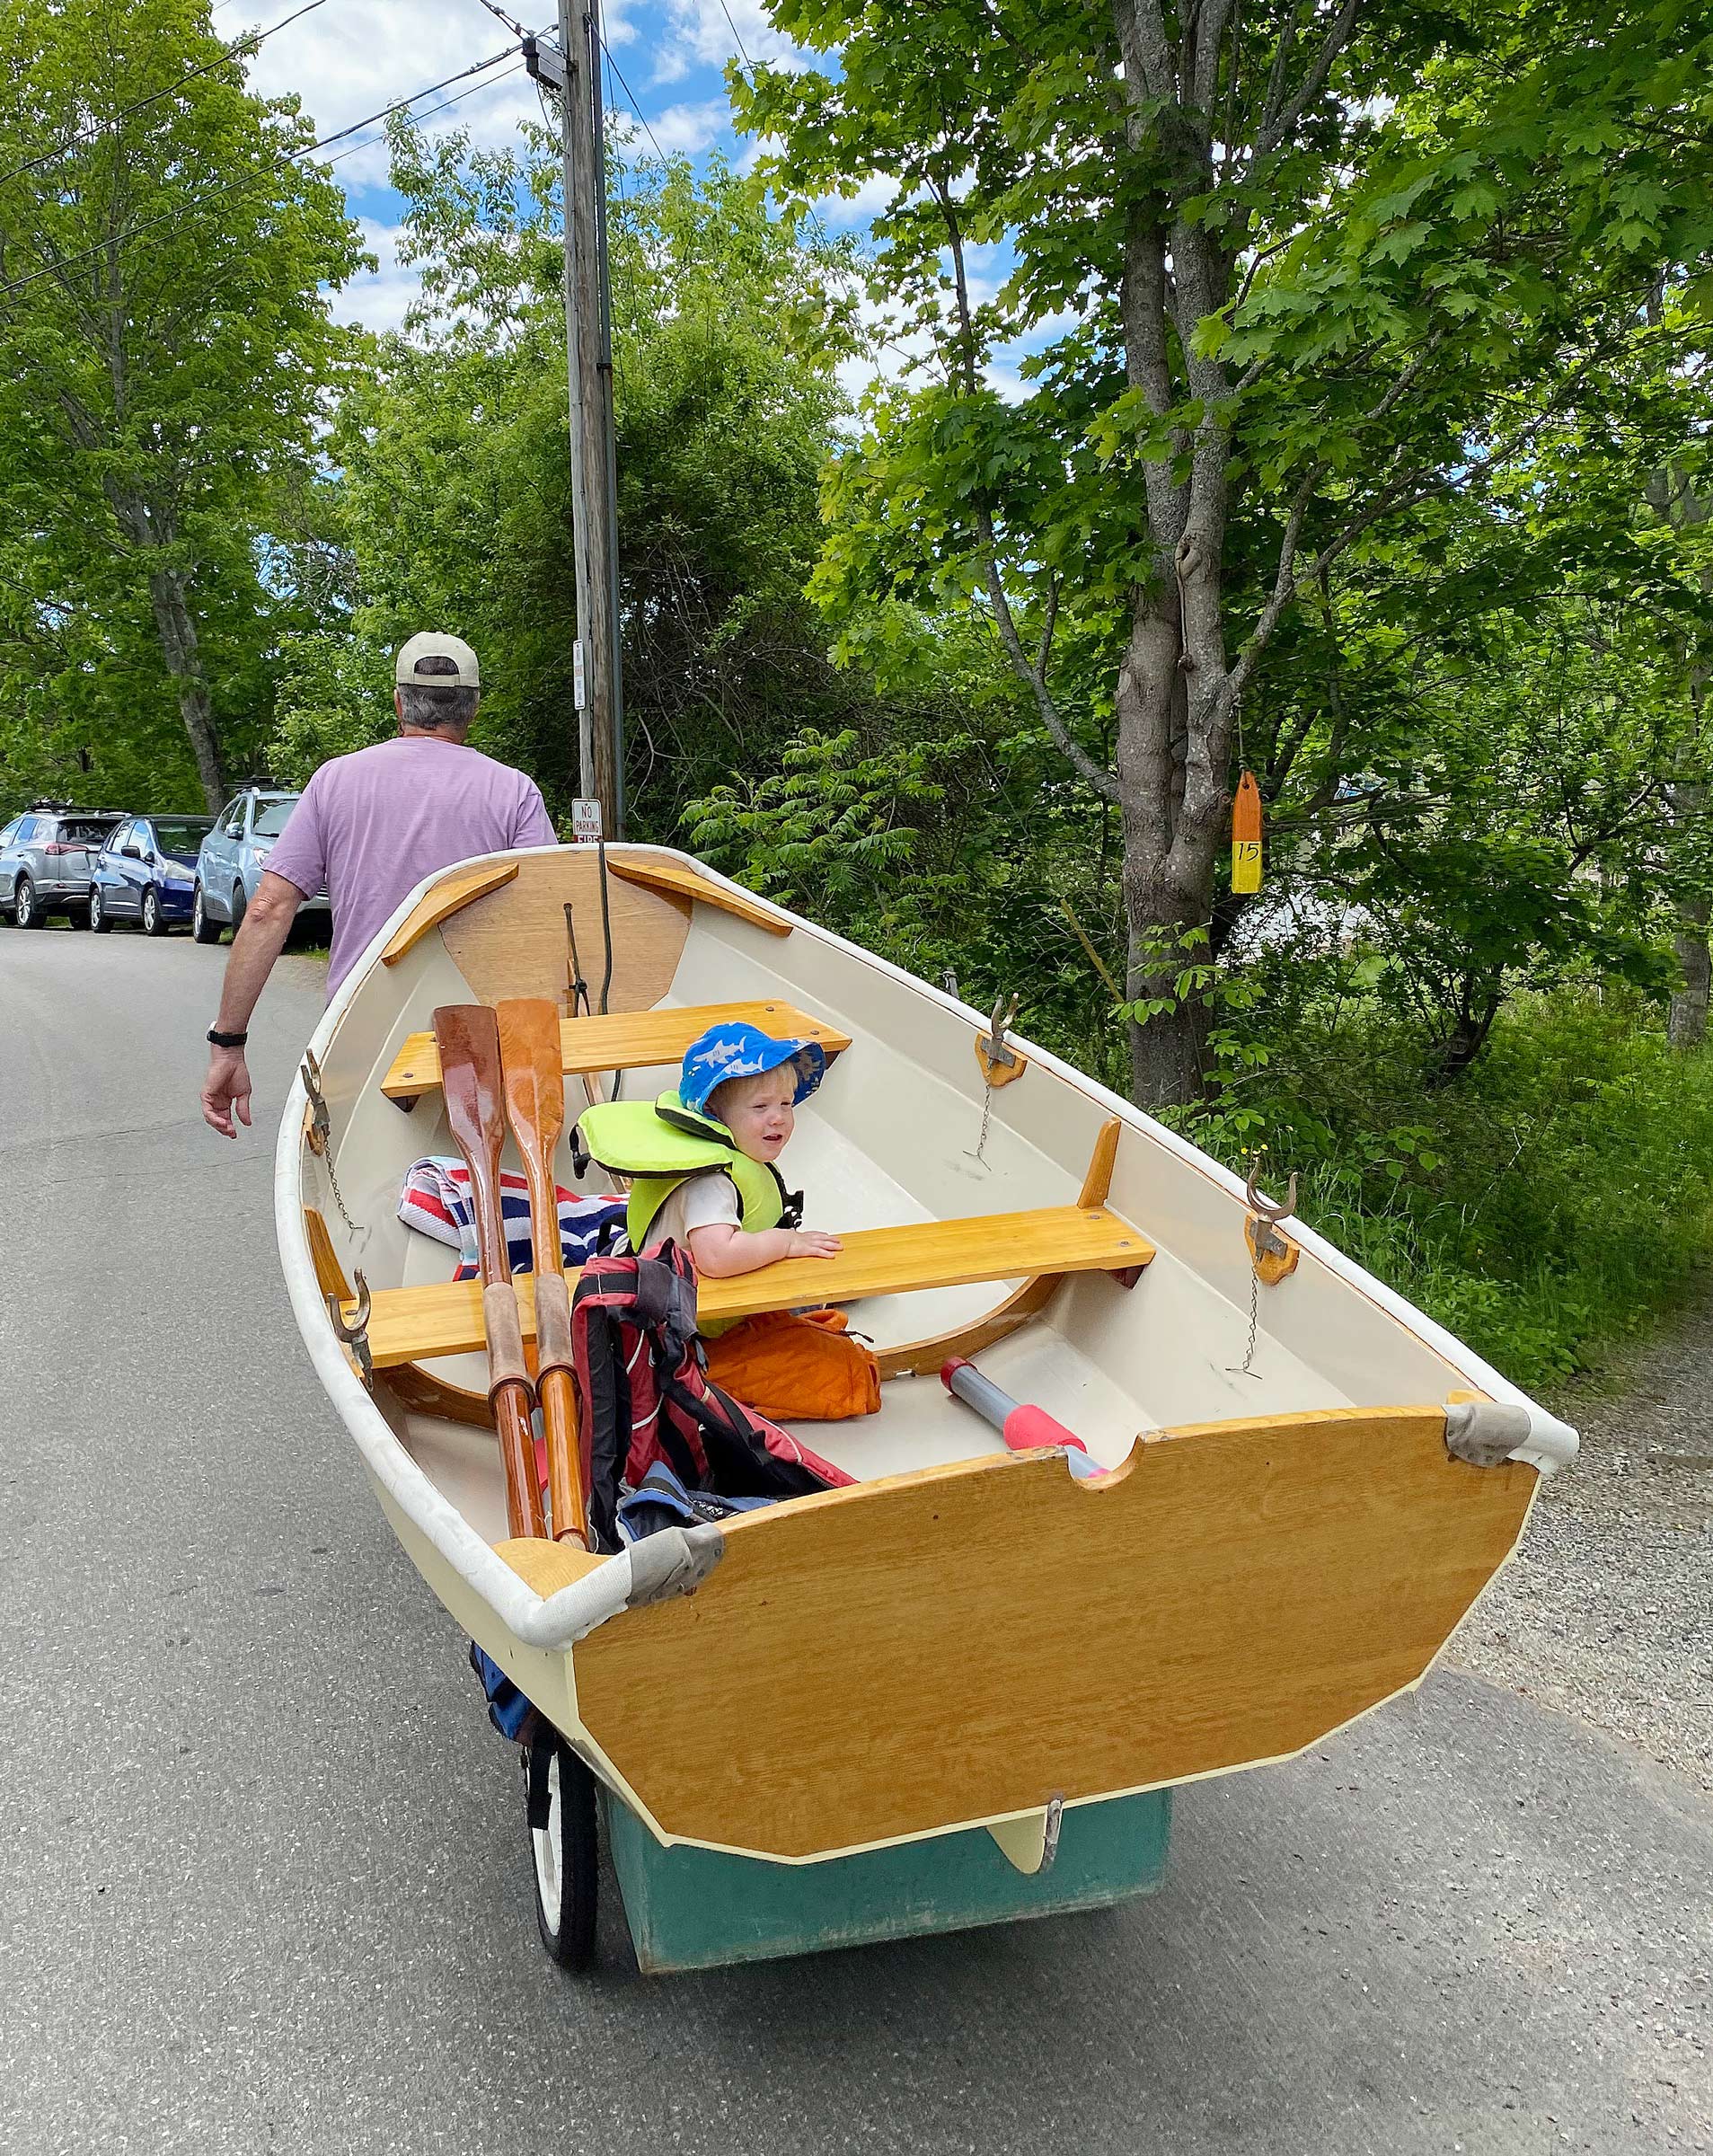
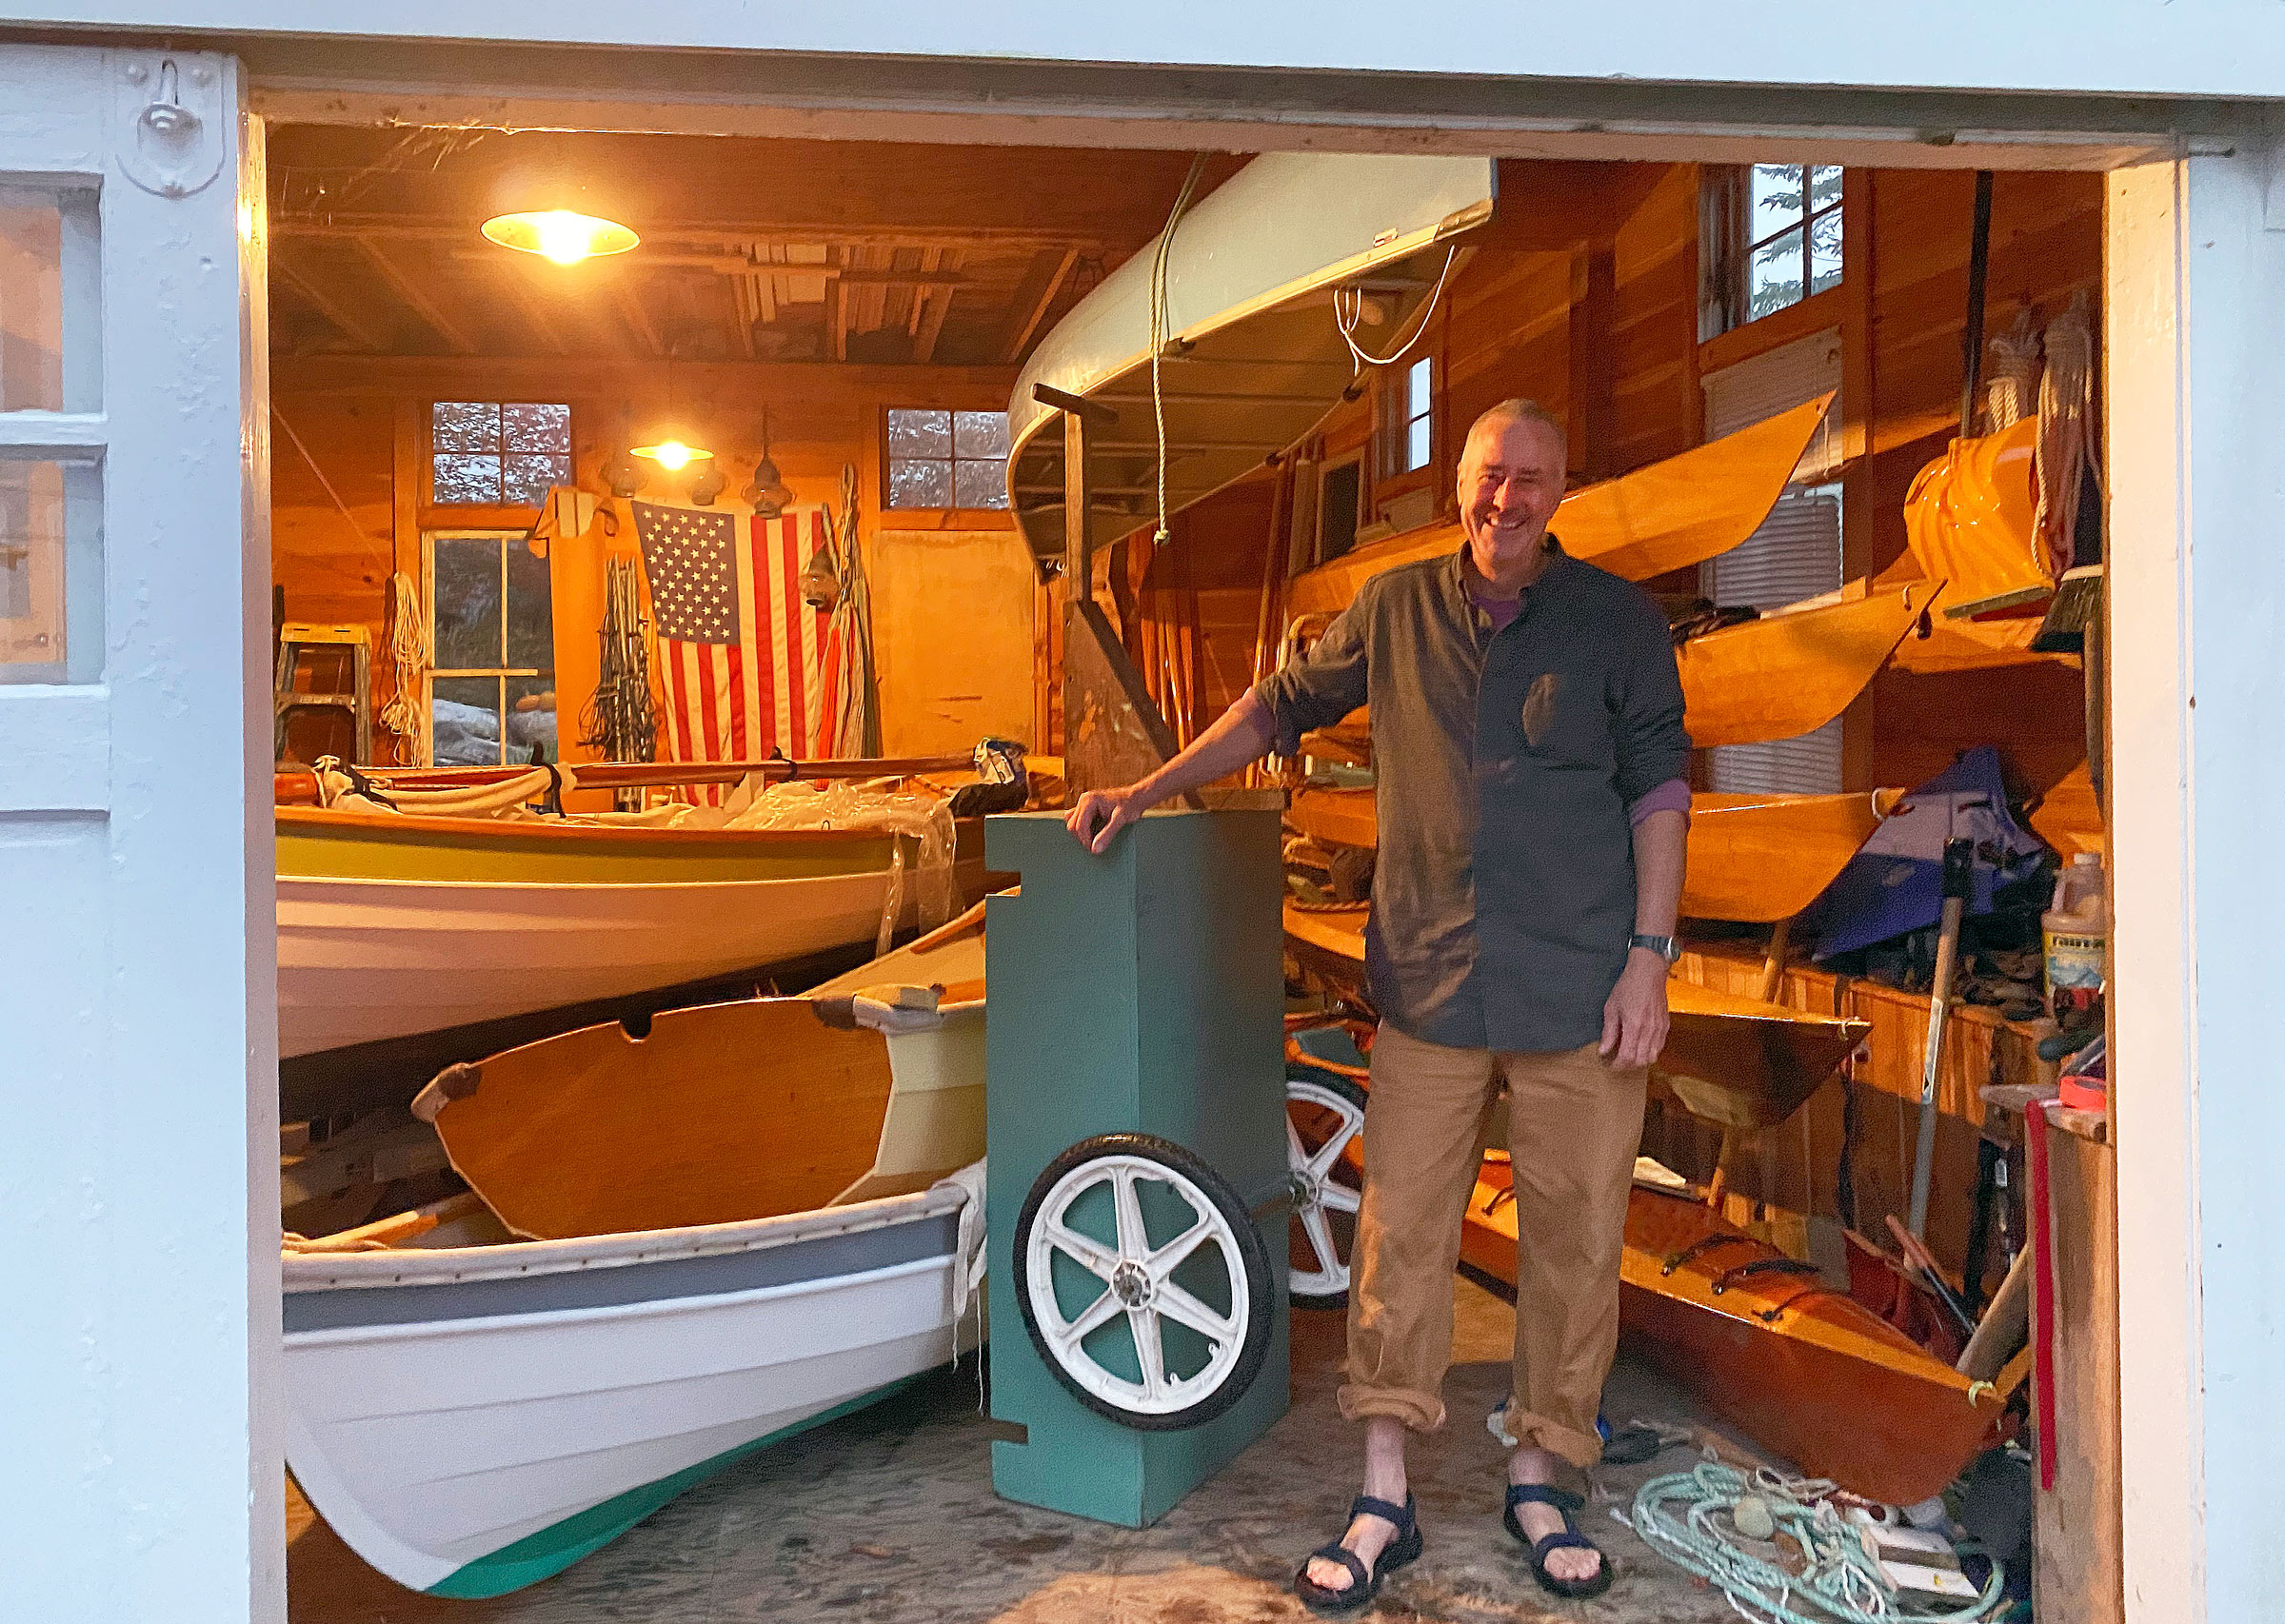
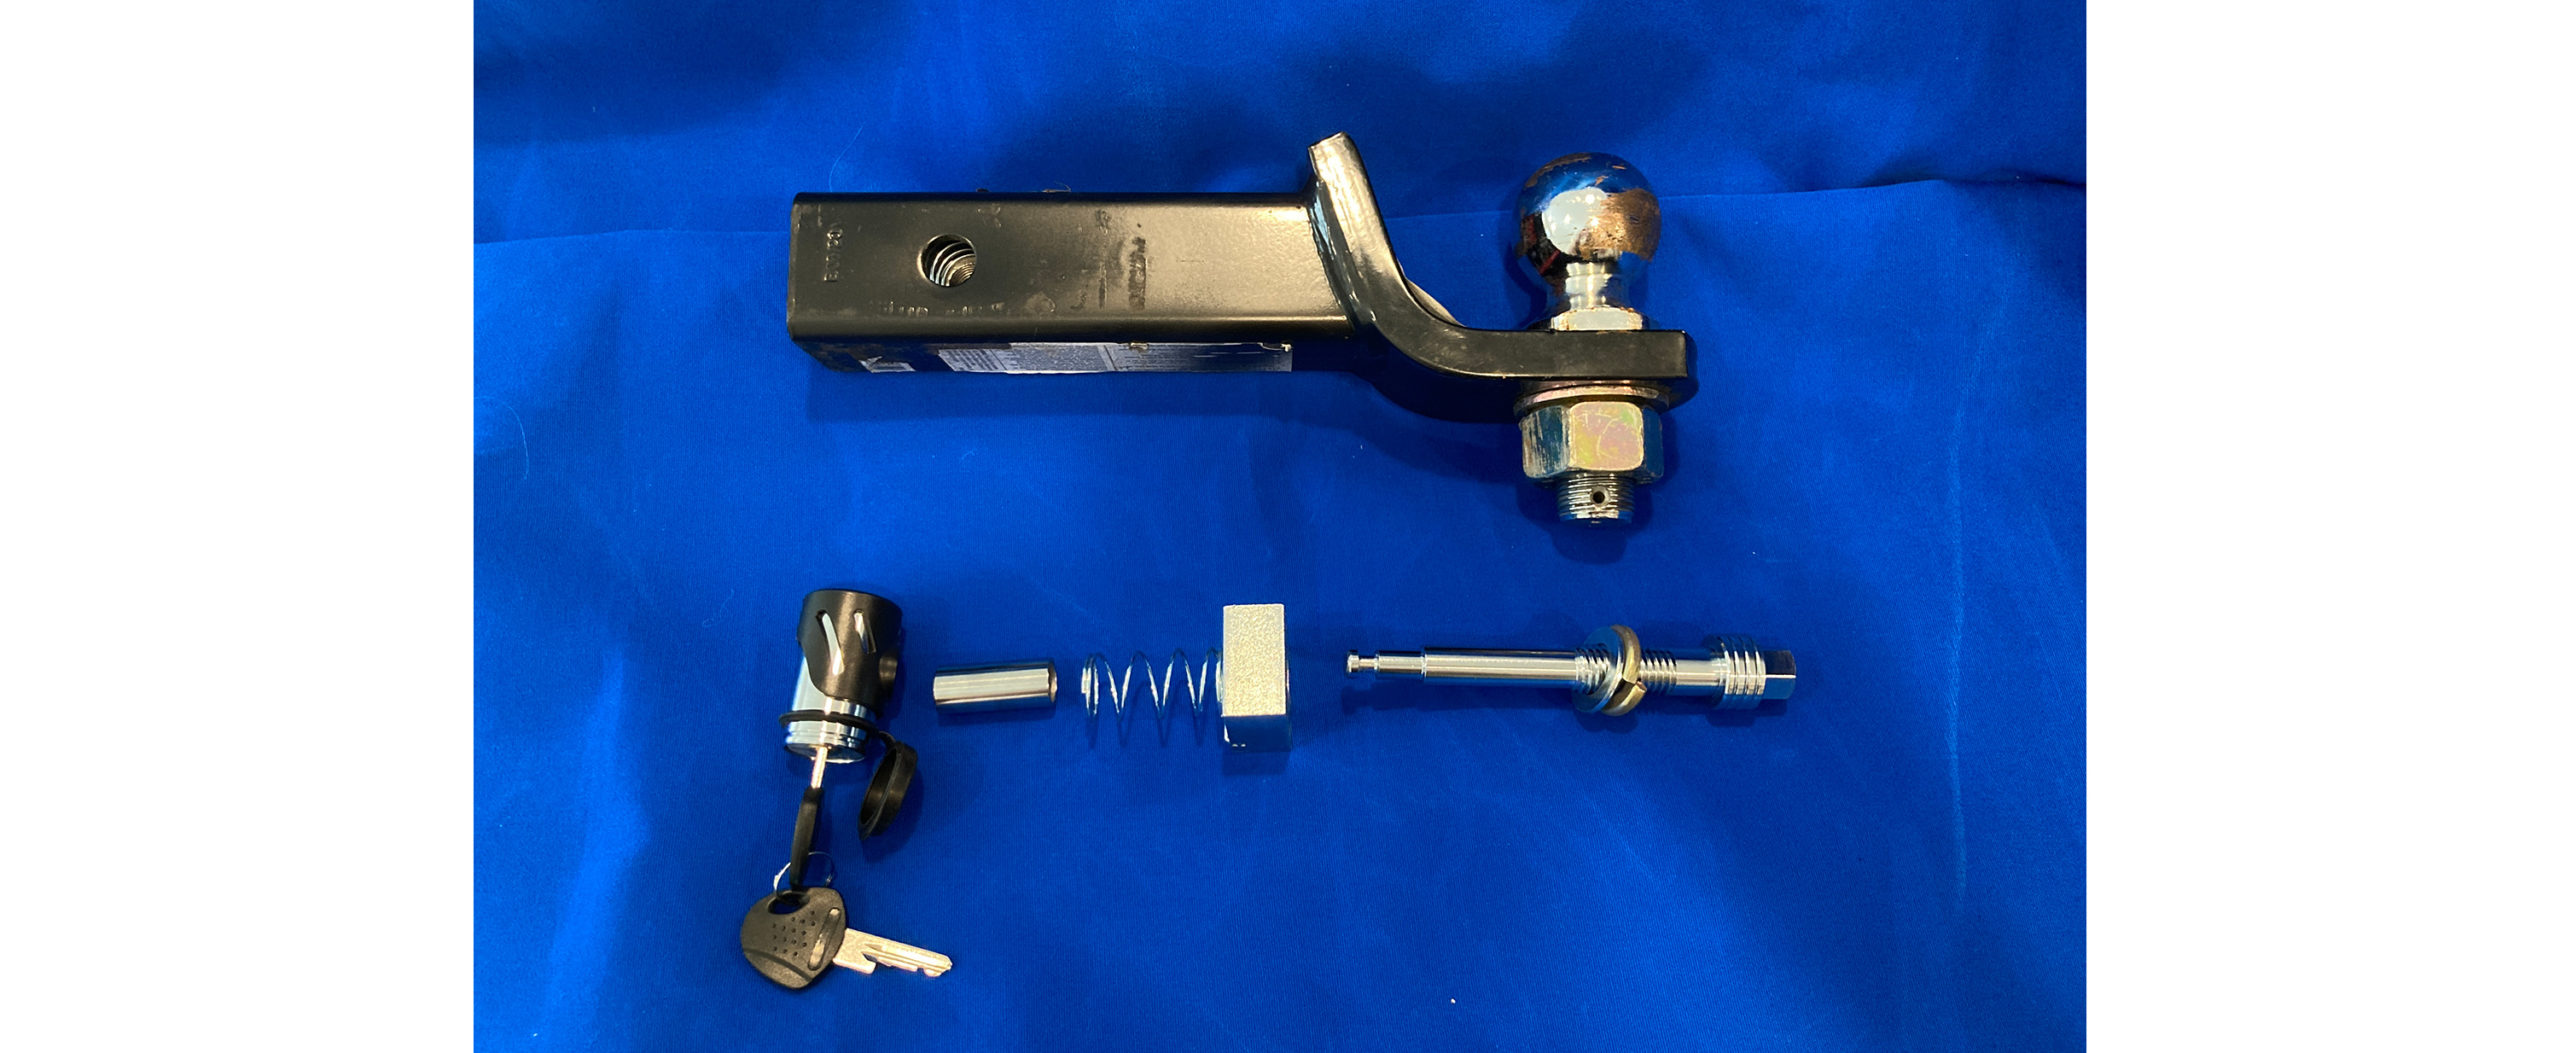
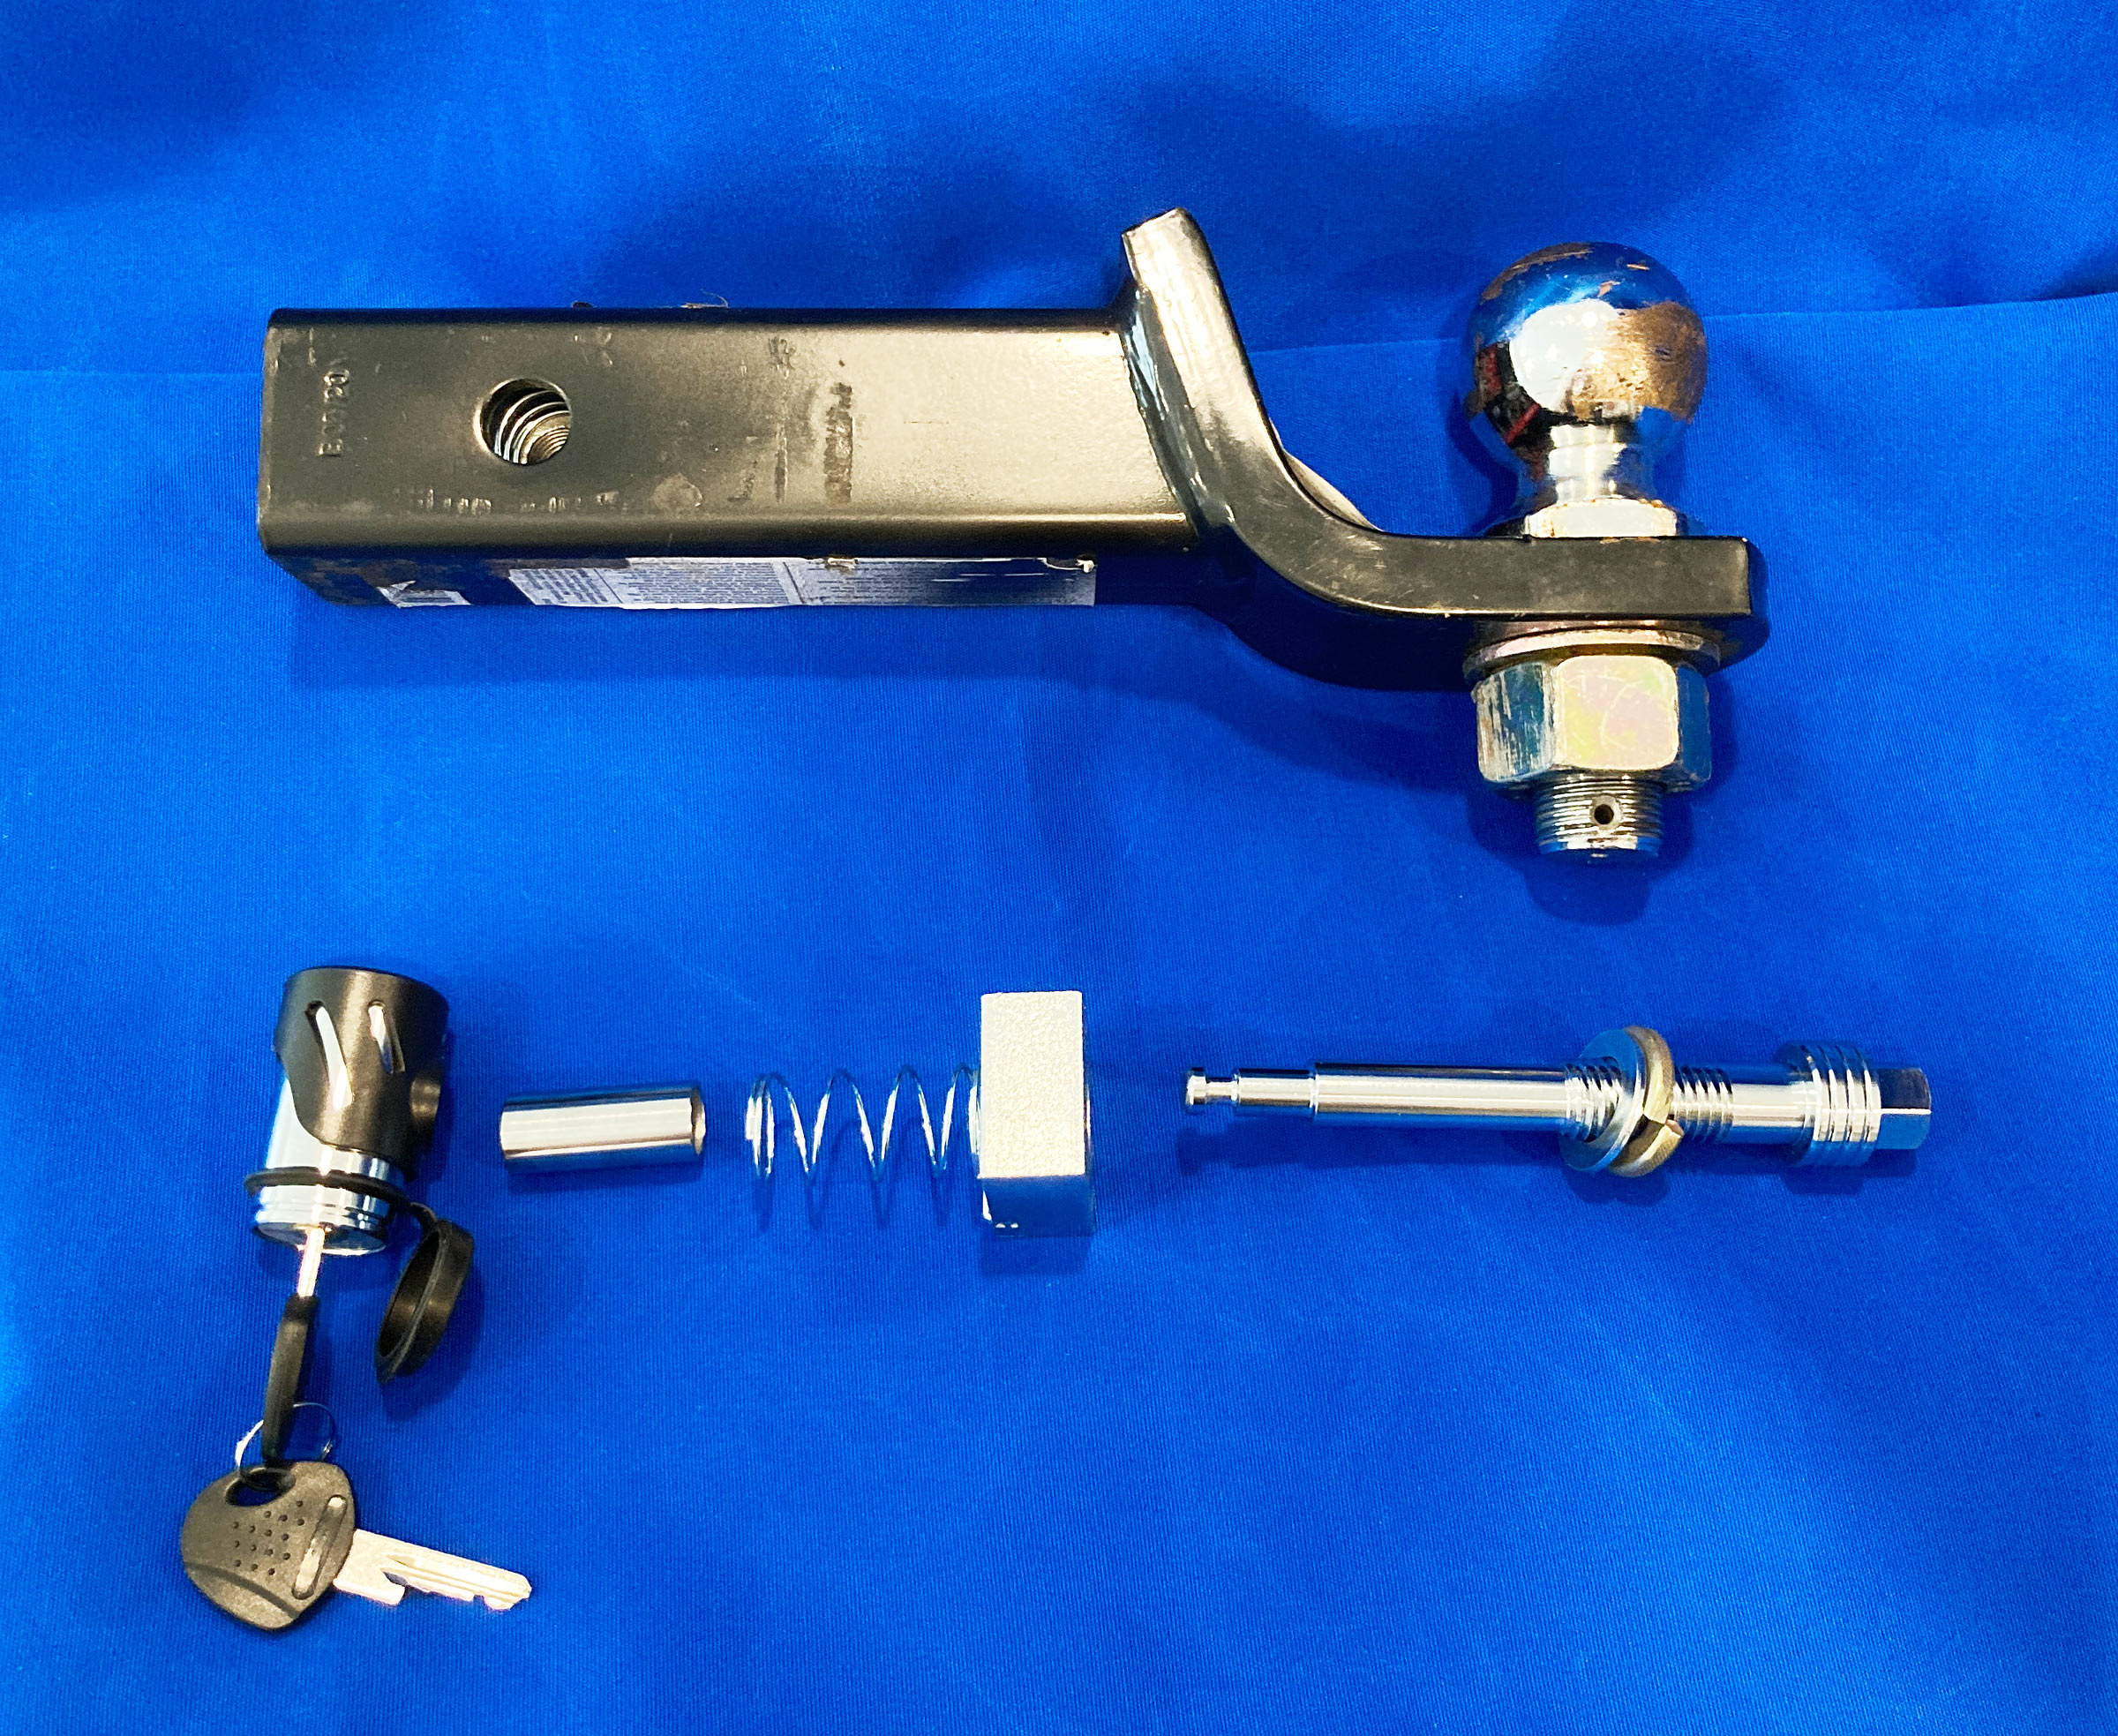
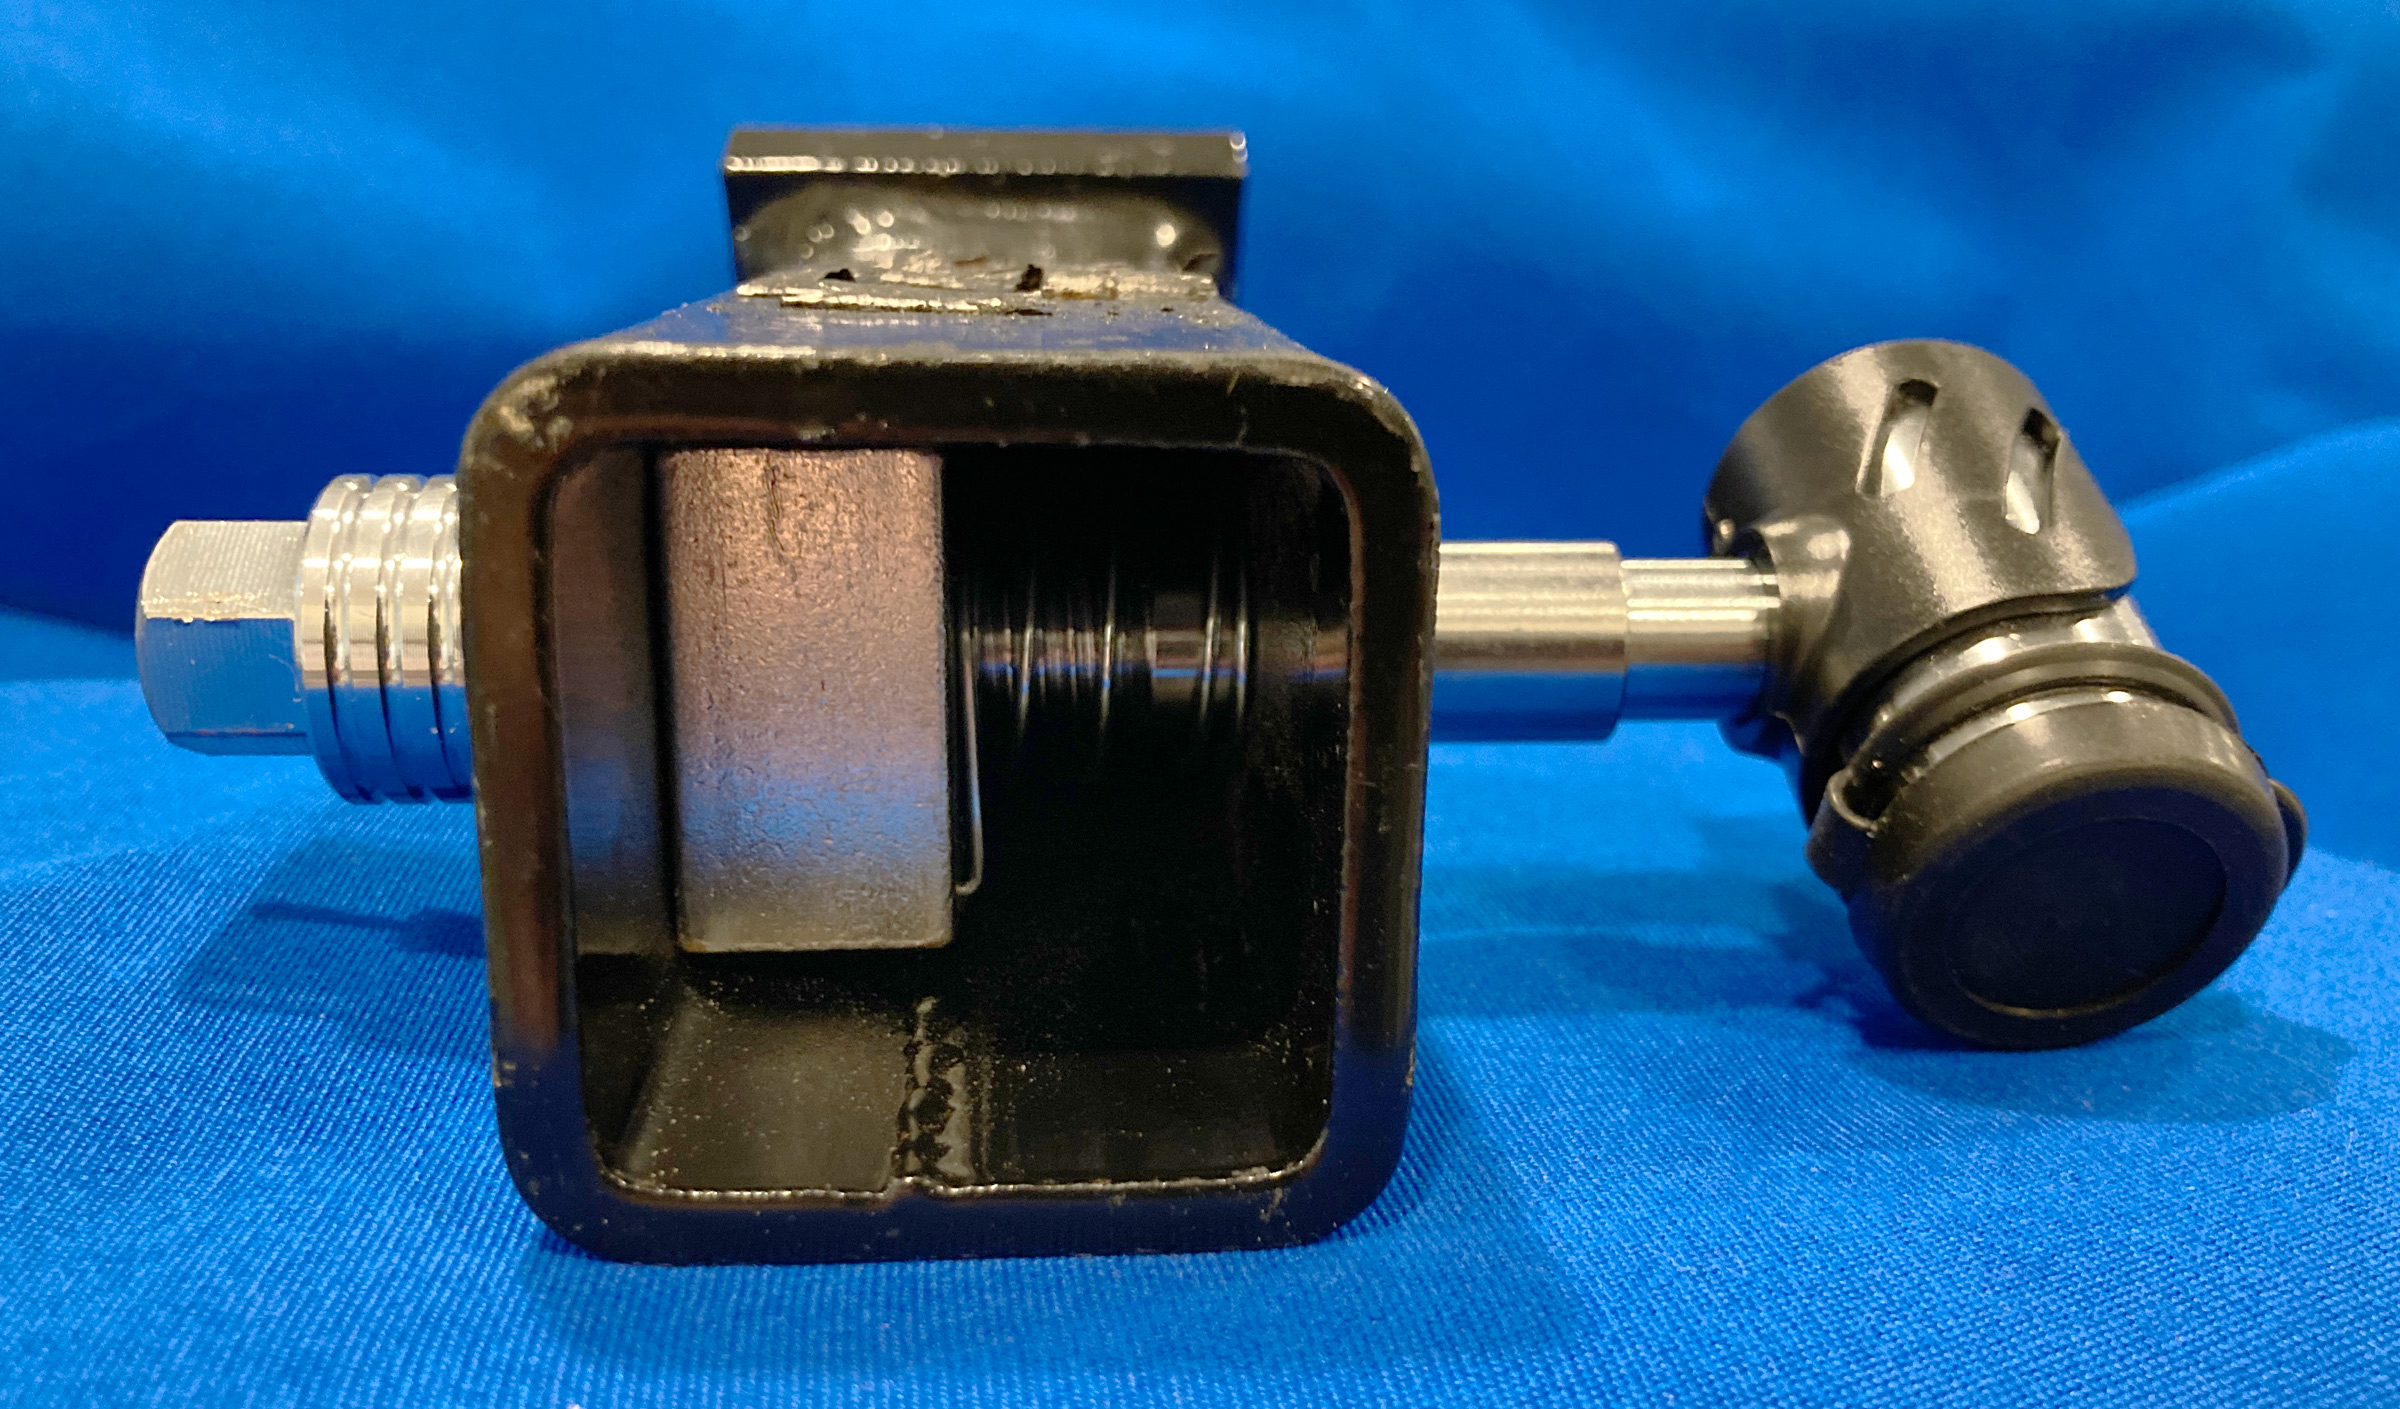
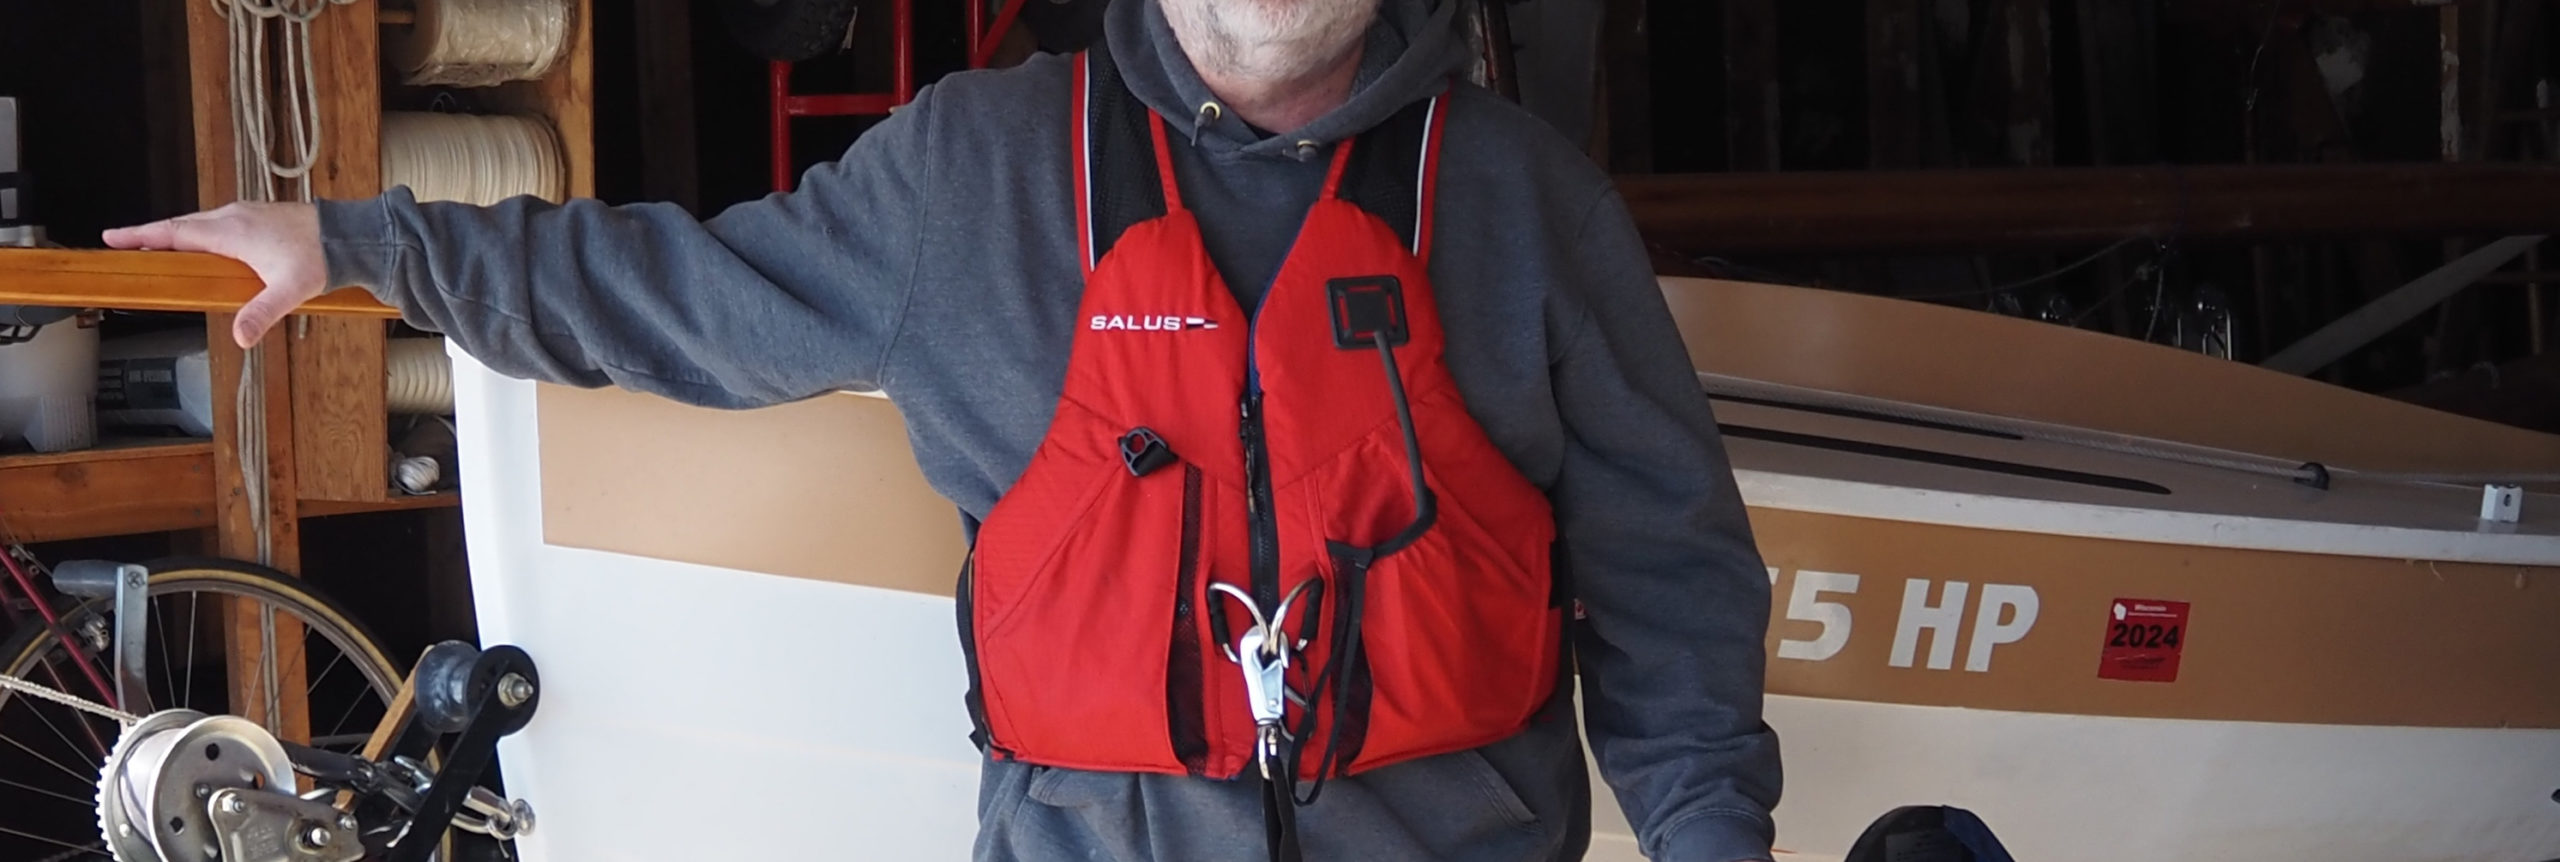
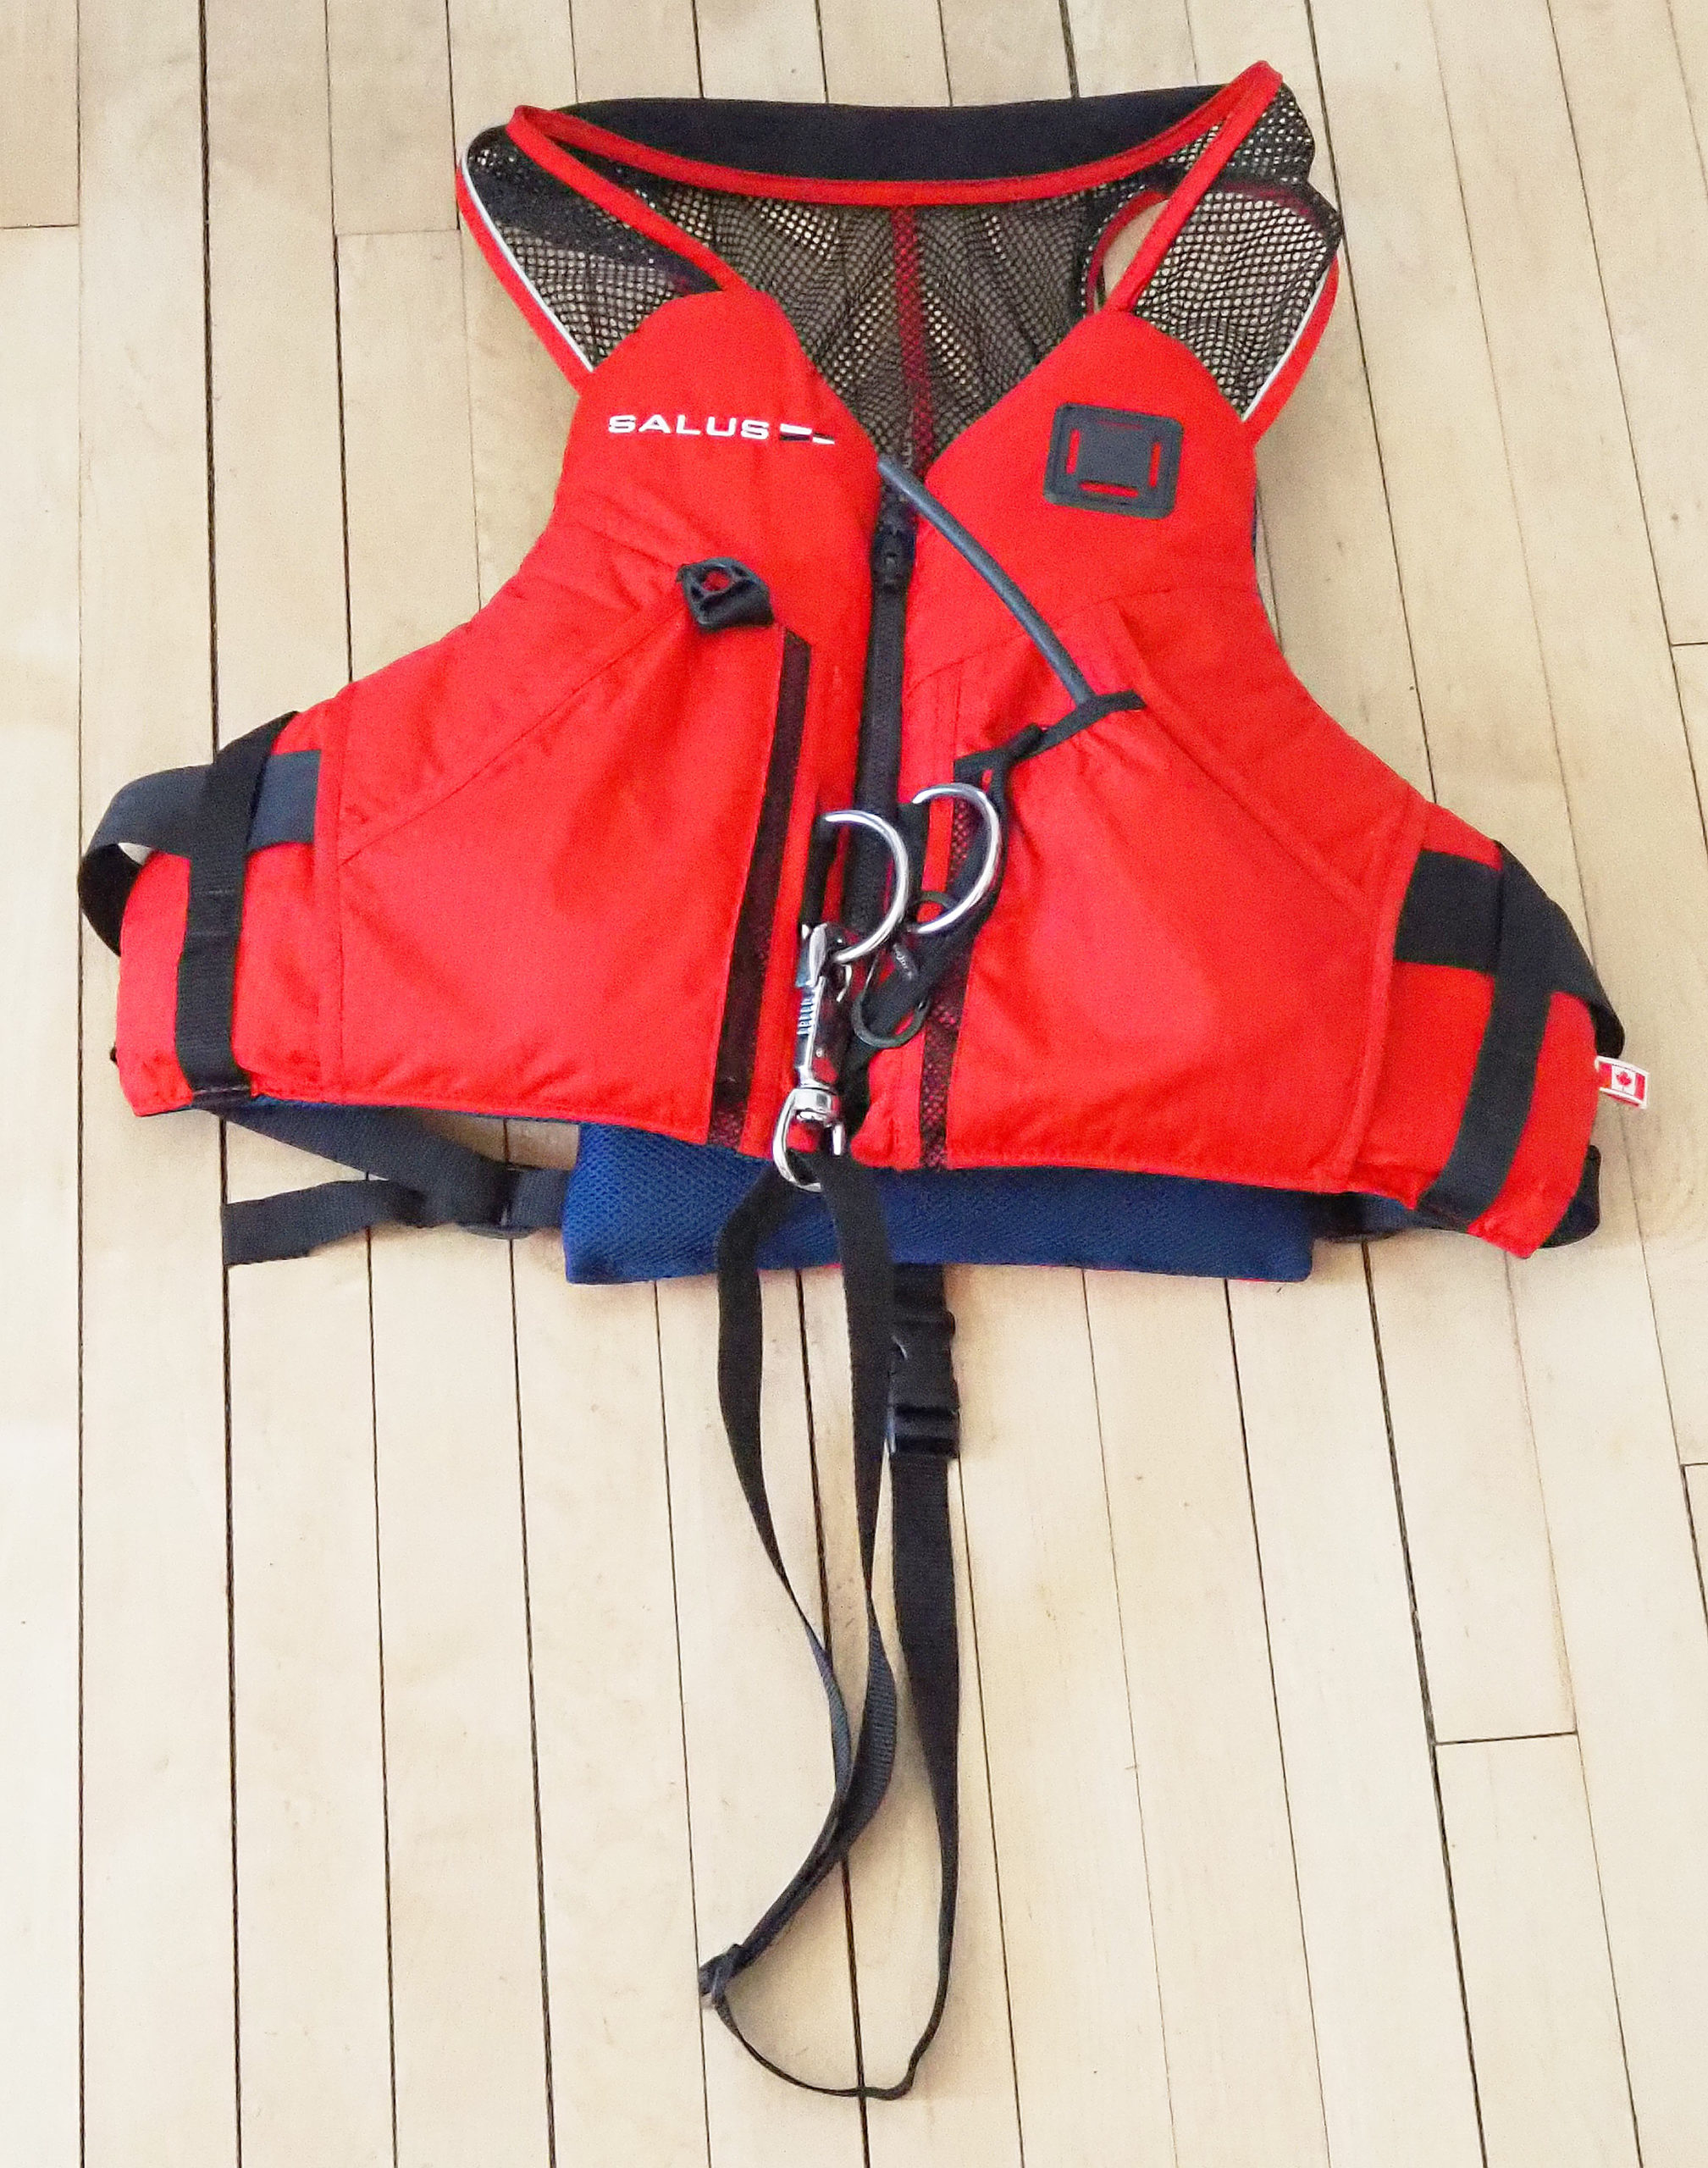
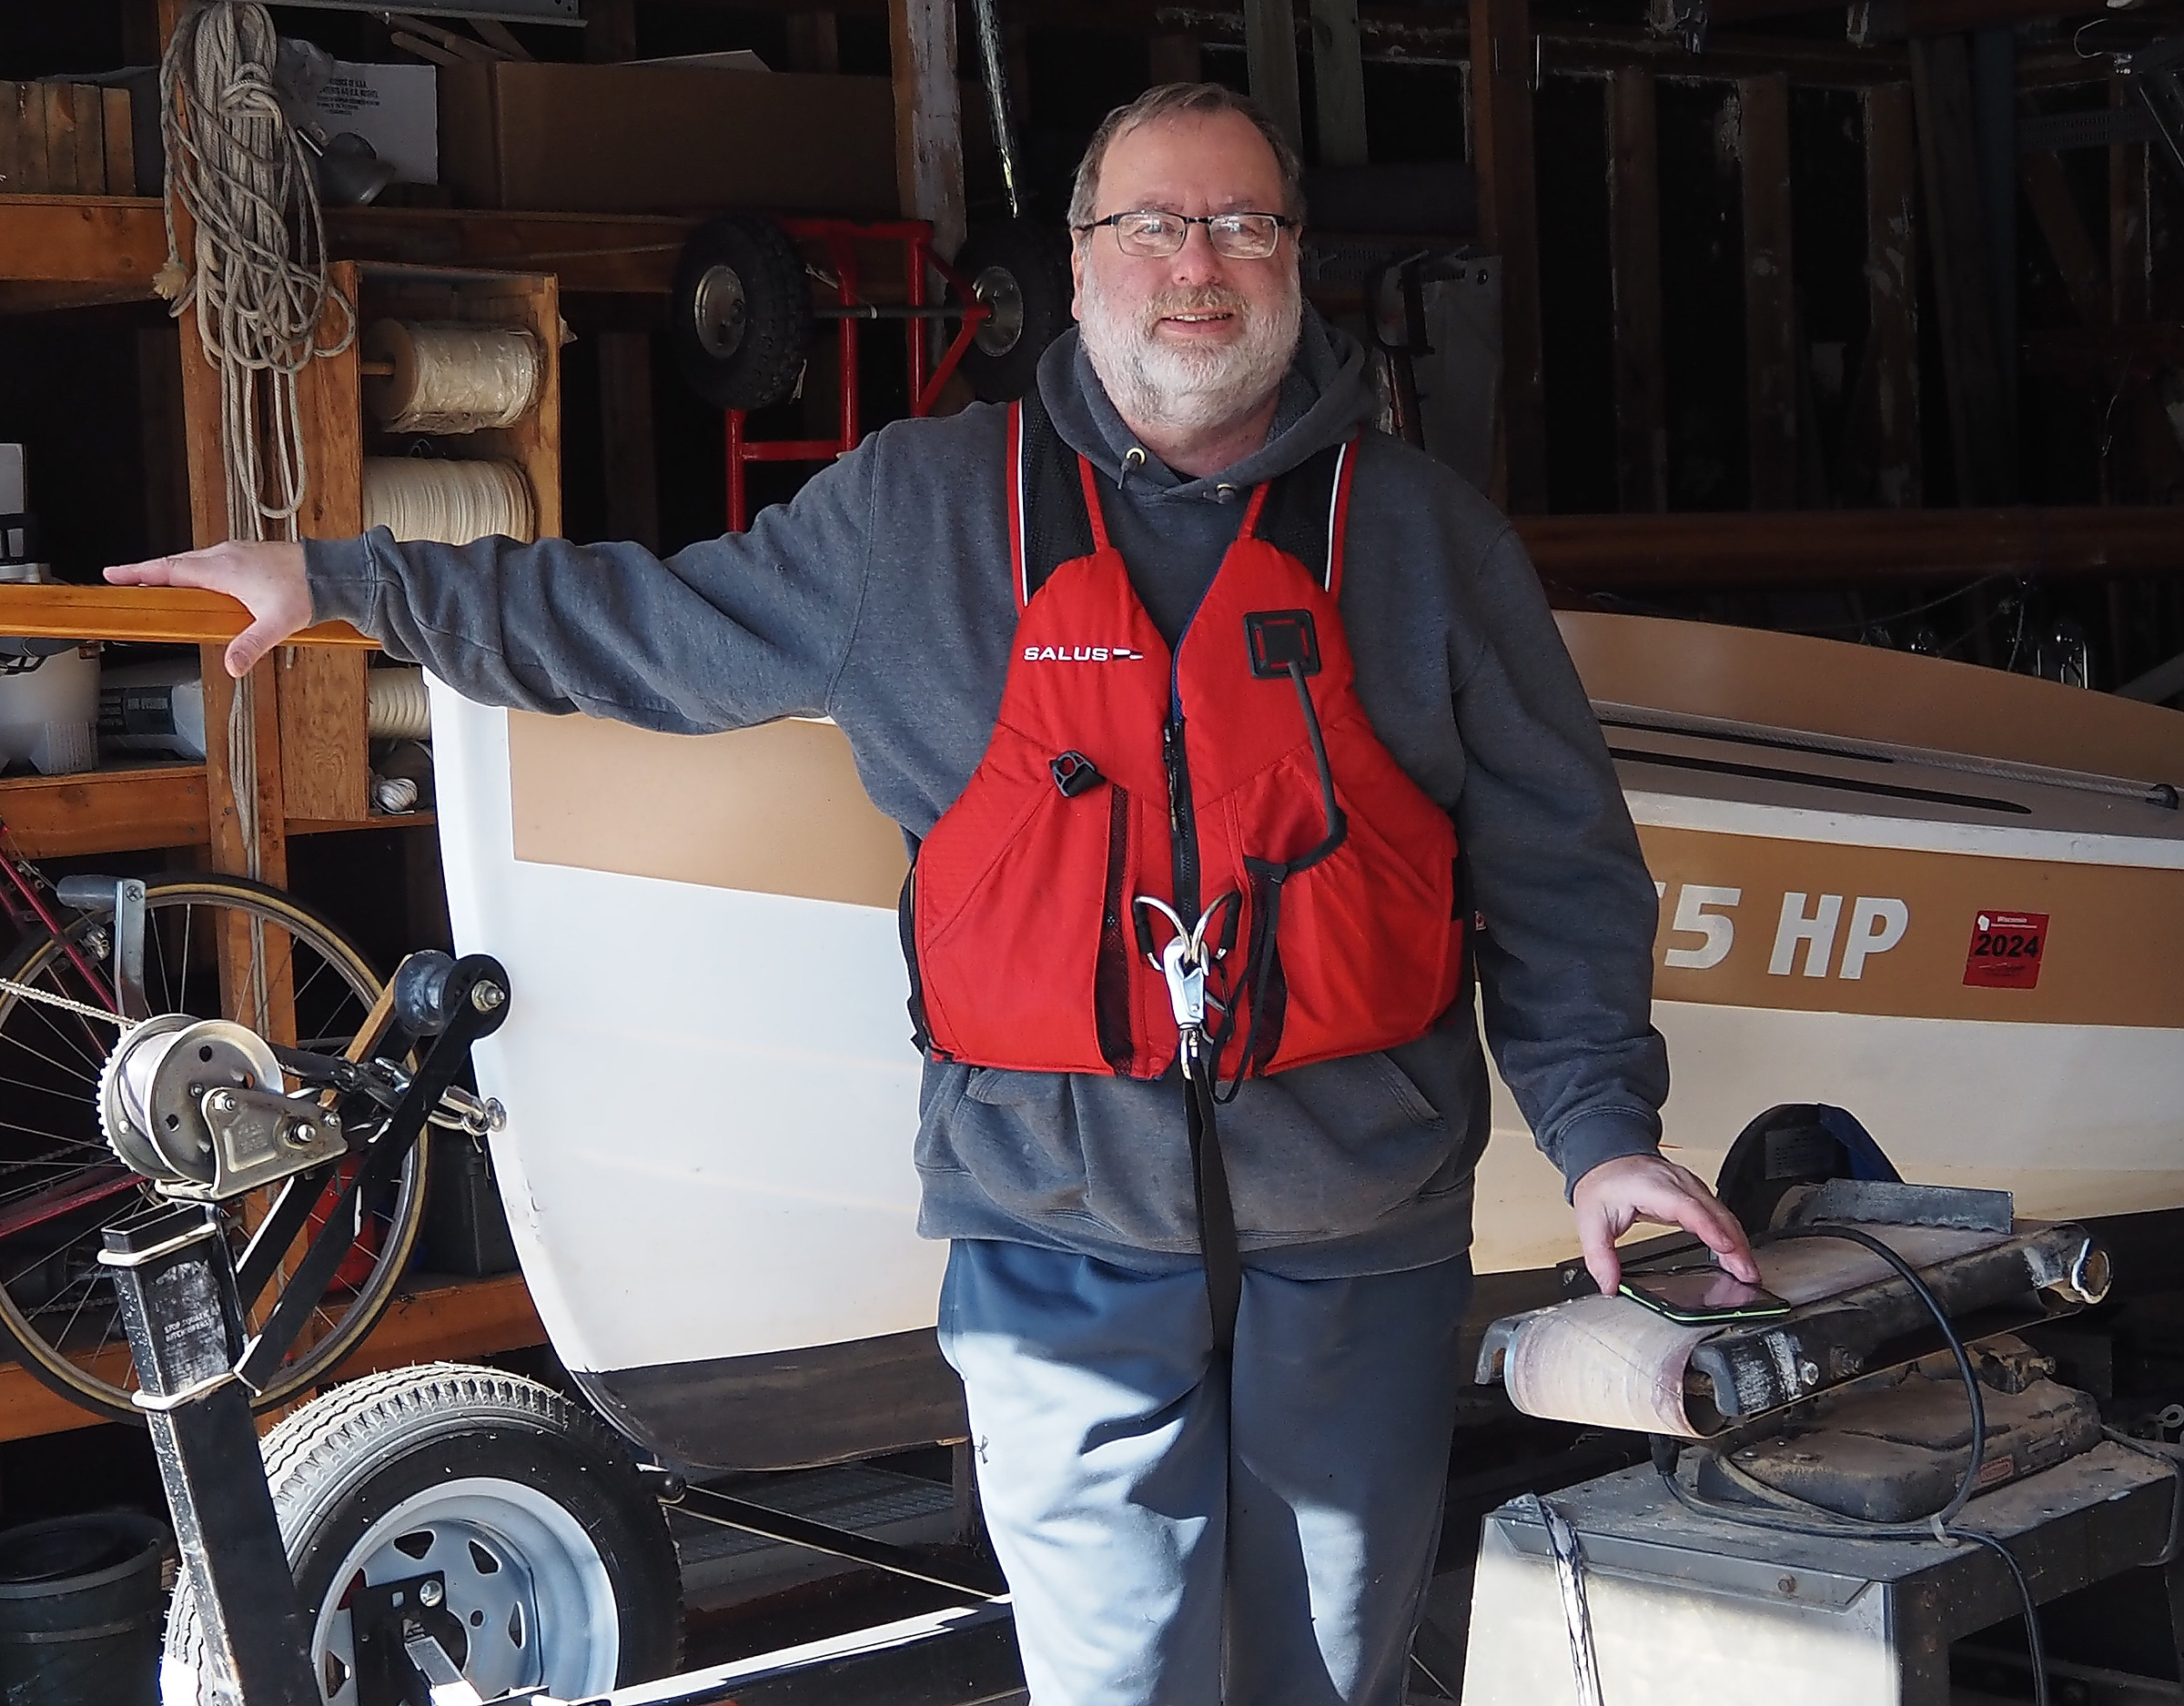
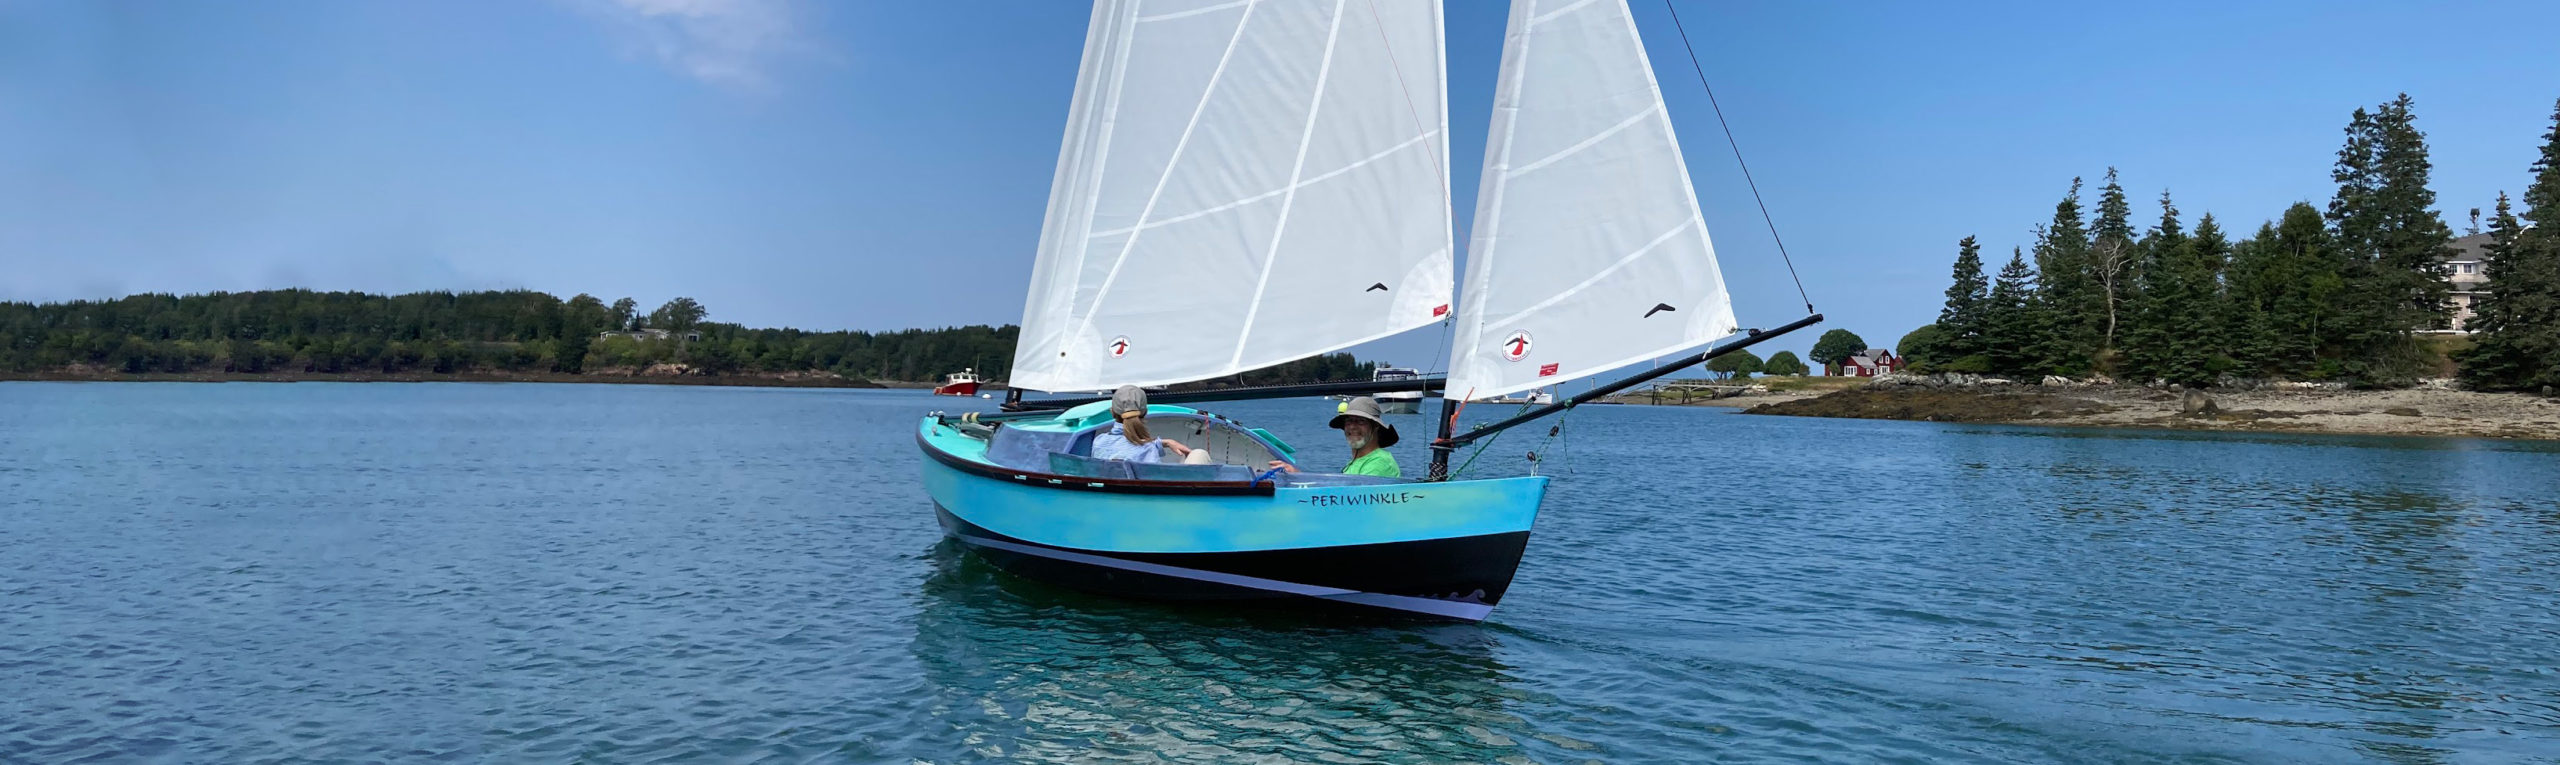
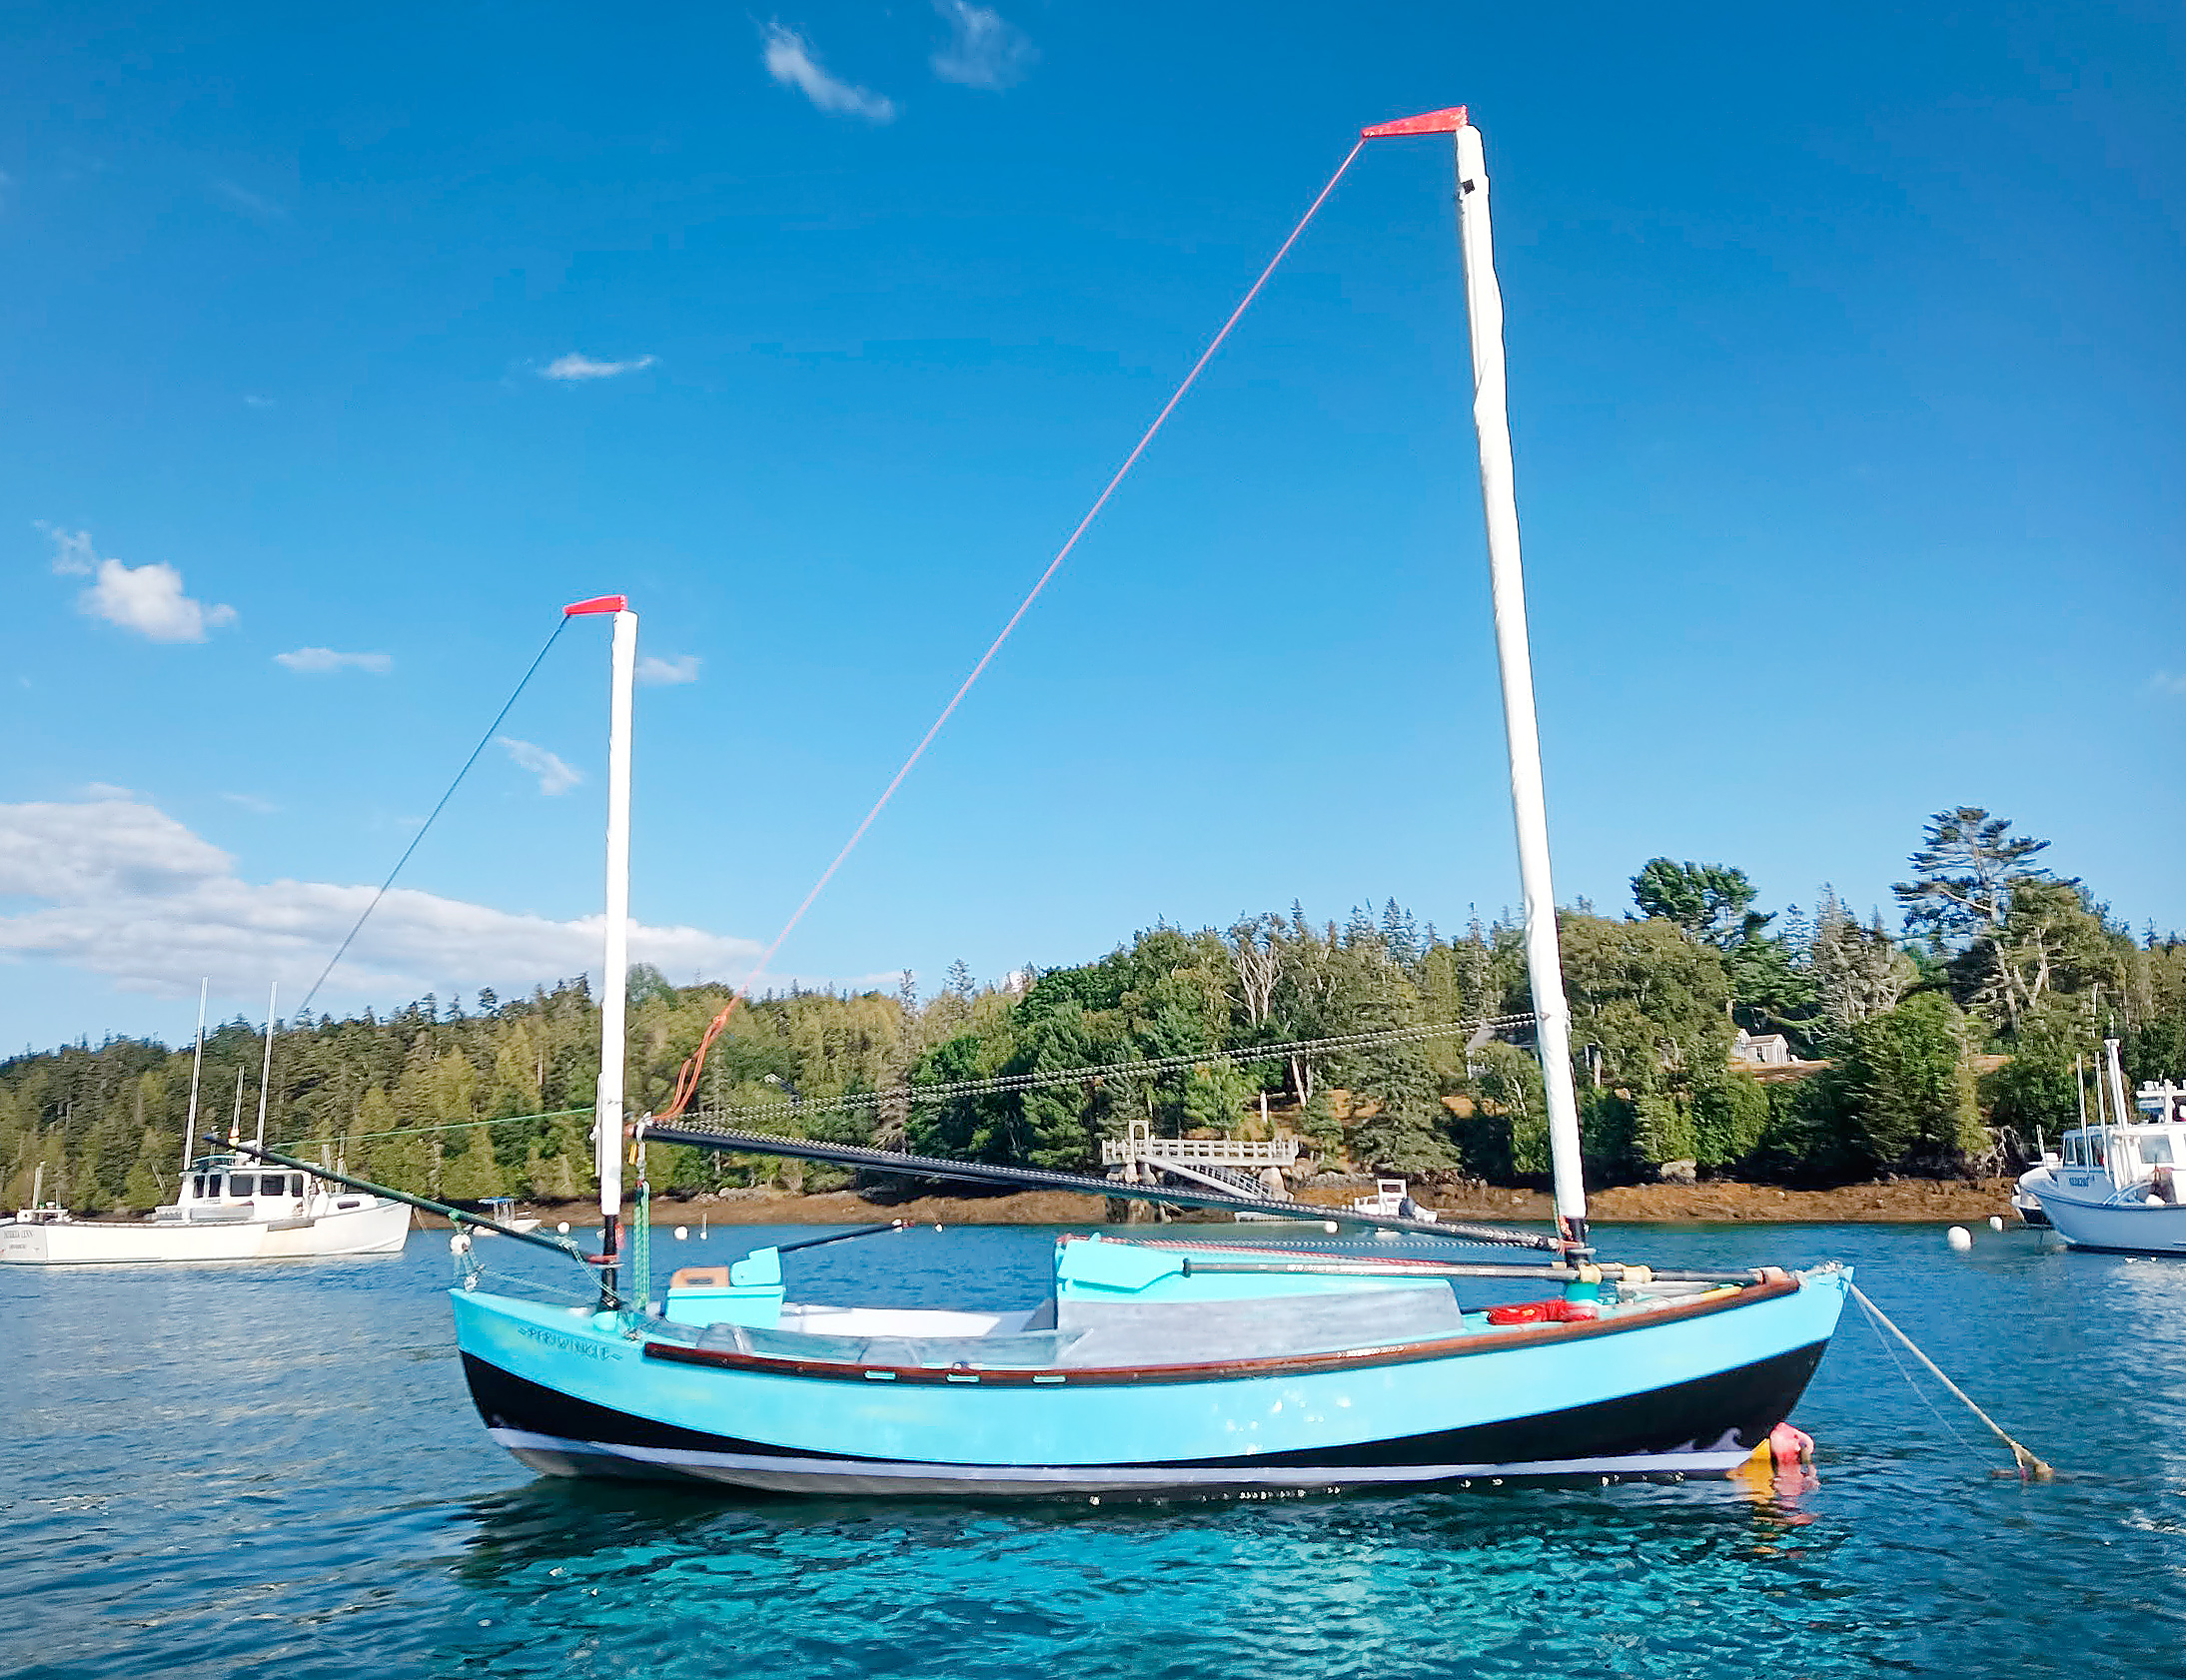
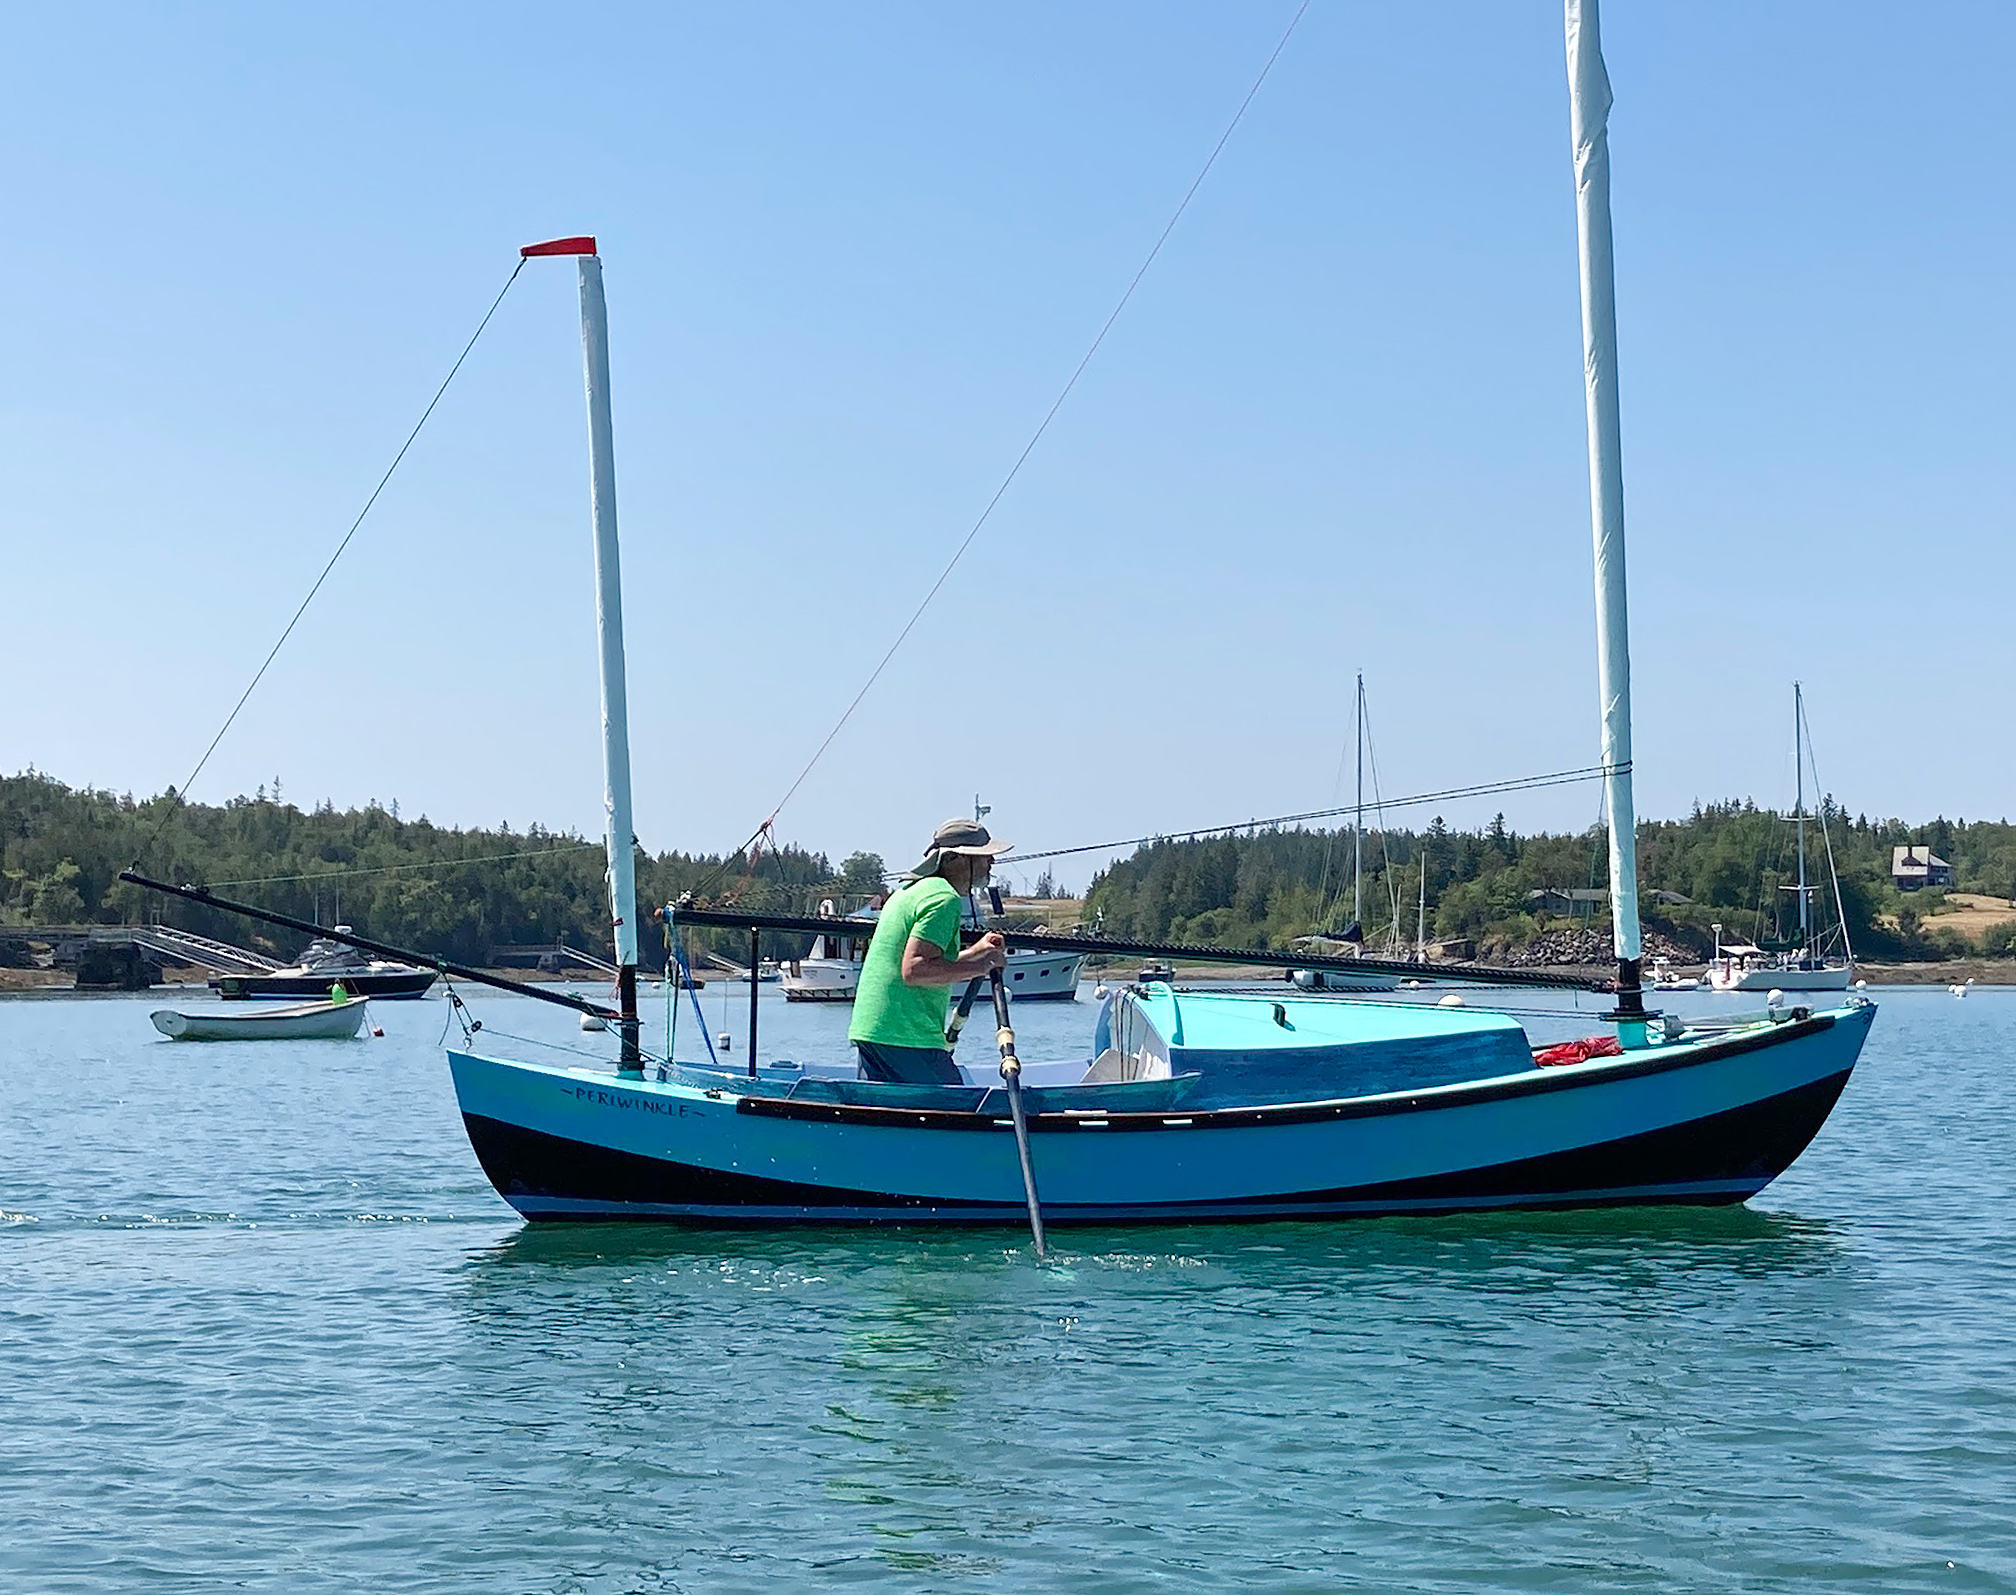


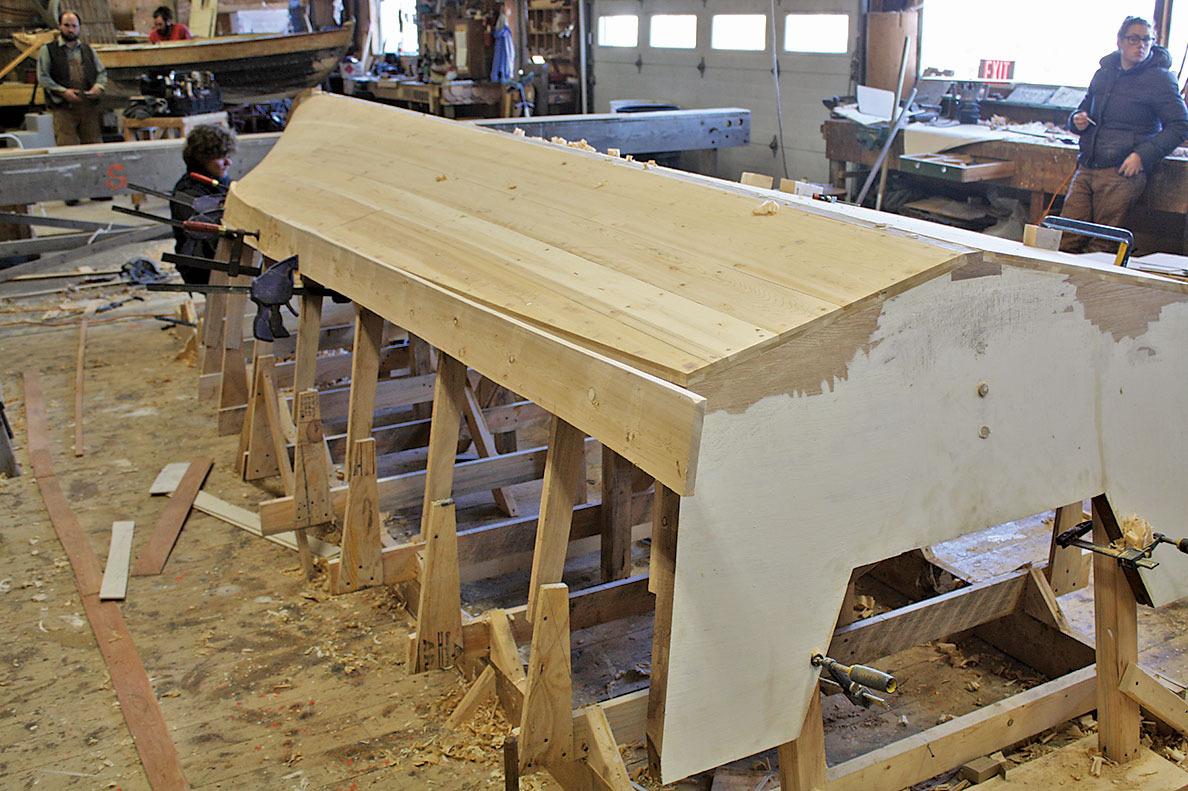
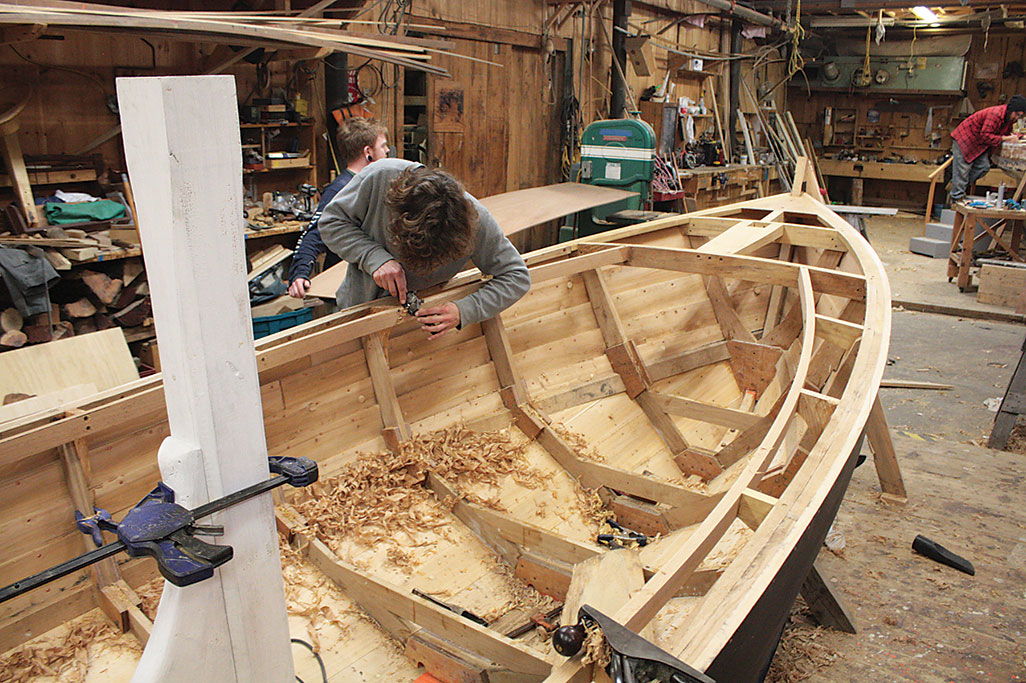
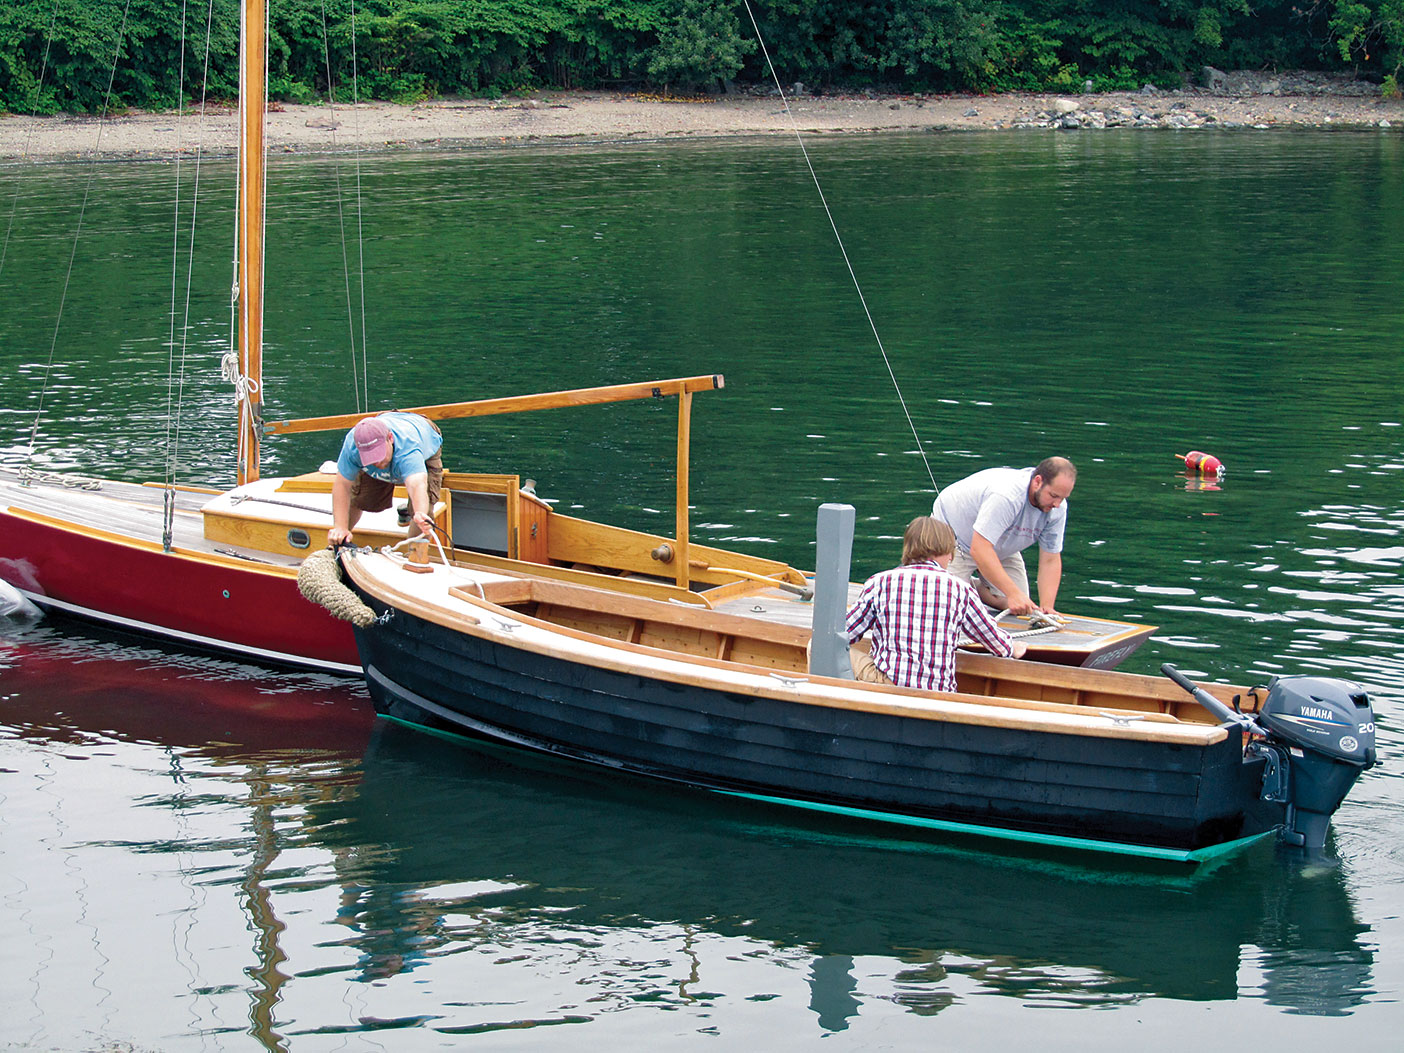

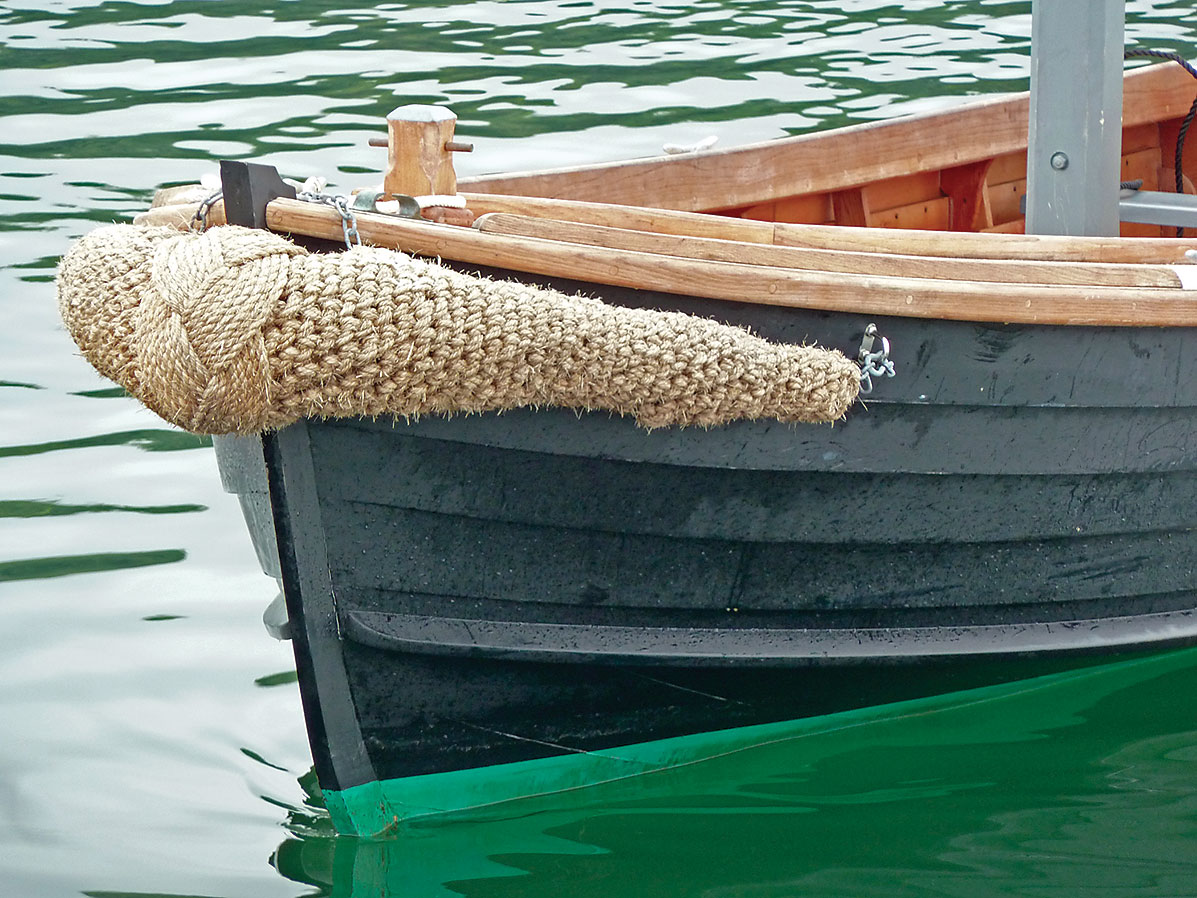
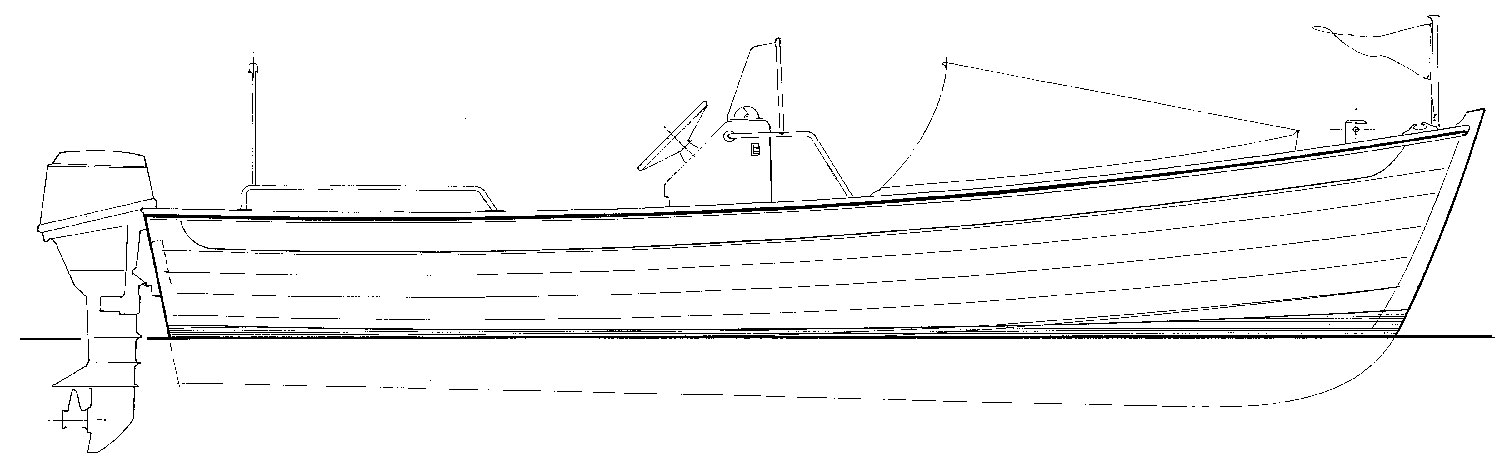
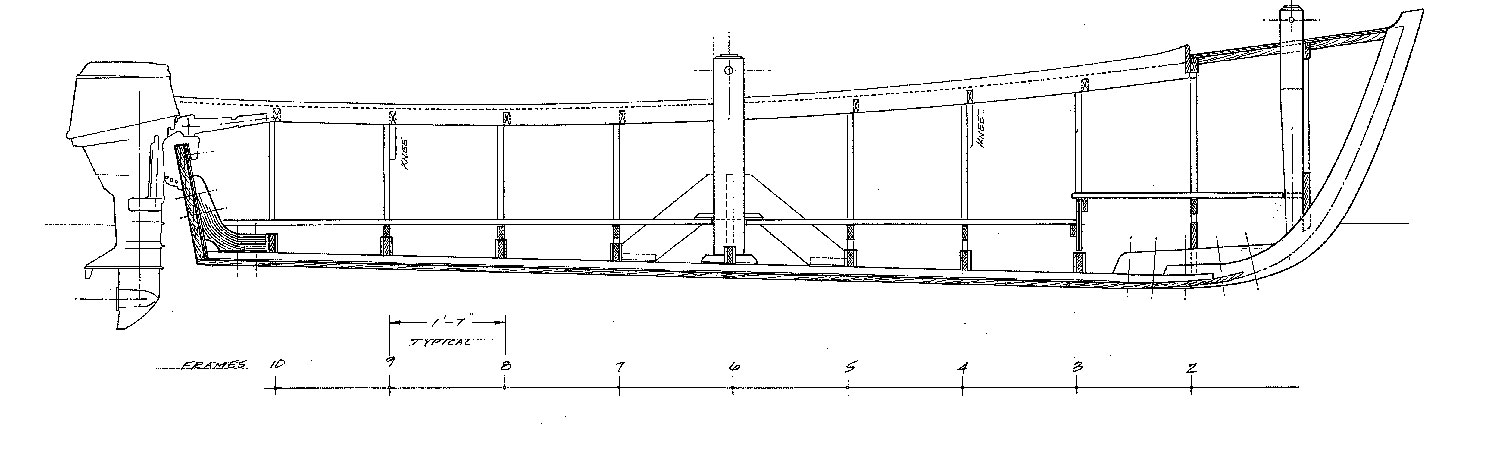
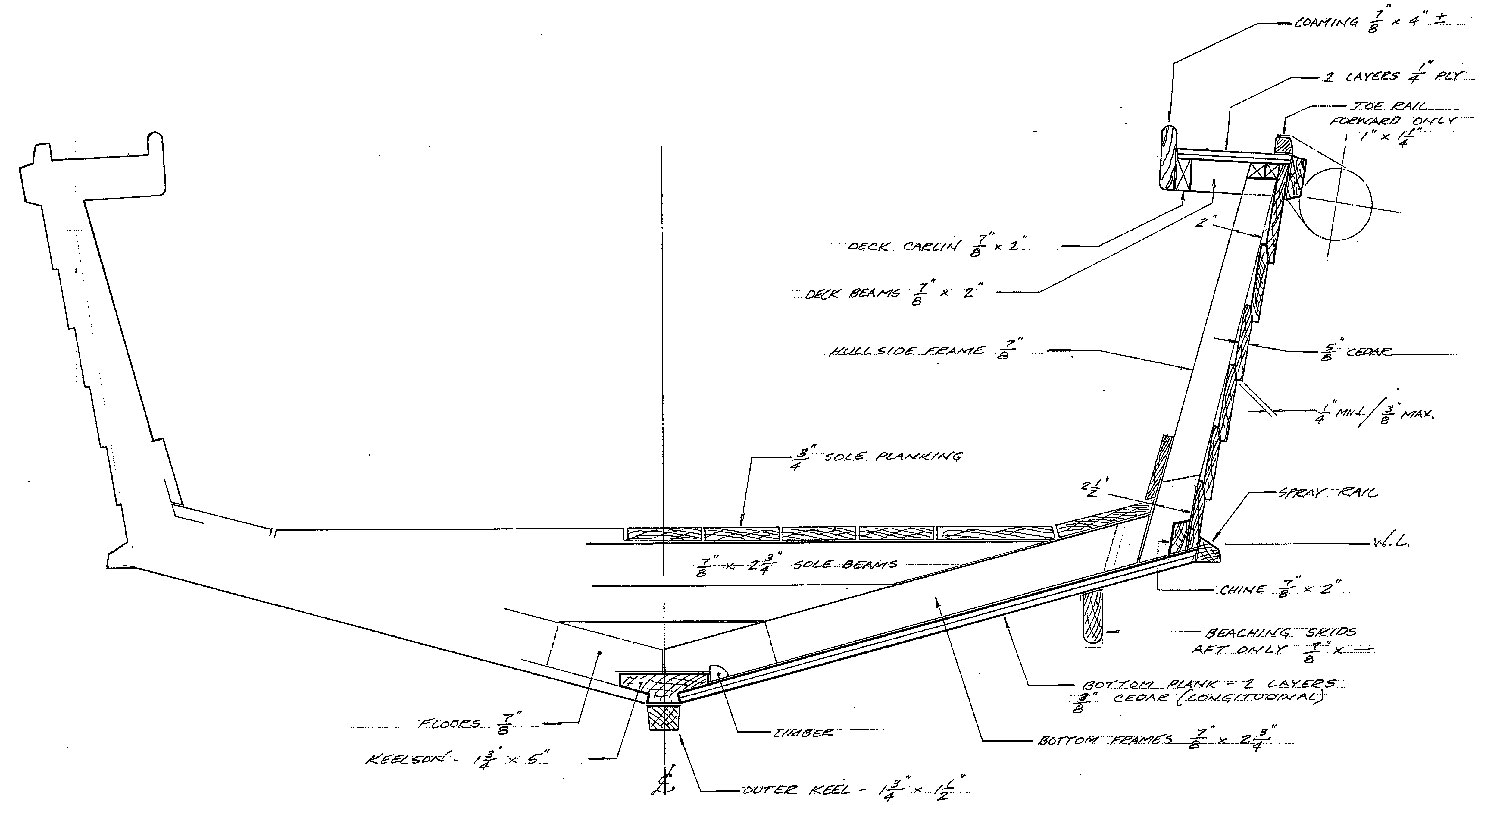

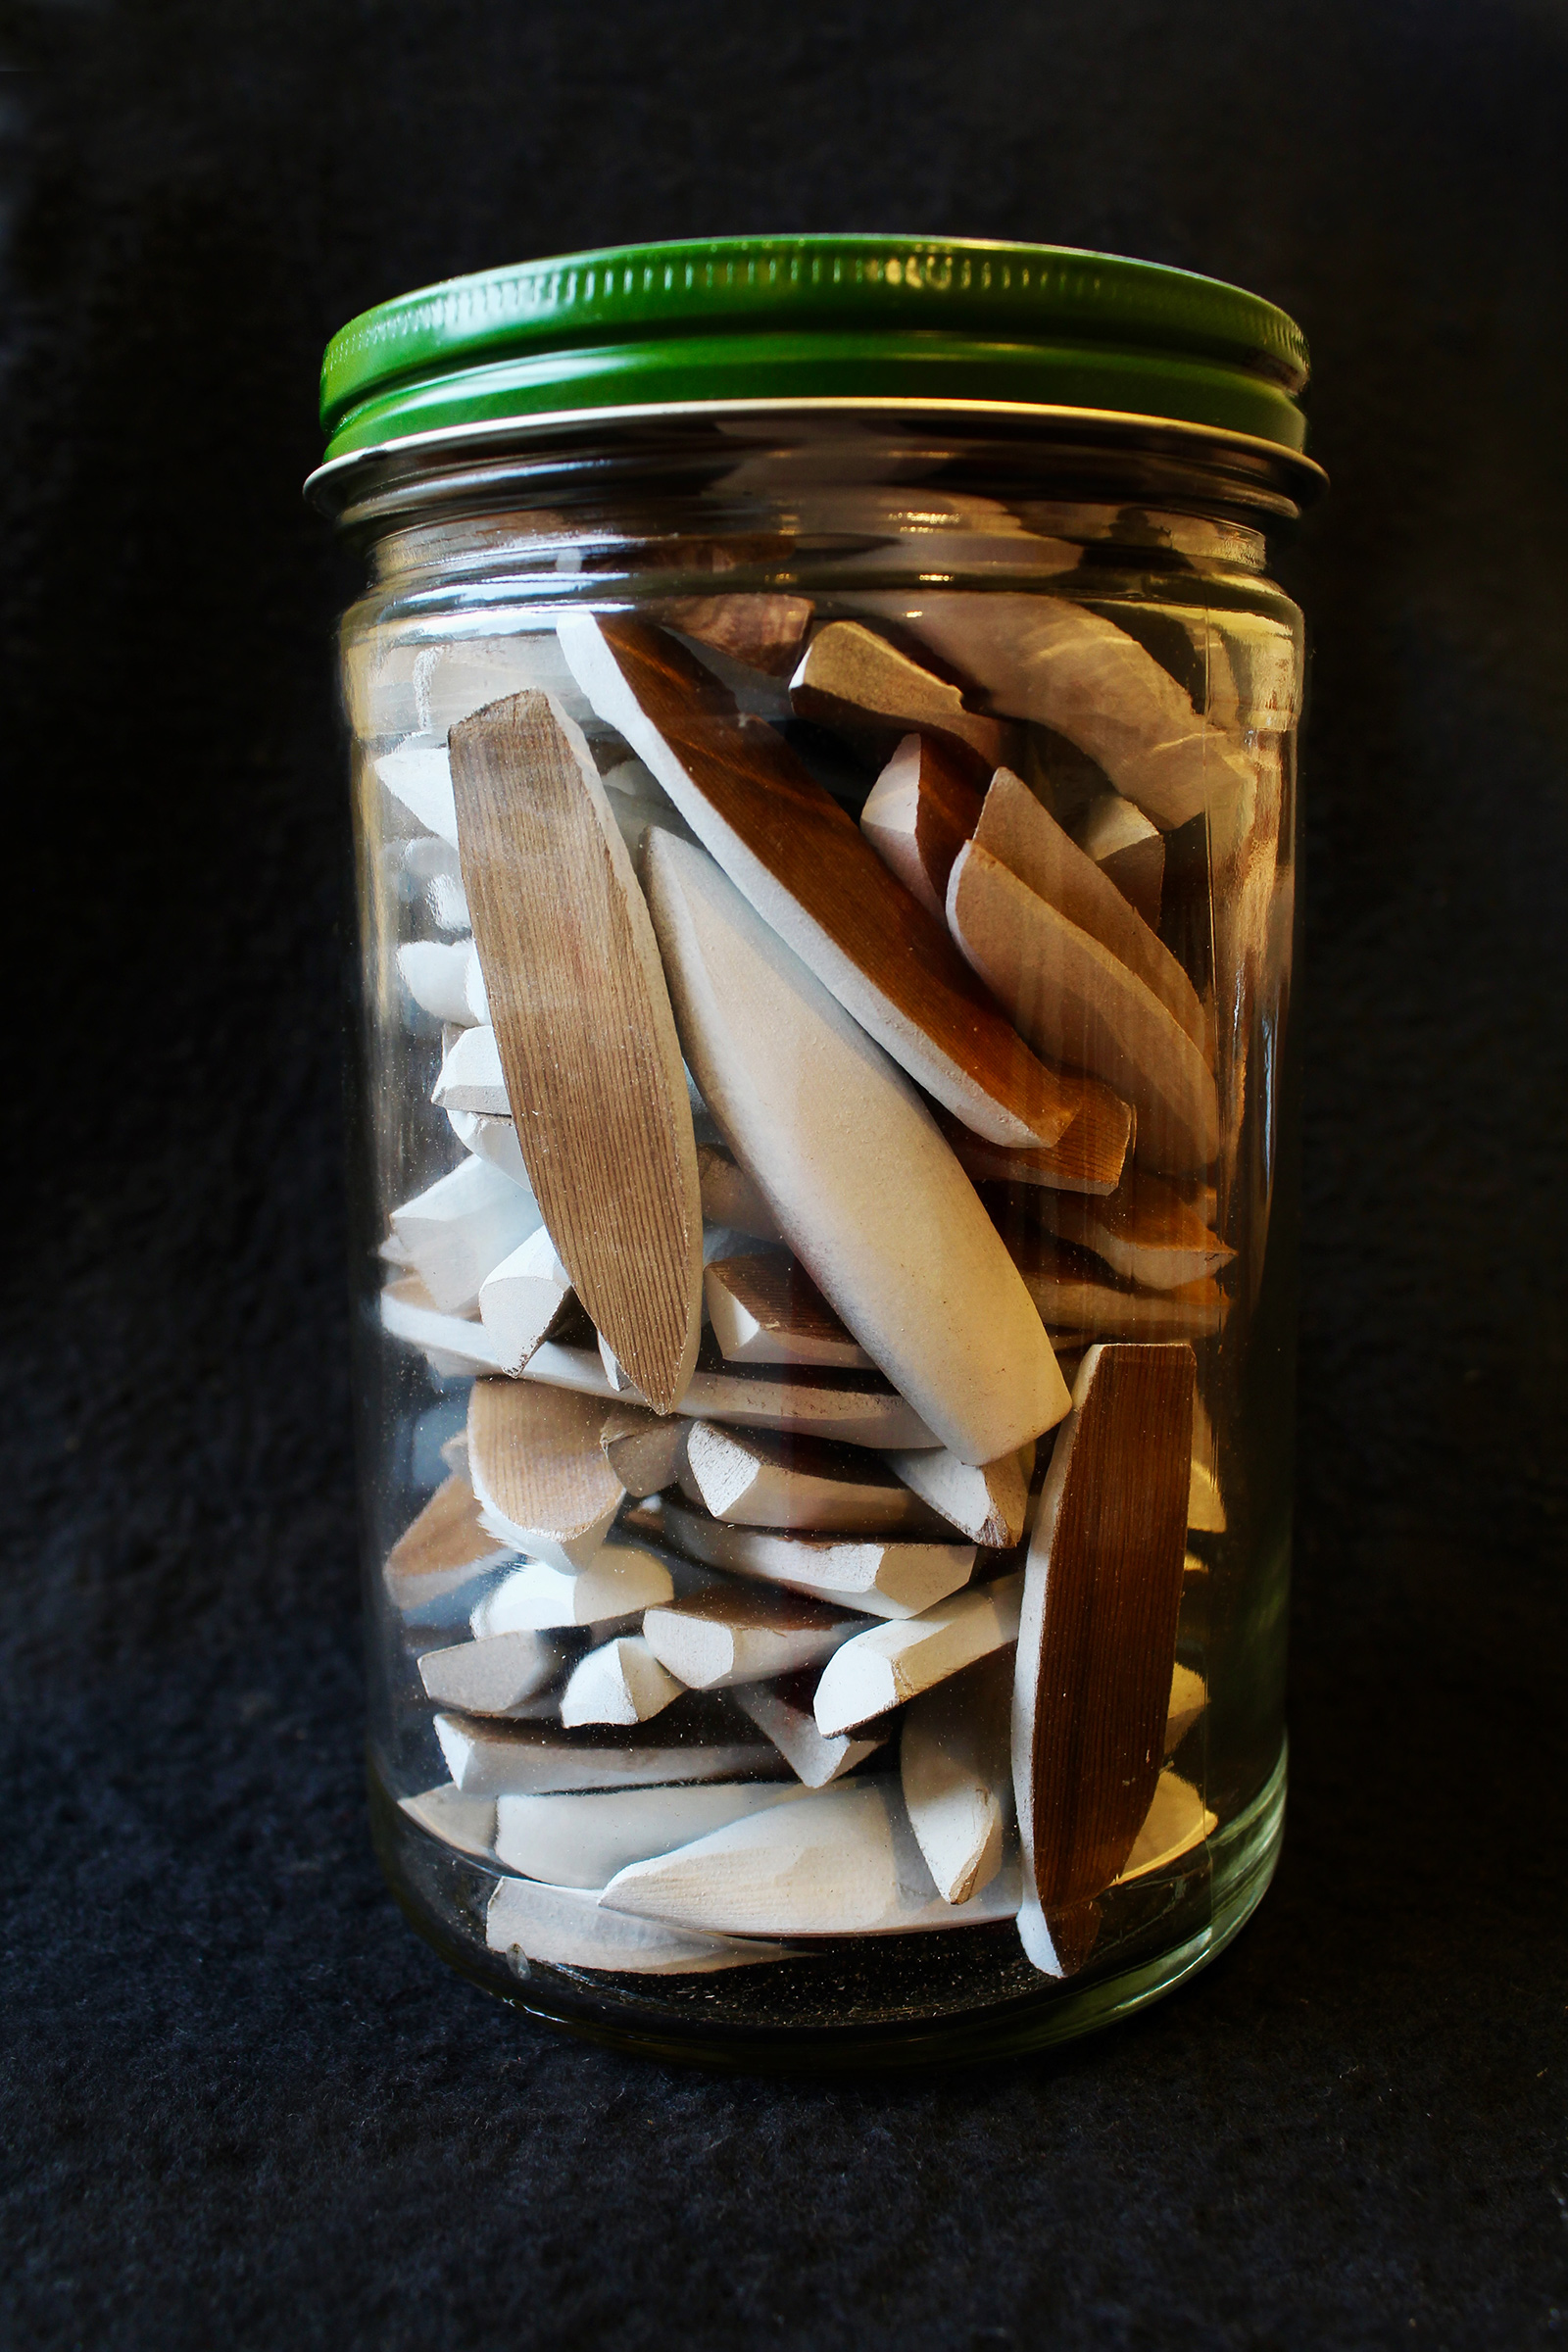
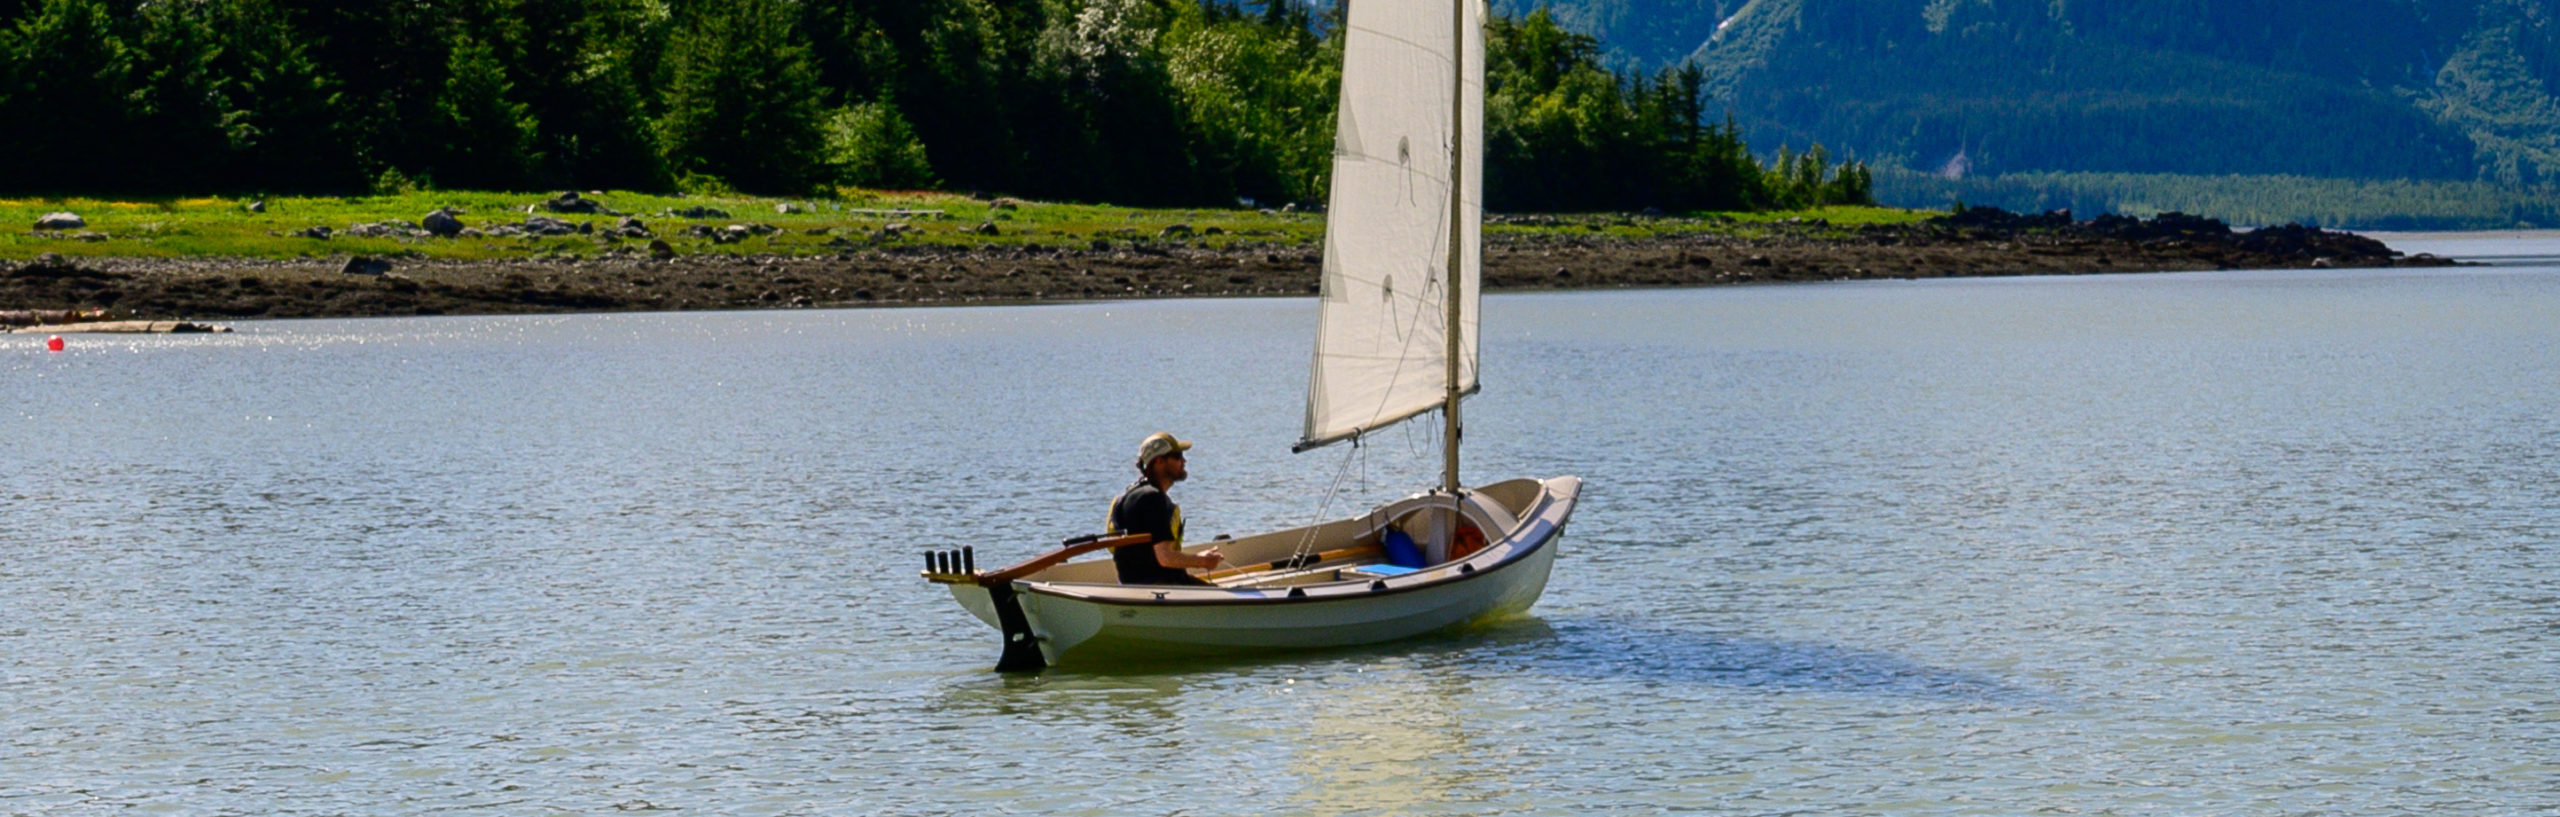
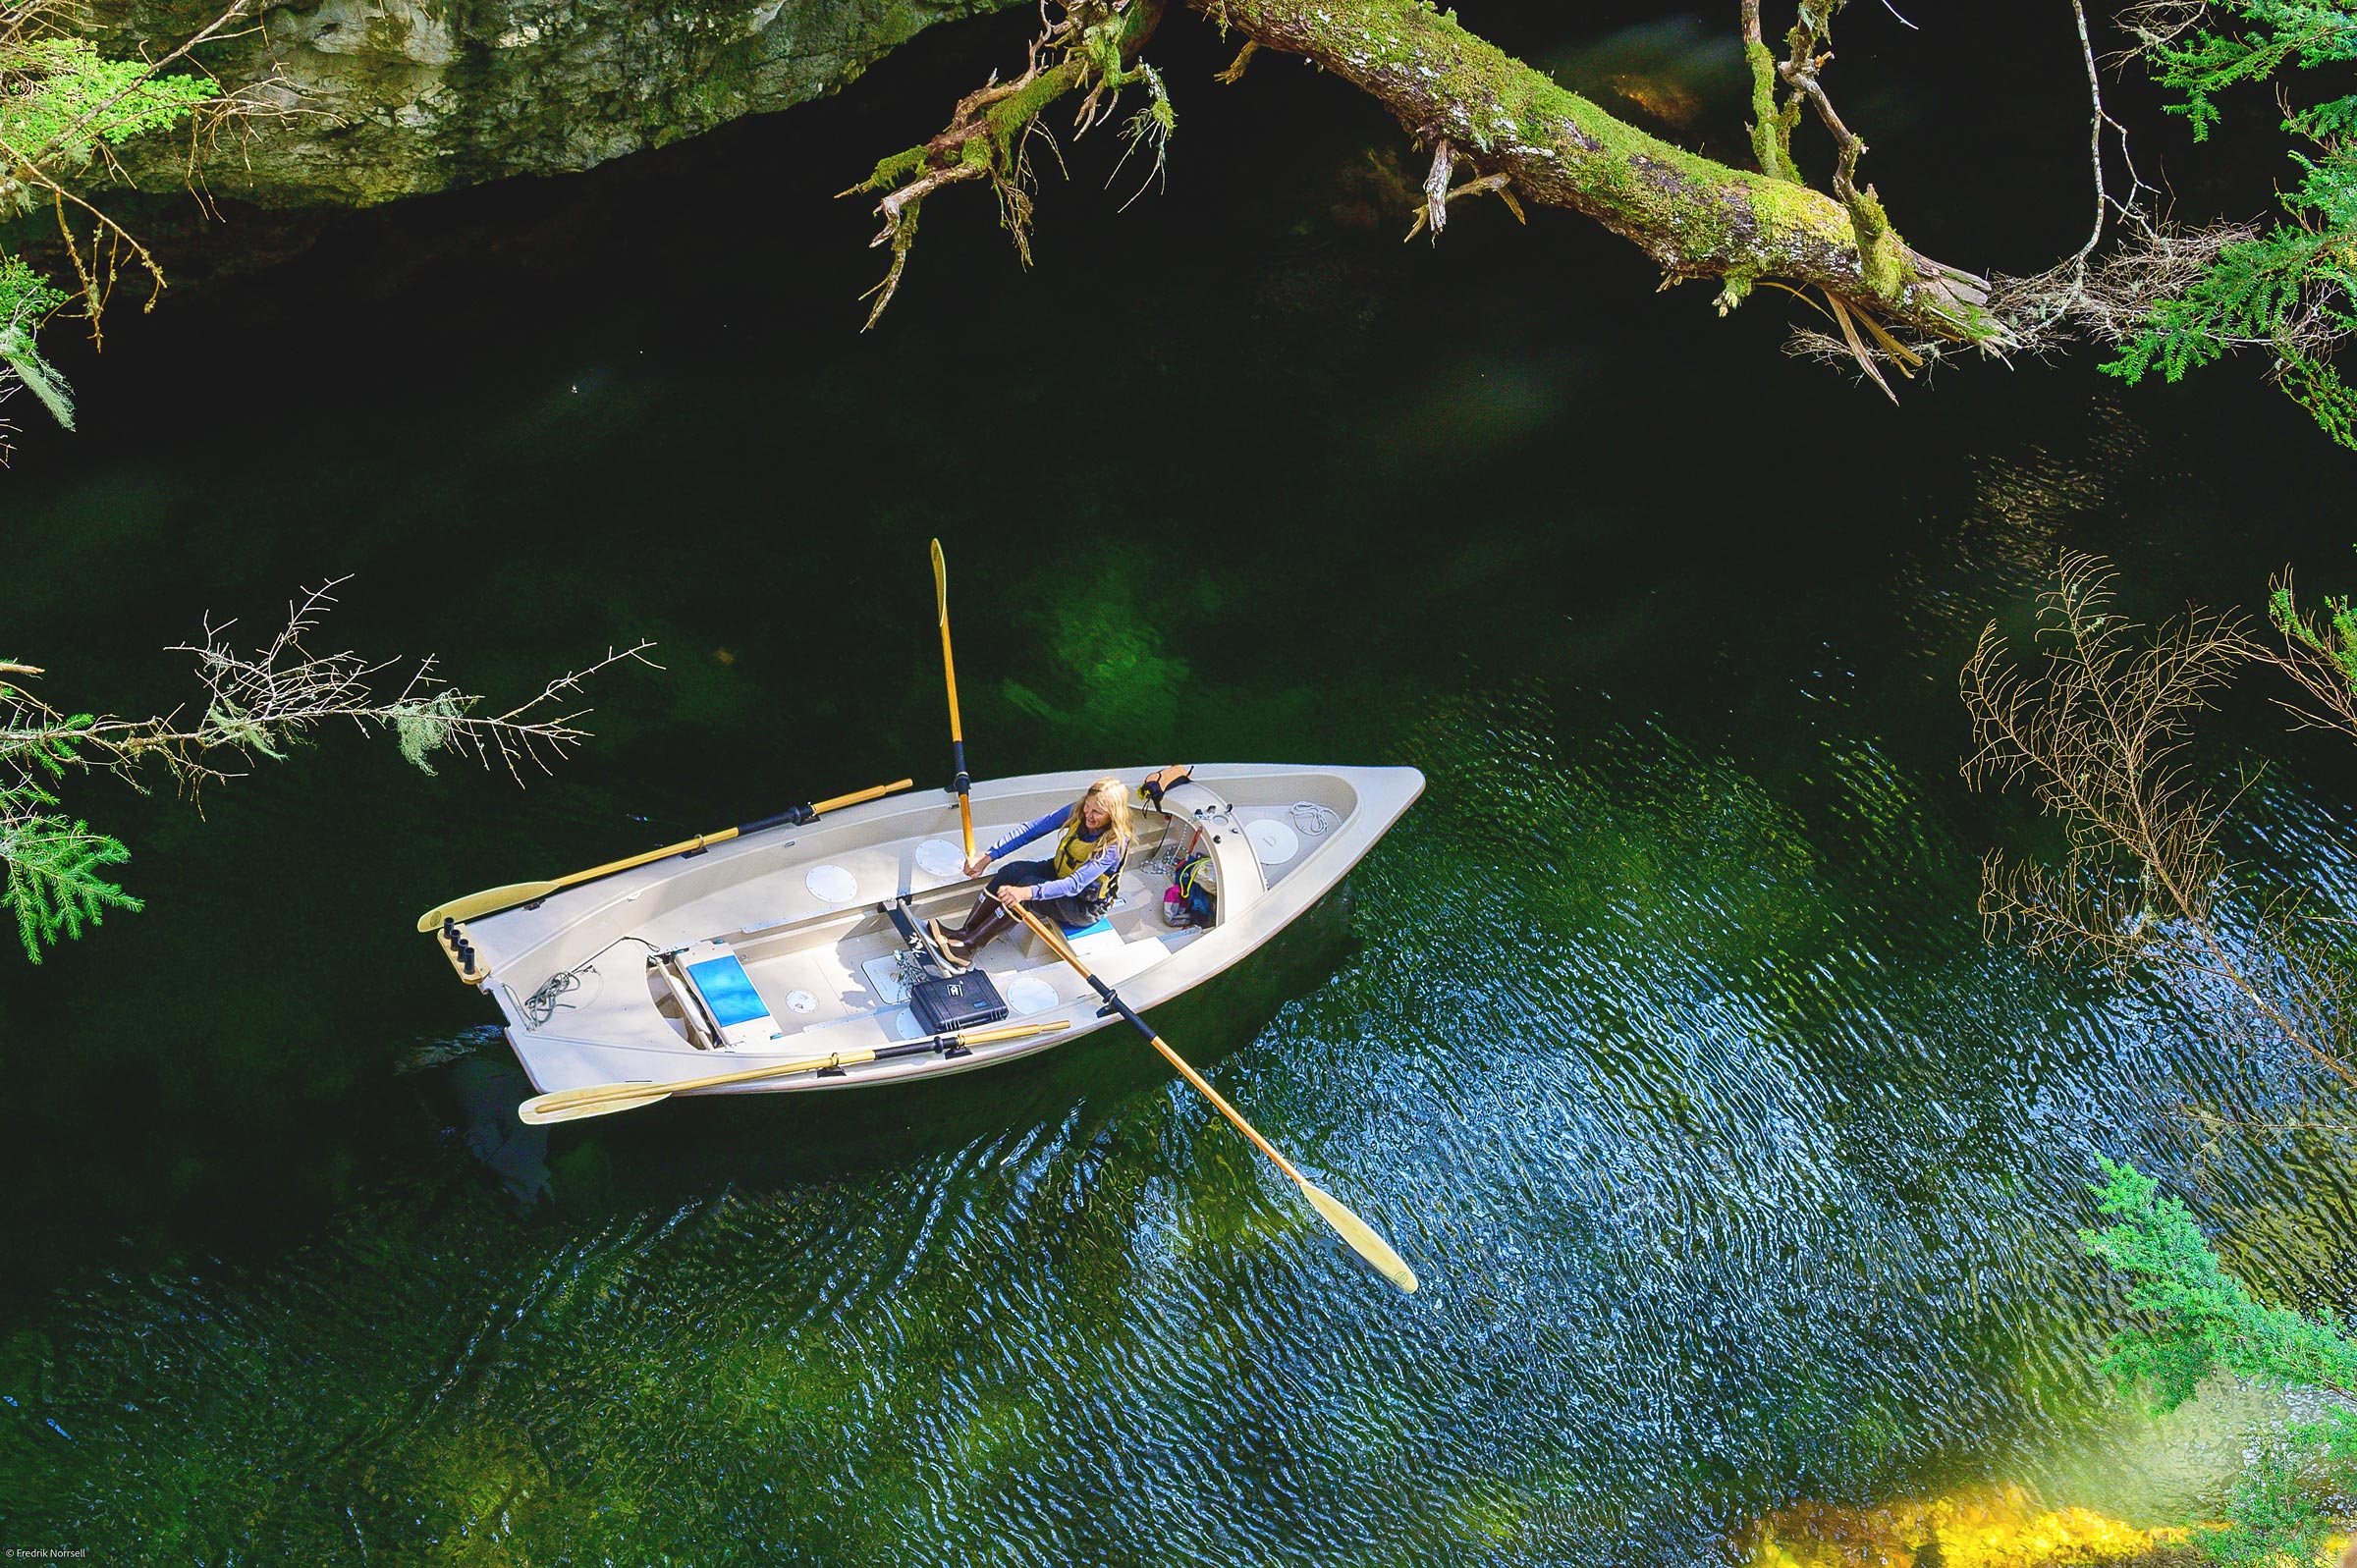
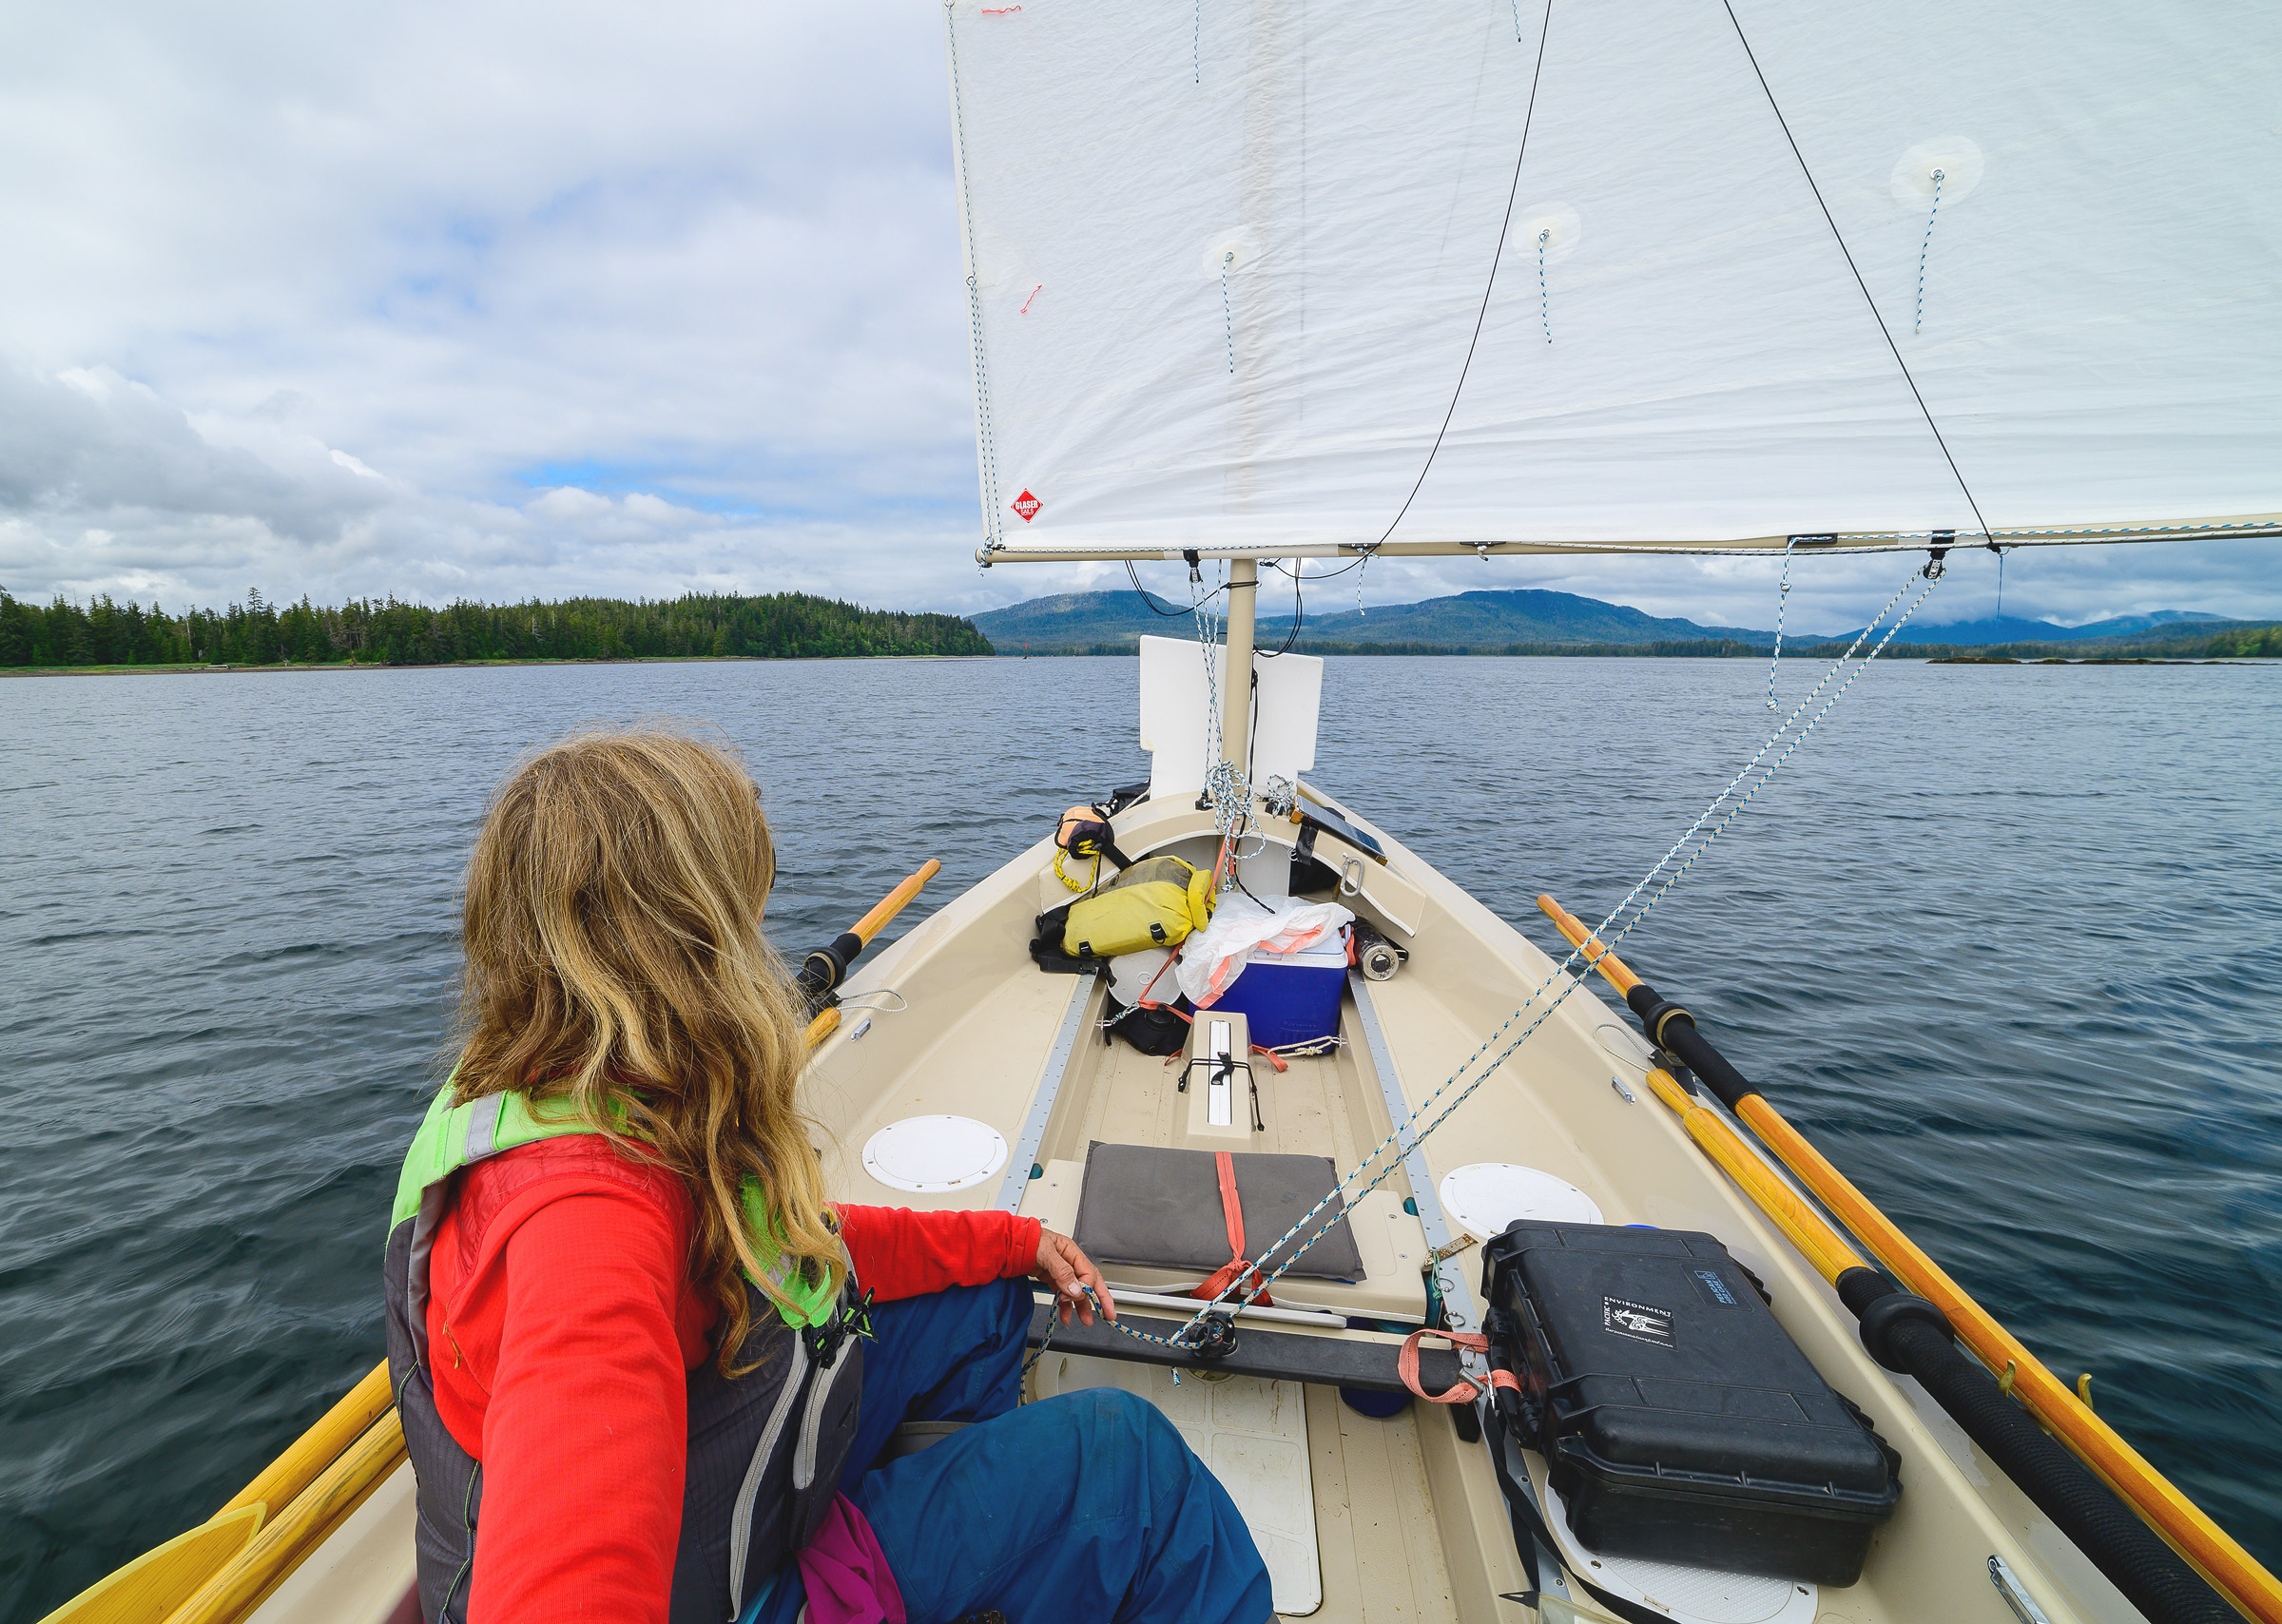
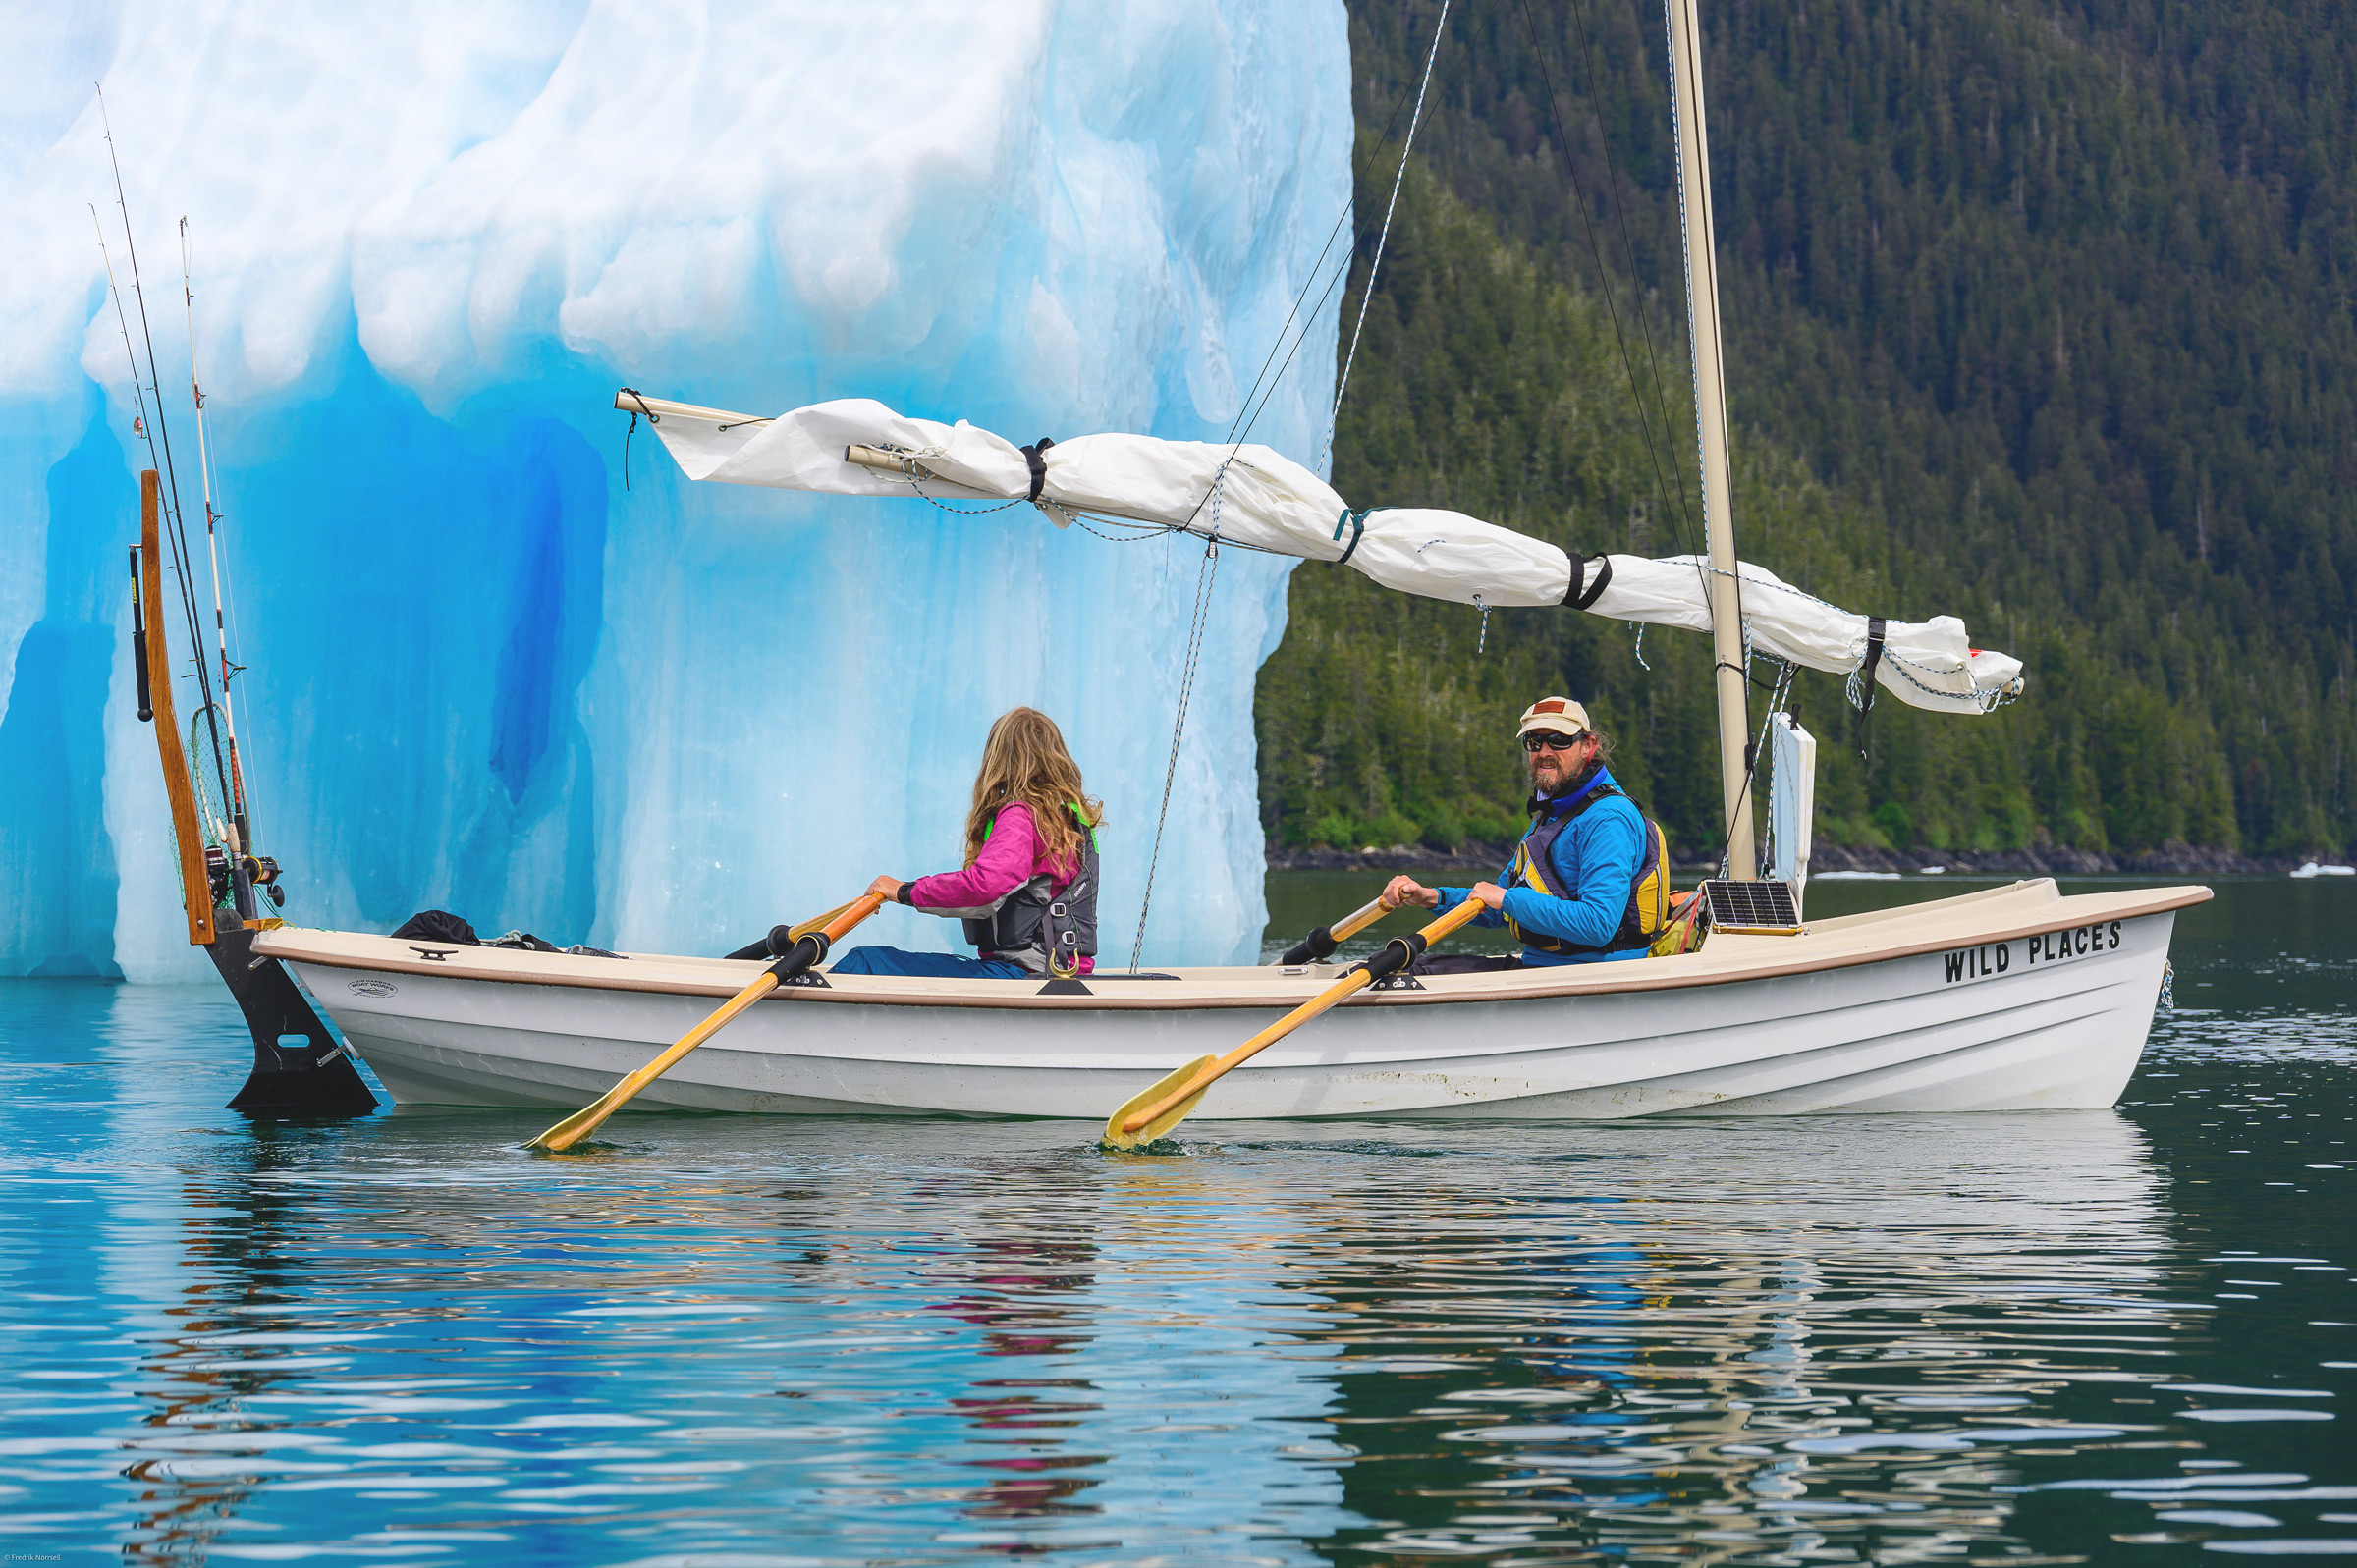
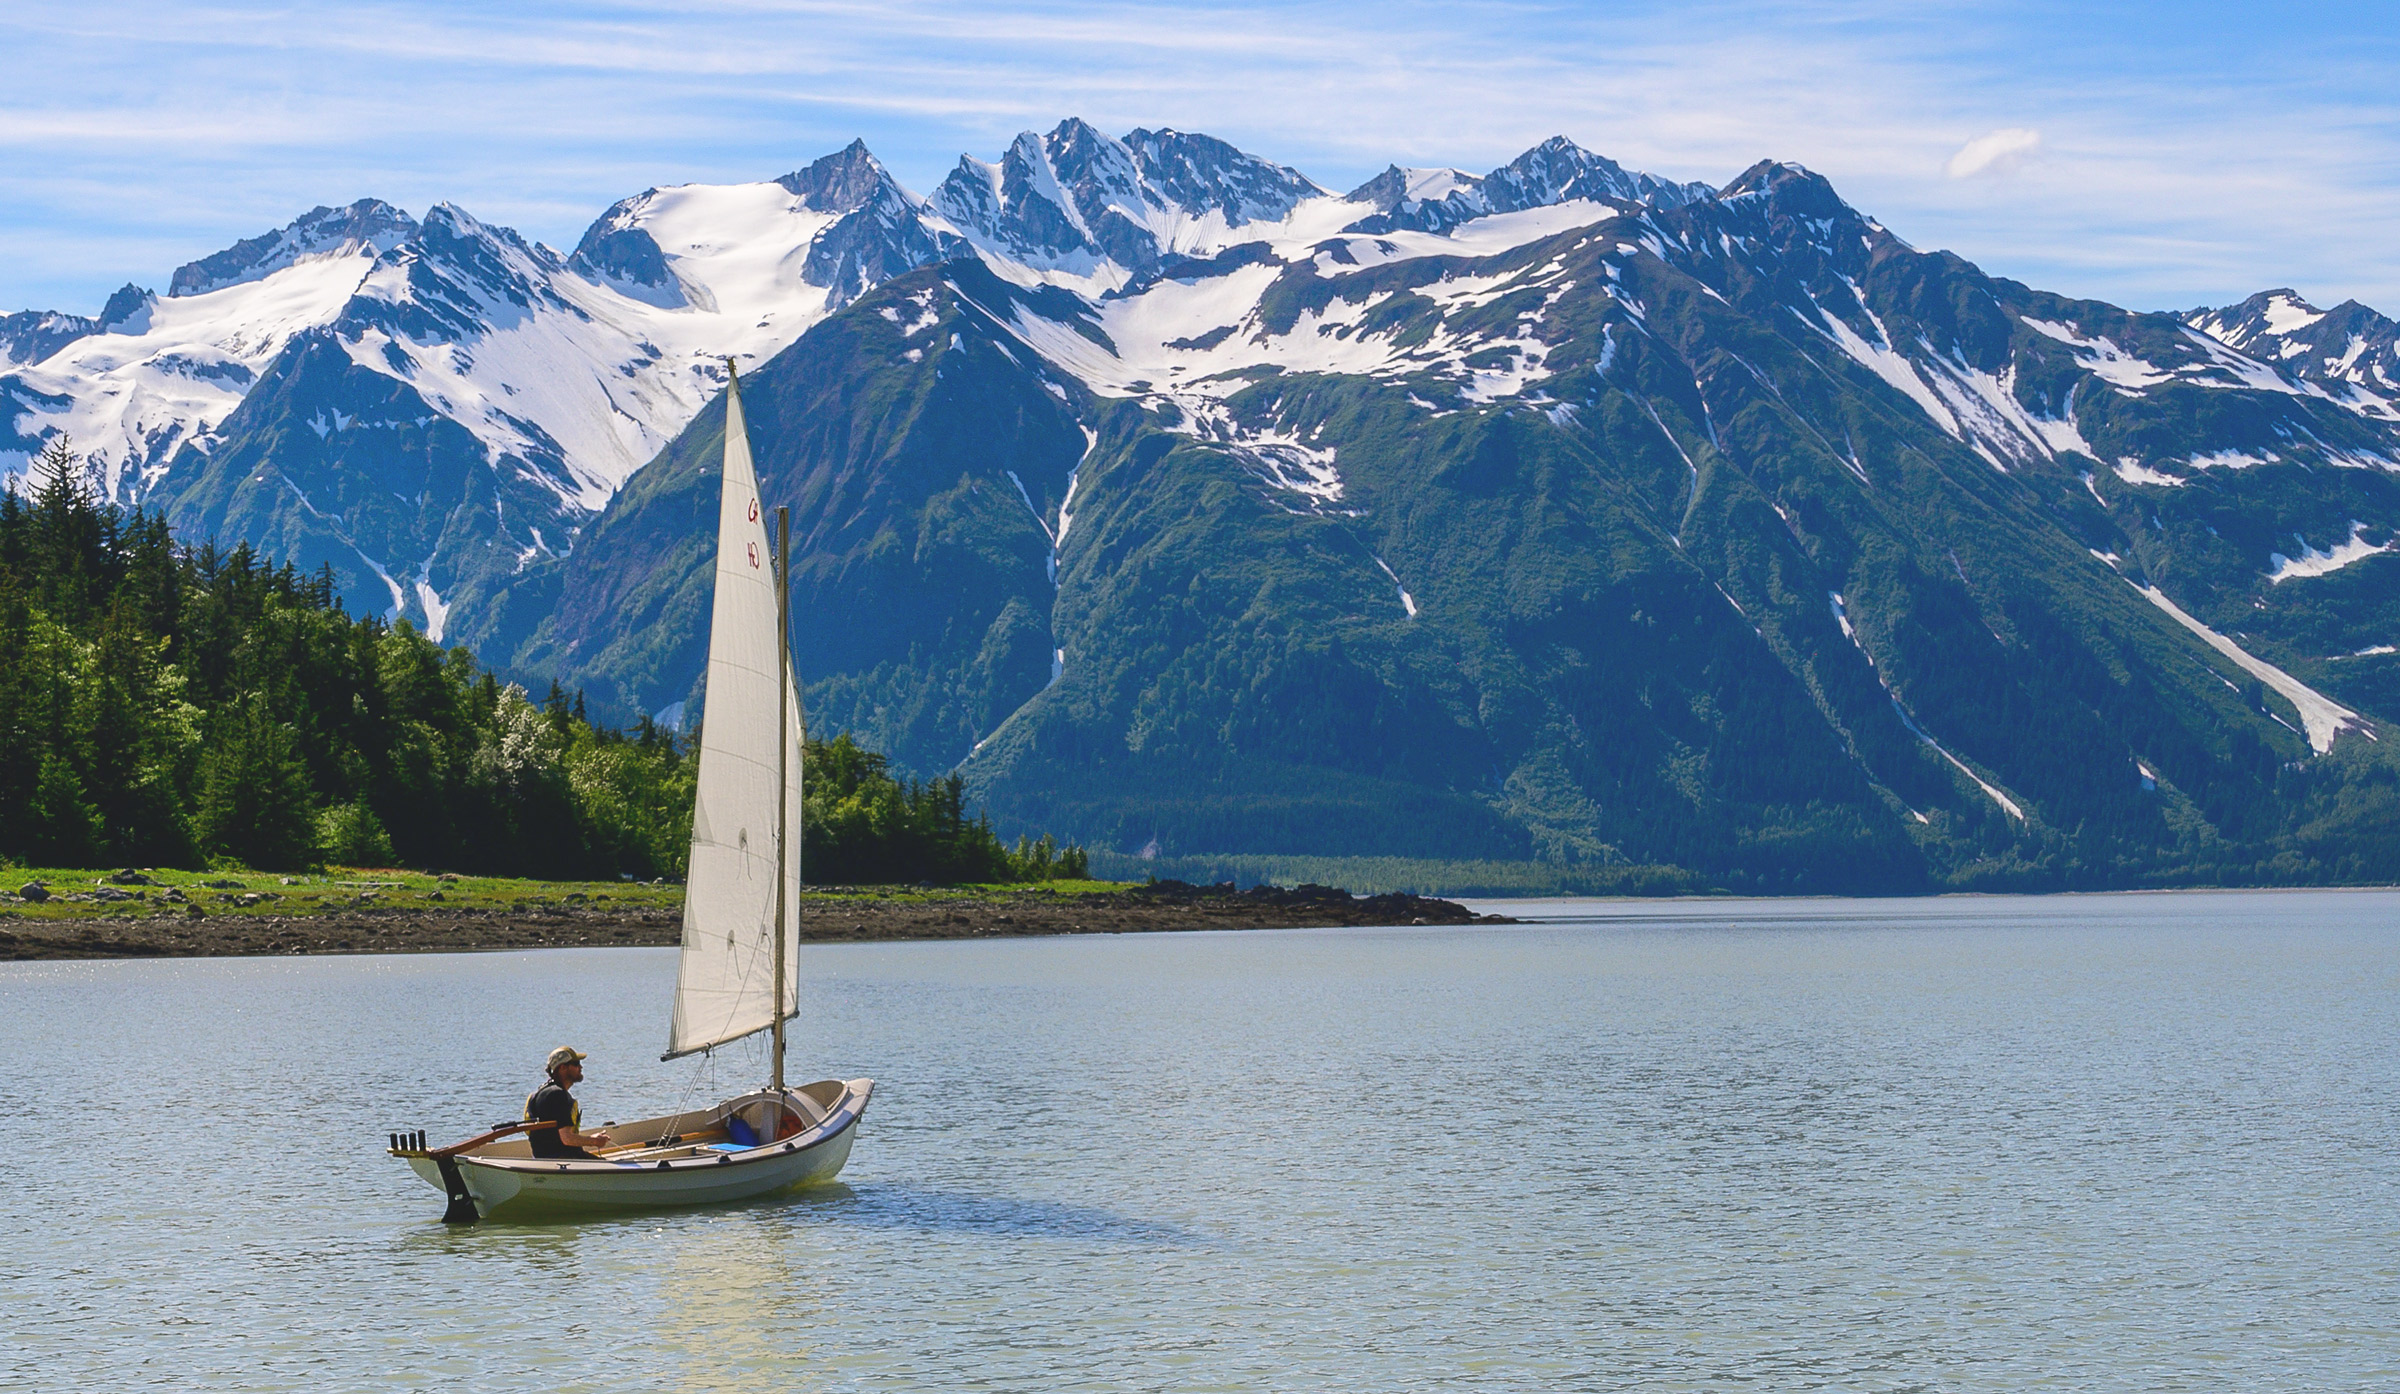
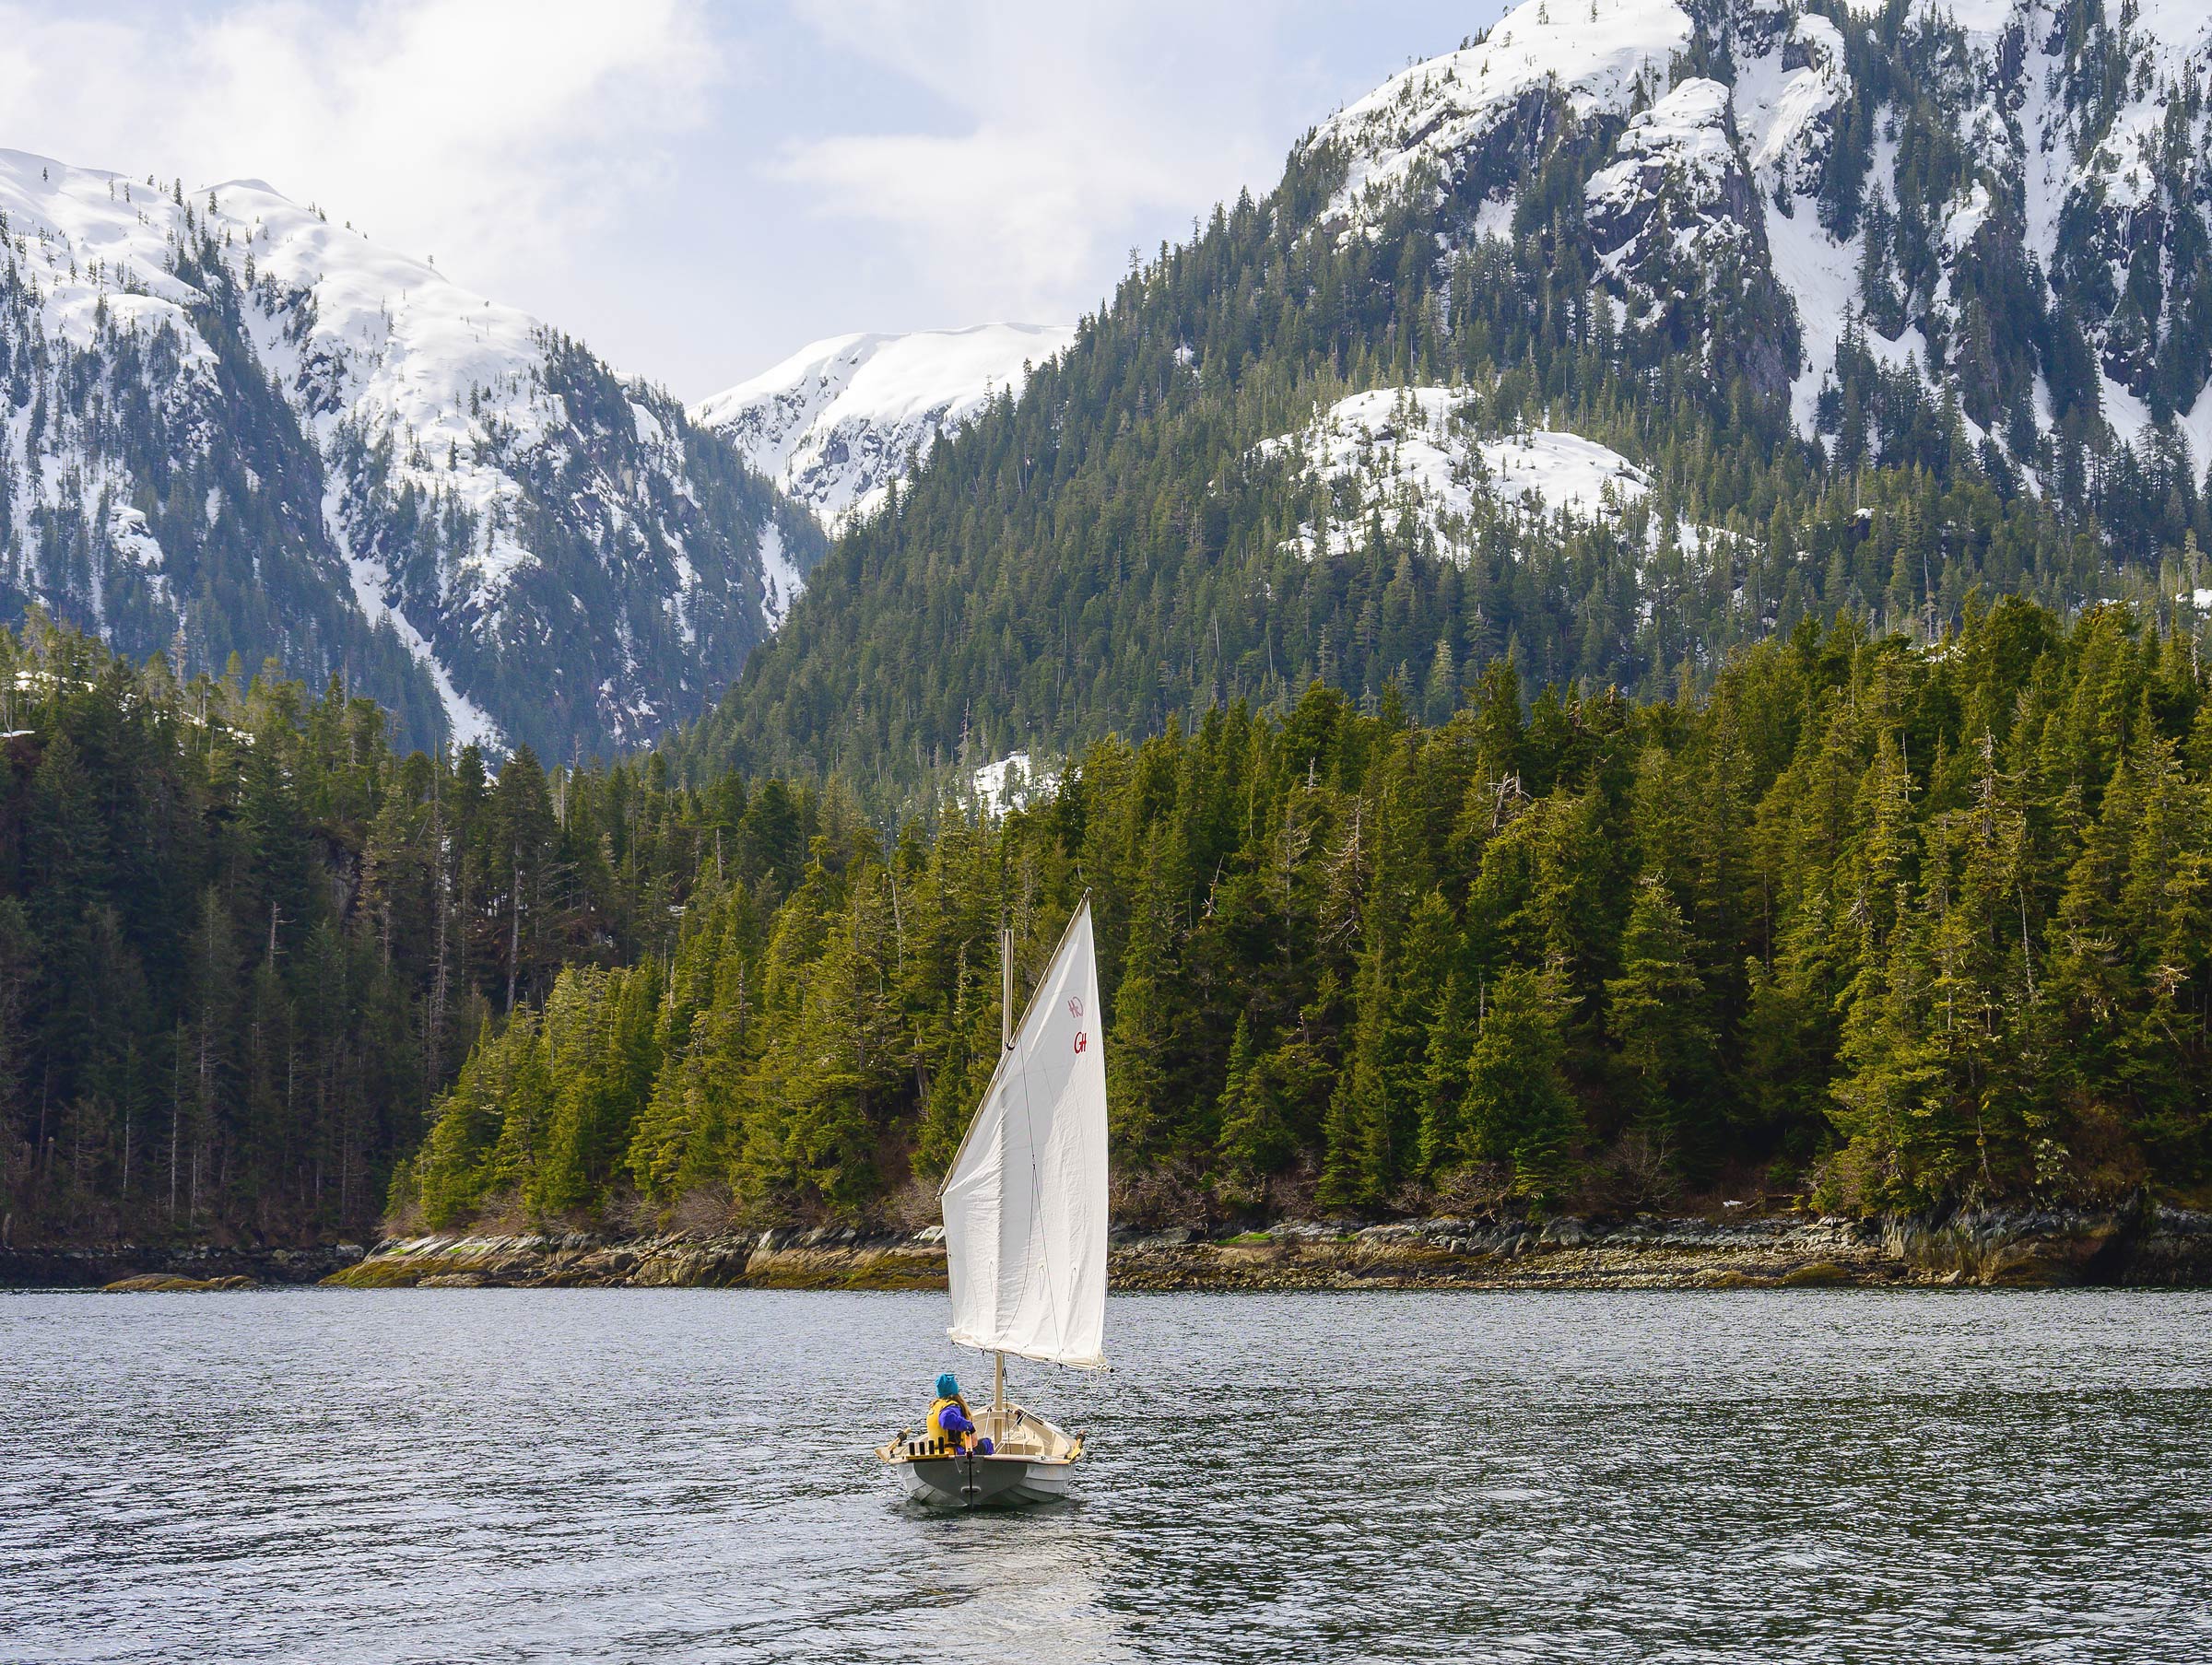
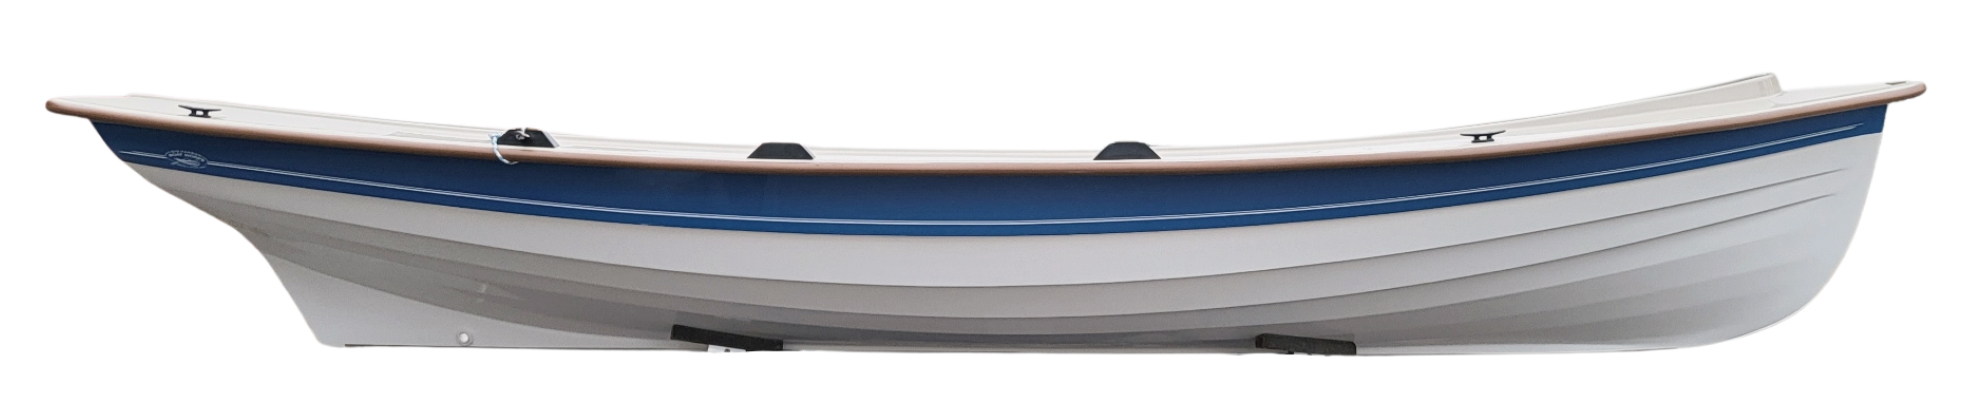
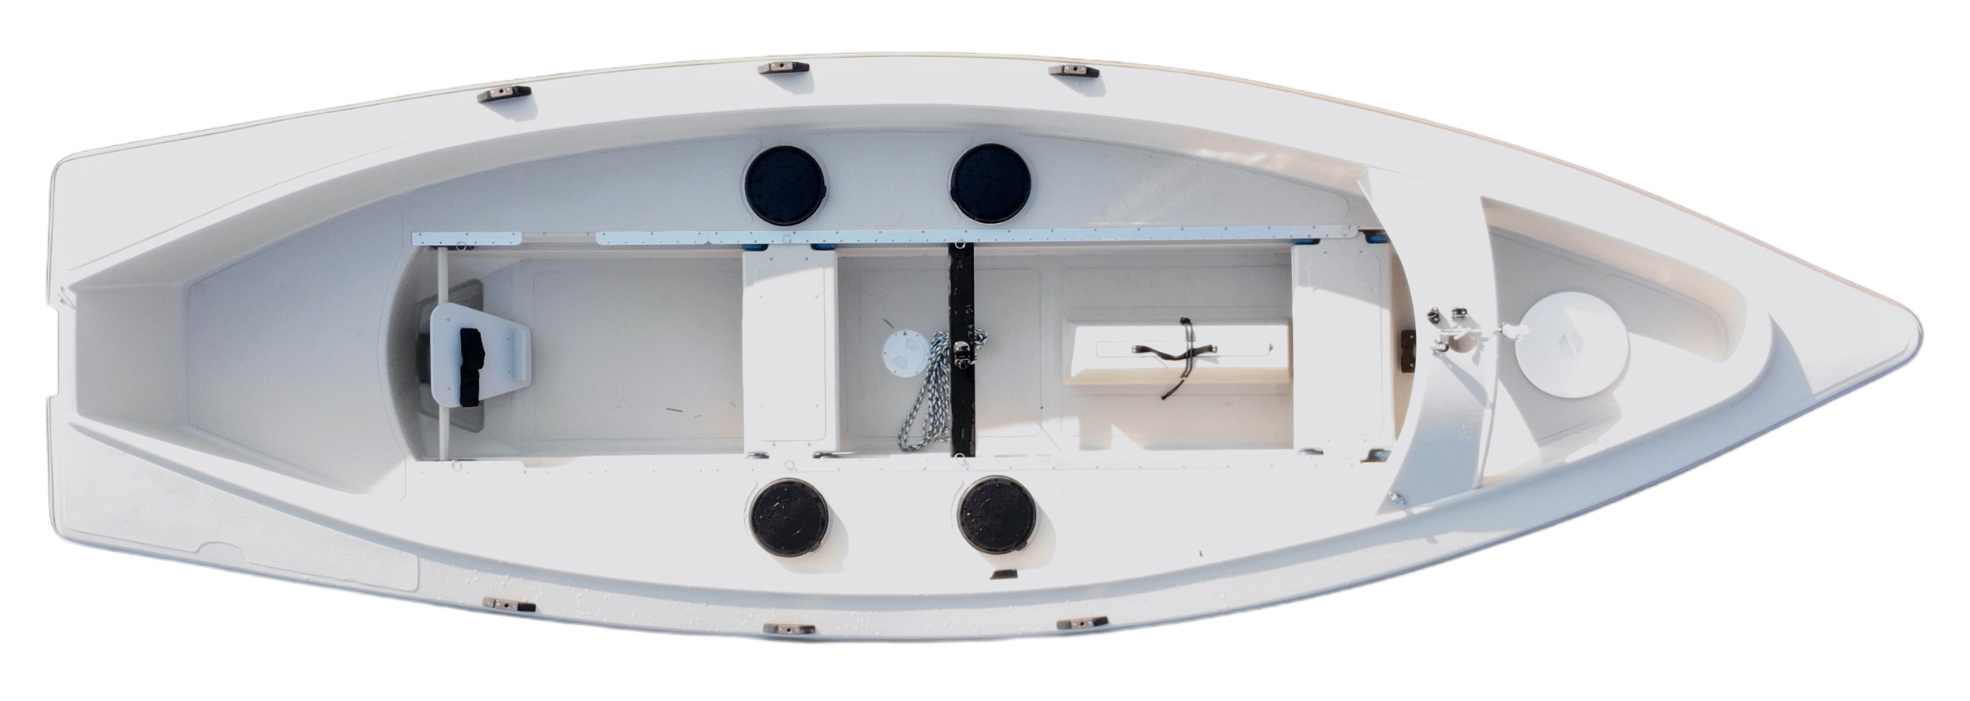
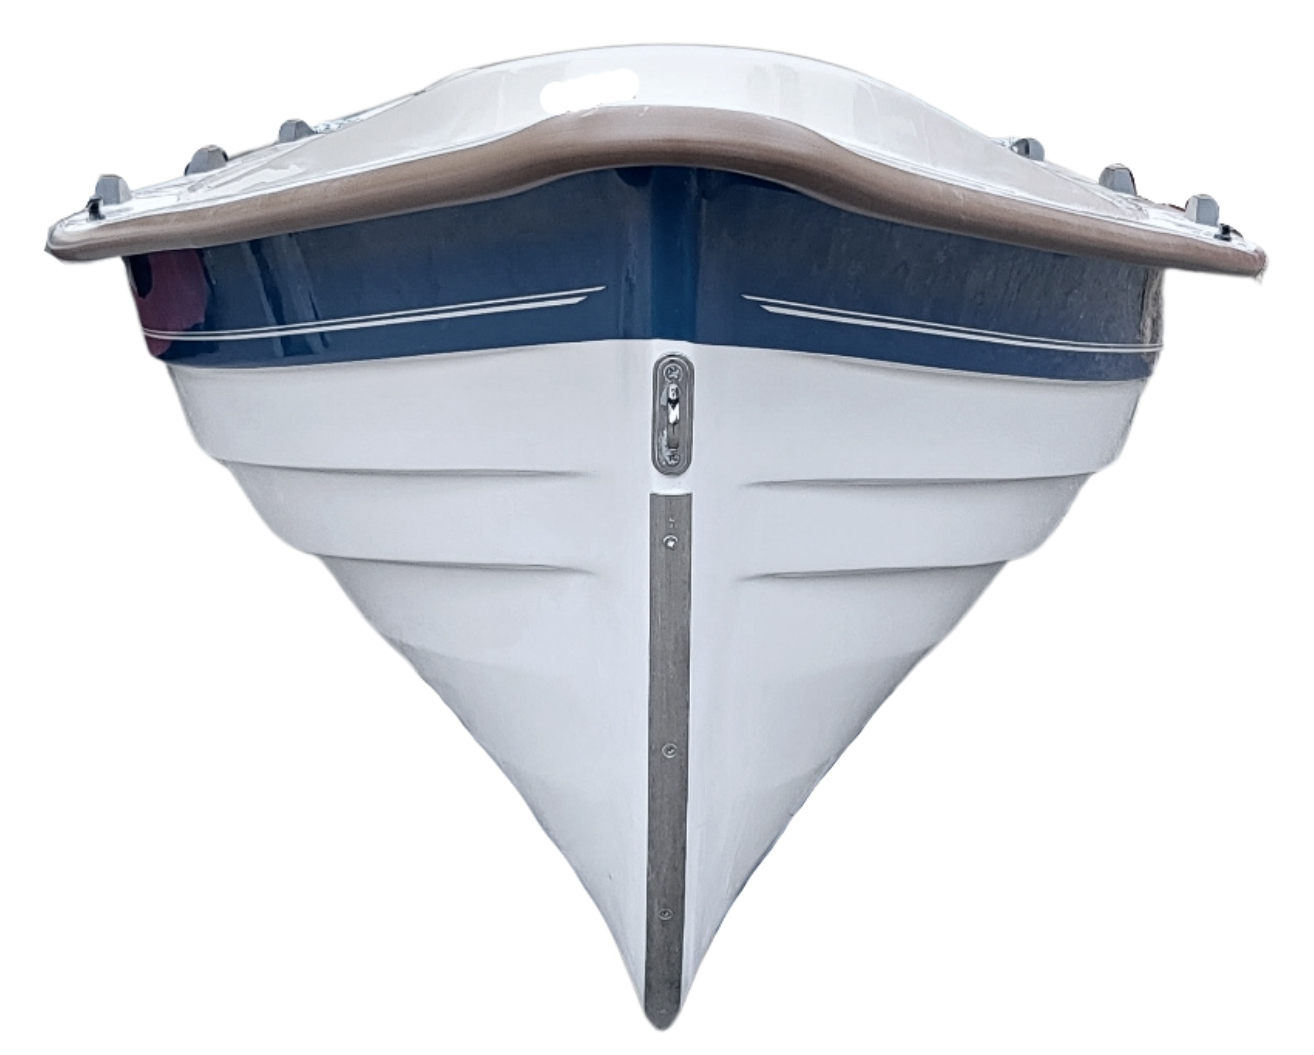
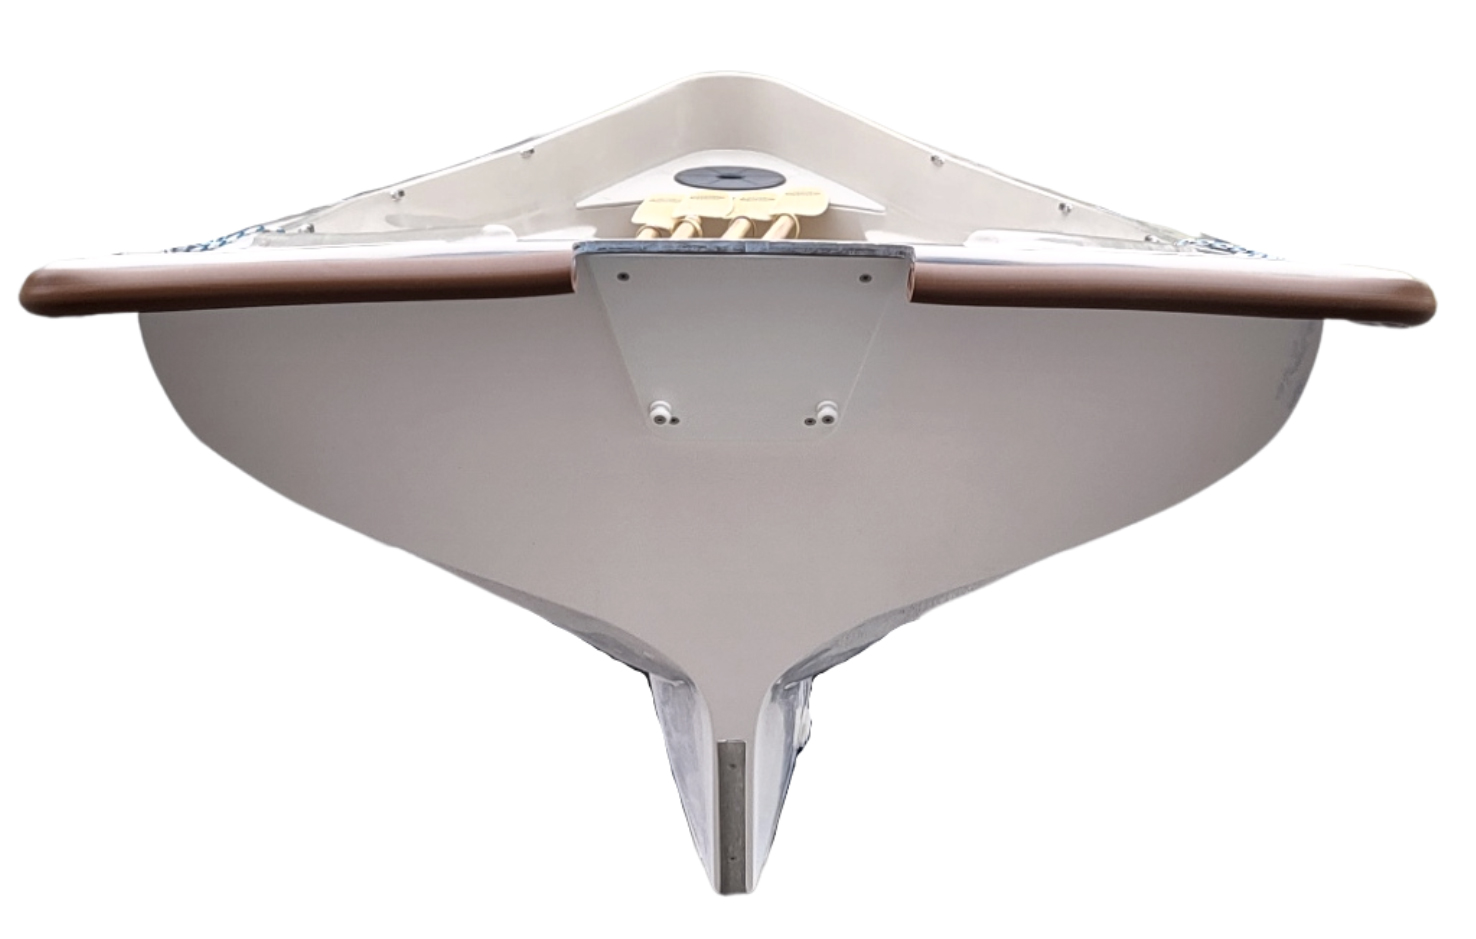
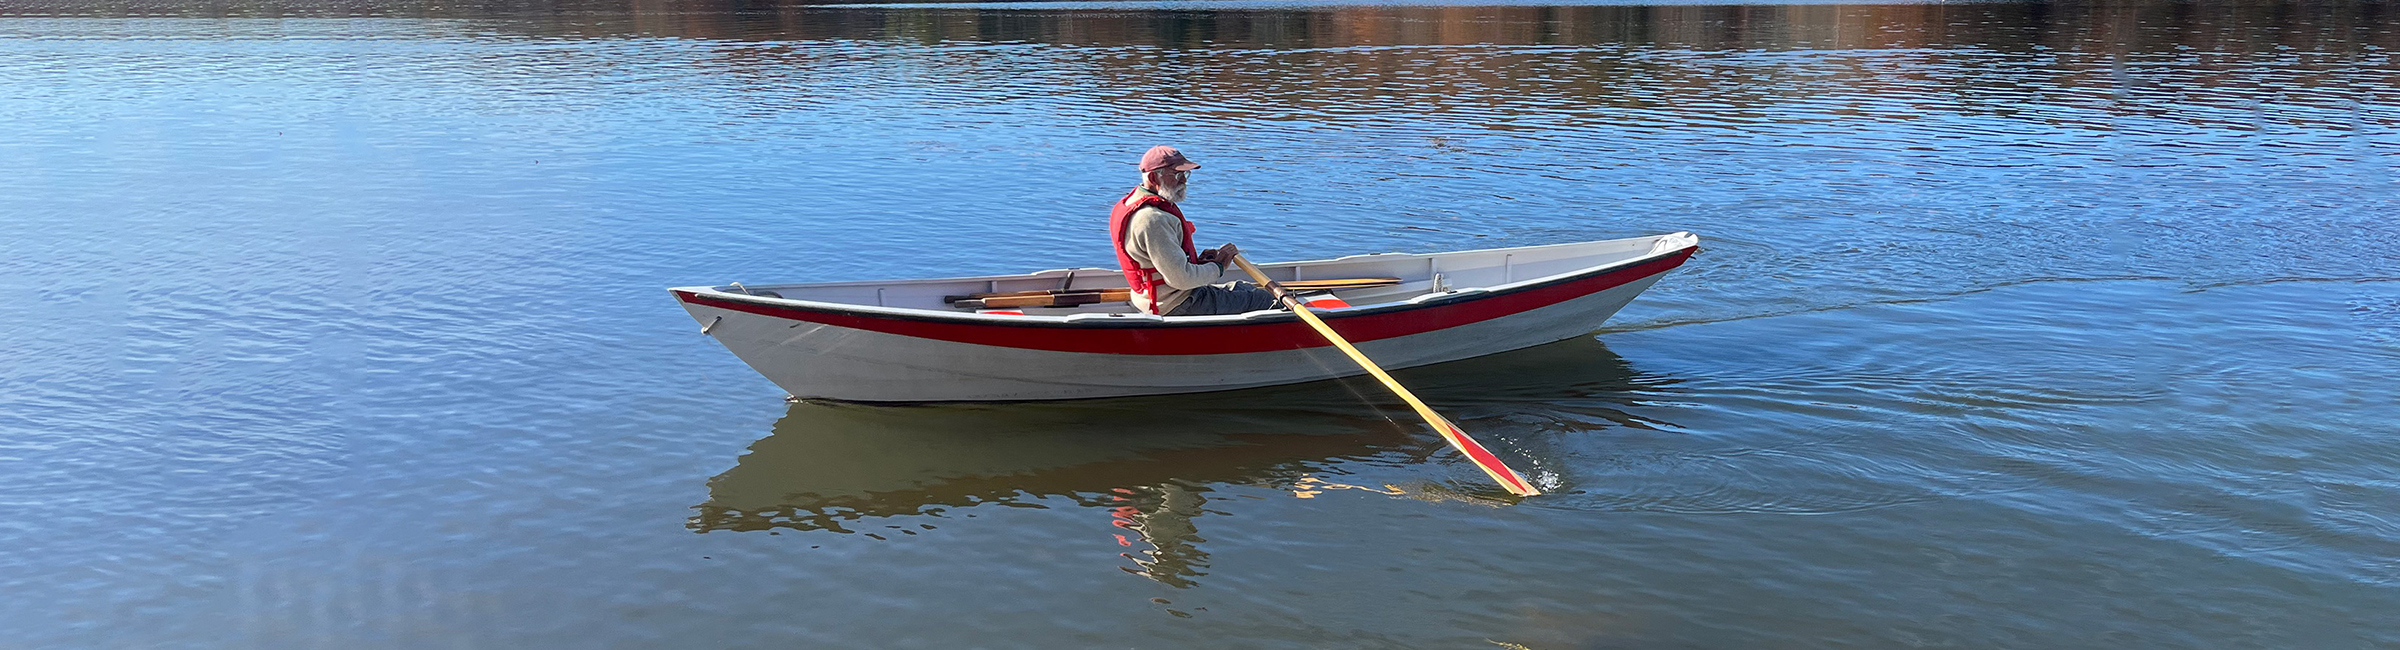
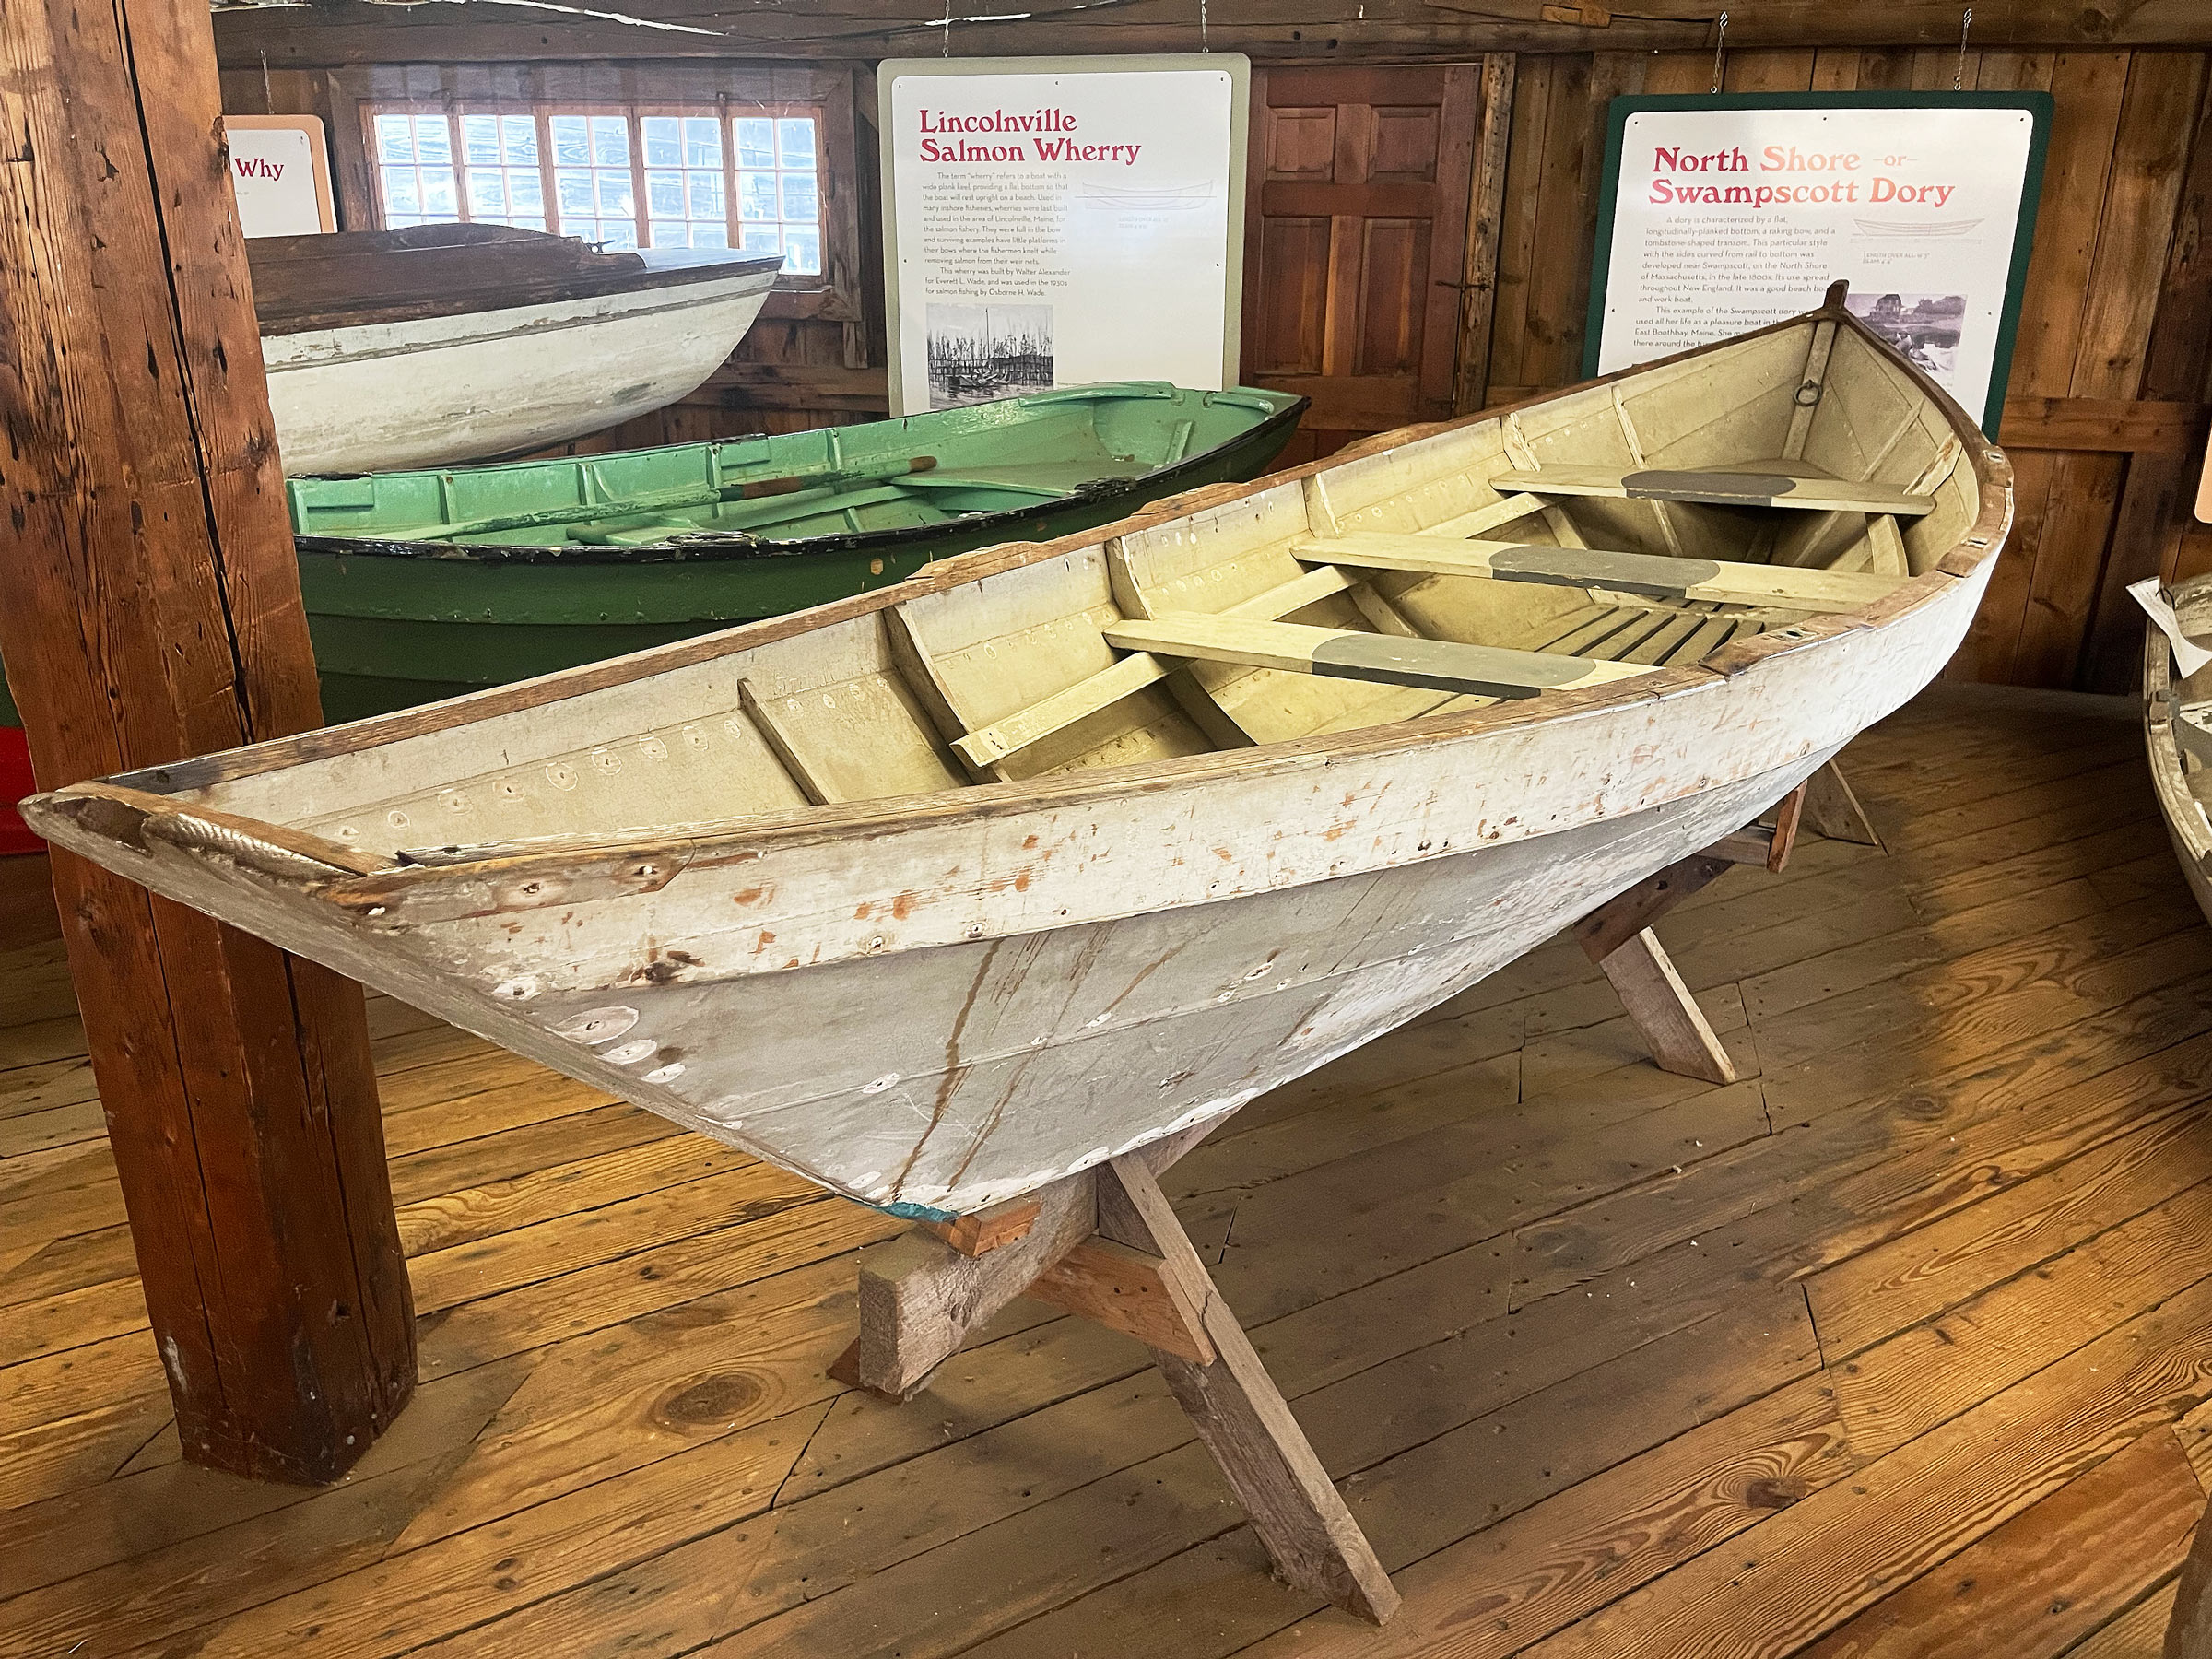

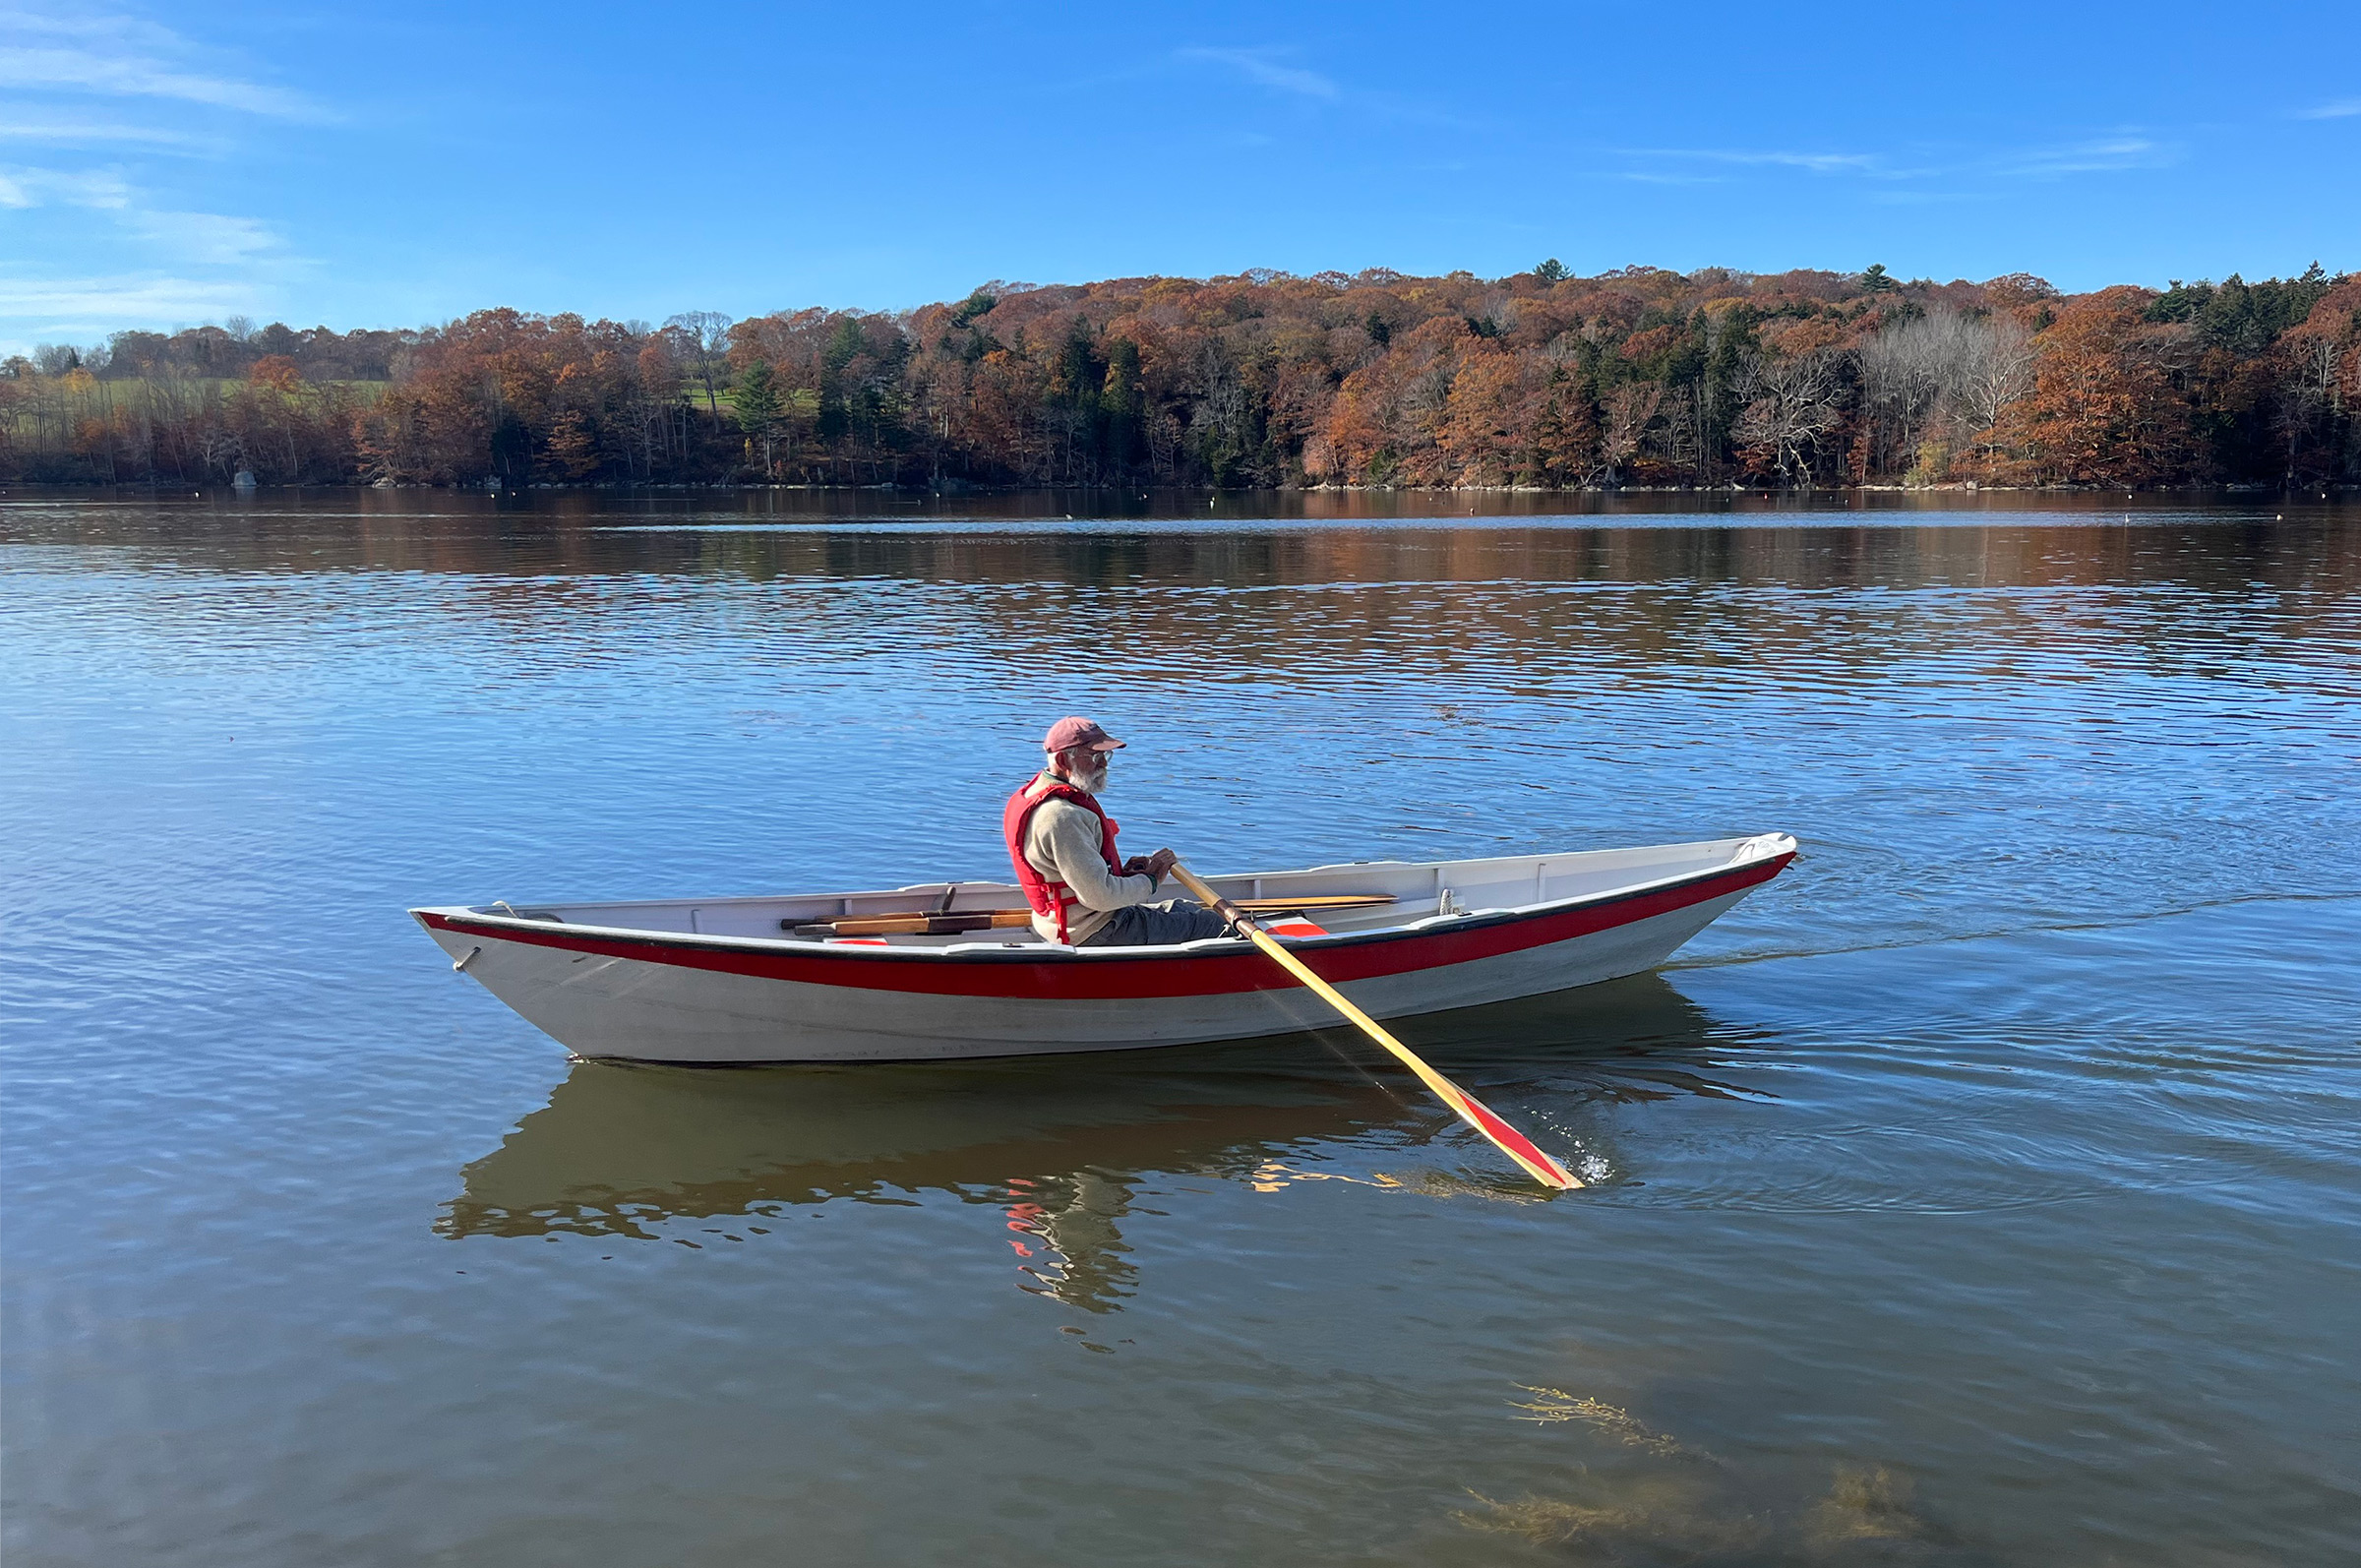
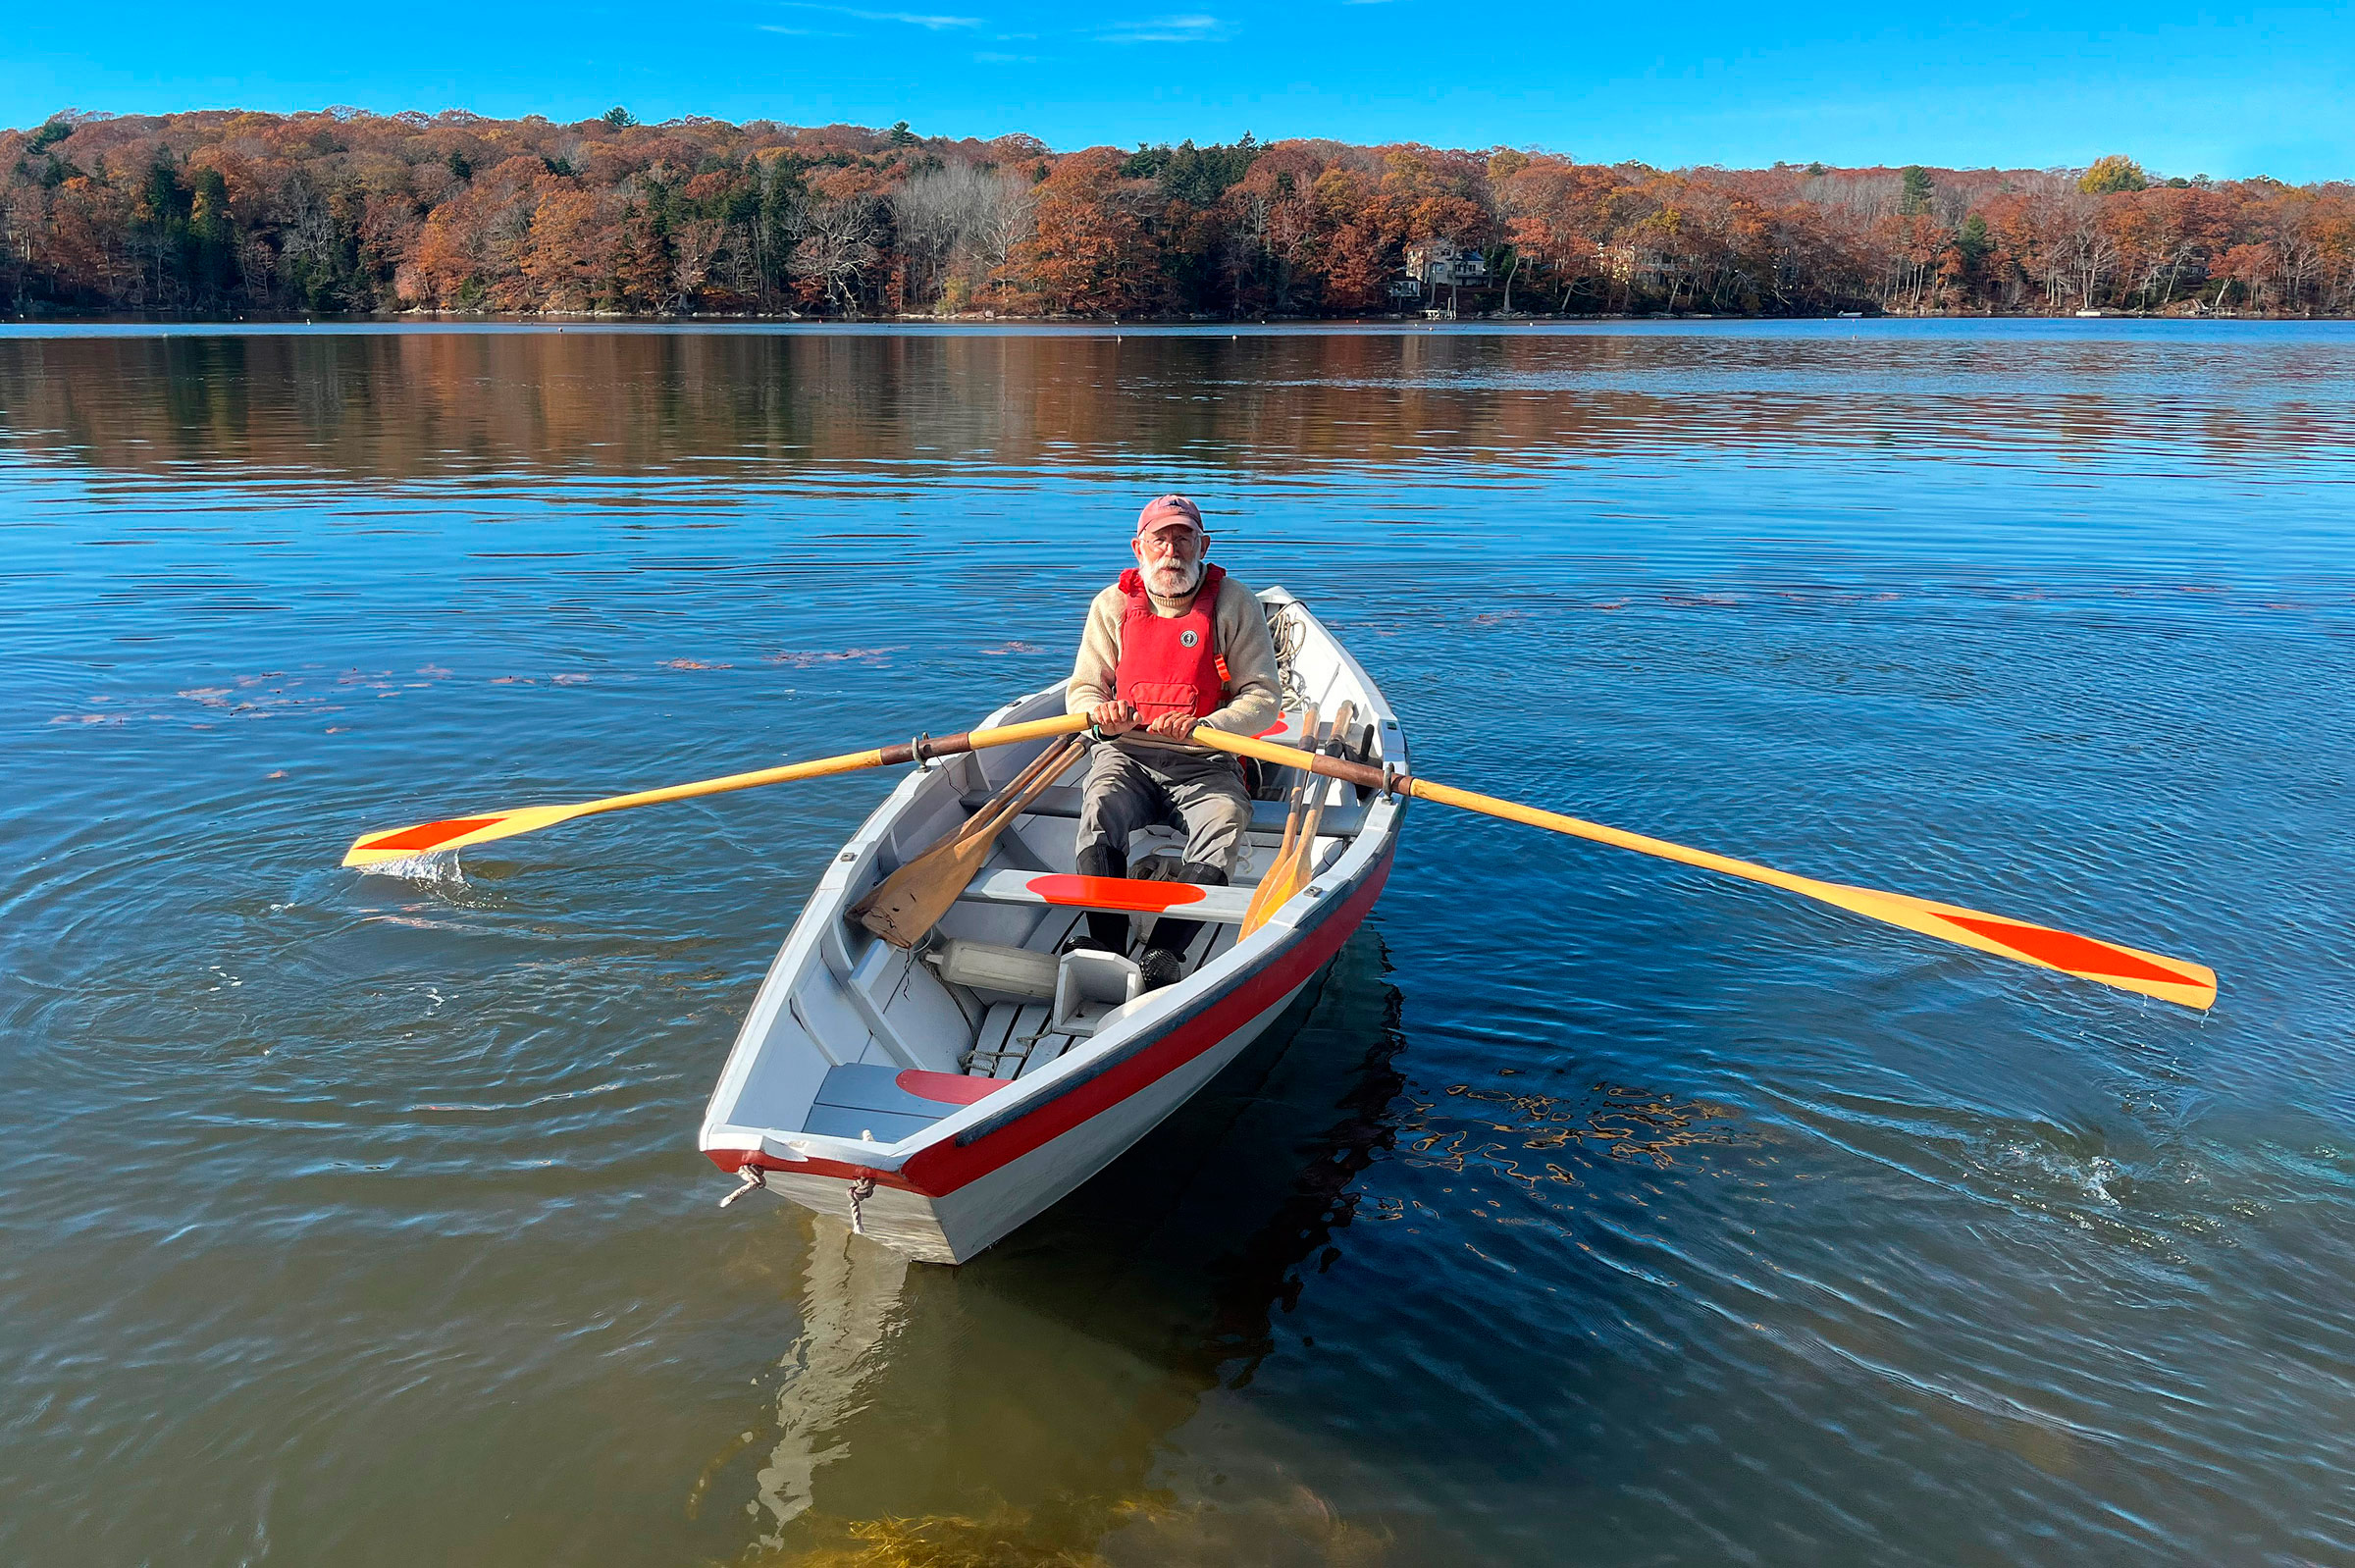
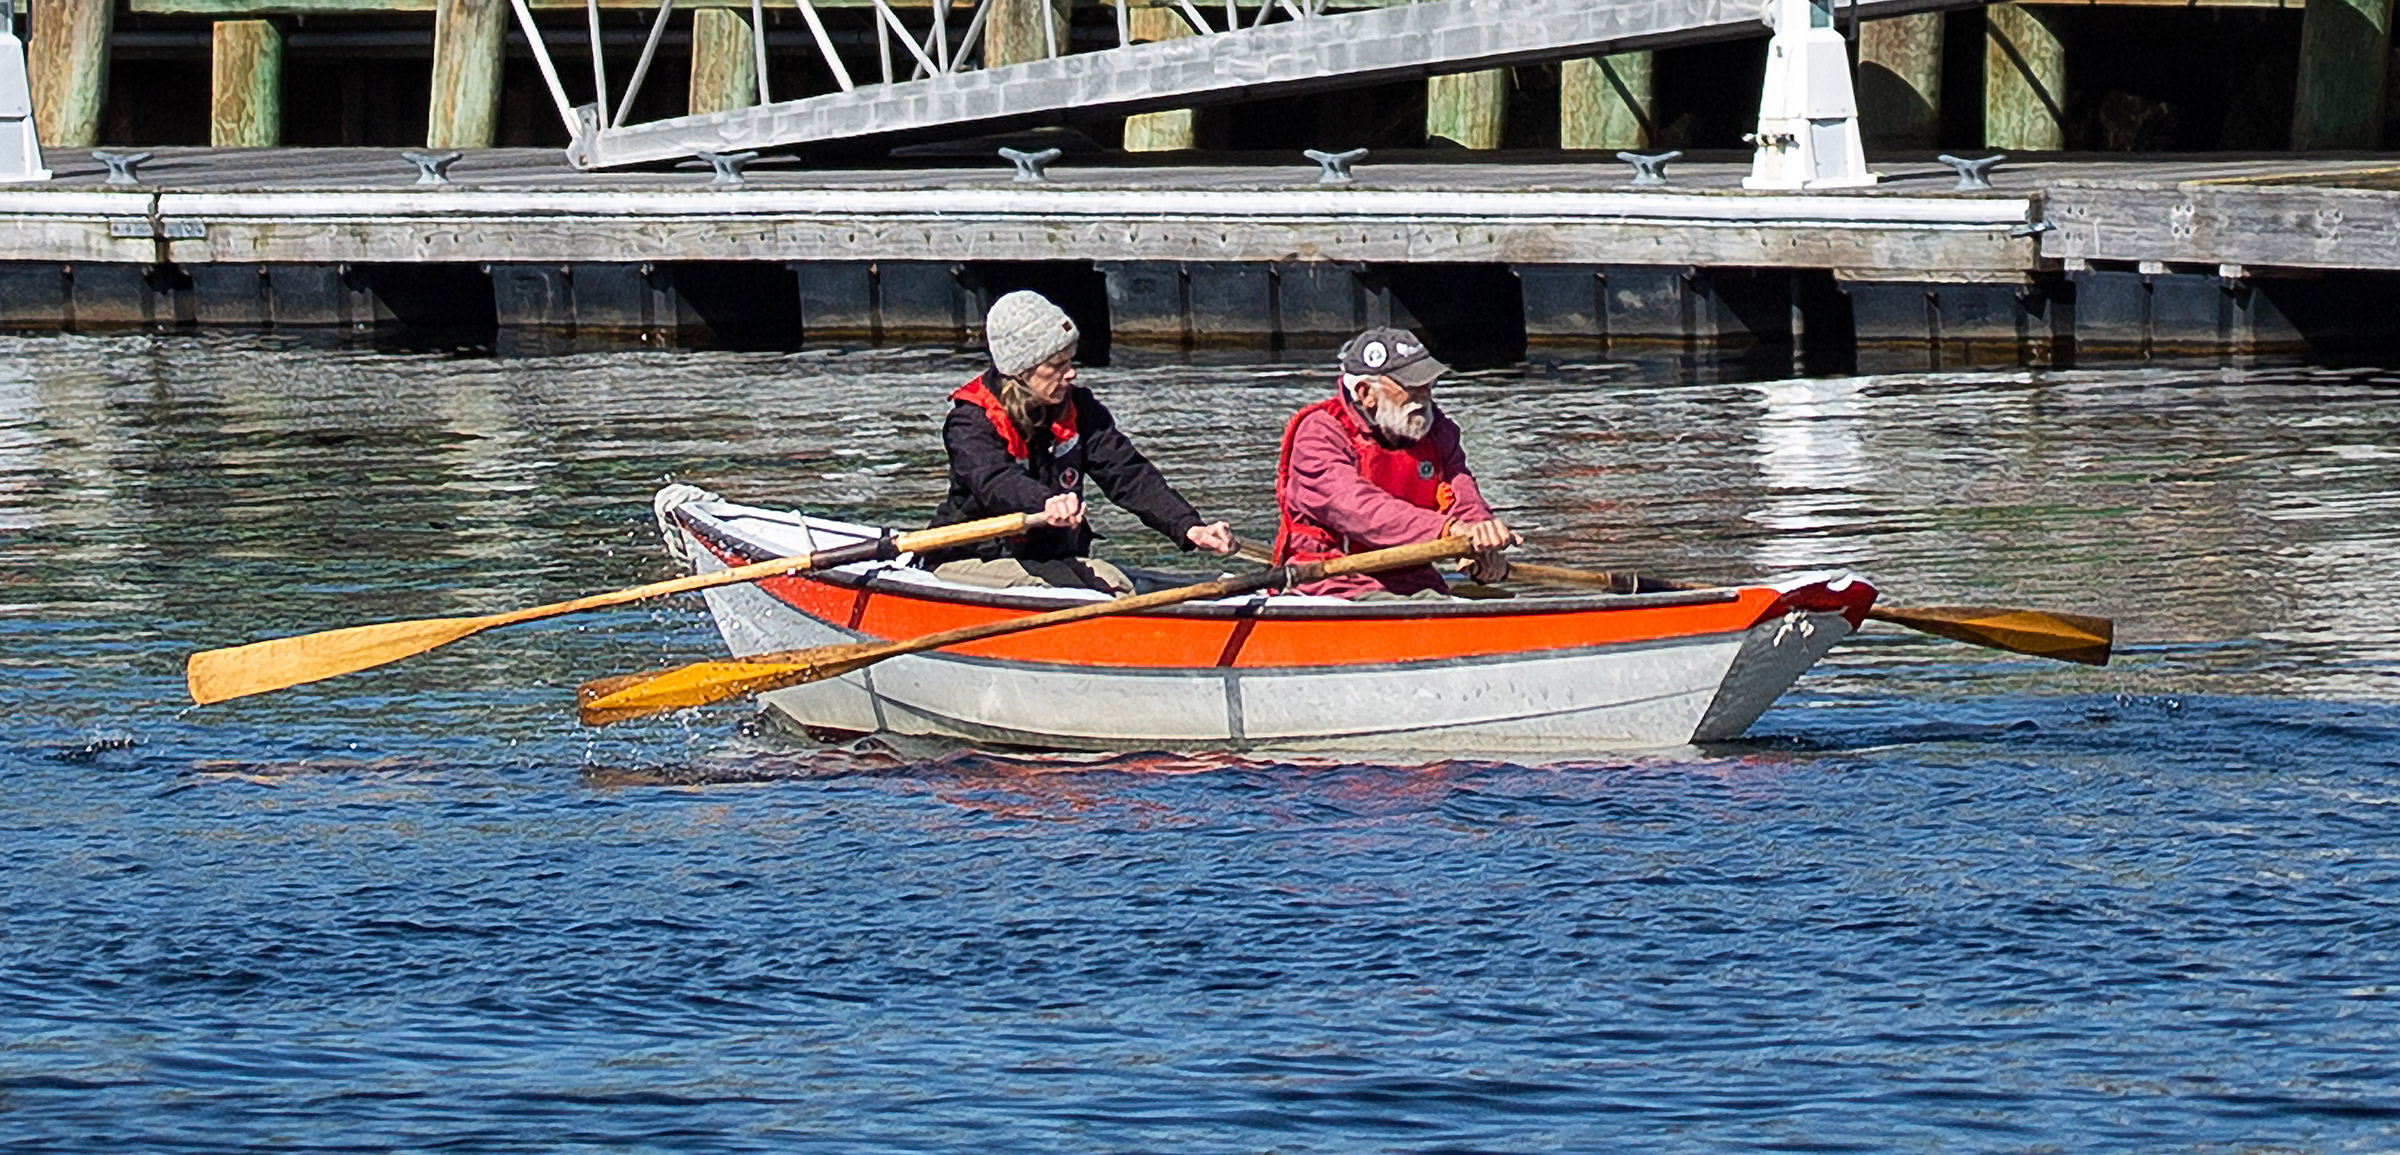
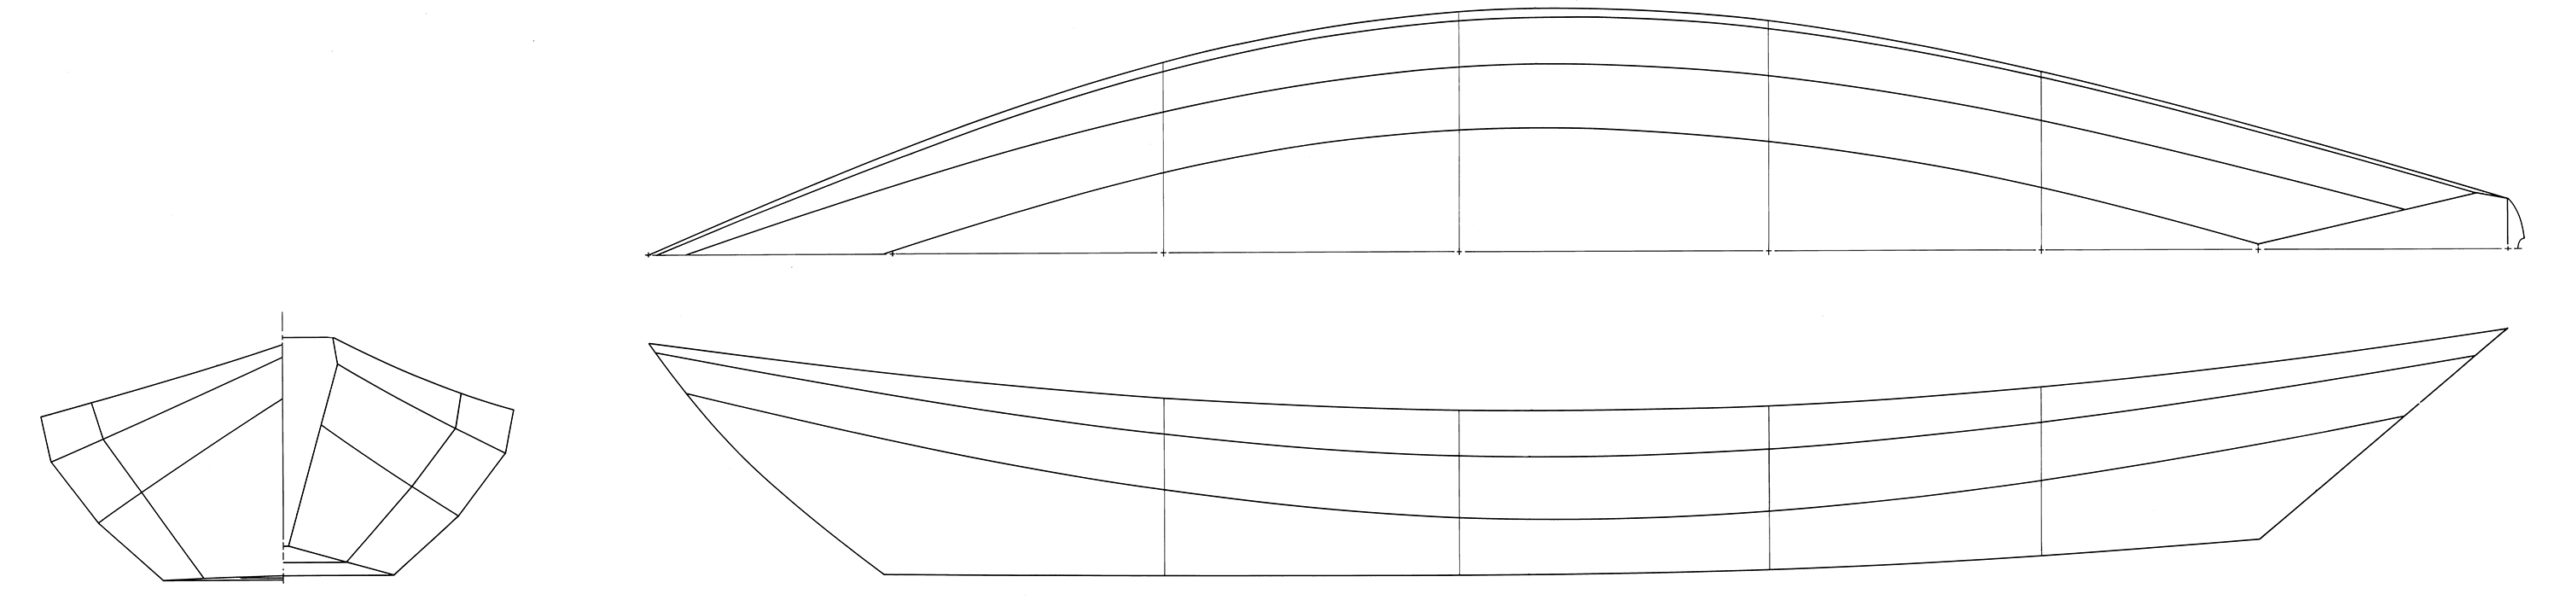
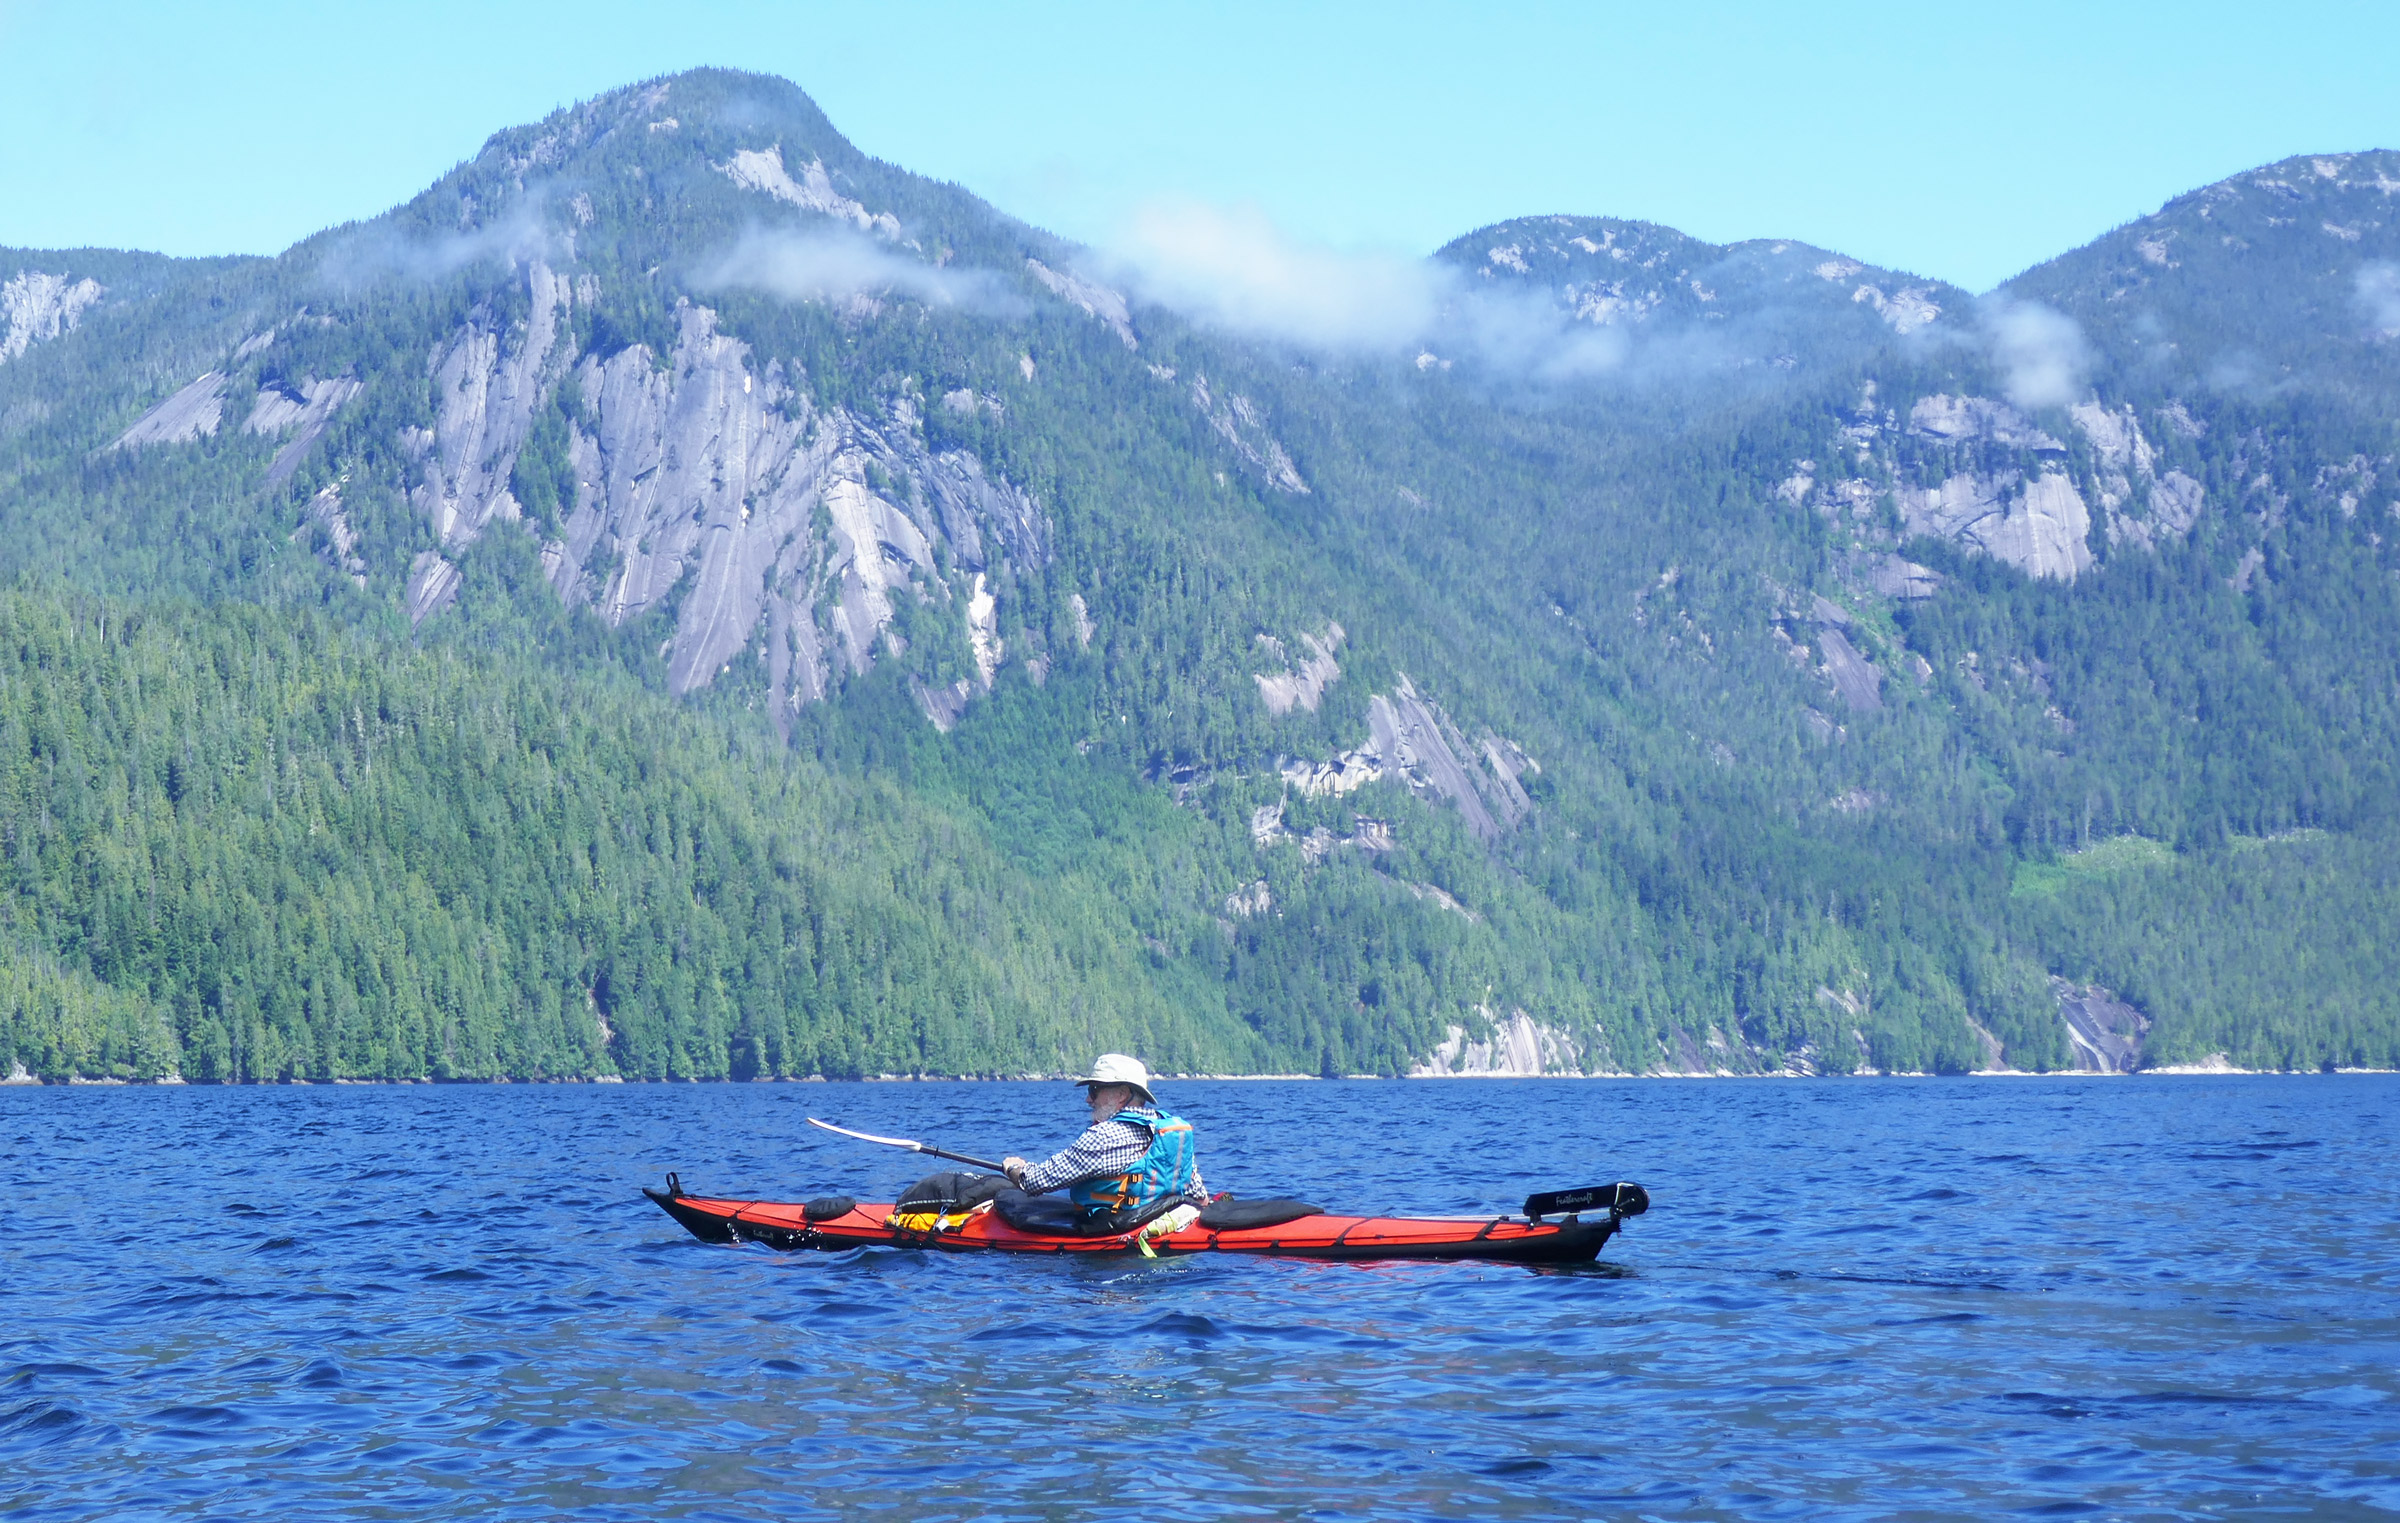
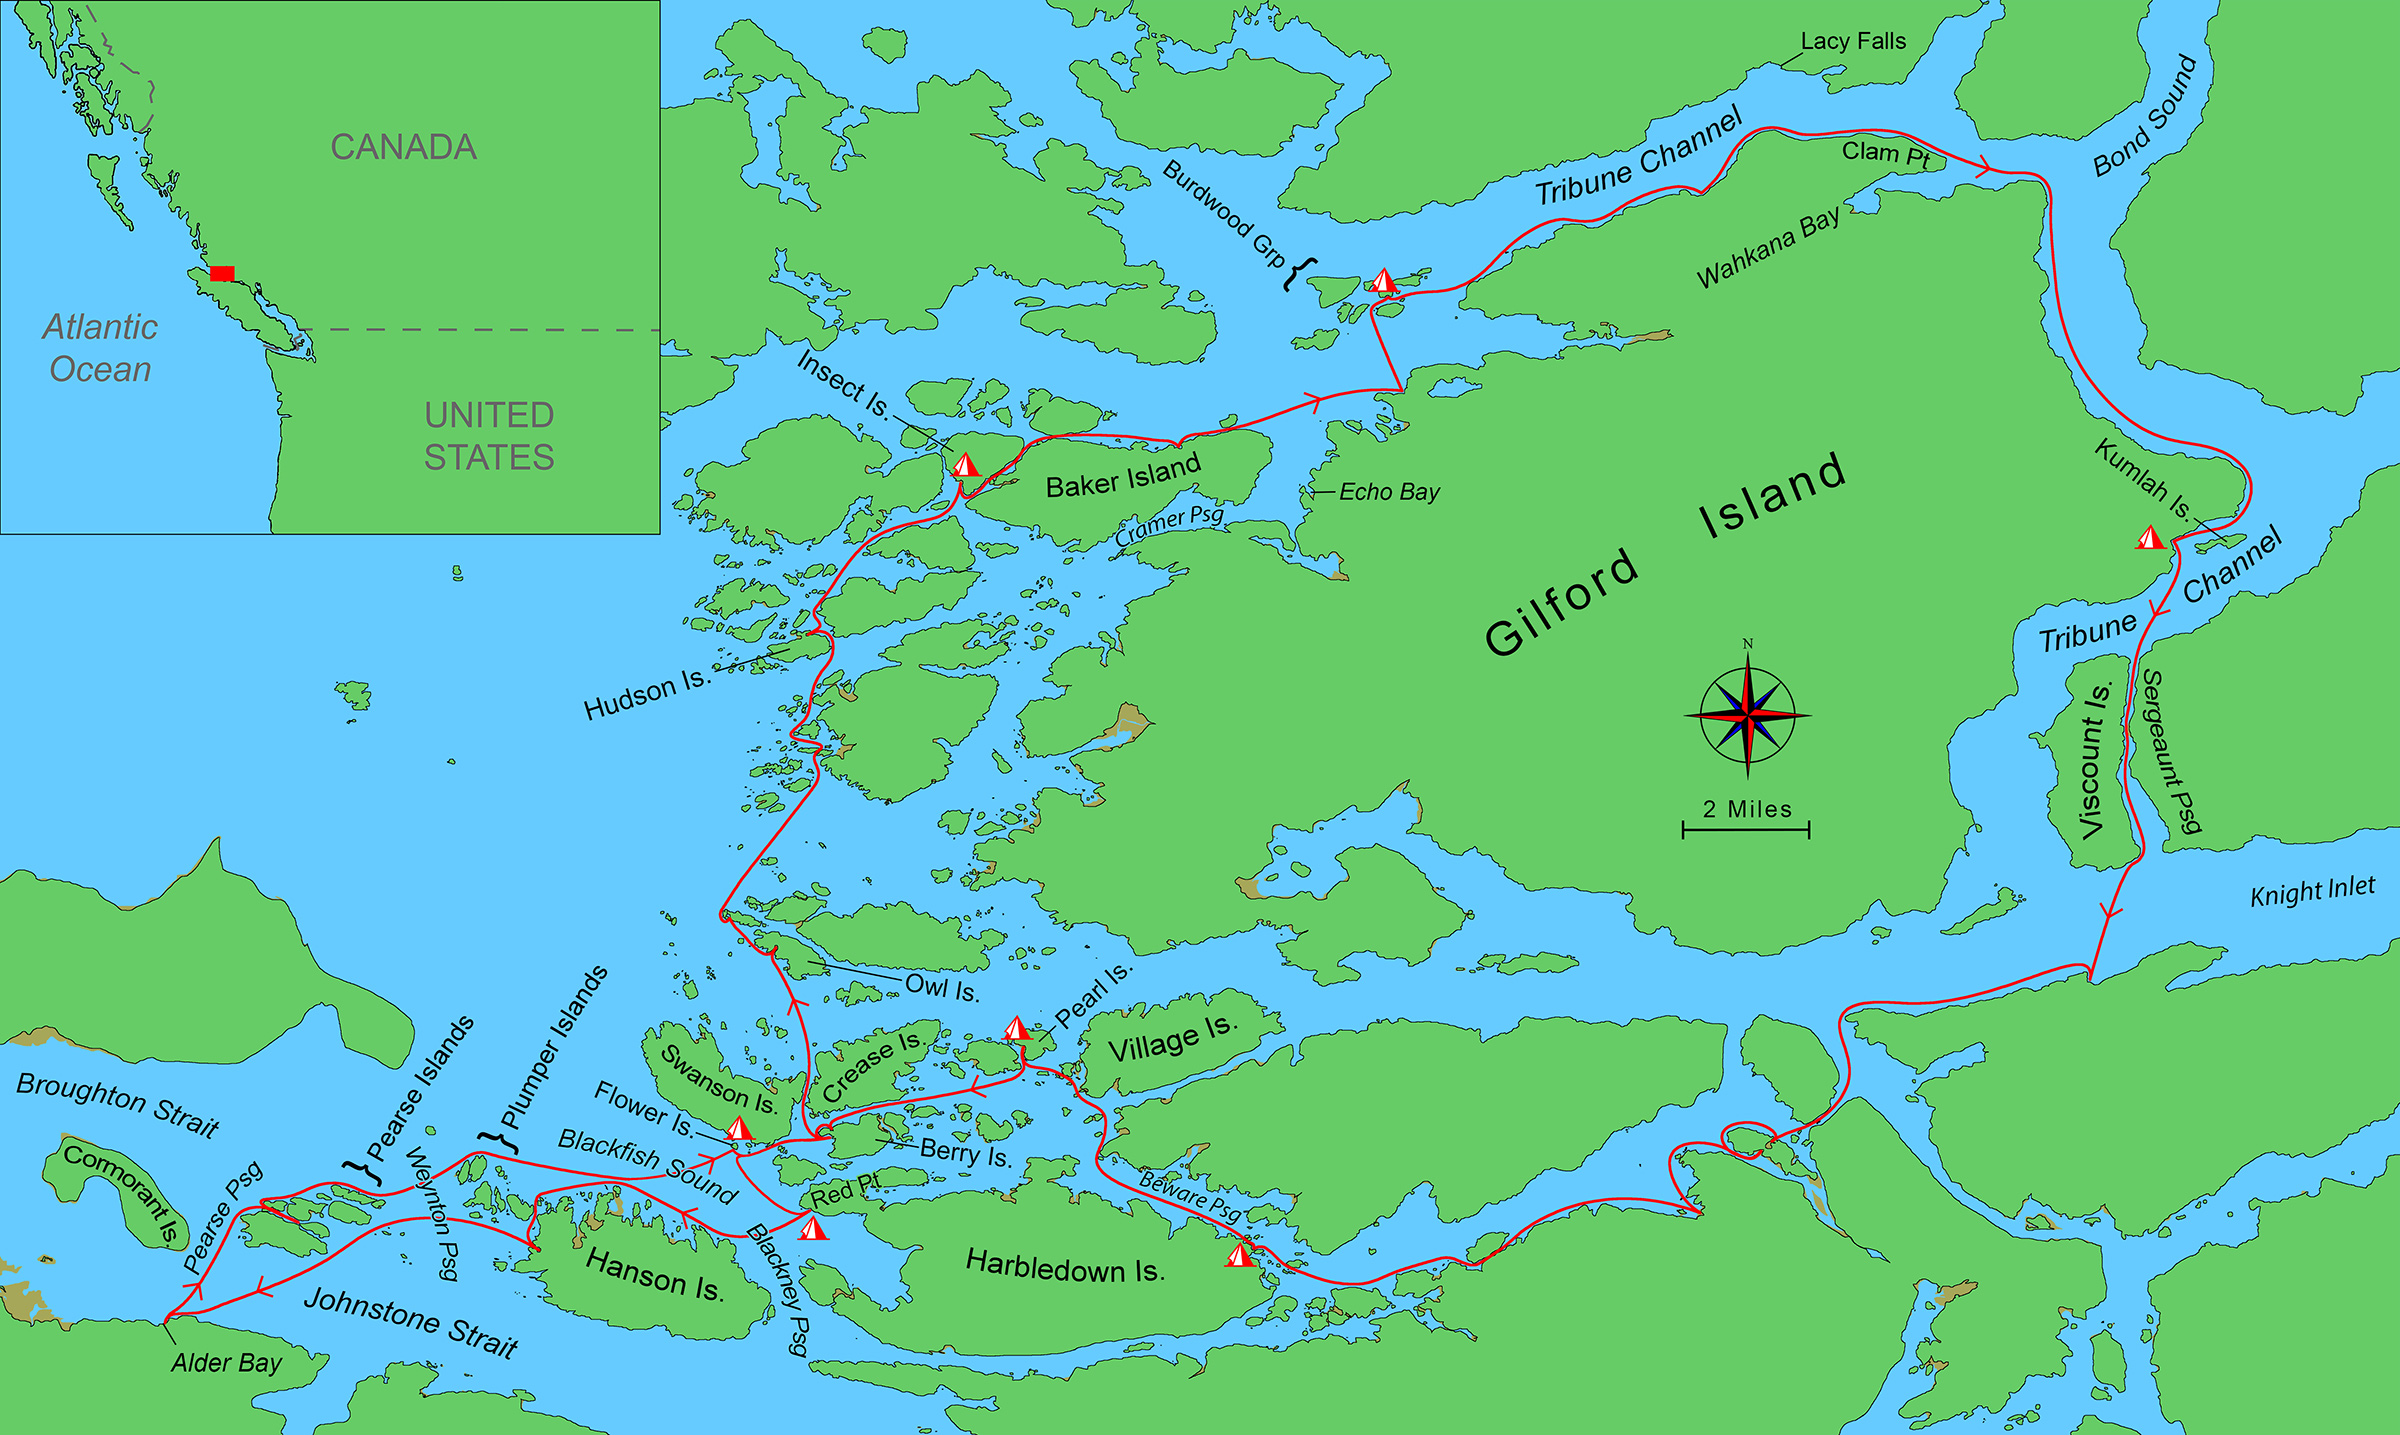
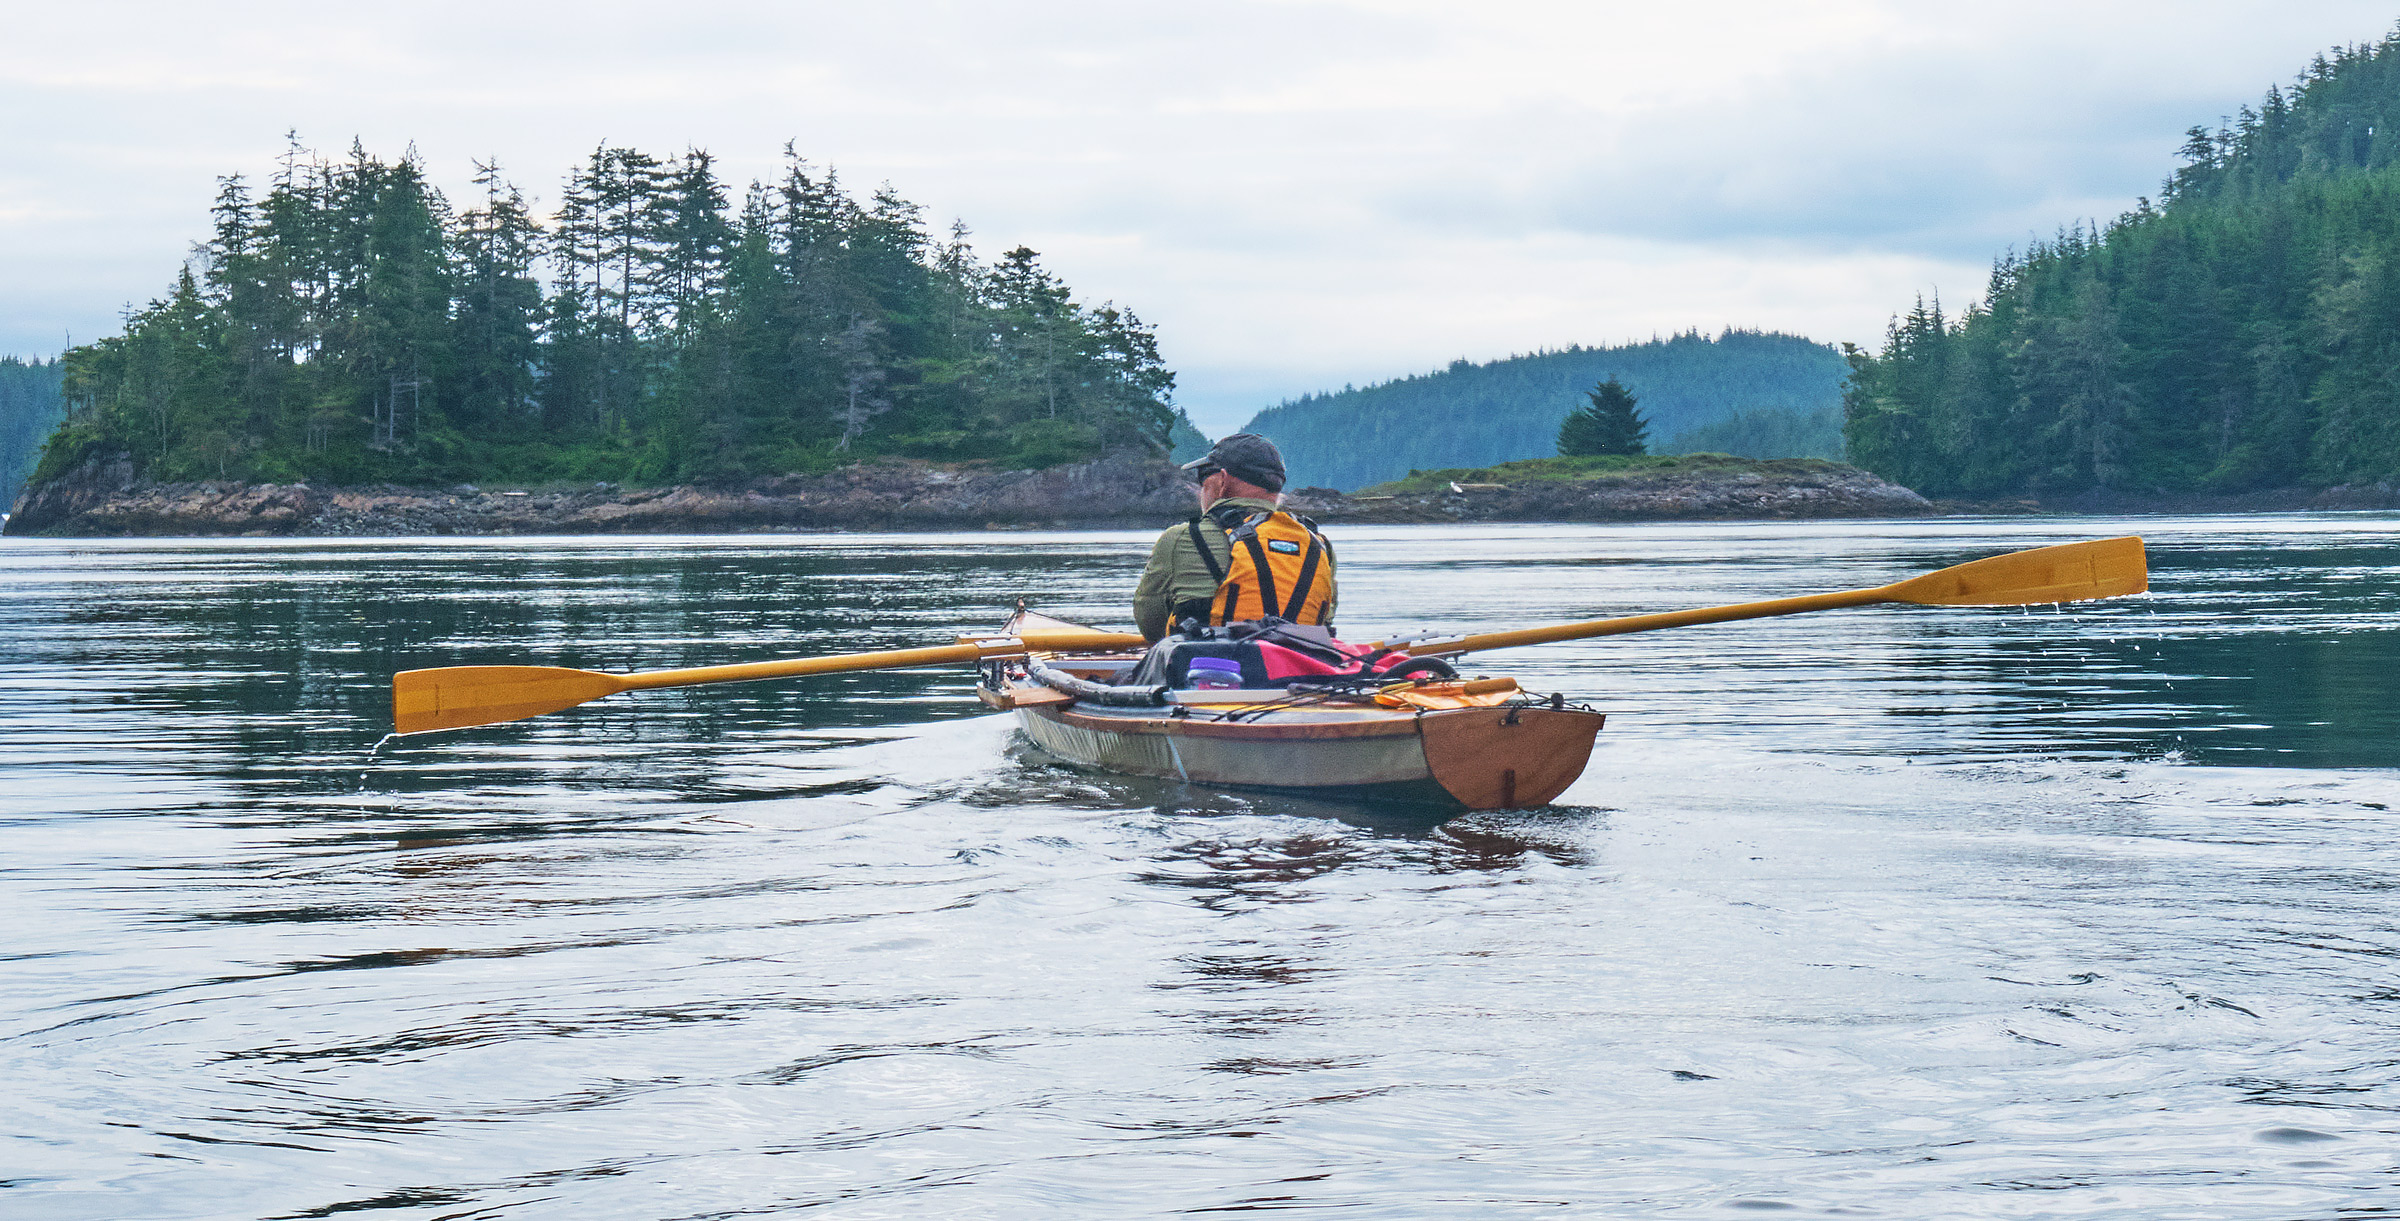
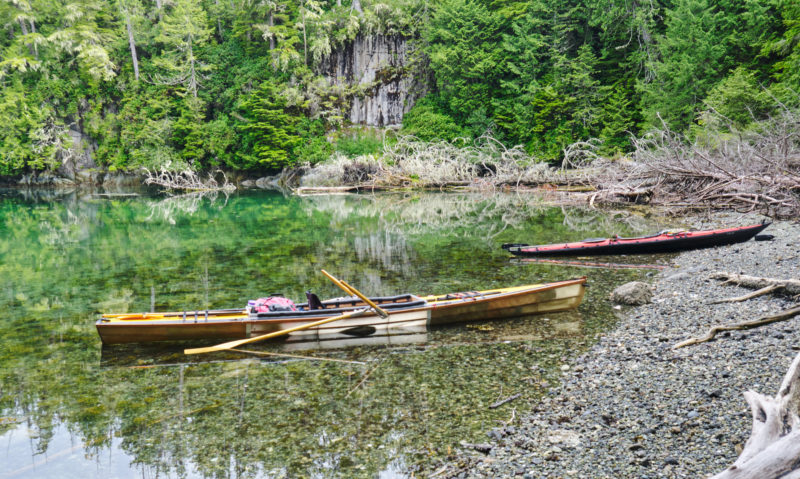
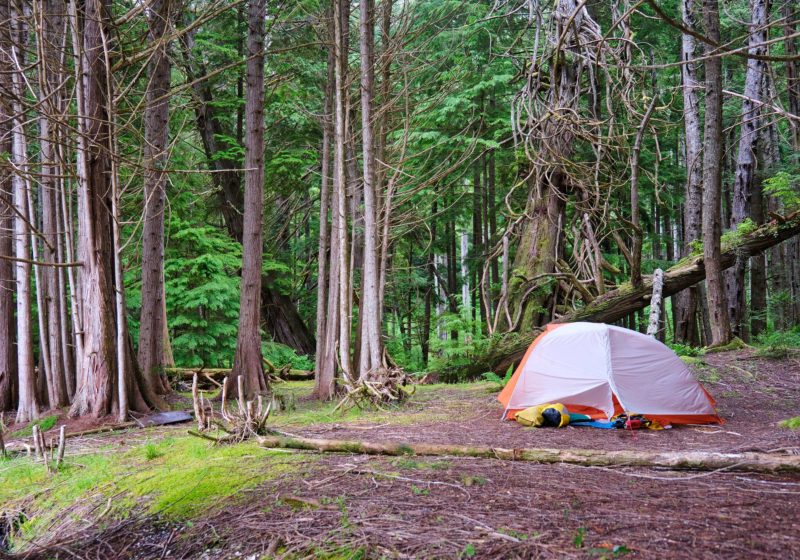
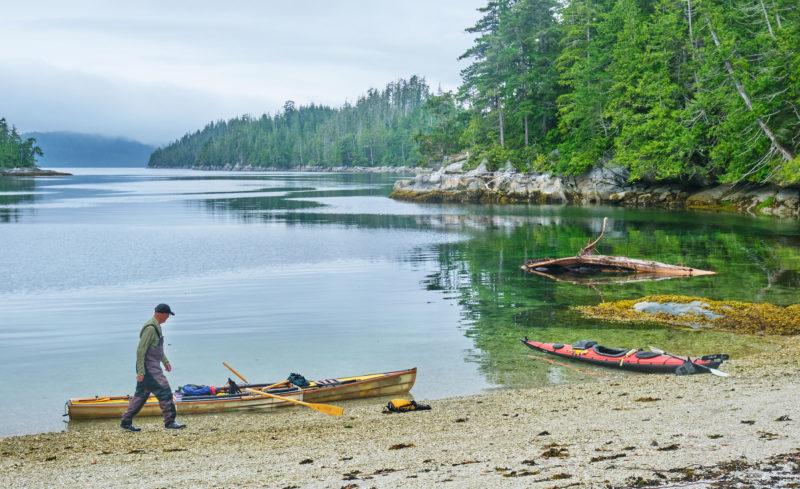

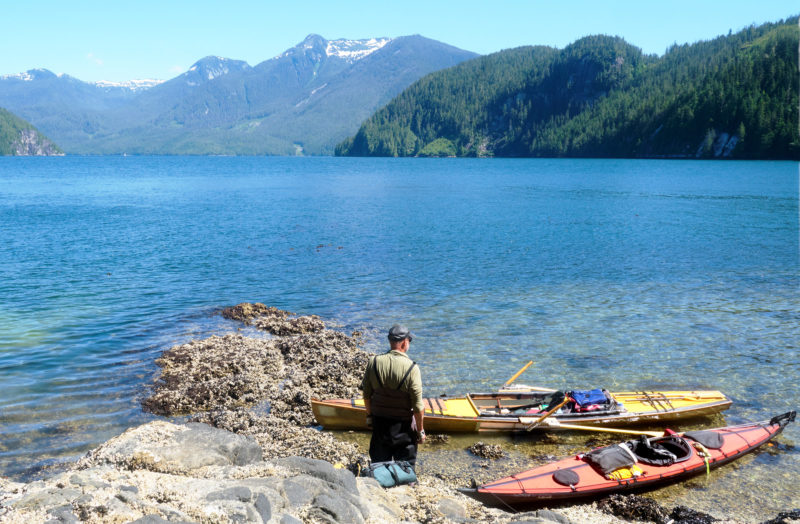
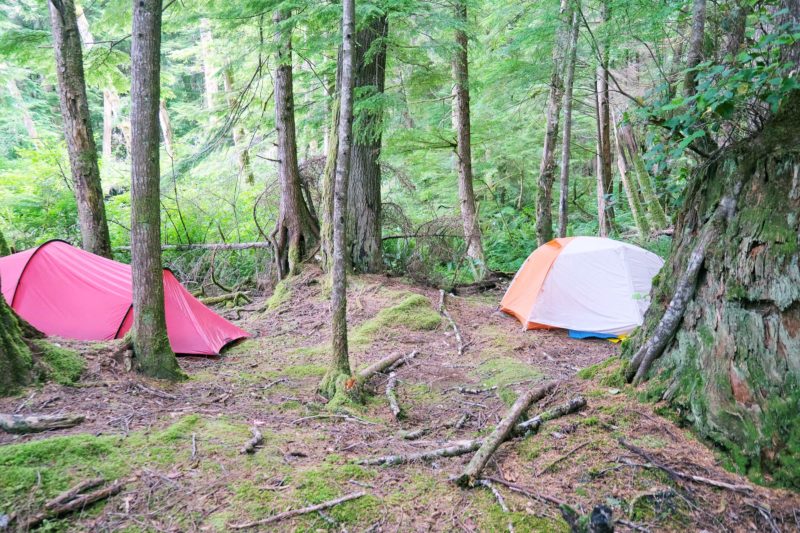
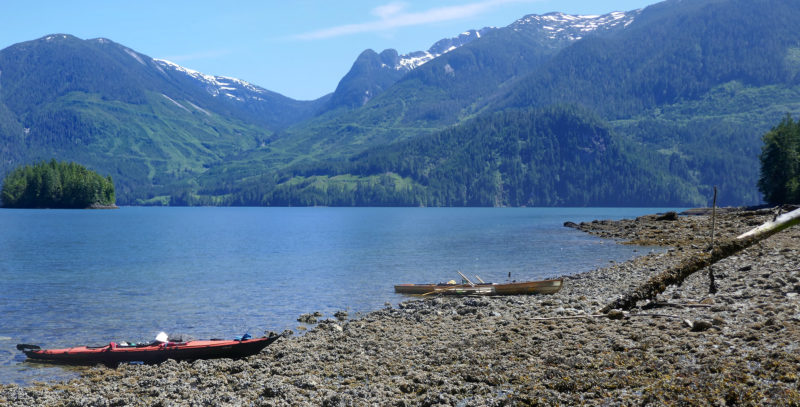

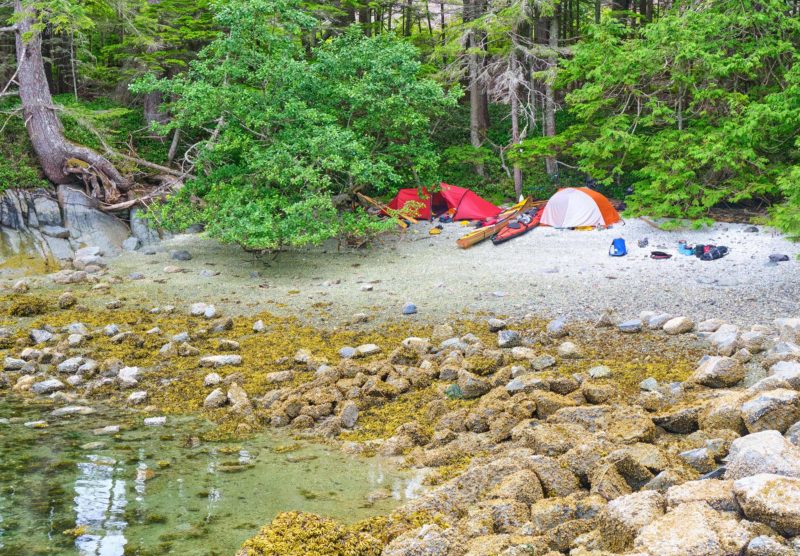
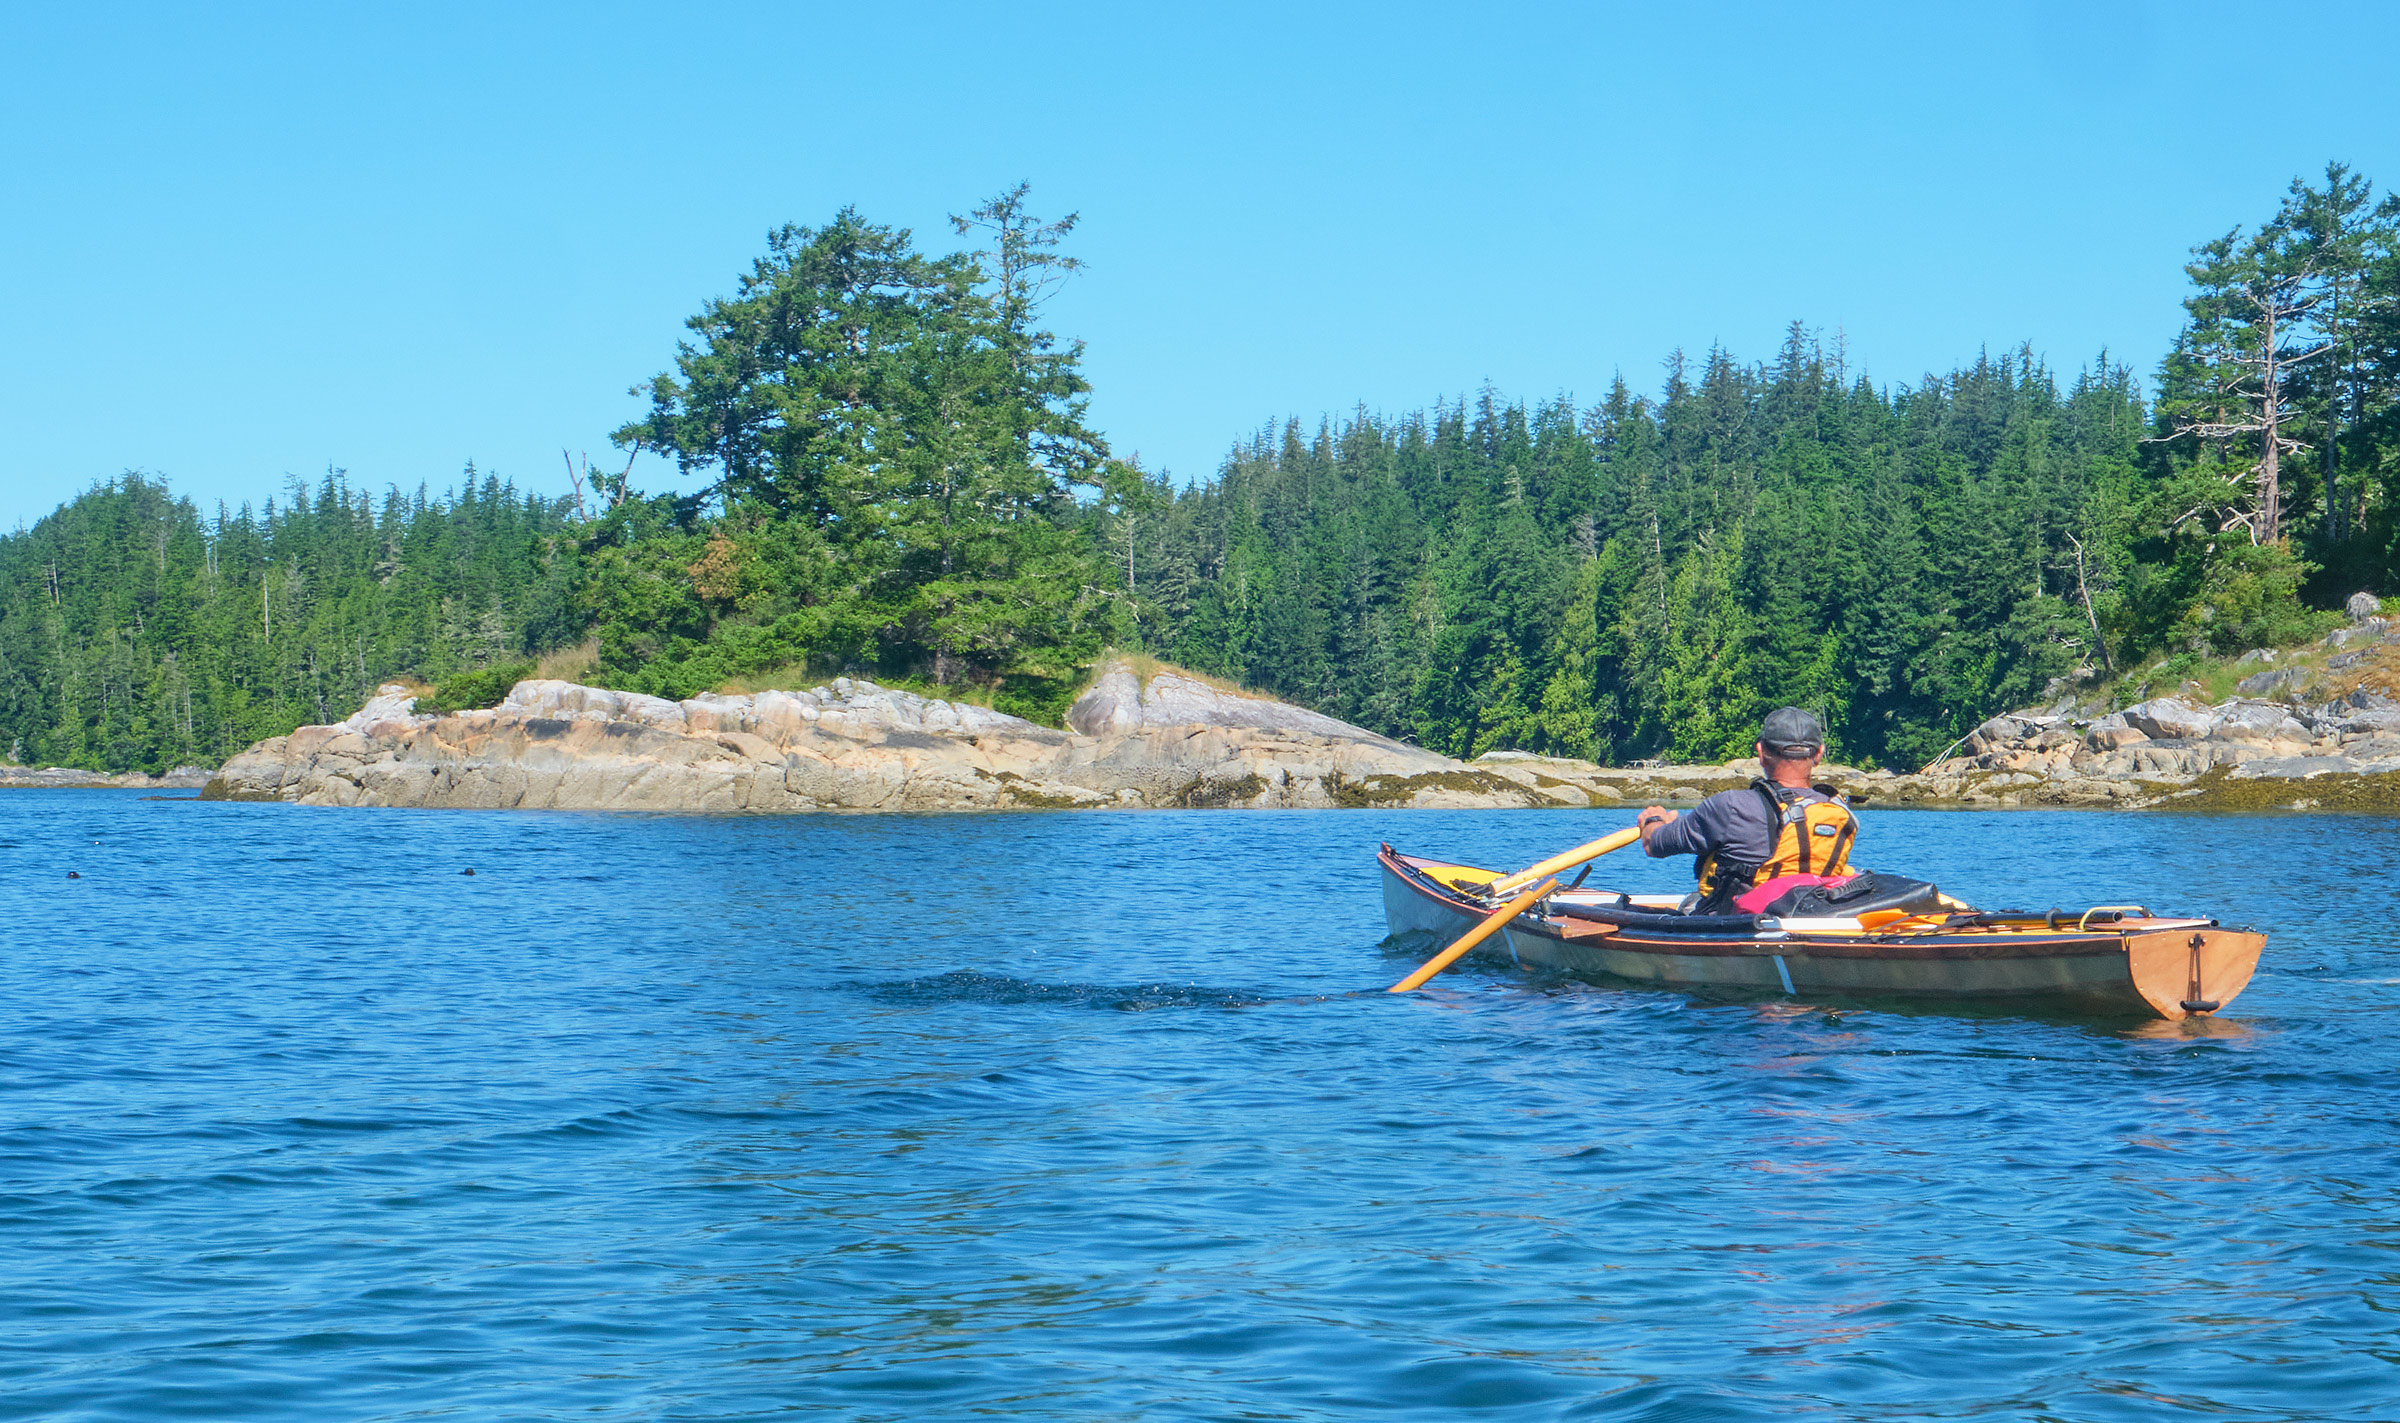
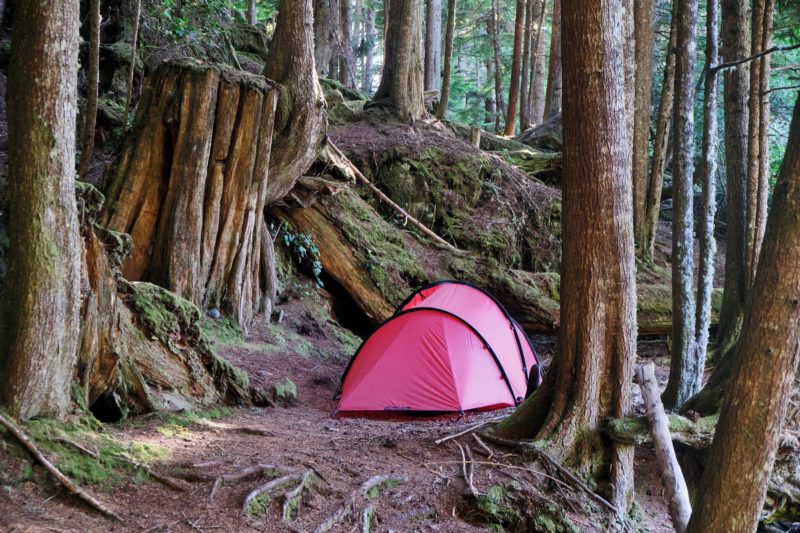
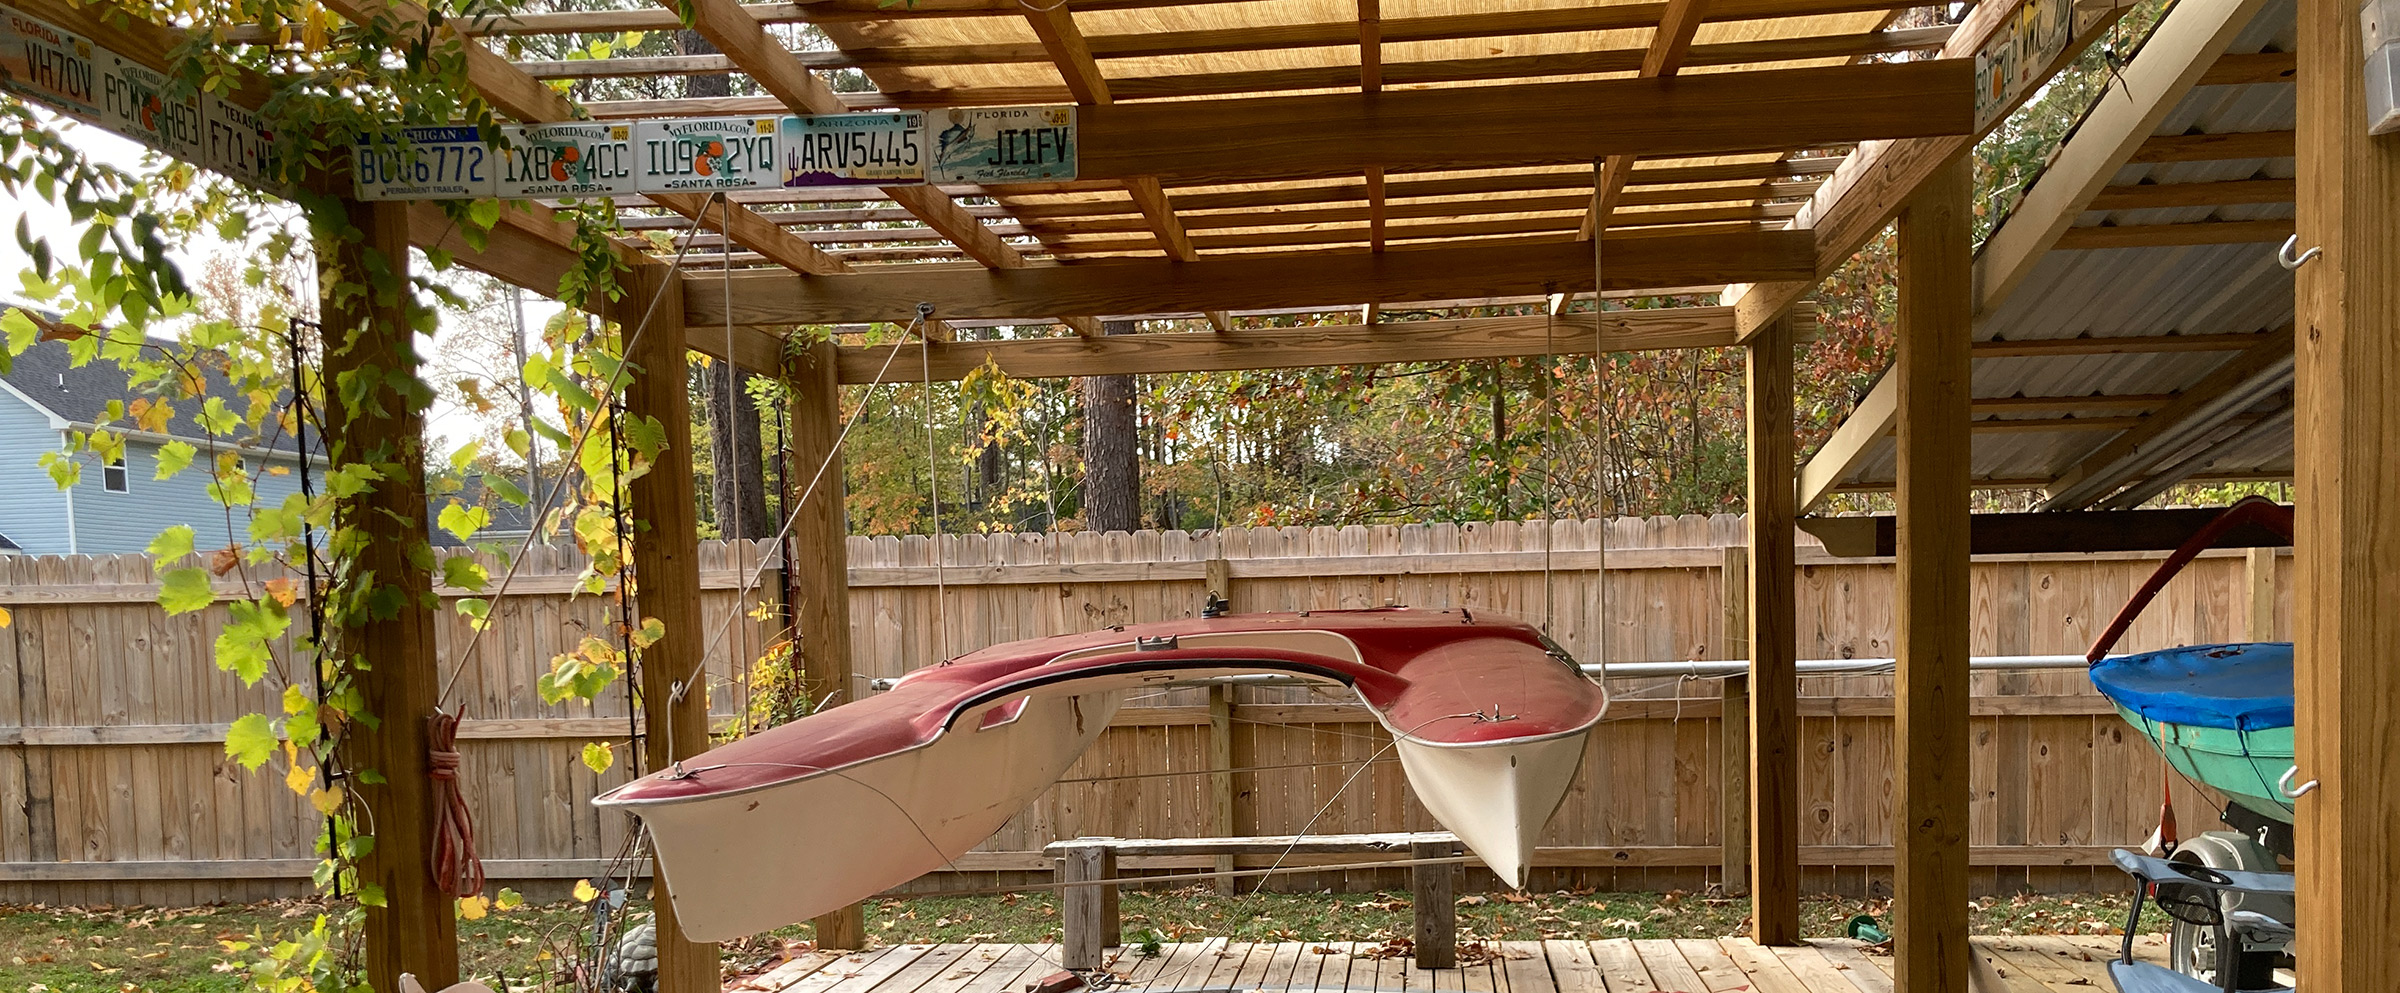


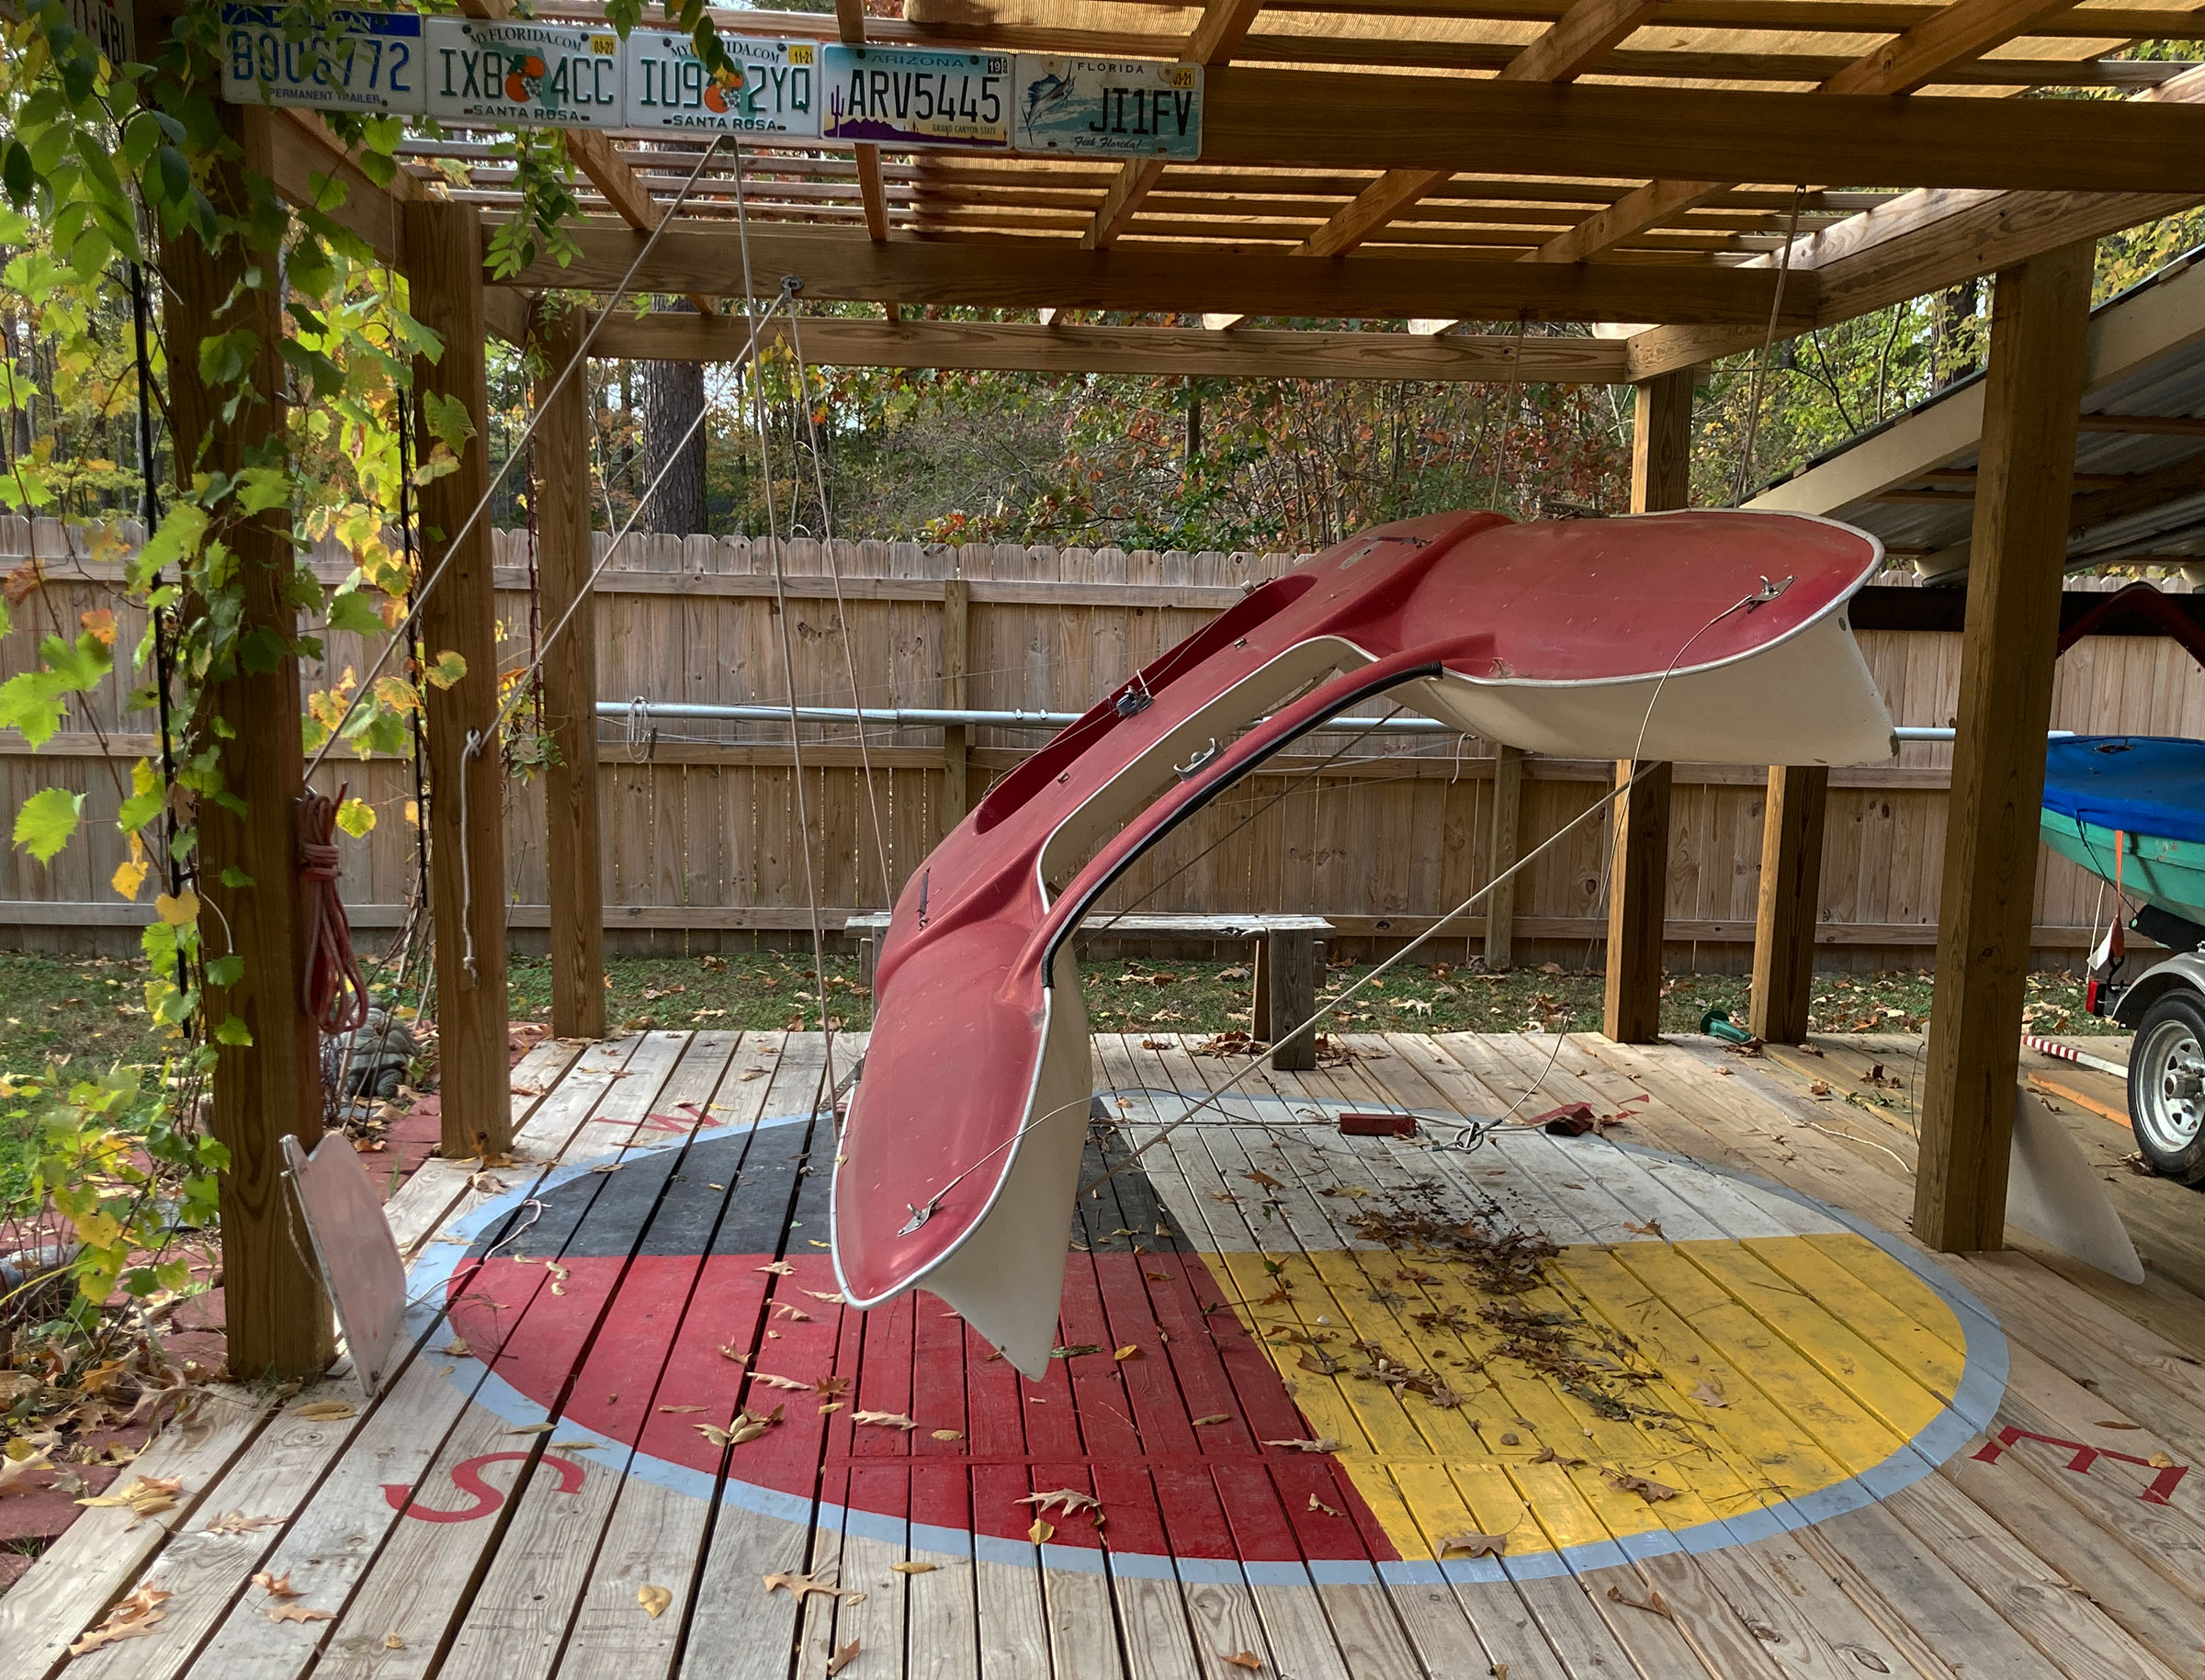
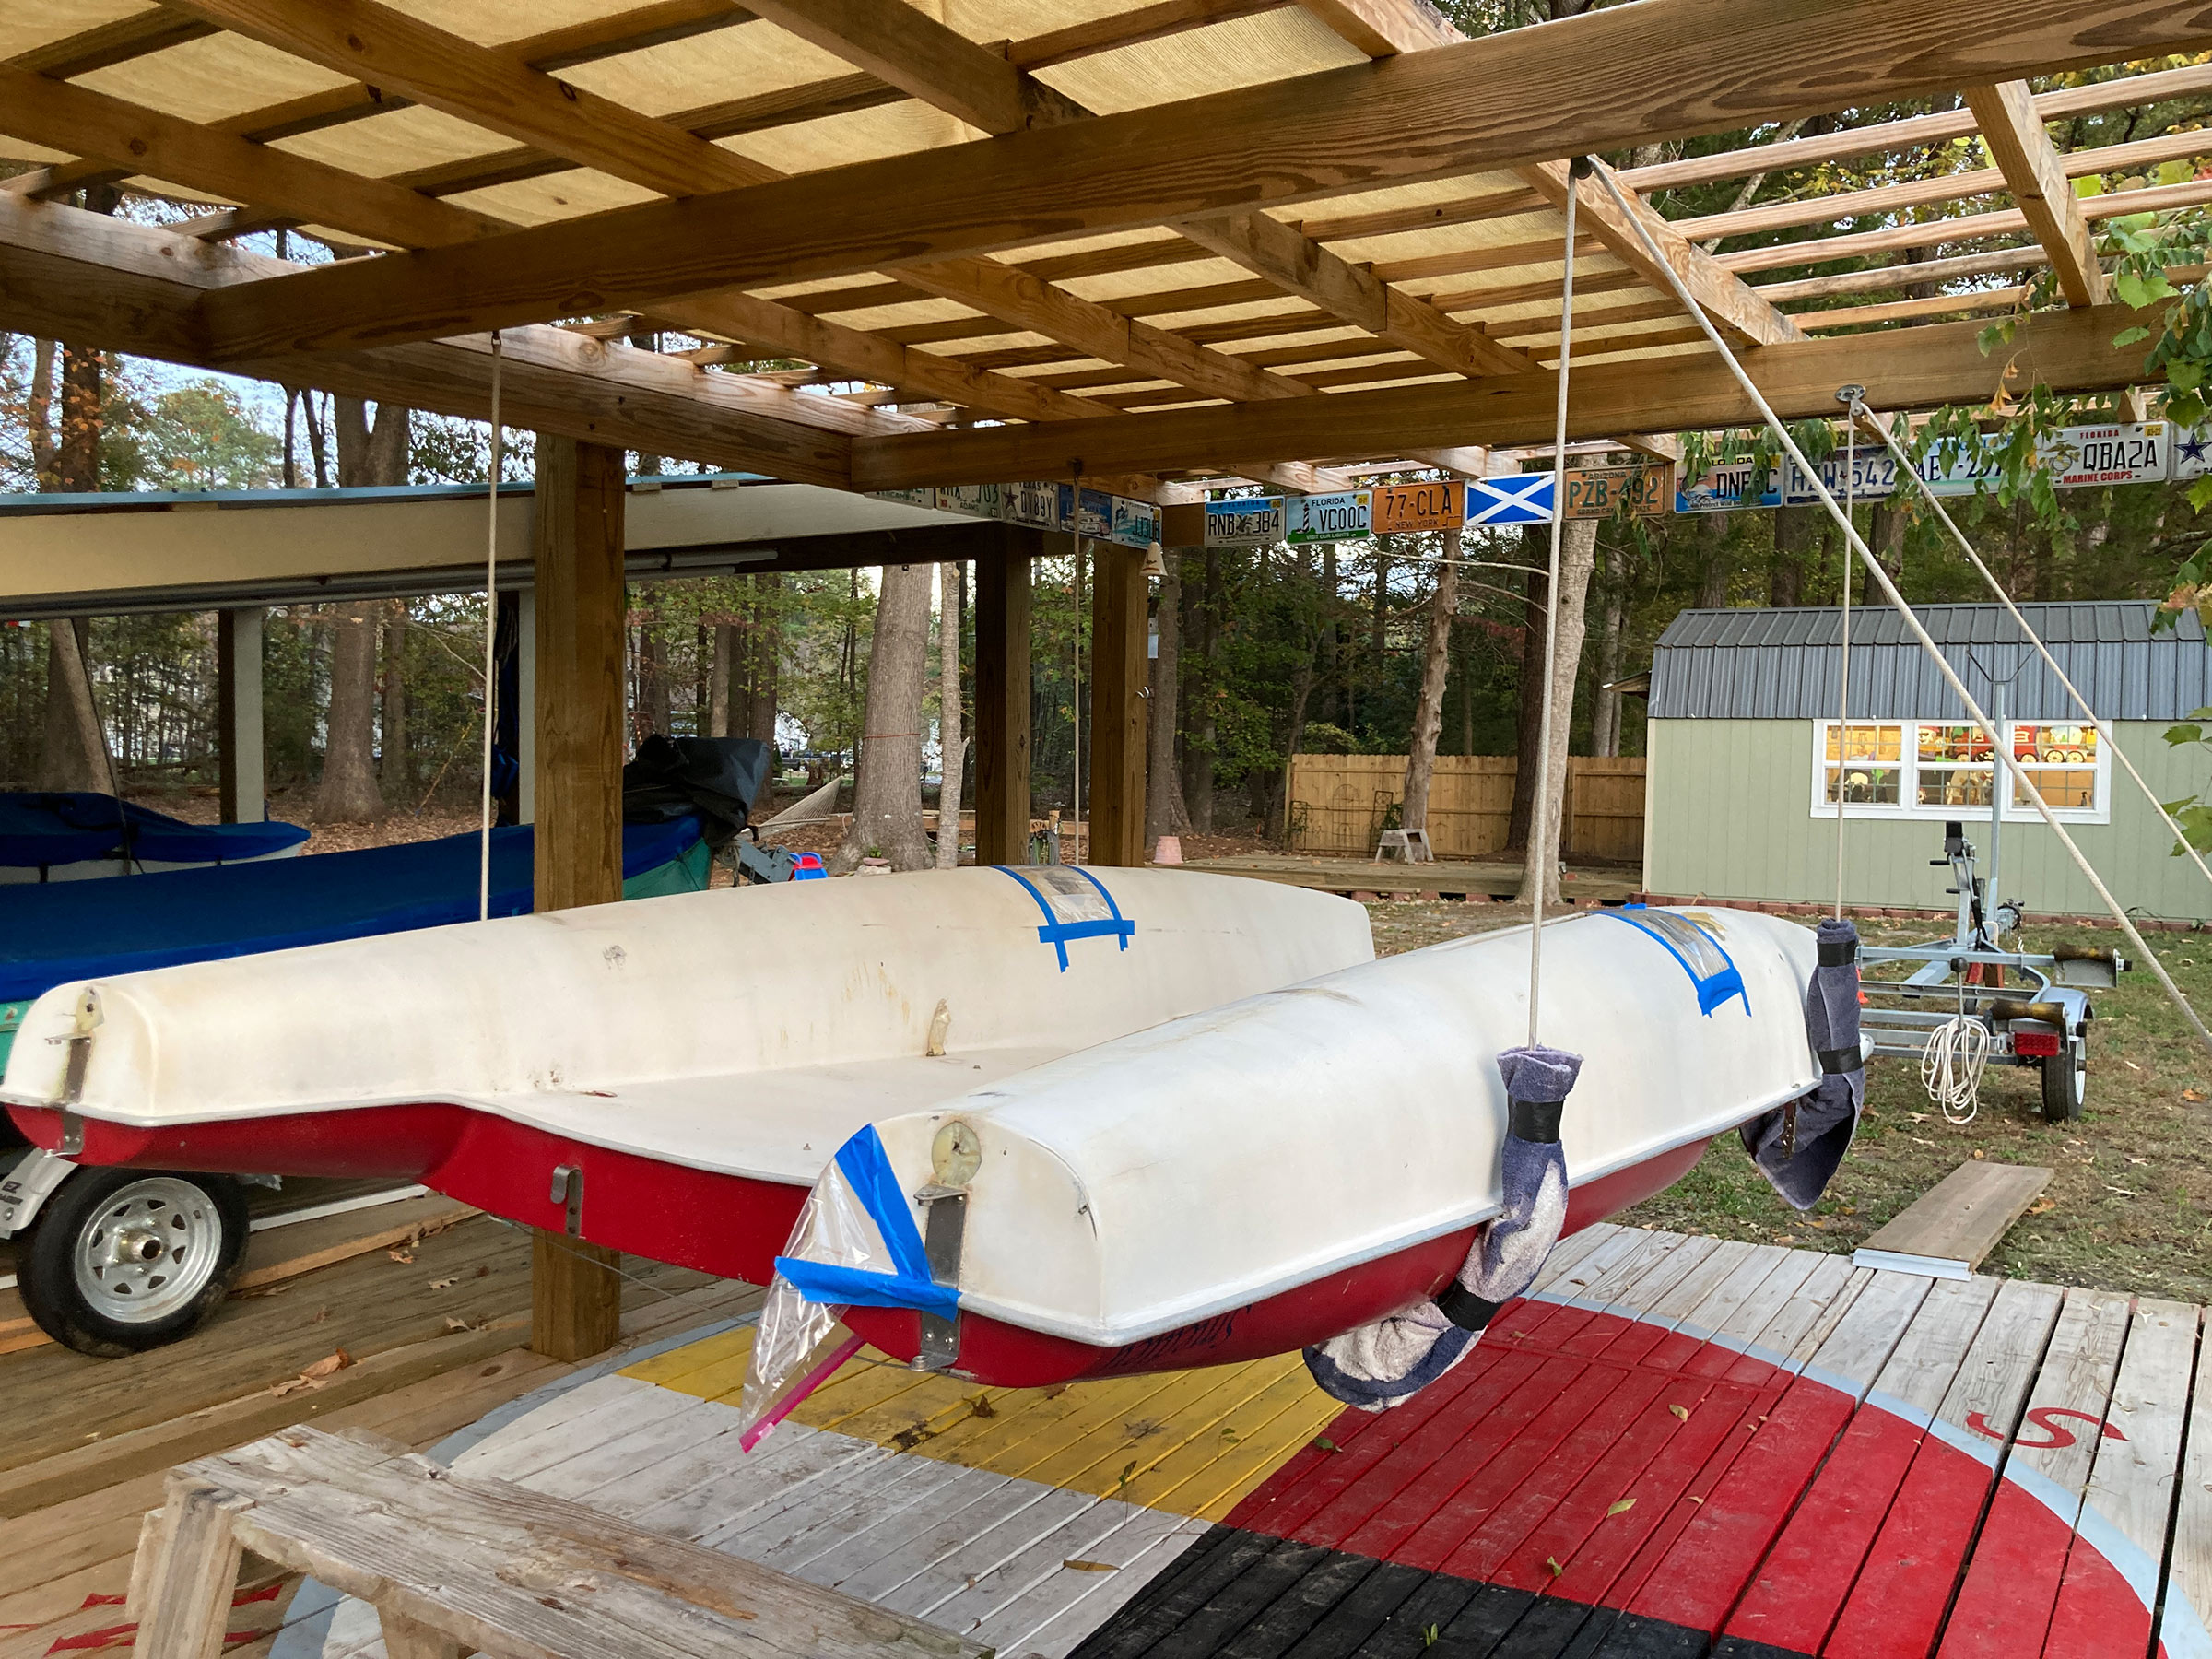
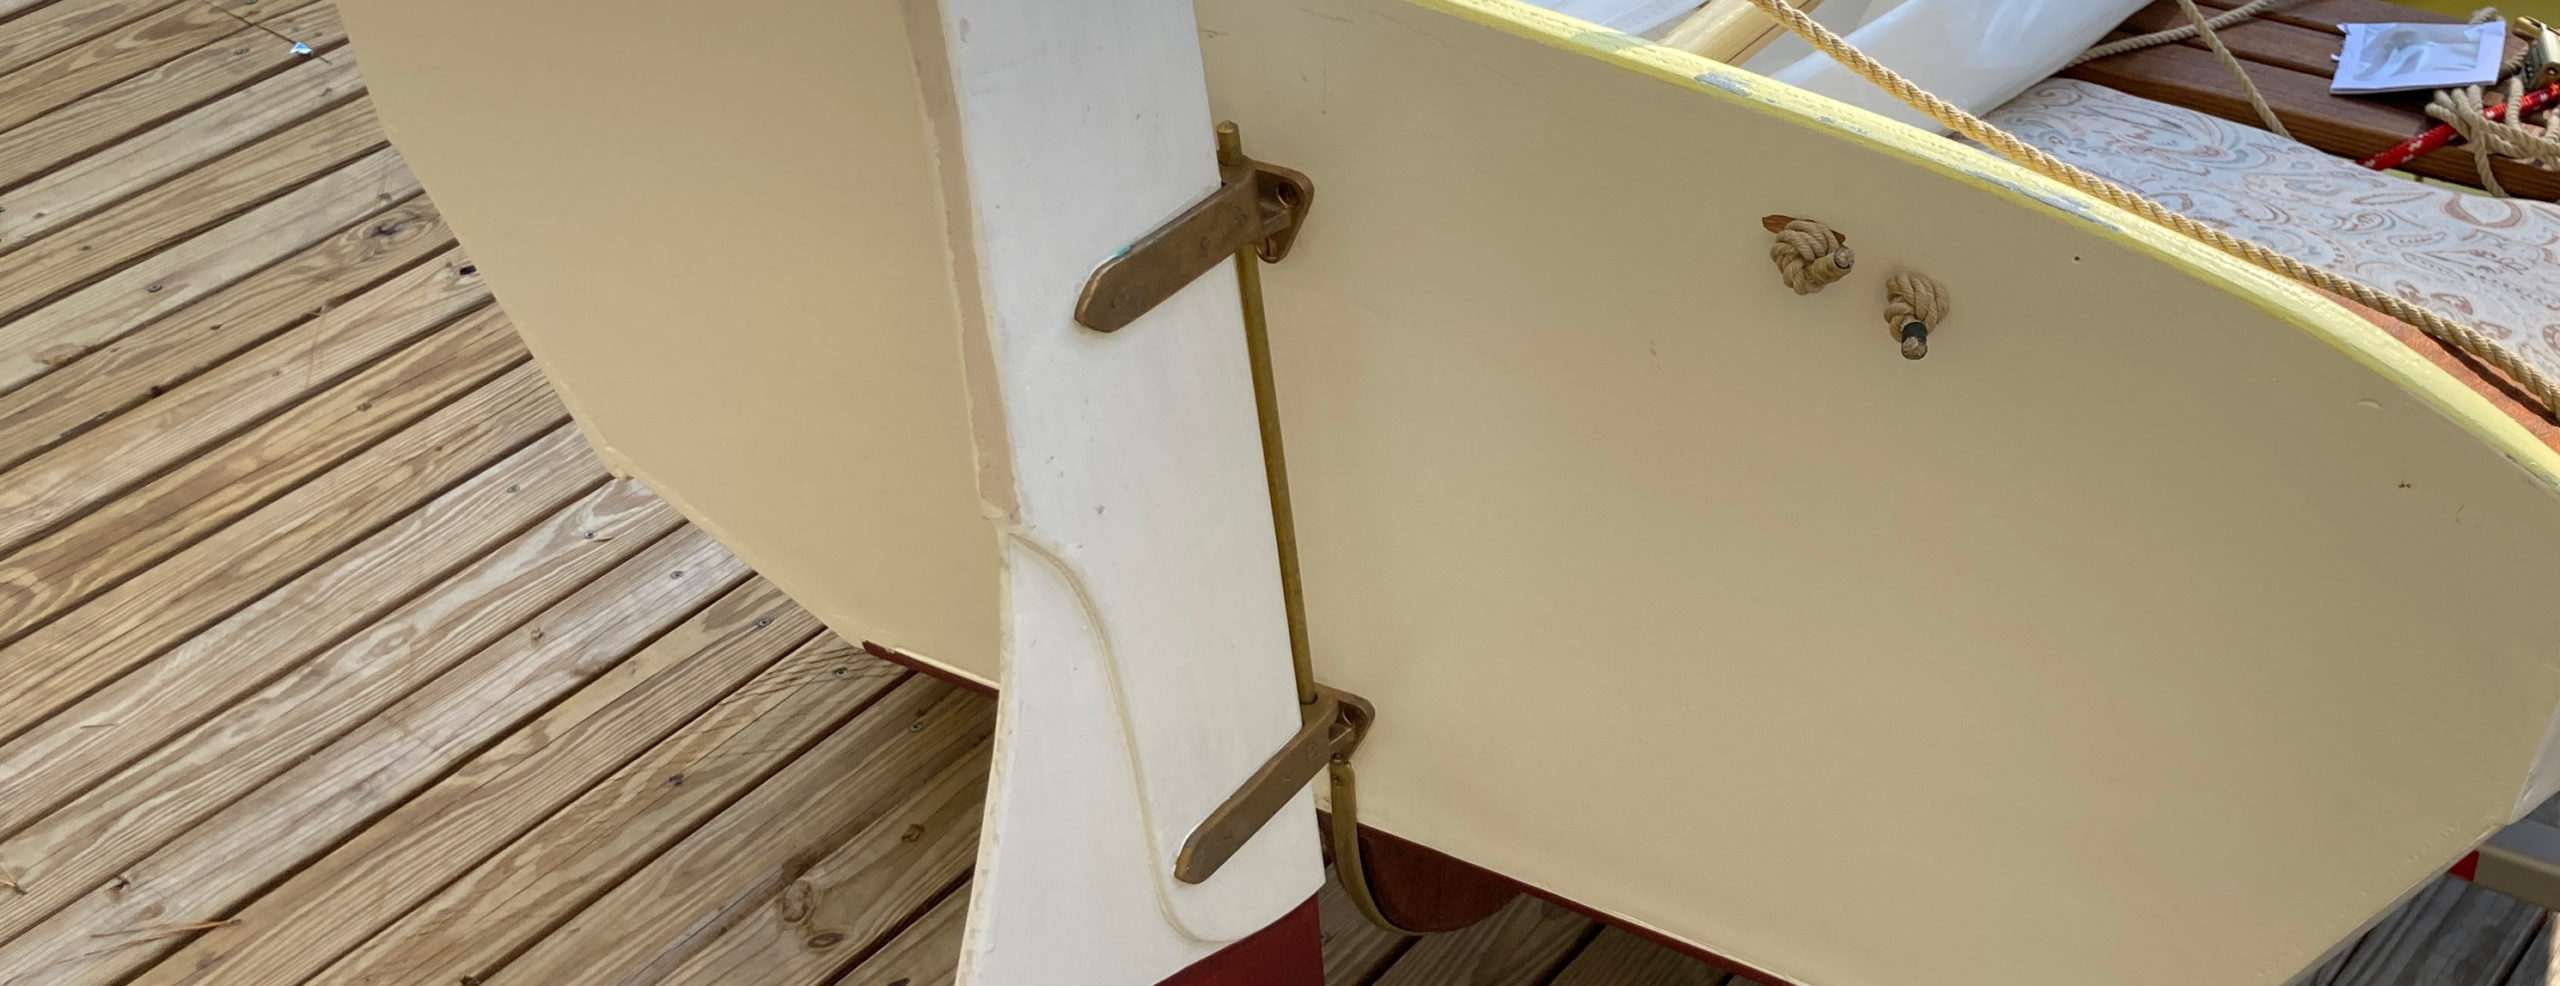
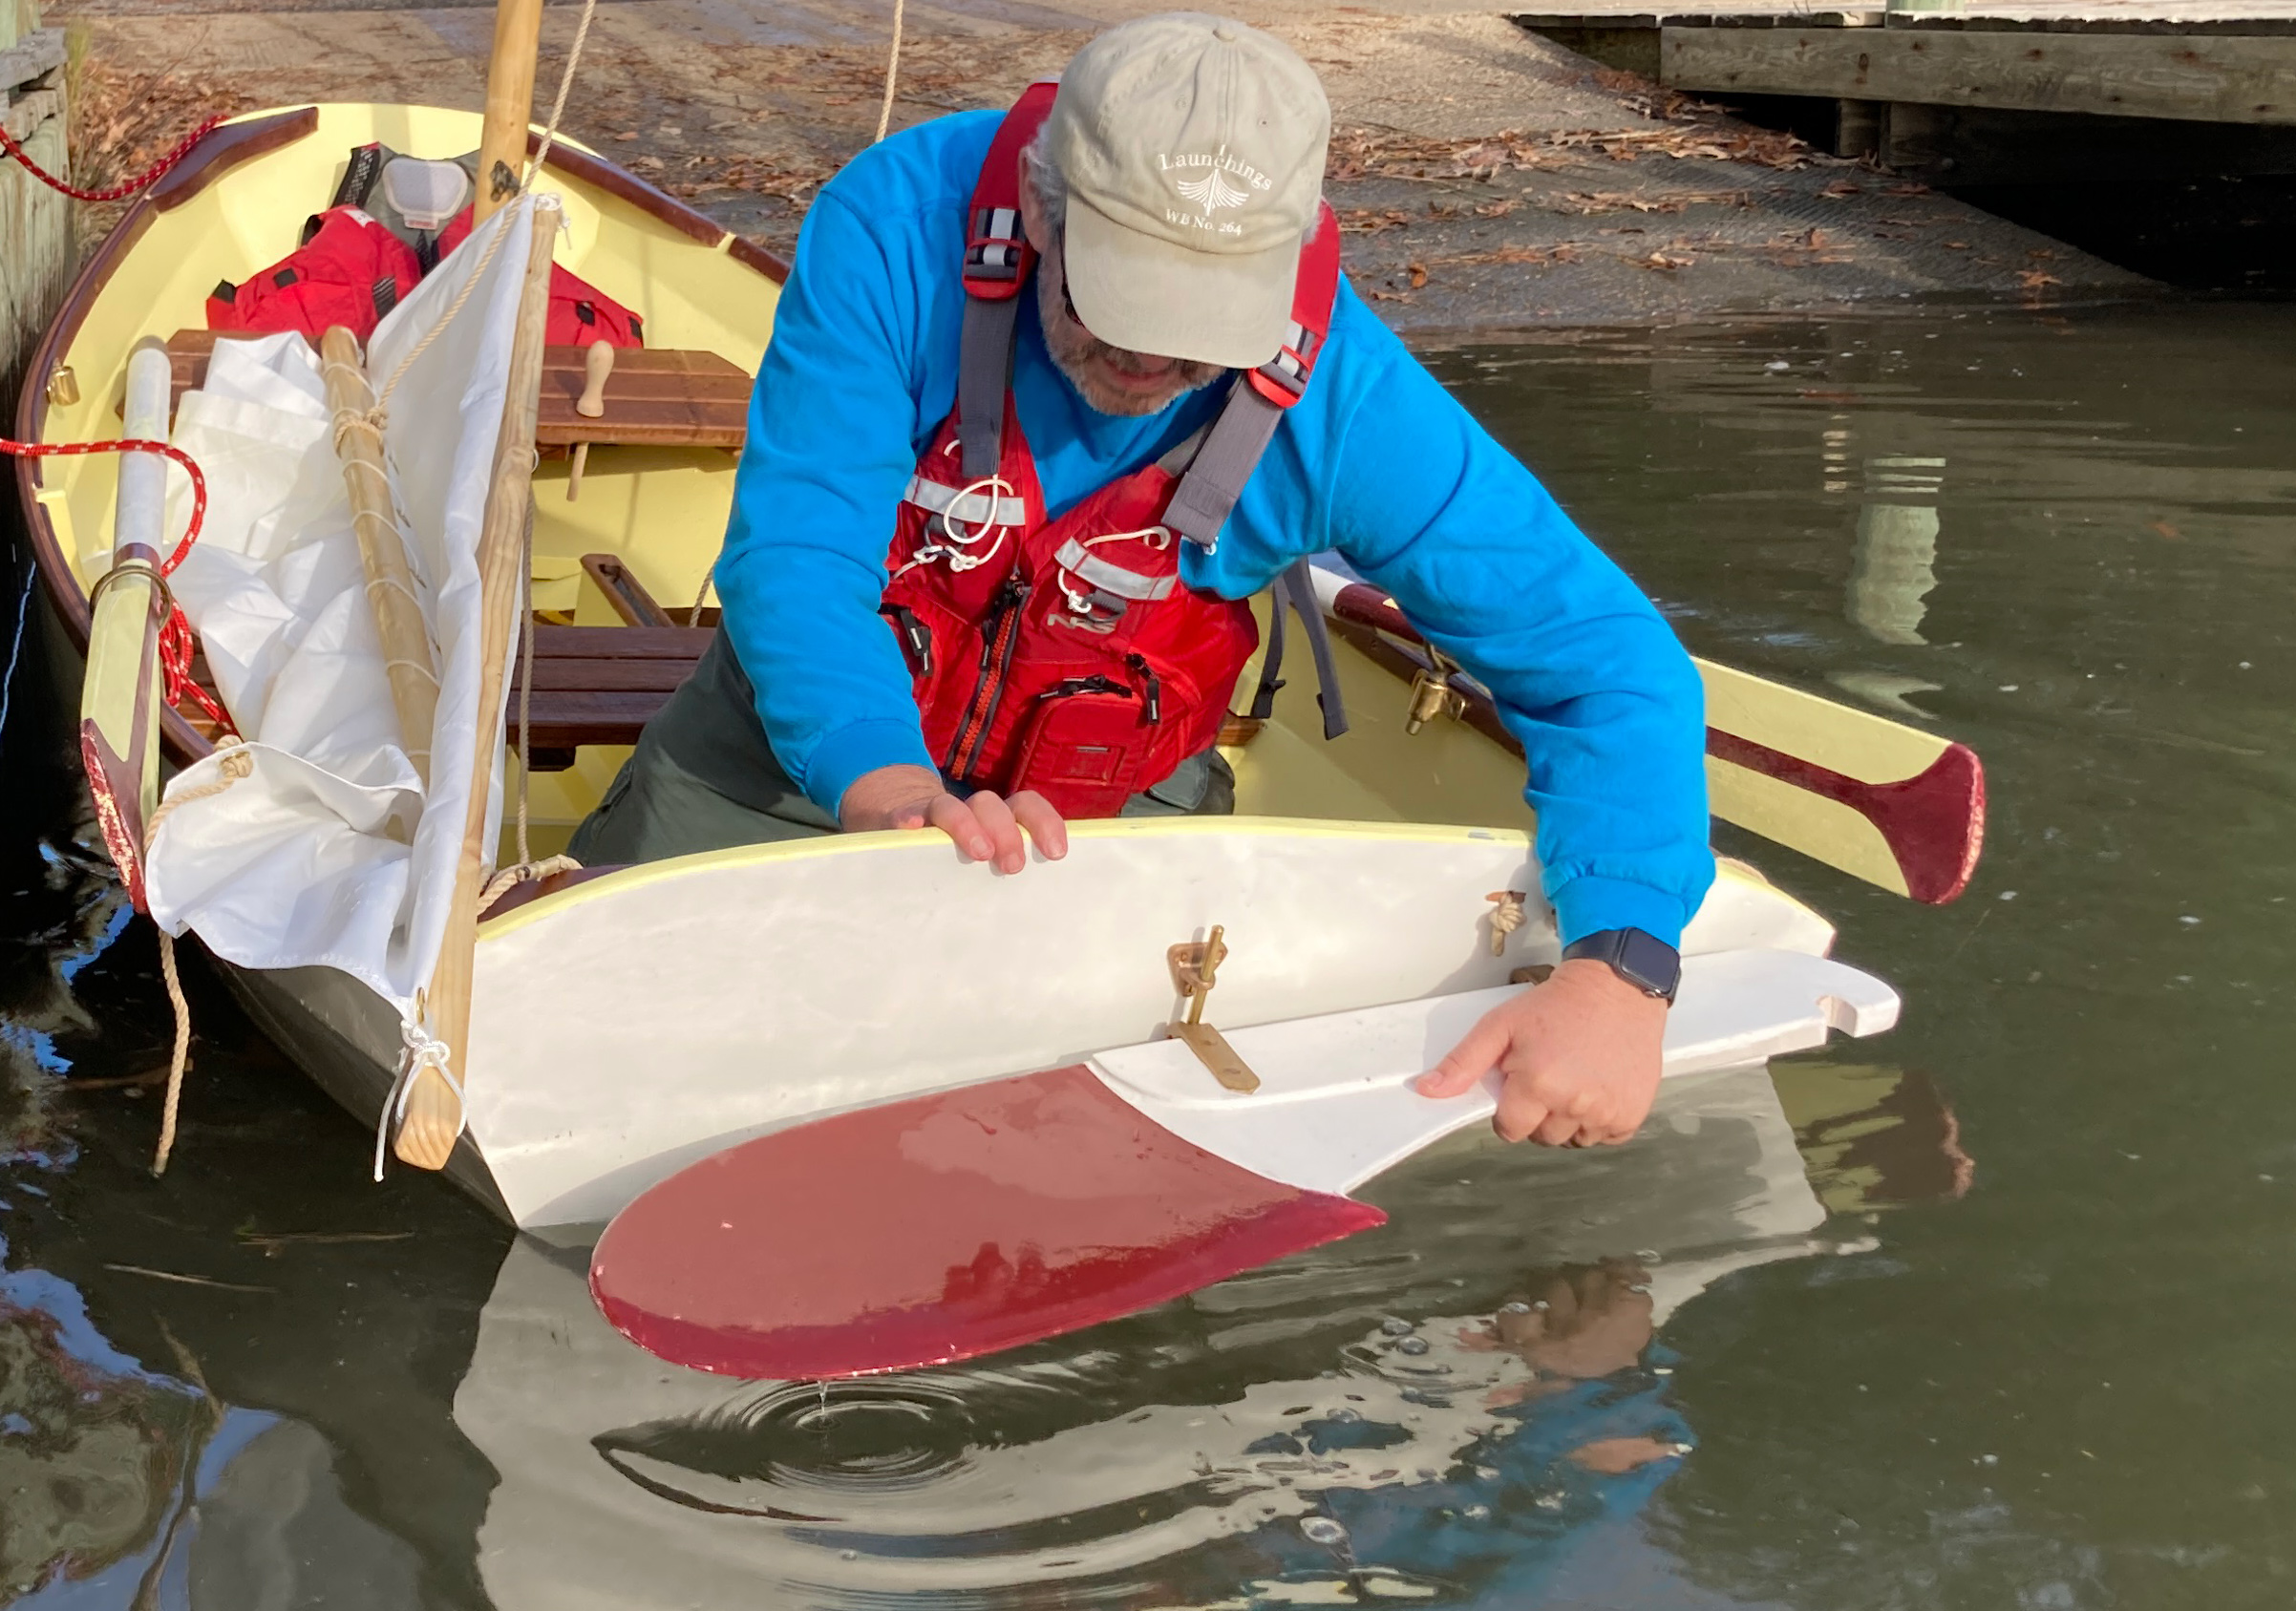

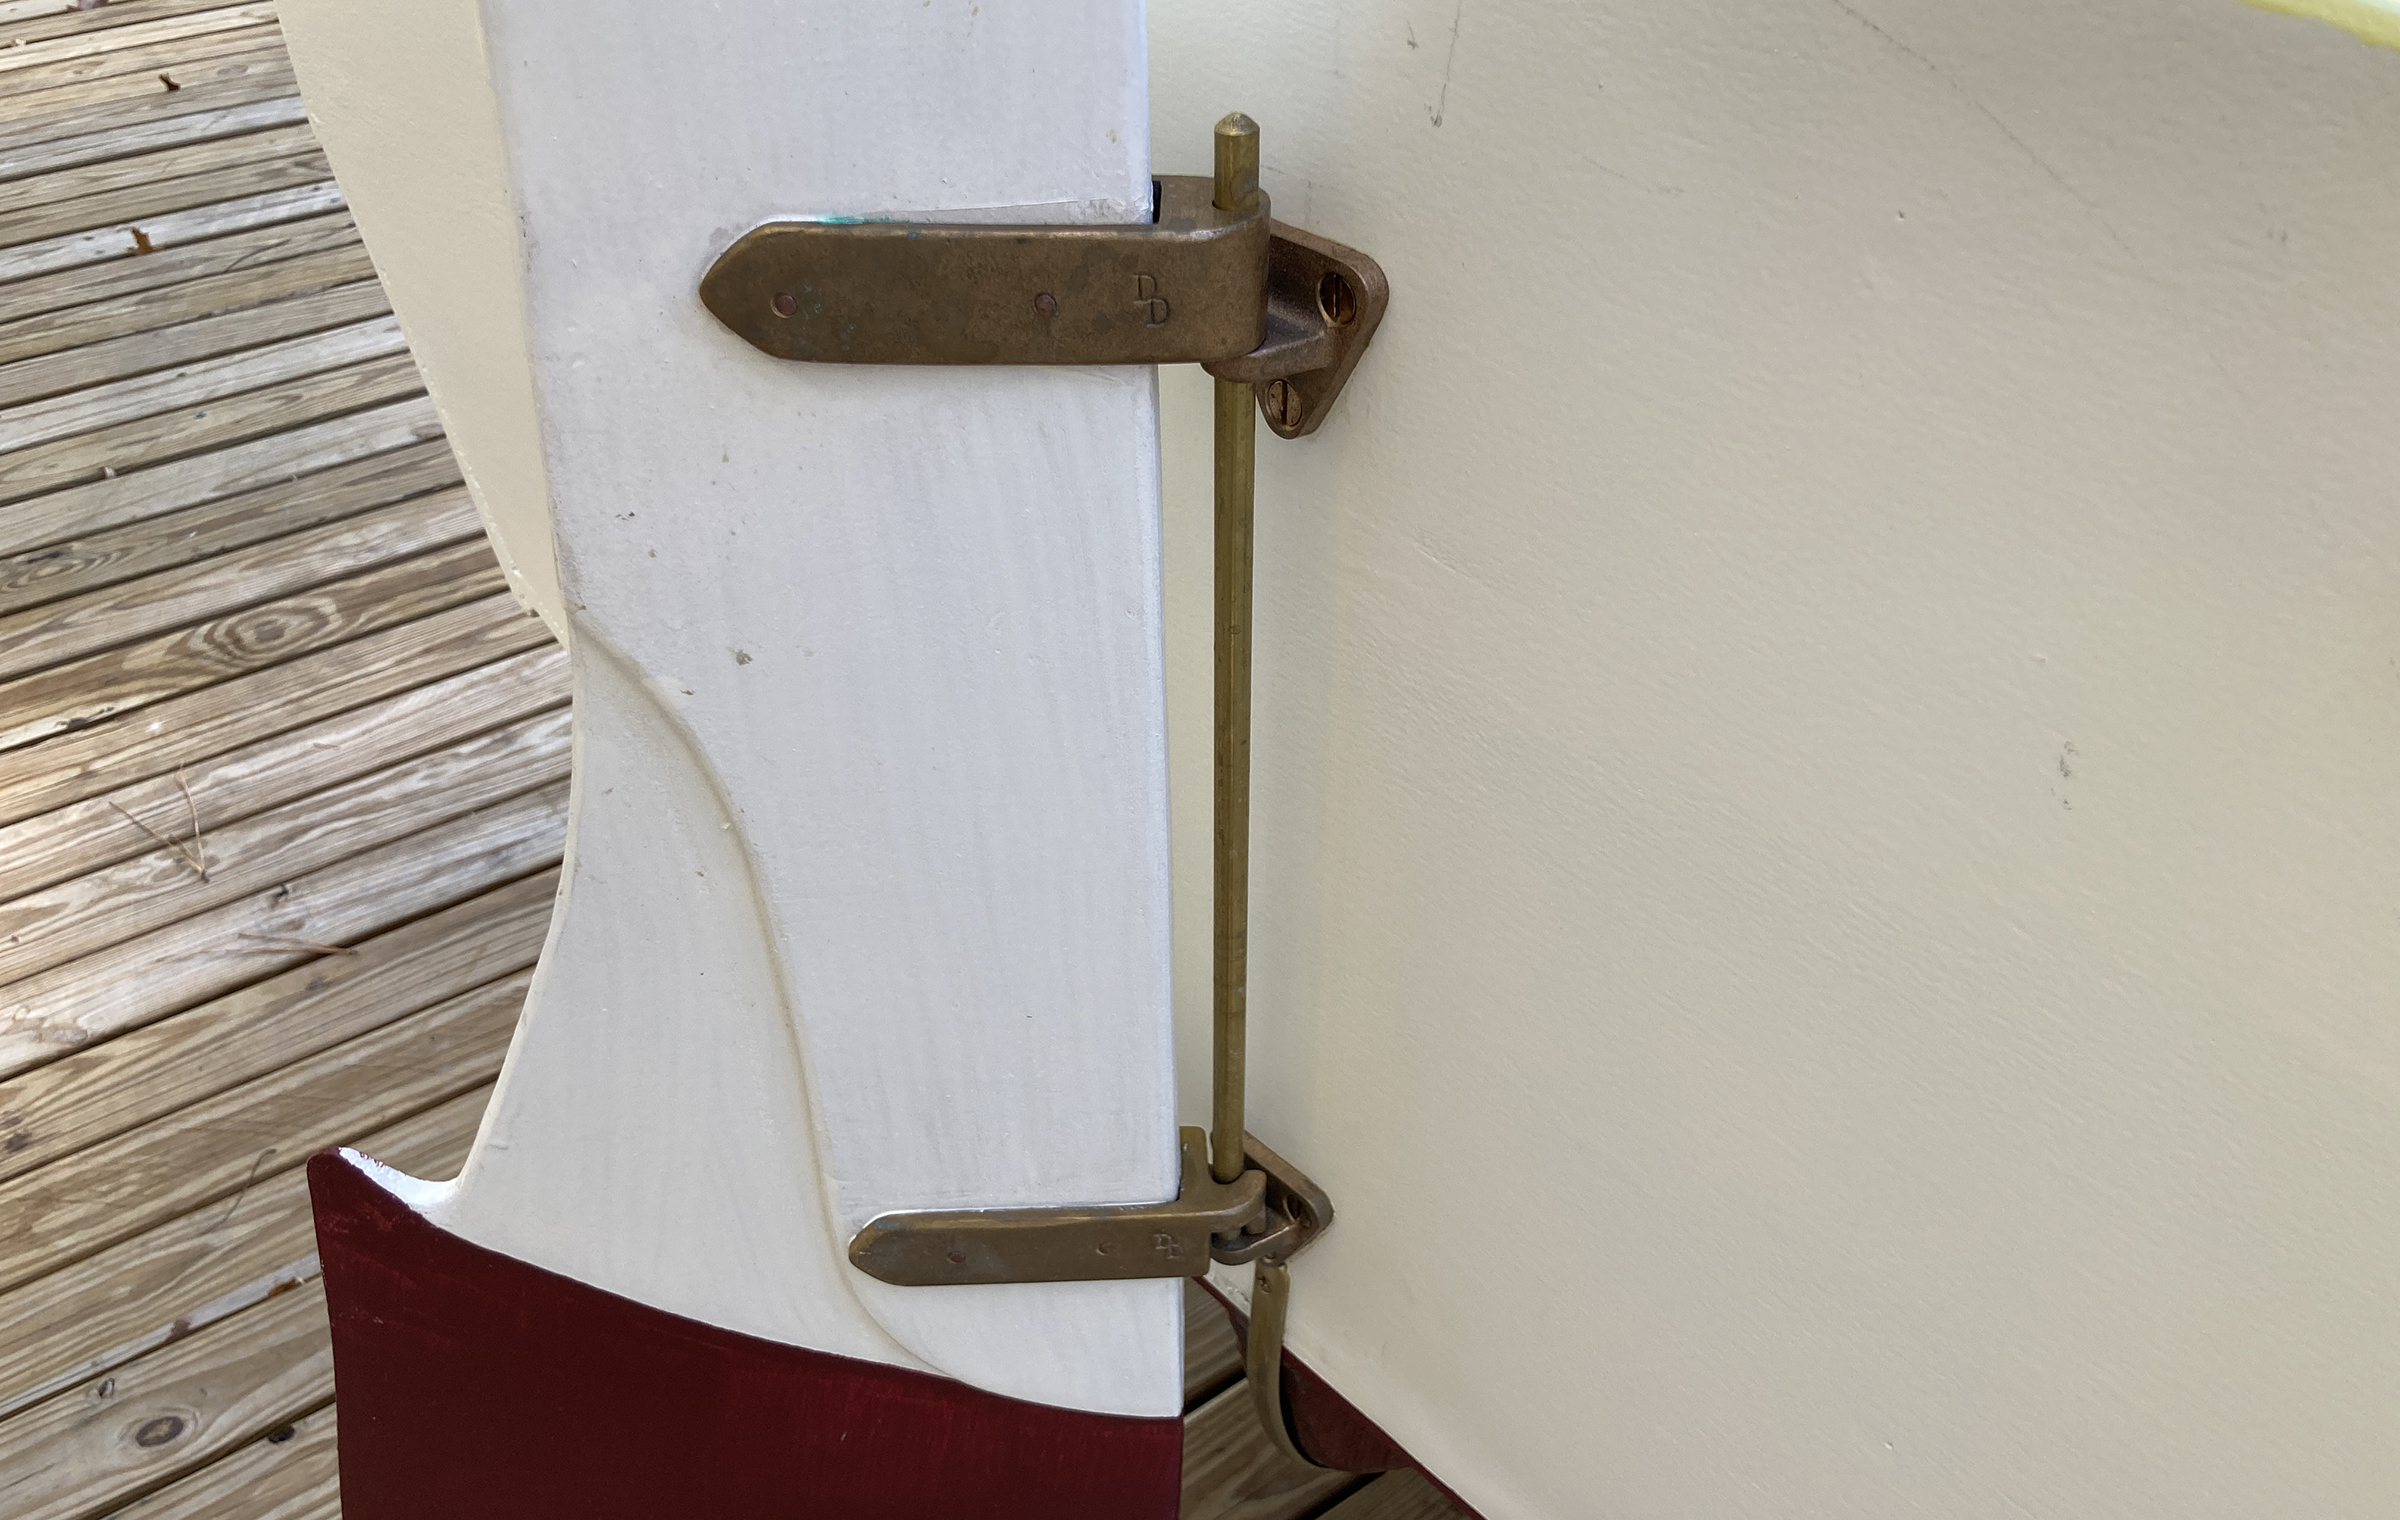
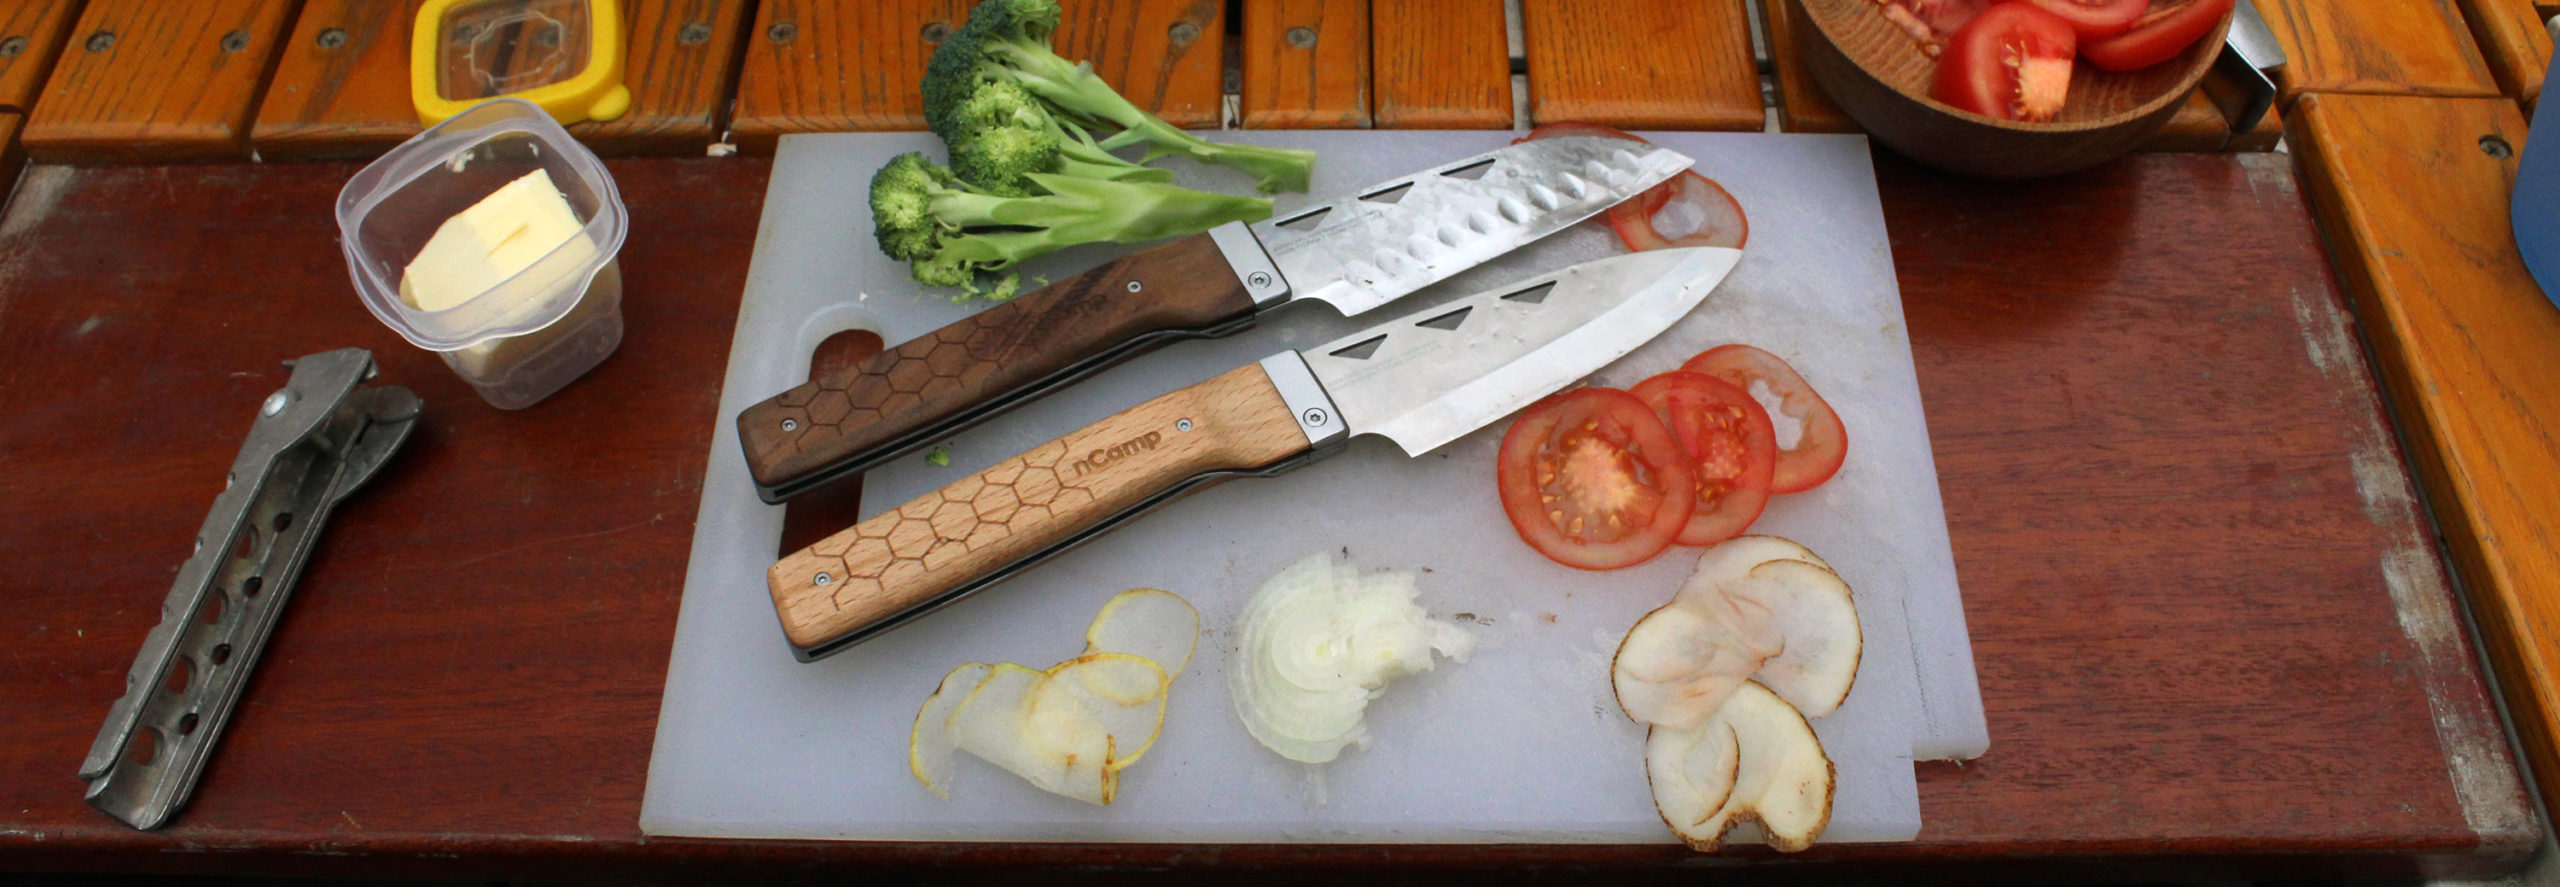
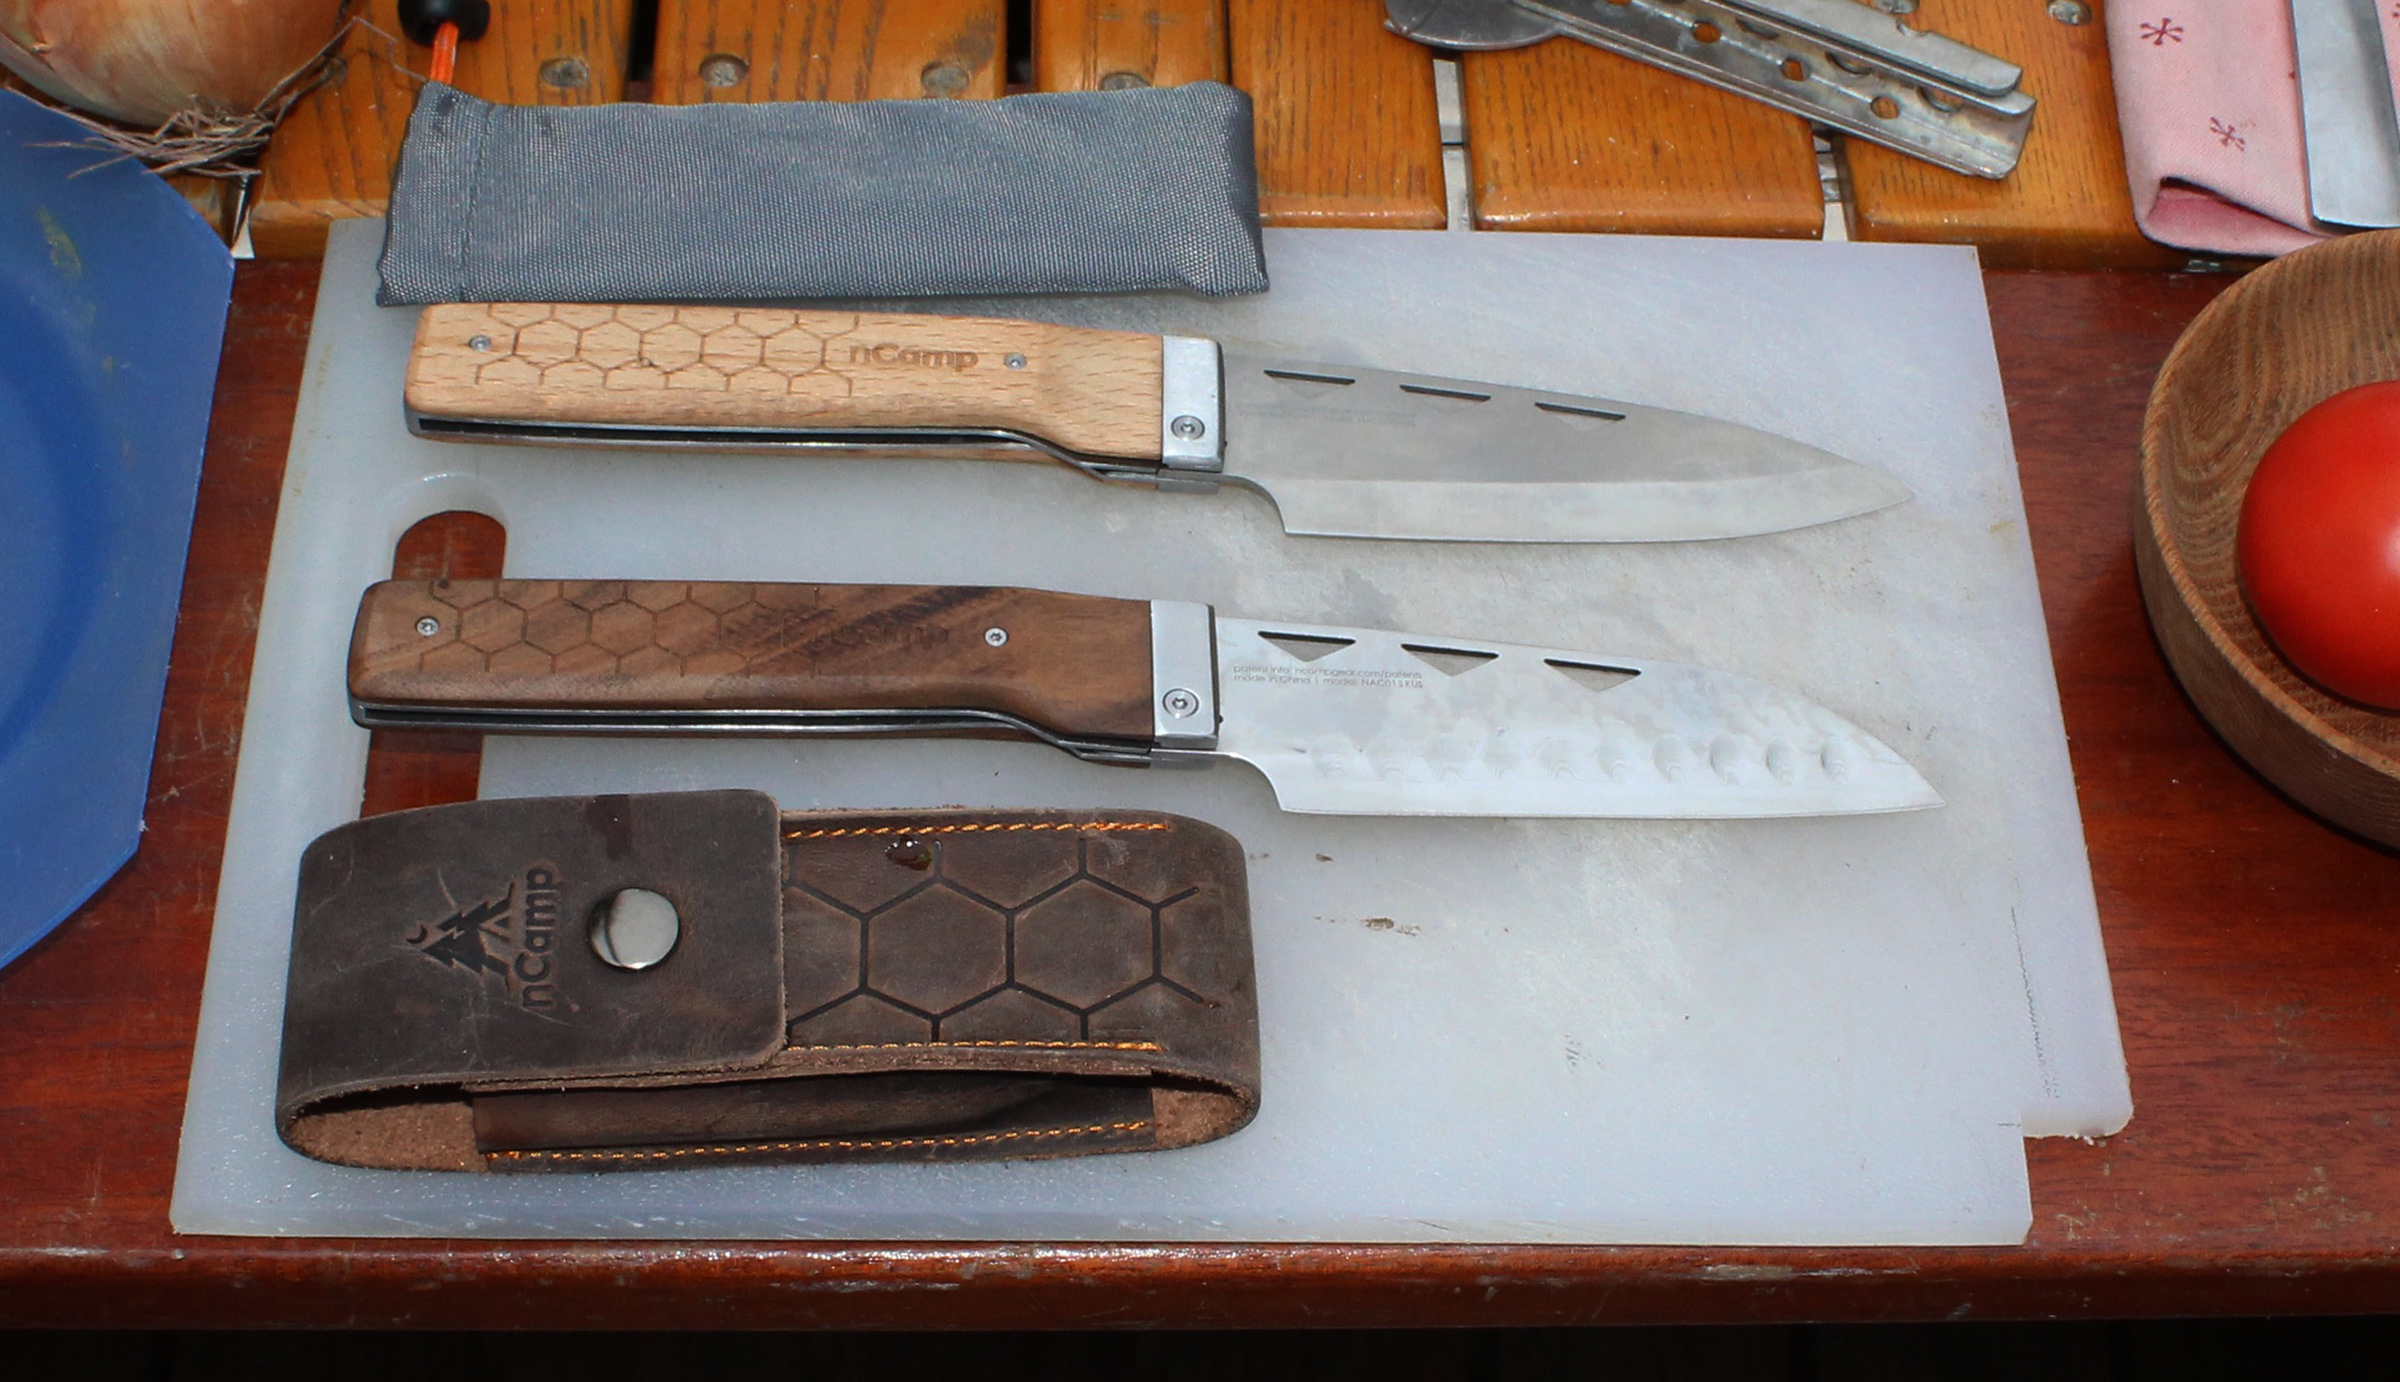

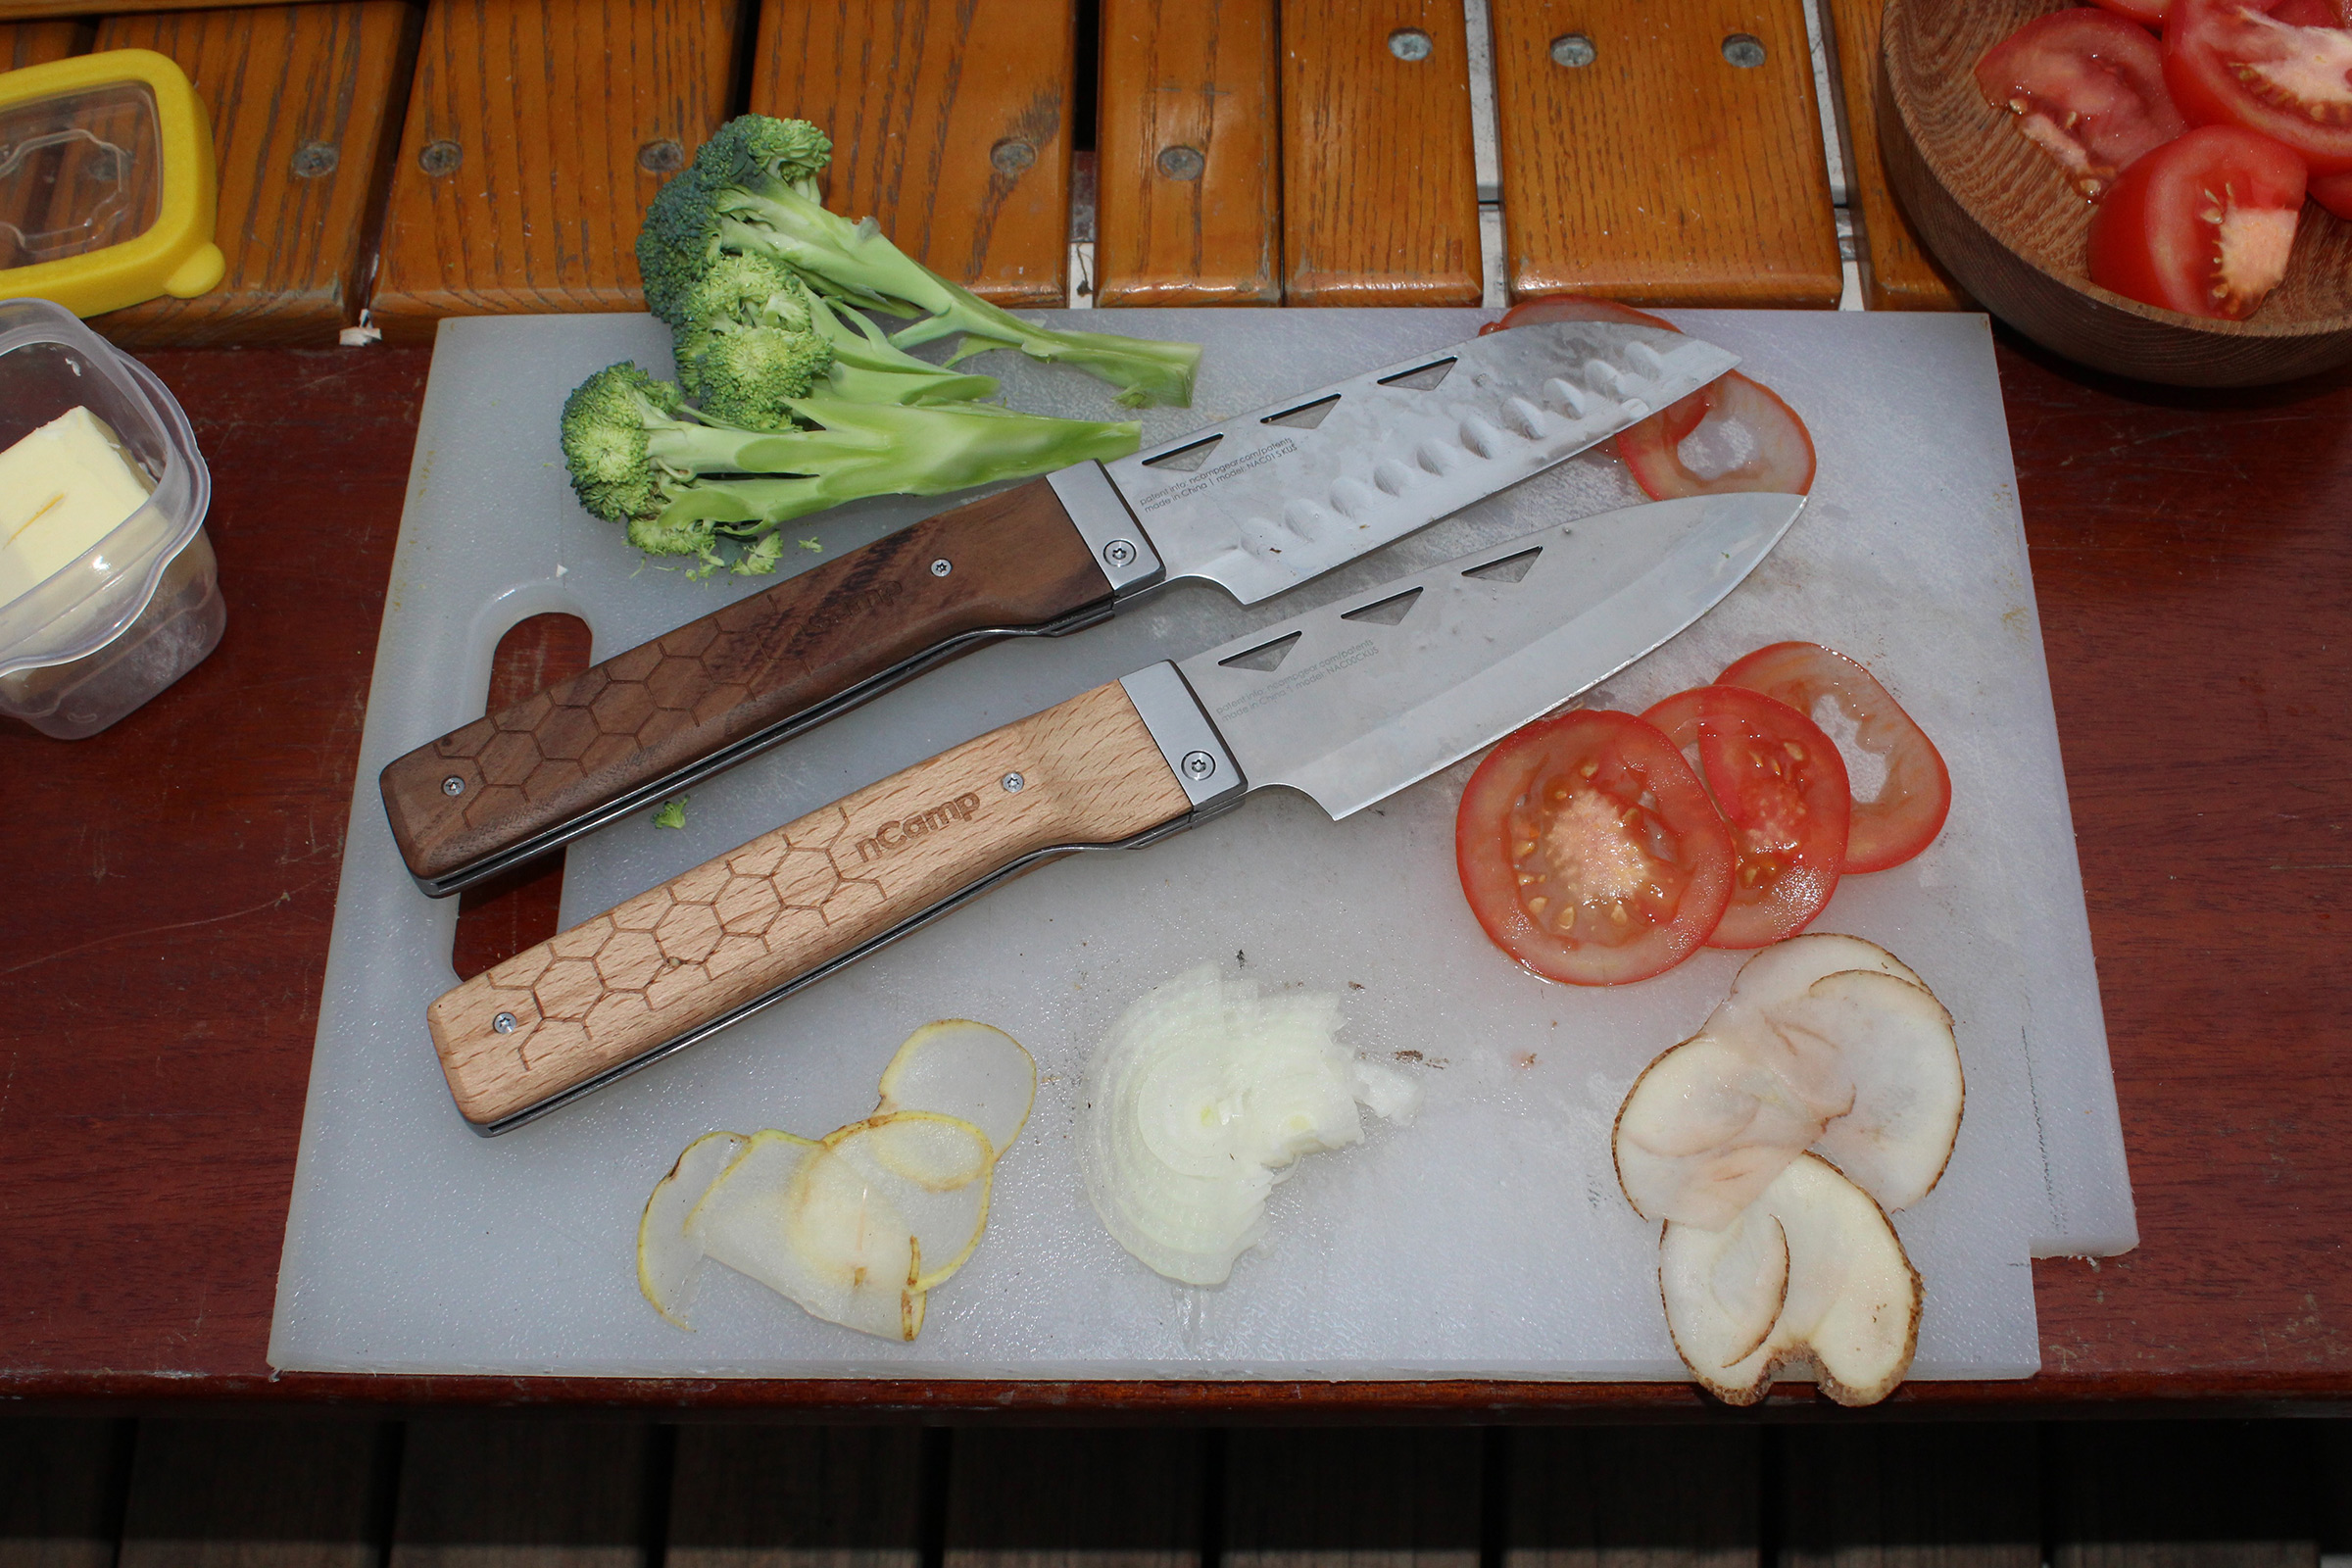
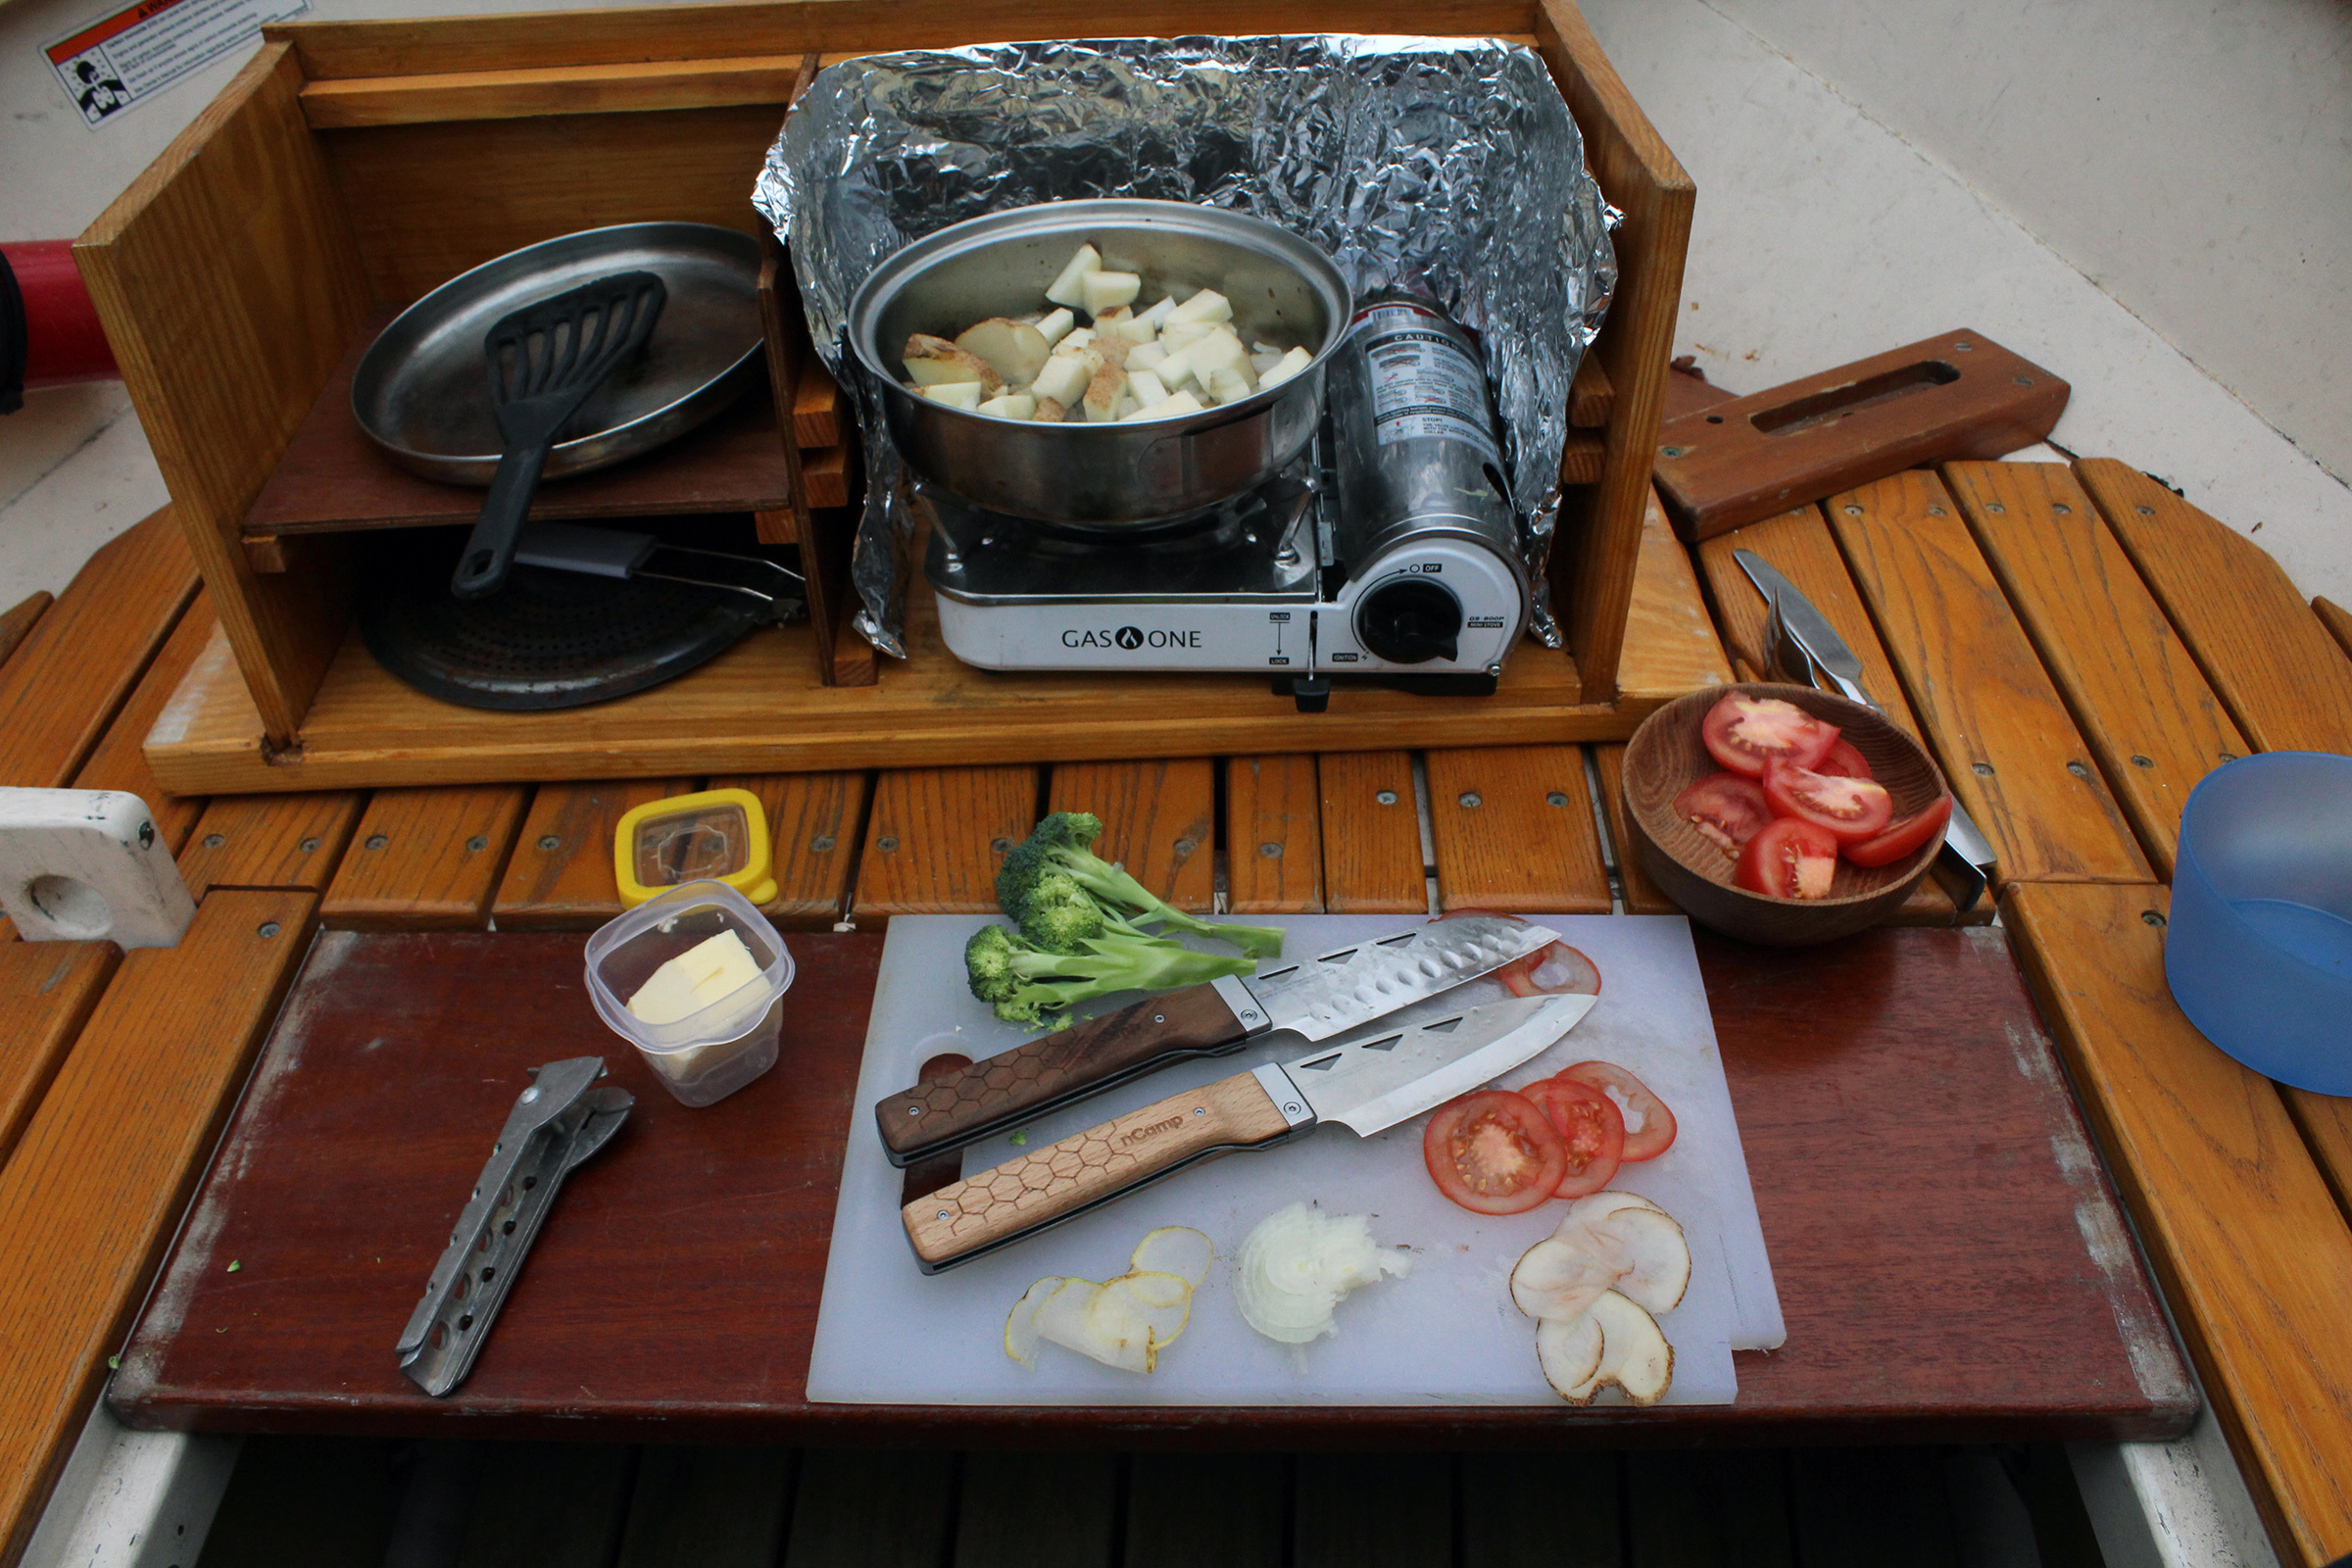
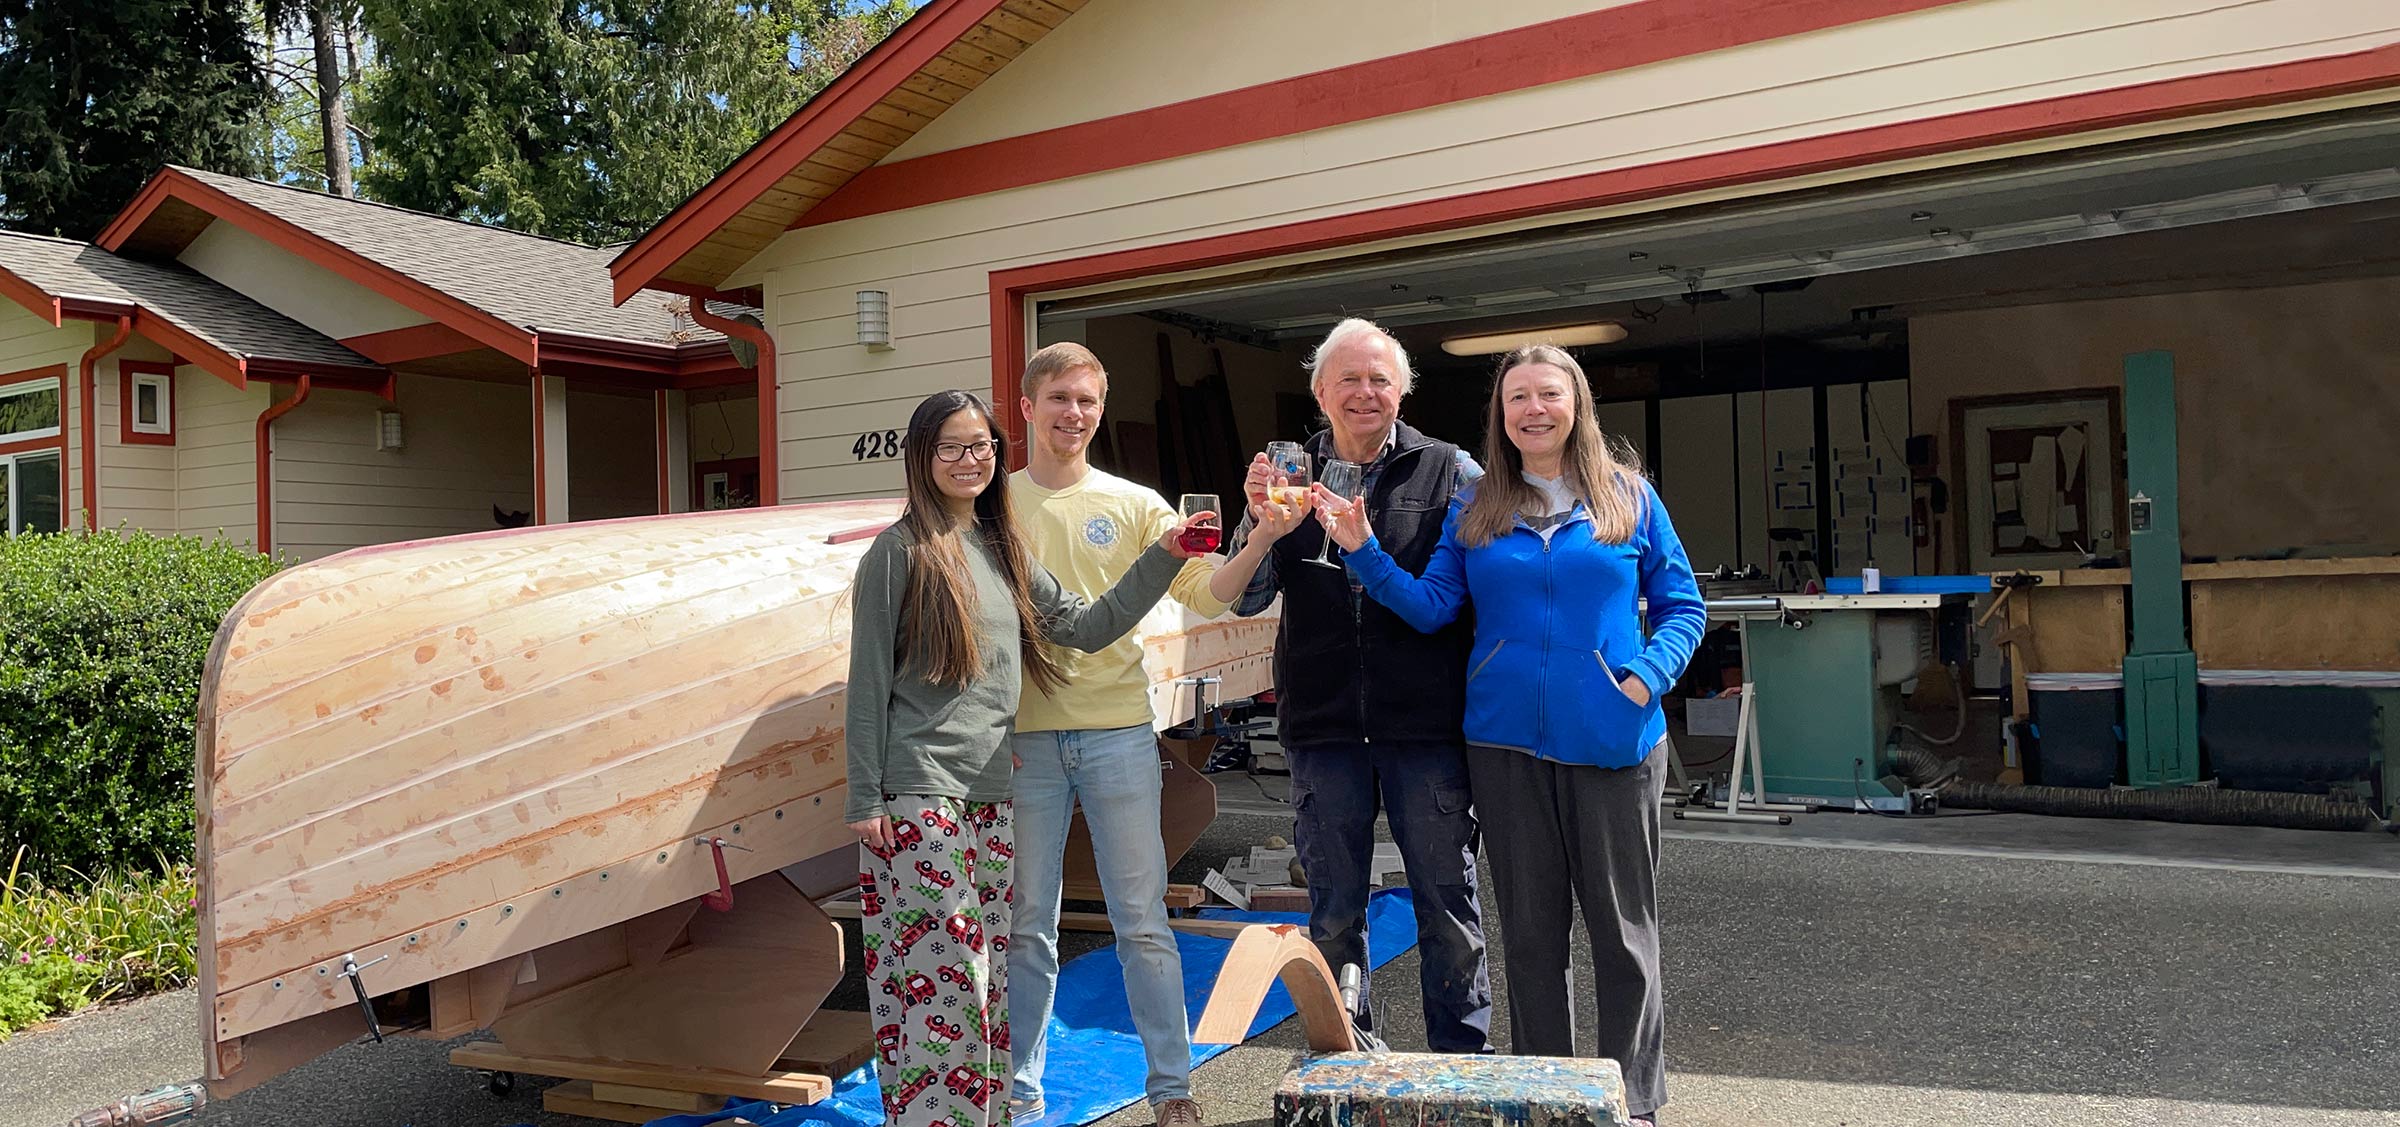
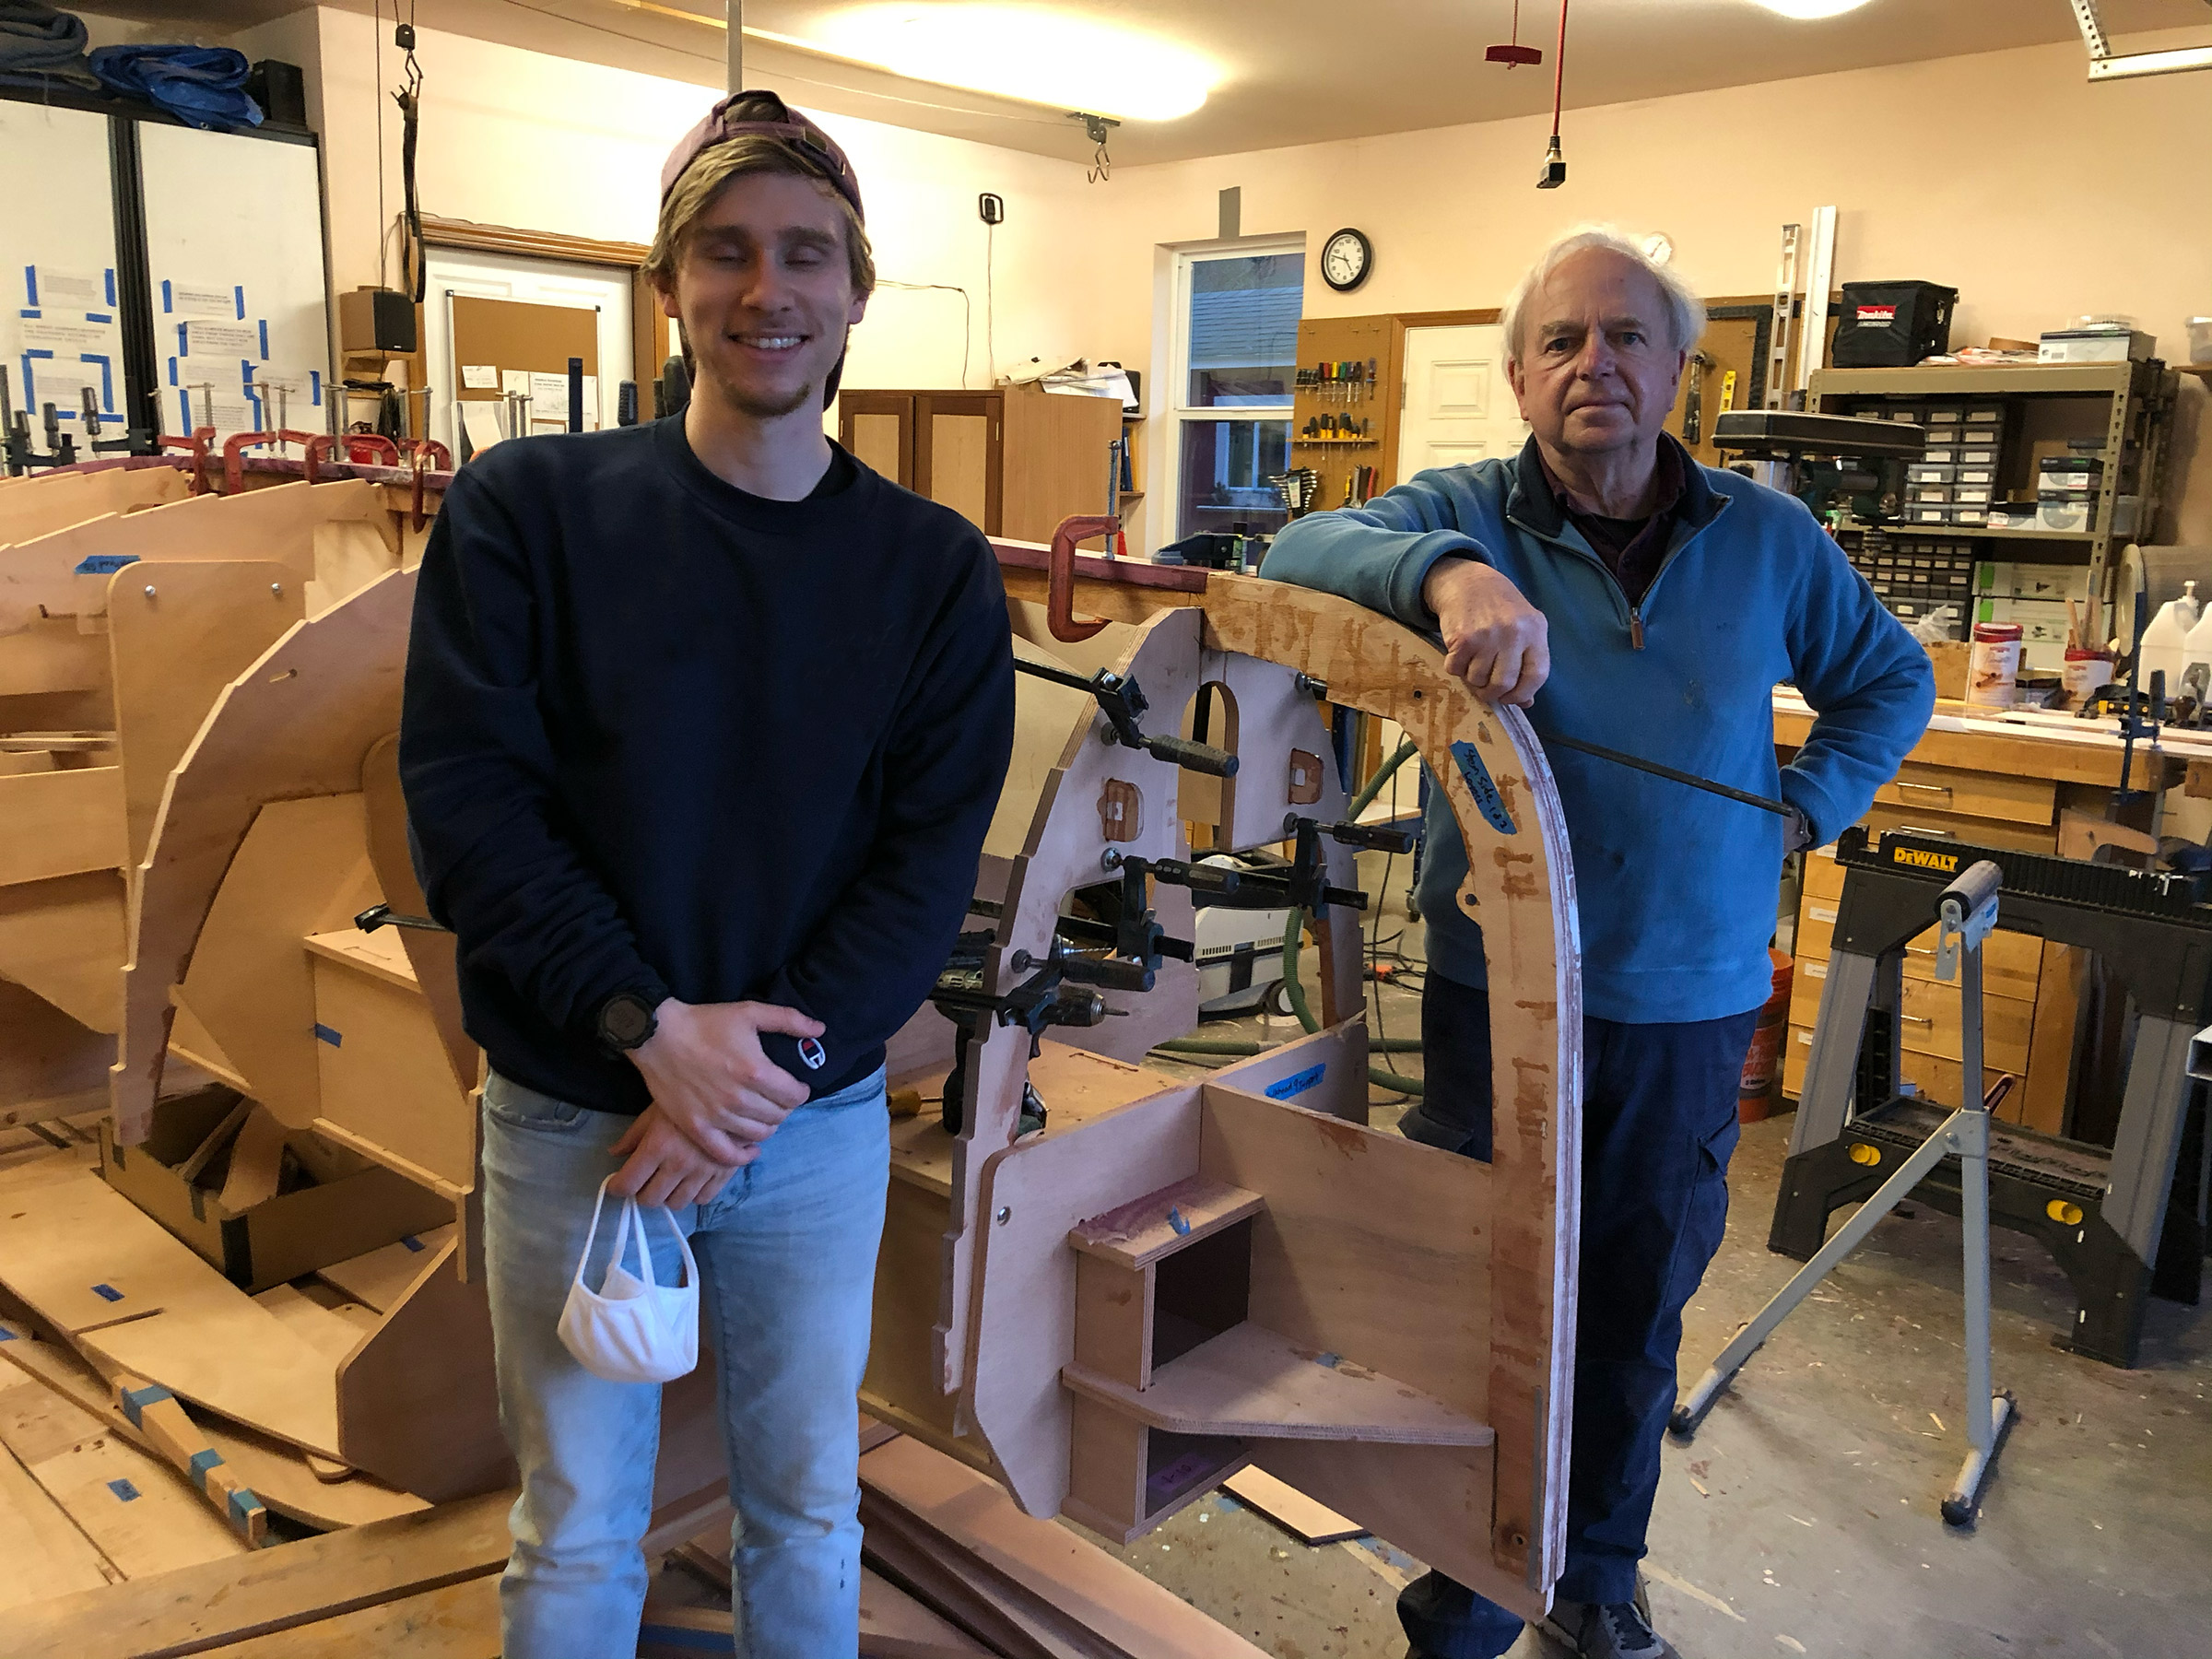
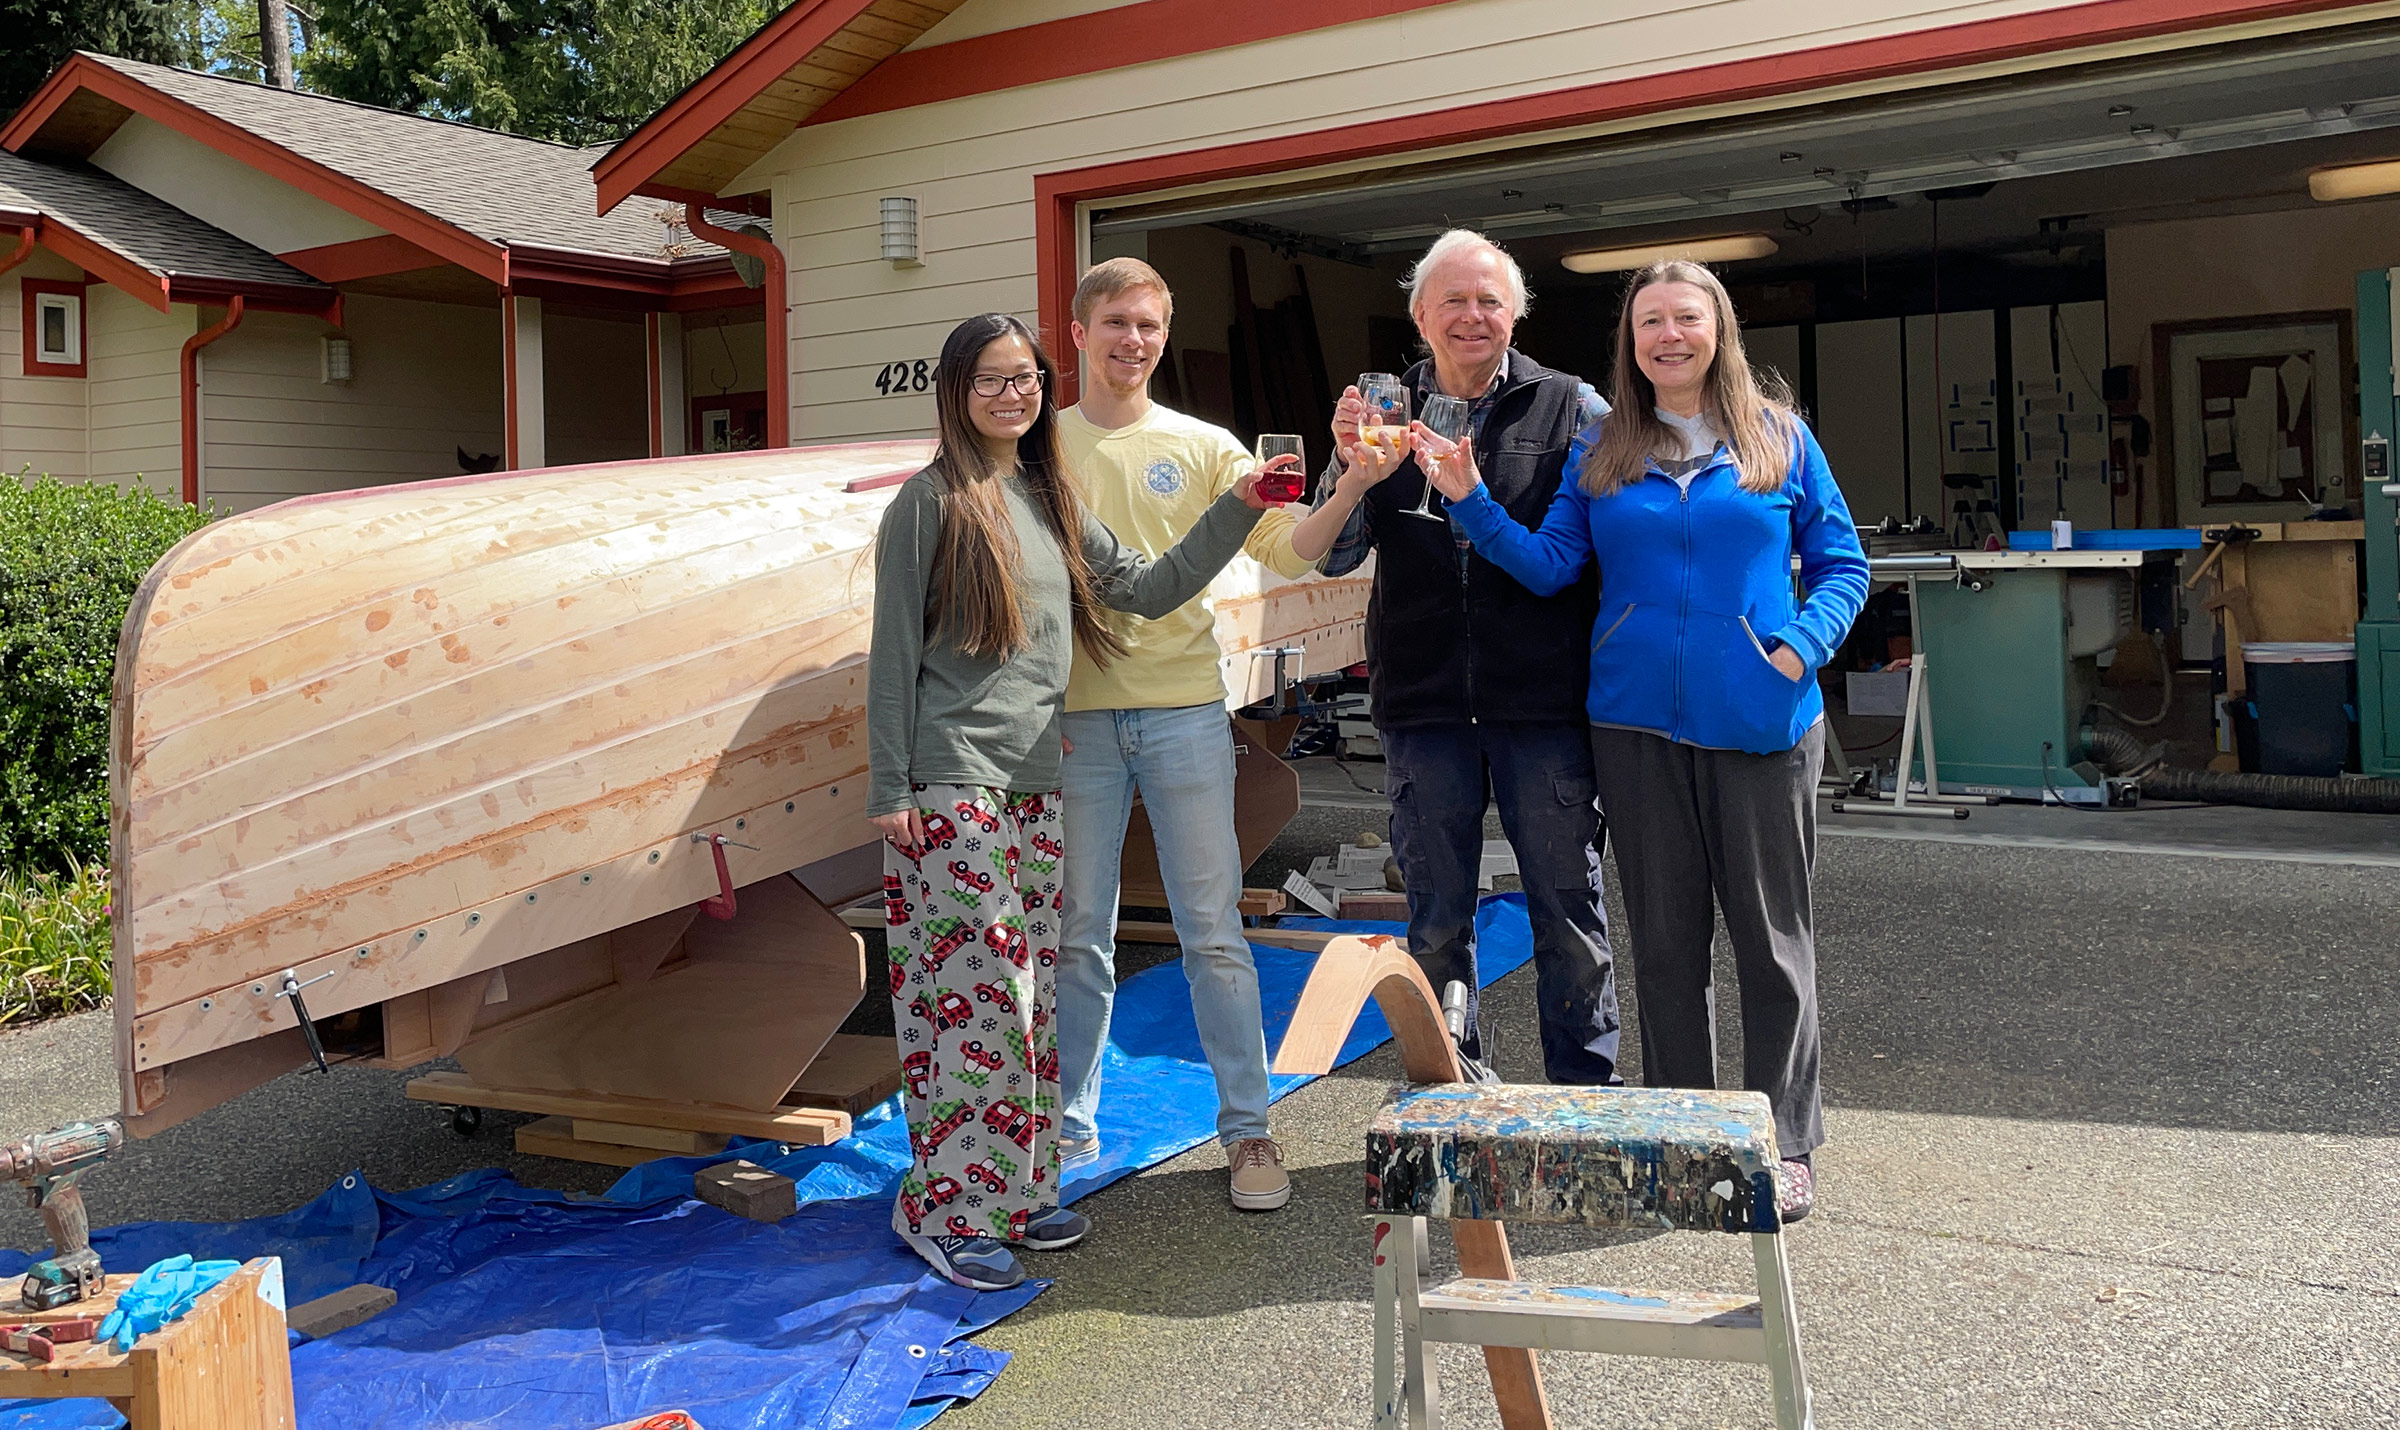
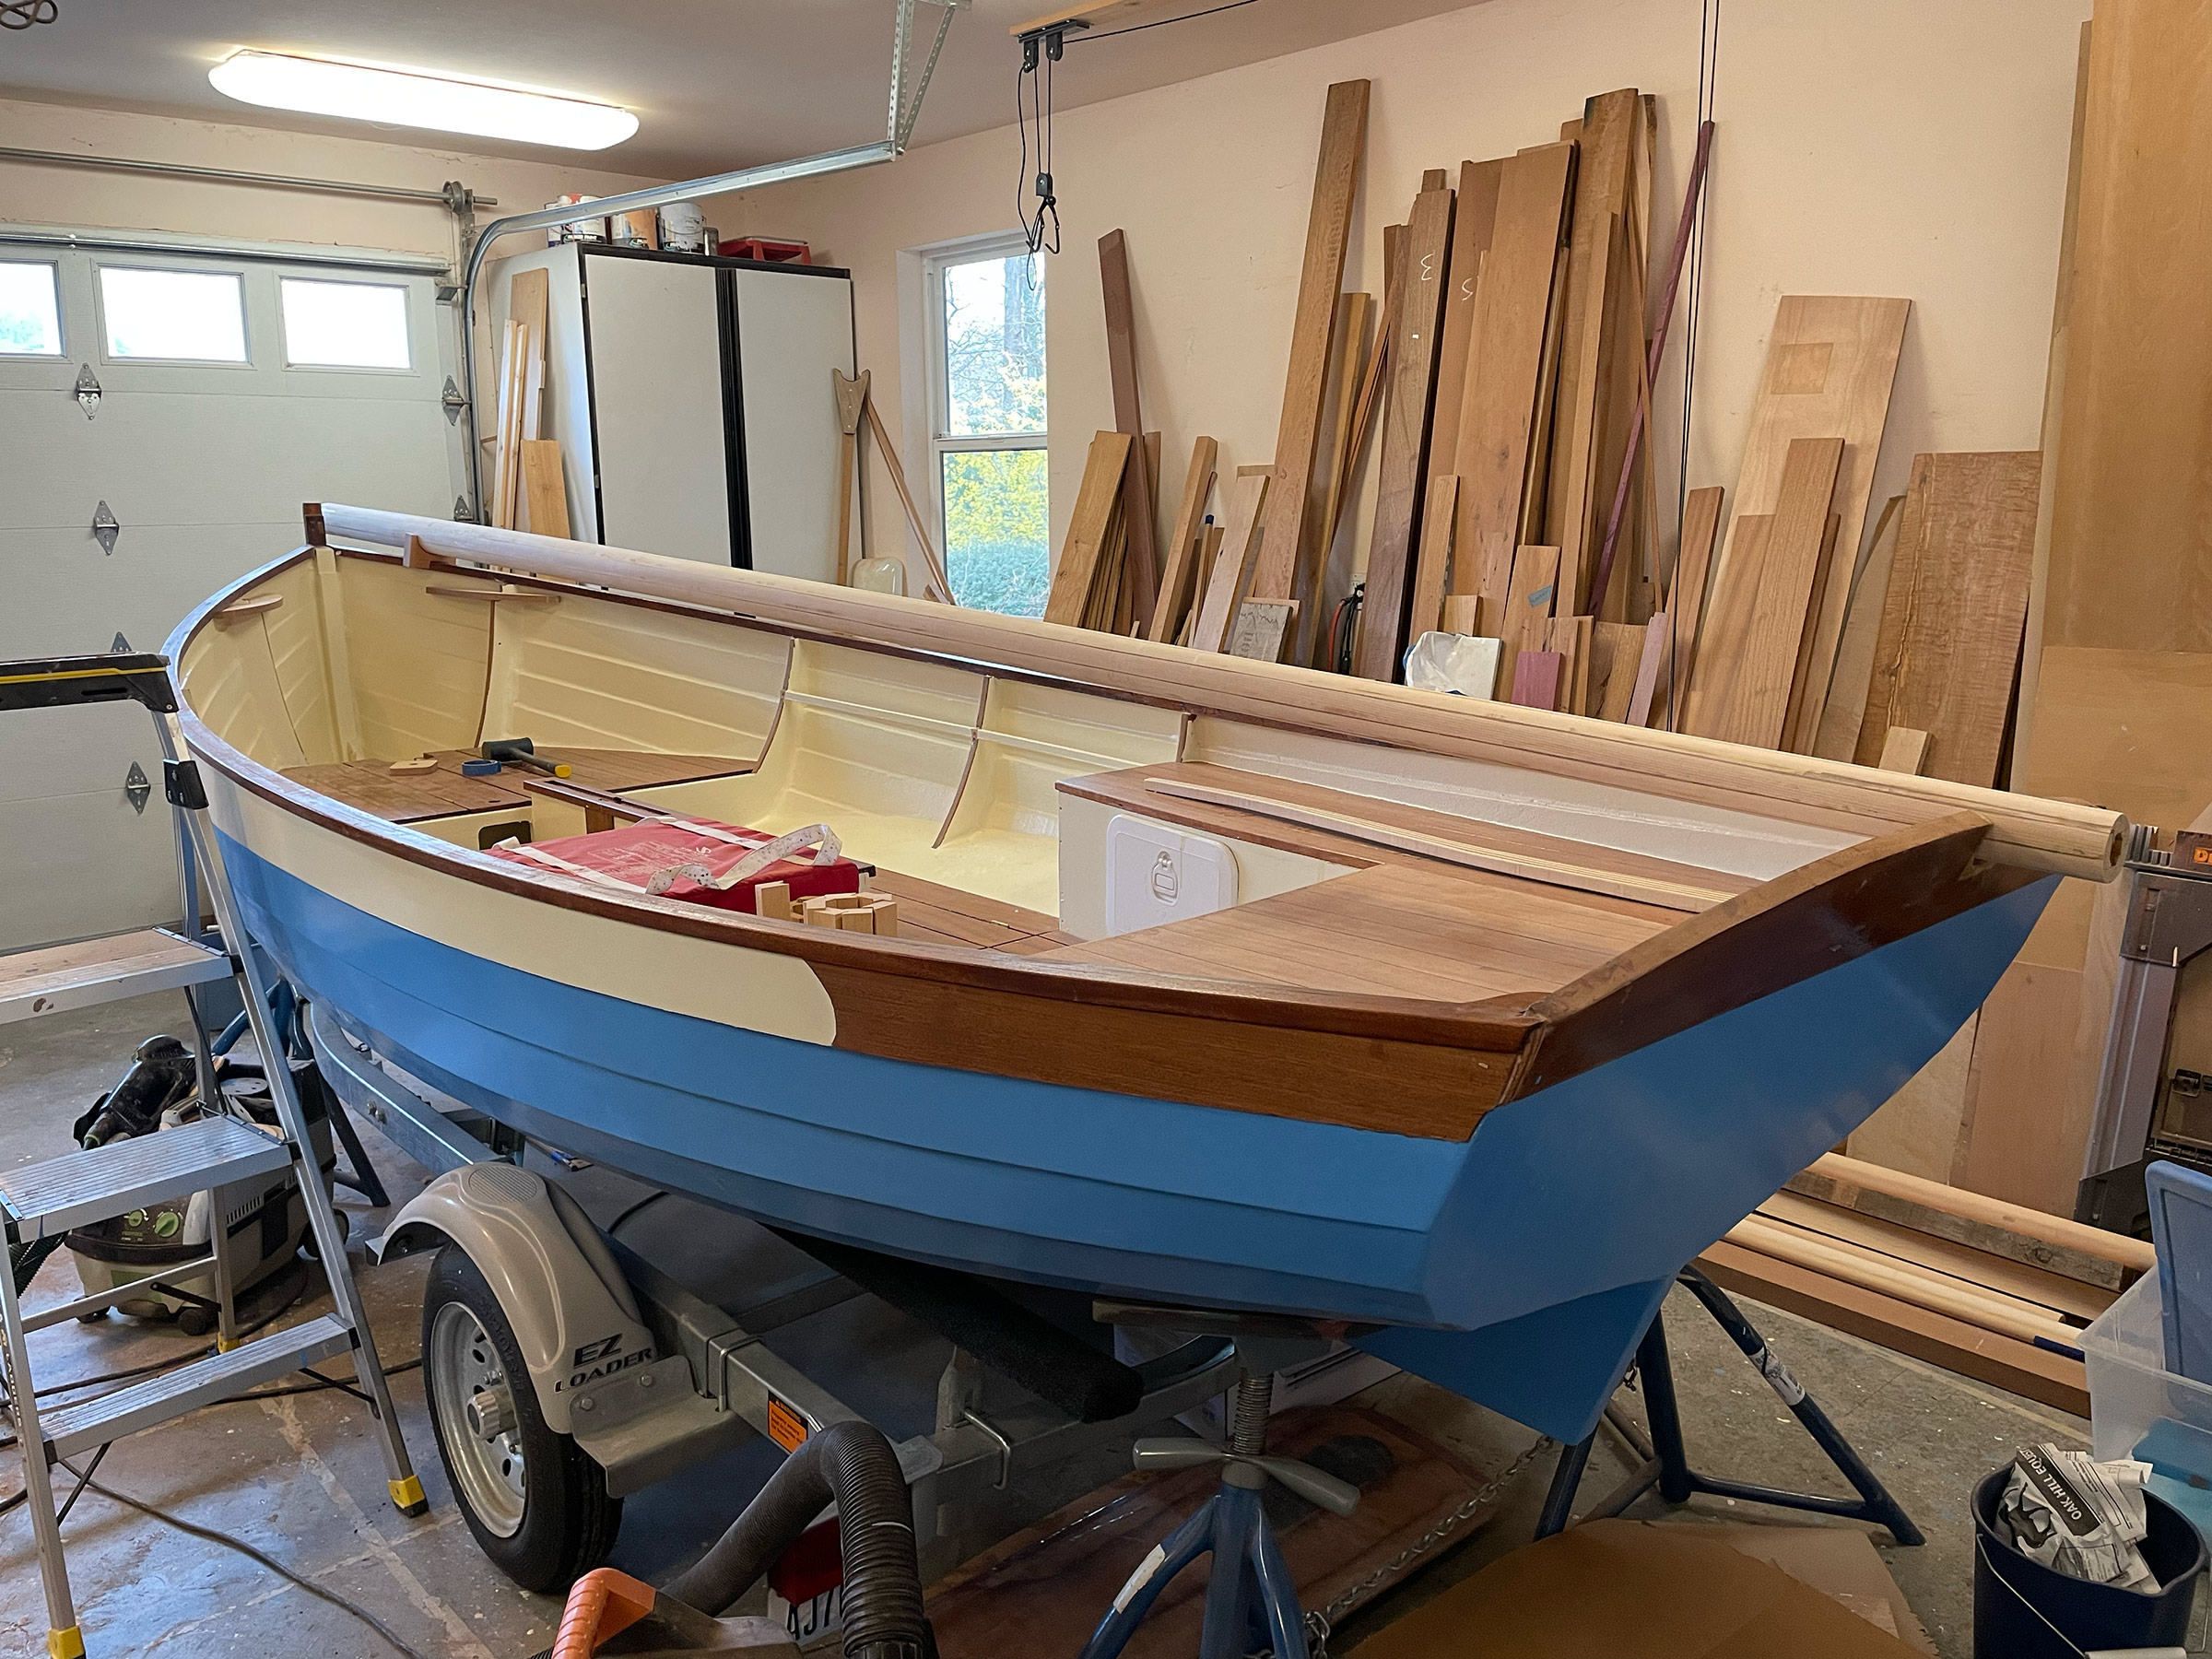

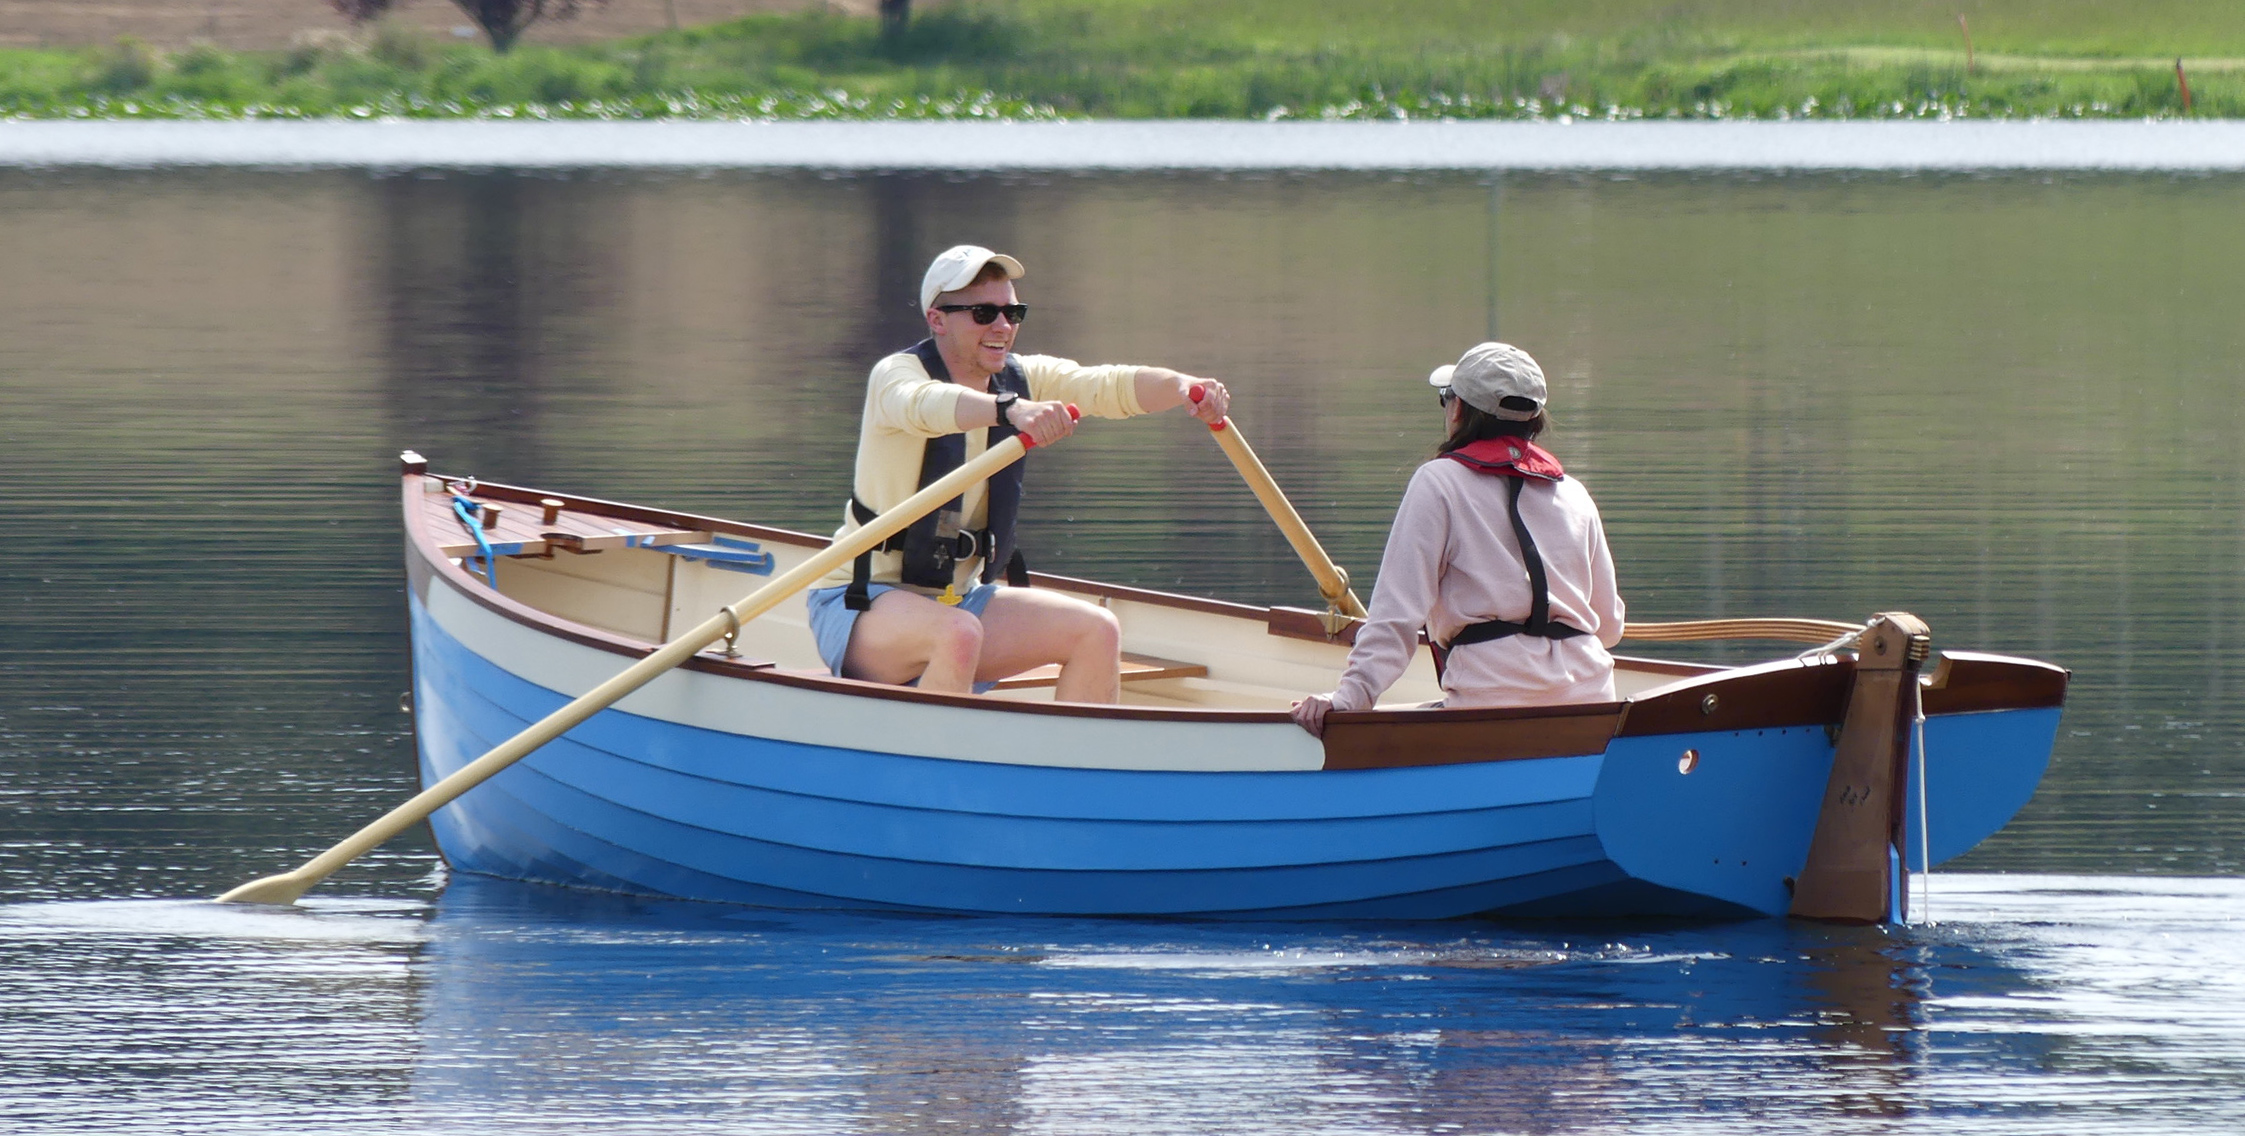
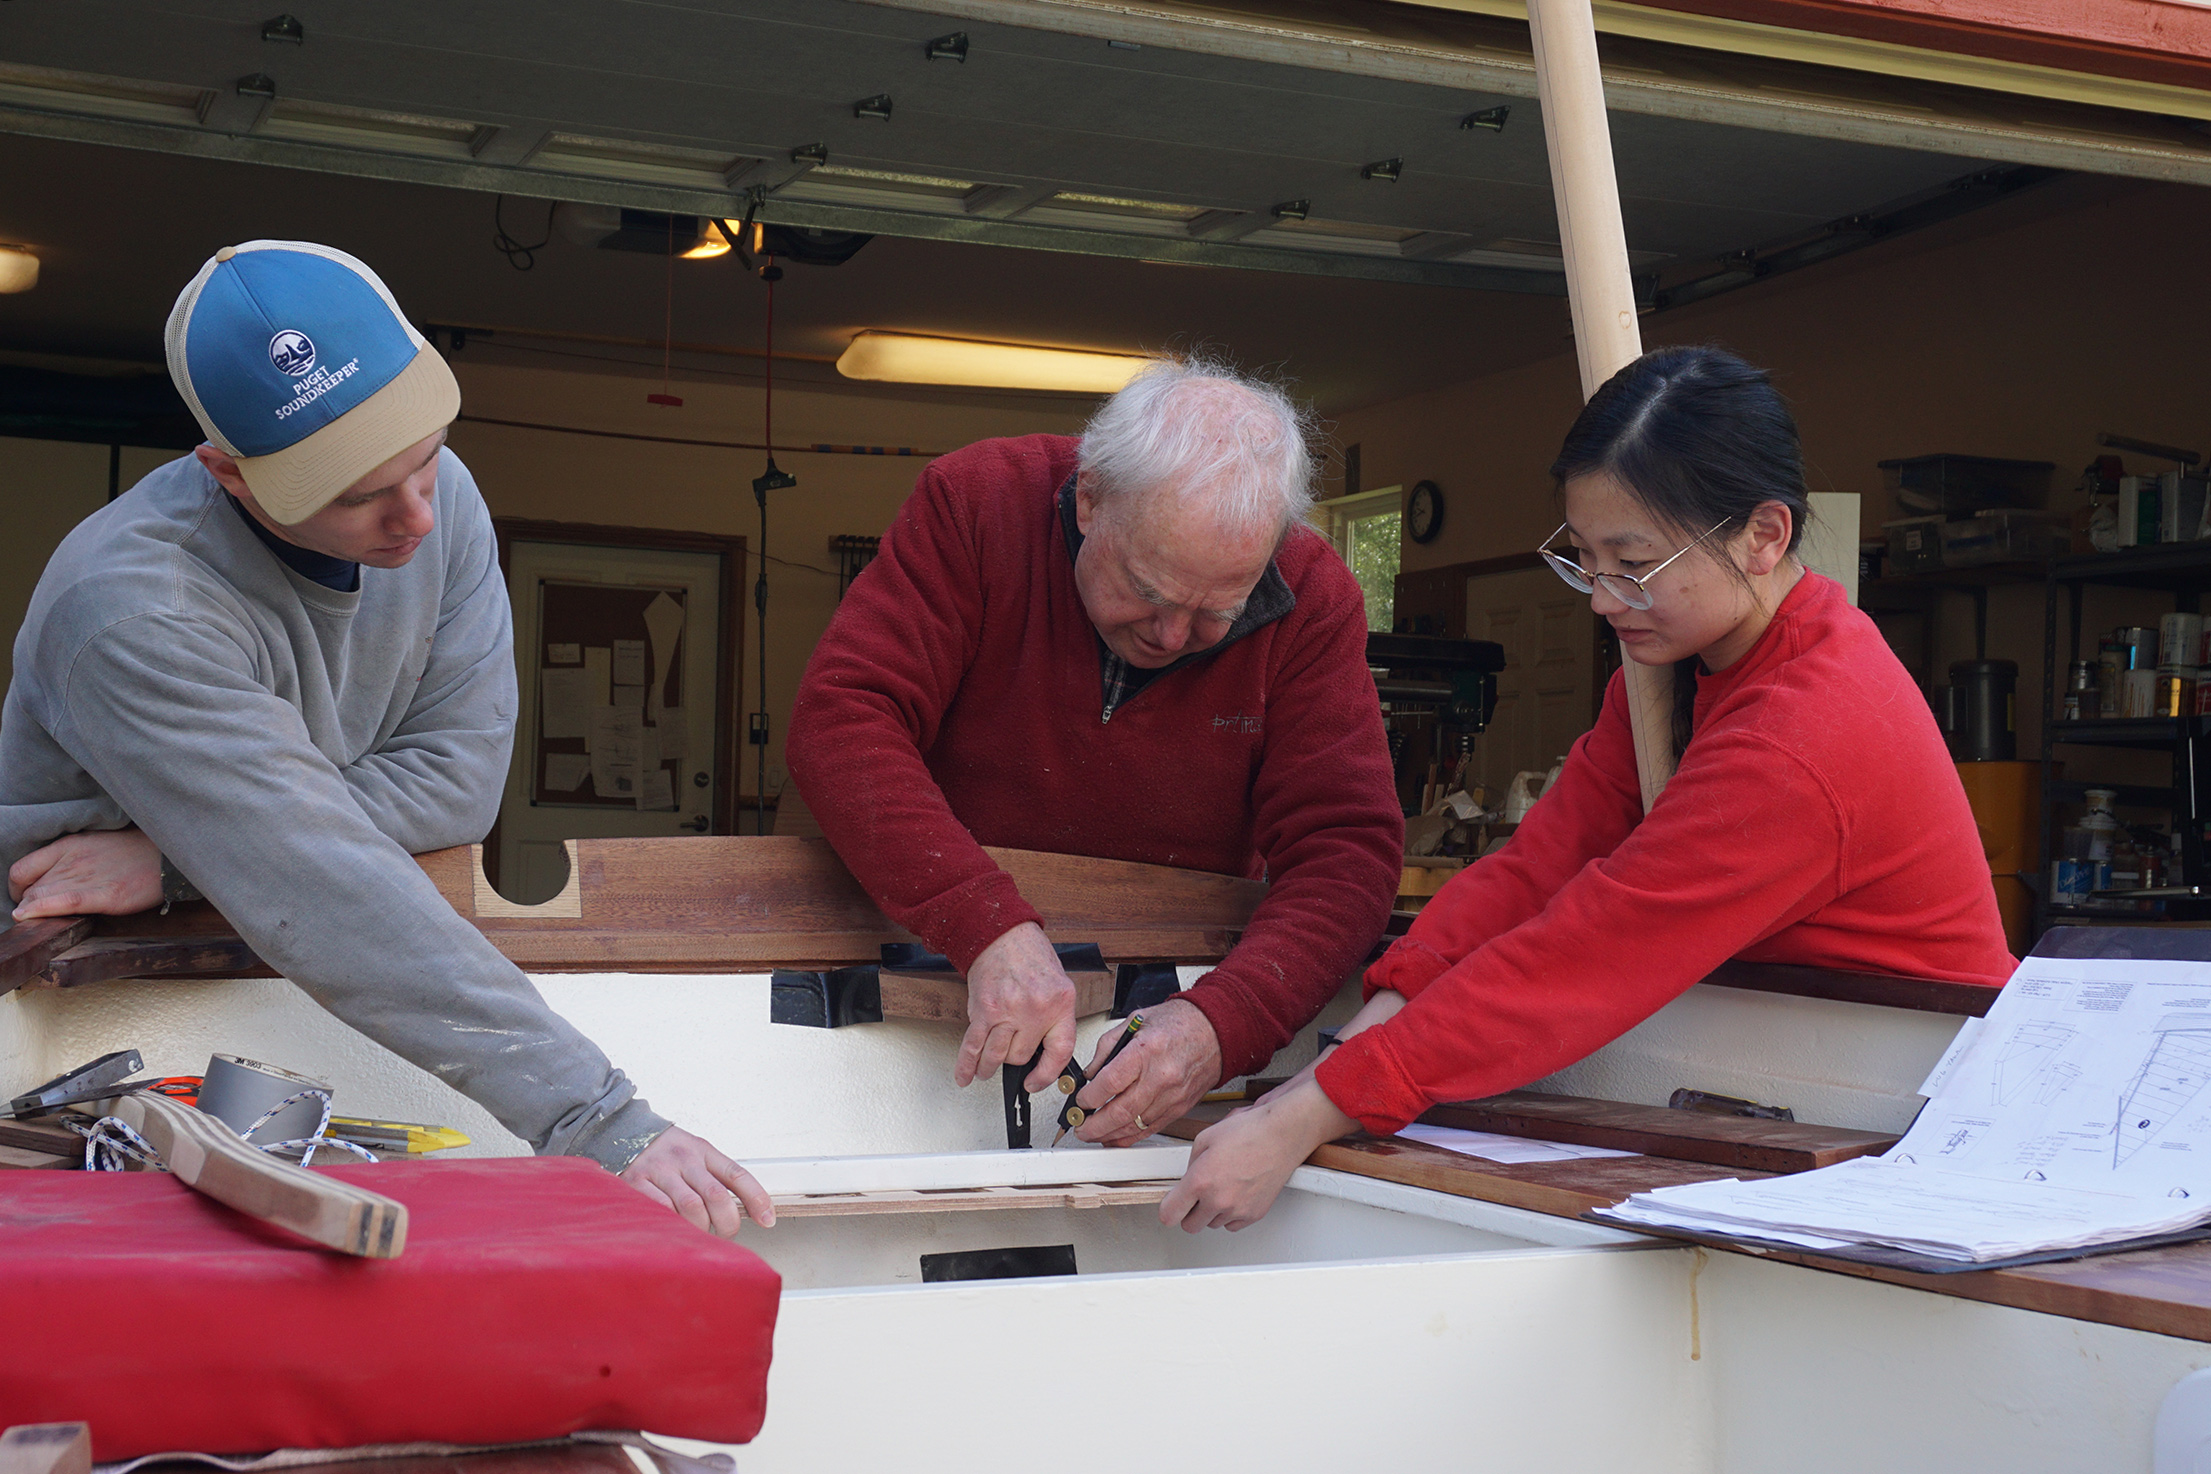
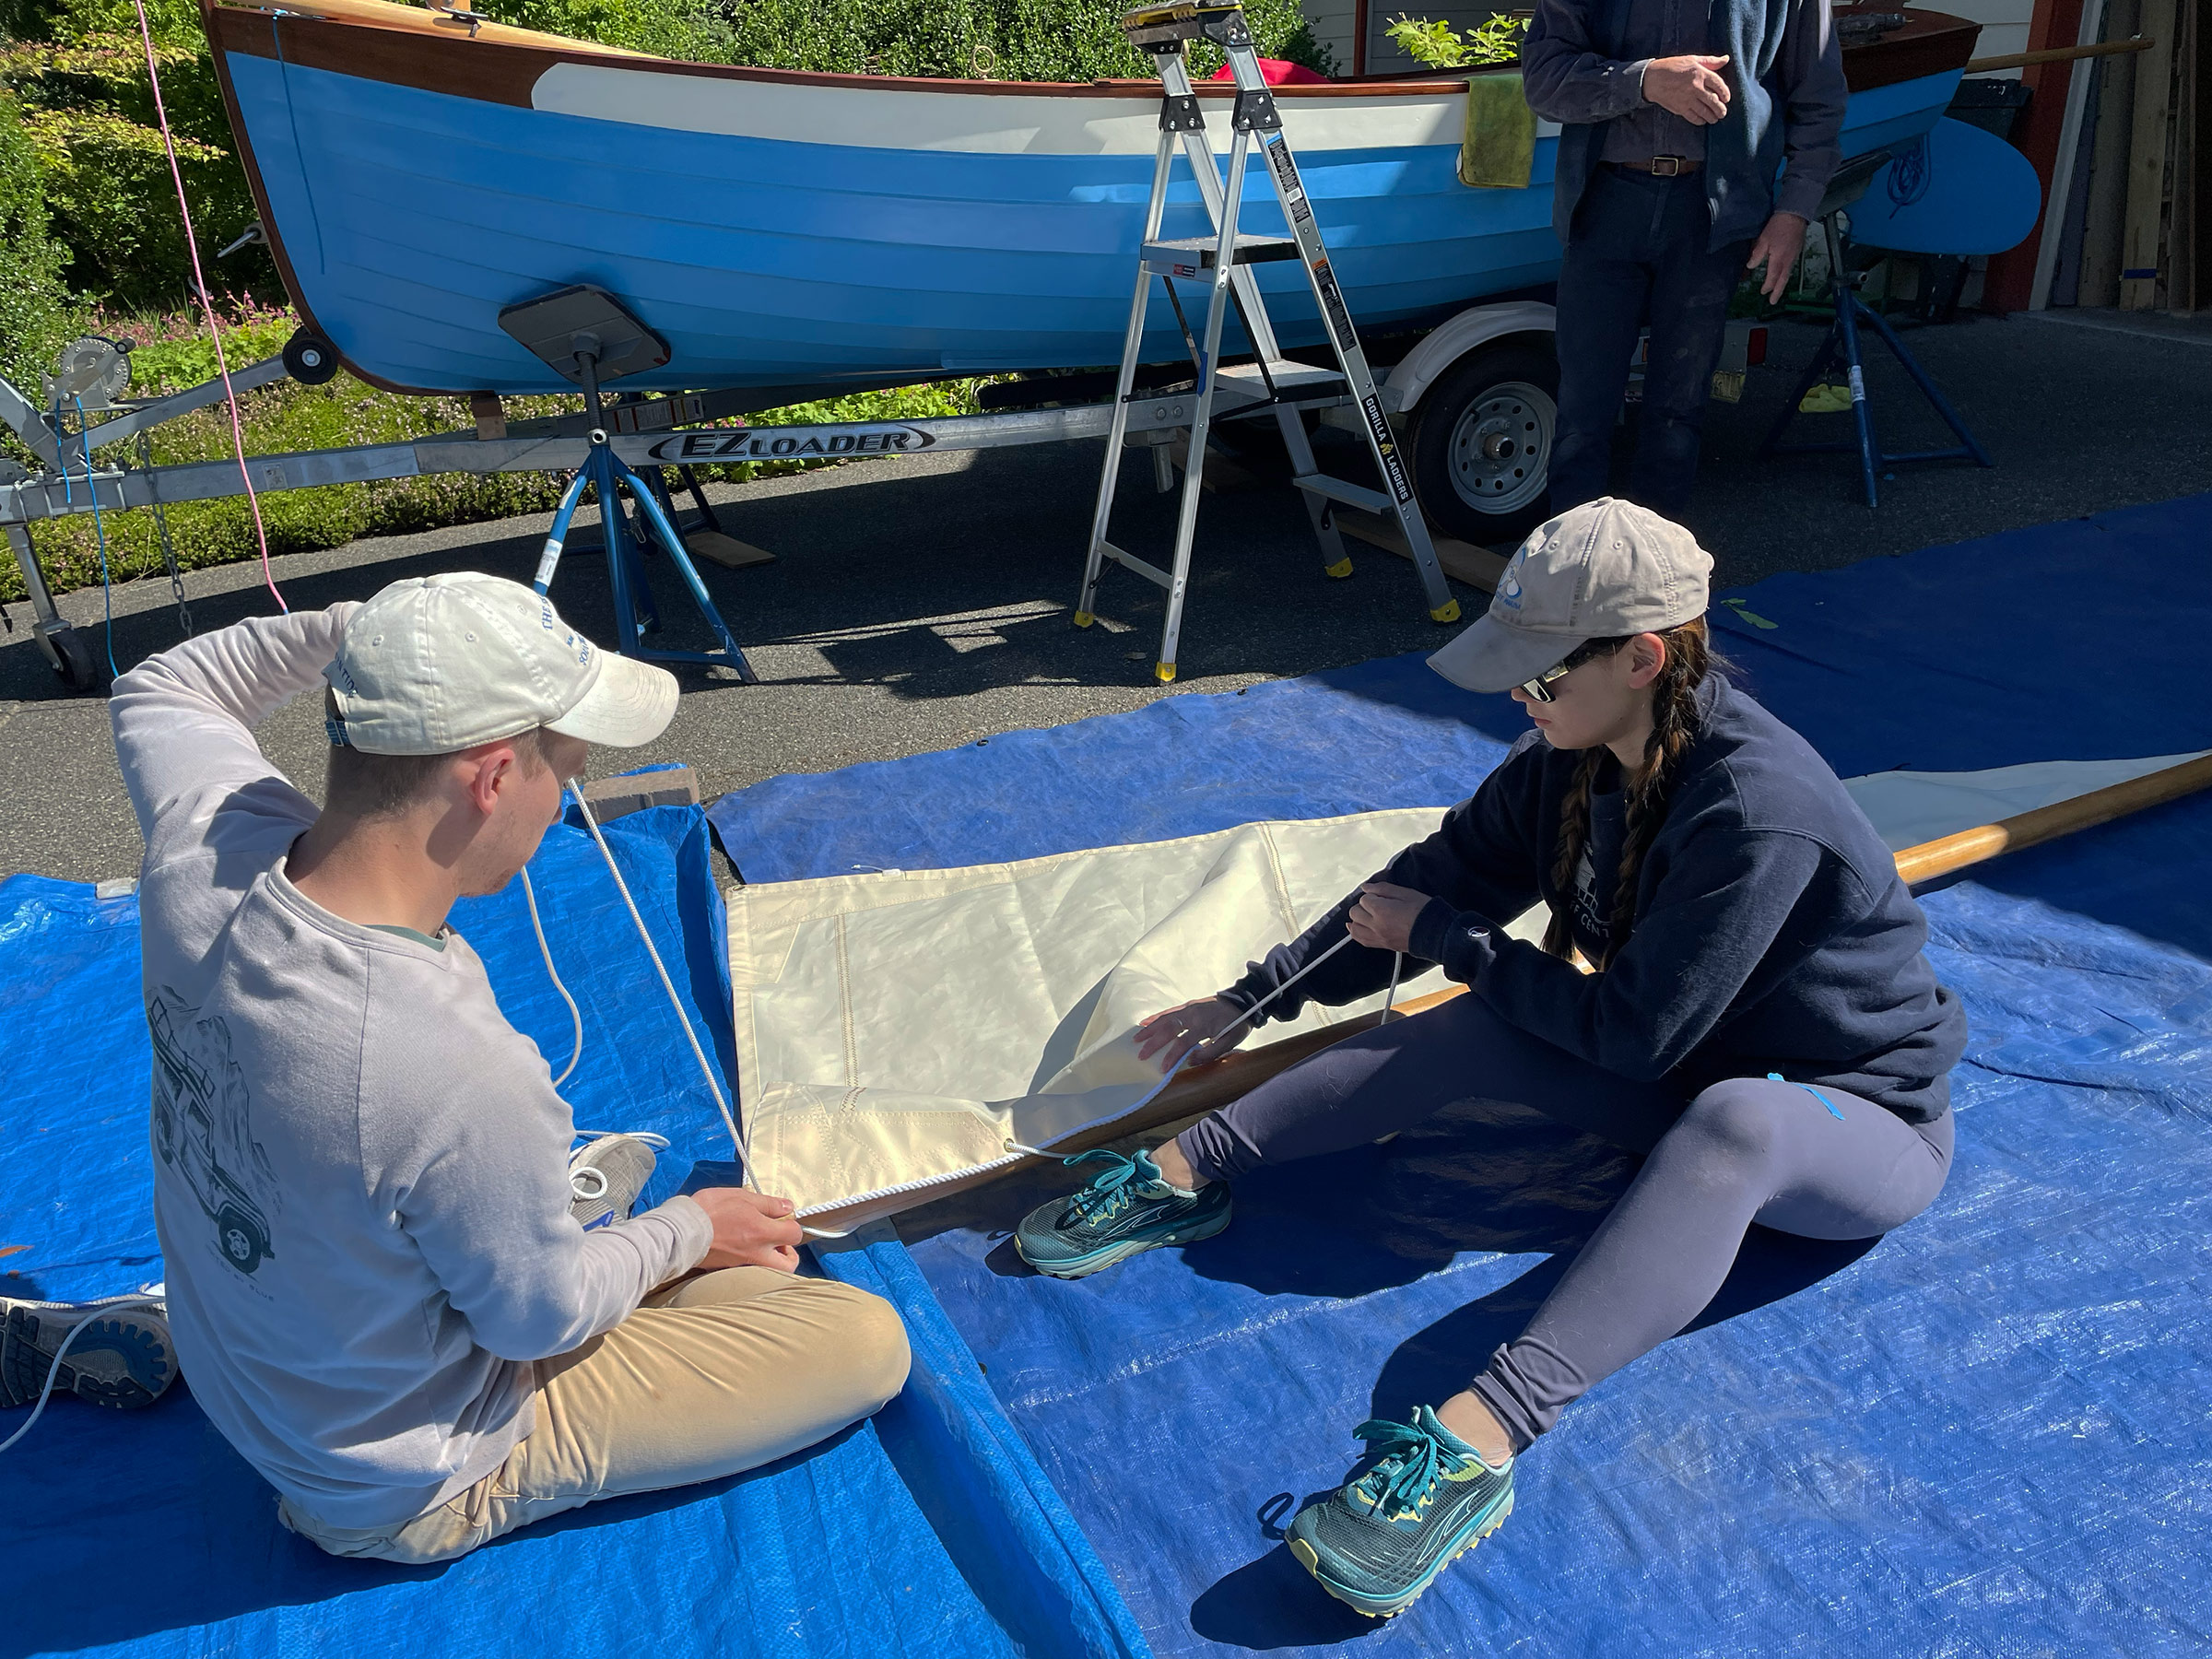
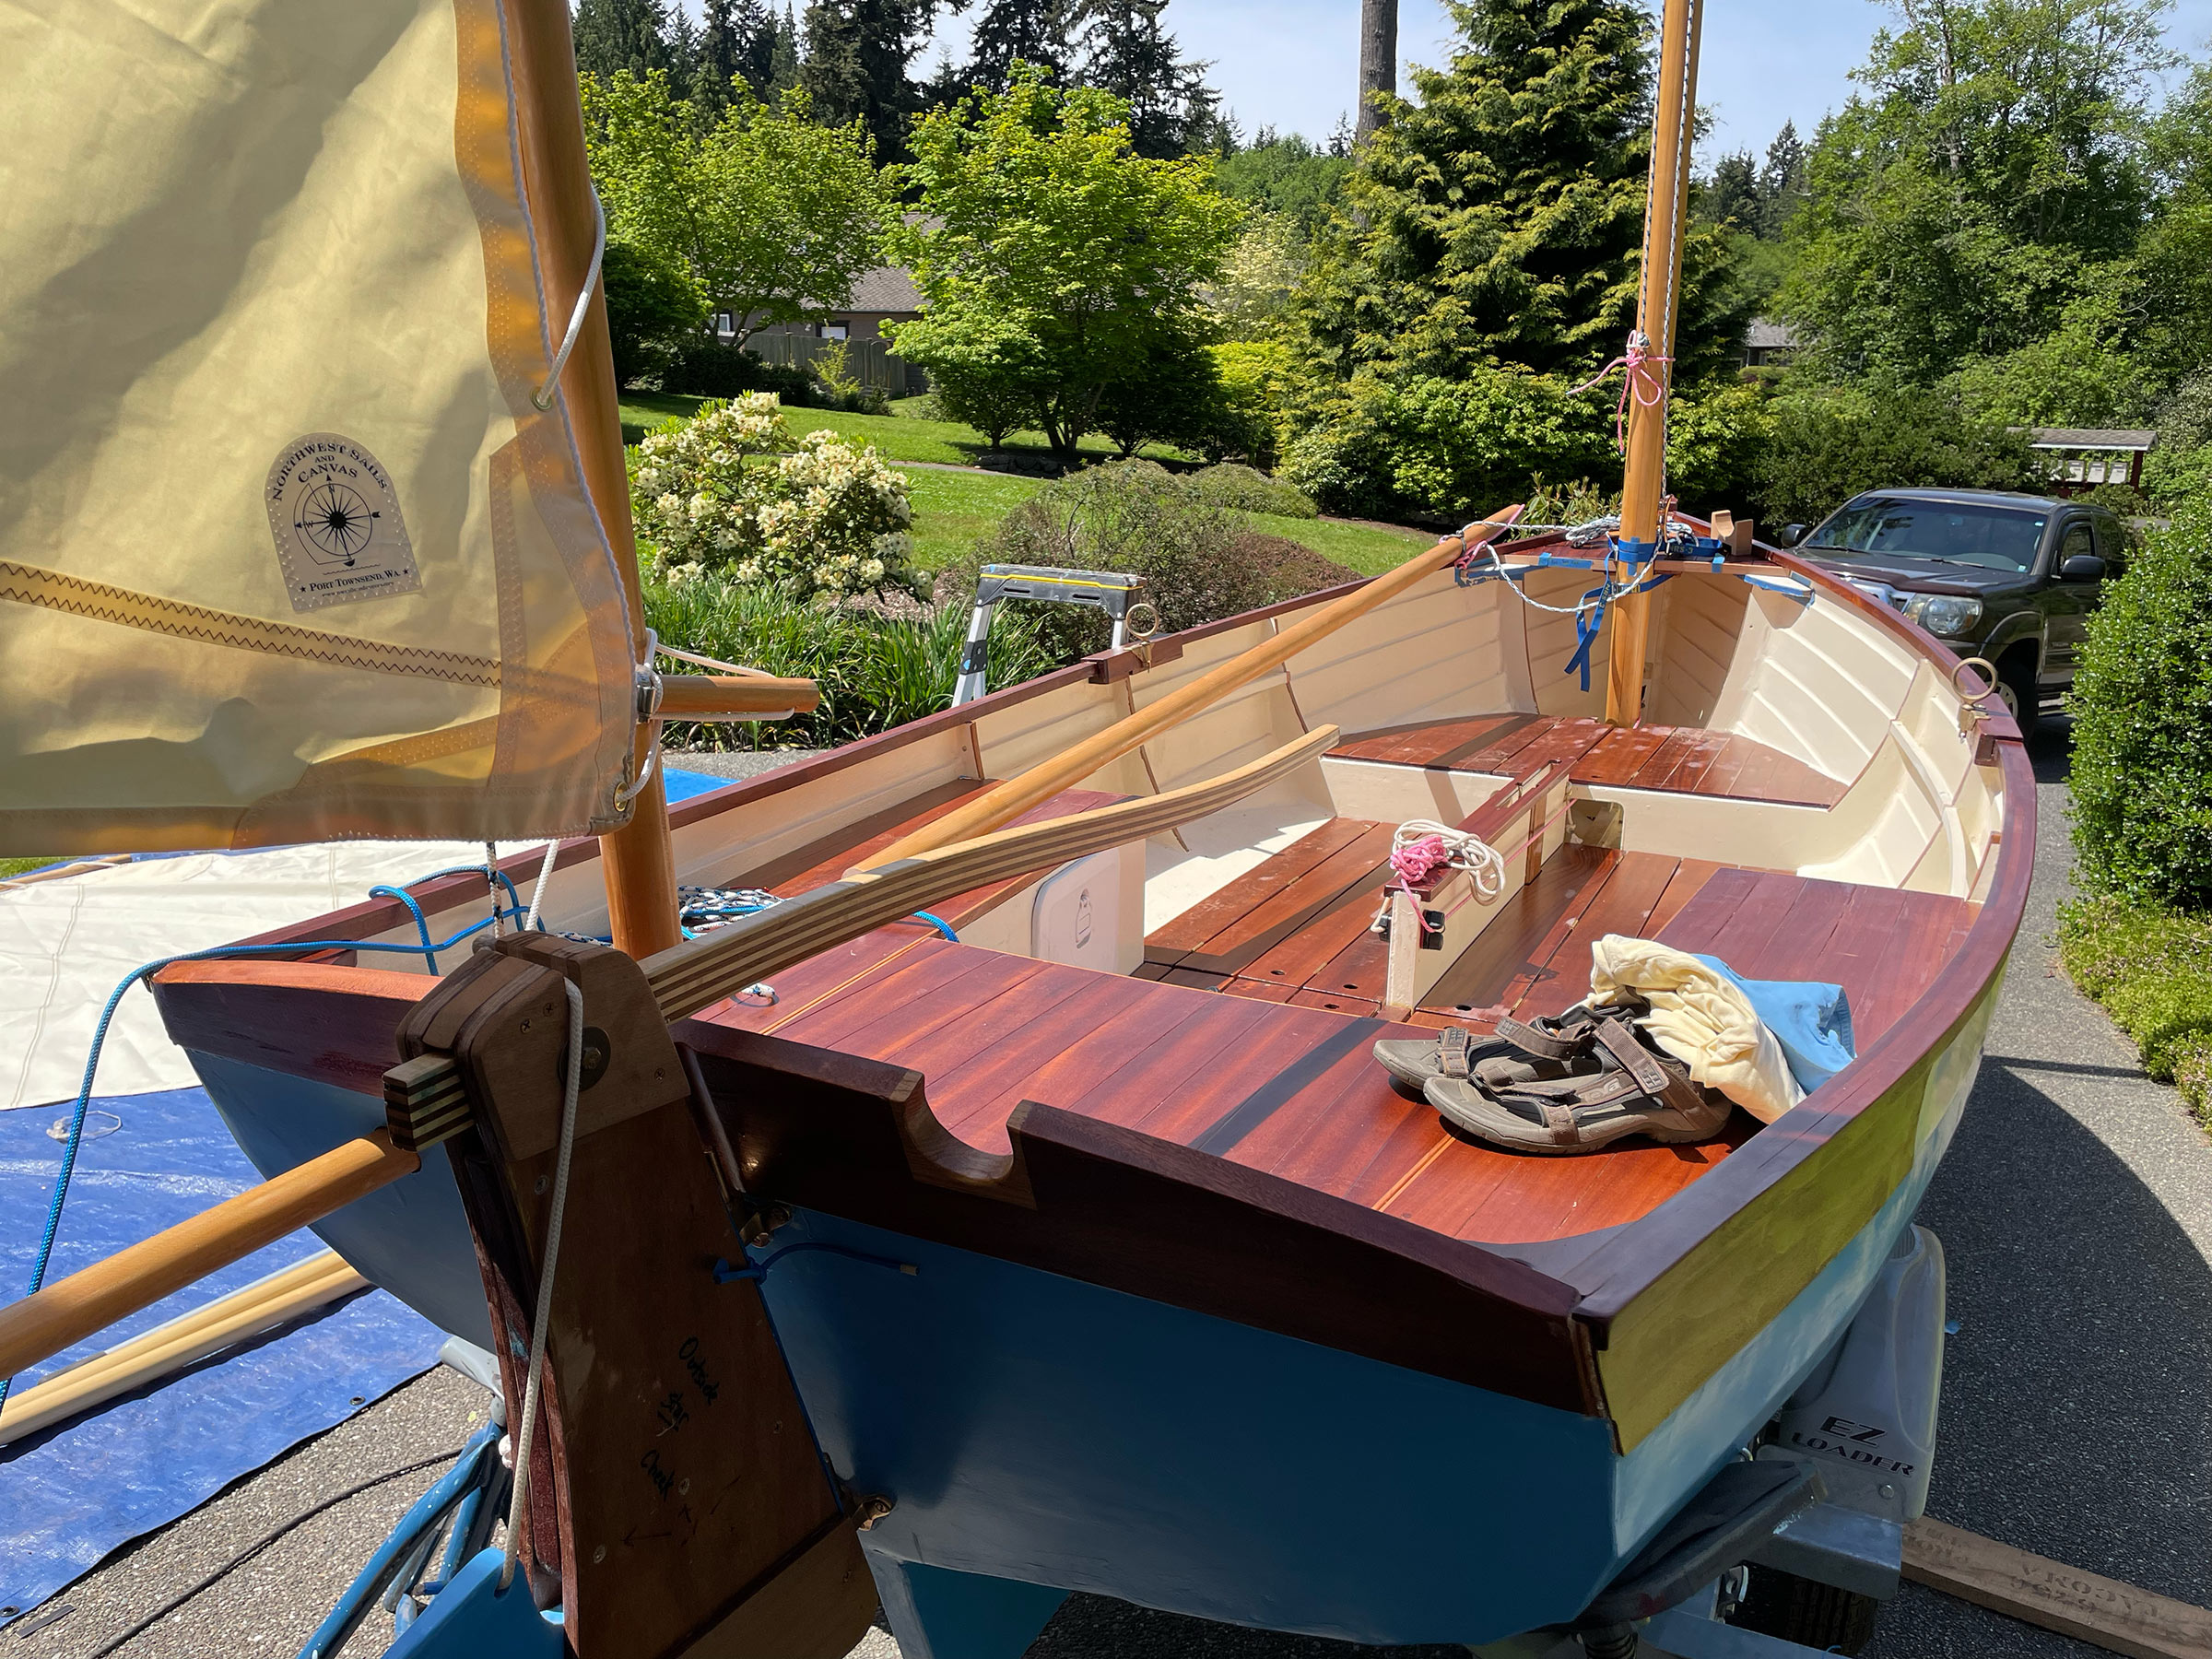
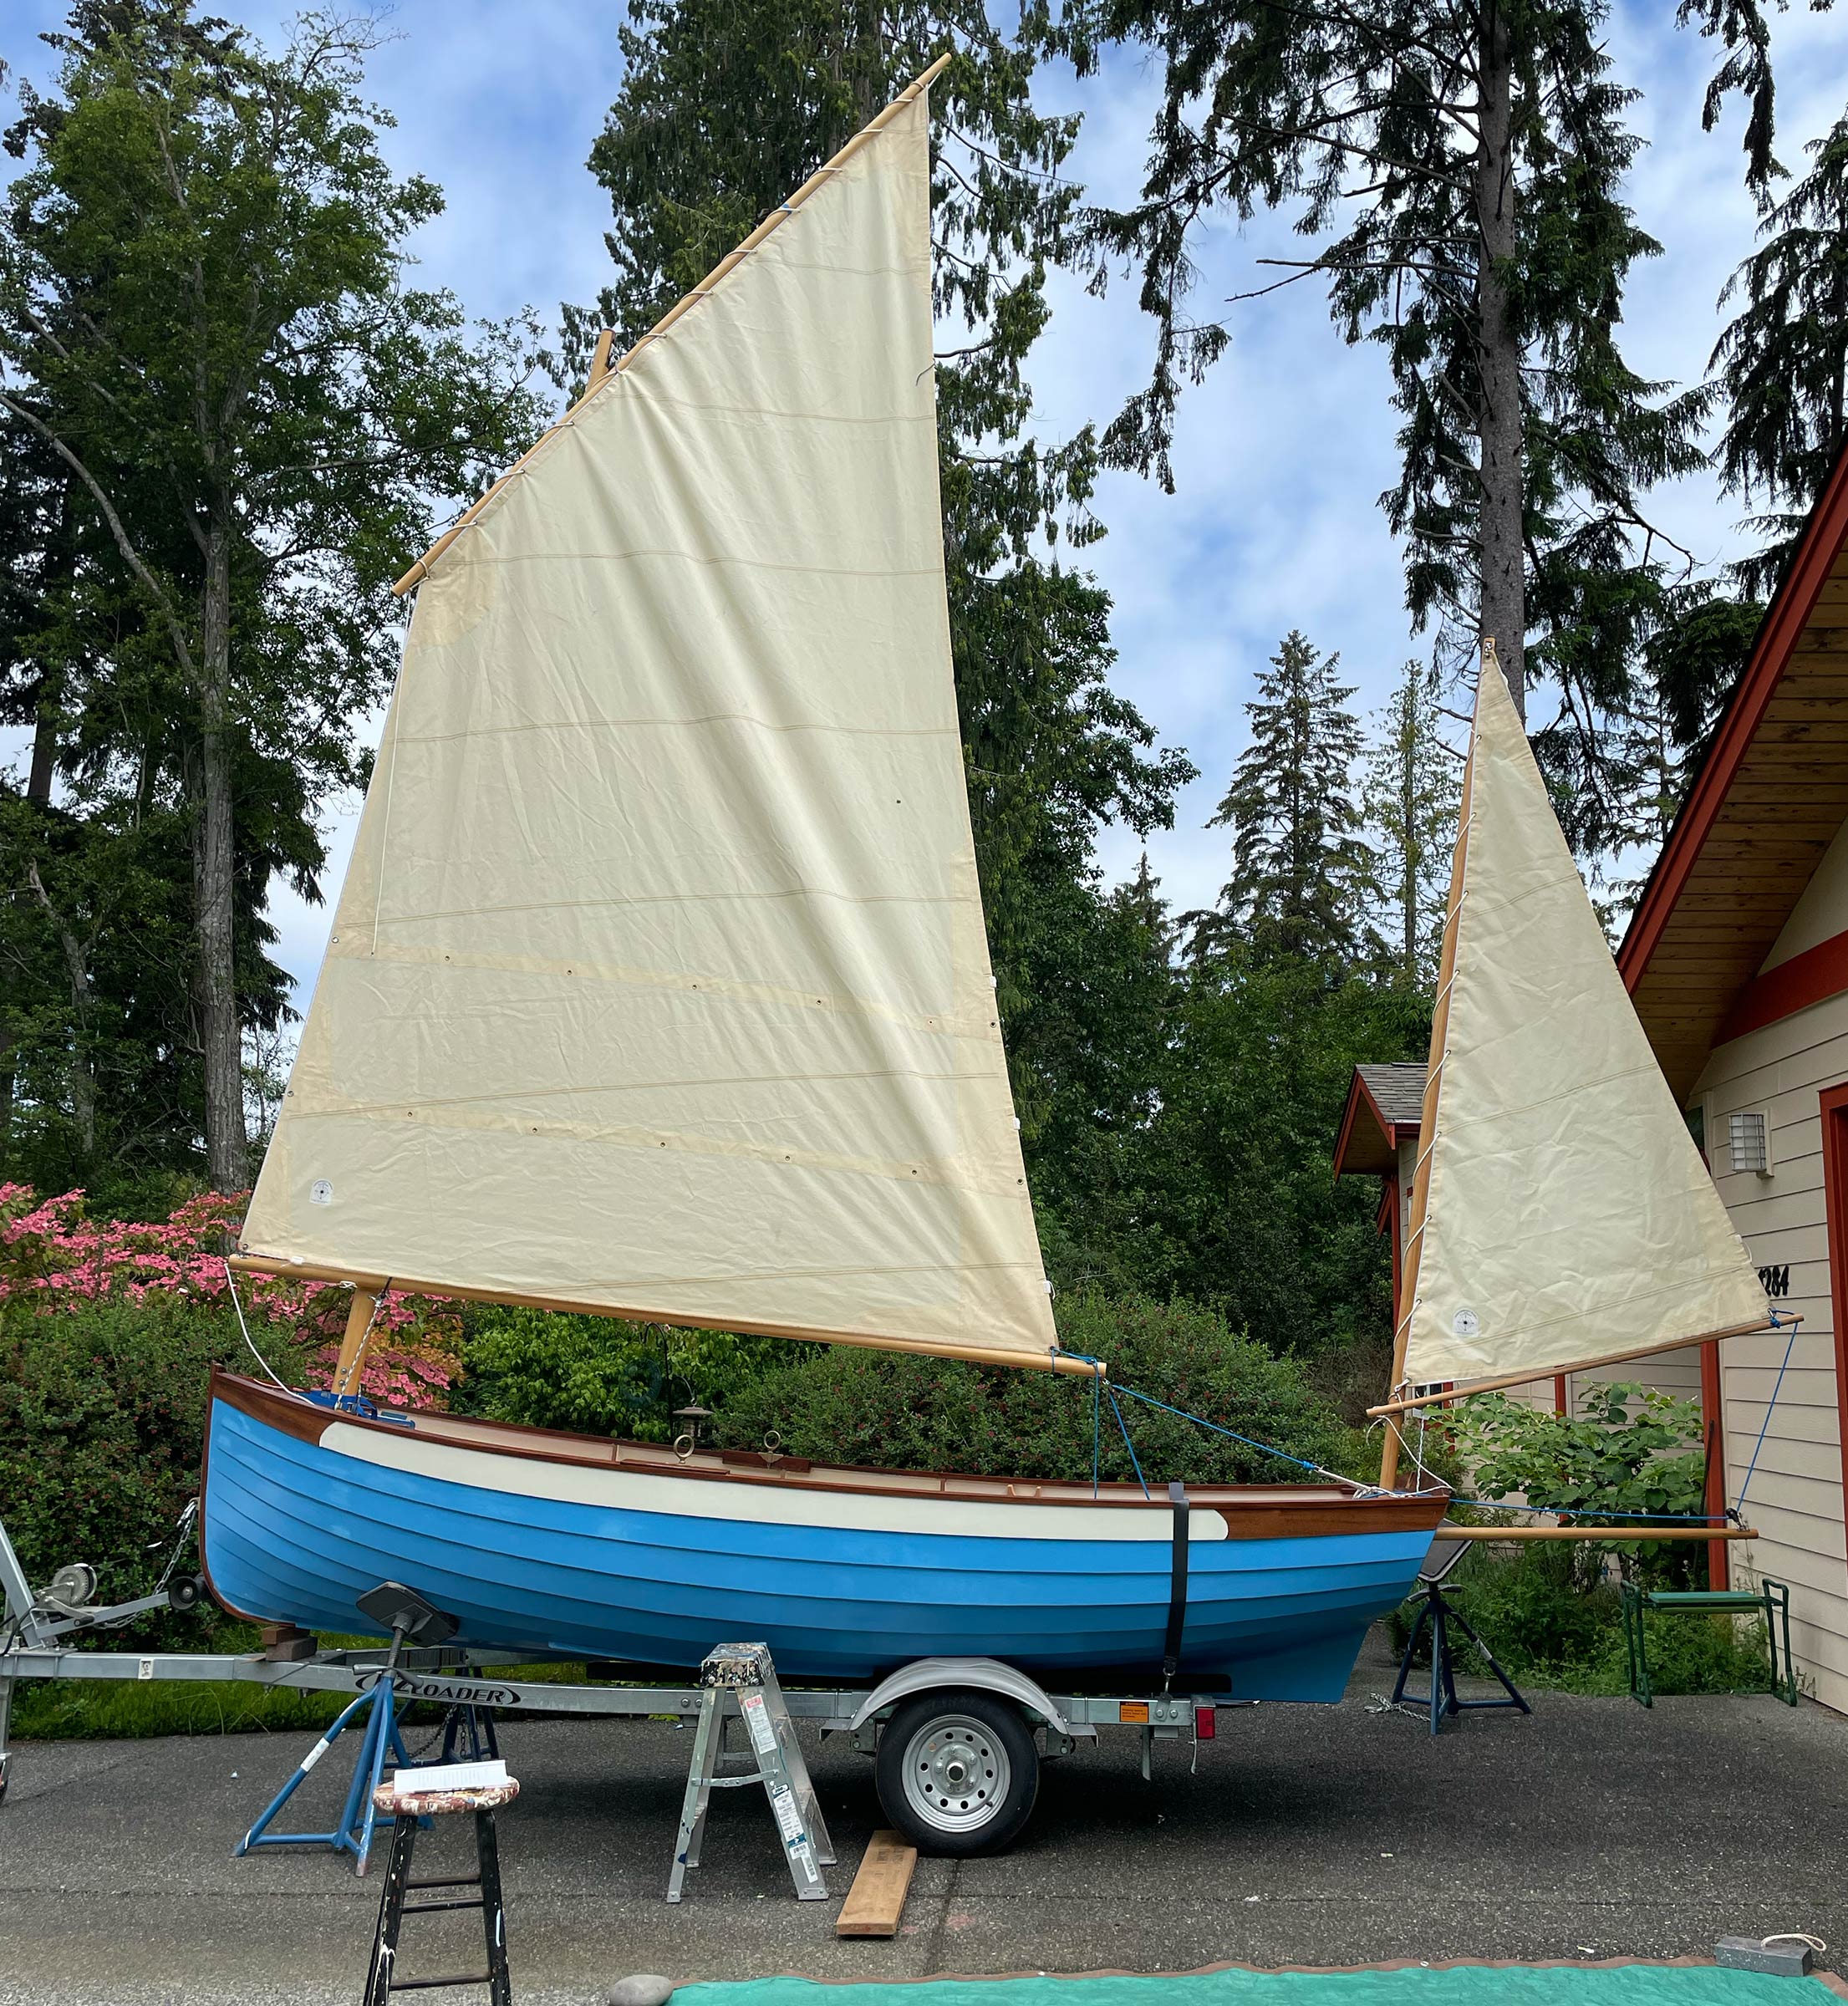
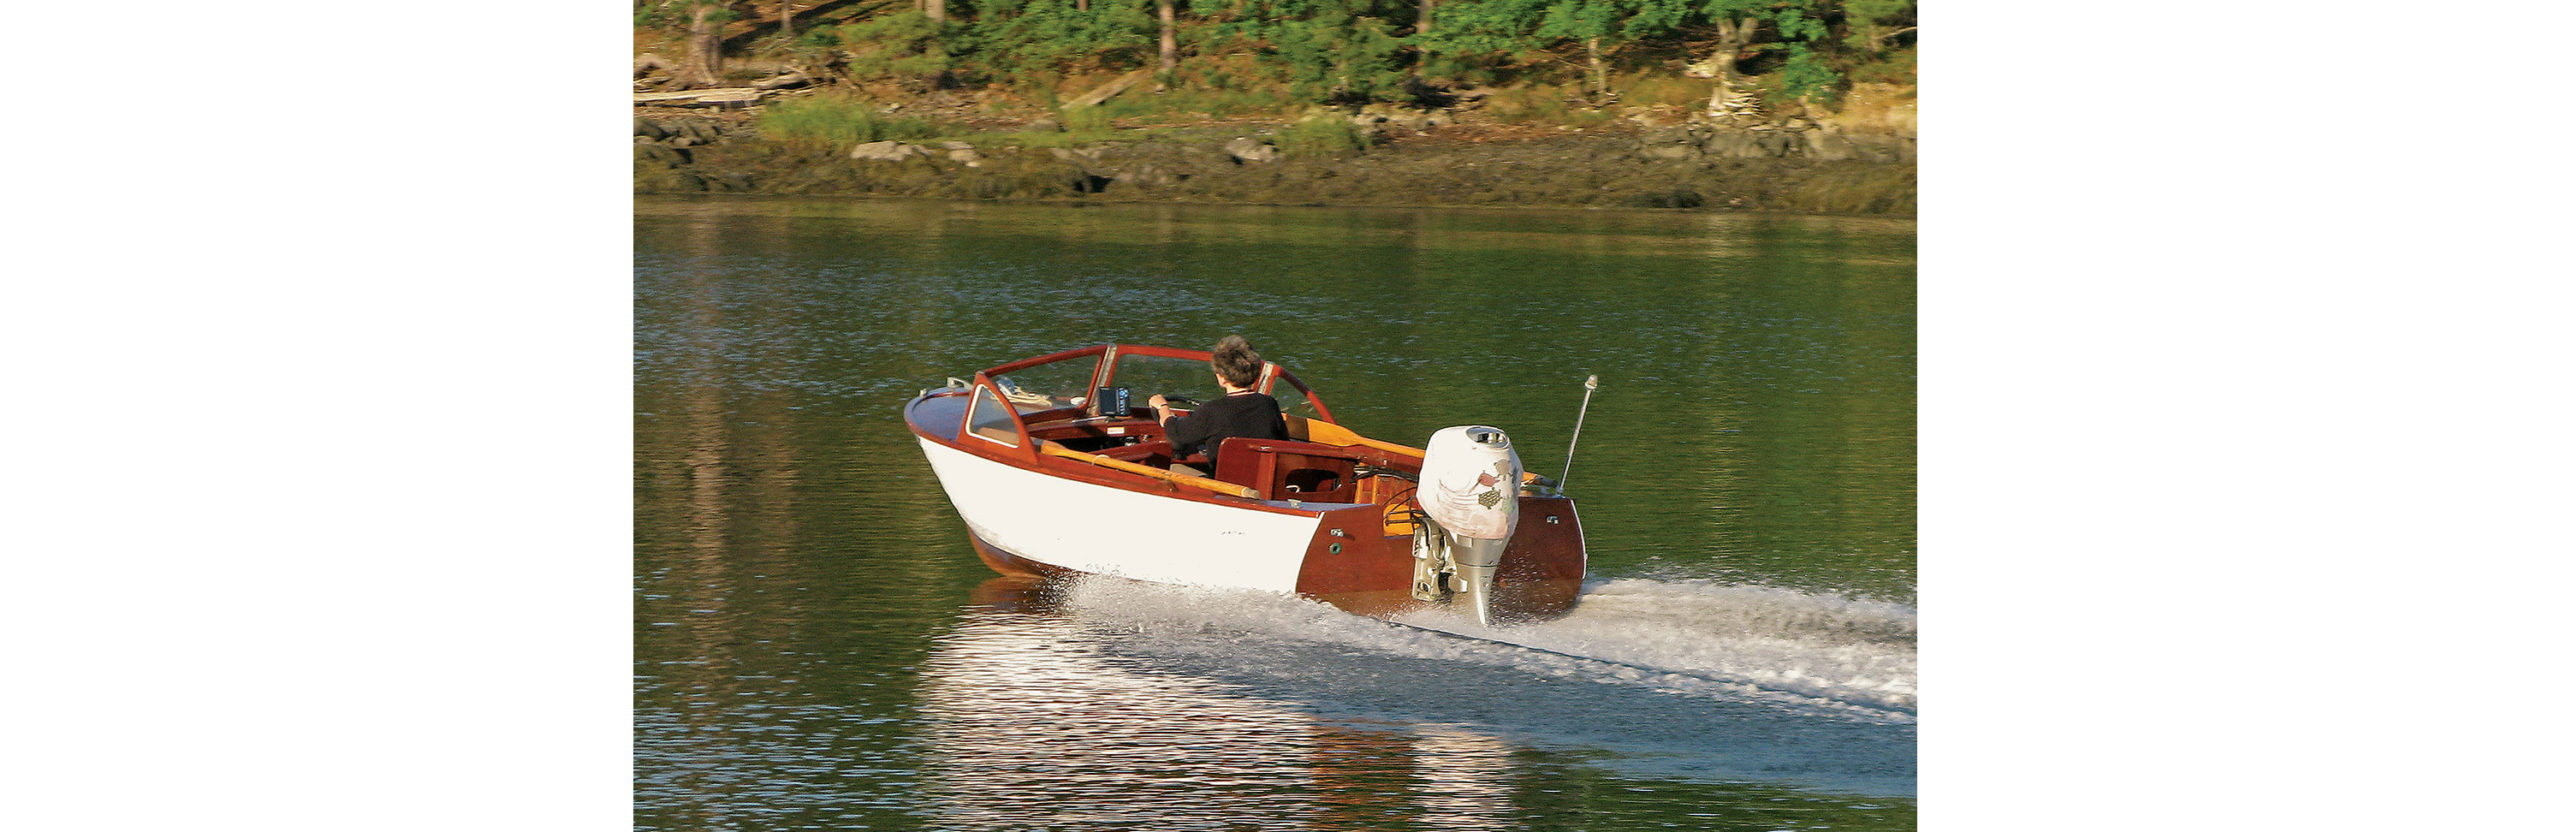
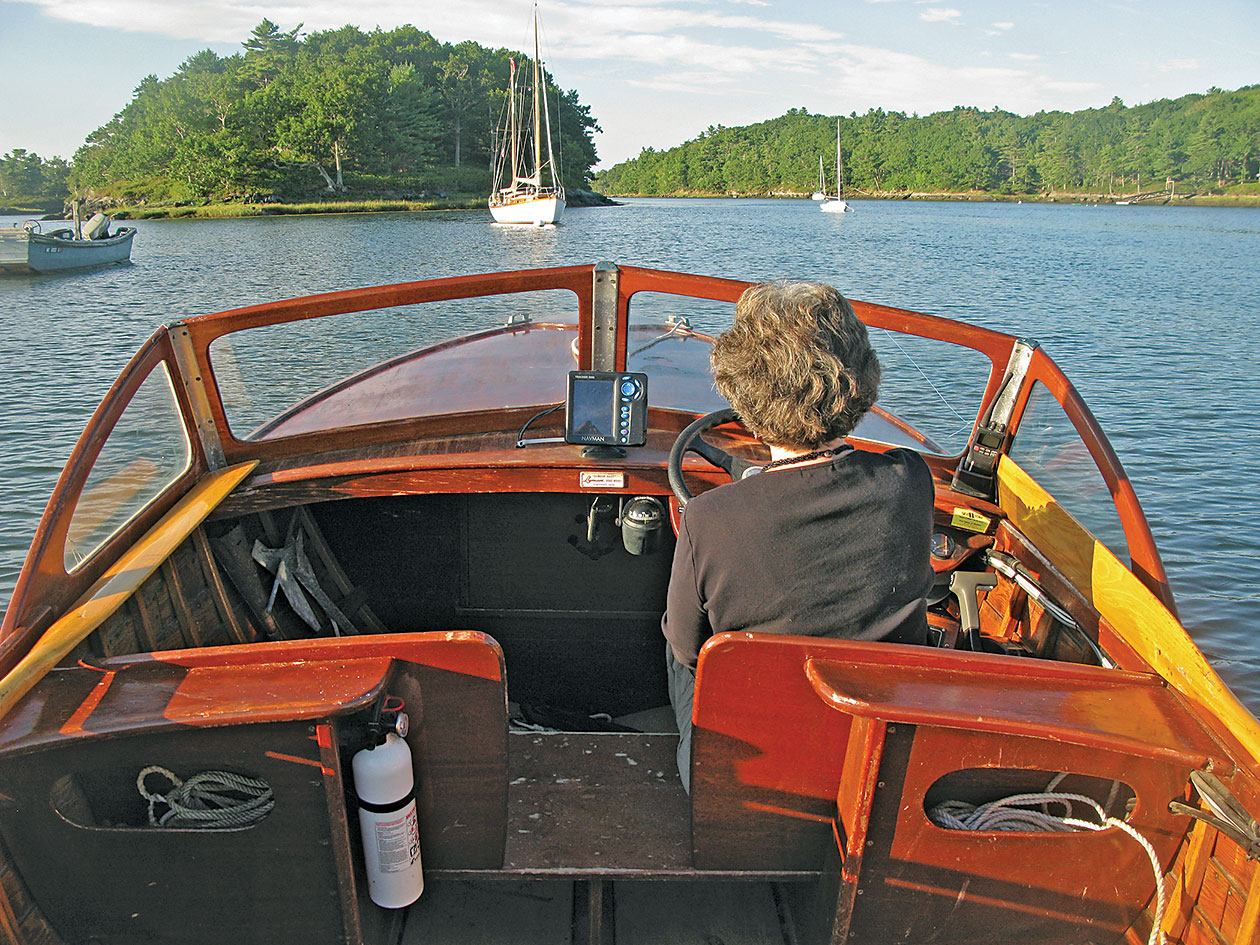
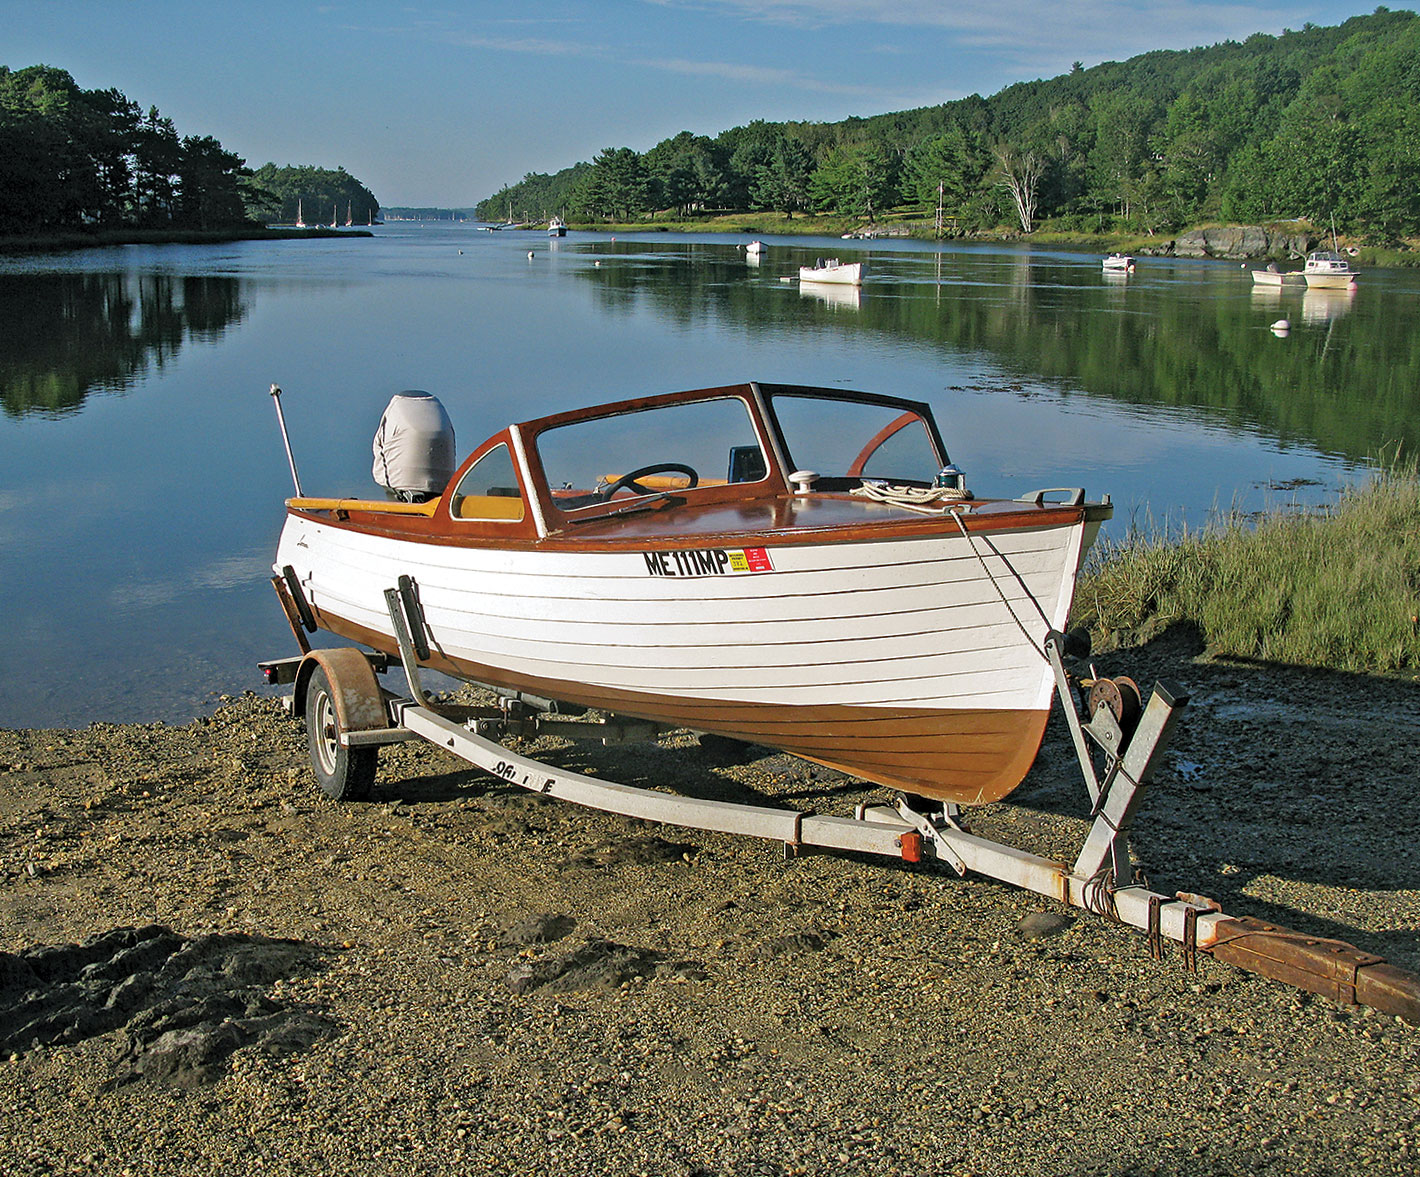

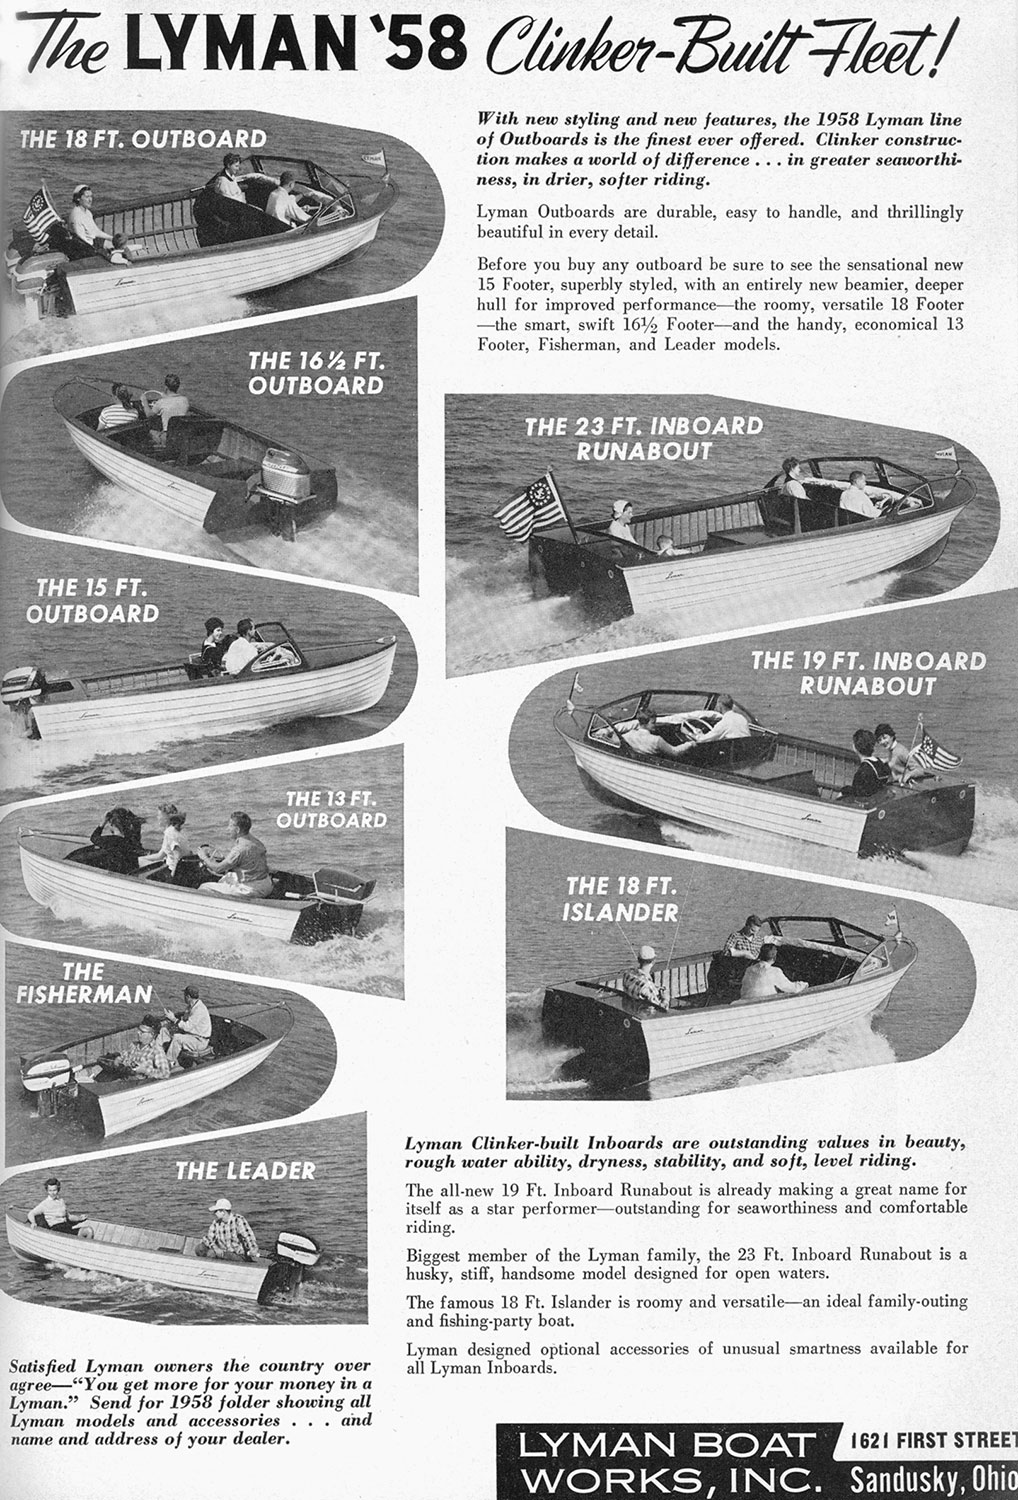
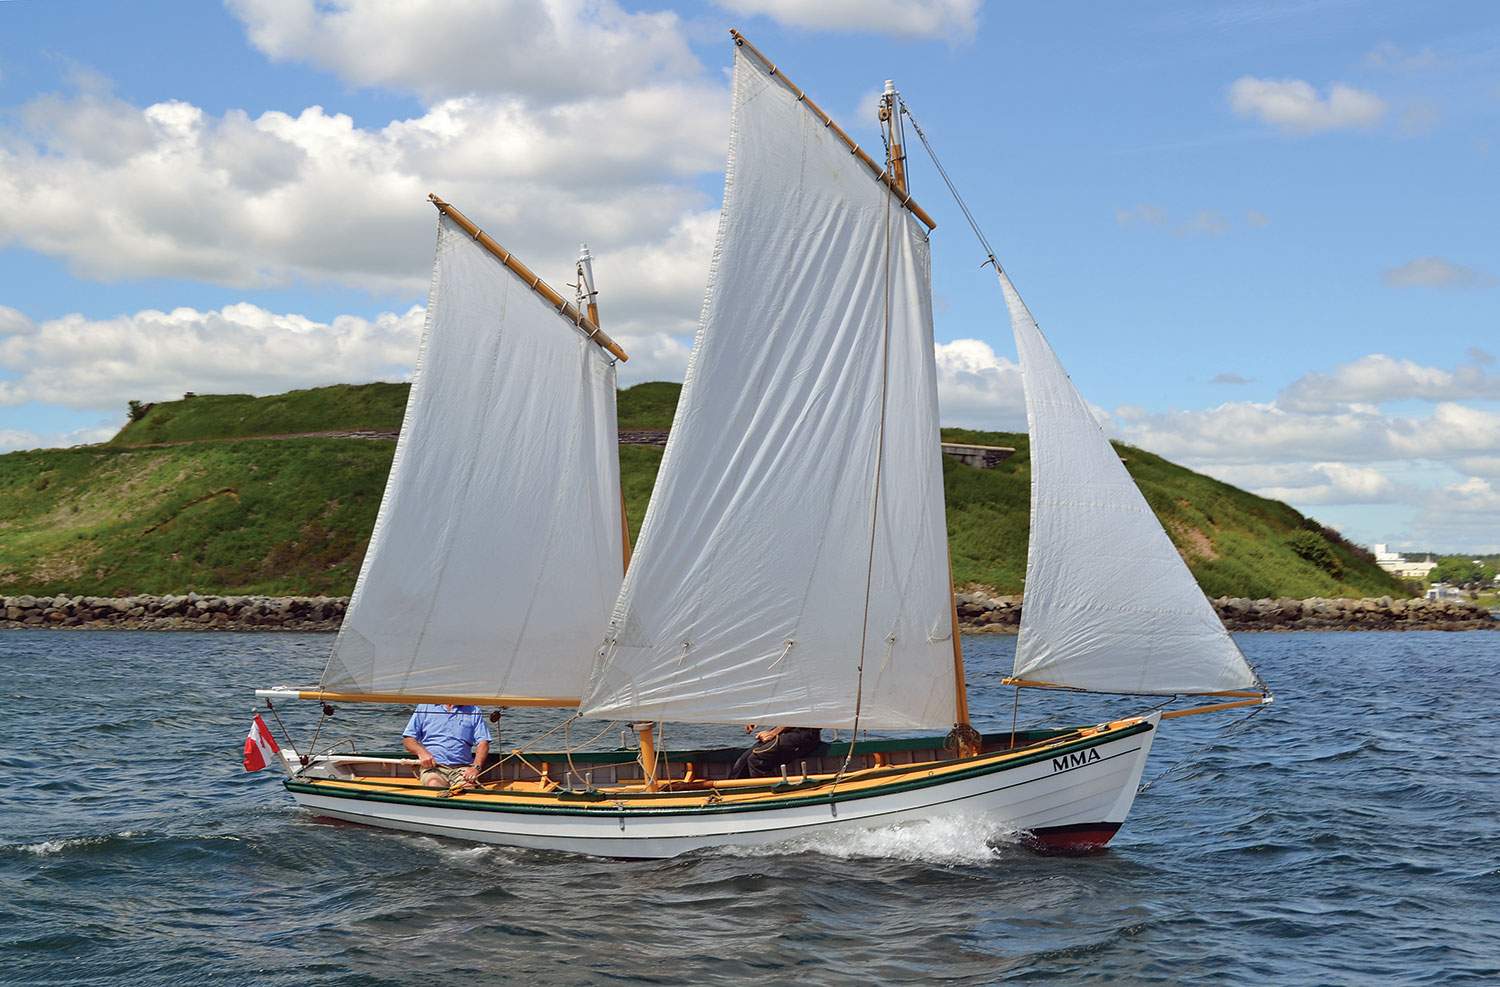
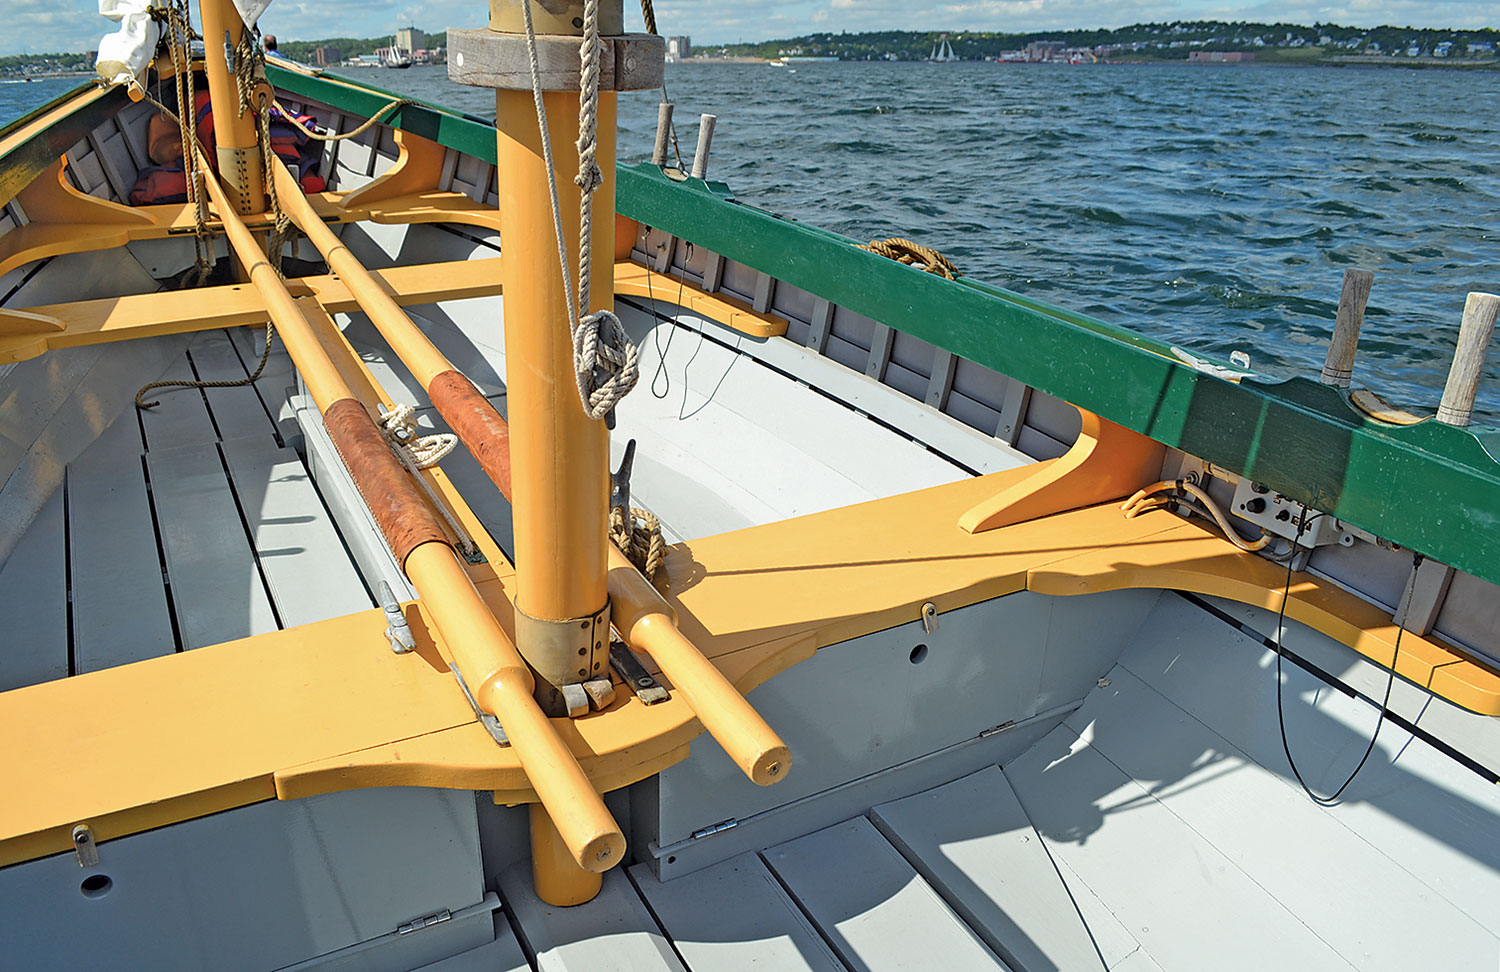
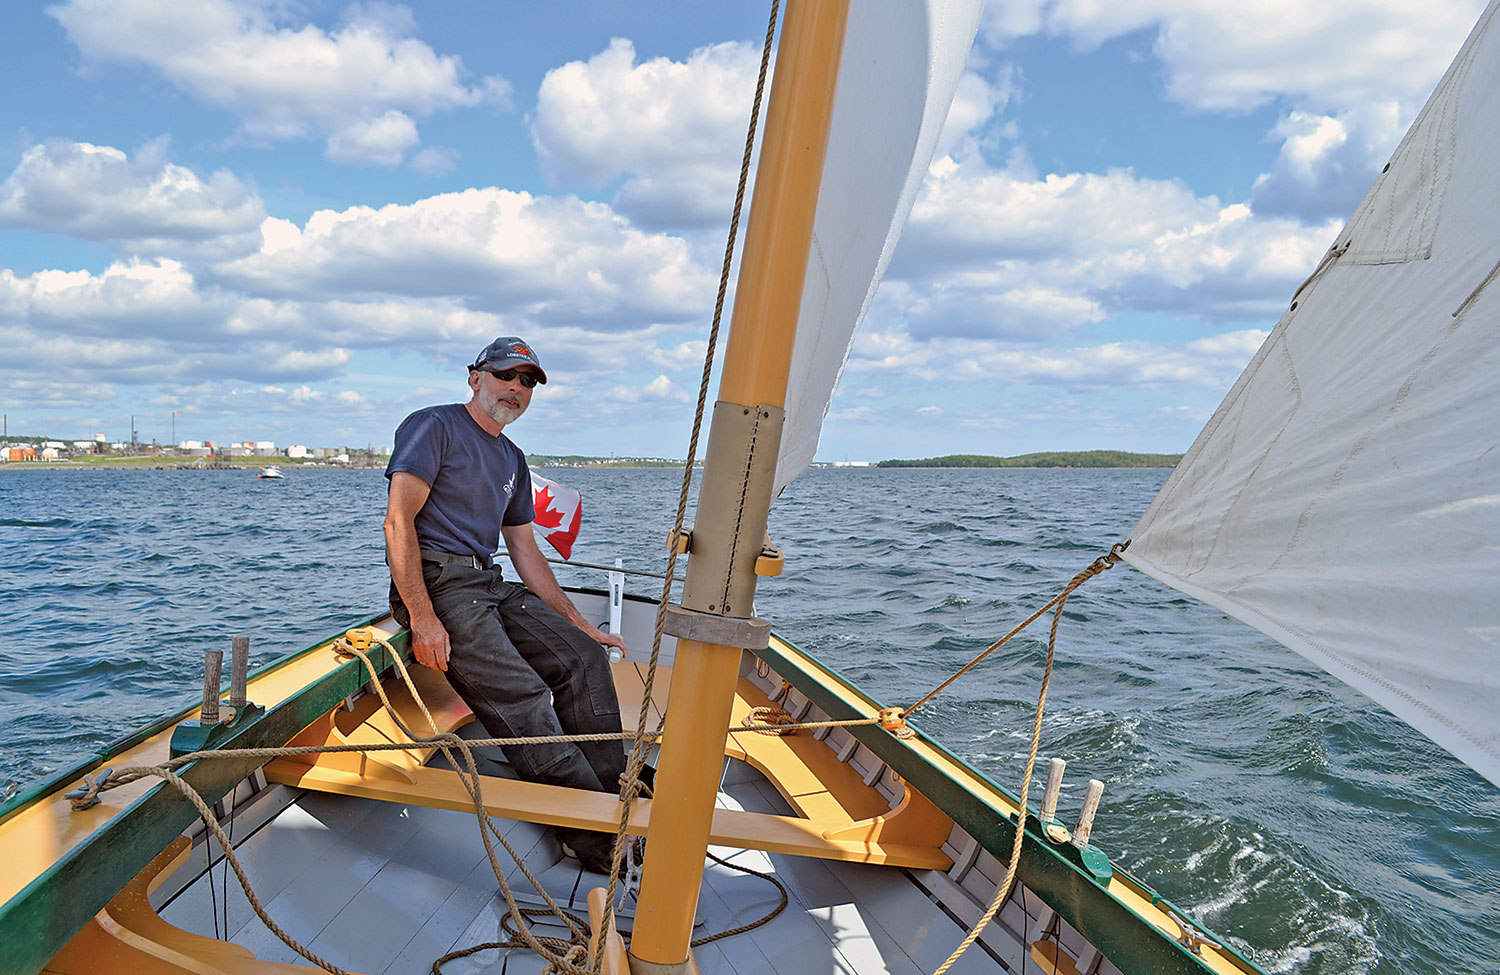
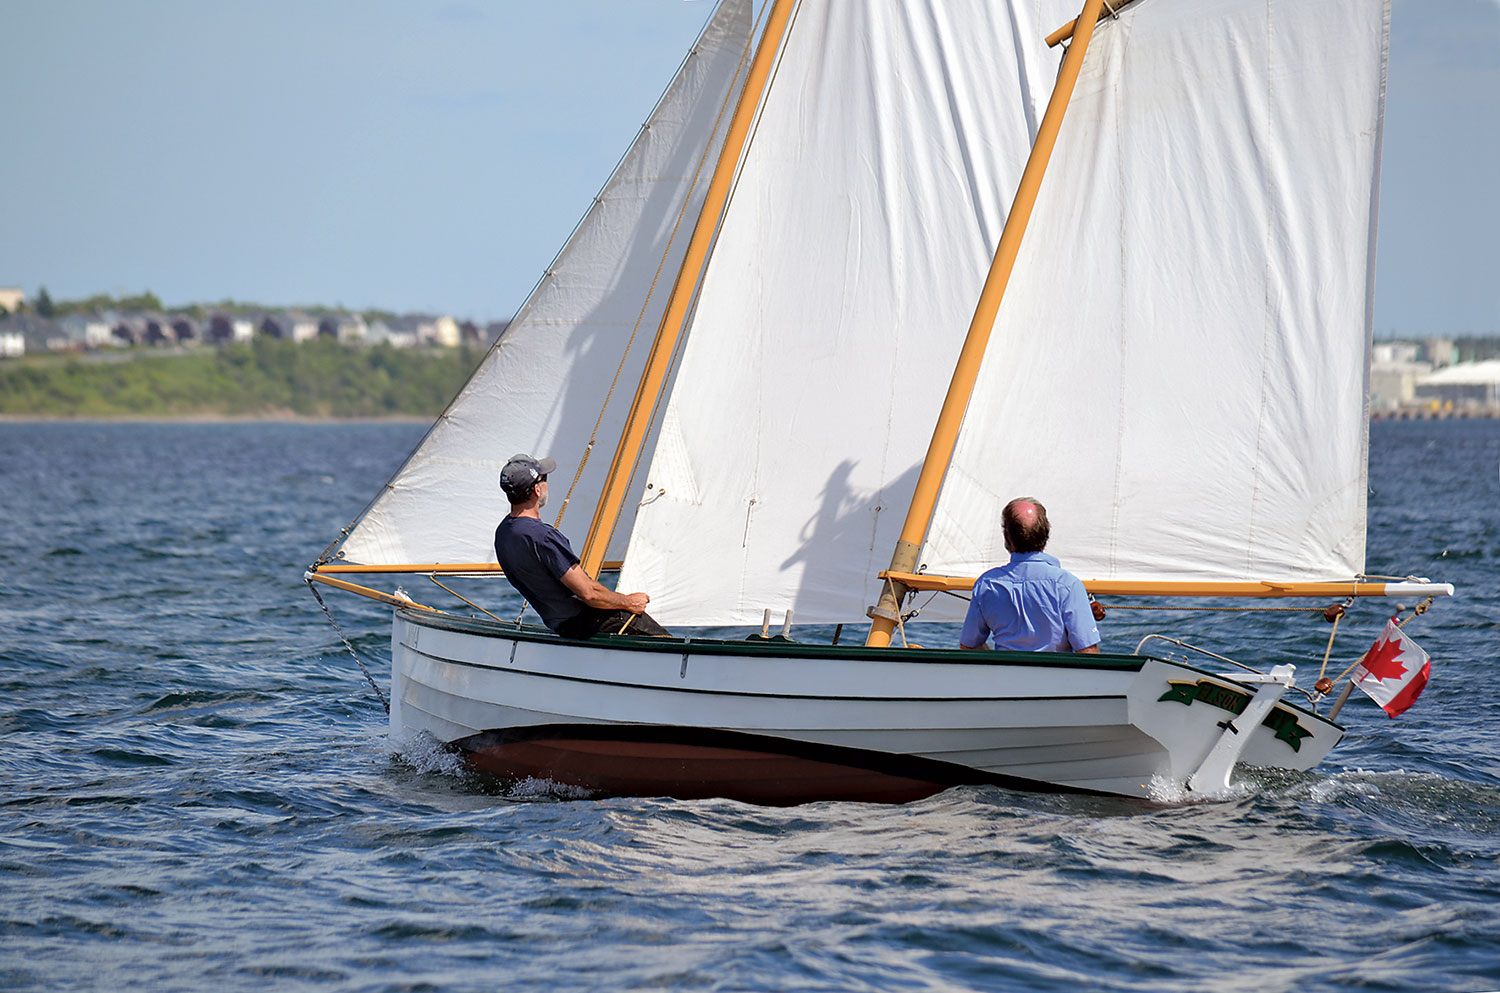
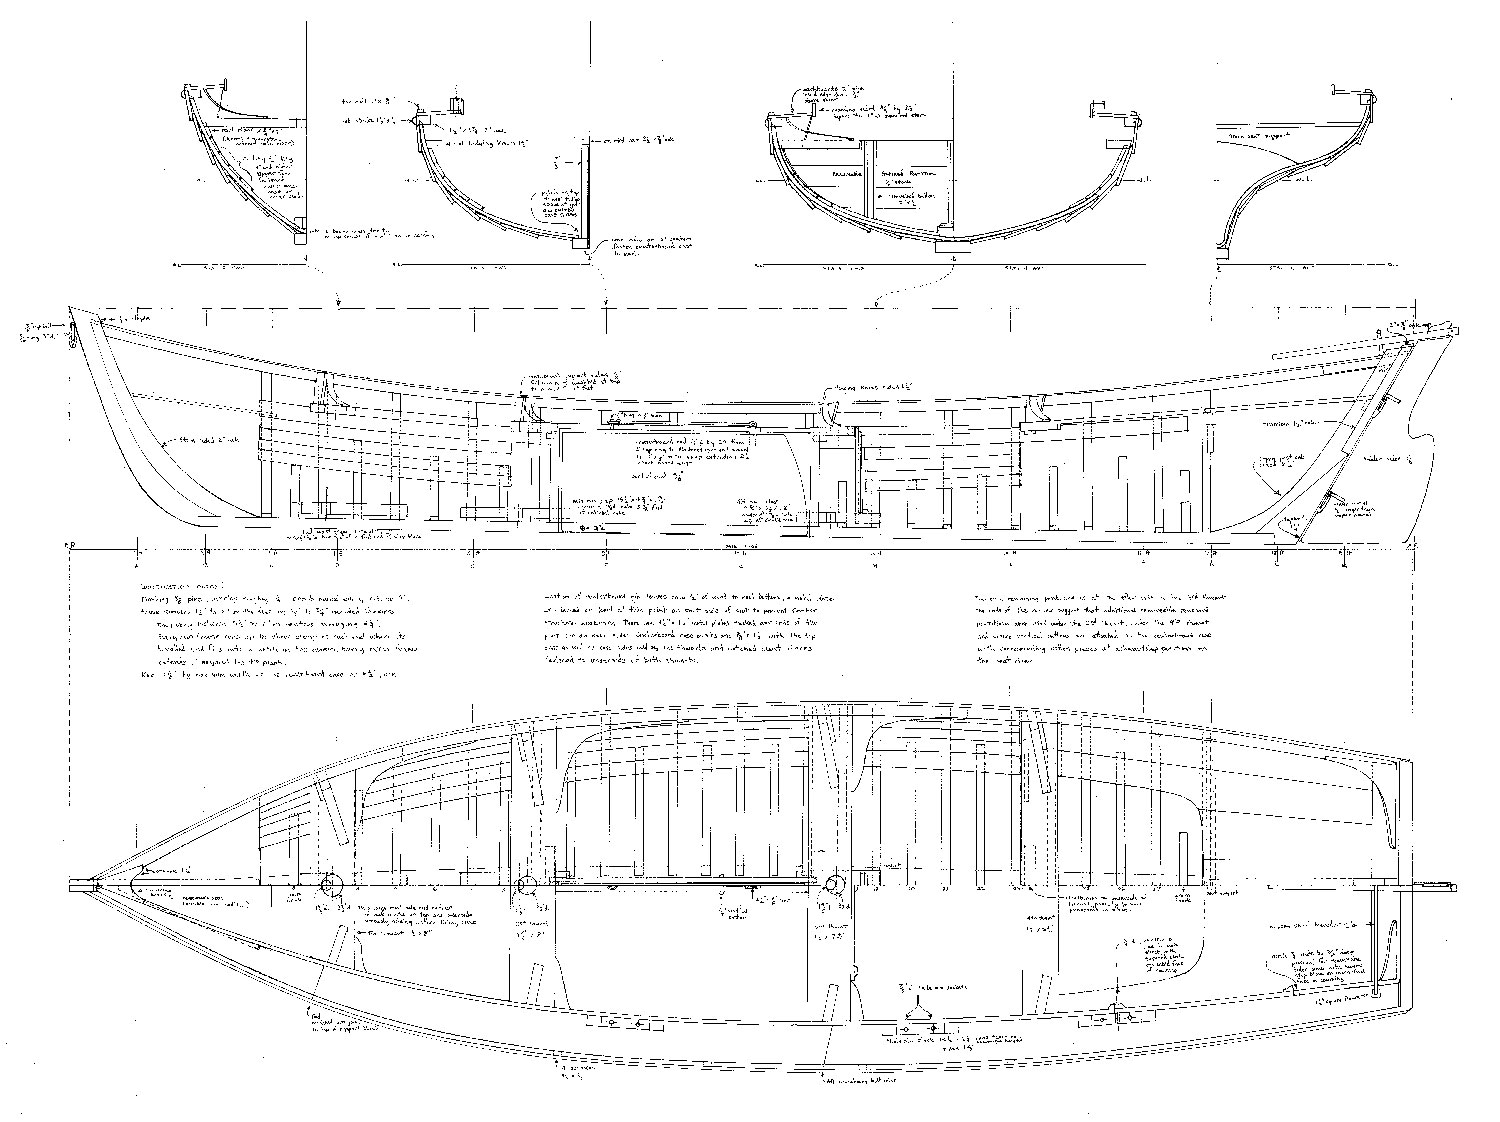
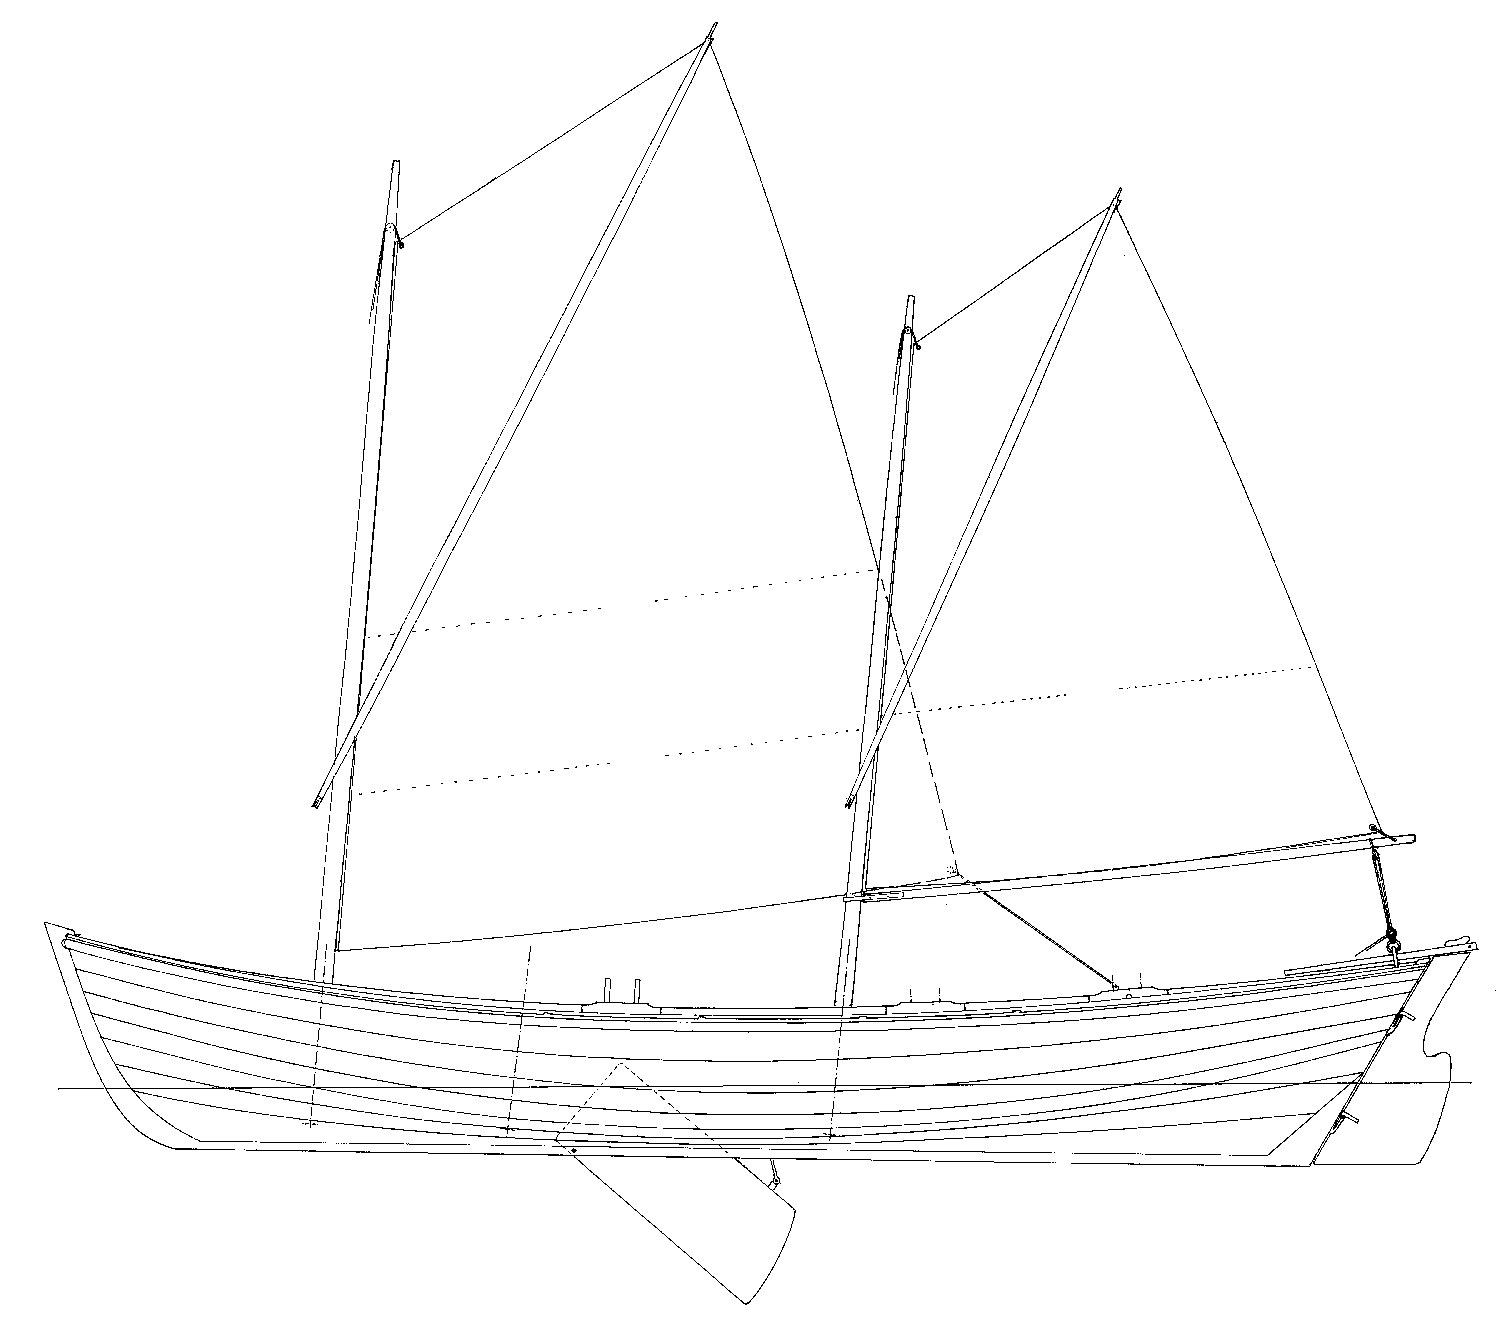
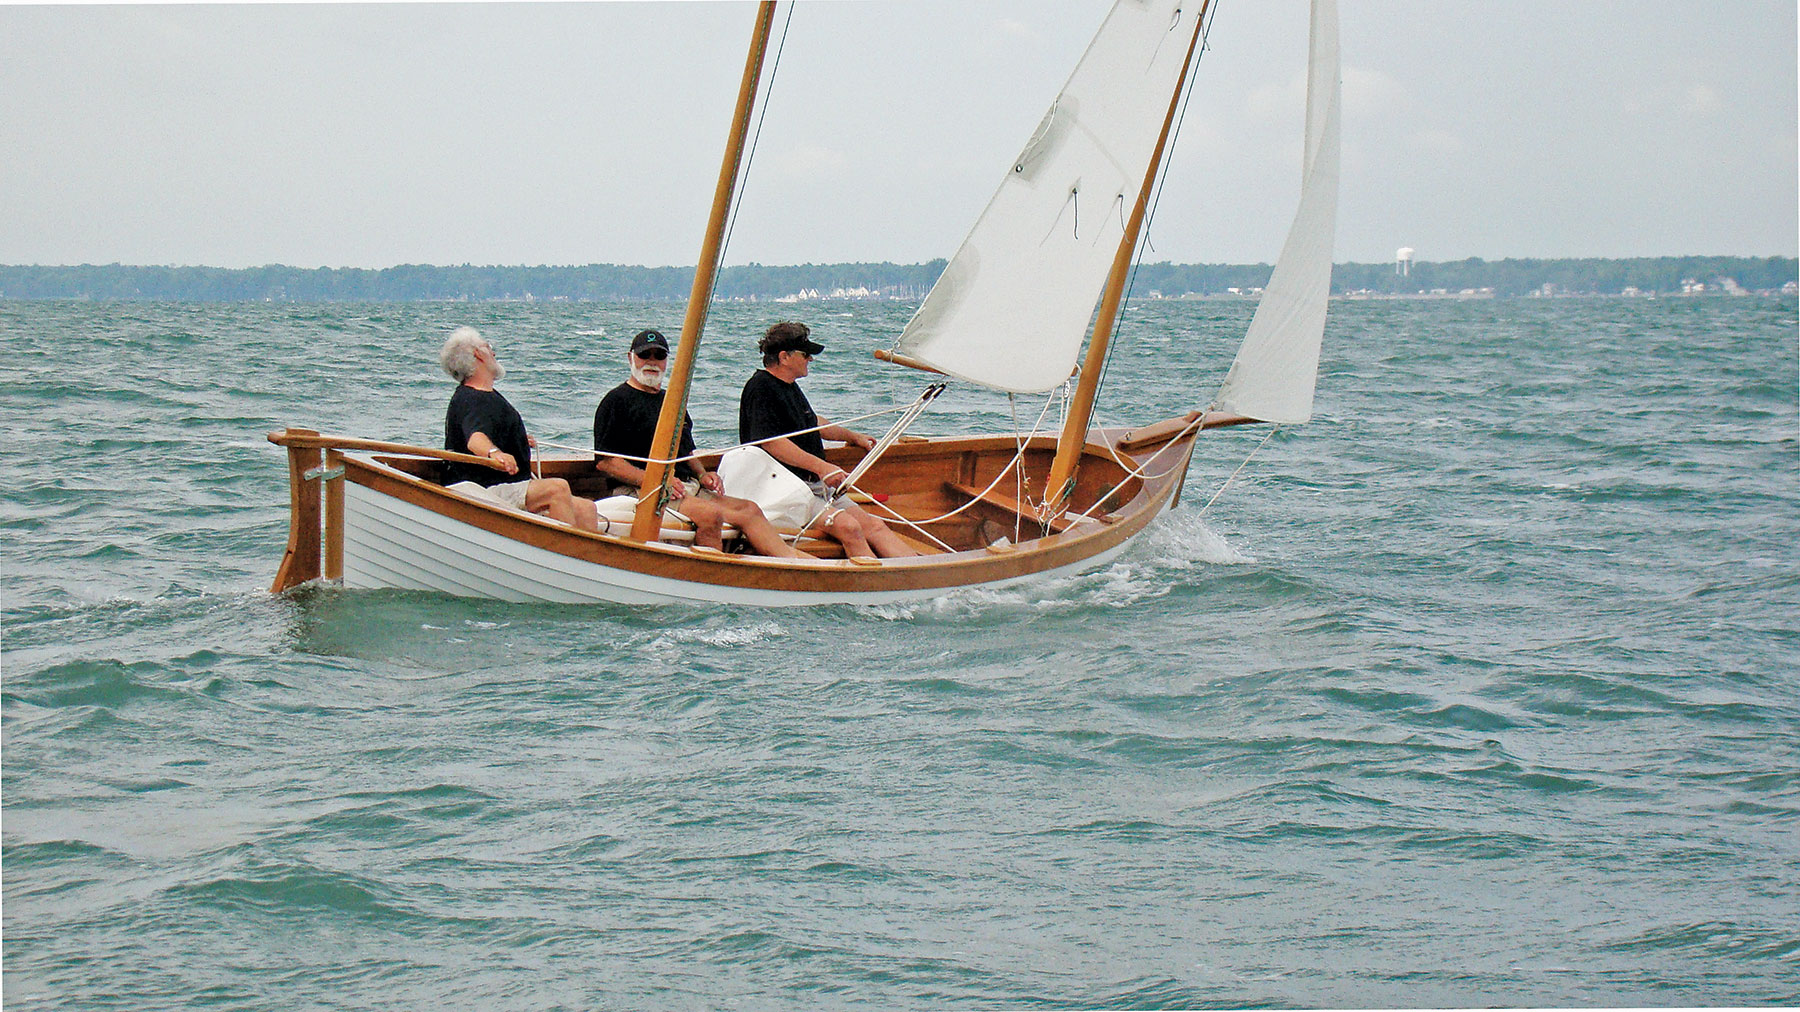
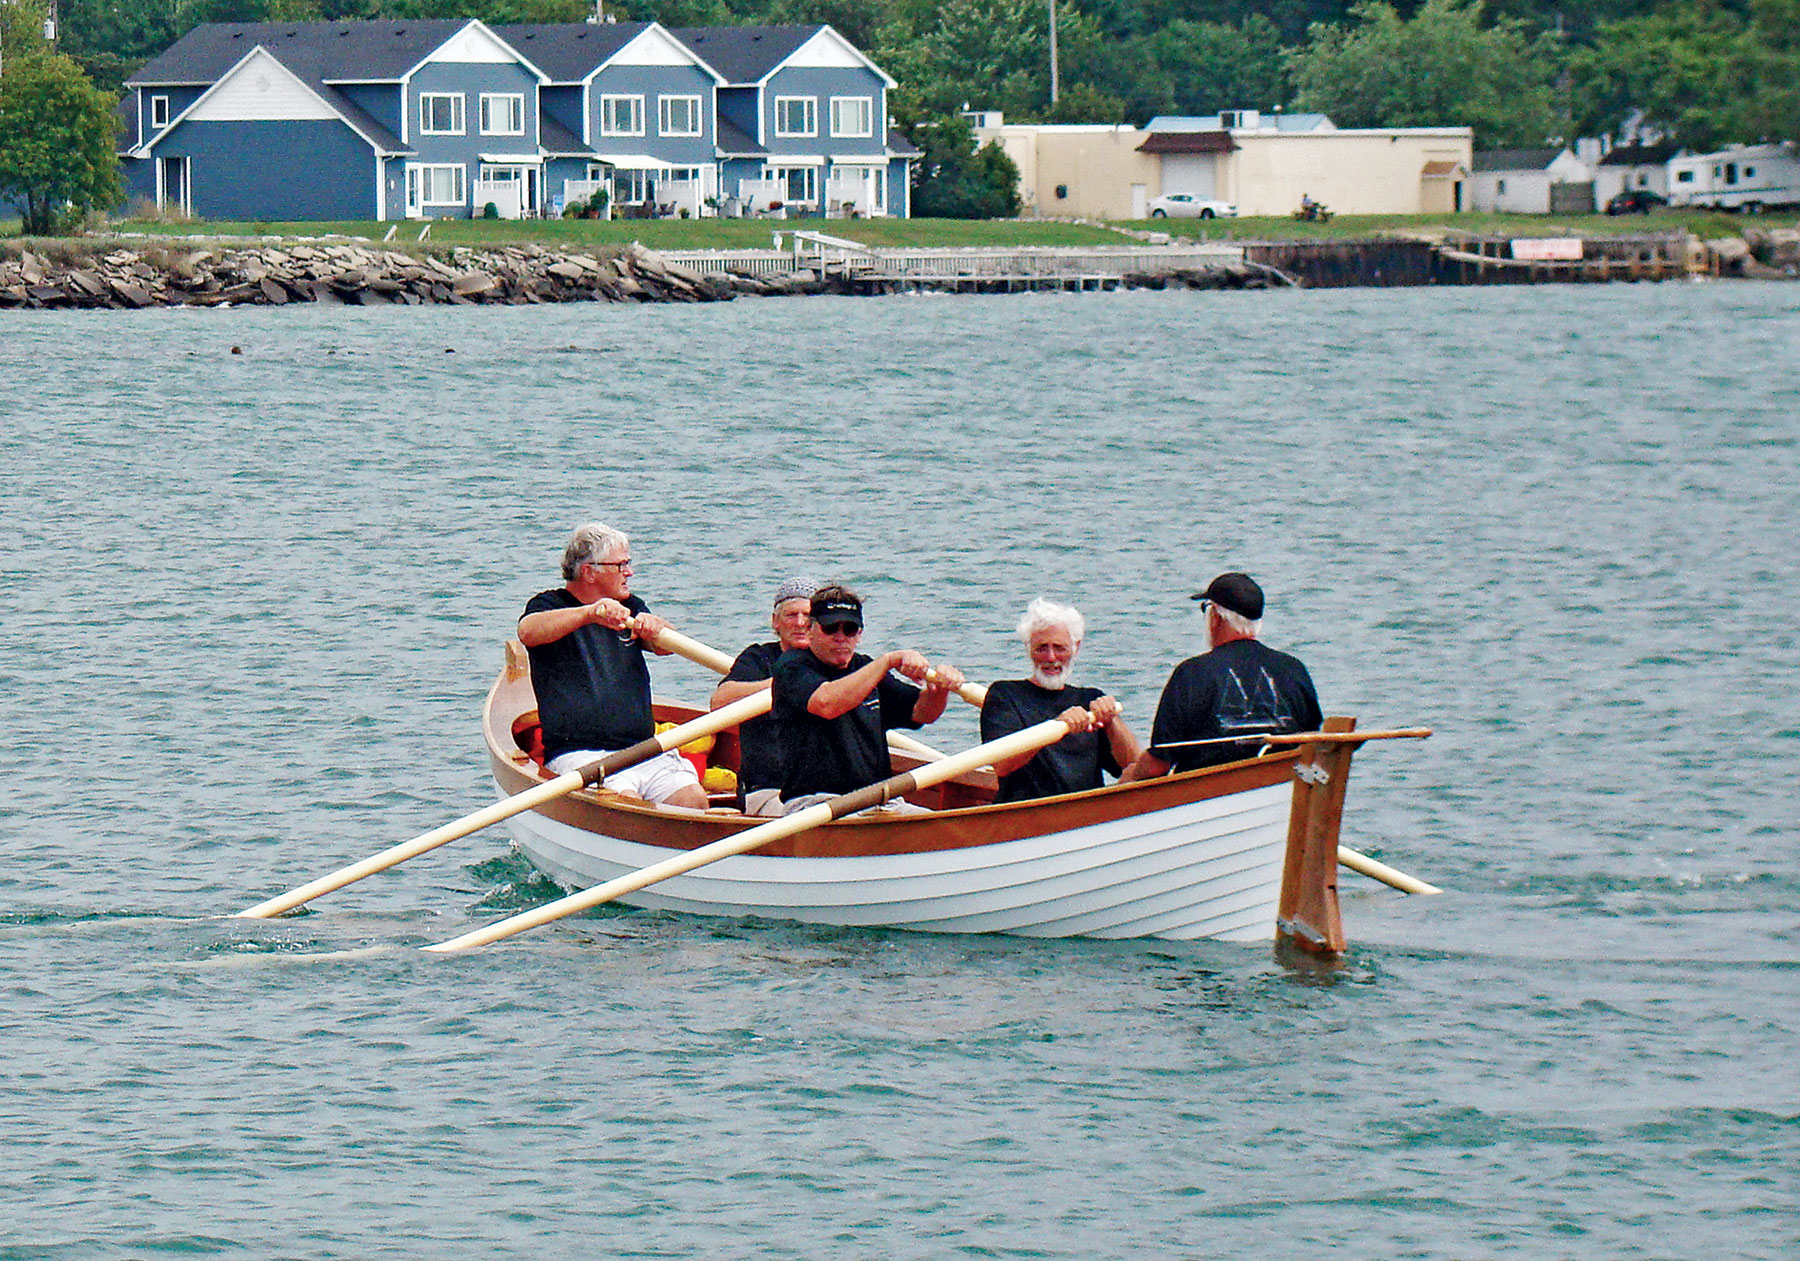
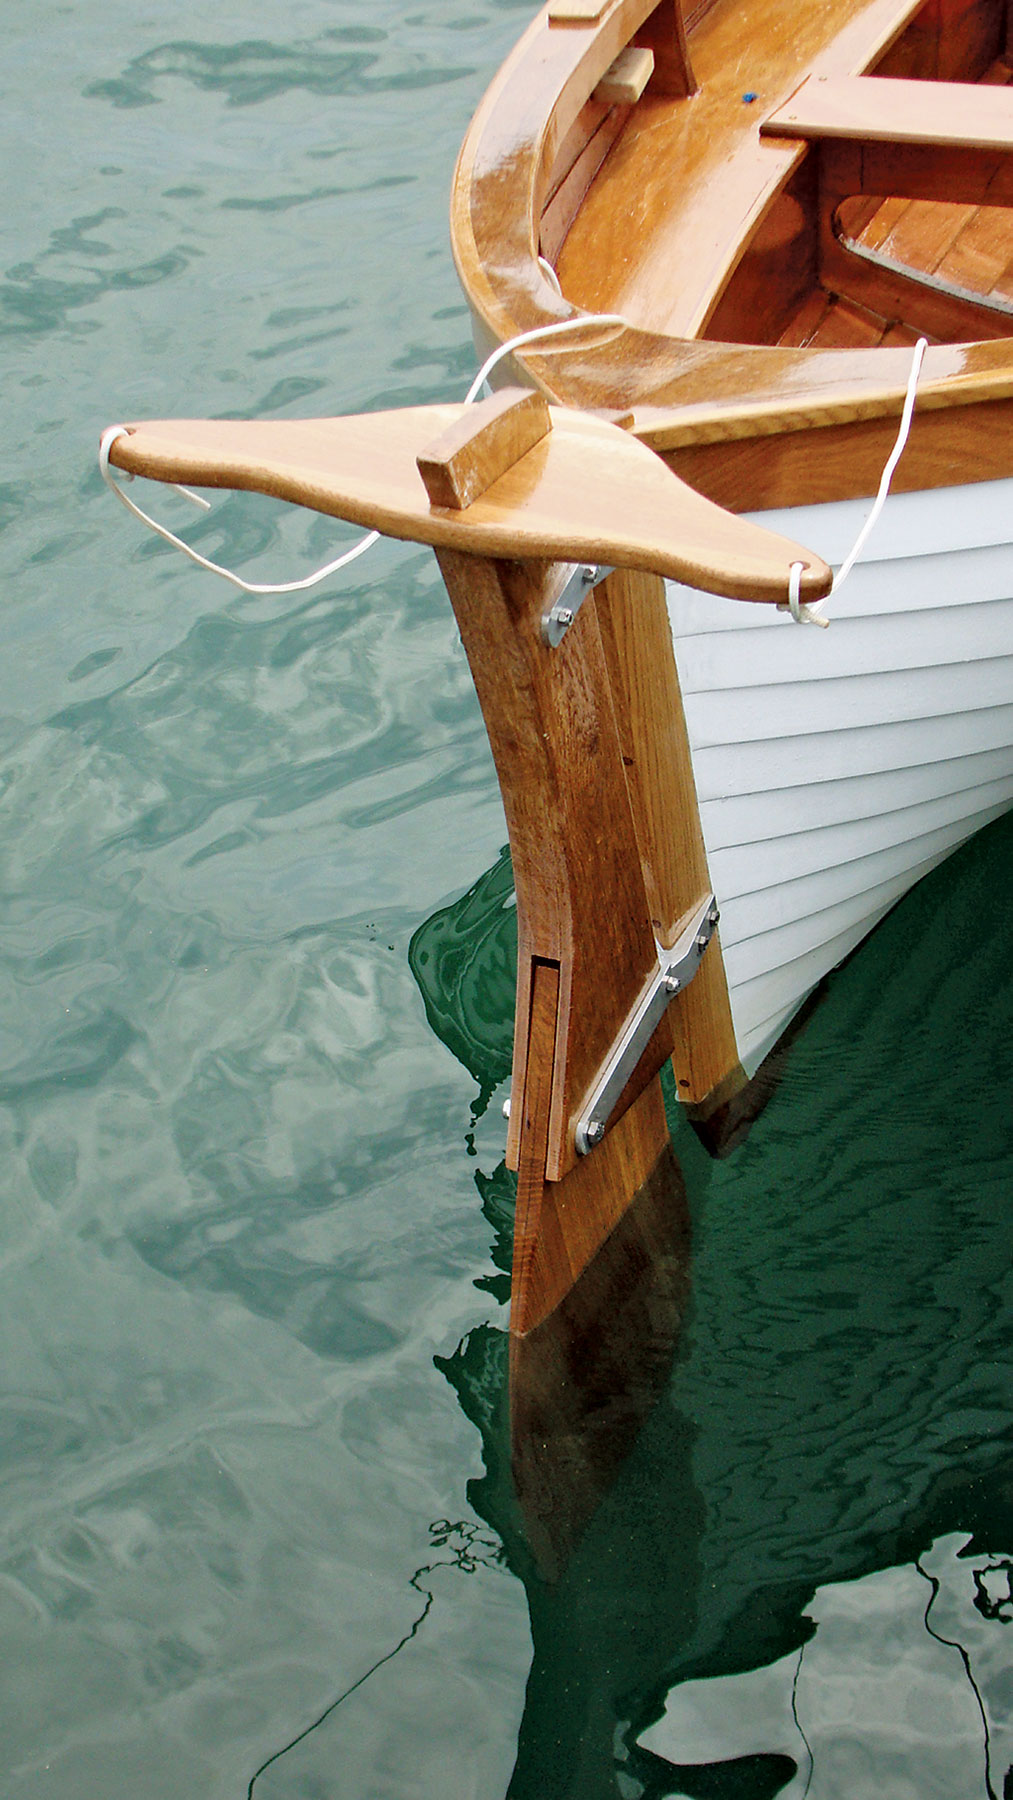
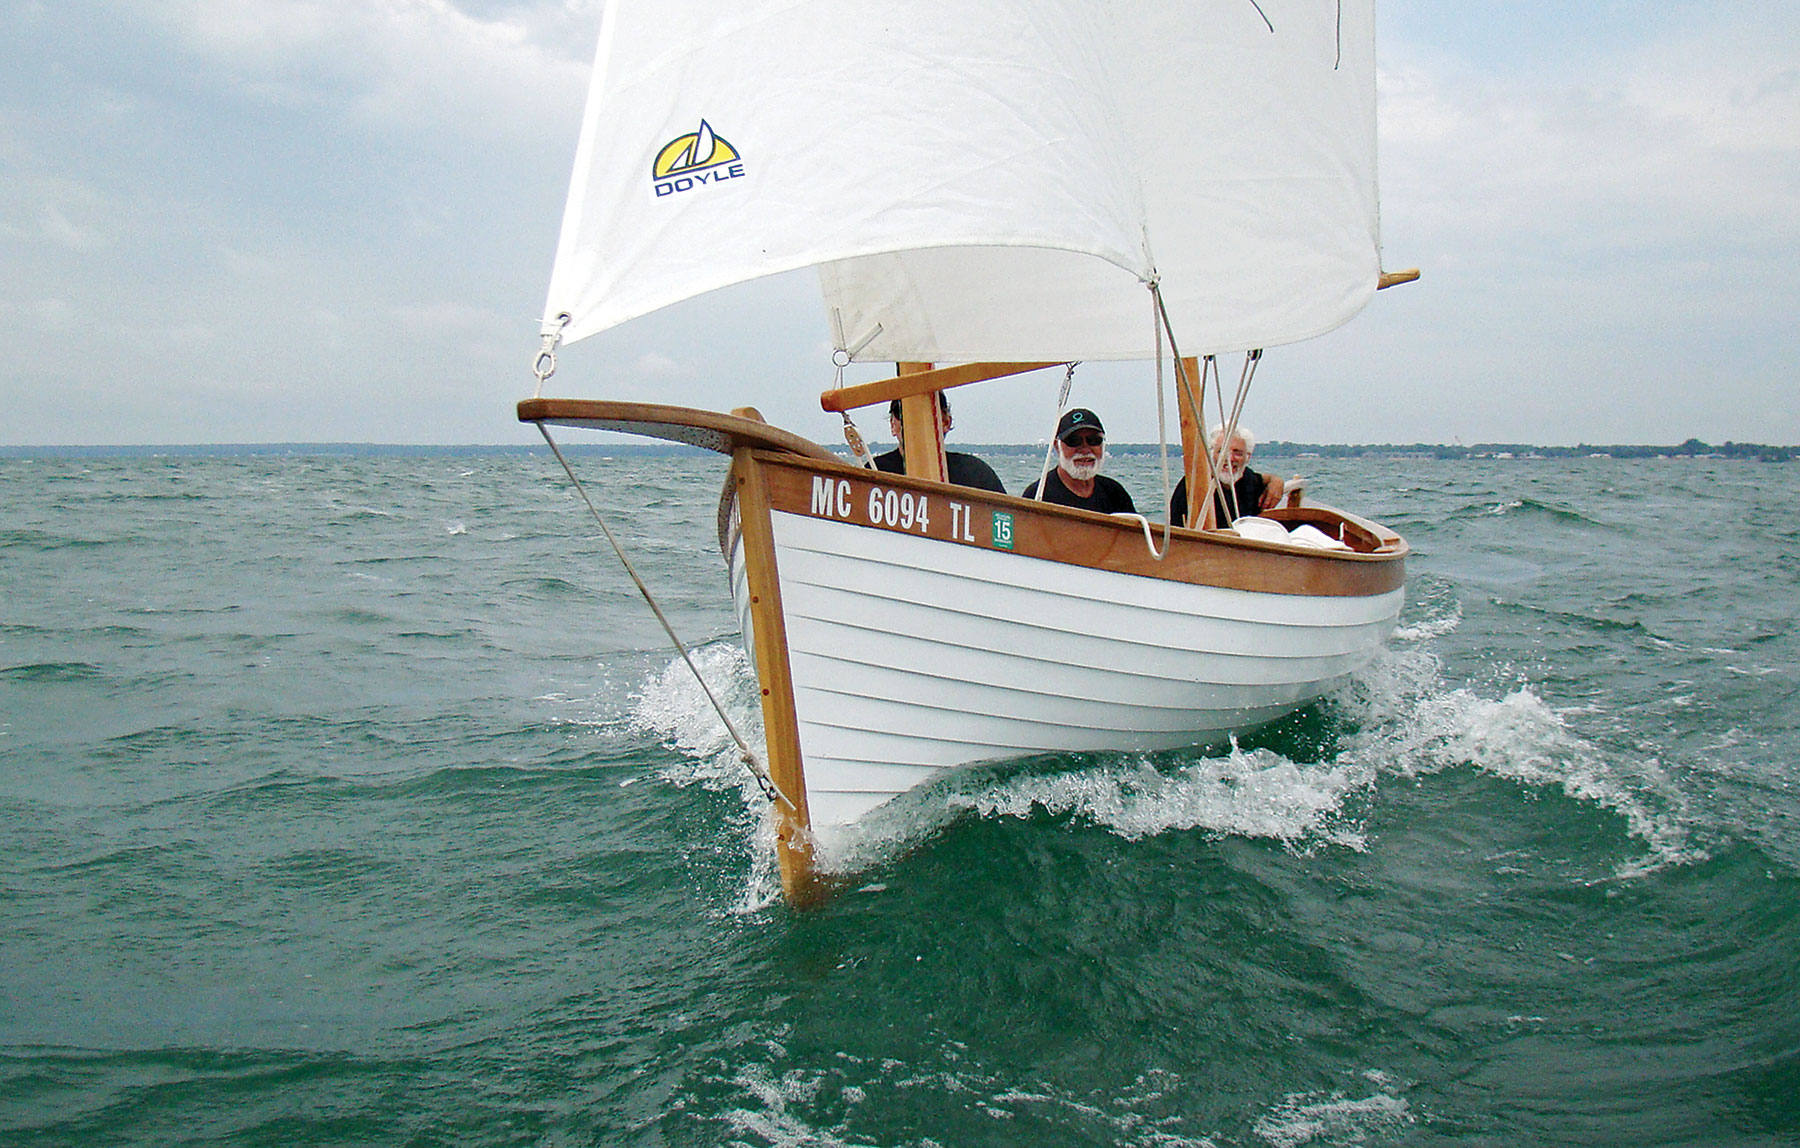
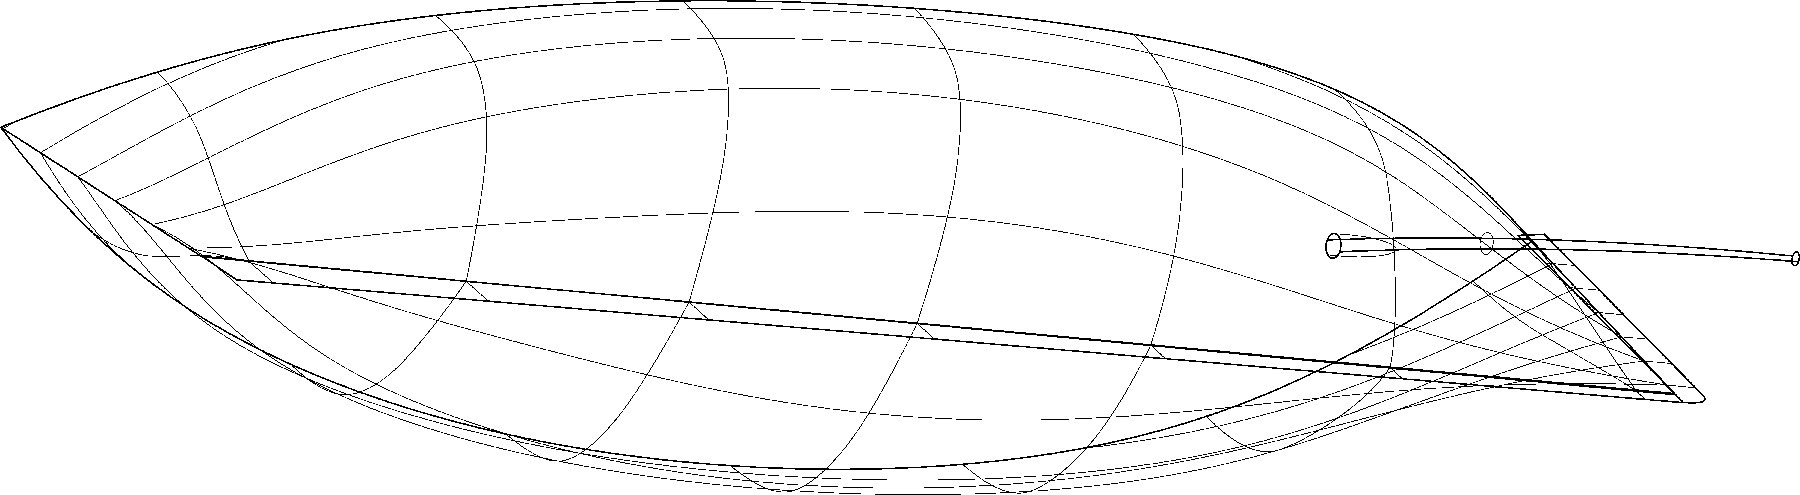
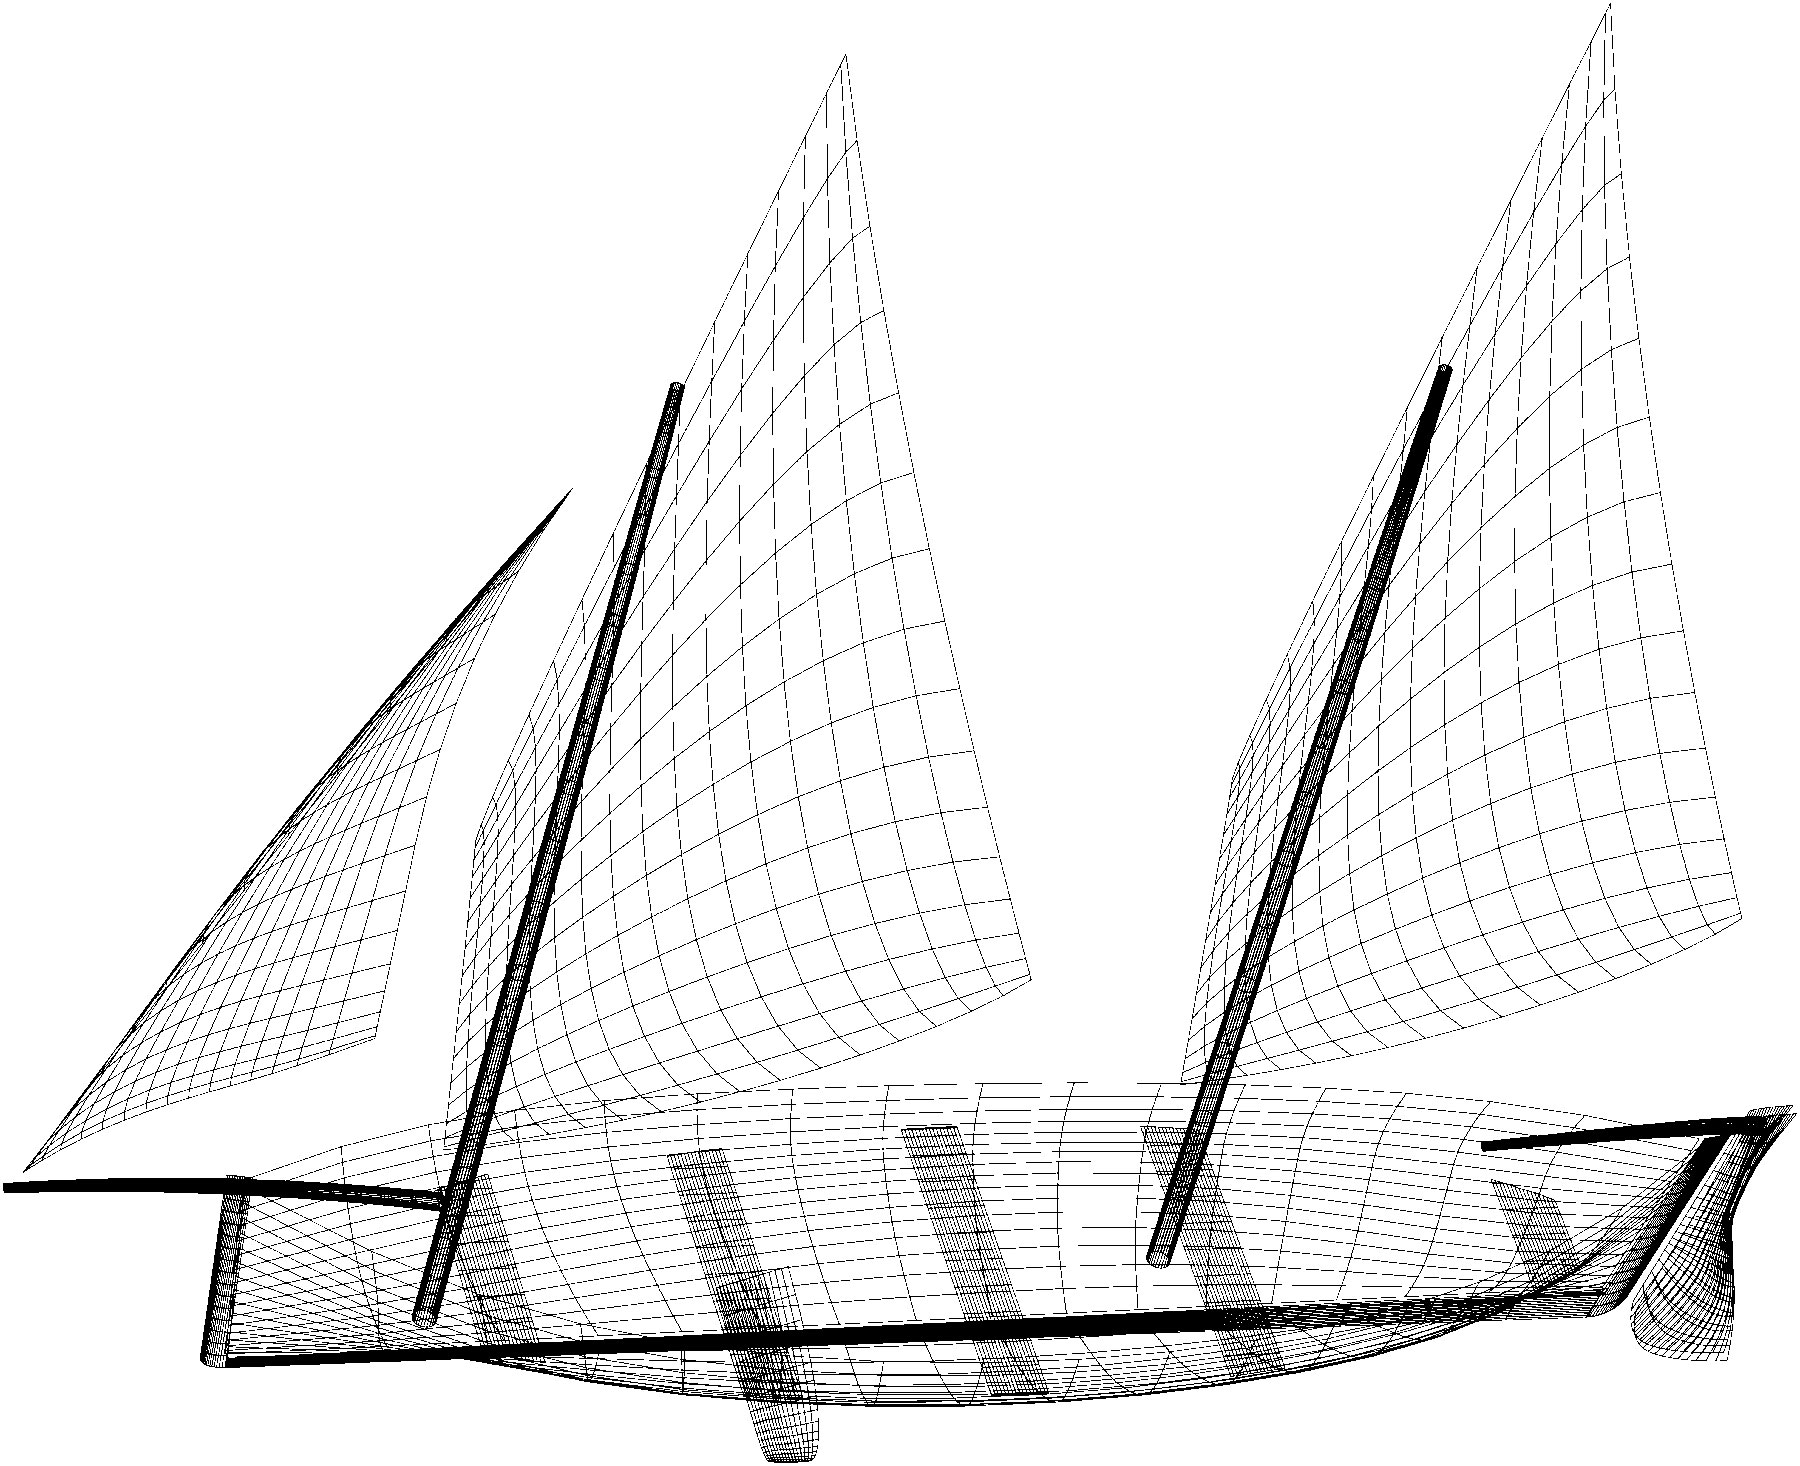
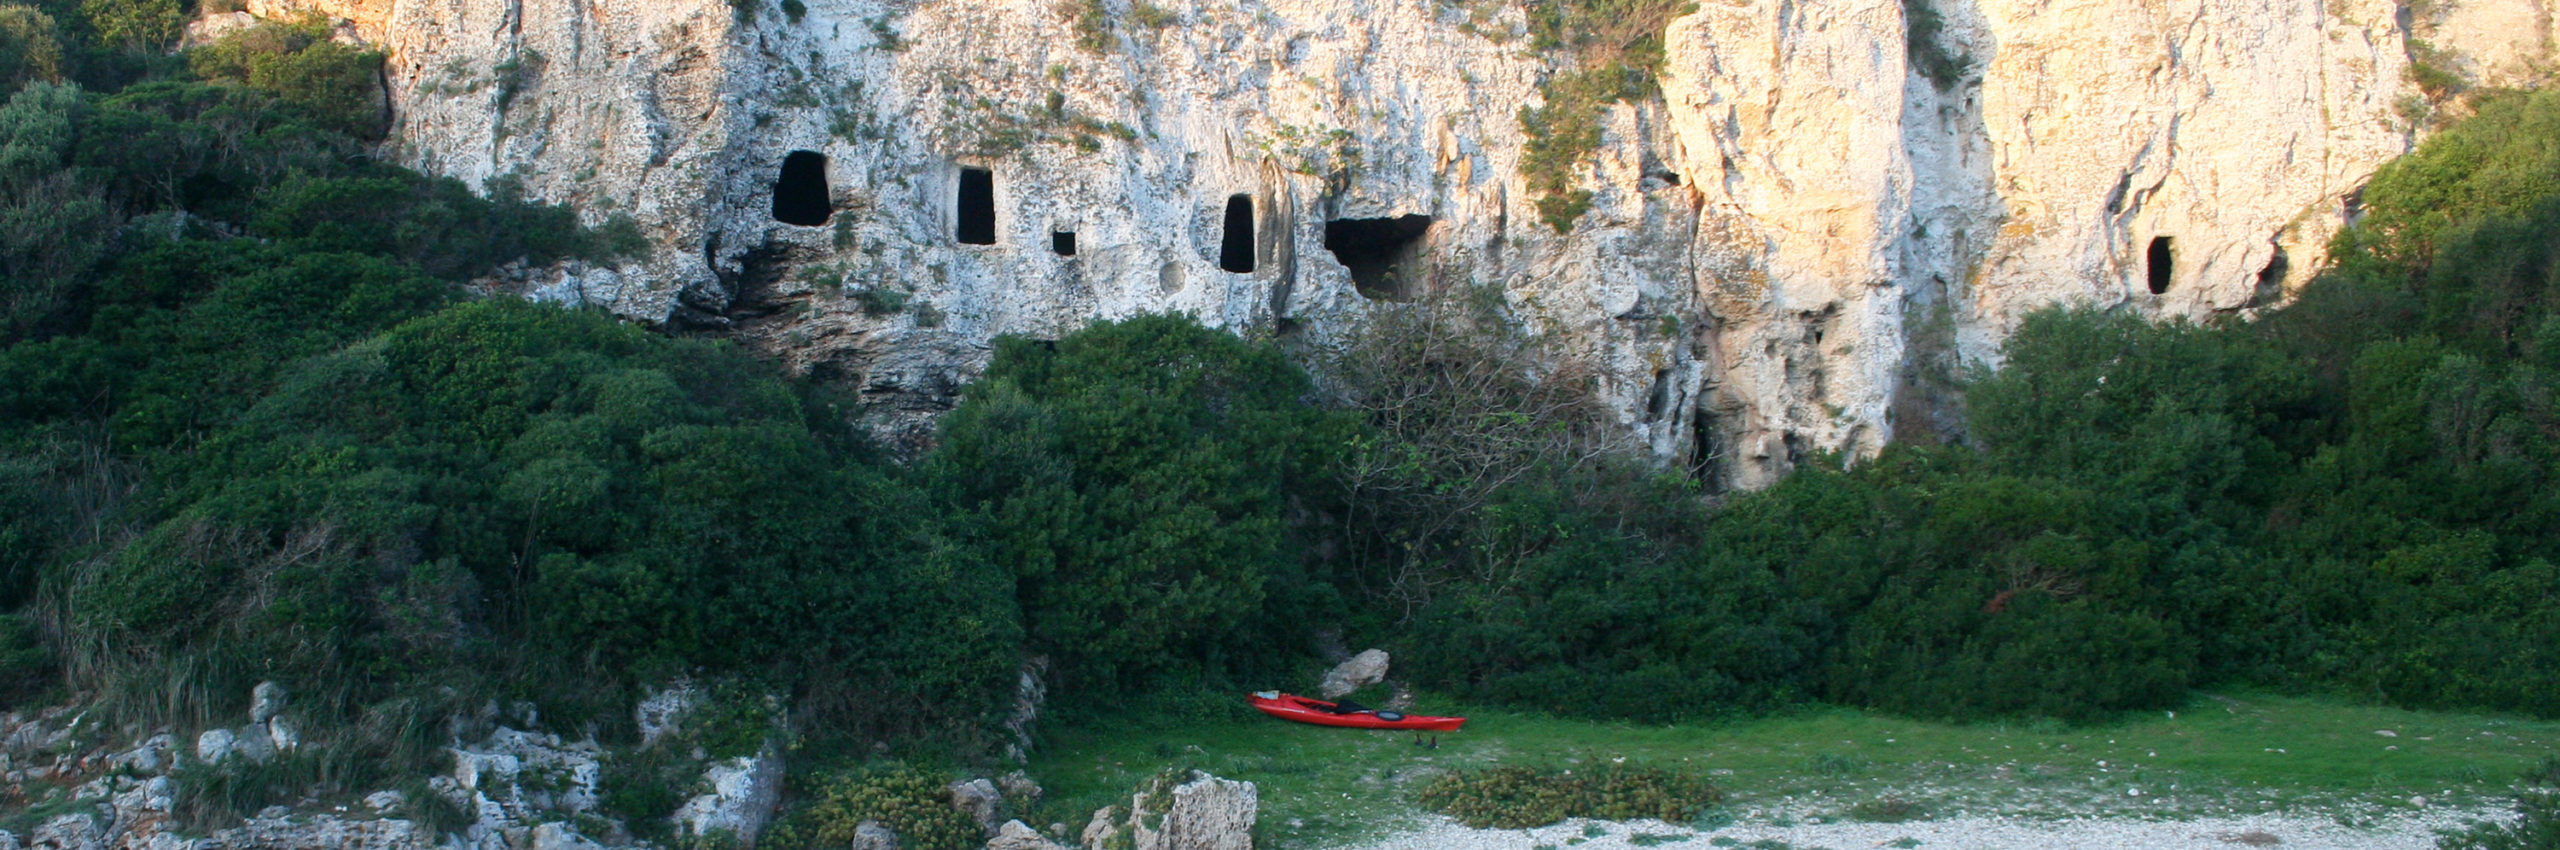
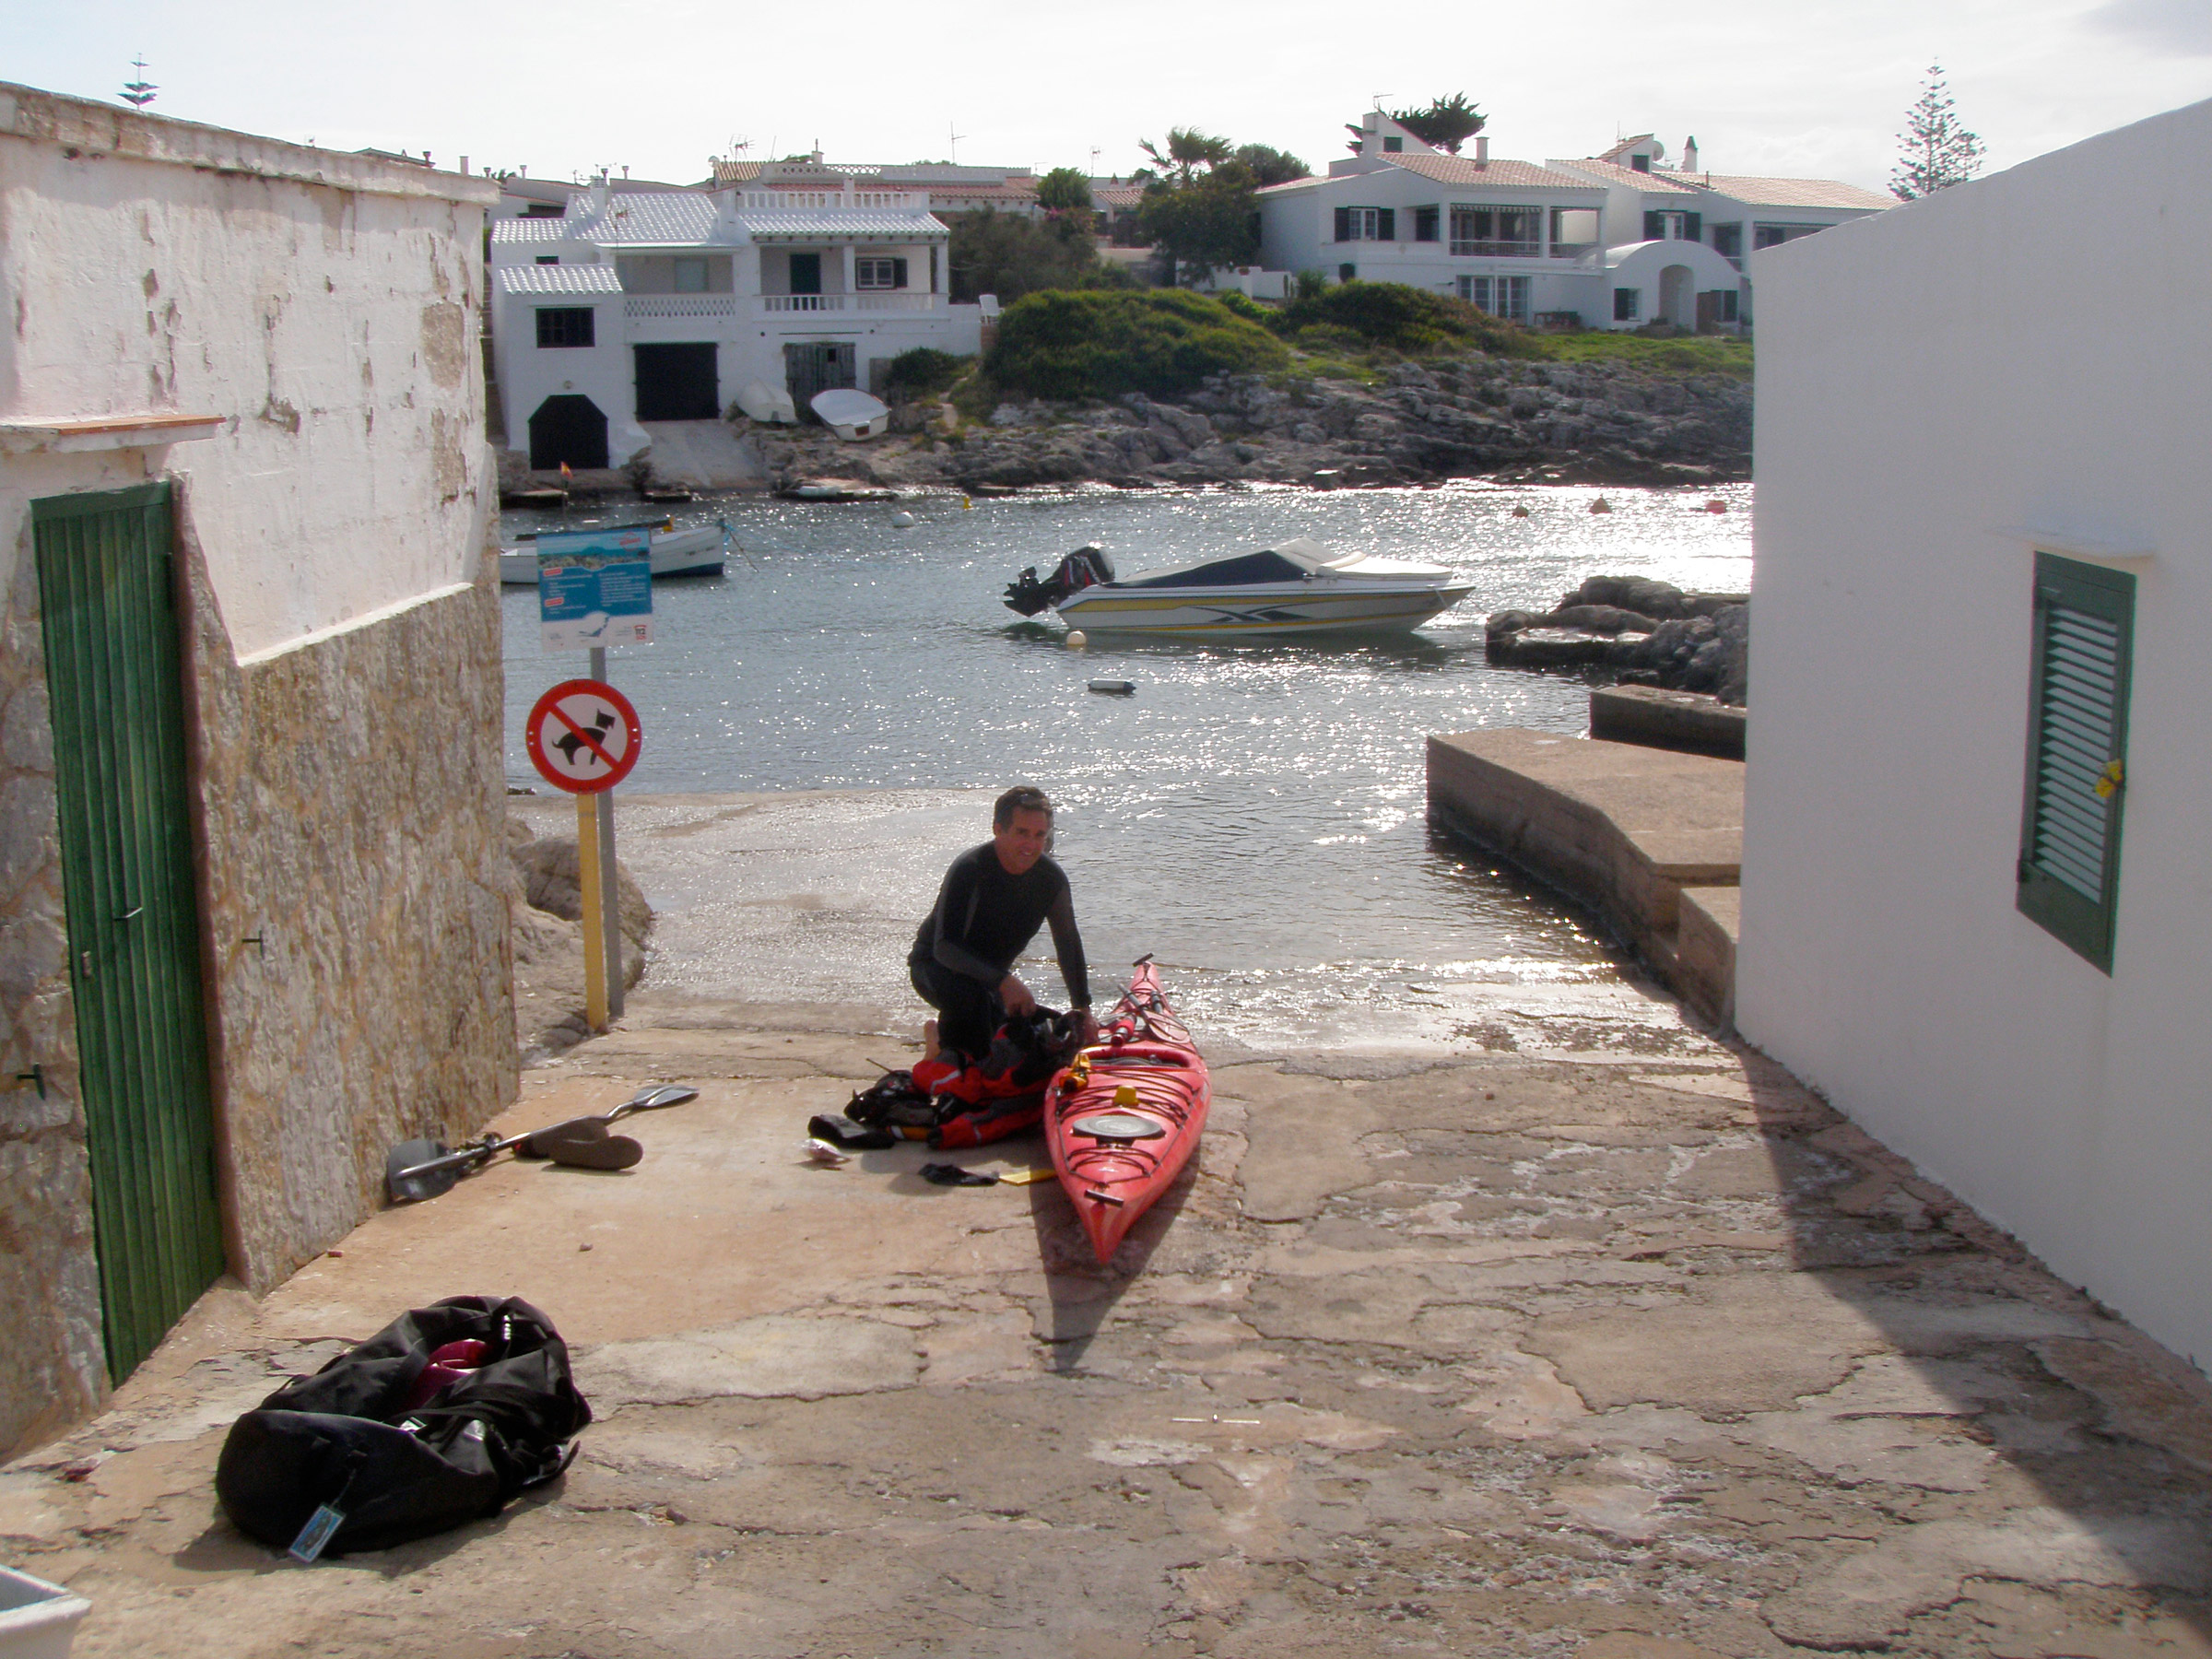


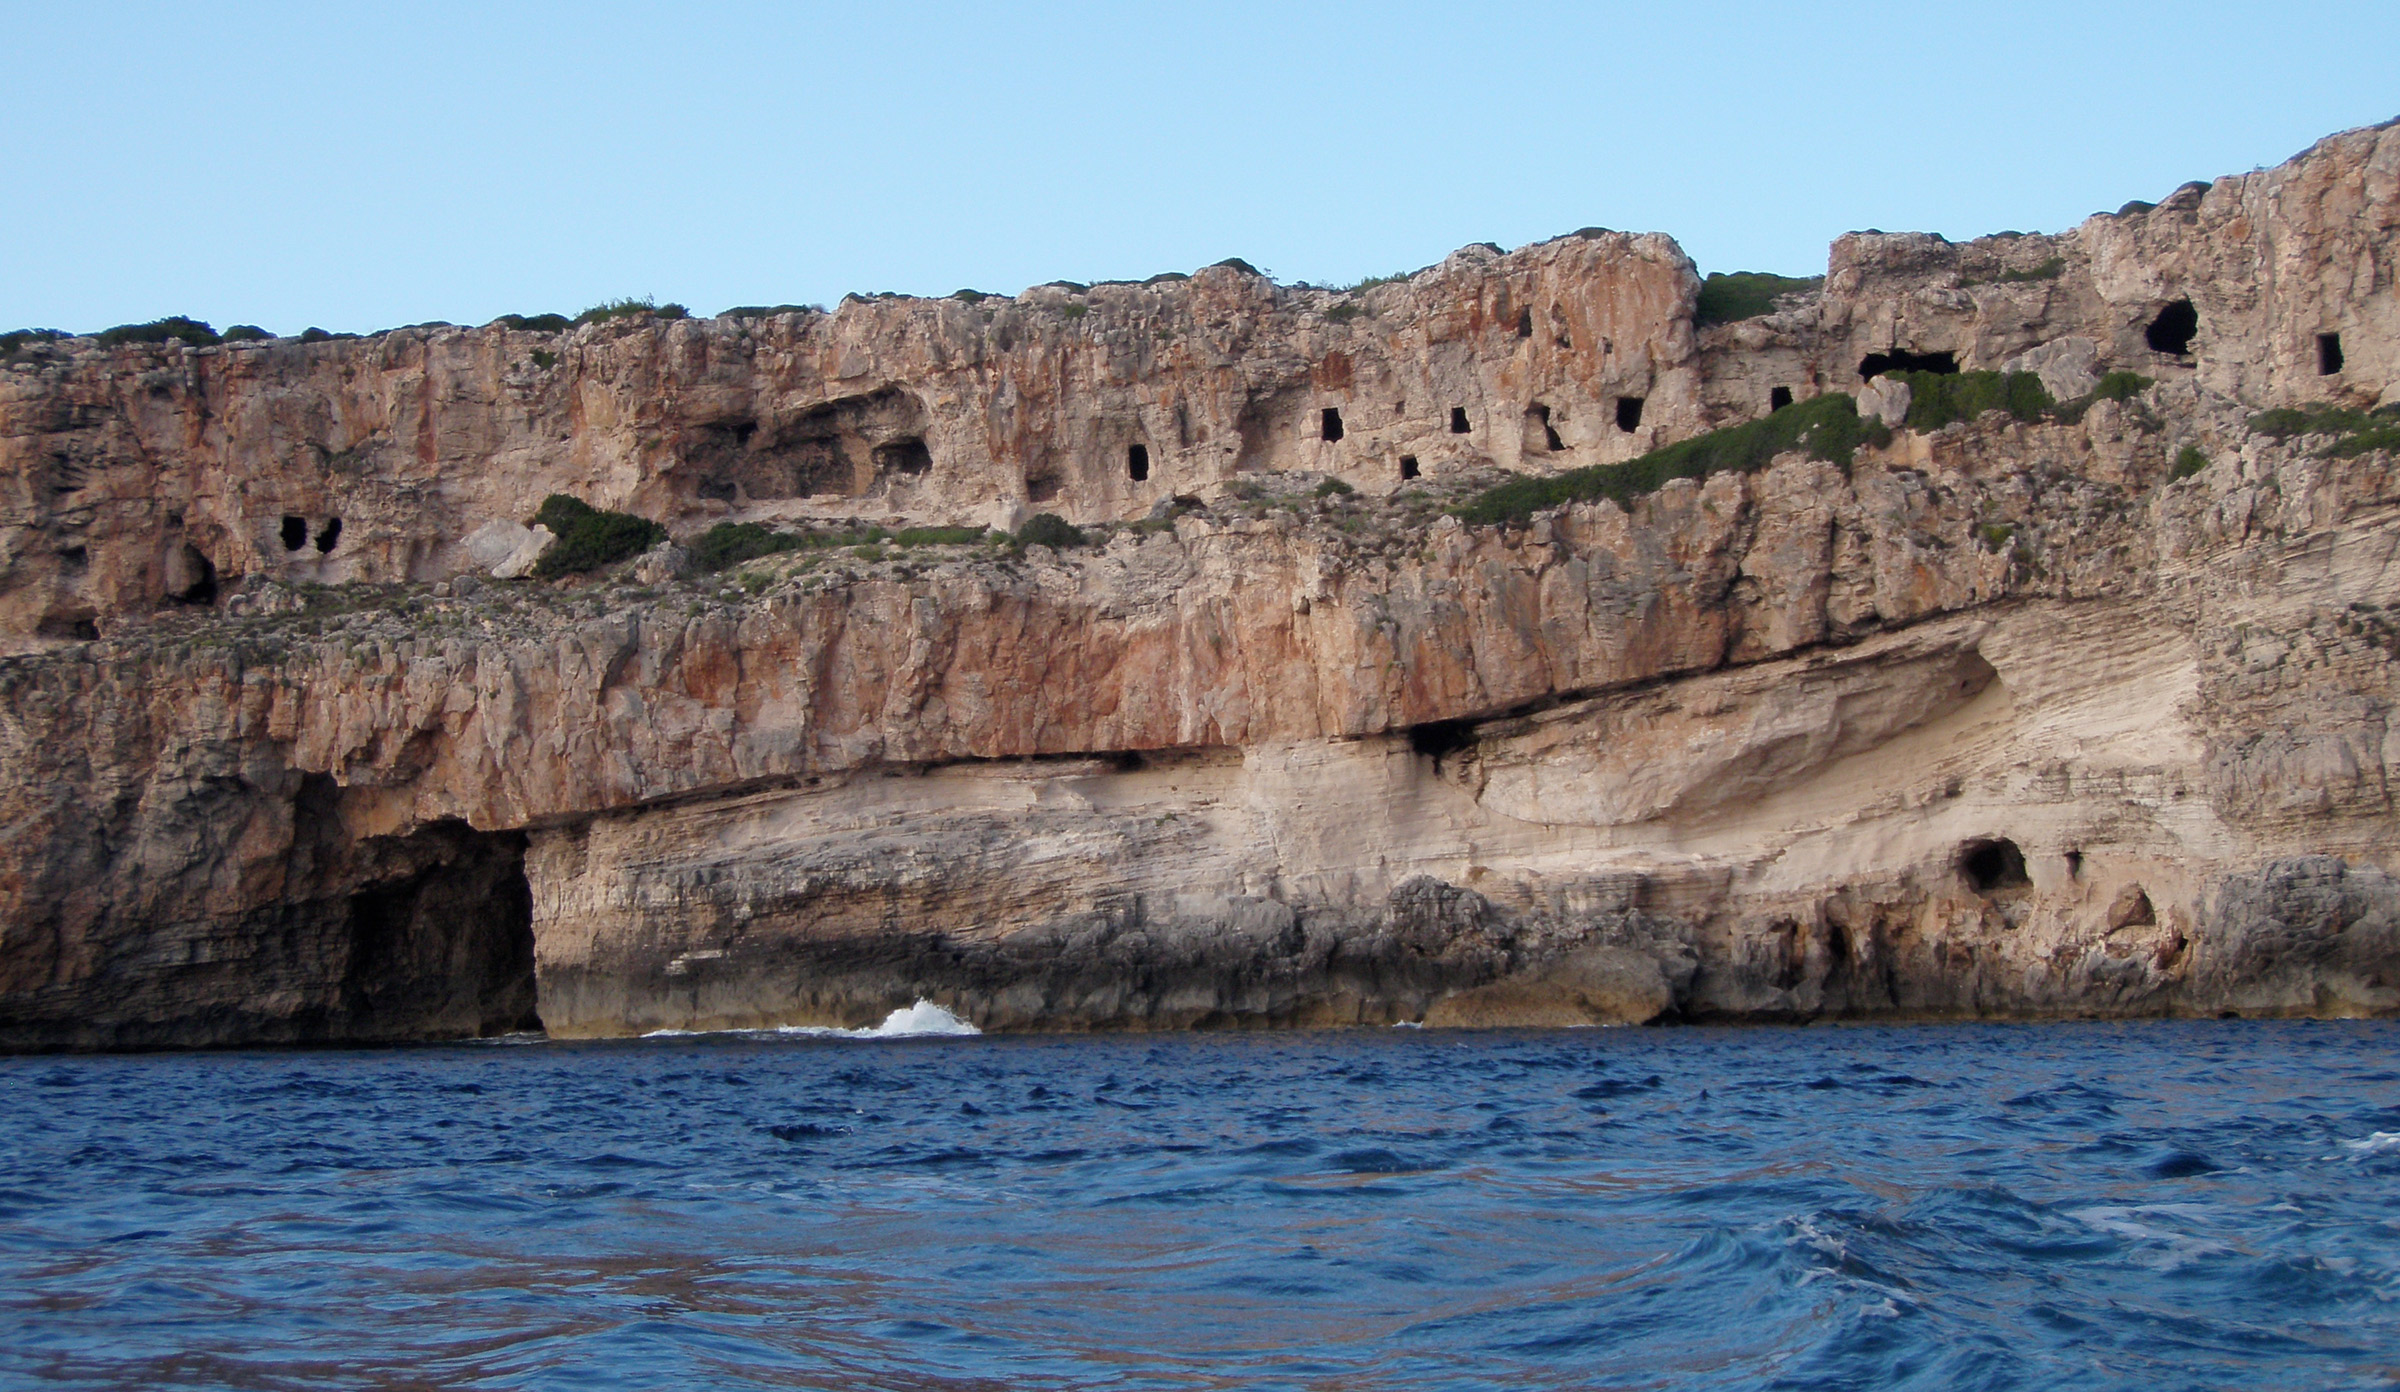


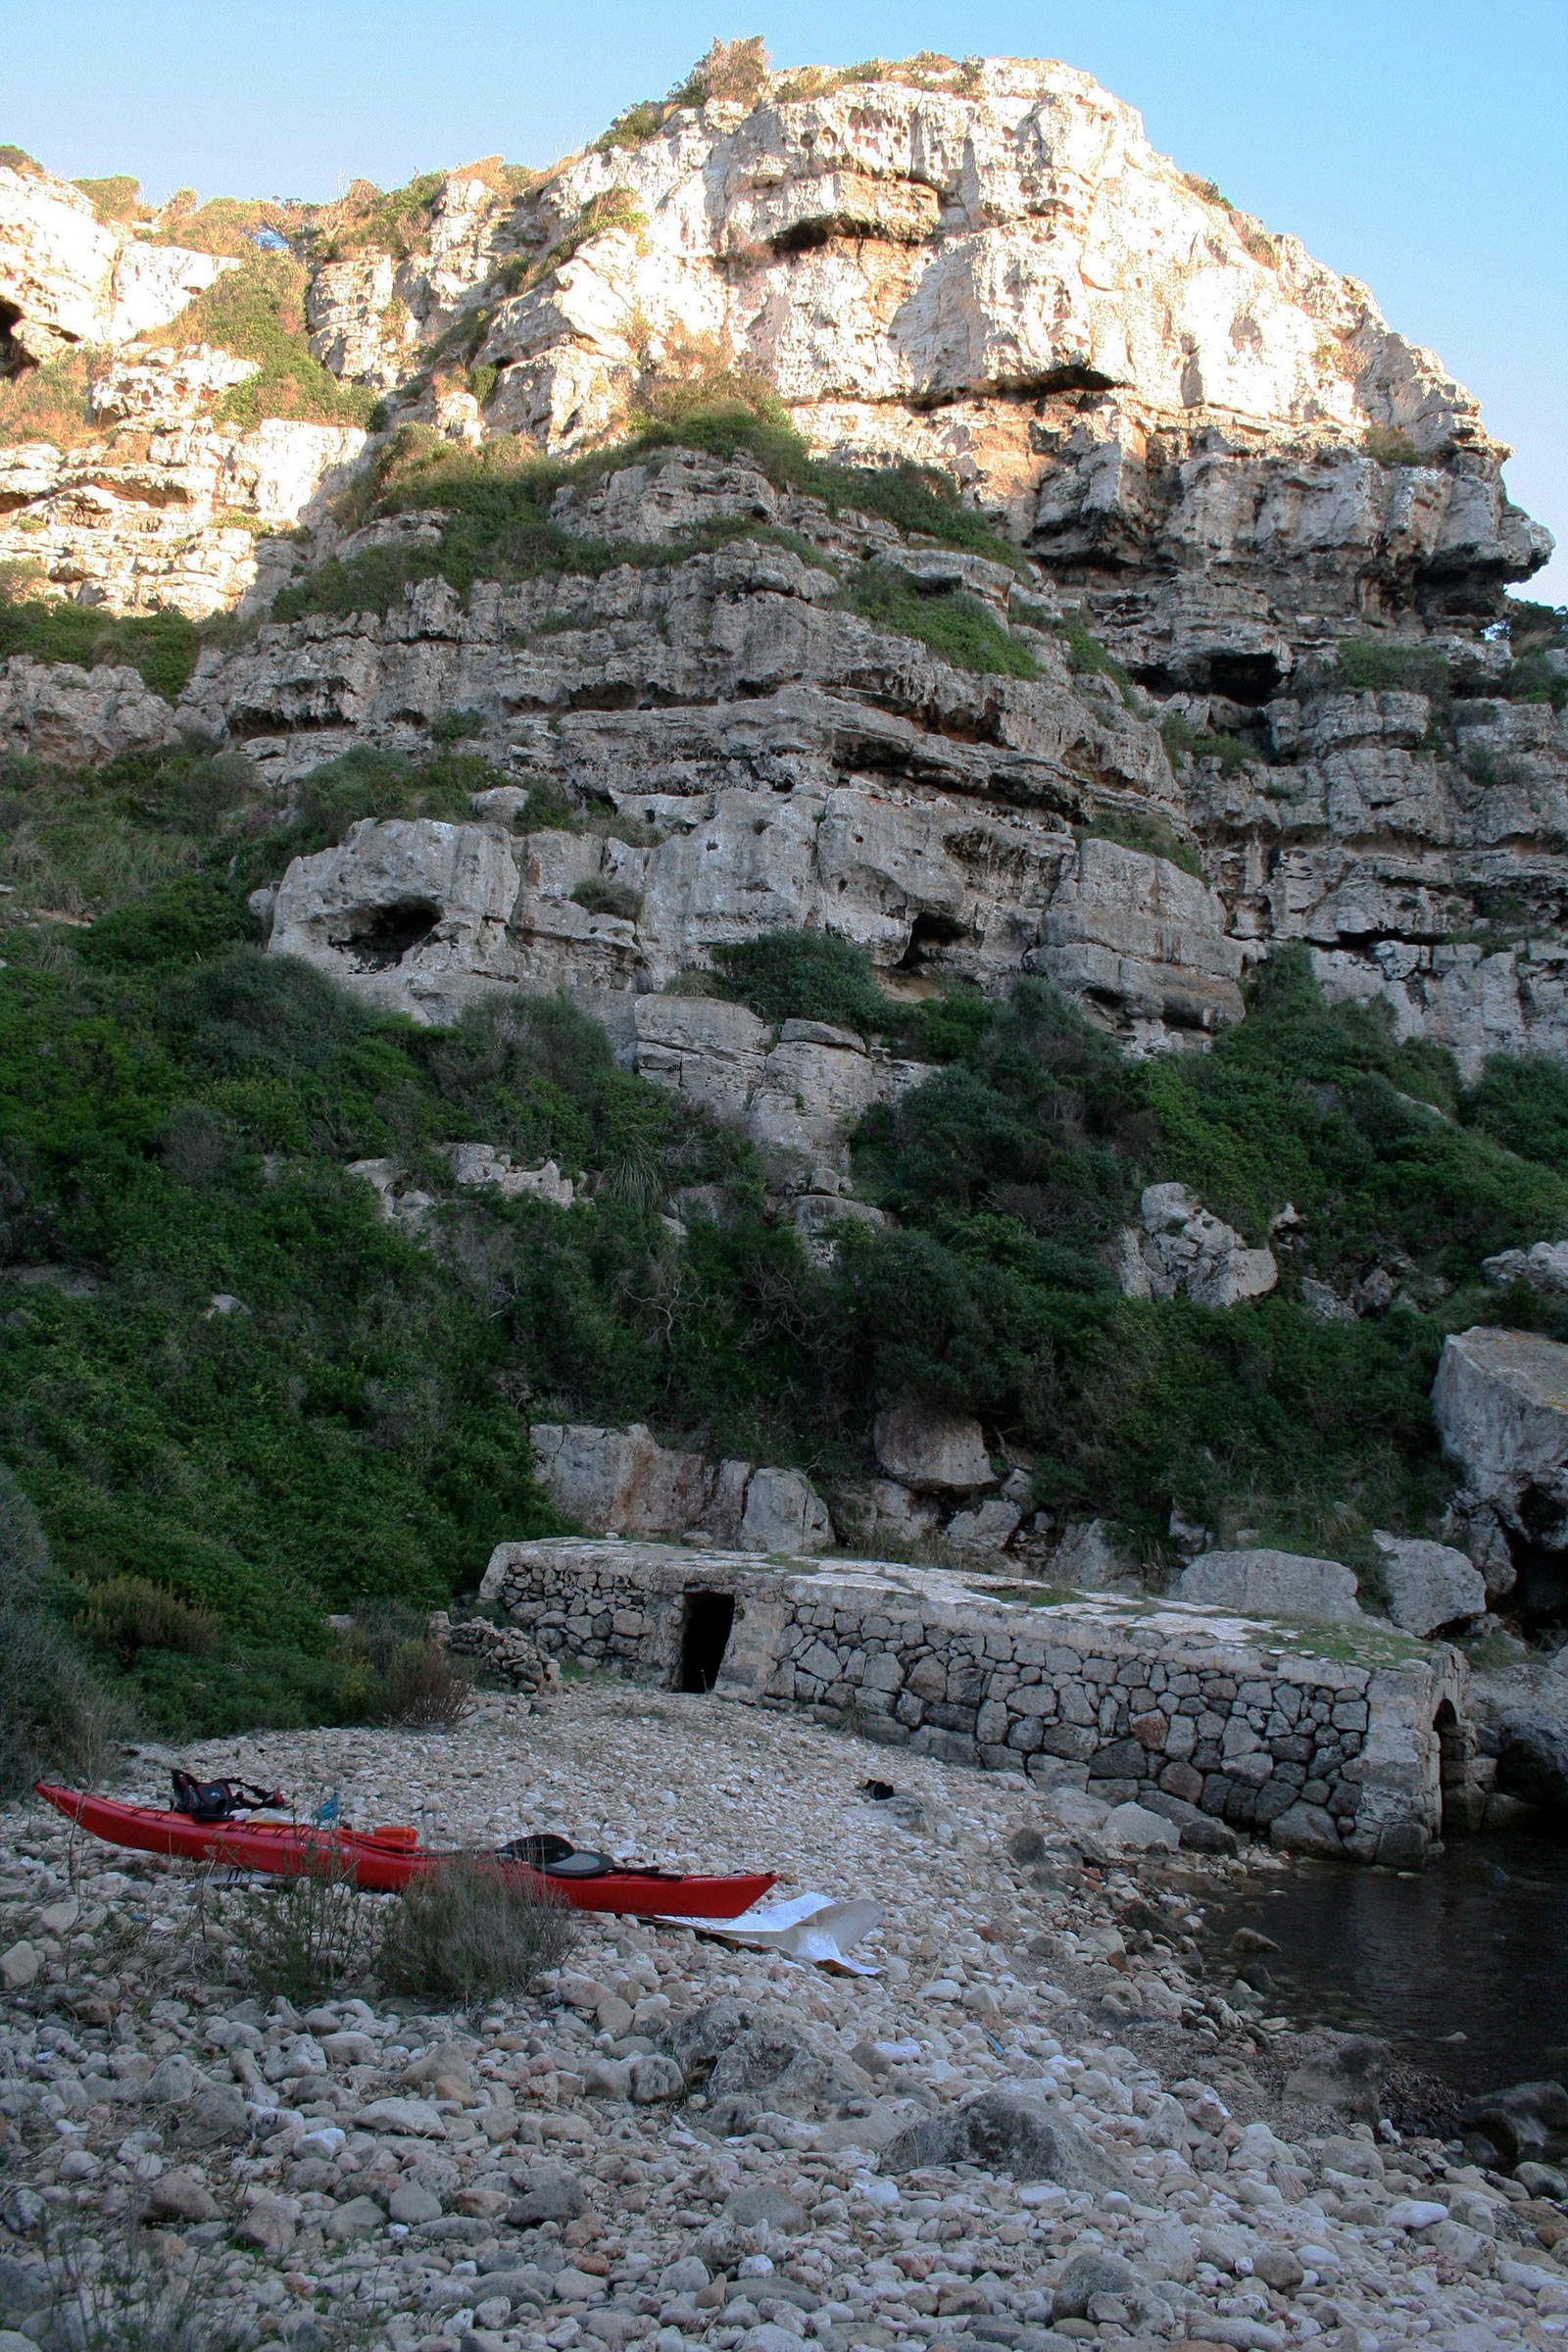


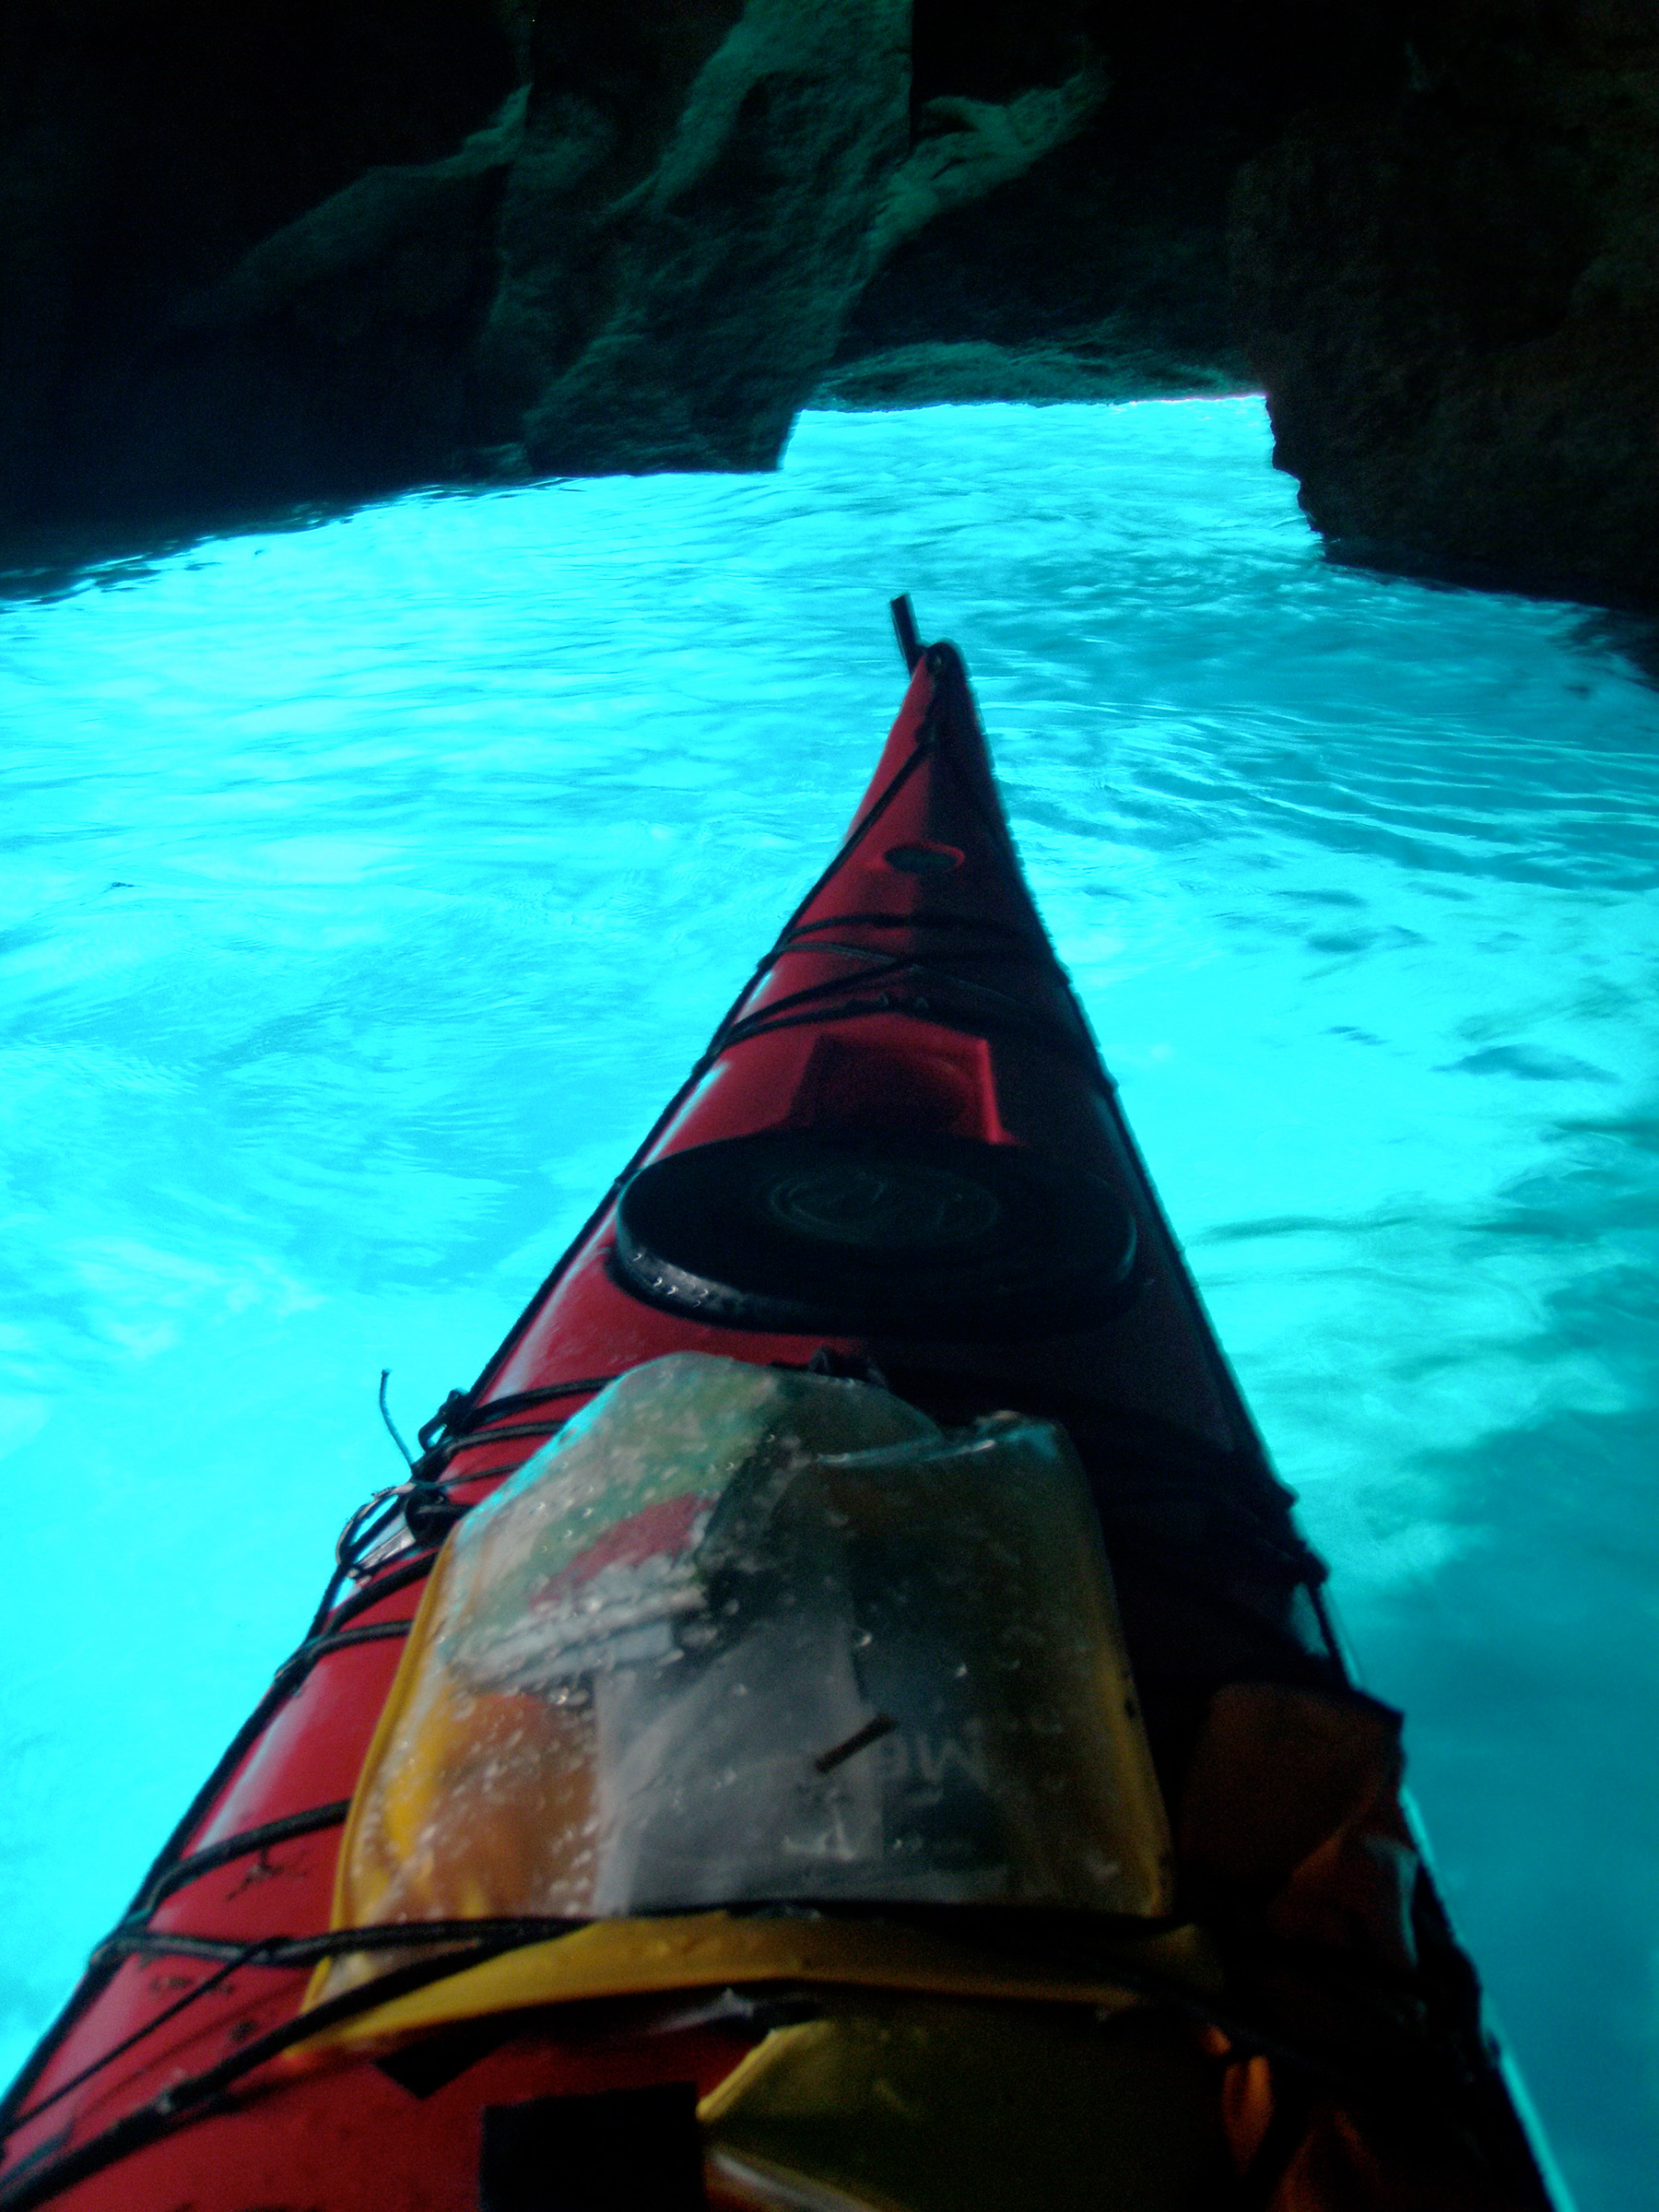
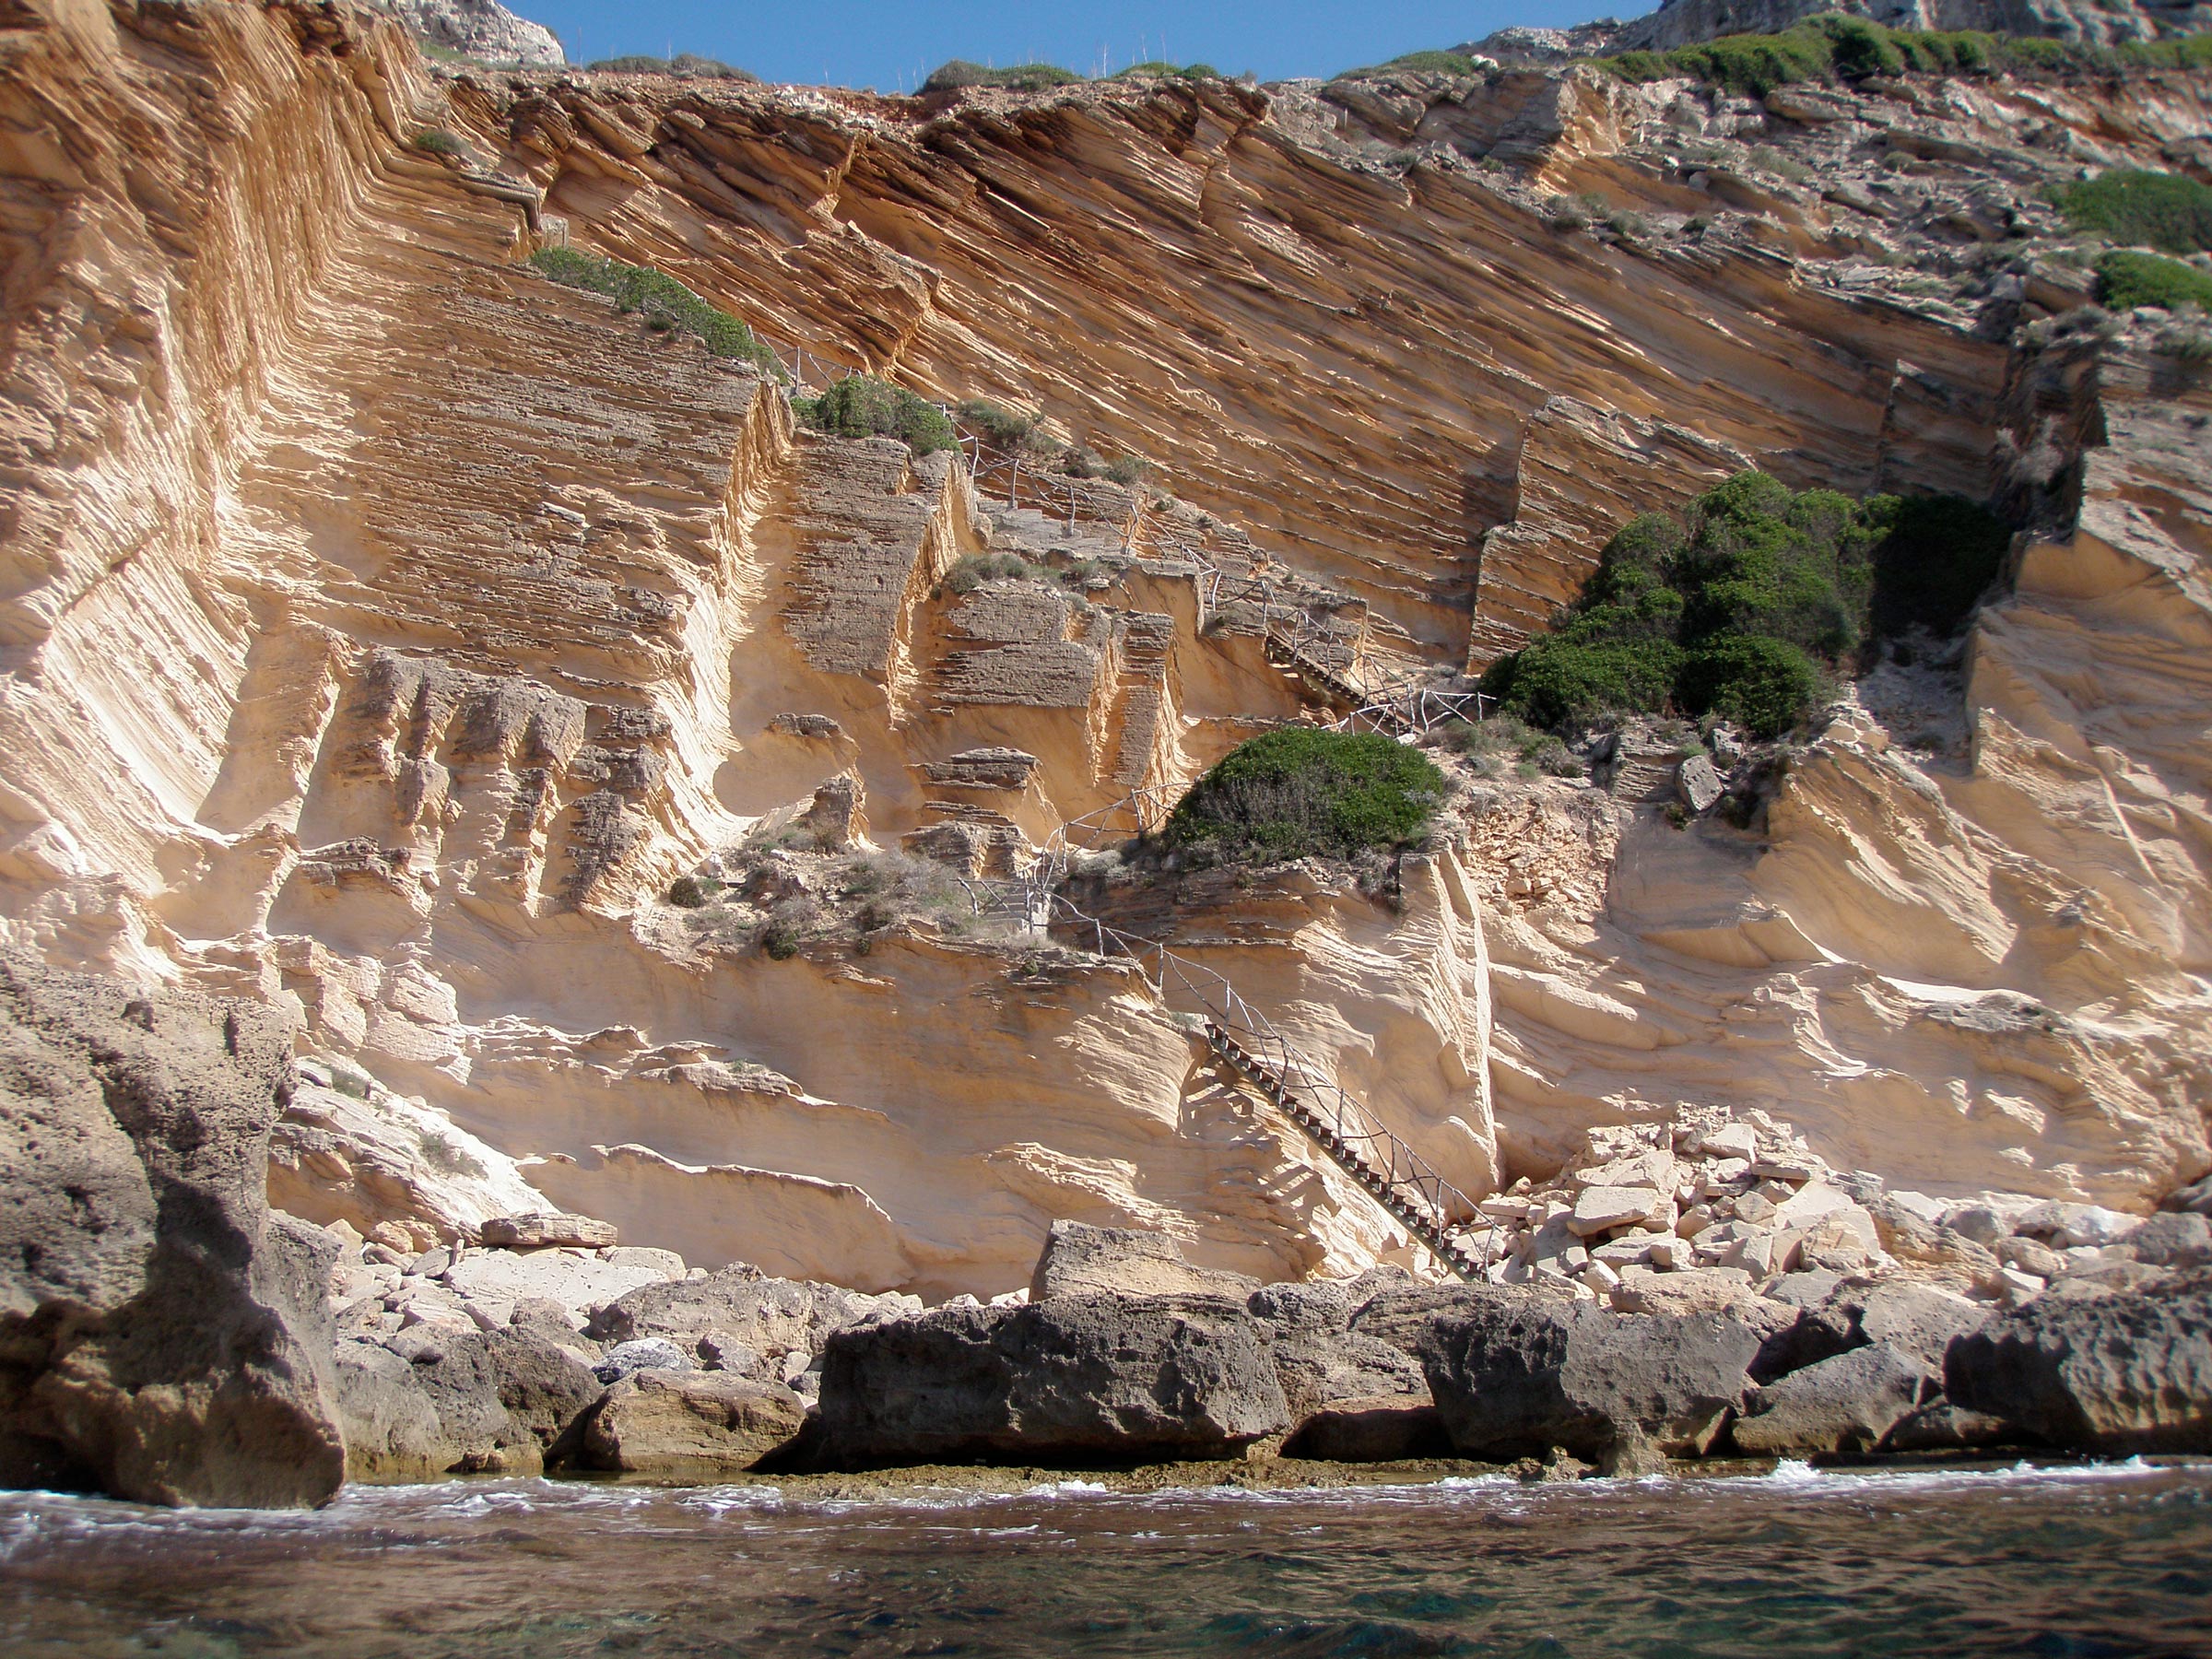
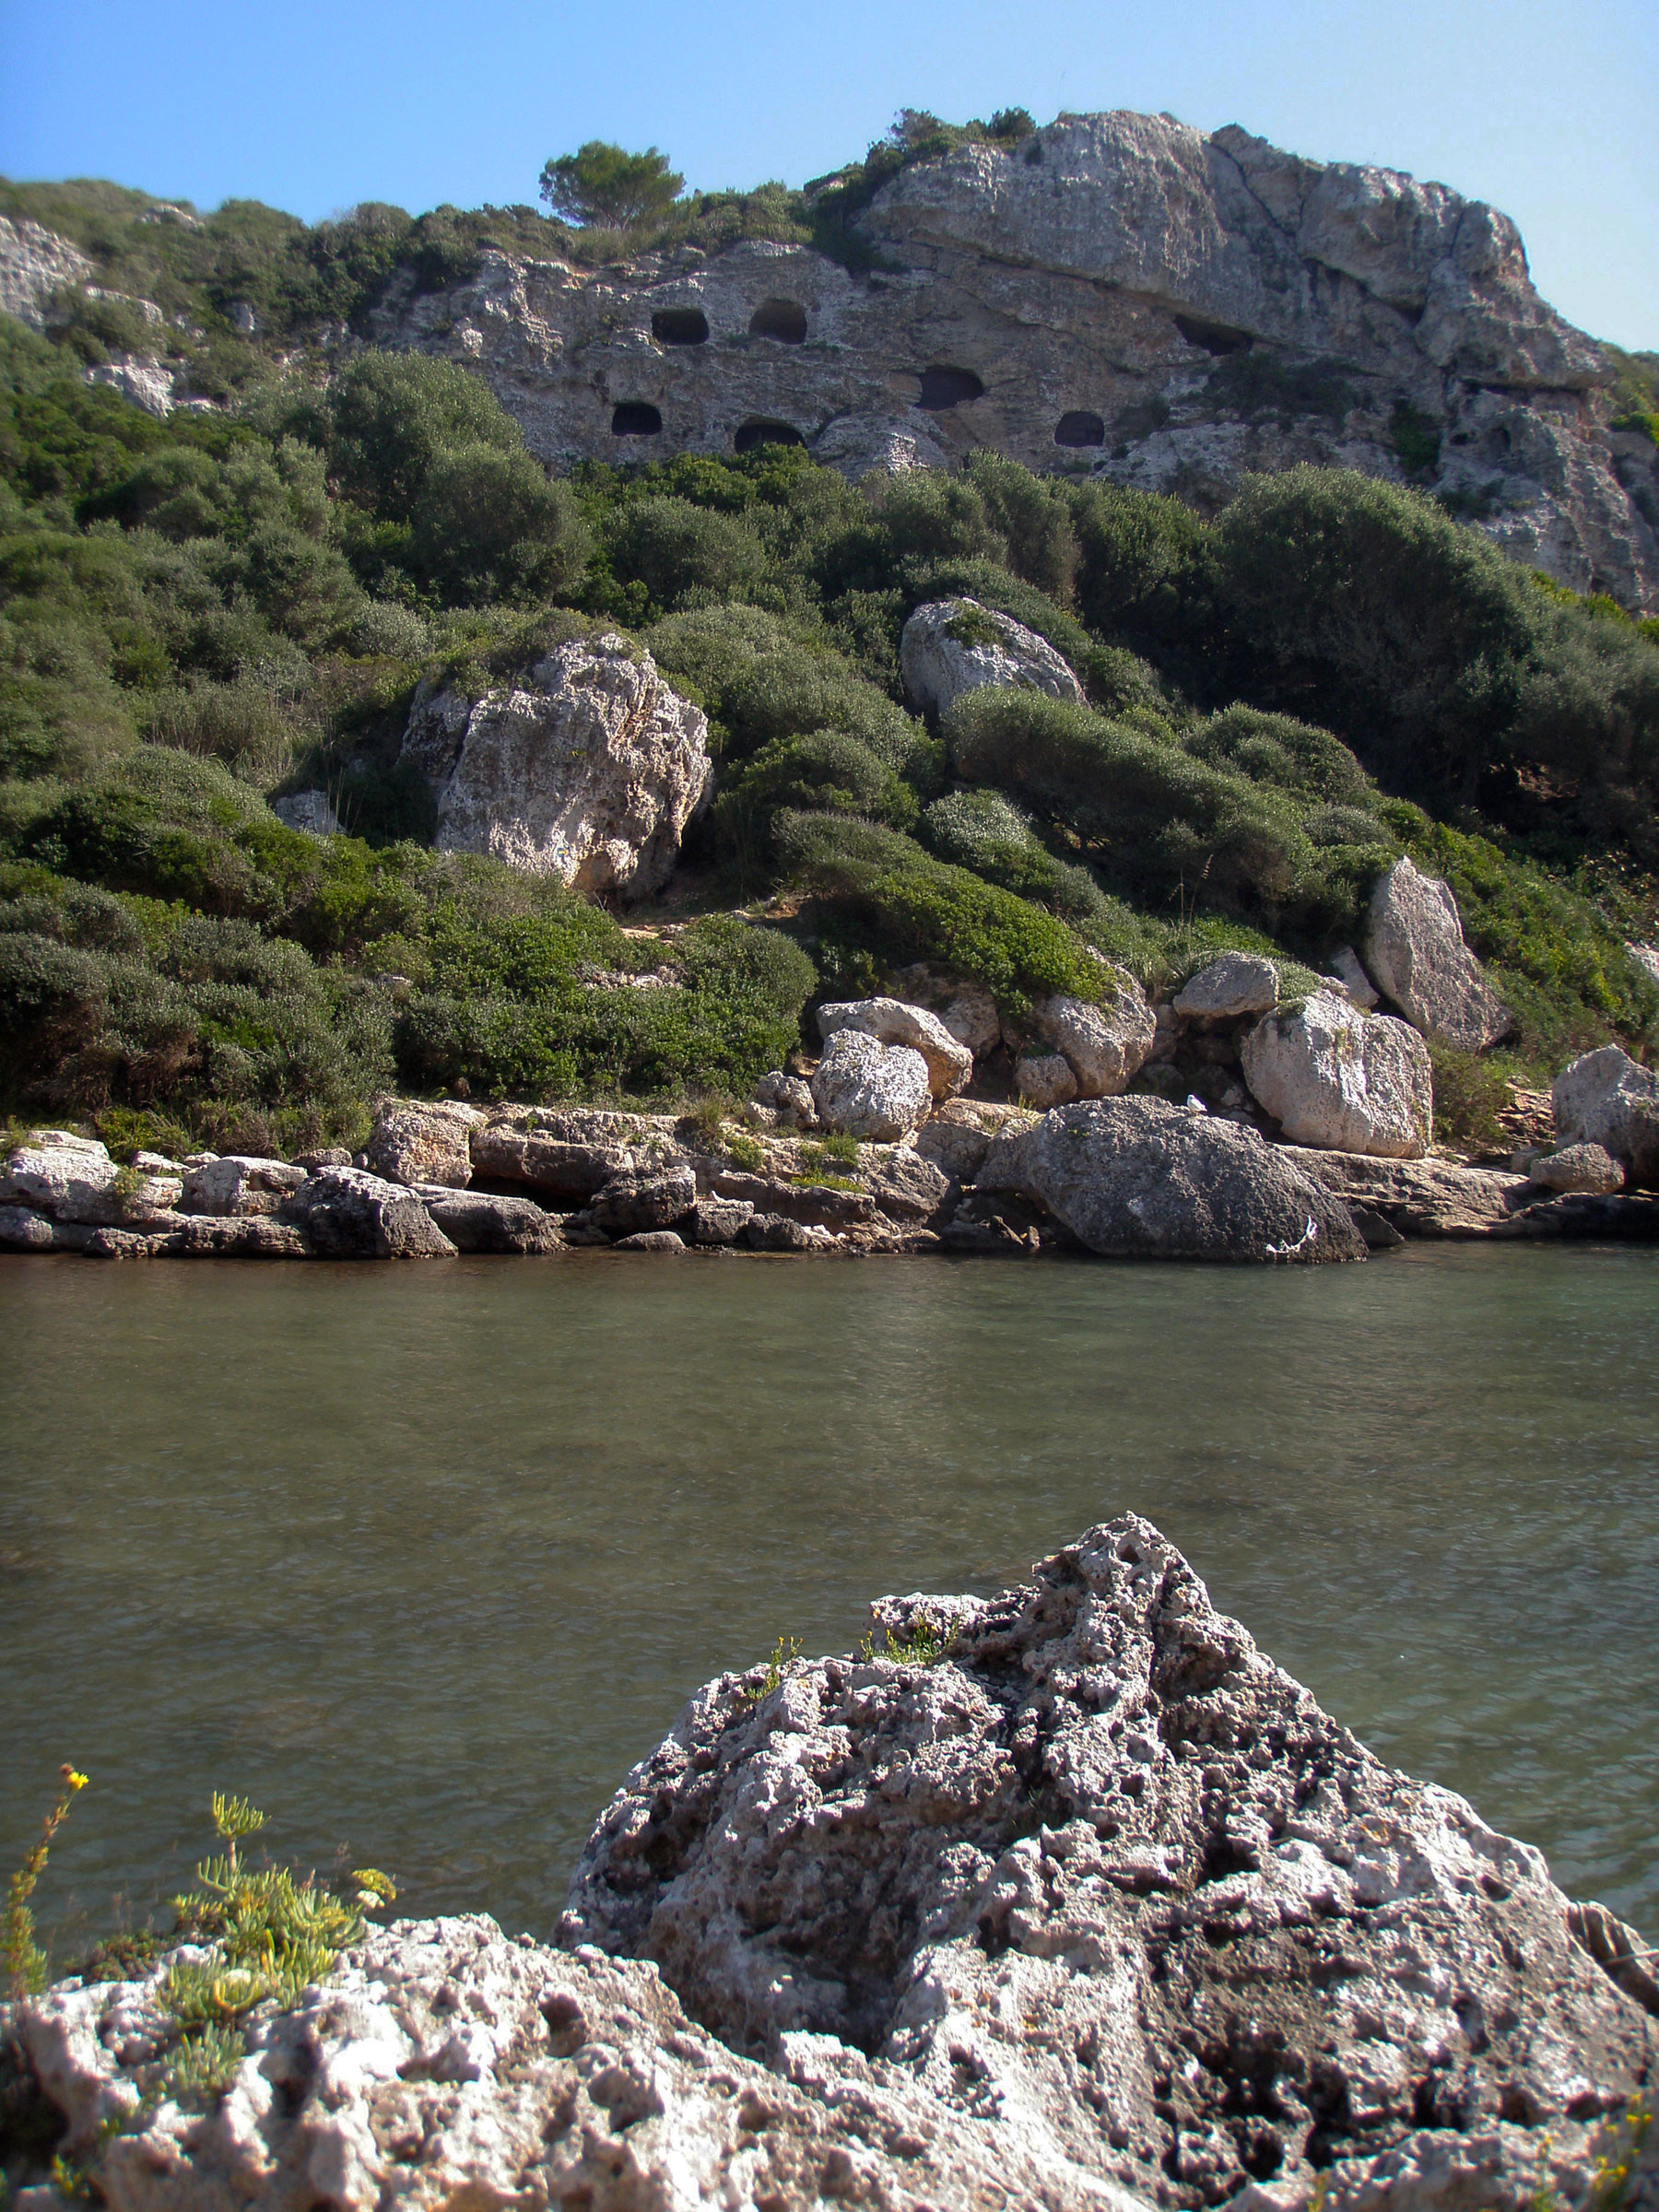

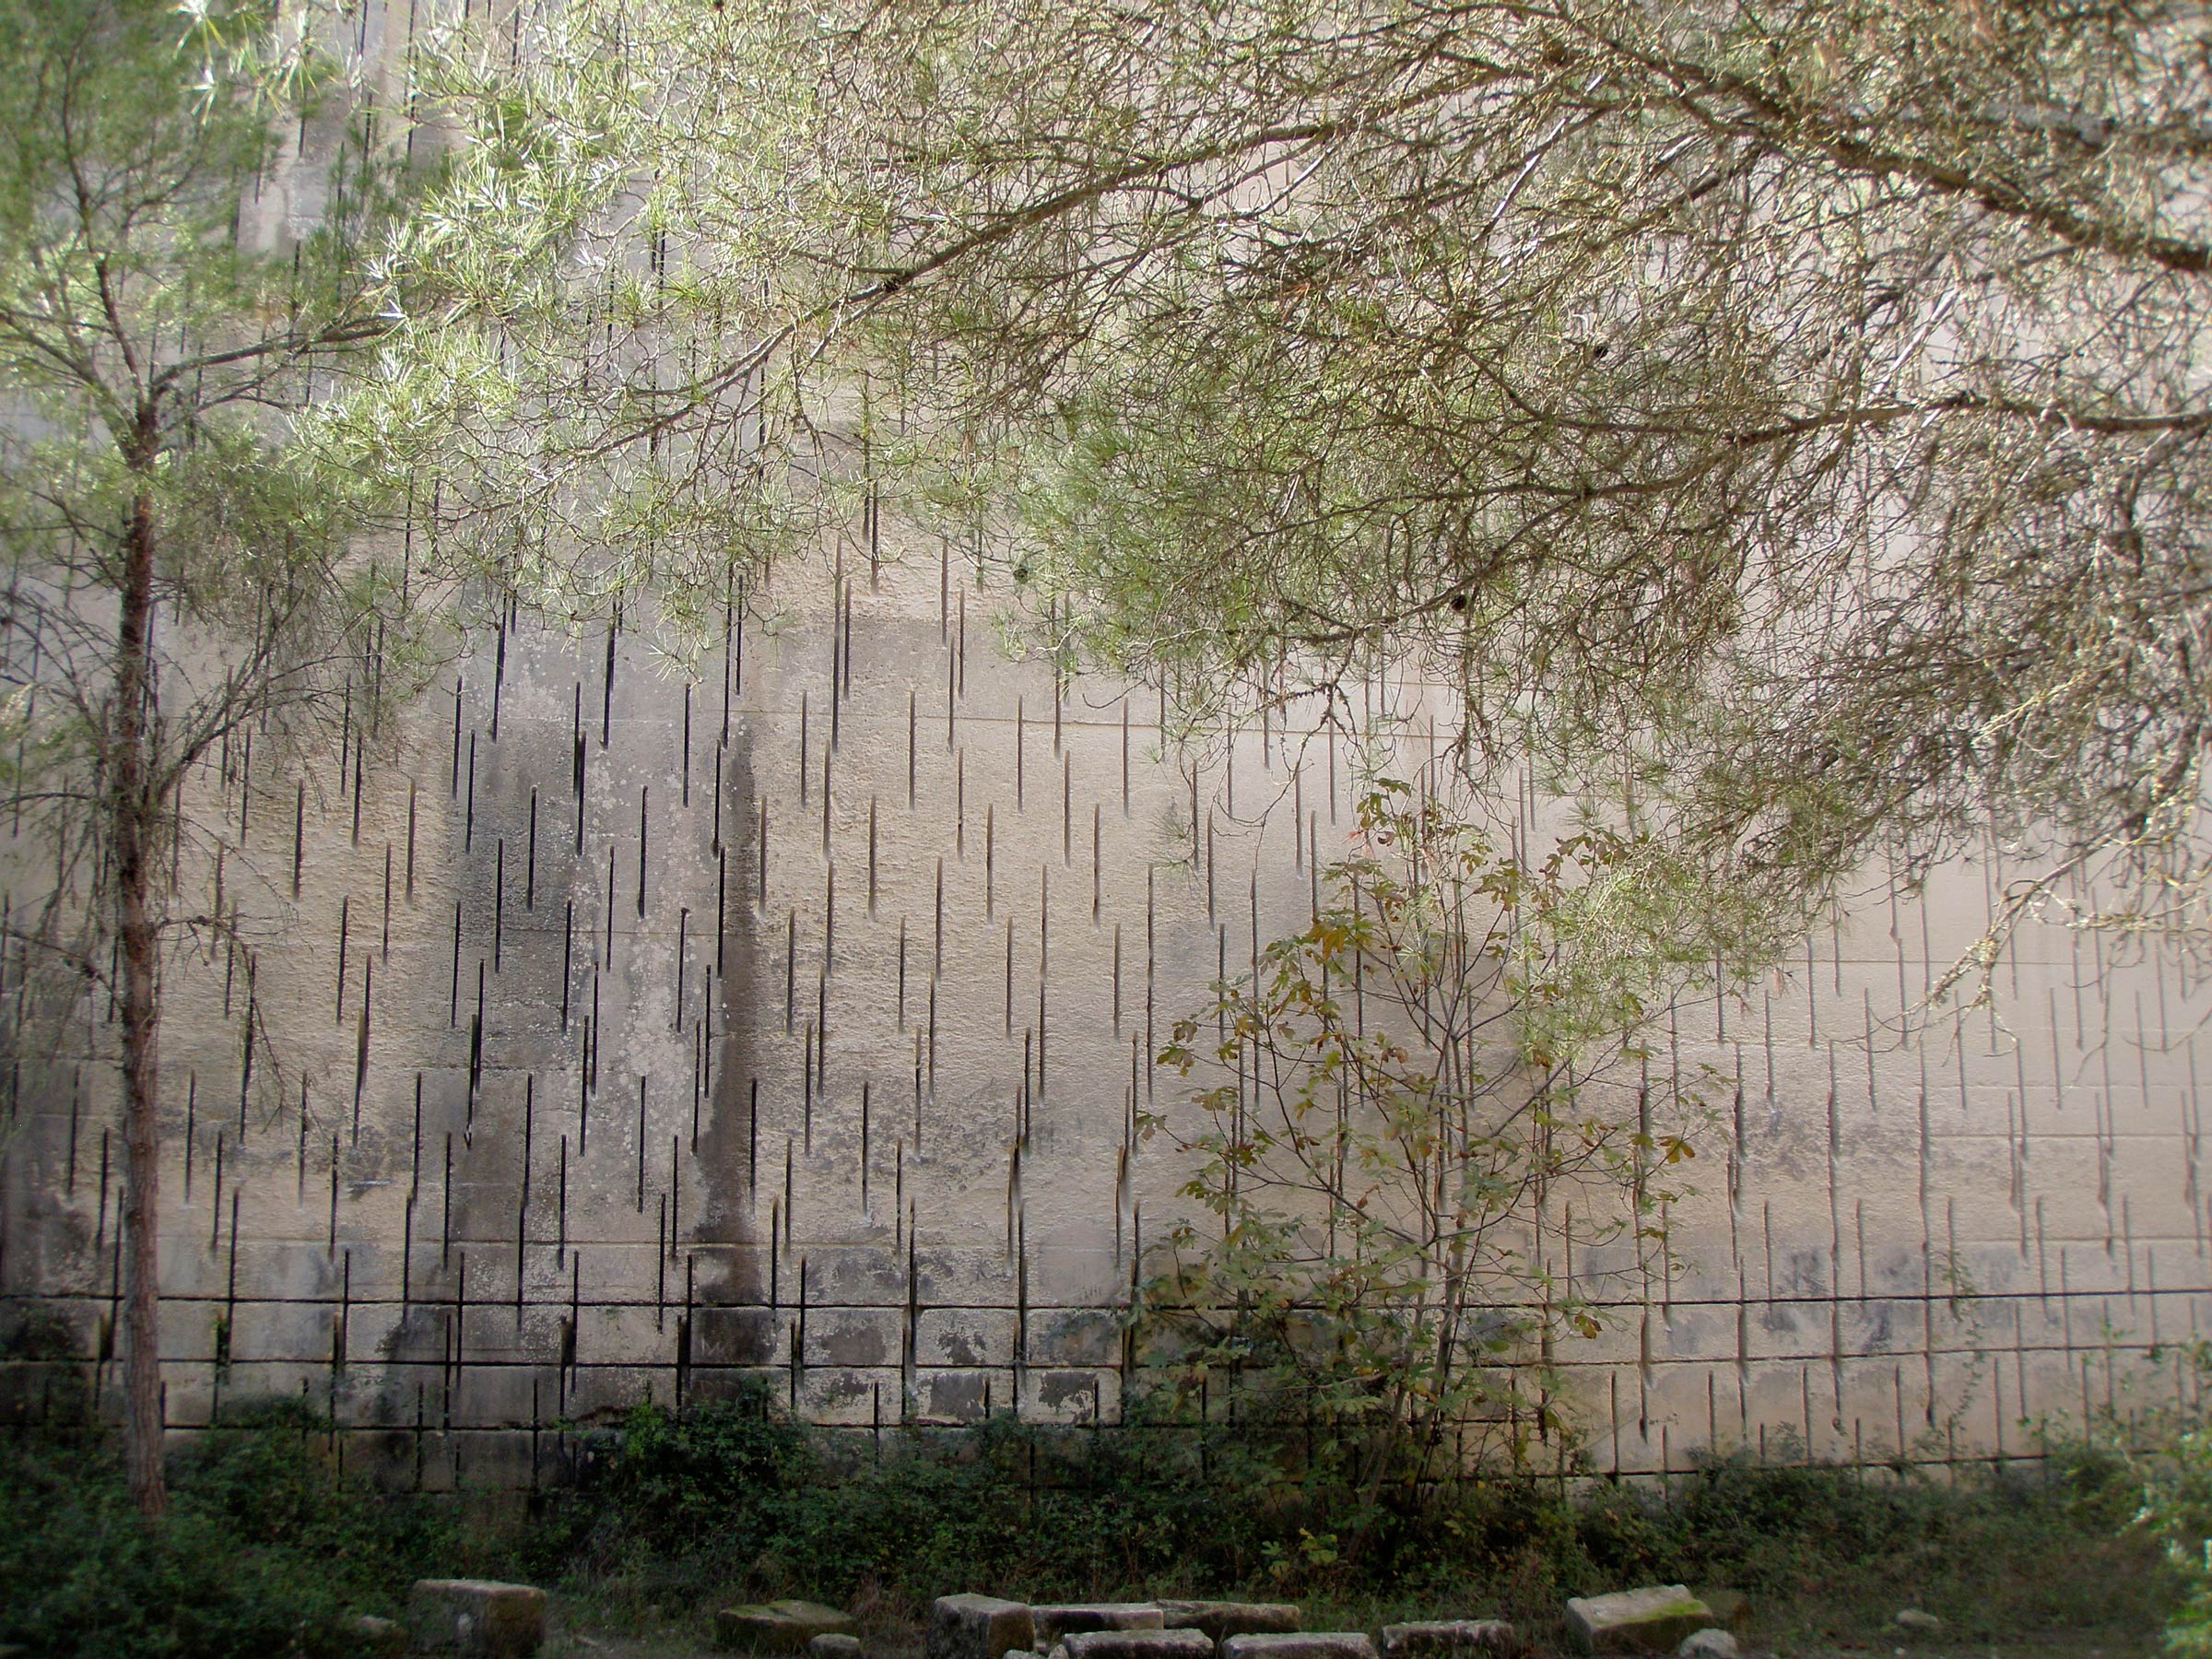
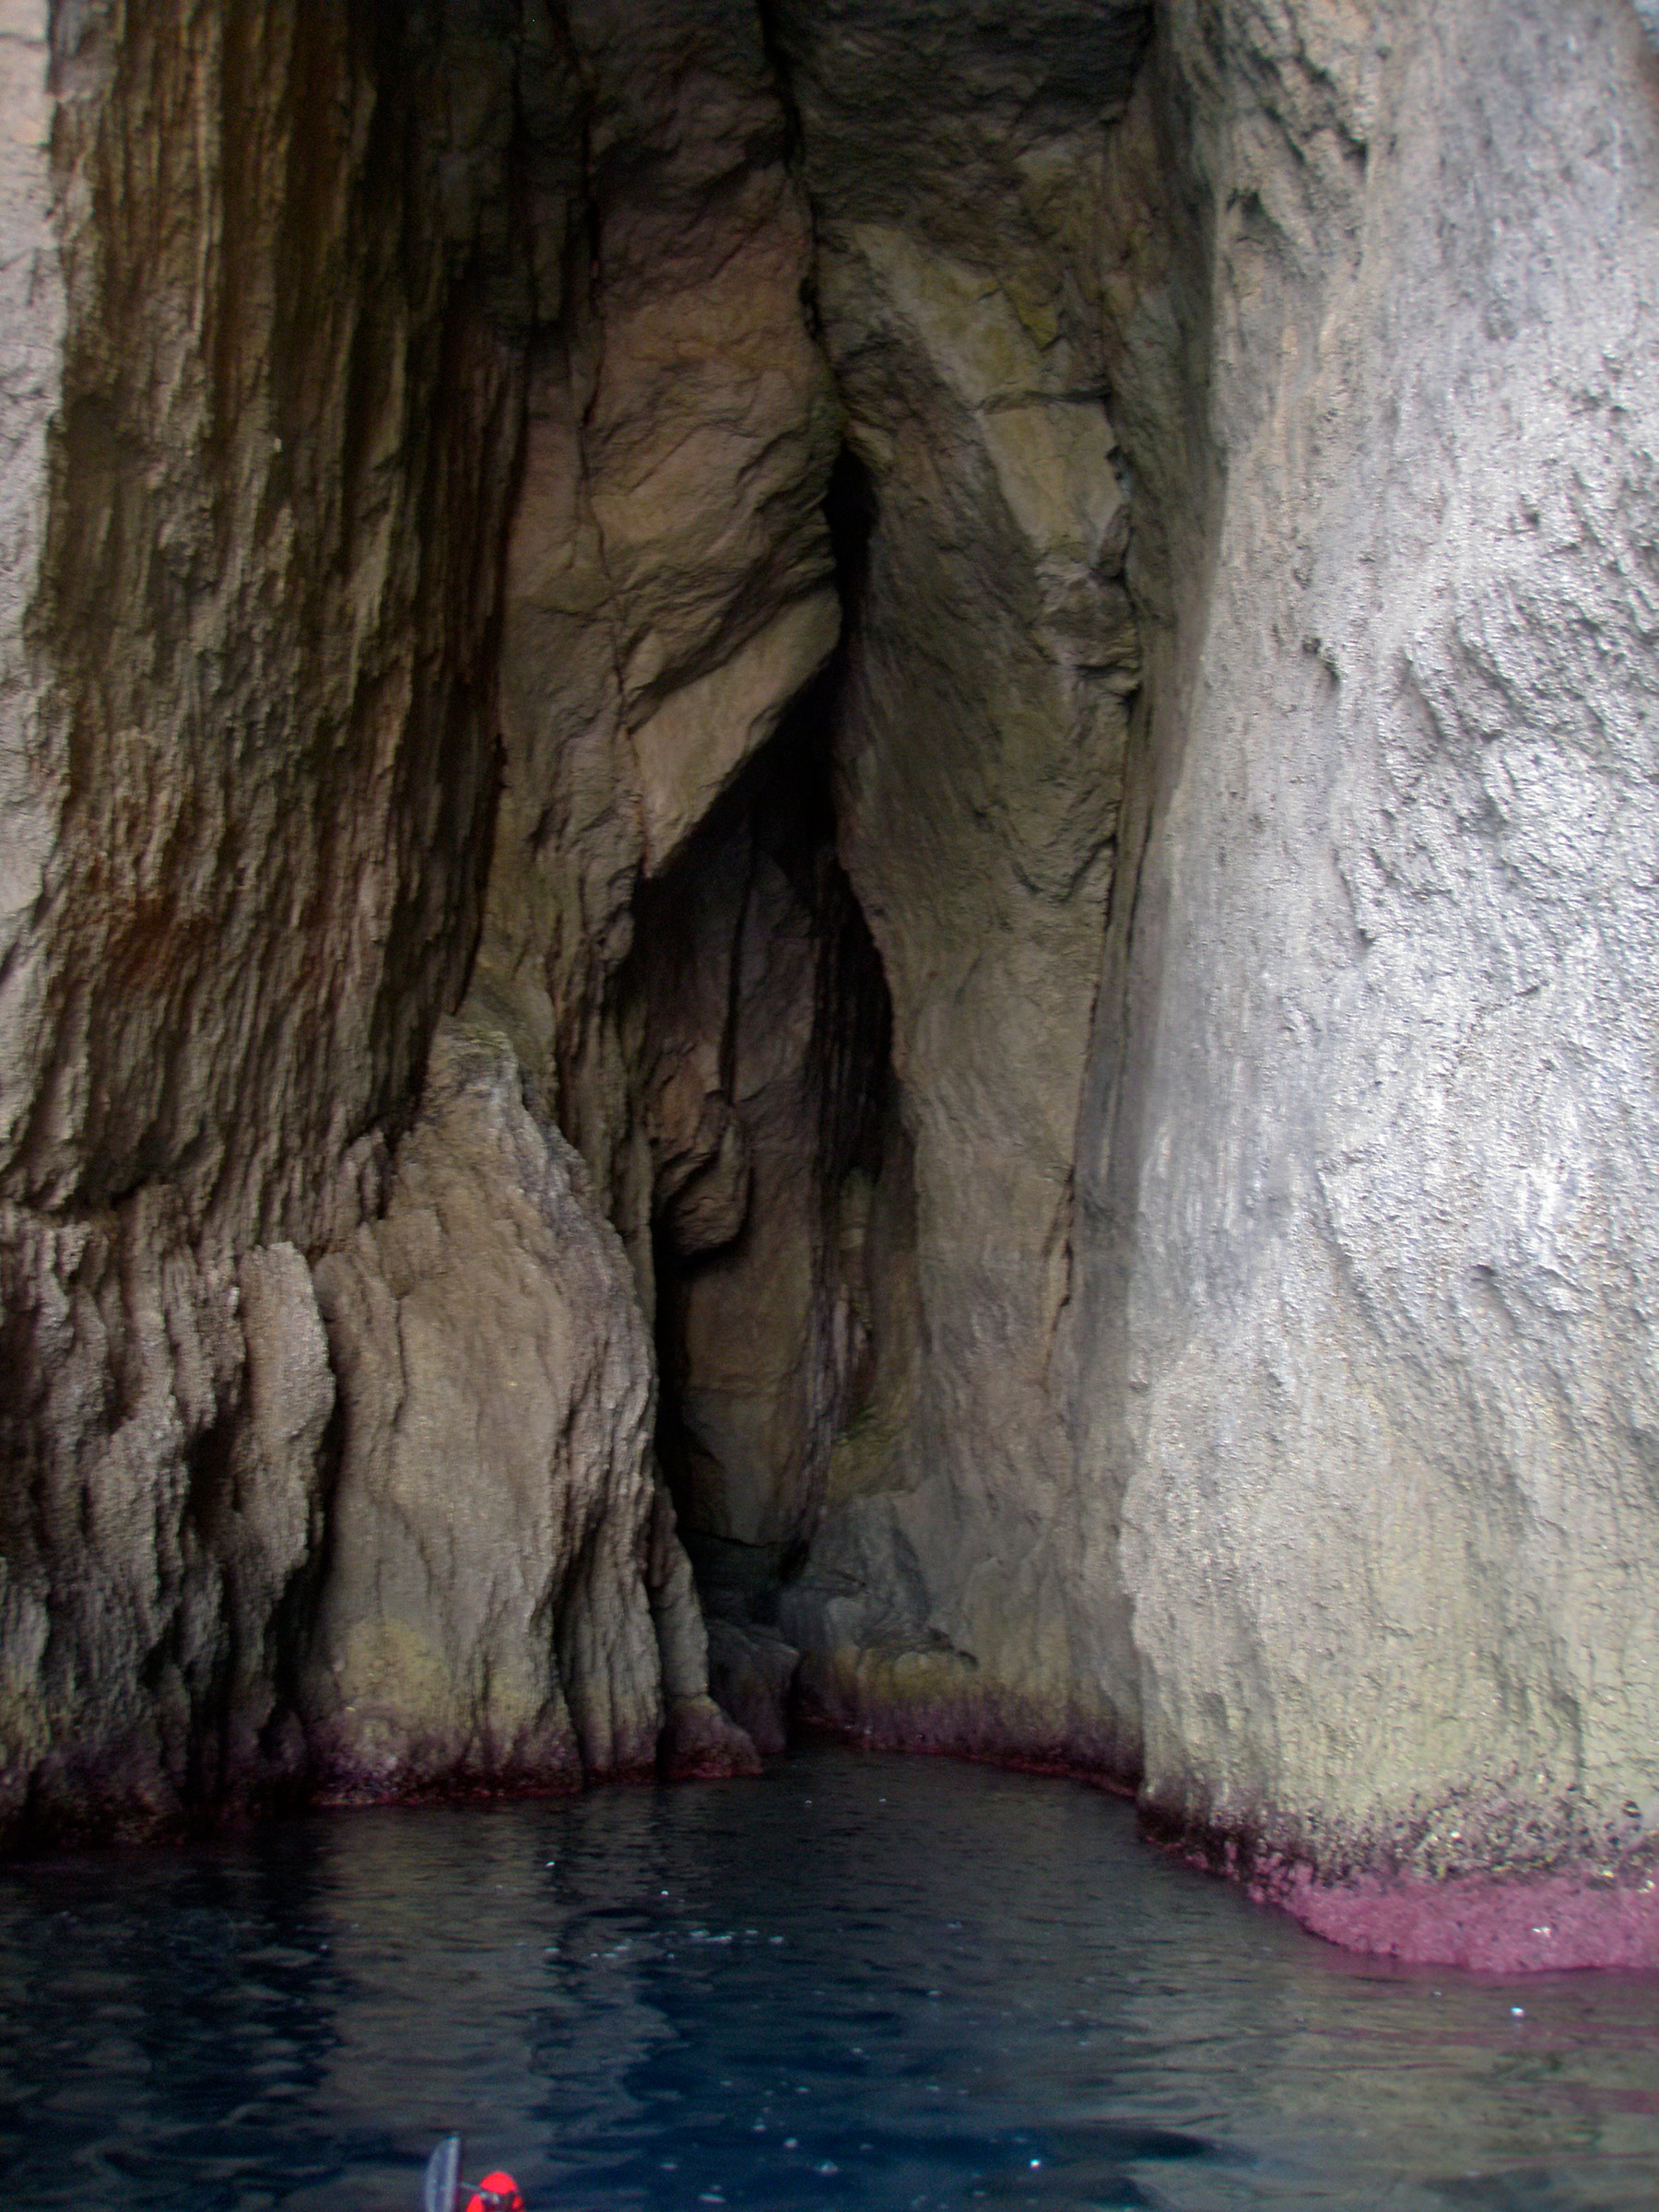
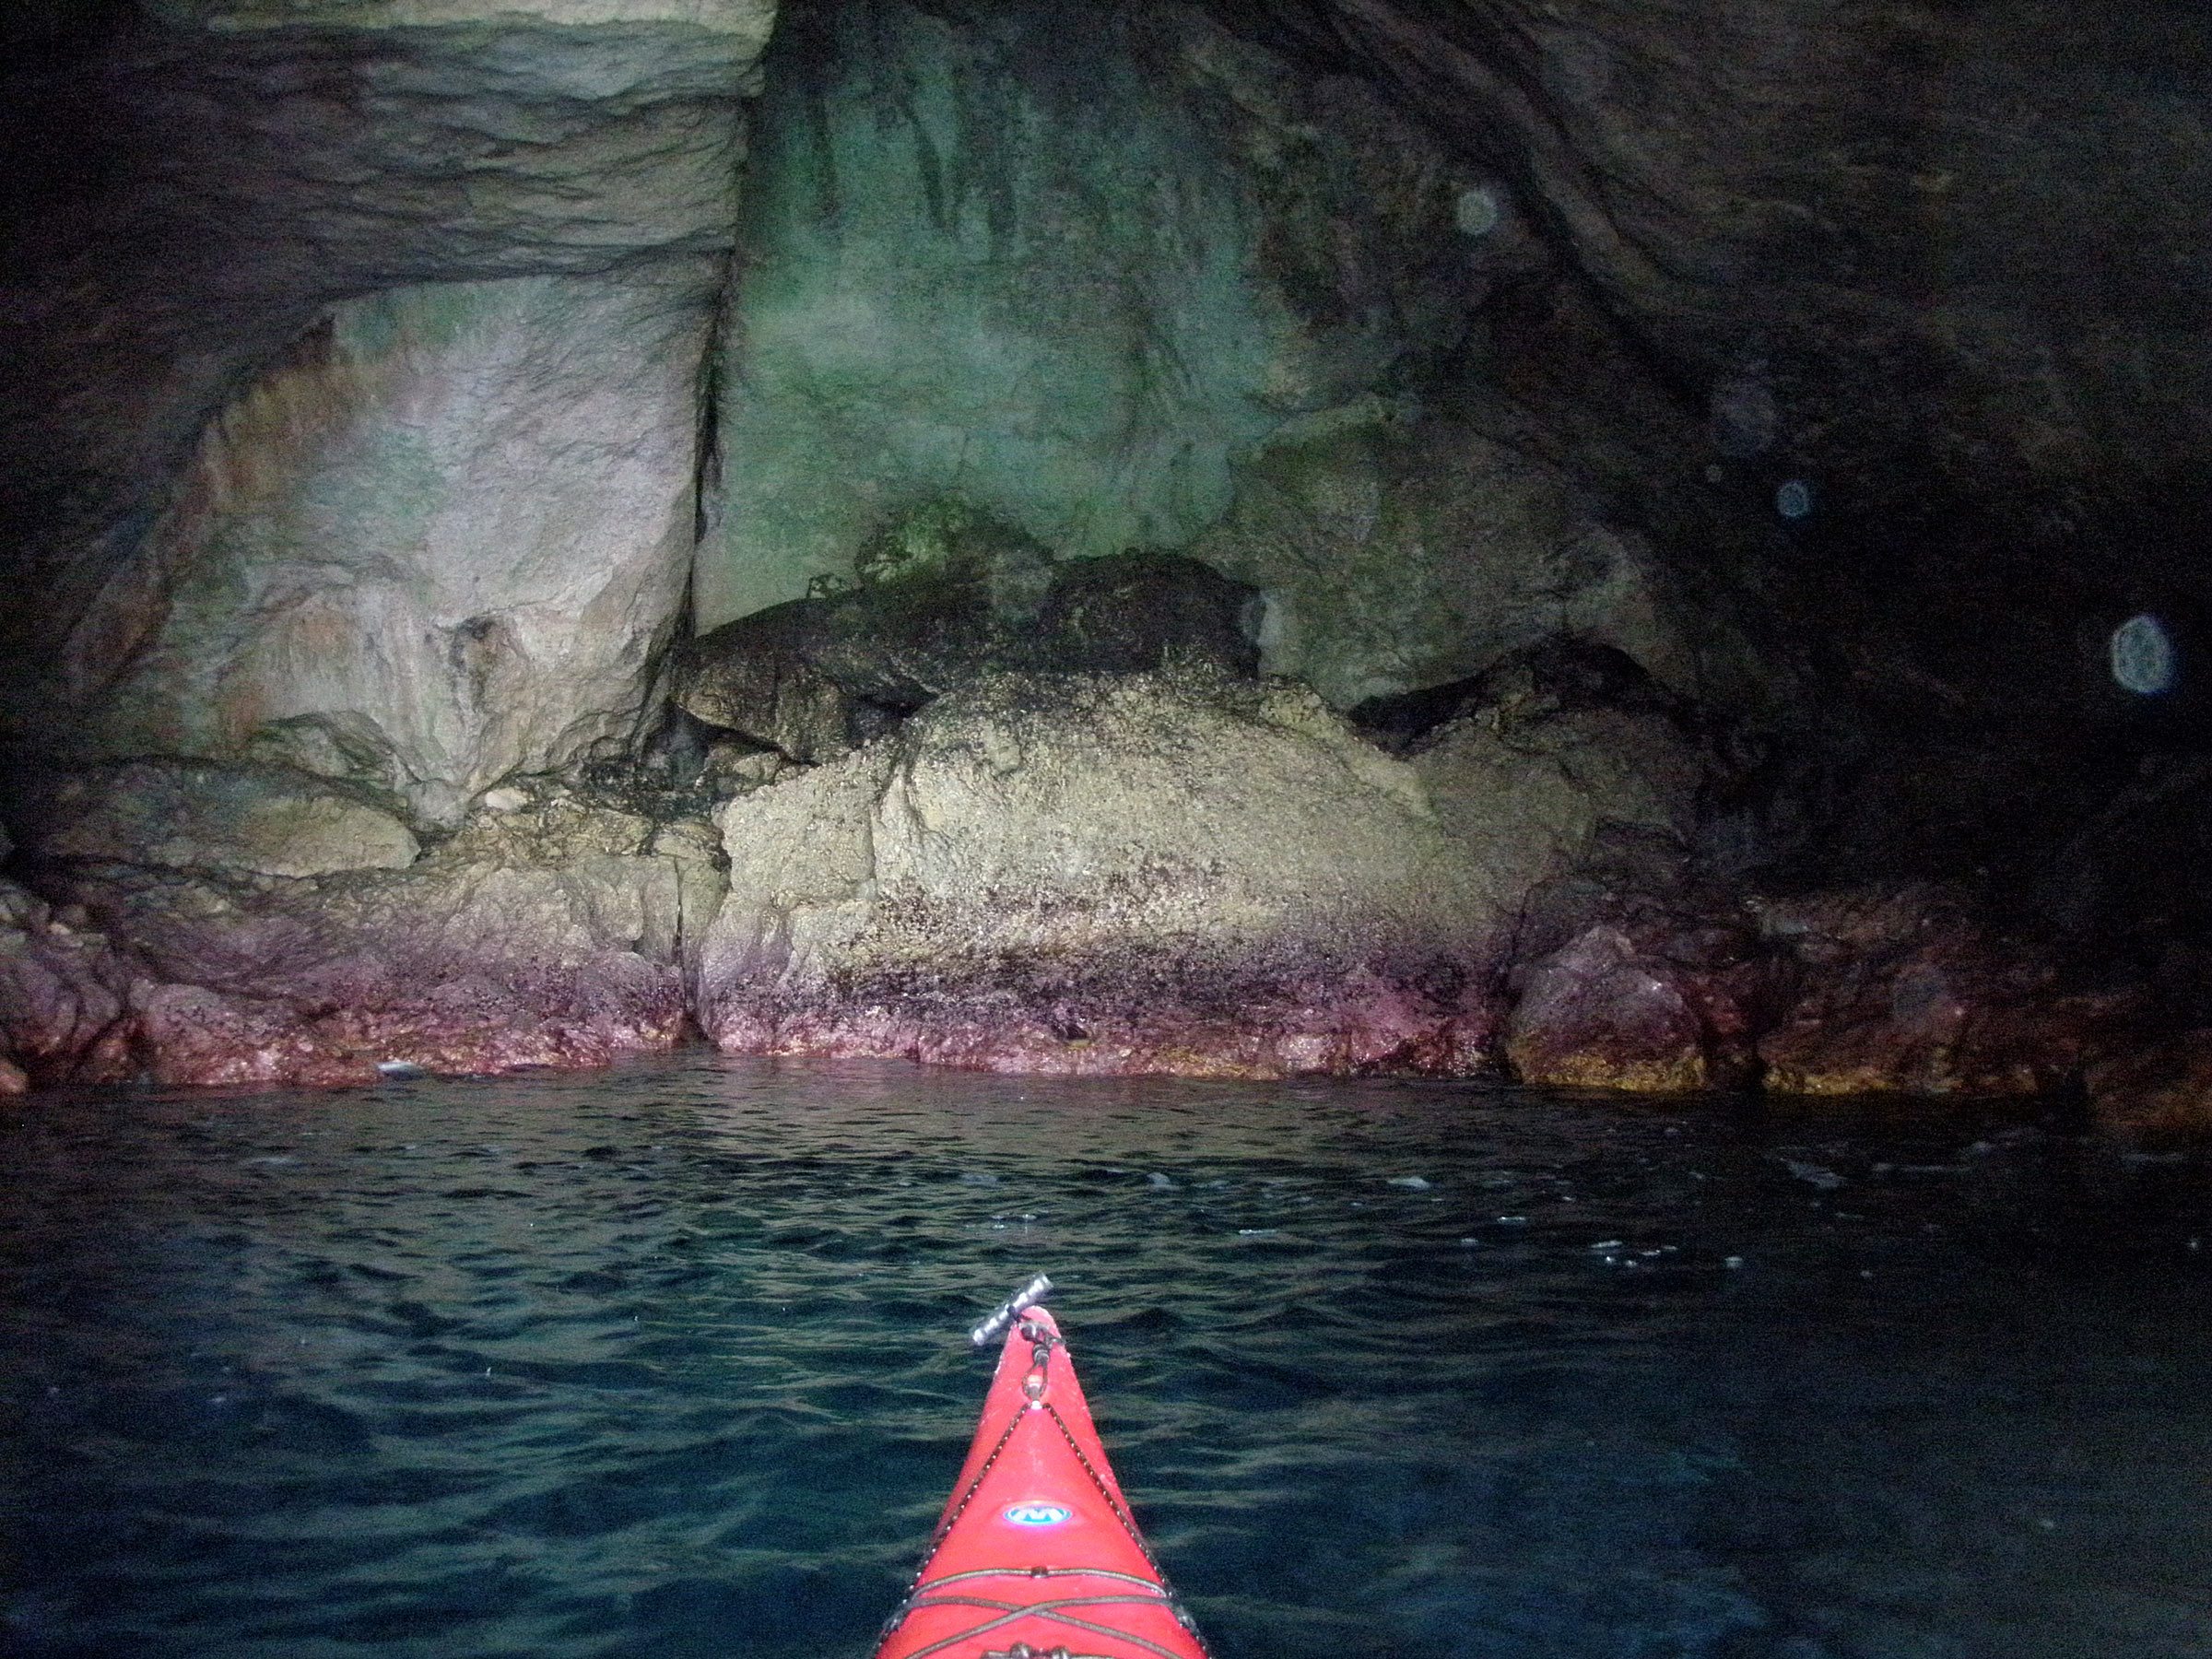
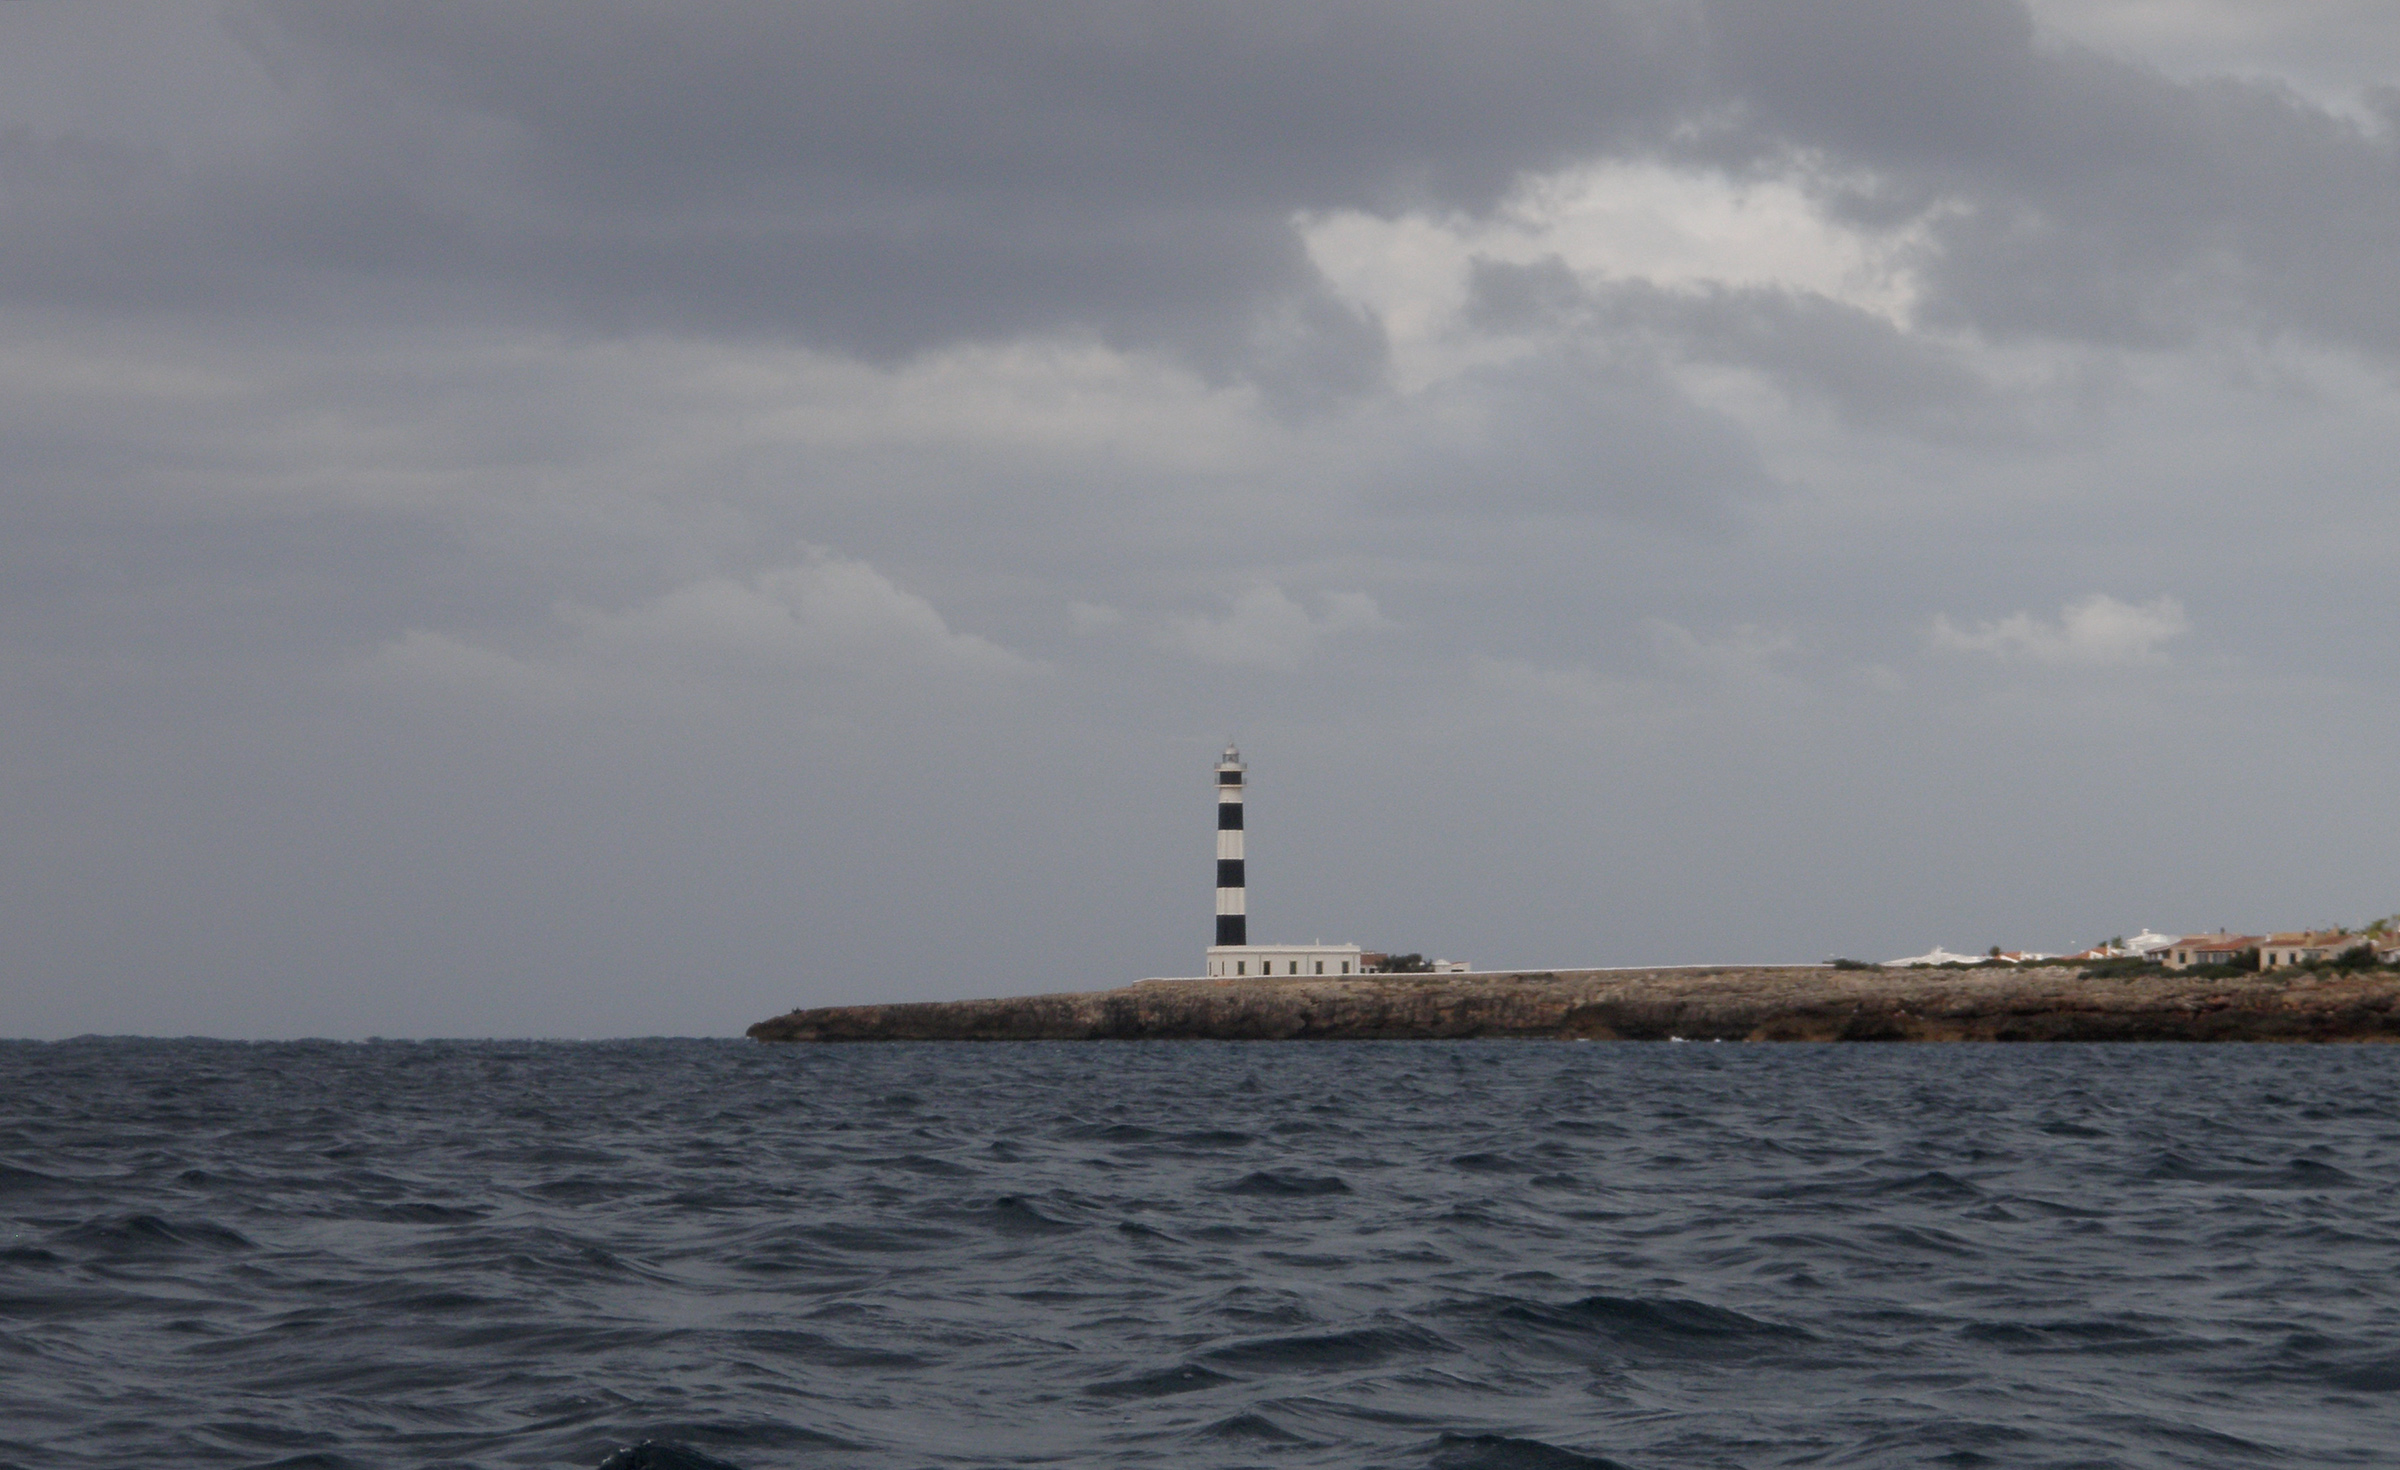
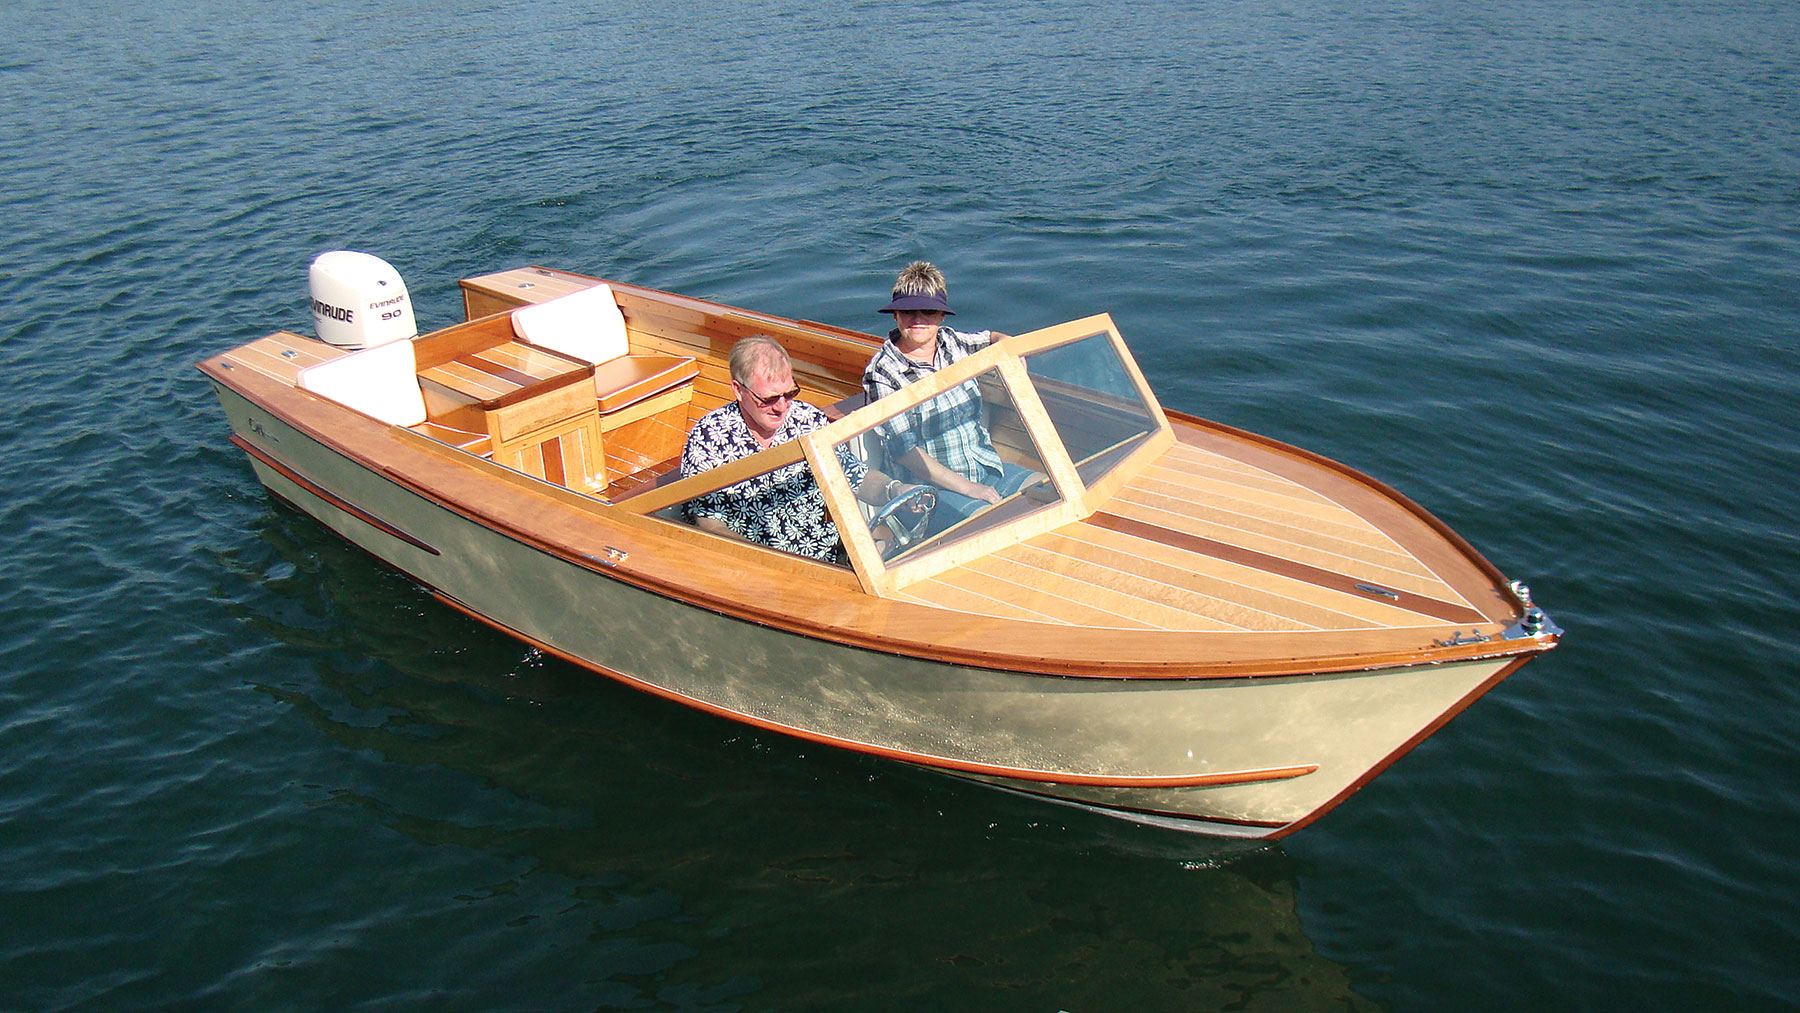

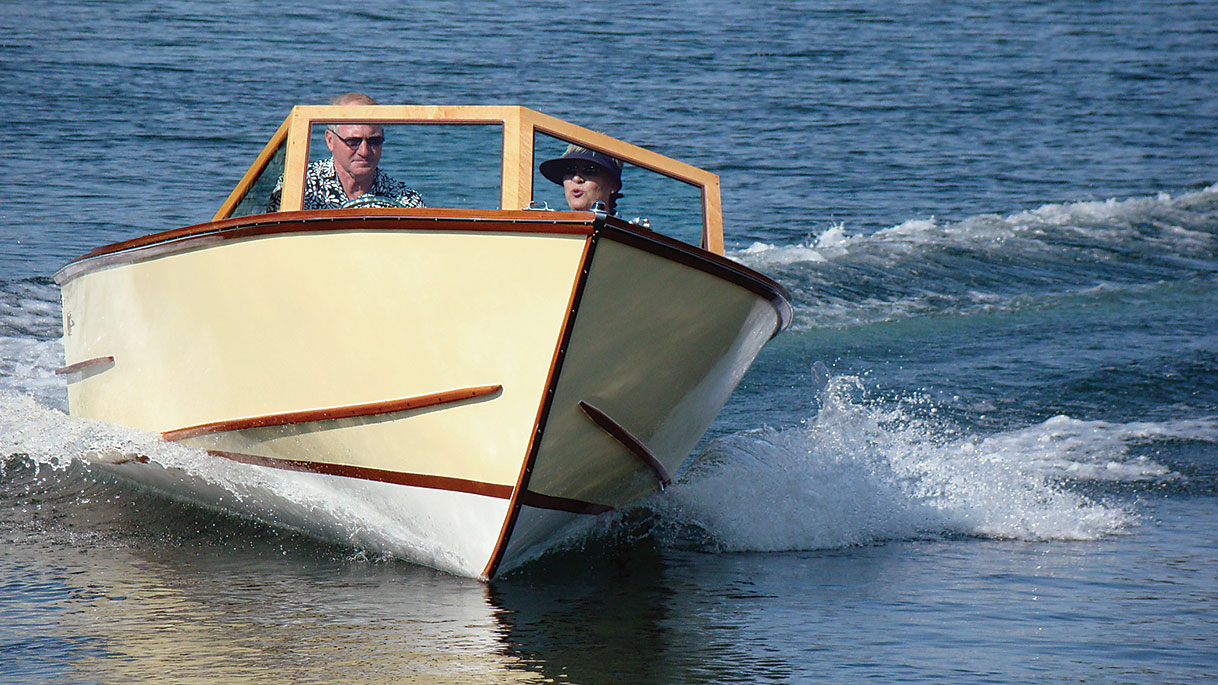
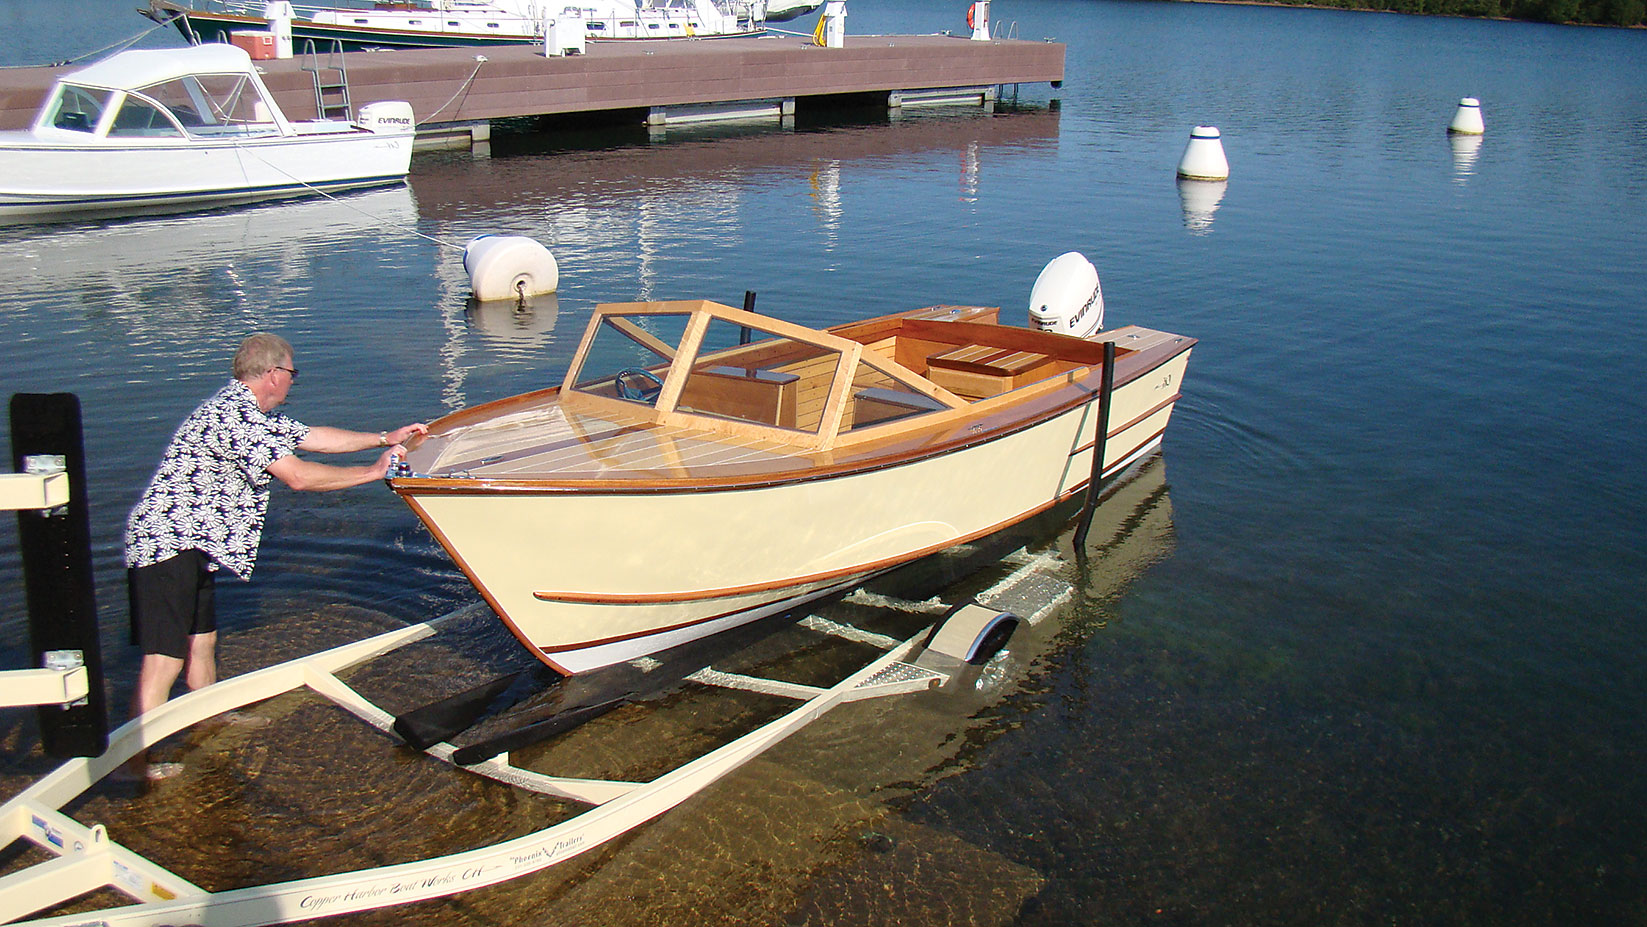
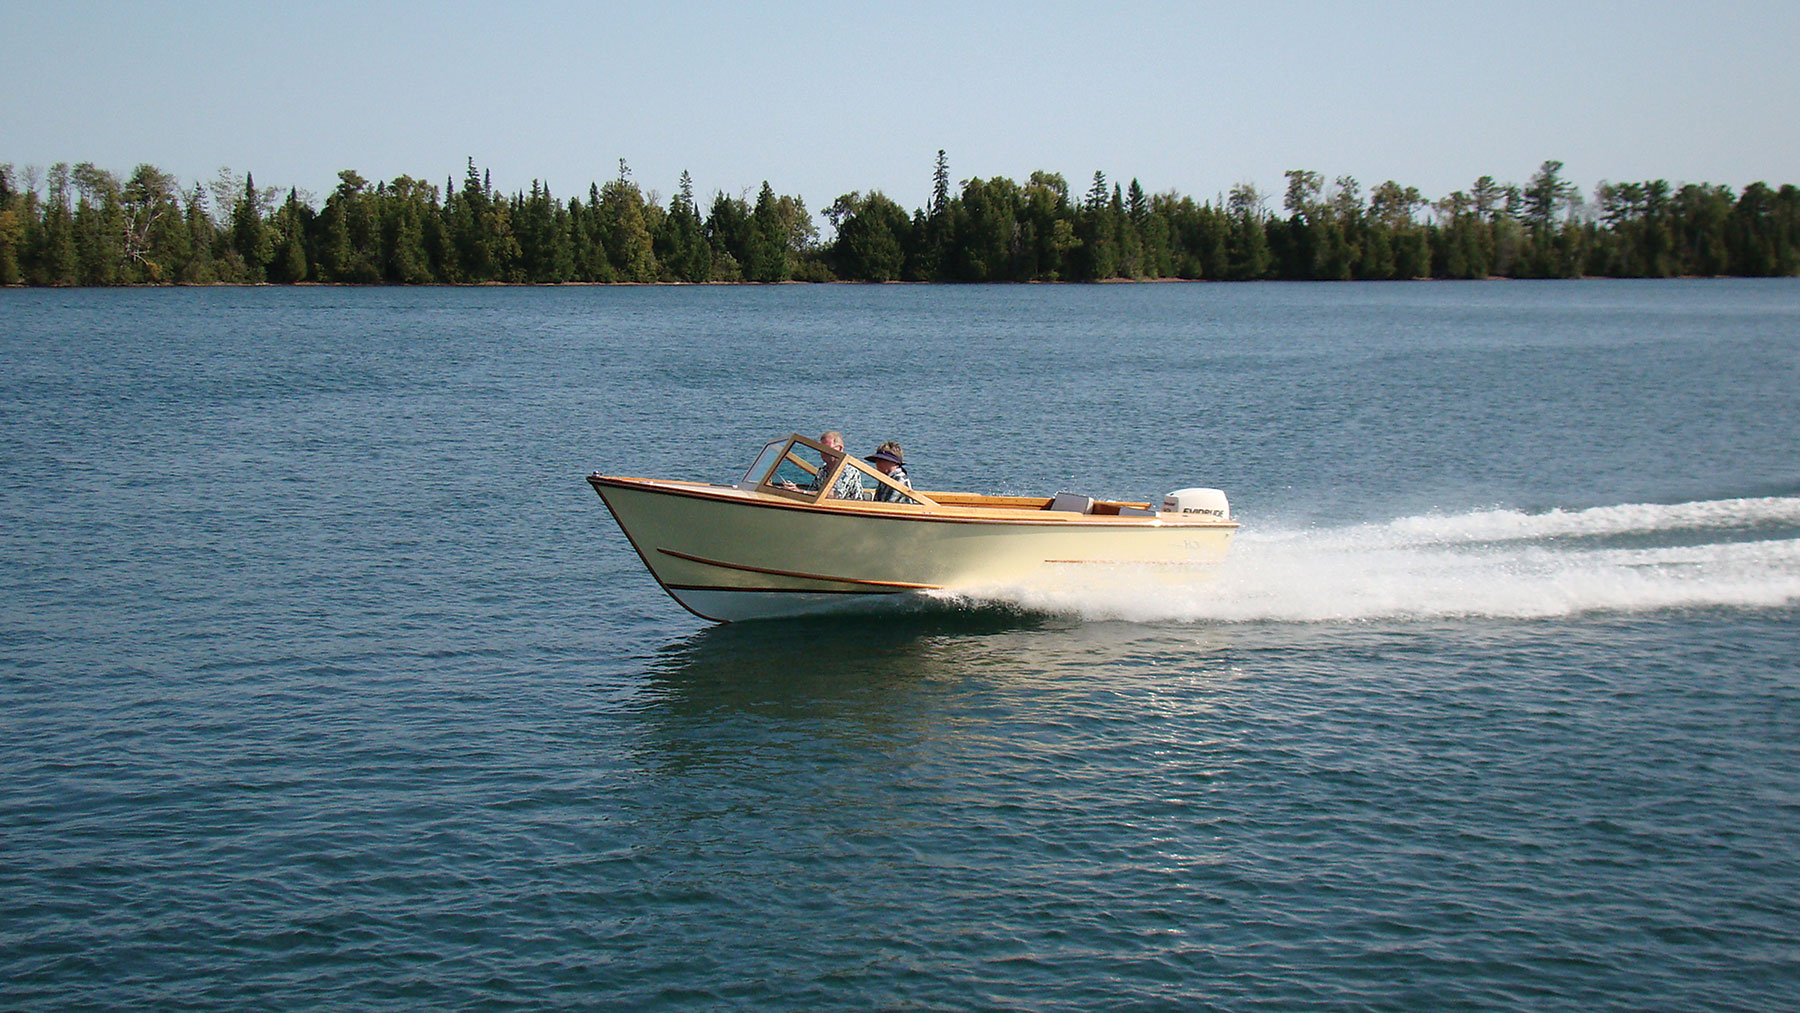

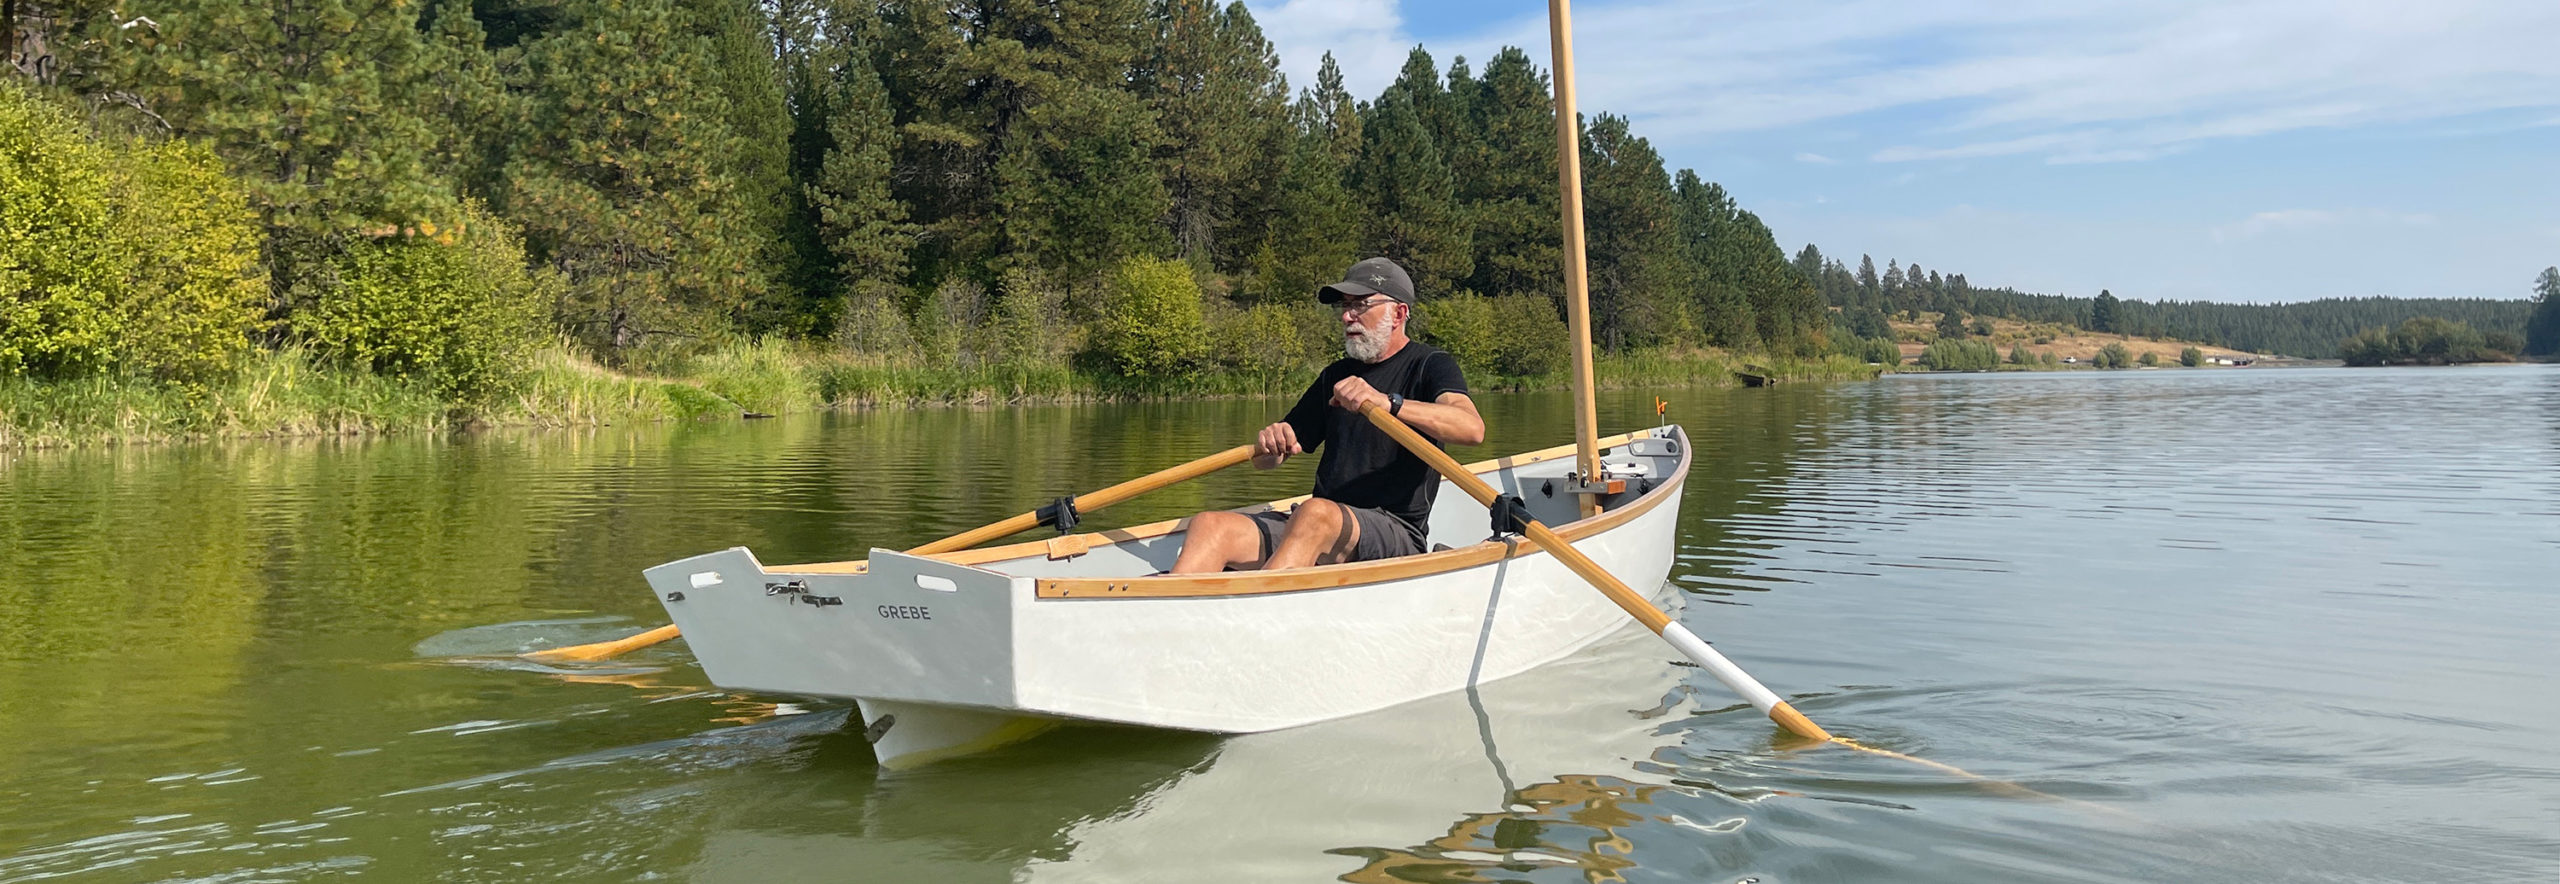
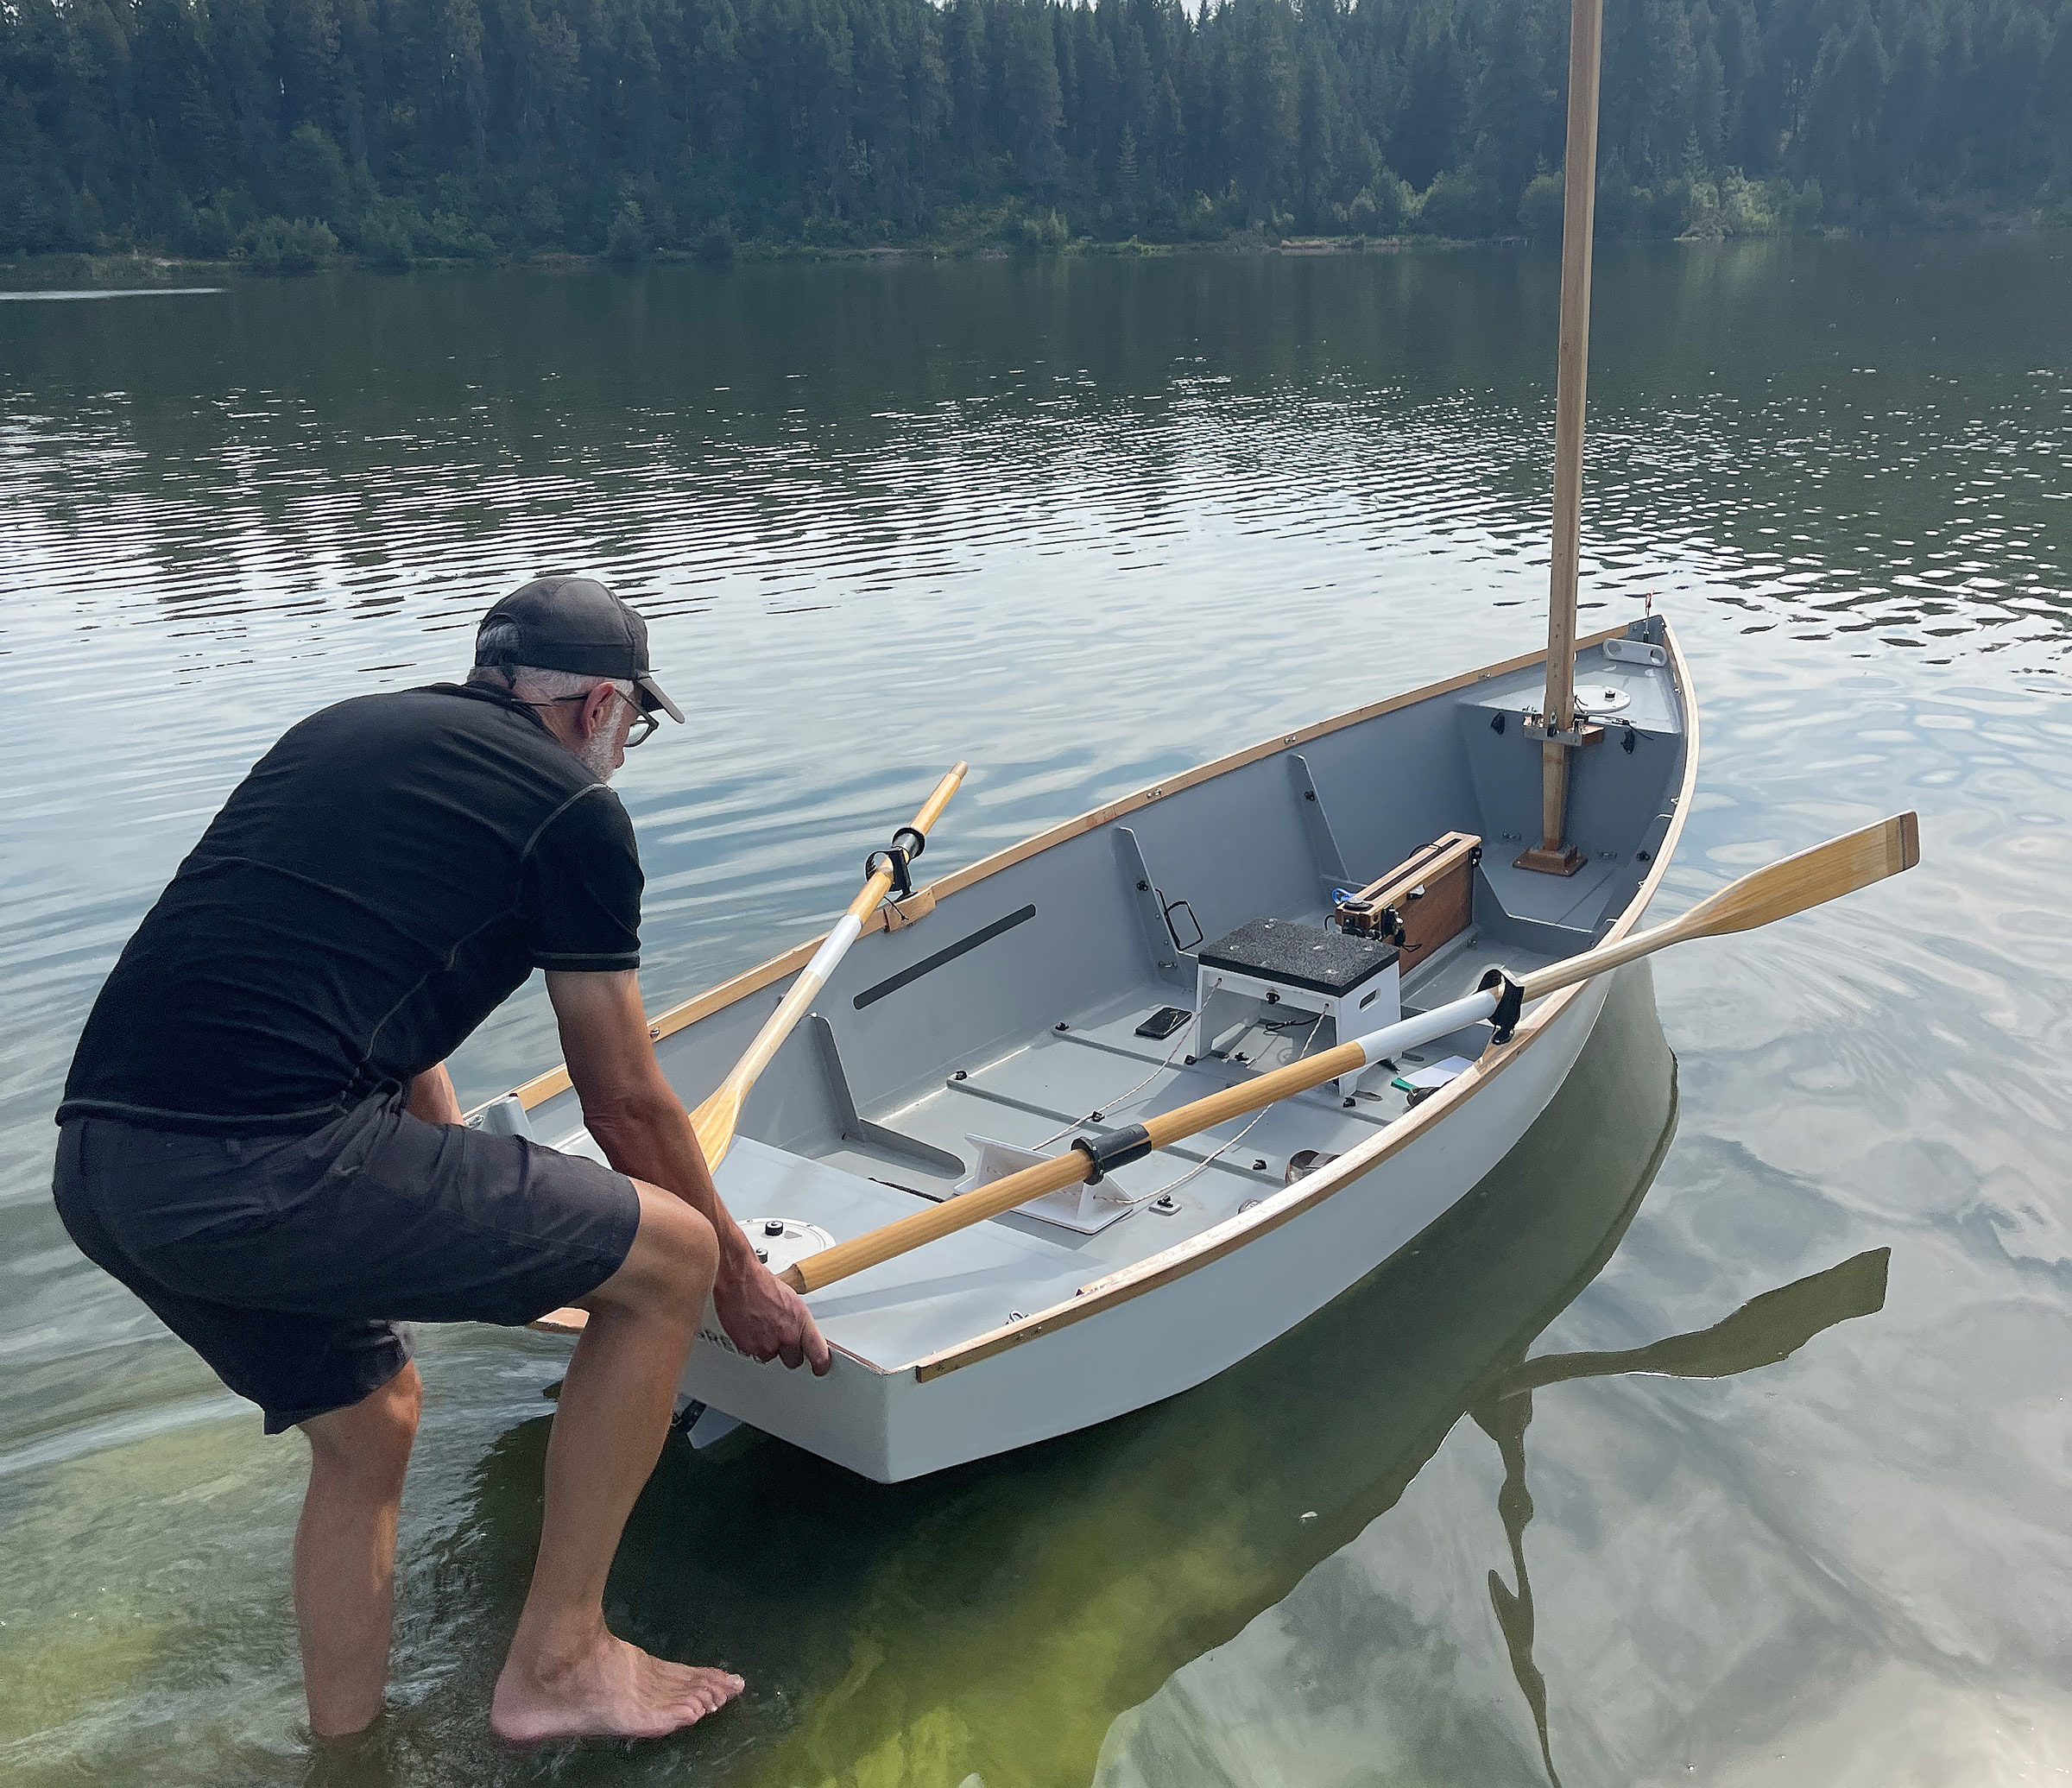
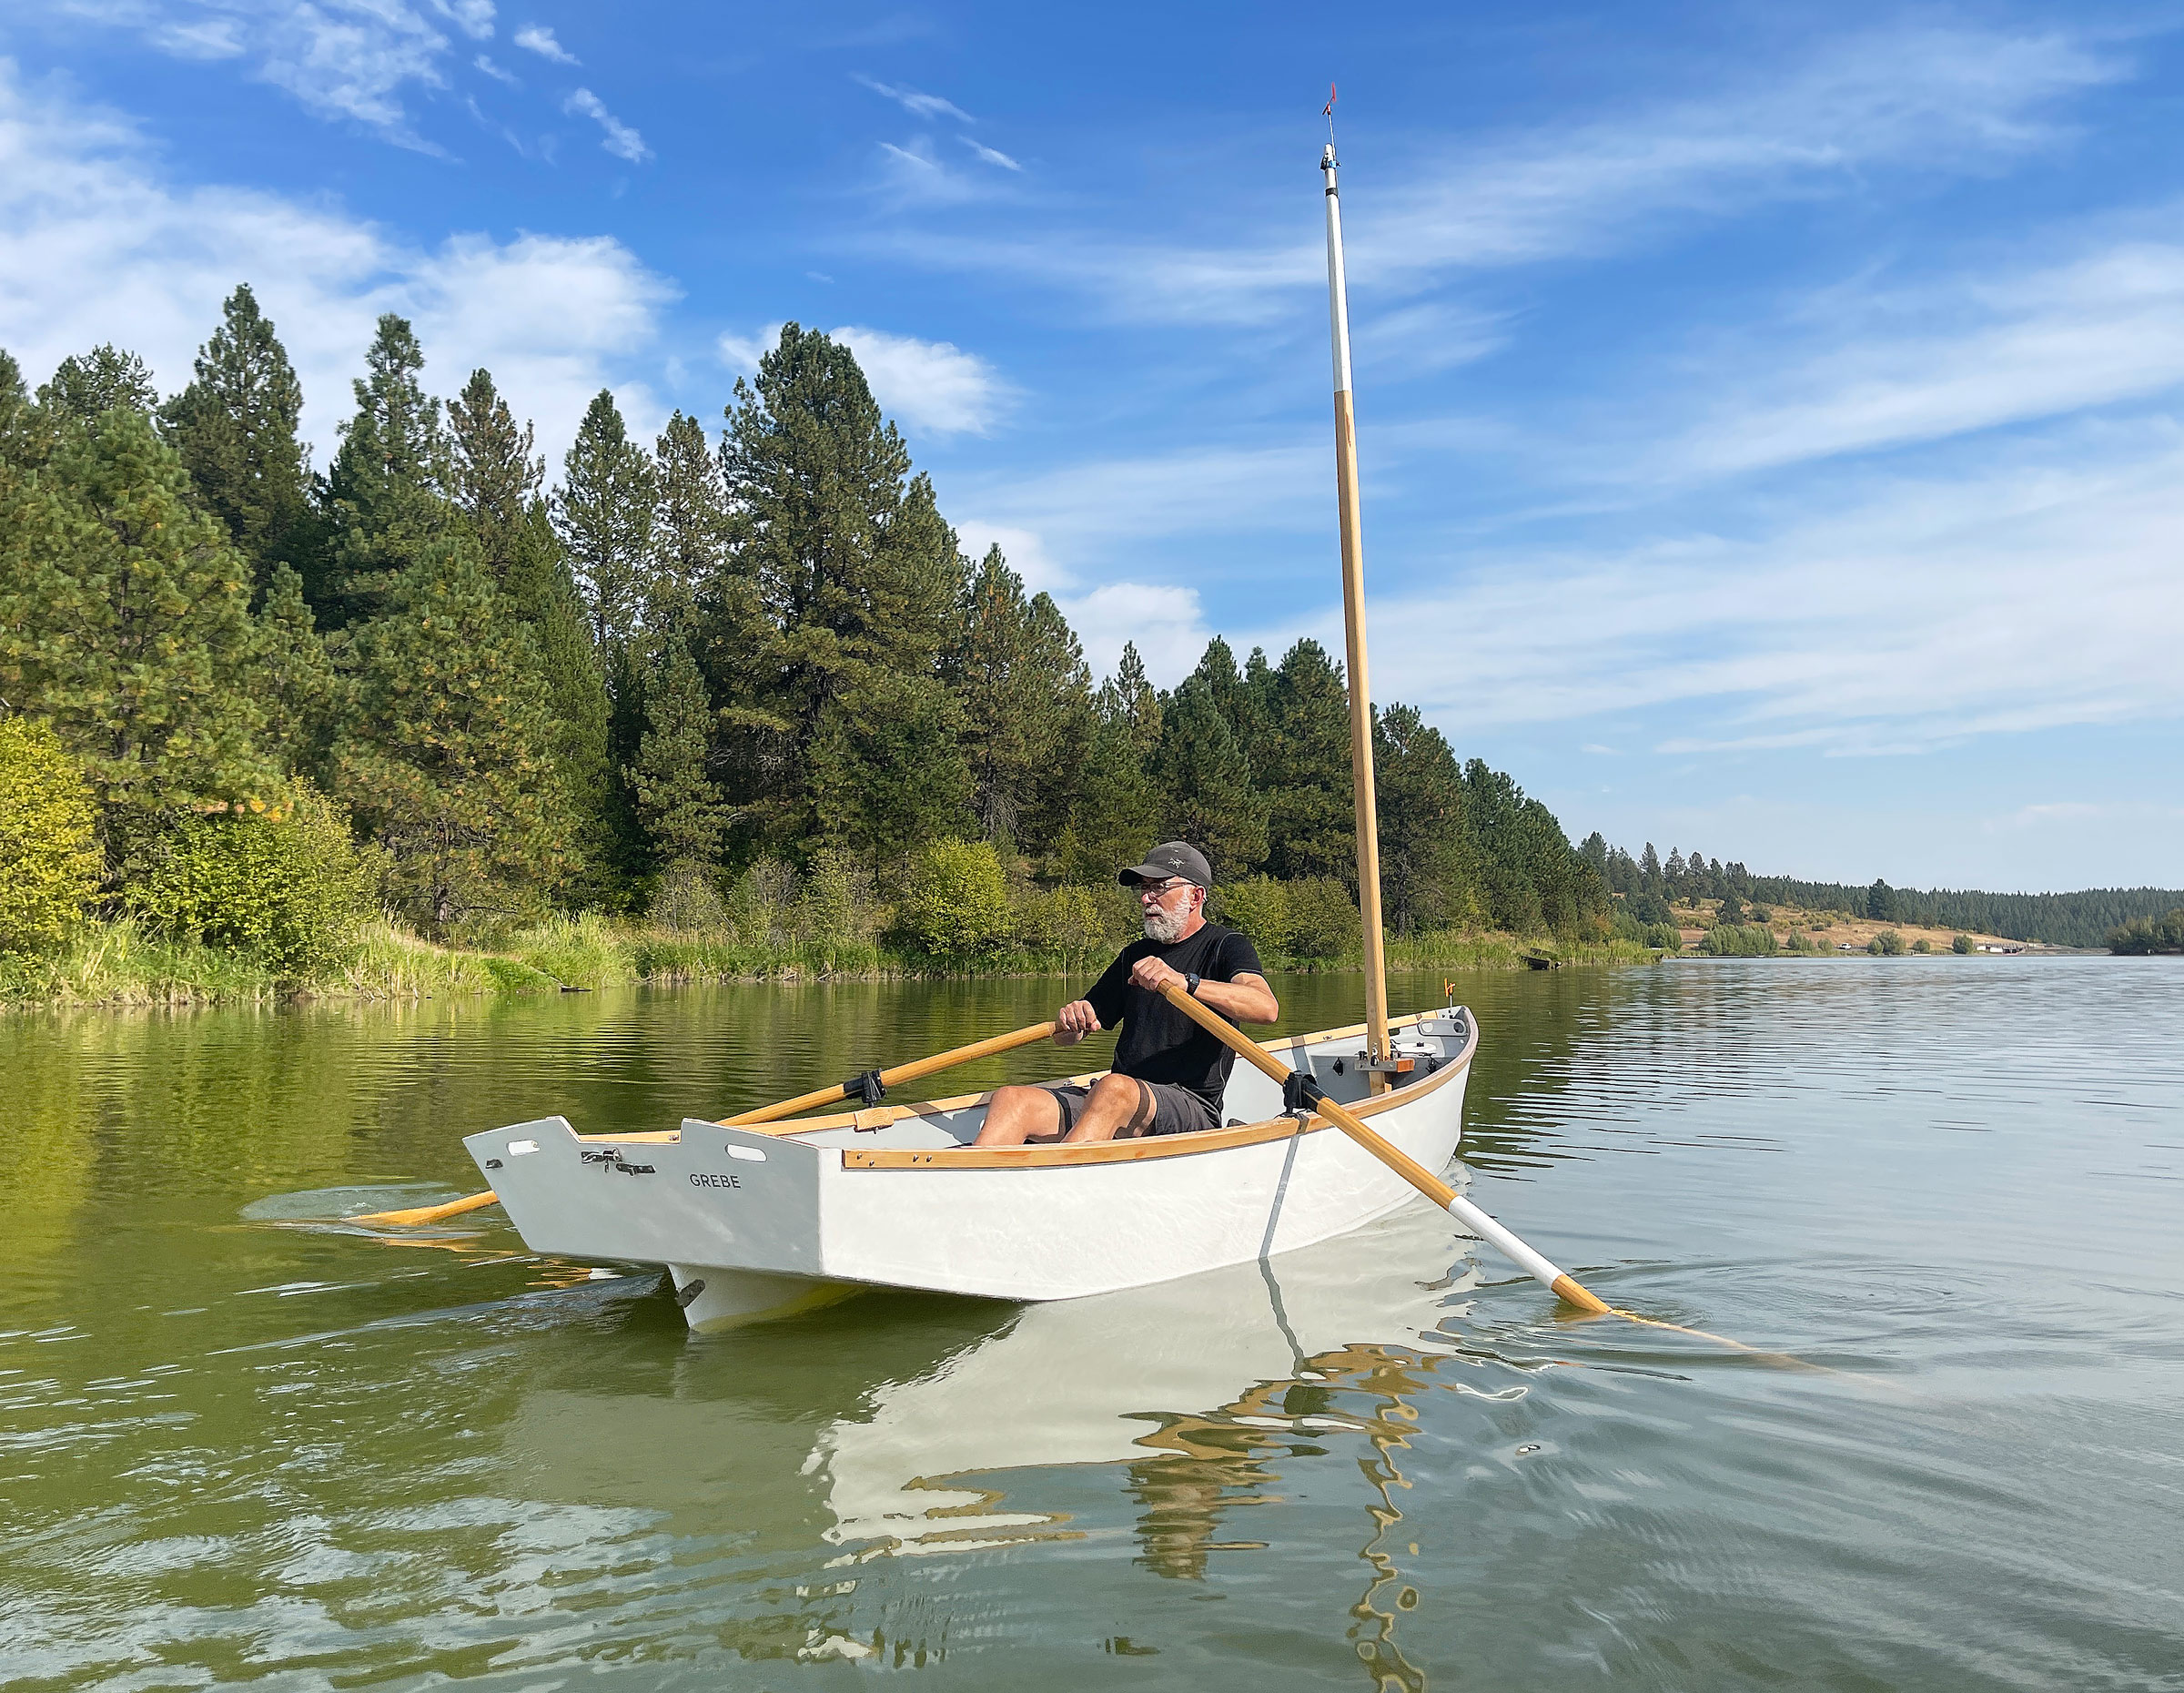
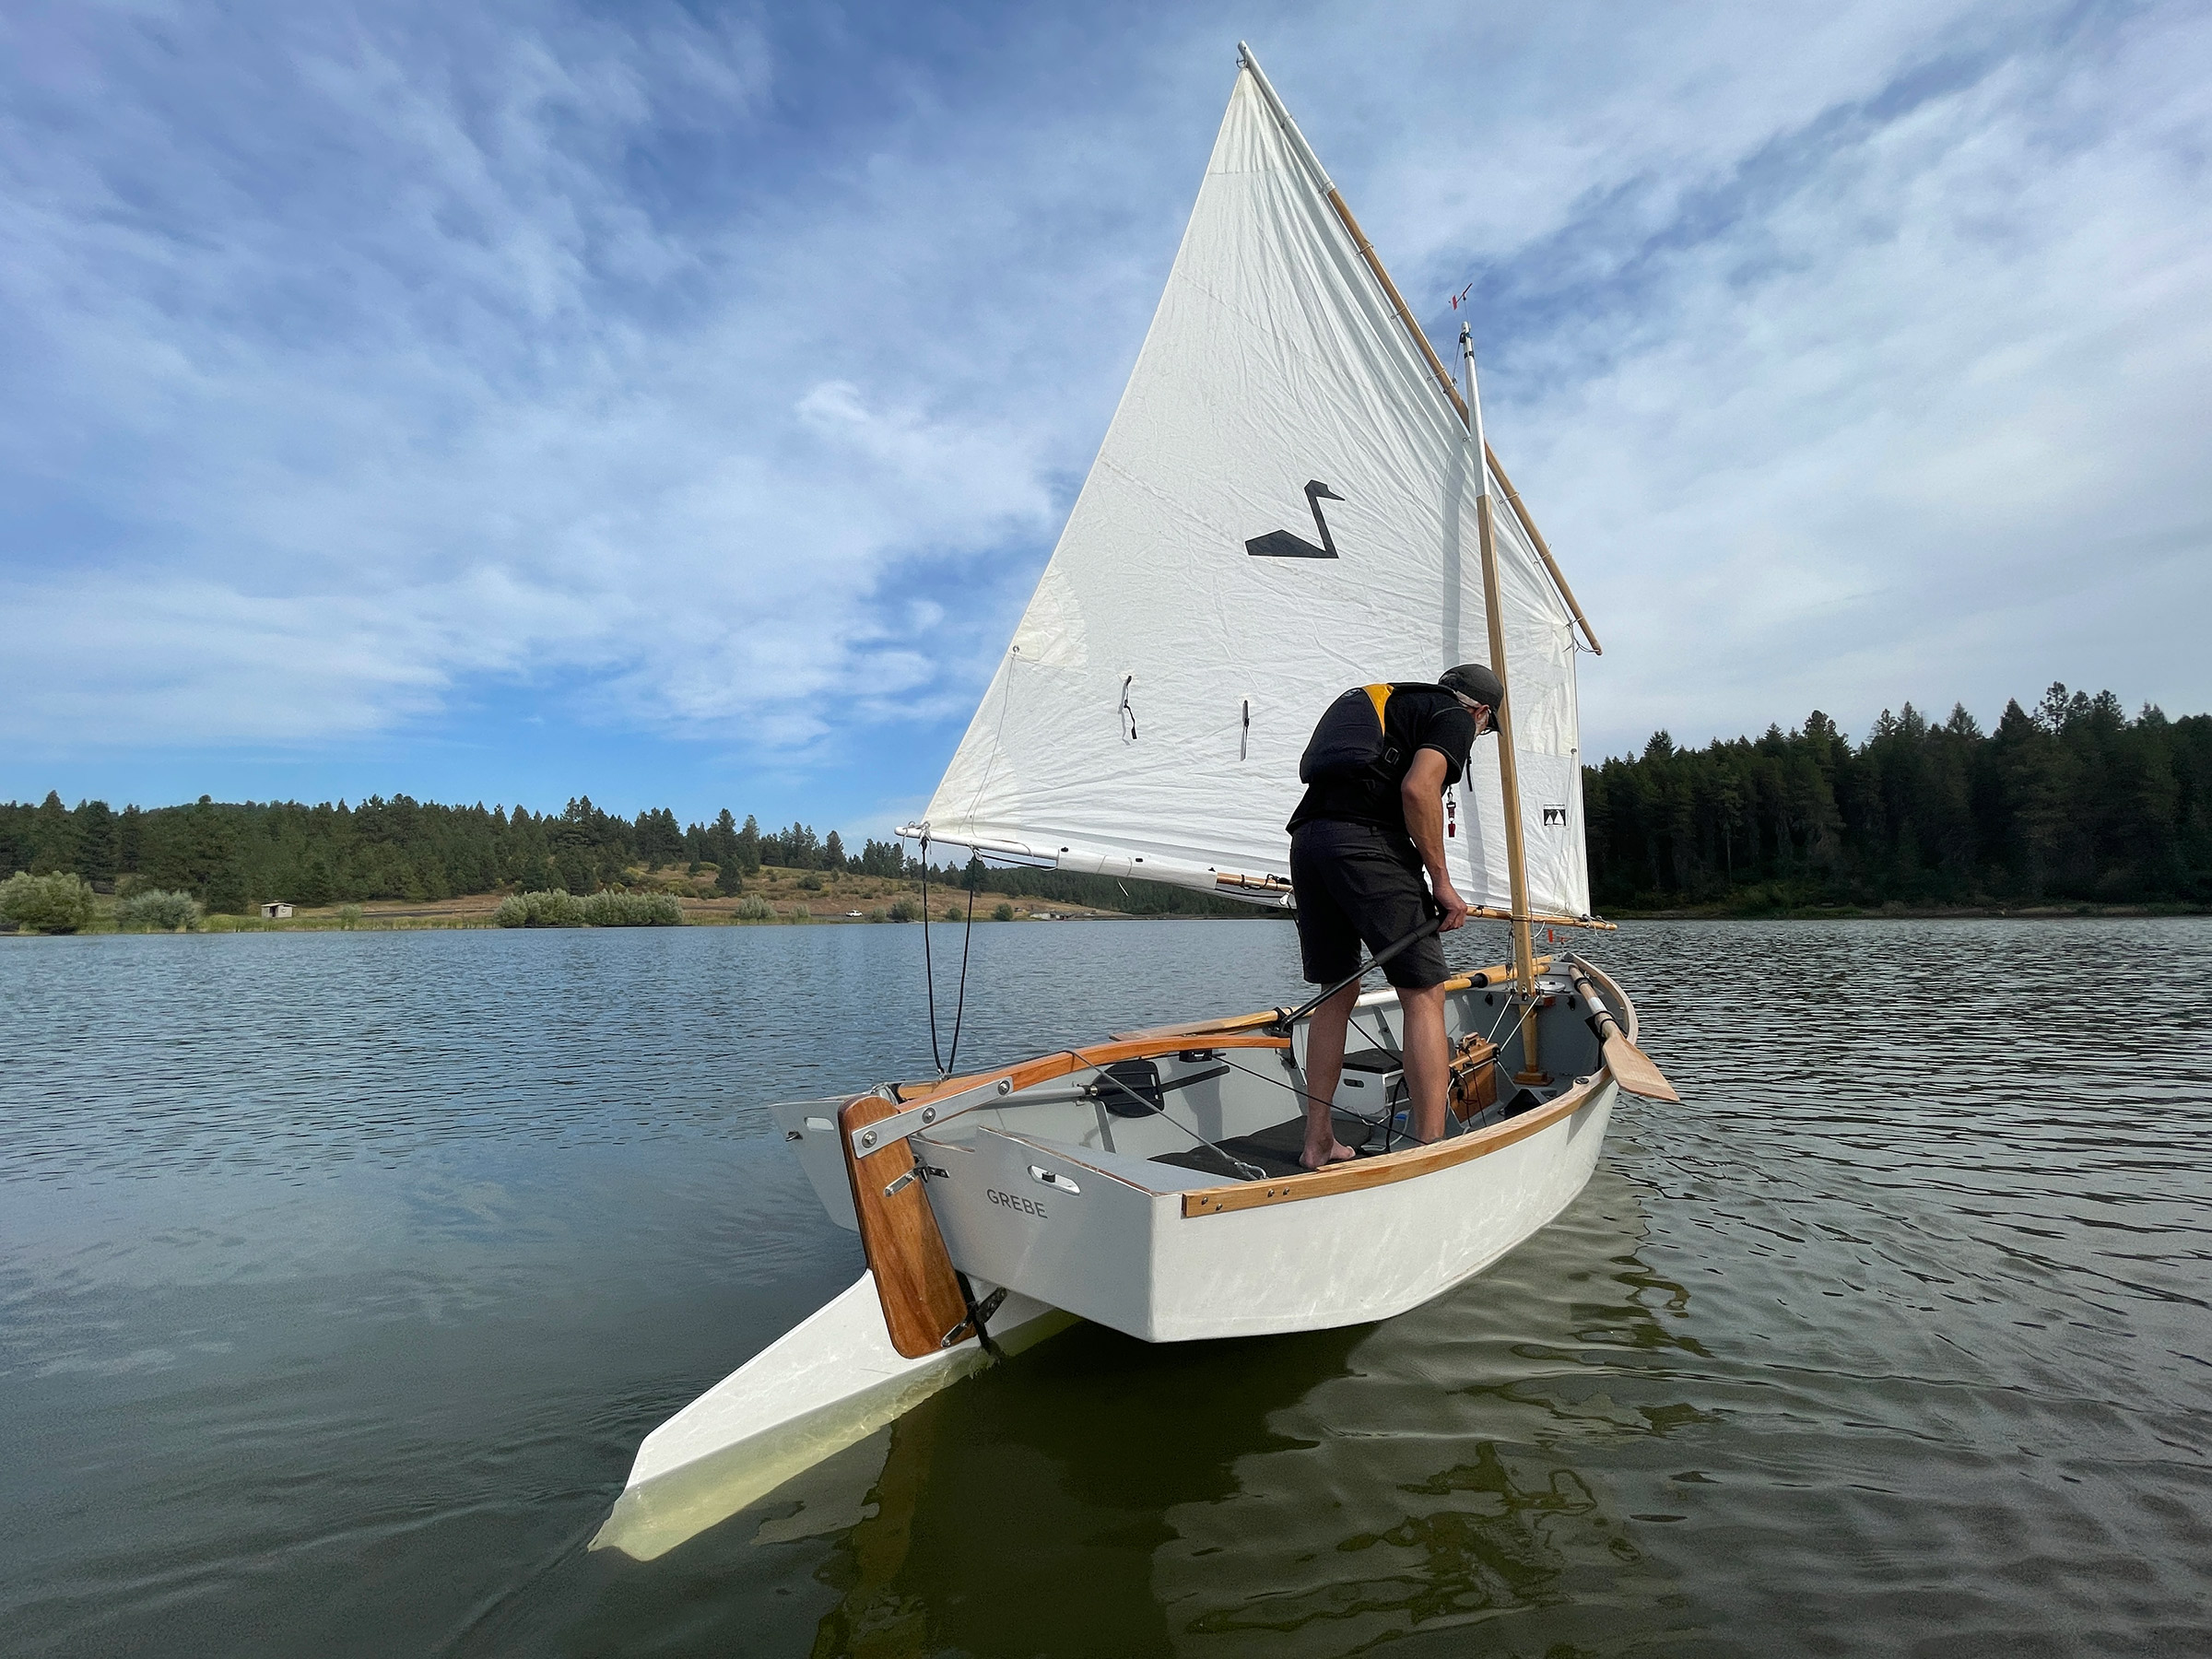
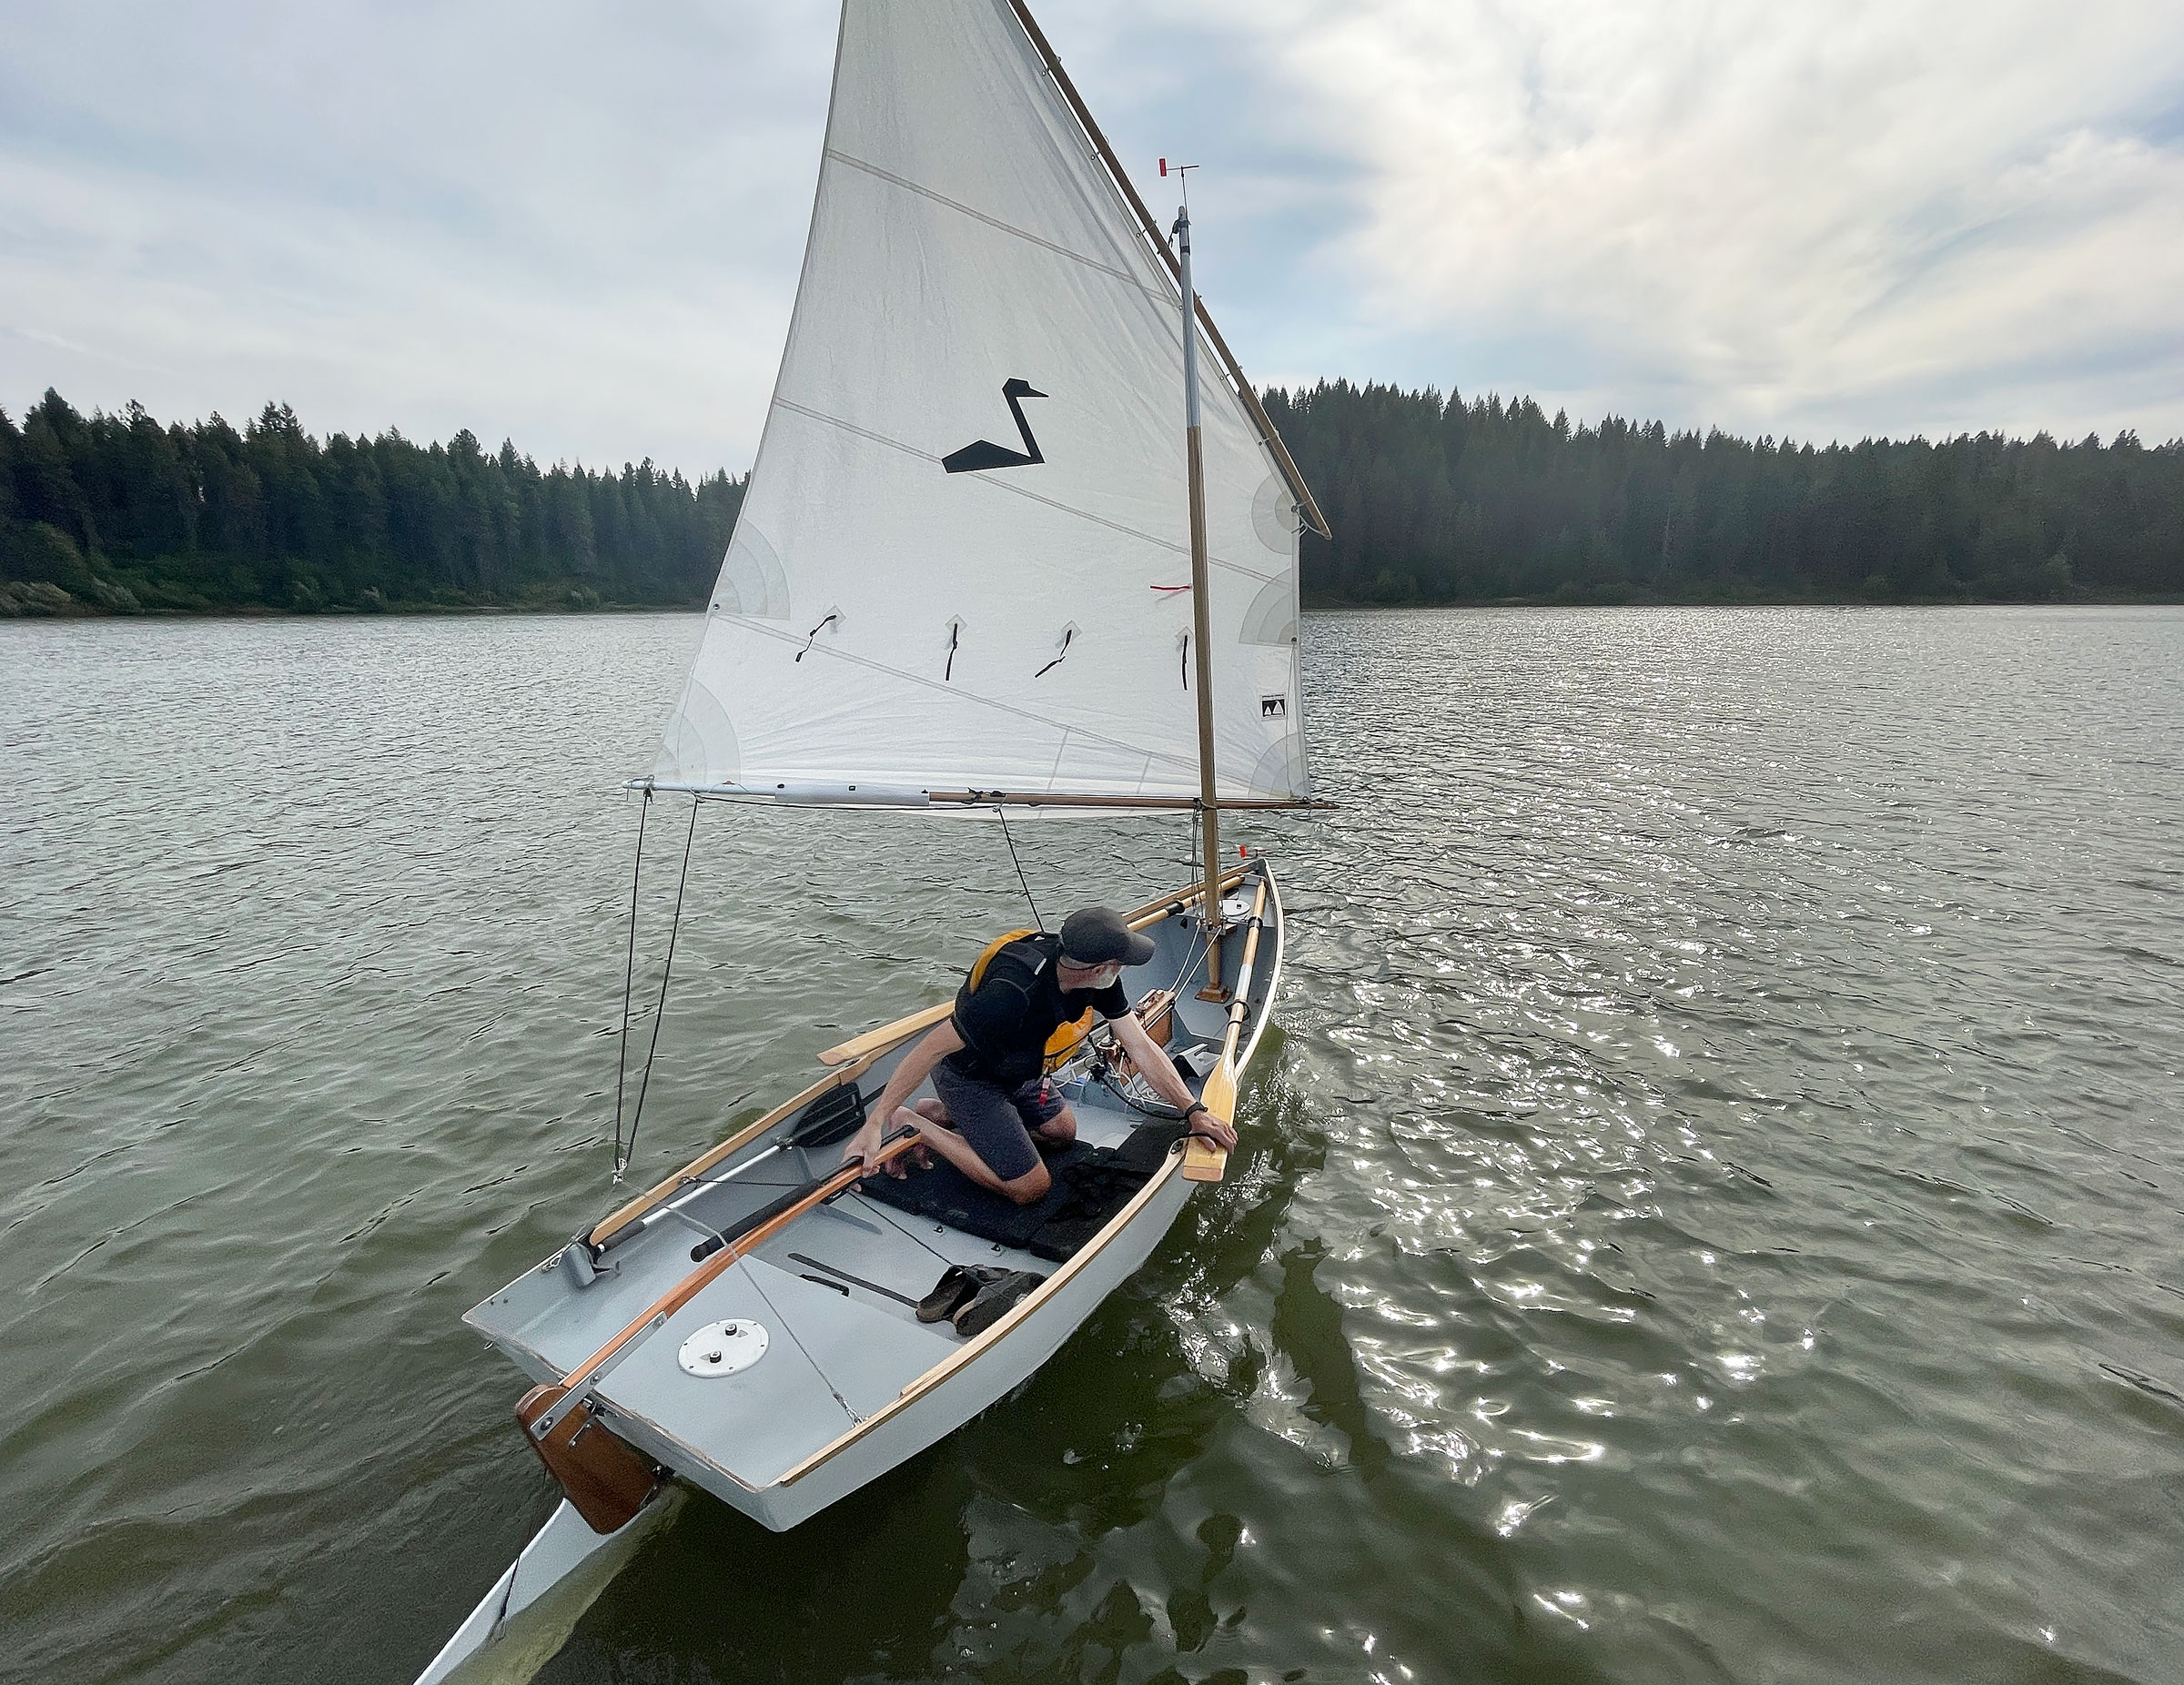

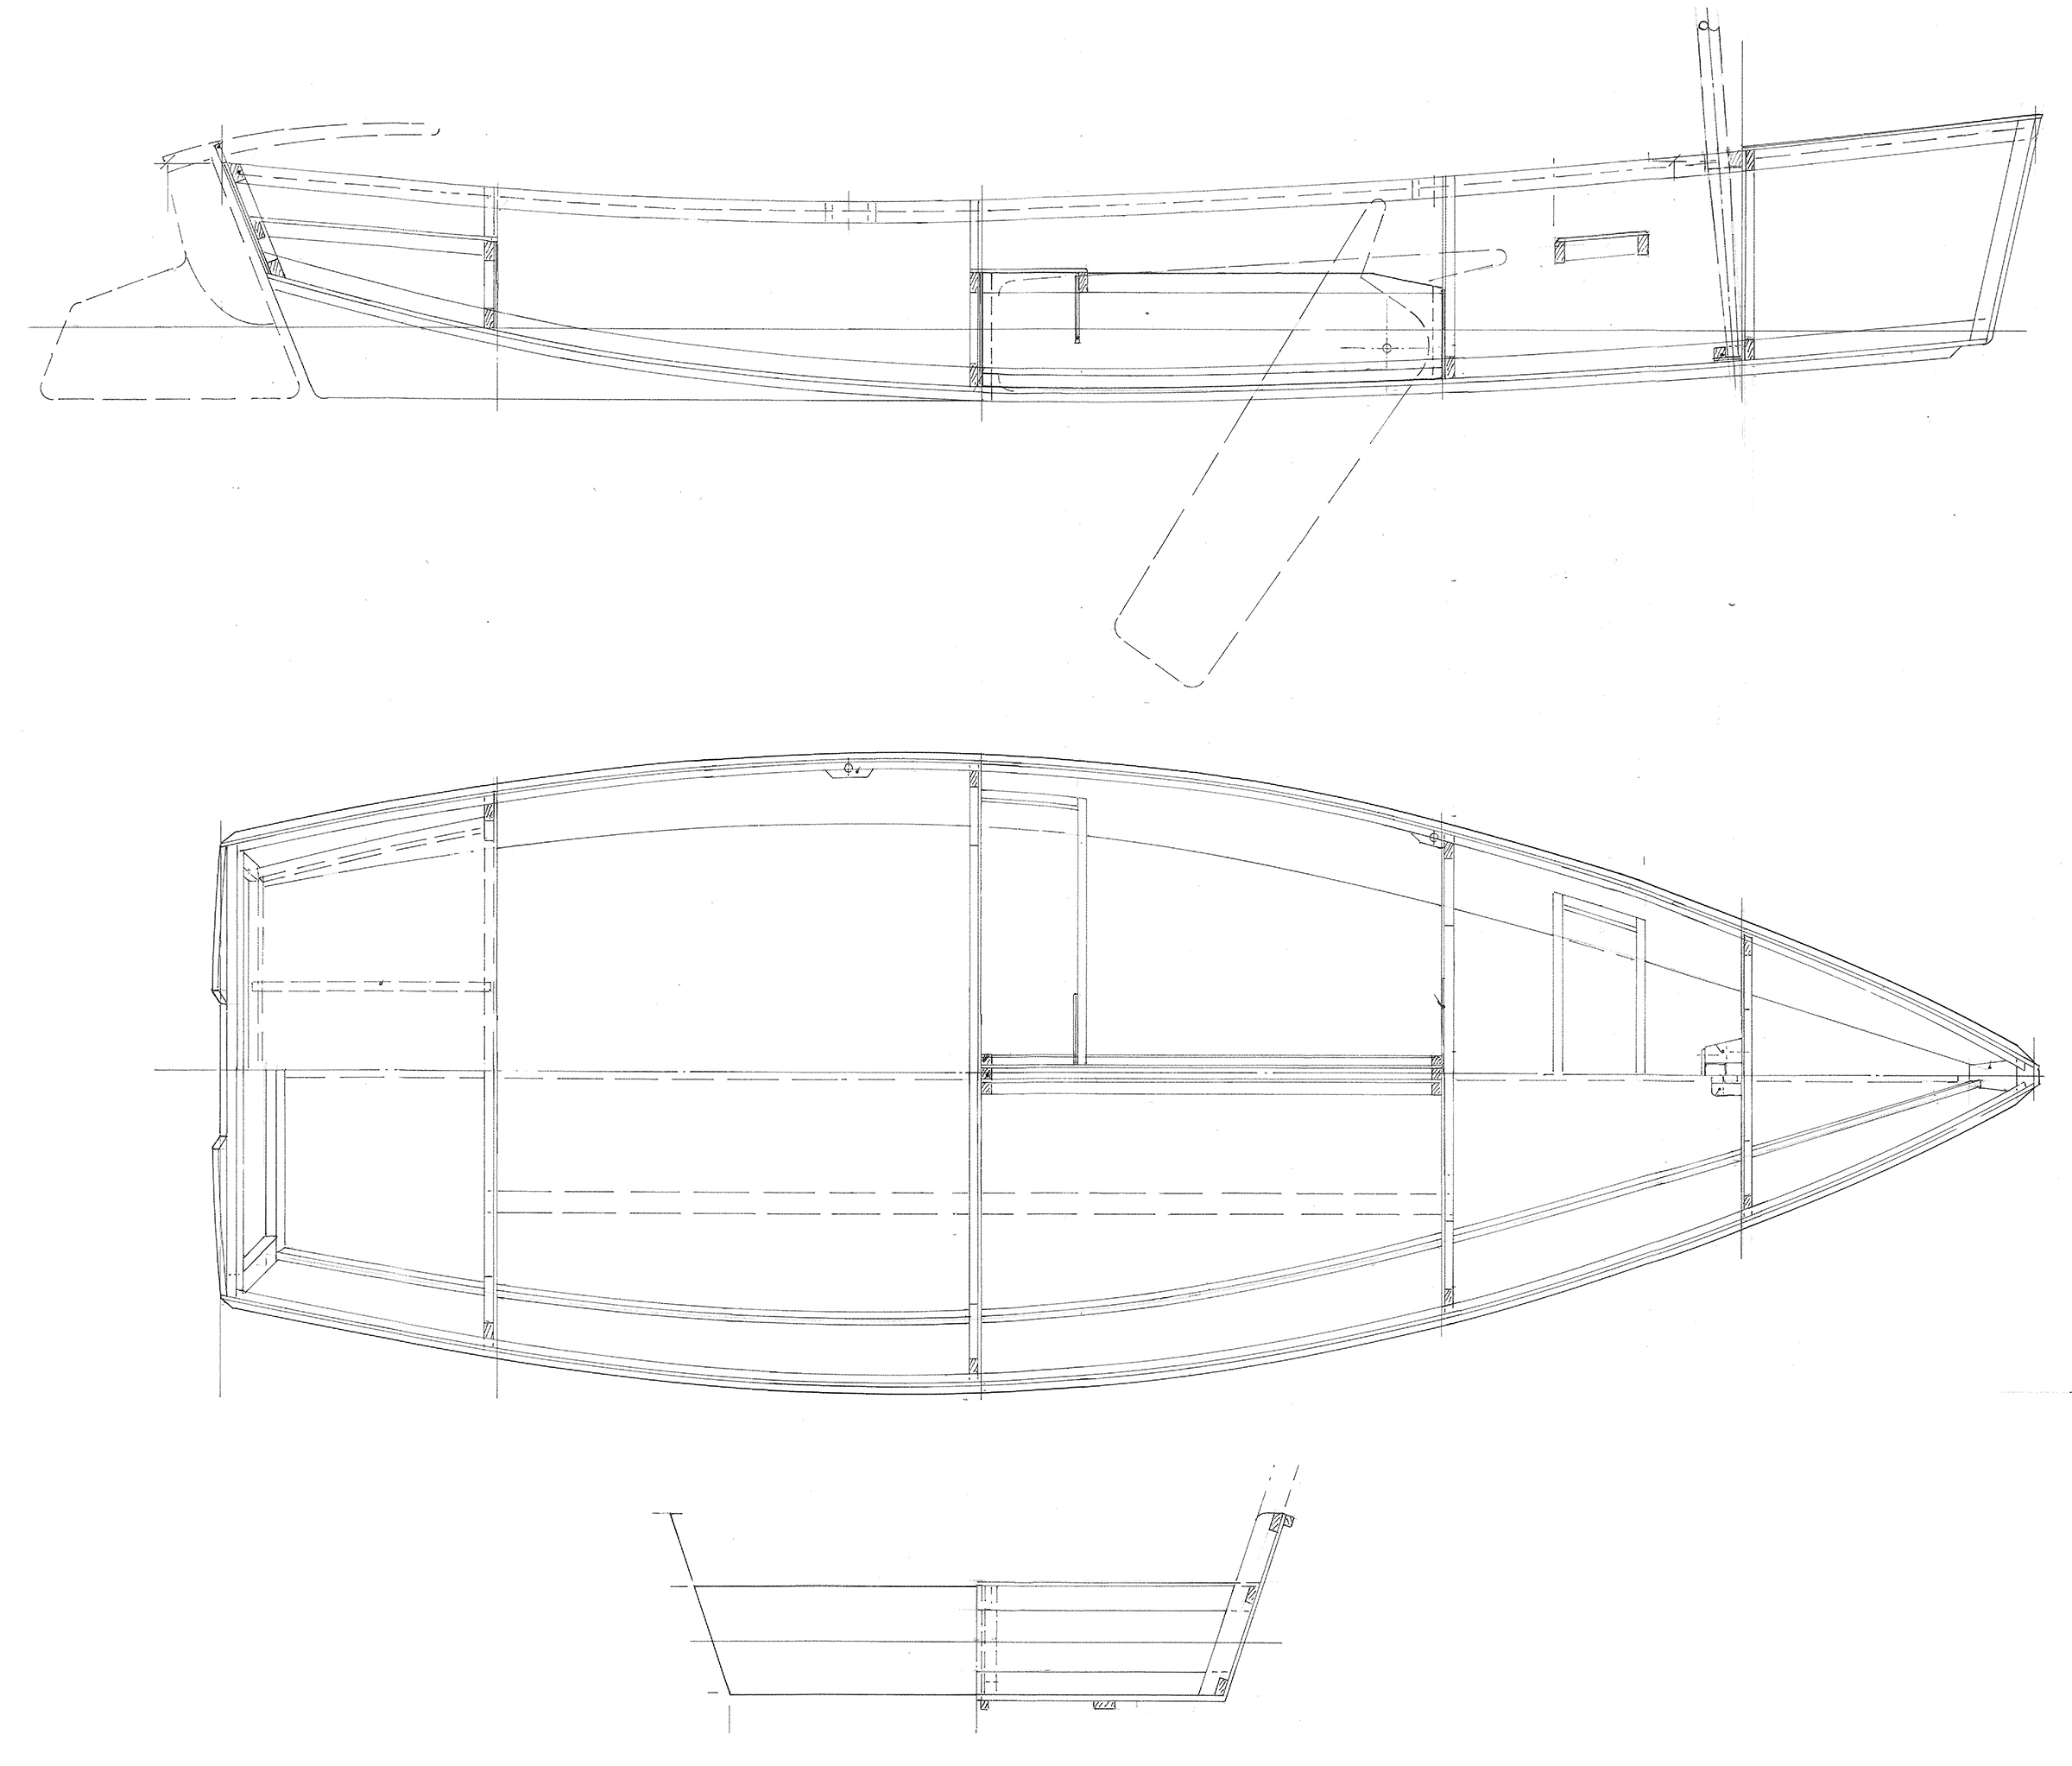
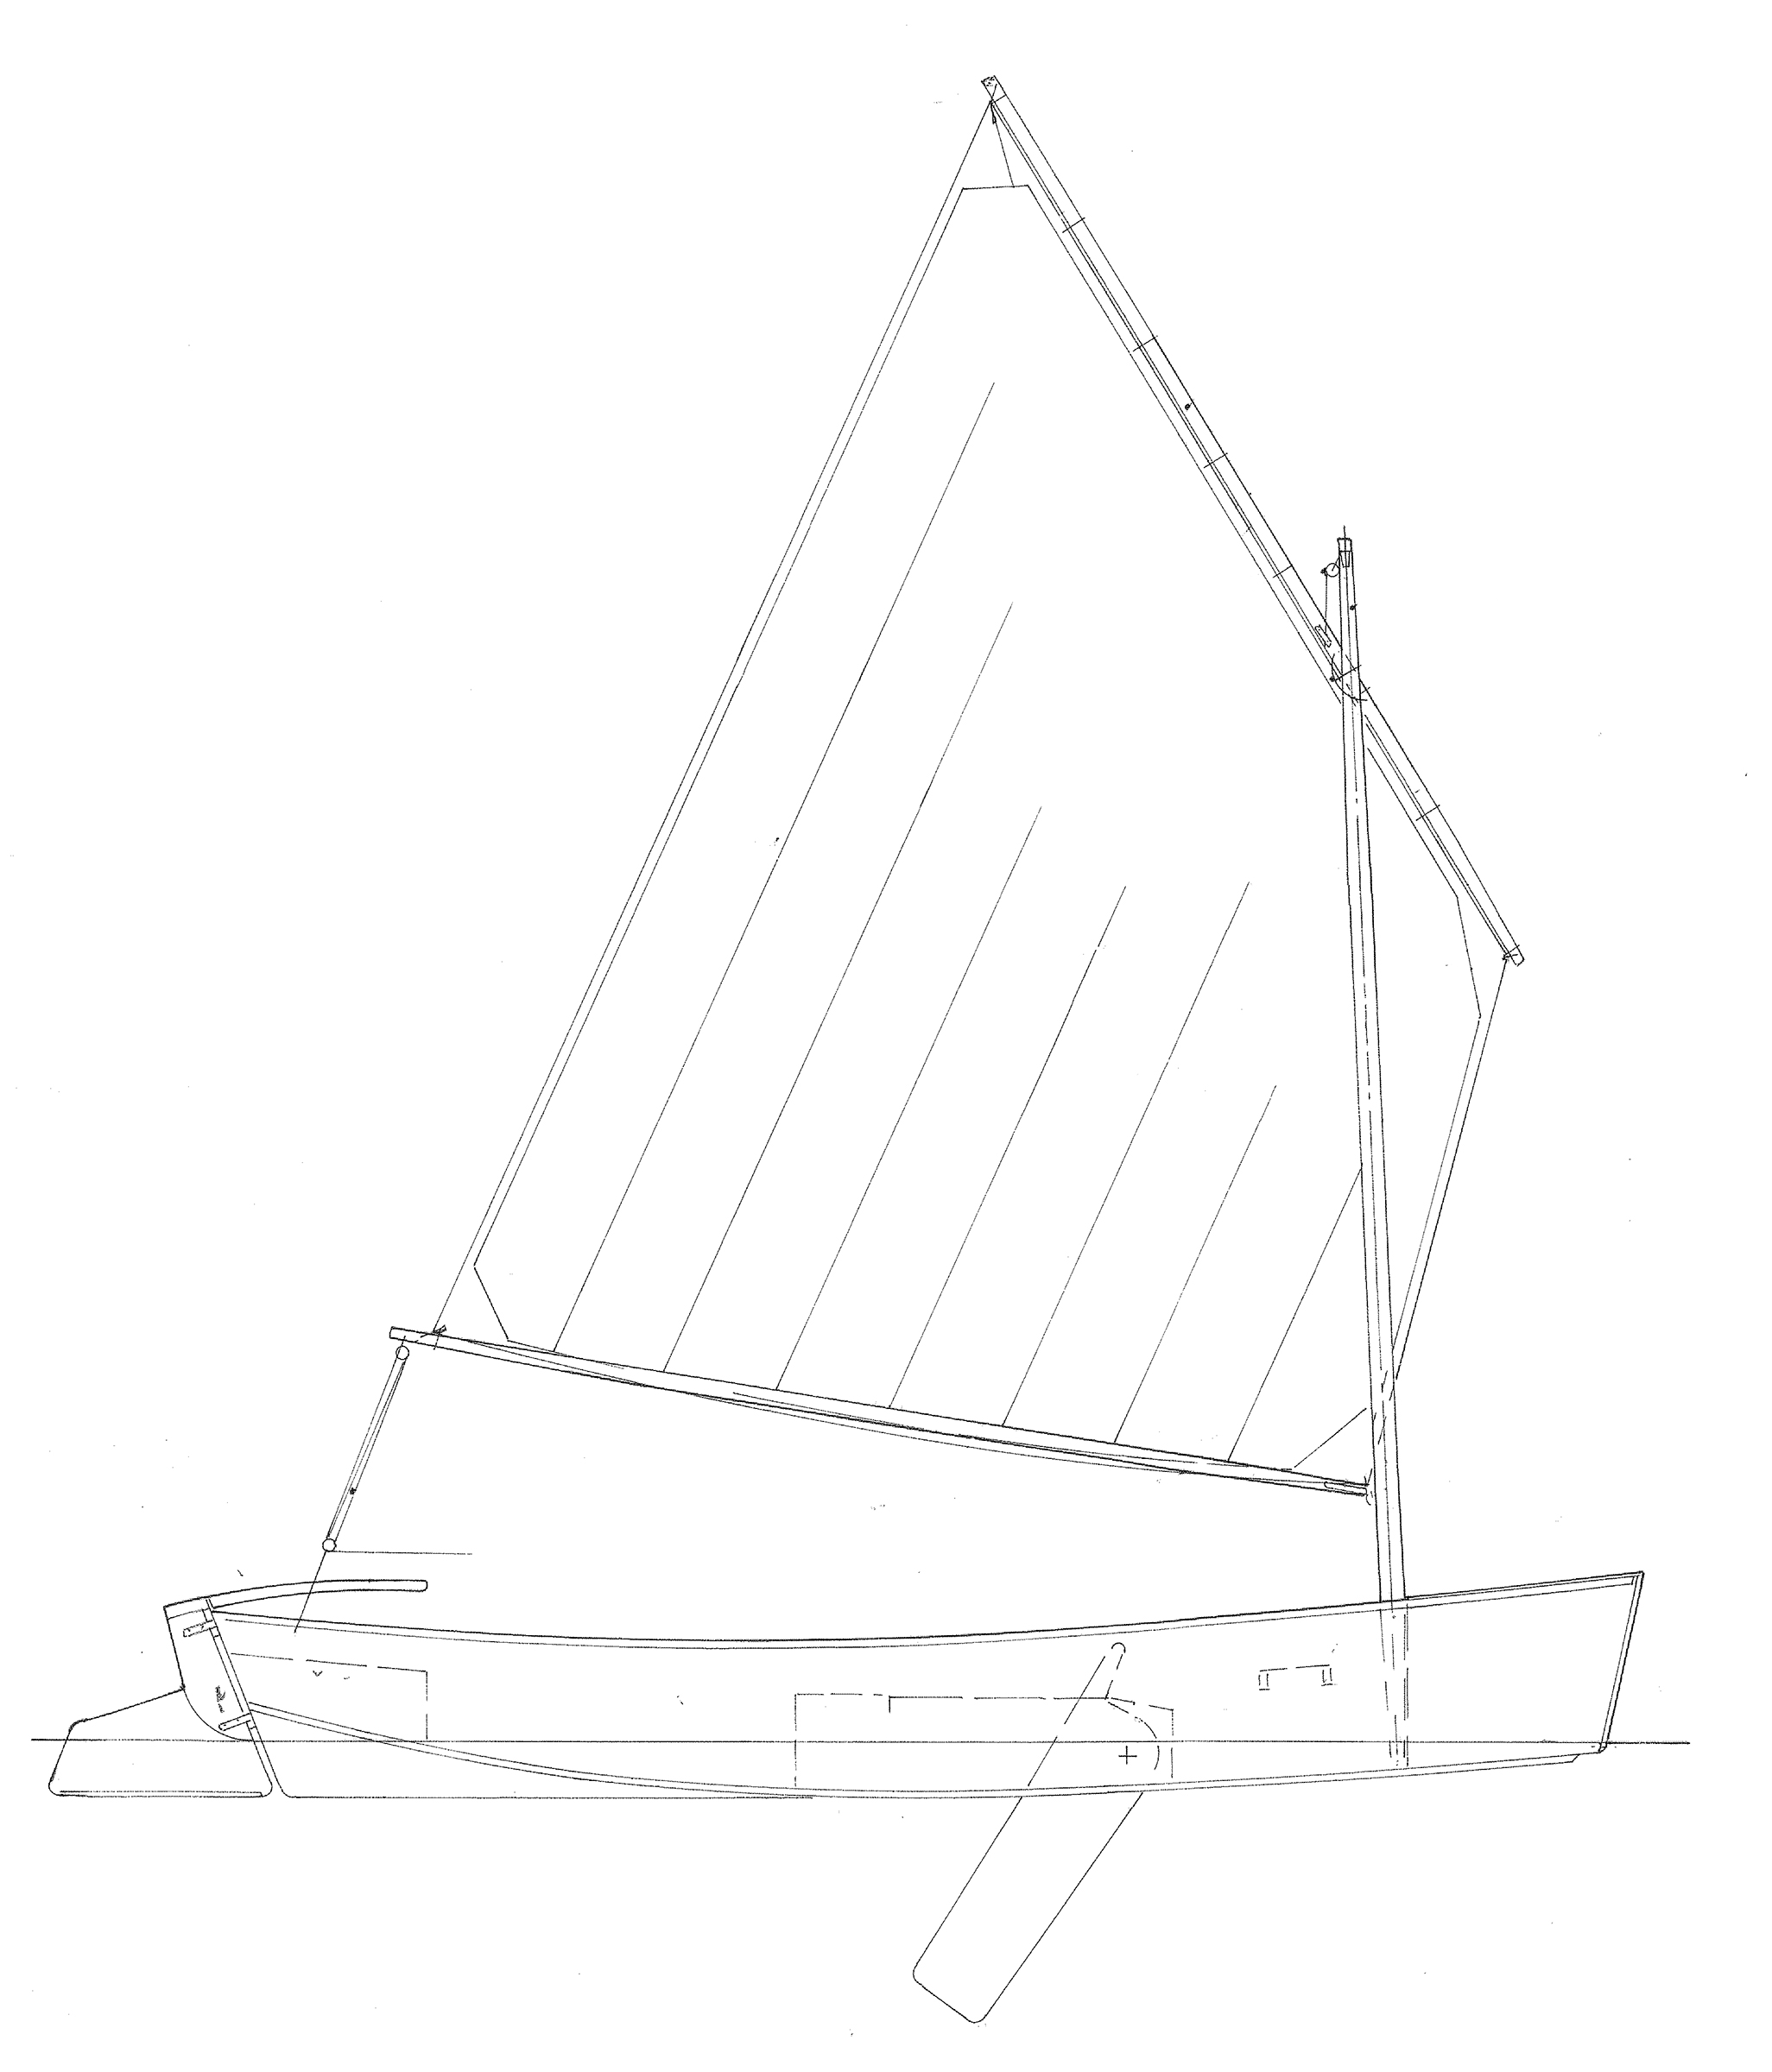
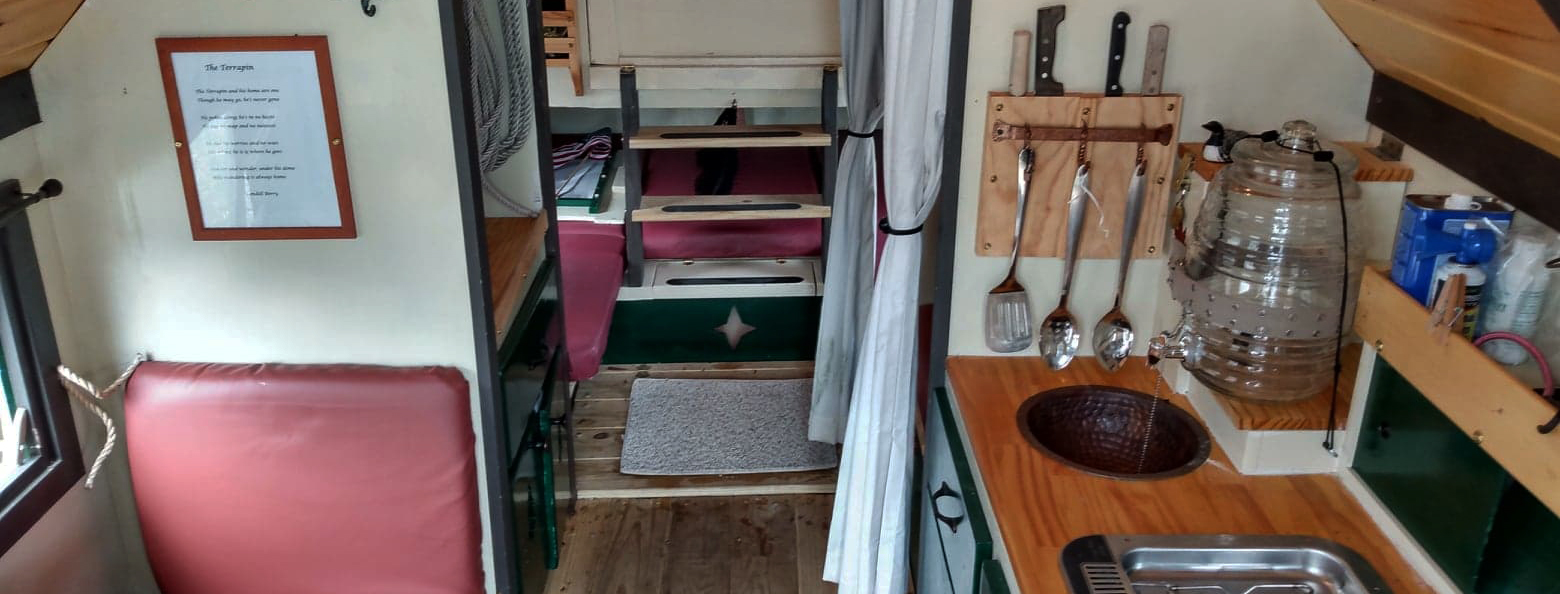

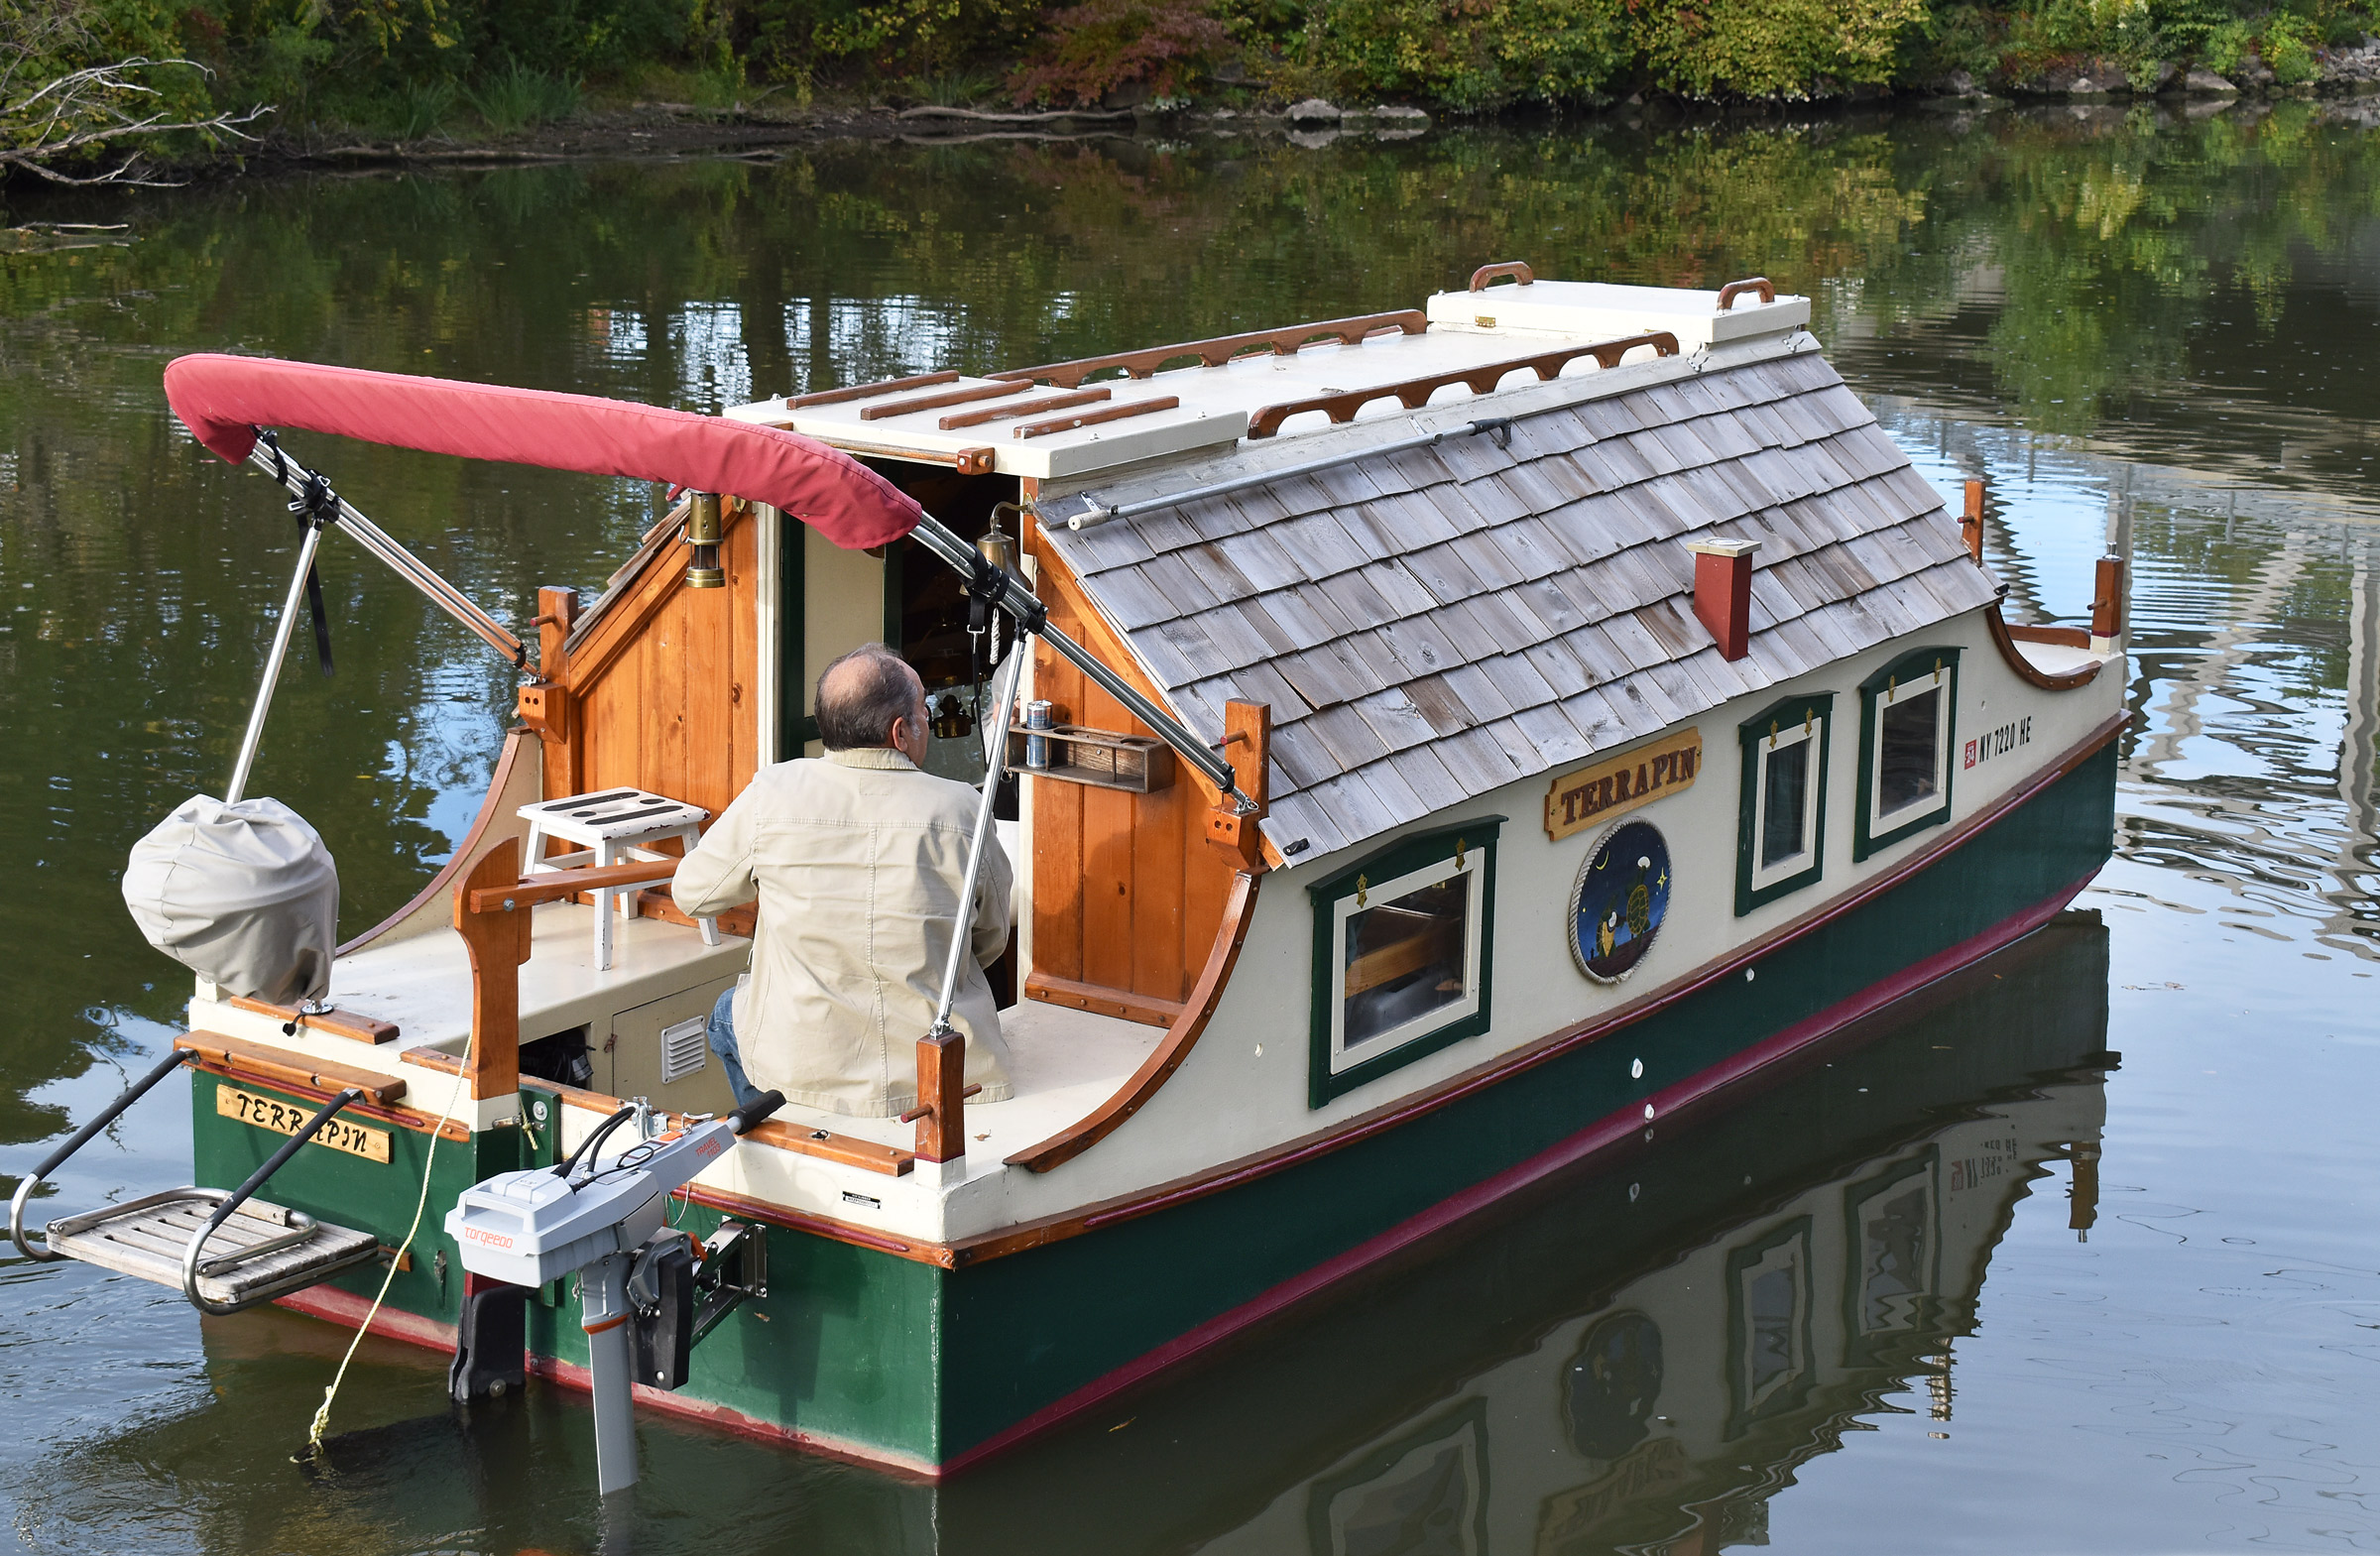
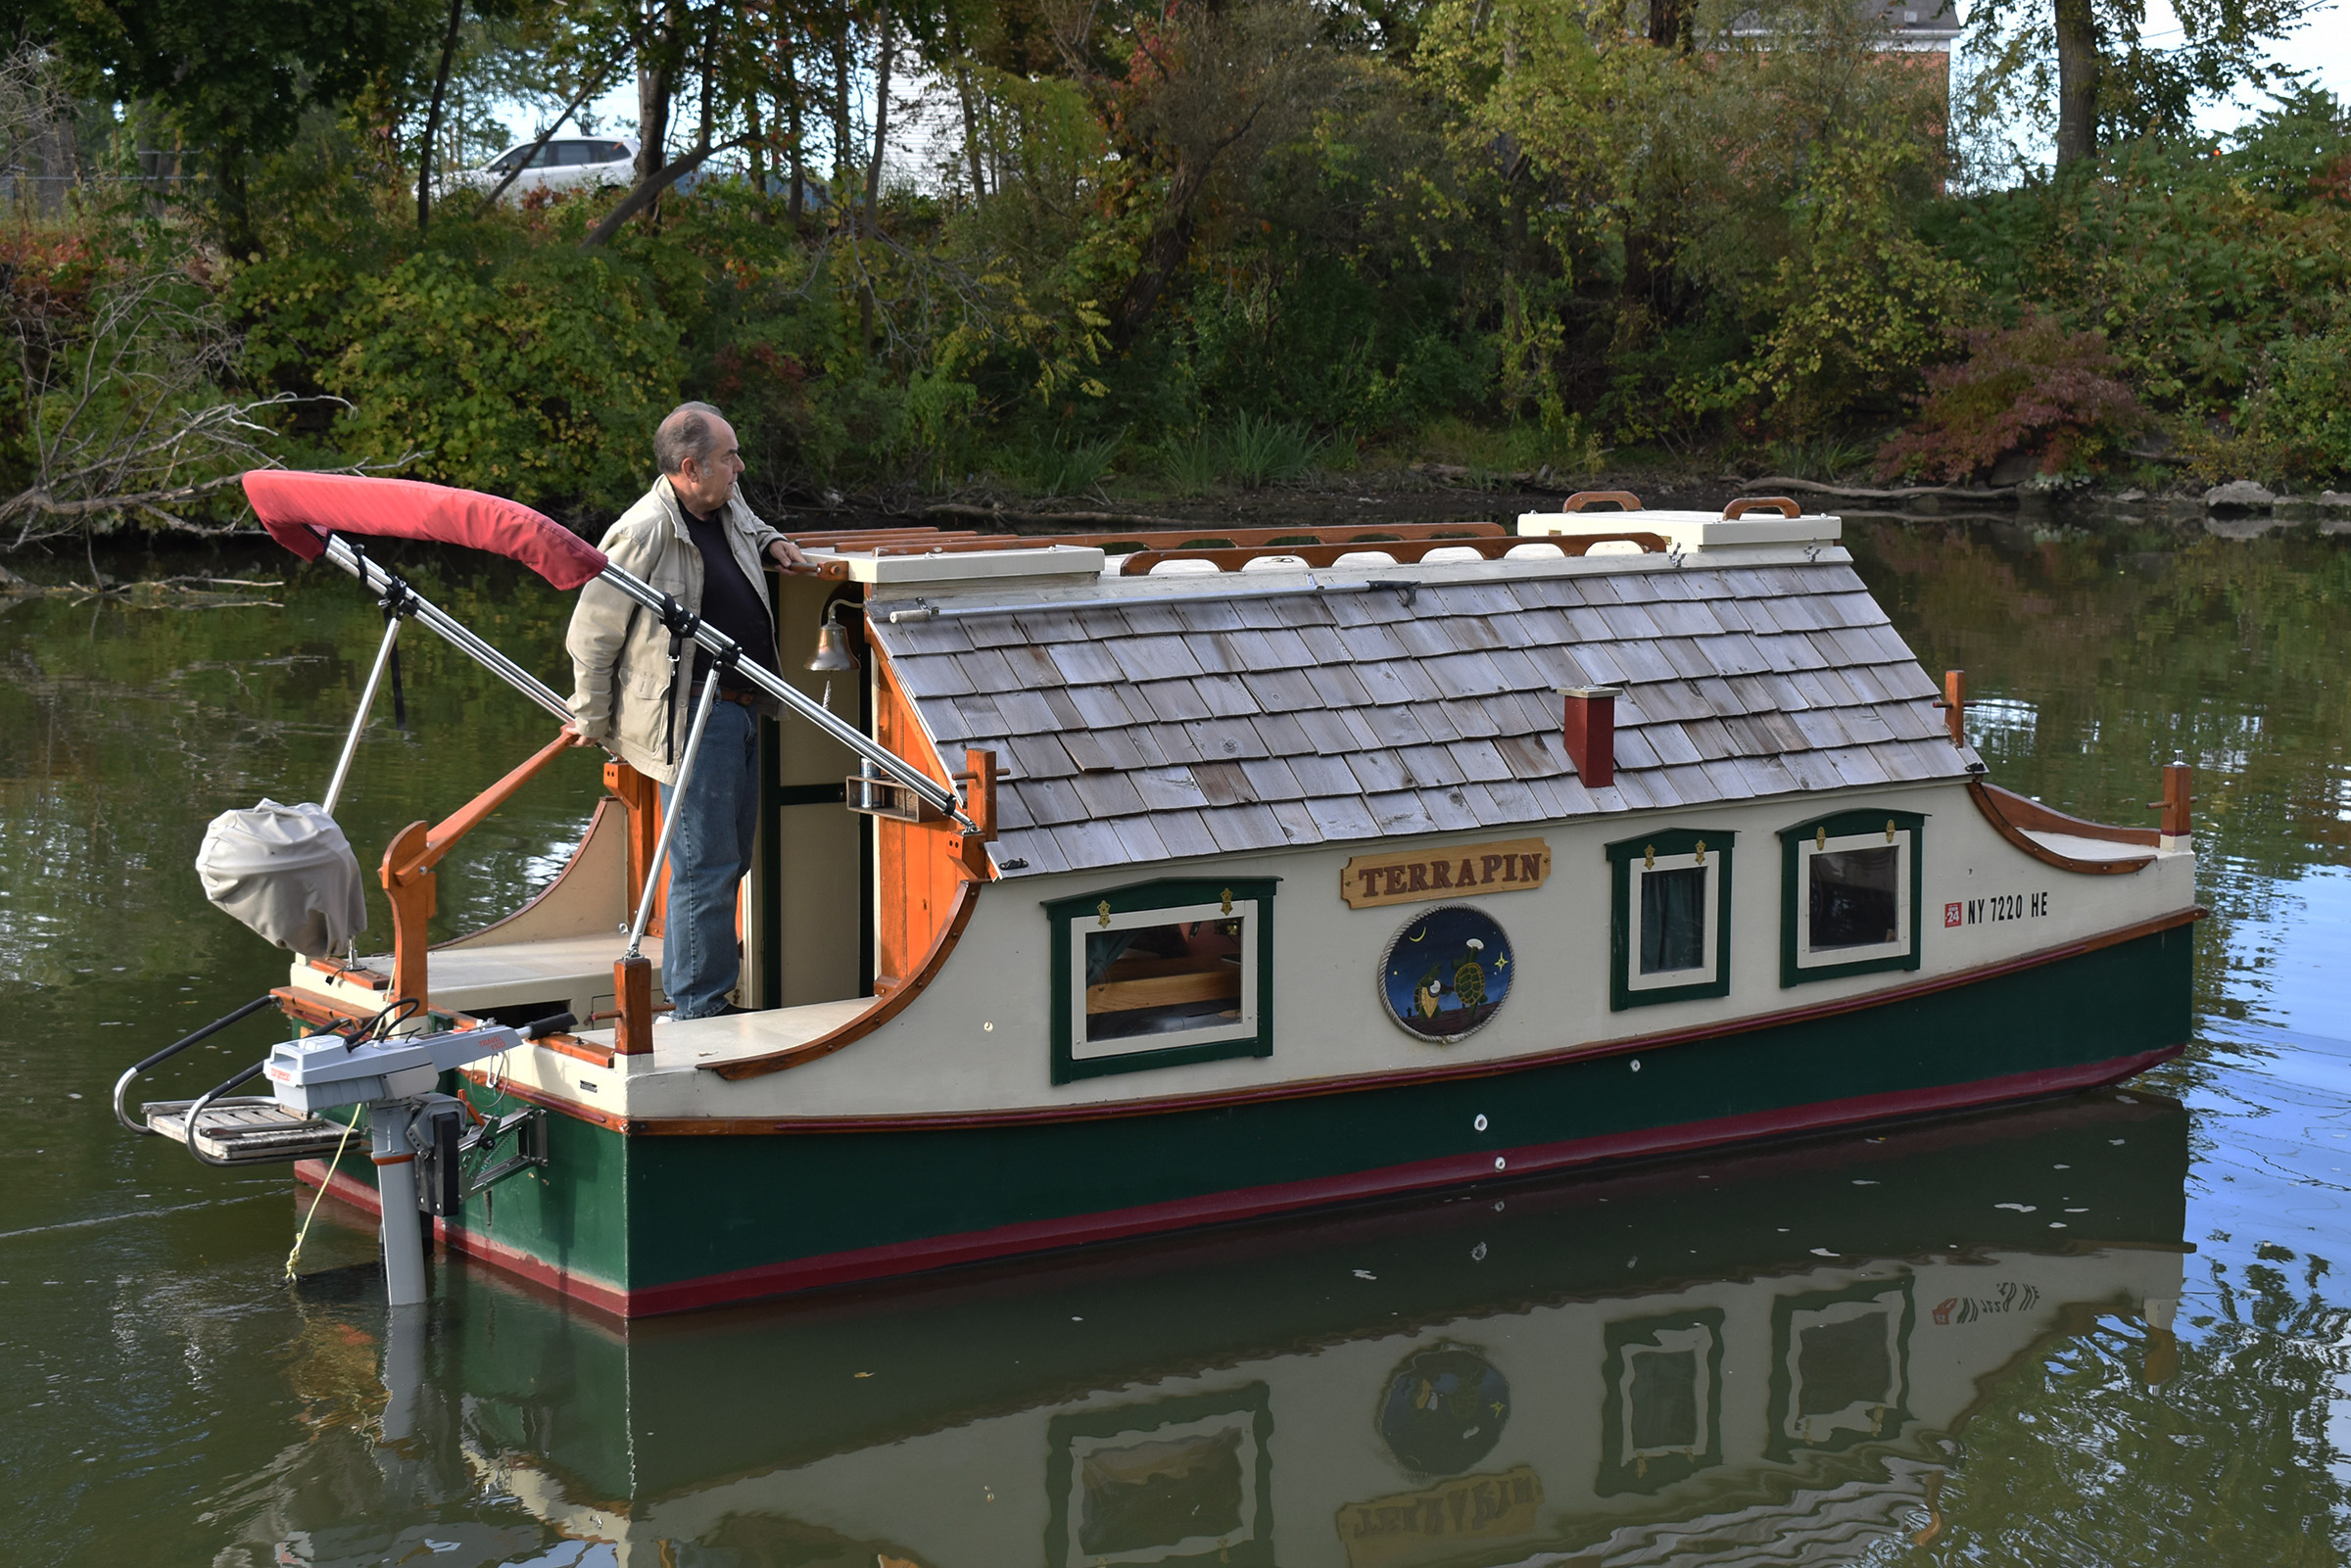
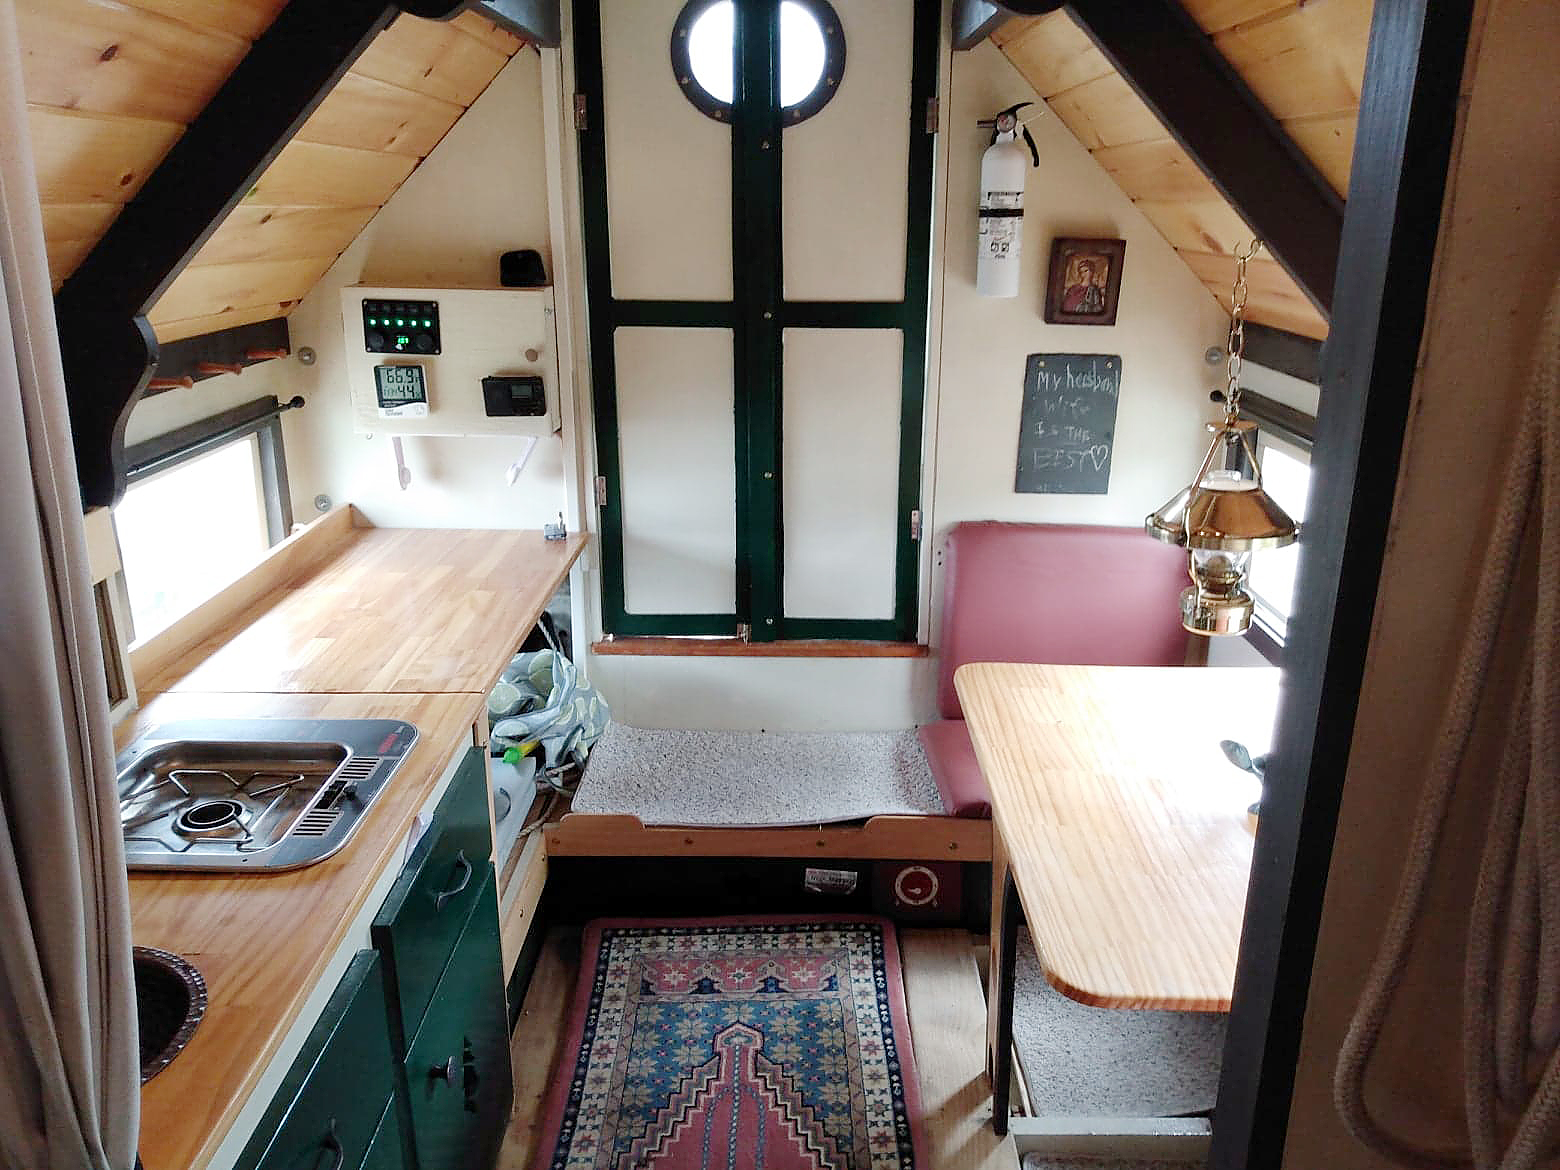
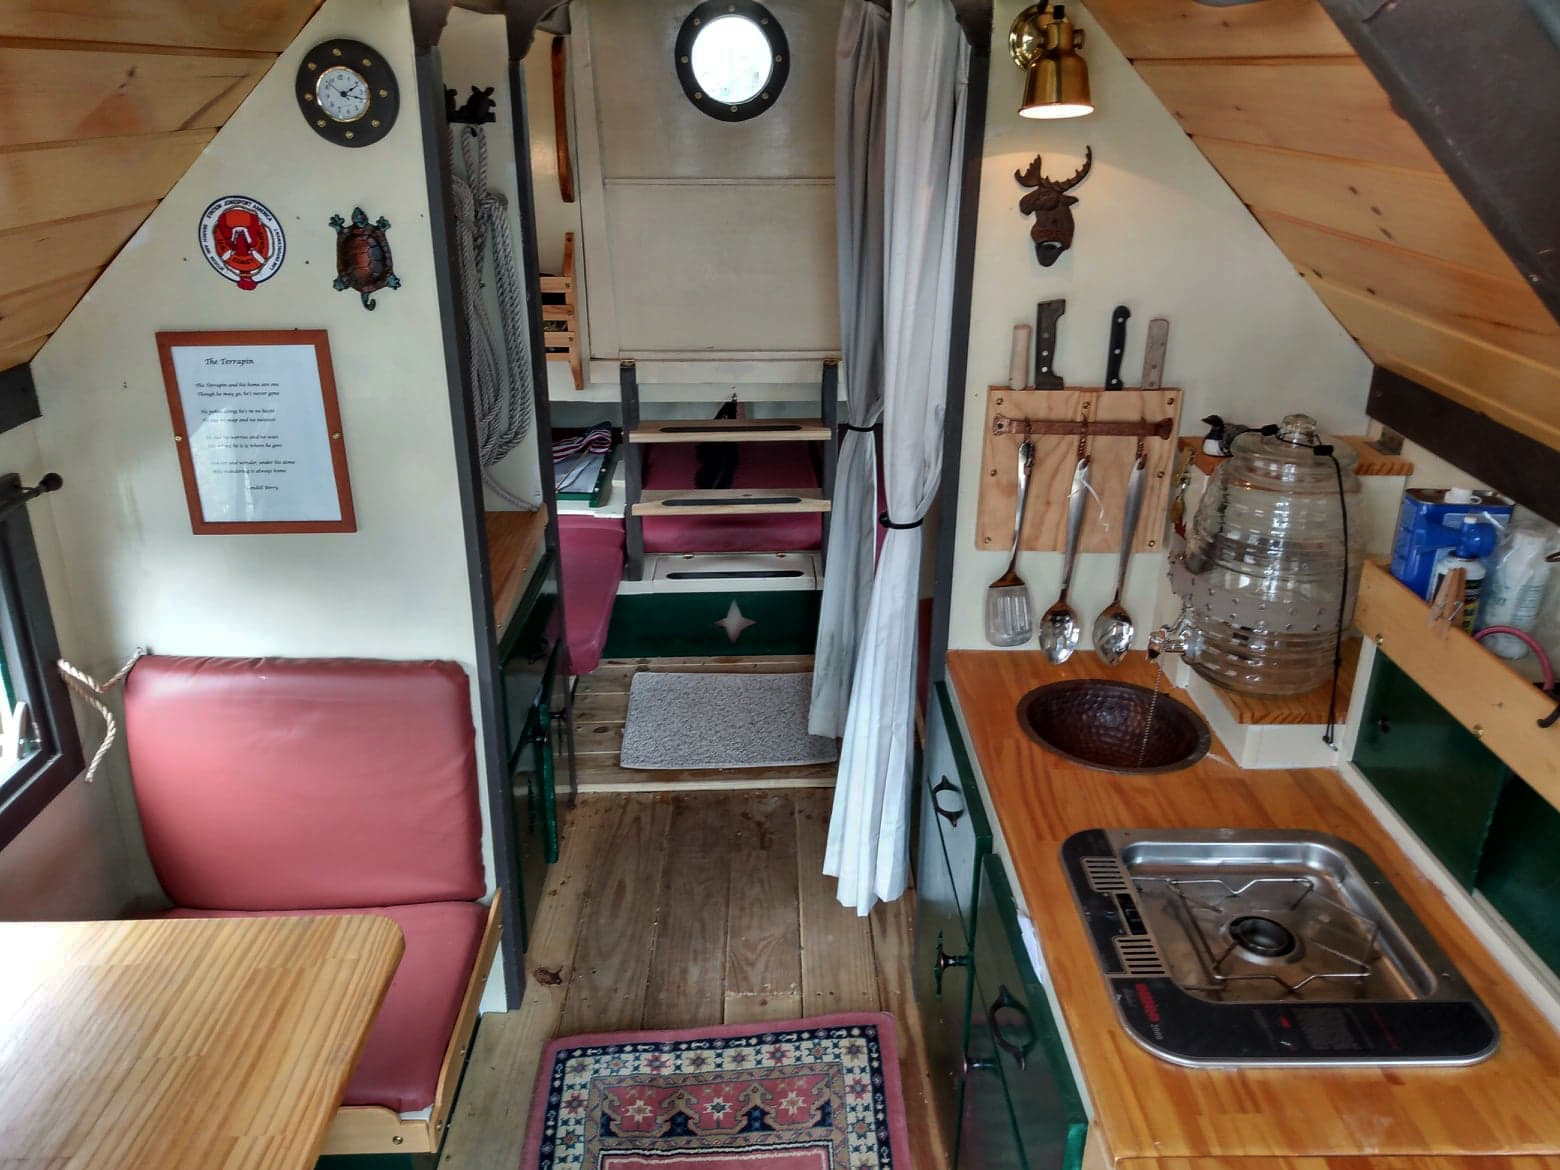
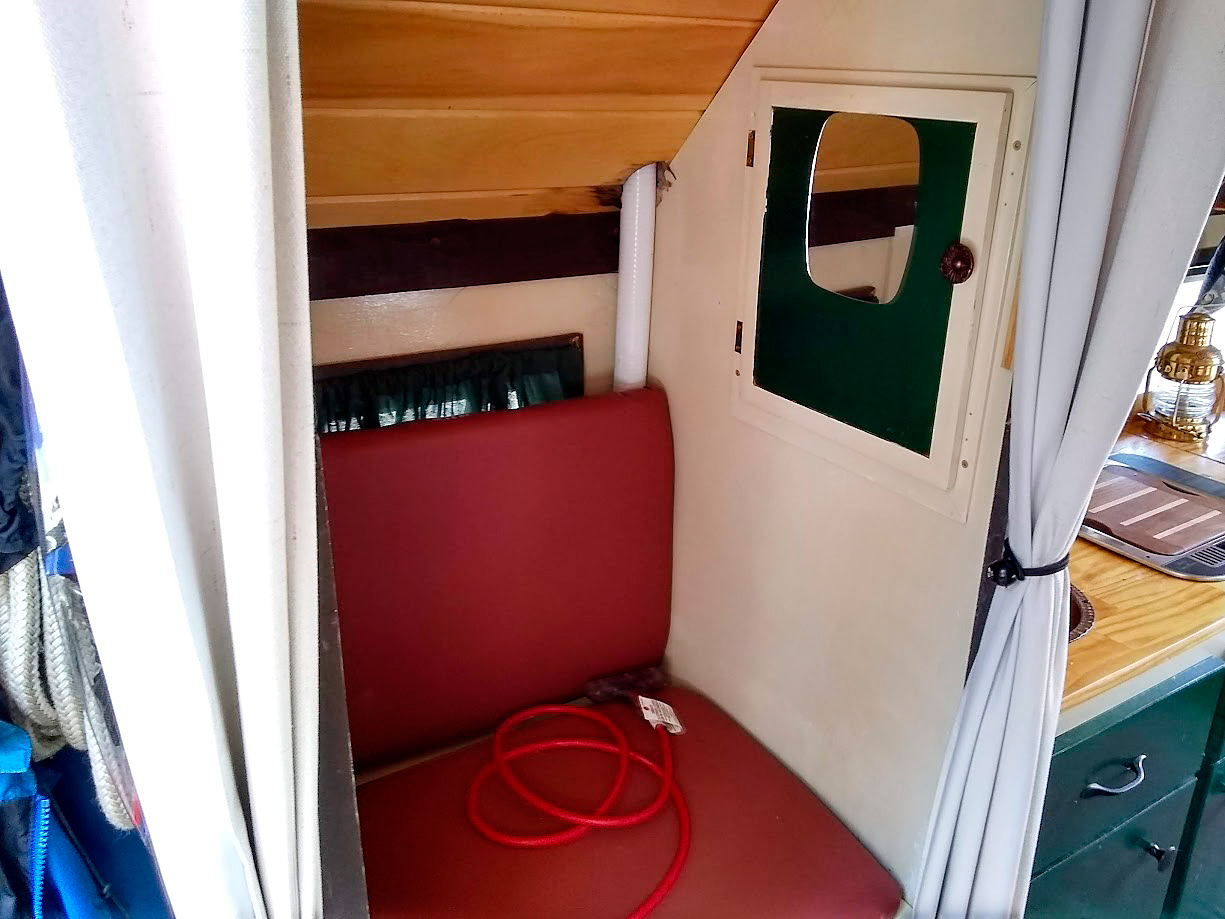
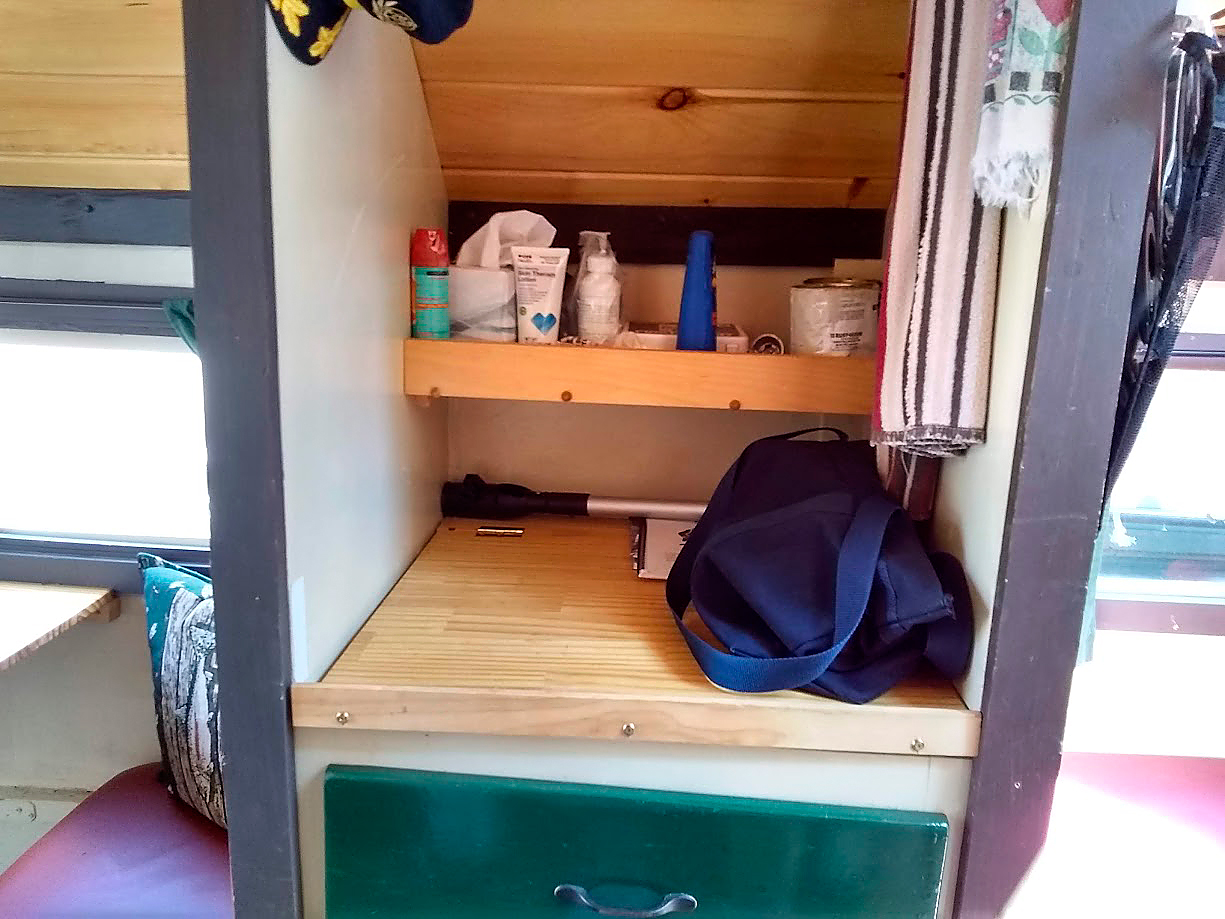
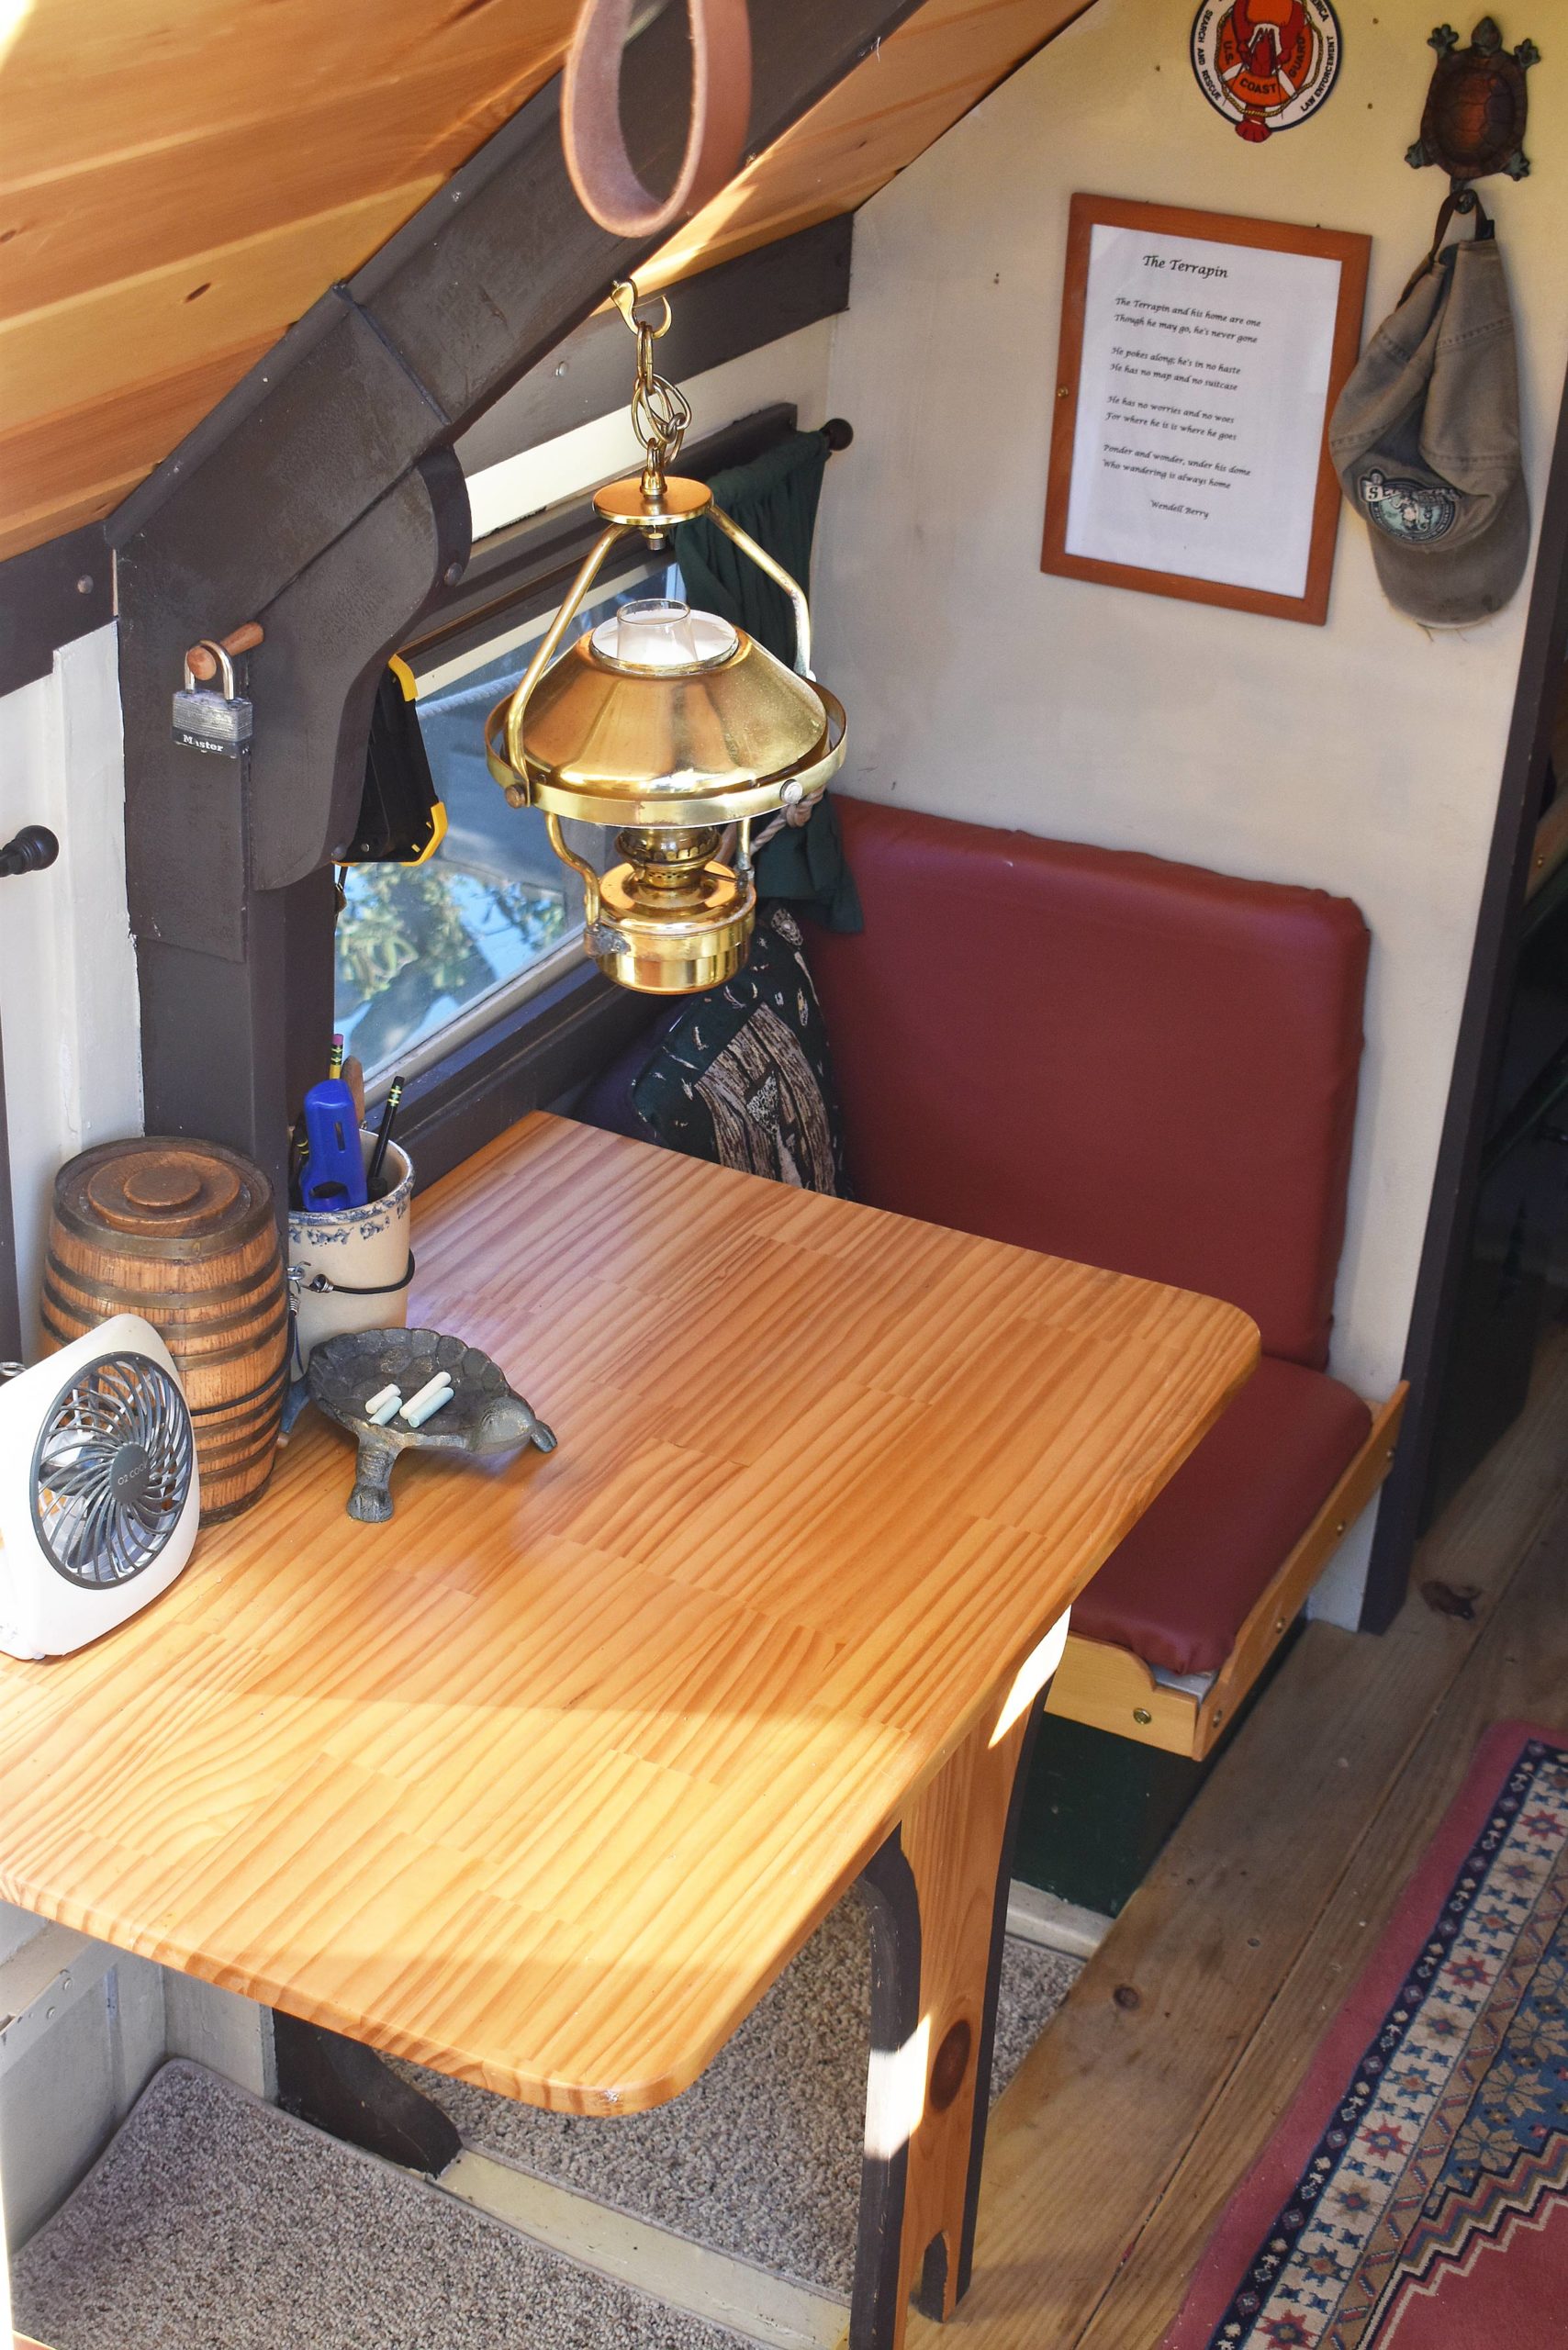
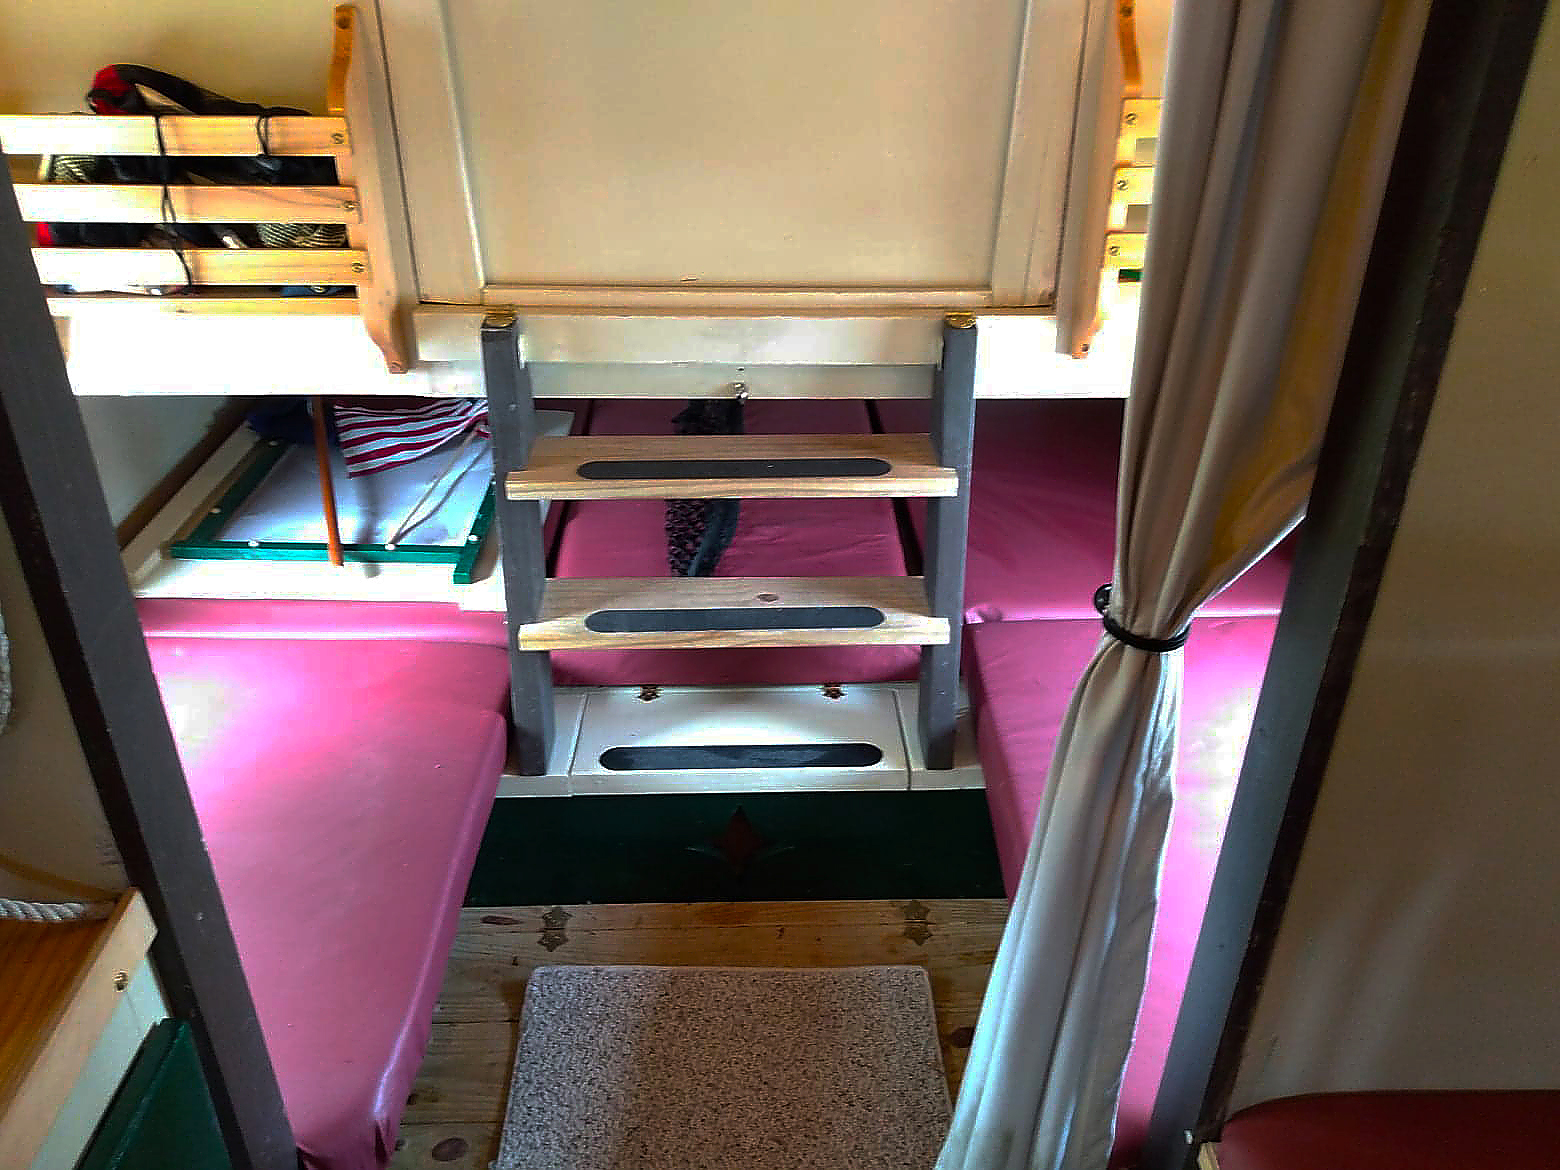

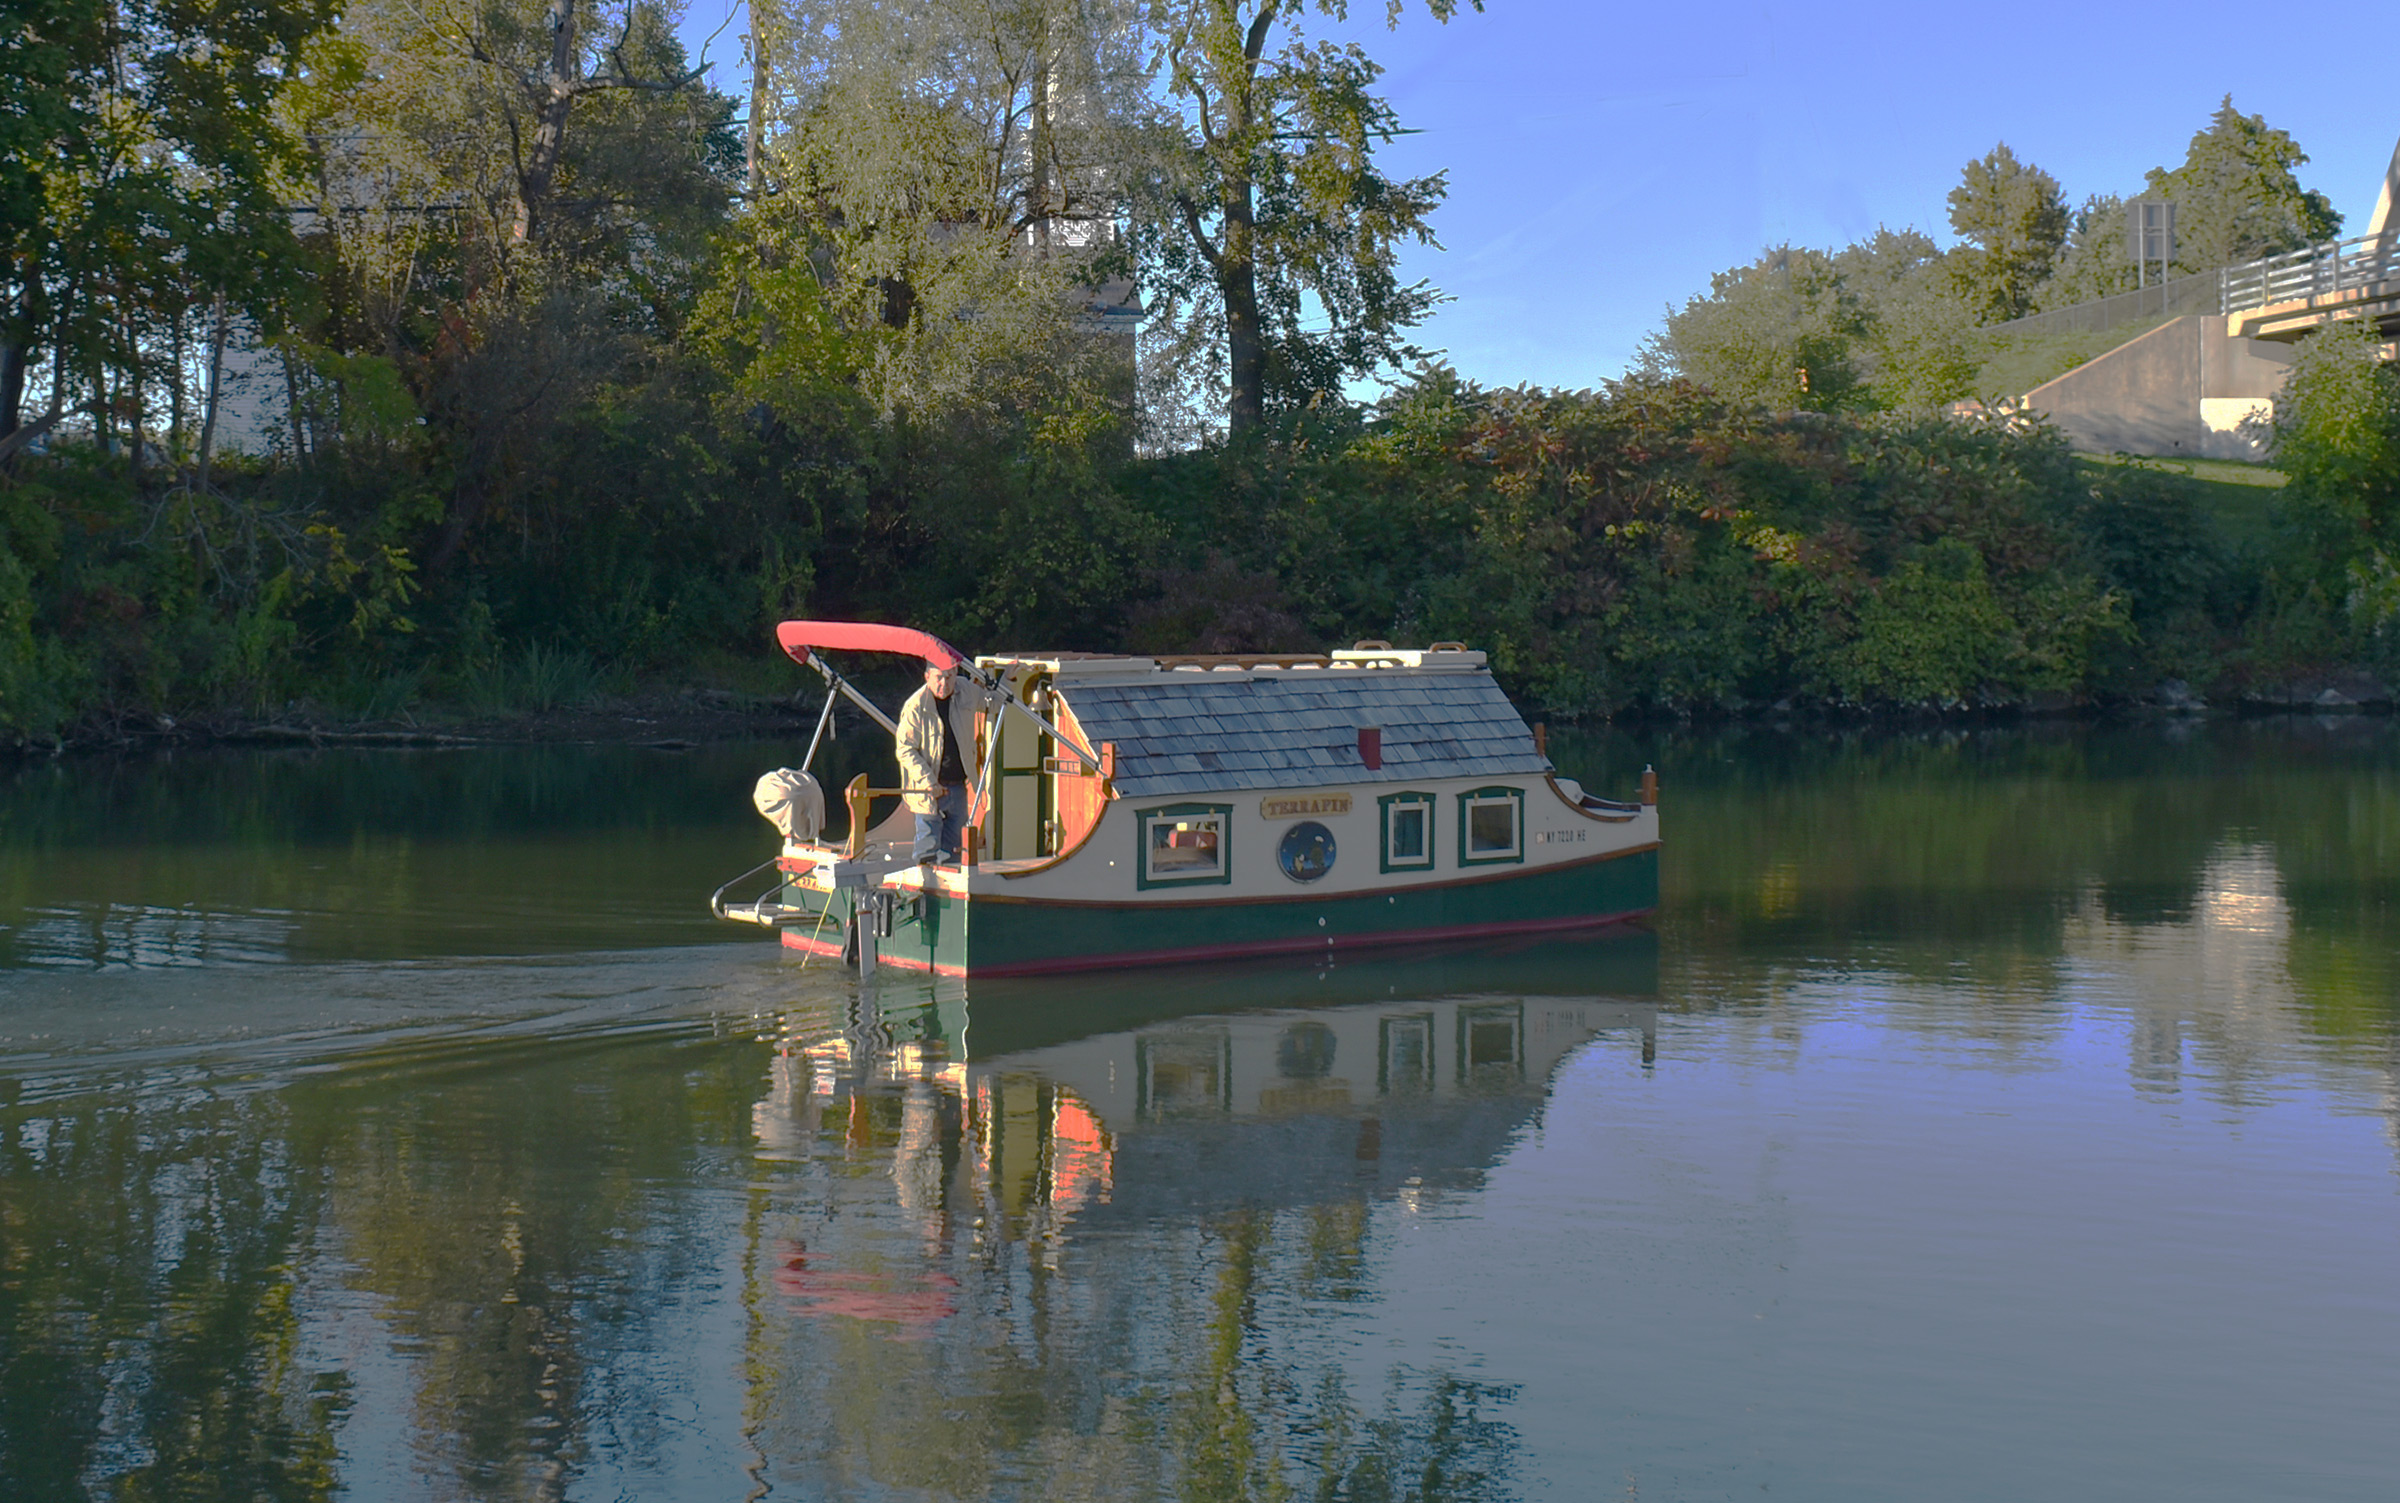
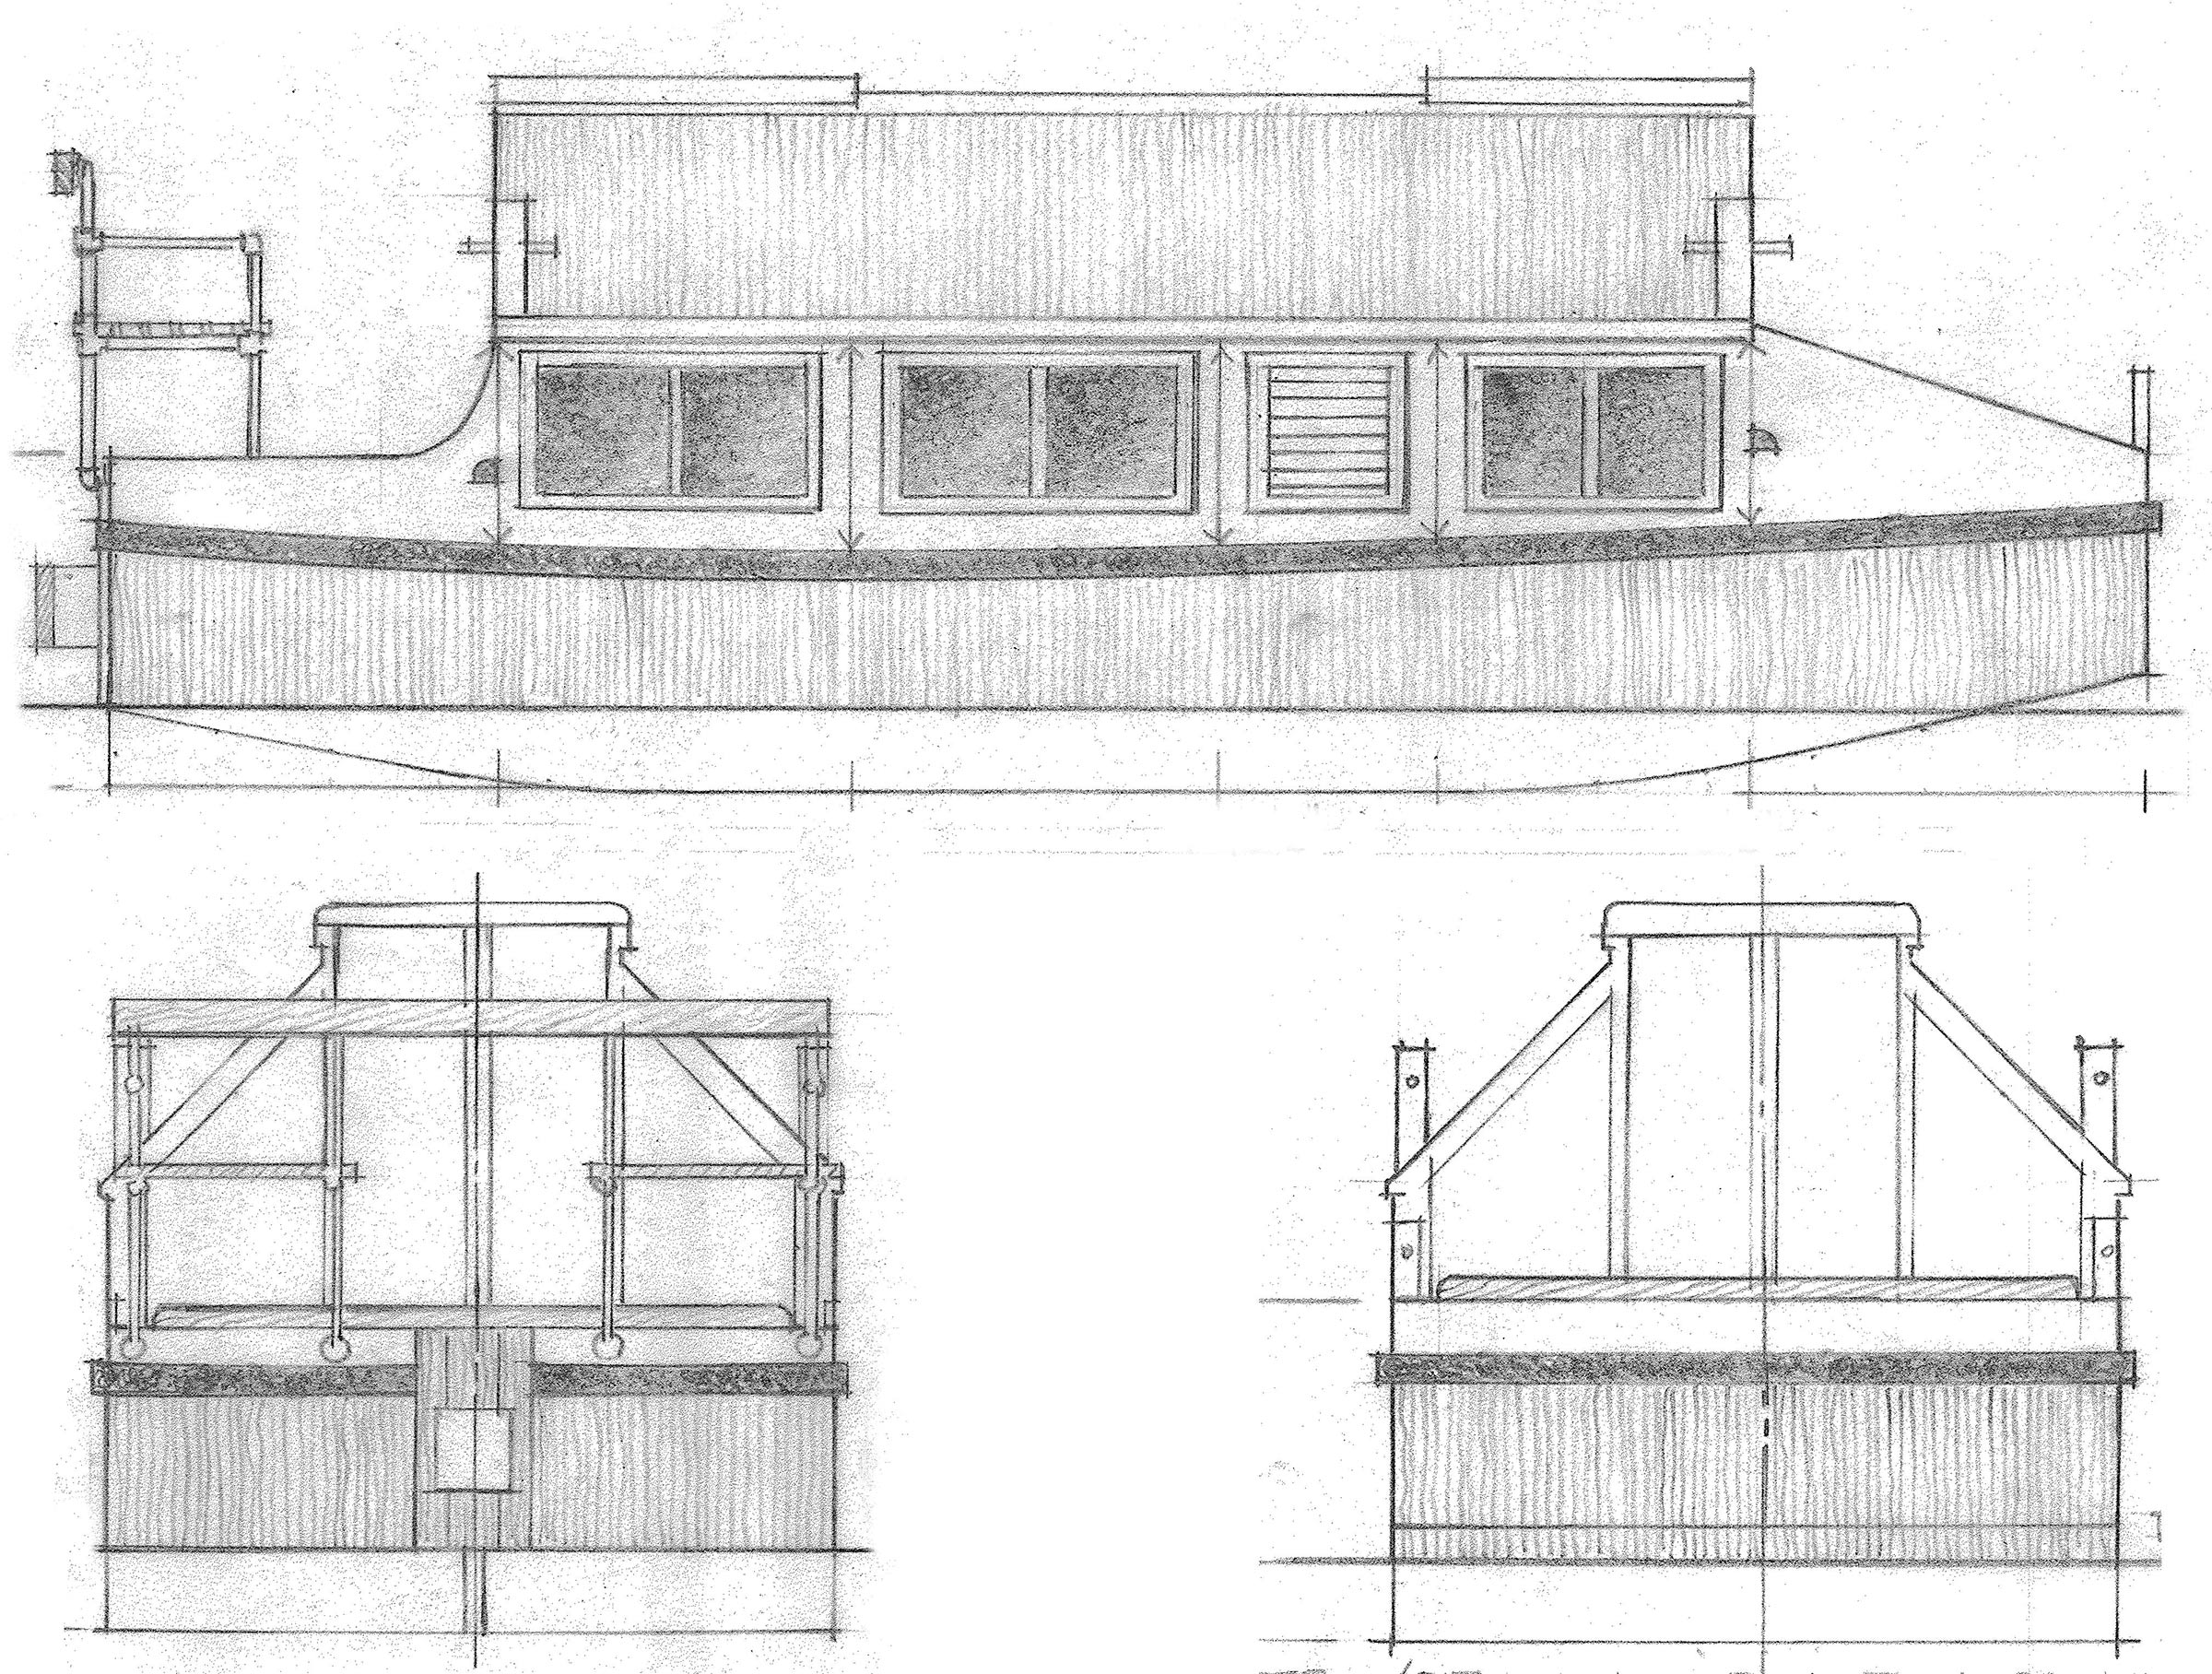