When sailing masters aboard tall ships needed to call out commands to the crew, they used speaking-trumpets, a type of megaphone, to aim and amplify their voices so they could be heard the full length of the ship and up to the topmasts. On a small boat, it’s not likely you’ll have trouble making yourself heard by anyone on board, but your voice may not carry well to people on shore, lockmasters, or other boaters in the area, especially if the wind and waves are making a lot of noise.
Cupping your hands around your mouth is instinctive and will help a bit, but megaphones are much more effective. For short distances, they can be small, like the pre-electronic type coxswains wore strapped to their heads to reach all members of the rowing crew; for more range they can be larger, like the traffic-cone-sized megaphones coaches once used to communicate between their launches and their crews.
 Photographs by the author
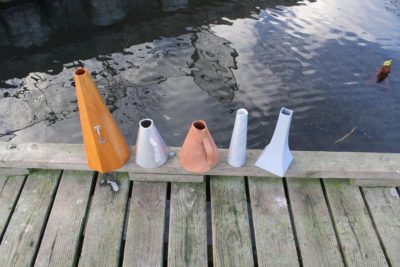
Megaphones come in many shapes and sizes. In general, the longer and larger the better, but the more compact ones are easier to keep aboard a small boat.
As you’d guess, megaphones work by focusing sound in a particular direction, but there’s another factor at work that accounts for the perceived amplification of sound: acoustic impedance. The sound energy produced in the small space of your vocal tract can’t effectively make the transition to the wide-open space around you. I have to admit I don’t fully understand how this works, but I think of it this way: If you poke your finger into still water, it won’t make much of a splash or generate anything more than a small ripple. If you hit the water at the same speed with the flat of your hand you’ll make a splash and a wave. The megaphone effects the transition from a small area of impact at one end to a larger area at the other, setting more air in the open space in motion. A writer on one web site put it more accurately: a megaphone “acts as an impedance-matching acoustic transformer to efficiently couple the sound from your mouth to the open space.” And the effect isn’t restricted by the direction of the megaphone. I’ve noticed that rowing coaches using non-electronic megaphones are very easy to hear even when their megaphones aren’t aimed at me.
The most familiar acoustic megaphones have conical shapes (properly called frustums, as they are cones with their pointed peaks lopped off). Bullhorns and electronic megaphones flare like the horn of a trumpet. A conical megaphone may not be as efficient, but it is much easier to make, and I’ve made a several from plywood, aluminum, leather, and PVC drainpipe.
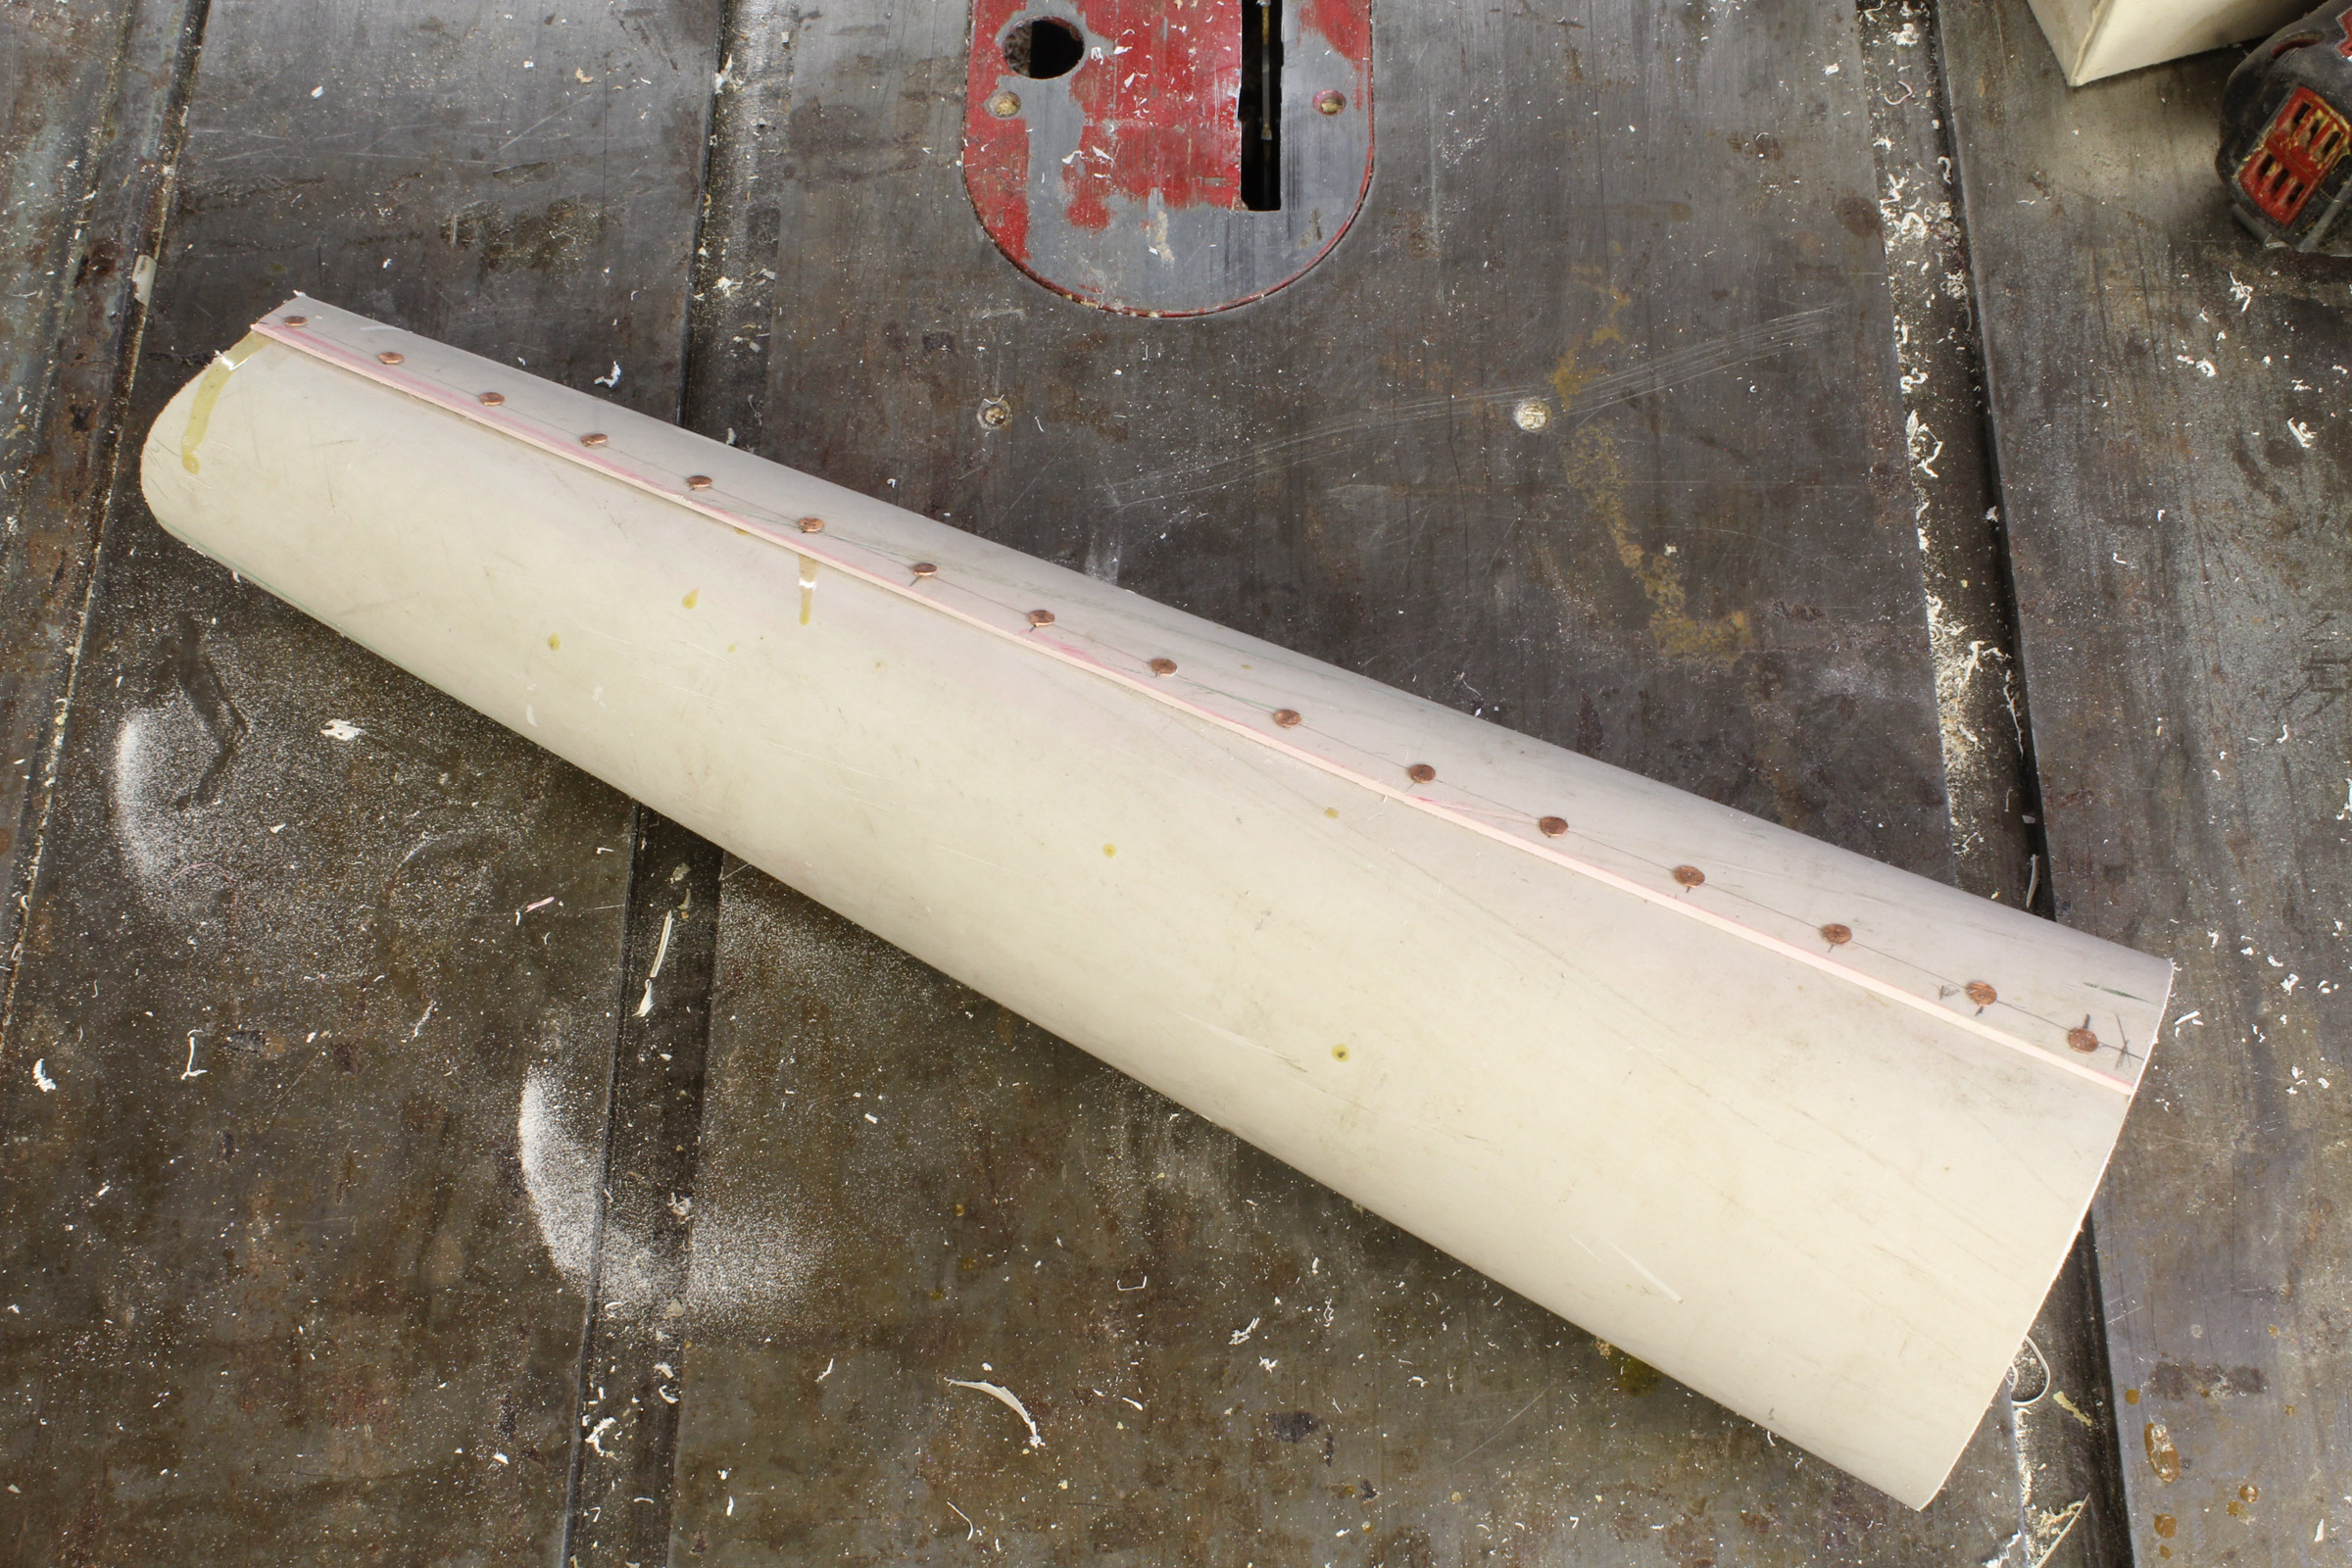
Staved plywood
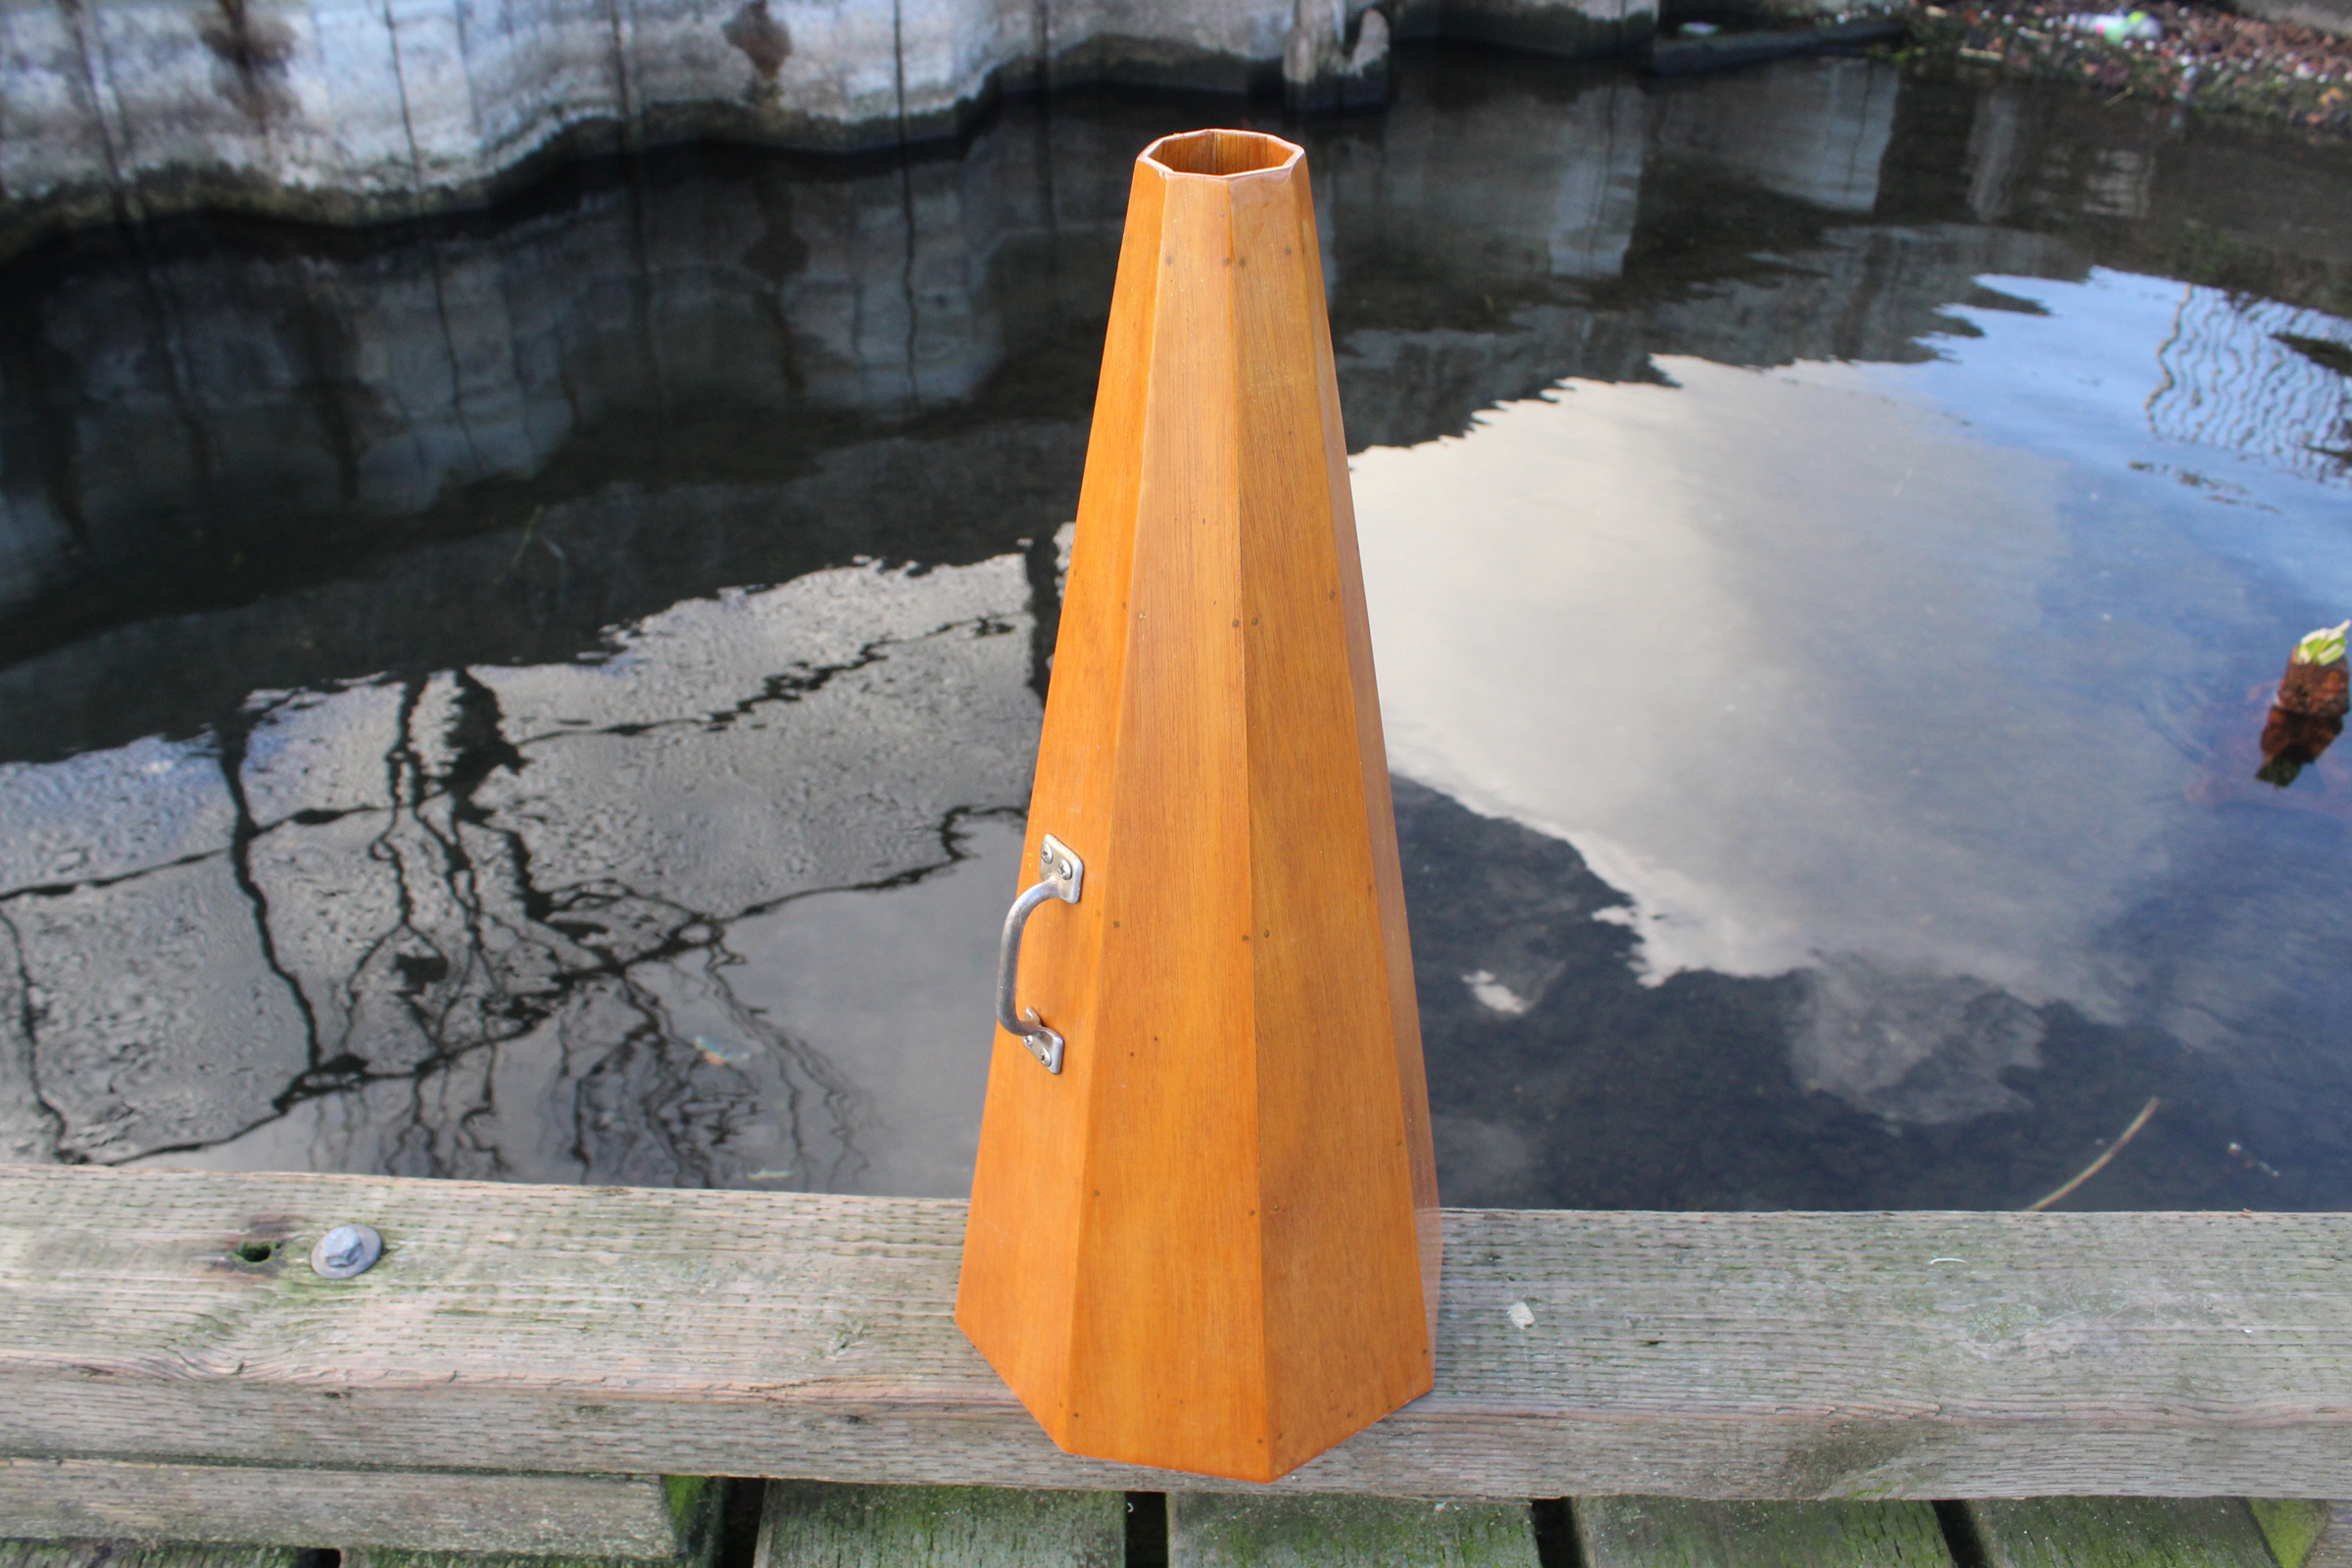
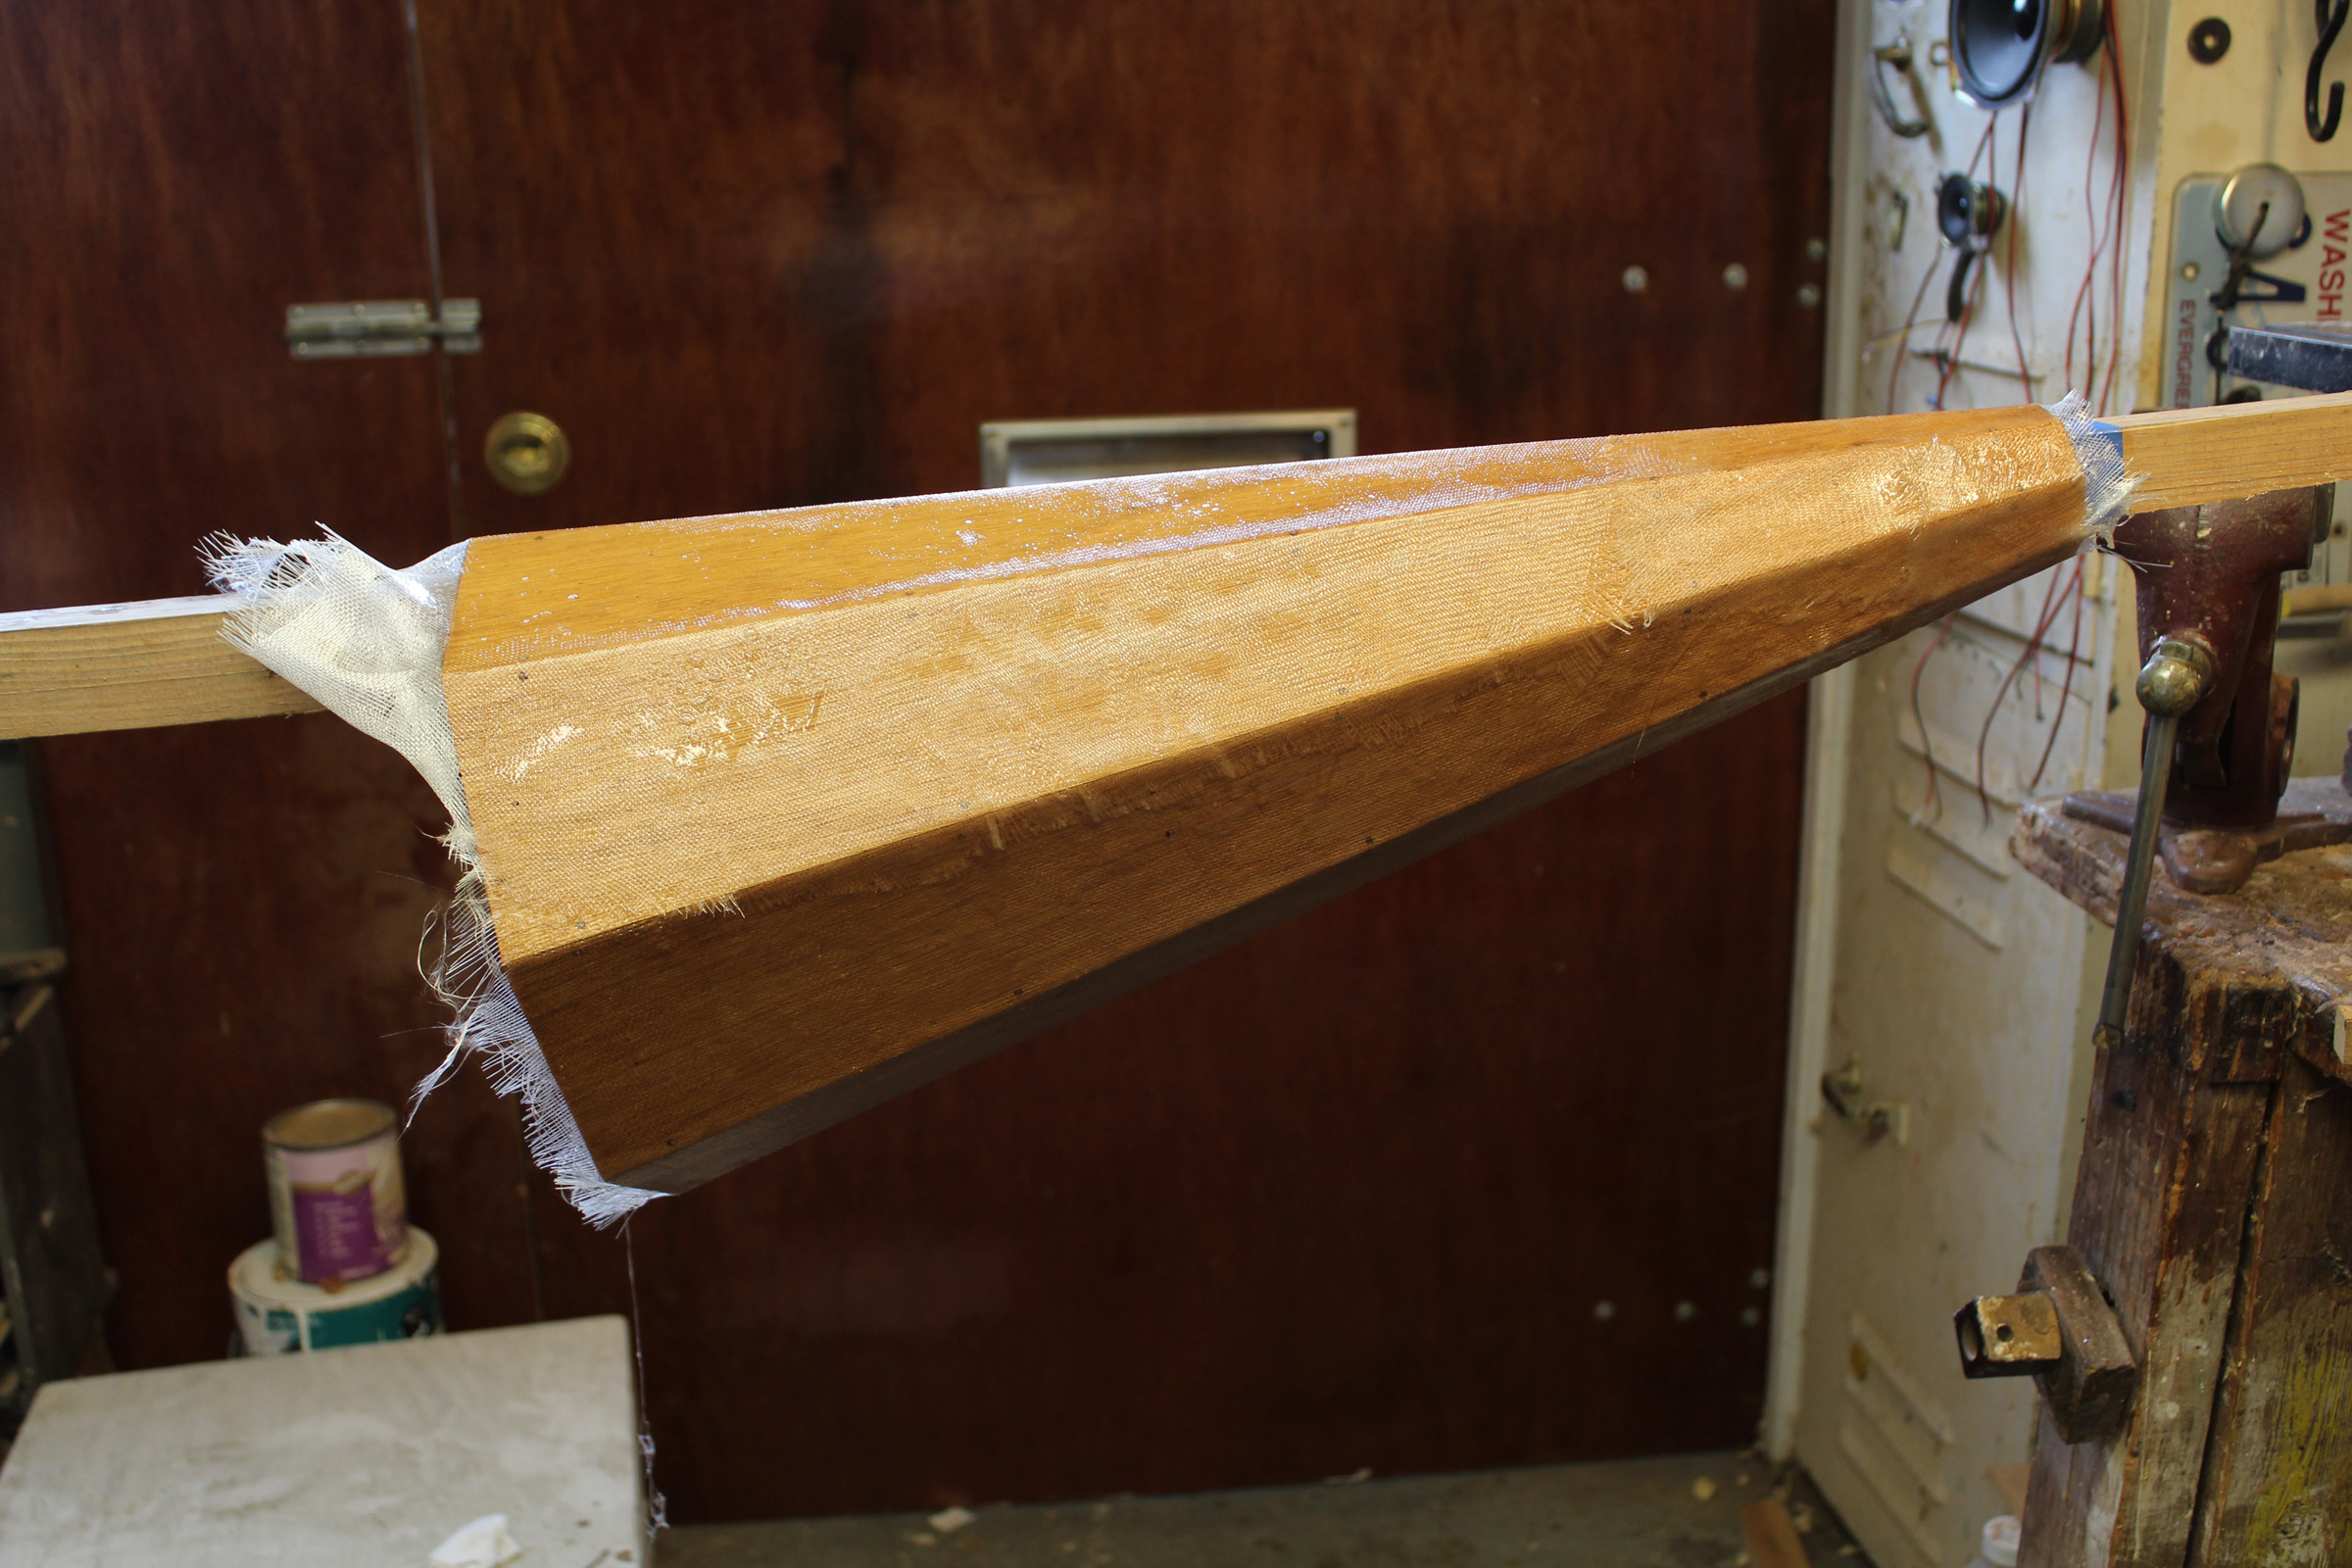
This eight-staved plywood megaphone is 22″ long and 9″ across at the wide end. It greatly amplifies the sound of a voice.
My largest megaphone, and the loudest, is made of 1/8″ mahogany plywood. I cut eight staves 22″ long and 4-3/4″ wide at the bottom, 7/8″ at the top. It’s a bit much for my smaller boats.
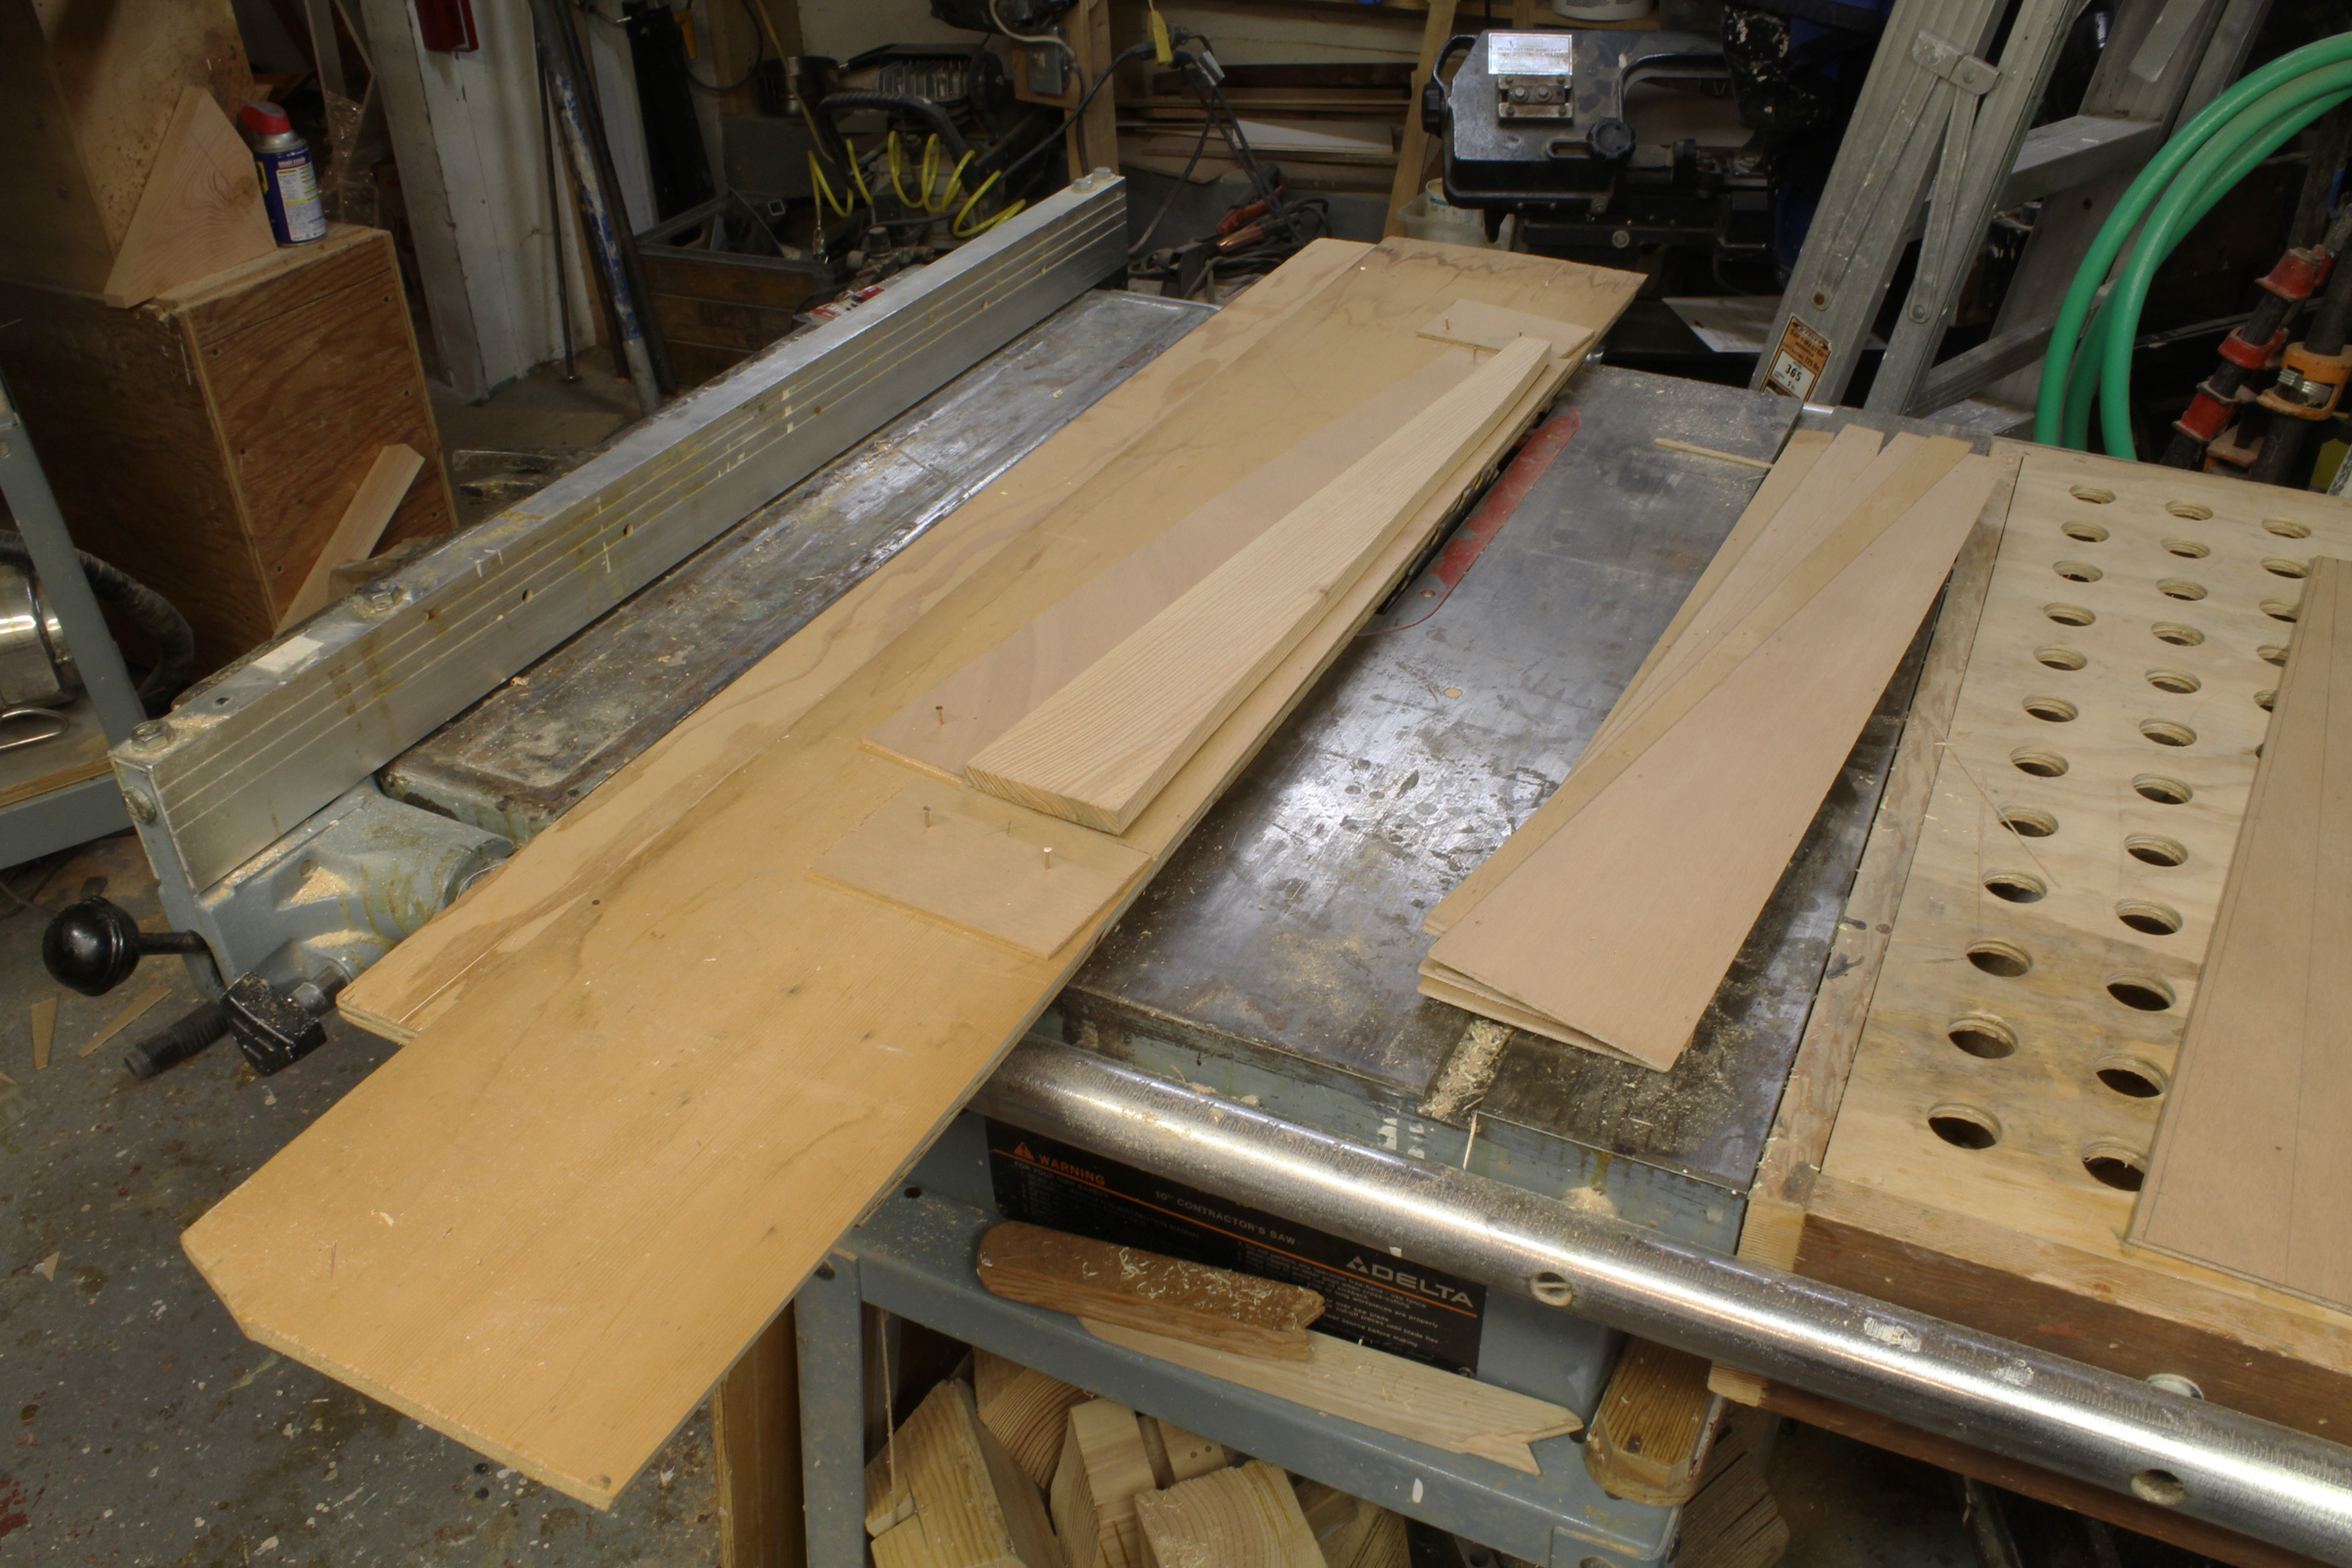
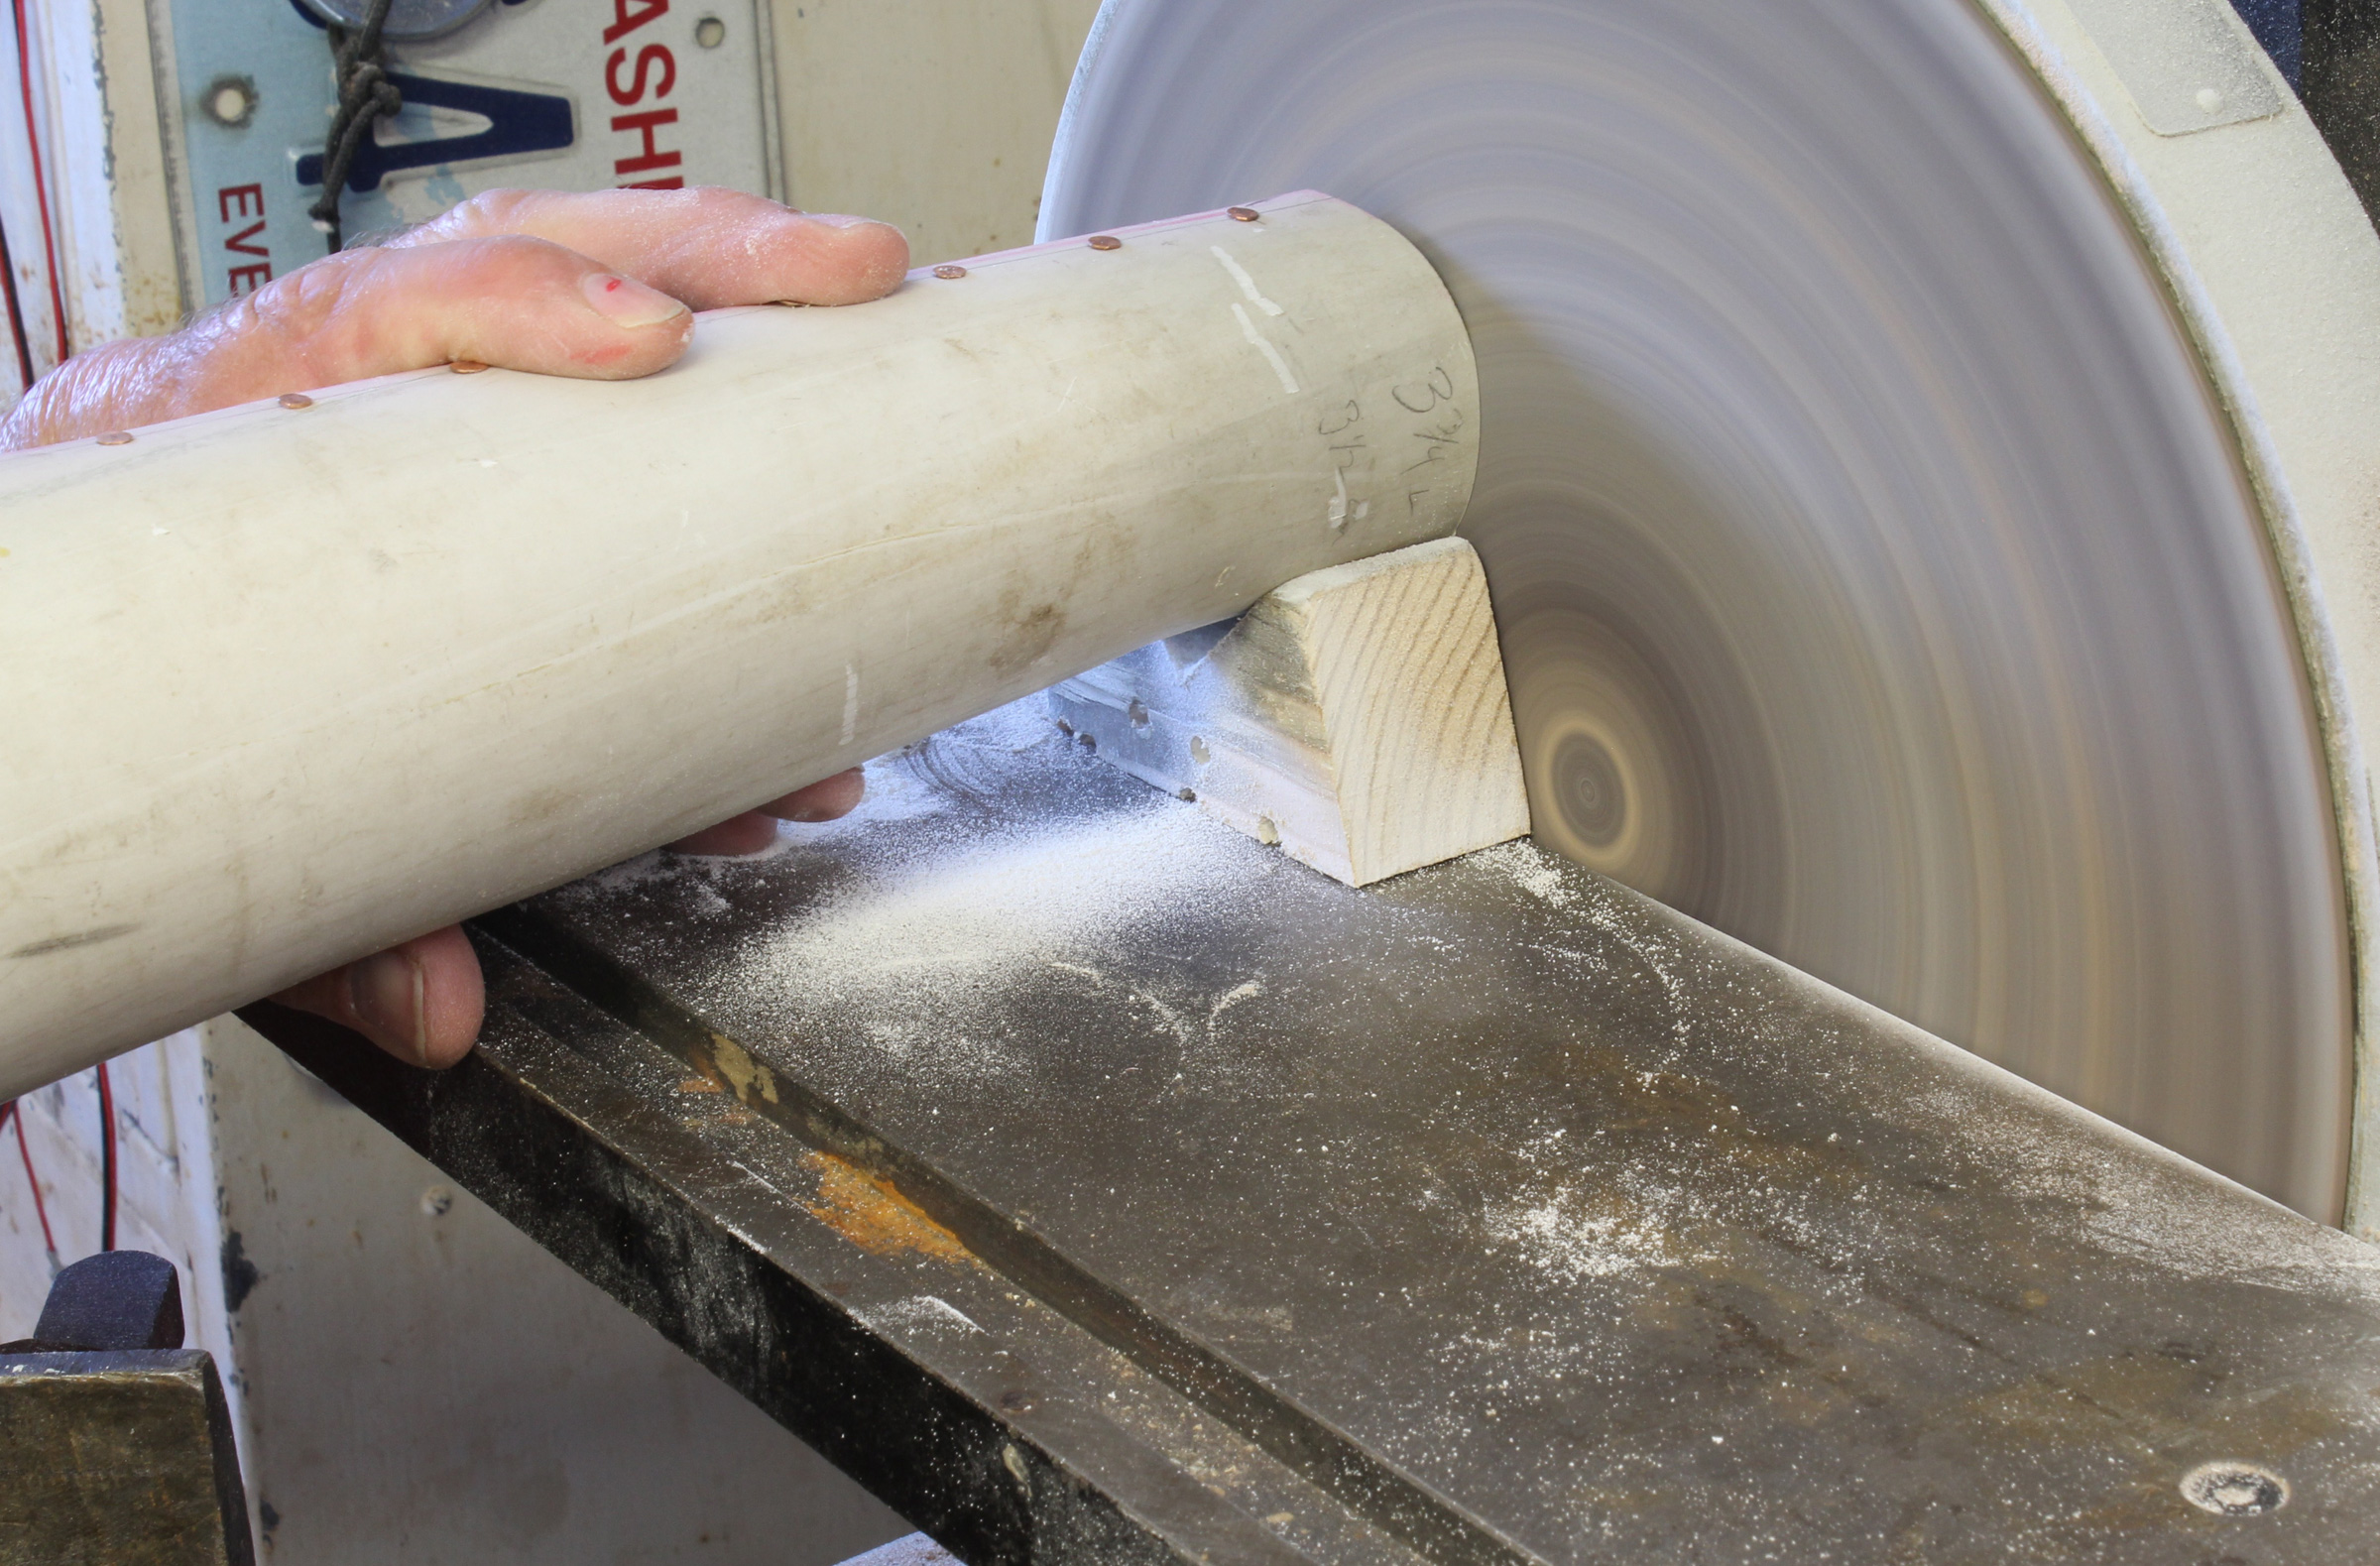
I have a simple sled for cutting tapers on the table saw. It’s a piece of plywood with a strip on the bottom, which rides in the slot. Scraps of plywood tacked to the top orient the megaphone staves. The staves are stacked at right, The thicker piece of wood on the sled was made to hold the staves flat while being cut.
I had intended to join the staves with copper wire, stitch-and-glue fashion, but getting them to line up edge-to-edge wasn’t working. I went back to the table-saw sled that I set up to cut the staves and beveled the edges at 22.5 degrees.
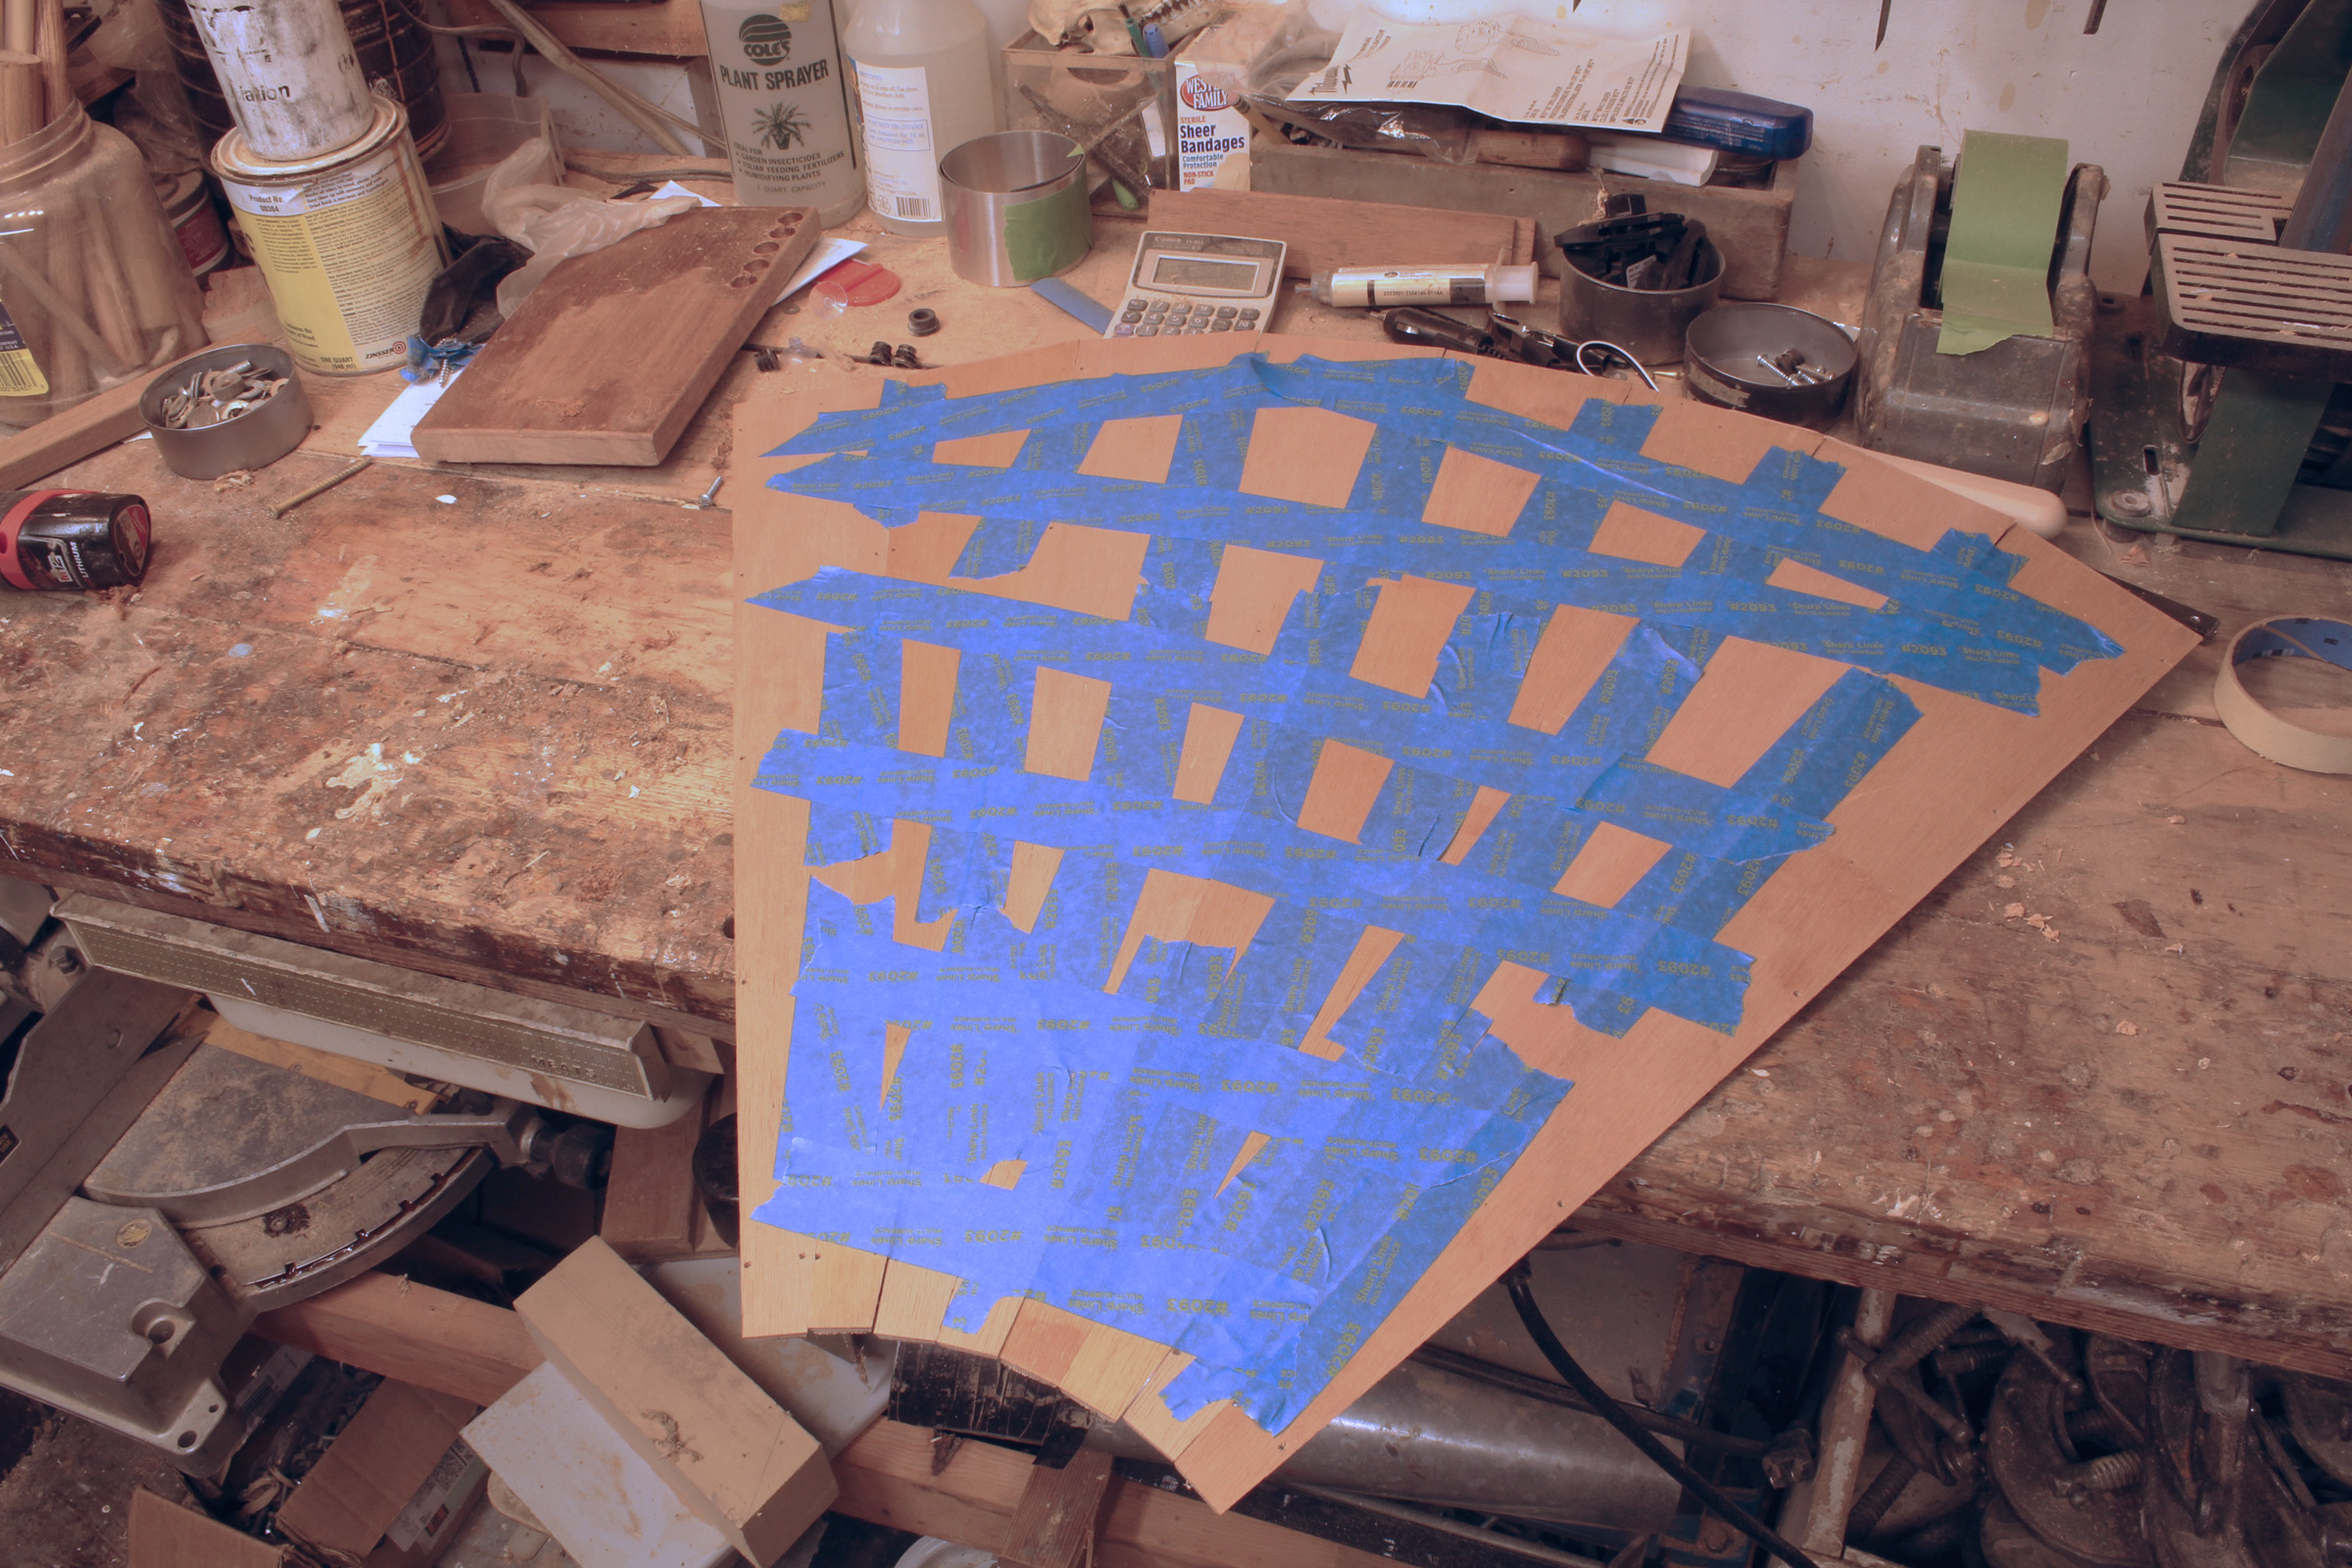
Rather than wire the newly beveled staves together, I taped them together, flipped the bunch over, and brushed the edges and inside faces with epoxy.
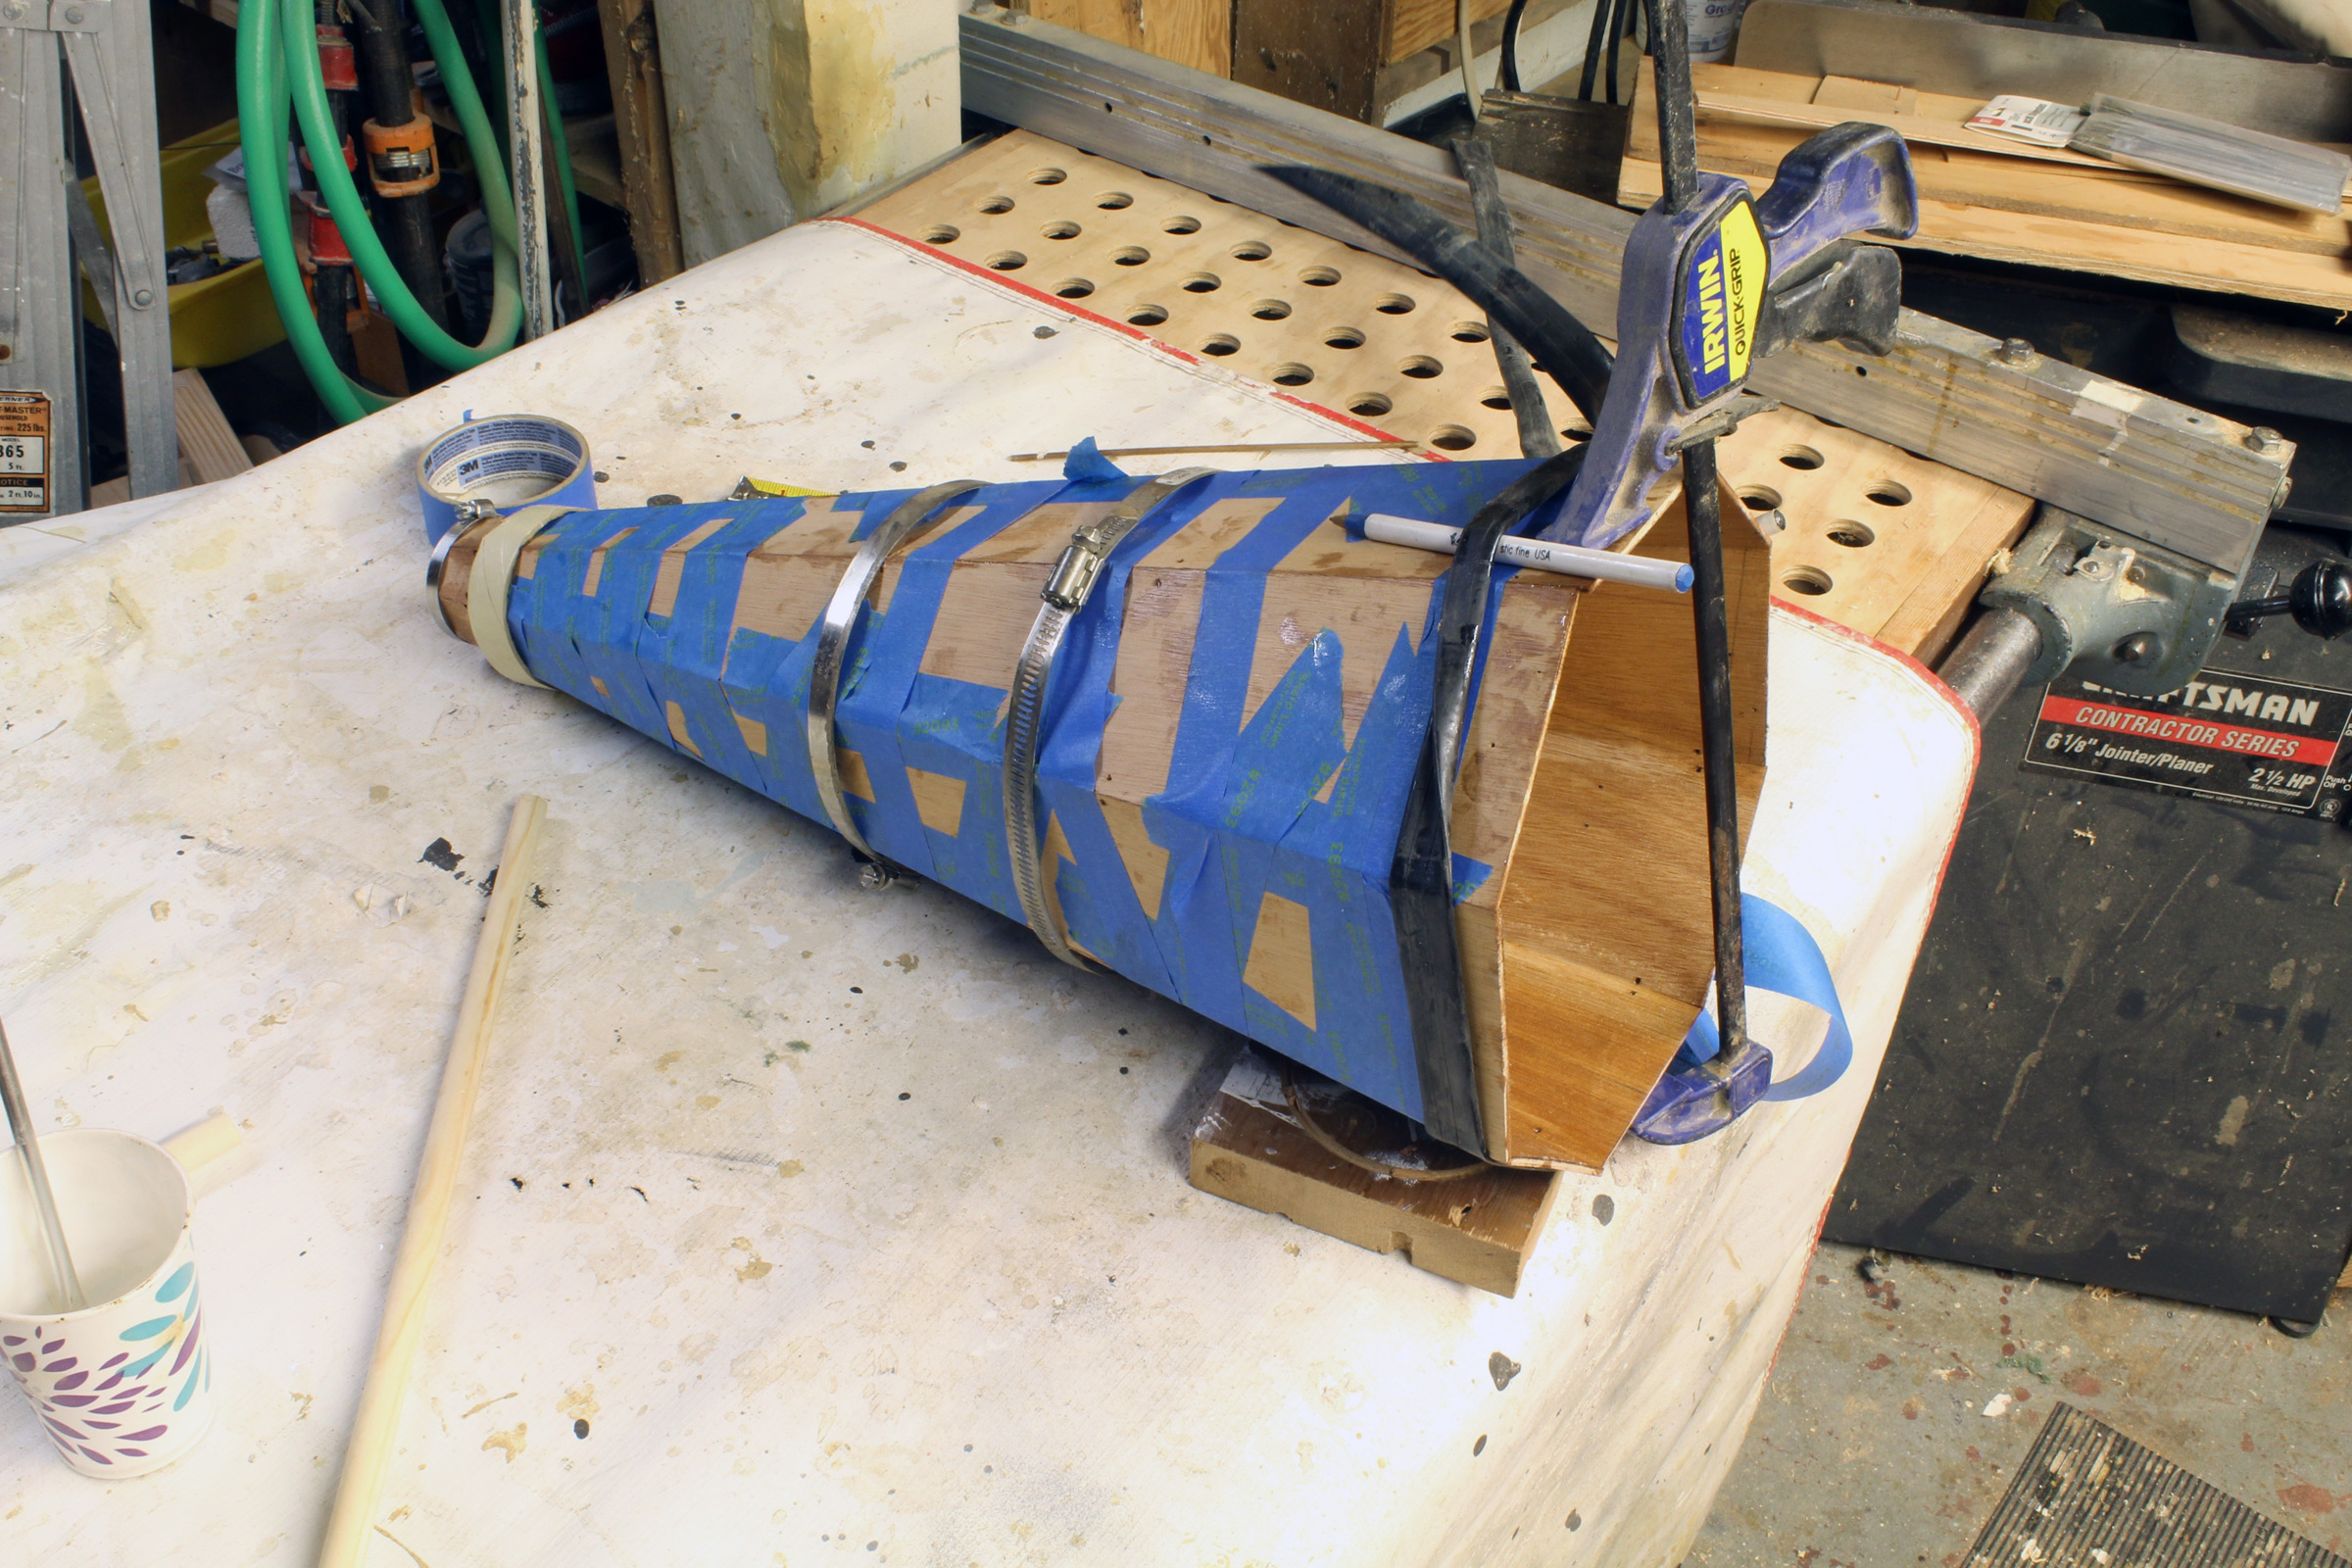
After brushing the interior surfaces and seams with epoxy, I folded the bunch of staves to bring the last two edges together and close all of the joints tight. I taped the last seam and slipped hose clamps loosely over the megaphone to set its shape. A lightly applied bar clamp fine-tuned it.
After the epoxy cured, I sanded the exterior smooth, supported the megaphone on a horizontal stick, and gave it a layer of 2-oz fiberglass and epoxy. A coating of epoxy to fill the weave was followed by varnish. A brass window-sash handle finished the job.
Sheet Pattern
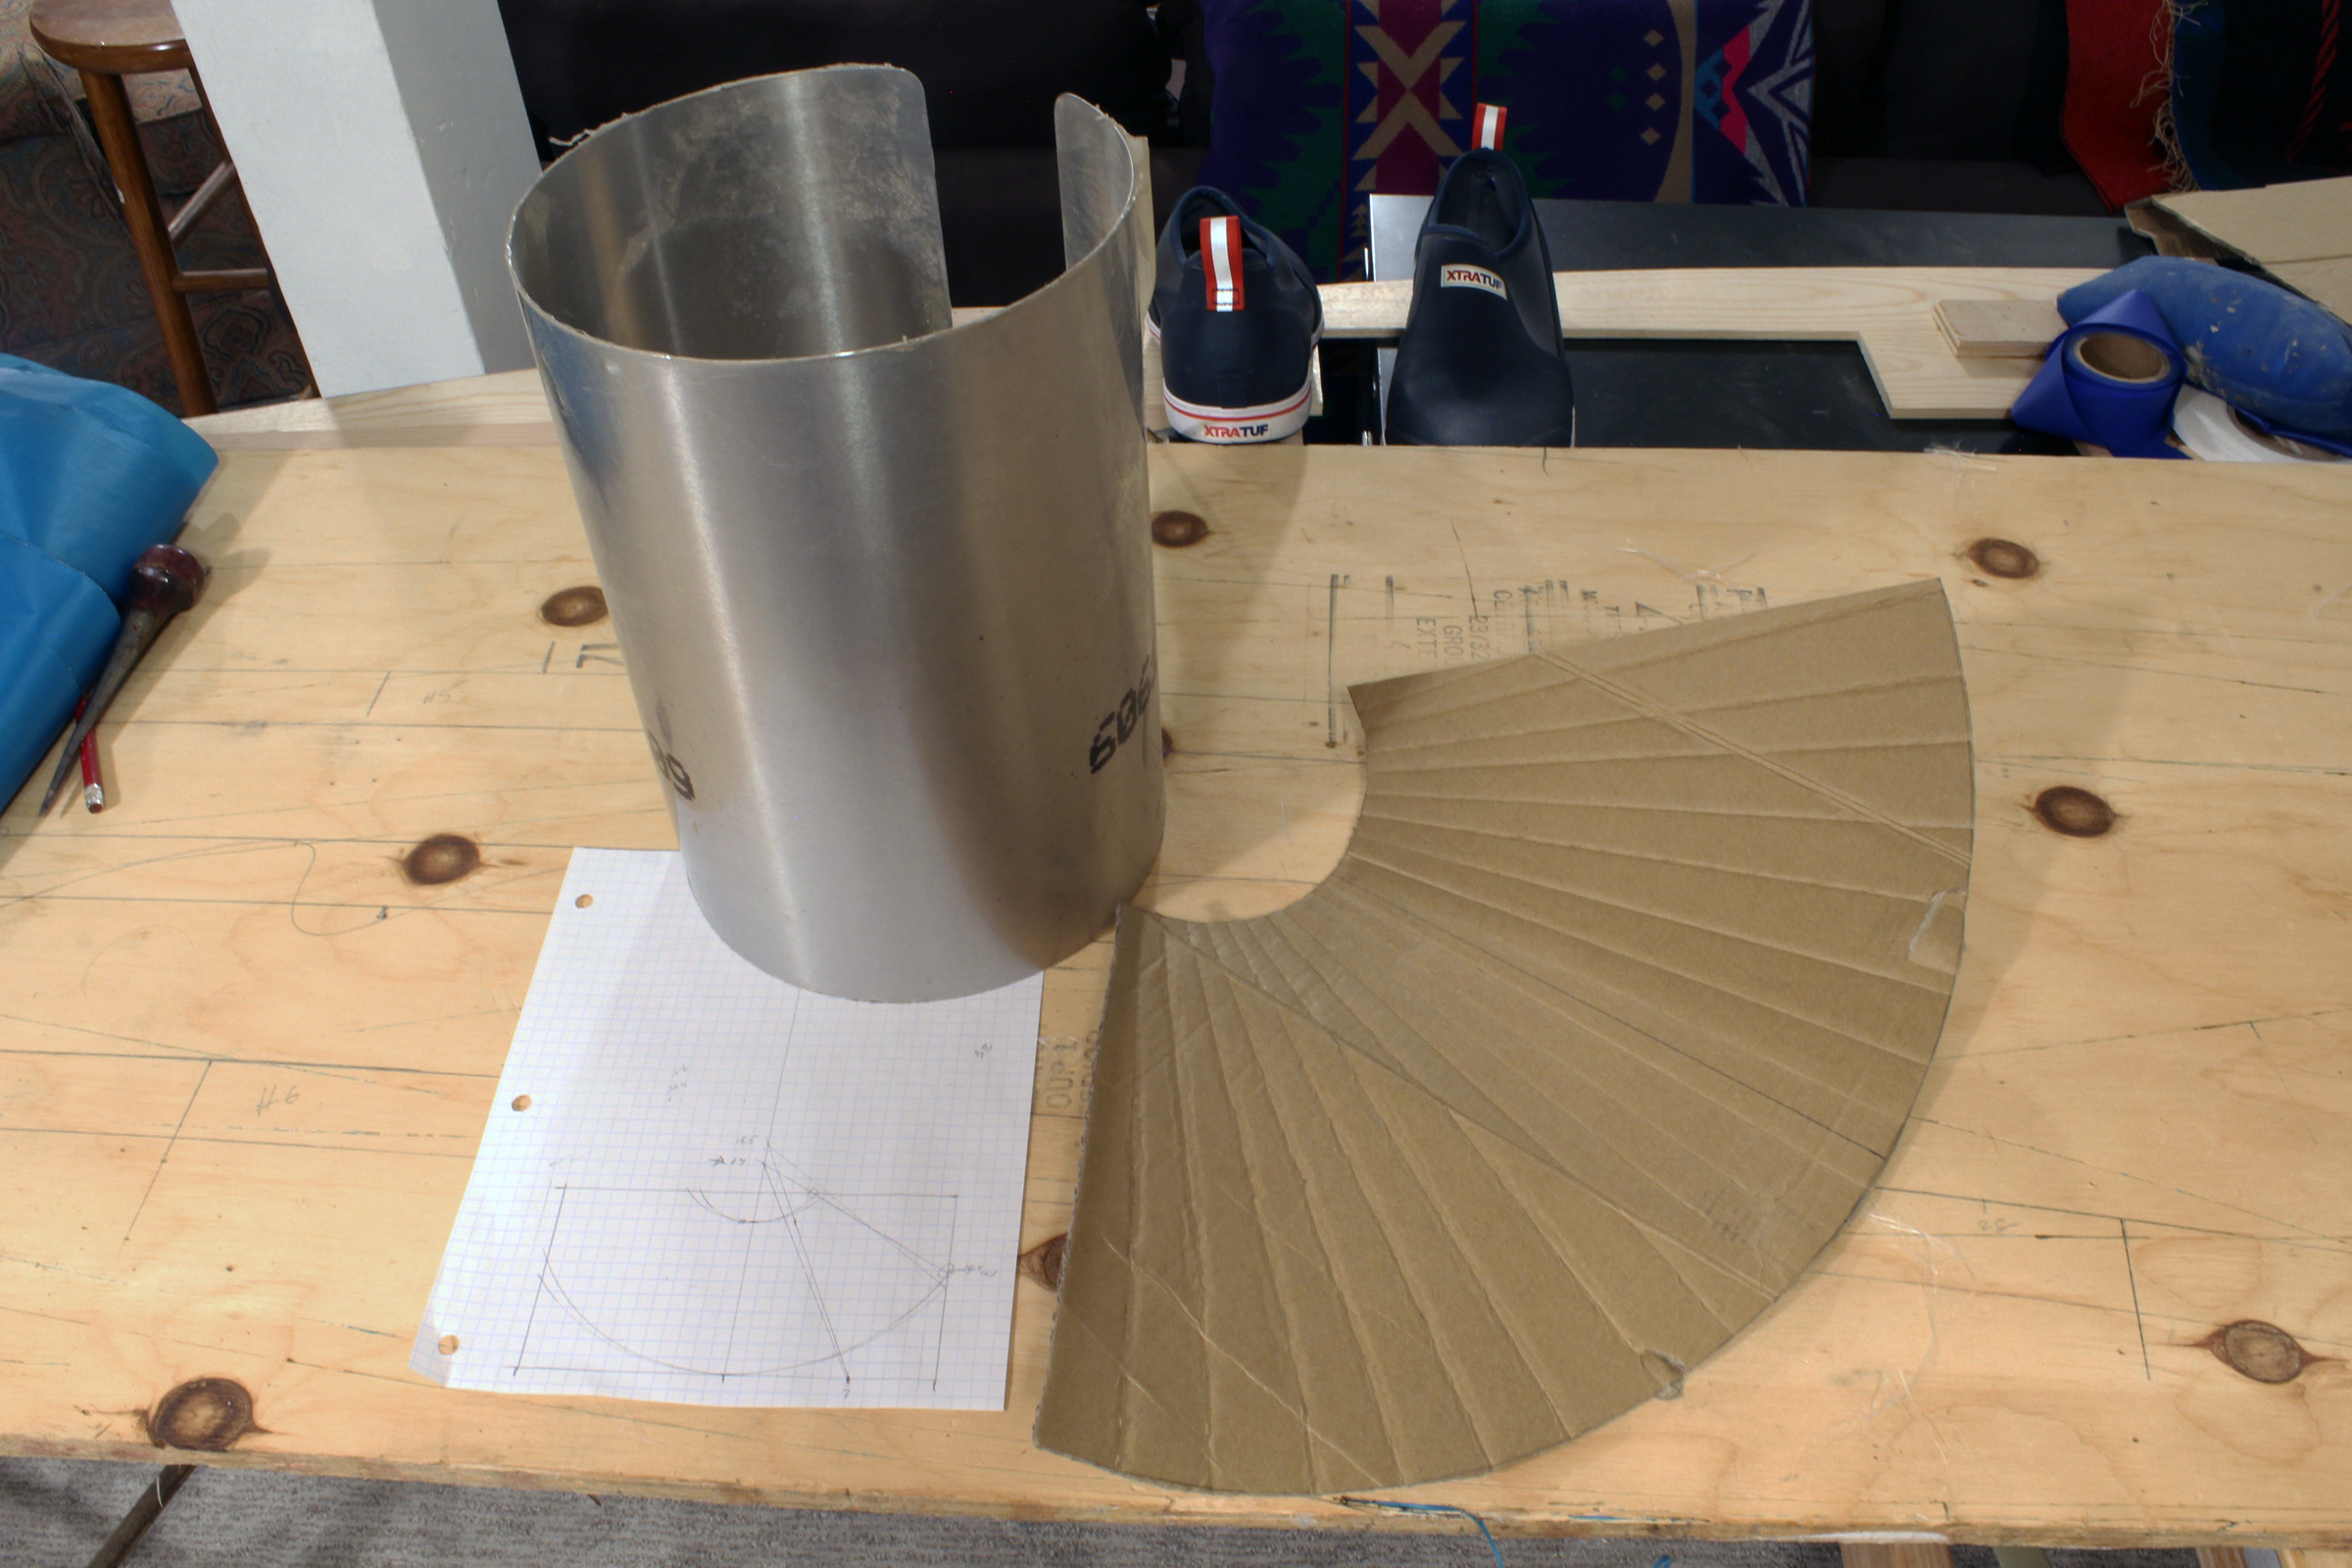
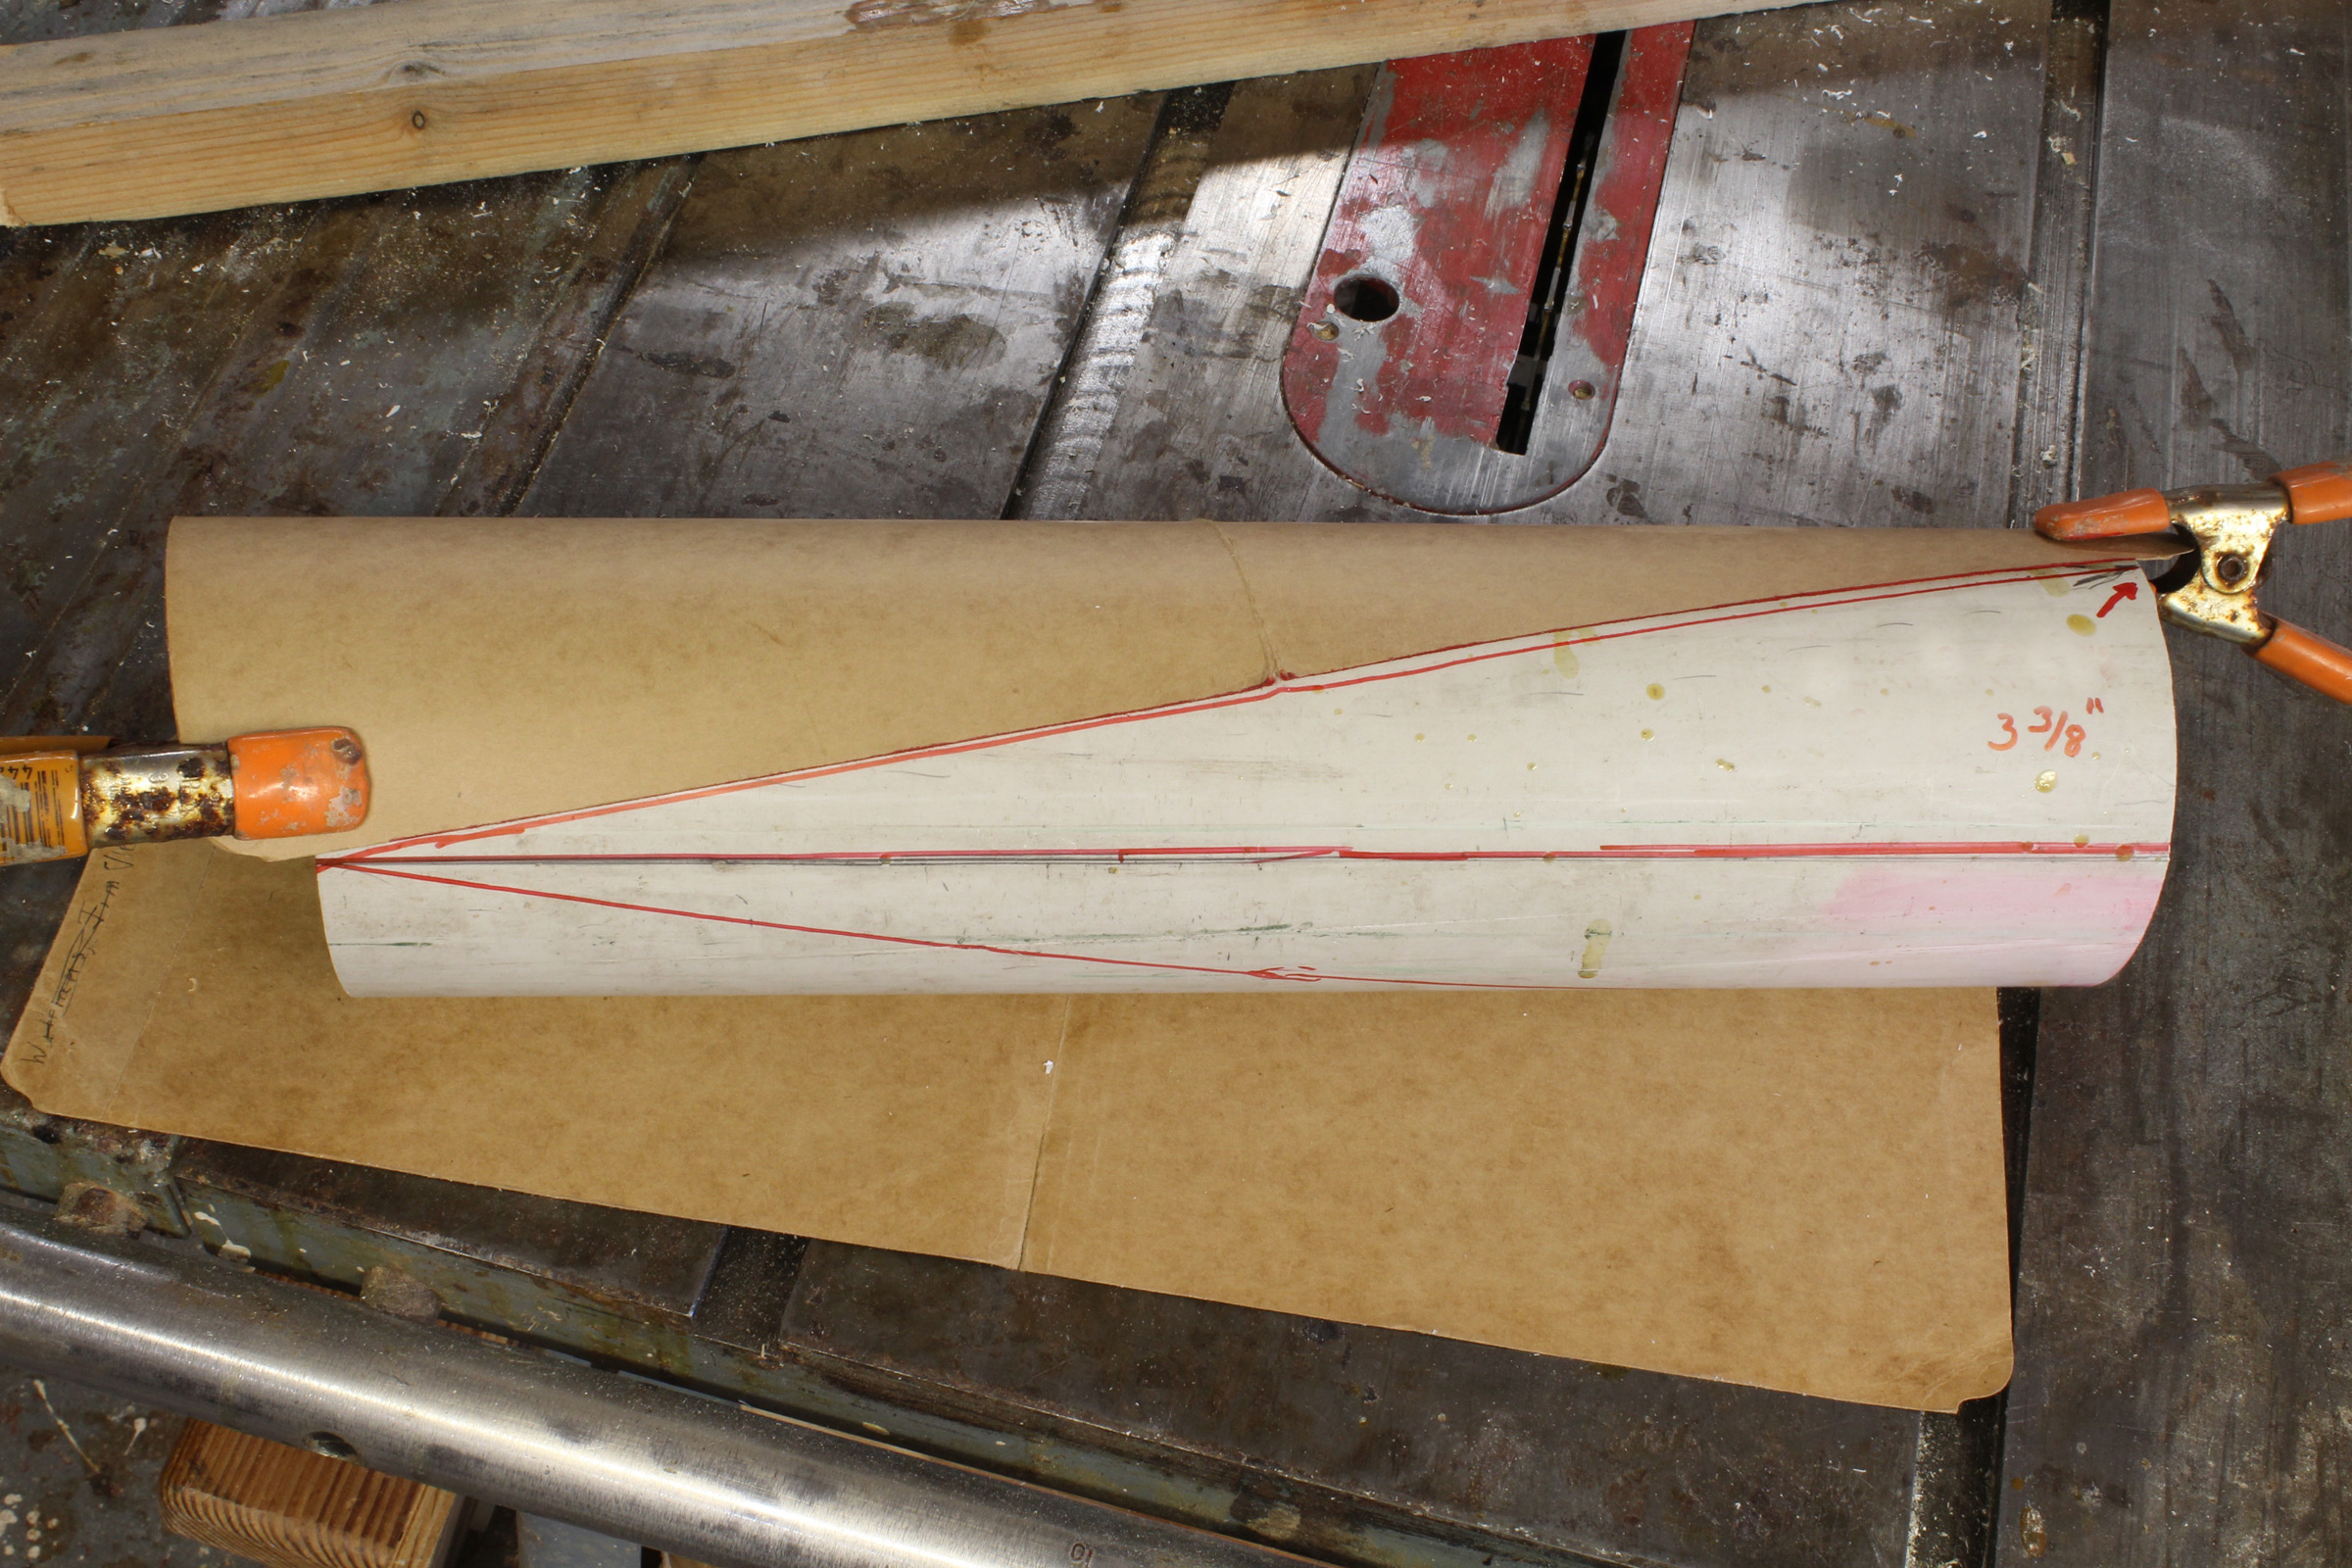
Many common megaphones have been made from sheet material. To make one in that manner, you need to create a frustum pattern.

Draw a side view of the megaphone you want to make and extend its centerline. For the small end of the megaphone, I use a diameter of 1-3/4″. The length and the diameter of the large opening of my sheet-material megaphones were somewhat determined by what I had available to work with. The pattern here has a length of 10″ and a large opening of 8″.
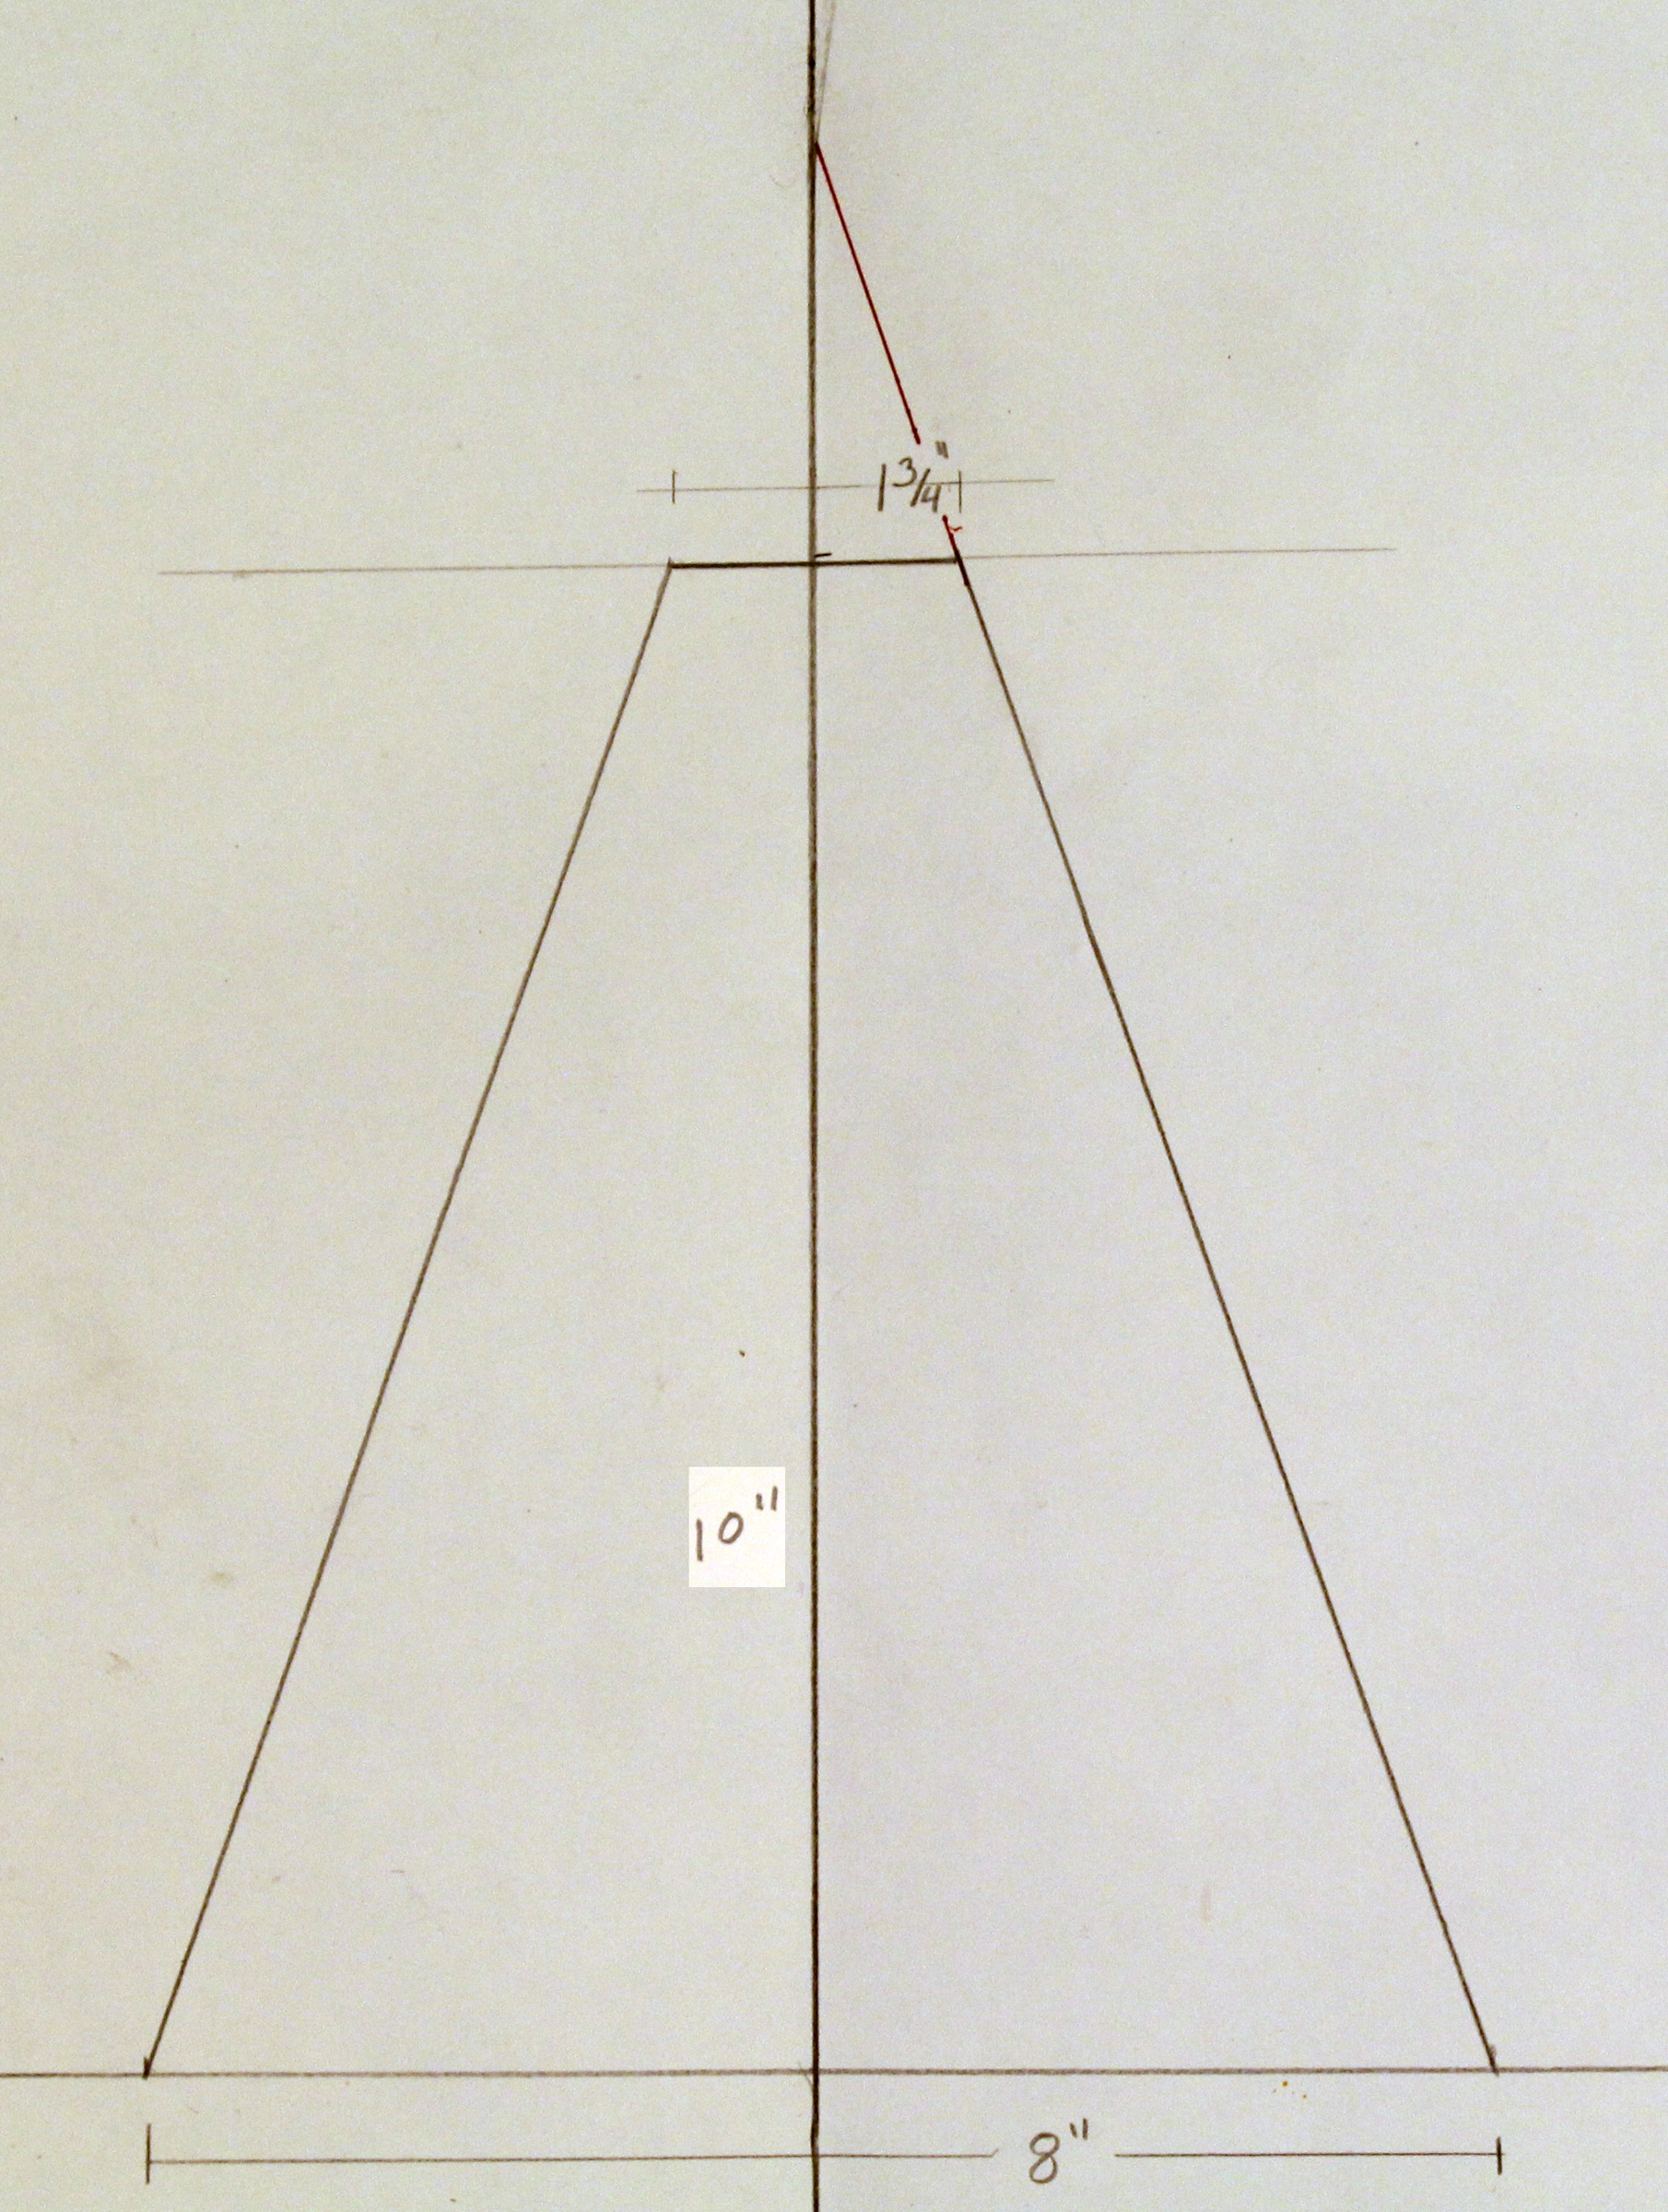
Extend one of the sides to intersect with the centerline. The is the center point of the arcs that follow.
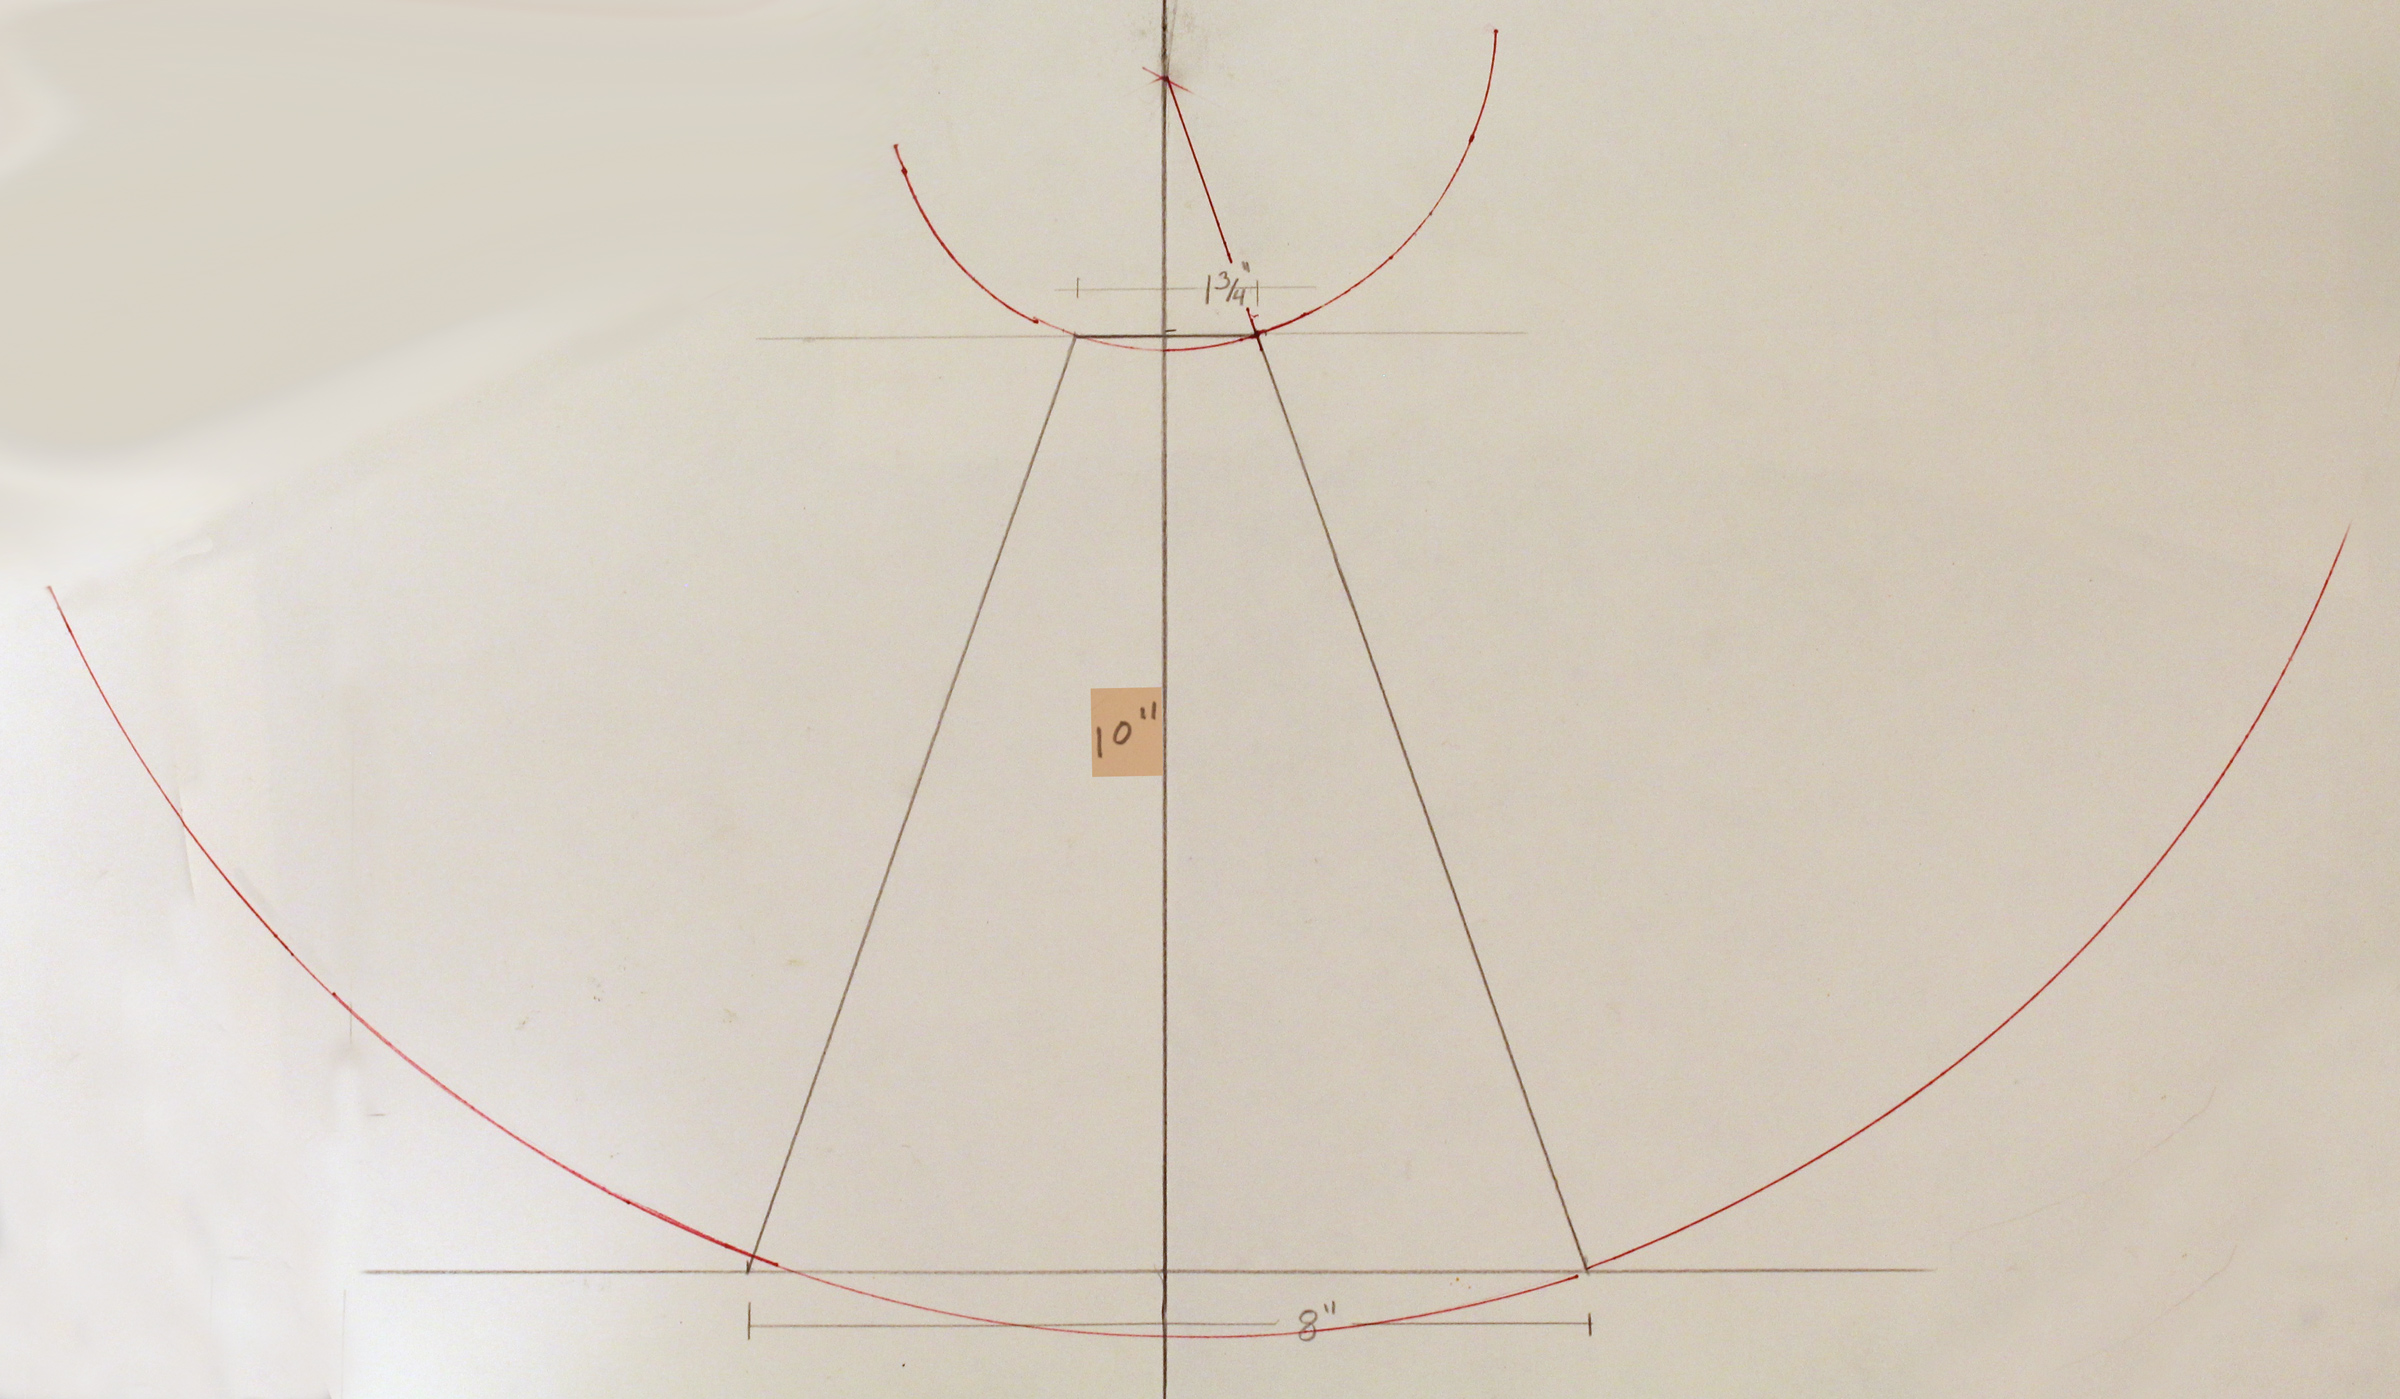
With a compass or a trammel bar, swing arcs from the top and bottom of the side of the megaphone profile.
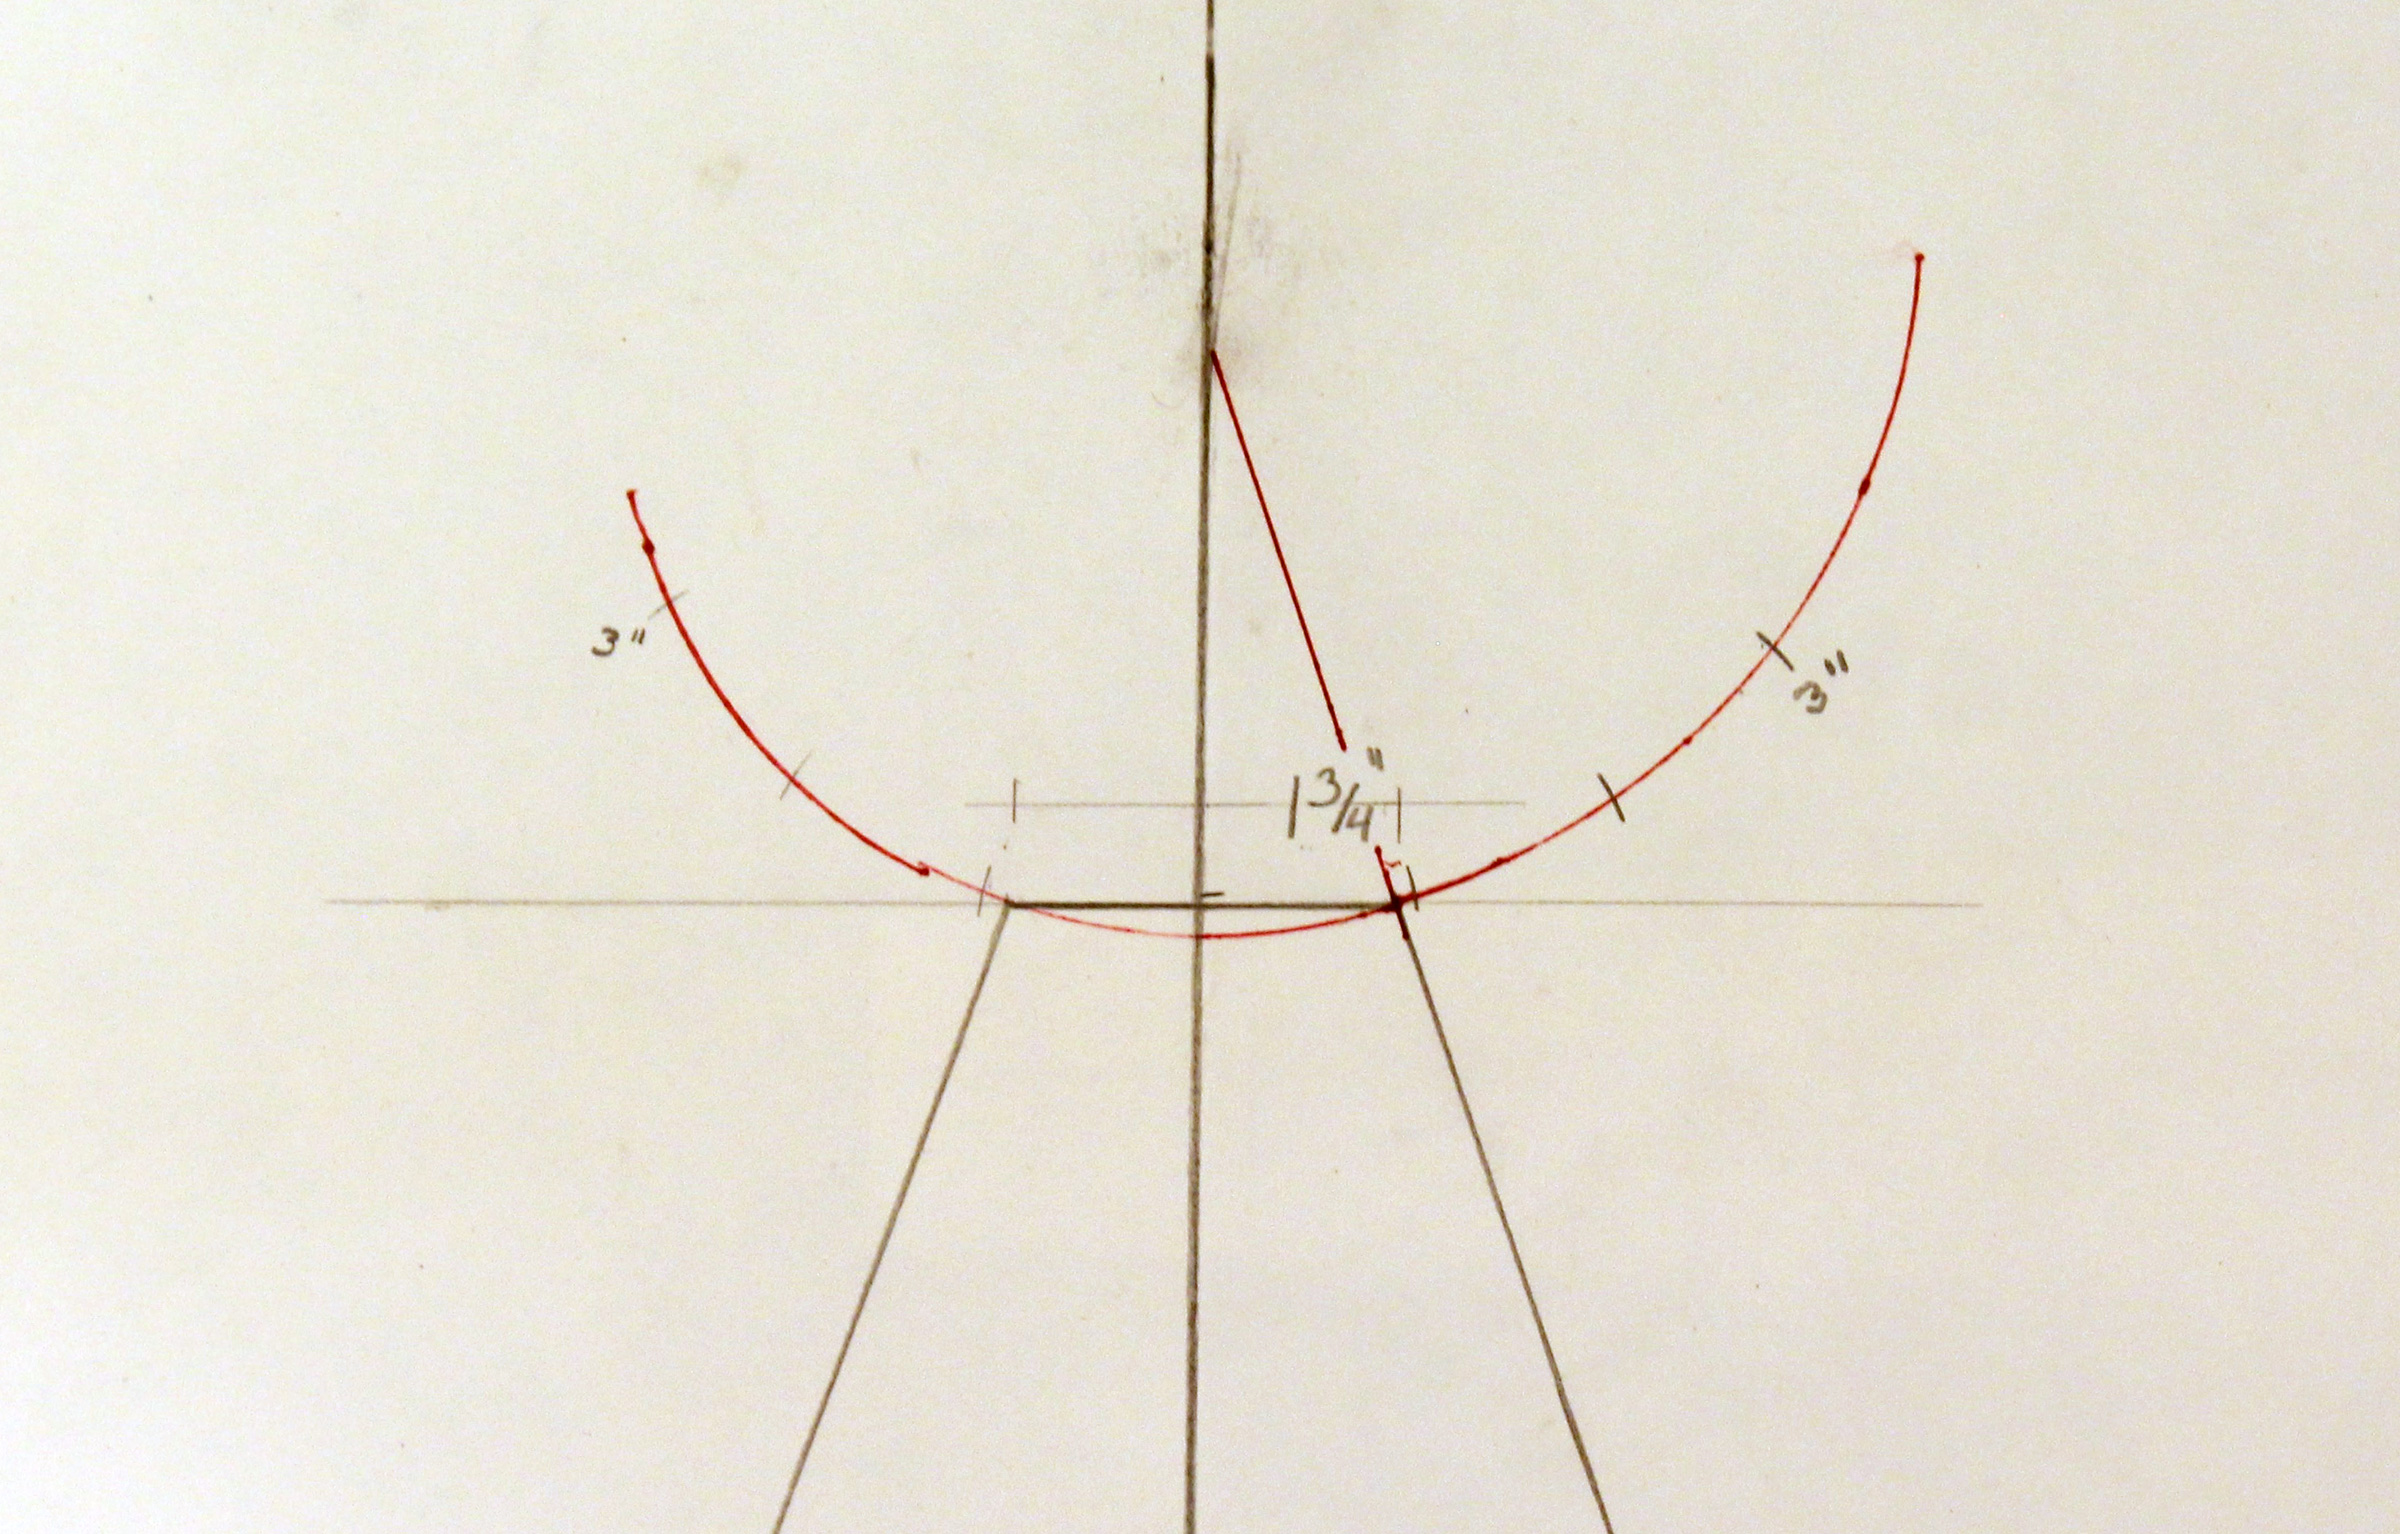
The circumference of the 1-3/4″ circular opening plus 1/2″ for the overlap at the edges comes to 6″. With a compass set to 1″, walk off 3″ on each side of the centerline.
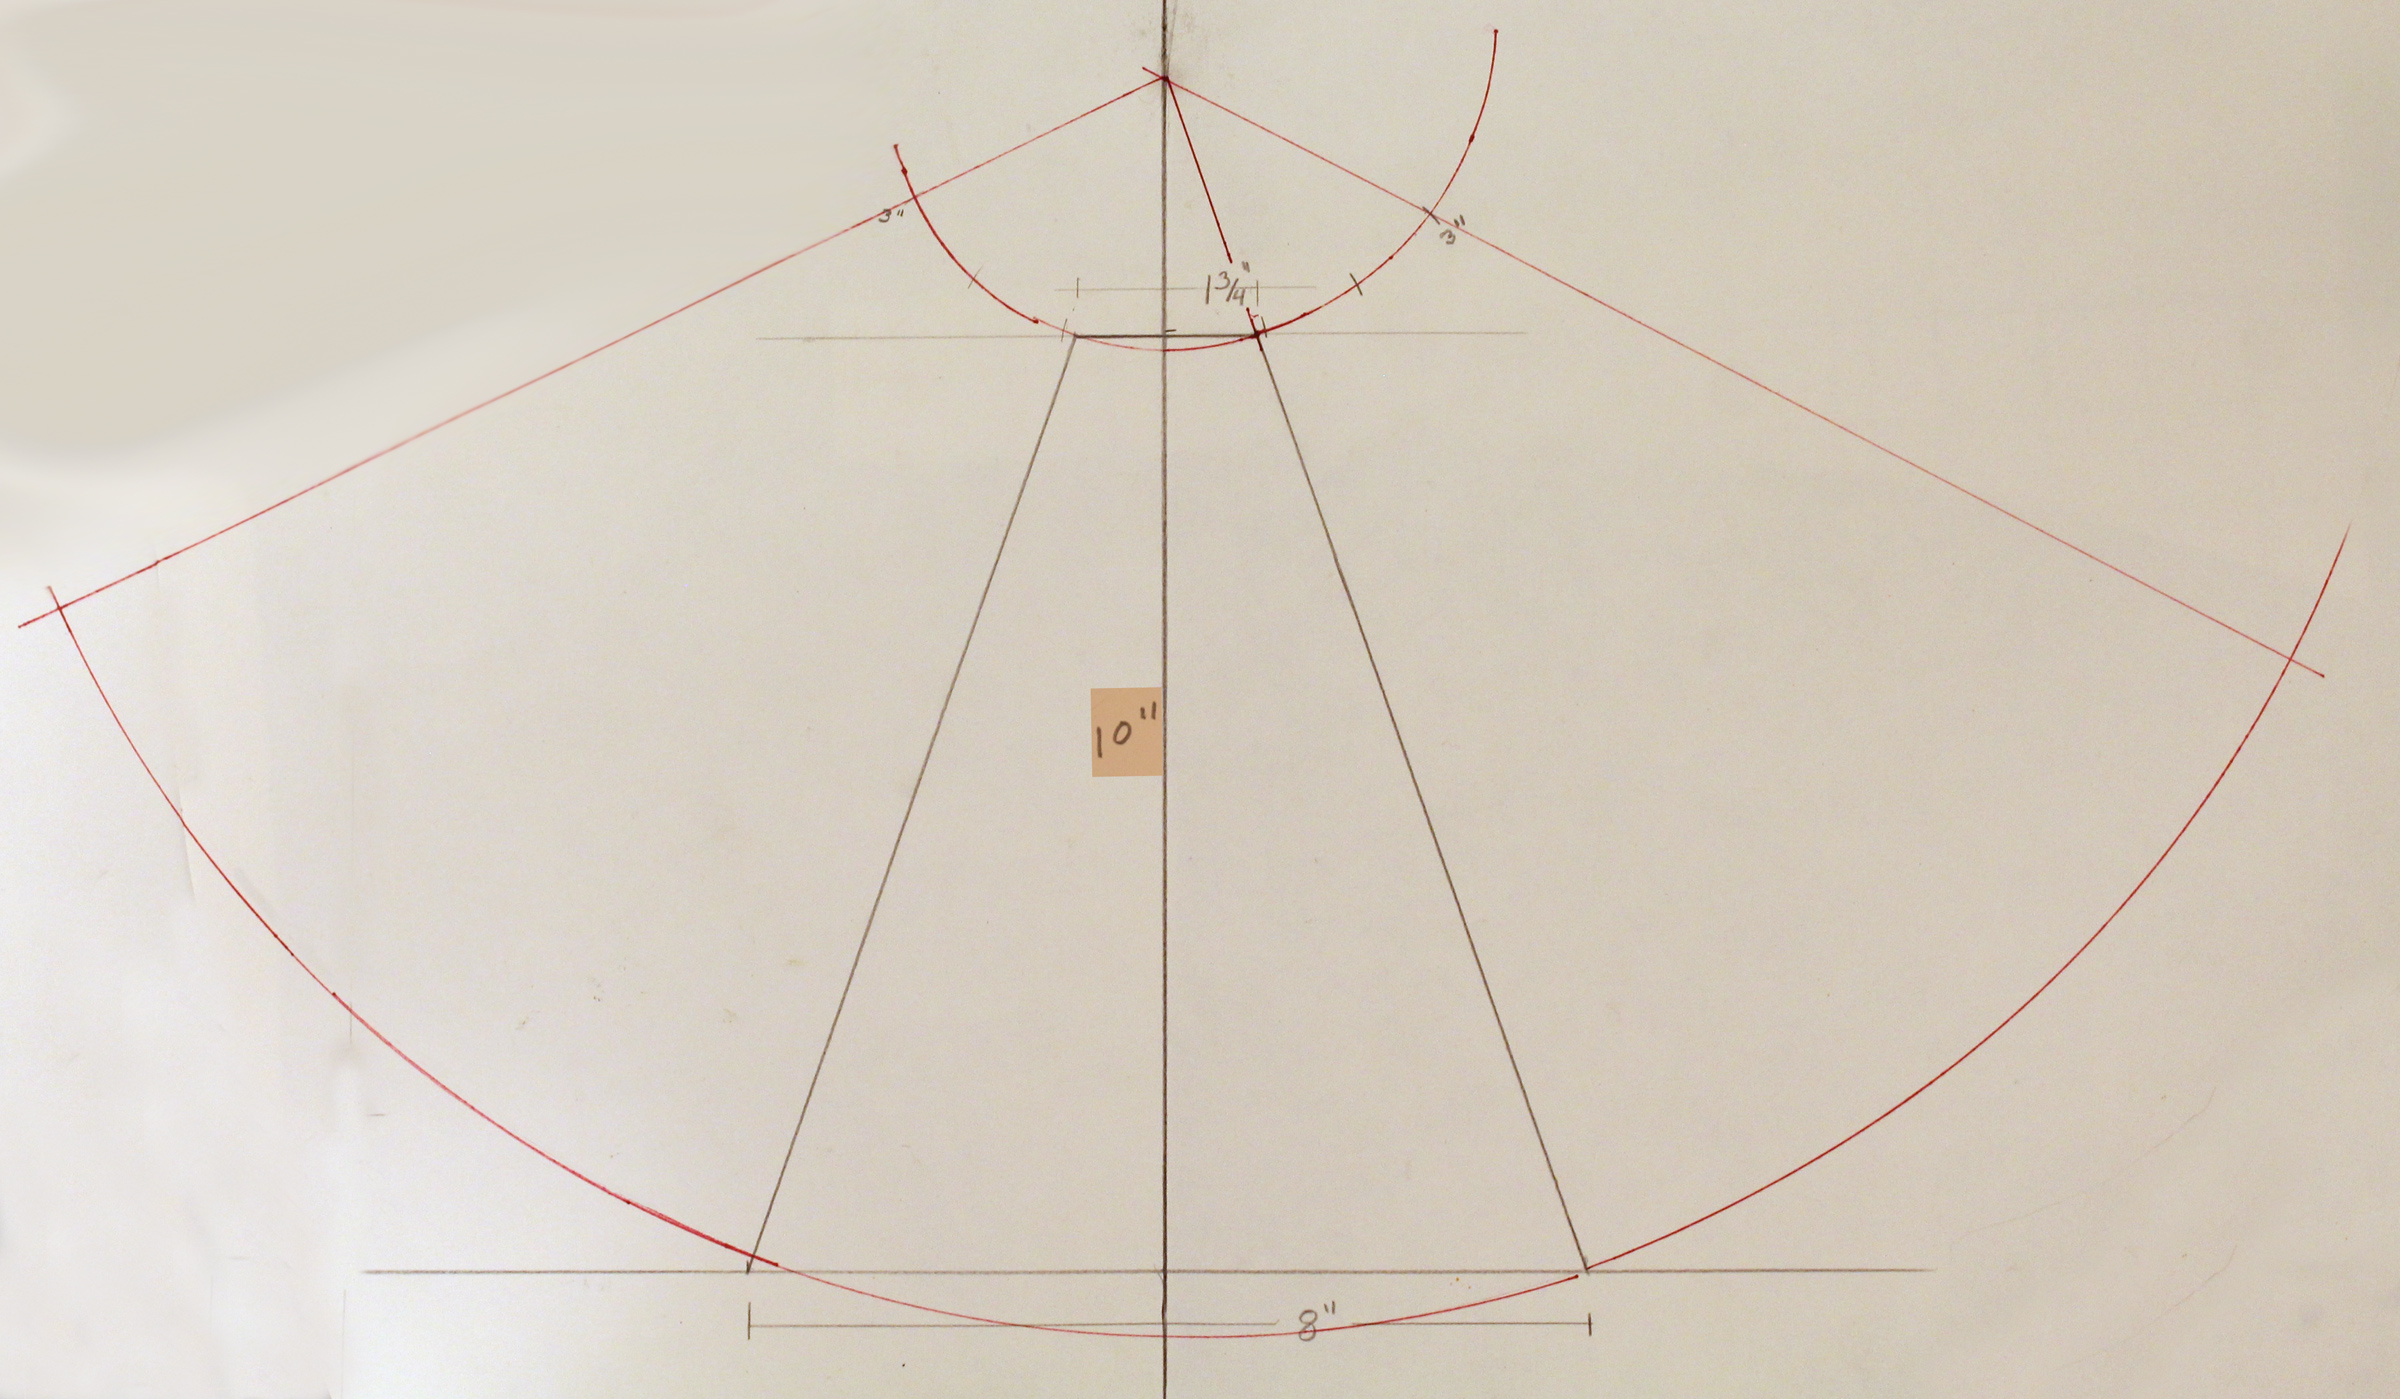
Draw lines from the center point through each 3″ mark on the top arc.
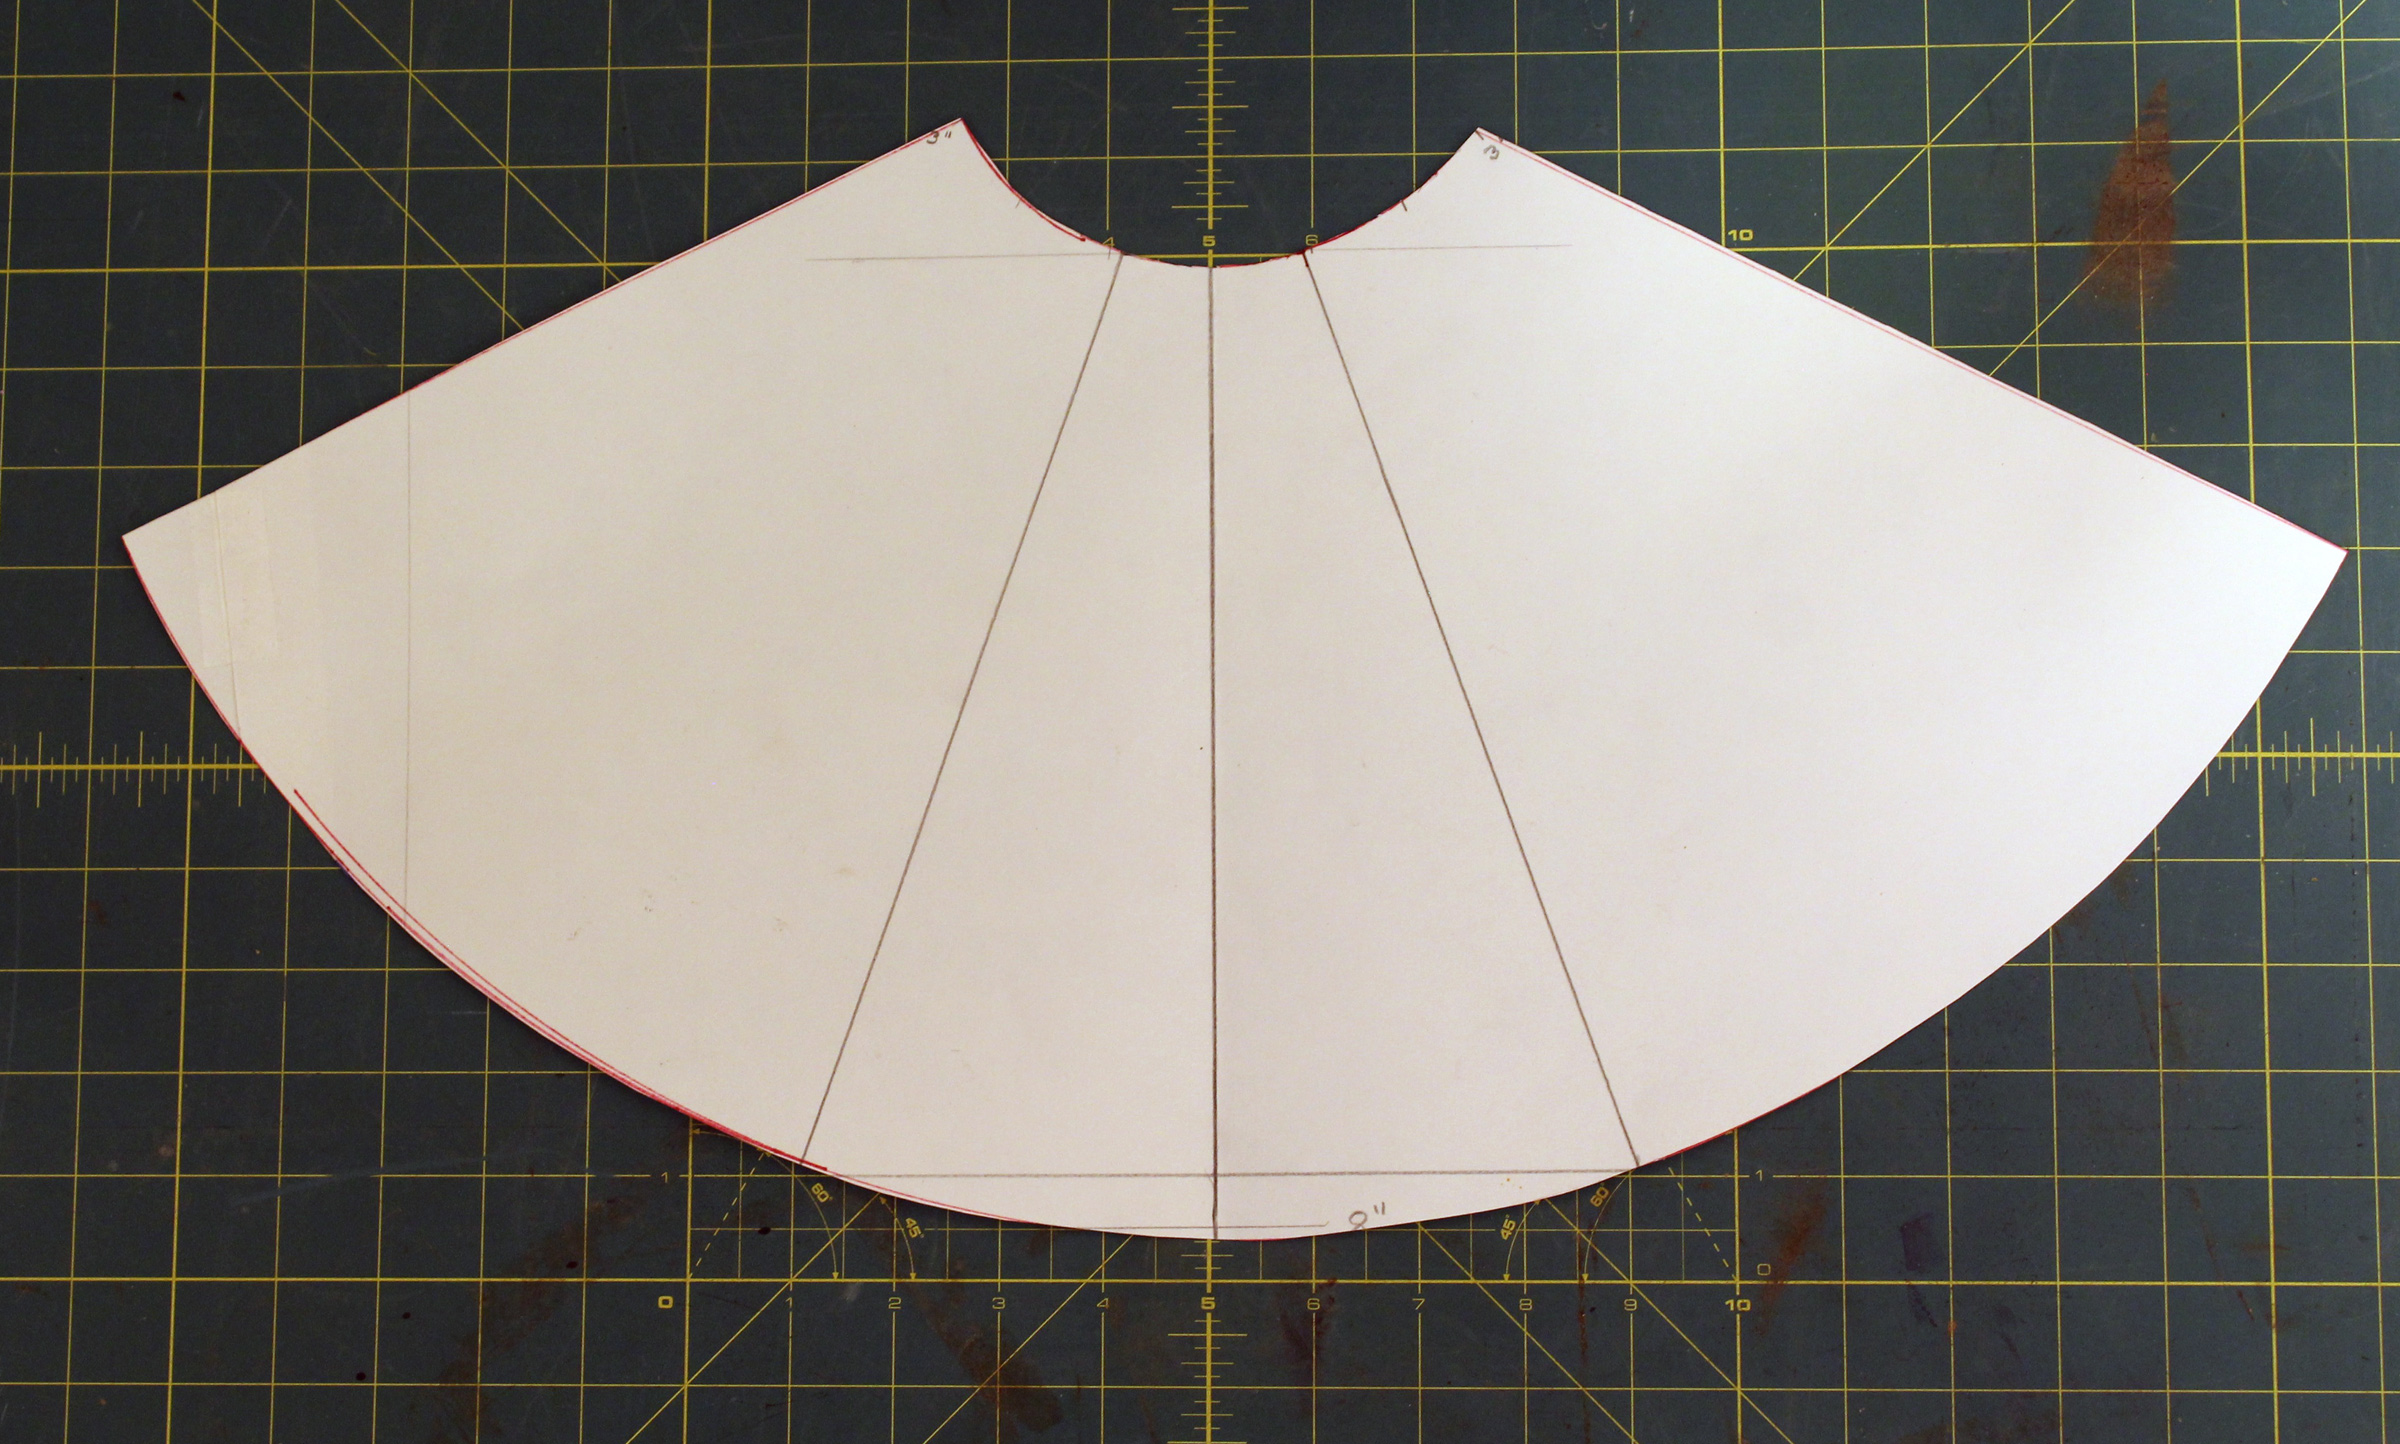
Cut out the pattern and trace it on whatever sheet material you’ll be using
Sheet metal
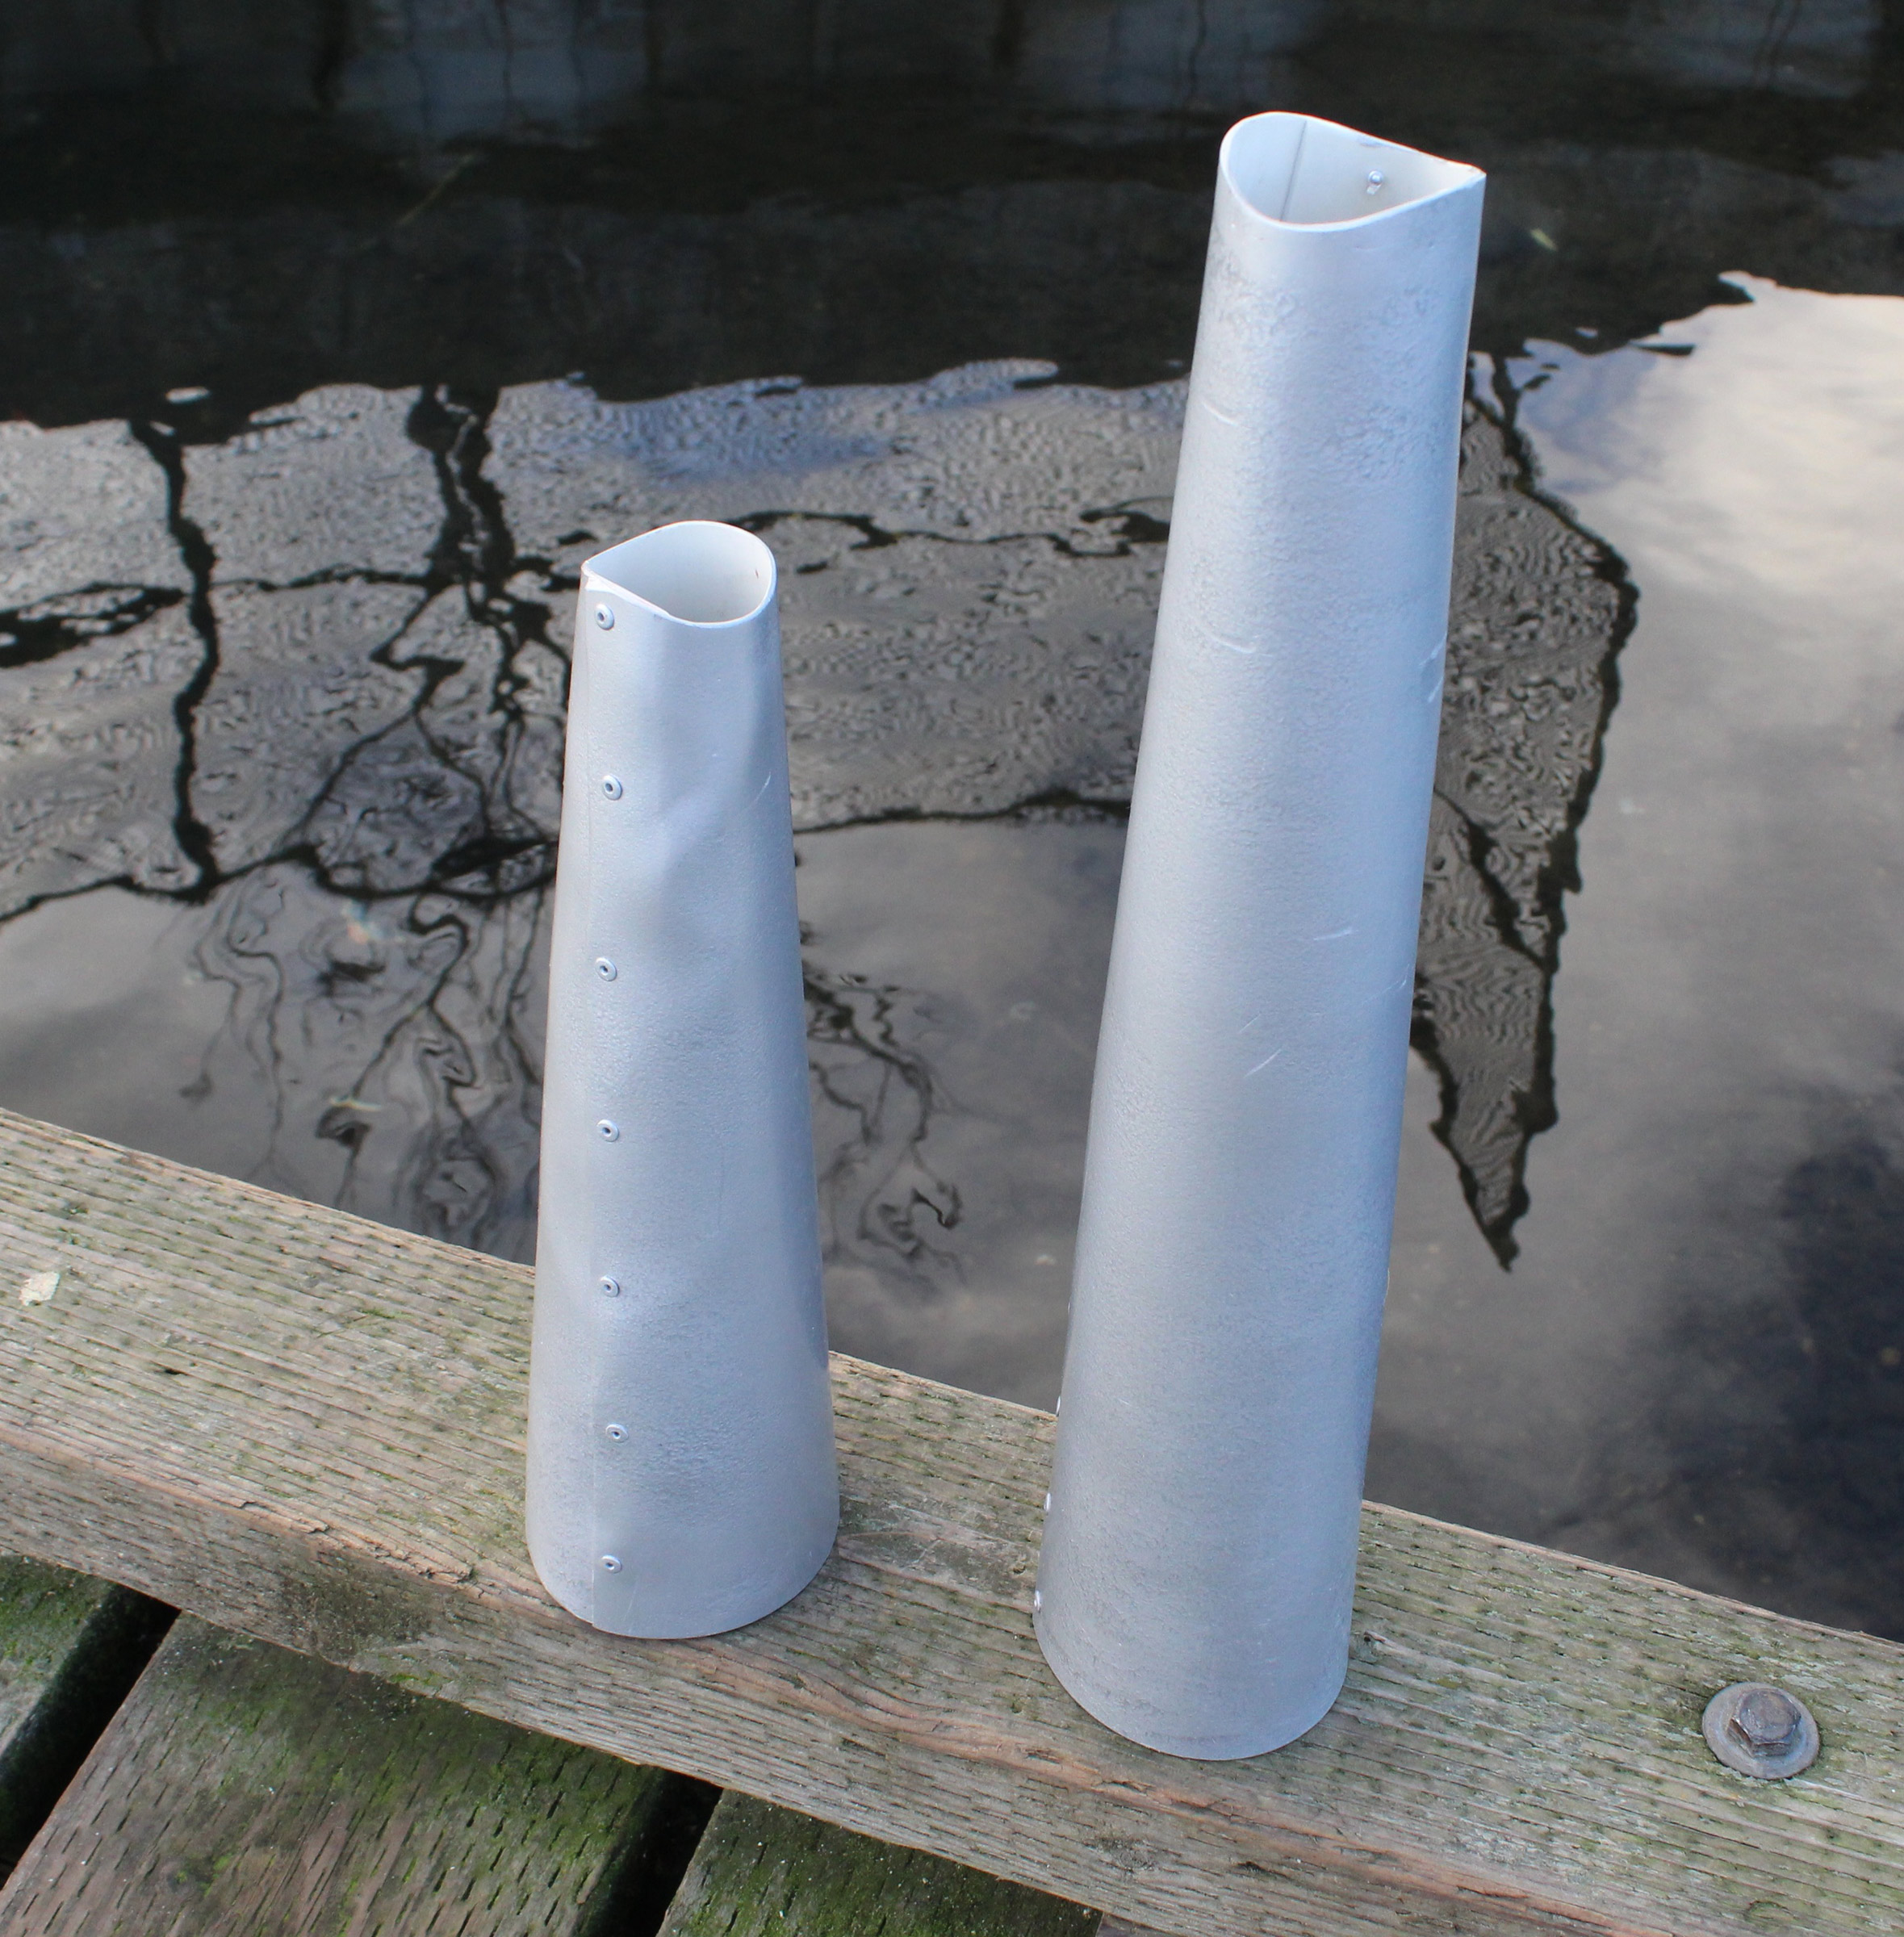
All of the megaphones here were made from scraps I had around the shop. I wanted to make one from brass, but I didn’t have any suitable material, so I worked with aluminum.

This commercially made brass megaphone is the one my father used for coaching crews. It is 8″ long and 4-3/8″ in diameter at the large end.
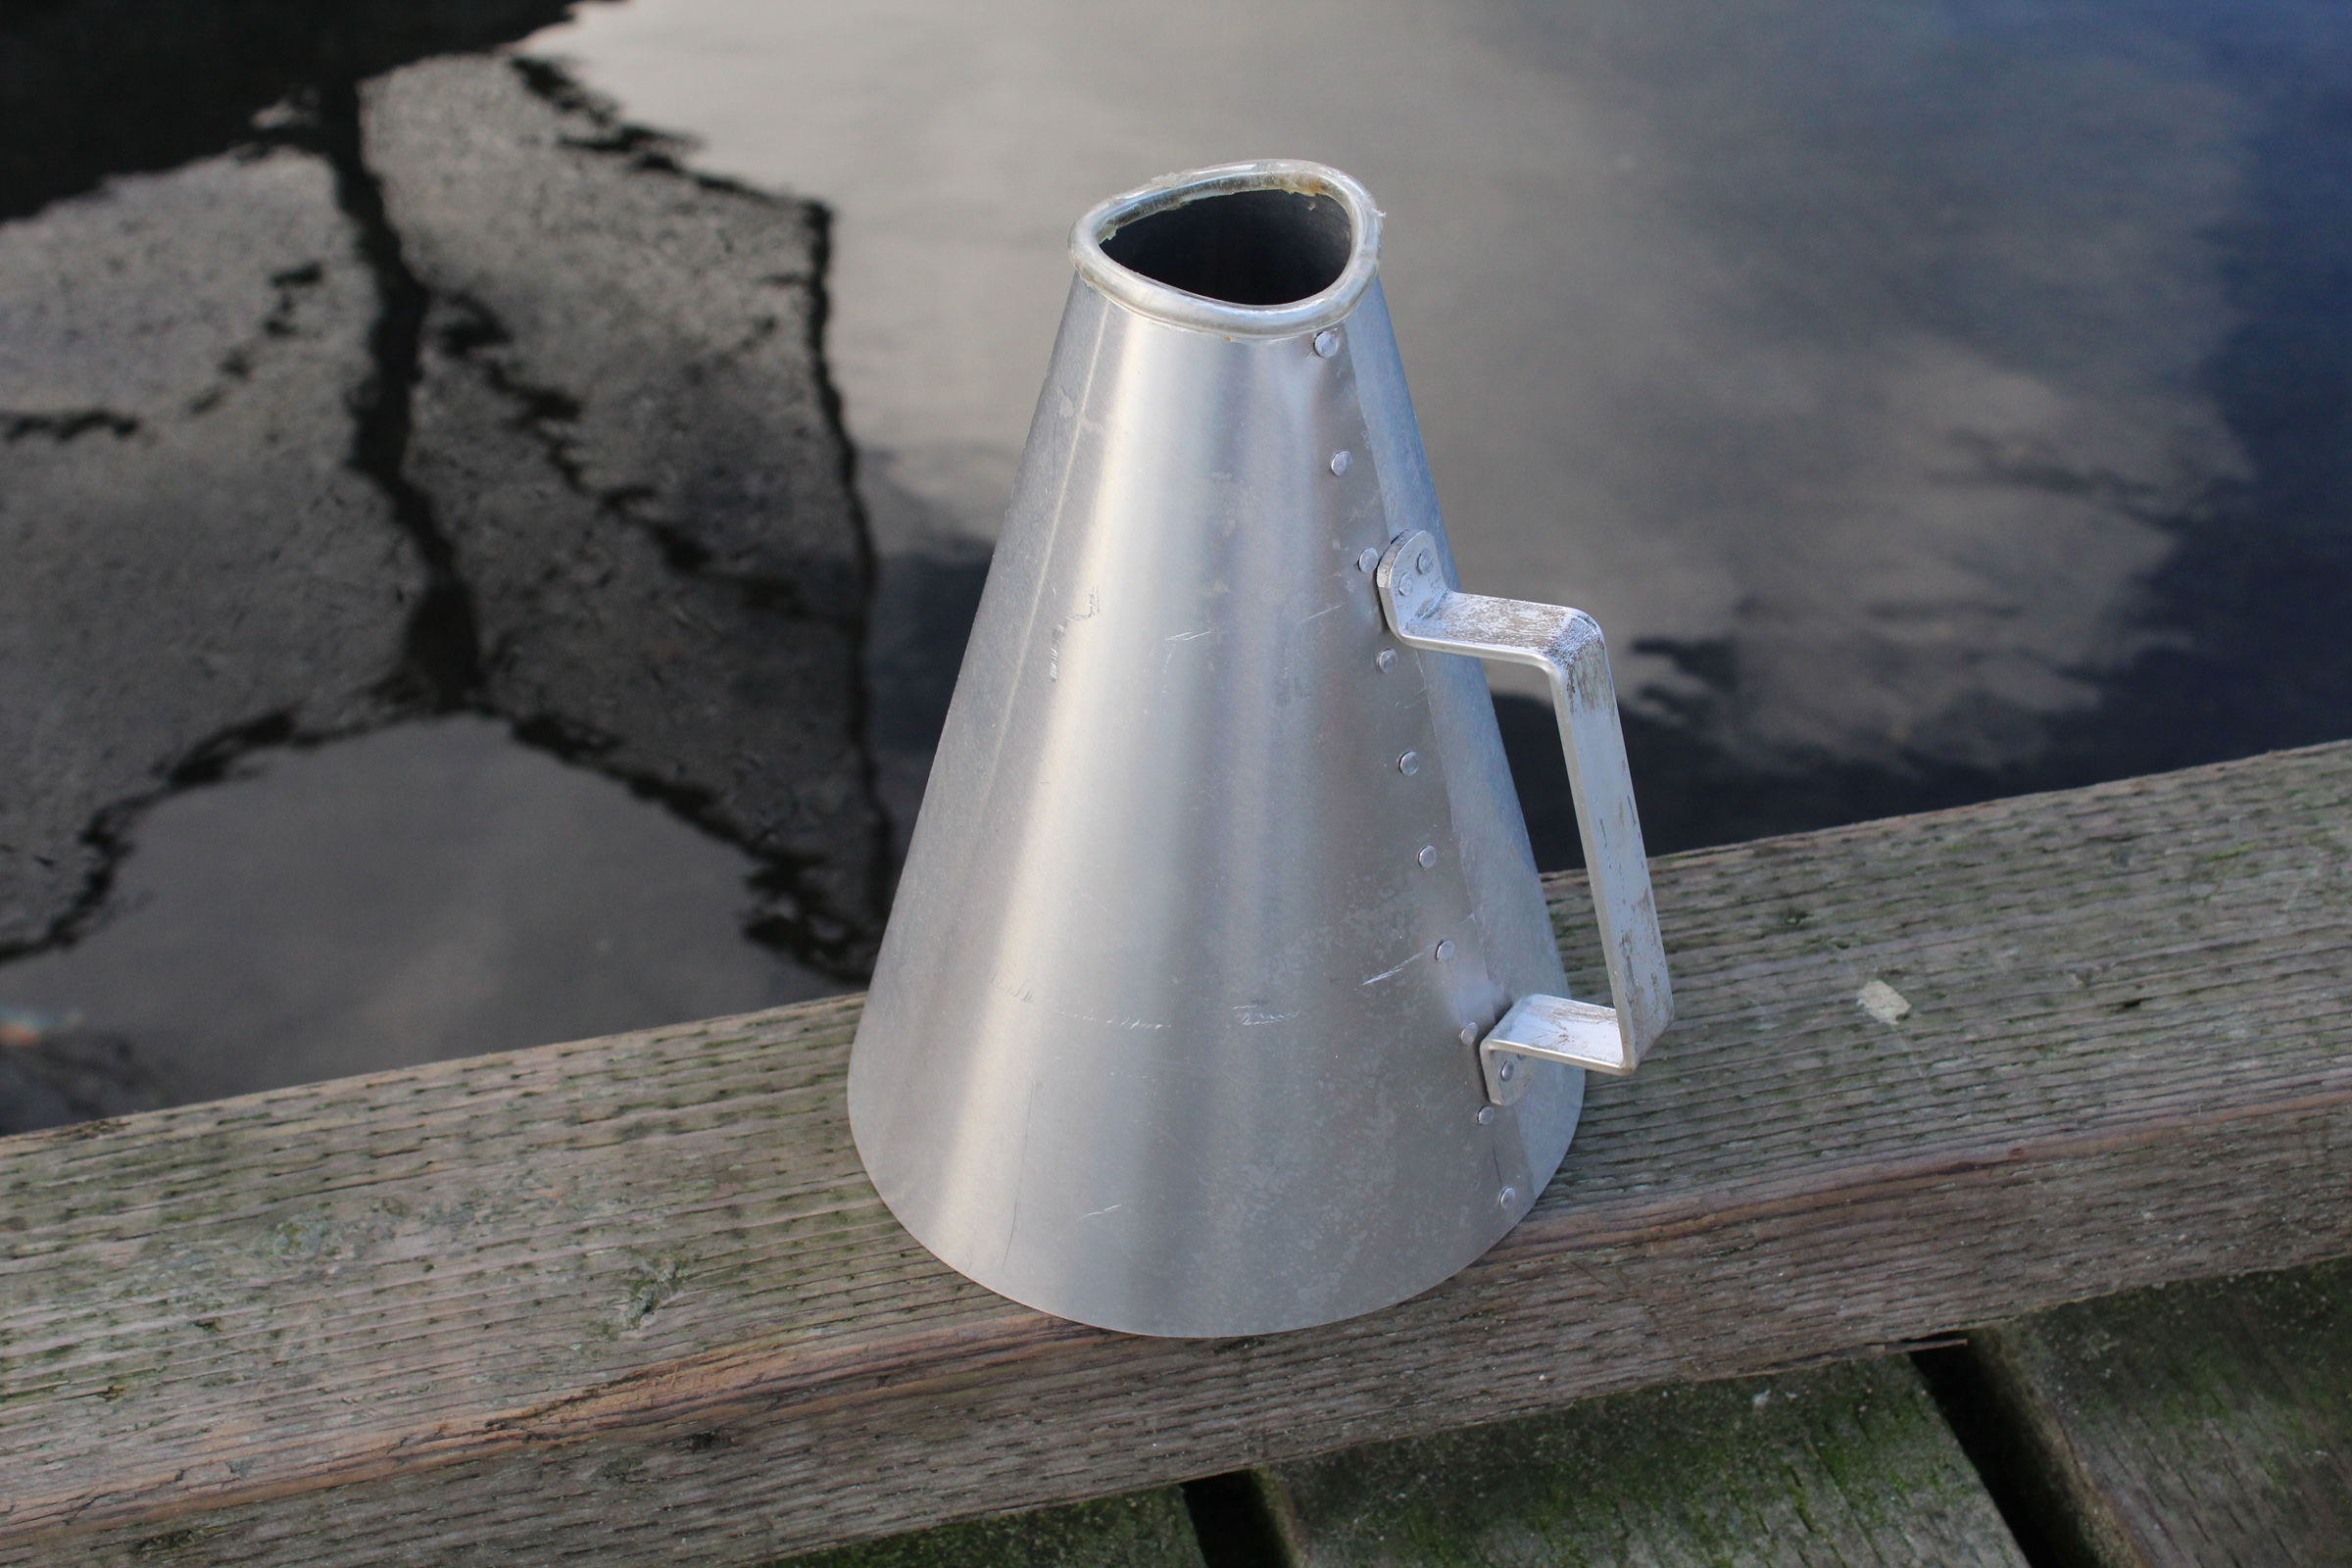
Aluminum is easily worked and makes an effective and durable megaphone. A piece of vinyl tubing, slit along its length and glued over the mouthpiece with vinyl cement, covers the edge of the aluminum. The opening is contoured to fit around my mouth. A handle bent from 3/4″ x 1/8″ flat bar, is riveted over the seam.
I had some aluminum which had been liners for bear-proof food containers. It was 1/64″ (0.5 mm) thick, quite stiff, and big enough for a megaphone 10″ long and 7-1/2″ at its widest.
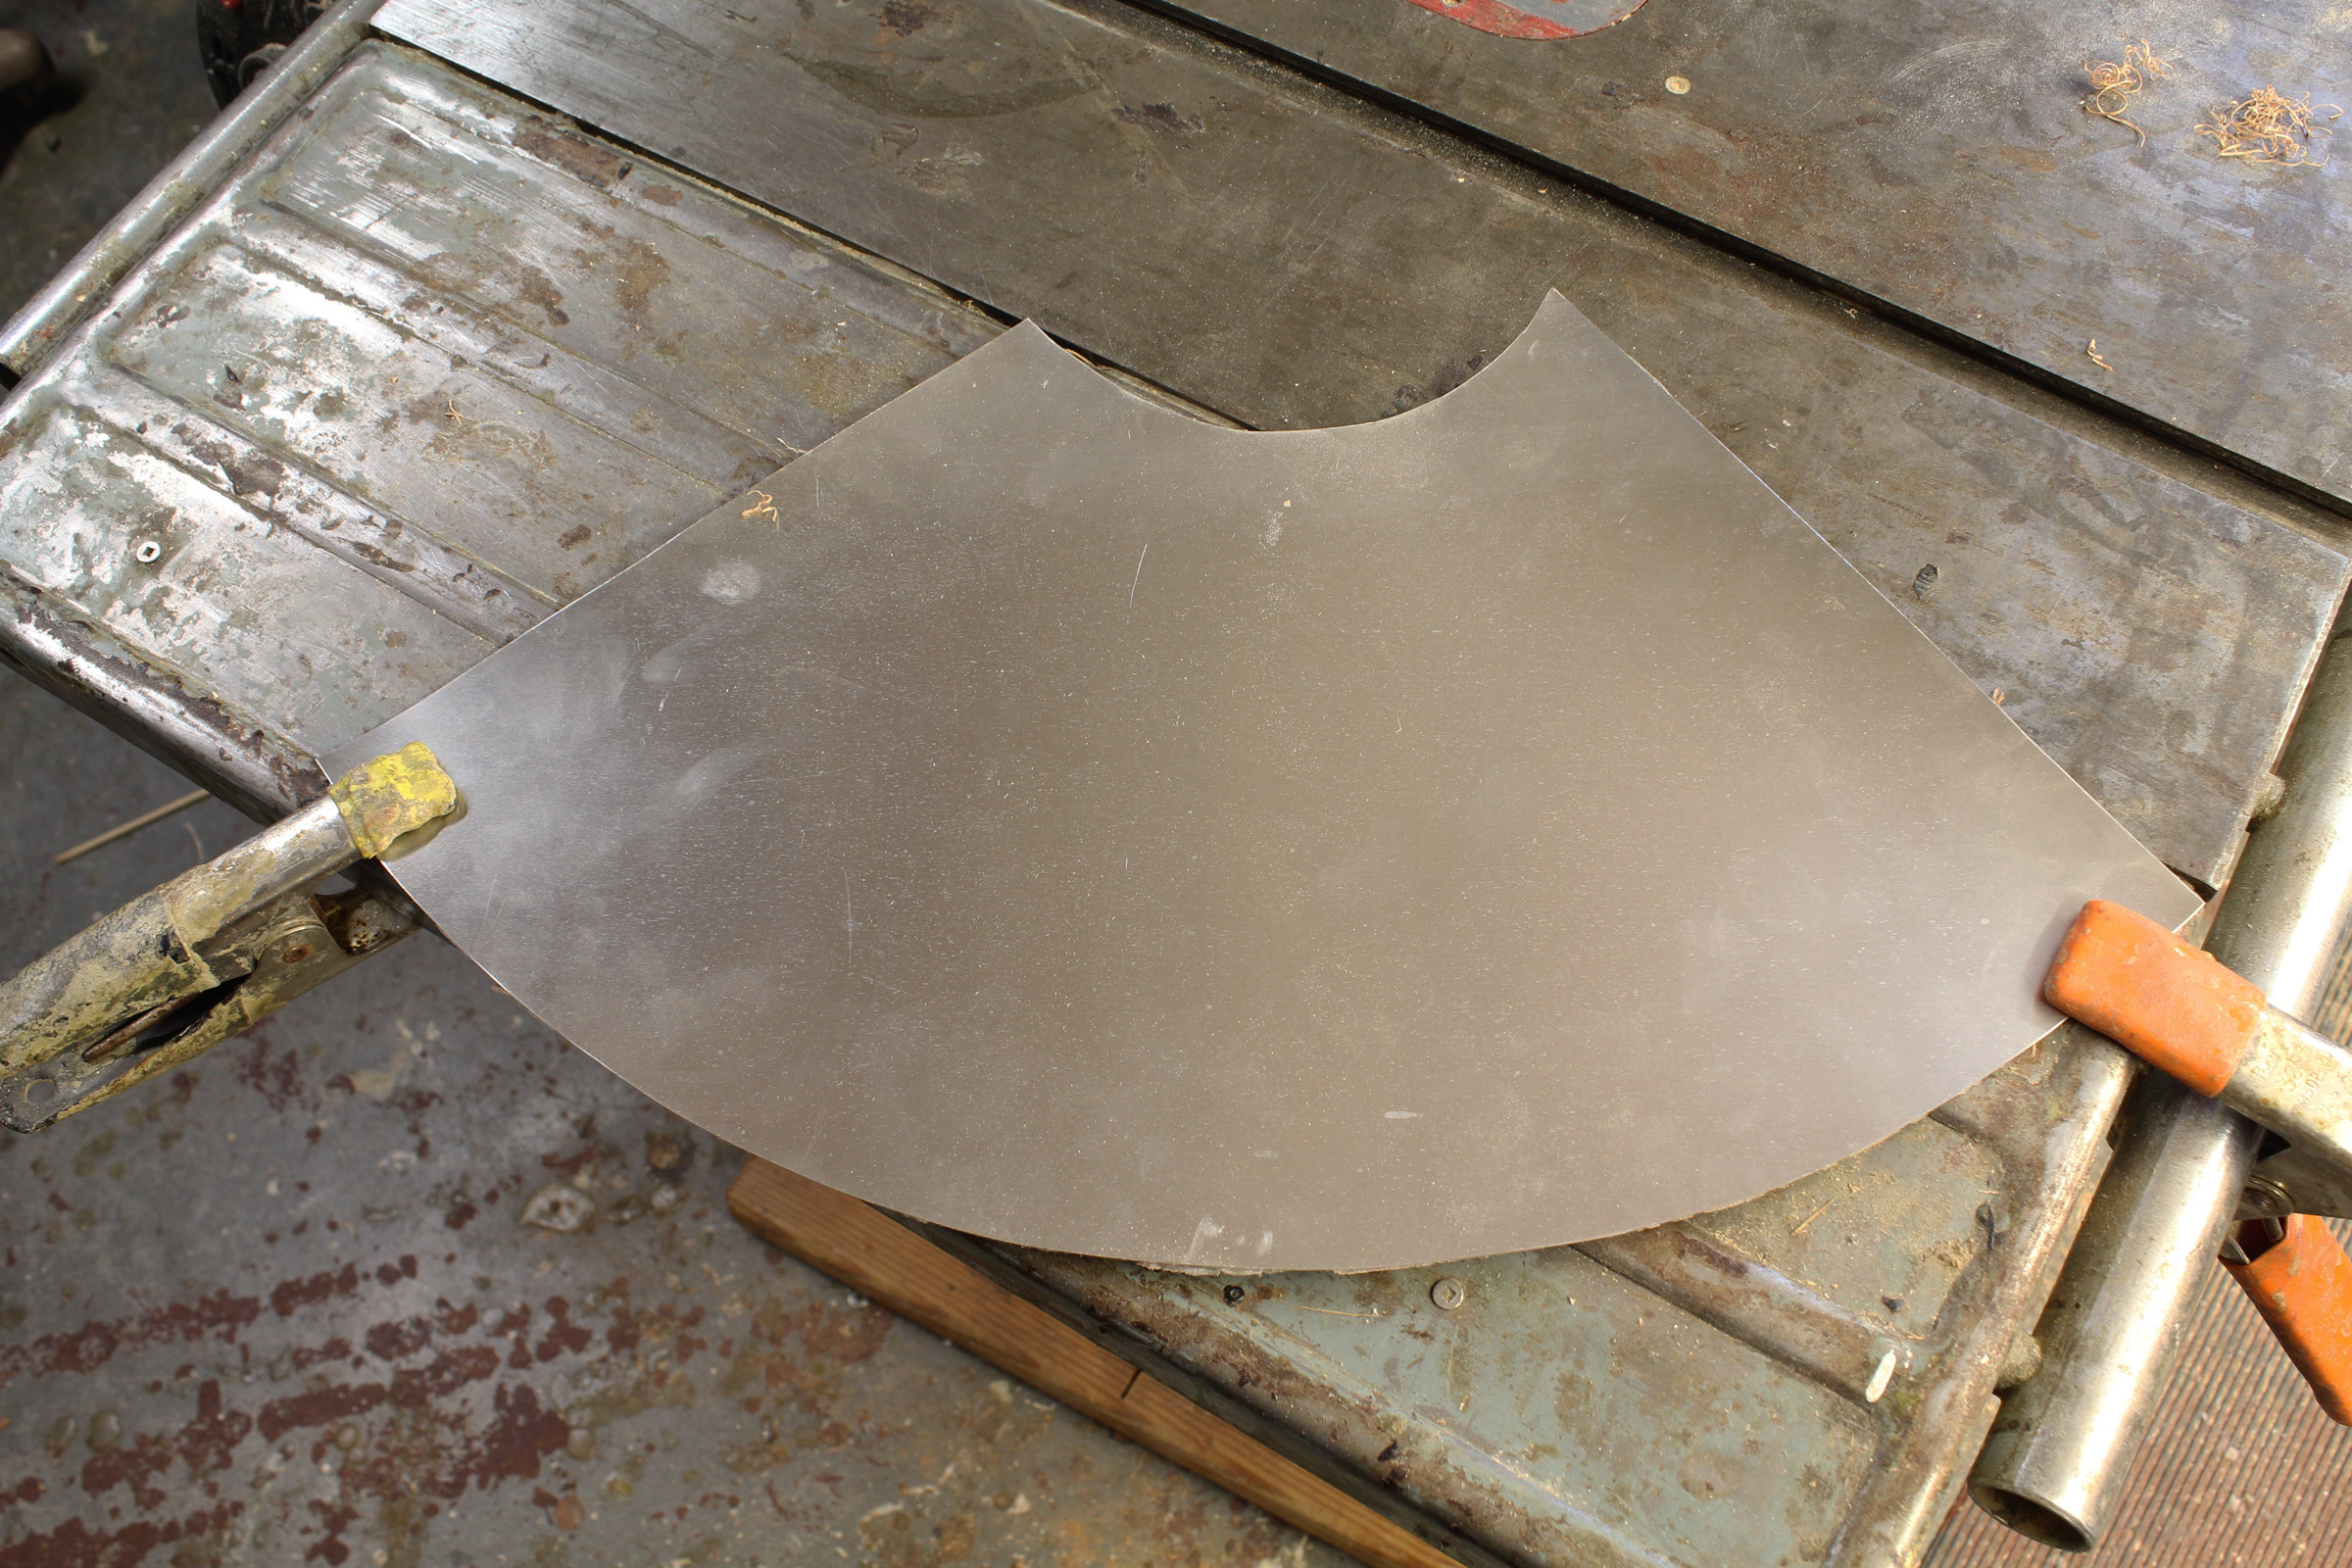
The aluminum, cut to the pattern, is ready to be curved into a frustum. The piece still had the curve of the bear-proof container, but it didn’t resist taking the new shape for the megaphone.
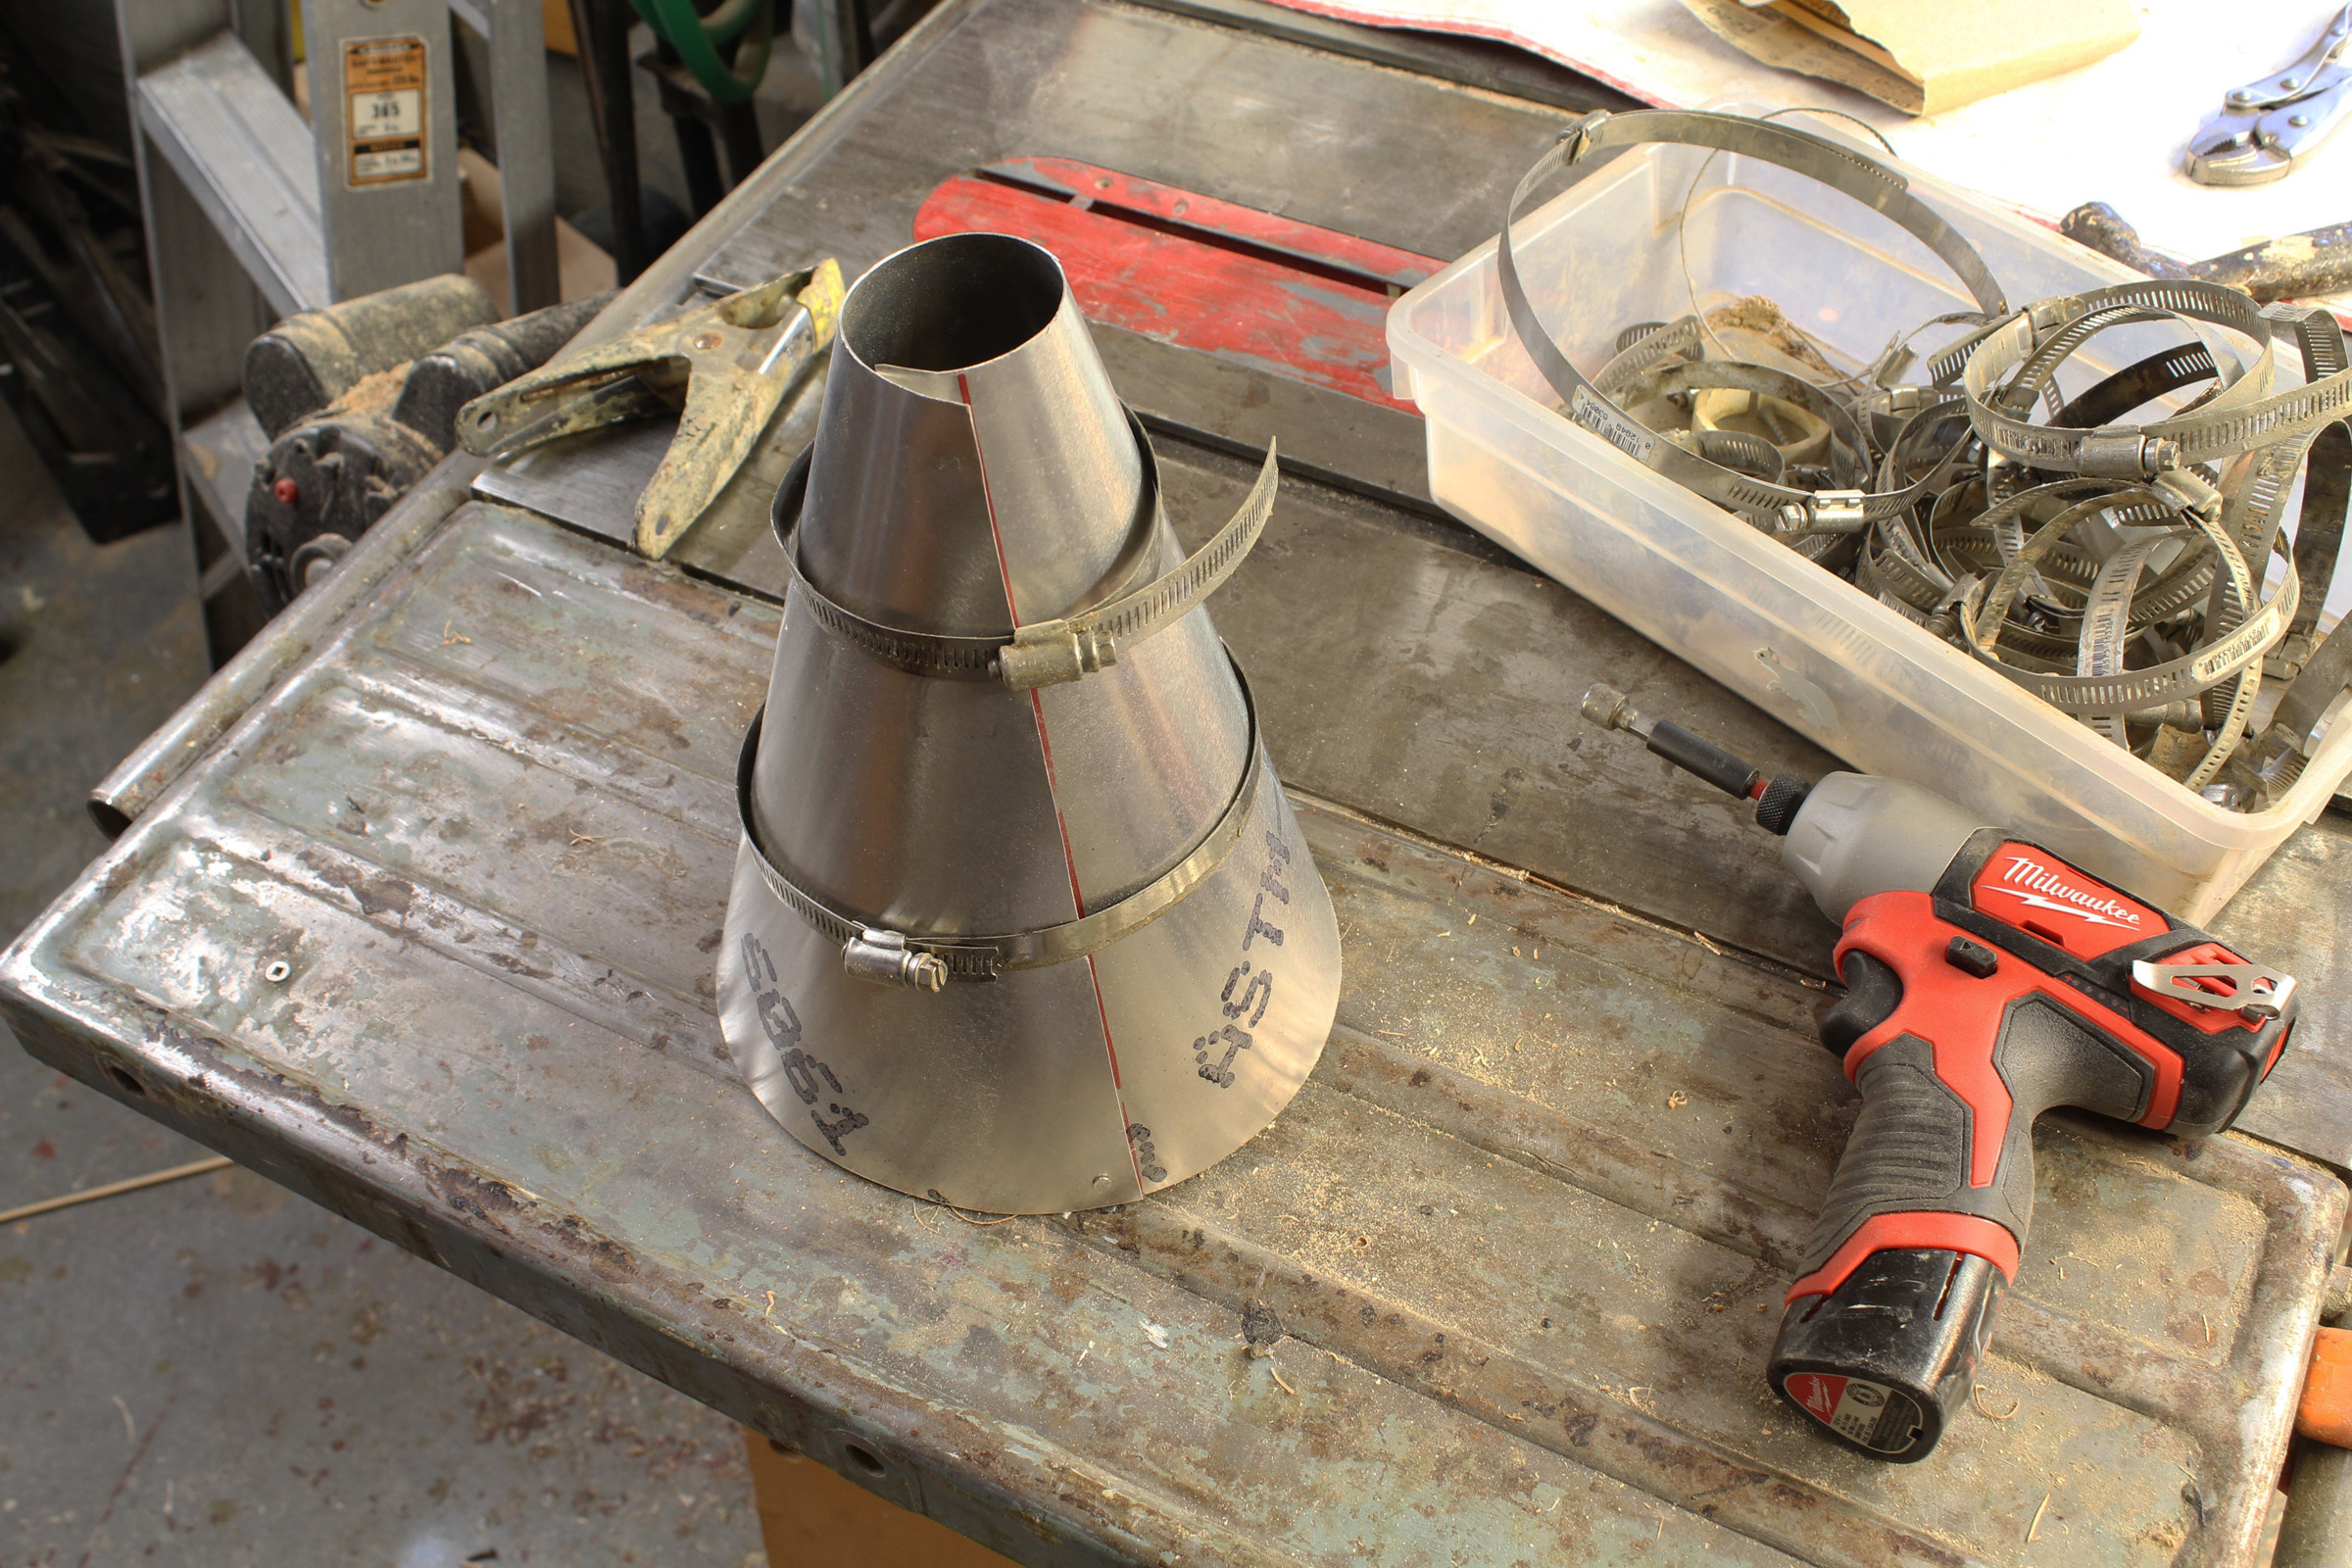
Hose clamps squeeze the aluminum to shape. I drew a line for the 1/2″ overlap in red Sharpie. Alcohol will remove the line later.

A 2×2 clamped to the workbench provides a support for drilling holes along the seam. I used 1/2″ aluminum tacks as rivets.

To form the rivets in the small end, I clamped a steel pipe in a vise and hammered clipped tacks in the holes from the outside. This didn’t flare the trimmed ends of the tacks, but folded them over, which was good enough.
Leather
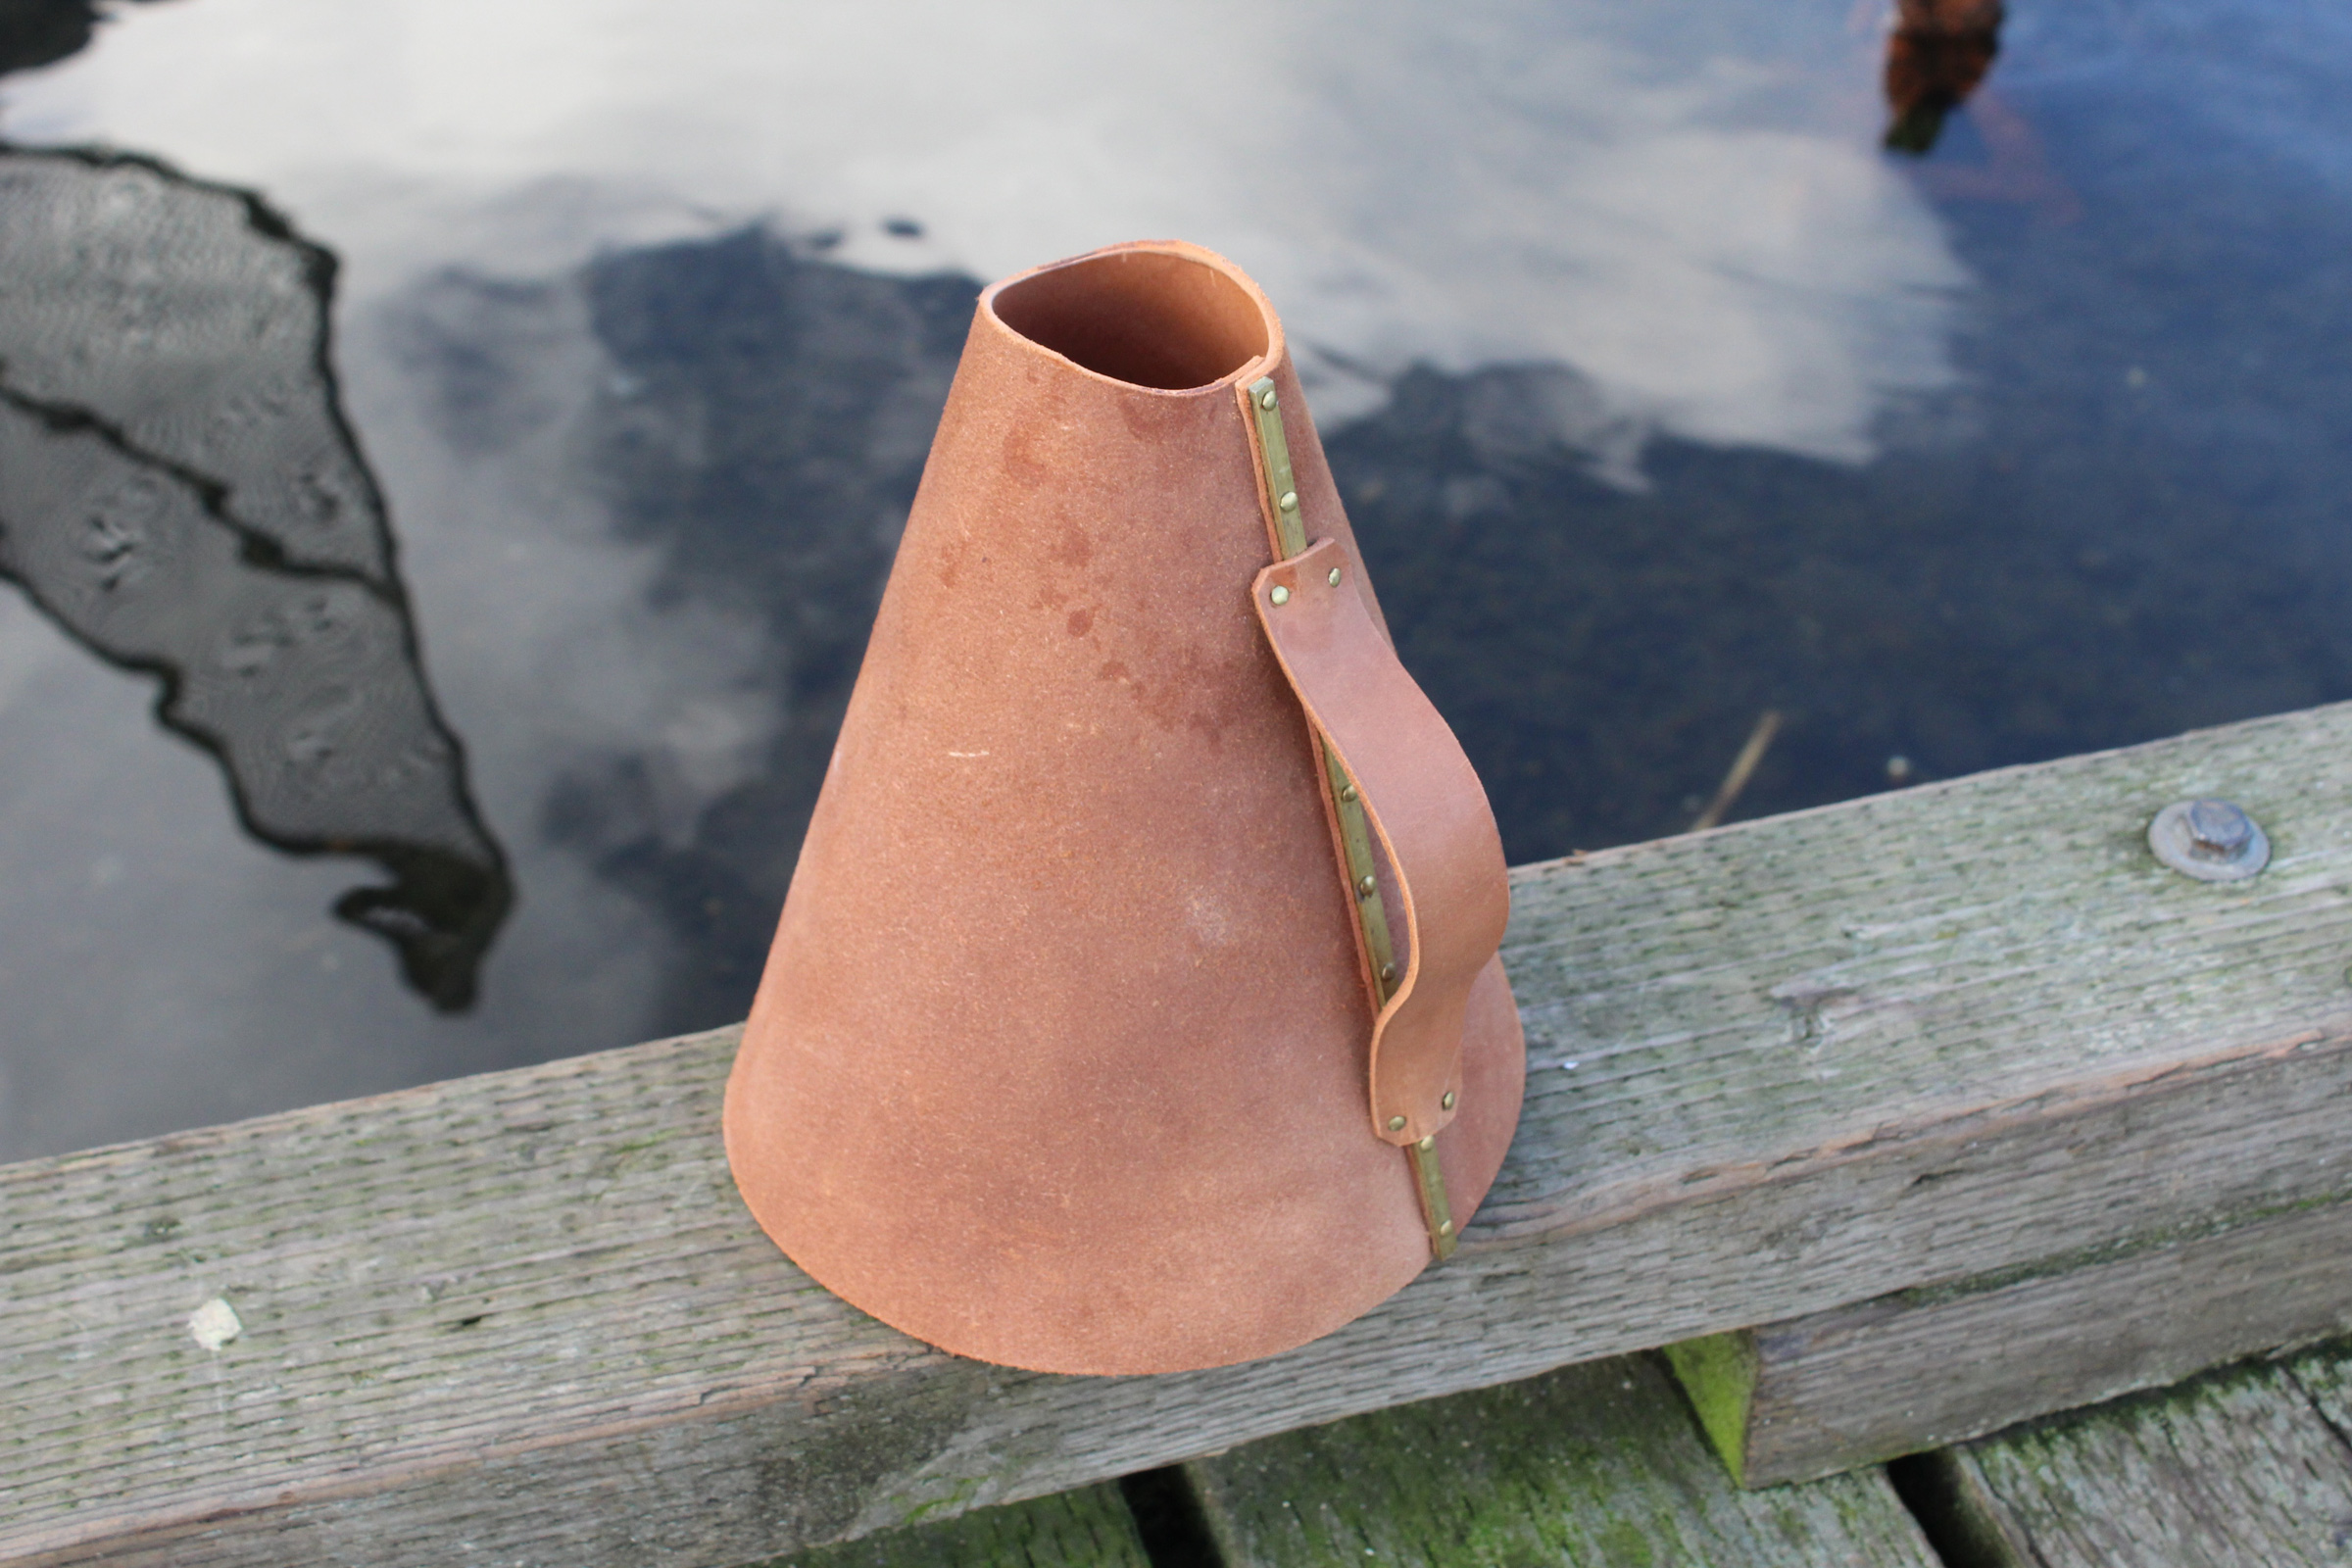
I thought leather was an unlikely material to use for a megaphone, but it was commonly used prior to the development of plastics. A handle is useful for a megaphone that is too large to hold with one hand. A leather strap works here. The small end, contoured to fit around the user’s mouth, adds to the effectiveness of the megaphone.
Stiff leather was once used to make megaphones, typically those used by cheerleaders. Metal rings were usually fit to the ends, but they aren’t necessary if the leather is stiff. A scrap of leather I had—2.5mm vegetable tanned full-grained cowhide—was just big enough for the pattern I made for the aluminum megaphone.

To cut the 1/8″ leather, I drew the pattern on it and marked the intersection of extensions of the edges. With a stick with one hole pivoting around an awl at that intersection, I pushed a knife point into holes drilled to cut the two arcs. Cutting freehand works too.
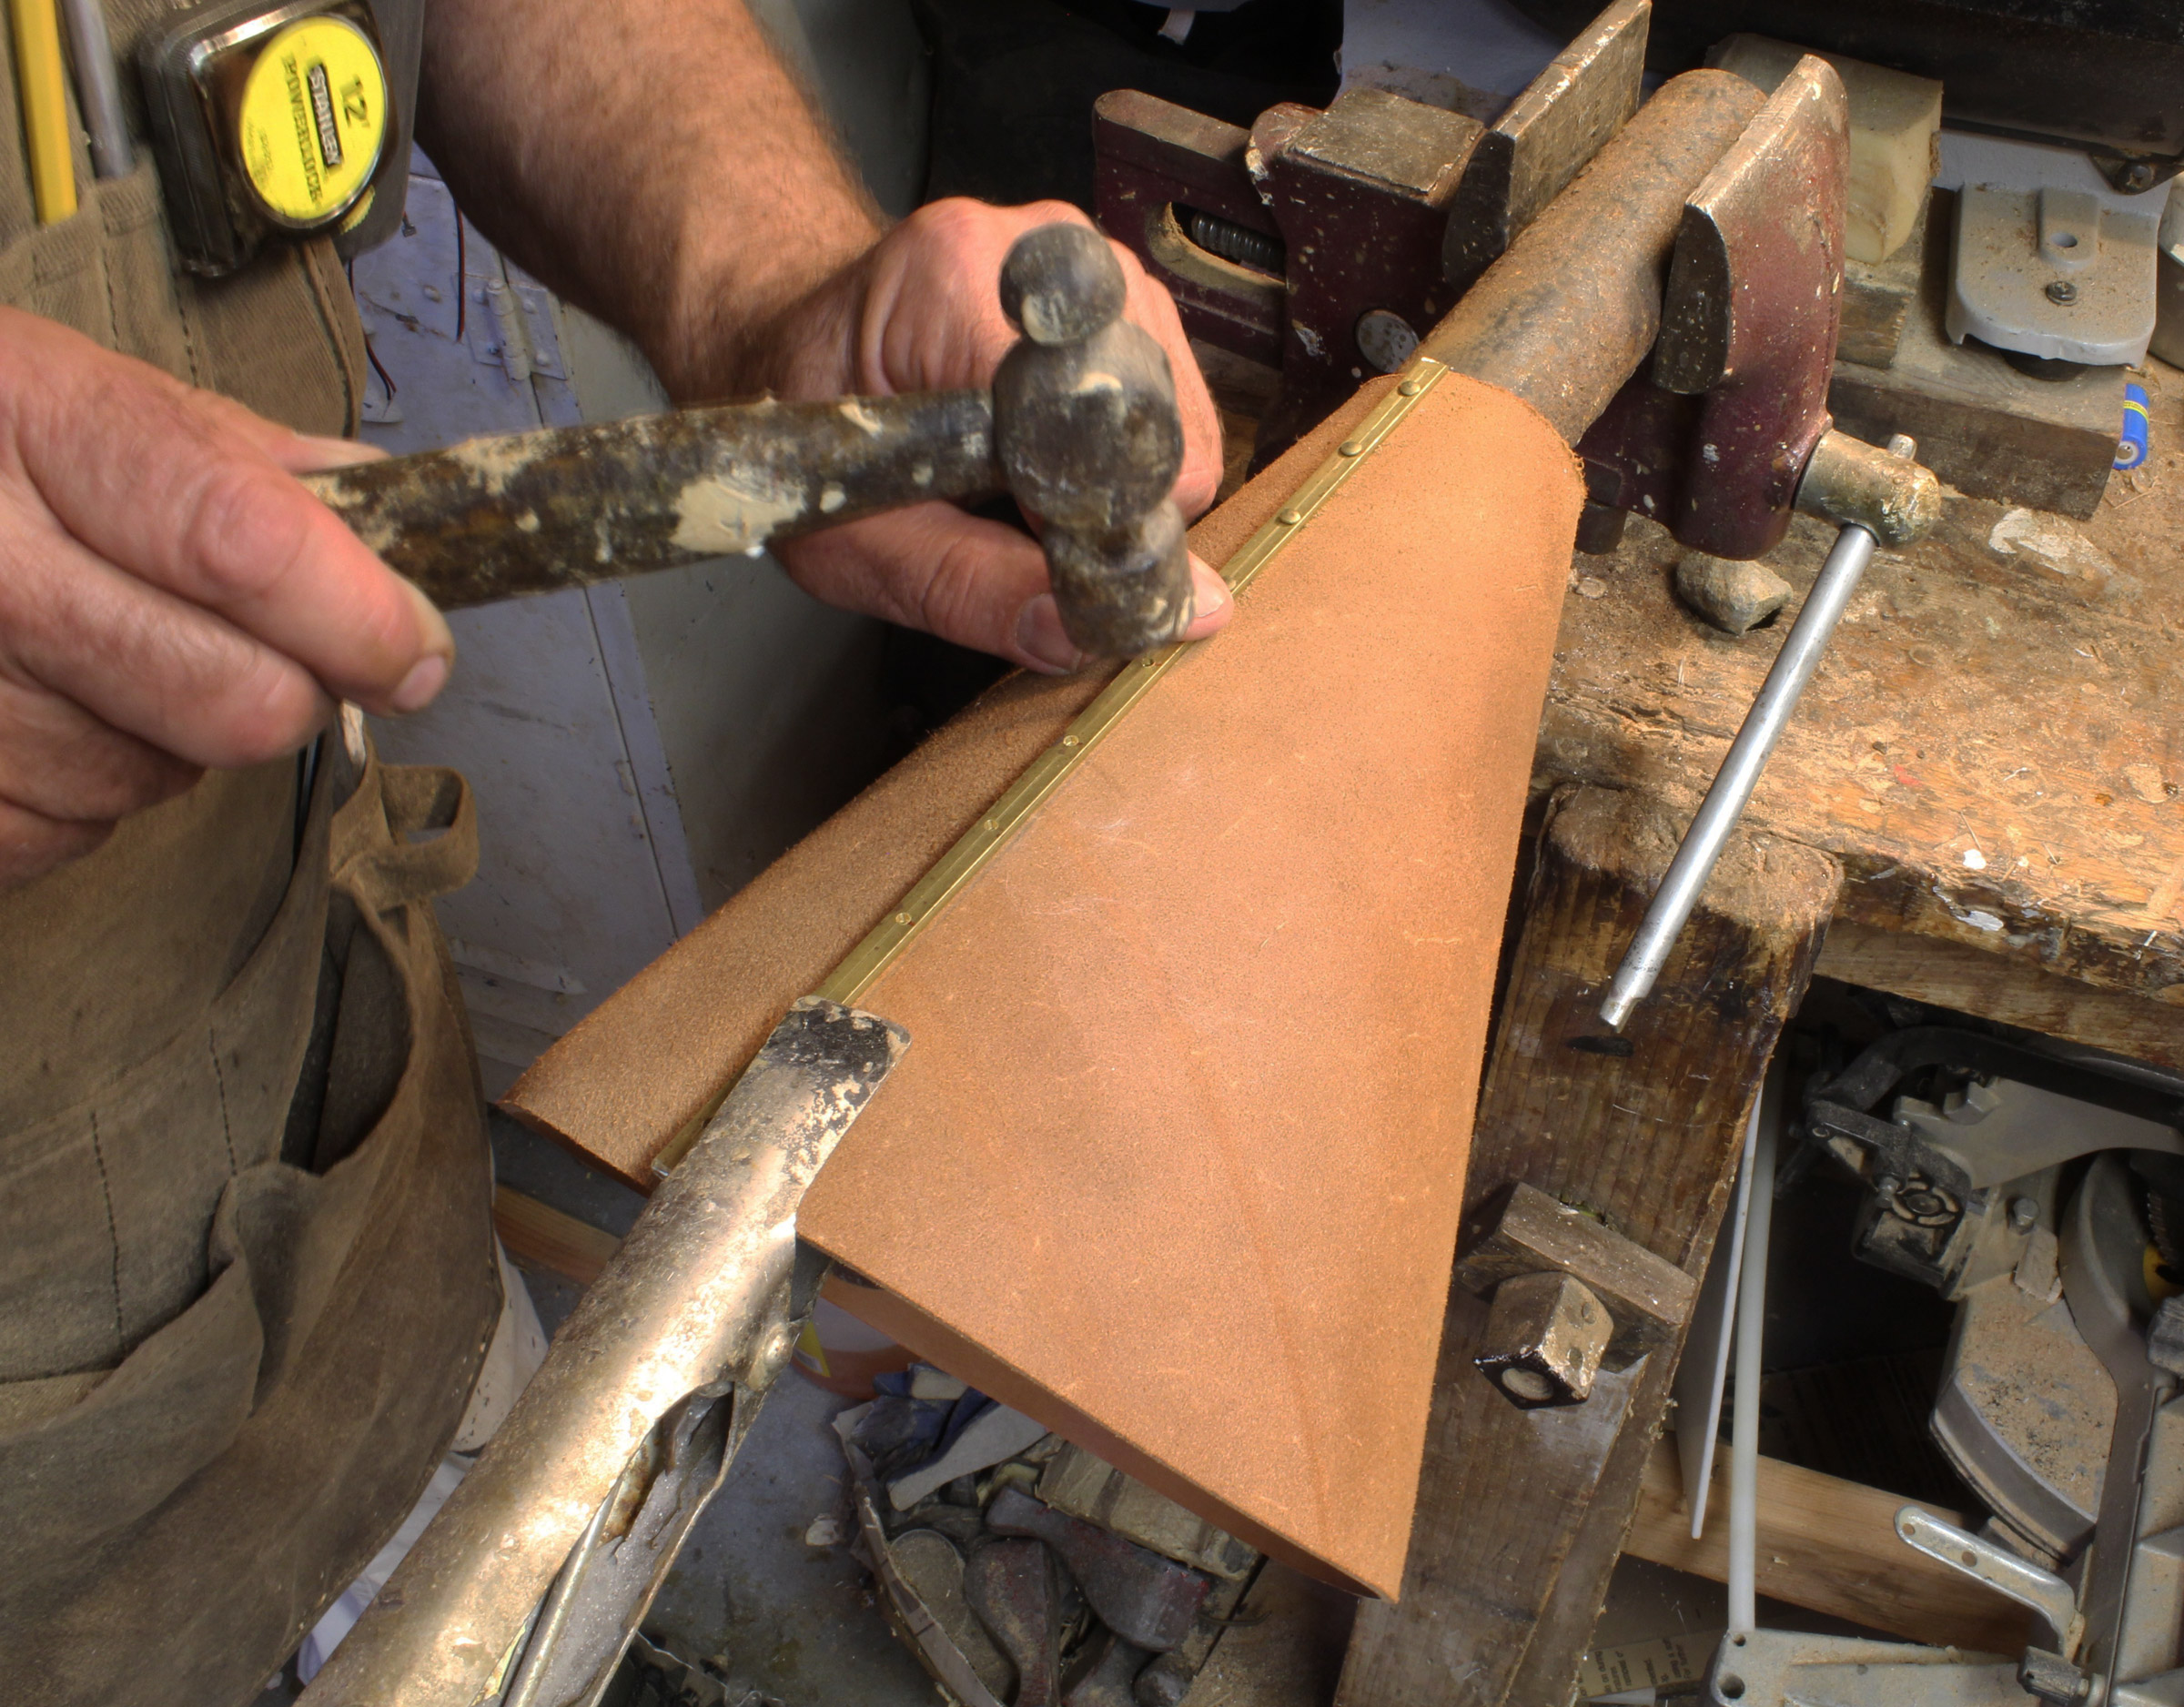
Some of the old leather megaphones had a metal strip along the seam to stiffen them. I predrilled a length of 1/8″ x 1/4″ brass, set brass canoe tacks in the holes, and tapped them through the leather (without pilot holes) to clench inside against a piece of pipe.
PVC Plastic
My first PVC megaphones had their overlapping edges held by pop rivets and were painted with silver hammered-finish spray paint.
PVC is a versatile and remarkably tough material that can be coaxed into new shapes by heating it in a kitchen oven to 170 degrees F. I’ve used some 4″ drainpipe—with walls about 1/16″ thick (Standard ASTM D 2729)—for other projects and it’s well suited to making megaphones.
Starting with a 16″ length of pipe, I drew a centerline and measured 3-3/8″ from either side of the line on one end. The section of pipe removed between these two marks will take the small end to a diameter of 1-7/8″ (with a 3/4″ overlap). Draw a line from each mark to the centerline on the opposite end. A file folder makes a flexible straightedge.

Saw along both lines. A fine-toothed Japanese saw cuts PVC quickly though almost any handsaw will work. Sand or plane the edges to smooth them.
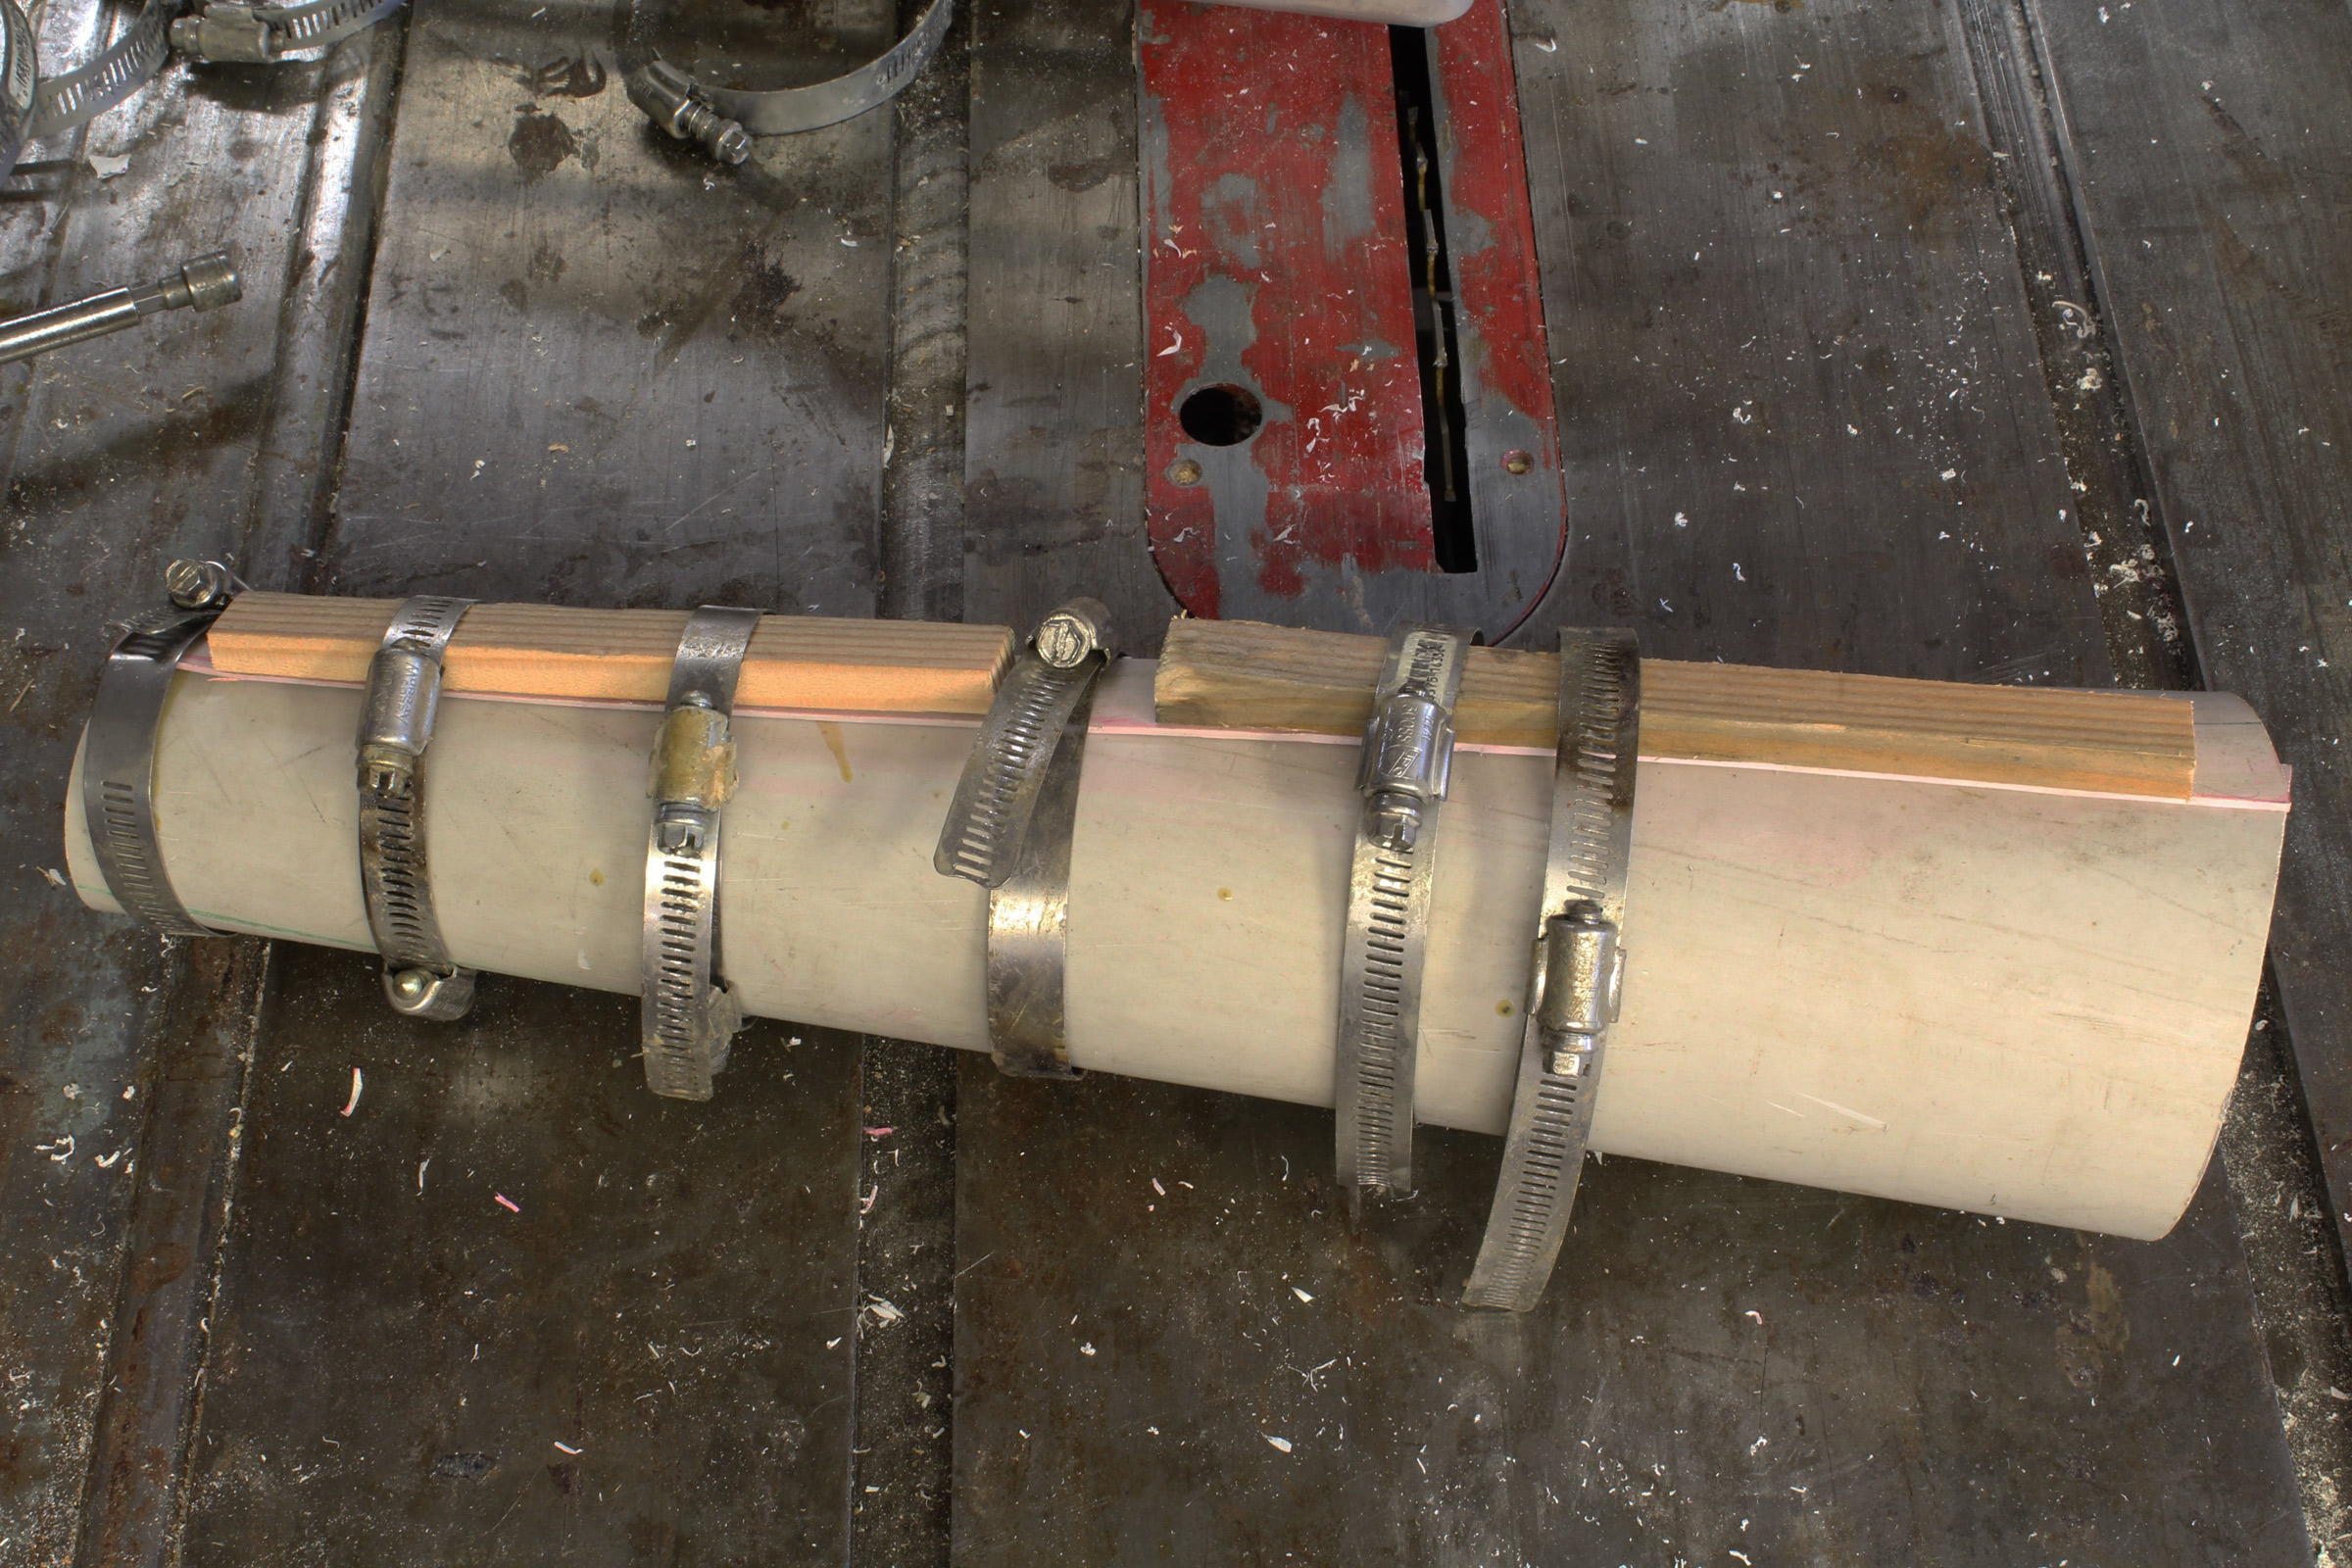
Draw a line 3/4″ along one edge and curl the other edge toward it. Hose clamps hold the overlap of the edges against the resistance of the PVC. Sticks on the outer edge hold it flat for the next step. Heat the whole set-up in a 170-degree oven for 8 minutes. This will relax the PVC and allow it to hold its new shape.
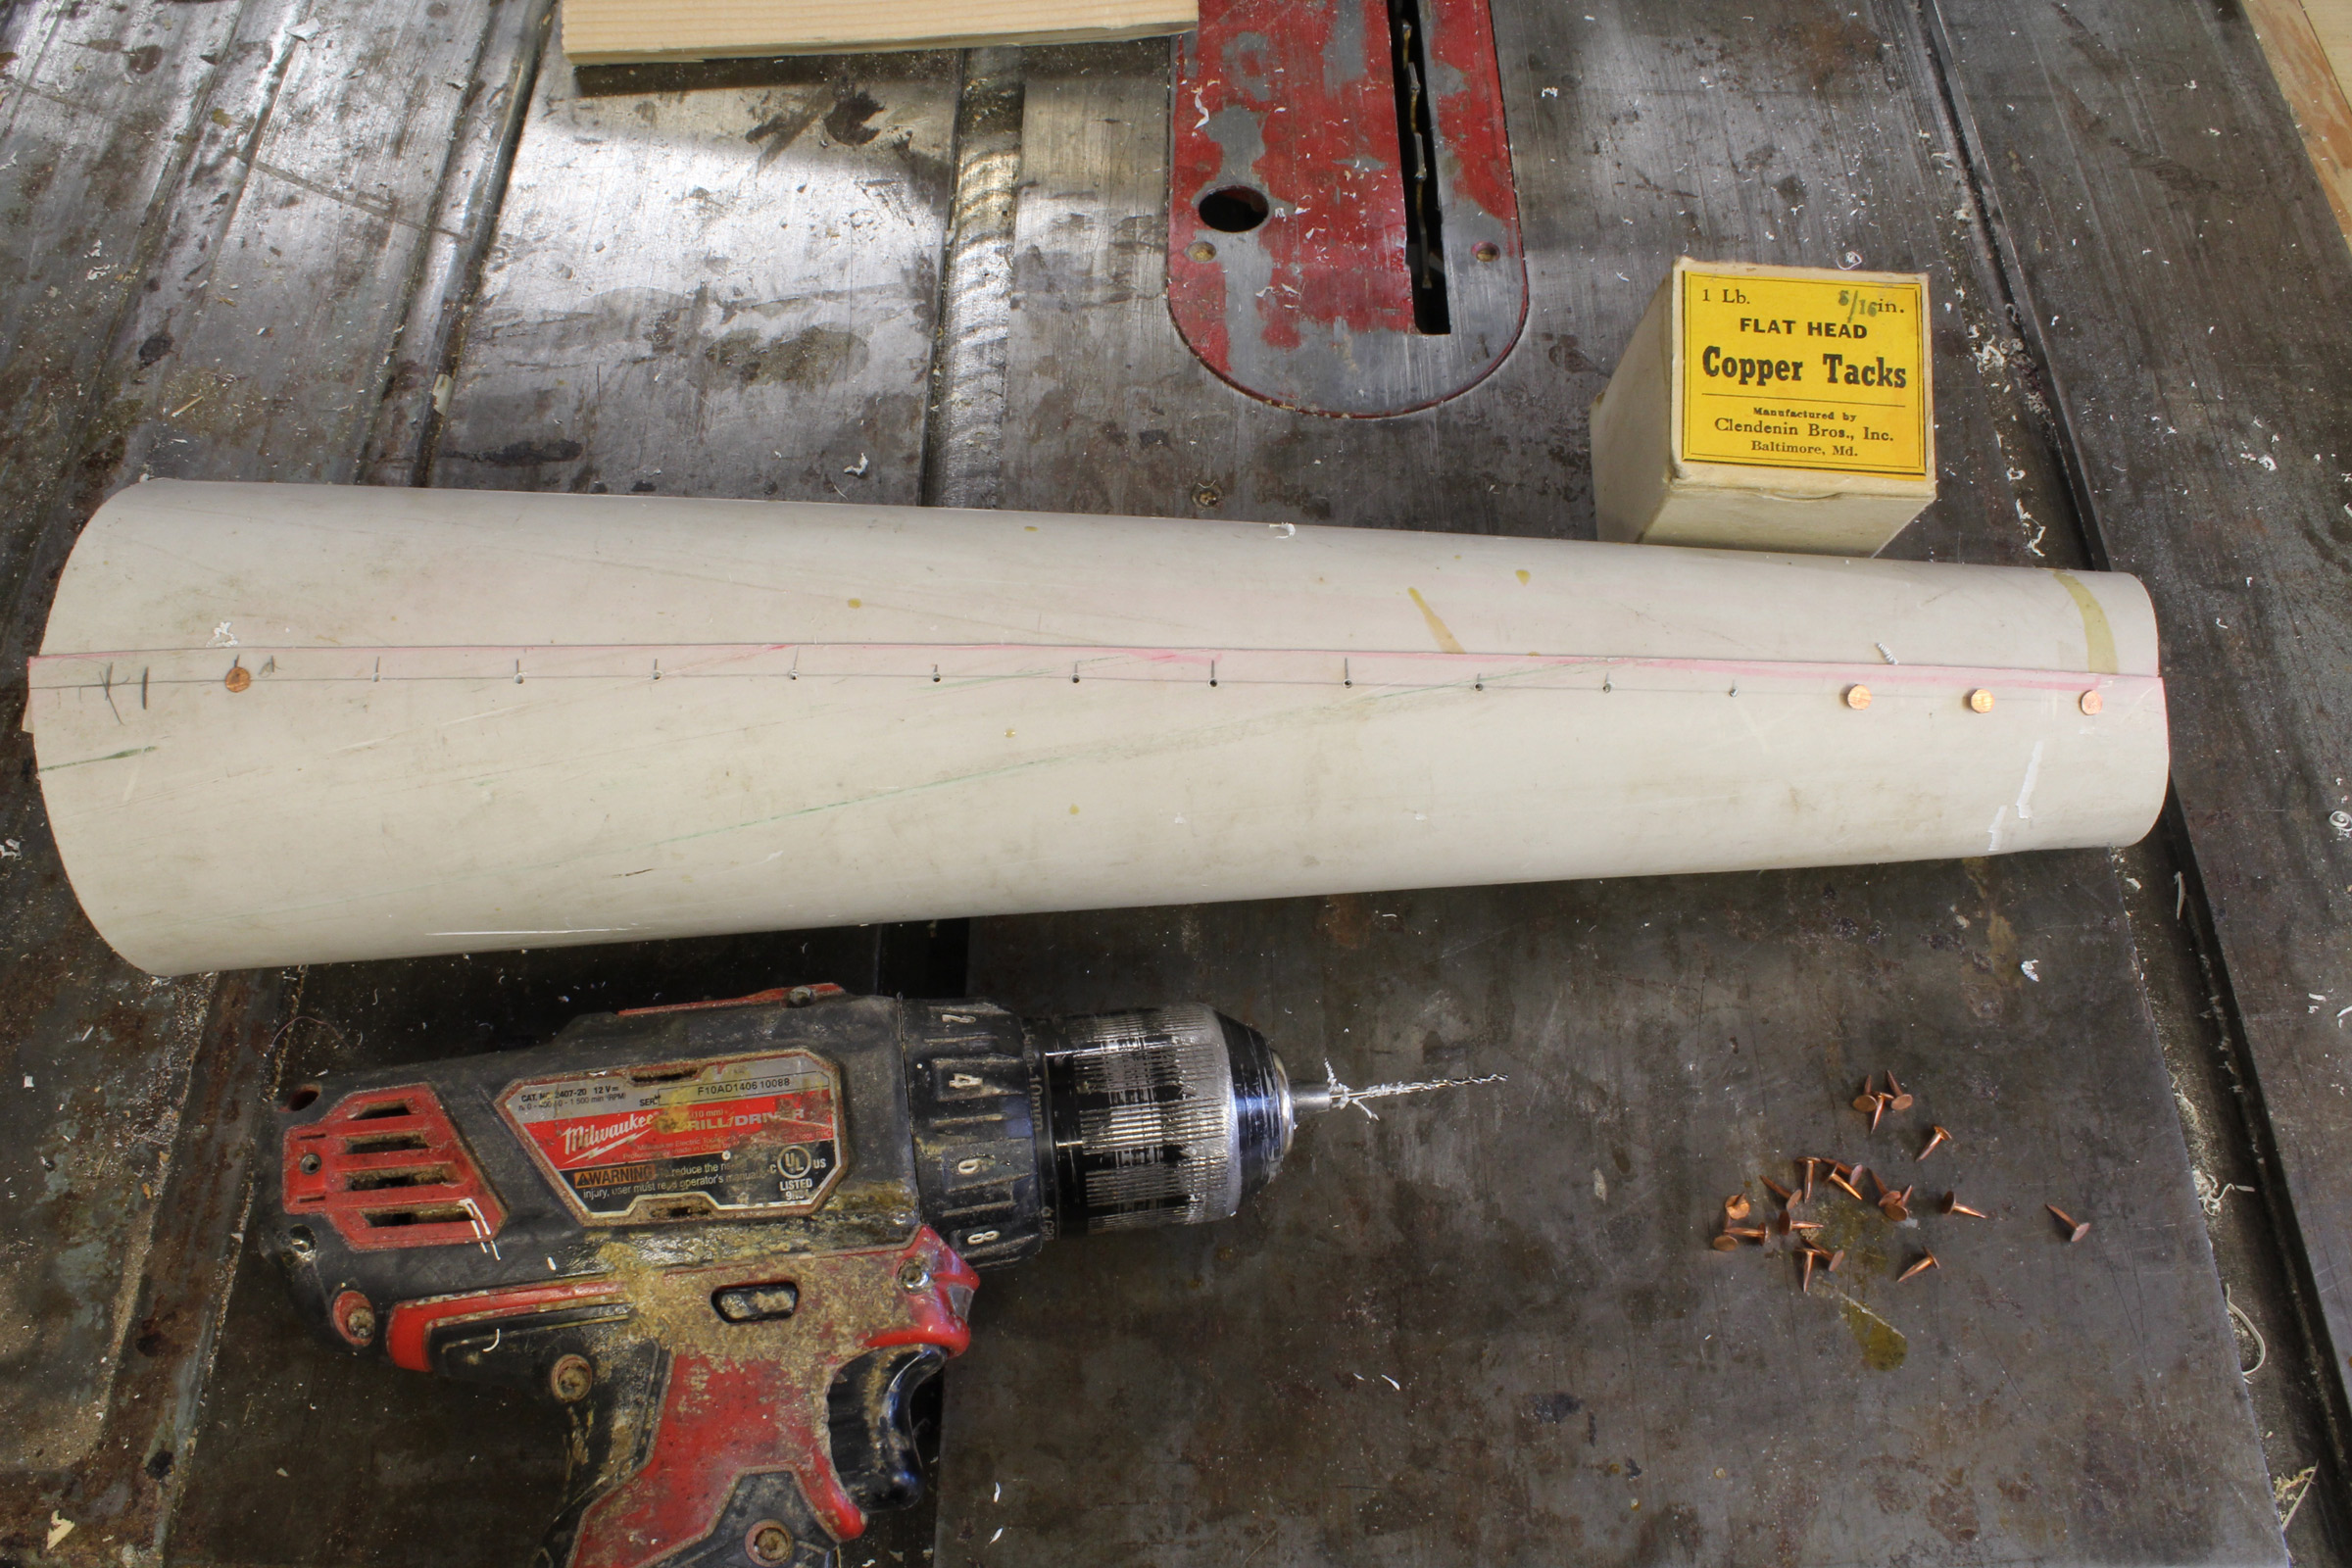
After the PVC has cooled, the hose clamps can be removed and the edges will remain overlapped. Drill a 1/16″ hole near each end, 1/4″ from the edge, and tap a 5/16″ copper tack in each, clenching them with the megaphone slipped over a steel-pipe bucking iron. Drill the rest of the holes 1″ apart and clench copper tacks in them. (On other PVC megaphones, I’ve also used pop-rivets to fasten the laps instead of copper tacks. I prefer the tacks.)
The ends of the megaphone will need to be flattened either by sawing or sanding them. On the disk sander, because of the megaphone’s taper, the small end needs to be elevated on a V-block.
The mouthpiece end is sculpted on a 2″ drum sander to create a contour to fit the face. PVC takes spray paint well (when the surface is scuffed), so a sanding with 150-grit paper follows.

I made two PVC megaphones as gifts for my son and daughter and spray-painted them with a pattern derived from the Cunningham coat of arms and house flag.
Curved Megaphone
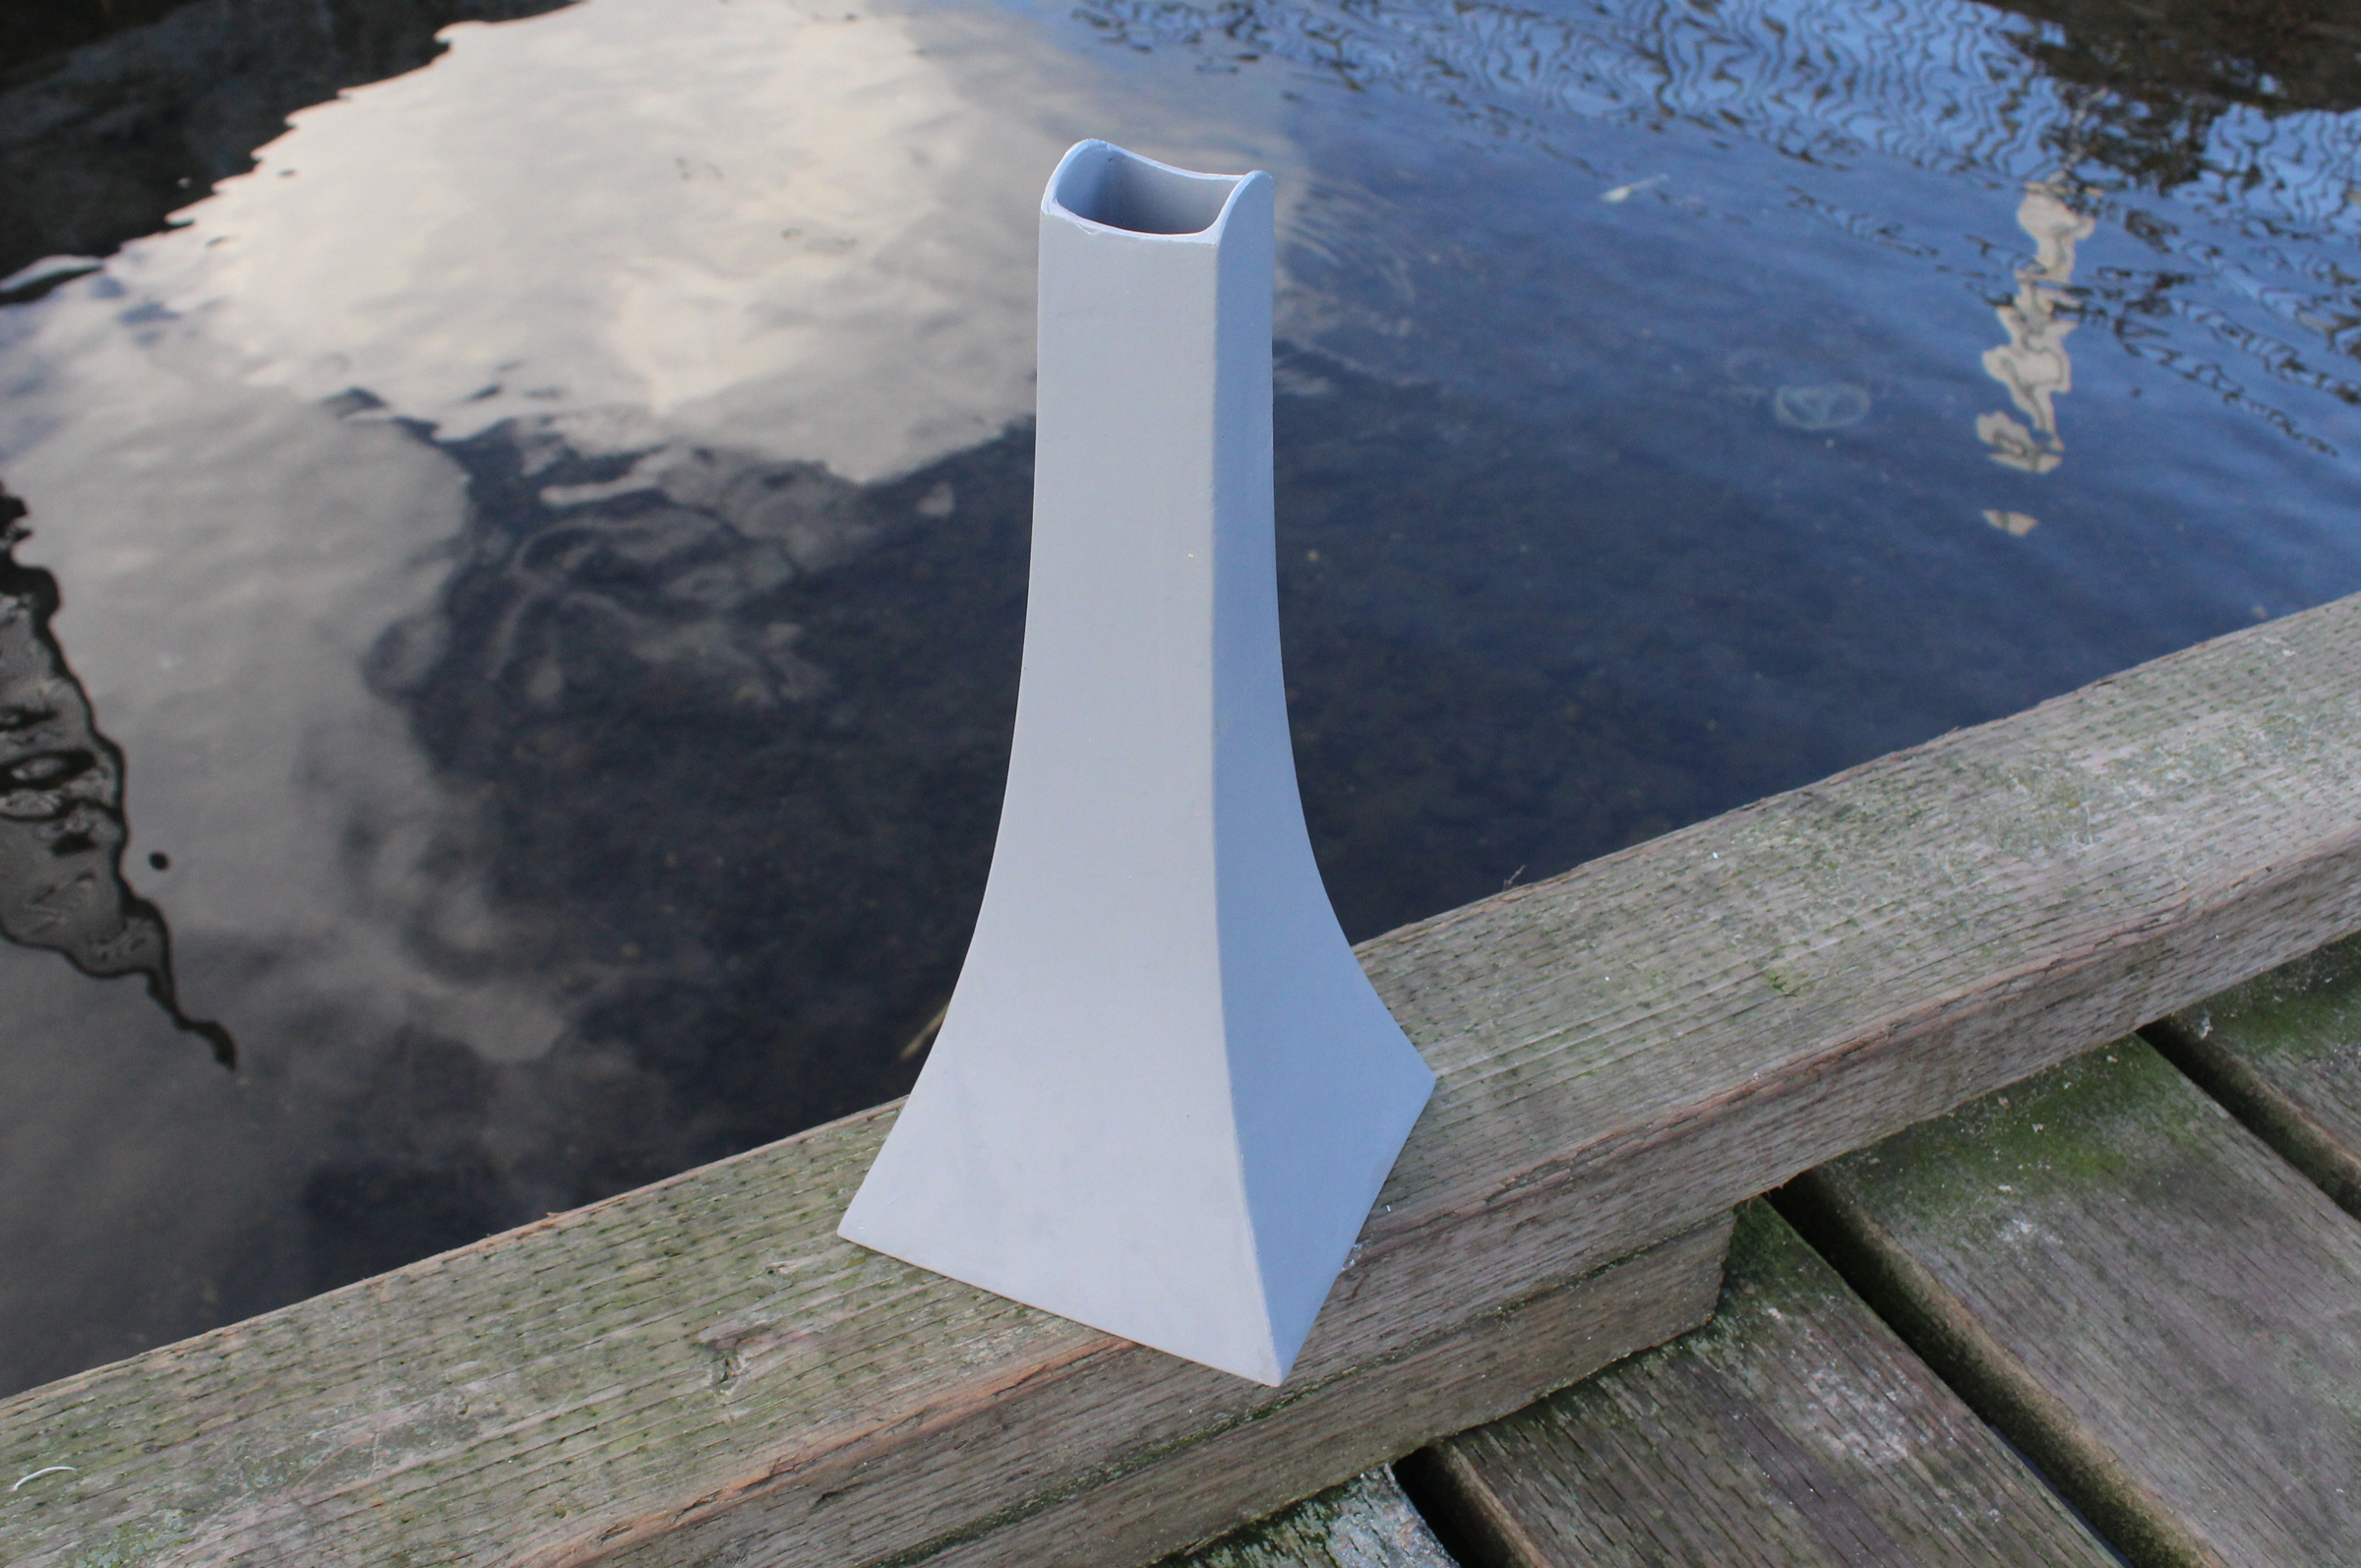
This wooden megaphone with a flared shape was surprisingly effective.
While the conical megaphones work well enough, I wanted to see if a more sophisticated shape would make a difference. Exponential curves shape the horns for hi-fi speakers and P.A. systems. I couldn’t make sense of the exponential formulas I found online, so I just copied a section of a graph that I found.

I copied a section of a more complete exponential curve from a graph I found on the web. To my eye, it is close enough to other megaphones of the type.
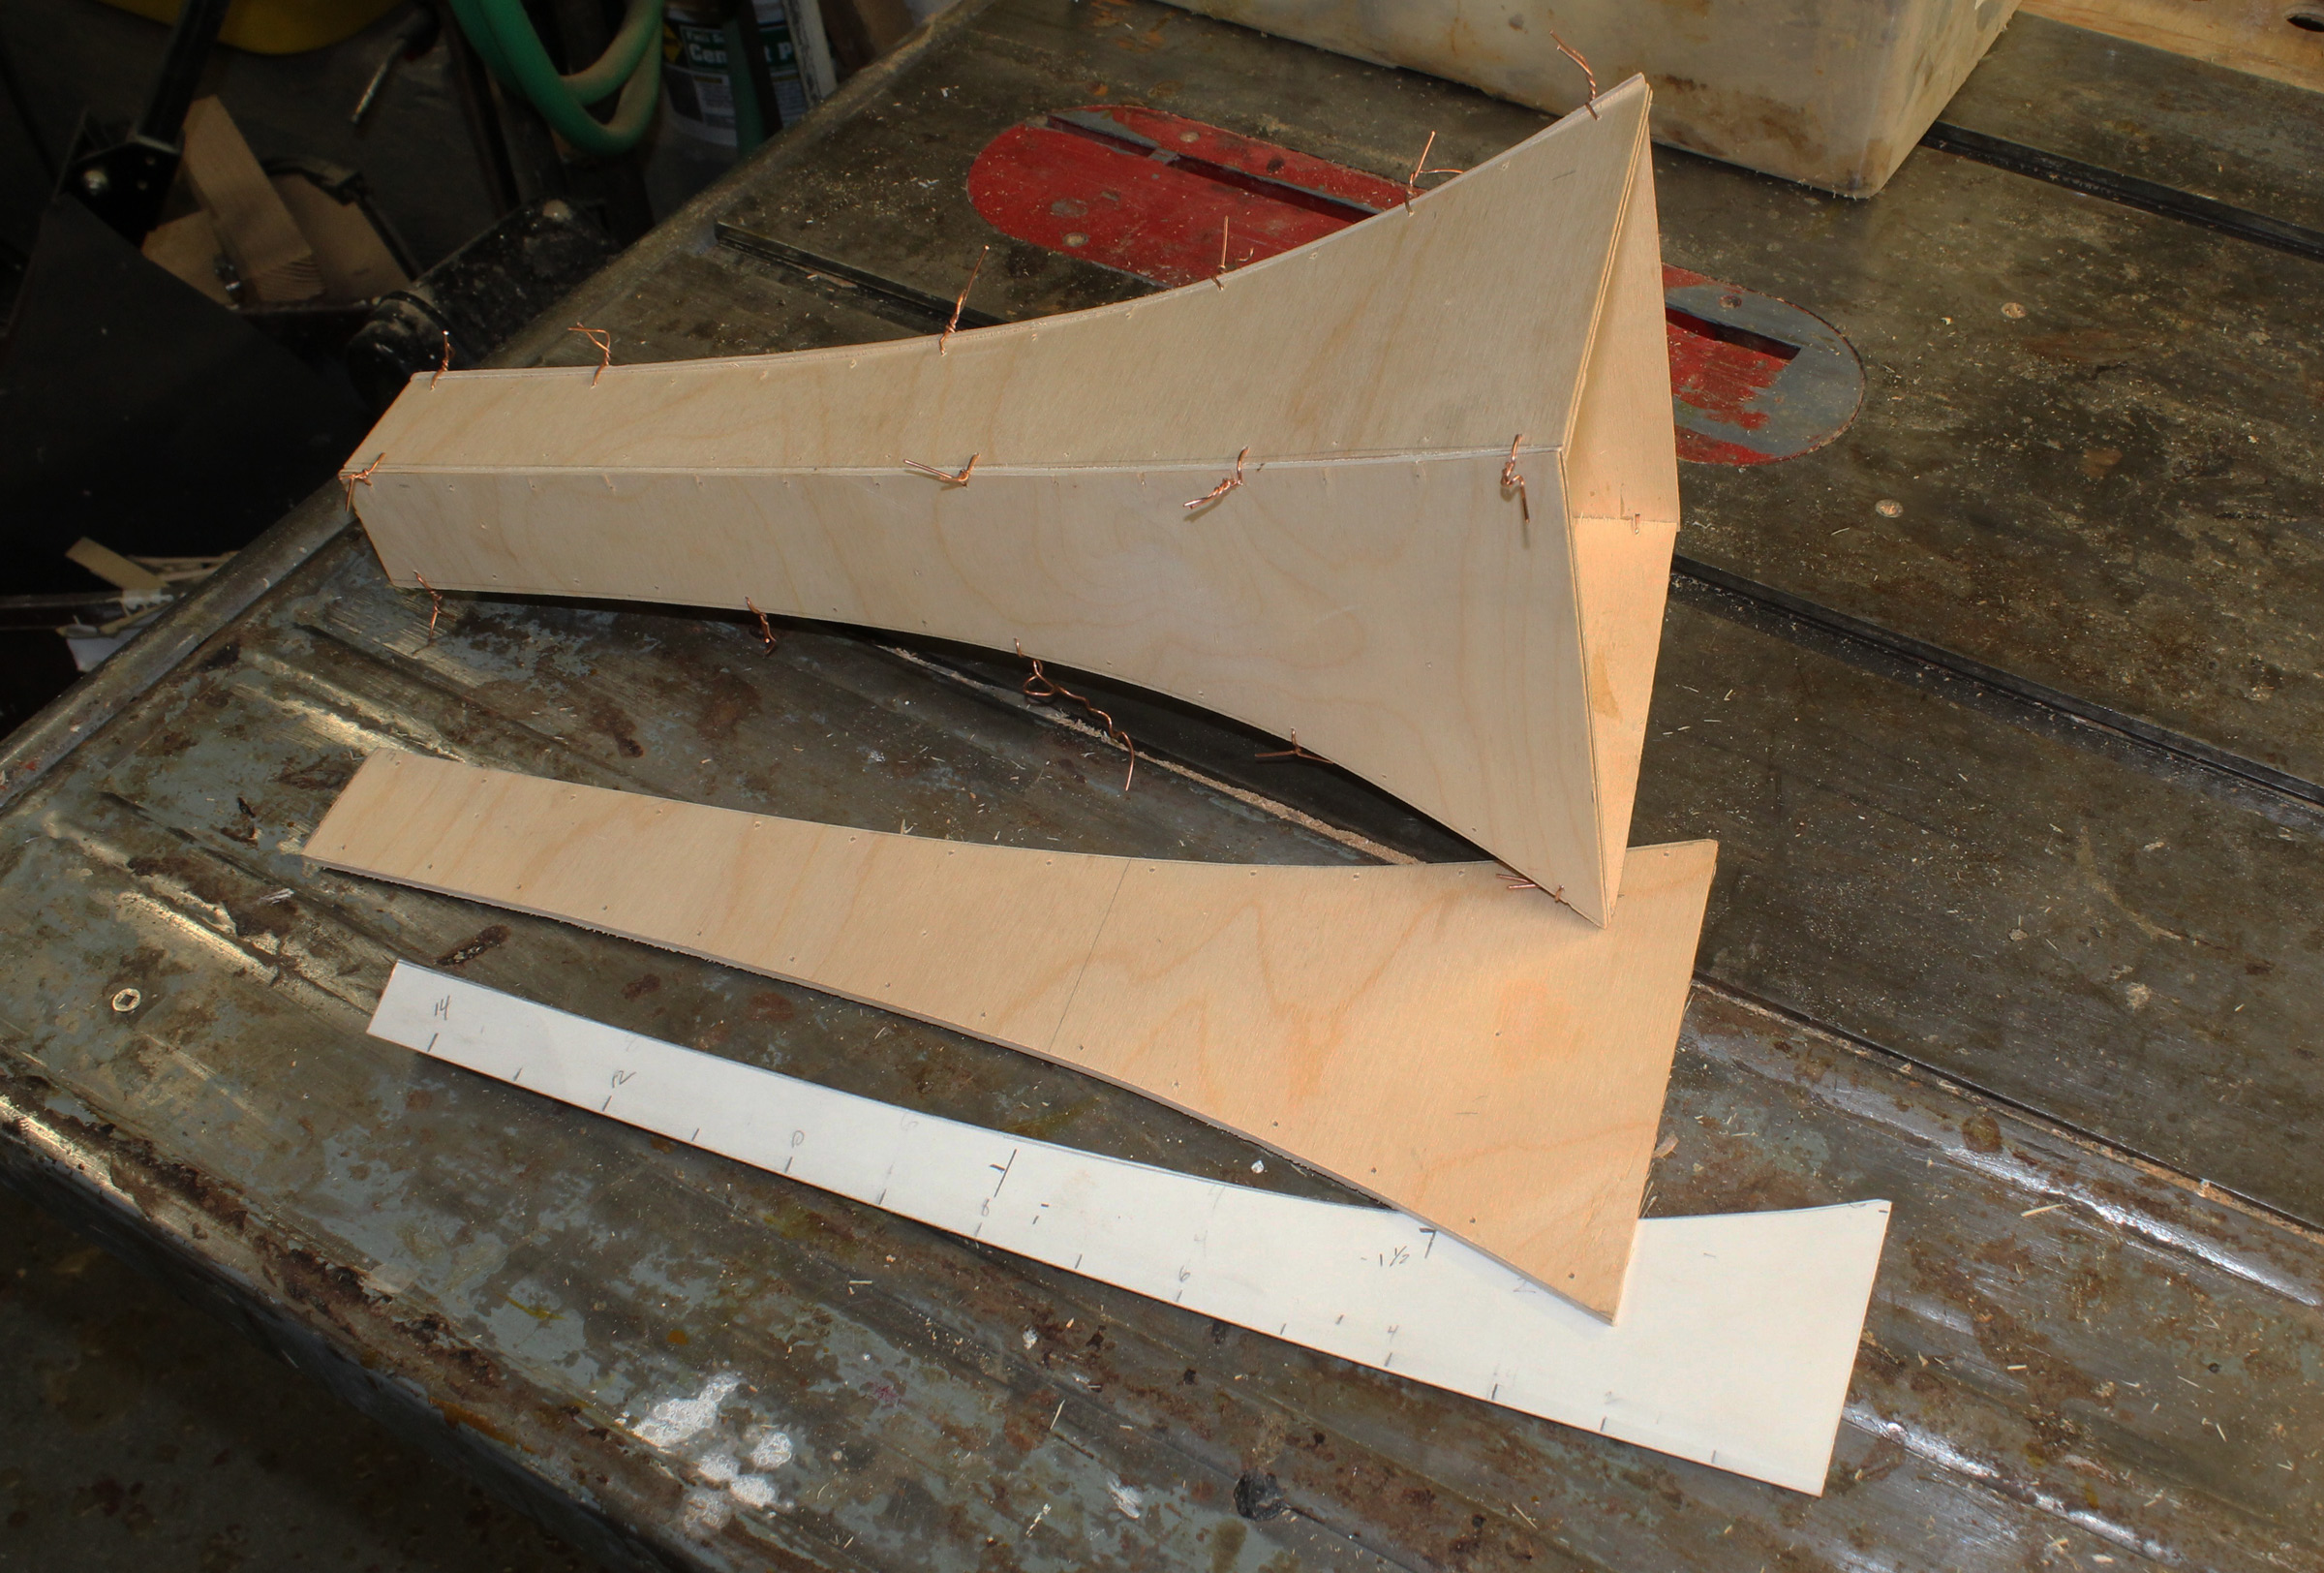
The paper pattern, here folded in half, was used to shape pieces of 1/8″ three-ply birch plywood. I drilled holes every 1″ for stitching the pieces together, but only needed a few copper-wire stitches to get the piece bent to shape—a good thing since my hands didn’t fit very far into the opening to insert wires. I brushed epoxy along the seams and filleted the joints. After the epoxy cured, I removed the wires, heating them to release them from the epoxy.
With everything sanded smooth, I sheathed the exterior with epoxy and 2-oz fiberglass. I shaped the small opening for a good fit at the mouth. Although I don’t have a similarly-sized megaphone with straight sides as a comparison, this curved megaphone did seem to project my voice louder than I had expected.![]()
ADDENDUM
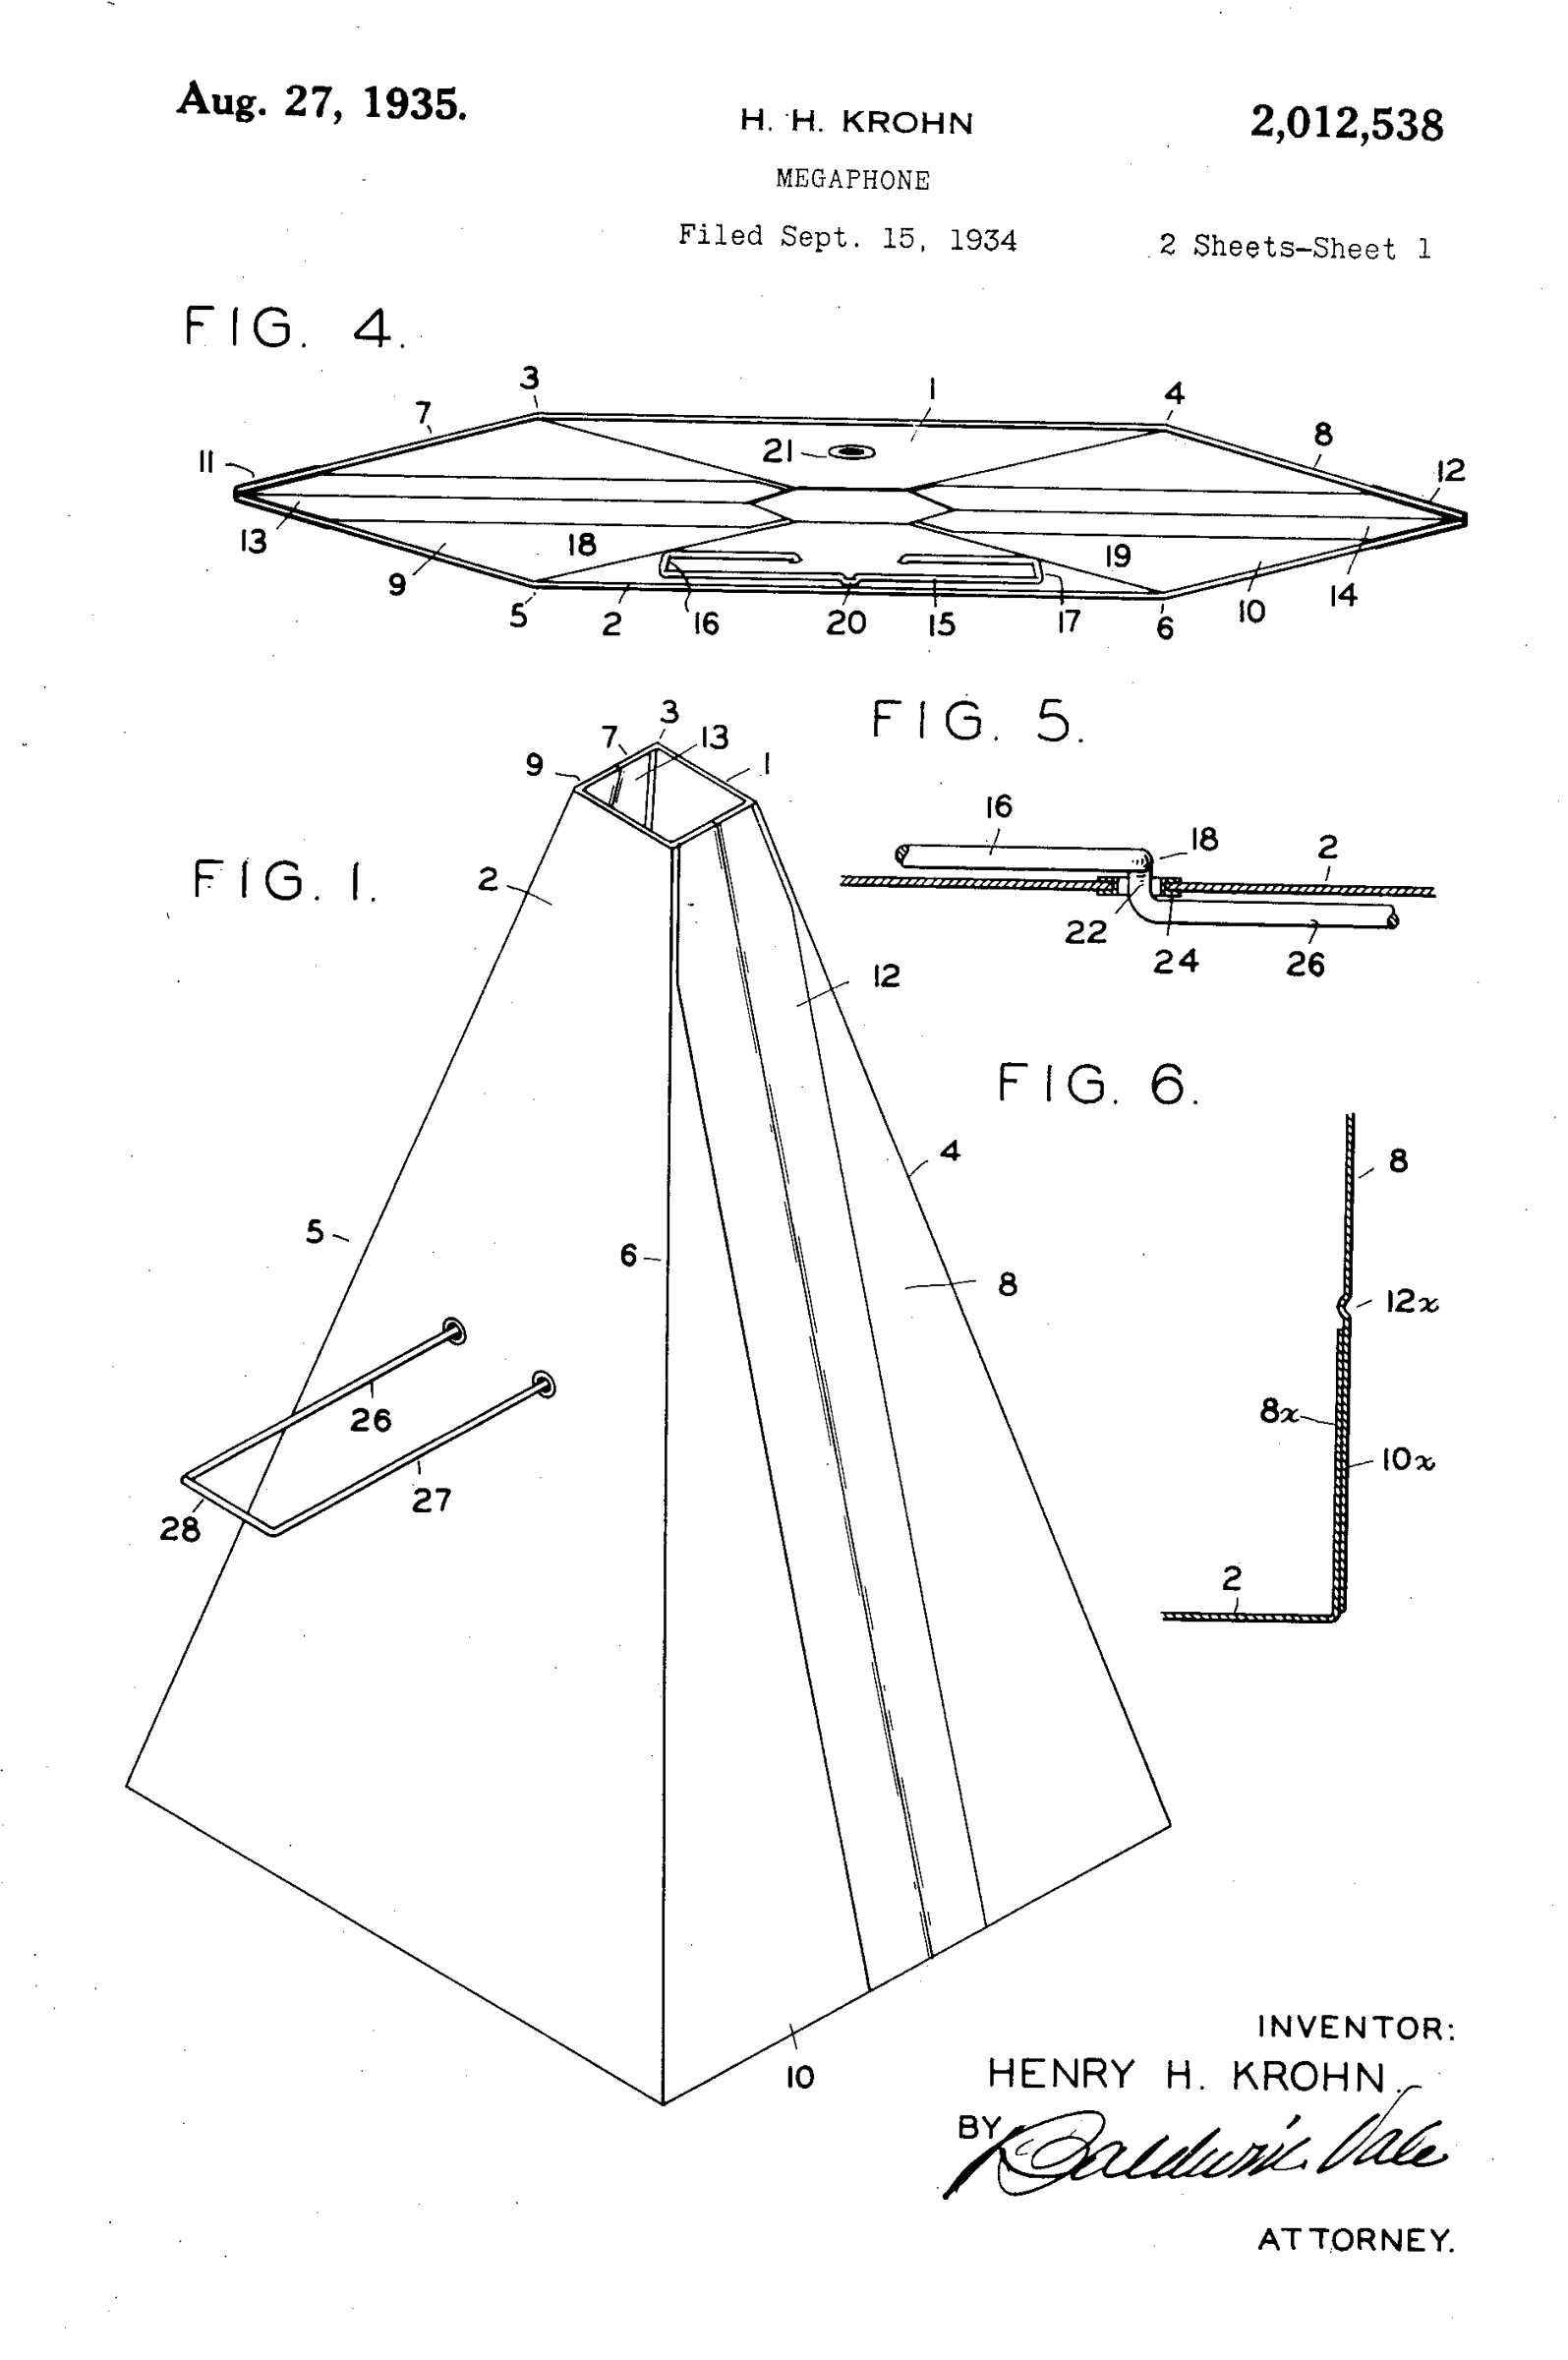
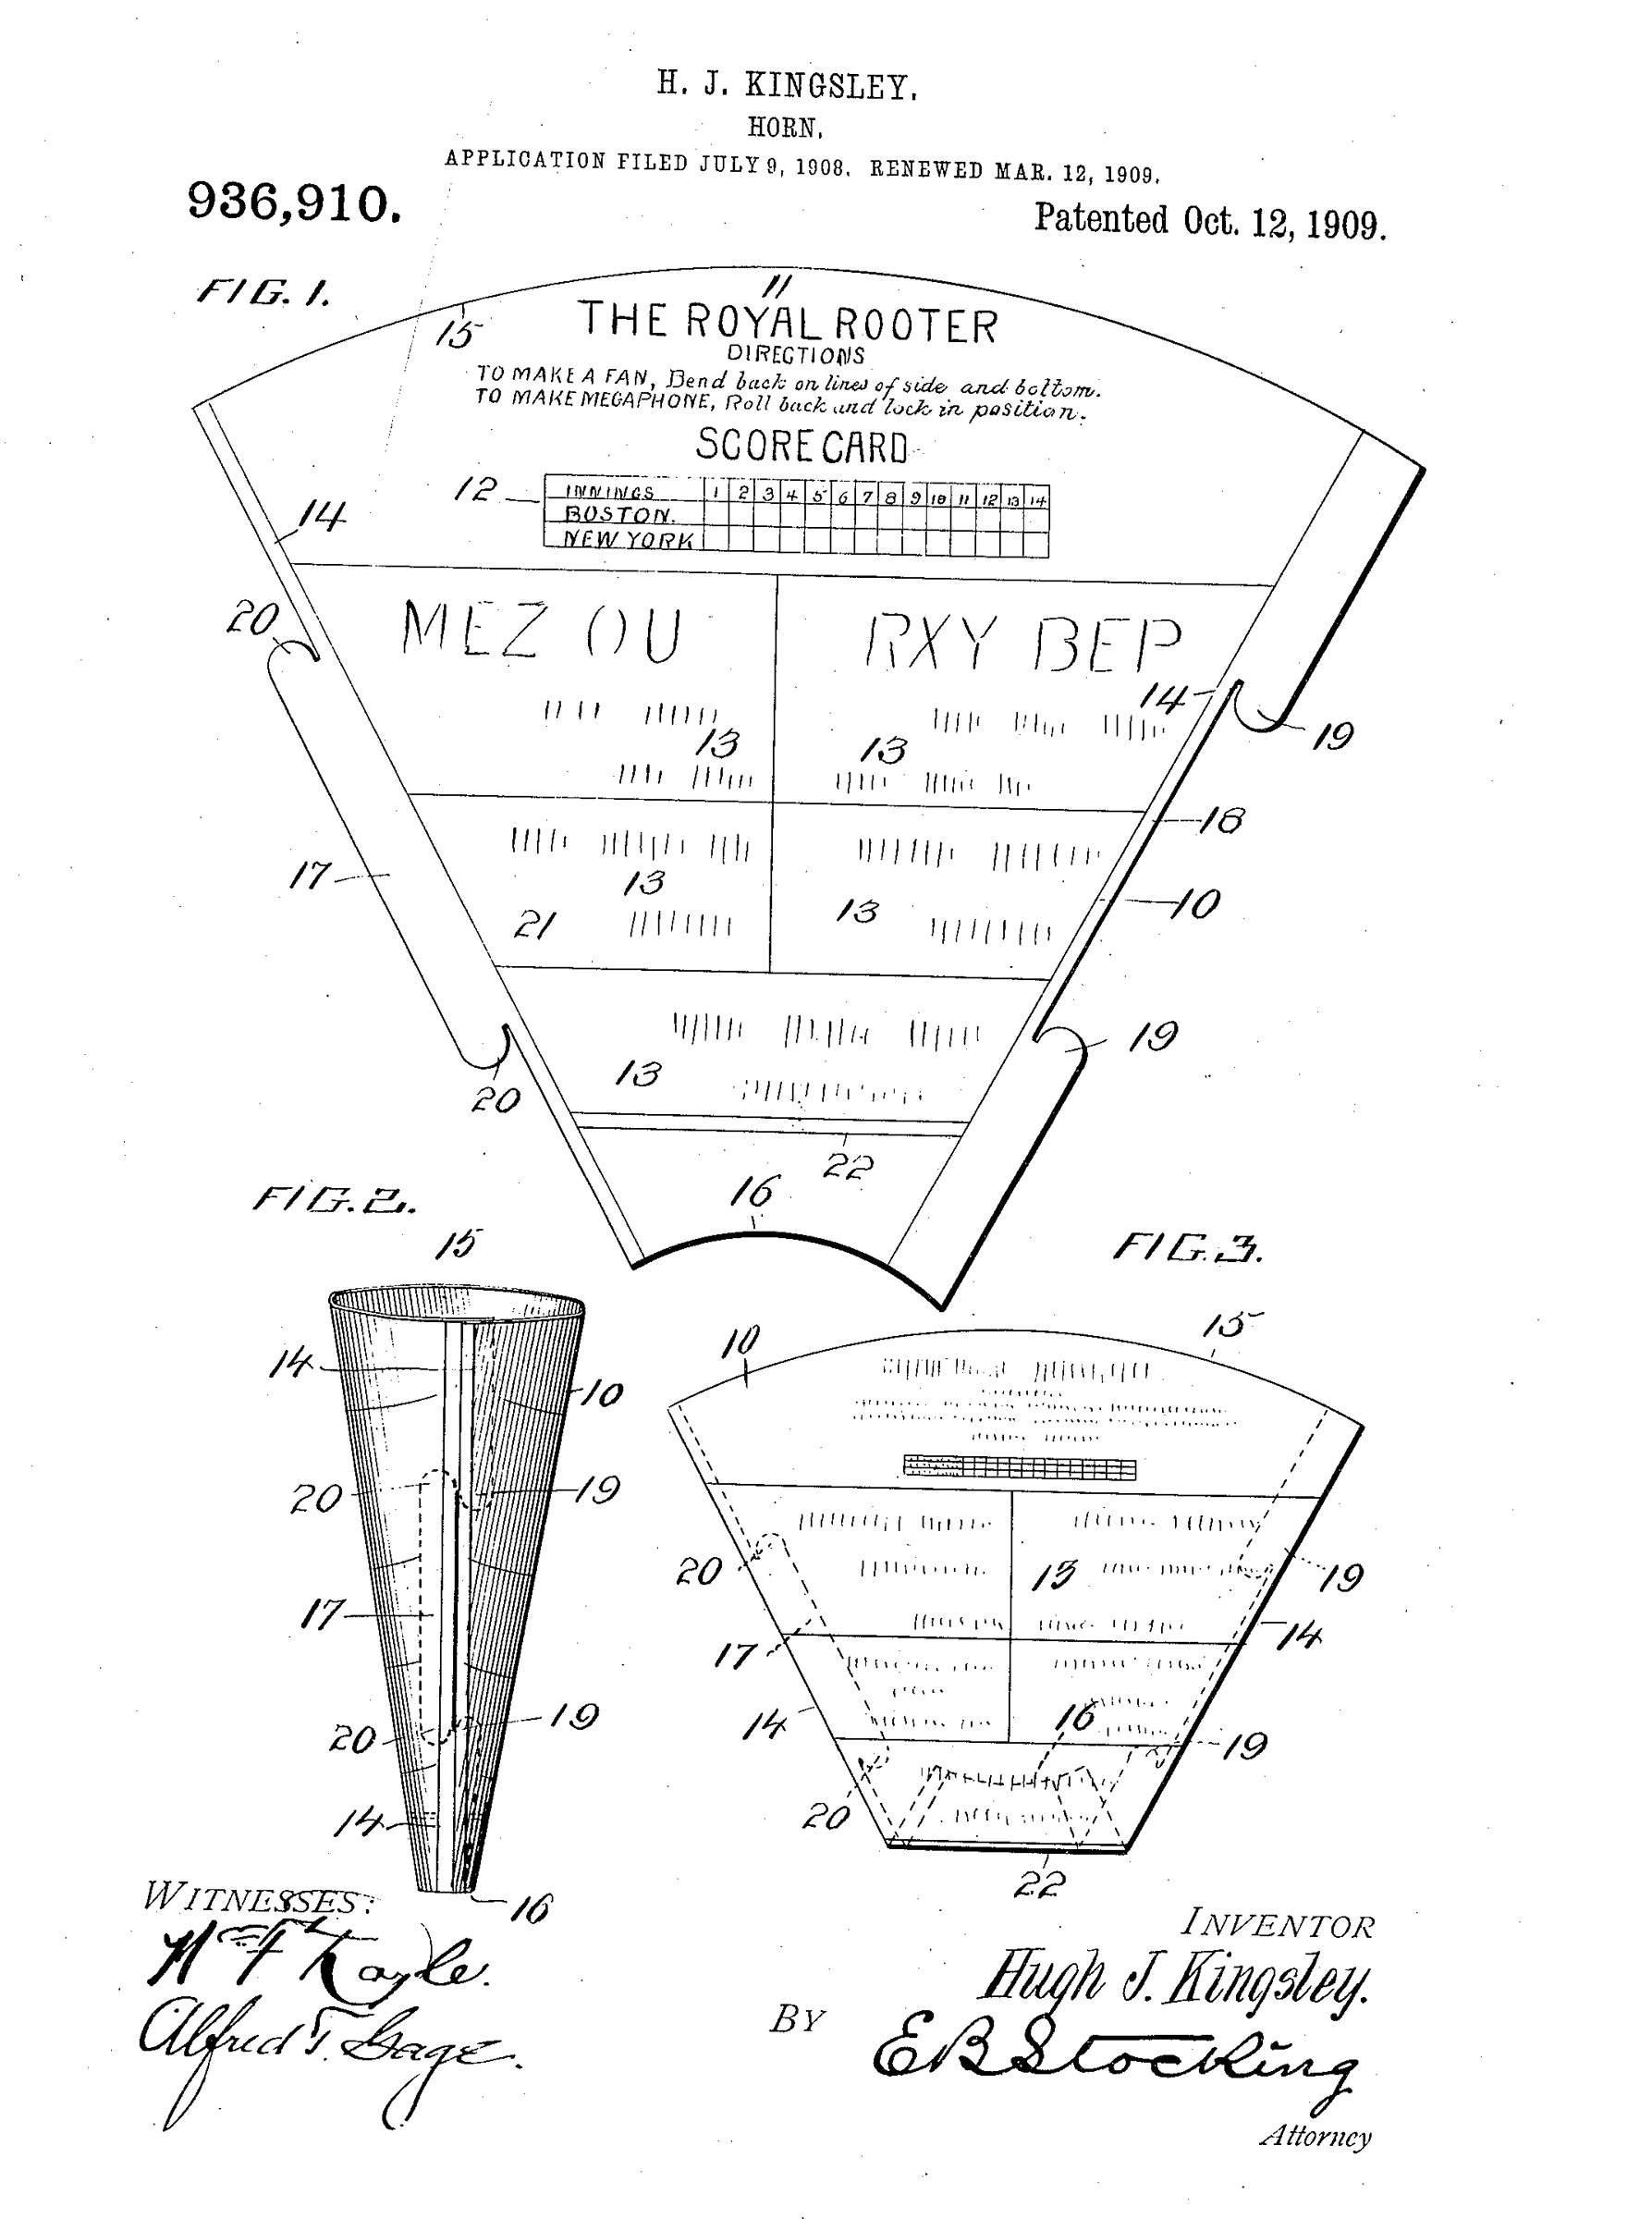
Reader John Bishop, in the comments below, thought that a megaphone would be useful, but rightly guessed it would be bulky aboard a small boat. He wondered about making a leather megaphone that could be stowed flat or rolled up to take up less space in a small boat. A century ago, several inventors filed patents for easily stowed megaphones. Here are a few:
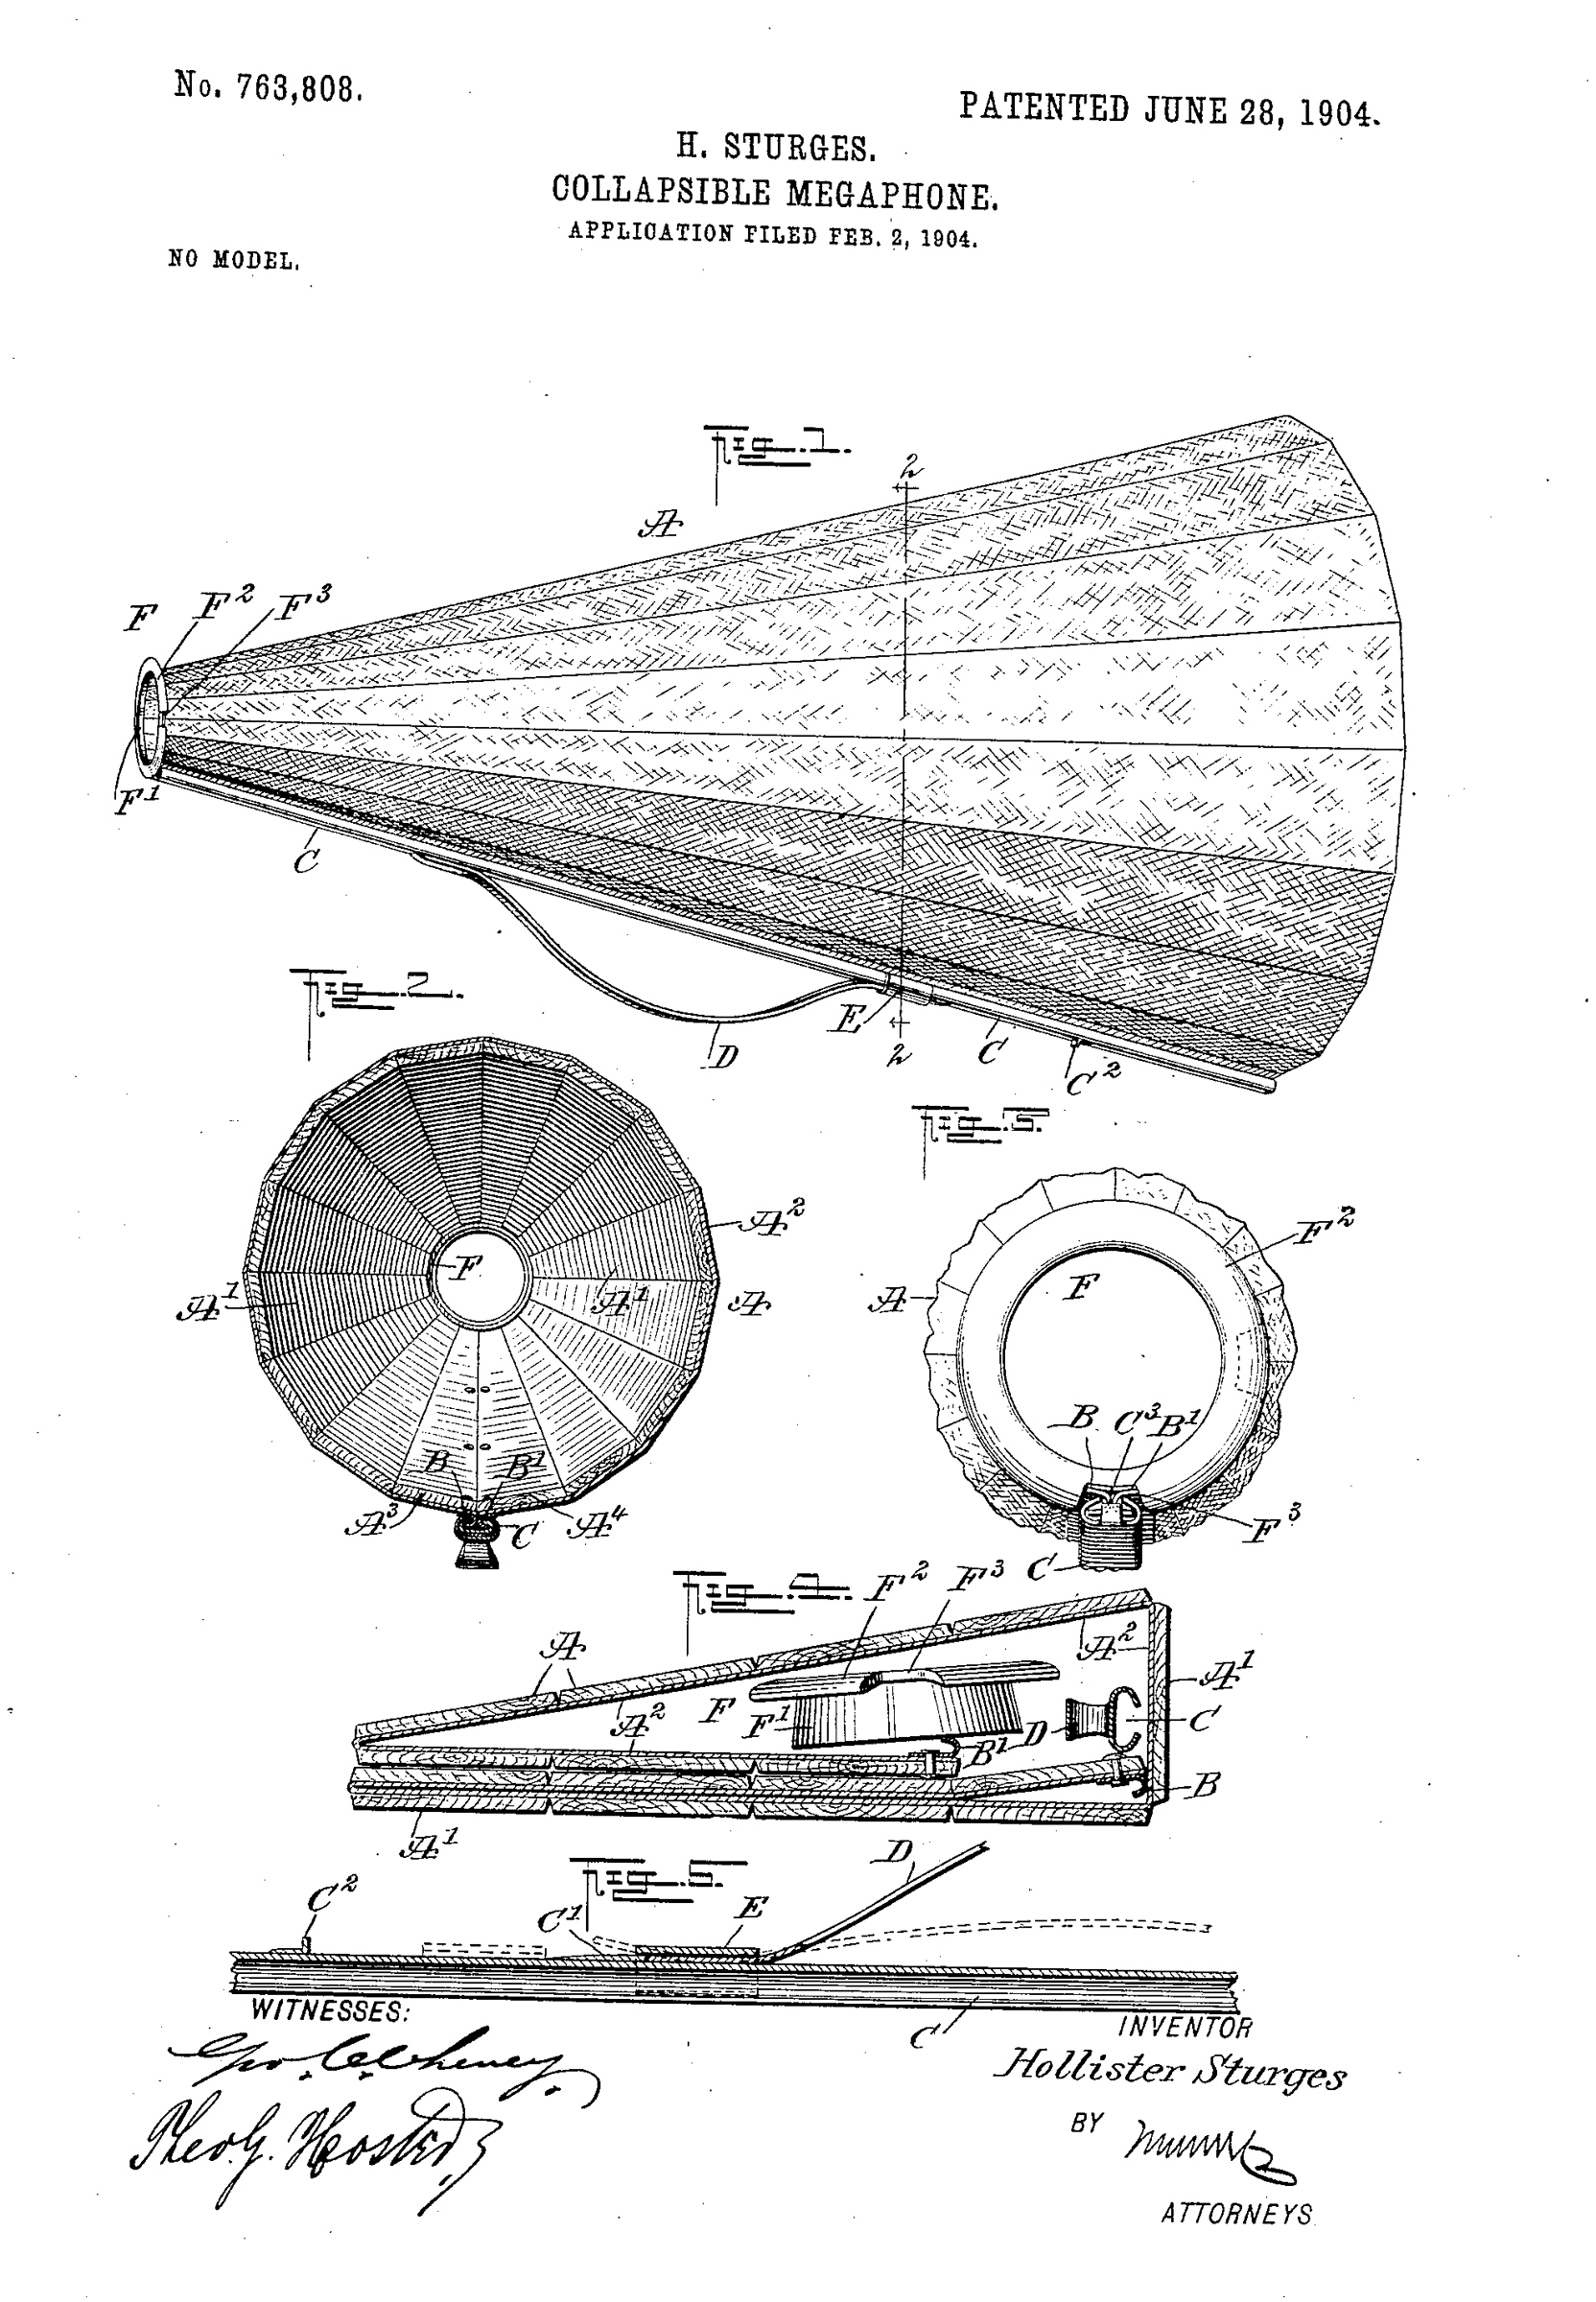
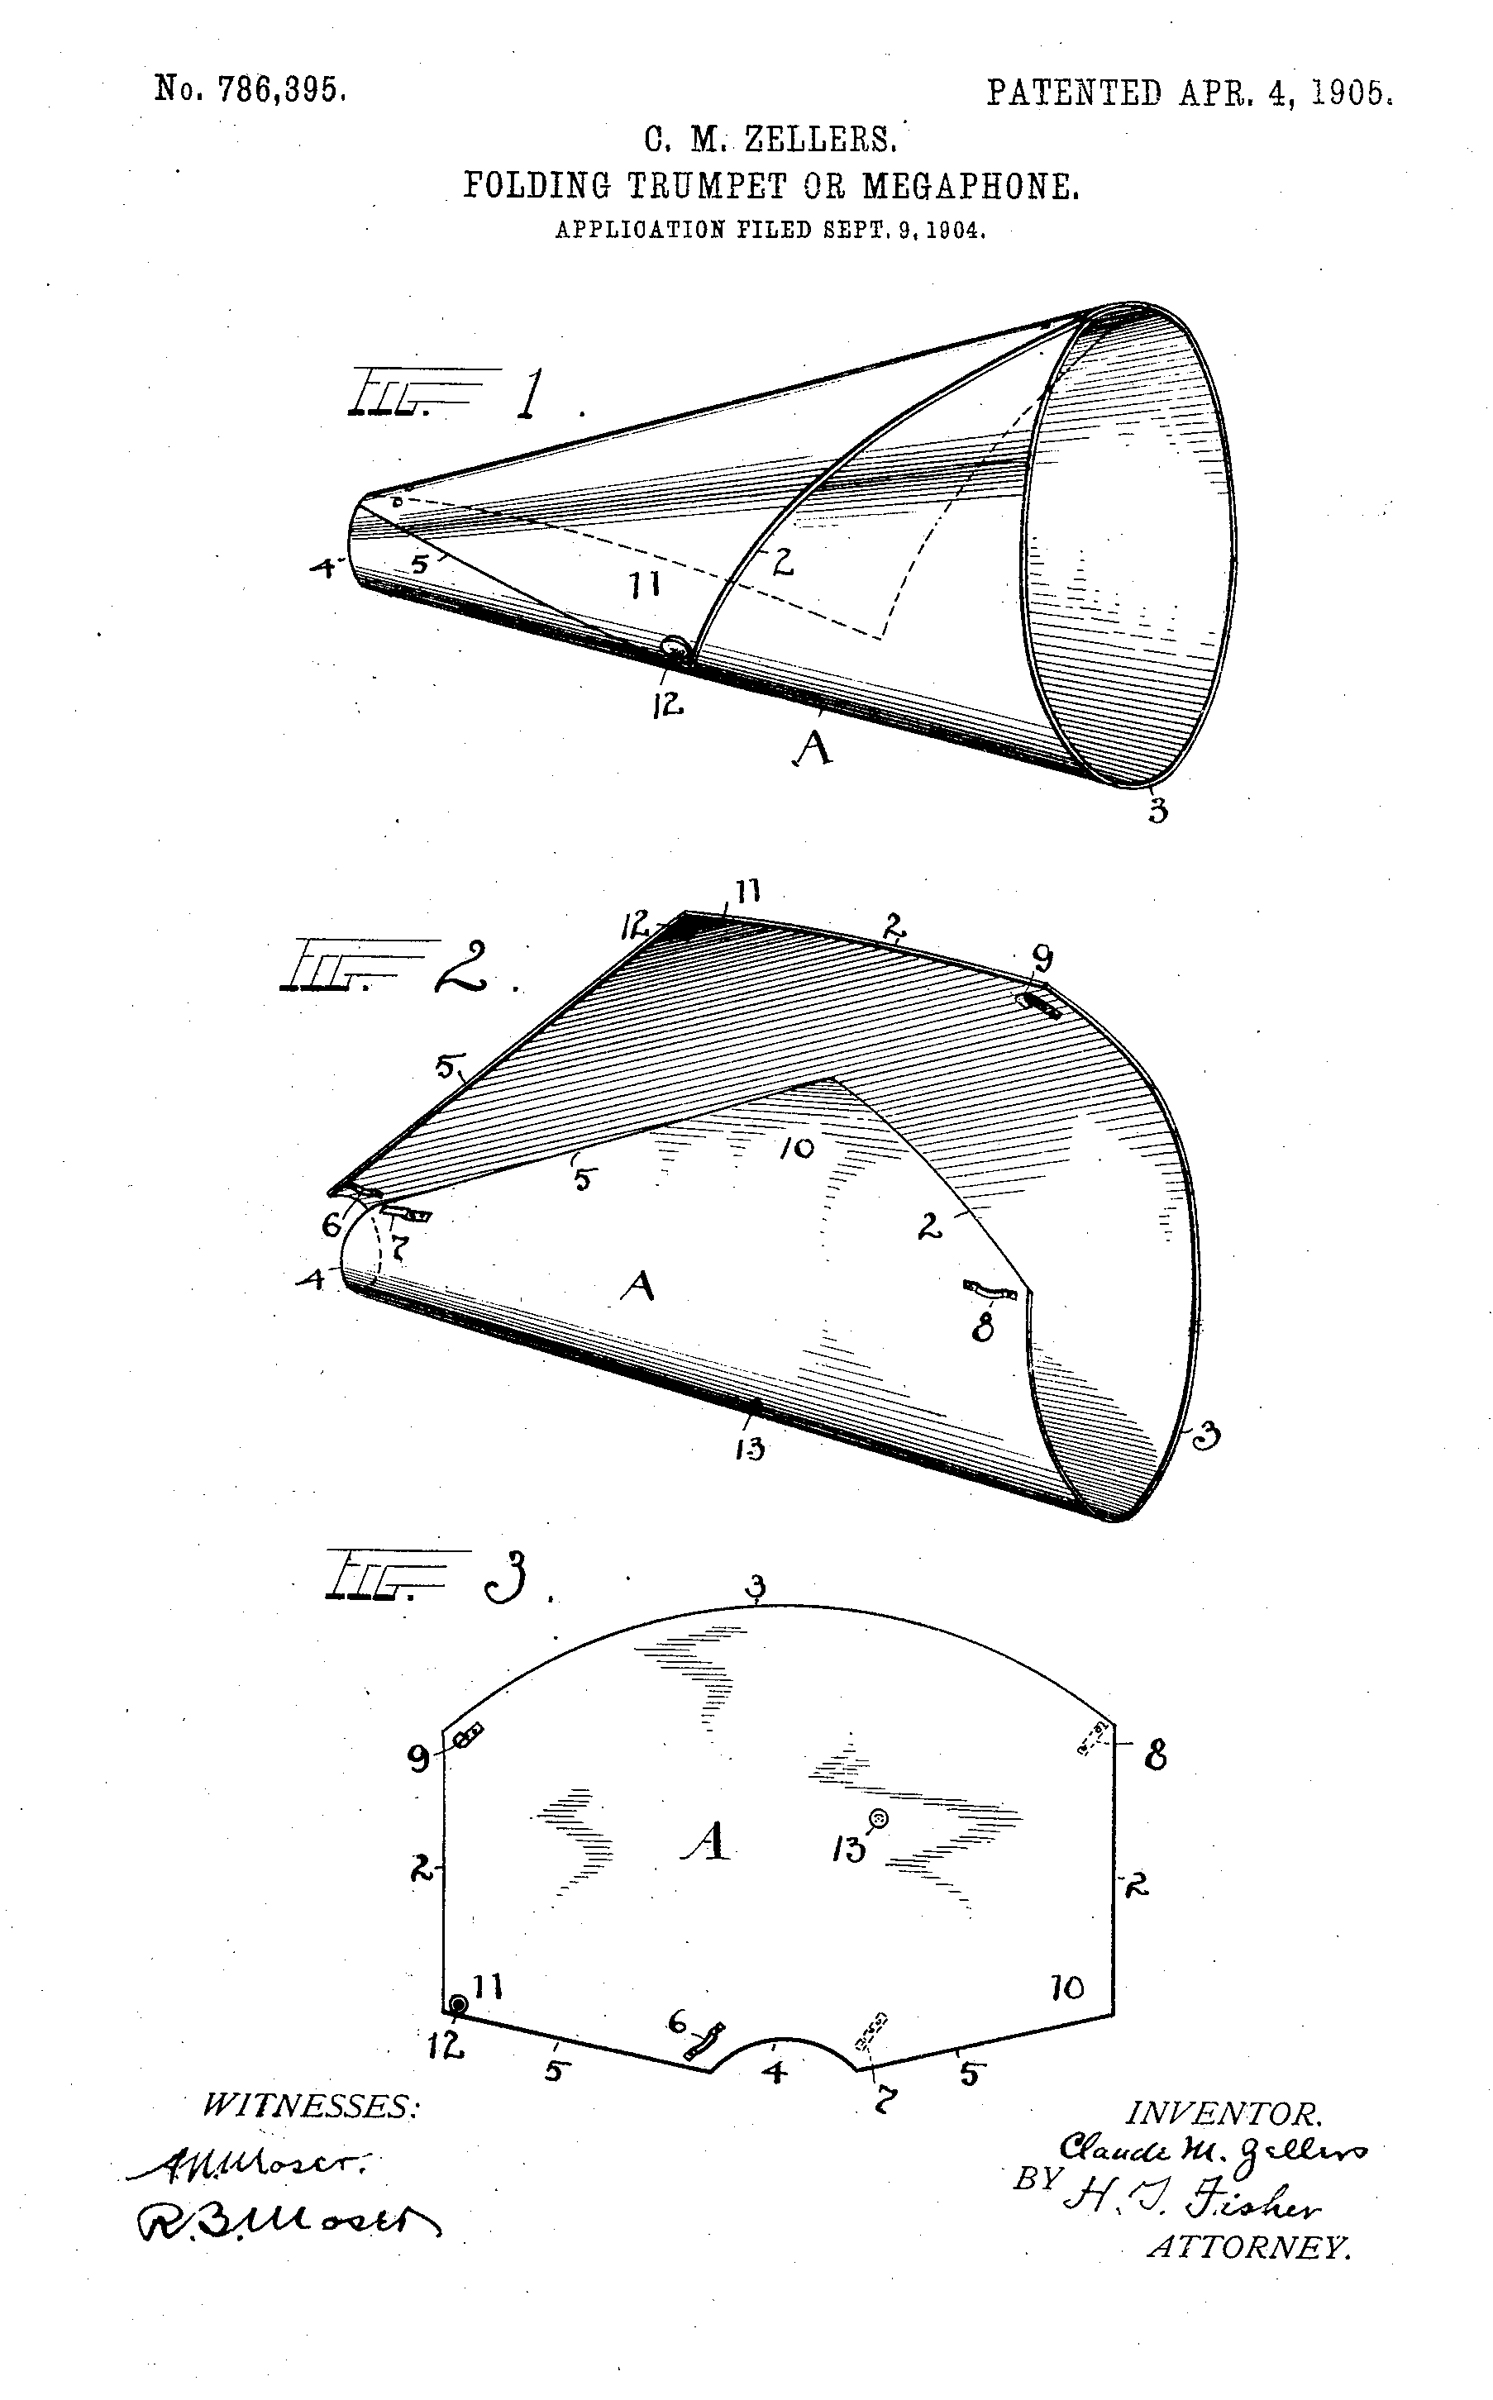 Zellers’ 1905 patent, the last of the four above was for “a foldable trumpet or megaphone consisting wholly of a sheet or blank of flexible material, like heavy paper or cardboard….” It could work for the leather megaphone John had in mind. I didn’t have any more scraps of leather large enough to make the Zellers megaphone, so I bought a $9 flexible plastic roll-up snow sled. It wasn’t as thick as I thought it would be, but rigid enough to hold a cone shape.
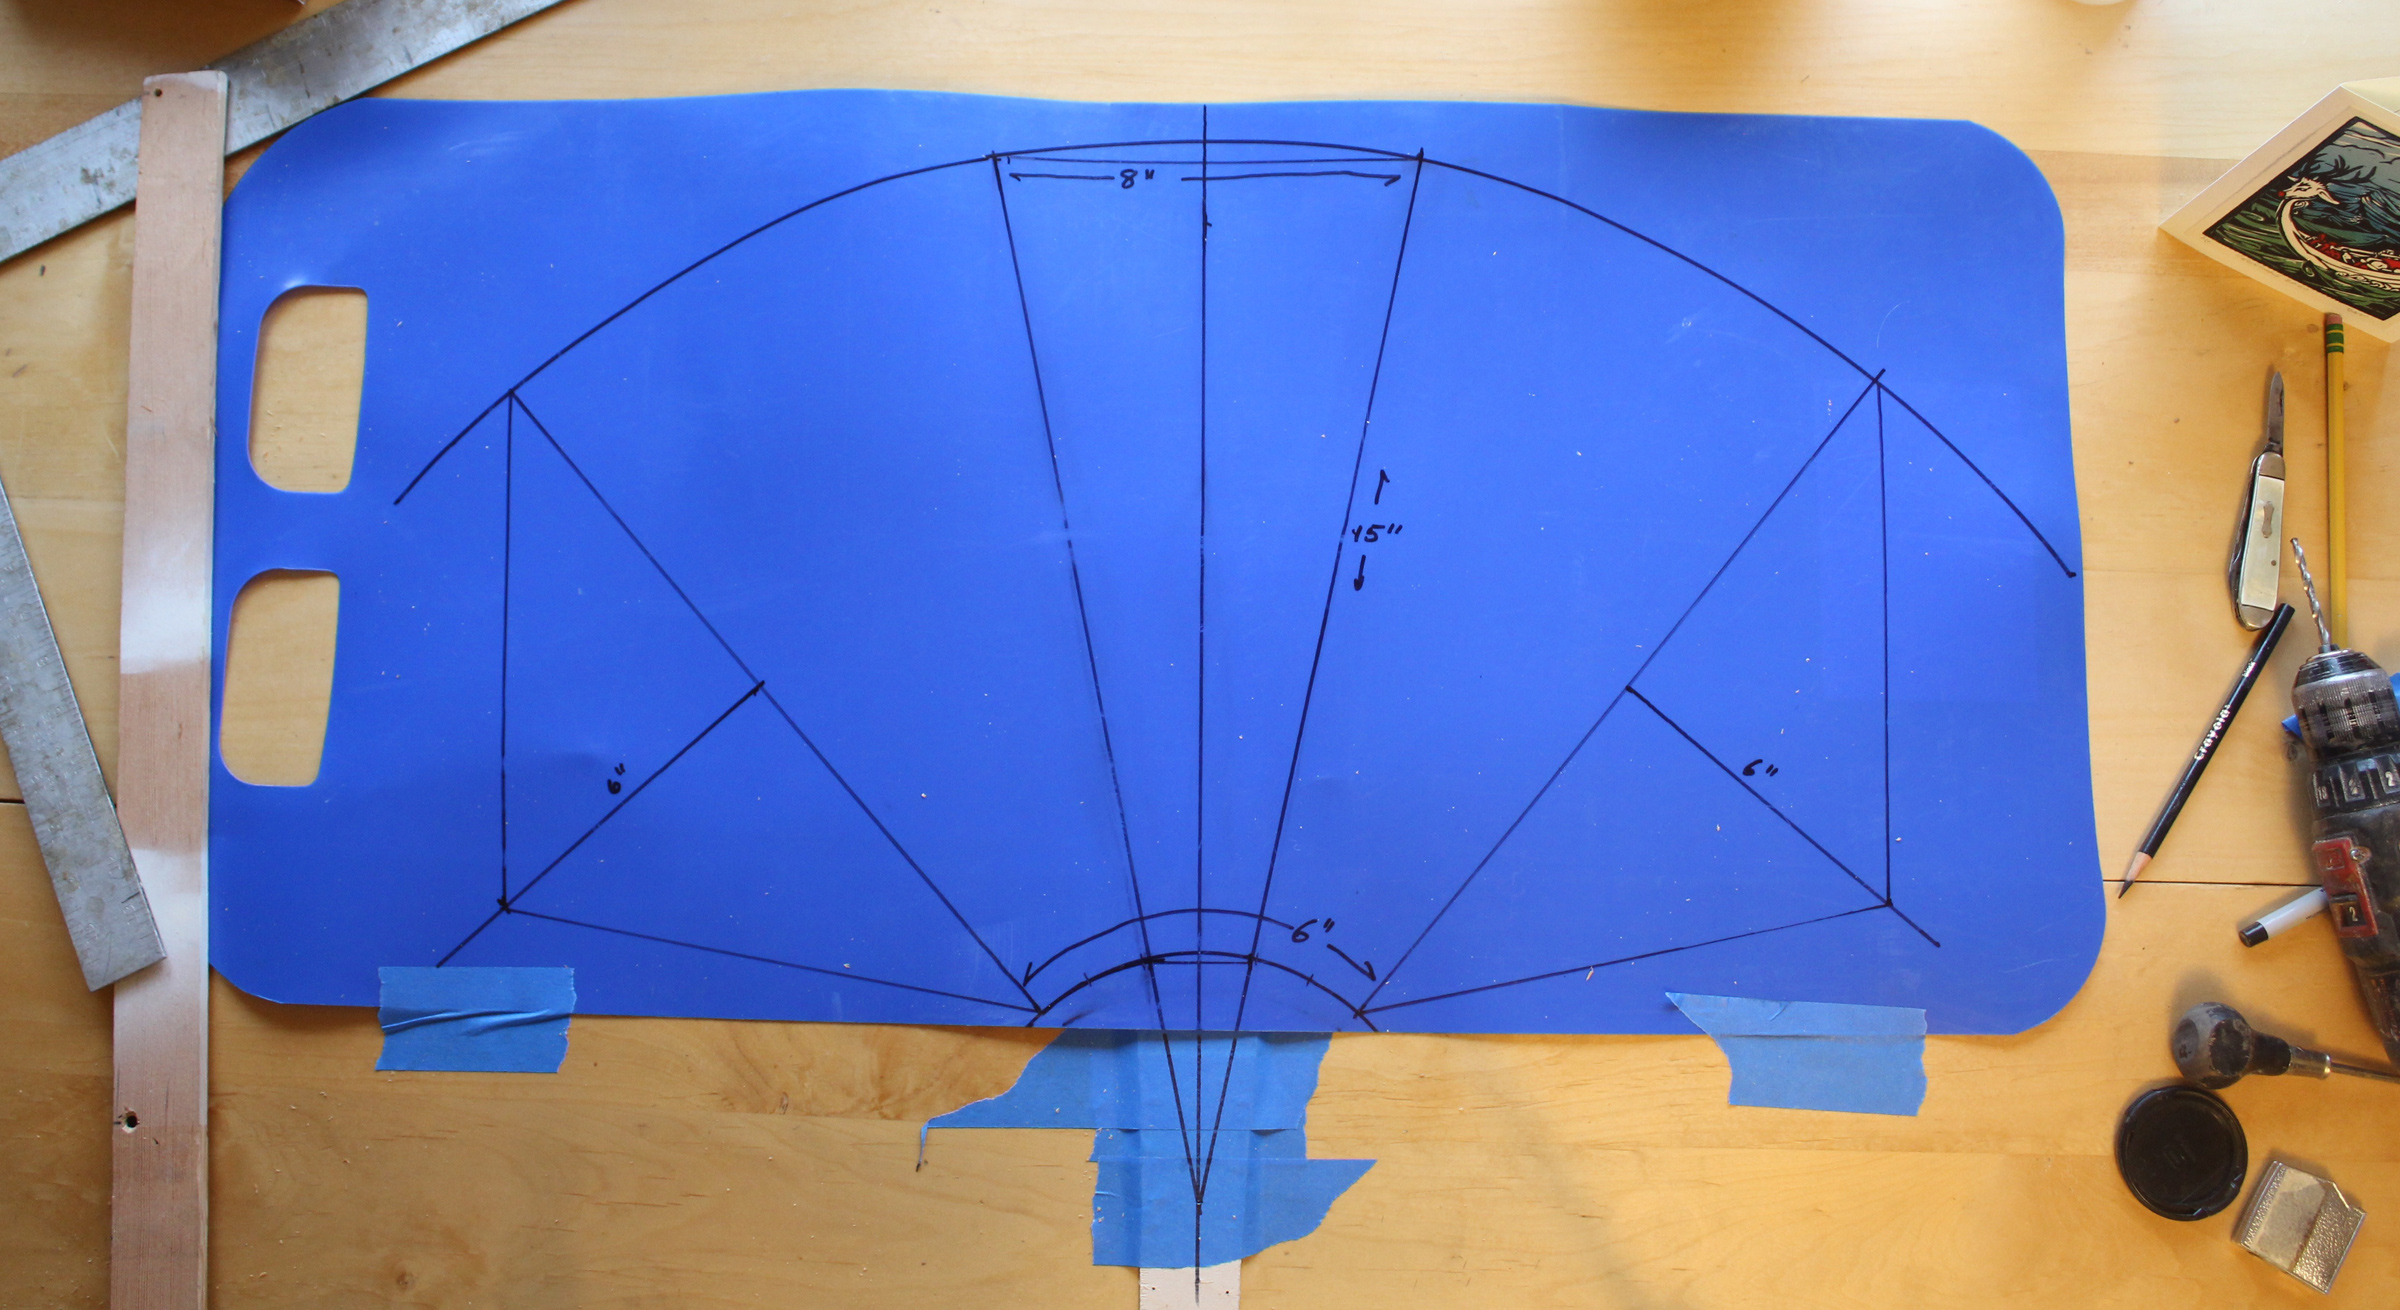
I drew the frustum pattern on the sled with a 1-3/4″mouthpiece (with 1/2″ overlap) and an 8″ diameter. The length of 15″ , fits within the 17″ width of the sled.
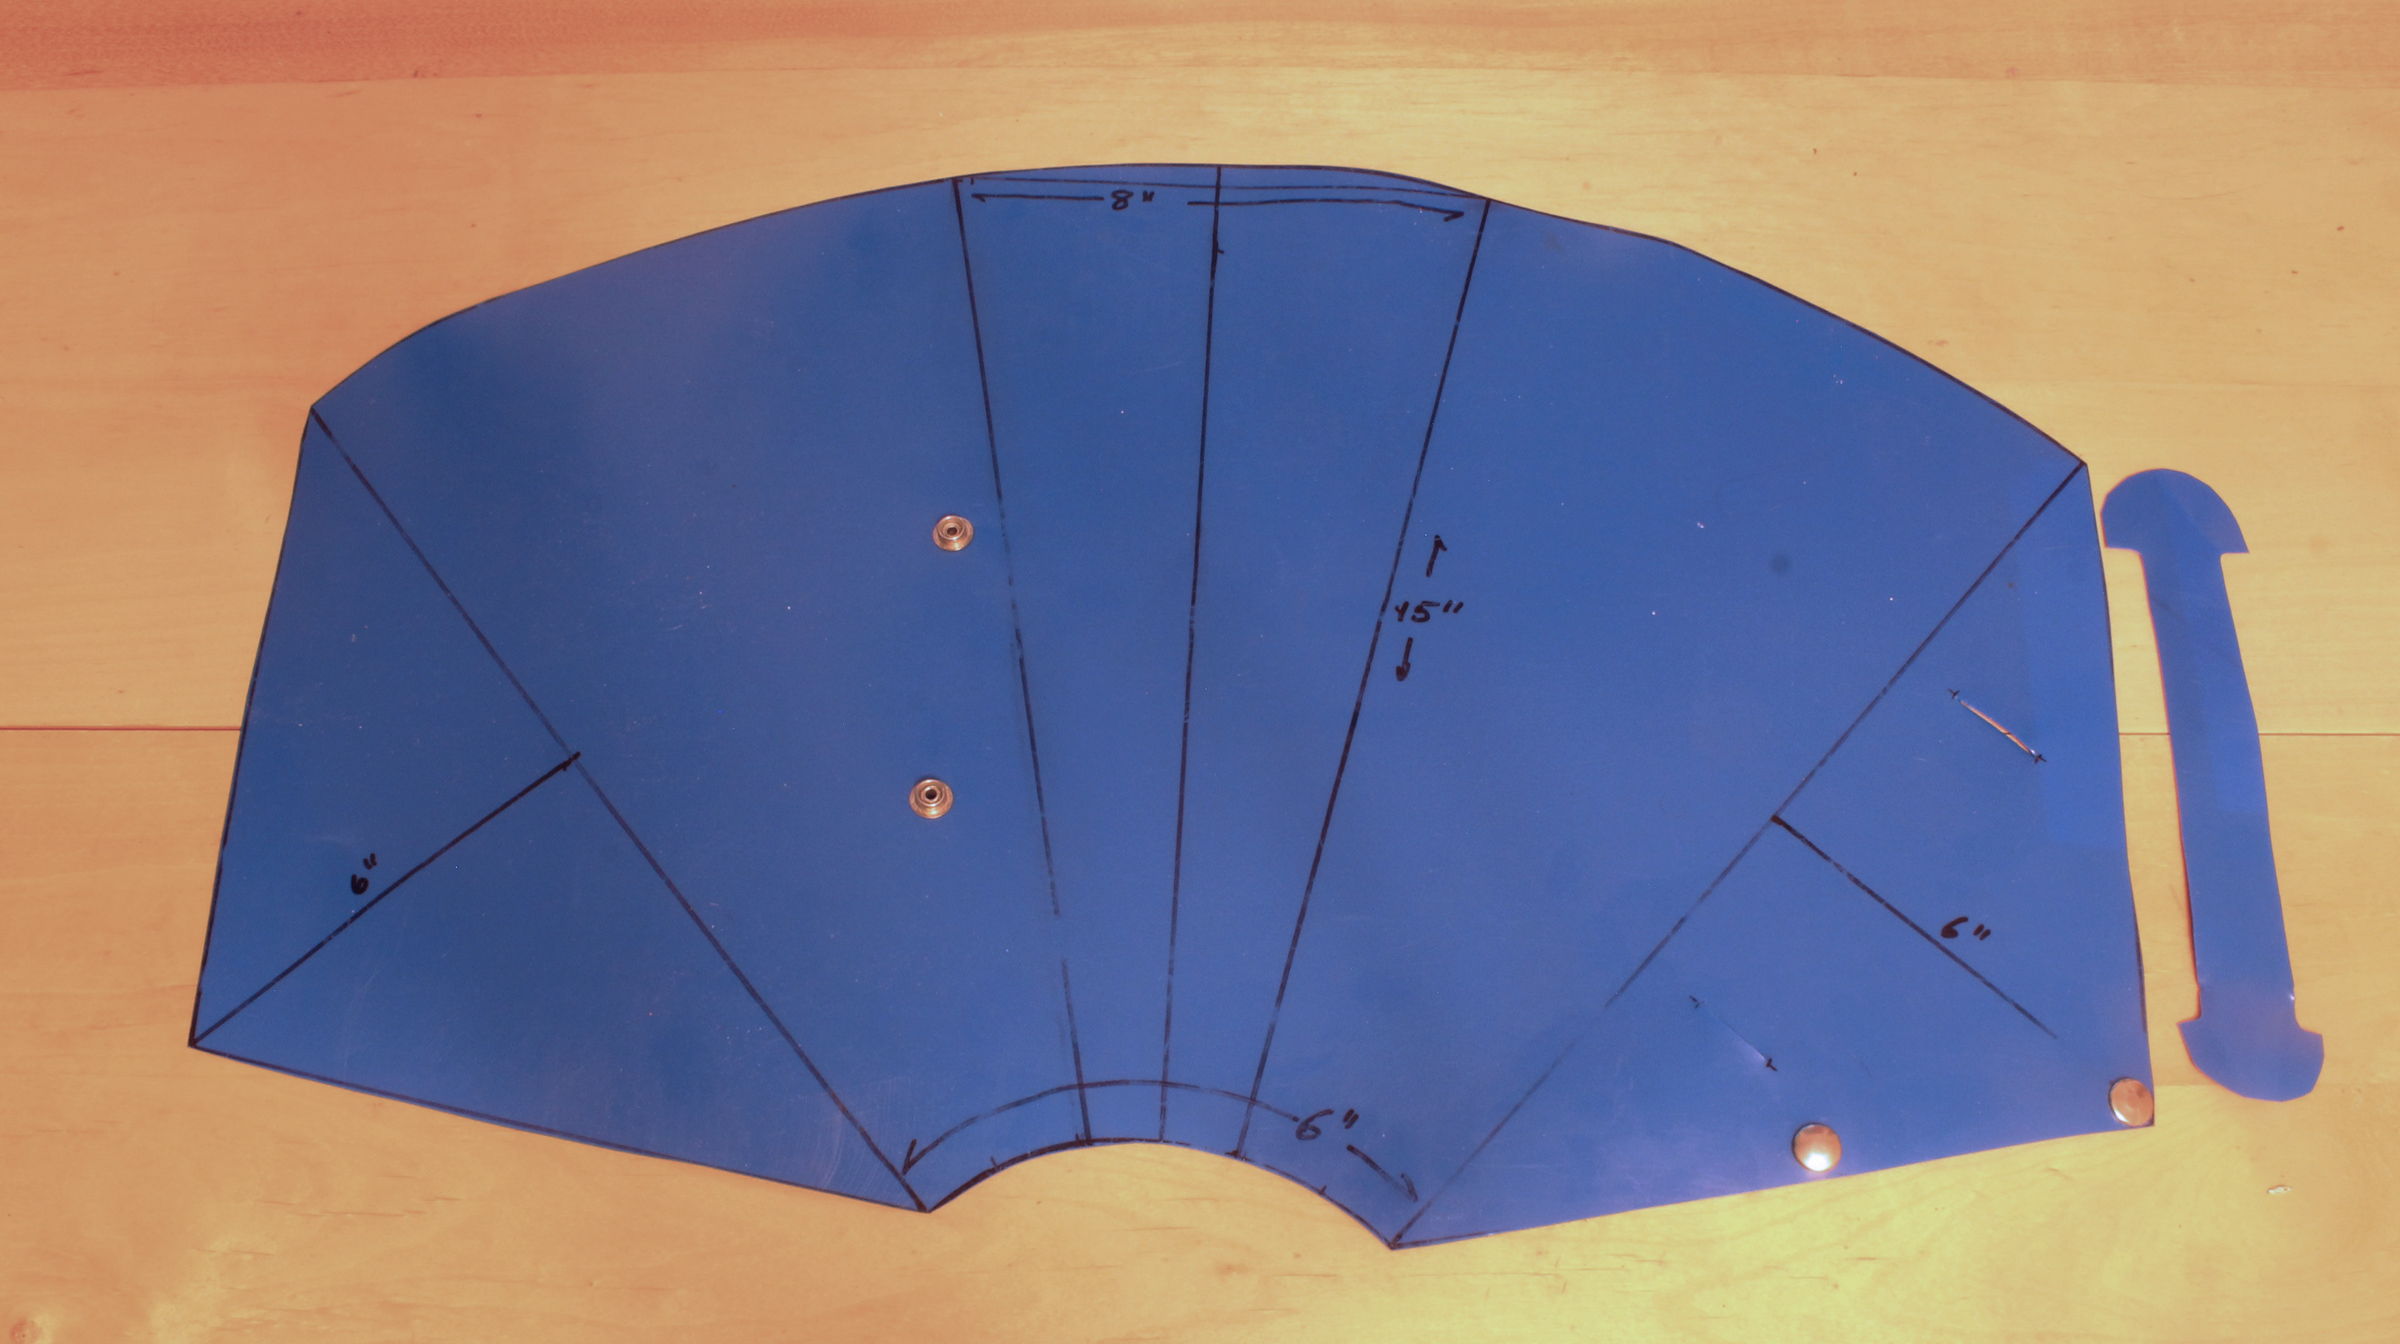
After the drawn shape is cut out, the snaps are located while the plastic is curved into the megaphone shape. The handle, at right, slips into two slits in the triangle on that side of the megaphone.

The Zellers-style megaphone rolls up to an easily stowed cylinder.
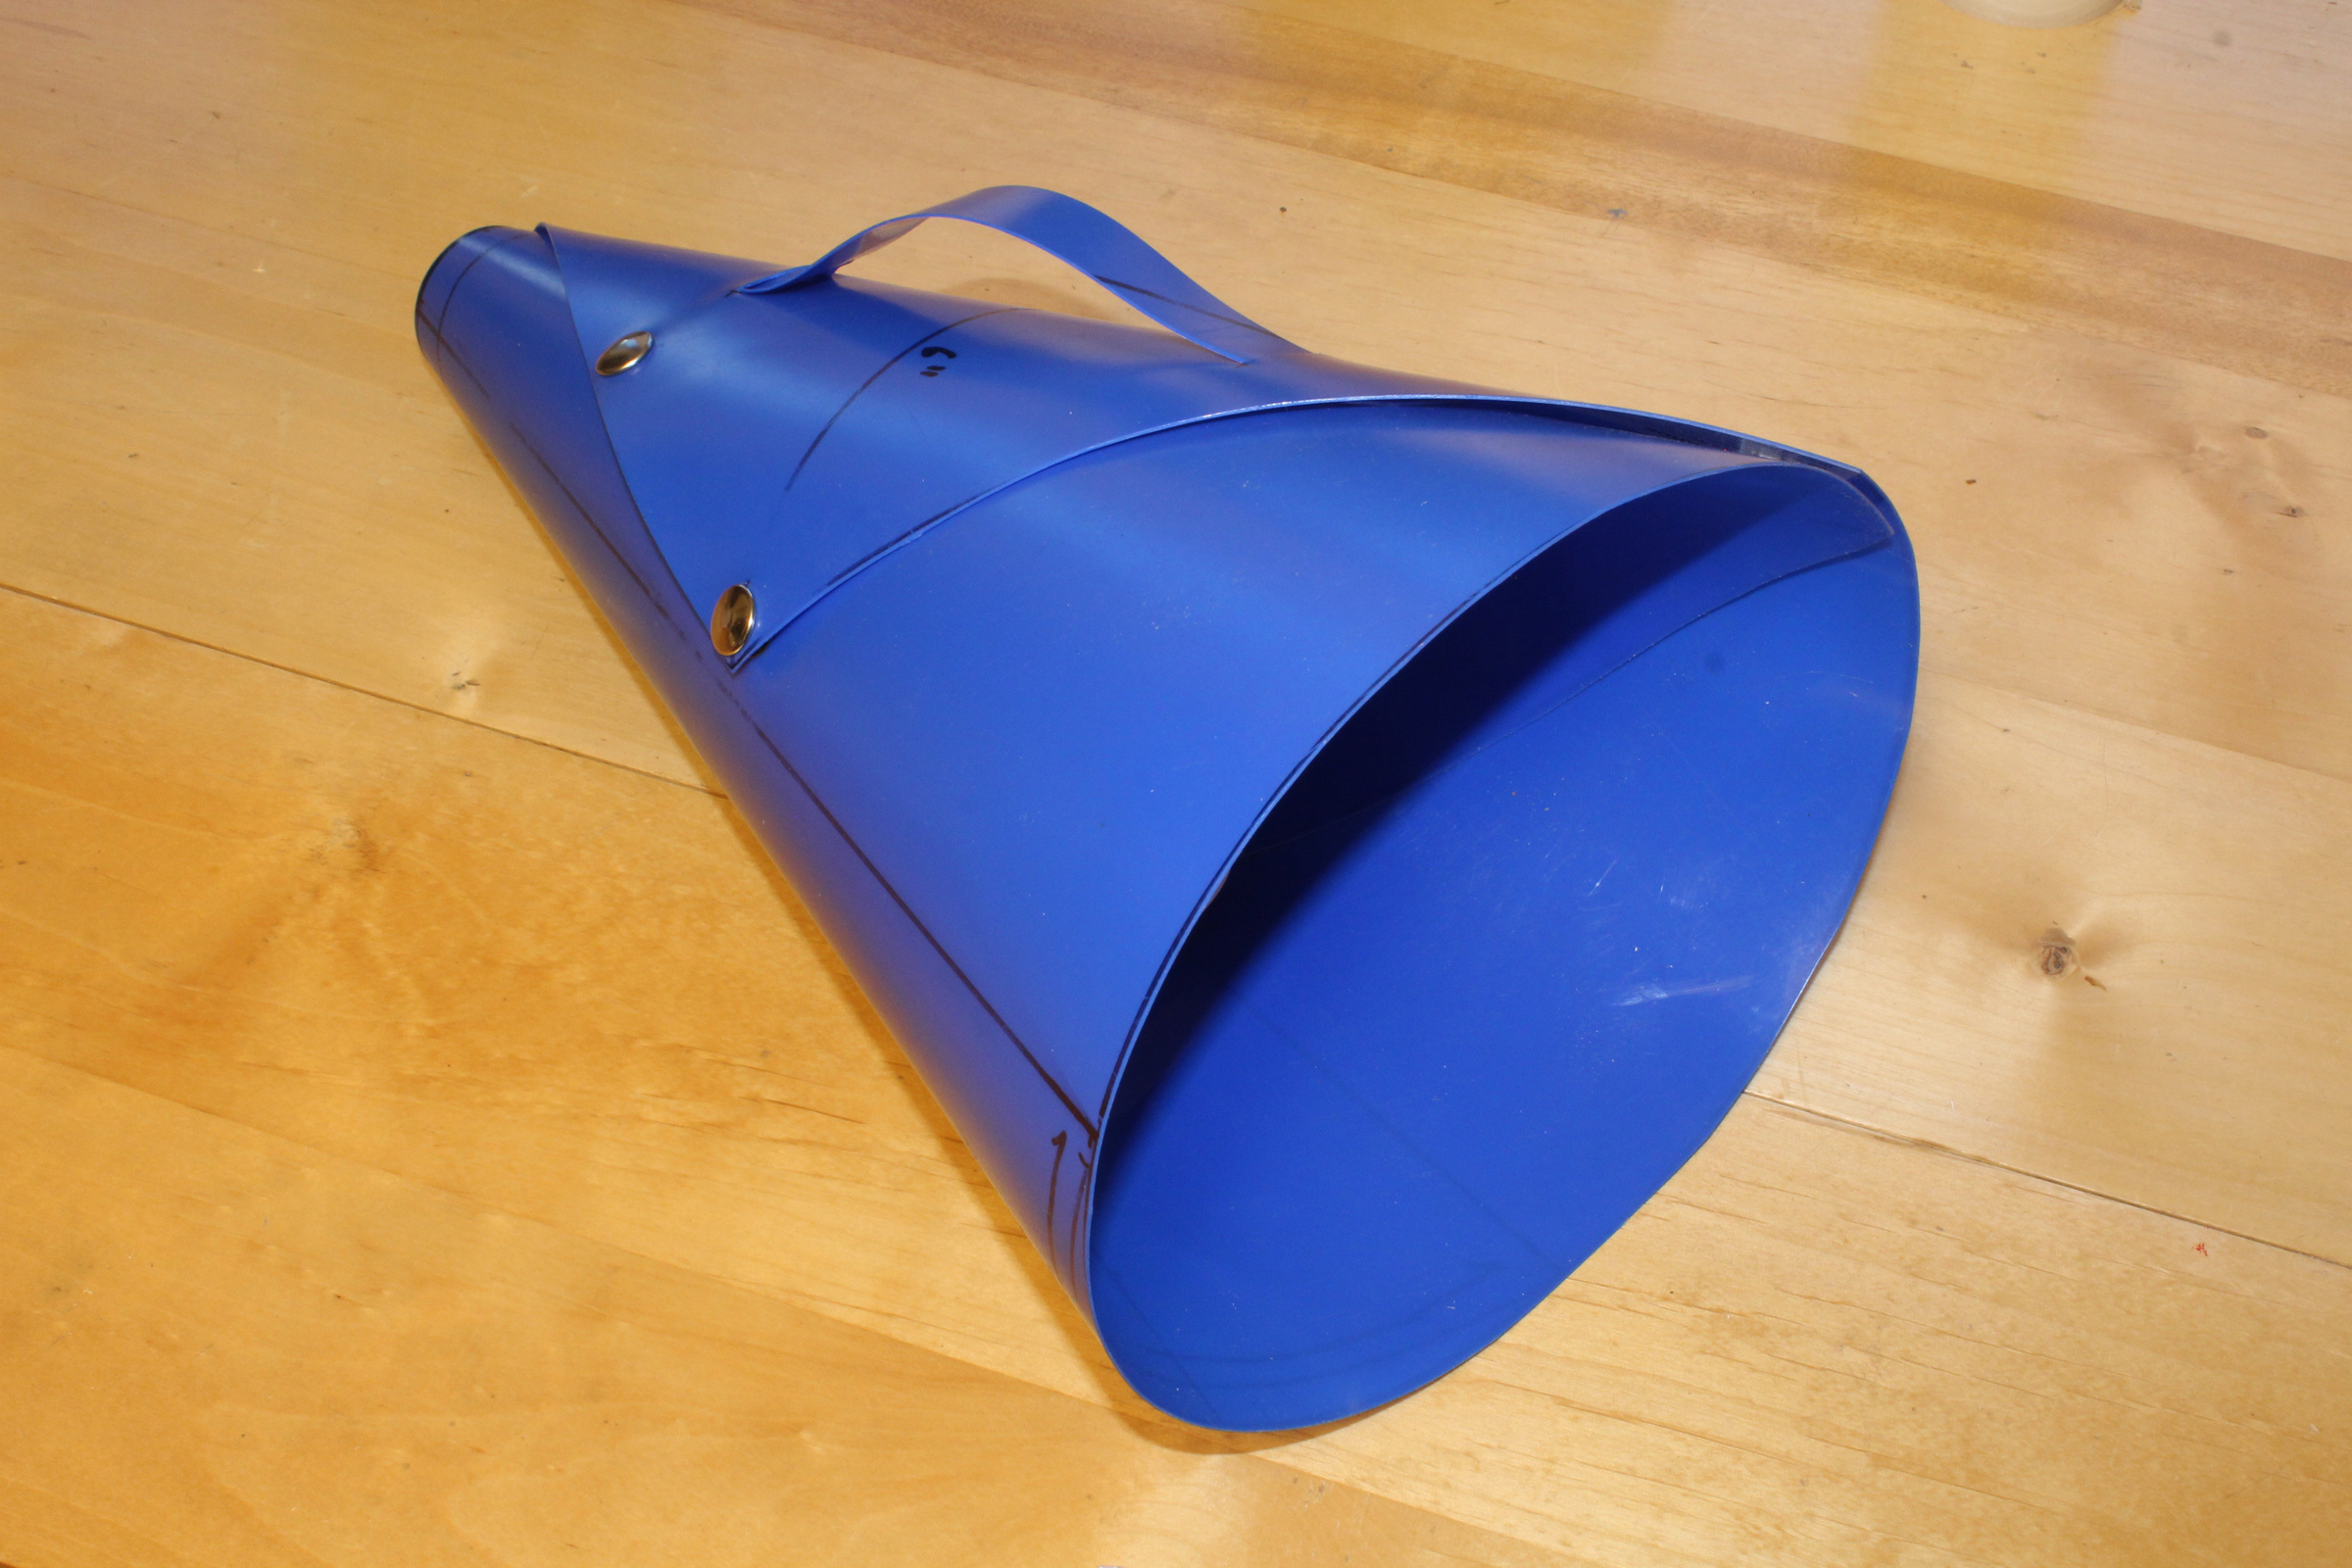
The handle makes it easier to grip the slippery plastic. The megaphone produces good voice volume when in use.
I came up with my own pattern for a square folding megaphone that could be stowed flat. I had in mind to make it with corrugated plastic (Coroplast) and the only piece I had was a neighborhood sign I’d put in my front yard to remind passing cars to go slow. I painted it gray.
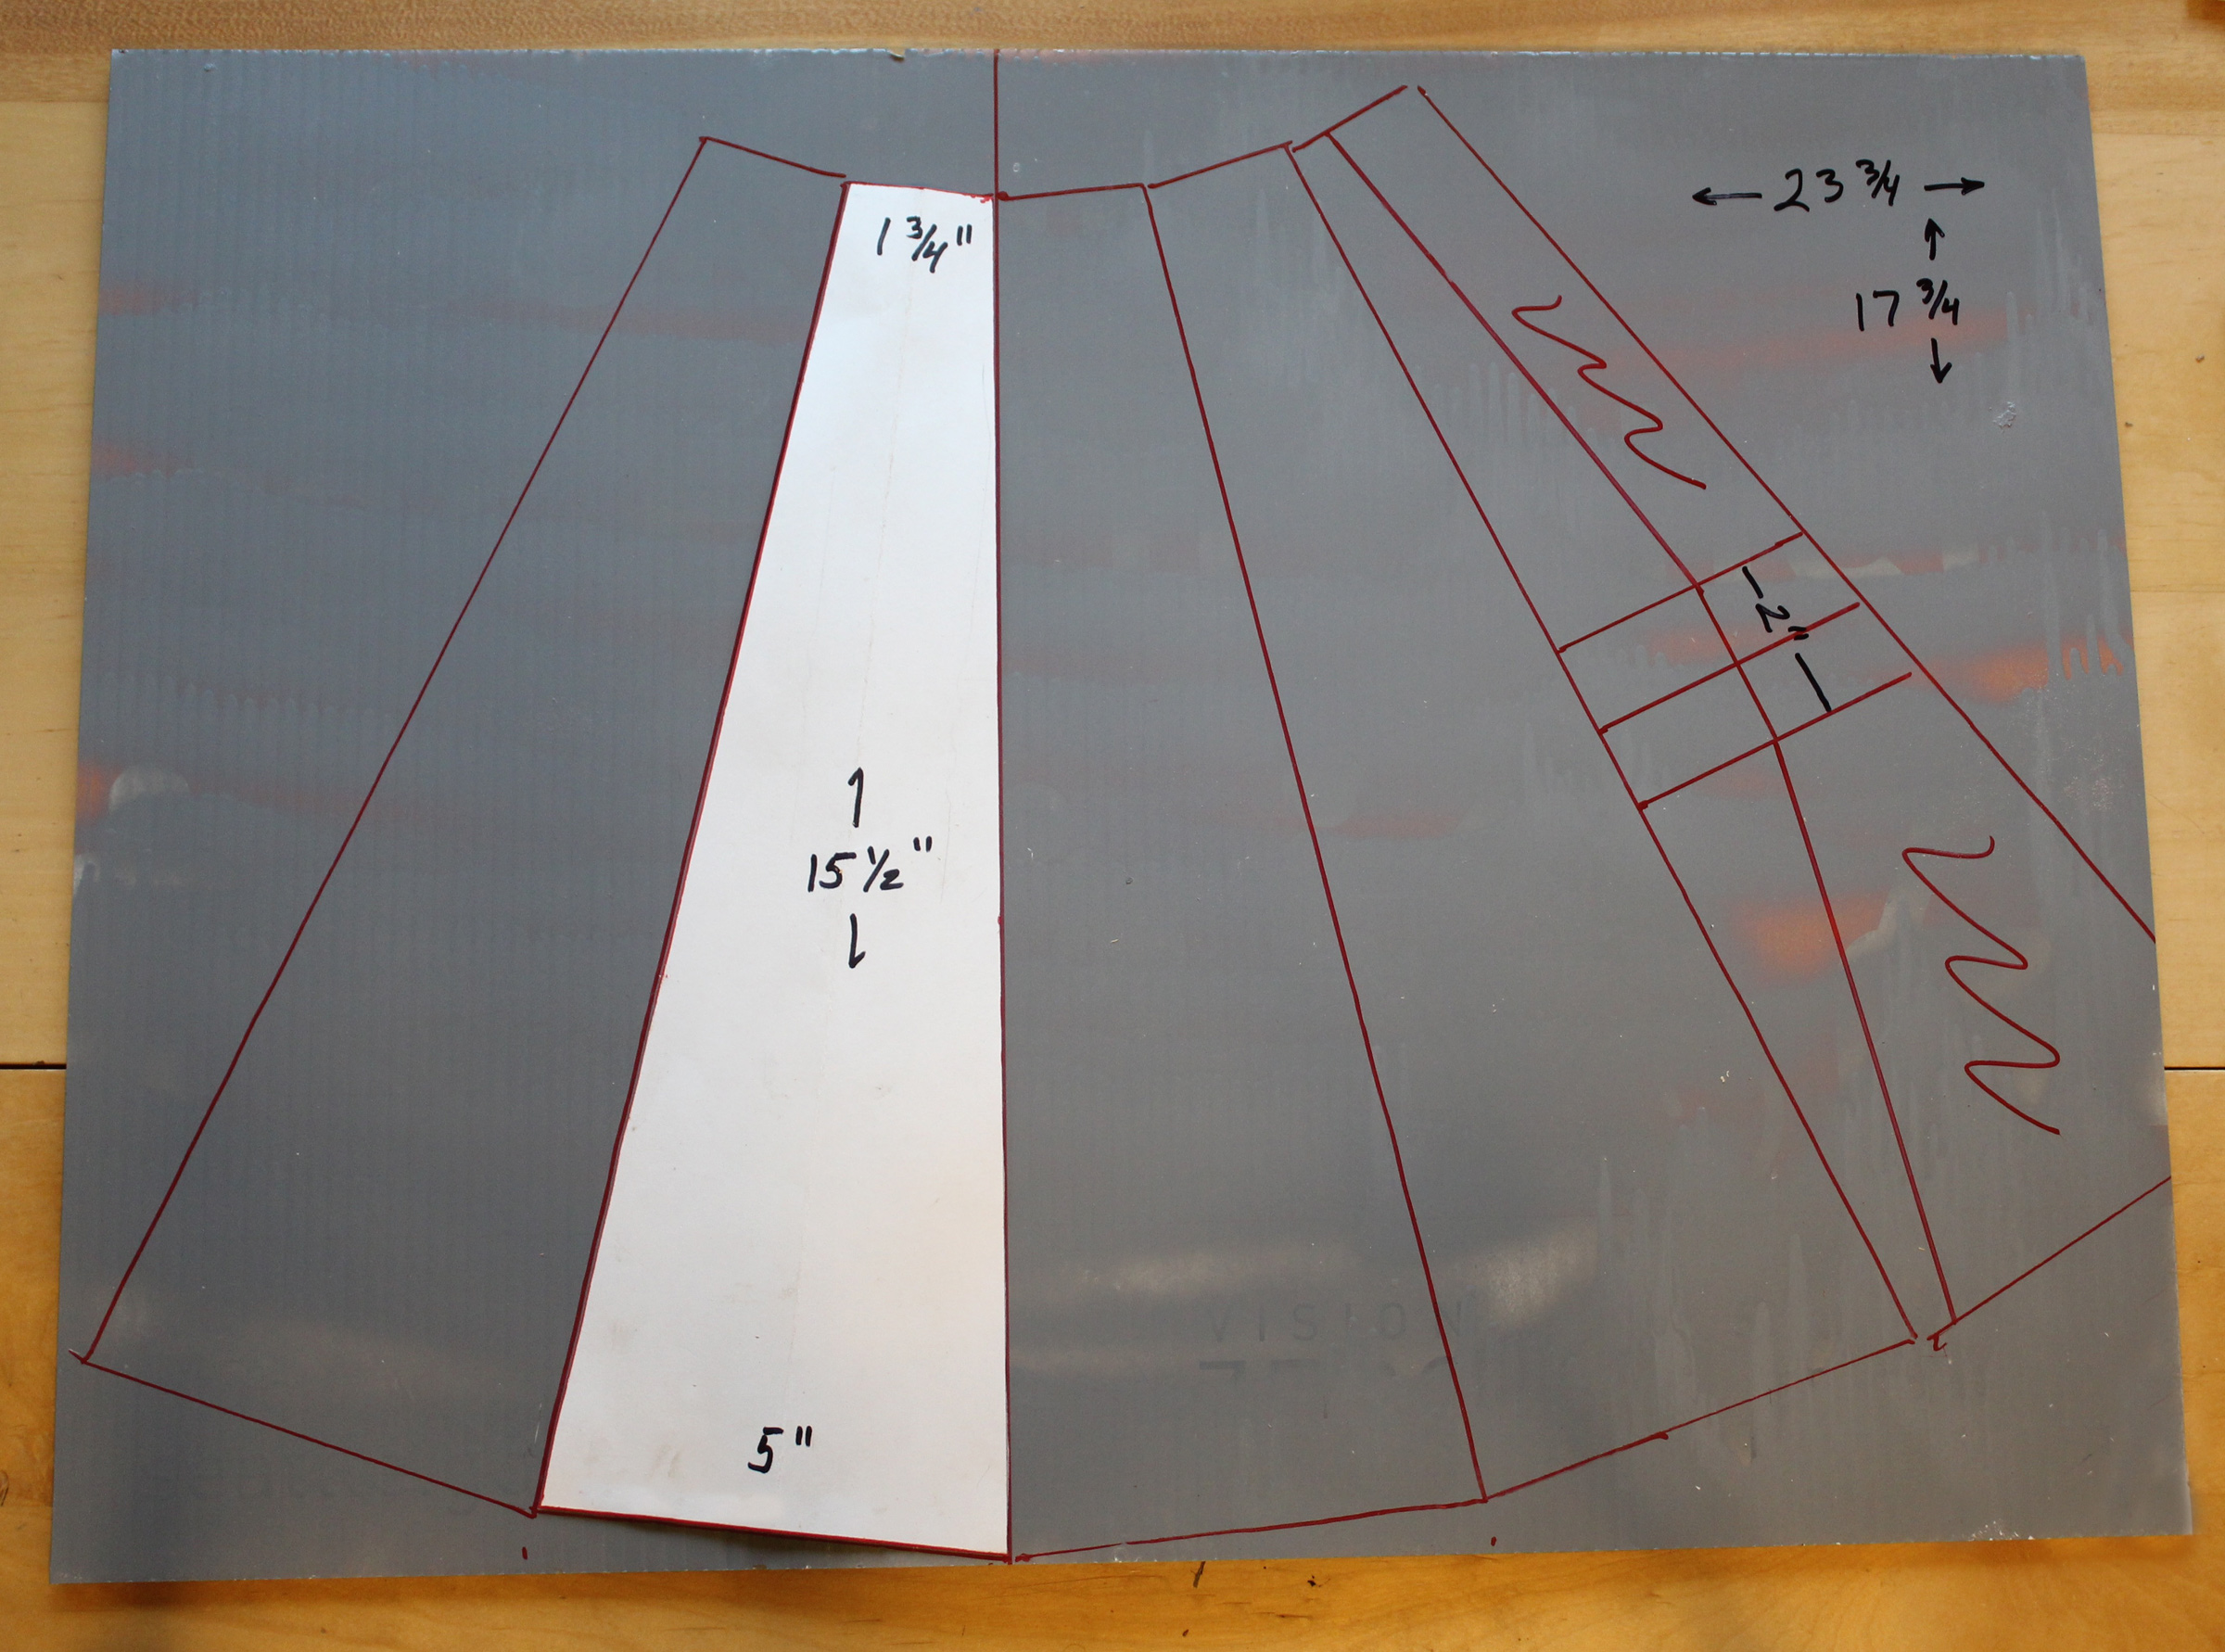
I made a stiff paper pattern and traced it five times on the twin-wall plastic panel. The fifth tracing was modified to create a tab to insert in a slot that I’d later cut in the first traced panel. I cut the shape out with a ruler and a sharp utility knife.

To make the folds, I clamped a ruler on the panel and creased the plastic along the fold lines with a pizza cutter. (The cutter doesn’t have an edge sharp enough to cut the plastic.) After rolling the crease, I folded the outside panel up to make the bend against the ruler.
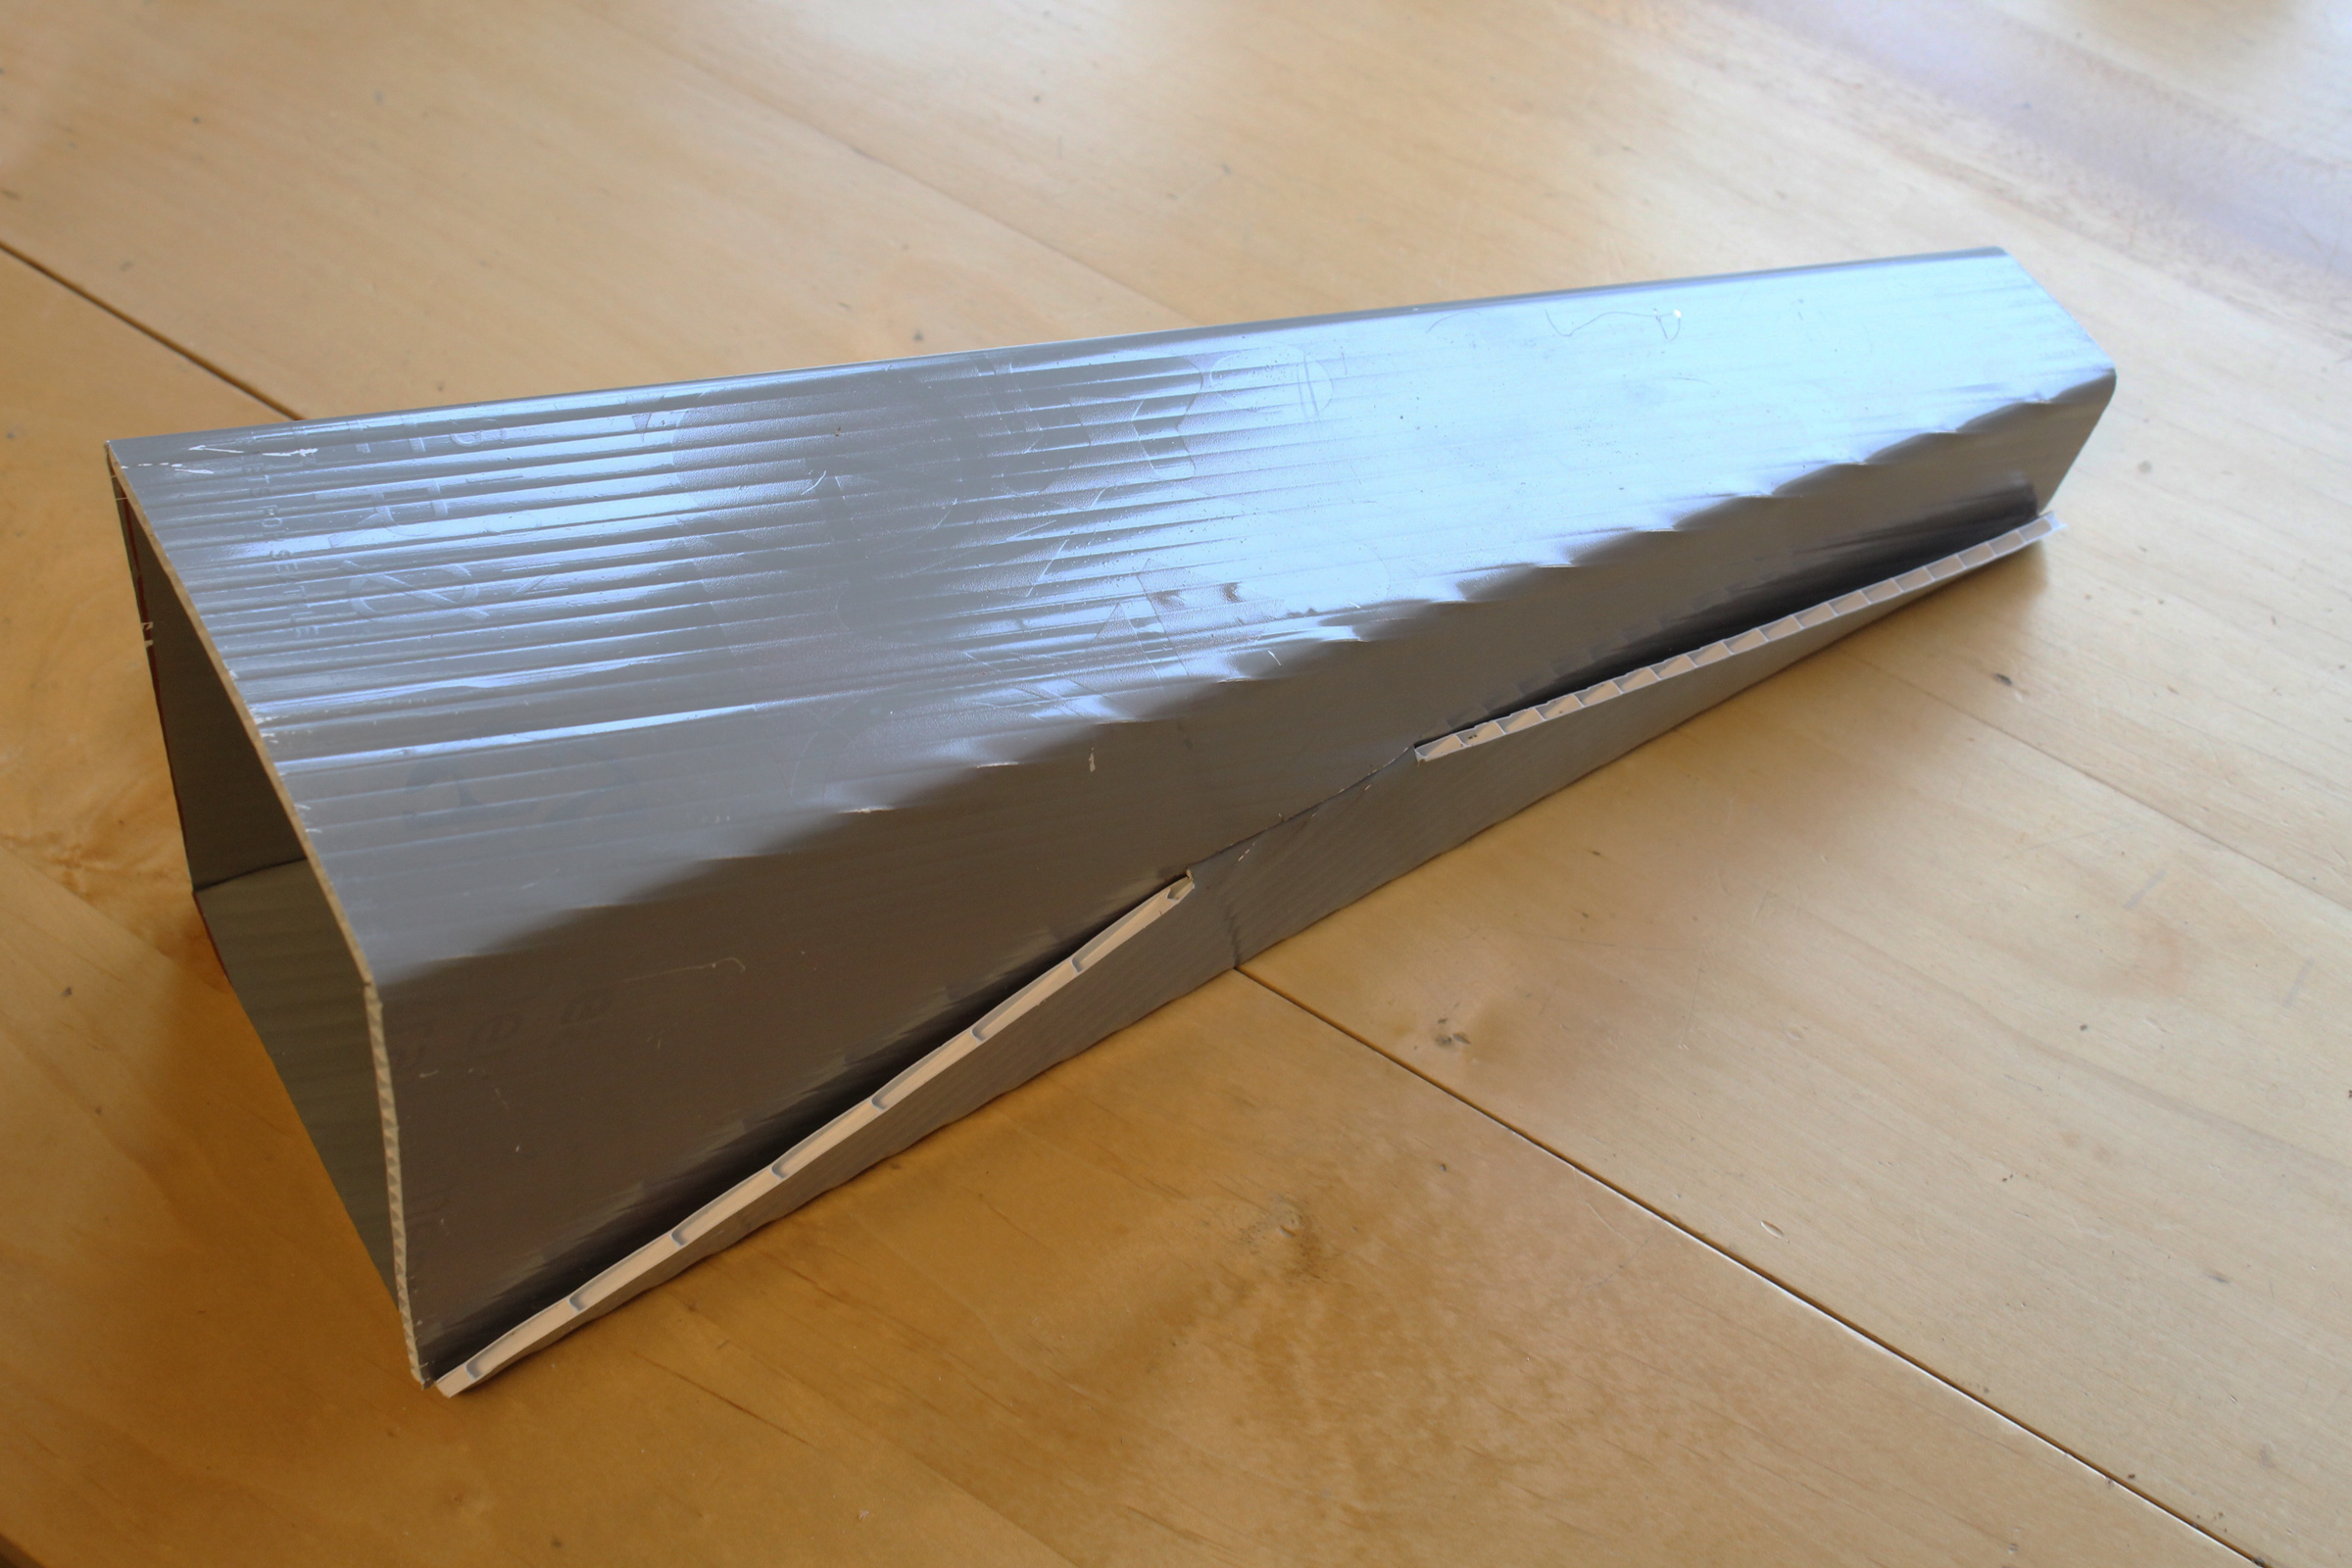
The tab, inserted into the slot cut for a tight fit, holds the folded megaphone together.
Christopher Cunningham is the editor of Small Boats Magazine.
You can share your tips and tricks of the trade with other Small Boats Magazine readers by sending us an email.


Your description of a leather megaphone fits the one that came with my 1927 cruiser exactly – stiff leather, with metal rings at each end, and, of course, a handle. What a unique article, and one I’ll use when I make a replacement for the megaphone!
I wonder if holding a megaphone up to one’s ear will aid hearing? An ear trumpet.
My friends and I often sail in close proximity and like to exchange both information and pleasantries. My lousy hearing usually precludes my full enjoyment but maybe with some low-tech mechanical help….?
Megaphones do indeed work as hearing trumpets. My largest megaphone can pick up footfalls on concrete at 50 yards. Outdoors there’s a lot of white noise that you’ll hear, like putting a seashell up to your ear. Megaphones in the sizes I’ve made are best at picking up higher frequencies, which, I’ve read, means consonants are more clearly heard. That improves comprehension. But you have to turn your head to use a megaphone for hearing so it’s hard to aim it. I taped a plastic 90-degree plumbing fitting on my largest megaphone so I can face whatever it is I want to hear, and that has proved effective for listening.
Inventor Thomas Edison created a device with a megaphone flanked by two similarly sized ear trumpets so the user could speak and hear facing the target. It was effective but it wasn’t portable. I ran across a patent for a more practical device that was invented by a C. Cunningham in 1945. It had a swiveling earpiece attached to the side of a megaphone. I can’t take credit for the invention. It was before my time and my name isn’t Cecil.
I shared this link with my Large Format Photography Forum friends as they love archaic DIY and your shapes resemble camera bellows.
A great project!
Thank you!
Thanks for another interesting article.
A megaphone could be handy, but they are quite bulky. Do you think it would be possible to make the leather version with the join fastened with press studs or a zipper so it could be stored flat or rolled more tightly to take up less space?
A folding megaphone is a good idea, John. See the Addendum I’ve added to the end of the article.
You work quickly! Two new megaphone versions researched, constructed, photographed, and uploaded in 24 hours!
The blue Zellers style one looks like a very practical option. It may not be as stylish as the staved plywood design, but it looks like one of the simplest to make and will be much easier to store. As you mention, it looks like it could work in leather if you wanted an upmarket version.
Another design that may work would be a telescoping megaphone. Somewhat like way collapsible cups are made.
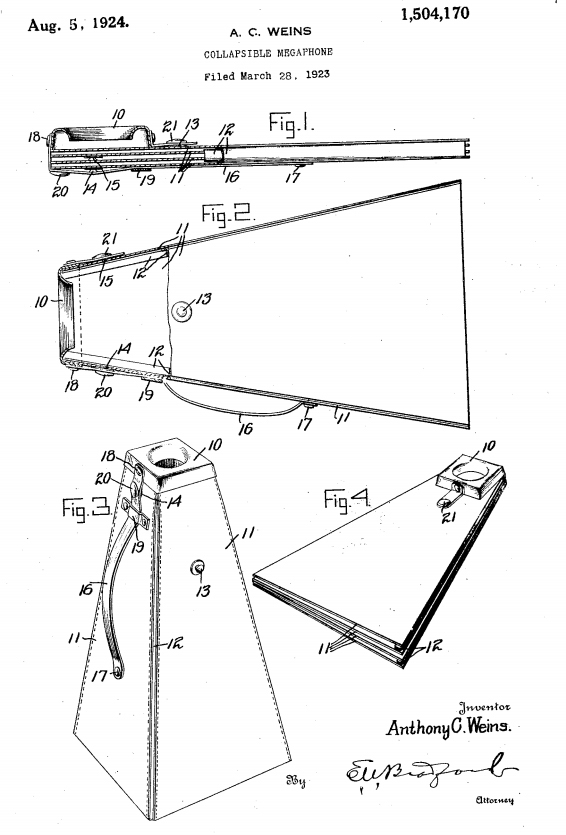
A good idea, and patented in 1924.
I tried my hand at making a megaphone, following your examples. This one is leather, 10″ by 4″, largest I could make with the leather scrap I had. I got the leather from some chairs my neighbor was throwing away, it’s about 1/8” thick. There is a strip of yellow cedar inside that the screws attach to.
I was drawing out the pattern and had my wife Pat help me scribe an arc. When I had the pattern cut out, I showed it to her. She said, “Is that what you were working on? Why don’t you just roll up a piece of paper?”
I thought it turned out pretty well for using what I had on hand.
That’s a good-looking megaphone and a great reuse of a leather chair. Rolling a piece of stiff paper to make a pattern is a great idea.
When I saw this collection of megaphones, I instantly thought they could mostly each do double duty as an underwater scope! I’m not certain whether they need a waterproof clear “lens” at the big end or perhaps they would work just as is, I’d love to hear if a yone tries it!
A clear window is required. Without it, the surface of the water inside the megaphone would move around, distorting the view. The seal around the face needs to block out the light to avoid reflections off the window’s inside surface.
You can see my bathyscope here.