In the early 1980s, I bought Phil Bolger’s plans for the 15′ 6″ LOA Gloucester Light Dory. I was living in an apartment at the time, and I was intending this boat to be my first built to an “official” design. I had built furniture in my living room, and in those single-man days my dining room table was a large Black & Decker Workmate with a cover thrown over it when domesticity required, which wasn’t very often. Of the triumvirate of components for boat construction, though—place, time, money—one always came up short.
While I bought tools and plans, sailboat racing and kayaking satisfied my waterlust. Eventually, projects other than the dory came along, most recently my own 18′ Interminable Project Boat. It’s senseless to live anyplace without a boat, and Maine is like other places, only more so. I could wait no longer. I went back to my plans bank to find something simple, something I could use while the other boat awaited my attention.
A Swampscott dory was a contender, but that sail would add cost and time. The dog ate the Kingston Lobsterboat plans, sparing me those lovely time-consuming curves. There were others, too, but in the Gloucester Light Dory I found what I was looking for. The boat has no rig, no outboard, no systems, no complexity. It’s a pure rowing machine. Besides, I already had the plans, so I was ahead $25.
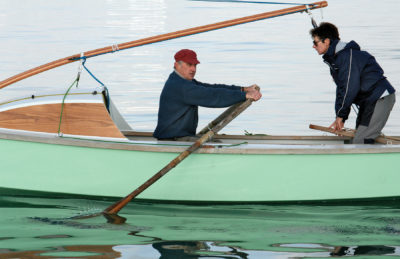
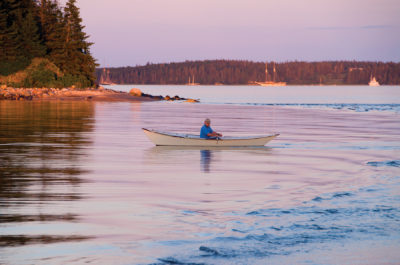
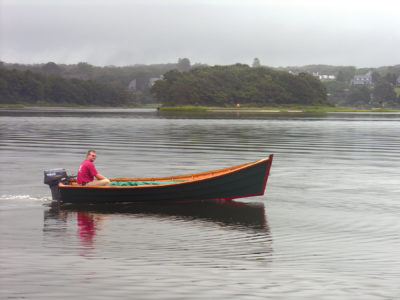
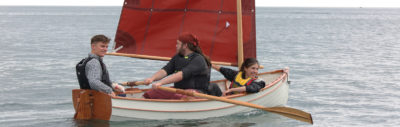
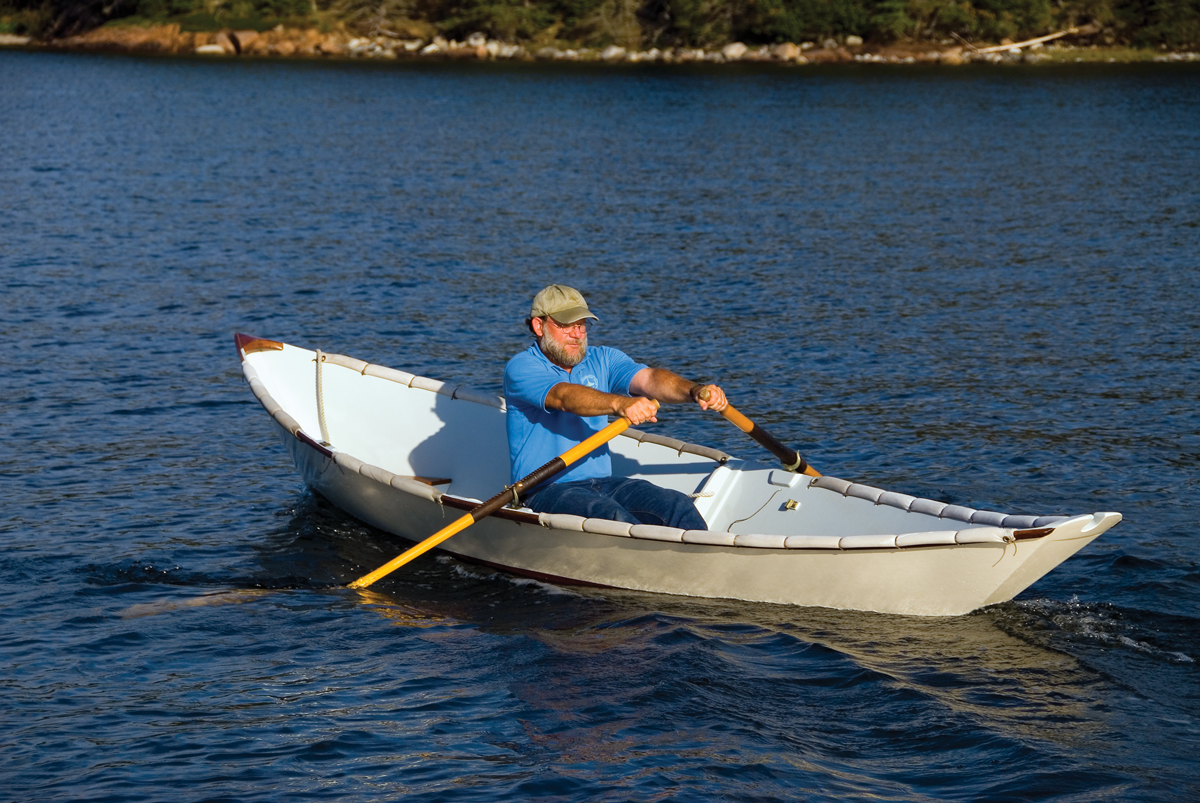 Photo by Benjamin Mendlowitz
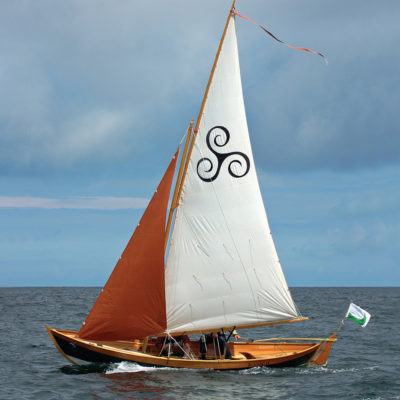
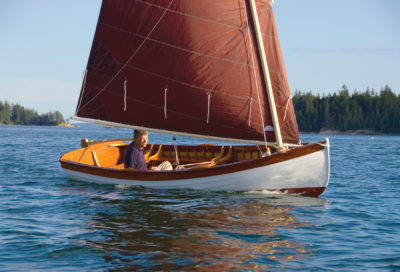
Phil Bolger’s Gloucester Light Dory design is at its very best for solo rowing, although it will also carry a surprising quantity of gear.
The things that first attracted me about the design still attracted me 20 years later. That sheerline is delightfully clean. The straight sides imply simple and fast construction. Complexity is delightful but costs time and money, and on that score my other project caused me to observe, as Meriwether Lewis and William Clark had after being chased by the first grizzly bear they encountered, that my “curiosity on the subject was pretty well satisfied.” Bolger provided an expanded, or “laid flat,” shape of the side panels, too. The preliminaries would take no time at all. I could start today. All I would have to do would be to ask the approval of the parliament of squirrels living in the shed.
I worked weekends on the construction over a couple of months, part of which involved just watching the thermometer. The most time-consuming part of the job was coaxing epoxy to kick and waiting for paint and varnish to dry in my unheated shop.
It’s just as much effort to make an ugly boat as a pretty one, so I made it pretty. Anyway, it’s difficult to make that shape ugly, although I’ve seen very serious attempts more than once. I had some lengths of Honduras mahogany left over from my “real” boat, just enough for varnished rubrails. I used short lengths of Philippine mahogany I had on hand for seats, also varnished.
I didn’t vary at all from the hull design. On the interior, though, I took some liberties. For one thing, I didn’t want the plywood thwarts called for in the plans. I used the wood I had available and carried the thwarts all the way to the stem and transom in the ends, leaving just enough room for drainage and ventilation. Now, I can throw my sweater or dry bag on the after thwart and it stays up off the bottom.
The plan shows ’midship limbers in all three frames, which support the thwarts. These make sense, but I added limbers at the chines and wouldn’t have it any other way. This boat is quite tender, so when you are moving around and flailing your arms—as in bailing—it is hard to keep it perfectly level. The easiest and best thing to do is to go ahead and heel it to one side, which is a much more stable position, and then bail from the chine. Mostly I bail rainwater. Only once have I shipped seawater, and then just a bit over the quarter when working downwind in a pretty heavy breeze.
Every year, I’ve added one little detail or another to make the dory just that much more convenient to use. For me, part of the fun is figuring out little improvements. Oarlock keepers came first. Then I added 6′ lines eye-spliced into holes bored in each of the ’midship frames to serve as trailer tie-downs. I’ve found these useful a dozen different ways—for example, for lashing things down or making off the painter of a boat under tow. When I turn the boat over ashore, I use one of these lines as a tag line to let it roll over gently. I added gunwale guards (see Currents, WoodenBoat 181), brass half-oval guards on the upper stem and the skeg, and an improved footrest. This year’s project has been the addition of a compass bracket. Last summer during a pestilential fog with darkness coming on, a small demon appeared at my shoulder, sneering in its Peter Lorre voice, “No, no, no, no, no! You need to go that way! That way!” A fitted, removable compass, which I promise not to leave ashore anymore, will silence that guy.
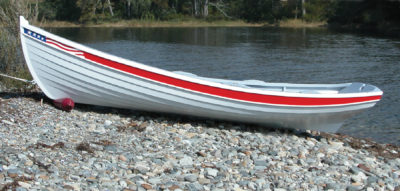
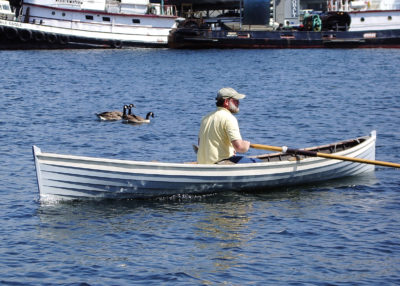
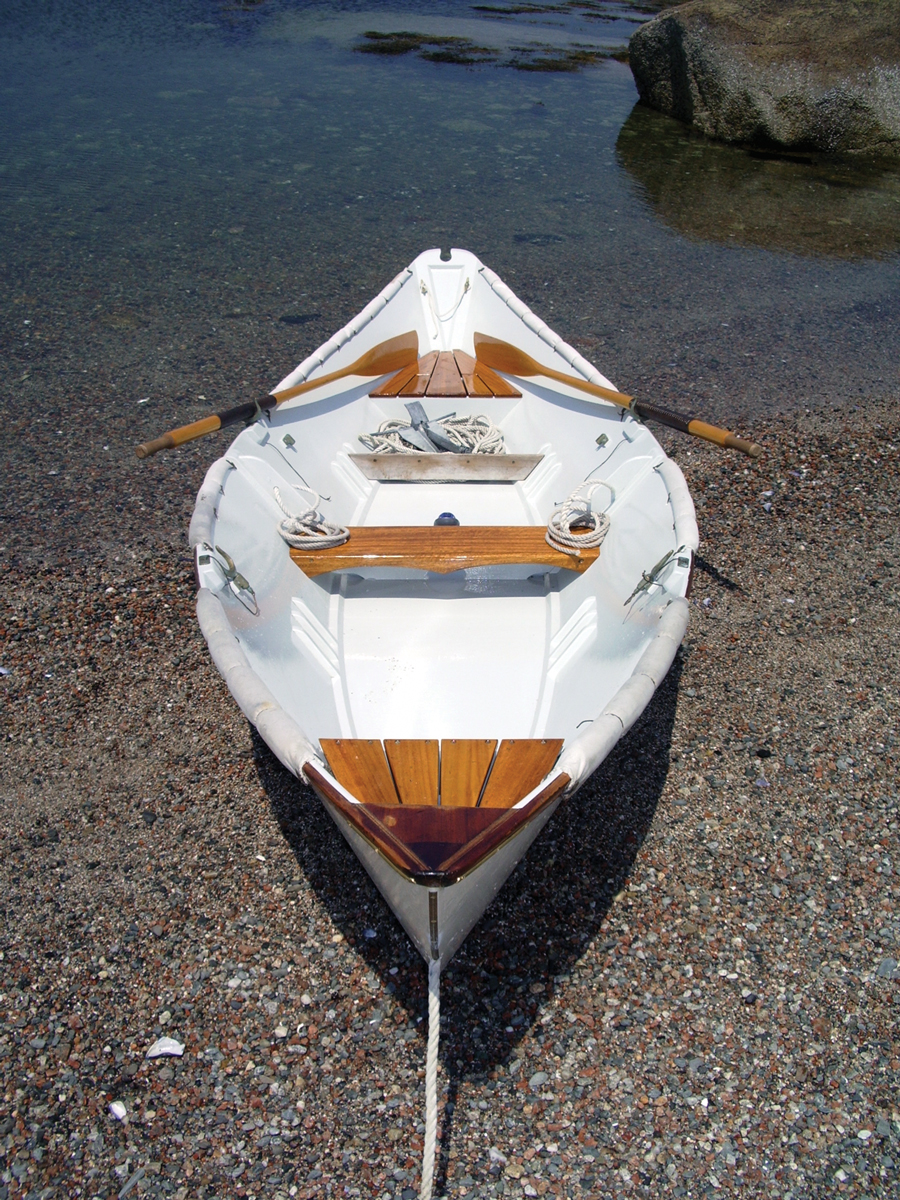 Photo by Tom Jackson
It may be best not to monkey with the designer’s specifications for the hull, but the builder’s own sense of function and aesthetics can roam fairly freely on the details and appointments of the interior.
I’ve found two things I would do differently. First, the vertical footrests shown in the plans are too close to the rowing stations. Better to wait until the thwart is fitted and the oarlock positions are fixed, then get in the boat and set the footrests for your own comfort. I also canted mine well aft, matching the angle of my foot at rest.
Second, I would greatly strengthen the frame-to-planking joints at the forward and after thwarts. After several seasons of hard use, the forward frame began to let go from the sides. It is held by screws that go through the plywood and into the frame’s end grain—never a really strong way to build anything—and even fortified with epoxy, that joint hasn’t held. Last year, I backed up the forward frame with a vertical wooden block, called a cleat, on the forward side, tucked out of sight under the thwart, well epoxied into place and also screw-fastened through the frame. If I were building again, I would strengthen all those joints from the outset, perhaps adding tapered frames running up the sides a little ways. Maybe that’ll be next year’s task.
The plans call for 1/2″ bottom planking and 3/8″ side planking, but I used 3/8″ meranti marine-grade plywood throughout, and it has been completely satisfactory. I repaint every year as needed, and take the thwart pieces off for revarnishing. A weekend or two of work fit in around rainsqualls and spring cleaning, and she’s good to go.
The only fiberglass-and-epoxy sheathing I used is on the outside bottom, extending just above the waterline. A couple of years back on a way-low tide, I had a Chariots of Fire rowing episode (for the unenlightened, that would be hard effort imagined in slow motion to capture every heroic grimace, and all set to a dramatic musical score), and I plowed straight into Quasimodo, my name for a great, hulking, green, ugly, hunchback of a rock. I fixed the forefoot with fiberglass cloth and epoxy. This year, I ran a half-oval down the lower stem, which someday I might be tempted to carry around the forefoot and a little ways onto the bottom.
There is absolutely no doubt that this boat is at its best for solo rowing. With two people at the oars, it trims down by the head and you can’t steer. With a third person aft— or a heavy weight, say about two curling stones or a full complement of camping gear—things balance out all right. But such a load makes the freeboard too low for really pleasant rowing, and you wouldn’t want to venture out in too much of a chop in that condition. I don’t have guests all that often, so I much prefer the benefits of solo performance. Somebody who likes this design but favors tandem rowing or a lot of company would do well to look at the 19′ version that Bolger worked up to answer this very issue, with four rowing positions to choose from so you can get the trim just right.
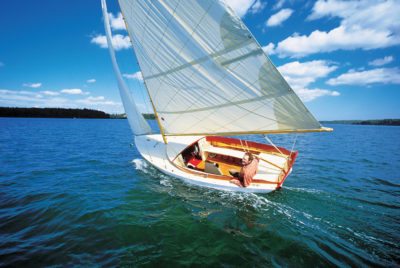
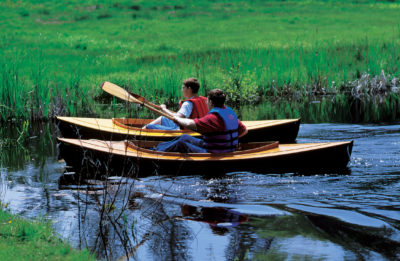
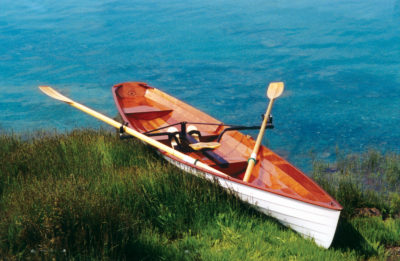
 Photo by Benjamin Mendlowitz
Even obscured a bit by gunwale guards, the perfection of the Gloucester Light Dory’s sheerline is difficult to hide. A careful balance between rowing speed and seakindliness, she has plenty of speed to overcome modest currents, has a go-anywhere draft of 7”, and is seaworthy enough to explore islands and inlets.
The Light Dory’s sculling notch is pretty to look at. It’s pretty near useless for sculling, though. If I’m in a tight spot where sculling might work, it’s just a whole lot more effective to stand up and use one oar to paddle with a J-stroke. However, the notch has proven very handy for other purposes. When I’m towing another dinghy, as I often do, I bring its painter aboard in the notch. In rough weather, the line is apt to jump out of the notch, so I have rigged a short keeper line, which doubles as a tie-down for my dry bag when the wind pipes up. I often find myself in a position to set an anchor aft and a long painter off the bow to a pierhead, and the notch comes in handy there, too. And, finally, using both hands knuckle-to-knuckle, it’s easy to pick up the aft end by the notch, while someone else lifts the bow by the breasthook.
The construction details are easily understood in Bolger’s plans. One variation is a plywood butt joint Dynamite Payson wrote about in his how-to-build series in WoodenBoat Nos. 41, 42, and 43. But I stayed with Bolger’s original way of backing this joint with a butt strap, a flat-laid piece upon which the frame lands.
Some people say there’s no such thing as building this boat too light, but I can’t agree. When I’m out in some sloppy weather, which I’m not afraid to do, I like a boat that has what you might call “gravitas.” Anyway, the boat certainly has no trouble moving fast when you want it to.
I have two and only two tests for any boat. First, as I’m walking away, do I find myself continually turning around to evaluate it from one angle or another? Second, if I had the same conditions and criteria in mind, would I choose that design again? For me, the Gloucester Light Dory passes on both counts.
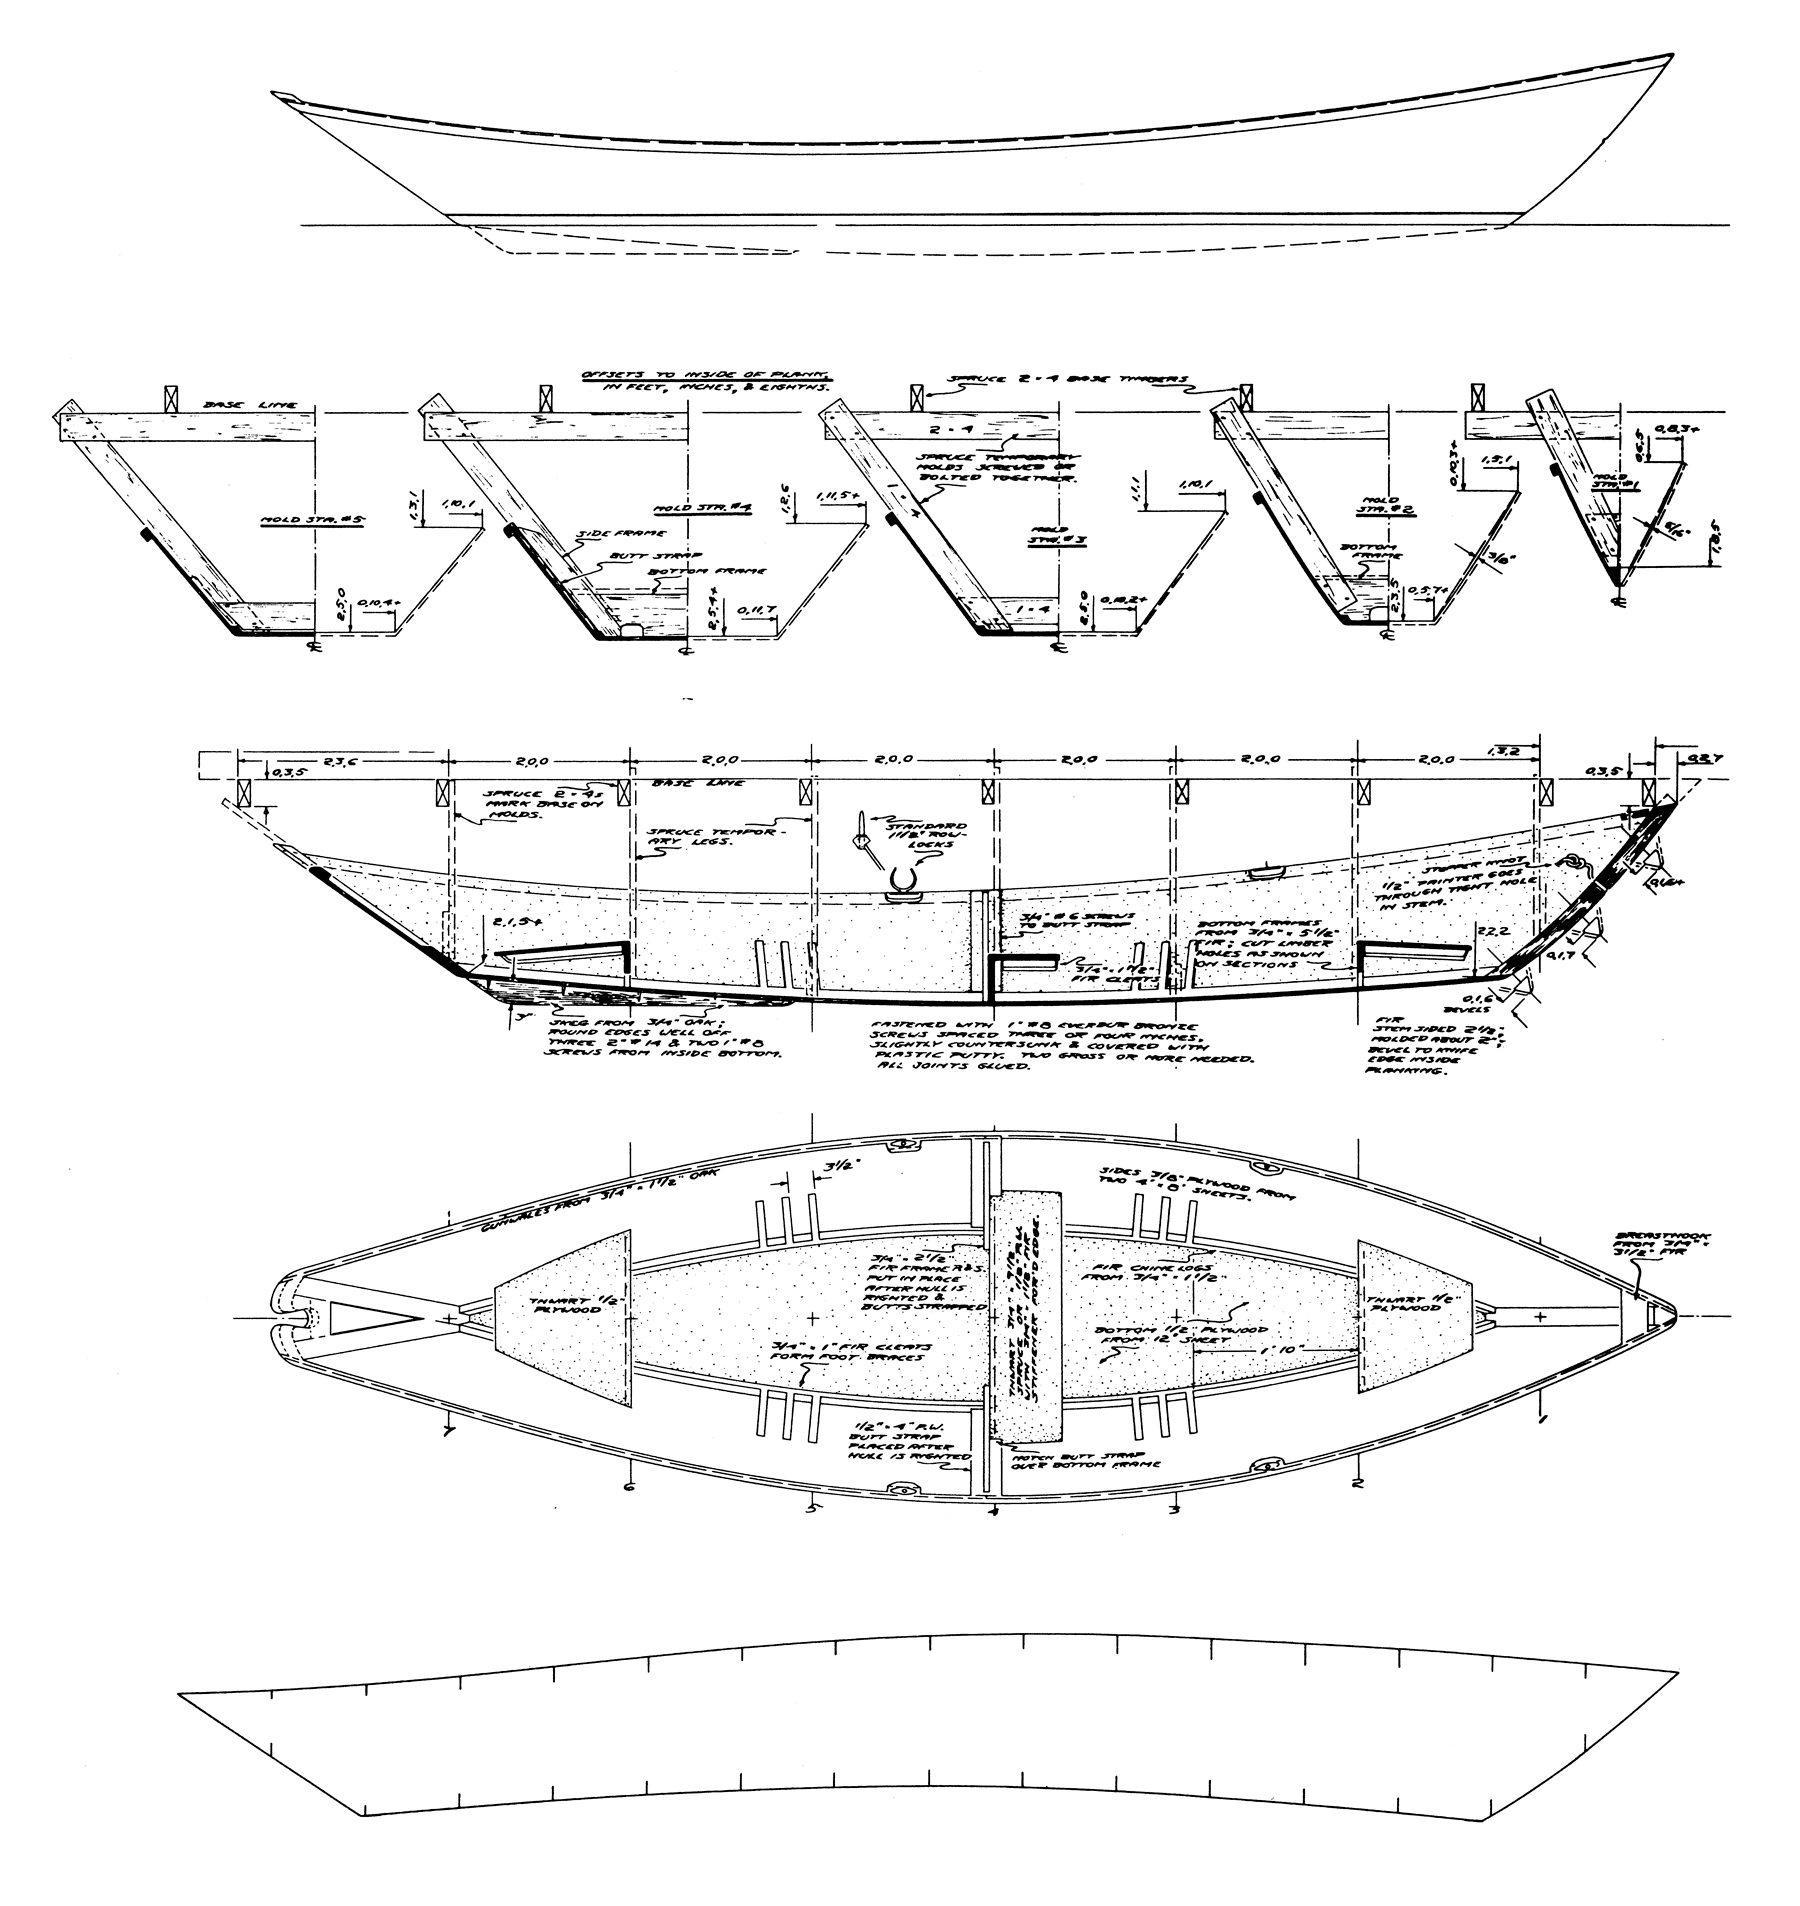
Phil Bolger’s sixth and final version of the Gloucester Light Dory offers all of the information needed for construction in one plan sheet. A supplement, which shows the fully expanded shape of the sides, makes getting the subtleties of her sheerline right just that much easier.
Plans, full-size patterns, and the book How to Build the Gloucester Light Dory are available from H. H. Payson & Company. How to Build the Gloucester Light Dory is also available from the WoodenBoat Store.
Is there a boat you’d like to know more about? Have you built one that you think other Small Boats Magazine readers would enjoy? Please email us!
Want More Phil Bolger Boat Designs?
Explore our other reviews of rowing and sailing boat designs by Phil Bolger.
Bolger’s Pirogue: Phil Bolger’s Design #451 is simple but versatile
Sweet Pea: An Instant Boat for oar and sail, with a removable keel
Bolger Bobcat: Bolger’s adaptation of the Beetle Cat for tack-and-tape construction


Thanks, Tom. Any recommendation as to oar length?
Brad,
Payson’s book, How to build the Gloucester Light Dory, recommends 7′ oars.
I use 8’ spoon blades and I love them. I row several days per week year round and compete in several races a year. Also, I’m 6’1”. So for someone smaller, maybe the 7’ will work. Also, when I get tired, I simply row with overlapped hands, thus reducing length by 6”. Good luck, great boat.
Very sensible boat. Knowing you are always interested in finding ways to improve, a suggestion: add flip-out oarlocks to increase the spread, and row with a pair of oars a foot or more longer. My guess is that rowing performance will be greatly improved, and rower’s hands will be at the right height, with no changes in hull shape or size. As seen in the picture here, the blades are burying deep and the rower is forced to work much harder than necessary. Of course, when stowing longer oars is a problem, you could always switch back to shorter blades. A low-cost experiment worth trying?
A touch of the Kinney Dory here!
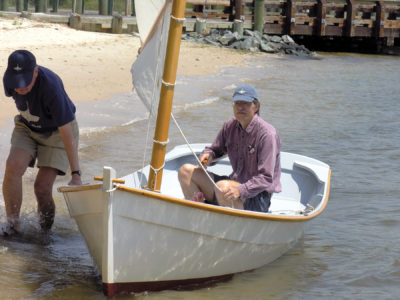
To my taste, I would have preferred a version with an optional sail rig.
Nice looking boat though.
Bolger himself would have discouraged this notion, on the grounds that a boat with such a narrow bottom would have almost no sail-carrying ability.
There was a recent article about a couple who tried a small sail rig on the Gloucester during a long rowing expedition, and they agreed with Bolger, who said it was a bad idea. Only directly downwind did they find it safe.
I built one 20+ years ago with the Dynamite Payson book, using 1/4″ plywood throughout.
I took it to the Bowron Lakes circuit in British Columbia, 73 miles of lakes, rivers and land bridges and it performed excellently and was light enough to portage. It was quite a standout among the many canoes and kayaks normally found on the circuit.
Hello John Leyde,
I have two 4×16 sheets of 1/4″ marine plywood. Did you add more strength to your boat with epoxy? Do you know if two sheets is enough to do the whole boat? Bowron Lakes has been on our list for a long time, but we got distracted by the Churchill River system in Northern Saskatchewan.
Doug,
Yes, you can do the whole boat with two sheets of 16′ ply. Both sides can be gotten out of one sheet and the bottom out of the other, which, I think is 12′ long. Harold Payson built his with a chine log. I did a fillet-and-fiberglass-tape joint for the chines and it was plenty strong.
I think I just fiberglassed the bottom panel. Doing the whole boat would add some rigidity and strength.
So fun to read this article! My son and I built Bolger’s dory when he was in middle school. We stopped by Dynamite Payson’s house a number of years before that to buy the plans and had a wonderful chat and visit in his shop, and he sent the plans soon after. Just as in this account, the plans sat on a shelf for years before we actually got around to building the boat.
I would love to say that we used the boat extensively, but that was not the case – time and exposure to the weather took its toll, and the transom rotted, but I brought the boat with me to Maine when we moved here, and finally, this past summer, cut the transom off and fit a new one on. It was meatball surgery and the fix relies on a considerable amount of thickened epoxy to make it work, but, with a new coat of paint, the boat looked pretty good from 25 feet!
The impetus for getting it going this summer was that we put our sailboat on a mooring here in Georgetown after it sat on the hard for 6 years, and we needed a tender to get to it! As Tom points out, the dory makes for a pretty tender tender, but it works. How silly does it look for a 23′ sailboat to be towing a 15′ dinghy behind it, but who cares 🙂 It actually tracks very well and is light, so it did not impair the sailing qualities of the boat and it is one of the best-looking dinghies at the marina 🙂
Thanks for sharing!
Jason Thatcher
I’ve always admired the simple elegance of Bolger’s dory, it is a haiku in wood.
By the way, Tom, you didn’t mention that other important addition, the large log for rolling the boat up the beach.
I swear, Tom, you must be related to Bill Bryson…cousins at least in your joyous play with the language. There’s no boat without a tale to be told and you set the standard for salty narratives. Nice looking boat, too.
30 years or so ago, Tip Johnson of Bellingham, Washington, started a small boat livery near Fairhaven. He had a fleet of these dories, which he may have built himself. As I had helped Tip set up this livery, I sometimes would borrow one of the dories for a row on the bay. One time, when the wind was blowing a good 12 knots or more, I “raced” (informally) a Row Cat, which was a twin-hulled rowing scull, against the wind and considerable chop, for maybe a mile. I was able to stay level with the Row Cat by following Bolger’s advice for such conditions: use a short, quick stroke. I have found the same principle to work in paddling a kayak into a stiff breeze and chop. It seems the quick stroke means you almost always have a blade in the water, thereby keeping steady pressure on the boat.
I know from experience that it is tempting to take big long strokes and apply lots of muscle, but all that does is wear you out. I think the reason may have to do with the fact that both the kayak and the dory are of very light displacement, and can’t develop the inertia to punch through a chop without being stopped or slowed down. By the same token, the scull was also a very light displacement boat, but in typical scull fashion, propelled by big, long strokes with lots of muscle, and would consequently lose way between strokes.
I don’t know how long Tip’s oars were for these boats, but I was convinced they were much too short. I did row one with a another person one time, and we were able to make it go pretty well, but we didn’t go far enough or long enough to come to any conclusions.
I do remember watching Tip working on one of his floating docks while kneeling in the dory’s bilge so that the gunwale was barely out of the water. It appeared to be an amply stable platform heeled over like that. Of course it was a flat calm day.
Eventually the small boat livery became the Bellingham Community Boating Center. I don’t know whether any of the old dories are still around.
I was recently watching video of sculls racing (these were multi-rower boats) or just rehearsing for the Olympics. What was striking was that during the recovery, when everybody scoots aft at once, the sculls almost came to a stop, from the inertia of all that rowers’ mass, before shooting ahead again with the next stroke. Can’t imagine how to overcome that effect, though a heavy enough boat would maintain momentum through the unpowered glide. But of course sculls have to be as light as possible. Maybe that’s how Bolger’s idea of the short, quick stroke works.
I also use such a stroke when paddling my kayak against a head sea and wind. Seems effective in that situation.
My hunch (this is just a thought experiment) is that the oar blade is describing an arc, and that the beginning of the stroke is working against a net gain in propulsion, the principal being the same as sculling over the stern with a single oar in a transom notch. If that doesn’t seem clear, blame my inarticulate gibberish (I am fluent in gibberish).