In all my early cruises, back in the 1980s and before I had boats big enough to carry a portable head, I did my business on shore in cat holes dug and buried in out-of-the way places. While that was still accepted practice then, river runners, to preserve the places that saw lots of use and abuse, had already begun packing-out all waste. I got with the program for the last sea kayaking cruise I took, along the Gulf coast of Florida where the islands were small, sandy, and easily spoiled. I carried newspaper to catch and wrap waste and stowed it in a cylinder I’d made of plastic drainpipe with a watertight screw-on lid. It was the right thing to do but by no means pleasant.
With my latest larger cruising boats, I’ve become accustomed to the comfort and convenience of portable heads, but they’re too big to carry aboard my canoes and small rowing boats. I’d still like to cruise in those smaller boats, but I won’t revert to cat holes, and I’d much rather sit than squat.
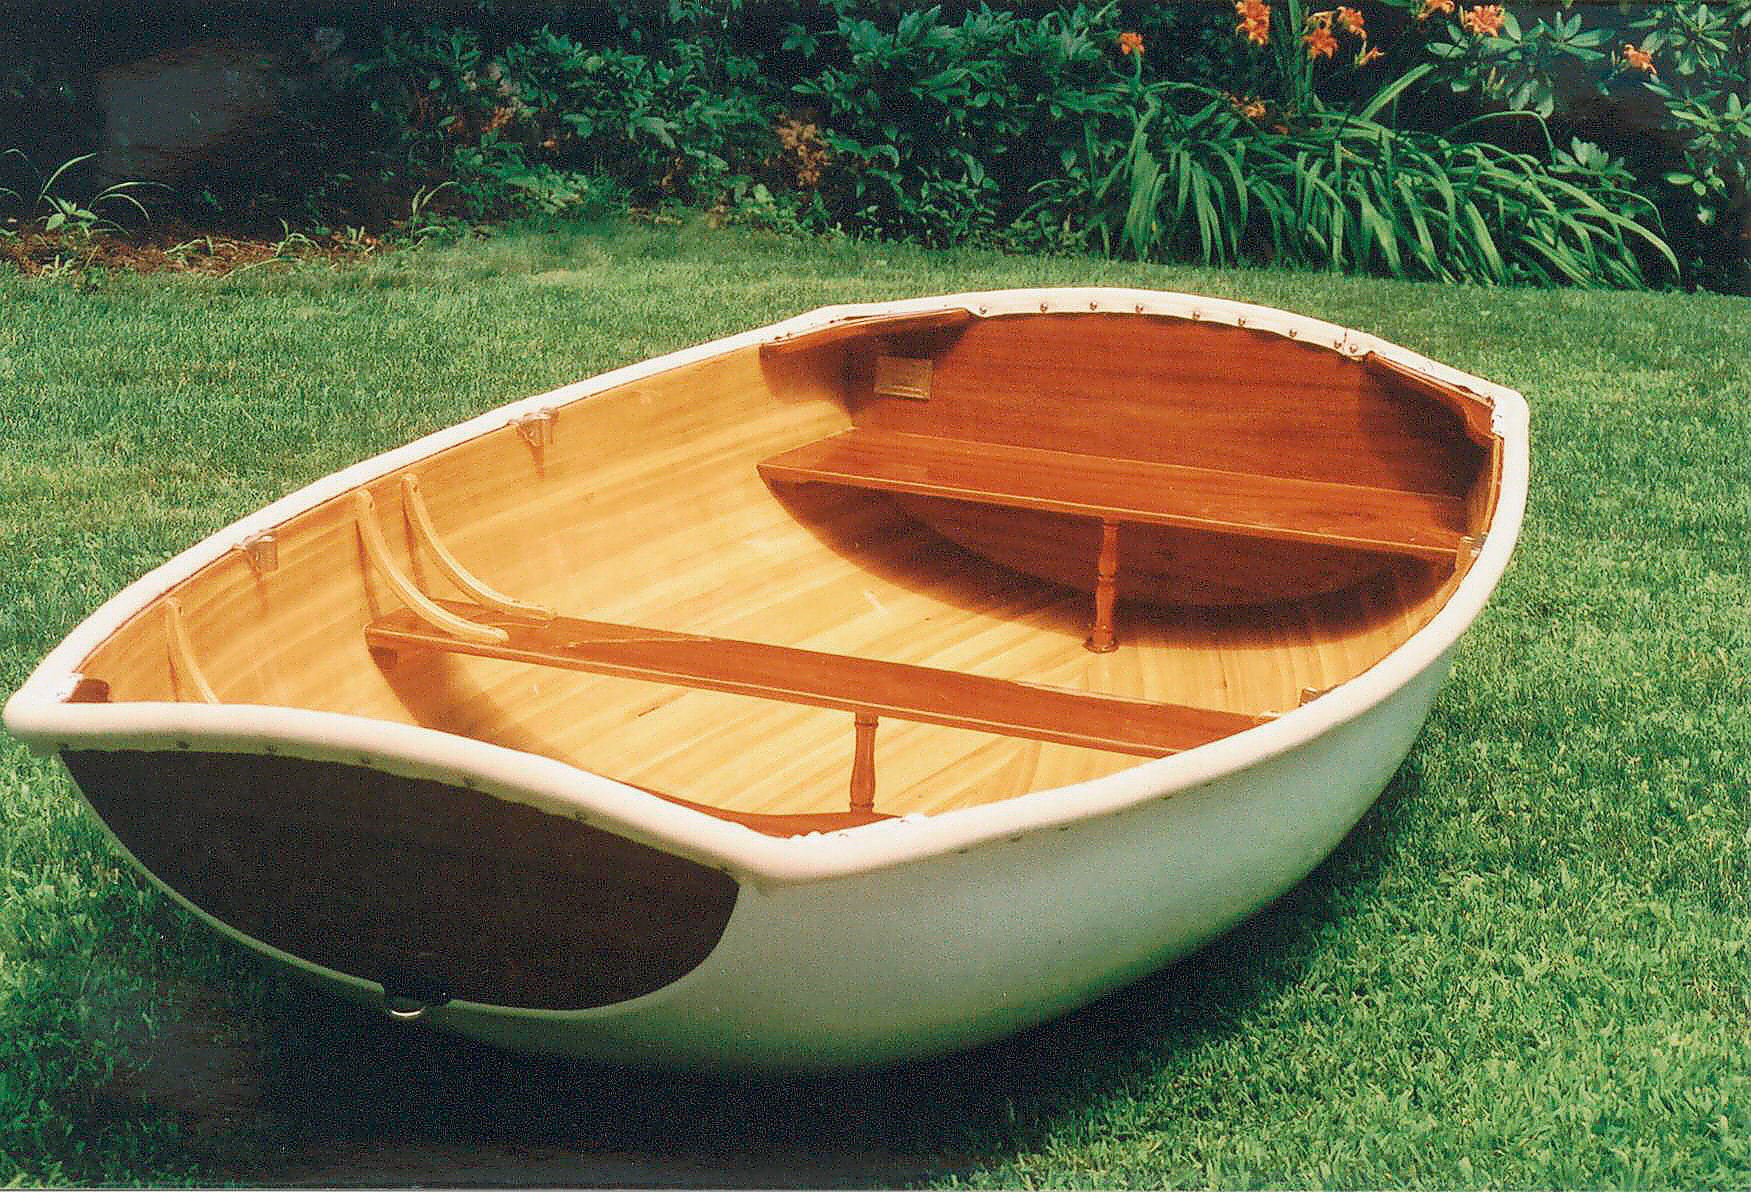
photographs by the author
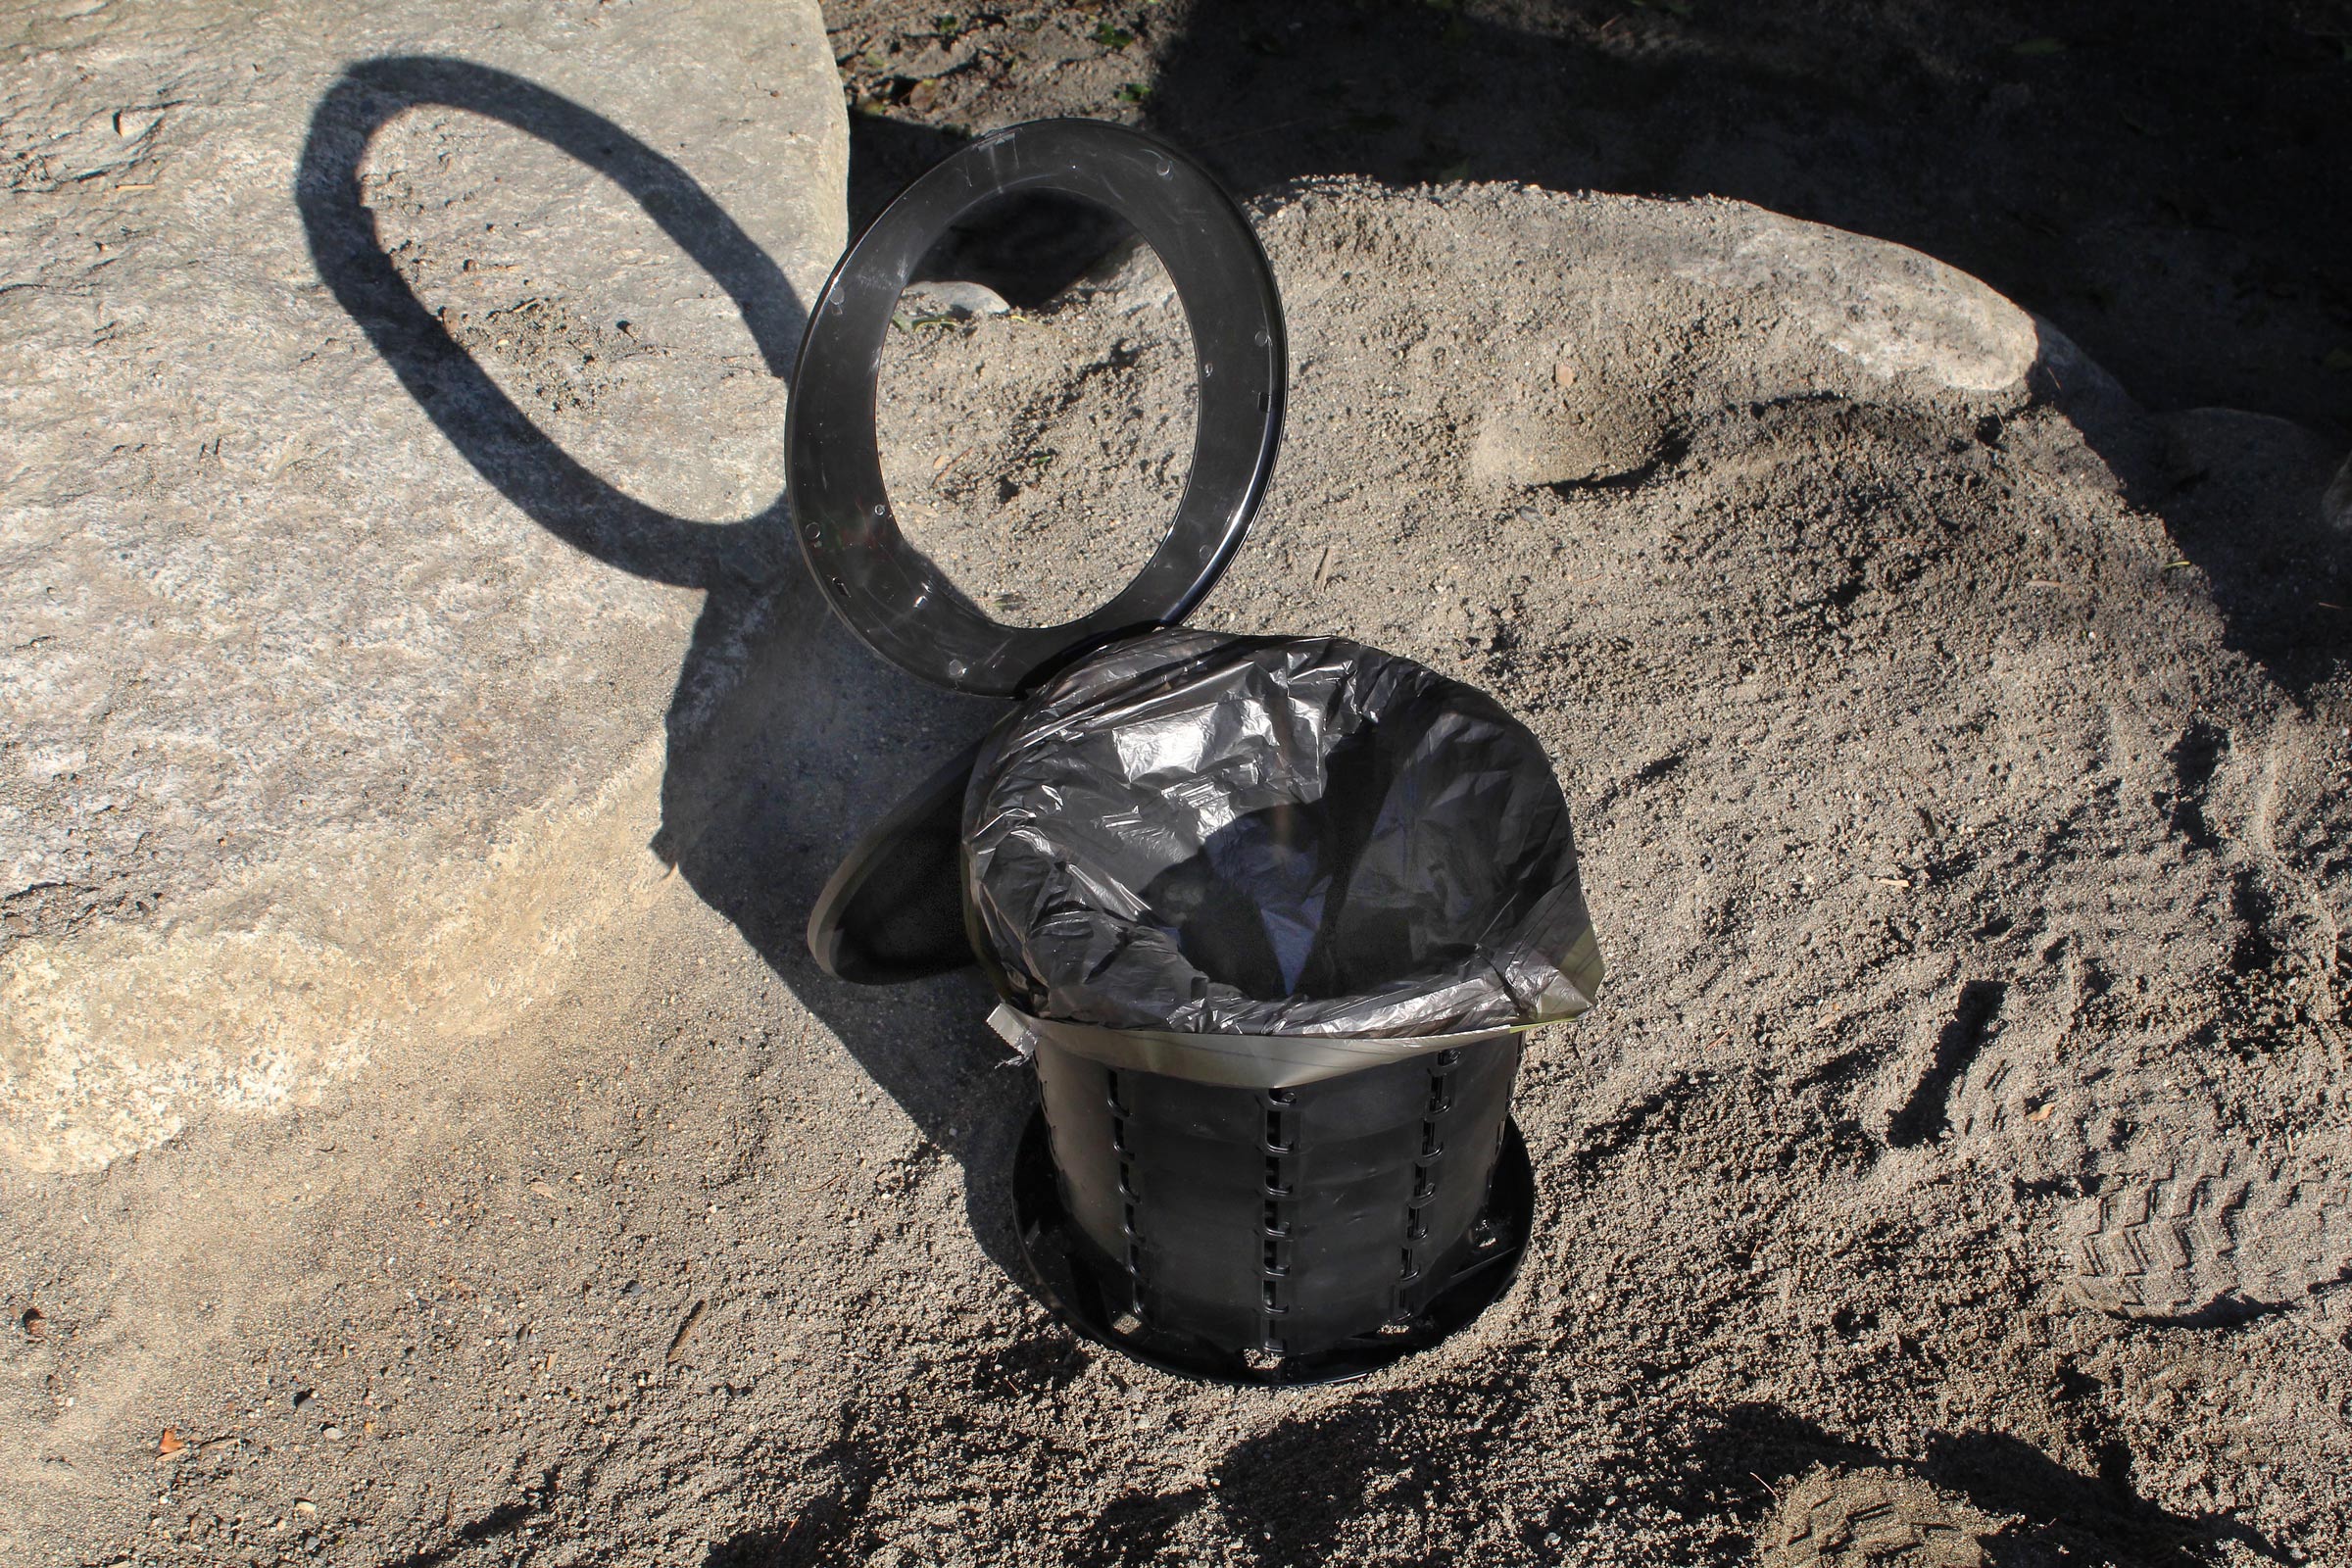
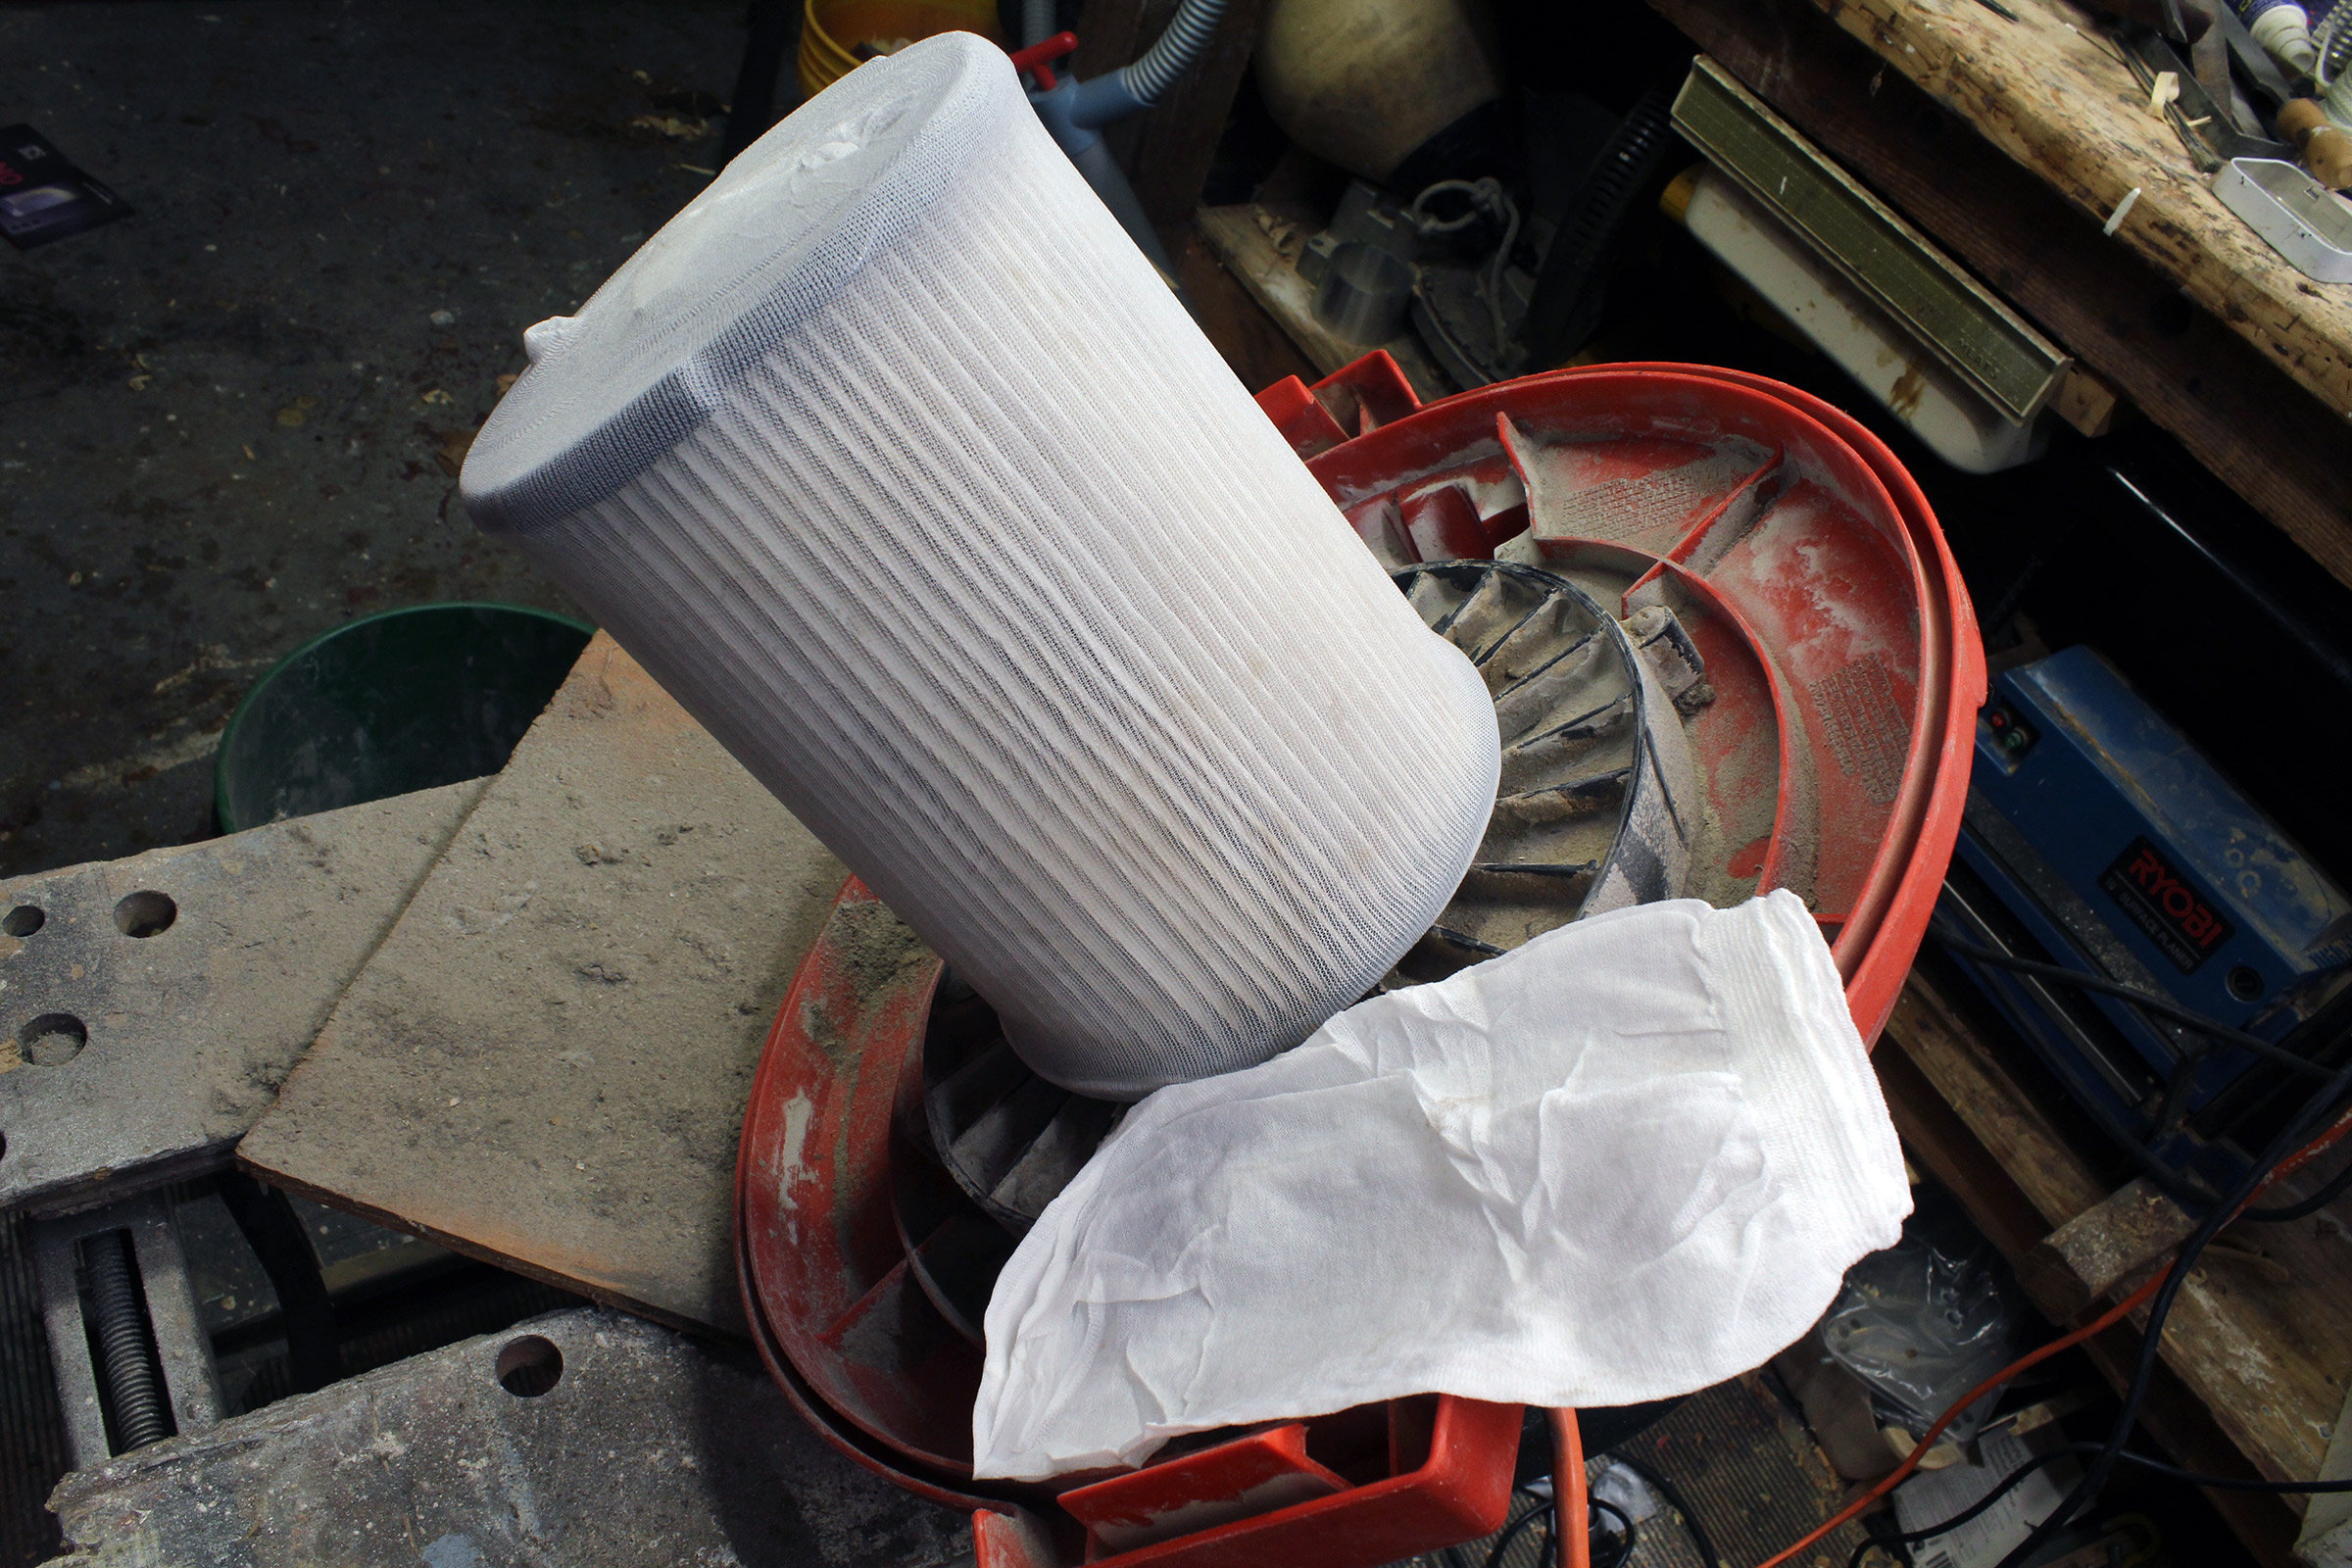
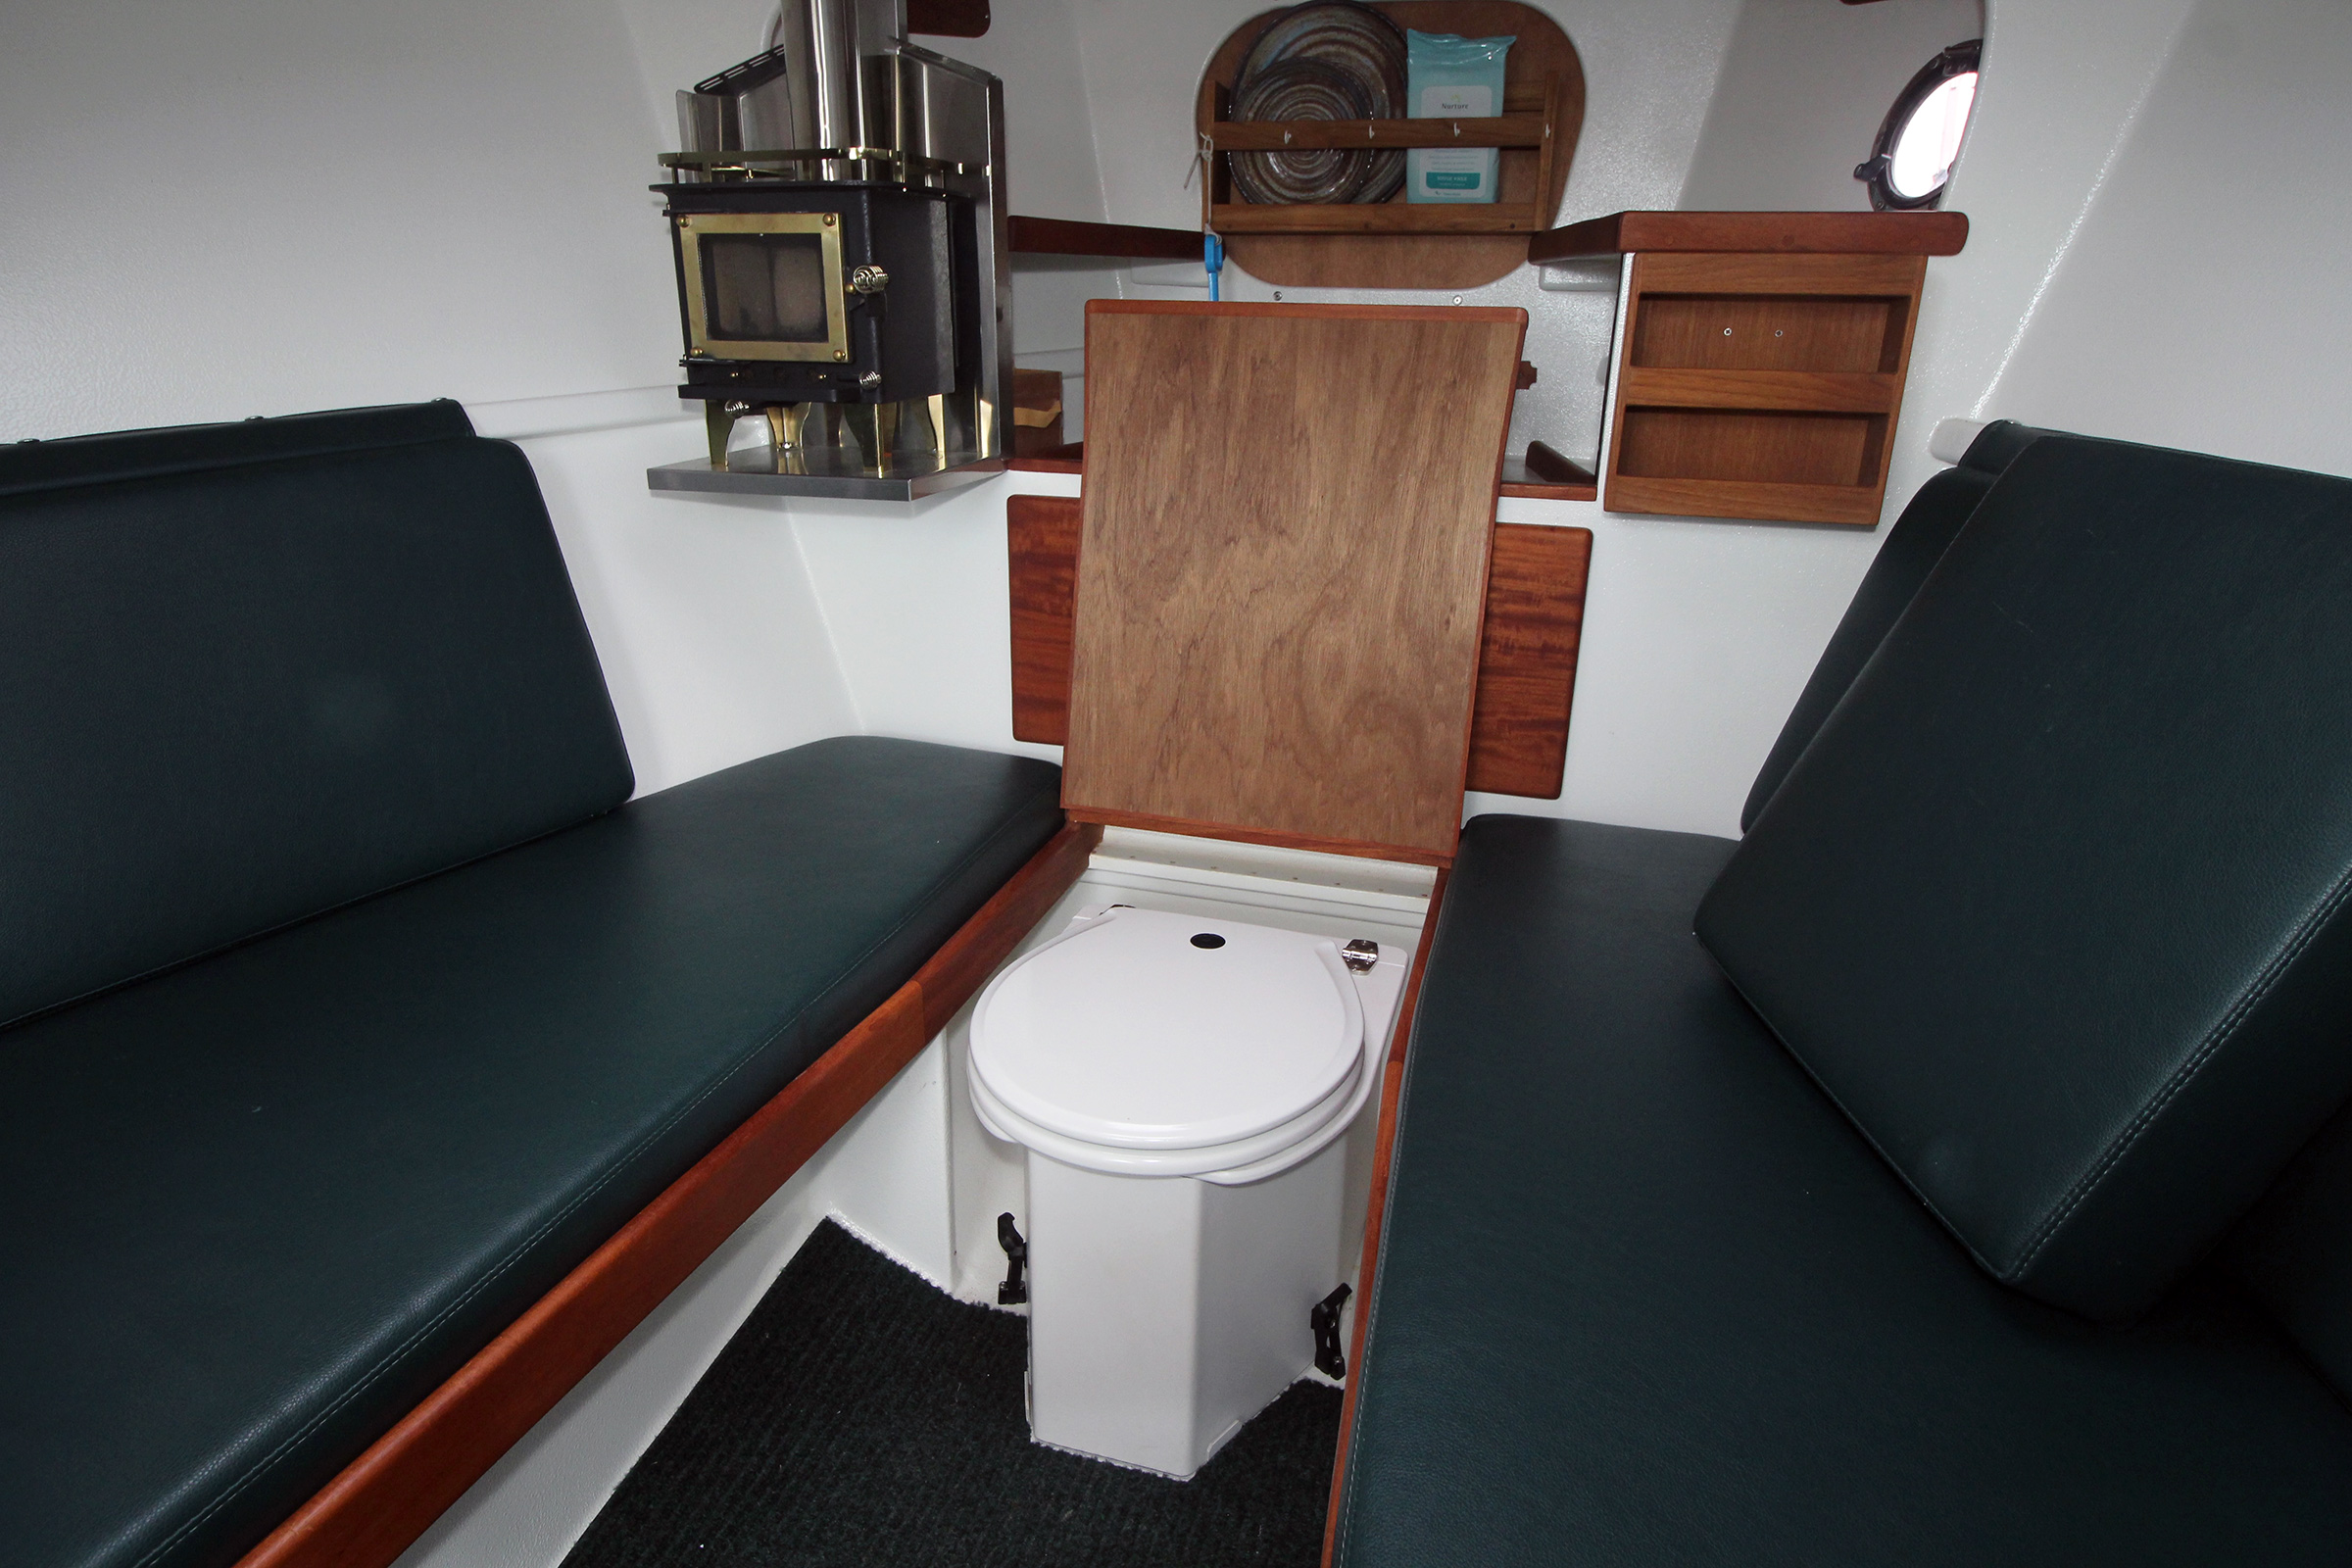
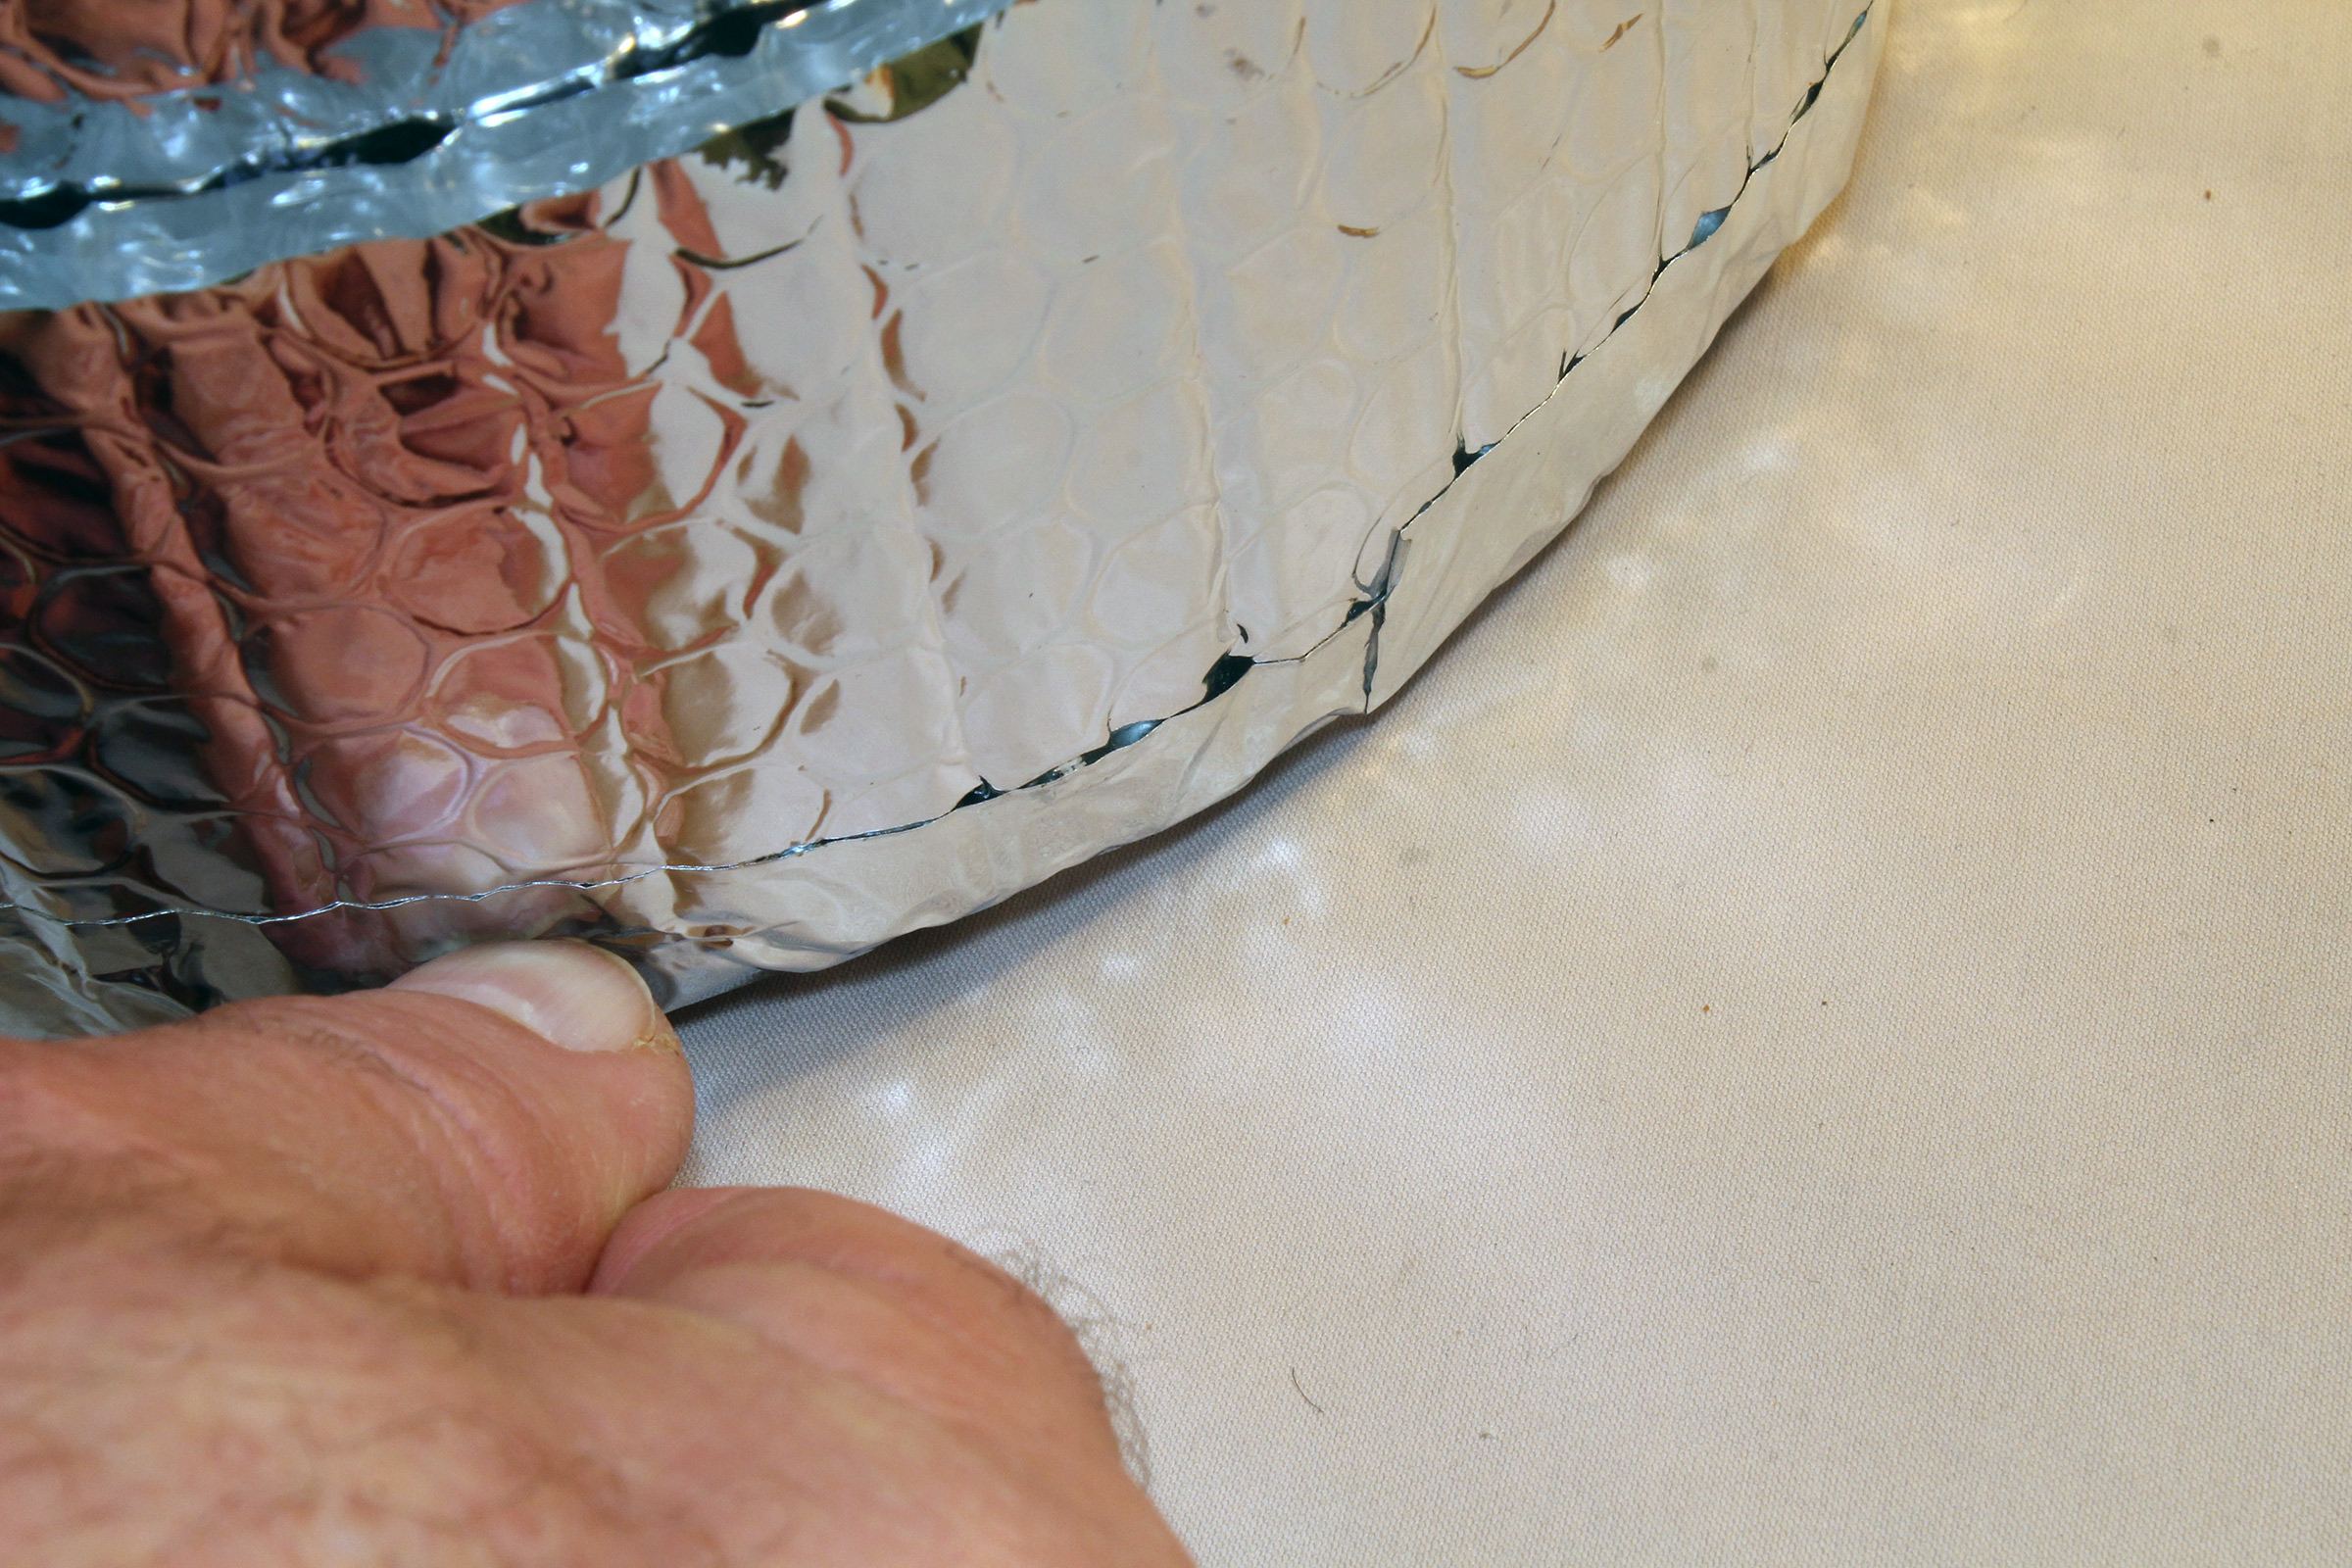
The collapsed toilet fits in a zippered bag that ensures it stays closed when it not in use. The roll of 10 liner bags fits in the toilet when it’s collapsed.
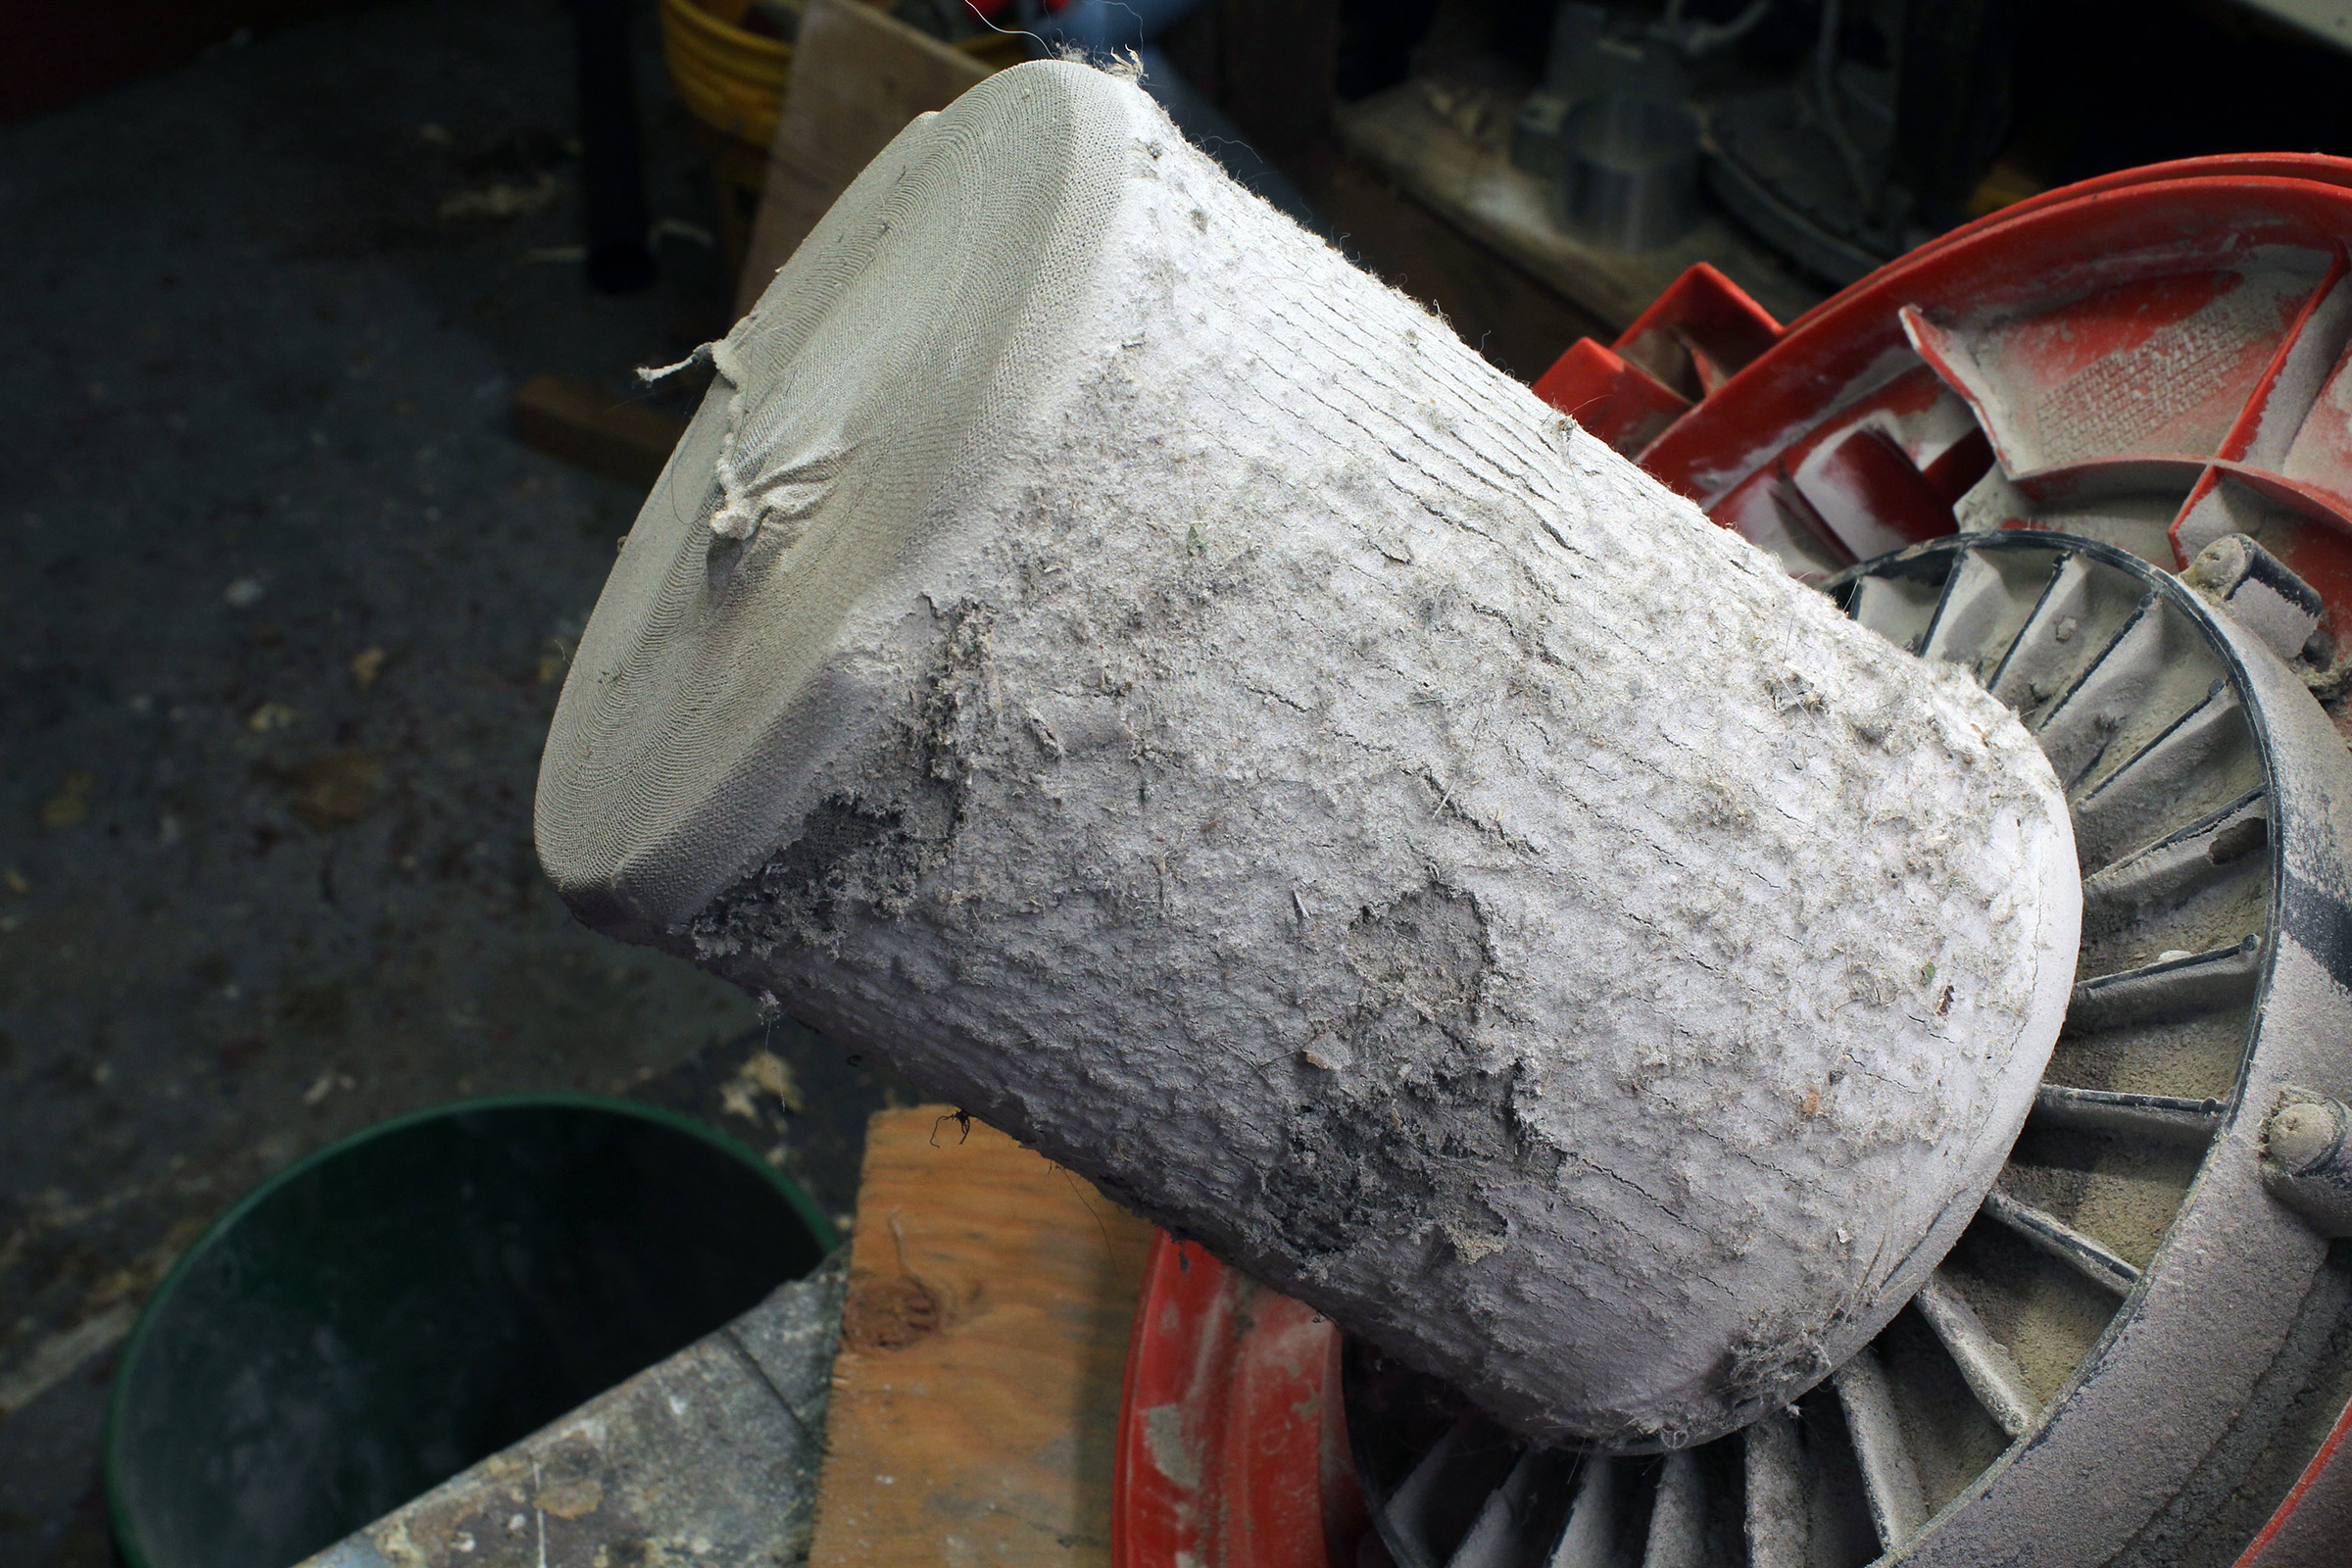
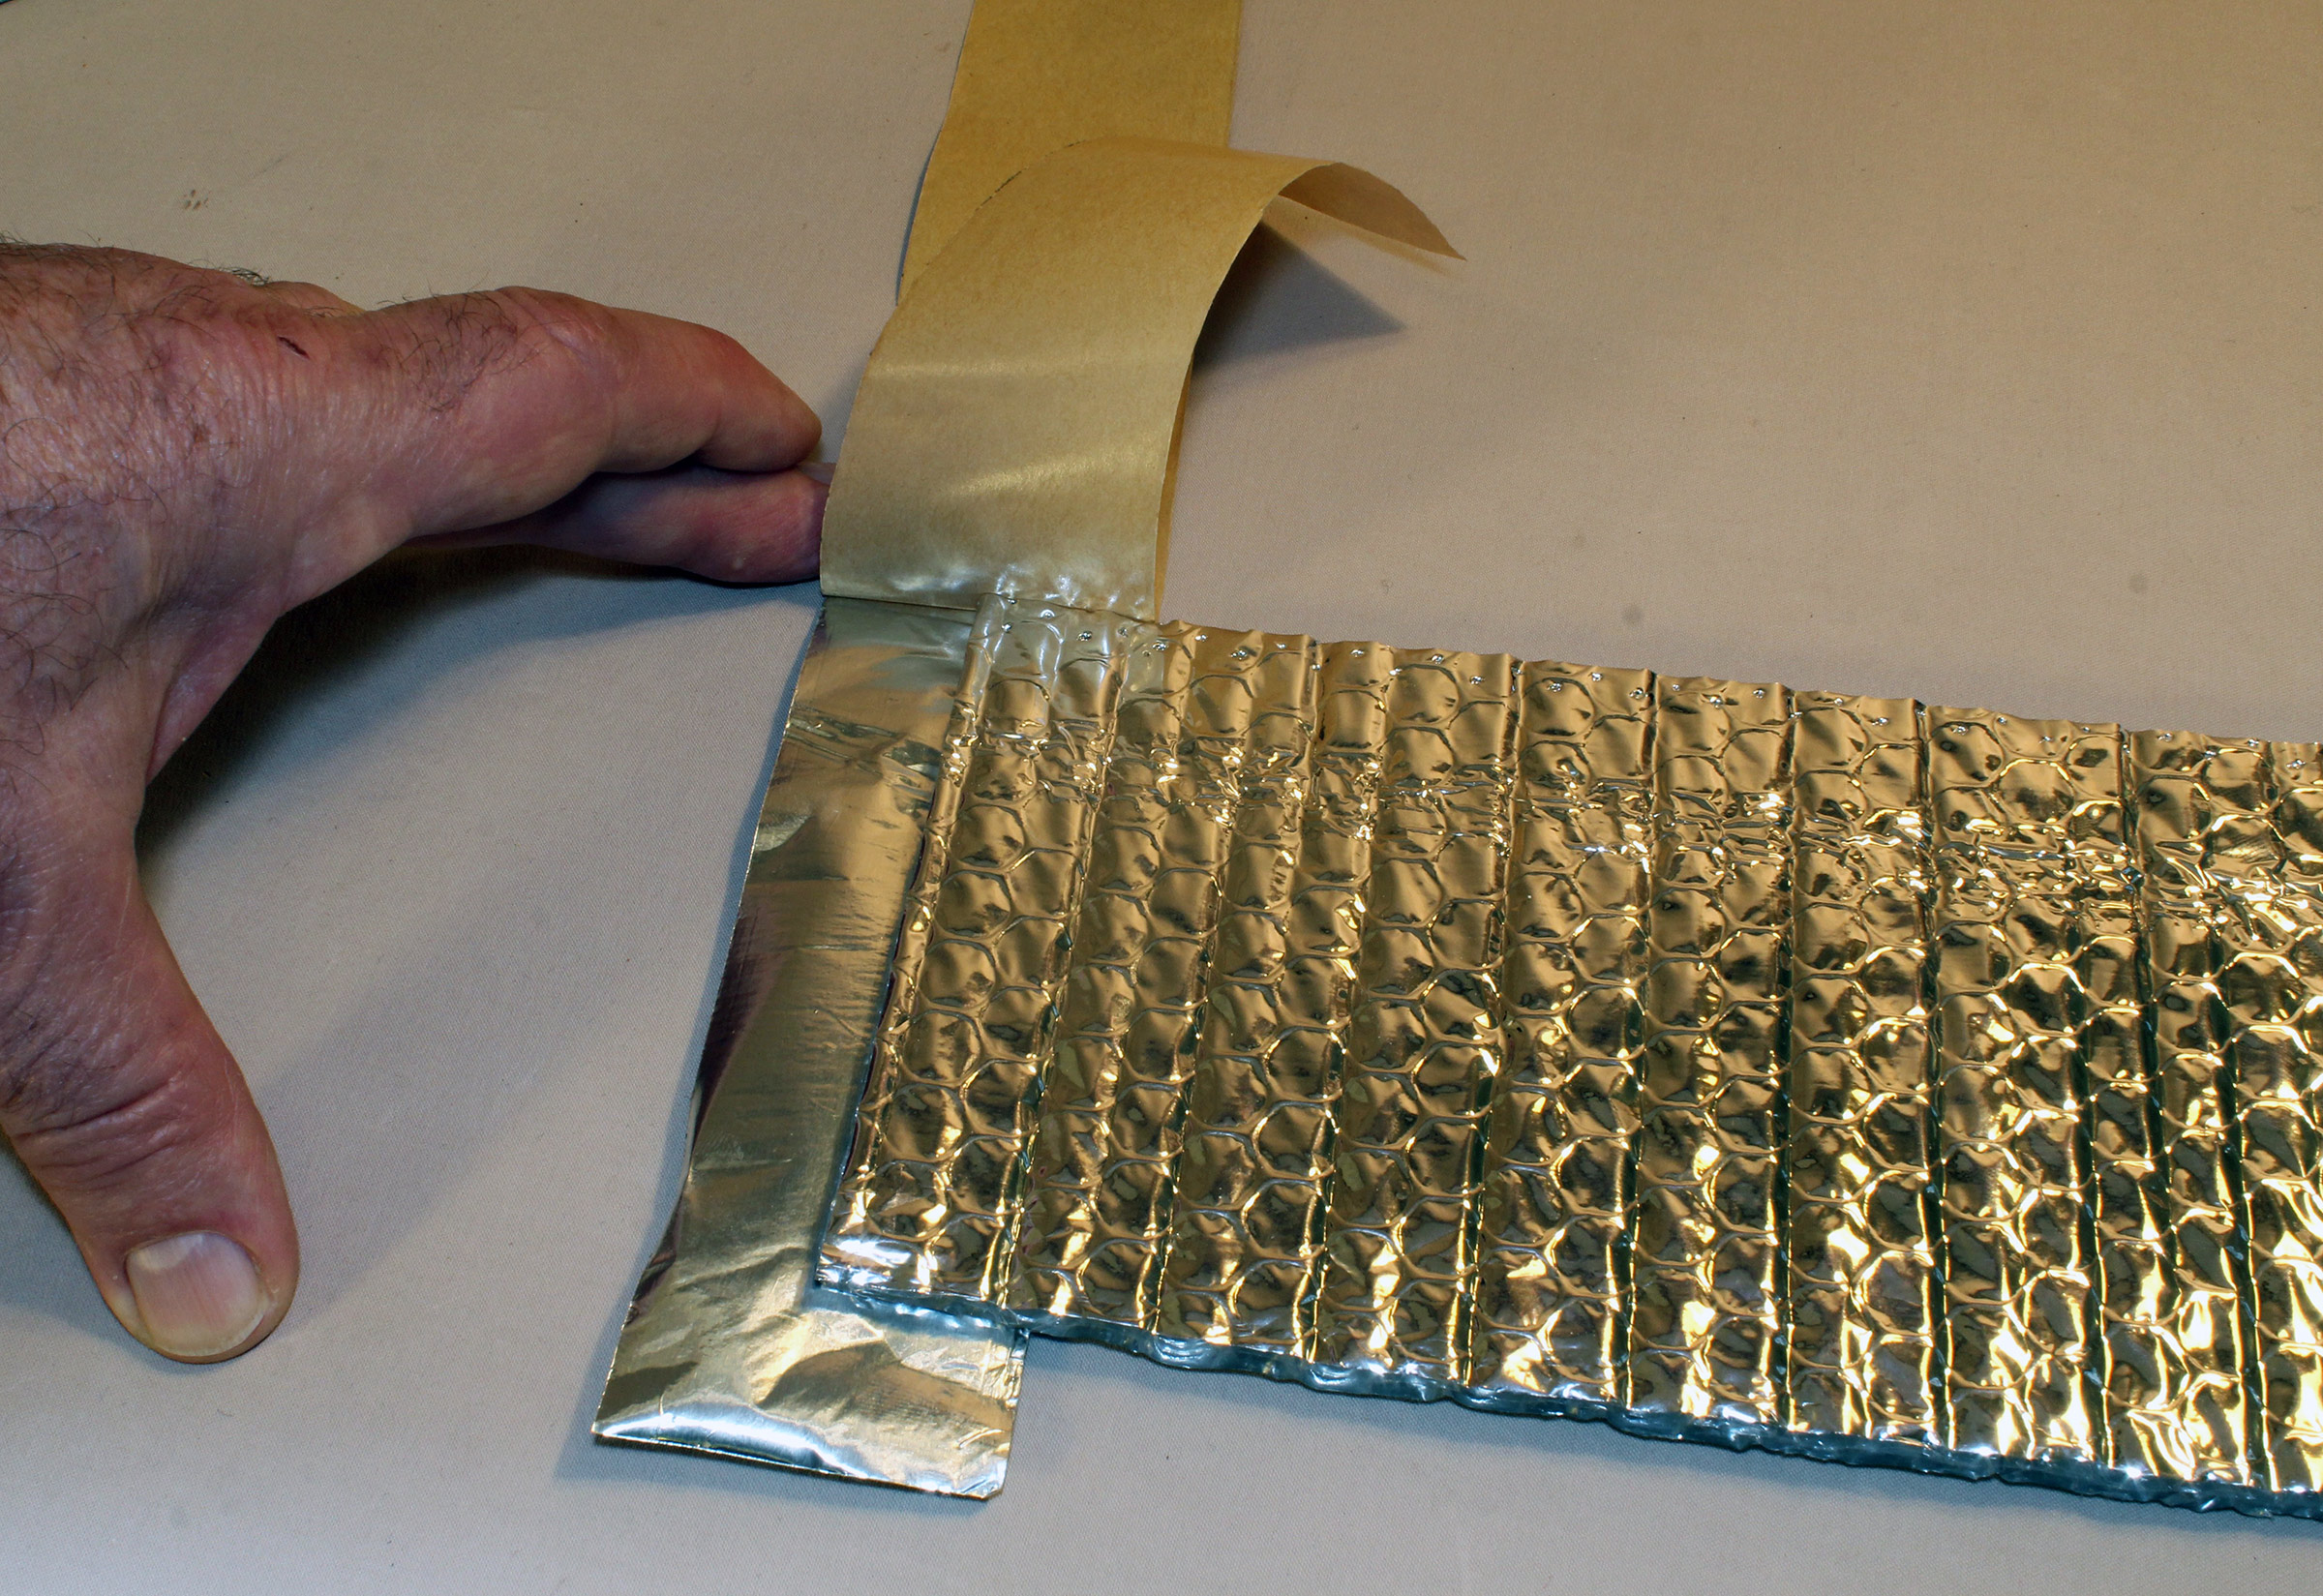
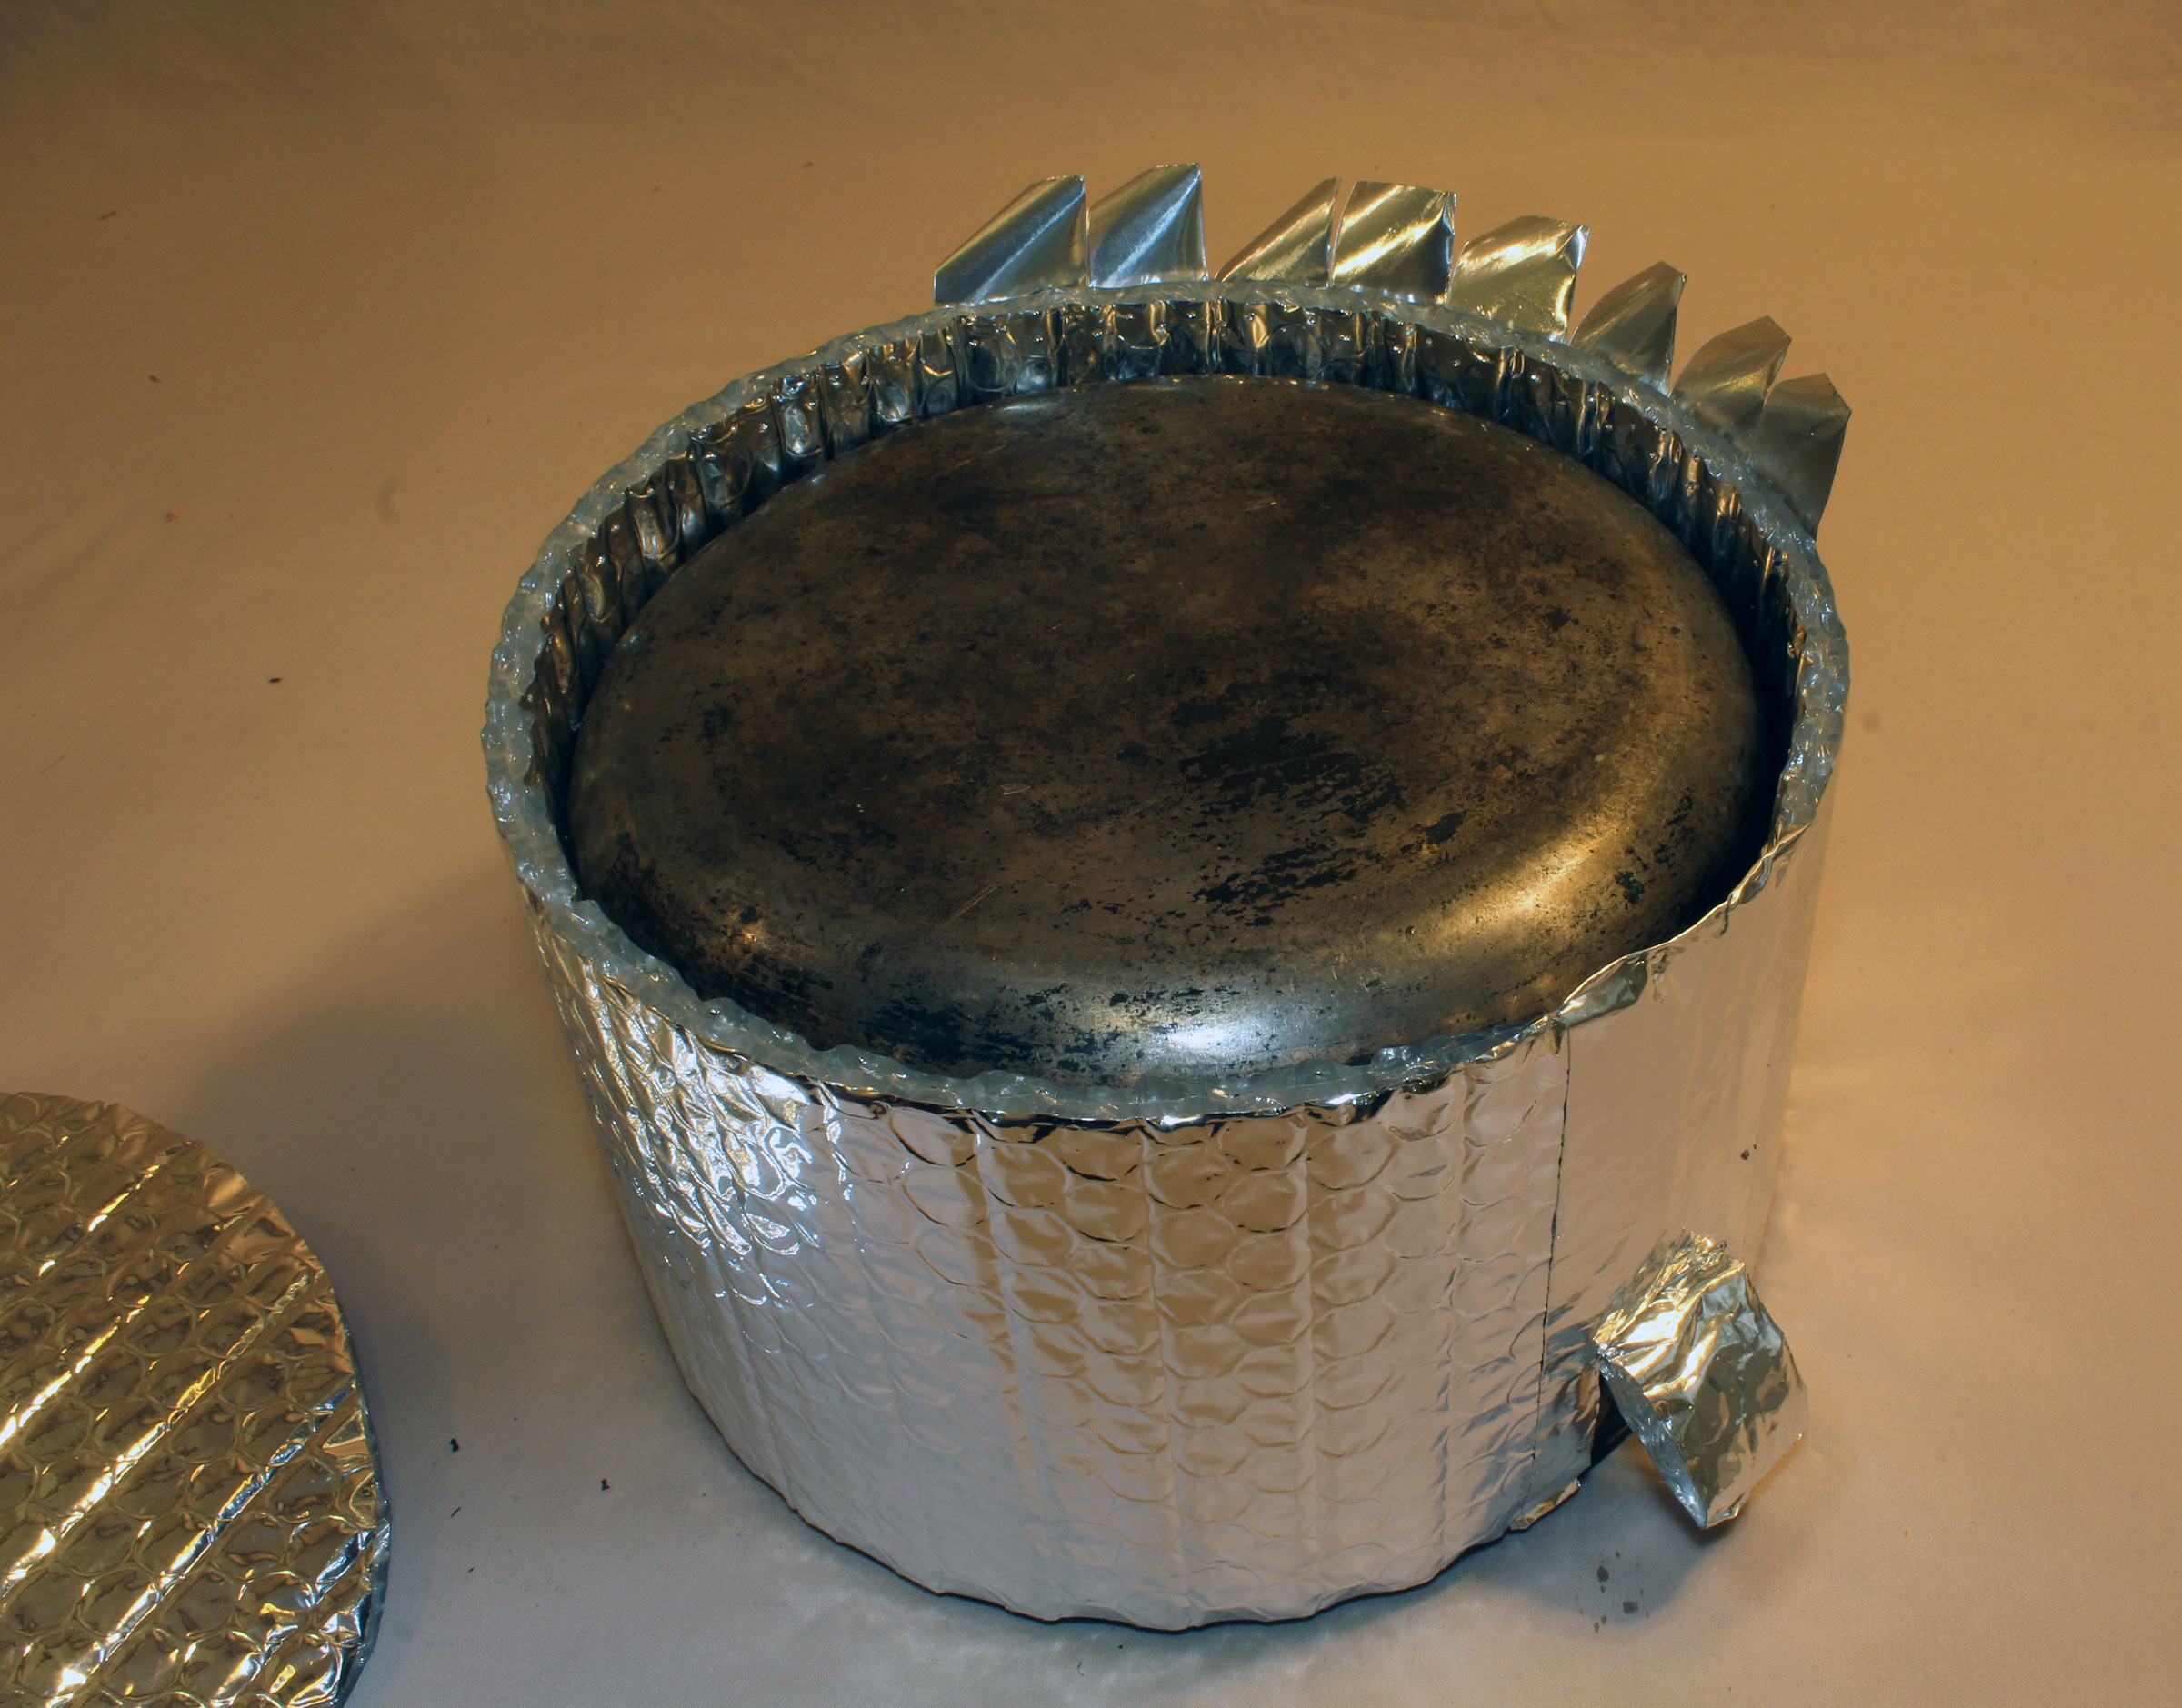
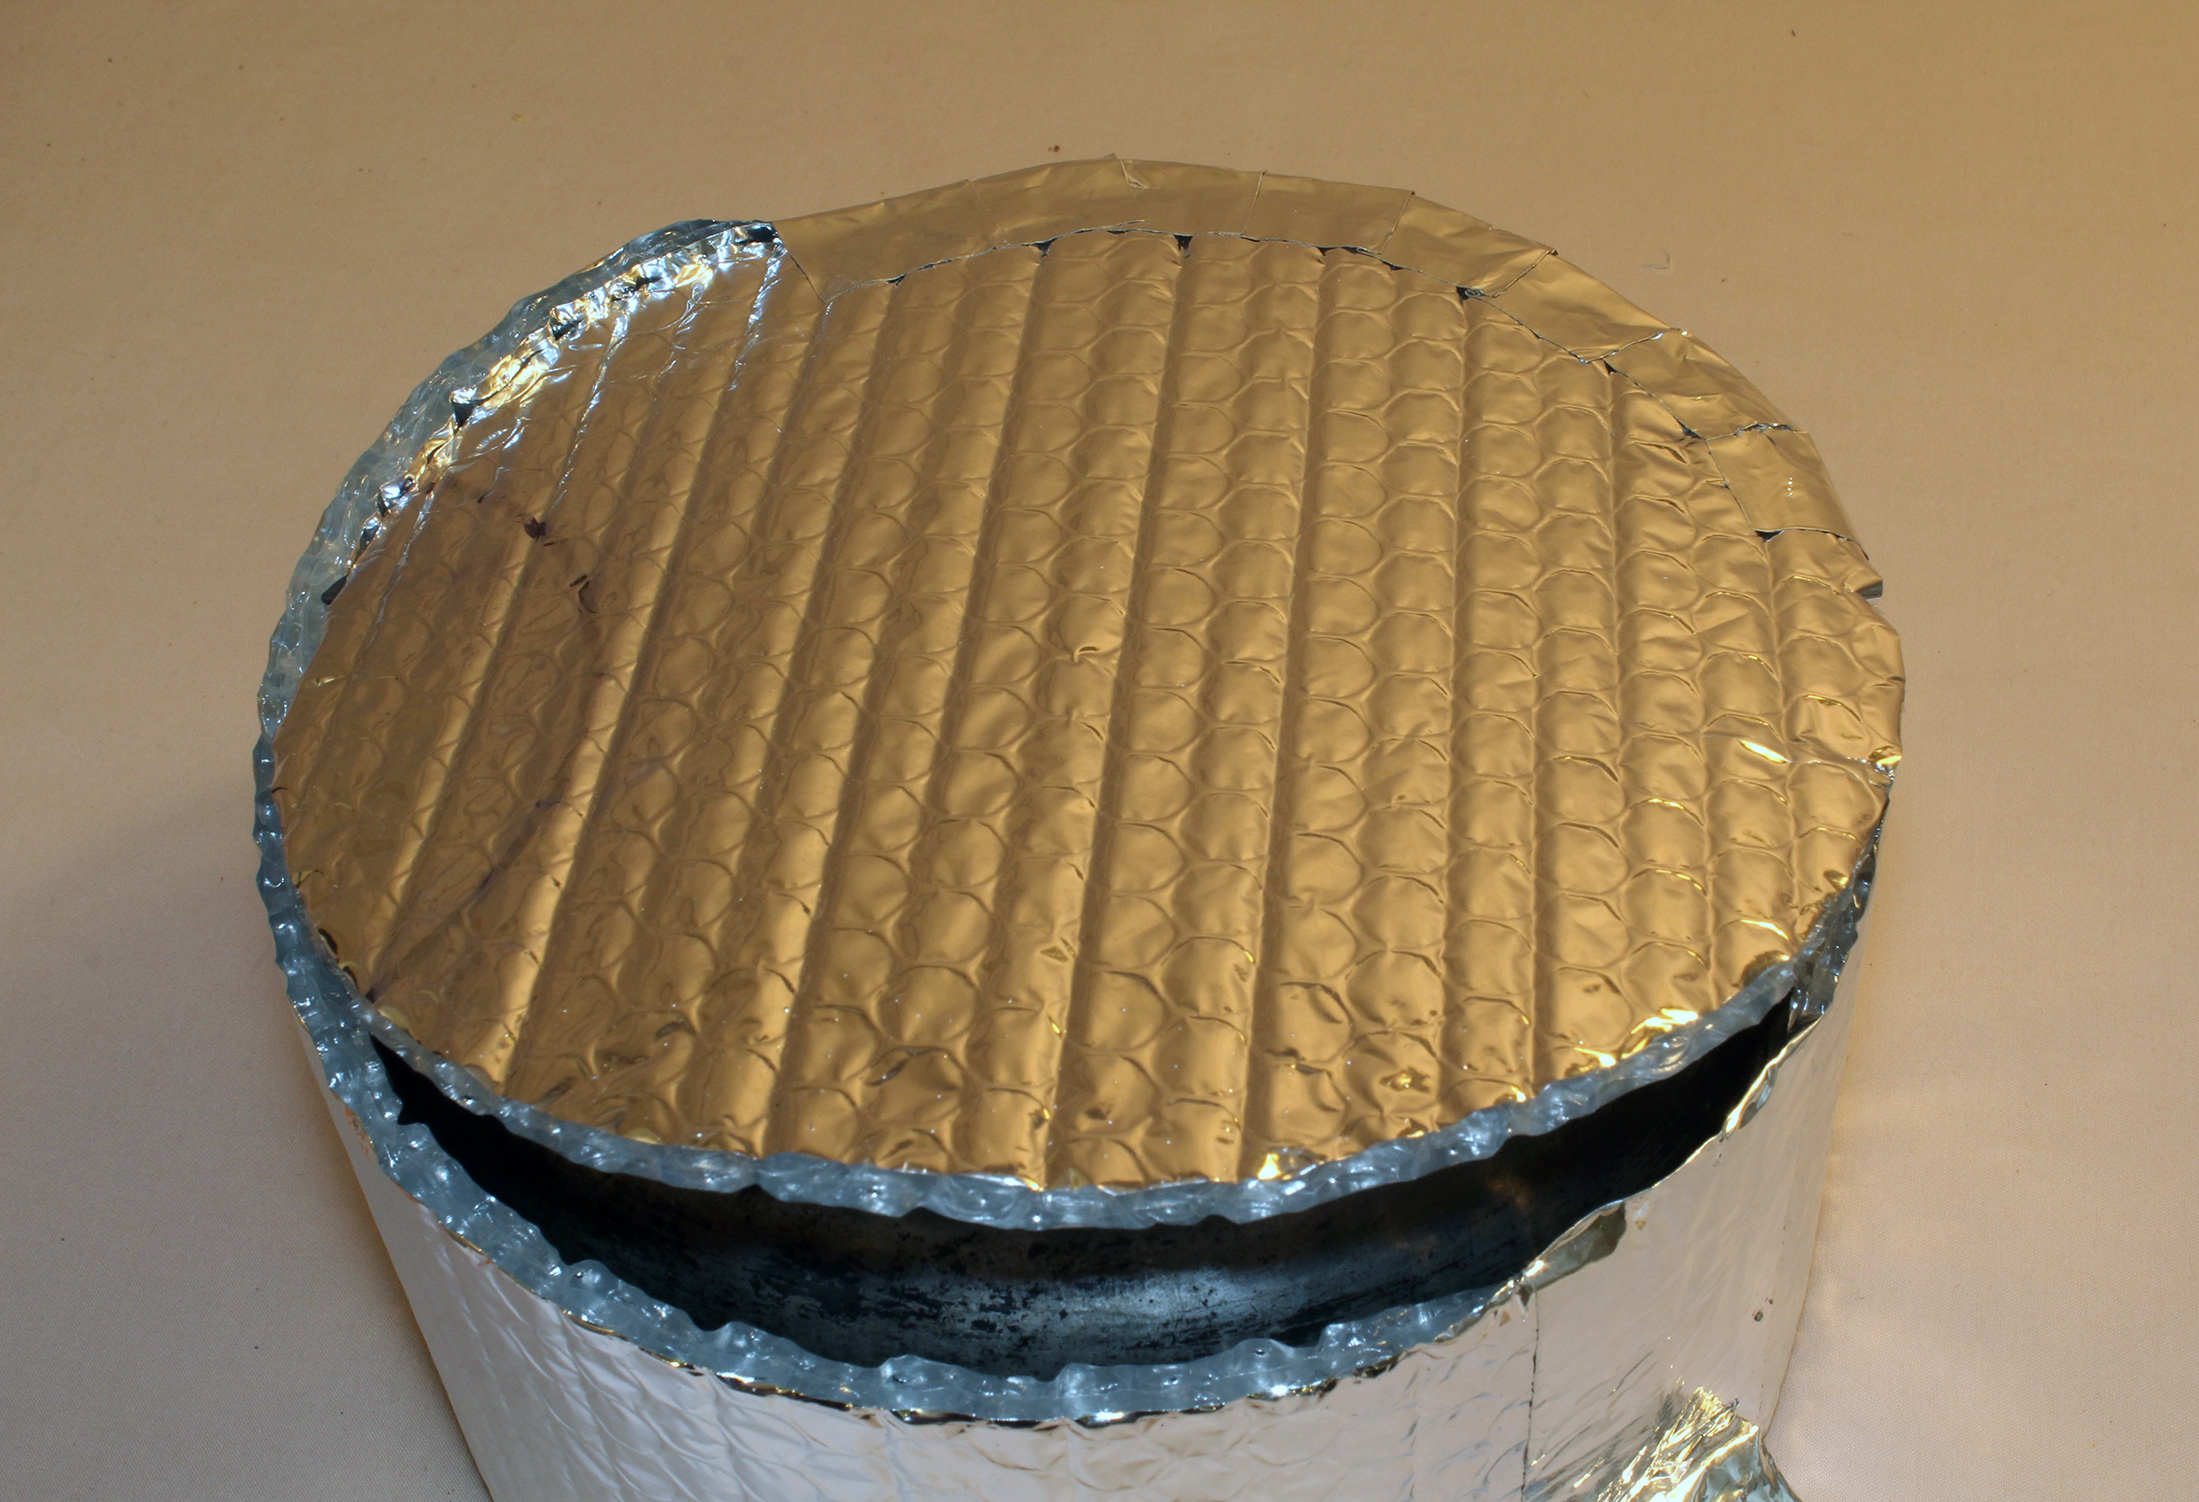
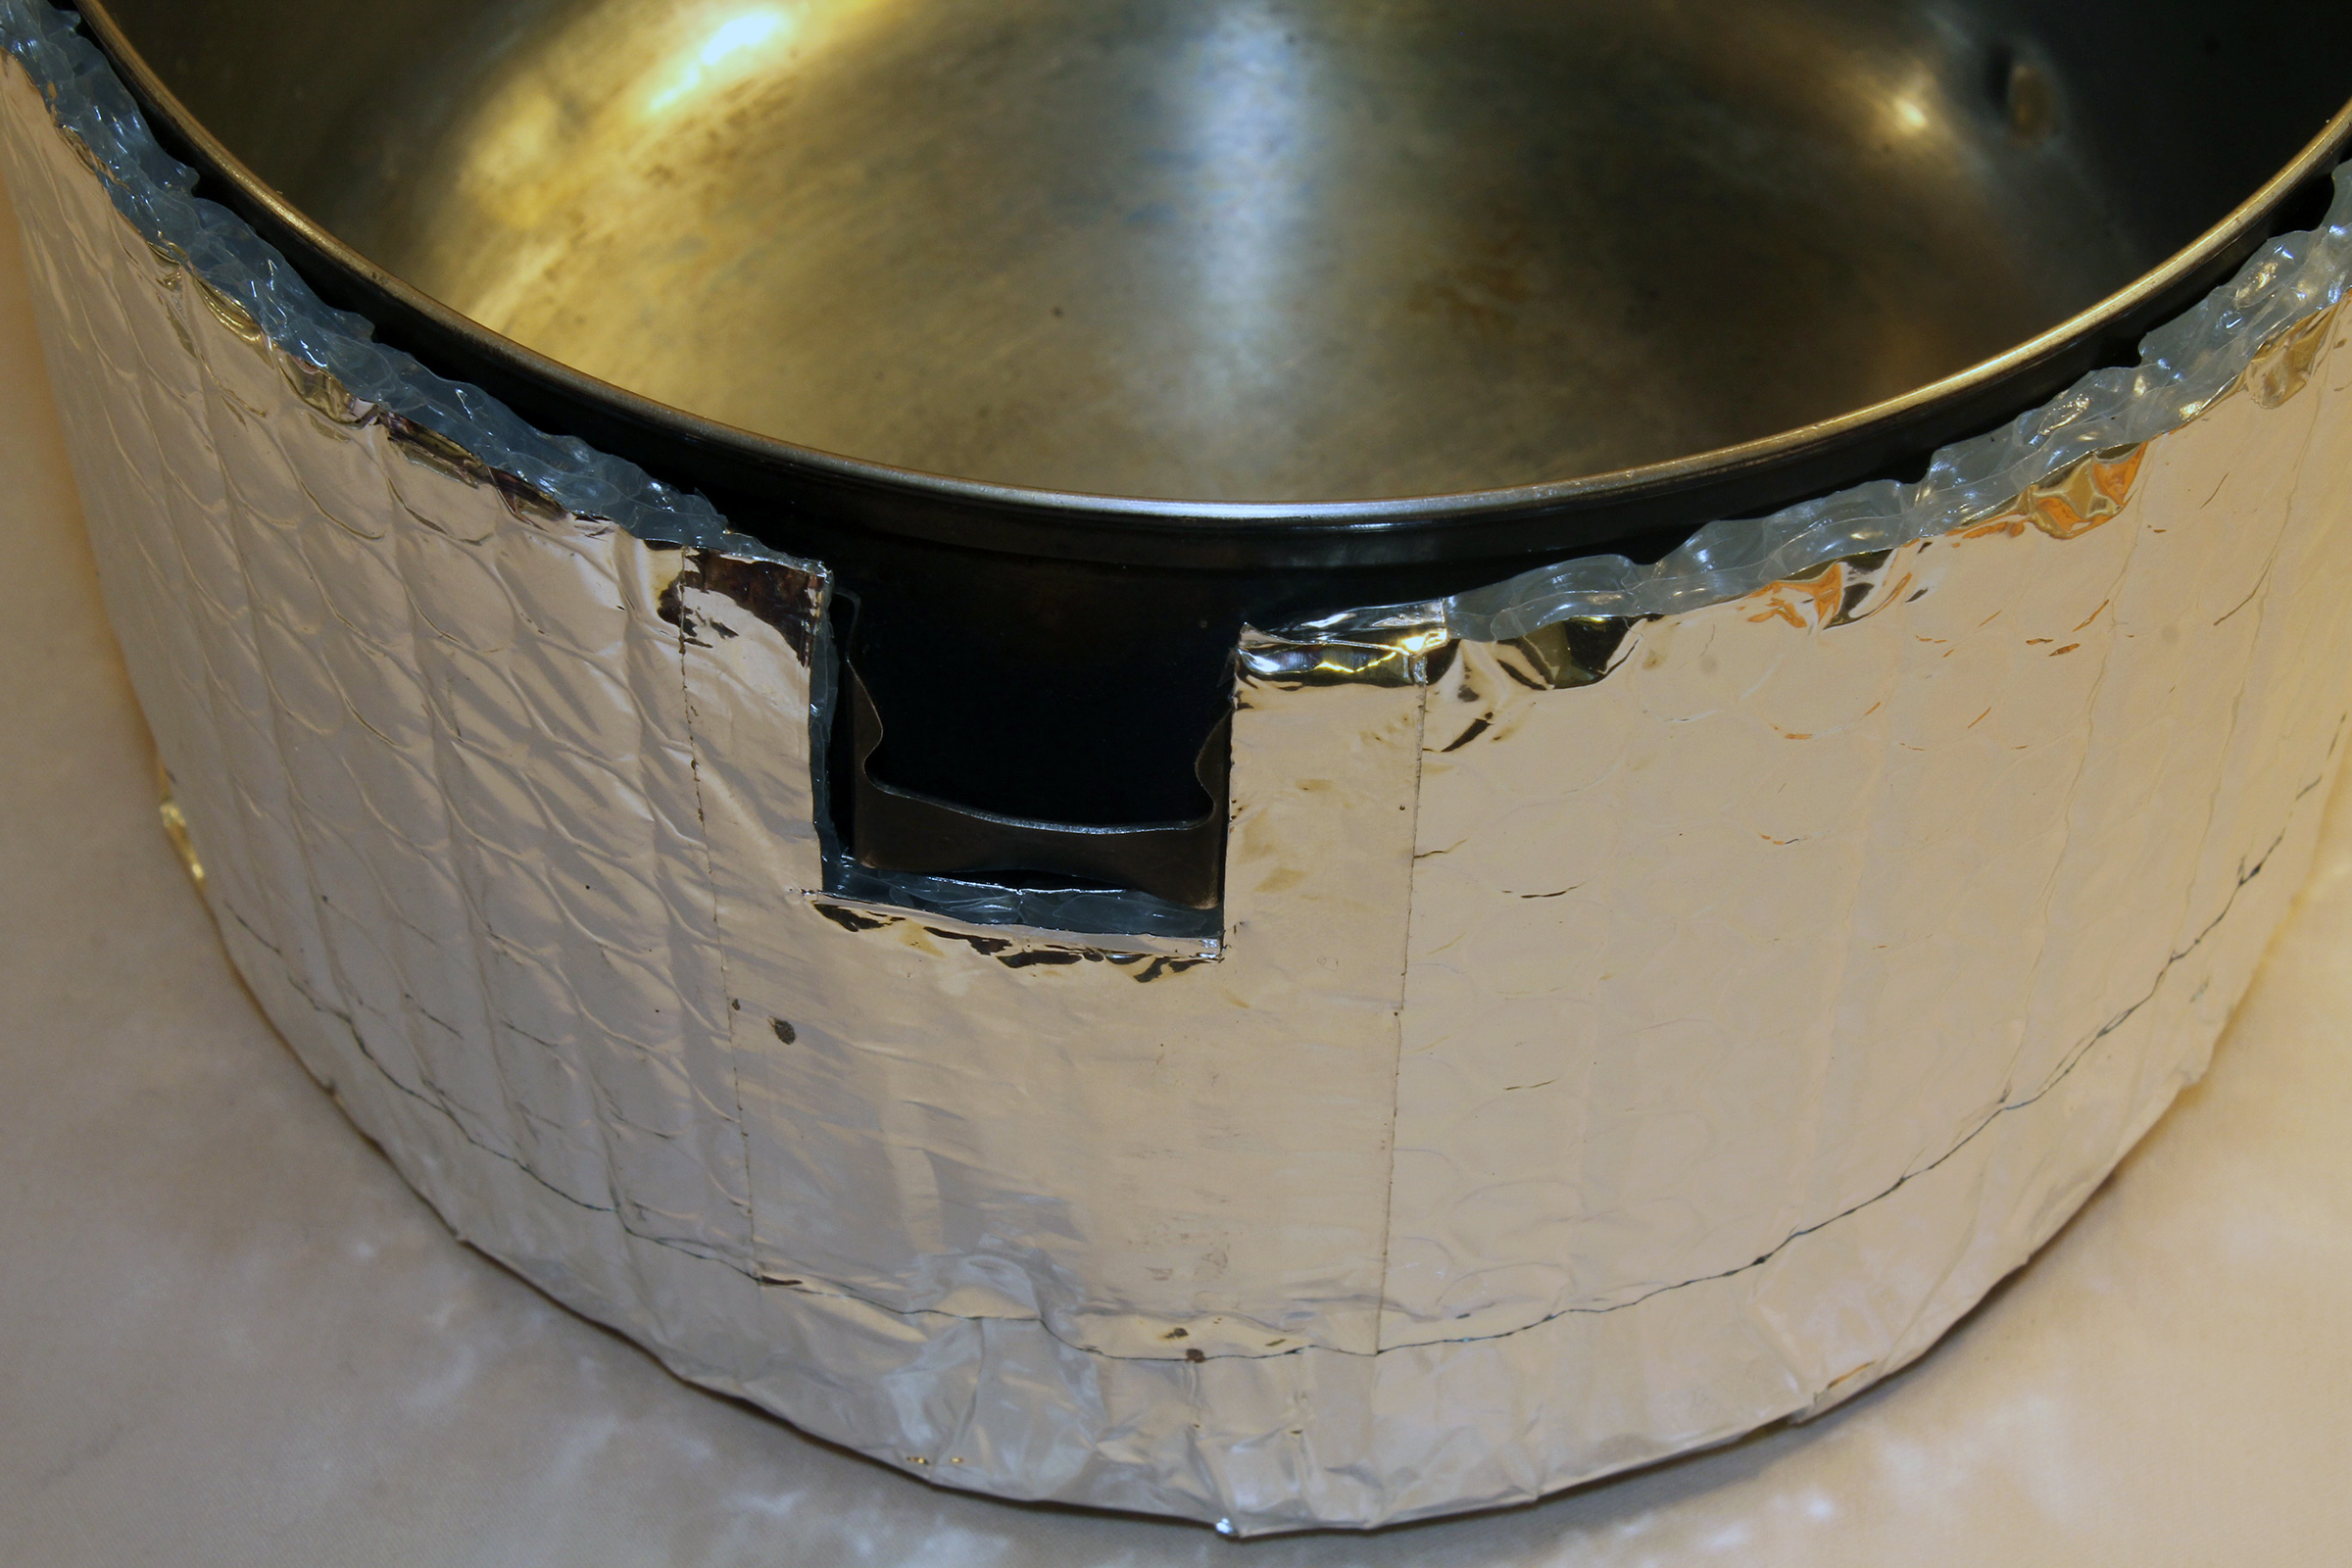
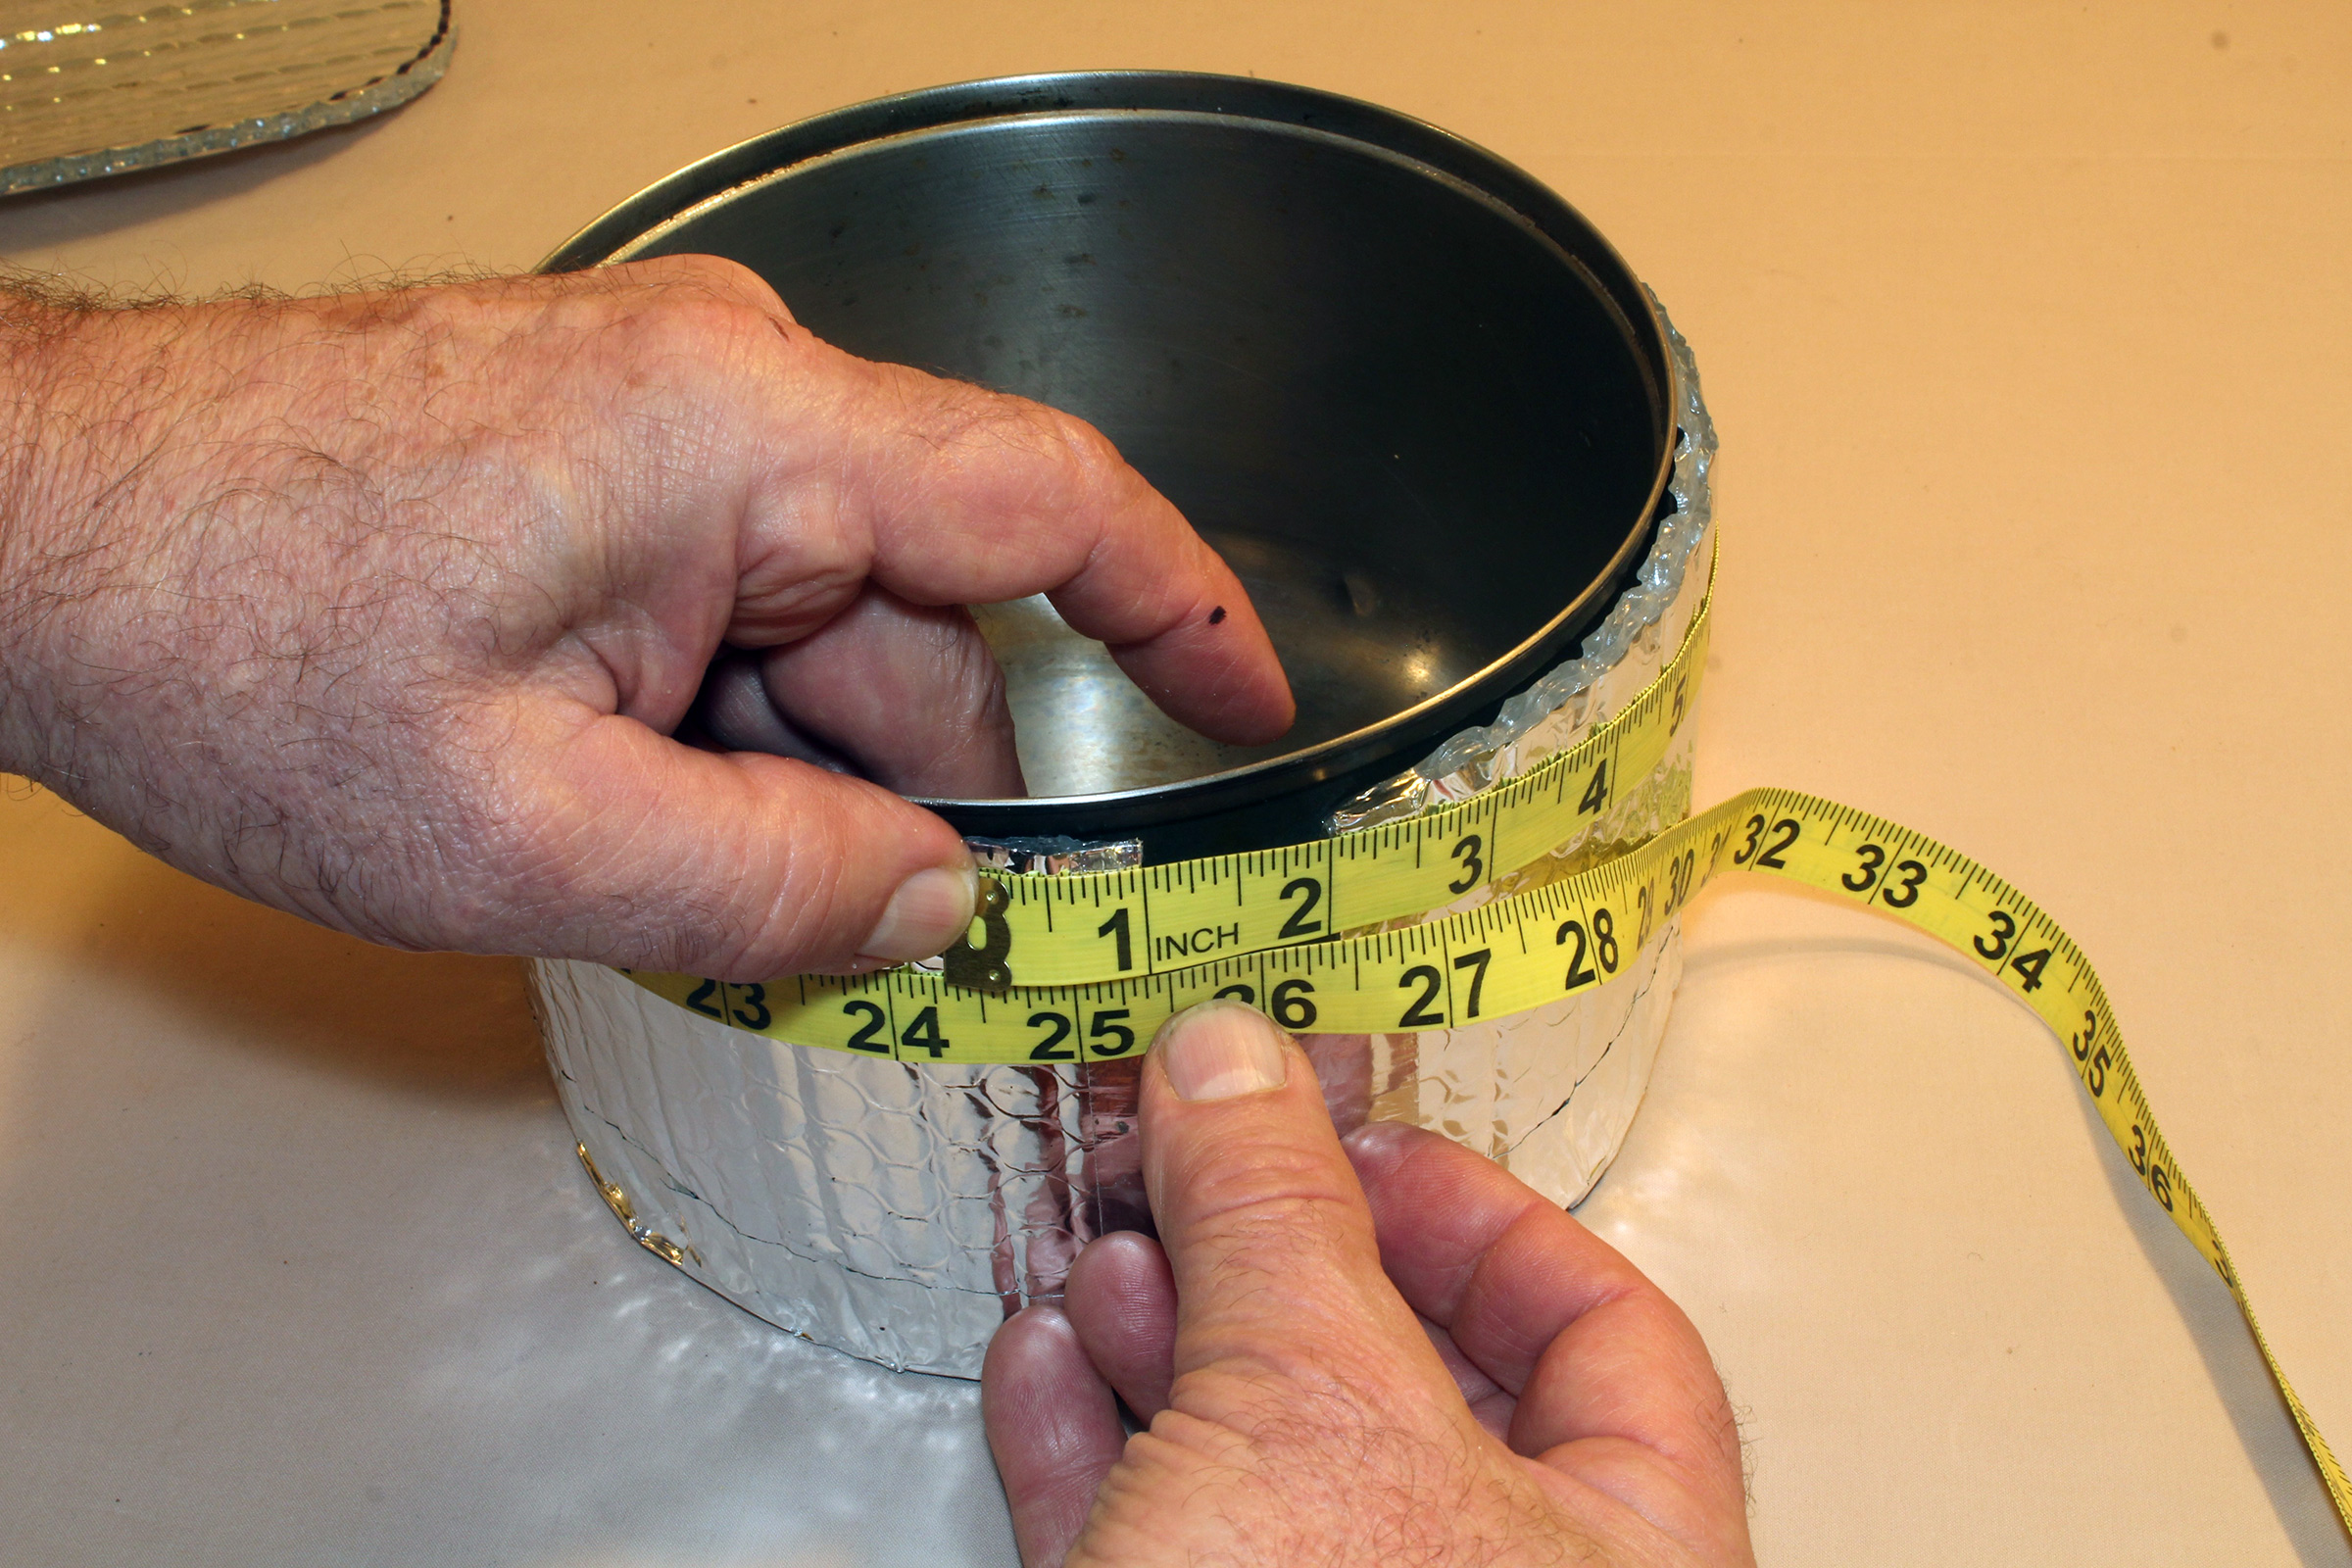
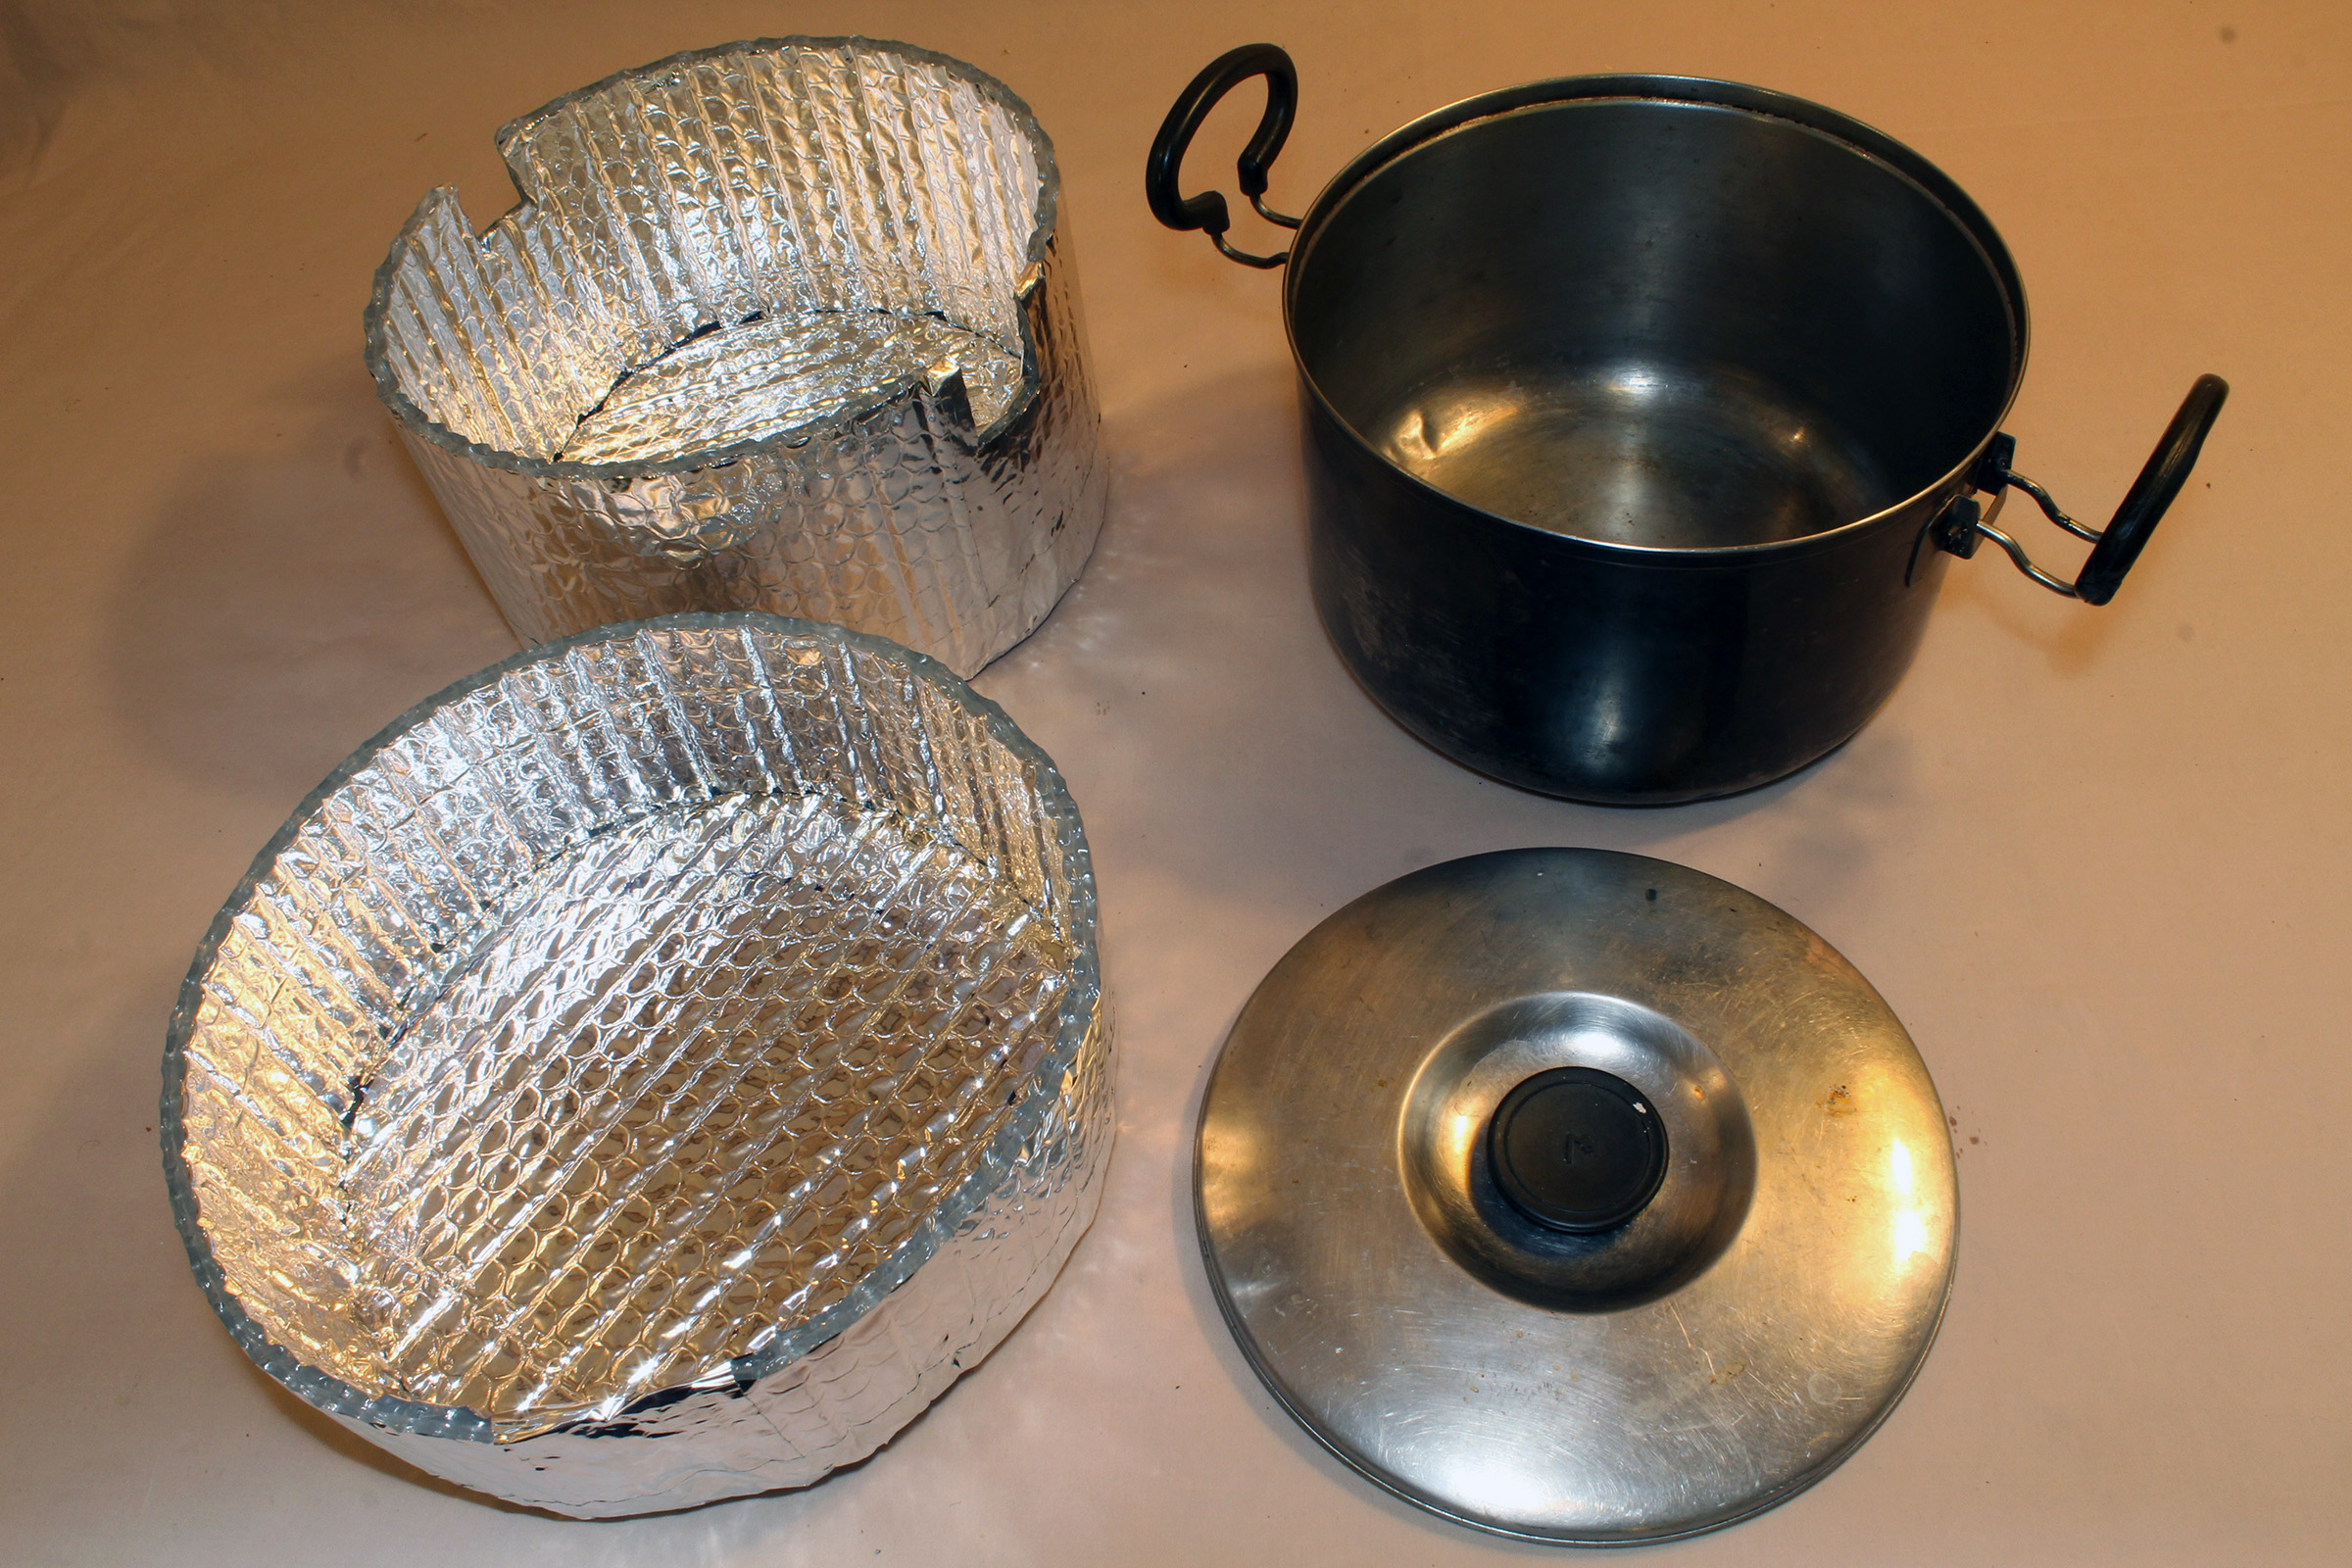
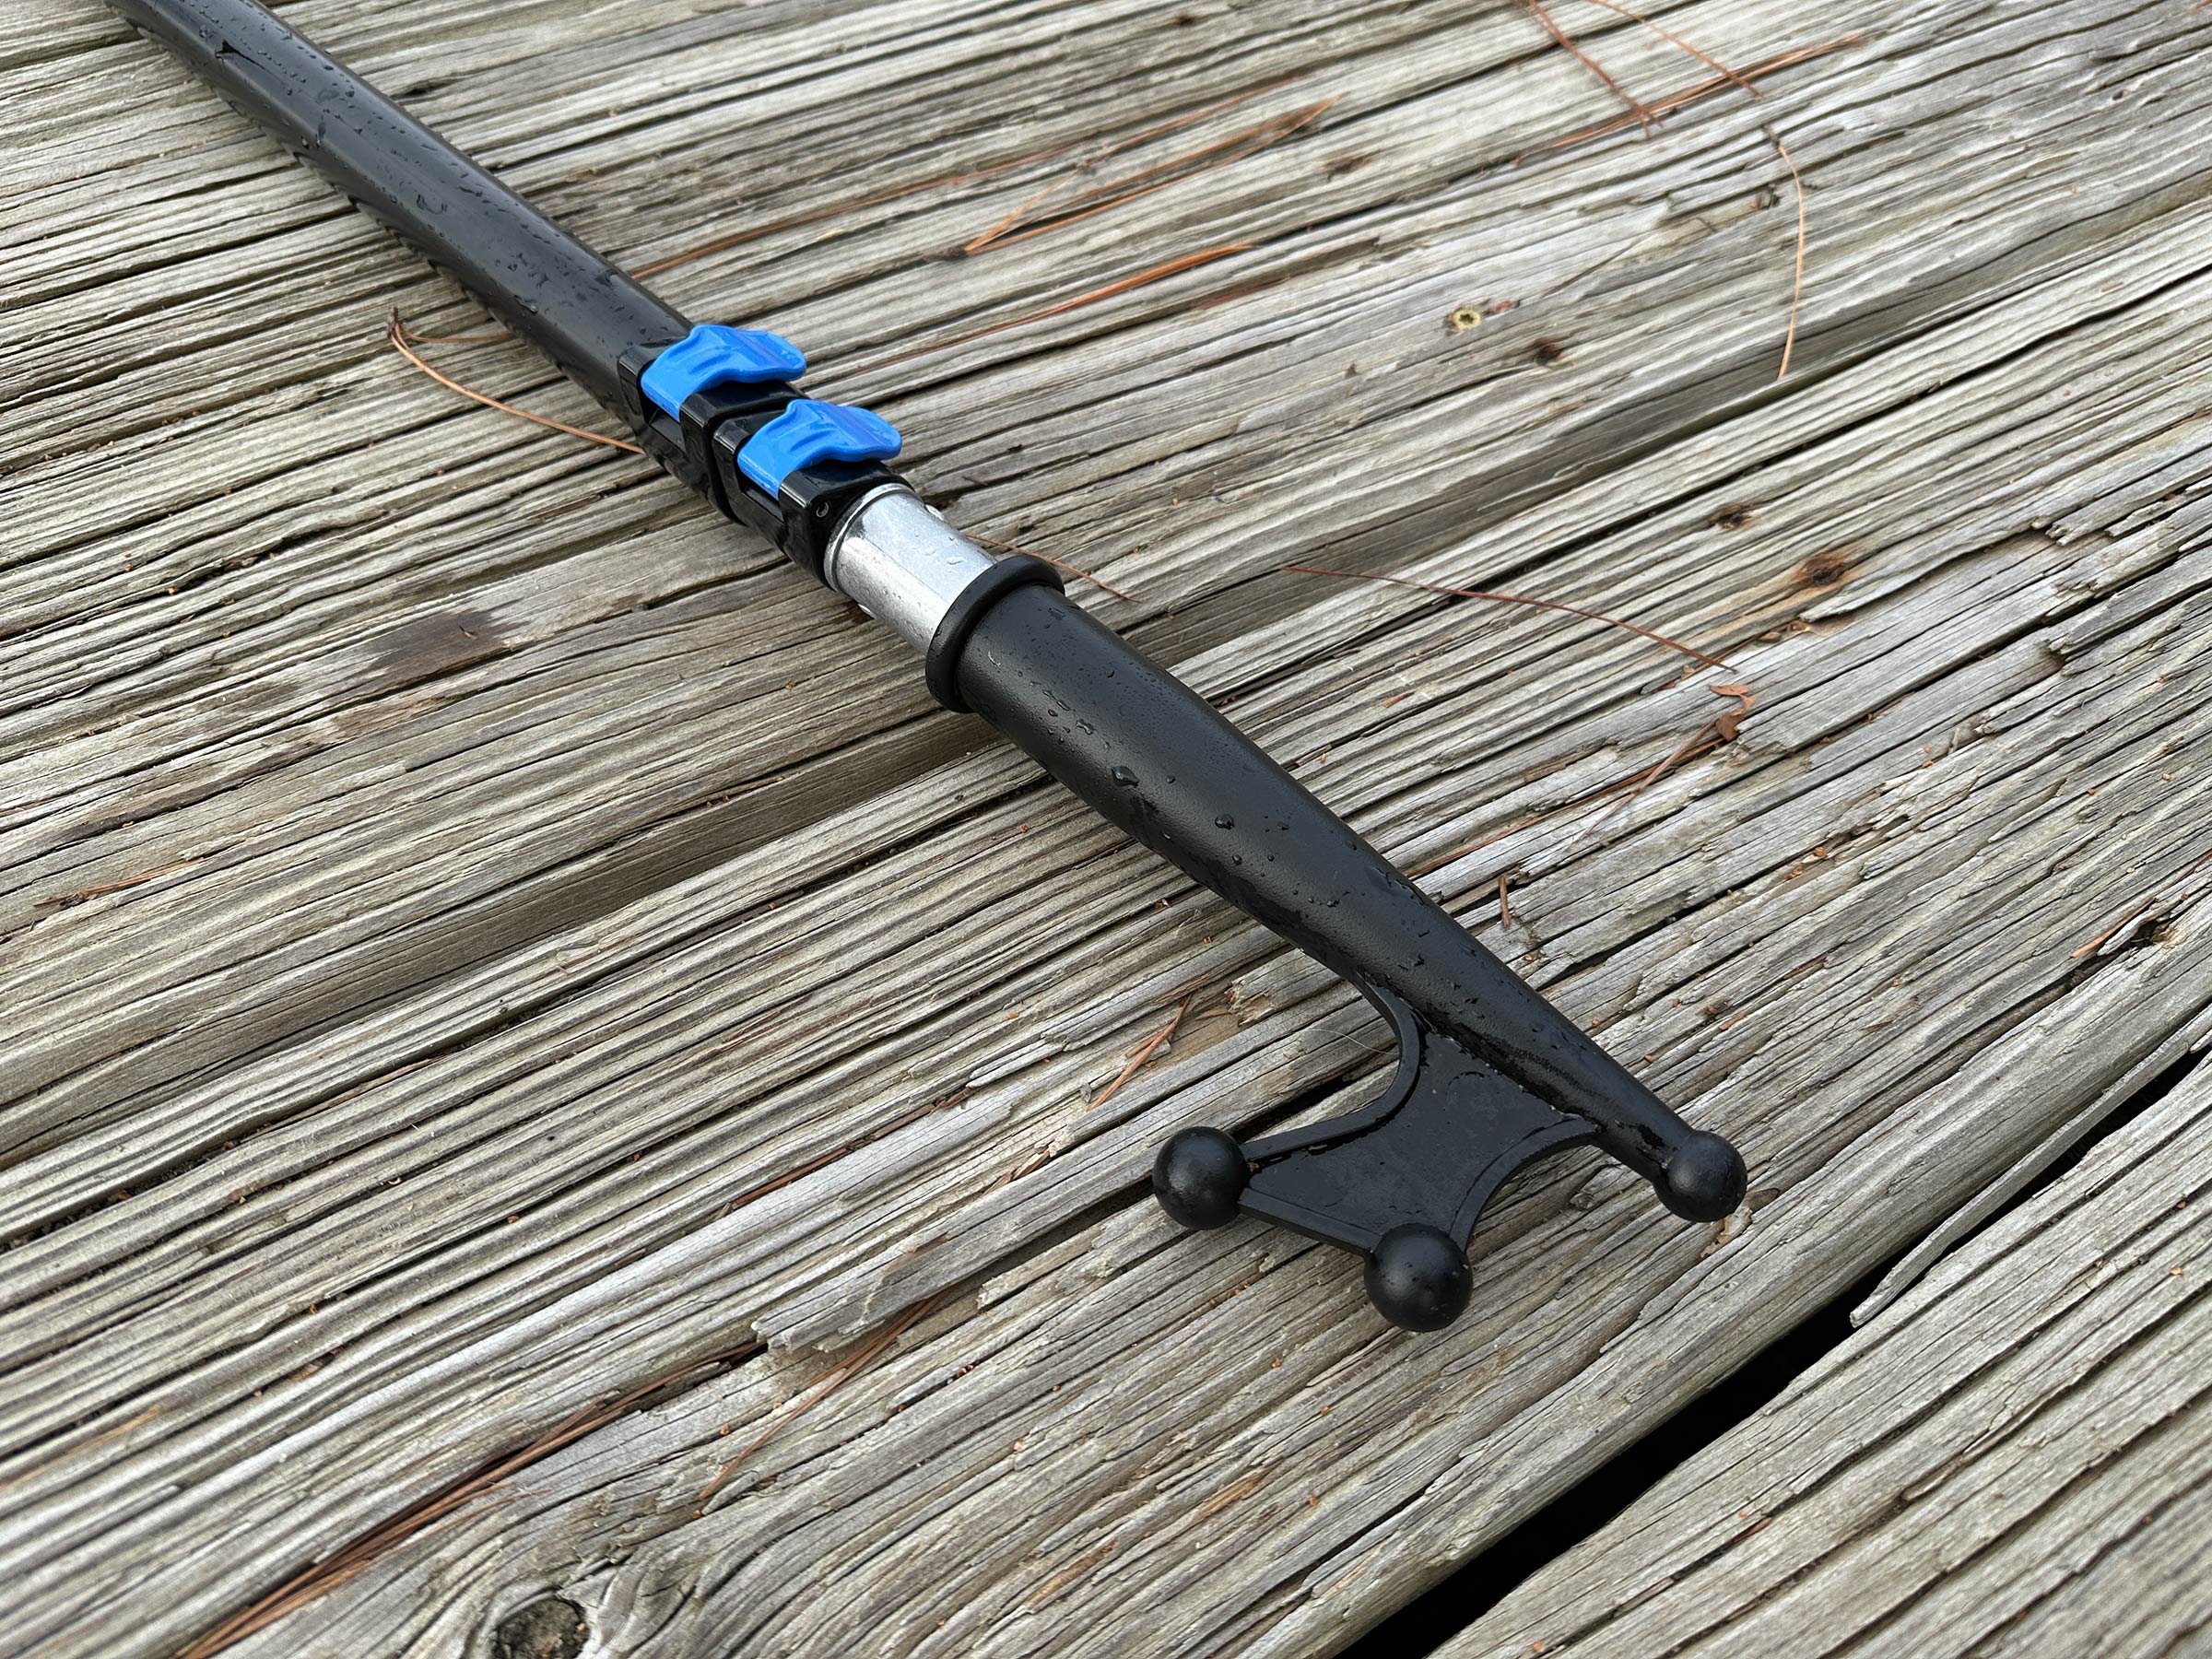
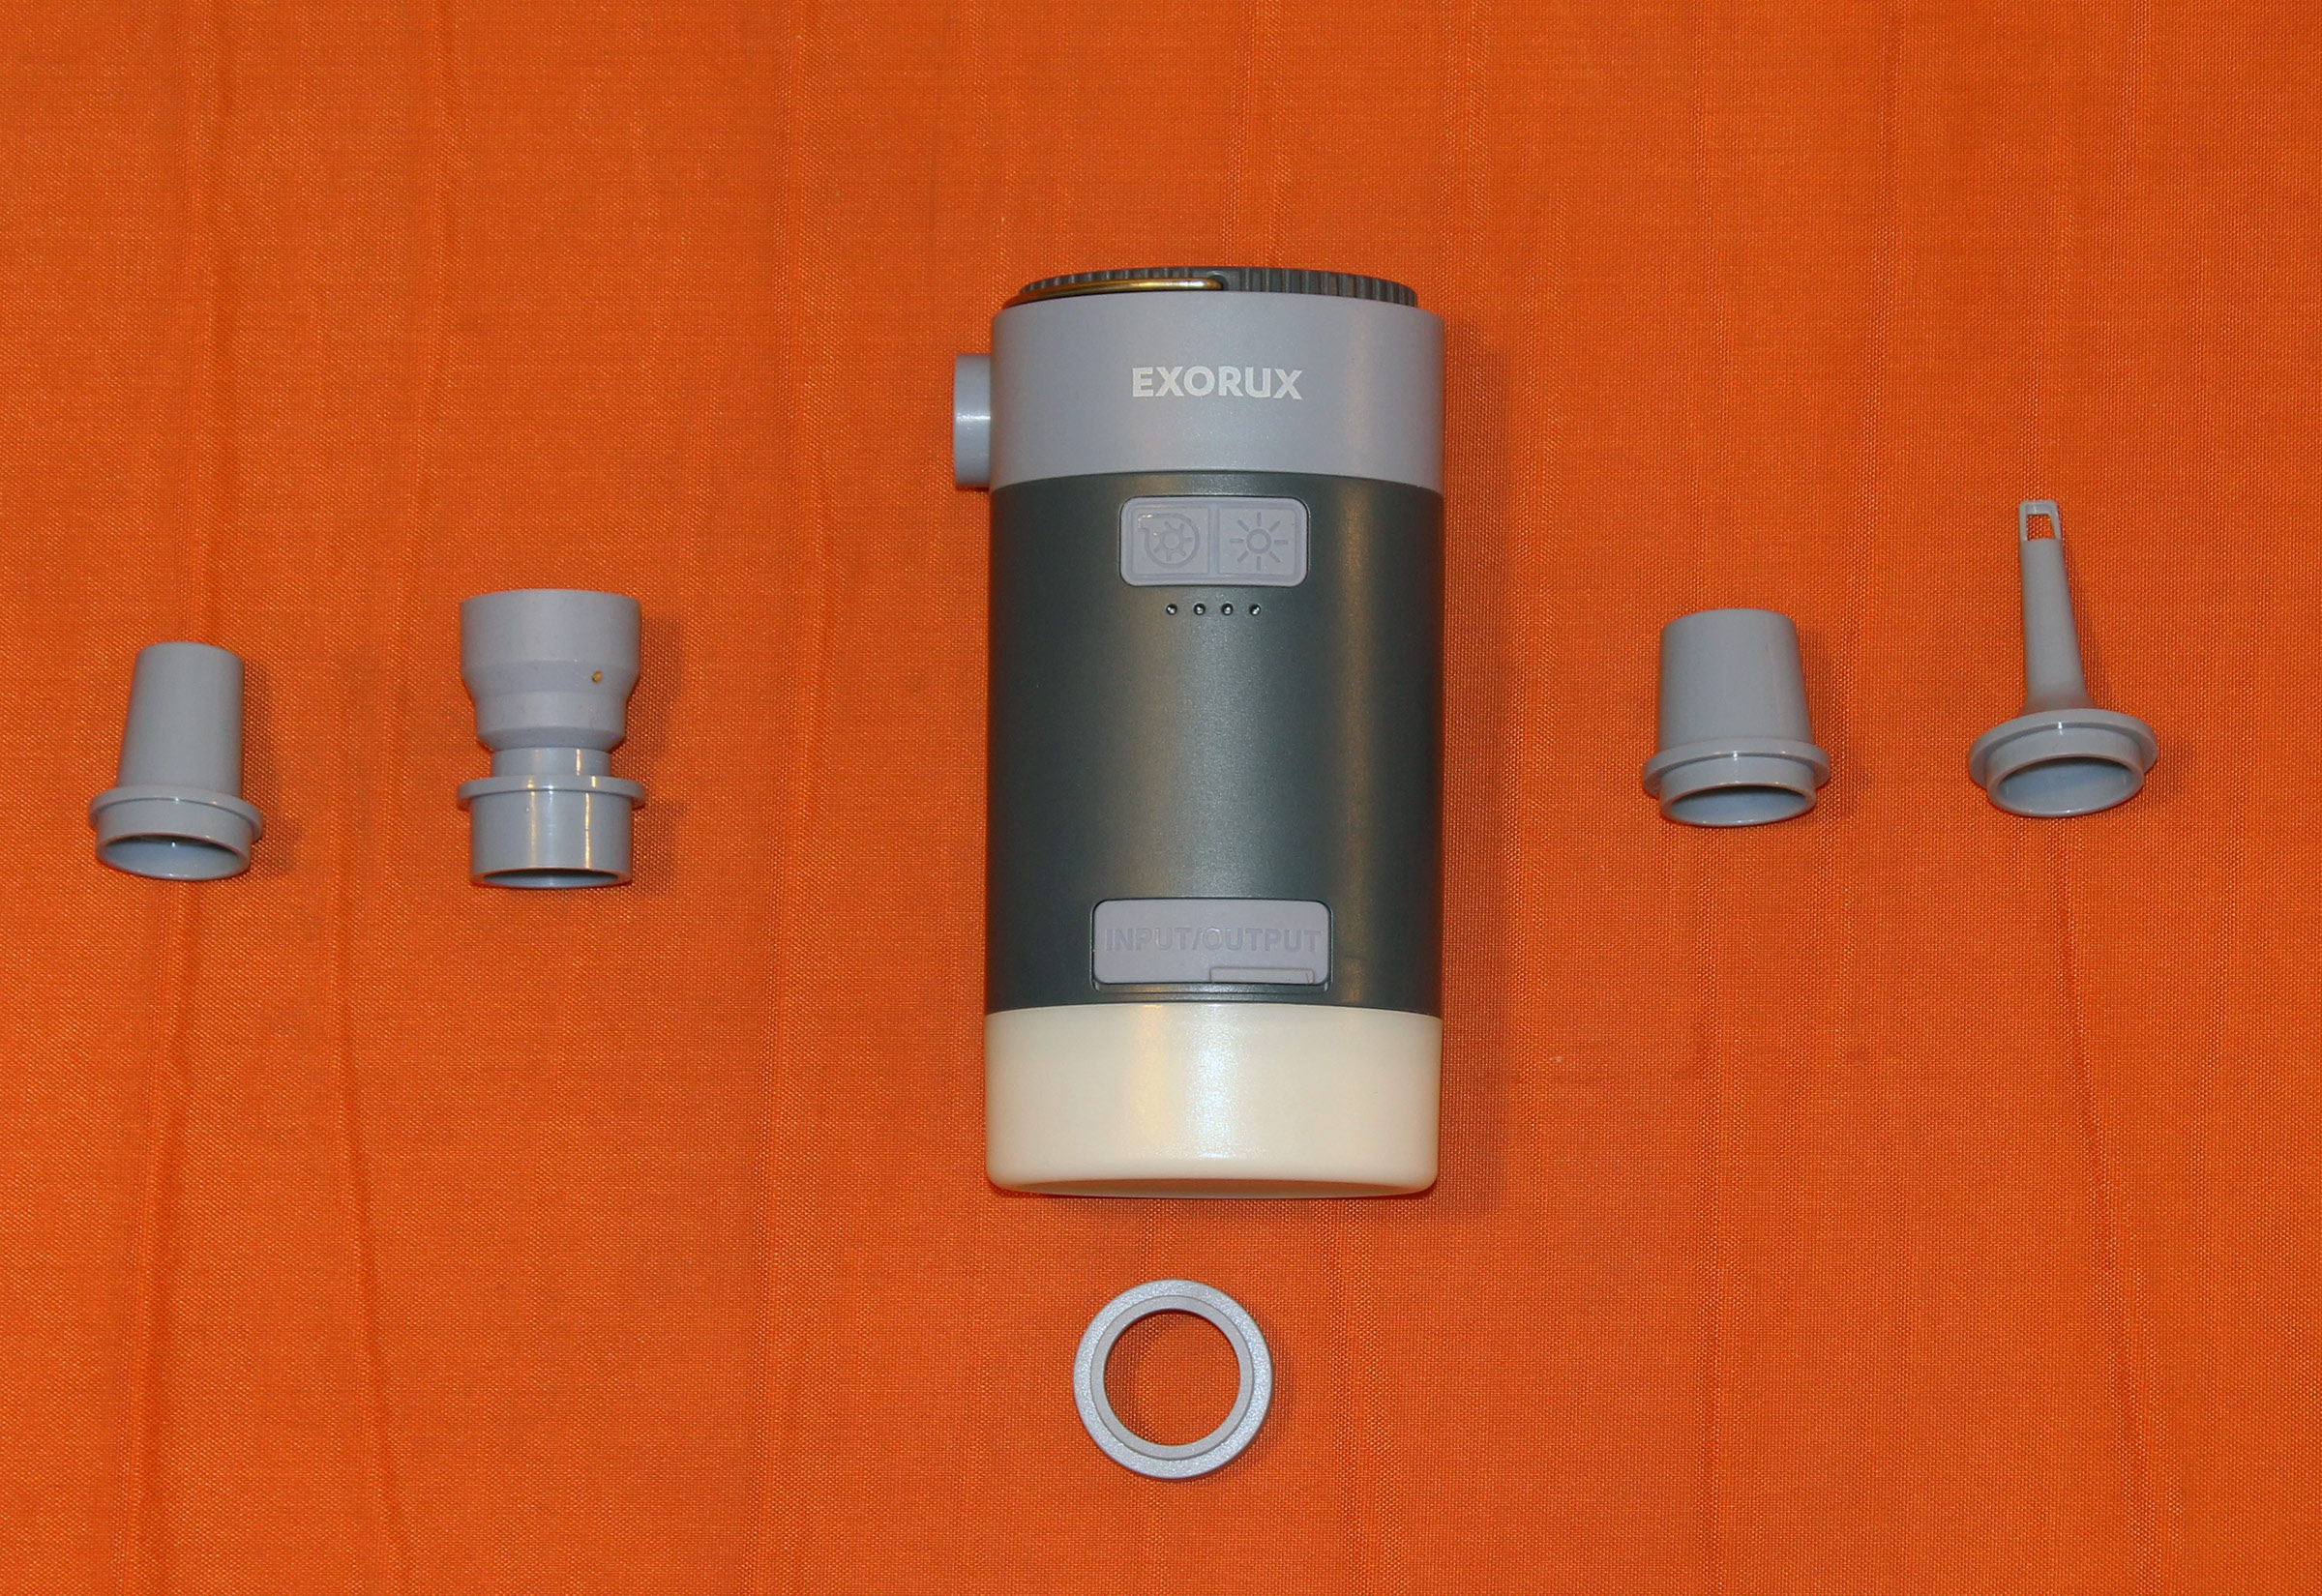
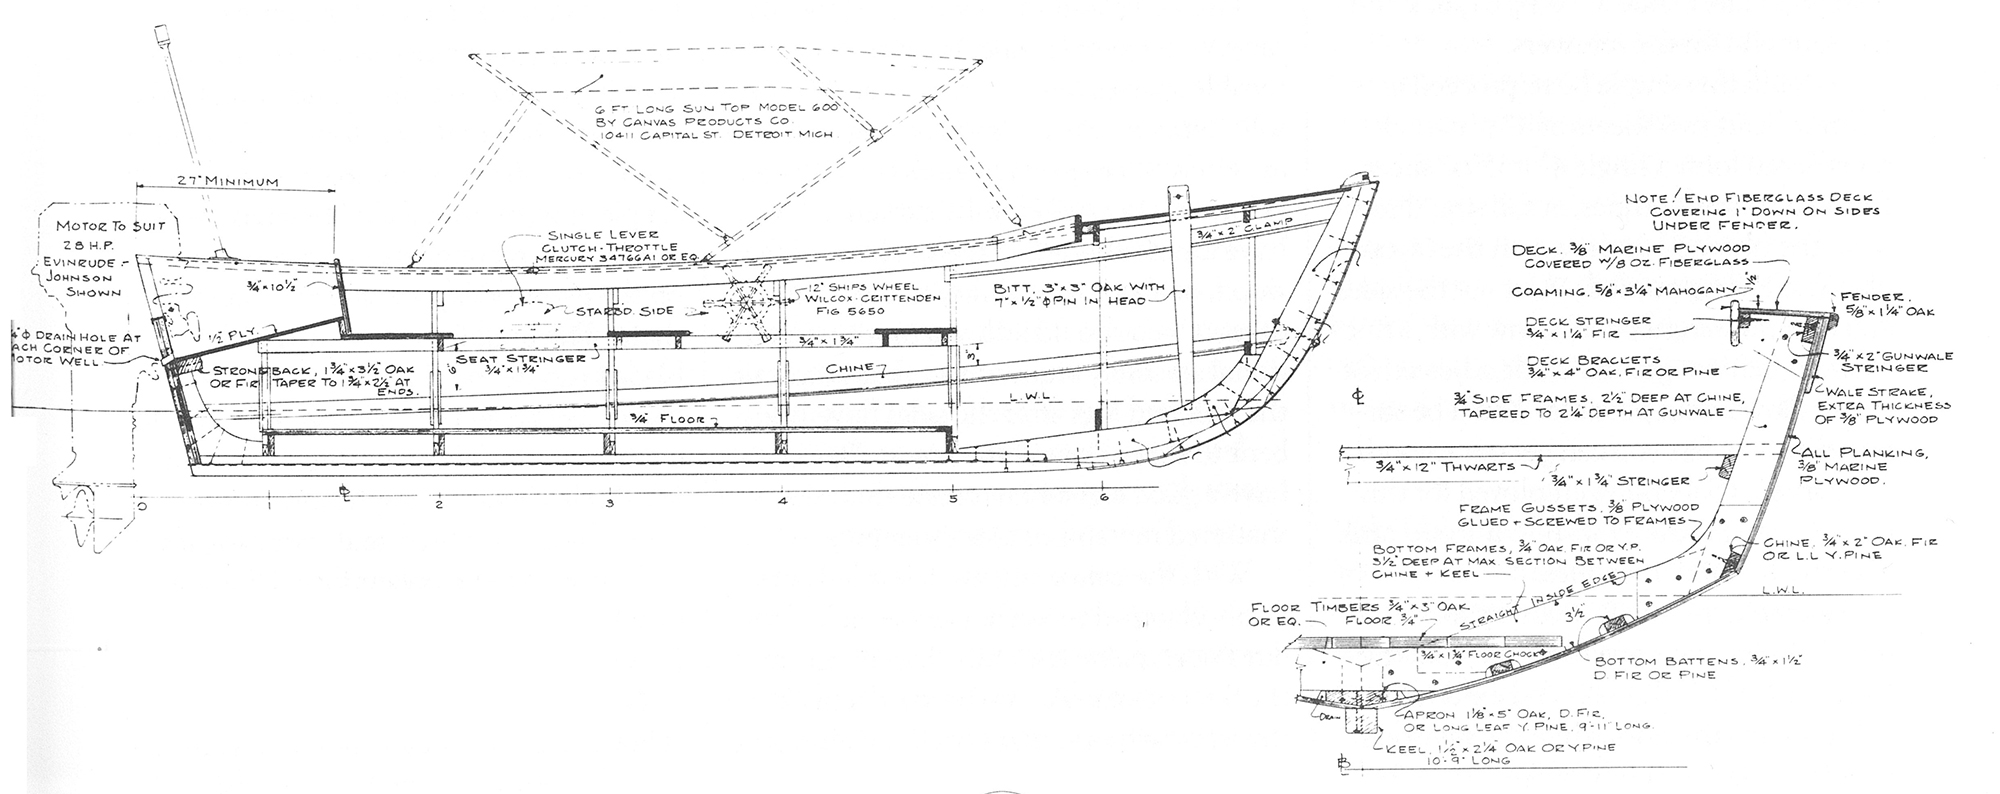
I had cut down a 5-gallon bucket for my Small Boats Head System to make it more compact for my rowboats, but it’s still a bit large for carrying aboard my canoes. The XL Retractable Portable Toilet from TripTips is even more compact and is easy to fit aboard any boat. Packed in its zippered case it weighs just under 3 1⁄4 lbs. It is 13″ in diameter—the same as systems using 5-gallon buckets—but only 3 1⁄4″ tall. In use, its eight telescoping sections rise and, with a small twist, lock to hold the seat 13″ high. That’s just 1 3⁄4″ shy of one of my toilets at home. I’m 6′ tall and setting the toilet on a throwable boat cushion gets it up to a more comfortable height. For children, the seat can be lowered in eight 1 1⁄2″ increments by not engaging all the sections. TripTips makes another retractable toilet that has a maximum height of 19 3⁄4″.
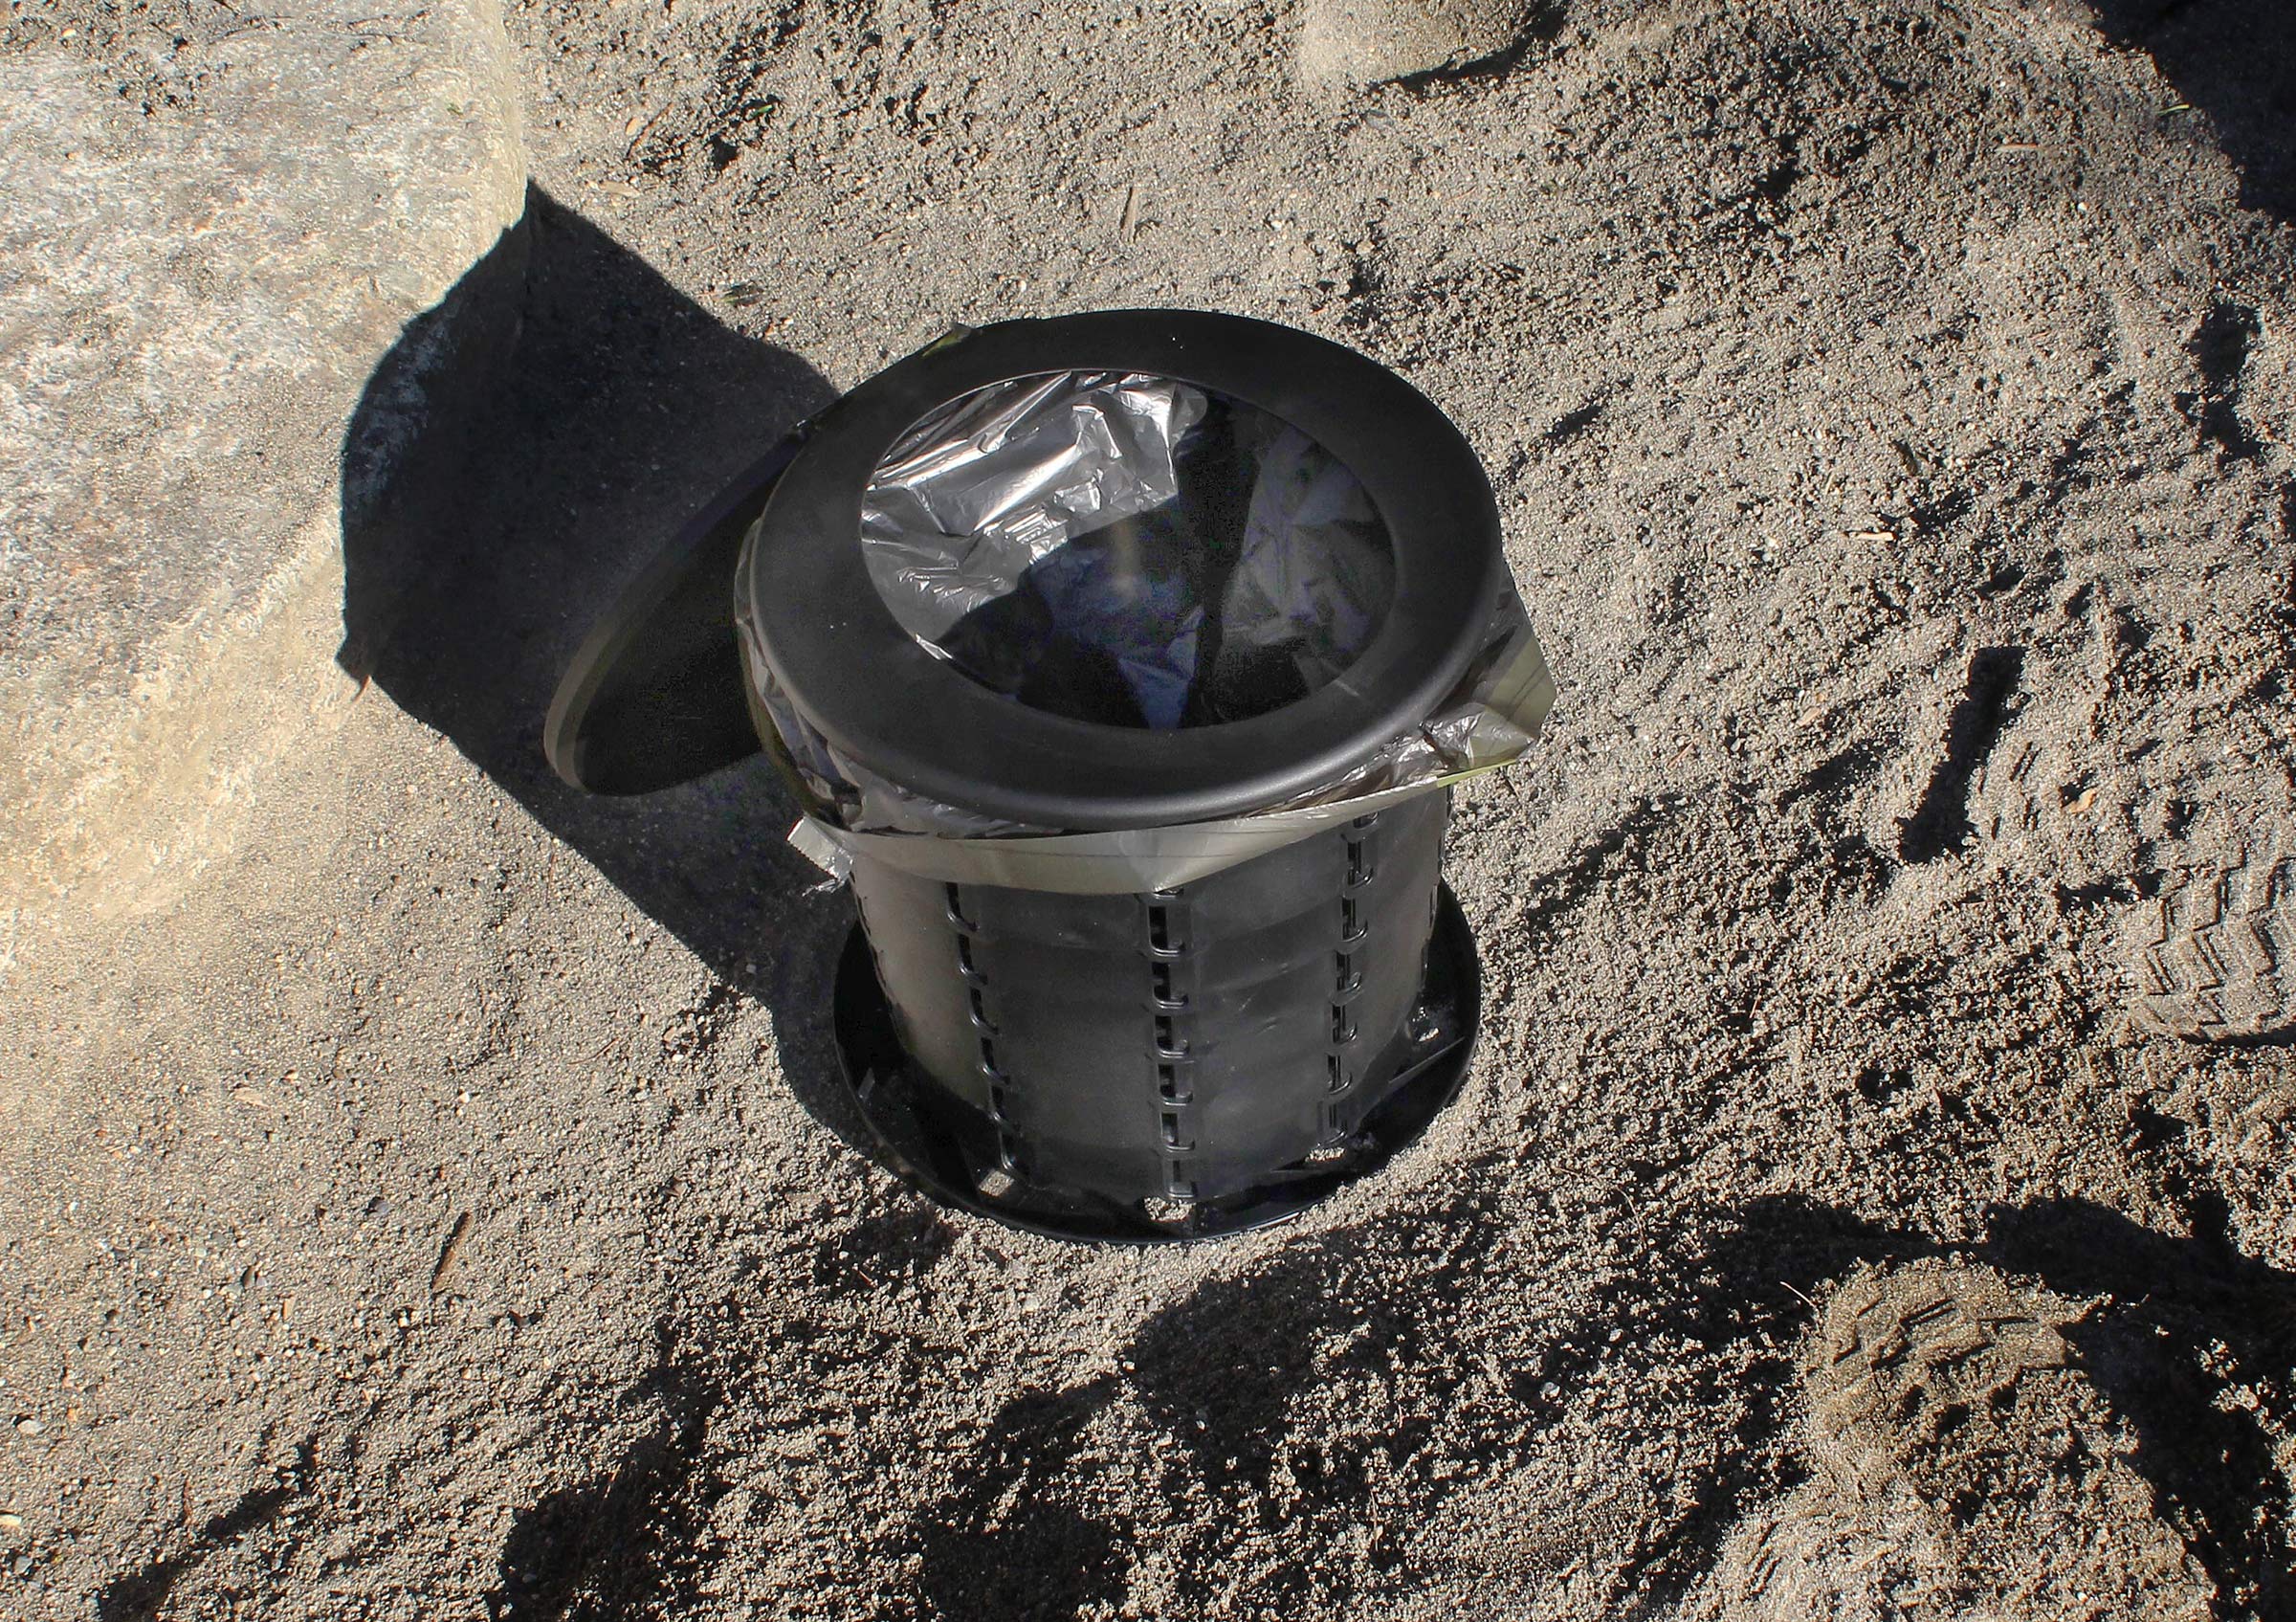
The 8-gallon liner bags fit the collapsible toilet are well as 5-gallon bucket systems. They have a draw cord at the top for closing the bags after use.
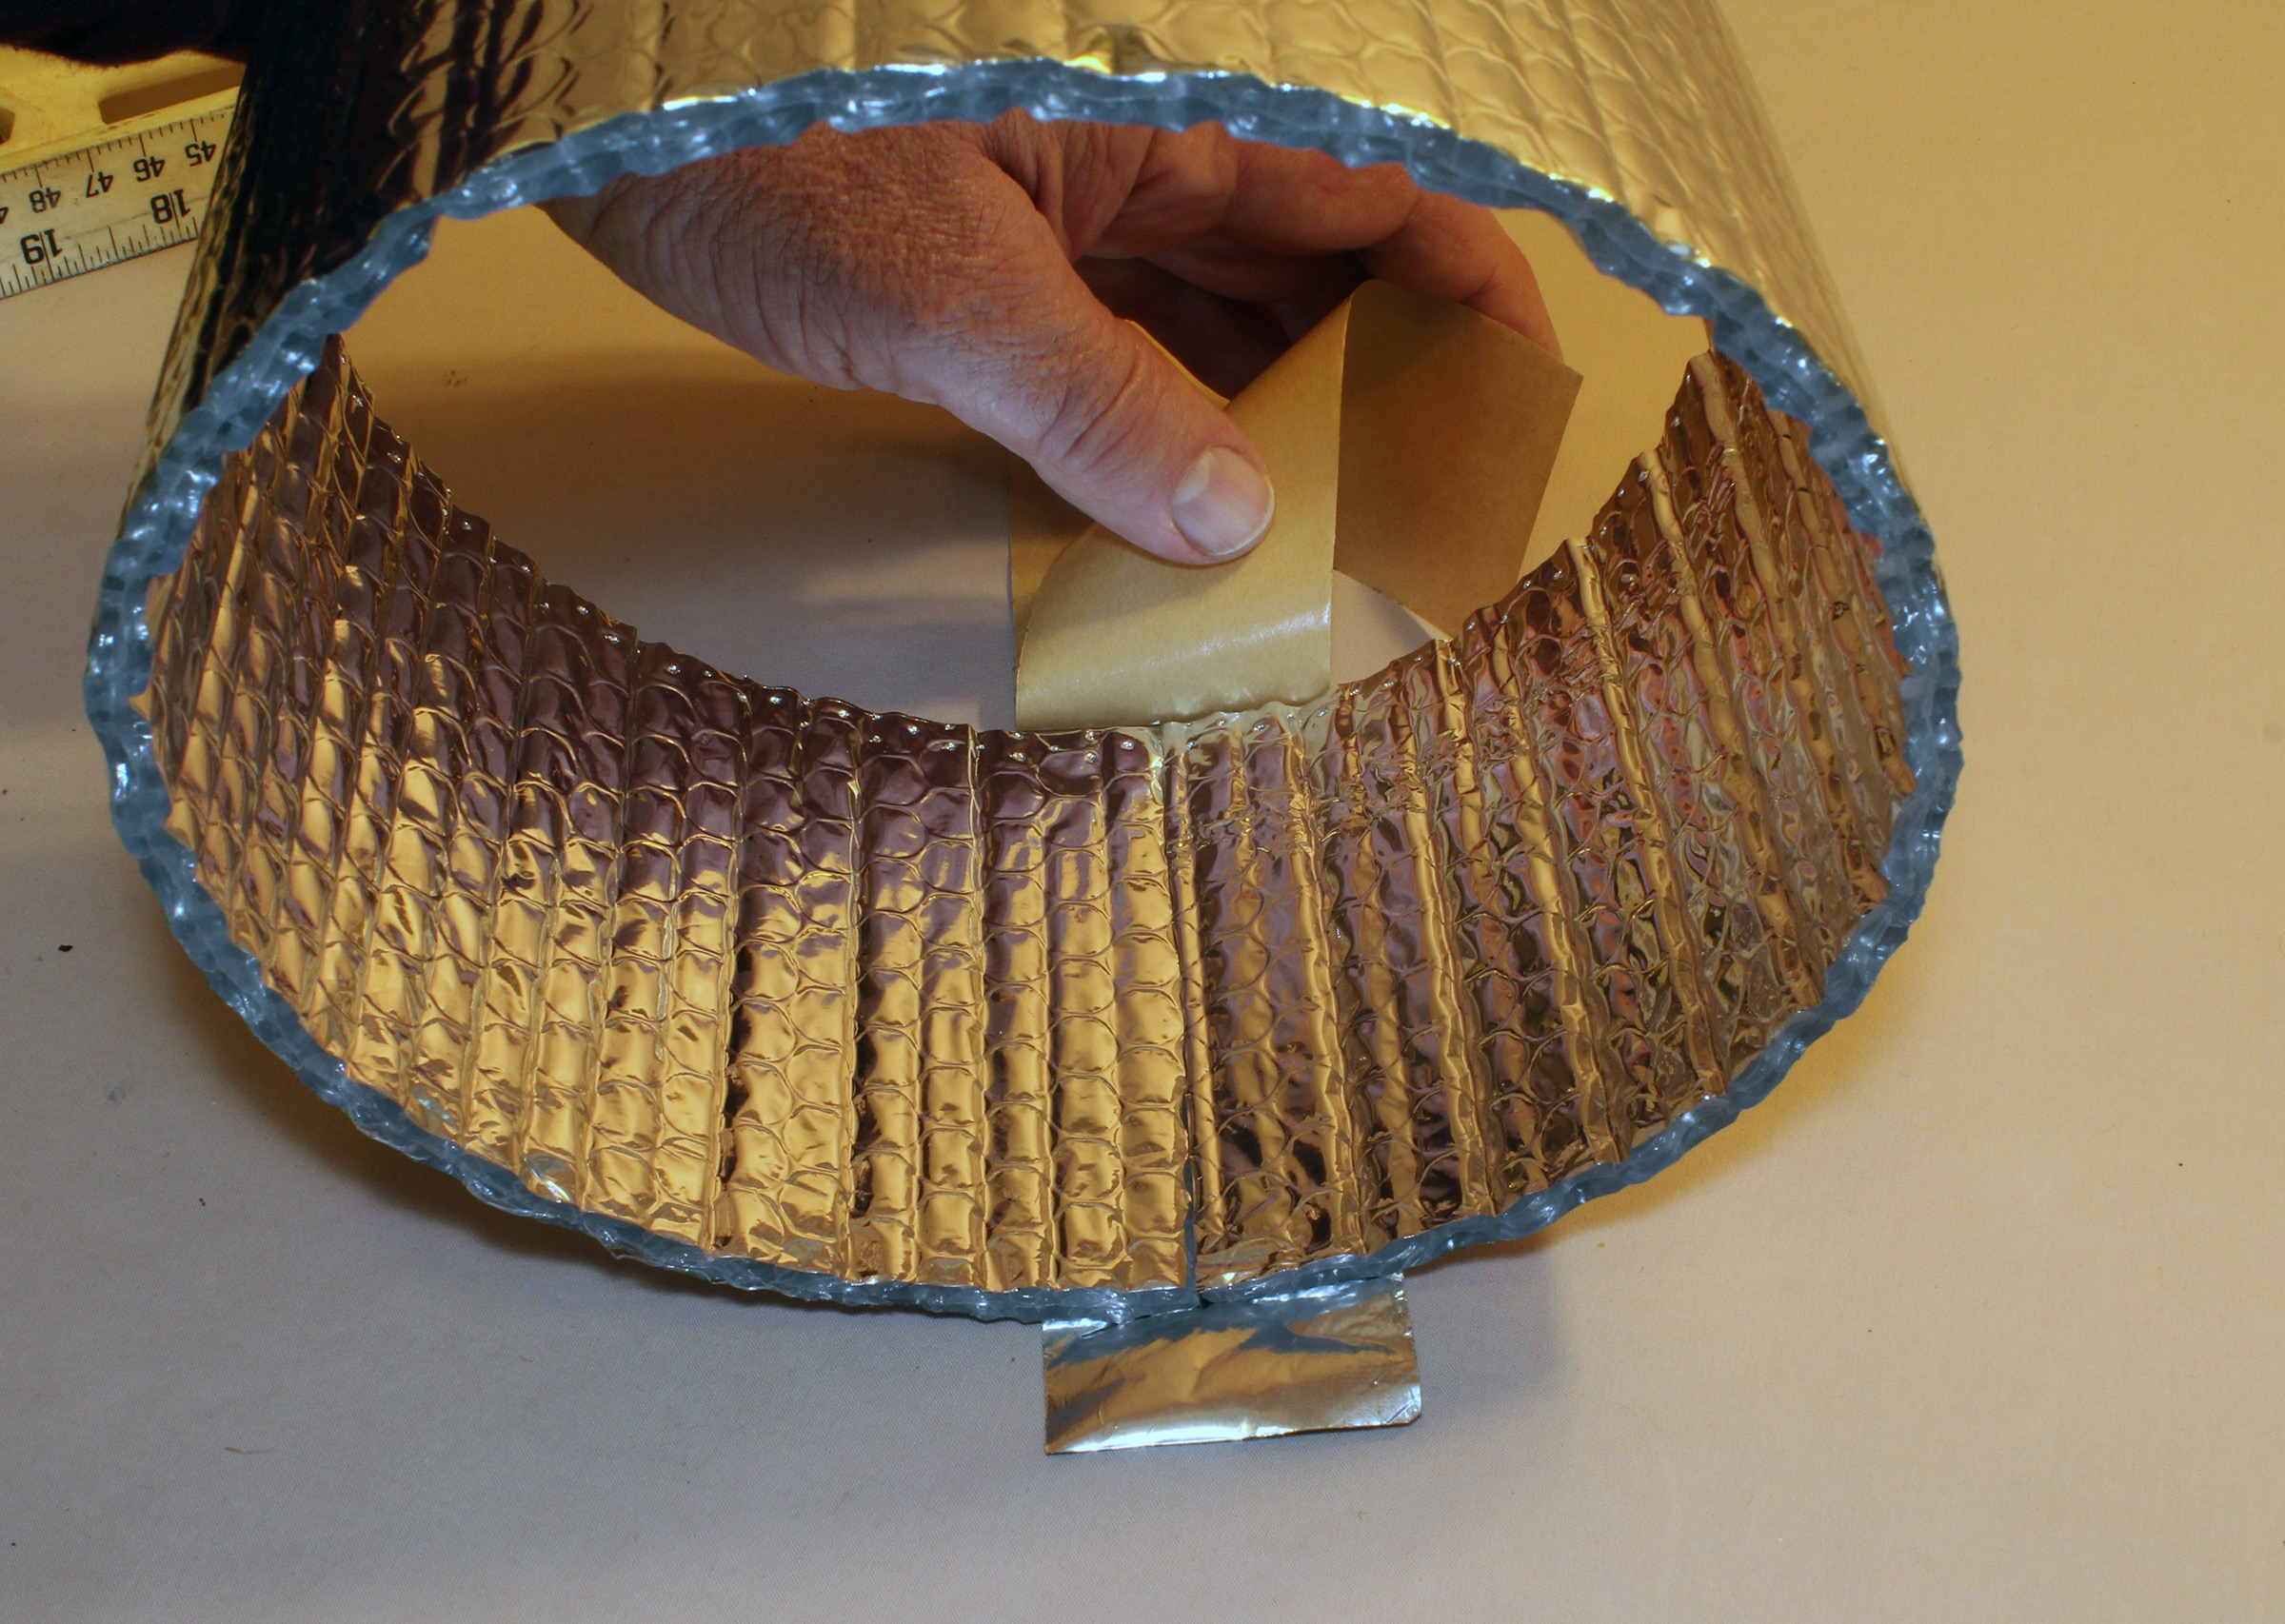
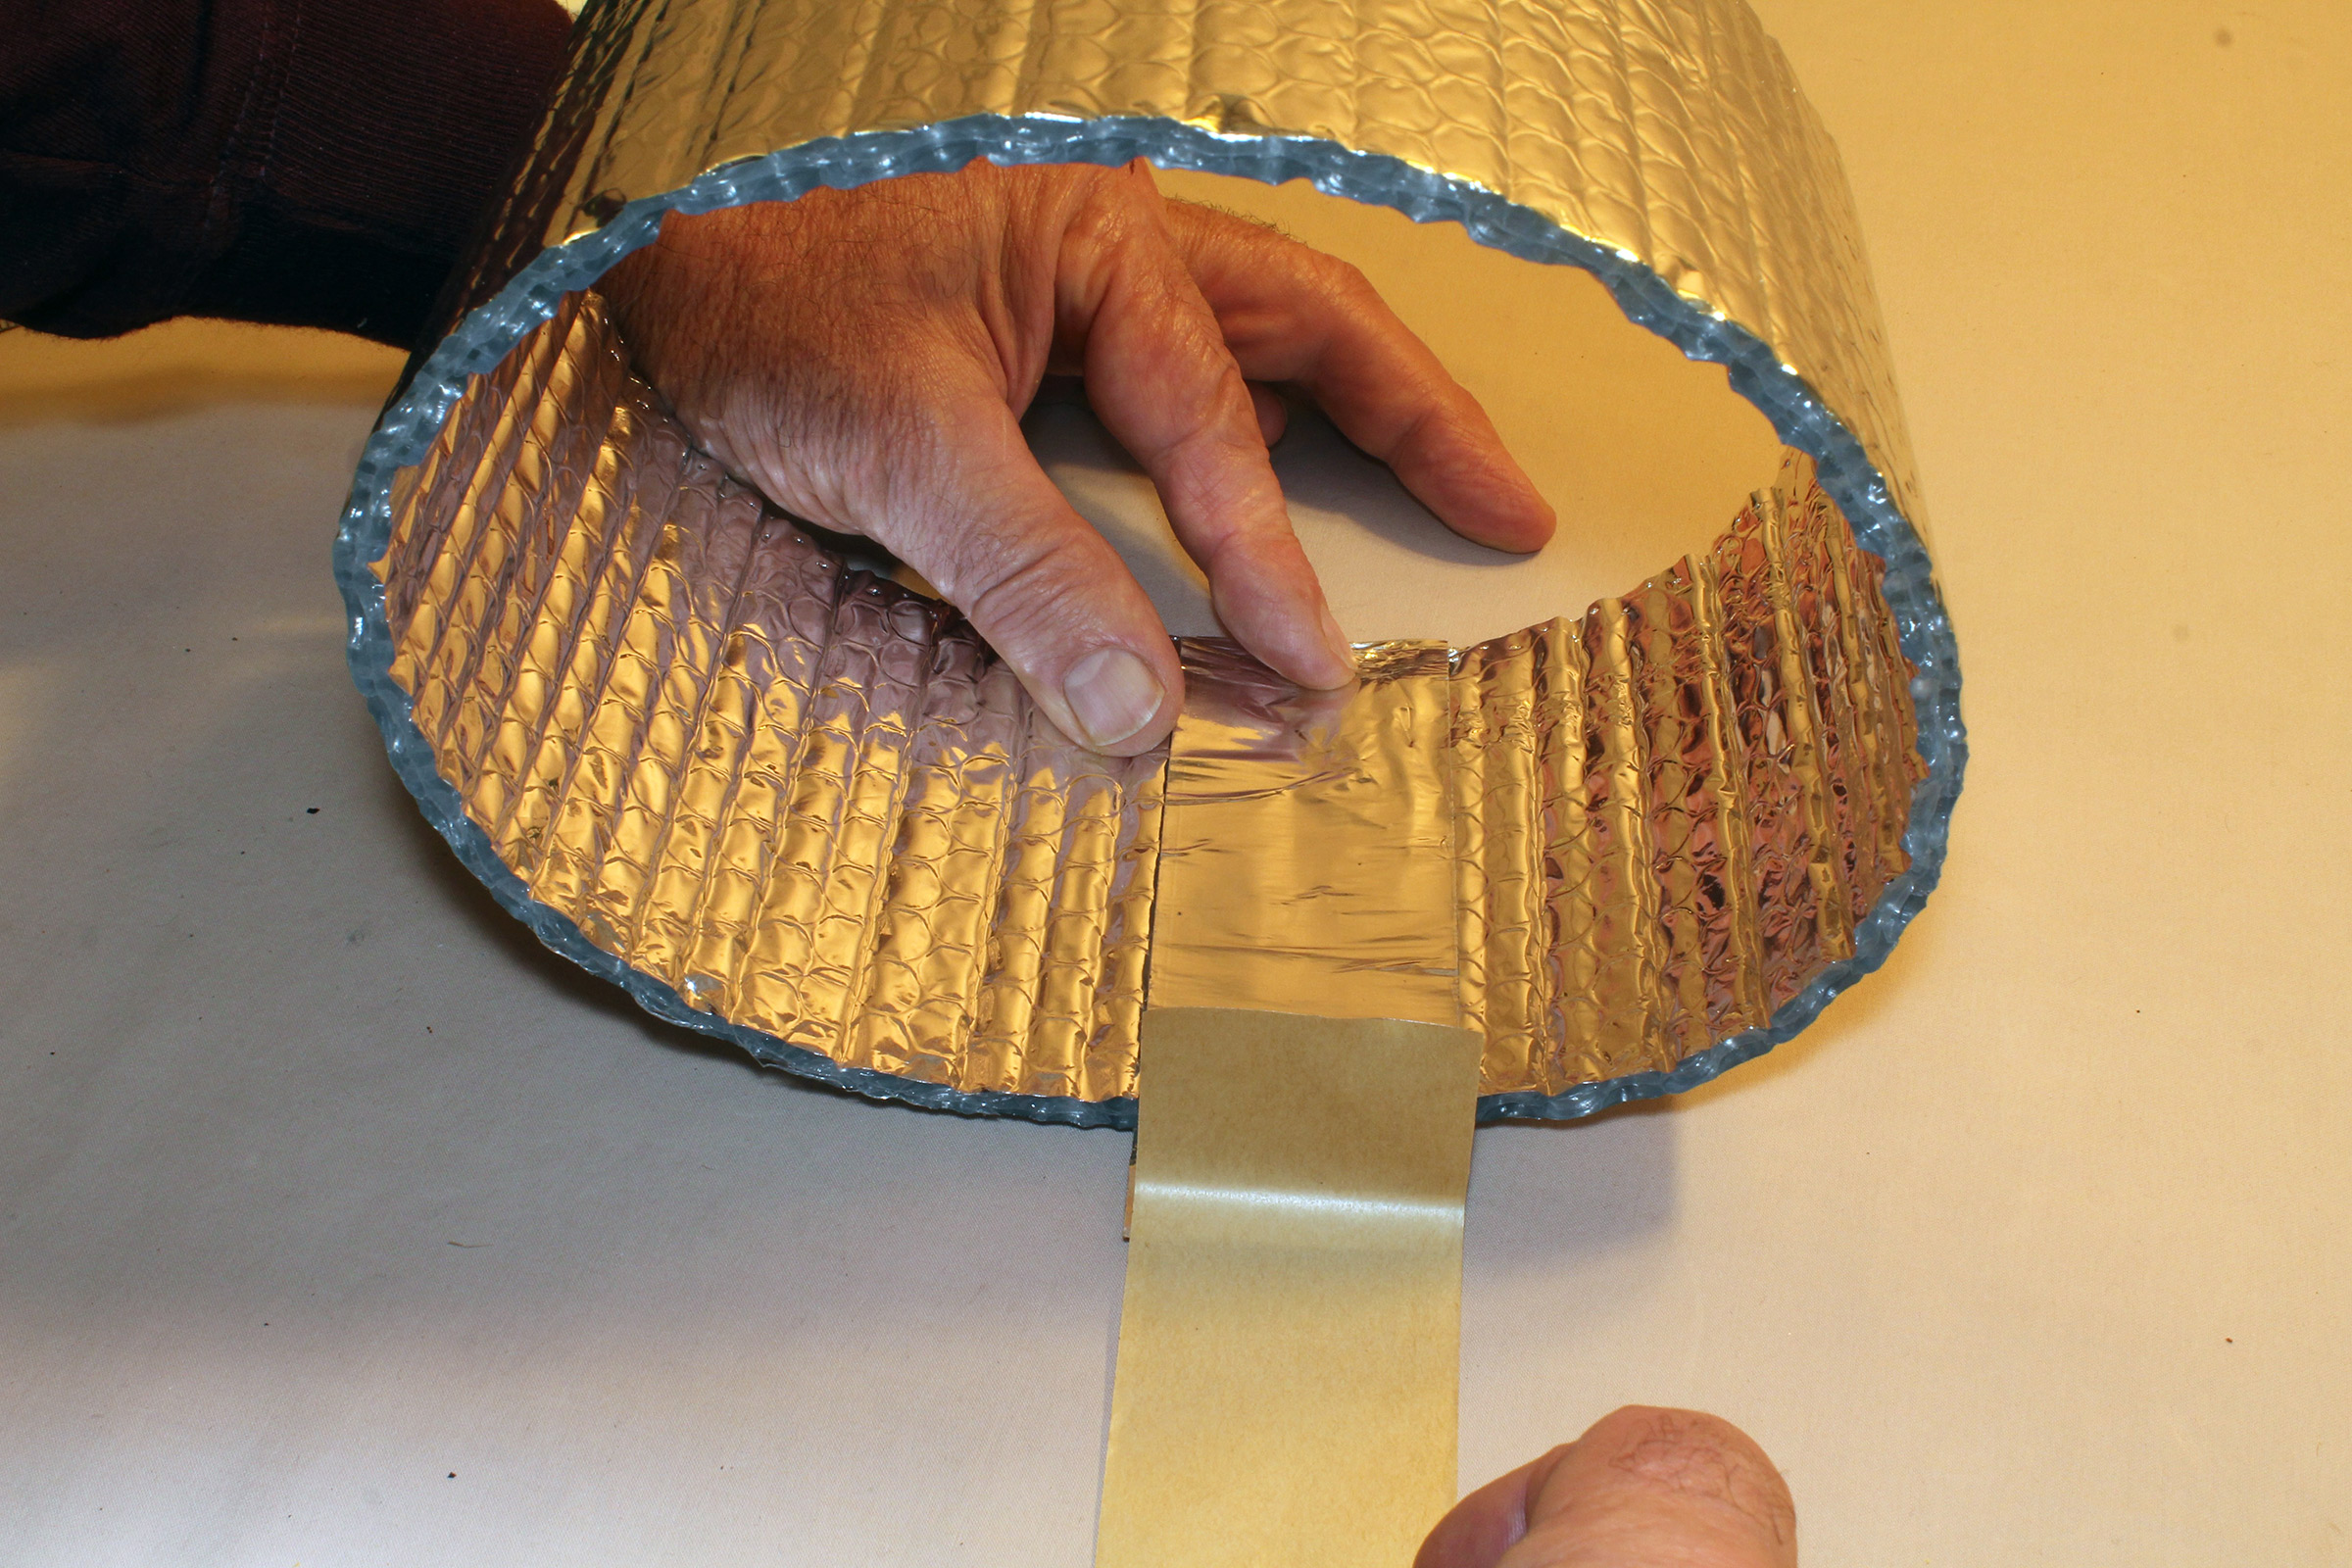
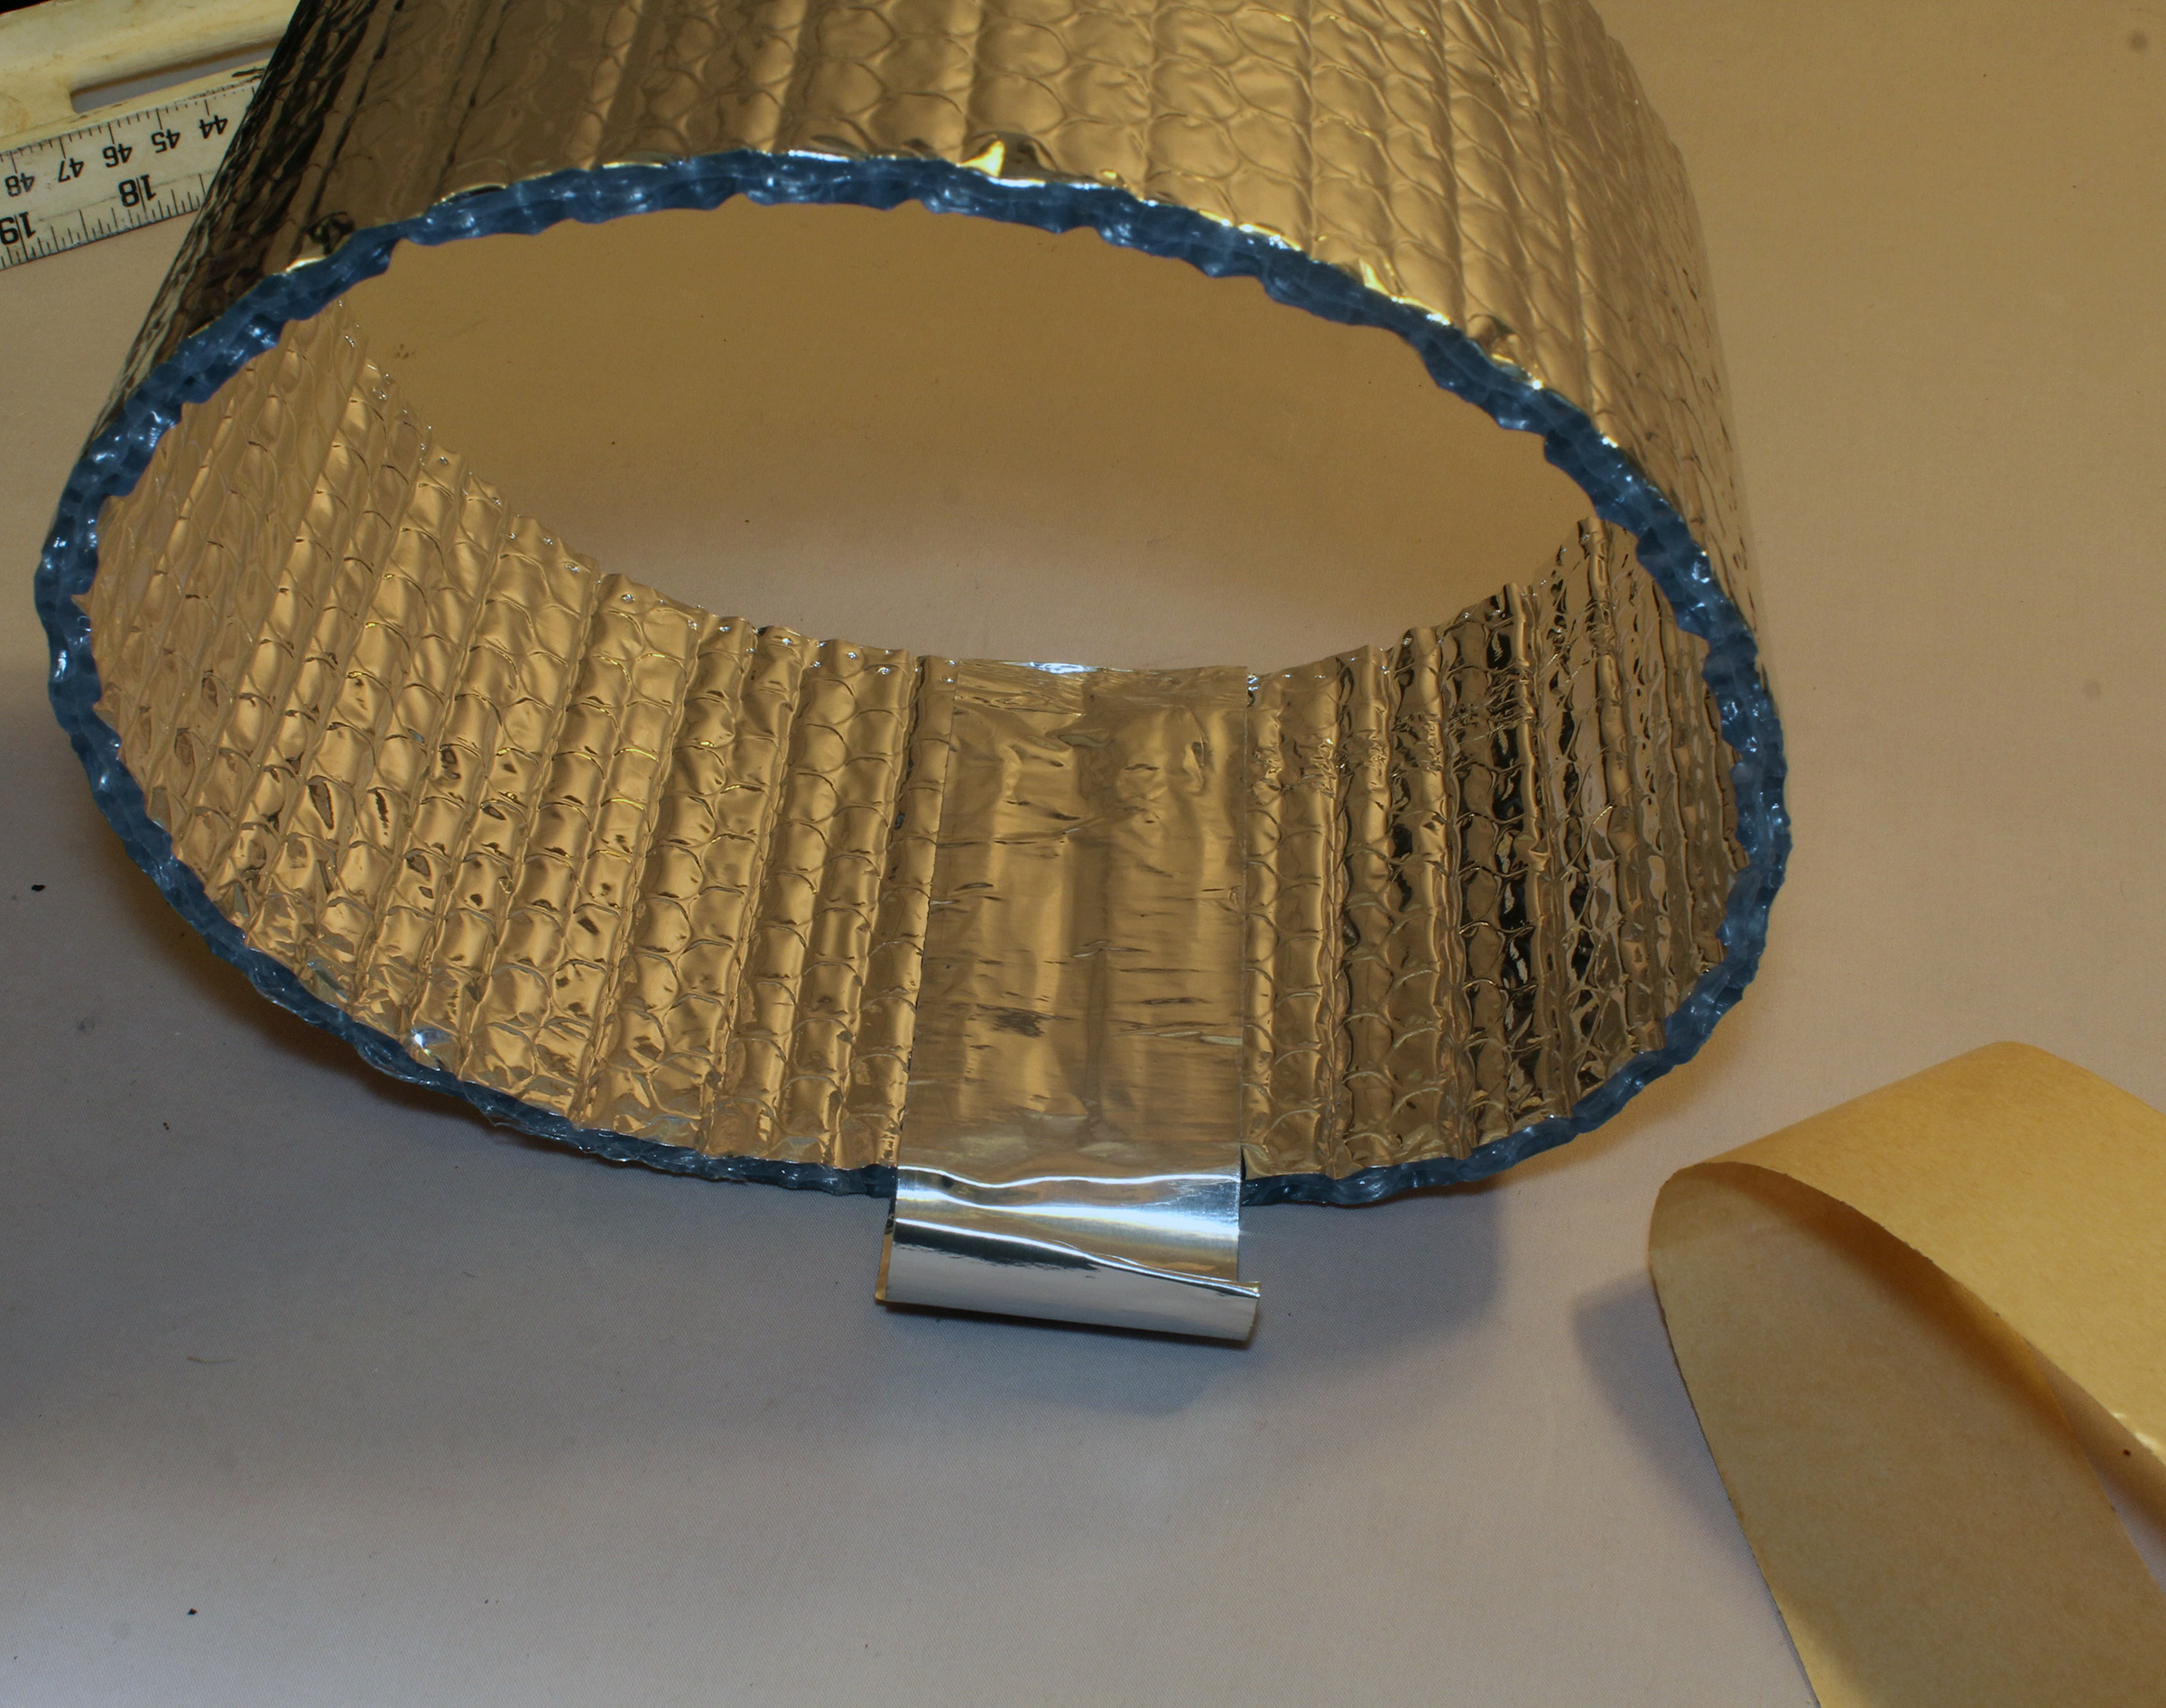
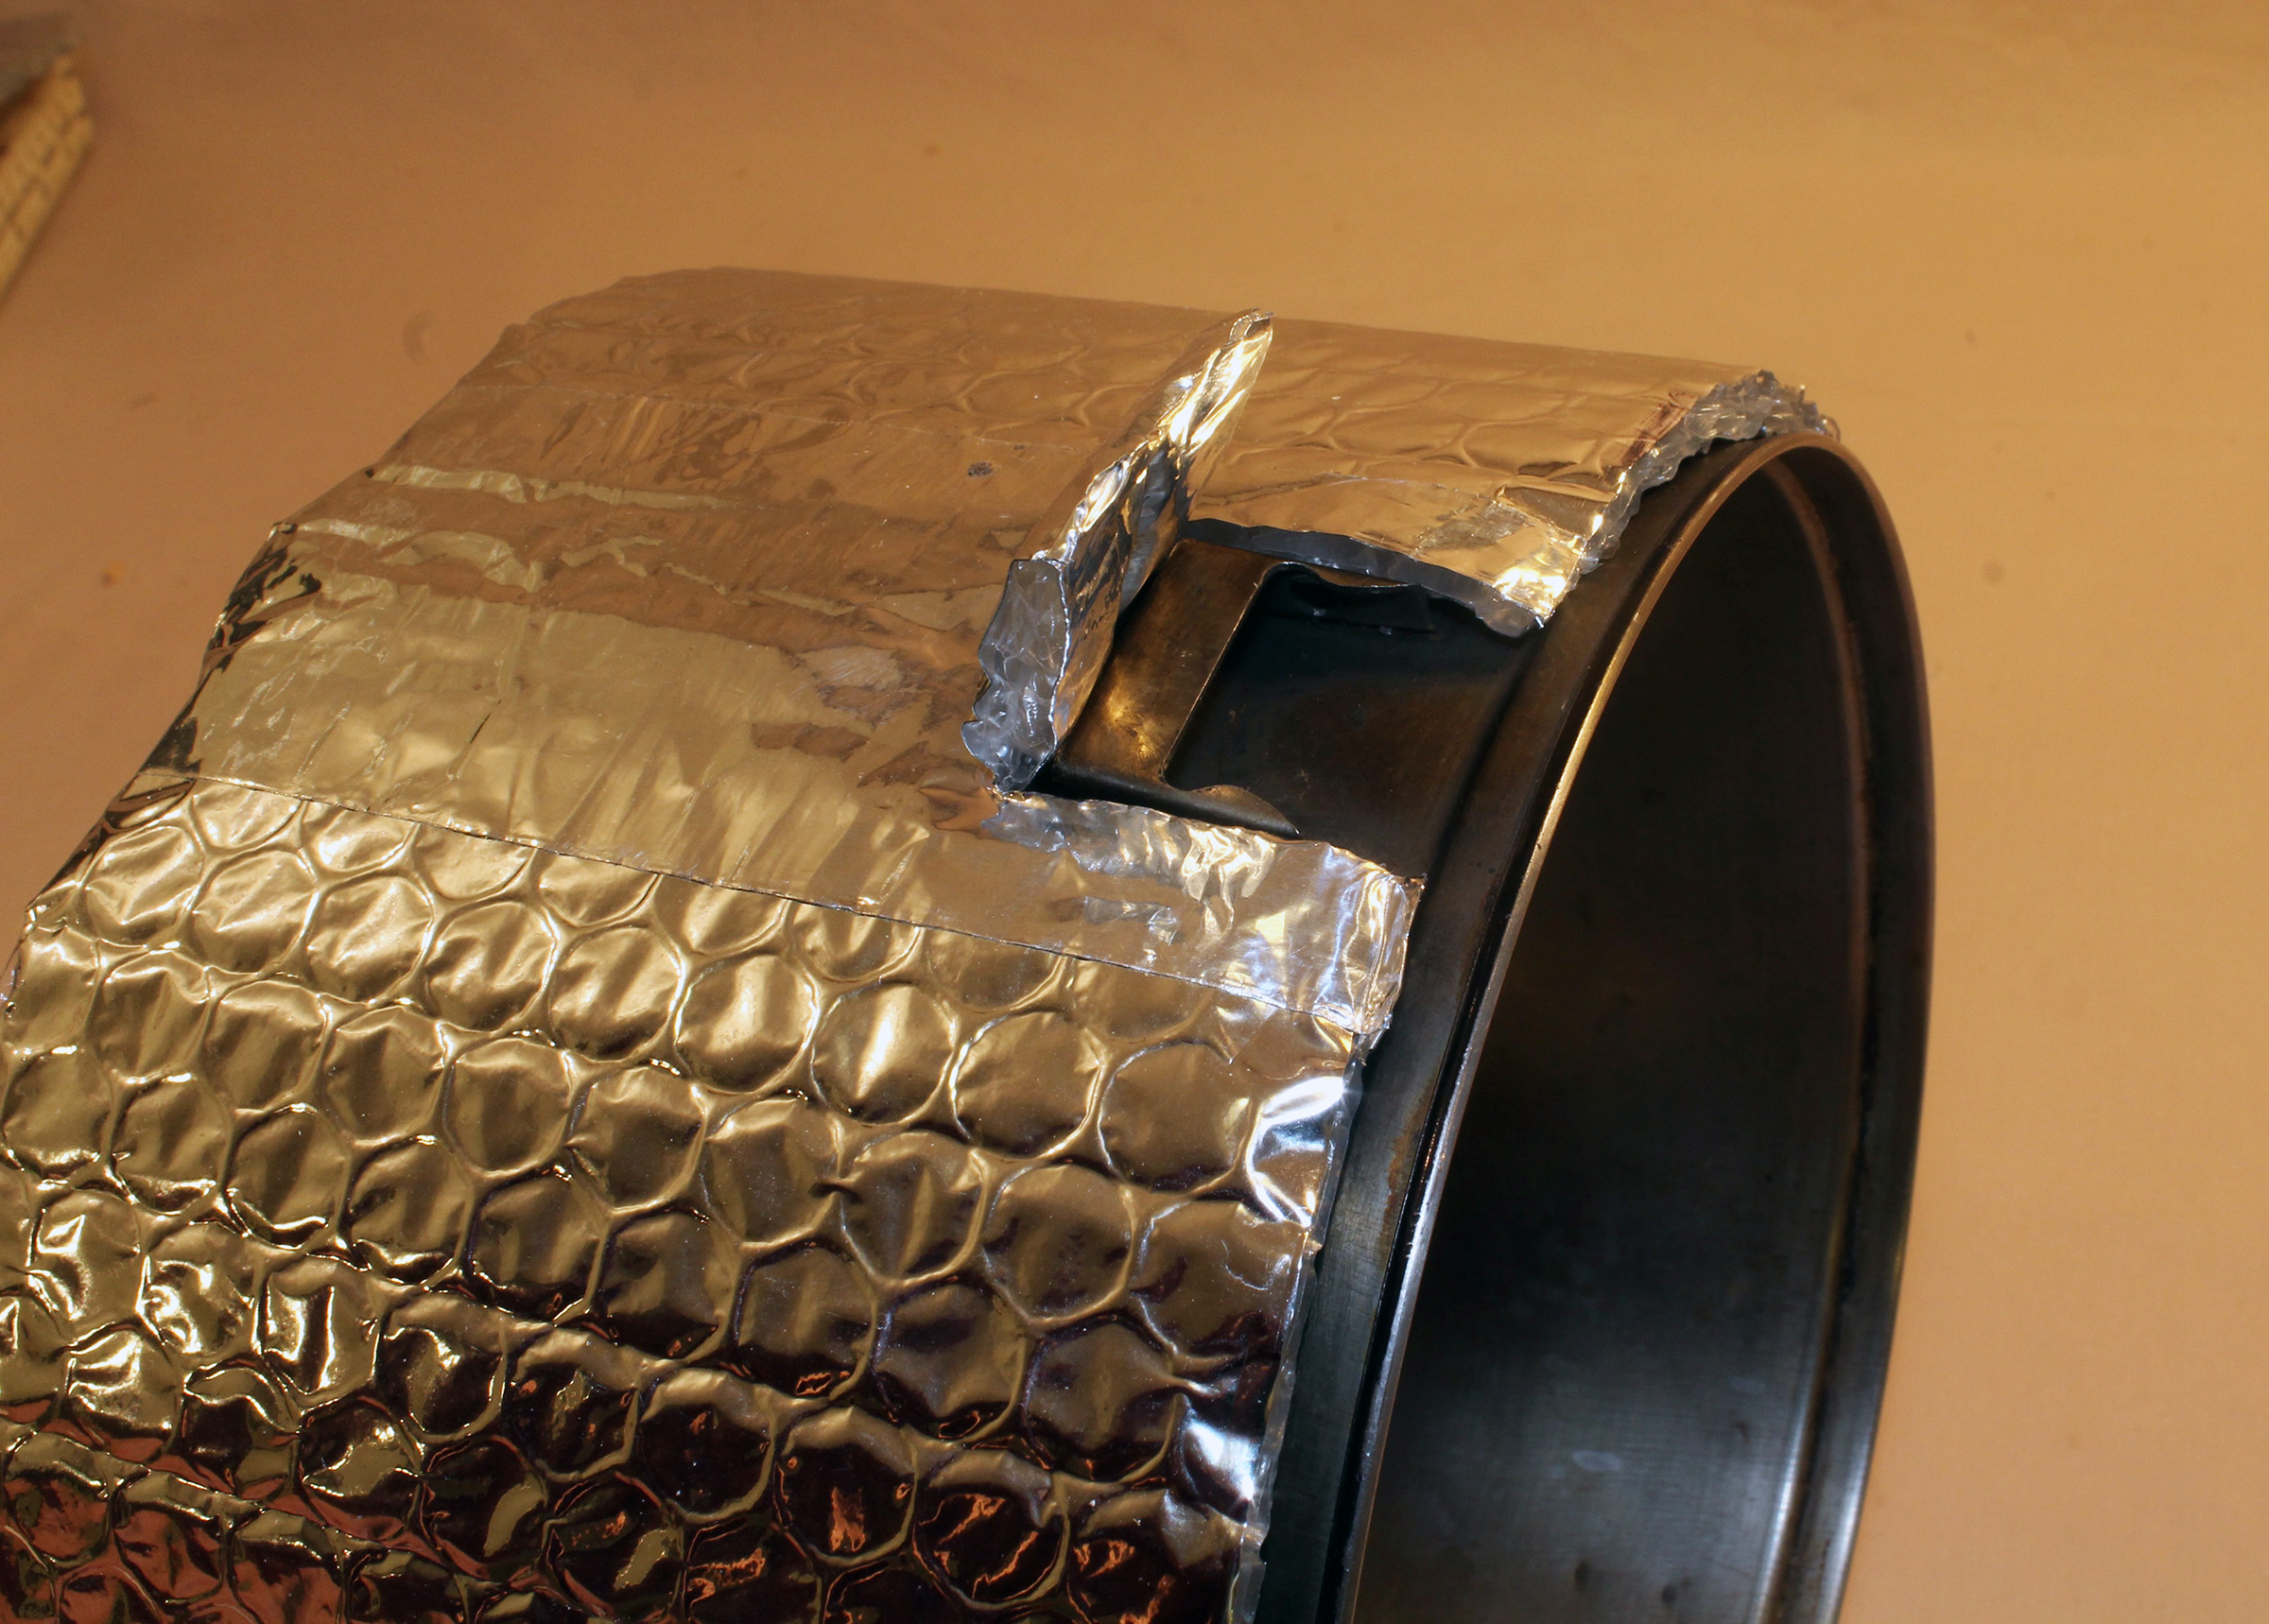
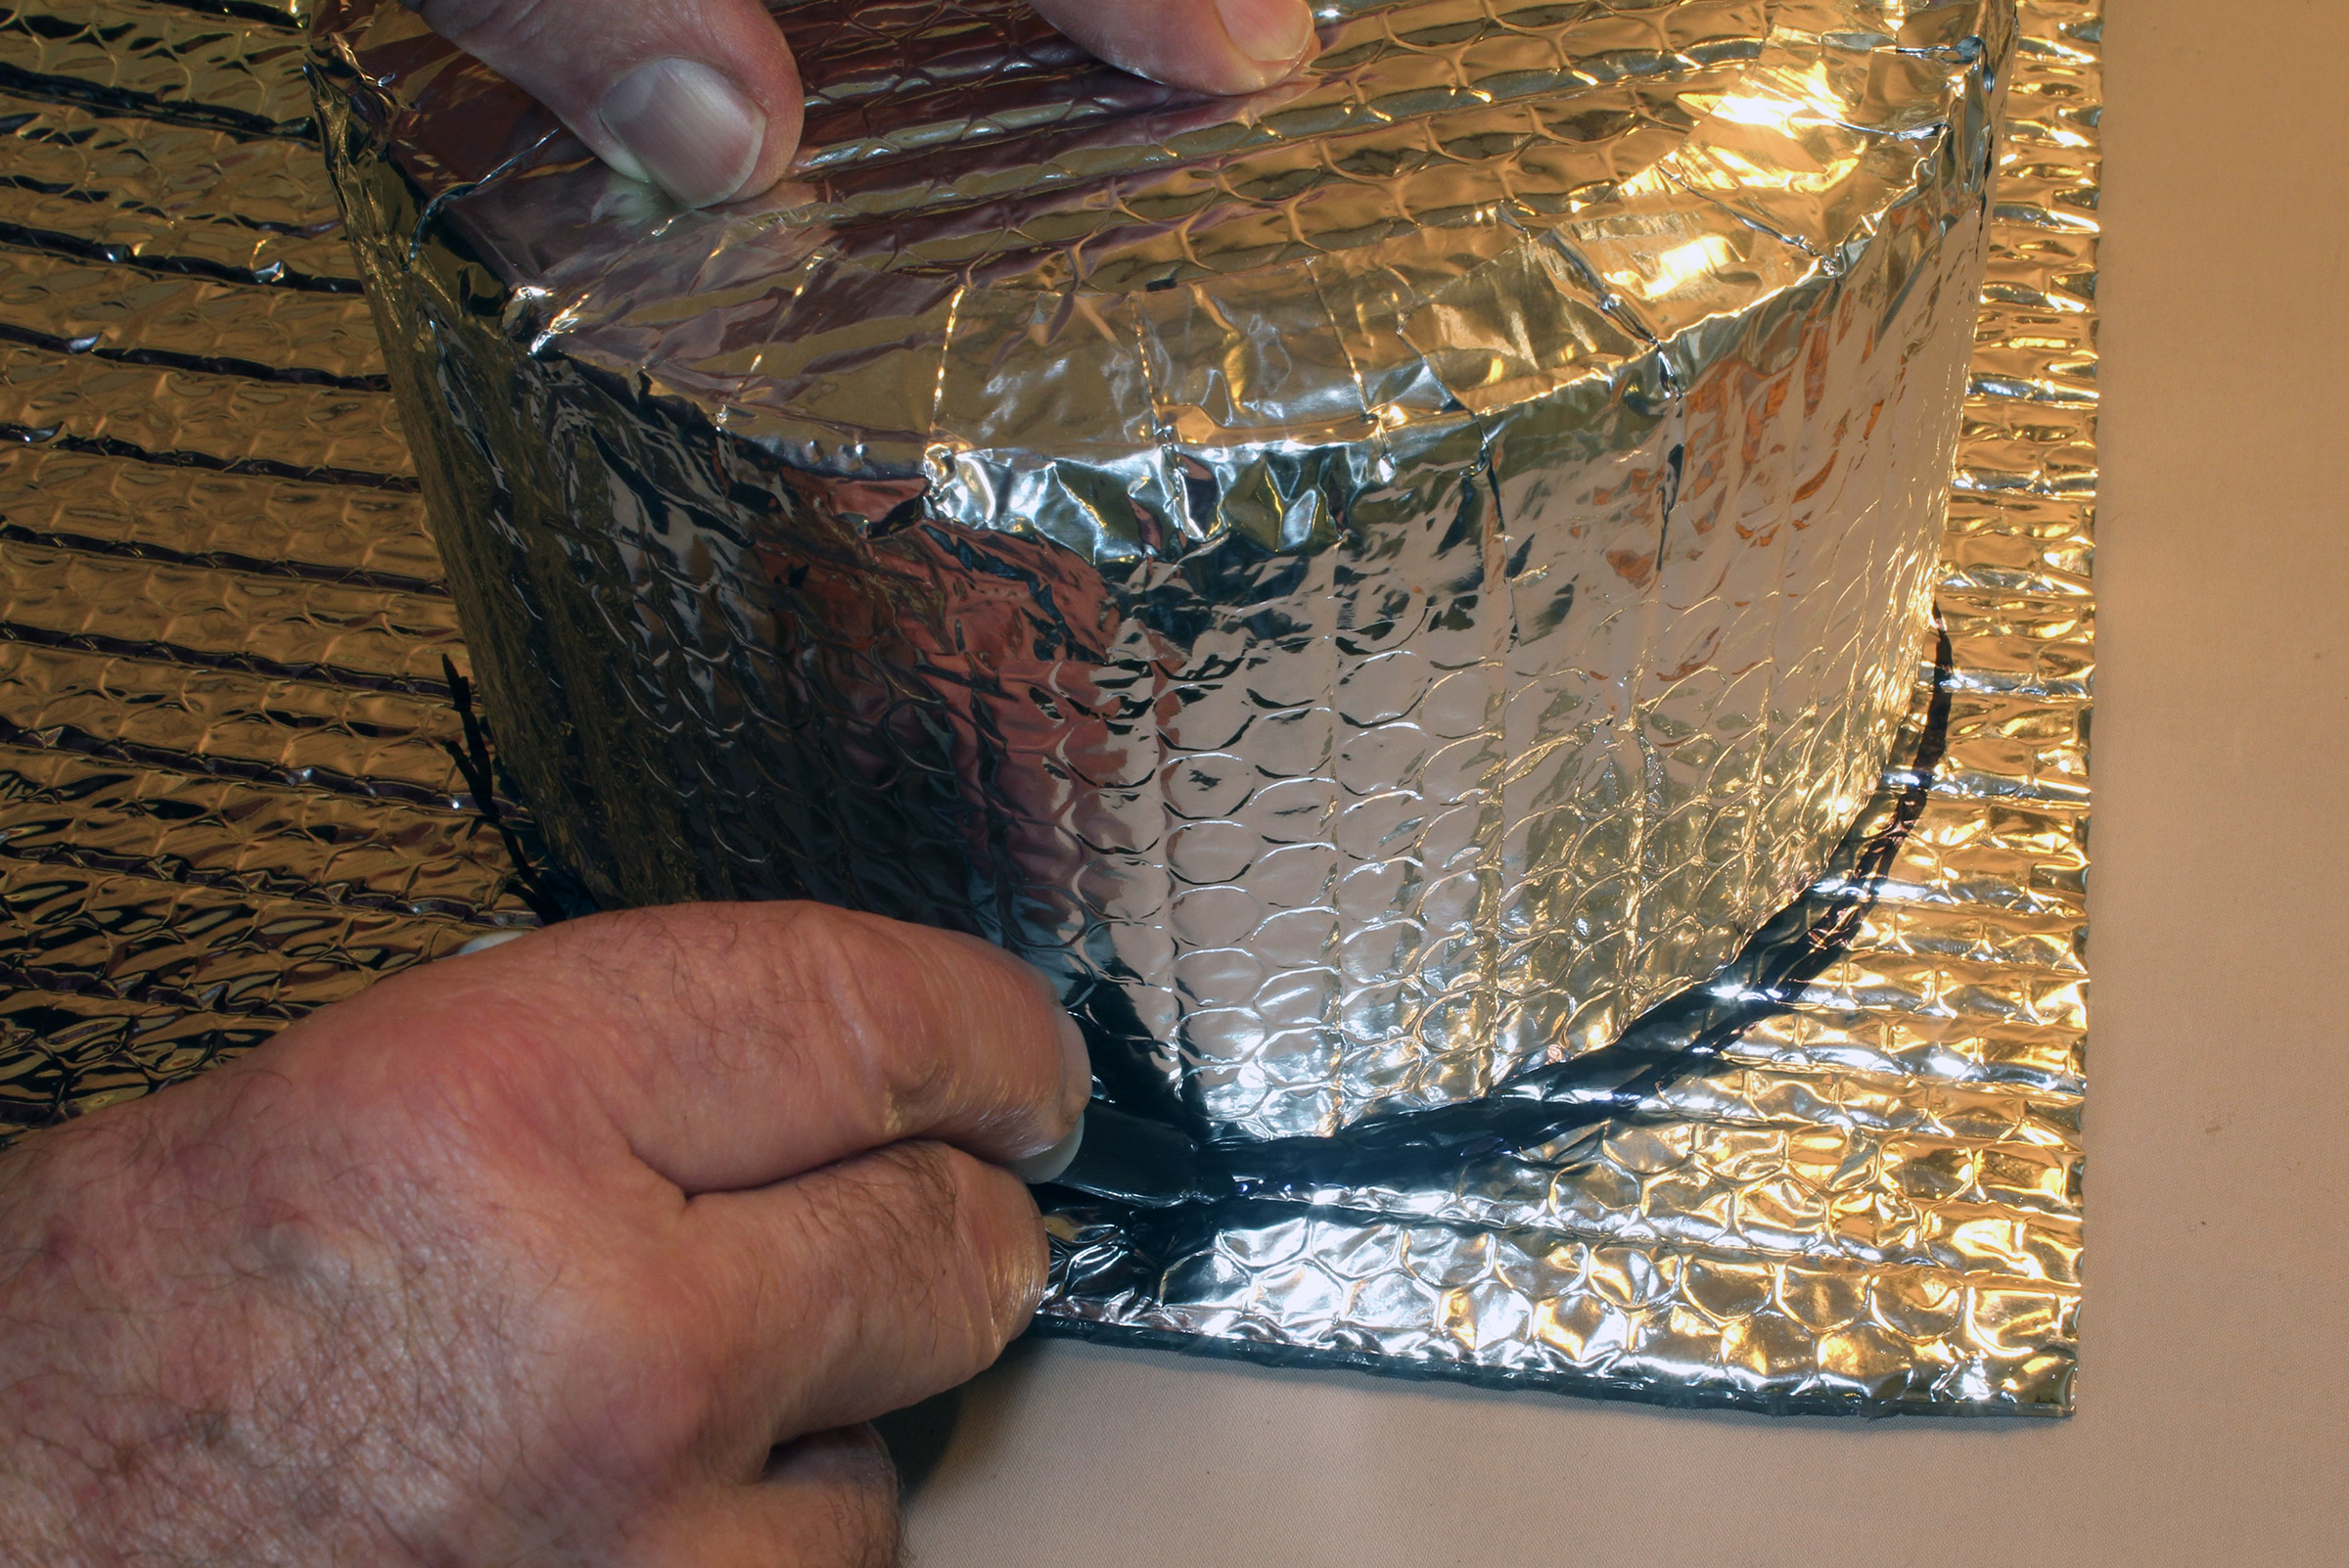
The toilet is made of ABS plastic and is rated to support 440 lbs. It can support my full weight—with my feet off the ground—and feels very solid. An instruction manual and a roll of 10 plastic bags for waste collection are included. A bag is installed by lifting the lid and the seat, folding the bag over the opening, and keeping it in place by lowering the seat. After use a plastic strip in a sleeve at the top of the bag draws it tight. The two extended loops of the strip can then be used to tie the bag tightly closed.
The seat holds the bag in place and the lid folds down out of the way.
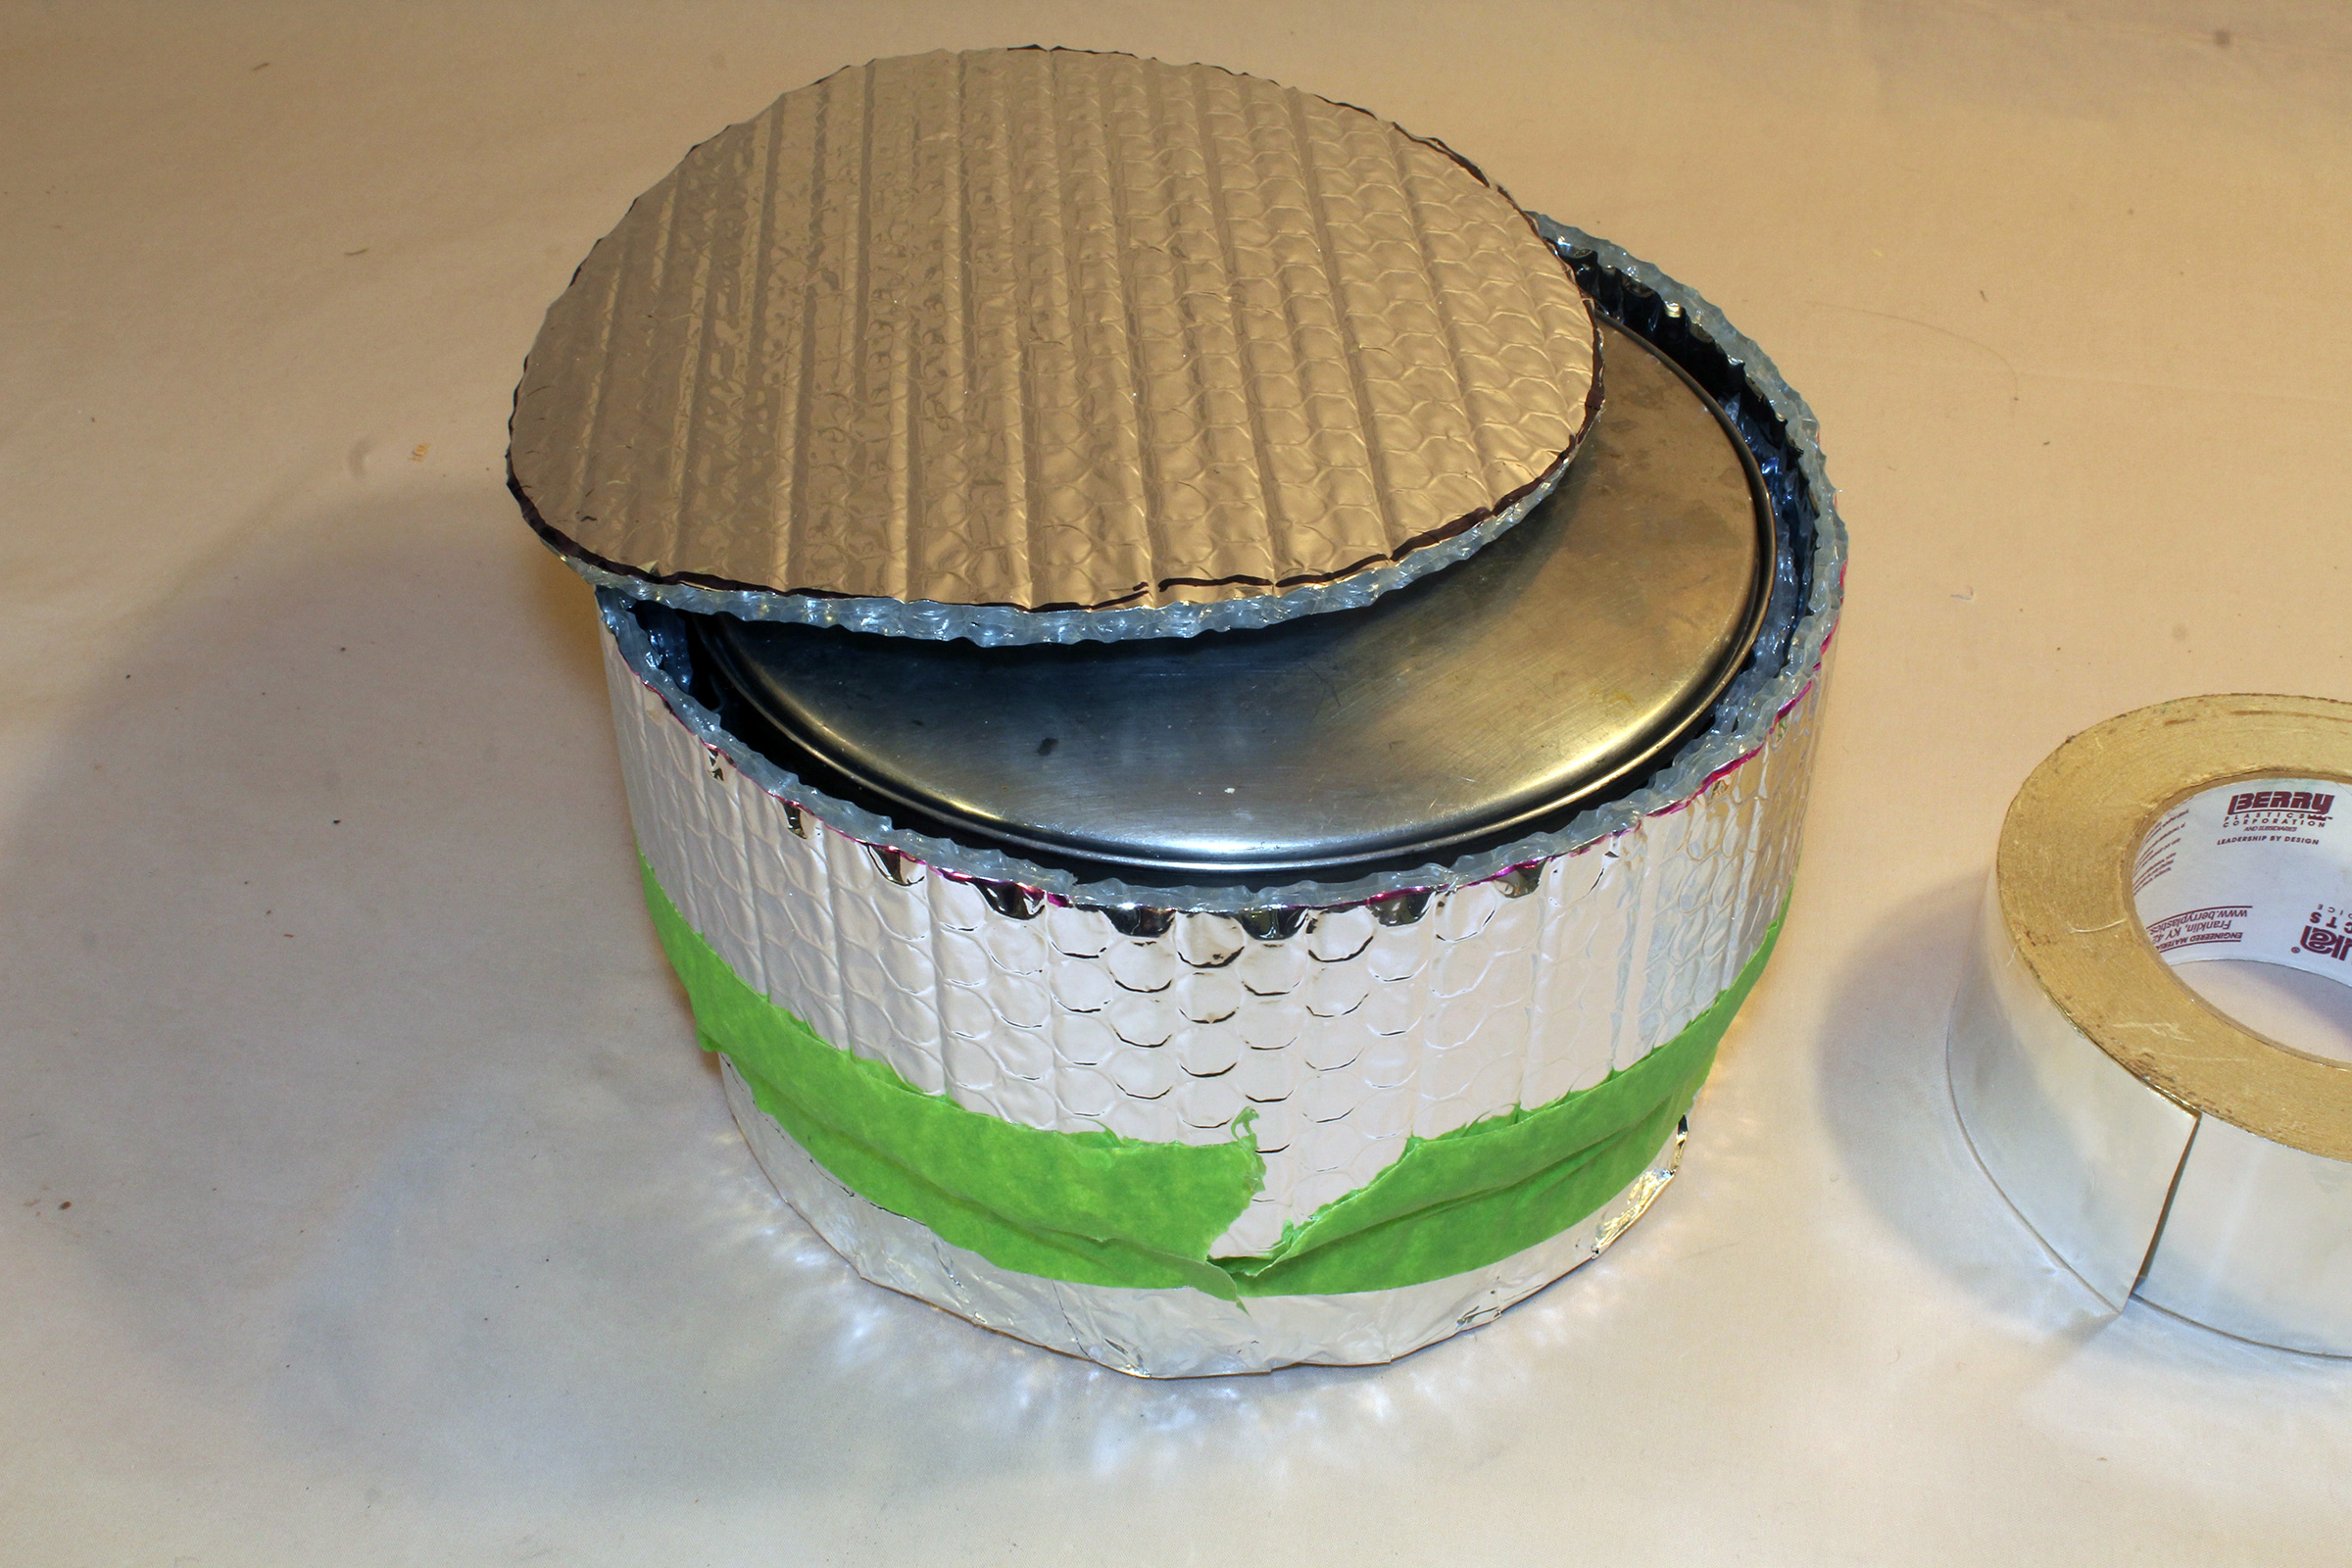
TripTips offers Poo Powder, separately, for use with the toilets. The scented powder solidifies liquids into a gel to prevent leaks, spills, and odors. (Similar gelling agents are available from other outdoor equipment suppliers.) The base of the toilet is an open compartment 9″ in diameter and 2 1⁄2″ deep in which used bags can be stored. Those used bags are ultimately disposed of as trash destined to landfill. Wherever possible, I take advantage of shoreside facilities that are connected to a wastewater treatment plant to minimize the environmental impact.
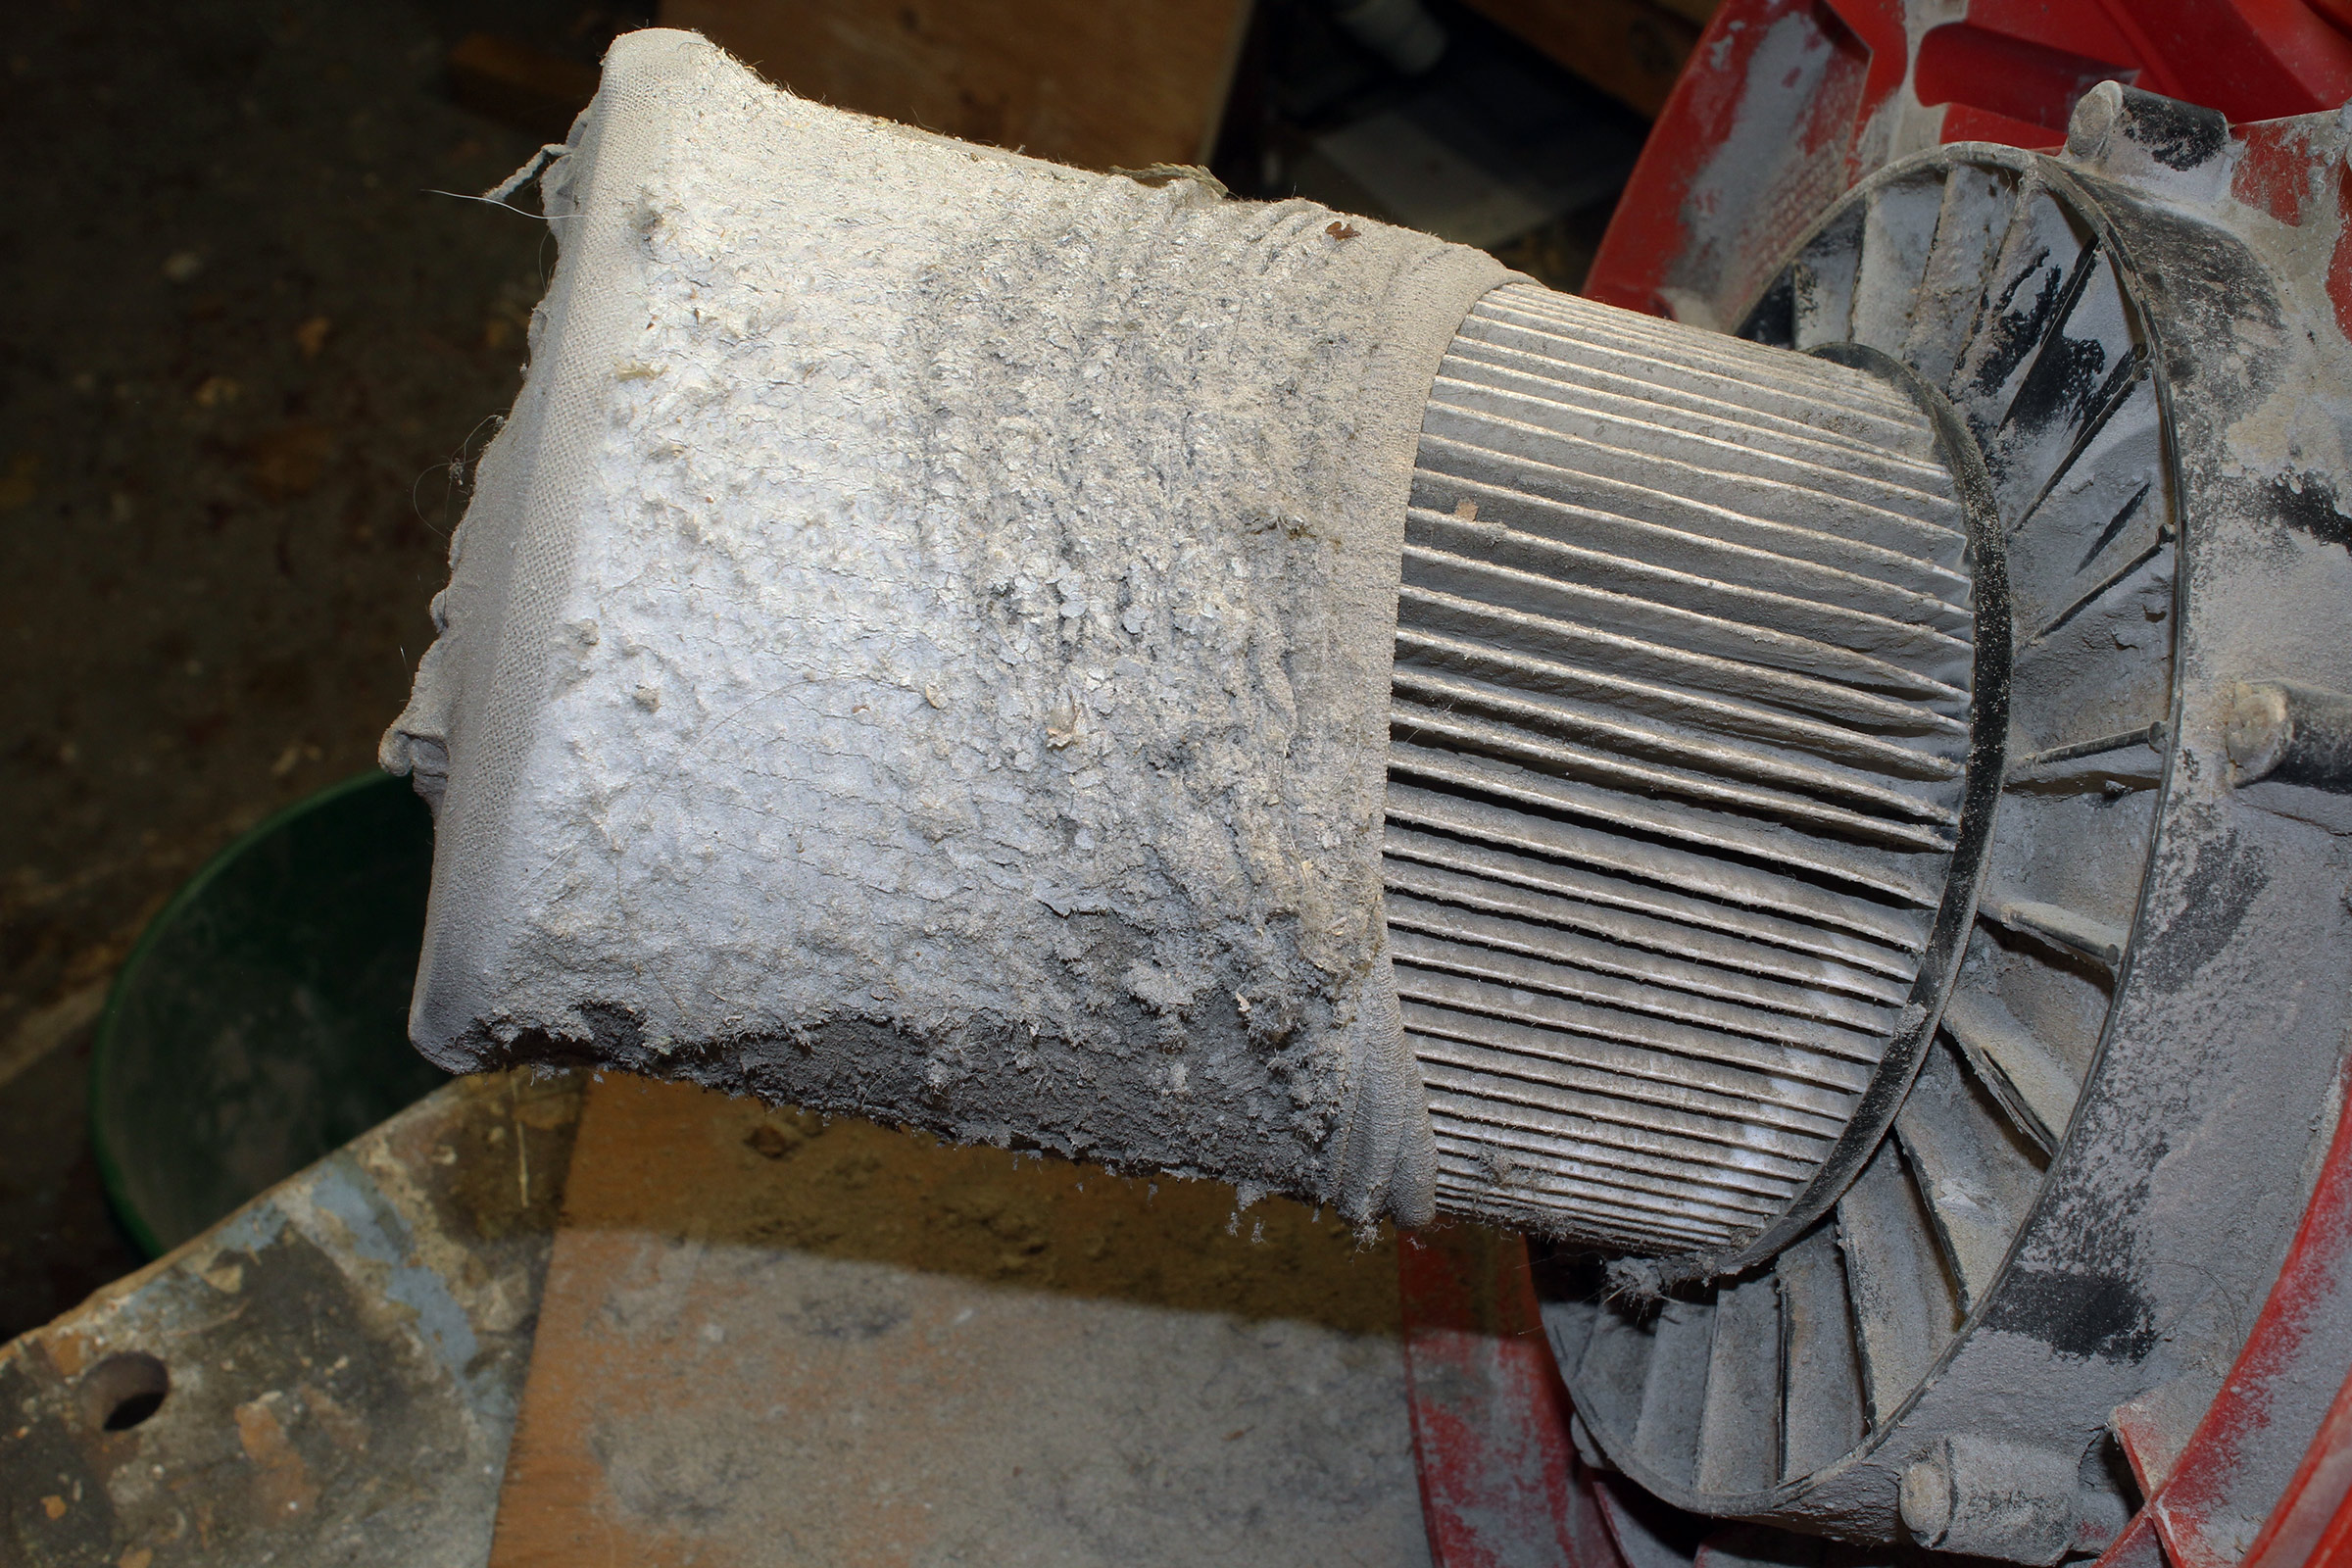
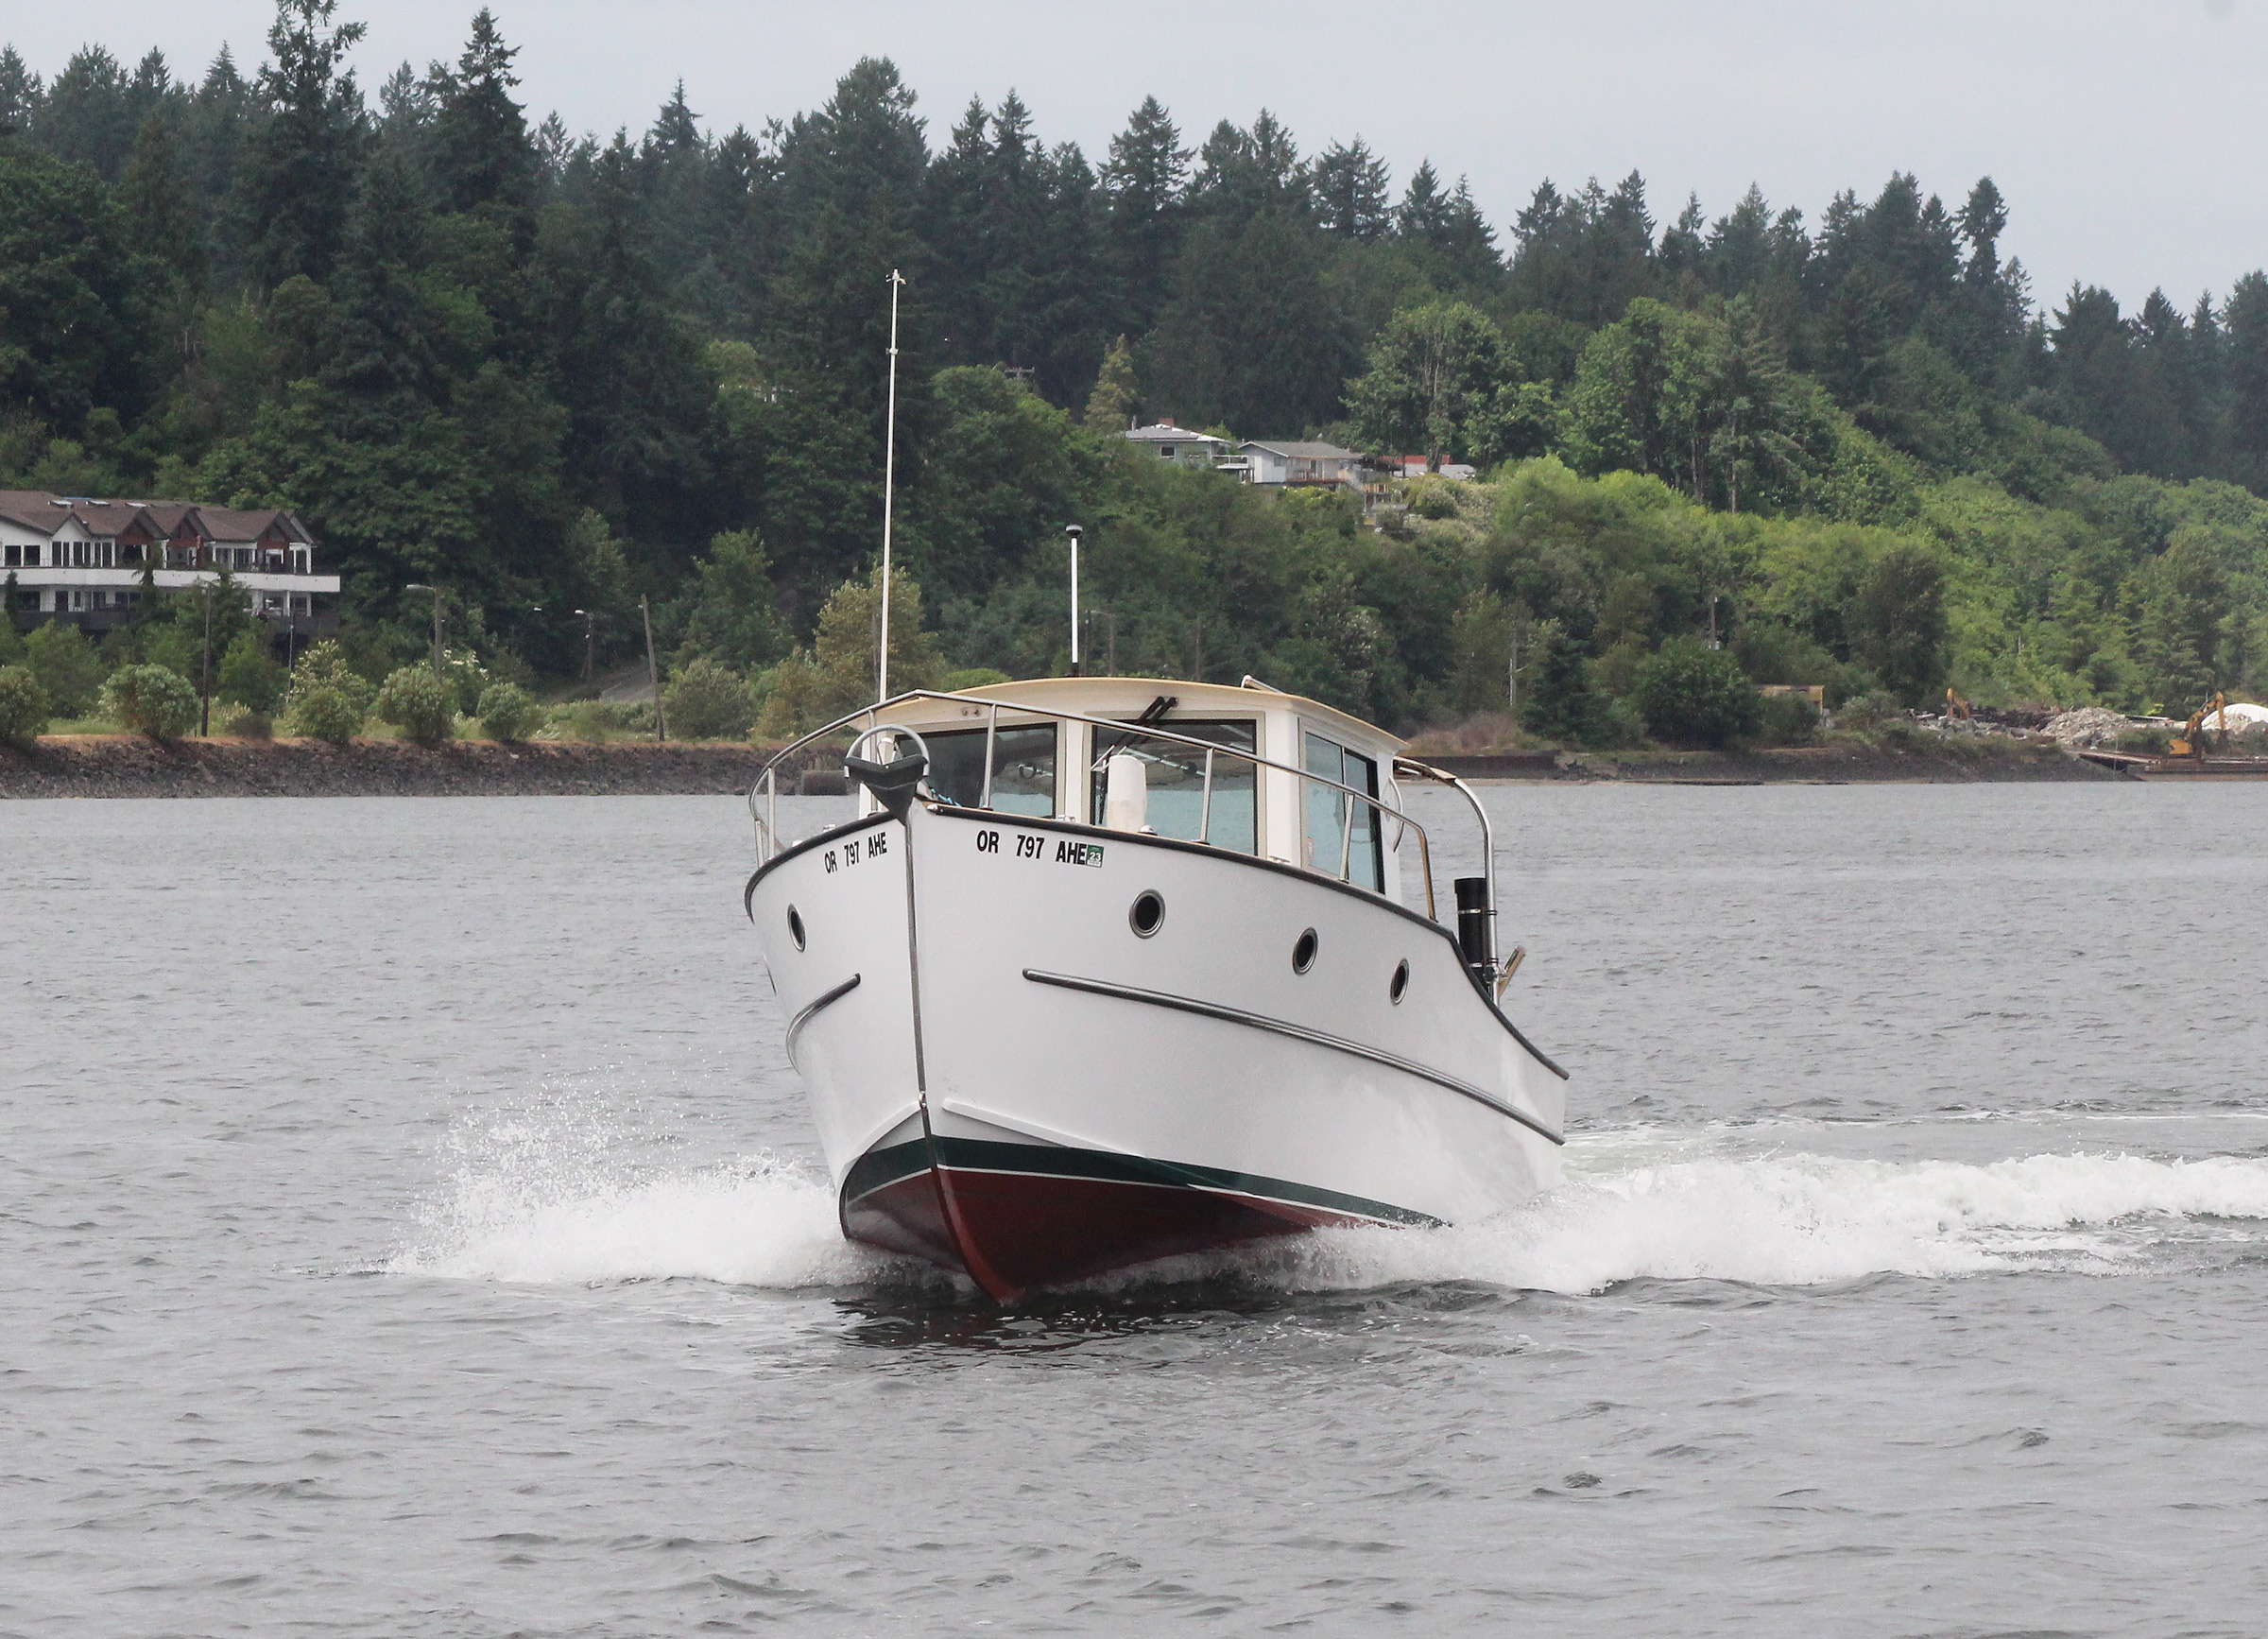
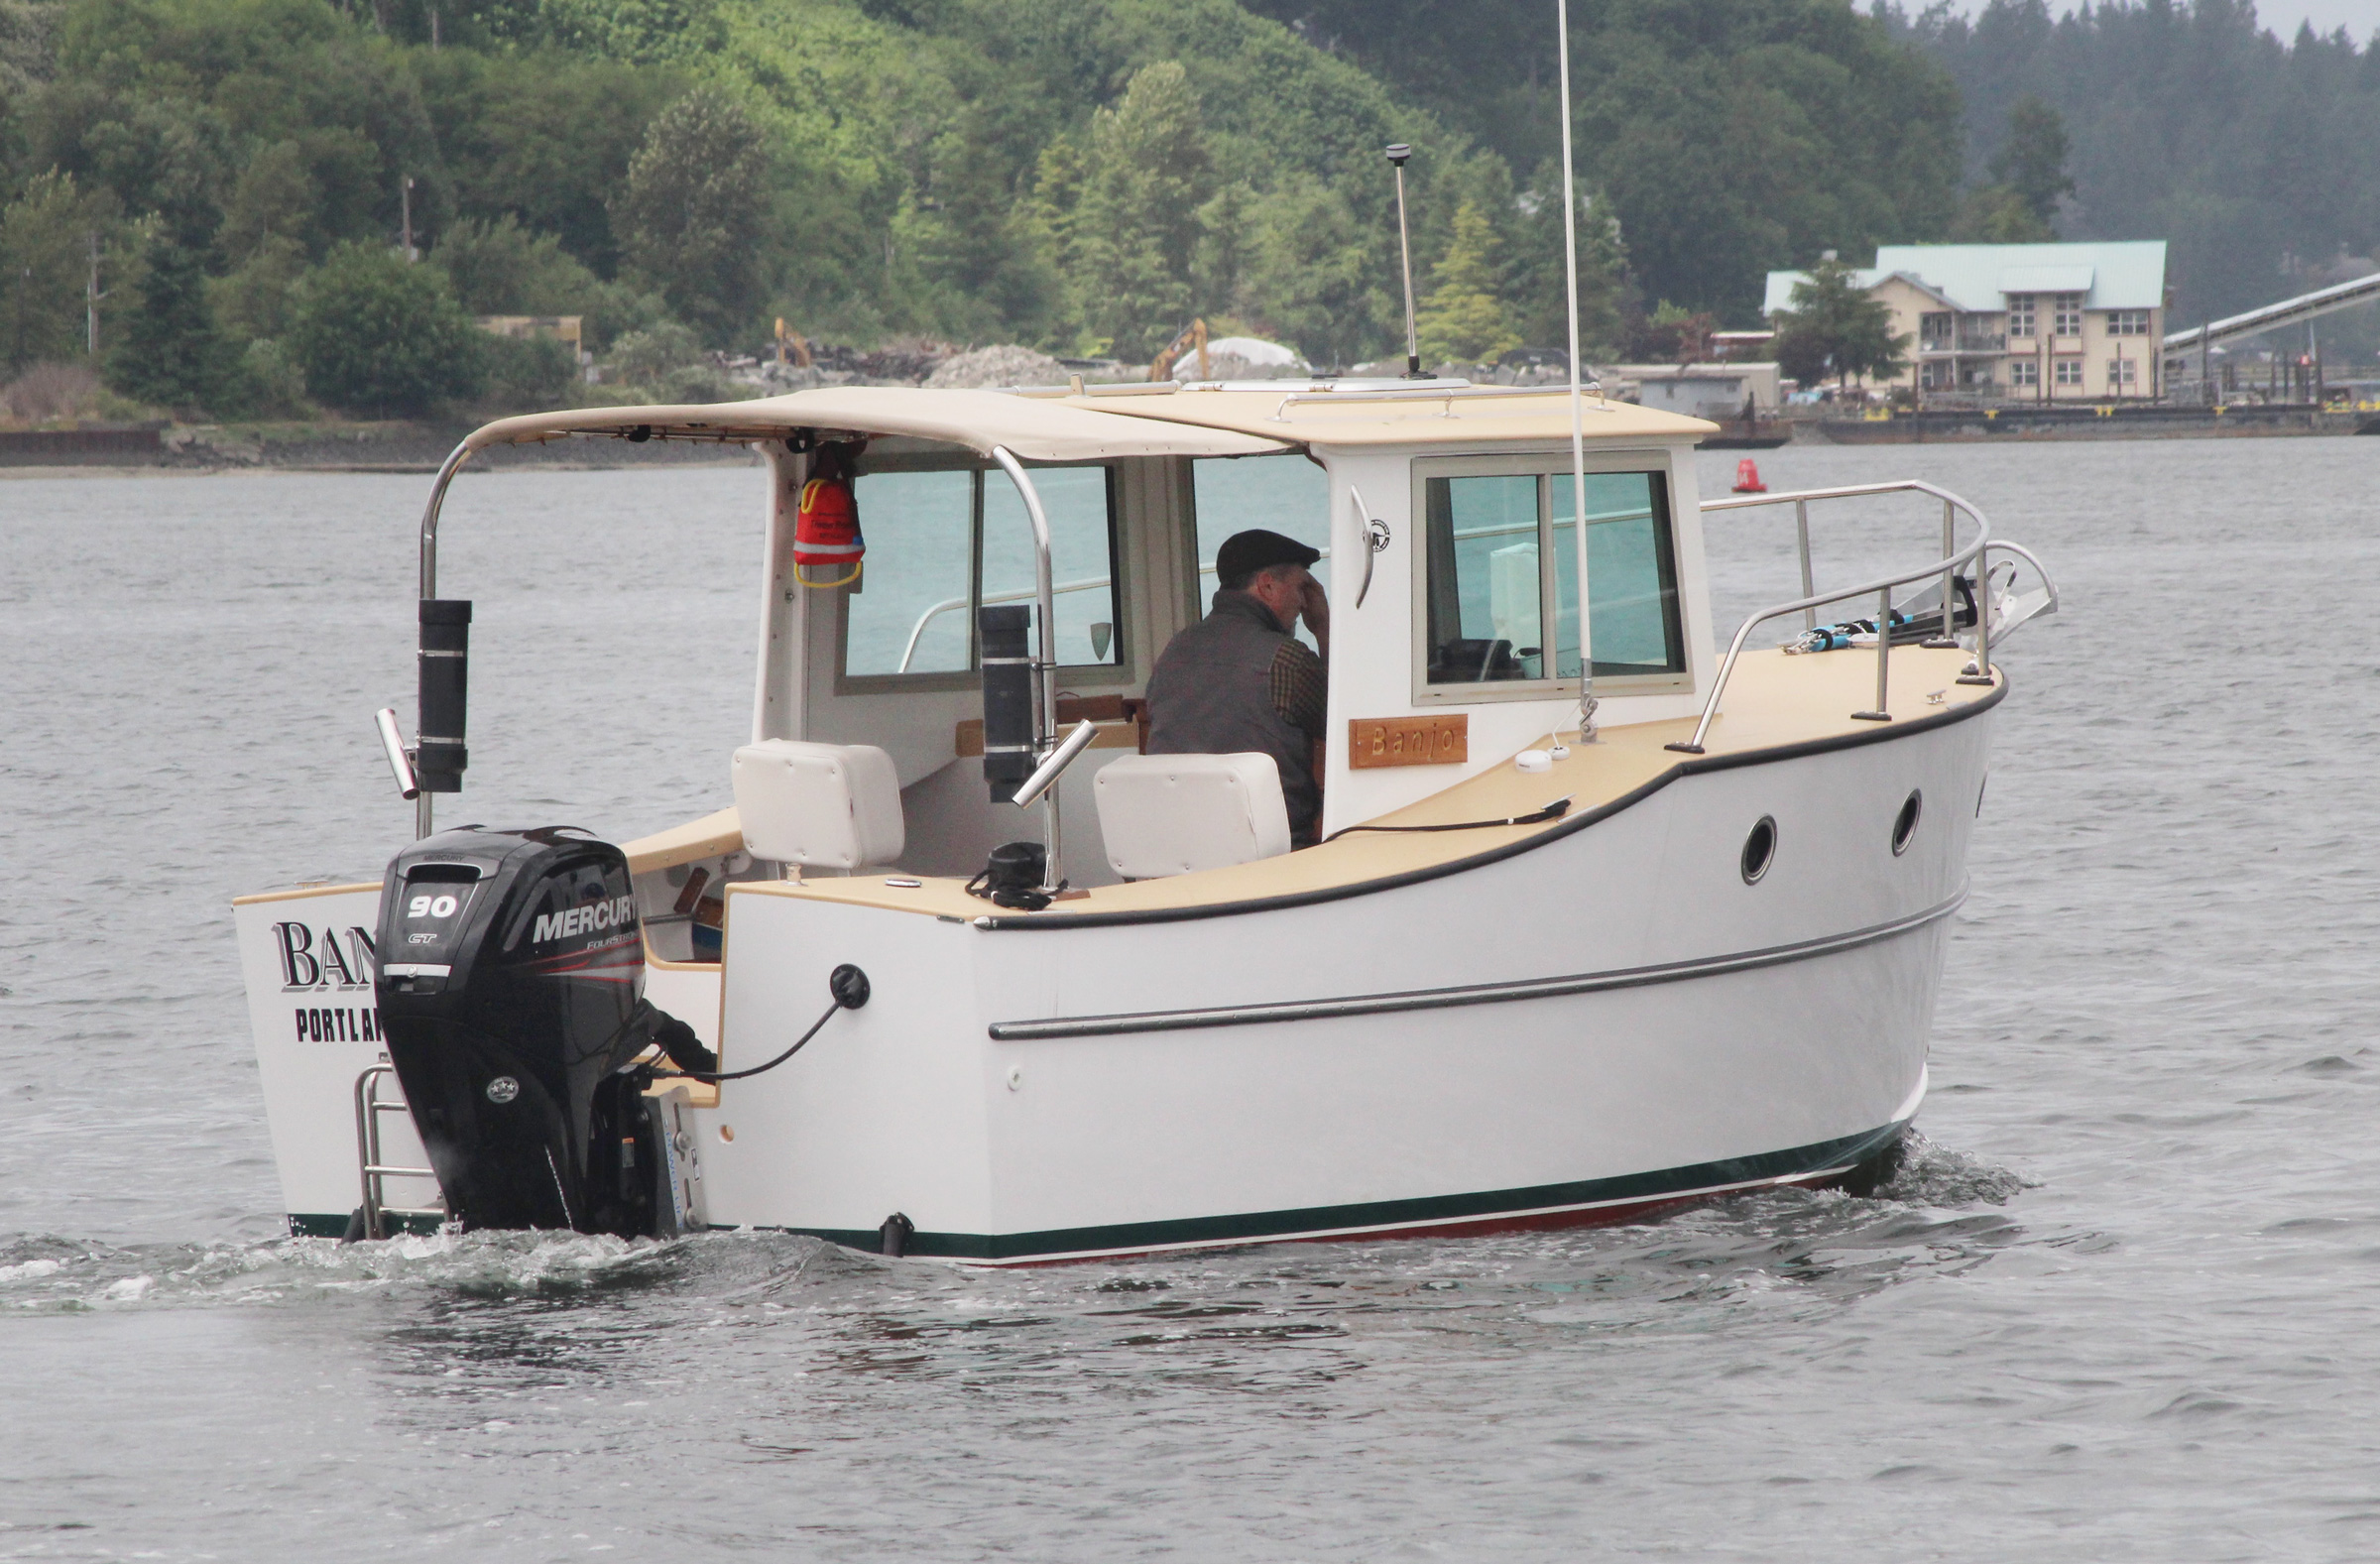
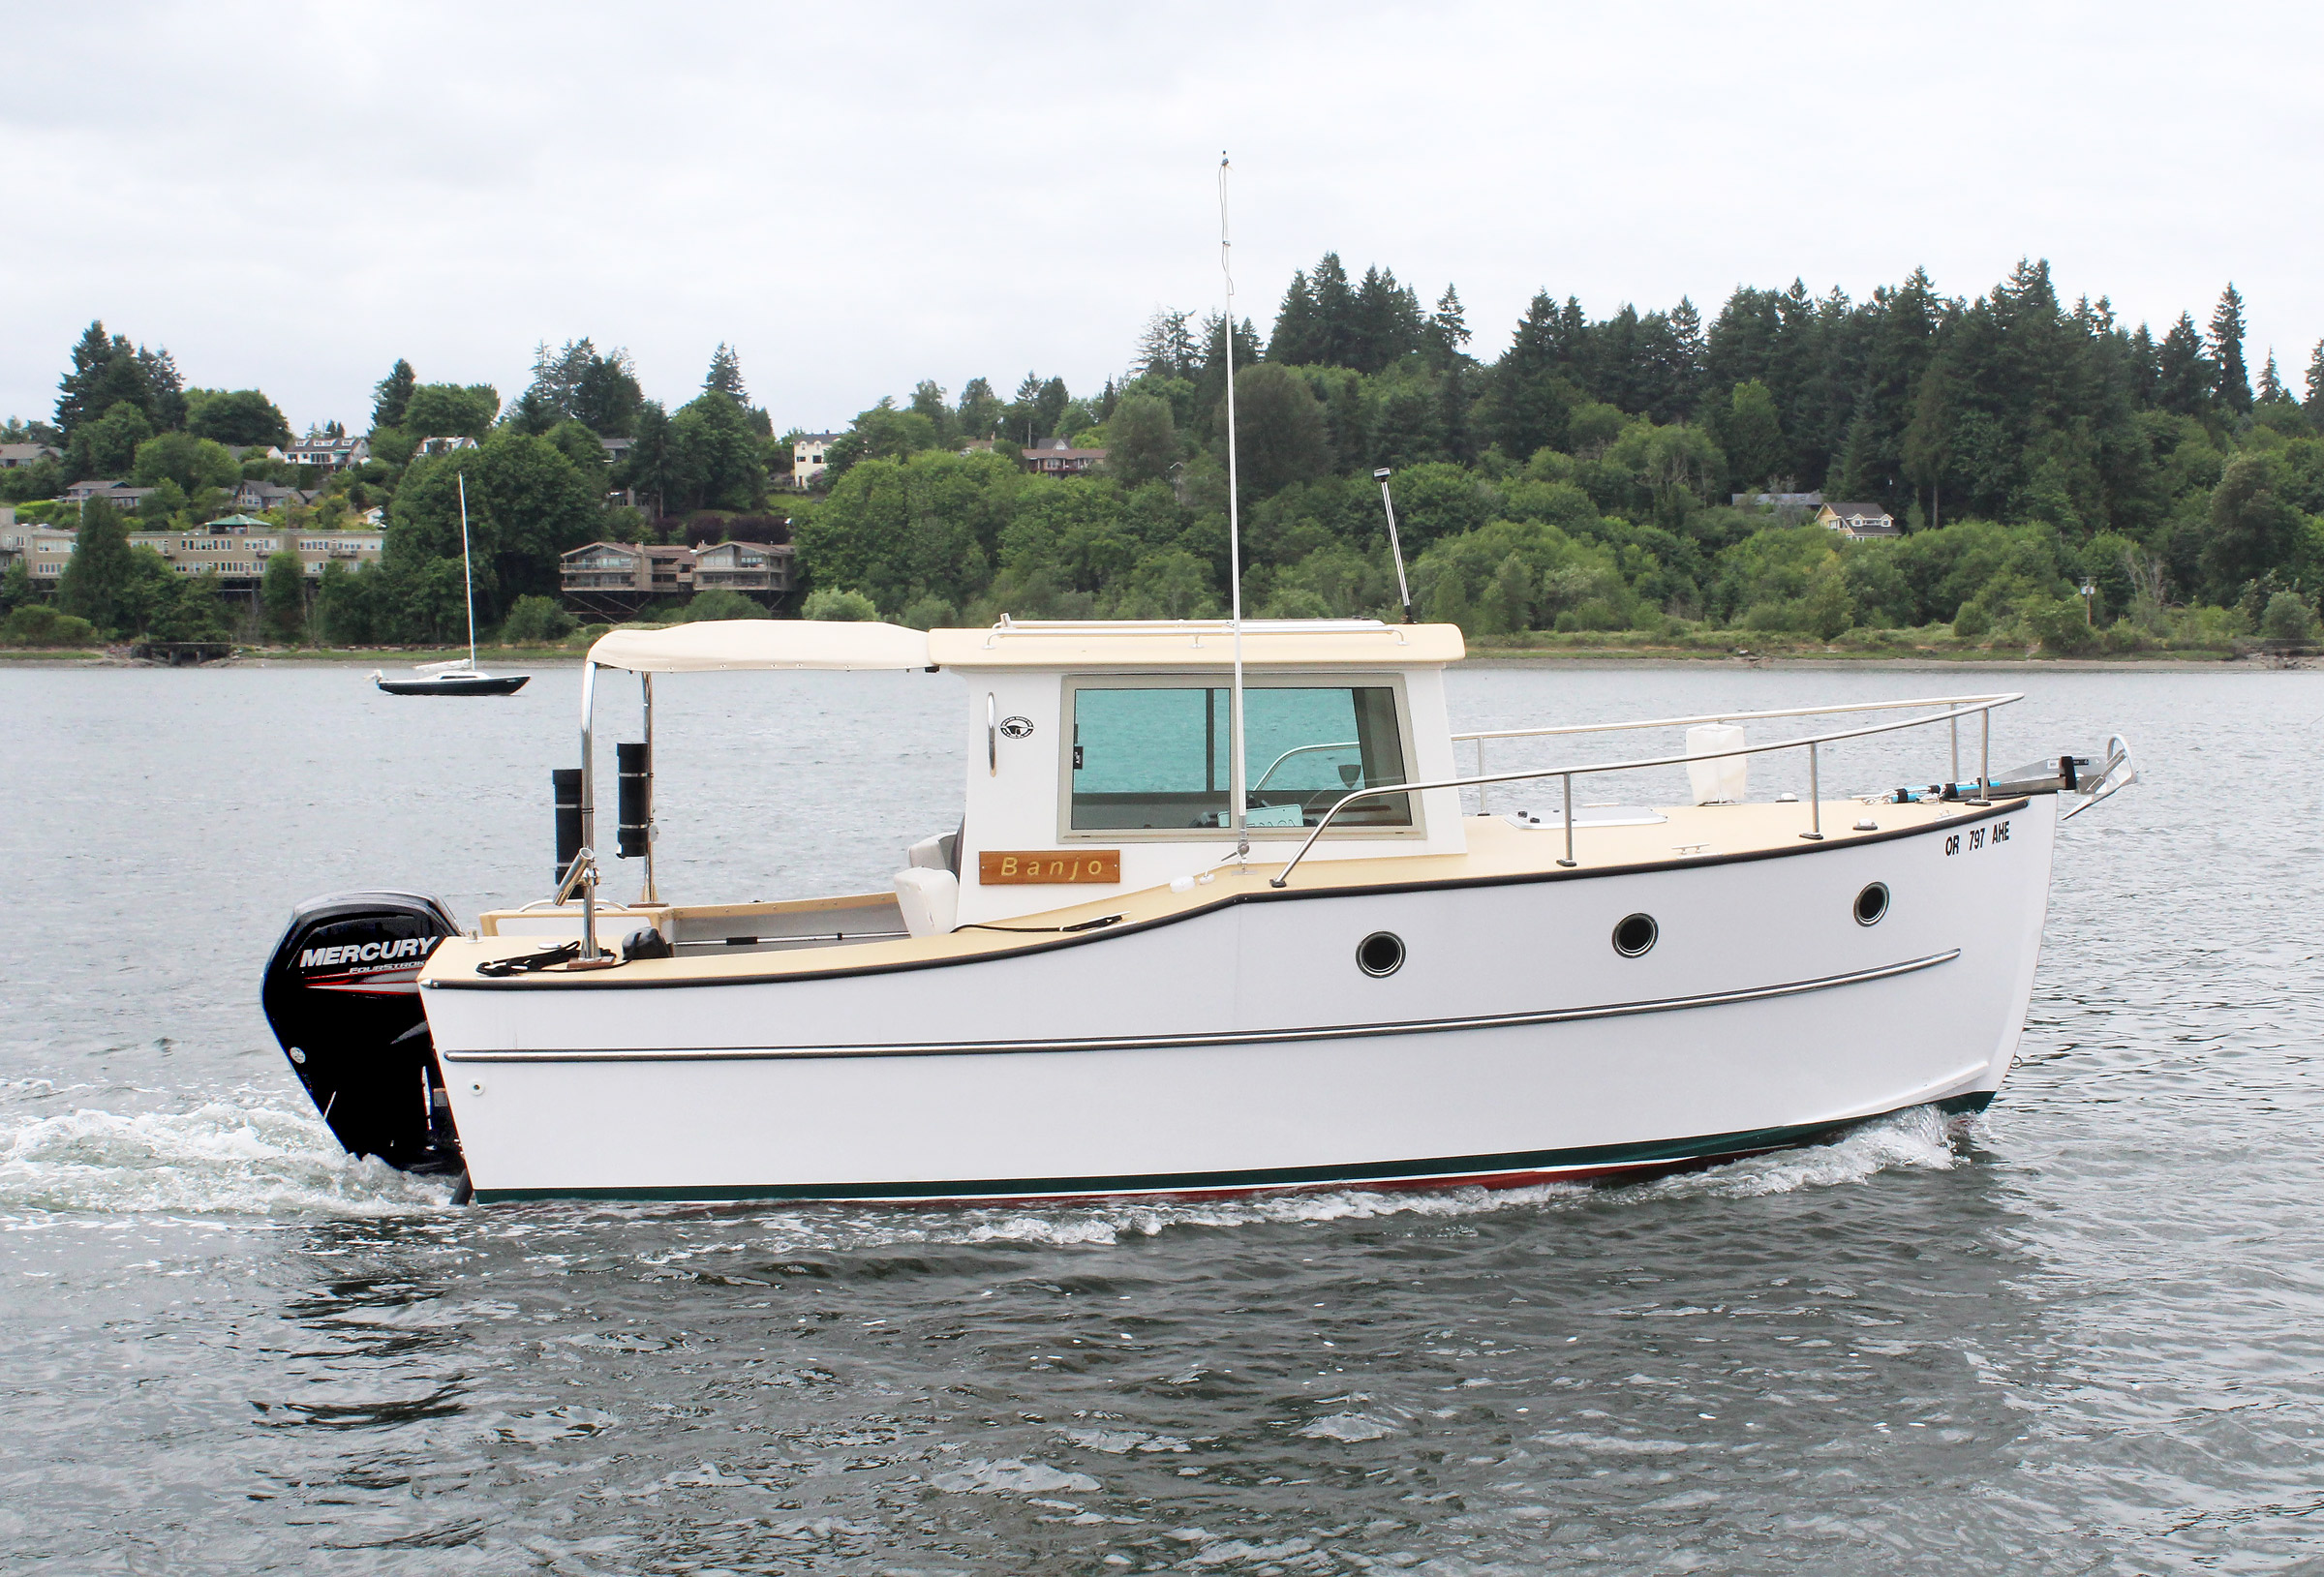
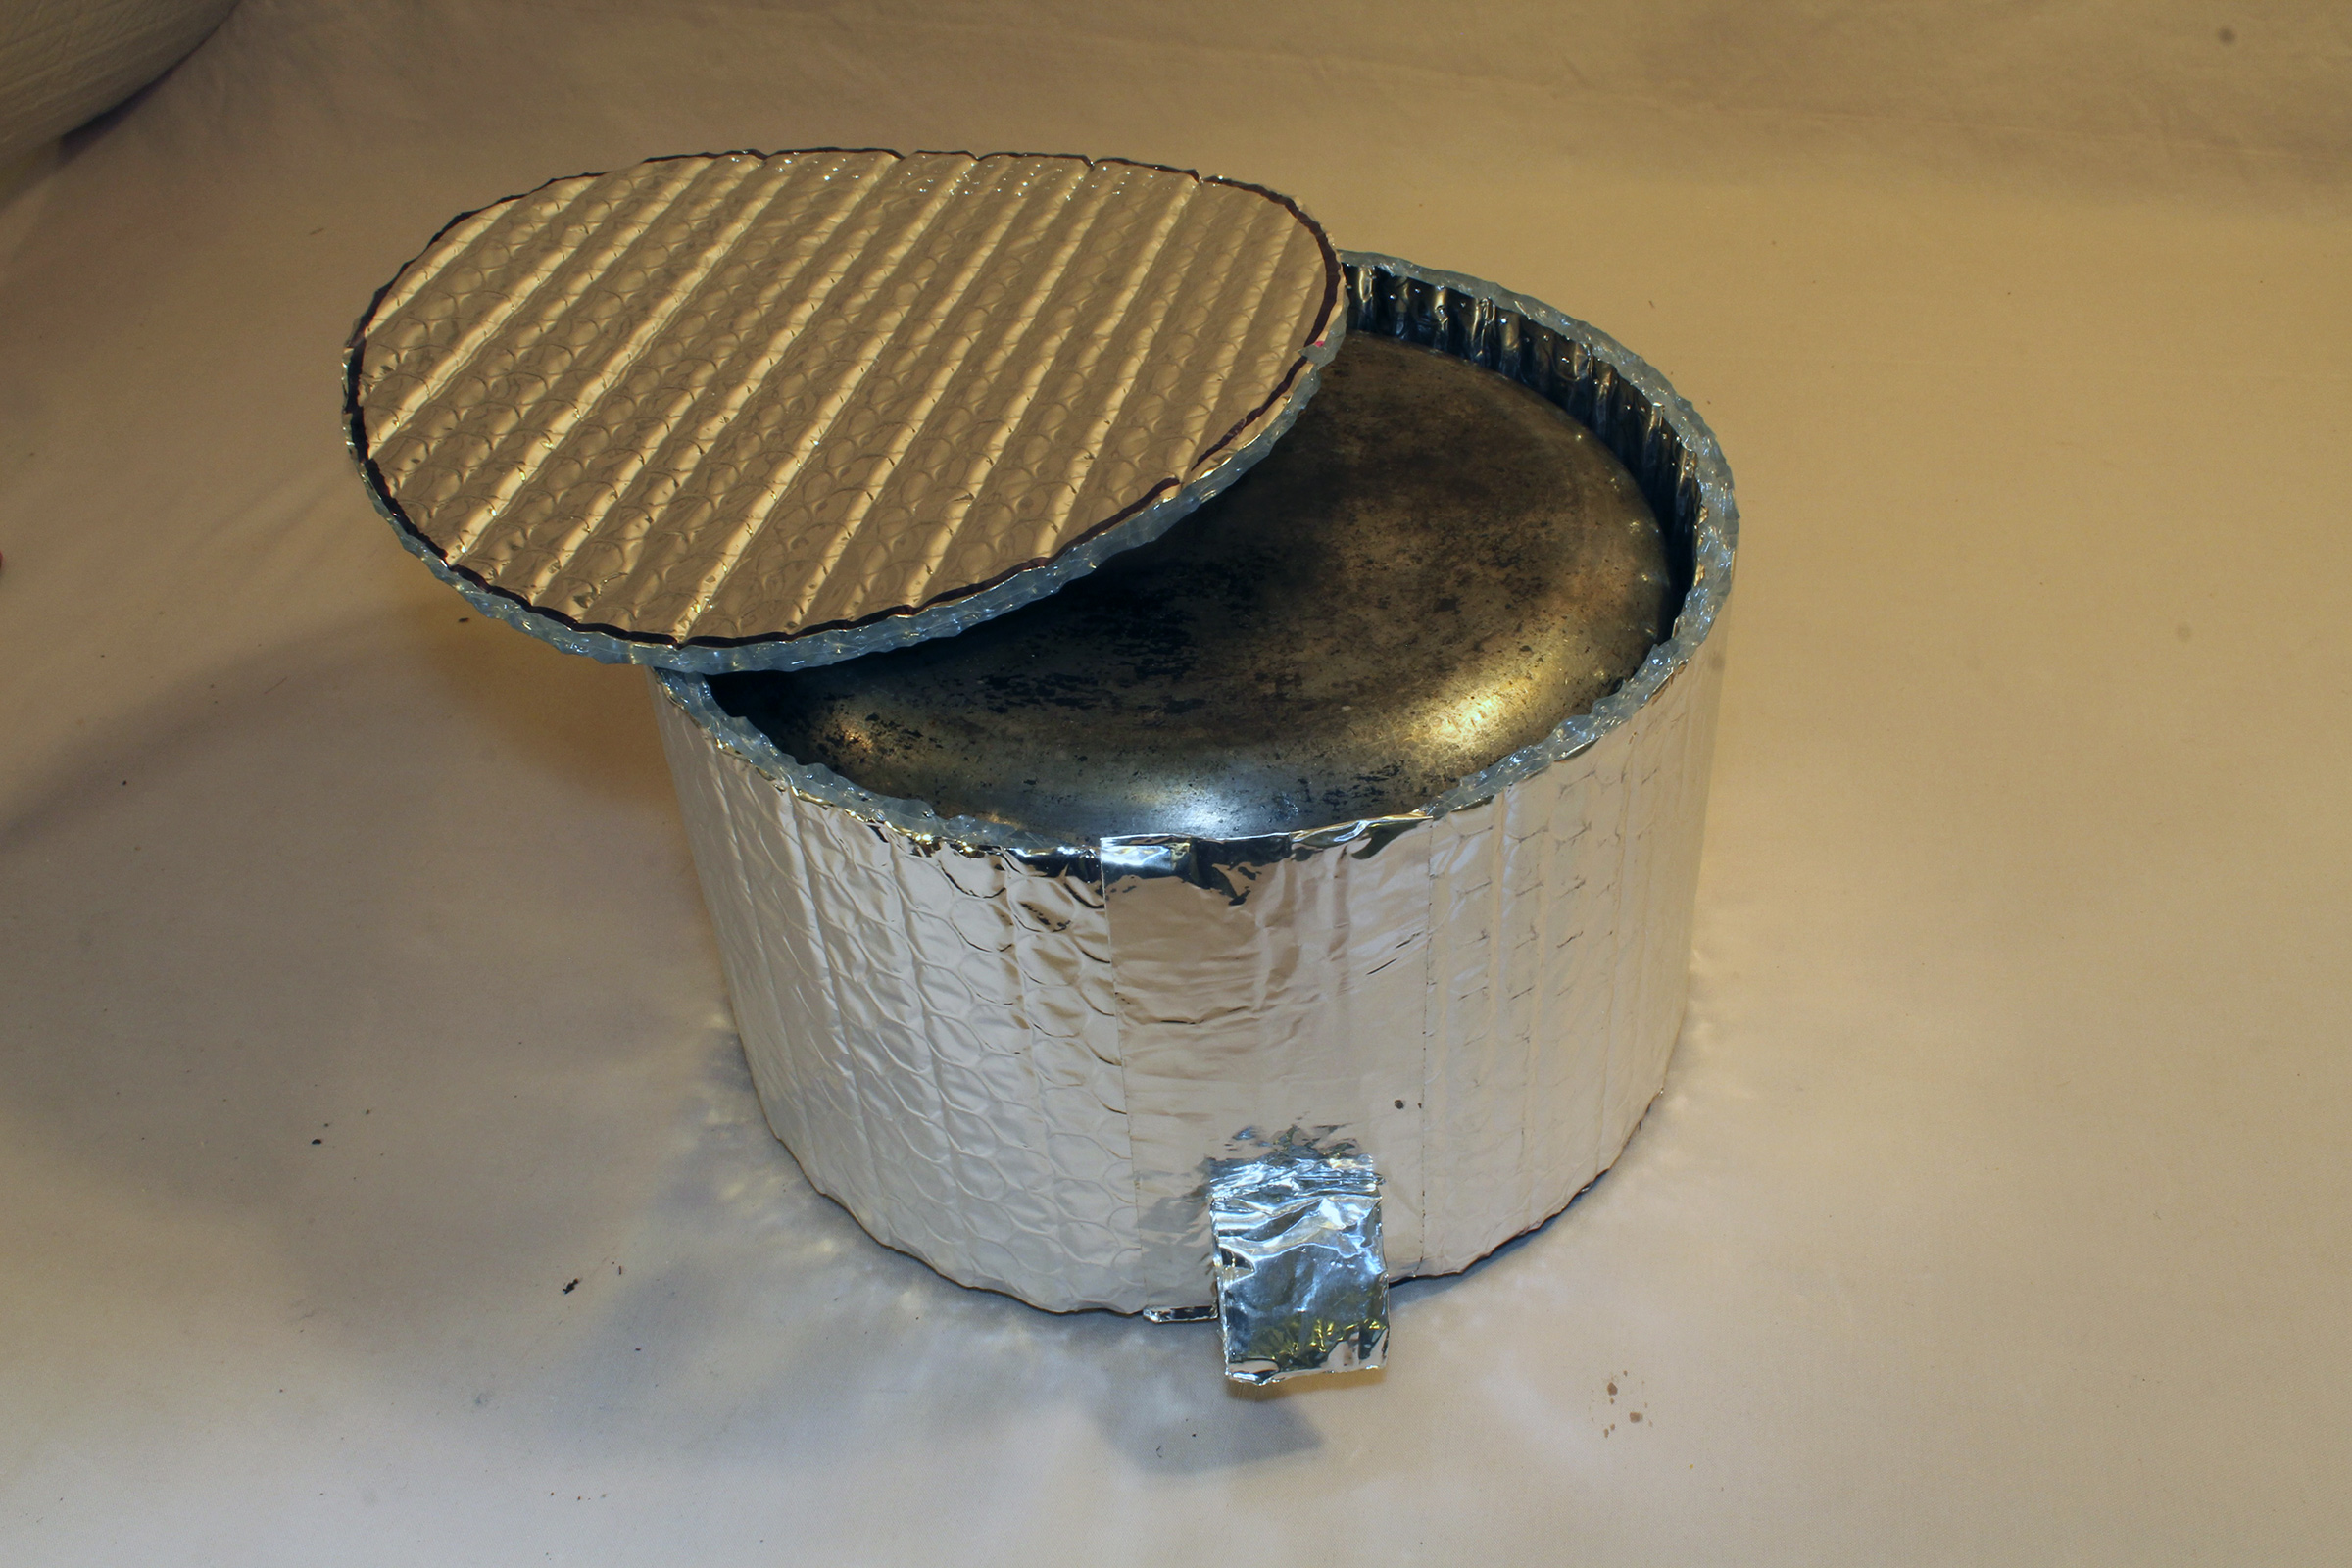
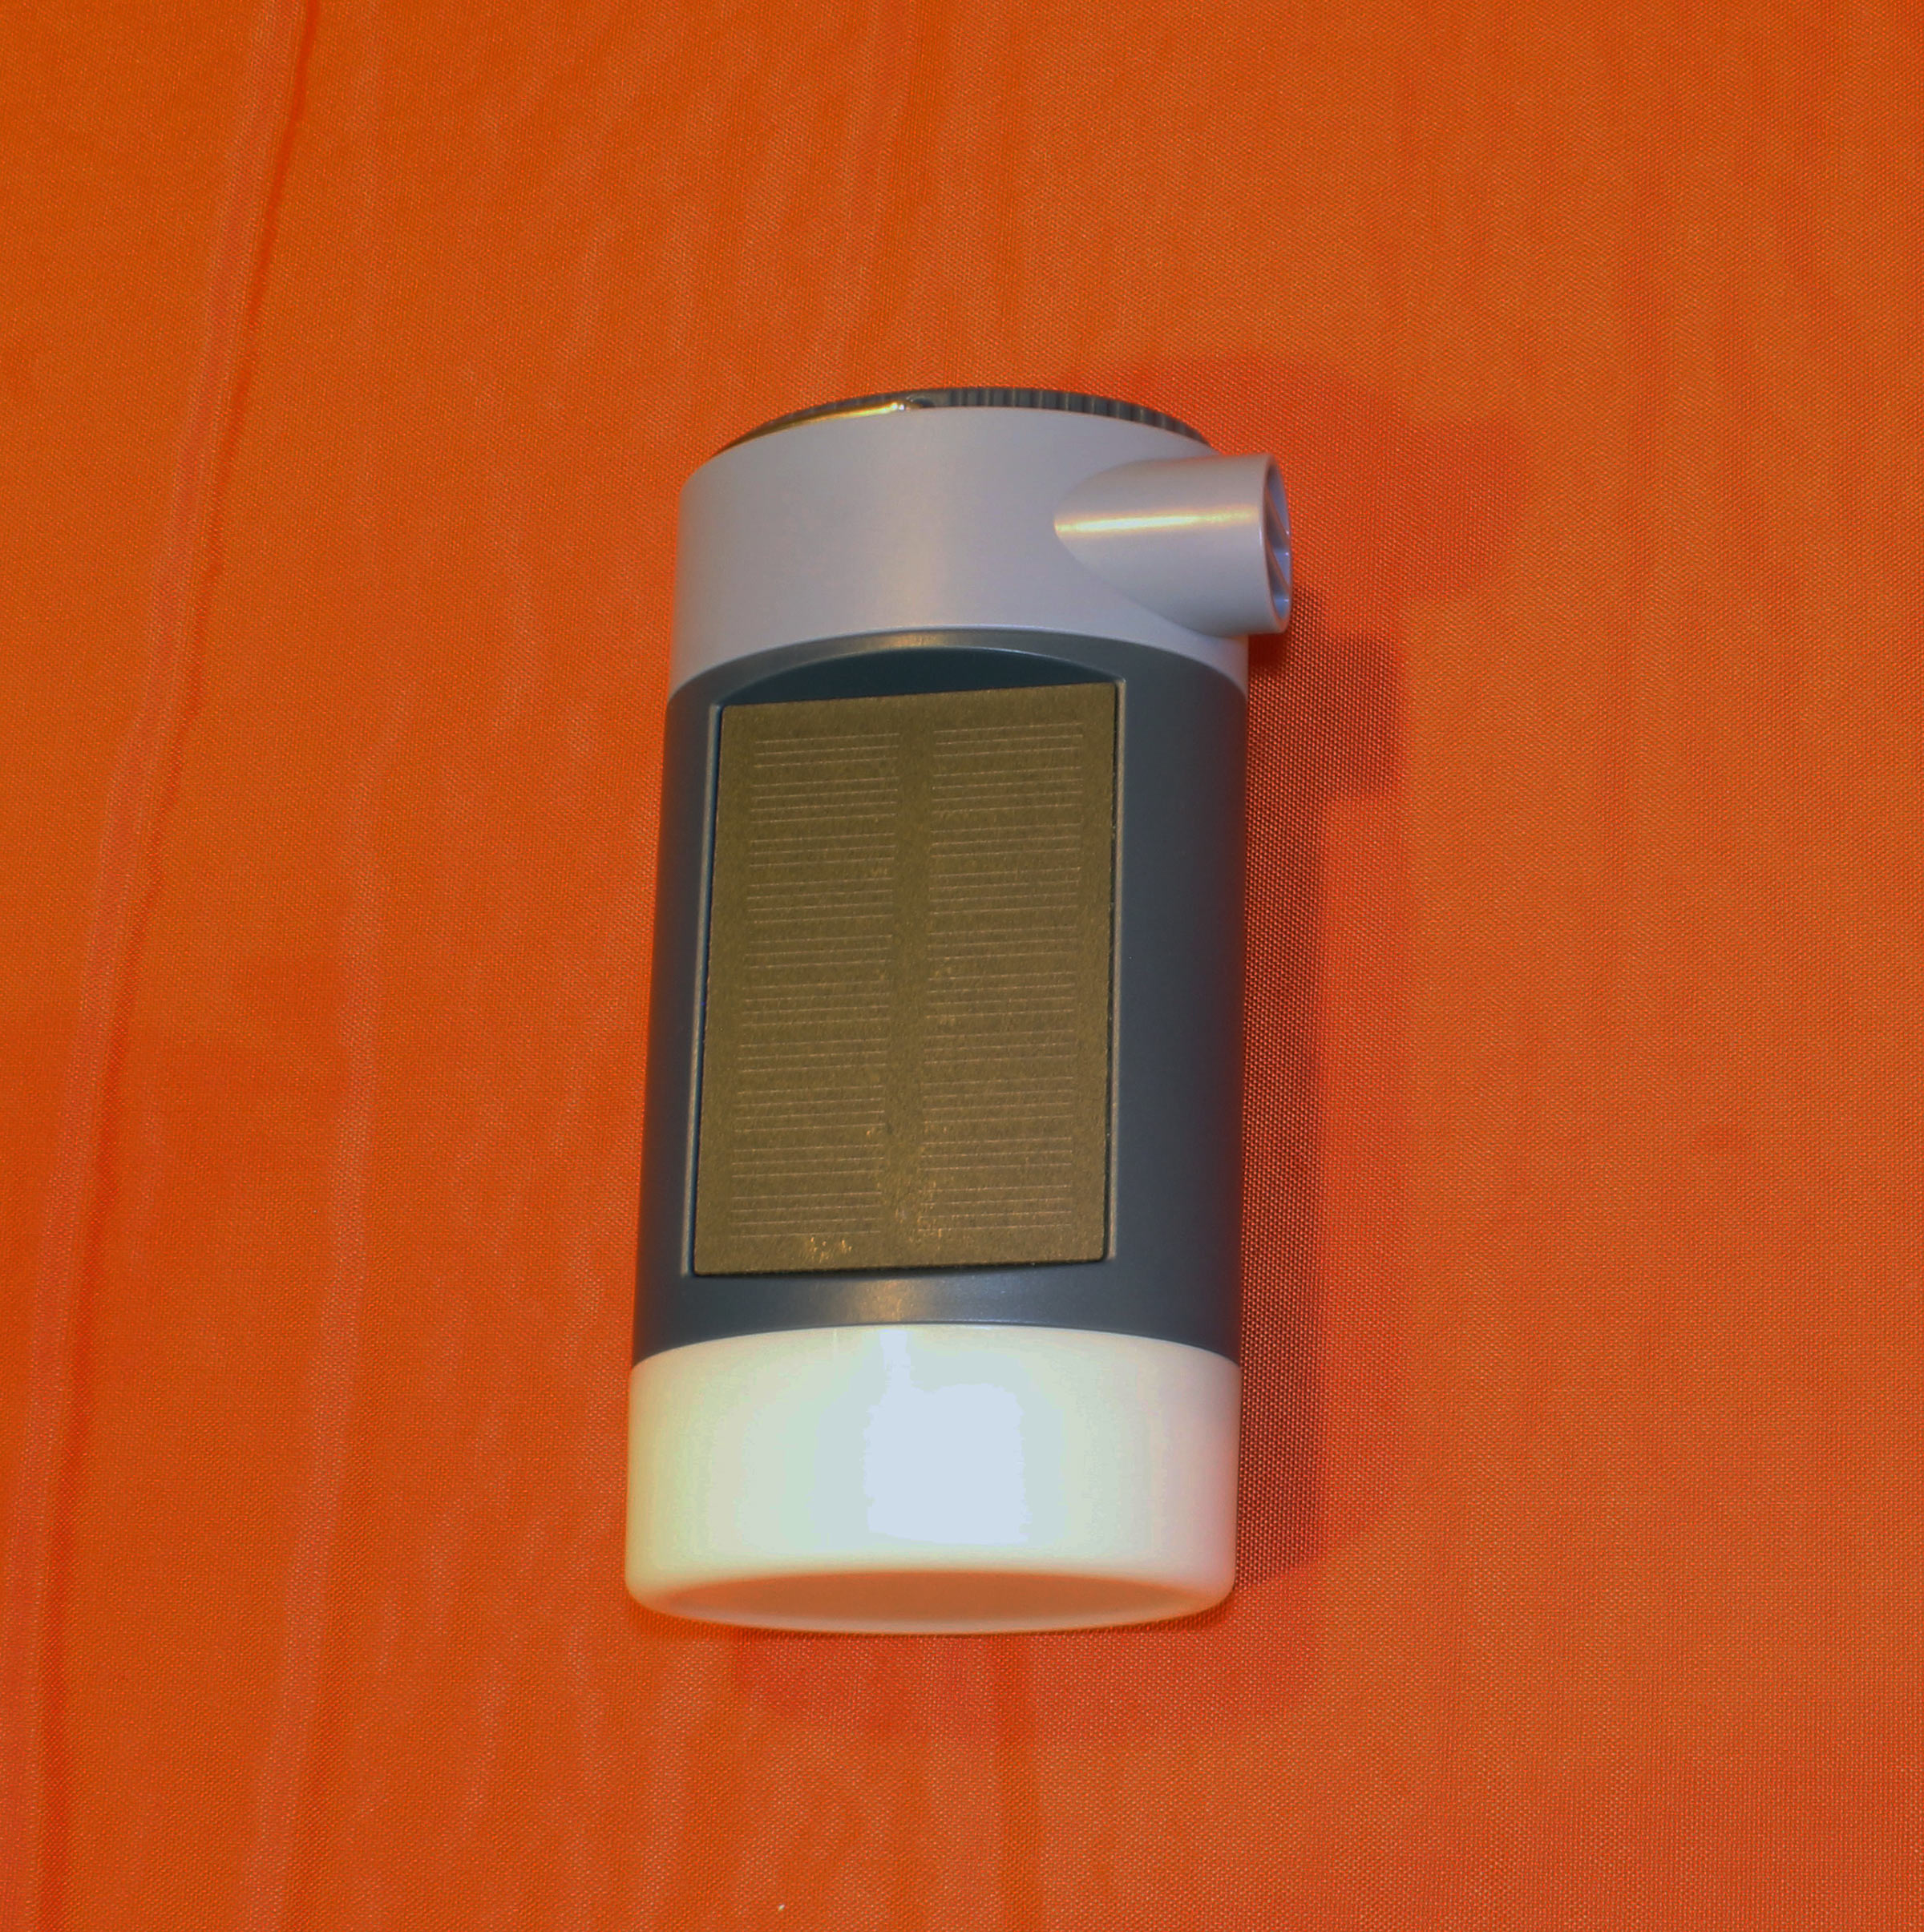
Packed in its case, the portable toilet is compact enough for canoes and can even fit below decks in some kayaks.
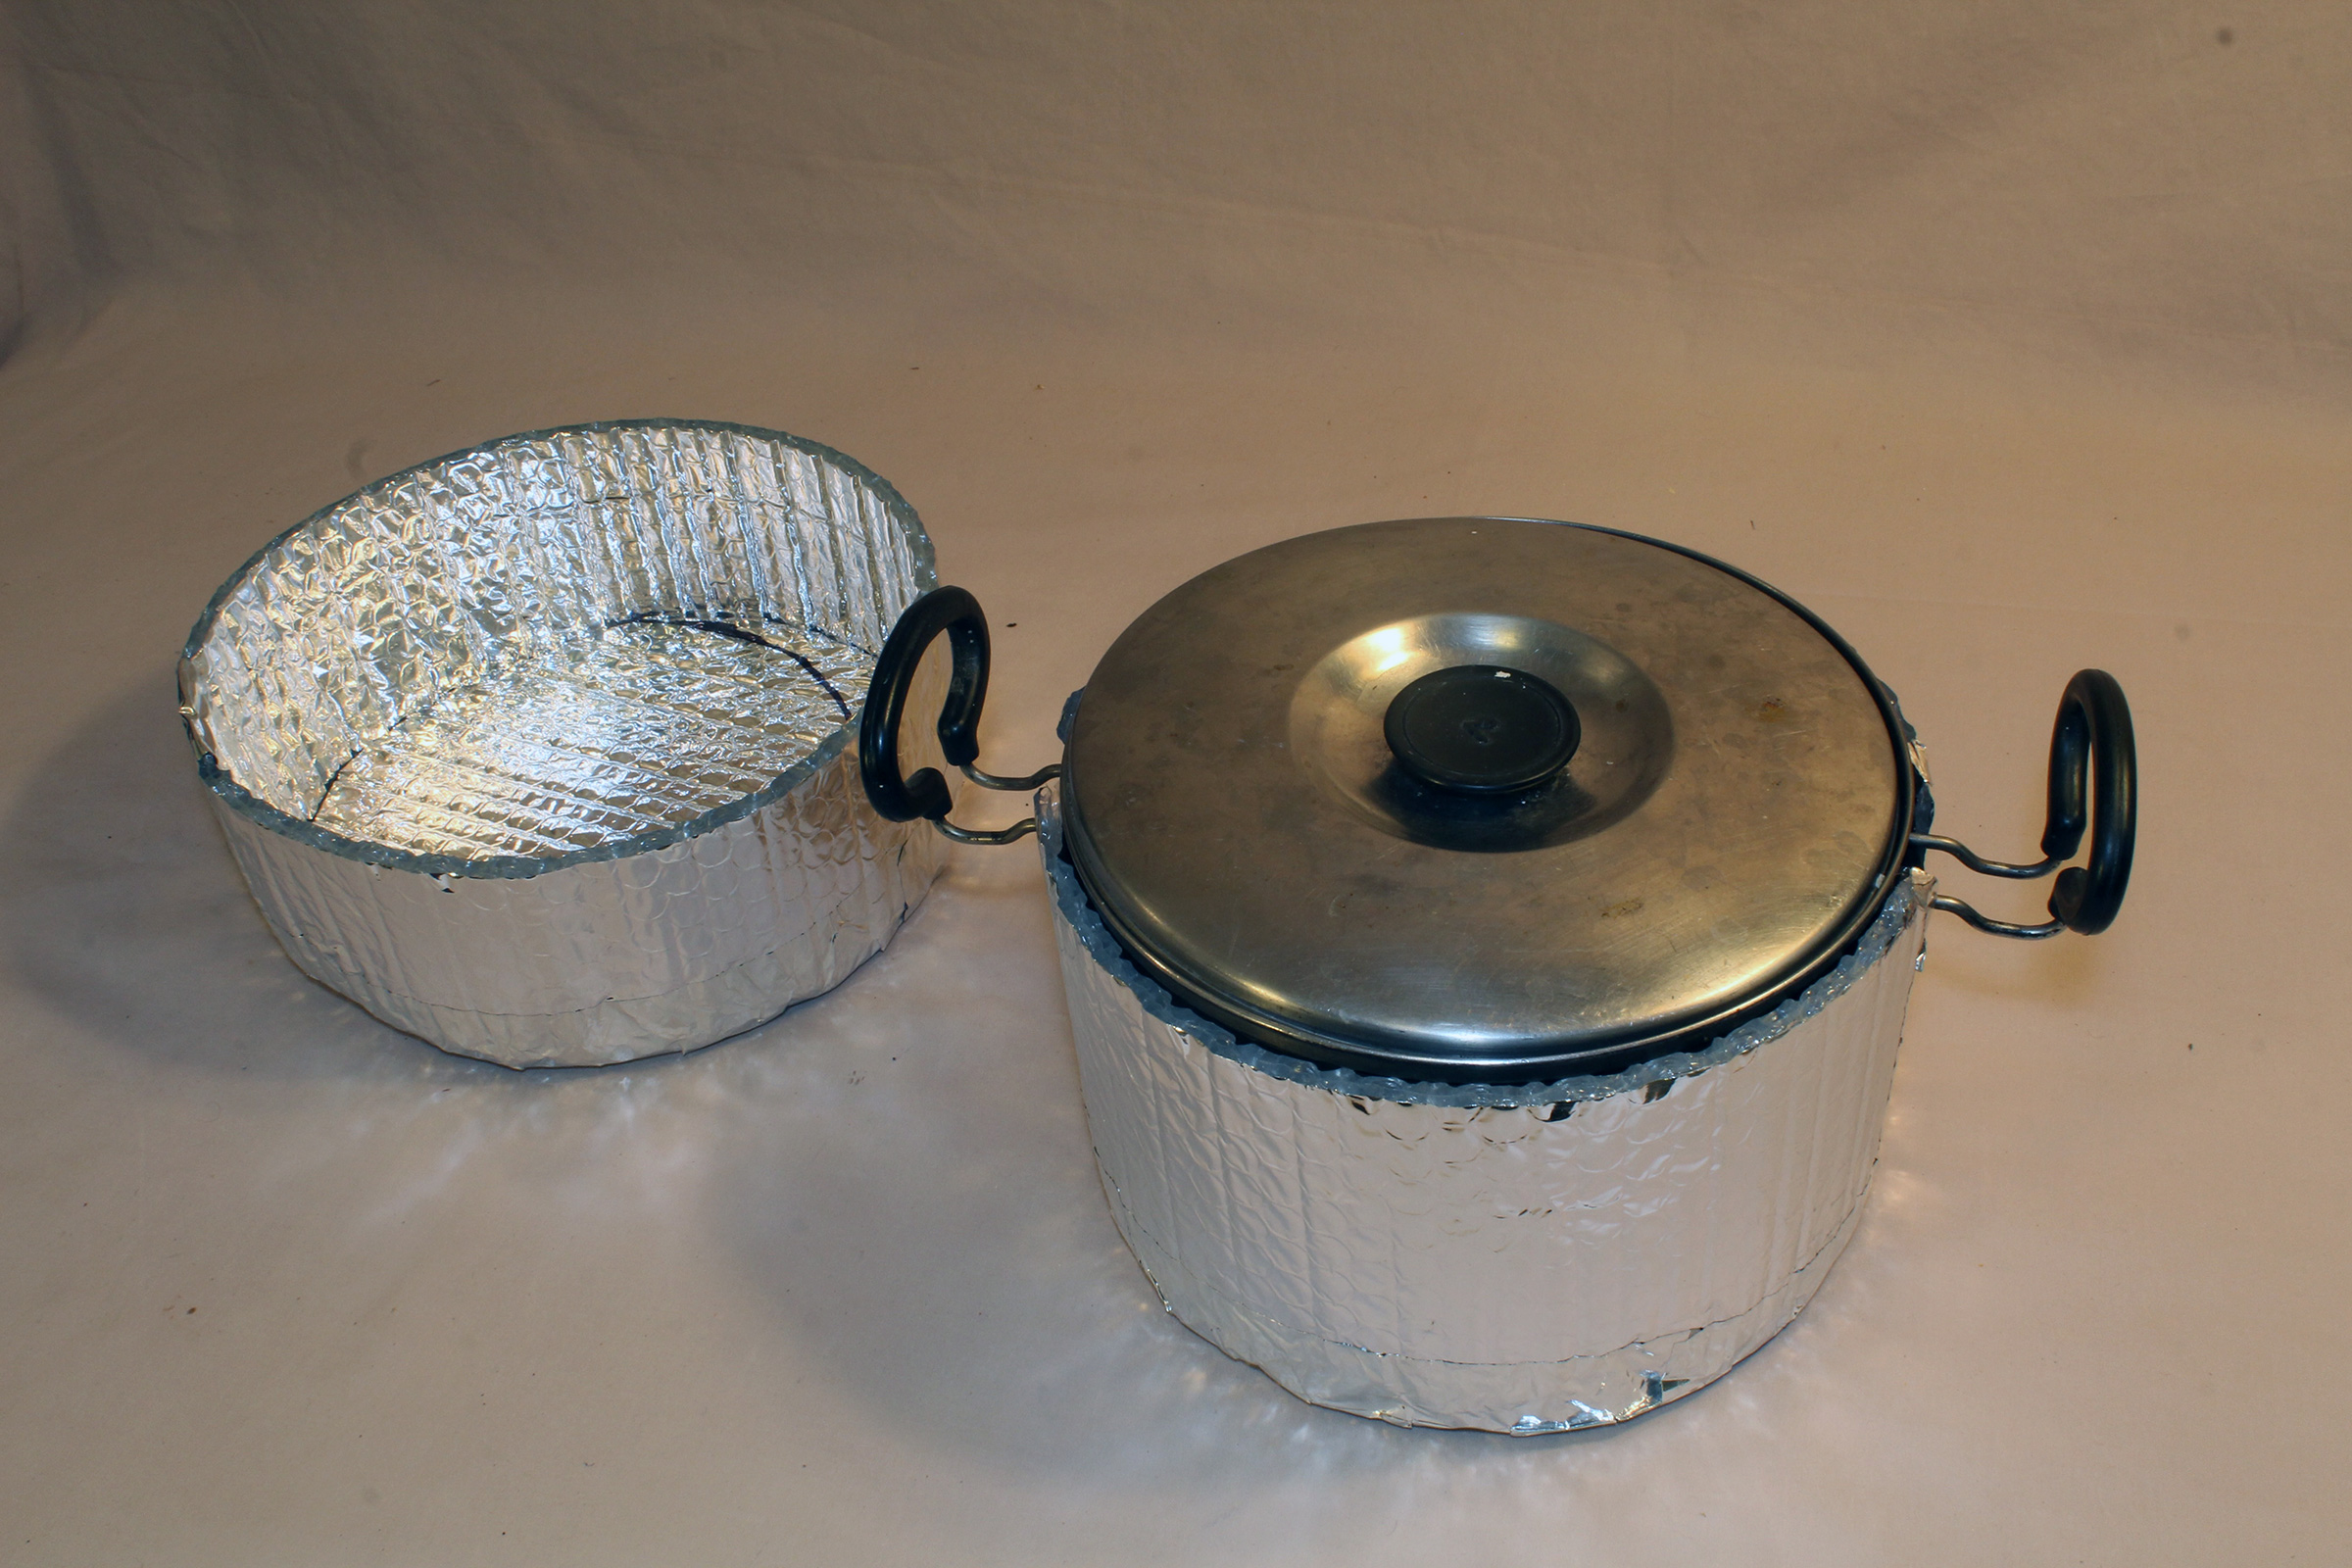
With the lid that covers the toilet seat closed, the unit can be used as a camp stool (putting that throwable cushion on top adds height and comfort). The toilet can also be used with a waste bag in place as a trash can for keeping a campsite tidy. Even for the smallest of small boats, the TripTips Retractable Portable Toilet is a good fit and makes it more convenient and less unpleasant to keep the places we visit unspoiled, which is the right thing to do.
Christopher Cunningham is the editor of Small Boats.
When Erik W. was growing up in rural New Jersey, his father would take him on adventures in a 15′ Old Town canoe, fishing on small local lakes and paddling whitewater stretches of the Delaware River. When Erik entered high school, he joined the whitewater kayak team, playboating standing waves and creekboating through fast-moving whitewater in tight creeks and rivers. Those early experiences instilled a love of the water and of paddling that has never left him.
After high school Erik joined the Army and went to West Point where he trained in mechanical and aeronautical engineering. It was a natural fit for the young man who loved to see how things come together and how a design can turn into a functional, physical object. He was, he says, “the kid who took things apart, but who also built things like tree forts and pinewood derby cars.”
Erik W.
Before DORCAS was rigged for sail, she was used as any other canoe, for paddling and occasional camping trips. Erik and his father have also ventured with her into some whitewater stretches of the Delaware River.
All things wood and floating went on the back burner for Erik’s nine years in the military, but in 2012, returning from a final tour of duty in Afghanistan, a friend suggested bareboat-chartering a 42′ Hunter sloop in the Florida Keys, and Erik fell in love with sailing.
Upon his return to civilian life, Erik set himself up making fine furniture for a living. Largely self-taught, he specialized in chairs. He was drawn to the craft, he says, because “you’re constantly trying to figure out how to do things, how to transform ideas and designs in your head into things that have beauty, purpose, and longevity. I particularly liked chairs because they’re very technical; they have to have an aesthetic, the right ergonomics, and be structurally sound.”
Erik W.
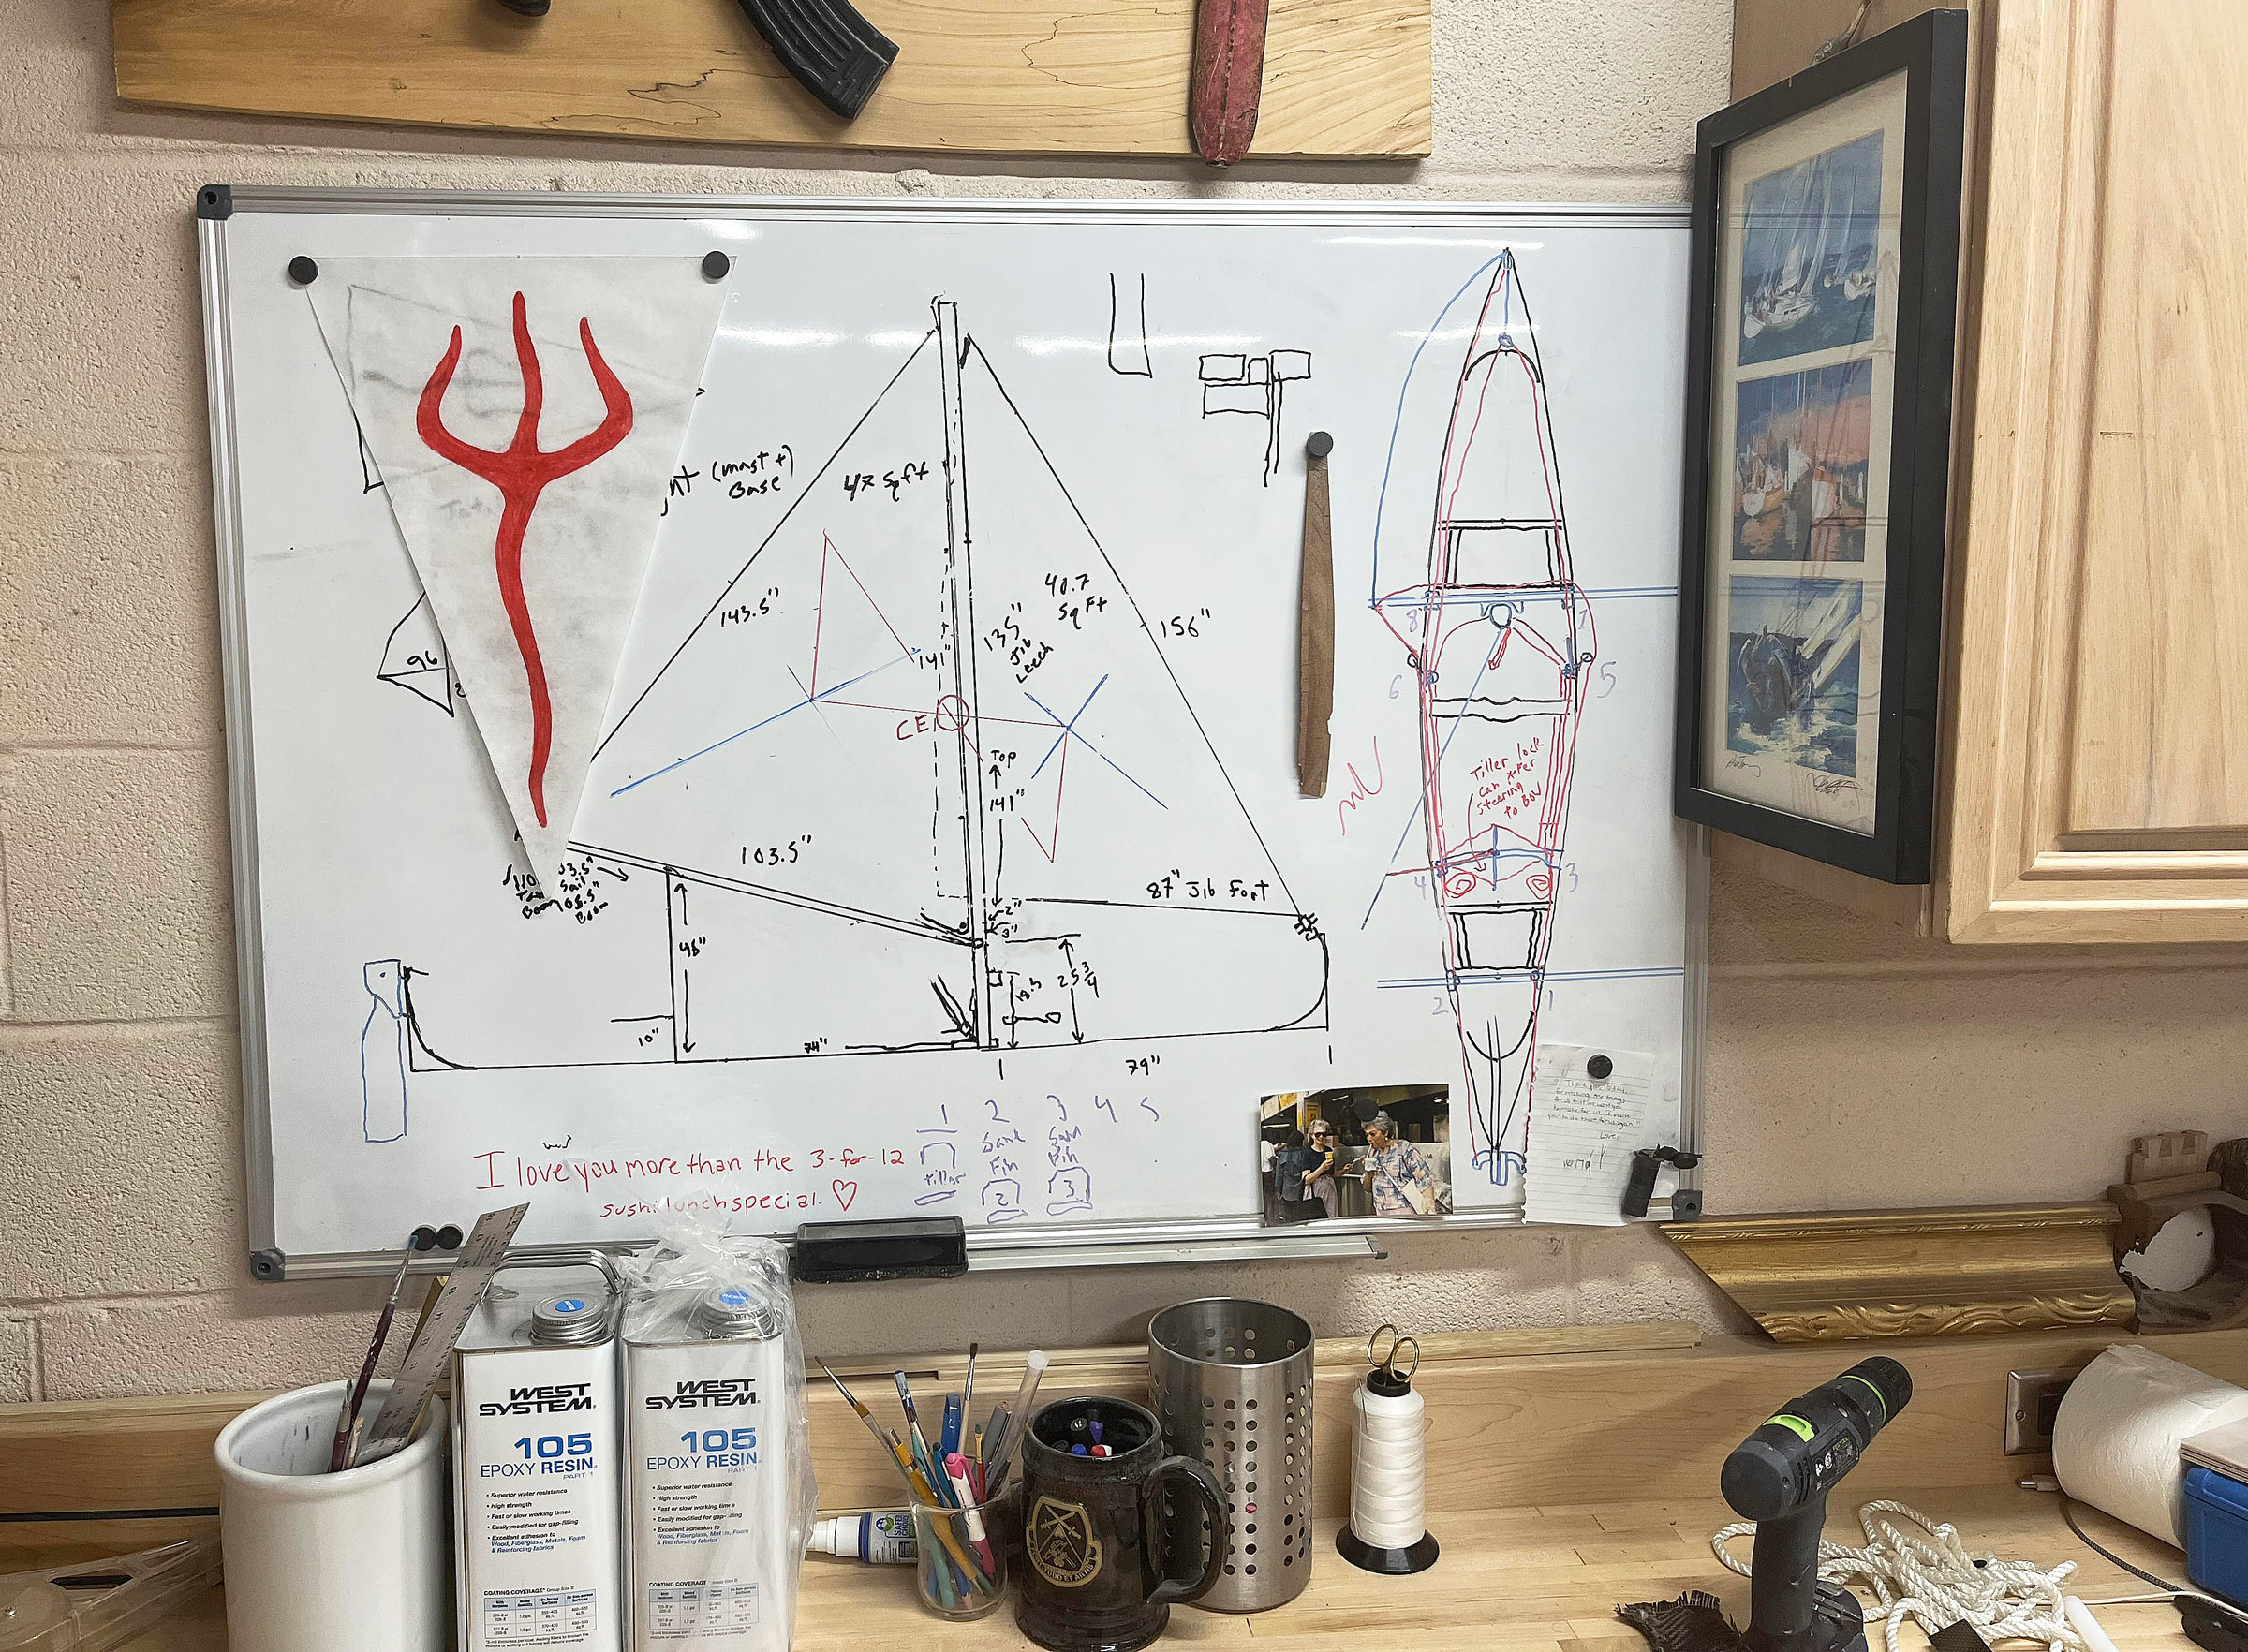
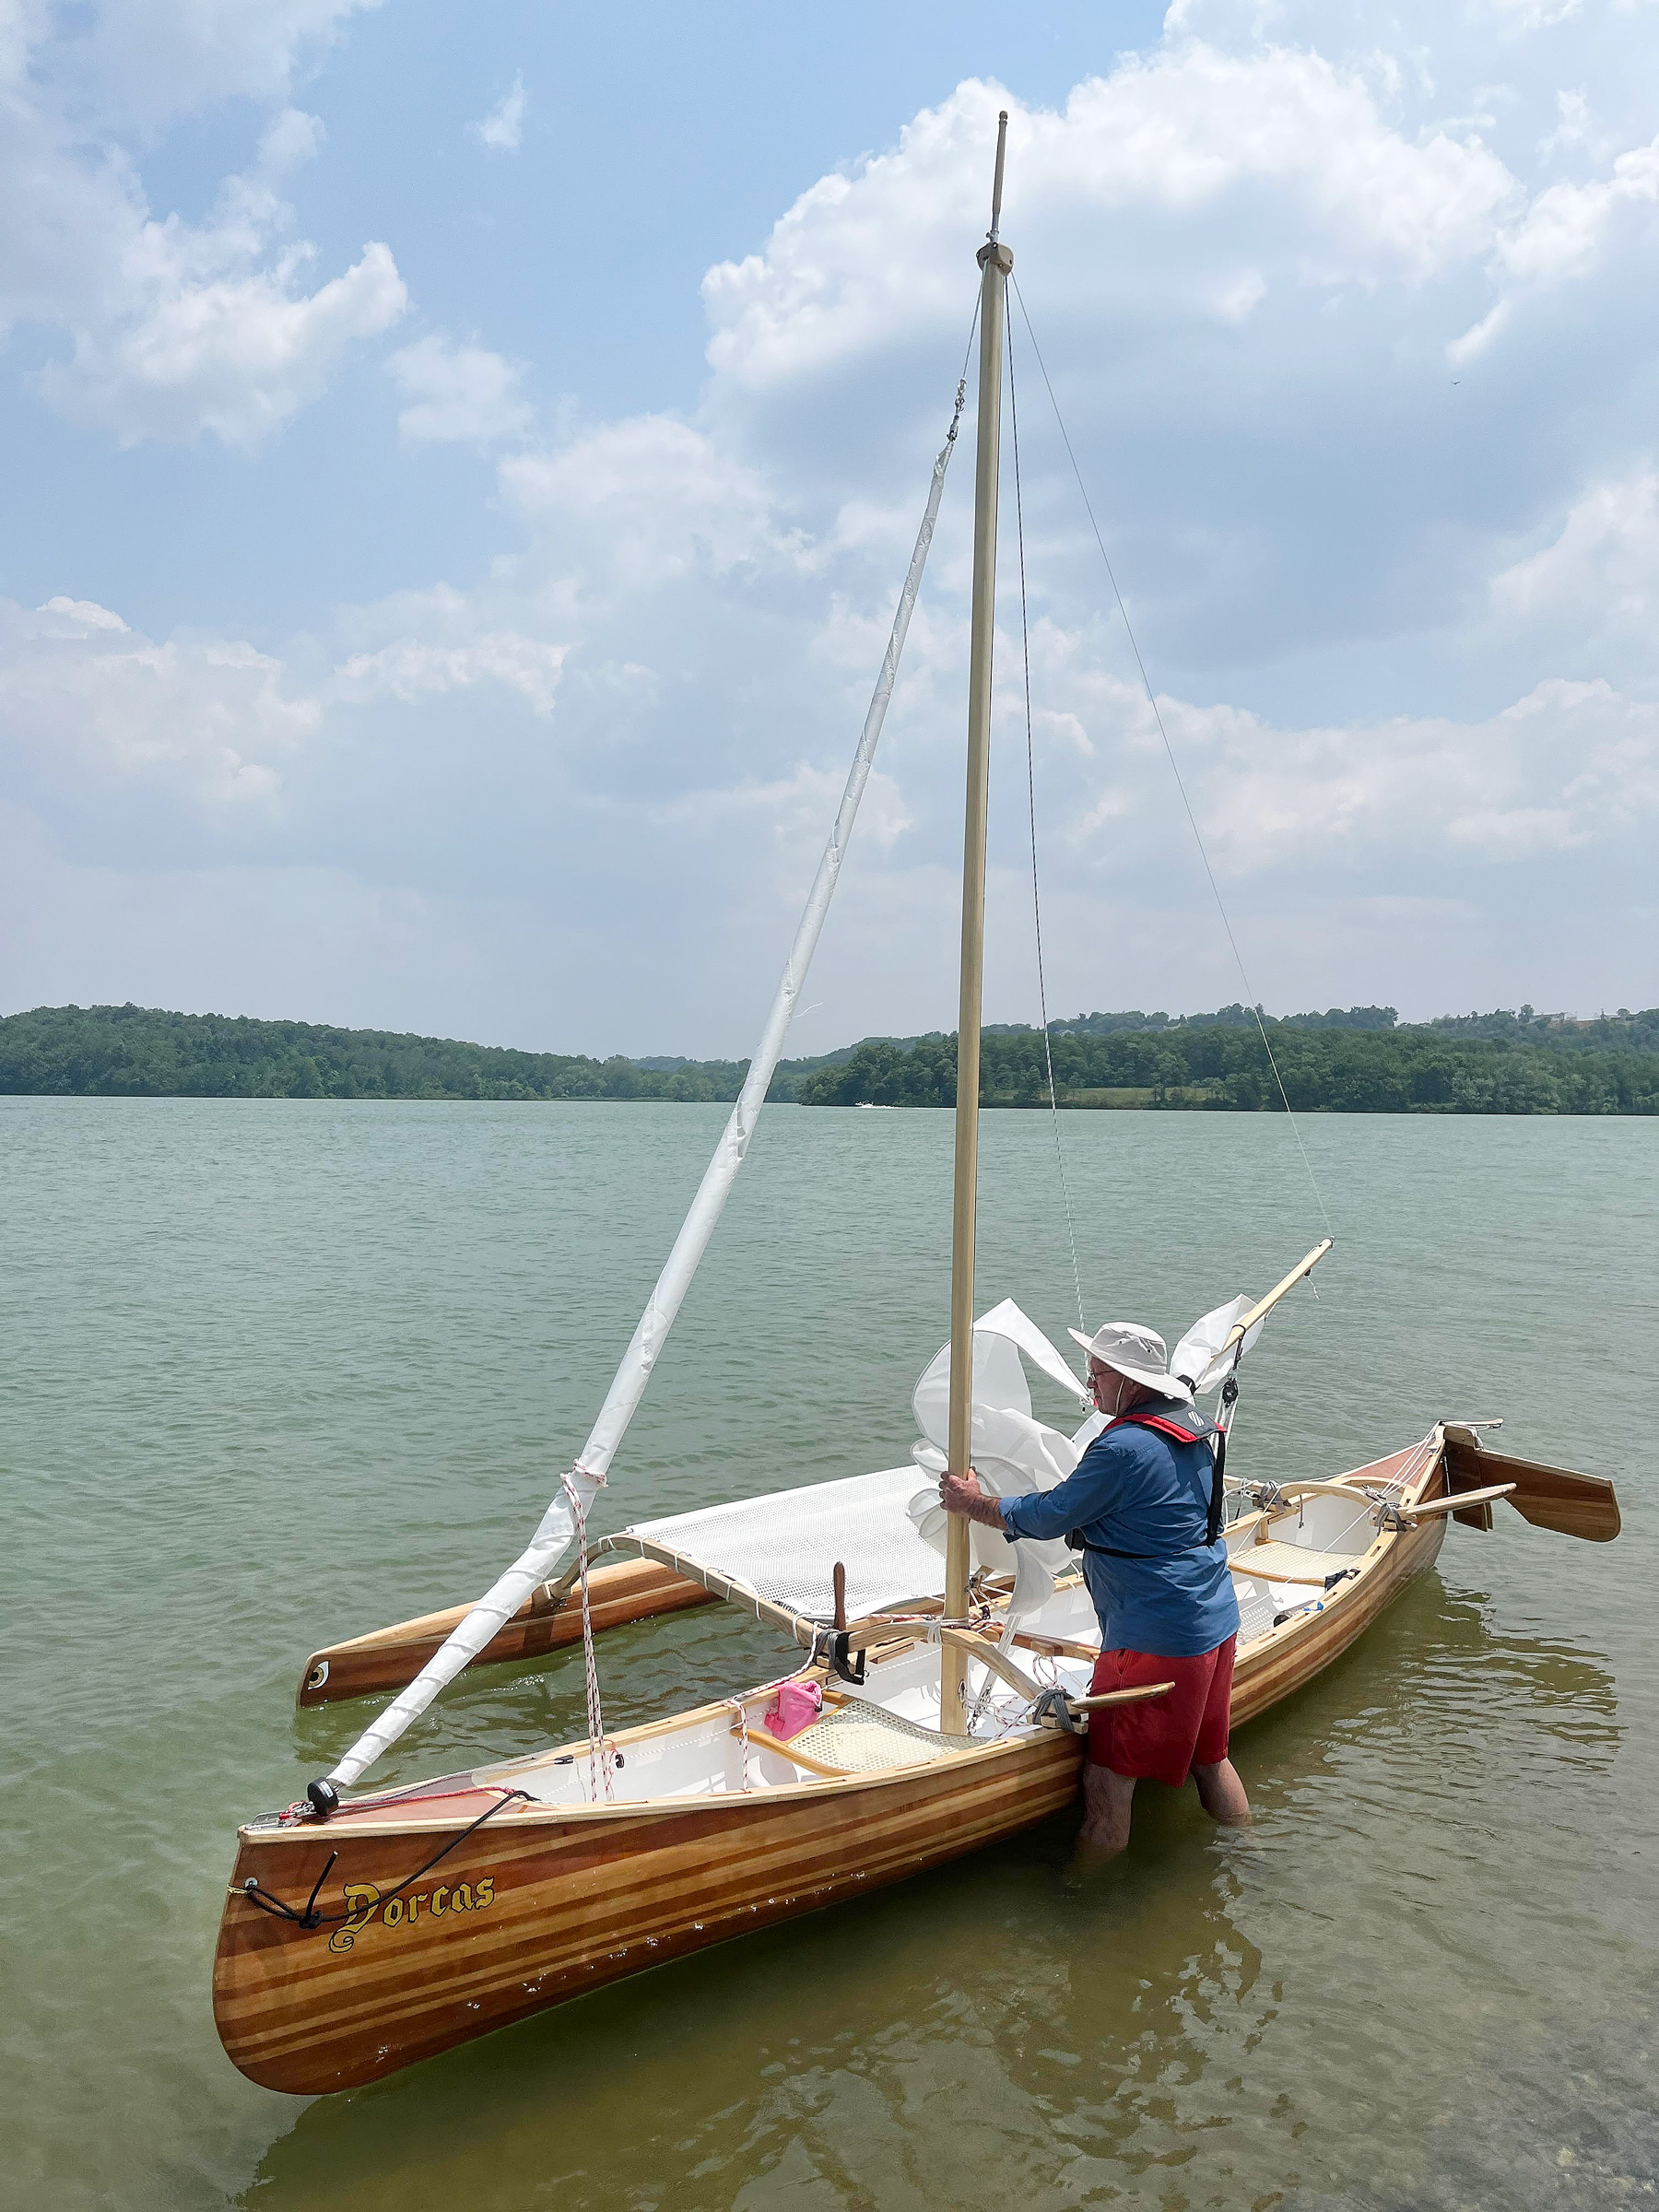
The scale drawing that led to DORCAS’s rig was worked out on a whiteboard in the shop. The house flag—a combination of a W (the family’s initial) and a trident—is flown at the masthead whenever Erik goes sailing.
Erik ran the woodworking business with two employees for three years, but inevitably, he says, “when you turn a hobby into a profession it robs the fun. I stopped enjoying it.” He closed the shop to commissions, “entered the professional world,” and went back to having fun with woodworking. In 2017 that “fun” led to the building of a cedar-strip canoe.
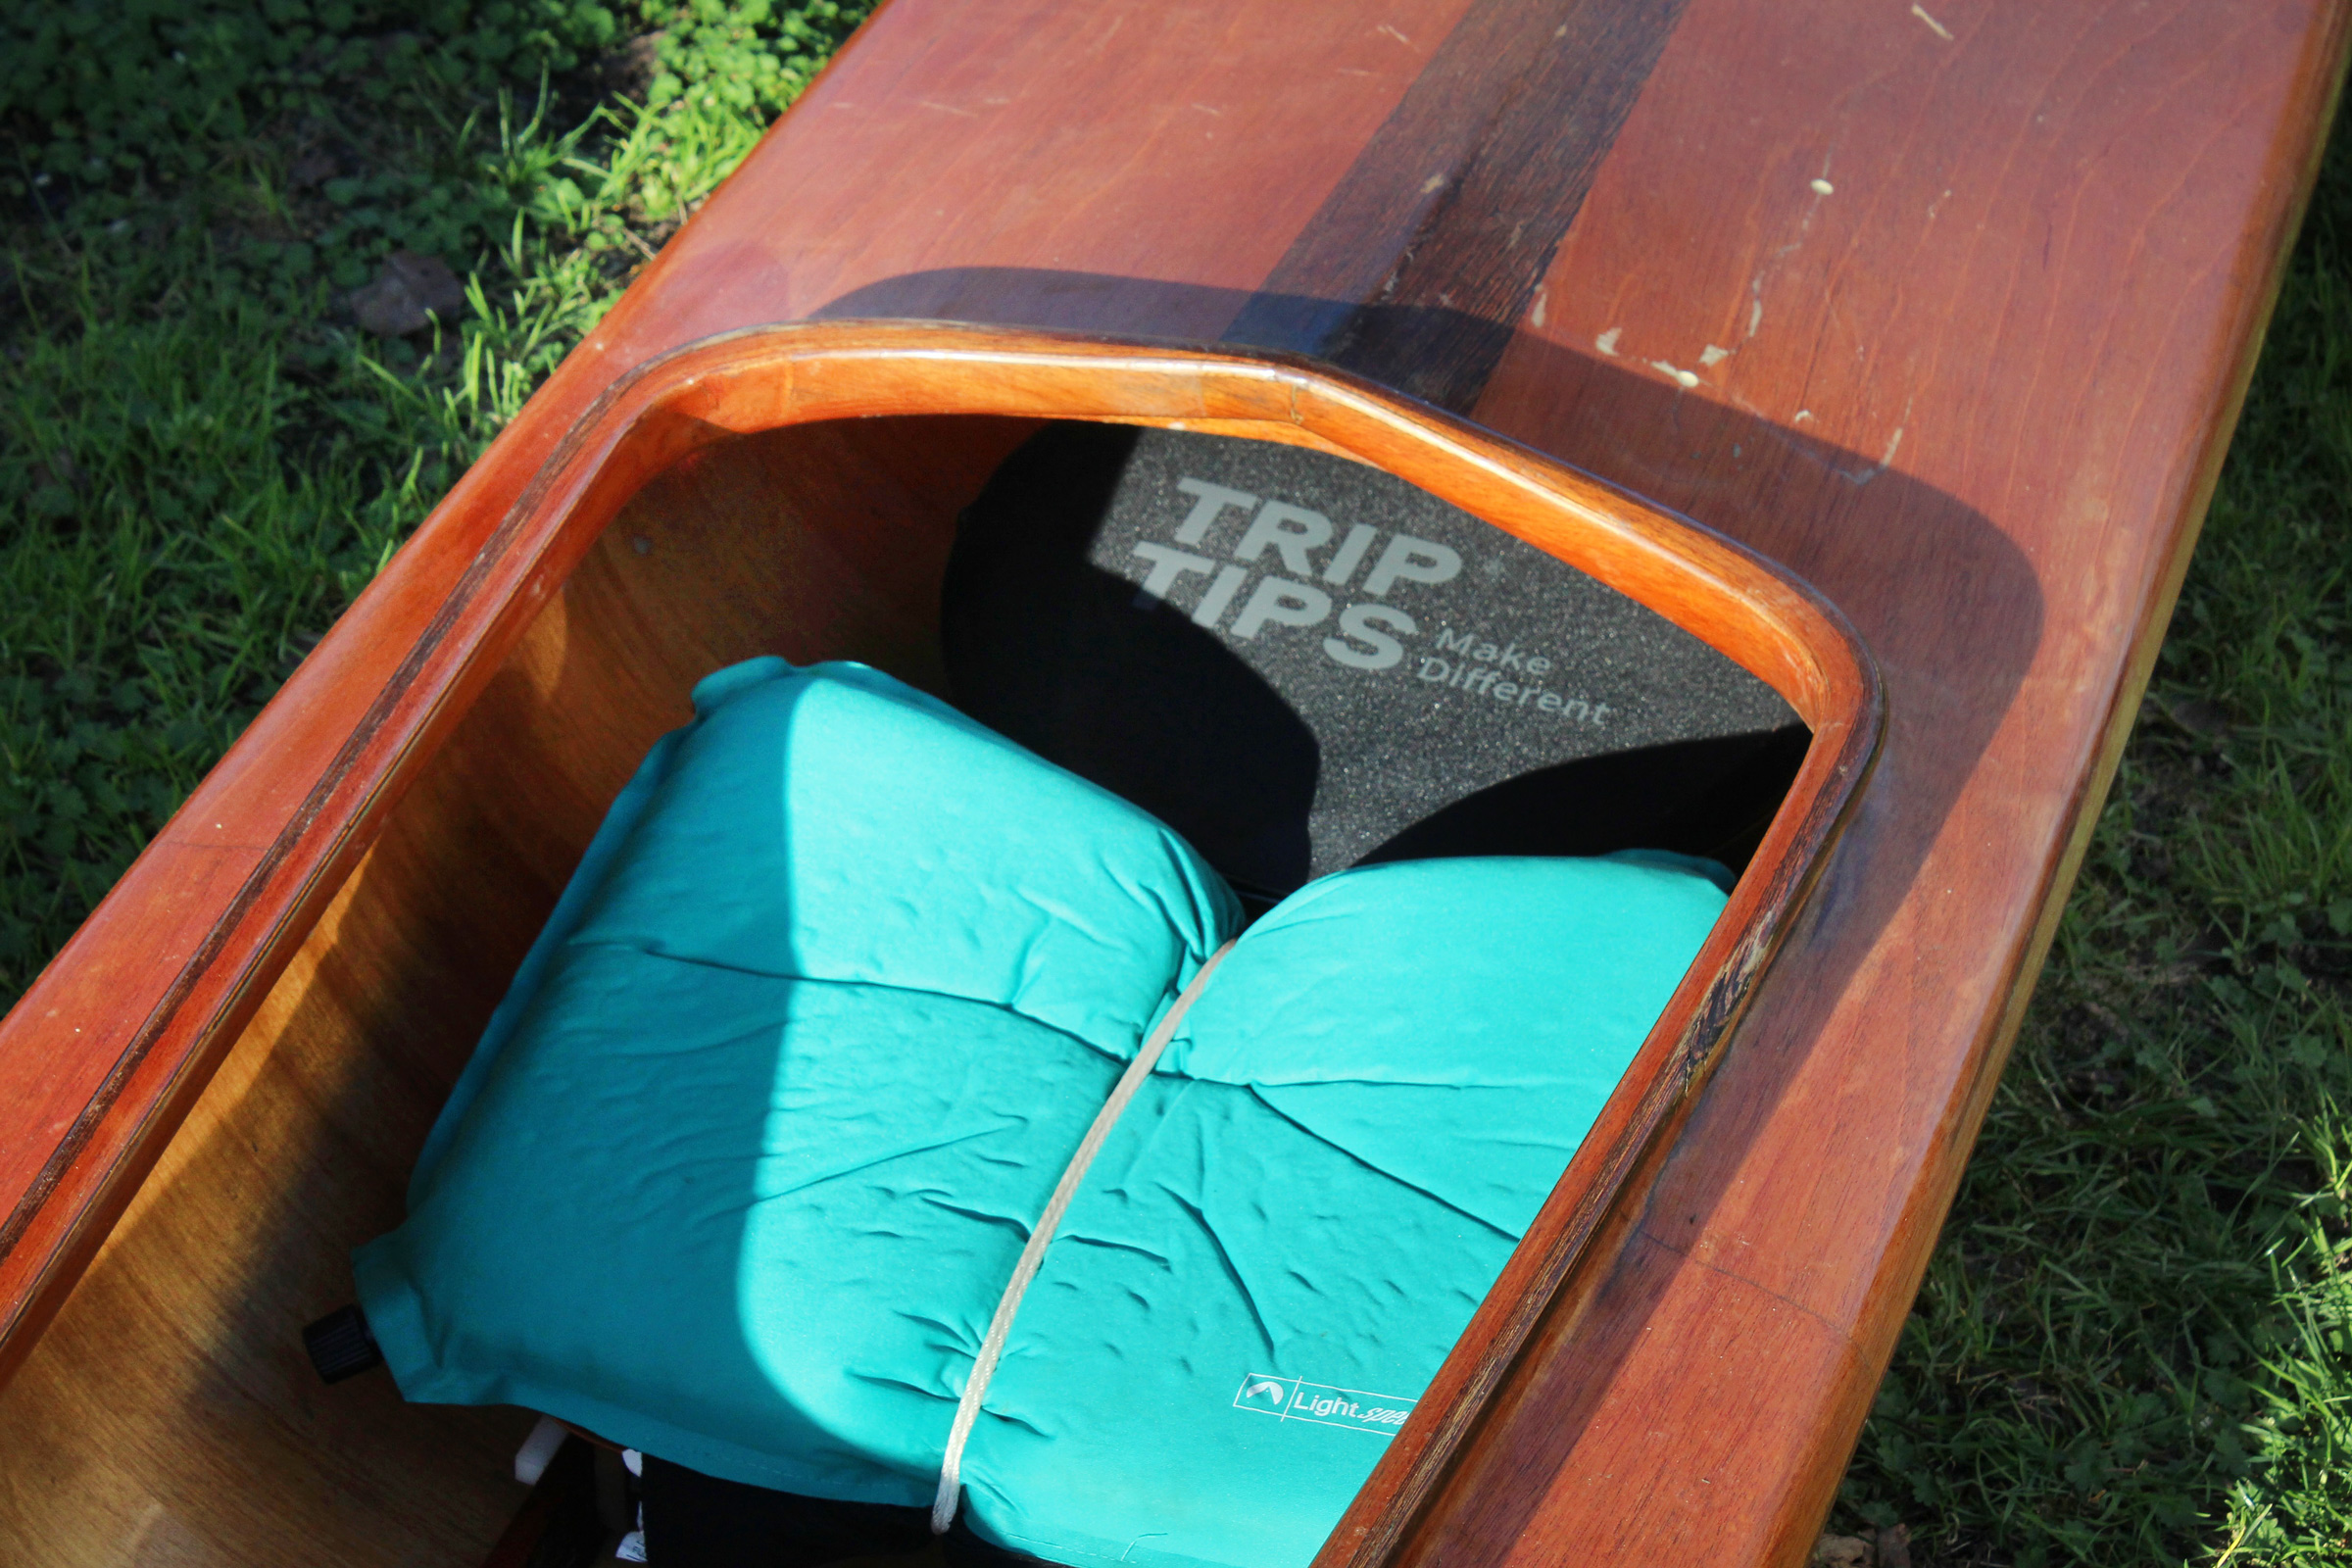
It was a return to his roots. He still dreamed of sailing, but paddling was more immediately attainable and familiar. He set out to build a cedar-strip version of the 18′ 6″ White Guide, a 19th-century canoe with enough carrying capacity to accommodate himself, his wife, and then-baby daughter, Wendy. “I thought it would be good to build something the whole family could enjoy, something we could take out for two or three days and not have to come back in to restock supplies.”
Erik W.
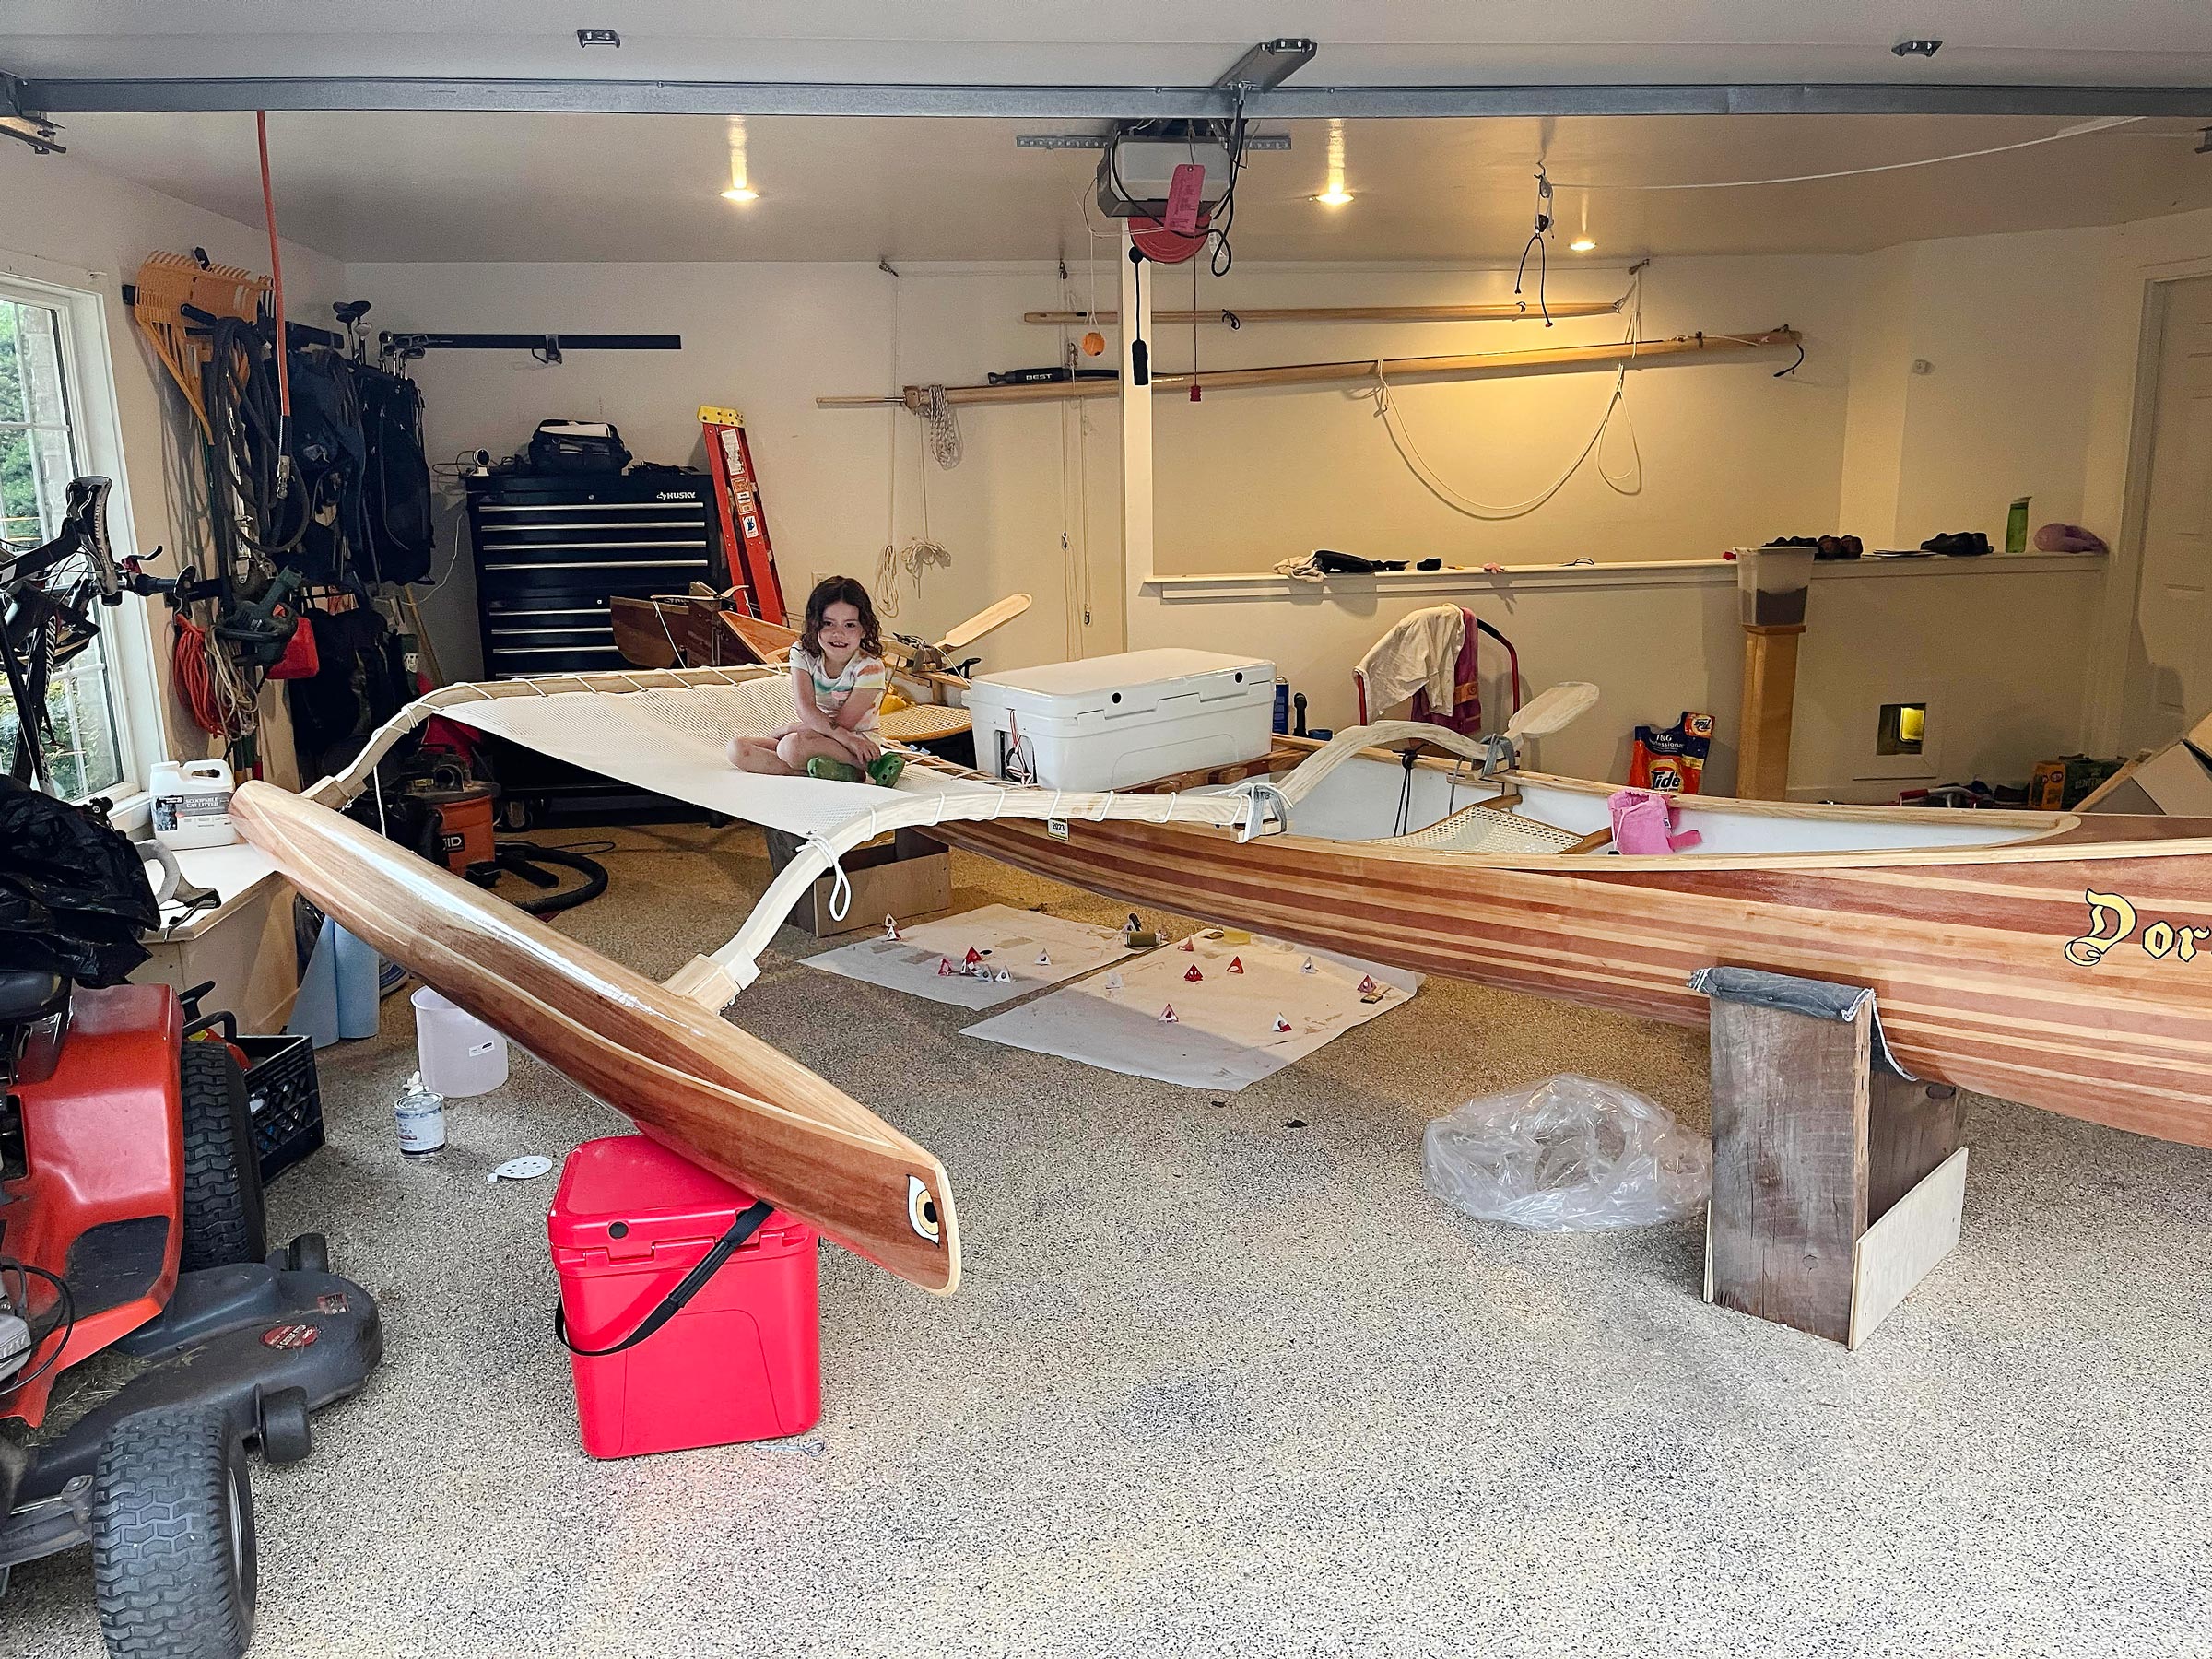
Before venturing out onto the water, Erik tested the outrigger (ama) set-up in the garage. The outrigger arms (akas) are tied to the gunwale mounting blocks with Dyneema line. Erik stands DORCAS in the cradle blocks when he rigs her at a launching site and has made similar cradles for the ama.
Erik began the project with high hopes and high energy. His original idea was to assemble all the parts, mill the bead-and-cove strips, set up the forms and strongback and then, with the help of two friends, get all the strip-planking done in one four-day weekend. “We worked furiously,” Erik says, “and by the end of the weekend we’d gotten half of it done.”
His friends departed, leaving Erik with half a canoe hull. Like so many builders before him, he discovered that even after all the strip-planking was done there was much to do. “There was sanding, fiberglassing, and fitting out.” Some of the construction, he says, was fun. To guide him in the process he had two books—Illustrated Guide to Wood Strip Canoe Building by Susan Van Leuven and Building a Strip Canoe by Gil Gilpatrick—but found that there was never quite enough detail to get him through. But he enjoyed the figuring out. “I don’t like the ‘paint-by-numbers’ approach to construction, so I was fine with that.”
Erik W.
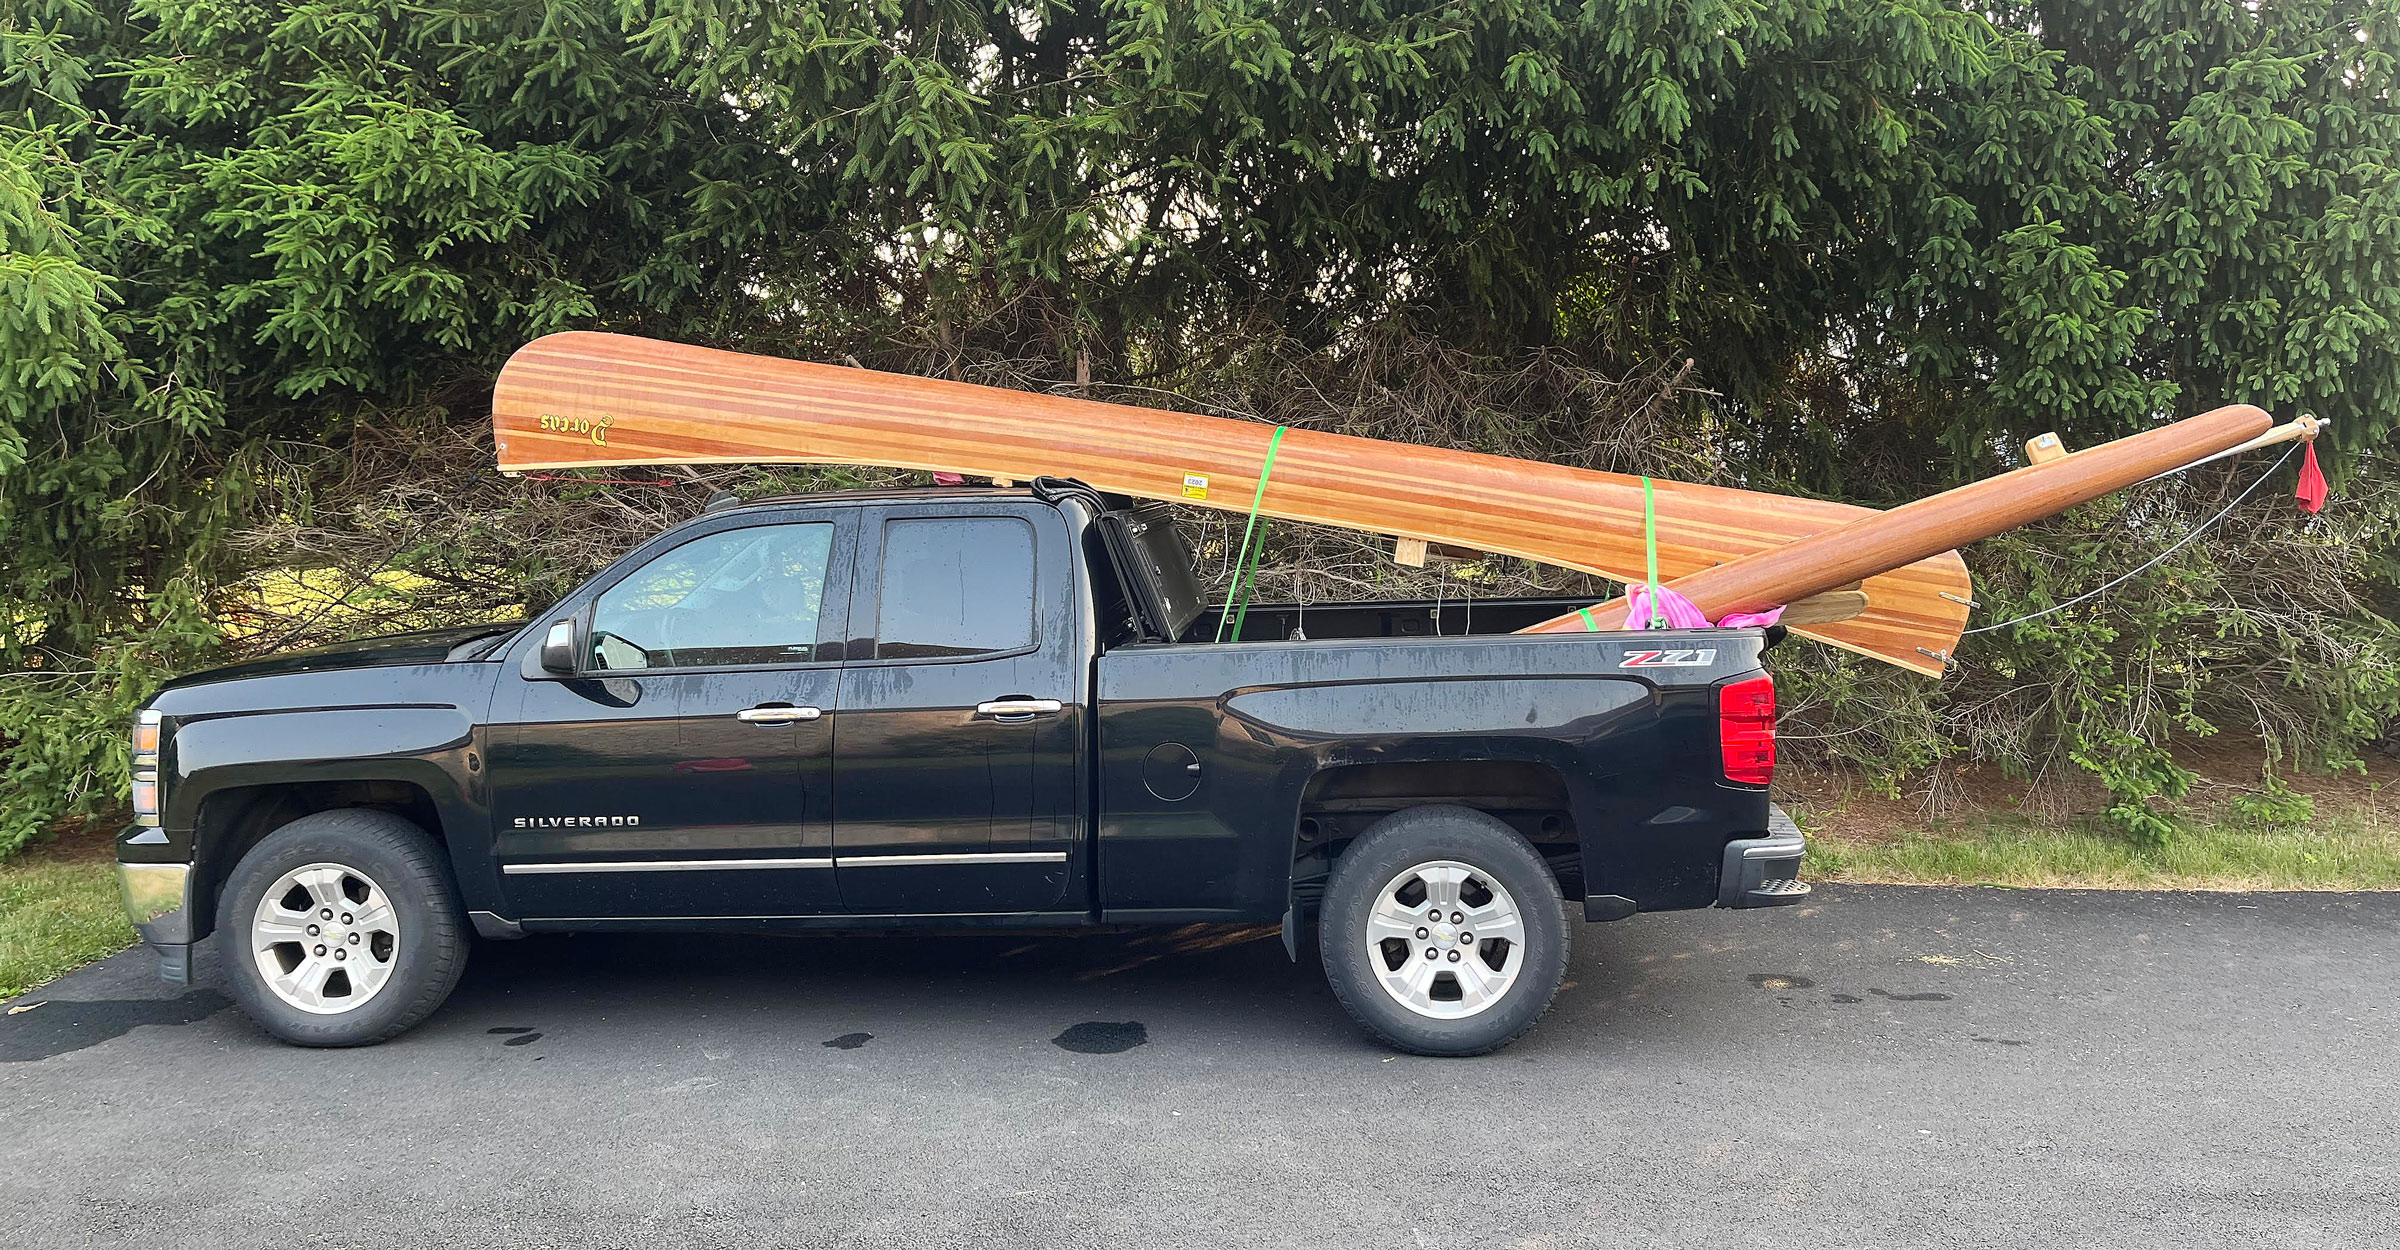
The canoe, ama, and all other parts can be transported in the back of Erik’s truck. Apart from the maststep, the only permanent fixtures that were added to the canoe were the rudder gudgeons and the stemhead fitting for the jib furler.
Along the way, Erik tweaked the design here and there. Wanting to improve the rigidity and strength of the gunwale, he increased the width of the spacers between the inwale and the hull from 1⁄2″ to 3⁄4″. He changed the decks from solid cedar to cedar strips to match the hull and installed bulkheads for additional flotation in the ends. He was glad of this last modification when, the following summer, he and his father almost swamped the canoe coming down the Delaware laden with food and camping gear. “We were well loaded,” he says, “and hit a wave train that was just too high. We would have swamped without that flotation.”
Between the figuring-out and the fit-out there was “always the sanding…so much sanding.” Faced with the tediousness of the task, Erik found himself veering away from the canoe to other “more interesting” projects and so the weeks became months, and the months became years. “I just wasn’t very engaged,” he says. “When it eventually came time to finish and name it, I was so frustrated that I chose what I thought was an appropriately terrible name, DORCAS.”
Erik W.
The forward aka also serves as a partner to support the mast. At the port end of each aka is a small seat for hiking out. On the inaugural outing, DORCAS’s mast was unstayed but Erik decided it wasn’t stiff enough and has since added shrouds.
Despite his early antipathy, DORCAS—both the name and the canoe—grew on Erik once she was out of the shop. For the next couple of years, he used her extensively. He and his father went whitewater paddling—“We’ve only cracked her three times hitting rocks… I never forget to bring duct tape, but I guess people don’t normally go whitewater canoeing in a cedar-strip”—and Erik would take his family out for less adventurous outings on a local reservoir, making the almost 1-mile crossing to a favorite beach for picnics.
All through the build and subsequent paddling, Erik continued to dream about sailing. He snatched up any opportunity to sail that came his way. He went on a weeklong camp-cruise in Annapolis with Warrior Sailing, a program for veterans, and delighted in being part of a sailing community. He considered buying his own sailboat, looked at some 21- and 22-footers that were for sale, but realized that he didn’t want “a trailer with a big boat on it” sitting in the driveway. He also knew he didn’t want to take on the commitment of a bigger boat with all its associated upkeep and maintenance.
Jackie W.
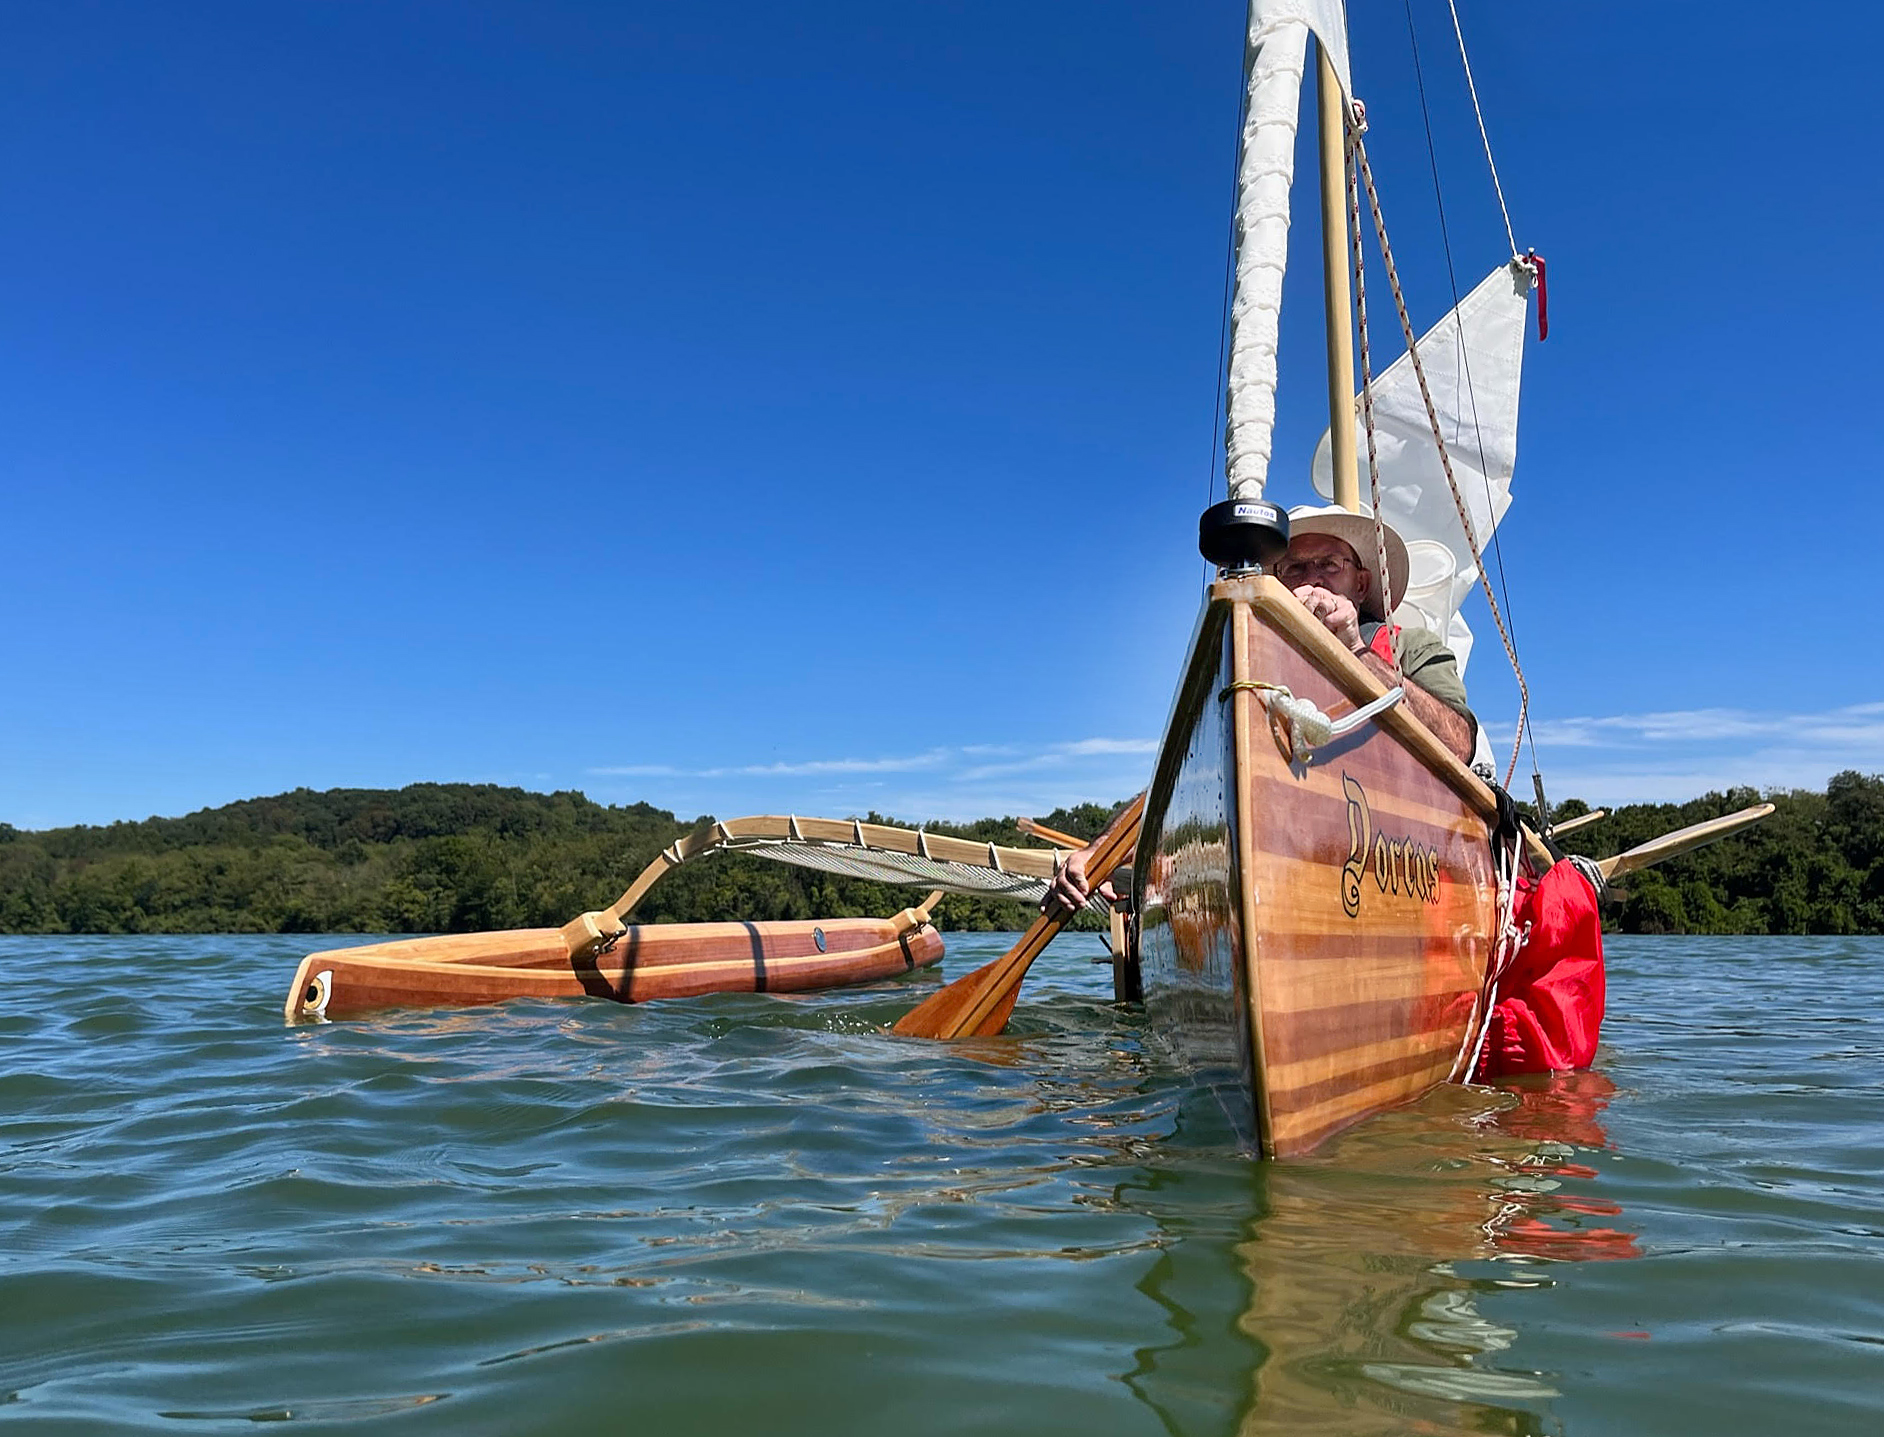
The golden eyes painted on the bow of the ama were inspired by the adornments once seen on Greek triremes. Erik chose gold for the irises because “it’s the symbol of shapeshifters in literature.”
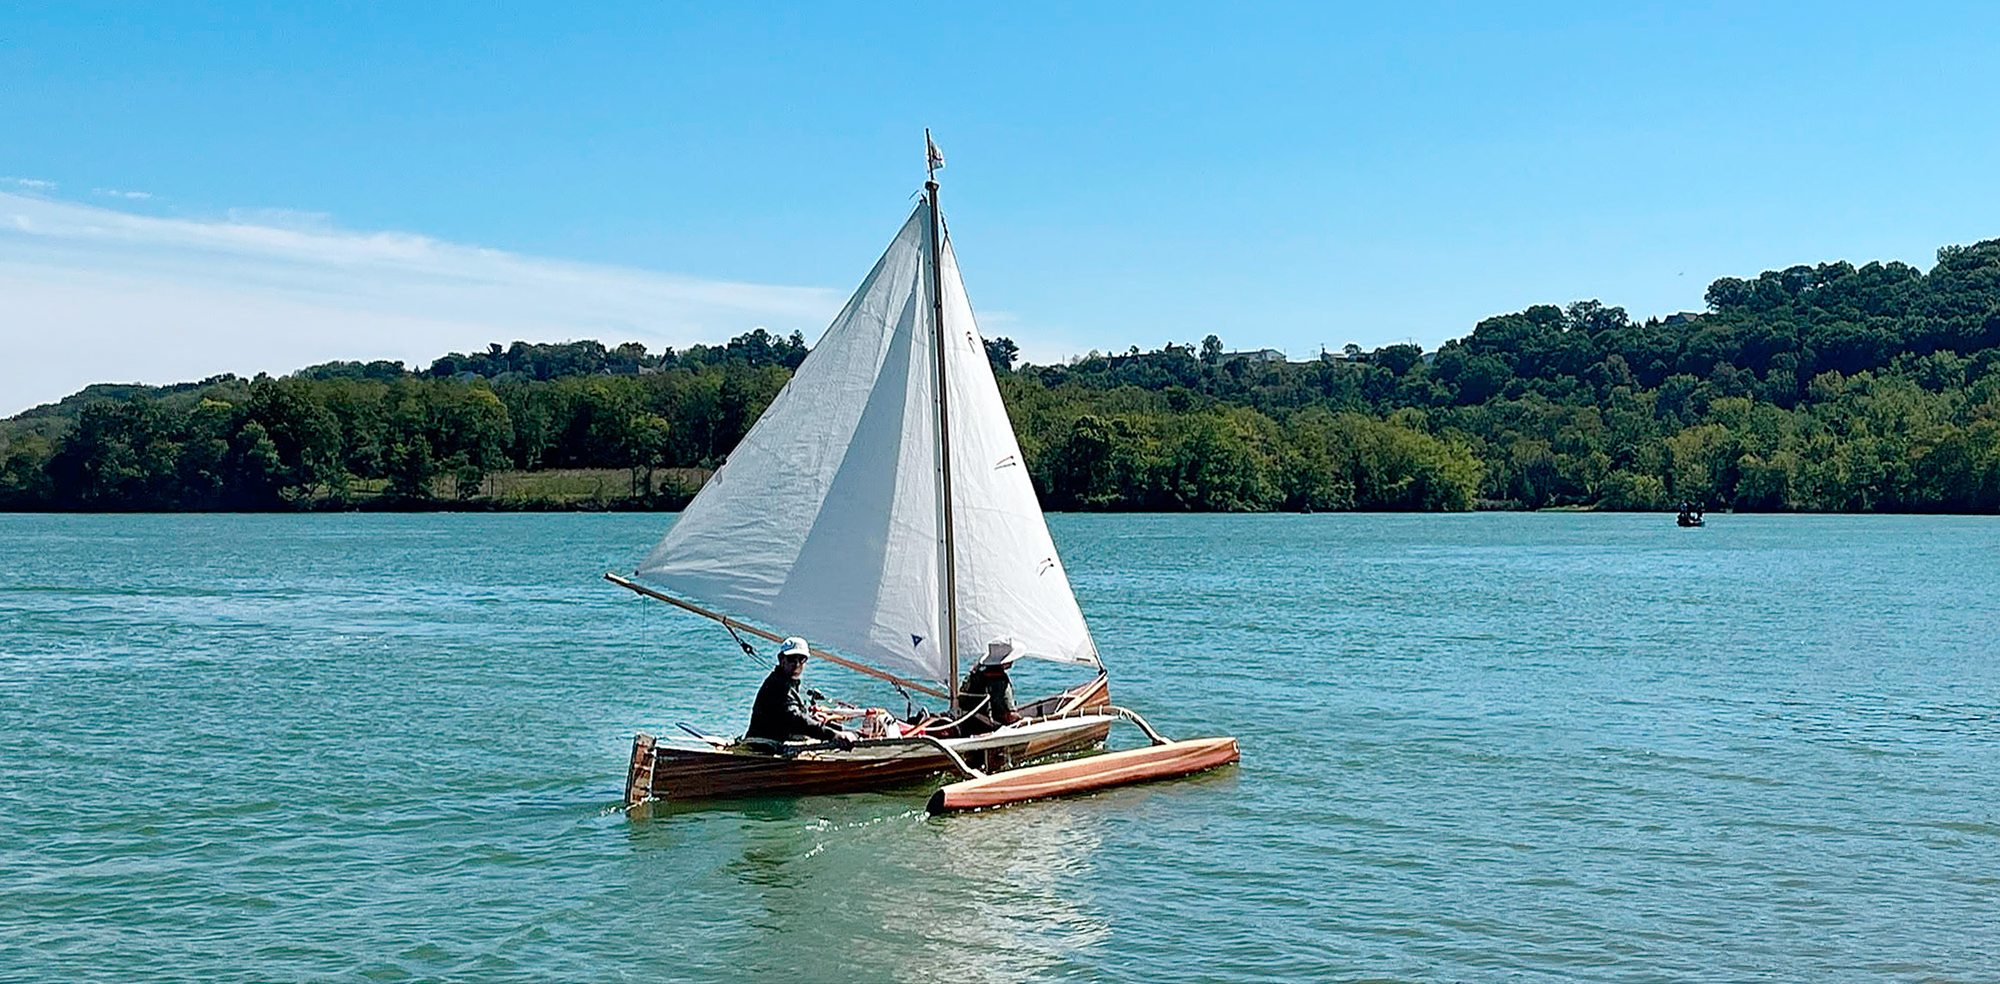
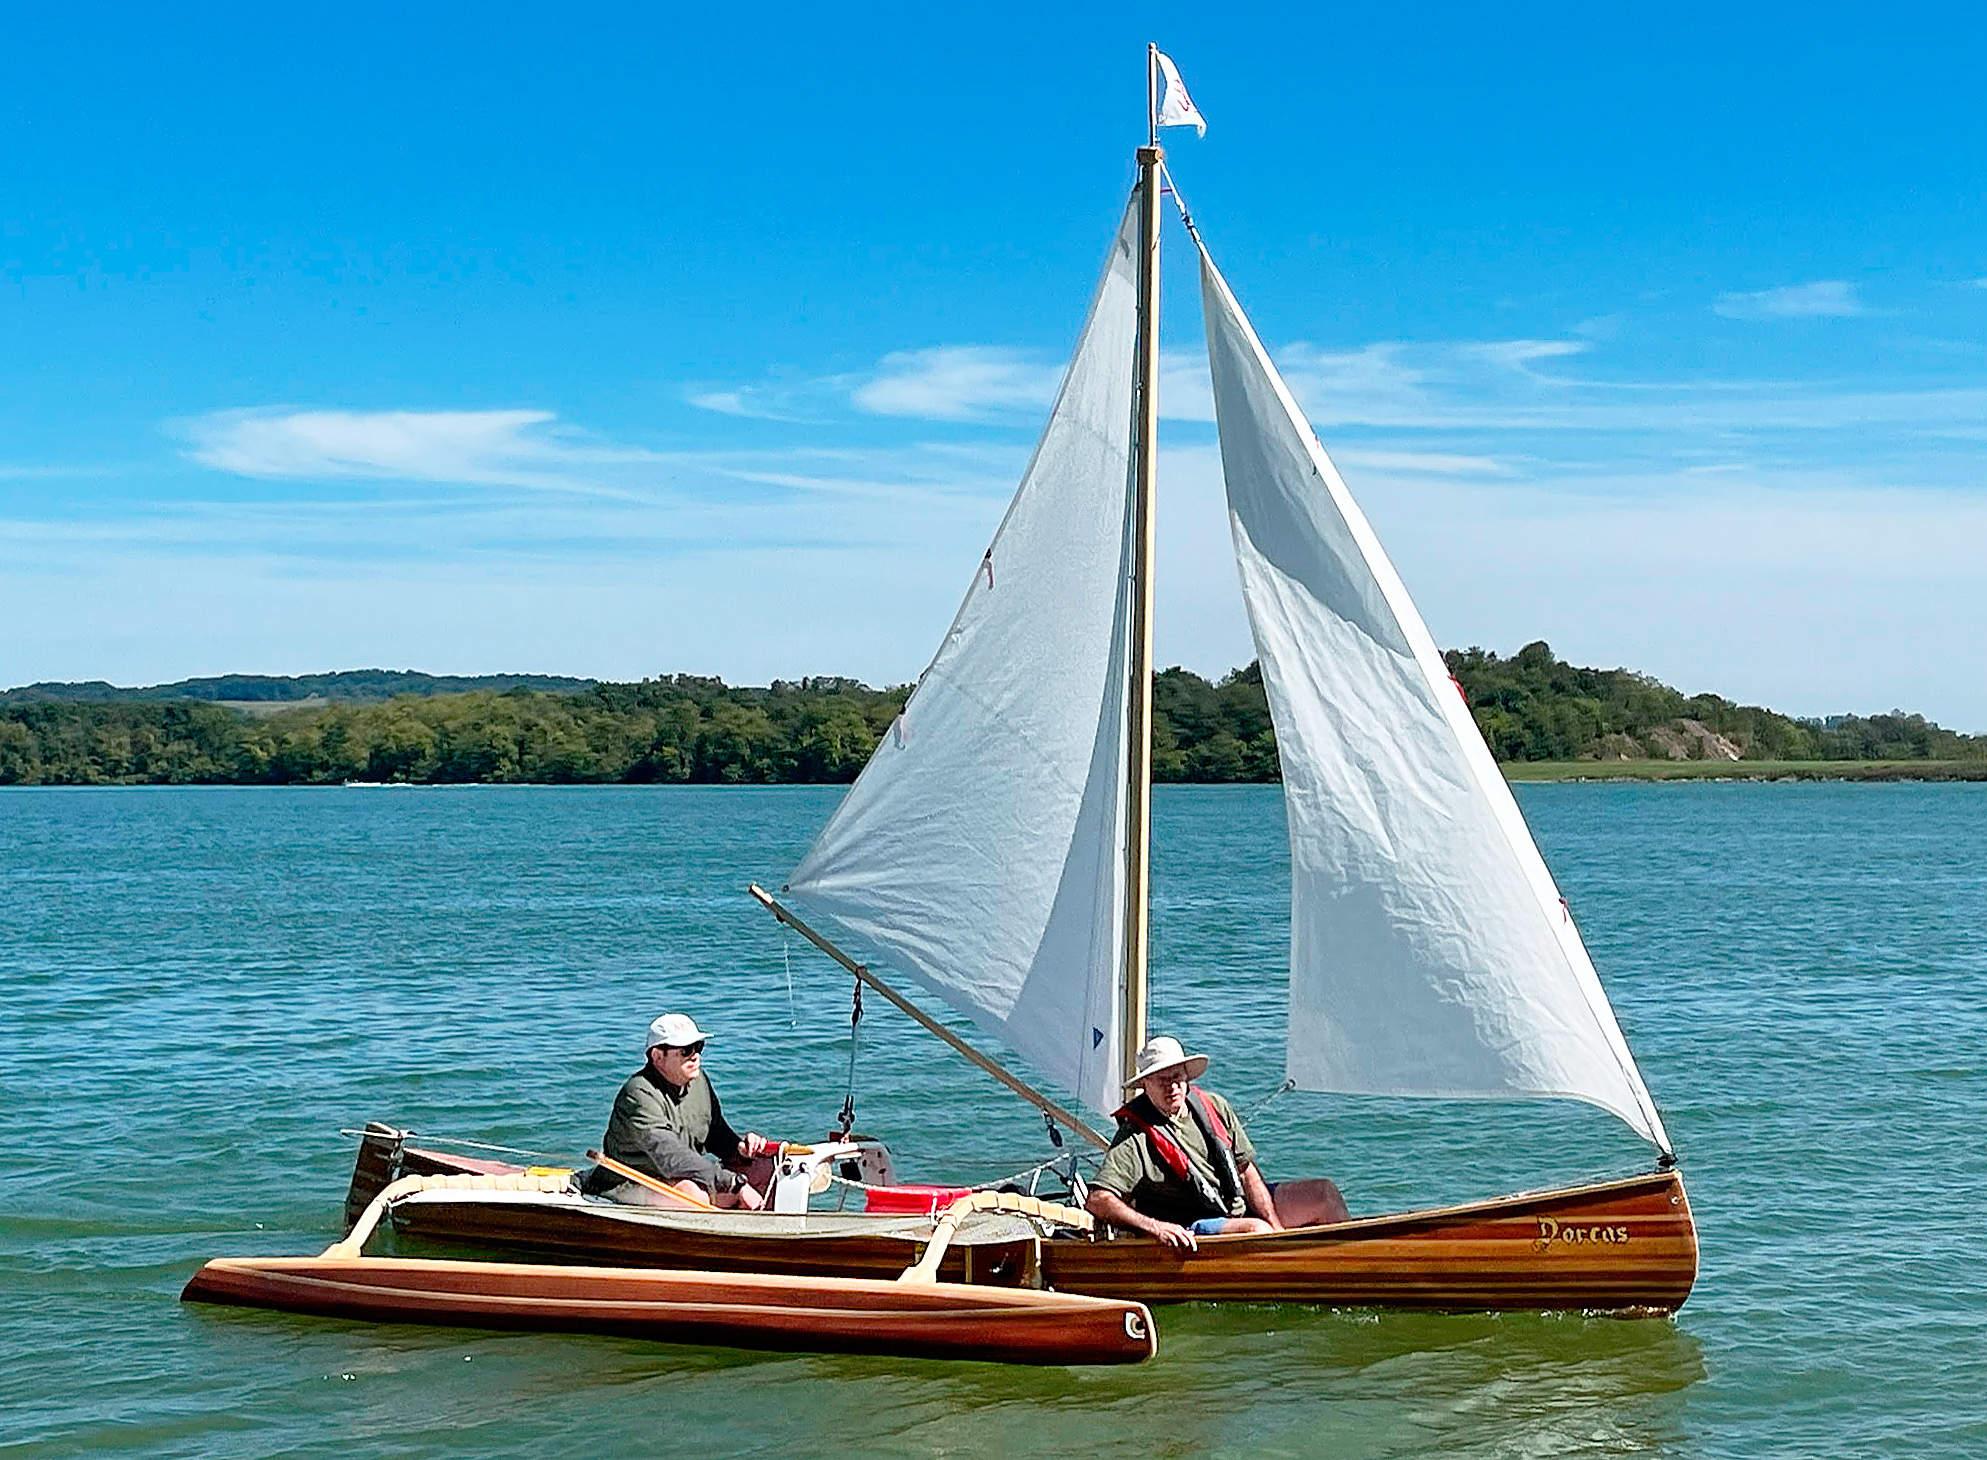
Instead, Erik imagined putting a sailing rig on DORCAS, and as he developed the idea, he came up with some design parameters: The rig had to fit inside the back of the truck. The canoe and all its parts had to rest on his truck’s cab and tailgate and be strapped down, as it always had been. The additions to the canoe had to fit in the garage, out of the way of his wife’s car. It had to be exciting but safe under sail, and he didn’t want to be hiking out the whole time. It had to incorporate an outrigger with enough trampoline area between the outrigger and the canoe for the whole family to come along for the ride in comfort.
He eventually devised and built an outrigger, ama, with a compartment in the middle for water-ballast and flotation in the ends. The curved laminated-white-ash outrigger arms, akas, are inserted into sockets on the ama and held in place by locking latches. The akas are lashed to blocks bolted to the gunwale.
Jackie W.
Wishing to avoid an offset tiller from astern Erik designed a system of pulleys and lines leading from the rudder yoke to a ring mounted beneath the sheet bridge. He steers with a short tiller mounted on the ring. The removable bridge is also the mount for all the running rigging lines.
“I didn’t want to make any significant changes to the canoe other than installing the rudder gudgeons, the stemhead fitting for the forestay, and ’glassing in a maststep,” says Erik. He also wanted the process of rigging the canoe to be simple and quick. “There are five lashings to attach everything to the canoe,” he says. “We don’t always put on the trampoline, but even if we do, start to finish, it can be rigged and ready in under an hour.”
To keep everything short enough to fit in the truck, Erik considered a gunter rig to keep the length of the mast down, but “it felt like there’d be too many moving parts.” Instead, he went with a leg-o’-mutton mainsail on a 14′ mast with a furling jib. In its original iteration the rig was unstayed, but on the first outing Erik realized the mast was too unstable, so he added shrouds. A leeboard to starboard reduces leeway and improves the canoe’s maneuverability.
Erik completed the rig in May 2023 and sailed DORCAS five times that summer. “I changed the rig each of the first four times, but by the fifth it seemed pretty well sorted out. Once I’m set up for sailing I’m pretty much committed, but I can still paddle her. I designed it so the forward paddler can work on either side. The aft seat is blocked by the outrigger to starboard, but I can compensate with the rudder. Plus, she tracks really well with the leeboard down. Under sail she’s very responsive. She scoots around in 5 knots of wind. I’ve sailed her in 18 knots, but I did spill a lot from the sails. There are no reef points, but I can furl the jib and she sails really well with just the main.”
Erik W.
Seated forward of both the mast and the forward aka, the bow paddler can work to port and to starboard. The red bag to port is holding the anchor and all the anchor line. It’s attached to the gunwale with a soft shackle. When needed, the anchor is taken out of the bag and the line is then paid out, being stopped with a Prusik hitch to another soft shackle.
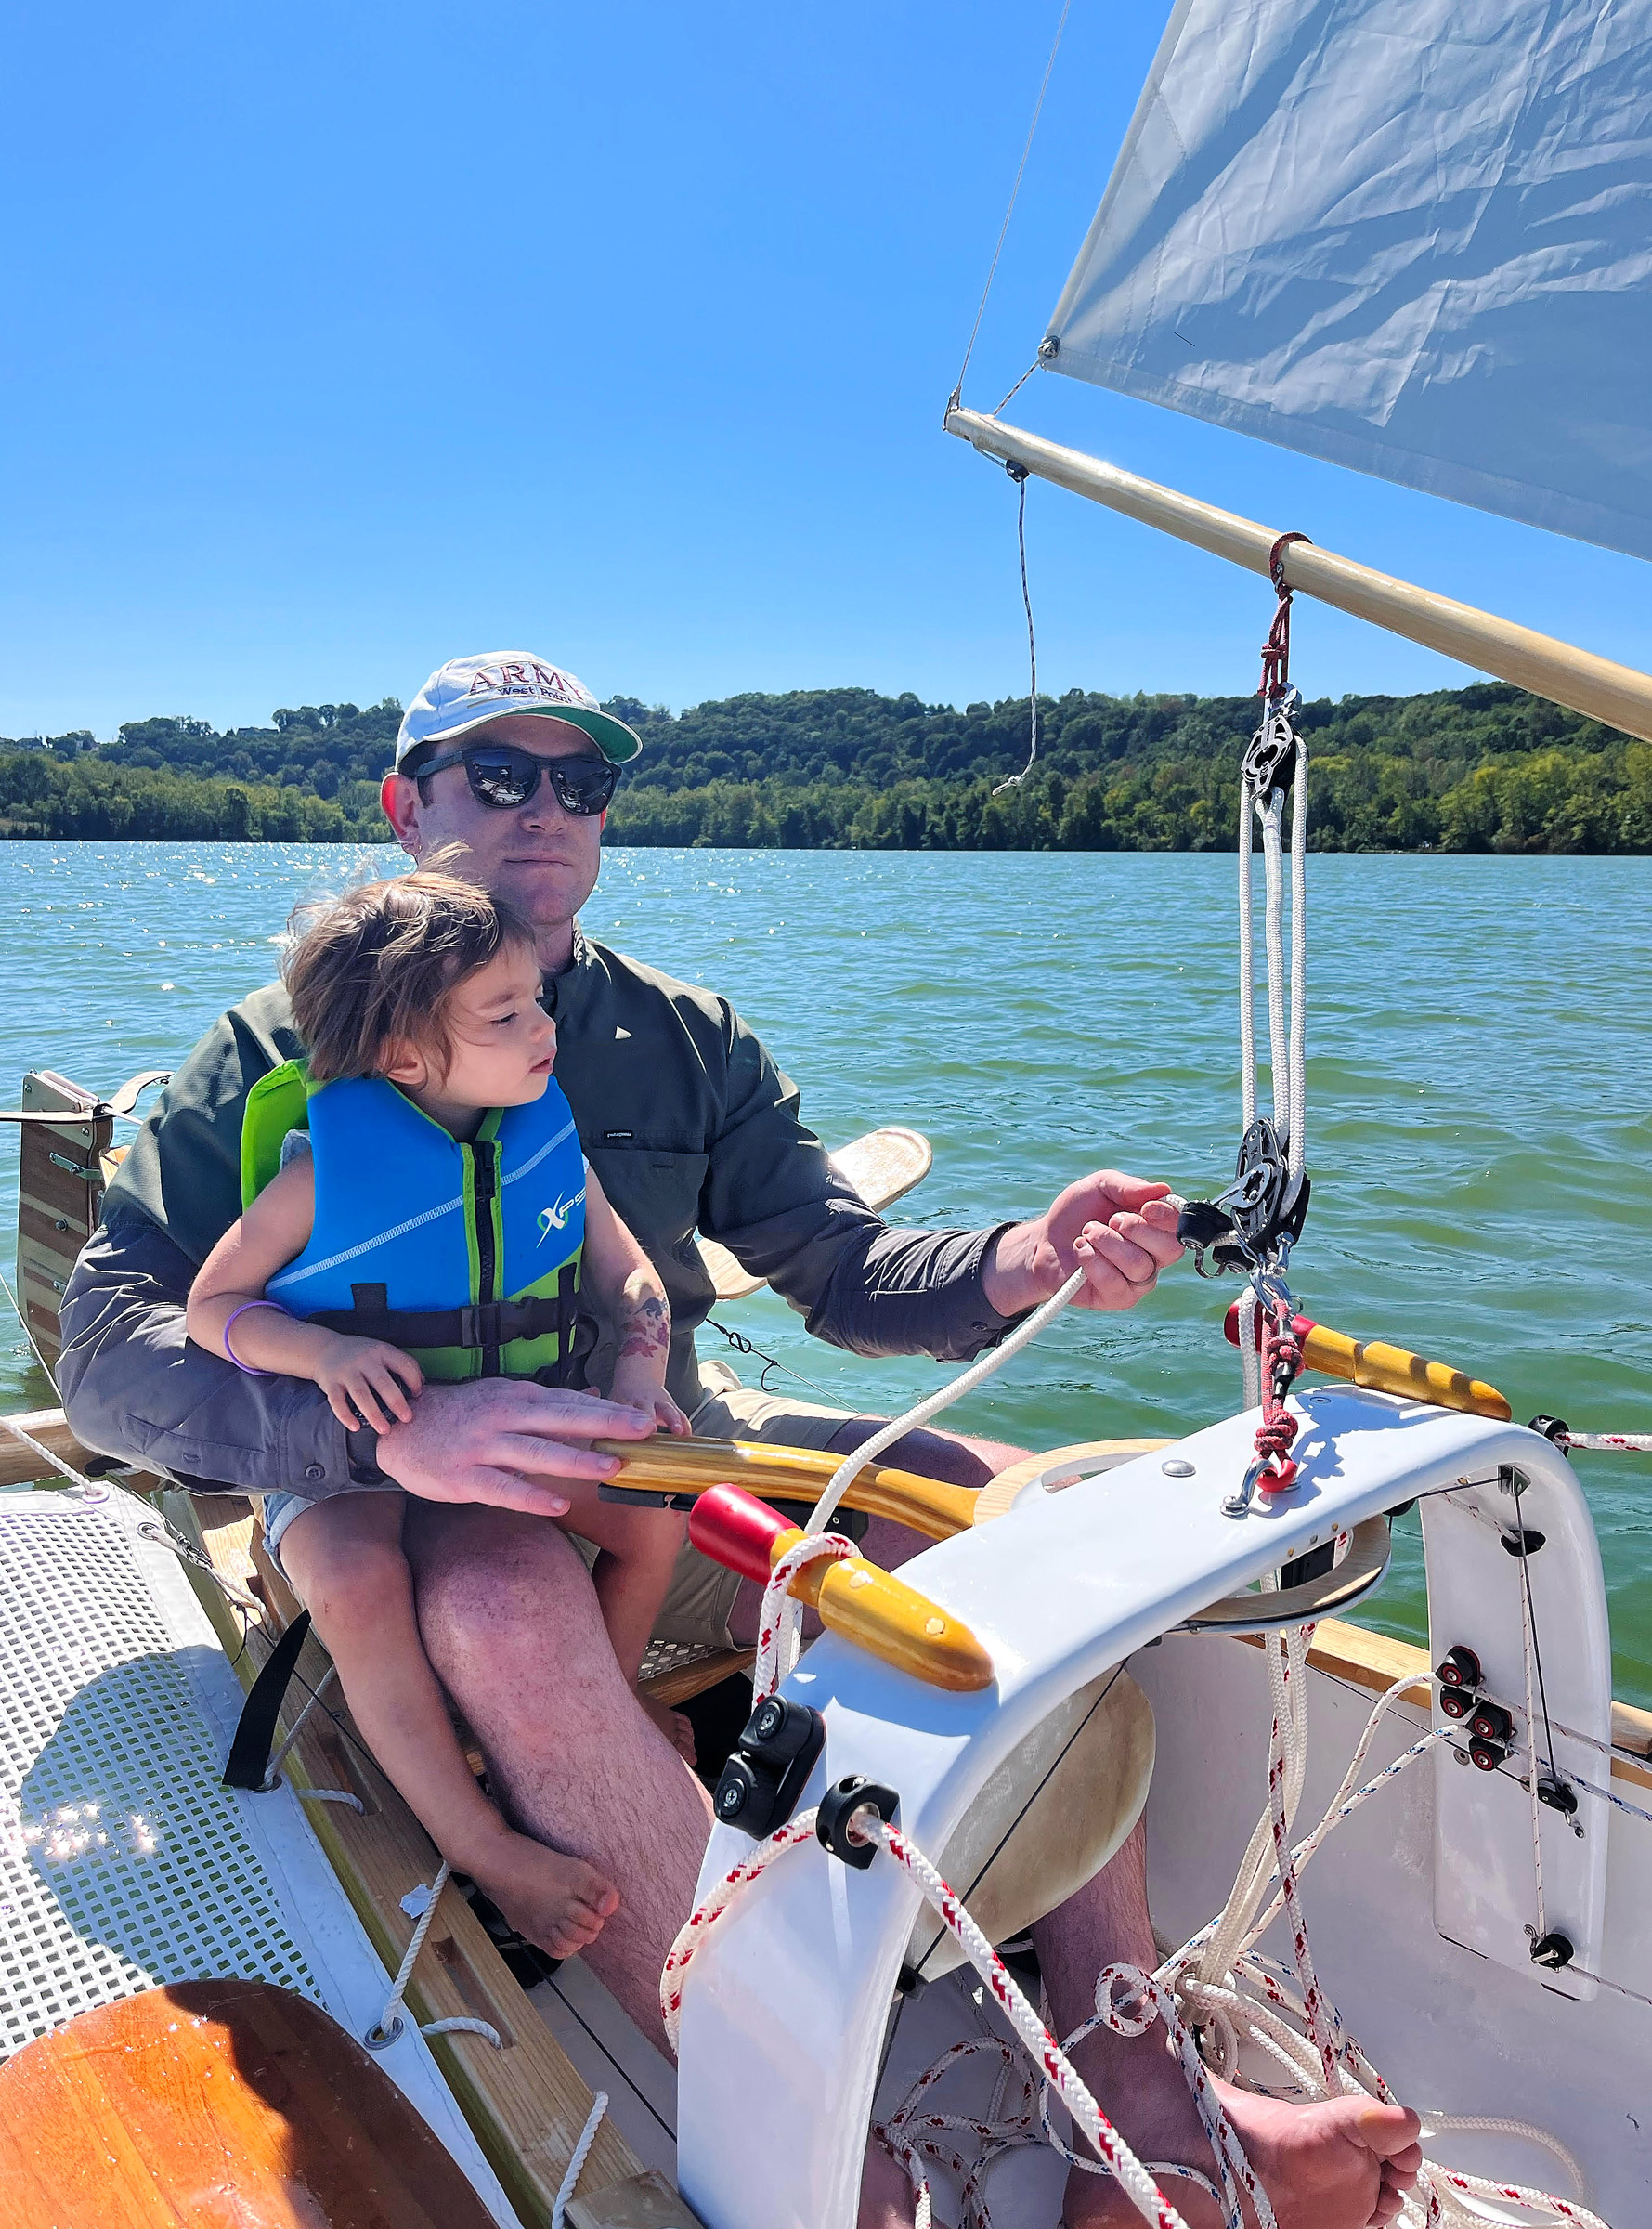
For Erik, the sailing rig has been a great addition to the canoe. His daughters—Wendy, now five, and her two-year-old sister, Robyn—have had a mixed response. Robyn loves it and sits with Erik at the helm excitedly shouting, “Go Daddy, GO!” while Wendy is less enthusiastic. Erik thinks she was having a bad day when she came out with him but admits that she’s also used to “just sitting around on the cushions of her grandfather’s 31′ powerboat while he cruises her around.” Not to be daunted, Erik is planning a couple of overnight trips this summer and hoping to meet up with other sailing-canoe enthusiasts at the Wooden Canoe Heritage Association’s gathering at Paul Smith’s College in New York.
As for DORCAS, she has risen from time-consuming chore to much-loved family boat. And Erik has even changed his opinion of the name. “Turns out dorcas is Greek for gazelle,” he says. “Given her speed under sail, that seems very appropriate.”
Jenny Bennett is managing editor of Small Boats.
Do you have a boat with an interesting story? Please email us. We’d like to hear about it and share it with other Small Boats readers.
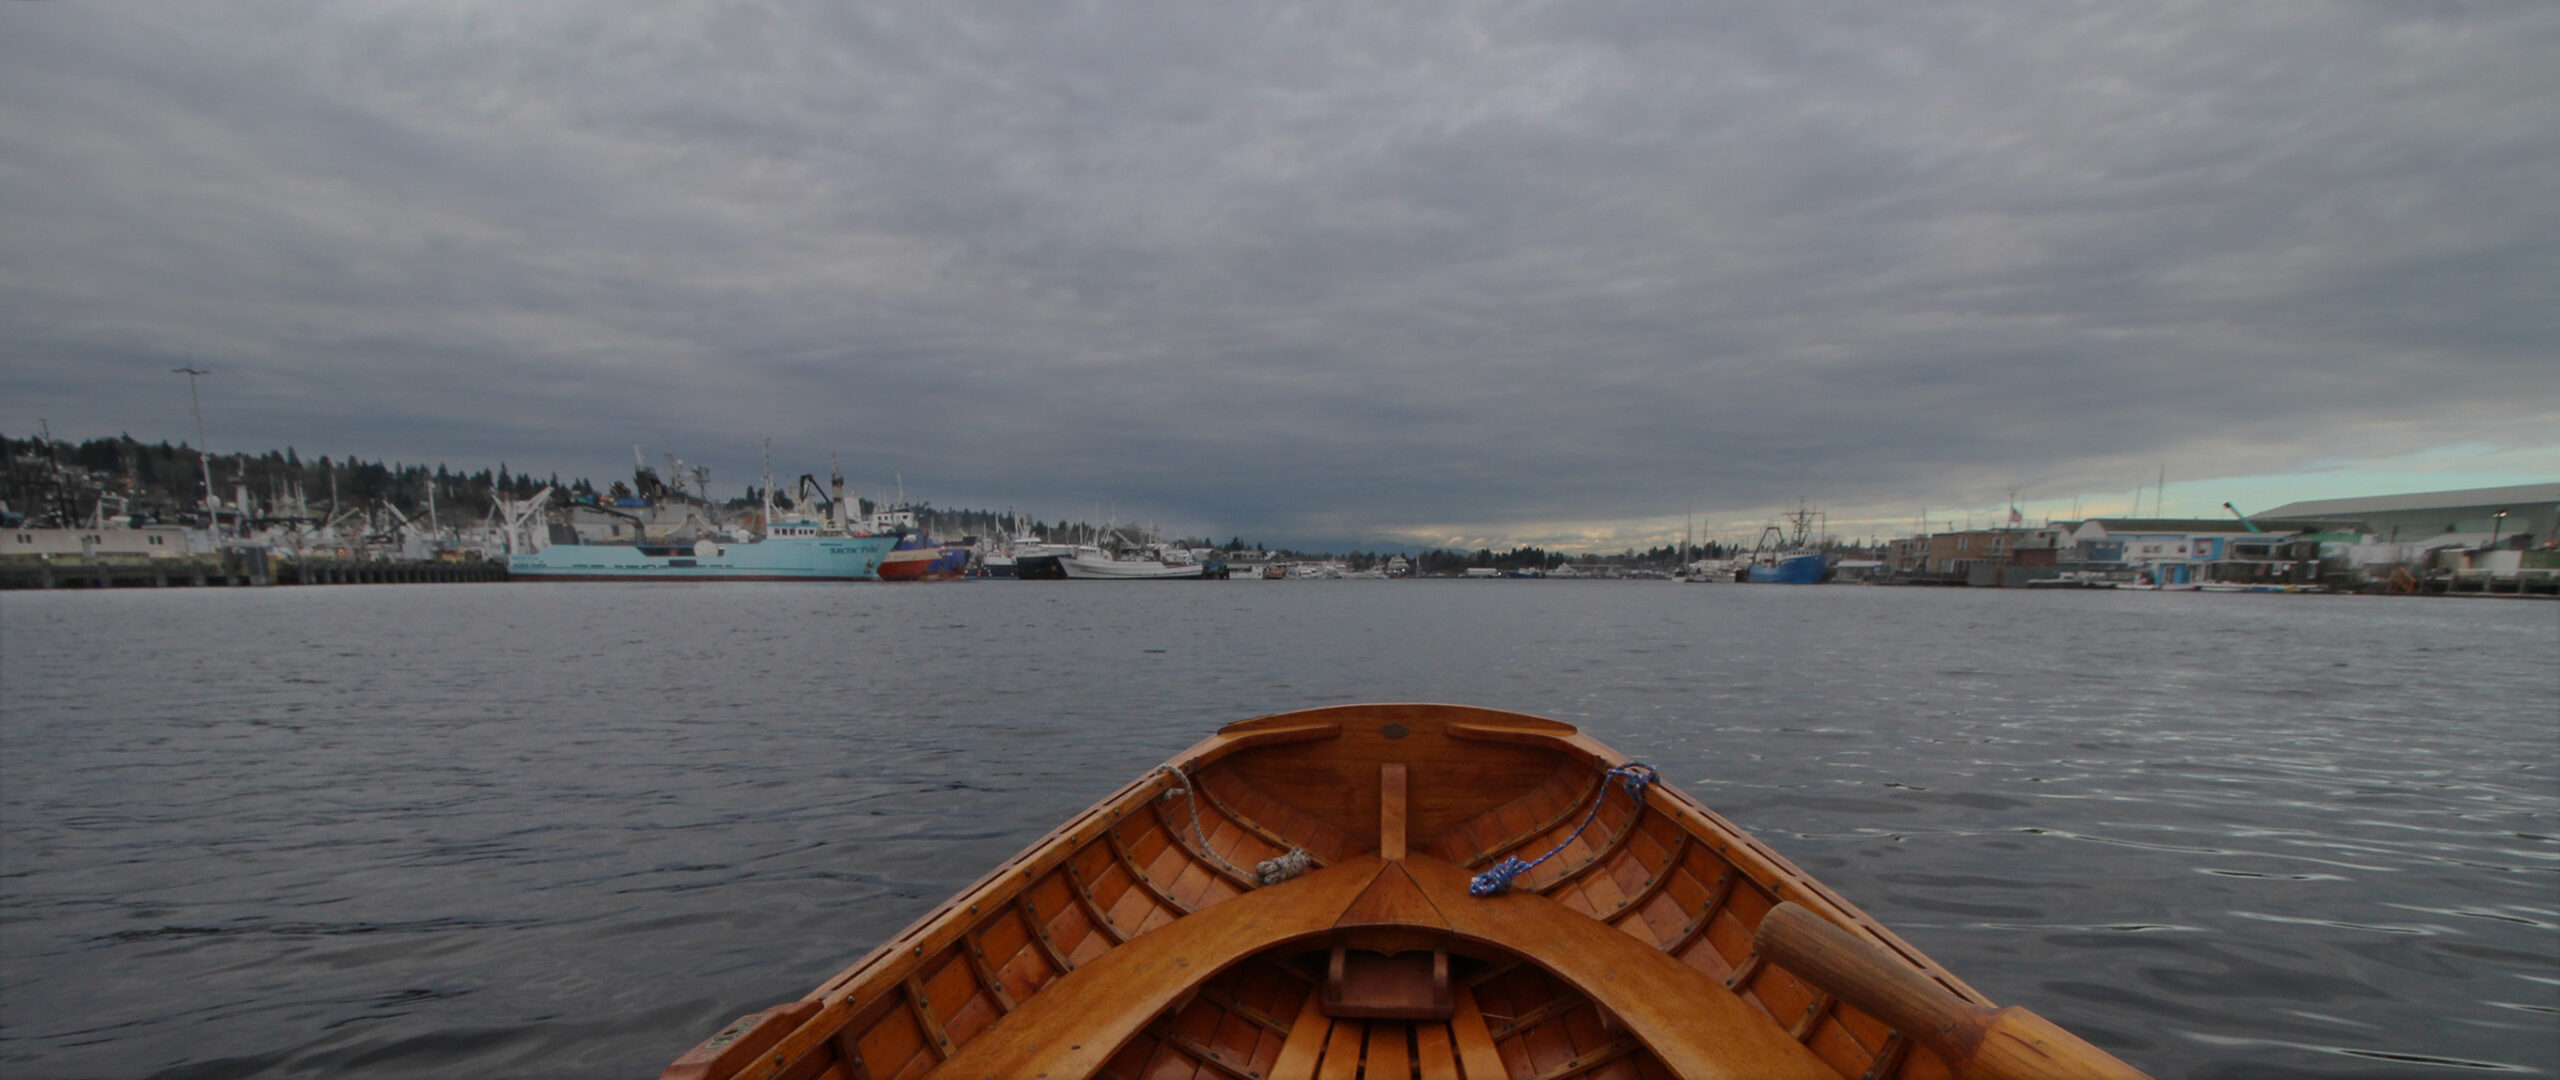
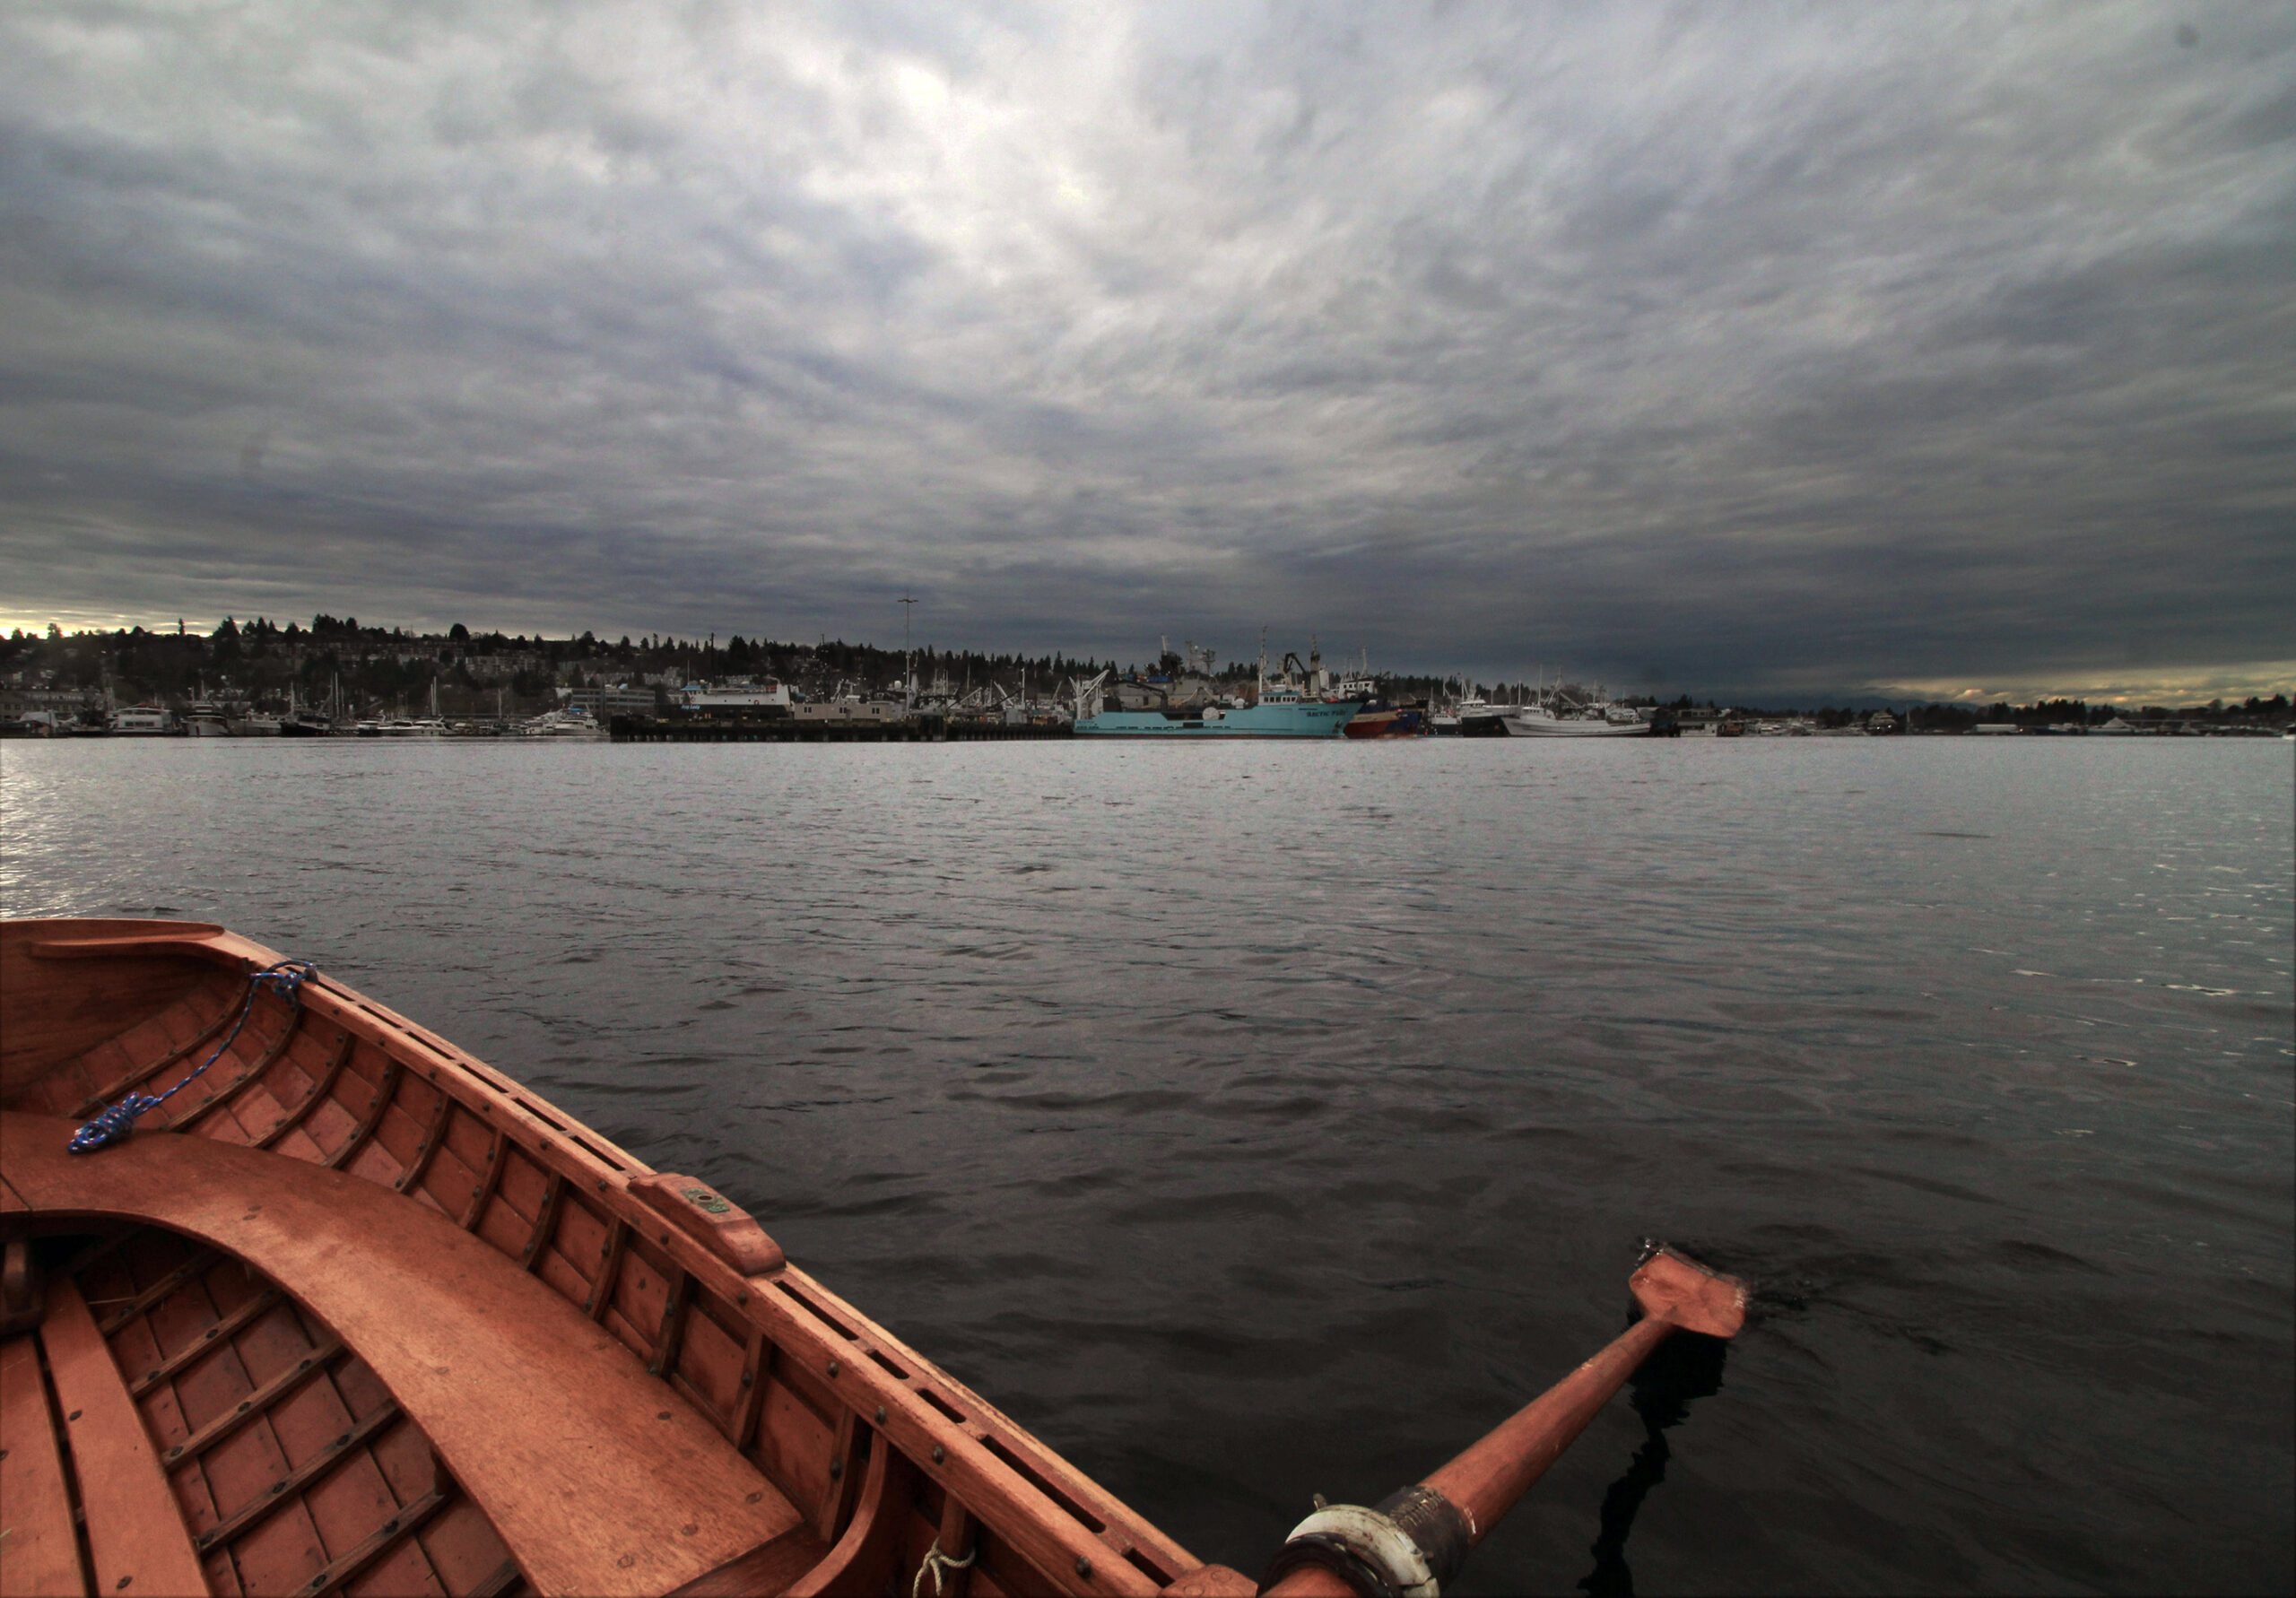
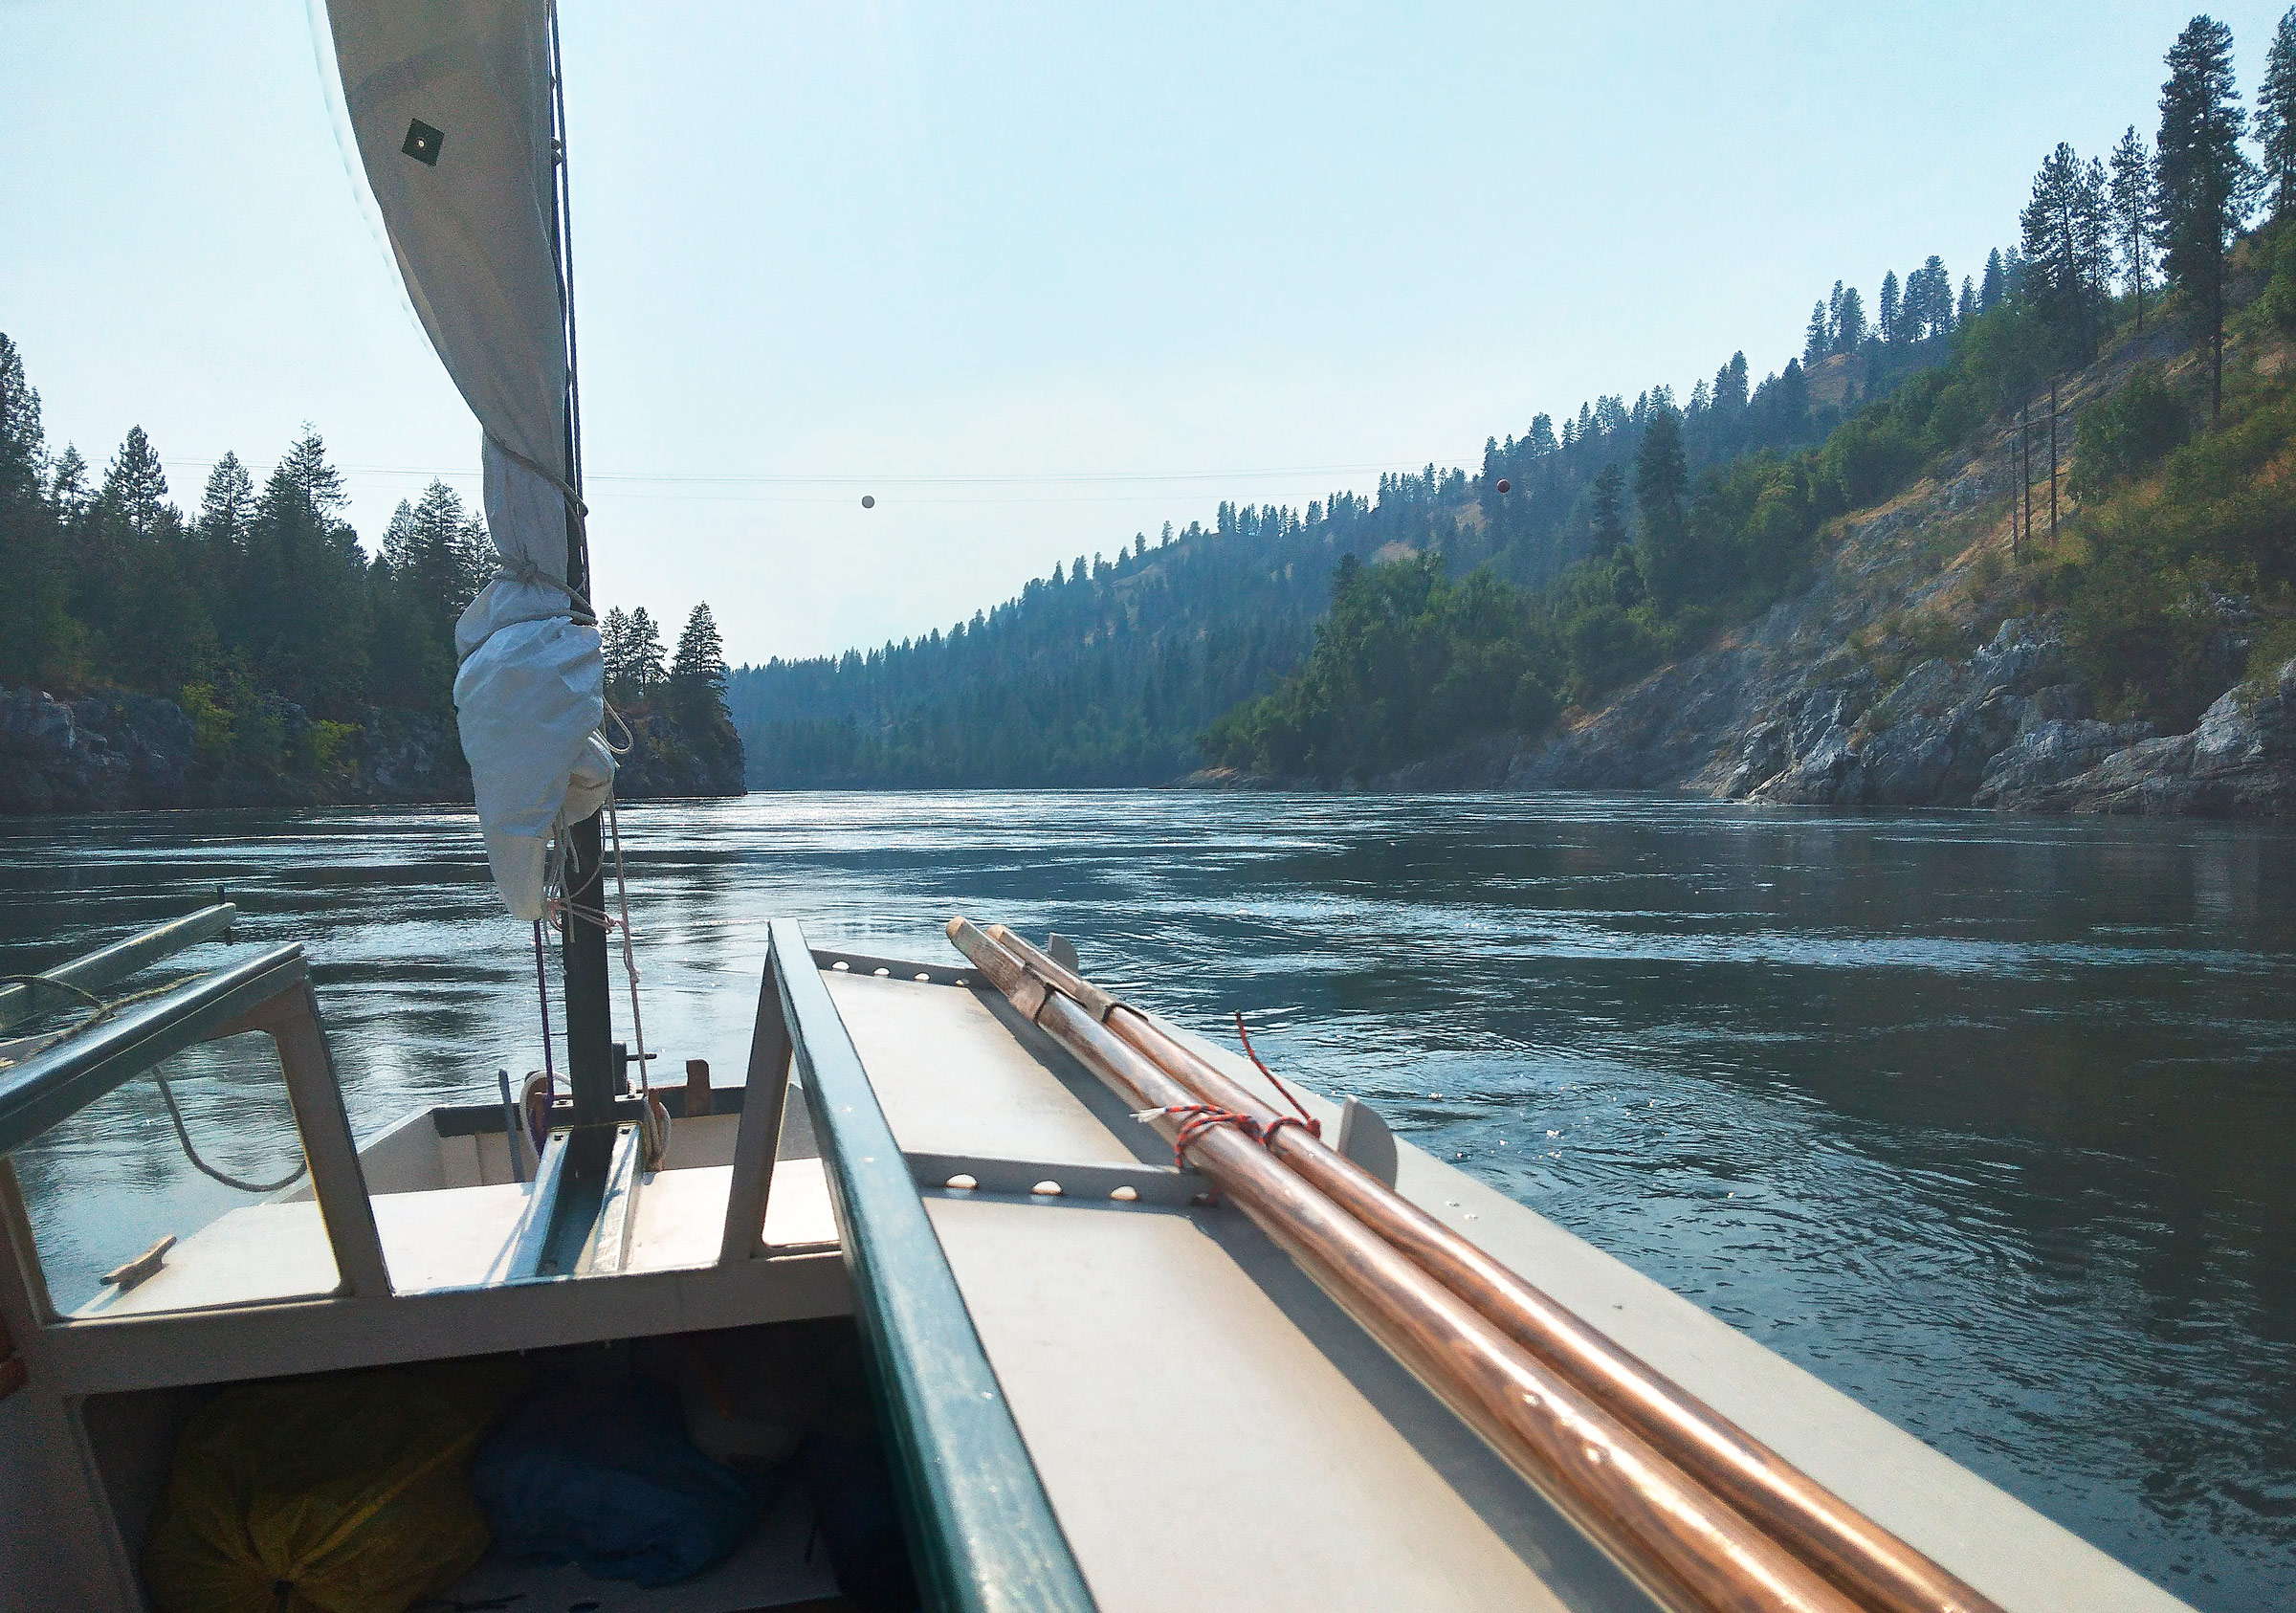
I almost didn’t go rowing yesterday. After spending too many long hours at my desk, I needed to get out of the house to clear my head. In the early afternoon, I studied the sky to the north through my home-office windows. Beyond the black filigree of leaf-bare tree branches, the sky was dimmed by a leaden overcast. The dull gray sky threatened rain and I balked at all the work it would take to get ready for a short afternoon row. I’d have to clear a path through scattered boxes and lumber to get the Whitehall out of the garage, gather foulweather gear, hook up the trailer and make sure the lights work, lubricate the locks and the oar leathers, and load a PFD and a fender aboard. I got busy and in about a half hour I was ready to drive to the ramp.
The last thing I had to do before I backed the trailer into the waters of Seattle’s ship canal was put the rubber stopper into the Whitehall’s drain. It slipped in easily enough, but when I flipped the lever to expand the rubber for a watertight fit, the plug was still loose. I adjusted it several times, hoping this outing would be worth the effort.
I didn’t need to wait long for the reward. The first three strokes left my lethargy in the Whitehall’s wake and returned me to a feeling of vitality that rowing had been giving me for decades. My hands had been at the keyboard and the mouse for days, and the pressure of the oar handles triggered in them an impulse to pull just as the pressure of a harness does to sled dogs and draft horses. I could feel the contact of the blades with the water not as vibrations of the handles in my hands but as if my sense of touch and proprioception extended to the blades themselves.
During the summer, the Lake Washington Ship Canal is crowded with recreational boats motoring between Puget Sound and the two lakes that surround Seattle’s city center. The waterway is a more peaceful place to row in the winter, when there is almost no boat traffic to steer clear of and the water is not deeply furrowed by wakes.
The sky to the north was just as gray as it was when I’d looked at the rectangular patch framed by the window sash, but the rest of the sky was an intricate tapestry of color, shape, and texture. To the west, resting on the sawtooth silhouette of peaks on the north end of the Olympic Mountains, was a smear of toothpaste-blue sky. Above it were clouds in a shade of gray that had a touch of lavender at one moment and then periwinkle the next. The expanse of overcast above was mottled pewter gray with darker patches the color of unpolished silver.
The sound of car and truck tires whined and growled in their varied pitches as they crossed the steel grating of the bascule bridge that spans the canal. A biplane flew by to the west, its radial engine making the distinctive rumbling that my mother, who had flown biplane trainers and multi-engine bombers stateside during World War II, always looked up for, as I have since childhood. The laps of the Whitehall’s planks gurgled with the lapping of the ripples. In the silence of my home office, hours can go by and all I hear is the clatter of the keyboard in front of me and the hiss of tinnitus inside my head. On the water I sat in the middle of an immense sphere brimming with sounds that gave depth and life to the space that surrounded me.
While I’m at my computer, I’m never aware of the air. It is stock still and even the lightest pieces of tissue paper lie lifeless on my desk for hours. I can hear myself breathe, but if I feel my lungs at all it’s their emptiness. Out rowing on this afternoon, the air leaves its mark everywhere. Flags are lifted and undulated, the water is rasped into ripples, my windward shoulder is chilled, and I feel the air’s chill, briefly, as it enters my chest and dissipates.
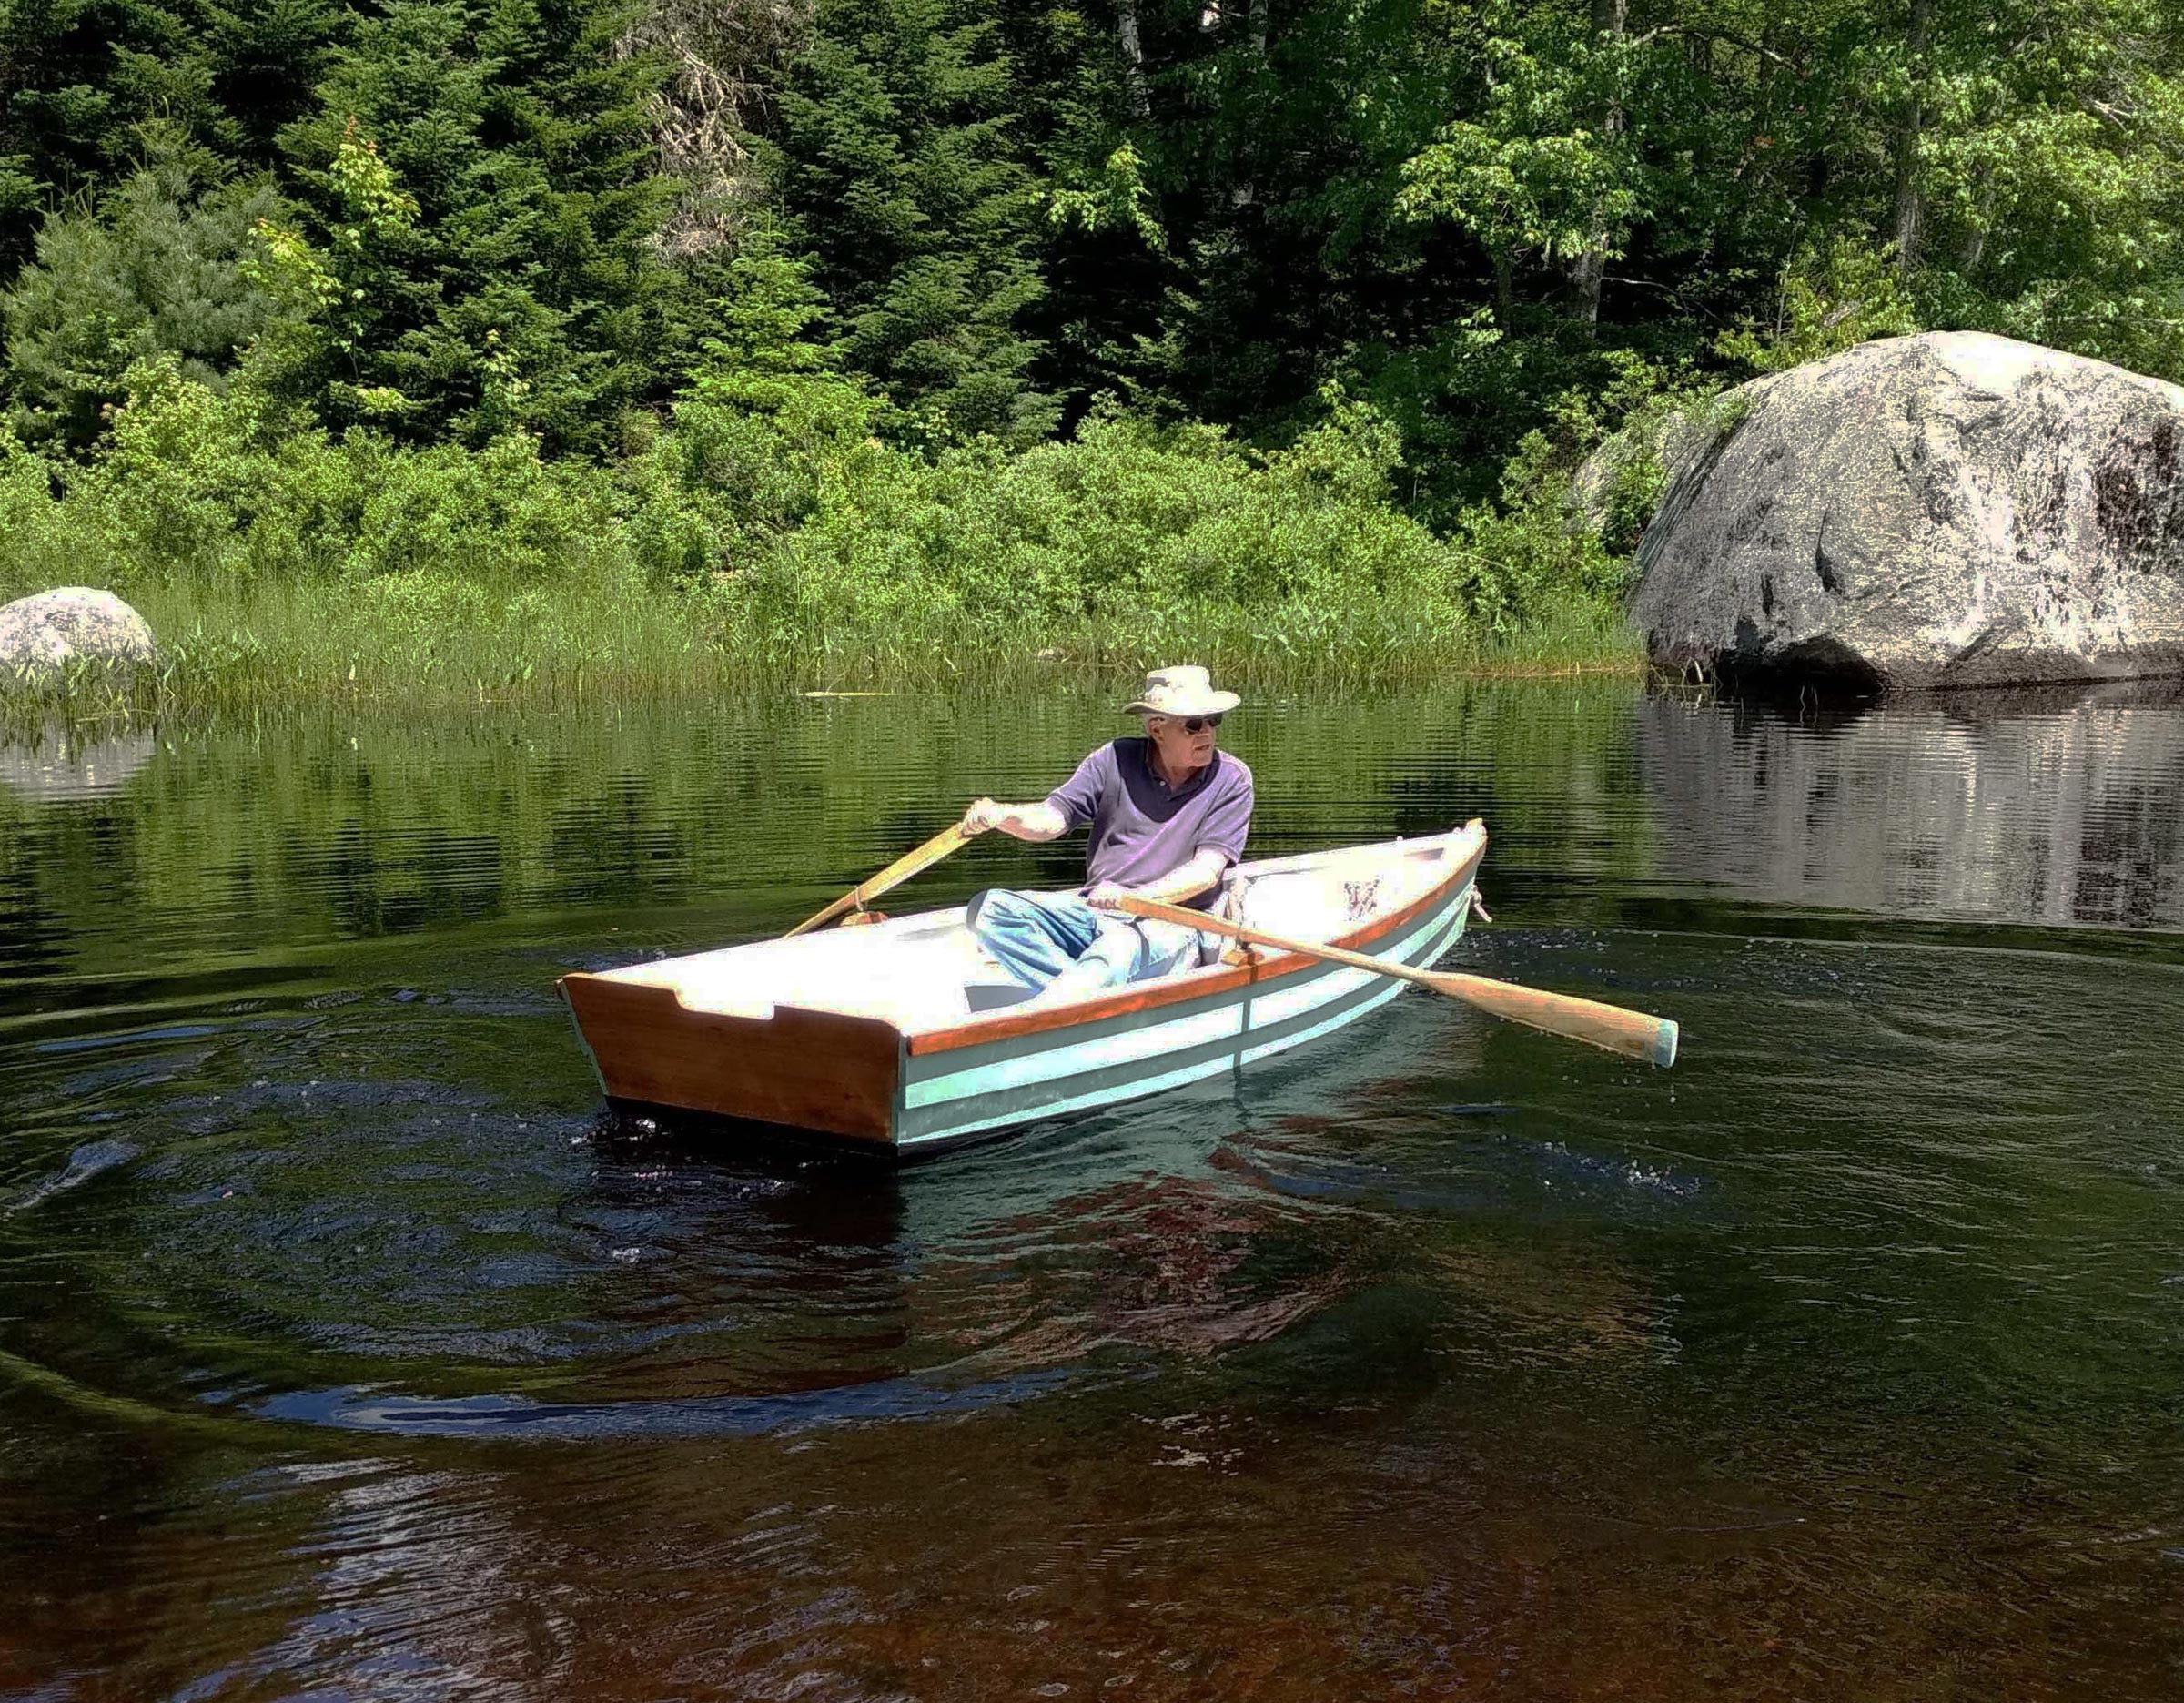
My father started me rowing when I was five or six years old, about the same time I learned to ride a bicycle. I’ve been rowing and riding with few interruptions since then. In my 60s I noticed the speed that I rode had gradually diminished. I didn’t have the power I’d once had for climbing hills, and the speed calculated by my bicycle speedometer confirmed I couldn’t sprint as fast as I’d used to. While my rowing speed surely must have diminished too, I don’t feel it and GPS readings give me numbers that don’t press home the somber news that I’m getting older.
My father, an oarsman and sculler for most of his life, rowed racing singles into his early 80s, giving up only when he had to accept that he no longer would have the strength to get back aboard after a capsize. My interests in rowing have always been for recreation and cruising rather than racing, and the boats I row take more than a moment of inattention at the oars to capsize. I expect I’ll be able to keep rowing into my 90s, if I get that far. But as more gray creeps into my temples and eyebrows with each passing year, it will be even more important to take to my boat and row into the brilliant light that comes through even overcast skies.
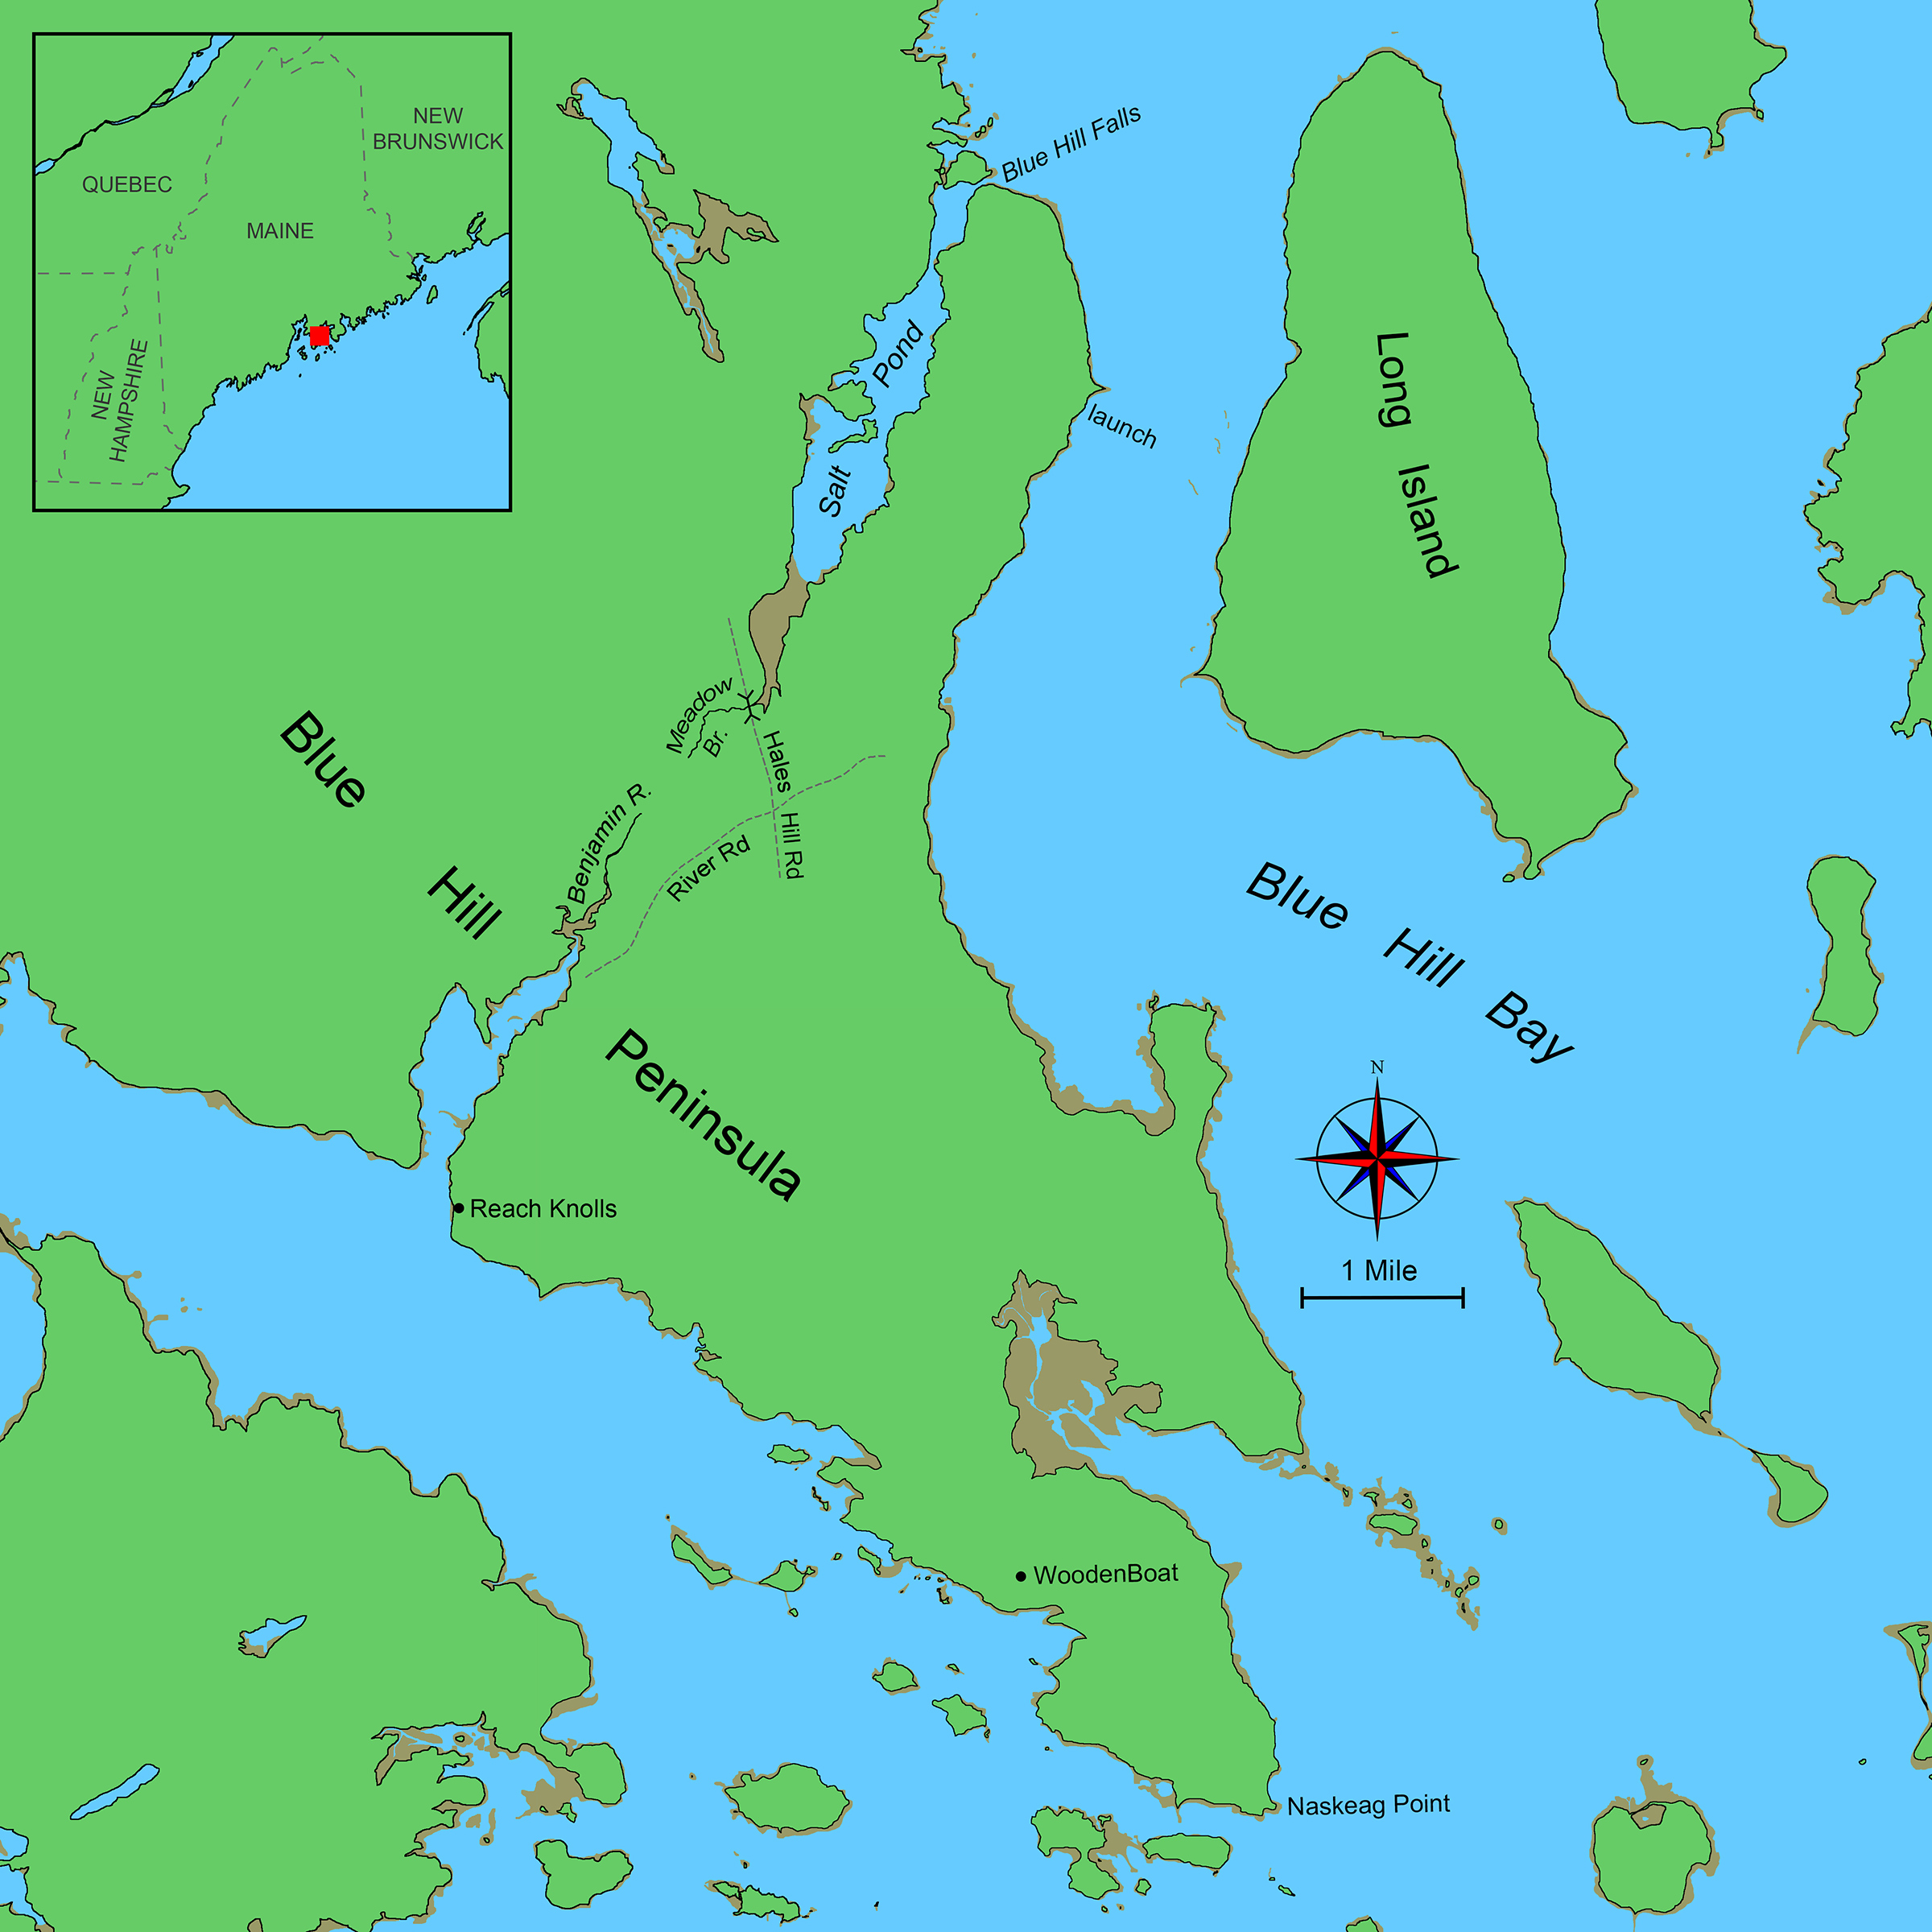
The Wyman 12 is about as basic a boat as there is. It is simple to build, easy to row, stable, and can carry a load. Its flatiron-skiff design has been, and is still, the pickup truck of workboats along our Maine waterfront for many years. Ben Fuller, a preeminent small-boat guru, believes that the original flatiron skiffs, which had cross-planked bottoms caulked with oakum, originated in the United States around 1880, likely in the Long Island Sound oyster industry.
Soon after my wife Susan and I relocated to Blue Hill, Maine, I realized that we would need a boat to get to the sailboat that we’d moored in Blue Hill Bay in front of our house. Shortly after moving in, I attended the annual meeting of the Downeast Chapter of the Traditional Small Craft Association. There was so much boat knowledge and experience in this group that finding advice about a skiff, or just about anything concerning boats, was an easy task.
Haley Blake, Wilson Museum Manager of Community Engagement and Museum Experience
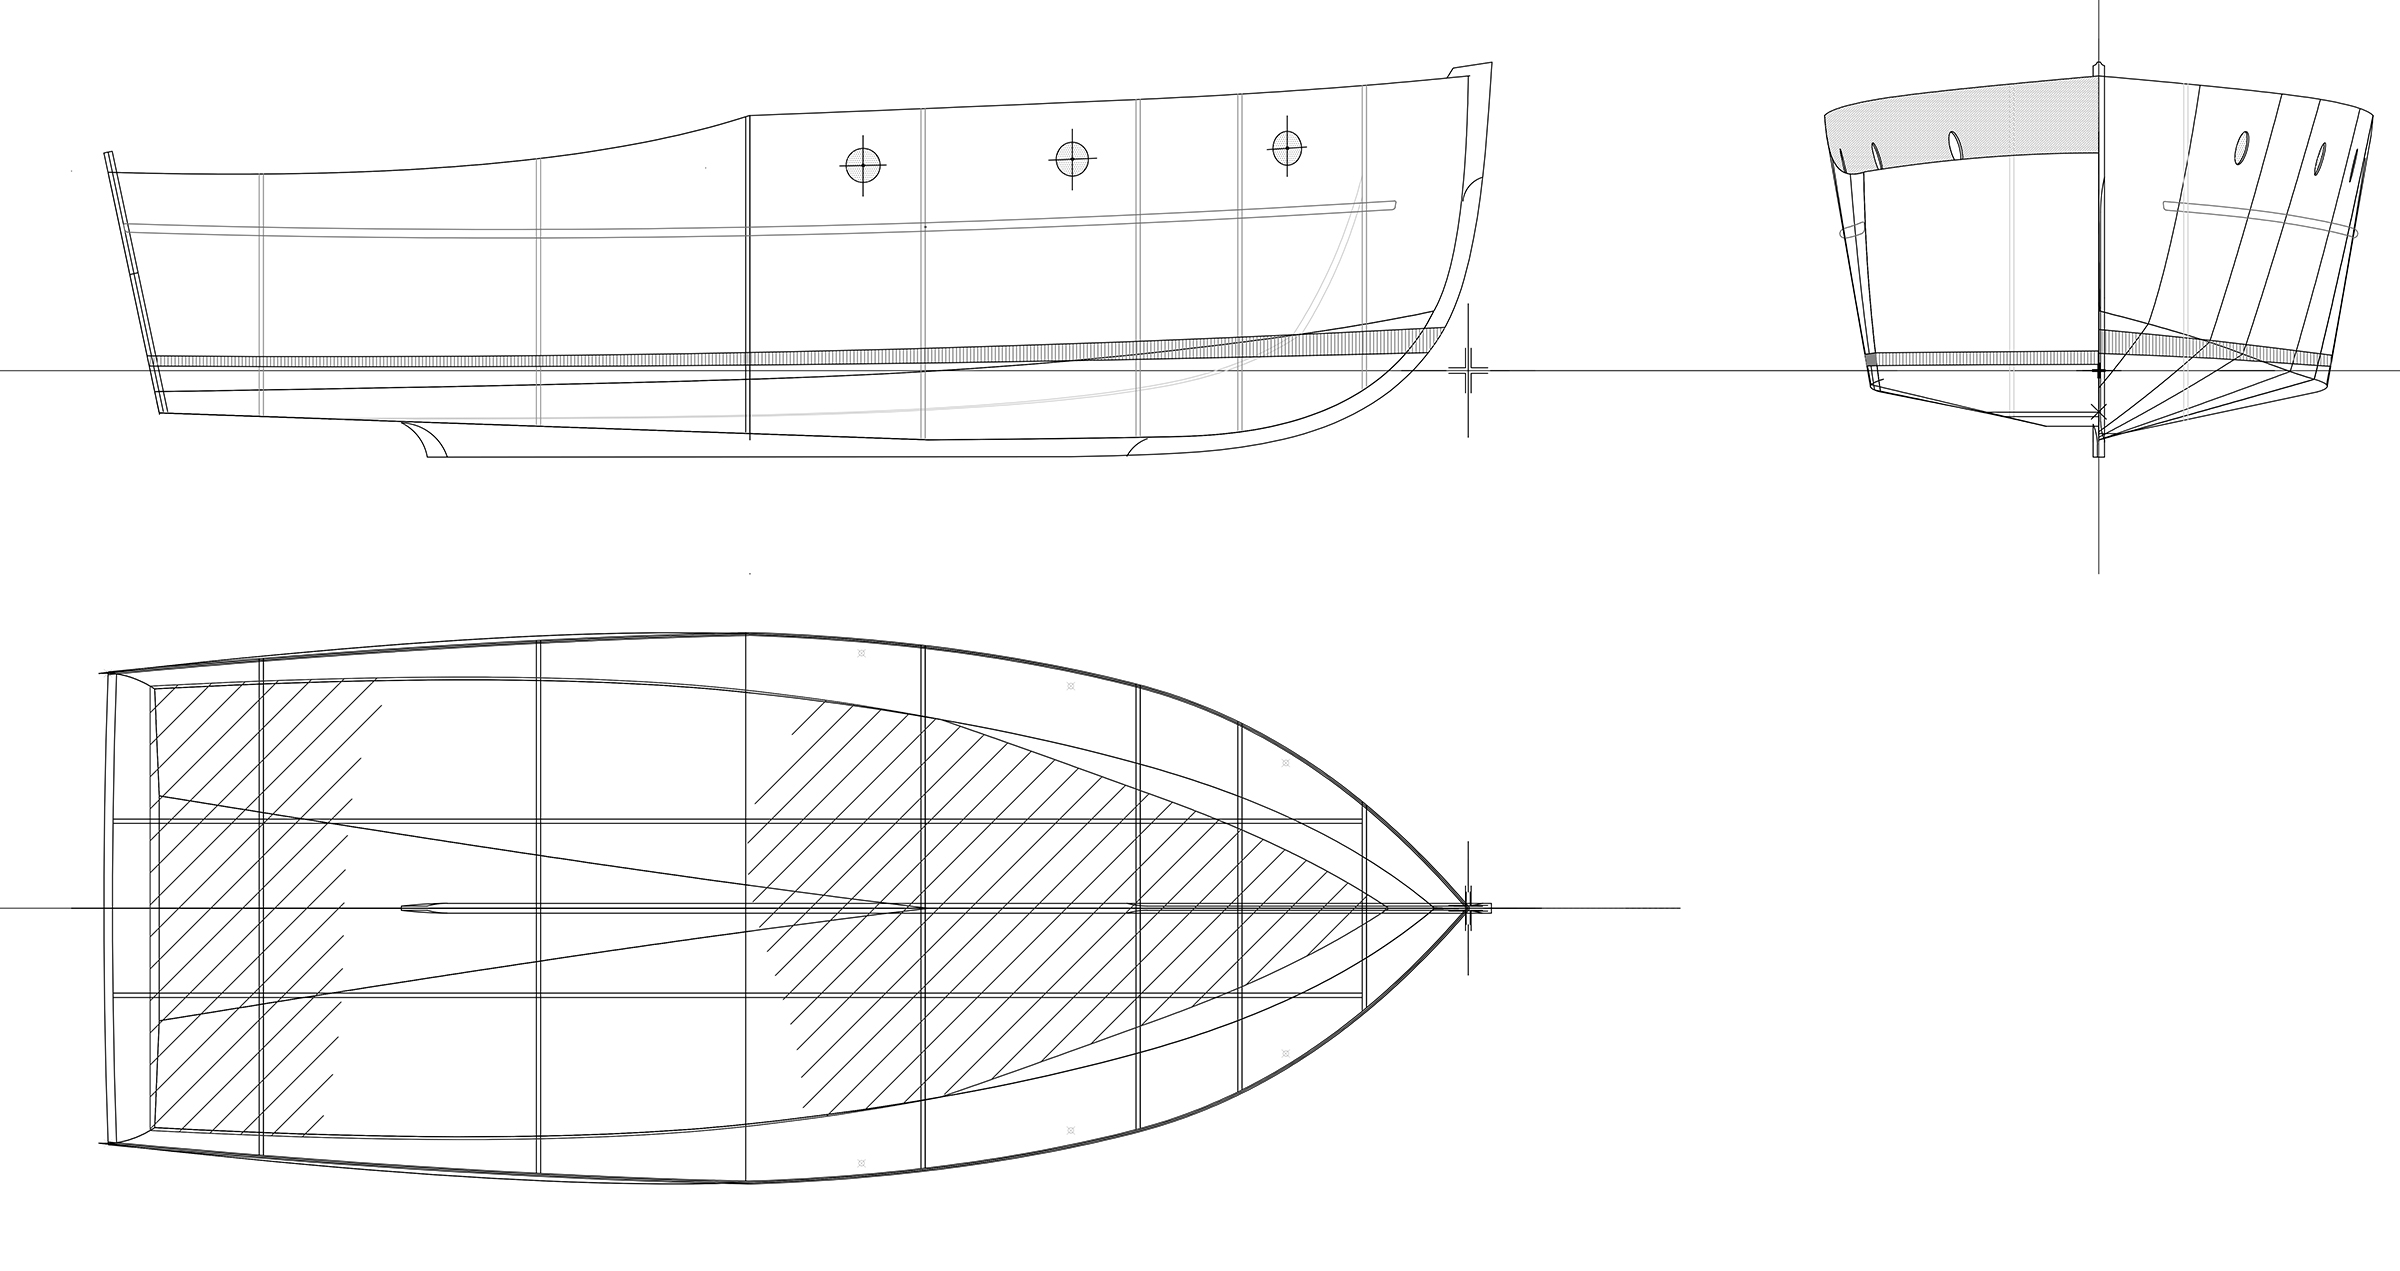
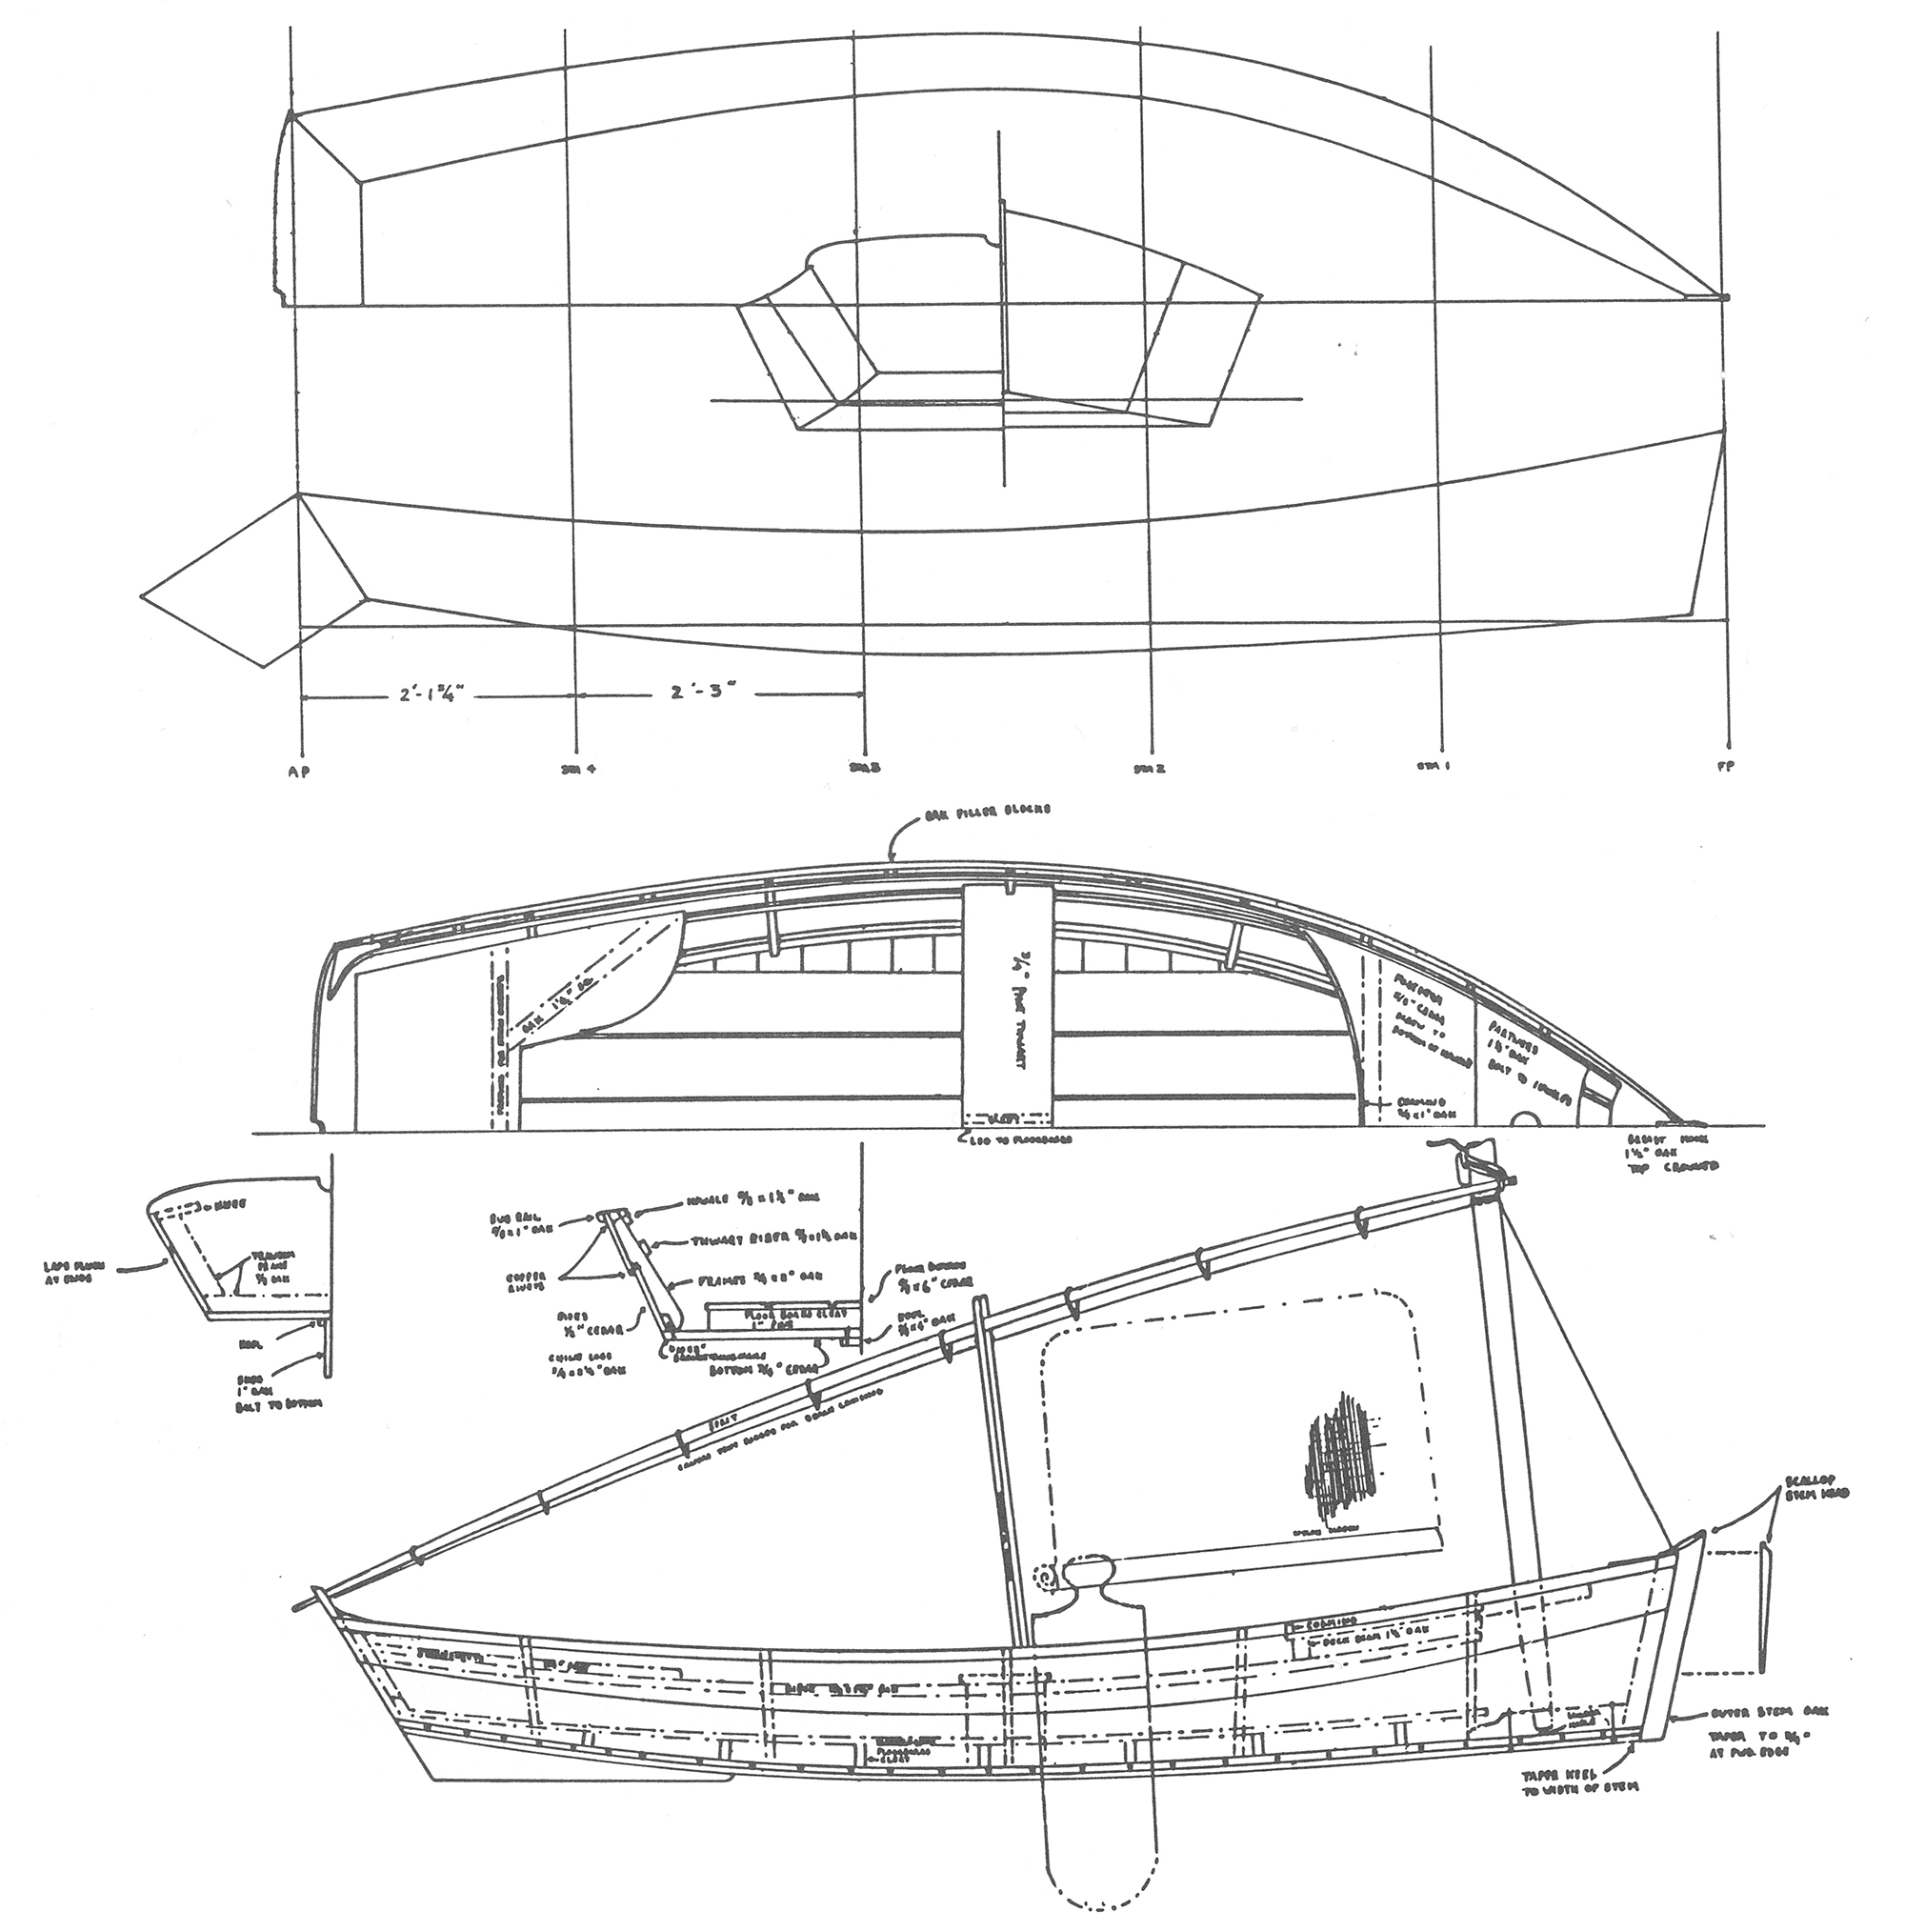
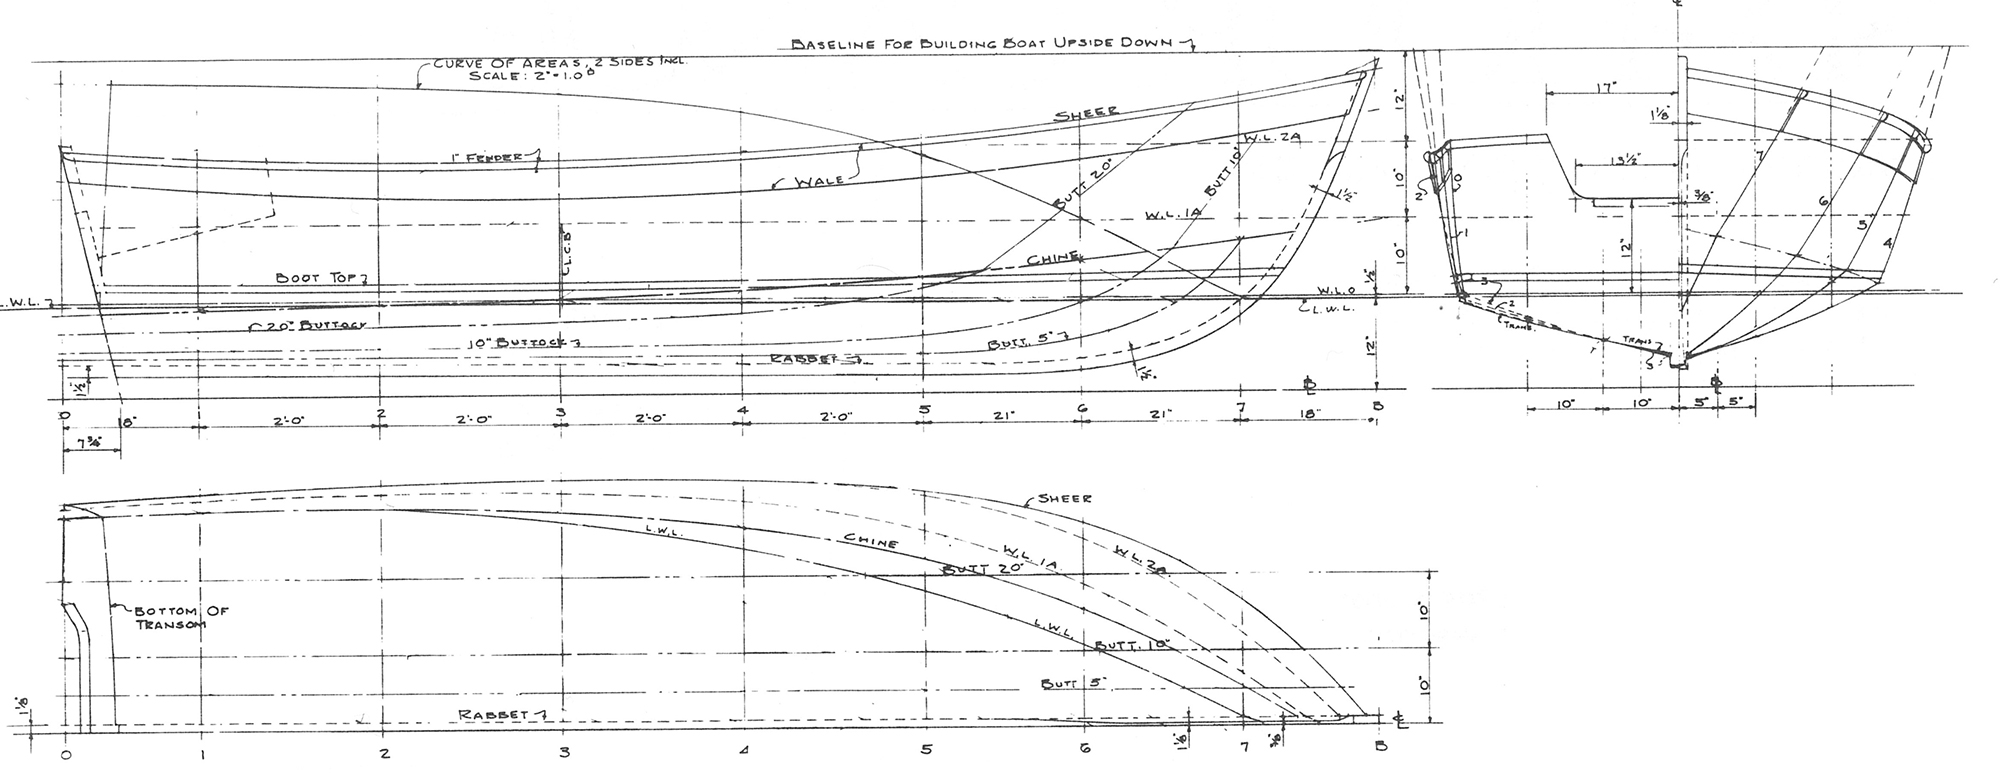
The ’midship frame has a slight curve from side to side and the lower planks, when angled and bent from stem to transom, create a fore-and-aft rocker for the bottom. The resulting compound curve stiffens the 3⁄8″ plywood bottom. Note that the jog in the sides of the transom allows the simple overlap of the planks to run all the way aft.
Shortly after that meeting, David Wyman, a respected naval architect and engineer, asked me to stop by his boat shed to see the 19′ yawl that he had designed. While there, I noticed a skiff propped up against a wall and mentioned that building one like that was next on my list. David didn’t hesitate to offer to design one for me. It was probably David’s easiest design challenge, as his impressive designs catalog includes everything from submarines for Navy Seals to VIRGINIA, a 51′ pinnace.
David’s plans for the Wyman 12 could not be more straightforward. They include two sheets of drawings: one with plan, profile, and body views, and the other with measured drawings for the planks, transom, stem cross section, and ’midship form. A page of construction steps and a materials list complete the set. There is no table of offsets, as lofting is not needed. David drew the plans knowing that I had some boatbuilding experience, so he didn’t include a lot of construction details.
Haley Blake, Wilson Museum Manager of Community Engagement and Museum Experience
The twin skegs are visible beneath the transom of this finished Wyman 12.
To simplify the construction of the Wyman 12, David specified 3⁄8″ marine plywood for the bottom in lieu of cross planking. The materials list notes #2 white pine for the planking, transom, gunwales, and thwarts, and white oak for the stem and side frames. I opted for western red cedar for planking because it was available at the local hardware store. I used cherry for the transom and gunwales, a bit fancy for a workboat, but I had a good supply of it on hand. I carved a rabbet in the stem, a slight variation from David’s plans, which specified separate inner and outer stems.
The lower planks, which start out with straight and parallel edges, are attached to the stem with screws and glue, then bent around a white-pine ’midship frame. The aft ends of the planks are then fitted and fixed to notches in the transom that make beveling or cutting gains in the laps between the bottom and upper planks unnecessary.
The plywood bottom, slightly oversized, is set in place. The bottom edges of the ’midship frame and transom are both curved and give the plywood a 1″ camber as its perimeter is secured to the beveled lower planks with Monel ring nails and polyurethane. After the bottom has been fastened, it is trimmed flush with the lower planks and the transom bottom.
Steve Brookman
Designer David Wyman took a turn at the oars of the author’s skiff. After seeing the boat built according to his plans, he decided to raise the sheerline from amidships to the stemhead for a livelier look.
For most of their length, the top planks have a 1″ lap with the lower planks without bevels. The plans don’t specify how to work the laps at their forward ends, so I opted for an 18″-long gain at the bow to bring the planks flush with each other at the stem. I secured the laps and plank ends with PL Premium polyurethane construction adhesive rather than the Titebond III or 3M 5200 specified in the materials list.
The instructions specify fiberglass tape on the outside chine to keep it leakproof. I opted to cover the entire bottom with Dynel and to add a couple of runners to show some respect for Maine’s rocky shores. The instructions call for a keelson and two sister keelsons. The bottom gets two skegs, one on each sister keelson. On the inside of the bottom I added a strip of black locust for a heel brace, which is not in the plans but is very useful for rowing. David recommended 7′ oars; I carved mine from leftover ash.
White cedar is used for the seating: slats oriented fore-and-aft in the ends, and a solid thwart amidships. They sit on the top edge of the lower strake. The ’midship thwart also has white-pine knees, but I made mine from 3⁄4″ marine plywood. Rigid foam, glued under the seats and thwart, provides flotation.
Steve Brookman
The bright-finished cleat spanning the bottom aft of the thwart is not indicated in the plans, but is a useful addition that anchors the rower’s heels to put more power into the stroke. The 7′ oars proved a good length for the boat’s 52″ beam.
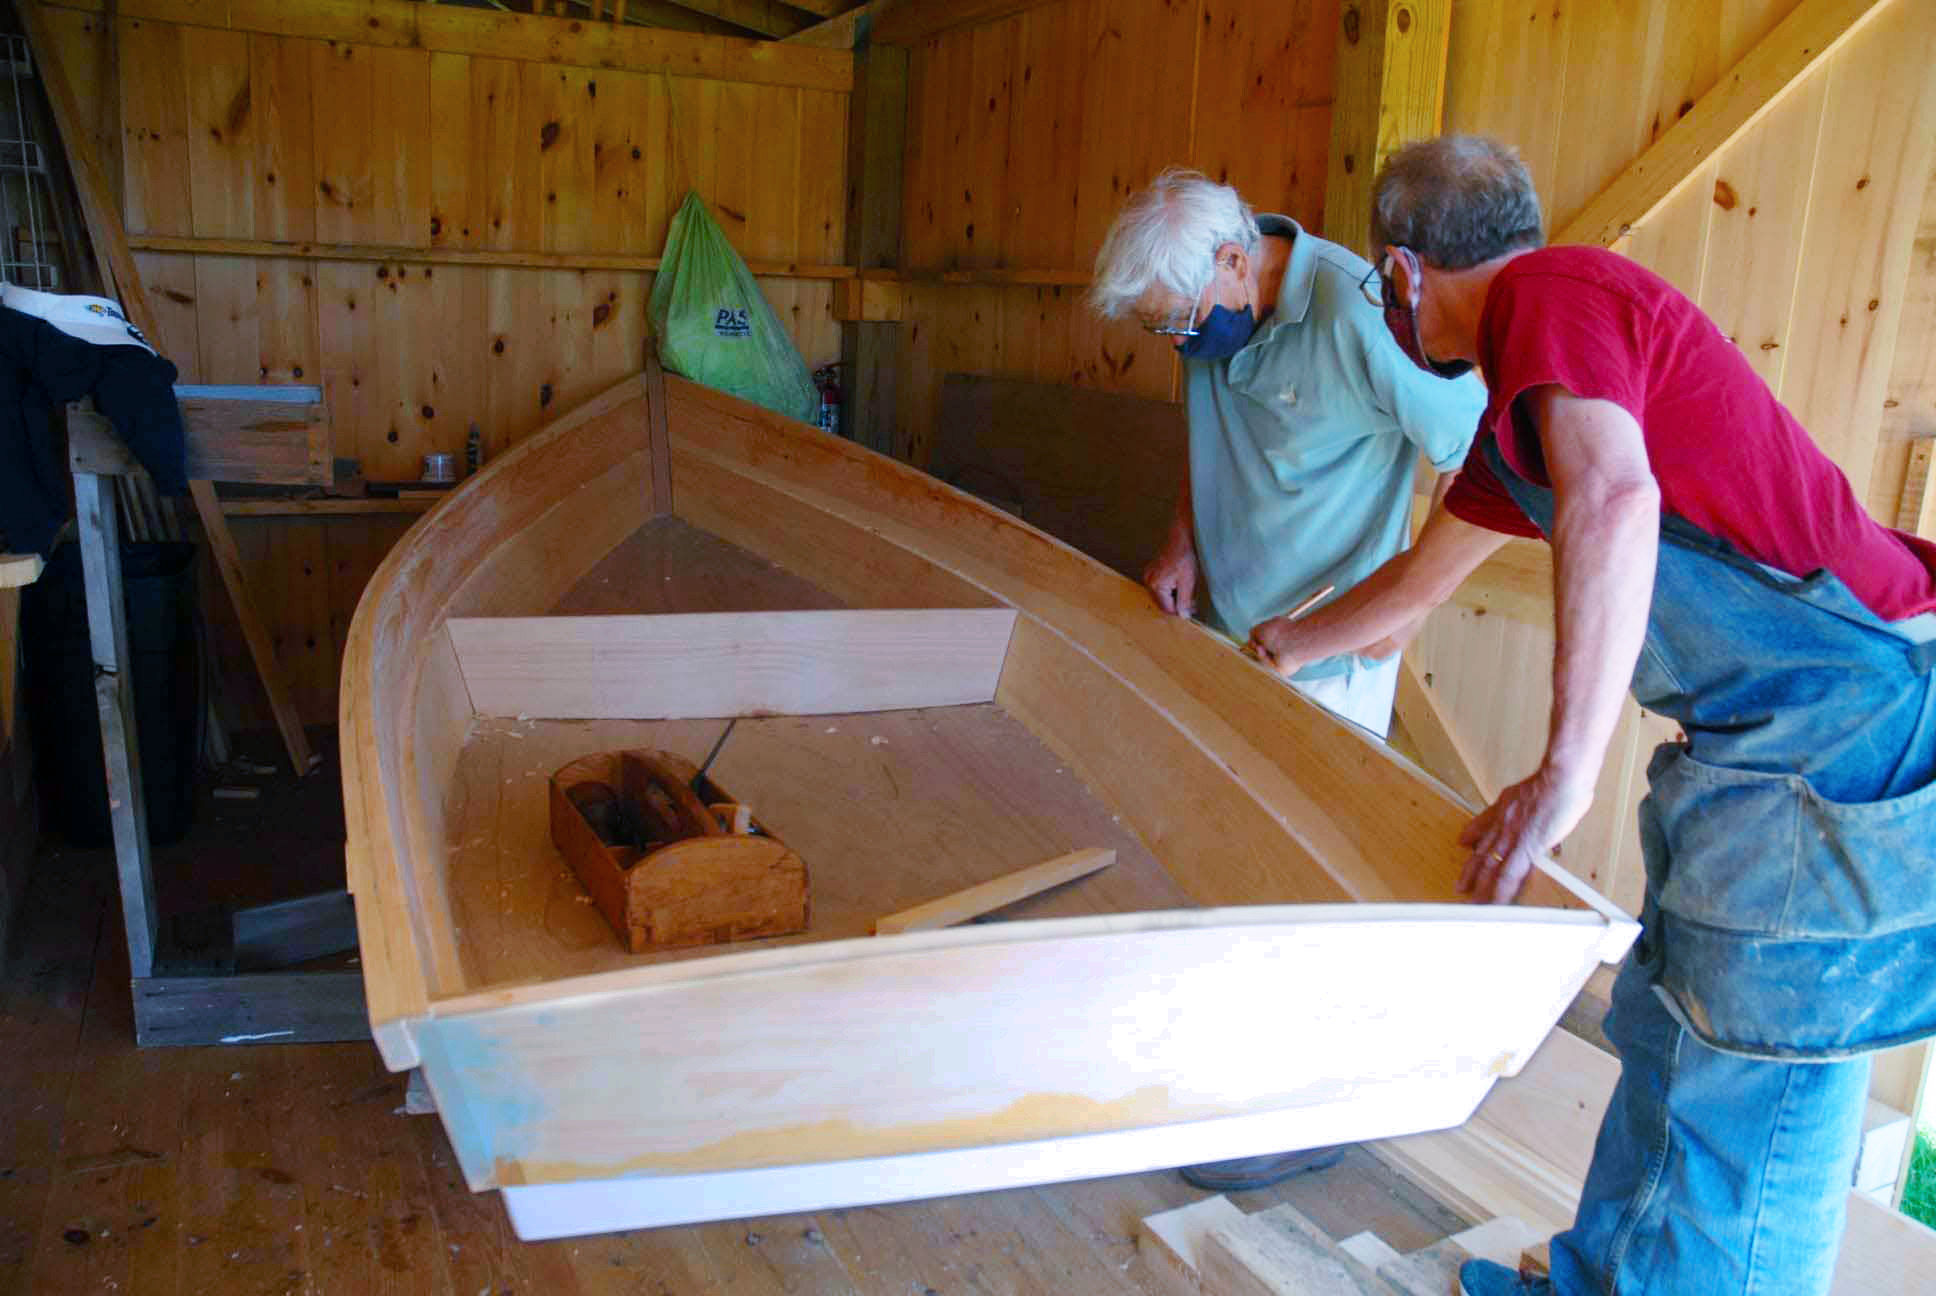
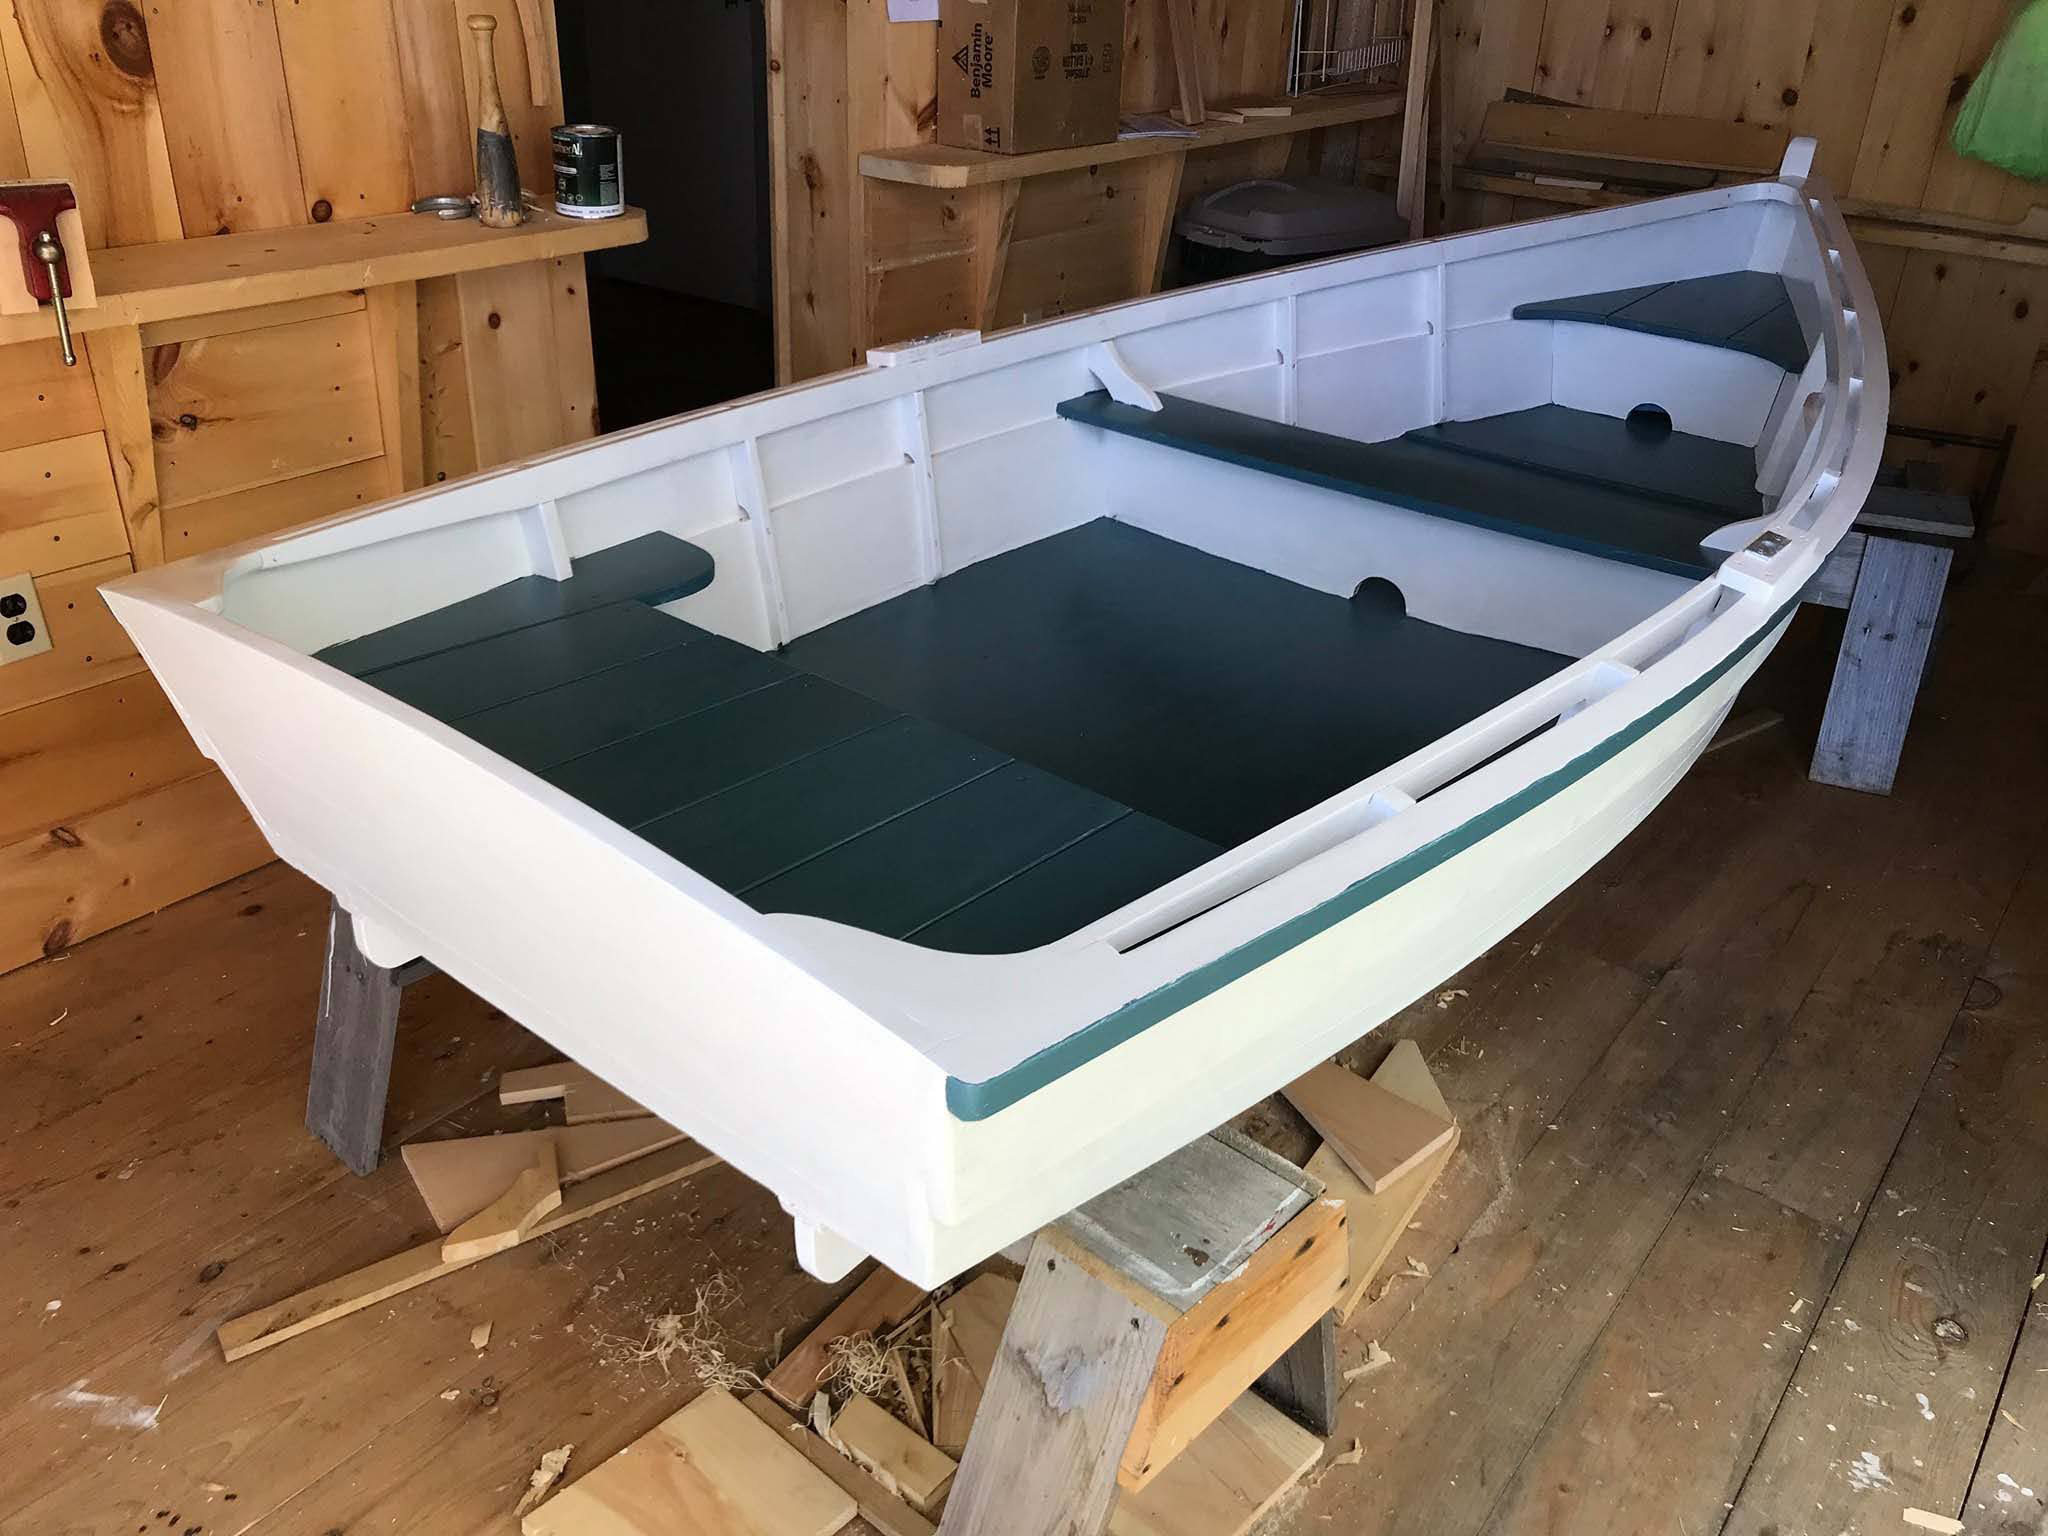
I didn’t keep track of the time or expenses, but it took a few months of occasional work to build my skiff. Over the past few summers, a group of volunteers and I built two Wyman 12s at Castine’s Wilson Museum, working just a few hours two days a week while talking with visitors and getting kids to help.
I estimate the Wyman 12’s weight to be about 150 lbs. I transport it using a bed extender on my midsized pickup, and Susan and I manage to get it in and out of the truck without much difficulty. We first launched my Wyman 12 at Blue Hill’s town wharf without fanfare—after all, this is a simple working boat. The boat was not particular about how it was boarded, and stable no matter where that first step landed. The 7′ oars were the ideal length. I was impressed with the boat’s rowing ability as it tracked nicely, leaving a straight wake. It was very maneuverable and, while approaching a dock, I found it quite easy to turn with just a few strokes. Two large golden retrievers that I ferried to a nearby island hopped about in their excitement and barely rocked the boat. When I had to rescue one that jumped overboard, lifting that heavy, wet dog by her doggy life jacket was a non-event as the boat had more than enough secondary stability to handle the shifting weight. When any water gets aboard, from wet dogs, spray, or rain, the open gunwales allow for complete draining when the boat is tipped on edge.
Soon after launching, I met David at a local pond with my boat so he could row it. He was pleased, and the only change he made to the plans was to give the sheer more spring by adding a piece of planking forward, increasing its height at the stem by 2″; bending the outwale upward along that piece establishes the curve for the sheerline.
Susan Brookman
The author, seen here at the oars of his Wyman 12, built the skiff before the side frames were added to the plans. In six years of use, the boat has not suffered from their absence.
With a 40-lb, 3-hp electric outboard hung on the transom, the boat needs a passenger or weight forward for proper trim. For another skiff we recently built at the Wilson Museum, David modified the design to accommodate an electric trolling motor. Moving the after seat forward created space for the battery. It has not been launched as of this writing.
My skiff has held up well over the last six years while setting moorings, being dragged up on rocky beaches, and sitting in the mud twice a day enduring the 10′+ local tides. It still has the original black locust runners. I kept the cherry varnished for a few years, but then it and the oiled thwarts gave way to more easily maintained paint. I added lengths of 1″ three-strand rope to the outwales, and fire hose to protect the transom. It now looks like the workboat it was designed to be.
Boats have been a major force in Steve Brookman’s life. He grew up near a lake in northeast Connecticut, and spent as much time as possible on, or under, the water. Family vacations on their 26′ classic wooden bassboat cemented his love of being on the water. He even attended “boat school,” the U.S. Naval Academy. While flying in the Navy he spent years dreaming of boats, studying them, even attempting to design them. For a few years he got to live on and cruise sailboats. After retiring from an airline career, he and his wife Susan moved to Blue Hill, Maine, largely for the boating. Her love for snow, sugaring, and the charming small town of Blue Hill made that retirement decision easy.
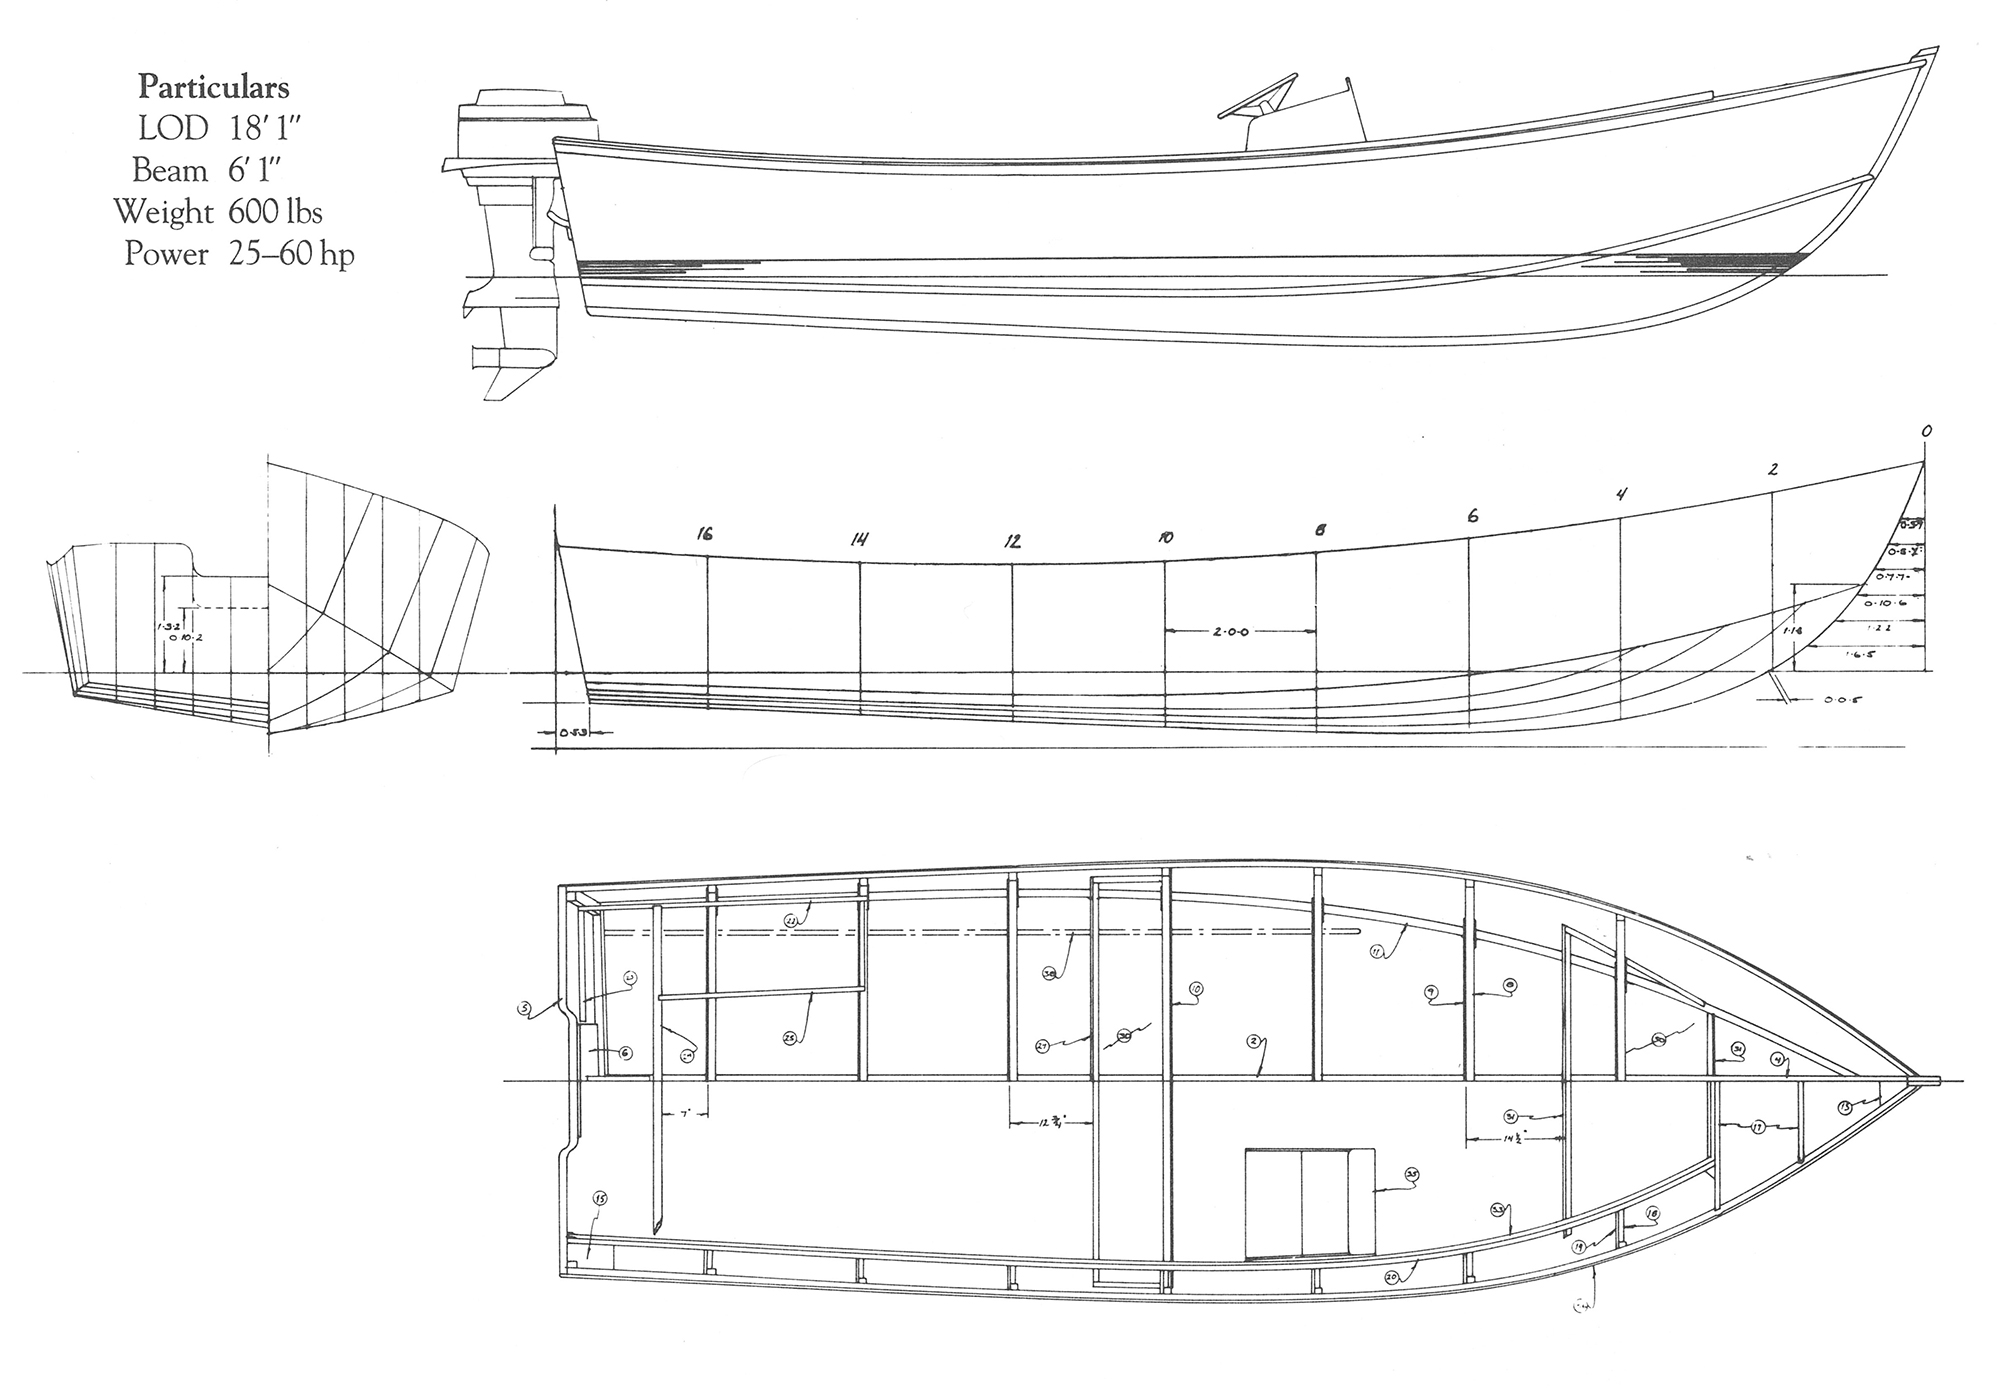
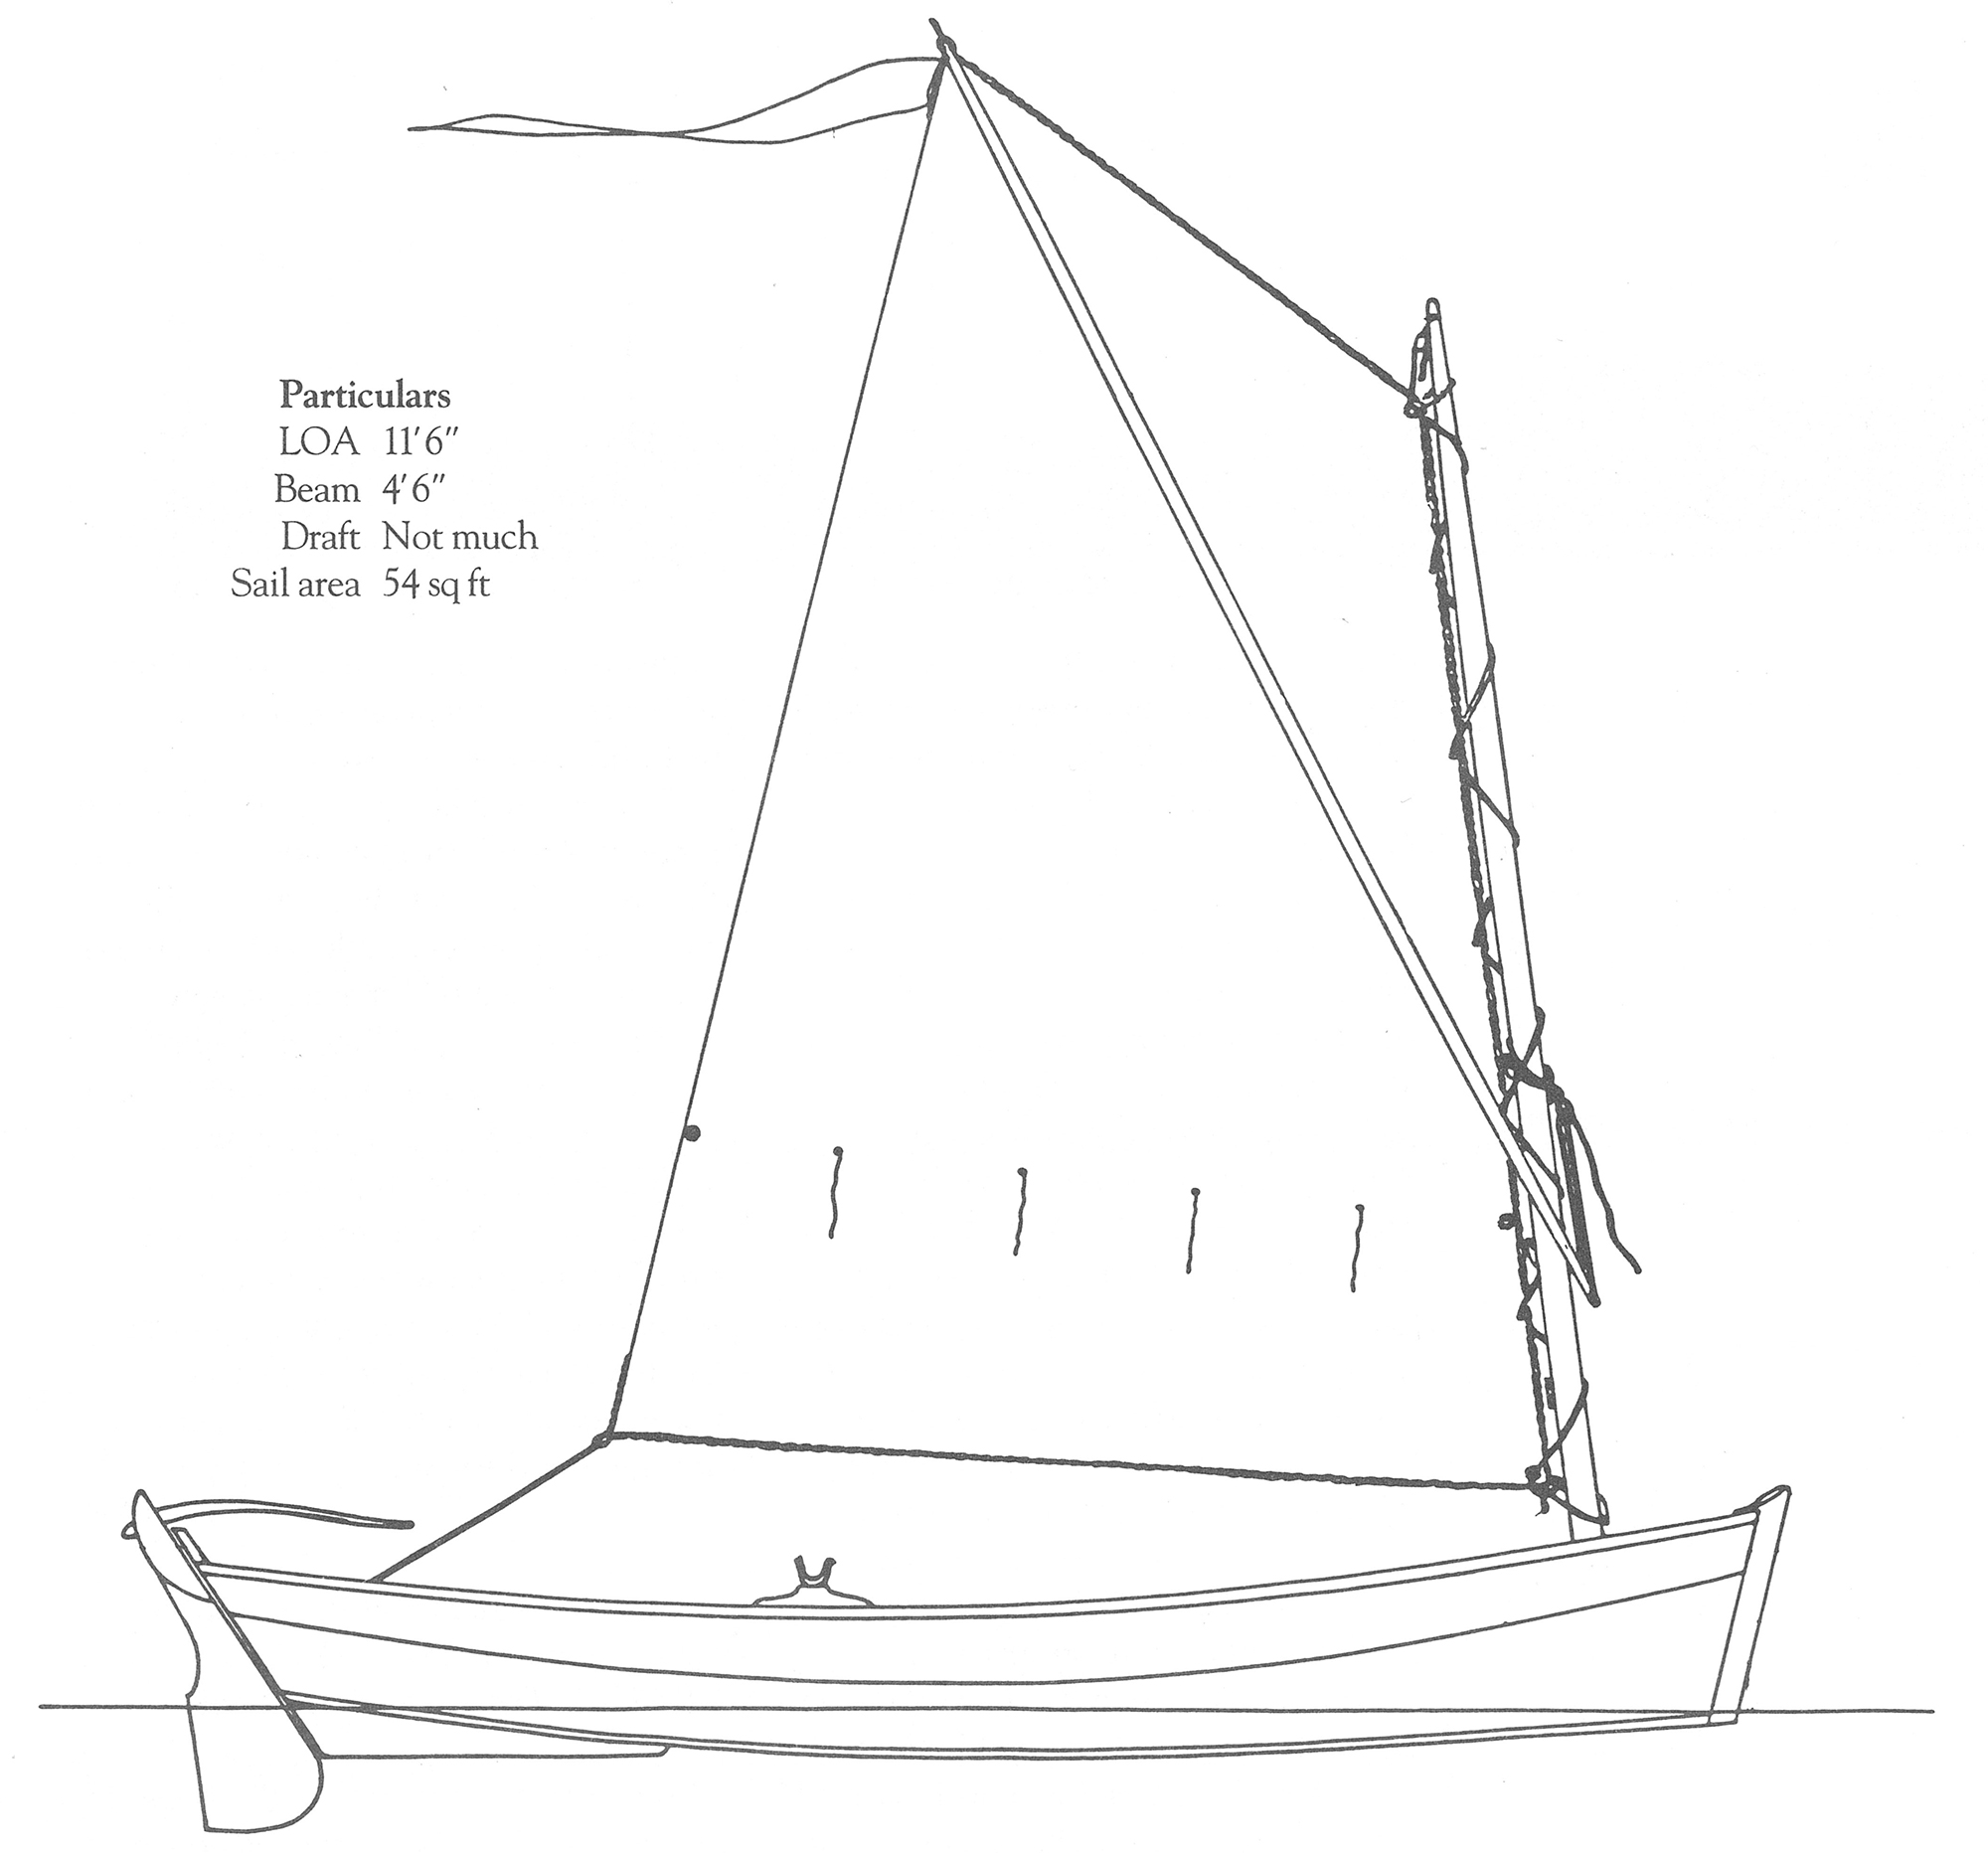
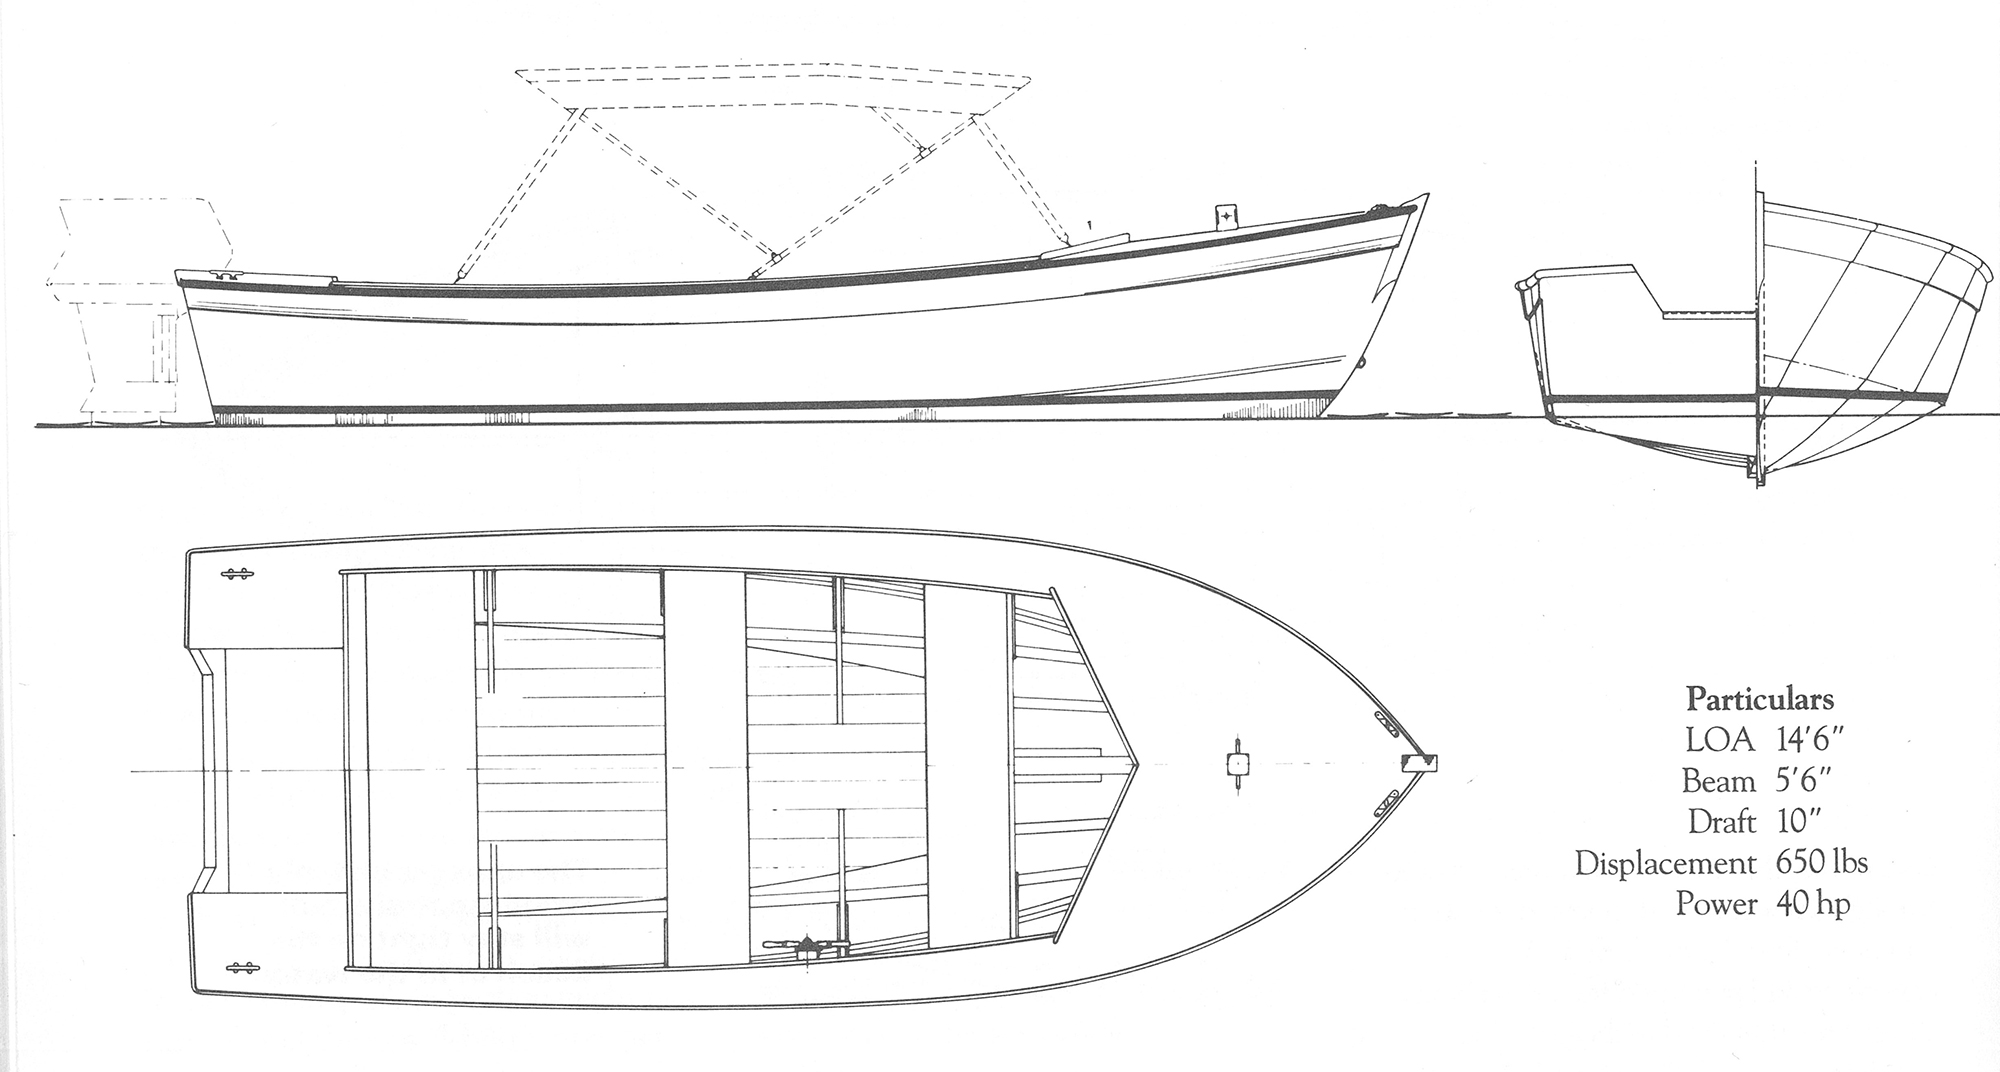
Wyman 12 Particulars
Length: 12′ 3″
Beam: 4′ 4″
Depth amidships: 14″
The complete plan set is available here for free download:
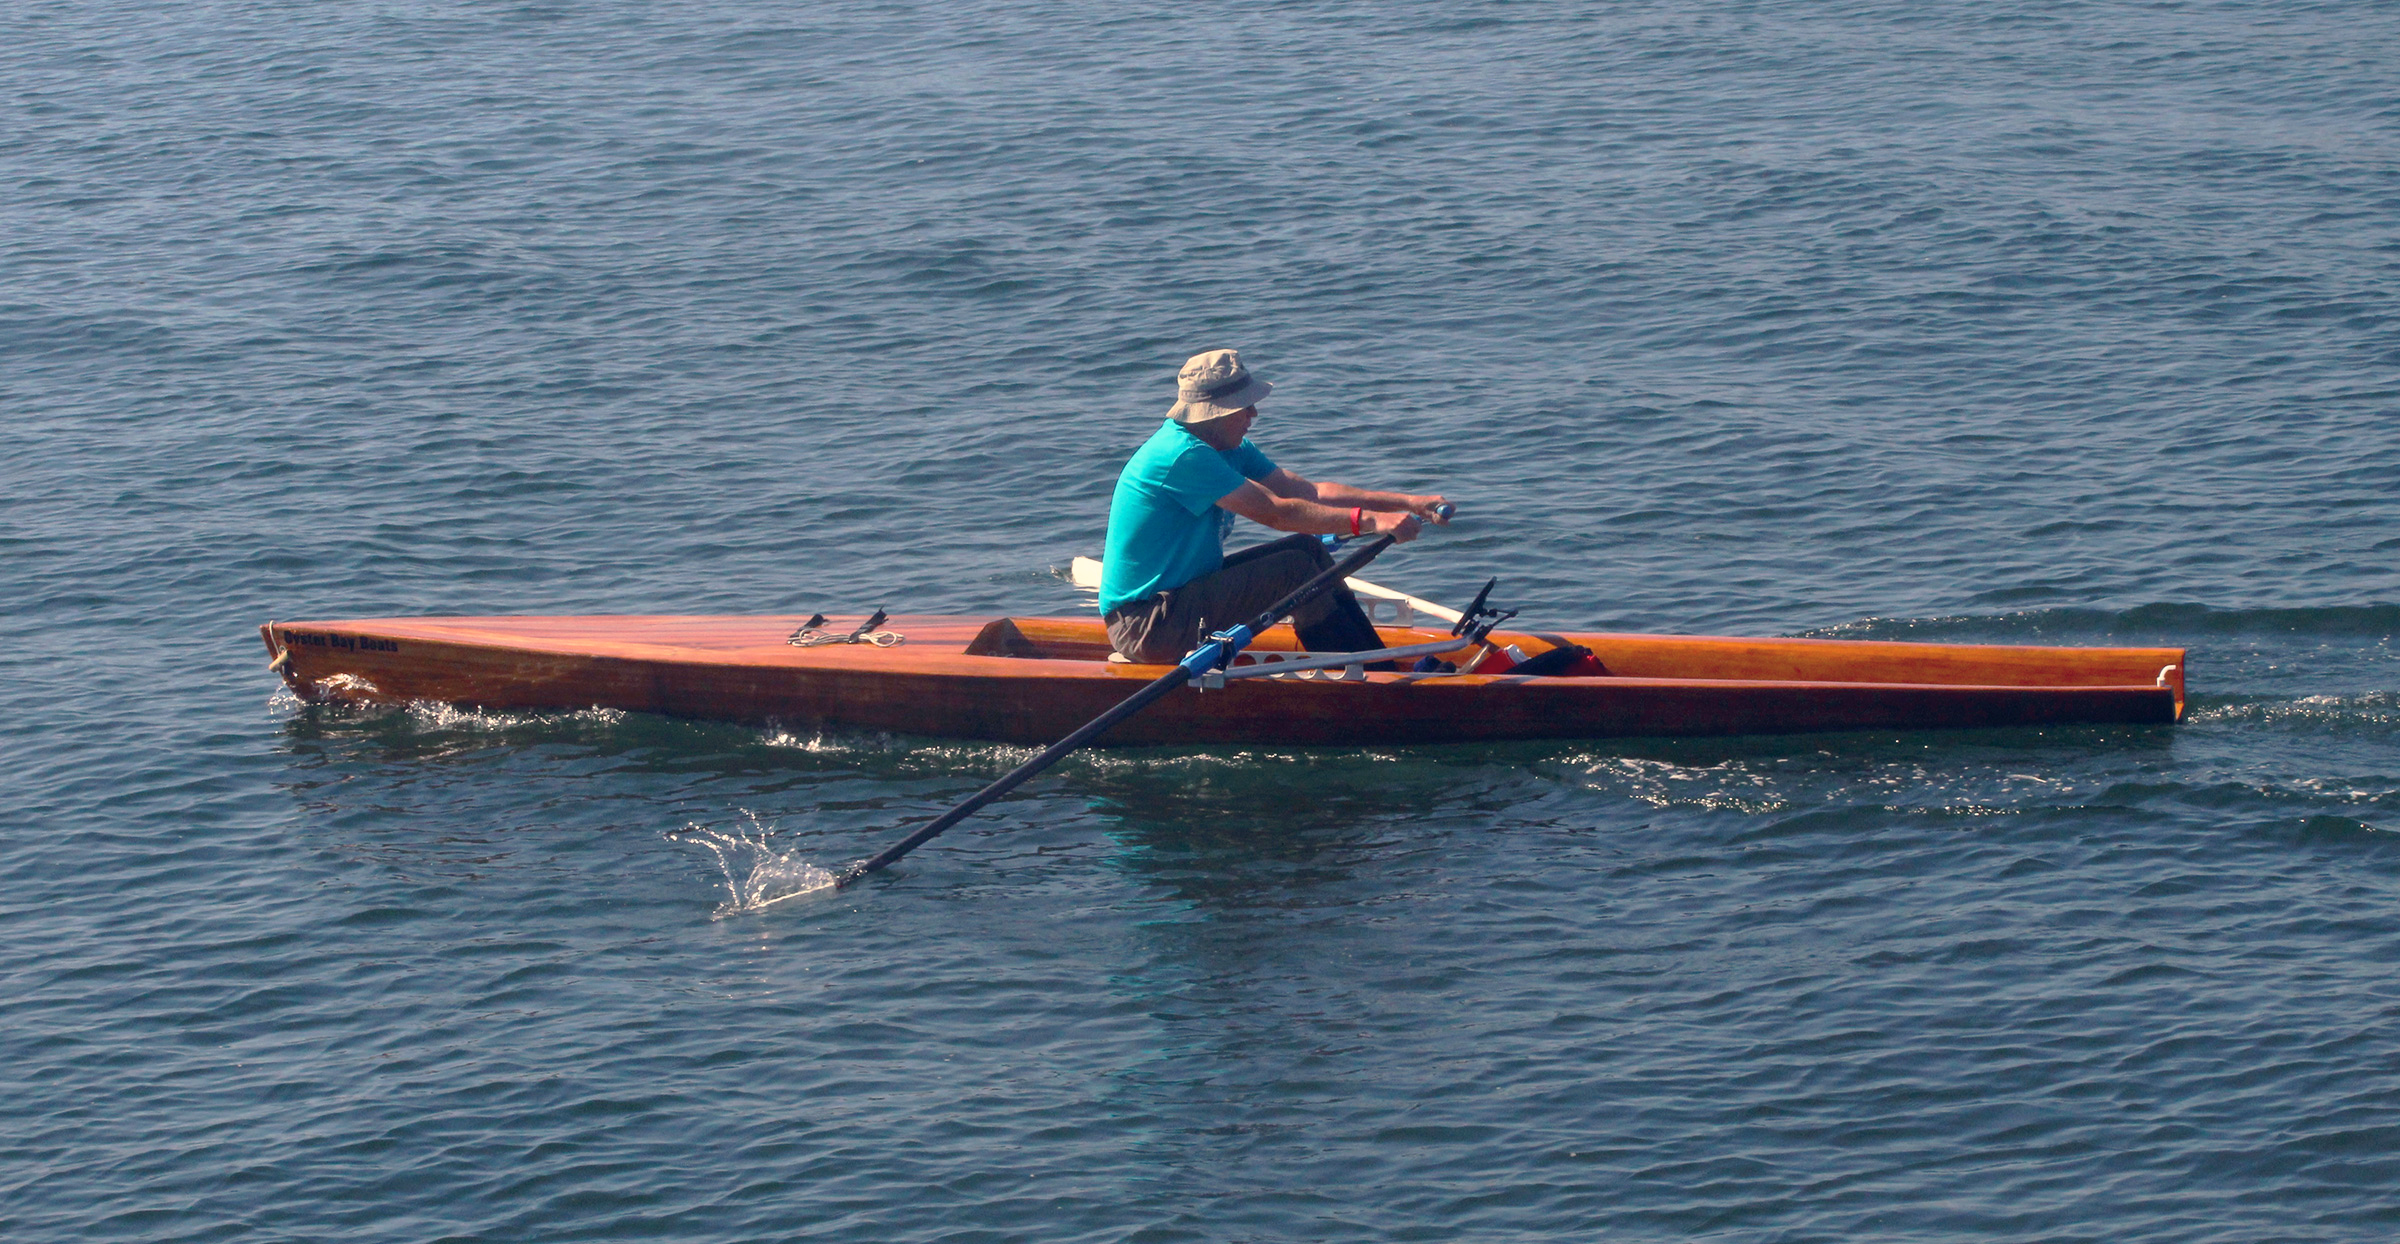
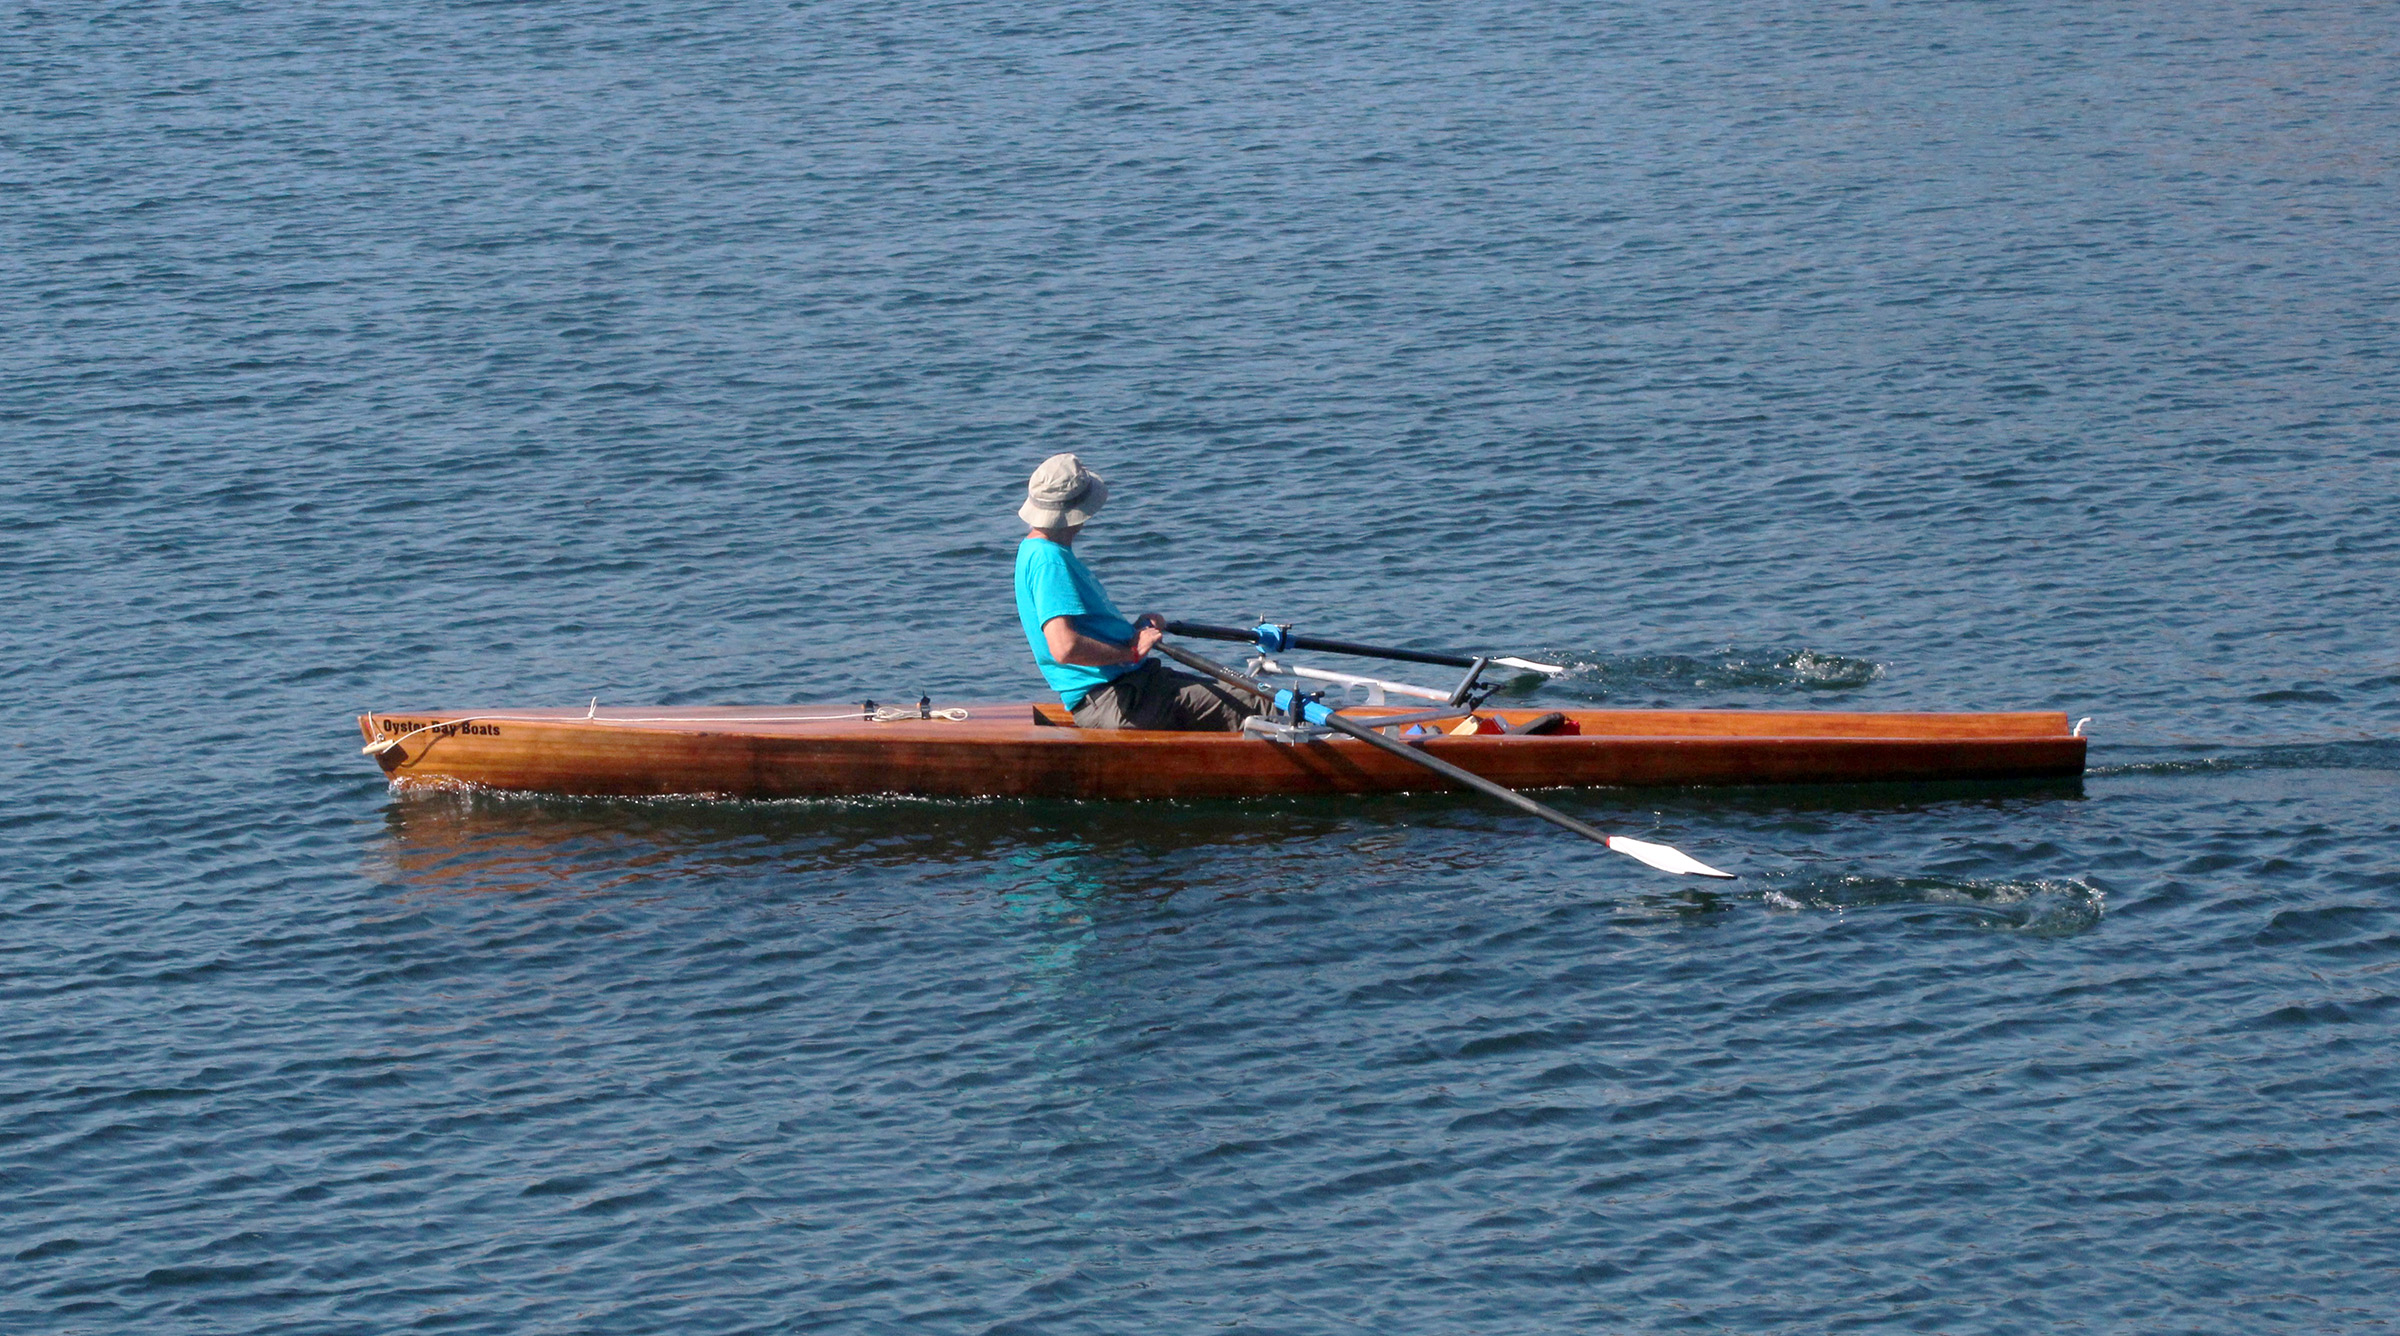
A year ago I reviewed the Fine, a fast sliding-seat rower from Oyster Bay Boats, a shop in Madeira Park, British Columbia, run by Rick Crook, designer and boatbuilder. I was impressed by the boat and pleasantly surprised that I could row it even after I’d intentionally swamped it. In the past year Rick developed another fast rower, the Salish, a coastal rowboat that can’t be swamped. Rick described the Fine in his website as a “full-body workout machine…wider than a rowing scull, thus more stable, and suitable for ocean rowing, in reasonable conditions.” About the Salish he wrote: “Salish is built for enjoying and exploring coastal waters. She is self-bailing, and by virtue of this, will handle conditions that open boats like Fine may not.”
Christopher Cunningham
A gasketed hatch in the foredeck provides access to the voluminous forward compartment, which is one of four watertight flotation chambers.
Like all Oyster Bay Boats, the Salish is strip-built with cedar, and sheathed inside and out with ’glass and bio-based epoxy. The deck has inconspicuous specks where staples once held the strips to the molds. The boat is finished bright, and the cedar has an appealing warm glow, but the finish isn’t brought to the high shine of strip-built boats that span the gap between boatbuilding and art. The Salish is meant to be used and accumulate the scars of adventurous service without tormenting the rower.
Christopher Cunningham
The rowing station has a flotation compartment under the sliding-seat deck. A plastic port provides access.
Rick weighed the Salish seen here and it came in at 69 lbs. He saved some weight by using cedar strips that were 3⁄16″ thick, thinner than the 1⁄4″ strips he usually uses, but they made building more difficult. Subsequent builds using 1⁄4″ strips would come in a bit heavier, perhaps 72 lbs. That’s more than I’d be able to lift safely all at once onto a set of roof racks. The outrigger is easily removed by spinning the wingnuts off the four bolts that secure it to the deck, but lifting the boat from its middle would be virtually impossible because there are no handholds there. To load the Salish to a cartop without help would require lifting one end at a time. I’m able to do that with my 18′ 9″ decked lapstrake canoe, which weighs about 80 lbs.
Christopher Cunningham
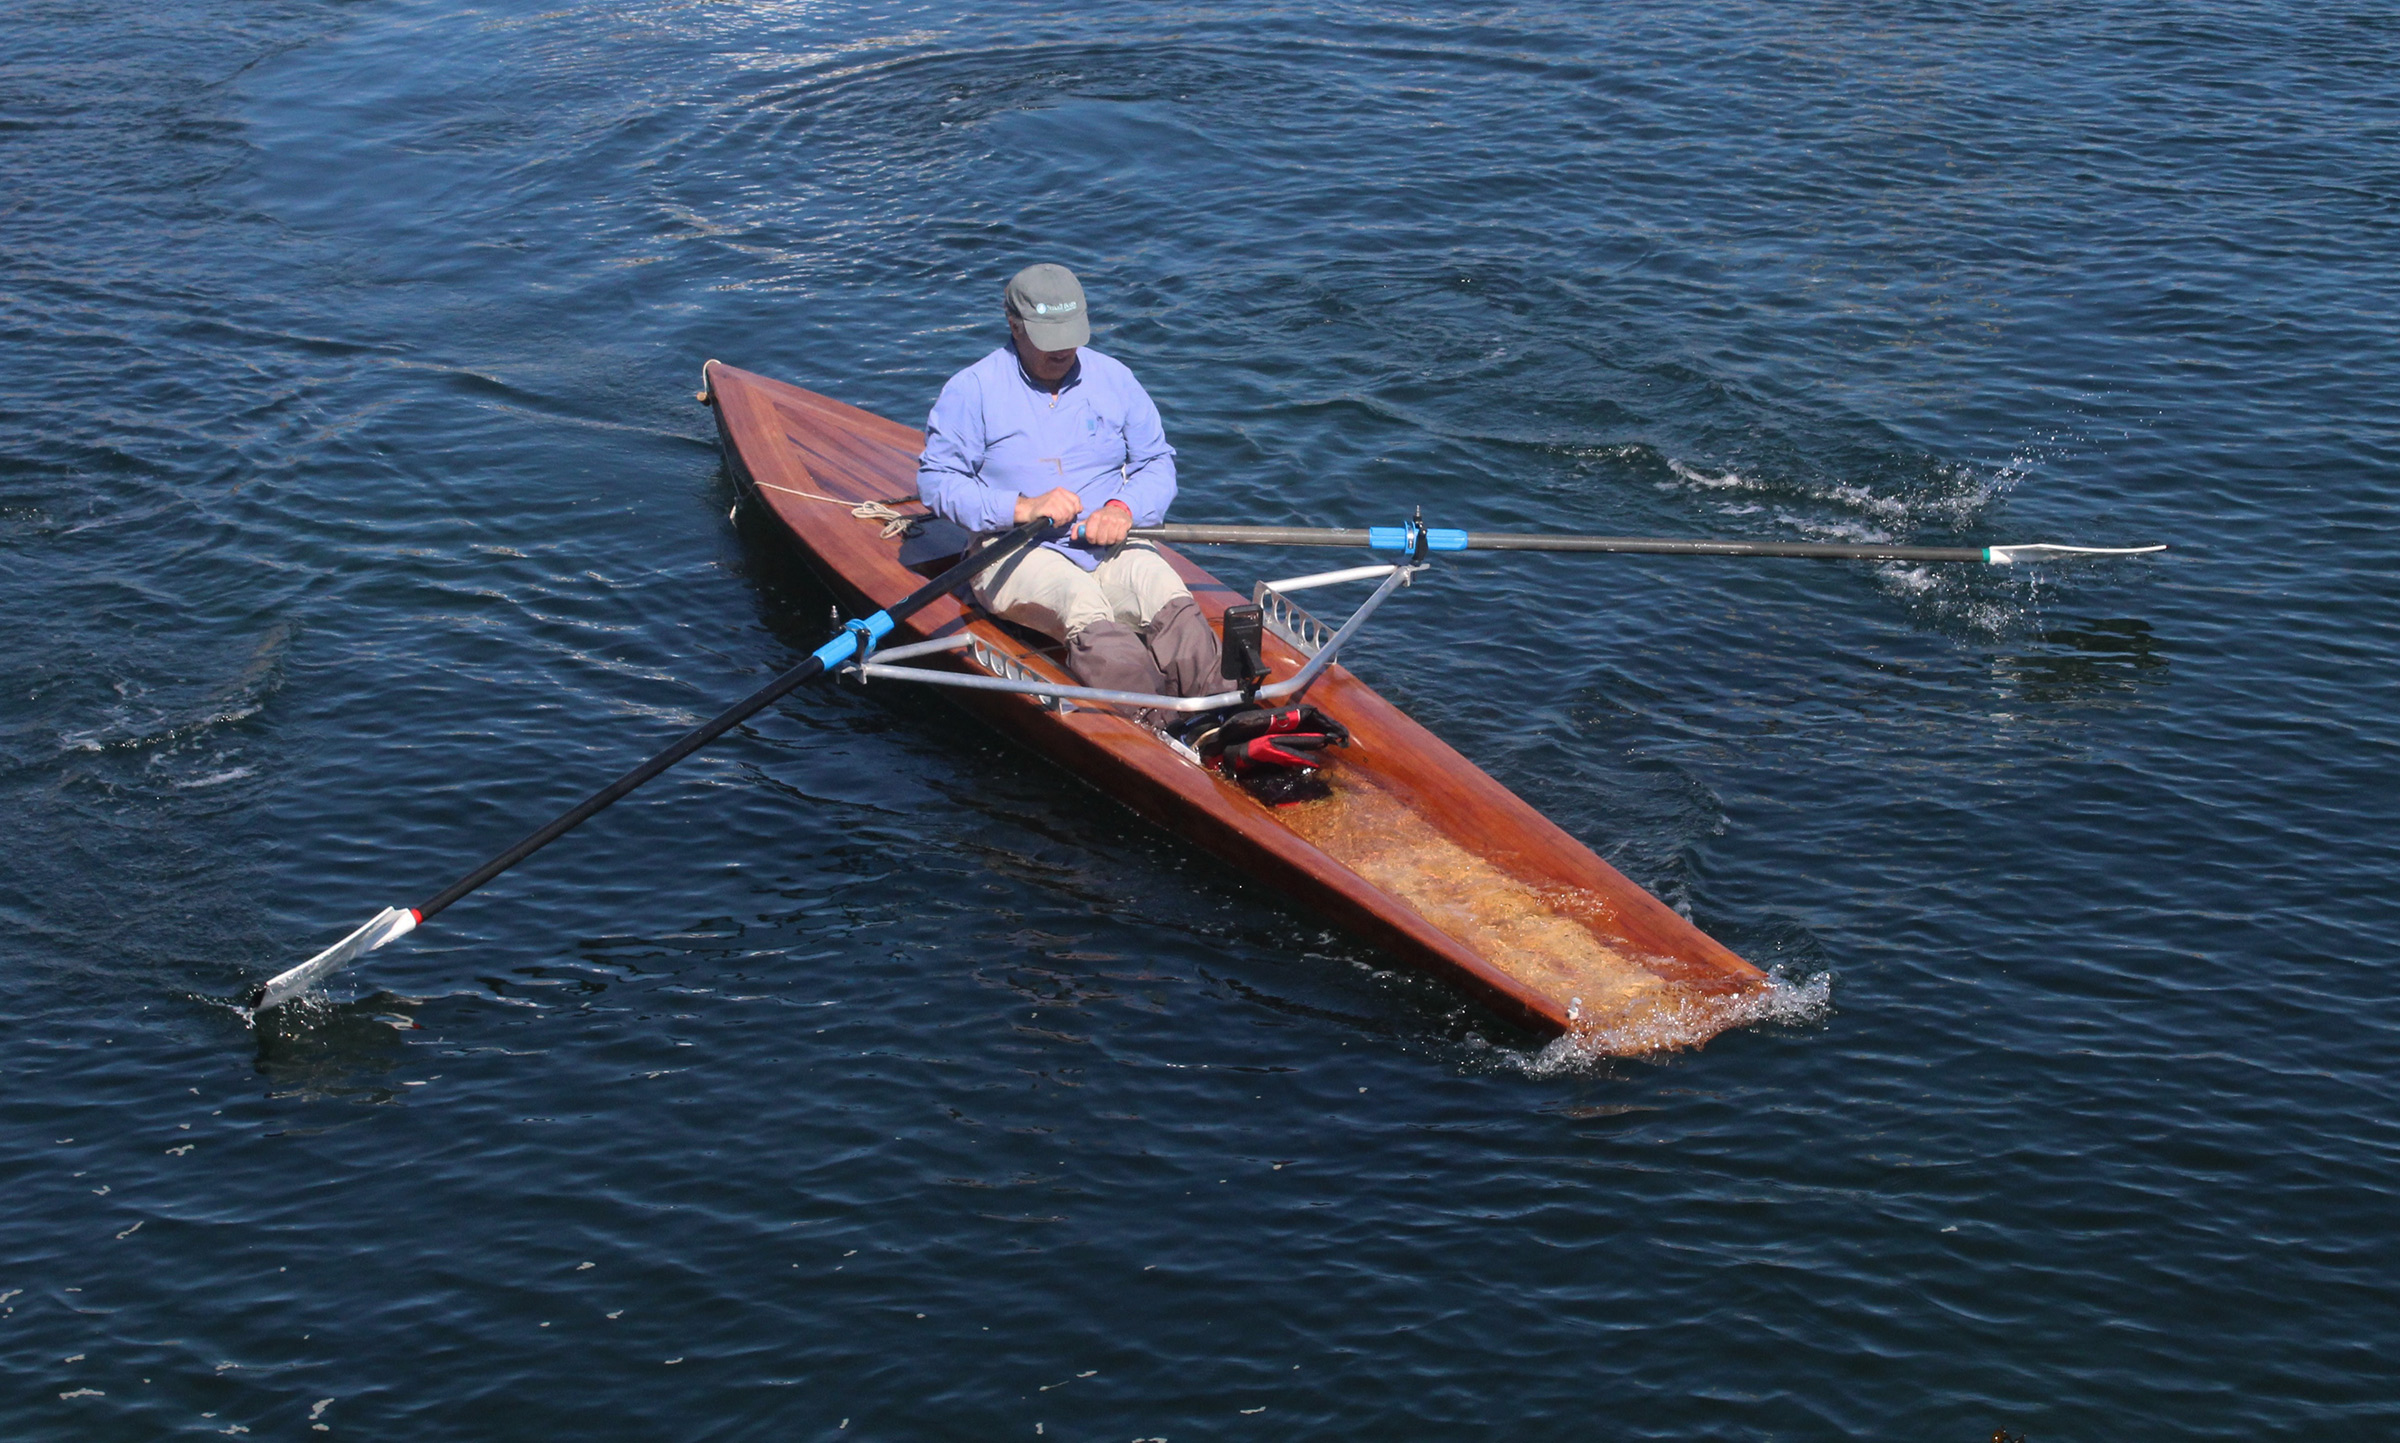
The stretcher sits in a footwell that limits how much water can get aboard without flowing out through the open transom. The sloped aft well allows water to flow up and out when the boat surges forward when rowed at speed.
Getting aboard a speedy sliding-seat boat can be awkward, especially if you must step between the tacks/slides on an elevated deck and rely on your oars to stay upright until you get seated. The Salish has excellent stability, better than I had anticipated, and Rick pointed out that there was no need for the boarding method I had been accustomed to. I could just let go of the oars, turn my backside to the boat, and sit down on the side deck. The boat would support me while I lifted my legs aboard and planted my feet at the stretcher.
Christopher Cunningham
The bottom of the open transom rides right at the water level. The fitting on the port side is a vent and drain for the stern’s flotation chamber.
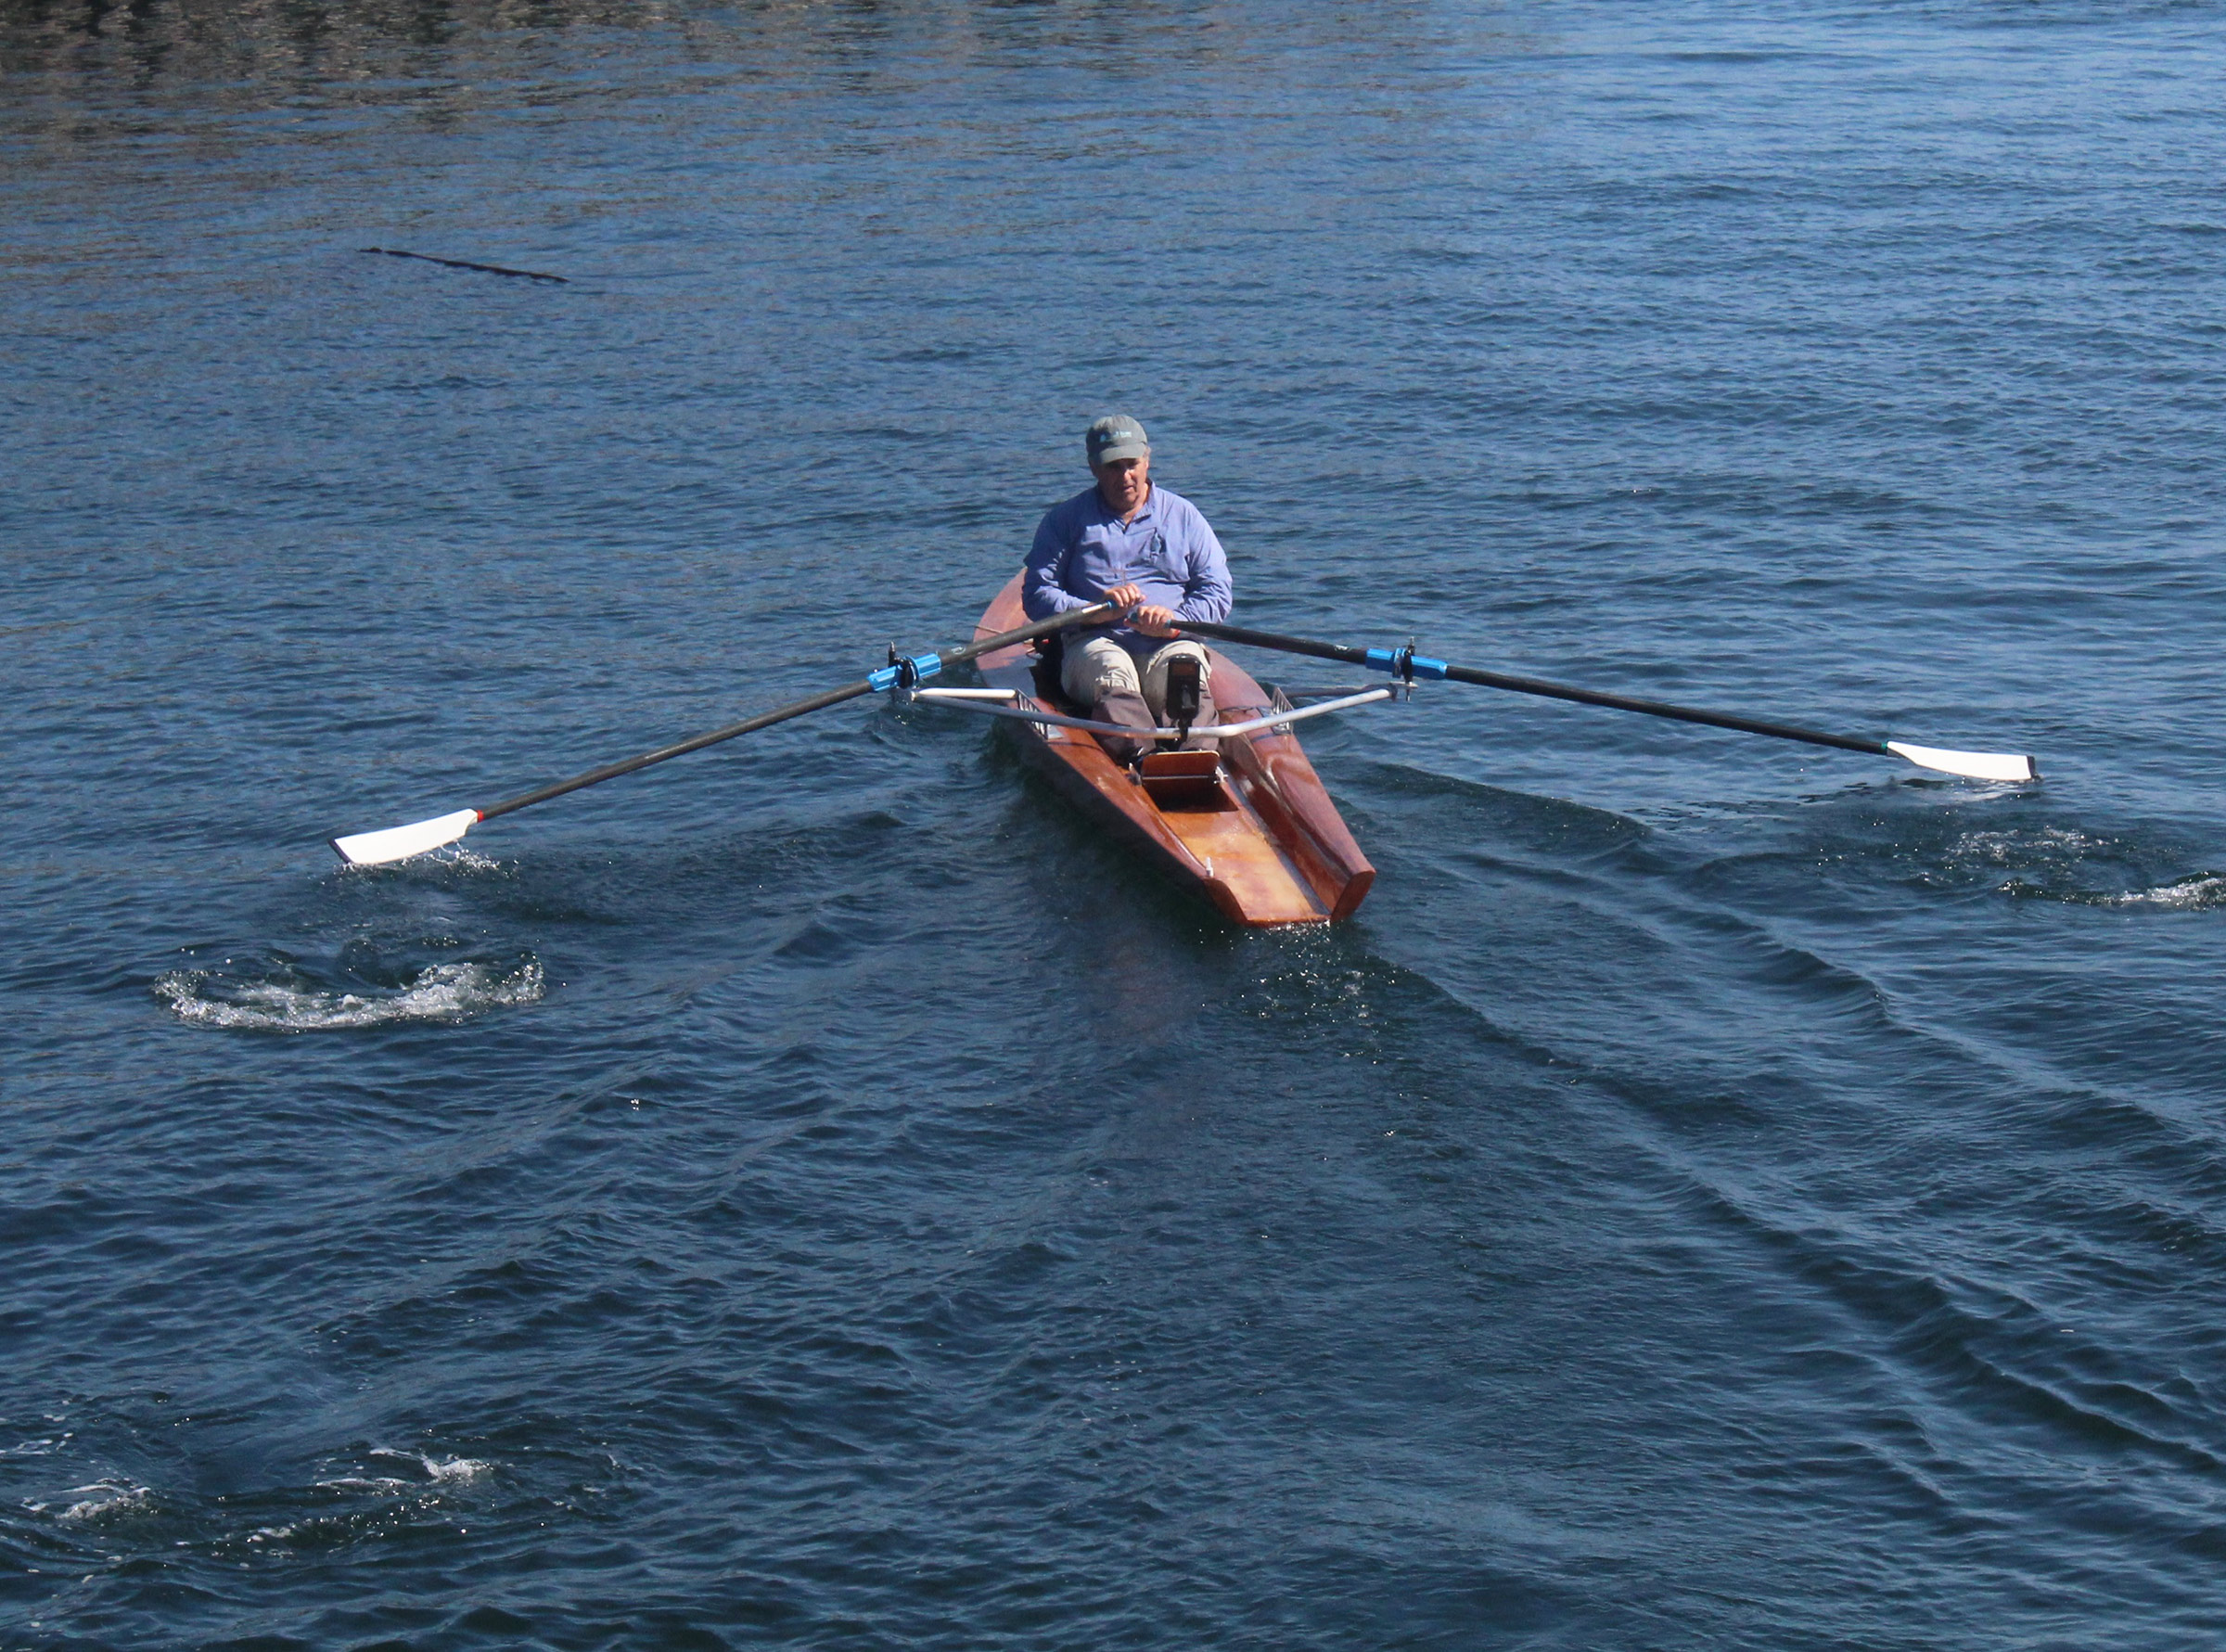
The rigging geometry was a good fit for my 6′ frame. During the drive, the handles traveled at a comfortable and effective level that was level with the bottom of my sternum. At the recovery, the handles were high enough that they wouldn’t hit the tops of my legs if the boat were rolling when the waves kicked up. The outriggers felt very firm and didn’t flex or creak, even when I pulled my hardest. The stretcher has a plywood footboard equipped with plastic heel cups and Velcro straps. It’s set at a comfortable angle and offers a solid surface to push against and its position is adjustable. The seat has a double-acting carriage rather than ball-bearing wheels and rides on aluminum tracks. It’s a system commonly used in racing shells and is smooth and reliable.
Christopher Cunningham
The Salish has surprisingly good secondary stability for its 34” beam. I could very comfortably and safely sit on one side.
For my speed trials, on flat water with no wind, at a relaxed pace the boat held a steady 5 knots. At a sustainable aerobic level of effort, the Salish did 5.7 knots. In short-all-out sprints, the reading on the GPS fluctuated a good deal as the hull sped up while I moved sternward on the recovery and slowed down as I moved toward the bow during the drive. The average speed in between was about 7 knots, a satisfying clip, made especially exciting because the boat trailed a little rooster tail in its wake.
Christopher Cunningham
At the catch, when the weight of the rower (here designer/builder Rick Crook) is well aft, the transom remains right at the water level.
The Salish tracked very well, due, I expect, to the skeg and the long waterline. Pivoting the boat through 360 degrees took 10 strokes, pulling first with one oar then backing with the other. It was easy to maneuver. On one of my speed runs, a stand-up paddler surprised me by paddling across my line of travel just as I was drawing near. I had been checking over my shoulder at the water ahead and saw the paddler just in time to slam the blades into the water with the starboard oar especially deep to veer away. I was able to stop the Salish with just a kiss of its bow on the paddleboard. The paddler remained standing.
Christopher Cunningham
At the finish, the bow has enough volume to keep the rower’s weight, shifted forward, from settling noticeably deeper in the water. The Salish maintains good trim throughout the stroke.
I rowed backward to see how the open stern would behave. A normal slow speed I’d usually use for maneuvering didn’t do much so I applied more power and used the full slide to get my weight as far aft as I could at the end of the stroke. That pushed the transom into the water and, as I kept rowing, I was able to get water to flow up to the footwell and even to the deck under the sliding seat. The boat didn’t feel at all unstable with all that water aboard and the sliding seat kept me high enough that my pants didn’t get wet.
Christopher Cunningham
The Salish’s broad foredeck is the result of the flare in the hull’s forward sections. The flare provides secondary stability when the boat is heeled, and lift while rowing into waves.
I only had a few boat wakes to row through so couldn’t get a sense for the Salish’s rough-water ability, but I’d expect that the hull would provide reassuring stability. The flare forward would send spray outward and any water that came over the foredeck would soon make its way through the cockpit and footwell and drain out the stern. The closed-deck Salish can’t be swamped. Its ability to support my full weight seated on the side deck is a good indication that a rower would fall out of the boat before it capsized and be able to crawl back aboard without having to rely on the oars to provide stability. (Rick experimented with a self rescue over the stern and documented it with a video.)
Todd Dickens
I rowed stern-first at a brisk pace to see how much water would come aboard. While I flooded the footwell, the Salish suffered no ill effects, and its stability wasn’t diminished by the weight of the water.
Todd Dickens
A couple of strong forward strokes forced almost all of the water out of the footwell and onto the aft deck to flow out.
If the Salish is indeed “built for enjoying and exploring coastal waters,” it should be capable of carrying enough gear to make multi-day cruises in comfort. There is sufficient volume enclosed by the deck and hull to contain much more gear than a well-equipped backpacker can carry and the only impediment in the Salish I rowed is the lack of access to the potential protected storage areas. The hatch on the foredeck would work well for day excursions, but the opening is only just wide enough for a sleeping bag and any gear pushed forward into the bow would be out of reach without a tether. Since the boats are built to order, having a larger hatch would better suit a Salish intended for cruising. The Salish shown on the company’s website shows a round plastic hatch on the recessed aft deck. There wouldn’t be as much storage space there, but it would be a good place for heavier items such as water, tent poles, and cookware that could balance the bulkier but lighter items in the bow and maintain the boat’s proper fore-and-aft trim.
The Salish has the stability to give a novice a good introduction to sliding seat rowing, the full-body exercise a fitness buff craves, the speed to satisfy an experienced recreational rower, and the seaworthiness to take an adventurer on explorations of coastal waters.
Christopher Cunningham is the editor of Small Boats.
Salish Particulars
Length: 18′
Beam: 34″
Draft: 4.7″
The Salish is built to order by Oyster Bay Boats for $6,800CAD. The price includes carbon-fiber composite oars.
Is there a boat you’d like to know more about? Have you built one that you think other Small Boats readers would enjoy? Please email us!
Our lopsided skin-on-frame vessel yawed and flexed and the lashings creaked as the swells rolled up astern. The following sea propelled us forward while I wrestled with the rough, axe-hewn steering oar to prevent broaching and a potential capsize. The driftwood mast strained against paracord rigging as the wind billowed the slapdash tarp sail. The sky was clear. The winds were strong, but in our favor. We reached across several miles of open water, aiming to skirt the next closest island. A lobsterman turned his boat away from checking traps, crossing over to run alongside.
“Are you OK?” he asked. “Do you know where you’re going? Winds and seas are supposed to build over the day,”
“We are fine,” we told him.
“Are you boys flying a f—ing bedsheet?” he said.
We weren’t, but I liked the idea. “Yes, we are flying a bedsheet,” I replied.
My cousin Ross and I have a long history of planning and occasionally embarking on harebrained adventures. We have traveled and sailed all over the world and have discussed many voyages that we have yet to, and may never, embark upon. This particular adventure, however, started off as a question, a question about what to pack in an emergency ditch bag for a sailing voyage. Many cruising boaters pack a ditch bag and stow it where it’s easy to grab if everything has gone wrong and they have to abandon ship as the vessel begins to sink out from underneath them. The survival equipment in the bag is meant to keep them alive until they can be rescued. The question we contemplated was, if we were to find ourselves stranded on an island with a ditch bag that was equipped with minimal tools, would it be possible for us to build a small craft to navigate to the safety of an inhabited shore? We wanted to find out.
Ross Beane
Our friend Kipp waited on the dock at Isle au Haut as Derrick arrived in his lobsterboat. Ross and I prepared to load our gear aboard for the nighttime voyage to the island where we would be stranded.
For years we worked on a plan. Where would we maroon ourselves? What equipment should we bring? How authentic should the experience be? The plan easily could have been filed away with countless other bad ideas and eventually forgotten, but it sounded like too much fun. Over the winter of 2019, we began planning for real.
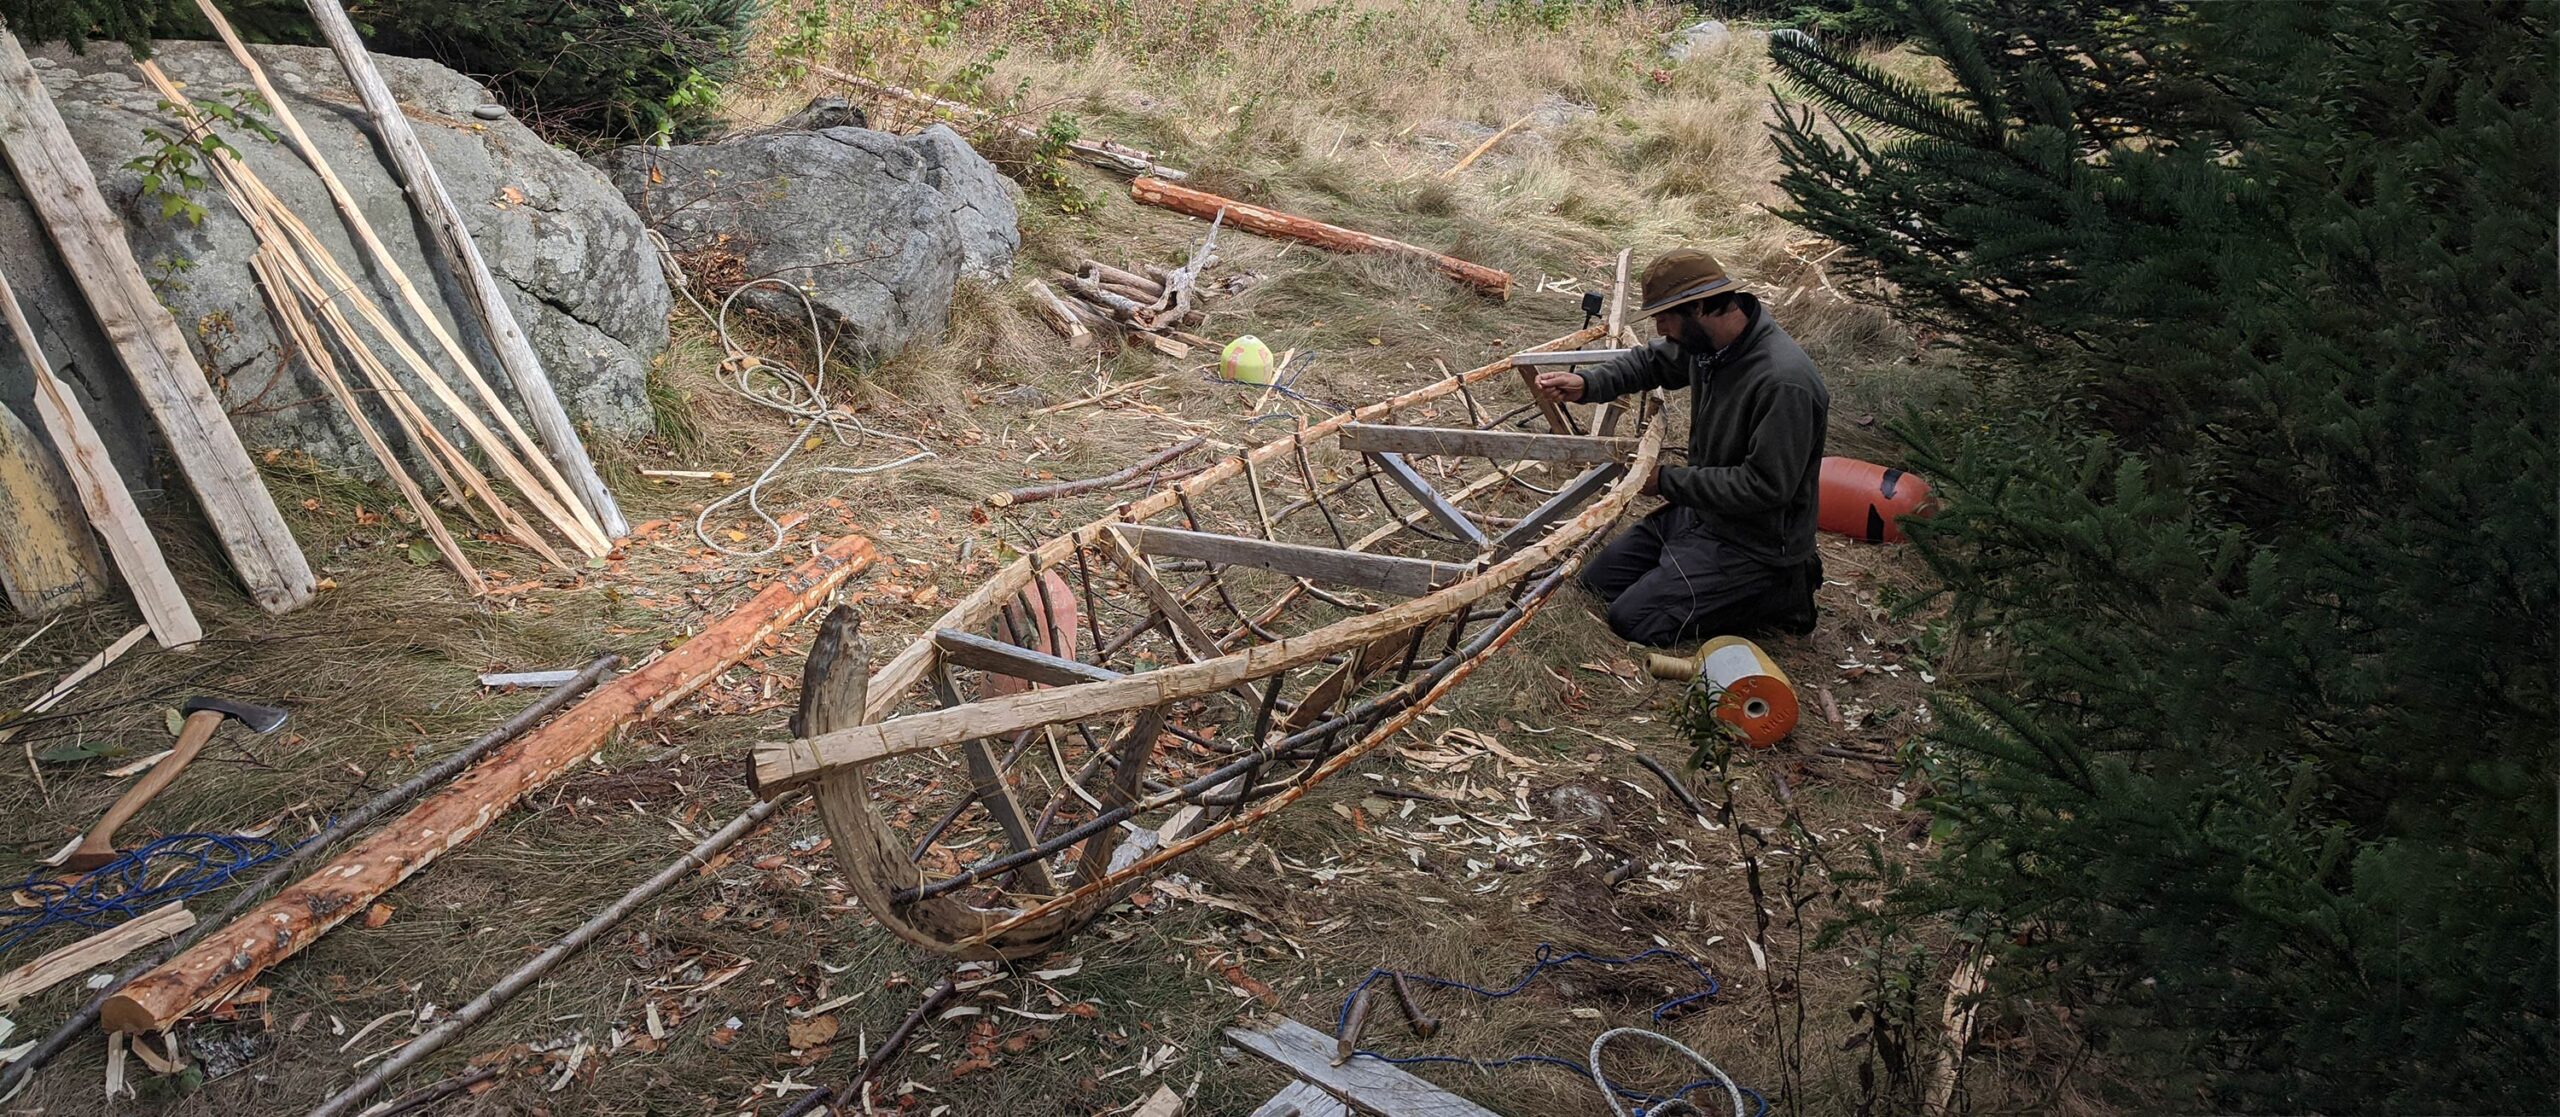
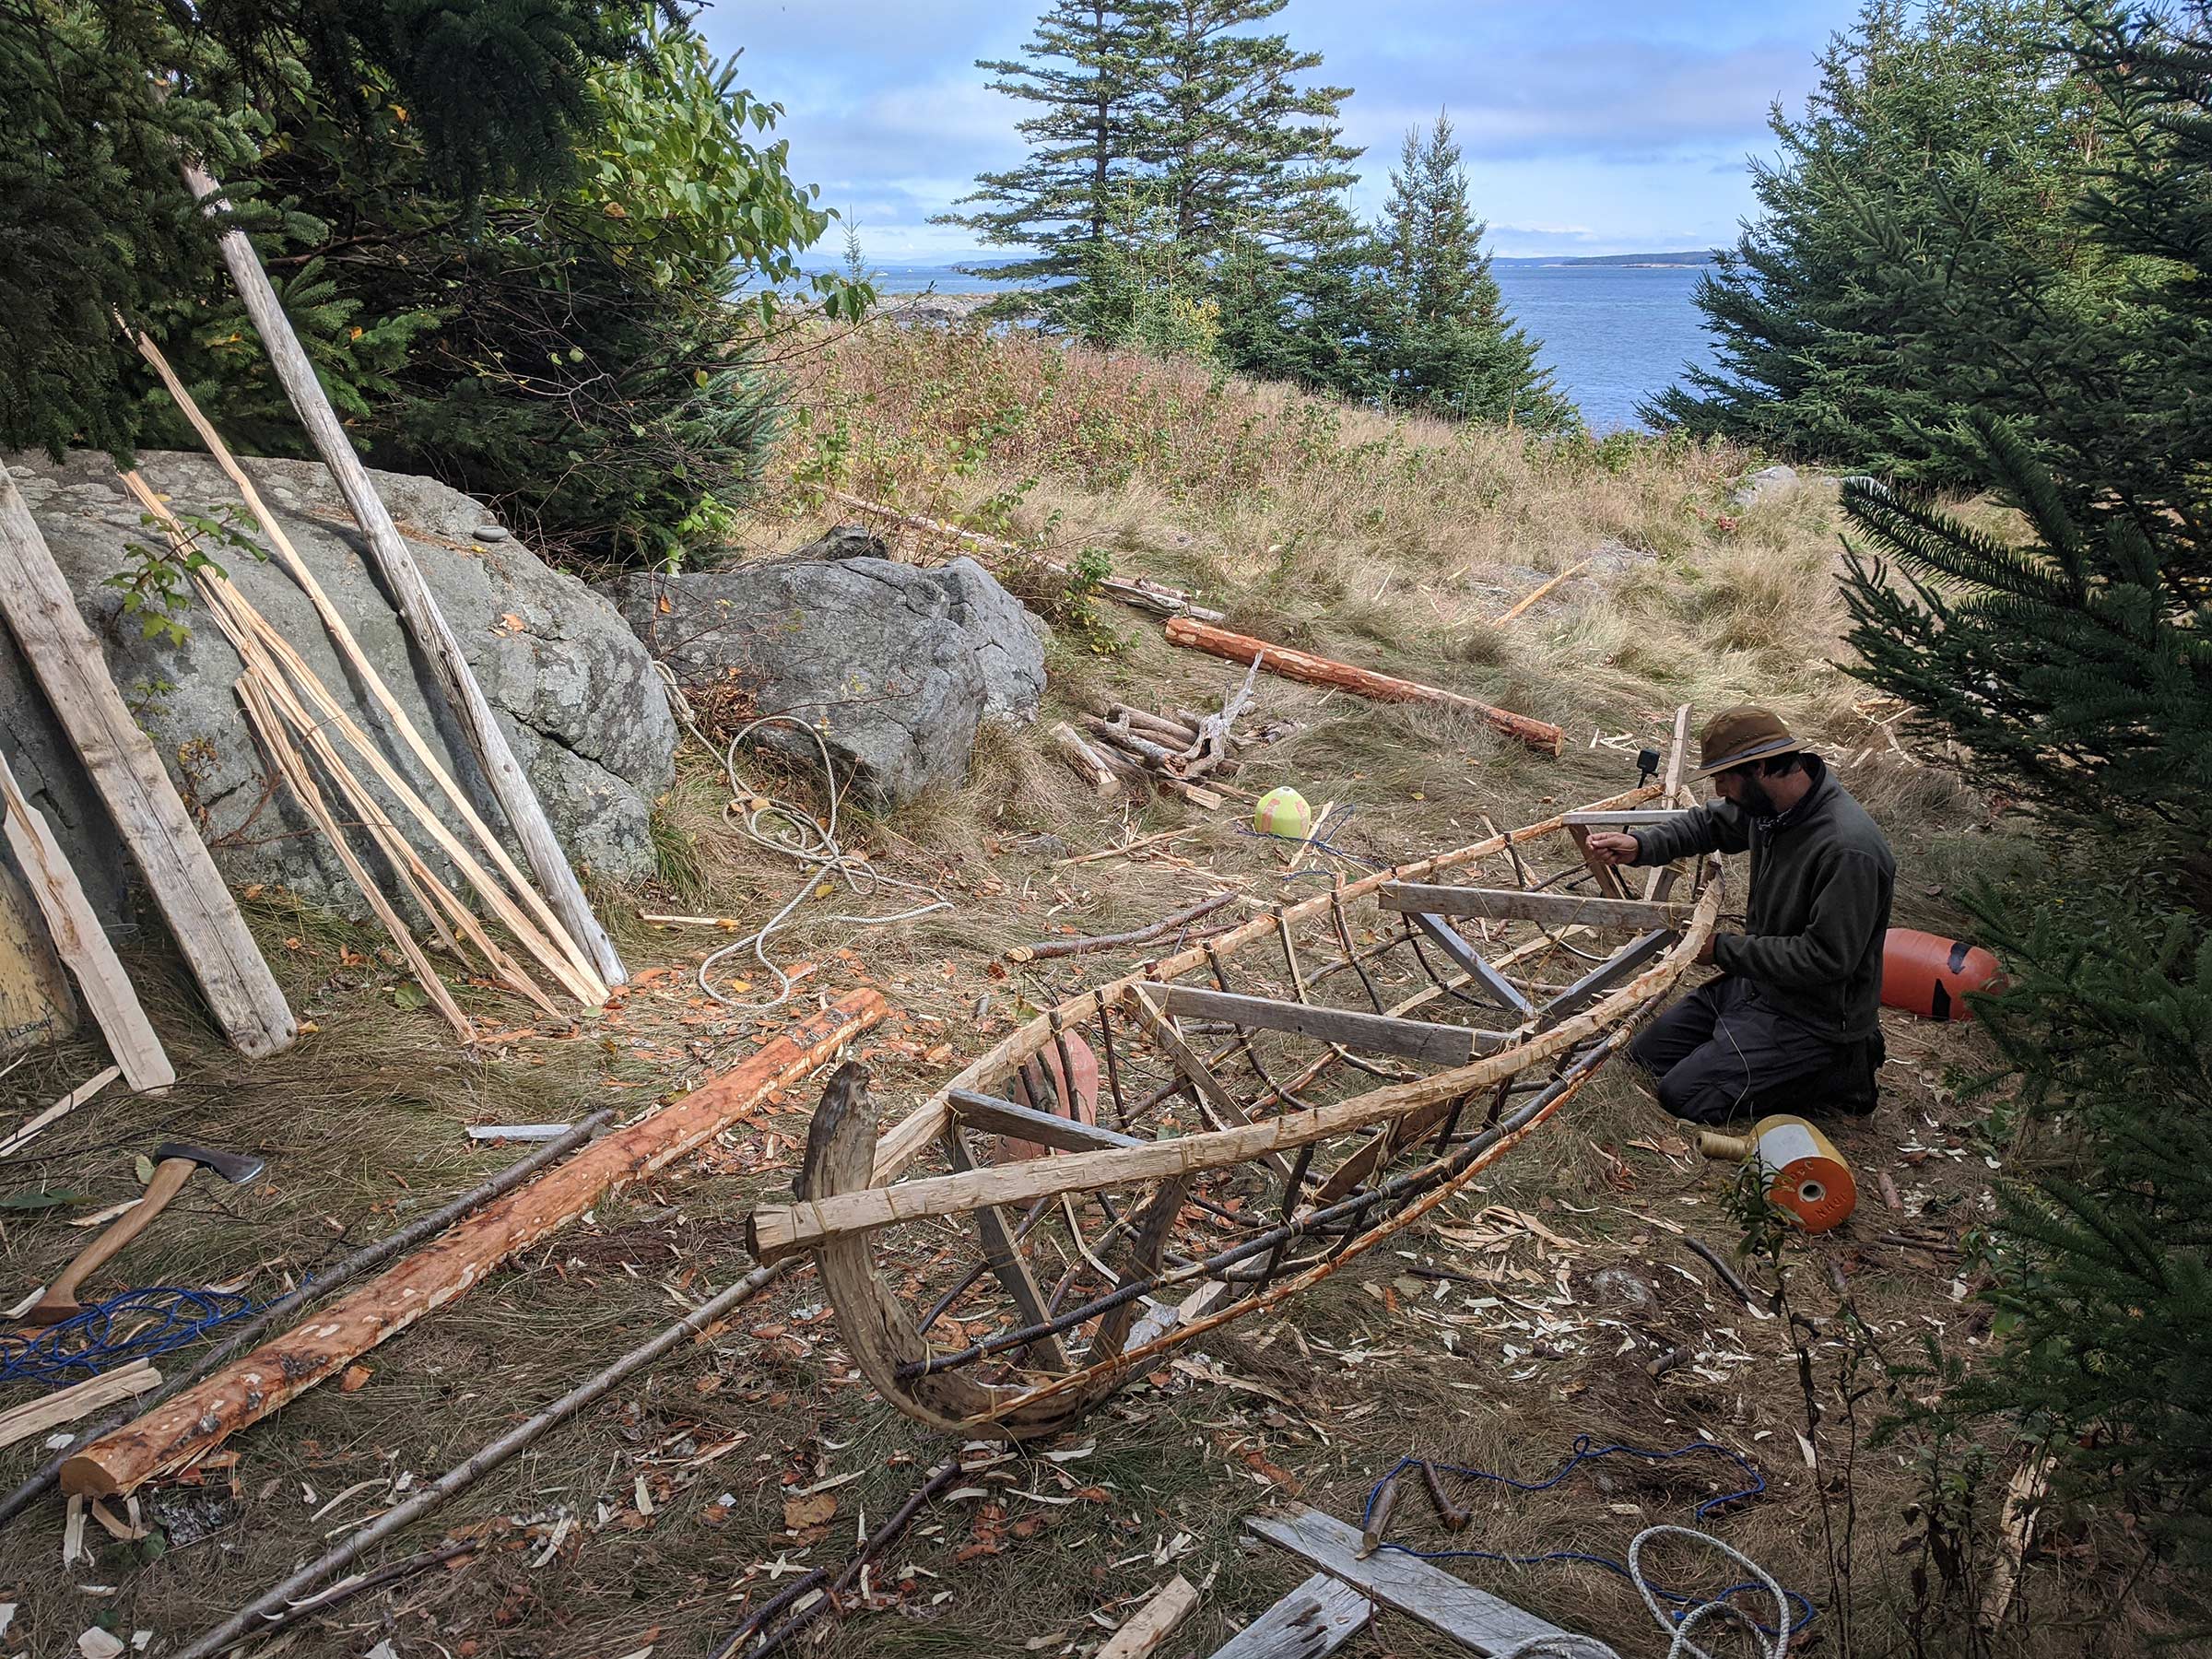
Given the time constraints imposed by our usual obligations, we decided that the most feasible type of boat to build during our marooning would be a skin-on-frame vessel. Traditional Arctic kayaks and umiaks were skinned with animal hides, but hunting to get skins wasn’t on the table for a variety of reasons and this led to the first of many concessions to our plan. Ballistic nylon coated with two-part polyurethane is a common covering for contemporary skin-on-frame kayaks in the Greenland and Alaskan style, so we ordered enough of those materials to wrap an 18’ open boat.
Ross Beane
After we felled a straight birch, I used a wooden wedge and an axe to split out the gunwale pieces.
Our plan got a boost in an email from Kipp, one of Ross’s college friends who had become a Downeast Maine fisherwoman. She had caught wind of the plan and made an offer that eliminated the last major hurdles and added an element of authenticity we could never have accomplished on our own: Kipp knew of a suitable uninhabited private island that the owners would allow us to use. She and a lobsterman friend of hers, Derrick, could take us to the island at night to keep us from knowing the exact location and geography of the island.
We picked a date in mid-summer to make our “shipwreck” as pleasant as possible. The plan was to start our adventure by bailing out over the side of our delivery vessel and swimming to shore, each towing a drybag that would be our ditch bag. Since this was all for fun, mid-summer water temps would avoid making the swim a potentially life-threatening endeavor.
Ross and I waited, planned, ordered supplies, and went over our gear list during animated phone calls. Then, as often happens, our responsibilities got in the way and pushed back our schedule—first to early September, then to late September, and finally, due to a tropical storm, October. Because of the change in season, we modified the challenge and packed cold-weather gear and tents that weren’t practical or realistic to keep in a sailboat’s ditch bag. We decided that the goal was to build the boat—not to be rescued while being stupid. Days before the scheduled drop, a local lobsterman who fished off the undisclosed island told Kipp about a shark, perhaps a great white, that had been aggressively chasing traps as he hauled them. Kipp and Derrick were not willing to drop us into the ocean in Maine in October at night in shark-inhabited waters before steaming off into the dark, so there would be no swimming start. Ross and I agreed it was a reasonable modification of our plan.
Ross Beane
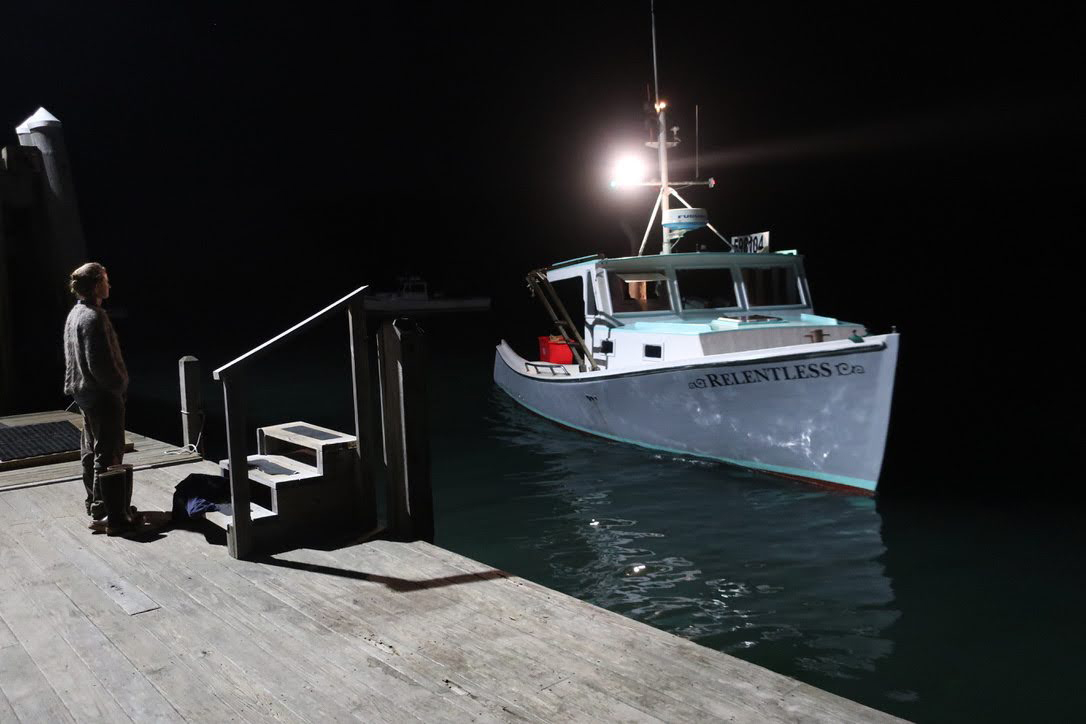
Sitting near our campsite, I began cutting and shaping the stem from a curved piece of driftwood.
The day we began, we rendezvoused with Derrick at a commercial pier in Stonington where he kept his 41′ open-sterned lobsterboat. After we stacked our gear on the deck and got aboard, he cast off and eased the vessel away from the dock. He steered out through a few moored boats, and then throttled up. After we wound through the serpentine channels and out into bigger stretches of ocean, the open water started to look a little wide for whatever rough-hewn boat we were planning to build. We stopped on Isle au Haut long enough for a dinner with Kipp and to pick up a small flat-bottomed skiff that would take us ashore to the island without having to swim.
As we motored off into the night, Ross and I both studiously averted our eyes from the glowing chart plotter. For a while, the harsh glow of nav equipment was the only break in the darkness of the ocean at night. After a time, the soot-black silhouette of the mystery island gradually emerged from the surrounding darkness. As we rounded a headland, the engine wound down to a sputtering idle as Derrick angled in toward a small, well-protected bay. I was relieved not to be going over the side into 50-degree water for a swim to shore.
Ross Beane
We propped up the beginnings of our boat frame so that we could visualize the next steps of construction.
After a quick ride in the skiff, Ross and I scrambled over the bow onto seaweed-slippery rocks and unloaded our gear on the cobble beach. The departing lobsterboat swept its spotlight back and forth searching for shoals until it rounded the headland. Its engine revved up as it hit open water. Then there was only the dark and the sounds of the ocean—small waves gently lapping at the beach in our protected cove, and the distant thunder of swell pounding a far-off rocky shoreline.
Packed in our pile of drybags we had food and shelter as well as basic hand tools, nylon fabric for a boat skin, and artificial sinew (also nylon) for lashing. We had only a vague idea of our location. We were in Maine’s Penobscot or Jericho Bay region and knew that the island was much too far out to swim to the mainland. Until we could figure out how to build a boat, we had none for the voyage home.
After shuttling our gear by moonlight the short way to the head of the beach, we dug into our bags to find headlamps. Seeing the place for the first time by their narrow beams, we took stock of our surroundings, both of us grinning and excited to kick off this adventure. Quickly scouting for a camp, we discovered that just beyond the head of the beach there was a brackish marsh. To the south was thick underbrush, but off to the north the headland was covered with grass and scattered raspberry bushes. We decided it was a suitable spot for the night, and set up the tents, planning to seek out a better camp the next day.
Ross Beane
In the comfort of the Boatshop, protected from sun and wind, I lashed in a fire-bent rib.
In the morning the island was blanketed in thick fog—a familiar weather pattern in Downeast Maine. Our tents turned out to be in a great location, so we remained camped there. After a breakfast of tea and instant oatmeal, we set out to take stock of our surroundings and see what useful materials we could find. Walking the perimeter of the island quickly revealed that, like most islands in the area, it had no shortage of washed-up lobster gear and driftwood. Amongst the flotsam, Ross spotted an old canoe paddle, its varnish baked off by the sun, but otherwise in good shape. Farther along, we came upon two washed-up boats: a canoe and a small rowing dinghy. The dinghy was heavily damaged, but the canoe, while broken, could have been repaired in a pinch. If we were truly trying to self-rescue, fixing the broken canoe would’ve been the best option. This wasn’t the adventure that we had come for, however, so we passed it by.
Partway through our exploration of the shoreline, the unmistakable sound of an approaching low-flying helicopter thumped through the thick fog. It whirled into sight, cutting past the island on a course farther out to sea. Its color and markings unmistakably identified it as a Coast Guard aircraft. We kept walking, but within a few minutes heard the helo circling back. Once again, they passed us flying low, but this time the crewman sitting in the open door raised a hand in a casual wave. We waved back, trying to look casual, too. Still, this encounter worried us, and we jogged back to camp to check on our emergency beacon to make sure it wasn’t somehow accidentally transmitting. It was not, but I powered up our handheld VHF radio to listen in on the Coast Guard pan-pan call. They were checking on a reported sighting of a red parachute flare. We hadn’t seen the flare because of the fog and had no idea where we were or our proximity to the flare sighting. At least we knew they weren’t looking for us, but it served as a reminder that these could be dangerous waters even for capable craft.
Ross Beane
We heated sapling rib-stock over two fires built roughly the boat’s bilge-width apart to put a bend in each side of a center section that would be flatter, providing better stability in the finished boat. While this rib has had its bark stripped, keeping the bark on the saplings was a more reliable technique for bending them without fractures.
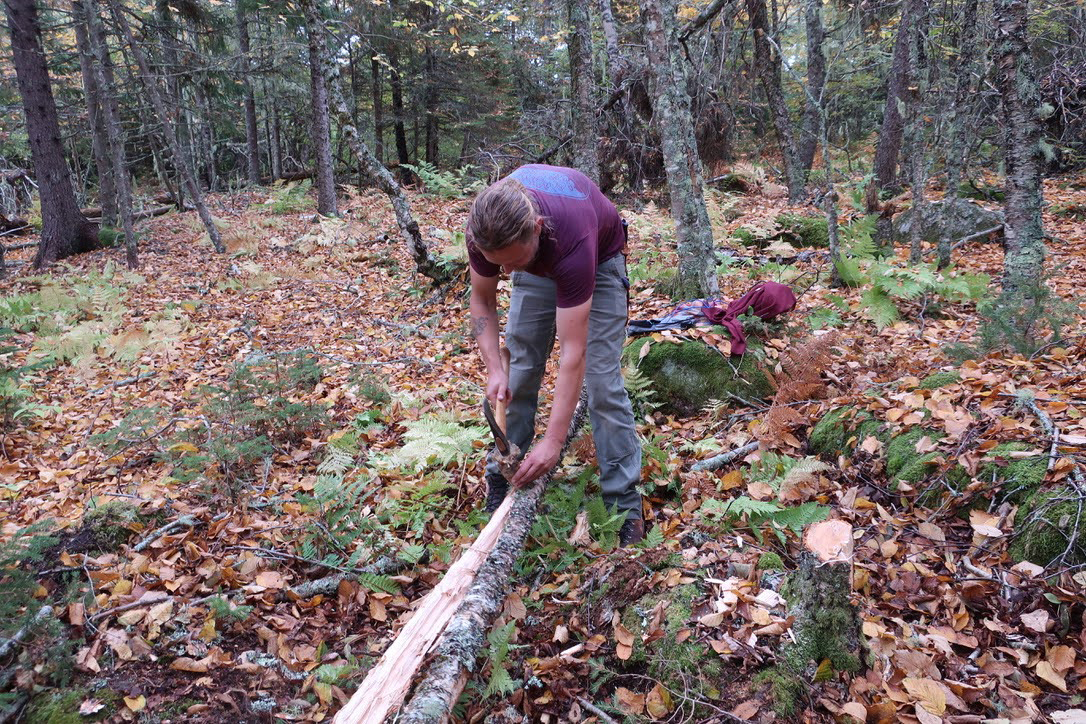
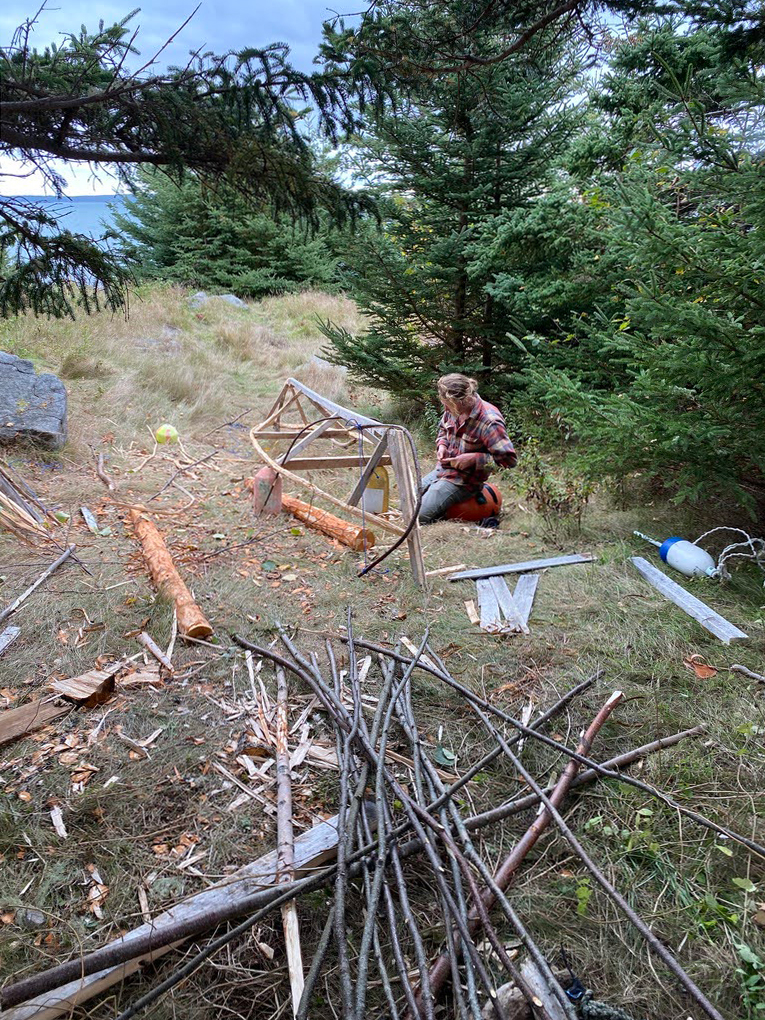
After walking the perimeter, we walked two transects of the island to get a feel for the species of trees available, finding almost exclusively spruce and birch. Then, over a lunch of cheese and peanut butter on tortillas and more tea, we discussed a plan for the construction of our boat. I sketched in our logbook a rough drawing of the framework that I was envisioning for the boat and then we set off into the interior of the island to harvest a large sapling for the gunwales.
A few minutes’ walk from our camp we found a straight birch among a stand. Low swings of our axe made short work of severing the trunk close to the ground, preserving as much usable wood as possible. To split the log along the grain into two pieces, we fashioned a pair of wooden wedges. We sharpened them to a flat point with oblique swings to the end of a log, then cut the wedge off at a good working length with a folding saw. Splitting the birch took some time and sweat. While starting one of the wedges, I accidentally struck my hand with the butt of the axe head. The blow didn’t break my knuckle, but it drew blood and caused my hand to swell up. The mishap reminded us that we were indeed stranded and while we had the technology to call for help, it was best to slow down to avoid additional injuries.
We spent most of the rest of the day splitting out pieces for the gunwales and further shaping them with our camp saws and axe. Once shaped, we lashed their ends together and bowed out their middles with a temporary spreader rough-hewn from driftwood.
Ros Beane
We trued the boat frame by lashing scavenged nylon three-strand line to nearby trees. The L.L. Bean beavertail canoe paddle Ross found on our first day is leaned up against the boulder on the left amongst other pieces of driftwood from which we carved a second paddle.
With the remaining daylight, we scavenged the rocky shoreline for useful driftwood for the stems and keel, but a sudden rainfall sent us back to camp. Before calling it a night we hastily prepared a meal of beans and rice in the partial shelter of a broad pine tree.
The next day was clear and sunny, giving us our first views of surrounding islands and coastline. Both Ross and I had spent time working on the water on the coast of Maine, so we found our bearings pretty quickly. We still could not identify the island Kipp had stranded us on, but the direction to sail to reach the mainland was clear enough.
After breakfast, we began shaping the keel and stems. A split driftwood plank 12′ to 14′ long, likely washed away from an old dock, became the keel piece. We hewed the stem from a driftwood trunk of a tree that had grown curved out of a hillside.
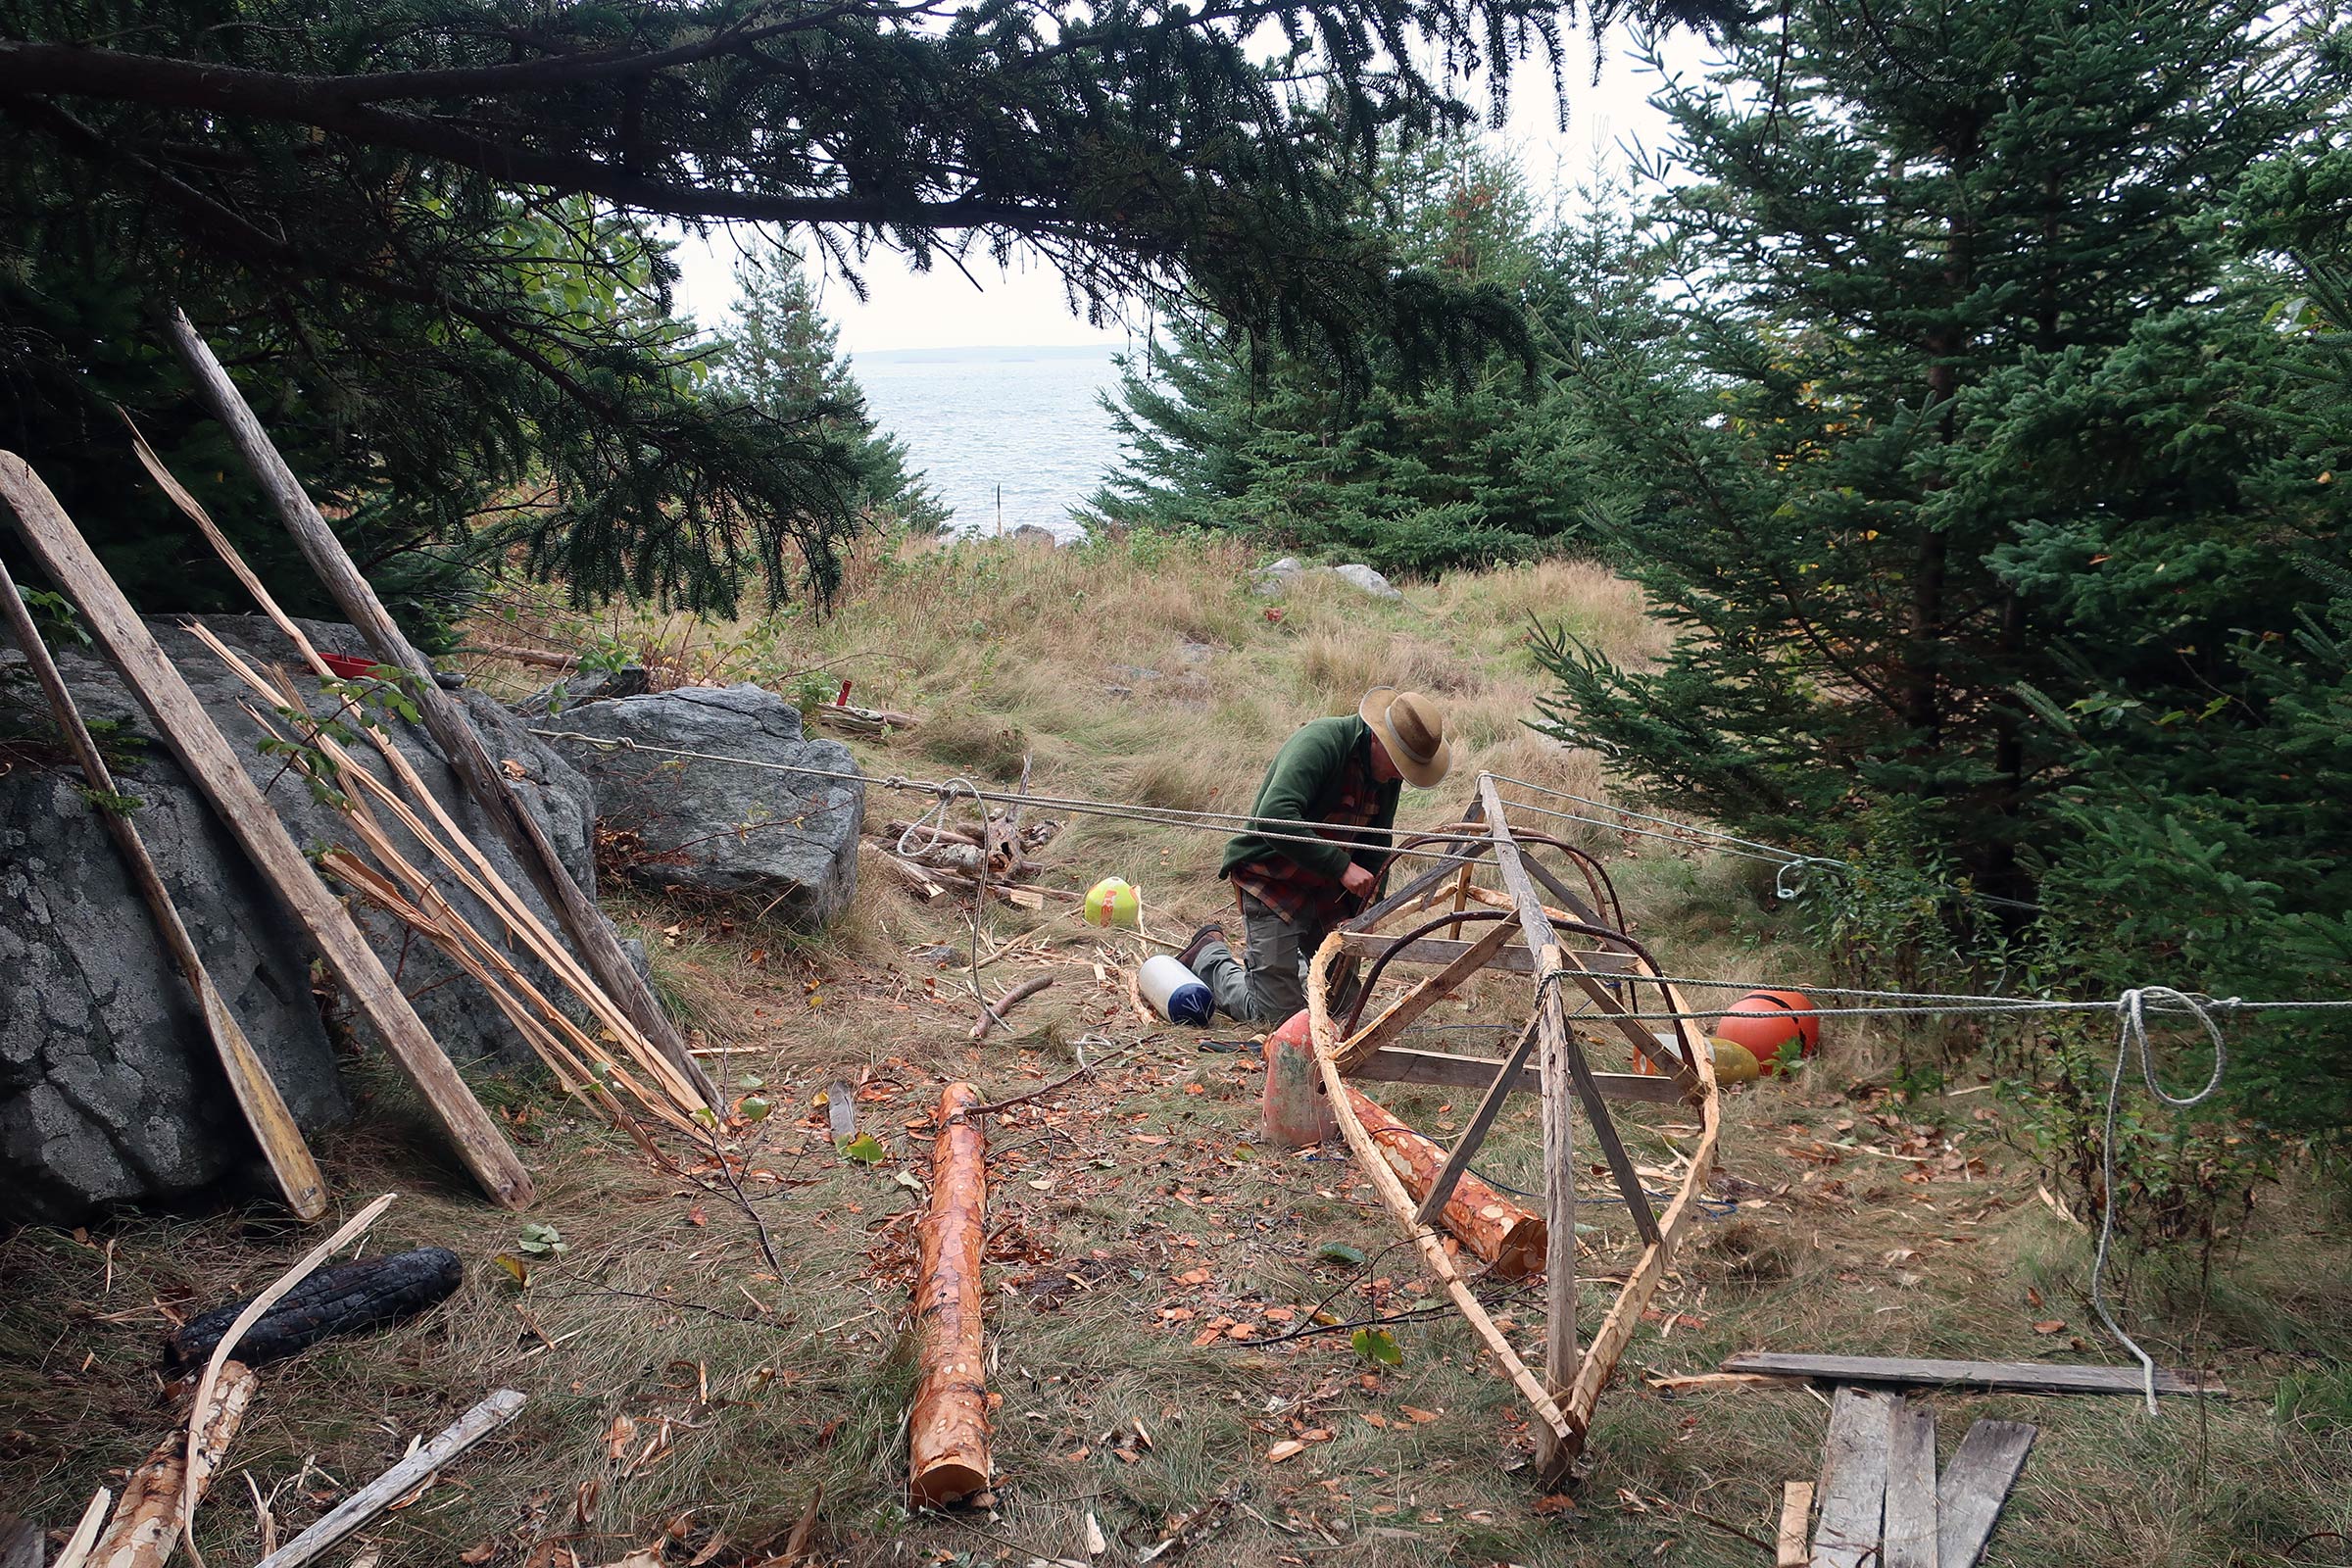
The clear skies that day came with their own challenges: with the sun beating down on us, we were overheating and getting sunburned. We scouted to find some shade and found a narrow grassy gully close to our camp. It was an old overgrown camping site with the remains of a fire pit; spruce trees growing on either side provided shade and windbreak. We moved our boat frame and tools, and named the gully the Boatshop.
Tyler Sauter
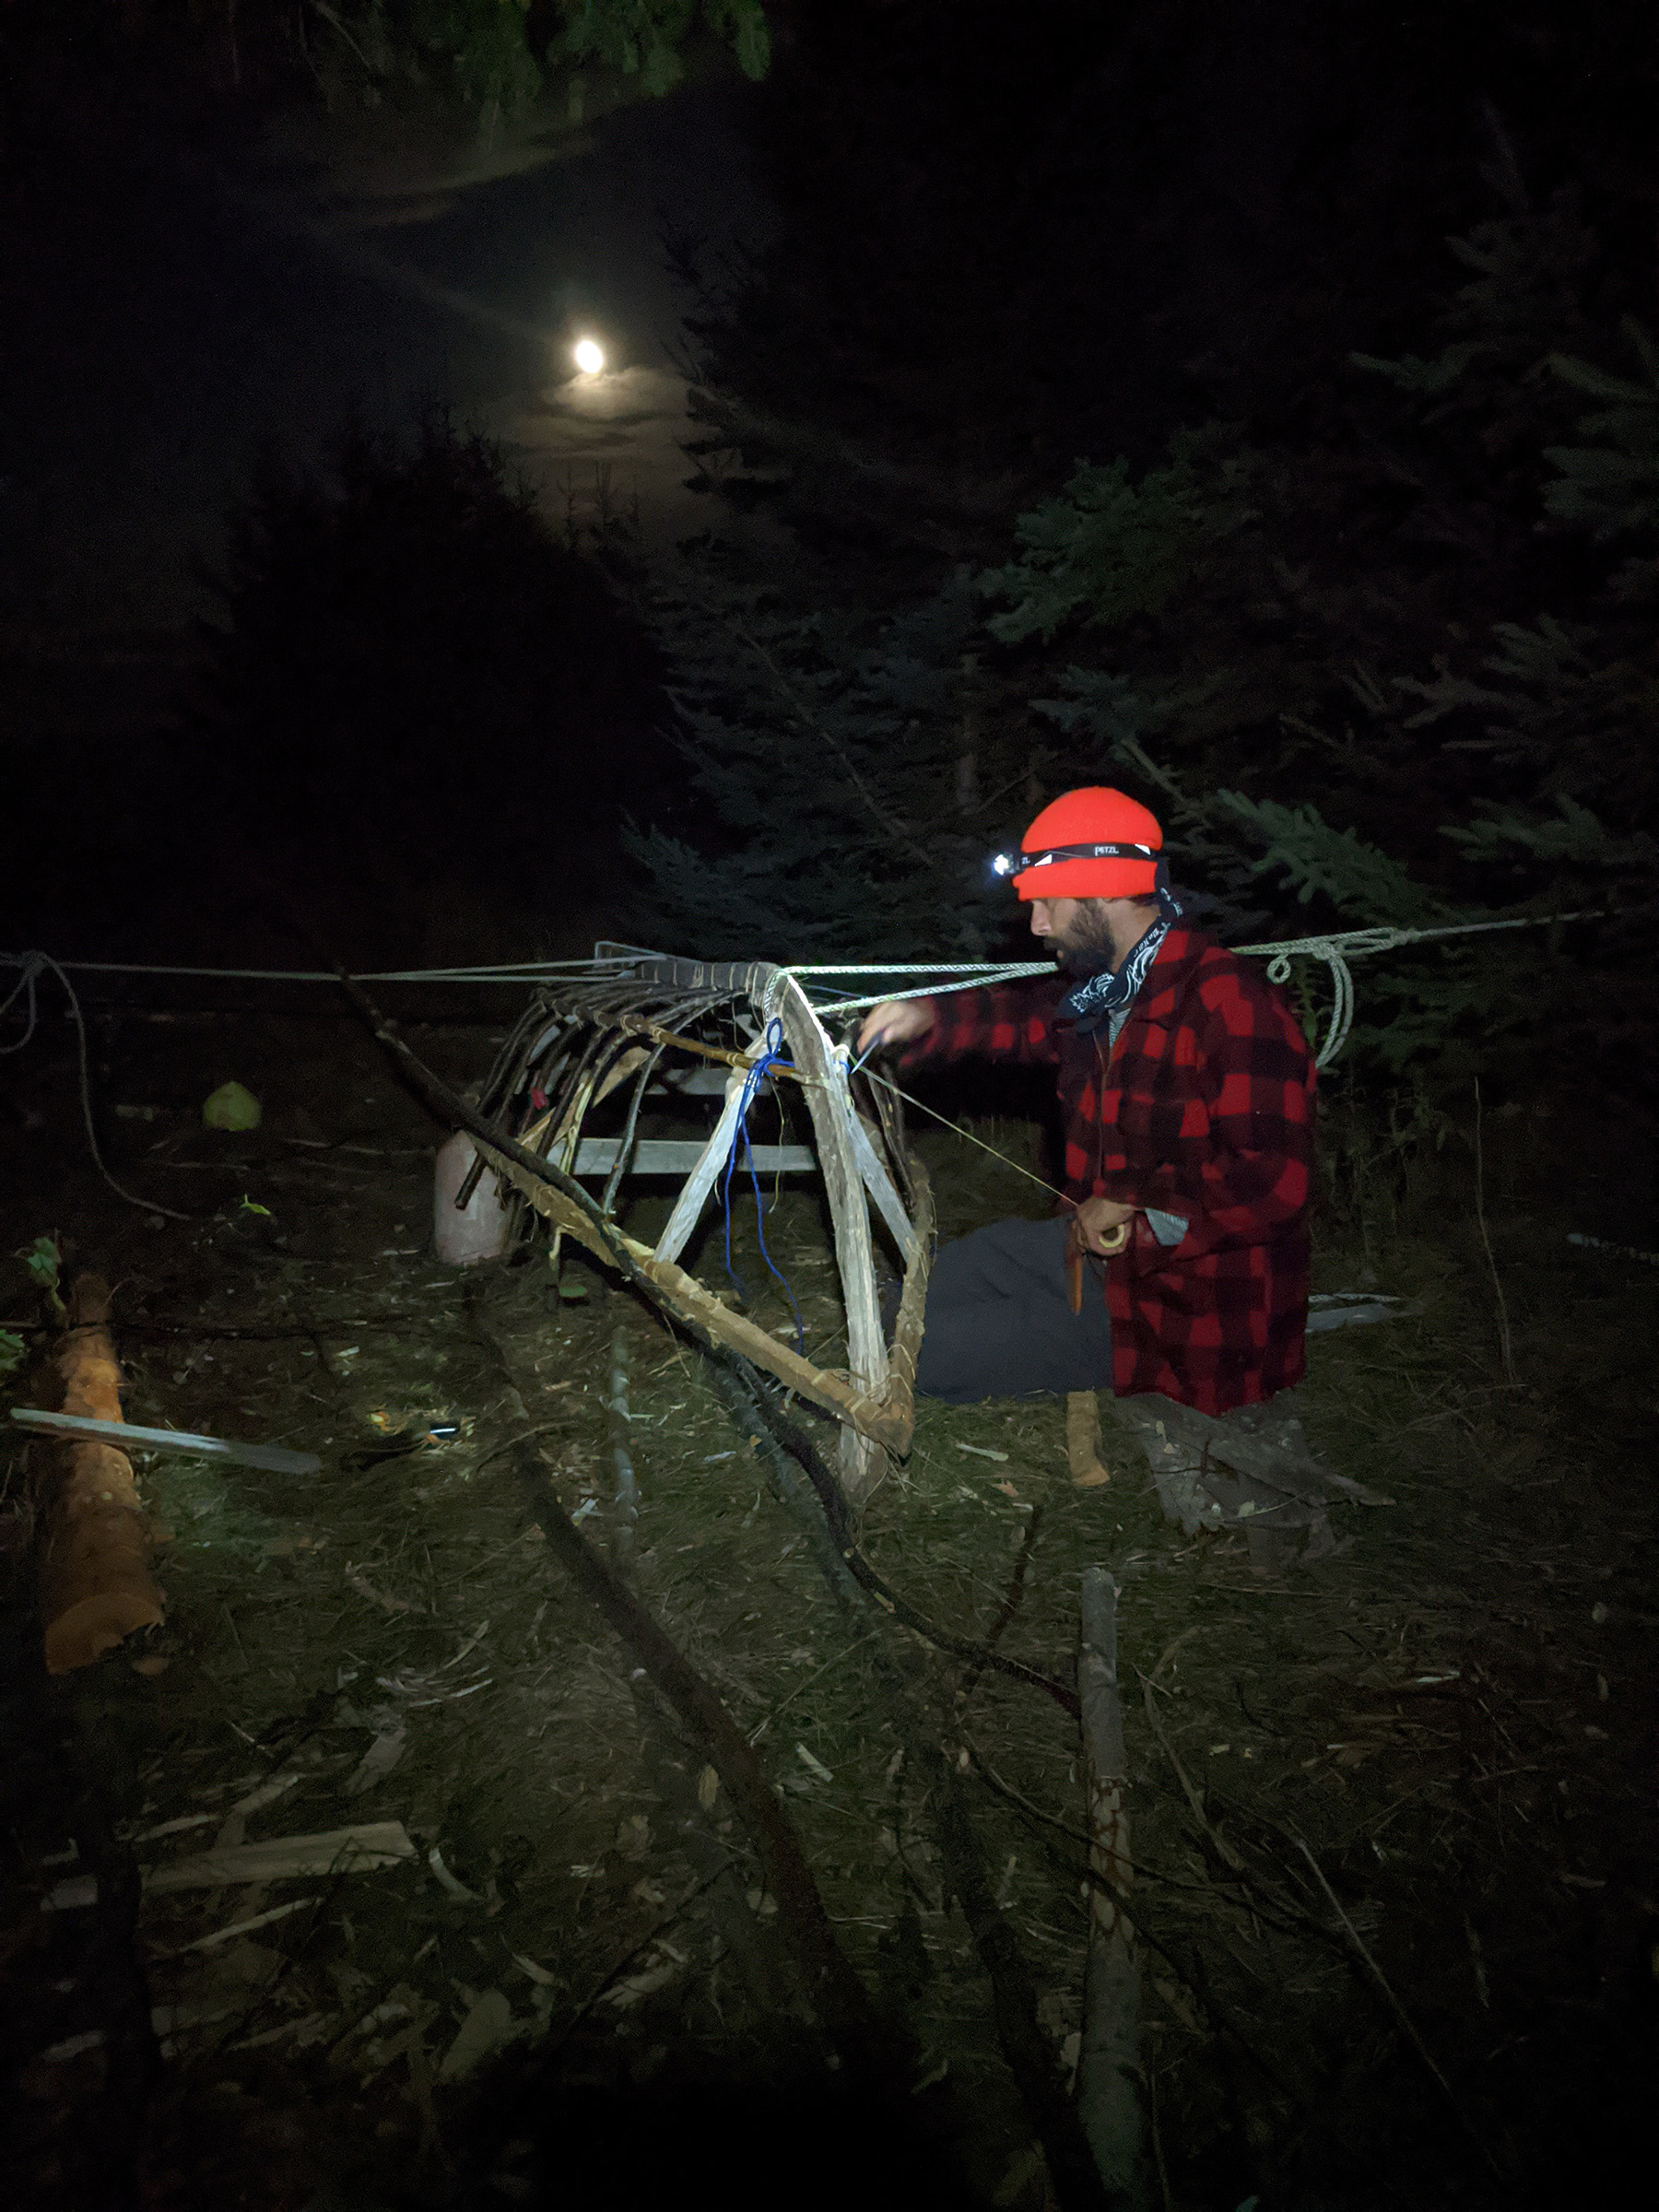
Ross worked by headlamp late into the night to complete the rib bending and lashing.
In the cooler comfort of this new location, we finished lashing the keel-and-stem assembly to the gunwales and thwarts. Triangular braces, added at the two thwarts from each gunwale down to the keel, helped keep the frame somewhat rigid and solidified the structure and it began to resemble the bones of an actual boat. The next step was to bend in the ribs. This was one of the stages of the process that I was most unsure about. In a real boatshop, with nicely milled and still-green ash or white-oak ribs and a steambox, this is a straightforward process. But on an island with none of those things available, it was a different matter. As an experiment, I tried splitting rib stock from a length of birch log. This approach didn’t achieve consistent results with the tools we had. We discussed a few other options but were running out of daylight and decided to tackle this stage of the project the next day with fresh eyes.
In the morning, after testing a few techniques, fire-bending the birch saplings proved to be the most effective means of bending the ribs with the resources available. We built two campfires side by side, approximately the boat’s bilge width apart, and fashioned a rack system out of stones to hold the saplings over the fires. Once the saplings were heated through, they bent easily by hand into approximately the right shape. Lengths of cord tied to the ends, in the manner of a bowstring, held the ribs’ shapes while they cooled. We had roughly a 50 percent success rate with this technique, losing the rest to breakage. Because the saplings were full rounds with bark still on and tapered, they tended to bend unevenly. We had to tune most of the ribs after they had cooled. We did this by whittling away wood from the inside of each rib until the turns at the bilge matched as close as possible side to side.
Tyler Sauter
Ross lashed the chine rails on with nylon artificial sinew. The blade of our axe-carved paddle is visible just above the axe, at left.
Once the tuning process was complete, the ribs were lashed into the boat—first to the keel and then to the gunwales. Each rib was sighted from the end of the framework as it was installed and flexed to fair the hull as much as possible. As we started bending in ribs, we realized that the keel of our boat wasn’t true. Being made of driftwood, it was not entirely straight in the first place, but the unequal stiffness between the two gunwales had swept its middle to starboard. To straighten it, we tied lengths of scavenged three-strand lobster-trap line between three points on the keel to nearby trees. Tensioning the lines with trucker’s hitches successfully trued up the vessel but created three thigh-high obstacles in our “shop.” We worked hard throughout the day and continued bending and lashing ribs late into the night, working by light from our headlamps and campfire.
We woke the next day excited with the progress we had made. Our vessel’s framework was close to completion. It only needed the four chine stringers lashed to the ribs to complete it. While we could easily complete that task in a day, if we worked quickly and efficiently, we could also stretch and stitch the nylon skin to the frame and perhaps even coat it with polyurethane. We could possibly set sail the following day. Being this close to completing construction in four days was substantially faster than we had imagined we could build a boat under the conditions we had chosen. We had told everyone it would take a week to 10 days. We had provisioned for two weeks and had discussed food rationing options to stretch for longer, but now a completed boat was only a day or two away.
Ross Beane
The morning after we finished the canoe, I prepared to launch it for a test paddle.
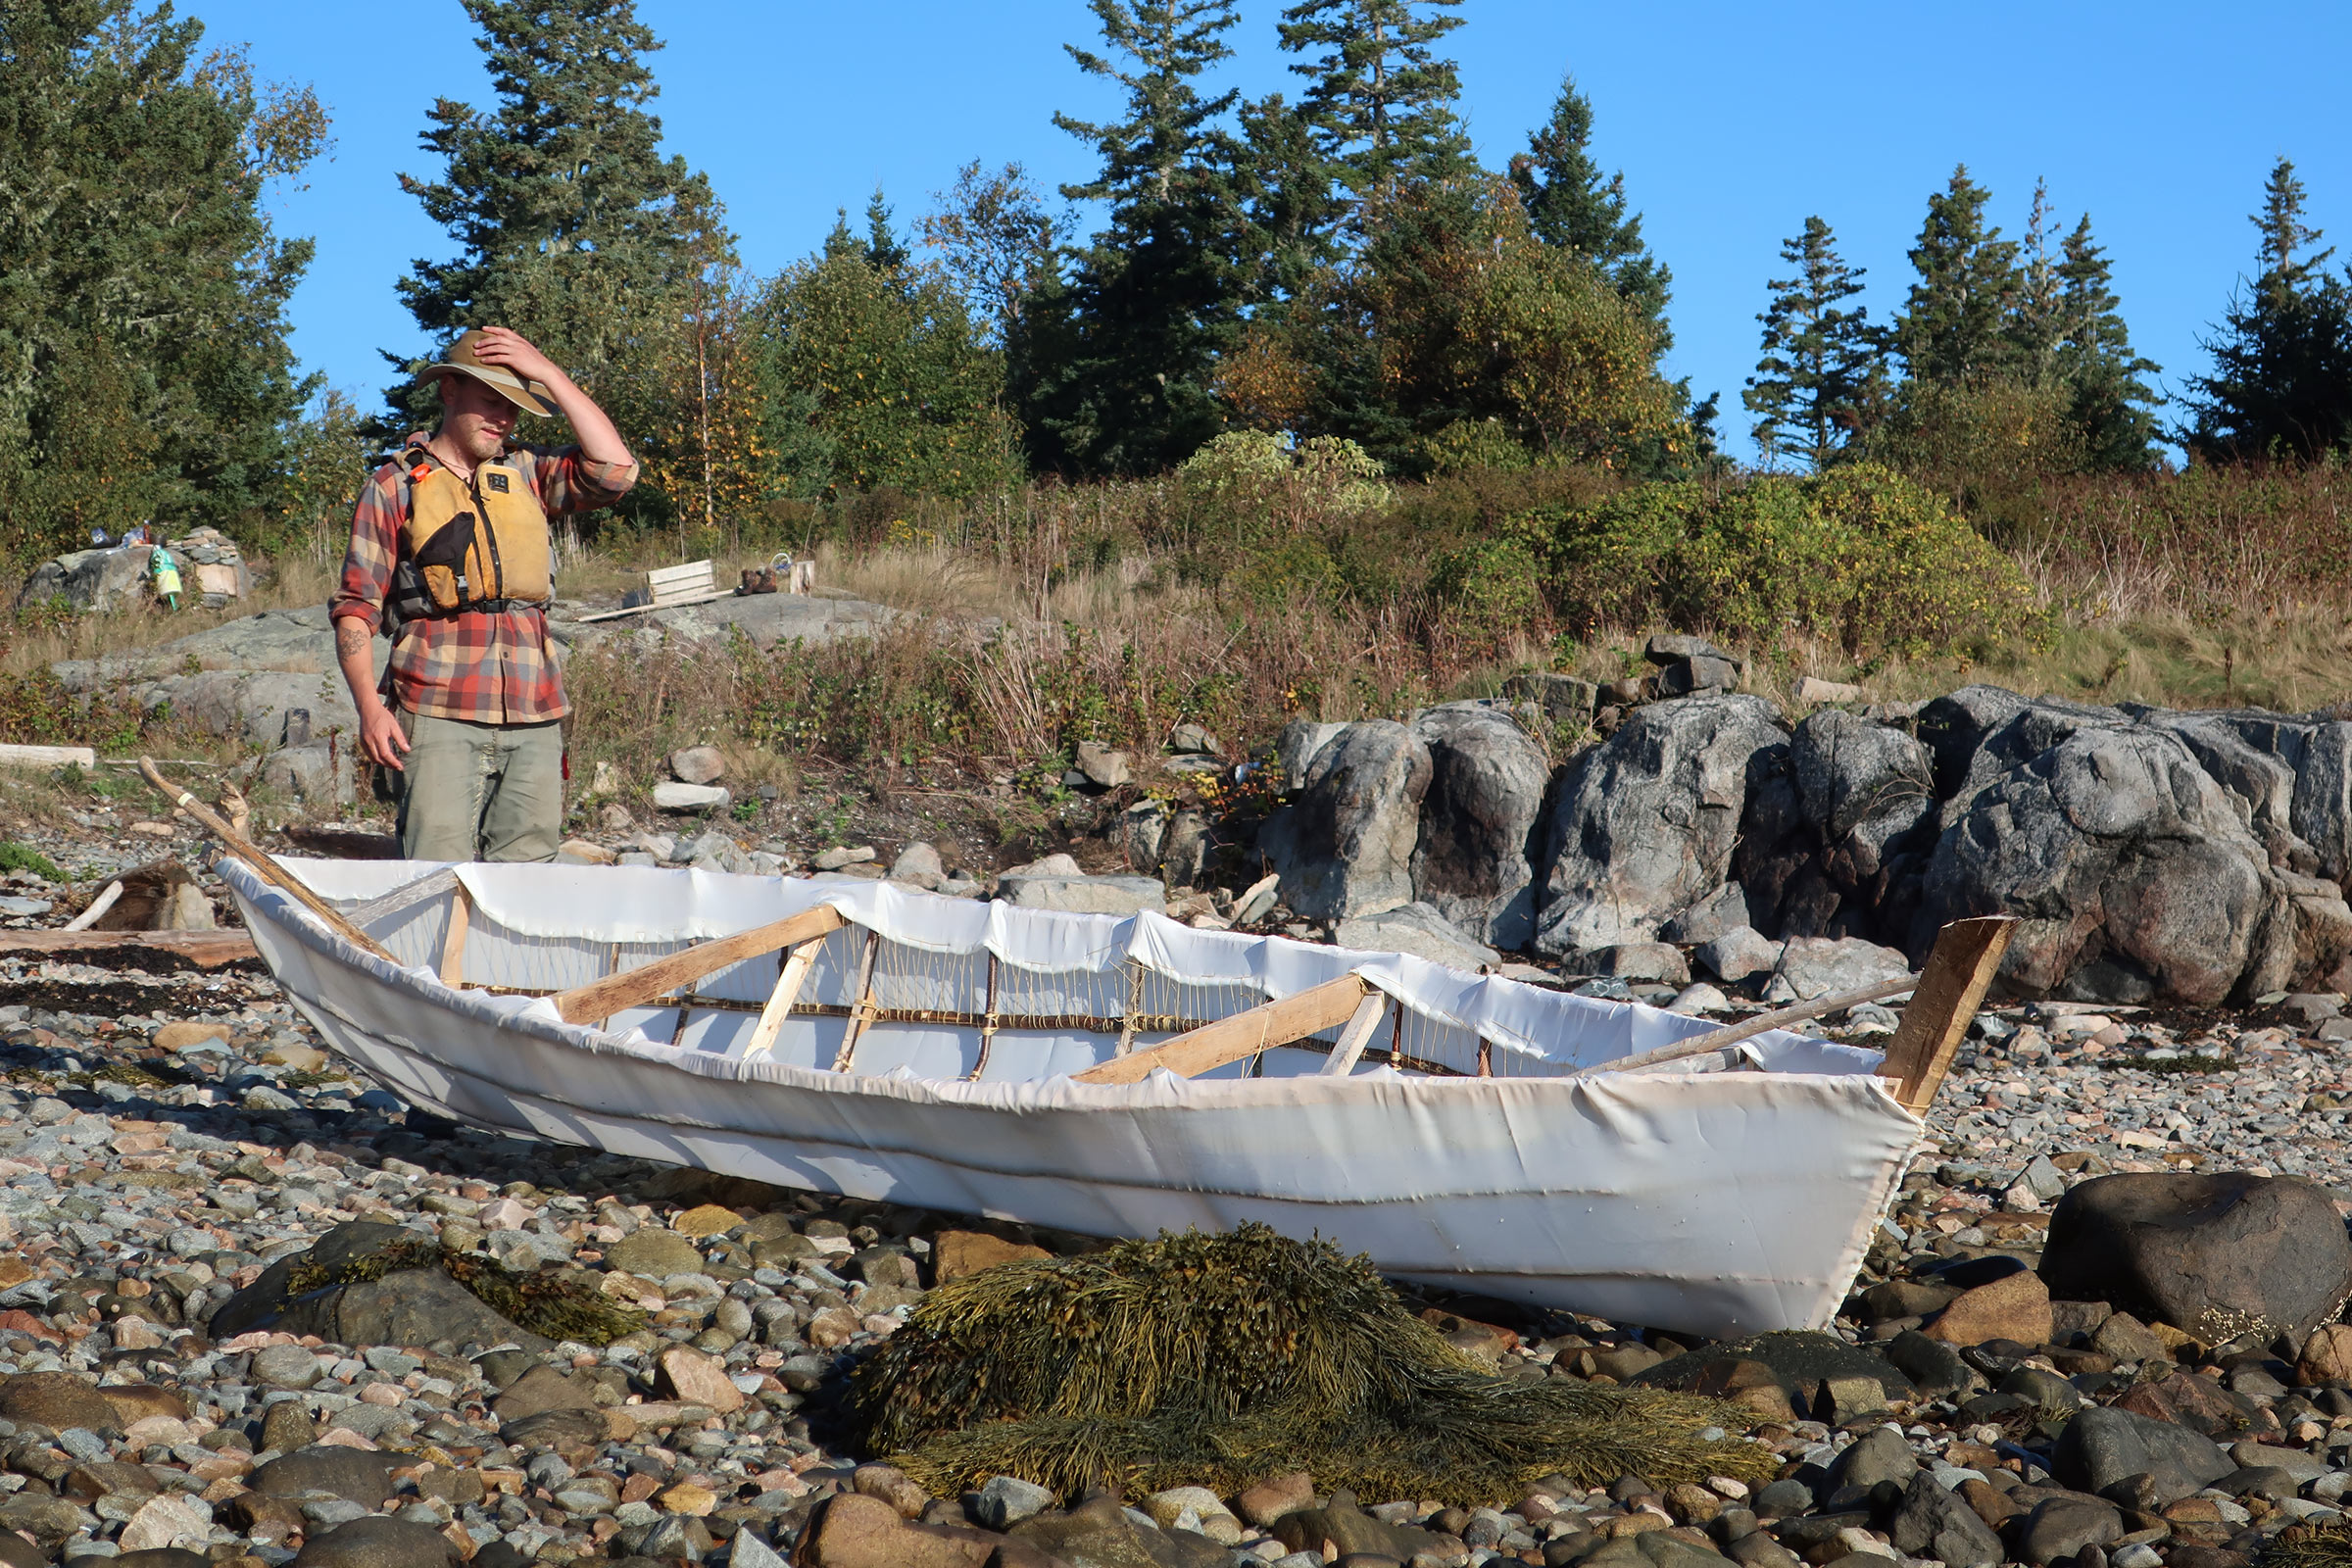
We decided to break our self-imposed ban on using technology to check the weather forecast. Our goal from the outset was to test our boatbuilding skills in wilderness conditions, not to blindly face whatever weather might be coming in our small roughly built canoe. The forecast showed bad weather on the way in two days. We decided to go for it and worked hard for the day and finished lashing the frame, stretched the nylon skin, and, as the sun was setting, finally treated it to be watertight.
After the sun rose the next day, we ate a quick breakfast and then launched our makeshift vessel. A quick paddle to test seaworthiness revealed it to be somewhat tippy but quick. We hoped it would sit lower in the water and gain stability once all our gear was loaded aboard. Lashed-in floorboards, paracord standing rigging, and pieces of driftwood suitable as mast and maststep completed the final touches to the boat. With our camp broken down and gear stowed, we bent on a lightweight camping tarp as the mainsail. After double-checking our camp and boatshop, we pushed off from the beach.
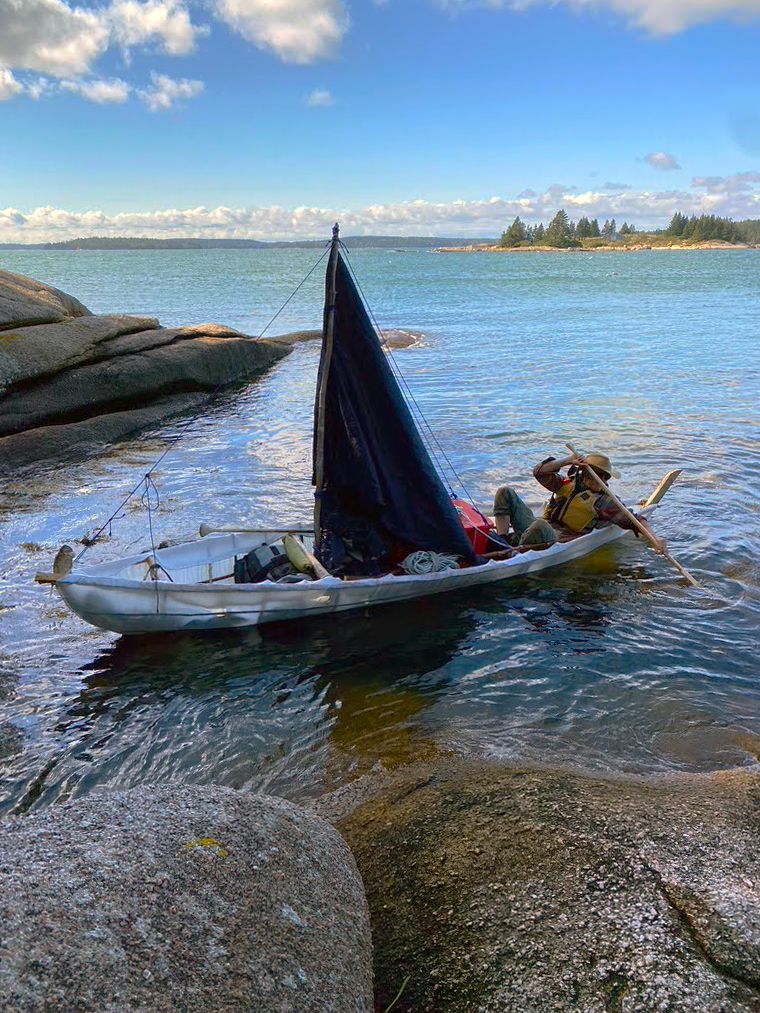
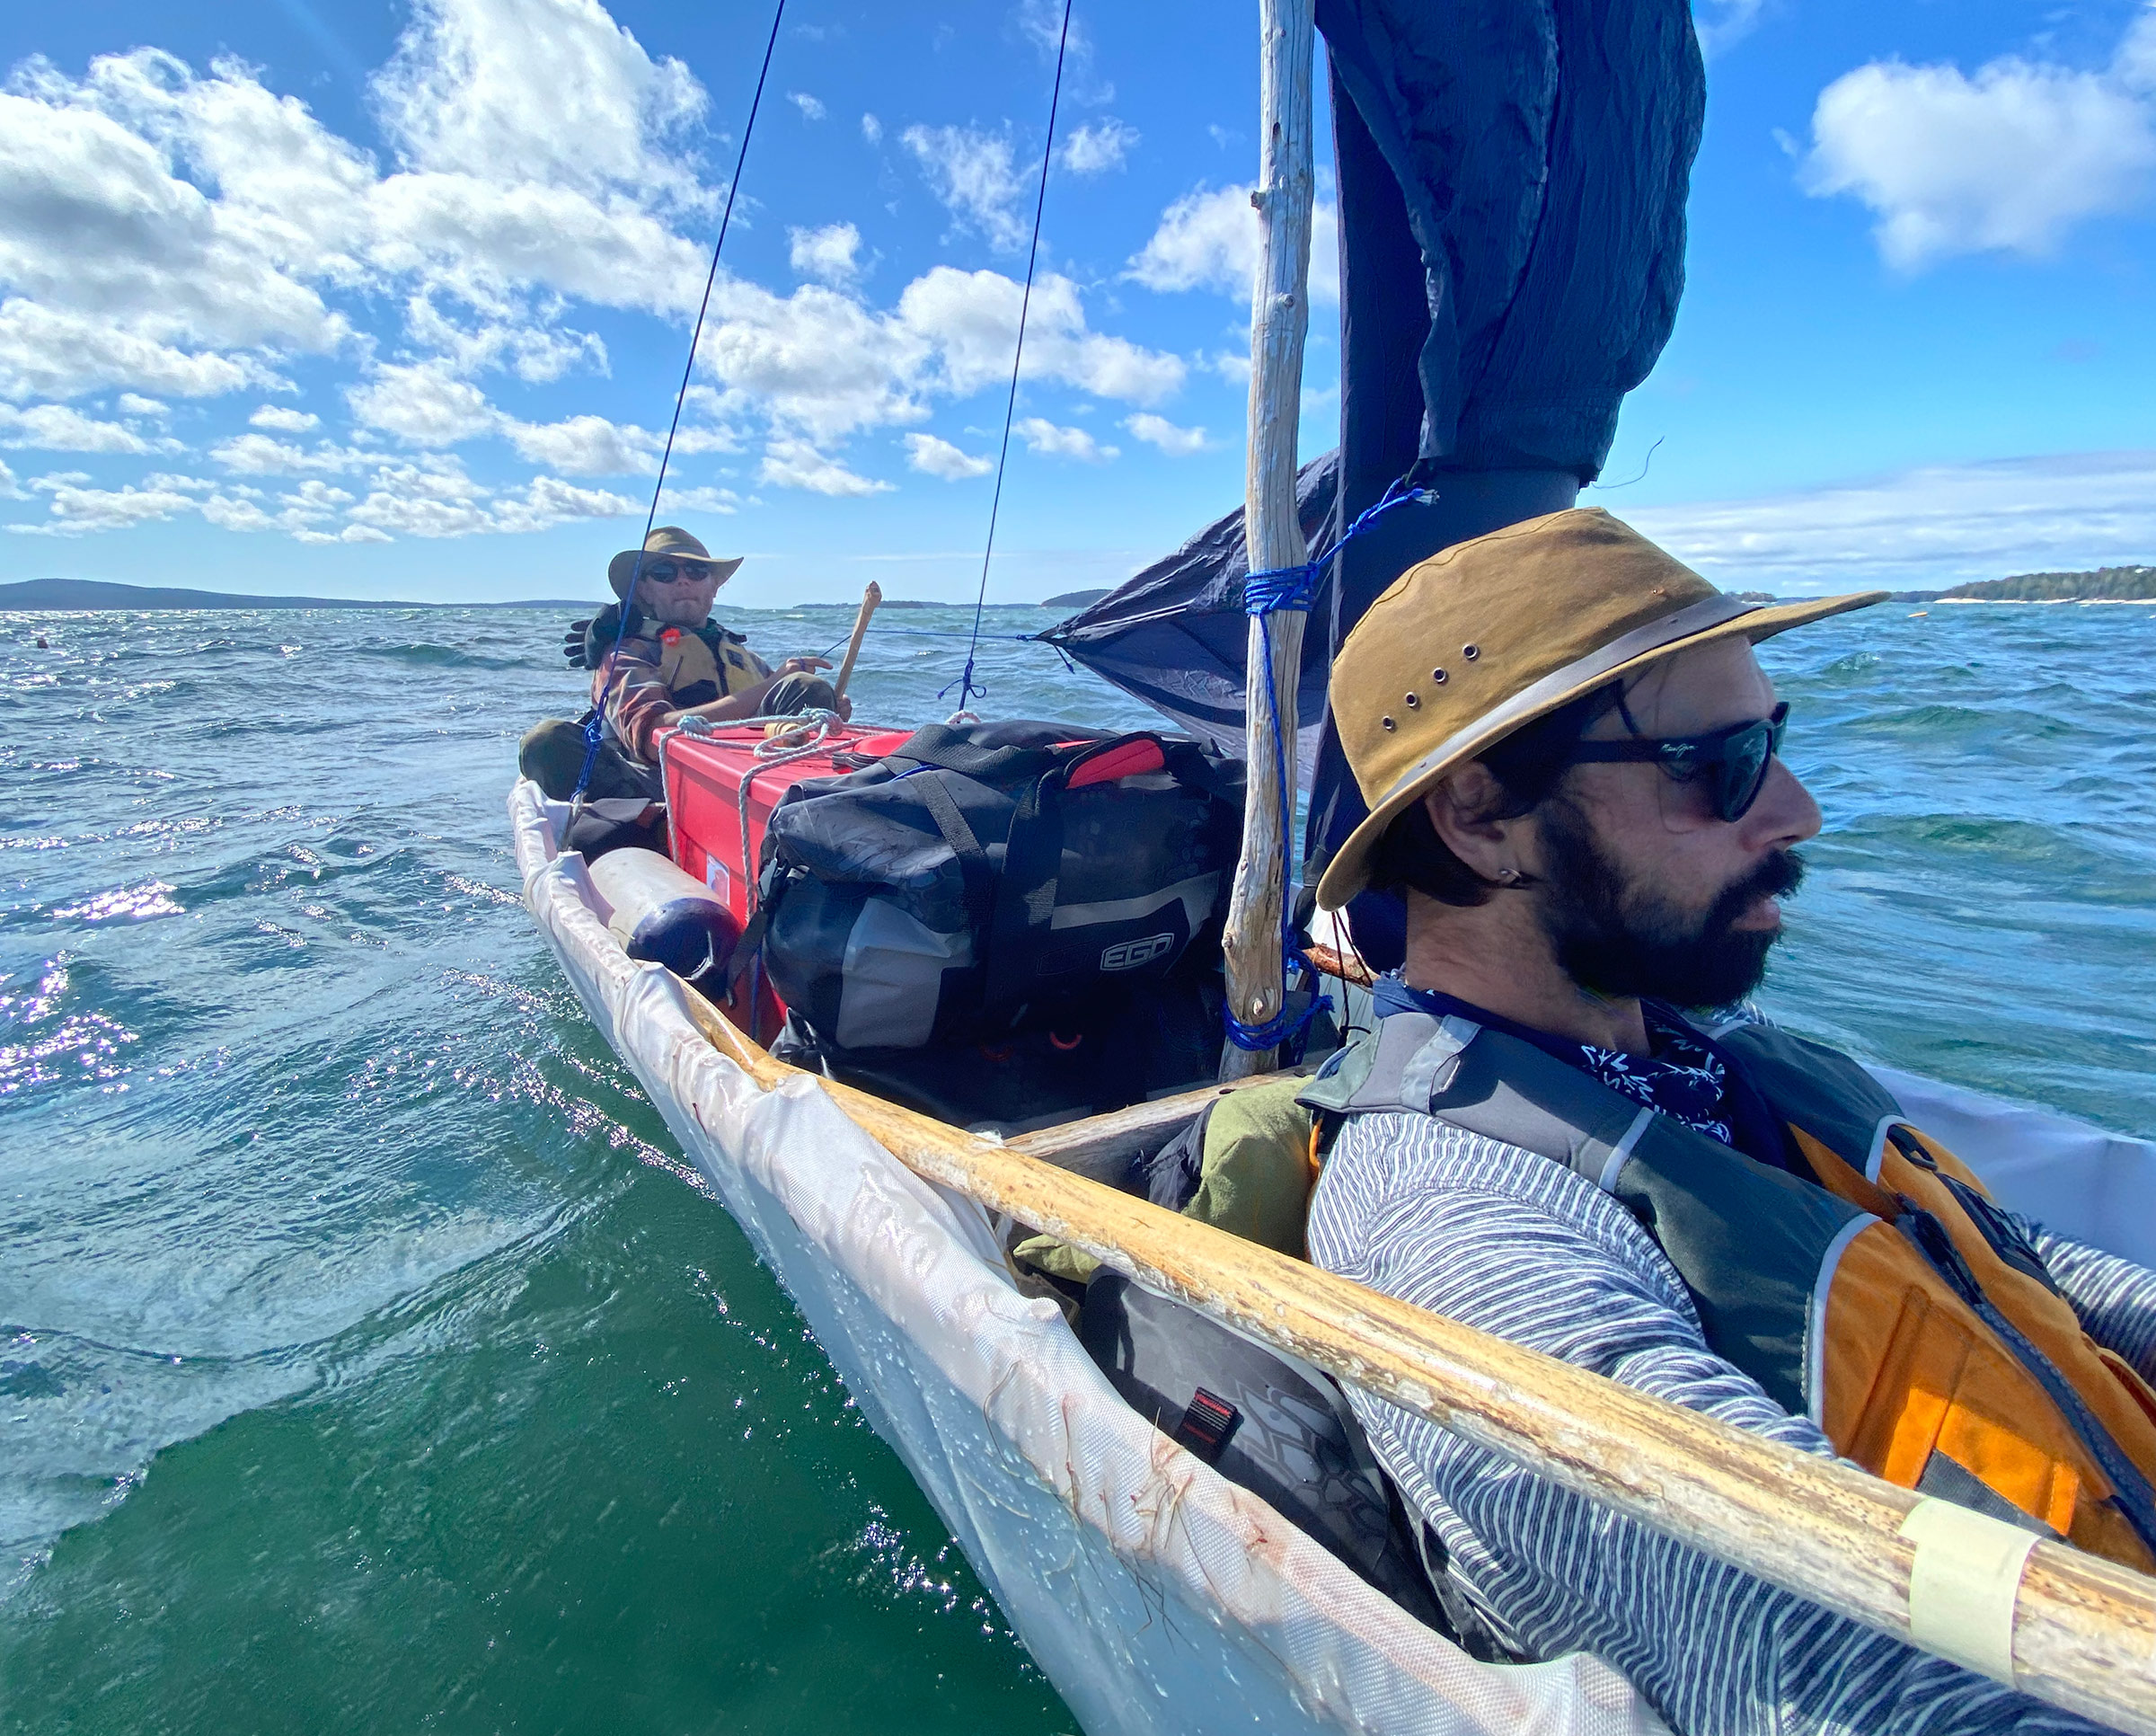
The canoe, as we had hoped, had gained a reassuring stability. To play it safe, we paddled to the lee of the island before setting our mainsail. The gentle breeze in the lee eased us away from the safety of land. We gradually gained speed as our tarp/sail caught the stronger winds out of the shadow of our island. We began the first and longest crossing of our voyage. Pointing for the next island on our assumed course, our boat danced along before a favorable 12- to 14-knot breeze. Riding over ocean swells that felt bigger than they would in a more seaworthy craft, the canoe creaked and complained with every wave. About halfway across, a lobsterboat approached us, its skipper wanting to make sure we were safe and to ask about our choice of sail fabric.
Ross Beane
Part way through the voyage to the mainland, we stopped on some rocks near a small island to take a rest and switch out on the helm. We had rigged the tarp as a spritsail, but ended up sailing it the whole way scandalized, without the sprit; once we were out in open water, the winds where too strong to set the full sail.
Glimpses of familiar landmarks started to peek out between islands unknown to us. The seas were steep, and the winds were strong, but so far our vessel was handling both well. We jibed across the wind, correcting our course as we began to recognize familiar islands and sailed on, propelled by the following wind and waves.
Eventually, Stonington appeared in the distance between two islands in Merchants Row that had been blocking it from our view. Stonington would be the closest option to make landfall that, while still on an island, was accessible by car. We could land there and claim success, but the sun was shining, and our vessel was sailing well. We decided to push on. I made a few sweeps of the axe-hewn steering paddle and adjusted our heading to run through the islands on the eastern side of Merchants Row. This pointed us north-northeast toward Eggemoggin Reach and the town of Brooklin and WoodenBoat School where both Ross and I had worked in the past.
Ross Beane
During the first half of our sail from the island, I was at the helm, steering with the rough carved paddle. Ross rode in the bow with his driftwood canoe paddle stowed but at the ready.
The day of sailing was downright pleasant and our vessel, though of rough construction, made good time. Stopping mid-afternoon on the rocks in the lee of a beautiful little island with a small, seemingly unoccupied cabin allowed us a chance to swap positions in the cramped little boat. Ross took over steering and sailed us the rest of the way. At one point we crossed a shoaling bar that stood the seas up into sharp little peaks. To have broached at this time to take a wave broadside would have certainly rolled us, but Ross’s skill as a helmsman carried us through as our vessel surfed each wave that rose up behind.
Crossing the Reach, we were questioned by another concerned lobsterman, then sailed past Hog and Piglet islands to starboard and Babson Island to port before finally dropping the tarp/sail and unstepping the driftwood mast in WoodenBoat’s mooring field. We paddled in and ran our keel aground on the boat ramp. Stepping ashore brought an end to our adventure and answered our question: If we were ever shipwrecked on some far-flung mystery island, could we build a seaworthy vessel with rudimentary tools and scavenged materials and sail to safety? Perhaps, but probably not.
Tyler Sauter is a woodworker who lives in southern Maine. He has taught sailing and has worked as a carpenter in boatbuilding, cabinetmaking, and furniture-building shops. For a time he lived aboard a 30′ sloop following work along the northeastern coast of the USA, and going on longer international voyages. Now back on land, he tries to go on as many adventures as time allows in the rivers and along the coast of New England in canoes and small sailboats.
After graduating with a degree in Outdoor Education, Ross Beane has been relentless about sharing his love of wilderness travel wherever he goes. From guiding glacier travel in Alaska to teaching sailing in Maine, he delights in spending time with people in beautiful and remote locations to foster technical know-how and an appreciation of the natural world. Ross is a perpetual student of wilderness emergency medicine, and brings an understanding of risk management that keeps it safe without compromising the fun. As an avid sailor since youth, Ross has sailed in many places worldwide, taught sailing for WoodenBoat School, and co-founded the Sailing Collective Travel Co.
If you have an interesting story to tell about your adventures with a small boat, please email us a brief outline and a few photos.
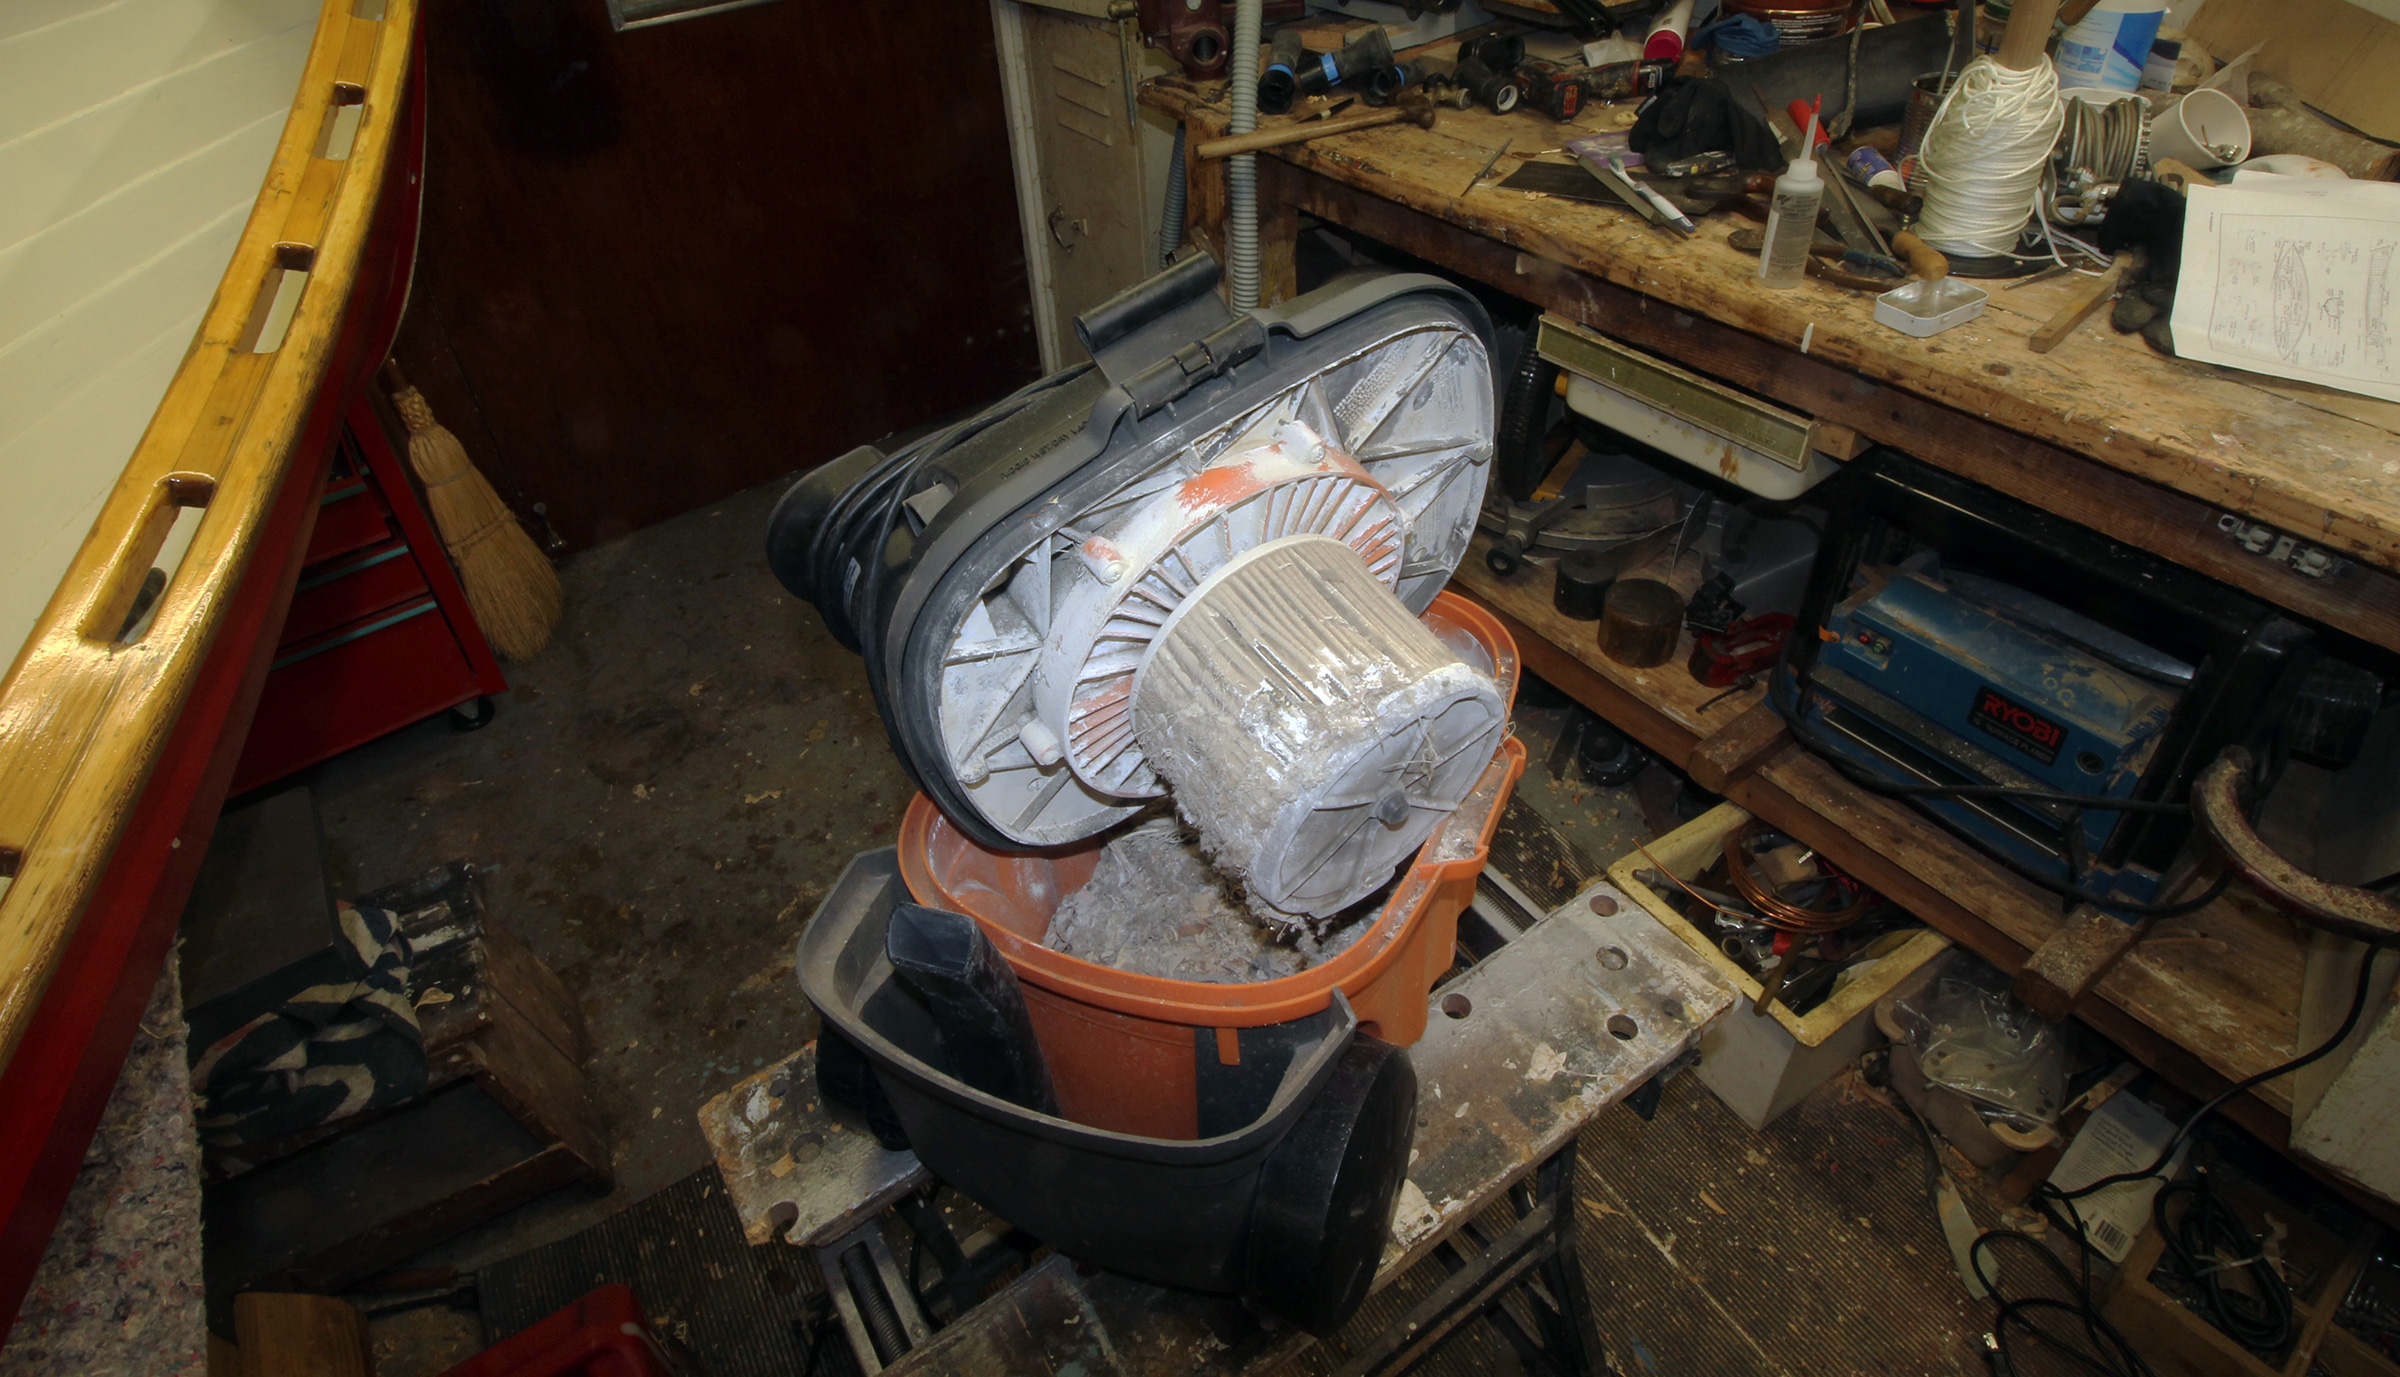
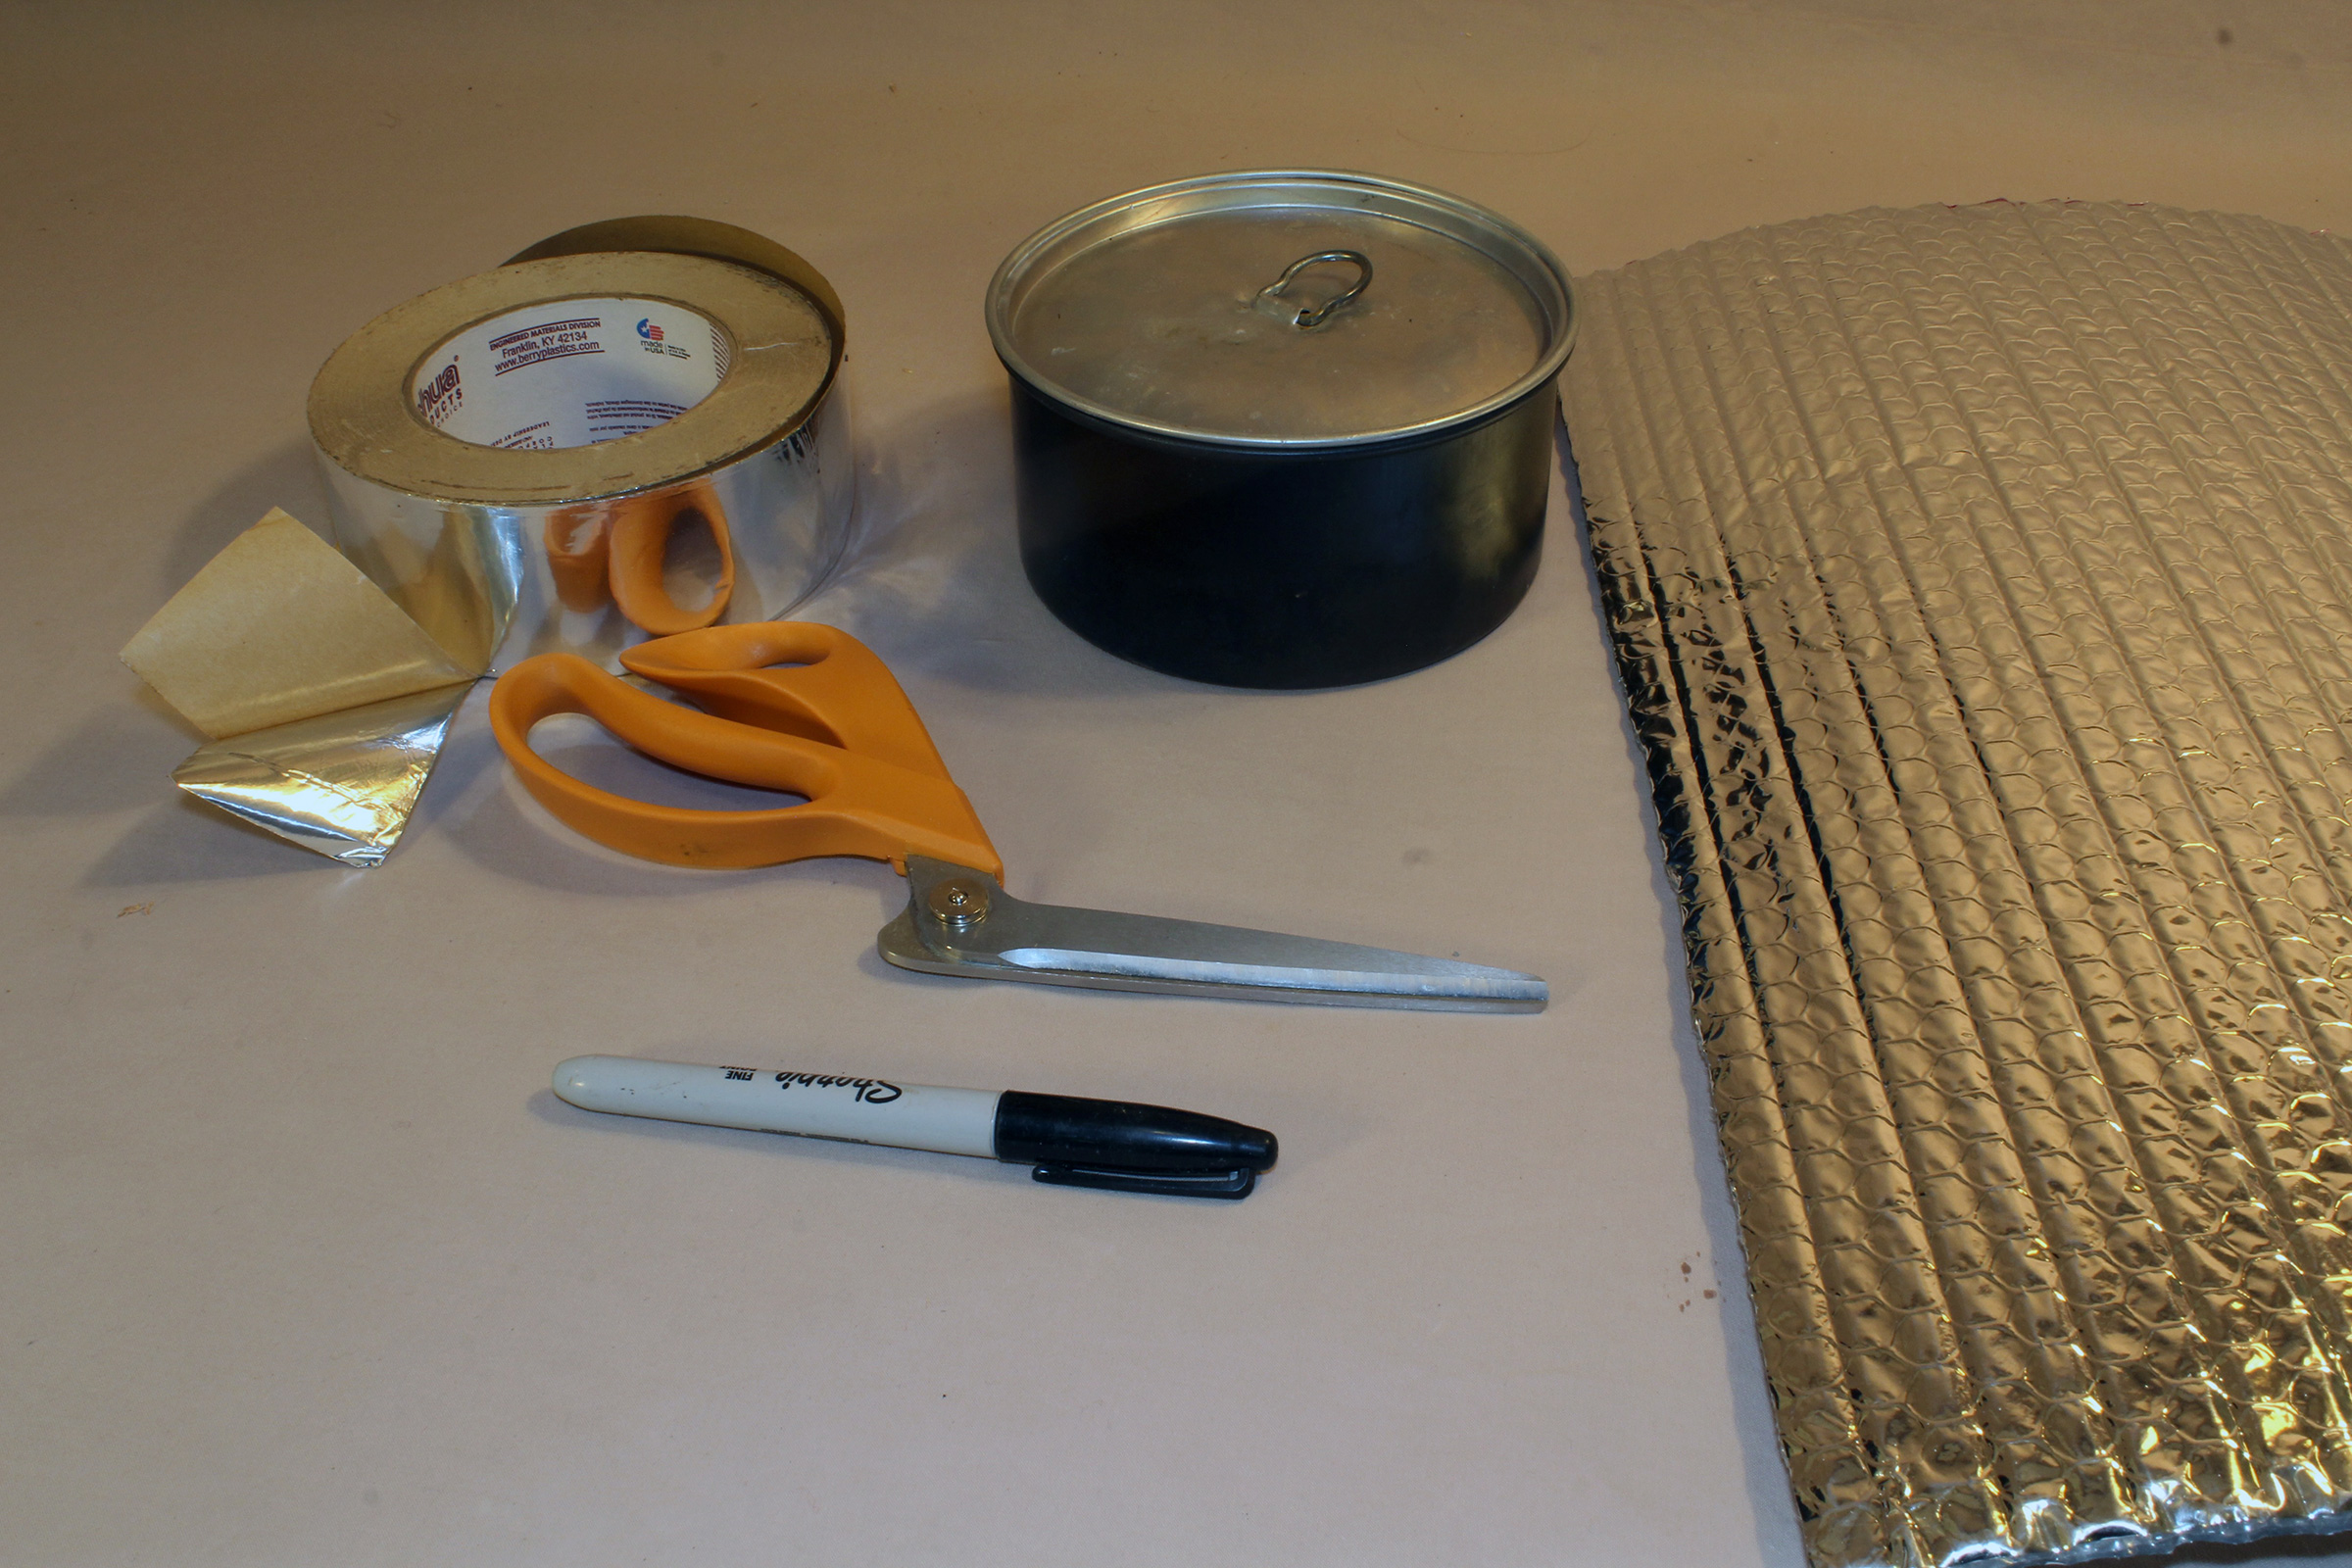
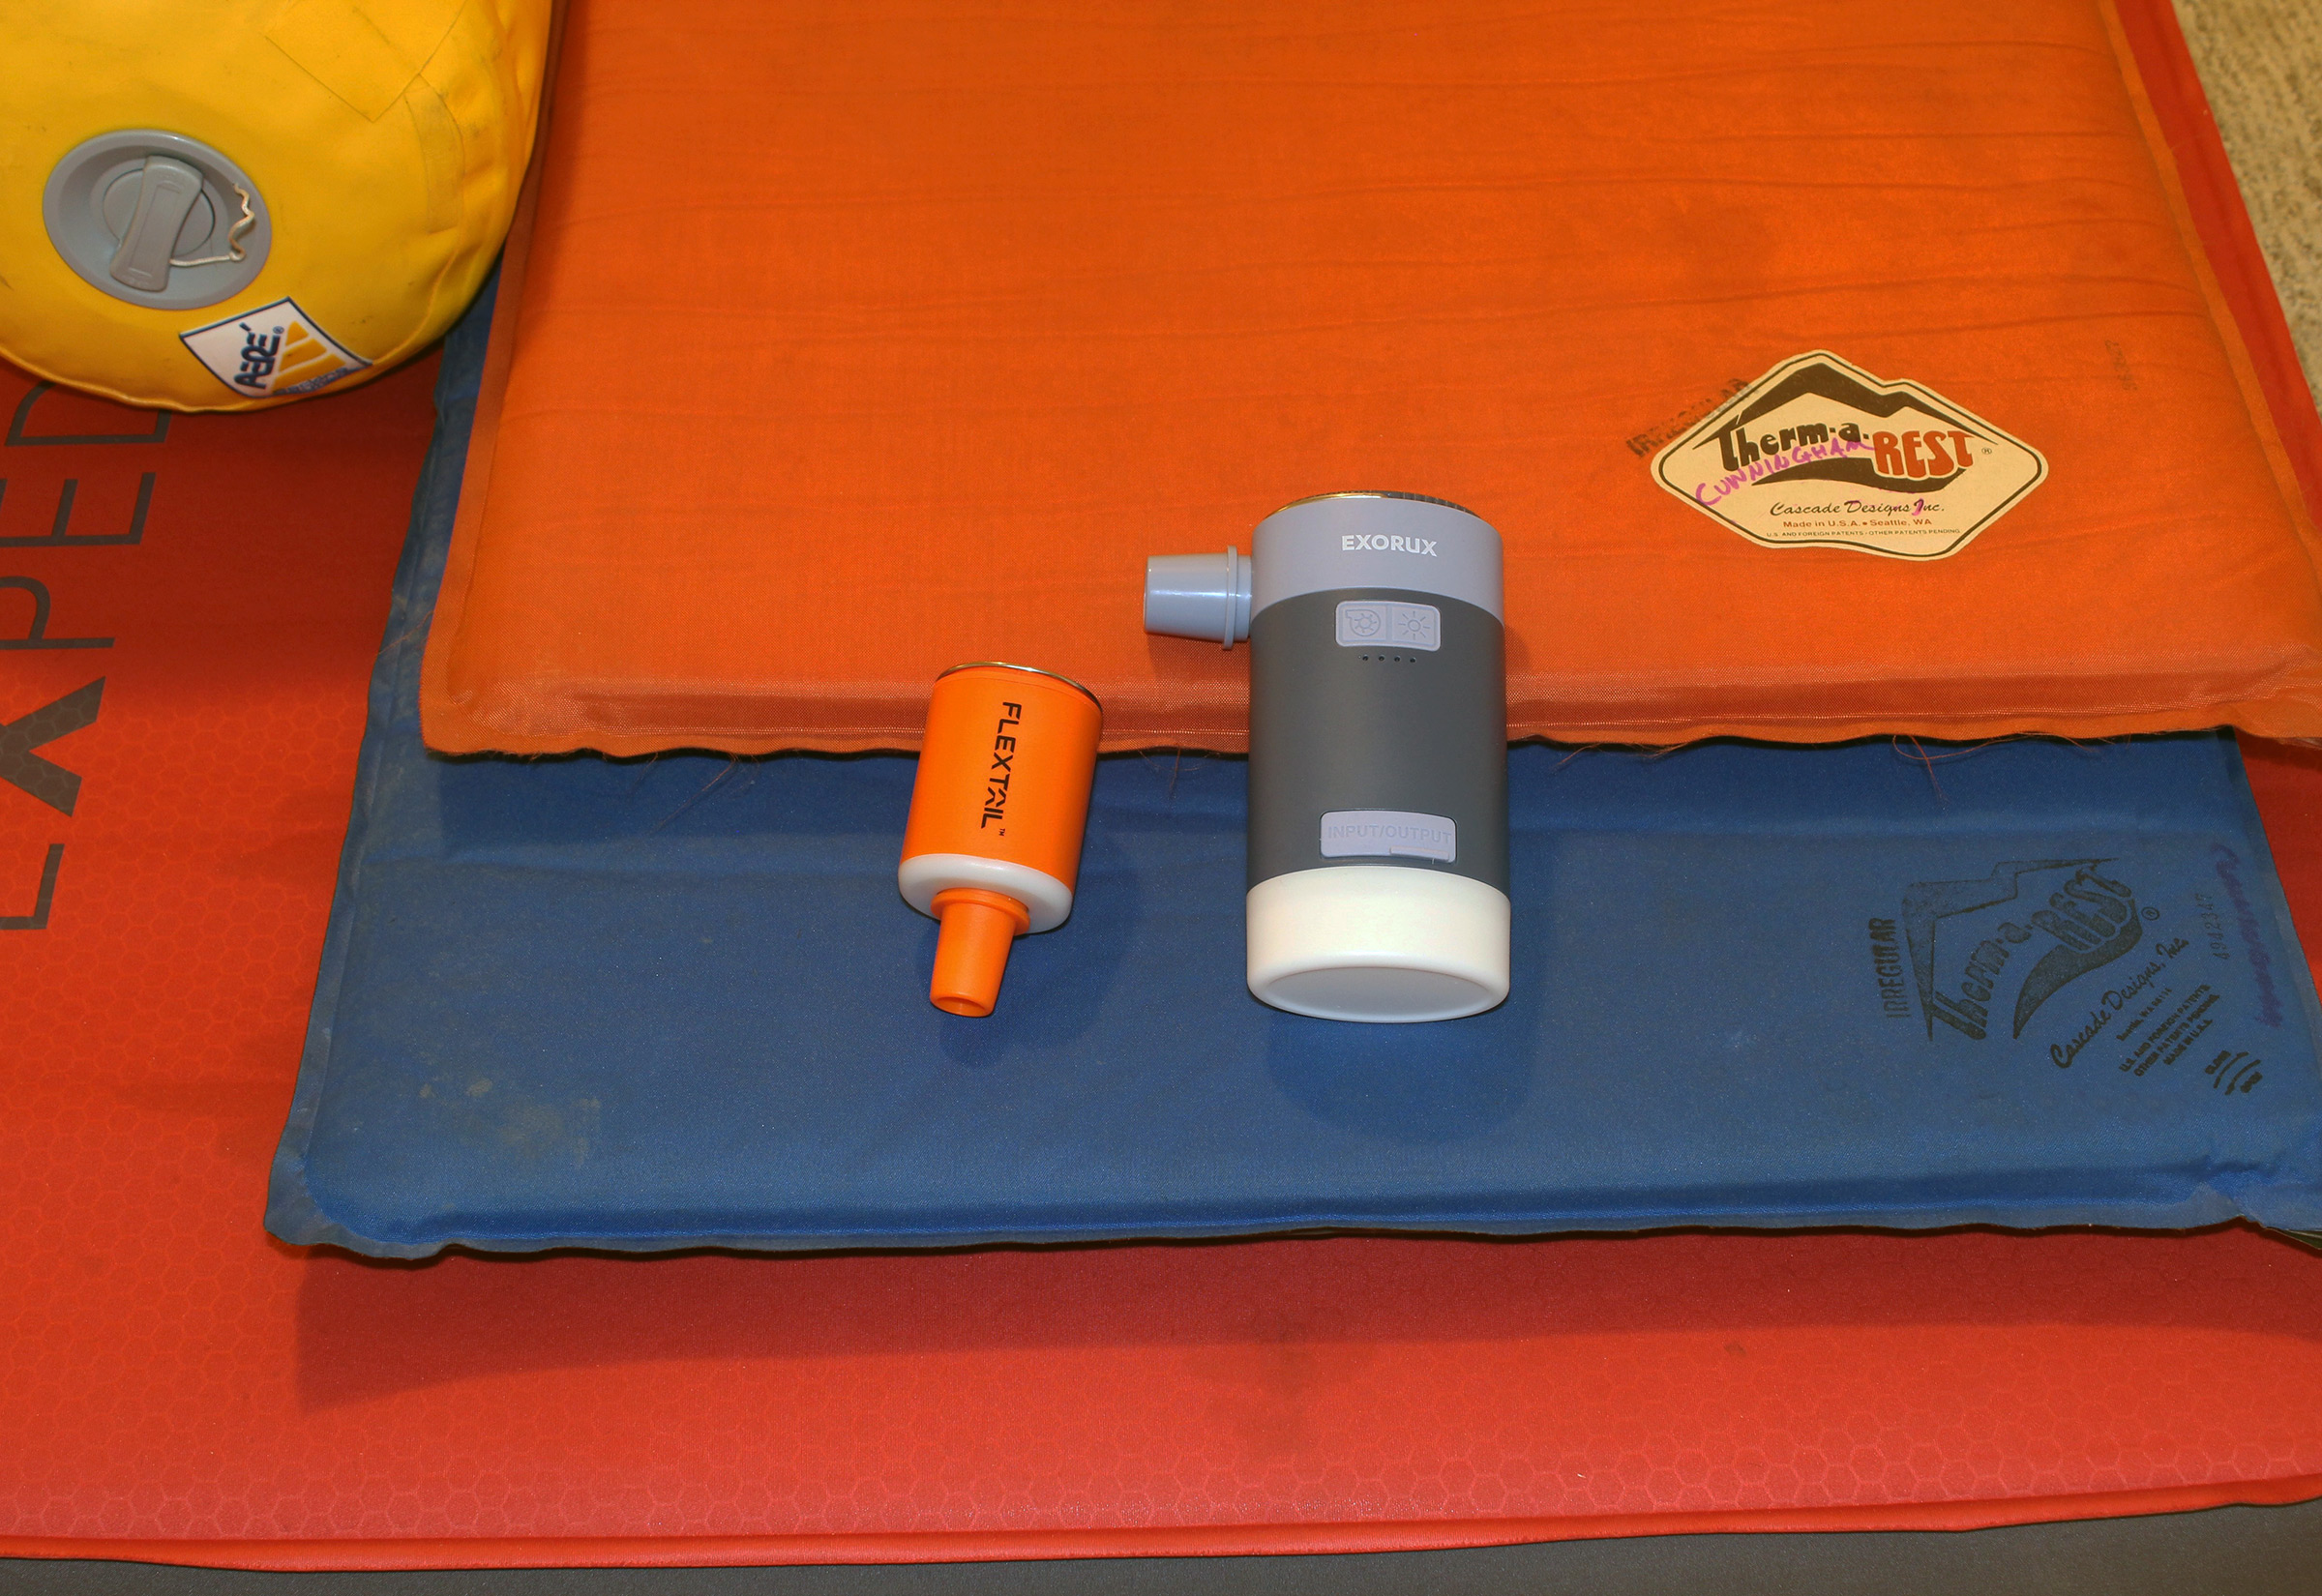
Boatbuilding creates a lot of dust, and to keep it from spreading everywhere, including into my lungs, I have several vacuum systems to collect it. I have a two-bag dust collector that gathers the coarse sawdust from my tablesaw, jointer, and thickness planer, and I rely on two shop vacuums to catch the fine dust coming from sanders and to clean up whatever winds up on the floor and workbench. The filters in those two vacuums need to be cleaned periodically, and it’s a job I don’t much like. When it was time to clean a filter, I used to take it outside, hold it in an open grocery bag, and shake it. I wore an N-95 mask to protect myself from the powdery dust that drifted up from the bag.
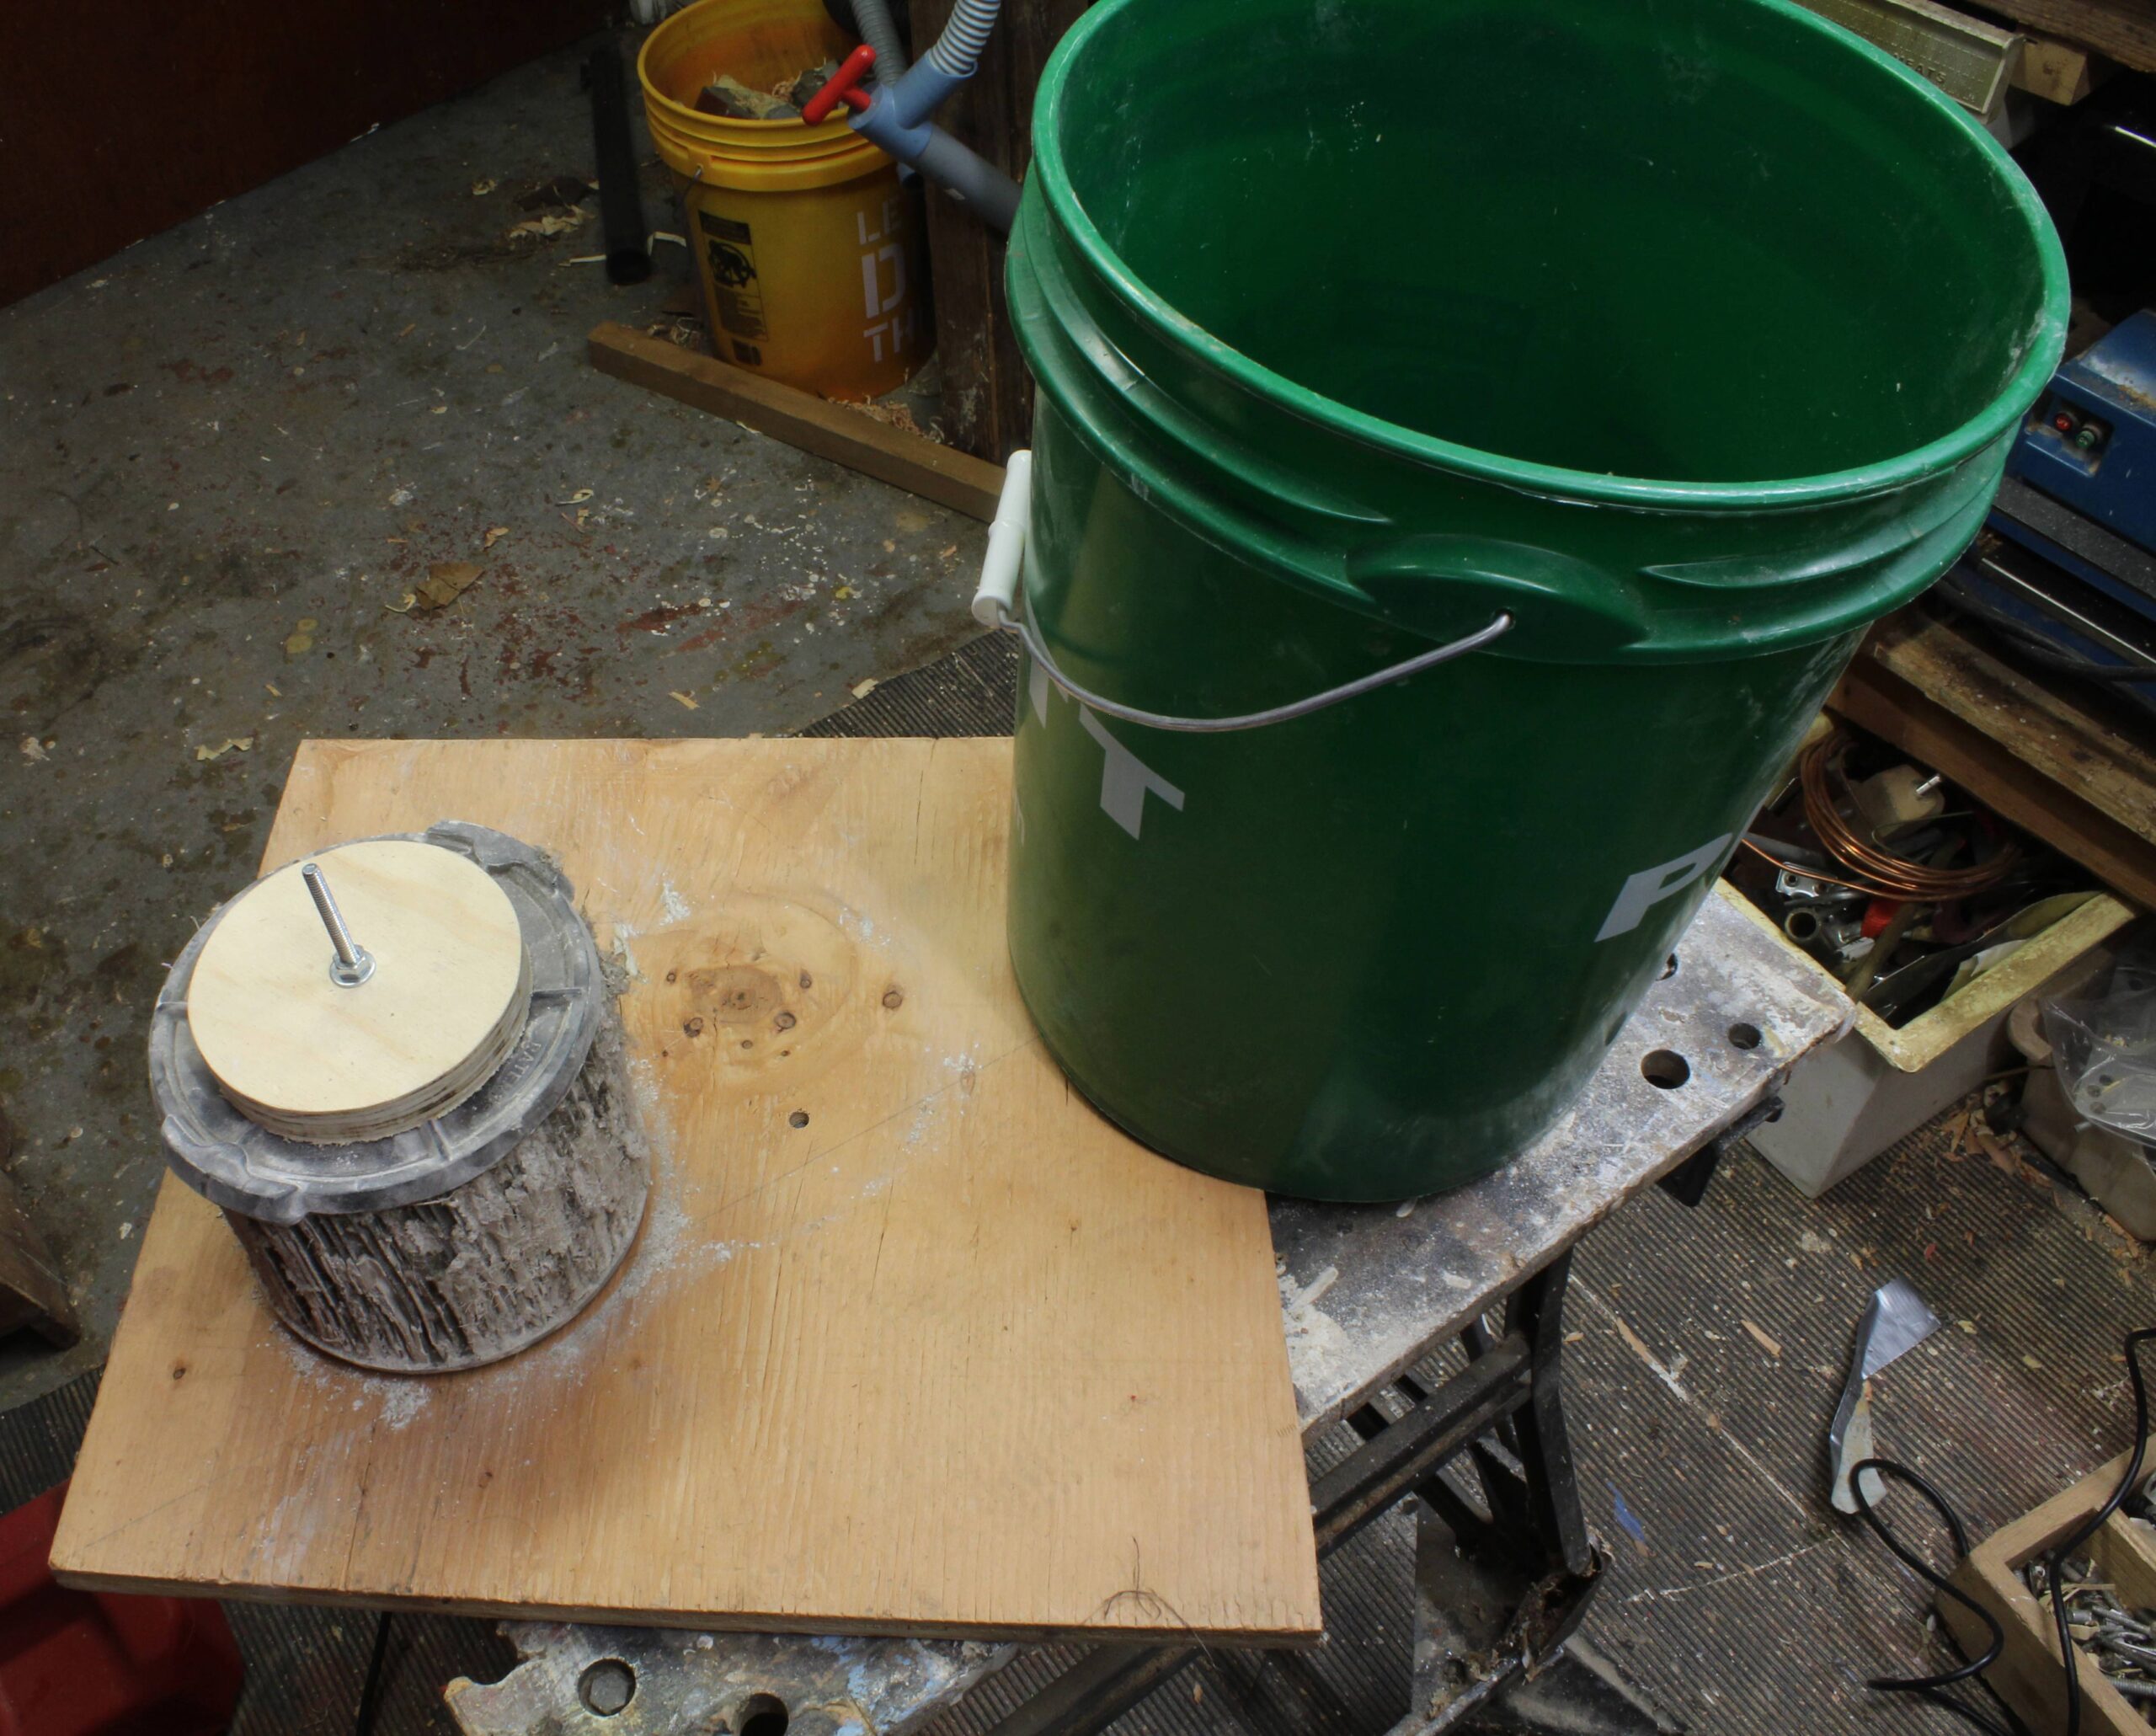
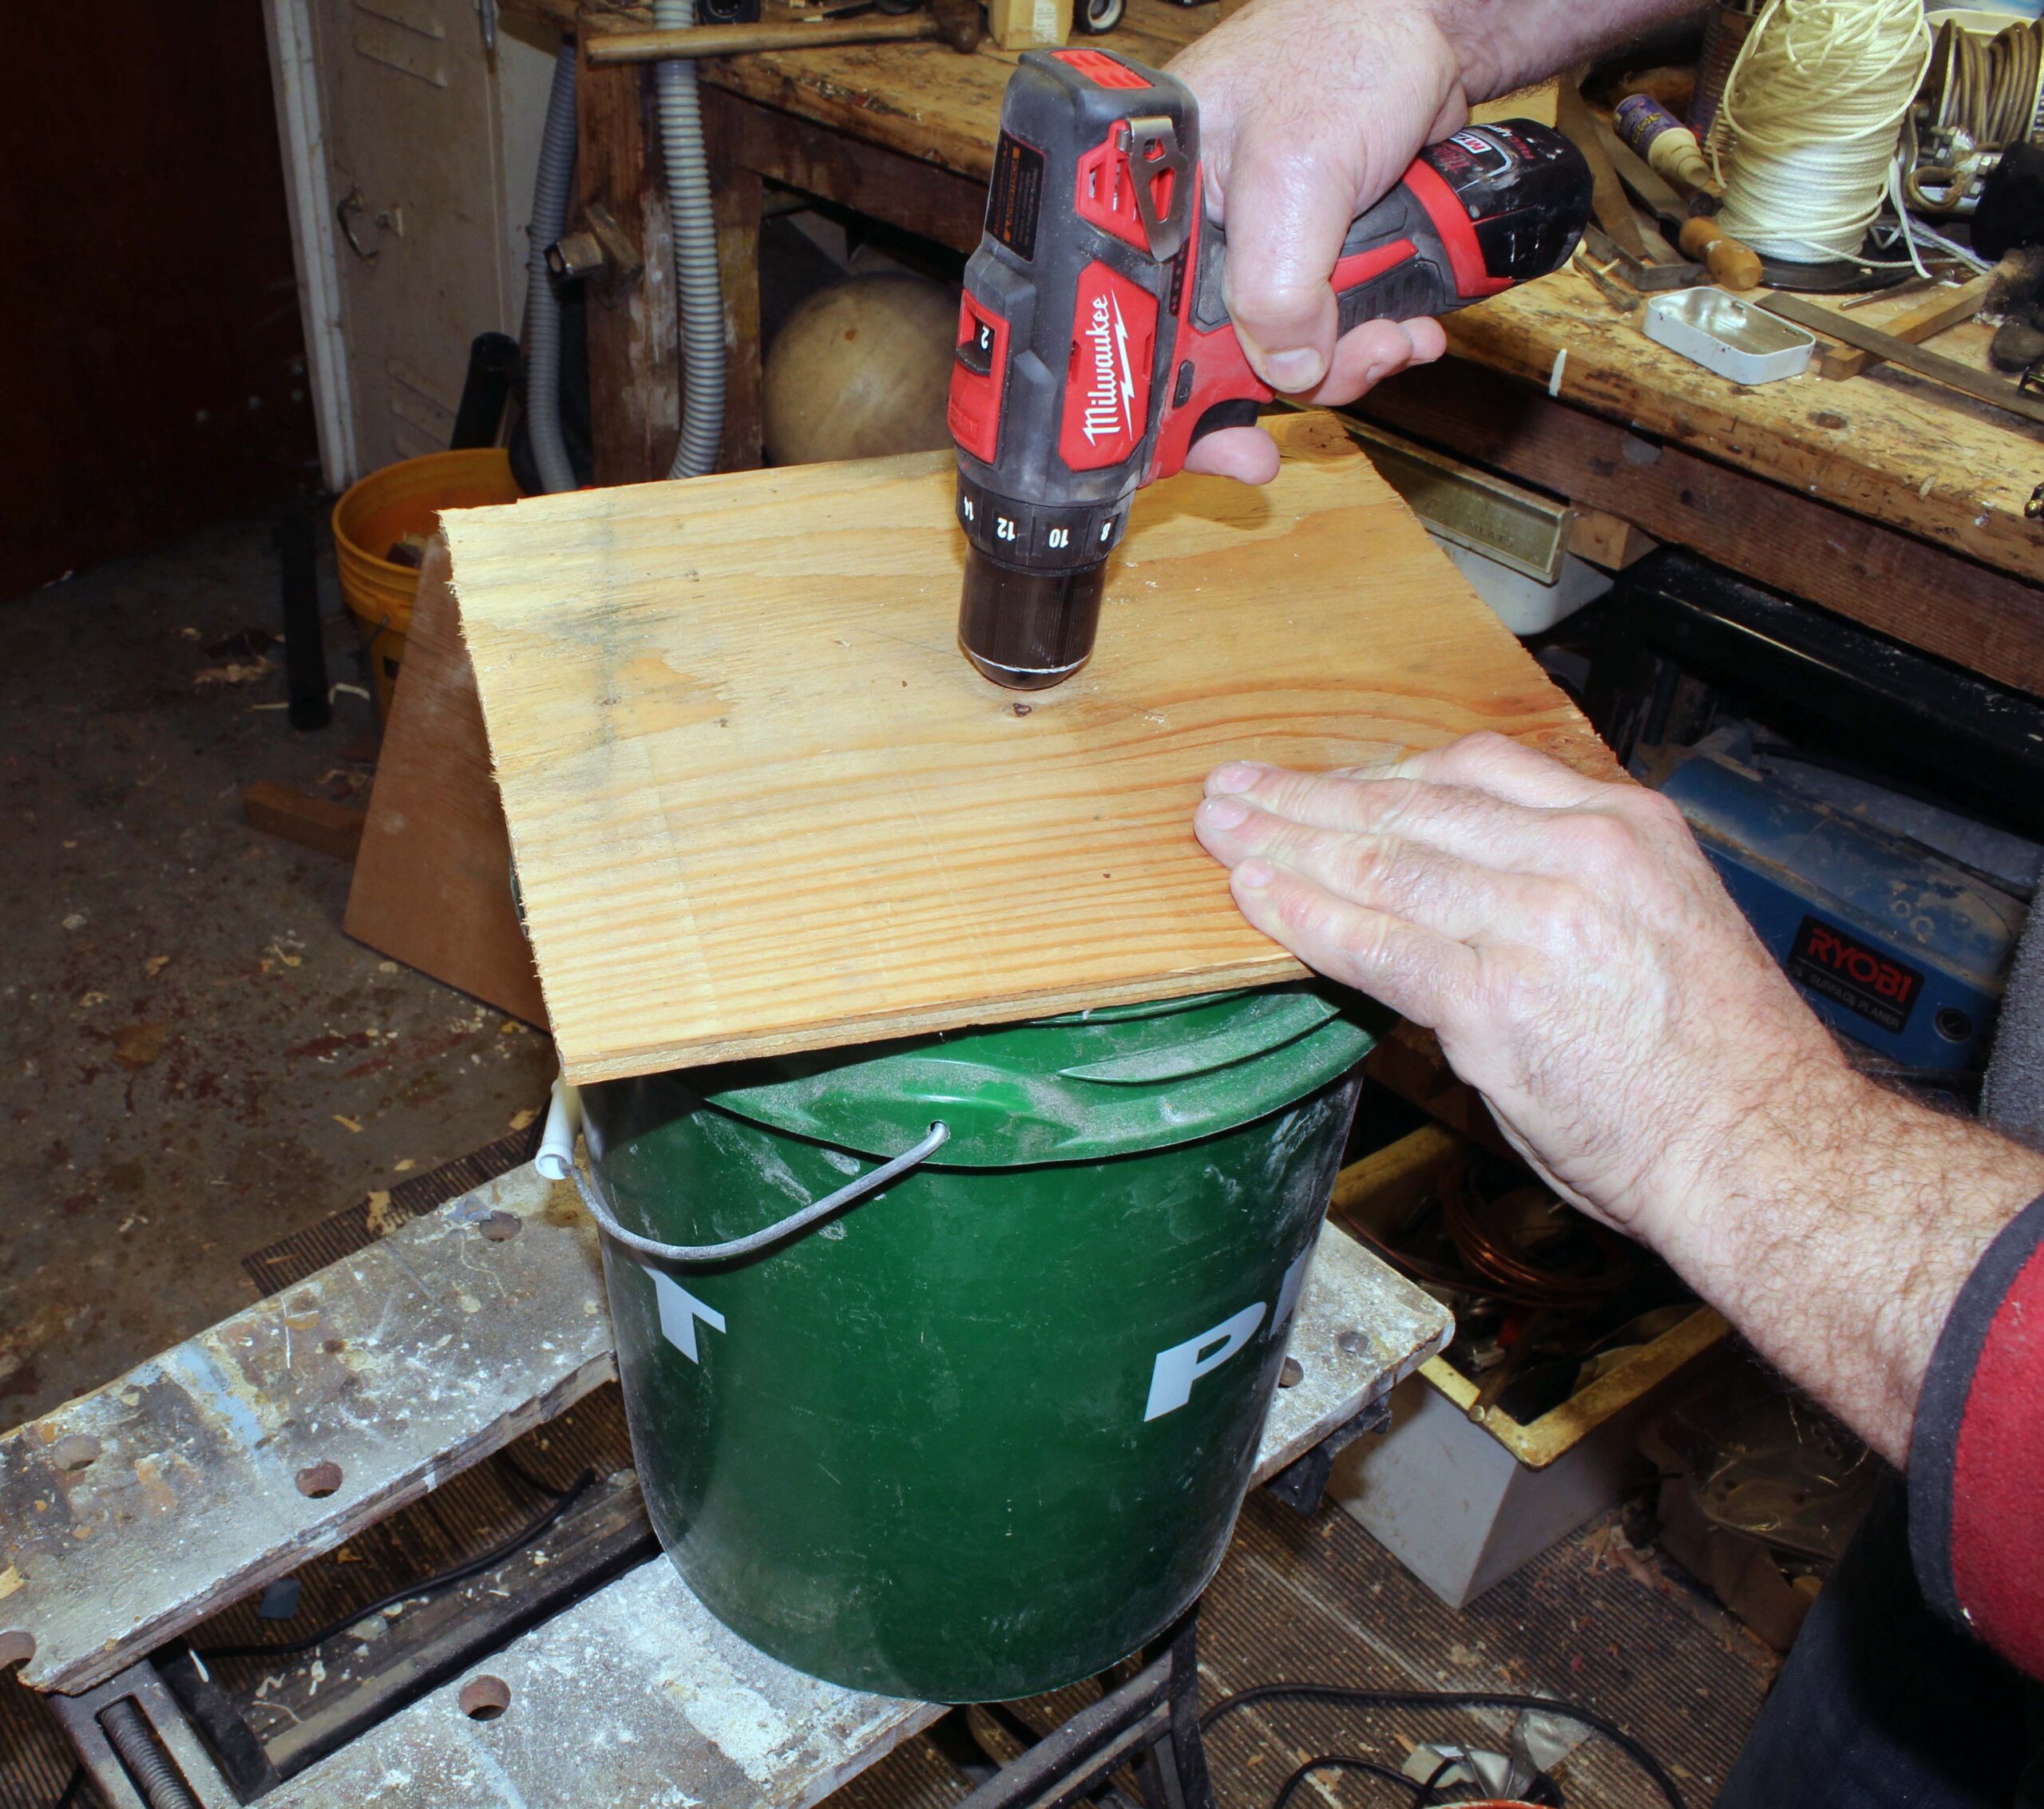
There had to be a better way, and it didn’t take long to find one: let centrifugal force do the job. I’d already figured that out with my food processor: Rather than do an unavoidably ineffective job with a spatula, I pour out the blended batter and spin the blade in the empty processor bowl. It’s instantly clean. Spinning a shop vacuum filter is equally effective. All it takes are a couple of plywood discs, a machine screw with washers and a nut, and an electric drill. To contain the dust, a 5-gallon bucket and a piece of plywood big enough to cover its top will do the job.
Photographs by the author
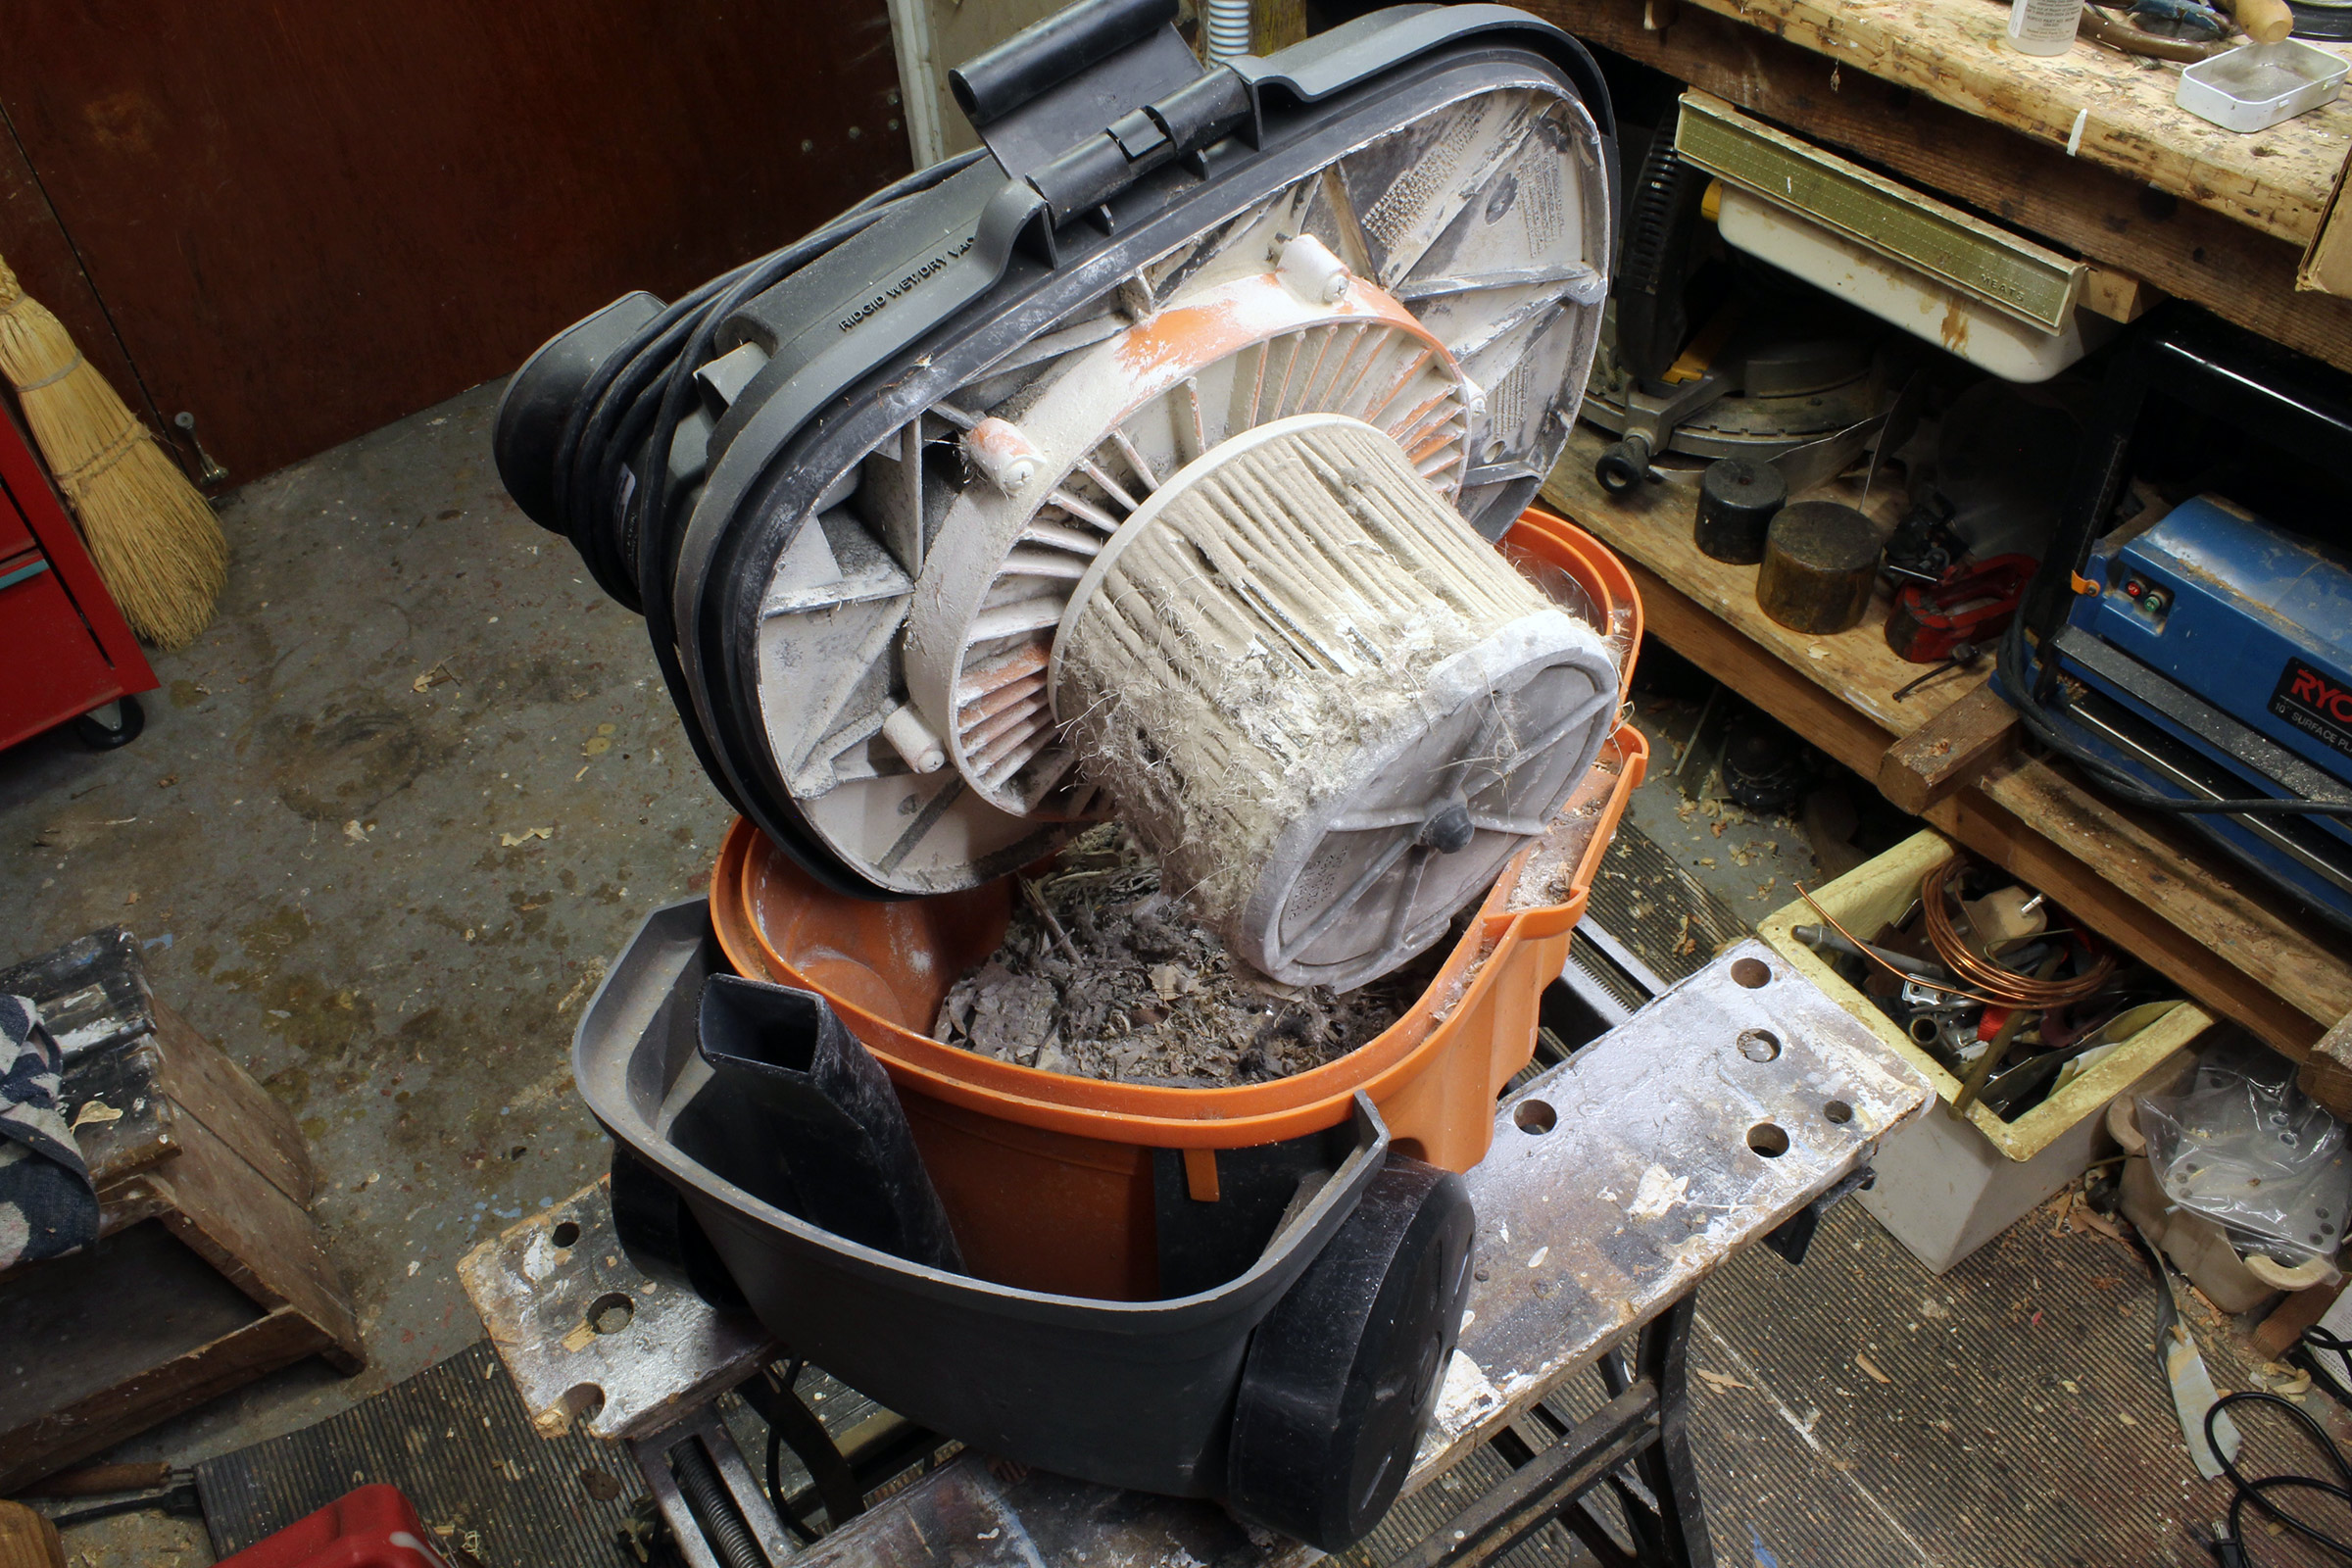
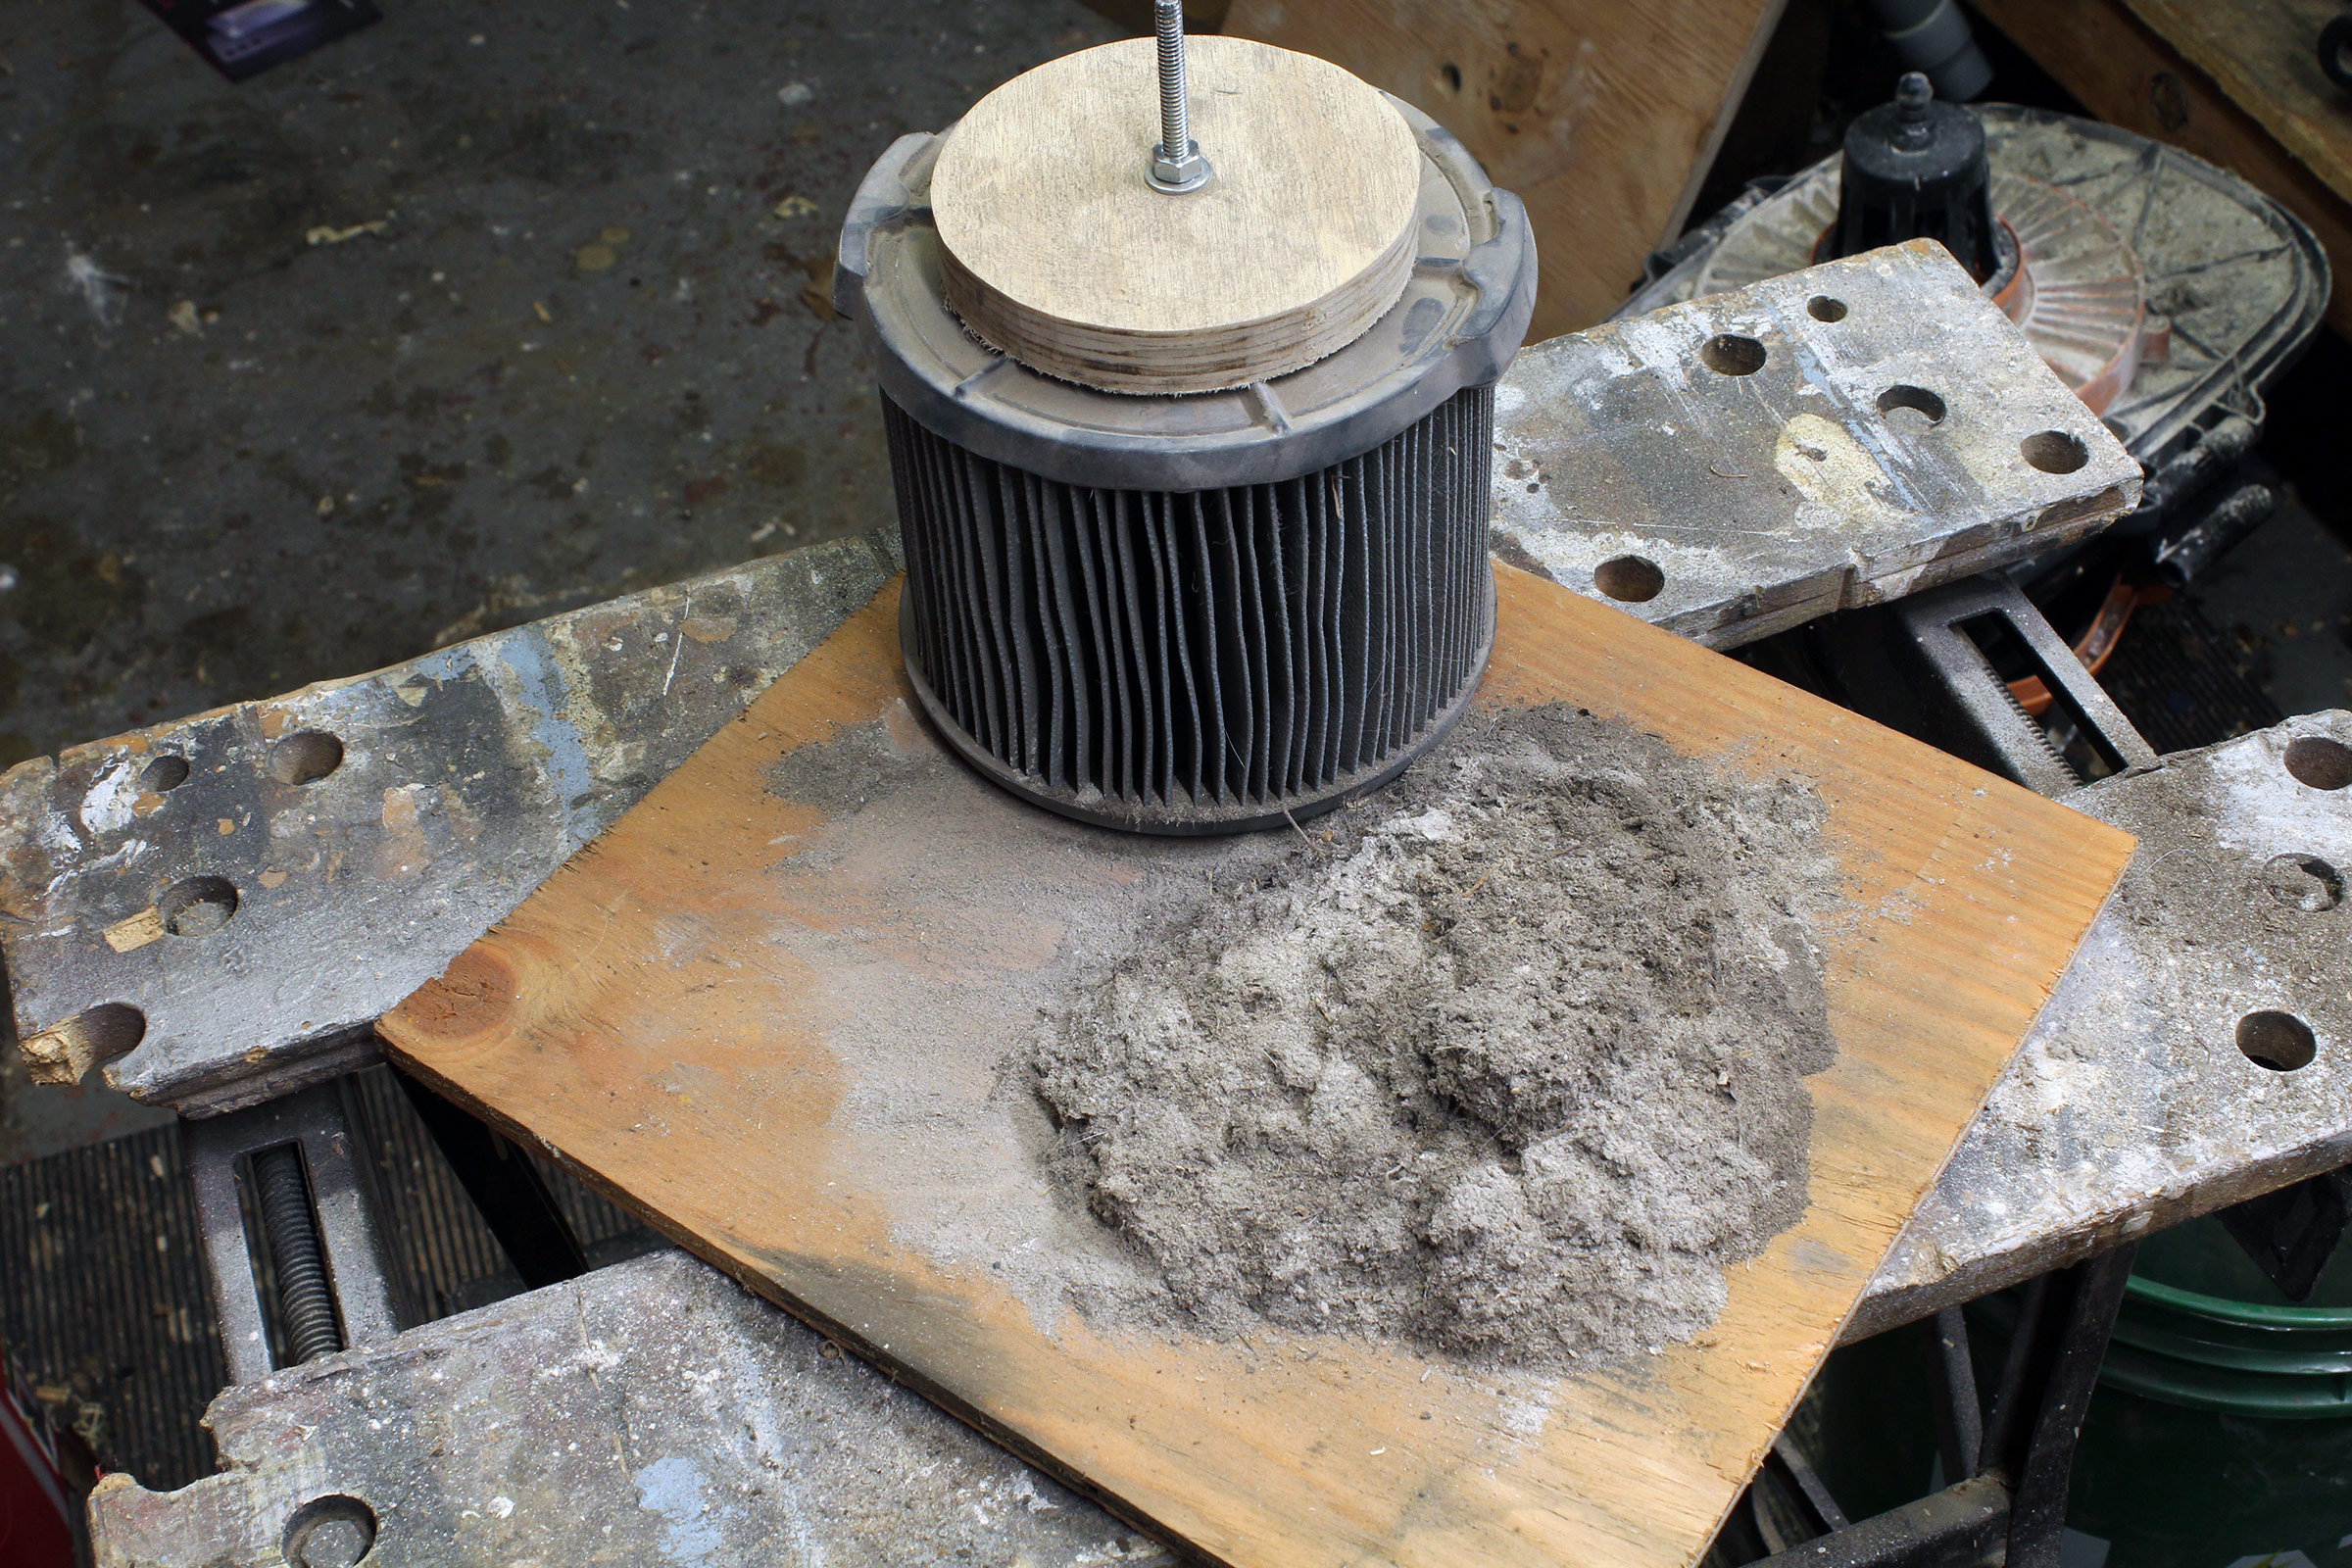
My smaller shop vacuum had apparently been used to clean up after drywall work, and its filter was coated with compacted dust along with a variety of other debris. I had been given this vacuum, and it may have been used for many jobs without having the filter cleaned.
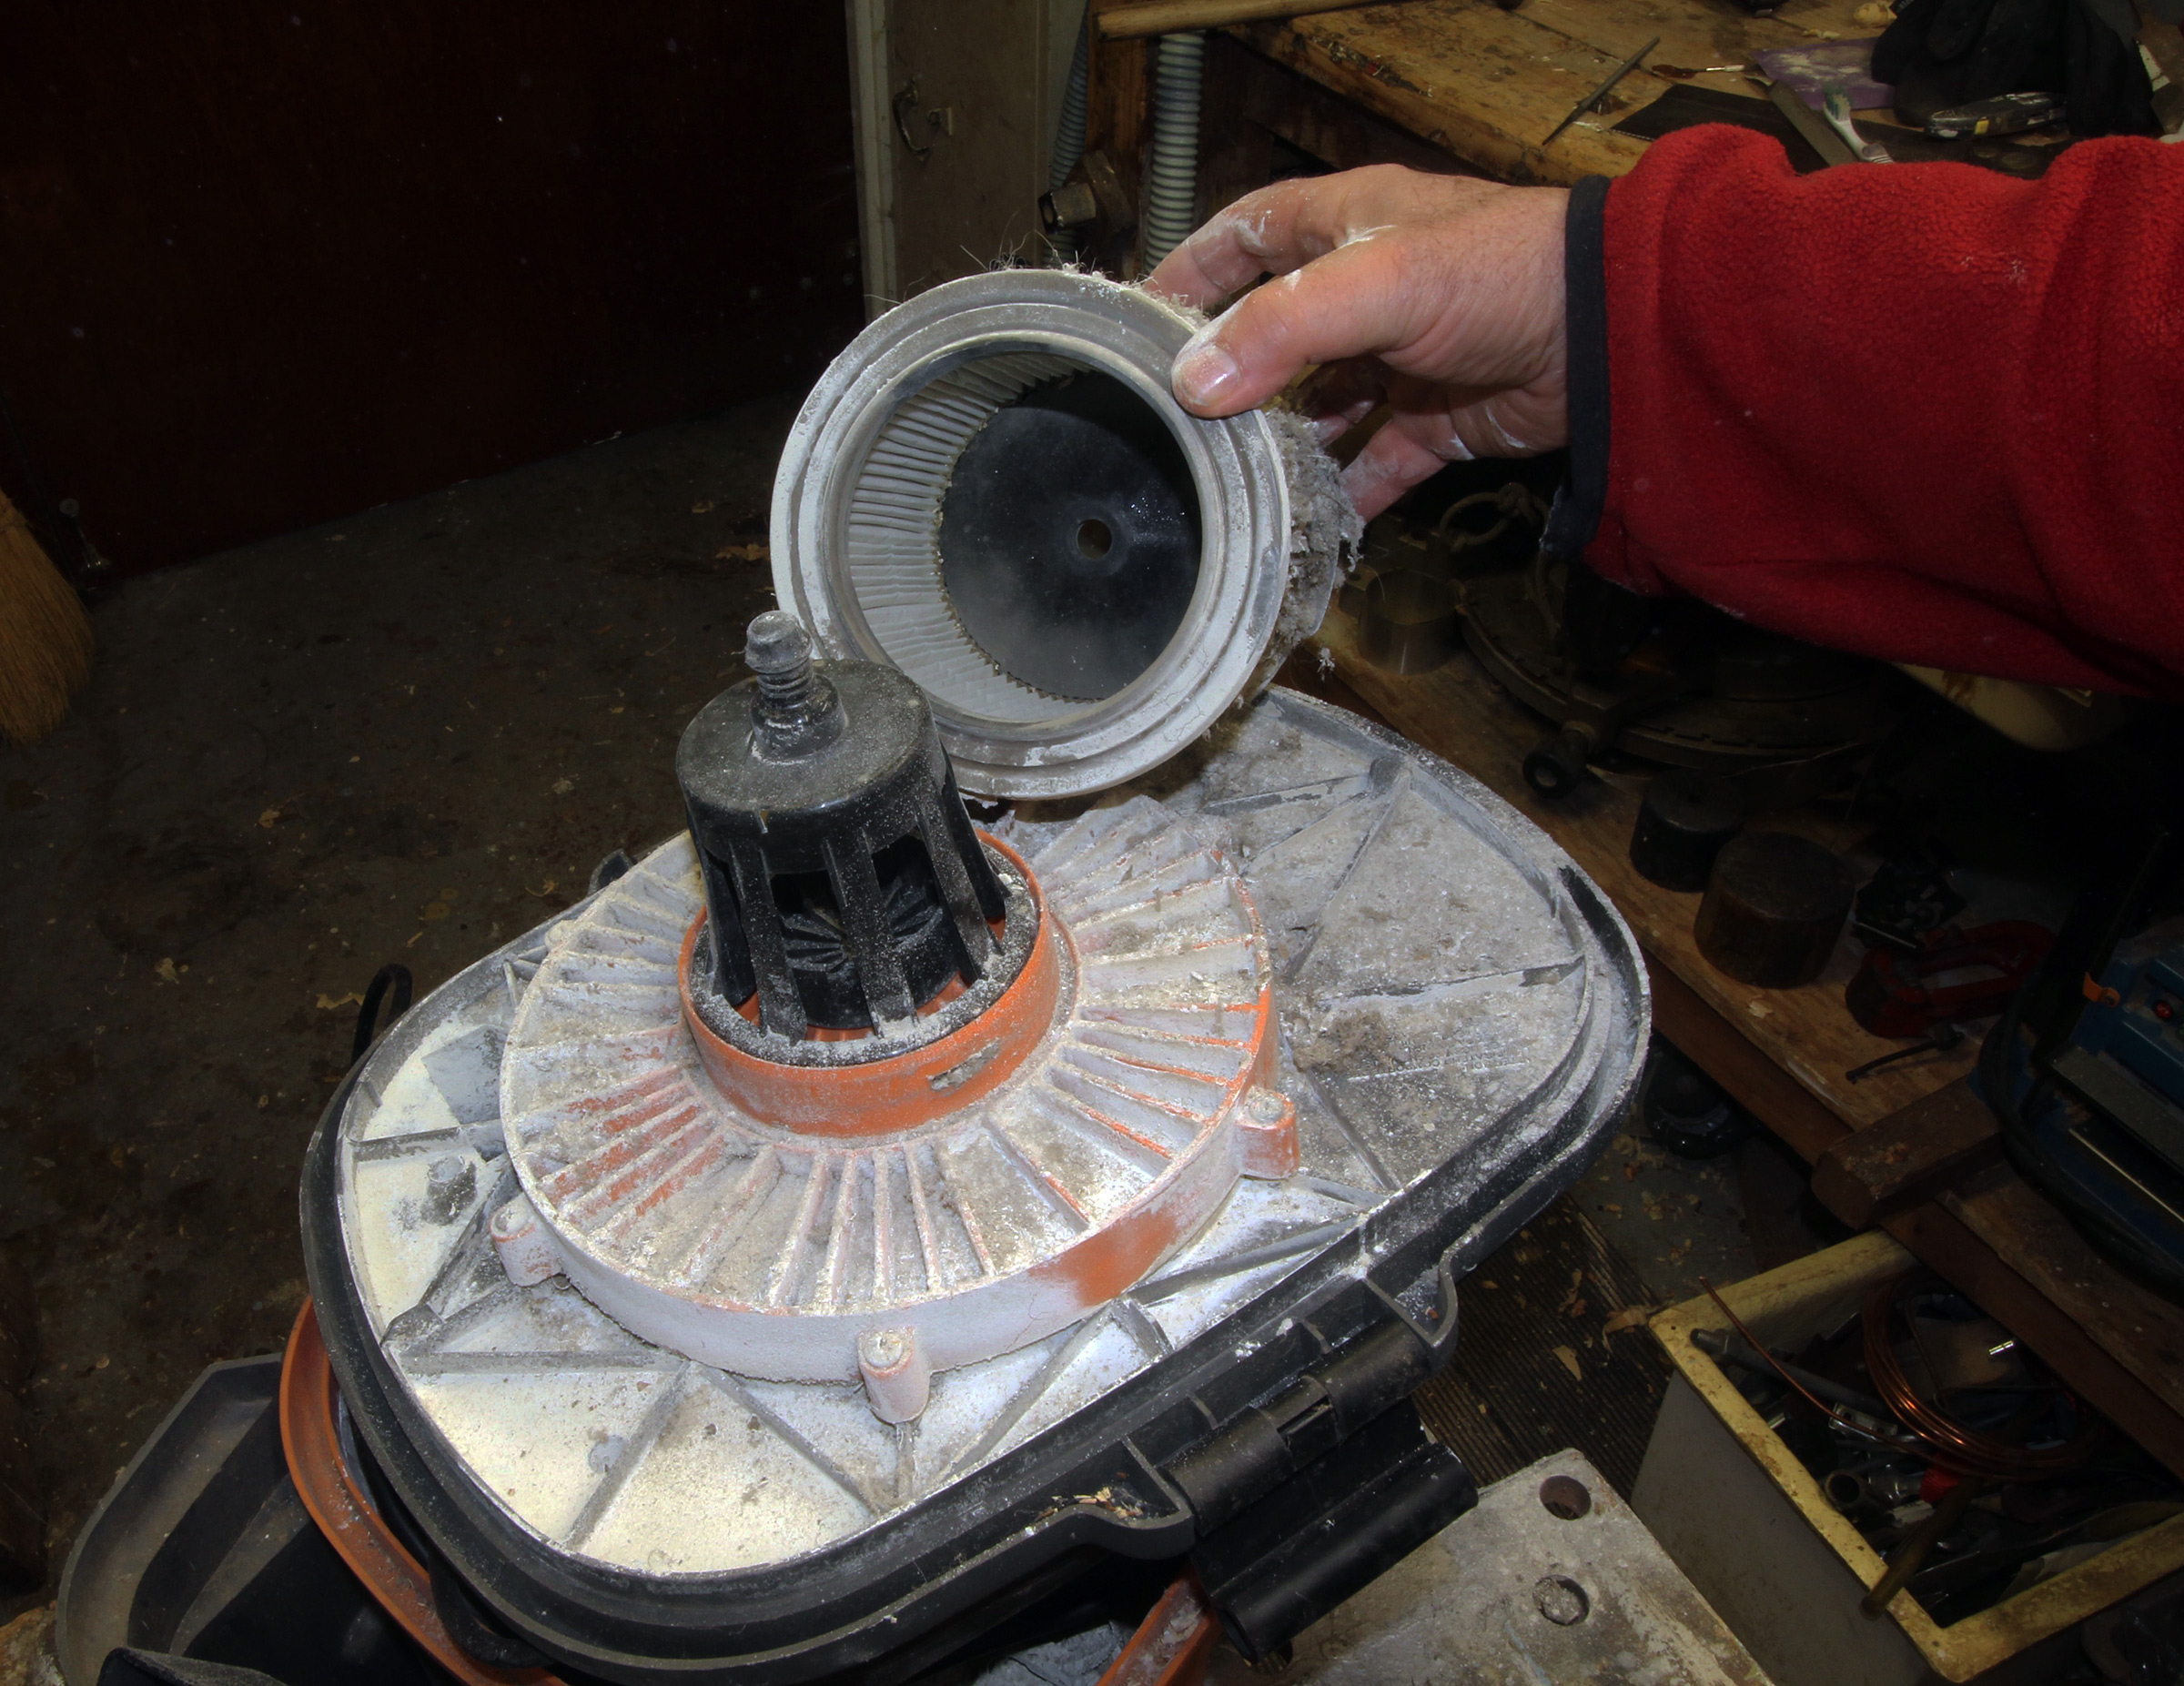
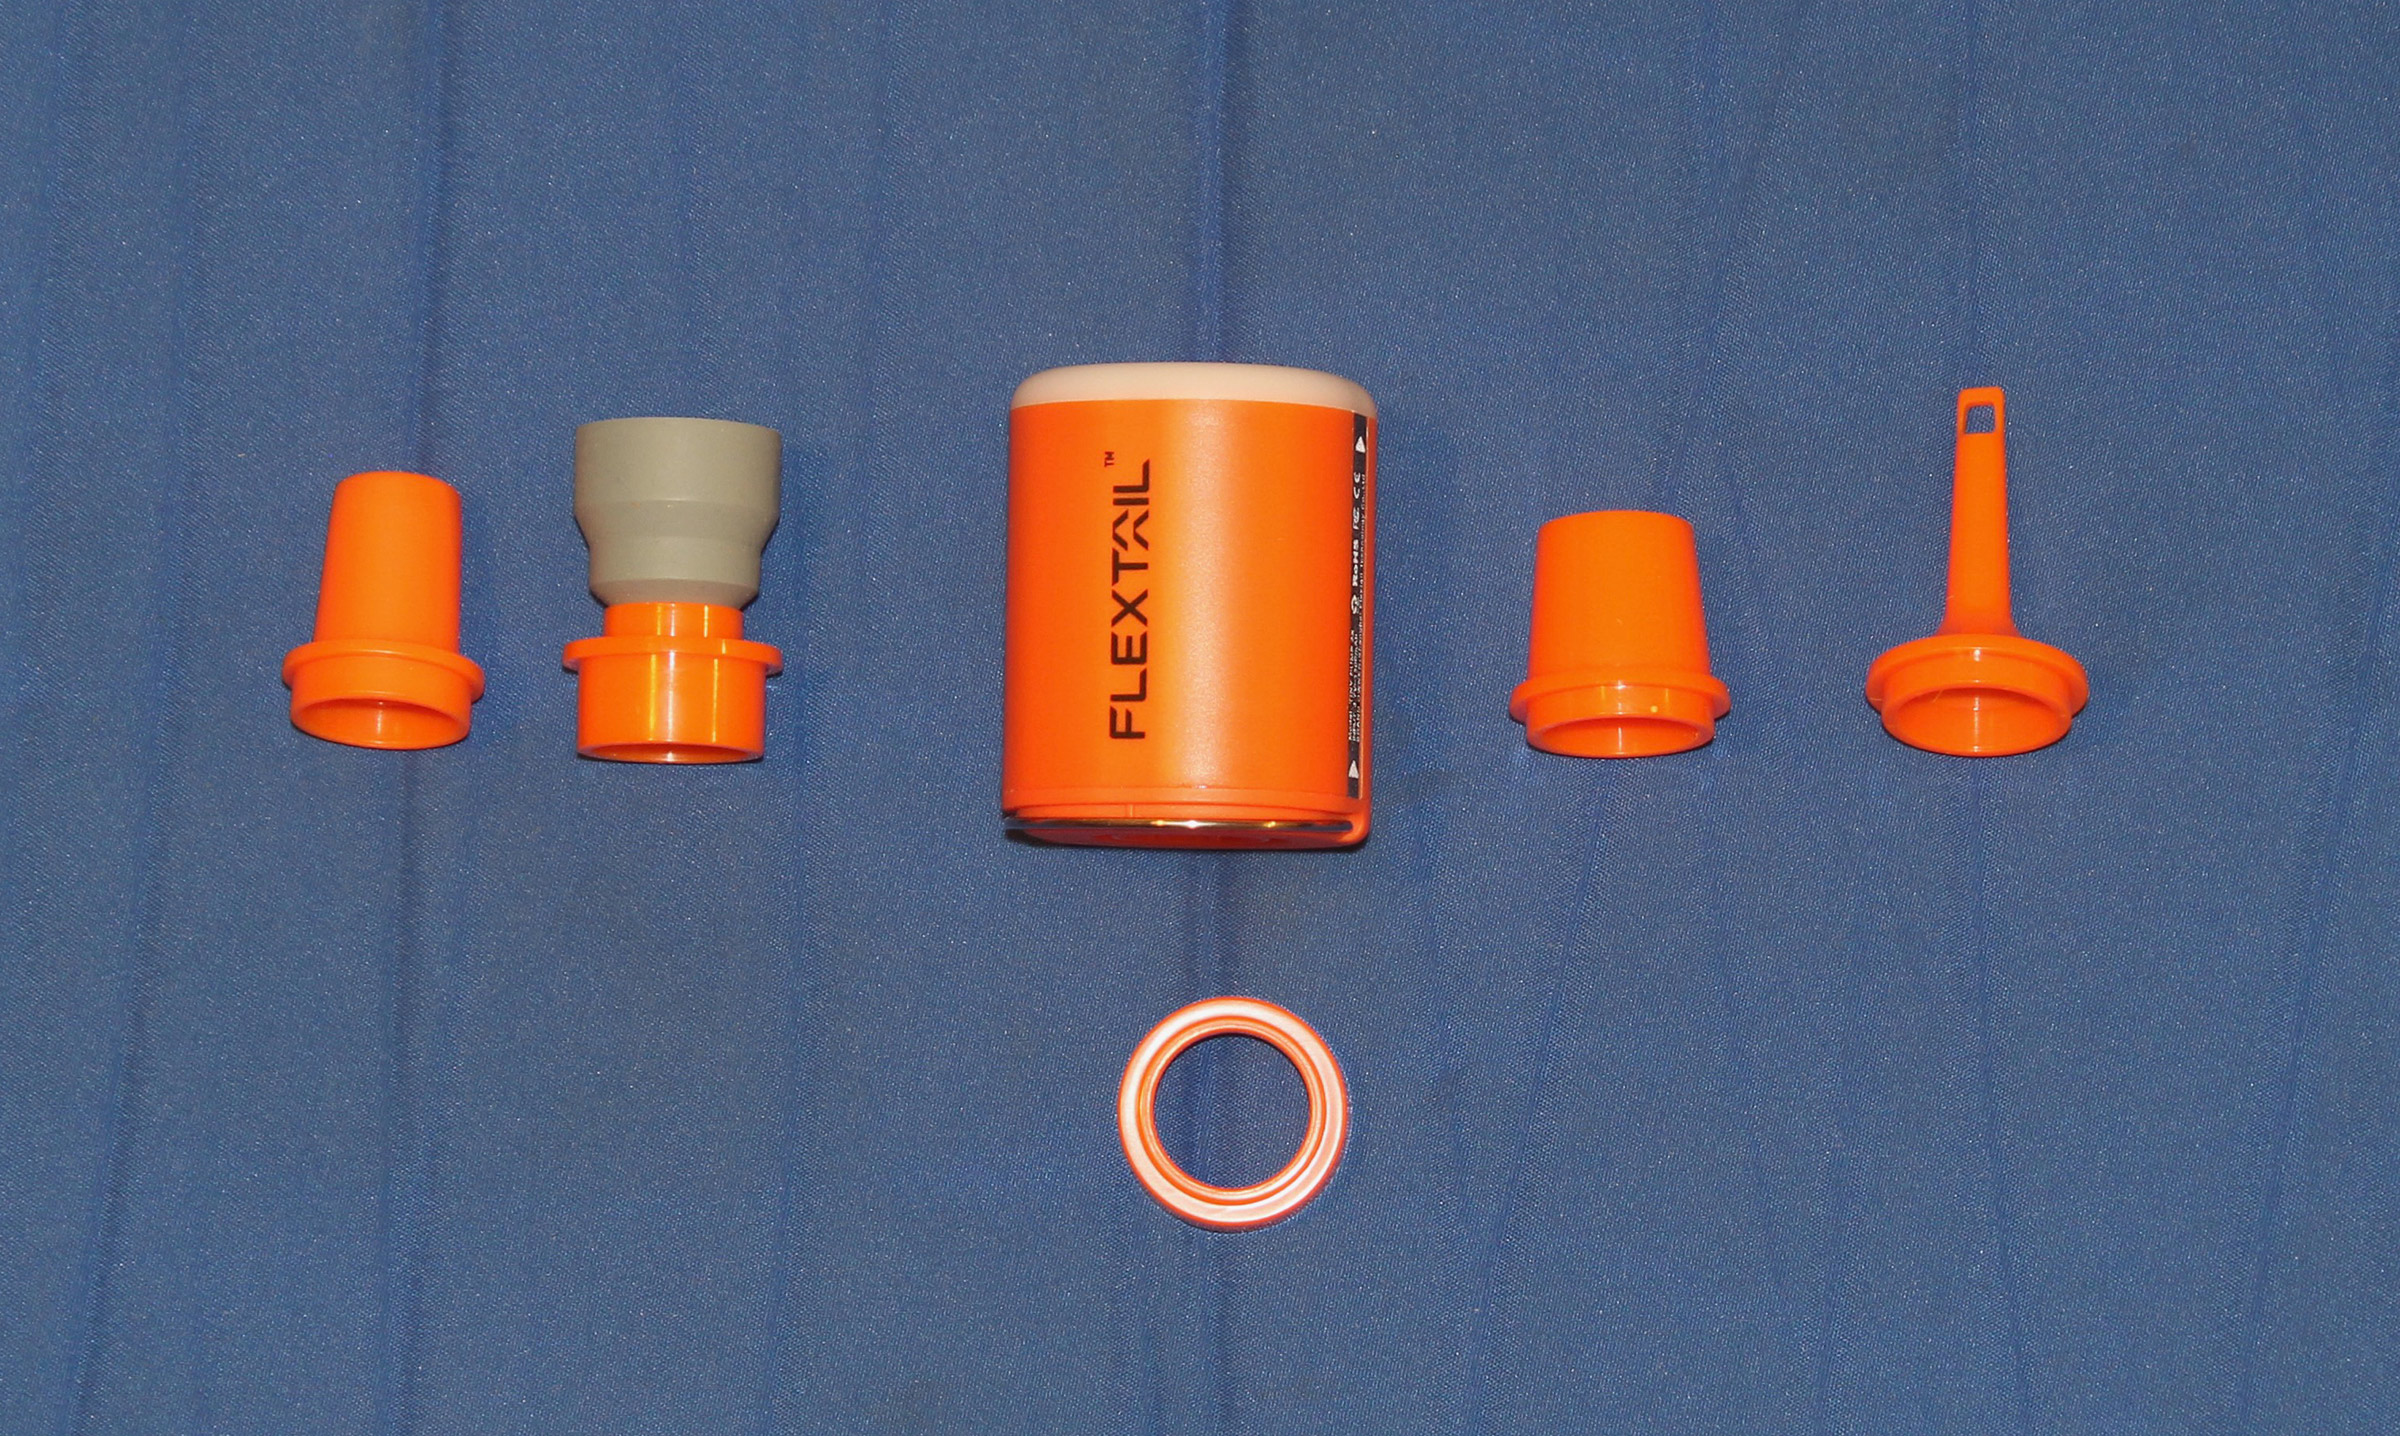
After removing the filter, I measured its inside diameter to make a plywood disc to fit.
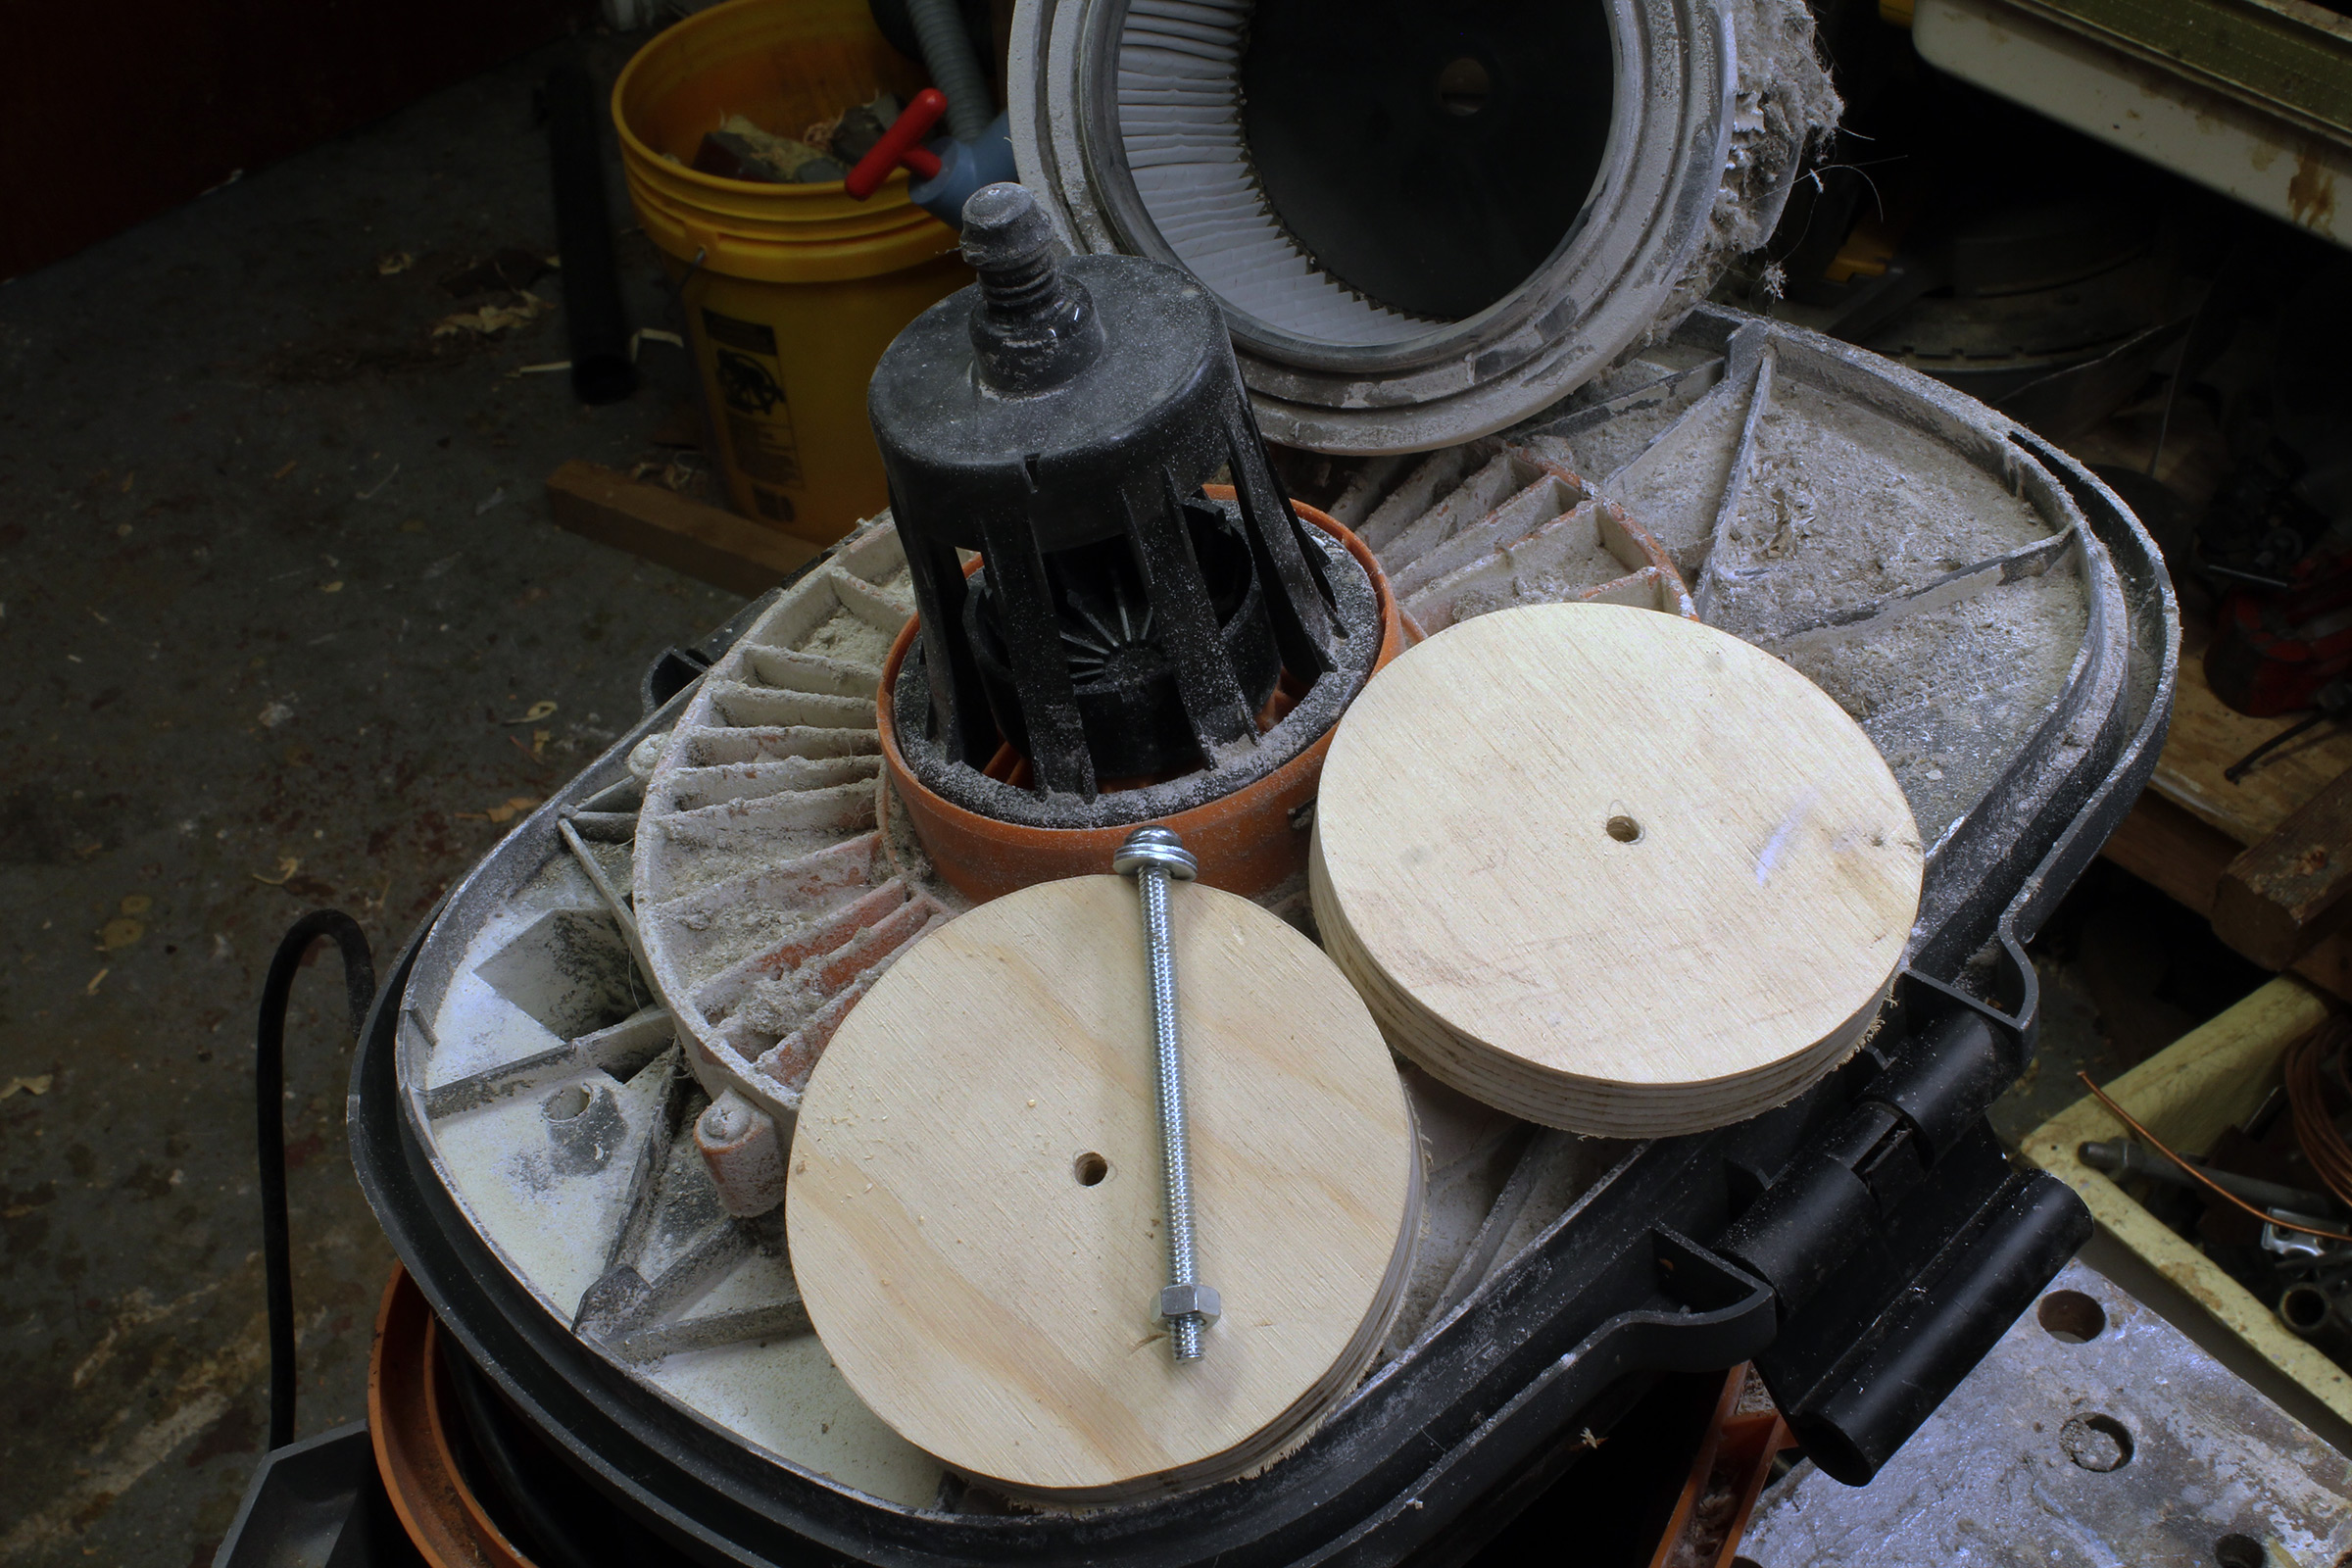
Two plywood discs with 1⁄4″ holes in the center and a 3 1⁄2″ machine screw with its 1⁄4-20 nut and two washers are ready to install.
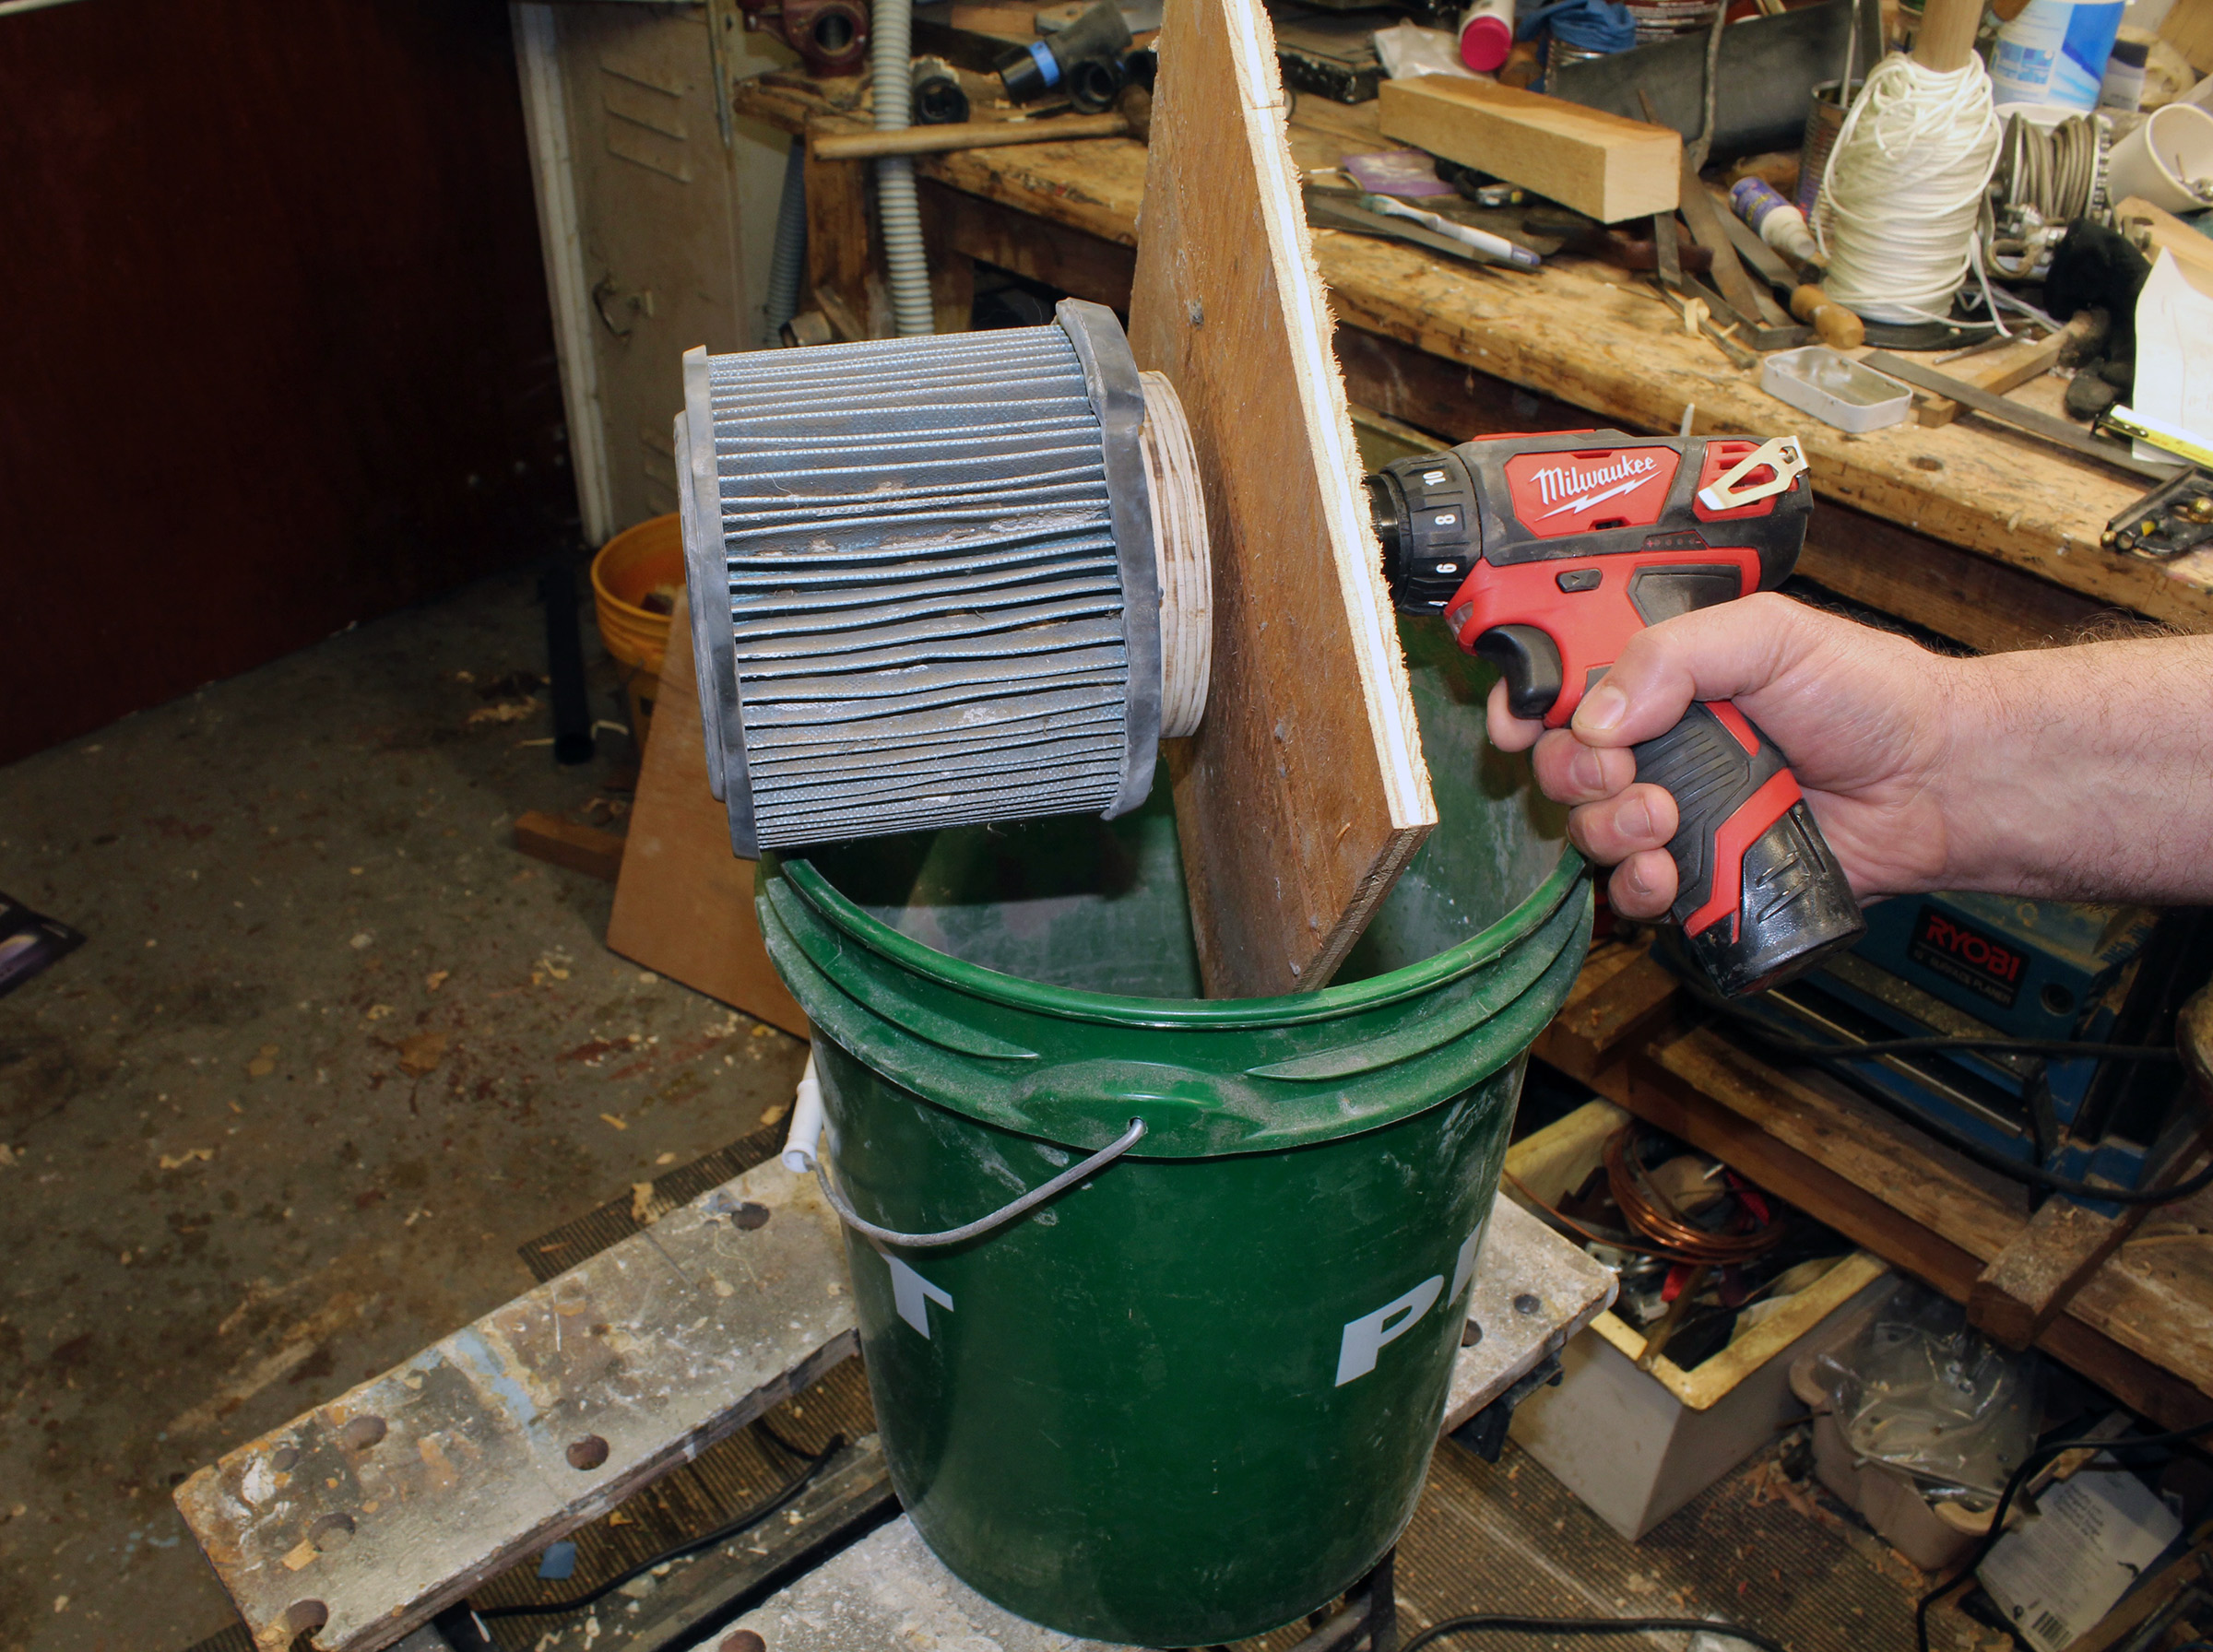
With the two discs sandwiching the end of the filter and held tight with the nut, the disc is ready to spin. The bucket will collect the dust, and the plywood square, with a 1⁄4″ hole for the machine screw, will contain whatever gets airborne.
Spinning the filter clockwise will loosen the nut, so the drill is set to run in reverse. The filter will wobble when it comes up to speed.
After a spin, most of the debris has been thrown off the filter. A few bits of caked dust in between pleats needed a little coaxing to break them up. Another spin finished the job. The drill’s chuck jaws can press into the machine-screw threads and the nut won’t come off the end as freely as it went on, but a wrench will coax it around.
This pile of dust came out of the filter. When the cleaned filter was put back into the vacuum, its suction was greatly improved.
While spinning a filter can effectively remove the material that it collects, preventing it from getting clogged in the first place will reduce how frequently you need to clean it. There are dust-separating cyclones that can remove debris before it gets to the shop vacuum. Unfortunately, these units are about as big as the vacuum and make it awkward to move the combination around and in and out of the shop. Inexpensive nylon mesh pool-skimmer socks happen to fit over shop vacuum filters and can catch debris. The dirty sock can then be removed, the debris shaken off, and the sock used again. Some of the finest dust can still get to the filter, yet it can do its job well without being excessively burdened by the coarse material that the sock collects.
I had recently replaced the filter on my larger shop vacuum, and to keep it from getting clogged quickly I pulled a pool-skimmer sock over it. Another sock is in the foreground to show its size before being stretched over the filter.
A good test of the sock was to vacuum the debris from my small vacuum, including the dust extracted from its filter, into the large one. That dust immediately gathered against the sock.
To get rid of the dust, I just needed to remove the sock and shake it into a garbage bag. The filter is no longer completely clean and white, but it doesn’t have a thick coating that would reduce the airflow.
A well-maintained shop vacuum will be a more effective tool, and the less time and mess that’s involved in keeping its filter clean, the less reluctant you’ll be to take care of it.
Christopher Cunningham is the editor of Small Boats.
You can share your tips and tricks of the trade with other Small Boats readers by sending us an email.
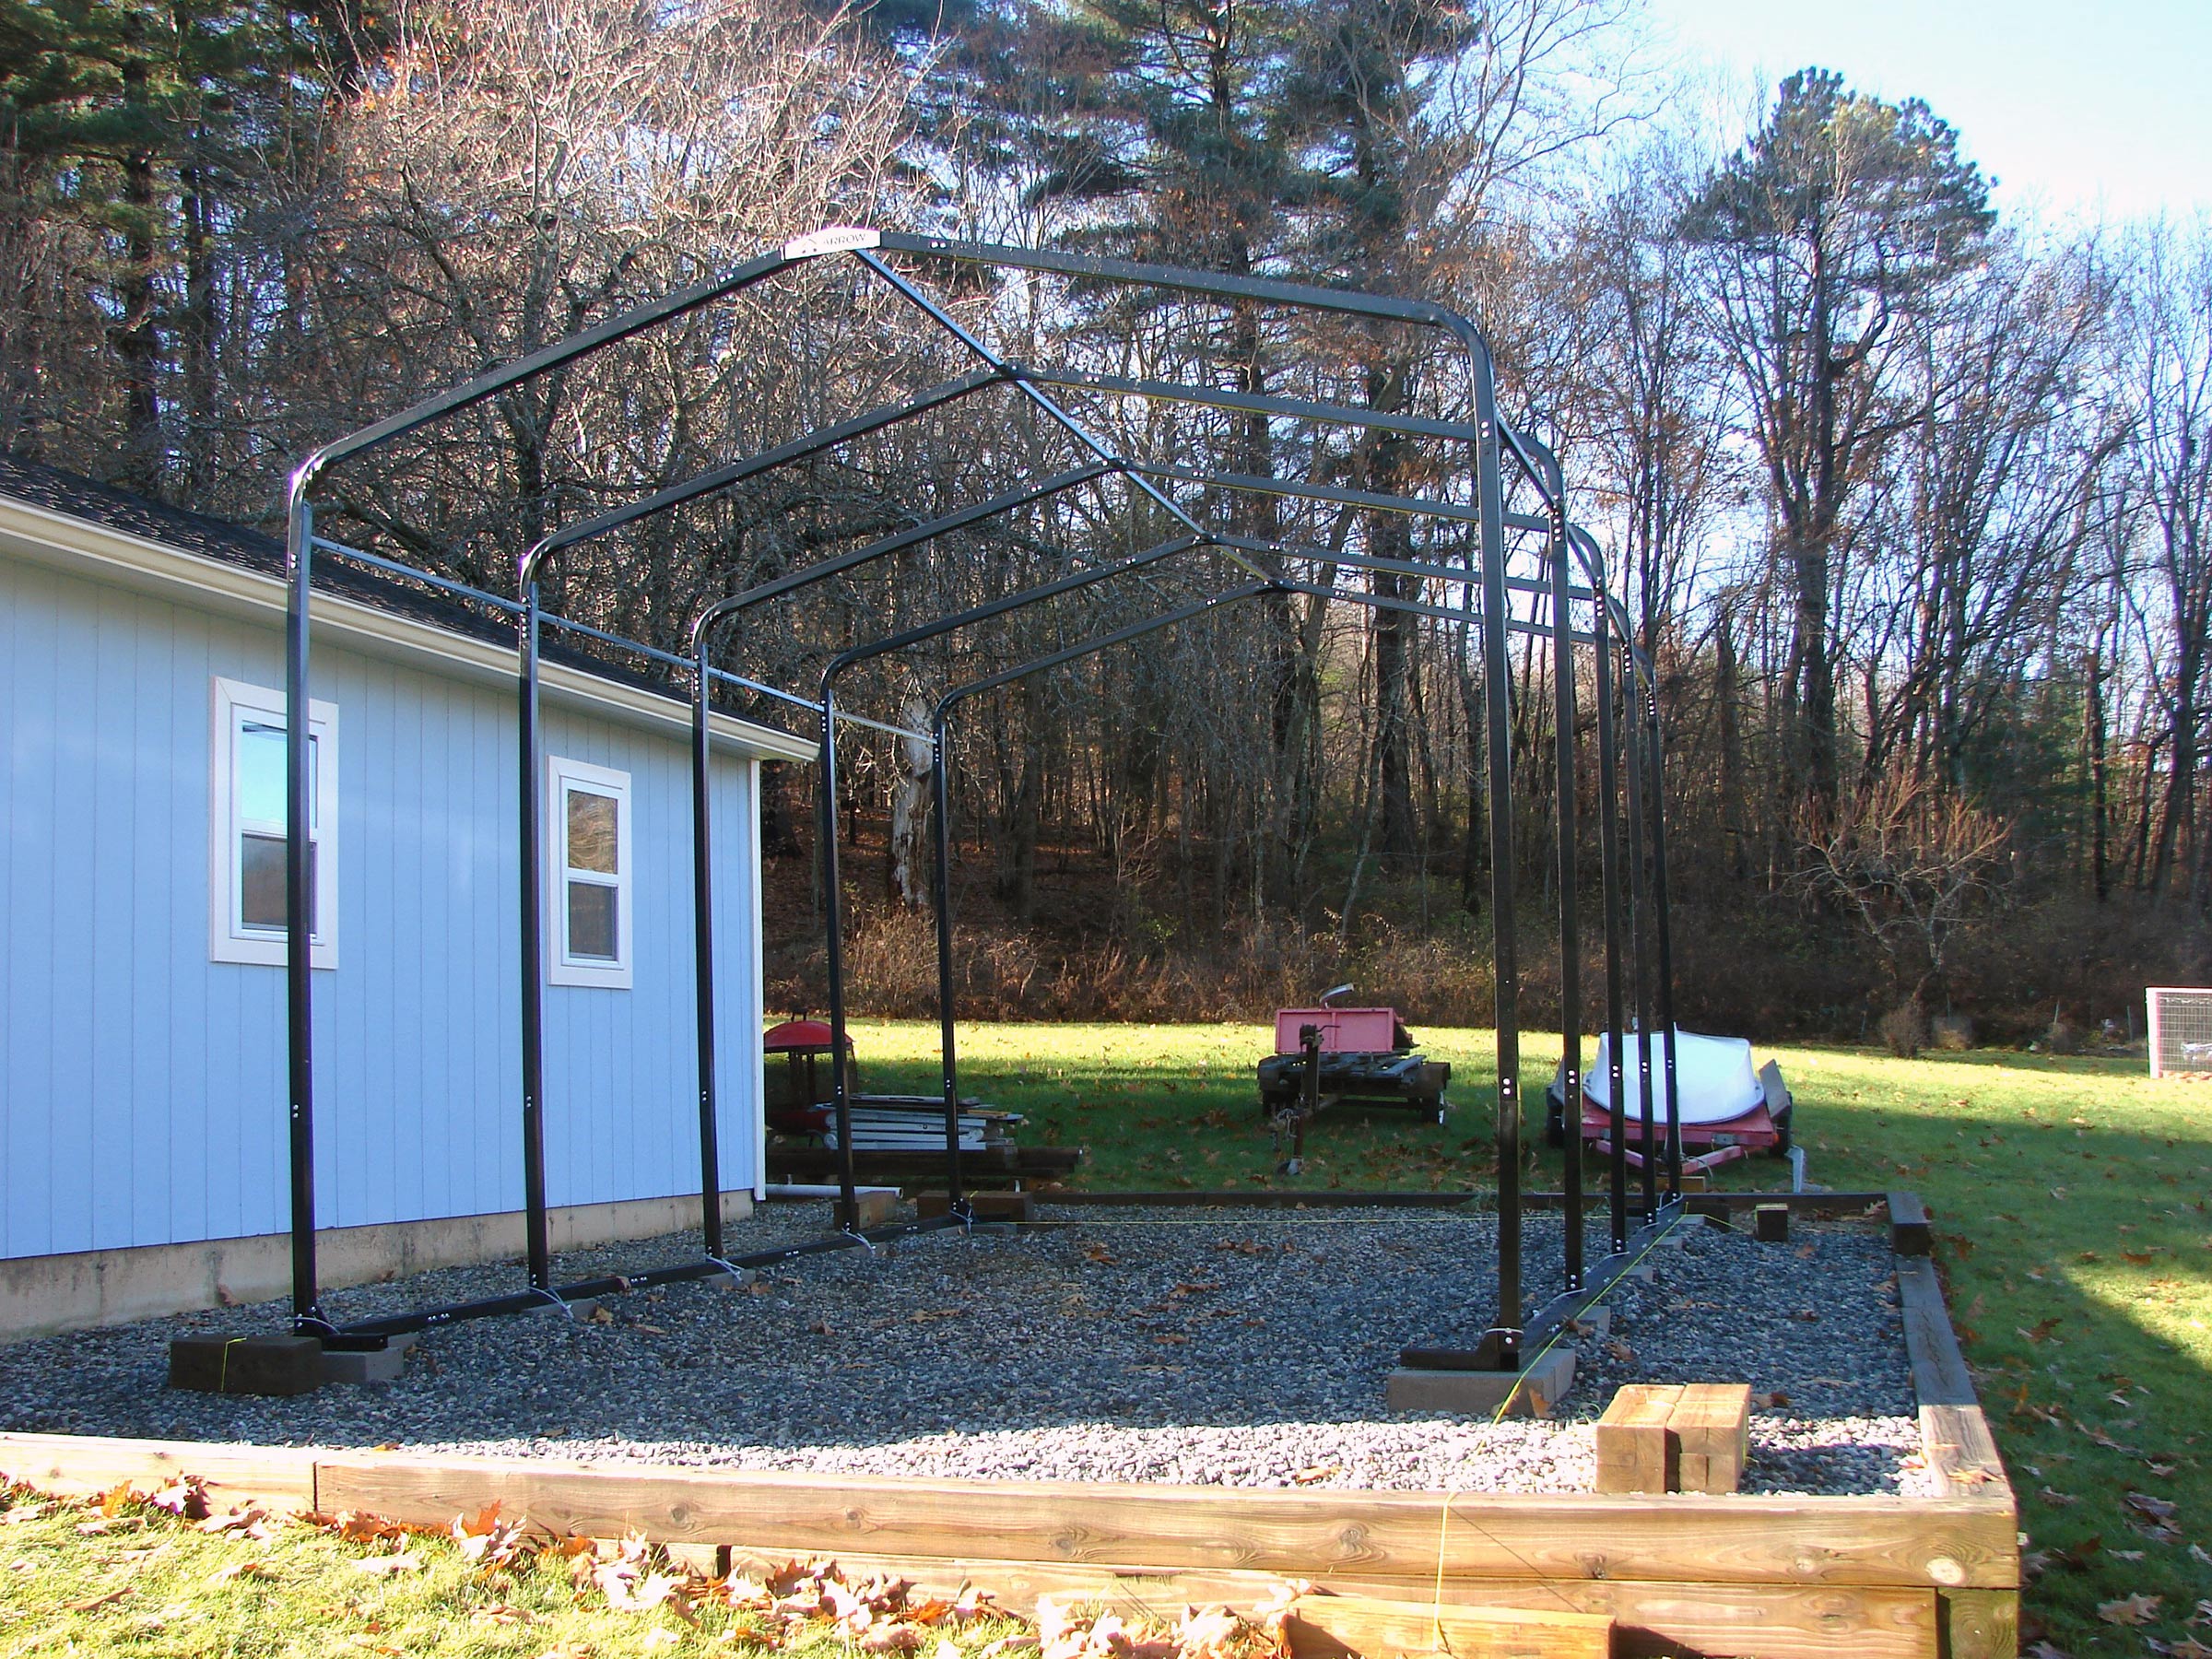
Rare is the small-boat enthusiast who has all the storage room needed for their boats and gear. Outside storage can be detrimental even with tarps or covers, particularly for wooden craft. When my daily routine of moving boats in and out of the workshop grew tiresome, I investigated fabric-covered “portable” garages as an auxiliary storage solution.
The ShelterLogic ShelterTube line is a step above the lightweight shelters sold in big-box stores. The framework is heavy-gauge 2″ × 2″ square steel tubing, powder-coated for corrosion resistance. I opted for the mid-grade heavy-duty shed, which has a 14.5-oz cover and roll-up zippered doors at both ends. This grade is not sold in retail stores and is only available directly from the manufacturer. Each unit is built to order, with a variety of sizes available up to 99′ long. For my space I chose a 12′ × 18′ shed with a 10′ height.
Photographs by the author
The assembled frame is made of 2″ × 2″ steel tubing and is considerably sturdier than designs with round-tubing. A flat and level surface is critical to a successful assembly.
Four weeks after I placed an order with ShelterLogic, my unit arrived by truck, neatly and efficiently packaged, with all the tube ends protected by plastic caps. As I unboxed it the quality of the components was impressive; this is a well-thought-out design. The standard of construction and the organization of the kit are excellent.
A solid and level foundation is recommended, and unless one already has a suitable location, the importance and time required to create one should not be underestimated. ShelterLogic recommends a concrete pad as the optimum base; however, that wasn’t an option for me and I instead used a base of crushed stone with carefully leveled solid concrete blocks under each of the 10 legs.
The IKEA-esque assembly instructions were almost entirely pictorial but proved comprehensive and easy to follow. Each connection is secured by eight self-tapping screws (hundreds are needed in total), so both a drill for pilot holes and a second drill or impact driver for the screws are a must. Several stages of the assembly, such as attaching the overhead beams and securing the cover, require one or more helpers. Otherwise, the assembly was straightforward with no surprises. Apart from tools, everything needed is provided, including ground anchors and a kit to roll up the doors with a pulley system. The manufacturer recommends a weekly check on the cover tension to snug it up as needed. I added LED shop lights to make the interior more functional at night or when the doors are closed.
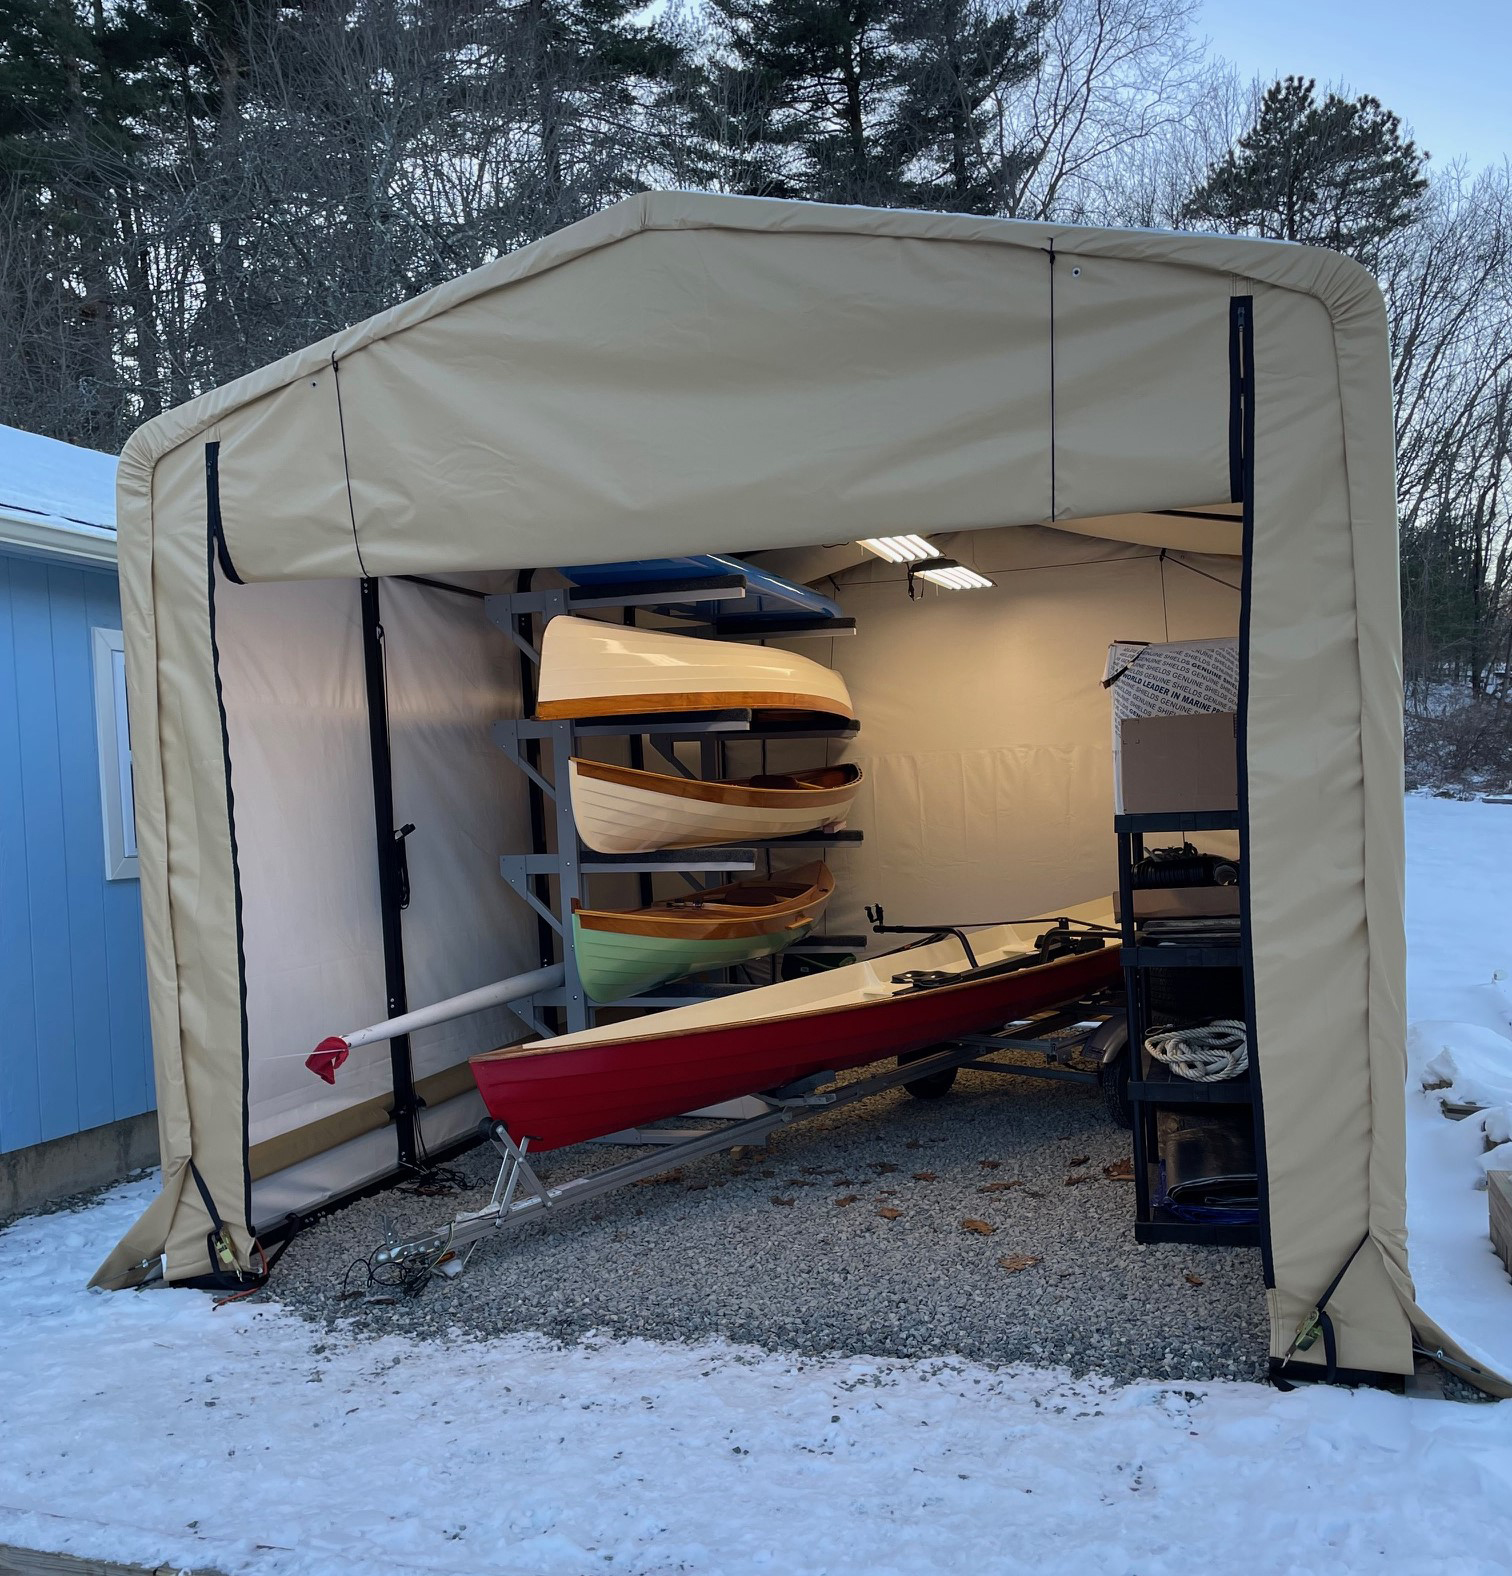
Roll-up doors at both ends provide easy access to the interior. LED lighting (not included in kit) together with the white interior provides a functional workspace.
The real test would be how the shelter held up to extreme weather. Here in New England, I did not have to wait long for the shelter to be put to that test. Within the span of several weeks we had two winter storms with 50-mph wind gusts; sandwiched in between was a 15″ snowfall. The shelter has handled everything that a Massachusetts winter could subject it to without any issues.
The ShelterTube structure has met all my expectations, and I continue to be impressed by its strength and stability. I now have room for several canoes and a paddleboard stacked vertically on a rack, space for some storage shelves, and even a small workbench on the opposite side, and enough room left over to roll my 18′ Annapolis Wherry into the center before closing everything up.
Walter Gotham operates Chadwick Pond Boats, a small shop in Haverhill, Massachusetts, specializing in lapstrake plywood small craft.
The ShelterTube garage is available direct from ShelterLogic, 1–800–563–8383. Prices start at $1,599.99; the unit described was $2,399.99.
Is there a product that might be useful for boatbuilding, cruising, or shore-side camping that you’d like us to review? Please email your suggestions.
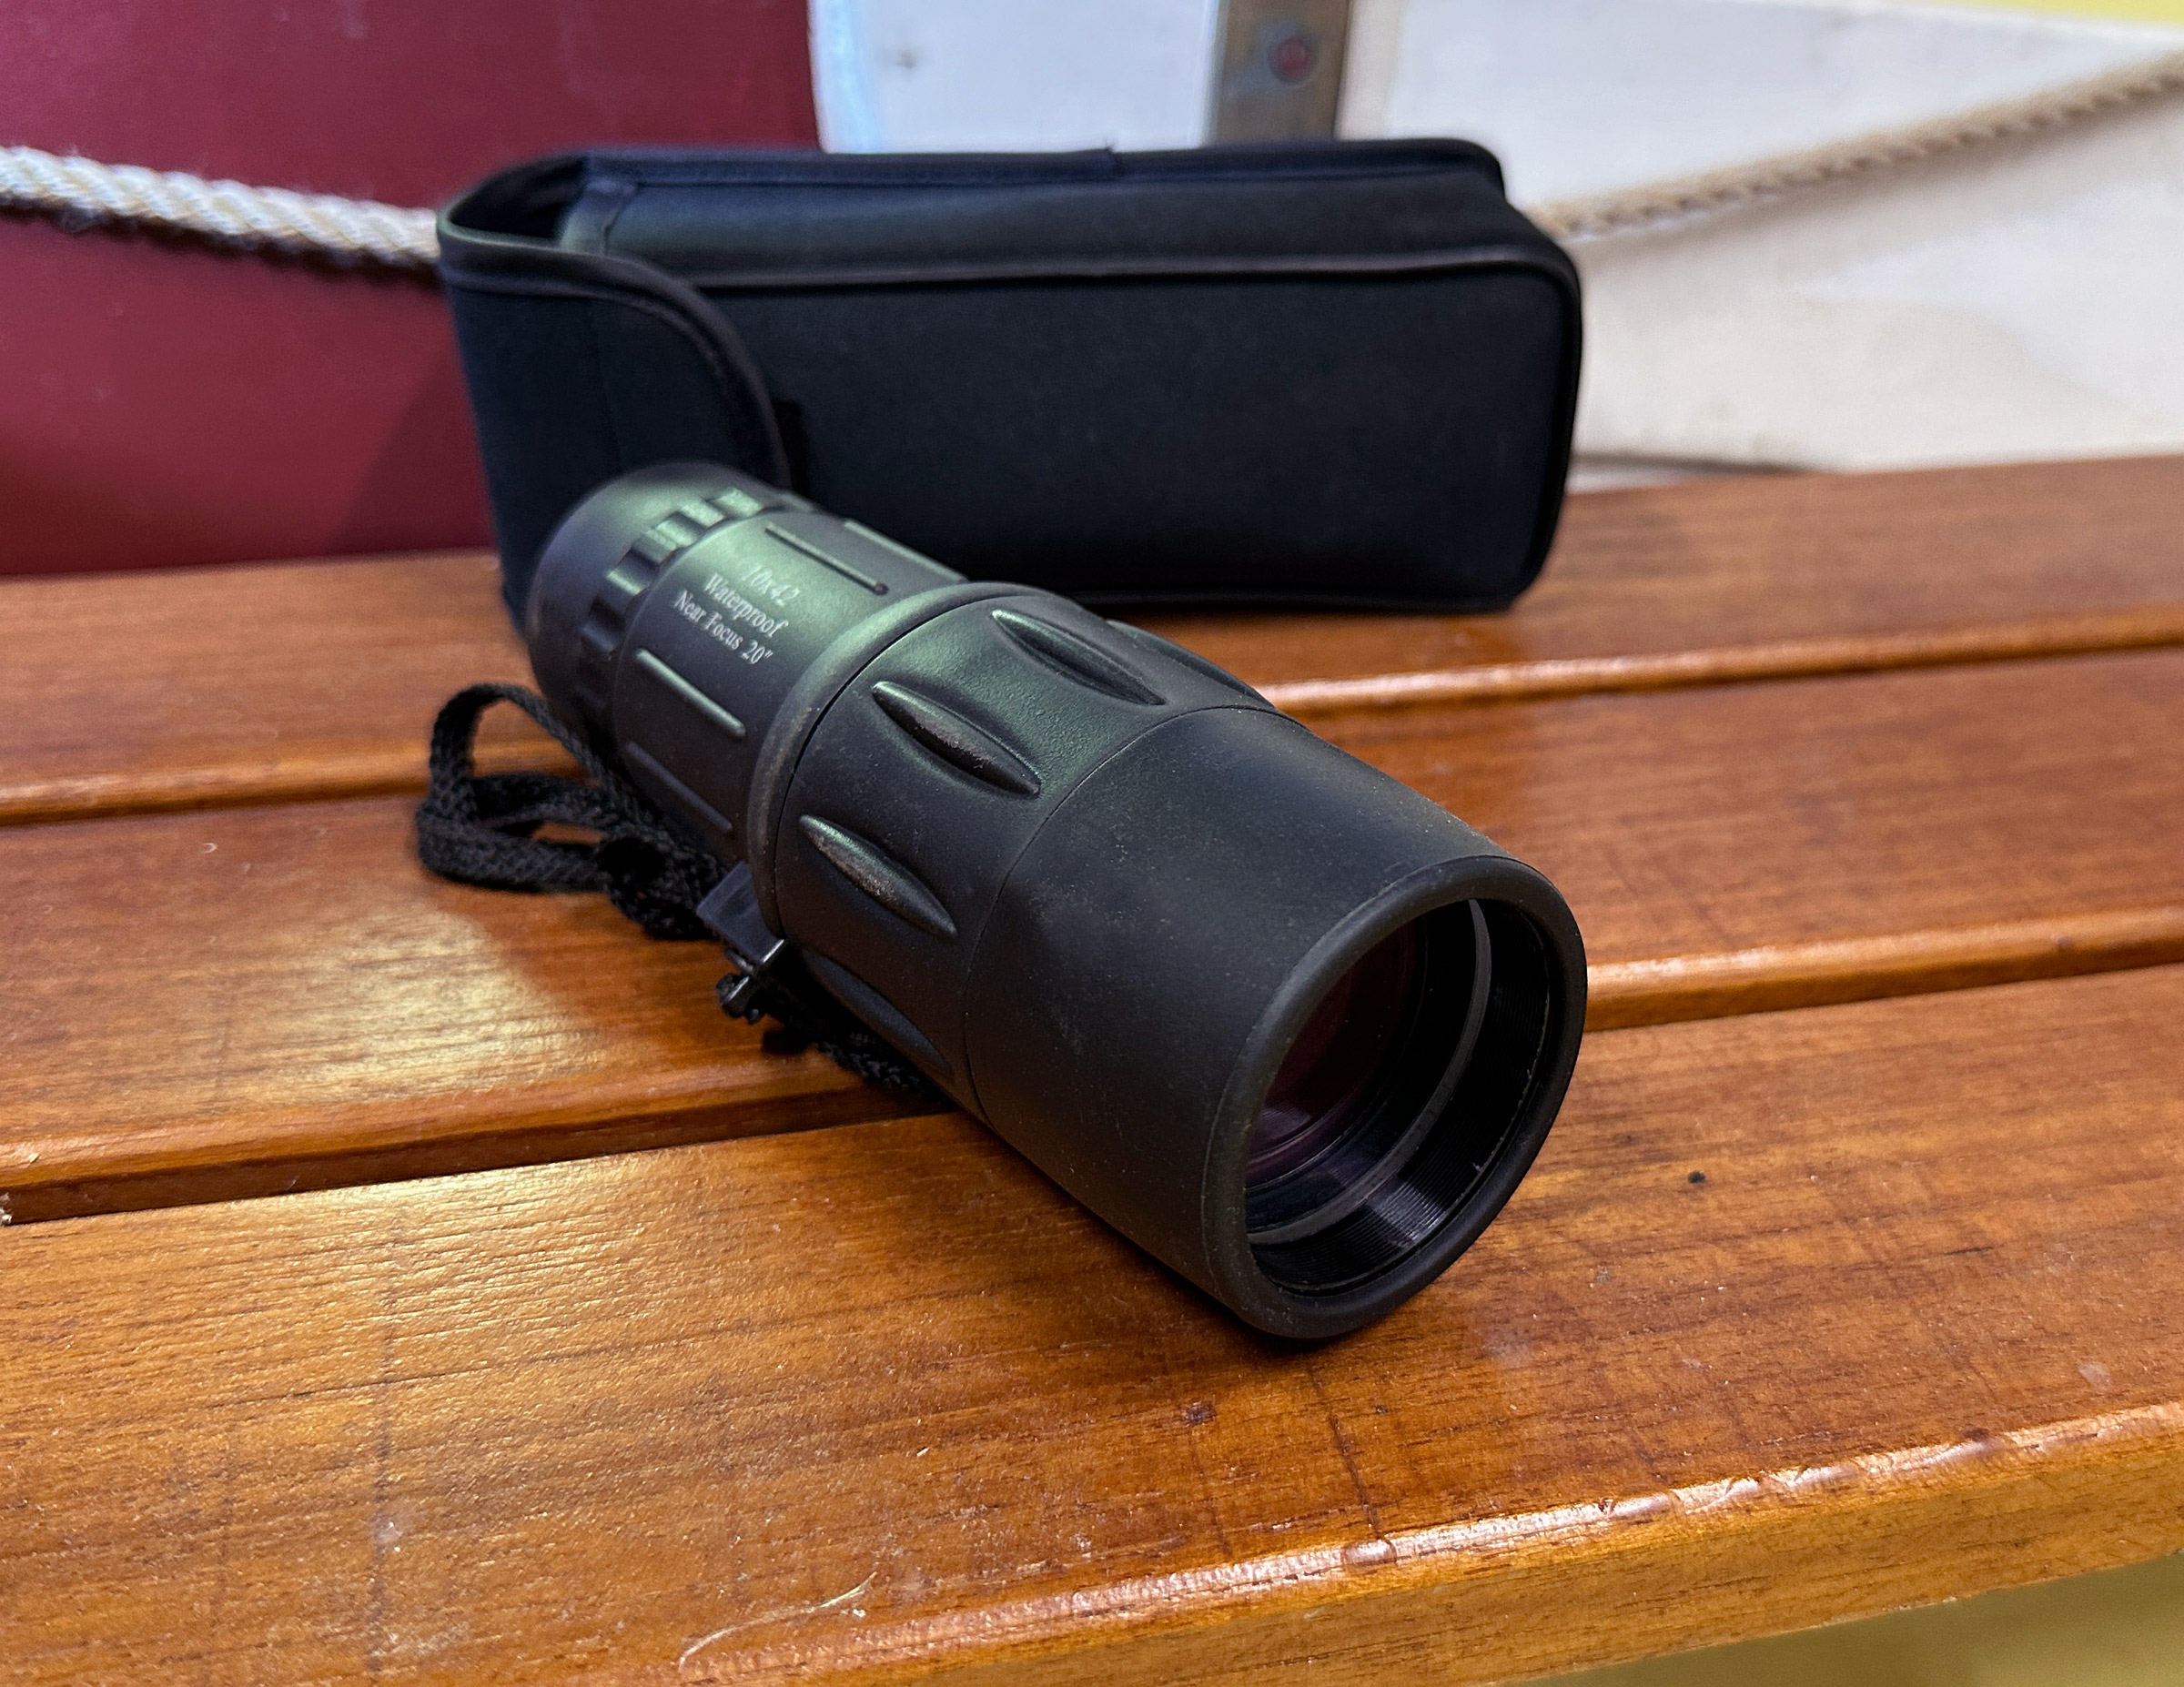
When we were on the lookout for a lightweight monocular to carry with us for waterway scanning and wildlife spotting, we checked with Orion, the company that made the telescope we enjoy using at home for stargazing, and discovered the Orion 10×42 Waterproof Monocular. It has turned out to be useful, durable, and reasonably priced.
Photographs by the authors
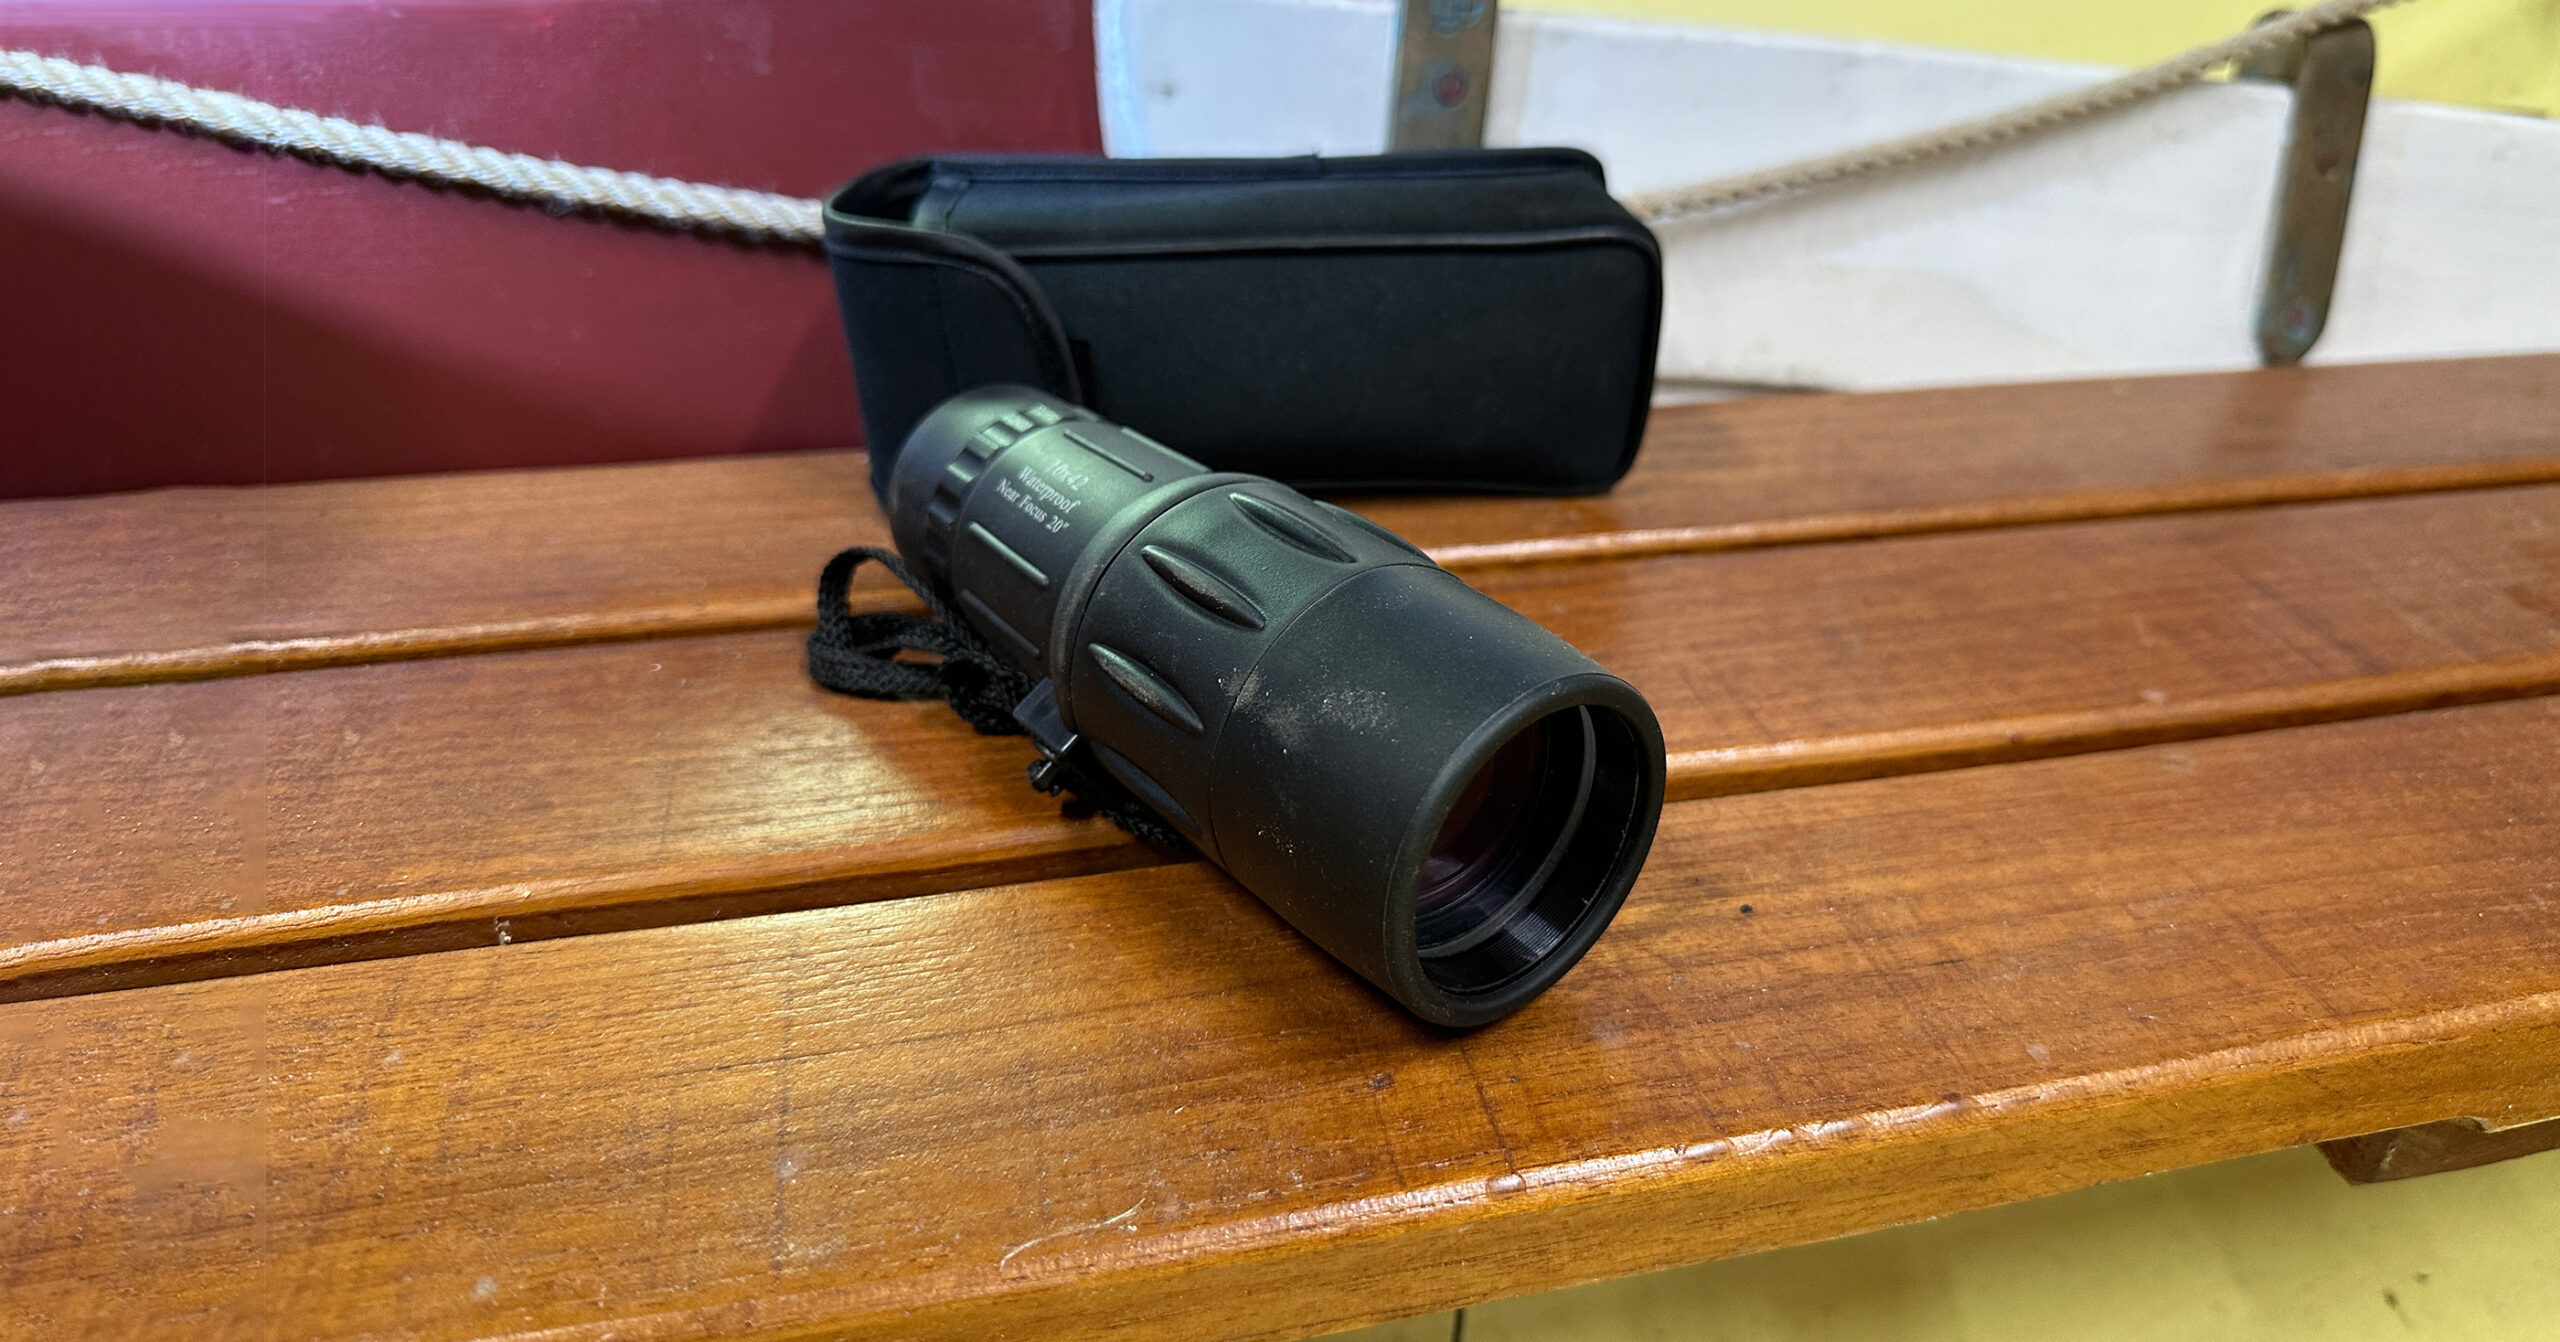
Orion’s 10 x 40 monocular is compact and has an exceptional ability to focus on objects as close as 20″.
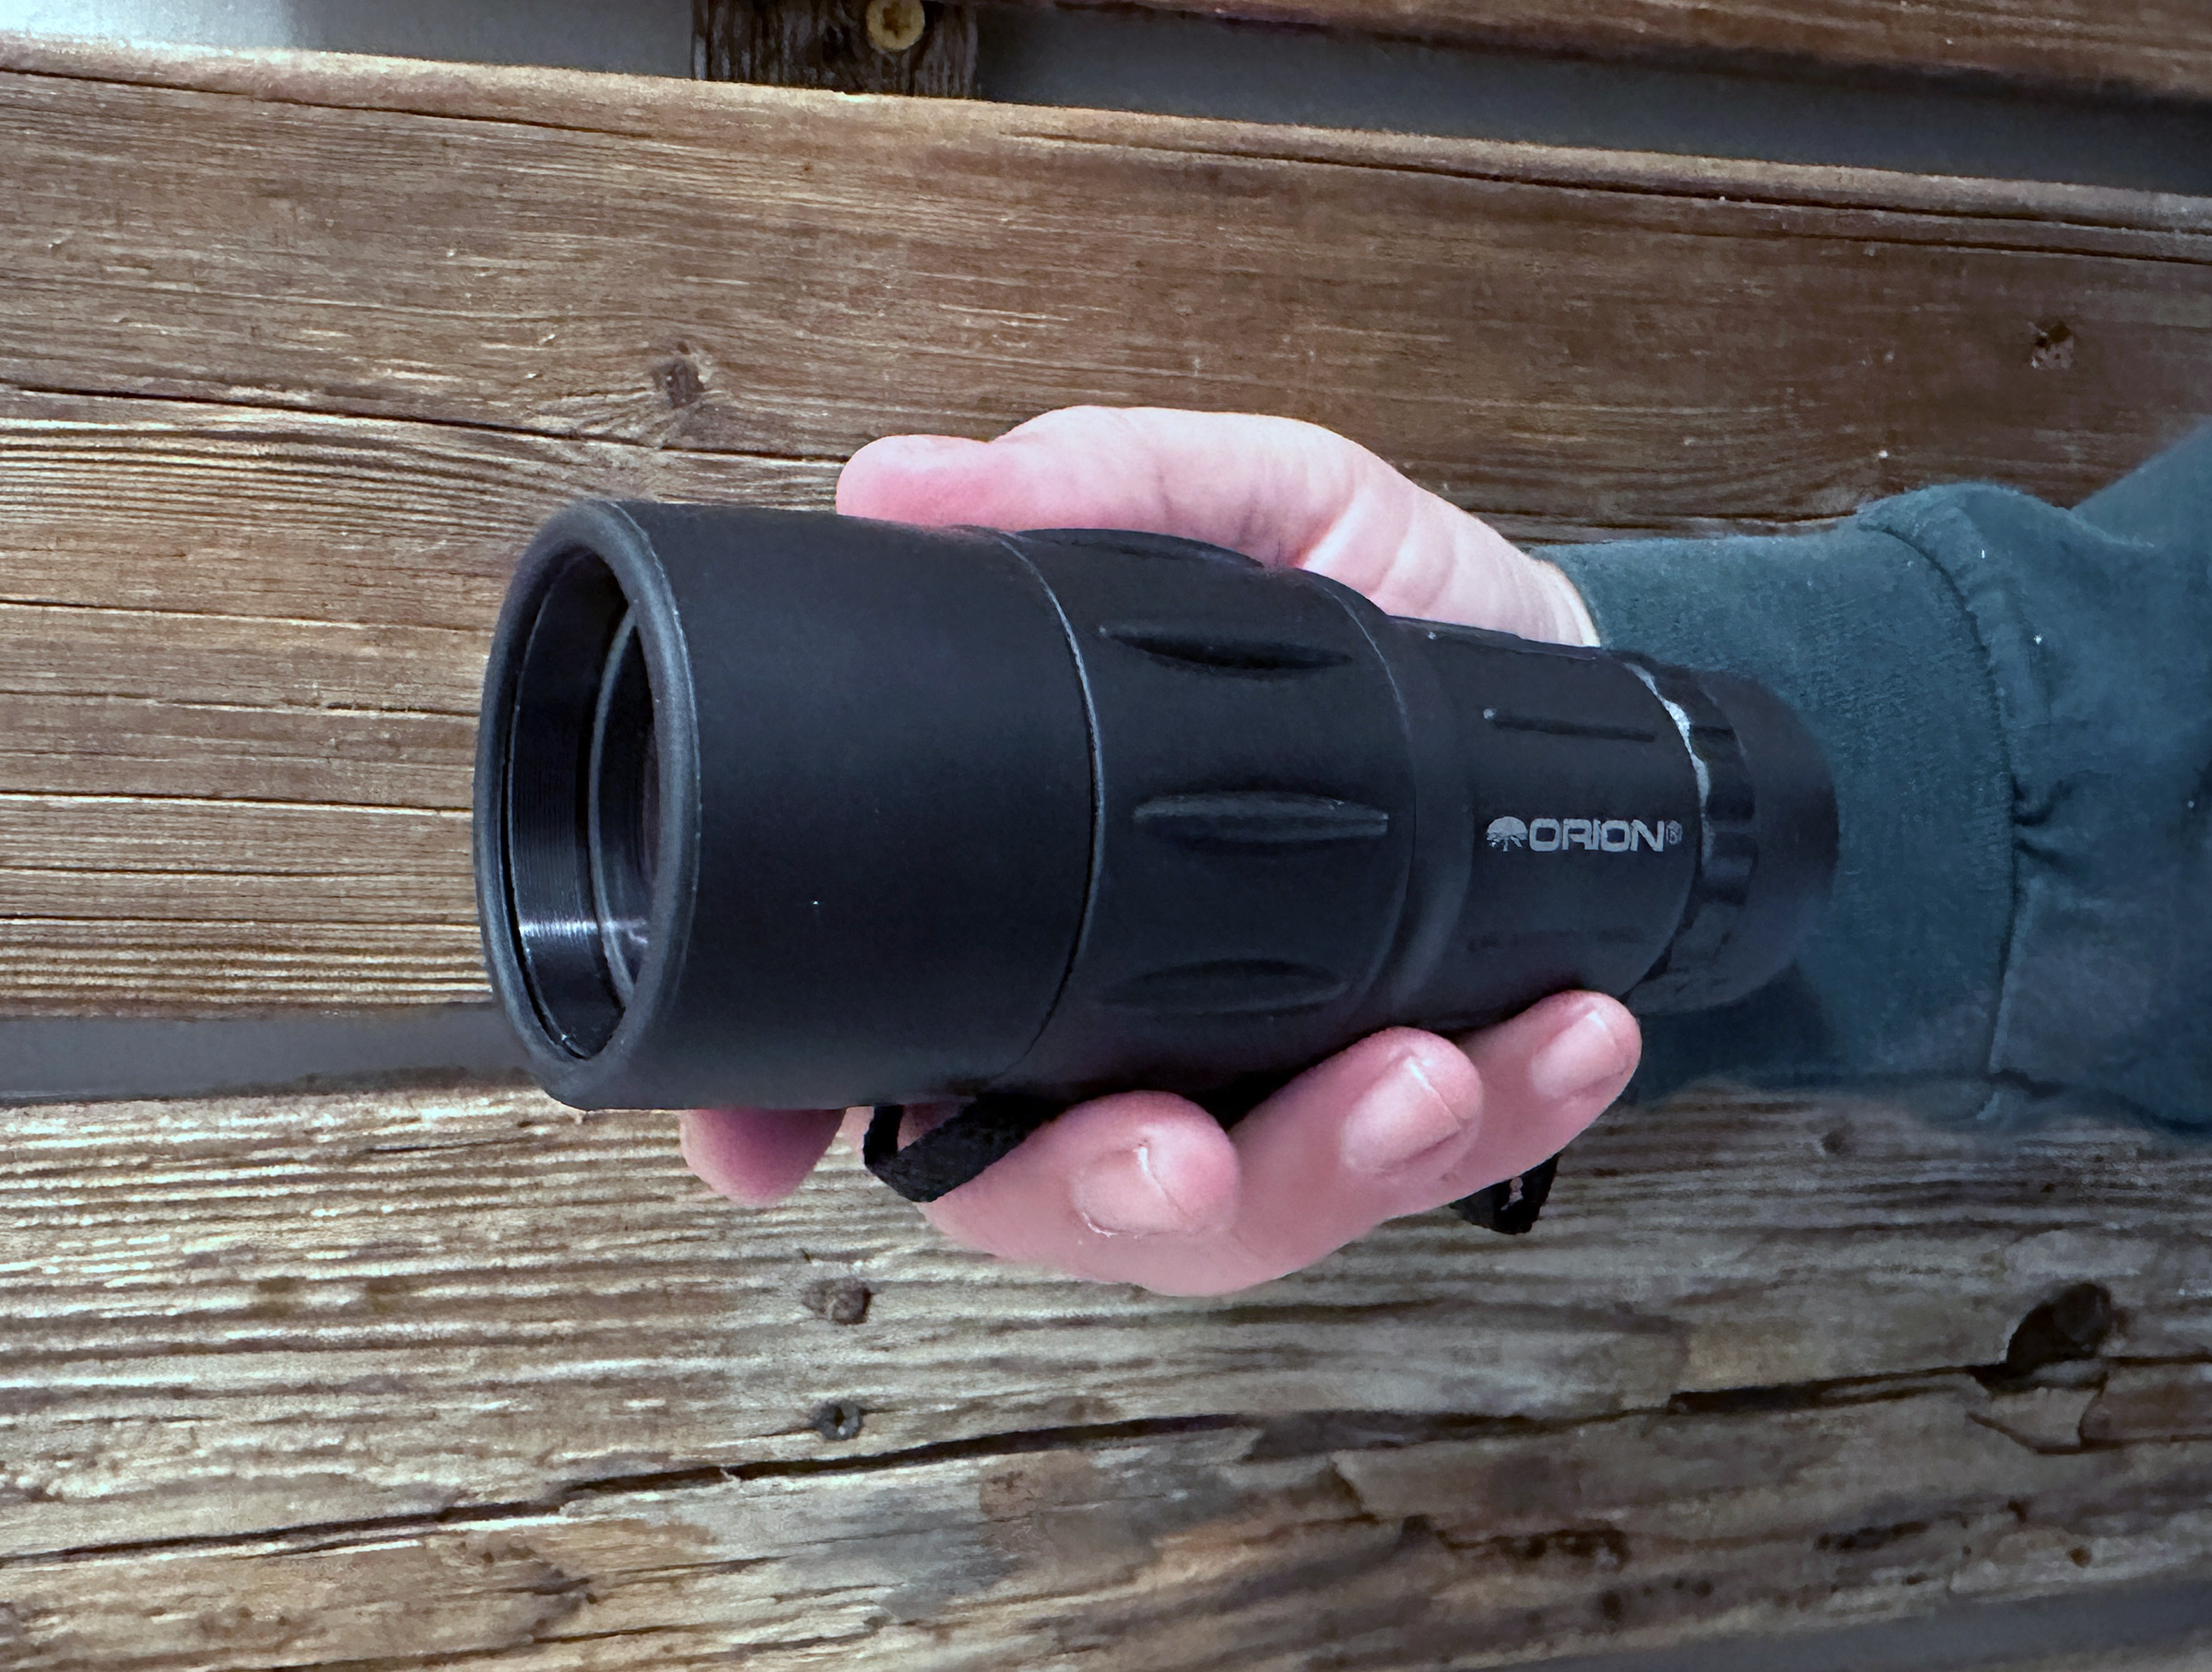
There are many thoughtful features packed into this small, well-made package. The monocular weighs only 11 oz, is a comfortable size to hold, and has a good ergonomic feel to it, thanks to the body’s slim, straight design—made possible by its roof prism, which takes the inverted image coming from the 42mm lens and flips it vertically and horizontally without requiring the zig-zag shape a monocular equipped with Porro prisms has to have. The straight body of the Orion makes it much easier to aim—you just sight down the tube, then look in the eyepiece. The molded rubber armor provides a secure grip on the 6.1″-long monocular, and the focus-ring ridges are long and raised just enough to make them easy to turn, even if wearing thick gloves. The objective and eyepiece lenses are recessed in protective rubber rings, so the monocular can be set face down without concern of scratching the large objective lens. The monocular is listed by Orion as “waterproof,” but it isn’t given a standard IPX rating. Instead, the website says that it has “waterproof rubber-armored construction for viewing in virtually any weather—but submersion or scuba diving is not recommended!” A neck strap and a neoprene carrying case with belt loop are included, and the body has a standard 1⁄4-20 threaded mounting socket for a monopod or tripod.
The monocular comes with a case and a strap that attaches to a ¼-20 fitting that will fit most tripods.
A rubber eye guard provides cushioning for comfortable viewing. The guard can twist down so one can keep glasses on while using the monocular. There is a fine-focus ring on the eyepiece that has a more sensitive adjustment than that of the barrel ring, but we mostly use the large focus barrel.
The optics provide a clear, sharp view and the coated 42mm objective lens gathers plenty of light for a bright image even in fading dawn or dusk lighting. The field of view (309′/1,000 yards linear, 5.9° angular) provides enough of a viewing area to get the monocular quickly aimed at navigational markers and landmarks as well as to track other boaters. The 10× magnification provides a closer look with more detail than does the 7× magnification more commonly used aboard boats, which are usually in motion, so the more powerful monocular is better suited for use on calm water or on shore. On our beach we enjoy using the monocular to view flotsam. We can study the intricacies of migratory waterfowl without disturbing them and look for tiny treasures like small shells or sea life we might not otherwise spot hidden among common objects.
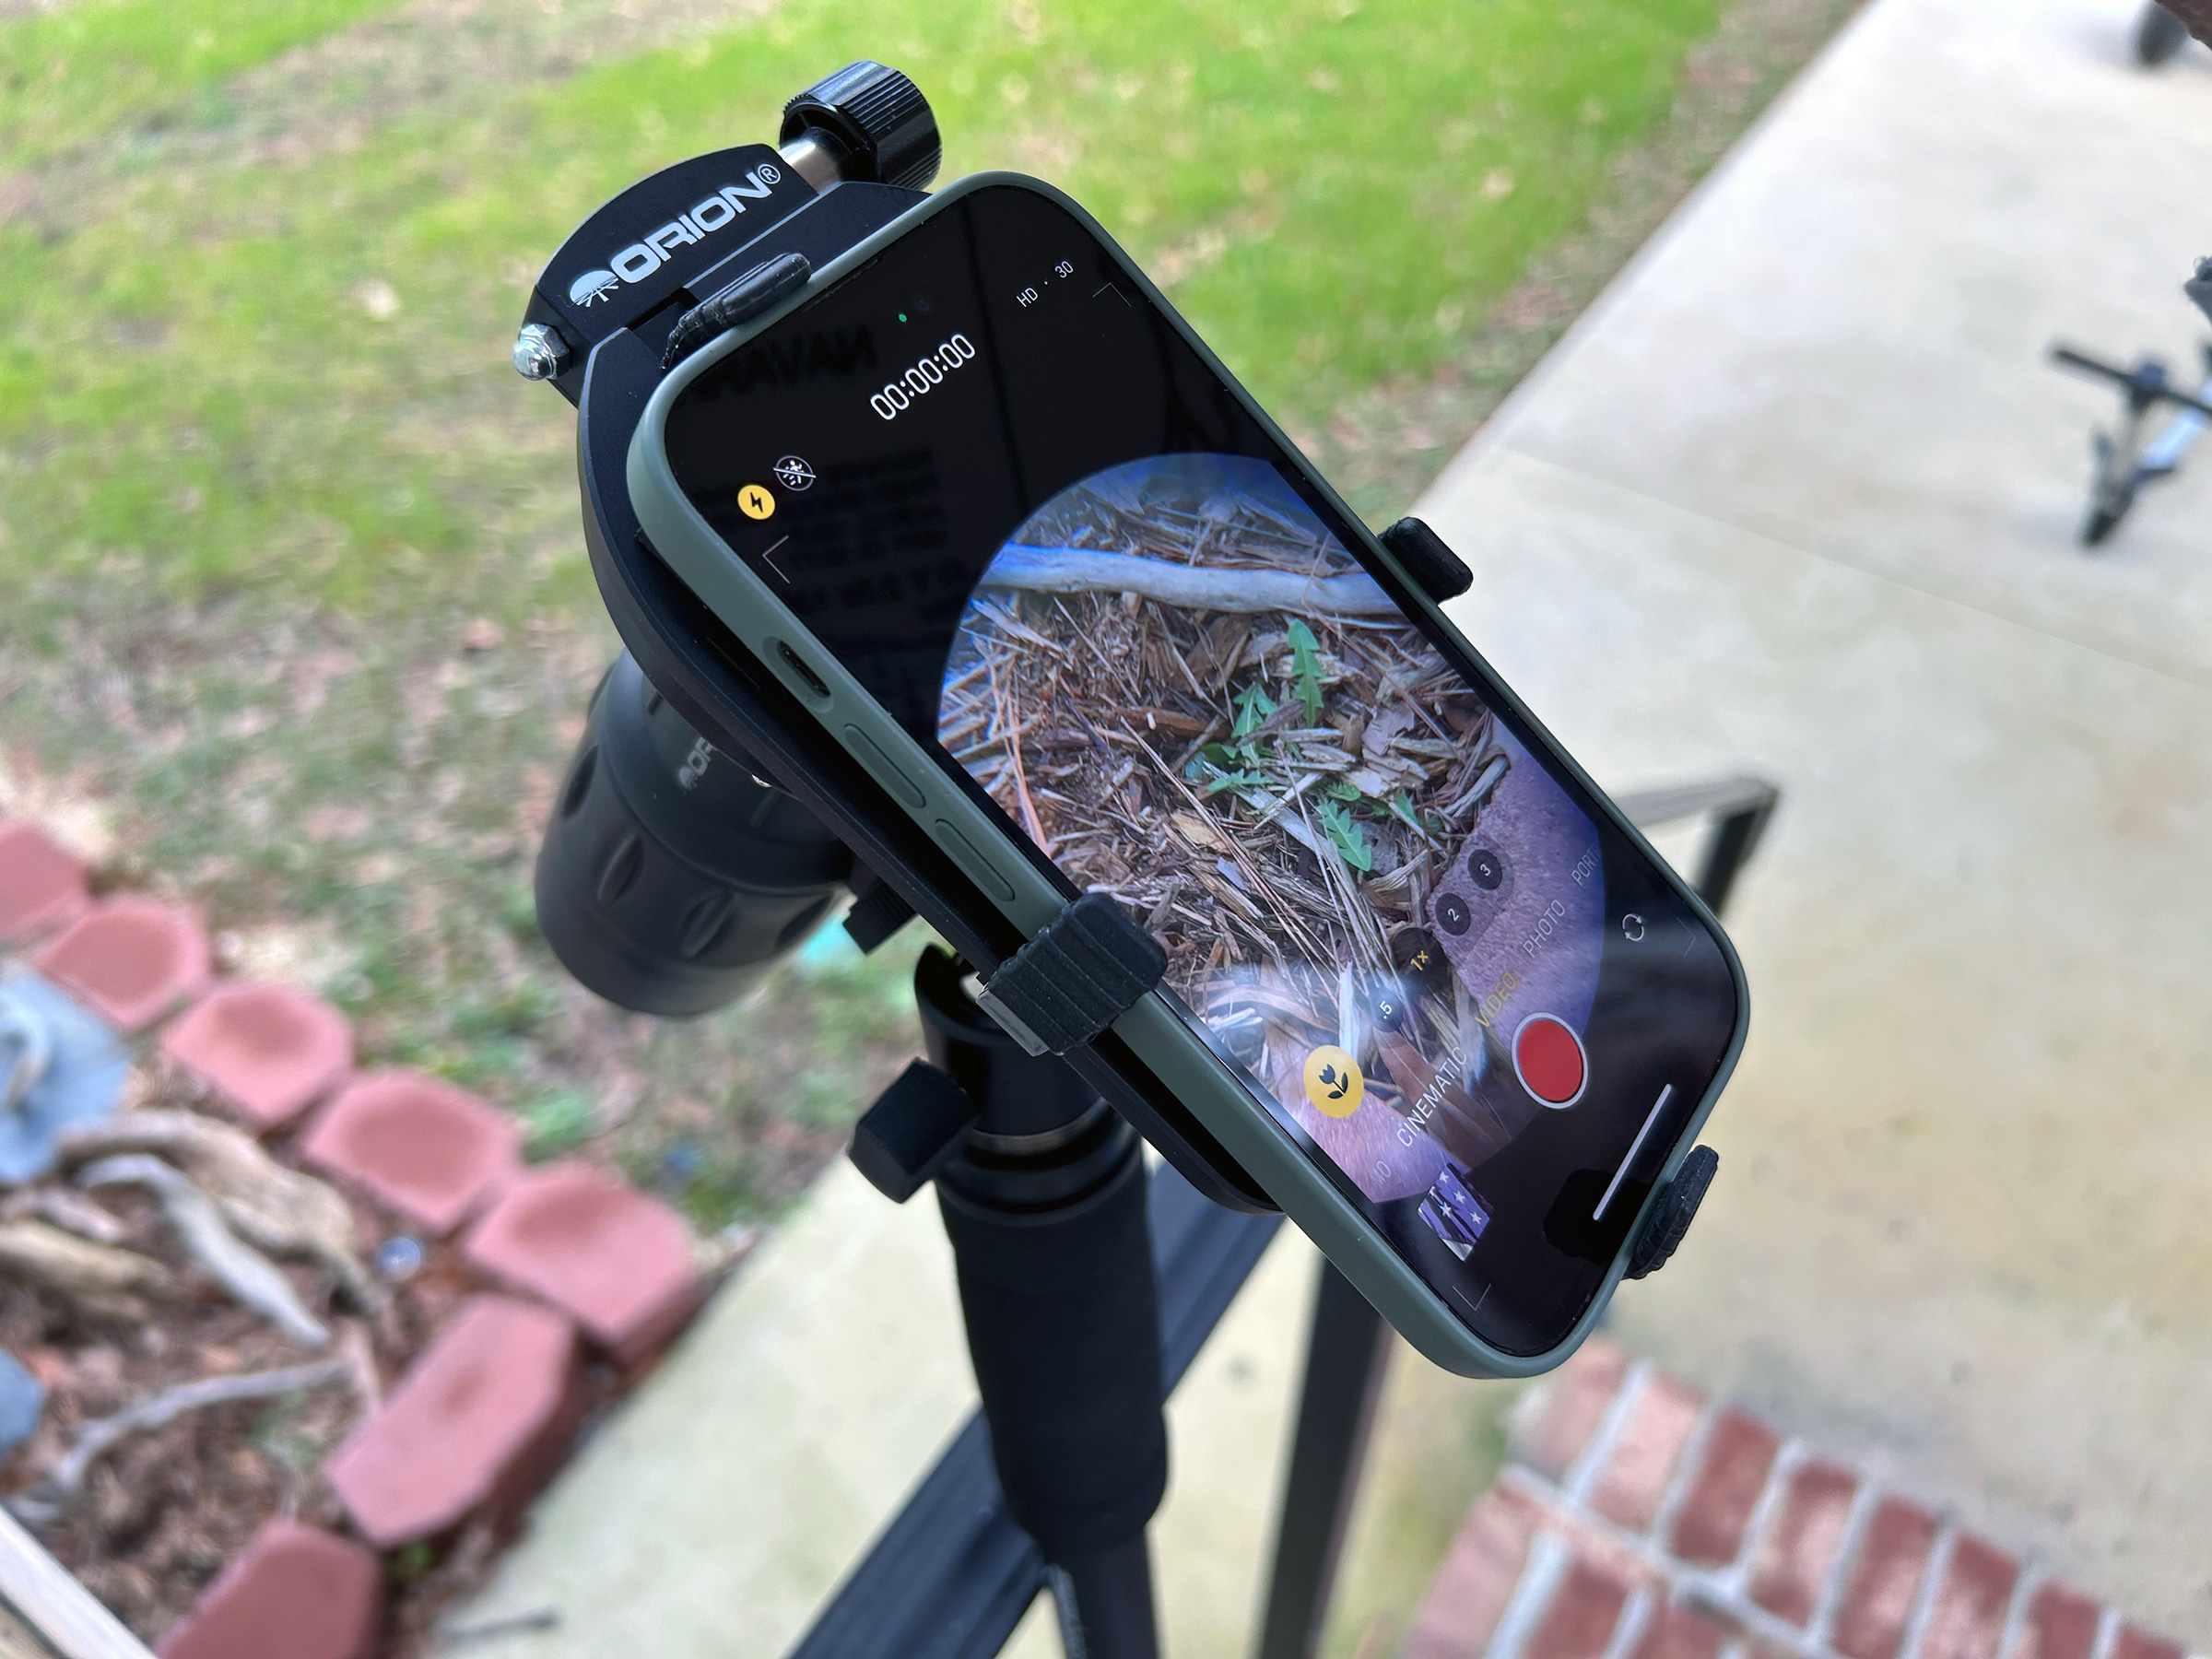
Orion offers an adapter that can connect the monocular with a smartphone for taking photographs and videos.
The monocular can focus on objects as close as 20″, which is great for our nature walks. In grocery store “field tests” we could read the fine print of ingredient labels of products on the shelves.
We also appreciate Orion’s adapter for the monocular, which holds a smartphone steady and in the correct position for taking photos through the eyepiece. It’s great fun to share photos of all the things that you can see, near and far, while using the 10 × 42 Waterproof Monocular.
Audrey (Skipper) and Kent Lewis mess about in the Tidewater Region of Virginia when not restoring or building boats. Their adventures are logged at Small Boat Restoration.
The Orion 10×42 Waterproof Monocular can be purchased directly from Orion with a 30-day money-back guarantee along with a one-year warranty. The monocular is also available from many retailers.
Is there a product that might be useful for boatbuilding, cruising, or shore-side camping that you’d like us to review? Please email your suggestions.
Derrick Burry can trace his family heritage back through multiple generations on Greenspond Island off the northeast coast of Newfoundland. On both his mother’s and father’s sides, his family have been seafarers through centuries. In recent times his paternal grandfather was a fisherman, and his father, born in 1931, worked in coastal shipping delivering cargoes around Newfoundland and up into Labrador.
Photographs Derrick Burry collection
Derrick stretched the boat’s length from 14′ to 17′ 6″ and used a borrowed set of three molds to establish the boat’s shape between the stem and transom.
Until the 1950s, few roads connected Newfoundland’s towns and villages, and the sea was everything. Families were self-sufficient and, says Derrick, if someone needed a small boat they would go into the woods, cut some lumber, bring it home, and build it. The culture was oral and local, communities tight-knit and isolated.
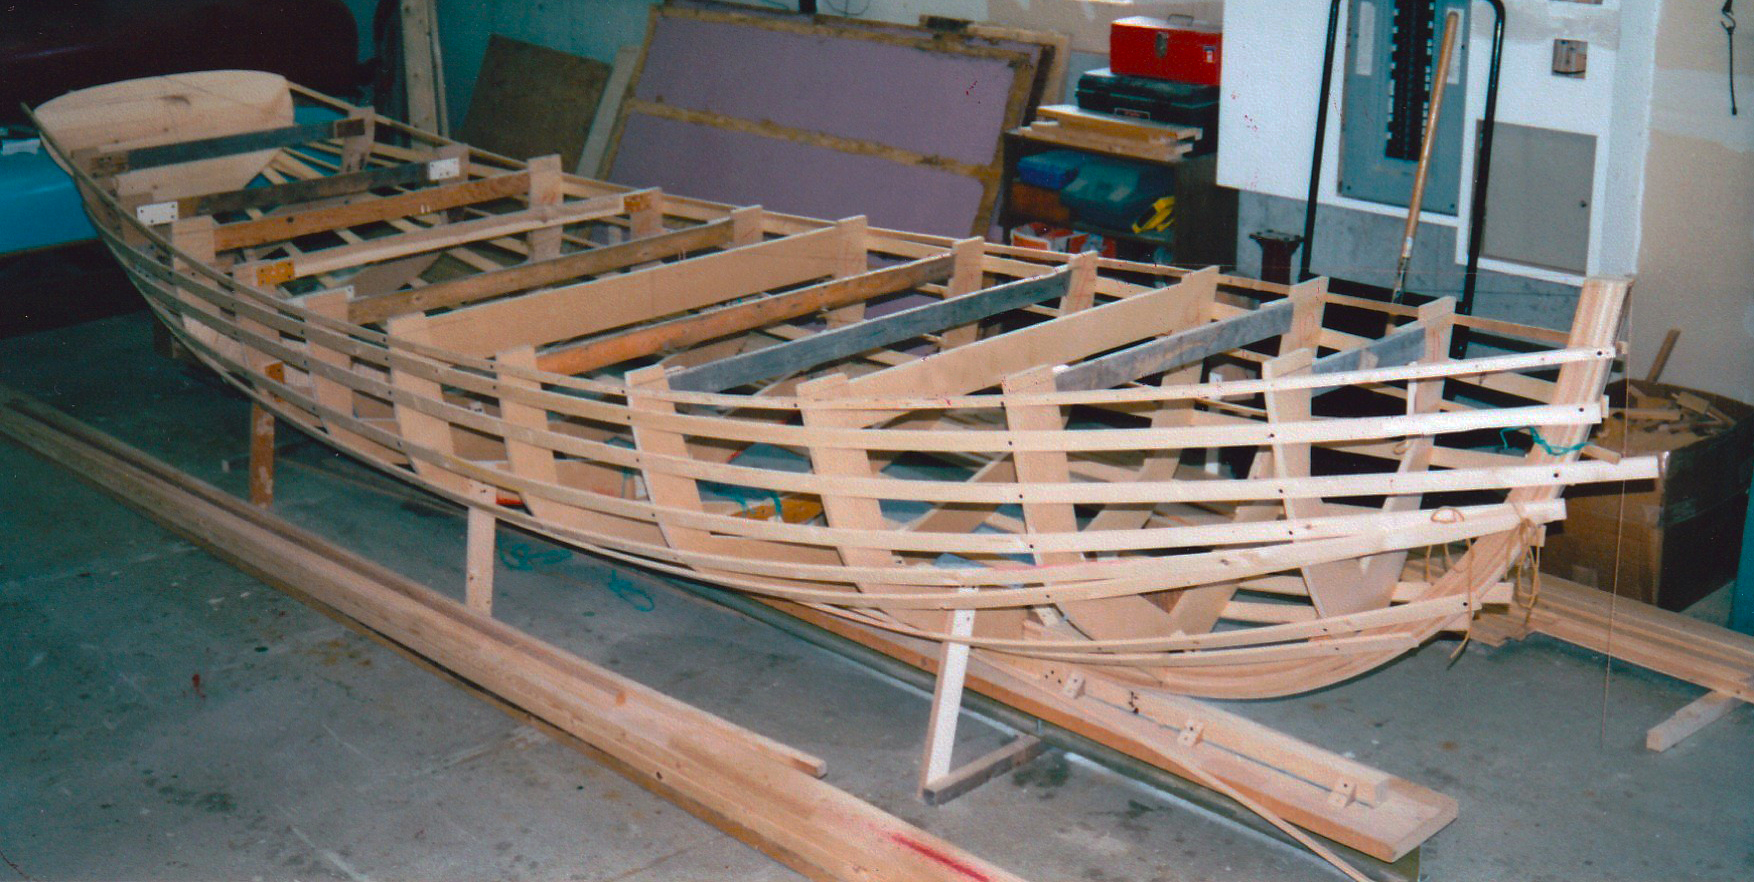
Derrick made 11 molds over which he would apply the strip planking. He planked the boat right-side up, working from the sheer down.
Derrick lived on Greenspond until he was six and, he says, was more accustomed to seeing boats than cars. “I can remember my first car ride,” he says, “but not my first boat ride.” His father built small boats, but unlike his forebears he built them for recreation rather than work. Outboards were becoming ever more popular in Newfoundland, and he built small powerboats, known locally as “speedboats.” He would build them one at a time, use them for a year or two, and then, when he got the itch to build a new boat, sell them on and go back into the woods to get some more lumber. Young Derrick joined him in the projects, going into the woods to help fell trees, lifting planks to be fit, holding the clenching iron while his father hammered in the clench nails.
The family moved to Gambo, a town at the western end of Freshwater Bay, a 15-mile-long inlet, where fewer people made their living from the sea, but Derrick’s father continued to build boats and Derrick’s love for small craft didn’t wane. One summer, when he was home for the long university vacation, he tried his hand at building his own boat. His father was away at the time, but Derrick believed he had the necessary skills to build a flat-bottomed outboard skiff. “I bought the lumber with money from my first summer-job paycheck, and built it by eye with hand tools,” he recalls. “It was a terrible boat. If it was empty it floated, but the moment anyone stepped aboard and the first seam went in the water, it leaked. I used it, after a fashion. I had an outboard and a bailer and wet feet.”
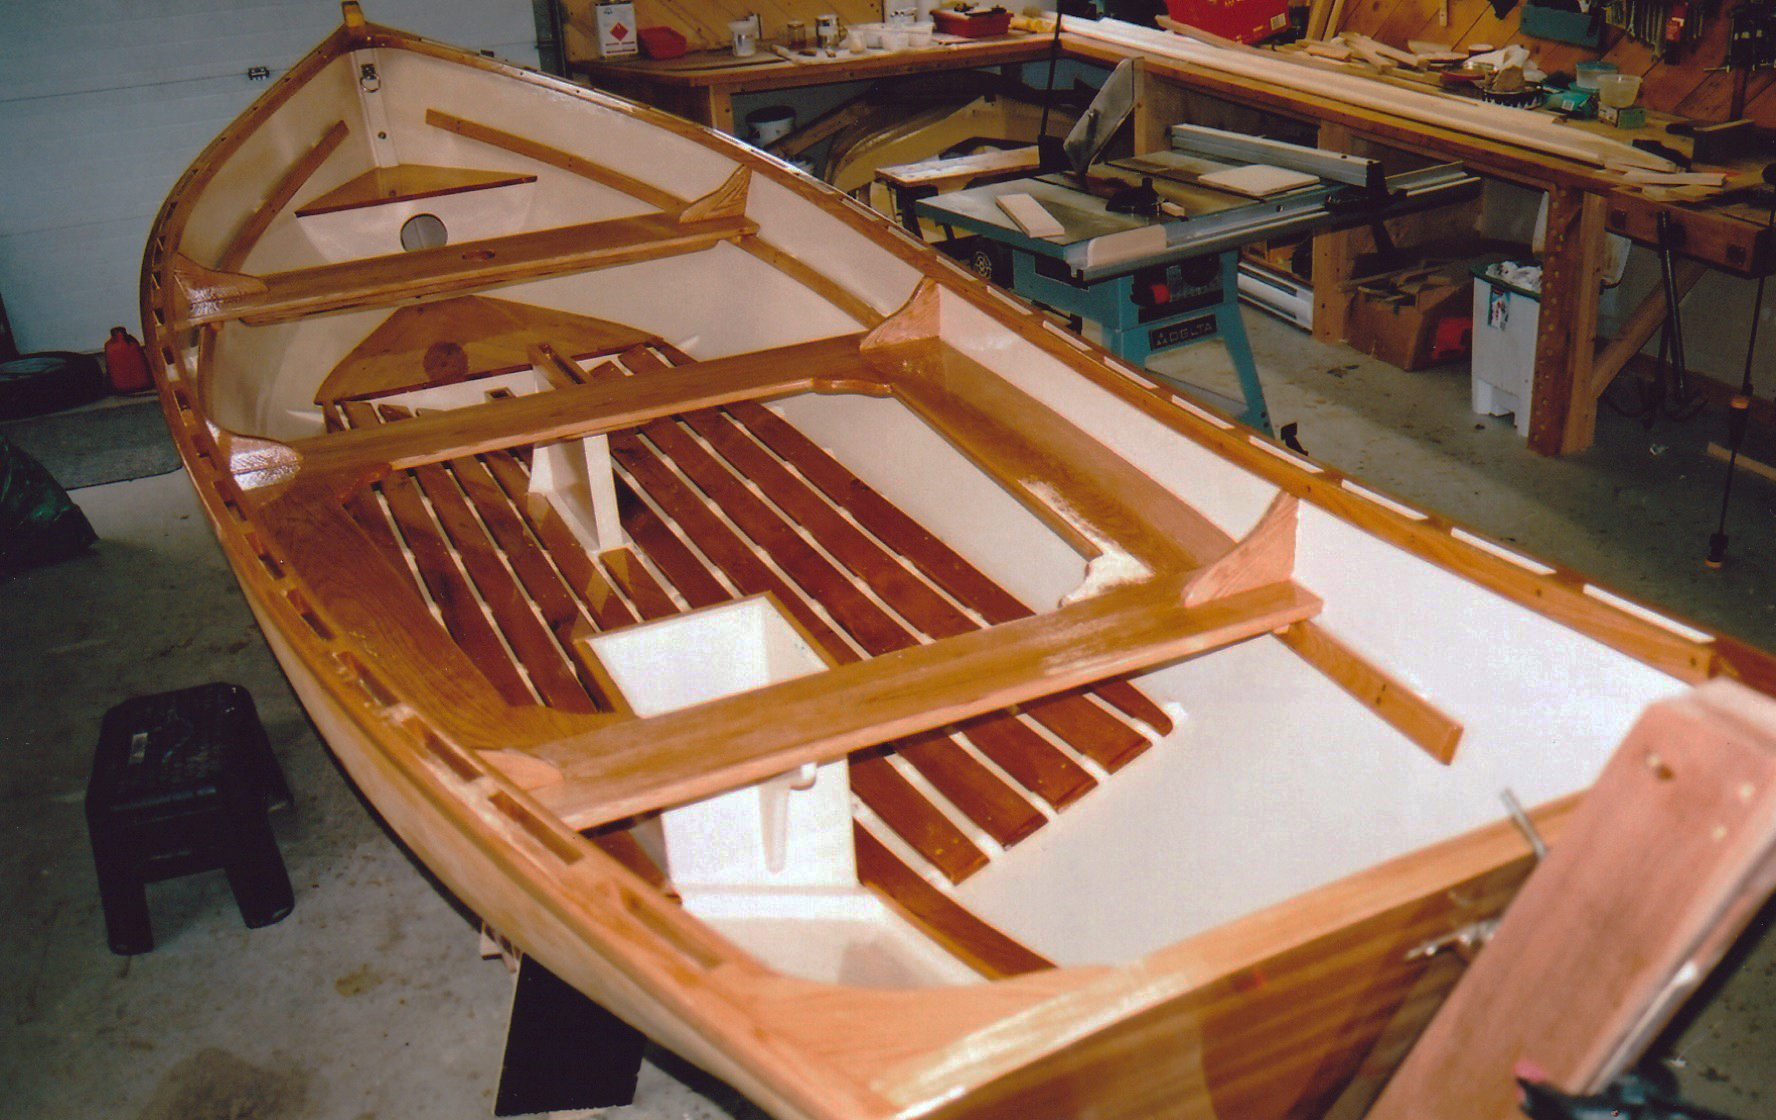
While Derrick strayed from tradition and designed an outboard well just forward of the aftmost thwart, in the bows he installed a small raised deck, known locally as a forechute—a feature found in many Newfoundland punts that combines a useful seat-cum-step and a small cuddy locker.
After graduating from Memorial University in St. John’s, Derrick remained in the city to pursue a career as a music teacher. He continued boating both in St. John’s and in Gambo, and then he restored a cedar-and-canvas canoe and became intrigued by boat construction. He helped a friend who was strip-planking a canoe, and the die was cast.
“At first,” he says, “I thought I’d build a ‘speedboat.’ I even got as far as buying some plans from David Stimson for his Ocean Pointer. But then I realized I wanted to learn to sail. My father had always spoken fondly about rowing and sailing punts in his youth, but I had never sailed. So, I changed tack.”
In Newfoundland, small working boats are known as either punts or rodneys. There seems to be little consensus as to the origins or true definition of either, although most agree that the rodney is the smaller of the two, typically no more than 16′ long, while both are smaller than 25′ with keels and round bottoms. Derrick decided he would follow tradition and build a punt for sail and oar.
Guided by the experience of strip-planking his friend’s canoe and having carefully studied Ted Moores’s book, Canoecraft, Derrick decided strip-planking was the way to go.
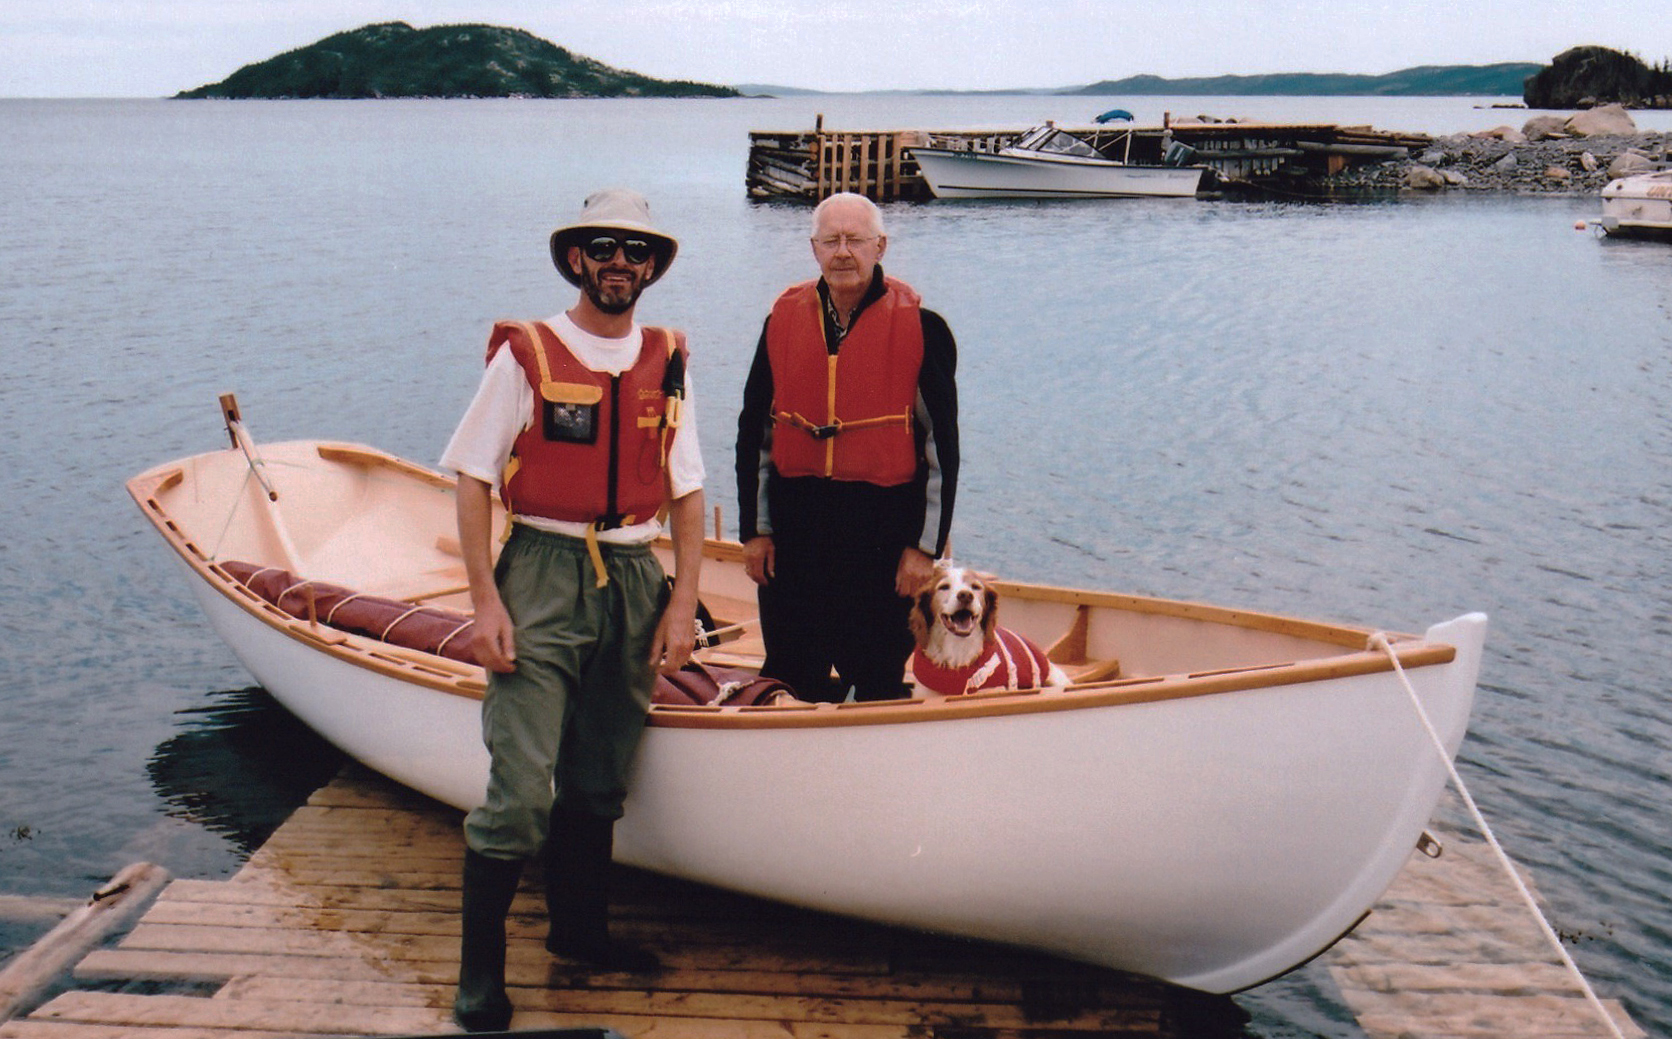
On launching day, Derrick was joined by his father, Edgar Burry, and dog, Rudy. At the time, CLEAR SKIES had just a single sprit-rigged sail, which could be wrapped around the mast and stowed within the boat.
“A local guy had a set of three molds that he was willing to let me use. Around here molds get used and passed along all the time, there’s no ‘intellectual property.’ Someone has it, they pass it along. The molds were actually for a smaller boat—about 14′ overall—so I had to stretch it out some. I wanted my punt to be 17′ 6″ and large enough to carry three people. I flattened the bottom some, and introduced a daggerboard, but it’s still a punt.”
Derrick built the boat by eye. He created patterns for the stem and transom, and bent battens around them and the three molds. Having thus determined the shape of the boat, he made 11 molds to provide a building form for the strip planking. “When I thought it looked right, I went with it. It’s how my father built his boats. I talked to him on the phone, and he advised me on things to look for as I went along, but I worked on my own.”
Derrick bought some 2 x 6 and 2 x 8 spruce, the best he could find, and milled it into 3/8″ x 1 1⁄2″ bead-and-cove strips. He set the molds up in his garage, built the keel, stem, and transom, checked and rechecked the profile, and started planking. “I planked her right-side up. Back in the day, my dad and other Newfoundlanders always planked their boats right-side up, working down from the gunwale and tipping the hull on its side to fit the garboard. So that’s what I did. It was all new to me, but I’d been around so many boat projects that I was comfortable with the process.”
In CLEAR SKIES’ first summer, Derrick sailed with just the mainsail. The simple arrangement meant plenty of space for his wife, Pamela, and the Brittany spaniel, Rudy.
Less easy was the configuration of the rig. “When I was building the punt in 2005–2006 I found very few sources to give me insight on the style of sailing rig the Newfoundland fishermen would have used. I came across the occasional archival photograph, but most of my searches came up empty. From Dad’s description of the sail rigs used in his youth around Greenspond, it seems clear that the sprit rig was the most common for small punts.”
Derrick went back to his research. The more he read, the more he liked the simplicity of the sprit rig. “All I’d need to set the rig in place was a hole in the bow thwart so the mast could pass through it into a simple maststep. The sail was small and simple and could be doused easily, rolled up, and stowed out of the way. It didn’t need any rope or wire stays.” He conceived a 70-sq-ft spritsail with a single reef to reduce it to 55 sq ft, and had it professionally designed and built out of Dacron.
On launching day, Derrick christened the boat CLEAR SKIES and was joined by his father for the first outing. “I had never sailed. Never. When we put the boat in, I was excited and apprehensive. Dad took the lead. He was in his 70s and I’d never seen him sail before, I don’t think he had sailed his whole adult life, but I was amazed by all the things he knew, and how comfortable he looked. It seemed as though he hadn’t forgotten one thing after all those years.”
Following the advice of his father, Derrick fitted a 25-sq-ft jib in his second season. Edgar, seen here sailing with Derrick, had identified that CLEAR SKIES had too much weather helm with just the spritsail and suggested adding the jib to better balance the rig for a more neutral helm.
Father and son sailed together for many of the boat’s early outings, and each time they went out Derrick learned a little more. “I’d researched all the theory, so I knew how it worked in principle, but he taught me to sail, and passed on tips that I couldn’t get out of books.”
For the first summer Derrick sailed the punt with just the mainsail. But at the end of the season his father suggested adding a jib. “He said she’d be better balanced. Because I was new to it all I hadn’t recognized that she had significant weather helm.”
The following summer, CLEAR SKIES was launched with three homemade Tyvek jibs of varying sizes. Derrick settled on the 25-sq-ft version and had one professionally made. “Dad was right, the balance was better.”
CLEAR SKIES is firmer in the bilge than a traditional Newfoundland punt, giving her greater initial stability. Because of this, Derrick can comfortably row standing up using long sweeps set to the forward thole pins.
In recent years Derrick has also added a mizzen. Around Newfoundland, he says, wind strength can pick up quickly during the day. “It can be calm in the morning and blowing 25 knots by noon. I’d seen videos of Drascombe Luggers sailing in heavy winds with just the jib and mizzen and realized the additional sail would give me more options. Now, if the wind picks up, I brail in the main, keep the jib and jigger, and feel safe.”
Adding a mizzen provided more options for managing the boat and adapting to a wide range of wind strengths.
Derrick has been consistently happy with CLEAR SKIES’ performance. Under full sail in 10 to 12 knots, she moves easily at 5 knots and in heavier winds has often attained 6 and even 7 knots on a broad reach. She points high and has good stability on all points of sail but, he says, even after almost 20 years he’s still learning how to sail her and “on each outing I discover more of her characteristics and gain confidence in her ability to handle varying weather conditions.”
Today, CLEAR SKIES lives on a trailer in the garage where she was built, about 5 minutes from the launching area. Derrick has retired from teaching, so now, if the conditions are good, he drops everything and goes. The fall of 2023, he says, he had some of the best sailing he’s ever had.
With her daggerboard raised CLEAR SKIES has a very shallow draft, allowing Derrick to pull up to gently shelving beaches on calm summer days.
Derrick’s father died in 2021, but for as long as he could, he went on coaching and offering Derrick advice in boat handling and seamanship. From building to sailing, Derrick has learned every step of the way and built himself a boat he loves. And above all, he says, “I’m grateful for the opportunity to provide my father with another chance to experience the boating that he so enjoyed in his youth.”
Jenny Bennett is managing editor of Small Boats.
Do you have a boat with an interesting story? Please email us. We’d like to hear about it and share it with other Small Boats readers.
Whenever my daughter Alison comes home to visit, I enjoy taking her to the airport at the end of her stay. During the 30-minute drive I get a chance to have one-on-one conversations with her and, because she’s a digital native, I also get updated on developments in technology. On our drive this past December, I was surprised to see her answer a phone call by talking into her watch, just like Dick Tracy did with the two-way wrist radio that he stretched out from the sleeve of his yellow trench coat. As usual, I asked Ali to check the traffic ahead on her smartphone to make sure we were on the best route to get to the airport without traffic delays. She brought up the app and when I glanced at her phone’s screen, I could see the blue bull’s eye indicating where we were with the map sliding in the background. I noticed there were other similar dots, something I hadn’t seen during previous drives. Ali told me they indicated the locations of her friends and other family members.
Ali mentioned that when one of her friends had gone on a first date with someone new, she and other friends tracked her in real time, and if the route her dot took gave them cause for concern, they could call her to see if she was okay and find her if she needed help. And in late November, while all of us in the family were waiting to hear from my son Nate about the birth of his first child (my first grandchild), Ali was watching, in real time, the signal from his wife’s phone as he drove her to the hospital for the labor and delivery.
In the ’80s, when I did my longest cruises, that technology didn’t exist. I could keep track of where I was only by paying attention to my surroundings and keeping an eye on my chart. And, for days if not weeks at a time, my friends and family back home wouldn’t know where I was.
I took whatever safety equipment was available and affordable at the time, but that didn’t amount to much more than a weather radio. If compact handheld VHF radios, tracking devices and phones equipped with GPS, and satellite messengers and emergency locator beacons had existed, I might well have purchased them. Fortunately, in thousands of miles of cruising, I had the good fortune never to have an emergency that I couldn’t manage on my own. I did get lost a few times, in as much as being lost meant finding myself unsure of my location and not knowing which way to go. Here are three of those occasions, all occurring on a paddling trip from Quebec to Florida:
My paddling partner and I got lost on the first day of a 2,500-mile canoe and kayak cruise from Québec City to Cedar Key, Florida. Our map didn’t indicate the broad tidal flats between the St. Lawrence River’s channel and the shore. We didn’t see any potential landing sites and paddled into darkness. We left the channel, paddled through a maze of boulders and walked probably 1⁄2 mile in the shallows while eels slithered around our ankles. Under an overcast sky on a moonless night, the only thing we could see beyond the beams of our flashlights was a single light, whose reflection is seen here just beyond the bow of my canoe. When we reached land, it was a railroad seawall. The only place to camp above the tide was at the base of the light tower that led us to shore. We set the tent up on the rock ballast at the top of the wall, 20′ from the railroad tracks. While I knew we wouldn’t get hit by a train, it was terrifying to have them race past so close by.
South of Charleston, South Carolina, we took a shortcut through the marsh. The passageways were much more intricate than they appeared on the chart, and with an overcast sky it was difficult to keep a sense of direction. I stood up frequently to get a better view forward, but it didn’t do much good. In case we had to return the same way we had come, I bent stalks of grass over to mark the route. It was slow going and saved us no time, but we eventually reached the marked channel of the Intracoastal Waterway and stuck with it thereafter.
After crossing the Okefenokee Swamp in northern Florida, we dragged the boats over the levee that separated the swamp from the headwaters of the Suwanee River only to find that there was no river, just a flooded forest. There were no landmarks among the trees and I was at a loss to know which way to go. The foam floating on top of the river made it easy to see the variations in current. Passages where the water was not moving would, I guessed, lead to dead ends. We let the boats drift and whenever we saw foam outpacing us, we followed it. The current eventually led us to the place where high ground appeared and funneled the water into the river channel.
Getting found again was just a matter of moving to a place where I could correlate landmarks around me to the chart or map. I was in no hurry to get somewhere, so I didn’t mind being lost. It was invigorating and heightened my awareness. I don’t think I’d have such lasting memories of finding my way if I’d had my head down taking my directions from the Global Positioning System.
Two years later, when I rowed a sneakbox solo down the Ohio River and the Lower Mississippi, it was virtually impossible to get lost. Both are just corridors between riverbanks, easily followed with no route finding required. While I was never lost, no one back home would be able to find me; I called my parents, collect, from pay phones, every week or so and in that time between calls I might be anywhere along a 200-mile stretch of river.
The Mississippi was especially remote; levees along both banks blocked towns, farms, and homes from my view from the river. And rowing during the winter, I had to myself all the land and water I could see. I recall seeing only two other recreational boats underway along the 950 miles from the Ohio River confluence to New Orleans.
I might still find the same wilderness along the Lower Mississippi, but if I carried even just a smart phone, the experience likely wouldn’t be the same. Being connected by this century’s technologies brings undeniable advantages in safety, but with it come invisible tendrils that make it difficult to find one’s own way and fully inhabit the “emptiness” of wilderness.
I count myself fortunate that I took advantage of the opportunities that I had 40 years ago and traveled without today’s technology, not by an unwise choice to dismiss it, but because it didn’t exist. I was drawn to solo wilderness travel when I was 18, in part to find out if I could meet the practical challenges but also curious to know what kind of company I could be to myself if I were alone. And in 1985, lost to the world on the Lower Mississippi, I’d found what I was looking for: aloneness without loneliness.
Our plan was simple: on Friday, April 30, 2022, Delaney and I would embark from Brooklin to make a 26-mile circumnavigation of the southern end of Maine’s Blue Hill Peninsula by way of Blue Hill Bay, Blue Hill Falls, and the Salt Pond and Benjamin River with a half-mile haul between the two along what once was an old Wabanaki portage. We were hoping that if we worked hard, we’d be able to make it back to Brooklin in three days, camping along the way on Long Island in Blue Hill Bay and at the Reach Knolls campground at the mouth of the Benjamin River.
The trip was conceived only a week earlier as Delaney and I stood in my parents’ garage in Worcester, Vermont, and looked at the 17′ Chesapeake Light Craft Northeaster dory my father and I started building in 2014 in a one-week class at WoodenBoat School. He and I thought it would be a boat I could cut my teeth on for boatbuilding and rowing, but we had never finished it. Since the class it had been languishing in the garage for eight years. WHISTLER—as we named the dory for my propensity as a 13-year-old to whistle while building it—looked forlorn as I ran my hands over the dusty hull, but all it needed to be ready for the water was interior paint and varnish on the rail.
Roger Siebert
.
Last year, while working at WoodenBoat School, I’d heard the stories visiting Grand Canyon river guides had told about running dories through rapids, and while WHISTLER is a different kind of dory, I imagined running the Blue Hill Falls tidal rapids at the entrance to Salt Pond. Delaney liked the idea of running the rapids and taking on the circumnavigation, and we decided to cartop the boat, take it with us back to Maine, and get it ready to launch.
We worked on the boat in the shop at WoodenBoat the following week, and by Friday morning the paint and varnish we’d applied had dried. If we were going to do the circumnavigation, we had to start that day, as that last weekend in April was the only time we’d have together for several months, and the tides were perfect. The only problem: the wind was blowing 20- to 35-knots from the north, the worst possible direction for our row from the launch ramp at WoodenBoat School. Still, we were determined, until a small-craft advisory finally convinced us that launching to take on a 12-mile row from Brooklin to Blue Hill Falls would have been not only ill-advised but also rather dangerous. The new plan was to launch on Saturday from the South Blue Hill boat ramp 1-1/2 miles south of the falls.
By 8:00 Saturday morning, Delaney and I were at the oars, bashing WHISTLER into steep swells. I was at the forward station, with Delaney at the aft thwart; we struggled against a 15- to 20-knot wind on Blue Hill Bay. The bow rose over a rolling 2′ wave and when the flat bottom slammed hard into the trough, I felt a painful pinch in my lower back as it compressed. A 20-knot gust brought us to a stop and tugged at my oars even though I had the blades feathered. Each stroke moved us forward only a few feet before WHISTLER butted against the next wave.
I could feel the burning in my forearms even though we had only made it ¼ mile under the steel-gray skies and whistling wind. “Need a break?” I shouted to Delaney. “Not a bad idea,” was the reply, and I turned us toward a patch of beach 50 yards to port with the promise of a calm resting spot drawing us in. We beached on a bed of baseball-sized rocks covered in dark green seaweed and dragged the boat out of the water so it wouldn’t get beaten by the knee-high swell breaking on the beach.
Photographs by Delaney Brown and Tom Conlogue
After backing WHISTLER onto the beach, we did a reconnaissance run to the bridge to scope out the falls. The north end of the Blue Hill Falls bridge is visible above the dory’s aft thwart.
We sat on a smooth, waist-high boulder, watching the whitecaps roll by for five minutes, and caught our breath before pushing back out into the grim, green-gray water, white streaks trailing from the wave crests. I took short tugs on the oars to get us moving as Delaney shoved off and boarded over the stern. My oar blades dragged through mats of tangled seaweed until we were two boat lengths from shore. Delaney settled on the aft thwart, slipped her oars out through the locks, and we fell back into our rhythm, working our way to windward at barely over 1 knot. We stayed 30′ from shore, away from the waves as they steepened and crested in the shallows but somewhat protected by the land. Spray flung by the diving bow pelted my back. The water was loud on the hood of my jacket, ran down my back, and pooled around my feet to slosh back and forth between frames.
Delaney’s port oar dug in suddenly, as a wave crest caught the blade and sent it diving for the bottom. The grip was almost wrenched out of her hand as it tried to push her off the thwart. The oar dragged the bow around to port and we were no longer pointing into the wind. As the dory veered toward shore, I quickly pulled hard on my port side to correct our course while Delaney freed her oar from the water. A few strokes later it happened again, on the starboard oar this time. “I’m going to count how many strokes I can get in a row without catching a crab!” she yelled and began counting aloud as we continued to row. With Delaney chanting her stroke count aloud, we laughed every time she had to restart and cheered when she reached a new high score of uninterrupted strokes. After we had rowed for a half hour, I looked over my right shoulder and saw the sandy-gray arches of the Blue Hill Falls bridge, and we made for a beach just south of the bridge.
Blue Hill Falls is a short stretch of reversing tidal rapids at the entrance to Salt Pond. Four times a day water pours through the 100′-wide gap beneath the bridge, creating standing waves as the tide floods into and ebbs out of the 3-1/2-mile-long pond. While the safest way through is to wait for slack water, we had decided to go through at the peak of the flood when the current would be strongest and the rising tide would significantly shorten the portage at Salt Pond’s far end.
After beaching the dory and taking a quick water break, we walked over to the bridge to see what we had gotten ourselves into. After clambering up the scree slope at the side of the road and walking to the middle of the bridge, we looked down over its Salt Pond side at the flood tide’s standing waves. My worries about getting capsized instantly evaporated. While the rapid was moving fast, it wasn’t nearly as turbulent as I had remembered. On the north side, the water ran smooth and black under the bridge before plunging into a train of 3′ standing waves, but on the south side there was a straight shot through with only the occasional riffle disturbing the surface.
“This isn’t going to be nearly as exciting as we thought, is it?” Delaney said. “What do you think, should we go straight down the middle?” I replied, “Yep, let’s hit the medium-sized waves.” That approach would avoid the extremes, either too rough or too smooth. We climbed back down the rocks at the end of the bridge and walked gingerly among the softball-sized rocks along the shingle beach to the boat. We pushed off under a sky overcast with low steel-wool-gray clouds and maneuvered stern-first into the current upstream from the bridge.
Delaney took her seat and braced her feet on the sternsheets, and we let the dory get carried under the bridge. As WHISTLER picked up speed, the water turned from gray to dark green as it piled up on the bridge’s concrete footings on either side of us and funneled us through. Pulling occasionally on the oars to keep the stern pointed in the right direction, I steered us in between the fast, clean water off the starboard beam and the tumbling standing waves off the port beam. Below the bridge, we gently rolled over a smooth crest, then rose up the far side and crashed down. Looking past Delaney’s shoulder I saw just a tongue of water lap over the transom, and then we were past the waves and into the pond.
Choosing to take the middle route down provided a smooth ride, although in hindsight the line on the north side of the rapid would have provided a sportier experience.
Just past the Blue Hill Falls bridge, visible at the far right, and onto the Salt Pond, Delaney provided directions and encouragement while I enjoyed the easy rowing, good view, and occasional warmth from the sun.
In its narrow entrance, the wind was calmer and with the sun coming out we needed to peel off some layers, so about 500′ beyond the bridge, we cut diagonally across the current and made our way to the beach. After we took off our spray jackets, we pushed back out and rowed across the upstream current of a back eddy where leafy seaweed on the bottom waved gently toward the bridge. When we reached the main current, it again carried us southwest. Delaney moved to the sternsheets to take a break and watch the scenery slide by as I rowed us down Salt Pond with the wind and current nudging us along at an effortless 4 knots.
A half mile farther along, we skirted a rounded granite boulder that splits a channel where the pond narrows from 1/5 mile to just 80 yards. A half mile farther we saw a field of buoys ahead, arranged neatly in long rows 20′ apart. At the first buoy, Delaney peered over the side into the water at the fuzz-covered ropes hanging straight down and disappearing in the olive-green murk. “Mussels?” she wondered out loud; I shrugged. She did a quick Google search on her phone, which revealed it was indeed a shellfish farm, growing oysters as well as mussels.
By noon we had made it to the head of the Salt Pond, where it turned into Meadow Brook, a channel 10′ wide with grassy banks on both sides. We had timed it perfectly, and arrived at high tide, but the brook was still too narrow for the oars. We climbed out and used the bow and stern lines to guide WHISTLER up the winding stream, our boots crunching softly over the dead grass on the bank.
Nosing up to Meadow Brook, the channel became shallower and we dragged the dory over submerged rocks while avoiding the visible ones. The guardrail of the Hales Hill Road bridge was within sight, beyond the large boulder in the distance.
The brook quickly became too narrow for rowing, so Delaney and I hopped out and lined the dory up the last bit of the way to the beaver dam.
After navigating six bends in 60 yards and crunching the boat on a few submerged rocks, we were at the Hales Hill Road bridge. Its cement slab, supported by stacked rough-hewn stone blocks, spanned an opening just 6′ wide—barely enough room for the boat—and 4′ high, too low for us. The water running through the culvert was more than boot deep. Delaney scrambled up the embankment and crossed the road to the upstream side of the bridge, where she stepped over the metal guardrail, pushed through chest-high raspberry bushes, and poked her head and an arm over the edge above the water, ready to catch the boat. I gave WHISTLER a shove. The boat coasted smoothly upstream through the culvert for a few feet, before veering to port toward the rough-edged wall. Dangling as far out as she could without falling into the stream, Delaney grabbed the breasthook and saved the newly varnished rail from making contact with the rocks.
The water flowing under the Hales Hill bridge was especially deep, so we shoved WHISTLER through unmanned.
Just 50′ upstream from the bridge, we came to a 3′-high beaver dam of tangled twigs flanked by thick brush. Rounded granite boulders scattered around the dam had tan-colored bands marking the water level when the dam had been about 1′ higher. We had brought two large fenders to use as rollers for just such an obstacle as the dam and deployed them for protection from the rocks. We scooted WHISTLER safely over and into the still, pooled water upstream. Delaney crawled over the transom and stood up forward with an oar in hand, and we paddled canoe fashion up the beaver pond.
The rollers that we brought with us helped us clear the beaver dam with little struggle. Beyond the dam, the water was deep and clear, making the paddling easy.
As the water got shallower, poling became the only way to move forward. Despite the common knowledge that you should never push off the bottom with the blade of an oar for fear of it splitting, the width of the blade proved less susceptible than the handle to sinking into the muck below.
The smooth going was short lived. After only two minutes of paddling, the skeg started to drag in the mud below. We decided the best option was to drag the boat over dry land toward the tree line 1/4 mile away, and Delaney leaped from the bow for the streambank and landed on a tussock of grass. I thought she had made it, but then the tuft sank under her, and she splashed down into knee-deep water with a howl as her boots quickly flooded. She scrambled for firmer ground and eventually found a piece of grass that did not sink immediately. She stood up with a scowl.
I poled the boat a few more feet until the bow was nestled in grass, then gingerly stepped over the rail onto a firm-looking patch of grass. It shifted unsteadily below me. I knew we had to get the boat to firmer footing if we were going to drag it any farther. I braced my feet against two tussocks, grabbed the breasthook, and pulled firmly. The boat lurched forward no more than 1′, and then came to a halt with the screech of dry grass on paint.
From where we had run aground, it was a half mile to where satellite images we’d studied seemed to indicate the portage should have started. Realizing that we clearly were not going to make it to the Benjamin River that day, our new goal was to get the boat to the portage before dark. It was only 12:30, and that seemed like a realistic goal.
Abandoning what was left of the main channel, I began dragging the boat toward the tree line, hopping from one tuft of grass to the next to avoid the deep puddles scattered around them.
Getting ready to schlep the gear to lighten the boat, we took a quick break to feel sorry for ourselves before beginning the first long trudge to the tree line.
I began unloading some of the heaviest items: Delaney’s duffle, the cast-iron skillet, two 1-gallon jugs of water, and my dry bag backpack full of food and camping gear. Delaney worked her way toward me, lifting her legs over the tussocks and pushing through the chest-high grass, falling with almost every other step. Loaded down with gear, we scrambled toward a point in the tree line 1/4 mile away where we would stash everything and eat lunch before coming back for the boat. As soon as we set out, we knew we had made a mistake. What had looked like drier land was in fact just more tufts of grass, surrounded by water. Stepping from one clump to the next, I crushed each tussock down, throwing my balance off and sending me stumbling. Water poured into my boots, and thick mud beneath the water threatened to pull them off. My clothes were damp and sticky and my back prickled with sweat.
In most areas the grass reached Delaney’s chest. As we headed back to the boat after lunch, she gave me a distinctly displeased look amid the expansive grassy landscape.
Delaney, whose legs weren’t long enough to step up on the tussocks, slogged through the mud and water while carrying a gallon jug of water in each hand. Every few steps she fell from one puddle to the next and disappeared behind the tawny grass, but somehow remained smiling. By the time we had made it to the firm, dry ground at the tree line, it was 1:15. The carry with our gear had taken us 45 minutes to traverse a quarter mile, and we hadn’t even brought the boat.
Delaney crawled into the trees leaving a trail of wet socks and spray gear. I pulled a wool blanket out of the duffle and stretched it out on some moss amid the trees, then made BLTs from homemade bread and Delaney’s favorite vegan bacon. Munching on my sandwich, too hungry to care about the fake meat, I looked out over the expanse of undulating golden grass, and my optimism began to increase. “This ain’t too bad after all,” I said, looking at Delaney. She offered a half smile, and I noticed she was shivering in the light early spring breeze blowing through the trees. I scrambled over to my backpack and pulled out the space blanket I had stashed for just such an occasion. She lay down on the wool blanket, I spread the space blanket over her, and tucked the upwind side under the backpack. I curled myself around her back; the shiny silver rustled over our heads. Through chattering teeth, she cheerfully said she would warm up in no time.
Ten minutes later, her shivering hadn’t stopped. “Time to move,” I said. Delaney grumbled but got up and put on her wet spray gear and socks as I packed up our gear and piled it by the edge of the trees. To warm us both up, I set a brisk pace back to the boat; soon we were both sweating again, and once she started cursing again I knew she would be okay. After reaching WHISTLER what seemed like hours later, we sprawled in opposite ends of the boat while we caught our breath. “This may have been one of the worst ideas I’ve ever had,” I said, feeling bad for dragging her on this adventure. “Maybe make the next one an easy trip?” she offered, and we got ready to drag the boat.
It was slow, brutal work. With me pulling and Delaney pushing, we moved the boat only 2′ at a time before it came to a halt or one of us fell into the mire. The sharp bottom edge of the breasthook dug into my hands and the grass under the boat turned from gold to black as it was crushed into the water. Working slowly, we inched toward the tree line, leaving a dark scar through the brush behind us. The effort made my arms burn and left me panting.
A little over an hour later, we made it to the trees. Gasping and saying little, we unpacked the last of the gear and looked for a place to set up the tent. Even though it was only 5:30 and there was plenty of daylight left, this was as far as we were going for the day. We were completely burned out and needed to get out of our wet clothes before we got chilled. We found a flat spot in the trees, and pitched the tent; I crawled inside, lying face down with the warmth of the smooth nylon sleeping bag tempting me to sleep. Delaney joined me, using my back as a pillow and we remained motionless for a while, waiting for our strength to come back so we could make dinner.
At the beginning of the day, while we were launching WHISTLER at the boat ramp, we had met a lobsterman who, after hearing our plan, had invited us to stay on his land if we didn’t make it as far as we hoped. His only direction had been “on the left beyond the bridge at the end of the Salt Pond.” We were unsure if we were in the right spot, but we started gathering wood for a fire, hoping this piece of the woods we had found was on his property.
I kicked loose leaves and grass to the side and made a fire ring of soggy logs, and soon the warmth of the leaping flames provided a welcome relief from the chill of my damp clothes. We heated up dinner, an Indian rice affair, in a cast-iron skillet and scarfed it down as the dark crept in steadily. Fed, watered, and starting to warm, we sat by the fire for hours, socks spread around the flames like fallen flower petals. Around 10 p.m., Delaney did an especially jaw-cracking yawn, so we extinguished the fire and moved into the tent, with the pleasant scent of wood smoke clinging to us like an earthy perfume. In the dark, above the tent’s mesh panels, the sky had cleared to a kaleidoscopic view of stars, and we fell asleep to the sound of spring peepers.
I woke up late the next day, and, gingerly testing my muscles, was surprised to find I hadn’t locked up overnight. The weather began as the day before had with low puffy clouds, with occasional breaks that let the sun through. We packed up and were ready to get underway by 10:30, keenly aware of our dwindling time. Trying something new, we used two fenders as rollers, sticking as close to the tree line as we could where the ground was dry and the going a little easier. Delaney placed the fenders under the bow and pulled while I pushed and threw the fenders forward when they slipped out the back. It was slow going because fenders refused to roll over the hummocks and the dory bottom dragged across them. “Do you think we need these things?” Delaney asked, after half an hour of wrestling with the fenders. We threw them into the boat and dragged it, Delaney leading the bow with the painter while I pushed the stern.
It was a dramatic improvement. Compared to the day before, the sliding was much easier on the dry grass, and we could make it a full 10′ before I ran out of breath and had to take a break. Two hours later, after stopping for a half-hour lunch break in the trees, we had covered a quarter mile. We left the boat next to an abandoned cow pasture and walked up the remaining distance along the edge of the trees to where the portage proper should have started. It wasn’t good. Branches were tangled together in a thick wall and the trees were clustered close together; while a portage was definitely possible with a canoe or kayak, WHISTLER was far too wide to squeeze though. Our options were to go back the way we came, or try to cut up over to River Road, a quarter mile to the southeast.
Delaney led WHISTLER like a recalcitrant mule toward the cow pasture. As the ground evened out, it became easier to move the boat without the rollers and rely on strength and stubbornness.
Since retreating over the difficult ground we’d already covered was not an option—we had run out of time—we walked up the cow pasture toward the road, hoping to find a house with someone friendly enough to let us bring our car to pick up the dory. Walking up a gravel access road off one of the pastures, we strolled past a spent 12-gauge shotgun shell on the ground. Apparently, this was an unusual sight for a Florida girl, and Delaney grabbed my arm. “We’re going to get shot!” she said. “Relax,” I replied, “Most people at least have the courtesy to ask who you are before they shoot you.”
We crossed River Road and walked up to a farmhouse perched on the top of a hill, where a couple in their mid-forties were more than happy to help, insisting we have a drink of water before giving us a ride to our car.
Delaney and I drove back to the cow pasture and threw gear into the car. When we rolled WHISTLER over to lift her onto the roof rack, twigs and grass poured out. The bottom of the boat was scarred where rocks had cut through the epoxy, graphite, and fiberglass, and the topside paint had long pale streaks from brush dragging along the side.
After securing permission from the property owners to bring our car to their field, we faced the last challenge of the trip: hoisting the 100-lb dory onto the roof rack. Delaney apologized to WHISTLER for the rough treatment. At the beginning of this adventure, the hull didn’t have a scratch on it.
We had done only about 6 of the 26 miles of the circumnavigation of the Blue Hill Peninsula we’d set out to do, but we’d had more than our fair share of adventure. We might have made the whole loop if we’d had more time, or a more friendly weather forecast. We had underestimated the difficulty of hauling a 17′ dory to an ancient and inaccessible portage, and if we had done a little more reconnaissance, we might’ve known what we were getting into. But we had made an attempt, and managed to have a good time and keep each other going even while doing something that couldn’t be done.
Tom Conlogue is a former WoodenBoat School waterfront staff member who is currently feeding a crippling boat addiction as a student at Maine Maritime Academy. He can usually be found near some patch of water messing about in small boats.
If you have an interesting story to tell about your adventures with a small boat, please email us a brief outline and a few photos.
A striking double-ender, form perfected by evolution
The hull design for this handsome jekte (Norwegian for this type of boat) should be credited to generations of builders along the shores of Hardangersfjord, Norway. We’re told that these double-enders enjoy a reputation for hard work and possess rough-water capability comparable to our peapods and Sea Bright Skiffs.
One day in the early 1950s, John Atkin and his father, William, caught a quick glance of an imported Hardangersjekte resting in a lot beside a busy New York highway. The hull form, perfected by evolution, moved them. Fortunately for posterity (us), the Atkins found a sister hull, and John set about taking off its lines. (That is, he recorded measurements from the boat and used the data to draw the hull lines on paper.) Because he suspected that a transplanted jekte wouldn’t be carrying its usual cargo- a healthy catch of fish – he drew a shallow ballast keel that housed about 106 lbs of lead.
An expert Norwegian builder had planked the Hardangersjekte with lapped and riveted ½” pine strakes that measured some 18″ in width. Aware that 20″ -wide boards of any usable species would be hard to find, the Atkins specified ¼” plywood for the hull of this boat. John’s drawings indicate that lapstrake construction gave way to multiple chines.
Valgerda forsakes the wide pine planks of her predecessors for high-quality plywood. Construction remains clean and open.
Because we now have access to epoxy, you might consider building Valgerda using the glued-lapstrake plywood method favored by Joel White for his Nutshell prams and their cousins (see WoodenBoat No. 60, page 100). This technique is faster than battened multi-chine construction in the hands of most builders, and it can produce a slightly lighter boat with a cleaner interior. Shadow lines cast by the laps will accentuate the hull’s shape, as they must have in the original Hardangersjekte.
Although similar boats had been fitted with tall, sloop rigs for racing and daysailing in their native waters, the Atkins gave Valgerda a solitary standing lugsail. William applauded the chosen rig as being “a most practical one for for hard use and thin pocketbooks; to say nothing of long life.”
In the interest of control and simplicity, you could replace the standing lugsail with a balanced lug. The modest ability of the latter to reduce sail twist might be appreciated in a boat with so narrow a sheeting base, and the gooseneck fitting would be eliminated. A slightly more robust mast and partner would permit dispensing with all standing rigging – at the cost of some what greater weight.
A long time ago, I had the pleasure of rowing a boat built to these plans. Strong effort was required to get her moving, but she consumed little power underway. Between strokes, Valgerda’s considerable momentum could have carried her into the middle of next week. She loved rough water and had sense enough to mush through the small waves and ride over the big ones. Rowing this boat was pure joyor would have been if the builder hadn’t installed a centerboard trunk.
-M.O’B.
Plans from Atkin & Company, Box 3005,
Naroton, CT06820.
Simple, able, and efficient, this competent outboard boat will carry a substantial payload through choppy waters.
Working on the coast of Maine in 1985, Bob Stephens drew his Design No. 1 for the Williams College-Mystic Seaport Maritime Studies Program. The commission stipulated that the boat must carry seven adults, or fewer crew and considerable cargo, it should be propelled easily by a motor of moderate size, and it should be trailerable.
The young designer responded with this plywood launch. Considerable deadrise (“V” to the bottom) forward – considerable, at least, for a sheet-plywood hull – and a relatively high bow, reportedly result in good windward performance even in dirty weather. Back aft, the deadrise diminishes, giving the boat greater initial static stability than most of its deep V counterparts. In an effort to gain volume (for carrying large loads) and to spread out the displacement, Stephens drew the chines well forward before sweeping them upward to meet the stem.
The working drawings call for straight forward, traditional plywood construction. That is, you’ll have to make and bevel seven frames, real chine logs, sheer clamps, knees, all that good stuff. Some builders might prefer to see greater use of longitudinals, the elimination of some transverse frames, and, perhaps, stitch-and-glue construction. As may be, following the plans as drawn results in a stiff, relatively light ( 600 lbs) hull.
Good sheet-plywood outboard boats – really good ones- are hard to find. But they are out there if you look, Calkins’ Bartender, Dunbar’s Bristol Bluefish, Bolger’s Diablo, and others. By all reports, Stephens’ 18-footer can run in their company. Not bad for Design No. 1.
Chutaro lives on Majuro Atoll in the Marshall Islands and needs a boat that will do a wide variety of things very well: carry his young family of five around the coral-studded lagoon, sit upright on a sandy beach, drift reef flats while fishing, navigate breaking waves, and ferry people and supplies across open ocean to distant atolls. For over 20 years, Ben’s do-it-all boat has been a 16 Montauk—a Boston Whaler that was built in 1974 and is 16′ 7″ long with a 6′ 2″ beam and a 9″ draft and powered by a 90-hp Honda outboard.
In addition to frequent trips in his 16 Montauk inside and offshore of Majuro Atoll, Ben has made scores of safe passages to outlying atolls. I’ve had the good fortune to join him on many of those trips including perhaps two dozen open-ocean passages ranging from 20 miles to well over 60 miles. For our most recent trip in September 2023, Ben added a slightly larger 17 Montauk to his fleet. Built in 2004, it is 17′ long with a 7′ beam and a 9″ draft.
By the time Boston Whaler built the first-generation 16 Montauk in 1973, the boat already had a distinguished pedigree. The design was a collaboration between Dick Fisher and his friend, Ray Hunt. Fisher was a Harvard philosophy grad who ran a small business near Boston, but he tinkered with novel small-boat designs and new fabrication materials and methods. Hunt was a prep-school dropout, champion sailor, and self-taught naval architect who would go on to find fame as a designer of fine motor and sailing yachts.
Their first product was the original 13′ Boston Whaler, which launched the company in 1956. That first boat incorporated three fundamental innovations of hull design and fabrication that were subsequently carried over, virtually unchanged, to the 16 Montauk. The most distinctive innovation was the cathedral hull that placed a pair of longitudinal runners or sponsons in the forward section of the hull on either side of a narrow and moderately V-shaped central hull—a configuration that required the wide hull that came to characterize the Montauk line. In the aft section of the hull, the sponsons and the central V gradually merge to form a generally flat surface for planing.
The cathedral hull remains an important part of the Whaler mystique today, but the company gradually phased it out in the Montauk line in favor of a moderate V-shaped hull that would provide customers a drier and more cushioned ride. Today all new Montauks have moderate V-shaped hulls forward with only vestigial sponsons that seem intended only to deflect spray and to maintain a visual connection with the Montauk heritage.
Photographs by the author
The first-generation 16 Montauk was essentially an enlarged version of the original 13′ Boston Whaler. Indeed, the Montauk maintained the distinctive Boston Whaler cathedral hull, the injected polyurethane foam between the inner and outer hull skins, and the self-drain cockpit and low freeboard. New to the Montauk was the substantial center console.
The second and perhaps most significant innovation was the polyurethane-foam core injected between the molded fiberglass interior and exterior. This revolutionary approach allowed the new company to mass-produce affordable boats that were strong, lightweight, durable, and unsinkable. Called Unibond construction, it remains a central feature of all Boston Whaler boats today.
The third innovation involved an elevated self-draining cockpit sole and a low freeboard to limit the volume of water that could accumulate inside the boat if swamped. Together with the buoyancy of the foam core, the result was a boat that would float even if full of water and weighed down by an outboard motor, passengers, and gear.
The boat and the company took off in 1961 when Dick Fisher appeared in a series of marketing photos in Life magazine and elsewhere that featured him, sporting a bow tie and Harvard tweeds, in the stern of a 13′ Whaler as a saw cut the boat in half. Fisher then motored back to the dock in the aft section of the boat while towing the bow section.
Boston Whaler began offering a 16′ 7″ hull in 1961, and the company soon rolled out diverse models and marketing plans targeting every possible use from yacht tenders to bass boats to Coast Guard boats patrolling the Mekong River of Vietnam. In 1973 the company distilled what had become a dizzying scramble of 16′ 7″ models to focus on what they called the 16 Montauk.
In 1976 Boston Whaler modified the 16 Montauk hull shape within the same overall dimensions and changed the name to 17 Montauk. Bob Dougherty designed the new hull to moderate the extremes of the early cathedral hull—reducing the sponsons and moving them inward slightly, increasing the width and depth of the central V in the forward section, and flattening the aft section a bit more. The narrowed sponsons were carried upward and inward as “reverse chines” to meet smoothly in the center. This created a wraparound bow chine that helps deflect spray and gives the bow an expressive lip that Boston Whaler calls a “smirk.” The 17 Montauk increased the finished hull weight from 750 to 900 lbs but kept the minimum and maximum outboard ratings at 35 and 90 hp.
The 170 Montauk was introduced to accommodate the heavier four-stroke engines which, by the early 2000s, were rapidly overtaking two-strokes in the marine-outboard market. The new 170 model retained the general Boston Whaler appearance despite significant changes to the hull below the waterline and increased height in the freeboard.
In 1998 the 17 Montauk hull weight was increased to 950 lbs and the maximum outboard increased to 100 hp. Some of the increase is likely due to a shift in materials that started in the 1990s and has now replaced more than half of the 30-odd plywood reinforcement pieces with fiberglass-reinforced composite board. These hull reinforcement pieces are required in places where extra strength is needed and where deck and hull fittings are mounted because the foam core and fiberglass shell are not strong enough in themselves. Plywood inserts are cheaper and lighter than composite board but are susceptible to rot.
At about the same time, Boston Whaler created a Commercial and Government Products Division that offered boats with even more robust specs for special uses. These boats often become available to the public as surplus, even though the boats still have decades of good use ahead of them. Ben estimates there are between 100 and 200 Boston Whalers on Majuro Atoll, and, like his 16 Montauk, perhaps 90 percent of them are military-spec boats that people on Majuro acquired as surplus from the U.S. military base on Kwajalein Atoll.
In 2002 Boston Whaler completely redesigned the boat—increasing the length to 17′ 0″ and the beam to 6′ 10″, modifying the hull further toward a V-shape, and eliminating the smirk. The name was changed to 170 Montauk.
The larger, heavier hull of the 170 Montauk was made necessary by the rapid adoption of four-stroke engines, which are much heavier than two-strokes of the same horsepower. Additional reinforcement was also added to the transom to support a small kicker outboard alongside the primary motor. The weight of the 170 Montauk increased to 1,440 lbs, and the minimum outboard size increased to 60 hp. Improved manufacturing processes reduced labor costs so much, however, that Boston Whaler reduced the suggested retail price 25 percent compared to the 2001 boat.
In 2018 Boston Whaler again redesigned the boat and increased its size once again but retained the 170 Montauk name. The length increased to 17′ 4″, the beam to 7′ 3″, and the draft to 12″. The hull shape was modified even further toward a moderate deep-V hull—again with the goal of providing a drier and more comfortable ride—while still retaining a visual link to the past. The hull weight increased to 1,700 lbs—more than double the weight of the 16 Montauk—and the minimum and maximum outboard sizes increased to 90 and 115 hp, respectively. This is the current design.
With a 50-year production run and roughly four design generations, the approximately 17′ Montauk has been in production longer and sold more copies than any other stock boat. Following its success, Boston Whaler currently offers the Montauk in nominal lengths of 15′, 17′, 19′, and 21′.
At speed the 170 Montauk is drier and smoother than the smaller, lighter 16 but, even when not fully laden, the most comfortable position for a passenger is standing alongside the helm at the center console.
Even the early Montauks were well built using high-quality materials and fittings; Ben’s 49-year-old boat is still going strong. Old boats generally require some repair and refitting, and like many other Montauk owners, Ben has done that work himself. A common task in old Montauks is to cut out and replace sections of floor where the foam core and plywood reinforcement pieces have become spongy. Cracks in the surface gelcoat and underlying fiberglass or leaks that develop over the decades around deck and hull fittings require repair and filling because water can seep through them to the interior core, eventually degrading the foam and migrating to any plywood reinforcements, which eventually rot.
Understanding what repairs to do, and how, and finding the necessary parts and diagrams and other information for an old Montauk is made easier by the large base of existing boats, OEM and aftermarket parts, official documentation, and helpful owners. A wealth of advice, parts, used boats, information, diagrams, and other resources can be found online.
Ben keeps one of his Montauks on a mooring and the other on a lift. With relatively modest V-hulls, flat stern sections, and shallow drafts, the boats are easy to get on and off the trailers, and the low freeboard makes it easy for people to get on and off the boat from a trailer or a dock or from shore. The boats are so stable that an adult can sit or stand on the broad rail without dramatically altering trim. The 16 Montauk is particularly easy to move up and down a launch ramp because of its relatively light weight—with a 90-hp outboard, fuel, water, food and gear, the boat only weighs about 1,400 lbs. Even the larger 170 Montauk can be towed and launched by a family car or SUV.
Boston Whaler says that even the 2018 design of the 170 Montauk will fit, albeit tightly, into a standard-sized single-car garage. Most new-boat dealers offer 170 Montauks with a trailer that has a swing tongue that shortens the overall length by 2′ 8″ and makes garage storage possible.
No matter which design, all Montauks can be run up or pushed directly onto a beach, where they will sit comfortably, flat and upright, and are then easily pushed back off into ankle-deep water for loading. The 16, 17, and 170 Montauks all have the same 19″ freeboard, which makes loading and unloading and getting in and out of the boats very easy.
All Montauks are center-console boats. The outboard sizes are too big to be controlled by a tiller, and the combined weight of a large outboard motor and an operator would put the boat well out of trim. Of equal importance is the Montauk’s relatively hard ride in rough water. At planing speed, the ride is usually too hard to take sitting down except in the aft section of the boat. It’s best to stand at the console for support and have your legs absorb the pounding.
Fuel for the 16 and 17 Montauks and for the 2002, 170 Montauk is stored in two plastic fuel tanks under the skipper’s seat. The 2018, 170 Montauk has an integrated 25-gallon aluminum fuel tank.
Seen side by side the difference in the hull shape between the 170 Montauk (left) and the 16 Montauk is clear. While the 170 is less than 1′ longer and only 8″ beamier (the newest 170 is an additional 5″ beamier), the 170 is significantly larger thanks to the increased freeboard and flare forward. The evolved hull shape is also obvious having moved from the archetypal cathedral hull of the 16 Montauk to the narrower sponsons and wider forward v-section of the 170.
All versions of the Montauk have dry storage space inside the center console and an integrated storage space for an anchor and anchor rode built into the bow platform and covered by a plywood hatch. The 2002 and 2018 designs of the 170 Montauk both have storage space for two plastic trays of fishing tackle built into the starboard side of the console. Additional storage space and seating can be provided by strapping a cooler or heavy plastic storage box in front of the console and/or behind the captain’s bench. A big storage box placed aft of the captain’s bench doubles nicely as a seat for fighting big fish. The current 170 Montauk design has an optional cooler with cushions mounted forward of the console as additional seating.
The flat, open floor of the Montauk is ideal for stowing additional fuel, stores, and gear. On our recent three-week fishing expedition, both the 16 Montauk and the 170 Montauk were crammed with hundreds of pounds of fuel, stores, and gear—all carefully positioned and tied down. Once that cargo was removed, the flat, open cockpit floor and the bow platform made excellent casting platforms—one in the bow and one in the stern.
The Montauk’s hull is relatively short compared to its beam, and its aft section is nearly flat. The waterline length of the 16 Montauk is just a bit over 14′, and at planing speed it tends to bounce and pound a bit over short, choppy waves. The hull can come down hard, and any passenger not in the stern will likely be standing by the console with a firm hold on the grip rail.
An ocean passage in the 16 Montauk becomes tiring after a couple of hours even in only moderately rough conditions, but we have endured passages longer than eight hours when we were slowed by a brisk headwind and steep swells. In such conditions, Ben constantly works the throttle to manage the boat’s speed—getting up to plane whenever possible but backing down quickly when the boat begins to pound or heads into a big wave.
The ride in the 170 Montauk is noticeably softer and drier than in the 16 Montauk. Motoring at about 20 knots on our four-hour outbound passage, with a 10-knot wind and 1′ waves over confused 3′ swells coming onto the port bow, Ben and I only caught occasional spray in the 170 Montauk while Kimi Takiah and my son, Paki, were frequently hit with spray in the 16 Montauk. We expect the newer 170 Montauk design to be even more comfortable, but we don’t have direct experience on that boat.
Both the 16 Montauk and the 170 Montauk have very good lateral stability at all speeds and sea conditions. Both track and steer easily at all speeds—even when creeping slowly over shallow reefs with the outboard tilted up so just the bottom half of the prop is in the water. In that mode, both boats can operate safely in 1′ 9″ of water with only the outboard’s skeg and prop at risk. When necessary, we can tilt the motor all the way up and get out and walk the boat through water no more than 1′ deep.
Both boats readily rise to plane at about 3,000 rpm when lightly loaded and with only a light chop on the water. The 16 Montauk rises a bit more quickly—likely due to its significantly lighter weight—but the 16 Montauk was driven by a Honda 90-hp with a loading prop and the 170 Montauk was driven by a Yamaha 100-hp with a standard prop. Both boats run smoothly on a plane at about 20 mph as measured by GPS. The 170 Montauk runs at 22 mph at 3,300 rpm and at 37 mph at 4,600 rpm. We didn’t test it at higher rpm.
On the three-hour return passage, the 170 Montauk carried two people, 15 gallons of gas, 5 gallons of water, food, and gear. With a light breeze on the quarter and 3′ swells, the 16 Montauk planed at 22 mph at 4,200 rpm and 23 mph at 4,300 rpm. On that passage, the 170 Montauk averaged about 4.5 mpg; the 16 Montauk is more fuel efficient, averaging about 0.5 mpg better than the 170 Montauk. Two weeks later, Ben and Kimi made the same return passage on the 170 Montauk in much heavier weather with rough seas and crossing winds up to 20 knots; the 170 Montauk averaged only 3.0 mpg because the seas were too rough to maintain planing speed consistently.
In common with other planing hulls, neither Ben’s 16 Montauk nor his 170 Montauk can maintain a speed that is just below the boat’s planing speed. Both boats will generally plane at around 20 mph and 3,000 rpms when lightly loaded, but reducing the rpms to 2,800 does not decrease the speed proportionally. Instead, the boat goes off plane and slows to 12 or 14 mph because it no longer has the power to climb the bow wave. Revving up to 3,000 rpm or so again puts the boat back on plane and increases the speed from 12 or 14 mph all the way to 20 mph. It is not possible to speed up a little bit when running just below planing speed or to slow down a little bit when running right at planing speed. Running too slow and climbing the bow wave wastes time and fuel, but running too fast on a plane in a stiff chop or heavier seas can quickly get very rough and wet. The solution is to work the throttle constantly.
The 16 Montauk is light and nimble: easy to handle under power, easy to maneuver and to back down, and easy to manhandle whether at a dock, a ramp, or a beach. When the 16 Montauk became stranded on a beach during an overnight camping trip, Ben, Paki, and I were able to push the boat across coconut-frond skids off the beach and then 75 yards until we reached deeper water. Another advantage of an old, used 16 Montauk is that it might be acquired and refit inexpensively. Ben’s was already 30 years old and in need of TLC when he got it, and his DIY repairs and salvaged accessories don’t look out of place. We both like the boat.
Ben got the 170 Montauk this September mainly because it provides a softer and drier ride than his 16 Montauk. After 20 years, he was tired of the pounding on long ocean passages. I was, too. The other advantage of the 170 Montauk is that it is larger and roomier, so it provides more space for people and cargo and a larger platform for casting. Three people is a bit of a crowd when fishing from the 16 Montauk but not from the 170 Montauk.
Ben’s old 16 Montauk and his newer 170 Montauk represent the first and third generations, respectively, of the 17′ boat in Boston Whaler’s Montauk line. Both are well built, stable, stylish, and durable. Many thousands of owners use the boats as yacht tenders and for family excursions, water-skiing, and fishing inshore flats and ocean depths. A few, like Ben, use the boats to carry people and gear on long ocean passages. Military and law-enforcement personnel even use them as patrol boats. Both boats perform well over a wide range of activities, with the 16 Montauk excelling most at being light, nimble, and maneuverable, and the bigger, heavier 170 Montauk providing a roomier interior and a drier, more comfortable ride. And, in keeping with the Boston Whaler traditions, both are unsinkable.
Tim O’Meara grew up sailing and otherwise mucking about in small wooden boats on Lake Okoboji in northern Iowa during the 1950s and ’60s. In college he was fortunate to sail 30′ sloops on San Francisco Bay as a junior member of a club team, and during two summer breaks crewed on a wooden 50′ Rhodes cutter off the California coast and then around the Hawaiian Islands and back to San Francisco. After graduating in 1970, he set off with two friends and a brother and sailed around the Caribbean for a year in an aging fiberglass sloop. A lost year soon followed, during which Tim built a cold-molded version of the tender for Herreshoff’s yacht COLUMBIA; the tender now hangs in his garage above his 20′ Whitehall. Three graduate degrees in archaeology and anthropology were followed by 13 years of teaching at universities in the U.S. and Australia and then 25 years working as a consultant on economic development projects focused on the Pacific Islands where he learned to sail traditional wood canoes: in 1973 on the island of Taha’a in the Leeward Society Islands, and in 1988 and again in 1993 on Ifaluk Atoll in the Western Caroline Islands. Tim is now retired and spends as much time on the water as possible.
New 170 Montauks can be ordered from Boston Whaler in one of several colors and configurations at a base MSRP of about $47,697. Many options and accessories are available. Used Montauks of every type are widely available. Support for working with used Boston Whalers can be found at Continuous Wave, Whaler Central, and Classic Boston Whaler Owners Group.
Is there a boat you’d like to know more about? Have you built one that you think other Small Boats readers would enjoy? Please email us!
Before Sam Devlin fired up the motor and backed the Banjo 20 from the dock, the two of us relaxed in the cabin and chatted about boats each of us had designed and built, family, and getting older. Before even casting off, the trailerable 20′ outboard pocket cruiser Sam had designed had lived up to one of its primary purposes: providing a comfortable place to welcome company. The geometry of the interior’s conduciveness to conversation was not incidental. The footwell has room to sit facing one another without crowding feet or knees and the benches are comfortable and set the cabin occupants neither too close to nor too far from each other.
I had met with Sam to take notes on the Banjo 20’s underway performance, but I was content to let the time slip by with the boat still tied to the dock. We did eventually cast off and get underway.
Photographs by the author
The airy cabin has a pair of 7′ 2″ benches. Six portholes and a skylight hatch brighten the space.
The Banjo 20 is built of plywood in the stitch-and-glue method that Sam pioneered in the late 1970s and detailed in Devlin’s Boat Building: How to build the stitch-and-glue way, first published in 1995 and updated in a second edition released in 2023. Plans for Banjo consist of 16 sheets of drawings, clear and easy to read, computer-rendered in color. They include a partial list of wood needed for the hull and deck and measured drawings in metric and imperial dimensions for the seven 18mm bulkheads that serve as molds, the transom, the 12mm side and bottom panels, and the doubled 12mm “ski.” The ski is an elongated triangle with its 39″ base at the transom and its apex on the centerline, 8′ aft of the forward perpendicular. It creates a flat planing surface at the aft 12′ of the hull where there would otherwise be a deep-V.
A porta-potti hides under a hinged seat. Behind it is a hatch that provides access to a storage space and a shelf that serves as a galley. A wood-burning stove makes chilly days and nights more comfortable.
The plywood panel edges get a 45-degree bevel along half the thickness to avoid the struggle to accurately align sharp, 90-degree corners with each other. The seams are given fillets of thickened epoxy inside and 6-oz biaxial cloth is applied inside and out. The exterior of the hull is sheathed in 6-oz fiberglass cloth and a layer of Dynel.
The keel and stem are a laminate of three layers of 3⁄4″ marine plywood, cut to fit the contours of the hull along the centerline. Fillets of thickened epoxy fair the backbone pieces into the hull and ’glass finishes the connection.
The drawings provide the information needed to build the boat without lofting or spiling but do not include a step-by-step guide to construction; Sam’s book will serve in that capacity. For a newcomer to boatbuilding, a smaller stitch-and-glue boat would be a useful hands-on introduction to the method.
The companionway at the aft end of the cabin has a folding door and a hinged hatch that open to provide easy passage to the pilothouse.
The aft end of the cockpit is open for 49″ of its length. Flanking the outboard-motor well are decked-over compartments for fuel tanks, easily accessed by openings in the bulkhead.
The 3⁄4″-plywood cockpit sole is above the waterline and self-draining. It is slightly convex and that 1⁄2″ of sway guides any water that accumulates to a drain pit, set under the motorwell, where it can be pumped overboard.
The skipper and a companion are protected from the elements by the pilothouse, which is open aft in the standard arrangement. The plans include details for fully enclosed accommodations.
The 6′ 10″-long pilothouse roof provides cover for the skipper and a passenger, with 6′ 6″ of headroom except for the roof beams that take up just 2″ of that clearance. Pilothouse seats are not detailed in the plans; commercial pedestal seats are bolted in place. The roof also offers protection for the cabin companionway and a flat interior extension of the foredeck where charts and other items needed while underway can be kept. The accommodations for the motor controls, wheel, and instrumentation are left up to the builder. The last sheet of the 16 drawings provides details for enclosing the aft end of the pilothouse with a bulkhead and a 24″-wide hinged door.
The companionway has a flat hatch cover, hinged at its forward end. When open, a hook, mounted on one of the beams supporting the pilothouse roof, engages an eye fastened to the side of the hatch. A bifold door opens the passage to the cabin. It’s a 10″ step down to the cabin sole; with the hatch cover open, there is standing headroom, so there’s no need to duck while stepping into the cabin. Forward of the opening, there is about 4′ 10″ between the sole and the roof.
On both sides of the motorwell there is plenty of covered space for fuel tanks.
Three portlights on either side of the cabin, along with a foredeck hatch/skylight, illuminate the interior. All can be opened for ventilation.
The side benches have good headroom and the back-rest cushions, held in place by snaps to make them removable, are set at a comfortable angle. The benches are 7′ 2″ long and can serve as berths; at their forward end they are 26″ wide. A builder looking for more sleeping space could make panels to insert over the footwell and use backrests as cushions there.
The Banjo, with a 90-hp outboard, comes up on plane in just a few seconds and will do 28.5 knots at wide-open throttle.
A removable panel and cushion, set flush with the side benches at their forward ends, covers a space that accommodates a portable head. The bulkhead at the forward end of the benches encloses a storage compartment and supports a shelf that serves as a galley.
The gallows and canvas cover for the cockpit are an option indicated in the plans.
The plans call for an outboard of 60- to 90-hp; the Banjo 20 web page mentions “a top end of 30 mph with a 115-hp engine or an economical 15- to 18-mph cruise with a 60.” That turned out to be an understatement. The Banjo I was aboard and pictured here has a 90-hp four-stroke outboard and running straight at full throttle, the Banjo hit 32.8 mph. At an idle the engine pushed the boat along at 7 1⁄2mph. When it was powered-up, the bow rose, as expected, for about 3 or 4 seconds and then settled back down, clearing the view from the helm to the horizon. The water was merely rippled at the time of these trials and the only waves we had were the Banjo’s own wake and that of a passing fishing boat. The V sections forward cut through them without pounding. I made a few turns at speed and the Banjo stayed very nearly level while carving through them.
The Banjo was designed to be “a bridge between a serious, large cruising boat and something that is small enough to enjoy on a whim.”
Sam wrote that the Banjo 20 was “designed as a compact, trailerable outboard cruiser that could move quickly when needed. She also needed to be able to access shallow river waters as well as being able to deal with the sometimes rough waters of San Francisco Bay.” That’s the designer in him speaking. In the conversation we had before we got underway it was clear that his aspirations for the boat reflect a shift in perspective as he approaches 70: the Banjo is a cozy setting for enjoying the company of friends and family whether at the dock or out for an afternoon or a weekend.
Christopher Cunningham is the editor of Small Boats.
Ever since I first saw Lake Roosevelt, a Columbia River reservoir in northeast Washington, I’ve wanted to voyage down its 133-mile length. The place seems made for small-boat cruising. The shoreline is almost entirely undeveloped because the west side of the lake is mostly tribal lands and the east side mostly federal lands. The sandy beaches, coves, and campsites are seemingly endless. The summer of 2023, decades after my first encounter with the lake, the stars aligned, and I was able to shove aside the affairs of life on land for two weeks. While August is not the best month for a voyage on Lake Roosevelt, because of the heat and light winds on the lower lake, this was my time. I packed the boat and on August 7 my wife dropped me off at Northport, a town on the left bank of the Columbia River about 10 miles downstream from the Canadian border.
Photographs by the author
Fully laden SIRIUS weighs only about 600 lbs and can be comfortably towed behind a family car.
Here, the Columbia isn’t a part of Lake Roosevelt but a large, forceful river, not yet blocked by the Grand Coulee dam. This free-flowing stretch is the domain of motorboats and canoes, not sailboats. I launched at the Northport ramp, just upriver from a 1⁄4-mile-long cantilever truss bridge. A strong, blustery upriver wind and swirling downriver current full of eddies and whirlpools made motoring under the bridge interesting. My 22′ mainmast just cleared the bridge. Beyond it I killed the motor and hove-to, then went forward to set the mainsail. Ordinarily SIRIUS, my modified Michalak Jewelbox Junior with a cat-yawl rig, heaves-to perfectly, but with the solid Force 5 wind countering the roiling current, the little boat didn’t know what to do and wandered all over the river. I balanced on the foredeck, trying to loop the snotter around the mast and hang the sprit boom. Holding the end of the boom on my shoulder, I struggled while the mainsail, its clew clipped to the other end of the boom, did its best to knock me overboard.
The boat eventually grounded itself on a gravel bank near the river-right shore, and I was able to get a reef tucked in and set the mainsail properly. With a pivoting leeboard, kick-up rudder, and 1″-thick flat bottom, I never worry about running aground, which is one of the reasons I like SIRIUS. Indeed, I usually sail her right onto the beach.
Just a few miles downriver, the railroad line crosses a stream at the mouth of Onion Creek and the northern border of the Lake Roosevelt National Recreation area.
After pushing off the bank with an oar, I hauled the leeboard down by its pendant, caught the wind, and sailed out into midstream. I tried tacking but got caught in irons, stalled, and rolled about at the mercy of the conflicting wind and current. What the heck? For a flat-bottomed plywood box, this boat usually points high and foots fast, a paragon of sailing virtue. But I was beginning to understand the advice given to me by a friend, “Don’t launch a sailboat north of China Bend.” I realized the strong current from astern made steerageway difficult to maintain. I eased the mizzen sheet to fall off the wind a point or two and hauled the mainsail in tight. The boat heeled over and zoomed across the river, making short, broad tacks. As long as I kept the speed up, I could control the boat.
A couple miles below the town, I spotted my wife sitting on the railroad tracks that follow the left bank. She wanted to be sure I had everything well in hand before driving away. I hove-to close to the bank and we shouted our goodbyes. We didn’t expect to be able to communicate for days, if at all, because we knew the area’s cellphone coverage was poor in these parts. As it turned out, I found enough signal to get a call out every day.
As the river flows into and through Little Dalles, the current becomes fast and often unpredictable. With no GPS or detailed chart, I had no idea this narrow gorge existed. For me, discovering the river as I go is a large part of the fun.
With the strong current going my way I covered plenty of ground, industriously short-tacking down the river. In an hour the river slowed, and the wind stilled. Nestled on the left bank was a quiet cove backed by the railroad line that crossed a stream on a rusted trestle bridge. I sailed in and landed to stretch my legs and have lunch. This is the mouth of Onion Creek, the official start of the 133-mile-long Lake Roosevelt National Recreation Area according to my only navigational aid, the National Park Service map, which I’d picked up at the launch ramp.
When I left the cove, the wind on the river had died and I didn’t feel like just drifting, so I racked the sprit boom on the cabintop, rolled the mainsail up from the clew, loosely furled it to the mast with the snotter, and started the motor.
As it flows through the Lake Roosevelt National Recreation area, the Columbia River is fed by many streams and creeks. Flat Creek is typical and offered a sheltered overnight spot out of the main current.
Soon the lazy river started to pick up speed. Ahead, it narrowed between tall cliffs and with the aid of my binoculars I confirmed that an eddy line stretched clear across the river! That usually means rapids ahead, although the map didn’t indicate any here. I hurriedly raised the leeboard, donned my life jacket, and made sure everything was squared away. I gunned the motor to maintain steerageway as the current continued to gather speed. I’m no stranger to rapids, but I’ve certainly never run them in a sailboat. “OK,” I figured, “keep the boat pointed downstream, try not to hit anything, and whatever you do, don’t get broadside on a rock.” I’ve lost a boat that way before.
There were no rocks, but the current was powerful and unpredictable, full of 10′ whirlpools and strong eddy lines. The volume of water moving through this narrow gorge, called the Little Dalles, is tremendous. The Columbia has flowed more than 500 miles from its source by the time it reaches here, gathering the flows of countless streams and tributaries along the way.
The forward half of the cabin has a plywood inset to create a stable and comfortable sleeping platform with plenty of storage below the benches on either side. The large windows provide plenty of natural light and excellent all-around visibility from within the cabin.
SIRIUS was grabbed by an unseen eddy and instantly heeled over so far that I let go the tiller and threw myself to the cabin floor to help keep her upright. This was no place for a boat with a deep, hard chine like SIRIUS. The gorge funneled an upriver wind so strong it unfurled the mainsail from the mast; having 96 sq ft of sail flapping furiously about didn’t help matters. Fortunately, the Little Dalles gorge is only 300 yards long, and I was soon out into calmer waters.
Beyond the gorge the wind died again, and the current slowed to about 2 mph, so I lowered the sail and kept motoring. Two or three miles downstream the water went glassy, and I cut the motor, letting the boat drift. The afternoon had turned hot, so I stripped down, jumped in, and swam around the drifting boat. SIRIUS has a boarding step on the stern at waterline, and with the help of the mizzen boomkin and mast, climbing from the water is easy enough.
The footwell in the stern of the cabin doubles up as a flat surface on which to prepare meals, and the flare of the cabin sides provide comfortably sloping seat backs.
Back aboard I broke out the stove and brewed afternoon tea. Two jet skis passed by, heading north. I cooked and ate dinner. The two jet skis passed by again, heading south. That was all the boat traffic for that day. Eventually I refilled the motor’s fuel tank and continued, passing China Bar, a 65-yard-long, narrow island where Chinese immigrants panned for gold back in the 1860s. The evergreen-crested bar looked like a great place to camp, but I had no idea how long this trip might take and figured I’d better press onward. I passed the China Bend boat ramp on the left bank, which is as far upriver on the lake as big boats dare to launch.
The Columbia curved to the west, and I found a cove in the north bank where Flat Creek tumbles down to the lake. I went up as far as I could, tossed the anchor over the bow among the rocks of the creek, and let the boat snuggle against the muddy bank. Despite a late start thanks to the current, I’d made some 14 miles, according to the river-mile marks on the map.
For much of the trip there was little wind and at times the Columbia was a flat calm. With everything lashed in place—the throttle on the outboard’s tiller arm held by para cord and the tiller centered by a length of bungee—SIRIUS needs very little hands-on supervision.
The Jewelbox Junior is a Birdwatcher design, sailed from inside an 8′-long slot-top cabin. For a 15′ boat accommodations are pretty good. Low seats line the cabin sides where the headroom is about 36″. At night, filler boards bridge the seats to make a double berth. A vinyl cover supported on wooden slats snaps over the slot at night or during inclement weather. As tall grasses along the creek brushed the port cabin windows and a hundred little bugs swarmed around my light, I listened to a pocket radio tuned to a Canadian station for company as I read myself to sleep.
The next morning, the silvery beads of a heavy dew covered the boat. I had a pleasant breakfast-in-bed of tea and oatmeal, listening to the chuckle of the little stream and reading The Venturesome Voyages of Captain Voss. Underway by 9 a.m., I motored downriver through the North Gorge where I feared a repeat of my experience in the Little Dalles. I needn’t have worried. Steep, wooded hills reared above the river, but the channel was wide and the water glassy. I stayed close to the right bank where I discovered several little rock-bound coves, one with a waterfall.
In fair weather I roll back SIRIUS’s cabin top to transform her into a high-sided open boat. With the sleeping platform put away there is no obstacle from one end of the cabin to the other. Gear and food are stowed in lockers beneath the side benches while the bedding goes up under the foredeck. In light airs or when motoring I steer from the stern deck but in stronger winds it’s safer to steer from inside the boat.
There was no longer a discernible current; the Columbia had turned into a lake and with no wind, the voyage was turning into a motor-cruise. My little two-stroke outboard was so loud I wore earplugs. I landed to explore North Gorge Camp and walked the train tracks along the shore. The line ran right beside the road at the camp entrance, but the two soon diverged: the road headed inland while the rails veered through the forest close to shore. The rails, spiked to wooden sleepers, were bright with use. Through the trees I caught glimpses of the quiet cove on the upriver side of the camp.
I motored on and by 11:30 a.m. a gentle upriver wind had sprung up. I killed the motor and raised sail to conserve fuel. I had brought only 1 gallon of gas and couldn’t get more until the marina at Keller, about 40 miles below Northport. I tacked downriver and upwind for several hours, making a gentle 3 mph. Gradually the wind grew and at 2 p.m. I landed at a boat launch at Snag Cove. Despite the name, here there is neither cove nor snags. I went ashore for lunch carrying my stove to brew tea but had a beer instead, courtesy of a passing fisherman. The wind grew strong but fluky, and I left Snag Cove reefed, but soon shook out the reef to make better time. I luffed through strong gusts, on and off sailing, becalmed, then wham!…another gust. It was tiring and took several hours to reach the first big bay of the trip, about 1 mile wide and 2 miles long. Here the wind blew strong and steady. Rather than reef, I flew along close to the wind and sailed full-tilt up to the dock at Evans Campground, cast off the sheets at the last possible moment, and leapt ashore with docklines in hand. It was a perfect landing, but no one was there to witness it.
In the height of summer the upper reaches of Lake Roosevelt were almost deserted. There were many quiet isolated spots to pull up to overnight, such as here on Summer Island.
It was 5 p.m. and I was bushed. I set up my kitchen under a pavilion and cooked a good dinner of a homemade polenta-couscous mix with diced tomato, cheese, and tea. I considered sleeping on shore, but it looked like rain and I hadn’t brought a tent. The wind was dying, and I was tired, but I didn’t want to stay on the dock in this exposed location, fearing I wouldn’t sleep well. SIRIUS has pronounced rocker fore-and-aft, which makes her rather tender, so it’s best to beach her for the night. Besides, visitors leaving a boat at the dock all night are supposed to pay for a campsite. I sailed from the dock bound for the opposite shore, only a mile away, but the winds had calmed, and it took me an hour of tacking upwind to cross the bay to Summer Island, one of the many boat-in campsites on Lake Roosevelt that are free of charge and are first-come, first-served. I landed on the sandy shore at 7 p.m. I’d managed 13 miles that day. The beach was sheltered and quiet, and I had the whole island to myself. I bathed in the lake and turned in for the night.
It rained a little that night, but not much. The next day was overcast and cool, and I left the vinyl cover in place over the cabin’s slot-top; it looked like that kind of day. I had a lazy morning, cast off at 10:30 a.m., and sailed away from Summer Island in light, variable winds, chasing ripples across the lake. I didn’t get far and was soon motoring slowly along with sails up. The bay narrowed back into a river between rocky banks and low wooded bluffs, and I could see weeds bending in a gentle current. The water was glassy, reflecting a gray sky.
The sand bluffs just above Marcus Island camp are unstable, particularly between Gifford and Enterprise. All was quiet when I passed by this trip, but in an earlier summer, I saw two cliffs collapse in clouds of dust and sand, reminding me of icebergs calving from a glacier.
Somewhere along the way I passed over the remains of the town of Marcus, one of the 10 communities drowned when the lake was formed. I motored past Marcus Island Campground and out into the biggest bay on the Roosevelt, more than 1 mile wide and 5 miles long. The water here was rippled and the wind light. I was on my last tank of gas, so I killed the motor and ghosted. A gentle breath of air from the north pushed me down the bay from behind, the first following breeze I’d experienced on the trip. I ghosted straight down the middle of the bay, headed for the narrow exit straddled by the Kettle Falls Bridge. Halfway down the bay, the wind picked up and shifted to the west, putting me on a reach, and as I neared the bridge the water grew choppy; the wind shifted to dead on my bow and increased to about as much as I care to handle without a reef. As I got closer to the bridge, I could see that it was not one, but two bridges close together. I’d have to pass under the lower railway bridge first. I short-tacked up close but at the last moment chickened out and sprang to the motor. It came alive at the first yank, I cranked it wide open and motored through, bouncing in the chop. The wind was just too strong and fickle in the narrow gap, and there was little room for error.
After clearing both bridges, I killed the motor and was once again tacking down a narrow river against a strong south wind, heeled well over. Soon the wind quieted, the boat settled back upright, and the flat bottom pounded in a leftover chop. I started shifting my weight to the leeward side of the boat with every tack to heel it over—a flat-bottomed boat has to sail heeled in a chop or it will pound to a stop. I was making little progress and eventually gave up, furled the sails to the masts, and started the motor. I had just enough fuel to get to Kettle Falls Marina, not quite 2 miles below the bridge.
SIRIUS’s roll-top cabin roof is an old above-ground pool liner cut to size and shape. It is supported by thin wooden battens sprung across the opening, their ends held in slots in the coaming. I got the idea from plans of AMOS BROWN in John Atkins’s book “Practical Small Boat Designs.”
I tied up at the gas dock, refilled my 1-gallon gas can, and bought oil and an ice cream.
I motored out of the little marina and raised sail. The wind was now blowing from the north, strong enough that I took in a reef. I ran off to the south, making good time as the wind continued to build and entered the mile-wide bay above Rickey Point, where about a dozen large sailboats are kept on moorings. A mass of low rain clouds rolled down the hills from the northwest behind me, and I considered ducking into a cove on the right bank for shelter. But I was making such good time, the storm wasn’t gaining on me, and I didn’t care to spend the rest of the day swinging at anchor in the rain; so I made sure the cover over the slot-top was snug, put a transparent drop board in the forward companionway, dropped the aft flap, and kept right on going downwind. It felt odd sailing with the cabin battened down for heavy rain. I could see out the windows, but not directly behind, and I couldn’t see the mainsail at all.
Being flat-bottomed SIRIUS can be beached anywhere with a soft landing, and her bow is low enough so I can simply step ashore without getting my feet wet.
Suddenly SIRIUS was hit by a terrific gust of wind and heeled well over, and I cast off the mainsheet as fast as I could. The storm had overtaken me. Because I couldn’t see the mainsail it took me a moment to figure out what was happening. The wind was now blowing hard from the west and the boat was caught broadside on. Torrential rain hammered, thunder boomed, and the wind increased yet again, heeling the boat alarmingly. The only thing I could think to do was to heave-to. I had to plant both feet against the aft bulkhead to haul the mizzen flat, but the boat rounded up. I was amazed that nothing broke, but feared the flogging mainsail would knock the boat down any second. The rudder was hard over to port and SIRIUS was being driven backward across the lake at a surprising rate. I tried to force the rudder over to starboard but gave up as the force required was so great that I feared breaking something; then belatedly I realized that with the mainsail to port and the boat going backward, the rudder should also be to port. The boat knew what it was doing better than I did! I wanted to haul down the mainsail and considered reaching across the foredeck with a knife to cut the halyard, but the only way to get the sail down is to stand on the foredeck and free the boom’s snotter, which is looped tight around the mast trapping the sail lacing and halyard. The storm was frighteningly violent, but slowly I relaxed, realizing there was no immediate danger. SIRIUS is fully self-righting; the buoyancy of the high cabin sides and weight of the inch-thick bottom and 135 lbs of lead ballast will bring her right back up from a knockdown. A good deal of rain was driving in over the front drop board and under the slot cover. I put on my raincoat, life jacket, and hat, and spread a small tarp out to catch the rain coming into the cabin. I’d been blown clear across the lake and was headed right for the sailboats moored off Rickey Point!
I considered dropping the anchor, but with only 100′ of rode I had no hope of it finding the river’s deep bottom before I ran in among the moored boats. The storm moved eastward and the wind moderated, if not the rain. I loosened the mizzen to fall off the wind, gathered my courage and the mainsheet, and sailed downriver, away from the point, and left the storm behind.
When stopping overnight at a beach with a steeper slope, such as here at Quillisascut Creek, I bring SIRIUS in stern-to so that my head is higher than my feet when I’m sleeping.
The wind stayed In the north for the rest of the day, strong enough for a reef, but conditions moderated for a time and the sky shone brilliant blue between broken clouds. At 5 p.m. I landed at Bradbury Beach. The floating dock there was pitching in the waves and the approach was guarded by log booms. I hove-to and tried to furl the mainsail, but the wind was too strong; I had to lower it instead. I started the outboard and steered for the dock but had to abort the attempt. I gunned the motor to spin the boat about, got out past the booms, and ran the bow up on a sandy beach in their lee.
I stretched my legs on solid ground but couldn’t stay. The sky had darkened again; another storm was blowing down from the north. I pushed off the beach and motored south along the left bank looking for a cove. About 4 or 5 miles down, Barnaby Island came into view off the right bank and, just as heavy rain hit, I spied a small opening in the opposite bank and motored into Quillisascut Creek. With the strong tailwind and motoring I’d covered about 20 miles from Summer Island where the day had started.
SIRIUS will sail herself to windward with the tiller held by the bungee and the mizzen sheeted a little freer than the mainsail. My weight moving around the boat has little effect on the heading and I make course adjustments by sheeting the mizzen in or out. The mainsheet comes from the end of the sprit through an eyebolt on the sterndeck and into the cleat—it has no mechanical advantage.
I waited out the storm, then motored back out into the lake to find a cellphone signal and, drifting broadside to the waves and rolling all the while, made a brief call to my wife. The fetch was miles long and considerable chop had built up. Motoring back to the creek, I had to quarter the waves—SIRIUS could not take them on the beam. Well up the creek I put the stern on a bank, tied up to a tree, and tossed the anchor off the bow into the grass on the other side. Only tiny wavelets made it all the way up to where I was. I cooked dinner and ate as the sun set, glad to be in a snug, dry, cabin.
I spent the next morning in the cove. I tidied the boat, wandered the beach, explored the nearby woods, and had a shower under a cataract that tumbled 20′ over moss-covered rocks. At about 11:30 a.m., I took my leave and sailed across the lake on a broad reach before a brisk north wind under blue skies scattered with fluffy cotton-ball clouds. I bore away to run the gap between the west bank and Barnaby Island, a 1-acre wooded islet rimmed in sand and silver-gray driftwood. The passage was too shallow even for SIRIUS. Barnaby Island is no longer listed as one of the boat-in camps, but I could see picnic tables and latrines among the trees. About 1 p.m. the following wind picked up so much that I hove-to and took in two reefs. The boat quieted right down with the double reef. I think I was being overly cautious, worried about another surprise storm. A half hour later I made Daisy Station on the left bank where the gas station, store, and restaurant are now out of business. As the wind died, I shook out the reefs and drifted, bobbing about in the leftover waves.
The 2′-long bow well is self-draining. For the samson post and mast step I was inspired by the setup drawn by Phil Bolger for his Black Skimmer design. I carved SIRIUS’s mainmast from a 35-year-old Douglas-fir. Sitting at the bow while your boat sails on is truly mesmerizing, but it is a little dangerous—if I fell overboard the boat would happily sail away without me!
In a little while a south wind sprang up and I tacked down the lake. The lake here is about a mile wide between low wooded bluffs with scattered sandy beaches. For the first time the wind blew nice and steady. I strapped the tiller amidships with a bungee cord, cleated the mainsheet, and adjusted the mizzen to hold a course about 45 degrees off the wind. SIRIUS would hold her course like this for hours. When we neared a bank, I’d push the tiller over to come about, then center the tiller again and go back to writing in my journal, talking to my wife on the phone, and making lunch. I even washed some clothes, using the aft deck as a washboard and towing them behind on a cord to rinse. I hung them to dry on the boom. While SIRIUS sailed herself, I stood on the aft deck with a hand on the mizzenmast, studying the scenery, or sat on the forward cabintop, mesmerized by the bow wash.
At about 6 p.m., the wind left for the evening. I furled the sails, started the motor, and putted past the Gifford-Inchelium ferry. A little beyond the landing on the right bank I passed a series of coves.
South of the Inchelium ferry dock, I found a small deep cove where I moored up and went ashore to explore the forest before rowing on to an even more sheltered spot for the night.
I killed the motor and broke out the oars for some exercise. I set SIRIUS up for stand-up rowing with 9′ homemade oars. She is no joy to row, but with the sails furled and the leeboard and rudder up I can maintain about 2 1⁄2 mph and have rowed a mile or two upon occasion. (Mostly I use the oars for maneuvering or poling in shallow water.)
On this fourth day, I’d made 15 river miles downstream, much of it beating to windward. I chose a sandy beach in a small cove that my map said was about 75 miles up-lake from Grand Coulee dam. It was wide open to the east, so I would be awakened by the morning sun.
Many of the coves, like this one, showed no signs of human activity—no old fire rings, no trash, and no trails leading into the woods.
The next morning, I was underway by 8:30 a.m., sailing gently downwind past wooded hills interspersed with sheer sand cliffs, sometimes as much as 100′ high. At the base of the cliffs spread beaches of fine, white sand. It was Friday, and there were plenty of smaller powerboats on the water and camps on shore. There was not a cloud in the sky and the day was already on its way to being a scorcher, but it was pleasant in the shade of the mainsail. By 11 a.m. the wind died, and I couldn’t drift on the lake, baking in the heat, so I started the motor. Within half an hour I had landed on an empty sandy beach on the right bank a few miles upriver from Hunters Campground. A swim in the lake cooled me right down and I shaved while standing waist deep in the water, my pocket mirror propped up on the stern deck. After lunch, enough of a breeze sprang up from the south to make beating to windward profitable and I was on my way again.
I made the floating dock at Hunters Campground under sail and stayed long enough to refill my water jugs before casting off.
The Hangkia 3.5-hp outboard worked well throughout the trip, starting every time it was needed. I had a limited supply of gas so used the outboard as little as possible, but even so I burned through 4 of my 5 gallons of fuel.
I tacked to windward the rest of the day, usually with the helm untouched. Many of the beaches were occupied by campers, with boats lined up along the shore, tents pitched, music blaring, and ski boats and jet skis blasting in and out. The weekend had come to the popular part of the lake. About 7:30 p.m. I landed on an empty, sandy beach at the mouth of Oh-Ra-Pak-En Creek for a swim to cool off and remove the sweat of the day. I looked up and realized I was providing entertainment for a bunch of people camped on the opposite shore of the creek who had nothing better to do but sit in the shade and watch the antics of the old guy in the odd little boat across the way. It creeped me out, so I pushed off and motored as far up the narrow and deep creek as I could both for privacy and to get out of the setting but still blinding sun. I anchored among the submerged snags at the head of the creek. Evening sent a breeze down the canyon, cooling me off as I dined on canned chili, diced tomato, some baby Gouda cheese, the last of the bread, and a pot of tea. I had covered about 17 river miles—not counting the endless tacks—almost entirely under sail, which was a record for SIRIUS. The breeze blew all night, making the boat swing to her anchor, and I slept soundly.
Saturday, the sixth day of the voyage, dawned bright and cloudless but the sun couldn’t penetrate up the canyon and I didn’t get underway until almost 10 a.m. I motored down the creek and out past Camp Enterprise, which had at least a dozen boats pulled up along the beach. The shore looked like a tent city. Here the lake jogs westward in a big dogleg. The day was already getting hot as I motored across to the right bank to find a shady beach to wait for a wind. As I neared the far side, the outboard’s fuel tank started rattling sharply inside the housing. I landed in a shady cove and went for a swim as the engine cooled. I disassembled the motor and found the tank mounting bolts had worked loose, an easy fix.
With little wind and not much left in the gas tank, I took to the oars to keep SIRIUS moving. I row standing up looking forward, the oars pressed against the sides of the oak-trimmed oarports like thole pins.
I stayed in the cove for two hours, beachcombing and waiting for wind. The morning was hot and still, without a cloud in the blue sky. Motorboats occasionally chewed up the lake, throwing huge wakes. Finally gentle cat’s-paws appeared on the water. I motored out to meet them, shut down the engine, and ghosted along. I rowed now and then, but it was too hot, and my heart wasn’t in it. It took three hours to make the next 5 miles, to the end of the dogleg where the lake turns south again. Around the bend is a bay more than 2 miles wide. Here, a good south wind sprang up and I tacked a few miles south before it died. It was still early, but I’d had it for the day. There were several coves with sandy beaches on the left bank, but I needed to get out of the afternoon sun and find shade on the right bank. I sailed for another half mile, gave up, and motored on my last tank of fuel across to a small, rock-bound cove that was in the shade on the right bank. I’d managed only about 7 1⁄2 miles.
I dropped the anchor and bathed standing in the self-draining bow well, pouring water over my head with the anchor rode bag. I had my last tomato and the last of the cheese with dinner. Feeling much better, I hung a kerosene lantern from the end of the sprit boom racked on the cabintop—the first time I’d bothered with an anchor light—and settled back against my pillows to catch up on my journal.
Throughout the trip and most especially towards the end, the weather was so hot that I sought shade wherever and whenever I could. Here, SIRIUS is moored in the shade of a basalt cliff.
On Sunday morning, I was vigorously bounced awake by sharp little waves entering the cove. I sat up and was blinded by the low-angle morning sunlight. Groggily I hunted up my watch, it was just after 6 a.m. A reefing wind blew southward past the mouth of the tiny cove. I got an early start and, before too long was heading south under one reef, making great time. About 5 miles along, I spotted a 70′ pontoon houseboat beached on the west shore, looking like a stranded whale. I knew that boat well, having done plenty of work on it this summer. I released the mainsheet, threw the tiller over, and ran the boat up at speed on the sandy beach about 100’ from the houseboat. As SIRIUS scrunched to a stop on the white sand beach I hopped over the bow and startled a black bear that had been foraging near the houseboat. It ran off and scrambled up a sandy hillside sparsely forested with ponderosa pines and sagebrush. That set the dogs on the houseboat barking, and soon my bleary-eyed friends were peeking out at me. It was only 8:30 a.m. We spent an hour chatting, and they generously refilled my gas can and gave me a gallon of two-cycle oil.
I continued south, enjoying the strong following wind and making great progress. I had planned to stop for two-cycle oil at the marina at Two Rivers, the confluence of the Spokane River and Lake Roosevelt, but since I no longer needed any, I continued past.
As the upriver forests gave way to the starkness of sand and basalt, the landscape and heat were quite forbidding. For a while, the shade in Hawk Creek offered welcome respite.
Three miles farther down on the left bank is Seven Bays Marina, home of the only restaurant on the lake. As I neared it, the Roosevelt grew crowded with all kinds of motorboats heading this way and that. SIRIUS carried the only sail in sight, and I was grateful for the strong wind that enabled me to plow through the confusion of wakes and chop. I hove-to outside the marina entrance to furl sails and motored into the courtesy dock where SIRIUS looked out of place among the fiberglass and aluminum powerboats. I enjoyed a cheeseburger at the restaurant and filled an extra gallon jug with gas. I might need it if the weather turned back to hot and still.
After leaving the marina, I sailed a few miles down the lake as the wind gradually faded away and the lake grew calm. Without the wind it became very hot. I started the motor and sat on the stern deck with the tiller between my legs, an umbrella balanced on my shoulder to shield me from the broiling sun. The cabin was a greenhouse, too hot to occupy. I entered the wide mouth of Hawk Creek where, on its north shore, a wedge of shade was cast by a sheer basalt cliff that plunged into the lake at the mouth of a small cove. SIRIUS had turned into a furnace, the wooden cleats and dark green trim too hot to touch. I beached in the shade. The water was murky with fine clay silt, but I was far too hot to care and spent an hour floating in the shade on a seat cushion, then sat in the shade reading and writing until 6 p.m.
The 40′-high waterfall at the head of Hawk Creek narrows to a fast running stream in late summer, but in the spring is a spectacular torrent.
In the cooler evening I motored up the creek. The entrance is 300 to 400 yards wide with many sandy beaches and campsites, gradually tapering down to a narrow, winding channel enclosed by tall, sheer cliffs called the Palisades. The sun couldn’t penetrate in there and it was cool in the shady passage. Little kayaks and paddleboards splashed about like water bugs, and several motorboats were anchored, one with smoke curling up from a barbecue on deck. I motored on through and the Palisades opened up to reveal shady Hawk Creek Campground nestled below sage-covered basalt hillsides. I motored, rowed, then poled as close as I could to the 40’ waterfall at the head of the canyon, but SIRIUS ran aground about 200’ shy of it. The day was fading, and eventually I headed back downstream and anchored in a shady, rock-bound cove on the south shore near where the mouth of the creek opens onto the lake.
During dinner, while spreading peanut butter on a cracker, I carelessly dropped my sheath knife onto my air mattress. Naturally, it landed point-first. I had no patch kit, and I spent the rest of the trip sleeping on a flat mattress.
As I neared the end of the trip and cruised through increasingly rugged terrain the wind dropped off to almost nothing and the daytime temperature soared to over 100 degrees. I made frequent stops at shady beaches in my efforts to cool down.
On the morning of my eighth day out, the radio warned of a heatwave with temperatures in the shade exceeding 100 degrees. From here, Lake Roosevelt no longer heads south but turns northwest. Underway at 8:30 a.m., with no wind and not a cloud in the sky, I motored slowly close to the left bank where there was the most shade. I sat on the stern deck, with the umbrella on my shoulder, and occasionally plunged my shirt over the side and put it back on, dripping wet. The lake here is 1⁄2 mile wide and bordered by desiccated grass-covered slopes rising to rocky sage-covered hills. Gone were the forests of upriver; this was desert country. Gone also was the boat traffic. It occurred to me that a desert is not the ideal location to sit out a heatwave, and that I was now utterly dependent upon the cheapest and perhaps most unreliable outboard sold, which had never run so many miles without failing. If it quit, I might be in a bit of a pickle. I reasoned I’d row to the nearest available shade, cool off in the lake as necessary, and either fix it or wait for a wind to carry me to the nearest boat ramp where I would call my wife to come get me. I still had plenty of food, even if it was of the oatmeal, ramen, and canned tuna variety. With this contingency plan in place, I motored on.
I passed the ramp at Lincoln and the camp at Sterling Point, making perhaps 7 miles before I landed in a tiny cove with cool, crystalline water caressing a beach of coarse sand with tiny wavelets. Shade was provided by a sheer 40′ granite cliff and there were cool, rounded boulders to lean against. Seldom have I chanced upon such a nice spot. I stayed two hours, and maybe should have stayed two days, until the heat lessened.
Whitestone rock rises 700′ above the lake. The boldness of the cliffs offered little in the way of shade and with the temperature topping 100 degrees in the shade, the heat out on the glassy lake was exhausting.
I motored the next stretch at what passes for high speed with my outboard. From time to time, I dipped a cloth in the lake and wrung it out over the fins on the cylinder head to cool it down. The lake was glassy as I passed Whitestone Rock, a sheer-sided granite monolith that rises 700′ from the lake. The lake is over 1⁄2 mile wide here, the left bank rocky, the right bank rising in barren brown steps clothed in short prairie grass.
The engine ran out of gas after about 5 miles. I poured gas in and continued to the next shady beach to cool down. After a break in the shade yet again, it seemed better to cruise at 3 or 4 mph, so I motored slowly on past the ramp, the three-dozen lakeside houses at Hanson Harbor and the picnic tables at Goldsmith Campground and made the marina just past the Keller Ferry landing where I refilled my gas can yet again. I sailed for perhaps a mile beyond the marina in a light, fluky headwind to a big rocky island, but I soon gave it up as unproductive. I motored to the left bank and ran the bow up on a muddy beach in the shade below a steep bluff topped with houses. I drank two quarts of Gatorade while lying on my back in the boat with my feet propped up on the aft deck and passed the time reading.
As the daylight faded an unexpected notch opened up in the cliffs giving onto a short rocky cove where I could spend the night.
At 7 p.m. I refilled the outboard and slowly motored into a blinding setting sun, past a confusion of jagged pillars, towering cliffs, and talus-draped ridges lining the bank, and turned into a deep, narrow opening that unexpectedly appeared among the cliffs and pillars. This led into a deep cove ringed with craggy granite, with a narrow dry wash choked with brush at the back. As I came in, a river otter slowly swam out. I’d pushed about 25 miles and was bushed. I set the anchor over the bow, tied the stern to the shore, bathed while standing in the bow well, and went to bed.
On the morning of my ninth day on Lake Roosevelt, I got underway at 8:30 and motored slowly along the left bank as before, stopping about every hour in any scrap of shade I could find to cool off. With only 10 miles to go, I was not in a hurry. I had arranged for my wife to pick me up at Spring Canyon, within sight of Grand Coulee Dam, at 2 p.m. The craggy granite cliffs gave way to low, sandy, sage-covered hills. An endless beach ran along the left bank. Without the cliffs, shady beaches were becoming rare, and I tied up to a big jumble of granite slabs and blocks along the shore for lunch. The pile was just steep enough to offer some shade as I settled in among the boulders. I watched fish swimming in the shady depths while I munched on crackers, peanut butter, a can of tuna, and a can of orange wedges, washed down with a quart of Gatorade. After the break, I motored the last few miles and at about 1 p.m. tied up to the dock at the Spring Canyon boat ramp. I spent the next hour swimming. My wife was right on time at 2 p.m.
Any shade was welcome. The mooring spots were not always the most hospitable but with no wind and away from the current, even an unpromising notch in the rocks allowed me to escape the worst of the heat out in midstream.
Cruising the entire 133-mile length of Lake Roosevelt fulfilled a decades-long dream, but I still feel I’ve only scratched the surface, and nowhere near exhausted all the possibilities for exploration here. SIRIUS, a boat that can be beached at will and easily pushed off again, was a perfect match for the clean, clear, water, the broad blue sky, the coves and creeks, and the endless beaches.
Bob Van Putten and his wife live off-grid deep in the Washington mountains in a straw-bale cottage they built for themselves more than 20 years ago. He is a self-employed systems integration technician specializing in smaller municipal water and wastewater systems. Small boats and being close to the water provide him with dynamic engagement with the real, natural world and force him to live in the moment and continually renew his interest in life.
If you have an interesting story to tell about your adventures with a small boat, please email us a brief outline and a few photos.
A hot dinner at the end of a cold day on the water is a welcome reward. It’s all the more appreciated at camp or aboard a boat without a heated cabin, but there’s often no time to savor the meal before it gets cold. If dining attire calls for a cap and jacket, your cookpot could probably use something to keep it warm, too: a cozy.
It’s easy to make a cozy to fit almost any camp-cooking pot. The insulation is provided by Reflectix, a double-reflective, double-bubble insulation made for use in construction to provide thermal insulation for everything from water heaters to walls. Its silvery metalized polyester outer layers reflect heat and the two layers of polyethylene bubbles provide dead air space for insulation. The bubbles can’t be popped like those in bubble wrap can. I can stand on Reflectix with all my weight on one heel and not pop a single bubble.
The tape used to put a cozy together is aluminum film with an aggressive rubbery adhesive on one side, which is protected by a peel-off layer of treated paper.
Here’s how to make a camp-cookpot cozy:
Photographs by the author
All that’s required for the project are aluminum foil tape, scissors, a Sharpie marker, some Reflectix, and a pot with a lid.
Trace around the bottom of the pot. Sight down the side of the pot and hold the Sharpie to mark a circle that is the same size as one that would be traced around the outside of the pot’s side. Cut along the outside of the Sharpie line to make the disk of Reflectix a bit oversized. Note that the bubbles on the edges of a roll of Reflectix are deflated to create a margin that can be stapled to wall studs prior to the installation of drywall.
Measure the circumference around the side of the pot. Then measure the height of the side from its bottom to where the side flares to meet the rim. Cut a piece of Reflectix that is about 1″ longer than the circumference measurement and 1⁄4″ wider than the height measurement. The rows of bubbles evident on the Reflectix should run perpendicular to the length of the piece to be cut for the side of the cozy.
Wrap the cozy side around the pot, keeping it below the pot rim, and mark the point of overlap. Trim the end of the side to that mark. This should provide a slip fit for the cozy.
Cut a piece of aluminum tape that is 2″ longer than the cozy side is wide. Peel the tape backing halfway back and set the side on the tape, covering half of the tape. Locate the Reflectix carefully: the tape grabs quickly and firmly but it can be peeled off with a bit of care and effort if you need to reposition it.
Loop the cozy side over the tape and butt its ends together. Press them to the tape.
Put the far end of the tape through the loop.
Set the tape over the seam and pull the tape backing through and off.
Trim the excess tape.
Slip the cozy side on the pot and make any slits that are needed to accommodate handles. The pot will be moved from the stove while hot, and the handles need to slip into the cozy. The handles can then be folded or remain deployed. In some cases, the flap created by the slits can remain connected to be laid back against the pot to insulate it.
Slip the cozy side on the pot, butting it against the flared rim. The cozy bottom will fit inside the cozy side.
It’s easiest to tape the bottom and side together in a few sections. Cut the tape in pieces 4″ to 6″ long and cut slits, about 3⁄4″ apart, from one side to the middle of the tape.
Peel the backing off, starting at the side without the slits. Apply the tape to the side of the cozy with the tabs up.
Fold the tabs over, pulling them tight to press the cozy side tight to the bottom.
When the entire perimeter has been taped press the tape tight to the Reflectix.
For this pot, the flaps could not be folded over the handle fittings, so I cut them off. The missing insulation will be covered by the cozy’s lid.
Put the pot and cozy upside down on a piece of Reflectix and trace a circle. As before, sight down the side of the cozy and angle the Sharpie to draw its line to the outside of the cozy side.
For the side of the cozy lid, measure around the cozy side. Add 1″ to that dimension for the length of the lid side. The width is not critical. For this pot I chose 3″, more than enough to cover the pot’s handle fittings.
Tape the ends of the lid’s side together as before and slip the ring formed over the pot, lid, and cozy bottom. Use masking tape to hold the lid side in place with its top edge 1⁄4″ above the pot lid. Tape the lid in place using sections of aluminum tape with tabs cut on one side.
Check all tape edges and press them tight wherever there are gaps.
The finished cozy is ready for use.
The pot should slip into the bottom of the cozy with the handles in place.
After the handles are folded, the pot is ready for the cozy lid.
With a hot meal inside the pot, the cozy holds the heat in. A small piece of Reflectix, to right, protects the varnish on the boat’s seats. The larger piece of Reflectix serves as a pad for kneeling at the galley.
Reflectix is designed to be used in environments as hot as 180 degrees F. A pot of water heated to a rolling boil and removed from the stove can be immediately set on Reflectix without damaging it but a cookpot heated to the point of making olive oil smoke will melt the material and leave some adhered to the pot. For the higher temperatures of frying, I’d recommend cooking in a fry pan and transferring the finished dish to the cookpot nestled in its cozy.
Meals can be eaten directly and immediately from the cookpot—the cozy makes it possible to hold it. The cozy will also keep food hot between servings. After I’d had a bowlful of seasoned instant rice, I put the lid on the pot and slipped it into the cozy. After 20 minutes in 55-degree temperatures, the rice was still pleasantly hot, about 122 degrees F.
Reflectix can also be used to insulate Nalgene bottles to keep ice water cold in the summer, serve as a windshield sun guard, and provide warm, cushioned seat pads.
Reflectix and aluminum tape can be purchased from hardware stores and online retailers. Small rolls of Reflectix and tape are available. AntiGravityGear offers kits for making single cozies. A similar-looking product carried by Home Depot under the Everbilt brand is only half as thick as Reflectix. It comes at about half the price but I recommend against using it.
Christopher Cunningham is the editor of Small Boats.
You can share your tips and tricks of the trade with other Small Boats Magazine readers by sending us an email.
A boathook is handy to have on board any boat, but the smaller the boat is, the more awkward it can be to store. We like to have a boathook with a telescoping pole. Over the years we found that the twist-style mechanism on telescoping poles could become hard to operate due to corrosion, or the pole could collapse in on itself while pushing off a dock, especially if it was inadvertently twisted in a way that allowed it to retract. When we recently found that the Eversprout telescoping boathook has flip-tab locks, we gladly added one to our collection.
The 1 1⁄2-lb pole is 5′ long when retracted and 12′ long fully extended (Eversprout offers lengths of 1 1⁄2′ to 5′, 6′ to 18′, and 7′ to 24′). It has three sections made from anodized aluminum, which holds up well in the marine environment, and each section is friction-locked in place by a sturdy plastic flip-tab. We quickly came to prefer the flip-tab over the twist-lock of other telescoping poles, especially when our hands are cold, wet, and slippery. The flip-tab friction locks work well, even with gloved hands, and are a great option for folks with compromised dexterity or grip strength. Each section of the pole is keyed along its length to prevent rotation, which ensures proper control and orientation of the hook. We can pull as hard as we want with the pole, and while Skipper cannot push hard enough to get the pole to overcome the lock friction, I can slowly compress the pole using around 50 lbs of force, which is much more than I apply when pushing away from a dock. We have had no issues with the friction lock slipping in normal use.
Photographs by the authors
The Eversprout boathook is locked into position with flip-tab friction locks, making it reliably stable when extended. The non-marking nylon hook can be replaced with other accessories such as deck brushes, sponges, or mops.
The 12′ pole has two EVA foam grips, which provide a secure, balanced handhold even when the pole is fully extended. The grips are 5″ wide; one grip is at the base of the pole and the other is spaced 2′ up from the base. The closed-cell EVA is waterproof, and the manufacturer states that the pole will float for two minutes—presumably the time it would take before water getting inside the pole would make it sink. We dropped the pole in the water to test the claim, and it was floating just fine even after 10 minutes. Afterward there was very little water inside the pole, whether the pole was retracted or extended.
Fully extended, the 5′ Eversprout is 12′ long and, in experiments, the authors found that its friction tabs would withstand pressure up to approximately 50 lbs and only then compressed slowly. The locks held up against all pulling efforts.
The pole has a galvanized tip with Acme threads that accept the boathook as well as a variety of attachments including a soft-bristle deck brush and household cleaning implements. The hook is 7 1⁄2″ long and made of nylon so it will not mar boat surfaces or corrode. It tightens down sufficiently on the pole threads to prevent rotation and adds 6″ to the length of the pole. The hook has three rounded tips and can be used to snag a line or push off a dock.
The Eversprout Telescoping Pole with boathook has been a welcome addition to our boating kit, and we have been very pleased with its overall design, quality, and utility.
Audrey (Skipper) and Kent Lewis mess about in the Tidewater Region of Virginia when not restoring or building boats. Their adventures are logged at Small Boat Restoration.
The earliest sleeping pads I had for camping, back in the 1960s, were 3⁄8″ sheets of closed-cell foam. In the early ’70s I switched to the first self-inflating pad which was only three-quarter length but was easily a full 1″ thick and a great improvement in comfort. Since then, I’ve been drawn to longer, wider, and thicker pads and I am now more comfortable sleeping at anchor than I am at home.
These luxurious sleeping pads are also self-inflating, but it takes a long time for the foam inside to expand and draw air in through the intake valve. The earliest self-inflating pads had to be topped off by blowing into them, but the moisture that method introduced could damage the air-proof coating on the inside surface of the fabric. My two newest pads avoid that with pumps that are included. One of the pads has a small palm-sized fabric hand pump, good for topping off, and the other has an open-ended roll-top inflation bag to speed filling.
While the comfort of my largest sleeping pads has been well worth the time it takes to inflate them, I took a chance on buying two compact electric pumps with internal rechargeable batteries. Both are rated IPX4 (splashproof) and include five adapter nozzles and LED area lights.
Photographs by the author
The Flextail Tiny Pump 2X has five fittings to connect to common inflatable devices. The pump kit includes a type-C charging cable and a storage bag.
Flextail’s Tiny Pump 2X is the smaller of the two products. It is powered by a USB rechargeable 1,300mAh battery and pushes air at 6.4 cu ft per minute with peak pressure of 0.58 lb per square inch. The light has three settings: 40, 160, and 400 lumens. A magnet can hold the Flextail to a steel surface, which can be handy. When the pump is turned on, it emits a shrill 90-decibel whine.
The Exorux 3-in-1 Solar Portable Air Pump has the same five adapters. The included type-C cable is used to charge the pump and to charge other devices from the pump‘s battery. A row of four lights indicates the charge level.
The 3-in-1 Solar Portable Air Pump from Exorux is powered by a 4,000mAh battery and delivers air at 10.6 cu ft per minute with a peak pressure 0.65 lb per square inch. Its light has settings for 50, 100, and 150 lumens, and also registers around 90 decibels while pumping. The Exorux pump, however, has a few extra features that the Flextail lacks.
The back side of the Exorux has 0.3-watt microcrystalline solar panel for charging its battery.
While both pumps have USB ports for charging themselves, the Exorux has a 0.3W monocrystalline solar panel on one side for recharging itself in daylight as well as a USB 2A “emergency charger.” The fully charged Exorux recharged my Android smartphone from 16 percent to 79 percent in 2 1⁄4 hours, then stopped charging, good enough for an emergency.
I bought the compact pumps for inflating three of my sleeping pads and a pair of beach rollers.
I put the pumps to work inflating three of my sleeping pads: the old three-quarter-length Therm-a-Rest at 48″ × 20″ × 1 1⁄2″, a full-length Therm-a-Rest measuring 72″ × 20″ × 1 1⁄2″, and a luxurious Exped Megamat at 78″ × 31″ × 4″.
I inflated and deflated the mats with each pump and noted the time it took for the pump to rise in pitch, signaling that it was at its maximum pressure.
The Flextail pump inflated the smallest of the three mats in 20 seconds and deflated it in 20 seconds. The larger Therm-a-Rest took about 40 seconds to inflate and 30 seconds to deflate, and the Megamat inflated in 2 1⁄2 minutes, deflated in 3 minutes.
The larger and more powerful Exorux pump inflated the small Therm-a-Rest pad in 18 seconds and deflated it in 30; it inflated the large Therm-a-Rest in 40 seconds and deflated it in 30. While the times for the two pumps on the Therm-a-Rest pads don’t set the Flextail and Exorux apart, the Exorux achieved higher pressure inflating and greater compression of the pad when deflating.
The Exorux inflated the Megamat in 1 minute and deflated it in 2 minutes. The Megamat, a base-camp sleeping pad, is normally left unrolled for 15 to 20 minutes to self-inflate before getting topped off with the small hand pump. The Flextail and the Exorux hasten the process without creating excessive pressure that could damage any sleeping pad.
Inflating the beach roller requires the end fitting and a short section of the hose taken from the manual pump usually used to inflate the roller. The slender adapter supplied with either compact pump fits tight against the corrugated hose and its long tip depresses the roller spring-loaded valve.
One of the other tasks I had for these compact pumps was inflating my Aeré Beach Rollers. The rollers are exceptionally handy for moving a boat across a beach and, when strapped under side benches, can provide flotation in the event of a swamping. The hand pumps ordinarily used to inflate the rollers are bulky and take up almost as much space as a pair of rollers deflated and rolled-up to be stowed.
The Aeré valves are spring-loaded and neither of the battery-powered pumps produces enough pressure to open them. I inflated a roller with its valve in the open position, but I couldn’t remove the pump and close the valve fast enough to prevent the roller from losing about half its air. The solution was to use the hand pump’s valve fitting with a 1 1⁄4″ length of its ribbed hose attached, and the slender toy nozzle fixed to either of the compact electric pumps. To reach the valve, the nozzle will have to be pushed tight against the end of the hose, compressing it to create a tight seal. Inside the hose, the end of the nozzle depresses the valve stem, opening the valve. After the roller is filled with air, the nozzle can be removed and the valve will close, blocking air from escaping. (The hand-pump that provided the length of hose can easily be restored to its normal use by inserting the valve fitting into the end of its remaining hose.)
The Flextail and the Exorux have folding bails and LED area lights with three settings.
Both of these compact pumps can also be used to help start campfires. The steady, forceful flow of air they provide can get a good conflagration of twigs going without the faceful of smoke that is common when using your lungs as a blower.
The Tiny Pump 2X from Flextail and the 3-in-1 Solar Portable Air Pump from Exorux can both make themselves useful for camp-cruising and do much more than a hand pump can while taking up much less space.
David Stimson based this fine skiff on the work of Pete Culler.
David Stimson of Boothbay, Maine, submitted the drawings for his Sea Urchin to WoodenBoat magazine’s “In search of the Perfect Skiff” design competition in 1991. The judges (including myself) were taken with the shape of this skiff’s hull and awarded Stimson an honorable mention. Had the boat been larger, and thus a better match to the contest’s criteria, I suspect it would have earned one of the top prizes. (In fairness, it should be said that Stimson designed the boat prior to learning of the competition.)
In any case, the young builder presented a strong argument for a small skiff: “Two people can easily carry the boat, and it will fit in the back of a pickup truck-eliminating the need for a trailer. Lower materials costs should not be ignored. Also, Urchin’s small size makes it ideal for children to mess about in.”
To meet the contest’s camping criterion, Stimson drew a nifty tent that pitches under the sprit ( with the ‘midships thwart removed to permit sleeping on the floorboards). Some of the judges worried that the tent and its associated gear would be difficult to pack in the tiny hull – along with crew, food, and other necessities. As may be, they all agreed that, once erected, the tent would provide palatial accommodations by beach-cruising standards.
Plans for flat-bottomed skiffs can be tricky to draw and difficult to interpret. That is to say, a handsome profile on paper provides no guarantee of pulling a goodlooking, three-dimensional skiff out of the shop. After a few near disasters, I learned early on to always model straight-sided boats before drawing them. Indeed, Stimson and his apprentice developed Urchin from a model, and a fine one at that.
Top: The traditional cedar-over-oak construction will age with grace. Bottom: Sea Urchin rigged for a comfortable night.
They built the prototype of cedar over oak. If a wood more pleasant than white cedar exists, I don’t know what it might be. It takes fastenings well, glues well, works well, and has a satisfying aroma. It is soft. Cedar planks can work into each other as they swell, and they’ve been known to cure imperfect plank bevels with no help from a builder’s hand. On the Jersey beaches of my youth, cedar-planked skiffs seldom required seam compound. Boats planked with mahogany consumed gallons of the goop.
Stimson includes alternate specifications for sheathing this skiff completely with plywood. Although we might favor a plywood bottom if our skiff must live on a trailer, let’s stay with cedar for the lapped sides. A decade from now, we’ll appreciate the decision. Cedar skiffs age with dignity and grace. Plywood skiffs just grow old.
-M.O’B.
Plans from Stimson Marine, Inc., RR 1 Box 524, Boothbay, ME 04537.
As a child, Jim Conlin spent several weeks every summer on the Massachusetts family farm where his father had grown up. It was a world of “build and fix”; early on he knew the difference between a wood screw and a carriage bolt, and among his earliest memories is a large jar of fastenings. On the farm and at home, just outside Boston, he fixed bikes and built soapbox cars and model airplanes. There were no boats until, in the early 1950s when he was 12, his parents signed him up at the Community Boating facility on the banks of the Charles River in Boston. He could ride his bike to the center and sailed Mercuries, Fireflies, 110s, and Thistles. When he went off to college, he captained the sailing team.
Through the ensuing years of adulthood, Jim was never far from the water. In his early 30s he and his wife bought a first-generation fiberglass Alberg 35, which they cruised on the Maine coast for 25 years before selling it in 2000. His daughter grew up sailing the sloop and was so attached to it that in recent years she and her partner found it and bought it back. It also inspired Jim’s first boatbuilding project: a stitch-and-glue pram to replace the old ’glass tender that had come with the Alberg.
Jim Conlin
Early in his boatbuilding career Jim became enamored of small wooden canoes and built a Wee Lassie designed by Mac McCarthy. He was pleased with the outcome but quickly realized he was not built for such a small, tender vessel. Today the Wee Lassie hangs in a stairwell in Jim’s home.
Next came a canoe. Living near a river, Jim thought a canoe would be fun and bought CanoeCraft by Ted Moores, a manual on building canoes with wood strips and epoxy. The resulting boat, he says, “came out well. It gave me my first experience of the satisfaction that comes from building something pretty.” He still has that first canoe and, just as sailing had in his childhood, boatbuilding now hooked him.
He came across a WoodenBoat article about the Piccolo lapstrake sailing canoe designed by Robert Baker, and suddenly it seemed there were small wooden canoes everywhere he looked. Jim was enchanted: “I had to build a fancy little canoe,” he says, “whether I needed one or not.” He chose a Wee Lassie designed by Mac McCarthy and described in his book Featherweight Boatbuilding. As with the canoe before it, Jim was pleased with how it turned out, but he found he lacked the agility to use it and it was destined to become largely decorative. Today it hangs in a stairwell at his home in Padanaram, Massachusetts.
Jim Conlin
The cedar-strip L. Francis Herreshoff pram described by John Gardner in his book, Building Classic Small Craft, was Jim’s first boatbuilding commission.
Around the same time, Jim was traveling with his first canoe on top of his car and was approached by a woman who said she was looking for someone to build a dinghy for her husband’s birthday. She wanted, she said, a tender to a Dark Harbor 17, a 26′ gaff-rigged sloop. Jim had been thinking about building small boats as a sideline to his real job in computer technology and leapt at the chance. “I hung out a shingle and Conlin Boatworks was born,” he says. “We had a motto: We don’t do good work, but we’re slow!”
Jim Conlin
Following the success of the Herreshoff pram, Jim was commissioned to build a modern-construction Concordia Baeteka pram. He was keen that the boat should be bright-finished and resemble the originals as closely as possible but was unable to find suitable plywood. Instead, he vacuum-bagged a Honduras-mahogany veneer to 1/8″ okoume plywood.
For the Dark Harbor couple, he built a cedar-strip version of the L. Francis Herreshoff pram described in John Gardner’s Building Classic Small Craft. Soon after delivering it, Jim received his second commission: building a replica of the Concordia Baeteka pram for LUNA, a 40′ Concordia yawl launched in 1962. Researching the Baeteka, which had been supplied with early Concordia yawls, took Jim across southern New England to look at plans and survey surviving originals. He decided to keep the look of the original lapstrake prams but to update the construction with glued-lapstrake ply. “I couldn’t find the right plywood,” he says, “So I vacuum-bagged Honduras mahogany veneer onto 1⁄8″ okoume plywood. It looked right and was good to work with.” The project took far too long to be financially viable but, Jim says, “It was a good boat and started a resurgence of interest in Baeteka prams among other Concordia-yawl owners.”
Jim Conlin
The 16’ Cape Split peapod was built in Jim’s new dream workshop—all light and space and easy access.
In 2015, Jim built a new house with the workshop he’d always wanted: “Big doors, easy entrance, good heat and light.” Over the years since, he’s built a number of small boats from a 16′ cedar-strip Cape Split peapod to a replica 17′, 1908 Palmer Fantail Launch, which he built with a friend who had a 1908 one-lung engine that needed an appropriate boat. And along the way he built a rowboat for his nephew’s six-year-old son. “It’s the simplest possible 7′ flat-bottomed skiff: plywood, ’glass tape, Styrofoam blocks for seats and flotation. But after I built the first one, I started getting requests for more. I’ve built seven of them.”
Jim Conlin
The simple, flat-bottomed plywood skiff designed by Jim for a young family member is comprised of 11 wooden parts—seven solid and four plywood—three Styrofoam blocks and some fiberglass and epoxy.
Jim’s most recent project is a 22′ double-ended sloop. Long an admirer of L.F. Herreshoff’s Rozinante, and Sydney Herreshoff’s Arion, he was on the hunt for a boat that combined the grace of those classic canoe-sterned designs with very light displacement, modern construction, and reasonable cost. He found Joel White’s Fox Island Class.
Jack Haley
Jim and his friend, Jon Armstrong, built OWL to accommodate Jon’s single-lung engine. A replica of a 1908 17′ Palmer launch, OWL included custom bronze fittings cast to patterns fabricated by Jim, and finishing details by Jon such as book-matched planking in the aft deck. Jon “is a very talented woodworker,” Jim says. “Anything in OWL that’s fancy, he did.”
The Fox Island is designed for glued-lapstrake plywood construction over laminated frames. Jim decided he would build his hull of ’glassed cedar-strip planking. He had completed two-thirds of a yacht design course and was happy to meet the challenge of the redesign. But he was “more daunted by the 955-lb lead fin keel. I didn’t want anything to do with molding it or paying to have one manufactured.” Fortunately, the Joel White–designed keel was a close match to the J24 keel and “at that time, early J24s with mushy balsa cores were being given away.” Jim found a suitable candidate at a boatyard in Westport Point, Massachusetts, parted with $100 to take ownership, and had the crew there separate the keel and spars from the rest of the boat. “I love the idea of recycling old boat parts into new boats,” he says. “It saves time and money and makes otherwise impossible boatbuilding projects financially viable.”
Jim Conlin
SOME PIG under construction in January 2021. The panel in the foredeck gives access to a well that contains the furling mechanism. From there the furling lines and jibsheet are routed under the deck to the aft end of the cuddy where they are easily to hand for the helmsperson or crew.
Jim turned his attention to the hull design. With the help of a friend, he re-lofted the Fox Island lines with round sections and, assuming that a cedar-strip version would be lighter than the original lapstrake hull, brought the draft up about an inch. Other than that, Jim left the lines of the hull unchanged.
The sail plan was reworked from scratch to suit the J24 mast and boom and to incorporate a roller-furling self-tacking jib. Jim shortened the mast by about 2′ 6″ and raised the gooseneck about 8″. The mainsail, he says, is very like that of the J24 but nearly a foot shorter in the luff, while the jib is much shorter in the foot, has a jib boom (made from a piece of windsurfer mast), an on-deck traveler, and a furler tucked beneath the deck in a well. The jib’s furling line, outhaul, and double-ended sheet are also led under the foredeck. “Concealing the many jib control lines under the foredeck and inside the jib club took the most head-scratching,” Jim says, “but it came out tidy and works well.”
Jim Conlin
The day of SOME PIG’s launching in Westport, Massachusetts, was exciting, but less so than the day the yard crew lowered the hull onto the keel and the bolts lined up perfectly with the holes in the bottom of the boat.
As the days of COVID-19 took over through 2020 and into 2021, Jim worked alone on the build. When friends did come by to check on progress or offer advice, they came wearing masks and rarely more than one at a time. The project, says Jim, “kept me cheerful during those 15 months of isolation.”
The boat was to be named SOME PIG. “My wife and I were rereading E.B. White’s Charlotte’s Web in which the spider announces that the small farm pig, Wilbur, is not just any pig. It struck me that that was true of the new boat: it may look like a classic keelboat, but it’s light as can be with a decidedly modern underbody. Plus, E.B. White was Joel White’s father, so there was a sweet connection.”
Walter Piescik
Jim typically sails SOME PIG singlehanded. Learning how to trim the sails to their optimum advantage occupied much of his time during his early outings. In particular, he says, the jib is a “fussy sail to trim.”
Jim built SOME PIG of 5⁄16″ x 1″ Alaska yellow-cedar strips. He describes the construction as “straightforward strip composite with beefy floor timbers to receive the five bolts that stuck out of the keel.” Knowing that he would be sailing on Buzzards Bay, where winds can build quickly, and that the boat’s sail plan would be generous, Jim built in bulkheads forward and aft of the cockpit, creating large buoyancy tanks in the boat’s ends. “I built them because I felt that getting knocked down and swamped was a real possibility,” he says. “But after three seasons of sailing, I’ve had no such excitement.”
He kept the trim simple and classic: the rails, toerails, and coamings are varnished African mahogany, the floorboards unfinished white cedar, and everything else is painted. But when it came time to install the hardware, Jim felt that “the boat deserved proper fittings and found some on eBay and at consignment shops.” When he couldn’t find any suitable off-the-shelf bow chocks, he made patterns for Herreshoff-style chocks, had them cast, and finished them himself.
Anne Conlin Koffel
Jim Conlin at the helm of SOME PIG. The boat is lively, and Jim keeps the mainsheet handy most of the time. Since this shot was taken in August 2021, Jim has added hooks on the tiller where he can temporarily hold both the mainsheet and the traveler.
In May 2021 SOME PIG left the workshop for the Westport Point boatyard where the hull was lifted onto the keel. It was a memorable occasion. “To my moderate astonishment,” Jim says, “it fit! The five bolts went into the five holes. It was quite the moment!” A few days later SOME PIG was quietly launched and rigged. Jim was joined by some “adventurous friends who came on test flights. The first dozen outings were adventures, and we had surprises but no breakages or other mishaps.”
Walter Piescik
With the jib furler housed in a well below the deck, SOME PIG’s stem and foredeck are uncluttered and apparently free of modern, mechanical conveniences.
Since those early days of testing and tweaking, Jim has gradually become comfortable with the boat. His dream of having a classic double-ender that performs like a modern-day racer has been fulfilled: “She’s the liveliest, most enjoyable daysailer I’ve sailed in my 80 years; she goes like mad in lighter airs, and “she balances very nicely. I guess that’s beginner’s luck!”
Jenny Bennett is managing editor of Small Boats.
Do you have a boat with an interesting story? Please email us. We’d like to hear about it and share it with other Small Boats readers.
If we build monuments to ourselves, the late Charlie Wittholz constructed a memorial with highly crafted plans that describe wholesome boats. Little Moby came near the end of the designer’s 50-year career, and he held the husky plywood skiff in high regard.
Wittholz referred to Moby as a “rough, water skiff.” The appellation seems appropriate when we look at her ample freeboard, moderate deadrise, and robust construction. The freeboard will help keep her dry and provide some reserve stability. Despite her high sides, windage shouldn’t be a problem here as the worst offenders – windshields, houses, masts, and standing rigging – are absent. (The sketched-in Bimini top would be stowed in a hard chance.) As may be, the hull’s good grip on the water, and 40 horses strapped to the transom, ought to provide peace of mind in tight situations.
Deadrise ( cross-sectional V-shape to the bottom) will ease Moby’s motion in wave action – at the cost of some initial static stability. That is to say, a simple flat-bottomed skiff of similar proportions would tend to be steadier on its feet when at rest in a slick calm. Also, if both boats were to have equally straight runs, the flat, bottomed design might require less power to achieve and maintain planing. Speed in rough water is another matter.
Had Wittholz chosen to enter additional deadrise in the design equation, Moby might blast to windward more smoothly; but she’d not make a solid plat, form for fishing or other low-velocity activities. With 13° deadrise at the transom (measured upward from horizontal to the boat’s bottom) and 15 ½° at Station 3, this skiff displays considerably less than the approximately 24° deadrise usually associated with high-speed, “deep-V” boats of the Moppie type.
While we’re talking about the hull lines, notice the convex sections in the forward bottom. These curves develop automatically as the plywood sheets are bent into a conical shape. (In this case, the projected apex of the cone probably would fall on the baseline almost directly below the stemhead.) If a builder tries to force the plywood sheets hard against dead-straight frames in this area, the builder will lose. Copiously shimmed frames, sometimes seen in bluff-bowed boats of this construction, provide mute testimony to past battles.
Deadrise will ease motion in waves -at the cost of some initial stability.
Moby’s fully framed, ¾” plywood hull has rigidity to spare. Much of the internal structure could be eliminated if we were to attempt a conversion to stitch-and-tape construction (see WoodenBoat No. 106, page 80). The relative merits of these building methods can make for spirited debate. It would seem that the latter technique sometimes trades a cleaner boat for a dirtier shop. It would seem, too, that a composite (“taped”) chine can produce a stronger joint than can any solid chine log of reasonable proportions. There seems little question that a stitch-and-tape boat goes together very fast – at least until we have to grind and sand…. And so the arguments go. The bottom line: When properly accomplished, both methods can provide more than sufficient strength.
Less than a year ago, Wittholz wrote to us saying that “the world seems to be turning to stitch-and-glue construction.” His letter indicated neither approval nor disapproval. Whether he, too, would have dispensed with chine logs in favor of epoxy fillets was left unsaid. We should have asked.
We might simplify Moby’s internal structure, but she’s light and rigid just as drawn.
Moby’s layout speaks of tradition -three thwarts and a side-mounted steering wheel. This wheel orientation, though fine for slow launches, might supply cause for concern here. The arrangement doesn’t lend itself to hand-over-hand wheel spinning, sometimes desirable for tight maneuvering and in emergency situations. Perhaps a small console hung from Frame 4 would permit the more familiar athwartships mounting without stealing too much space. In any case, if you should see this writer tooling around the cove at 25 knots while clutching the king spoke of a side-mounted Wilcox Crittenden wheel, be afraid.
From Moby’s crisply sculpted stemhead and mooring bitt, past the coaming, to the afterdeck and splash well, Wittholz made a fine job of combining traditional appearance with contemporary performance. This honest skiff deserves a good measure of popularity.
-M.O’B
Plans from The WoodenBoat Store, Naskeag Rd., Brooklin, ME 04616.
Based on traditional Shetland workboats, this rugged double-ender makes good use of plywood and epoxy.
When asked by WoodenBoat to talk about my Chesapeake Bay open-boat cruising adventures of long ago, I described a typical ( or perhaps a composite) summer’s day: Up at first light after having slept on the beach; take a short, slow walk along the waterfront; drag the stranded 15′ peapod down to the water, stow the meager camping gear, and row off into the morning calm. Breakfast about a mile offshore, safe from at least some of the biting insects; row on until the climbing sun makes the effort uncomfortable (usually about 10:00 a.m.); go ashore and find a proper shade tree under which to doze until lunch ( the insects have disappeared in the heat of a dry day). At the first sign of the afternoon sea breeze (sometime between noon and 1 :30), set up the unstayed lug rig and sail to wherever. In the evening, when the thermal fades, strike the rig, and pull the last mile or so to a secluded cove. Such are the simple delights of beach cruising.
The Whilly Boat, near in overall size and intent to my old pod, seems ideal for singlehanded beach cruising. lain Oughtred based this appealing little double-ender on the Shetland ness yoles and sixerns. These workboats, in turn, can trace their heritage back to Norwegian roots – a fine origin for any small boat.
Oughtred tells me that he borrowed the name “Whilly Boat” from a term used to describe relatively small and light traditional Shetland fishing craft. But, at 20′ or so, the generic whilly boats dwarf this 14 ‘6″ plywood beach cruiser; and they differ more than quick inspection might suggest. To suit the new Whilly’s intended purpose, her hull is much shallower and lacks the substantial external keel of the old boats. The designer applied tradition where appropriate, but he seems never
to have forced the issue. His catalog describes the results as “quite Shetlandish, without being presumptuous.”
Whilly’s lines: Balanced ends, a strong sheer, and ample reserve buoyancy will help in rough water.
These hull lines possess a timeless universality. Sailors who have grown up in the surf will recognize the balanced ends, strong sheer, ample reserve buoyancy, and light-but-strong construction as desirable traits in any boat that must handle breakers and beaches. The Whilly Boat lacks a flat run and bearing aft that might help keep her abreast of a planing dinghy on a screaming reach, but she’ll atone with civilized behavior in waves.
When you’re blasting out through the surf, keep the rig and rudder stowed, keep the centerboard raised ( or the daggerboard secured in the bilge), keep your weight low and amidships, and pull hard. This boat will take care of you.
The Whilly Boat’s construction makes good use of plywood and epoxy. Four wide strakes for each side are spiled, hung over temporary molds, and beveled. Drywall screws can act as clamps until the epoxy sets. Solid lumber shouldn’t be used for planking this hull – lack of cross-grain strength makes it prone to splitting, especially along the laps.
The 74-sq-ft standing lug (left) is light and simple, but the boom fitted to the 80-sq-ft balanced lug (right) will be appreciated off the wind.
The plans call for ¼” or 5/16″ plywood for planking. This design deserves the best marine mahogany sheets you can find, and, to me, that means Bruynzeel. I sawed through a few hundred sheets in my shop and never found a single flaw. Yes, it’s expensive and perhaps difficult to obtain. There are other good mahogany sheets out there, but you’ll have to rely upon the integrity of your supplier to find them.
As is his practice, Oughtred offers the Whilly Boat’s builders several options. Two rigs are shown at large scale: an 80-sq-ft sliding gunter sloop and a 74-sq-ft boomless standing lug. Certainly the gunter would be faster (and more expensive), but the simpler free-standing lug will require less time to raise and strike – and it will stow more easily. Off the wind, you’ll be unhappy with the lugsail’s habit of folding up on itself ( though this tendency will be mitigated by the nearly vertical leech and short foot). In any case, my selection would be the 80-sq-ft balanced lug sketched, apparently as an after-thought, in the margins of plans sheet number 3. This rig’s modest self-vanging properties, boom, and unstayed mast give it a good measure of the other rigs’ best characteristics.
You have a choice of building a pivoting centerboard and kick-up rudder (desirable if you’re going to sail in thin water) or a daggerboard and fixed rudder blade (acceptable if the only shoal water you’ll encounter is near the beach).
The epoxy-glued, plywood lapstrake hull will stay tight on the beach or in the water.
Oughtred shows optional forward and after decks; both are drawn below the rails. This arrangement looks fine as it allows our eyes to follow the sheer uninterrupted from stem to stempost, and it gives better access to the ends of the boat.
I’d suggest omitting the optional side benches that run between the ‘midship thwart and the stem sheets. When you’re sailing, you’ll be happier on some cushions in the bilge. Your back will enjoy the added support, visibility will be much improved, and so will stability when it really counts. As for the thwarts, they’re useful for rowing and for maintaining the hull’s shape.
This striking little boat offers the independence desired by all solo sailors. She’s as able as an open boat of her size can be. She’ll sail you just about anywhere within reason, and you can row her home if the wind dies. You’ll not need mechanical assistance ( though Oughtred shows an optional motorwell), or a boatyard, or a chandlery. And, when you think of her shape, you’ll smile.
-M.O’B.
Plans from The WoodenBoat Store, Naskeag Rd., Brooklin, ME 04616. Phone: (800) 225,5305.
Iain Oughtred can be reached at Gorton House, Lasswade, Edinburgh EH 181 EH, Scotland.
Corvus comes with a gaff-headed sail and a cuddy, or as an open, lug-rugged daysailer (far right).
A small boat with a big heart,” that’s how an anonymous editor at WoodenBoat described this little catboat from Charlie Wittholz’s drawing table.
In fact, Corvus (named for a stellar constellation that resembles a gaff-headed sail) might be just about the right size for a cat-boat. Measuring 14’11” by 7’5″ on deck, she’s big enough to provide the traditional catboat benefits, yet small enough to mitigate traditional catboat deficiencies.
As soon as we hoist sail, Corvus will want to take off – whether we’re ready or not. Unlike more sophisticated (and complex) rigs that can leave their foresails or headsails in the bag and lie to their after, most sails, catboats don’t make good weathervanes. But, unlike her larger single-sail cousins, this boat will be amenable to casual control. Grabbing hold of a luffing 170-sq-ft sail bears little resemblance to trying to tame the 500 sq ft of flailing Dacron we might find on a 25′ cat.
Once underway, Corvus will tug at the skipper’s arm with the usual catboat weather helm. We can’t easily avoid strong weather helm when designing a catboat. The long boom causes the sail’s real center of effort to move well outboard when reaching and running, which creates a healthy turning moment. (The calculated center of effort represents the geometrical center for the sail as drawn on a flat, two-dimensional piece of paper. It’s helpful for purposes of design and comparison, but it doesn’t represent the effective center of force.)
The short, fat hull only makes matters worse. As the boat heels down, its water-lines become wildly asymmetrical – strongly convex on the lee side and straighter on the weather bottom. This configuration will want to turn the cat-boat, any boat, towards its high side. Hard chines and full bows associated with sheet-plywood construction reinforce this phenomenon. Again, Corvus is saved by her small size (and by the relatively far aft location of her centerboard). Her weather helm seems little more than a polite reminder of trim.
The Corvus hull: lots of shape for sheet plywood.
An advertisement for the fiberglass Marshall 18′ catboat made the rounds of the yachting press a decade ago. Referring to the simplicity of the boat’s propulsion system, a copywriter stressed the joy of having “only one string [sheet] to pull.” Indeed, relatively small catboats are easy to sail. They are not necessarily easy to sail well. Without headsails to direct airflow, the set and trim of the catboat’s single sail become critically important and, often, more difficult to accomplish perfectly. Novice sailors seem inclined to sail around for hours on end with everything strapped down hard – no matter what the apparent wind direction.
As may be, Corvus is a gentle boat, and she will reward proper handling. If you’ve not worked with a gaff-headed sail before, you might find the experience to be a revelation. When hoisting sail, set up the throat (lower) halyard hard, and haul sufficient tension into the peak halyard to form vertical wrinkles running parallel to a line from the sail’s head to tack when it is luffing. How many wrinkles, and how deep should they be? That will depend upon the cut of the sail, the angle of the gaff, the strength of the wind, the point of sail, and your mood. In due course, experience will let you know what’s right. I’ll note in passing that most beginners seem to carry too little tension in the peak halyard.
In order to grab the attention of Madison Avenue’s “average family,” a production builder might be tempted to erect a split-level house on Corvus’s deck. For the way most of us will sail her, the cuddy and large cockpit shown here make more sense. The 3’6″ headroom described on the plans seems to be about the comfortable minimum for using an enclosed head. Of course, we’ll replace the traditional marine unit depicted in the drawings with one of the portable variety. We’ll sleep in the cockpit – dozing off on the benches while under sail, and secure beneath a boom tent for the night.
Not many 14’11” sailboats can justify an optional inboard auxiliary. Corvus can.
We’ll cook our meals and warm the coffee on a small gimbaled stove mounted on the after face of the main bulkhead. Most of the time, the stove will hang from an extra mounting plate fixed to the bulkhead below decks. We’ll do well to avoid carrying foods that require refrigeration. If the crew considers this spartan and perverse on our part, a common plastic cooler will resolve the issue.
Worried that we might be concerned about limited headroom, Wittholz drew a hinged cabintop option. And the plans bristle with other alternatives for Corvus: a completely open daysailing version with, as you might surmise, a huge cockpit; a fixed ballast keel, which adds stability (and draft) and eliminates the centerboard trunk; a choice of outboard or inboard auxiliary power; and a standing lug rig to replace the gaff rig.
Lug rigs offer great simplicity, and they are dandy for small boats. Unfortunately, this rendition has been compromised with too much roach and requires battens to support the sail’s after edge. Perhaps we should ask the sailmaker to cut some hollow into the leech and forget the expensive batten pockets.
Close inspection of the lug rig’s drawing reveals a roller-reefing boom. We’re supposed to tuck in a reef by winding the sail around the boom as if it were an inverted window shade. This noble idea enjoyed some popularity decades ago – before we realized that it doesn’t work too well. The hardware is expensive, and sheetleads can be complex and inefficient. Limitations are placed on sail design ( one of the most noticeable being the 90° angle needed at the tack). Because the sail should be hoisted before rolling it around the boom, crew and sail sometimes are exposed to the elements more than with conventional reefing. And, all theory aside, roller-reefed sails often don’t set well. Oh, my. I’d be inclined to replace the roller-reefing goose, neck with a simple rope parrel and spread the sheet attachments forward and aft ( to ease the strain on the boom and to provide a more comfortable lead angle to the skipper’s hand). The money we saved by dispensing with the battens will buy us a row, or two, of conventional reefpoints.
The head and stores occupy the cuddy. The crew lives in the cockpit.
Corvus’s ample transverse framing pro, vides a solid skeleton for her hull, and it will look impressive when set up in our shop – it forms a three-dimensional body plan, really. Those among us who are bothered by complexity, might want to follow Sam Devlin’s instructions for translating designs into “stitch-and-glue” (see WoodenBoat No. 106, page 80).
Wittholz specified ¾” plywood for Corvus’s planking; and, with the tight turns in the forward bottom, he’s asking for all we can expect from the 4 x 8′ sheets. If we’re tempted to apply a thicker bottom, we should laminate it in place. I knew a builder who tried to coerce ½” marine fir plywood into taking these bends. He failed despite copious application of boiling water (poured over bath towels), the efforts of five strong men, and the biggest bronze ring nails in the county. The partially sheathed boat still sits behind his shop, and the builder now makes his living by selling insurance.
Sailing Corvus brings us as close to pure, lazy delight as we’re likely to get in this life. She heels little and requires a minimum of attention from her skipper. Her buoyant hull is handsome from almost any perspective. No matter that the same building time and money could have bought us a bigger (longer, that is), faster boat. No matter that she sails about at her mooring in a maddening fashion. No matter that she won’t lie quietly to the wind while we have lunch. Catboats are, after all, difficult to justify- but they’re mighty easy to like.
-M.O’B.
Plans from The WoodenBoat Store, Naskeag Rd. , Brooklin, ME 04616.
Subscribe For Full Access
Flipbooks are available to paid subscribers only. Subscribe now or log in for access.
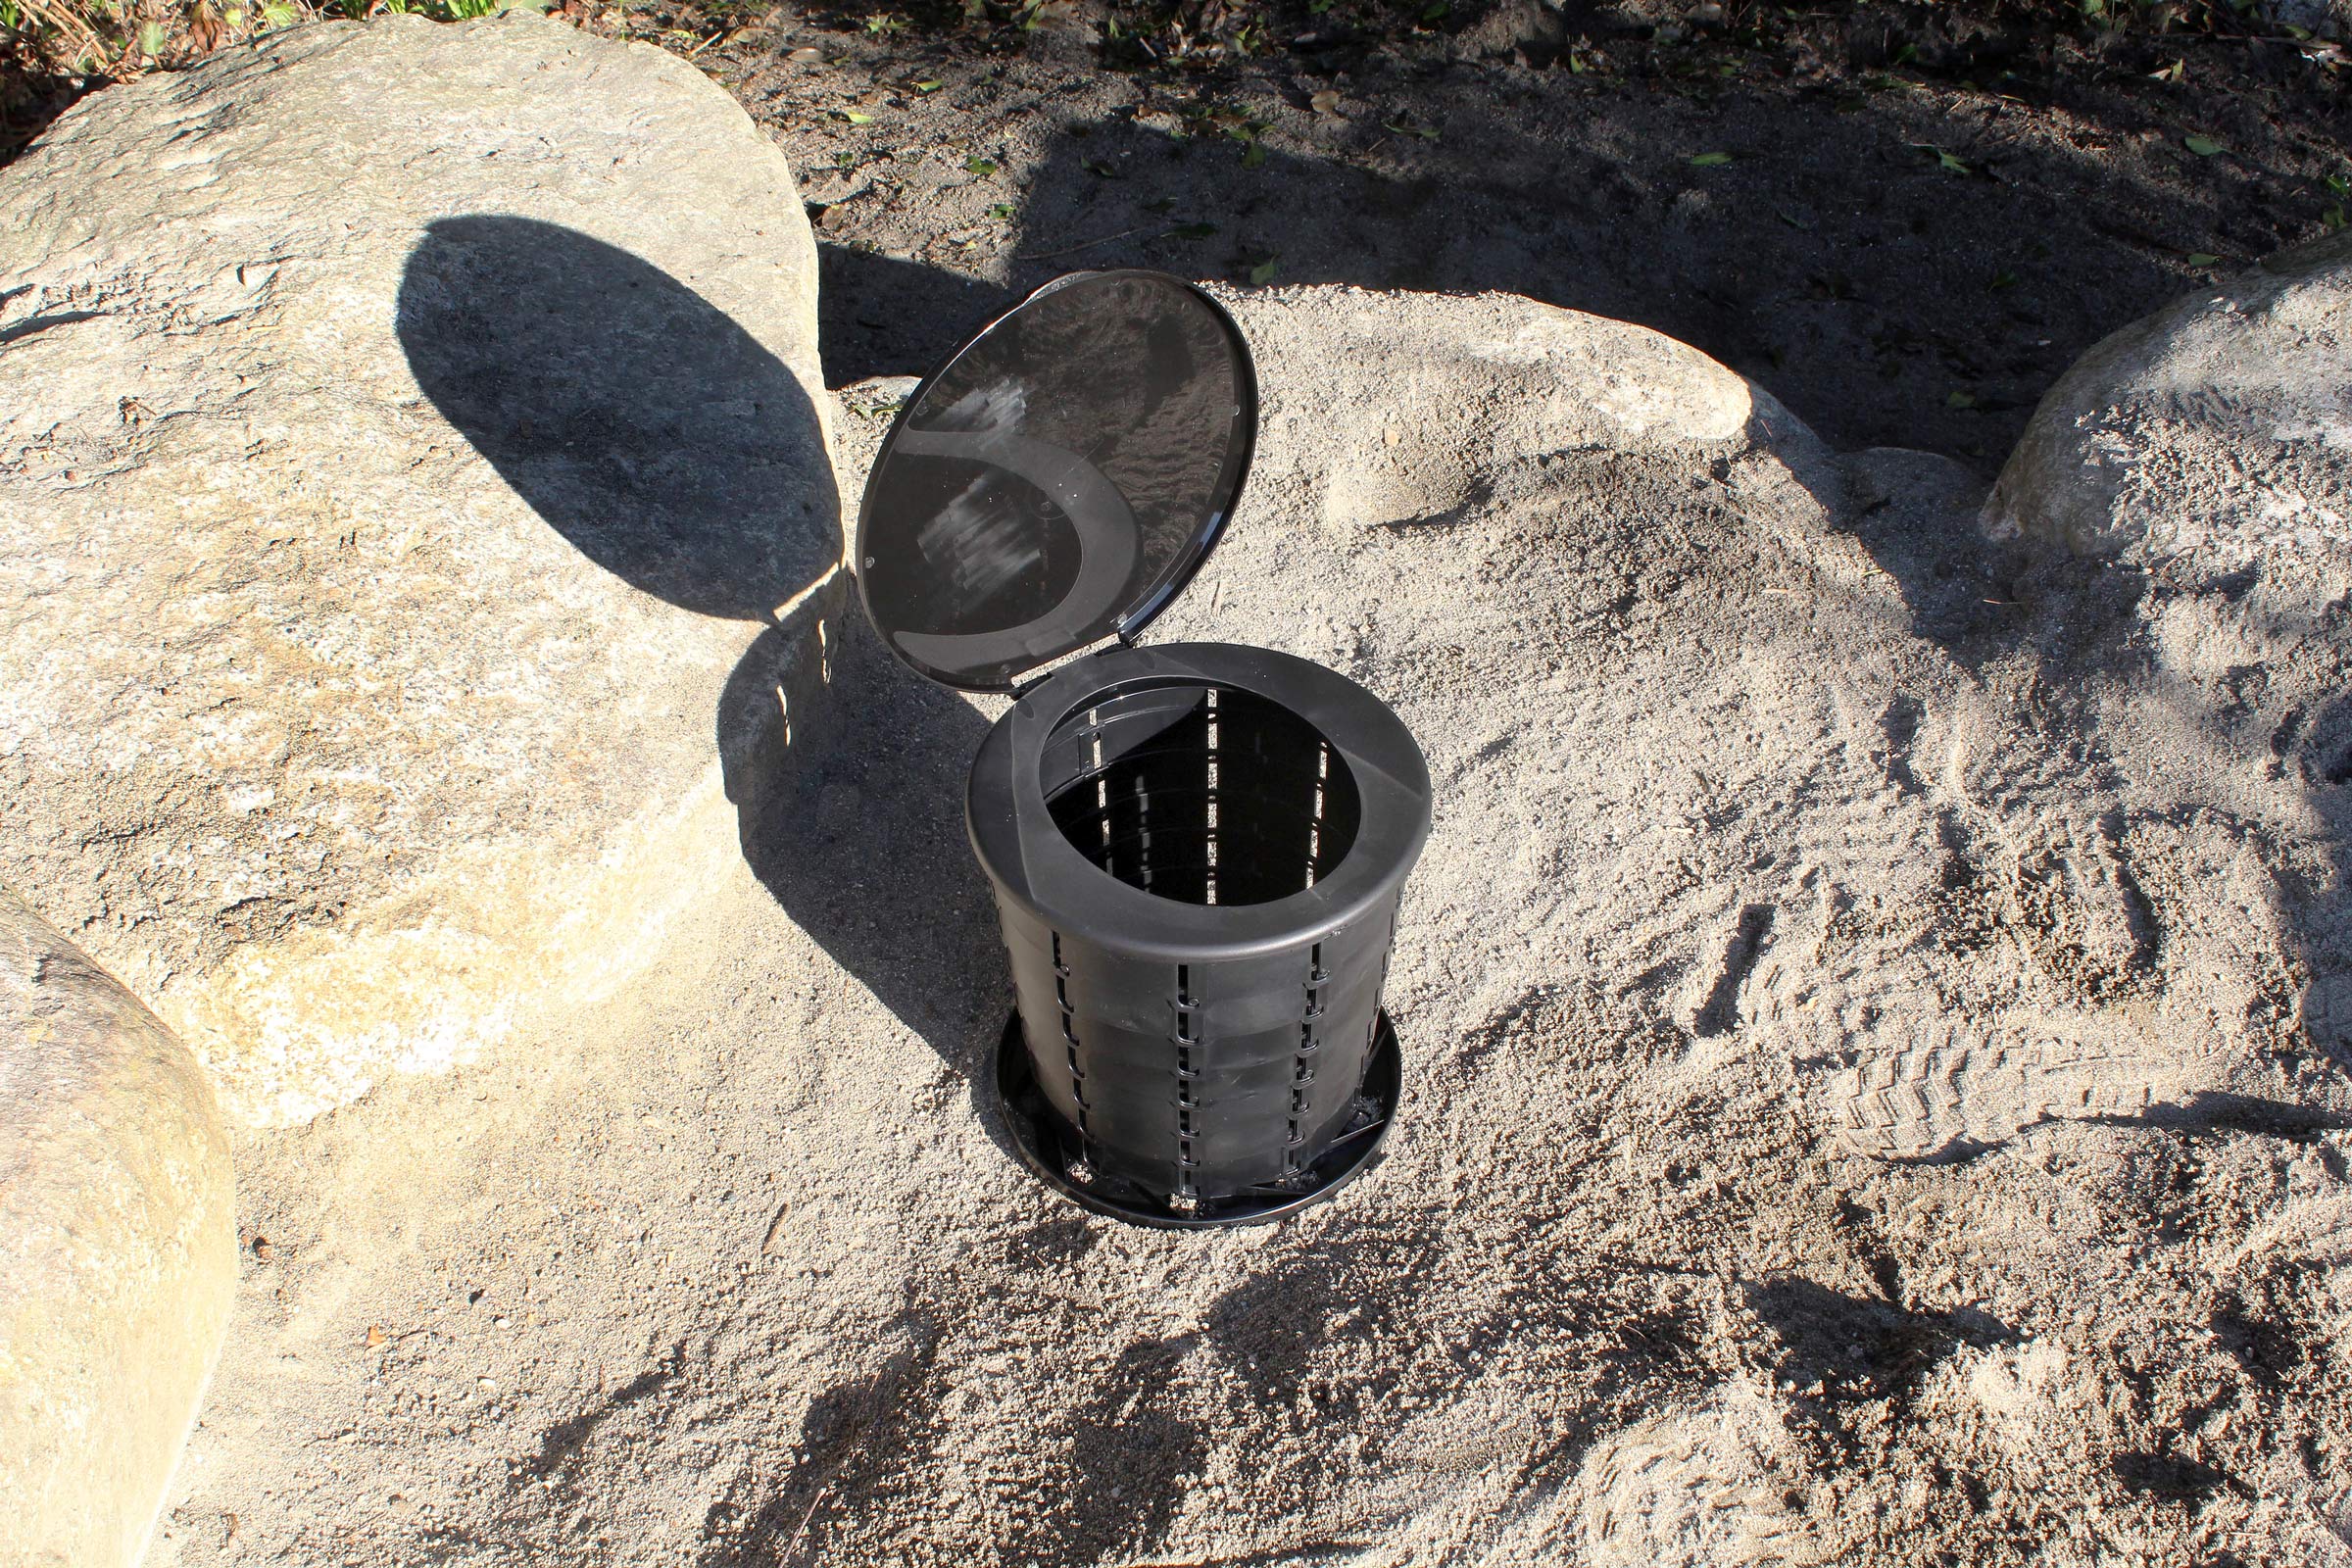
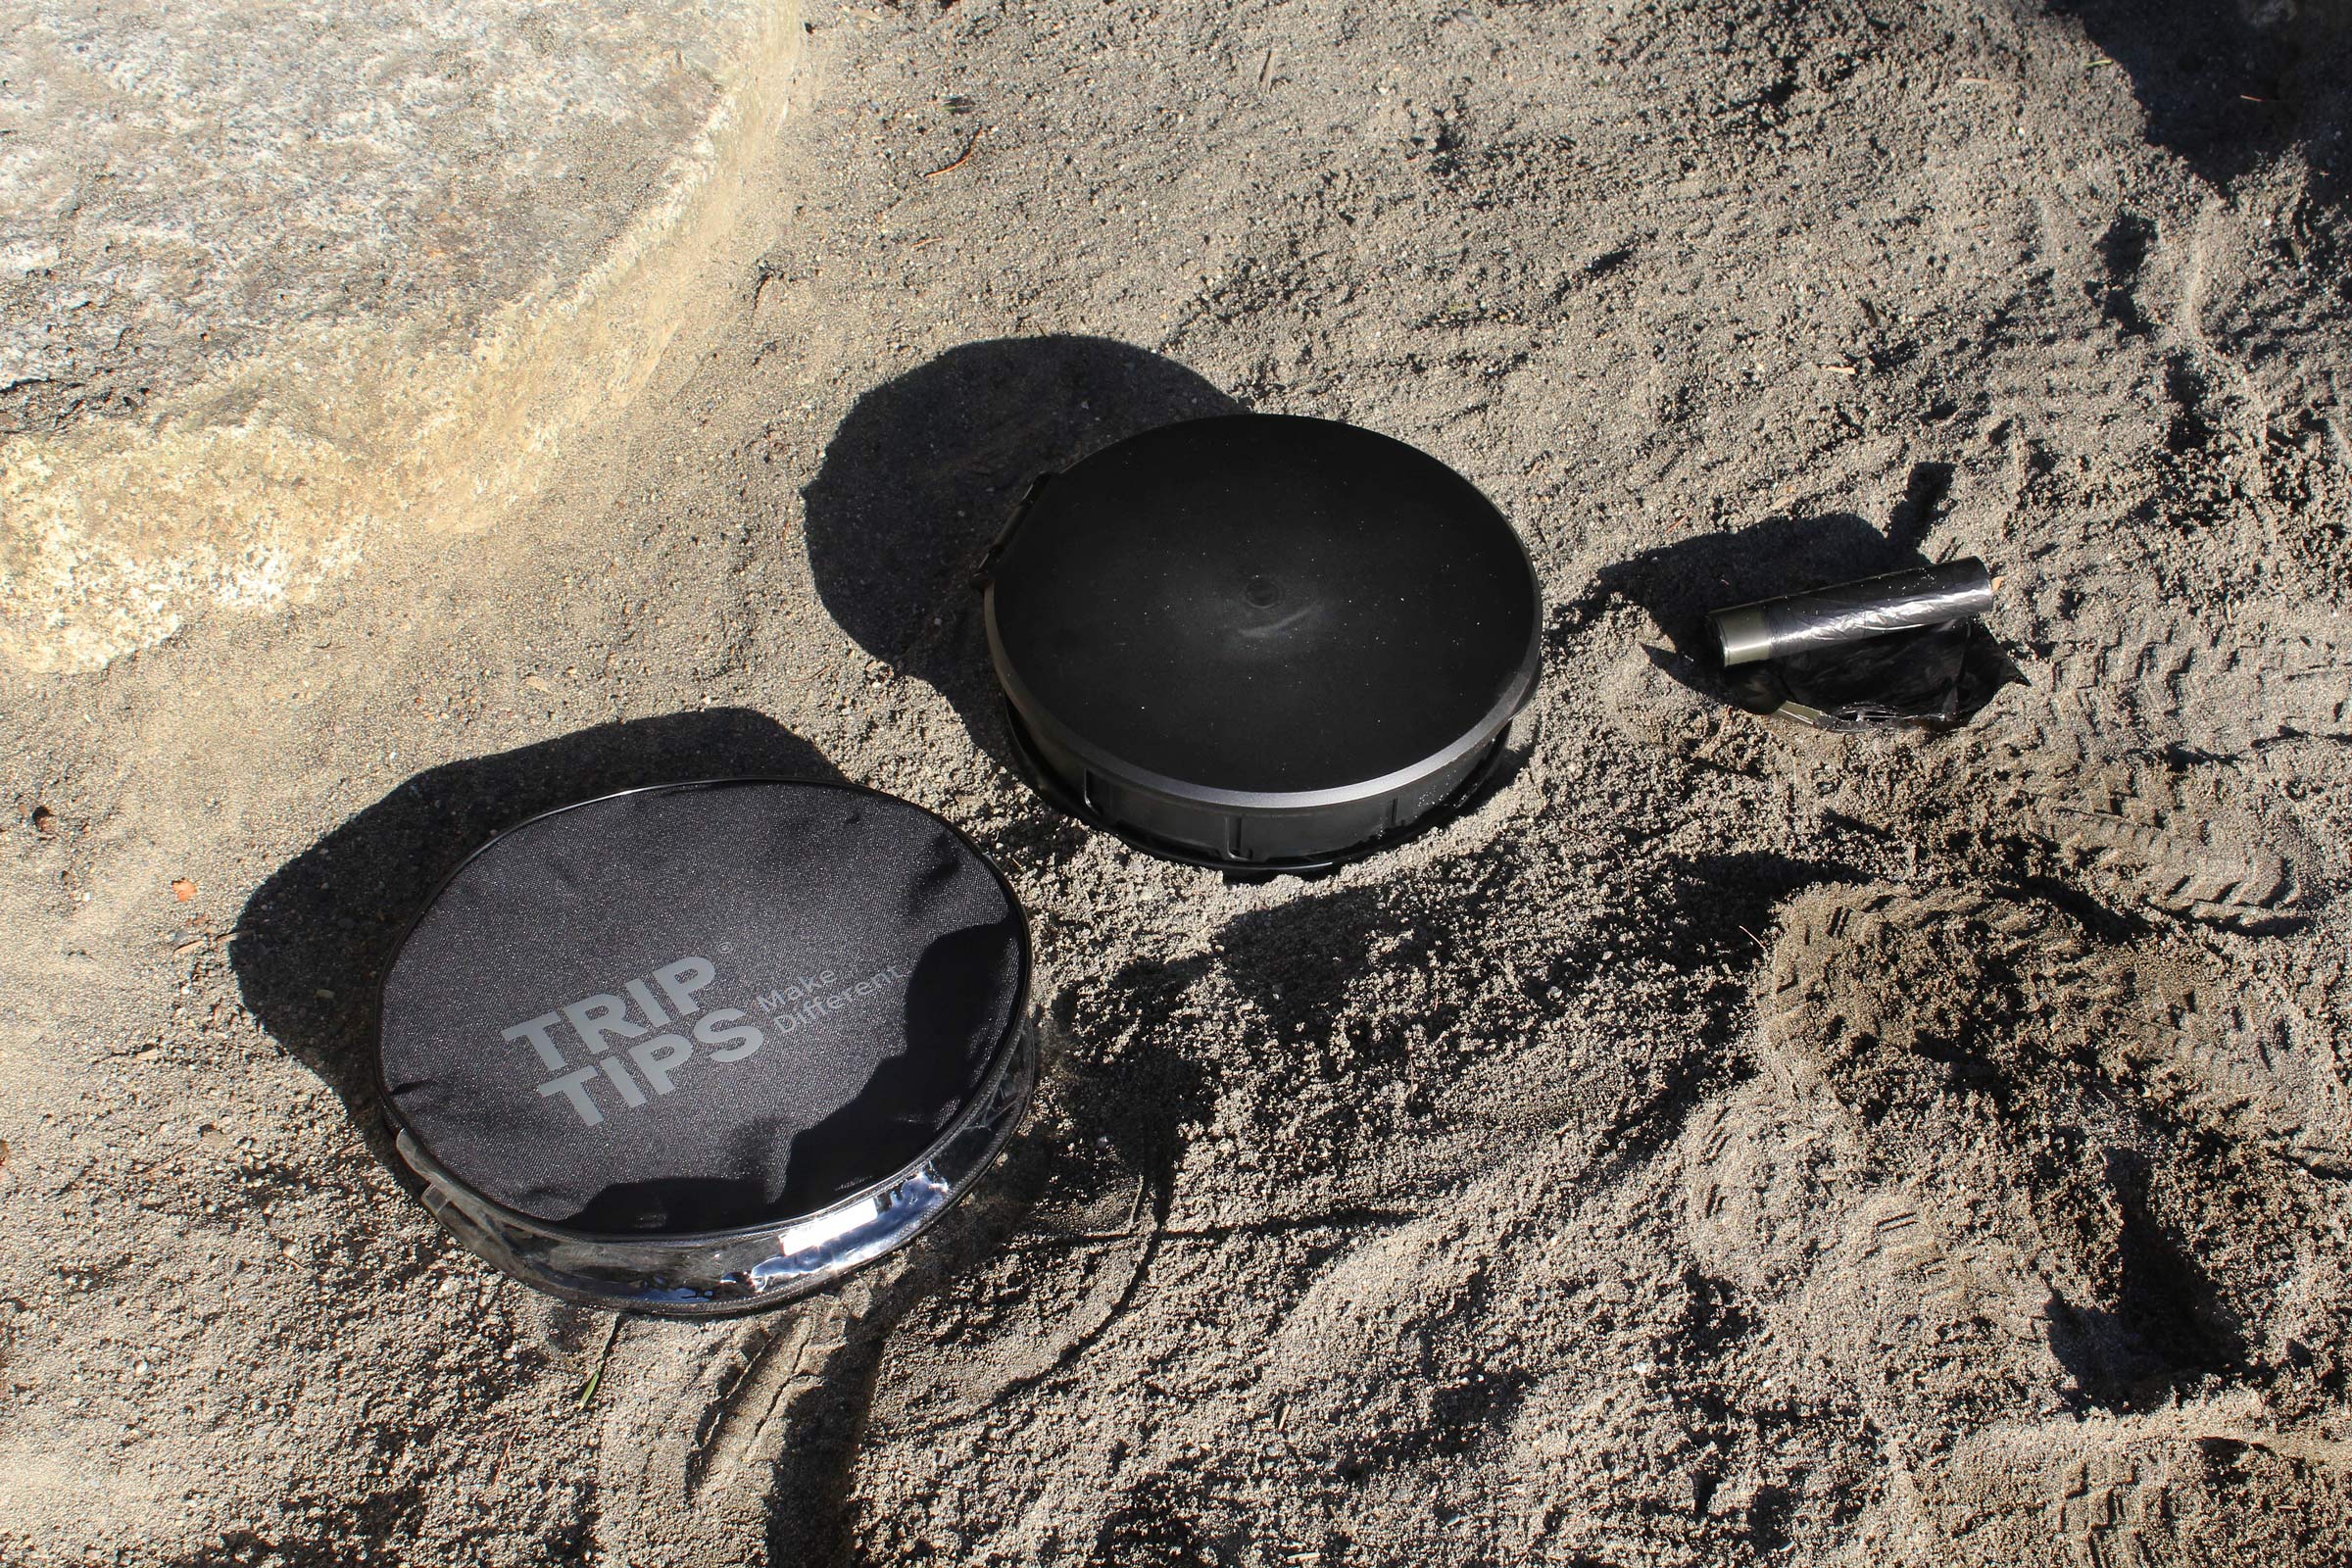 photographs by the author