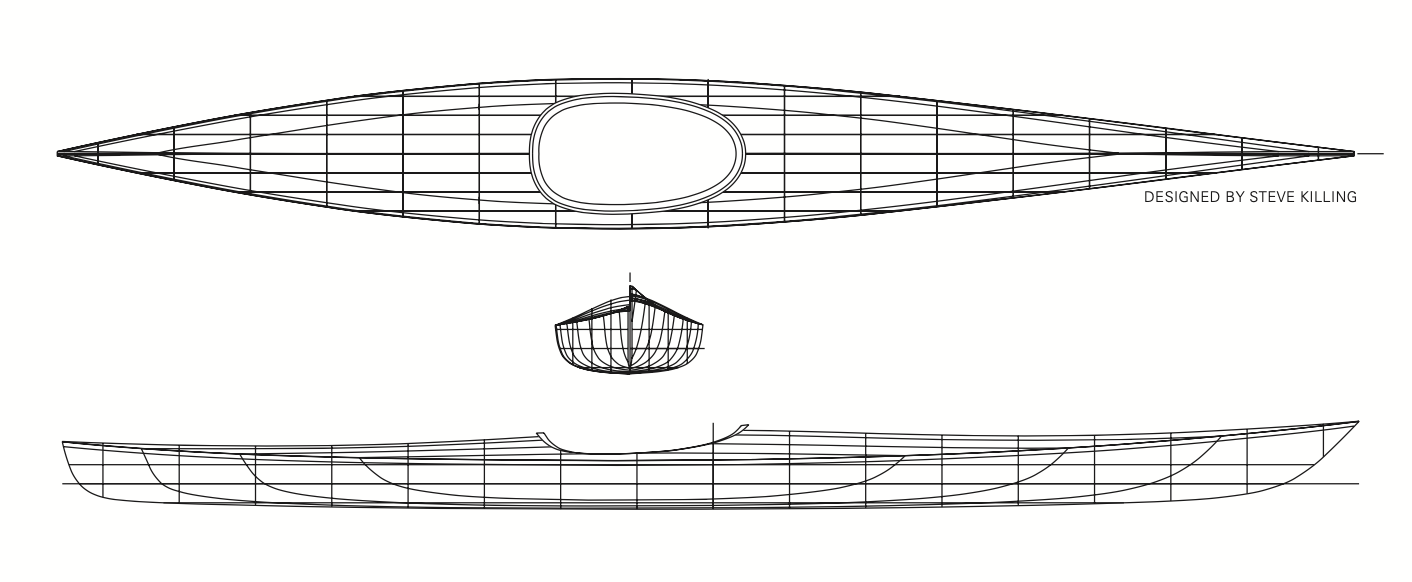
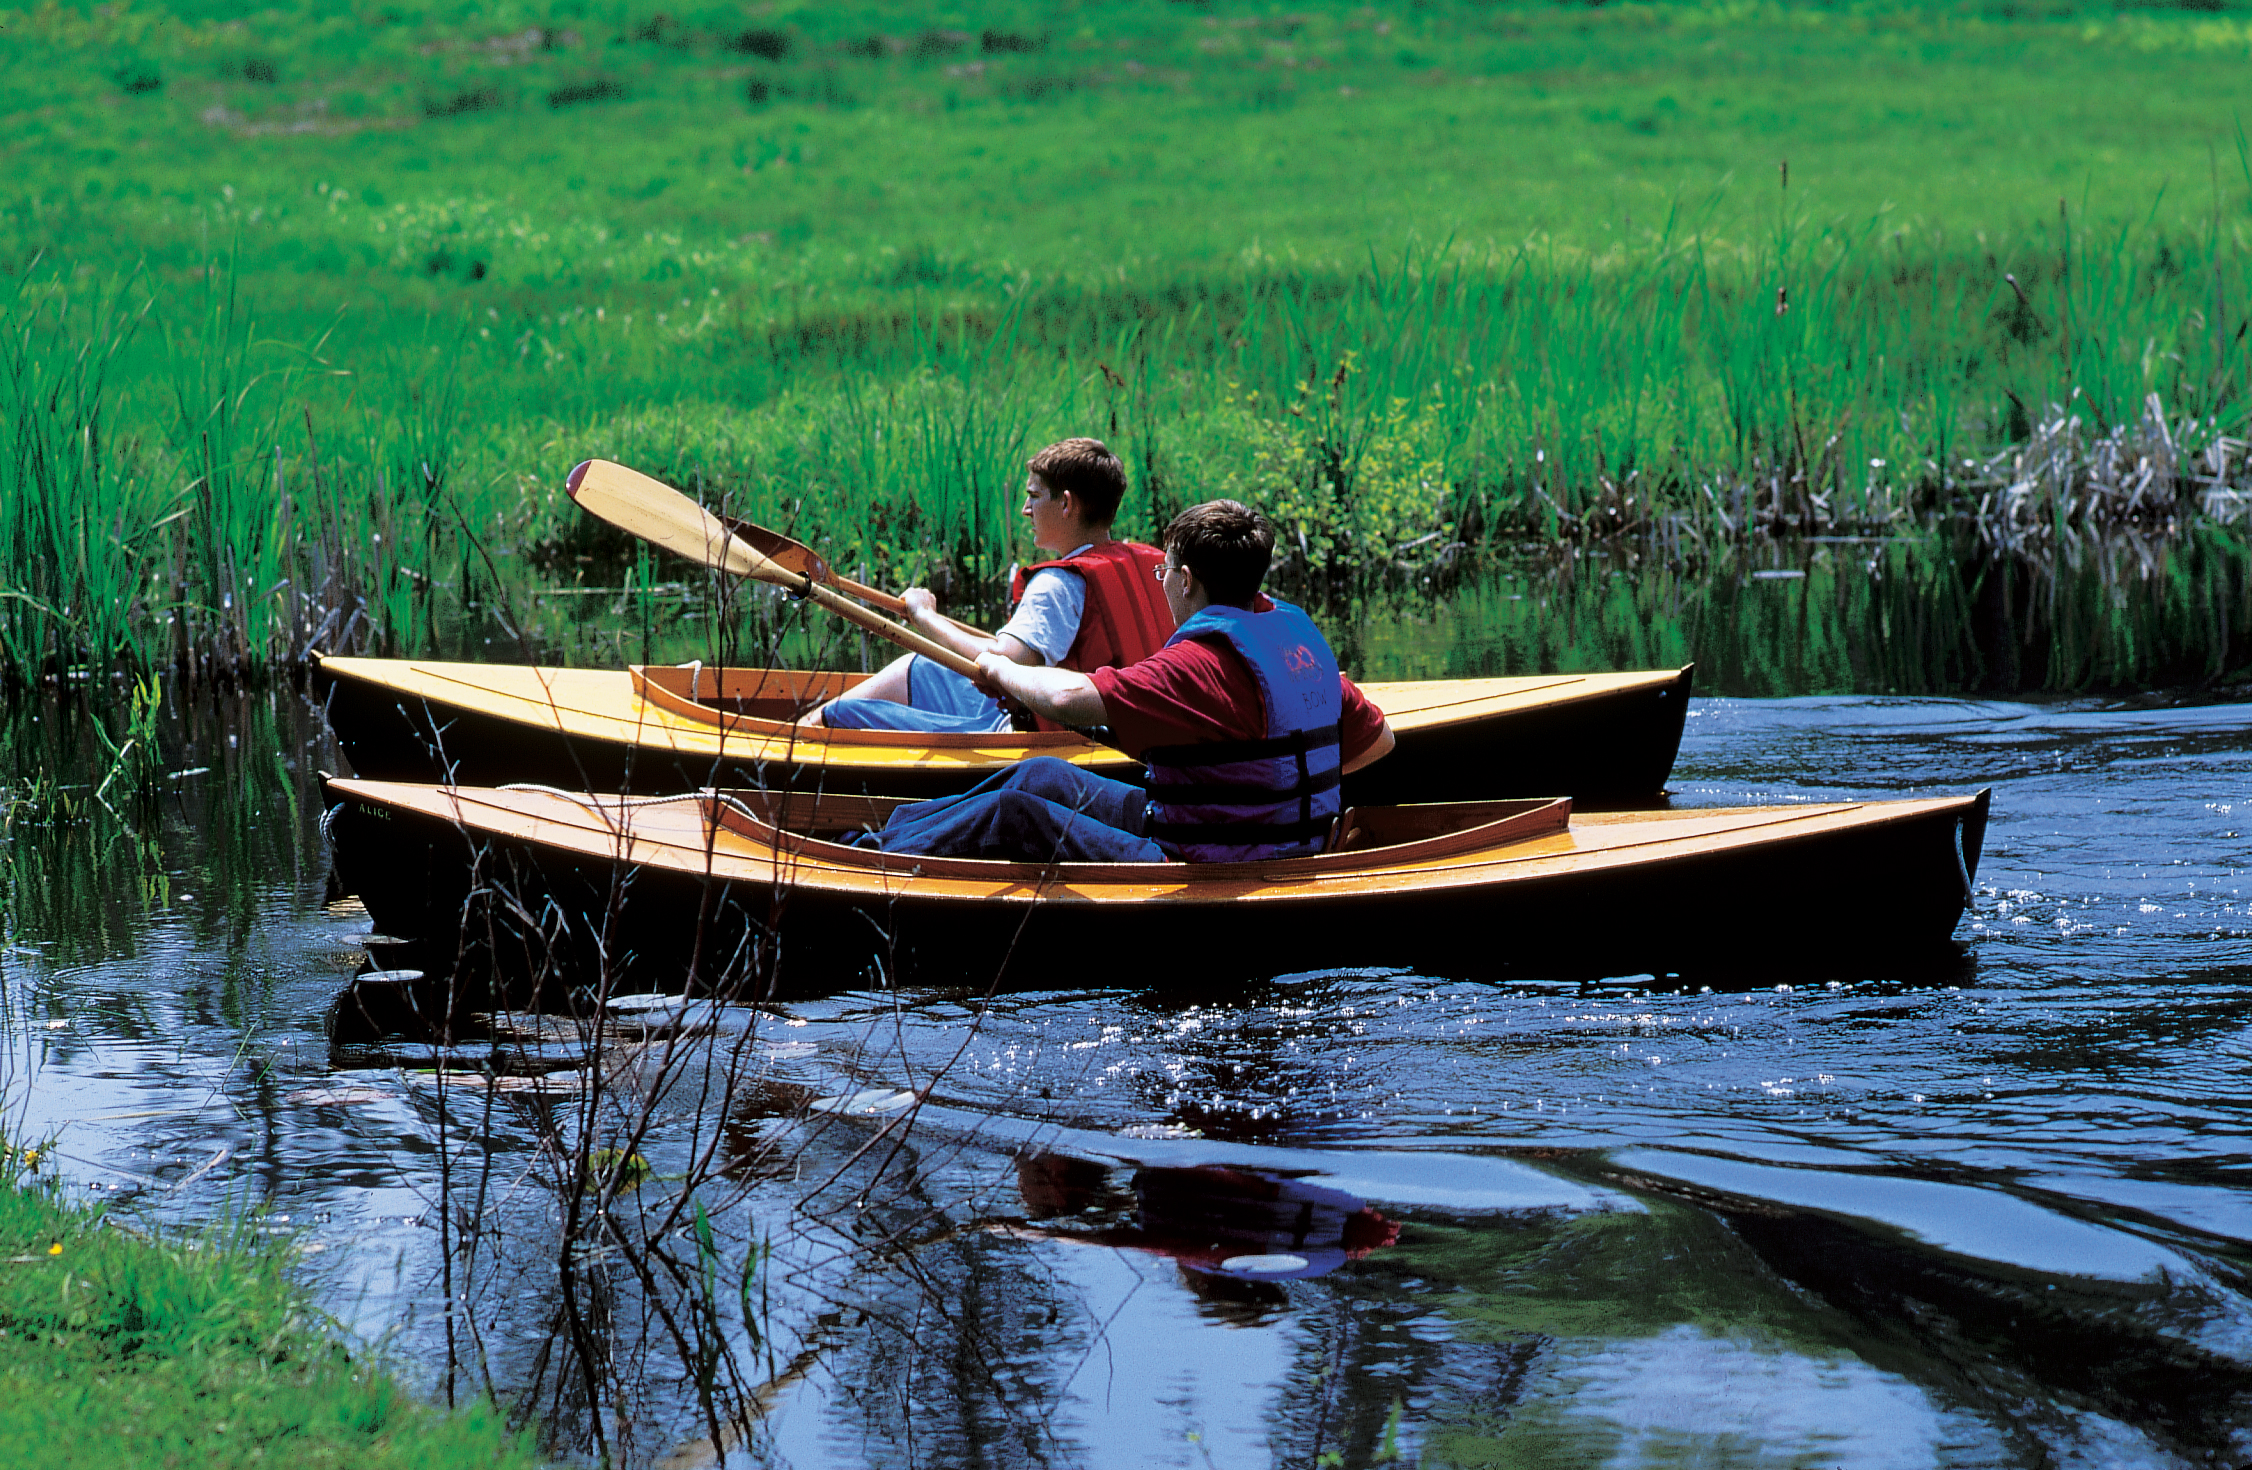
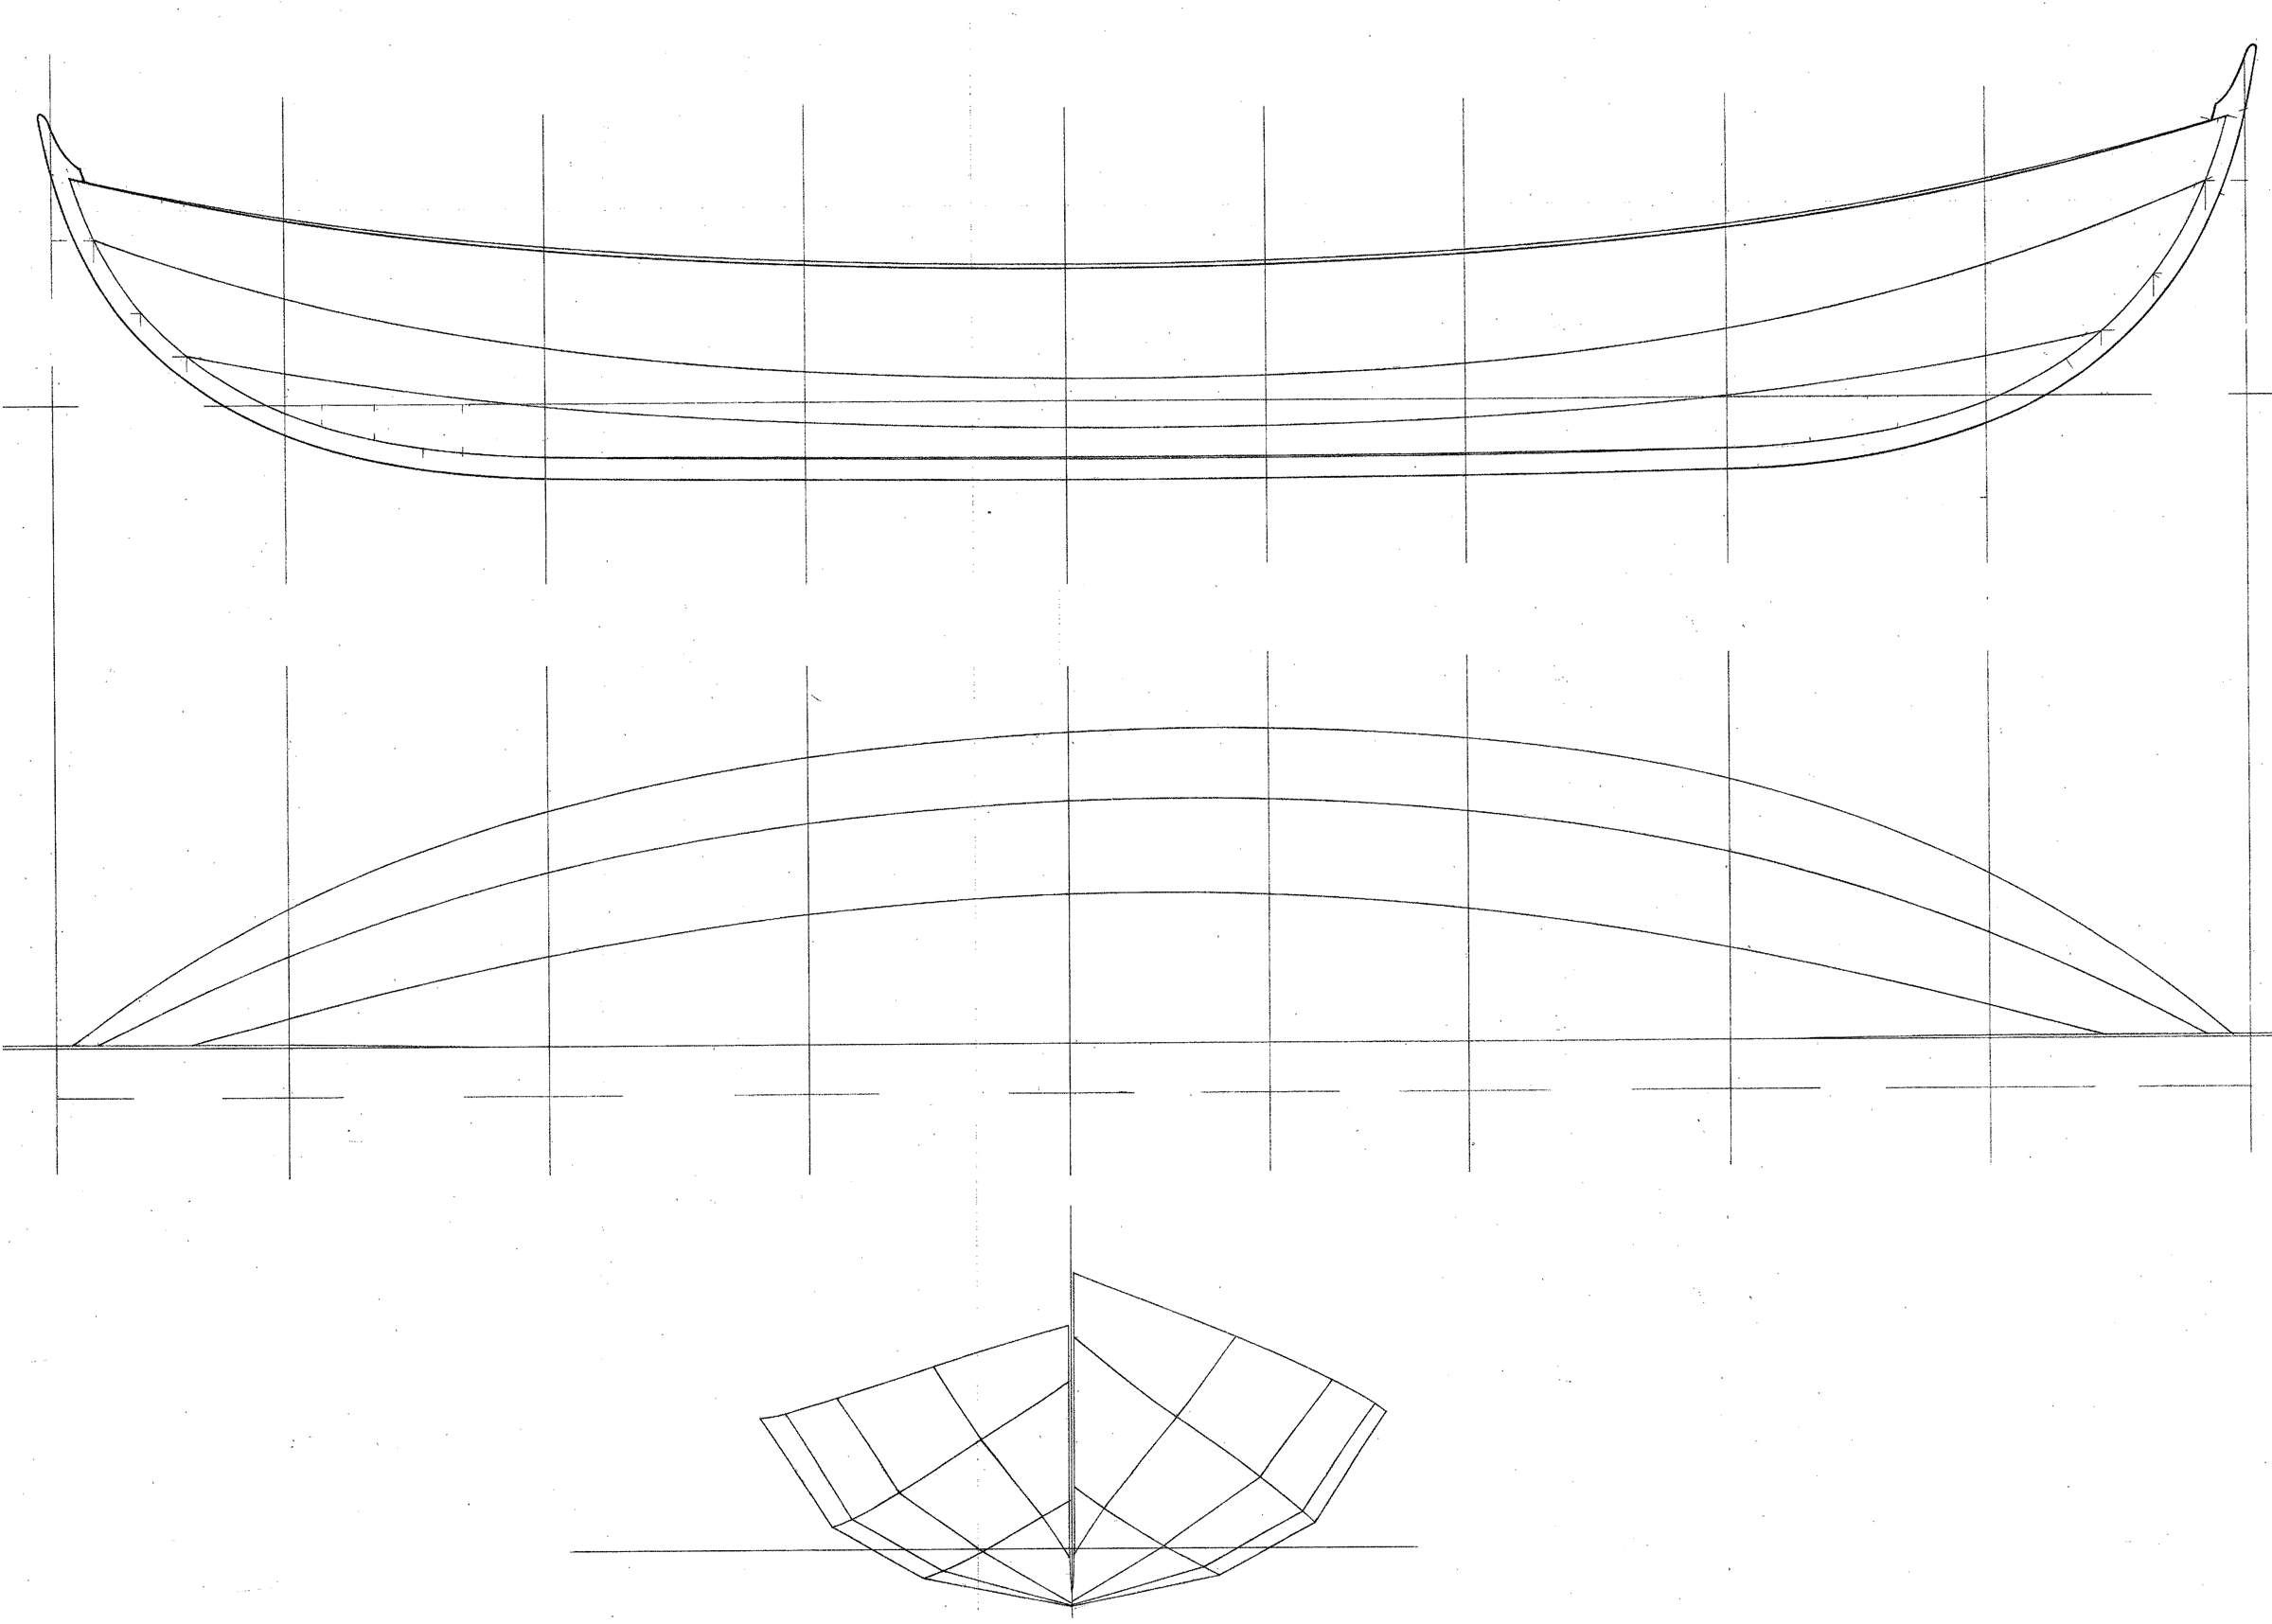
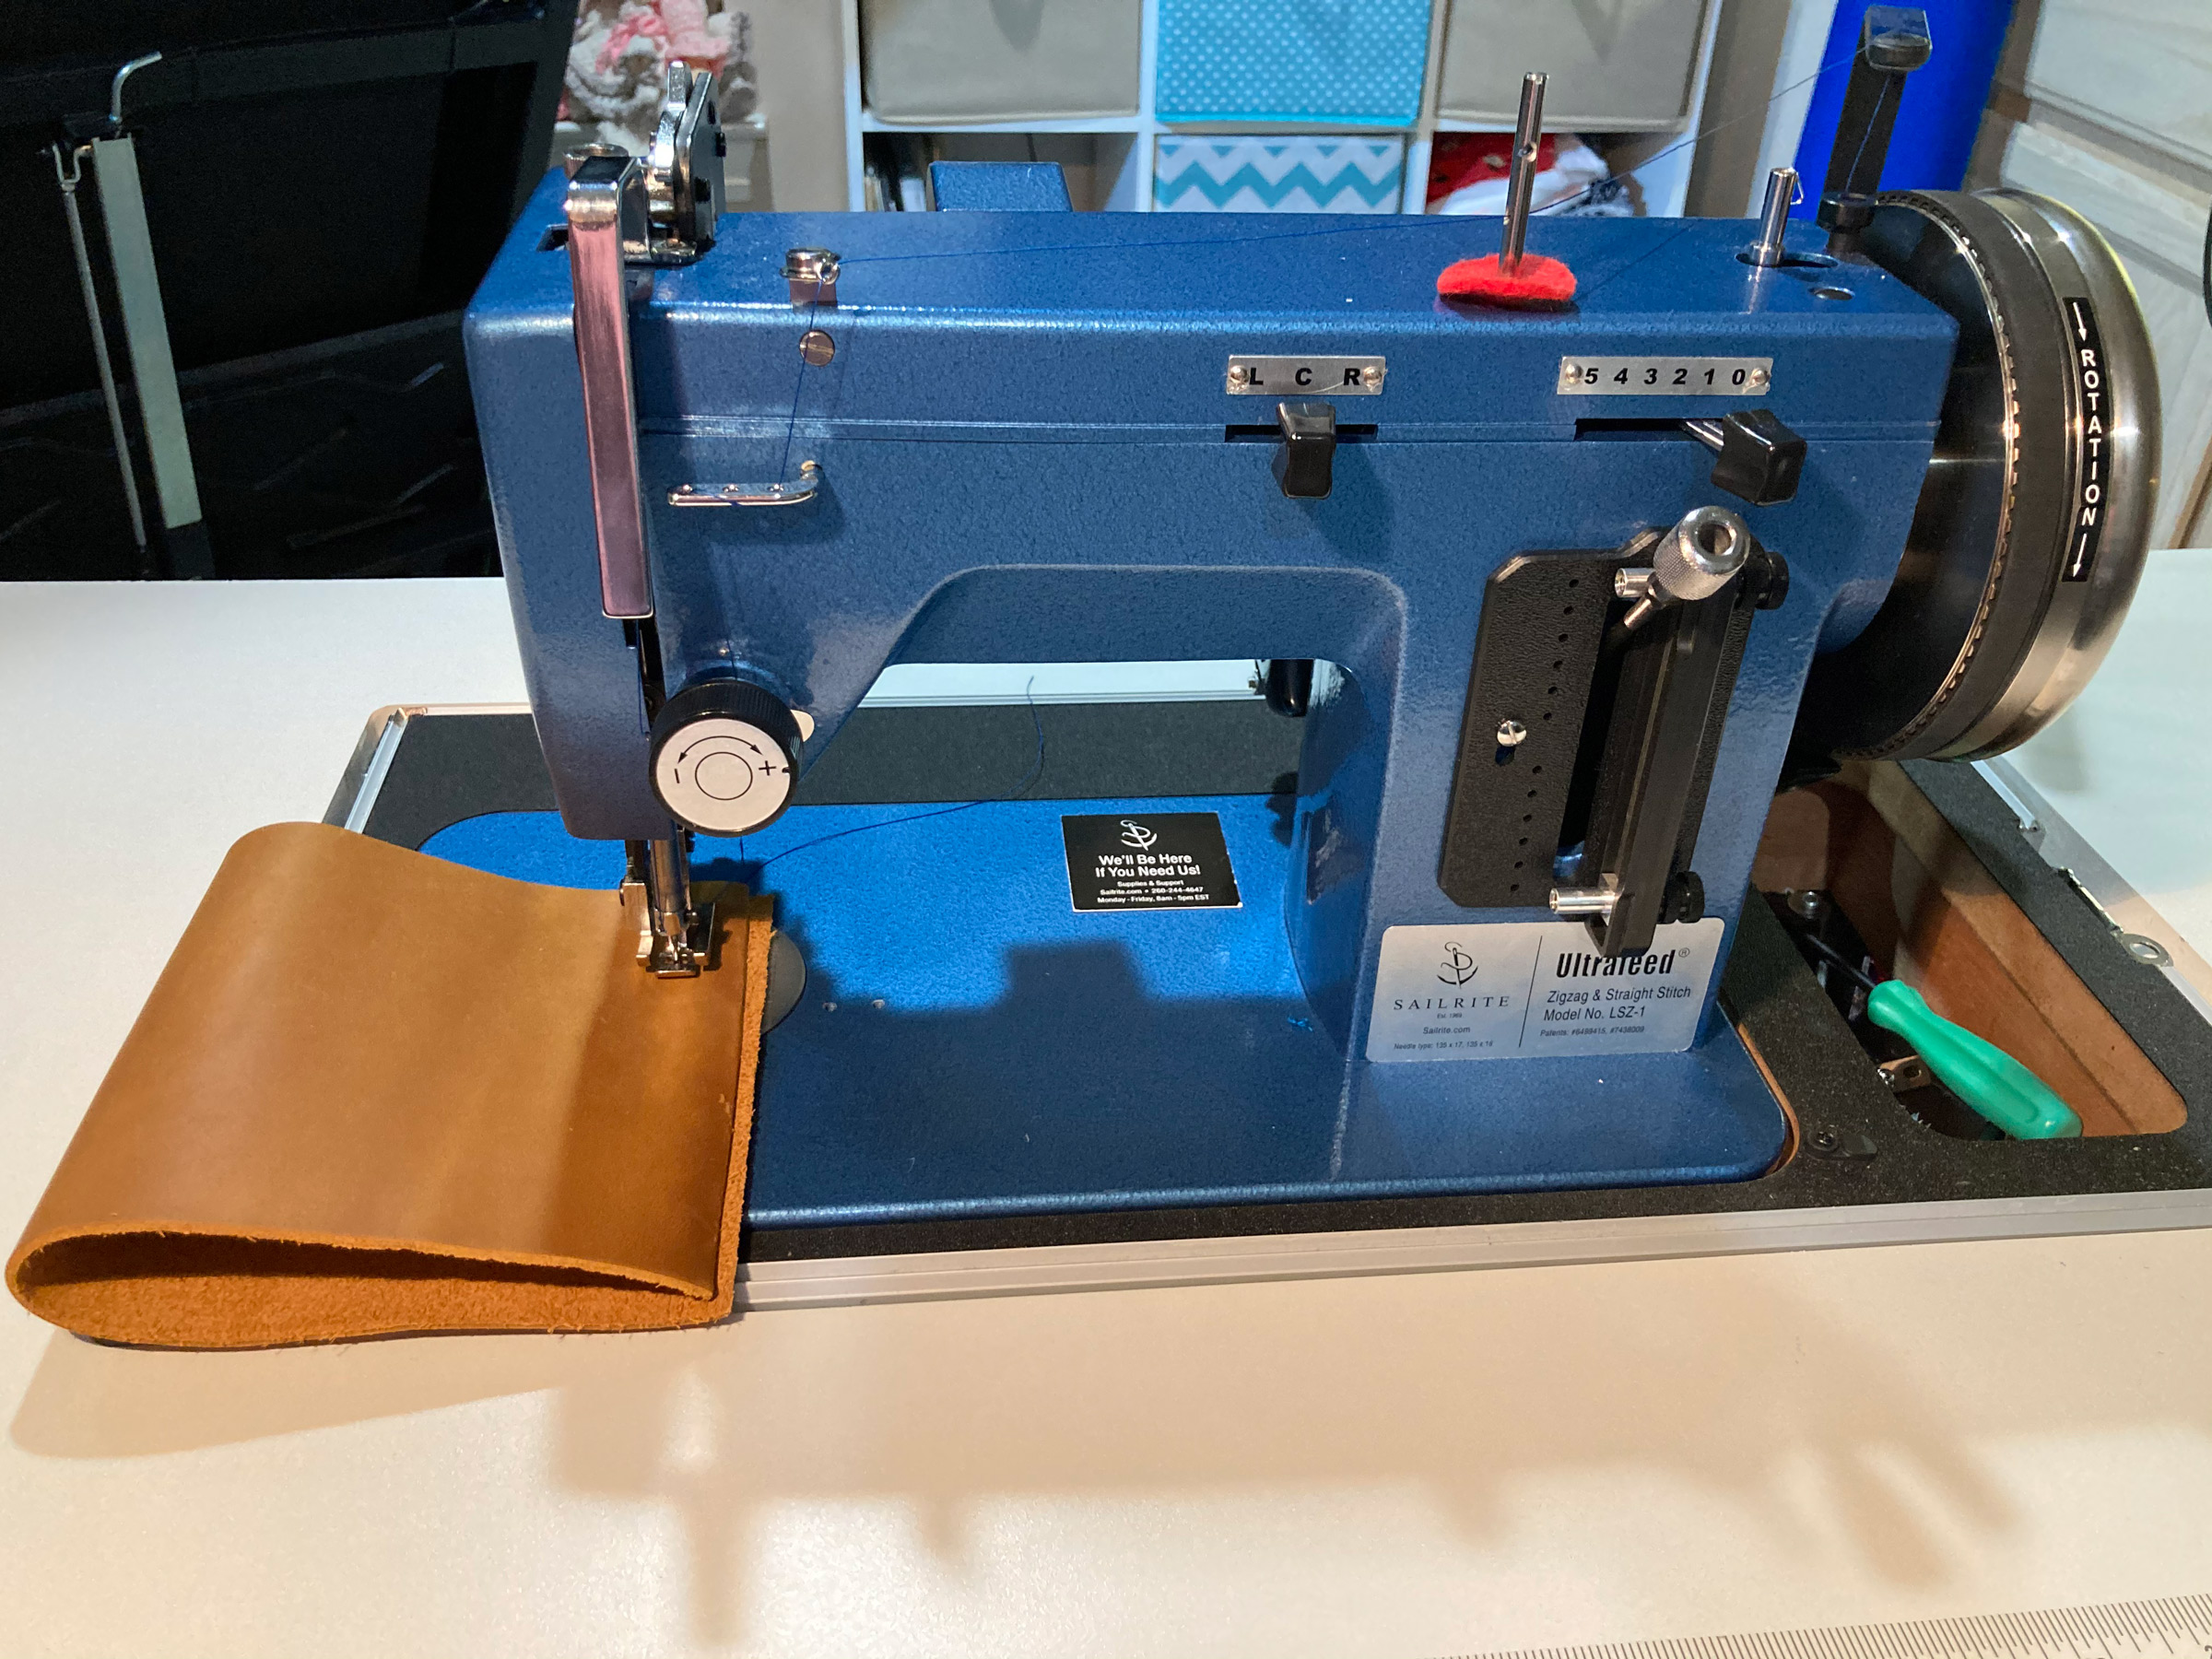
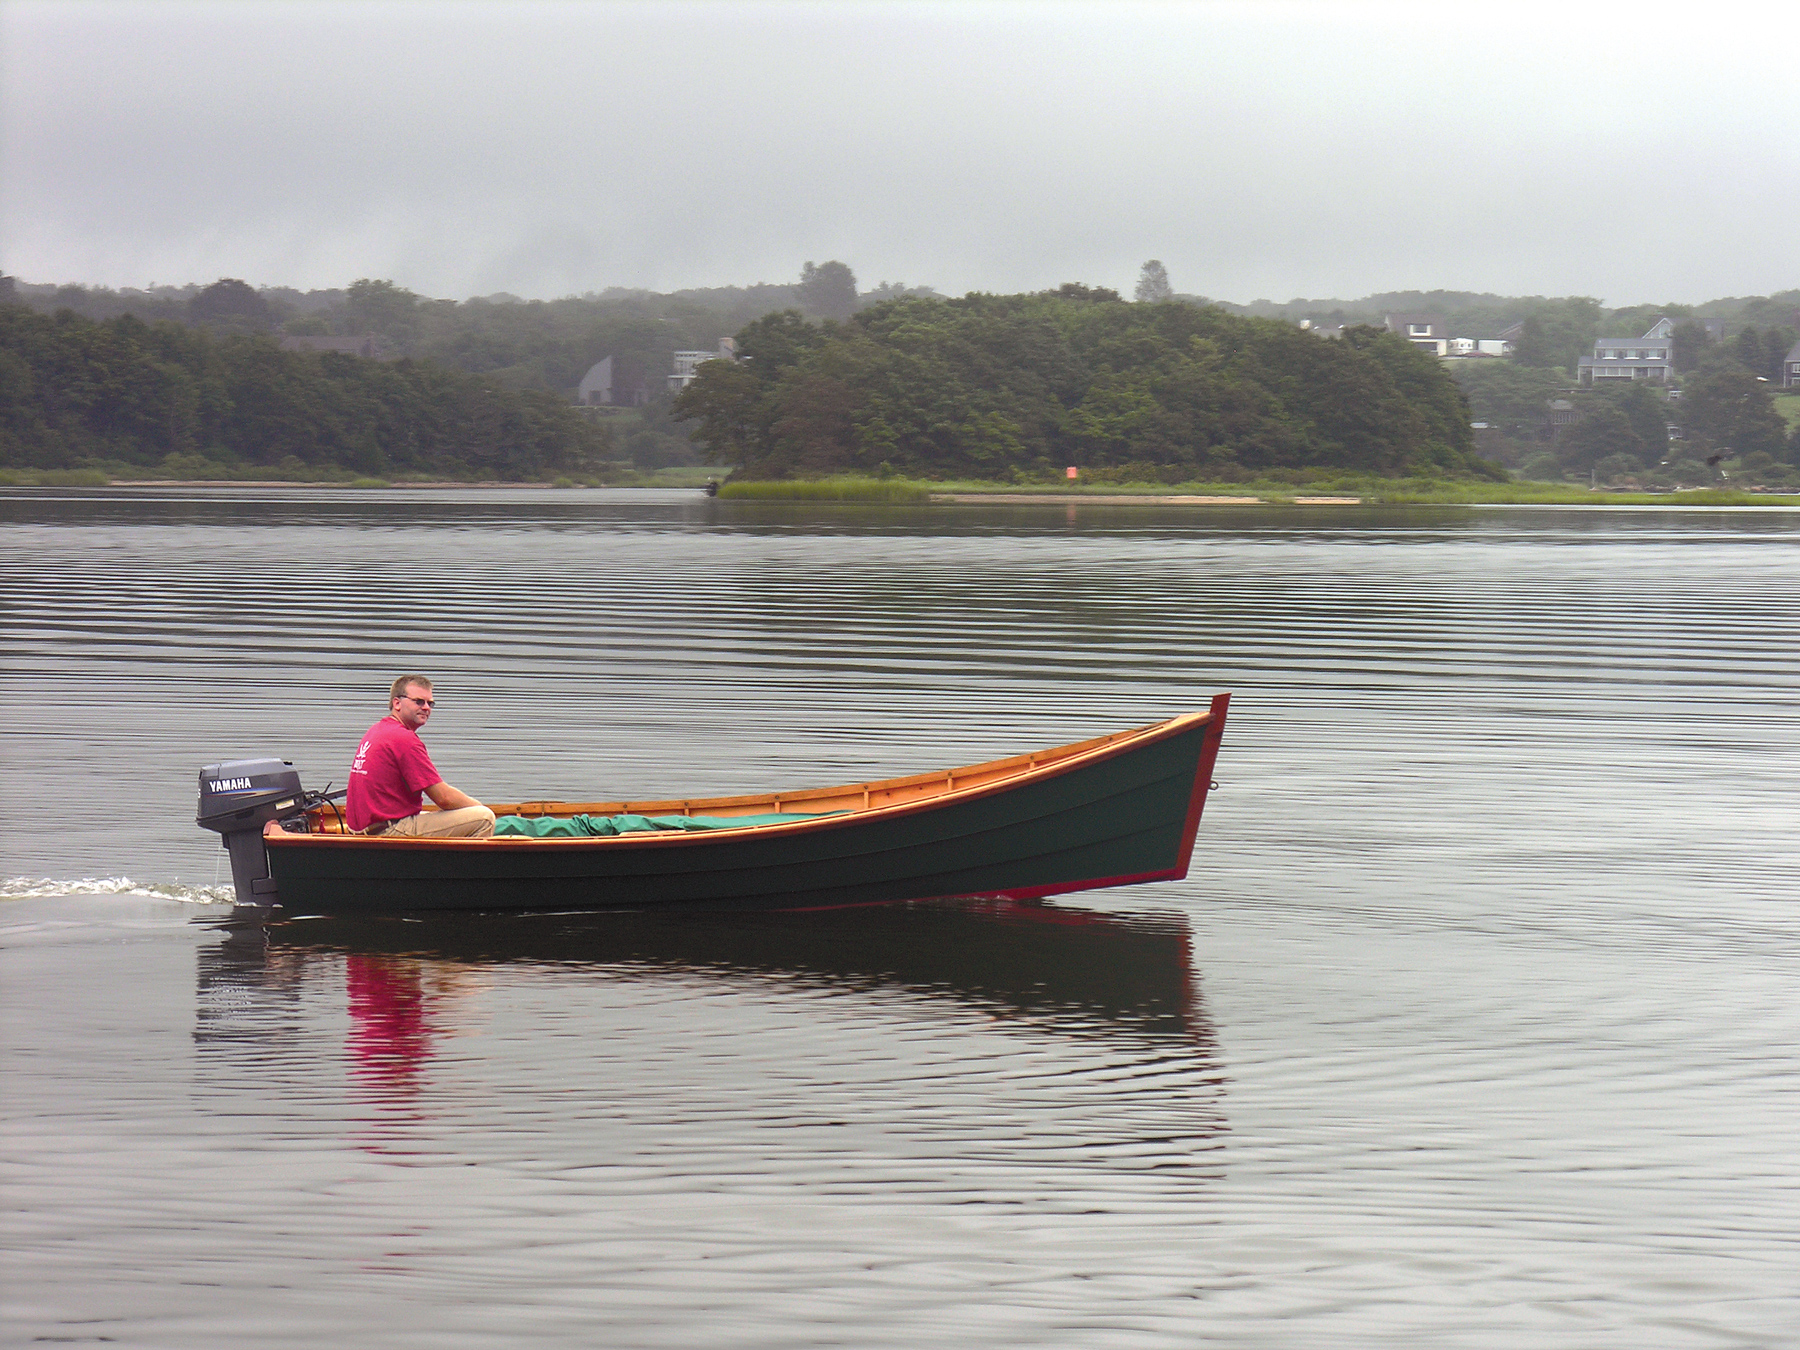
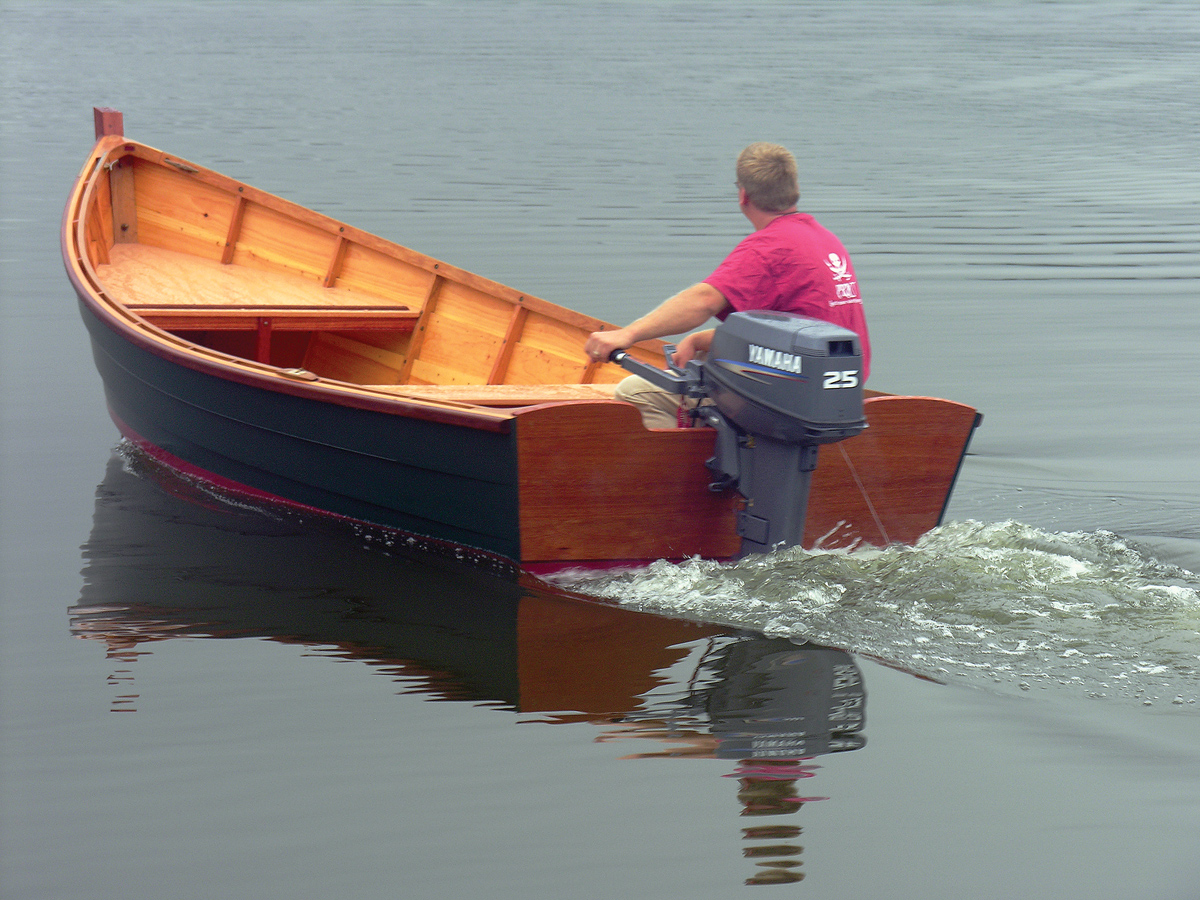
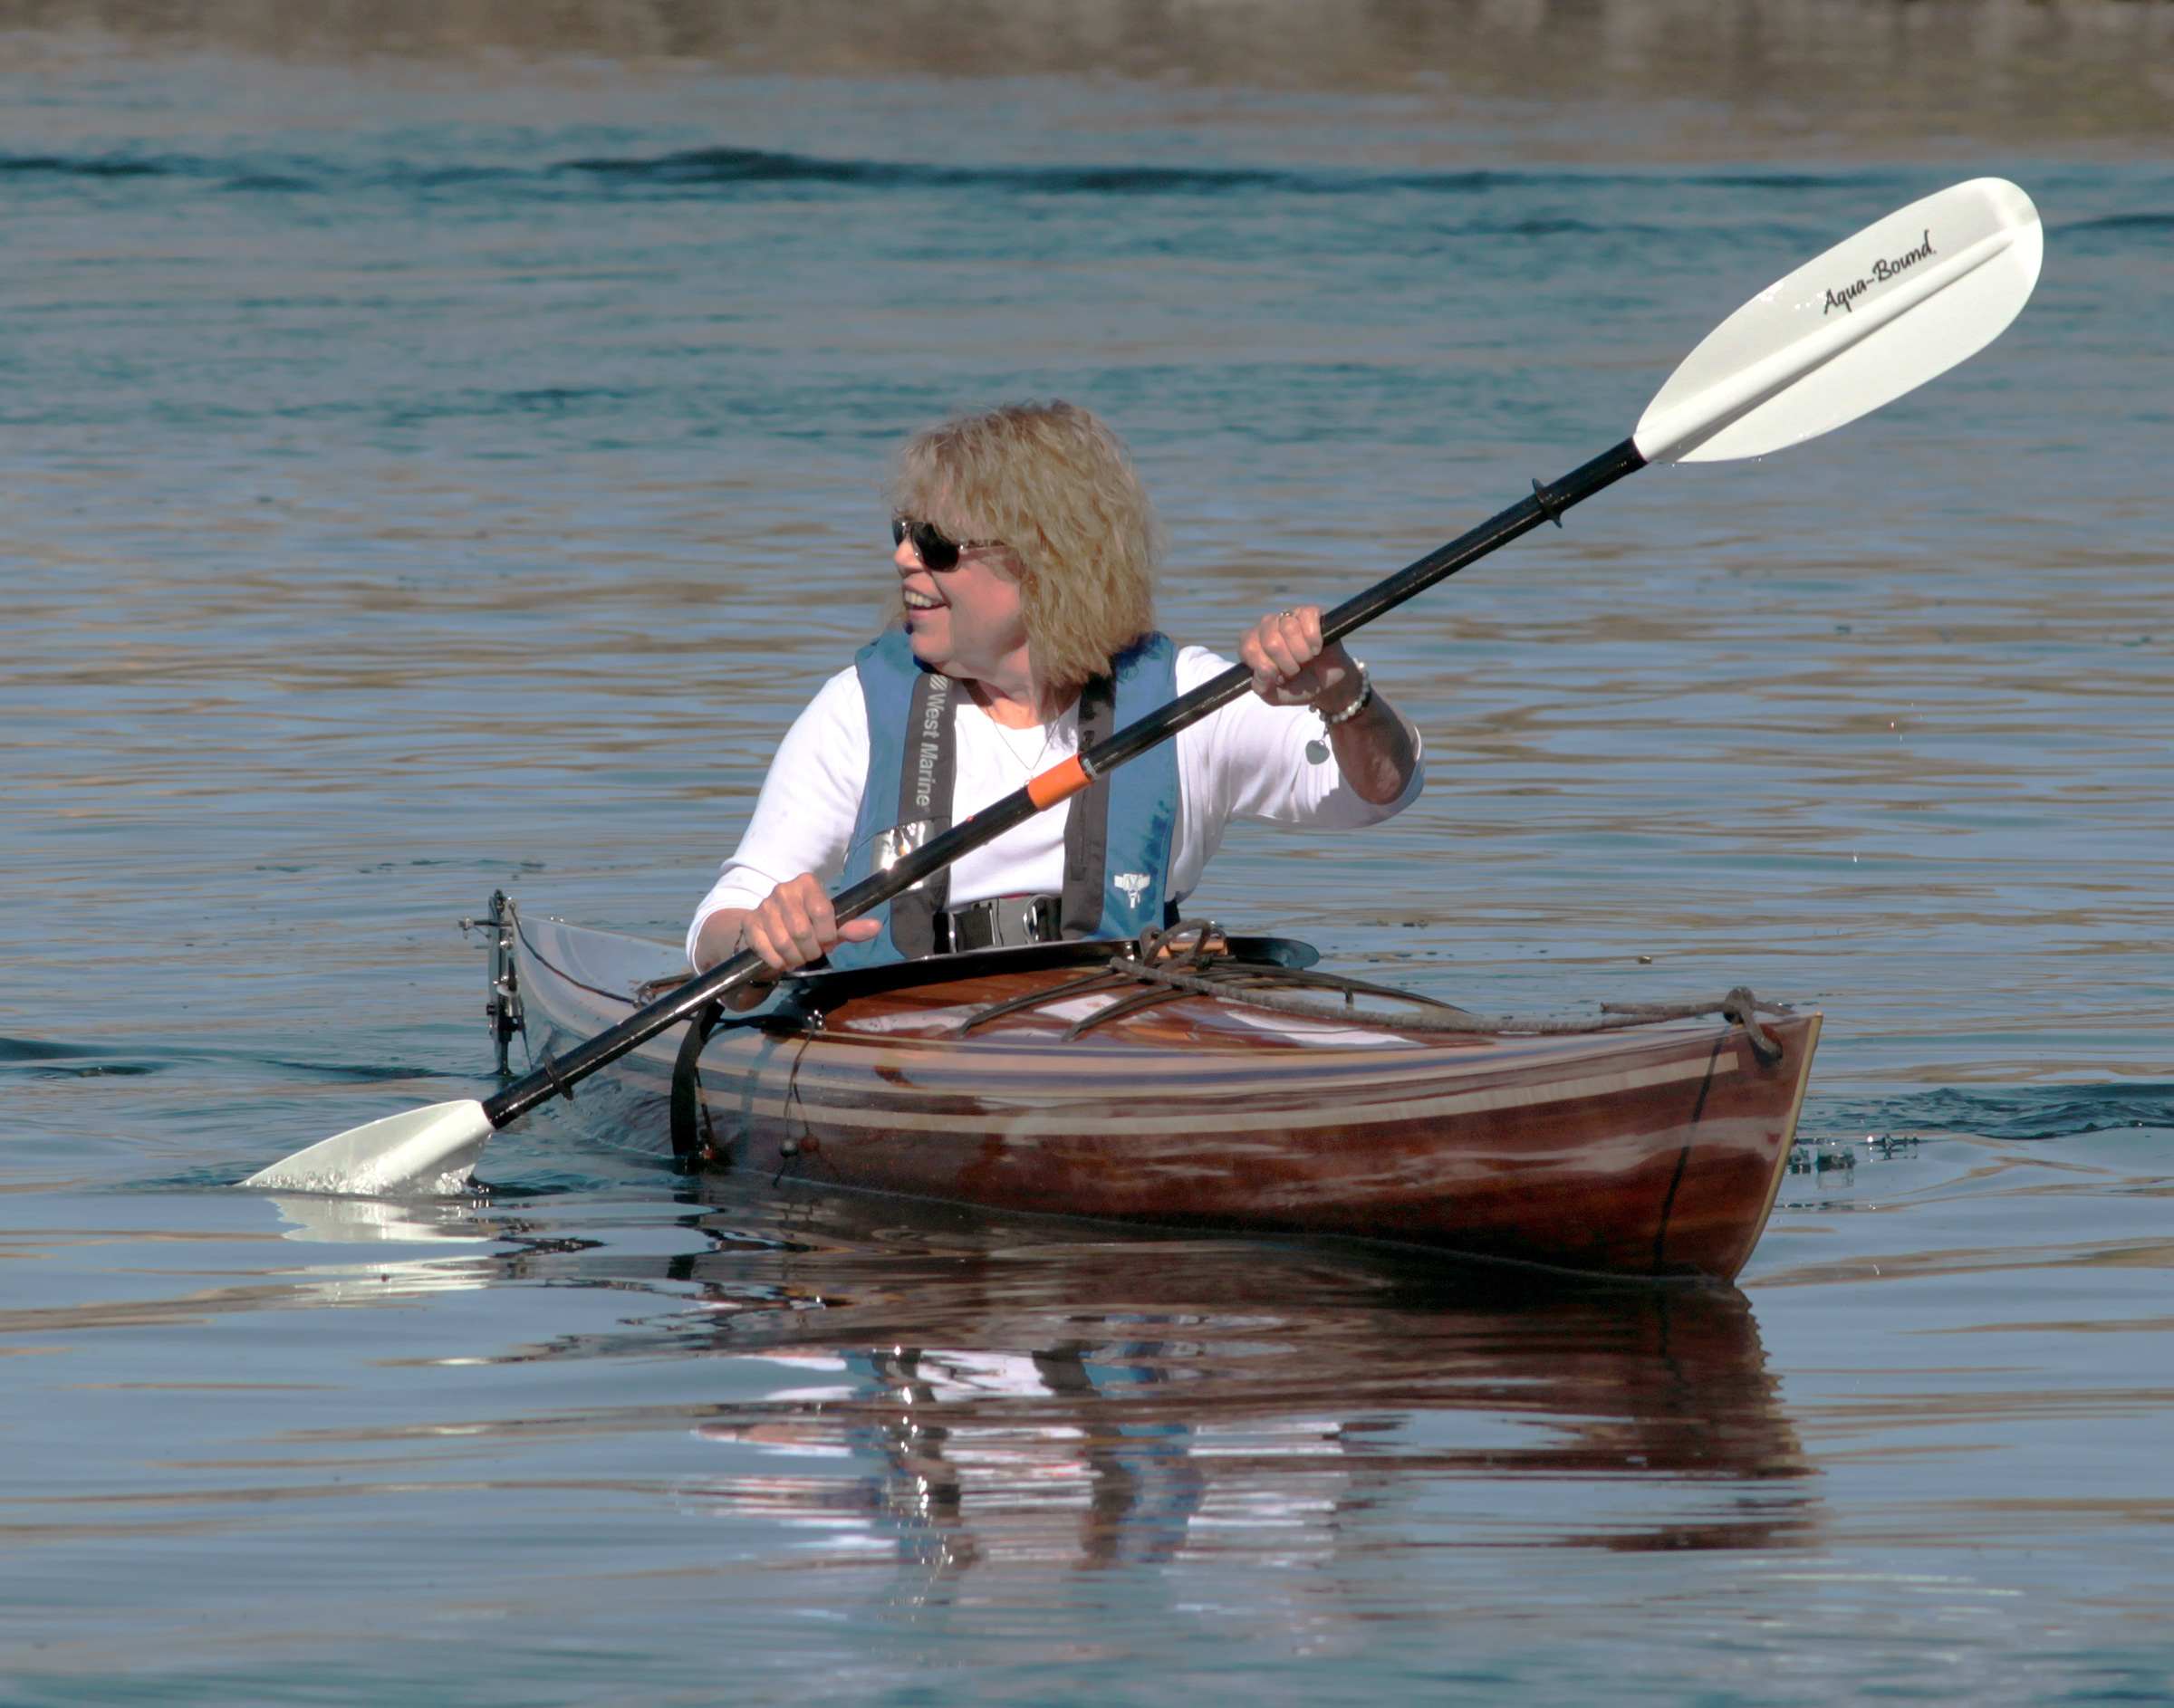
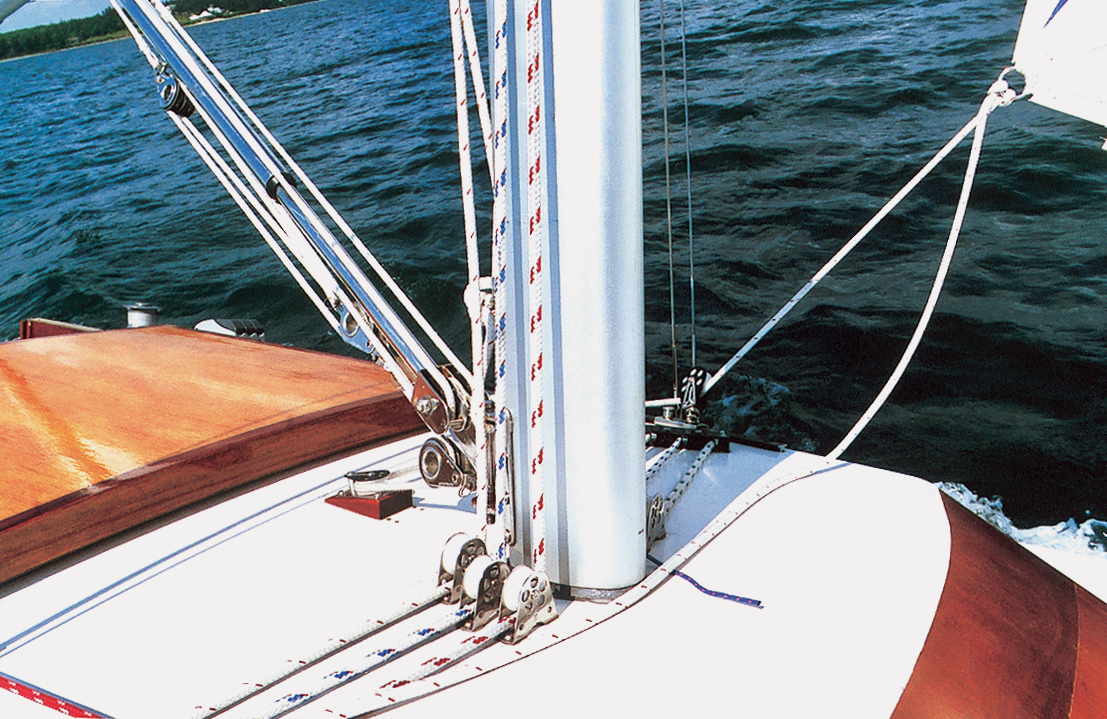
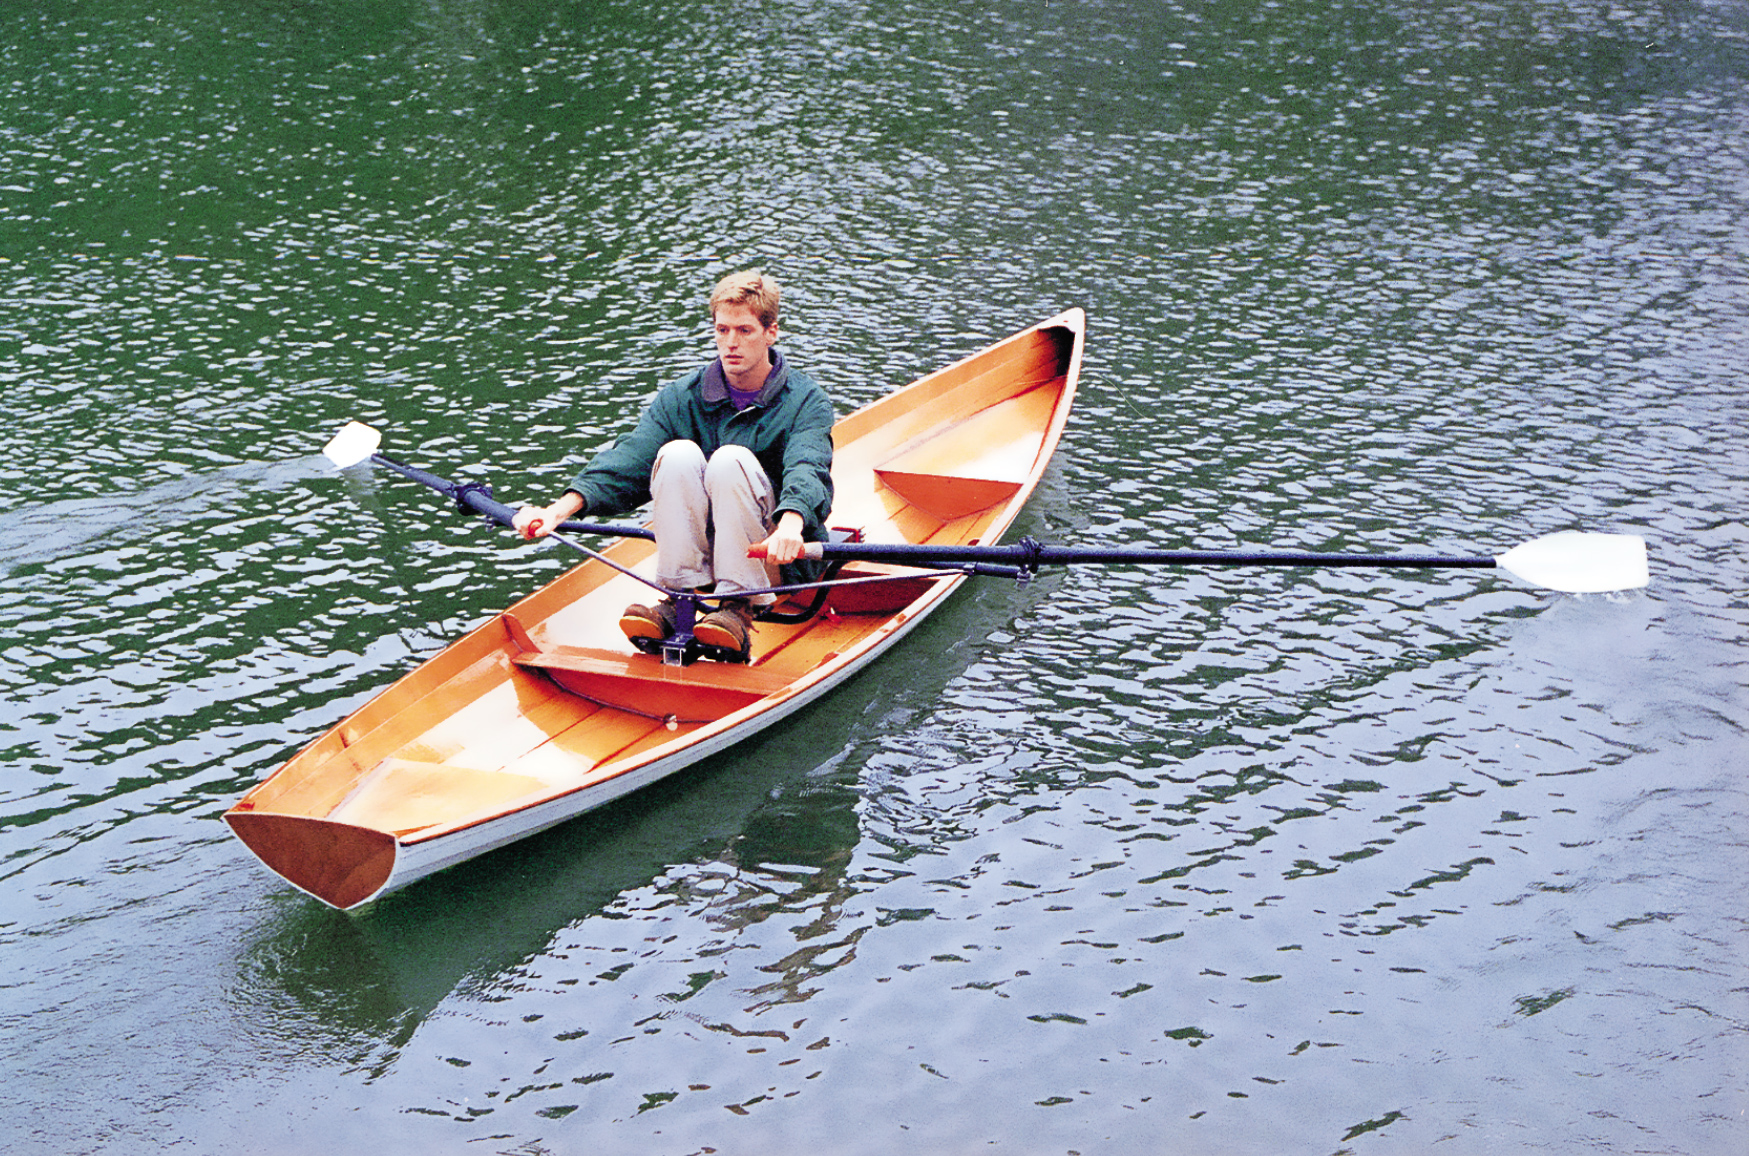
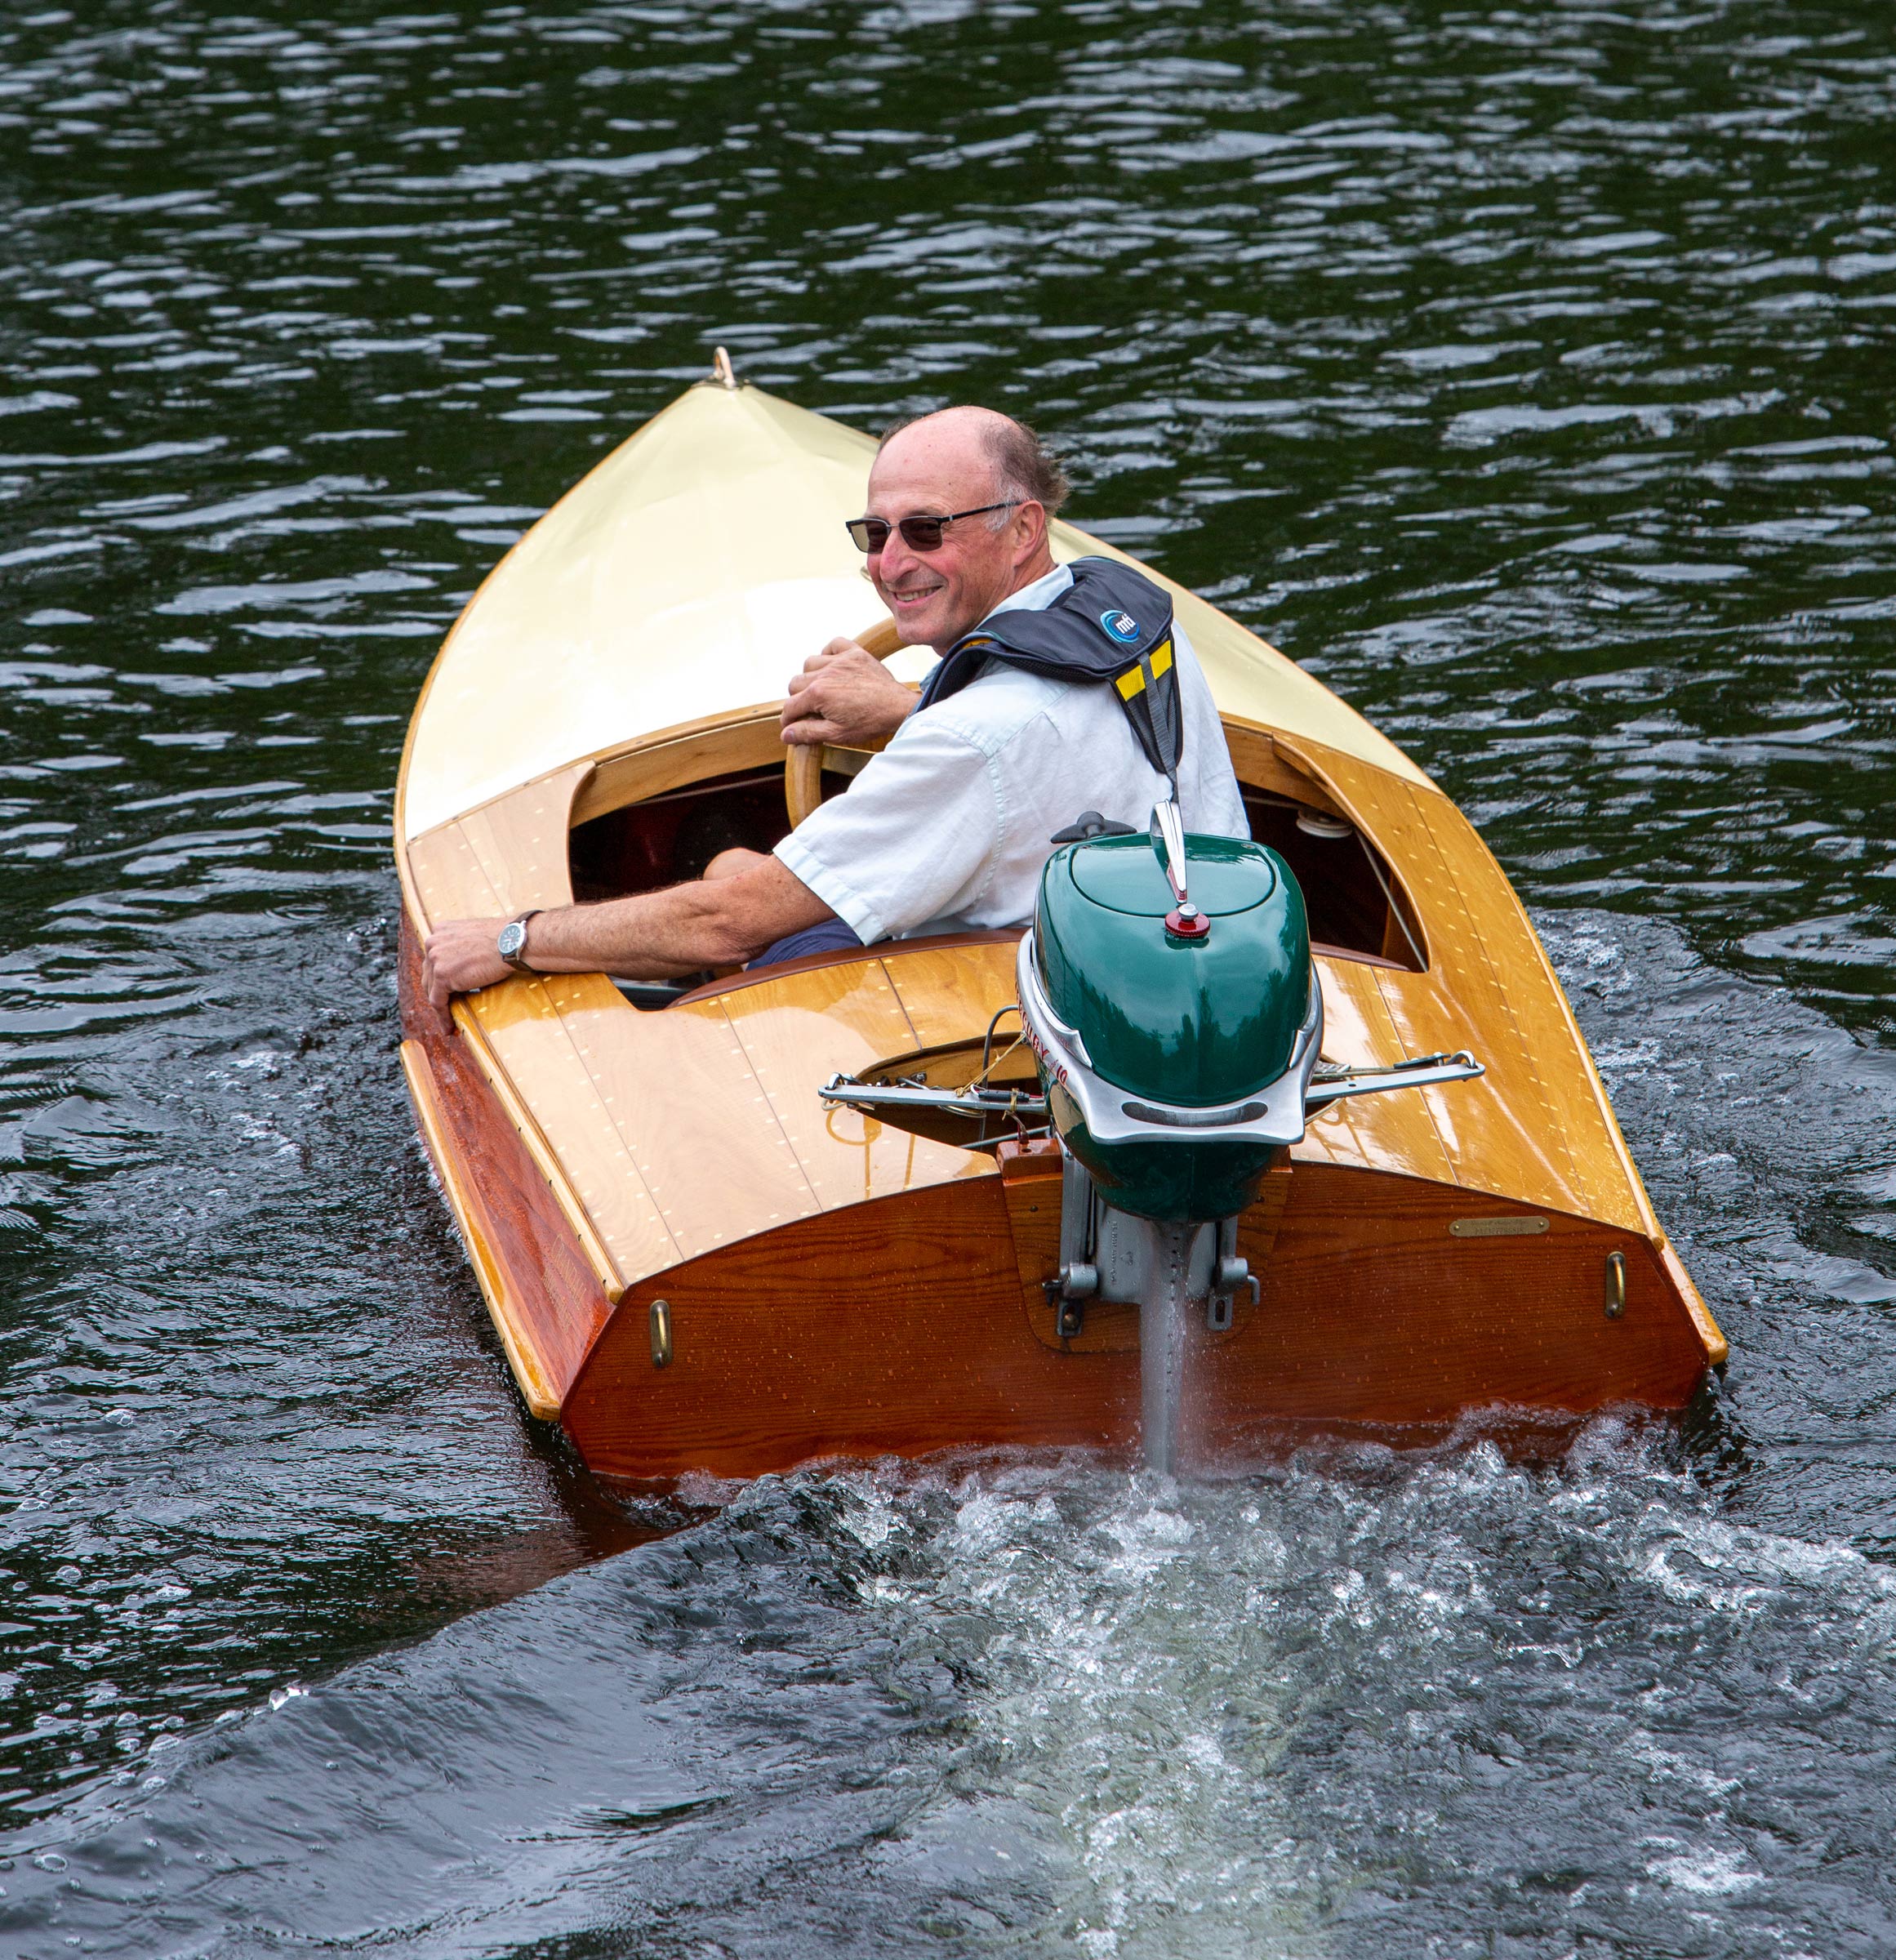
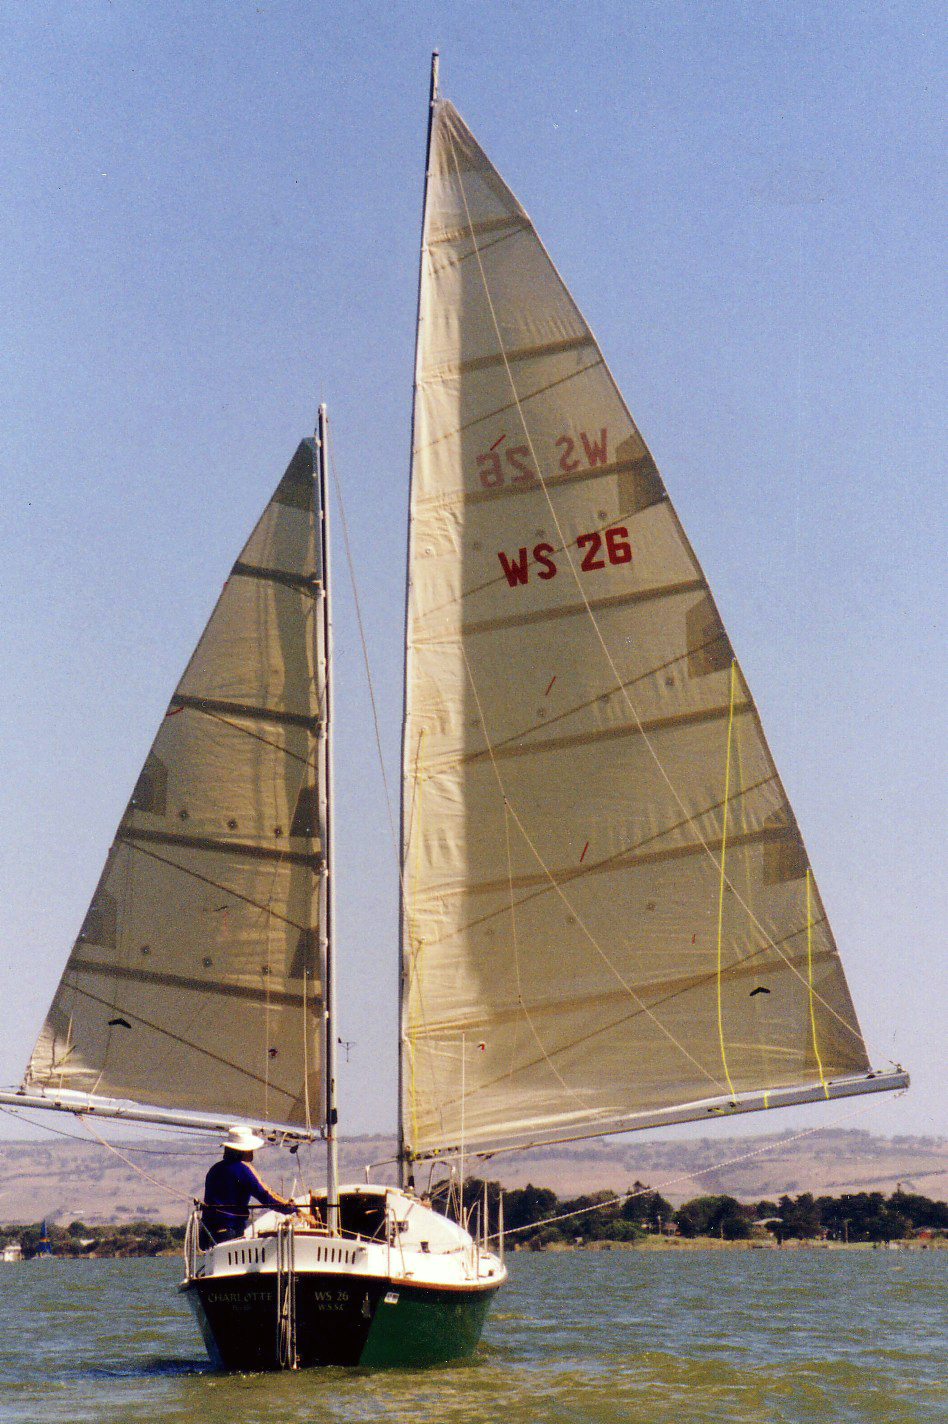
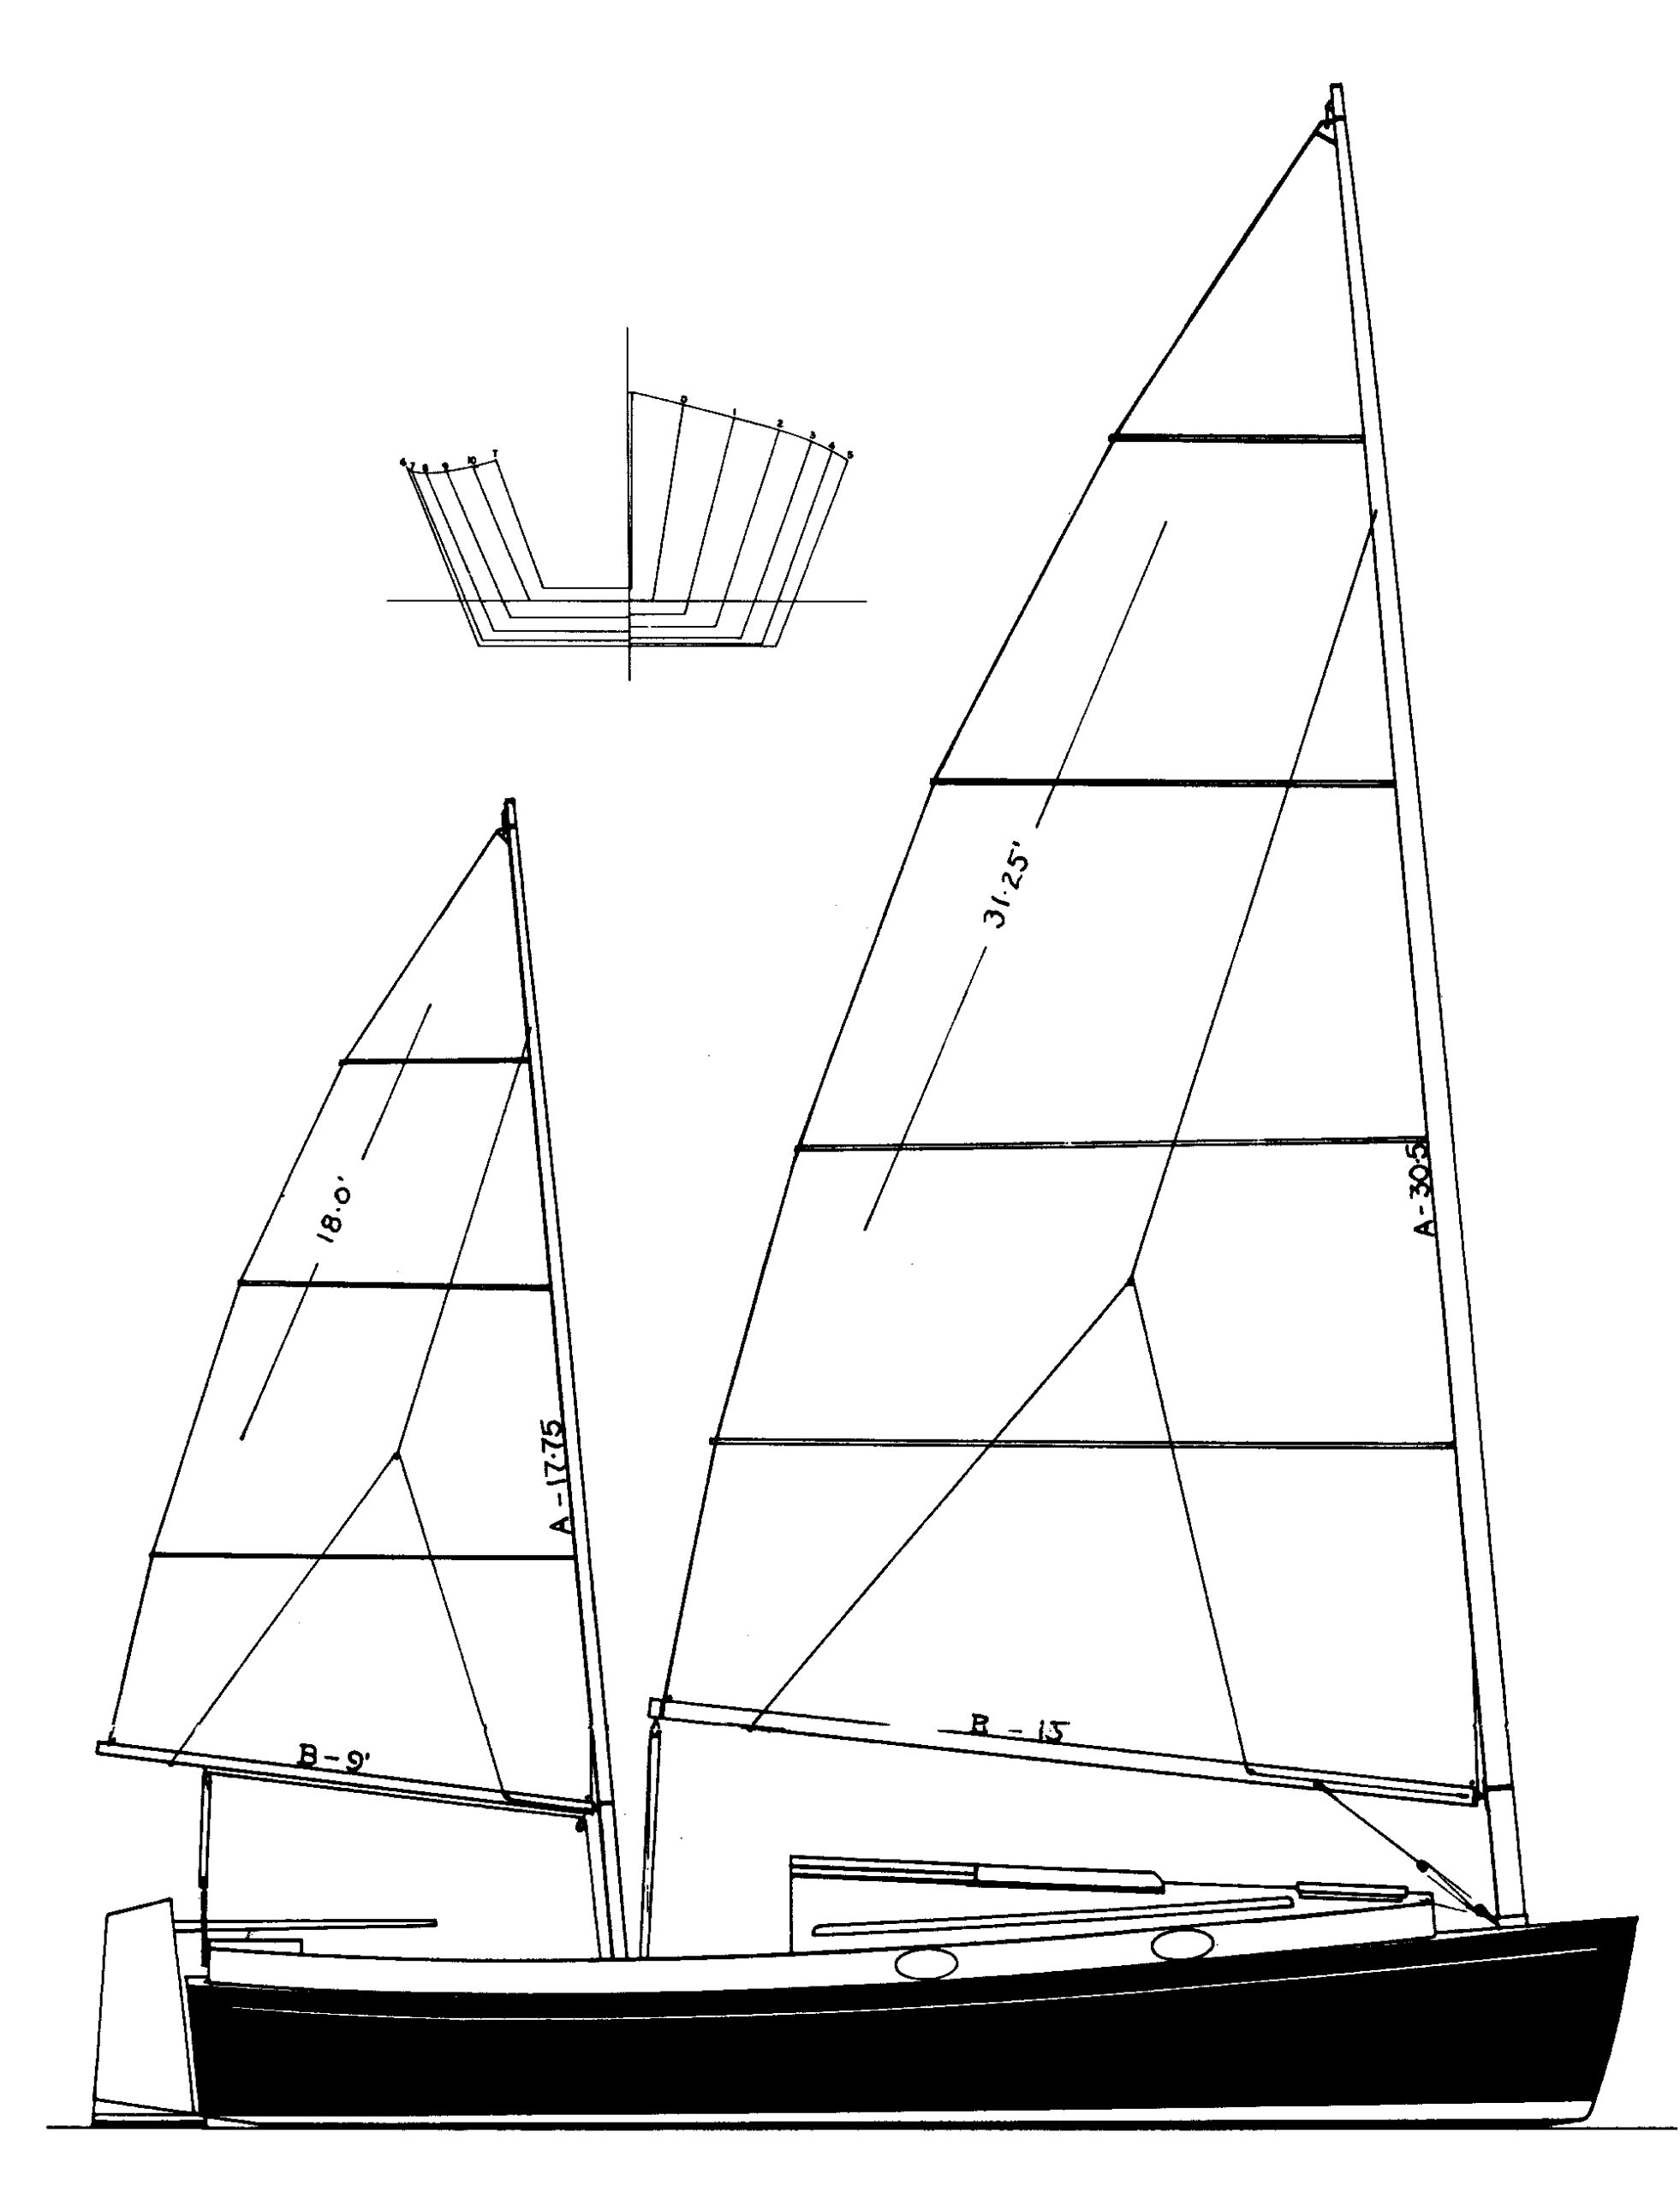
The Steve Killing–designed Endeavour 17, a kayak built of cedar strip planks and fiberglass, combines beauty, fast lines, load-carrying capacity, and relatively easy construction. Let’s have a look at each of these points—the last one, ease of construction, in some detail.
Photo by Darel Bridges
The Endeavour 17, a sea kayak built of cedar strip planking, fiberglass, and epoxy, is suitable for a wide range of paddlers. Sufficiently stable for a novice paddler, the boat also has performance characteristics to satisfy the more experienced. It’s a great kayak for skill development.
While the building of this boat has some challenging aspects, there’s nothing about it that should turn away a first-time boatbuilder possessing fundamental wood-working skills. Some processes — the bending and beveling of the stems, for example, or the trimming of the cockpit — might require the hand-holding of a good instructor, but we’re lucky in that regard: Ted Moores, one of the best builders of strip-planked small craft in North America, has written a book detailing the process of strip-kayak construction (KayakCraft, WoodenBoat Publications, 1999). The subject boat of that book is the Endeavour 17. (The book includes a gallery of designs, and all are of the Endeavour 17 family; the Endeavour is considered the patriarch.)
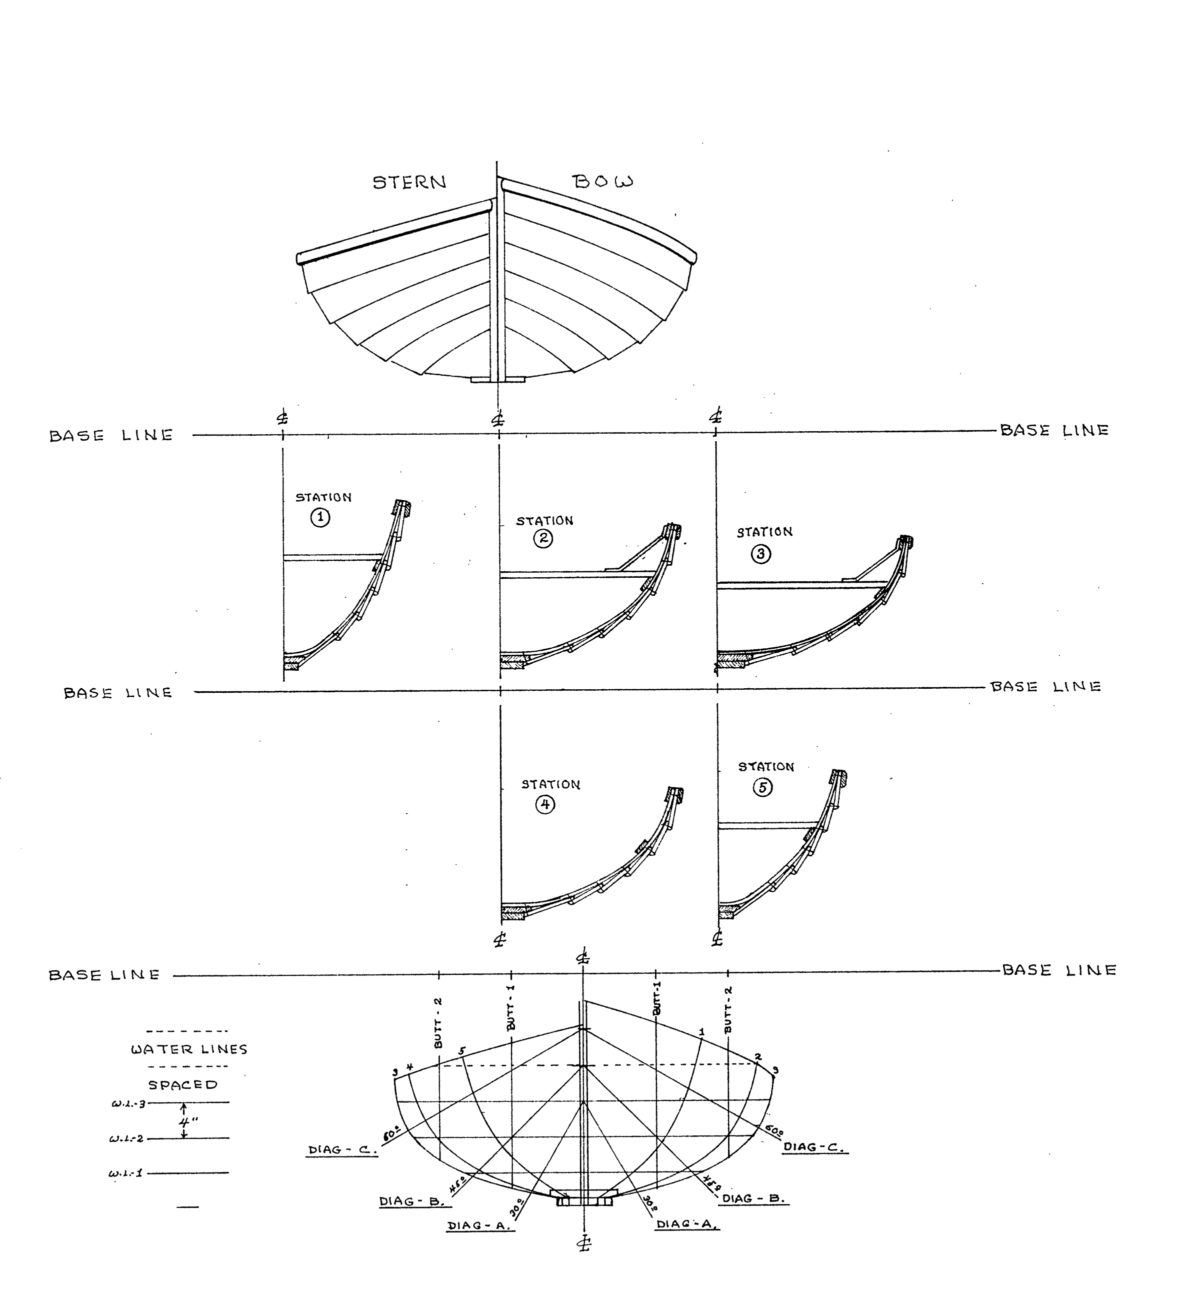
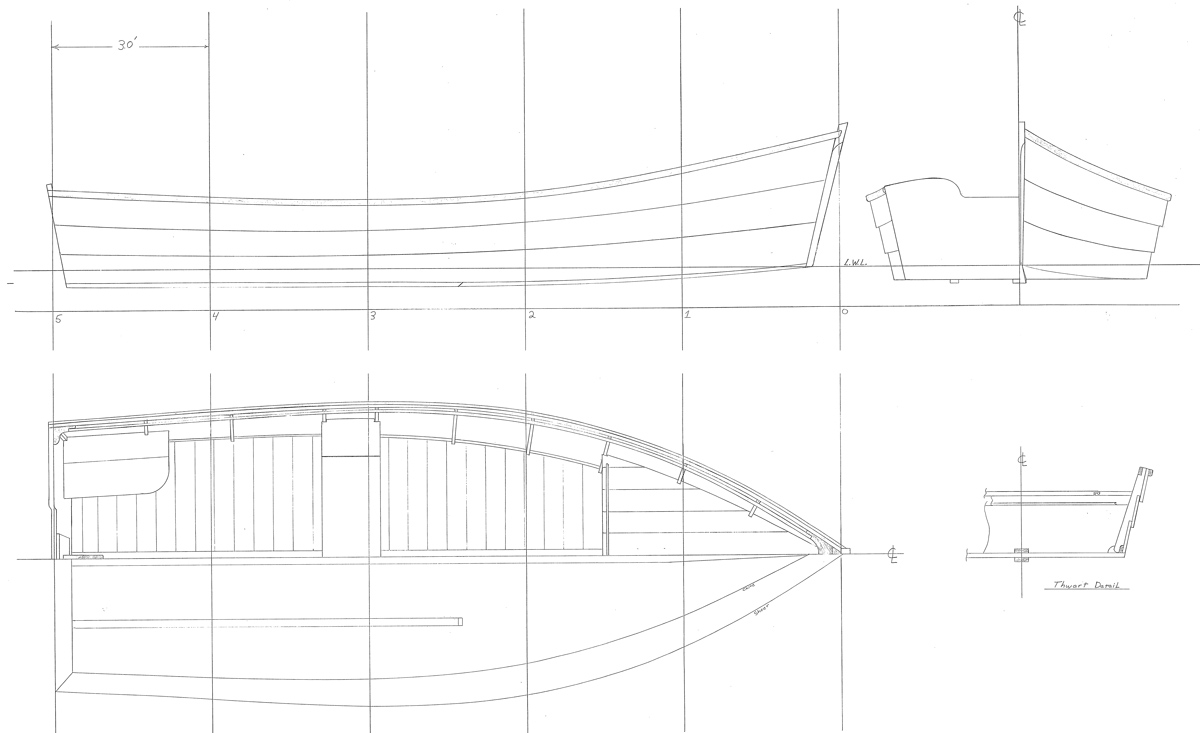
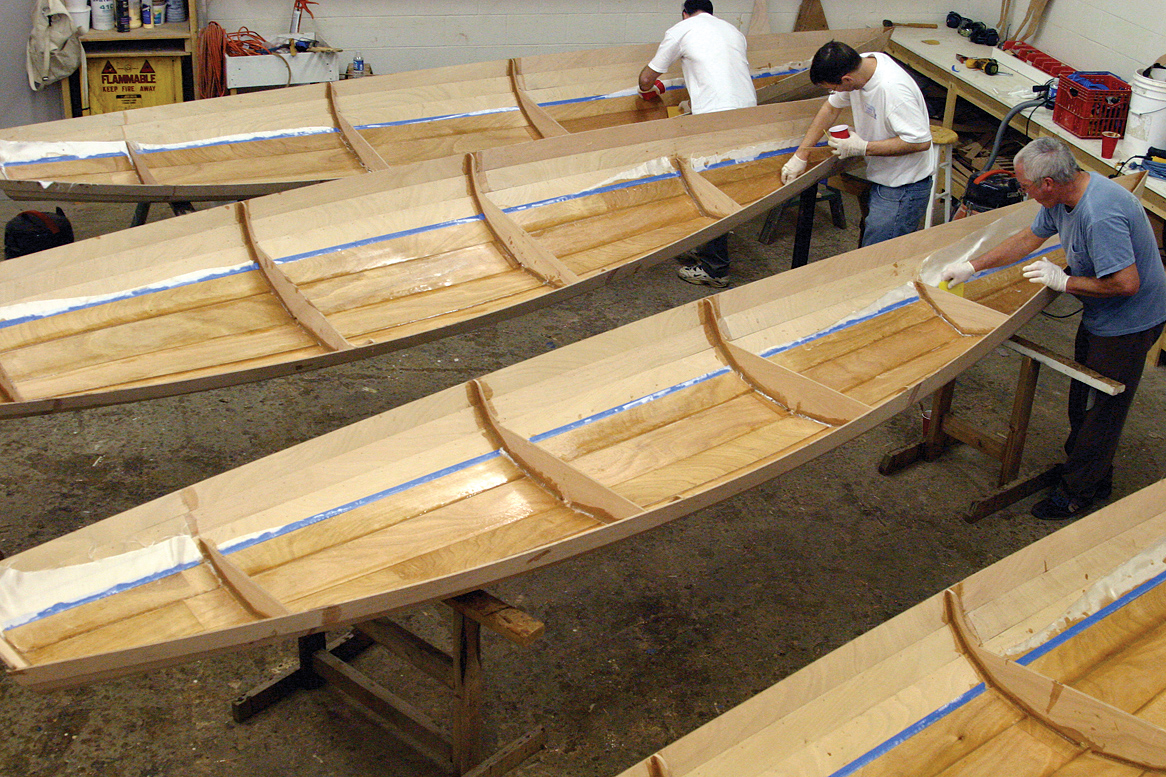
Construction, as with most (but not all) wooden boat building, begins with a series of molds that define the sectional shapes of the boat. These are set up at established intervals on a long, narrow table-like structure— a so-called “strongback.” The shapes of the molds can be determined by the laborious process of lofting—the drawing of the plans full-sized, from a set of numbers provided in Ted’s book. But we needn’t do that, for the plans include full-sized patterns. It’s best to use those, and to get on with the construction.
KayakCraft, by Ted Moores (WoodenBoat Publications, 1999), details the construction of a strip-planked sea kayak. The Endeavour 17 is the example used in the construction sequence, but several sister designs are also profiled in the book.
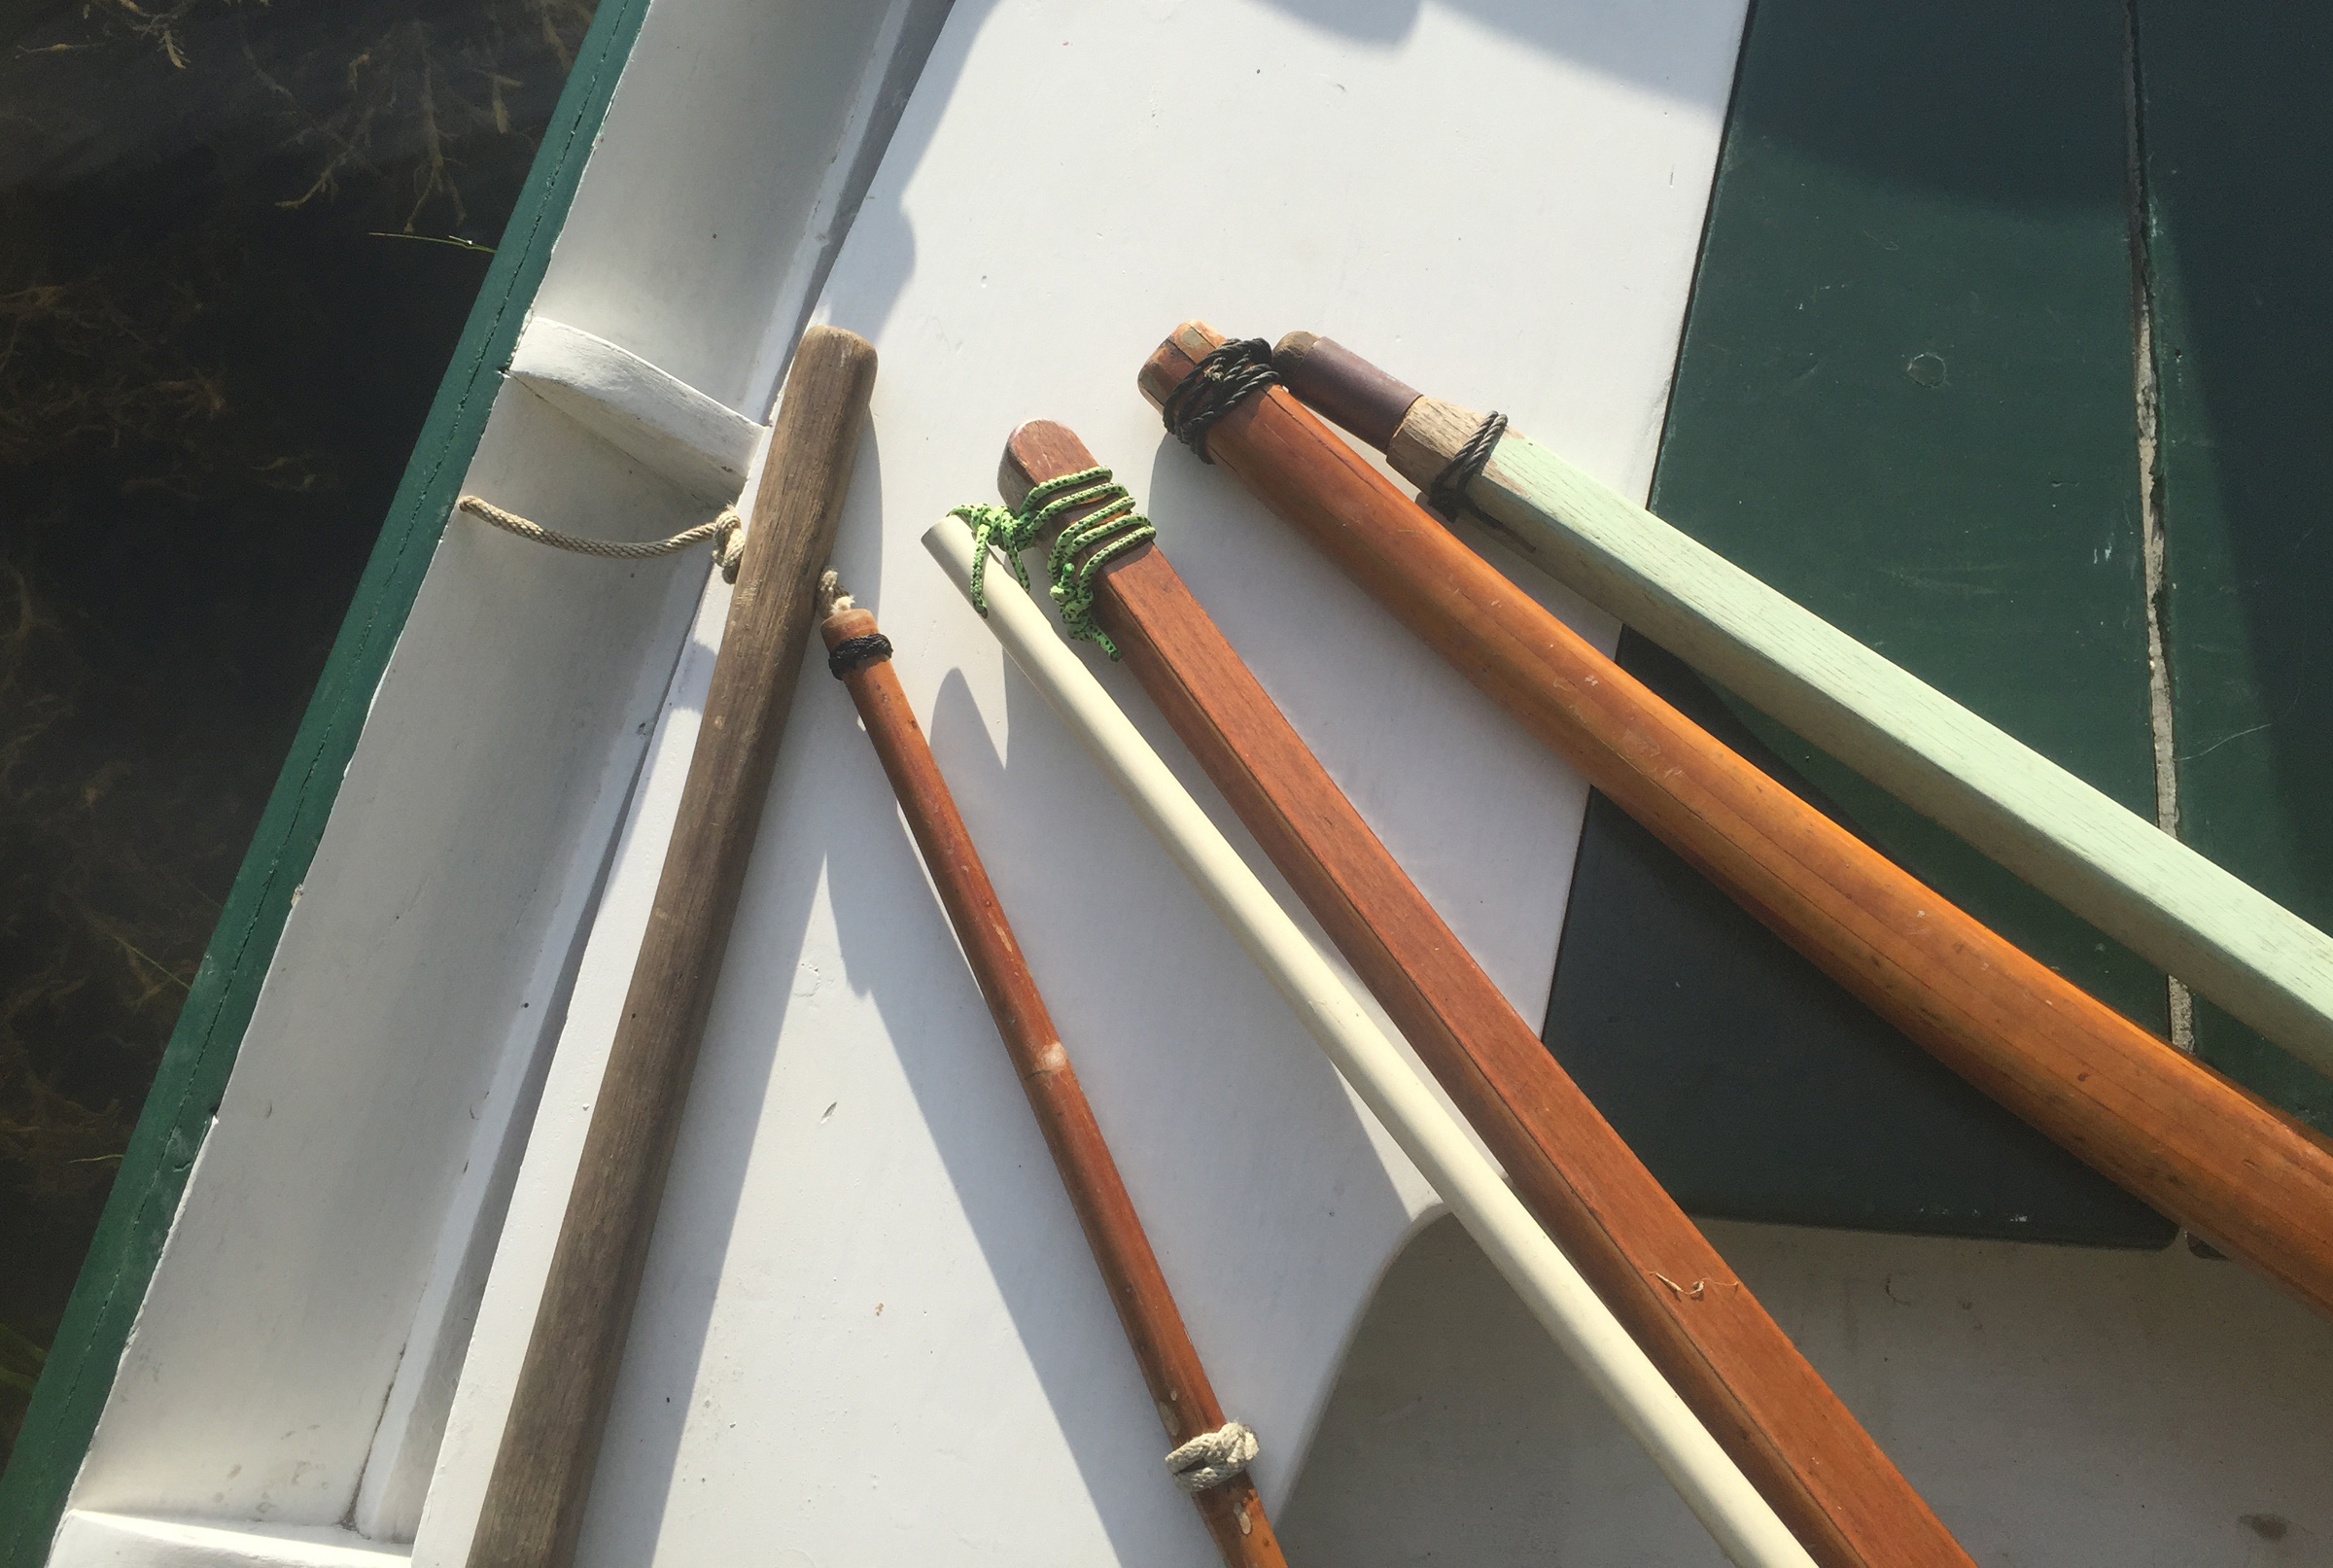
When it comes time to plank the boat, a first-time builder might find it best to purchase already-milled strips from one of several companies that specialize in producing these. Why? Because the milling of strips is a messy and mind-numbing job best left to shops equipped with power feeders, dust collection, and sharp power tools. Which isn’t to say that the home-based boatbuilder blessed with a good supply of rough-cut cedar should not do this. Rather, it’s to say that if he does, he should be prepared for a day or two of dust and noise and sweeping—not to mention a lot of pushing and feeding of stock through machines that require careful tuning.
One edge of each of the 1⁄ 4″ strips receives a concave profile (a “cove”), while the other receives a matching half round (a “bead.”) When these two profiles are put together, the result is a tight joint that can articulate around the sectional curve of the mold—sort of like a linear ball-and-socket joint. This eliminates the time-eating process of beveling the edges of the strips for a tight fit—something nobody in their right mind would do when building a boat like this. (Anymore. For that’s the way it was done in the early days of strip-planked canoes.)
The stems (the curved structural ends of the boat) are built from steam-bent laminates of ash or cherry. Steambending is often a daunting process to a first-timer, but it shouldn’t be. It’s fun. It’s easy. And with these small pieces, it can be accomplished with a stovetop teakettle and a rudimentary box. Ted Moores’s book will show you how.
The planked hull requires lots of sanding. Ted Moores has reduced this process to a series of steps which, if followed to the letter, will yield a flawless surface ready for fiberglass. A layer of ’glass on the inside and a layer on the outside completes the hull, though there’s still some filling and sanding to be done before varnish is applied.
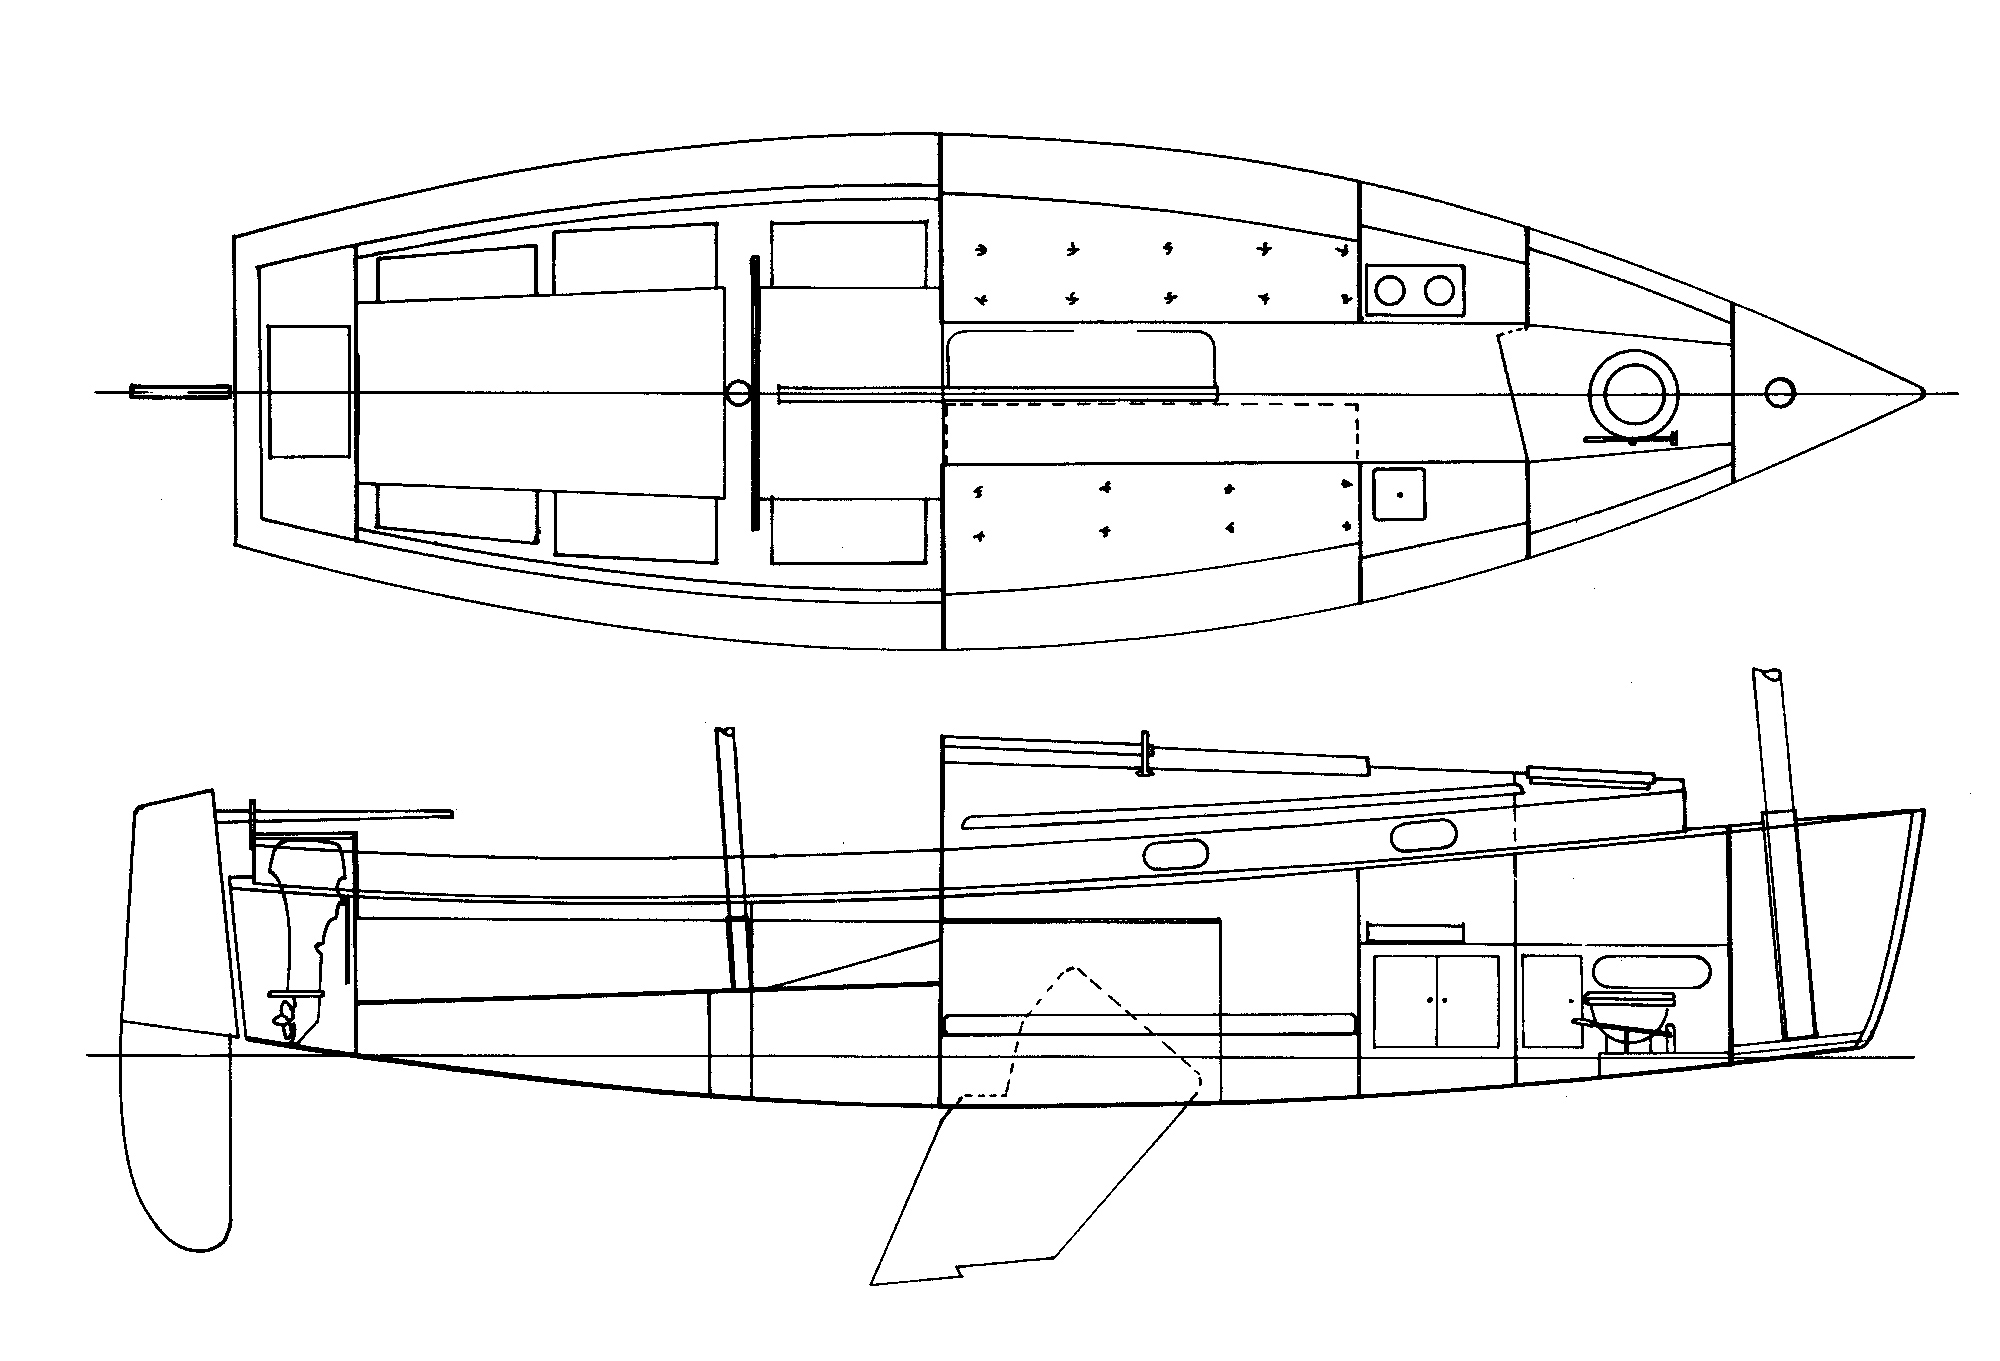
The deck is built on a separate set of molds, in the same manner as the hull. When complete, this structure fits like the lid of a cookie jar onto the hull, and is glued in place, stiffening the whole considerably. Imagine a shoebox—a shoebox lacking a lid. Grab it in both hands and twist those ends in opposite directions. It’s flexible, isn’t it? Now put the lid on it. No more twist. The same mechanics apply to the Endeavour 17.
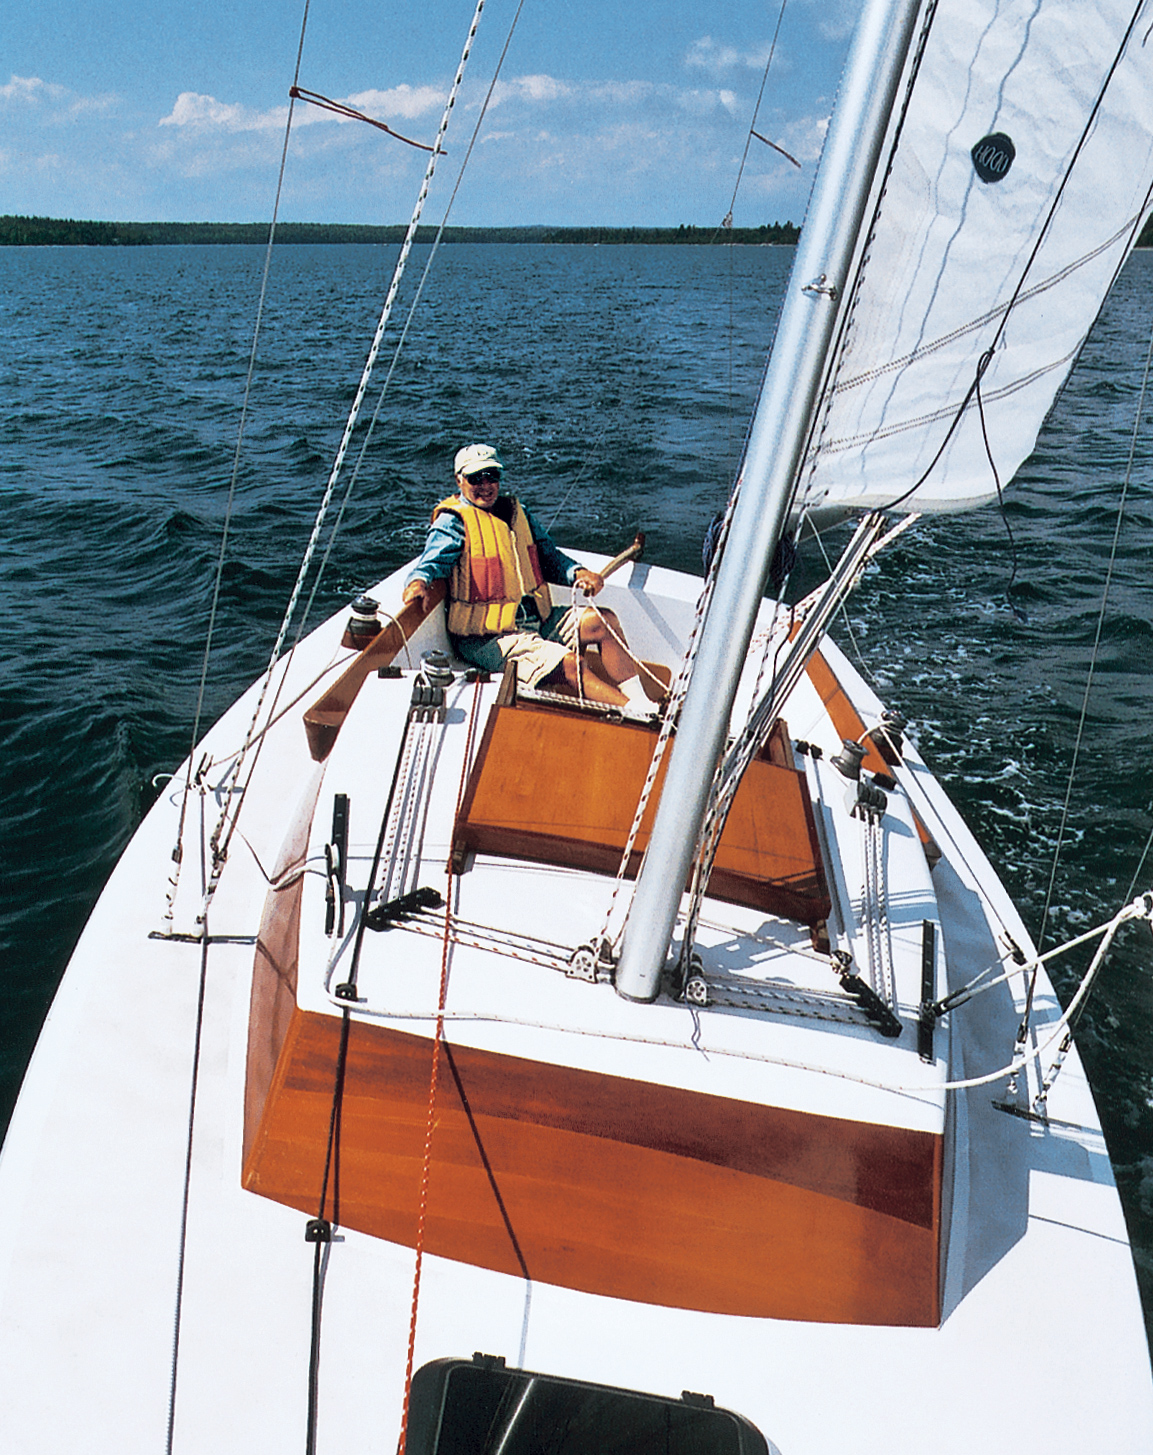
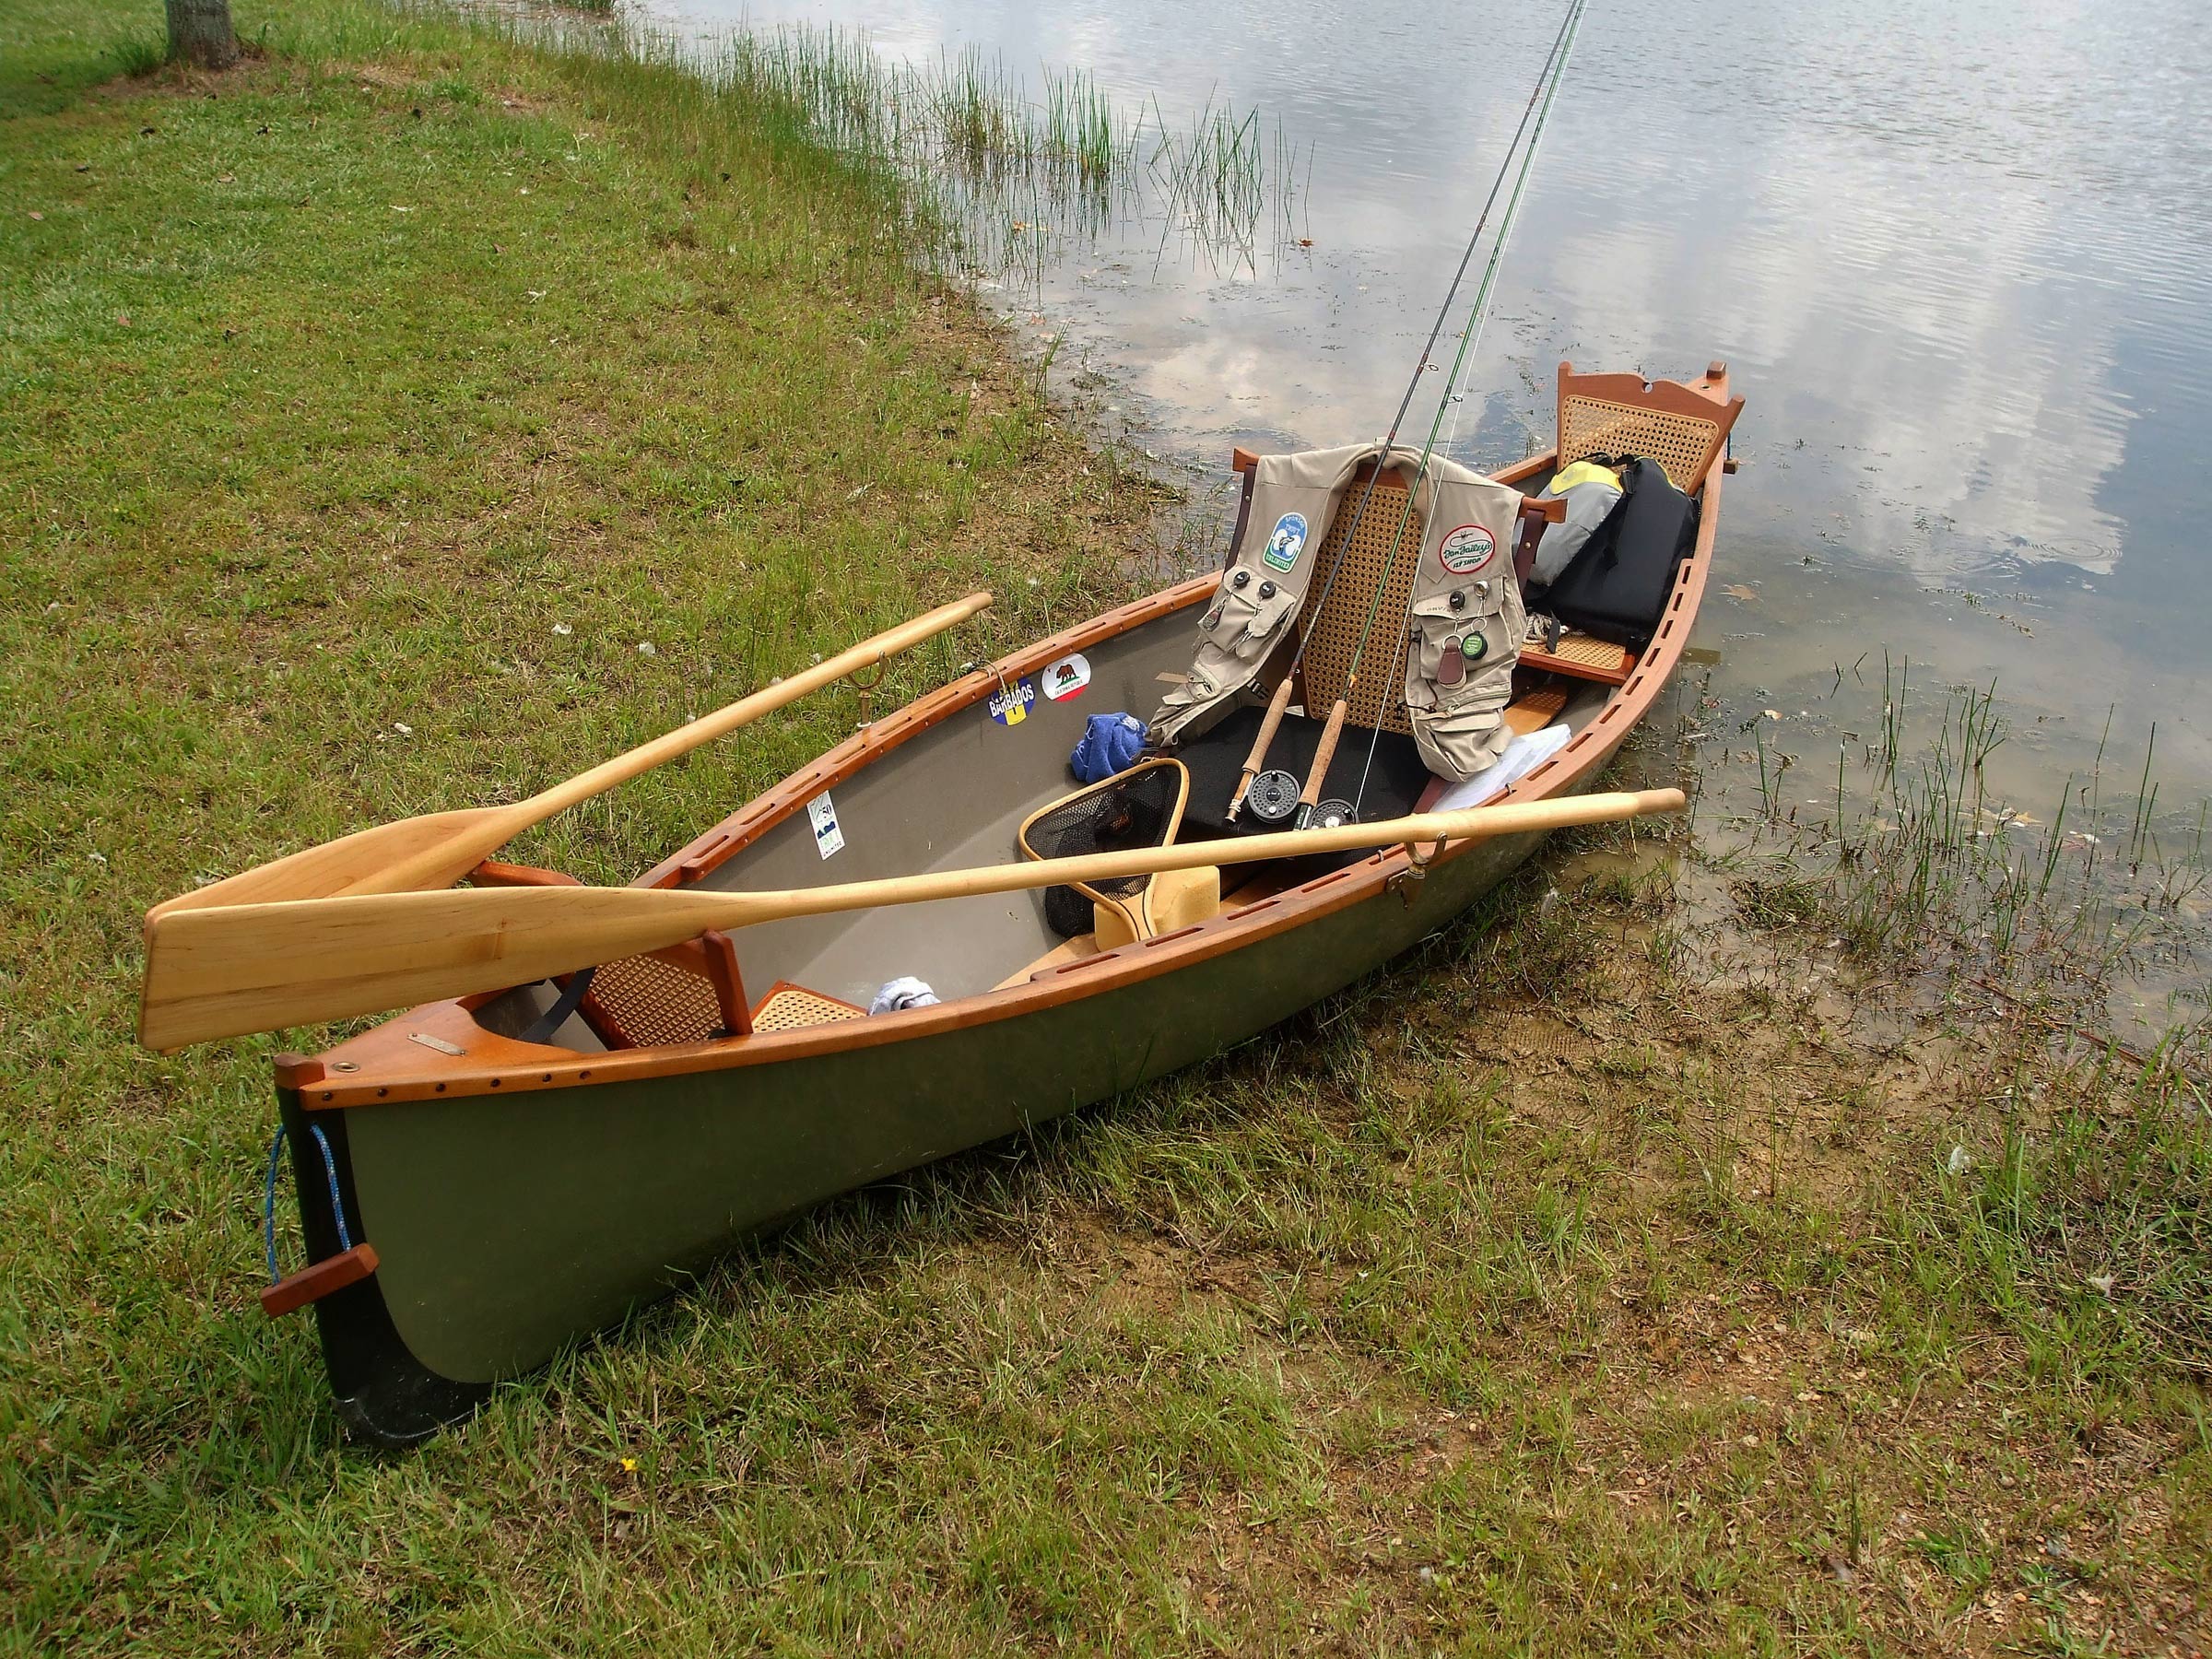
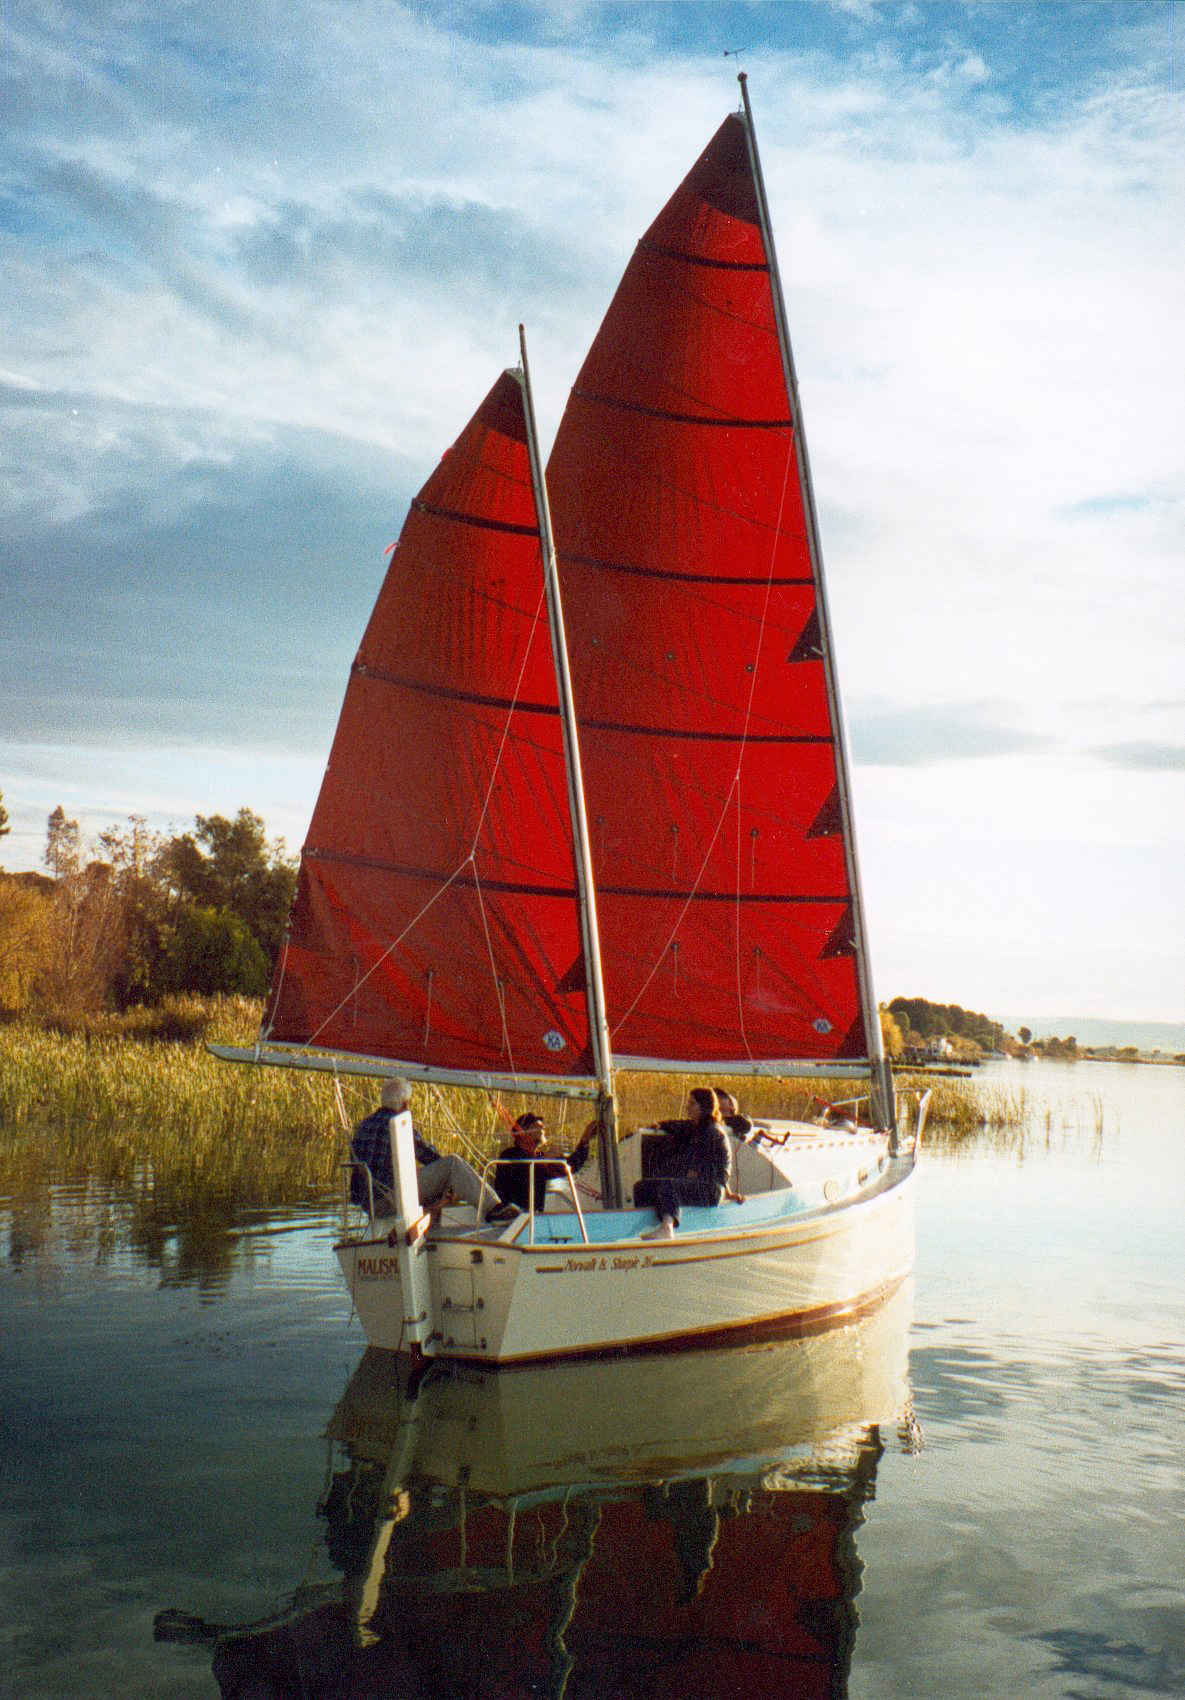
You can get fussy, or you can stay basic with the fitout of this boat. The choice depends both on your skill as a woodworker and on your intended use of the boat. If you’re a day paddler, you might not want to cut holes in the deck. If you’re going on an expedition, a couple of hatches, one forward and one aft, are in order. The average build time of an Endeavour 17 is about 150 hours. This varies, of course, depending on the builder’s skill and the boat’s level of detail.
Photo by Darel Bridges
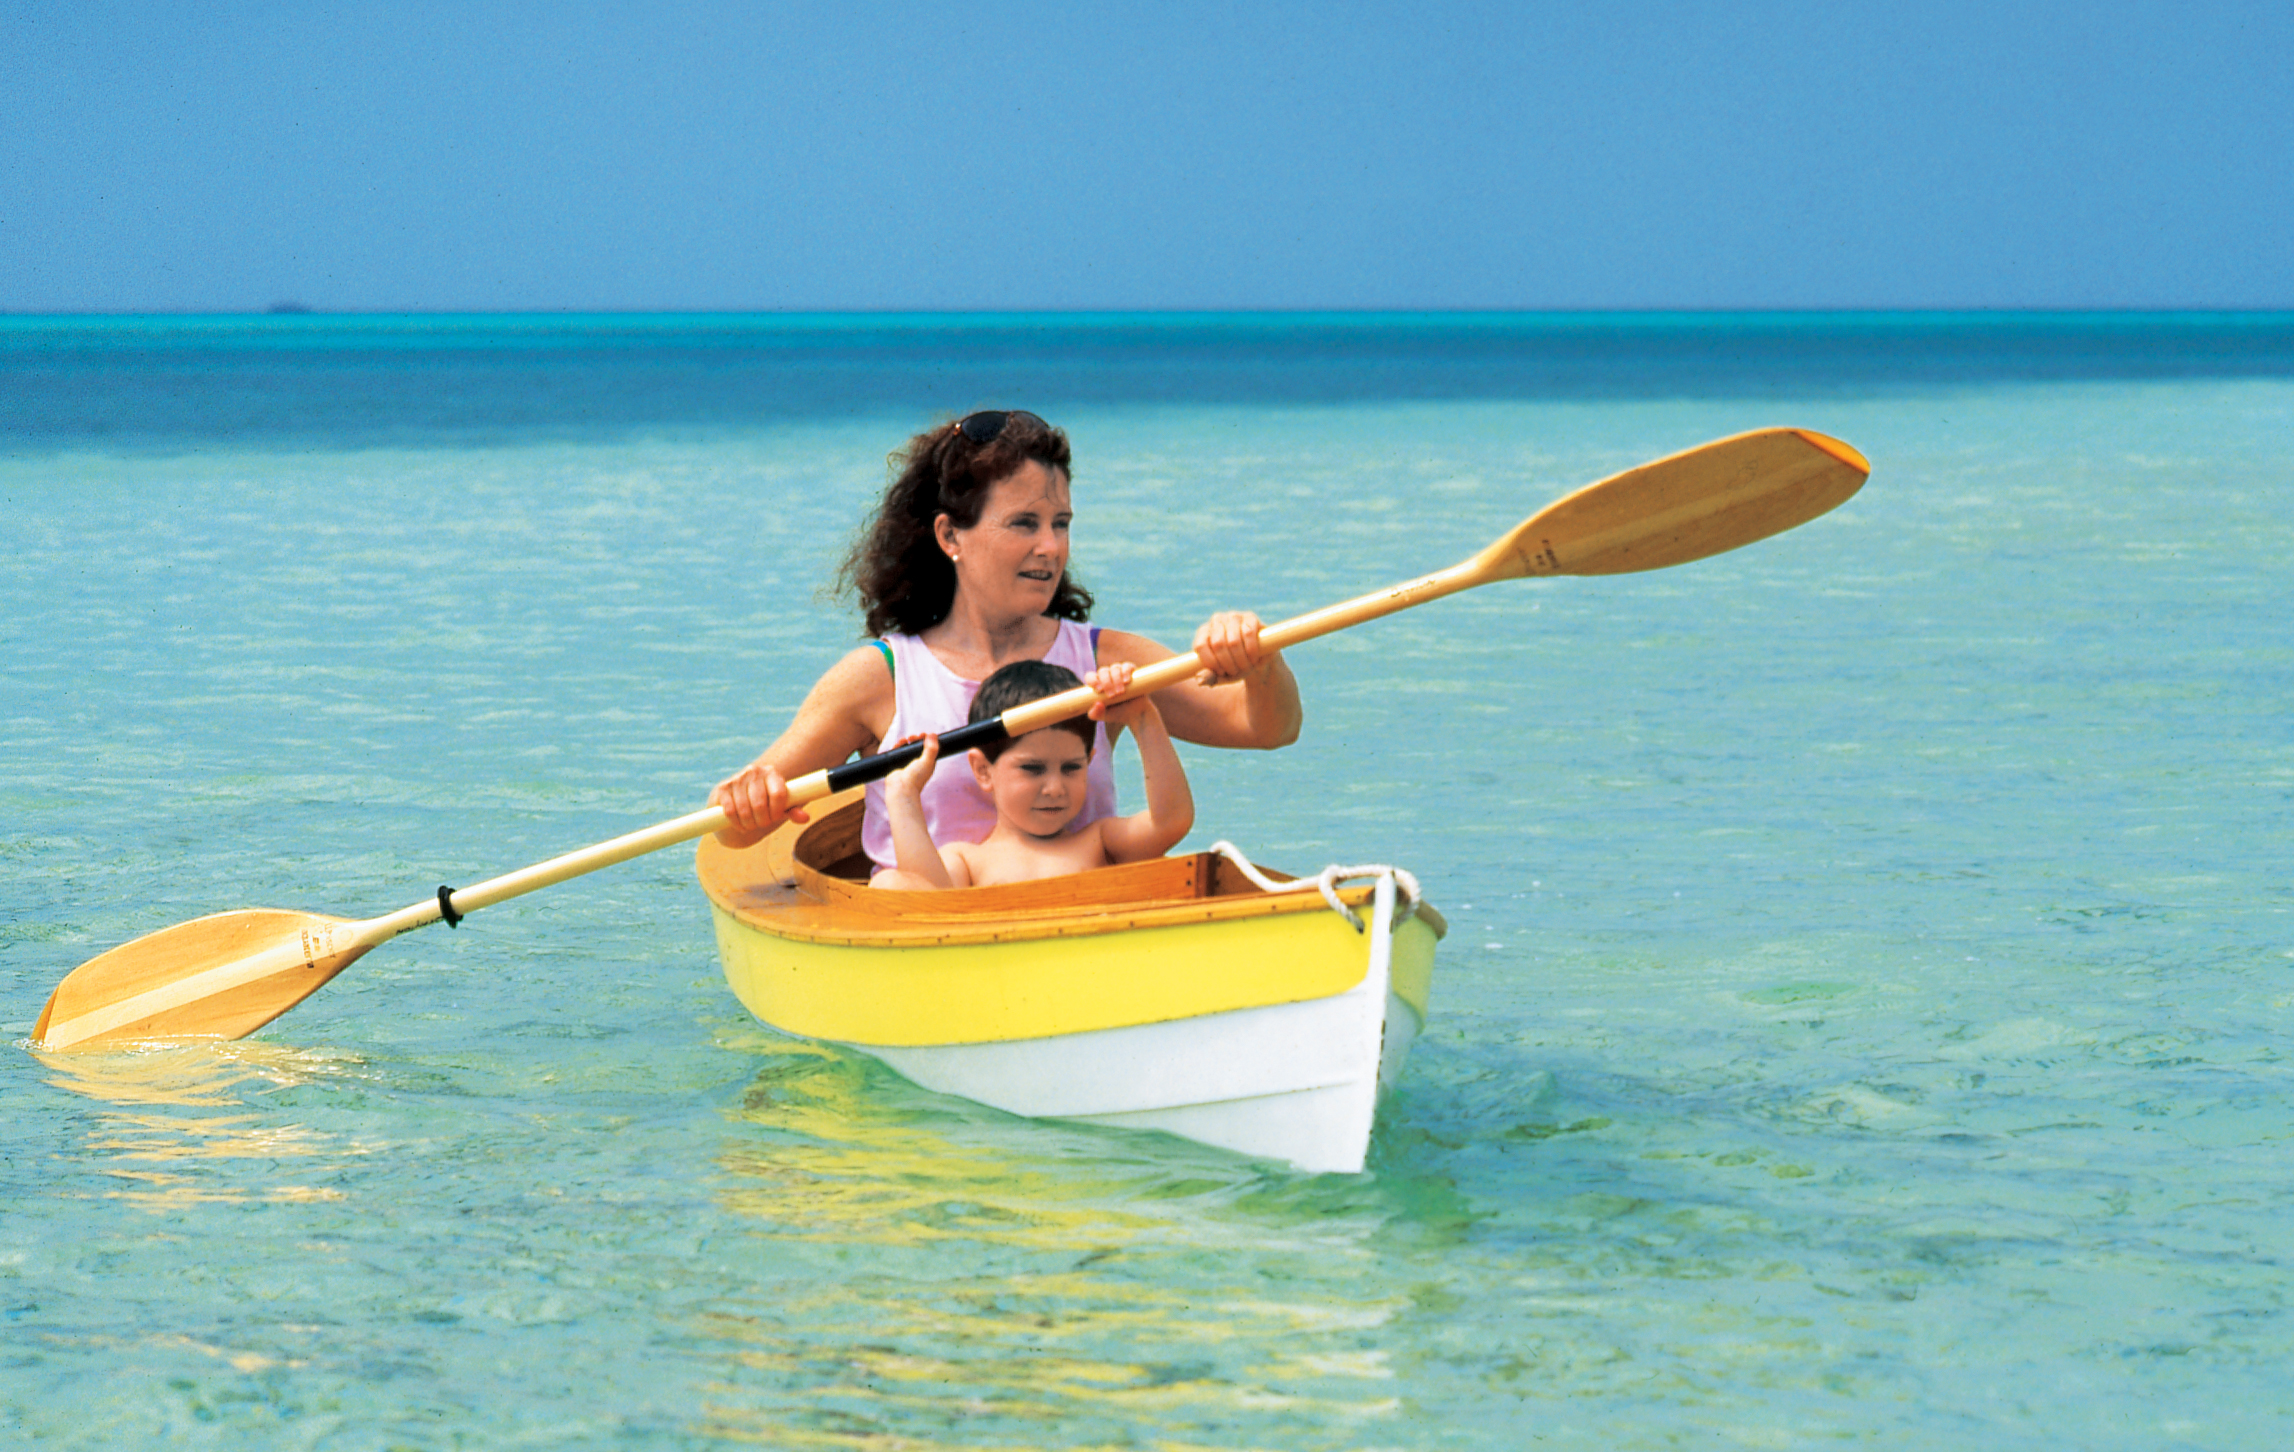
The Endeavour can be configured for serious camping, with hatches in the forward and after decks.
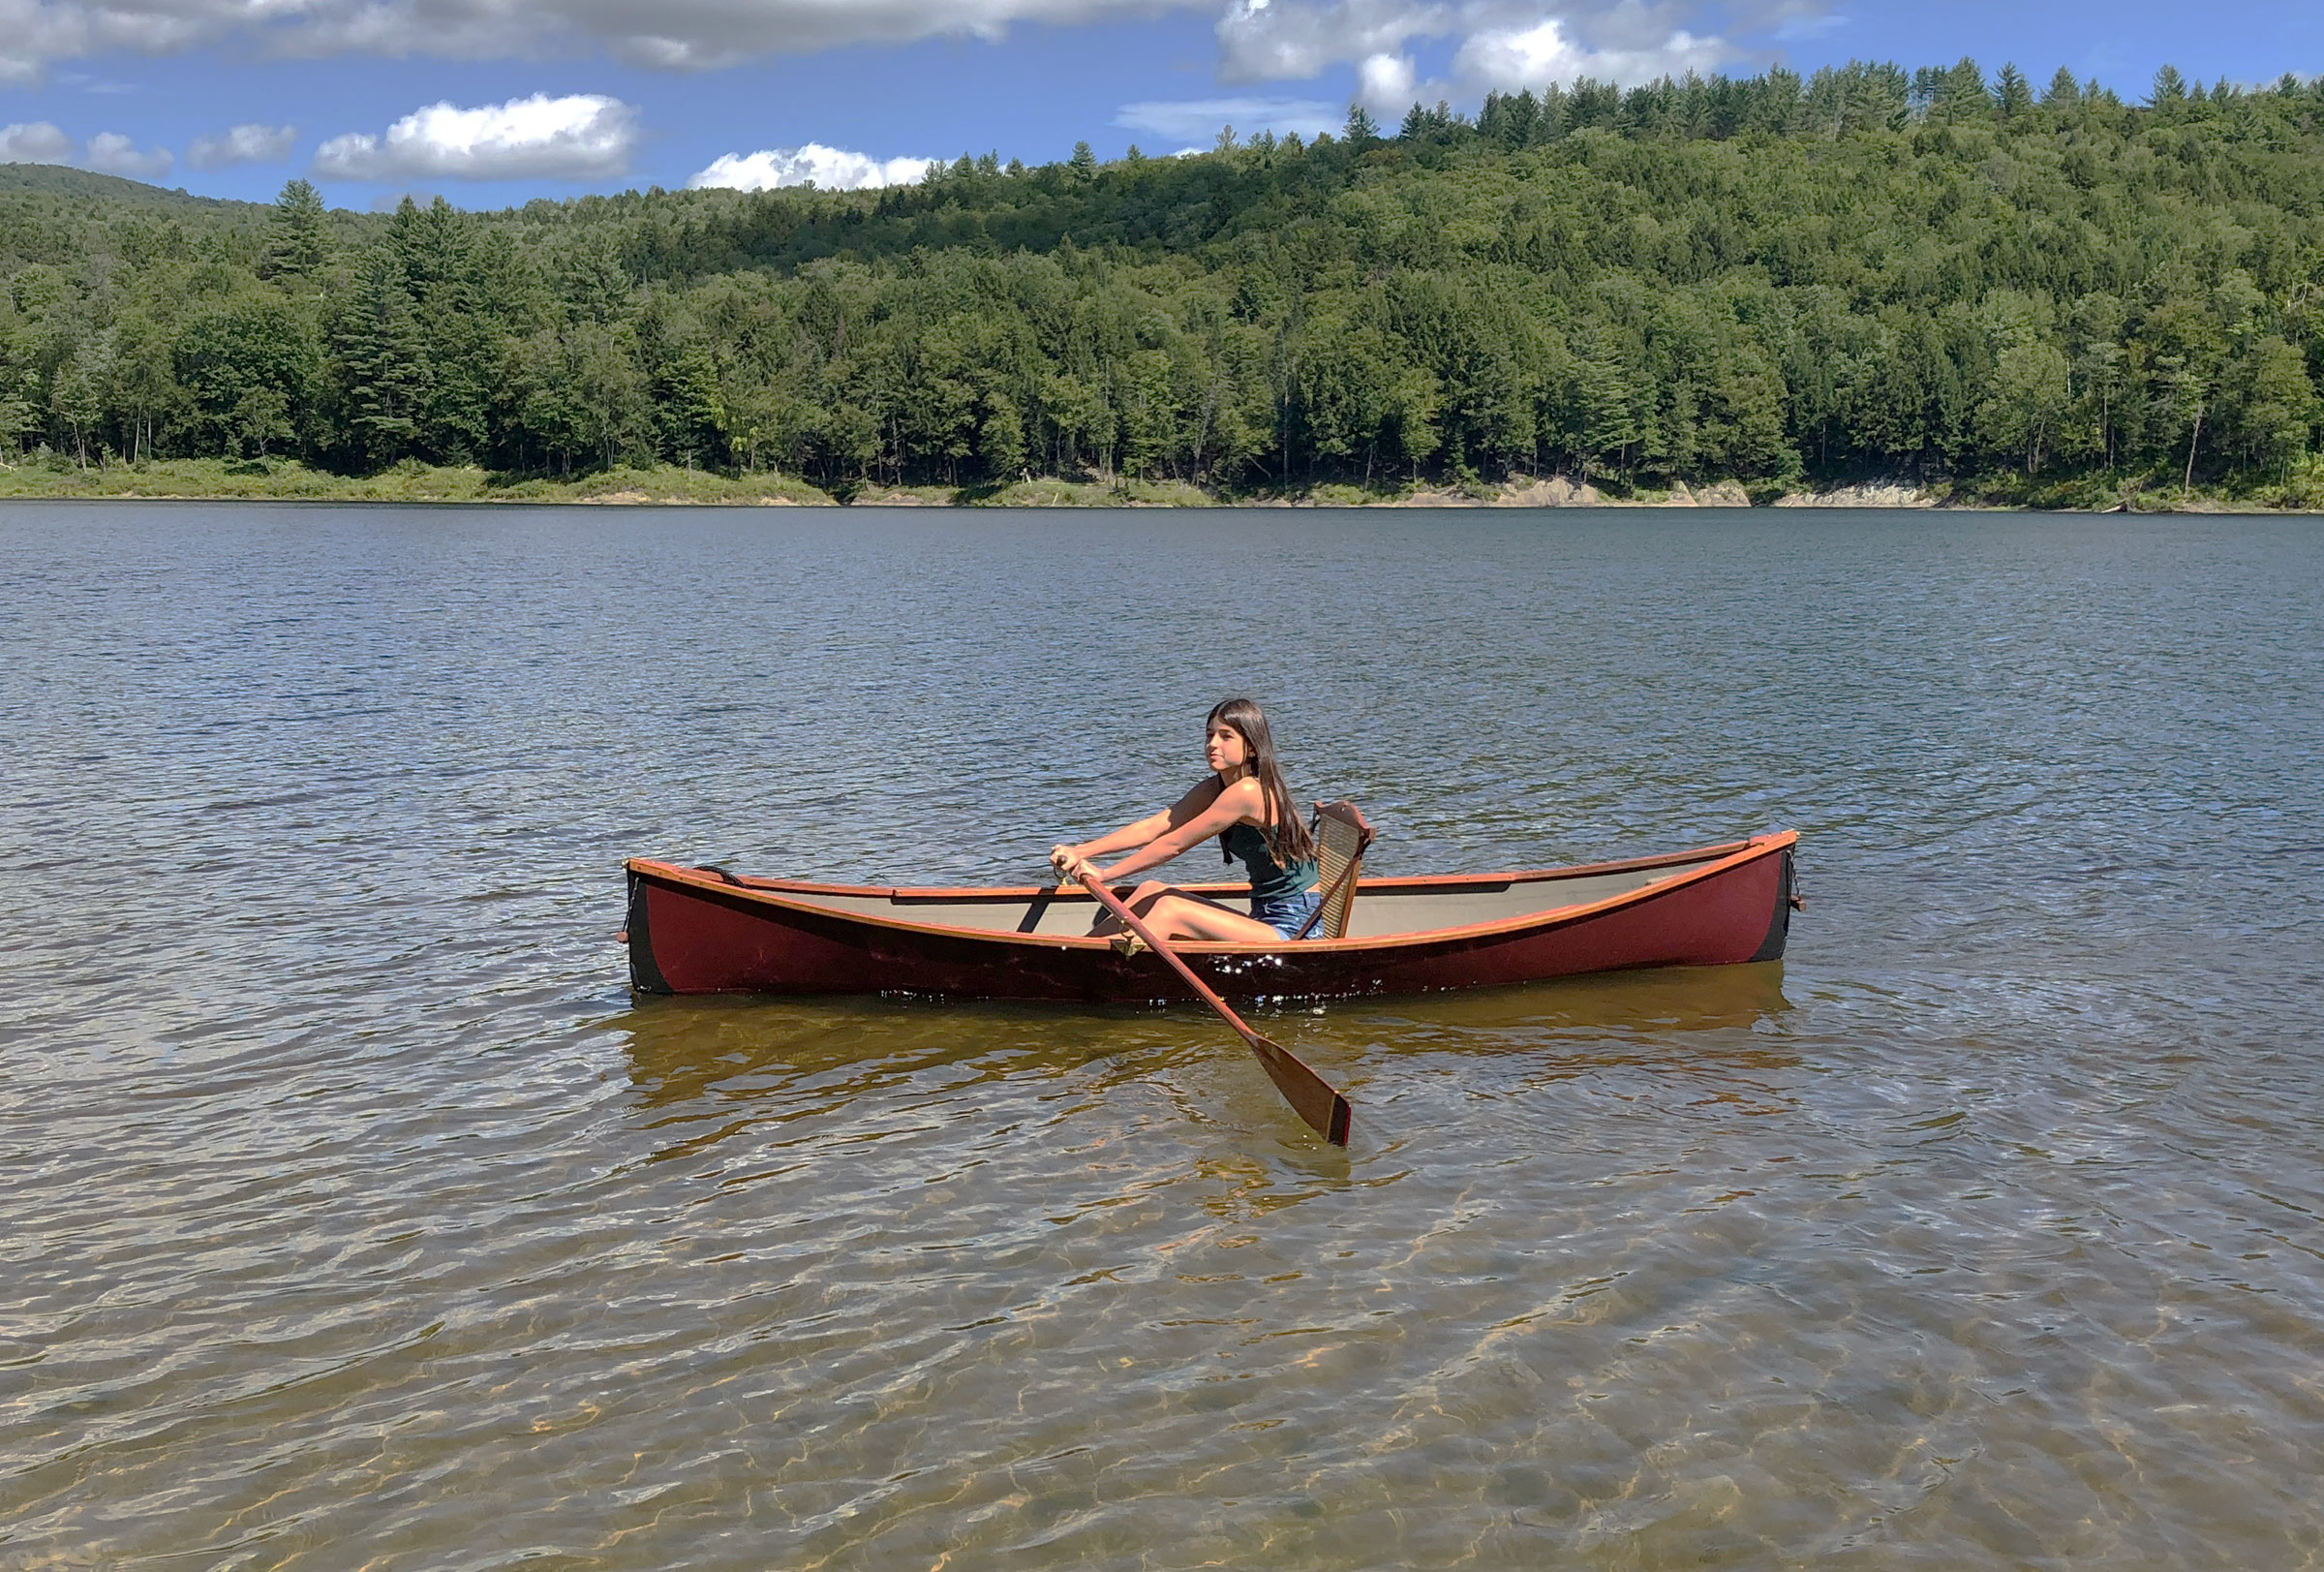
The Endeavour is a good weekend expedition boat. Its payload range (paddler and gear) is 130 to 250 lbs, and its fine lines and stiff hull combine to make it a moderately fast boat. But is it durable? Yes, it is. Can you haul it up a sand beach and over rocks? No. Or, at least, you shouldn’t. There’s no doubt that one of the ubiquitous brightly-colored rotomolded plastic boats will serve a hardcore boat-dragger better than an Endeavour 17. But a kayak dolly, a strong back (not a strongback) or an extra set of hands will help to avoid such finish-marring behavior.
Is this boat heavy? Again, no. It weighs the same as an off-the-shelf fiberglass boat—perhaps just a little more. But for the title of this magazine, one might be tempted to describe the construction of an Endeavour as fiberglass with a cedar core. Cedar is a light wood. It is stiff and fatigue resistant, meaning you can bend it without weakening it. That’s not true of fiberglass alone, without a core. Bend that stuff a few times, and you’ve permanently weakened it. That’s the real beauty (besides the obvious eye-catching Beauty) of building a fiberglass-sheathed strip-planked boat. They’re durable. Wicked durable, the beach-dragging caveats above excepted. They’re stiff. And they’re a joy to look at.
The Endeavour 17 is among the best designs for strip-planked kayaks. If you’re an inexperienced paddler, it’s a boat to grow with: You won’t get bored with its performance as your skills develop. Ted Moores describes it as “mid-road between rock-solid platform for the beginner and a slim performance kayak.” He rightly says that “this hull suits just about everyone.”
The choice of kayak is quite personal: it depends on both the size and weight of the paddler, and the intended use of the boat. The Endeavour 17 fits a wide range of payloads and uses, but one of its sister designs, built using the same techniques as those employed in the Endeavour, may be better for some paddlers. Full-sized patterns for the construction molds are included in each plans package.
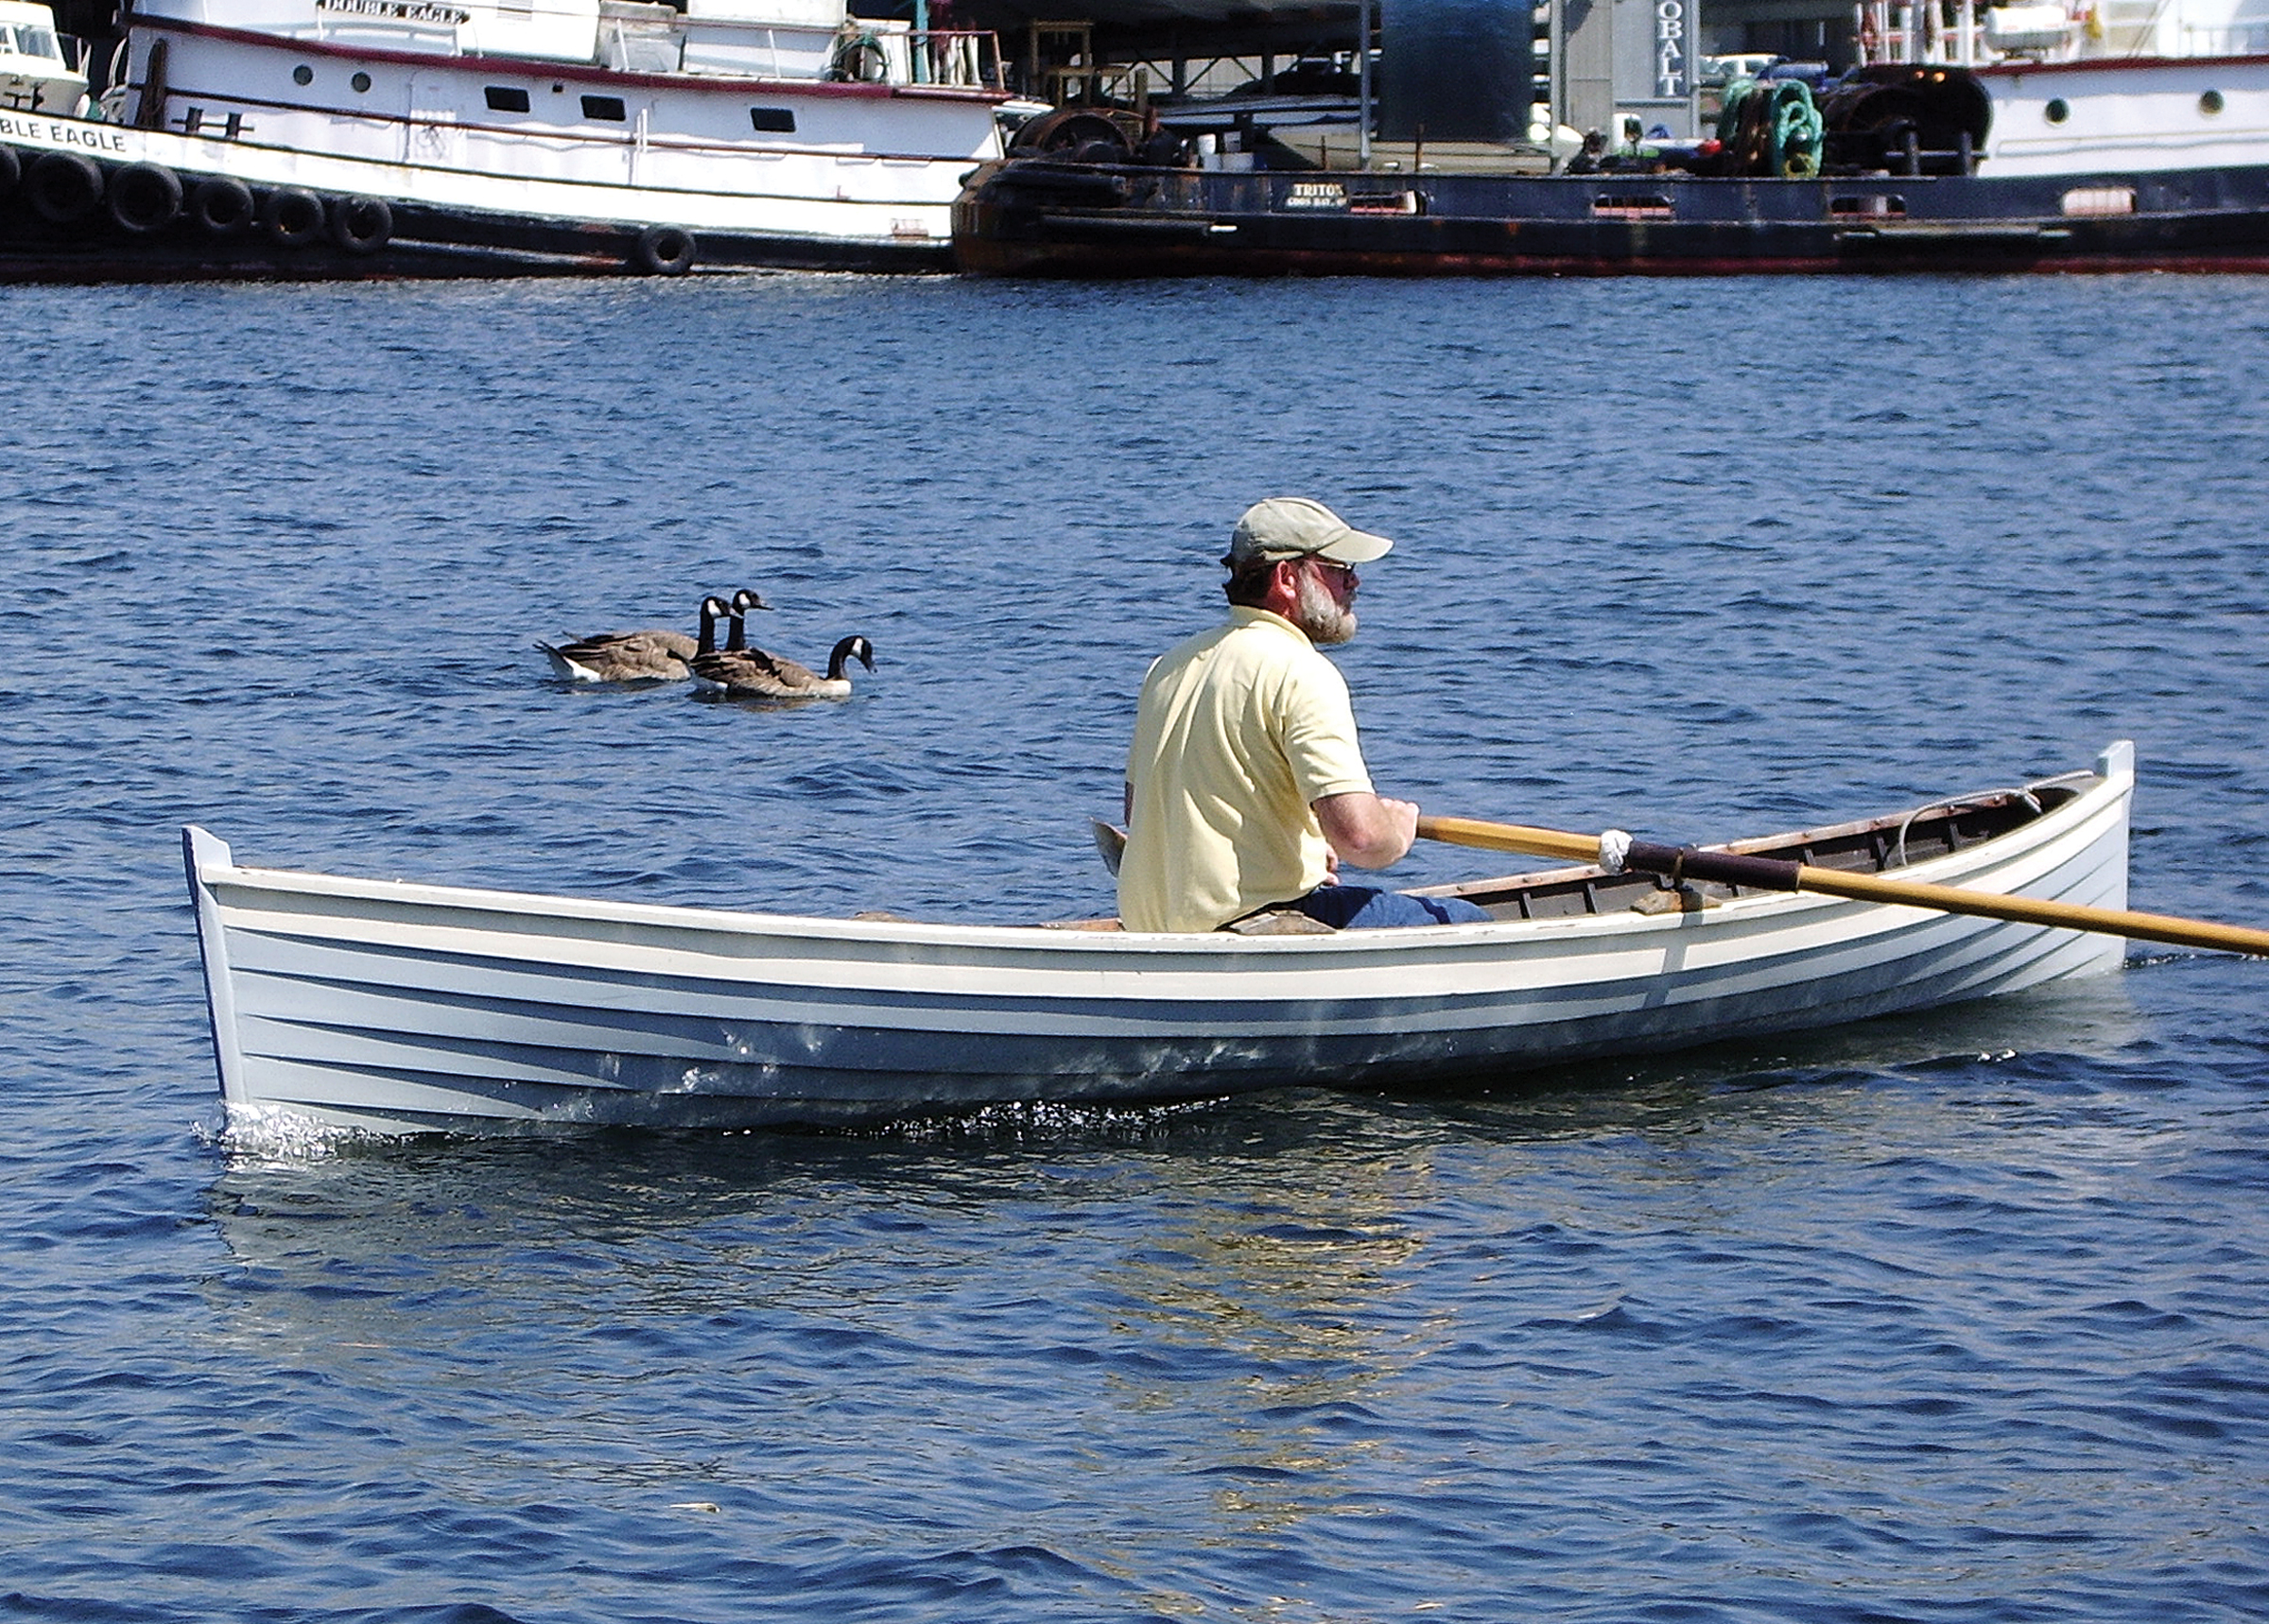
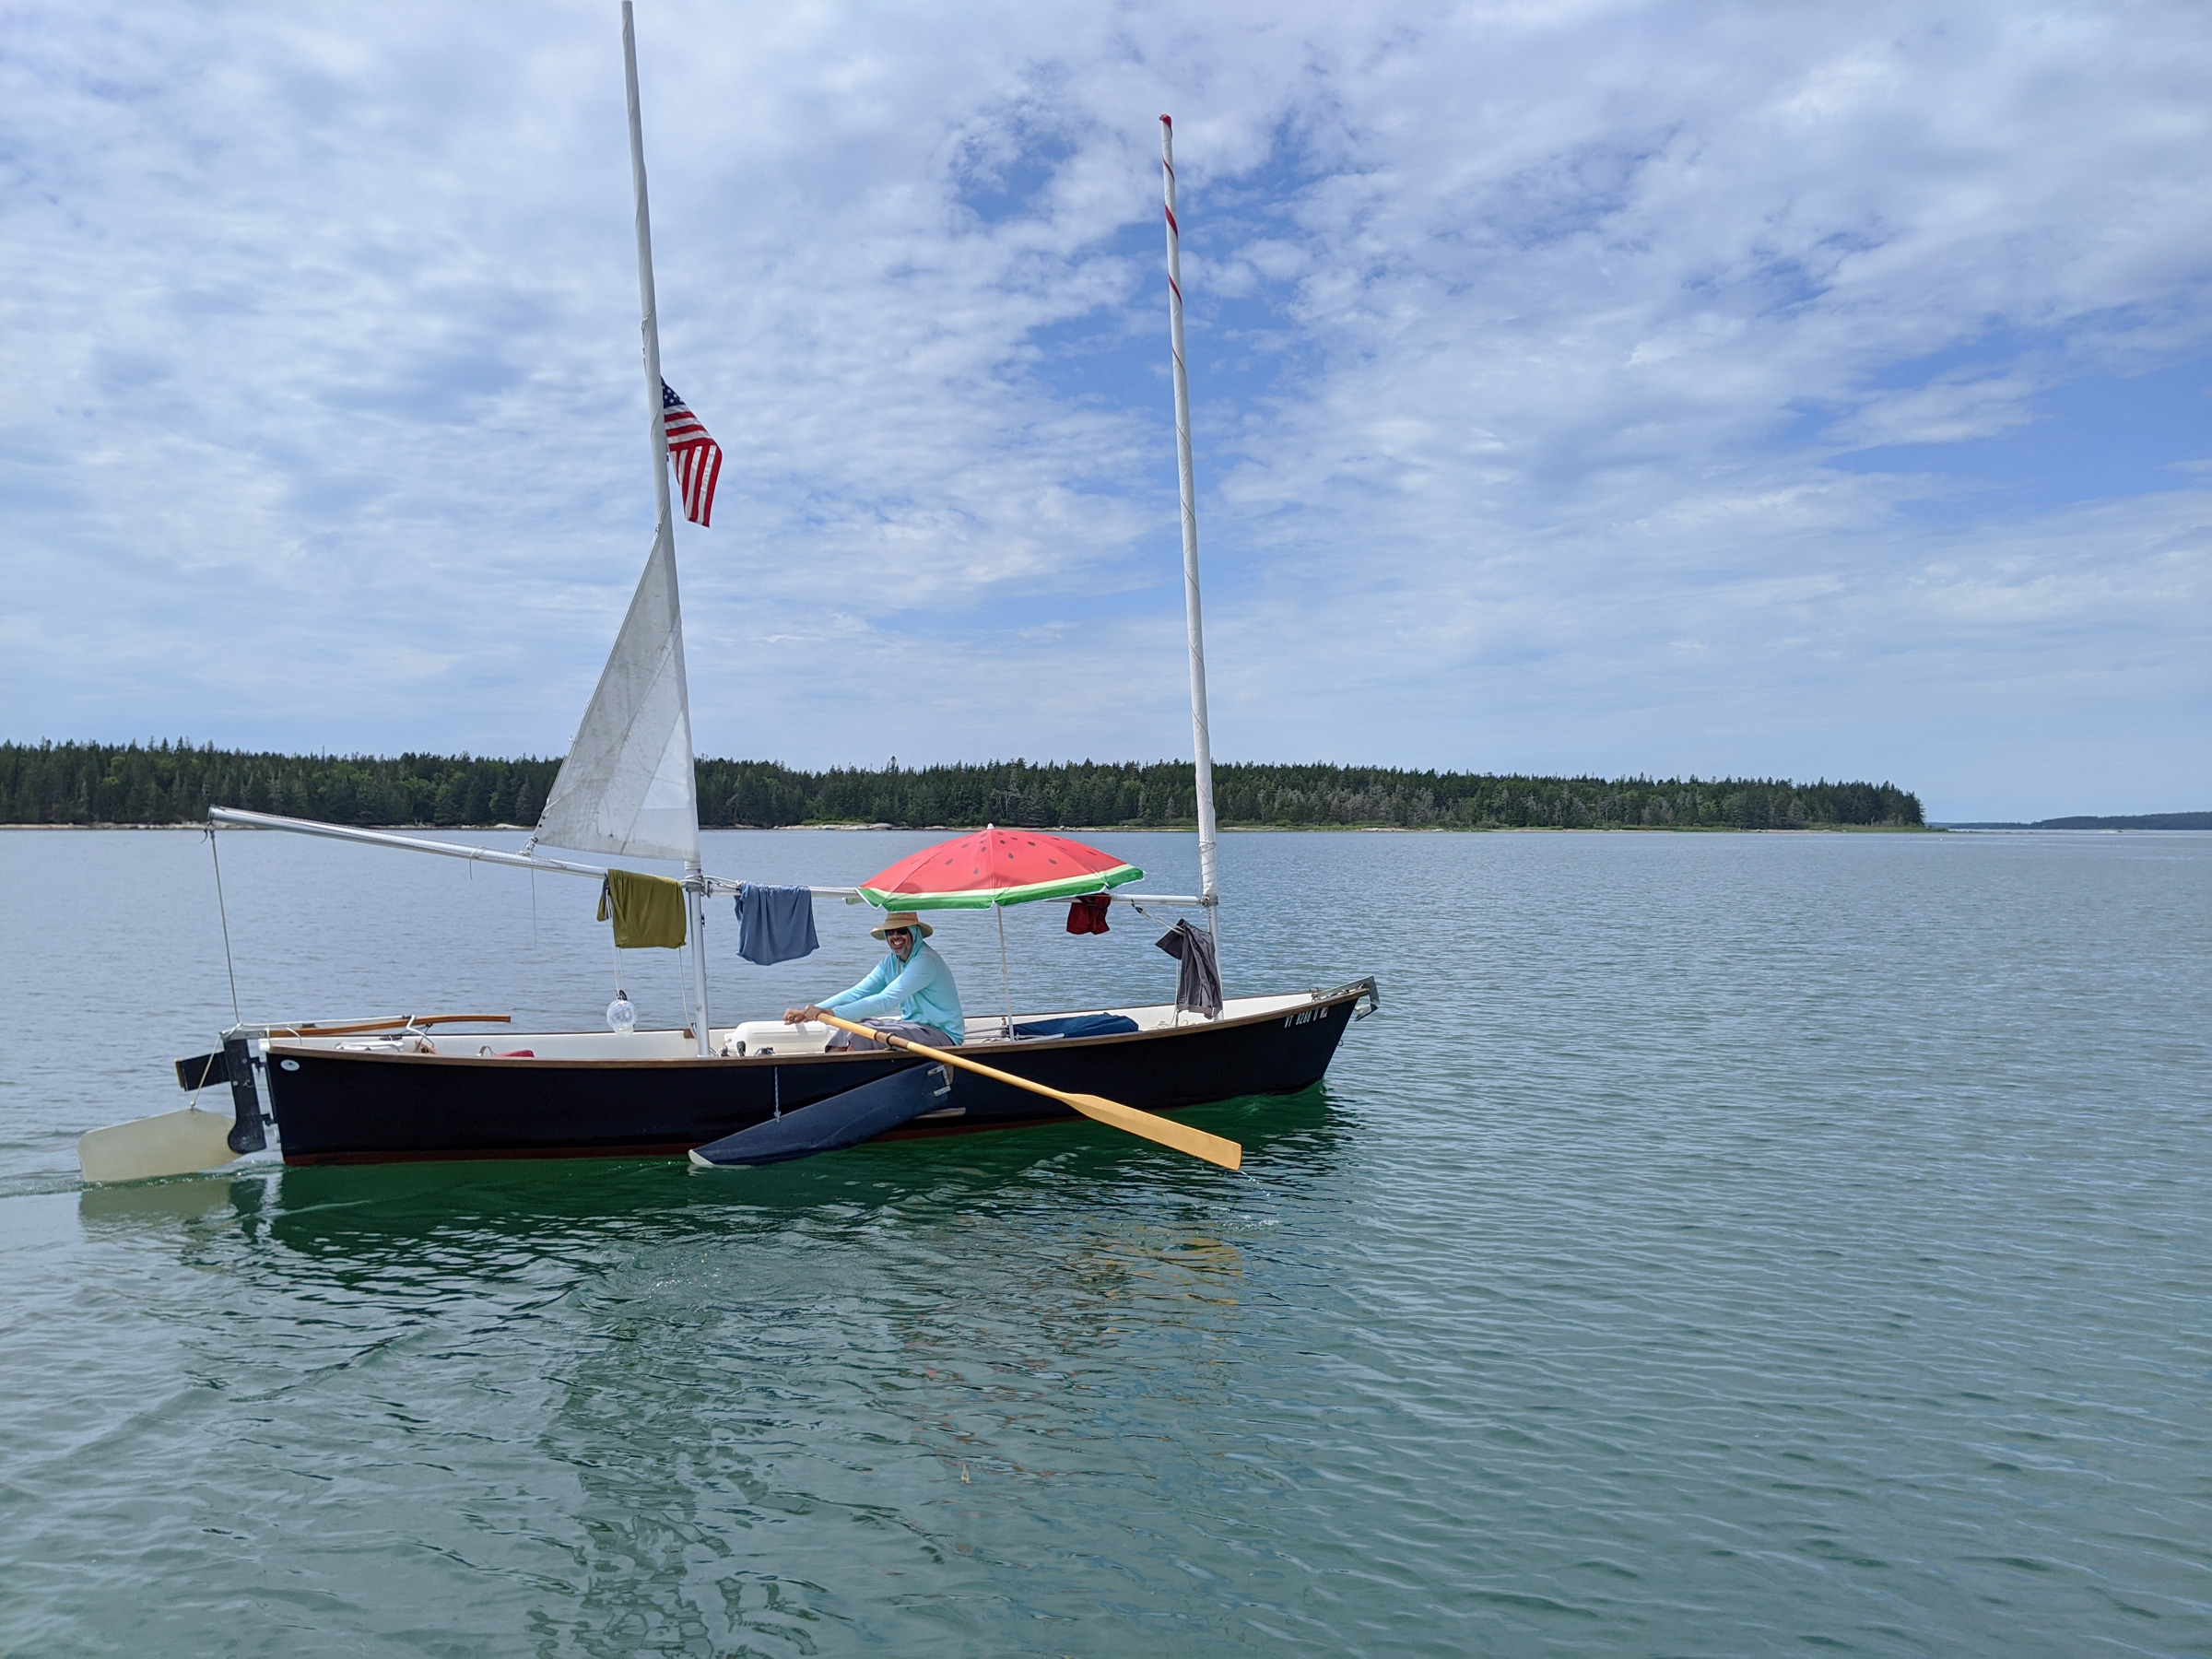
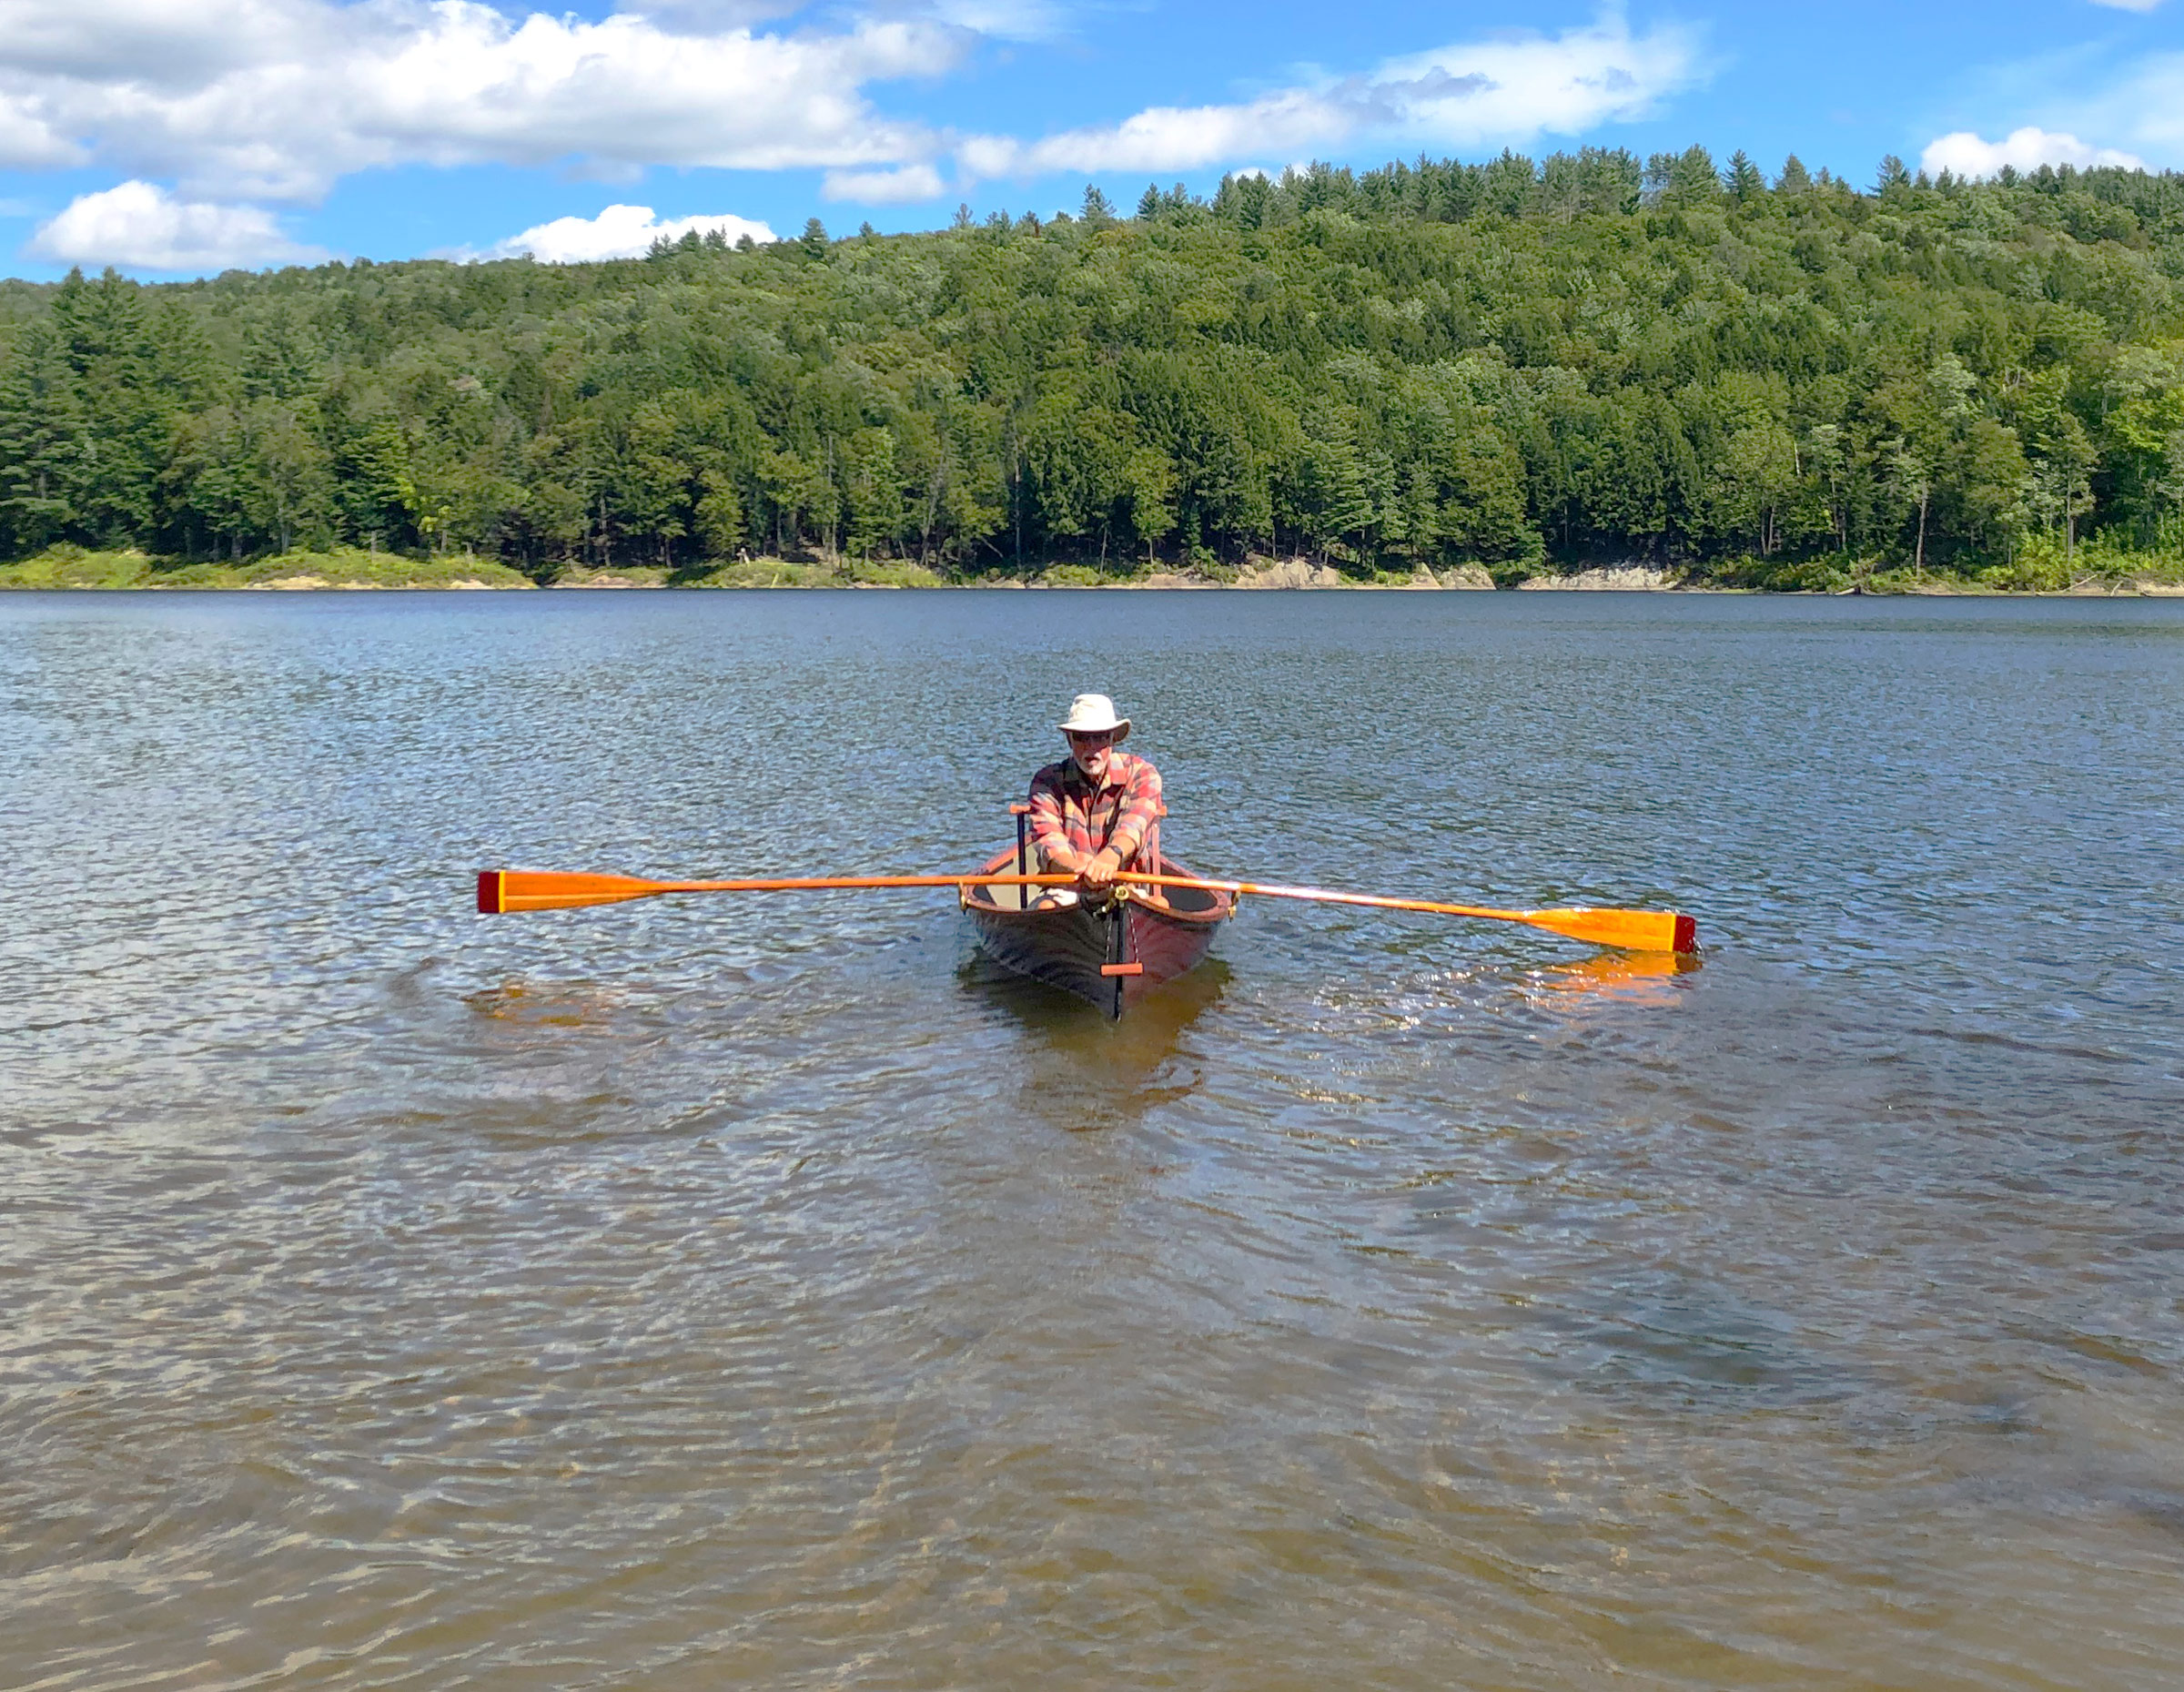
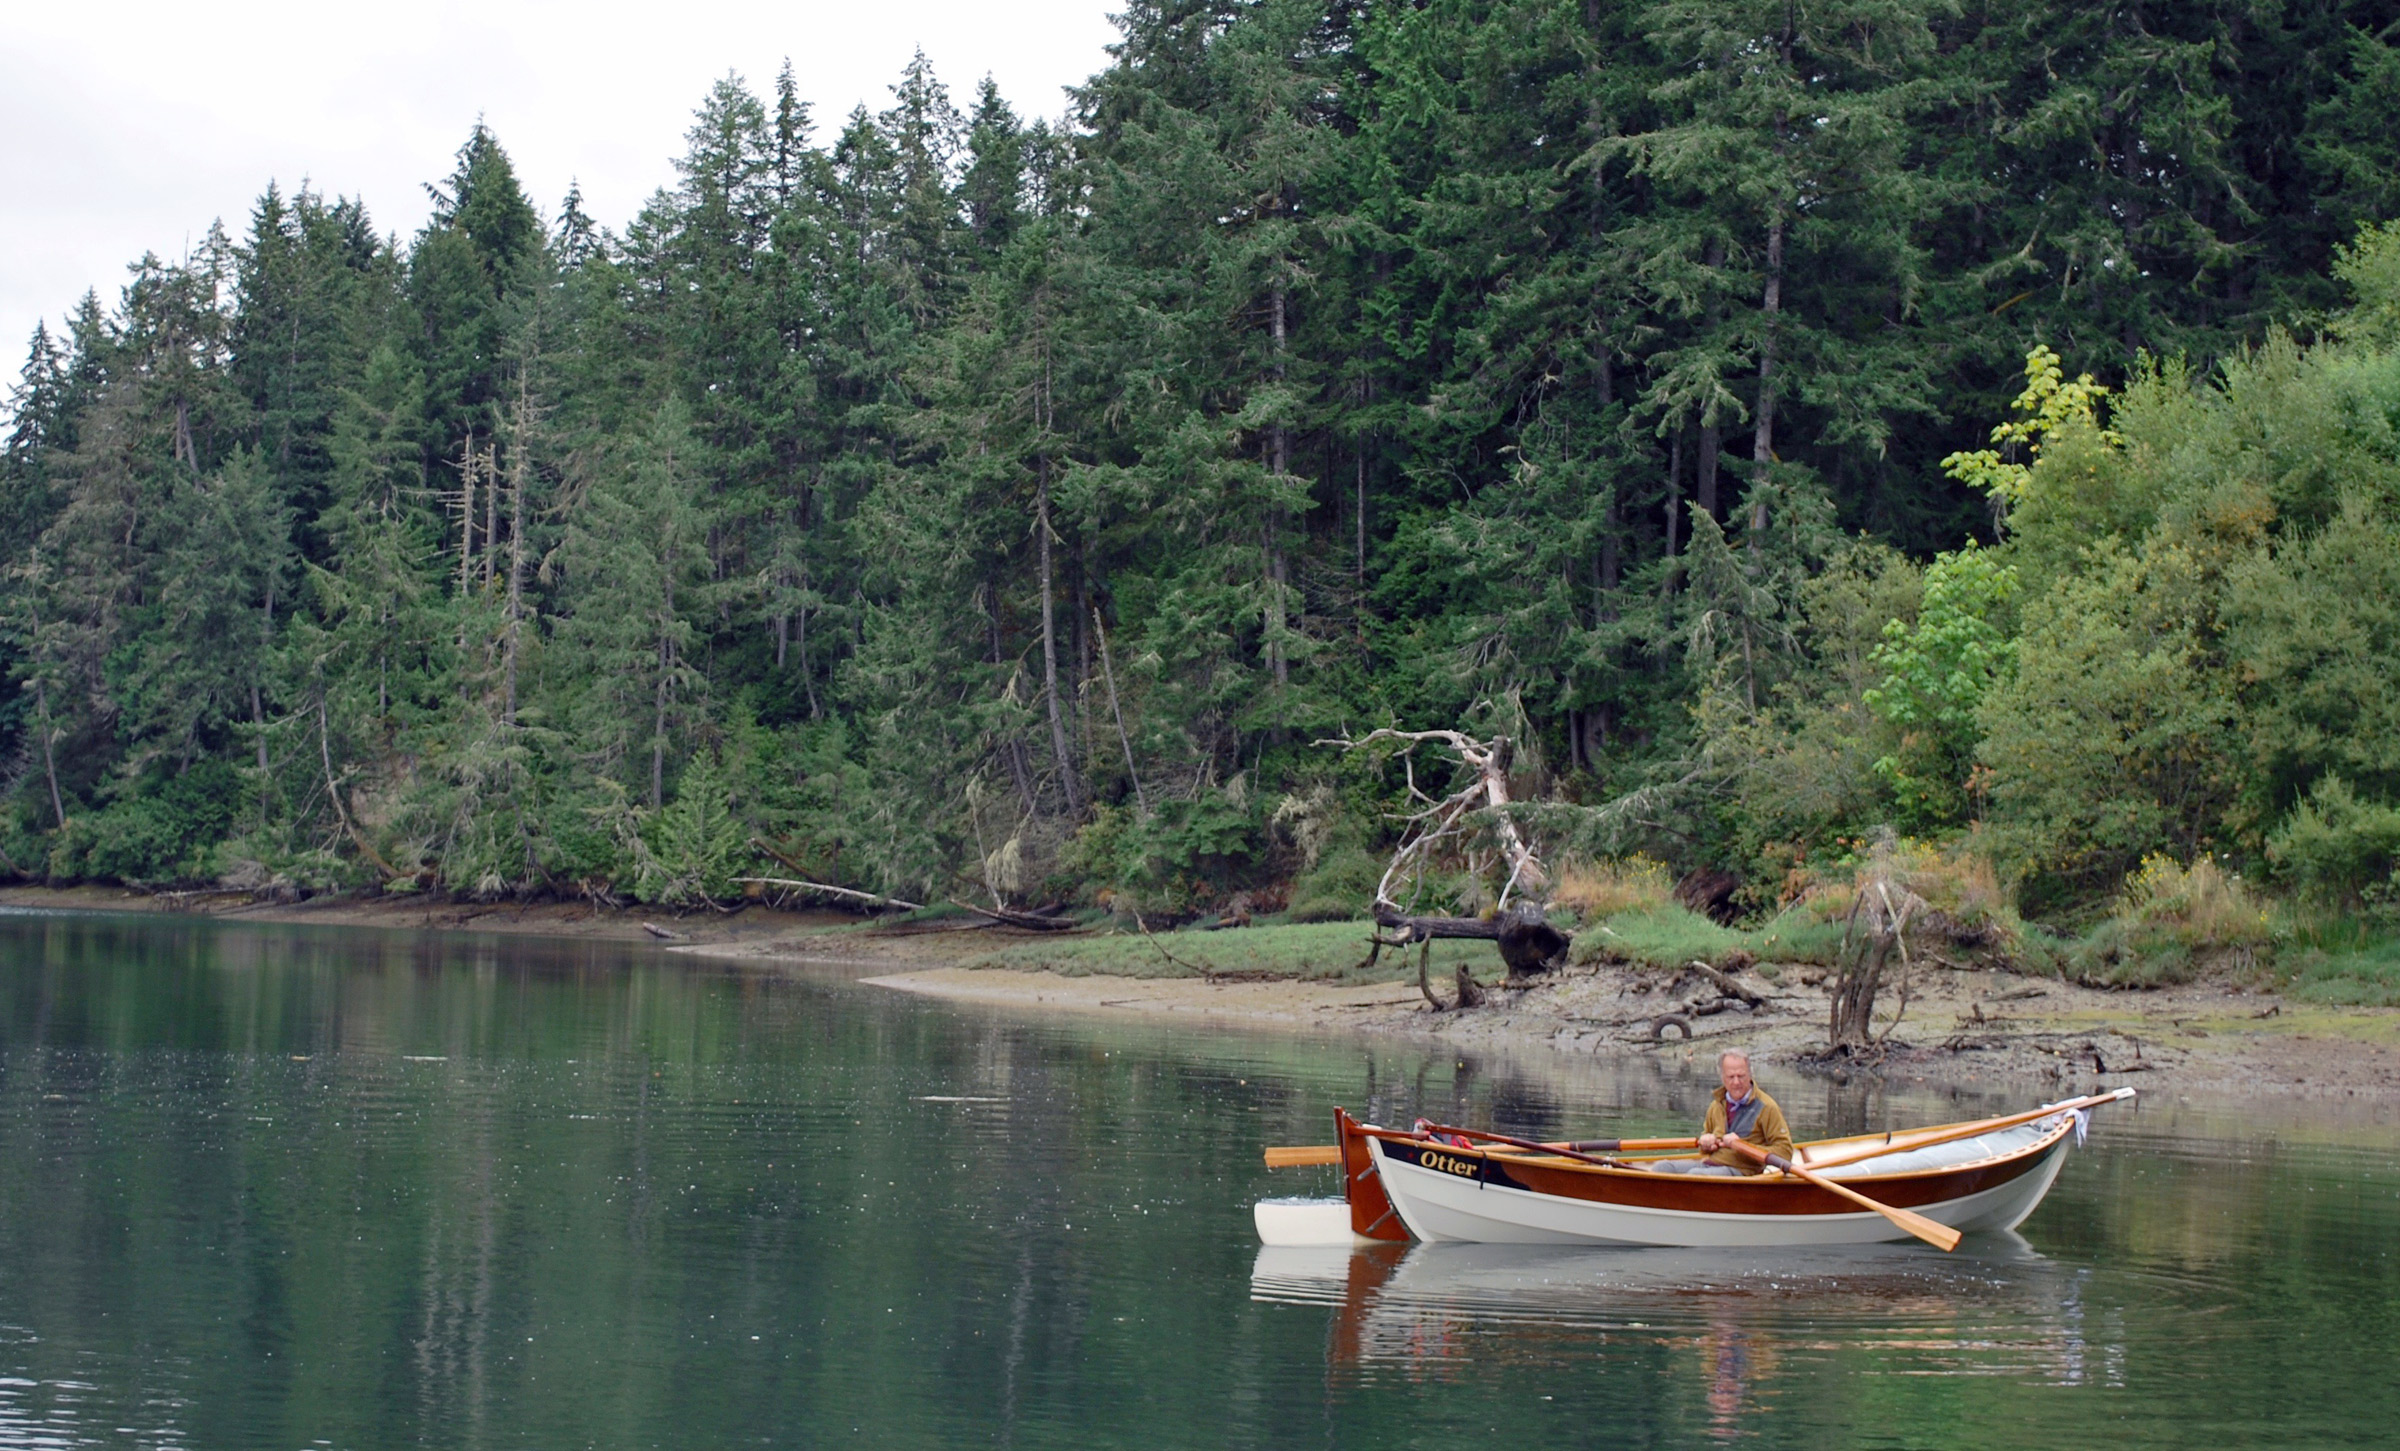
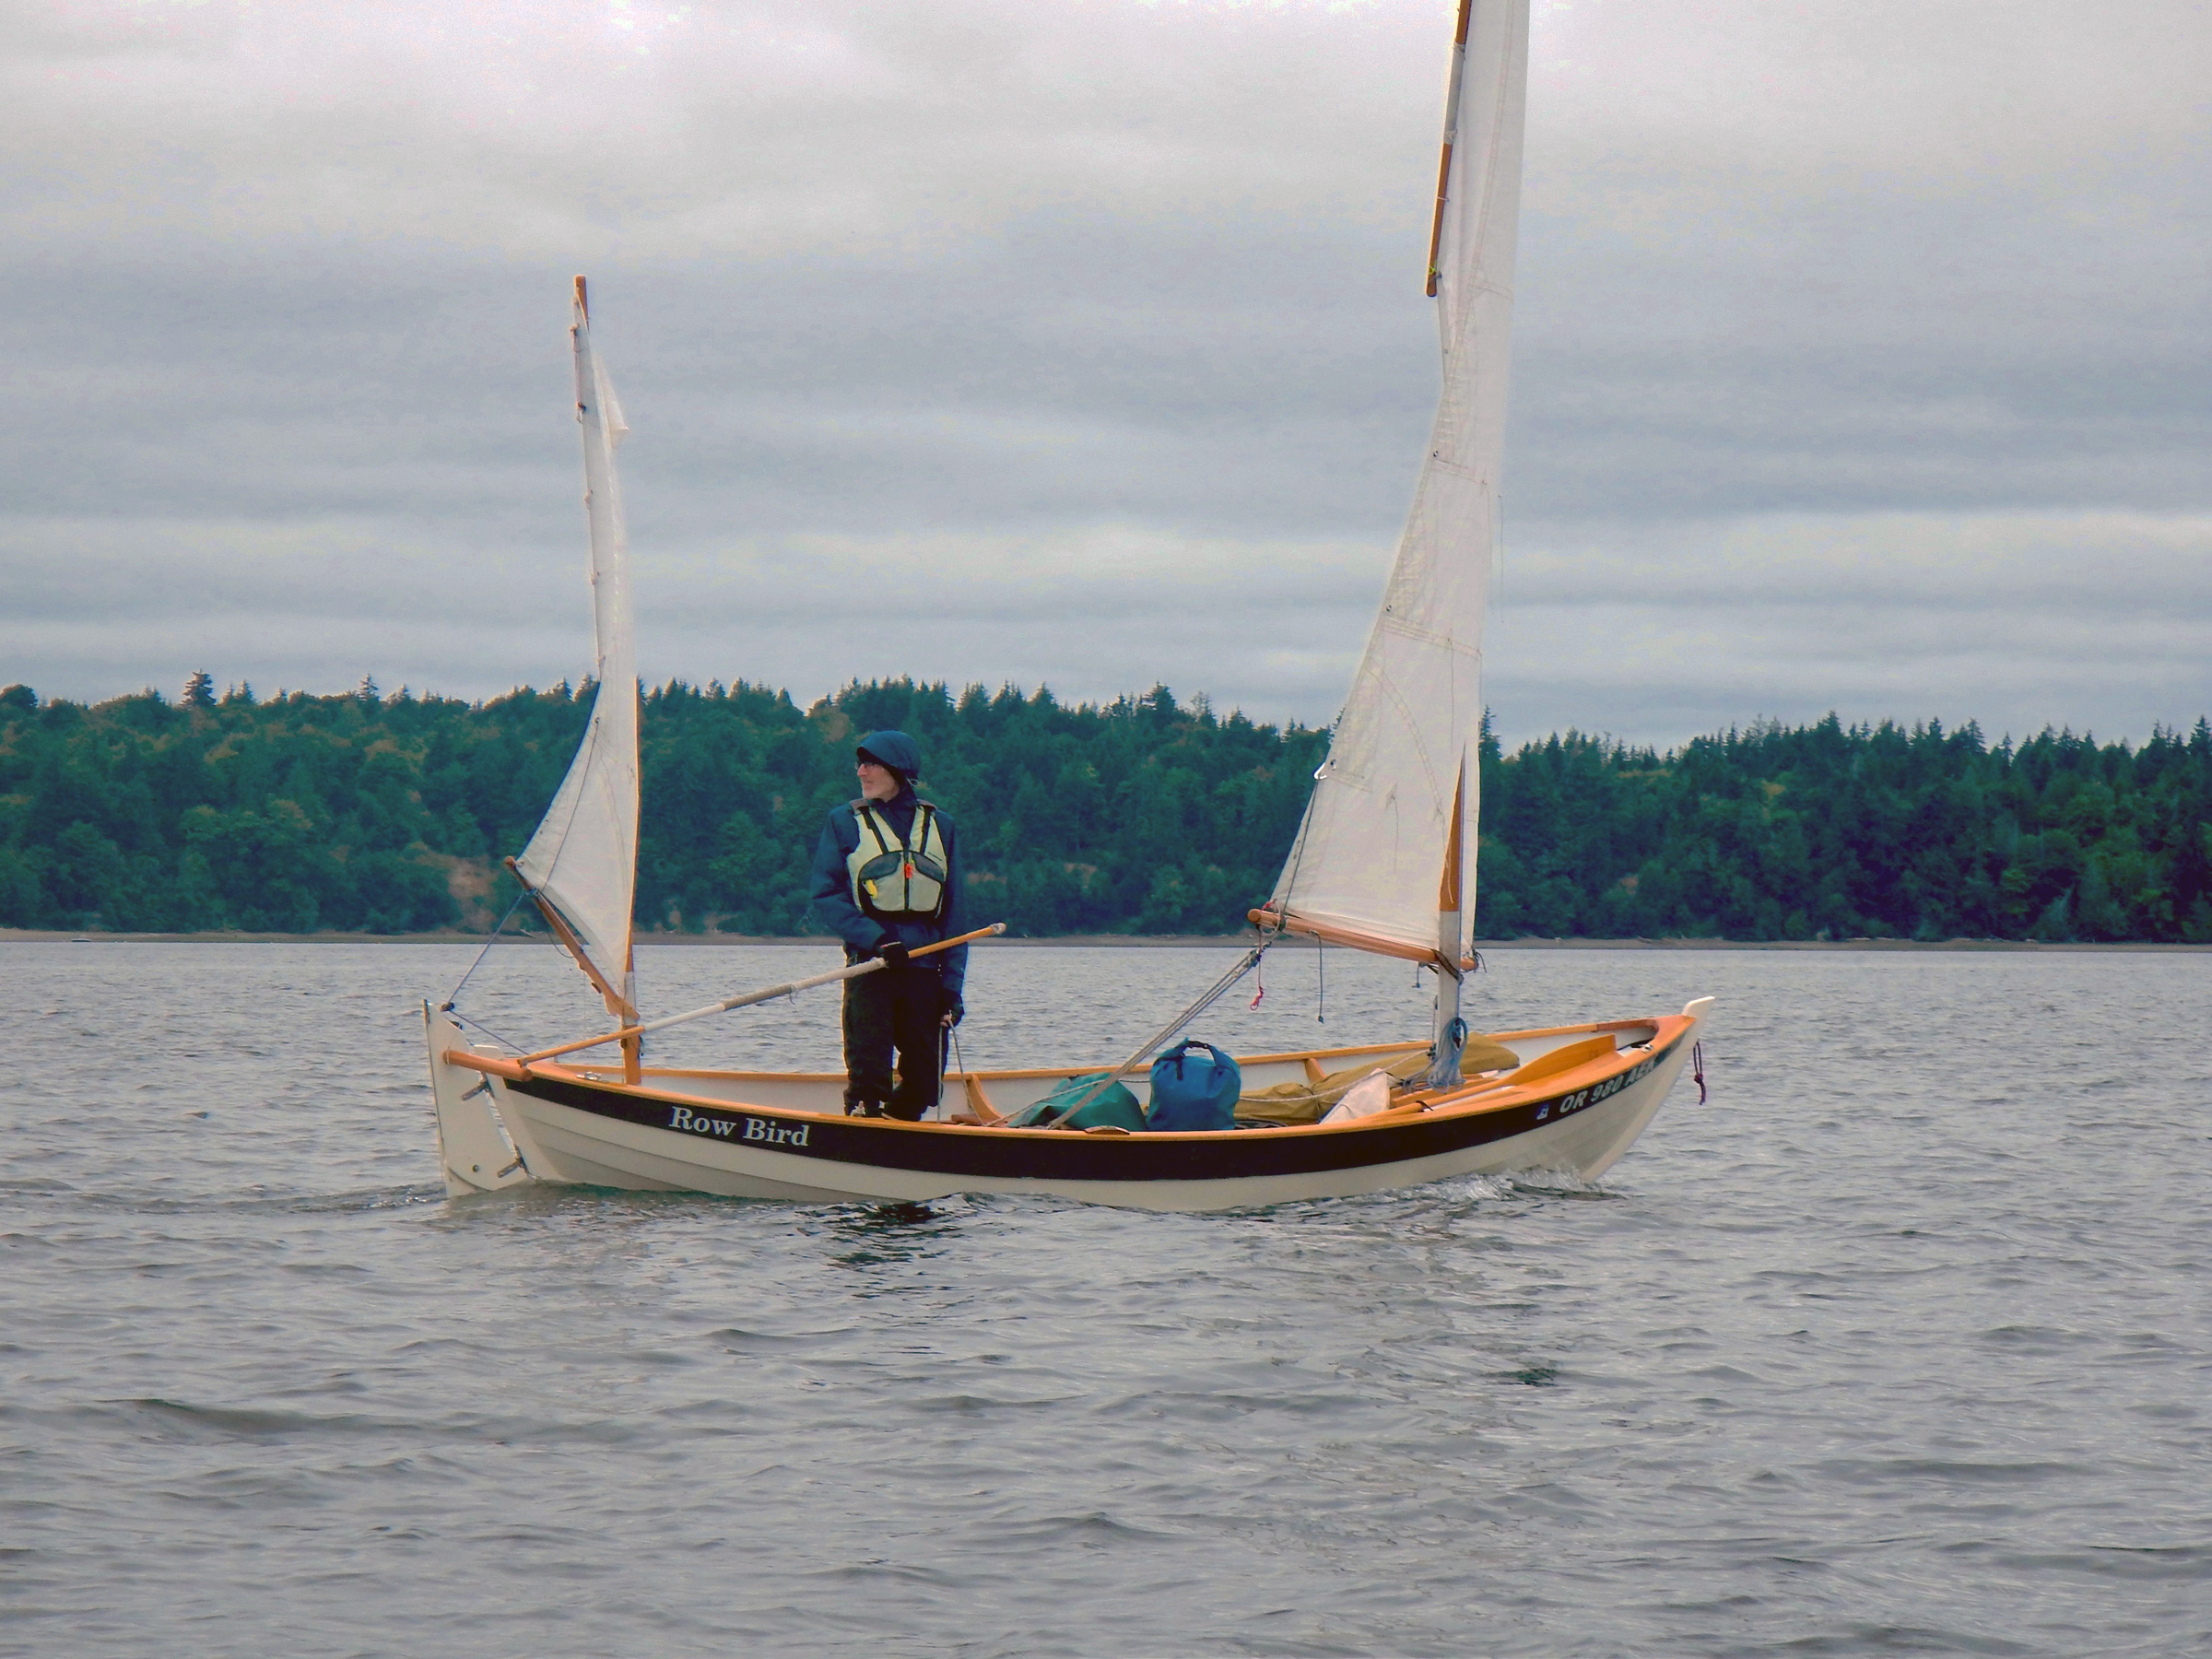
Few joys in life are simpler than a morning row. Oars over the shoulder, hollow footsteps along a wood-decked float, the boat quivering with the first step aboard, the sharp ring of the oarlocks as they slip into place, the soft purling of water against lapstrake planks as they leave the first wake of the day…all these seem to require stillness—all the better if it’s the perfect kind of stillness found on a lake just after dawn.
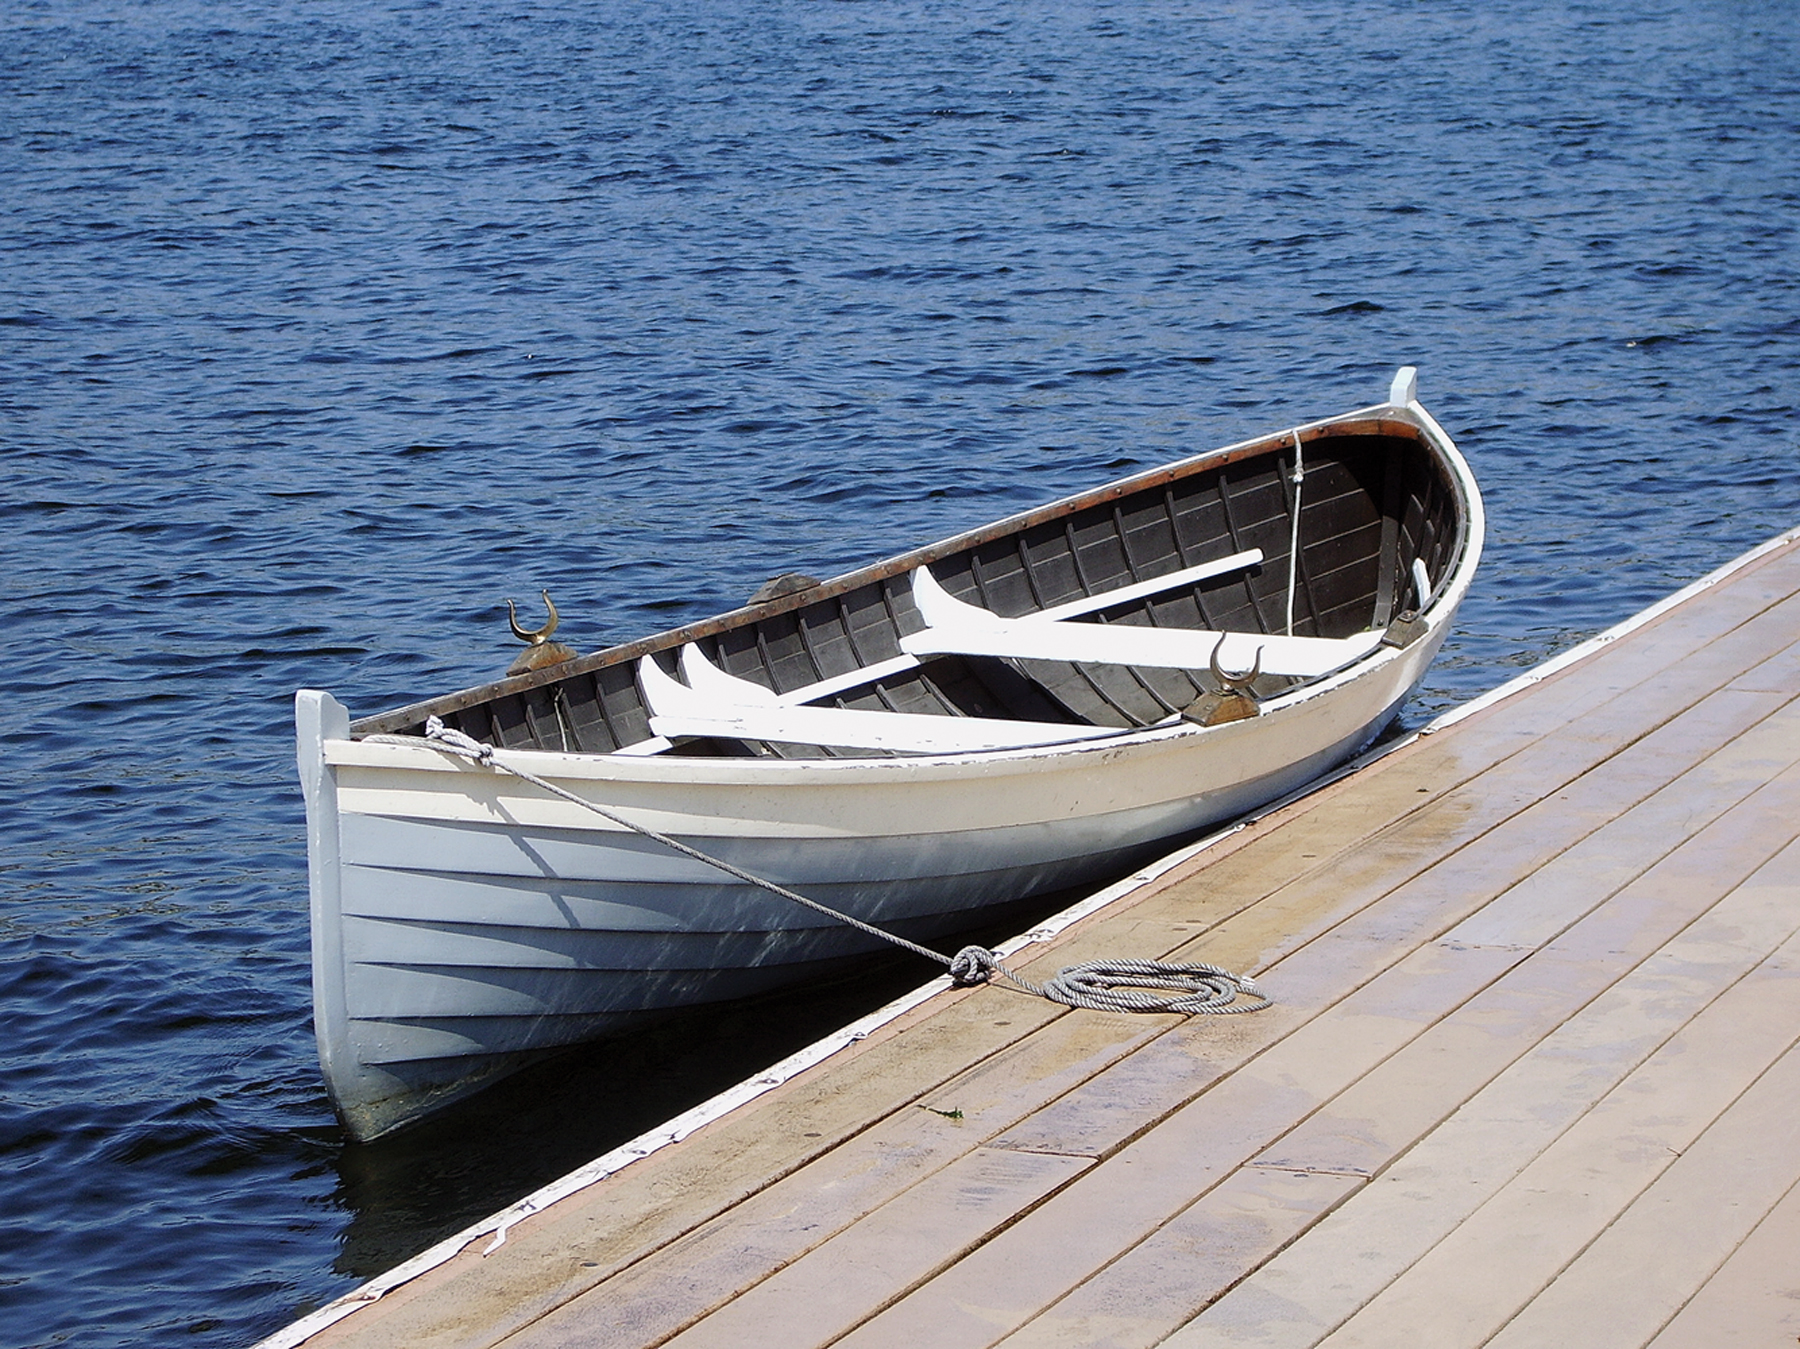
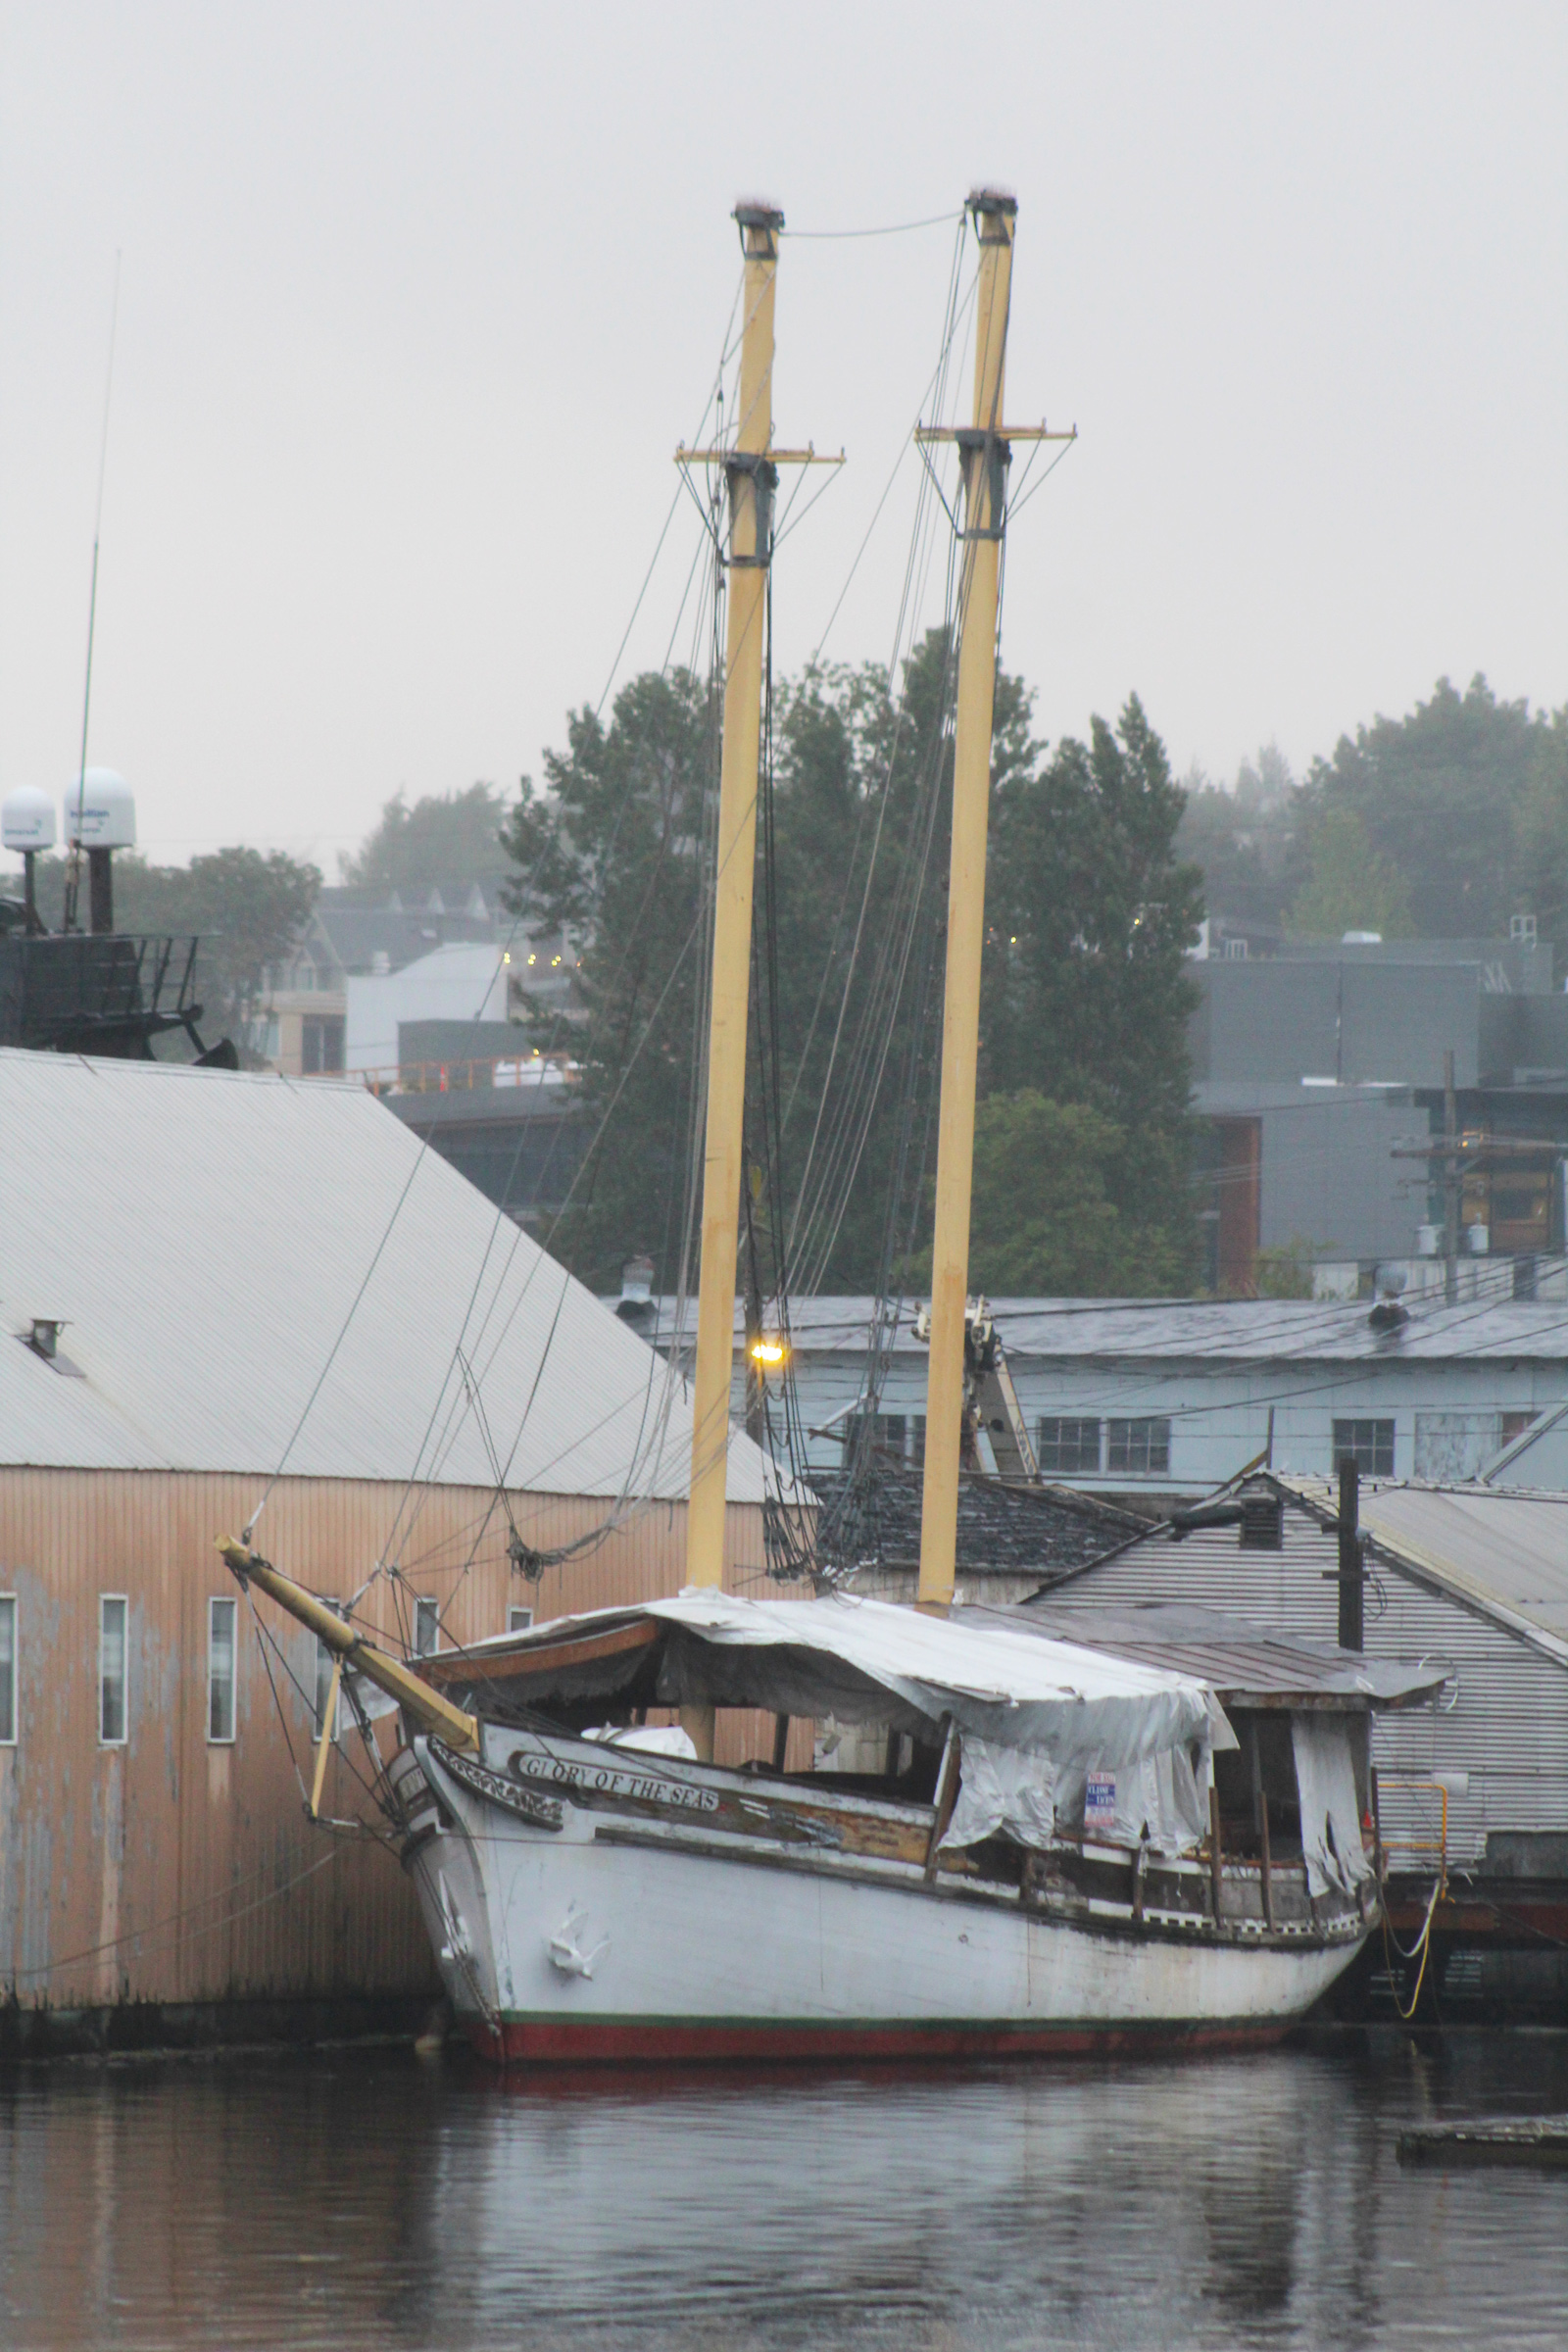
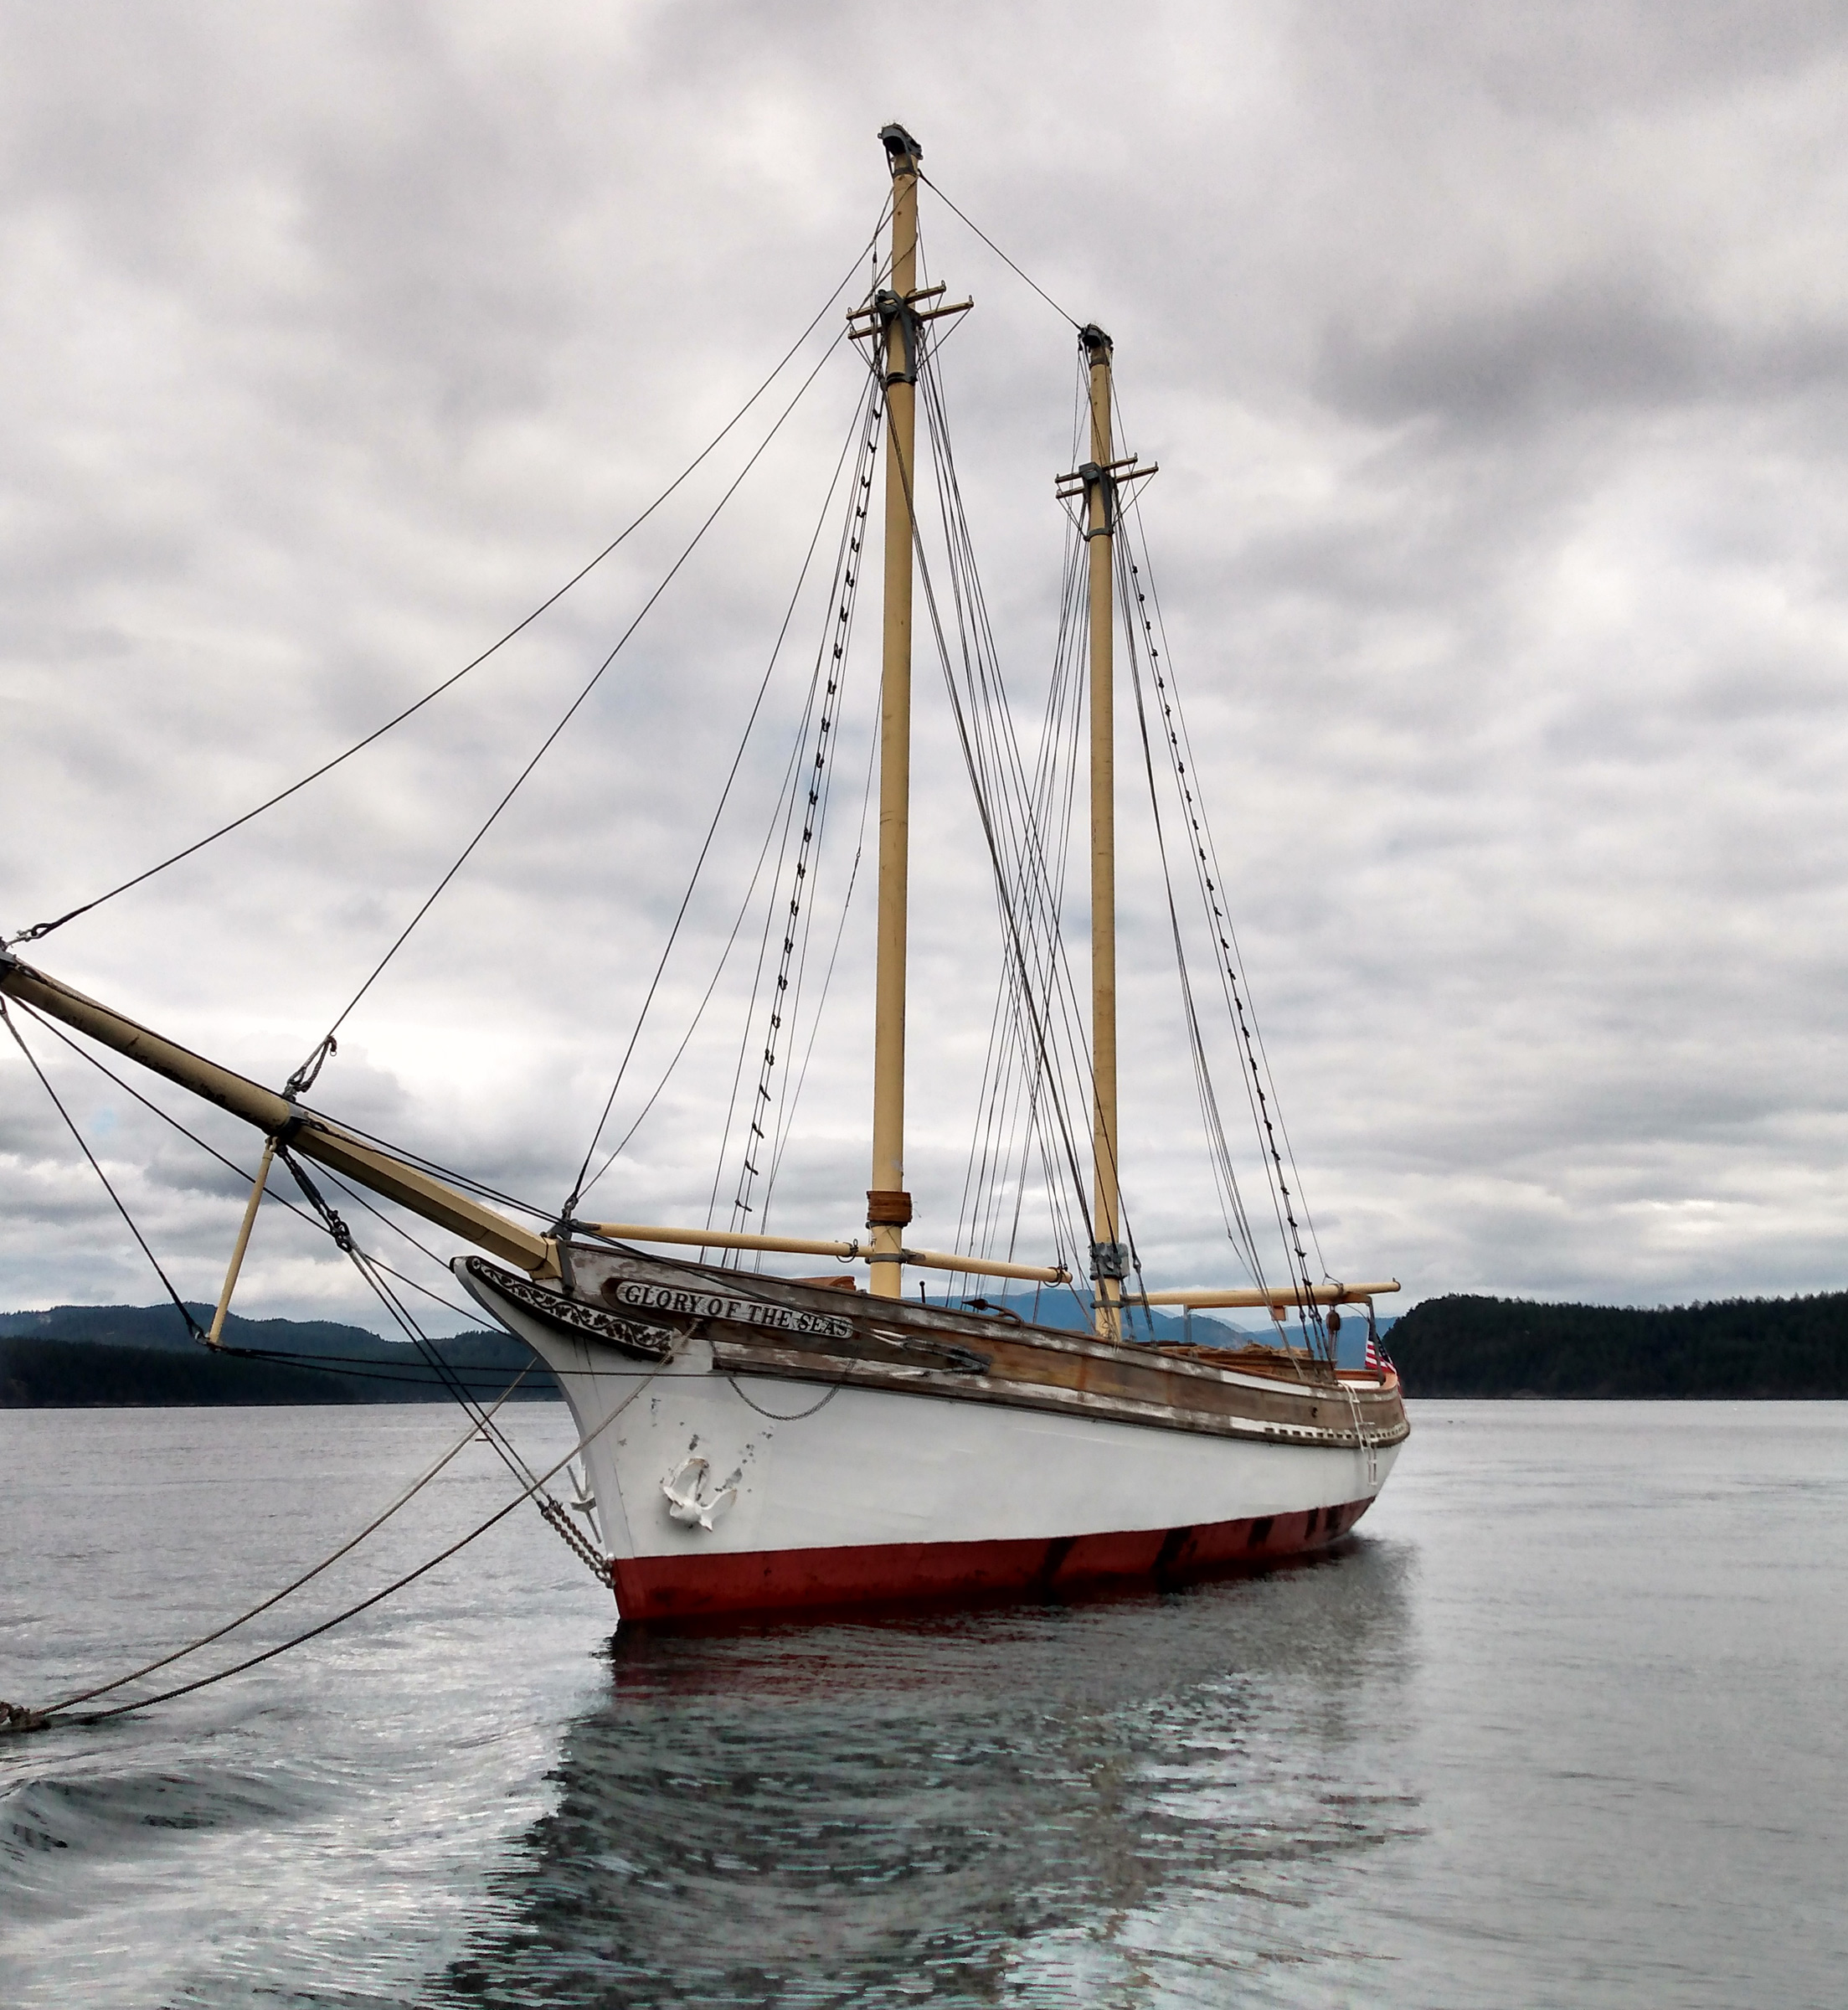
Time was, wooden pulling boats dedicated to such pleasures were common throughout the land. Lakeshore liveries—at least any with true boats in them—are largely and regrettably a thing of the past. One rare exception is The Center for Wooden Boats in Seattle, Washington, where a variety of boats can be used on Lake Union. Many of the boats in the CWB collections are of a type once common in liveries, and one in particular stands out as an exceptional lake boat. She is a light and lithe double-ender, a handsome 15-footer they call the Lake Oswego Boat.
Photo by Corinne Ricciardi
At just over 15′ long and with light scantlings (meaning small dimensions for each piece), the Lake Oswego Boat is a prime candidate for construction in a small home workshop.
Thought to be of Finnish descent, the original builder had the type as a stock offering in Portland, Oregon. His name is unknown, and so is the boat’s year of construction. Lines were taken in the early 1980s, and CWB students working under Eric Hvalsoe built a new one to the resulting plans. As the story goes, the builder produced the boat to a half model brought in by a customer, so its origins are obscure at best. The type became popular as a livery boat on Skunk Lake, which was later renamed Lake Oswego, a much more suitable name for what was destined to become a toney suburb of Portland.
Prevailing theory is that the first boat, built some 60 years ago, may have been loosely based on the Rangeley boats of Maine (see WB No. 39). But the differences—a flatter sheer, straighter stem and sternpost, and a much less pronounced turn of bilge—outweigh the similarities found in her dead-straight plank keel, use of an inner and outer stem assembly, and lightweight lapstrake planking fastened over closely spaced, light frames. To me, she looks like a cross between the Rangeleys and early double-paddle canoes.
She is a pleasure to row. She moves easily through the water and tracks well, and yet she’s easy to maneuver. Two can take to the oars, with room for a passenger or kibitzer aft. With my wife as passenger (and bailer; more about that in a minute), we explored some of the canals of Lake Union’s chic houseboat community, and once or twice I reverted to paddling. A canoe paddle would have served well in these tight quarters from the after thwart, which, together with her 4″ draft, bodes well for the boat’s ability to explore narrow channels at some remote lakehead. The original boat also shows a hole in the forward thwart for some sort of light sailing rig, but there is no sail plan. The CWB reconstruction is strictly for rowing, which makes sense to me for this type.
Photo by Corinne Ricciardi
Handsome lapstrake planking lines make the Lake Oswego Boat as much a pleasure to look at as it is to row. The sheerstrake’s width is neatly calculated so that after the installation of the rubrail, the remaining visible portion of the plank is well-proportioned in comparison with planks below it.
At the CWB, the boat is a true livery boat, and the center’s staff rotates boats in and out of service. She had been out of the water for some time before I asked to use her for a morning, and she hadn’t had enough time to take up well. A bilge pump was essential equipment.
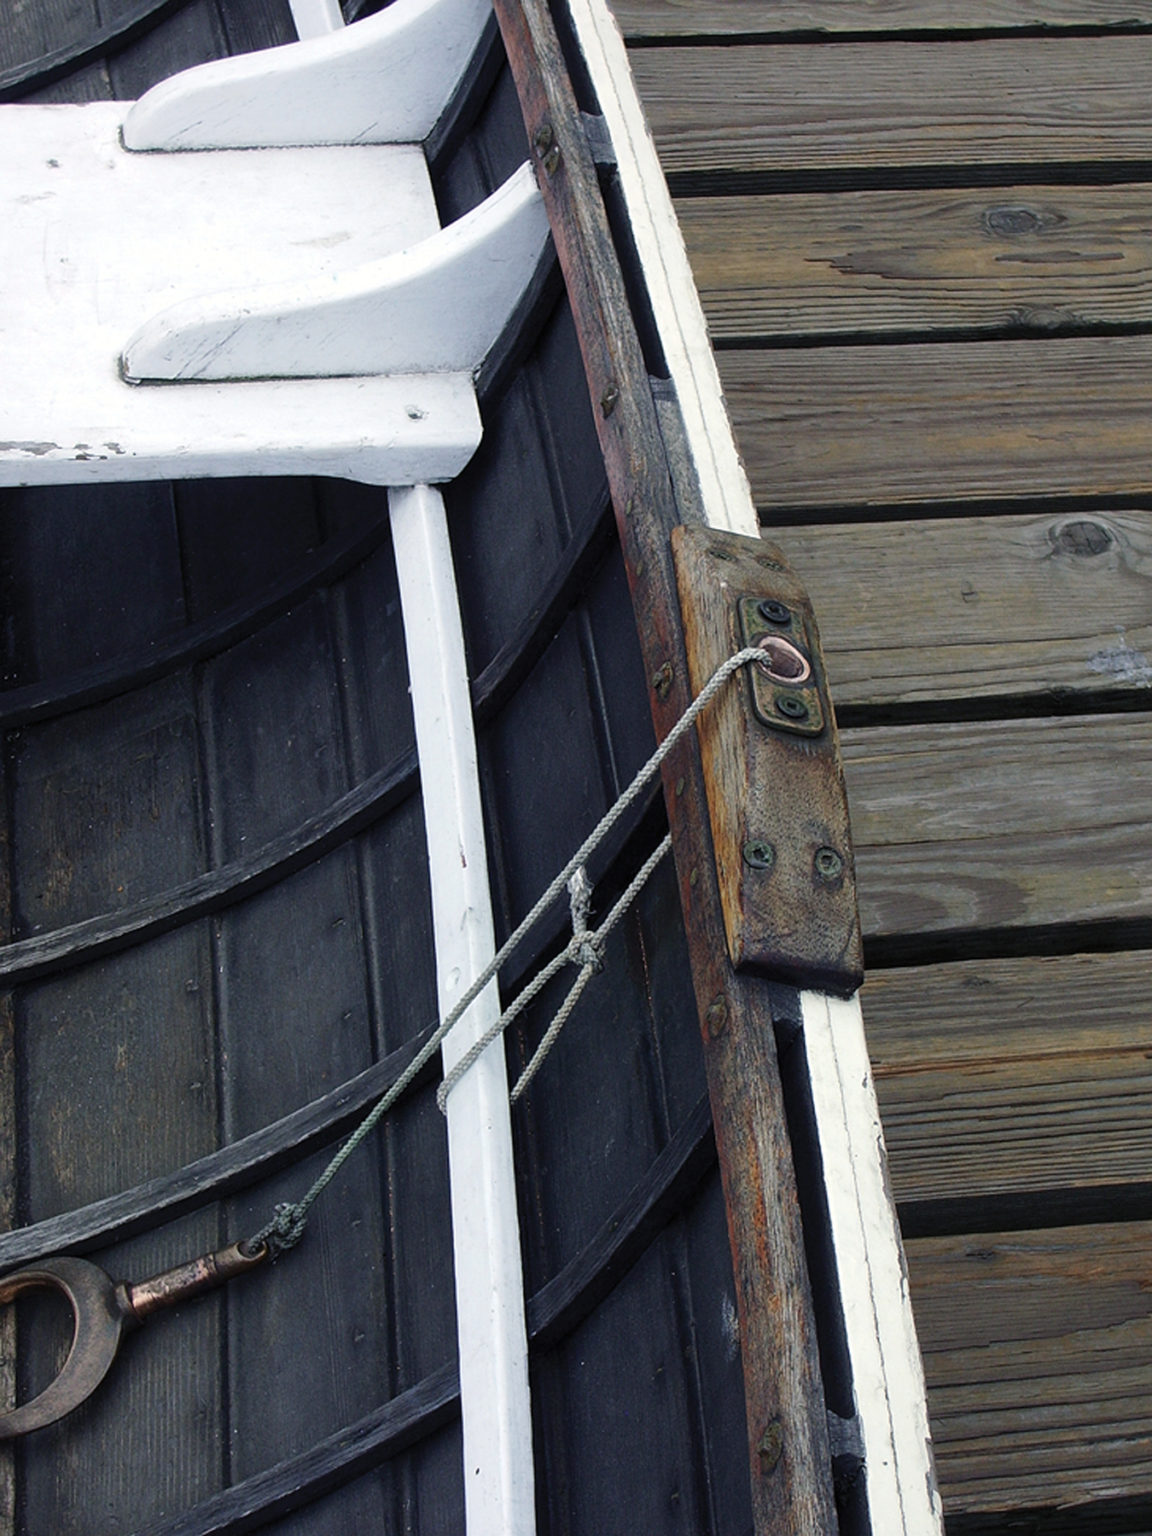
With her long, lean shape and her easy entry and run, this would be a simple and pleasurable boat to plank. Either light copper rivets or clench nails would serve as fastenings for the plank laps and conceivably even for the plank-to-frame joints. It’s typical in a boat like this that the lapstrake seams don’t leak—water coming in is more than likely coming from the garboard seams and, especially, the hood ends. Extra care in fitting planks in those areas and carefully caulking the garboard seams should keep the water in its rightful place—out there in the lake with the rest of it.
For a builder who is contemplating a first foray into fully traditional construction, and with either some experience, a lot of confidence, or both, the Lake Oswego Boat would be an excellent choice. With no complicated hardware, no centerboard trunk, and scantlings that keep the materials cost on the low side, she’s all about the loveliness of planking, and she’d prepare such a builder very well for the next project up the scale of ambition.
Photo by Corinne Ricciardi
A linseed oil– based finish turns black over time but is easy to apply and reapply.
This boat’s appearance rests squarely on its planking lines. Careful attention should be paid to how fair the plank edges are, how evenly the ends are spaced at the stem and sternpost, how neatly the gains are shaped so that they come together flush at the rabbet forward and aft, and how fair the curves appear when viewed in profile and from all quarters. The right calls on these details will have everything to do with making this boat look its absolute best.
The plans are in one sheet, and they leave considerable room for interpretation. The boat will have to be lofted, no doubt about it, but the offsets are taken to the inside of the planking, which should ease the job of making station molds. Many decisions, perhaps starting with whether to build right-side up or upside down, will be left to the builder. Common sense will prevail, and somewhere along the line the boat will become personal.
On Lake Union, near dawn is the right time for this boat, before the seaplanes and powerboats awaken and while Interstate 5, with a little imagination, still sounds like a distant waterfall. The lake is a great place, don’t get me wrong, and urban gunkholing is as interesting as any— but while I was rowing this boat I found my mind wandering back to lakes I hadn’t seen in a long, long time.
Photo by Corinne Ricciardi
She’s just right for gunkholing, urban or otherwise.
She’d travel easily, probably best with a small trailer, making her range pretty well infinite. Someplace farther out and higher up, I thought. Someplace of solitude, where the end of the lake has a trace of a stream begging to be explored a little farther and remembered fondly. Someplace so pretty that it can only be improved with a boat as handsome as this one, and—if you’re rowing properly—left astern without leaving behind so much as a sound.
Lines taken off of an original Lake Oswego Boat are clear, but lofting will be necessary. The look of the boat will depend on how well the builder lines off the planking, taking into account the fact that from the exterior the top edge of each plank will be covered by perhaps 5/8”. The amount of plank lap is one of the details not explicitly spelled out in the plans, so keep that engineer’s ruler and a sense of judgment at the ready.
Plans for the Lake Oswego Boat are available from The Center for Wooden Boats.
Is there a boat you’d like to know more about? Have you built one that you think other Small Boats Magazine readers would enjoy? Please email us!
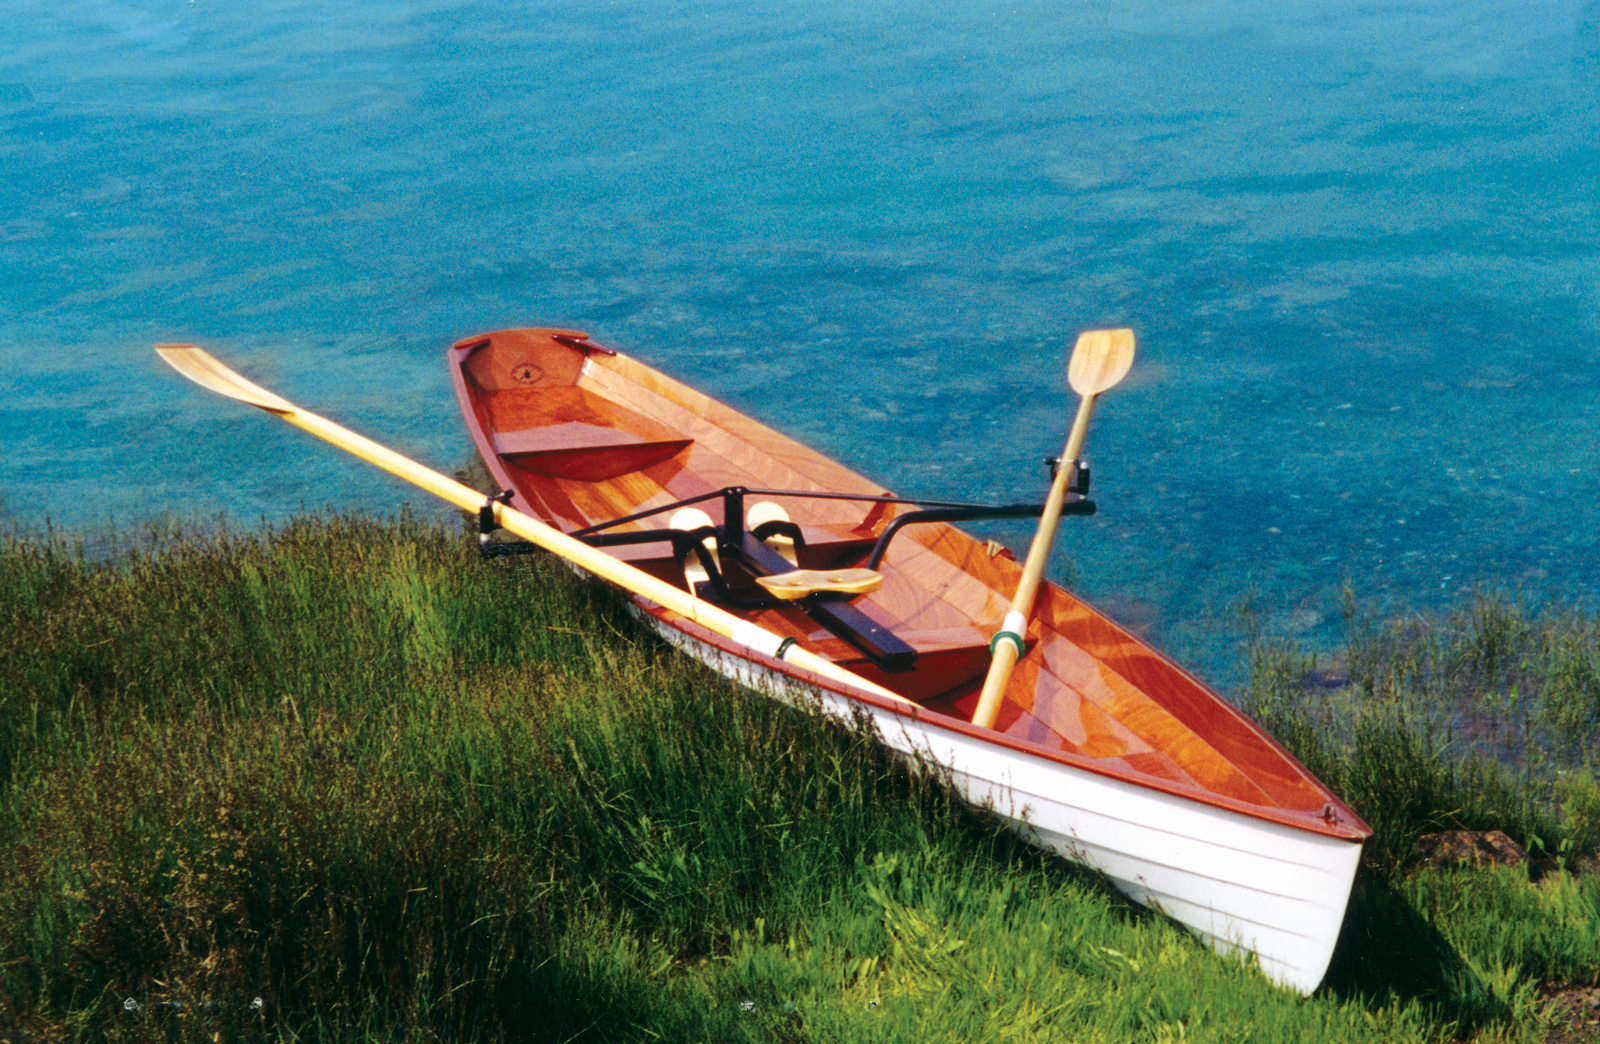
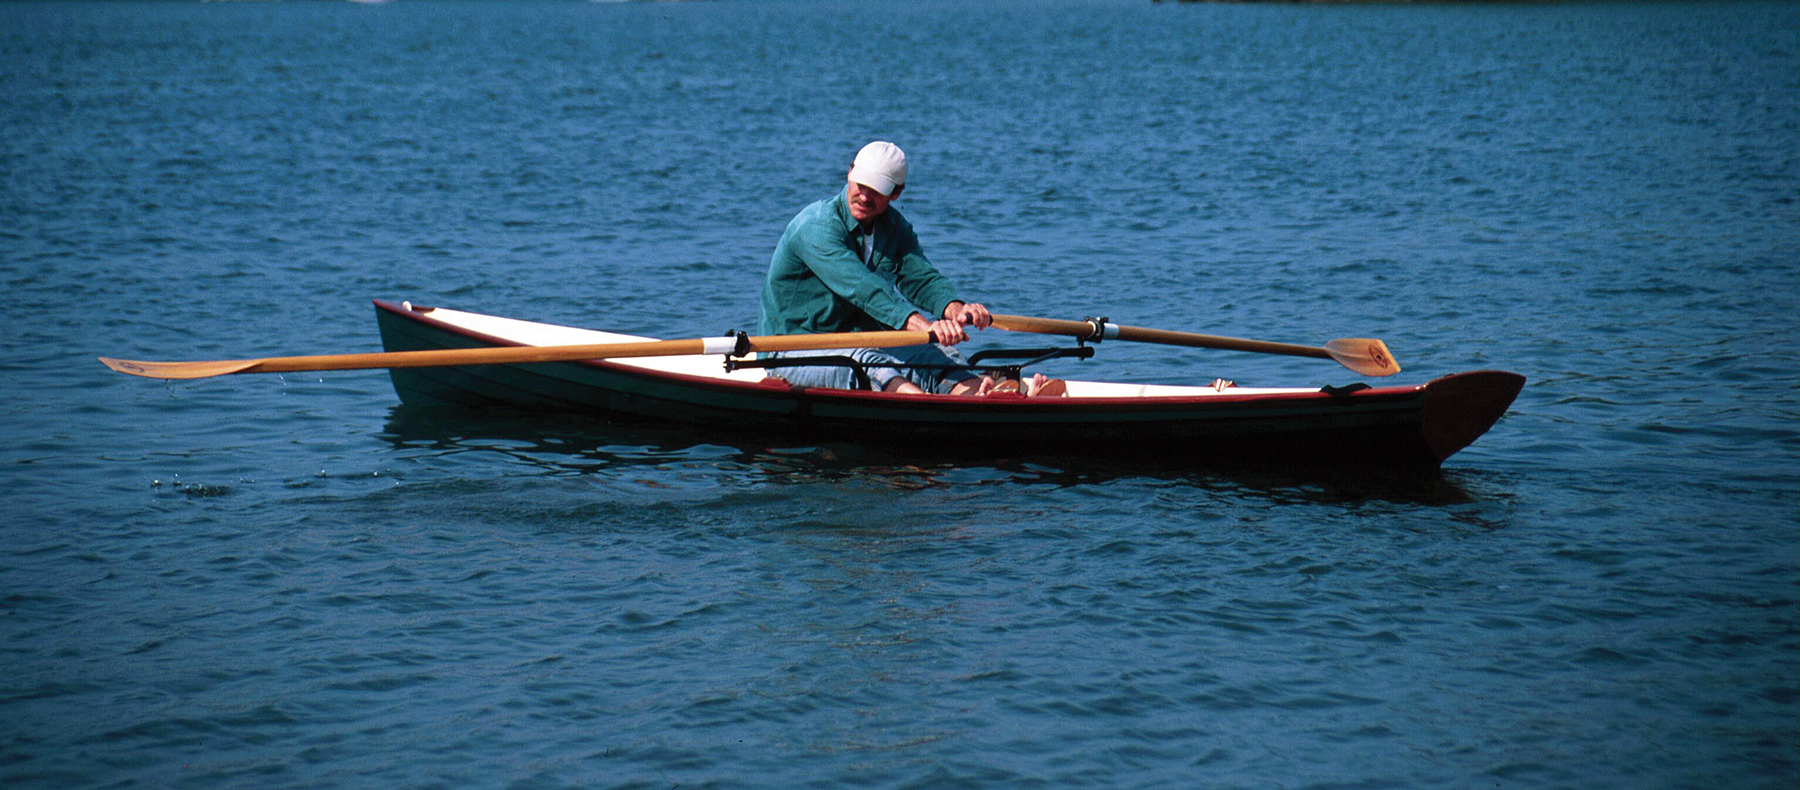
Harry Bryan, a boatbuilder and designer from New Brunswick, Canada, designed the Fiddlehead, a 10 1⁄2′ double-paddle canoe, in 1992 after his sister-in-law introduced him to her Wee Lassie. The Wee Lassie is a small double-paddle canoe designed by J. Henry Rushton around 1893. Bryan had always rowed small boats, rather than paddled them. He had “never faced forward in a boat,” because rowing requires that one face aft, looking at where he’s been rather than where he’s going. This paddling business was something of an epiphany for Harry Bryan, and his fertile mind was inspired to adapt the Wee Lassie to his preferred construction techniques. We’ll come to those in a moment. First, a word about the Wee Lassie.
J. Henry Rushton was a great designer and builder of boats and canoes one hundred years ago. He conceived the Wee Lassie to be an easily portaged solo canoe—a boat that could cross a lake and then be hoisted onto a shoulder and carried through the woods. Its popularity today continues to increase; it allows a paddler to get into thin, otherwise inaccessible waters and see wonderful things from a rare vantage point. Bryan is not the only builder to have taken inspiration from this design. Henry “Mac” McCarthy, formerly an instructor at WoodenBoat School, has coached uncounted builders through the construction of these boats to his own adaptation, which uses strip planks and epoxy. With the Fiddlehead, Bryan took things in a different direction.
Photo by Benjamin Mendlowitz
Inspired by a 100-year-old solo canoe design, Harry Bryan conceived Fiddlehead for “dory style” construction. While the boat is meant for one person, a passenger of appropriate size can be allowed.
Bryan builds boats from a home-based boatshop that uses no grid electricity. He has a foot-powered bandsaw, a jigsaw built from the remains of an old Singer sewing machine, and a drill press operated by hand crank. His lumber is cut and milled locally (and selectively), and his choice of woods for Fiddlehead reflects that. The boat is planked in cedar and framed in spruce, with bits of oak and locust here and there, where hardwood is required. “I wanted to use dory construction,” he says, “with a relatively flat bottom and strength in the planking.” Dories have no wood keels. Instead, their narrow bottoms are the keels. Or their wide keels are the bottoms, if you prefer. The point is that there is no complex structural joinery involved in the building of a dory bottom. A solid flat surface provides the foundation for the topside planking.
The topside planking is lapstrake. This means that its edges overlap each other, like clapboard siding on a house. They are fastened together with clenched (bent-over) nails, and are supported by widely spaced frames. While Fiddleheads are good looking and worthy performers, their essence is simplicity. That’s often a tough combination to achieve in a design; usually, you get one in exchange for the other. Here’s how Bryan describes the Fiddlehead concept and aesthetic in the introduction to a manual for building the boat:
“She is simple because she is small, has a modest number of parts, and is constructed with techniques worked out over centuries of small boat building. She is elegant not by any standard devised to measure such a quality (such a measurement is impossible), but because we have observed people’s reaction to her and we know that it is so.” That’s true. I’ve observed people’s reaction to her, too, at boat shows and in workshops. A Fiddlehead always swells a crowd of smiling admirers.
The design is so simple and so alluring that, for the past several years, seventh and eighth graders have built boats to it in an after-school boatbuilding program. The program begins in autumn, in the woods with live trees, draft horses, and a sawmill; it spends the winter in a wood -heated boatshop and ends in the spring on a pond on the WoodenBoat campus.
Photo by Benjamin Mendlowitz
Fiddlehead’s combination of good looks, local materials, and simplicity have made it an ideal candidate for a boatbuilding program for Brooklin, Maine, junior high school students. Here, two young builders paddle newly launched boats on a pond at WoodenBoat.
If you wanted a Fiddlehead of your own, you could order one from Harry Bryan, or you could buy a set of plans and a detailed instruction booklet from the builder and do the job yourself. If you went the latter route, you wouldn’t have to take to the woods with draft horses, but you might find yourself casting about for substitute woods, depending on where you live. The instruction booklet covers this topic: instead of cedar planking, you might use pine or spruce; instead of spruce frames, you might use ash or oak.
Many builders will wonder if the boat can be built from plywood, and Bryan notes that, indeed, it can. For planking, he says that 1⁄4″ should be about right; the bottom will want to be beefed up to 3⁄8″. The decks will be 1⁄8″, and the bulkheads 1⁄4″. There’ll still be a smattering of hardwood in a Fiddlehead built mostly of plywood.
Bryan says that his manual “assumes that you have some knowledge of woodworking tools and how to use them.” He advises a first-time builder to enlist the help of someone with experience for advice and instruction before embarking on an uncertain next step. The designer himself is available by mail or telephone for answers to technical questions.
Harry Bryan, and his wife, Martha, go camping in their Fiddleheads. There’s an elliptical opening in the bulkhead through which a tent will fit; this opening is sealed with a removable cover, to retain the watertight integrity of the bulkhead. There’s space behind the cockpit seat to fit a drybag’s worth of essentials.
The boat is self-rescuable; there are two watertight bulkheads, and these create flotation chambers forward and aft, so the boat will float high when rolled over. A person of average ability can dump a Fiddlehead and get back in from the water, and then paddle away. Bryan has done this on purpose, just to be sure. He was back in the boat, from the water, in 14 seconds, with just 1⁄2″ of water in the bottom. He did the test off of his home in New Brunswick, in the Bay of Fundy, whose cold waters provided ample motivation to speed things along.
“Because I know I can get back in the boat, I’ve gone to St. Andrews — five miles cross.” But he wouldn’t recommend such open-water venturing for everyone—only for experienced paddlers with a proven ability to rescue themselves in the event of a capsize. Besides, Bryan finds it much more fun to paddle close to shore, and observe the natural drama at the water’s edge.
Harry Bryan has tinkered with the Fiddlehead’s design over the years, and come up with two enlargements. The first, which appeared in 1995, is a 12-footer; next, in 2000, came a 14-footer. Each plans packet includes three pages of drawings (with full-sized patterns for the bulkheads and frames) and an instruction book.
Harry has also devised several Fiddlehead accessories over the years. The plans have always included instructions for building a paddle. (Heed these words from the manual: “You could purchase a carbon fiber paddle, but I think you’re missing what Fiddlehead is about if you do.”) There’s a spray skirt, too—but not of the tight-fitting, kayak variety. This one is more like a low-slung dodger that fits over the forward coaming. “It keeps all of the paddle drip off of you and makes a huge difference in September or October,” says Bryan. There’s a sail now, too. This sail, however, won’t be set in the usual way, on a fixed mast. Rather, the inverted triangle mounts on the end of the paddle and is held aloft to provide propulsion downwind. “All of us want to open our coats when paddling downwind,” Bryan says. We do, for sure. I recall a canoe trip on Maine’s Allagash River years ago, with a strong tailwind on the last day. There were four canoes carrying eight of us, and all were standing with slickers open, looking like a fleet of little clipper ships. Oh, but for a bunch of Fiddlehead sails!
This boat will take you into the golden years. In addition to the spray dodger, a paddle, and sail, Bryan has devised a “geriatric boarding aid”—a shop-built device to stabilize the boat when boarding and disembarking. What more could you ask for: a boat with a built-in retirement plan.
The original Fiddlehead, shown here, measures 10 1⁄2′. There are now also 12′ and 14′ models. Each plans package consists of three sheets of drawings and a detailed instruction book.
Plans for Fiddlehead are available from Bryan Boatbuilding.
Is there a boat you’d like to know more about? Have you built one that you think other Small Boats Magazine readers would enjoy? Please email us!
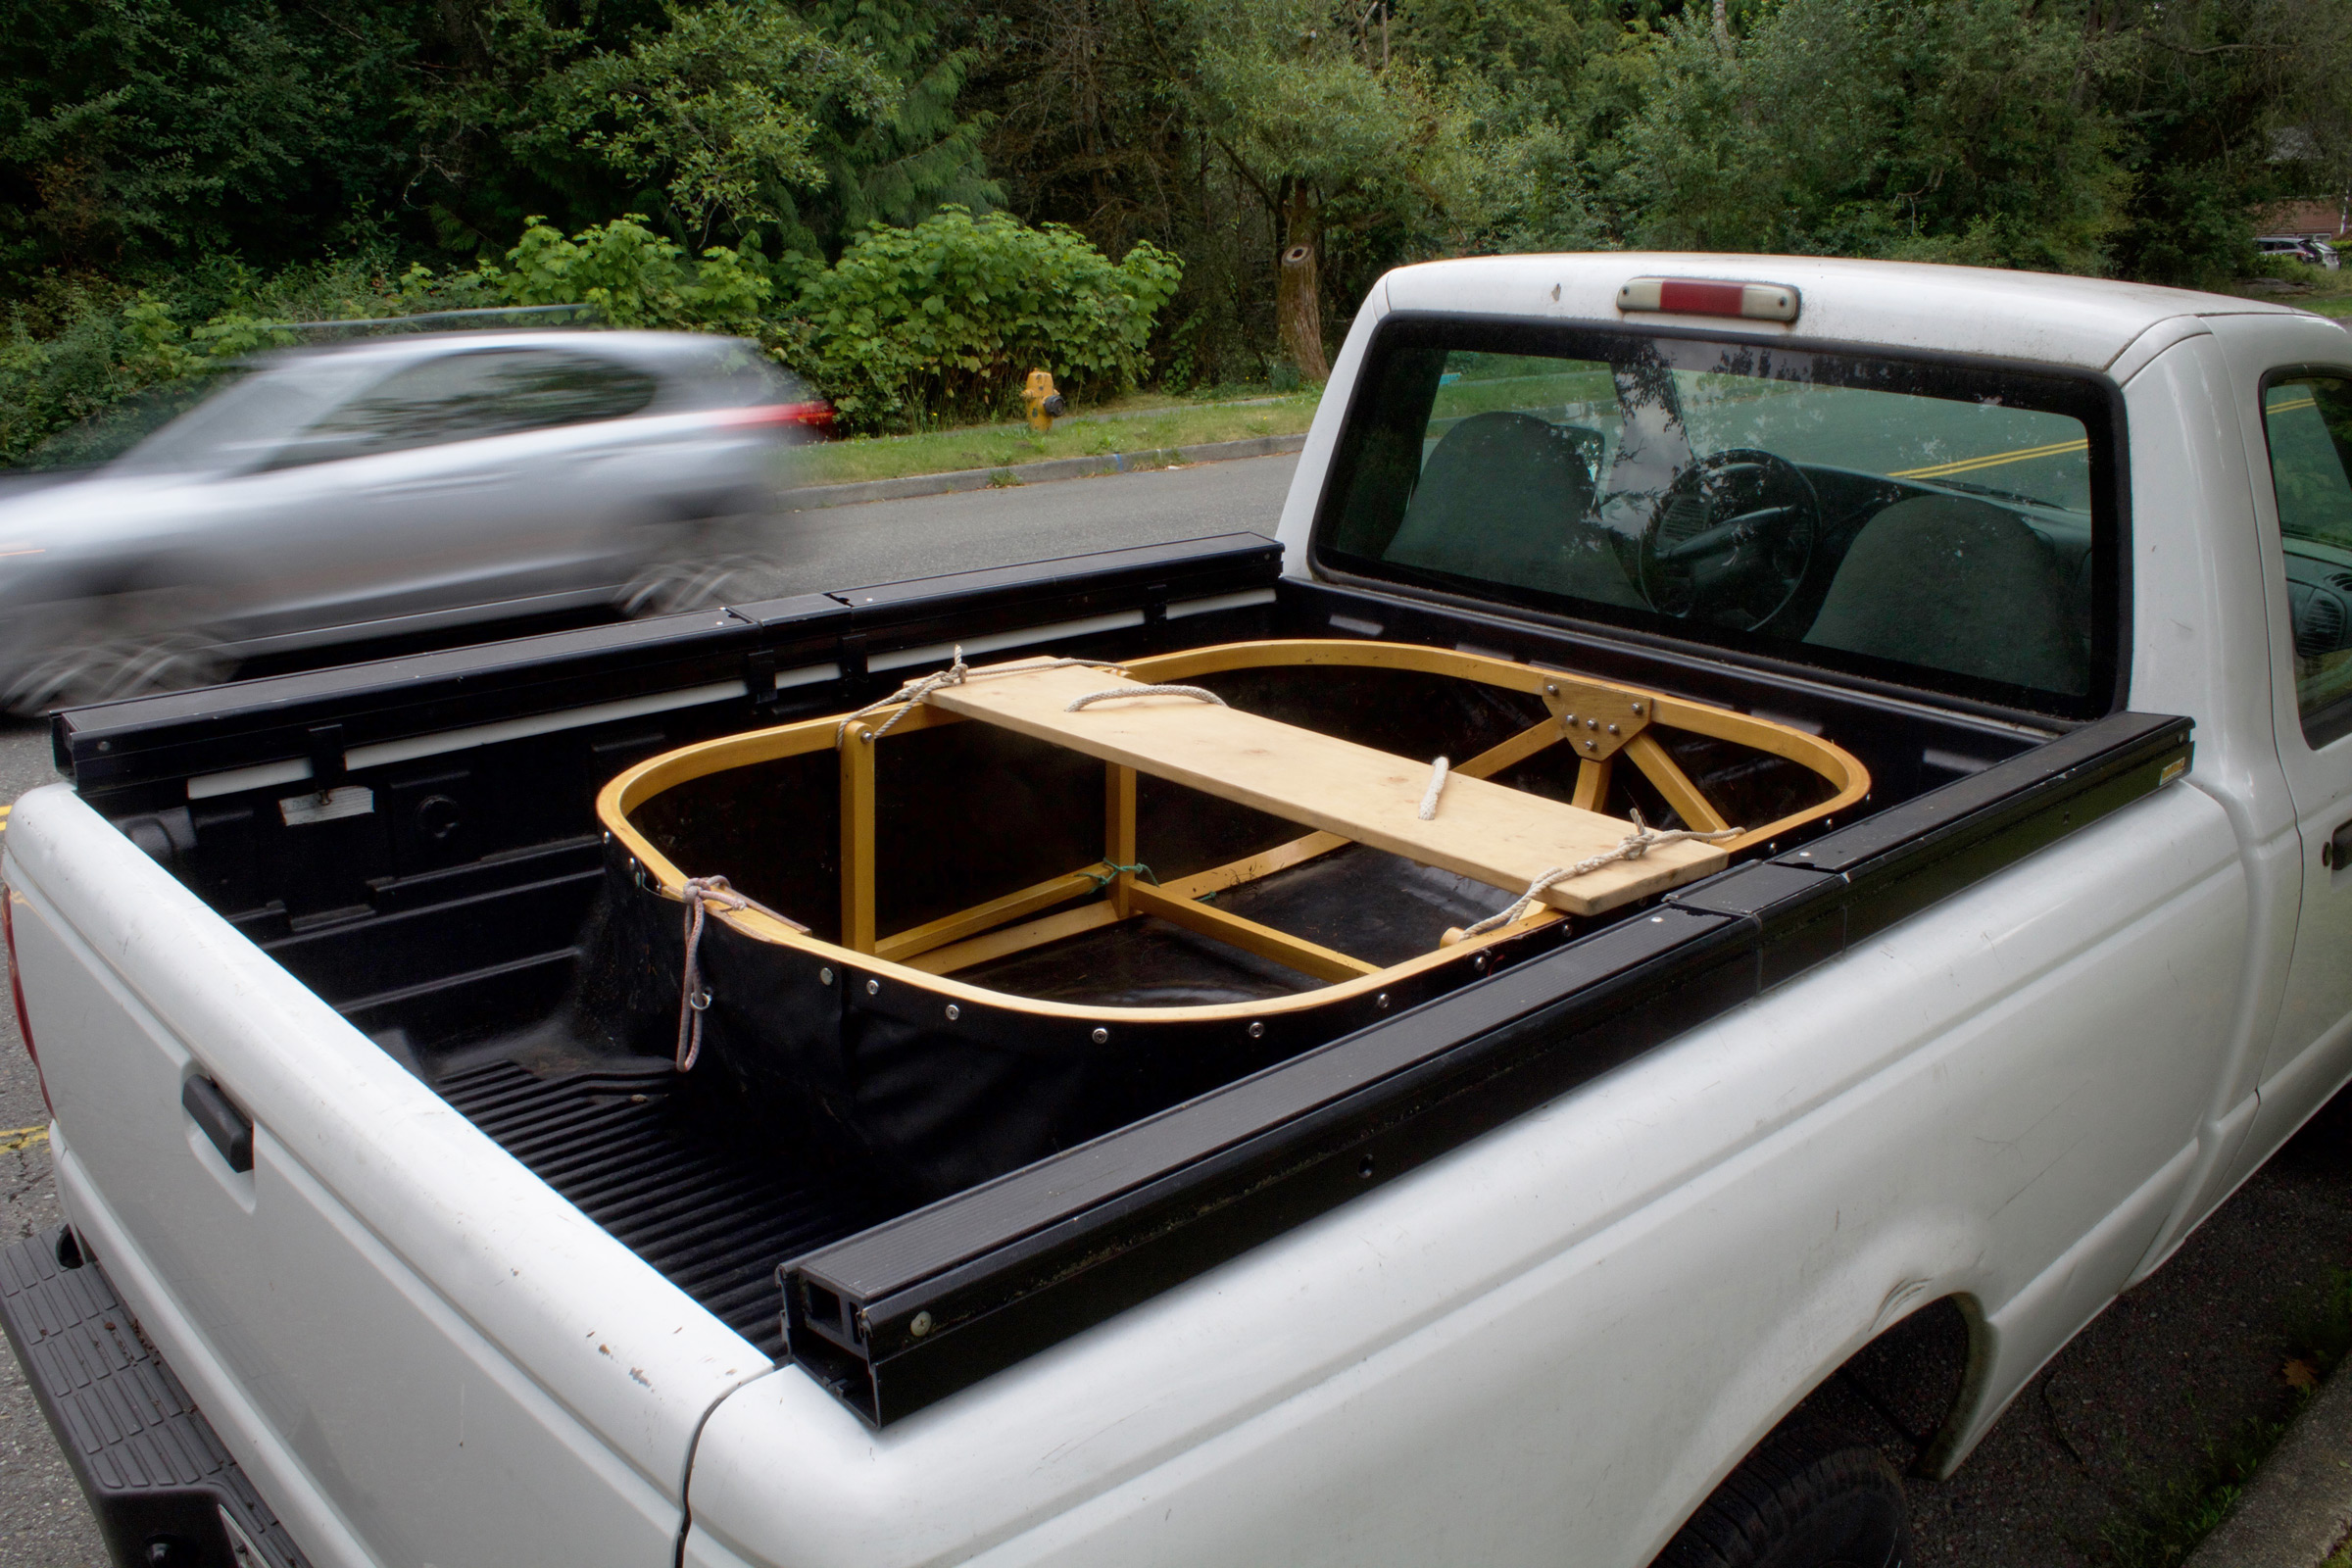
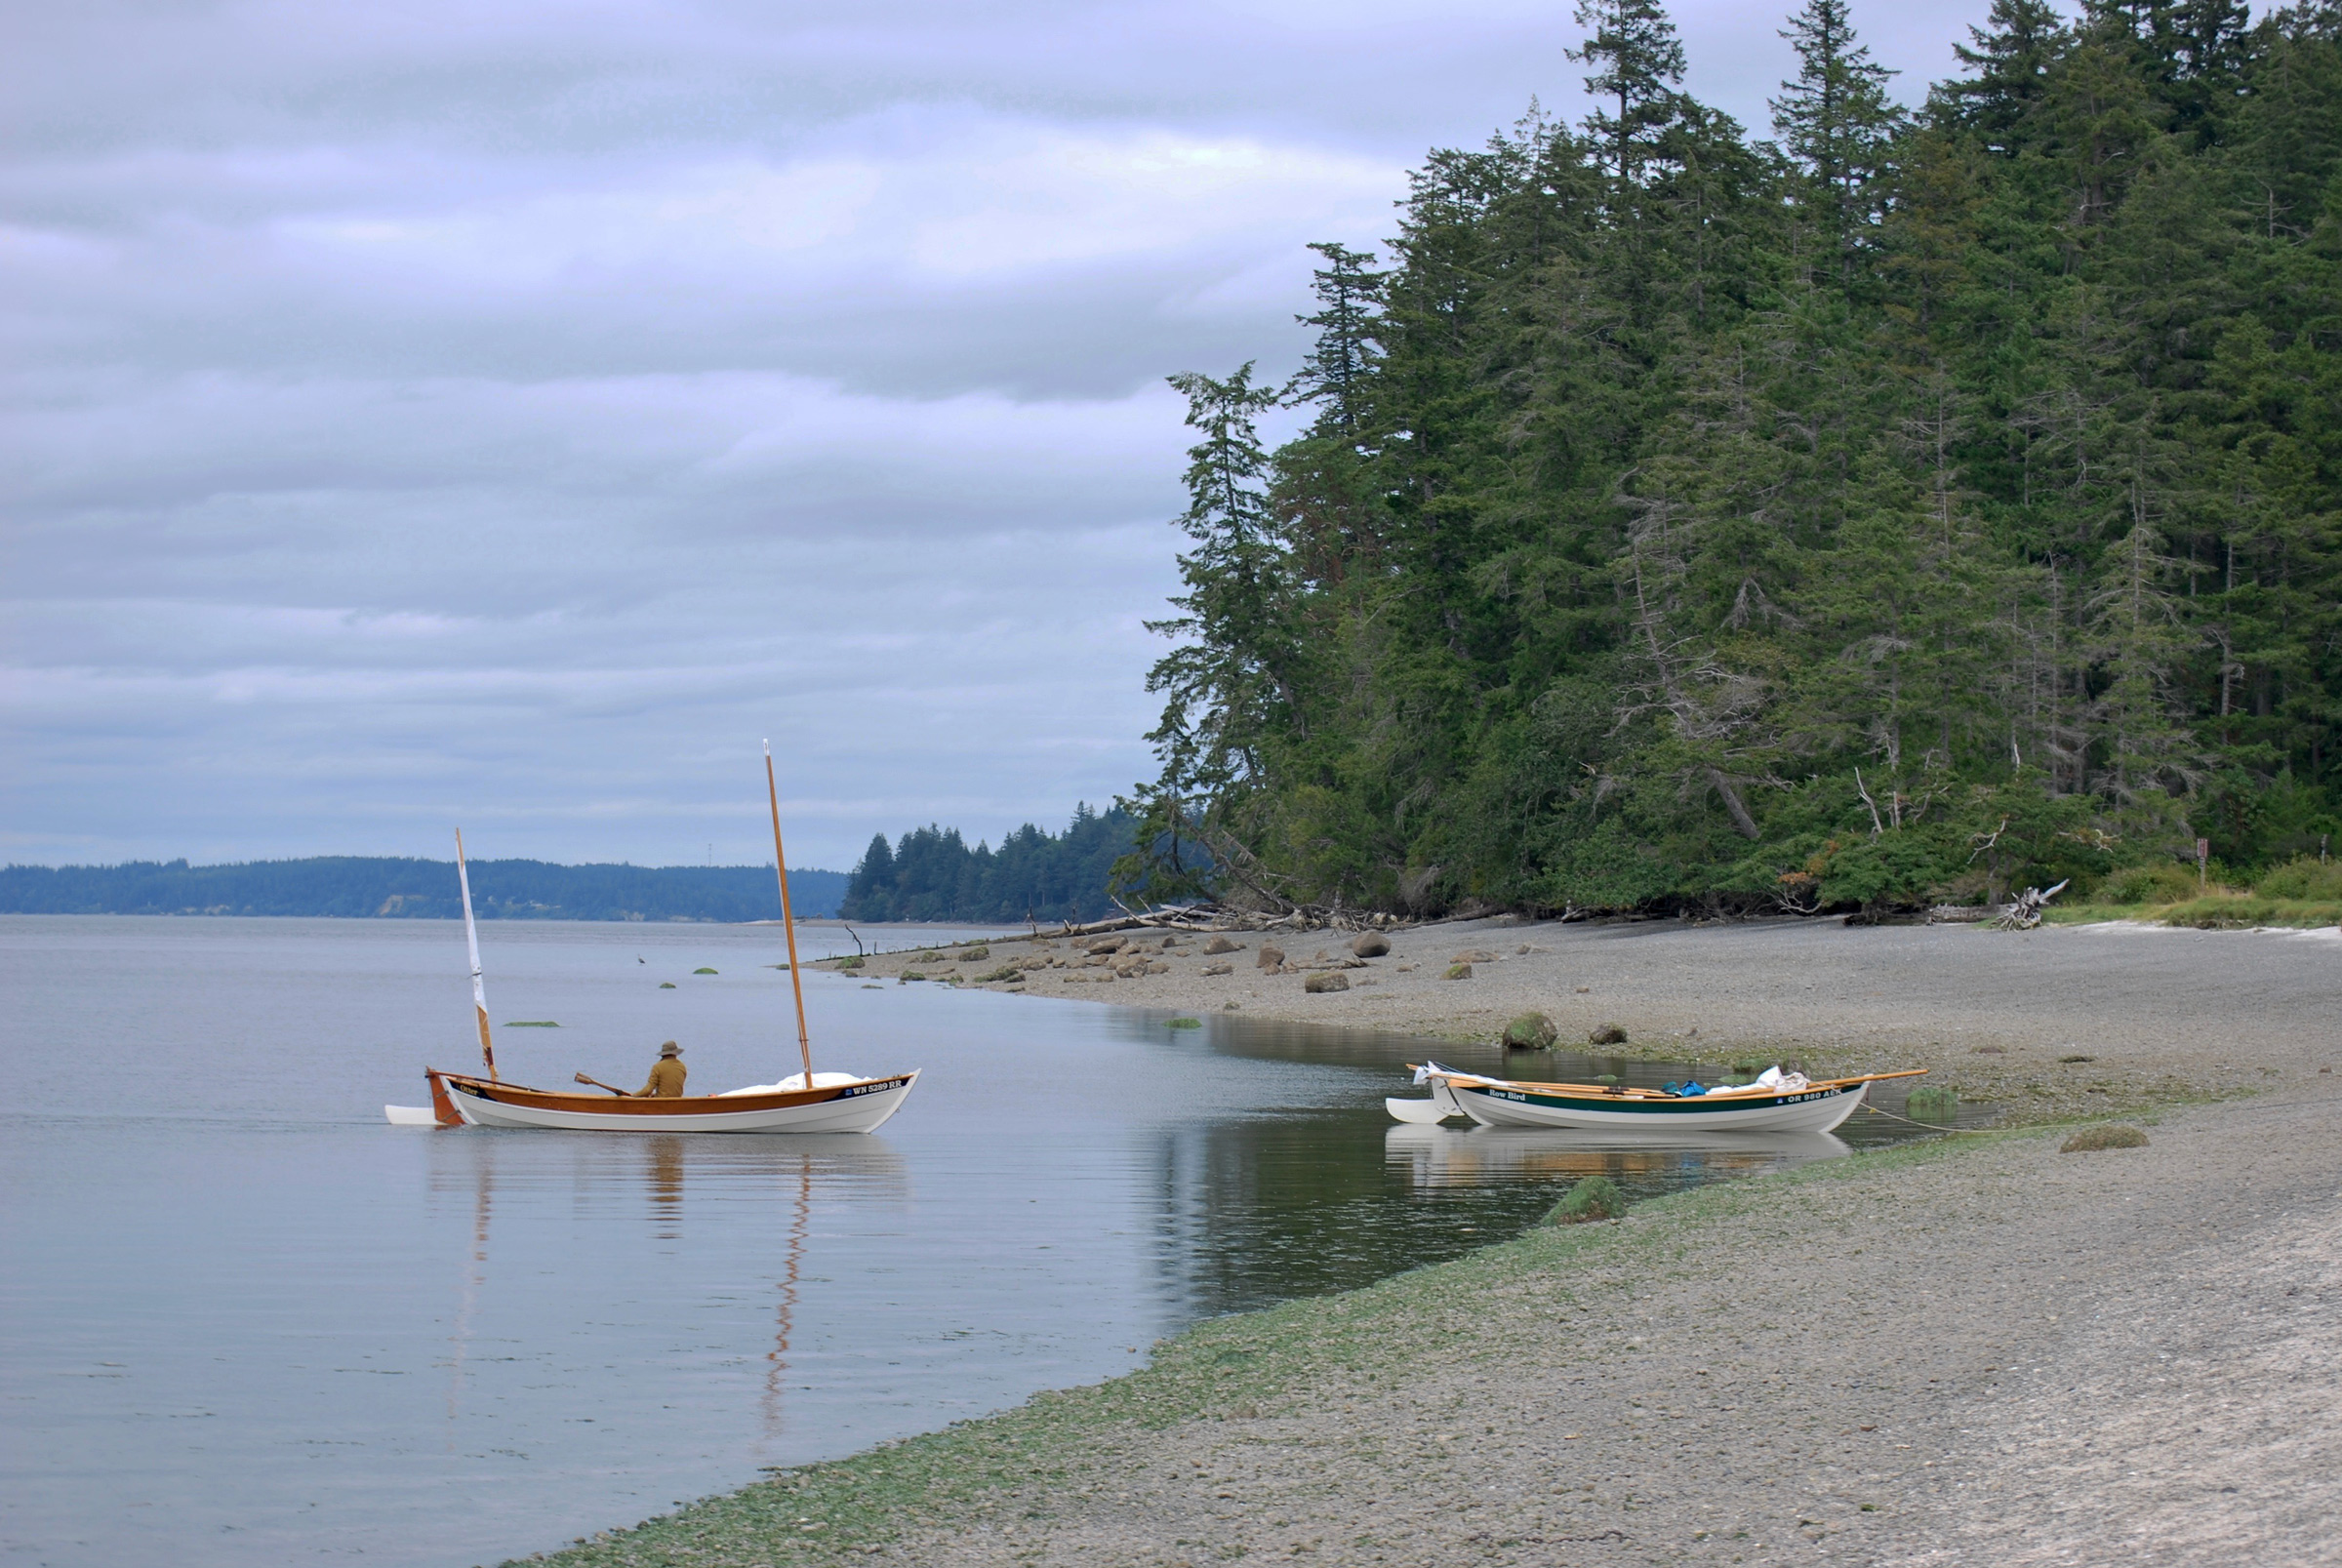
For many, 2020 has been a rough year. I’ve been very lucky, in that my main hardship was being largely confined to quarters through half the year, first by an invisible virus, then by a blinding pall of wildfire smoke that enveloped Seattle. I missed my chance to get out for a summer cruise, but I was able to make a brief restorative escape with my smallest boat.
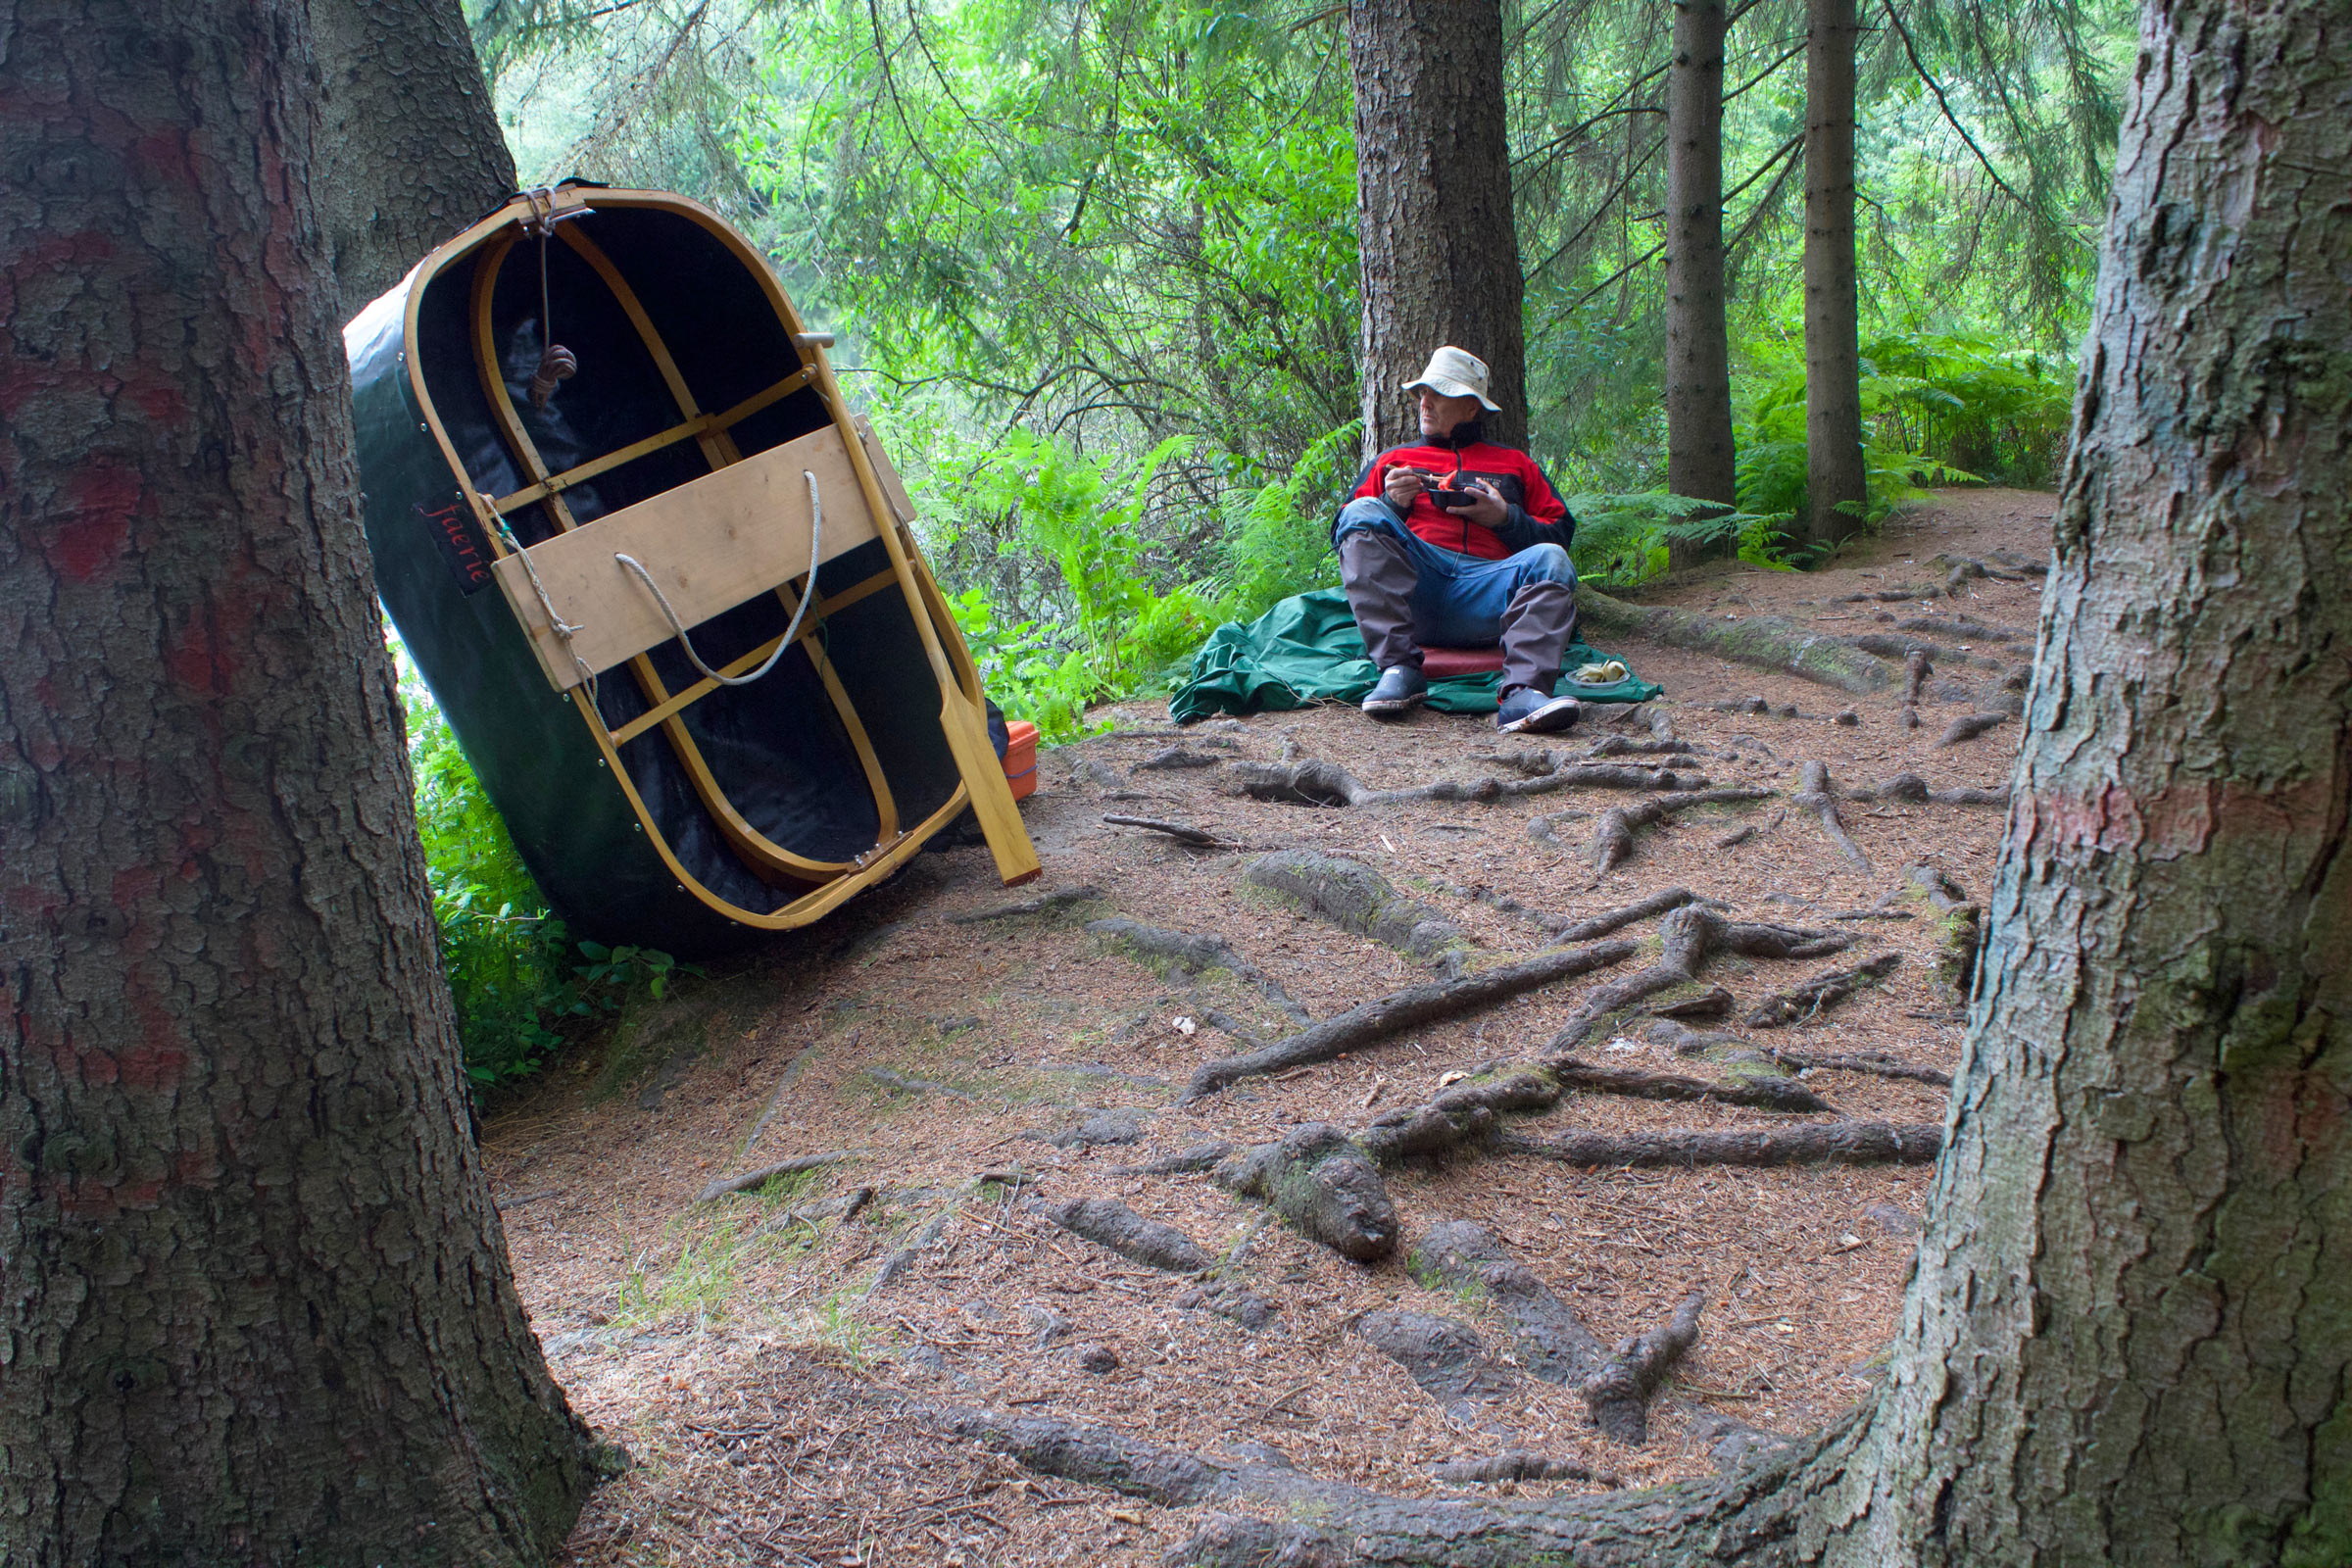
My coracle, FAERIE, is just 54″ long and built to be a folding tender for HESPERIA, one of my camp-cruising boats. She was never meant to go far, just from HESPERIA at anchor to shore and back. She’s neither fast nor seaworthy, so to take her on a cruise of her own, I needed to find a placid body of water scaled to her diminutive dimensions. Through satellite images, I searched the area north of Seattle, and I knew all of the small lakes I found—none of them held much interest for me except for a pair of ponds I had never seen before even though the park they were in was less than five miles from my home. I had passed the park’s west side by bicycle and by car countless times and years ago watched my daughter play soccer on its east side. The ponds were so well hidden by the woods that I had never caught a glimpse of them.
On a cool, overcast Tuesday morning, I packed a lunch, put FAERIE in the back of the truck, and headed for the park.
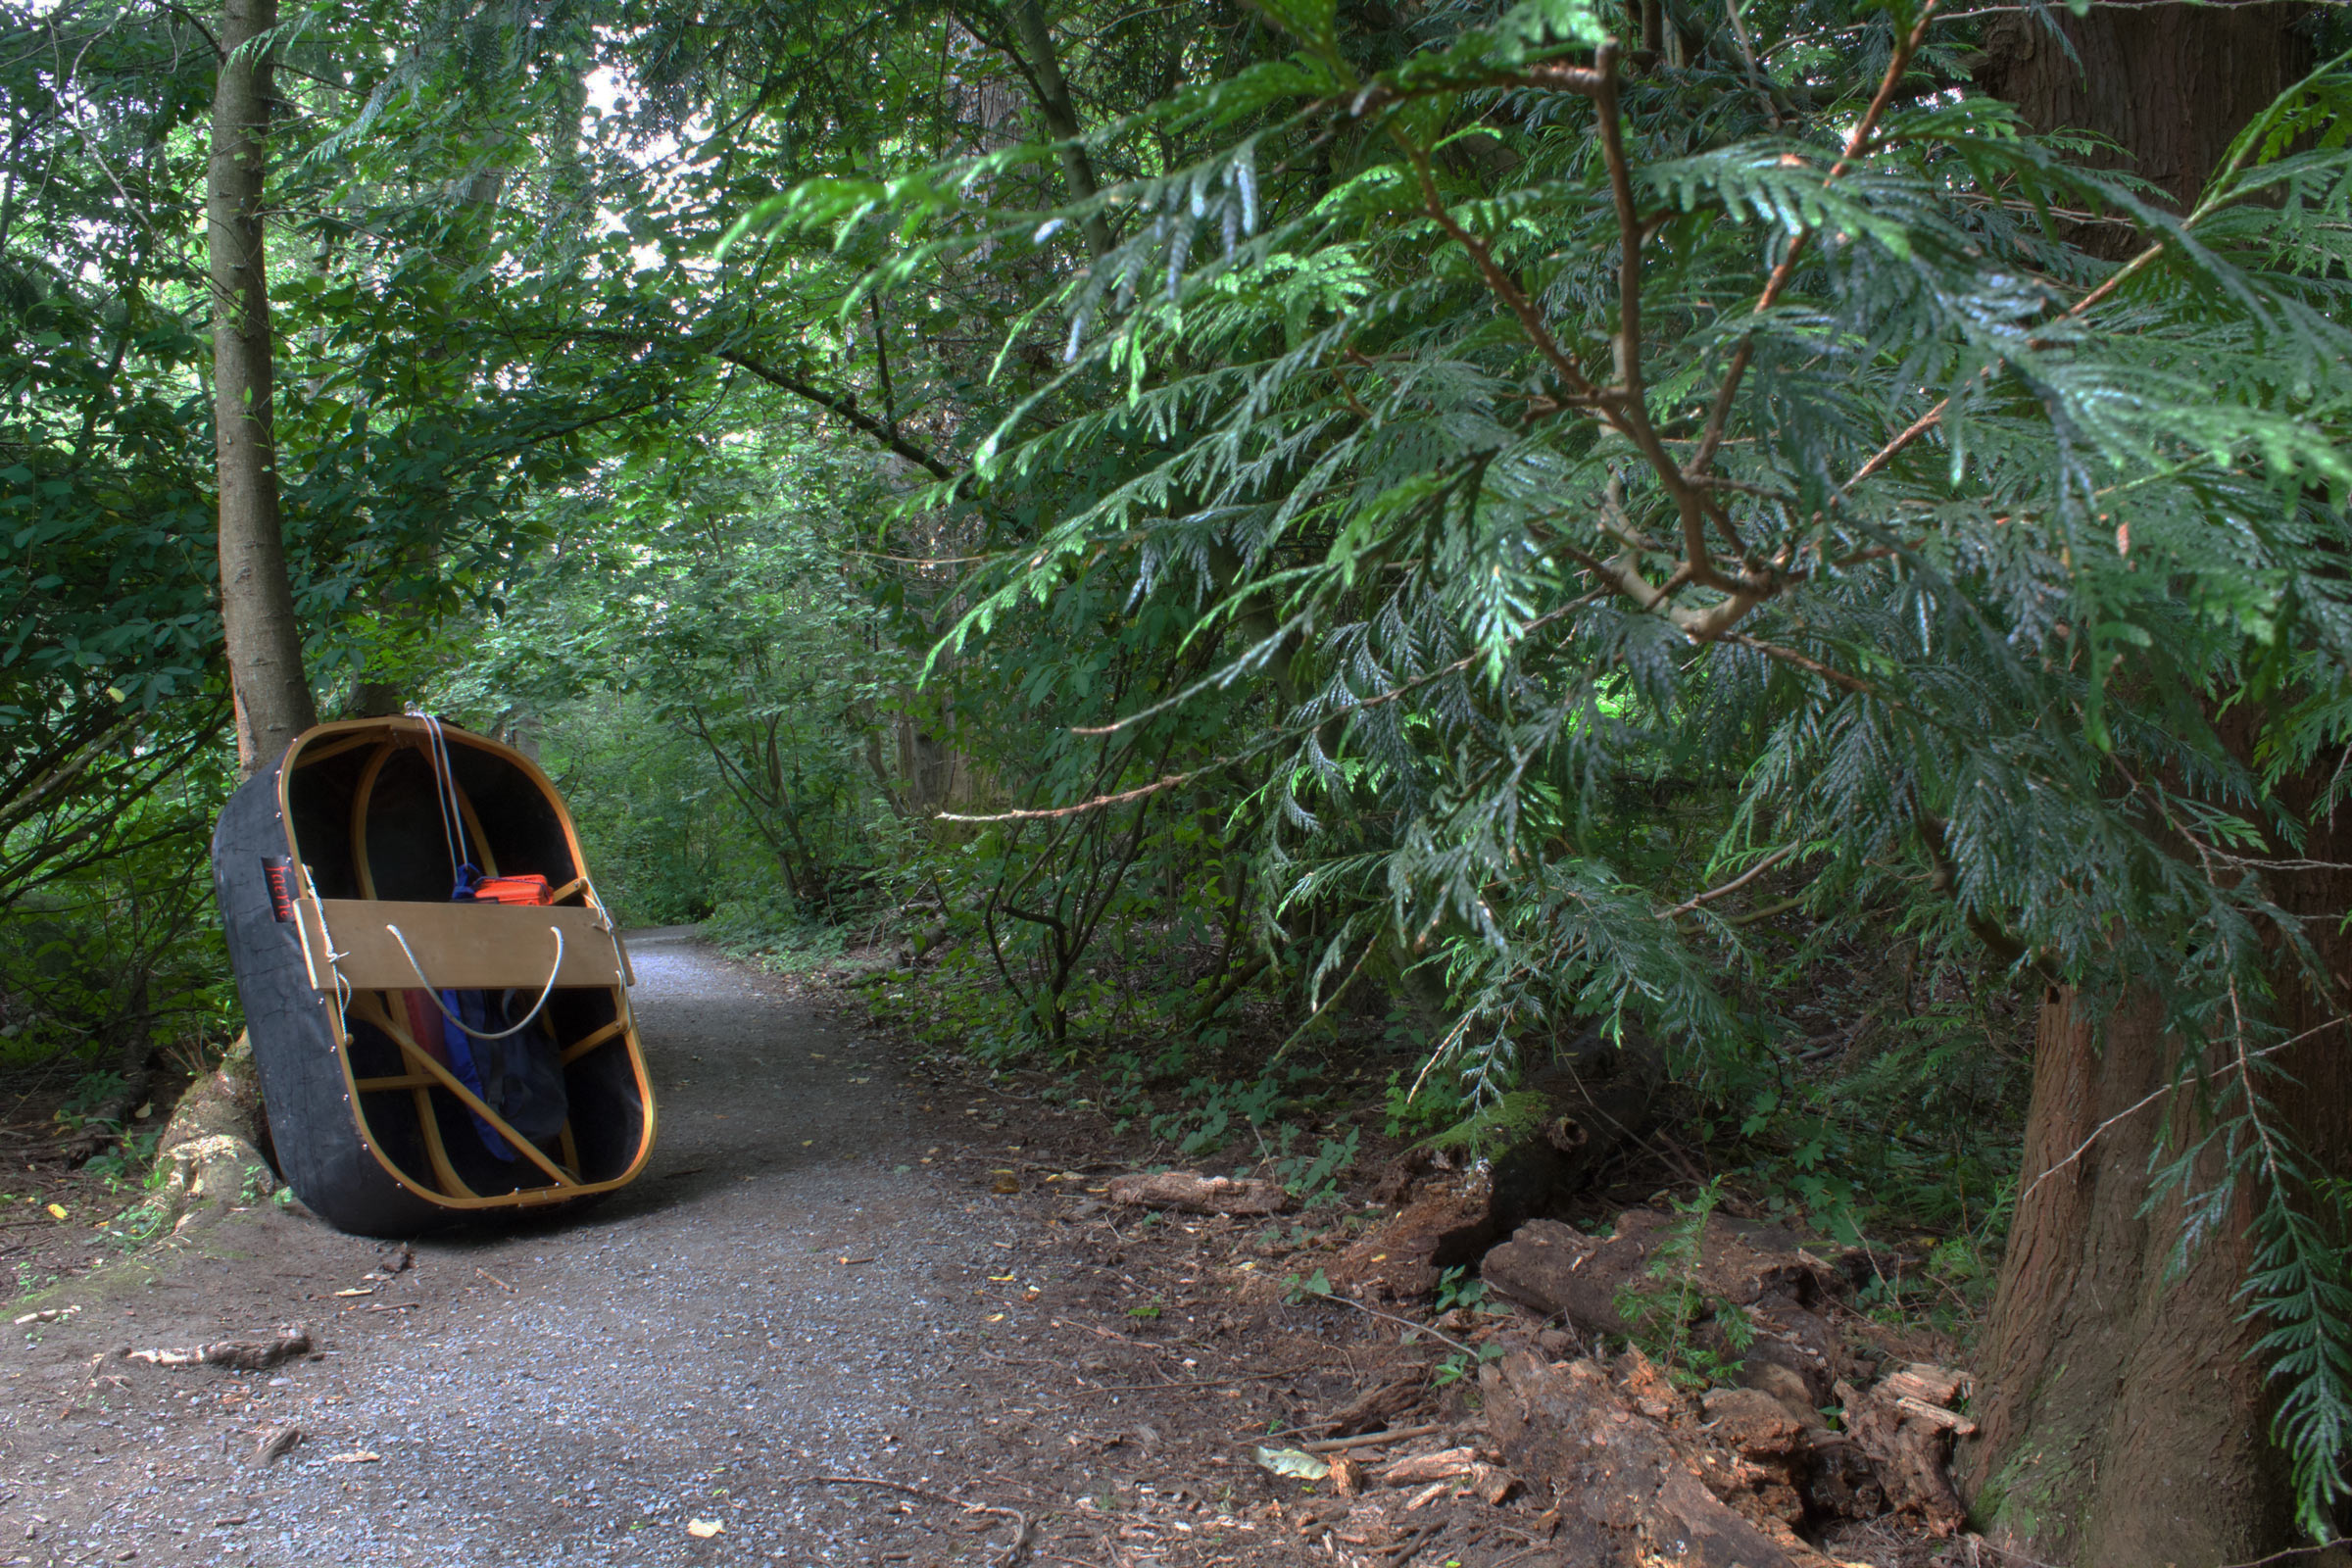
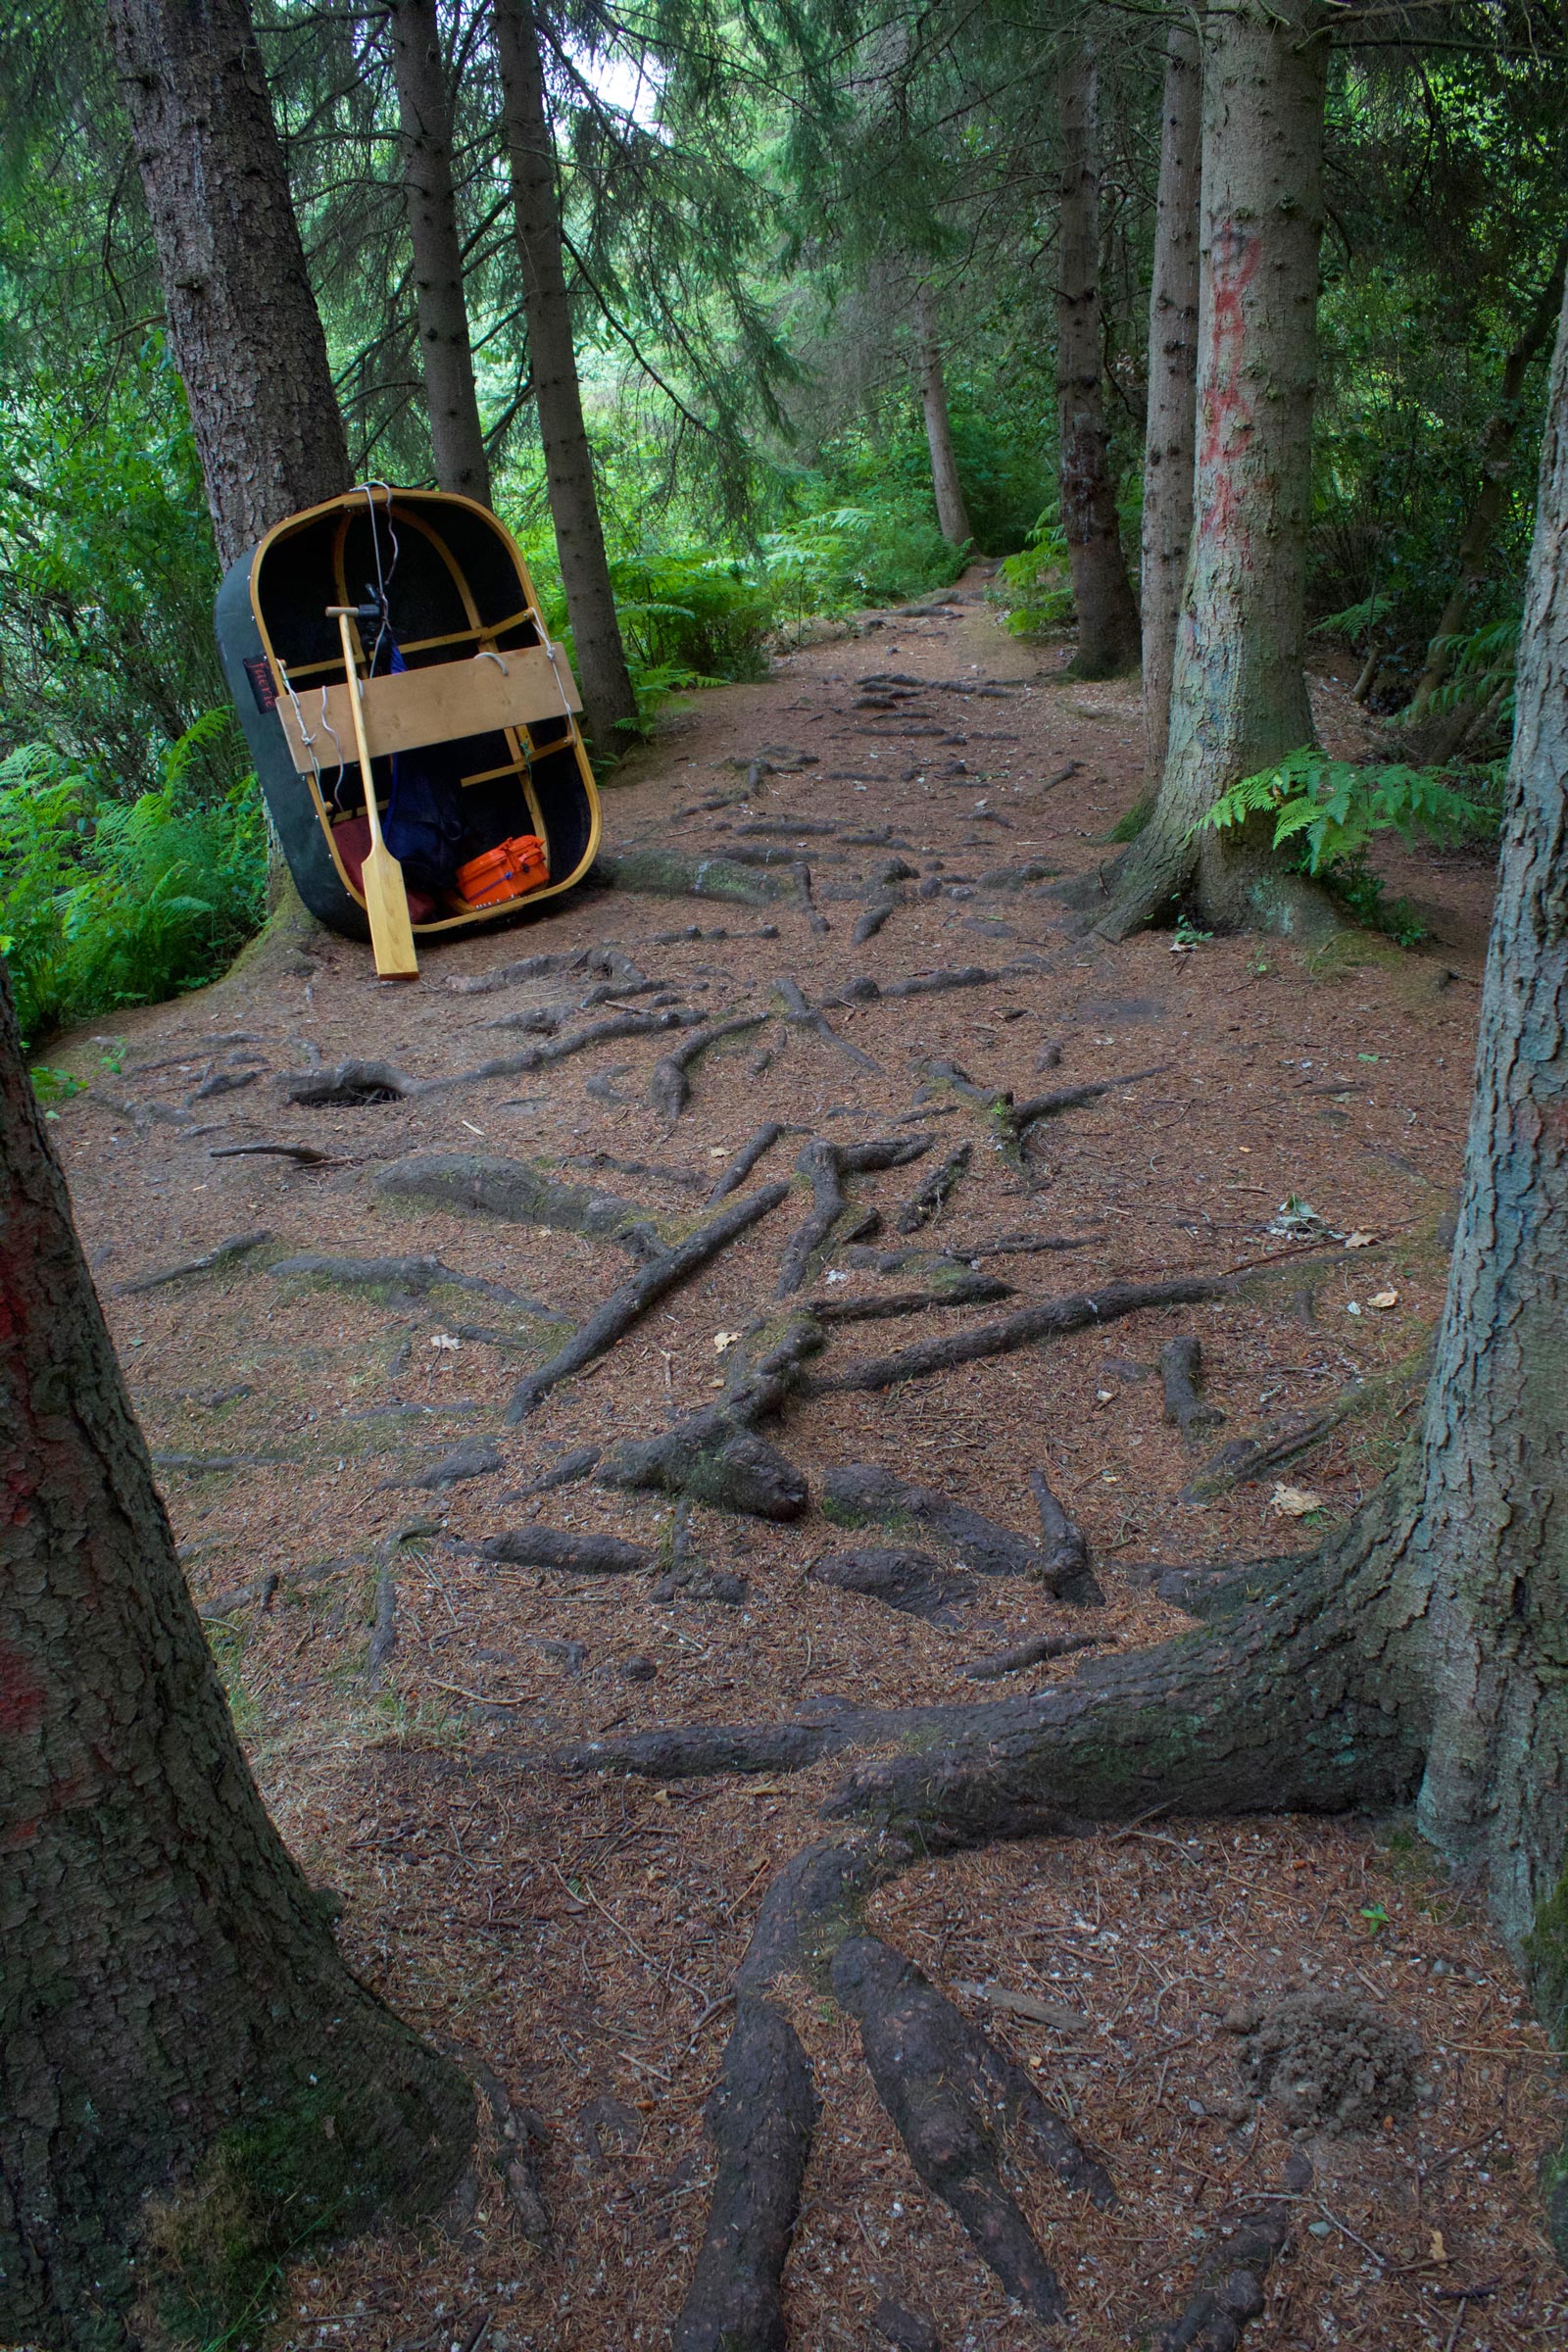
The path that leads to the Twin Ponds begins in that dark gap in the woods between the fire hydrant and the tree trunk just to the left of my truck’s cab. The only signs marking the park are set well back from the sidewalk and dimmed by the shadow of a dying willow; the road here is a 35-mph arterial, so it’s easy to race by without even catching a glimpse of them. Assembled, FAERIE fits neatly in the truck bed. The folding frame of laminated spruce is varnished, but I’ve kept the Port Orford cedar thwart unfinished. Even though it has been eight years since I built the coracle, when the sun warms the thwart, it is still redolent with Port Orford’s lemony fragrance.
Coracles have always been meant to be carried. Mine weighs 27 lbs and I carry it as coracles have been carried in Ireland and Britain for centuries. With the seat set against my back, the rope hanging from it crosses my chest just below my shoulders and holds the coracle in place, leaving my hands free. The paddle, a dry bag holding my lunch, and my camera case hang from the painter behind the thwart.
The path swerves through the woods in gentle curves, so while its entrance and its end at the ponds are separated only by an eighth of a mile, the view ahead and behind is veiled by trees and brush in subtle variations of green. The sound of cars rushing past the trailhead was muffled into silence by the leaves until the crisp grating of gravel underfoot was the only sound. I knew from the satellite photos that residential streets run parallel to the path and there are houses only 50 yards away on either side of it, but they were hidden by a thick wall of cedars and salmonberry and as easily forgotten as if they had been miles away.
The trail led to the east side of the south pond at one of the few breaks in the brush at the water’s edge. Dead tree branches in the water with sharp broken ends kept me from trying to launch here. I continued my portage north and took the path along the 10’-wide strip of high ground that separates the ponds. I emerged from the woods and walked along the edge of the soccer field where my daughter had played some 15 years ago, then back into the woods on the east side of the north pond.
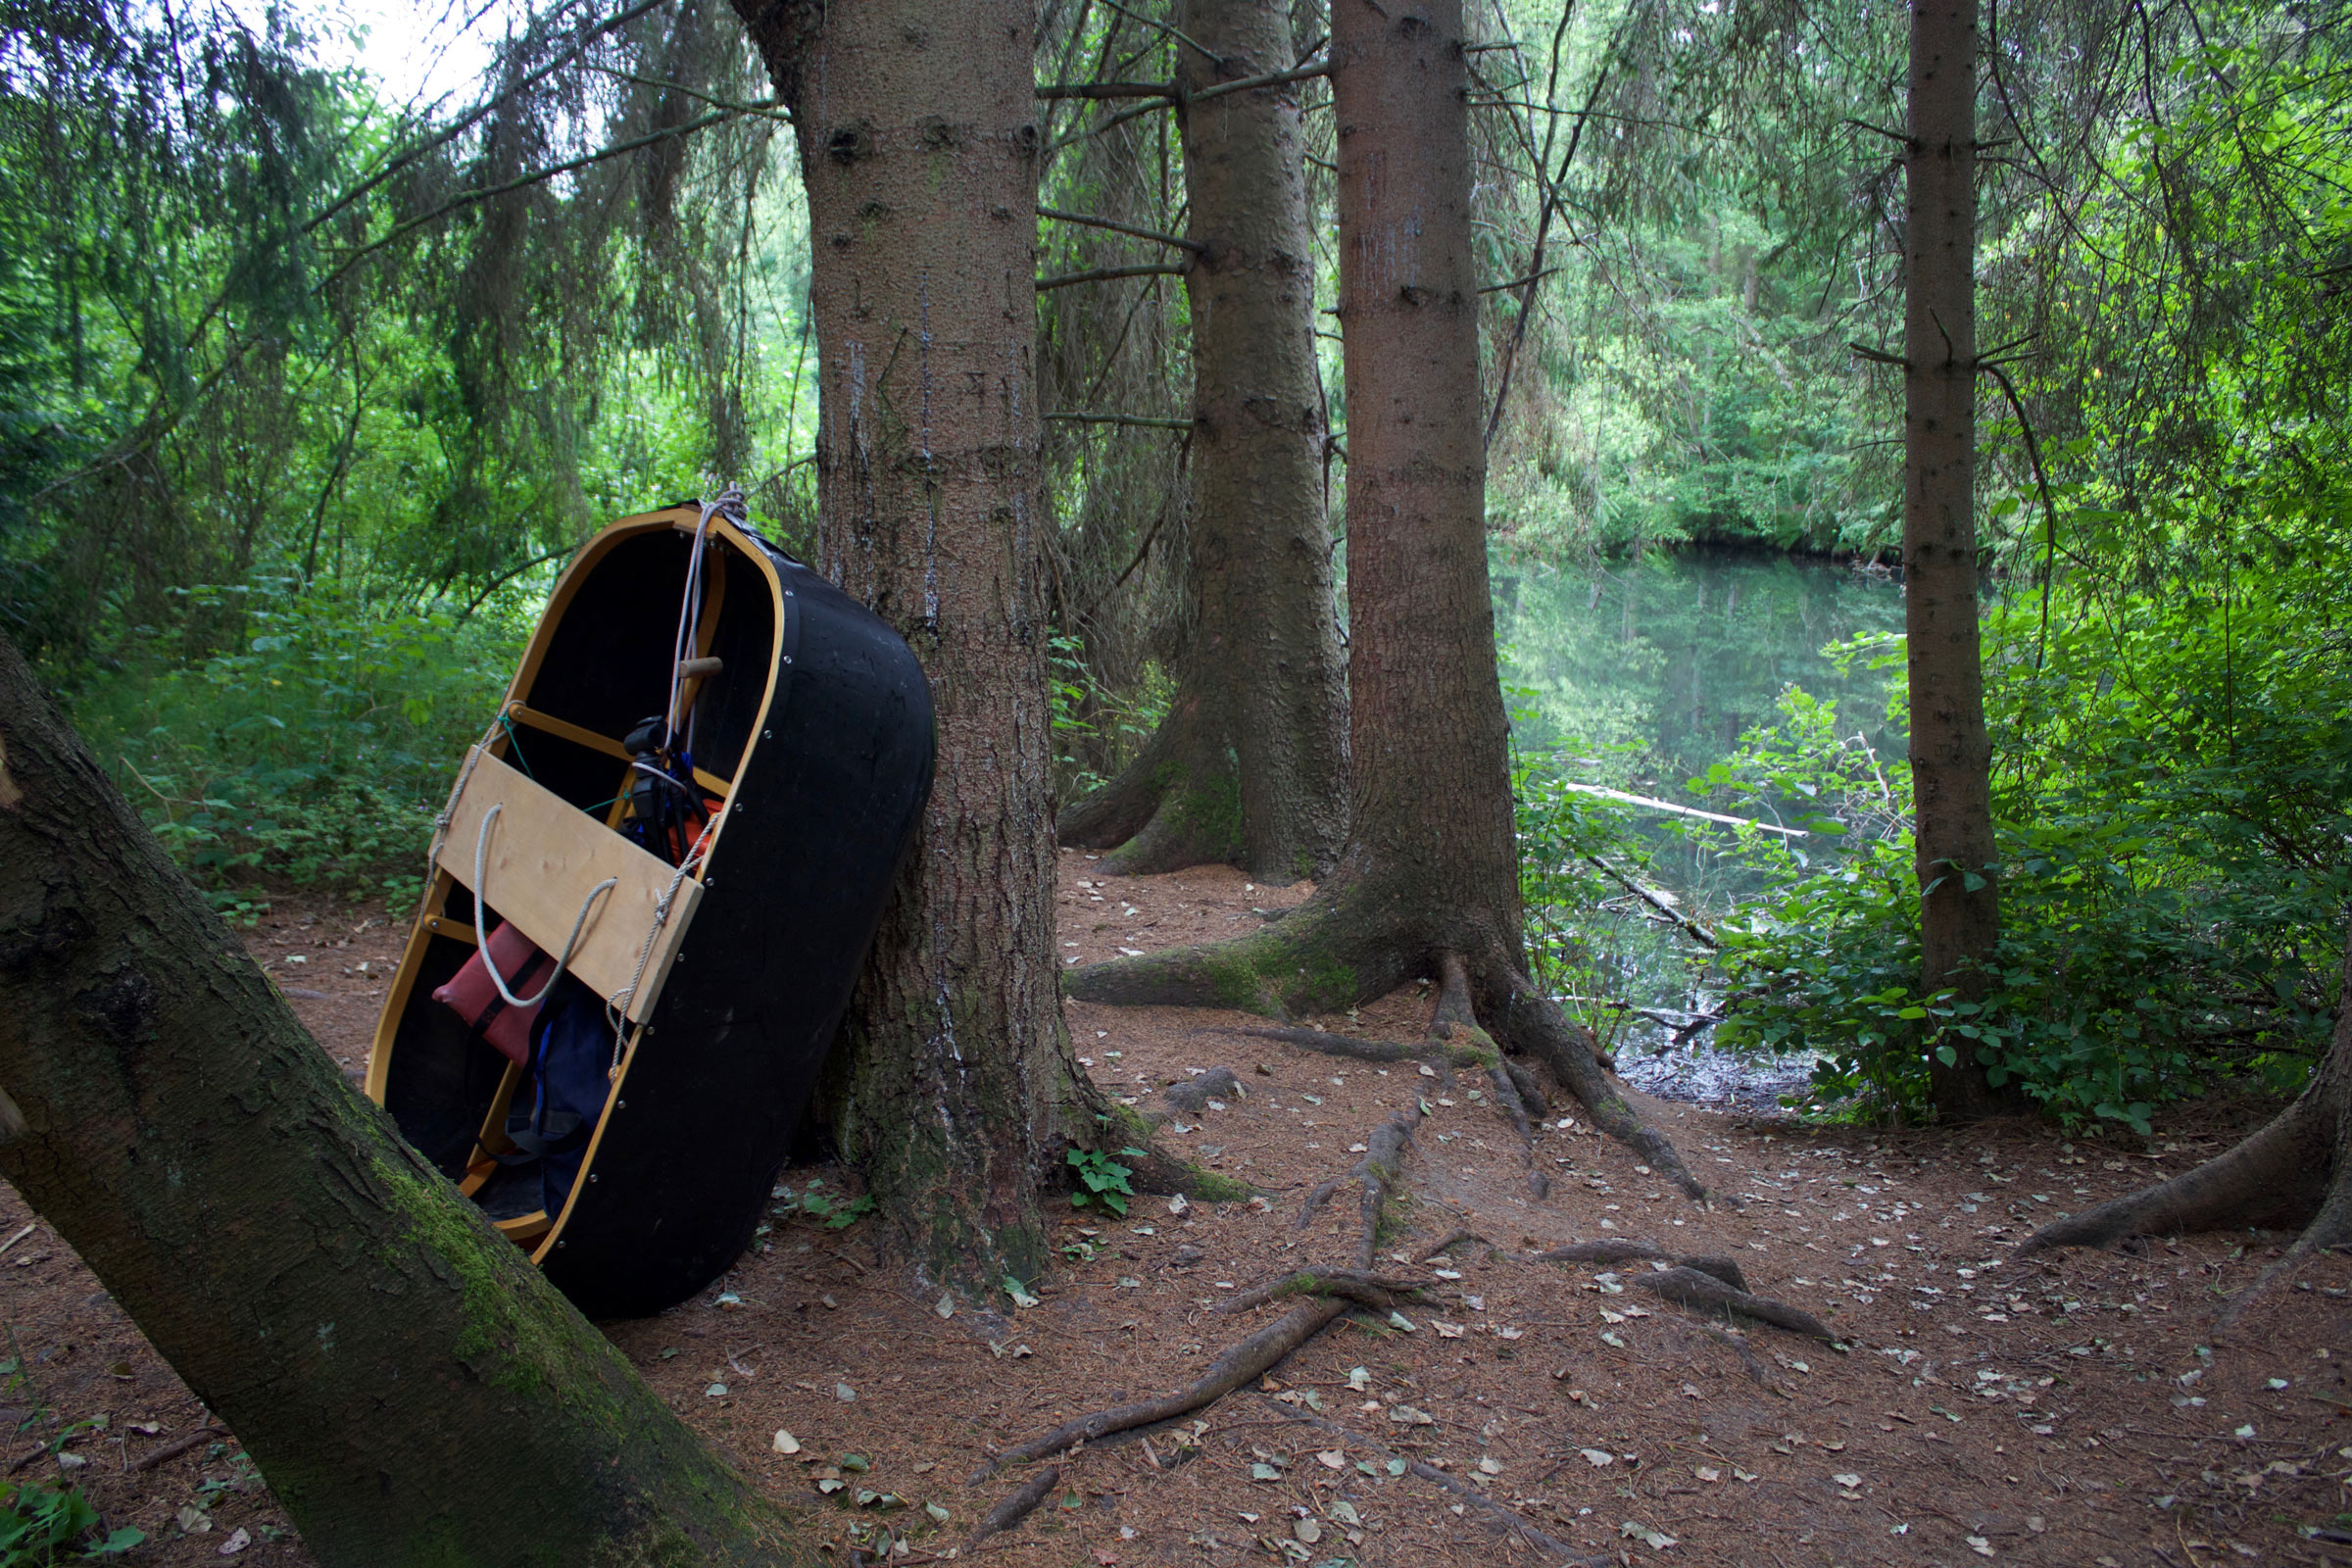
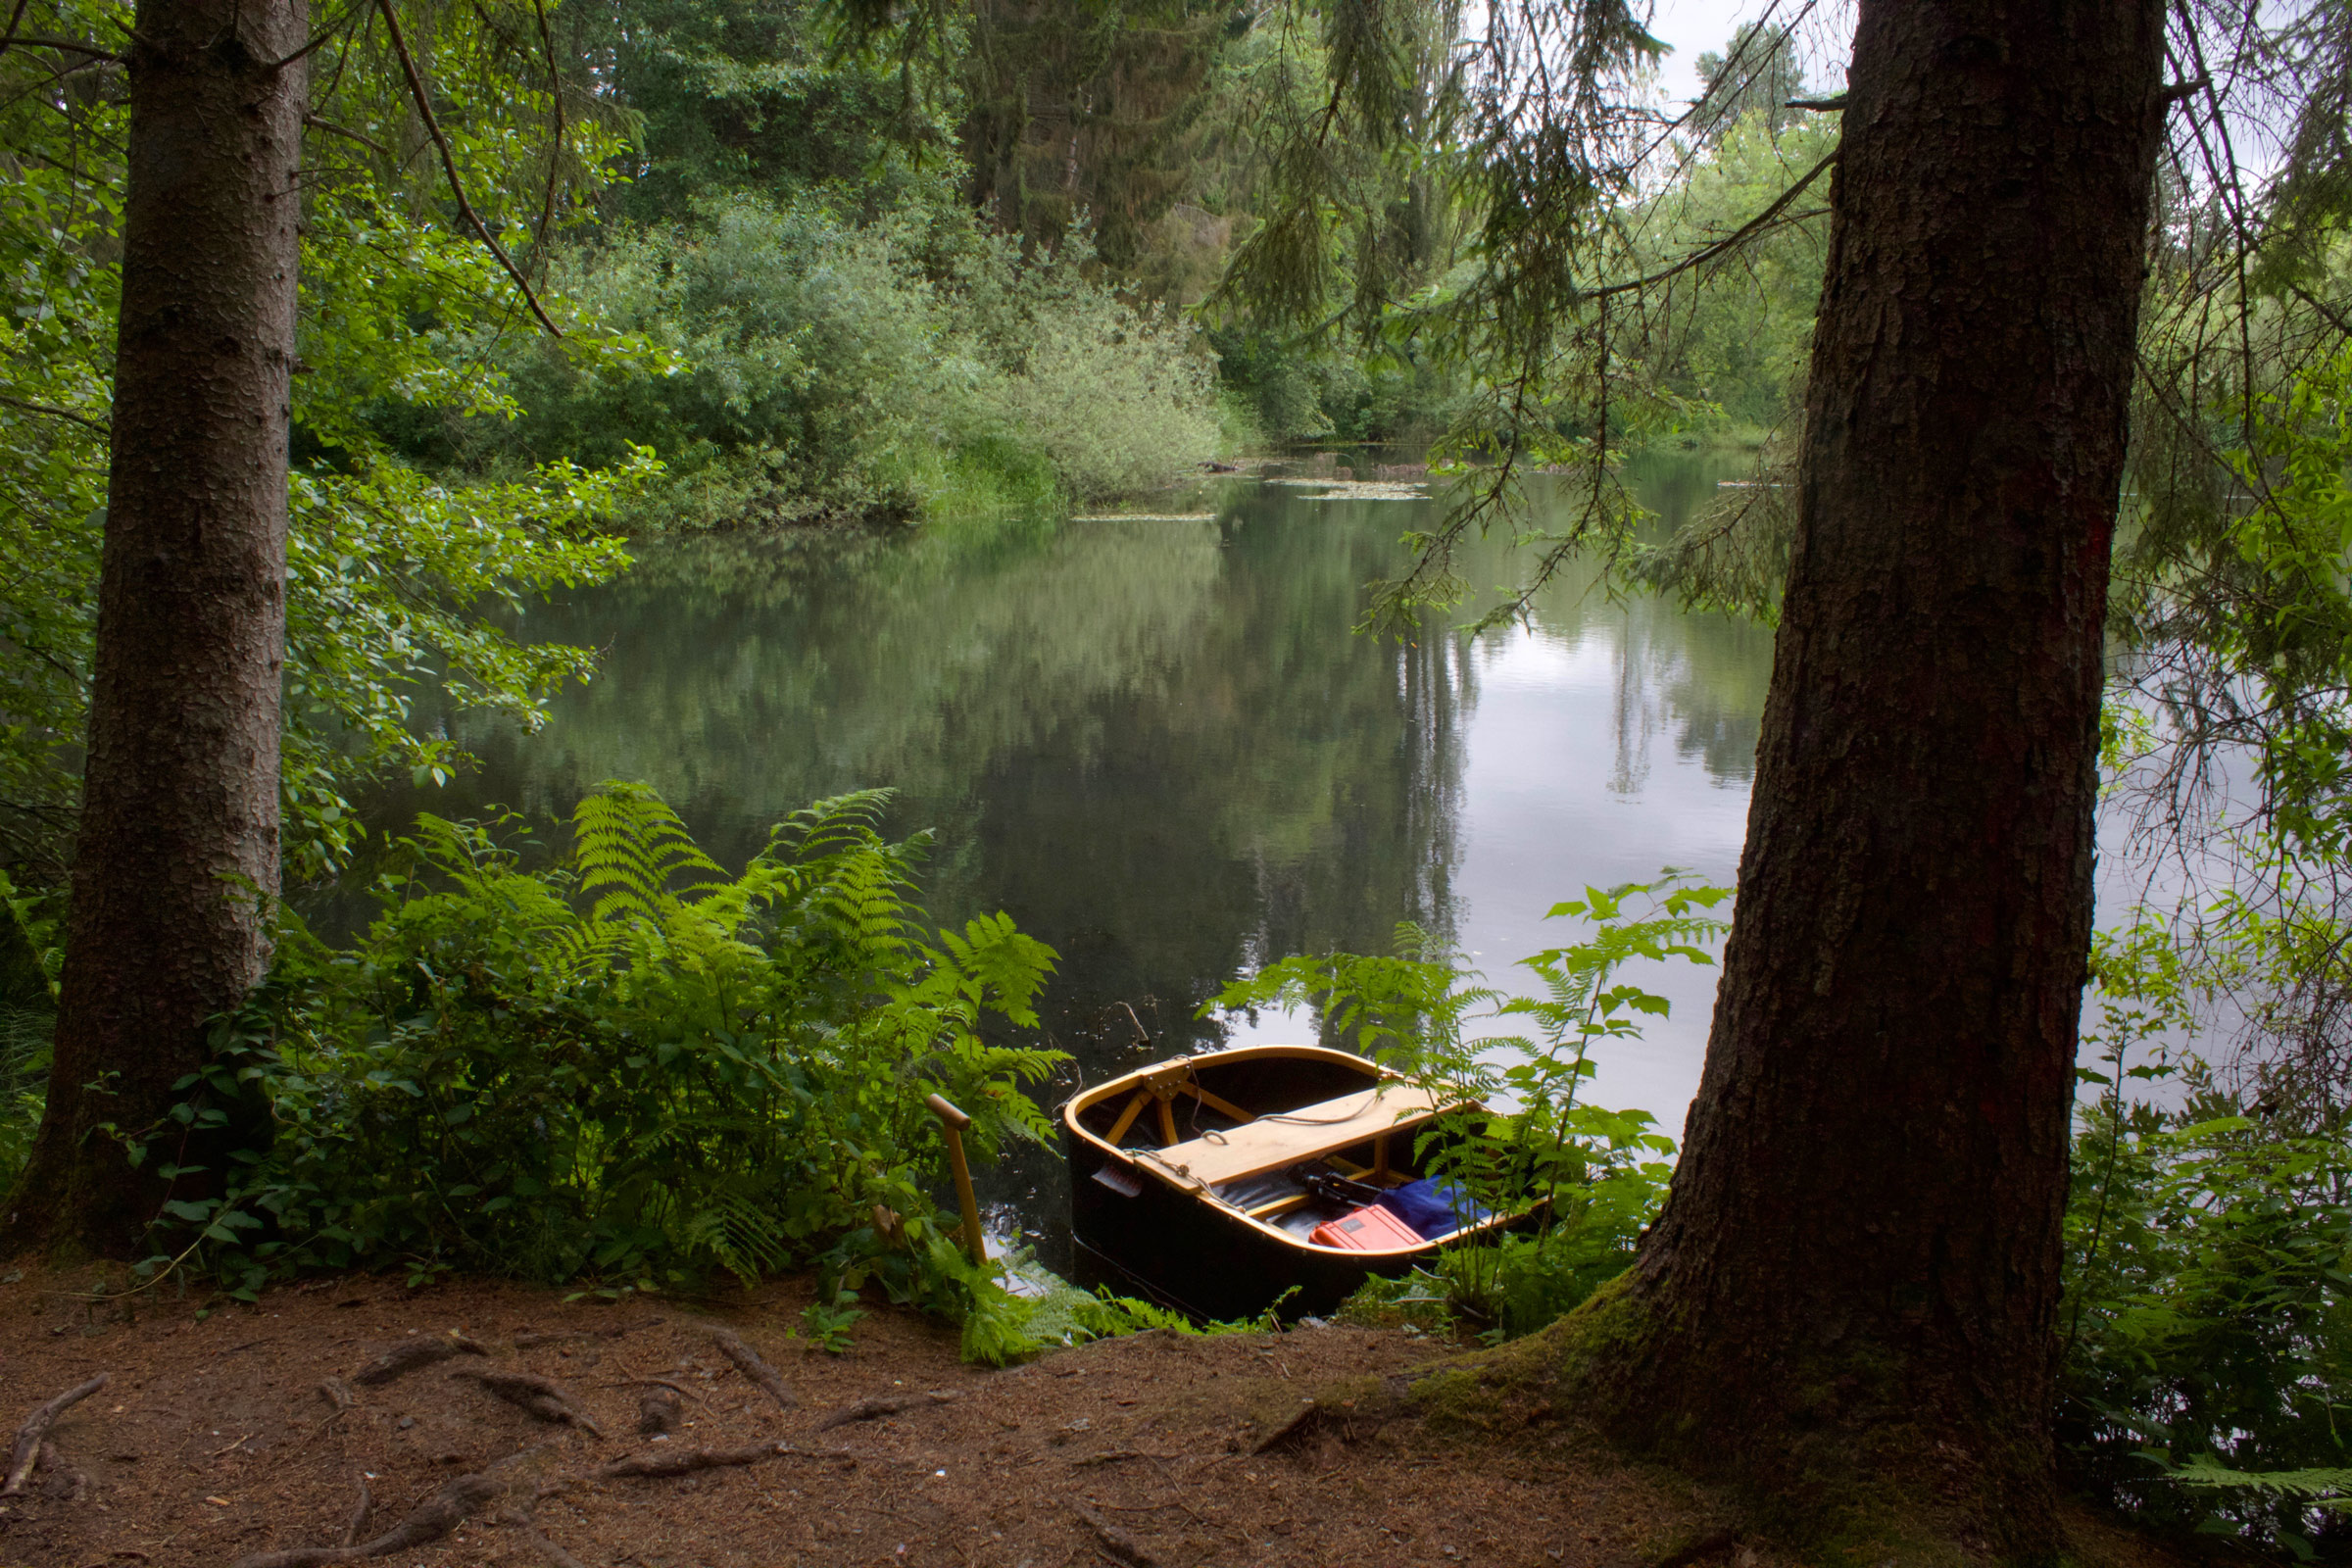
Thornton Creek trickles into the north pond after traveling from its source at Ronald Bog, a mile to the north, flowing through underground pipes for almost half of that distance. The creek approached the pond silently—its water so thin that it took the contours of the pebbles beneath it—and made its last bend around a Medusean tangle of soil-bare roots fanned out from a quadruple-trunked maple. I set FAERIE at the water’s edge and pulled her across the shallow of pale grey sand at the creek’s mouth.
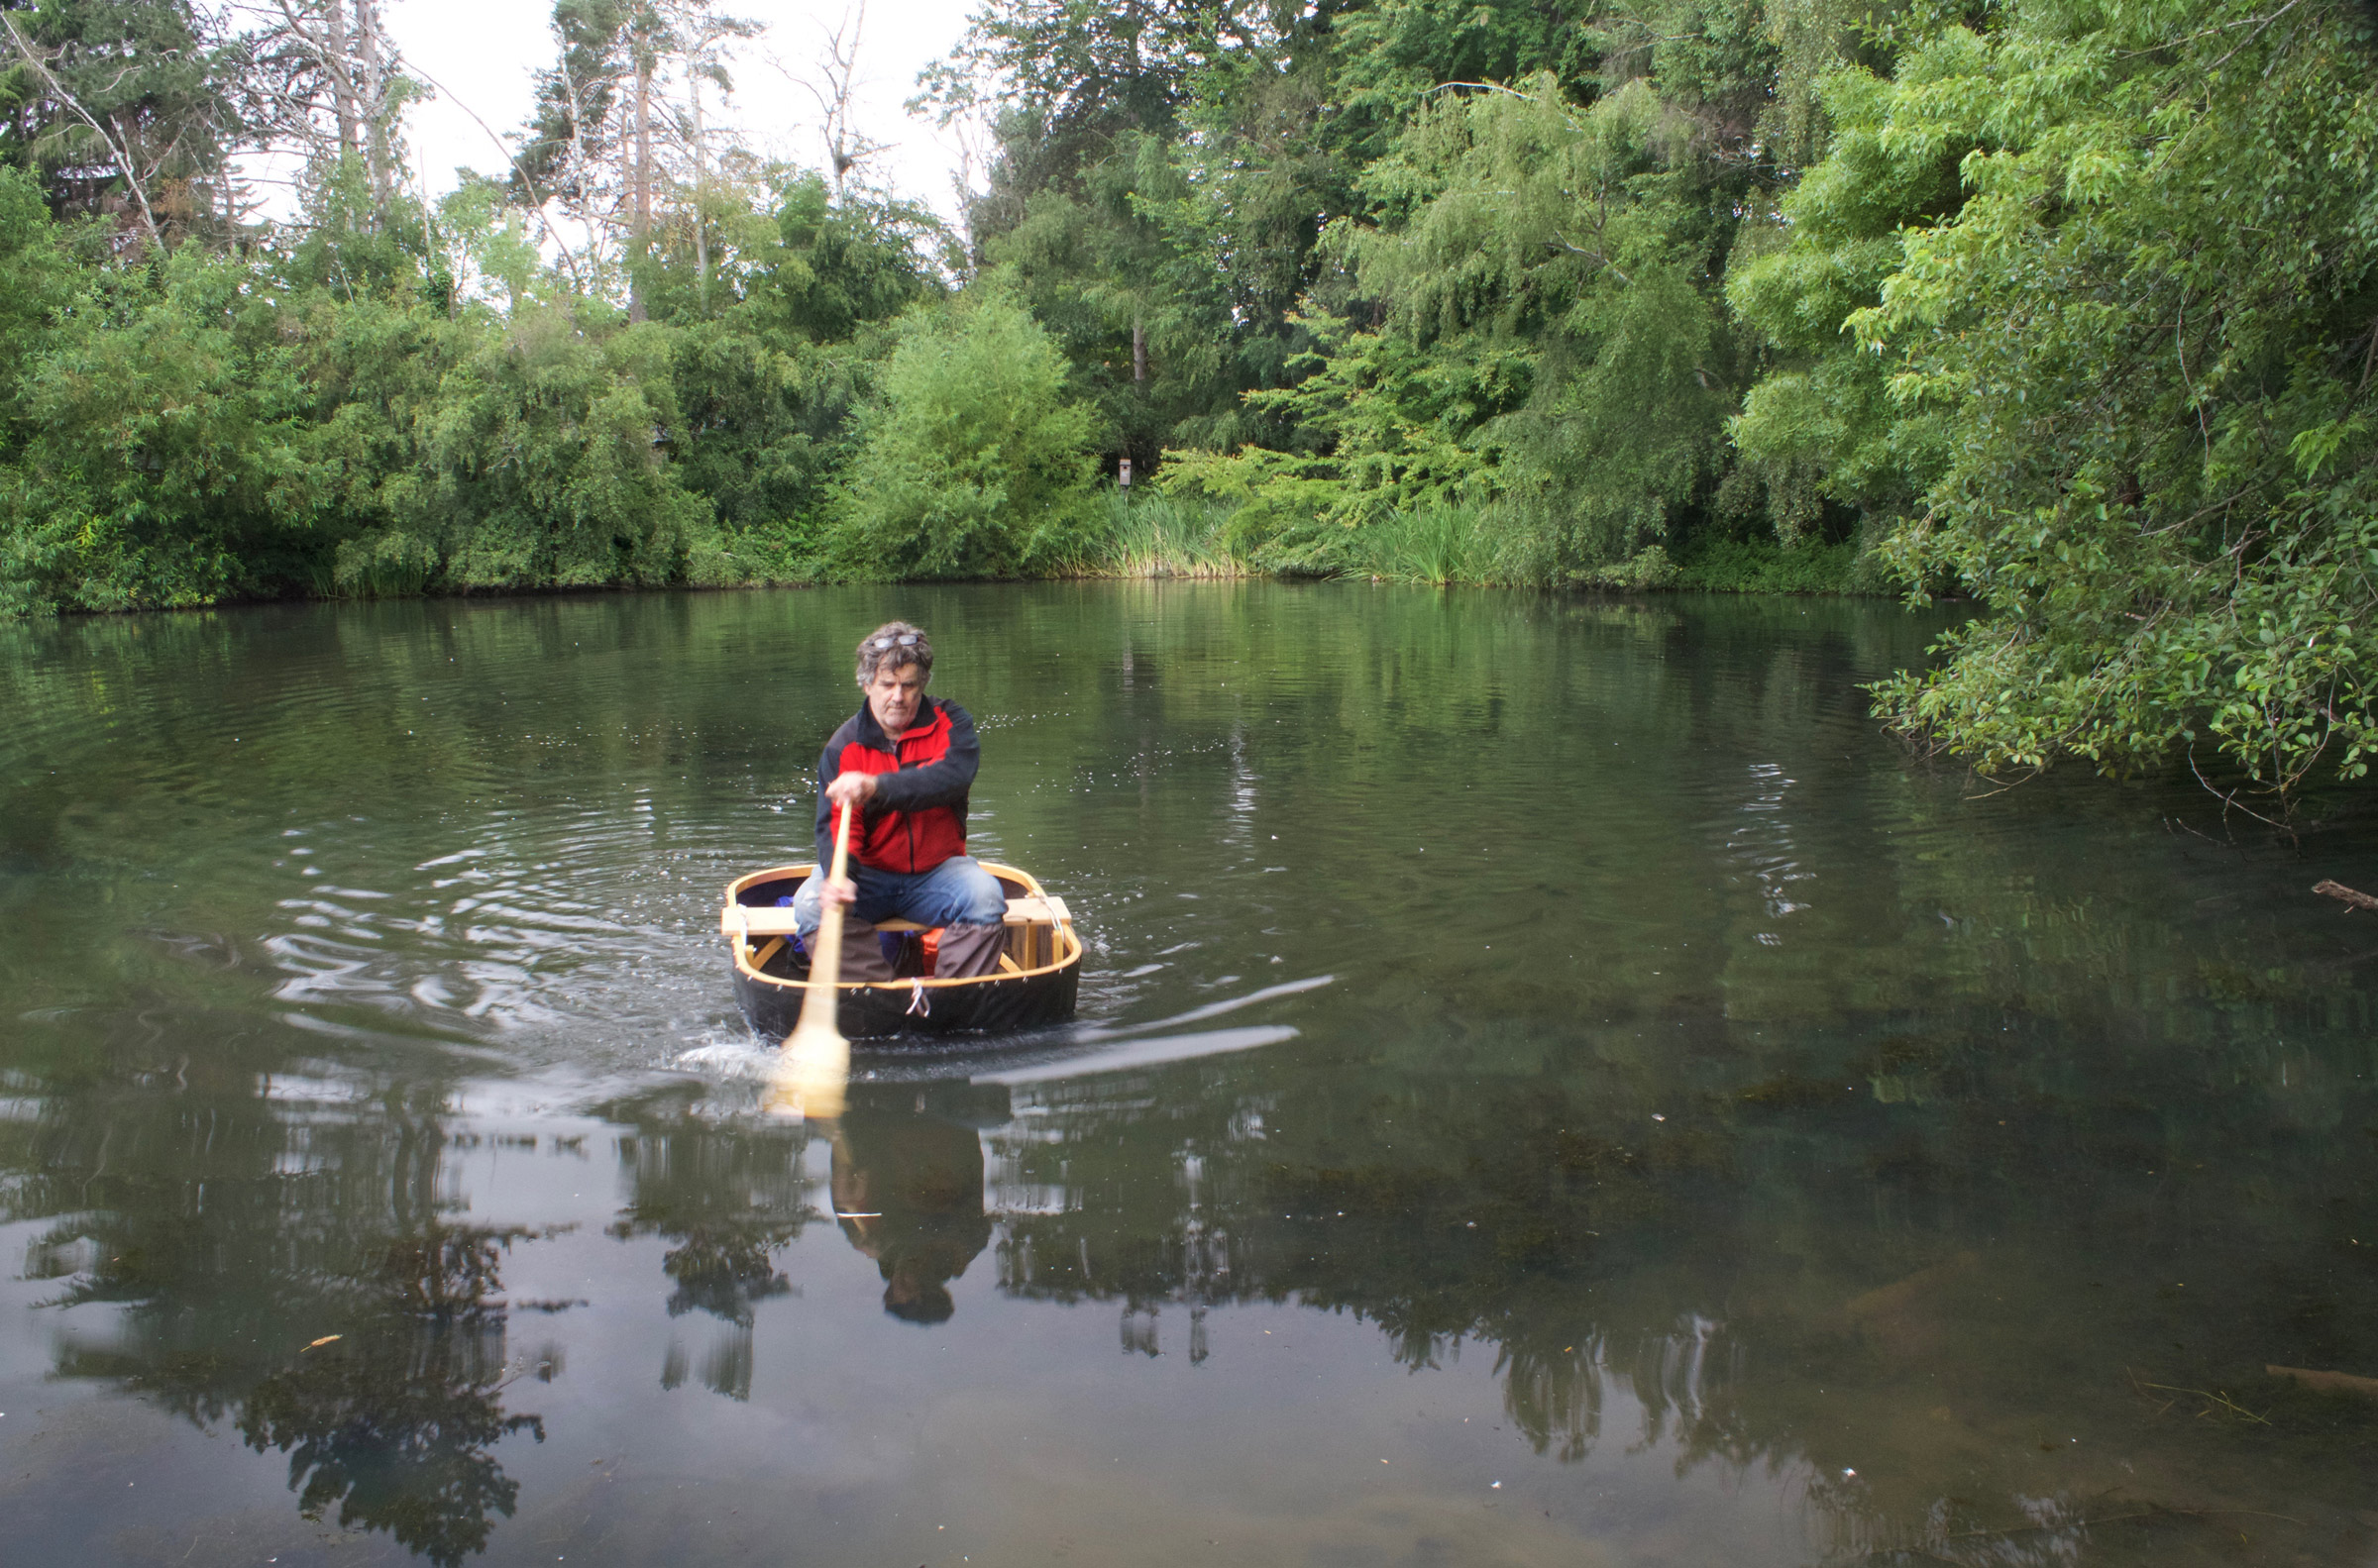
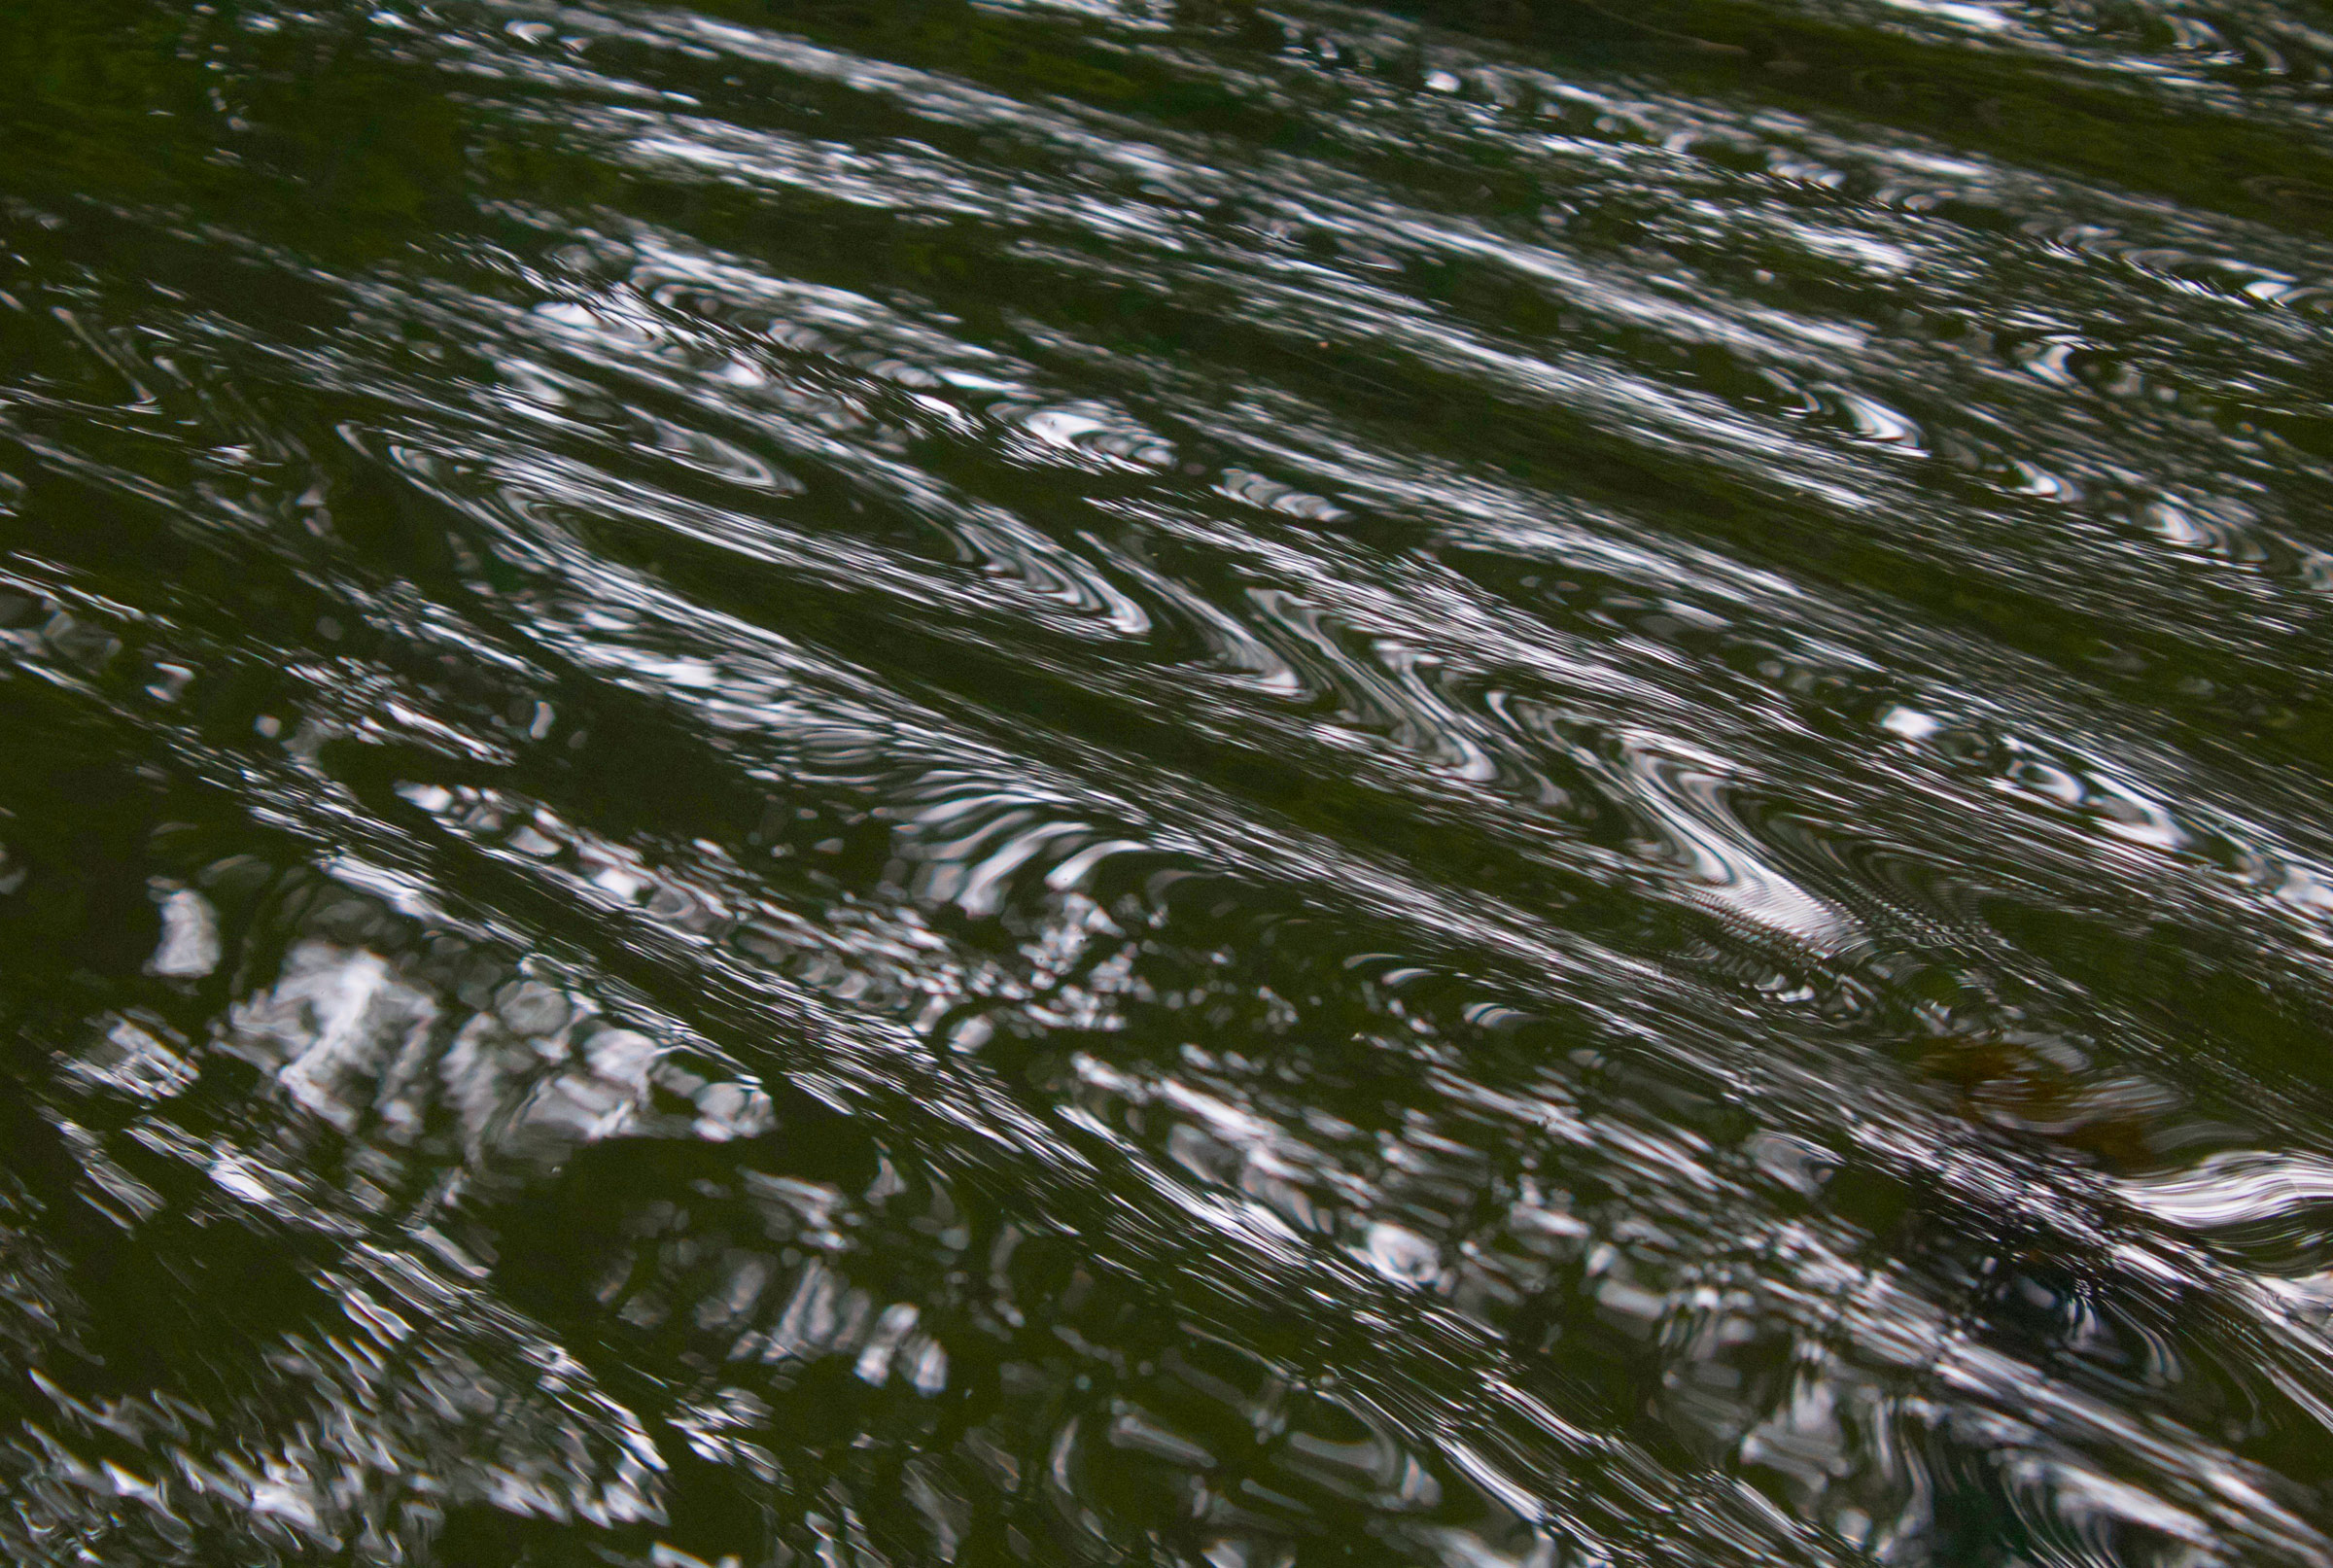
I set out on my circumnavigation of the north pond on shallow water, careful to keep the tip of the paddle from fouling in the long strands of weeds on the bottom. The stroke I use is one I learned watching short movies filmed in Wales and Ireland in the 1930s. Instead of figure-eight sculling with the blade continually in the water, I slip the edge of the blade in from one side, pull it straight back, and then slip it out to the same side. With the blade slightly angled to create lift, the stroke provides propulsion through all three phases.
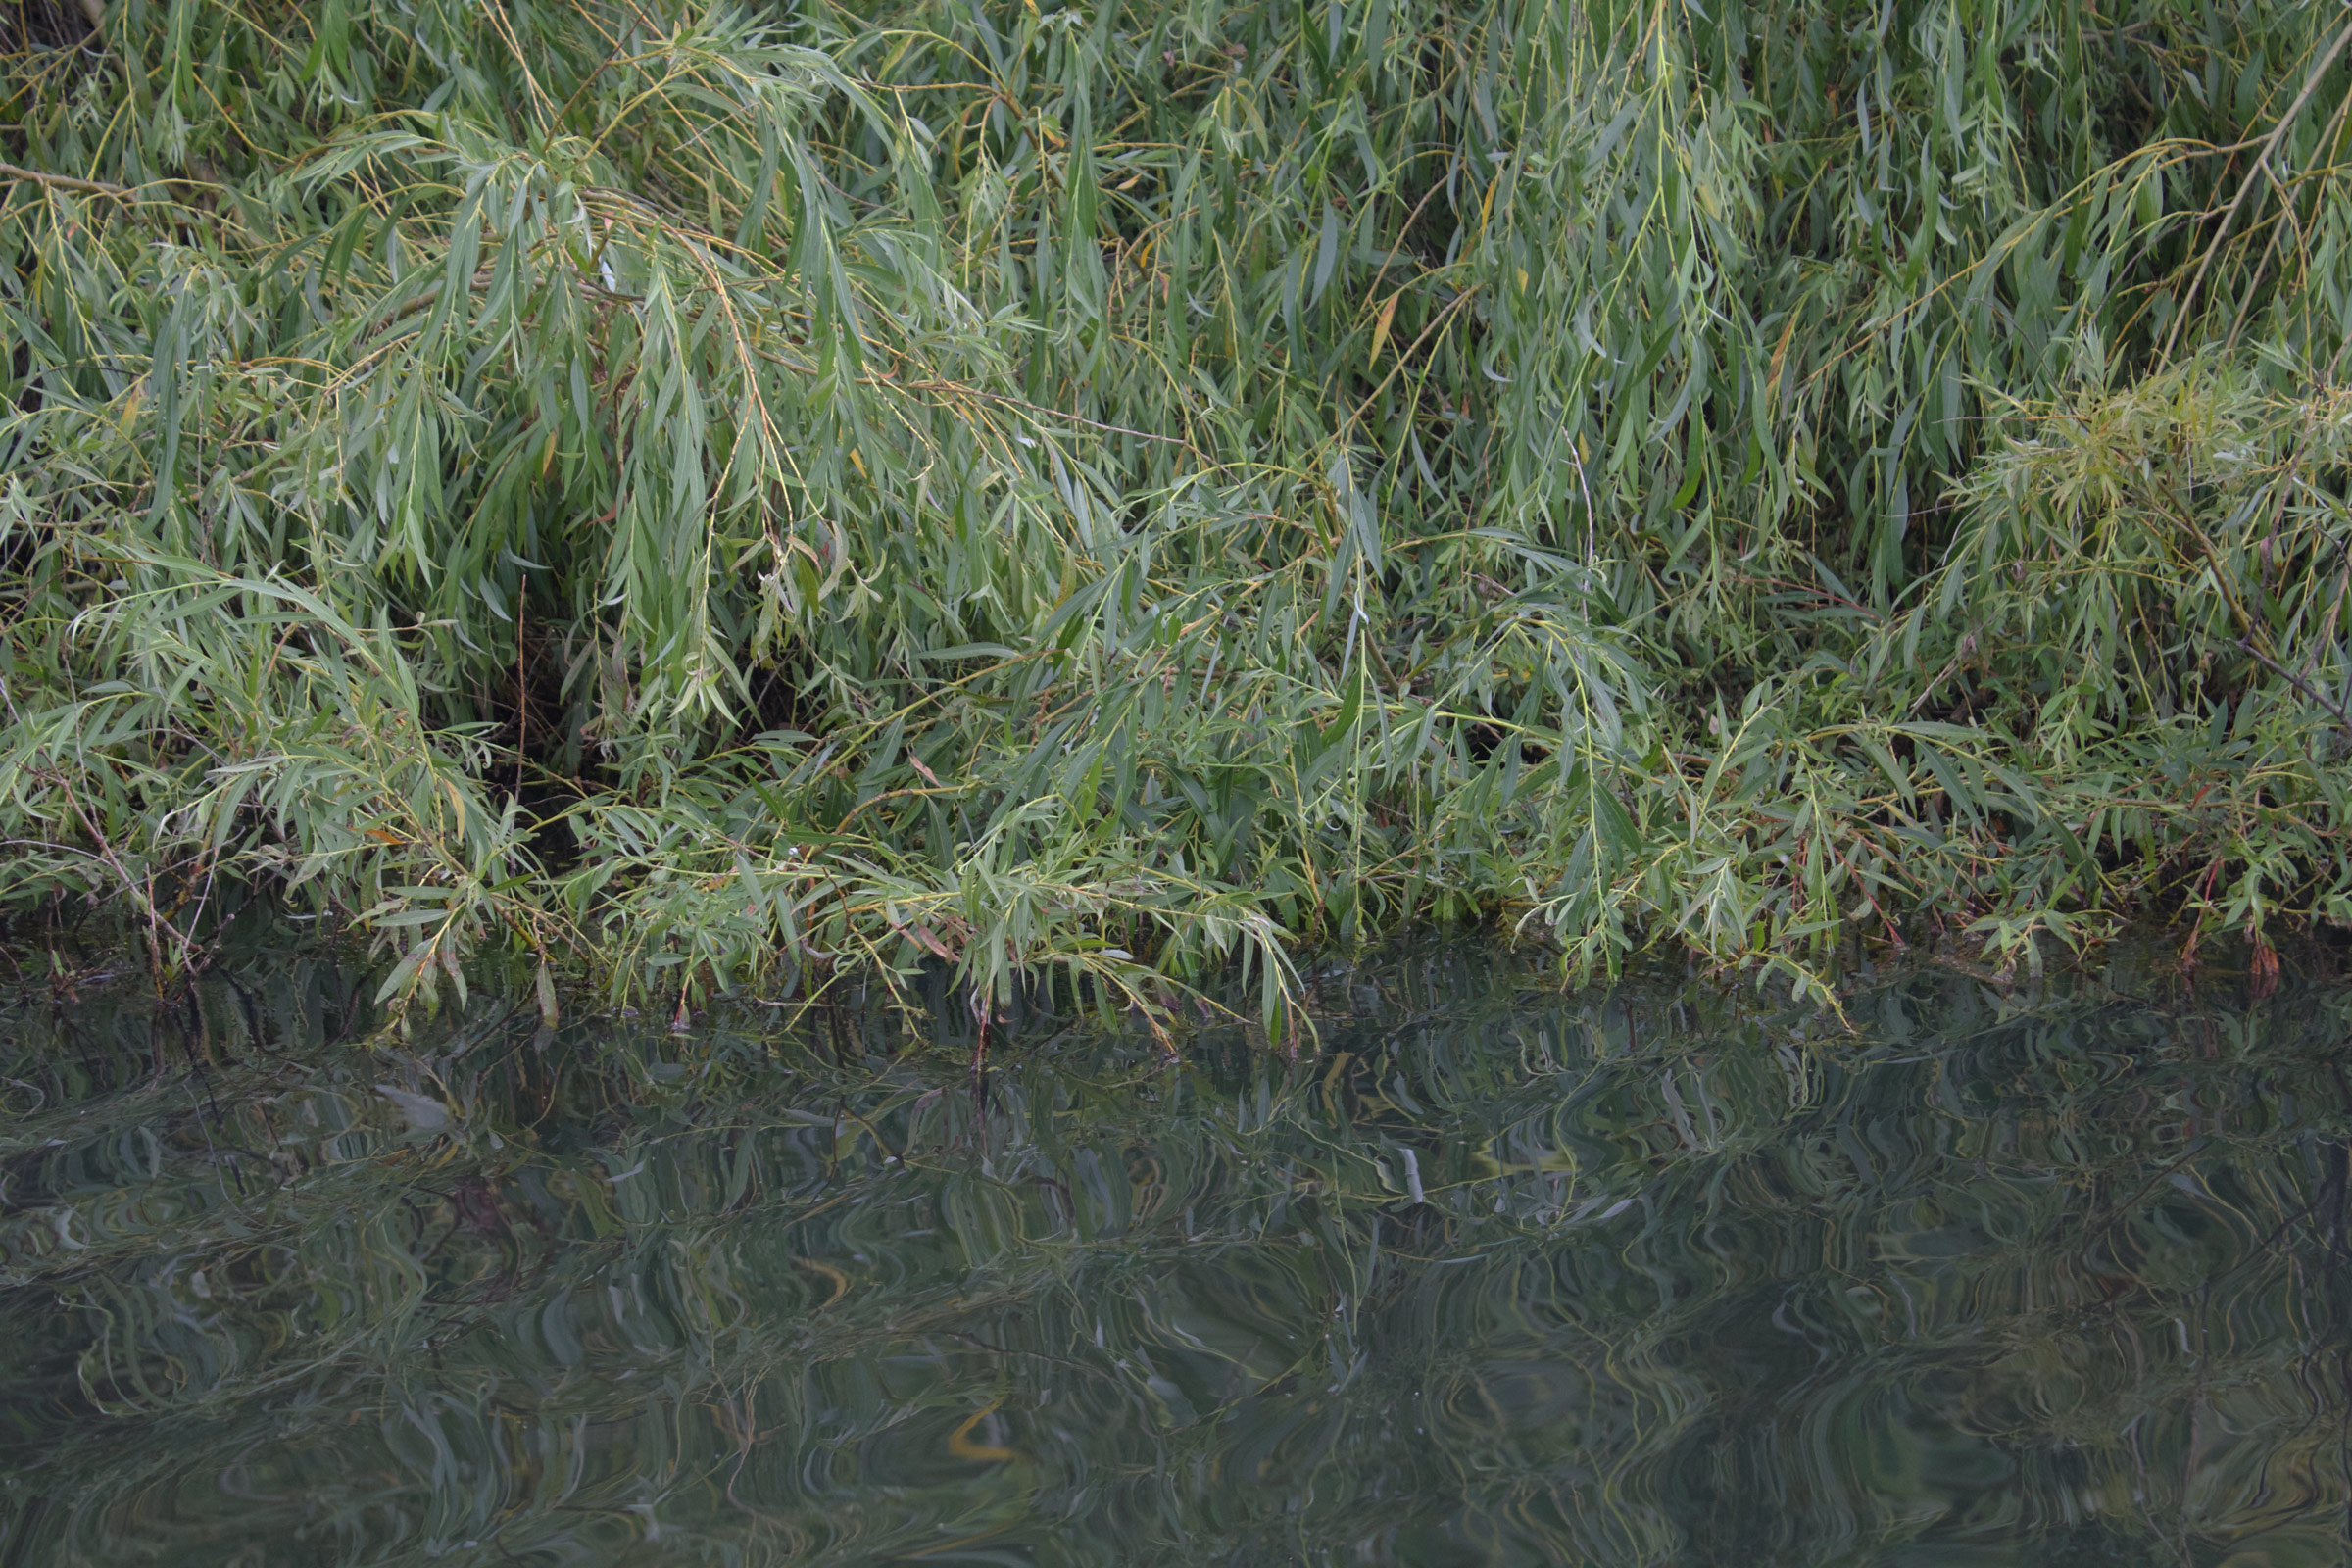
The shore of the north pond was crowded with lush plants either rising up from the still water or growing down into it. This web of pale-green willows dip into reflections made painterly by FAERIE’s wake.
At the south end of the north pond, I found the footbridge I’d crossed on my portage between the ponds. From the water side, its side fences were obscured by brush and the passage under it was blocked by a tangle of slender interlocked branches. To get to the south pond I’d have to portage.
There was no other break on the north pond’s perimeter, so I paddled FAERIE ashore on the same spot where I’d launched her. I made the portage around the north pond, completed a loop on foot, and continued on the path around the south pond. It was narrower and not so easily walked. Tree trunks were closer together and branches were lower; carrying the coracle, I took up almost as much room as a sheet of plywood and had to slip sideways and duck down to get through.
I found just one spot on the south pond where I could launch FAERIE. In between bracken ferns there was a 2′ drop-off where I could step into the water and lift FAERIE down after me.
Although the south pond is separated from its twin by a brushy berm no wider than a parking space, it had an entirely different character. The plants along the water’s edge were not growing in and out of one another, elbowing for space, as they were on the north pond, but distinct from one another, as if planted and tended to by a gardener. Cottonwood trees towered over the pond to the east and west, and its south end was spanned by a palisade of hemlocks with scaly grey-brown bark dusted with powdery green moss.
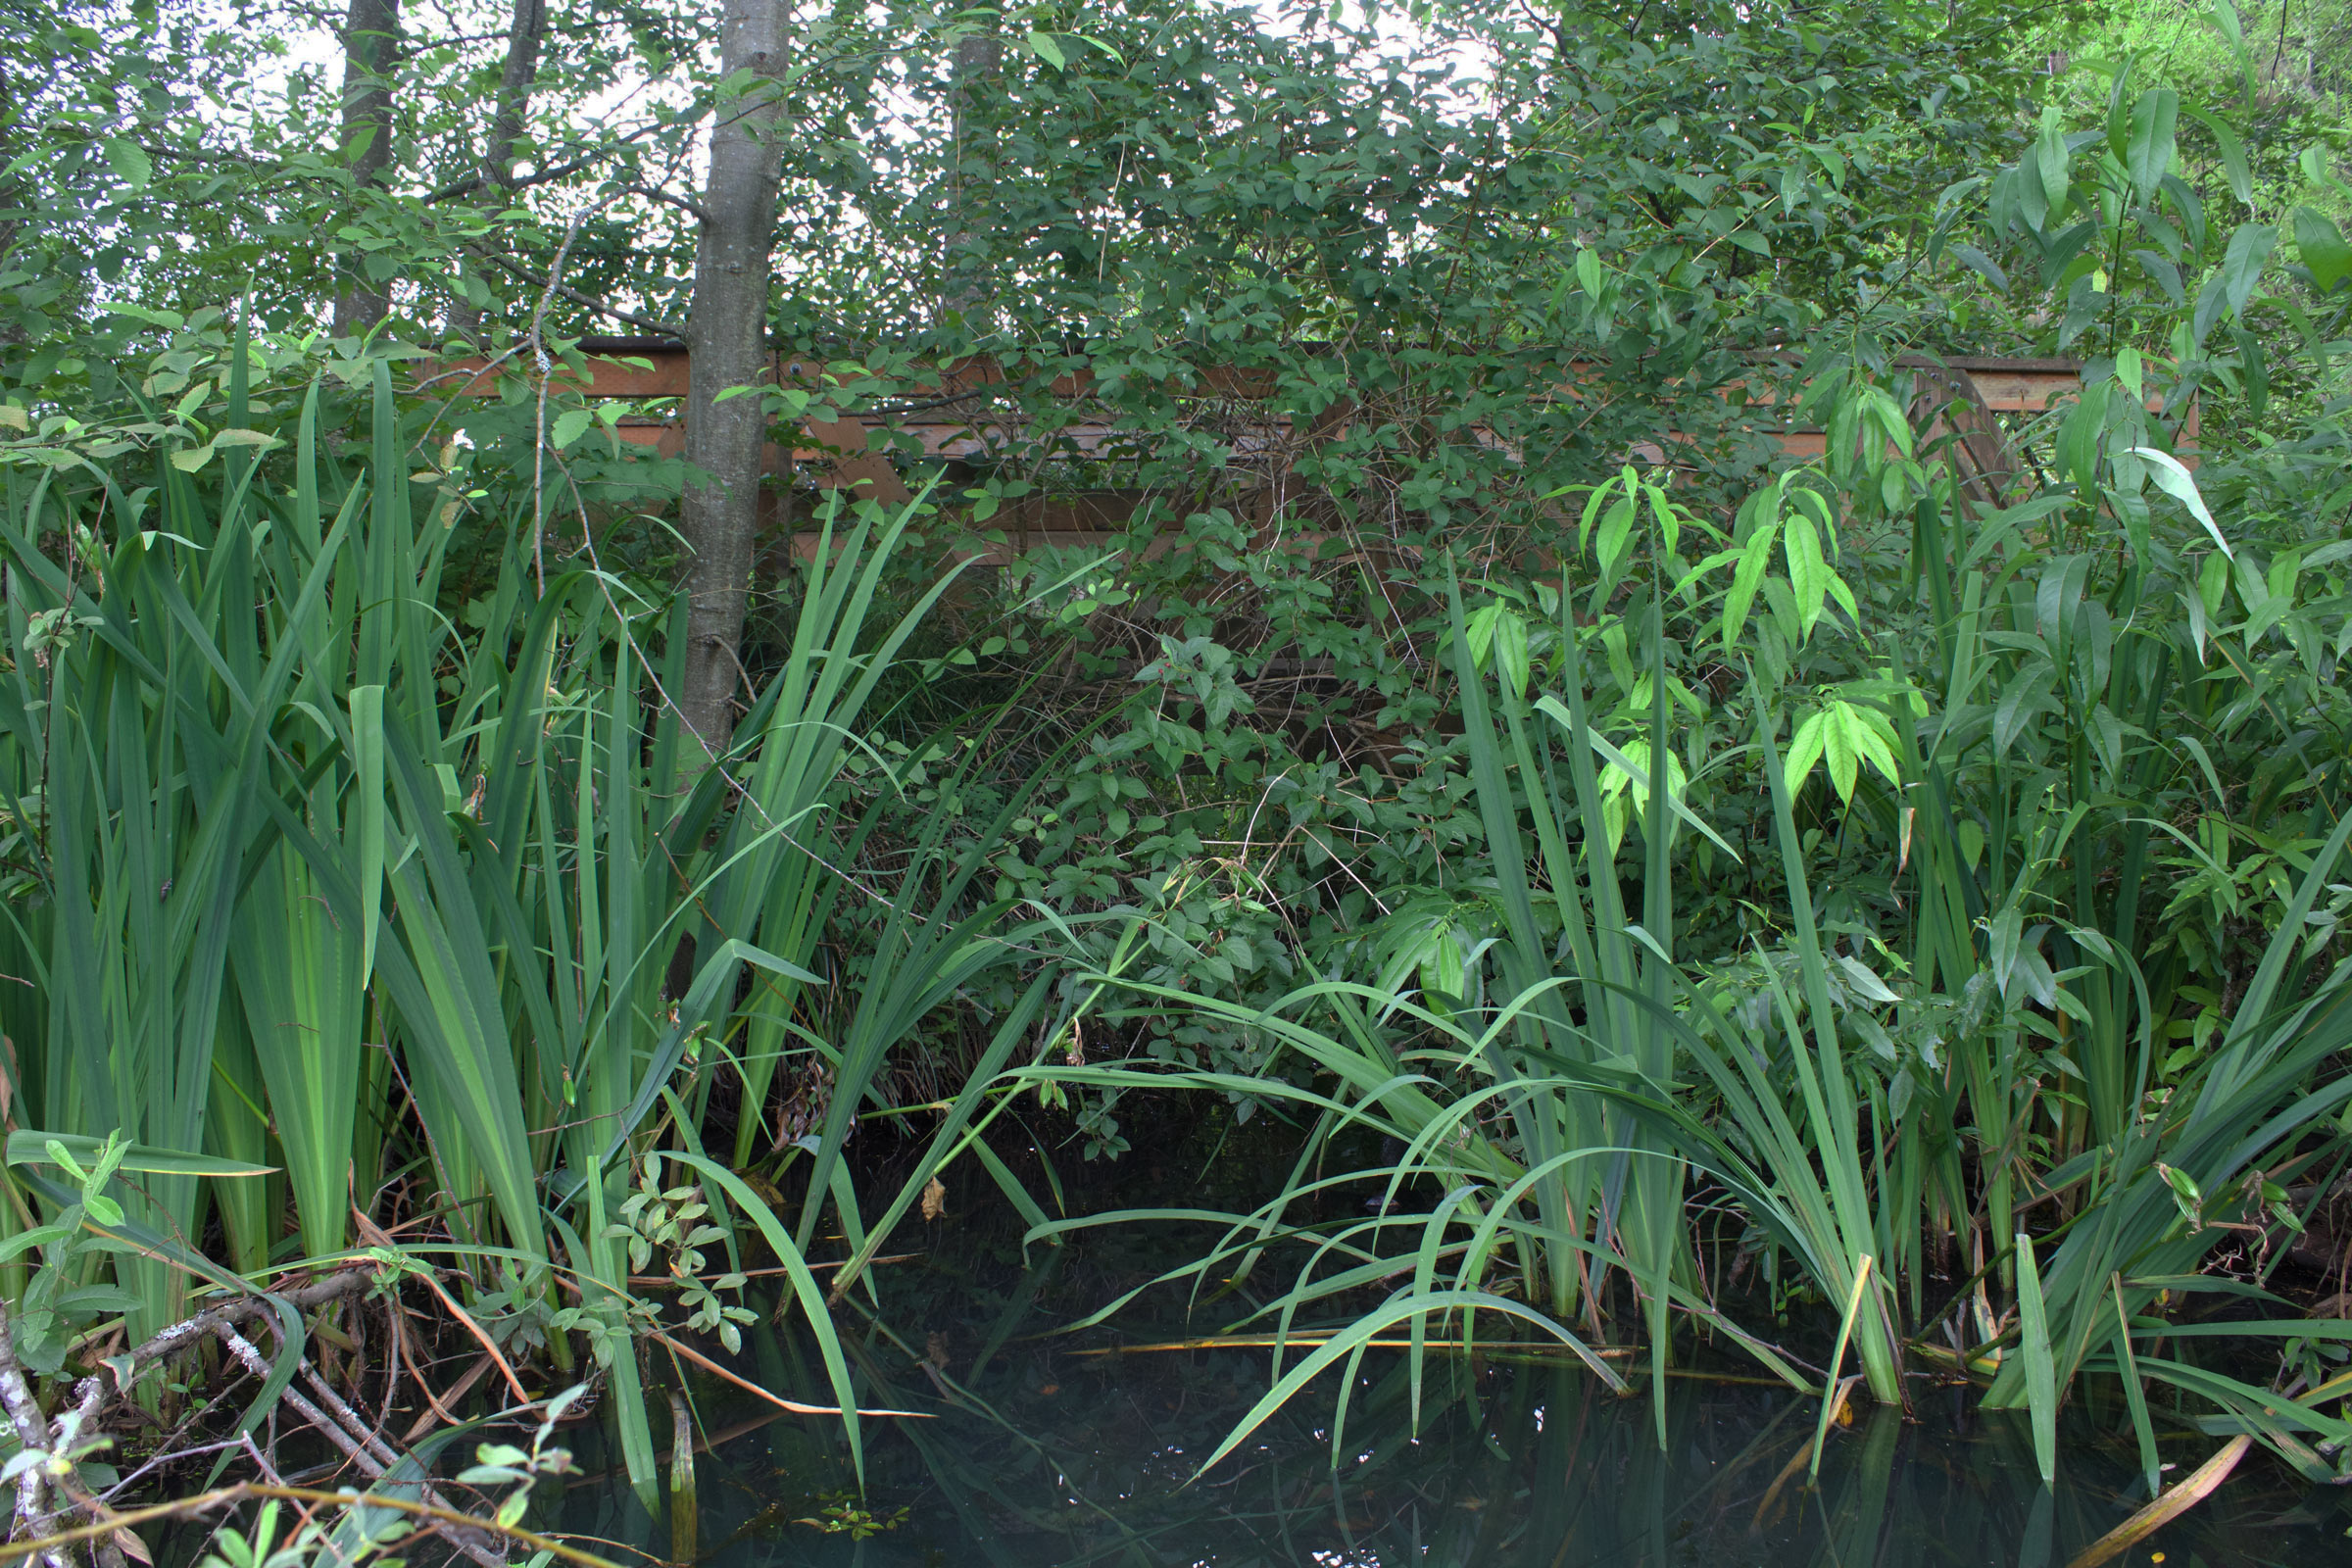
On the north side, long slender leaves of water iris rose in unfinished parabolic arches from patches of duckweed.
FAERIE, with her blunt square bow, can’t keep ahead of her own wake, and the silky corrugated ripples ahead of her turned the reflections of branches hanging over the water into patterns like those of combed marbled paper.
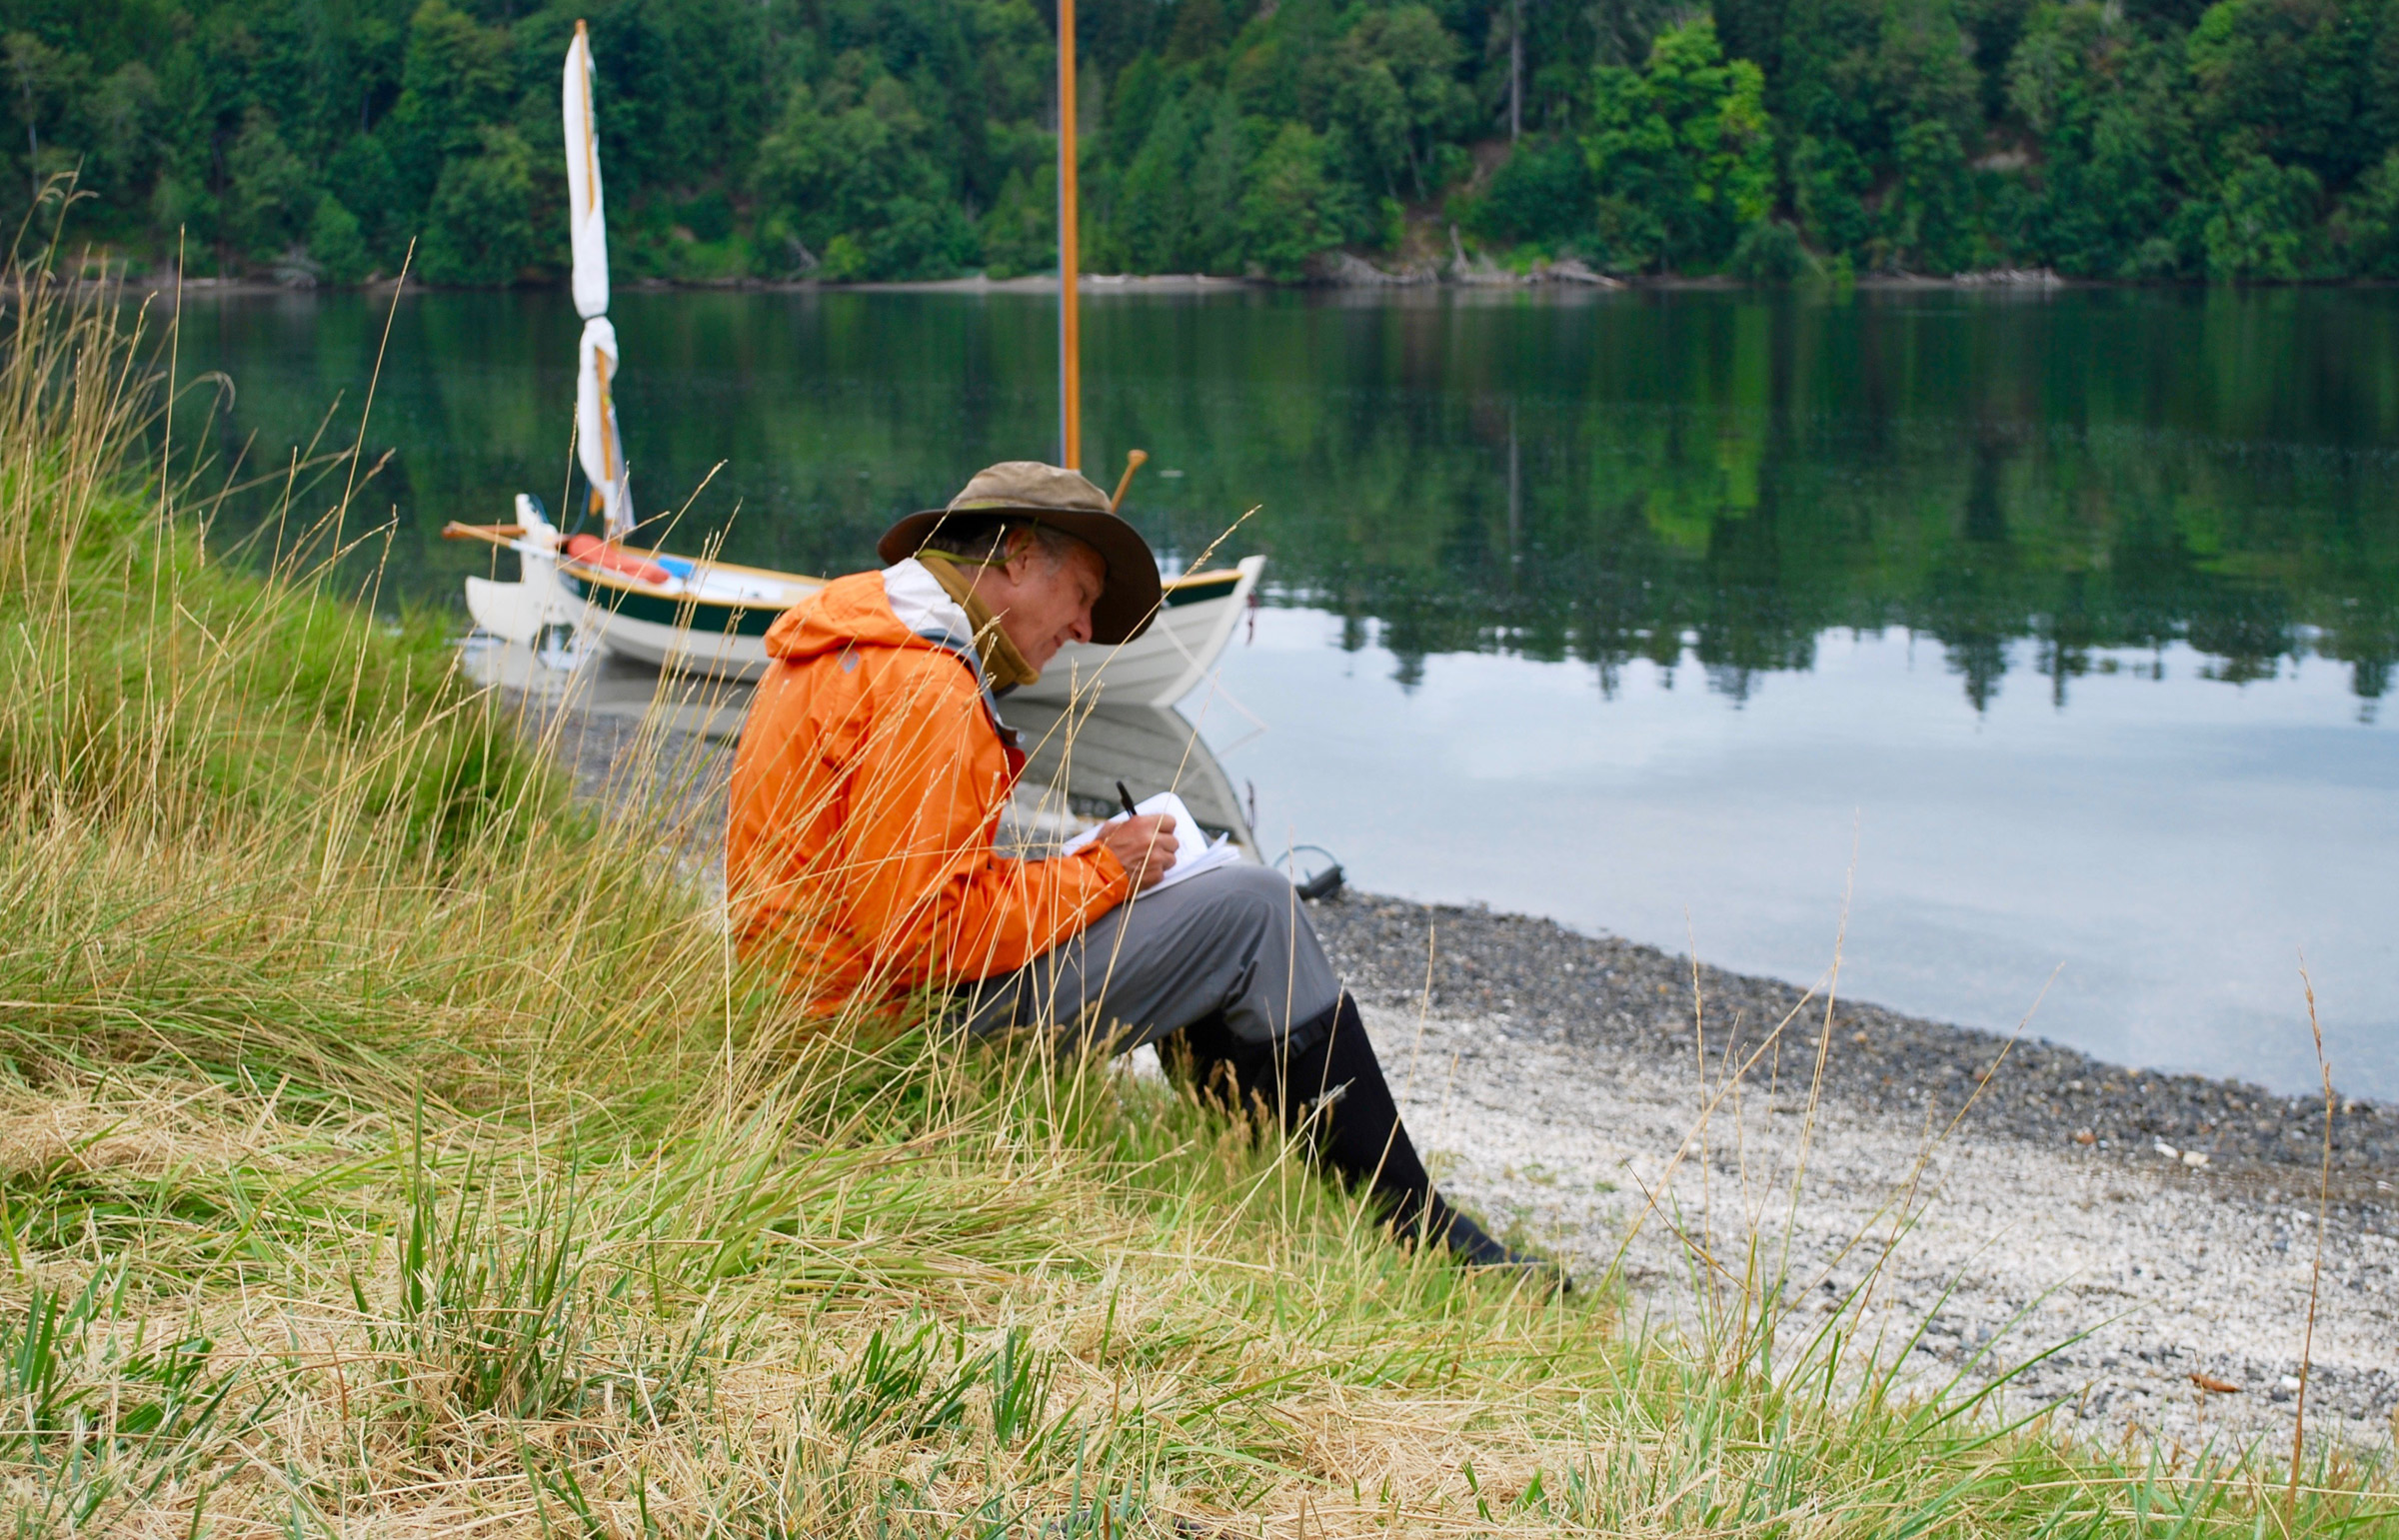
Blackberry brambles were in bloom and their berries were small and green, weeks away from turning crimson, a month from black. I doubt anyone has ever picked the berries here. By September they would have lost their firmness and their flavor and begin falling into the pond.
After I completed my loop of the south pond, I lifted the coracle to the clearing at the water’s edge and took a break for lunch. I’d only seen one person that morning, a woman jogging the path at the western entrance to the park, and my lunch was uninterrupted. Where I’m sitting in this photo is only 250 yards from the nine lanes of Interstate 5, the West Coast’s main thoroughfare. The noise of cars and trucks was so sifted by the woods around the ponds that I could easily imagine it as being the susurrus of a breeze shaking the leaves of the alders, cottonwoods, and willows. To my left, across the root-laced path, is a swamp that must have been the twins’ sibling until the press of plants surrounding tightened their perimeter and closed over it.
After lunch I packed up, strapped FAERIE to my back and threaded my way through the woods to my truck.
FAERIE and I didn’t travel far that morning, only a third of a mile on the water, and just shy of a mile if you add the portages, but, in a time when it is hard to escape the worrying news and devastating consequences of a world upended, it was far enough.
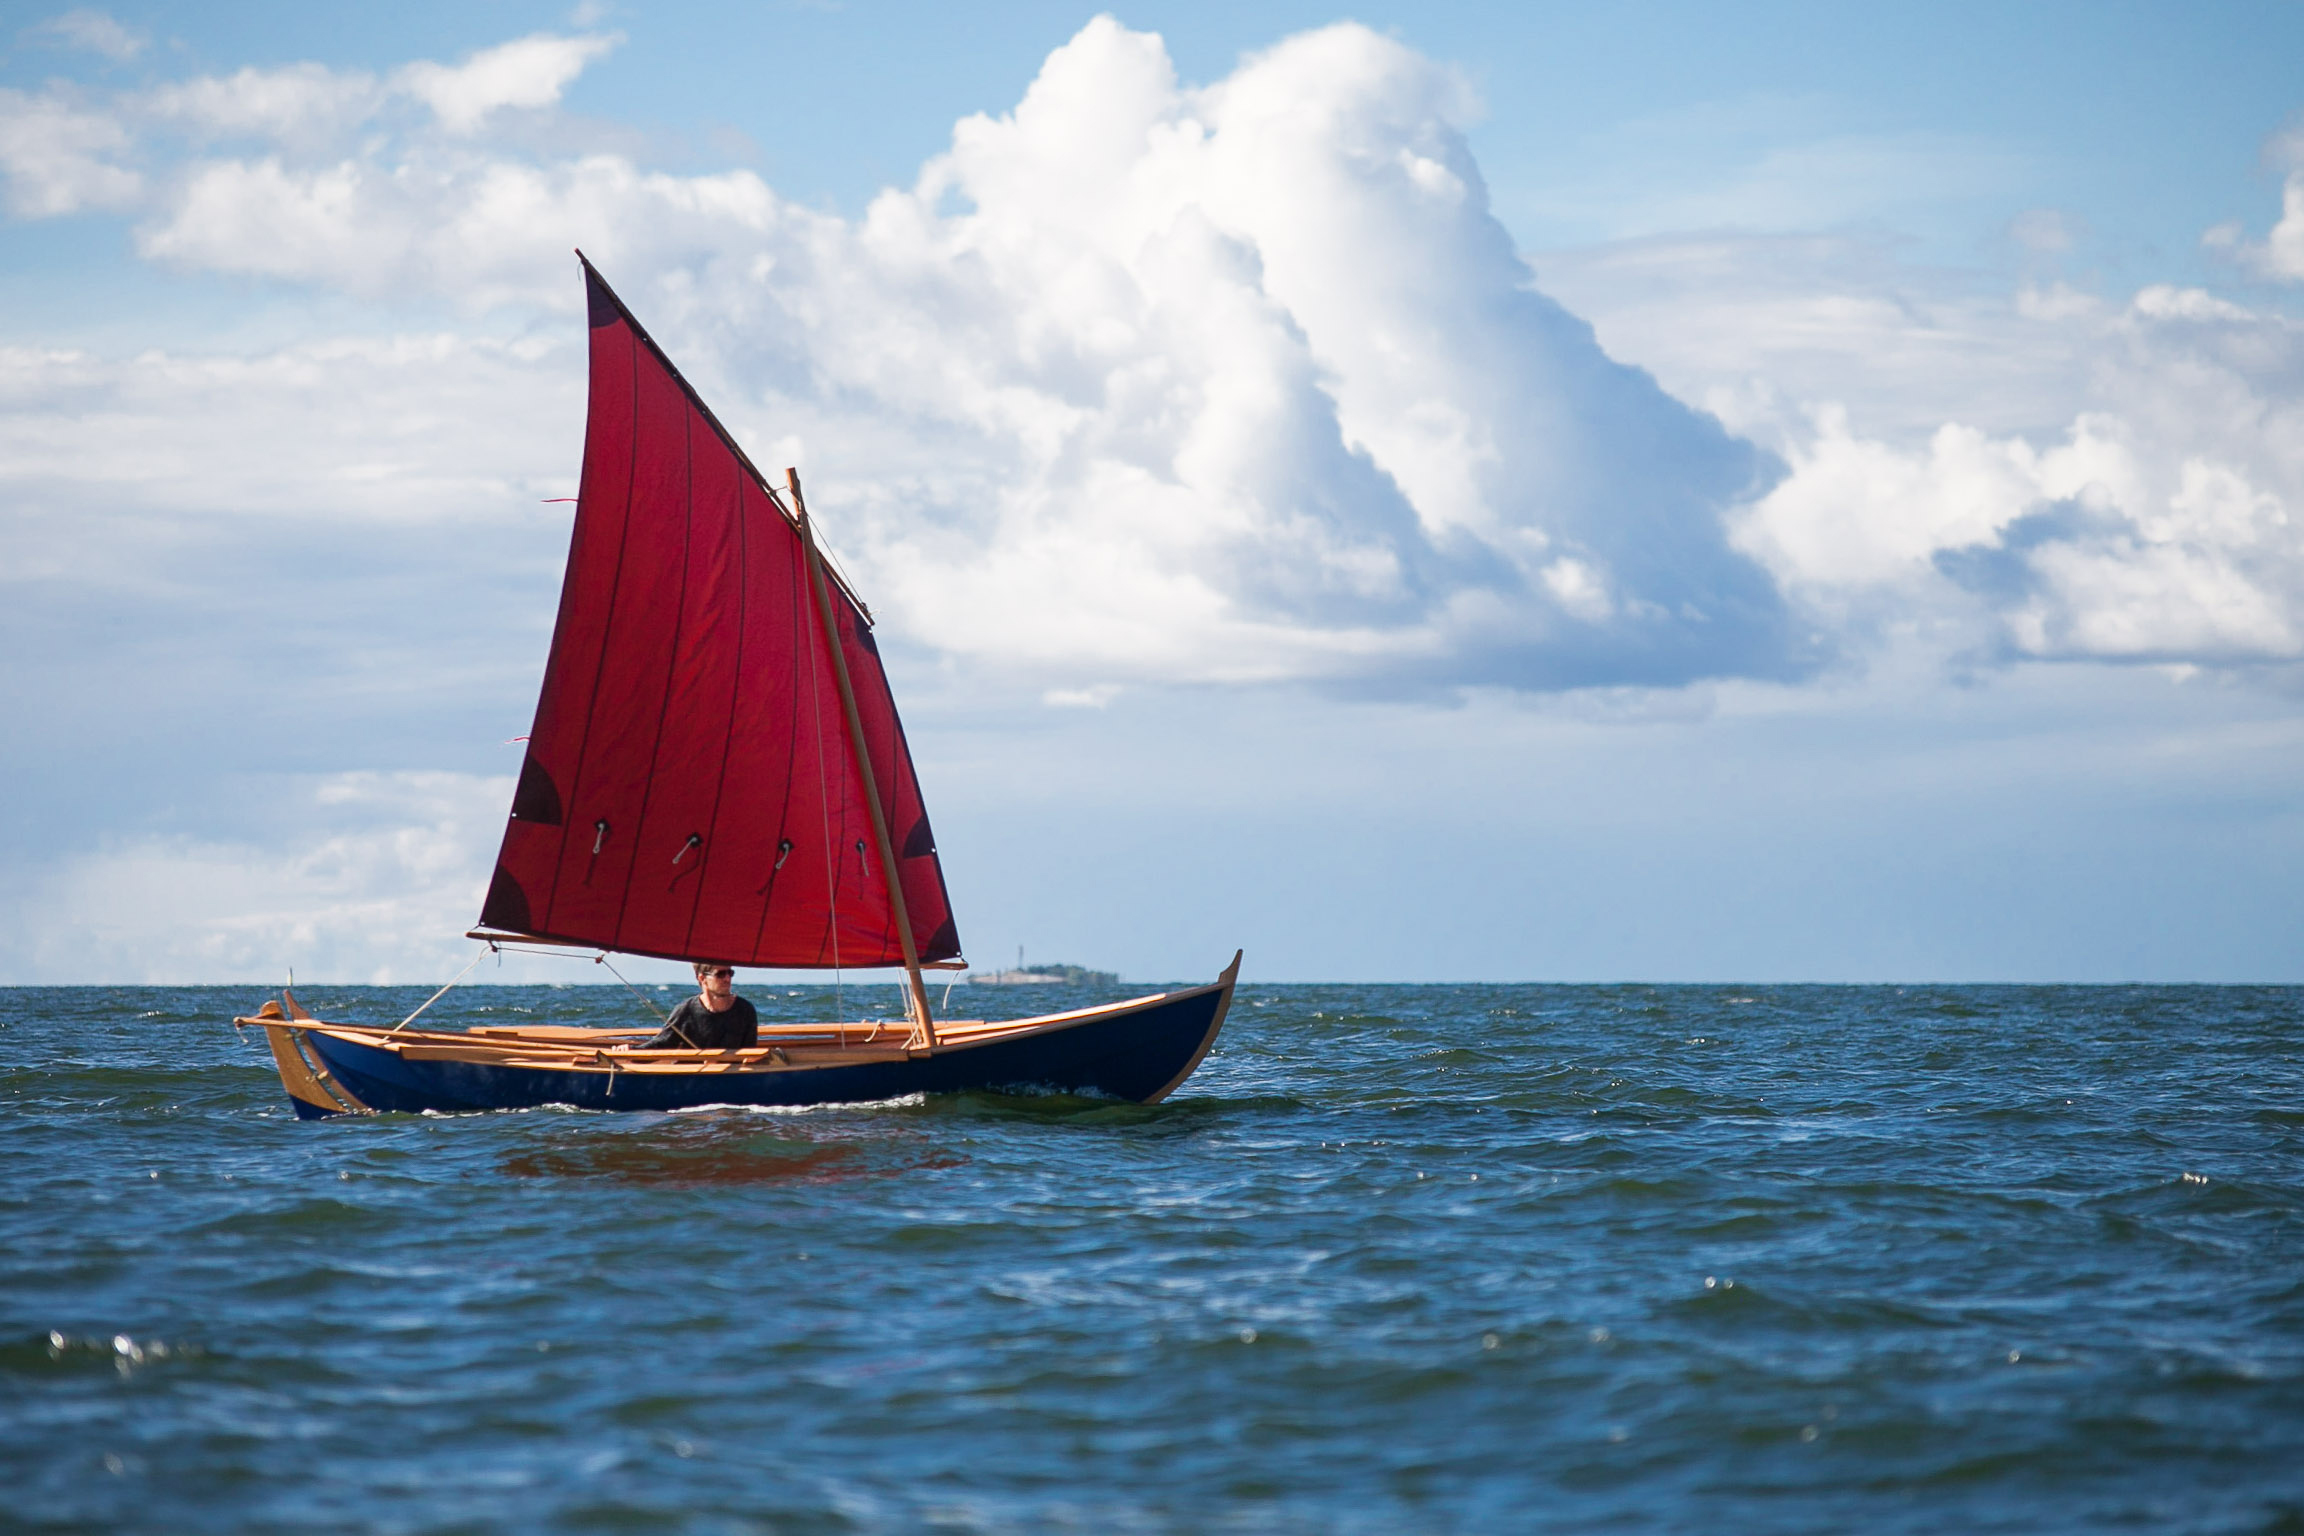
The faerings of western Scandinavia were the everyday workhorses that coastal people used for commuting, fishing, and carrying light cargo. Built by tradition and eye, the clinker-built double-enders were formed from three to four wide strakes supported by just a few frames. The narrow hulls rowed well, and the ample reserve buoyancy given by full and round midsections provided capacity for cargo and stability for sailing. The gracefully upswept bow and stern were necessary features along the rough seas of the North Atlantic coast.
When Australian-born, Scotland-based boat designer Iain Oughtred was commissioned to design a small faering based on a small scale model, he studied the type and designed a faering of his own. The end result was his Elf, a mini faering just 15′ long and designed for glued-lap plywood construction, with the most functional and yet simple of hull forms, a tribute to the hundreds of years of evolution of the traditional craft. Later came the stretched Elfyn. At 16′ 6″, it is more like the original faerings, long and lean.
Mats Vuorenjuuri
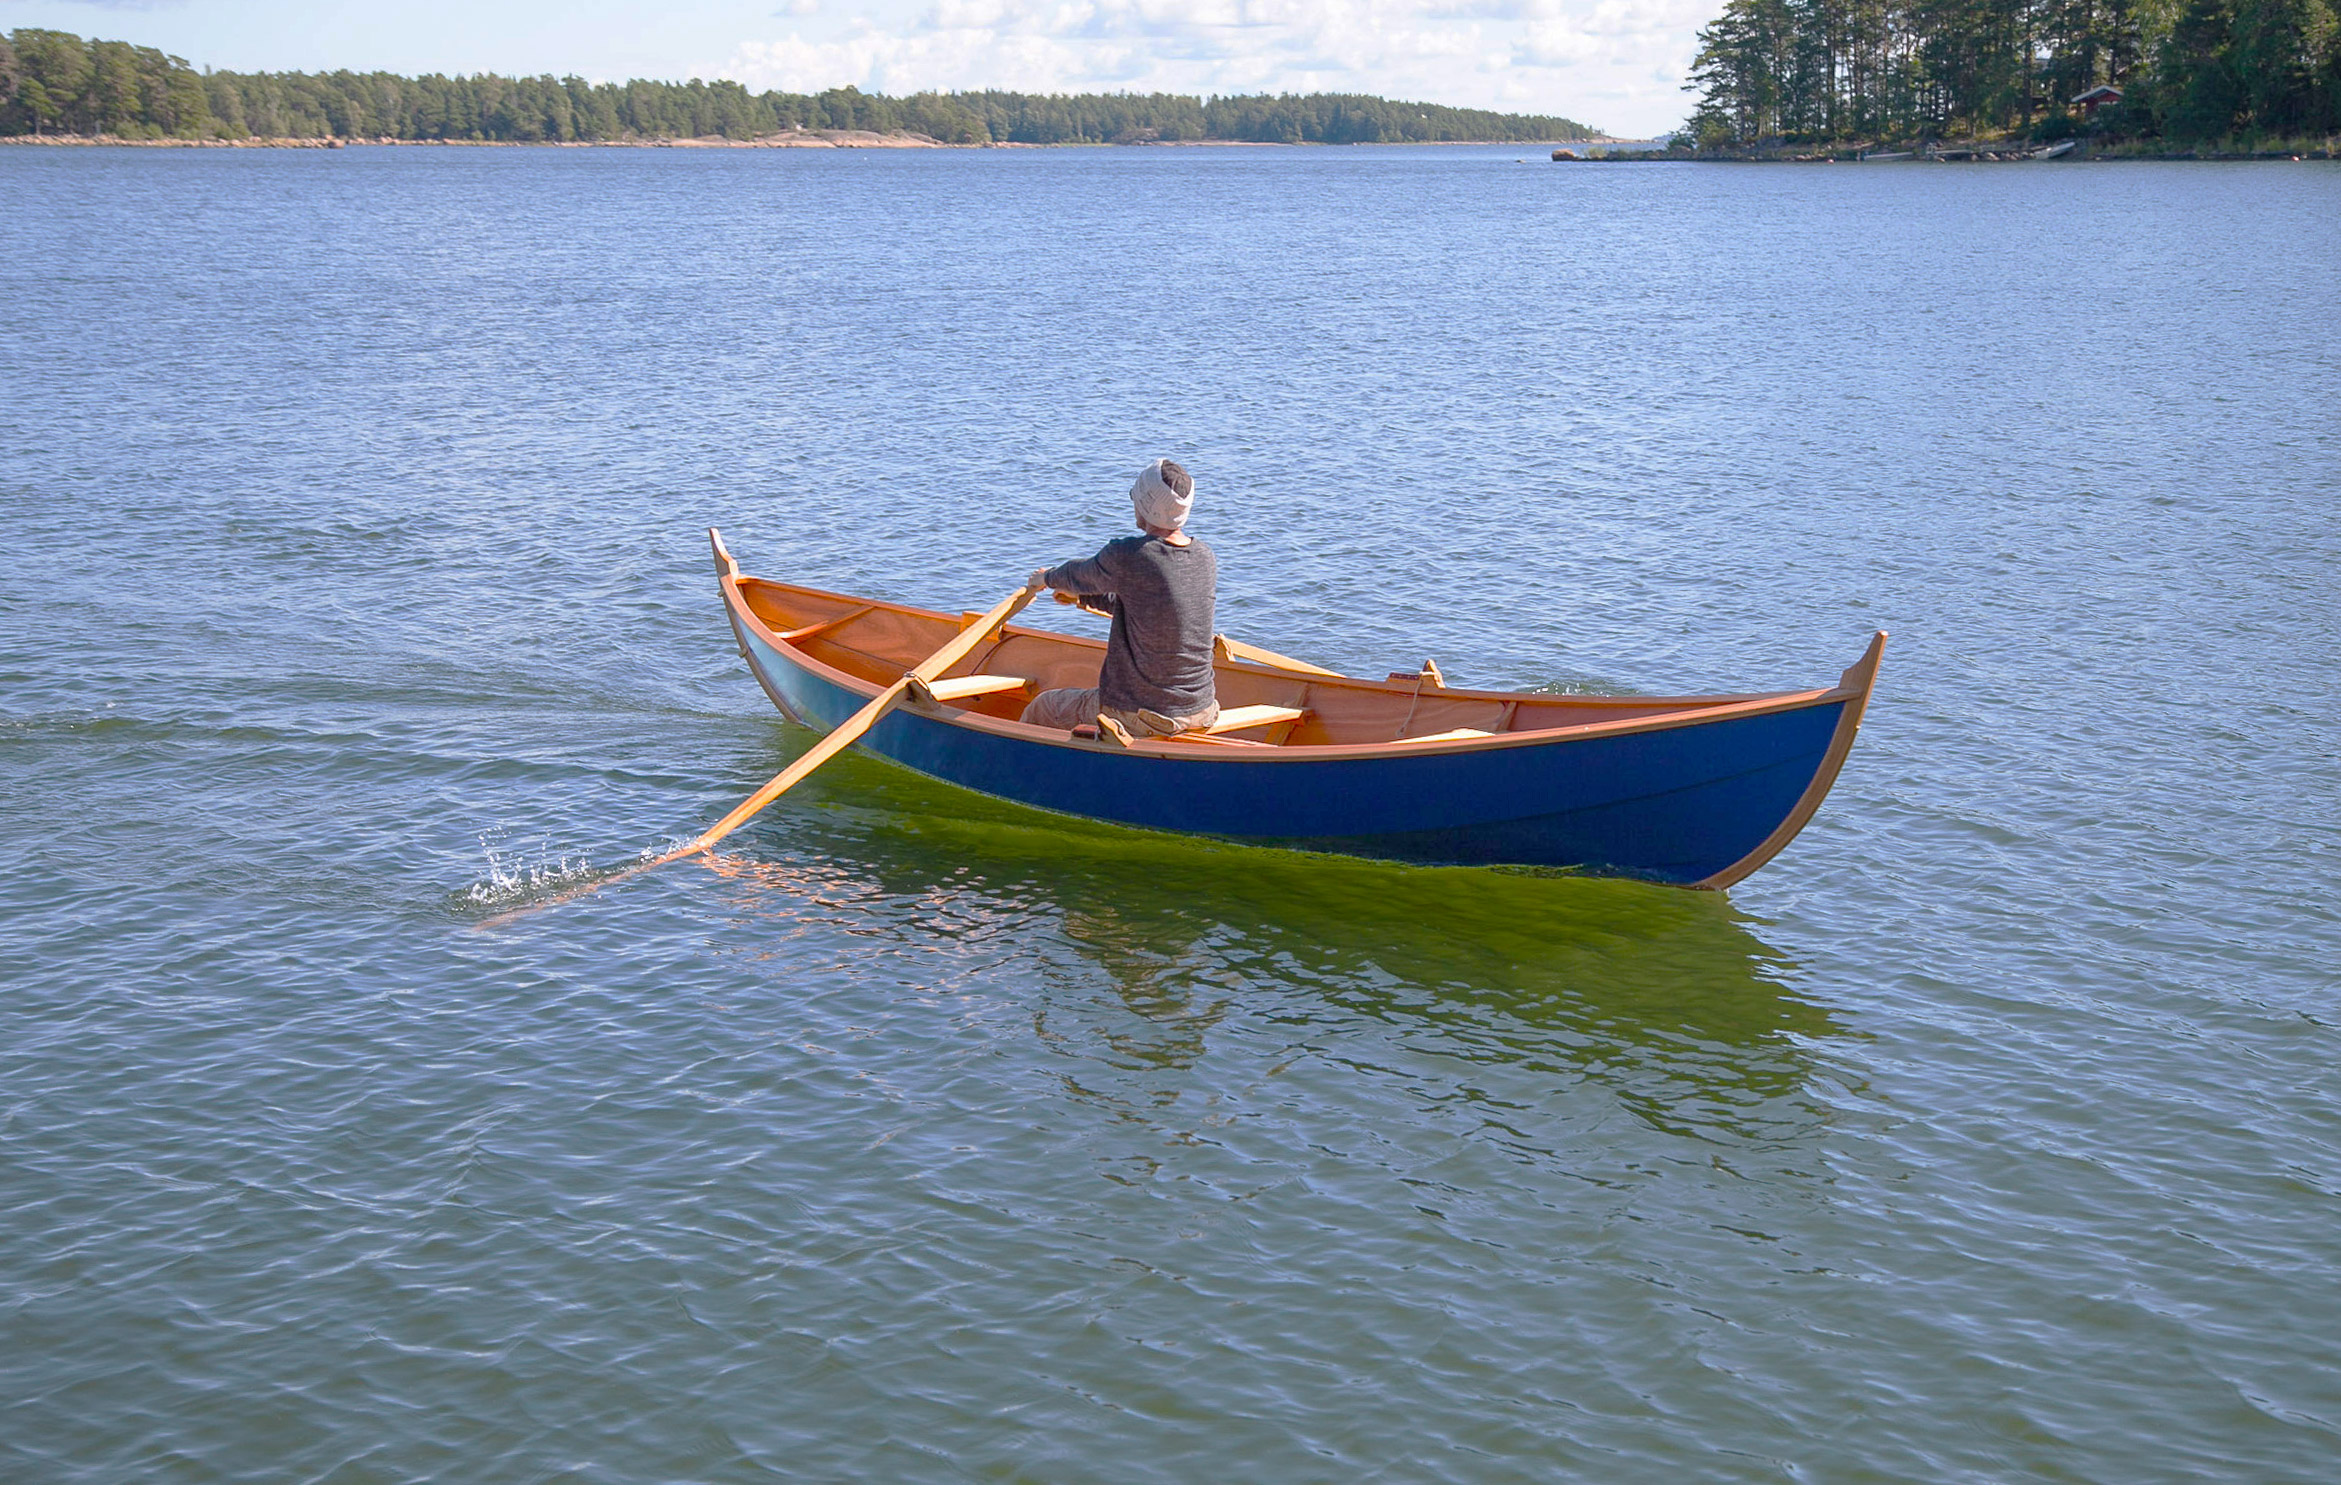
Elfyn is built upside down over plywood or MDF molds. With just three wide strakes, the hull takes shape quickly, and once the planking is done, the outer keel and stems are glued in place.
Last summer, my apprentice Kalle Pajusalo and I built an Elfyn. Having previously built an Elf, I found the building process straightforward and rewarding. The seven sheets of detailed plans include full-sized patterns for the molds in lieu of offsets—so there is no need to loft the hull—as well as for the stems, frames, rudder, and daggerboard. With the plans Iain provides some basic instructions on tools and build process and a full list of materials. The hull has only three wide strakes, which are supported by two laminated main frames and two smaller half-lapped fir frames, called rangs, set at an angle in the bow and the stern. The plans give three options for the planking plywood: 6mm mahogany, 7mm larch, or 9mm okoume. Lighter hardwoods—elm, Robinia (locust), or pitch pine—are recommended for the keel, stems, and frames. We chose to use okoume plywood for the planks and tight-grained Douglas-fir for the laminated frames and keel and local yellow pine for thwarts and, for the floorboards, pine cross-laminated timber (CLT), a material like plywood but with much thicker laminates.
Once the inner stems have been laminated, they are installed over the molds and glued to the keel. We chose to laminate the two main frames in place, clamped to blocks bolted to the molds. All but the garboard planks for an Elfyn need two scarfs to get the length required. We used narrow strips of fir screwed together to transfer forms from the hull on the plywood boards. The sides of the molds can be used as a guideline when beveling the planks. Once the planking begins, with just three wide strakes, the hull takes shape swiftly. The plank lands are beveled to accept the next strake, using the molds as guides to the amount of bevel required. The plans don’t mention fiberglass sheathing for the planking, and glued-lapstrake plywood construction generally creates a stiff-enough hull. When building an Elf for himself, Iain chose to use larch plywood imported from Germany and treated the finished hull with oil only. If you wish for a more maintenance-free surface, two or three coats of clear epoxy will protect the wood from the elements. After the epoxy coating, we covered the exterior with two layers of epoxy primer, followed by a two-part polyurethane paint for a relatively hard and abrasion-resistant surface. The epoxy-coated interior was sanded smooth and given three coats of Sikkens Cetol clear wood stain, which I have found to work well and to give proper and easily maintained protection against sunlight.
Rami Salle
Under oars, the Elfyn slides effortlessly with proper longitudinal trim. Rowing alone, some ballast, about 20 to 30 lbs, put where it’s needed, whether in the bow or stern, will keep the keel level.
It was only after turning the hull over that we truly realized we were building a boat significantly bigger than an Elf. The difference in length is only 1-1/2′ between an Elf and an Elfyn, but the beam and depth are also greater, more than enough to give the two boats different characteristics. Elf is small and handy, while Elfyn is a more substantial boat on shore and on the water. I think Elf is best suited for sailing or rowing solo or occasionally with a friend, while Elfyn is better for two, or occasionally three people. As Iain himself puts it, Elf is less of a handful.
Elfyn can be rigged with a sprit sail or balanced lug. We chose to use a 62-sq-ft lug sail. With the sprit rig, the plans call for a separate mast partner attached to the gunwales while with the balanced lug the partner is integrated in the forward thwart. There’s no mention of shrouds, but as the mast bury is quite small, 12″ for an 11′ mast, we decided to use a rope shroud on one side and the halyard on the other. The plans include an option for buoyancy compartments, enclosed under low decks in the bow and stern.
Rami Salle
The centerboard case is located a bit off-center, alongside the full-length keel. If you choose to install the daggerboard, its trunk will take up space in the middle of the boat. On the after edge of the forward thwart you can see the cleats we added, one for the rope shroud and the other for the halyard, doubling as the other shroud. Another wooden cleat was installed in the after edge of the center thwart for the sheet.
The leading edge of the rudder follows the curve of the stern and extends somewhat under the hull. The plans provide one option for traditional pintles and gudgeons and another for a long curved rod that the rudder fittings slide on, up for rowing—with the blade above the water—or down for sailing. We have used the traditional approach, but when installing the rudder gear, one should be careful not to have too much of the rudder surface in front of the turning axis, as this will make the rudder too balanced and provide limited feel. After sailing Elfyn the first time, I had to cut a small piece from the forward end of the rudder to make it less prone to turning by itself. The Norwegian push-pull tiller goes well with the character of these boats, and you also benefit from the possibility to steer even from the middle thwart, using the 5′ tiller.
On the water, Elfyn feels tender while boarding or moving about but is steady when you sit down for rowing or sailing. For sailing, sitting on the floorboards between the thwarts lowers the center of gravity, and then the boat is forgiving, heeling calmly once the wind picks up. The floorboards in the middle of the boat would be a sweet spot for the passenger, too, but the space is taken by the daggerboard case, which is installed a bit off center alongside the keel. Sitting in the forward thwart, the passenger has to duck under the boom during tacks and move swiftly to the windward side.
Rami Salle
For a sail-and-oar boat, the balanced lug rig is a simple and powerful choice. Reefing a lugsail is more convenient than the sprit rig and the performance upwind is better. Once you lower the sail, you have no sail dragging in the wind as you switch to rowing and, if you like, bringing the mast down is easy.
Elfyn sails very well without the daggerboard, even tacking into the wind. When returning to our launch ramp against a light headwind, I raised the daggerboard and Elfyn kept on going steady, with only a slight increase in leeway, and we had no trouble tacking upwind the last quarter of a mile. The faering’s moderate V-shaped hull and full-length, 2″-deep keel give it outstanding ability to sail even upwind.
Rowing an Elfyn singlehanded, you feel the bigger and heavier hull compared to an Elf, but still it is easy to get it up to speed and maintain 3 to 3.5 knots. The keel gives it excellent tracking and there is very little leeway while rowing with the wind on the beam. Turning will take some time and space, and you might need to back with the other oar in tighter spots. While an Elf could easily feel overpowered by two rowers, Elfyn benefits more from the help of a second rower. With both boats, pay attention to proper longitudinal trim; if the stern or bow is overloaded, you will immediately feel the extra drag.
Faerings have a good reputation for taking care of themselves when the going gets rough, borne out by Iain’s experiences rowing through surf and mine sailing an Elf in challenging conditions. In very strong winds, the extreme lightness and upsweeping bow and stern of Elfyn will have an effect on the boat and make rowing hard and unpleasant work. Some water-bag ballast or a load of cargo for cruising should help. The lightness has one drawback when sailing, too: sailing upwind in waves, the lack of momentum is bound to get you caught in irons if a wave hits the light hull during a tack. Downwind, lightness is a desirable feature and Elfyn will surf down the waves, occasionally exceeding hull speed.
Using inflatable beach rollers, it is fairly easy to get Elfyn rolled out of the water on a beach. For camp-cruising, hauling the boat ashore is a very practical feature; you do not have to worry about wind shifts or changing wave conditions. When sailing, the rollers are tied under the thwarts and serve as emergency buoyancy.
Iain’s faerings are easy to handle while launching and transporting and graceful, excellent performers under oar and sail. If you decide to build an Elfyn, you are in for some remarkable times on the water in a boat loaded with character.
Mats Vuorenjuuri is the father of three and an entrepreneur, making a living in graphic design, photography, and freelance writing. He is currently becoming a boatbuilder as well, offering boatbuilding and maintenance services through Nordic Craft. In recent years he has discovered the simplicity and joy of small boats after sailing various types including sail-training schooners. He wrote about cruising the Finnish coast in his Coquina in our May 2016 issue and about a Lakeland Row in January 2017.
Elfyn Particulars
[table]
Length/16′ 6″
Beam/4′ 9″
Sail area/67 sq ft
Weight/180 lbs
Construction time/240 hours
Crew/4
[/table]
Plans for the Elfyn are available from The WoodenBoat Store for $225 USD and from Oughtred Boats for $244.39 AUS. For kits, see Oughtred Boats.
Is there a boat you’d like to know more about? Have you built one that you think other Small Boats Magazine readers would enjoy? Please email us!
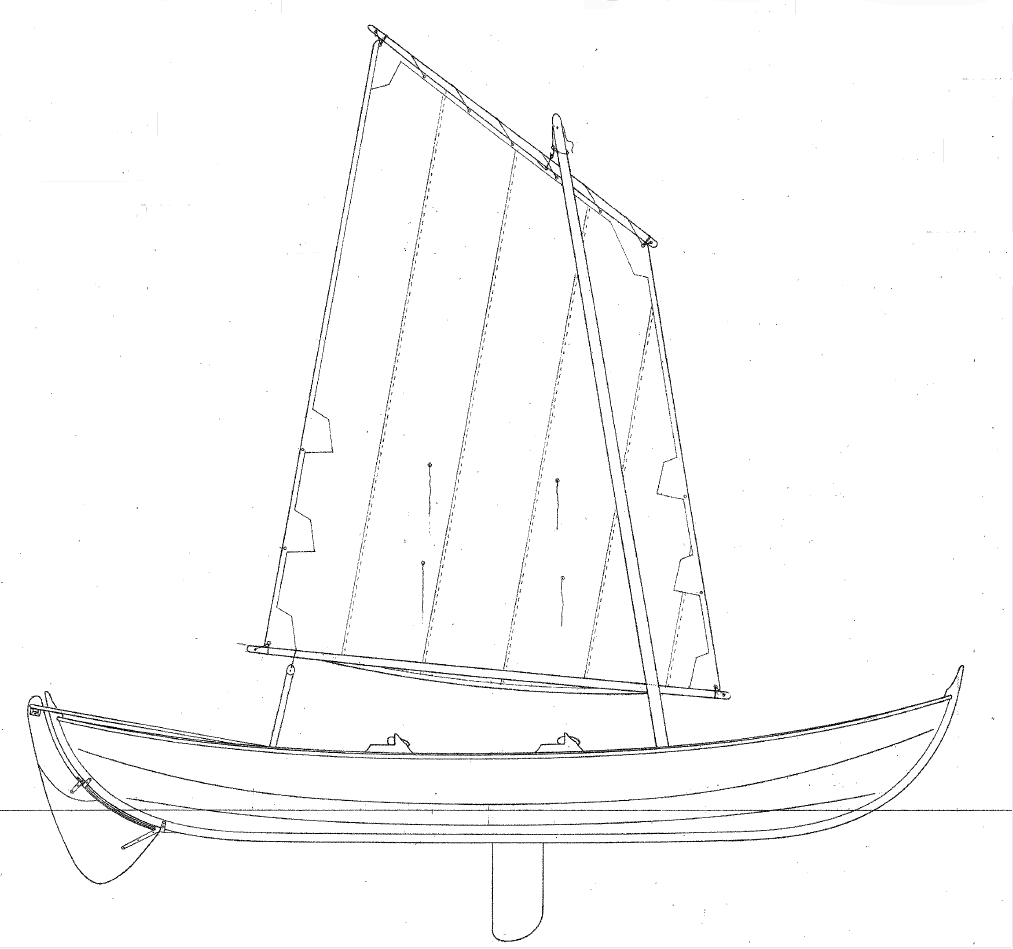
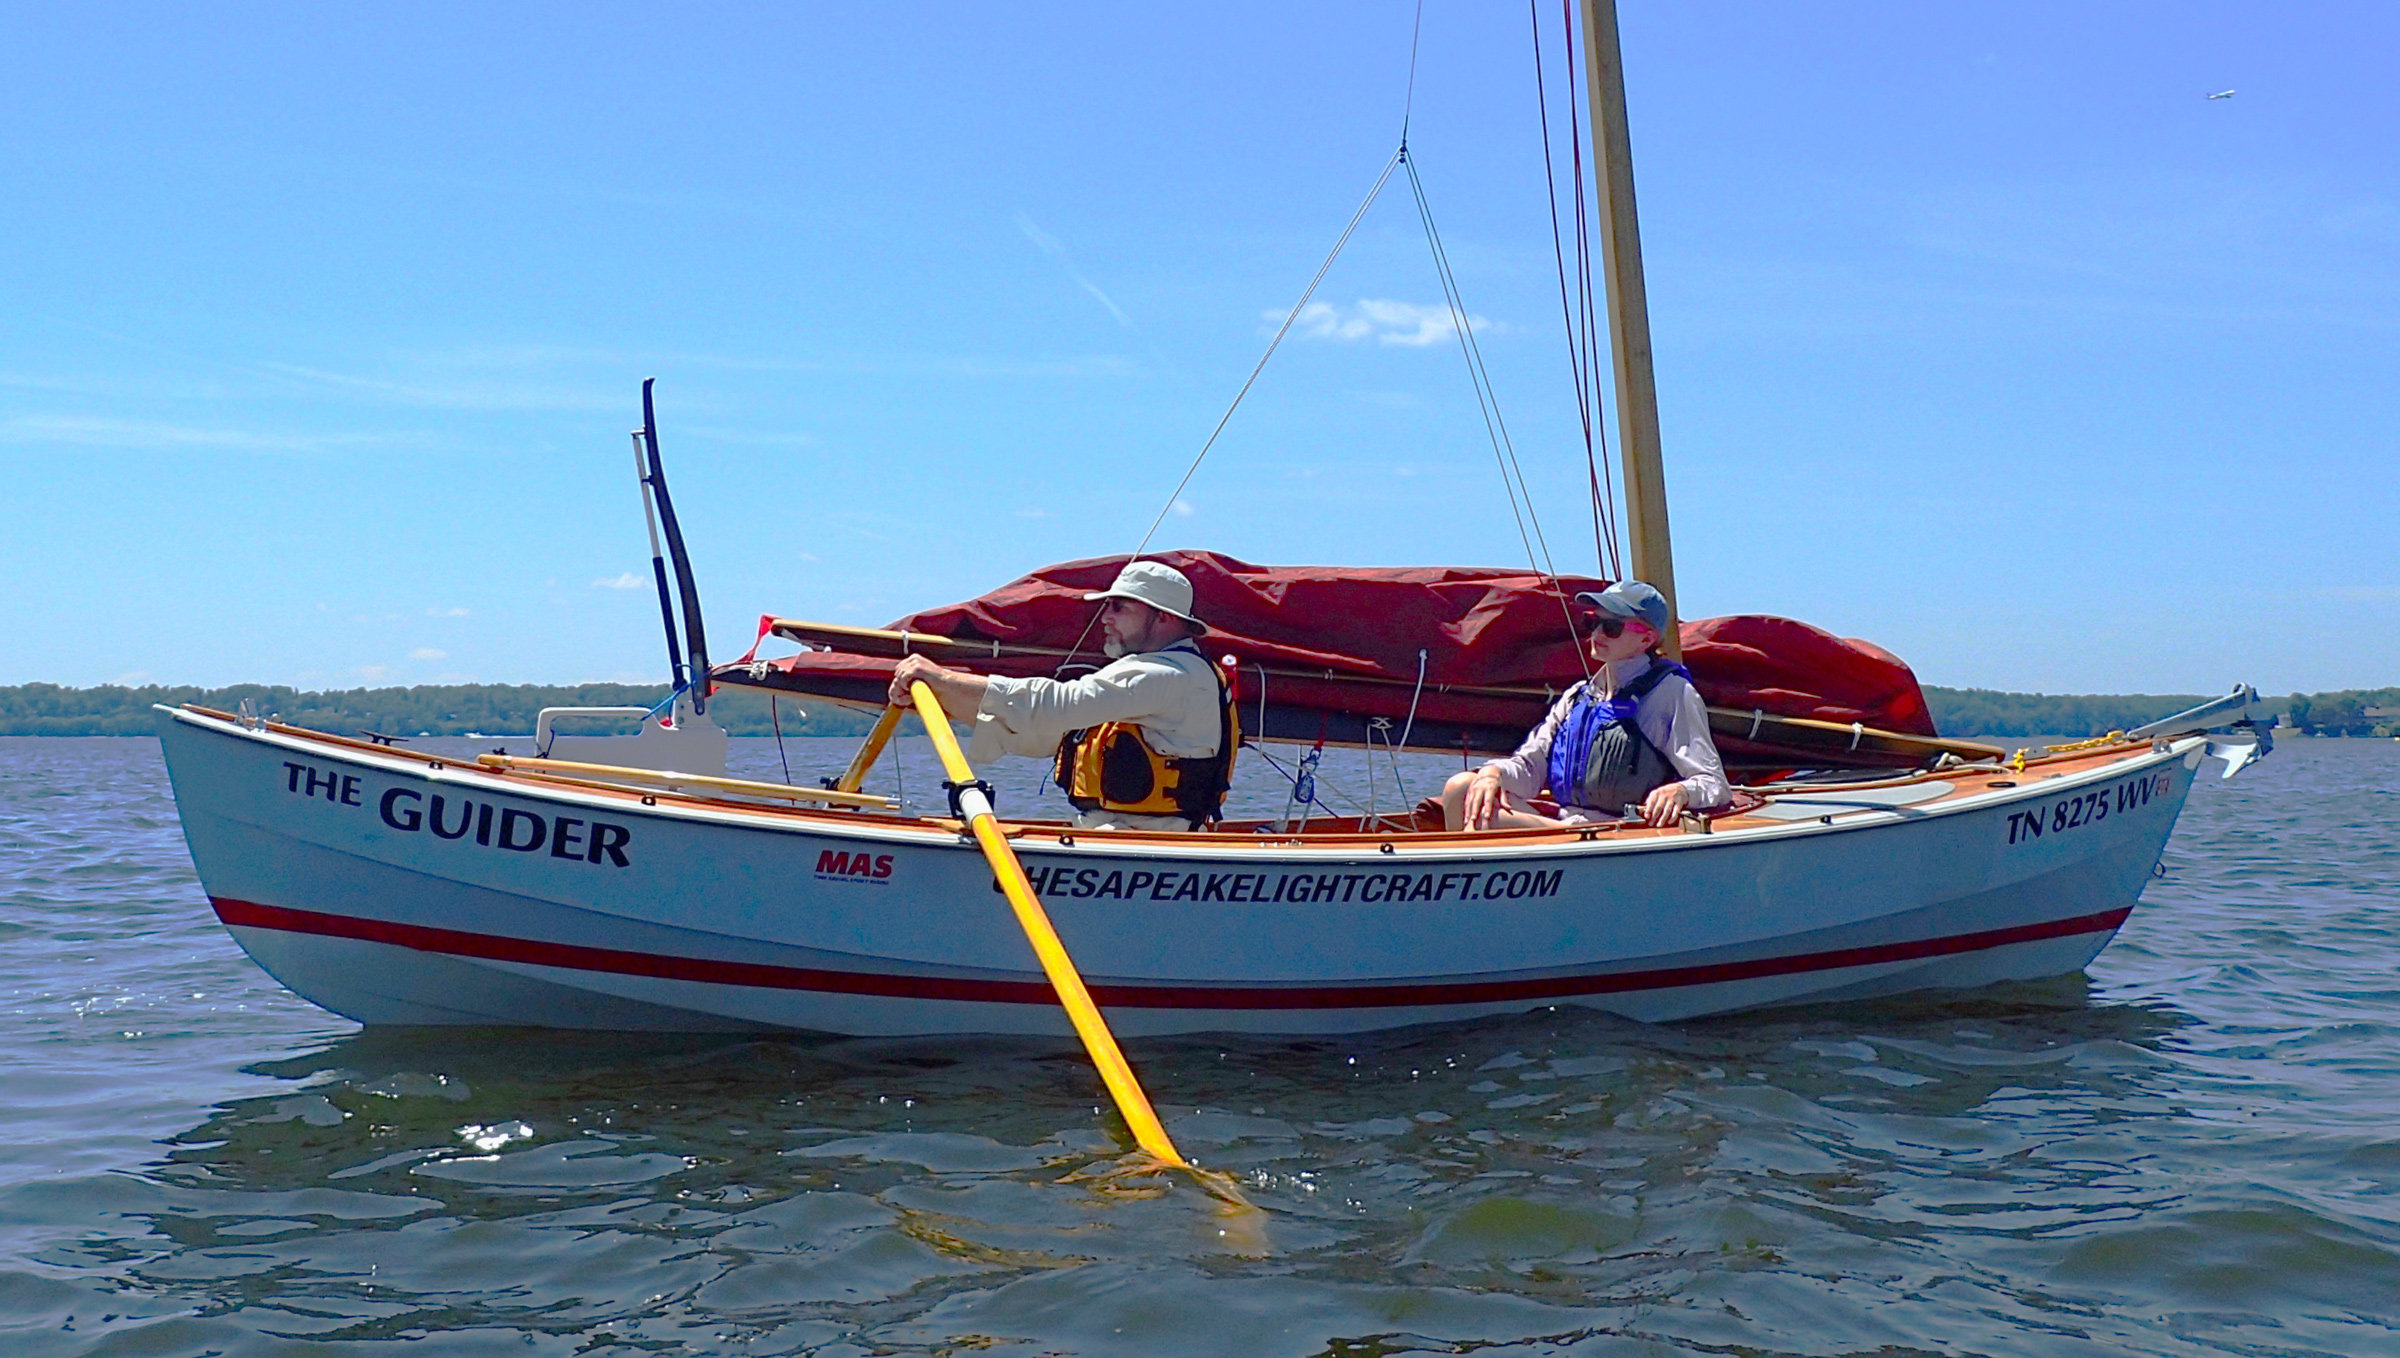
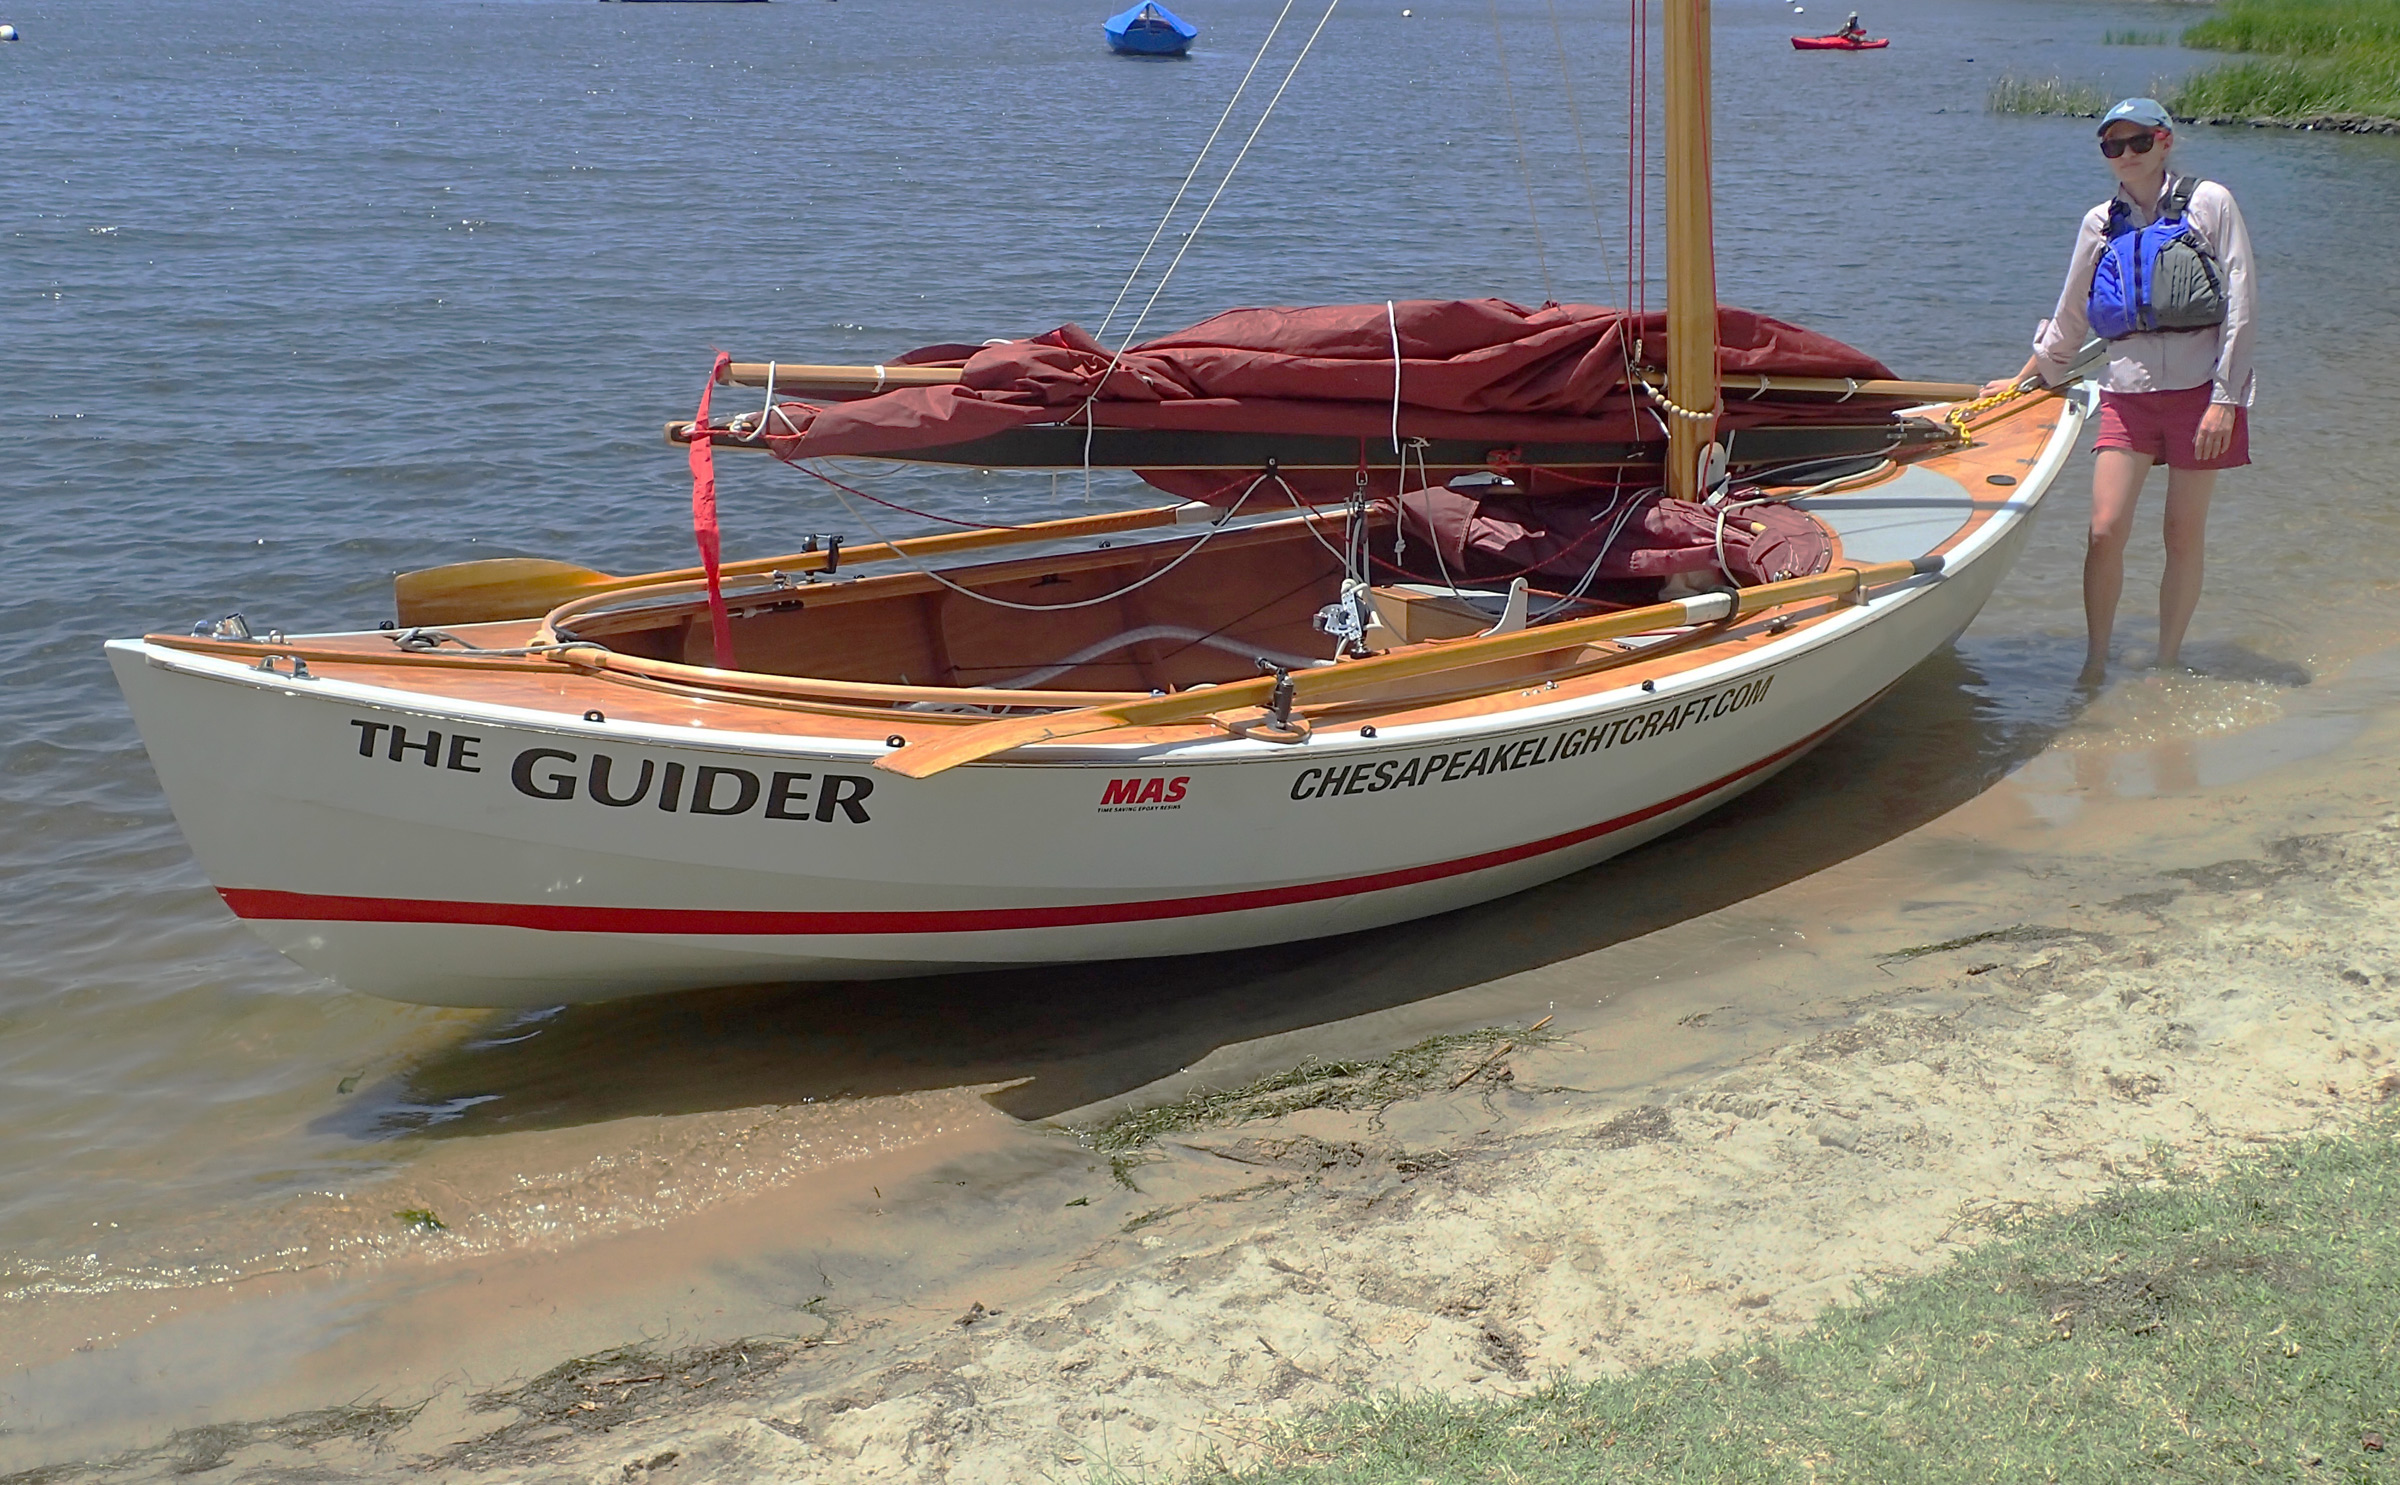
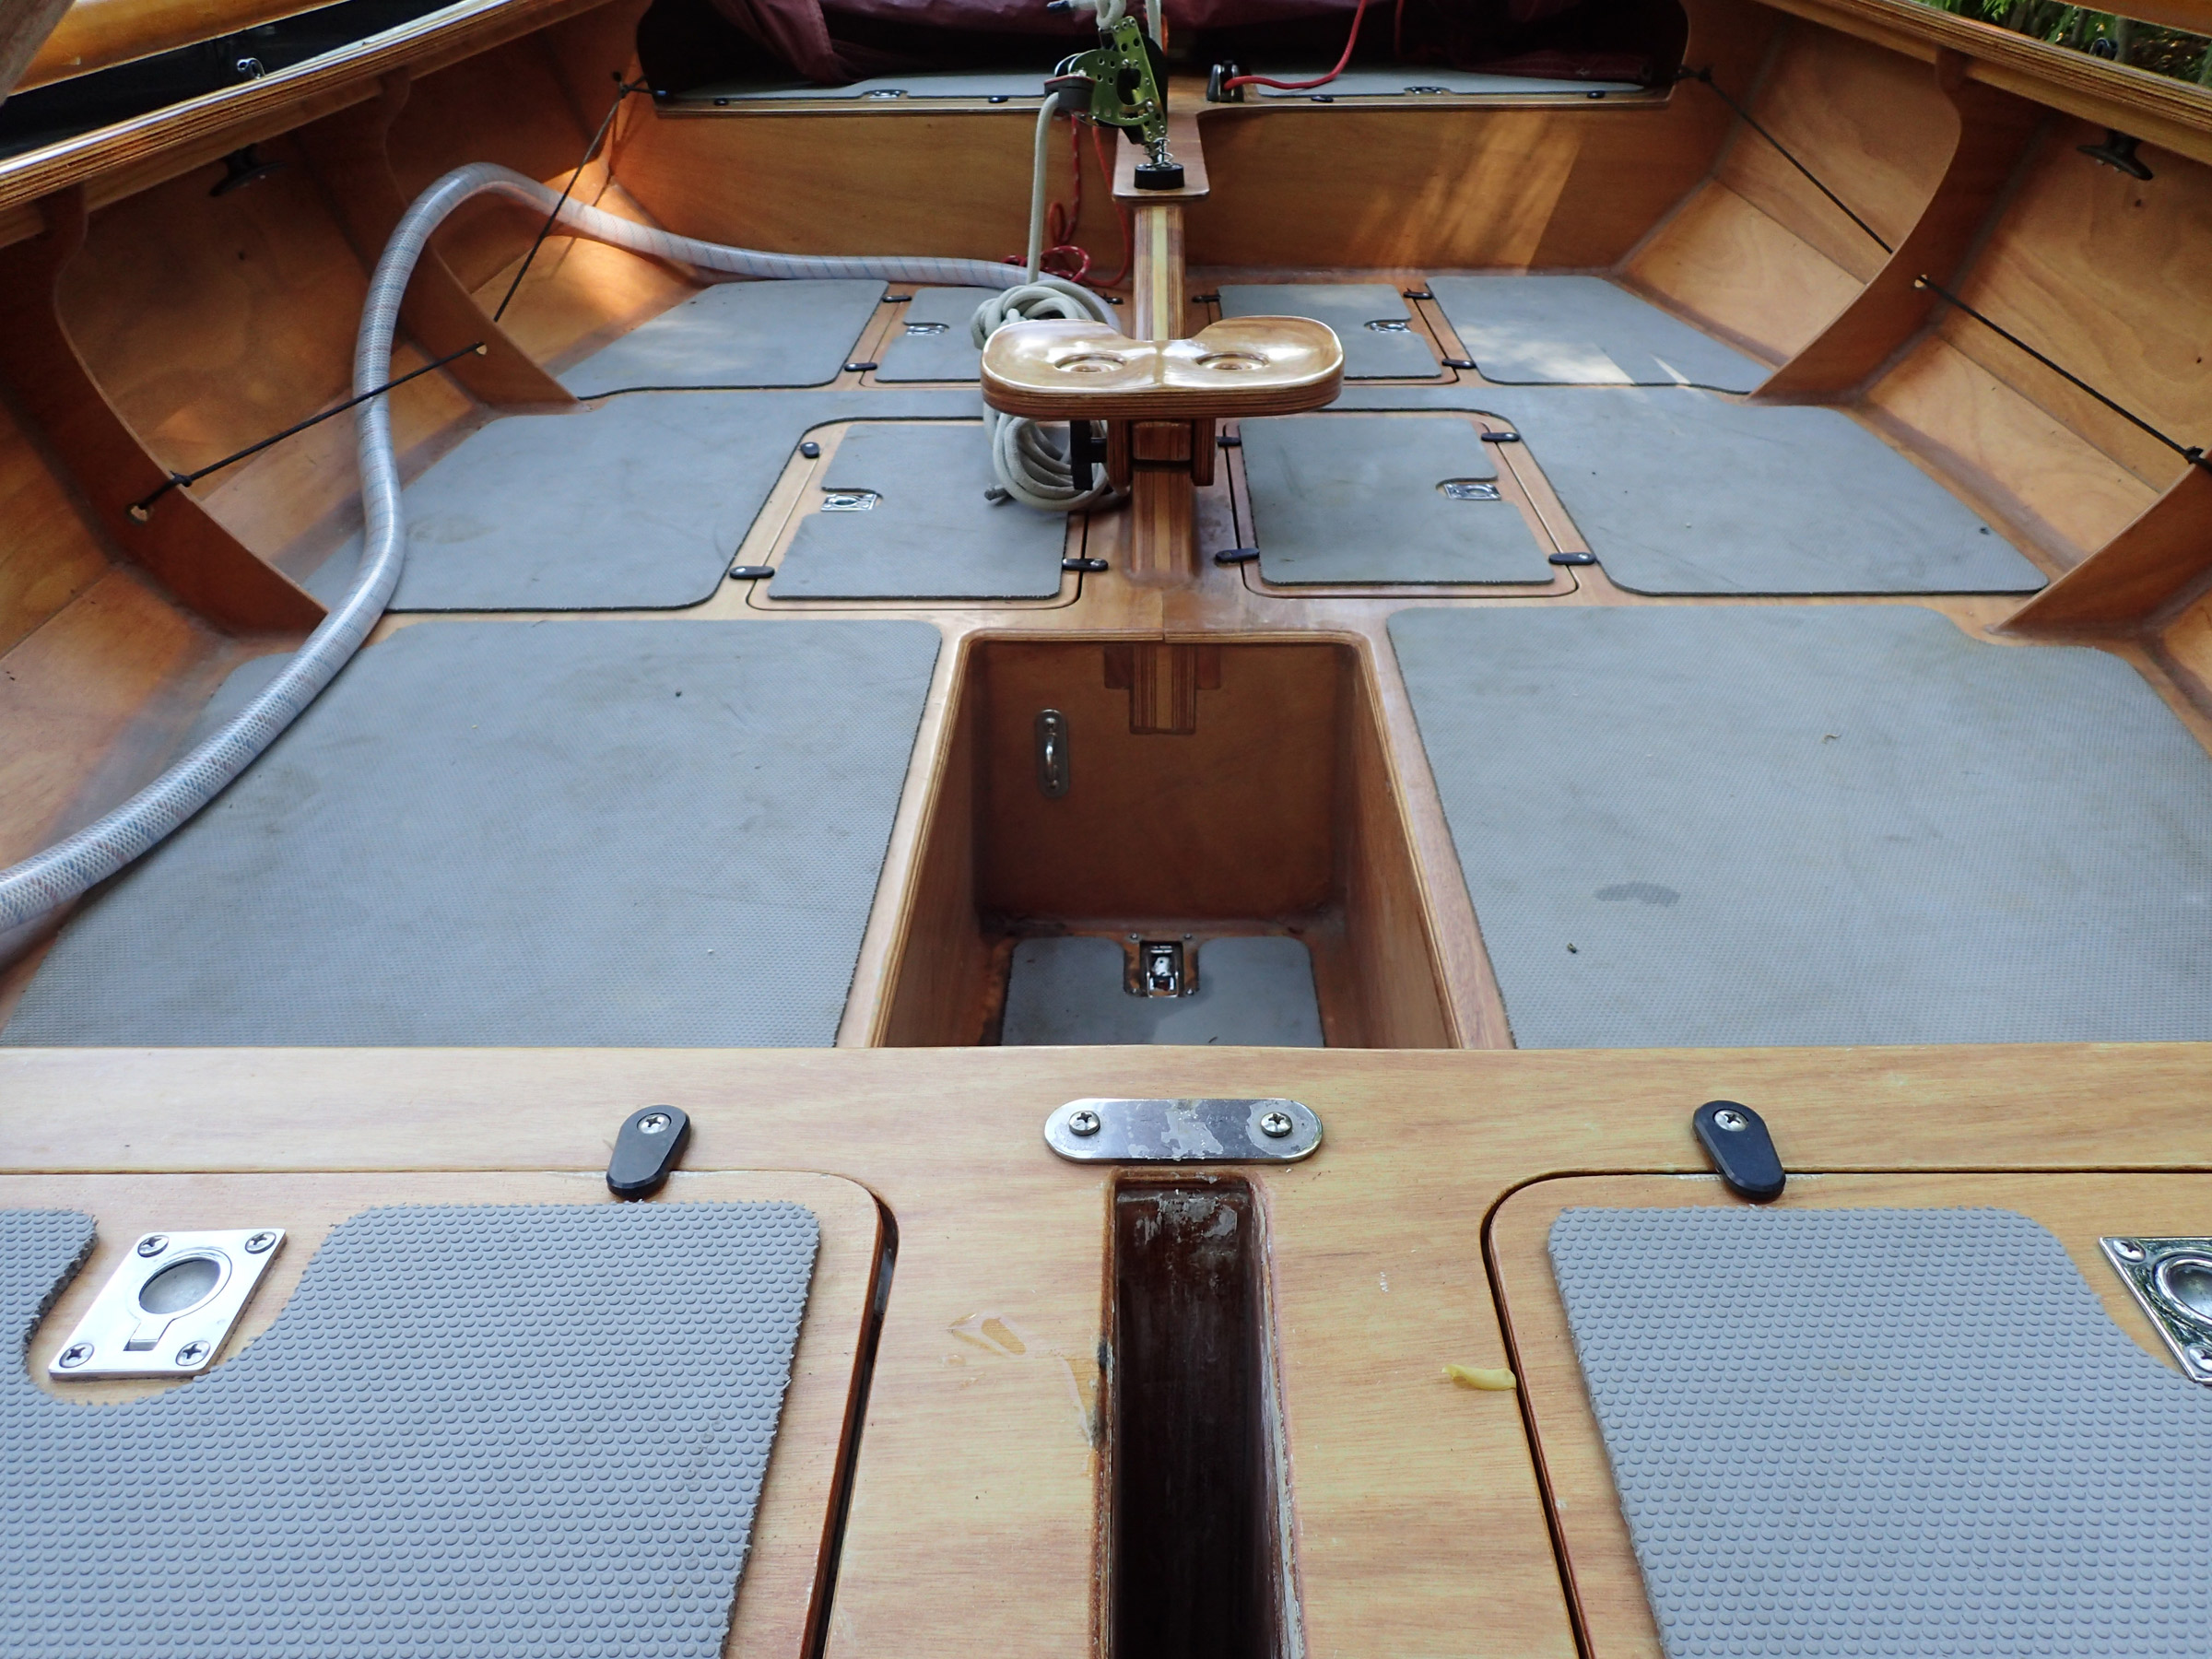
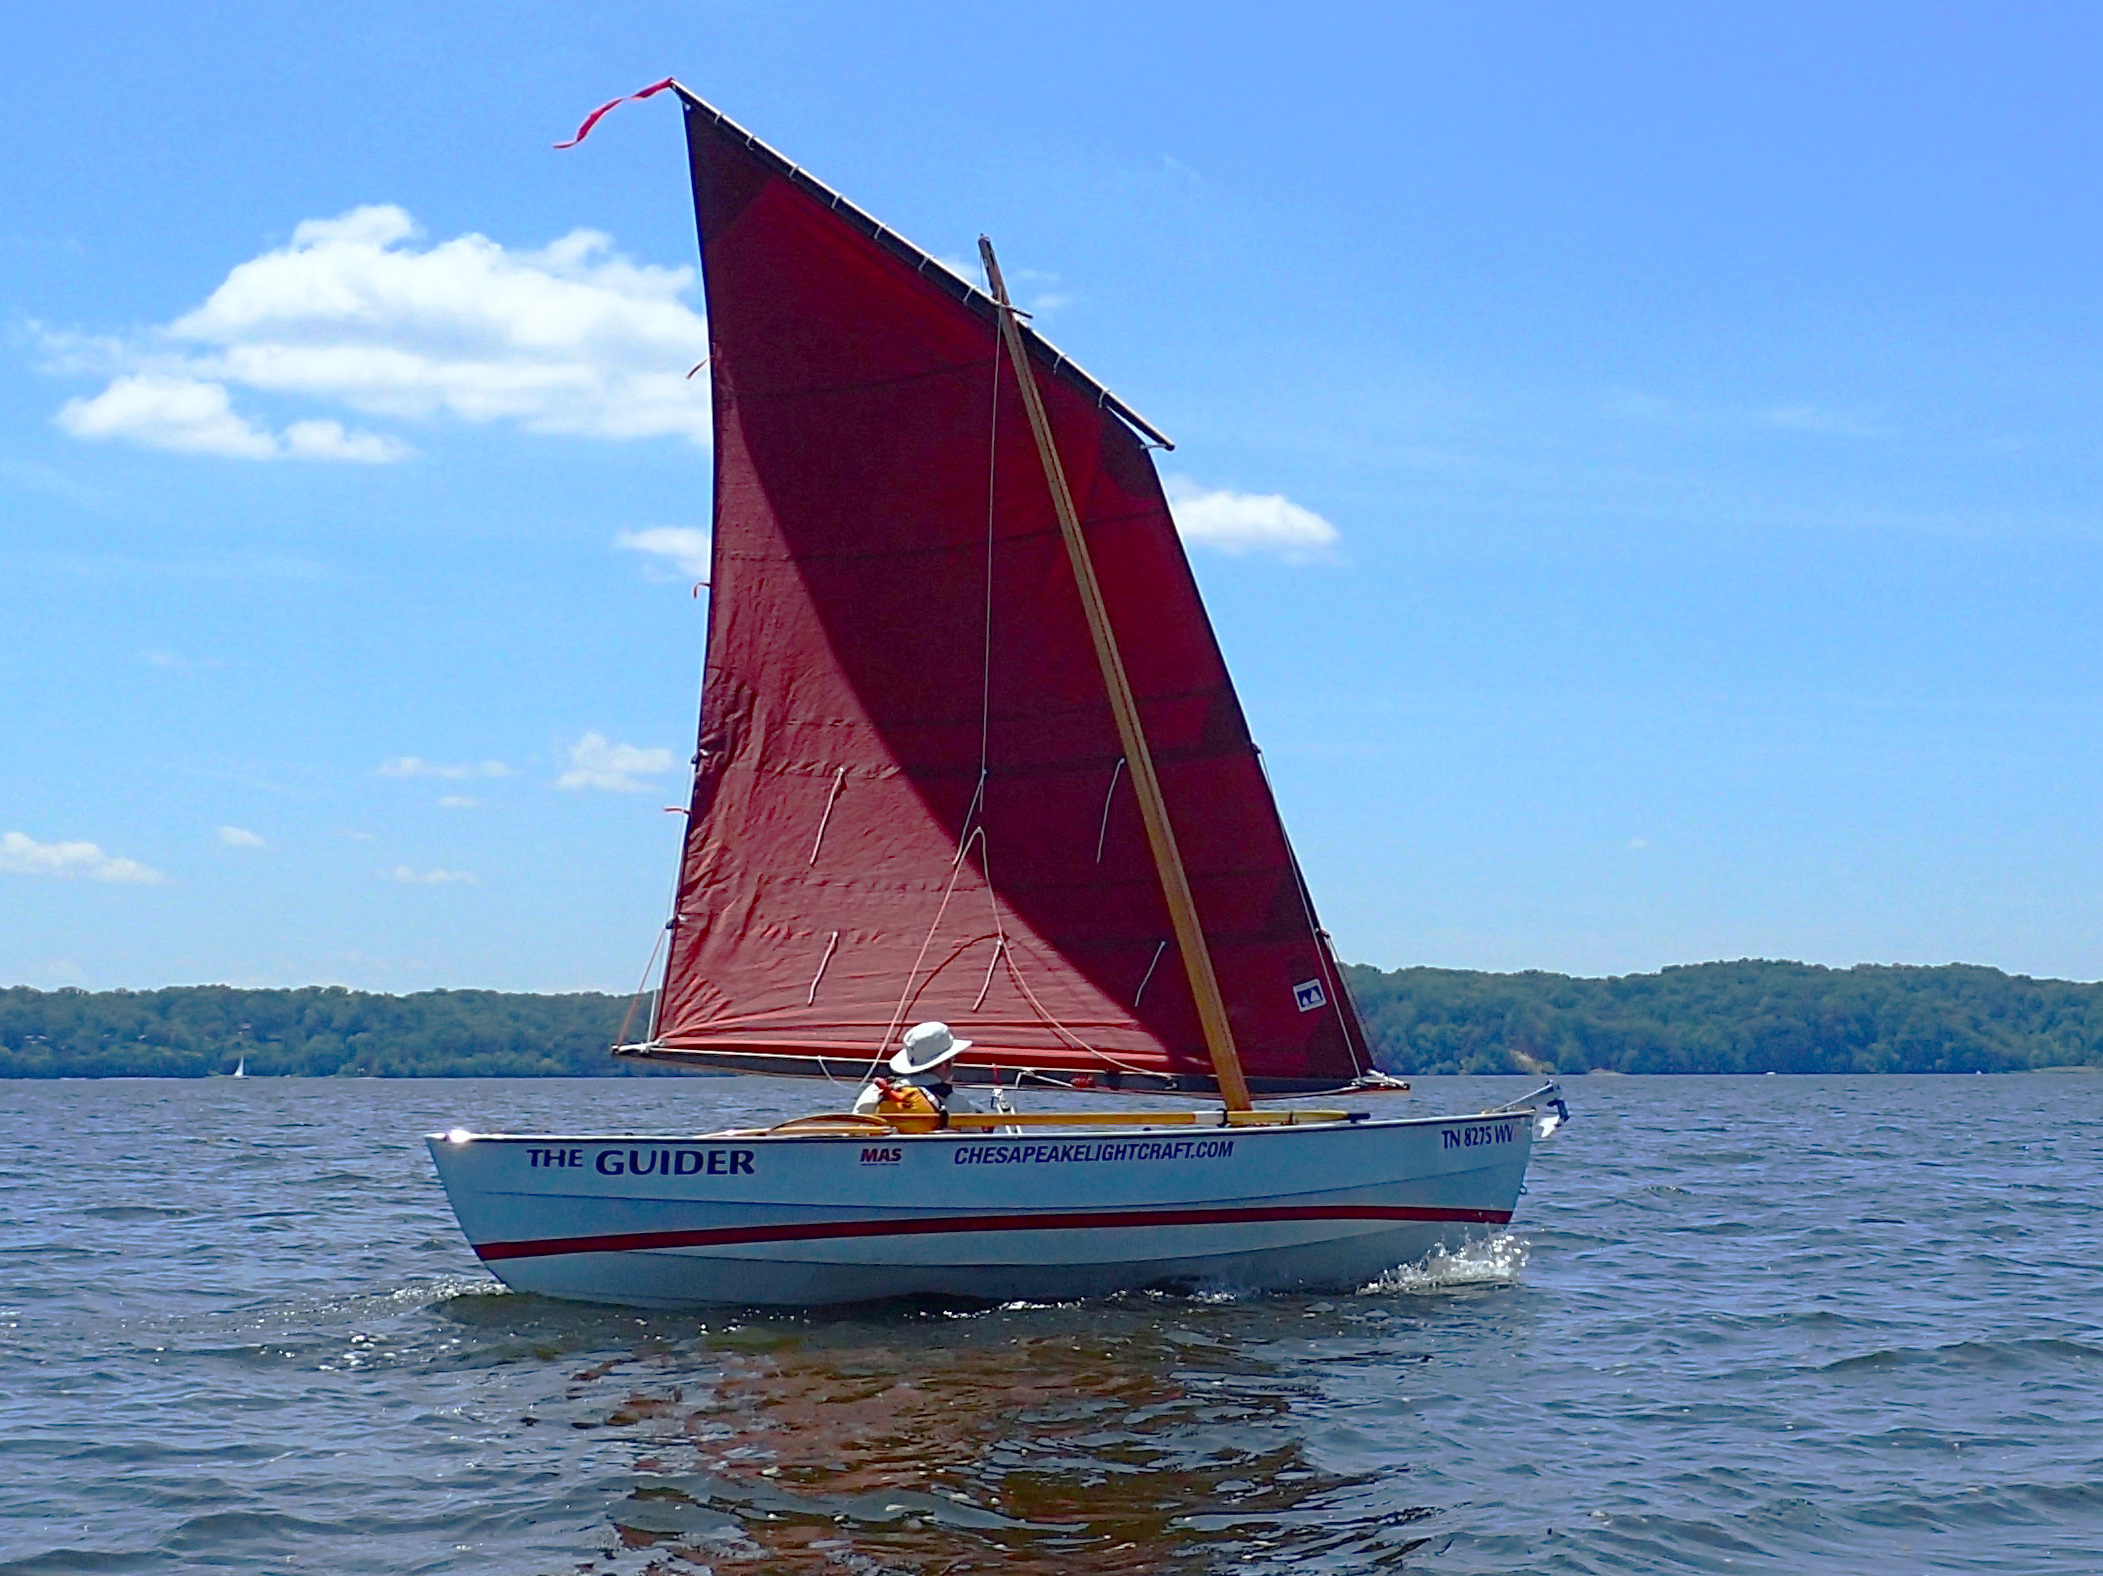
The Guider, a new 18′ 7″ expedition boat from Chesapeake Light Craft (CLC), has been a development project for CLC’s designer, John Harris, and John Guider, a professional photographer and small-boat adventurer based in Nashville, Tennessee. The two have known each other now for 10 years and had previously collaborated on the Skerry Raid, a slightly beamier and partially decked version of CLC’s 15′ Skerry sail-and-oar boat. John G. used the prototype to travel the 6,500-mile “Great Loop” of the eastern United States. The Guider was designed and built for John Guider’s solo of the 2019 Race to Alaska (R2AK), a 750-mile human- and wind-powered race from Port Townsend, Washington, to Ketchikan, Alaska. Compared with the Skerry Raid, the Guider design features more storage space and comfortable sleeping accommodations, and has the seakeeping ability to push harder in rough and windy conditions.
Brian Forsyth
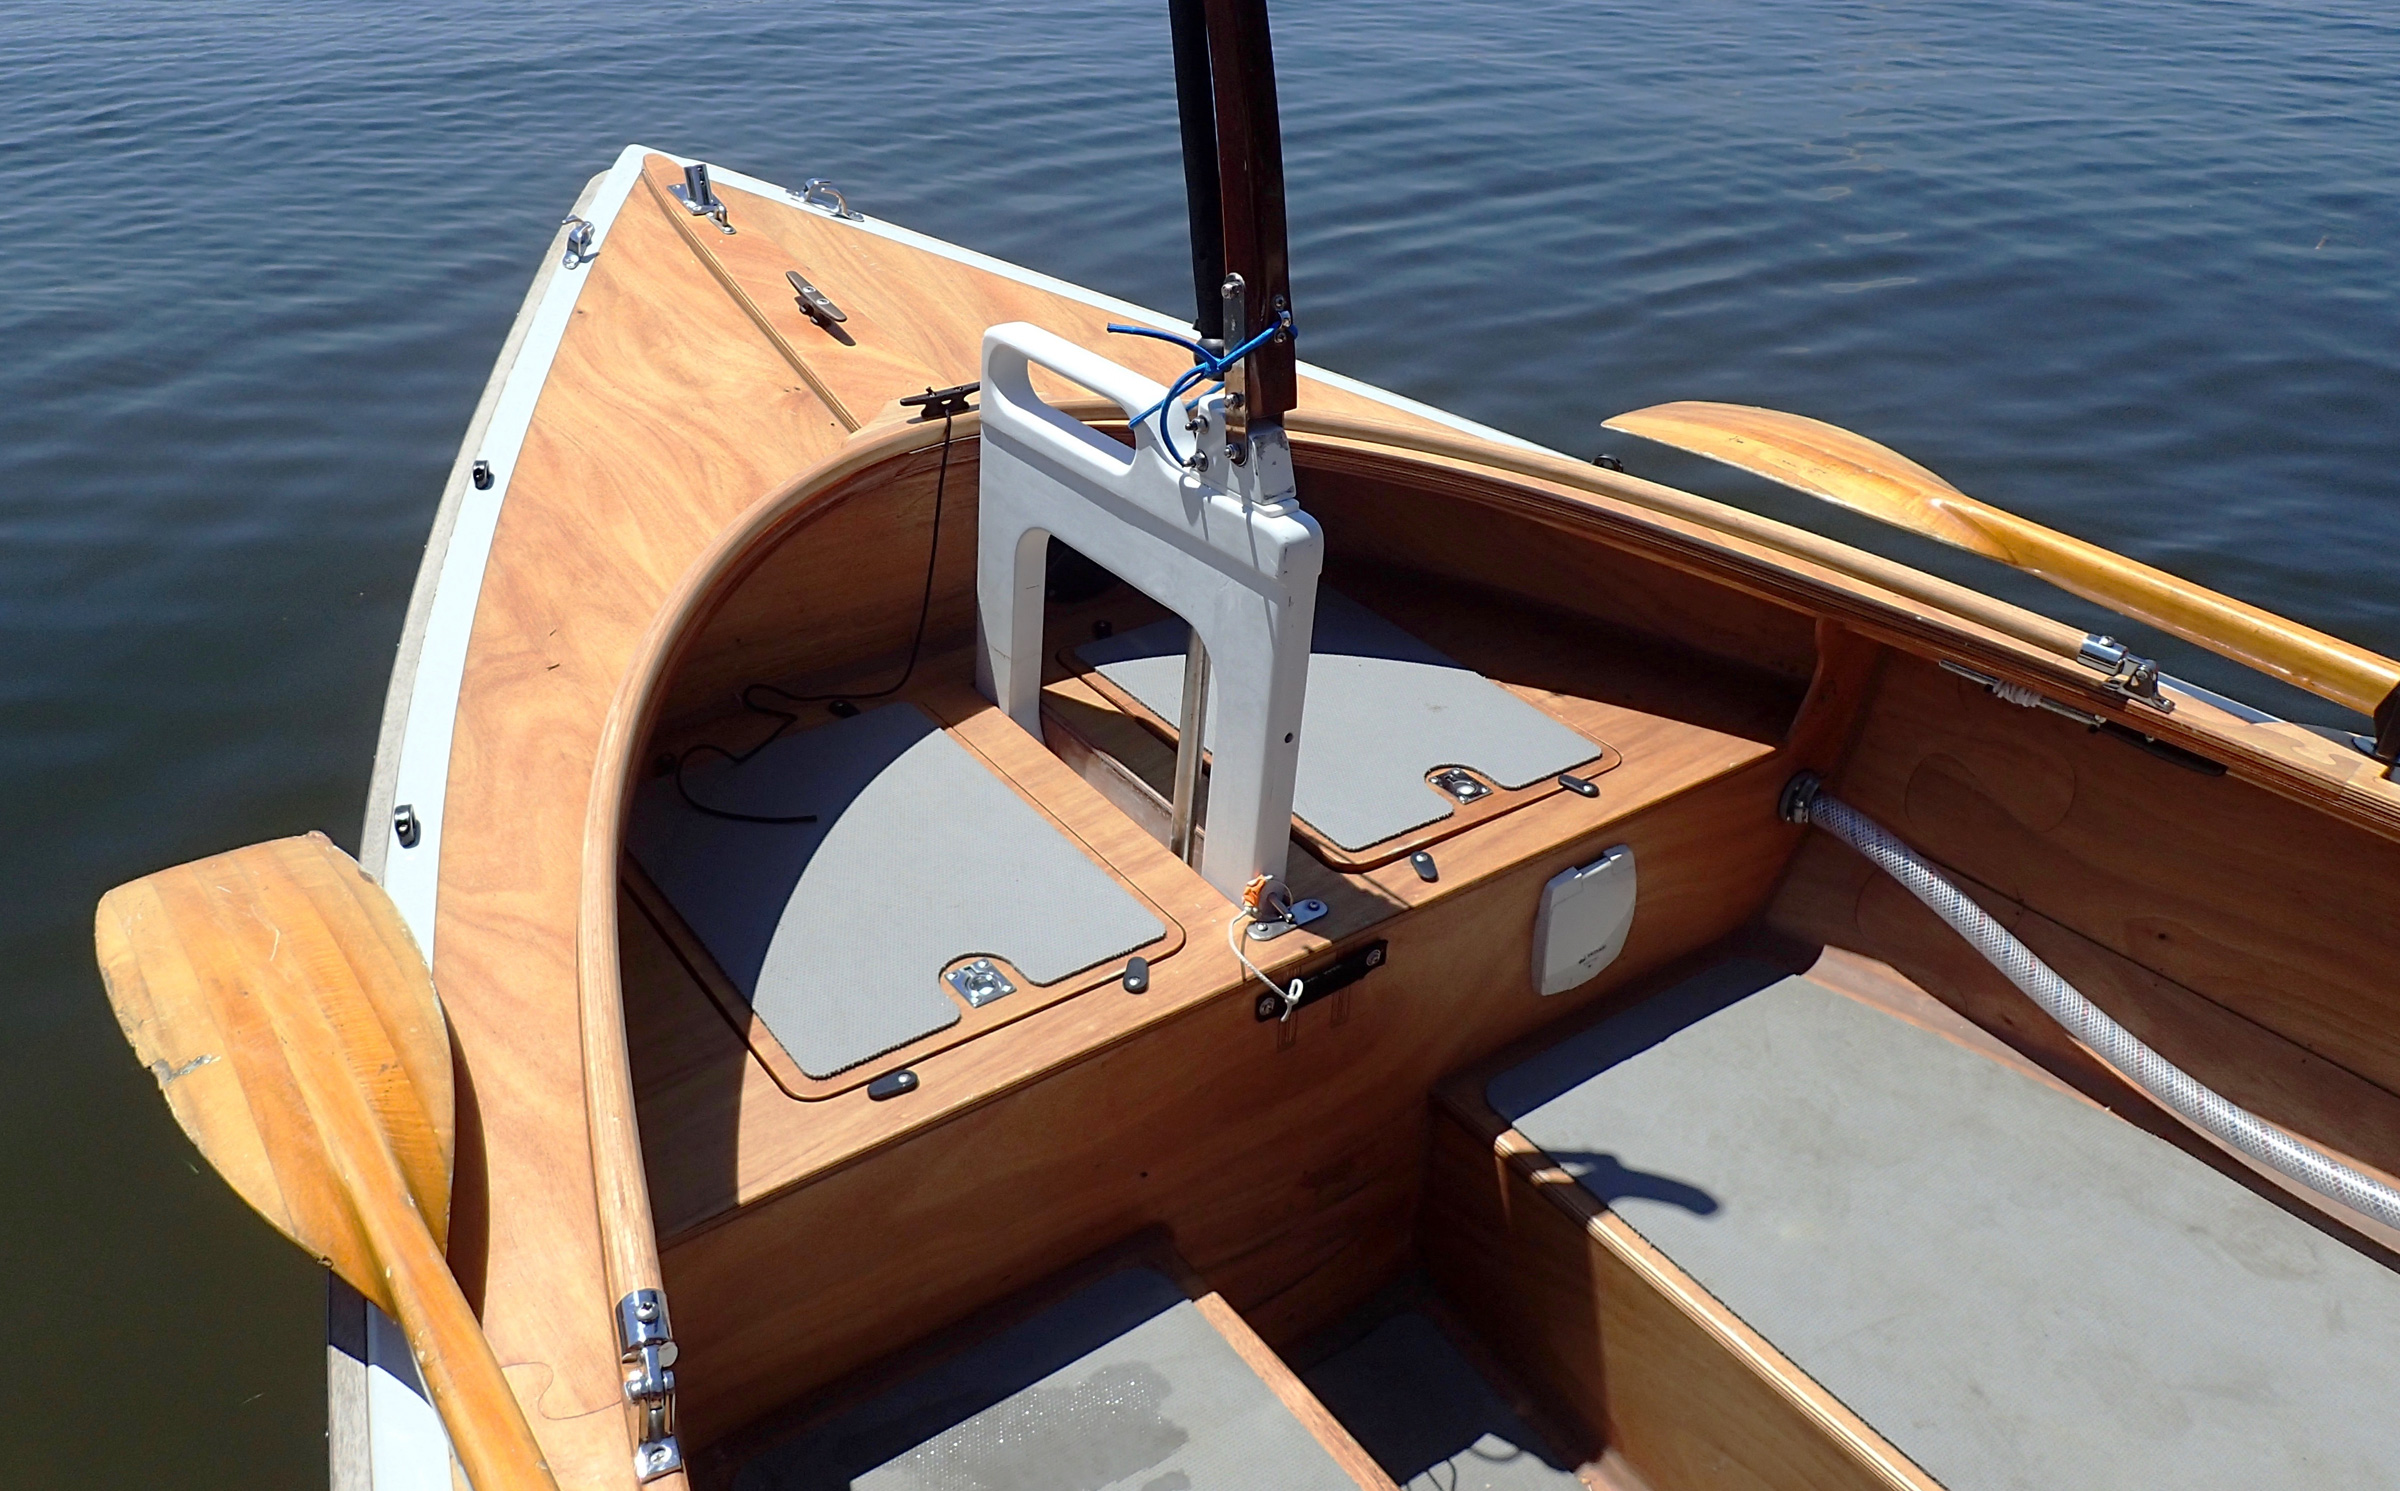
For approaching the beach, the centerboard is retracted and the rudder is lifted from its trunk.
To prepare for his summer 2020 expedition on Lake Superior, John G. brought his Guider to the CLC shop in Annapolis, Maryland, to be outfitted with a new cockpit tent arrangement. While the boat was in Annapolis, I was given the opportunity to sail it. A longtime beach cruiser and an aficionado of shallow-draft boats suitable for camp-cruising and sleeping aboard, I was delighted.
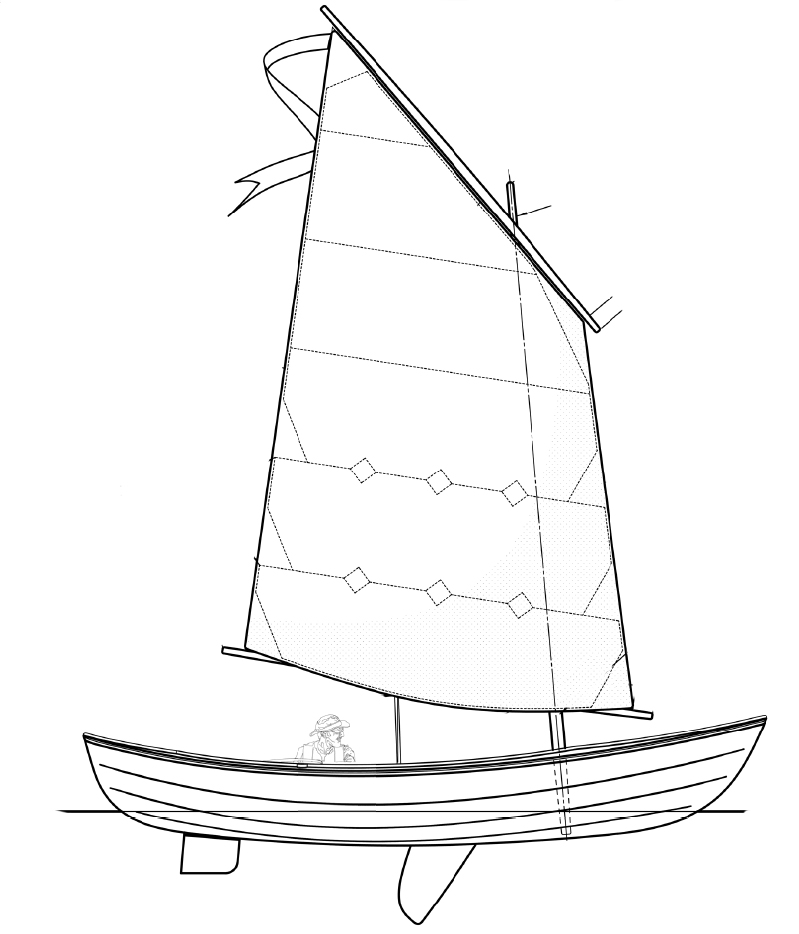
The Guider’s hull has fine ends and a relatively narrow waterline for easy rowing. The topside planks flare amidships to provide buoyancy and power under sail. The wherry-style plank keel is narrow but likely just wide enough to keep the boat upright on a beach or mudflat. The centerboard is a slightly profiled piece of 1/4″ aluminum plate, simple and tough. All spars are hollow and shorter than the boat for more compact trailering. The single balanced lugsail is 125 sq ft, about as big as a singlehander would want, providing plenty of oomph. Lazyjacks make sail handling manageable; the sail goes up and, more importantly, comes down in an instant. When lowered, the sail bundle is already mostly out of the way for rowing, and the lazyjacks can be snugged up to brail it completely out of the way, safely above head height. Two deep reefs are each set up with single-line reefing. All reefing lines and cleats are right where they should be on the starboard side of the boom, easy to use from a safe position amidships.
The Guider has decks fore and aft and side decks, making the boat significantly more seaworthy than a fully open boat. The side decks may look wide enough to hike out on, but with oars stored along the side decks in their locks and some purpose-made chocks, the decks are not available for sitting. This is an acceptable trade-off, as The Guider’s hull shape, beam, and intended stores and ballast should preclude the need to hike out. And the ready availability of the oars is the best I have seen on any sail-and-oar boat.
Brian Forsyth
The interior has room on either side of the centerboard trunk for two to sleep comfortably. The aft end of the trunk supports a racing-style rowing seat. The boat has a dozen storage compartments and as many hatches for access to gear.
The defining design feature of The Guider, though, is its interior layout, optimized with 12 waterproof buoyancy compartments, most of which double as stowage for expedition stores with large, easy-to-operate plywood hatches. (The foredeck hatch has a large oval rubber kayak hatch cover.) The cockpit area is mostly a level space with just a small footwell set under the tiller. This makes for a quick transition to camp/sleep mode. I have slept, and attempted to sleep, in a lot of different small boats, and for an open boat, The Guider is as good as it gets. There are two spacious 6′ 6″-long sleeping flats, separated by the centerboard trunk and footwell. Nothing needs to be moved or reconfigured for sleeping. It can be as simple as rolling out a pad and climbing into a bivy bag in under a minute. In a few minutes more, you could rig a cockpit tent or sun shade.
Brian Forsyth
The rudder is housed inboard so it can be accessed more safely than a rudder mounted on the stern. The rudder is retracted here and the cassette that occupies the trunk when it is in use is visible.
The Guider’s rudder and tiller assembly is an elegant solution to an old problem. Traditional rudders on double-enders use either an overly long tiller or a long steering stick loosely coupled to a yoke mounted on the rudderhead. In either case, these stern-mounted rudders are difficult to retract or deploy (a potentially unsafe exercise in any kind of sea), and the tillers always seem to be in the way when you want to move around in the boat. The Guider’s rugged, retractable rudder slips through a dedicated trunk aft of the footwell. Above the rudder blade, the cassette, which the rudderpost pivots in, fills the well when the rudder is extended beyond the hull. It’s easy to deploy and remove the rudder from the safety of the cockpit. The rudder can be set halfway, with half the blade projecting, and left fixed as a skeg, for rowing. And the tiller pops up out of the way and clear of the boom with a simple bungee cord loop. Very slick!
After completing the design, crew at CLC built John G.’s boat, Guider #1, in 22 days. Yes, it will take you longer to build one. CLC sells Guider kits and components under a new group of designs called ProKits, intended for more experienced builders who don’t require step-by-step instructions. The construction manual, developed by CLC designer Dillon Majoros, consists of 38 full-color, richly detailed, 11″ x 17″ sheets and assumes the builder already has the skills required for stitch-and-glue construction, working with epoxy, filleting, and fiberglass sheathing. This project is a lot more complex than a plywood kayak, and while it could be built in a one-car garage, it wouldn’t be any fun. I would consider a two-car garage or similarly sized shop space a minimum workspace.
Currently the only way to build The Guider is from one of CLC’s kits. A full plan set will be available soon and will include a roll of full-sized paper templates for every wood part, so you cut them out from plywood sheets. Having built plywood boats from both kits and patterns, the precut kits are a no-brainer choice. As much as I love my high-end jigsaw, there are a lot of wood parts in this design. Let the computer and CNC cutter do what they can truly do better, more accurately, and much faster than you can.
Launching The Guider from a standard galvanized two-bunk trailer was a cinch at a ramp on the Severn River near Annapolis, although the trailer wheels were completely submerged to float the boat off. Prior to launching I had stepped the 30-ish-lb mast myself without difficulty and set up the running rigging and sail in its lazyjacks. For cruising, I think The Guider could be beach-launched with inflatable beach rollers; a strong crew would be an asset.
Ryan Kramer
The Guider has a single rowing station, so the second crew member can rest or attend to chores during lulls in the wind.
In a word, my overall impression of the boat’s performance under way was: “Easy.” With 300 lbs of crew (my daughter and myself) and 200 lbs of foam-wrapped lead ballast (called for in the plans) in the amidships storage compartments, the boat had an easy motion and became even more stable with the centerboard down. The Guider is easy to row, easy to sail, easy to switch between the two, easy to reef, and easy to beach. And easy is what I would want in an expedition boat, where conserving one’s energy is an important consideration.
Ryan Kramer
The 125-sq-ft balanced-lug sail has two lines of reef points. Under sail, with the board down, The Guider draws 36″.
Easy does not mean slow. The Guider could hold a GPS-measured 5-plus knots on any point of sail in moderate 10-knot breezes. It is a fun boat to sail, nicely balanced and responsive. The 3:1 mainsheet tackle is essential but enough to handle the big lugsail. There is something special about the way that sail pulls the boat on anything higher than a beam reach in a good breeze, like being lifted by a hot-air balloon. I have felt this before in catboats occasionally, at least until the weather helm made me aware how much I was fighting the laws of physics. But The Guider’s helm has a balanced “on-rails” feeling I normally associate with keelboats. I could control the boat with one finger on the tiller.
This is a “sit-in” or rather a “sprawl-in” boat. Without the need to hike out, I always felt secure at the helm in the roomy, deep cockpit with my feet in the footwell. With my daughter at the helm, the cleverly designed removable rowing seat, held in place with a single bolt and hand-friendly knob, was my preferred seat for serving as crew under sail. I could sit facing forward and tend the mainsheet. The racing-shell-style seat provides a comfortable rowing perch, with the footwell’s aft bulkhead providing rock solid foot bracing. I’d consider bringing along one or two small, inexpensive vinyl beanbag chairs, a secret comfort weapon for many small-boat cruisers.
Beaching The Guider and getting under way again was a piece of cake. The boat is easy to move under oars from the rowing position, whether rowing forward or backward, another benefit of the double-ended hull design. Under sail again, the 1/4″ aluminum-plate centerboard is an effective depthsounder and takes care of itself in the shoals.
There is no provision to add any sort of motor to The Guider, and it would be challenging and counterproductive to try. Thoughtfully designed to be a purely sail and oar boat, The Guider is best employed and enjoyed motor-free. If you are looking for a fully realized expedition-worthy craft that’s also a hoot to sail, I would highly recommend The Guider.
Brian Forsyth learned to sail as a kid at Navy sailing clubs in the U.S. and overseas. After his own 20-year Navy career as an aviation maintenance officer and a second career as an information technology consultant, he is now free to mess about in boats as much as he wants. A former coastal-kayaking instructor and keelboat racer, he now sails, paddles, and builds small boats in Solomons, Maryland. He enjoys camp-cruising Chesapeake Bay with his sailing buddies, the Shallow Water Sailors, and is a member of the Patuxent Small Craft Guild, a group of volunteers who work in the boatshop at the Calvert Marine Museum.
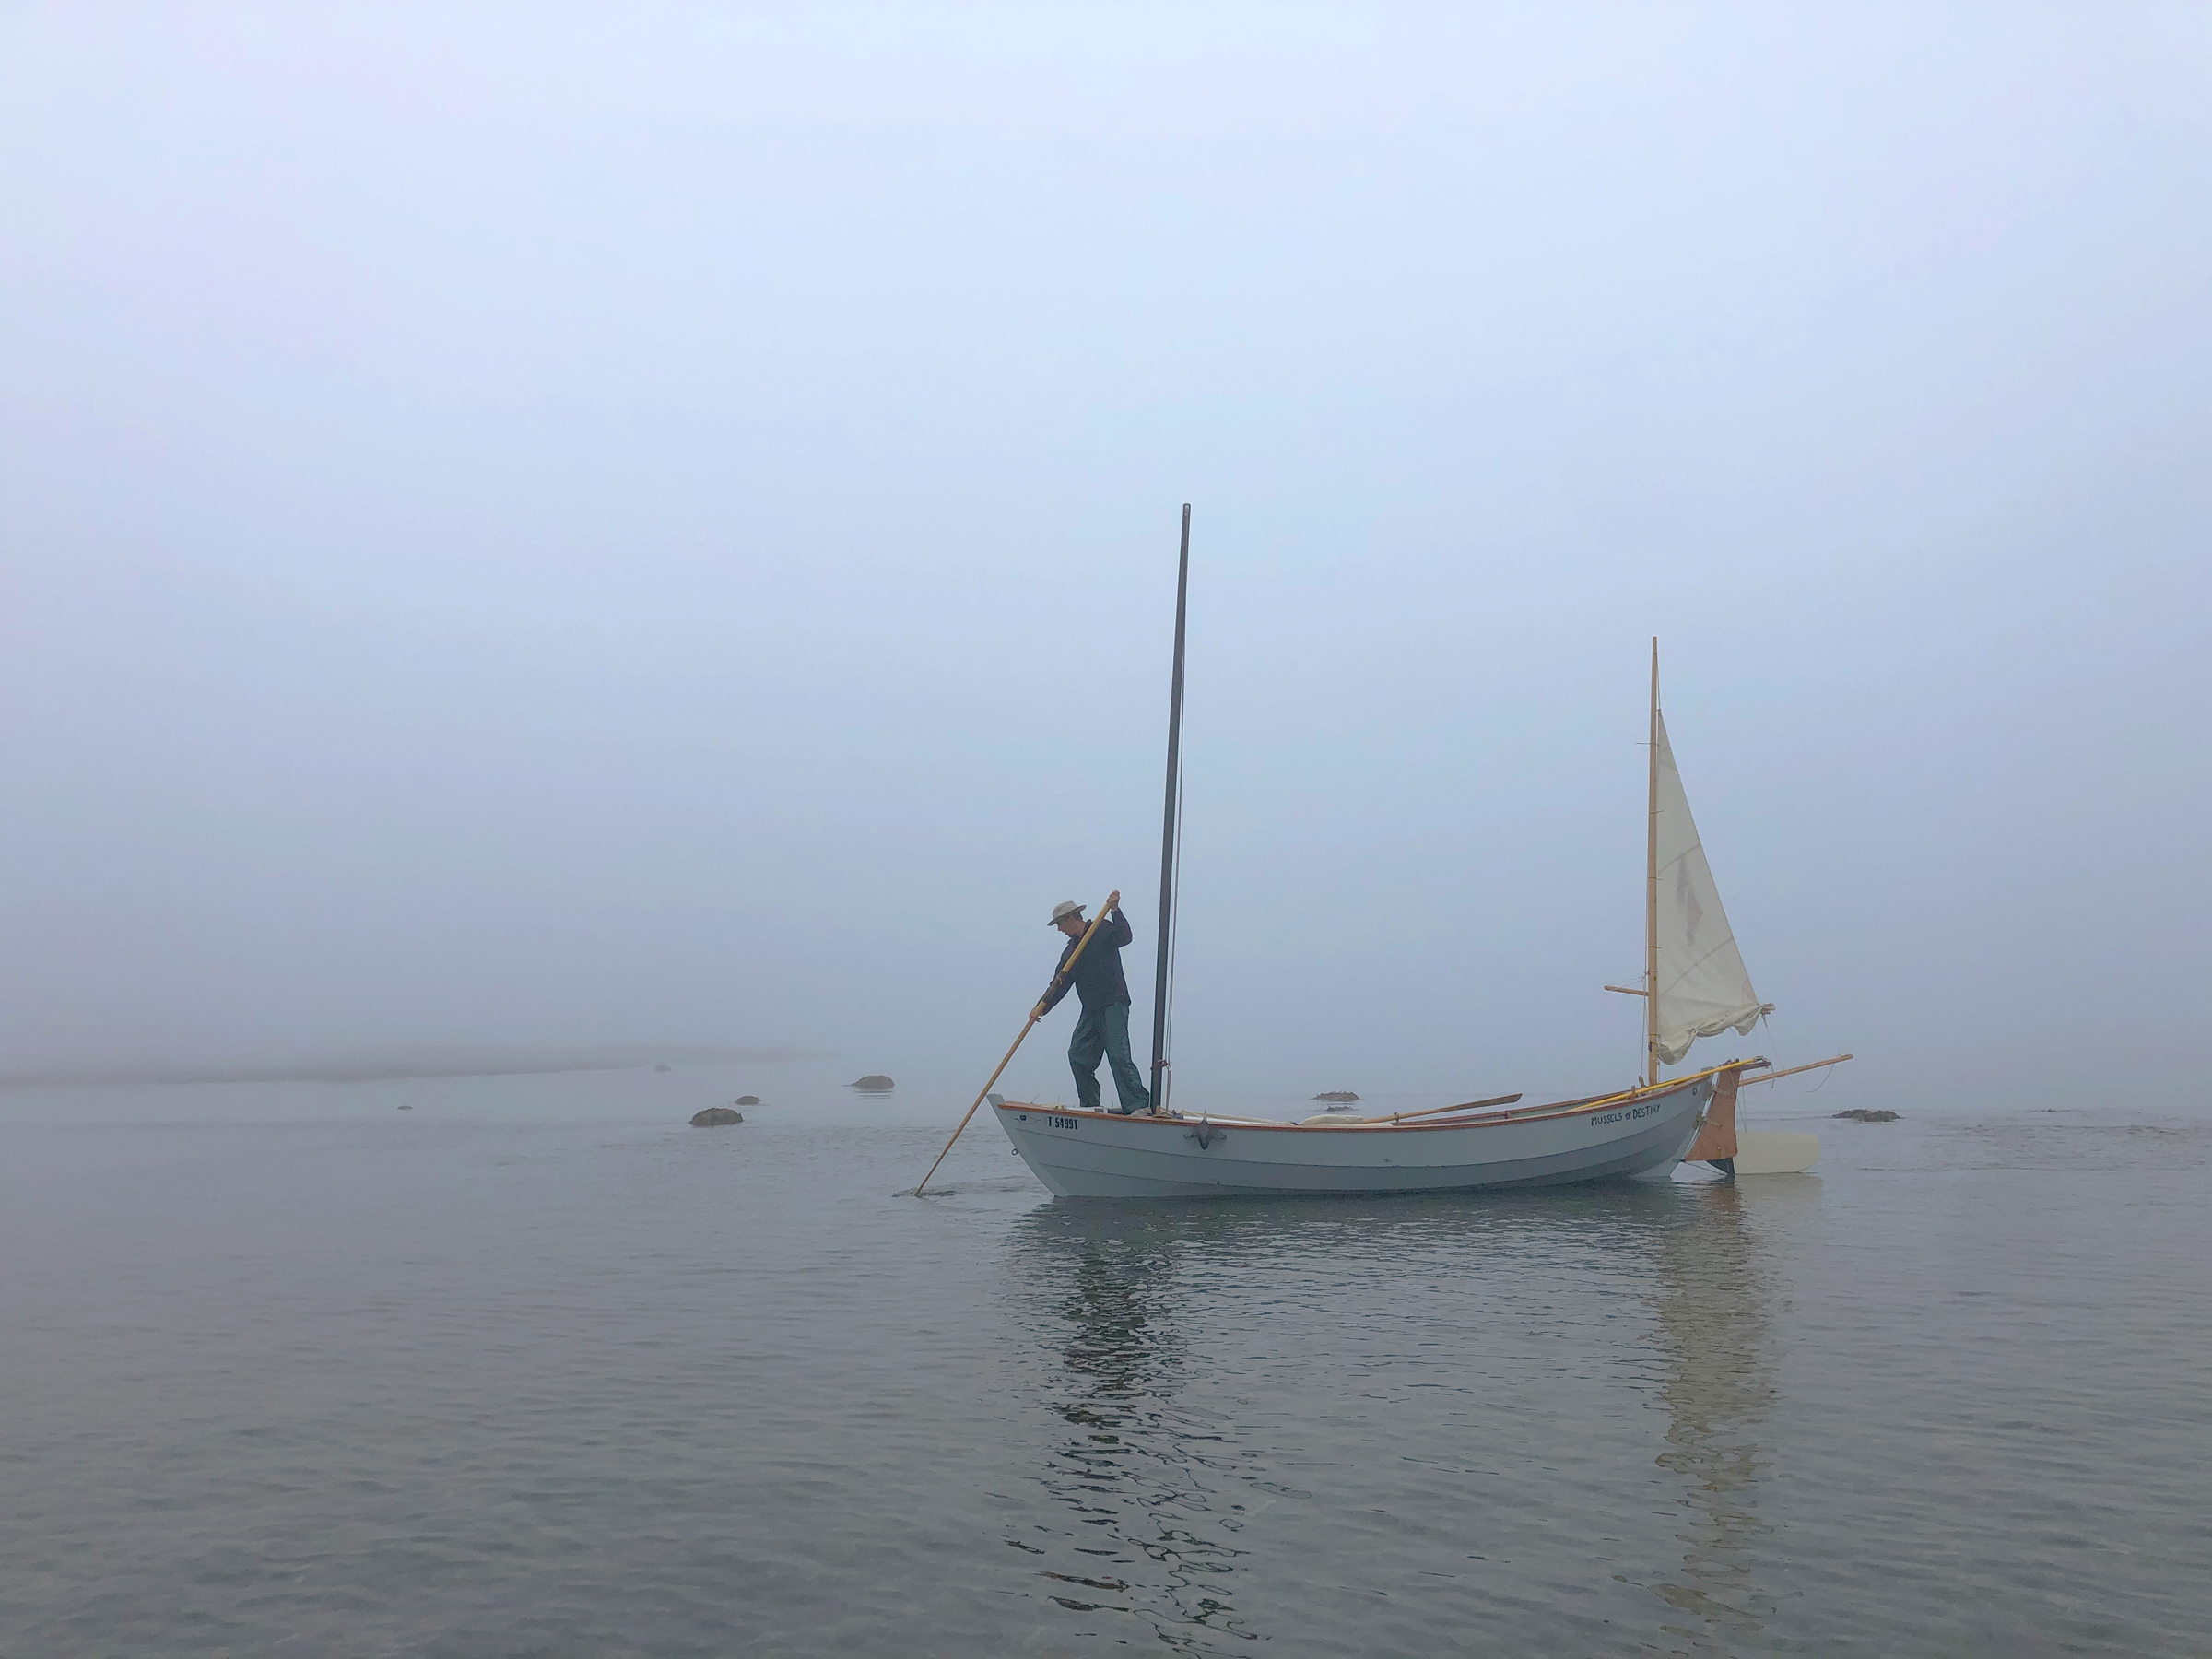
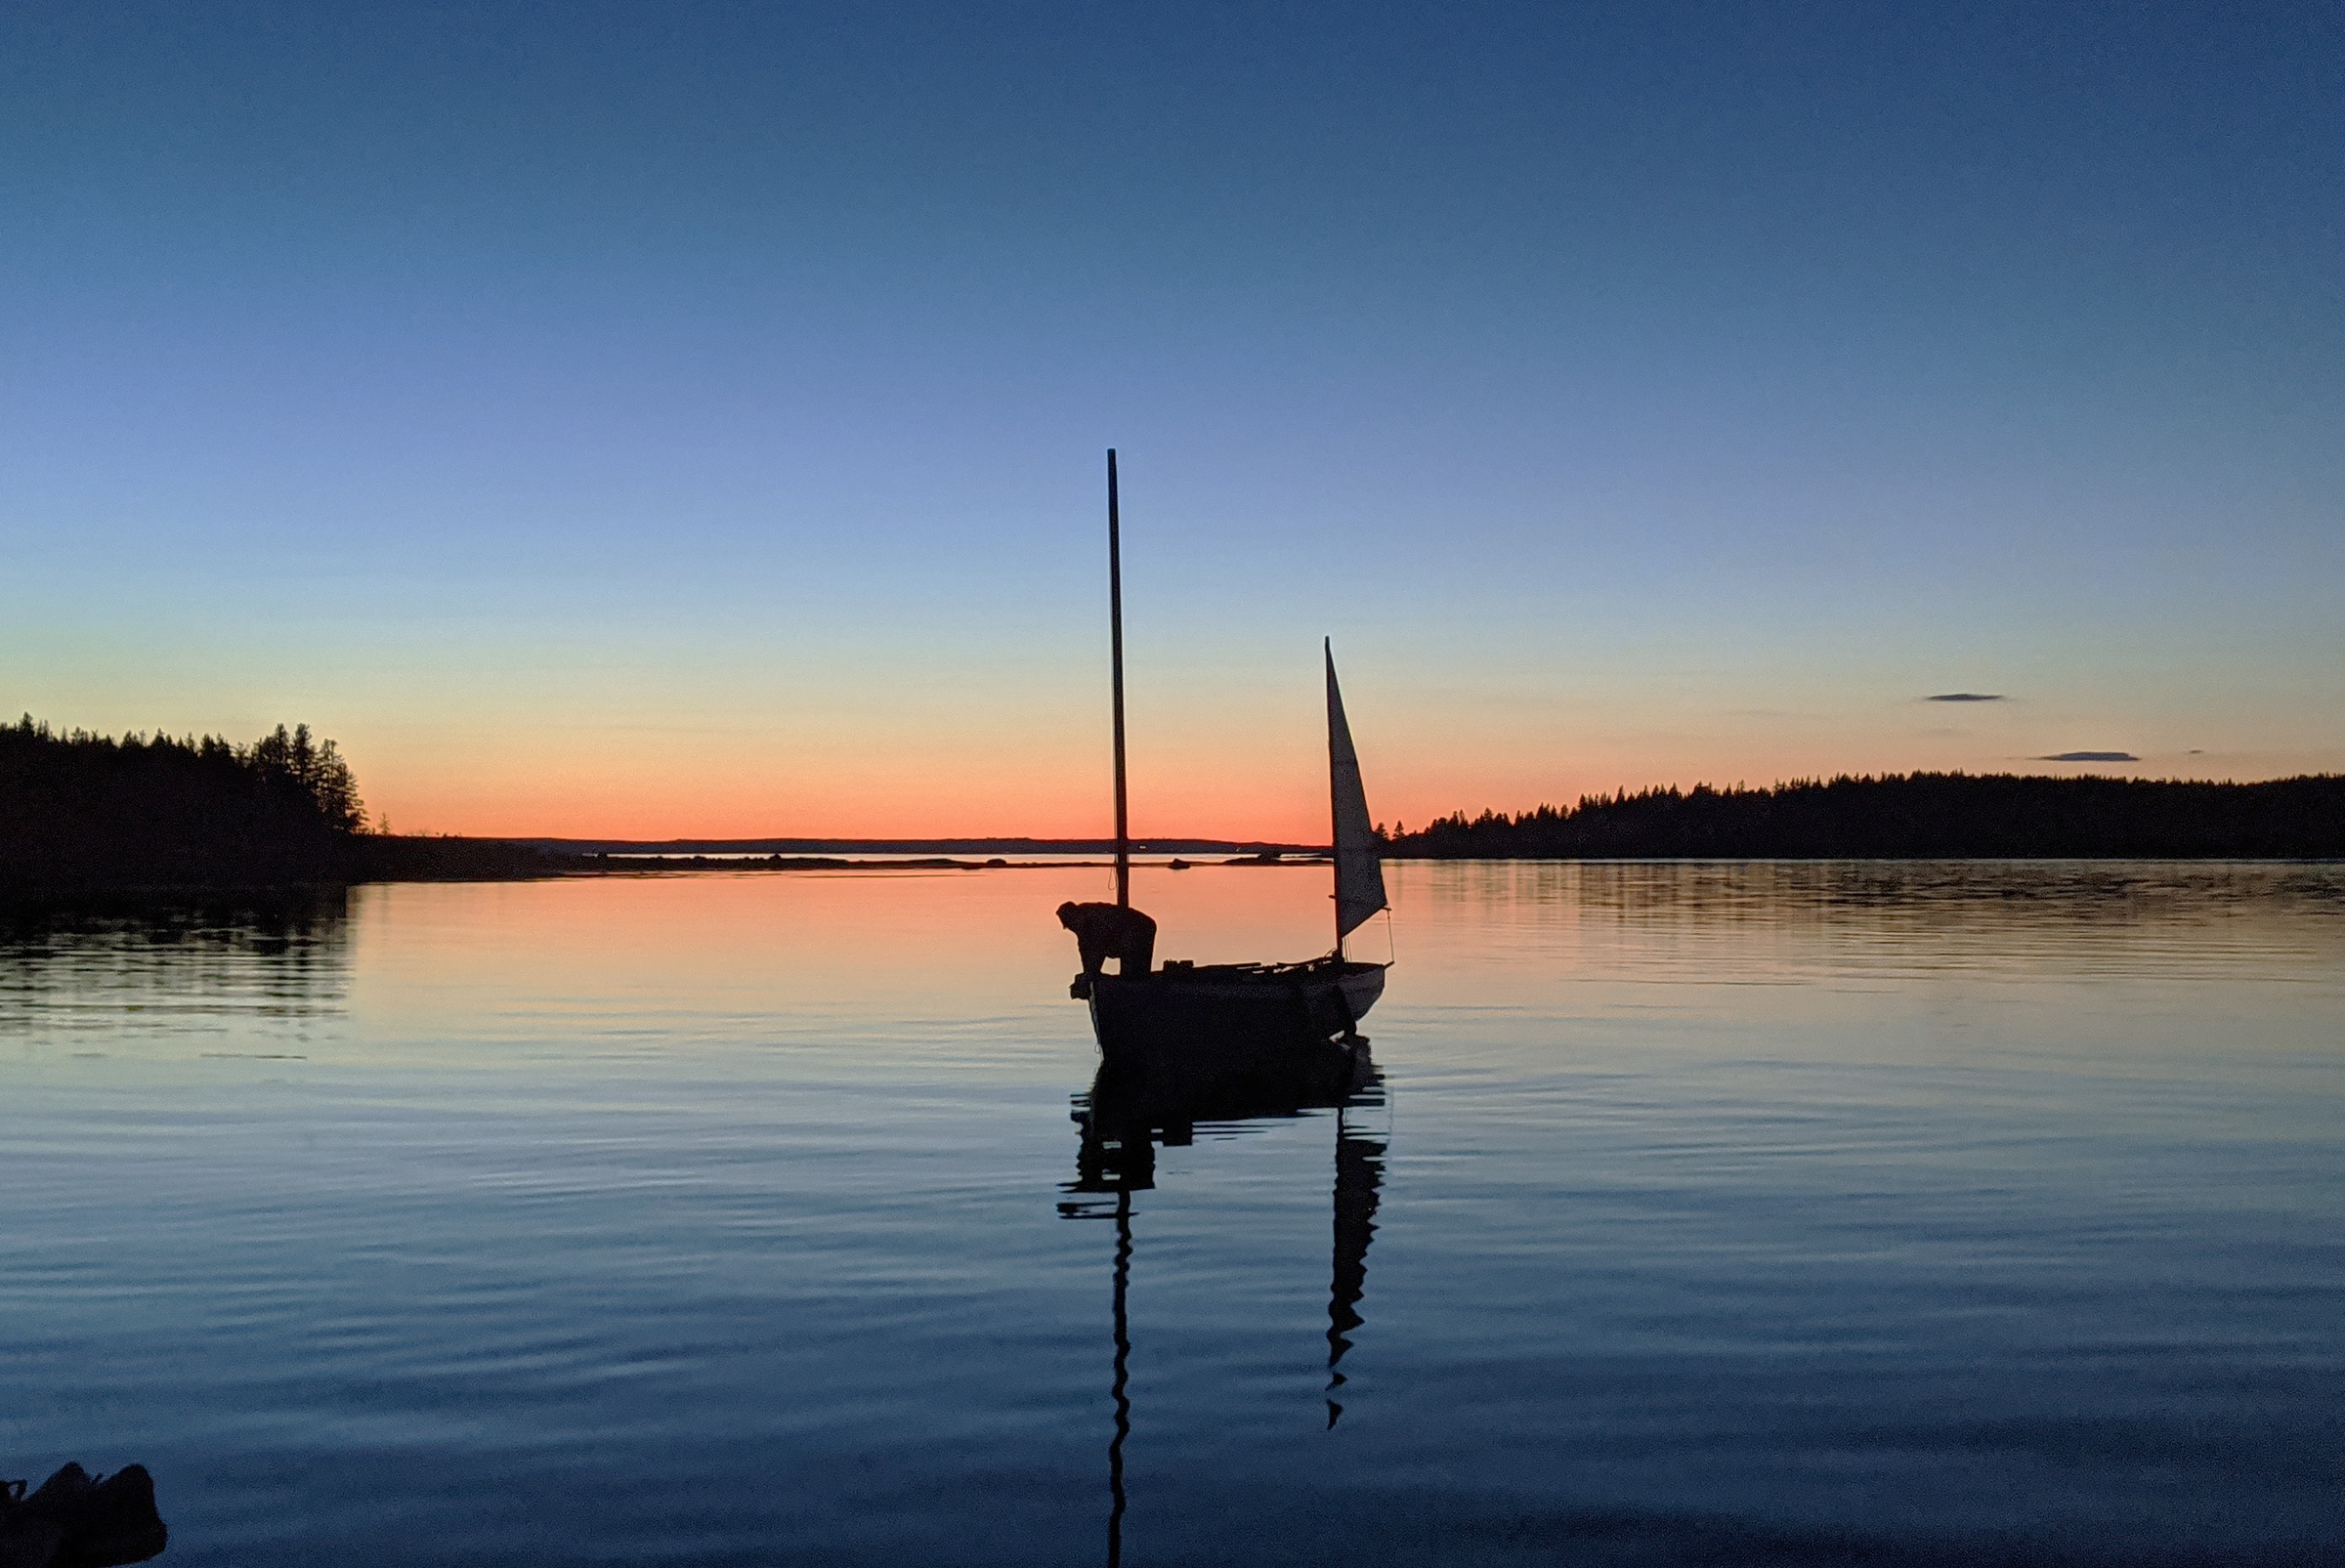
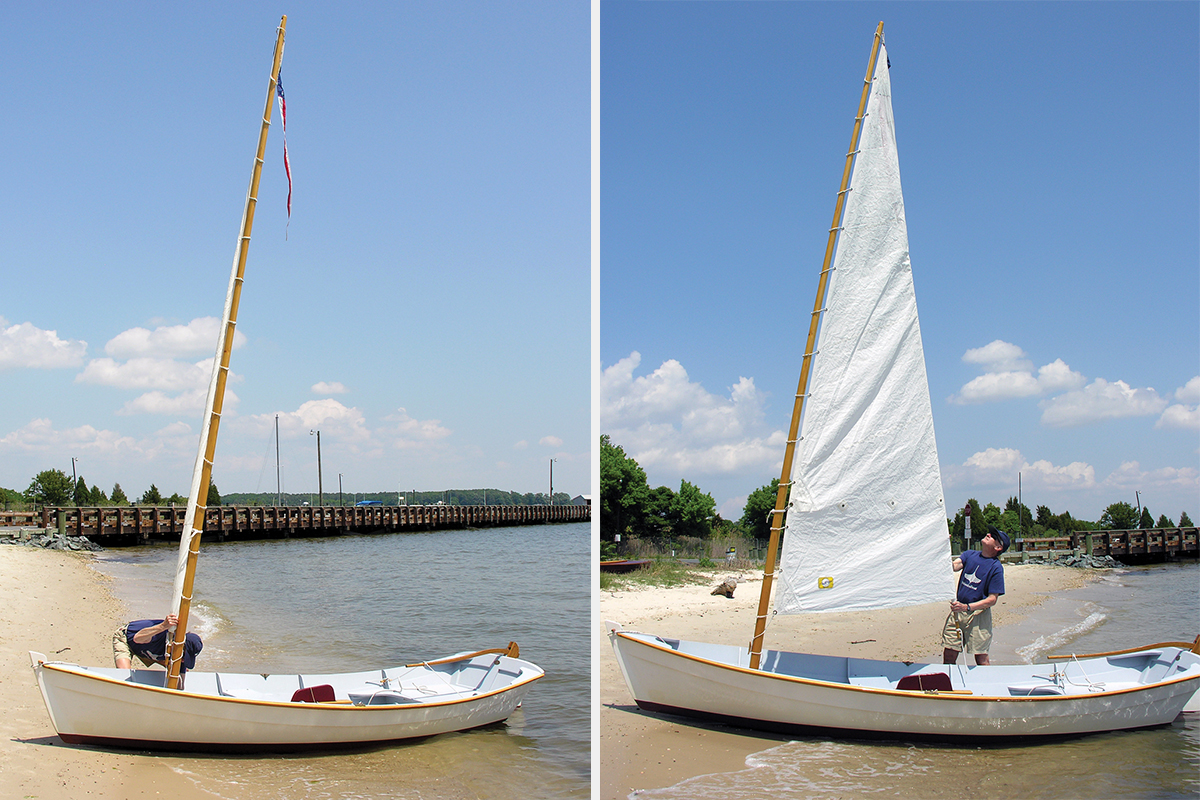
"We’re actually here!” John exclaimed through his mask as he met Jonathan and me near the water’s edge in Brooklin, Maine. It was late July and deep into the summer of 2020. Every year we cruise our small boats with our informal sailing group of five, usually starting in June and doing one trip a month. This year, things were obviously a bit off axis. Two of our friends were not able to attend. One decided to shelter-in-place at his Southern winter home and the other lived in a state that made him temporarily persona non grata in Maine unless he quarantined. Our long tradition of rafting up in the evenings and creating festive and delicious multi-course dinners wasn’t going to happen either. Hugging and backslapping were right out. However, even with home routines all thrown to pieces, we stood grinning at each other under our masks. We were going to squeeze in at least one short cruise despite the obstacles.
We rigged our sail-and-oar boats. John was in his Ilur, WAXWING, a 14′ 6″-long standing-lug yawl. Jonathan would sail his cat-ketch fiberglass Sea Pearl 21, INDIGO. I was in my second season of sailing MUSSELS OF DESTINY, a 19′ balanced-lug Caledonia Yawl I had purchased the summer before. Wanting to take advantage of the sea breeze, we quickly set out from our meeting spot near Flye Point on the east end of Herrick Bay. A chain of small, ledge-connected islands extends southeast from the point in a rocky finger indicating the way to Pond Island, our destination for the night. The last link of the chain is Green Island, where a squat, pearl-white lighthouse shone warmly in the low light of the afternoon sun. Almost 2 miles beyond Green was Pond Island, its granite shoreline shining beneath an inky-black band of forest. Just visible at the edge of Pond was Lamp Island, a 50-yard-wide nubble of rock with a crew-cut of stubby grass.
Roger Siebert
.
The 2-3/4-mile crossing from Flye Point went by quickly on a single reach through rows of gentle waves. The wind was steady and out of the south at 12 knots, the nippy sea breeze a refreshing break to the unending string of 90-degree days on the mainland. We pulled into the sand-bottomed waters off a 250-yard-long crescent beach on Pond’s north shore. Such beaches are uncommon along the rocky Downeast coast, making this a very attractive anchorage. The sand and shell holding ground is excellent and the bottom is relatively flat if we were to ground out at low tide. Behind the beach, a wide saltwater marsh full of waving grass would have meant being plagued by mosquitoes, but the steady wind kept them at bay. The beach sand had heated up in the summertime sun, and kept us warm in spite of the cool breeze.
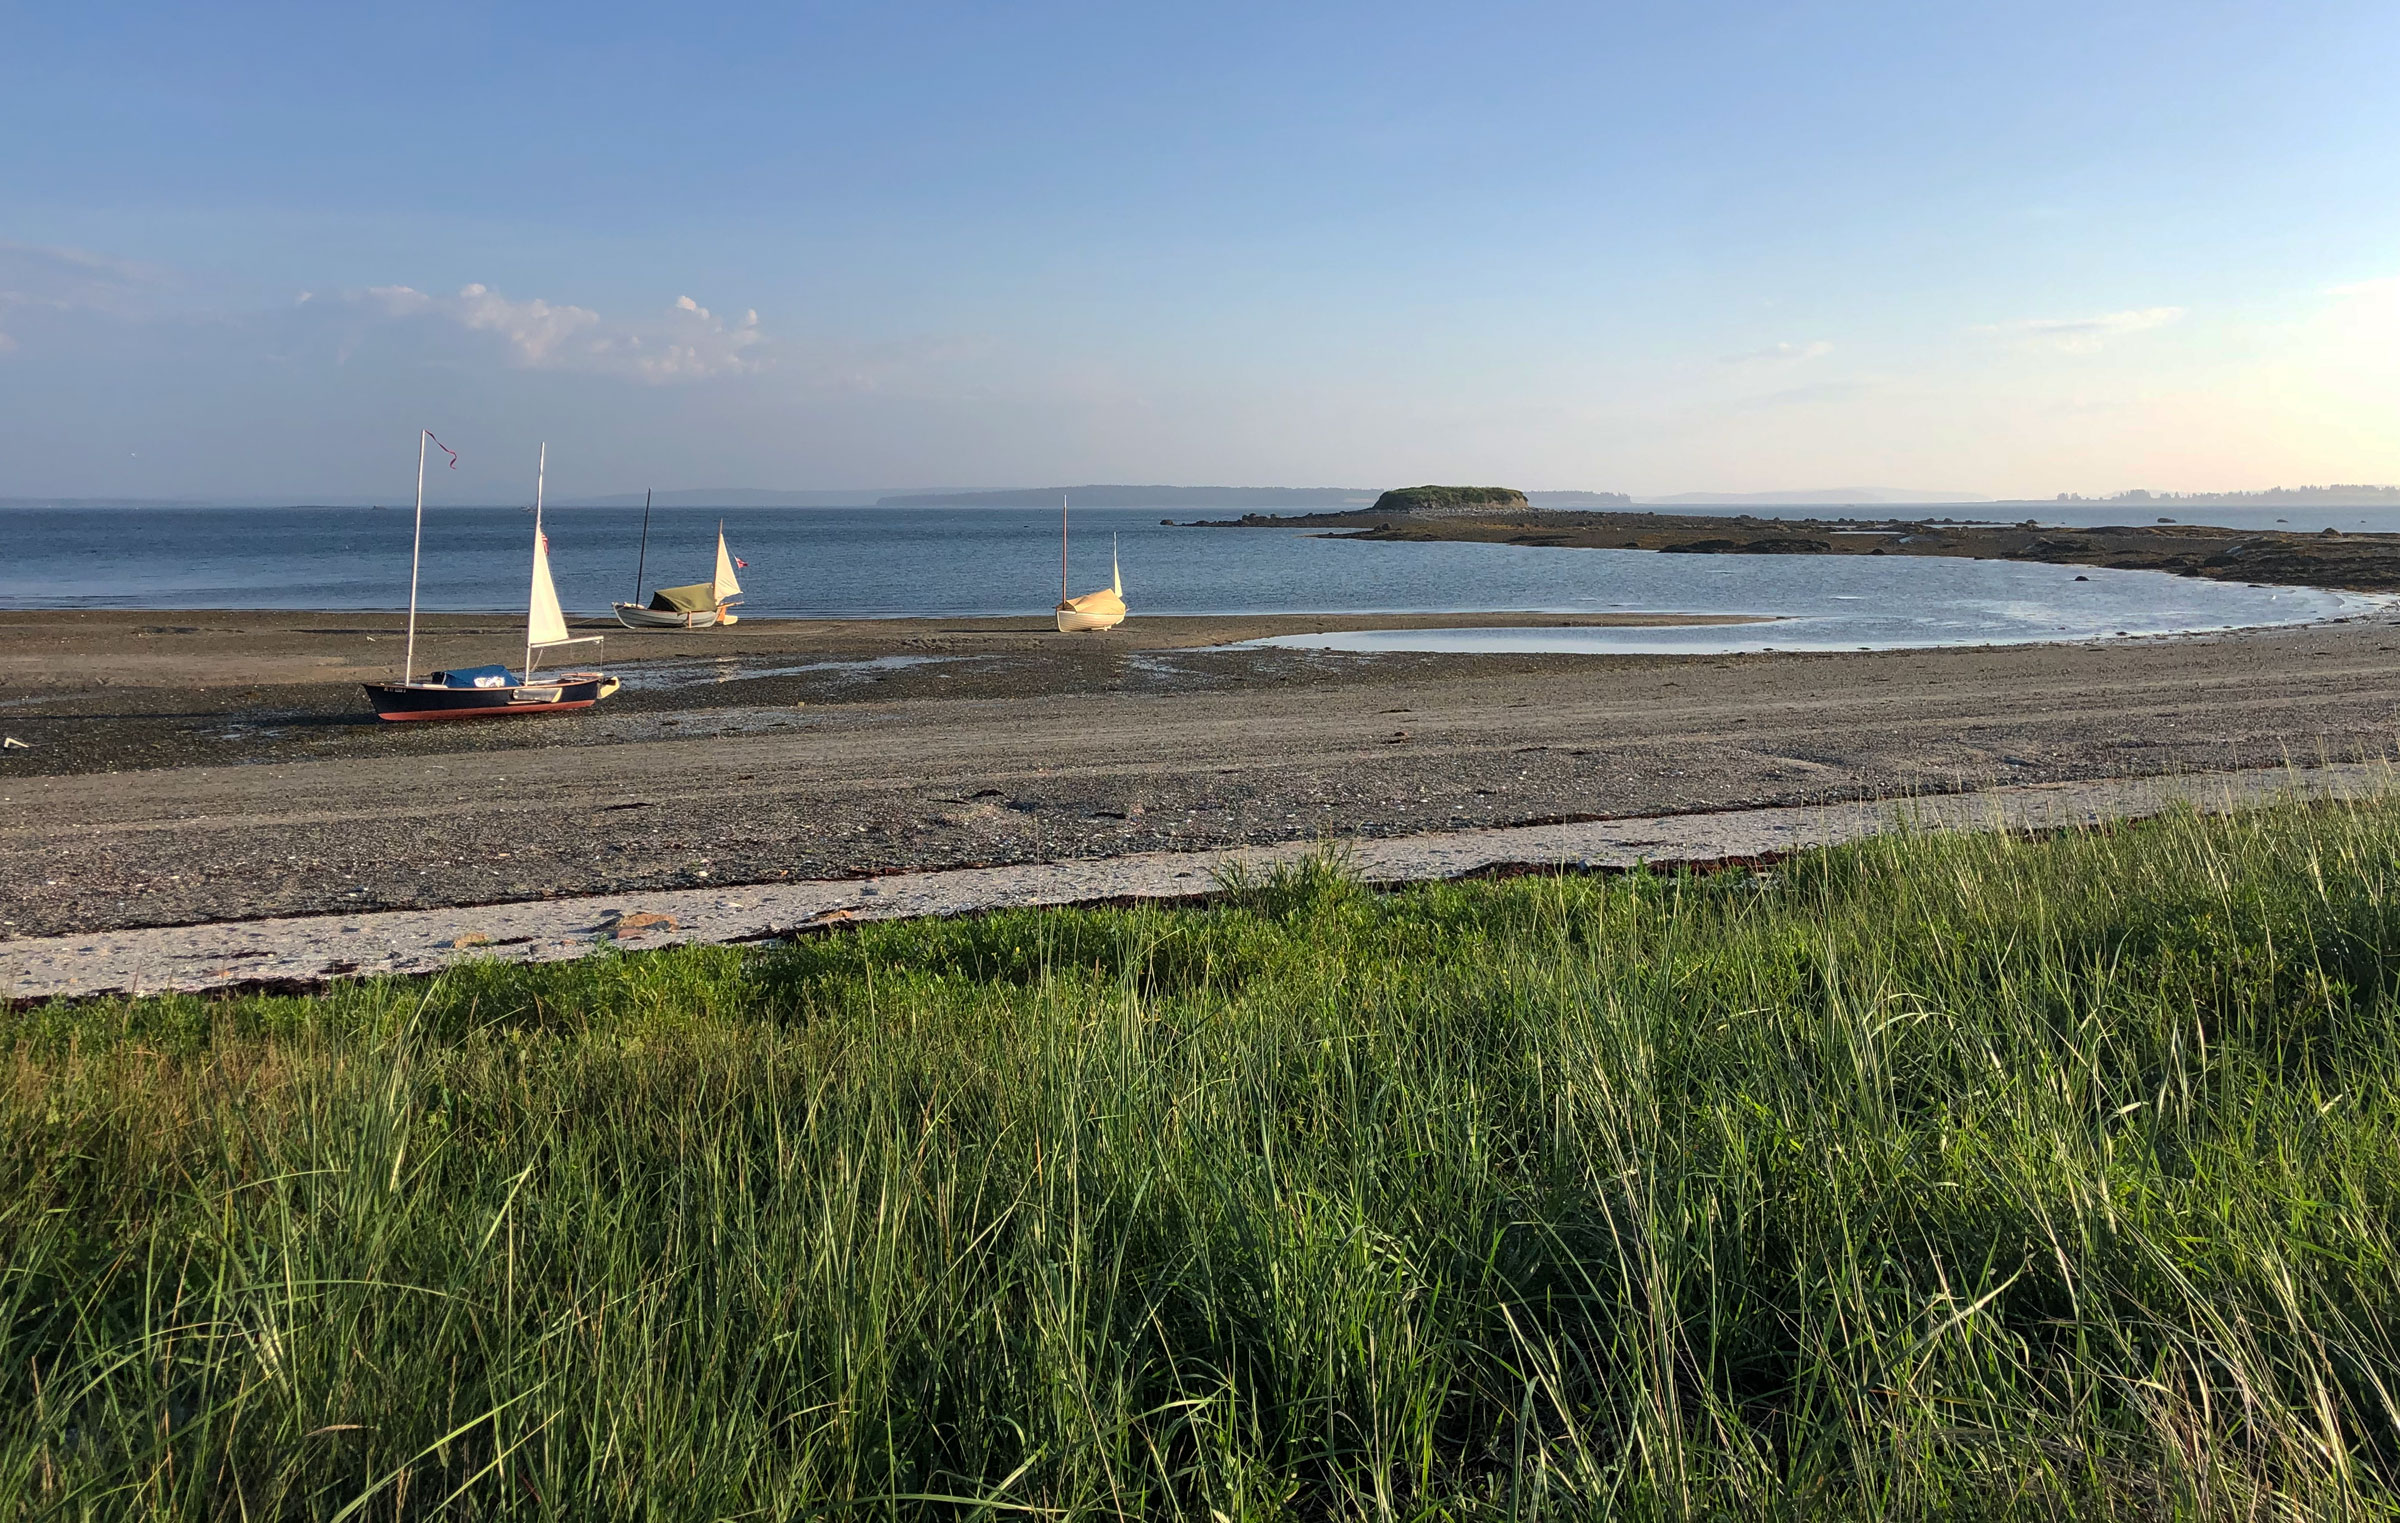
We anchored for the night just off the beach in a bay formed by the blunt northwest point of the island and the 1/4-mile-long bar that connects Lamp Island to Pond. I had anchored here many times in the past, so I was almost positive that I would stay afloat throughout the night. The low was going to be around 4 a.m., and, since the bottom is relatively flat, I did not go to the bother of deploying the boat’s beaching legs.
I stepped over the side into waist-deep water, and the three of us waded ashore and walked the slender tide-exposed stone bar between Pond and Lamp, taking care to not slip and twist an ankle on the weed-slick rocks. Lamp is almost 15’ high, a mound of coarse sand and rounded boulders that sit precariously suspended on its sides, waiting to tumble out onto the bar, as dozens already have. To the northeast the rounded 1,500’ mountain summits of Mount Desert Island rose above the horizon, and to the northwest the sun settled into the gentle rolls of the mainland hills.
Night came rapidly as I set up my skinny bunk by laying floorboard sections on two thwarts. With my dark nylon tarp/tent stretched between the masts and my bed made, I slipped under the covers and soon dozed off. I awoke a little later and saw the comet NEOWISE, a bright silver teardrop smudged among the stars. A steady southerly had picked up, and our three boats had swung around with their bows facing the beach.
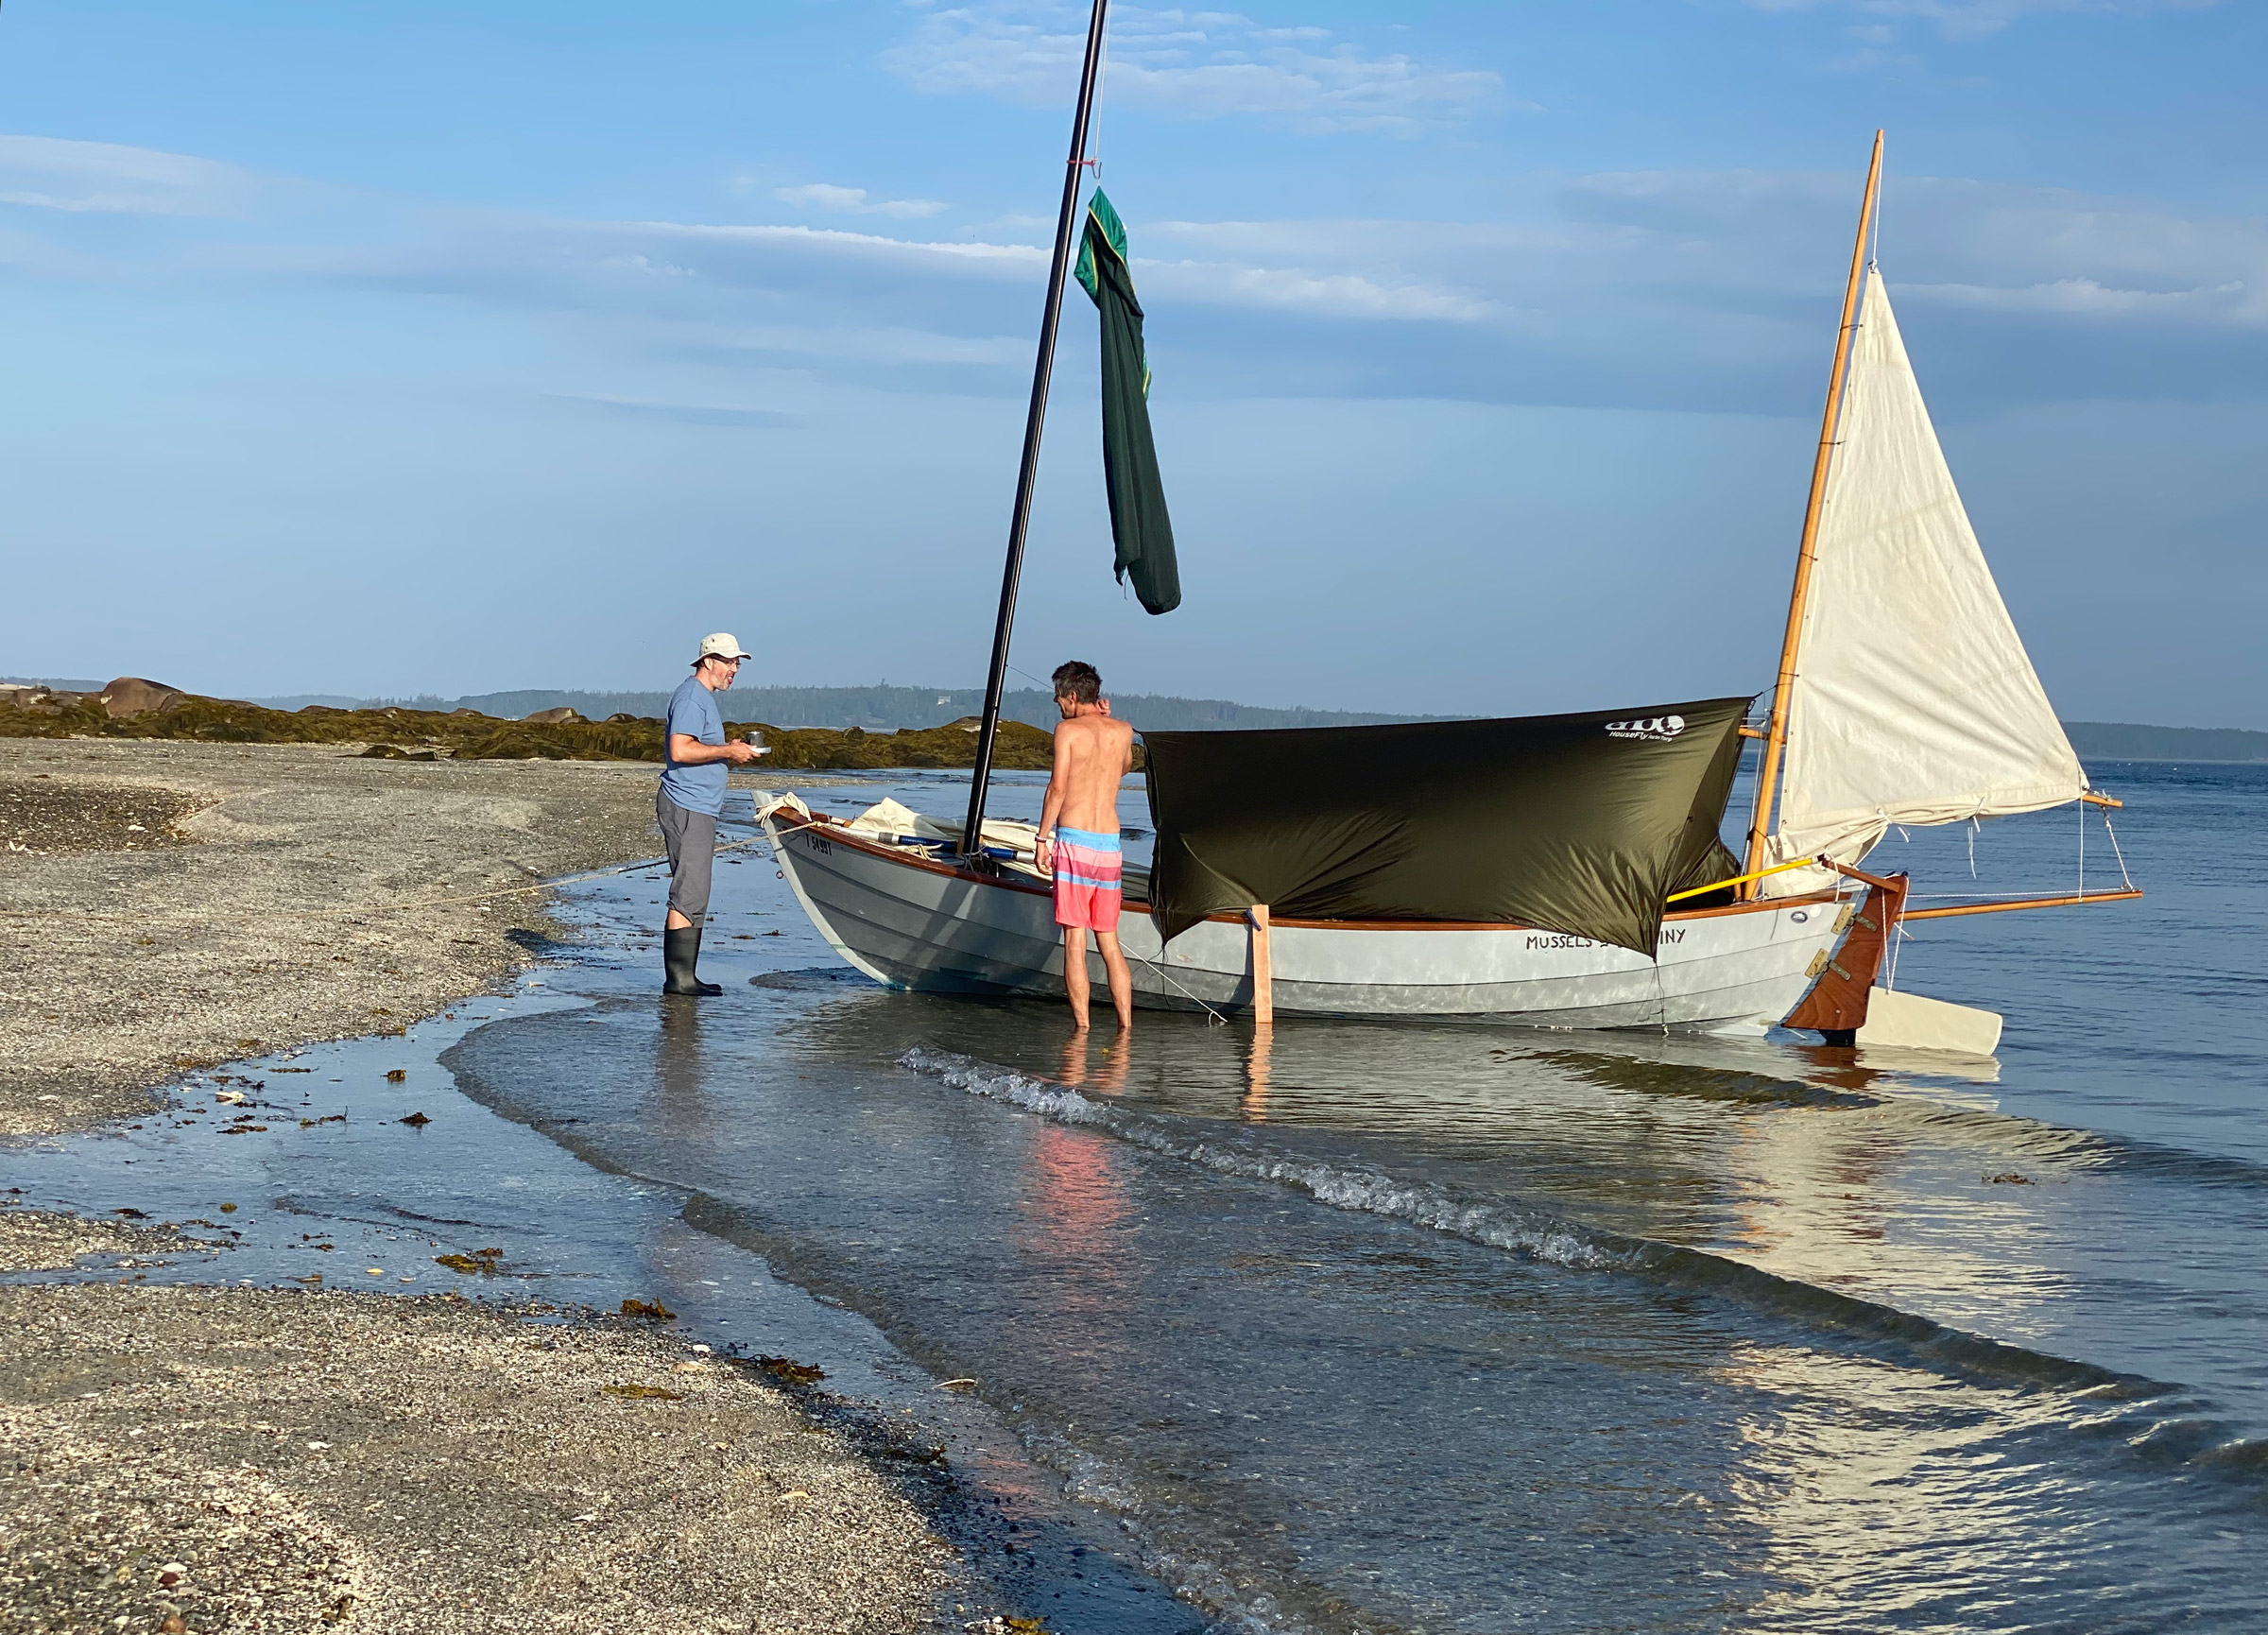
Later that night, I woke again to an unusual motion of my boat. I lifted the edge of the fly and peered around. My position hadn’t moved in relation to the shore-based points I had made a mental note of earlier, so MUSSELS wasn’t dragging anchor. Everything seemed normal, “Maybe nothing,” I thought and then I felt that odd sensation again, a barely perceptible stop in the boat’s roll. I looked over the rail into the water and the bottom reflected the beam of my headlamp far too brightly. The keel was just scraping the sand. It was 2 a.m., two hours to low tide and I was going to be aground for at least four hours. So much for my confidence of not running out of water! The Caledonia Yawl would fall off the keel onto its garboard at an angle steep enough to roll me off my bunk. I scrambled out of bed to unearth my stowed beaching legs, and in my rush forward I slipped and banged my shins on a thwart. I should have installed them when I anchored or made them easy to retrieve. I climbed over the gunwale into the water and kicked at the shells and sand to make a hole for the landing pads of the beaching legs to keep MUSSELS upright. The boat was quickly beginning to lean heavily into me as I forced the starboard leg into position. “You’re having fun, this is fun!” I tried to remind myself. I got both legs secure and the boat level, but I was soaking wet. I slipped back into my sleeping bag and slept hard until well after sunup.
Jonathan McNally
Early morning and our three boats were hard aground off the beach on Pond Island and waiting for the incoming tide. Lamp Island sits at the end of the bar that protects the anchorage.
I awoke to the smell of coffee wafting across the anchorage from INDIGO, which was perched on her skinny but flat bottom farther up the beach. I poked my head out from under the fly and Jonathan raised his mug to me. John’s ancient Italian espresso maker began to sputter in WAXWING as he bustled around his boat, a few yards away. The morning was brilliant and clear, the wind robust and steady.
John Hartmann
During breakfast on Pond Island, I told Jonathan about my midnight misadventure of installing the beaching legs. I hoisted my sleeping bag with the main halyard to air it out before packing up to get under way.
As the water crept over the tide flats and into the anchorage, we sat on the beach and deliberated on how to proceed over the next few days. We could make a long transit toward the mountains of Mount Desert Island and sail around it, or head southwest to the Merchant Row archipelago. I suggested that we sail south to explore Swan’s Island. Swan’s is the largest island in Jericho Bay. It’s quieter and doesn’t attract as many boaters as Mount Desert and Merchant Row, and yet it has an interesting coastline with many intriguing nooks. It would be new territory for us to explore.
We decided to circumnavigate Swan’s clockwise. The south-west wind would allow us to sail on a reach from Pond to Swan’s and down the east side of both islands instead of tacking upwind to the west side and struggling through Casco Passage, which was in flood and notorious for strong currents.
Jonathan McNally
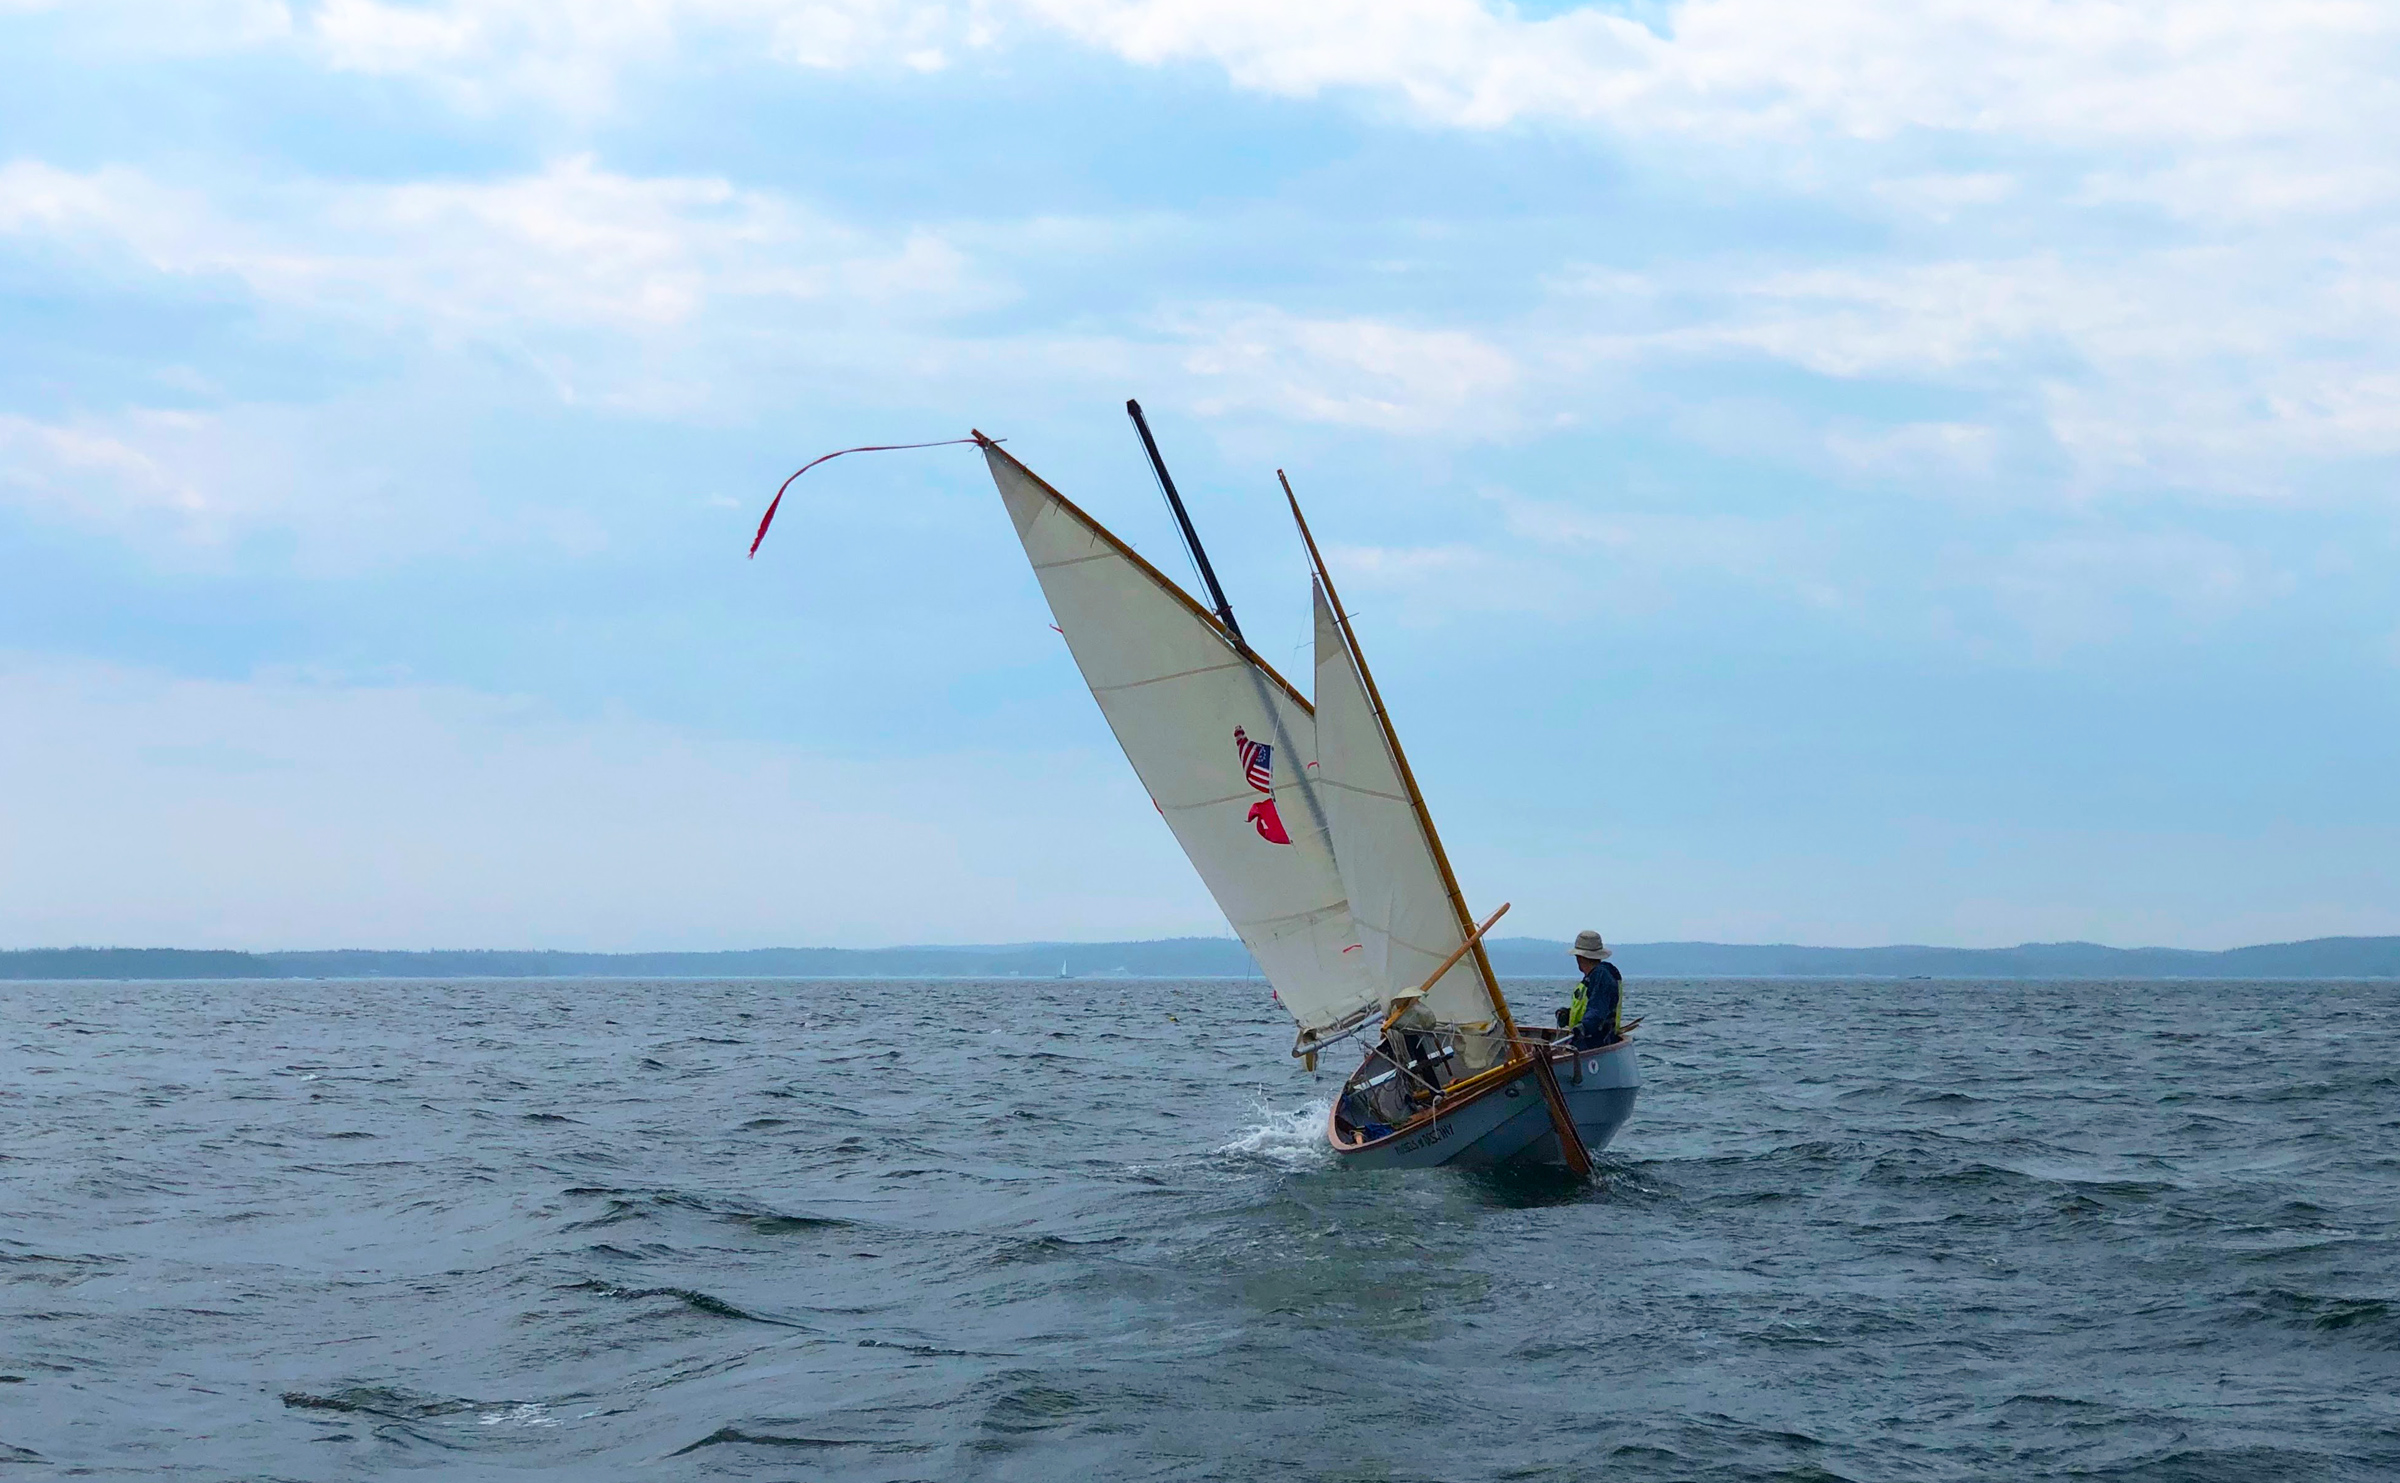
MUSSELS and I plowed southward to Swan’s Island with two reefs in the mainsail and one in the mizzen.
The forecast was calling for 15 knots, and outside of the lee sheltering our anchorage whitecaps were already showing. I tucked two reefs into the mainsail. When the incoming tide had our boats floating again, we all made ready and raised sails and anchors. I released the mizzen, grabbed the main boom, and backwinded the mainsail; MUSSELS’ bow slid easily away from the beach and toward the bar we had walked last night. We sailed downwind over the paper-thin water covering the rocky bar and, once clear of Pond Island, turned south on a close reach for Swan’s Island.
The wind was strong enough to keep MUSSELS’ gunwale pressed to just above the water. The bow sent frequent wide splashes to leeward and foam streamed alongside, trailing behind in a long tail. The uninhabited islands of Sheep and Eagle, just south of Pond Island, passed swiftly. The water turned midnight blue as the land slowly sank behind, leaving nothing ahead but Swan’s. The three of us made the 4-mile crossing in less than an hour and barreled into Mackerel Cove on the island’s north side. We sailed through its 1 ½-mile-wide entrance to the west side of the cove to a tiny protected pocket tucked behind a tiny islet and overlooked by a shuttered vacation home. With our boats anchored in tight formation directly off its front lawn, we reviewed our plan. We would sail downwind out of Mackerel Cove to North Point and then reach southward down the east side of the island. After turning the corner on the southern end, we’d head west to the center of Swan’s and find a place to hole up in Burnt Coat Harbor.
We finished our quick lunch at high slack tide, set sail, and sped downwind out of Mackerel Cove. After rounding North Point, we turned south onto a long reach down the east side of Swan’s, passing rocky outcroppings, long skinny beaches, open meadows, and forests of fir and spruce.
Christophe Matson
Jonathan in INDIGO enjoyed the fast broad reach down the east side of Swan’s with his sail reefed with a few wraps around the mast.
John had recently installed a hiking strap in WAXWING to keep her flat and fast, and sat on the rail with his upper body stretched out over the water. Jonathan, in INDIGO, sped back and forth between me and John, curling up a bow wave, his rudder halfway kicked up by boat speed. Ahead of us, less than 3 miles away, was Long Island and the town of Frenchboro, known among islanders as “the last stop until Portugal.” It was shrouded in a wall of fog with just a few trees jabbing out of the blanket. We quickly arrived at the dun-colored rocky finger of East Point and turned to sail closehauled toward the pass between West Sister Island and Swan’s. Rust-colored slabs of vertical granite were broken by small pocket beaches of tombstone-gray gravel.
Between the Sisters and Red Point on Swan’s there is a shoal covered by just 15′ of water at low tide. With the sustained southwesterly wind and the tide now on the ebb in the opposite direction we were faced with ever-growing swells. A lobsterboat came up from behind and powered up, gaining speed and momentum. Sooty diesel exhaust roared out of the stack in an angry growl as the boat charged into the building waves, cleaved them in two, and quickly disappeared behind the swells. If that was what it was needed to navigate over the shoal, we were sorely lacking adequate horsepower.
WAXWING completely disappeared behind a rising hill of dark azure water with only the streaming red pennant of his yard visible. As John came bounding up over the next face, MUSSELS climbed over a sweeping roll. Up on high I could see to the center of the shoal, where chaotic tightly packed waves with steep faces looked decidedly unwelcome. The water closer to shore was less turbulent and perhaps navigable, but a jagged collection of boulders and steep rock walls would be immediately on our lee. The heavy fog was now rolling in from the sea and cloaked the outer East Sister Island into obscurity. If anything happened here, and it was quite possible something could, the consequences would be catastrophic. Even though we were all in perfect control of our boats, continuing south was a needless gamble. As we sailed ever closer to the maelstrom I called over to John in WAXWING, “Are you feeling it?! I’m not feeling it!”
“I’m not feeling it either!” John shouted back. I waved vigorously at Jonathan in INDIGO who quickly worked his way to our position.
“Not a lot of margin for error here, chaps!” bellowed Jonathan over the wind as he approached us, momentarily dropping out of sight between windblown crests.
The prospect of an early dinner in the protection of Burnt Coat Harbor was but 3 short, enticing miles away. Turning around meant sailing against the ebb and, at least, backtracking the 6 miles we had covered since lunch. John stood up one more time and looked at the rowdy waters, paused, and then turned WAXWING away to northeast. Jonathan and I followed and we sailed northward again.
An hour later, we came around North Point for the second time that day and started the grinding work of tacking against a strong westerly that wrapped around the top of Swan’s. With the hour now getting late, we decided to pass Mackerel Cove and attempt an ambitious push against tide and wind to Buckle Harbor on the northwest side of the island.
There is a narrow deepwater channel squeezed between Orono Island and Swan’s that lay before us and our goal. Steep rock slabs rise out of the water, and the wind and current get pinched between the islands. Our three boats battled forward for dozens of tacks gaining only marginal westward ground with each pass. If we were to make headway against the flow, there could be no half-hearted, sloppy sailing. Any large delay and we would run out of daylight and wind and would have to fall back to Mackerel Cove. Anchored off to the south side of the channel a lone sailor in a 35’ sloop watched us while sipping a cocktail. INDIGO led the pack with WAXWING and MUSSELS trailing behind. Fortunately, the wind held long enough and we broke free of the current in the channel and turned south into the lee of Buckle Island, and ghosted into the opaque jade water of Buckle Harbor.
John Hartmann
Finally at anchor in Buckle Harbor after a long day of sailing, we enjoyed the sunset before going to bed. The anchorage was glassy-calm all night and provided a much-needed night’s sleep.
We sailed to the southern end where deeper-draft boats could not venture and slid onto the muddy flats that extended out from Buckle and the two islets to its south. Devoid of houses, the harbor was peaceful and encircled us in a protective ring of weed-covered granite. Tall fir trees, clustered like spires on a Gothic cathedral, were festooned with wispy moss and the clouds glowed above in the sunset like fire-lit logs.
Christophe Matson
John’s homemade tent for WAXWING is streamlined to help the mizzen keep the bow to the wind. Weights hanging on the edge keep the fabric taut without having to resort to snaps or hooks.
We sculled off the mud and tried to find water deep enough to float us all night and avoid settling on any of the boulders we saw scattered just below the surface. We each deployed the anchors when we found our spots with enough room to swing. Sitting on MUSSELS’ floorboards I ate a dinner of fresh spinach raviolis with pesto as I watched the last light filter between the slender trees, wishing we were rafted up enjoying this moment in each other’s company. I passed on washing the dishes, deployed my tarp/tent and, in a haze of fatigue, burrowed into my sleeping bag on my floorboard bunk.
Christophe Matson
All was quiet in Buckle Harbor during the morning at low tide. We had all done a careful reconnaissance during the high tide before setting anchor and thus avoided waking in the middle of the night, perched on a boulder by the falling tide.
The morning was clear and utterly calm. The fog stayed south of Swan’s. We gathered on the small beach on Buckle Island and walked to the large flat ledges on the sea side and looked out over a placid Jericho Bay. We decided to continue sailing counterclockwise around the island. The weather forecast was excellent, but with winds expected at 10 knots or less. We could tuck into Burnt Coat Harbor as we’d previously planned or perhaps finish our circumnavigation depending on our speed.
John Hartmann
During breakfast, Jonathan relaxed under his umbrella while the tide rapidly filled Buckle Harbor.
We’d decide as the day progressed. John was eager to get started, and soon he rowed WAXWING out of the harbor into Seal Cove and made his way south. Jonathan and I groused loudly about how rowing is work, not recreation, and we took our time packing up, hoping that some wind, anything, would show up by the time we were ready to leave.
John Hartmann
I scanned southern Jericho Bay looking for the faintest sign of wind and finding none. A lobsterboat worked the traps; the small islands of Merchant Row are on the horizon.
The wind did not materialize, so Jonathan and I reluctantly rowed south across the mouth of Seal Cove and down the rocky west coast of Swan’s. With each hint of a breeze Jonathan quickly raised sail only to have the zephyr vanish, and he bobbed becalmed in the gentle swell. With binoculars, I watched WAXWING round West Point, John’s spoon blades flashing in the sun in a steady rhythm, until he disappeared behind the curve of land.
Jonathan McNally
We decided to stretch our legs for a few minutes and tucked our boats into a small pocket beach next to Buckle Harbor.
Mixing in some ghosting and rowing and foolishly committing to neither, Jonathan and I struggled to catch up to John. We headed out across the mile-wide opening of Toothacher Cove, where large schools of fish flashed by on the surface around us in agitated frenzy. Seals, whose heads popped up intermittently, were the apparent cause of the ruckus.
Christophe Matson
Jonathan rowed INDIGO while drying his clothes and protecting himself from the sunlight with his umbrella. His Sea Pearl has a flat bottom with no skeg, so a few inches of leeboards in the water offer improved tracking when he’s rowing.
We aimed for a 20′-tall knob of broken brown rock called High Sheriff, where John was waiting. Now early afternoon, the wind started to pick up out of the southwest and the tide began to ebb. John was interested in going up Burnt Coat Harbor, but I did not feel like fighting the ebb in the narrow channel with a multitude of fishing boats plowing in and out. We stayed on the outside of Harbor Island which defends the opening of Burnt Coat Cove from the Atlantic, and made our way to the north side of small, steep-sided Scrag Island, which is available for recreational day-use. We dropped our anchors in a small cove just off a steep-pitched cobblestone beach. The water in the cove was perfectly clear and, while looking over the side, I spotted dueling Jonah crabs, a lobster meandering across the bottom, and flounders lying camouflaged in the sand. I took off my shirt and plunged over the gunwale of MUSSELS, and went for a rejuvenating swim in water markedly colder than that at Pond Island.
Hoping the 8-knot breeze would continue until sunset, we planned to shoot for a long 8 1/2-mile leg all the way back to the south side of Pond Island. There is a large anchorage surrounded by Sheep, Black, and Opechee islands, but only deep enough for small boats.
Our pace against the ebb was steady but slow. With a steady southwest wind, we sailed wing-and-wing uneventfully over the shoal between Red Point and West Sister Island. We passed little Ram Island capped with just two knots of trees and then around East Point, completing the circumnavigation of Swan’s.
We headed north. Lobster buoys trailing seaweed leaned away from the ebb’s strong pull as our boats crawled against the push of water. The wind shifted to the northwest, and beating to weather, MUSSELS made more leeway than INDIGO and WAXWING and slowly slipped eastward. Closehauled, she lost even more ground as I had to come off my course by a few points to prevent pinching. Despite my best efforts, the 140′ summit of hulking Placentia Island, a mile off to starboard, remained unmoving under the boom. Disappointed in my progress, I sat idle looking at a seagull standing on a thick mat of seaweed 20’ off starboard. This was somewhat curious, as I had never seen a mat so thick that a seagull would perch on in open water. I stood up and realized it was the summit of Staple Ledge, a needle of dark rock that juts off the bottom of the ocean floor and just happens to kiss the surface at mid-tide. The view had been blocked by my mainsail and, in my ennui, I never bothered to check the chart or my position. I had missed the rock by a boat length.
Over the next two hours of slow closehauled sailing, I covered the remaining 3-1/2 miles to Sheep Island, where I could turn into the harbor we had chosen that night. The more weatherly INDIGO and WAXWING were there waiting for me.
Christophe Matson
John carefully set WAXWING’s anchor off Opechee Island before another calm evening.
As the sun touched the horizon, our anchors were settled into the mud bottom of the cove. Low-lying Sheep Island, covered in stunted trees and scrub, was off our east. Opechee Island and Black, heavily forested and seemingly impenetrable with no obvious entrances into the tightly packed firs, were to our west and south. We all quietly prepared our dinners and didn’t talk much, immersed in the isolation. On distant ledges beyond Sheep, seals barked and sang, and schools of bunker fish were chased along the surface creating the sound of a large crashing wave, incongruous with the dead flatness of the water.
That night was again clear with no moon and no artificial lights visible. The islands were blank dark silhouettes against the sky. We were the only three boats within miles. Leaning over the side of MUSSELS, I swirled the water with my hand and the bioluminescence blazed through my fingers, bright playful twinkles of light against the black of the water. I stripped down and slid over the side. The water erupted in an otherworldly, electric cyan. I swam to INDIGO and Jonathan watched as I streaked around his boat. “You look like a comet!” he exclaimed. I splashed the water wildly and laughed, which echoed around the tree-lined shores. I turned onto my back and relaxed my body, easily floating in the water. Suspended between sea and sky I gazed at the Milky Way’s foggy jog across the night. To my sides the blinking bioluminescence contrasted with the harder silver stars above. Behind me comet NEOWISE hung bright and cold. I took a long breath, curled underwater, and swam beneath MUSSELS. I passed the glowing curve of the anchor rode as I followed a path of light released by my hands stretched ahead.
John Hartmann
Before crossing back to Brooklin on the last day, we waited for the tide to cover a wide shell bar so we could escape our overnight anchorage.
In the morning we woke to a thick fog, tenacious and clingy, and dampness permeated my sleeping bag. Nothing outside of a drybag was spared from the wet slick. After breaking down our overnight shelters, we planned the return to the mainland. The air was oppressively calm and heavy, and rowing was the only option. Hunched over our charts we plotted a magnetic course and confirmed with each other the headings and time estimates. Cutting through the cotton of fog we could hear the deep diesel rumble of lobsterboats working the traps in Jericho Bay.
Jonathan McNally
The tide had come in enough to float my boat, but the water wasn’t deep enough yet to row. I sculled MUSSELS over the shell bar to deeper water on the other side so we could begin our passage home.
We hauled radar reflectors up the masts and started to pull for home. Jonathan in INDIGO blazed his own path and soon disappeared into the fog while John and I pulled together side by side, making frequent compass checks and course corrections. The world was reduced to an intimate circle, with just our two boats and isolated lobster buoys appearing for brief moments. There was no visual reference to distance covered, only our wristwatches marked the passage of time. Lobsterboats continued their work from trap to trap, motoring and then idling on a constant regular loop, their distance from us inscrutable. The slow, steady tempo of the oars left a trail of expanding rings which marked the way we had come, trailing endlessly behind the stern and absorbed by mist.
Suddenly a mooring ball passed off to starboard and a looming shadow materialized into a hulking steel fishing trawler as we entered the harbor right on the schedule we had estimated. The dock soon became visible as the fog broke into wisps closer to shore. Jonathan was already climbing out of INDIGO and tying her off. John and I nudged up behind her and secured our boats. We didn’t travel hundreds of miles or break any records, but we had traded daily worries for stars and fog, rowing and sailing. This year, it was an accomplishment.
Christophe Matson lives in New Hampshire. At a very young age he disobeyed his father and rowed the neighbor’s Dyer Dhow across the Connecticut River to the strange new lands on the other side. Ever since he has been hooked on the idea that a small boat offers the most freedom.
If you have an interesting story to tell about your adventures with a small boat, please email us a brief outline and a few photos.
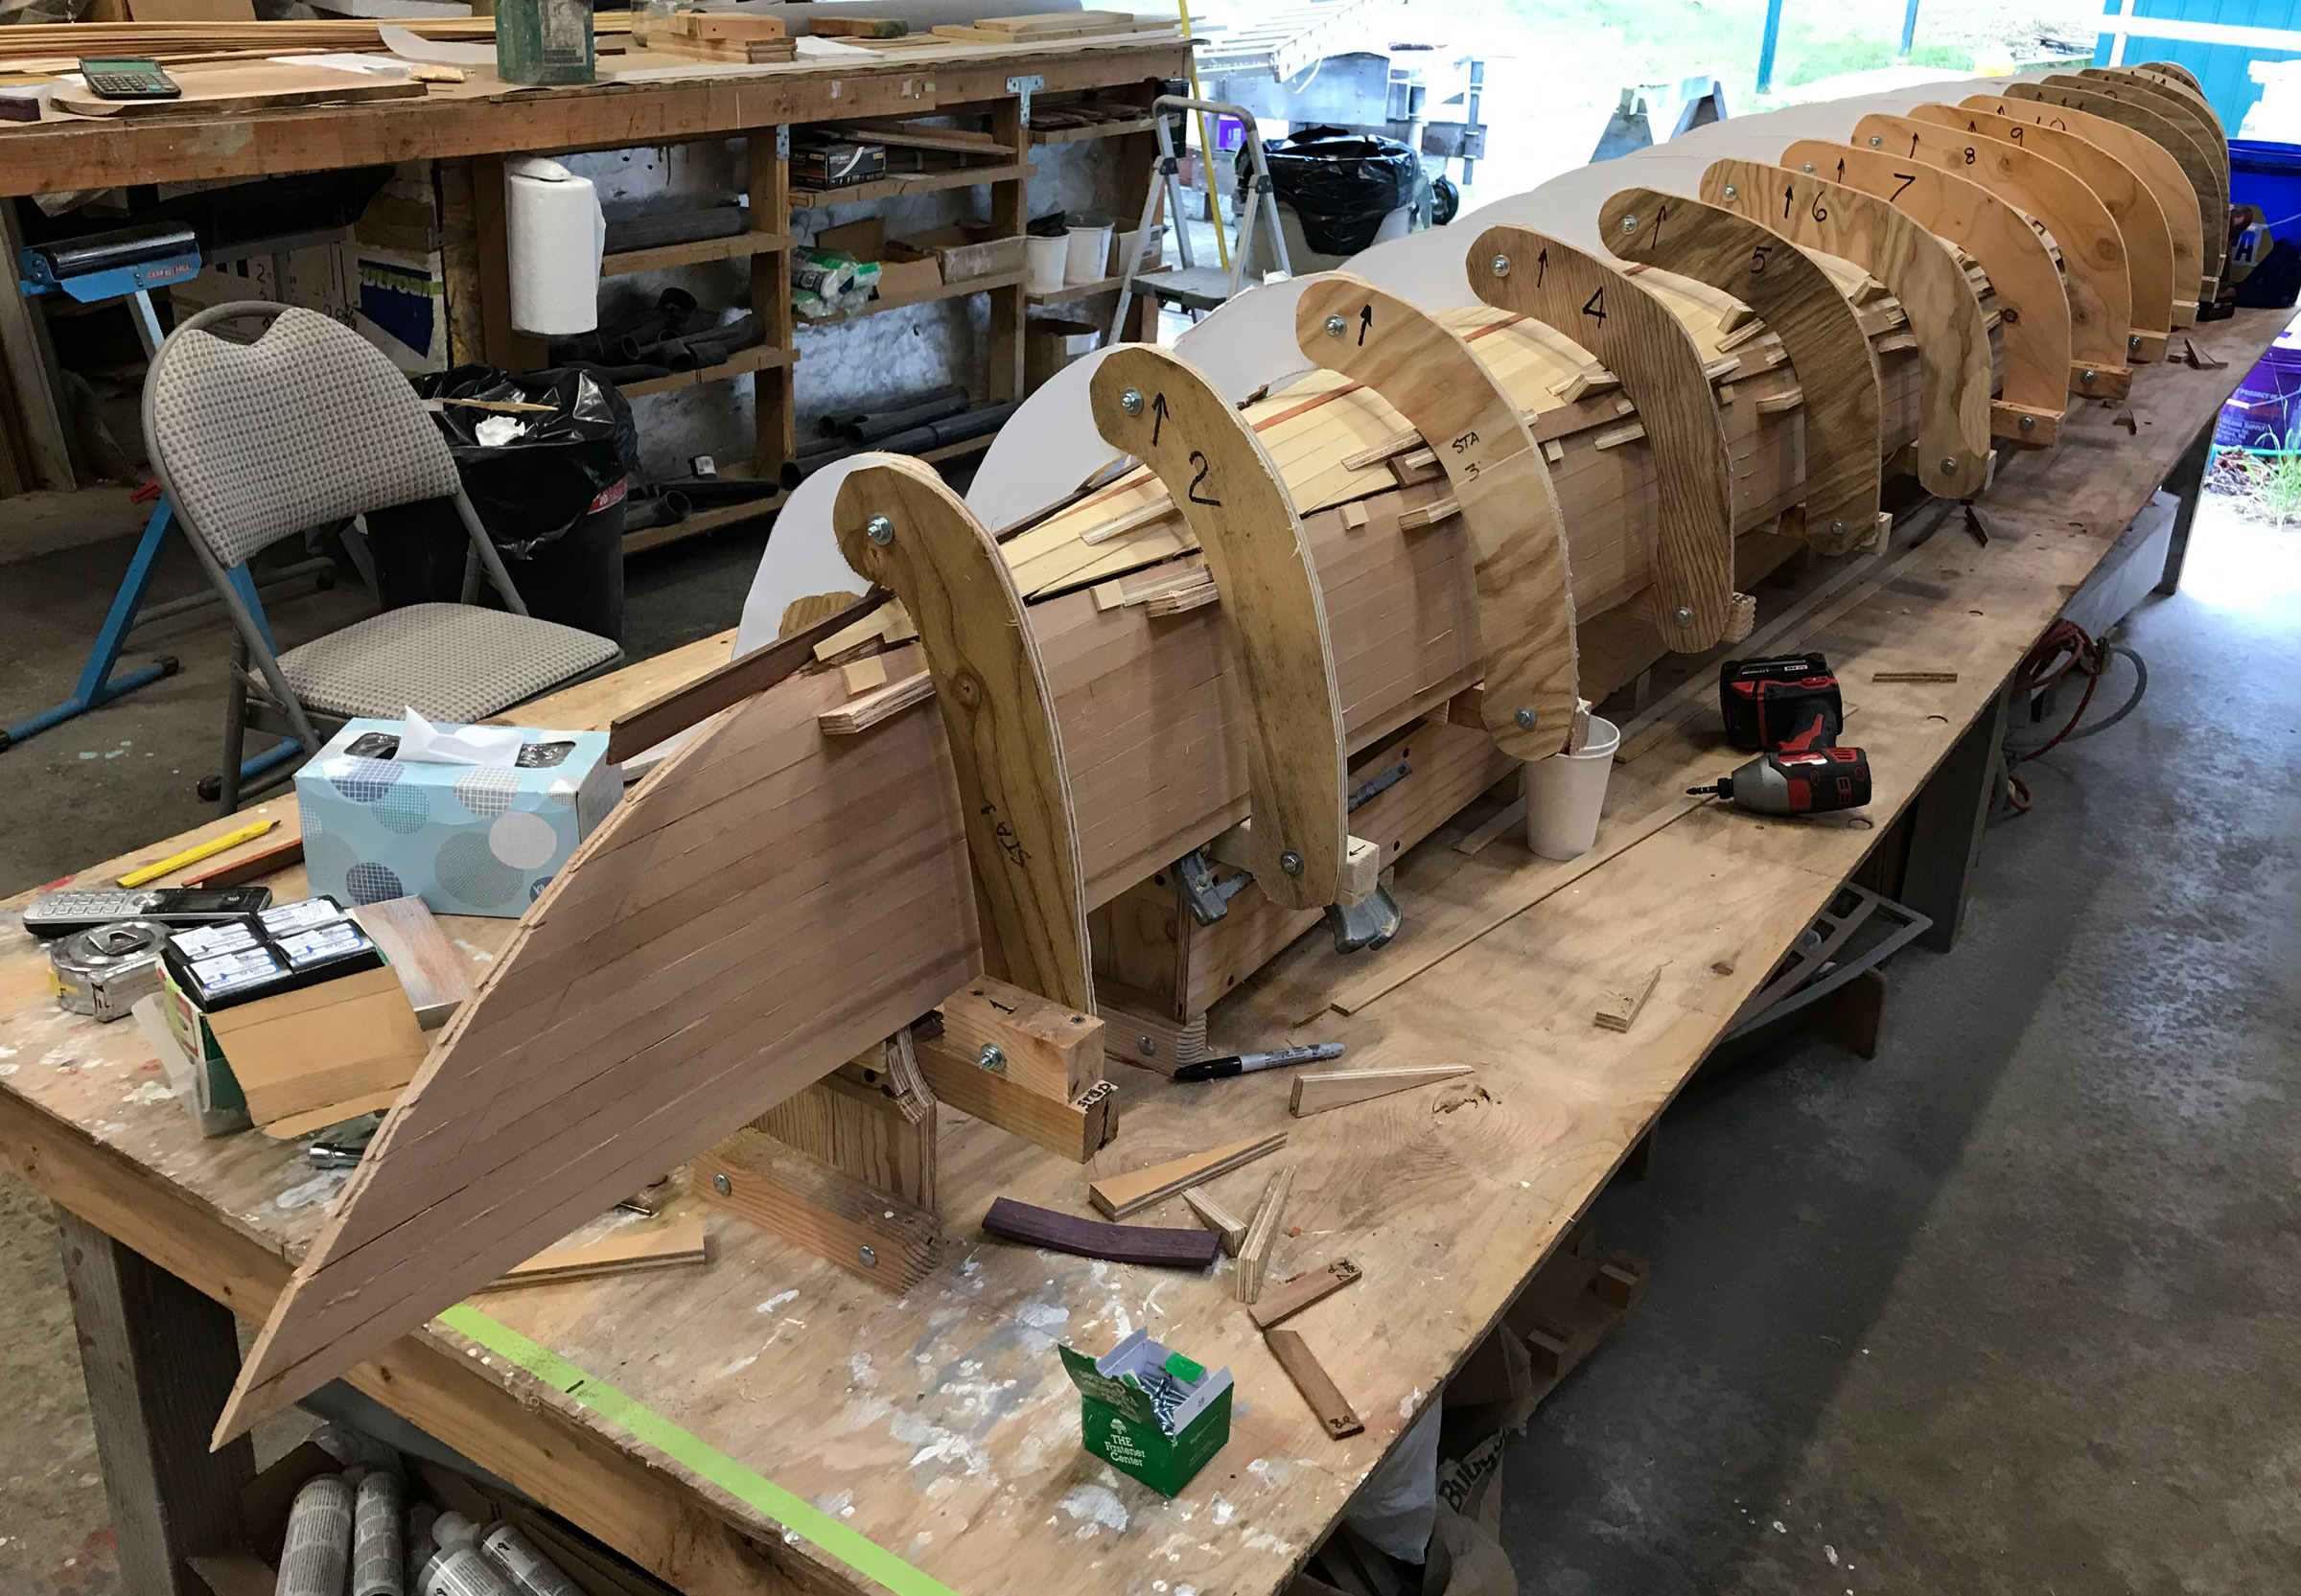
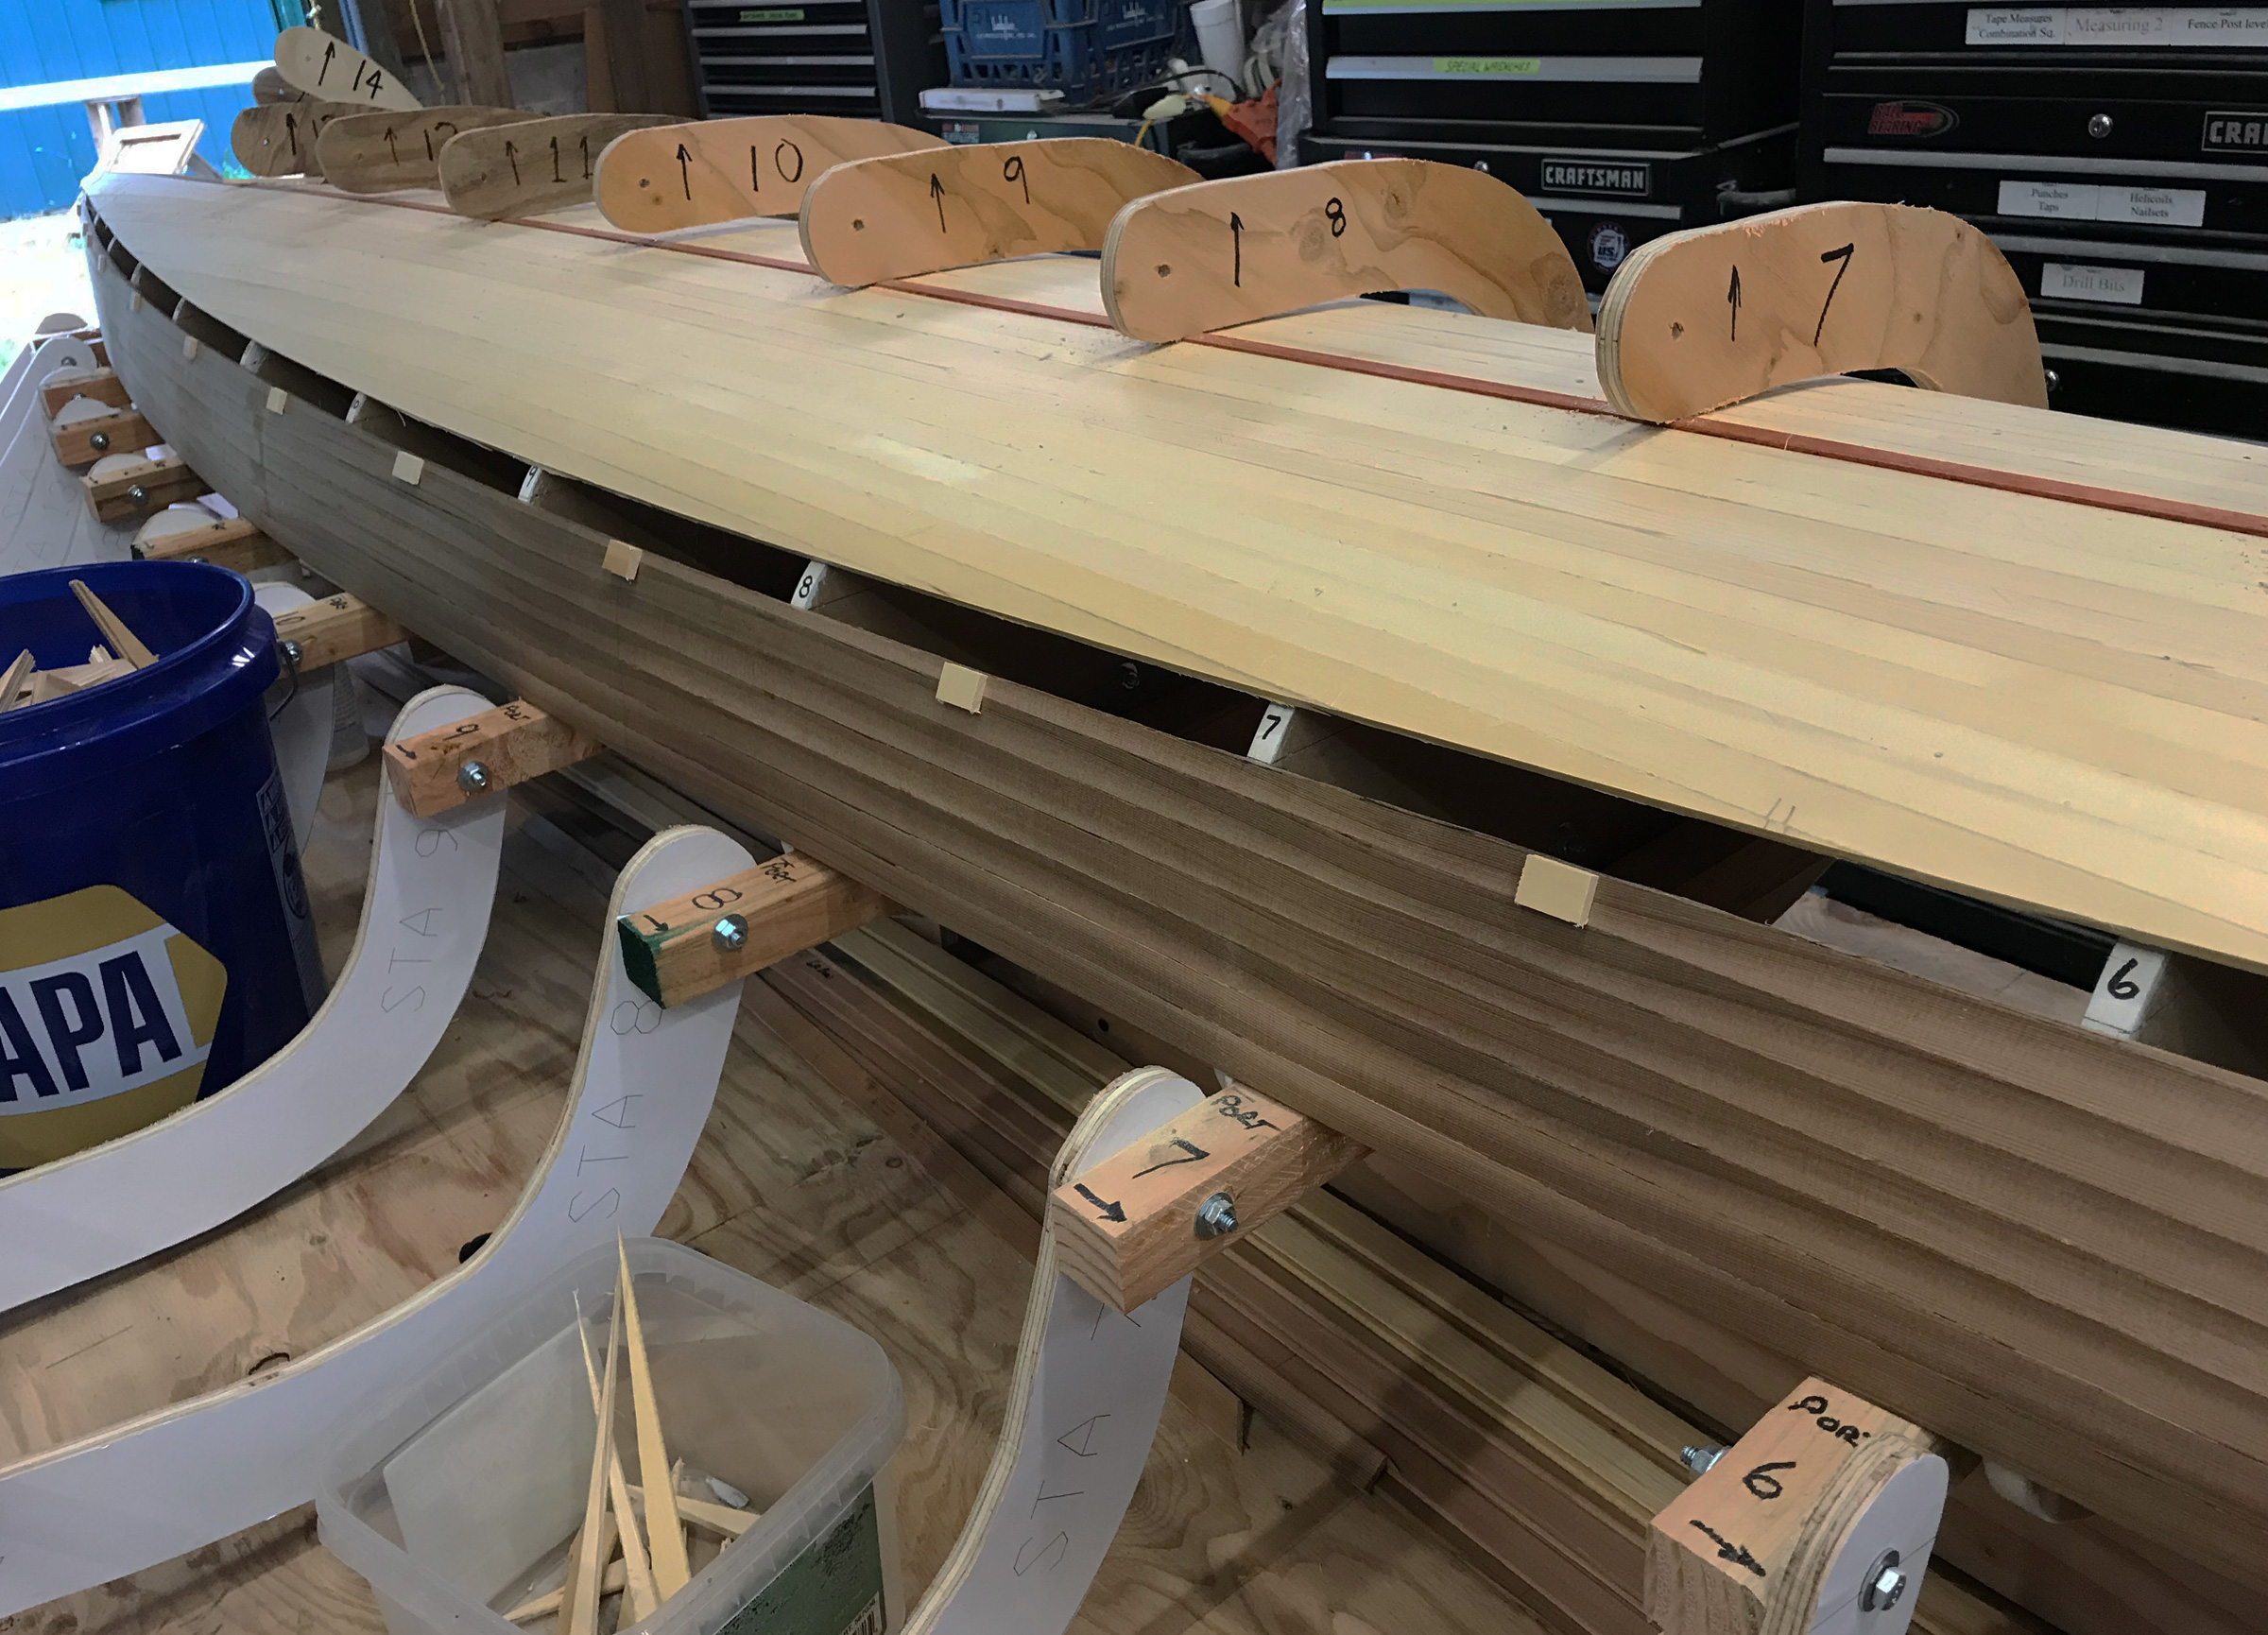
When I decided to build my first bead-and-cove strip kayak, the whole build process seemed pretty straightforward and I didn’t really anticipate any troubles. I had decided to use a variety of beautiful woods to complement and contrast each other, I wanted to inlay a laminated waterline stripe, and I was not going to use nails or staples through the strips, leaving hundreds of dark nail holes showing through the wood.
I discovered that it was easy stripping the topsides since there was just a gentle curve near the sheer and I could easily clamp the strips’ ends at the stems, but the bottom was a lot more challenging. Each strip had a considerable twist going from flat along the bottom amidships to nearly vertical at the stems. And as the planks tapered into the ends at the waterline, there wasn’t enough space to place clamps to the molds where the torsion was worst.
For this first kayak, I looped lines around the hull, tightening them with sticks to create a Spanish windlass at each mold. Under the tightened ropes, I used wedges to apply pressure where needed. But while this worked to some extent, it didn’t force the strips down to the molds nor against each other as tight as I would like. And I could do only two strips every few hours, since I had to wait for the glue to dry before proceeding to the next pair.
Photographs by the author
External plywood arches over each mold provide a way to apply multiple strips with each round of gluing, without resorting to staples or nails to hold them.
When I got ready to build my second kayak, CELESTE, I figured there had to be a better way. I had a lot of different ideas, but what I came up with was building an external frame over each mold in order to drive wedges against the strips. Each of these arches was made of two pieces of inexpensive 1/2″ CDX plywood connected with 1/4″ bolts and anchored to a 2×2 screwed to the base of the mold.
The center bolts holding the two halves of the arches together can be removed to provide access to the hull.
The arches could be assembled and disassembled quickly and wedges tapped inside of the frame, thus clamping the strips against the mold. I had designed and drawn the boat in AutoCAD so I could easily make patterns for the arches with a 3/4″ offset from the hull. The tolerance isn’t critical, so you can sketch the patterns freehand and they would work fine—the wedges will allow for very loose tolerances. A little time with a bandsaw and drilling some 1/4″ holes, and I was done.
Wedges, these cut from scraps of plywood, provide firm pressure on the strips being applied. They can even edge-set the strips without making it impossible to apply the next strip.
With the arches and wedges I was able to apply a tremendous amount of force on the strips if needed but still finesse the beads into the coves very easily, all without damaging the soft wood strips. The system was much easier and more accurate than any other method I had tried, and because it allowed me to do all of the strips without waiting for glue to dry, I was able to complete the bottom in a day whereas previously it had taken almost two weeks to do the 28 strips.
Dan Newland has been building boats from the age of 12. He lives in Port Hadlock, Washington, not far from the Northwest School of Wooden Boat Building. He has taught advanced composites at the school and serves on the school’s Program Advisory Committee. His wife, Linda, is on the board of directors. Dan designed carbon fabrics and high-tech sailcloth for several AMERICA‘s Cup projects. He has won the Singlehanded Transpac three times, twice in boats he designed and built.
You can share your tips and tricks of the trade with other Small Boats Magazine readers by sending us an email.
Audrey (aka Skipper) has sewn for decades, and she has five different sewing machines that she uses for various projects. A few years back, when we decided to sew our own sails and boat covers, she knew she would need a machine suited for working with thicker fabric and heavier thread. On the recommendation of a sailor friend, we bought a Sailrite Ultrafeed LSZ-1 walking-foot sewing machine and have ever since been very pleased with its performance. The LSZ-1 does both straight stitching and zigzag, which is used in sailmaking and repair; the Ultrafeed also comes in a straight-stitch-only model, the LS-1.
Both models have a walking foot, which pulls the top of the fabric at the same time as the feed dog pulls the bottom, ensuring even stitching and fabric alignment. This is a marked advantage over an ordinary sewing machine where only the bottom layer of fabric is pulled by the teeth of the feed dog. That may be fine for sewing a few layers of common fabrics, but not for sewing sails or boat covers where the fabrics are slippery or so thick that the top layers don’t keep up with those on the bottom. The walking foot also reduces the amount of seam tape or the number of fabric clips or pins required to hold the fabric together but gum up machines and slow sewing.
Photographs by the authors
The walking foot maintains pressure on the work at all times. Here the inner presser foot is holding two layers of leather down to keep them from lifting as the needle rises. When the needle is clear, the outer presser foot works in tandem with the feed dog below to advance the material being sewn.
The walking foot has two parts: an inner presser foot that holds the fabric pieces in place while the needle stitches them, and an outer presser foot with two rows of teeth that grip the fabric directly above the feed dog’s teeth, pulling the fabric ahead up to 6mm when the needle is above them. The inner walking foot alternates with the outer walking foot and presses down on the fabric, compressing the layers so the stitch is tight, and holding the fabric against the needle plate until after the needle has withdrawn and the outer pressure foot has descended. A larger-than-usual opening in the needle plate reduces needle strikes and allows for a 5mm-wide zigzag stitch on the LSZ-1. The long and wide zigzag stitch is important for sailmaking as it can move with the cloth as the sail stretches in strong wind.
The Ultrafeed has a needle bar stroke of 1-11/32″ (34mm), twice that of some home sewing machines, and 3/8″ clearance between the raised walking foot and the needle plate, also twice that of a home machine, and can sew almost anything that fits in that space. It can sew multiple layers of heavyweight fabric, leather, or canvas, which is essential when stitching corners where fabric gets folded for overlapping seams or reinforcing layers are added in places such as the corners of sails. We’ve tested the Ultrafeed on 16 layers of canvas, as much as we could fit under the presser foot, and had no trouble sewing it.
The base of this Ultrafeed LSZ-1 is set in a sewing table to provide a broader flat surface to support the work.
Many industrial sewing machines are equipped with a walking foot, but the Ultrafeed machines are affordable and find just the right balance of power, reliability, precision sewing, and portability for working multiple layers of a wide range of fabrics. A lightweight home machine’s motor and presser foot can be quickly overwhelmed, while industrial machines may be too heavy and too fast to do intricate work. The Ultrafeed’s walking foot is the perfect size feed for sewing seams in sailcloth and it has adjustable tension for the presser foot, thread, and bobbin to handle jobs from 0.75-oz spinnaker fabric up to several layers of 20-oz Sunbrella or leather. The 49-lb machine has a good weight that holds it steady when working with heavy fabric, is easy to thread and to wind bobbins, sews uniform stitches, is fast, smooth and quiet, and can handle the thickest jobs you’ll encounter sewing sails and outdoor equipment. If one machine that does just straight and zigzag can handle all of your sewing tasks, the Ultrafeed LSZ-1, with its adjustments for presser foot, thread and bobbin tension, will do light sewing for household chores as well as the heavy work for boat-related projects.
The Ultrafeed cost more than our other machines, but it quickly paid for itself after we made a sail for our Penobscot 14 skiff, repaired several sails, and constructed three boat covers. Cost sharing may be an option for small clubs like TSCA chapters or groups of like-minded do-it-yourselfers. Skipper isn’t one who would use a feather or a frying pan to pound a nail, and she found the Ultrafeed LSZ-1 is just the right tool for our small-boat sewing projects.
Audrey and Kent mess about in small boats in the bays and rivers of northwest Florida. Their adventures are logged at their blog, Small Boat Restoration.
The Ultrafeed sewing machines are available from Sailrite. The LS-1 retails for $795, LSZ-1 for $895.
Is there a product that might be useful for boatbuilding, cruising, or shore-side camping that you’d like us to review? Please email your suggestions.
While most small-boat sailors have a good sense of how wind speed affects their boats—when to reef, when to run for shelter—the more data-minded among us like to know the absolute wind speed. There are also times when knowing the actual speed can be useful, such as standing ashore before setting out, when it can be difficult to judge what the wind speed is out on the water.
Photographs by the author
The Kestrel 2000 comes with a lanyard and a protective case.
A good instrument for this is the Kestrel 2000, a small, lightweight, waterproof (to IP67), robust, handheld wind speed meter, made by Kestrel Meters of Boothwyn, Pennsylvania. These Kestrel Basic instruments come in nearly identical cases but with different capabilities, starting with the Kestrel 1000, which measures wind speed only on up to others that also measure temperature, barometric pressure and humidity, and can calculate dew point, heat stress, altitude, and barometric pressure trend. Several models include a clock function.
The Kestrel 2000 measures air and water temperature, weighs just 2.3 oz, and measures 4.8″ x 1.7″ x 0.7″, shorter than my iPhone and about half its width. Wind speed is measured by a 1″, seven-bladed enclosed impeller at the top of the instrument, and temperature is measured by a thermistor on a coil of wire set within a small cutout located below the wind speed impeller. There is a 1-1/4″ x 5/8″ LCD screen in the center and three control buttons below. A 26″ adjustable lanyard is fastened to the bottom, and attached to it is an integral hard cover that slides out of the way when the instrument is in use.
The Kestrel 2000 has an easily replaced impeller to measure wind speed. The coil of blue wire below it includes a thermistor, a type of resistor that can accurately measure the temperature in air or water. The whole unit is waterproof (IP-67) and floats.
The instrument can switch between various units of measure: temperature and wind chill in Fahrenheit or Celsius, wind speed in mph, kts, m/s, ft/min, km/h, and even Beaufort wind force. Using it is simple. It turns on, nearly instantly, with a short press of the center on/off button, to the last used function. The right- and left-arrow buttons step through the functions: temperature, wind chill, instantaneous wind speed, maximum wind speed, and average wind speed. The current function displayed is indicated both by a graphic icon and text. A second press of the center button turns on the screen backlight. The user guide gives clear instructions on setting up the unit to your preferences. The unit is powered by a 3V CR2032 coin-cell battery, which Kestrel states will provide an average of 300 hours of use. These are common batteries that cost only about $1 to replace.
Any breeze that can overcome the inertia of the impeller bearings is enough to produce a reading. I found that a slow walking pace, about half a knot, is the lowest reading I can obtain. Each impeller is calibrated to within about 1.5% accuracy, which is good enough for the range of wind speeds most of us are likely to encounter. Should the impeller drift out of calibration over time, it is user-replaceable, without tools, with a new one. Temperature is calibrated to within 0.04°C, and because the unit is waterproof, you can submerge it to take the water temperature.
On a recent weeklong trip, I found myself using the meter frequently while sailing. I found it handy to hang the lanyard over my neck and tuck the meter inside my life jacket, where it was easy to pull out and take a quick reading. I was interested to discover that I have been overestimating both absolute and apparent wind speeds (at least those under 20 knots) for years by about 20–25%. In the future, I will have to temper my stories about how awful the weather was and just admit that I am a wimpy sailor.
Alex Zimmerman is a semi-retired mechanical technologist and former executive. His first boat was an abandoned Chestnut canoe that he fixed up as a teenager and paddled on the waterways of eastern Manitoba and northwestern Ontario. He started his professional career as a maritime engineer in the Canadian Navy, and that triggered his interest in sailing. He didn’t get back into boatbuilding until he moved back to Vancouver Island in the 1990s, where he built a number of sea kayaks that he used to explore the coast. He built his first sail-and-oar boat in the early 2000s and completed his most recent one in 2016. He says he can stop building boats anytime. He is the author of the recently published book, Becoming Coastal.
You can walk across the Westport River in southern Massachusetts at low tide. It’s a mile or so across in some places, but the depth at full ebb is only 4′. If you want to cross that water with dry feet, then you need a shallow-draft boat. If you want to venture on that water to clam flats or to fishing grounds, then you need a shallow-draft boat with a reasonable amount of power and carrying capacity. Enter, the Westport skiff.
Photo by Matthew P. Murphy
Scott Gifford of Westport, Massachusetts, builds a flat-bottomed skiff called the Macomber 15. The boats are rugged, utilitarian, and good-looking, and designed by Scott in the signature style of his local workboats.
The Westport skiff is defined, roundly, as a wide, flat-bottomed, and rugged outboard-powered boat. It has a cross-planked bottom and lapstrake sides, and it evolved as a workboat for digging clams and for fishing on the Westport River. Early skiffs were sail-powered, and so had pronounced rocker, or longitudinal curvature, to their bottoms. They also had relatively narrow sterns. When people began hanging outboard engines on those narrow sterns in the 1940s, the boats ran with their bows high in the air, which obstructed the helmsman’s view forward. Evolution corrected the problem quickly: Wider sterns and flatter runs aft produced a stable, flat-running boat, and the vernacular Westport skiff was born.
Hundreds upon hundreds of these skiffs have been built in the past 60 years. Deacon Earle and Fred Hart were two of the most prominent builders, each man possessed of a unique, signature style. They’re both gone now, and the once-steady demand for their boats is diminished. But the demand isn’t gone, and a simple, rugged skiff built of local materials still has currency, as one young builder has been learning over the past few years.
Photo by Matthew P. Murphy
A pair of new Macomber 15s at rest, with an original Westport skiff in the background.
Scott Gifford grew up on the Westport River. His dad, Howie, built a wooden dory when Scott was a boy, and he spent a lot of time in that, and in other wooden boats. He went off eventually and got a degree in industrial and manufacturing engineering, but, he says, “I couldn’t get away from the water.” Scott eventually took up residence on the river, just upstream from the F.L. Tripp & Sons Boat Yard, where he works full-time as a project manager—dealing mainly in fiberglass. A brief tour of his house, however, reveals his true passions.
There’s evolution in progress here. On one wall hangs a series of half models: a sailing skiff on top, beneath that a flat-bottomed skiff, a boat of Scott’s own design that’s ideal for planing across the calm, protected water of the river. He’s built full-sized boats to this design. He calls the design the Macomber 15, and we took a spin in one last August, just a day after it attracted much attention at the WoodenBoat Show in Newport, Rhode Island. It’s fast—surprisingly fast for so heavy a boat. The slightest ripples on the water’s surface can be felt when the boat is zipping along—a rather pleasant effect, actually, but it suggests that the boat would be a handful in the wrong conditions, such as the ones that exist at the river’s mouth, and beyond. It’s a fact of life: flat bottoms, simple as they are to build, will pound when driven hard into a chop. To get out to the bluefish and bass, to venture beyond the river’s mouth, requires something else.
Consider the next model down on Scott’s wall from the flat-bottomed skiff. This one has a V-bottom—a shape that’ll be much kinder to the boat’s occupants in a Buzzards Bay chop. This is nothing new, of course; Scott Gifford did not invent the V-bottom. But what’s interesting on this wall of half models is that’s he’s recapitulated the evolution of local boat types. (There’s even a catboat at the bottom of the stack of models.) His V-bottomed model, in fact, looks surprisingly similar to the legendary bassboats of Ernest J. MacKenzie, built not far from here, for fishing among the rocky and choppy environs of the Elizabeth Islands in Massachusetts Bay. Scott didn’t set out to emulate MacKenzie. Rather, he seems to have arrived at this hull shape after being pressed by the same needs and longings of those who came before him: inshore watermen looking seaward. What better way to do this than to adapt a proven skiff for rough-water work.
Photo by Matthew P. Murphy
Wesport skiffs were designed for the shallow expanse of the Westport River, where the ability to travel in thin water at reasonable speed is more important than the ability to make way in heavy seas.
The V-bottomed model will be the same above the water as the flat-bottomed model—except that it will have a deck. Scott envisions someday building one with an inboard diesel engine, though the prototype for this boat will carry an outboard. In late August, Scott was “99 percent sure I’ll build it this winter.” If he does, it’ll be built on the same building form—modified to yield the V-bottom—as are the flat-bottomed Macomber 15s.
Which, in my opinion, are exceptional boats. They must not be pushed beyond the limits of their intended environment—a protected river, a lake, a harbor. They are not meant to go to sea. But they are rugged—“overbuilt,” according to Scott—and they’ll last for a good long time “with nothing more than the usual proper care and maintenance that a well-built wooden boat deserves.”
This is no-nonsense construction. Scott begins with local logs of pine and oak, which he has sawn locally, and he then seasons the lumber for about a year. Planks are of pine, frames are of oak, and fastenings are bronze screws and copper nails, clenched at the laps and riveted at the frames. Transoms are of 1″ mahogany, splined and glued together, and further padded with a 3⁄4″ transom key, in way of the motor mounts. The bottoms are cross-planked, meaning that they are composed of short planks running across the boat, rather than along its length. The seams between these planks are given a “good smear” of Life-Calk, a flexible sealant that will come and go with the shrinking and swelling of the wood. This simple bottom construction is quite good at keeping the water out, but if a boat does leak, or if it takes some rainwater or spray, there’s an additional feature worthy of note: the boats are self-bailing when underway. The builder mounts a shop-made copper scoop on the bottom of each hull, this to relieve the bilge of water when the boat reaches speed.
The exteriors and seats are painted. Interiors are treated with boiled linseed oil. Wood so treated will weather to black in a few years.
Photo by Matthew P. Murphy
The Macomber 15 is rated for 25 horsepower, but it will plane with much less power than that.
Scott Gifford’s Westport skiffs are rated by the Coast Guard to carry a 25-hp motor. They’ll do 32 mph with that power plant, compliments of the flat bottom, which skips over the river’s surface like a stone. The boat will also catch an edge—a chine—if you turn it hard at that speed, warns Scott. The result of such behavior would be a startling jolt. The builder recommends cruising at around 15 mph, and dialing back on the horsepower. “You can put a 25 on it, but you don’t need to use it all. I think 20 would be perfect, but nobody makes a 20 anymore. And then, considering further, he says, “15 would probably be ideal,” recalling that a 15 has got him and another guy up on plane, “no problem.” His musing on horsepower culminates with: “A Johnson 15, four-stroke, would be a very good match for this boat, weight-and horsepower-wise.”
“My goal,” writes Scott Gifford in one of his brochures, “is to bring back the tradition and simplicity that the Westport River skiff has had for the past few decades. I have designed the boats to be built from readily available stock and in traditional fashion.” A Macomber 15 built by Scott Gifford costs about $7,500. Customization and extras are, well, extra.
The Macomber 15’s lines are simple and good-looking. The boat is designed for relatively calm waters, but Scott Gifford, at the time of publication, was in the process of developing a model with a moderate V—a boat more suited than the Westport skiff to adventures outside the river.
You can order plans and finished boats from Macomber Boatworks, 95 Stillman Ave, Pawcatuck, CT 06379; scott71.sg@gmail.com
Is there a boat you’d like to know more about? Have you built one that you think other Small Boats Magazine readers would enjoy? Please email us!
Dan Newland has accomplished a lot in his lifetime. In his prime he built a 34′ IOR 3/4-ton sloop and three weeks after finishing it entered the 1982 Singlehanded Transpac, a 2,100-plus-mile race from San Francisco to Kauai, and took first place. He won the race again in 1986 and 1992. For the 1992 race he finished three days ahead of the next boat in a boat he designed and built using fabrics he designed while working for a company making composite fabrics. He also designed the fabrics for the boat’s sails, which he also designed and built. Dan’s career in composites included designing fabrics for AMERICA’s Cup projects and making carbon-fiber parts for rockets and satellites. He also built pricey boarding ladders for megayachts. (If you have to ask how much they cost, you can’t afford one. Hint: Think five figures.)
Surprisingly, Dan considers himself a late bloomer and writes, “I wasted the first five years of my life.” At the age of six, he began making up for his misspent youth by building model airplanes. His work improved after he learned to read. He learned Bernoulli’s Principles of Fluids in Motion sitting on his father’s knee, and soon after was reading about flight dynamics and could recite by heart his favorite passages to his bewildered friends. By the age of nine he was building model airplanes that could actually fly, and even took flight himself by taking flying lessons.
Dan was 12 when he built his first boat. It was a plywood hydroplane that he’d seen detailed in a magazine; he hounded his parents to fund the project. No one in his family really had an interest in boats; his dad had a canoe only as an accessory to his true interest—fly-fishing. Dan’s parents caved in, as he recalls, “to shut me up.”
When he took an interest in sailing, he sold his hydroplane and bought a Sunfish. That led to a 23′ Olympic Star keelboat and, at the age of 16, Dan graduated to even bigger boats and was racing offshore.
Photographs courtesy of Dan Newland
This kayak, the first of the two kayaks that Dan designed and built, was for his wife, Linda. It is the same design as CELESTE.
In recent years, Dan has returned to models and small boats. He builds and sails 37″-long T37 radio-controlled racing sloops and has built two cedar-strip sea kayaks. Dan had no experience with kayaks, so he drew upon Steve Killing’s Endeavour design when drawing up the hull. The first kayak he built was for his wife, Linda, using western red cedar, bird’s-eye maple, sapele, and Alaska yellow cedar.
CELESTE’s hull has a yellow cedar bottom and topsides of figured red cedar. Accents of padauk, rosewood, and sapele grace the stem, waterline and centerline. The hole in the bow is ringed with Bolivian rosewood.
The second kayak, CELESTE, is the one here, built mainly of red and yellow cedar, with some sapele and a dozen other different hardwoods for color and decorative touches. Dan has been drawing, painting, and sculpting for the better part of his life and has an artist’s eye. He recalls, “I got to thinking that wood could be an interesting medium for art. Bright-finished wood has the gift of nature’s artistry that you get to combine with your own imagination and skill.
The rings of the Saturn-like planet will have shadows cast on its rings, as does the moon that has already been inlaid on the deck.
Many woods are beautiful when varnished, but I realized that with a turn of the grain, a dark swirl or a knot, or unexpected color, this could be a palette that you selected to tell a story. I woke one morning and saw Saturn lying on the deck of the kayak. It hit me that the natural colors and swirls of grain of many different woods are reminiscent of the clouds and atmosphere of exoplanets.” He ran with that idea and embellished the deck with planets, moons, and a comet. One moon, with a diameter of just 3/32″, has a tiny knot for a crater.
The planets on the foredeck appear to float on the darkness of outer space, which Dan created with strips of Peruvian walnut. The contrast and color will be much more dramatic after the finish is applied.
Dan spent 550 hours building CELESTE, and that includes having to remove the deck’s ’glass-and-epoxy sheathing and five sprayed-on layers of clear topcoat. Dan noticed tiny white streaks where the epoxy had not fully saturated the ’glass cloth. They were almost imperceptible but were a flaw he wasn’t willing to live with. He redid the ’glass with an epoxy with a slow hardener, which continued flowing long enough to completely fill the weave. The experience proved his maxim: “All mistakes in boatbuilding are ultimately taken out with sandpaper.”
The afterdeck
CELESTE reflects the high standards Dan has held for his work and is one more reason to assure himself that he hasn’t wasted a bit of his life since he turned six.
Do you have a boat with an interesting story? Please email us. We’d like to hear about it and share it with other Small Boats Magazine readers.
All youngsters might begin their waterborne adventures in flat-bottomed rowing/sailing skiffs. Easy to build, but difficult to design properly, these honest little boats teach lessons in seamanship and self-reliance. At the other end of life’s voyage, a good skiff will take gentle care of old folks as they sail comfortable miles to nowhere in particular.
Here’s a flat-bottomed 15’4″ sailing skiff from Karl Stambaugh, and it looks just right. The talented young designer drew this boat for his dad to build in retirement. Carlton Stambaugh made a fine job of putting it together with plywood, epoxy, and paint.
On a pleasant, slightly hazy, day in late spring, I drove through the rural Maryland countryside to meet the Stambaugh family at the Bellevue ferry pier on the Eastern Shore of Chesapeake Bay. Freshly planted corn and beans, big-wheeled tractors scurrying from one field to another along too-narrow blacktop roads…the scenery hasn’t much changed in the past three decades. In this place of easy living, the scourge of “land development” seems to have been slowed.
Photo by Mike O'Brien
The Sailing Skiff 15 demonstrates her fine hull shape and shoal (4″ ) draft as builder Carlton Stambaugh pulls the boat to the beach. His son, designer Karl Stambaugh, rests at the helm.
Just south of the pier, the sailing skiff made a fine sight as she paced the ferry along the Tred Avon River toward Oxford on the far shore. Halfway across, the simple little boat turned about and reached back in my direction. The Stambaughs, father and son, relaxed in the bilge and stern sheets. As JOY came close in, Karl spilled the wind from her sail and eased the boat up to the sand beach. I climbed aboard, and we worked off into the gentle onshore breeze.
With the sheet trimmed, JOY accelerated in the brisk fashion that befits a light (170 lbs) skiff. She is propelled by a Chesapeake-style leg-o’-mutton rig…simple, efficient, and relatively inexpensive. The tapered wooden mast requires no standing rigging (wires that support the masts of her more costly cousins). Unlike common booms that run humbly along the foot (bottom edge) of a sail, the sprit boom attaches at a sail’s clew (lower, after corner) and runs across the sail to the mast. There, an adjustable rope snotter secures the boom well above the sail’s tack (lower forward corner).
Photo by Mike O'Brien
A rope “snotter” secures the sprit boom to the mast…simpler, less expensive, and more adjustable than the usual bronze or stainless gooseneck fitting.
The press of a breeze tends to twist sails and lift the after ends of their booms…not necessarily a good thing. Common yacht-club rigs use special devices called “vangs” and powerful, carefully placed sheets (lines) to control this twist. Aboard this skiff the triangle formed by the sprit boom, the sail’s foot, and the mast automatically takes care of the problem. As the boom tries to lift, tension in the foot of the sail holds it down. To obtain flatter sail shape desirable for sailing in a fresh breeze, we’ll snug up on the snotter and the halyard (the line that hoists the sail). When the wind eases, we’ll slack off on the snotter and halyard to give more fullness to the sail. This will produce more power in light air. We’ll accomplish the modification with few, if any, blocks (pulleys) and no gooseneck (an often bronze, and always expensive, fitting that connects a conventional boom to its mast). Unless we have a relative in the marine hardware business, there seems little sense to rigging an ordinary boom on a boat of this size.
JOY sails with a light weather helm. The nicely tapered tiller pulls gently in our hands, and if we release it, the skiff rounds up easily into the eye of the wind. This pleasant behavior aids in working to windward and ensures that the skiff won’t sail away without us should we fall overboard. The shallow rudder provides adequate control and allows us to explore marshes and winding creeks, which often prove more interesting and less crowded than deep water. A horizontal plate attached to the lower edge of the rudder increases its effectiveness.
Photos by Mike O'Brien
To furl the sail, roll it around its leech (trailing edge)…simple, neat, and tight. Lift the mast out of the step, and the skiff is ready for the trailer. You’ll find no expensive standing rigging (wire stays and shrouds) to fuss with.
The pivoting centerboard gives sufficient lateral resistance, which keeps us from sliding helplessly sideways to leeward. This we will realize the first time that we forget to lower the board. Yes, the case, or trunk, consumes interior space, but it also serves as a comfortable armrest when the crew lounges in the bilge. And that’s where we’ll often find ourselves.
Most of us will prefer sitting on cushions spread in the bilge, while resting our backs against the skiff’s perfectly angled sides. The crew will be happiest sitting on the floorboards, facing aft and leaning against the ’midships thwart. Aboard JOY, the crew’s cushions are replaced by a modified canoe chair, which offers portable and sybaritic accommodation. By cutting away just a little of the ’mid-ship frame, we’ll be able to recline in the bilge for a good night’s sleep. Many folks have camp-cruised aboard less worthy boats, and the designer assures us that the structural modification is acceptable.
Photo by Mike O'Brien
The versatile Sailing Skiff 15 seems about perfect for the noble purposes of education and relaxation (and perhaps an occasional fishing trip).
We’ll build this sailing skiff with plywood, lumberyard stock, and epoxy. Stambaugh cleverly specifies solid (not plywood) sheerstrakes. These planks, which form the upper portions of the boat’s sides, will lend stiffness and a traditional appearance to our skiff. JOY combines the light weight and leak-free aspects of a plywood hull with the handsome appearance of a traditionally planked skiff. She is simple to assemble but striking to look at.
Karl Stambaugh, who has drawn many skiffs, describes this one as “fine for rowing and sailing.” If you plan to row more than sail, consider putting together his slender Bay Skiff 15. If you would rather sail most of the time, the designer’s heftier Windward 15 might be the answer. A small outboard motor can be rigged on any of these skiffs…if you choose to endure the stench, noise, and expense.
Just as drawn, the versatile Sailing Skiff 15 seems about perfect for the noble purposes of education and relaxation (and perhaps an occasional fishing trip). If you can build only one boat, this might be the one boat to build.
Karl Stambaugh’s drawings show the skiff’s simple plywood construction. Solid wooden sheerstrakes add to the boat’s strength and traditional character. You’ll appreciate the simplicity and versatility of this traditional Chesapeake sailing rig.
Plans for the Sailing Skiff 15 are available from Chesapeake Marine Design.
Is there a boat you’d like to know more about? Have you built one that you think other Small Boats Magazine readers would enjoy? Please email us!
Frank Pedersen is a man of enthusiasms. Before setting out on a new boat project in 2002, he had owned a variety of modest-sized boats in his days, and he had also built a Wayfarer dinghy for himself. Over the years, he had gained enough experience to know what he liked and wanted in a boat. He studied hull forms, especially those of planing hulls, and when he felt ready he set out on a quest to design one for himself.
Photo by Andrew SIms/Wavelength Studios
WINDSPRITE has had good showings in such races as the 2005 Eggemoggin Reach Regatta, during which this photograph was taken.
He wanted a hull that would be fast, that would plane when the wind conditions were just right, something that would give him the thrill of surfing down the front of a following sea. At the same time, simplicity and low cost remained constant priorities for him. “I read everything I could find,” he said, and began working up some preliminary sketches.
At the same time, Brion Rieff’s boatyard in Brooklin, Maine, had just moved to a new location, a much larger building than it had previously occupied, with plenty of space to grow. Pedersen talked with Rieff about his ideas, and Rieff consented to have him build the boat in a then vacant space in the boatyard’s loft. With Rieff looking over his shoulder, so to speak, and offering advice on scantlings and construction techniques from time to time, Pedersen set to work. The boat would be for his own use, but he had in mind the development of lines plans for other amateur builders, with expanded mold outlines and plank shapes. Perhaps, in the long run, he could develop a kit of pre-cut parts.
The kit prospect hasn’t panned out yet, but the result of the design and construction is WINDSPRITE, a 26′ multichined boat built of plywood and intended to be simple, inexpensive, and yet exciting to sail. He’s calling the design the WindSprite 26, and lines plans with the amateur in mind have been completed.
Photo by Andrew SIms/Wavelength Studios
Frank Pedersen (at the helm) designed a light-displacement planing hull, and WINDSPRITE’s abilities as a performance daysailer—stable, dry, and fast—have been anything but a disappointment to him.
He used 50 sheets of okoume plywood in the construction, and plywood is far and away the predominant building material in the boat. Below the cabin sole, the construction is “egg-crate” style, with longitudinal and athwartships plywood bulkheads giving rigid structural support for the planking and making for a very stiff hull. The longitudinals form something like a fore-and-aft girder. Pedersen laminated the frames of his prototype, but the frames, too, could be made of plywood. All the parts, of course, are epoxied together and the hull is sheathed in fiberglass cloth set in epoxy.
In traditional flat-bottomed or V-bottomed boat construction, a chine is the angle where the bottom planking and the side planking come together. Typically a chine log, a kind of longitudinal stringer, supports the joint and receives the plank fastenings. Because plywood can’t bend to the same complex curves that traditional construction can accept, a design using more than one chine—“multichine”—allows plywood to emulate the lapstrake planking of a round-bottomed hull. In the WindSprite 26, the planking is 3⁄8″ plywood, with stringers backing each chine joint for the length of the hull. The keel “plank,” or the relatively small area of the bottom of the hull that is flat, is doubled in thickness, as is the transom. She has a fixed fin keel, which necessitates hauling the boat in slings to set her on her trailer.
The boat is light for a 26-footer, at 2,700 lbs of displacement. By contrast, the modified cold-molded Paul Gartside double-ender ELF (see page 96), with substantially more equipment for its completely different purpose of comfortable cruising, displaces more than 5,000 lbs for its shorter overall length of 24′. WINDSPRITE’s light weight makes her a responsive sailer. She’s quick to answer the helm and comes about very smartly from one tack to another. Those who grew up racing Lasers or C-Larks would feel right at home here—minus the wet ride. Her high freeboard keeps her dry, and Pedersen observes that the multichine construction tends to deflect spray. She’s meant for, as Pedersen describes it, “performance daysailing.”
Photo by Tom Jackson
WINDSPRITE’s rigging is uncomplicated and uncluttered, and all lines are led aft to be within reach of the cockpit.
At the helm, Pedersen himself beams with excitement when the boat picks up speed on a reach, and he seeks out opportunities to show how well the boat can take advantage of waves for a little extra boost off the wind. He’s in his 70s, but when a good breeze is up and the boat is sailing well, he’s like a kid on a carnival ride. She’s fast—in one recent outing in a lovely fresh breeze, our GPS showed she was routinely hitting 6.9, 7.2, as much as 7.4 knots without feeling any need of reefing the mainsail. Her large cockpit (8’6″ long) gives the sense of sailing a much larger boat. She has a seven-eighths fractional sloop rig, but she also flies an asymmetrical spinnaker on a short retractable bowsprit. Pedersen is the first to say he isn’t a hell-bent, ride-the rocket kind of racing sailor. He takes his joy in making the boat move well, and, as may be truly said of many a performance craft, the boat can probably take a good deal more weather than the sailor cares to. Her low trunk cabin allows ample working room on deck and good visibility forward. With roller furling and with the working lines led to locking fairleads on the aft end of the coach roof, all her lines except the halyards can be very easily managed from the cockpit.
But Frank has done his share of racing with WINDSPRITE, too. She has performed remarkably well. In the 2006 Maine Retired Skippers Race in Castine, she was eighth in a fleet of 42 boats. On corrected time in the 2006 Eggemoggin Reach Regatta in Brooklin, she finished in a respectable position, 13th out of 19 in her class. Not a bad showing at all when you consider that she sailed in company with some of the most recent cold molded racer-cruisers from places like Brooklin Boat Yard and Rieff’s own yard. Those other ERR fleet boats are all elegant in their perfection of long overhangs, lovely curved and raking transoms, the best materials available, cold-molded construction, high-end electronics—and with the price tag to match, too. WINDSPRITE bears them little resemblance, with her very high freeboard, straight stem raked forward only slightly, aluminum spars, Dacron sails, and plain-vanilla cabin. Her transom, especially, is an anomaly, being very broad, very high, and almost perfectly vertical, like a racing dinghy’s transom writ large. A person would be hard pressed to call it lovely, and none among the legions of rapturous boat poets would linger on its sensuality. But it has to be said that this boat isn’t about looking pretty at the mooring. It’s about the enjoyment of handling the boat. Frank deliberately left the transom broad so that the runout would provide ample buoyancy aft and contribute to WINDSPRITE’s planing abilities.
Photo by Tom Jackson
WINDSPRITE’s deck fittings are appropriate to her design: straightforward, functional, and as inexpensive as possible.
The vertical transom makes her outside-mounted rudder a very simple device. She has no inboard engine (and no expensive systems, either), so when the wind fails Pedersen uses a 2.5-hp four-stroke outboard to get her home at about 5 knots. The outboard is stored in a compartment under the starboard cockpit seat and is mounted on a simple bracket—another good justification for that dead-vertical transom. He sails on and off a mooring, and so far he hasn’t had much call for the outboard. The boat balances very well on the mainsail alone after the jib has been rolled up to clear the foredeck so the crew can comfortably fetch the mooring pennant.
The accommodations are ample for two, if spartan. No doubt an owner would find his own ways to trick it out with a few of the comforts of home. The plans show two portlights per side in the trunk cabin, but Pedersen hasn’t seen the need for them and saved expense by doing without.
The key aesthetic of this boat is its simplicity. Frank estimates his materials cost at about $18,000, or less than the price of a mainsail for some of the larger “spirit of tradition” boats he sees in the races. He spent about 1,500 hours on her construction, which he completed entirely on his own.
Multichine construction is well adapted to the use of plywood, as are the WindSprite 26’s athwartships and fore-and-aft structural bulkheads. Although higher-sided, she is shaped much like a sailing dinghy. With basic accommodations and without expensive electrical or mechanical systems, she’s all about the experience of fast daysailing at minimal cost, with the prospect of a bit of weekend cruising for two, as well.
This Boat Profile was published in Small Boats 2007 and appears here as archival material. If you have more info about this boat, plan or design please let us know in the comment section.
Is there a boat you’d like to know more about? Have you built one that you think other Small Boats Magazine readers would enjoy? Please email us!
Here we have a rowing boat that combines traditional aesthetics, and adequate stability, with the high performance and full-body exercise offered by sliding-seat rowing rigs.
Photo by Chesapeake Light Craft
Rowing the sliding-seat wherry requires competent technique, which includes feathering the oars (rotating the grips so that the blades are nearly parallel to the water during “recovery.”)
On a cold day in November, two visitors arrived at the WoodenBoat waterfront. Chris Kulczycki, founder of Chesapeake Light Craft, and John Harris, current CEO and owner of the company, had come to show us their fast new pulling boat. They carried their sleek white Annapolis Wherry on racks atop a Nissan Pathfinder.
We launched the boat into the tail end of a passing cold front, which still had enough punch to kick up a sharp 15″ harbor chop. I climbed aboard, strapped my feet into the stretchers (foot braces) and, urged on by cold air and a brisk wind, began to pull hard. The 65-lb wherry accelerated quickly and cut easily through the steep waves. Despite its modest inertia, the light hull carried way with authority. We experienced little loss of speed during the recovery portion of the strokes as the oars’ blades skimmed the tops of the waves. Yes, we took some saltwater spray aboard…not really a bother when we’re rowing fast.
Stability seemed all we might expect from a boat of this purpose. The wherry is much steadier than a typical “recreational shell,” but this is no rock-solid flat-bottomed skiff. The slender (38″-wide) hull asks that we keep our weight carefully centered. Of course, that stable skiff on its best day could not keep pace with this wherry.
Photo by Chesapeake Light Craft
Faster than a typical skiff, yet more stable than a recreational shell, the light (65 lbs) Annapolis Wherry from Chesapeake Light Craft offers healthy exercise and satisfying speed.
As this old oarsman supplied the propulsion for the wherry, a Piantedosi Row-Wing acted as the transmission. That wonderfully elegant “sliding seat” unit simply drops into the bilge, and off we go. The monorail rig works perfectly. There’s no slack or unwanted flexibility in its mechanicals; but, if we are dissatisfied with perfection, there are other options.
We can row this wherry from a fixed thwart. The oarlocks can be mounted on the gunwales or on short outriggers. Let’s raise the locks an inch or two so that the oars’ grips will clear our thighs during recovery. Those of us with stiff necks, who still like to see where we’re headed, might consider the forward-facing rigs available from Ron Rantilla Rowing Systems, 30 Cutler St. #207, Warren, RI 02885. These clever devices can be operated using just our arms, or just our legs, or we can employ all of our appendages. Our seats remain fixed in the boat, and we can see the path ahead without looking over our shoulders. Oarsmen who prefer to remain seated backward might simply affix a “Third Eye” cyclist’s mirror to their caps or sunglasses.
Photo by Chesapeake Light Craft
Sliding-seat rowing provides rigorous but smooth full-body exercise…gentle on our joints.
As the wherry’s appearance suggests, this is a glued lapstrake structure…but we’ll find a difference in assembly, a big difference. When creating conventional lapstrake hulls, experienced builders bevel the edges of the lapped planks to ensure a tight and even fit that gives strength and keeps out most of the water. The Annapolis Wherry goes together LapStitch fashion. This technique, developed by CLC, employs a CNC machine to cut the planks to shape and to work a constant 90-degree rabbet into the inside lower edge of each plank. Aren’t computers grand?
To assemble the hull, we’ll place the square edge of a plank into its neighbor’s rabbet and join everything with twisted wire ties (as in common stitch-and-glue construction). Then, using a plastic syringe containing epoxy filled with silica, we’ll fill the voids at each lap…no tricky compound bevels needed. Because the hull rests upside down while we work, gravity will be our reliable assistant. That great force of nature will cause the epoxy slurry to flow into all gaps.
Photo by Chesapeake Light Craft
LapStitch construction produces clean interiors with few frames.
These LapStitch hulls go together quickly. Compared to ordinary stitch-and-glue construction, we’ll need to do less sanding and grinding to achieve a smooth and fair surface. As with all lapstrake boats, the shadow lines cast at the laps accentuate sweet hull lines.
Fast and easily driven, the Annapolis Wherry makes a fine exercise machine for serious and casual athletes. In calm water, with the rowing position moved forward, this slender boat becomes the perfect vehicle for a romantic afternoon. Can there be a better way in which to court a young lady? Conversation falls into the rhythm of each stroke as the miles flow by. Good times.
The Wherry goes together LapStitch fashion. Rather than requiring the usual rolling bevels at the laps, this CLC technique employs right angle rabbets filled with epoxy (top, left). A Piantedosi Row-Wing sliding-seat (top) transmits the oarsman’s power to the hull and produces good speed. If ultimate simplicity is the target, we can build the wherry for fixed-seat rowing (middle). Easy hull lines (bottom) allow for quick building and fast rowing.
Plans for the Annapolis Wherry are available from Chesapeake Light Craft.
Is there a boat you’d like to know more about? Have you built one that you think other Small Boats Magazine readers would enjoy? Please email us!
I never saw Frank Prothero smile. He was a gruff, imposing figure with enormous beat-up hands who looked like he had strayed here from the 19th century. He was revered in Seattle’s wooden boat community for his lifelong career as a shipwright and, even beyond the respect due for his inestimable accomplishments, he had an air about him that commanded it. I used to see Frank back in the early 1980s when I was working for Joe Bucek and Land Washburn, owners of the Wooden Boat Shop in Seattle’s University District. I was in my late 20s and had built just a handful of boats and knew just enough about boatbuilding to mind the store.
Frank was then in his late 70s and had been building boats for over 50 years. It was in his blood. His ancestors in Wales had been building boats since the late 17th century, his great-grandfather immigrated to Seattle in 1870 and went into business building boats on the shores of Lake Union, and his grandfather, father, and brother were all shipwrights. Frank was in a retirement, of sorts, and was building himself a 65′ gaff-rigged topsail schooner in a floating boatshop on the south end of Lake Union. He had been working on it since 1965.
Frank would often come to the Wooden Boat Shop, always wearing a newsboy hat, a khaki shirt, and leather work boots with white crepe soles. I don’t recall ever speaking to him beyond a hello when he came in, or getting any more of a reply other than a nod. When he wandered the aisles looking at the wares, he had a habit of pressing his lips together tight in a straight line, turned neither up nor down at the corners of his mouth.
During one visit, he was browsing around the store while Joe was helping another customer come up with a fix for a leak between his boat’s keel and a garboard. Joe was well aware that Frank was within earshot, and when he had come to the end of his recommendation he turned to Frank and asked, “Does that sound about right, Frank?” I don’t recall that Frank even looked up, but he muttered, matter-of-factually, “I don’t give a good goddam what he does with his garboard.” I was thunderstruck; steeped as I was in Seattle politeness, I couldn’t imagine being that unbridled, and admired him all the more.
I could put Frank’s abrupt manner in a familiar context because my Massachusetts-born father had raised me on the Downeast humor of Marshall Dodge of Bert & I fame. His record albums were inhabited by lots of crusty New England old-timers. Dodge tells a story about Maine shipbuilder Harvey Gamage impressing the owner of a boat that needed a fix for a puzzling leak, at a garboard in fact. Gamage took one quick glance at the boat and gave him the simple solution to the problem. The customer asked, “How did you know just what to do?” and Gamage replied, “Goddammit man, I can’t understand all I know.” Frank was just such a character. Genius can be forgiven for the faults that often attend it.
Joe let me accompany him once on a visit to Frank’s shop. It sat on a 110′-long barge, and the schooner filled the cavernous shed built over it. I kept my eyes open and my mouth shut. As I recall, Joe told me that Frank started the project with the lofting—no model, no drawings, no offsets—he had all that in his head and just went straight to work with a batten. The hull was heavily timbered and immensely stout, and yet there were delicate carvings on the cabin cornerposts. The boat had already been 17 years abuilding and it was clear the Frank was not taking any shortcuts to finish the schooner in the years he had left in his life. Everything he did was a devotion to the best traditions of an era he had seen come to an end. He wasn’t just building a schooner, he was making a monument.
During the construction of the schooner, vandals had opened a faucet by Frank’s shop and left the water to pour into the barge. It went unnoticed for quite some time and eventually the barge listed heavily and the schooner fell over on its side. Frank pumped out the barge, righted the boat, and went right to work repairing the damage to the hull and resuming construction.
Christopher Cunningham
From lofting to launching took Frank 21 years. Here, with one hand on the boat’s cradle and the other on his hip, he takes a last look at the hull’s underbody.
He launched his schooner on a sunny day in July 1986. After working on it for over two decades, getting it afloat on Lake Union could have been a time for Frank to be beaming, but all the while his face was set in that tight-lipped impassive expression. He christened the schooner GLORY OF THE SEAS.
Christopher Cunningham
The launch of the schooner was done without fanfare. I suspect Frank may have been eager to be done with it so he could get back to work.
Frank wasn’t being vain about his work in the name he had chosen. It honored a 250′ three-masted clipper ship, GLORY OF THE SEAS, designed by Donald McKay, best known for his GREAT REPUBLIC, the largest full-rigged ship ever built in America and FLYING CLOUD, a record-setting clipper. GLORY OF THE SEAS was launched in 1869. She was the last and the finest of McKay’s clipper ships and sailed for 41 years before being stripped of her masts to serve as a cannery and cold storage. On May 13, 1923, she was run aground south of Seattle, at Brace Point, and burned for her iron and copper. Frank, then 18 years old, was there and took part in the salvage. He must have seen how beautiful a ship she was and regretted taking part in her ignoble demise.
Frank died on November 16, 1996, at the age of 91. Just the night before, he had been working on GLORY. As far as I know, he had never raised sail on GLORY, but that wasn’t his goal. His son, Bill, related how Frank felt about sailboats: “He used to say the only reason to take them out was to have an excuse to work on them when you get back.”
Christopher Cunningham
While I was looking into Frank’s background for this story, I happened upon the location of the grave where he and his wife were interred. The cemetery is along one of my regular bicycle routes and I’ve often ridden to it to pay a visit to the grave of my best friend’s mother. I had unknowingly passed by within a few yards of Frank’s grave many times.
GLORY remained afloat in Lake Union and for years, I often visited her when I kayaked around the lake. She was tied alongside a boat shed that could have protected her but for her masts, towering even though her topmasts were gone, so she remained out in the weather. The covering built over the deck was eventually in tatters. Her topside paint peeled, and a tangle of running rigging hung from the mastheads like cobwebs. The nameboard on her port bow couldn’t have been Frank’s work. GLORY OF THE SEAS was spelled out in plastic letters tacked on an unadorned board with the first S in SEAS upside down. Her condition worsened year by year, and then last year she disappeared.
Jeremy Snapp
After Frank passed away, GLORY languished at the south end of Lake Union.
Christopher Cunningham
I often visited GLORY when I went kayaking on Lake Union. She was hidden behind a row of floating boat sheds, out of sight, and seemingly forgotten.
Christopher Cunningham
The nameboard must have been a temporary one. It was hastily done and showed none of the care that Frank put into the trailboard (at left).
Several months ago, driving into Port Townsend, I caught a glimpse through the poplar trees along the road of a schooner propped up in a boatyard. It was GLORY. She had a gaping hole in the starboard side where the planks had been removed. Fragments of rotting frames had spilled out and littered the ground around her. A shipwright I spoke to there said that she was in need of a new owner, someone who had the skills and the finances to put her back to rights. A month ago, I went looking for her and she was gone again. A woman at the marina said she had been launched and was taken to Lopez Island.
Lark Dalton
Anchored off Lopez Island in Washington’s San Juan archipelago and under the care of a skilled boatbuilder, GLORY is finally getting some of the attention she deserves.
I tracked GLORY down and she’s now in the care of shipwright Jeremy Snapp and his son Trevor. I met Jeremy when I was living on Lopez Island in the early ’80s and was impressed with the caliber of his work. GLORY is in good hands, but she’ll need the support of a broad community to fund her restoration.
Lark Dalton
Frank had a hand in building hundreds of boats and GLORY OF THE SEAS, the last of them, is perhaps his finest.
Jeremy sent me the photograph above of GLORY at anchor just off the shore near his home and to see her looking shipshape again, freed from the confines of Lake Union, nearly brought me to tears. However gruff Frank might have seemed to me, this great beauty was always in his heart.
Mark Kaufman—a high-school woodworking teacher and collector of vintage runabouts—spent years looking for a classic runabout design to build that would complement his antique two-cylinder Mercury outboards. He had in mind something small enough to hum along with a 10- to 20-hp outboard and with a roadster-style cockpit to accommodate two. Kaufman knew that runabouts with hard chines could get tripped up during tight maneuvering and throw their pilots, so he wanted a boat with beveled—or “anti-trip”—chines. He found such a design while perusing a 1938 issue of Motor Boating magazine, which featured plans and building instruction for a boat designed by Bruce N. Crandall. The article, “Flyer—A Midget Runabout,” written by Crandall’s brother, Willard, stressed the 10′ Midget’s ease of construction, overall lightness, low cost, and ability to plane when powered by a 5- to 10-hp outboard.
Some 82 years later, these same attributes appealed to Kaufman, who opted to power his Midget with a 1950 Mercury KG7 Super 10 Hurricane—“the hotrod of the day,” he noted. “It’s a ball of fire.” In practice, the KG7 performs more like a 16- to 18-hp, which bumps up against Crandall’s maximum power recommendation of a 16 hp.
Donnie Mullen
The outboard is equipped with a yoke for steering. The arrangement of the steering cable and pulleys adds to the wheel’s mechanical advantage for a light touch with firm control. The plans called for spartan accommodations in the cockpit: just a plywood backrest and the floorboards for a seat. The cushions are a wise addition.
Crandall (1904–82), a naval architect, designed single-step hydroplanes, runabouts, utility boats, and sailboats. Many of his designs were published in Motor Boating, Sports Afield, Popular Science, and other magazines. During the late 1920s and early ’30s, he also co-owned—along with Willard and their father, Bruce V. Crandall—the Crandall Boat Co., where they designed and manufactured watercraft and sold plans for the do-it-yourself market. He continued designing boats until his death at age 77.
The Midget was a recreational version of Crandall’s 13′ Flyer—a class C racing runabout that also had beveled chines, as did many of Crandall’s designs even though they were uncommon at the time. The Midget is not believed to have been commercially produced. Kaufman obtained plans for the Midget Flyer from D.N. Goodchild, whose company sells reprints of the original 1938 plans.
Kaufman, who has taught high-school students how to build boats for more than 20 years and for a decade also was an instructor at WoodenBoat School in Brooklin, Maine, wanted to build his Midget Flyer using traditional lightweight batten-seam construction without any plywood, fiberglass, or epoxy. Solid wood planking would be screw-fastened to battens, which, in turn, would be fastened to internal frames.
Donnie Mullen
The boat’s controls are simple: a 14″ custom-built wheel, a deadman’s throttle, a tachometer, and a kill switch. The white fire extinguisher is close at hand just forward of the throttle.
Crandall specified mahogany, cedar, cypress, spruce, and white oak for planking, frames, transom, and battens. Kaufman opted for local hardwoods—sassafras, white oak, and paulownia—and held the cost of his wood down to $650 while keeping his Midget light in weight without sacrificing strength, durability, or decay resistance. He built the Midget in the woodshop where he teaches; the project took 18 months of his spare time.
Construction begins upside-down on a strongback with sawn ring frames constructed of lapped pieces for the bottom, sides, and deckbeams. The plans specified frames made from 5/8”-thick spruce or mahogany or 1/2″-thick white oak, but Kaufman went with sassafras, making the frames 9/16″ thick and the transom 5/8″ thick. Crandall had specified a transom rake of 12 degrees, but Kaufman, after determining that 15 degrees would provide a better angle for the outboard, added a motor block beveled to 3 degrees.
The keel is 3/4″ x 1-1/4″ white oak. The plans also call for 3/4″ x 1″ white oak for the full-length chines and 3/4″ x 1-1/4″ spruce or mahogany for the inner chines, which are faired with the chines just forward of station 2 and together create the angled anti-trip facet; he used 3/4″ x 1 1/4″ white oak for both. Kaufman originally used sassafras for the 1/2″ x 1-3/4″ battens, but it didn’t yield a smooth fair curve when steamed. He then tried paulownia, an exceedingly light Southeast Asian hardwood that now grows in Pennsylvania, which worked beautifully, and weighed less than half as much as white oak.
Donnie Mullen
“Auxiliary power” is provided by a paddle, used mostly for maneuvering around a launch ramp or a dock. The diminutive Midget Flyer offers good stability even while standing in the cockpit.
Kaufman also used paulownia for hull planks, taking advantage of the wood’s lightness to make them 7/16″ thick instead of the specified 5/16″ mahogany, cedar, cypress, or spruce. In a rare departure from traditional materials, he used 3M 5200 bedding compound to seal the plank seams. (The plans specify that seams below the waterline be filled with strips of cotton “flannelette” saturated in marine glue.)
Once the hull is right-side up, the cockpit coaming and transom knee are installed before the final two upper side planks are beveled and attached. The afterdeck is composed of six wide planks and a pair of narrow outer planks that run from the transom to station 3. Crandall called for the foredeck to be covered in light cotton cloth or balloon silk, tightened and sealed with airplane dope. Following the interior and exterior finish work, Kaufman used 2.7-oz aircraft Dacron, which he heat-treated and sealed with Randolph non-tautening nitrite clear dope.
Crandall’s article doesn’t mention the steering wheel, so Kaufman made a beautiful 14″-diameter one of brass and sassafras. He chose to mount the wheel amidships to maintain an even keel when driving solo.
Donnie Mullen
Here, builder Mark Kaufman sits amidships as he takes the helm solo. He’ll slide to port to bring a passenger along. The plans called for the wheel to be set to port, which works fine for boating with two, but awkward and unbalanced for going alone.
Kaufman used leftover planking stock for the floorboards and backrest, and he used the same wood for a seat, although no seat was mentioned or drawn by Crandall. The plans specify 1/4″ plywood for the backrest. For his backrest and seat, Kaufman fastened paulownia planks on sassafras cleats.
Crandall suggested installing 1/2″ aluminum half-round gunwales; Kaufman went with white oak 3/4″-thick tapered spray rails and 1/2″ x 7/8″ rubrails. The original plans also called for an aluminum fin for boaters wishing to travel over 20 mph, but for ease of trailering and to permit the Midget to be hauled ashore, Kaufman opted for a 3/4″ x 1 1/8″ white oak shoe keel that ends 18″ shy of the transom.
To get deck fittings with the classic look he desired, Kaufman fabricated his own. Instructions on how he made them are featured in his article, “Fillet Brazing for Custom Boat Hardware.”
Kaufman’s Midget Flyer weighs 130 lbs, just over Crandall’s estimate of 125 lbs. Kaufman chose a trailer with a center roller forward to support the forefoot of the keel. The Midget trailers, launches, and recovers “effortlessly,” according to Kaufman, who usually does this job by himself.
Alison Langley
A solo skipper can hit a top speed of 34 mph, a good clip made all the more exciting by the proximity to the water and rush of air over the bow.
When I piloted the Midget, I found that at low speed its trim is close to level; the bow rides up slightly, but not in an unsightly manner. With a touch of the throttle, it leapt to life and snapped on plane without delay. I thoroughly enjoyed the proximity to the water while piloting the Midget, an intimacy that reminded me of paddling. Kaufman said that his GPS clocked the Midget’s top speed at 34 mph with a solo driver. I piloted the boat in a few inches of chop and was at a speed of about 25–30 mph when I became aware of a transition from light chatter to pure glide; the hull felt as though it was floating, and the ride turned surprisingly smooth. “The best performance is in 3″ of chop,” Kaufman says, “you’re getting air under the boat.”
Several years back, I piloted a three-point hydroplane and never got comfortable with its airplane-like speed. In contrast, the Midget Flyer offers comfort and speed that do not disappoint but remain closer to the recreational side of the performance scale. You won’t lose your shirt, though your hat might blow off. The Midget doesn’t have a windshield, so be prepared to feel the wind.
“You’d kill the experience if you put on a windshield,” Kaufman told me (though he adds the caveat that the curvature of the deck pushes a fair bit of the airflow overhead). The wind and the proximity to the water combine to enliven the Midget’s ride, yet I felt at ease behind the wheel after a few preliminary runs.
The beveled chines and keel shoe stabilize turns and engender a sense of confidence—the Midget carves gracefully. The experienced driver will find that the Midget can remain on plane through playful banking maneuvers, though even Kaufman backs off the throttle for sharper turns, and high-speed turning requires a larger radius. In waves of 1′ or more or when crossing larger wakes, the Midget may porpoise as its shallow-V hull skims across the waves more than it cuts through them, but backing down the throttle will quickly return the pilot to comfort.
Alison Langley
The Flyer maintains level trim at almost any speed. The bow rises slightly as the boat jumps up on plane, but comes back down quickly. The deck is an unusual combination of planks aft and fabric forward.
Under rough conditions, Kaufman has also found that turning slightly and planting more of the hull’s forward V as well as one of the chines into the water can help stabilize the hull. Even in turbulent waters, the Midget offers a dry ride. Kaufman has only been doused once, when he was out on Long Lake, near Naples, Maine, in 2′ waves and even then, it was just the spray blowing off the crests. He also once went from full speed to a dead stop—he ran out of gas—and no water sloshed over the transom. For general use, he keeps trim ballast in the form of a gallon jug of water lodged under the foredeck centered near the bow, which helps to minimize porpoising. For high speeds, the bow ballast comes out and the cavitation plate on the outboard is placed parallel to the boat’s bottom. For routine use, the engine is tucked in about 2 degrees toward the transom.
The plans don’t call for any flotation, though Kaufman often carries a few boat cushions beneath the foredeck. Knowing that he would regularly fish from his Midget, he added a pair of vertical braces under the afterdeck to support its use as a seat.
While the cockpit was designed to accommodate two adults, the quarters are a bit tight when riding with a partner, and the driver will have to handle the centered wheel while sitting to the side. Getting on plane can require both to lean forward. Even so, the thrill of the ride sweeps away any inconveniences. With two aboard, the Midget’s top speed is 29 mph.
Donnie Mullen
An outboard rated around 16 hp is all that’s needed to get the the Midget Flyer moving at an exhilarating speed.
For Kaufman, the Midget “is as fun as it gets. I’ve got three powerboats, but with the Midget the fun factor is high and the hassle factor low.”
Donnie Mullen is a writer and photographer who lives in Camden, Maine, with his wife Erin and their three children.
Mark Kaufman wrote detailed instructions for building the Midget Flyer in WoodenBoat magazine, Nos. 275, 276, and 277.
Midget Flyer Particulars
[table]
Length/10′
Beam/45.5″
Beam of planing surface/38″
Maximum power/16 hp
Weight/125 lbs
Capacity/2 persons
[/table]
Plans for the Midget Flyer are available from D.N. Goodchild, who reprinted the article that originally appeared in the January 1938 edition of Motor Boating. Goodchild identifies the article as publication No. 5381, “A 10-ft. Midget Runabout”; see www.dngoodchild.com or phone 610–937–169.
Update: 8/13/21 D. N. Goodchild has had trouble with his website and is currently working to get it up and running.
Is there a boat you’d like to know more about? Have you built one that you think other Small Boats Magazine readers would enjoy? Please email us!
I was out rowing not long ago on a beautiful Vermont morning. There was no one but myself, a pair of loons, and a blue heron on the 900-acre pond, and the water so clear I could see small bass swimming in the weeds at the bottom. Above an unbroken shoreline of pines there was only blue sky and puffy white clouds. These are wonderful and fun times, and my Solo Packboat is what makes these moments possible.
Each 12′ Ultra-Light Solo Packboat is hand-crafted one at a time by the Martin brothers, Justin and Ian, of the Adirondack Guideboat Company (AGB) in North Ferrisburg, Vermont. It’s their latest innovation, inspired by the original cedar guideboats that have plied the lakes, rivers, and streams of New York State’s Adirondack Mountains since the middle of the 19th century, carrying sportsmen and their gear to places without roads. The boats needed to be tough for river bottoms, agile for streams, capable in whitecaps on windy lakes, large enough to carry plenty of cargo, and yet light enough to be portaged solo when needed. Although the Martins still build some boats from cedar, the majority are laid up with strong and light Kevlar hulls, with cherry gunwales and decks, and woven seats and backrests.
Photographs courtesy of the author
The flat bottom is wide enough to keep the Packboat upright on a beach.
The Packboats are beautiful to look at whether red, black, forest green, yellow, white, or, what I chose, deep burgundy. All come with especially made, fine-grained cherry or maple oars. The oars offer more speed than paddles and provide power and stability to handle whatever arises on the water. All the fittings on the boat are heavy brass: oarlocks and pins and the tow rings on the decks. Leather straps support the backrests and give unlimited adjustability for comfort whether on a long row or a short fishing outing. You sit deep in these boats, close to the water and stable. The bottoms are coated with a heavy abrasion-resistant coating to withstand pulling over gravel or inadvertently hitting rocks or oyster beds.
AGB modified the original guideboats not only by modernizing the construction materials, but also by making design changes to enhance performance and functionality. Over the years I’ve owned all three models of AGB’s boats: a 15′, 60-lb Adirondack Guideboat; a 14′, 80-lb Vermont Dory; and now, the 12′, 34-lb Solo Packboat. I bought the Packboat for one main reason: easier handling from storage to car to dock. As my father said to me when he was 90 years old: “If you want to keep going, Boy, you gotta keep adapting”! Now that I’m approaching 80, I know that was sound advice.
Adirondack Guideboat
Equipped with two optional seats, best suited for bringing a couple of kids along, this Packboat is decked out for fishing.
Of the three boats, I have to say that my Solo Packboat is turning out to be the most fun overall: it is shorter, lighter, narrower, and easier handling solo, on and off the water. While the other boats required a trailer-hitch T-bar extension to be carried in my pickup truck or SUV, the Packboat slides nicely in the back of either vehicle with only about 4′ protruding. I only have to lift one end of the boat onto the back of the car, and then lift the other end and slip it in. With two ropes to hold the boat down, I’m off. I can launch most anywhere from big-boat launch ramps to high-banked creeks and backwaters. A reasonably strong person can cartop this 34-lb boat but two people, of course, make the job easier.
The Packboat is wonderful on all kinds of water—calm ponds, blustery white-capped lakes, lively streams, and shallow backwaters—and takes the worry out of rowing it almost anywhere.
Entering the boat when it’s even just lightly grounded is easy. If the launch site is high-banked and the boat is fully afloat, it is a bit tricky getting in, but manageable. This gets easier with practice. I get out of the boat by using a “pull-up” rope I attached to the brass ring on the bow deck. I just pull myself up and step out. No trick to it, and it’s easy on the legs.
The author uses a rope to ease himself in and out of the boat.
Pulling away from shore is exhilarating—the boat is quick, runs true, and it almost seems to jump to the oar strokes. The Packboat gets up to speed pronto and holds its pace easily. Planting both oar blades deep and abruptly stops it quickly. The light weight, short length, and flat bottom give the Packboat exceptional agility. Pulling one oar and backing the other spins the boat around in place. To zigzag through tight turns, the boat responds immediately to light touches of one oar in the water, then the other. Just dipping a tip veers the bow right or left. It’s great fun. (My granddaughter is pretty good with the oars, too.)
The boat’s 34-lb weight makes it easy to handle and its draft of about 4″ lets it skim over the shallows.
On one outing, caught by a wind that picked up suddenly and soon had the waves white-capping in a shallow lake, the Packboat handled the conditions well, cutting nicely into the waves or riding over them. It was clearly livelier than my other AGB boats, but, as my confidence in the boat grew, this was truly enjoyable. The Packboat was really at ease in rough water, especially when rowed straight into it. When I wheeled the boat and headed downwind, it tracked nicely, and I did some thrilling surfing when a breaker rose astern. I turned the boat beam-to the waves and at first got a jolt of adrenaline as the Packboat rolled side-to-side; then, confident that it wouldn’t capsize (in 20 years I’ve never had an AGB boat capsize or even take on water, and it has flotation tanks on both ends), I let myself go with the rodeo and rowed on for quite a way, and soon got used to the jostling. When taking the waves on the quarter, the little boat really excelled, and the touch of an oar allowed me to position the boat to catch wave after wave and rush forward, with the water coming up inches from the gunwale and racing by alongside. The Packboat performed like a sports car!
The Packboat is easily driven under oars. For aggressive rowing, the seat back folds forward and down to provide space for a layback at the finish of the stroke.
On another outing, in a stronger wind that was blowing flags straight out, the boat rose to meet the greater challenge. It was a pretty nasty day and mine was the only boat on the water. As rough as it was, the Packboat didn’t take in spray from the front or the sides, so I didn’t get wet. There was no need to push things, so I headed back in pretty soon, but assured that the boat could handle it. My learning curve in rough (and really rough) stuff was steep, and I was soon completely confident in the Packboat. The handling was superb, even playful.
The 37-1/2″ beam of the Packboat makes it possible to use a kayak paddle when you want to travel stern first and see where you’re going.
While the Packboat is designed to be rowed, I’ve been surprised by how well it performs with a kayak paddle. From time to time, such as when I’m birdwatching in the swamps and rushes, I’d rather face the direction I’m going. Pushing both oars forward will do this, but the Packboat, with its narrow 37-1/2″ beam, takes well to being paddled like a kayak. Propelled by a double-bladed paddle, its quickness and agility again come through. I like to switch periodically from rowing to paddling—a change of pace, a rest for some muscles, and a good use of muscles otherwise not used. And, a kayak paddle makes it possible to thread through very tight spots on creeks and narrows. Of course, the Packboat takes well to a canoe paddle equally well. The adaptability to different forms of propulsion makes the boat nicely versatile.
The original Adirondack boats were built to haul multiple passengers and a week’s gear, and while the Solo Packboat is not capable of that, it’s not really tight on space either. When I was considering the switch to this boat, I was concerned that my 6′ 2″, 190-lb frame might not fit well, or might look awkward. That wasn’t so; the fit is definitely tighter, but not snug or the least bit restrictive. And its size hasn’t prevented me from heading out with the dog or a young grandkid, or lunch, or fishing gear, or even a guitar on calm rows. The Packboat is rated to carry 300 lbs, so it can carry me and another 100 lbs more.
The oars have the pinned locks traditionally used in Adirondack guideboats. They prevent feathering the blades on the recovery of a stroke, but hold them in a vertical orientation that’s good for letting the oars trail when the boat coasts.
My age-driven switch to a smaller and lighter boat was a good decision; getting the Solo Packboat was a great decision. I’ve found that the “grab-and-go” ability of the boat really does make a difference in how much I get out on the water. A quick row before lunch or after dinner is not only possible but also fulfilling. I definitely did give up space for others—full-grown passengers, that is—but then “others” didn’t very often want to come with me on my long two-hour rows in the backwaters or when the wind was up and the waves curling. Rowing in these close-to-the water boats on no one’s timeline but one’s own is a personal experience best appreciated alone. For me, it’s what rowing is all about: a calm mind, rhythmically active muscles, outdoors and on the water. The Solo Packboat is made for just that and more. And, if your partner ever begins to feel left on the shore too often, just get another Packboat. The Martin brothers might just deliver it to your door.
Mike Schmidt lives a cloistered life in the small town of New Smyrna Beach, Florida, near the mouth of the Indian River where it opens into the Atlantic. He rows lagoons, mangrove backwaters, and streams with birds and dolphins for company. Each spring, he and his wife move to the hills of Vermont to live in an old log cabin, surrounded by forest and overlooking a small trout pond. While in Vermont, he rows Lake Champlain, and its surrounding rivers and reservoirs and when not rowing, does sport shooting with a recurve bow and a shotgun, rides his bike, plays the guitar, works at playing golf, and, spends time with his grandkids.
Ultralight Solo Packboat Particulars
[table]
Length/12′
Weight/34 lbs
Beam/37.5″
Draft/~4″
[/table]
The 12′ Ultra-Light Solo Packboat is available from Adirondack Guideboat for $3,075, including cherry oars. Woven backrest $265. (Prices updated March 2022)
Is there a boat you’d like to know more about? Have you built one that you think other Small Boats Magazine readers would enjoy? Please email us!
It was July, and I was starting to feel claustrophobic. Surrounded by masked faces everywhere I went, switching sides of the street when I saw a neighbor coming, it seemed impossible to escape the pandemic. I yearned to be somewhere I could move freely without fearing human contact and breathe in cool clear air without restriction. The southern waters of the Salish Sea, which have drawn me back year after year, would be that somewhere. Its maze of narrow waterways doesn’t attract the boaters who crowd the San Juans and the Gulf Islands in the heart of the Salish, and offers many places so shallow that only small craft can travel there.
I trailered ROW BIRD, my 18′ Oughtred Arctic Tern, to Arcadia, a community of a dozen homes 11 miles north of Olympia, the state of Washington’s capitol. The concrete boat ramp there, usually busy with commercial shellfish boats equipped with dive gear and burly men in chest waders, was empty. Grateful for the solitude and the freedom to breathe, I felt surprisingly normal as I launched ROW BIRD. I set out late in the day, in that golden hour when the sun illuminates the water in long orange bands. With about three hours to make 5 nautical miles before dusk, and a steady sea breeze from the west rippling the water, I knew I’d make it handily to my first anchorage, Big Fishtrap, with time to spare.
Roger Siebert
.
Whenever I launch at Arcadia, I always head between the undeveloped shores of Hope and Squaxin islands. The former a state park, the latter a Native American holding, both give a glimpse into the past with their mature, or even old-growth, conifer forest and occasional cinnamon-barked madrone trees. The nearest houses and docks were three-quarters of a mile away and enough out of sight to provide the illusion of wilderness. I skirted the Squaxin Island shore and made the half-mile crossing of the southern entrance to Peale Passage, passed the slender end of Harstine Island, and did a second half-mile crossing of Dana Passage.
I reached Big Fishtrap as shadows from its western headland were cast across its opening. I paused for a moment to make sure I was in the right place. For years, even passing by only a hundred yards from shore in a rowboat, I had missed its narrow mouth, which had always been obscured by a sandbar. Then, on one occasion, I saw two native fishermen stretching a gillnet at the entrance and realized the salmon they were after must be going somewhere, so I rowed in through the 50-yard-wide gap in the shoreline. Inside, the mirror-smooth water reflected the tall cedar and fir trees. Beneath the boat, scads of lavender sand dollars were scattered about on a sandy bottom. Their presence was a sign that the tide never receded past this point. The inlet splits like a crescent, with one arm leading a quarter mile to the south, the other curving a half mile to the east.
Photographs by the author
From inside Big Fishtrap, I could look out past the sandbar toward the deeper waters of Dana Passage. No matter the weather outside, Fishtrap remains calm, and its shallow waters keep it from being crowded by larger boats.
Now, after just a single run and reach since the launch ramp, I headed toward the funnel-shaped entrance, gliding past the 42′ ferro-cement schooner PTERODACTYL moored at Fishtrap’s outer fringe. I tacked, aligning ROW BIRD with a dock and sandbar that mark the point where the entry channel narrows. A hundred or so feet offshore, I dropped my mainsail, furled the mizzen, and rowed through Fishtrap’s stream-like channel and into an utter calm and onward to a nook in the easterly arm. I set my anchor in 4′ of water, calculated that the tide would rise another 11’, and let out my rode. As I was unrolling my cockpit tent, a kayaker gliding by invited me to his house at the end of the east inlet for a cup of coffee and a shower in the morning, an unexpected and generous offer. A dog barked from a house tucked out of sight in the woods and a few crickets chirped nearby, otherwise the Fishtrap was absent of sound or motion. As the dark settled in, I felt smart and snug in this tiny anchorage, useless to so many bigger boats, but perfect for ROW BIRD’s shallow draft.
Inside Fishtrap, I pulled up my 9-pound Rocna anchor. An anchor that big may seem like overkill for a boat like ROW BIRD, but it provides me with peace of mind.
At first light I was ready to get underway. There was no sign of life at the kayaker’s house in the morning; I was too excited about going sailing to sit still over coffee anyway. I rowed out of Fishtrap at dawn into Dana Passage. A land breeze making the leaves of a shore-side tree flutter would push me eastward toward Nisqually Reach on the east side of Johnson Point, where I planned to meet up with my friend, Dan, at Zittel’s marina. The miles easily passed under ROW BIRD. I sat with mainsheet and tiller in one hand, a cup of hot tea in the other, passing vacation homes and enjoying watching the landscape broaden as I rounded the point and sailed into the wide-open reach.
The marina’s breakwater is a jumble of fractured concrete docks with yellowing grass growing out of the cracks and a raft of raw logs that look like splintered pick-up sticks. While people avoid the breakwater, harbor seals lie about there as if the place was made for them. As I arrived, a big trawler pulled in just ahead of me, and its wake rocked the breakwater, sending a dozen seals and pups scurrying into the water.
Dan investigates Baird Cove close to high tide. It dries to mud at low tide. His masts are down to make rowing easier.
It took me a moment to pick out Dan’s 19′ Ness Yawl, OTTER, among the jumble of masts, outbuildings, and covered docks. From a distance, I motioned him to follow me to the adjacent Baird Cove, a shallow inlet densely ringed with fir trees and nearly closed off by a muddy spit carpeted in lime-colored pickleweed. Dan rowed OTTER around a full circle taking in the landscape’s many shades of green. A bald eagle glided out from the woods, swooped down to the water, grabbed for a fish with a splash, but missed and alighted in a tree at the edge of the inlet.
“Where should we go?” Dan asked.
“Anywhere,” I said. “The wind is starting to fill in strong enough that we can buck any current the South Salish can dish up. How about visiting some mud?” That we’d “visit mud” was a foregone conclusion. Dan normally sails the northern waters where the shorelines are rocky. Here we’d find a lot of mud and a few patches of gravel.
After taking a break under mizzen alone, Dan raises OTTER’s mainsail as an afternoon breeze kicks up in Case Inlet.
We decided to aim for Dutcher Cove on the Key Peninsula side of Case Inlet, a snug anchorage where we could spend the night when the tide came up. With a 10-knot westerly wind, and little room for fetch to build up, we moved along briskly on a beam reach, sails full, but never strained. OTTER quickly took the lead. I fussed with sail trim and shifted my weight around, but ROW BIRD was outpaced.
OTTER is a foot longer than ROW BIRD, which, under a broad reach, makes her notably faster. Here Dan pilots OTTER near the lightly developed Key Peninsula.
The wind was steady so I cleated the mainsheet, leaned back in the cockpit, and enjoyed the breeze on my face and the motion of the boat beneath me. We had no schedule to adhere to; our transit of landmarks like McMicken and Herron islands marked the passage of time. Clouds rolled in from the west with the wind and, despite the season, I donned a ski cap and then my hood—the cool air a welcome respite from the 85-degree weather I’d left at home in Portland, Oregon.
Dan Murdoch
As we sail north past Herron Island, Case Inlet begins to narrow. An array of small harbors and inlets are perfect for shallow-draft boats. On a clear day, the snow-capped Olympic Mountains would be visible in the distance.
After nearly 7 miles of sailing since leaving the marina, we encountered the Herron Island ferry, the only boat we’d seen all day. Toy-like and bathtub shaped, it bumbled along, carrying just six or so cars on its deck, to the island a half mile from shore. Easily avoiding it, we continued sailing north as the wind grew.
By the time we reached Dutcher, which I had imagined would be an idyllic destination, the wind had shifted from westerly to southerly and waves were piling up on the beach. Dan hove-to, while I dropped the sails, pulled up my centerboard and rudder, and changed to oars to explore the shallows for a place we could pull ashore safely. I quickly ran aground on a mud bar, 20 yards from the beach, and had to shove off with an oar. Navigating around it, closer to shore, I stared up a long intertidal slope studded with rocks at the dry sand some 12’ above me. It would be hours until the tide would rise high enough for us to get into the cove or on to the beach. We had reached a dead end.
Rowing out to Dan, I noted a line where the wave-churned water changed color from stale coffee to a blackish blue. Once alongside, I shouted over the chop slapping our hulls, “Let’s go back to McMicken Island!”
Dan looked relieved. “Yes, let’s!”
Dan Murdoch
When conditions allow it, I like to stand while I sail. It gives me a different perspective on the landscape and water conditions, often better than sitting down. Here, I’m keeping an eye on an approaching motor vessel.
In the South Salish, the 5-mile stretch to the cove at the south end of McMicken would normally be a few hours under oars, with the occasional zephyr teasing us just enough to raise sail, then petering out a few minutes later. But with the day’s unusually steady breeze, we bounced along over wind waves, trading tacks, competing to see who would reach McMicken first. On this point of sail, the boats seemed evenly matched, and only our sail handling made the difference. I started out in the lead, but lost ground when I came too close to shore and dragged my centerboard on the bottom, slowing ROW BIRD to a crawl. When Dan tacked too far off shore, I cut close to the beach again, and gained a few boat lengths on him.
Dan arrived at McMicken Island State Park just after I did. The area around the island has shallow clean water making it a clamdigger’s delight, though we didn’t have licenses or a good low tide before dinner to take advantage of the intertidal foraging.
As I approached the cove between Harstine Island and McMicken Island, the wind was on ROW BIRD’s nose. It felt futile to tack further. Wanting to be first ashore, I switched to oars, keeping an eye on OTTER in the distance. A few minutes later, ROW BIRD’s bow hit McMicken’s pea-gravel beach with a crunch; Dan was still tacking a few hundred feet out.
Despite spending most of the day on the water, and the sight of inviting picnic tables in a nearby sheltered meadow, Dan and I unrolled our dinner bags on the gravel, leaned back on a sun-bleached log, and cooked on the deserted beach, wanting to savor the light on the water. A few dozen boats could have fit into the cove, but only two besides ours were at anchor a third of a mile away.
For daytime stops, we use elastic Anchor Buddies to keep the boats nearby, but afloat just off the shore. At this beach near Harstine Island State Park, we tied both boats together and used one Anchor Buddy off the aft end of ROW BIRD. A bow line with an anchor on OTTER keeps the boats accessible from the beach. Commercial shellfish boats are in the background.
As we ate, the slender quarter-mile-long sand and gravel tombolo that connects McMicken to Harstine Island was slowly engulfed by the rising tide, making McMicken an island of its own again. OTTER and ROW BIRD bobbed gently, a light breeze holding them on their tethers just off the beach.
Once at anchor, I always erect my cockpit tent before the damp marine layer sets in. Afterward, I write down in a waterproof notebook the tide and navigation details I’ll use the following day.
At dusk we hopped back aboard our boats. The wind was strong enough to blow us into the cove without the need for oars, and we set our anchors and ensconced ourselves in our tented boats. Listening to the water lapping on ROW BIRD’s hull made me feel as if I were still underway. I leaned back and filled out ROW BIRD’s log for the day: “Possibly the best South Salish sailing day, ever.”
A gray dawn crept slowly up on us. Like me, Dan is a fervent sketcher, and we spent a lazy morning back on McMicken’s stony beach making ink drawings in our sketchbooks. It’s easy to keep moving continuously on a cruise, but a voyage that includes time for drawing helps me remember the details of a place, like the cross-hatched, golden pattern of the salt grass that sits atop a knee-high slab of vertical mud just off the beach. Its dark-chocolate-colored surface was riven with cracks, like the bottom of a dry lakebed turned on its side. Tiny salt crystals had formed in joints of the grass blades.
Keeping a log is a great way to record conditions about places worth visiting again on future cruises. Dan and I also like to include sketches. On the beach at McMicken Island, Dan drew the scene in OTTER’s log.
When the sun broke through the clouds, the flag on my mizzen—ROW BIRD’s insignia, a green silhouette of a tern in flight against a white field—began to flutter. Never one to waste wind, Dan motioned me to wrap up my drawing and get going. I wanted Dan to experience the muddy, critter-rich, and sometimes smelly inlets that make the South Salish unique, so we set a course for Henderson Inlet’s western shore to explore Chapman and Woodard bays, a pair of half-mile-long serpentine inlets surrounded by a 900-acre wildlife preserve.
As Dan rowed past a mudflat near the mouth of Henderson Inlet, clams and other invertebrates squirted water from the mud, which helps them get oxygen until the tide returns.
Approaching Chapman Bay, we saw commercial shellfish farmers tending their crops along the banks of Henderson. Tall PVC pipes marked the edges of their plot while rows of larger pipes protected young clams. Workers carried wide-mouthed plastic baskets to gather those that had grown large enough for harvest.
In the distance, beyond the shoreside homes and private docks, evergreen trees dominated the uplands. A jumble of pilings and a crumbling pier nearly one-third mile long jutted across the mouth of the bay. The pier, now disconnected from land, is all that remains of a once bustling timber business where trains dumped their cargo of logs into the bay to be gathered into rafts, then towed by tugs to mills farther north.
We rowed along the pier. Overhead, thousands of barnacles clung to every inch of the pilings, clicking and bubbling as they waited out the low tide. Herons and gulls perched on the creosote-stained timbers. We noted a large box installed as a home for bats, hoping we’d be able to watch a cloud of them emerge at dusk.
After poking into Chapman’s winding channel, carefully watching for strainers formed by fallen cedar trees, we rowed as fast as we could to ram the boats high on a mucky beach near the head of the pier. Dan and I stared at each other, wondering who would step out first and how deep he’d sink. I secured a small anchor and rode to a cleat, then crept to ROW BIRD’s bow. Extending a tentative boot toe into the mud, I immediately smelled a puff of sulfur but, surprisingly, encountered a solid layer of silt an inch or two down. I let out rode, carefully minding my footing, and set the anchor near a log firmly lodged at the high-tide line.
Once secure, we left the boats to dry down with the falling tide while we explored the preserve by foot. Here in the peaceful dappled shade, the only sounds were the wind and the birds.
“What are all those gulls cawing about?” Dan asked.
I looked up to the treetops and saw dozens of nests. “Those aren’t gulls, they’re herons.” Then, scoping the birds with my binoculars, I noticed their dark, long necks and realized that we were both wrong. The ruckus and the nests belonged to hundreds of cormorants.
With OTTER, seen here, and ROW BIRD at anchor adjacent to the pier at Woodard Bay Natural Resources Conservation Area, we were concerned that our anchors and rodes might get fouled on old logging equipment or sunken wood. We were fortunate and had no problems.
As the sun began to set, we anchored between the cormorants on shore and a set of abandoned docks so packed with mother seals and their pups that they listed at the ends. But while the cormorants had settled quietly for the night, the seals squeaked, mewed, and barked until dawn. Although initially annoyed by their cacophony, I soon fell fast asleep.
At dawn on my final day with Dan, I was excited to get moving before it got too hot. Dan was content eating breakfast and watching the fog drift across Henderson Inlet.
The next day, Dan and I rowed north and parted company at the mouth of Henderson Inlet. He would return to Zittel’s then go back home and to work, but I had one more day and night out. I’ve often thought that I could spend my whole life poking into crevices and tiny bays throughout the Salish Sea and never see them all; so, on this final day of my escape, I decided to investigate a few more that I’d only seen on a chart.
I caught the last of the flood westward through Dana Passage following the mainland shore past Big Fishtrap, Little Fishtrap, and then into Zangle Cove which, disappointingly, was lined with houses and exposed to wakes from a swarm of fishermen jostling for salmon. The day was sunny and warm—gone was the cooling west wind from earlier in the week—and I broke a sweat as I rowed south around a series of points toward the village and marina in Boston Harbor. I hadn’t been there in years and wondered if I’d missed any of its charms, but seeing rows upon rows of houses and the crowded marina, I immediately decided that keeping away from people was my best course.
After a lunch break in the shade of tall confers at Frye Cove, I pulled out my binoculars to watch a pigeon guillemot diving for fish. I also scanned the mouth of the cove to ensure that a shoal wouldn’t block my exit as the tide dropped.
My chart marks tidelands in a muddy green, and I steered for these places, recognizing that they are often improperly charted and can make for great small-boat exploring. Taking a leisurely course, I wound into Eld Inlet, enjoying a lunch-and-birdwatching break in the welcome shade of the woods at a park at Frye Cove.
As the shadows lengthened and the number of boats on the water dwindled, I found myself about a mile from my take-out. Still eager to stay on the water, I sailed slowly past Arcadia into Hammersley Inlet, recalling from a previous trip that there was a question mark-shaped slough, Mill Creek, about 2 miles in. I changed back to oars just past low tide. The entry, right across the inlet from Libby Point was only about 100′ wide and just deep enough to row without scraping my blades on the bottom. I moved just far enough in to be invisible from the main inlet, turned ROW BIRD perpendicular to the flow of the tide, and set a bow and stern anchor. With a copse of trees standing atop mudflat to one side and a tree-clad cliff to the other, I was pleased to find myself in a natural cathedral, not far from homes that hogged the shoreline just out of sight, yet a world away. Here in the shallows, with a ceiling of stars and walls of tall trees, I finished working in my sketchbook, read, and felt completely at ease.
I drifted off to sleep before the turn of the high tide. In the middle of the night I awoke to find ROW BIRD perfectly still. Had I landed in the soft mud at low tide? Or was this stillness simply the absence of waves? I could have been concerned that I had misread the tide tables and would be stranded in the mud, waiting hours or days for a rising tide, but I didn’t bother to look and just rolled over. Stranded or not, there was no place I’d rather be.
Bruce Bateau, a regular contributor to Small Boats Magazine, sails and rows traditional boats with a modern twist in Portland, Oregon. His stories and adventures can be found at his web site, Terrapin Tales.
If you have an interesting story to tell about your adventures with a small boat, please email us a brief outline and a few photos.
Boats perform best floating at their designed waterlines. Many small sailing boats force you to sit at the tiller with your weight too far aft for proper trim, and the tiller can’t be reached if you want to sit to windward. If the bow is aimed at the sky, out of the water, you lose waterline length and sail slower. And it looks ugly. Even if the bow isn’t out, having the stern settle deeper can create lee helm, making the boat bear off in a puff of wind. With a tiller extension you are not forced to be an arm’s length from the tiller. Besides trimming the boat fore and aft, it also allows you to sit well to windward to balance the boat in a breeze. You can stand when looking for a landmark or the breeze. Racing-dinghy sailors call extensions hiking sticks, because hiking—getting crew weight to windward—is essential for speed.
If you have worked hard to make a nicely shaped wooden tiller, you don’t want it cluttered with plastic, stainless-steel, and aluminum hardware. I wanted to be connected to my classic Peter Culler designed Good Little Skiff’s tiller with a nice bit of wood. I also wanted to be able to take the extension off quickly and leave the tiller with nothing more than a small, unobtrusive hole.
I’ve tried simple extensions made with just a vertical bolt connecting them on top of the tiller. They tend to bind up and can’t be lifted for sailing while standing up. A common universal joint, with double U-shaped fittings, solves this problem but spoils the look of the tiller and isn’t easily made in the home woodworking shop.
Ben Fuller
The author’s collection of tillers and extensions includes, from left to right: a bamboo extension with a black seine-twine Turk’s head at the end and a thick braided cord connection to the tiller, a PVC pipe with colorful hi-tech 3mm cord, and an extension made from a repurposed tiller with sticky #60 seine twine and a piece of copper pipe to prevent splitting. The pipe is longer than it needs be—maybe 1″ would do.
The now-common commercial extensions with rubber joints have a full range of motion and some are removable, leaving only a small fitting on the tiller and in the extension, but they are made for extensions made from a tube: aluminum, carbon fiber, or a cheap piece of PVC. Functional all, but none belong next to my nice bit of wood.
For years I’ve been using extensions made of bamboo from an old bamboo cross-country ski pole. I cut just below a node, drill down the center past a couple of diaphragms, then drill a hole through one side just above the second node, and run a bit of line through. The cord has a stopper knot or a lashing to hold it in the pole and emerges from the hole in the pole end before going through the tiller’s hole to be lashed or stopper-knotted at the tiller. The cord gives me the same range of motion as the fancy rubber fittings.
Bamboo ski poles are getting harder to find, even here in the north country, so when I decided to make an extension for my Good Little Skiff’s tiller, I’d have to use a piece of wood. I decided upon an old ash tiller that had an end broken off but was too nice to toss out. To keep the cord from splitting the end with the hole I’d drill in it, I fit a short piece of 1″ I. D. copper pipe to the end of the extension. The ring of pipe is run up the extension far enough to have enough wood sticking out to be rounded over and keep the metal from damaging the varnished tiller. I drilled a 3/16″ hole down the center beyond the ring and a cross hole for the chord to run out and be knotted.
The connecting line can be anything of the right size with a bit of stretch. I used some tarred #60 nylon marline, but leech line or some of the now common 2mm or 3mm braided cord can work as well. Thicker cord can be used, but is harder to get tight. I clove-hitched it onto the extension where it emerged, then ran it through a vertical hole on the tiller. I pulled it very tight with a couple of frapping turns, then clove-hitched it to the tiller.
David Cockey
The author’s Pete Culler-designed Good Little Skiff is very sensitive to the weight it carries. This tiller extension, with seine twine as its joint, lets him sit on the center thwart.
The cord-connected extension works splendidly. It lets me sit on the center seat of the skiff for perfect fore-and-aft trim. The cord, lashed nice and tight to the tiller, has no slop. And this simple shop project let me recycle an old tiller that had had lots of miles and memories. You may already have the bits need for an extension, waiting to get you where you belong in your boat.
Ben Fuller, curator of the Penobscot Marine Museum in Searsport, Maine, has been messing about in small boats for a very long time. He is owned by a dozen or more boats ranging from an International Canoe to a faering.
You can share your tips and tricks of the trade with other Small Boats Magazine readers by sending us an email.
We have restored small boats for decades and for fiberglass repairs often used WEST System 105 Epoxy Resin with 206 Slow Hardener. During our 2013 restoration of our 1953 wooden Sunfish ZIP we decided to finish the fir plywood hull bright, and our marine carpenter friend Keith suggested WEST System 207 Special Clear Hardener. We tried it and have been very pleased with the results, even seven years later.
Photographs by the authors
We used the 207 Special Clear Hardener and 105 Resin on our old plywood Sunfish. The 207 doesn’t yellow like the other hardeners do. The two coats we applied in 2013 gave the boat lots of shine, and since it does not spend a lot of time in the sun, we skipped the UV varnish. It epoxy coating looked good for 7 years and I only sanded the boat down when I needed to apply a patch under the starboard splashboard. The old application of epoxy sanded easy and two new coats had the Sunfish looking grand again.
Keith had used the 105 resin with the 207 hardener for years on the interior finish of several high-end yachts for an epoxy mix that is easy to apply and provides a tough, glossy finish. The key feature of 207 is that it does not turn amber like the 205 Fast, 206 Slow, and 209 Ultra Slow hardeners. It includes a UV inhibitor, so if the cured epoxy finish does not get extended exposure to ultraviolet rays, there is no need to add additional protective coats of UV varnish. That sounded like a time-saver to us, as ZIP is stored indoors or covered when not in use. WEST System 207 is odorless and does not turn cloudy or blush in hot, humid conditions, which is pretty much every day here in Florida.
One of the big benefits of the epoxy coatings we’ve used is they have stopped the checking of plywood without requiring fiberglass sheathing. We applied 207 to the fir plywood deck of ZIP in 2013, and there has been no checking since then. At the same time, we had repainted the bottom, without first coating the plywood with epoxy, and that plywood has checked. The WEST System 105 resin with 205 Fast Hardener that we applied to our Penobscot 14 in 2016 has also prevented checking on the BS1088 okoume plywood.
WEST System’s technical support team confirmed our observation that a couple of coats of resin with any of the hardeners is a good strategy when working with plywood, with 207 being the best choice for a bright finish. Like the other WEST System hardeners, 207 with 105 resin can also serve as a structural adhesive for construction, fairing, and repair, though WEST notes it is not as economical nor as well suited to thickeners as the other hardeners.
For a smooth coat, the 105/207 epoxy can be applied with a roller and tipped smooth with a brush. The available pumps dispense the resin and hardener quickly and without making a mess.
The mix ratio for 207 is three parts resin to one part hardener (209 is also 3:1; 205 and 206 are 5:1), so we bought the WEST pump kit that dispenses the correct amount without the fuss of measuring. Application as a coating is straightforward. We used the WEST System 800 roller cover to avoid the shedding and disintegration that we have experienced with other roller covers. Thin applications of two coats are best to prevent runs and sags, and the second coat can be applied without rinsing as there is no amine blush. The 105/207 mix is not as thin as that with the slow-curing hardeners, and that helps to eliminate runs. The subsequent coat can also be applied without sanding as long as the first coat has not fully cured (generally, within 10 to 15 hours).
While 207 costs more than the other hardeners, the time savings far outweigh that cost. No rinsing or sanding, it is easy to use, and we can get the beautiful finish that our boats deserve, faster.
Audrey and Kent Lewis enjoy messing about in their small armada of boats in the coastal waters of Northwest Florida. Their boats’ adventures are chronicled in their blog, Small Boat Restoration.
The WEST System 207 Special Clear Hardener is available from a wide range of marine and hardware stores. A 10.6 oz can retails for about $50.
Is there a product that might be useful for boatbuilding, cruising, or shore-side camping that you’d like us to review? Please email your suggestions.
Where land and water meet there is often mud, and those of us using small boats likely have to take it into account when we’re cruising. Mud can be messy at best, a barrier or a trap at worst. On the Ohio River, a short span of mud between dry ground and my boat actually pulled the boots and socks right off my feet.
In the October 2017 issue, I wrote about mud pattens, squares of wood I can tie to my boots to keep me from sinking deep into soft mud. They’ve worked well for me in several intertidal mud flats, though I have to walk with my legs splayed and I did encounter one river mouth that had mud so sticky I had to turn back.
Straps hold the Mudders to the boots. The rubber deck shoe here is size 13. My size-14 rubber boots fit too.
I recently had the opportunity to try a pair of Mudder Boots, a product that takes a different approach to keeping on top of mud. Instead of using large, rigid panels, the Mudders are made of flexible plastic and expand only when the wearer steps into soft mud. On solid ground, the wings are tucked tight to the sides of your feet and have a width of only 8”, not enough to be awkward to walk in. In the mud, the wings flare to a width of about 14″. The manufacturer pegs the surface area of the expanded Mudder at 180 square inches. That’s more than the 144 square inches of my 12″ x 12″ pattens and almost as much as the 196 square inches of my 14″ x 14″ pattens.
The Mudders come in a single, one-size-fits-all version, and each weighs 2.35 lbs. A pair of straps with easily adjustable ladder-lock buckles cinch over the instep and the ball of the foot for a snug fit. The recess is just wide enough for my size-14 rubber boots with thick soles, and a good fit for my size-13 slip-on deck shoes.
With a patten, it’s essential to have the ball of your foot close to its front edge. At the end of your stride, the toe pushes down into the mud while the heel pulls the patten up, prying it out. If your whole foot is on the patten, you’re only trying to lift the patten free, which may not overcome the suction and, while you’re trying to pull up with the back foot, you’re only pushing the front foot deeper. With the Mudders, I have a few inches of my toe extending beyond the front, so I do get some prying action to pull them free, but they don’t rely on that alone. The extension at the heel is cut higher than the wings, and at the end of the stride, it will let air in under the sole. The wings also retract as you take the weight off, lessening the surface area in contact with the mud and pulling air in from the heel.
Photographs by the author
With just my deck shoes and waterproof socks on, I sank down to mid shin and could barely pull a foot out without losing a shoe.
I recently came ashore in a cove where there was some very soft, sticky mud. I could barely walk in it with my deck shoes without losing them, and each step took an effort that threatened to pull me over. With the Mudders on, the mud slowed me down, as I expected, but not nearly as much as going without them. I made steady progress without having to tug the back foot free. The wings fanned out as they’re meant to and brought the sinking to a stop.
In the same patch of mud, the Mudders kept me close to the surface. Here I have my weight on my left foot and the wings have spread outward.
An unexpected bonus was being able to walk comfortably on sand and hard ground without the awkwardness of pattens. The tread on the bottom provided a good grip on a steep grassy slope I climbed to leave the mud for high ground. Traversing the slope gave me my only complaint about the Mudders: the high sides pressed hard against the sides of my legs just above my ankles.
The sole’s pronounced ridges provide good traction, and their wide spacing makes it easy to scrape out sticky mud. The wings, here relaxed and close in, have curved edges that make them flare when pressed into soft ground.
When I was done tromping around in the mud, I waded a bit in water over a firm gravelly bottom to clean the Mudders. When I took them off, there was still a lot of mud on the soles. The mud I’d been walking in was so thick and sticky that I had to scrape it away with a stick (it was a wonder I could walk in it). The treads have plenty of space between the ridges, so with a bit of work I could get them clean.
If your boating takes you to areas of mud and soft ground, Mudders will give you the ability to move freely and explore places you’ve always avoided.
Christopher Cunningham is the editor of Small Boats Magazine and thanks reader Dallen Bounds for the suggestion and the loan of the Mudders.
Mudder Boots are available direct from the manufacturer for $144 per pair.
Is there a product that might be useful for boatbuilding, cruising, or shore-side camping that you’d like us to review? Please email your suggestions.
When it comes to woodworking and boatbuilding, Joe Lanni, a middle-school art teacher in north-central New Jersey, considered himself a “true novice,” defining that as “someone who does not have an expertise in woodworking or any related field nor a woodshop at home filled with all sorts of tools.” As a child, Joe did get a bit of experience helping his father do carpentry projects around the house, and while he had tools in his hands, he didn’t get to use them—he just held them for his father—and he “learned how to get yelled at and learned many words that I am not allowed to write.”
“I have always loved boats,” Joe says. “I’ve really admired wooden boats and dreamed about actually building my own.” Anyone who has built a boat, no matter their experience, knows that it starts with a dream, and as Pete Culler writes, “experience starts when you begin, and not one jot before. Start. Start anything, and the experience comes.” In spite of his lack of tools, a workshop space, woodworking skills, and even his own uncertainty, Joe did just that. He started.
Photographs courtesy of the Lanni family
With construction nearly complete, Joe’s Toter 2 is ready for paint. The back porch railing is ready for paint too, and the deck needs stain, but they’ll have to wait.
Joe began his project with a search for plans for a small, easily portable, and stable boat. “I looked at many, many plans. There are thousands out there.” A handful of phrases drew his attention—Easy to Build, Few Tools Required, For the Novice—though the boats making those claims covered such a wide range, from dories, prams, sailboats, and canoes to kayaks, that they didn’t help refine his search. Many of the web pages he browsed claimed their boats were “stable” and “safe,” making him wonder who would advertise their boats as unstable and unsafe.
The plans offered plenty of leeway in building the Toter. The sheer and the chines could be straight in each section or curved from stem to stern.
Joe’s internet search led him to Portable Boat Plans of Arizona (PBPA). The 44 boats there are all designed by Ken Simpson, a retired mechanical engineer who once worked on the navigational systems for Apollo spacecraft and later developed micro-switches for computers. He also designed and built a VW-engine-powered amphibious vehicle, a hovercraft, and an airboat. Most PBPA boats are built of plywood, but a few are made of Coroplast corrugated plastic sheet. Several are folding or nesting sectional boats. Some have simple curves, others are composed of straight panels joined at angles.
When Joe is traveling light, he can fit the boat in the back of his Subaru Outback.
Joe’s other way to carry the sectional is to secure it to a trailer-hitch cargo carrier.
Joe got in touch with Ken, expressed his interest in building a PBPA boat, and received a sample plan in return so he could evaluate the instructions. “There were step-by-step color pictures,” Joe noted. “That sold me immediately. And there were mostly straight cuts required, a big plus.” He ordered the plans for the Toter 2, an 8′ three-piece nesting runabout for trolling motor, oars, and sail.
Out for an early sea trial, the Toter’s sections are held together with clamps.
Joe appreciated the relaxed attitude presented in the plans: “One of the most appealing features was the built-in ability to personalize and customize the boat. I don’t know if Ken meant it the way I read it, but to me it meant adjust, ad-lib, and keep going when you make a mistake, which is inevitable if you are a true novice.”
Now equipped with oarlocks, a rudder, and her ensign, 3’S A CROWD is ready for adventure.
Joe bought the plans, 38 pages in PDF format, right around the time that the Covid-19 pandemic hit. He was able to work from home during the pandemic stay-home order, and had extra free time that he could fill with projects. There were some household tasks that needed doing; his wife asked him to “work on the deck,” meaning stain the deck and paint the railing. Ken took a broader interpretation of the request and decided that building a boat on the deck qualified as “working on the deck.”
To make his lugsail, Joe cut the top off a jib-headed sail, slipped the yard through the luff sleeve and stretched the leech out, loose-footed, along the boom.
Ken spent two months at home during the first stages of the pandemic’s social distancing and at the end of that period he had a fully functional boat ready to launch on the lake not far from his house. Taken apart and nested for transport, it had a footprint just 37″ square, small enough to fit in the back of his Subaru Outback wagon. He christened the boat 3’S A CROWD, which serves as a name as well as a capacity rating.
With a leeboard slipped over the gunwale, 3’S A CROWD is ready for windward sailing
While Joe is justifiably pleased with his accomplishment, there is a downside to his success. Now that his boat is finished, he’ll have to give up his status as a true novice. And he’ll have to revisit his obligation to “work on the deck.”
Do you have a boat with an interesting story? Please email us. We’d like to hear about it and share it with other Small Boats Magazine readers.
Boats don’t always need to have pointy forward ends. Here we have two easily built, square-ended workhorses that will handle all sorts of waterfront chores—and look just fine while they’re about it. Designed by Maine boatbuilder Doug Hylan, the 15′ 9″ and 19′ 0″ Ben Garveys will earn their wages.
Photo by Benjamin Mendlowitz
Designer-builder Doug Hylan and his daughter head out across the Benjamin River in his Ben Garvey. The stable boat is easily built with plywood and epoxy, and requires only modest power.
During the 19th century, garveys evolved as modified scows (square-ended boats) on the paper-thin waters of southern New Jersey’s coastal lagoons and bays. Because these boats were meant to be rowed and/or sailed, their flat bottoms curved upward back aft to clear their runs and make for easier propulsion at low speeds and/or while carrying heavy loads. The hulls’ sides flared outward, almost in dory fashion. In all, these early garveys showed considerable shape; they were mighty handsome, as scows go.
By the middle of the 20th century, garveys had changed to accept the substantial, predictable, and noisy power supplied by internal-combustion engines (inboard and outboard). The newer boats generally showed more breadth than their ancestors, and their bottoms ran aftalmost in straight lines to the sterns. This configuration allowed them to “plane” readily—that is, to skip across the water like shingles at relatively high speeds. Their bow transoms had disappeared, and the hulls’ bottoms swept up forward all the way to the rails at deck level.
While drawing the Ben Garveys, designer Hylan looked to the future and to the past. He specified modern, perpetually leak-free plywood-and-epoxy construction; but he resurrected the bow transoms, greater flare, and stronger sheer (profile curve to the upper edges of the hulls’ sides) of the old boats.
Photo by Doug Hylan
This Ben Garvey has its outboard motor mounted in an inboard well. Designer Hylan lobbies against building that well for general use as it reduces the boat’s efficiency, occupies space, and adds construction time.
Unlike many garveys, Hylan’s boats show some deadrise (V-shape) to their bottoms, and that deadrise increases as the bottoms sweep forward in gentle curves to meet the bow transoms. Deadrise adds complexity, but it gives advantages in structure and performance. For similar hulls with comparable scantlings (dimensions of structural members), V-bottomed boats tend to be more rigid than their flat-bottomed cousins. A V-bottomed hull likely will provide a smoother ride in a moderate chop and more predictable handling at speed.
A few years back, I borrowed a Ben Garvey in order to scoot across the Benjamin River for a visit with a large ketch. The spring tide was running close to high on a full moon, which allowed the fading sea breeze to push onefoot-tall waves across the bar near the river’s mouth. Riding on an easy plane, little Ben worked smoothly through this harbor chop and left behind only a barely perceptible wake. As we turned to circle the big sailboat at a respectful distance, the light garvey banked like a wellpiloted aircraft and went where she was pointed. Her ancestors were not always so well behaved. They pounded when traveling fast across anything taller than a ripple, and their flat bottoms often skidded through highspeed turns. If driven too fast with the tillers hard over, they sometimes “tripped” (capsized rapidly toward the outside of the turn). Compared to the old boats, the Ben Garvey’s handling is comfortably predictable and reassuring.
Photo by Bill Thomas
“They can perform every manner of waterfront task with easy competence and honest grace.”
Doesn’t that forward transom slap and pound? Well, yes, if we push too hard and fast into steep and tall waves. Ben is no press-on-regardless ocean racer, but with the throttle eased she’ll punch along well enough. We should note that even the pointiest of pointy-bowed boats of this length, no matter their design, cannot blast to windward in all weather. When running off (that is, traveling in the same direction as wind and waves), a course that causes some pointy-bowed boats to root and otherwise act up, Ben’s manners are impeccable. In fact, Ben’s square front-end offers some advantages. It gives the spunky little boat greater stability and volume. Many a dockside capsize occurs when someone stands tall on the short foredeck of a lightly loaded, pointy nosed skiff. The hull’s sharp and narrow forefoot sinks deep into the water, and its after end lifts clear of the water. The resulting geometry is obvious, and inversion is close to inevitable. With Ben’s greater bearing and buoyancy forward, she will tolerate our exiting over the bow. If we run her up to a sandy beach head-first, the broad overhanging bow will let us step ashore dry-shod.
Photo by Bill Thomas
Denny Robertson, a Maine waterman, built a house way aft on his 19′ Big Ben Garvey. The boat ferries people and supplies to an island camp in Blue Hill Bay.
We’ll build the Ben Garvey using plywood planking, epoxy-fiberglass taped seams, plywood bulkheads, and traditional structure (such as quarter knees, which connect the sides and transom). The hull goes together upside down over temporary molds on a ladder frame. This project offers an education to beginners or will go together quickly with experienced hands. In either case, the results should be light, strong, and tight. Unlike traditional plank-on-frame boats, a Ben Garvey will live happily on her trailer. She won’t leak when first put in the water or suffer structural damage if driven hard too soon after launching. Should the worst happen, built-in flotation compartments will keep the expensive motor’s head above the water.
As the drawings suggest, little Ben’s layout is plain as can be. We’ll steer from the stern seat by grabbing hold of the motor’s tiller—simple, direct, inexpensive. For Big Ben, the plans tell us to build a console amidships, which we’ll rig with remote controls and perhaps some electronic navigation paraphernalia.
Photo by Mike O'Connell
Mike O’Connell built this center-console Big Ben. The husky boat earns its keep by assisting rowing crews near Pittsburgh and working for the local Riverkeepers.
To ensure reliable power and to reduce pollution, we’ll hang a four-stroke outboard motor on the transom of our Ben Garvey. Designer Hylan suggests a 15-hp to 35-hp engine for little Ben and 25–85 hp for Big Ben. Talking about the larger boat, he adds: “Unless frequent heavy load is anticipated, 40 hp will be adequate.” The plans for the smaller garvey show a motorwell option, which would allow us to install our outboard motor inboard. But Ben’s creator lobbies against our building that well:
“For general use, this version is not recommended as it reduces planing efficiency, has less usable space and allowable capacity, and is more difficult to build.”
Boats that are similar to each other tend to increase in “size” approximately as the cube of their lengths. Big Ben, at 19′ 6′ 11″, is not simply 3′ 3″ longer than the 15′ 9″ 5′ 7″ Ben. Indeed, she is huge by comparison. Denny Robertson, a Maine coast waterman, made good use of that extra volume and capacity by building a small house way aft on his 19-footer, BERT FRIEND. Powered by a 90-hp Johnson outboard motor, that boat carries supplies and gear, including small vehicles, to an island camp in Blue Hill Bay. Another Big Ben tends to the needs of rowing crews near Pittsburgh and works for the local Riverkeepers.
Built as drawn, these Ben Garveys are tough boats that will be at home in almost any harbor. Boatyard chores, harbor ferrying, recreational fishing, entry-level lobstering or shellfish harvesting…. They can perform every manner of waterfront task with easy competence and honest grace.
Ready to Build Your Own Ben Garvey?
The Ben Garvey design is easily built with plywood and epoxy, and requires only modest power. Review our study guide for the Ben Garveys, then find plans for the 15′9″ and 19′ designs at the WoodenBoat Store.
Ben Garvey Particulars
[table]
LOA: 15’9″
LWL: 11’9″
Beam: 5’7″
Draft: 4″
Displacement: 460lbs
Power: 15-35hp
[/table]
The Ben Garvey
Big Ben Garvey Particulars
[table]
LOA: 19′
LWL: 14’3″
Beam: 6’11”
Draft: 6″
Displacement: 810lbs
Power: 25-85hp
[/table]
The Big Ben Garvey
Plans for the Ben Garvey and Big Ben are available at The WoodenBoat Store
Is there a boat you’d like to know more about? Have you built one that you think other Small Boats Magazine readers would enjoy? Please email us!
Here’s a flat-bottomed sharpie ketch that we can build in the backyard. This shoal-draft boat will sail on the morning dew, right itself after a knockdown, and leave most deep-keel cruisers in its wake.
Photo by NIS Boats
The sheet-plywood Norwalk Islands Sharpie (above and opposite) can easily be built in the backyard, yet it outperforms more expensive yachts. Its simple cat-ketch rig needs no standing rigging (wire shrouds and stays that support the masts). The outboard-motor lifts into its own house when idle—no ugly mounting bracket, no hydrodynamic drag.
More than two decades back down the road, I visited with designer Bruce Kirby at his Rowayton, Connecticut, office. A crackerjack sailor, he was best known for his design work for the Canadian AMERICA’s Cup challenger and for having created the Laser, a sophisticated 14′ singlehander that revolutionized sailboat marketing in the 1970s.
I found the talented designer of high-tech sailboats hunched over the drawings for a simple sharpie that was to become the Norwalk Islands 26. He was excited about the design—with, history now suggests, ample justification. The easily built ketch sails fast on all points, offers reasonable cruising accommodations, and can handle rough water.
Photo by NIS Boats
Sailing wing-’n-wing off the wind—no need for a spinnaker here.
Kirby drew a handy cat-ketch rig to power the NIS 26—no labor-intensive overlapping headsails or tiny, impotent mainsails here. Full-length battens support considerable roach, that is, curve to the leech (trailing edge) of each sail. This allows more sail to be carried on spars of a given length, and it provides a more efficient sail shape. As an additional benefit, these sails are quiet. They don’t flog wildly when luffing. But we need to pay attention, as fully battened sails won’t telegraph word of improper trim in the immediate manner of unsupported sailcloth.
This is a controllable rig. We can fuss with the tension and taper of the battens to alter sail shape. We can back the mizzen to stop the boat or put it into a slip. A word of caution: unless we actively control fully battened sails, they tend to keep sailing. Simply releasing the sheets won’t quickly stop the boat. We should remember this as we approach the dock, lest we come to rest in the parking lot.
The original NIS 26 rig measured 302 sq ft. After sailing the prototype, the designer increased the area to 340 sq ft. He also has changed from aluminum masts to sticks made from carbon fiber. The greater heeling effect of the larger sails seems to be offset by the lighter weight and greater flexibility in the upper portions of the tapered, thin-wall masts. In strong winds the masts bend, thus relieving tension on the upper leeches.
Photo by NIS Boats
With a draft of only 10″, the Norwalk Islands 26 can sail through marshes.
Robert Ayliffe, who sails and sells Norwalk Islands Sharpies from his base in Australia, recently devised a nifty tabernacle that makes raising and lowering the sharpie’s masts a casual singlehanded operation. The boats now will get underway quickly from their trailers, and we’ll have ready access to bridge-blocked water. Given a 10″-deep stream no wider than your driveway, we can sneak our NIS 26 into it…to hide from a hurricane or simply to get away from the crowd. Plans for the NIS 26 describe both a two-berth interior and a “sleeps-four” production-boat layout that carries a double V-berth forward and two quarter berths in the main cabin. The centerboard trunk is tall, which allows it to house the required board. (A sharpie will not go well to windward without a centerboard of substantial area.) Much of this trunk resides innocuously below the sole of the self-bailing cockpit. The aftermost berths in both accommodation plans offer sumptuous seating in the main cabin, and we’ll make good use of the exposed portion of the trunk by hanging a dropleaf table from it.
Both plans show “enclosed” heads, but you should understand that we won’t find anything resembling true privacy aboard a 26′ sailboat.
Photo by NIS Boats
Bring the boat right up to almost any shore.
The outboard motor, which provides auxiliary power, resides out of sight in its own house way aft. When not in use, the engine lifts vertically. We’ll not need to worry about dragging the propeller around the bay while we’re sailing, and we’ll have fewer concerns about corrosion of expensive machinery when we’re at the mooring.
All of this seems fine…but how, you might ask, can a sailboat that has no deep keel and that floats in only 10″ of water right itself? Here are some design rules to follow if you want a shoal-draft sharpie to pop up reliably from knockdowns and inversions: Draw the combined hull-house structure rather tall (say, at least 4′ for a 26′ boat). Keep the width on deck to an acceptable minimum so that the boat won’t become stable in an upside-down position. For the same reason, a strongly crowned housetop and/or deck will help (acting as a “round bottom” when the boat is inverted and providing plenty of volume where it’s needed). Concentrate structural weight low— make the bottom brutally heavy, as it will provide secure ballast as well as protection during hard groundings. To keep the center of gravity low, spread well-secured inside ballast in the bilge (do not pile it up against the centerboard trunk). Build the cockpit small, and be certain that it is self-bailing. Locate hatches near, or on, the boat’s centerline. Make the rig low and light. Last, be certain that everything is strong and tight. Yes, extremely shoaldraft boats really can right themselves without violating any laws of physics.
Photo by NIS Boats
The brilliant performance of EXIT 12, designer Bruce Kirby’s prototype NIS 26 (right), surprised Long Island Sound sailors during the 1980s.
Not all sailors will like the appearance of a boat designed to the above parameters, but Kirby has a good eye. On the NIS 26, a strong sheerline and dark hull sides lessen the visual impact of substantial freeboard. Low house sides and extreme crown (athwartships curvature) to its top reduce the apparent height of the house. In all, this ketch has a seamanlike look about it.
So, there you have it, a fast and easy-to-build cruiser that will take us to shallow coves that lie just out back of nowhere.
Bruce Kirby’s drawings reflect the startling simplicity of the NIS 26, but this flat-bottomed sharpie has been well proven in tough conditions around the globe.
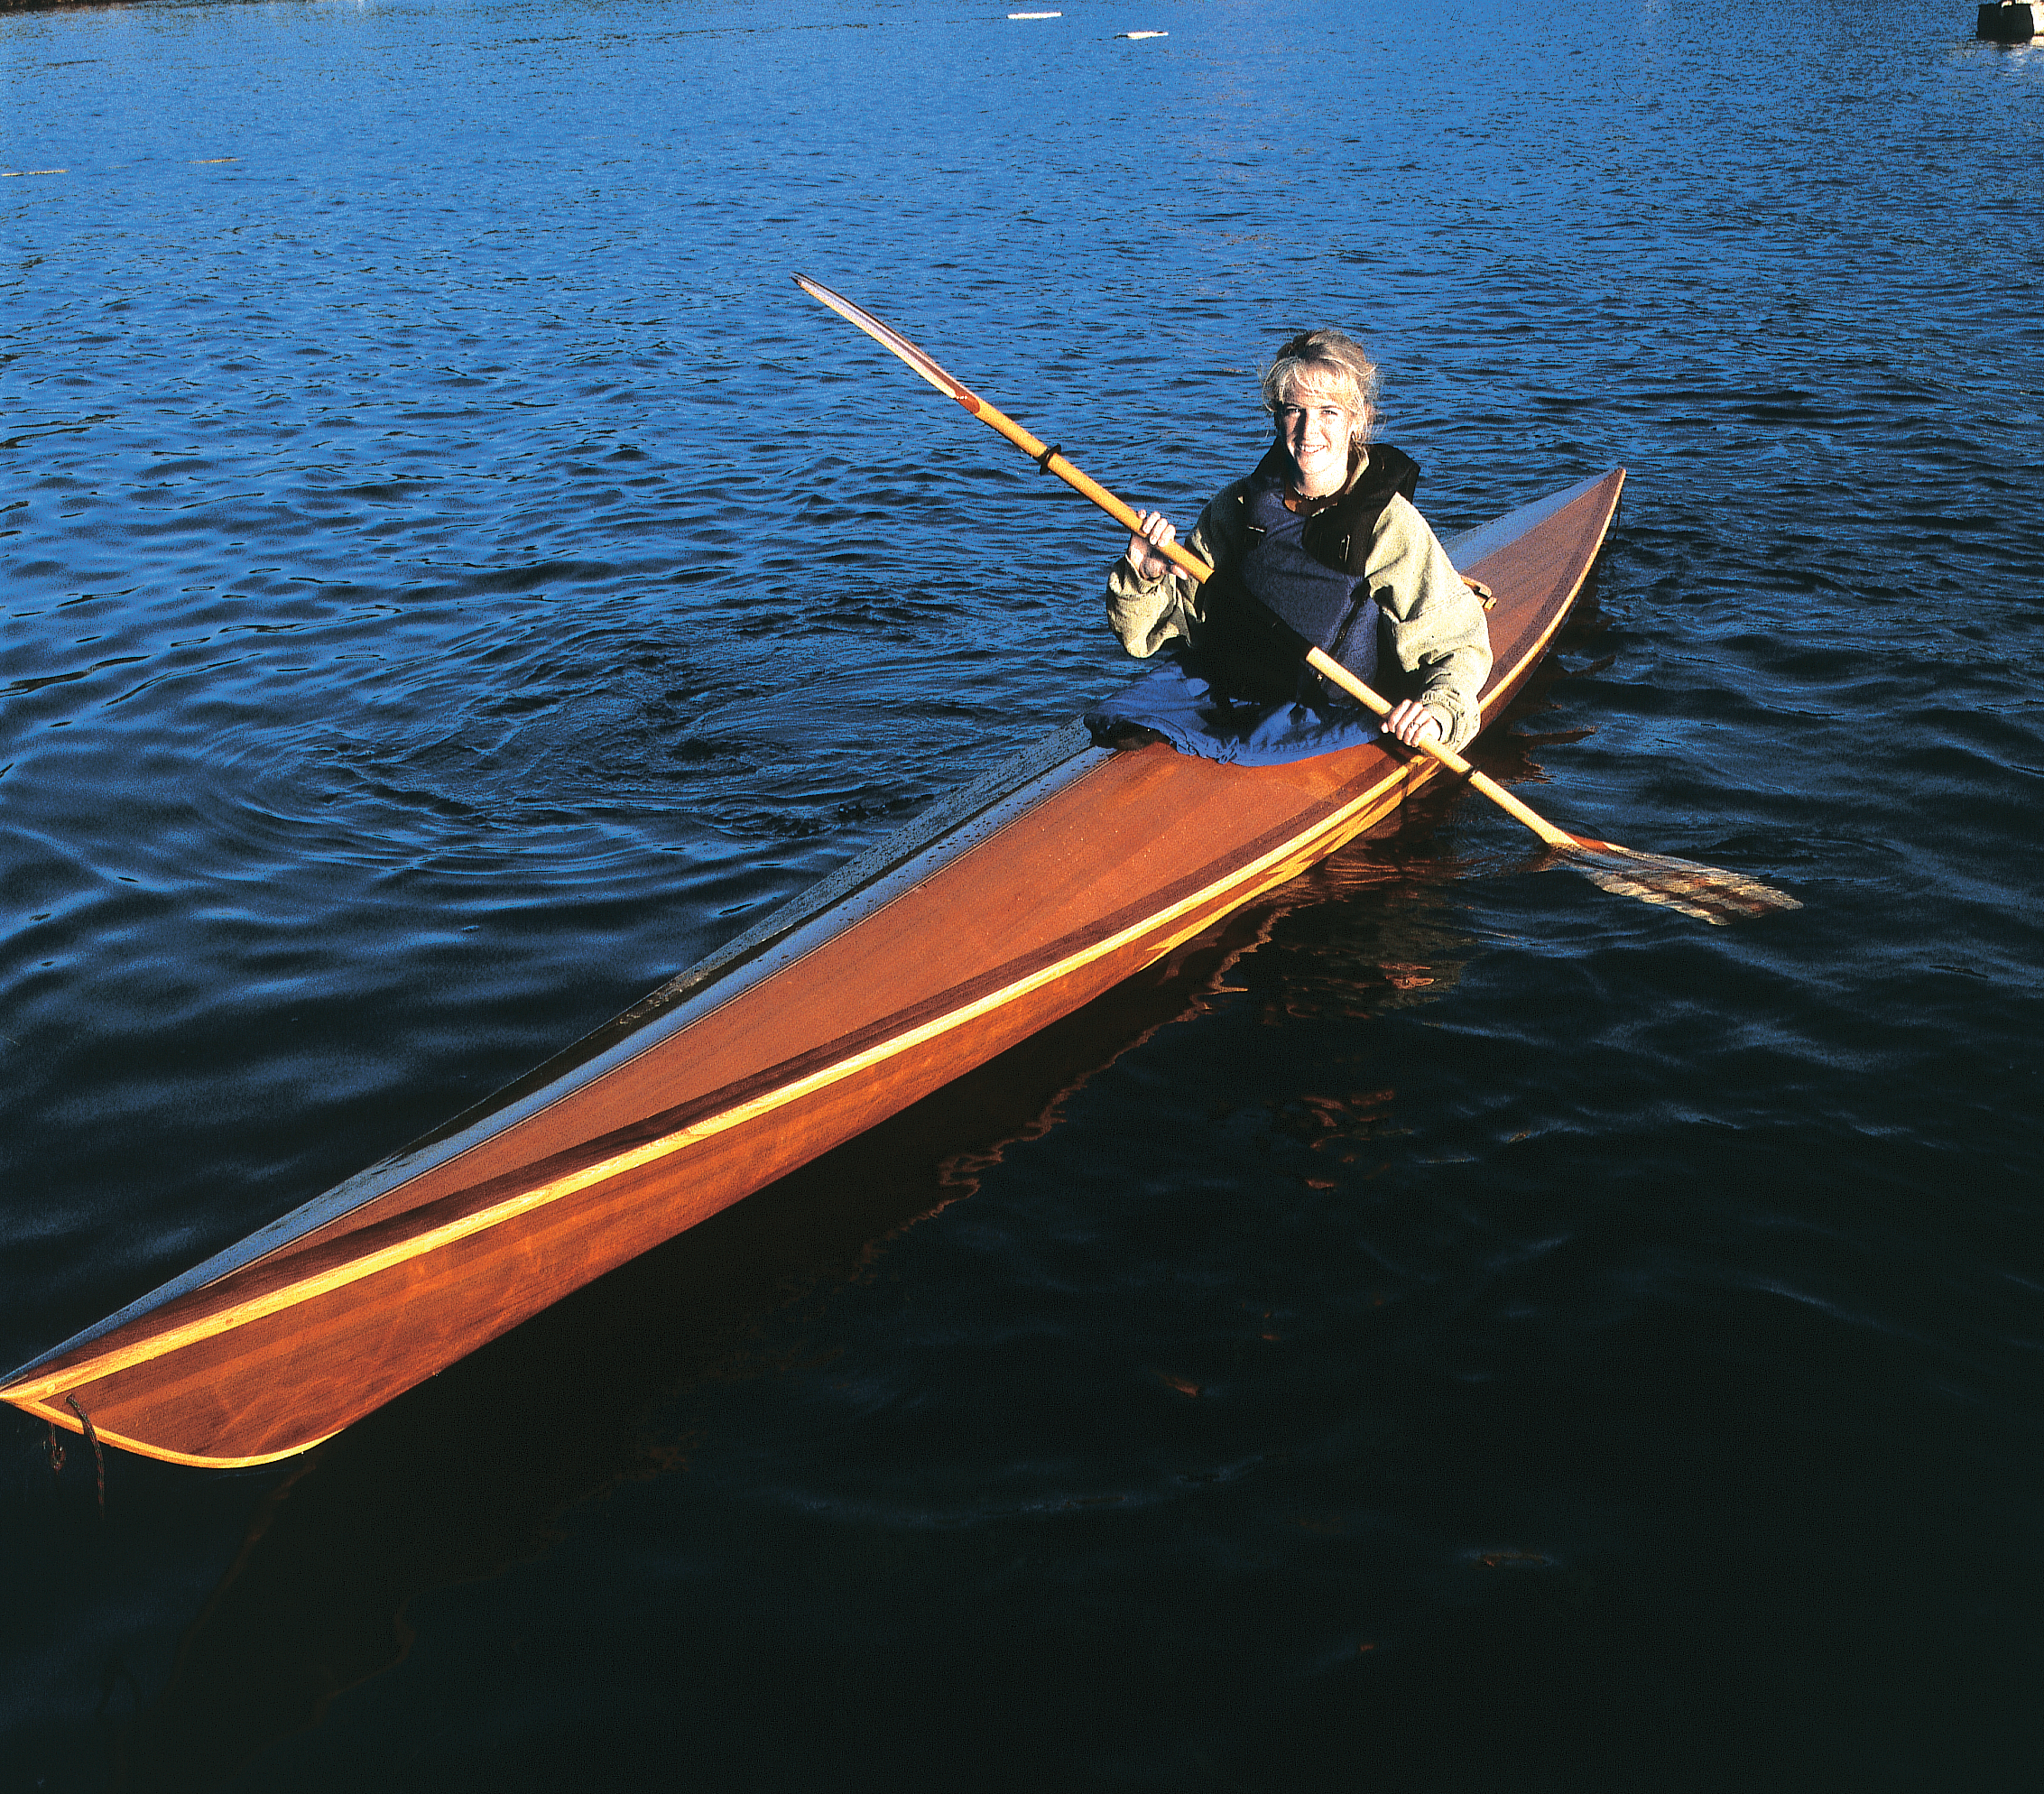 Photo by Darel Bridges
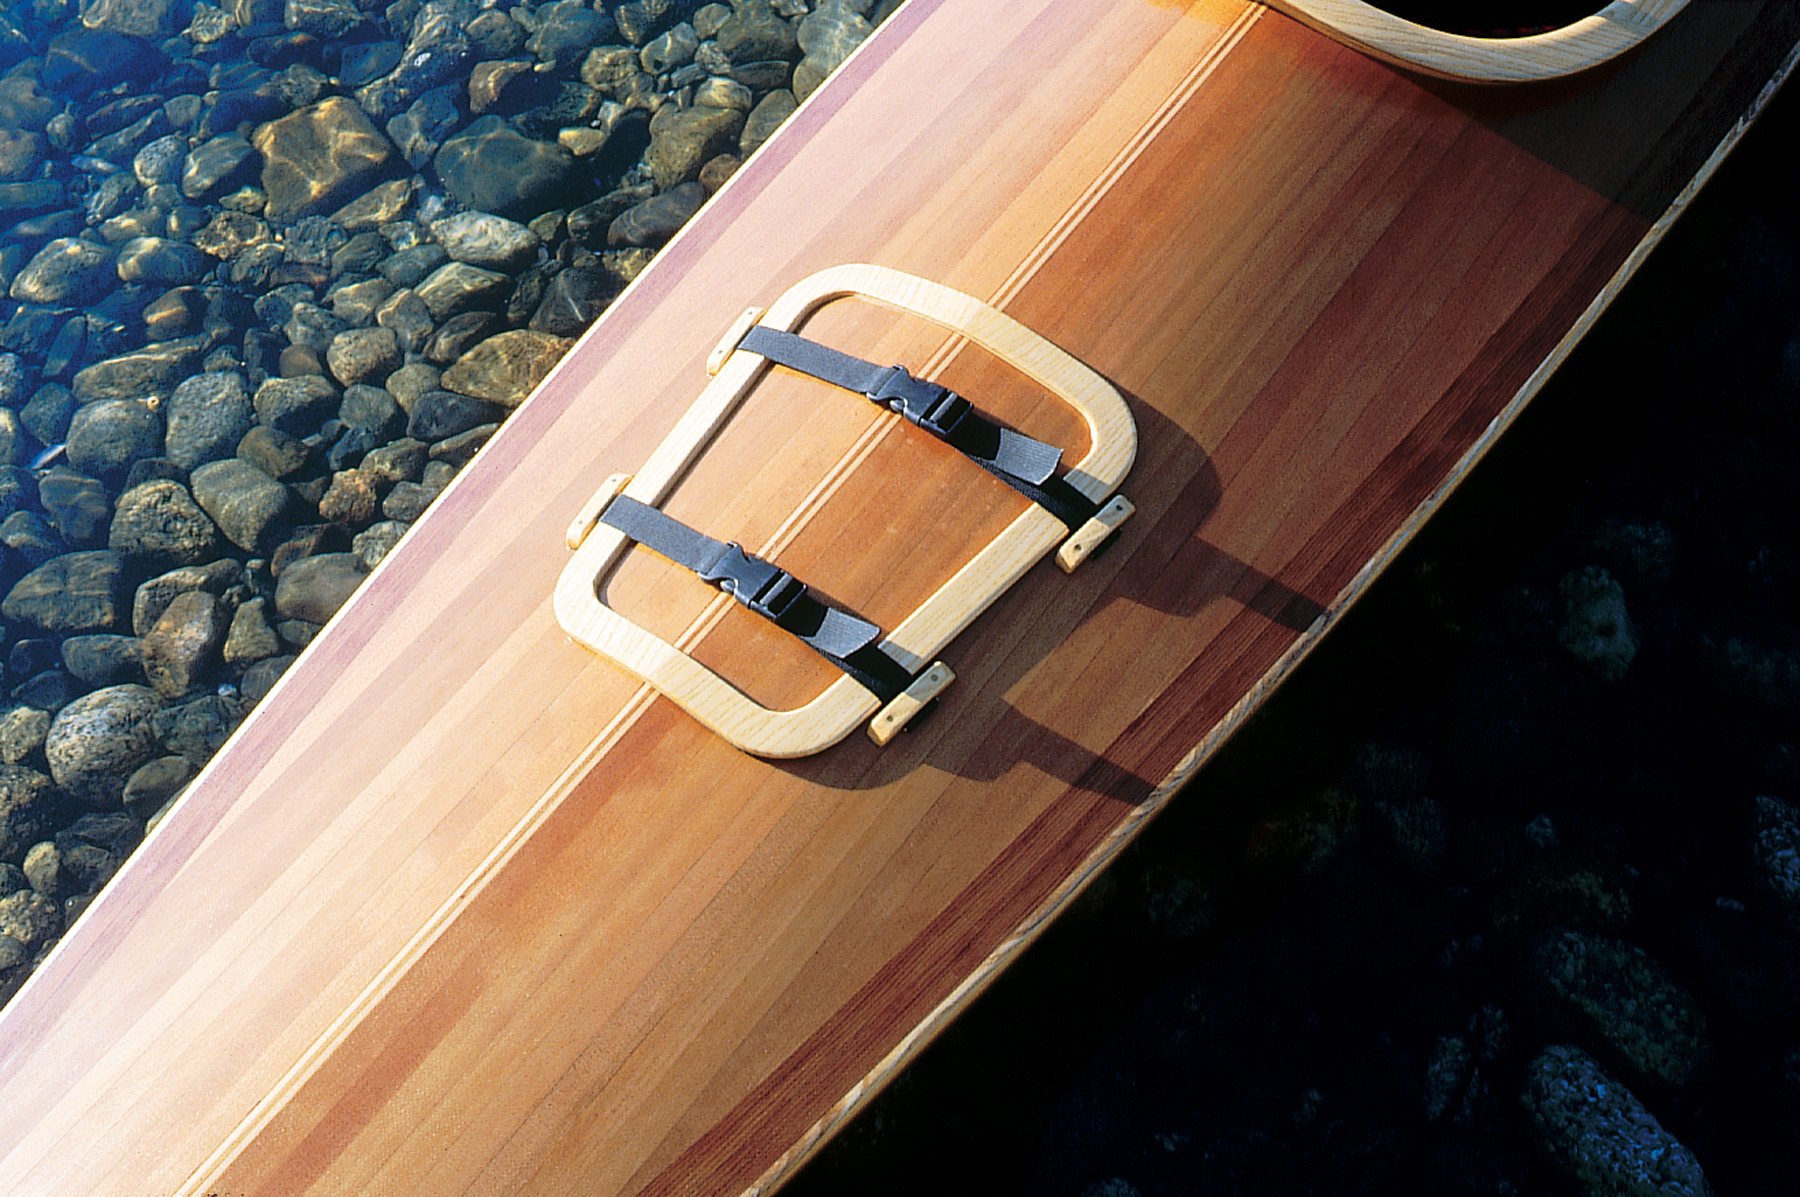 Photo by Darel Bridges