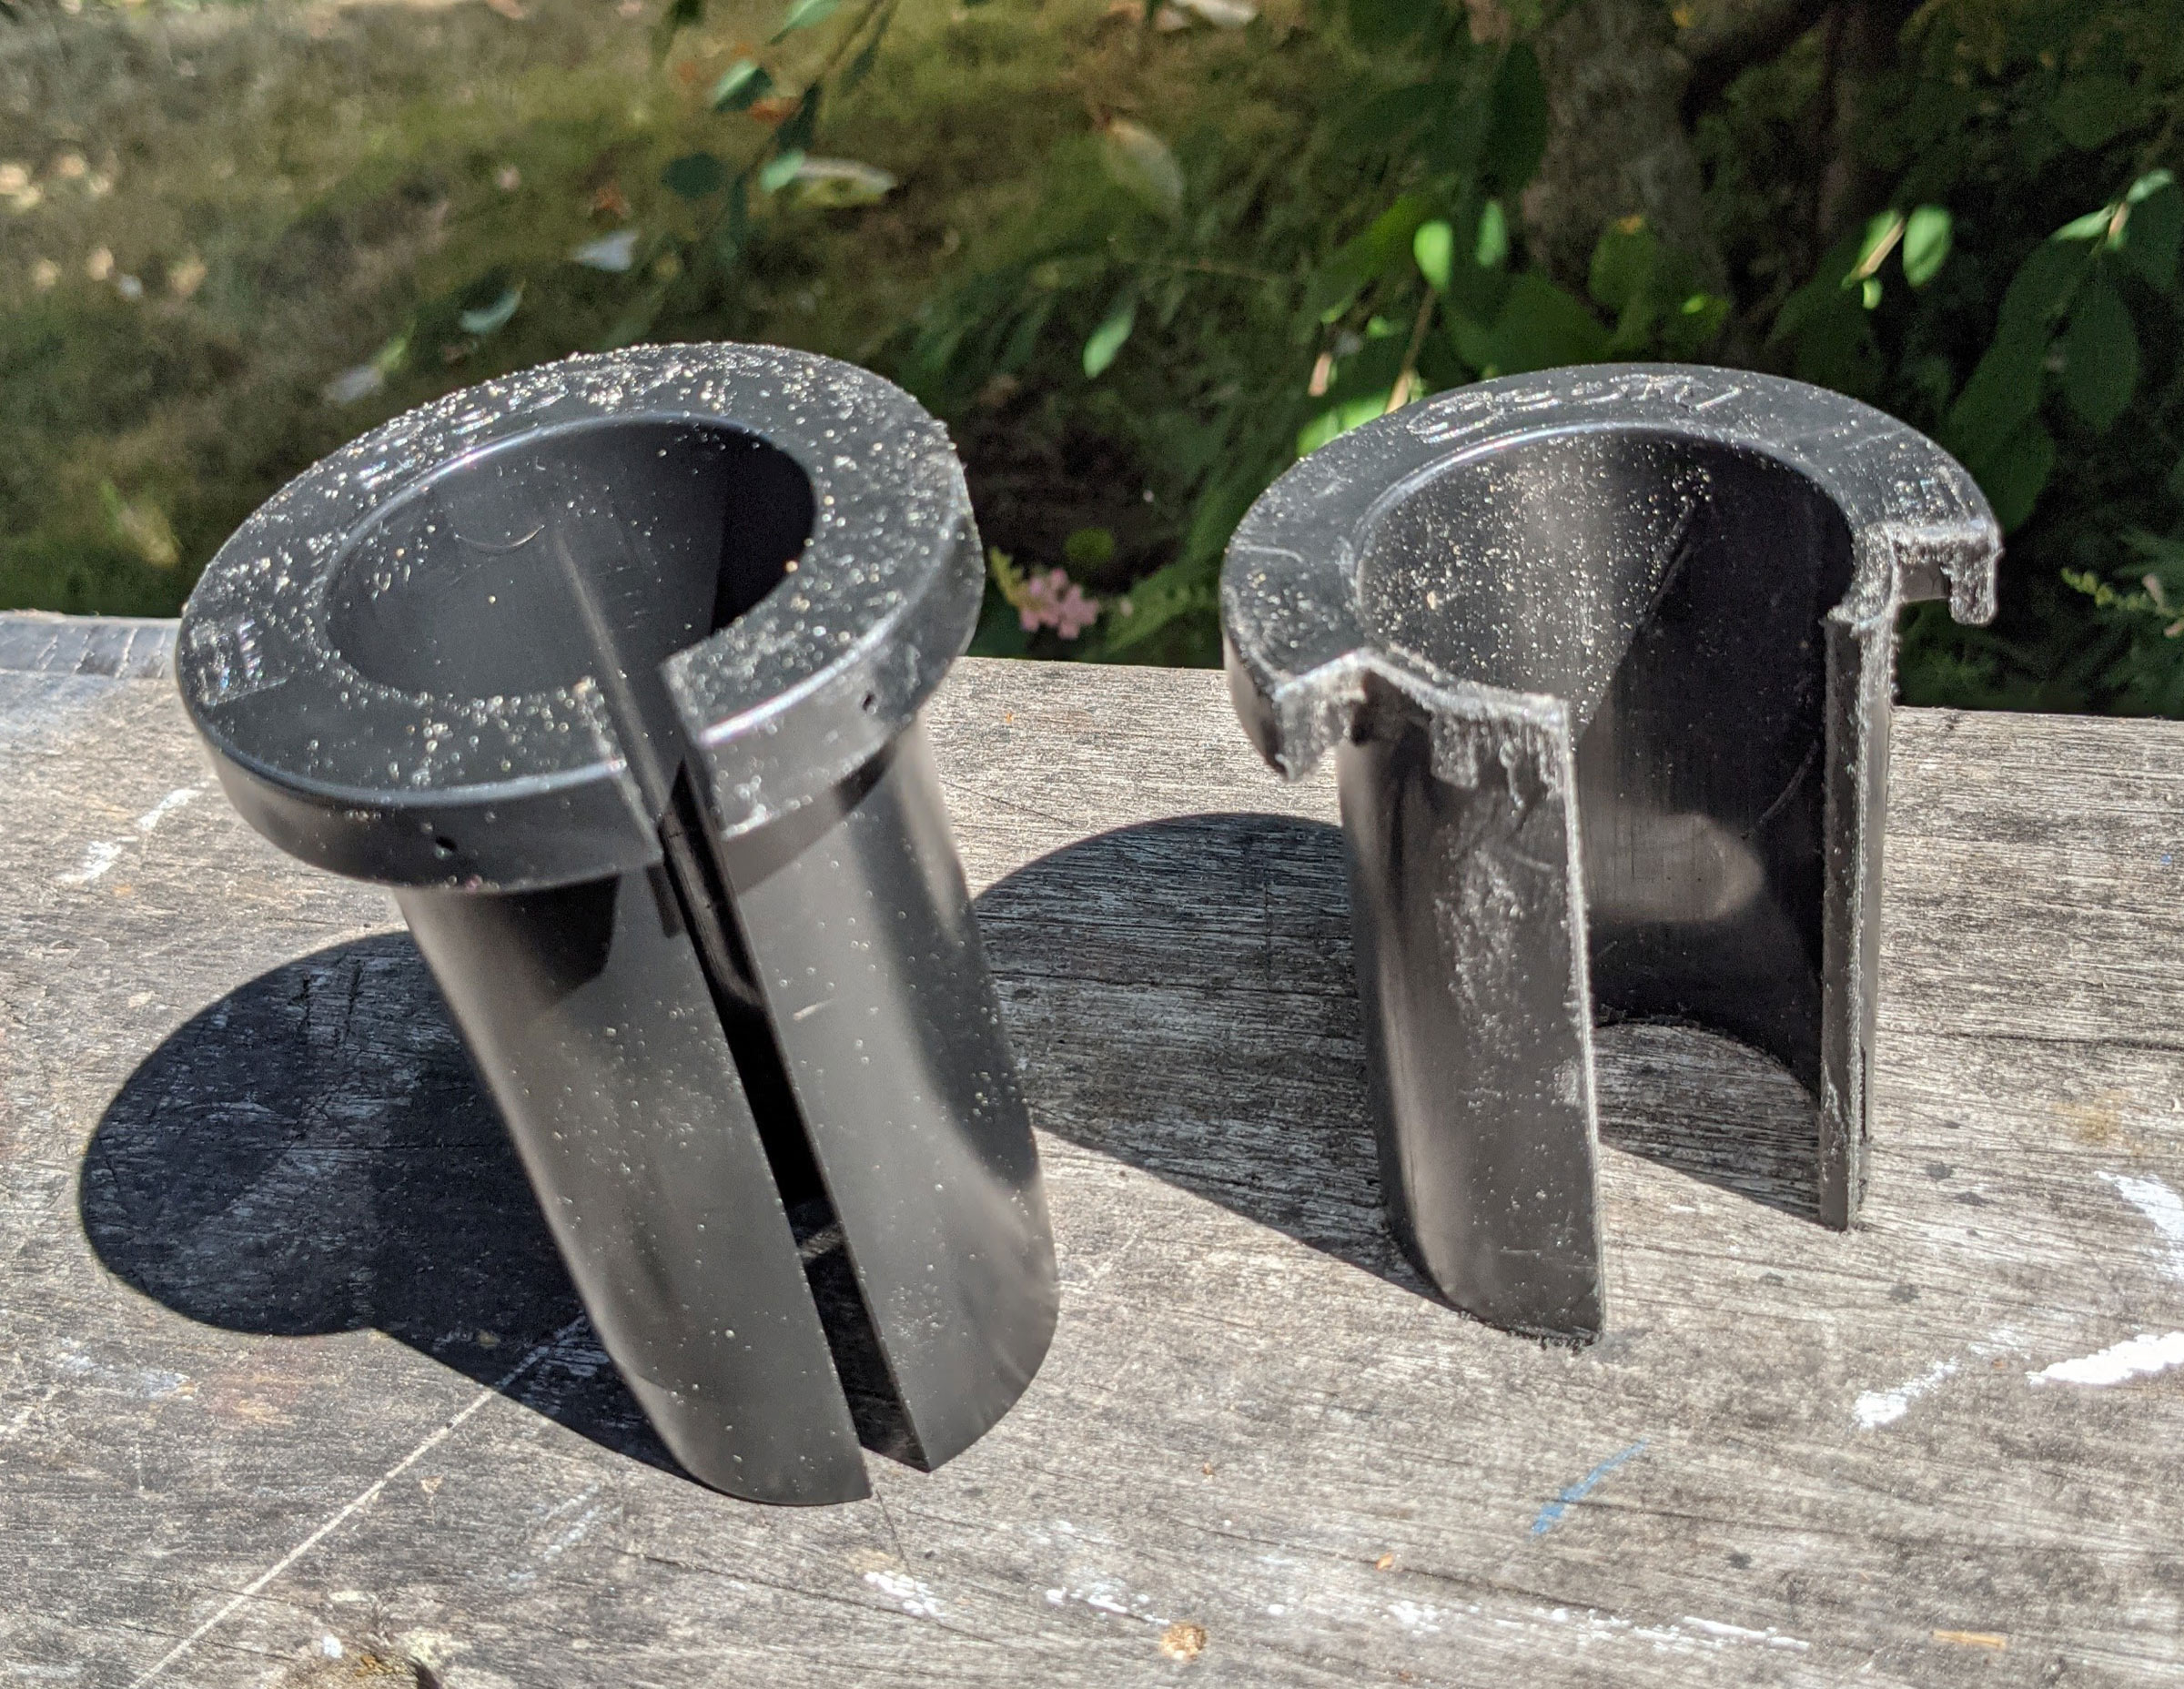
For years, my favorite camp-cooking knife has been a Joyce Chen paring knife with a 3-3/4″ stainless blade and a plastic handle and sheath. It did most galley jobs well enough, but I can only get three fingers on the handle, the blade doesn’t extend far enough beneath the grip for cutting-board tasks, and the sheath, while dishwasher proof, has a slot that’s scarcely a millimeter wide and impossible to clean.
The sheath’s alternating openings make it easy to clean and dry its interior surfaces.
MSR’s Alpine Chef’s Knife has a 6-1/2″ blade with a modified Santoku shape, a Japanese style meant for mincing, dicing and slicing, the three uses suggested by the translation of santoku: “three virtues.” The plastic sheath solves the cleaning problem with alternating cutaways that allow all of the inner surfaces to be cleaned, while still providing full coverage for the cutting edge.
Photographs by the author
The stainless-steel blade holds a good edge and the offset handle is very well suited for chopping on a cutting board.
The stainless-steel blade takes and holds a sharp edge (you can see the knife slicing paper in the Small Boats video “Stropping” starting at 1:37) that can take neat millimeter-thick slices from a soft, ripe tomato. The drop point puts the whole edge close to a cutting board for chopping, while the offset plastic handle provides lots of clearance for knuckles.
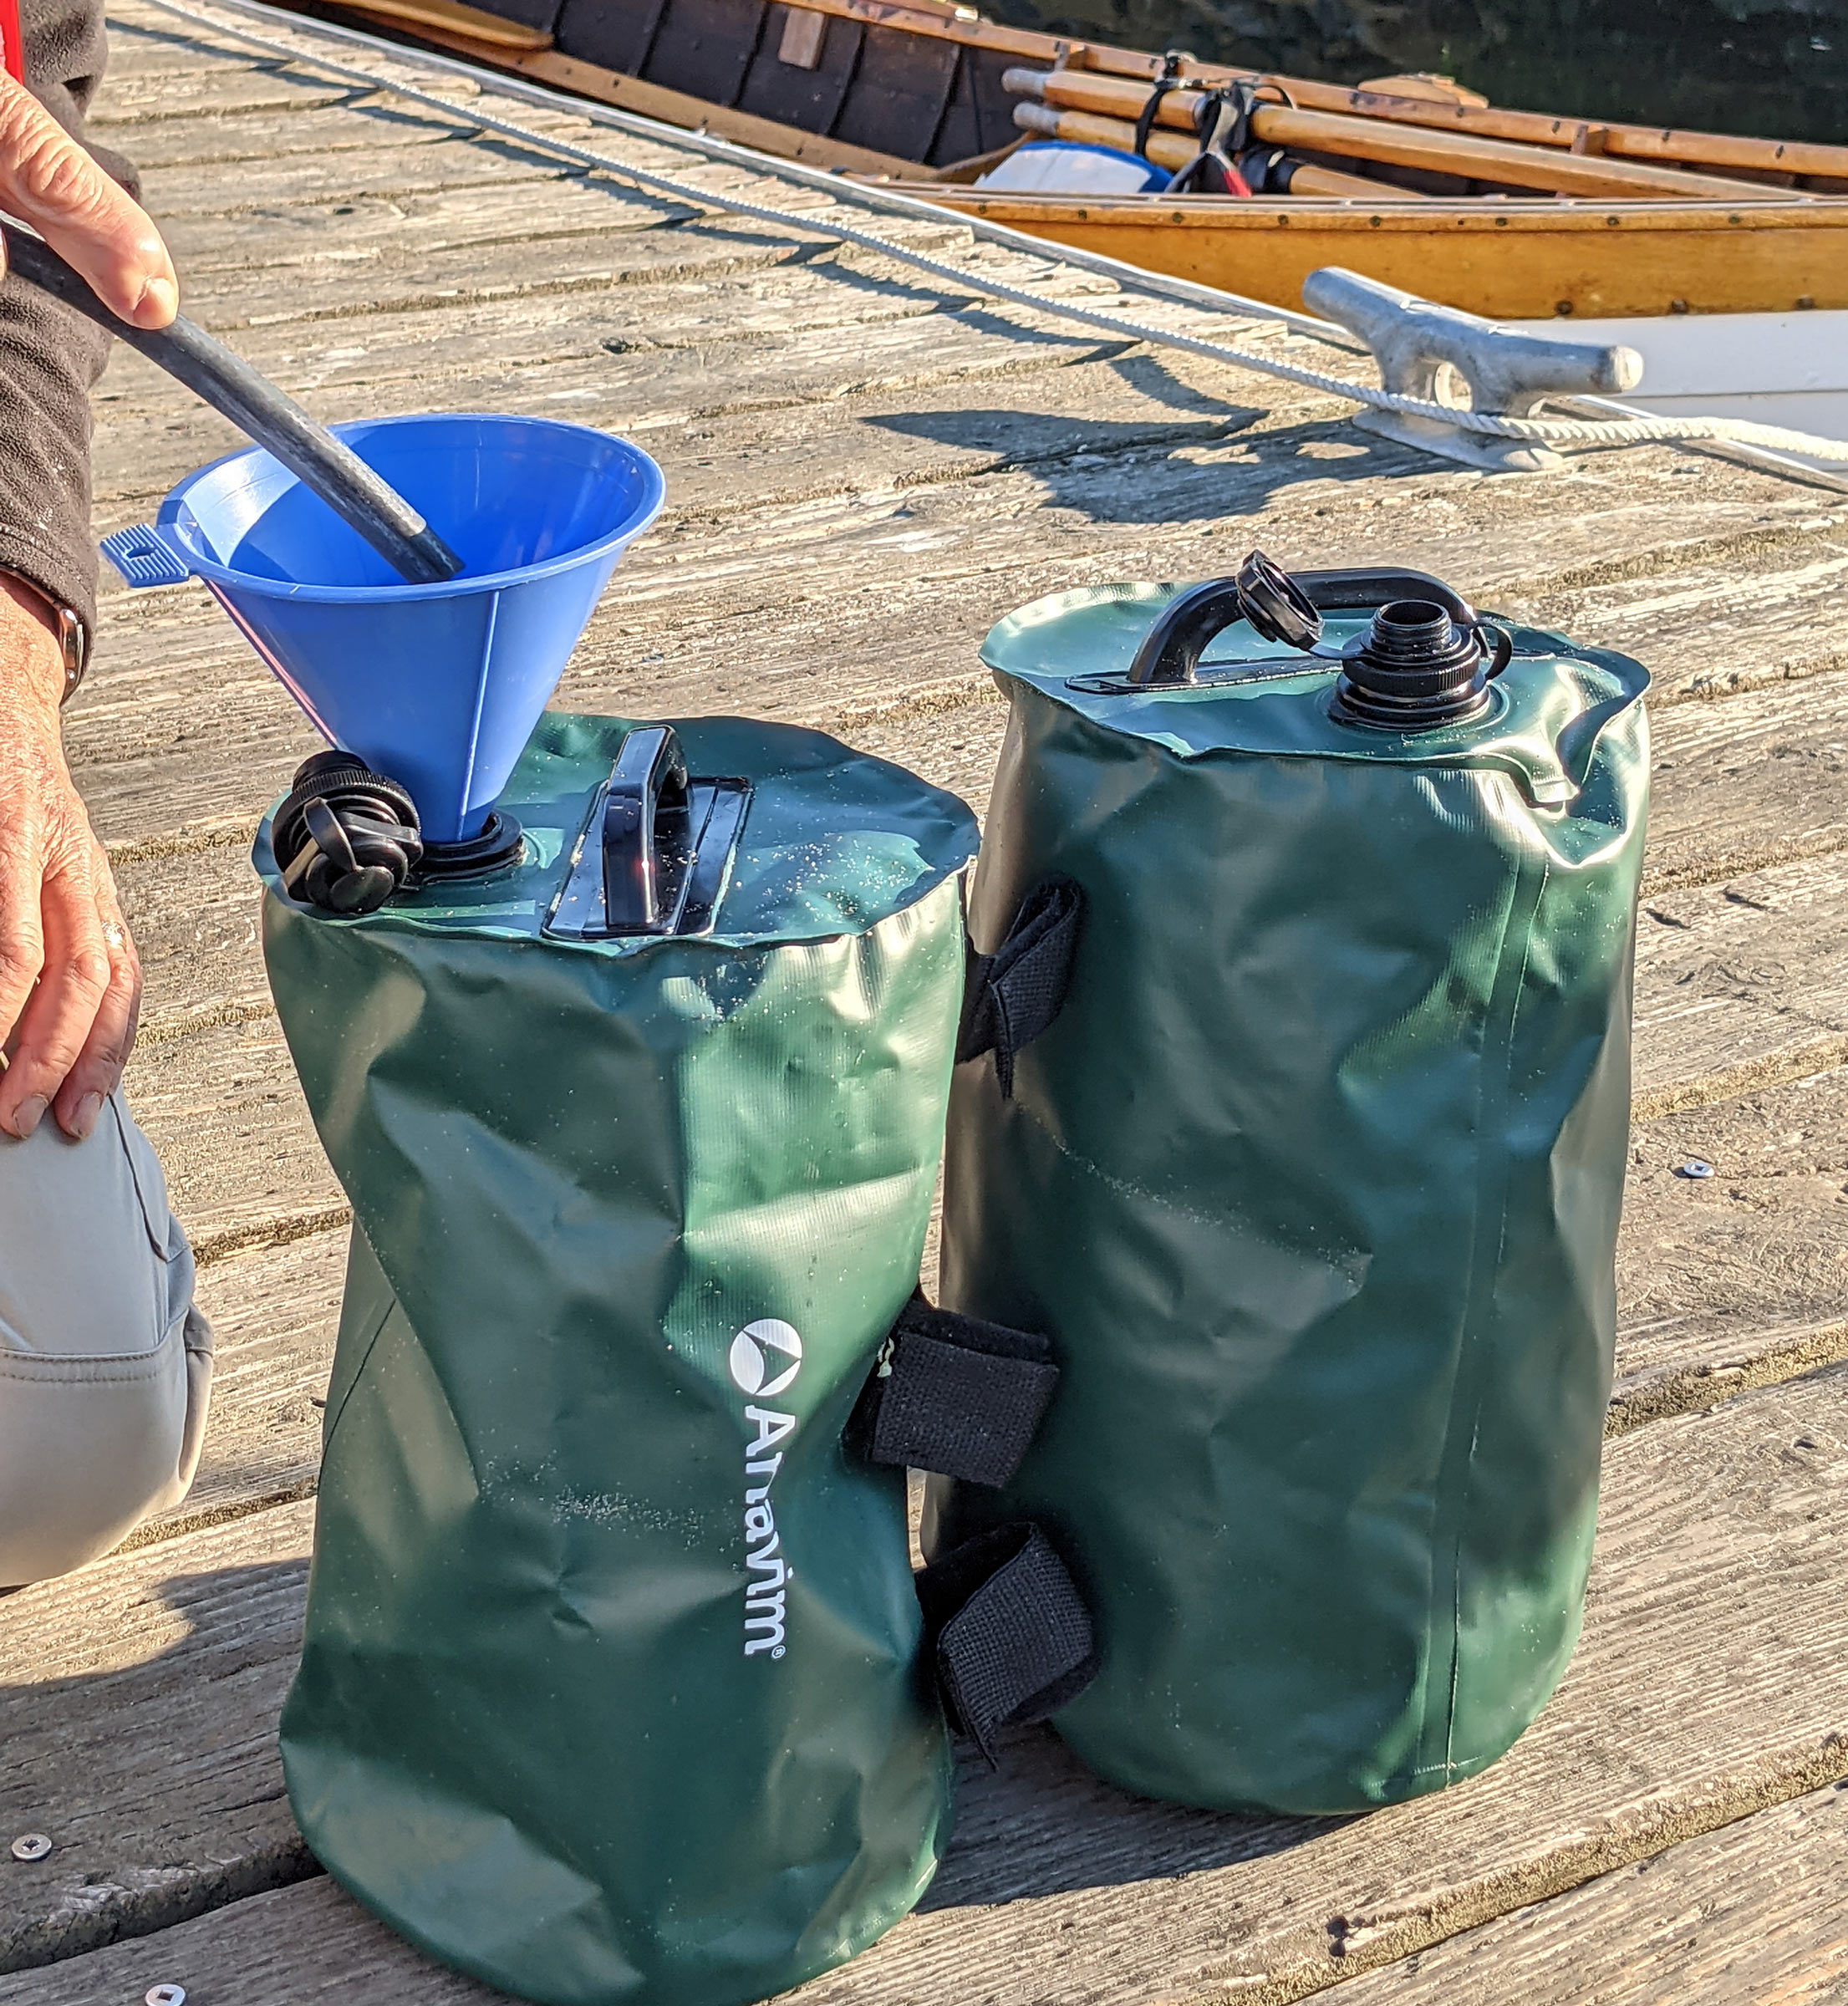
With two pairs of my glasses hidden in the murky bottom of Lake Union and one pair in the cold depths of Puget Sound, I know that glasses sink. I was introduced to floating sunglasses years ago; if they go over the side, I have a good shot at recovering them. (I do have retaining straps to help prevent losing glasses, and wear them for rough-water passages when I have to focus on navigating, but I find them awkward when I’m frequently using cameras and binoculars.) My first pair has air chambers built into the temples. More recent versions are made of lightweight materials that are inherently buoyant.
For the past year I’ve been using two pairs of floating sunglasses from Rheos: first, the Eddies model, followed by the Reedy. They both have nylon lenses, polarized to reduce glare and coated for scratch resistance. The coating has worked well to protect the lenses and neither have visible scratches. The coating is hydrophobic—water will run off and any small beads of water that remain can be removed by tapping the frames. The lenses provide full UV protection.
Photographs by the author
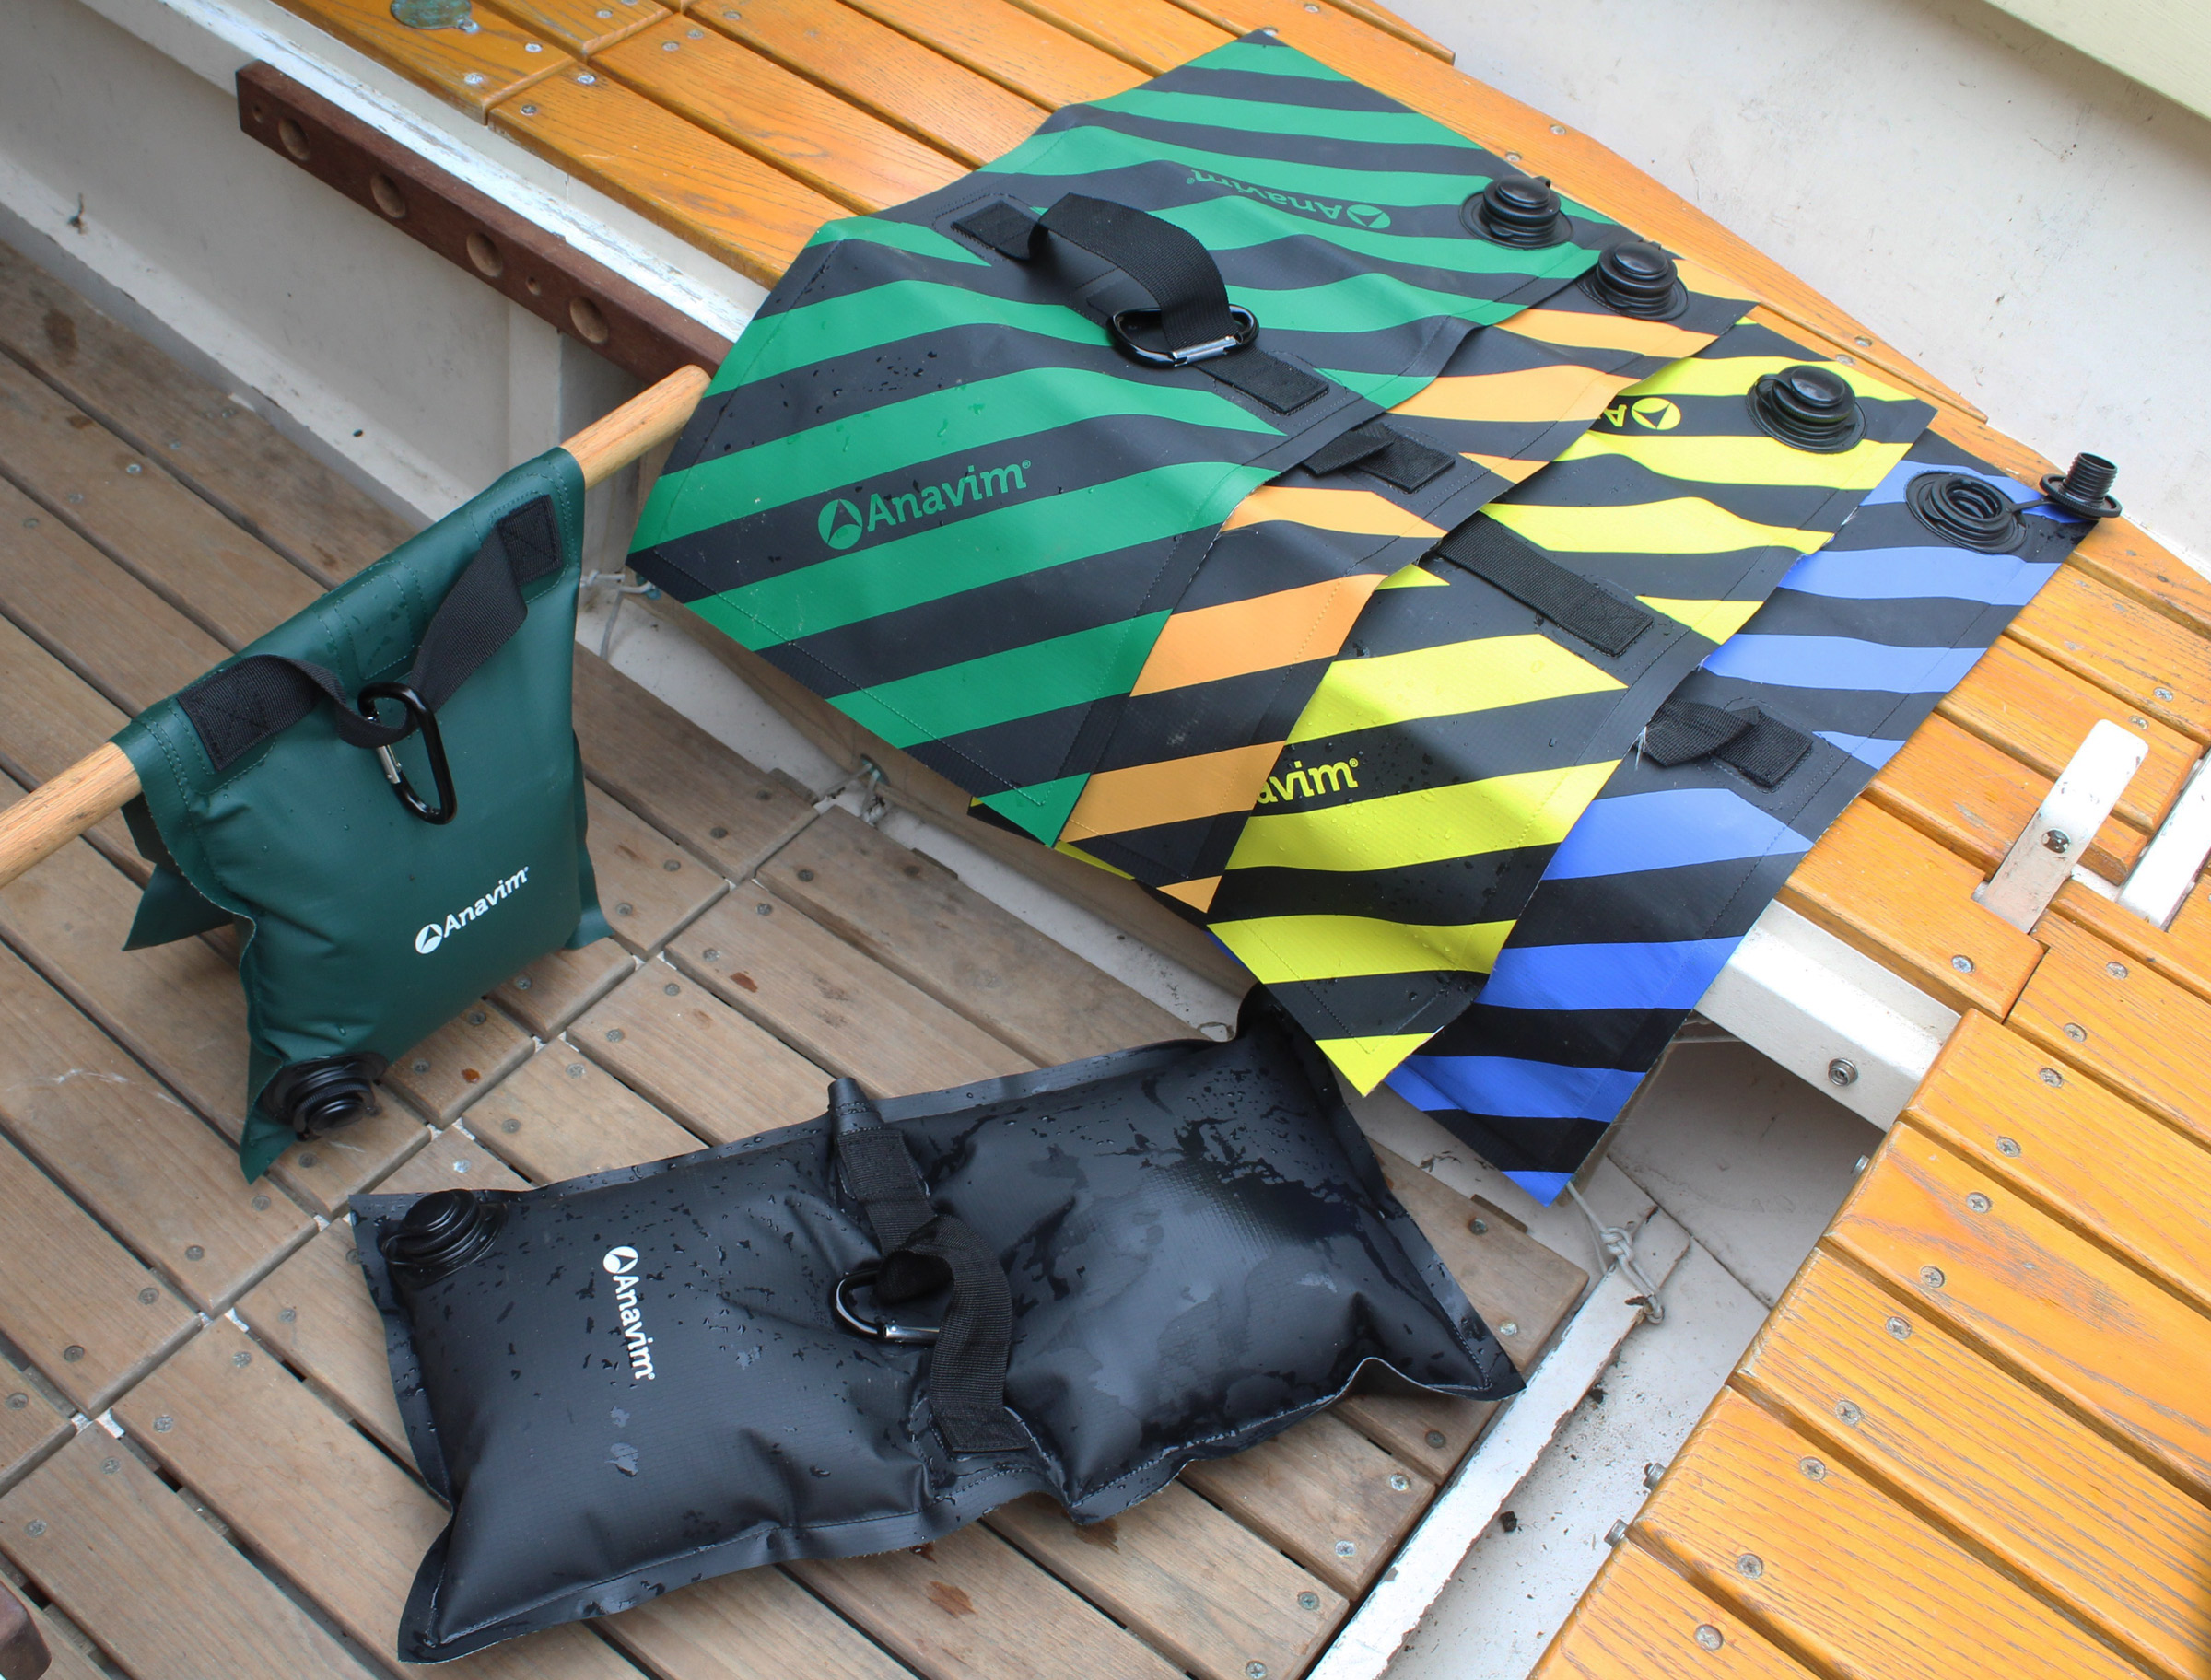
There are subtle differences in the frames of the Reedy (left) and the Eddies (right). The temples of the Reedy are a bit more flexible than those of the Eddies and make contact with the wearer’s head at a gentler angle. The Reedy frame is the better match for large heads. The Eddies offer a tighter fit for average heads while remaining comfortable.
I opted for “gunmetal,” a neutral gray color, for the lenses of both glasses. They’re dark enough to tame the sunlight on a clear summer day but not so dark that the world grows dim under an overcast sky. The polarization has effectively cut the otherwise blinding glare when I’ve paddled straight into the sun late in an afternoon. The Eddies are described by Rheos as having a “tight-fitting wraparound frame,” and at first I thought that would serve to keep the glasses secure on my head, but after about a half-hour the pressure of the temple tips became uncomfortable. At the end of a 90-minute kayak outing, I was happy to take the glasses off. I have a large head—hat size 7-5/8—and those with smaller sizes are not as likely to find the pressure objectionable.
Both of the Rheos models are light enough to float.
Rheos sent out the Reedy model, which is described on their website as having “a medium to large wrap-around frame.” The temple tips have a different shape to better distribute the pressure, and the temples are more flexible. The Reedys are very comfortable even for all-day use and still secure enough that they don’t slip down my nose. At 0.9 oz, they’re even lighter than the 1-oz Eddies.
The Reedy sunglasses came with an ingenious case that forms a rigid, protective prism shape for the glasses, and folds flat when not in use. A magnetic catch holds the case closed.
The Reedy sunglasses do their job, and do it well, by slipping from my consciousness: I cease to be bothered by the sun, and I forget that I have sunglasses on.
Christopher Cunningham is the editor of Small Boats Magazine.
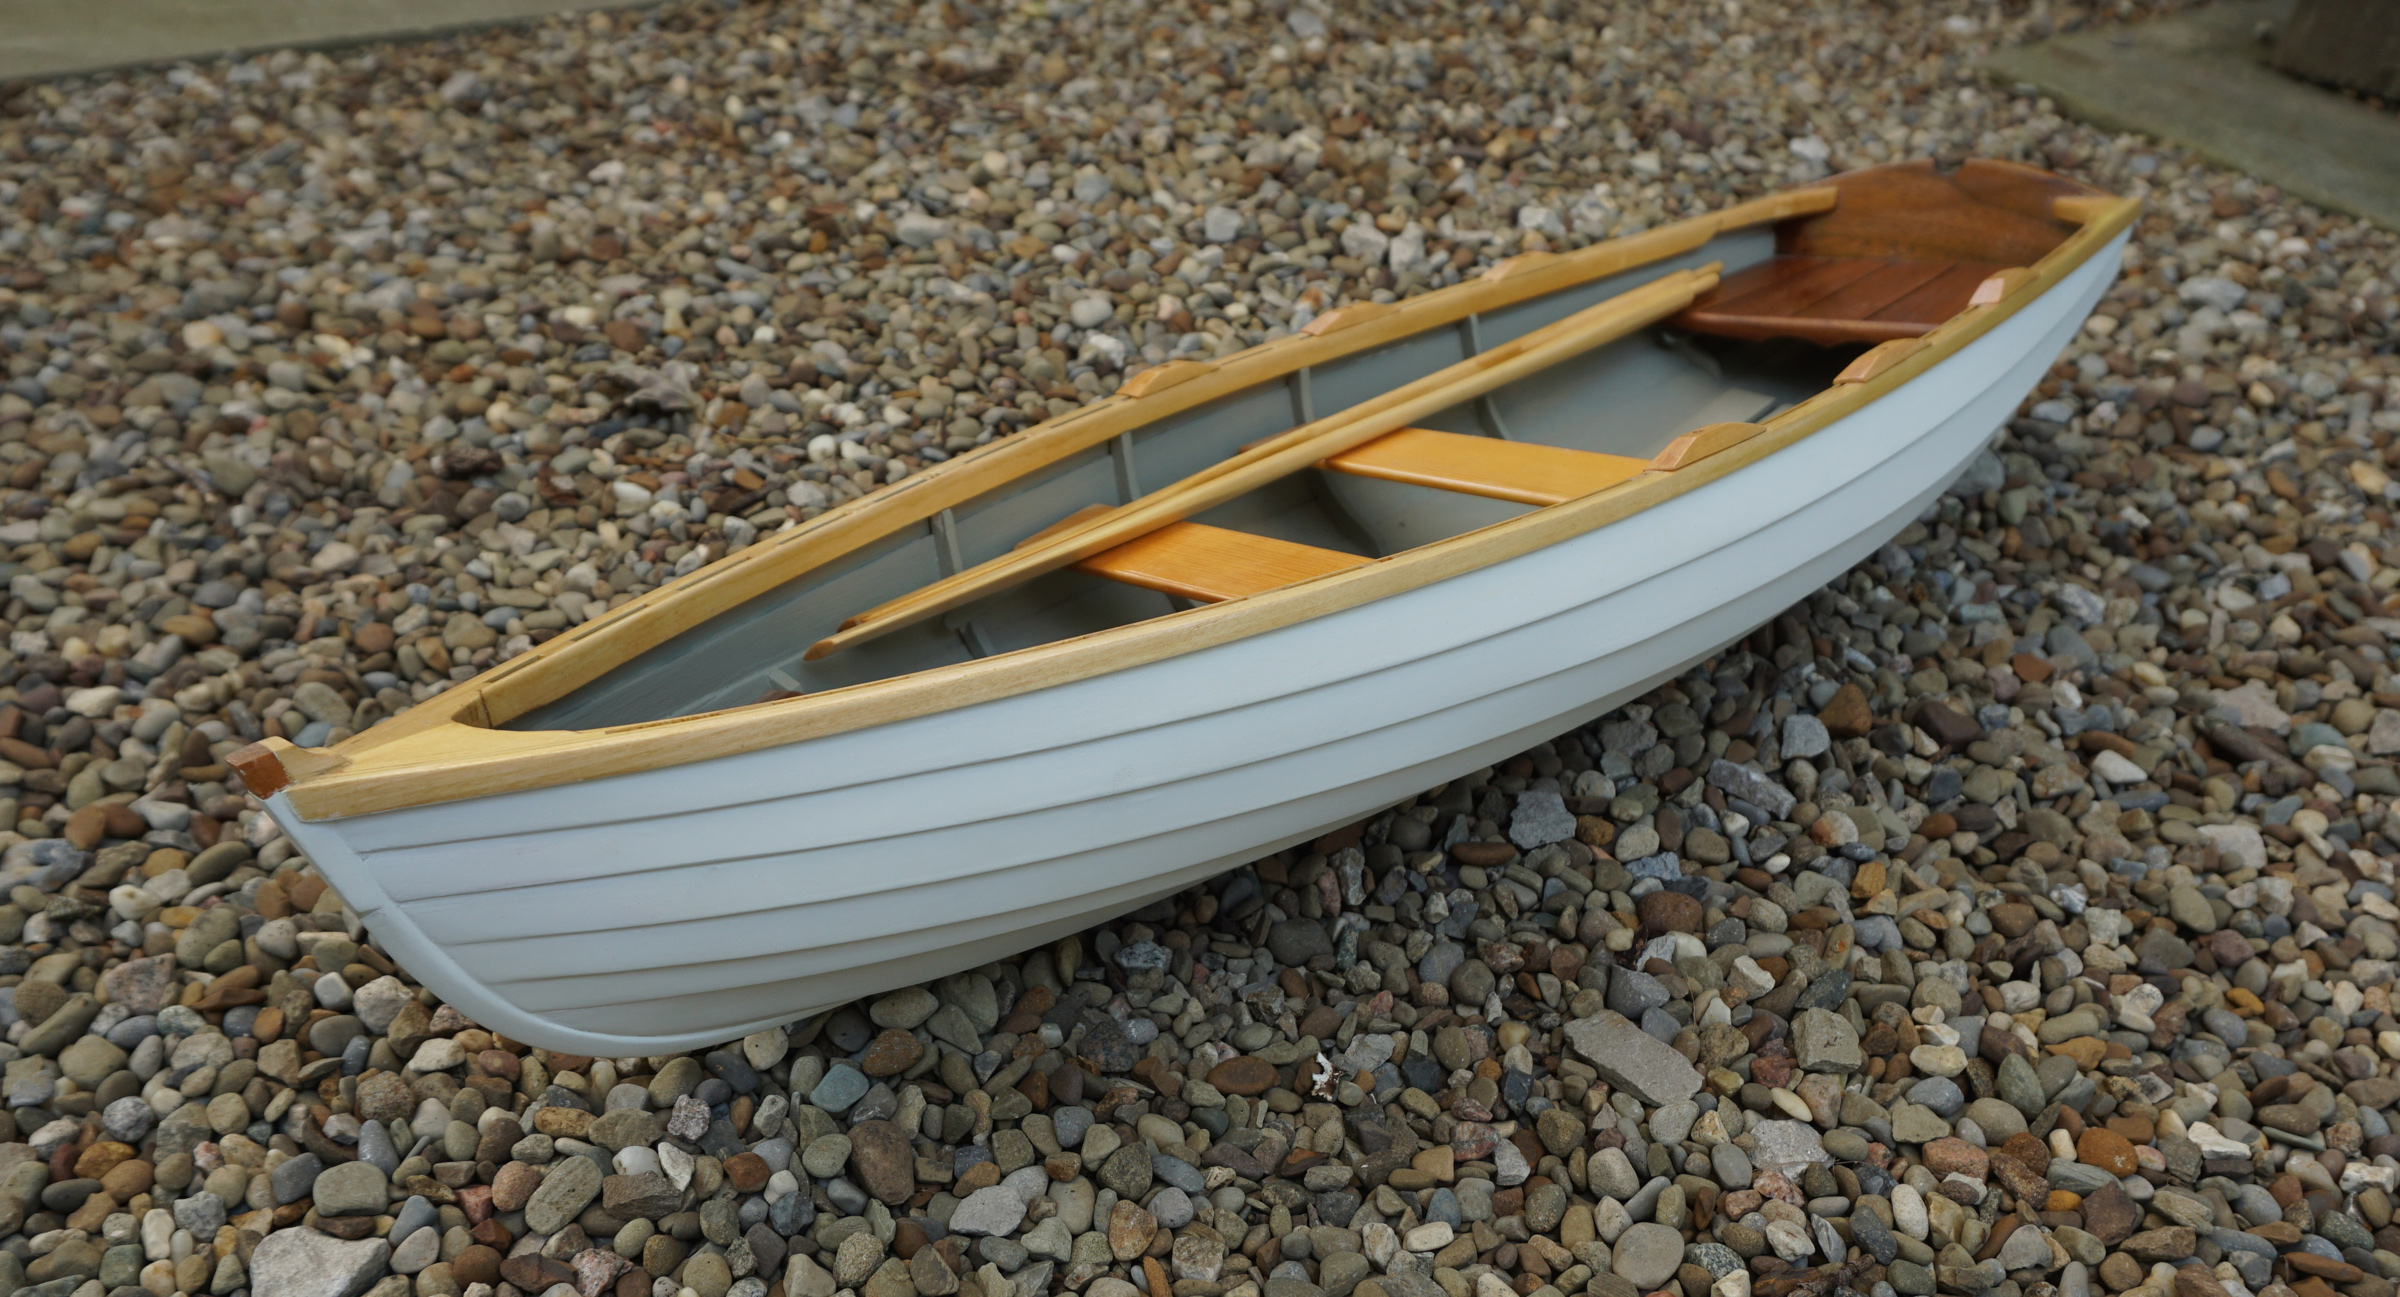
Paul and Sharon LaBrie live in West Gardiner, a rural community 10 miles to the southwest of Augusta, Maine, and while they are 25 miles inland from the state’s south-central coast, they don’t lack for access to the water. Their 7-acre lot borders Cobbosseecontee Stream, a gently flowing tributary of the Kennebec River. The couple have always shared a love of paddling. In 1976 they celebrated their first anniversary with an overnight canoe trip on Maine’s Narraguagus River. A short time later they bought a Grumman canoe—their first boat—and matching paddles, and throughout their nearly half-century of married life they have continued boating and camping together.
In 2005, Paul took an early retirement from a 21-year-long career in academic technology management, and established LaBrie Small Craft, a hobby business devoted to building and restoring boats. Among the boats he built were two reviewed in Small Boats: L. Francis Herreshoff’s CARPENTER and the E.M. White Guide Canoe. He and Sharon also joined forces for several years to do custom work for Island Falls Canoe/Old Town Canoe when customers ordered wooden canoes covered with fiberglass rather than canvas.
About eight years ago, Paul had designed a peapod and before he began construction, he and Sharon had a difference of opinion, the kind that can push even a long, happy marriage to the brink: strip-built or lapstrake. Paul had a number of good reasons to go with strip-built: “Twisting a slim 1/4″ cedar strip, as it leaves the flat bottom and makes a 90-degree twist to the ends of the boat, is easier than torturing a long piece of plywood. Strip-planked bottoms lend themselves better than lapstrake to various coverings like Dynel and a mix of carbon powder and epoxy—just the thing for the ledge and rough landings we often encounter here in Maine. Lapstrake-hull bottoms don’t lend themselves as well to ’glass coverings. And a ‘clean’ bottom, sans seams, is probably a more efficient one, especially for small, human-powered craft.” On the other hand, Sharon likes the look of lapstrake.
Their difference might have led to strife, but even the ancients could point the way to restore harmony to a marriage in such dire straits: De gustibus non disputandum est. Literally translated from Latin, that’s “Of taste there is no disputing.” Any effort to address matters of the heart with reason is as destined to fail as mixing oil and water.
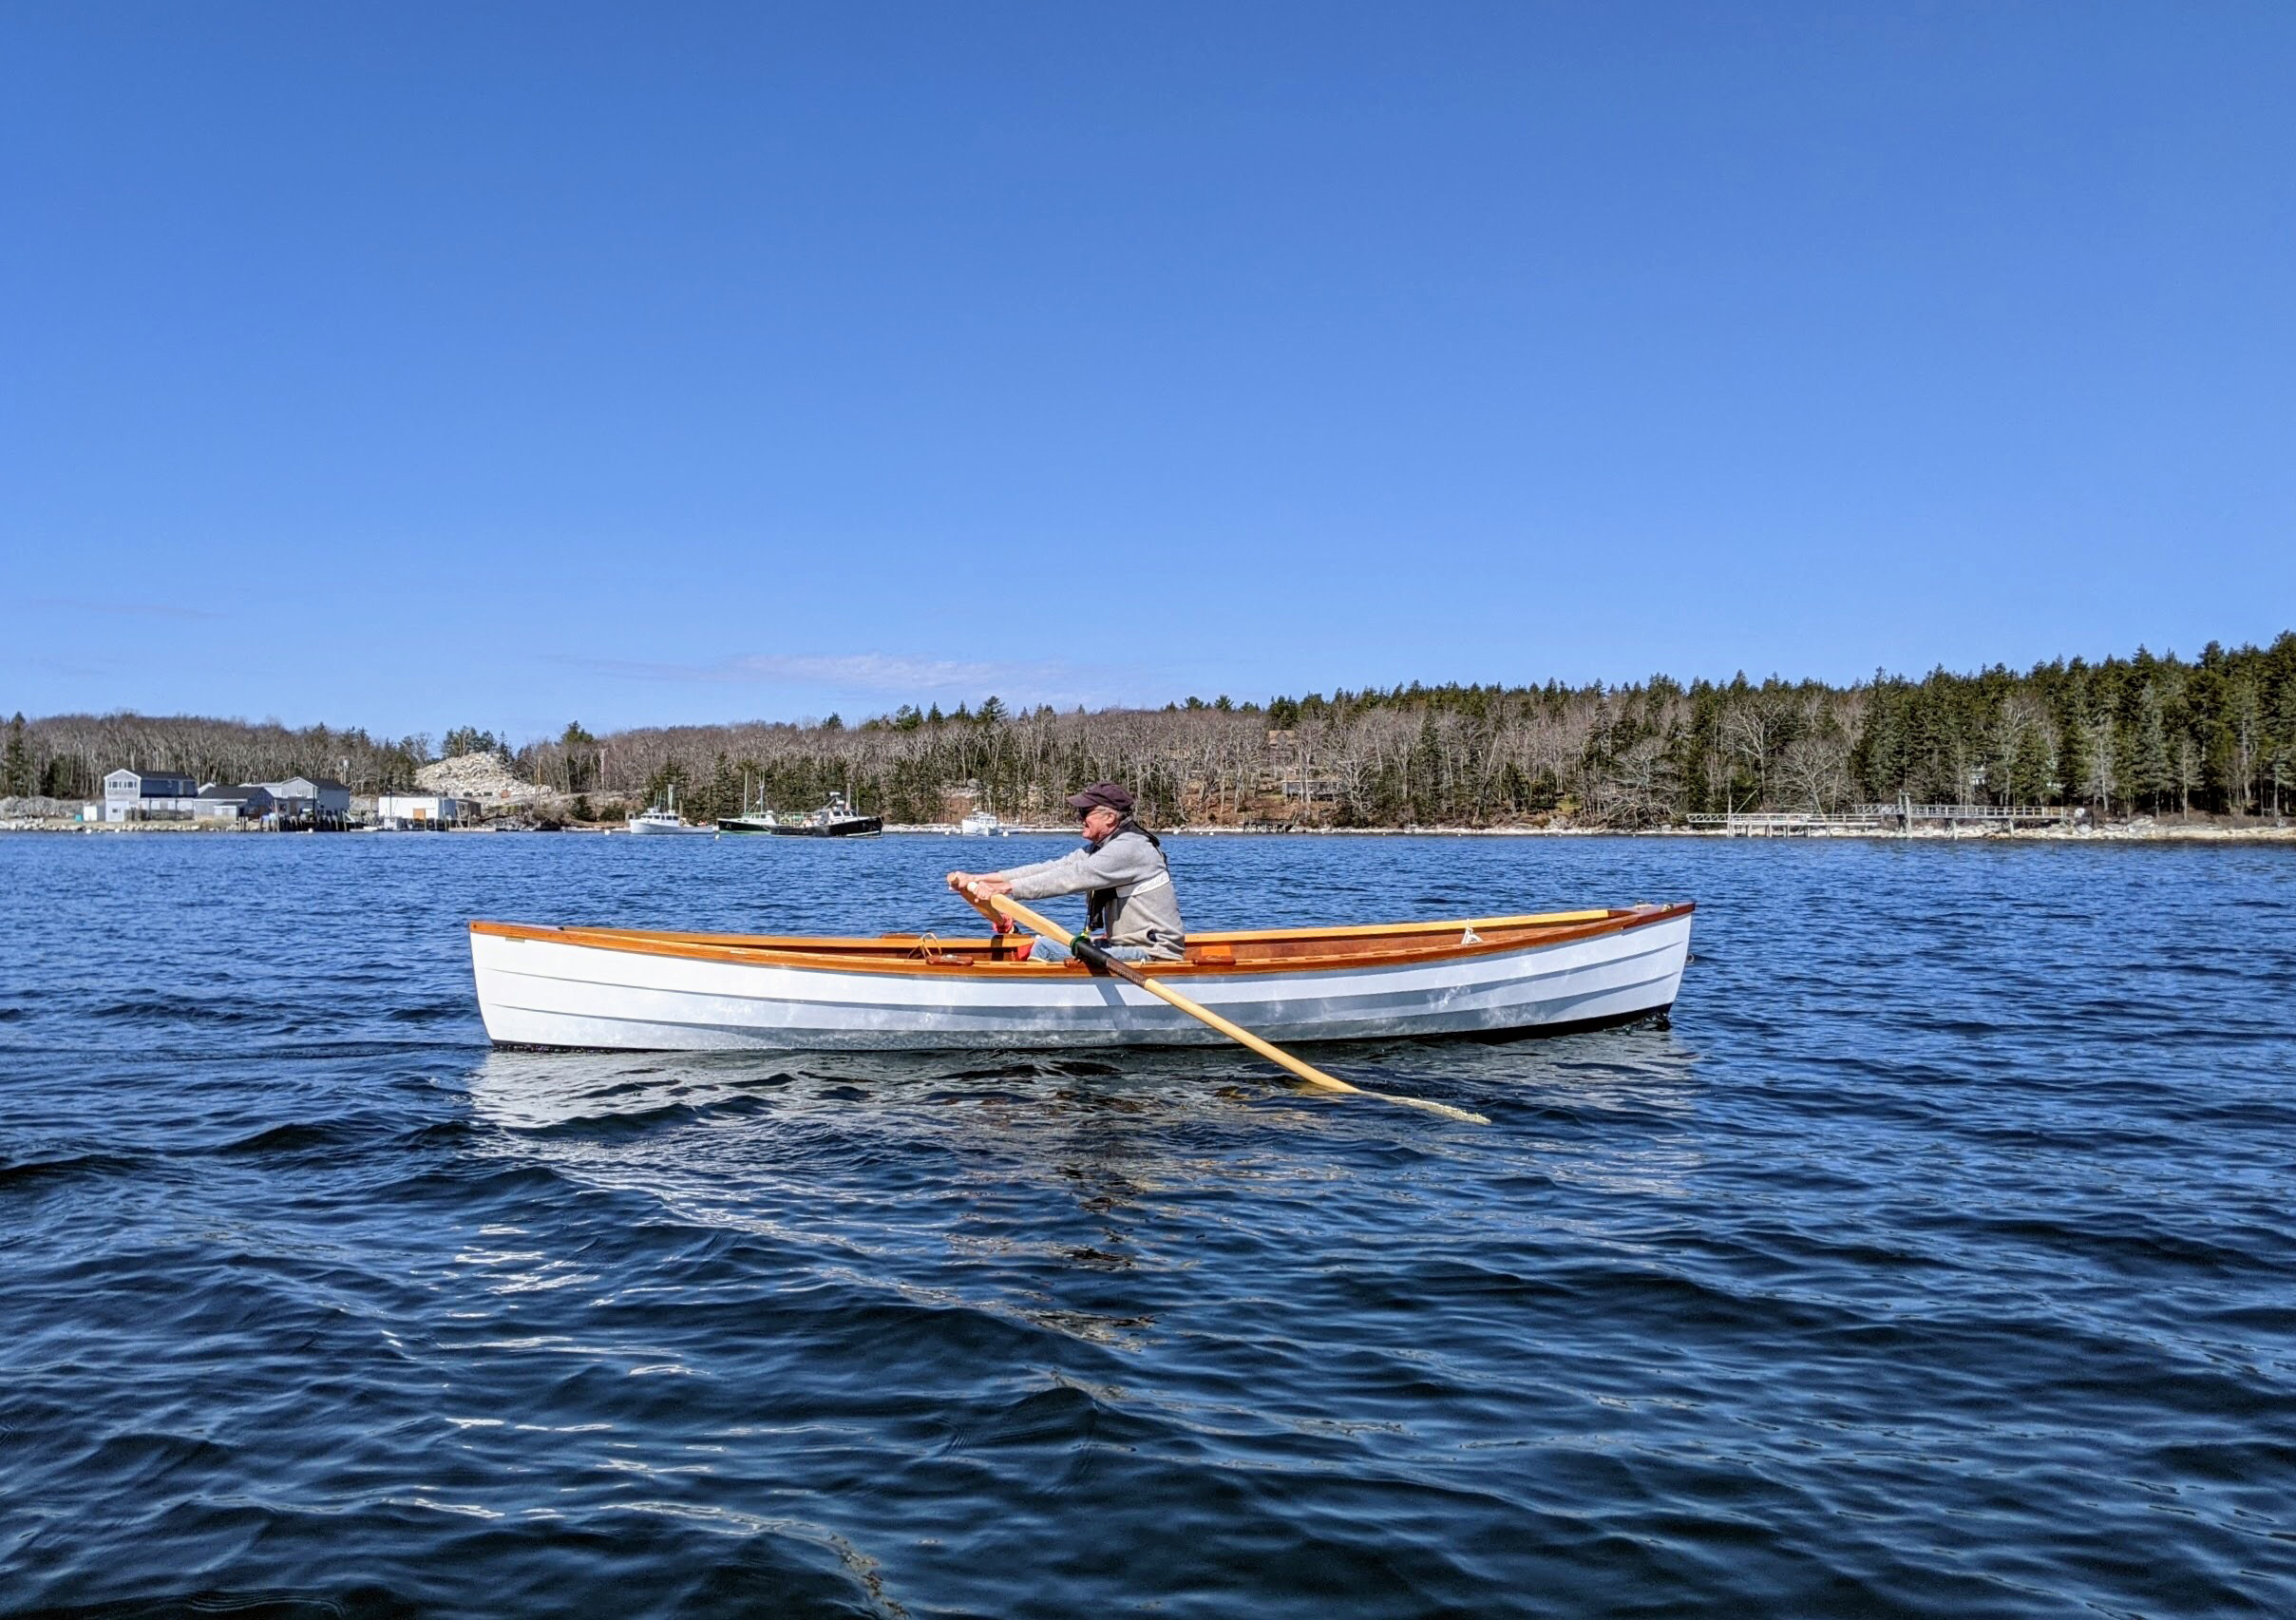
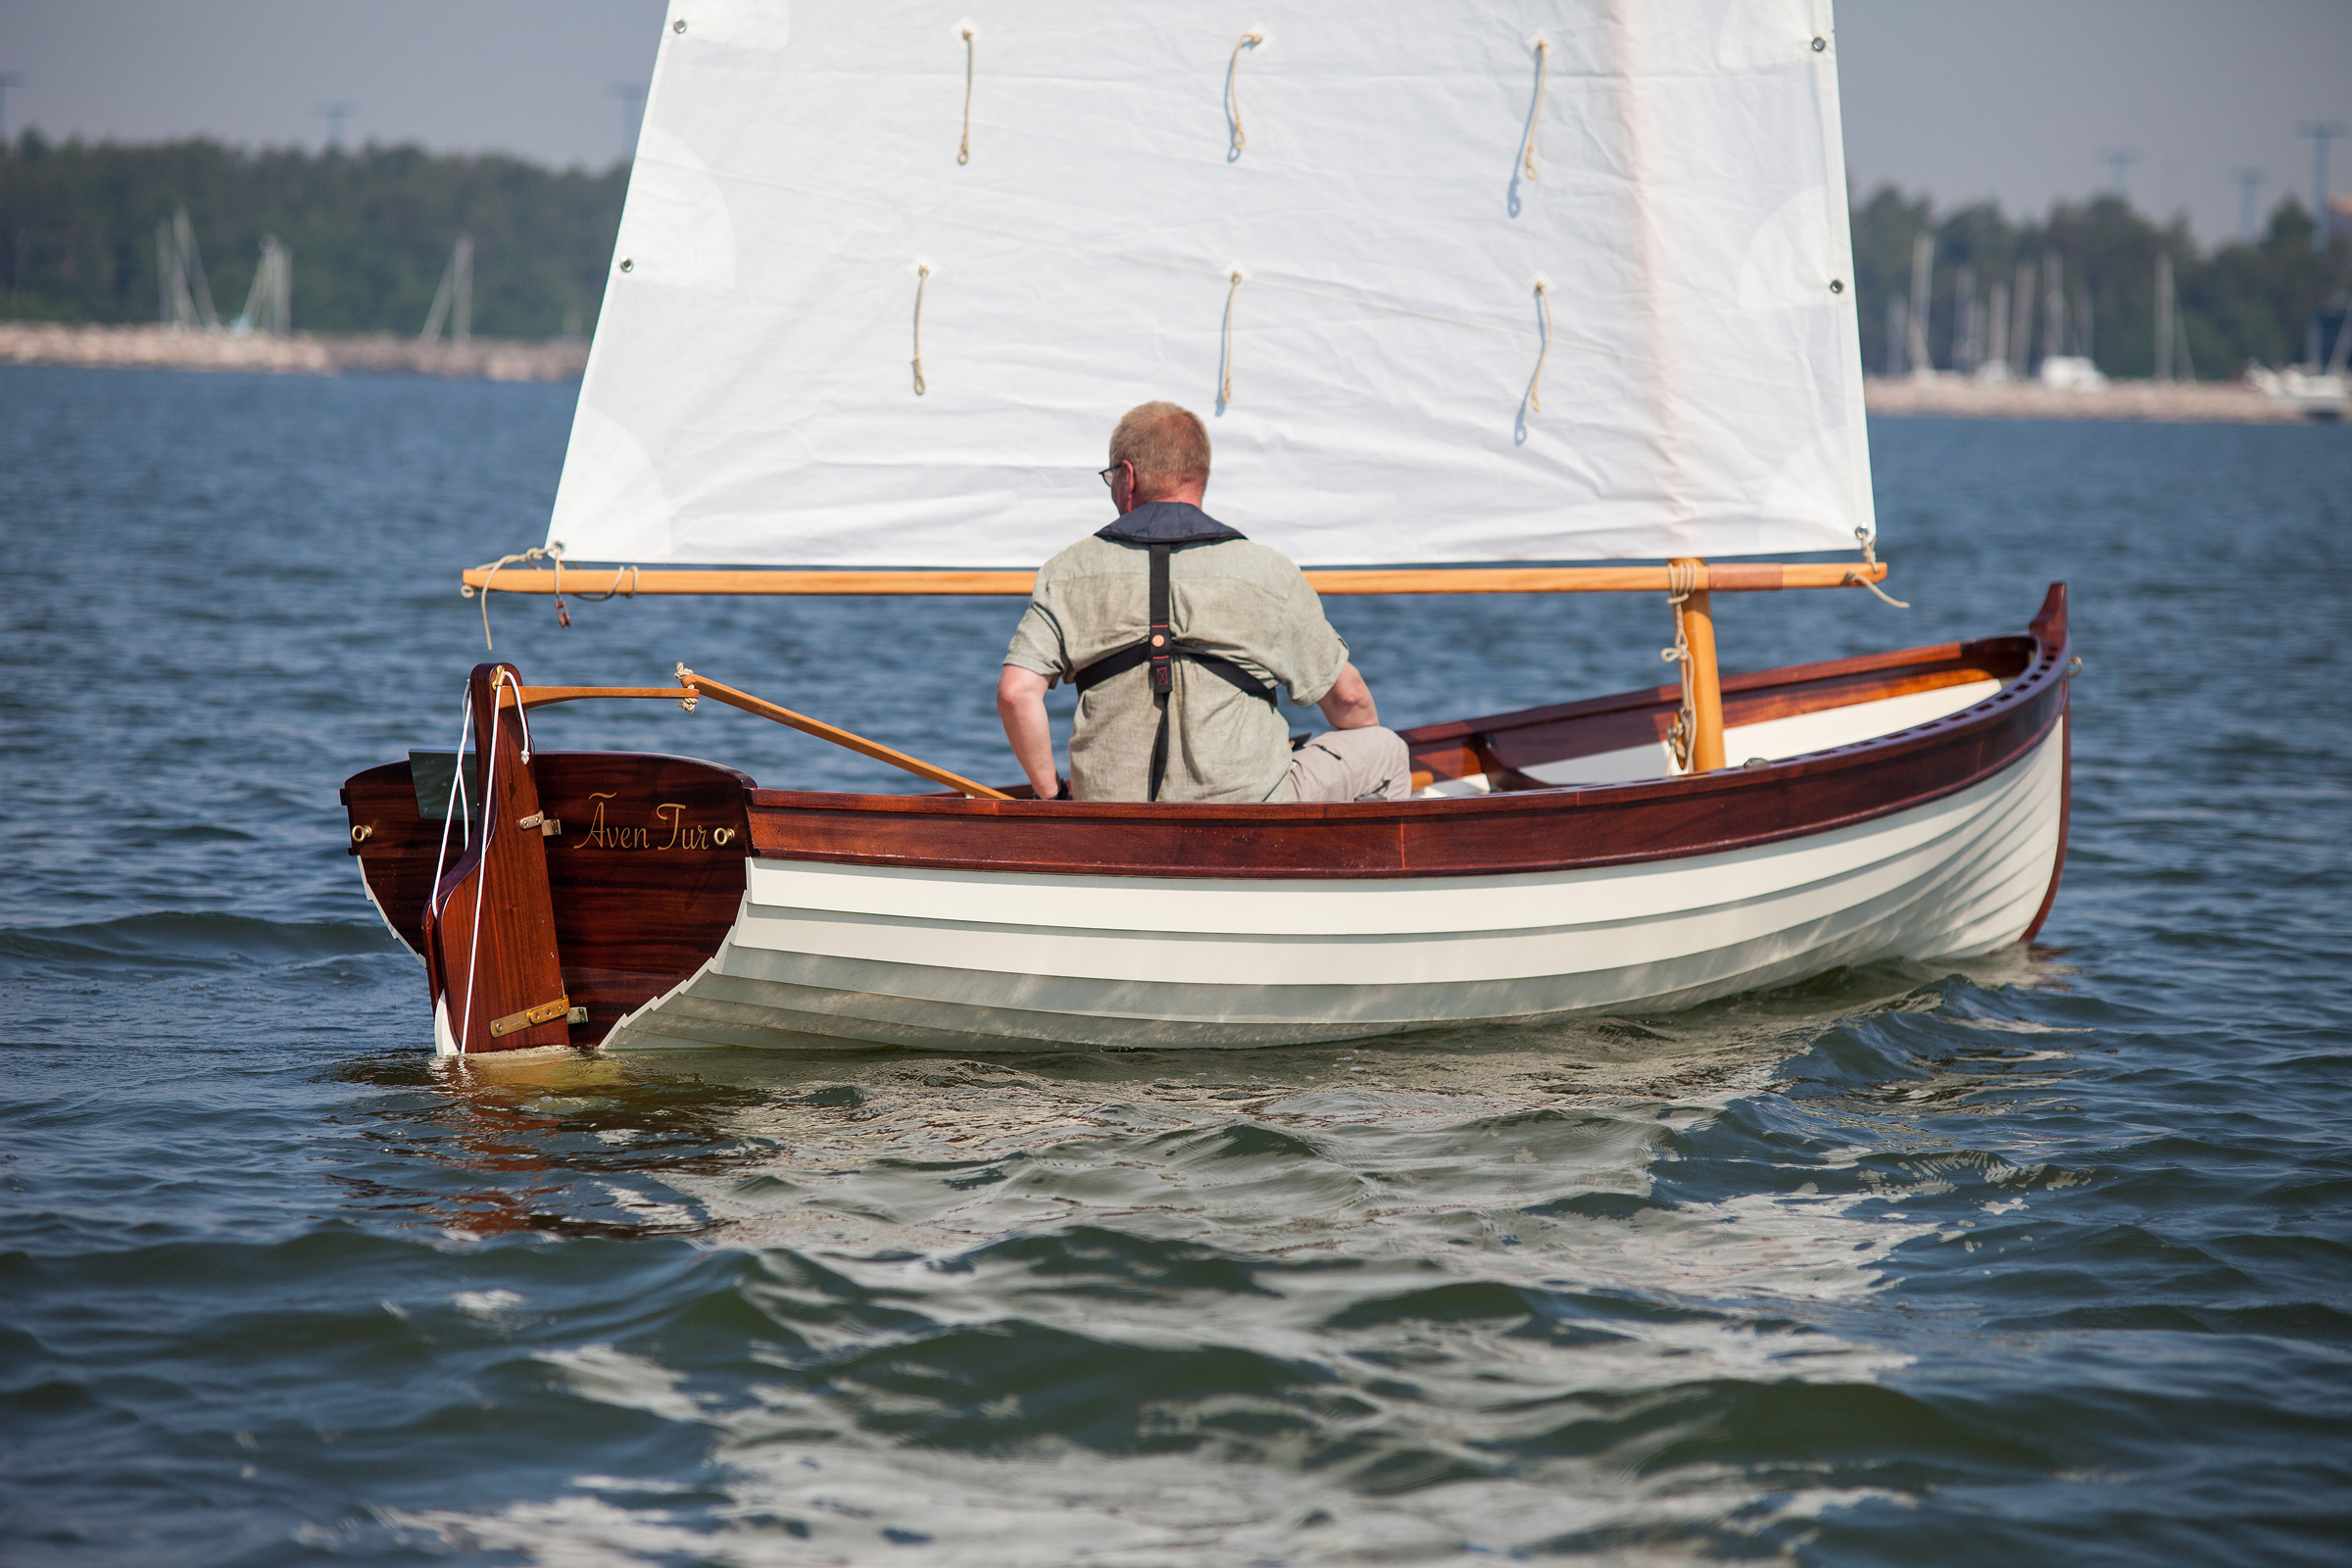
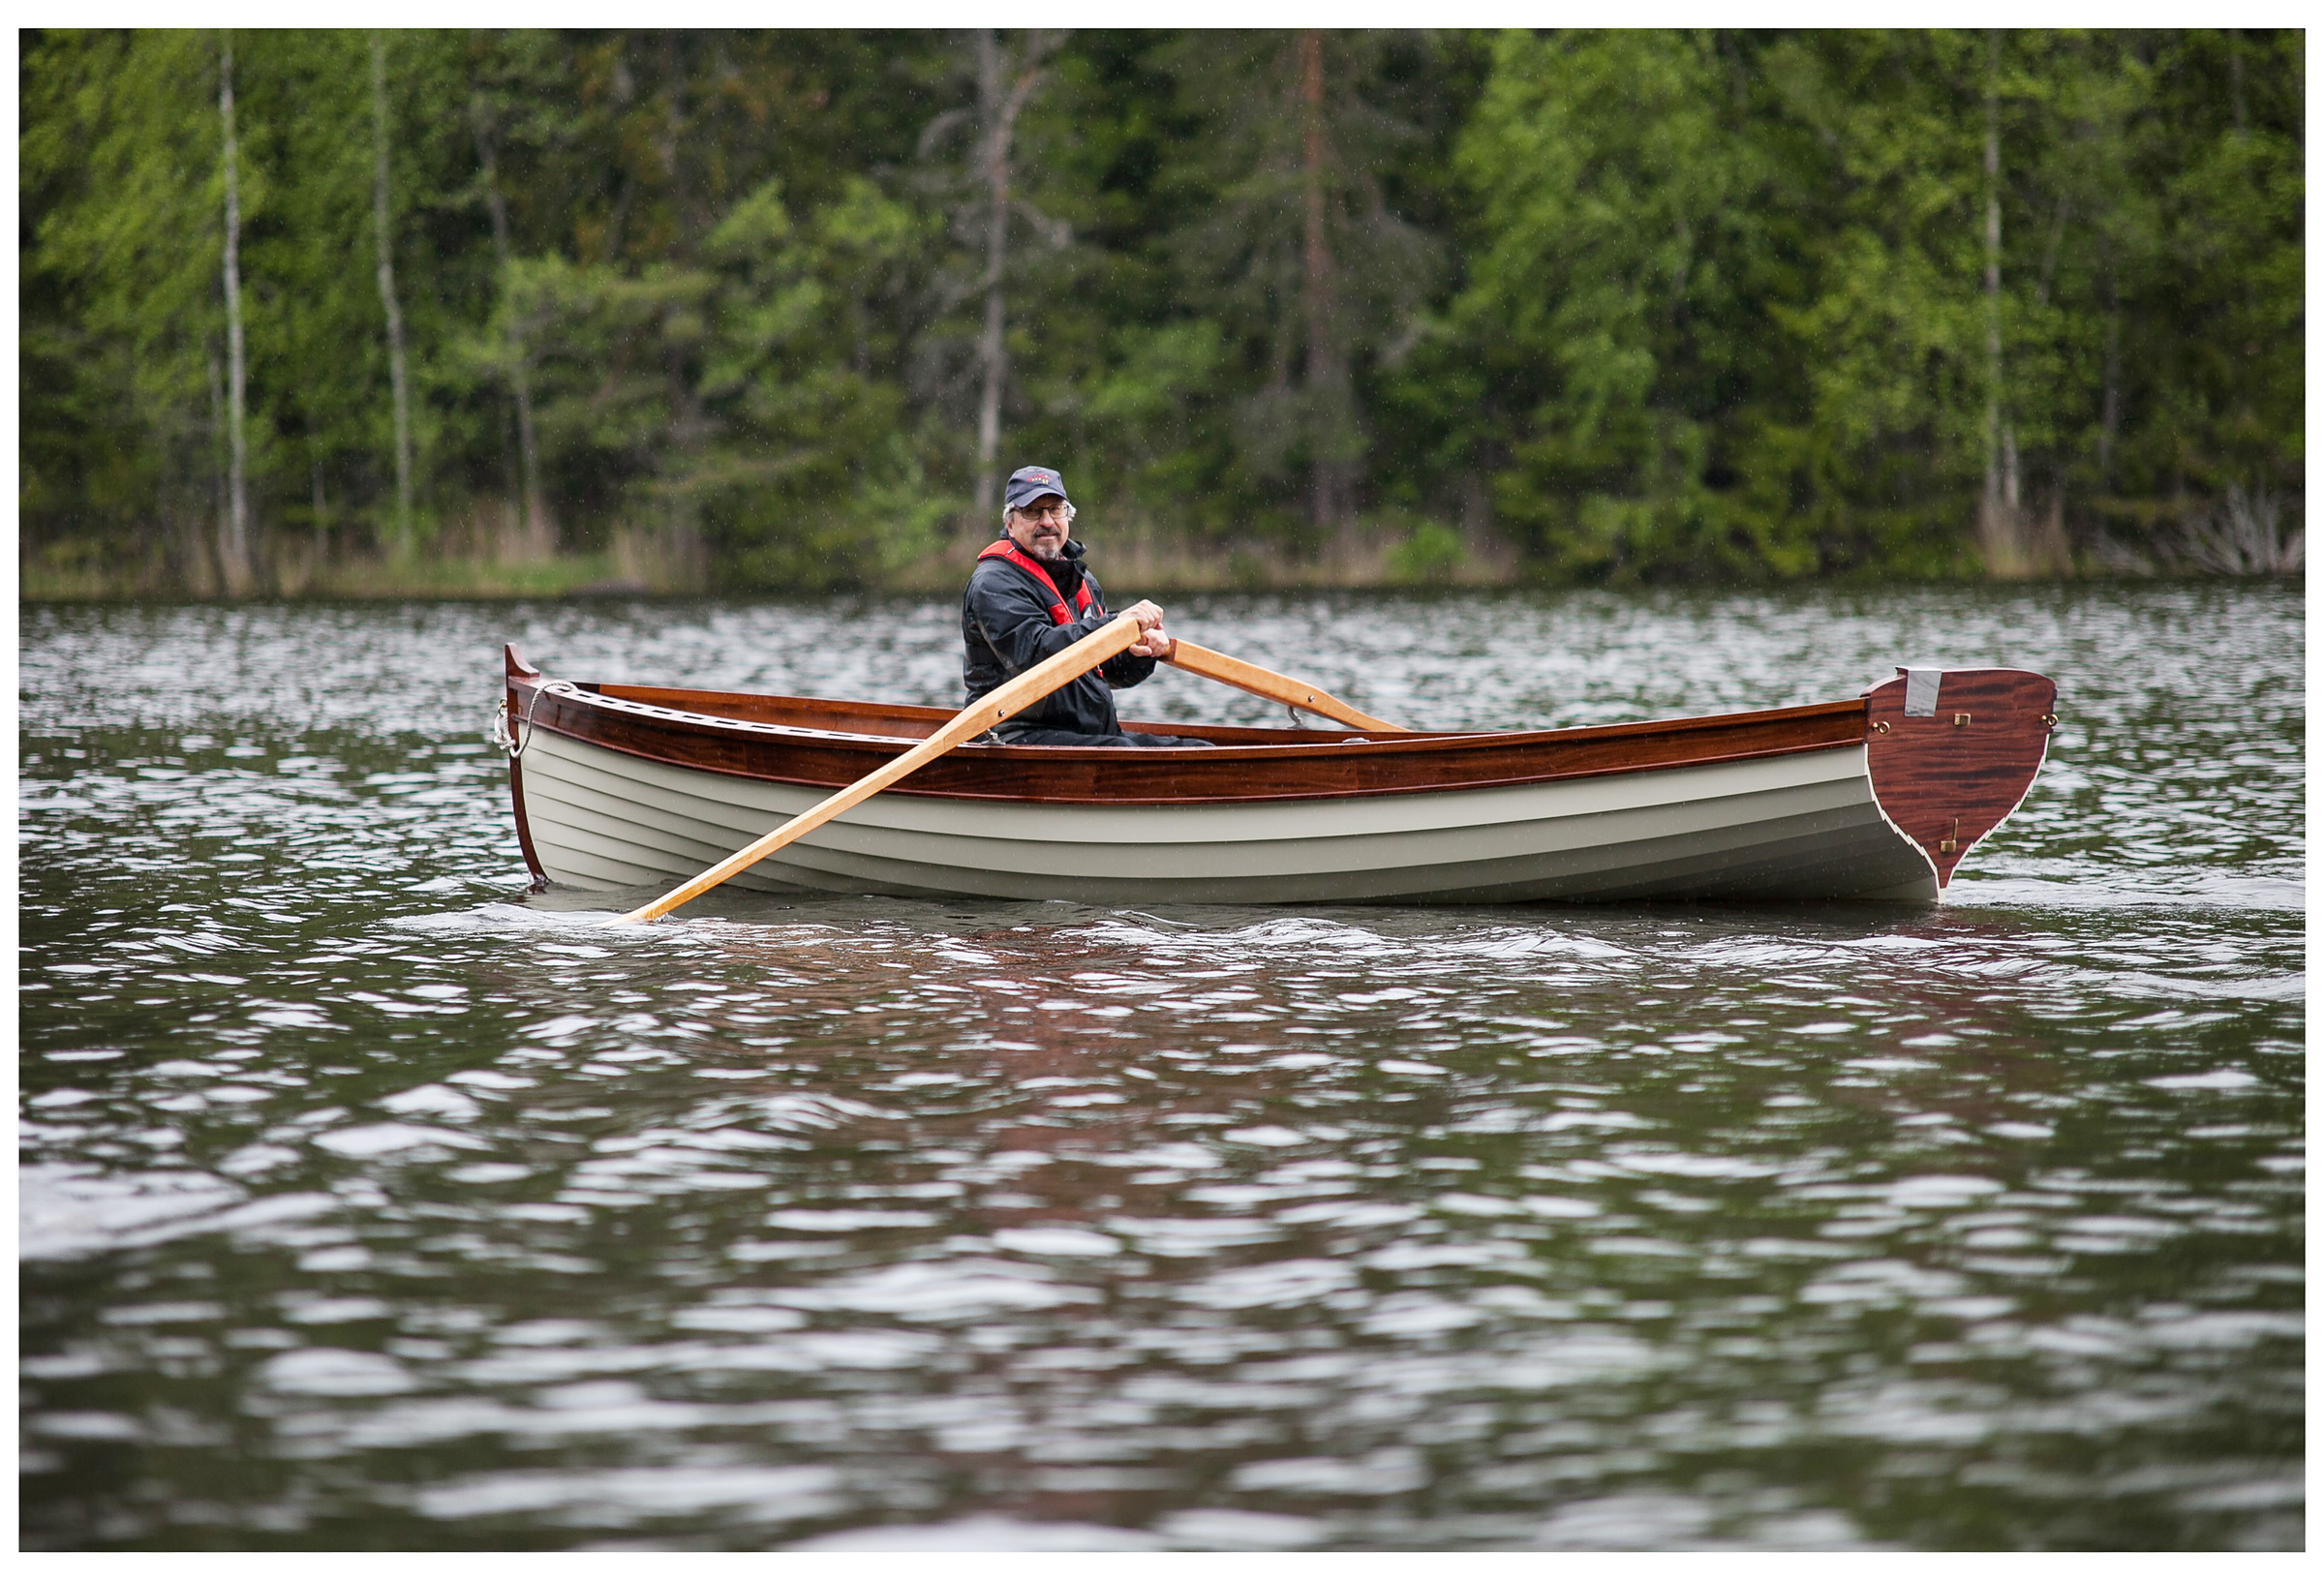
Christophe Matson
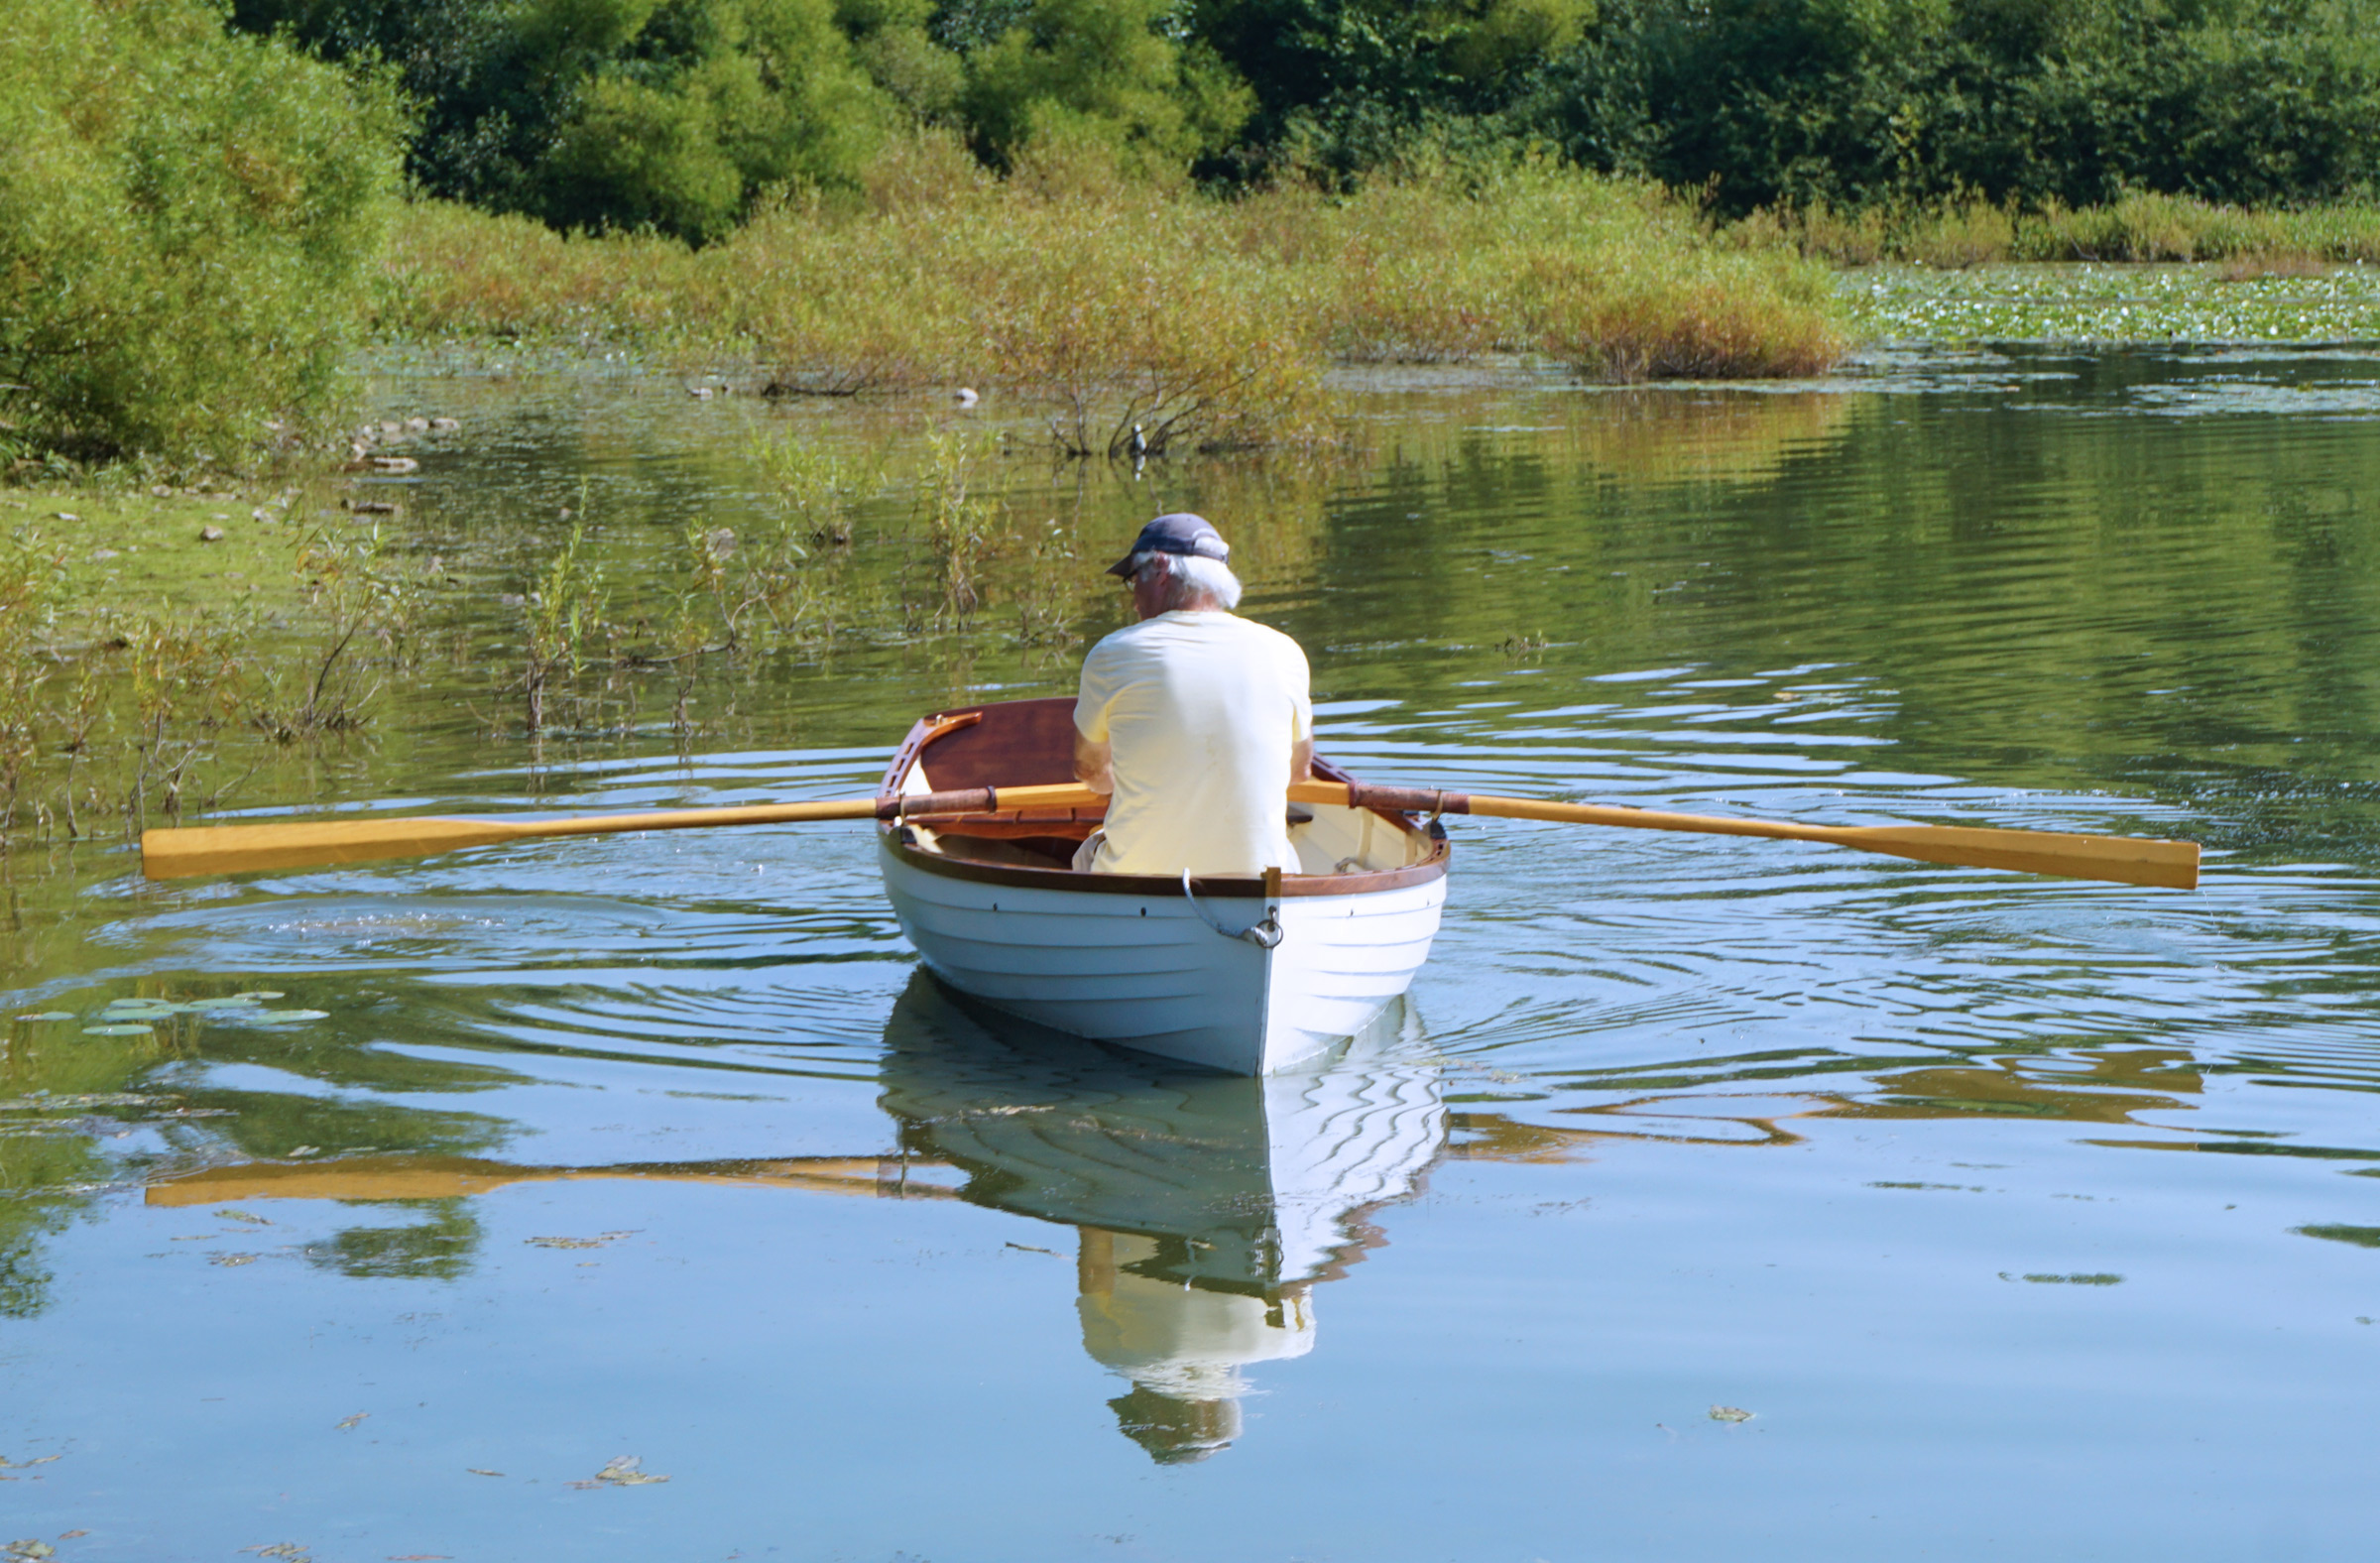
Here Paul is rowing KESÄ during the 2021 Downeast TSCA early spring gathering at Tenants Harbor in Maine. This event was hosted by Small Boats contributor Ben Fuller. KESÄ is primarily a rowing boat but has a 40 sq ft downwind rig and rudder but no centerboard. She is a veteran of many Small Reach Regattas, among other adventures.
Paul and Sharon didn’t need try to sway one another; they could meet each other halfway, at the waterline. Paul would strip-build the bottom to give it every technological advantage, and from the waterline up, the peapod would be lapstrake with the laps and their shadows highlighting the hull’s curves. Christened KESÄ (Finnish for “summer”), the peapod quickly became their favorite, the “go-to boat” for coastal cruises, including many Small Reach Regattas.
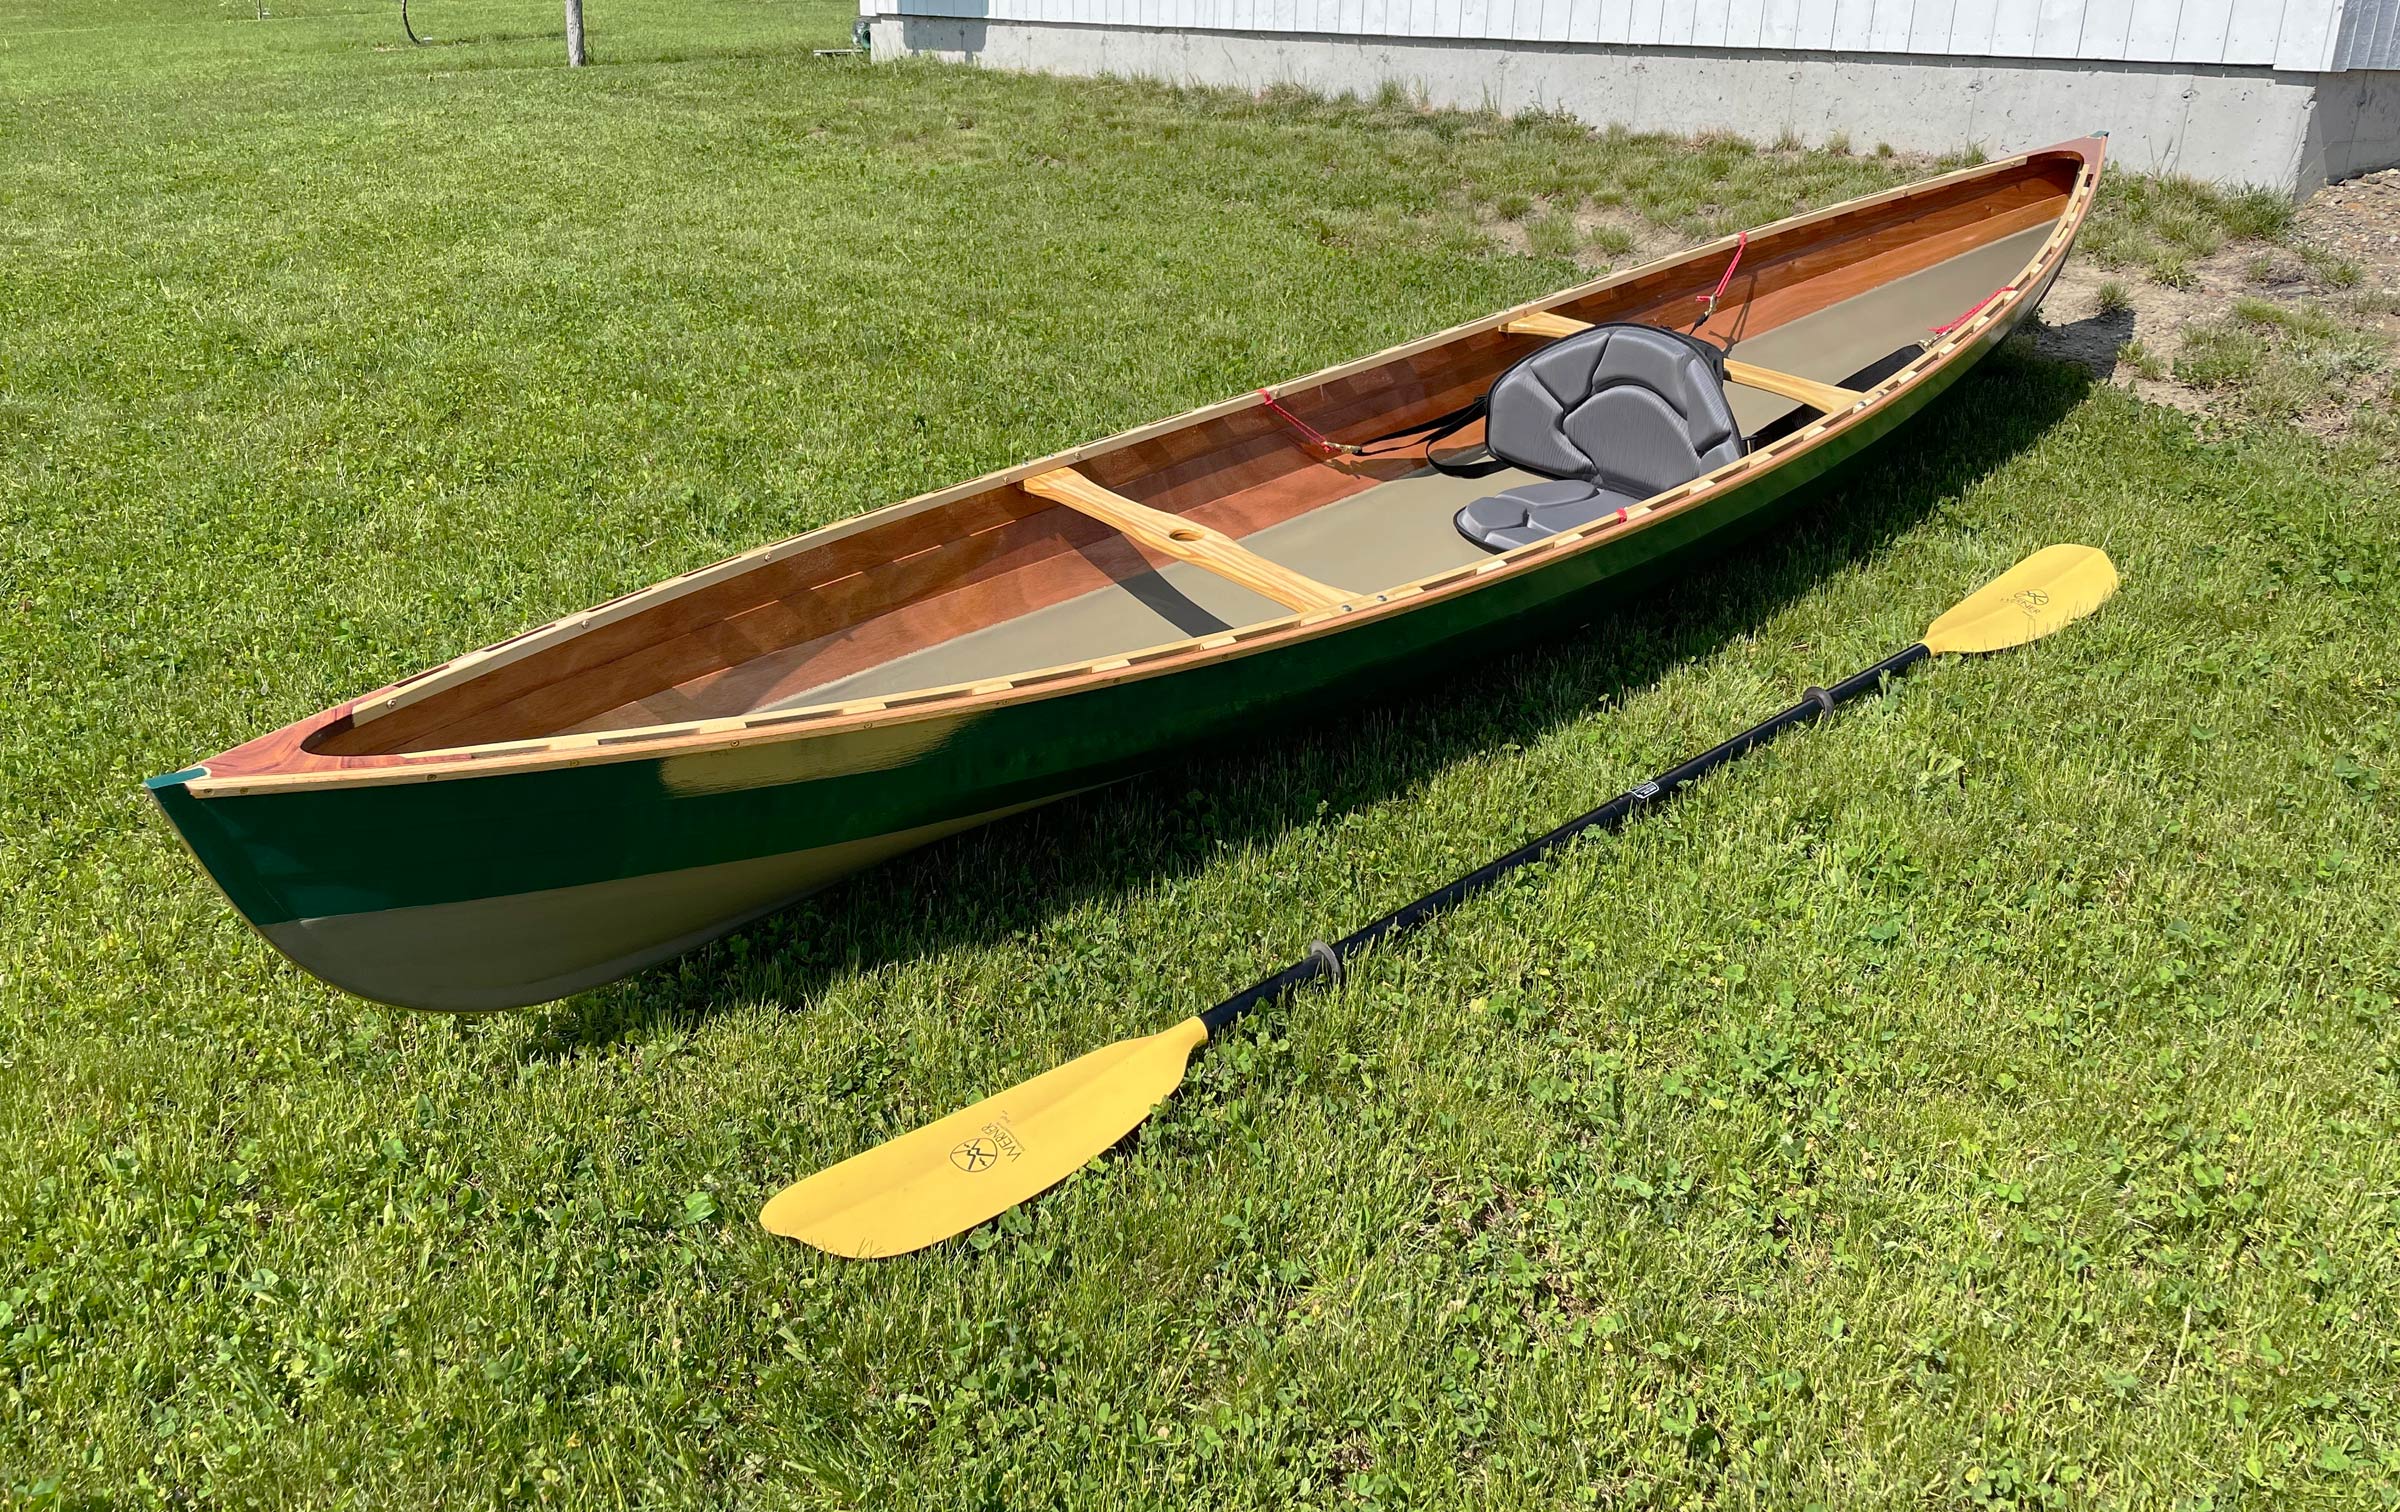
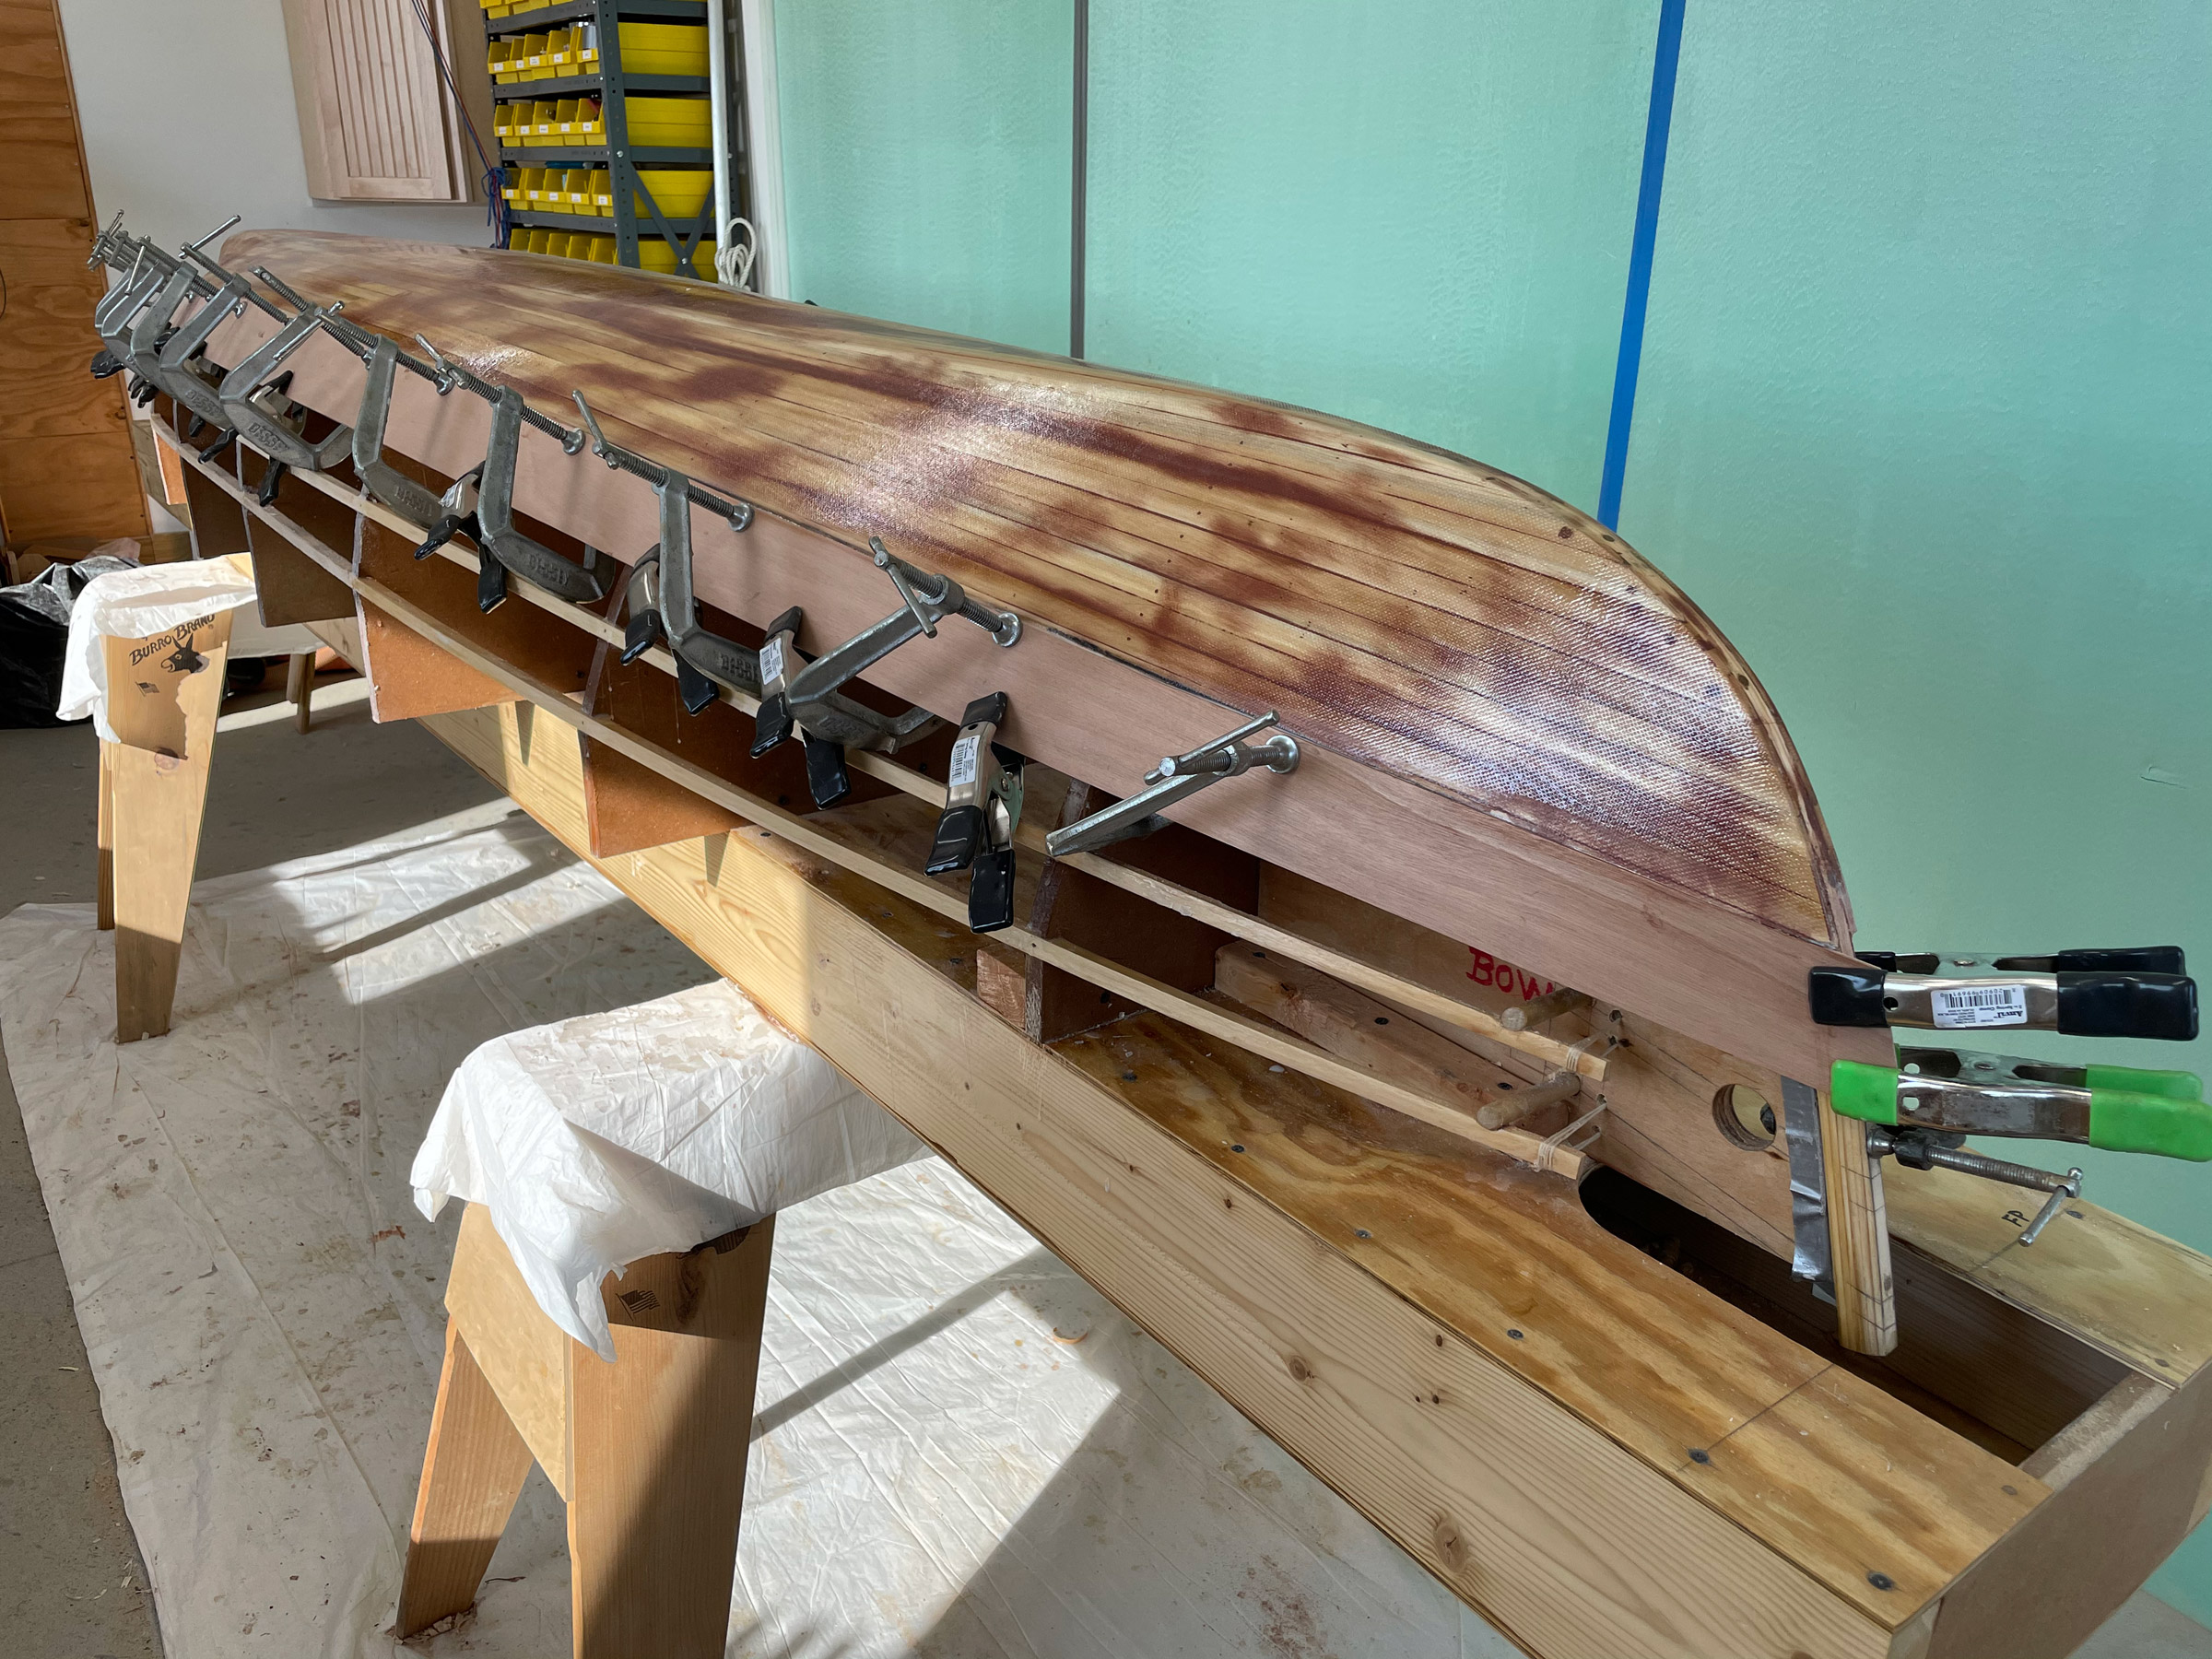
In the past five years, the LaBries have devoted much of their time to building their net-zero home in West Gardiner and maintaining a 25-tree orchard growing heritage Maine apples. With the Cobbosseecontee Stream flowing past their front yard, they wanted to have two easily carried double-paddle canoes that they could launch on a whim. They settled on Iain Oughtred’s Wee Rob, and last winter Paul began work on the first of the two canoes. While the plans specify glued lapstrake construction, Paul used the method he developed during the construction of the peapod.
Paul LaBrie
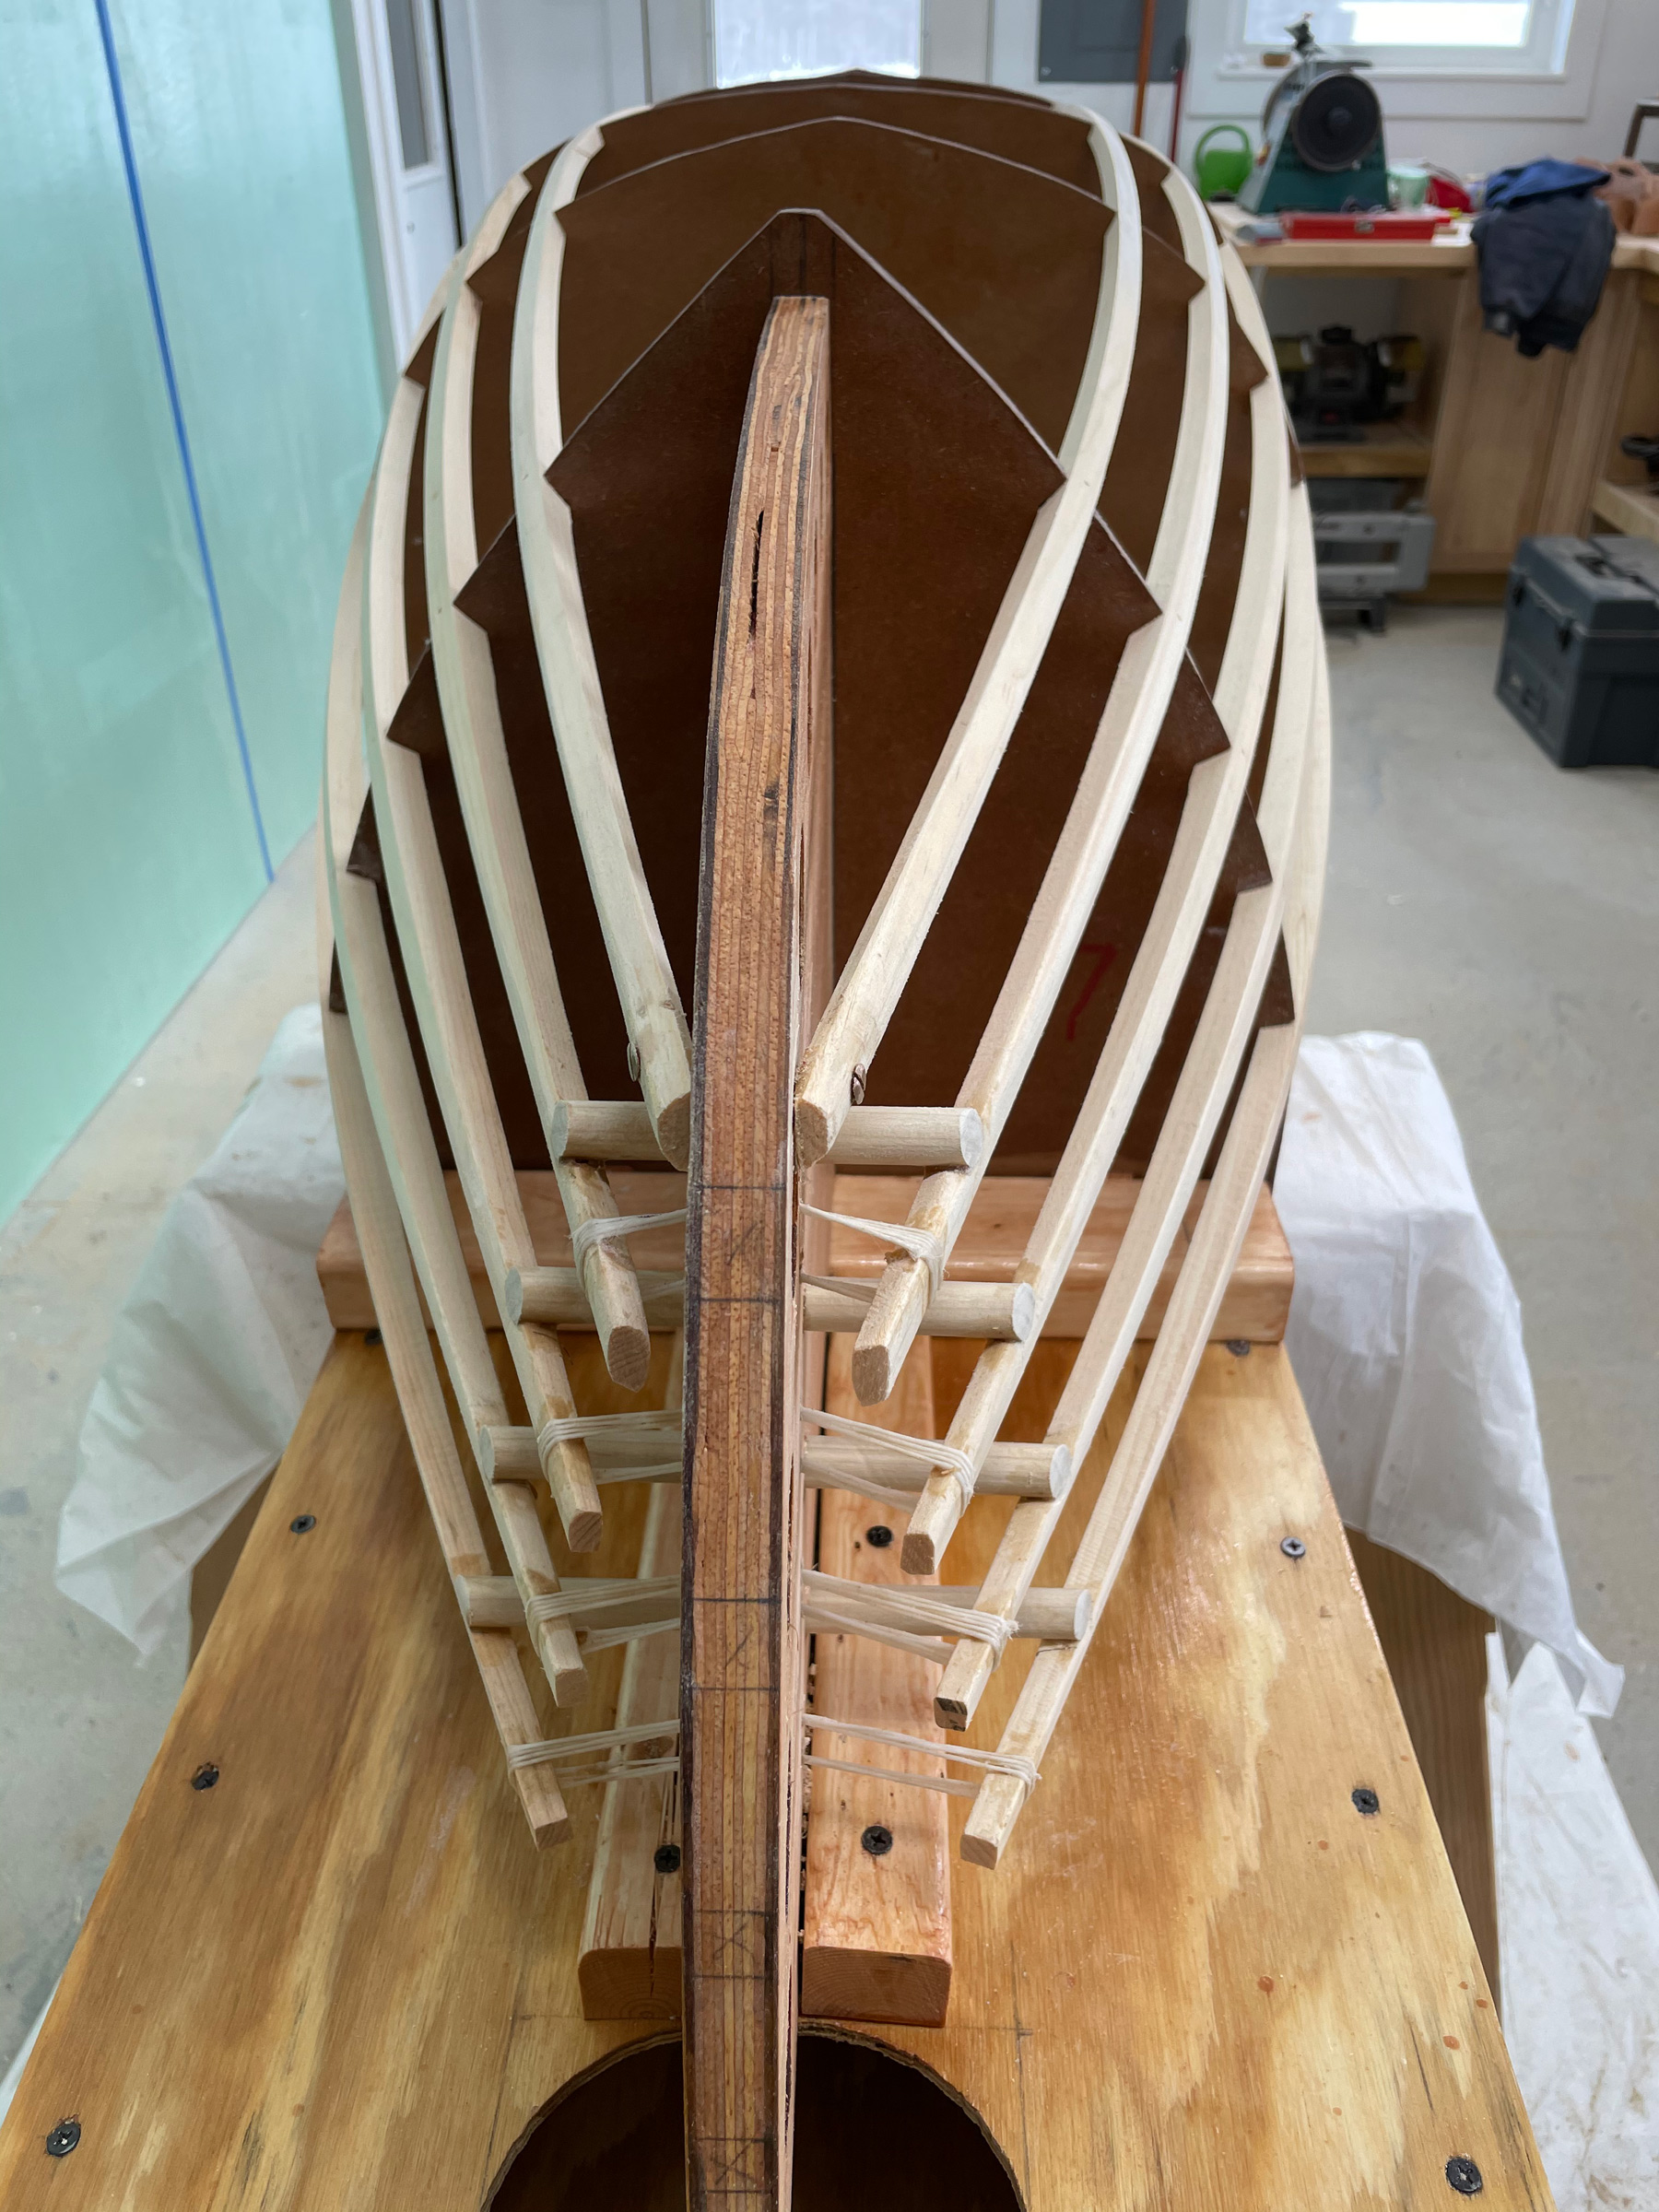
After KESÄ had proved the concept of using strip planking below the waterline and lapstrake planking above, Paul began work on the first of two Wee Robb canoes. The building form is based on the one described by Tom Hill in his book, Ultralight Boatbuilding.
Paul LaBrie
Paul milled the 1/4” strips for the bottom from locally sourced northern white cedar.
Paul LaBrie
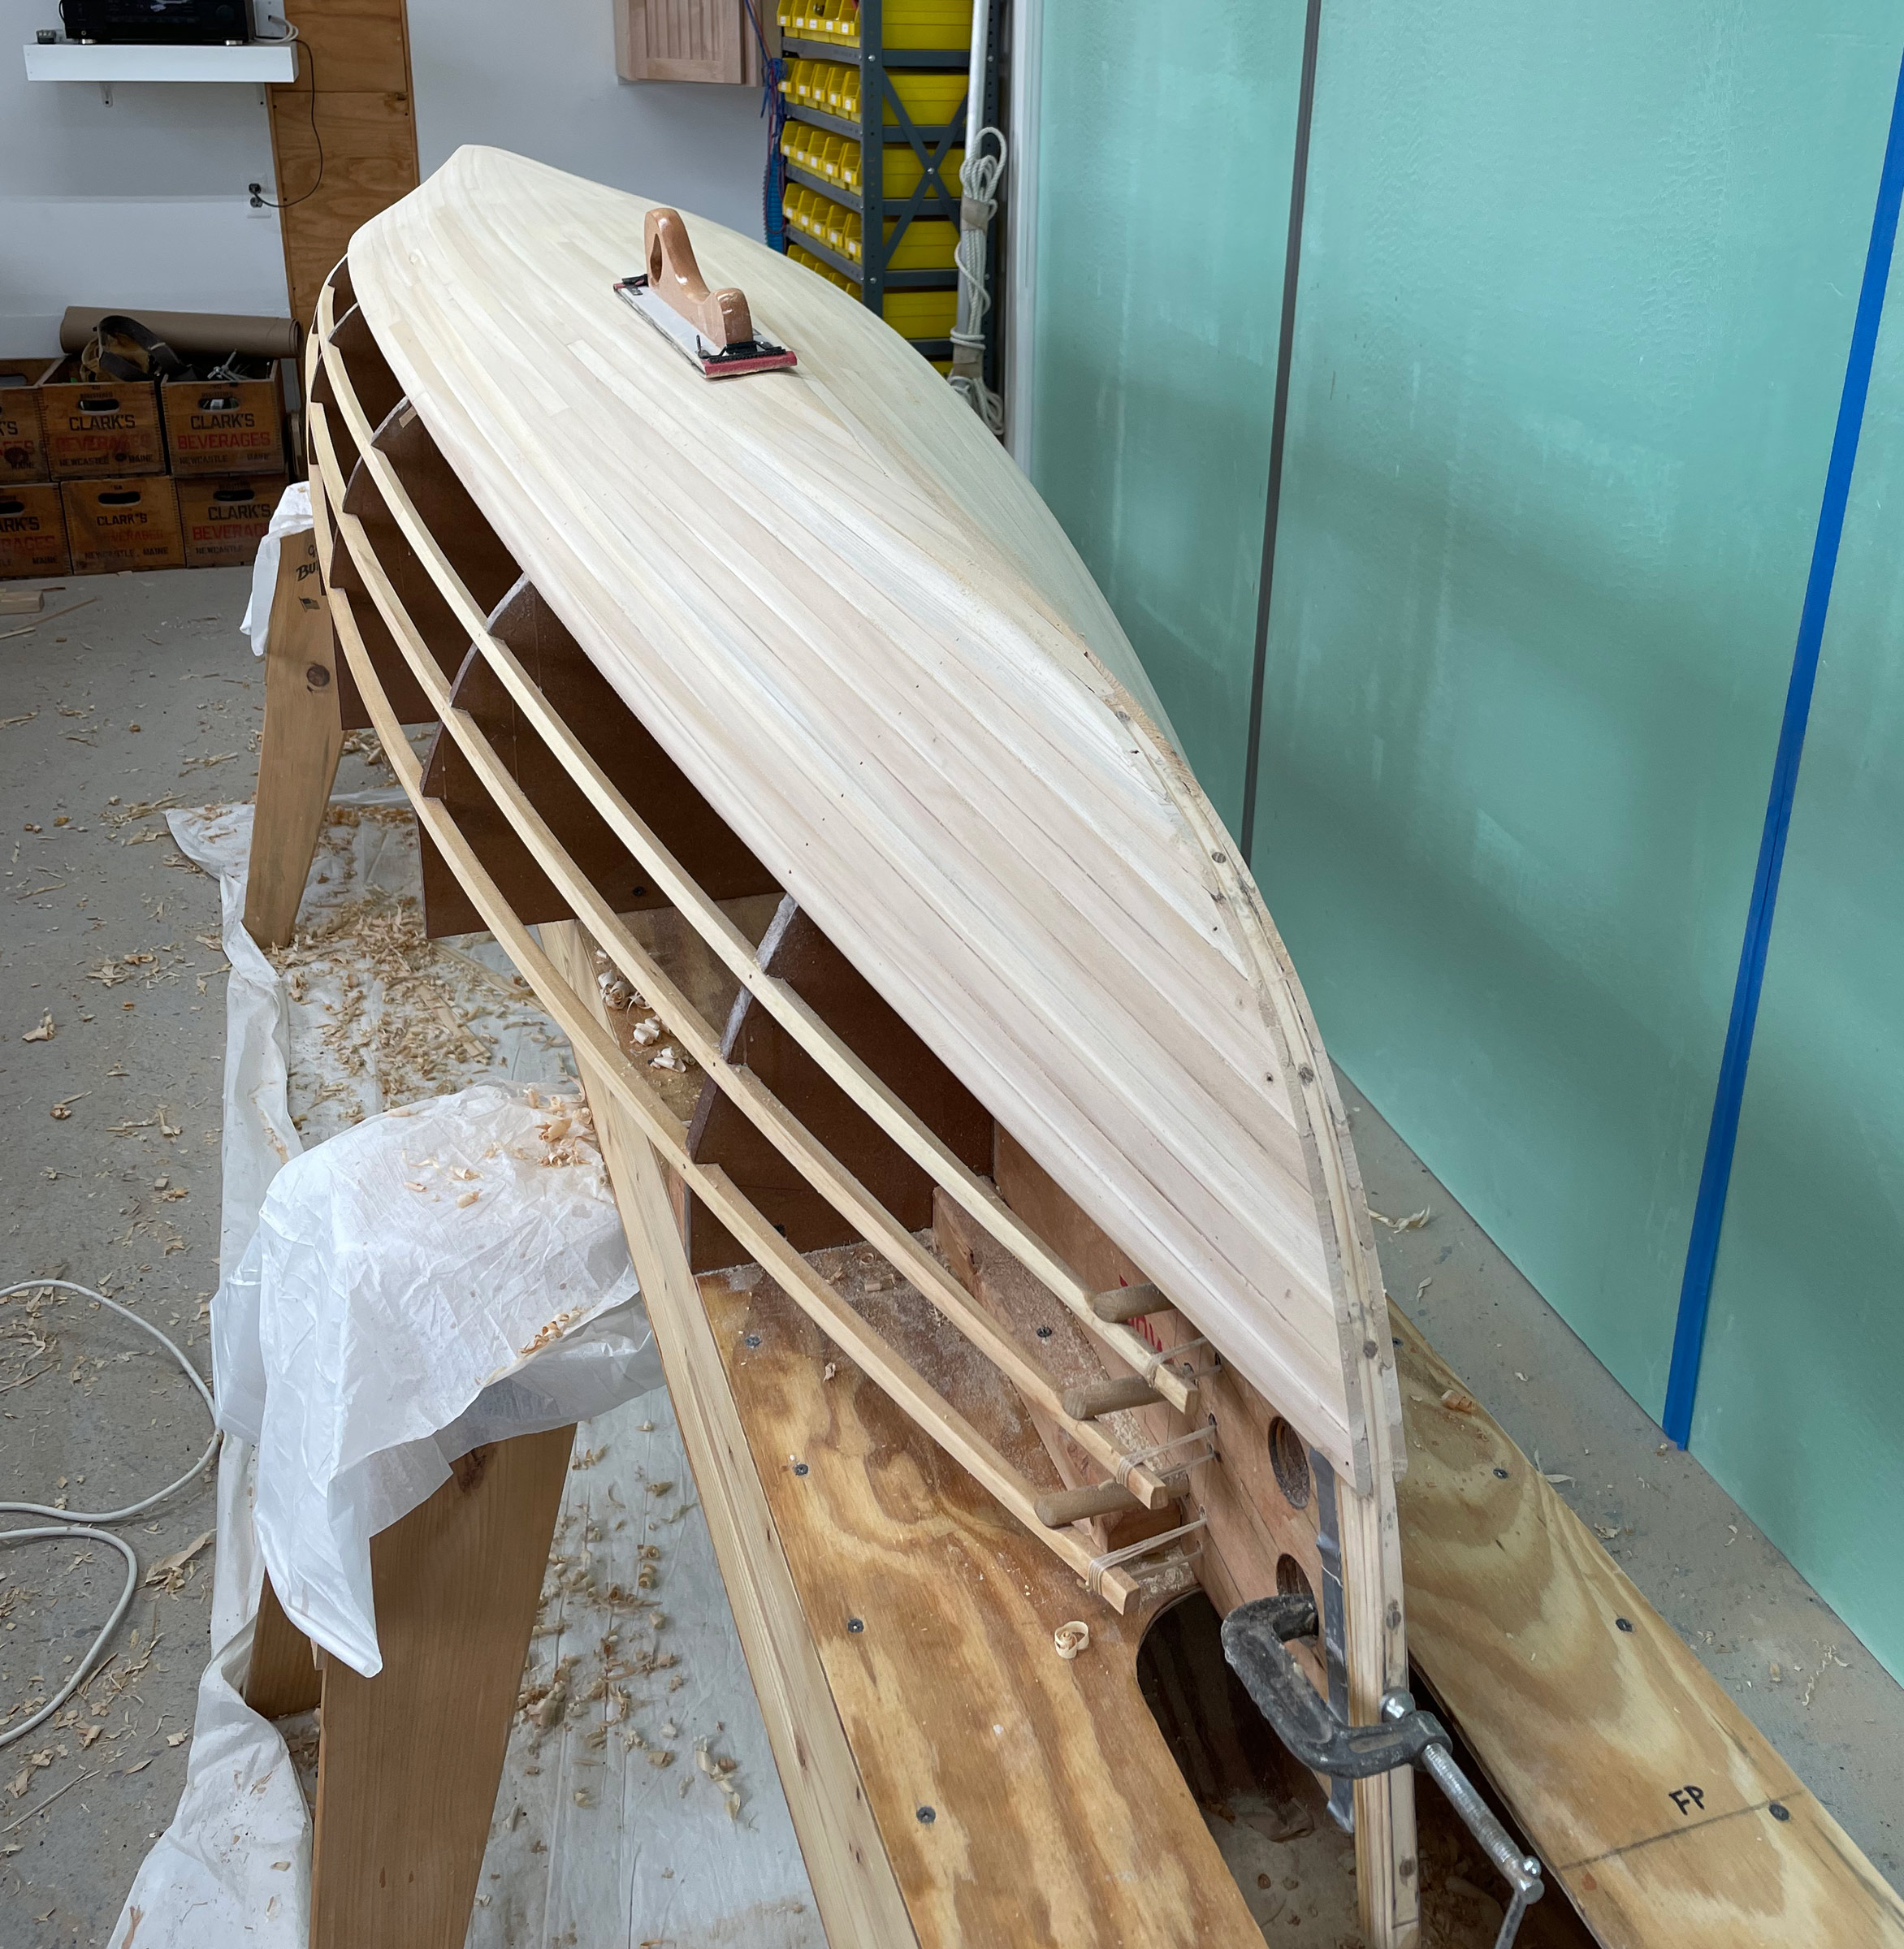
After the strip-built bottom was ’glassed, the first of the 3mm okoume plywood strakes went on.
Paul LaBrie
The bottom is not only uninterrupted by laps, but also well protected with sheathing of fiberglass and epoxy. Three strakes of glued-lap plywood finish the hull.
Paul LaBrie
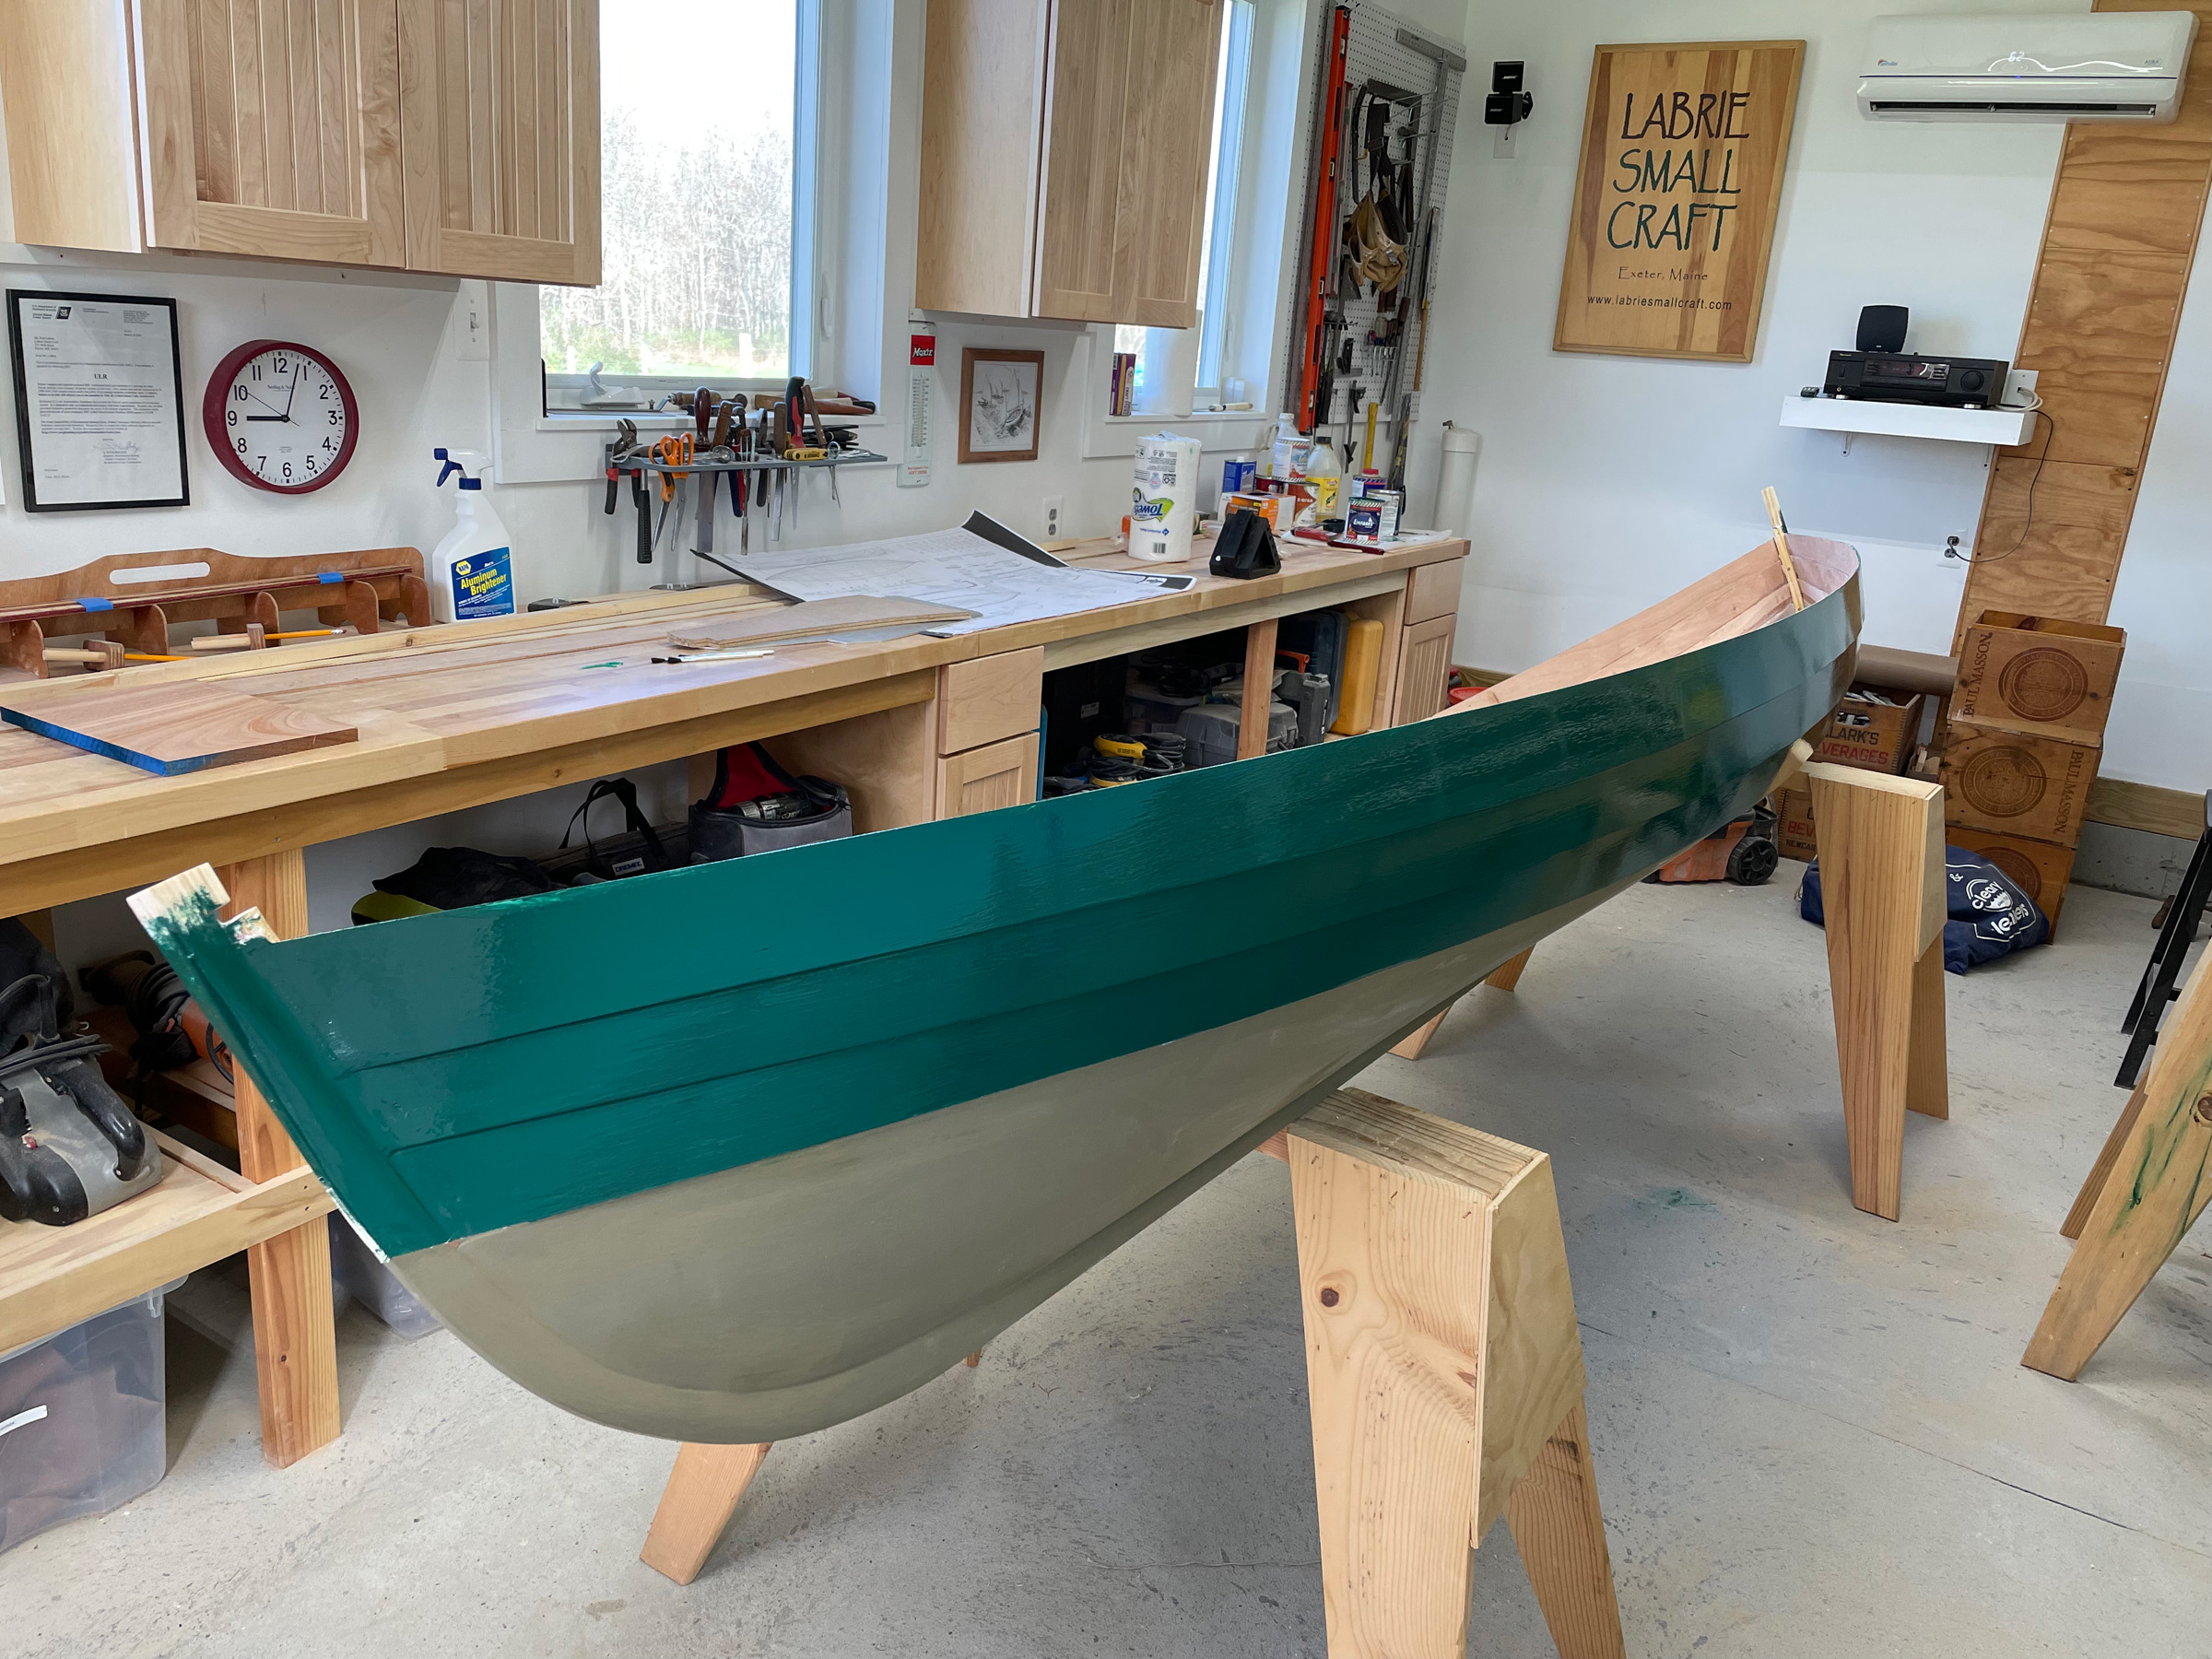
The three plywood strakes will be fully visible above the waterline. The bits of the strip-built hull that will also show will easily be taken to be a fourth strake, completing the illusion of a fully lapstraked hull.
Paul LaBrie
The canoe was finished with inwales of locally-sourced spruce and outwales of red oak. The thwarts are also spruce; the forward has a hole in it and serves as a mast partner. The seat is designed for sit-on-top kayaks. The 230 cm kayak paddle, seen here at launch day, turned out to be a bit too short.
Paul LaBrie
To the left is part of the LaBrie boat collection, with their original 18′ Grumman canoe, KESÄ, a 18′ E.M. White guide canoe, and the newly launched Wee Robb. The setting is the LaBrie waterfront on Cobbosseecontee Stream and the occasion is their annual Cobbosseecontee Stream Downeast TSCA gathering, usually held in late May. The man in the black shirt is Ben Fuller, David Wyman is in the red shirt, and at right is Hildy Danforth.
Paul LaBrie
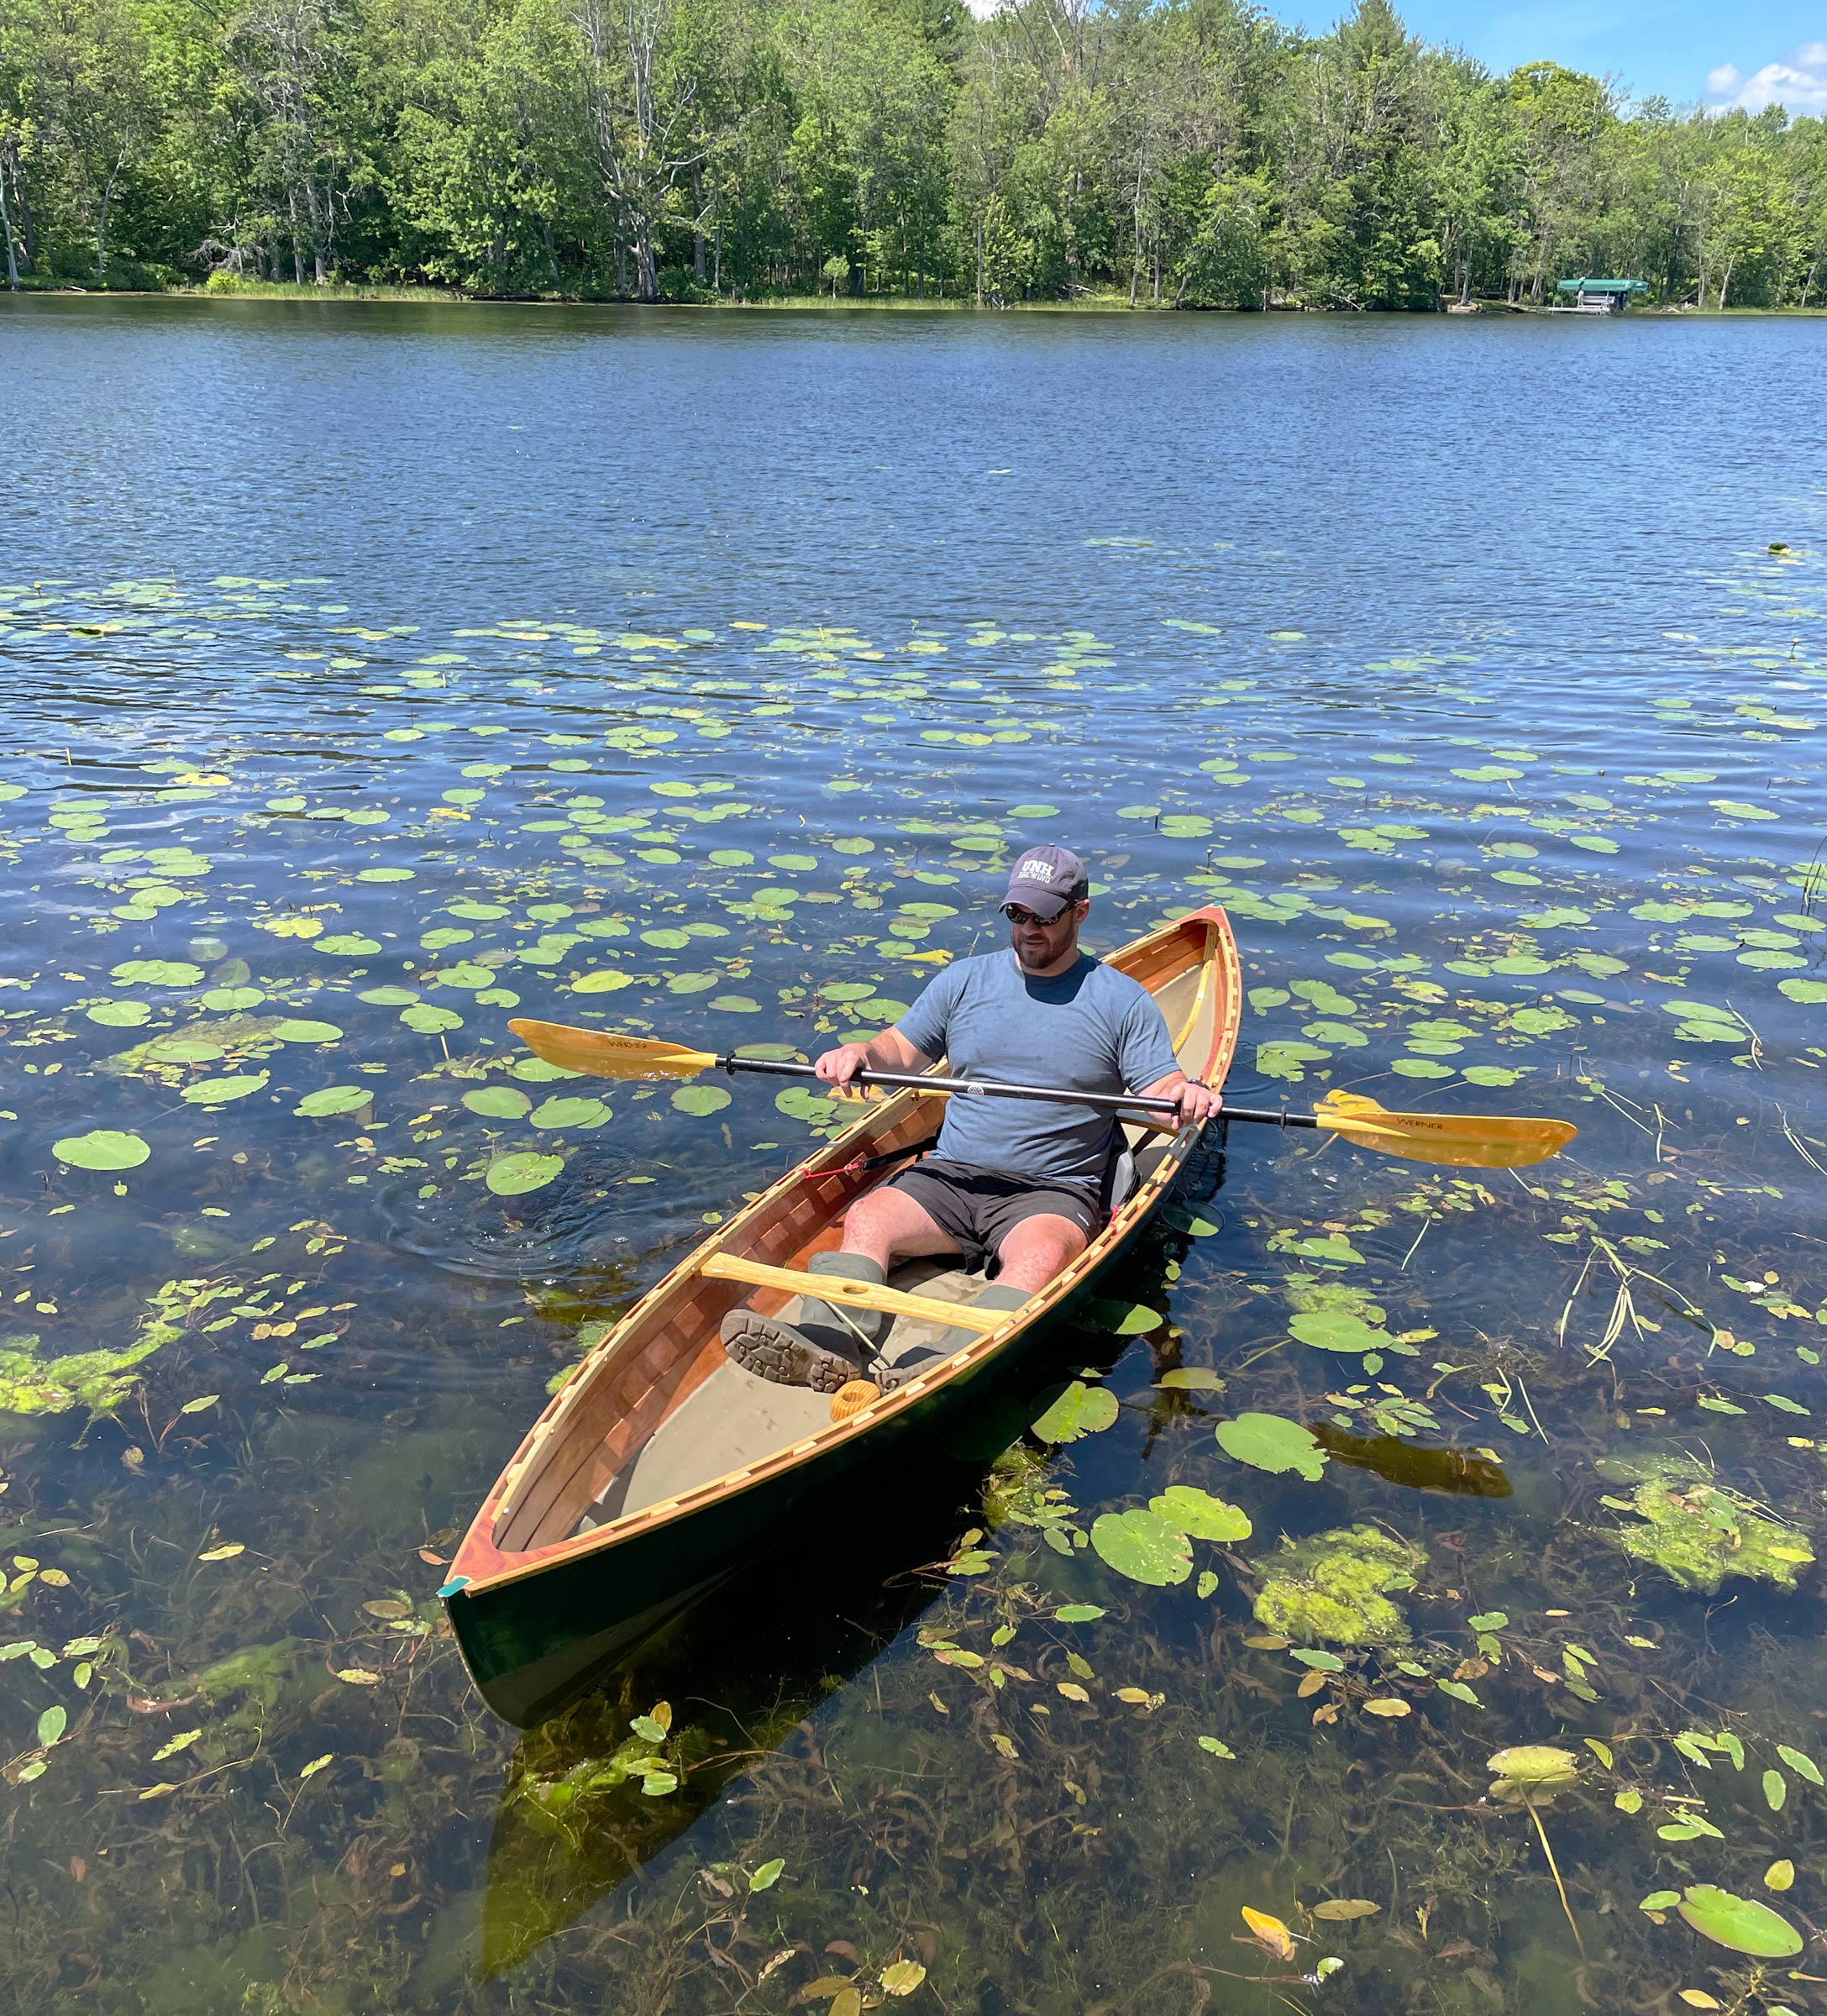
The LaBrie’s son, Jonathan, after launching from their dock on Cobbosseecontee Stream. Jonathan loves the canoe and has asked his parents to build him one.
Paul LaBrie
Jonathan paddled the Wee Robb out through some shoreline reeds to the open wasters of the Cobbosseecontee.
Of course, Paul could have built a lapstrake version for Sharon and a strip-built for himself, but he and Sharon wouldn’t be paddling toward a fiftieth anniversary if they didn’t believe that when two hulls—or two people—are joined together, the whole can be greater than the sum of its parts.
Correction: The photograph of Paul rowing KESA was initially credited in error. The shot was taken by Christophe Matson and the credit has beed corrected above. We apologize for error. —Ed.
Do you have a boat with an interesting story? Please email us. We’d like to hear about it and share it with other Small Boats Magazine readers.
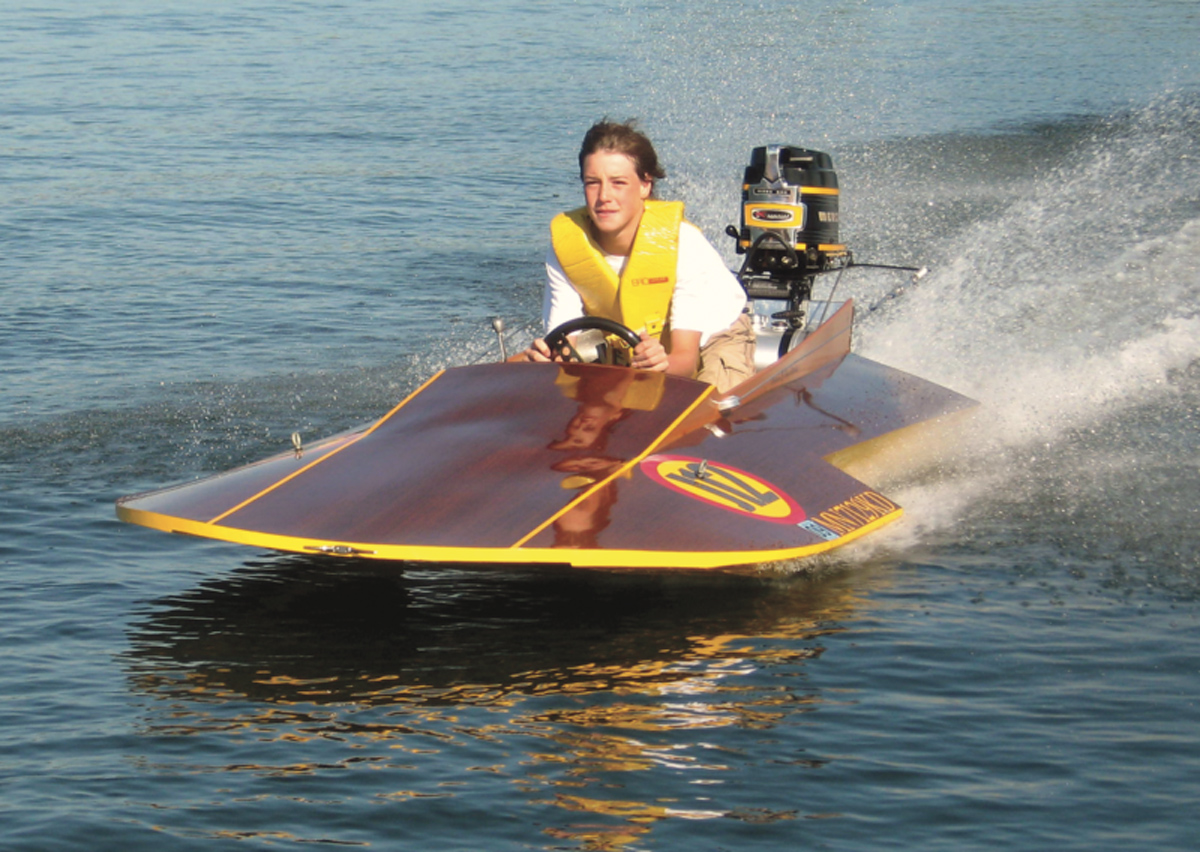
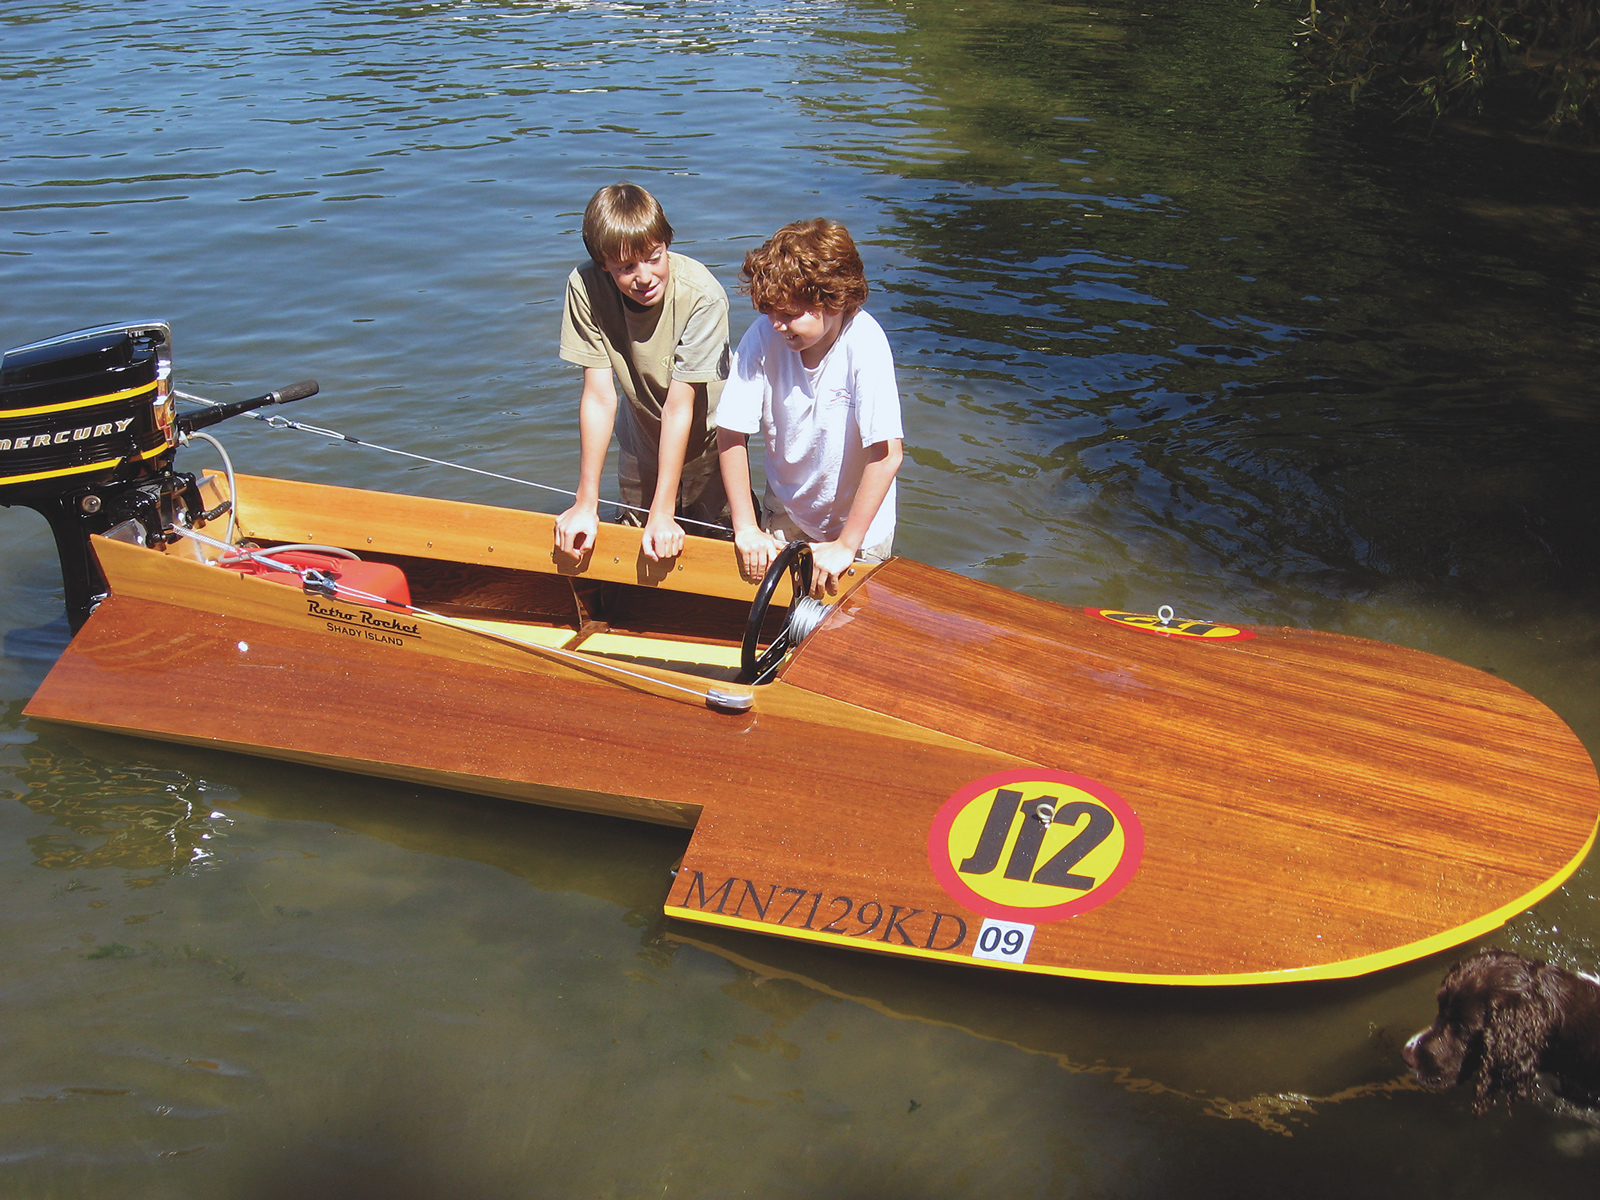
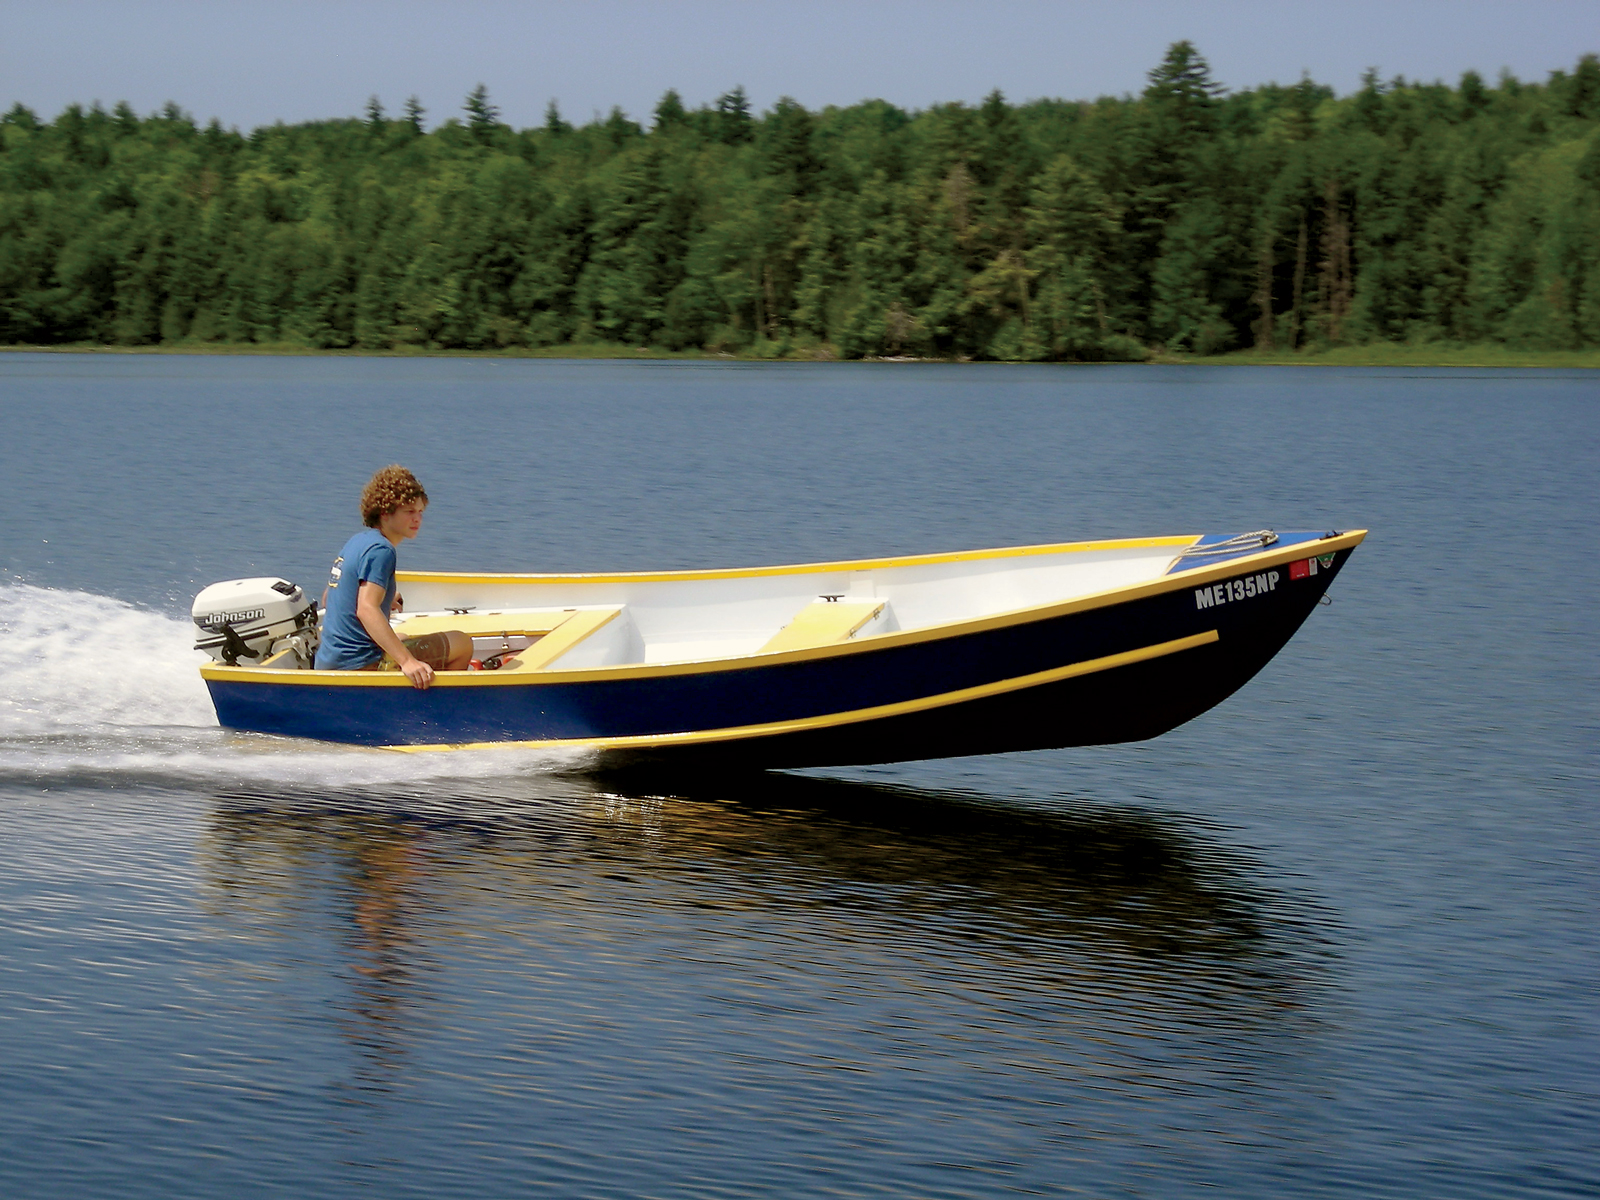
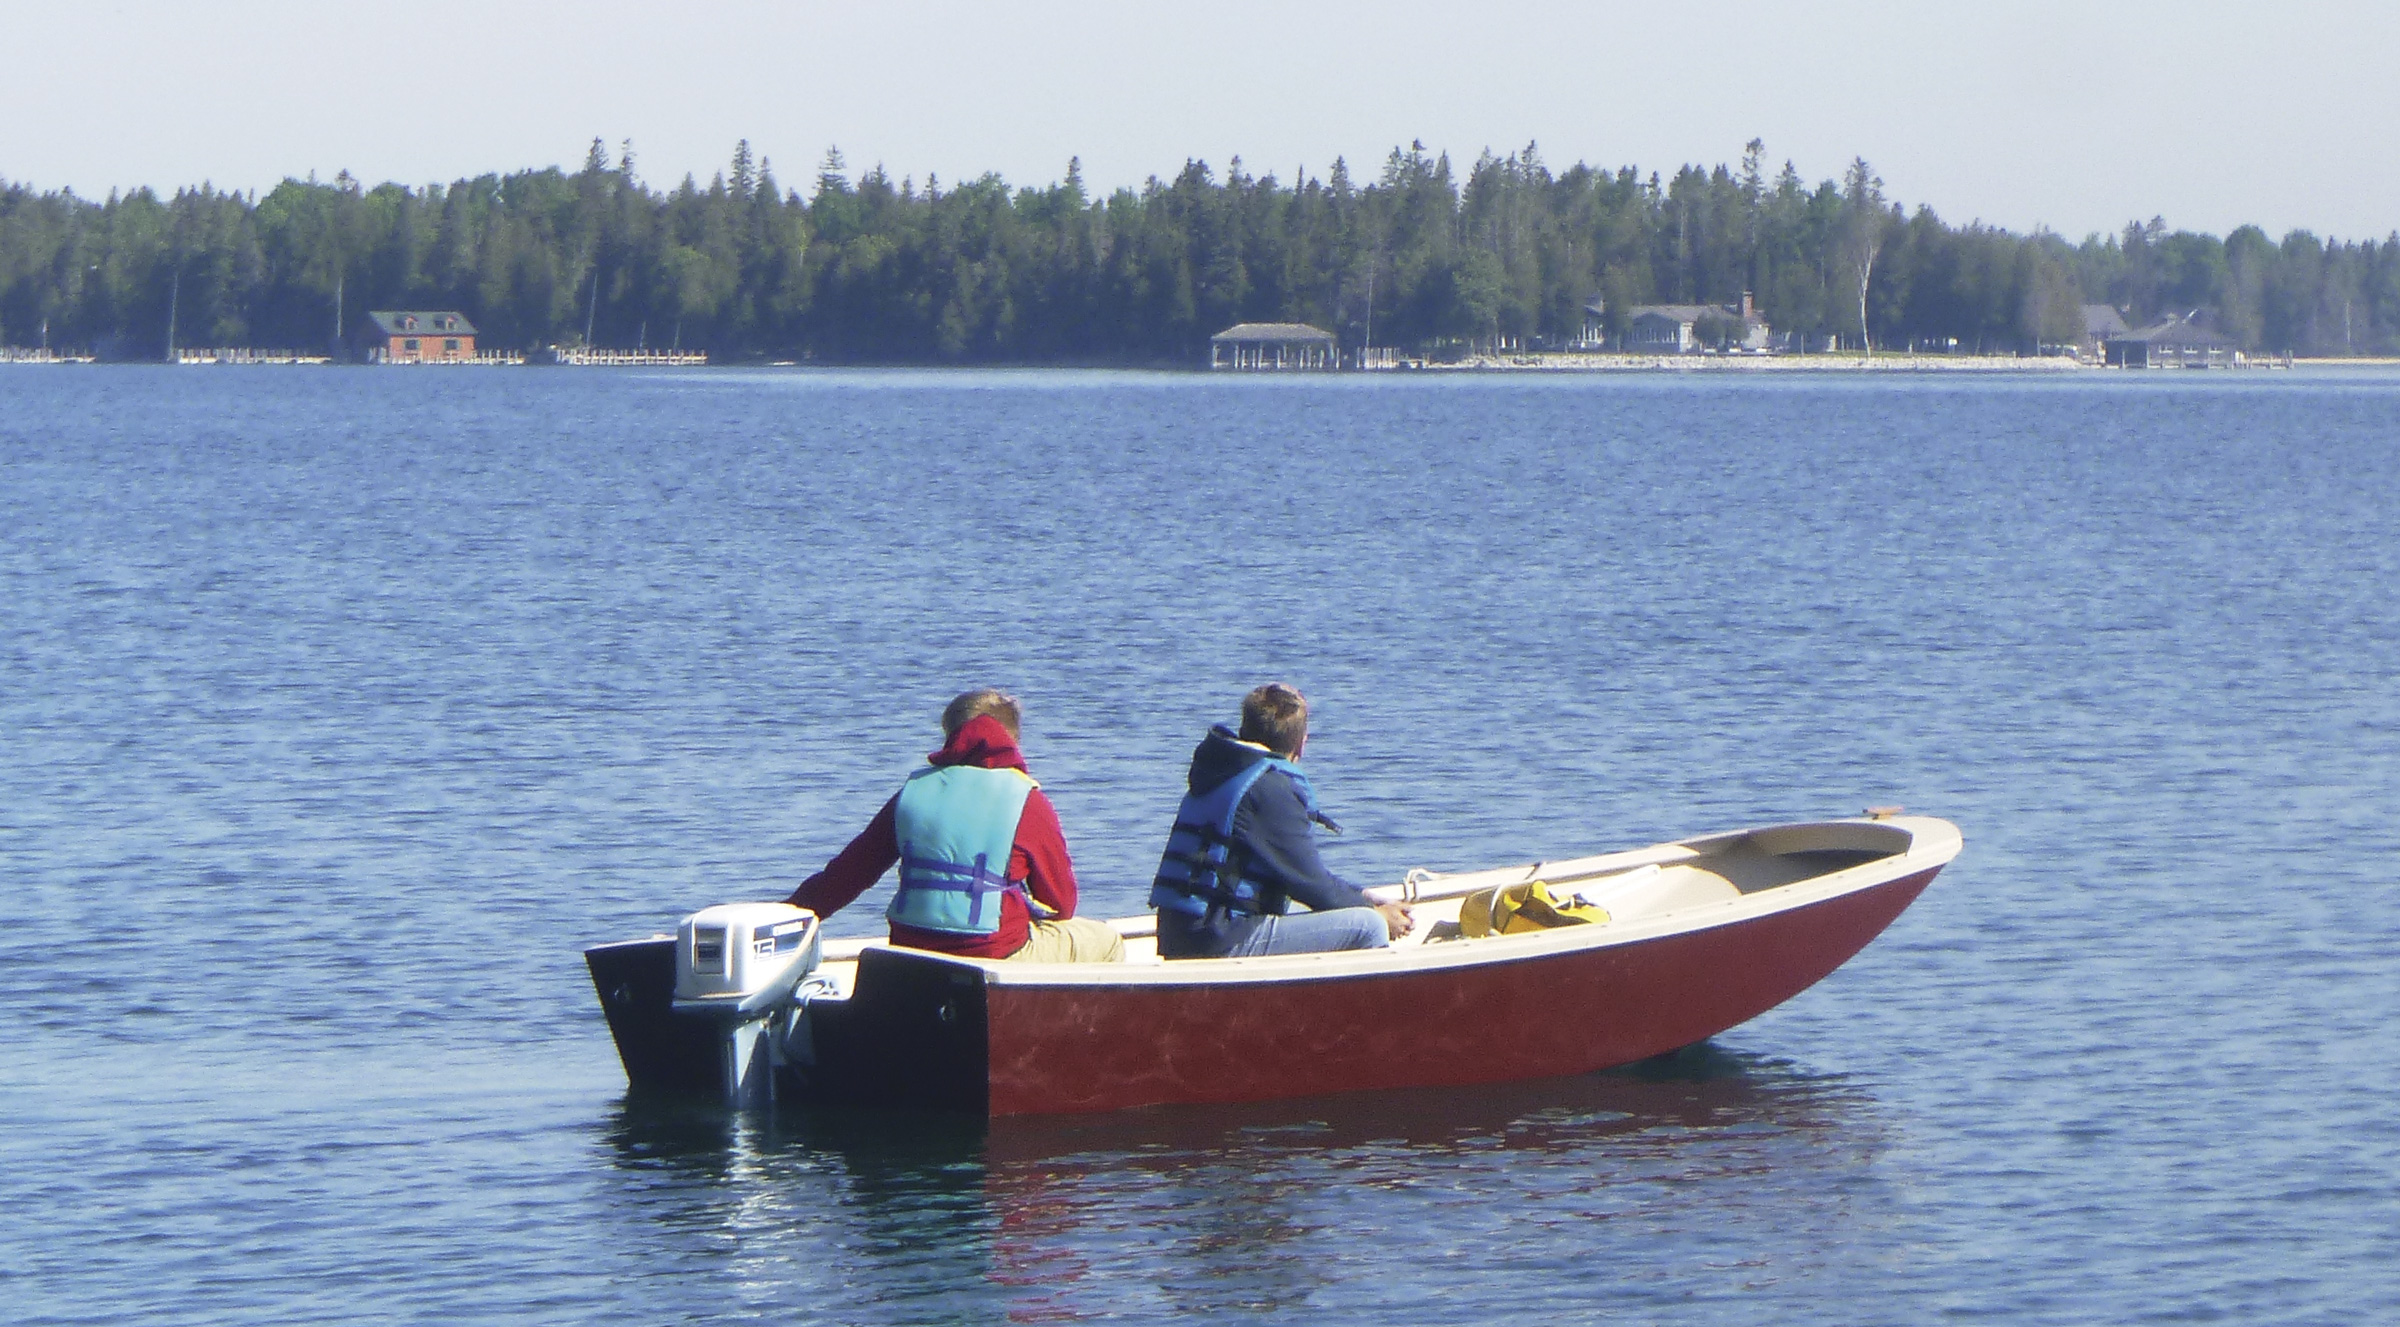
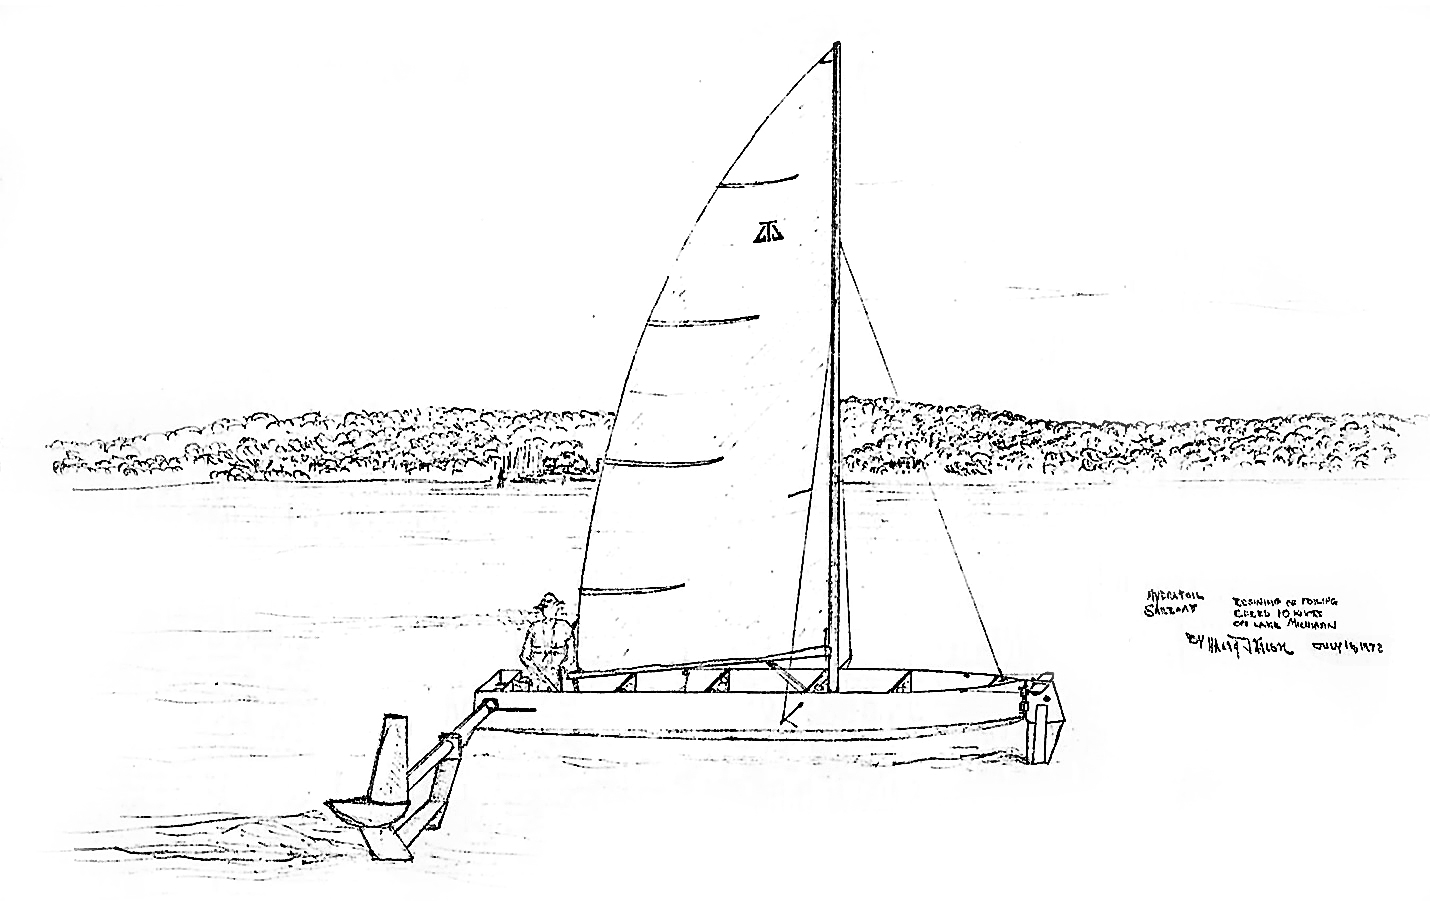
A blast from the past, RETRO-ROCKET skims across the glassy surface of Minnesota’s Lake Minnetonka. At 10′ 2″ LOA, a 5′ beam, and 12″ draft (standing still), this pocket-sized hydroplane was built by Rob Sotirin for his son, John, to run in the waters off the family’s Shady Island home.
Named for the boat’s old-time style and its speed, RETRO-ROCKET is a throwback to the small outboard-powered hydroplanes that were popular during the 1940s, ’50s, and ’60s. After World War II, plans for do-it-yourself builders were available through boating and woodworking magazines, sparking an interest among returning veterans, and others, who were looking for on-the-water excitement at a reasonable price. Best of all, these boats were of a size that could easily be constructed in a home workshop.
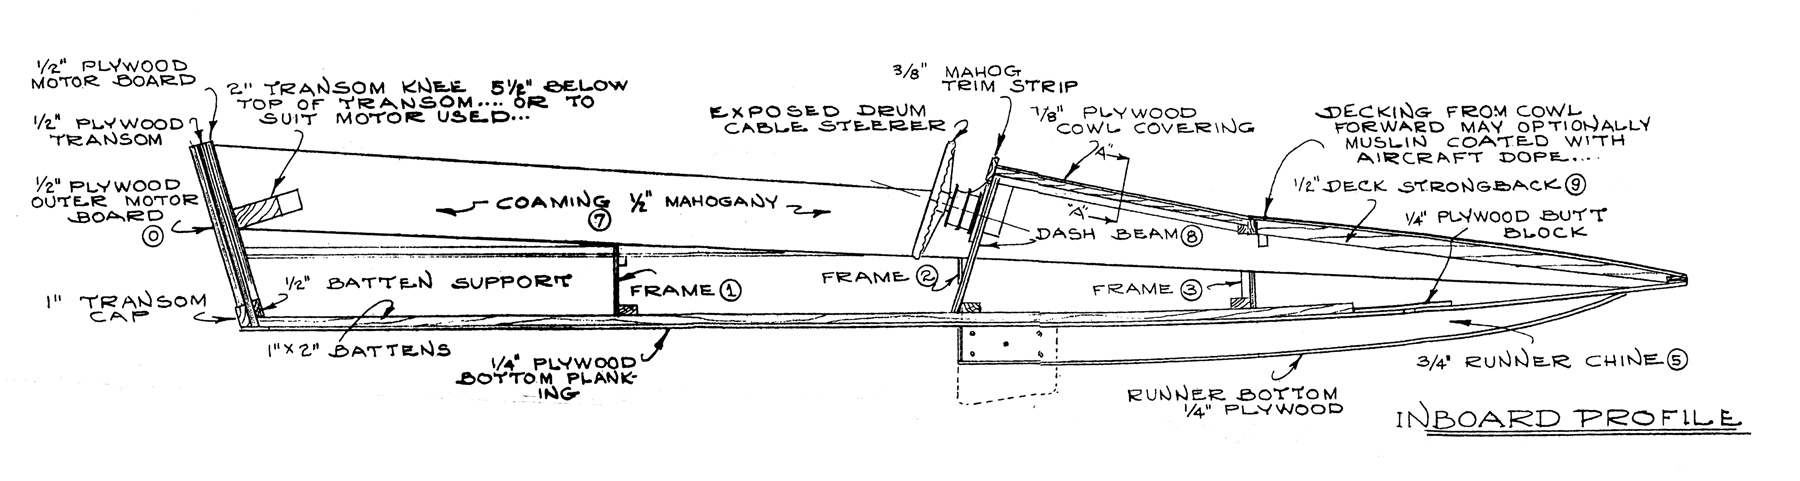
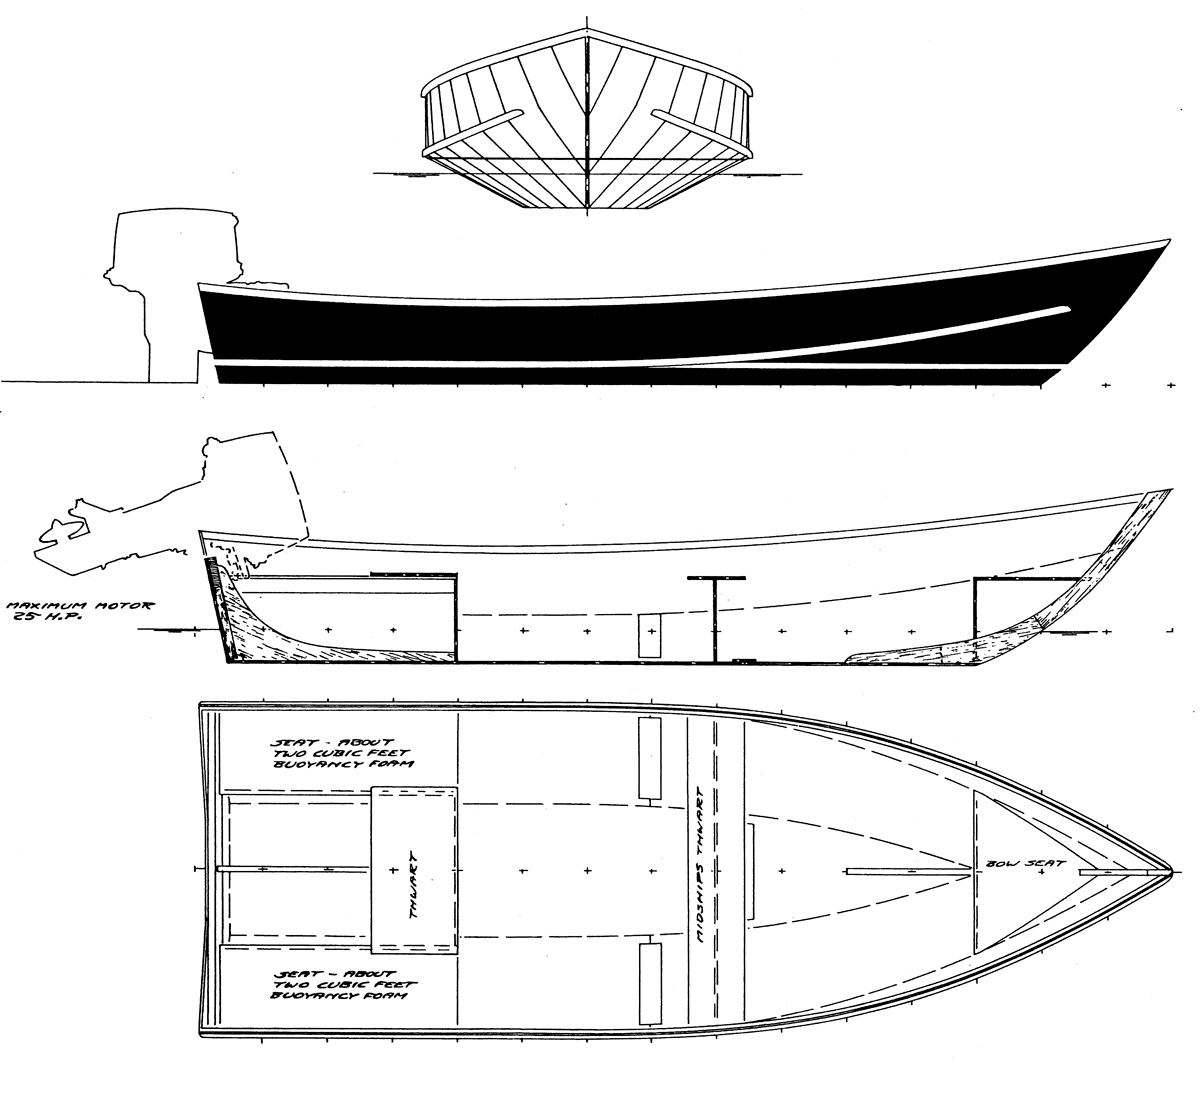
RETRO-ROCKET was built from Glen-L Marine Design’s plans for Super Spartan, a three-point hydroplane. Constructed in marine plywood, RETRO-ROCKET weighs less than 100 lbs and darts across the water, mostly on a cushion of air. A three-point hydroplane has two forward sponsons, plus the aft end of its hull, which is flat. When on plane, only the sponsons and the aft bottom surface touch the water.
At an overall length of 10’2” and weighing just 100 lbs, Glen-L Marine Design’s Super Spartan looks like she’s ready to race but is mostly intended to provide summertime fun on calm waters.
Rob built the Super Spartan to keep pace with the interests of his children. “My son John is now 13, and I figured he would be ready for a little excitement. We live on an island, so the kids spend a lot of time on the water.” At the outset of the project, Rob took time to carefully read and understand the plans. “I found it useful to have them posted right next to the ‘operating table’ so that I could turn around to refer to them every step of the way,” he said. “This is such a small, light boat that there isn’t much in the way of materials or cost. Glen-L does a nice job of providing step-by-step pictures of the construction process.”
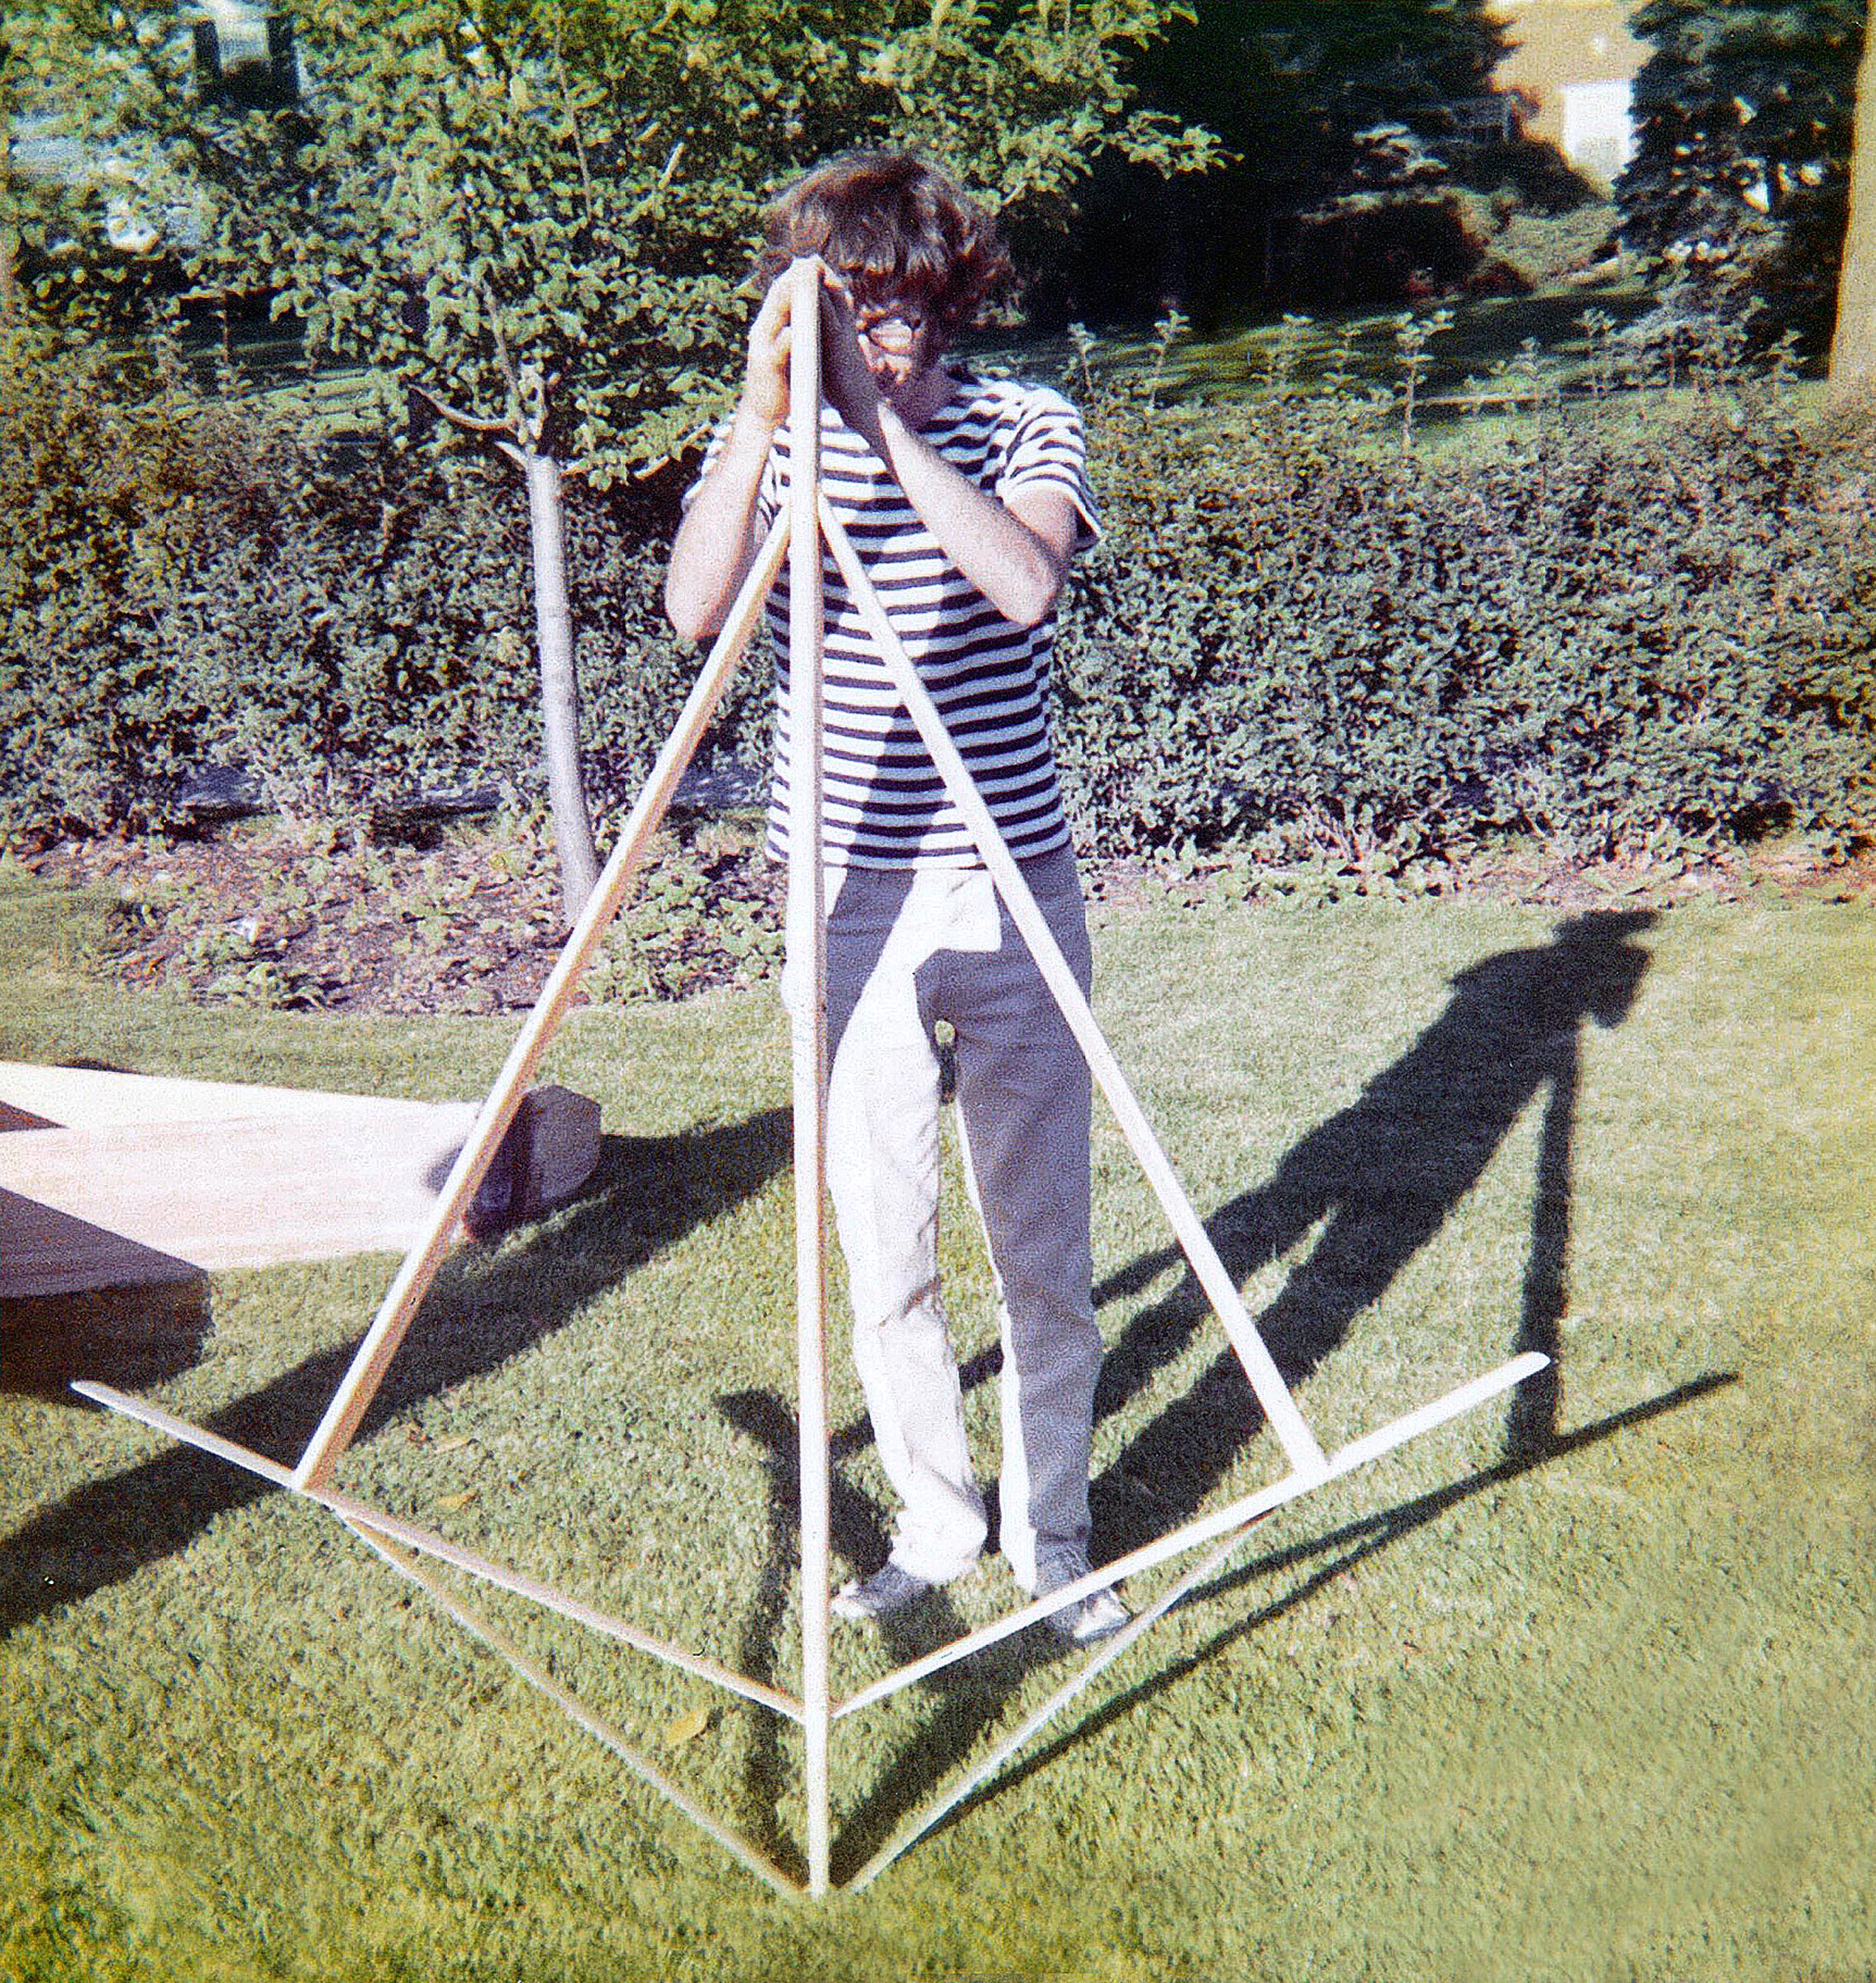
Facing another Minnesota winter, Rob began work on the hydroplane in his basement workshop. Thinking ahead, he constructed a full-sized mock-up out of scrap wood to assure that he would be able to get the boat up the stairs and out the door when his project was complete. By the following summer, the boat was ready to launch.
RETRO-ROCKET’s bottom is made of 1⁄ 4″ marine fir plywood and the deck is 1⁄8″ mahogany plywood. He used two layers of 3⁄4″ solid mahogany for the transom. The stringers and cockpit cowling are also made of mahogany. Rob remarked, “The idea is that with very little hull weight, a small motor will accelerate the boat quickly and bring it up out of the water [on plane].”
Rob purchased Glen-L’s fastening kit, which is specific to the Super Spartan and includes silicon-bronze screws and ring nails. He assembled the boat’s lower hull stringers and transom with 3M-5200, assuring that seams were watertight yet allowing the hull to remain somewhat flexible. He bonded the less vital deck pieces with a polyurethane construction-grade adhesive, which is less expensive.
Photo by Rob Sotirin
RETRO-ROCKET’s stained-and-varnished 1⁄8″ mahogany plywood deck is pleasing to the eye. Strategically placed racing stickers hide seams where plywood sheets were butted to one another.
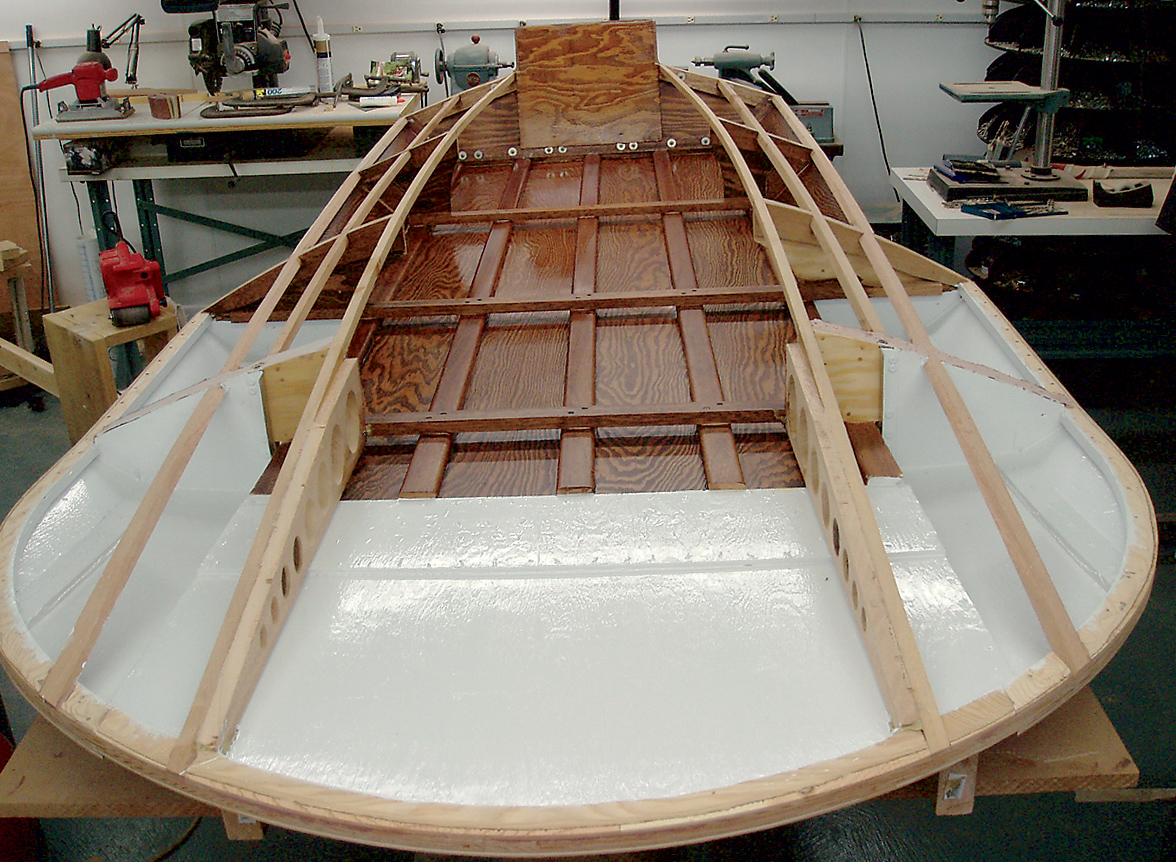
Well before Rob installed the deck, he sealed, primed, and painted the hull’s forward interior. Water that gets inside the boat can collect in the sponsons, so it’s a good idea to make sure they are protected to discourage rot. He stained and finished the aft interior (which is visible) with four coats of varnish, along with most of the outer hull. The cowling pieces were left natural to provide a two-tone effect and allow sufficient contrast with the lettering. Rob strategically placed a large racing number (even though his son doesn’t race) to hide the butted seam between two pieces of deck plywood. “I took a lot of extra care so that the whole boat could be varnished,” Rob added. “This made for a lot of critical attention to fit and finish. However, if you planned to paint the boat, you could be a lot less fastidious.”
As RETRO-ROCKET neared completion, Rob was concerned about the comfort of the driver, who must kneel on the cockpit sole when the boat is underway. “It’s important to put something down to absorb shock and stay dry,” he said. “At a local surplus store I found just the thing—the long black foam wrist rests used with computer keyboards. I bought 20 of them, and that’s what you see lined up on the floor [sole] of the boat.”
As a practical matter, Rob recommends that strong stainless or galvanized eyehooks be built into the boat’s hull before the deck is attached. This allows owners to store the boat by hanging it in the garage over a car. “With the motor off, a couple of people can easily lift [the boat] off the trailer and pulley it up to the rafters,” he explained.
Stock boat trailers require some modifications to accommodate the Super Spartan. The hull is basically flat, so Rob built some bolt-on attachments to his trailer that provide the bow the support it needs, while keeping the back end from sliding sideways. He can use the same trailer for several small boats this way.
Photo by Rob Sotirin
The simple design of the compact-sized Super Spartan let Rob Sotirin complete this racy little hydroplane over the course of a Minnesota winter in his basement workshop.
Flat water is critical to the safe operation of RETRO-ROCKET, which is only allowed to run on relatively smooth days. Underway the “shovel nose” bow is only inches above the lake’s surface, and a wave could cause the boat to “submarine,” or dive under the water. The other extreme is that the boat can go airborne. To keep this from happening, the driver must lean forward, especially when accelerating. “It’s easy once you get the feel for it, but can be dangerous to the uninitiated. No one is allowed to drive without a proper understanding of how to handle her.”
Glen-L calls for a short-shaft outboard motor up to 35 hp to power the Super Spartan. Rob chose a 1960s-vintage Merc 200 (20 hp), which he found through word of mouth. “I spent some time getting it ship-shape with new paint and a few new parts, but it’s reliable and fits the boat very well,” he said. “I found other parts like the steering components, gas tank, and remote controls online. I find that 20 hp is more than enough to scare you. It does an easy 40 miles per hour with my son at the controls, and that’s plenty fast for both of us.”
Though RETRO-ROCKET looks like she’s ready to race, she’s really intended for family fun—providing summer-time thrills on calm waters. She certainly achieves that goal.
Super Spartan by Glen-L Marine Design is an ideal beginning project for adults or youths (with a little help from dad or mom). Construction of the three-point hydroplane, using sheet plywood planking, is straight-forward, requiring no building form.
This Boat Profile was published in Small Boats 2009 and appears here as archival material. Boat plans for the Super Spartan are available on Glen-L’s website.
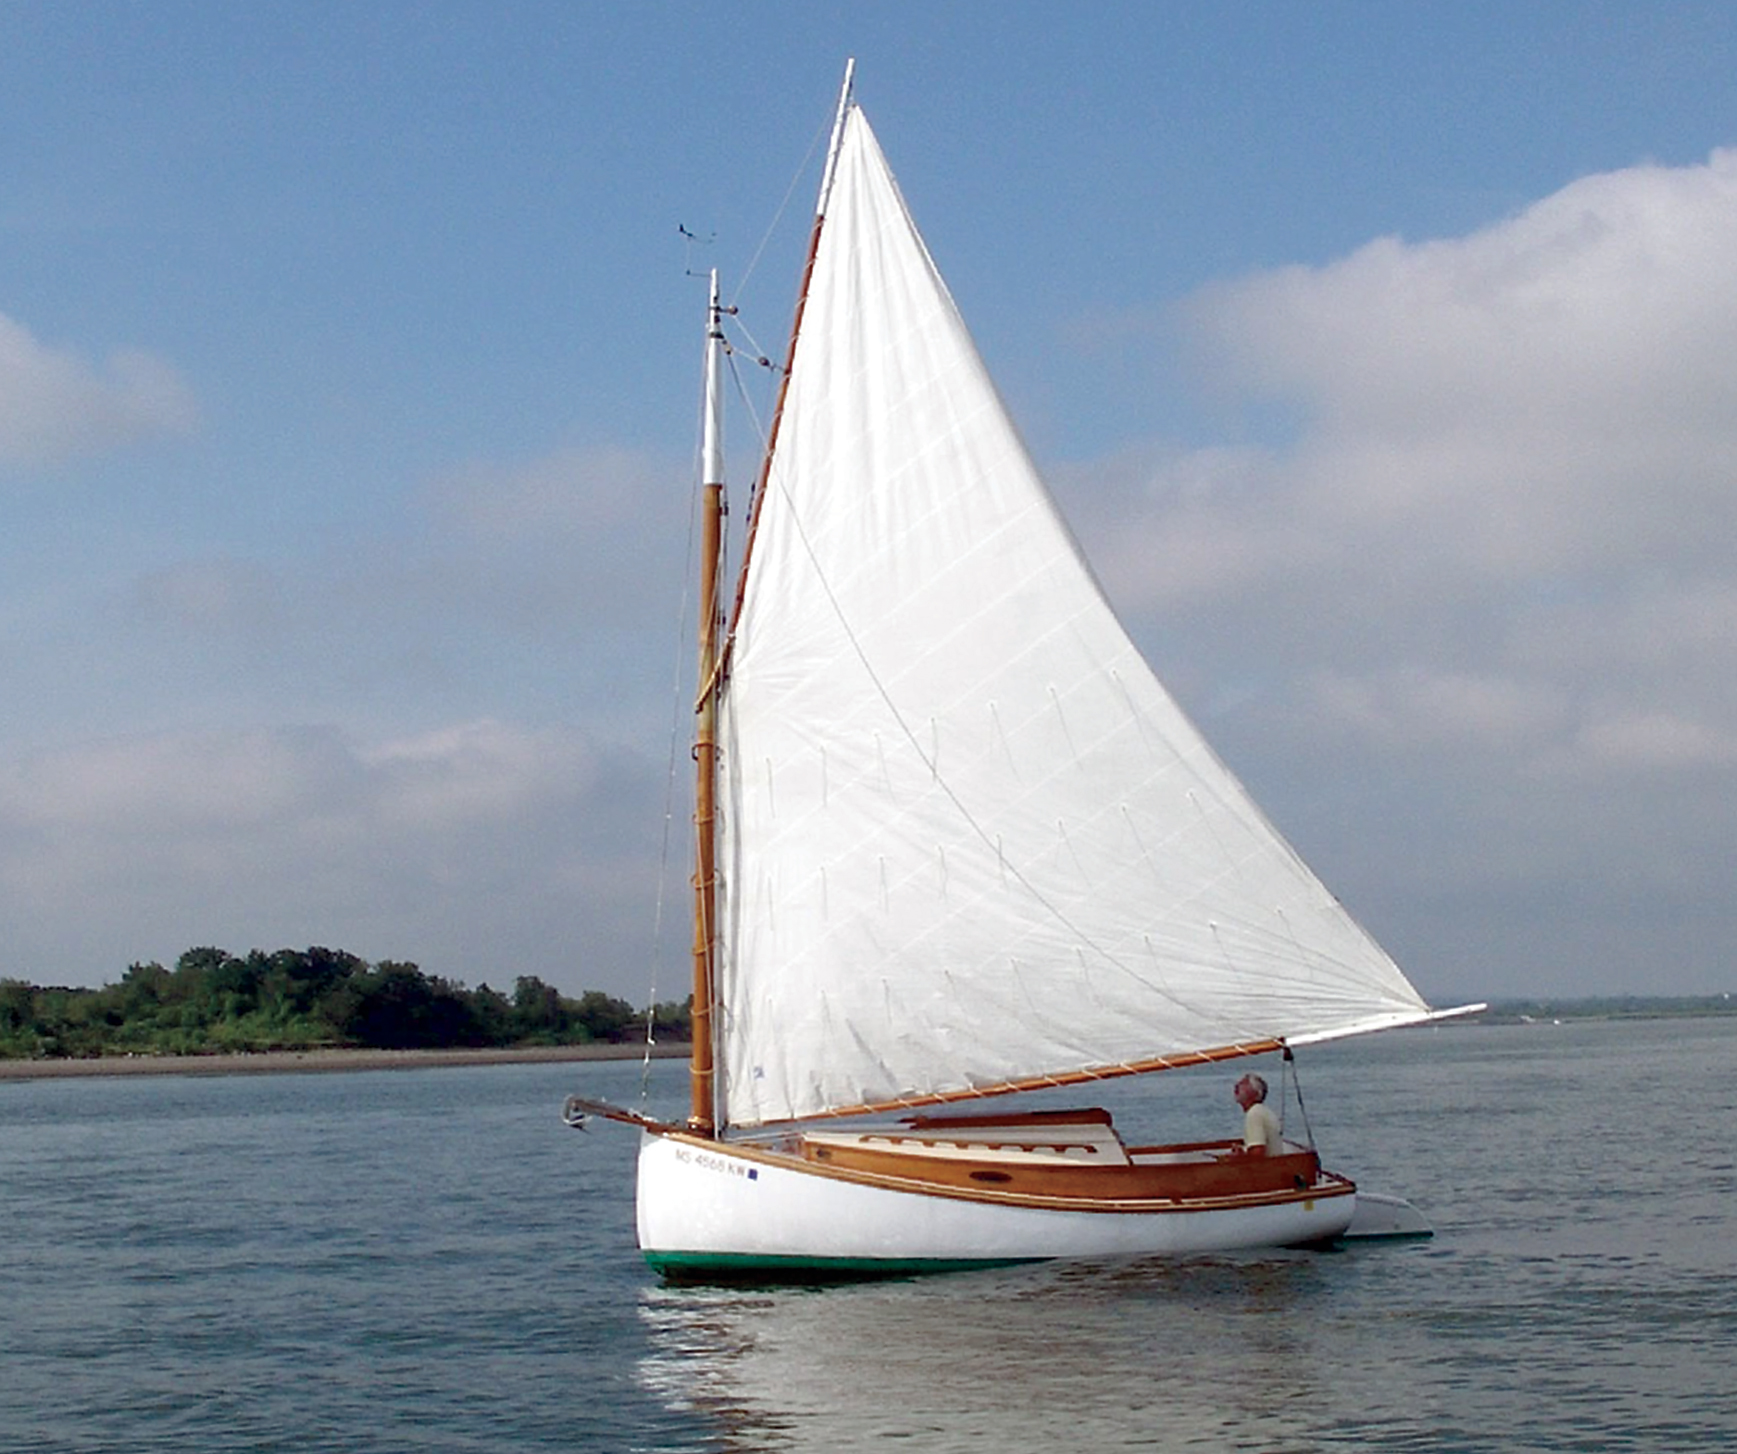
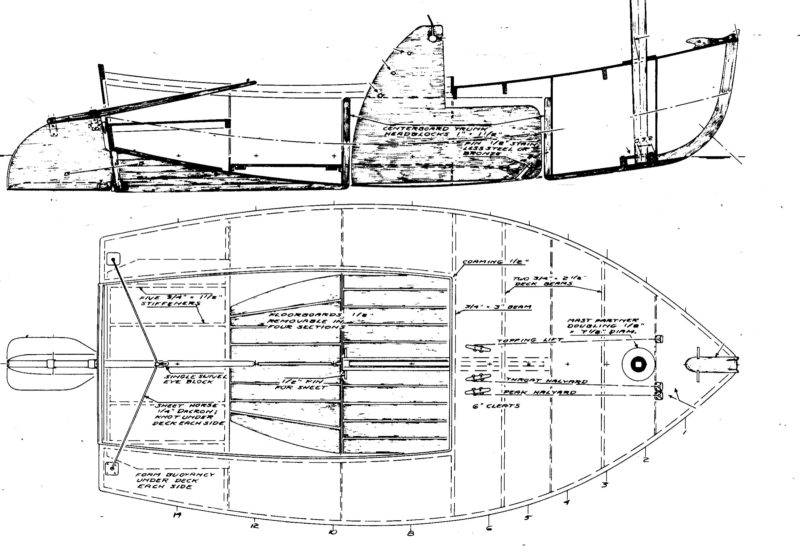
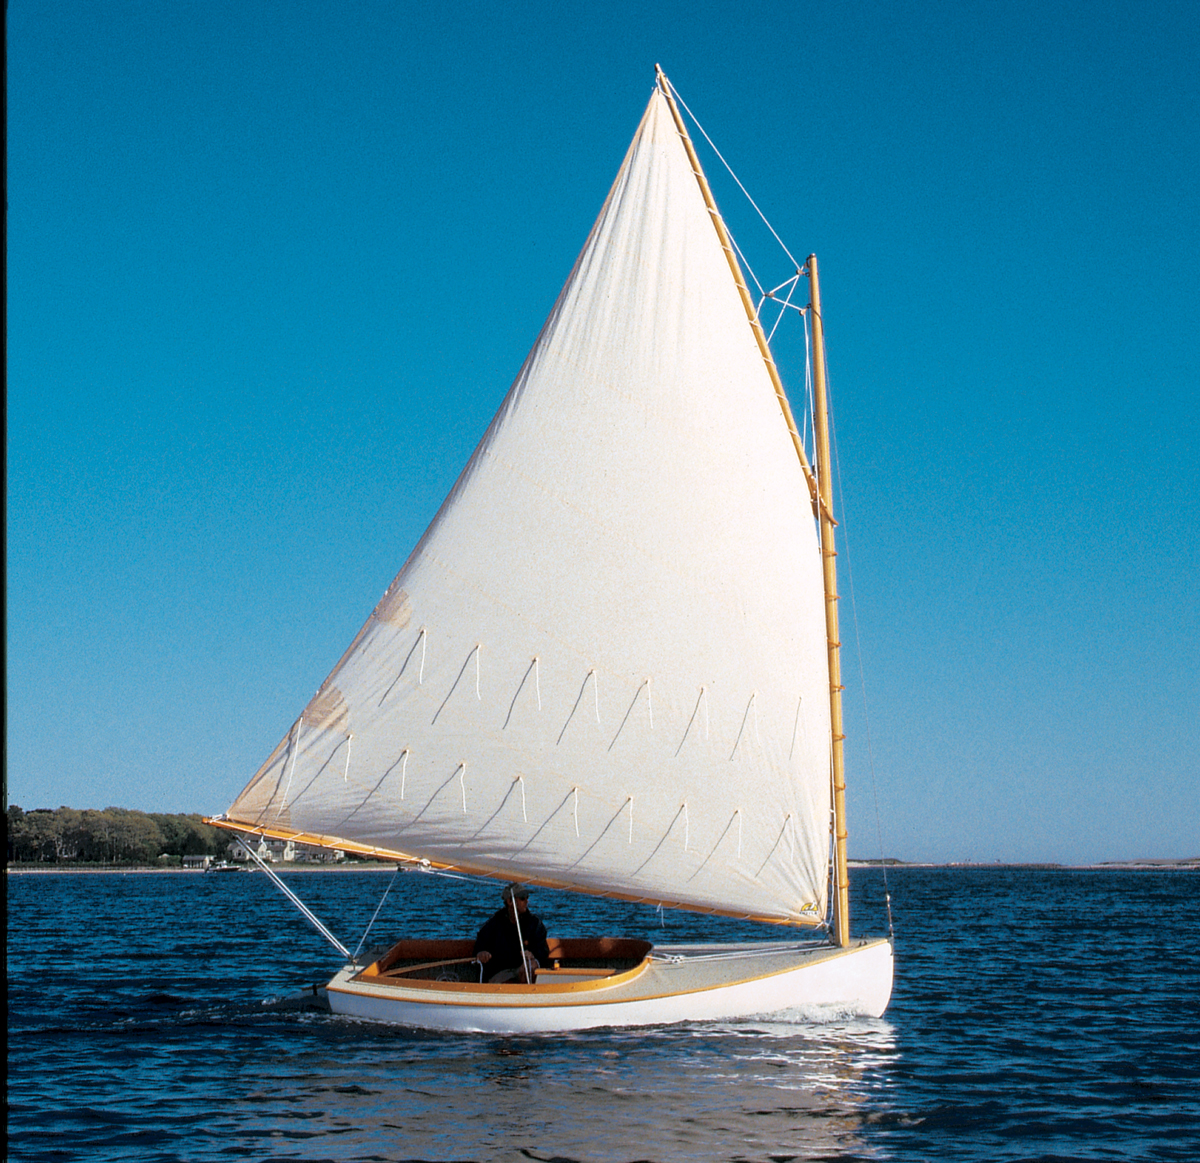
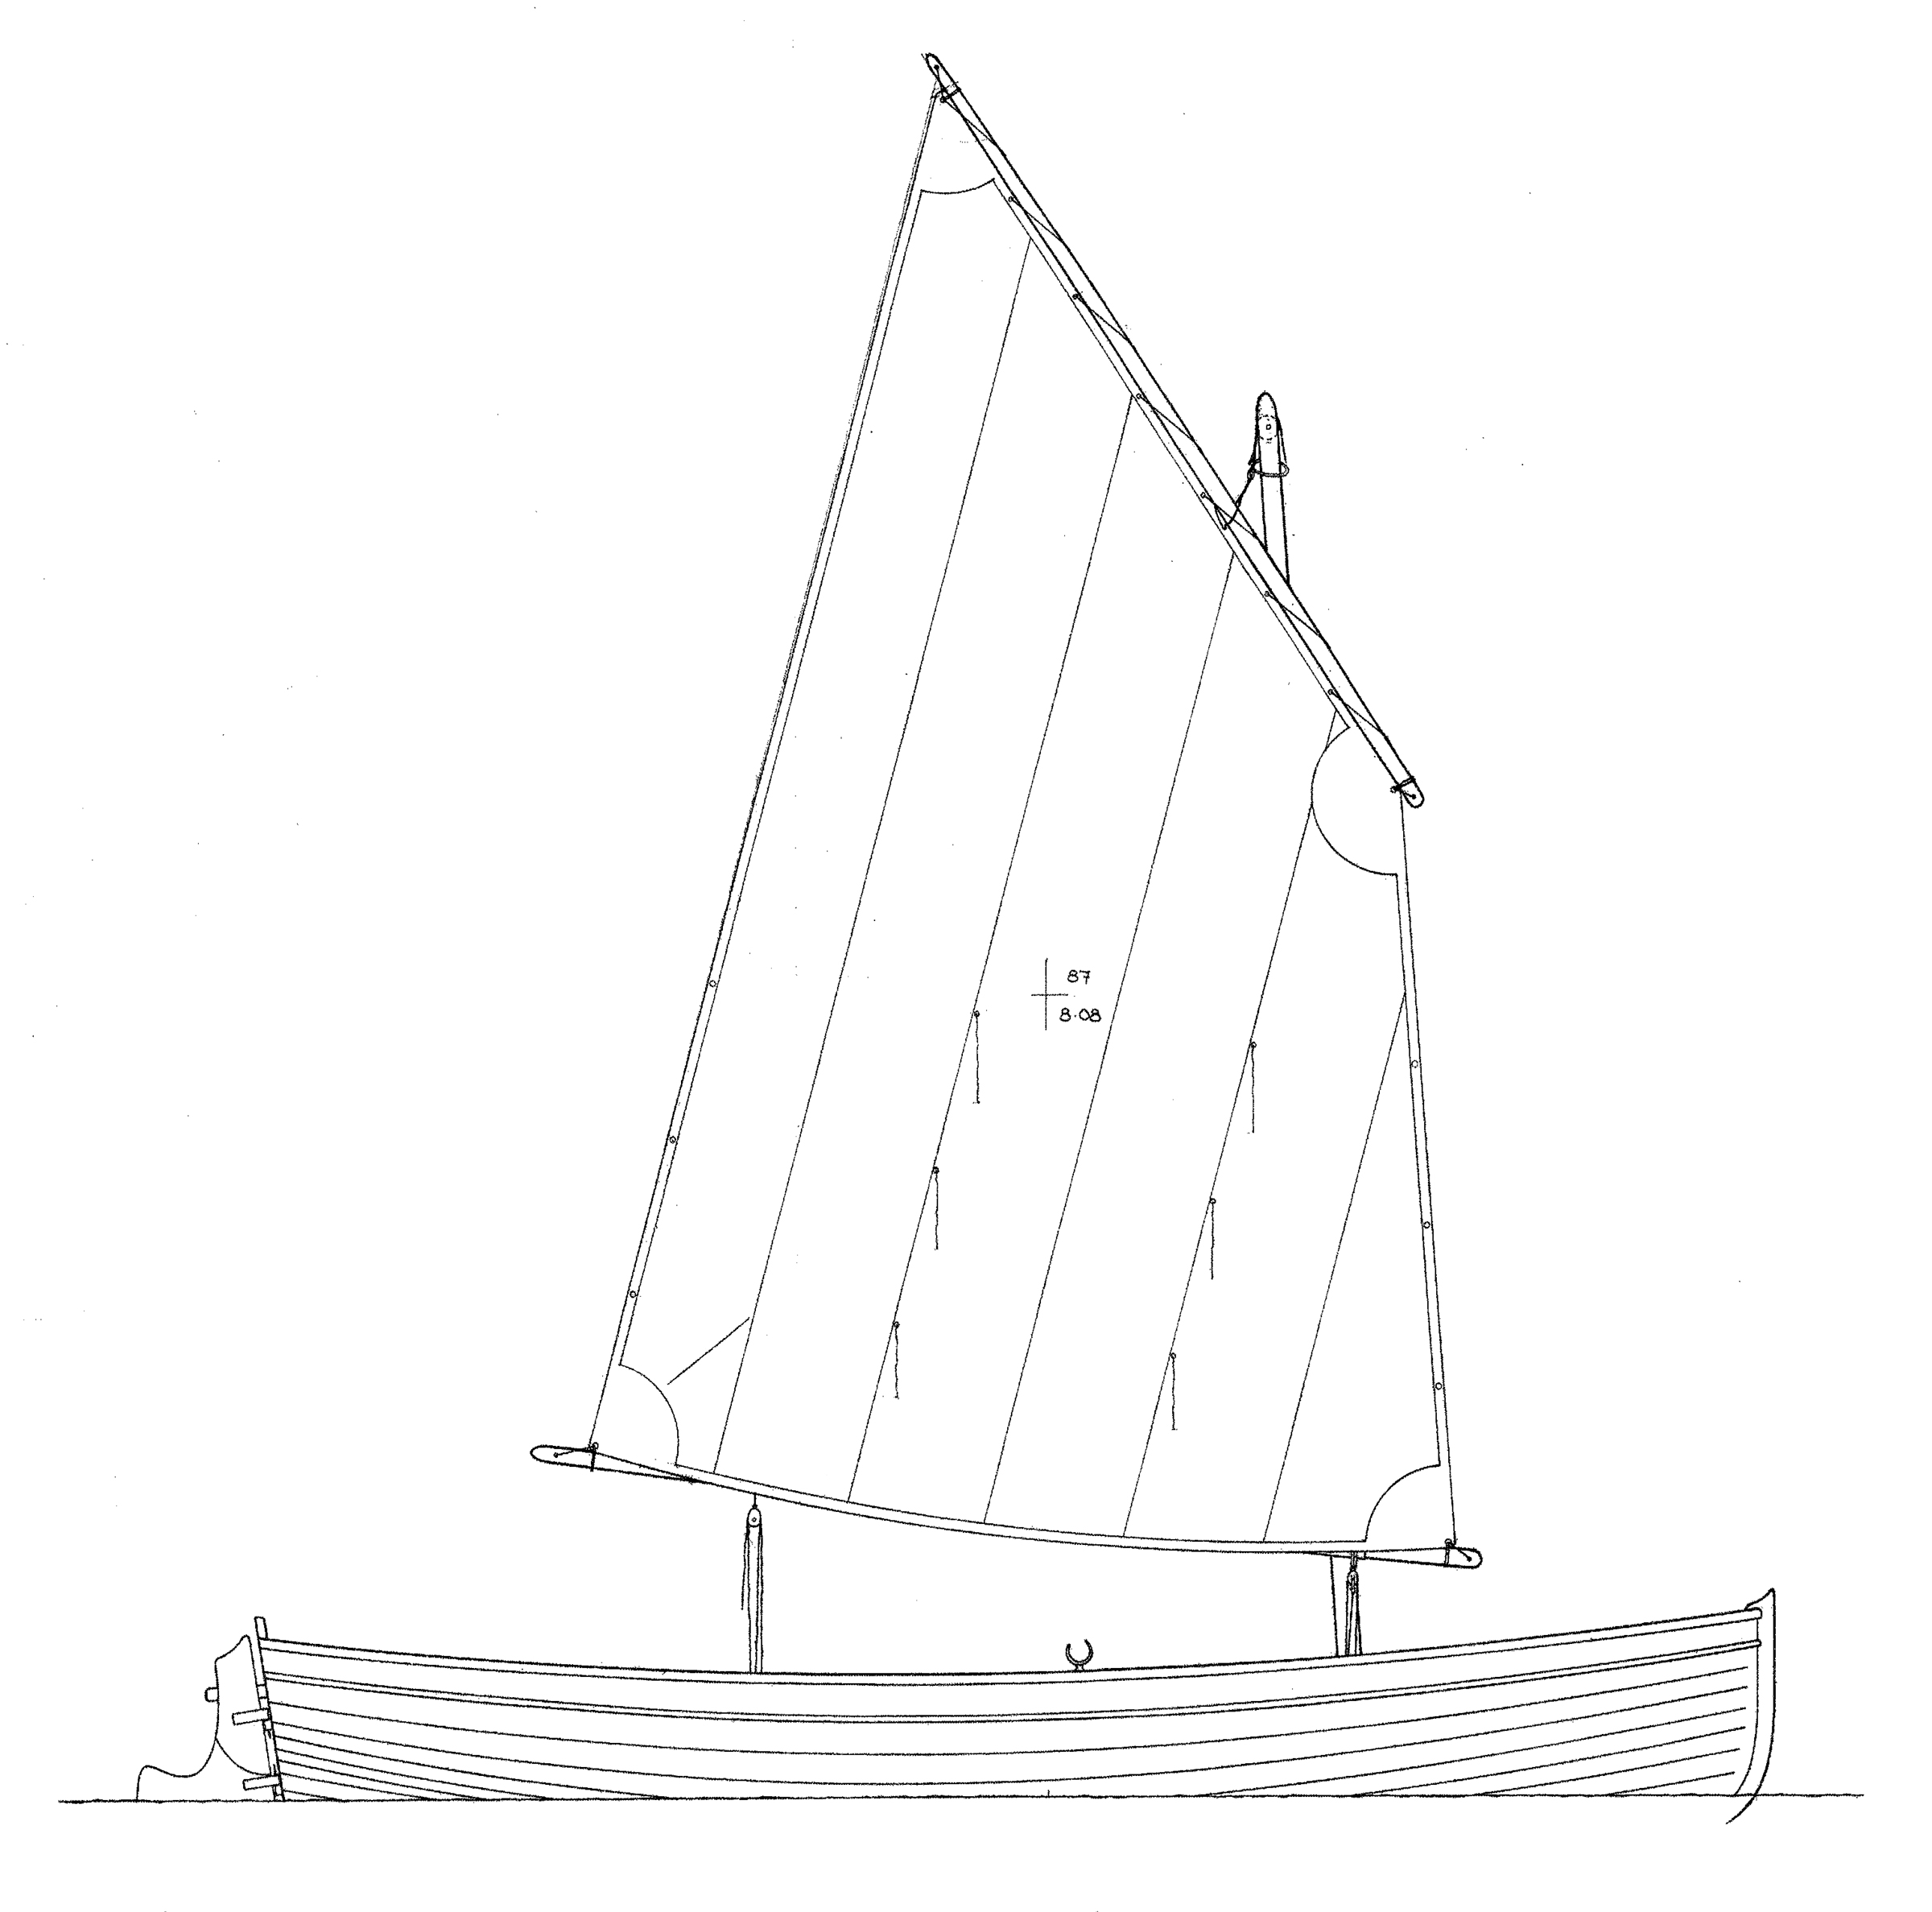
Fenwick Williams designed 17 catboats from 8′ to 30′ in length. All of them are legendary, but his first, an 18-footer created during the height of the Great Depression in 1931, stands out as a little gem.
Originally intended to be an inexpensive craft for people who couldn’t afford larger boats, Design No. 1 remains popular today because of its perky appearance, comfort, and lively performance. Her stability and ease of handling accommodate young and old, from a software designer escaping the digital world to a traffic-weary bus driver seeking peace and quiet. Retired senior editor of the Catboat Association, John Peter Brewer describes this family of boats with both accuracy and affection:
“The catboat is …an American art form. She was developed, built and sailed with great skill by ordinary men who needed her for honest work. Her origins go back at least 160 years, and perhaps more.
“…the hull is wide and the big, gaff-rigged sail is set on a strong mast with a single forestay well forward near the stem…the sail is controlled with a topping lift, lazy jacks, separate throat and peak halyards, [and] reef points…. The gaff main is not meant to be picturesque. It’s to lower the center of effort, give more drive off the wind and allow more control through the peak halyard and topping lift…. The classic catboat has a plumb stem, high bow, and big barndoor rudder. Those cats 17 feet or more usually have a cuddy cabin with two bunks and the rudiments for overnight sailing.”
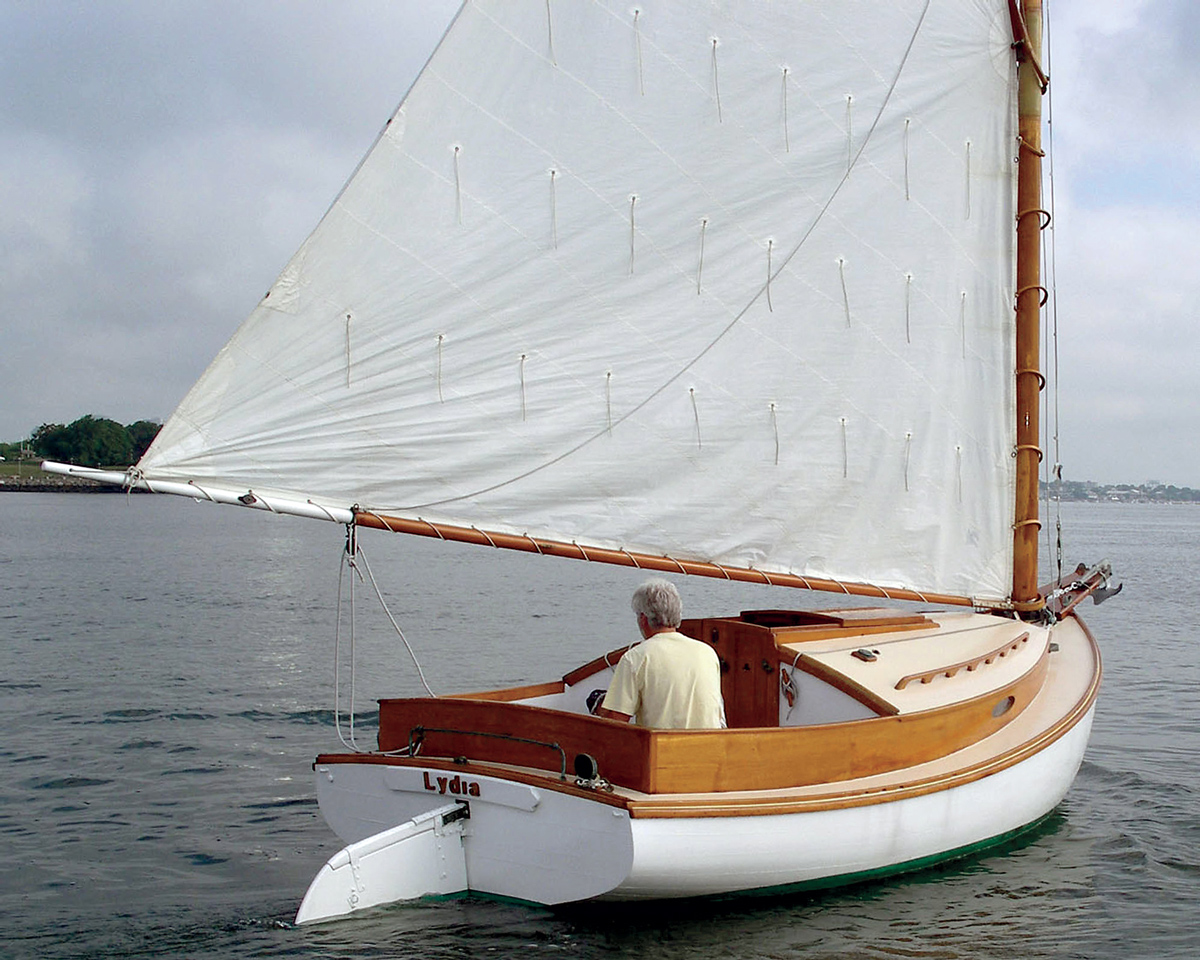
With her large cockpit, easily handled sail, and anchor on the bowsprit, LYDIA is ready to take the whole family for an afternoon sail or an all-day picnic. If it gets late, there is room for all hands to spend the night, with the kids sleeping under a boom tent.
As Brewer describes it, the catboat was originally a working boat with features designed for the fishing trade. For example, if you slack out the mainsheet and put the helm down, she will come up into the wind and to a virtual stop, ready for hauling lobster traps or shellfish nets. A friend of ours used to startle the committee boat judges at informal mixed-class “chowder races” by pulling up to within a couple of yards of the starting line and letting the mainsheet run. While all of the Bermuda-rigged boats tacked for position, he simply waited there until the starting gun, when he hauled in the boom and started sailing. He was inevitably first across the line at the start— although seldom at the finish. Another advantage to the gaff rig is the ability to lower the peak in a sudden blow. Called the “fisherman’s reef,” this maneuver spills air and helps maintain control of the boat.
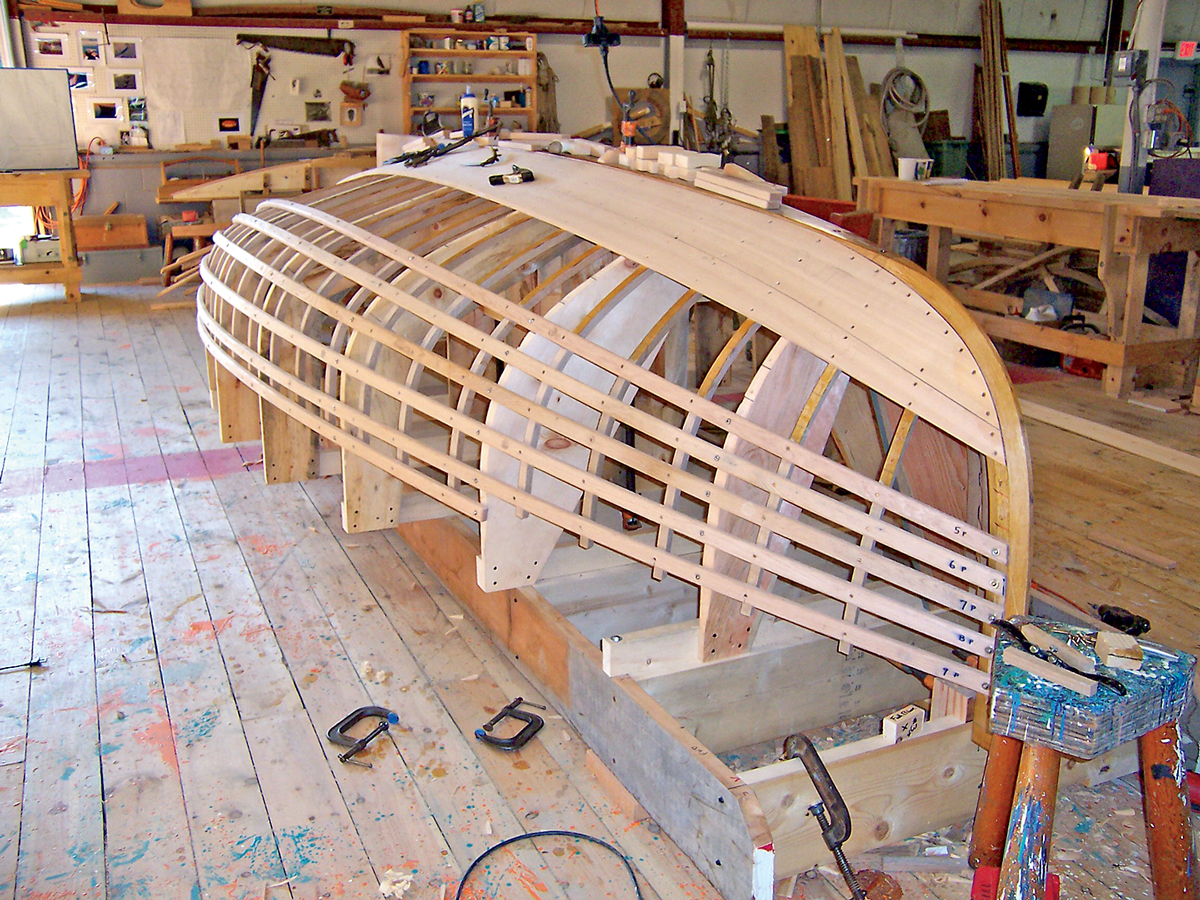
After finishing Harvard Graduate School in the summer of 1967, Frank Cassidy answered an ad for a partially completed catboat. “I didn’t know what a catboat was,” he confesses; “I think I was probably expecting something with two hulls.” Actually, it was a weathered 18′ single hull, with only a few planks installed below the sheer, most of which had to be replaced; a pile of lumber; some screws and bolts; and a set of plans for Fenwick Williams’s Design No. 1. Except for the cross spalls spanning the sawn and steam-bent frames, there was nothing on deck, or above the sheer—the interior was totally open. He bought it all for $250.
Completing the boat took most of Frank’s spare time over the next five years. Frank christened the completed 18-footer KITTY KELLY, his mother’s nickname. She was launched from Mattapoisett, Massachusetts, in the spring of 1973. Over the next four years, Frank and his wife Lynda cruised her from nearby Marion with their two small children.
My late wife Jane and I first saw KITTY KELLY sitting on the trailer Frank had made. She had a prim white hull topped by caramel-colored teak cabin and coaming, with mint green Dynel on plywood decks. Her profile displayed all of the big catboat design elements in miniature, balanced and poised to go: a well-proportioned outboard rudder, plumb stern, and springy sheer swooping forward and upward to a snappy stem with just a touch of tumblehome. She was for sale and, clearly, she wanted to go home with us. That she did, and flying in the face of superstition, we rechristened her AUNT LYDIA after a favorite relative.
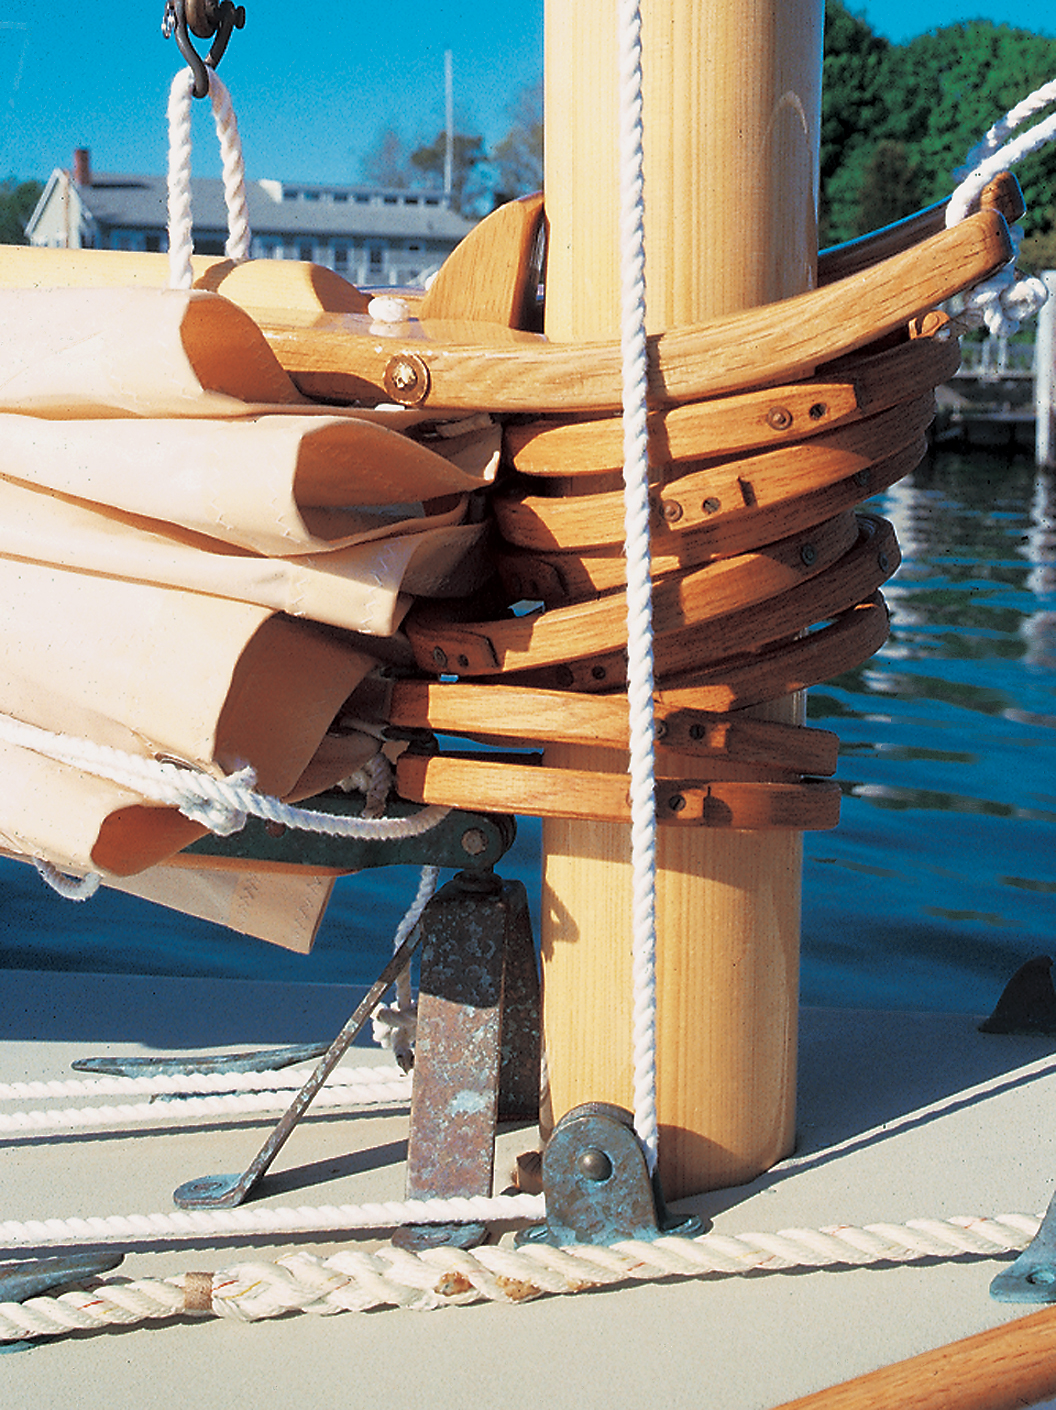
From 1978 to 1985, we explored the New England coast from Hingham, Massachusetts, to Kennebunkport, Maine, accompanied by our 28-lb Sheltie. We poked around little coves and rivers, confident that our 2′ draft (with the centerboard up) would allow us to glide over shoals. AUNT LY DIA gave us nothing but good luck, economy, and convenience. Eschewing yard fees, she sat comfortably covered in our driveway during the winter. Her size was ideal for trailering to a ramp for a spring launching. We opted to lace the sail to her mast, which proved quicker to rig than the traditional hoops and easier to raise and lower as well.
Getting underway for a month’s vacation or a Sunday afternoon day sail is a simple matter of raising the luff with the throat halyard and peaking the gaff; both operations are performed from the cockpit. The only reason to go forward is to drop the mooring line. The moment you fall off on one tack or the other and start to move, the balance of this design becomes abundantly apparent. In a moderate-air reach, I could connect the tiller and mainsheet in a makeshift autopilot. Even in a stiff breeze she has only enough weather helm to give you the feel of the boat through the tiller, but not so much as to invite an arm-wrestling match. She rides in the water with confidence, going smoothly over swells, and flattening all but the most violent chop.
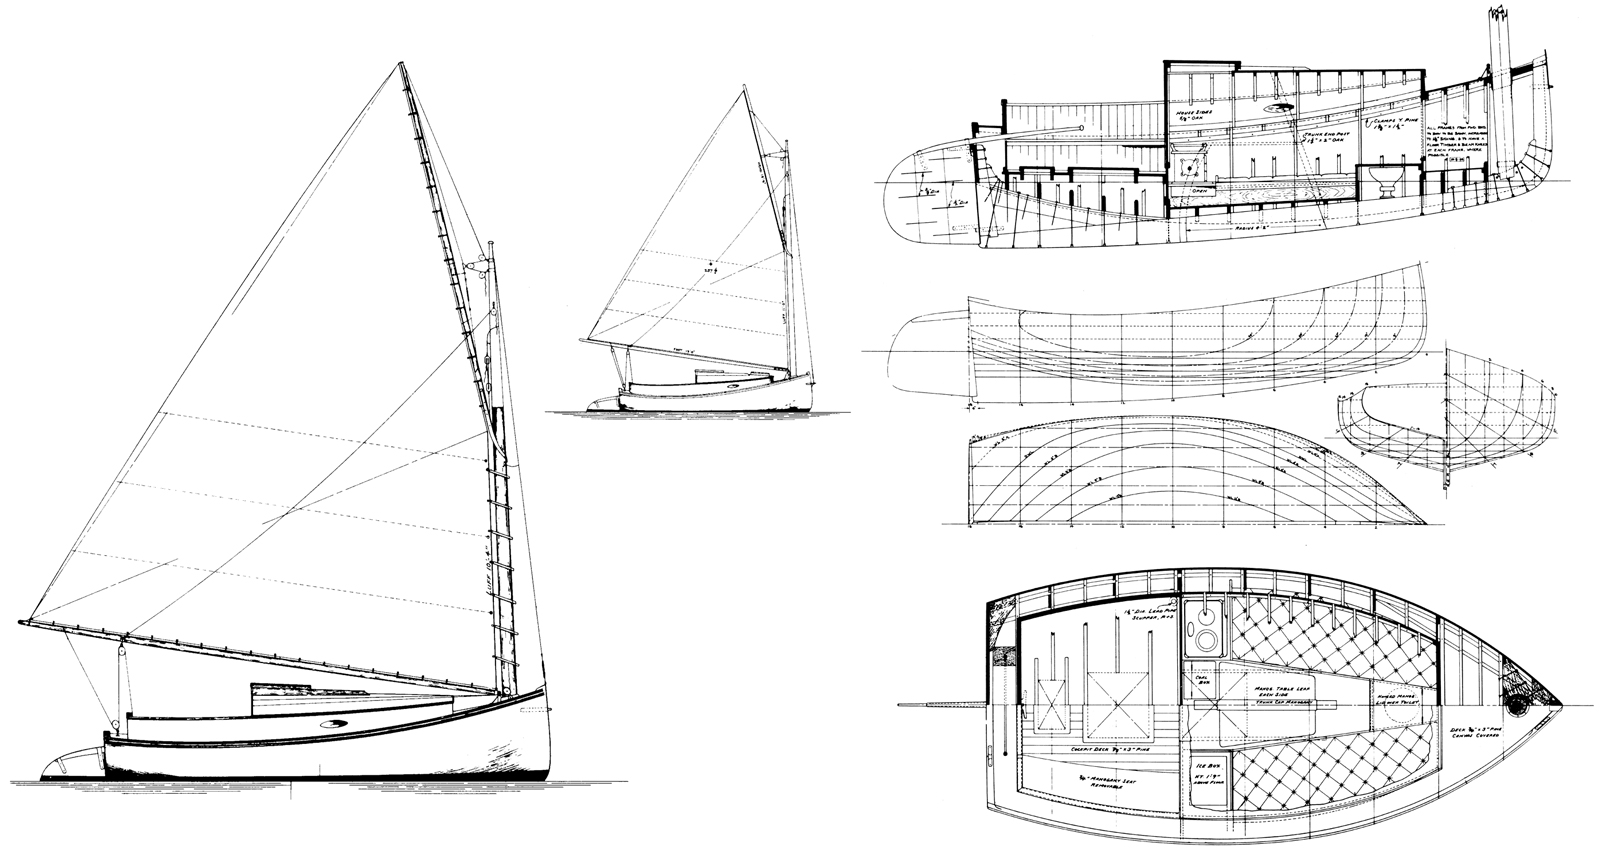
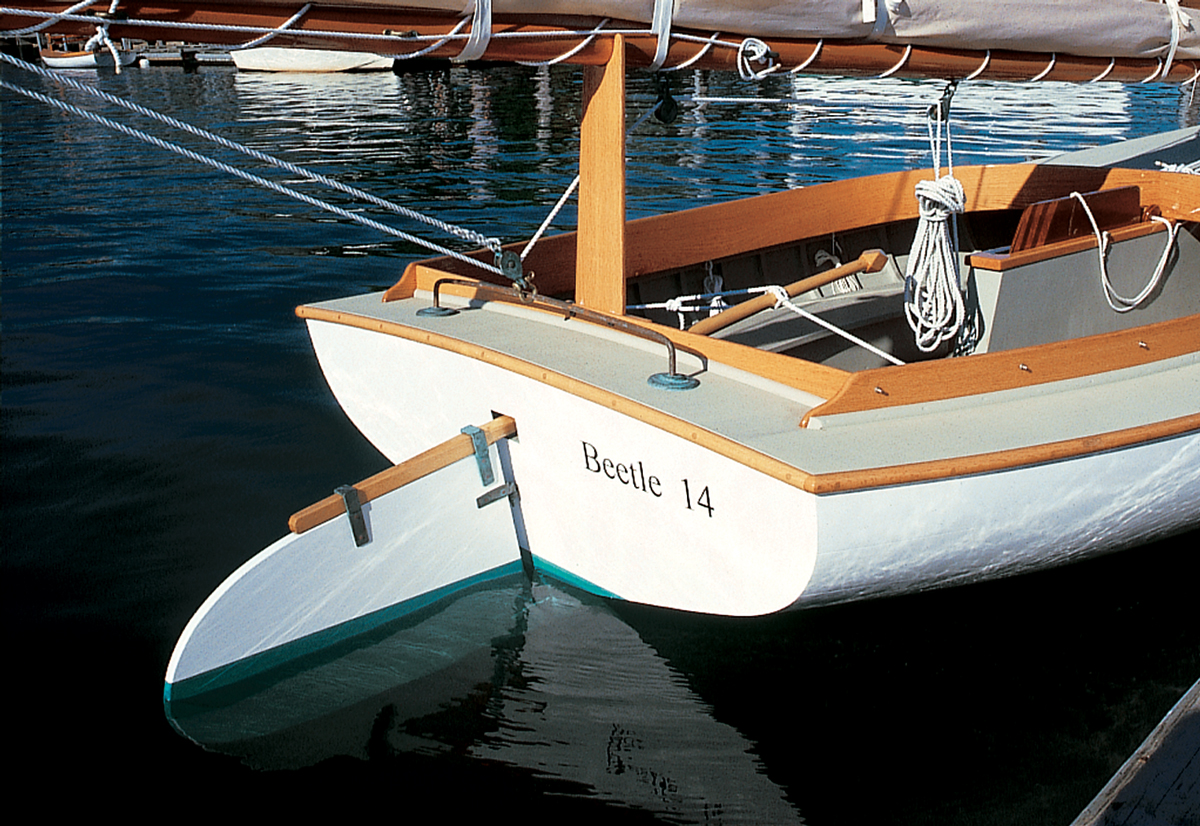
Like the saucy young clipper spotted on Paradise Street in the sea chantey “Blow the Man Down,” AUNT LYDIA is bluff in the bow. In fact, her bow is so full that one imaginative Marbleheader, Rodney Bowden, named his sister 18-footer (built in the late 1940s by Charlton Smith) BUXOM LASS. The reason for this fullness is buoyancy. Fenwick believed that a sharp bow on a catboat with its large sail set well forward tends to dig into the water, giving a heavy weather helm on close reaches and slowness when tacking. Williams positioned the centerboard trunk alongside the keel instead of cutting a slot through it. His keel is slightly deeper for extra stability with the board up. Another characteristic of his designs is a moderate and consistent deadrise from amidships to the stern. The resulting lifted quarters combined with the fullness forward prevents the bow from depressing when heeling.
Photo by F. Marshall Bauer
Some of the catboat’s traditional characteristics are the single gaff sail with its mast stepped well forward, cat’s-eye (elliptically shaped) portholes in the cabin sides, and a barn-door rudder.
A standard catboat’s beam is roughly half of its overall all length. This 18-footer’s 8’6″ beam creates a compact but cozy living space belowdeck. Her cockpit, made extra large in the working catboats to hold a haul of cod, scallops, or oysters, makes an ideal parlor for afternoon wine parties. We had a boom tent made, wherein we spent many a rainy afternoon reading and listening to music. The high coaming, originally intended to keep large following seas out, is also excellent for keeping active toddlers and pets in.
Frank Cassidy’s objective was to provide for a family of four sleeping inside the cabin in safety and relative comfort. He accomplished this with an ingenious arrangement of rails and two triangular inserts which sat on the rails to fill the gaps between the settees and the table. Two triangular cushions completed the double bunk for four.
We replaced KITTY KELLY’s 6-hp Evinrude outboard with a 9-hp Mercury. A couple of years later, Bob Cloutman of Marblehead installed a Universal Atomic Two inboard, which worked like a charm and, with the outboard bracket removed, gave us a more classic stern.
As an alternative to carvel planking, Australian Michael Storer reworked the structure to be built in cedar strips by David Wilson of Duck Flat Wooden Boats for Rob O’Callaghan. He describes some of his changes: “First, the boat is very much simpler. All ribs, knees, bilge stringers are eliminated, giving a much cleaner interior and cutting the labor required to build the hull to a fraction of traditional methods. Many other parts can be combined compared to the original design—sheer clamp and deck clamp can be combined, and the stem and backbone can be simplified into a simple scarfed structure with the hull skin itself acting as a knee between the two members.
Photo by F. Marshall Bauer
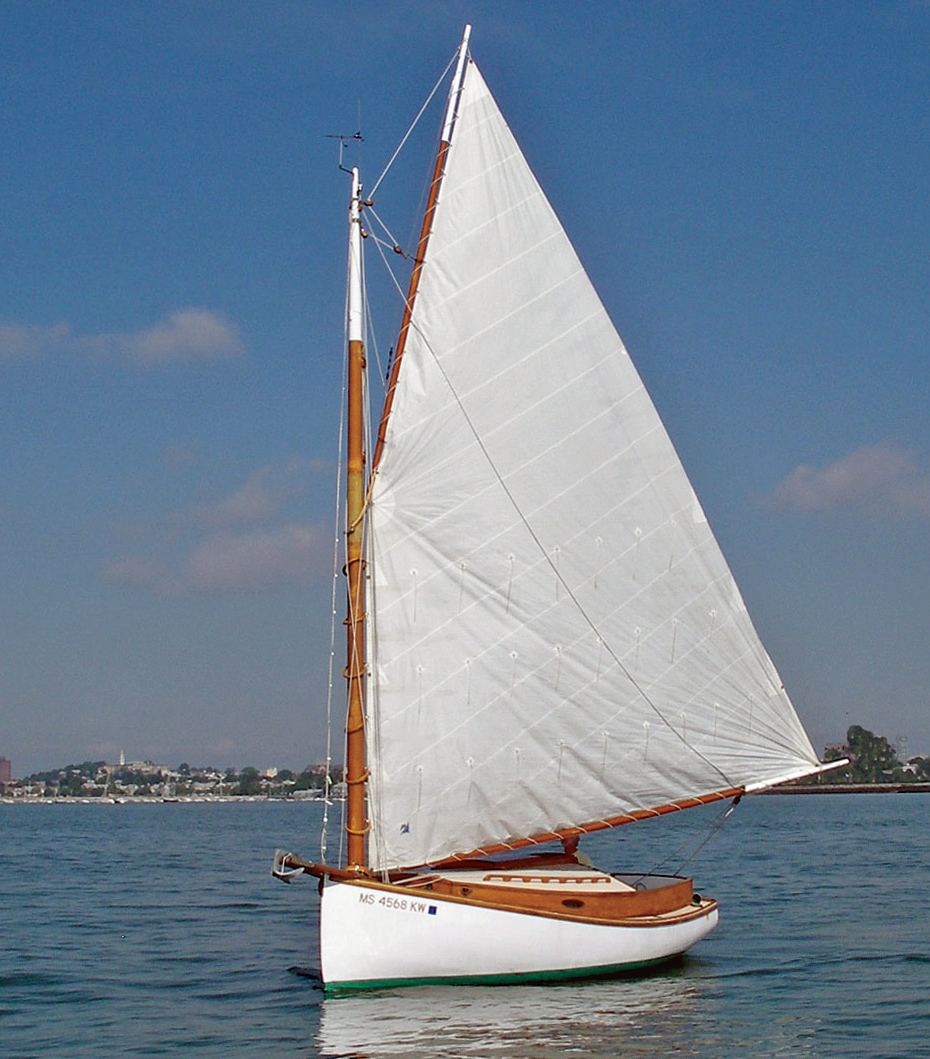
Ghosting along on a starboard tack, LYDIA shows Fenwick Williams’s saucy sheerline to good advantage. The green bottom, without a boot-top, is reminiscent of old-time yachts.
“The result is an immensely strong monocoque construction with loads from one area being dissipated into many others. There are no lazy bits of boat. The cabin and cockpit seat tops and fronts stiffen and support the hull skin, transferring loads into the bulkheads and centerboard case. This boat is much stronger than the original design, and much faster and cheaper to build because of the structural simplification.
“One of the aims was to create a boat that could live on a trailer without any risk of drying out the planking so that it would start to leak, or [risk of] trailering loads damaging hull integrity.”
Misty-eyed, we had watched Fenwick’s double-ended yawl ANNIE being built at the Arundel Yacht Yard in Kennebunkport. When the original owner put her up for sale in 1985, we could not resist. We said a reluctant goodbye to AUNT LYDIA. Today, 35 years later, I’m happy to report that our old boat is still sailing—happily frisking about Dorchester Bay as LYDIA under the able care of skipper Larry Yeakle, a Boston University Law School professor.
Fenwick Williams’s original drawings for his 18′ catboat specify carvel planking and solid backbone timbers. The boat has been built, however, in cedar strips and epoxy, creating a structure that can be dry-sailed.
This Boat Profile was published in Small Boats 2009 and appears here as archival material. Boat plans for the Williams 18′ Catboat are available fromThe WoodenBoat Store.
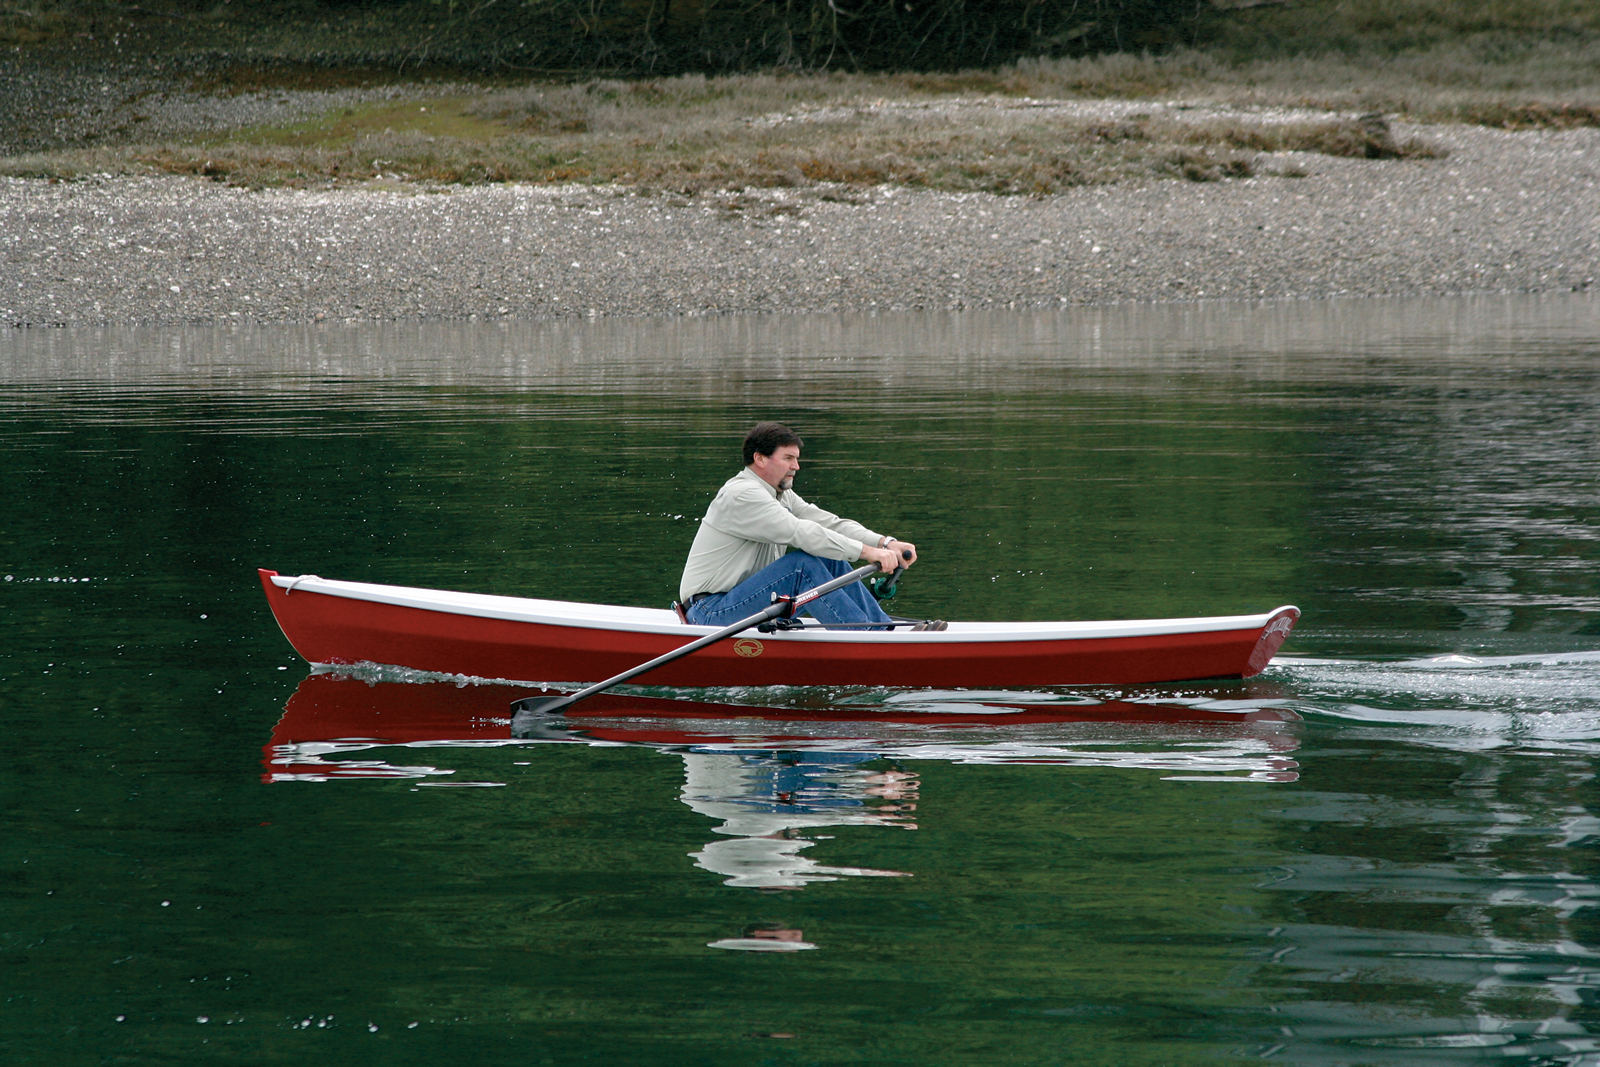
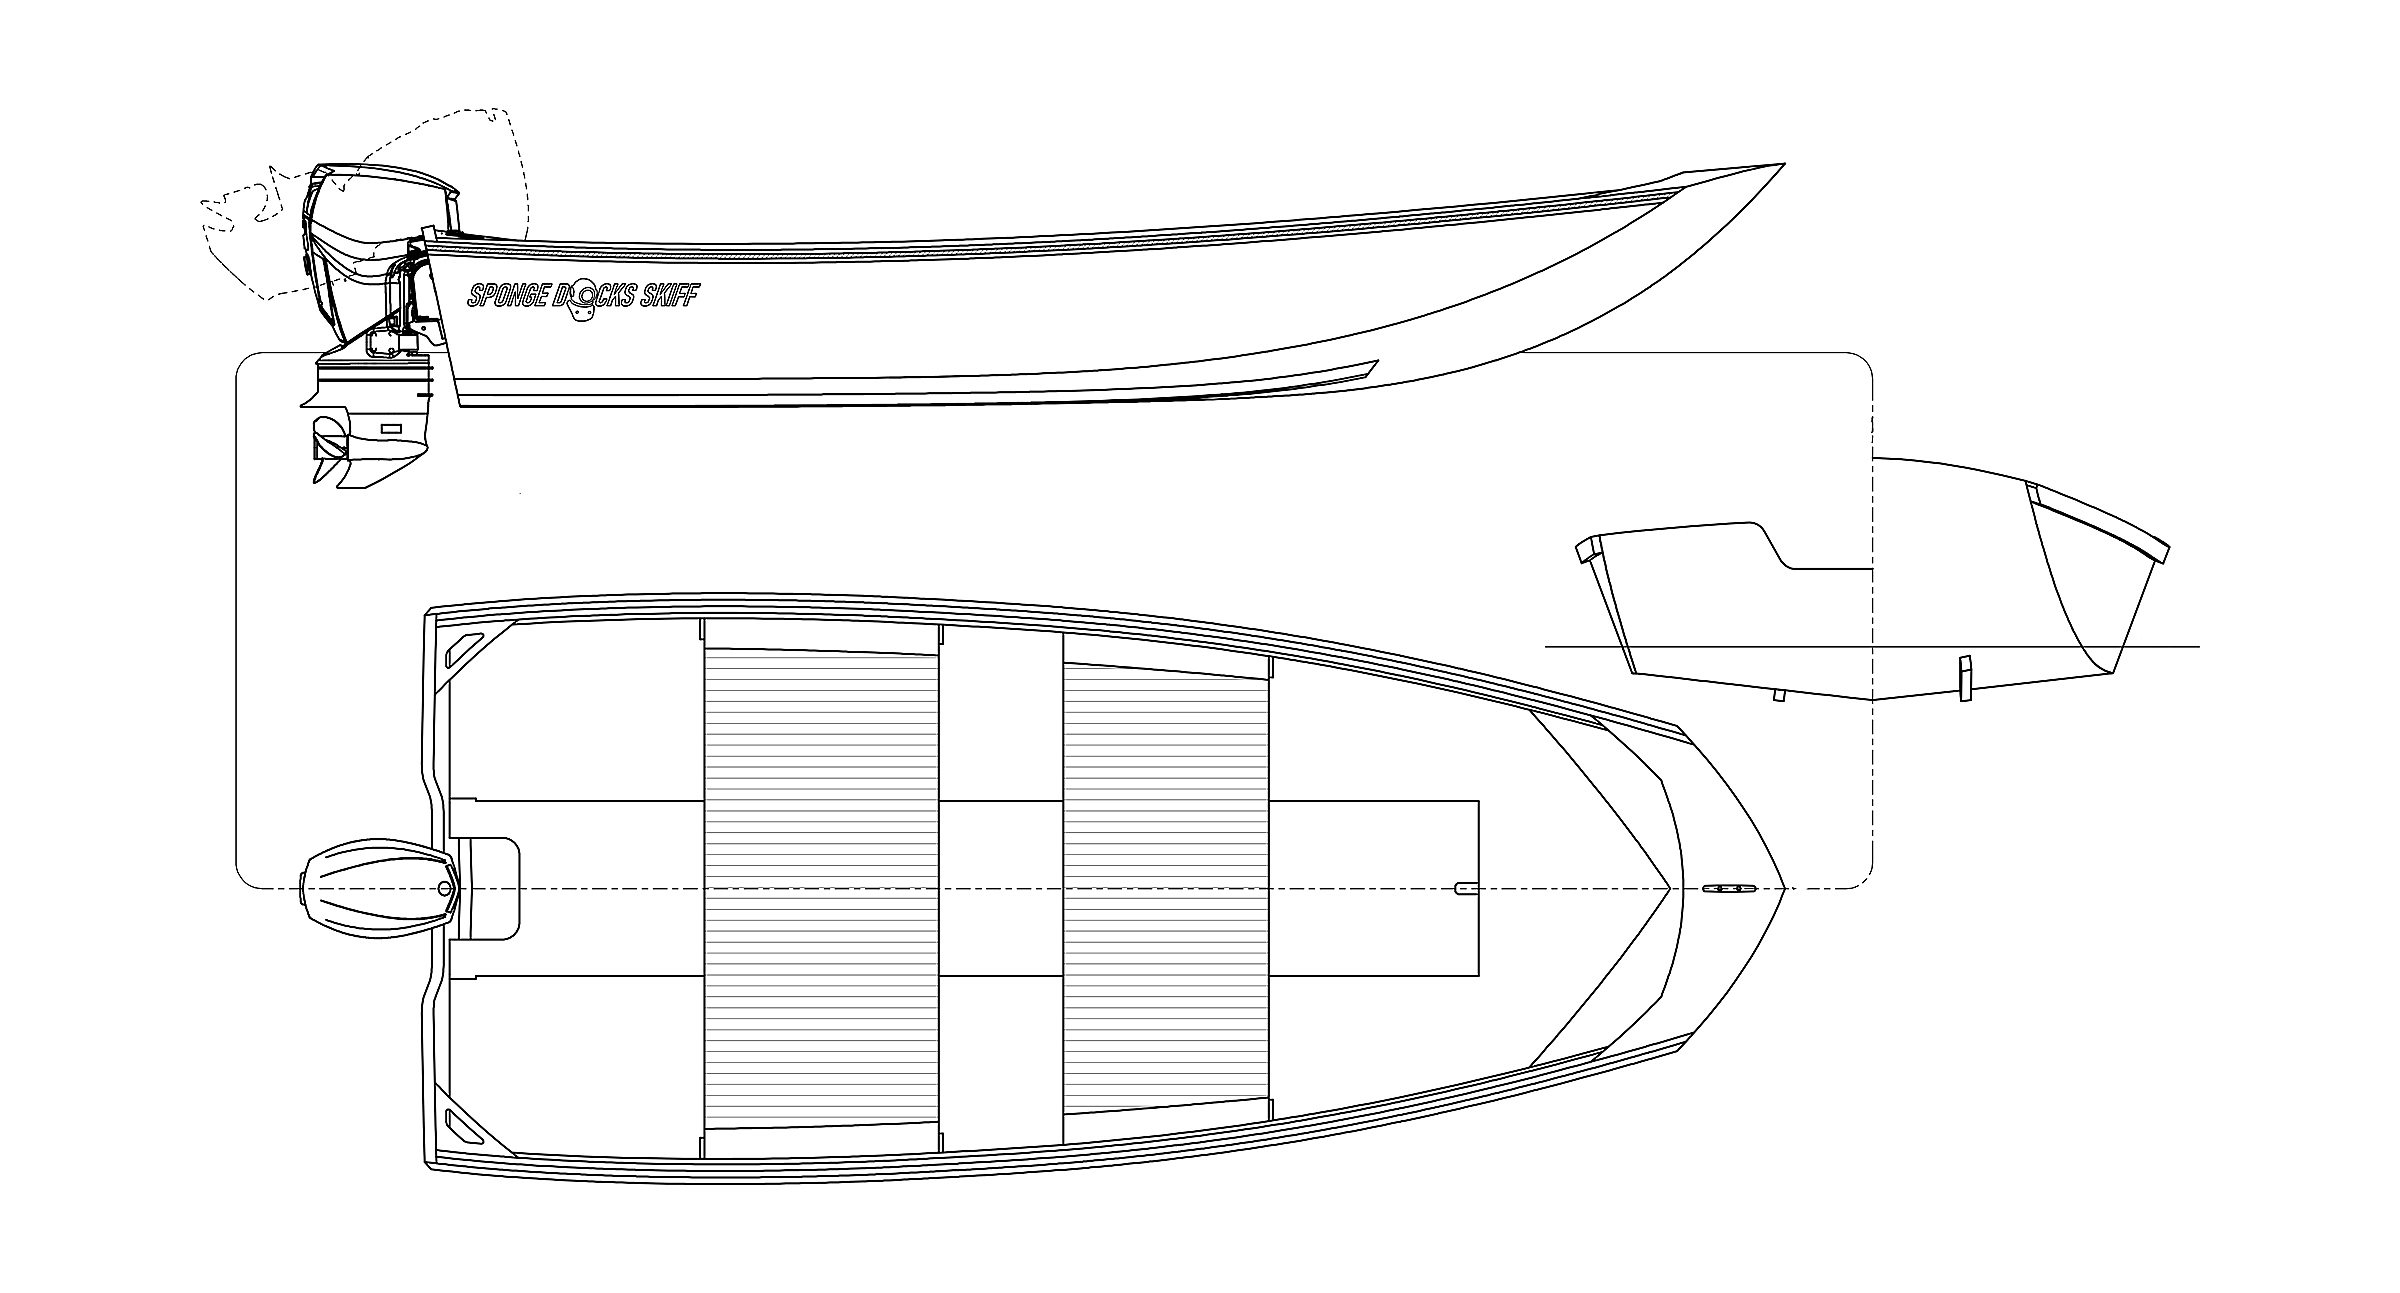
When Sam Devlin of Devlin Designing Boat Builders was commissioned to build a rowing skiff to be carried aboard a 45′ motoryacht, he was given two requirements: it had to be short enough to fit on the yacht’s cabintop, and it had to be equipped with a sliding-seat rowing rig. It’s a challenge to design a short boat that will perform well with a sliding seat, but Duckling, the sleek 14′ skiff Sam drew up and built, appears to fit the bill nicely.
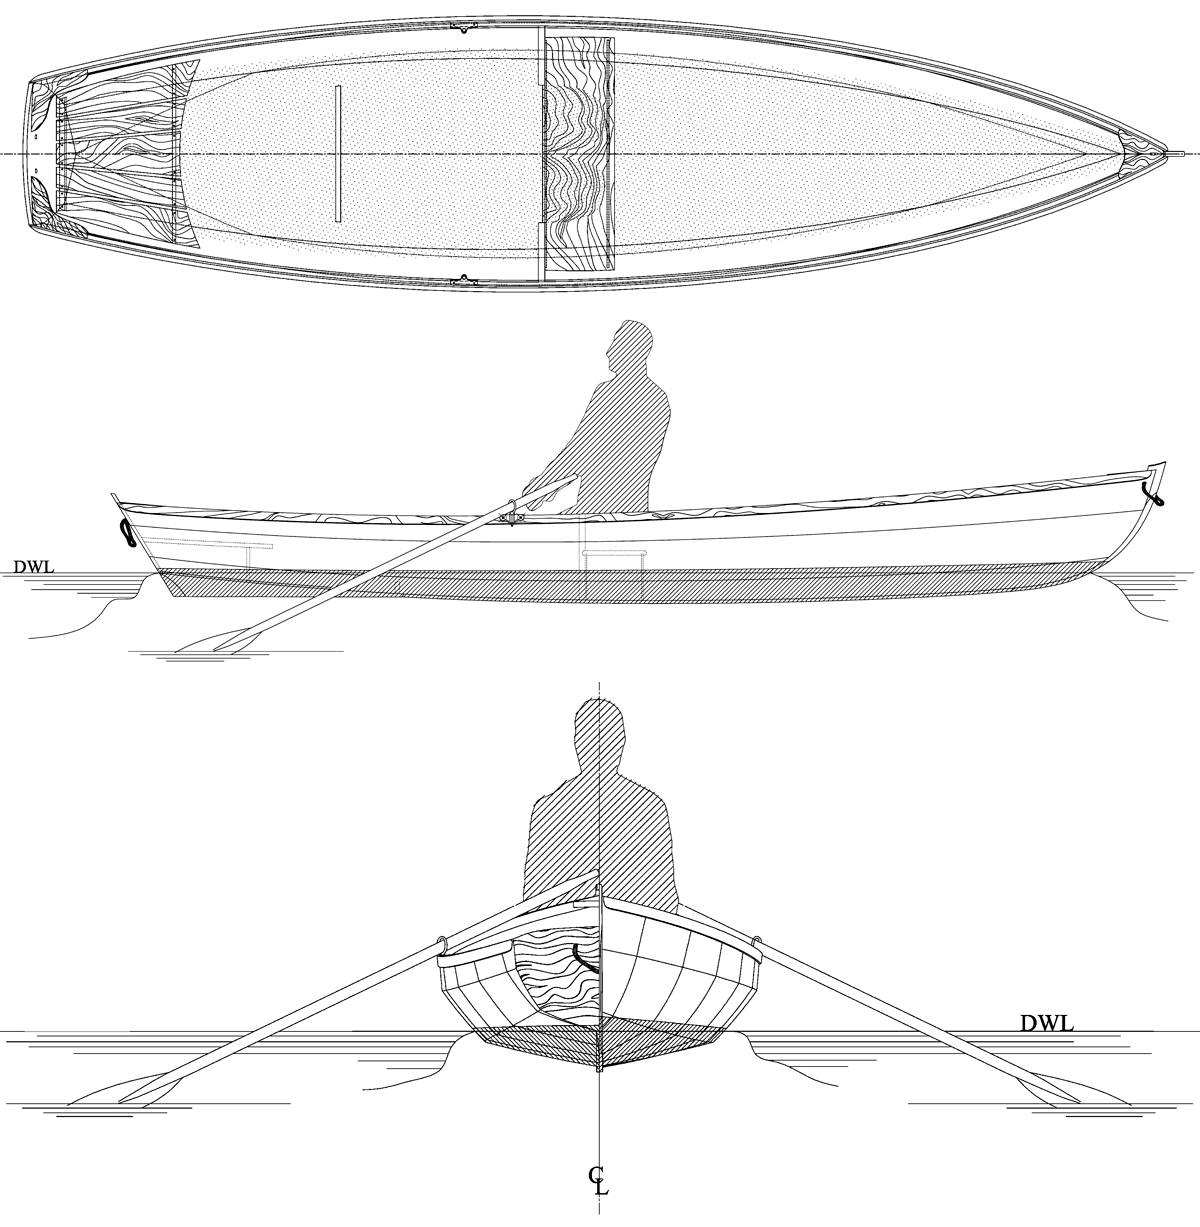
In a boat equipped with a sliding seat, the movement of the rower changes the trim of the boat with every stroke. The length of a racing shell keeps the resulting porpoising to a minimum, but Duckling is designed to support the rower’s weight at the ends of the stroke by carrying a lot of reserve buoyancy above the waterline. When the rower slides aft to take a stroke, the flare of the hull at the base of the transom keeps the stern from settling too deep in the water. At the other end of the stroke, the rower’s weight has moved forward, and the overhang of Duckling’s bow and the flare of its forward sections help counter the downward pressure.
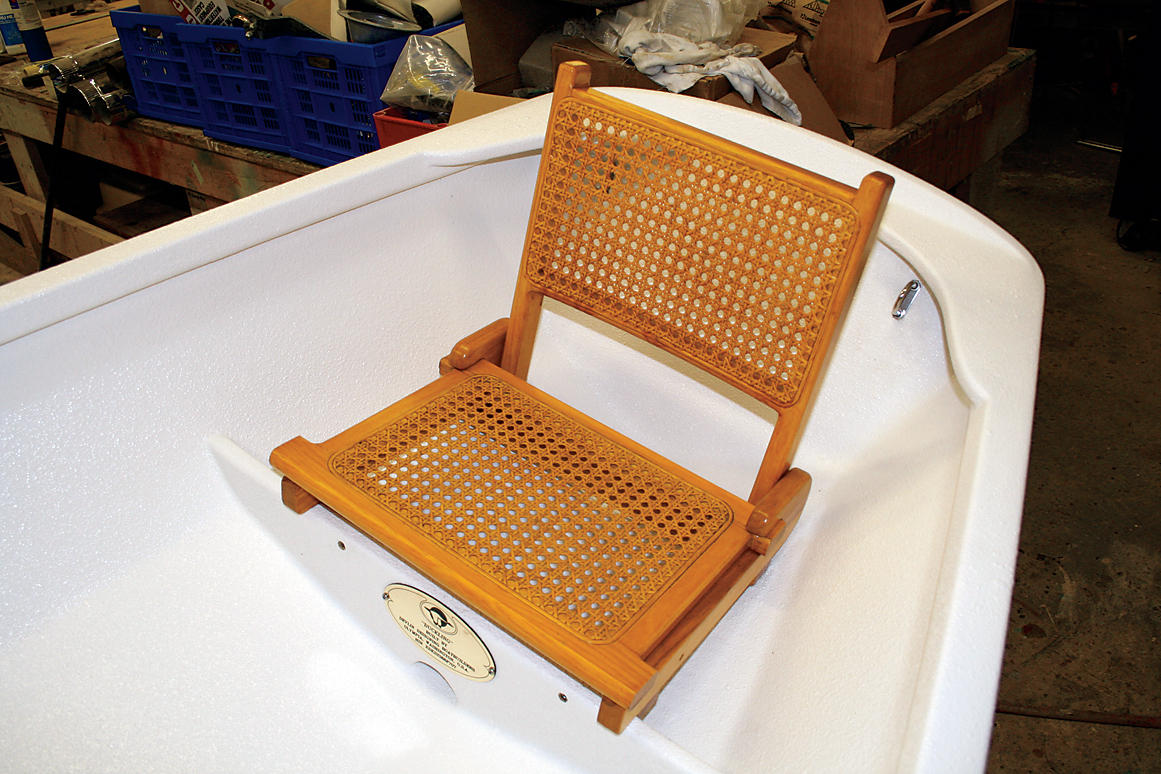
Photo by Christopher Cunningham
Duckling, a pulling boat designed by Sam Devlin for stitch-and-glue construction, was a custom commission. The boat was meant to be carried atop a motoryacht; it may be carried atop a car, too.
Typical of Devlin’s boats, Duckling is built with stitch-and-glue plywood. The three planks on each side are cut from 9mm mahogany plywood and then temporarily wired to each other and to the transom. Fiberglass and epoxy applied to the seams creates the permanent bond. The resulting structure is light and strong and requires minimal bracing. A single plywood frame amidships supports a fixed thwart and, paired with a bulkhead at the forward edge of the thwart, it creates a compartment for foam flotation. A similar compartment in the stern supports a woven cane seat for a passenger. The rest of the hull is uncluttered except for a pair of drain plugs. To withstand the rigors of being stored uncovered on the motoryacht’s cabintop, Duckling’s interior was finished with a thick coating developed for use as a truck-bed liner. Enamel would serve well for a Duckling stored out of the weather.
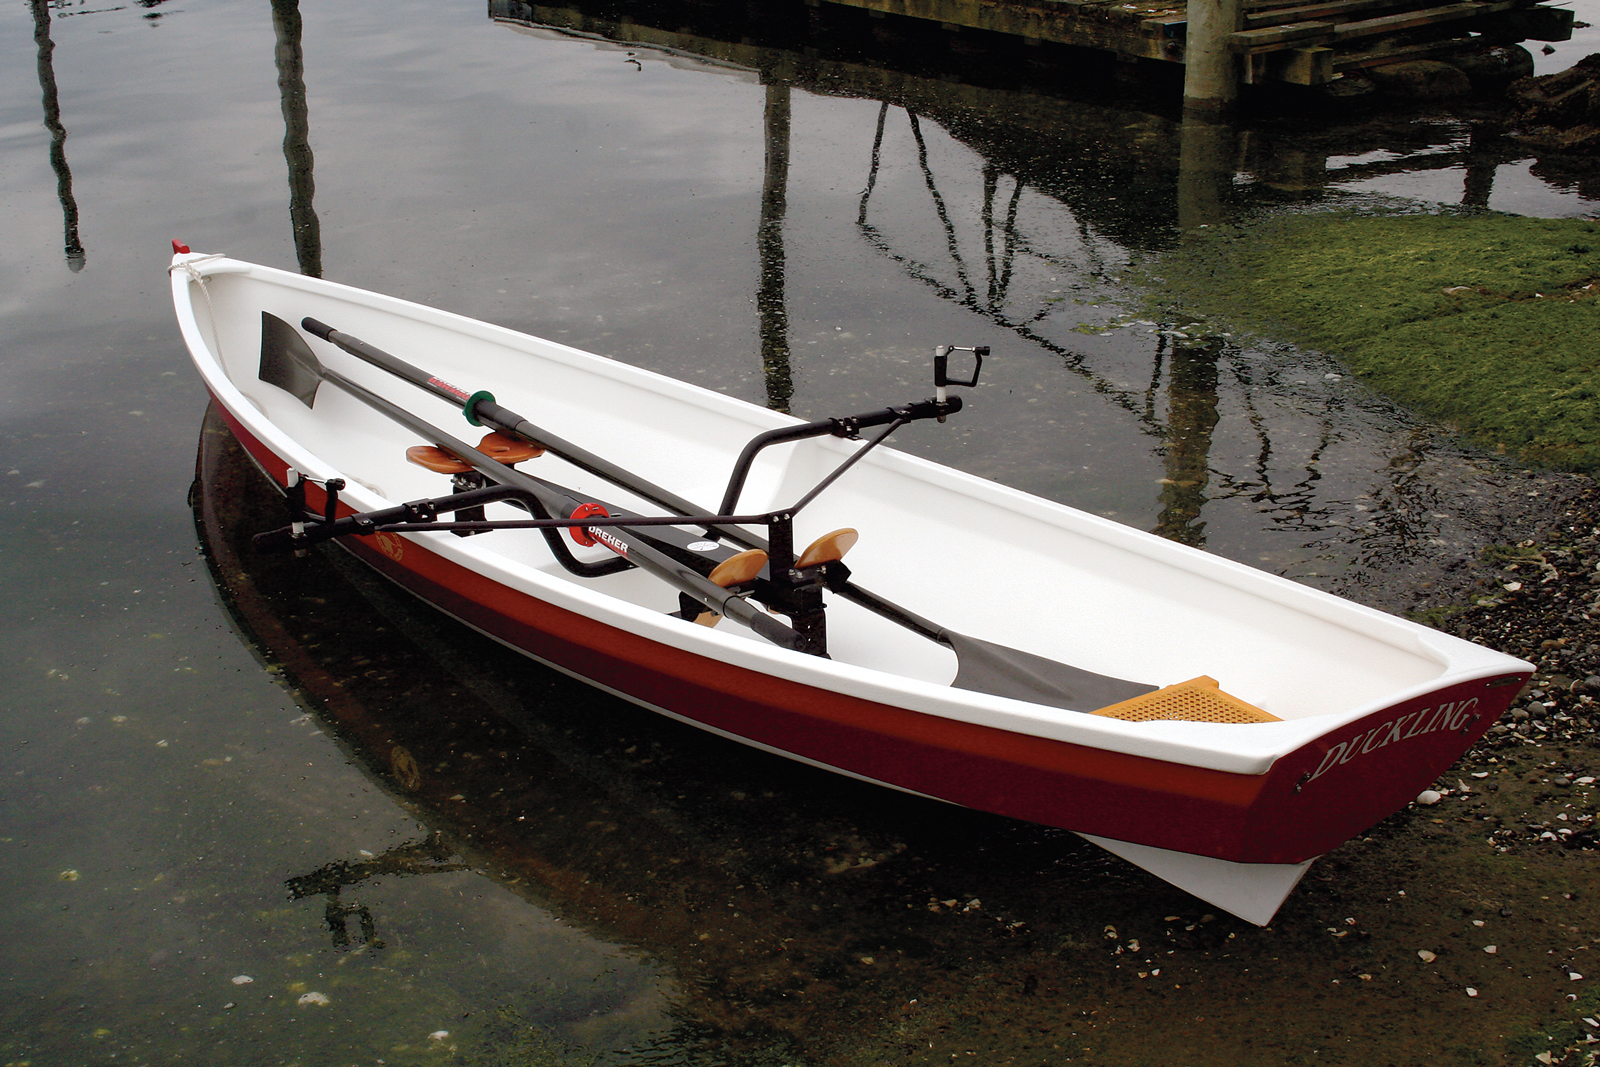
The 18-lb Piantedosi rowing rig rests on the hull and thwart and is held in place by brackets that connect the outriggers to the gunwale. The anodized aluminum rig has a solid feel and took the strain of my pulling at full power without flexing or creaking. The 9′ 6″ carbon-fiber hatchet-bladed sculls manufactured by Dreher are very light and balance well in the locks.
Underway, Duckling managed the sliding seat well. The stern had plenty of bearing to pick up my weight at the catch of the stroke; its settling in the water was scarcely noticeable. As you might expect, the bow, being finer than the stern, has more vertical motion when the boat is under way. While Sam was rowing I could see the bow travel a vertical 3″ to 4″, but when I was rowing I wasn’t able to feel any adverse effects of the pitching. Even if I let my weight fall heavily toward the bow at the end of stroke, Duckling didn’t slow down perceptibly or wander off course.
Photo by Christopher Cunningham
Reserve buoyancy in Duckling’s stern allows for passenger carrying. The sliding-seat unit may be dispensed with for fixed-seat rowing.
Duckling has a waterline length of about 12′ 6″ feet and a theoretical maximum hull speed of 4 3⁄ 4 knots. It didn’t take much effort at all to bring her up to that 1 speed. Using a GPS as a knotmeter, I measured 4 ⁄ 2 knots to 4 3 ⁄ 4 knots when I was just loping along. Even rowing at dead slide (the seat in a fixed position), I could easily manage 4 1⁄ 2 knots. Going all out added a bit of speed, but I couldn’t push much over 5 1⁄ 4 knots. At that speed the curdled stern wake starts crawling up the transom. With a 72-lb kid sitting in the stern, the trim was not too far out of whack and I could still drive Duckling up to 5 knots.
The long oars make Duckling delightfully maneuverable. Four strokes—two forward strokes on one side alternated with two backing strokes on the other—will spin Duckling 180 degrees in short order. Even though its beam is under 40″, the hull has very good stability. Standing up on the thwart, I felt quite steady. I could also lean on the gunwale to look over the side and still feel safely supported. You could easily go fishing in Duckling and reach over the side with a net and not wind up swimming.
The rowing rig takes up a fair bit of room in the boat, limiting what you can carry, and the outriggers make it awkward to come alongside a dock or another boat. Duckling would serve best as a tender with the rowing rig removed. Accordingly, Devlin has designed Duckling to be rowed without the sliding-seat rowing rig. Gunwale-mounted oarlocks would take 7′ oars. With its slender shape, Duckling would still be quick and easily driven from the fixed thwart. Rowing from the thwart would also drop the rower’s weight several inches, making the boat more stable and providing more inboard clearance for the oars when rowing in rough water.
Photo by Christopher Cunningham
Duckling is built of plywood, using the stitch-and-glue method. The 14-footer weighs 80 lbs.
For the yachtless, Duckling could be cartopped, though its 80-lb weight (without the sliding-seat rig) would require an extra hand for lifting to the roof racks. The solo boater could lift the bow to the back rack, then lift the stern and slide Duckling forward. A light trailer would probably be a better choice if you wanted to keep out of the chiropractor’s office. With just three planks to a side and minimal interior structure, Duckling would be a quick project for the amateur boatbuilder, and its size would be a good fit for a workshop squeezed into a single-car garage.
I should mention that I’ve never cared much for the idea of taking the outriggers and sliding seats meant for racing shells and putting them in a boat designed more for seakeeping ability than speed. The sliding-seat stroke may be graceful pushing a racing shell at 9 knots over flat water, but it can lead to bruised kneecaps and bloody thumbs shoving a rowboat at 2 knots across a beam sea. Duckling, though, is a brilliant idea for the couple who commissioned her. Wherever they find a quiet place to anchor, they’ll have a suitable place to row, and with Duckling they’ll have the perfect form of exercise to reinvigorate themselves after a day at the helm.
The Duckling prototype garnered much attention, and the design is now available to home-based builders. A modest sail plan was in the works at press time.
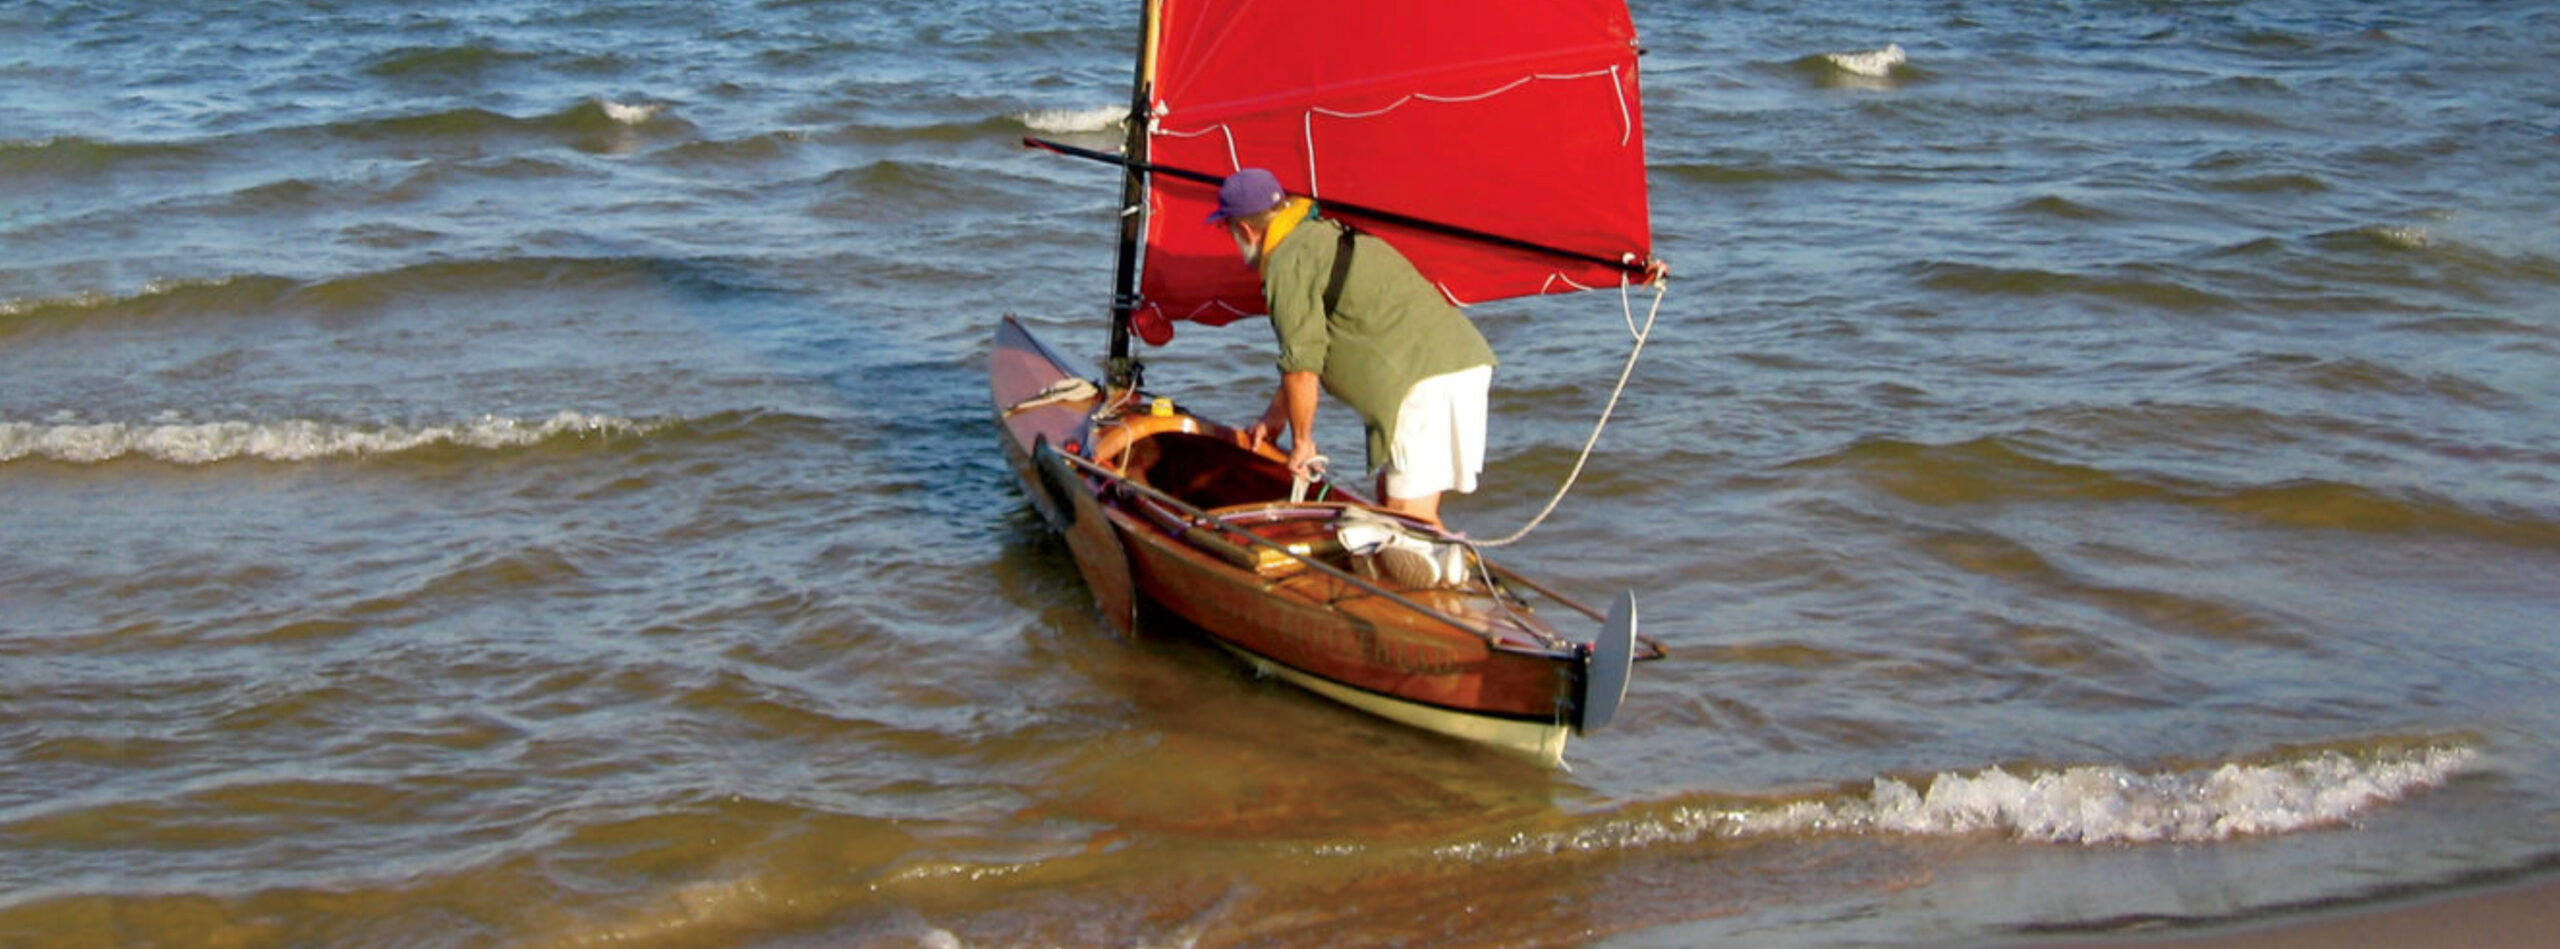
Standing in sugar-white sand on South Haven, Michigan’s, South Beach, I watched BUFFLEHEAD as she sliced through the Lake Michigan chop. Her okoume hull, finished bright, glowed in the sunlight of an early July morning that felt more like autumn than summer, and her bright red sail puffed full in the freshening westerly breeze. The lone figure in her cockpit— soaked with spindrift—clung to a single sheet with one hand and a steering stick (tiller) with the other as she danced over the aquamarine waves.
The design was inspired by the birchbark canoes of French Canadian voyageurs (travelers) and Native Americans, as well as the sailing canoes originated during the 1860s by Scotsman John MacGregor. This sleek, feather-light decked sailing canoe offers balance and flexibility to 21st-century adventurers. Michigander Hugh Horton created this easily transported cockleshell for those seeking to explore the rugged Great Lakes and ocean coastlines.
At first glance, BUFFLEHEAD resembles a kayak, although she appears to be greater in size. I wondered what made her a canoe rather than a kayak. Horton said she could easily be called a “high-volume, large-cockpit kayak.” Nick Schade of Guillemot Kayaks said, “A ‘decked canoe’ is called such by the designer, and a ‘kayak’ is called a kayak by its designer. Typically a decked canoe comes from a designer working in the canoe tradition and the boat is likely derived primarily from other canoes (decked or undecked) where kayak designs evolve from other earlier kayaks.”
Photo by George D. Jepson
While you may not want to try building BUFFLEHEAD without some experience under your belt, when ready, your hard work will pay off in an eye-pleasing, seaworthy craft for daysailing or extended coastal passages.
Horton has lived on the water most of his life, and began rowing fixed-seat boats from the age of six. “At 11, unpinned oars found me,” he says. “Since I eschew motors, I have rowed a lot.” After experiencing a small kayak and a double paddle in the early 1980s, his thoughts turned more and more to a craft that successfully combines paddling and sailing.
Named for the diminutive and swift species of duck, BUFFLEHEAD has an LOA of 15′ 5″, a 2′ 9″ beam, and a weight of 58 lbs. Heavy ’glass helps protect her bottom on a rocky shore or concrete ramp. The canoe’s ability to maneuver in shallow water and confined spaces allows a paddler/sailor intimate access to the natural wonders along beaches, rocky shorelines, or heavily forested and secluded streams and rivers.
In the late 1700s, voyageurs paddled birchbark canoes across a North American trade route covering more than 3,000 miles—often carrying their canoes and cargoes over grueling portage trails—as they supplied furs for the burgeoning European fashion market. These hearty souls conveyed barter goods from Montréal to the western Great Lakes, as they traversed the St. Lawrence and Ottawa Rivers, Lake Huron, the St. Mary’s River, and ultimately the sparkling, sometimes stormy North Shore of Lake Superior to a small outpost at Grand Portage in what is now Minnesota. I was surprised to learn that voyageurs often carried single square sails for the same reason BUFFLEHEAD carries her gunter rig.
A passage in the Great Lakes can fatigue even the fittest canoeist or kayaker, but by adding a sail the task becomes much more agreeable. Energy expenditure decreases when there is a breeze, and greater distances can be covered in shorter periods of time. If winds are fluky—or are blowing from the wrong direction—paddles serve well. “The voyageurs were no fools,” said Horton.
BUFFLEHEAD is a well-thought-out blend of traditional low-tech boat building and contemporary applied technology. The canoe’s hull was built from 3mm and 4mm plywood sheets over a mold setup. “It could be called ‘tack-and-tape,’” says Horton. “The idea is to hold the plywood in place and [then] add fabric in the form of cloth or tapes, set in epoxy, over the joints.” After the hull is removed from the molds, the inside surfaces are covered with Kevlar. There are five plywood panels per side, joined by S-glass (a stiff, strong fiberglass cloth) or carbon fiber on the outside. All plywood sur- faces, including the deck, are covered with one of these high-tensile-strength materials. The deck was built on a separate mold.
Photo by George D. Jepson
A bright-finished okoume deck and hull plus a Kevlar- reinforced coaming, coated with epoxy, give BUFFLEHEAD strength and luster. The contrast of the black, carbon-fiber mast and red sail add to the boat’s visual appeal.
When Horton arrived in the South Beach parking lot in this small Lake Michigan port at the mouth of the Black River, BUFFLEHEAD was lashed to the roof of his pickup truck. Unloading the boat was a simple task that can be accomplished singlehandedly or with minimal assistance. At water’s edge, Hugh set about rigging. The lightweight mast and spar are made from hollow red-cedar cores wrapped with carbon-fiber cloth, helping to keep weight to a minimum. Within minutes, the bright red sail filled as Hugh and BUFFLEHEAD began to beat to windward in the stiff breeze. Although she appears delicate, she slices through the waves with a purpose. After years of accumulating technical data, Horton has successfully wedded high-tech materials with wood to assure strength and created a hull shape that makes the most of them. “ The underwater fullness of the hull is more in line with modern multihulls,” Horton explained.
Meade Gougeon, a pioneer in the development and application of boatbuilding epoxies, sails SERENDIPITY, one of Horton’s earlier canoes, and has been a keen observer of BUFFLEHEAD’s development. The brilliance of the design—narrow amidships with fuller ends— according to Gougeon, is its stability and weight-carrying capability of about 300 lbs.
Hugh described BUFFLEHEAD as a “50/50,” meaning the boat either can be paddled or sailed. “I could say I strive for 100/100, in that the boat should be an exceptional sailor and paddler,” he says. “But she’ll never paddle as well as a 22″-wide kayak, nor sail as well as an International 14.” The canoe’s ability to stay on course is impressive. Paddling with a comfortable rhythm is an acquired skill and requires patience gained with time in the cockpit. Raising the adjustable seat adds comfort while paddling. And as with any wooden boat, there is the pleasing natural beauty of wood grain to contemplate from the cockpit.
The sheer is low enough to allow for comfortable paddling. Horton carries both single- and double-bladed paddles for different situations. There is plenty of space in the roomy cockpit, which allows him to move around comfortably.
A single leeboard built of 3⁄4″ meranti is fitted to the port side, serving basically the same purpose as a center-board while under sail. With one of two side-by-side steering sticks in his hand, Horton maneuvered his charge almost effortlessly, jockeying BUFFLEHEAD through the various points of sail using a single part (one line) hand-held sheet, which allows him to rapidly spill wind in a sudden blow.
The space below deck offers stowage for sleeping bags, a light tent, and provisions for extended voyages. Horton has extensively tested his decked sailing canoes, cruising among the granite-studded islands and along the rugged shoreline of Lake Huron’s North Channel. He also cruised through the Beaver Islands off Michigan’s Leelanau Peninsula. During the winter, he paddles and sails BUFFLEHEAD on the west coast of Florida near Cedar Key.
The simplicity of getting out on the water with such minimal effort is appealing. Although BUFFLEHEAD is an ideal craft for present-day Great Lakes voyageurs, this nearly bulletproof little boat can also handle virtually any coastal waterway in the world. Horton, a consummate tinkerer, has spent nearly two decades testing new rigs and components. The result is BUFFLEHEAD, a design that lives up to her feathered namesake.
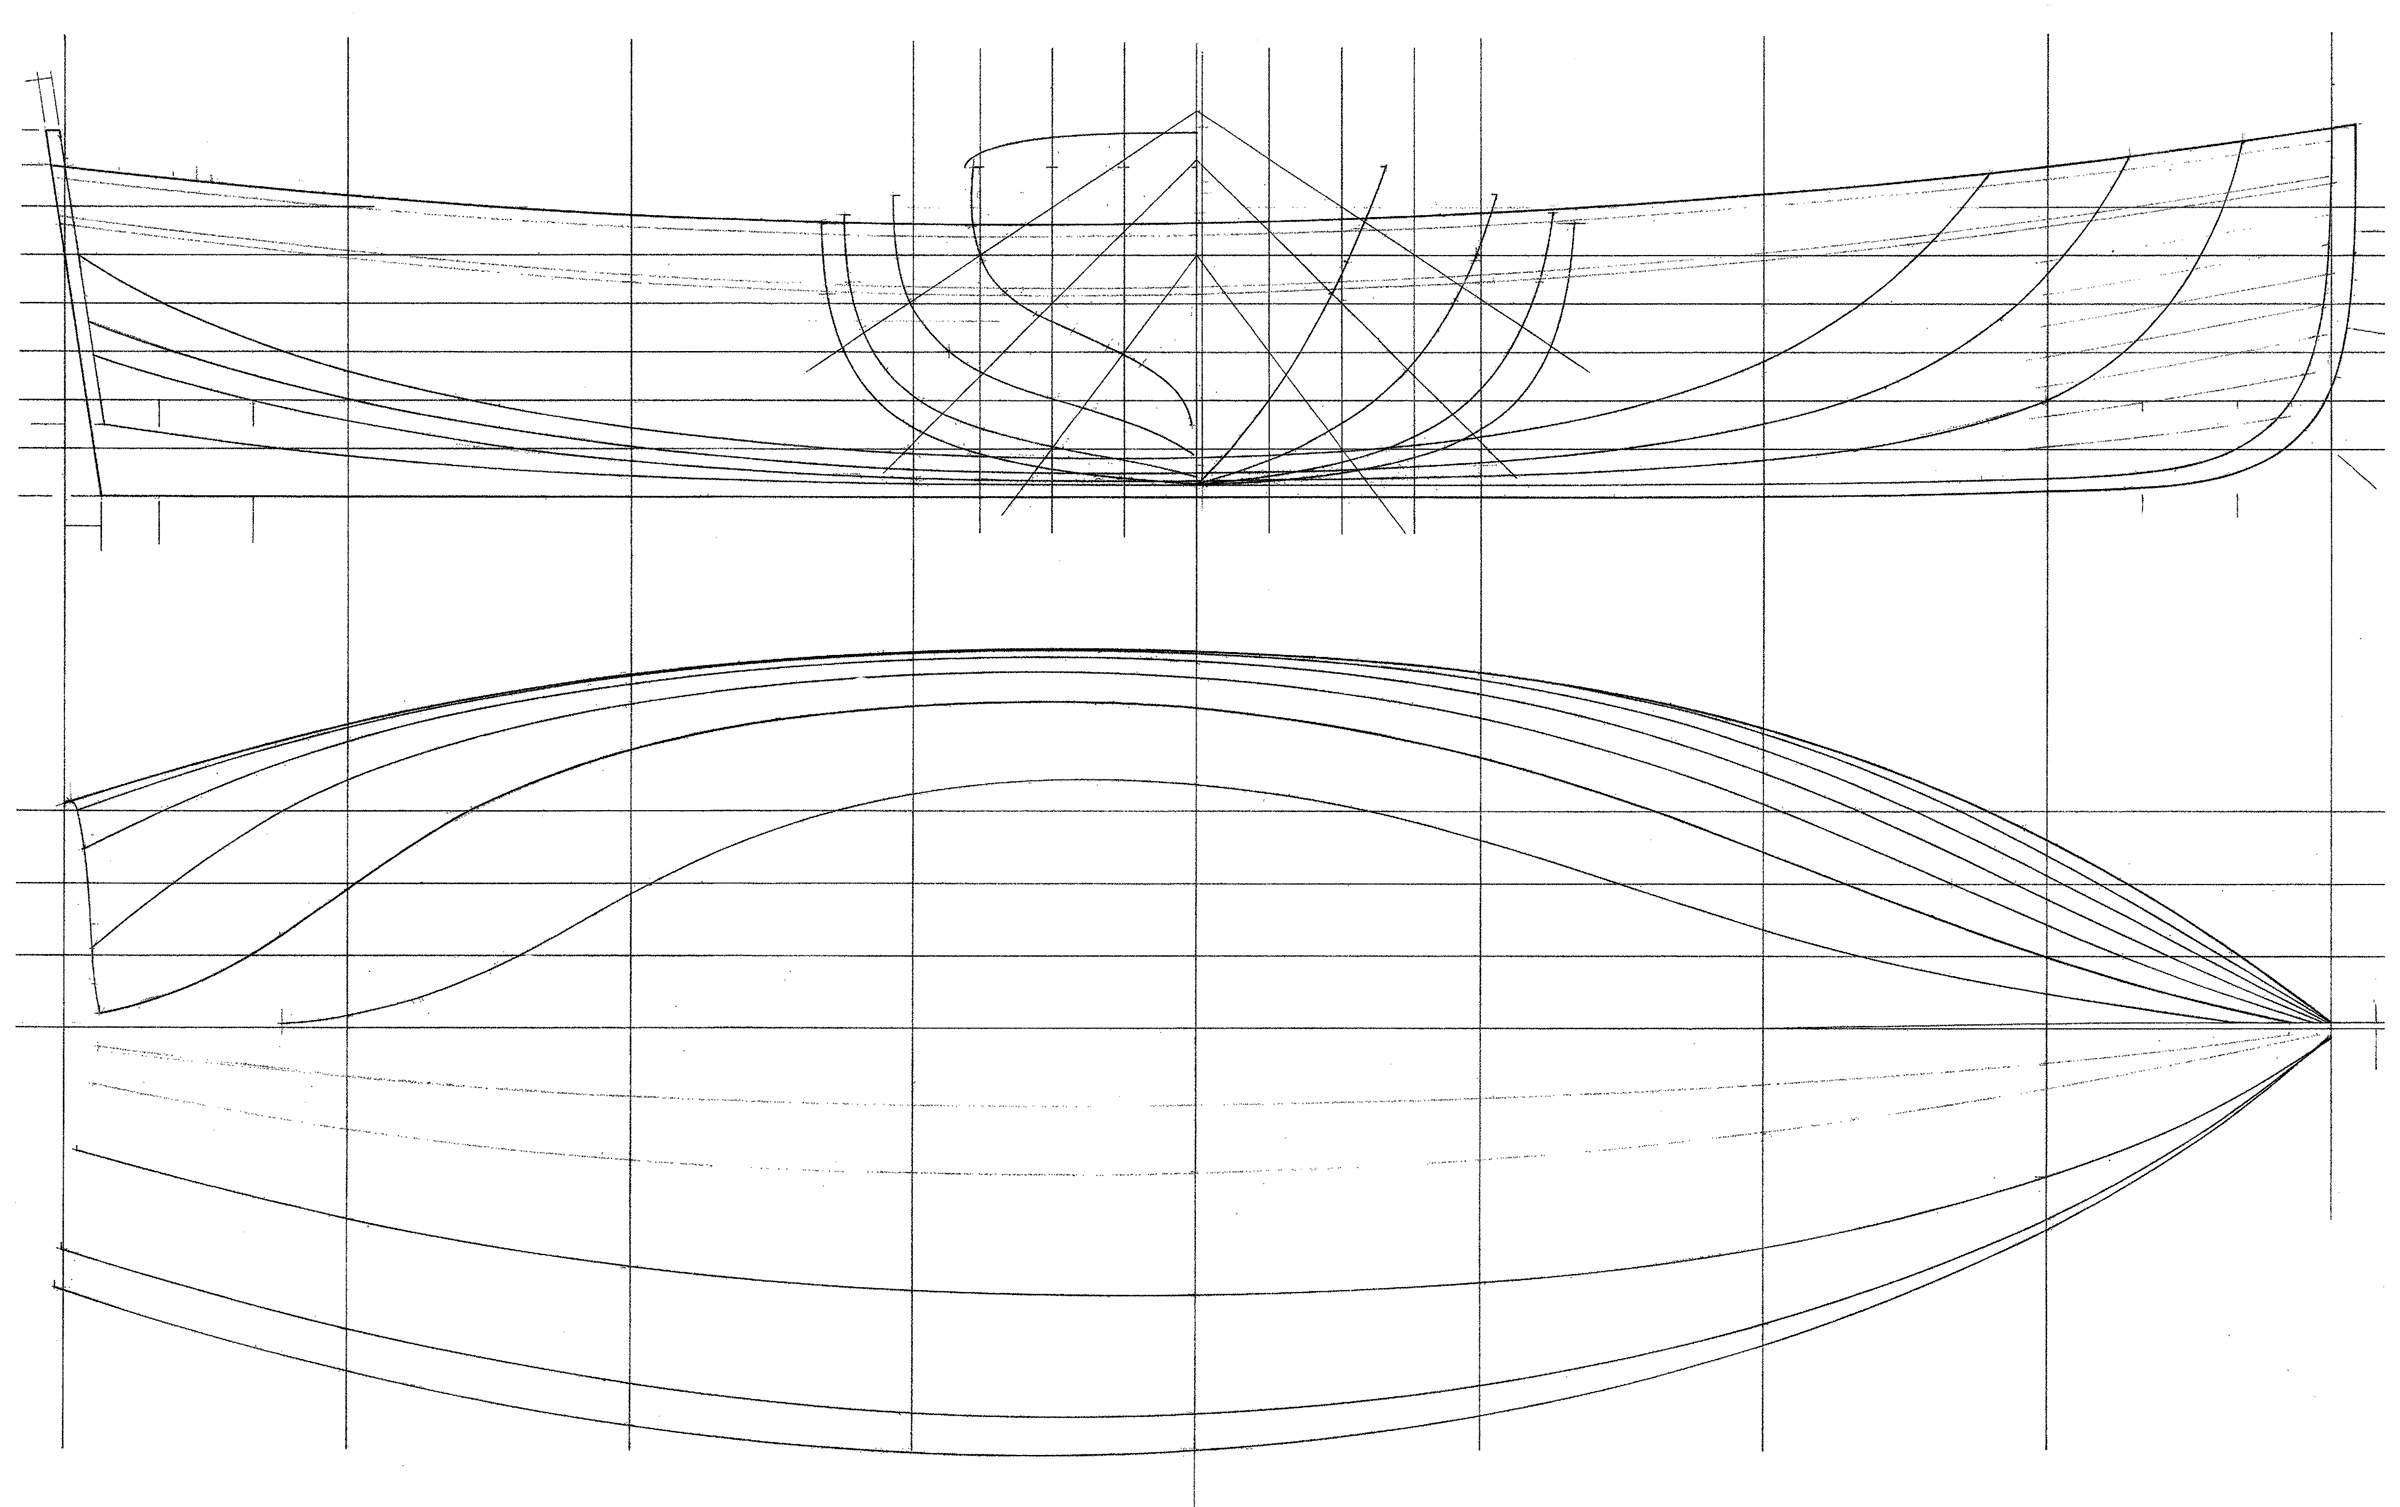
The best performing boats are often the most difficult to build. While BUFFLEHEAD’s lines show that she requires a careful hand, the shapeliness of each body plan section and their relationship to one another inspires confidence that she will part the water comfortably and efficiently.
This Boat Profile was published in Small Boats 2009. Plans for the Bufflehead are available from designer Hugh Horton for $40.
The first boat I built was a kayak that I designed after looking at the drawings of Arctic kayaks in The Bark Canoes and Skin Boats of North America. The kayak got me afloat, but more importantly, taught me how little I knew about boats. The unremarkable appearance, construction, and performance of my kayak set me on a path to see what traditional boats could teach me. Those with a long history, refined by generations of watermen whose livelihoods and very lives depended upon them, interested me most.
Greenland kayaks taught me about the seakeeping abilities of slender, low-profile hulls. They might make for a wet ride but they were hardly bothered by high winds. On stormy days when I saw no other boats venturing out on Puget Sound, I could paddle with confidence through steep breaking waves and stinging spray. My baidarkas, both single and double, showed me how a flexible hull can maintain speed in rough water by yielding to waves. The ancient design of a Gokstad faering proved that a hull formed by only three strakes could be so sleek in the water that its wake could be almost invisible in water scuffed by a light breeze. My sprit-rigged sneakbox may have been designed for waterfowling, but showed it could jump on plane and fly.
I pushed those boats and others hard to see what they could do, and at the same time I was discovering what I was capable of. They helped me come to terms with self-doubt, fear, discomfort, and, on the long cruises, even loneliness.
I built all of those boats while I was in my 20s and 30s when I was as strong as I would ever be. I was rarely outpaced by anyone whether I was paddling, rowing, or bicycling. At 68, I still like to push hard, but I’m not as fast and I don’t have the same endurance. I get passed frequently. I’ve adjusted my expectations but not by letting go of the effort to go farther or faster. I ride my bike through neighborhood side streets to avoid the younger, faster cyclists on the bike paths. And I built a coracle, a boat that is incapable of high speed or great distance.
A few years ago, I’d made a folding coracle-like tender for my little sail-oar-motor cruiser and had grown to like the feel of a boat so small that none of it is beyond arm’s reach. It was an awkward boat to propel—a standard canoe stroke spins it in circles—until I discovered the slash-and-pull paddle stroke seen in films of coracles from the 1930s. The traditional form of the coracle has its origins even farther back to pre-Roman times, more than 2,000 years ago, and consists of bent saplings, usually willow or hazel, interwoven or lashed together and covered with an animal hide. To see what I could learn from that ancient design, I decided to build one.
I knew of a local plant that grows in tall, mostly straight shoots. I harvested some decades ago, first for making arrow shafts for obsidian arrowheads I’d made and later for the 43 frames I needed for building an Aleut baidarka. I didn’t know back then what species the plant was and only recently had an arborist identify it as beaked hazel by a leaf I brought to her nursery. I looked it up on the web and learned the ways I’d used the shoots have been traditional uses: “Twisted twigs were used to tie things. Stems were used for weaving baskets and fish traps. Straight stems were used for arrows.” In the British Isles, another species, common hazel, was used for making the oversized baskets that are coracles.
The beaked hazel in the woods around here grows on south-facing hillsides. Each cluster had new growth, mature shoots suitable for harvesting, and leafless standing dead shoots. For the coracle I cut shoots that were between 1/2″ and 7/8″ at the base. A ratchet pruner was the only tool I needed for the harvest. The pruner was also the only tool I really needed to build a coracle.
The stems in the foreground and the cluster beyond them are beaked hazel. Growing in the shade of large trees, like the trunk at left, the hazel doesn’t grow much higher than 12′. The leaf at right center has the sunlight brightening its underside. There is a soft velvety fuzz on the bottom of the leaves, making them easy to identify.
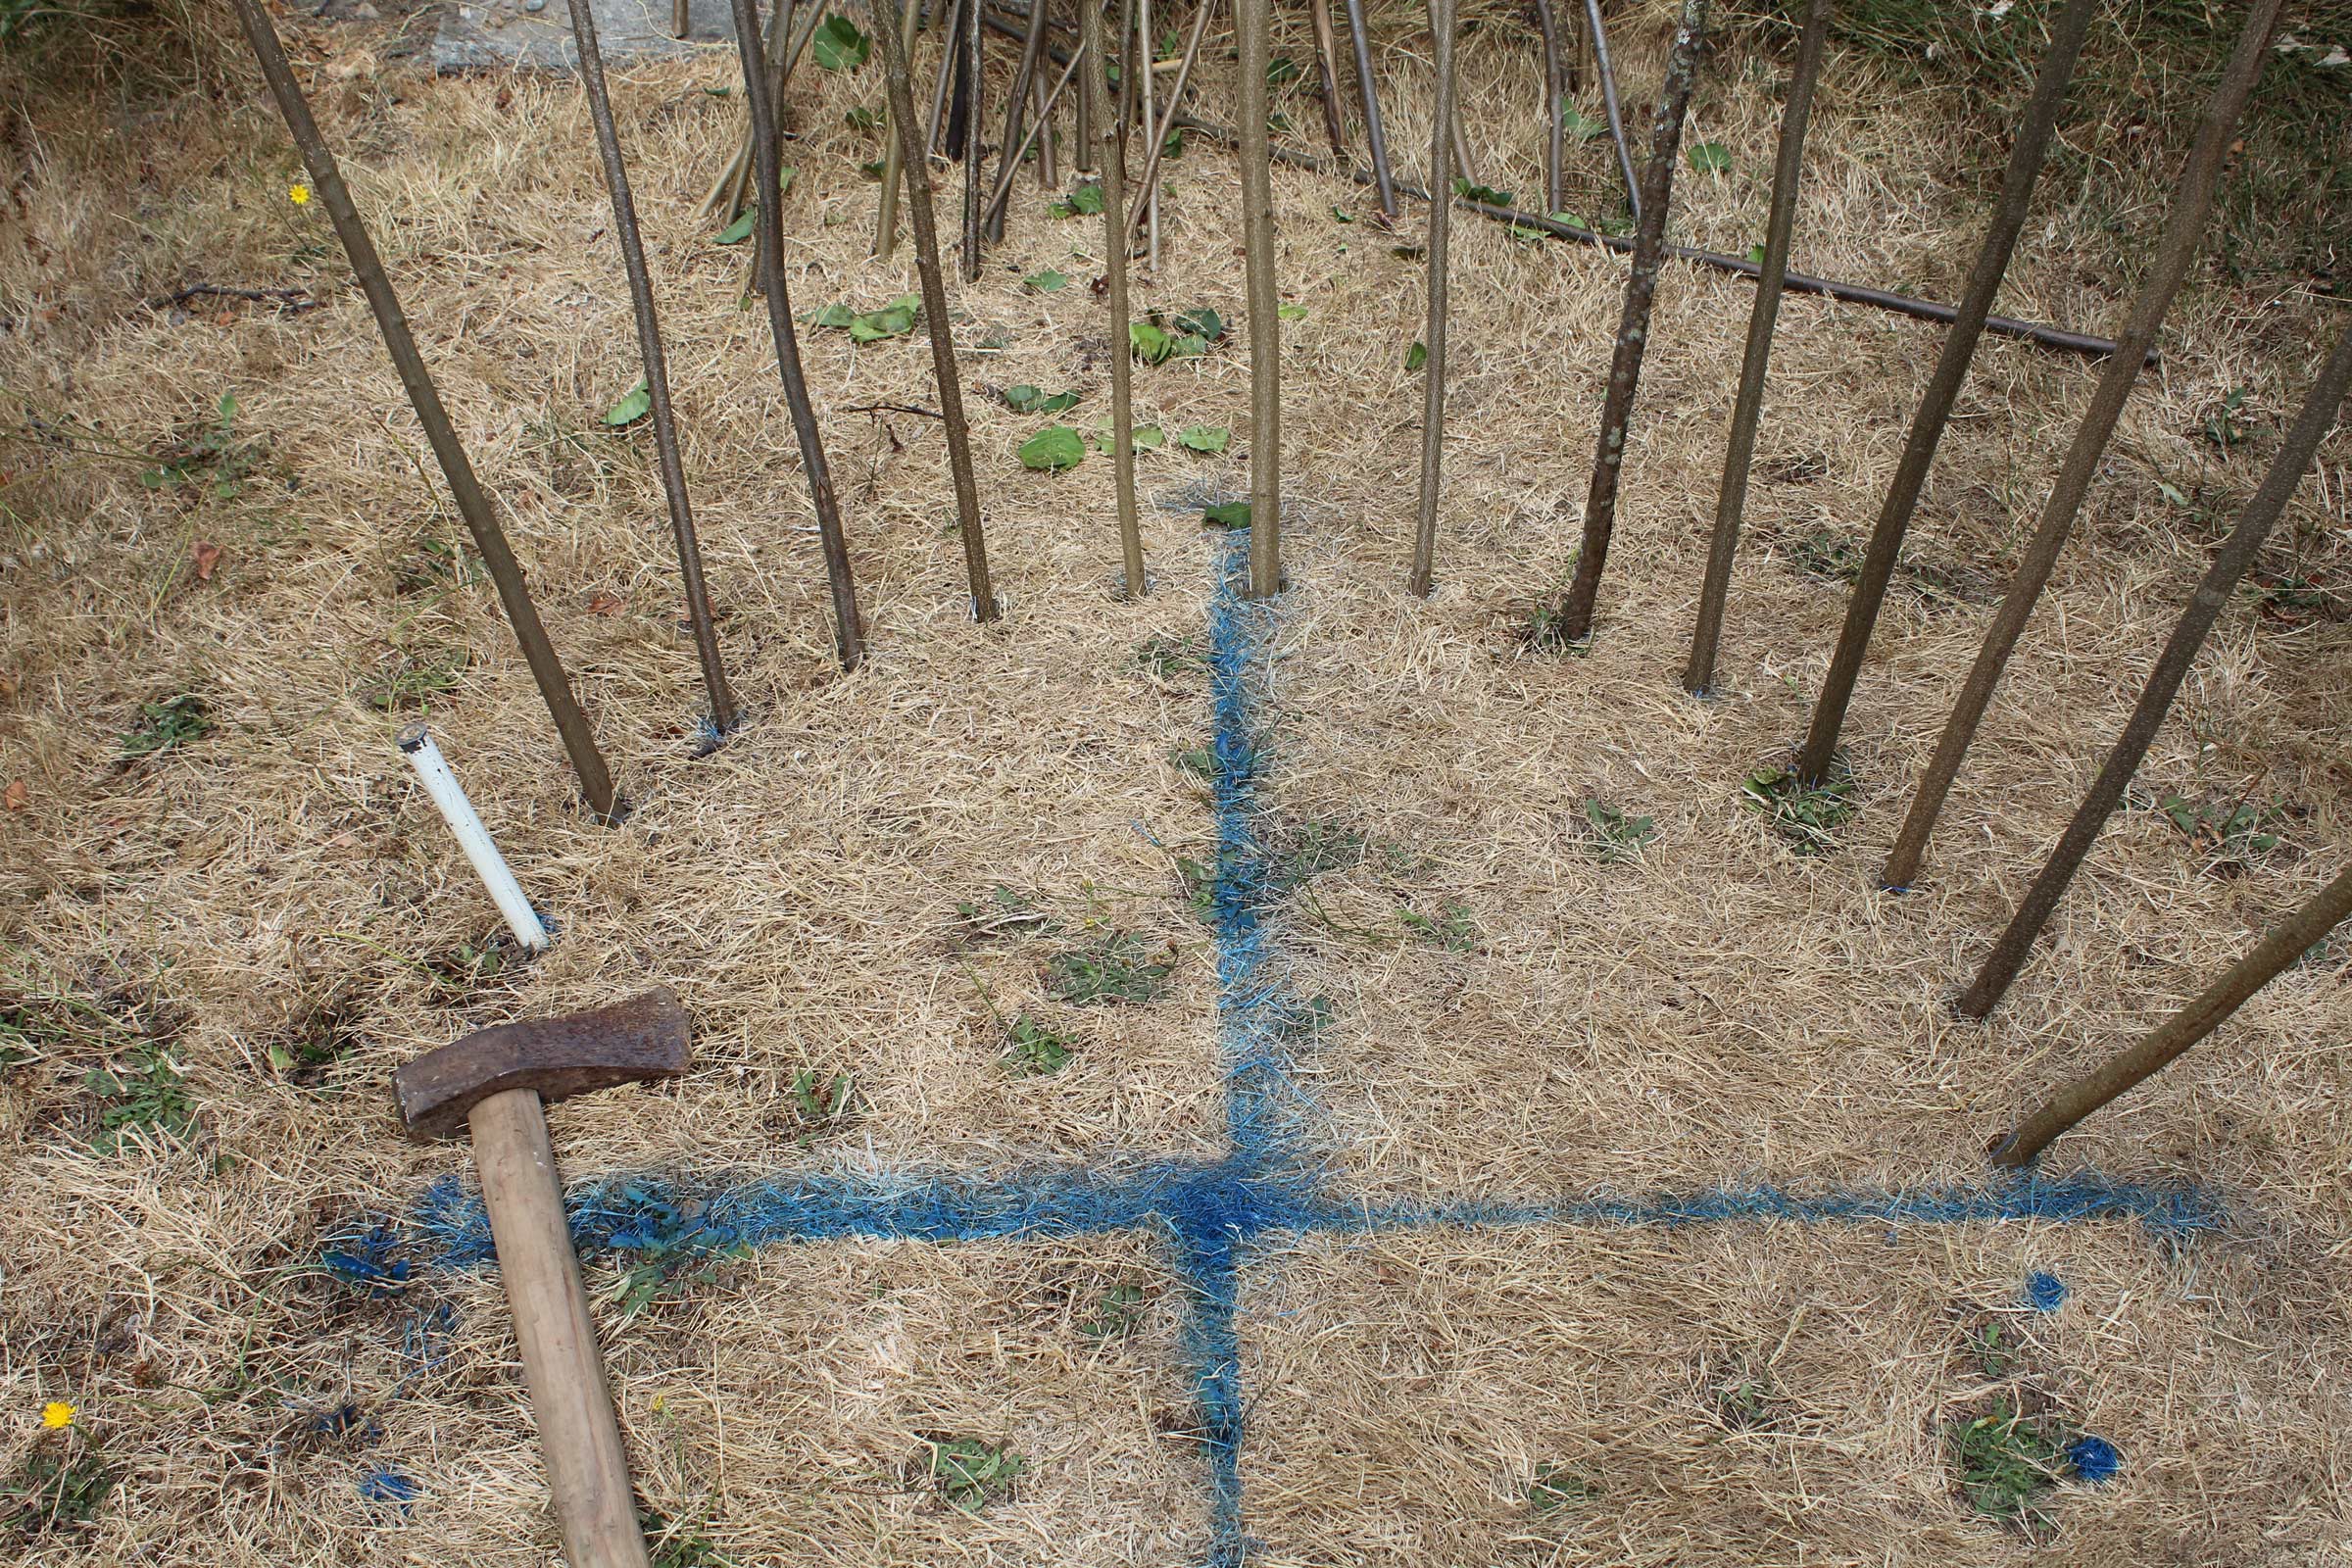
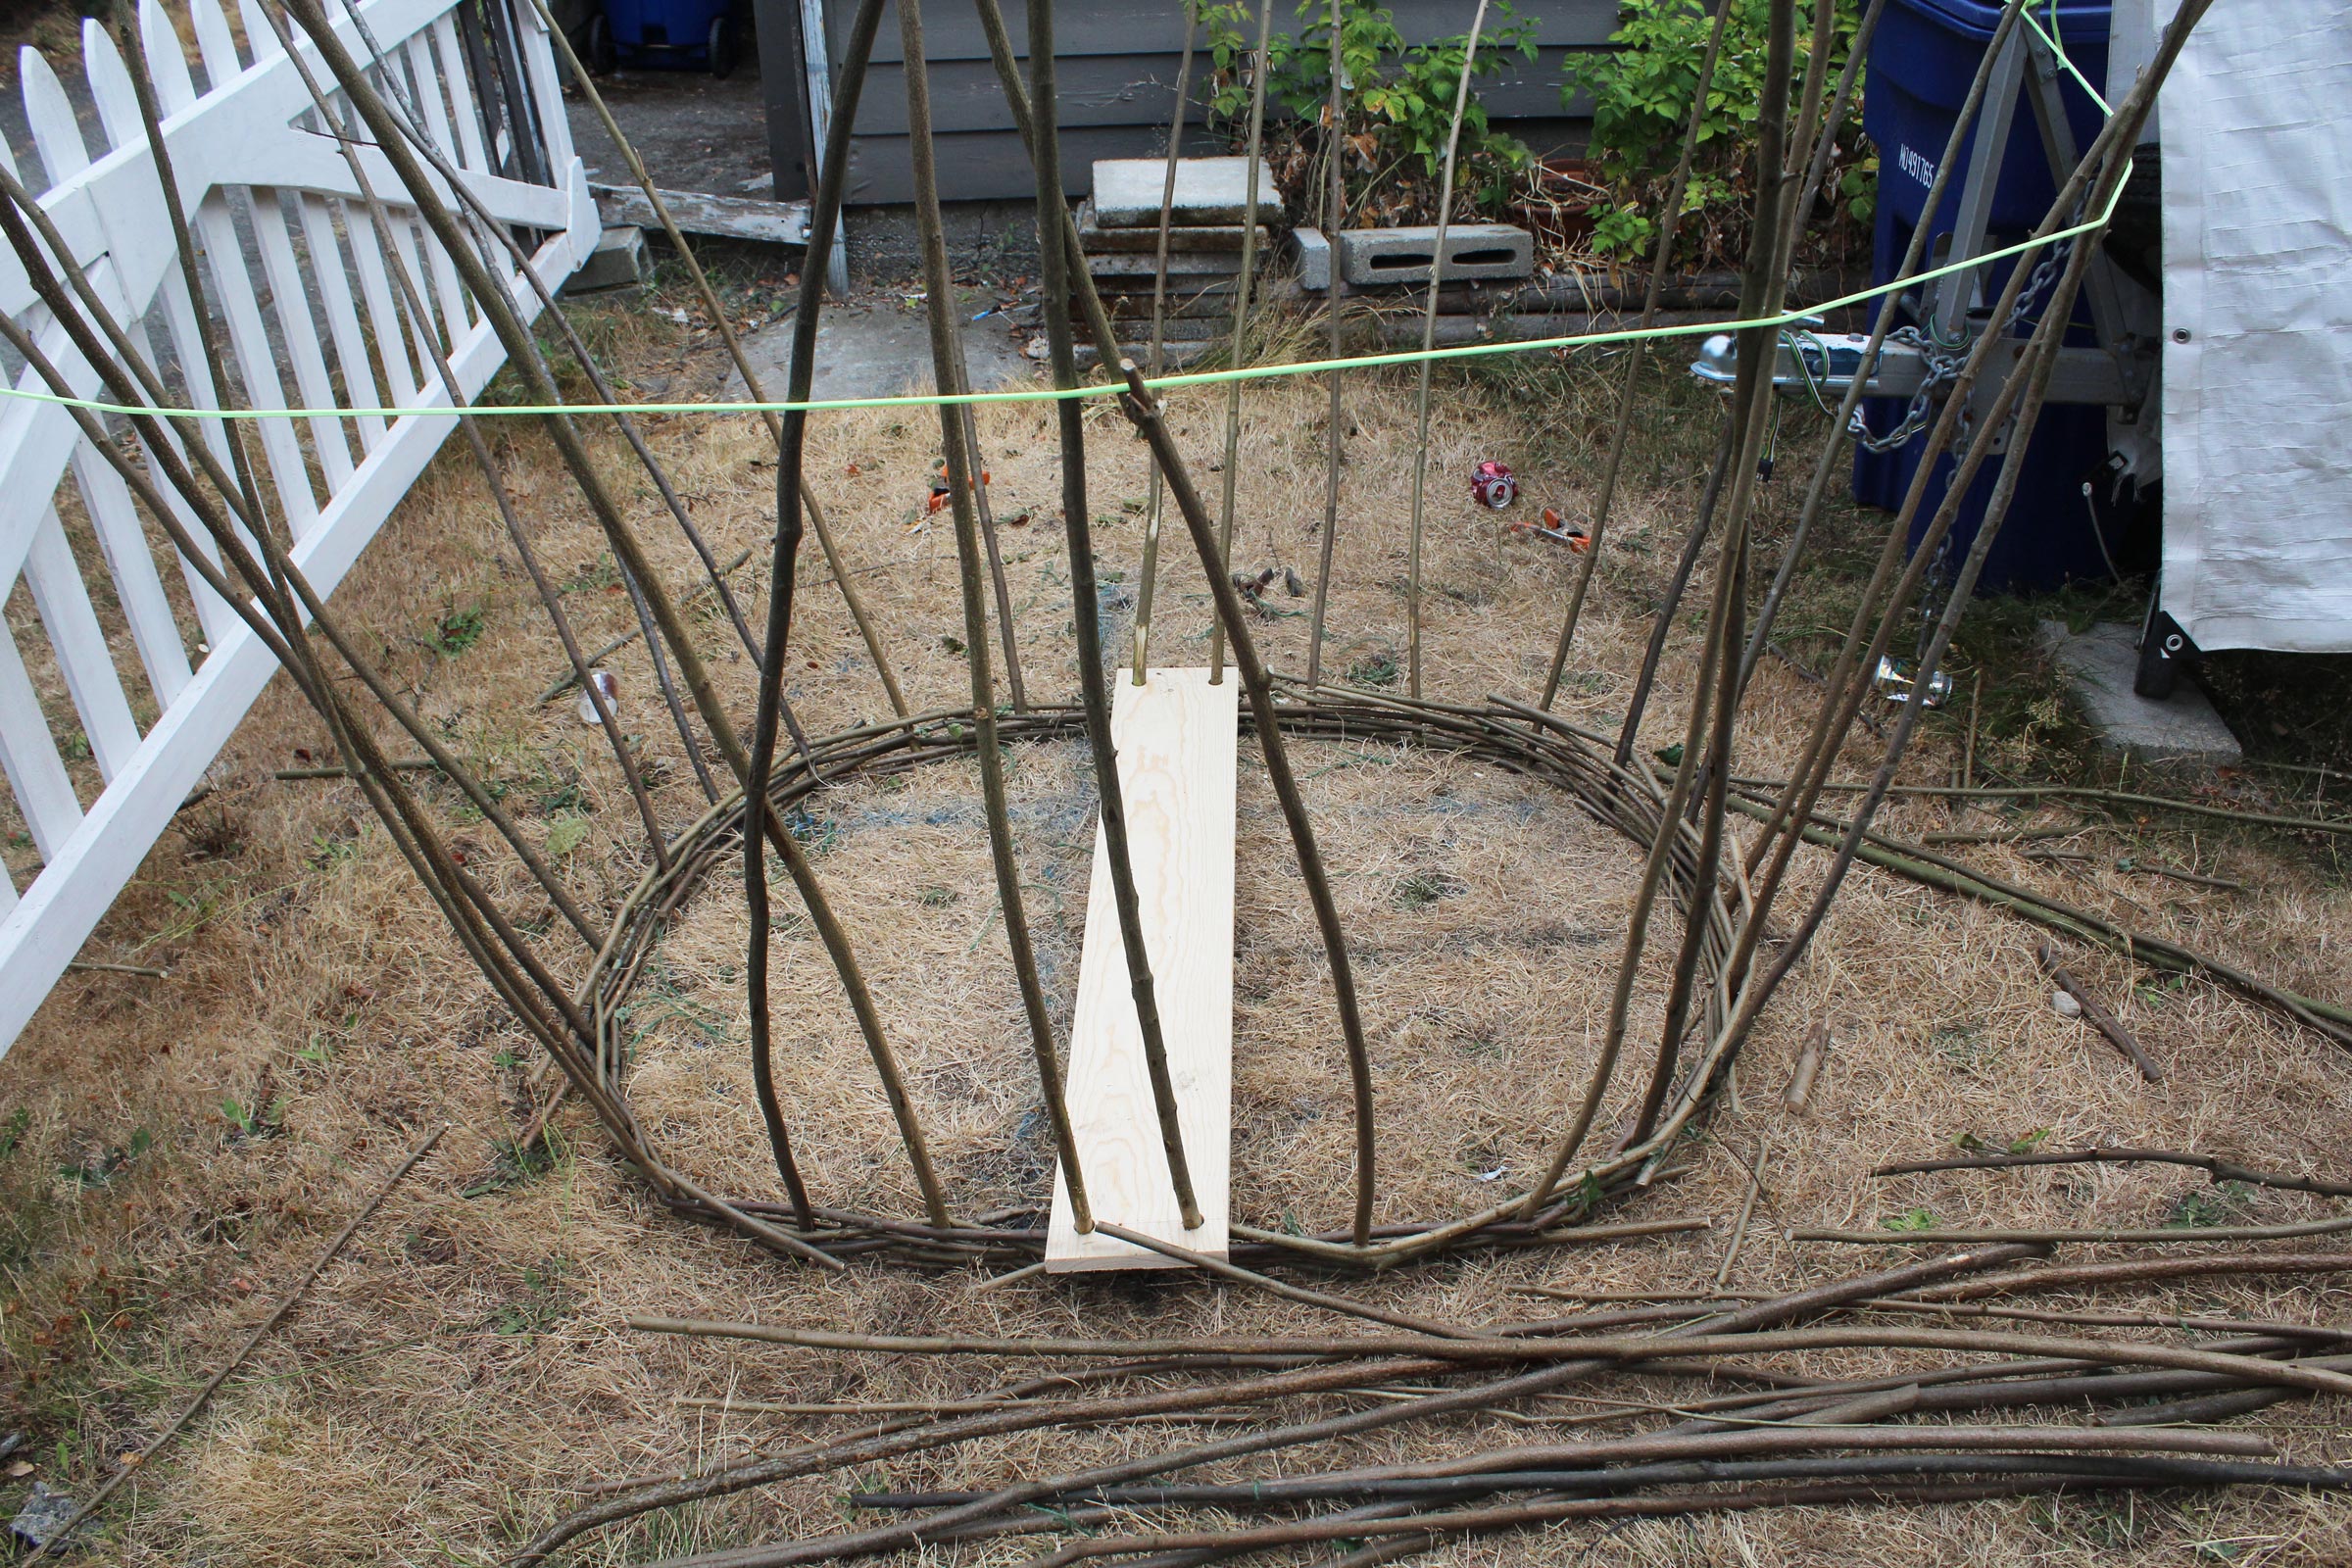
My lawn was too sun-baked to make it possible to sharpen the ends of the stems and push them into the ground. A galvanized water pipe and a splitting maul did the job. The holes get driven in at an angle to make the stems fan out away from each other. This is in the style of the coracles built for the River Boyne, north of Dublin, Ireland.
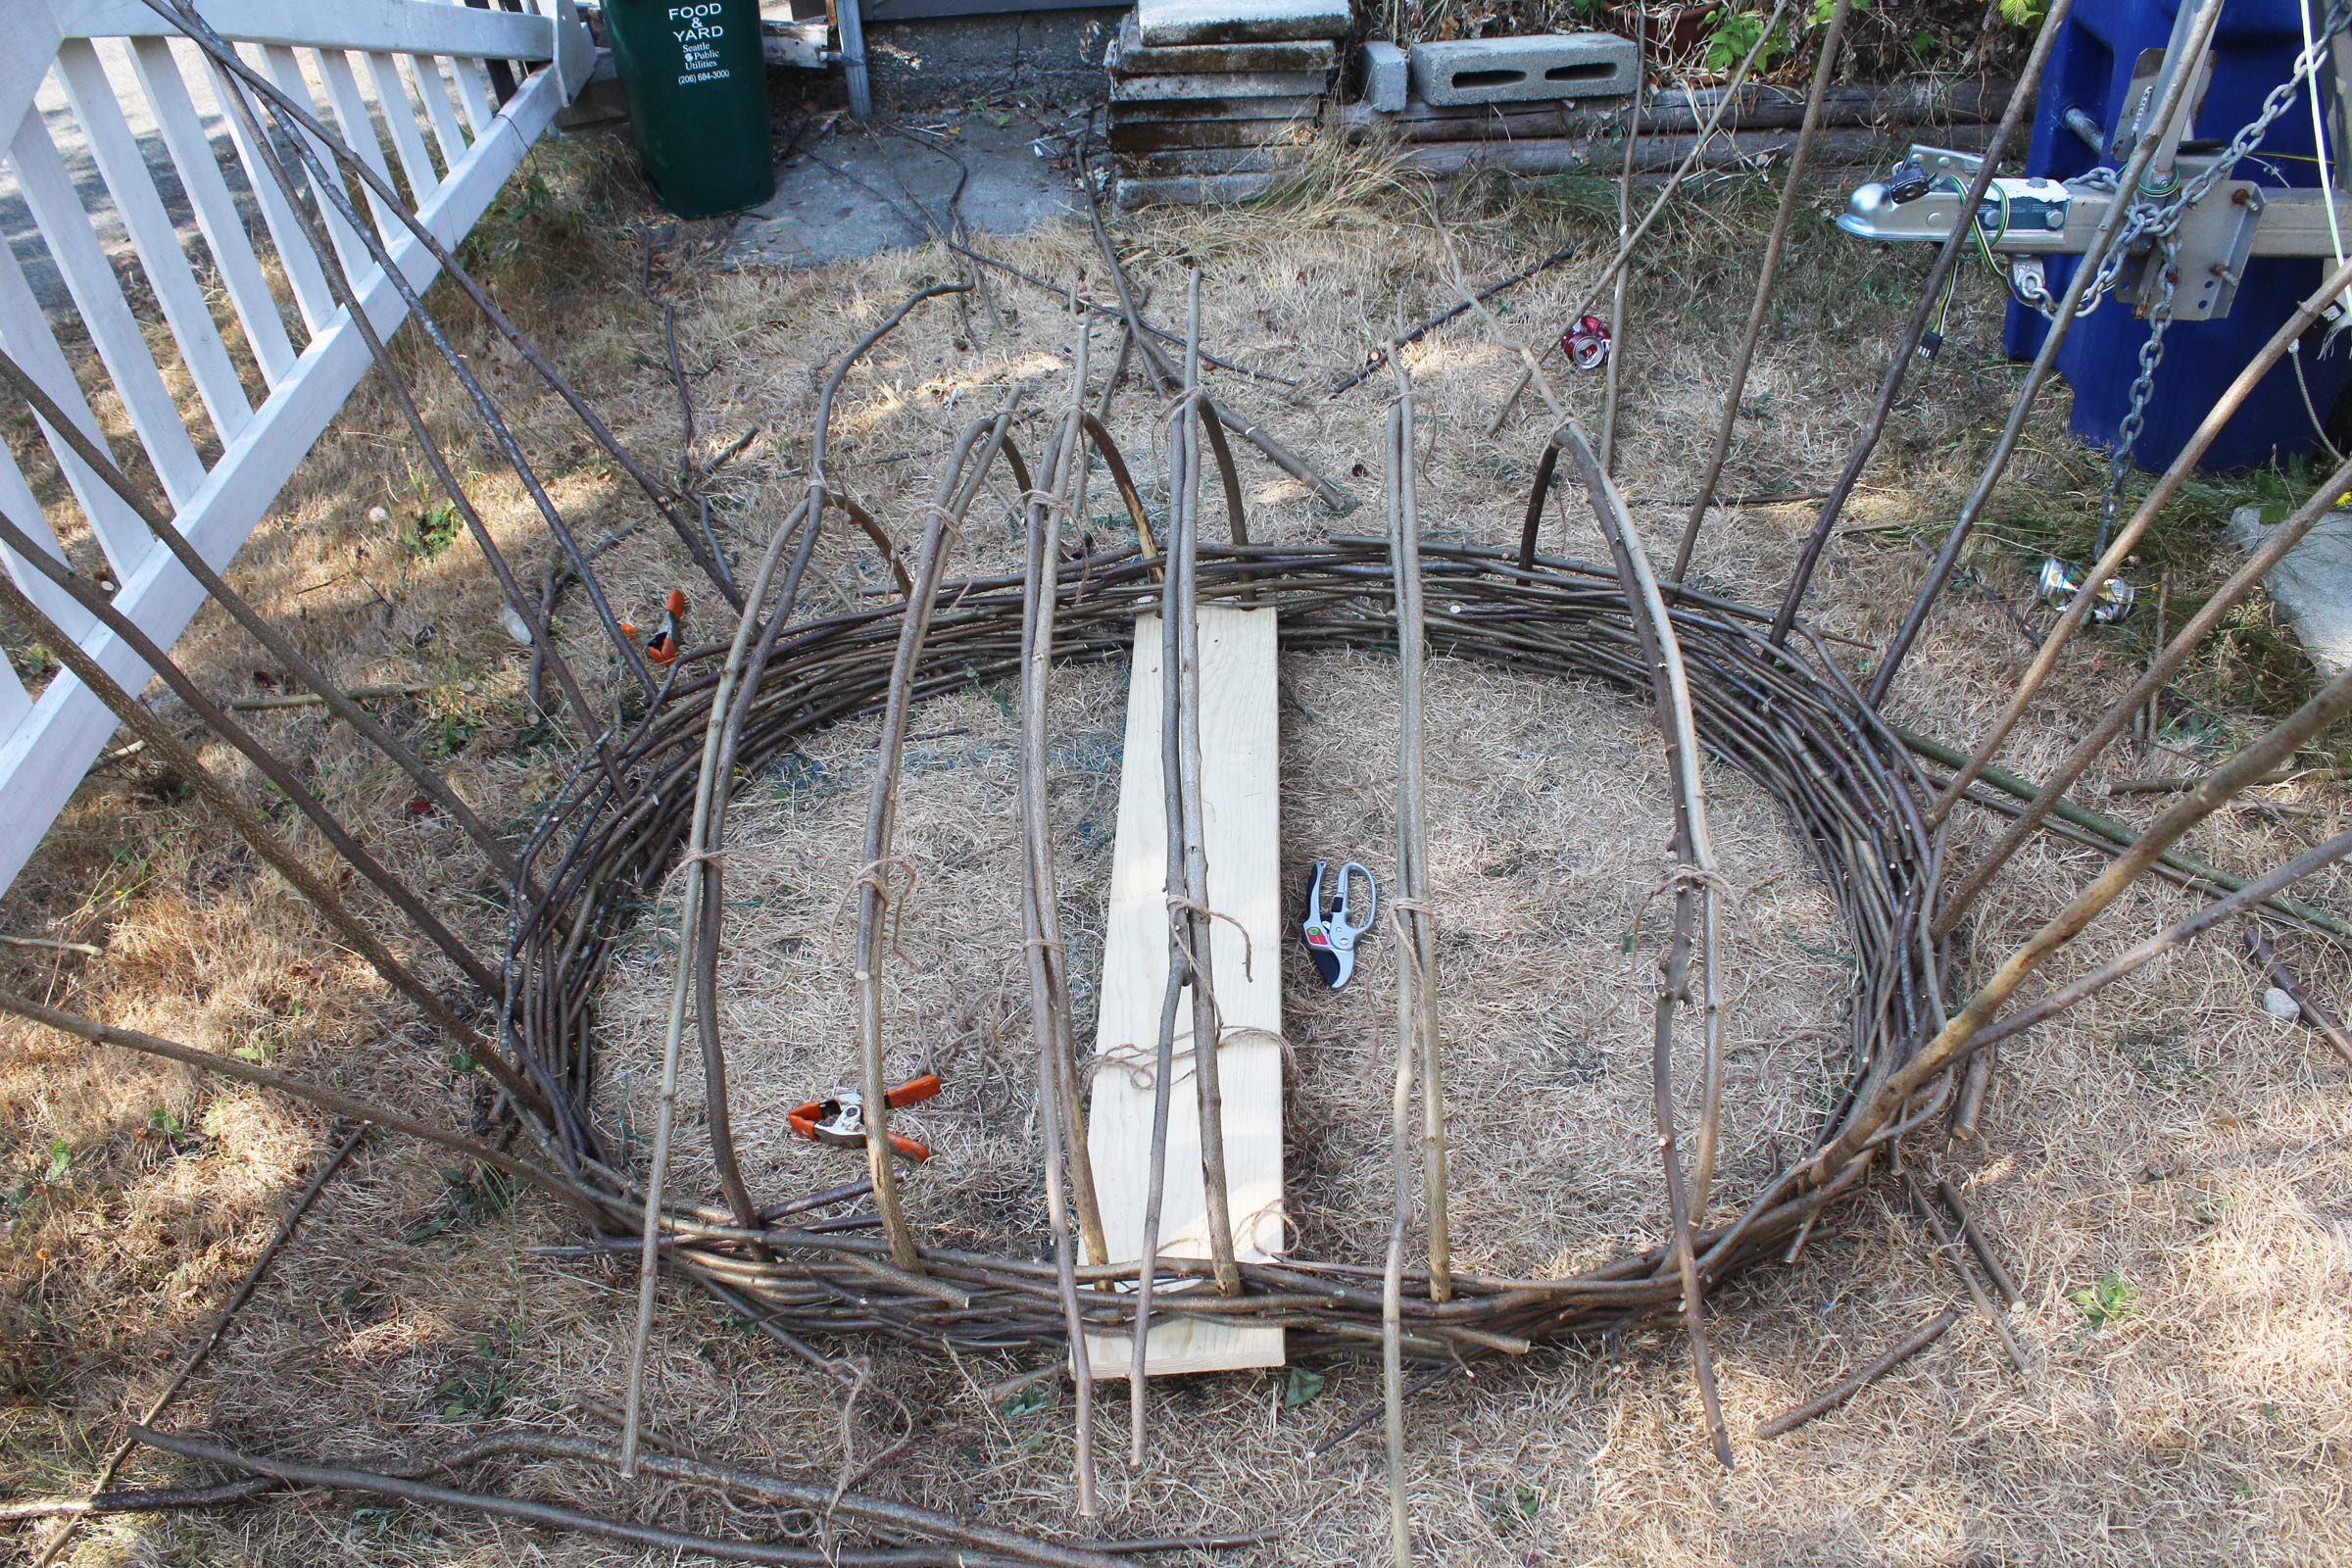
Thinner stems are woven around the base of the uprights to make the “gunwale.” The spacing of the stems was not clear in the book I consulted, and the 32 called for by the 4-1/2′ x 3-1/2′ ended up with a 4-3/4″ spacing, much too close to get the weavers at the sheer bent in without breaking. I redid the pattern with a spacing of about 6-3/4″ and made a new set of holes. Halfway through the process, the seat, with 7/8″ holes drilled in the corners, gets installed on the four stems amidships.
After the gunwale weavers lock the thwart in, the transverse stems get bent toward each other. I tied them temporarily with jute twine. Eventually the ends will get trimmed and tucked into the weaving alongside their partners. The pruning shears by the thwart were the only tool I really needed to make the frame from harvesting the hazel to cutting the twine.
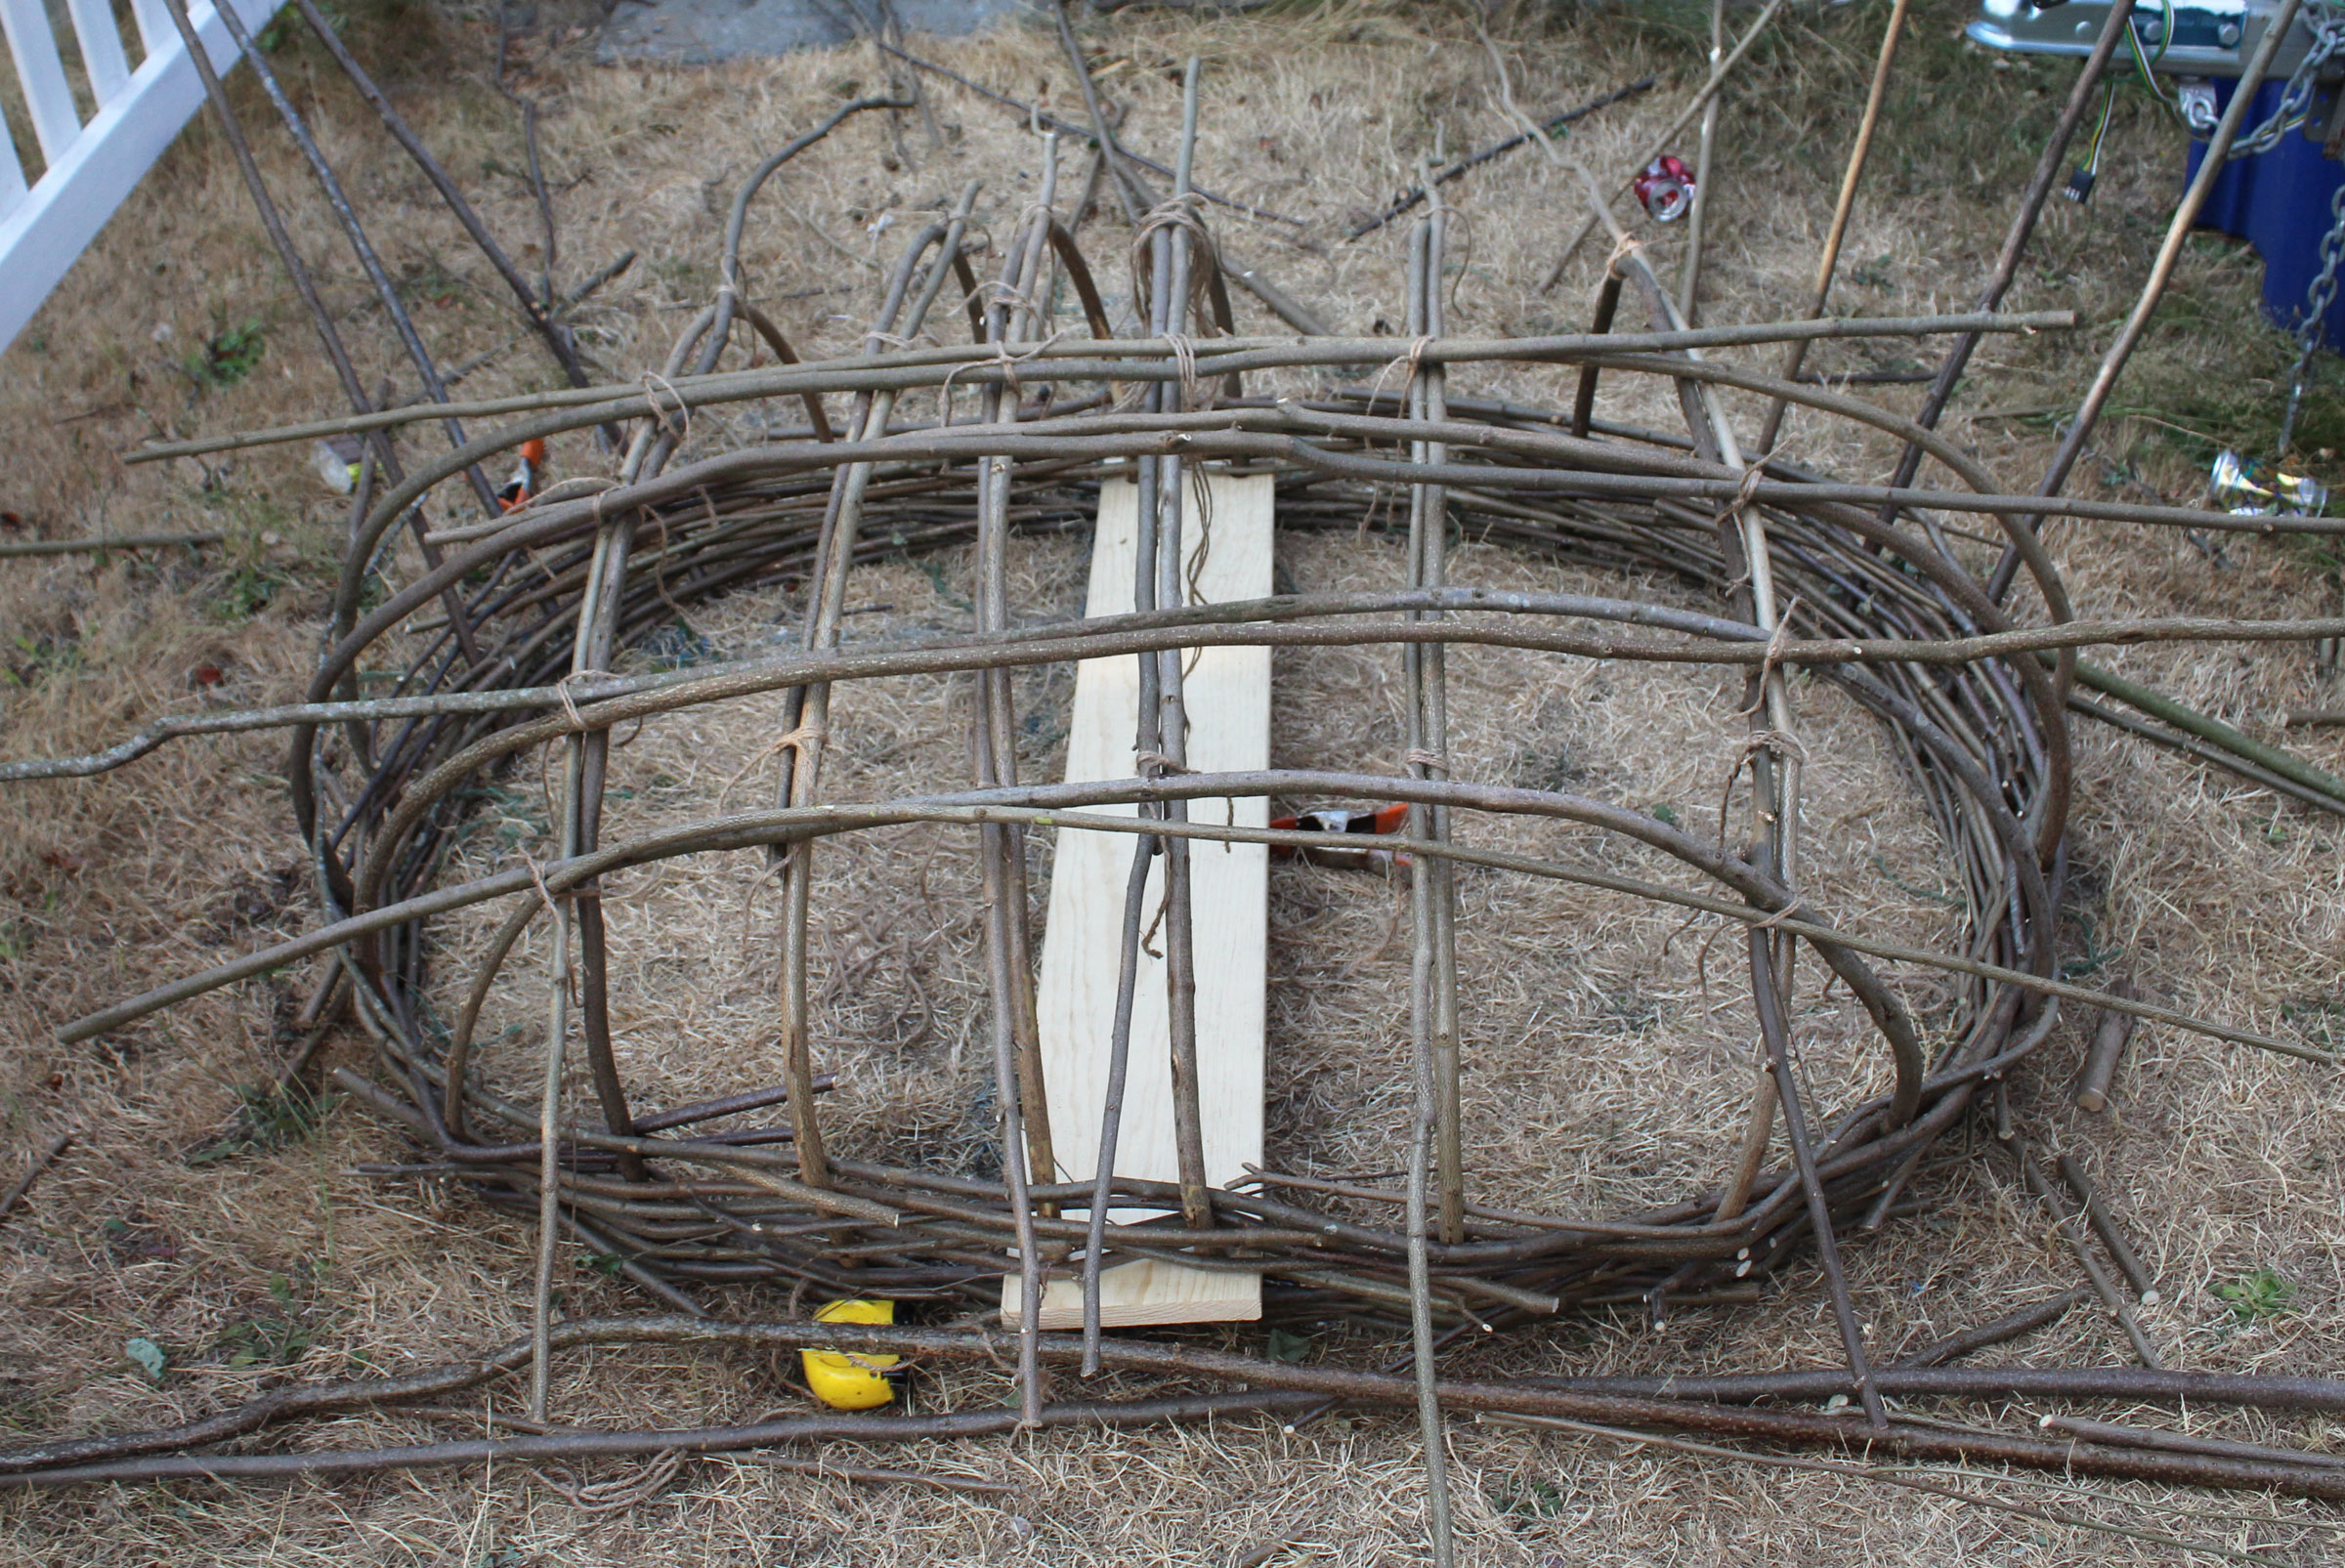
The longitudinal stems get bent second. Some coracles have them woven in, over and under the transverse stems, but I think that requires material much more limber than what I had.
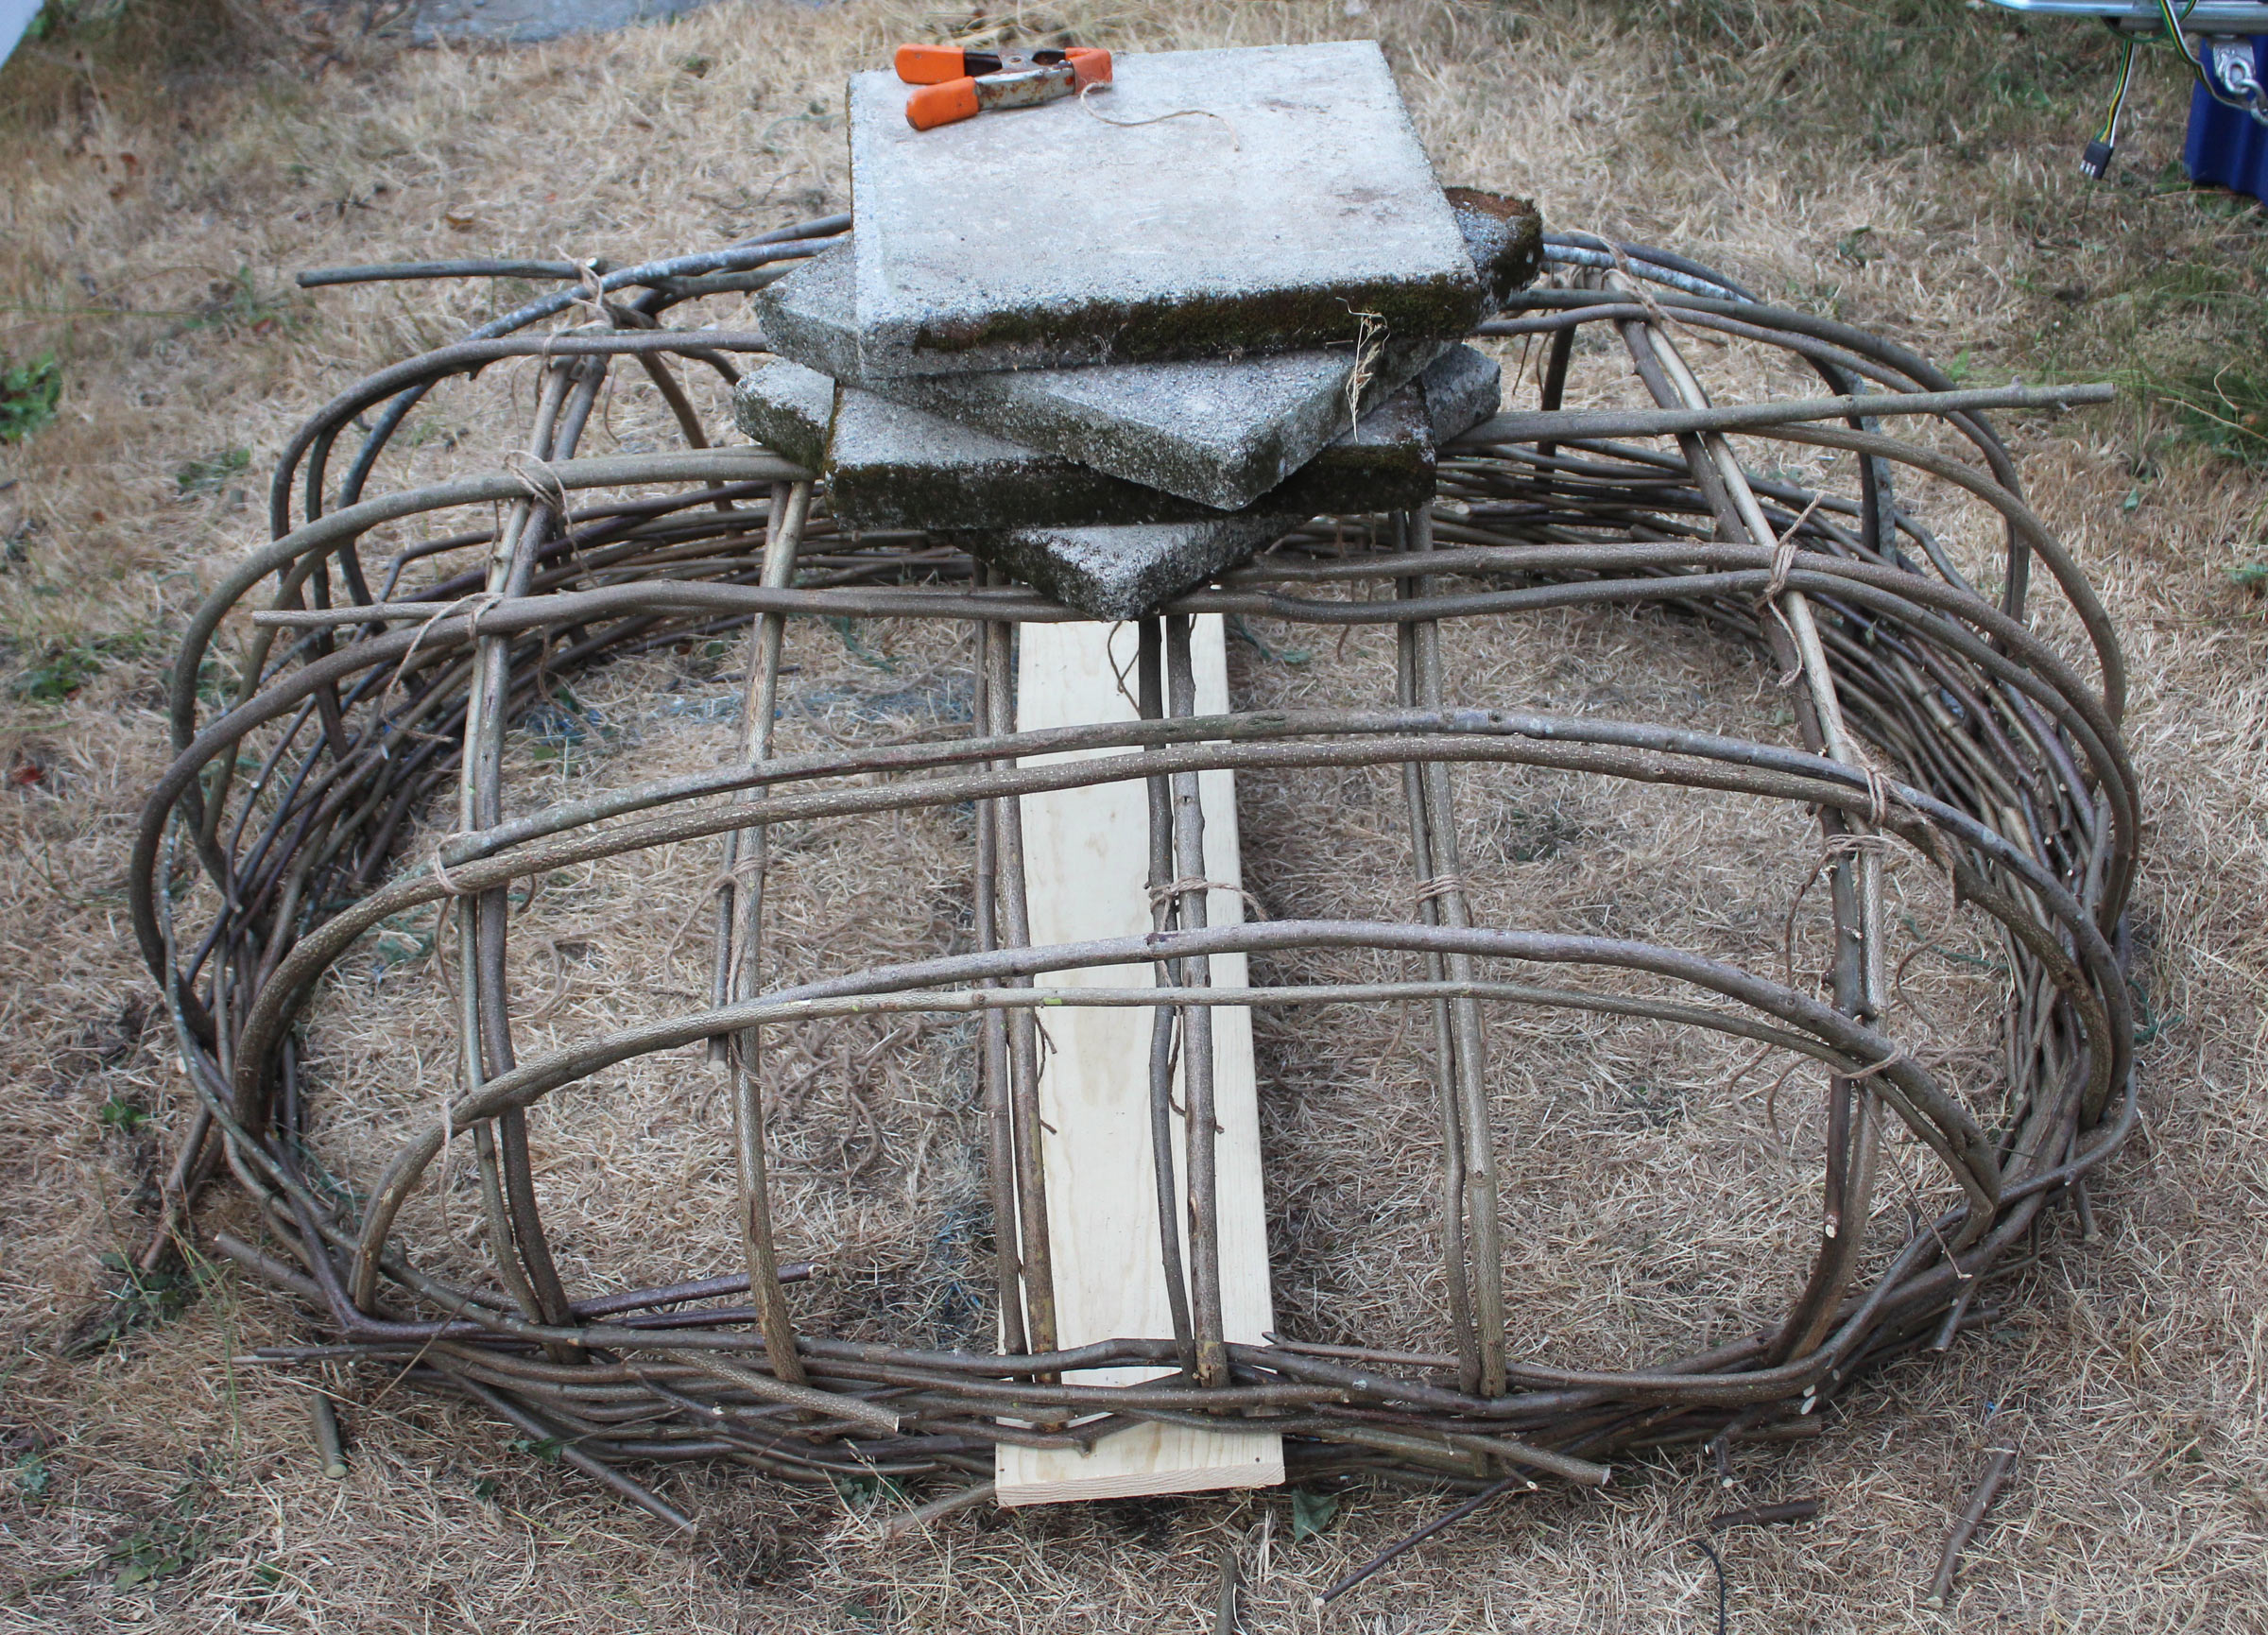
The hazel wants to bend in even, nearly circular arcs. That hull form would be unstable, so to flatten the hull I stacked 16″-square concrete pavers on it. Each paver weighs roughly 33 pounds, so the unlashed hull could already support 132 lbs.
So-called square lashings of artificial sinew hold the transverse and longitudinal frame members together, smoothing the shape of the hull and making it markedly stiffer.
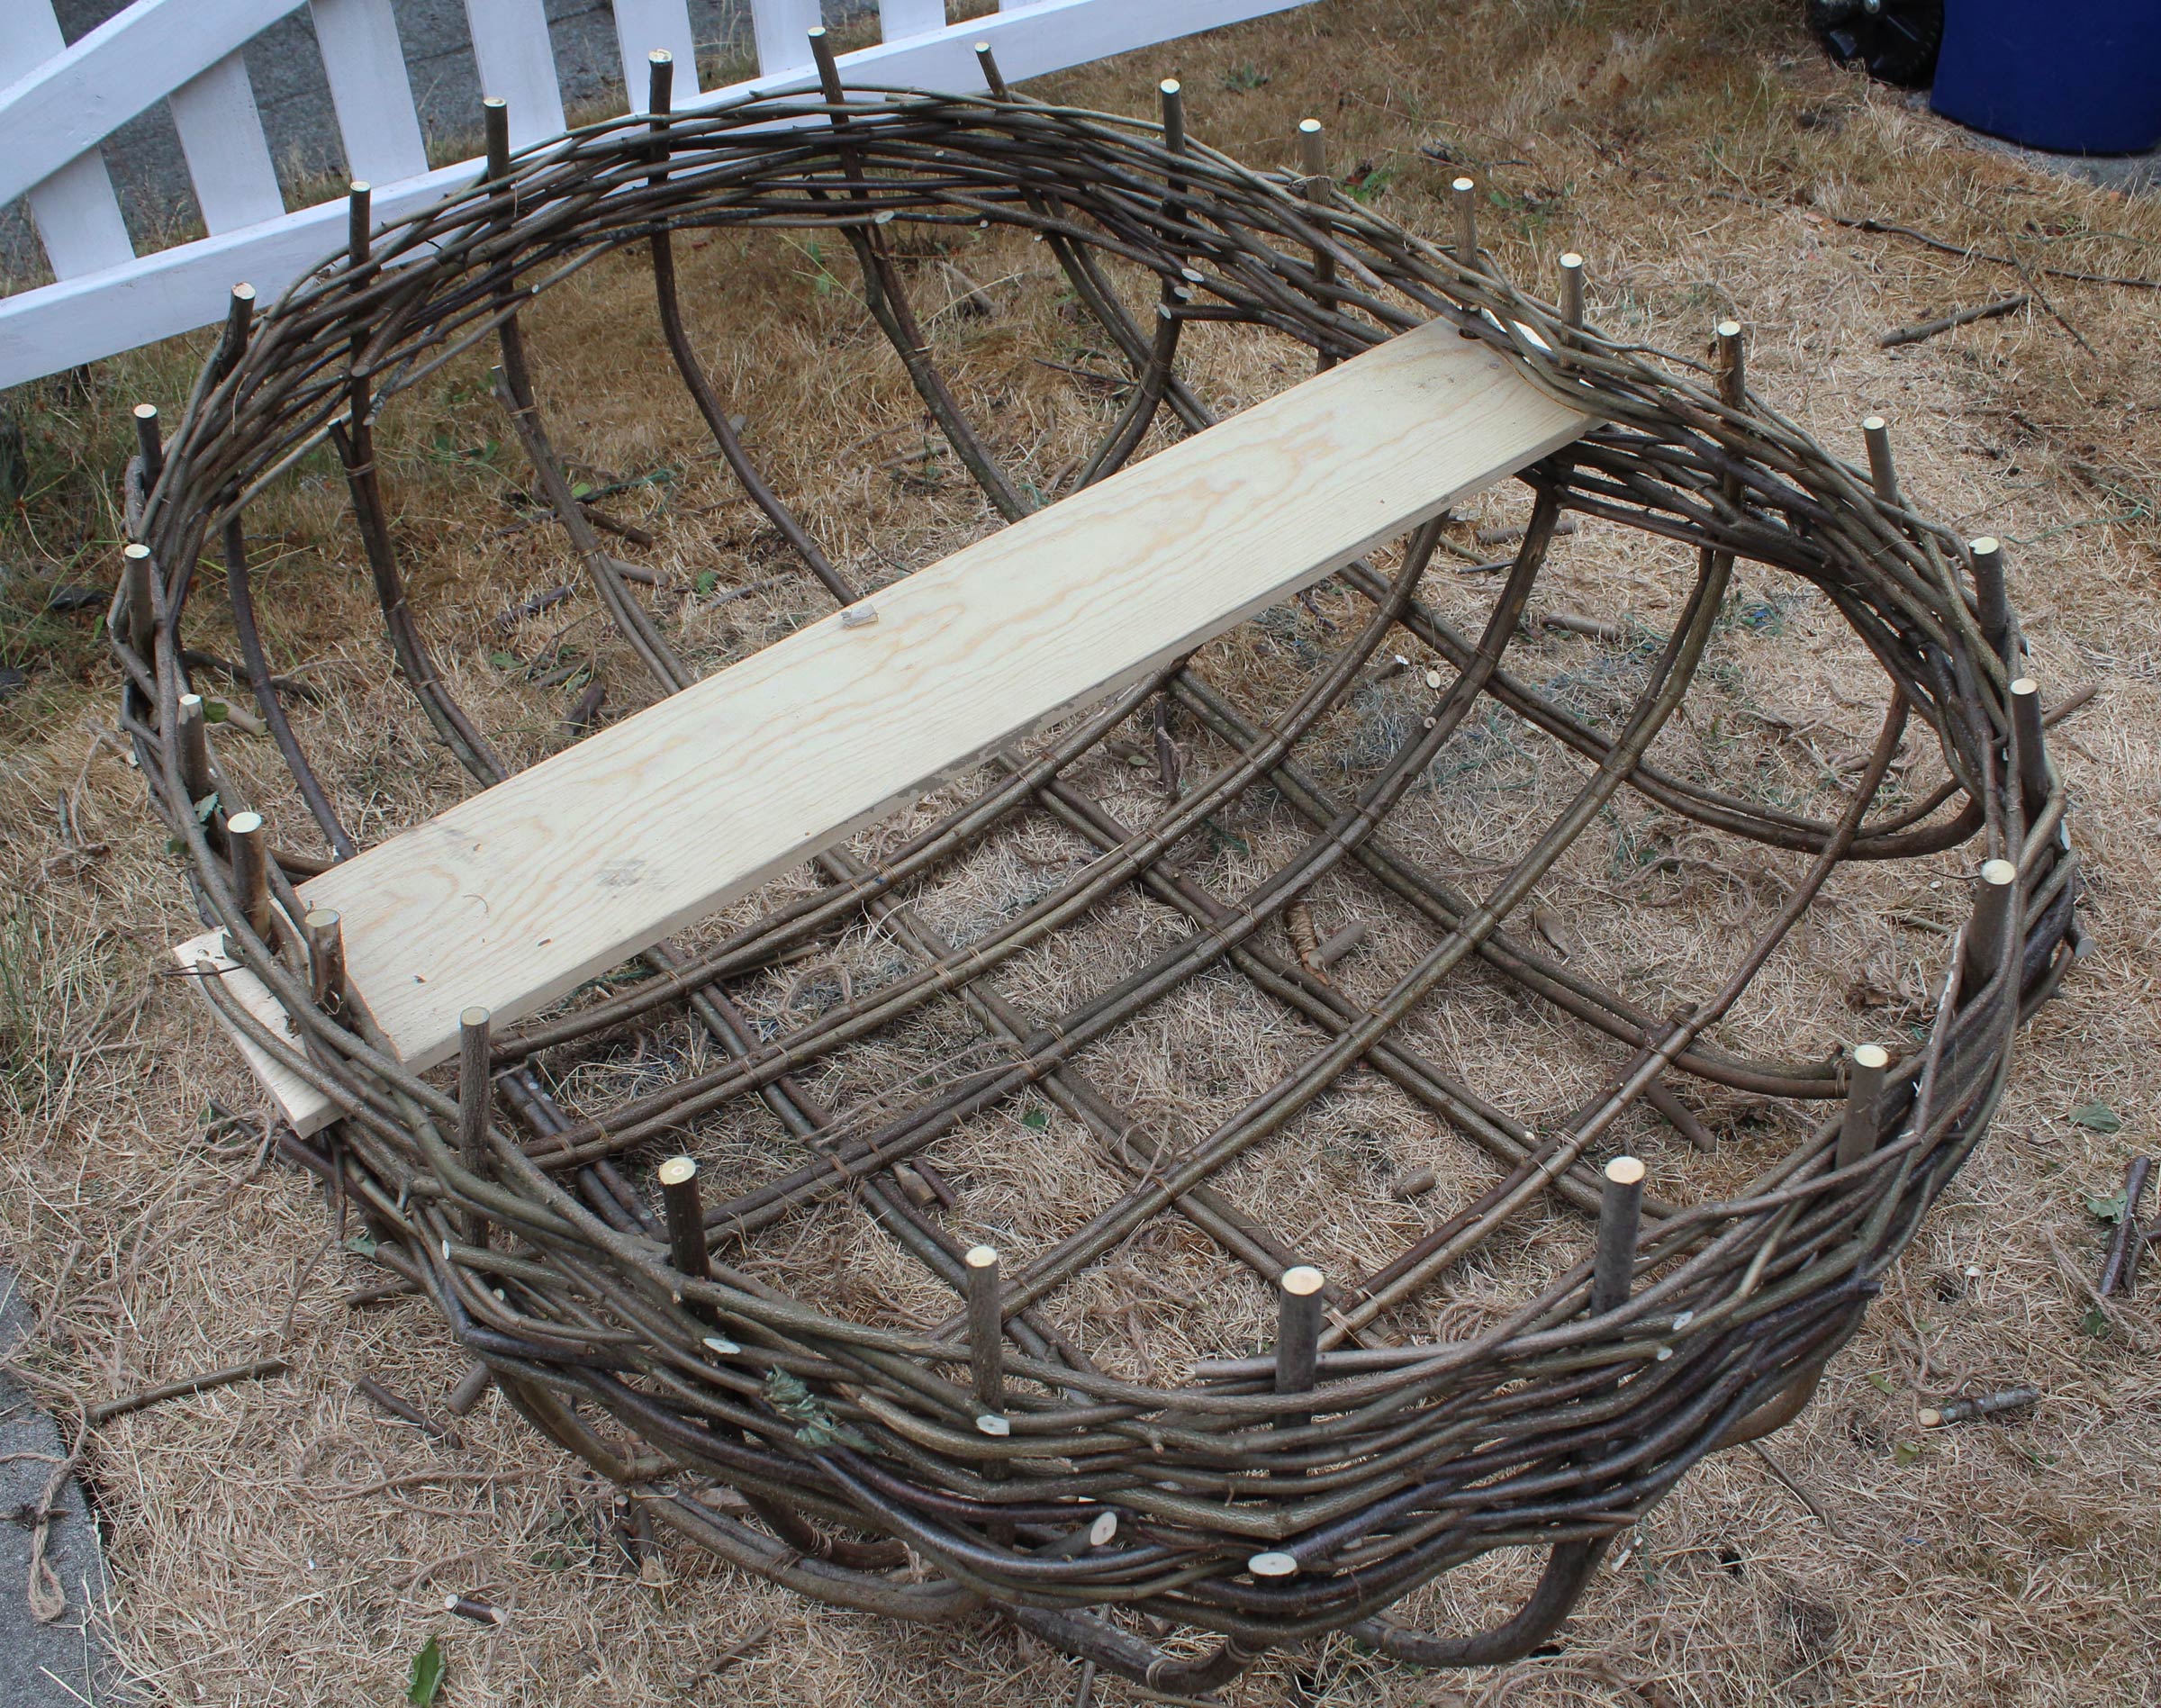
A firm pull on the frame loosened it from the ground. I’ve never aerated a lawn before, but I imagine it might look a bit like the holes left by the frame. I may have to build a lot more coracles to get a vibrant green lawn.
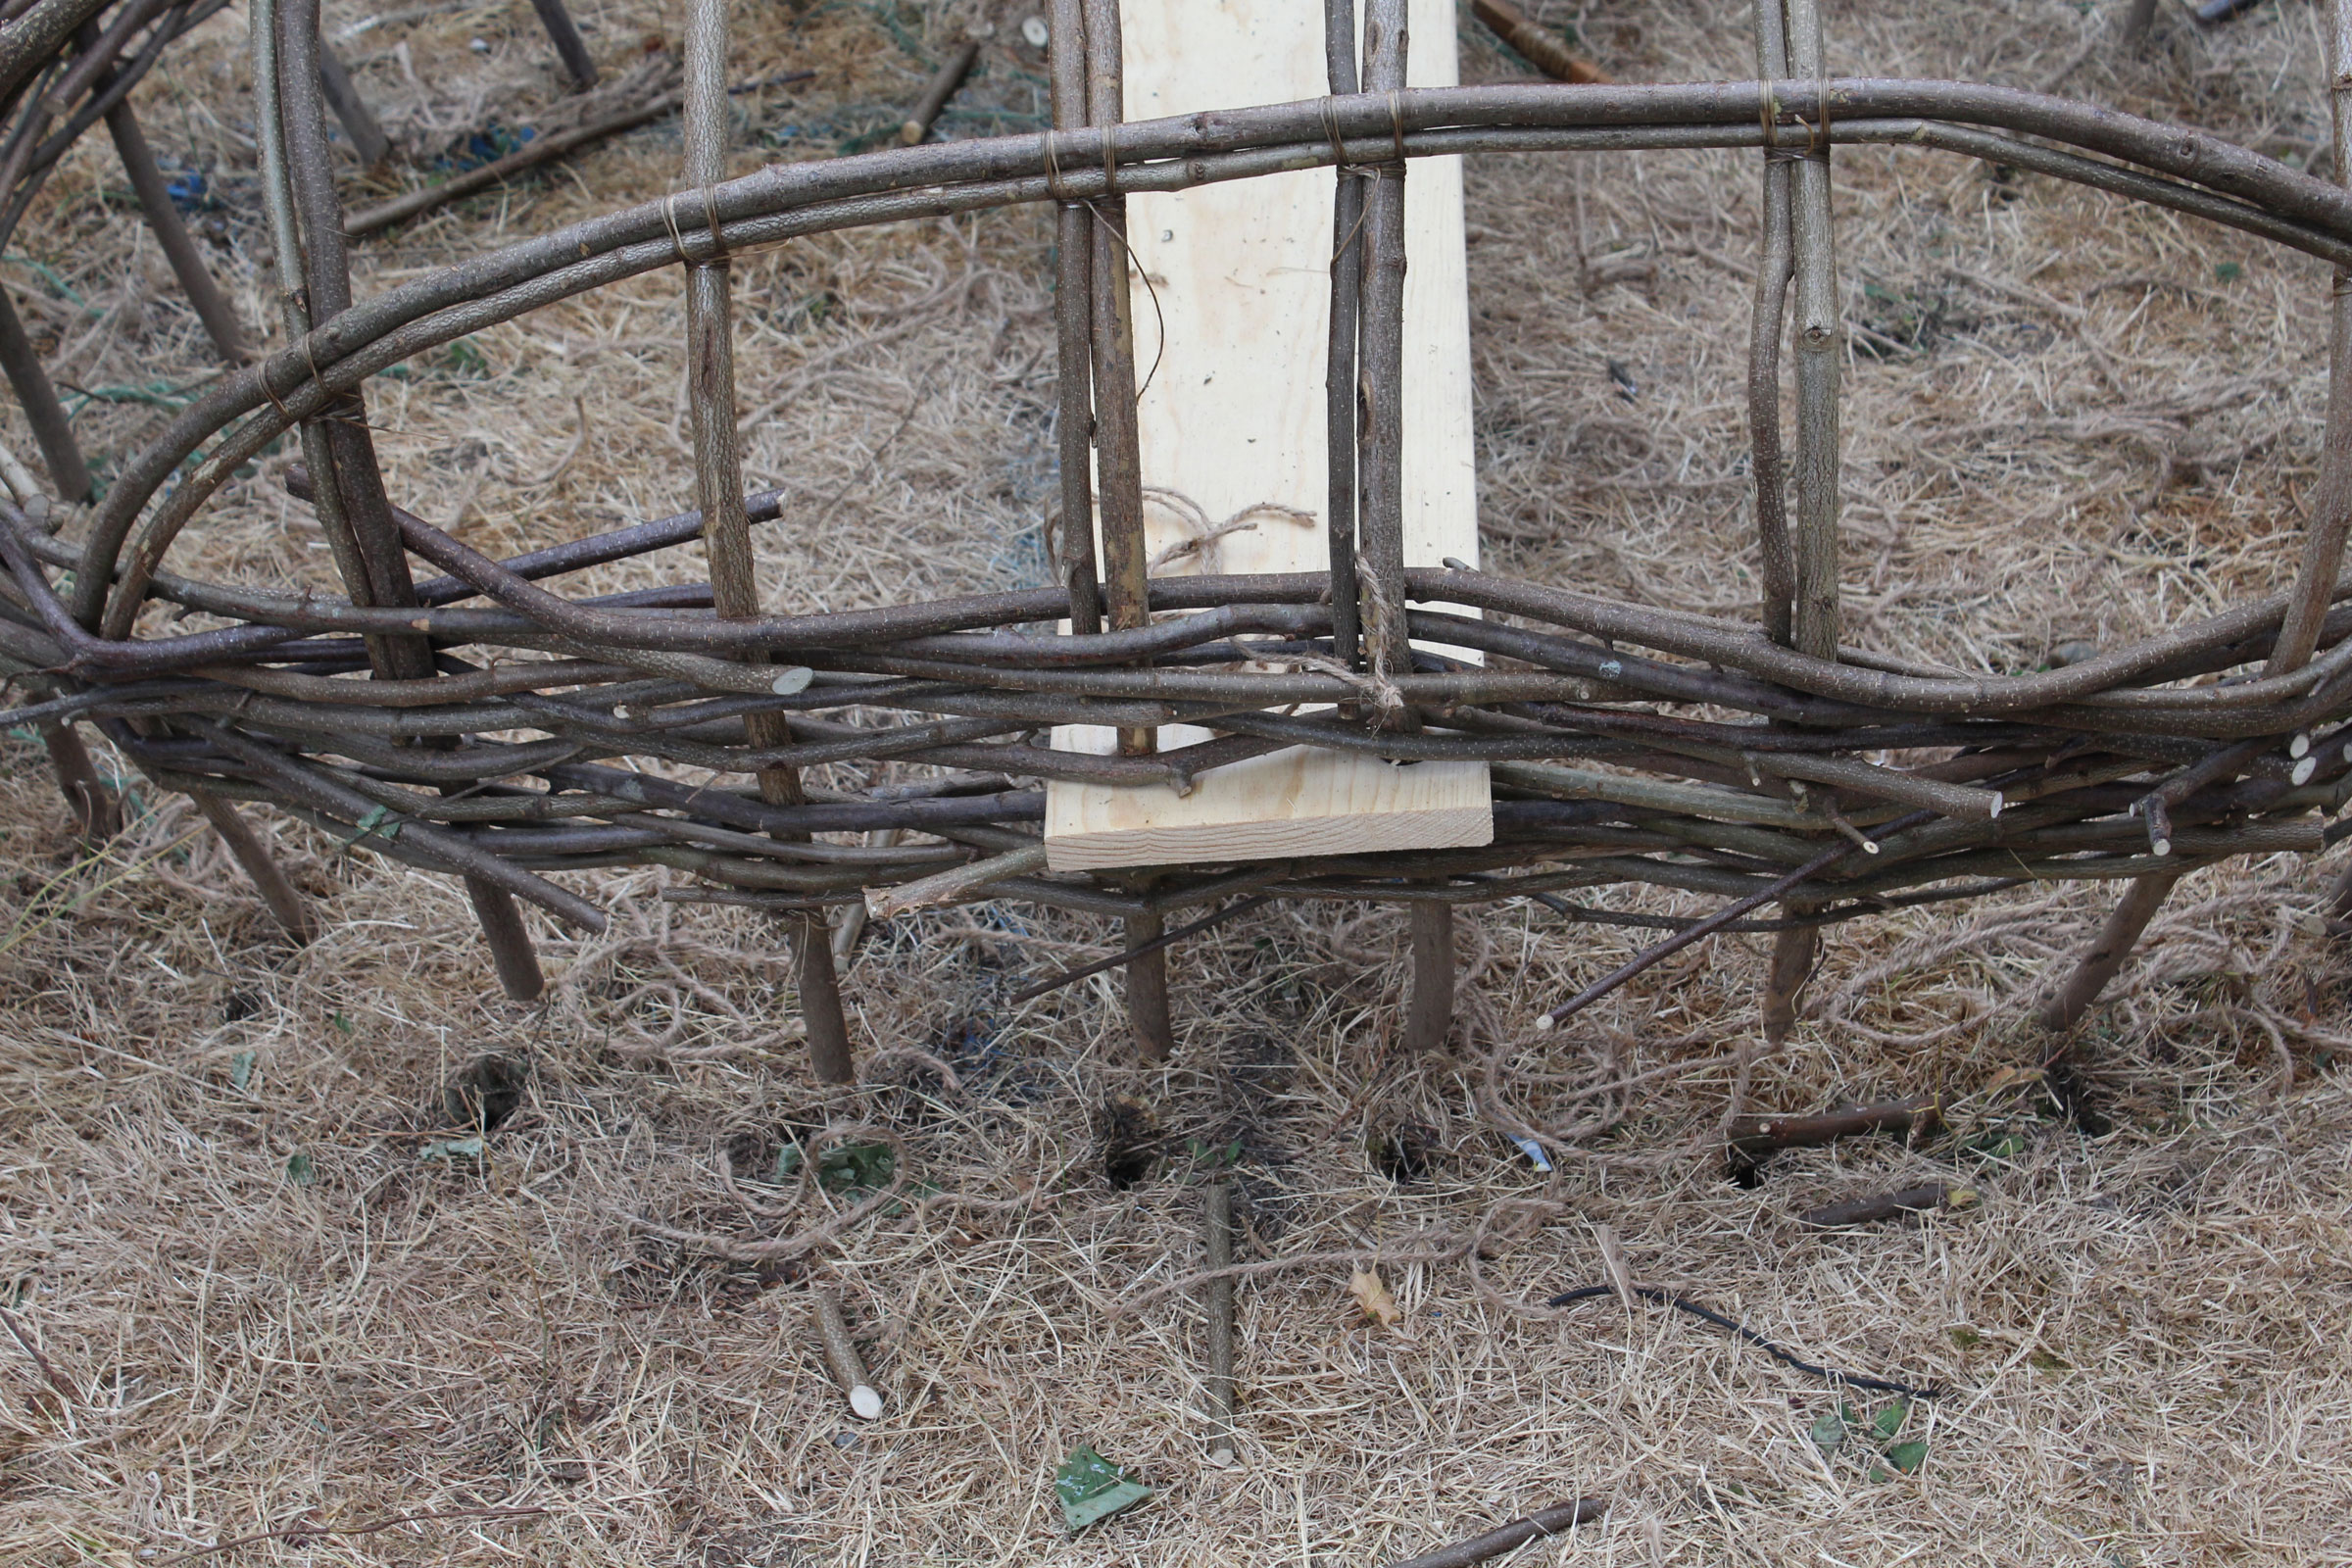
Set upright, the coracle shows that the angled holes in the ground for the frame pieces had given the frame a tumblehome all around. I assume that’s to make it easier to reach the water with a paddle. This is the only time I’ve finished a hull that still had a leaf (center bottom) attached to the wood I used.
I cut the ends of the frame pieces three finger-widths above the woven perimeter. The extra length will later get a weaving of willow to make a finished edge.
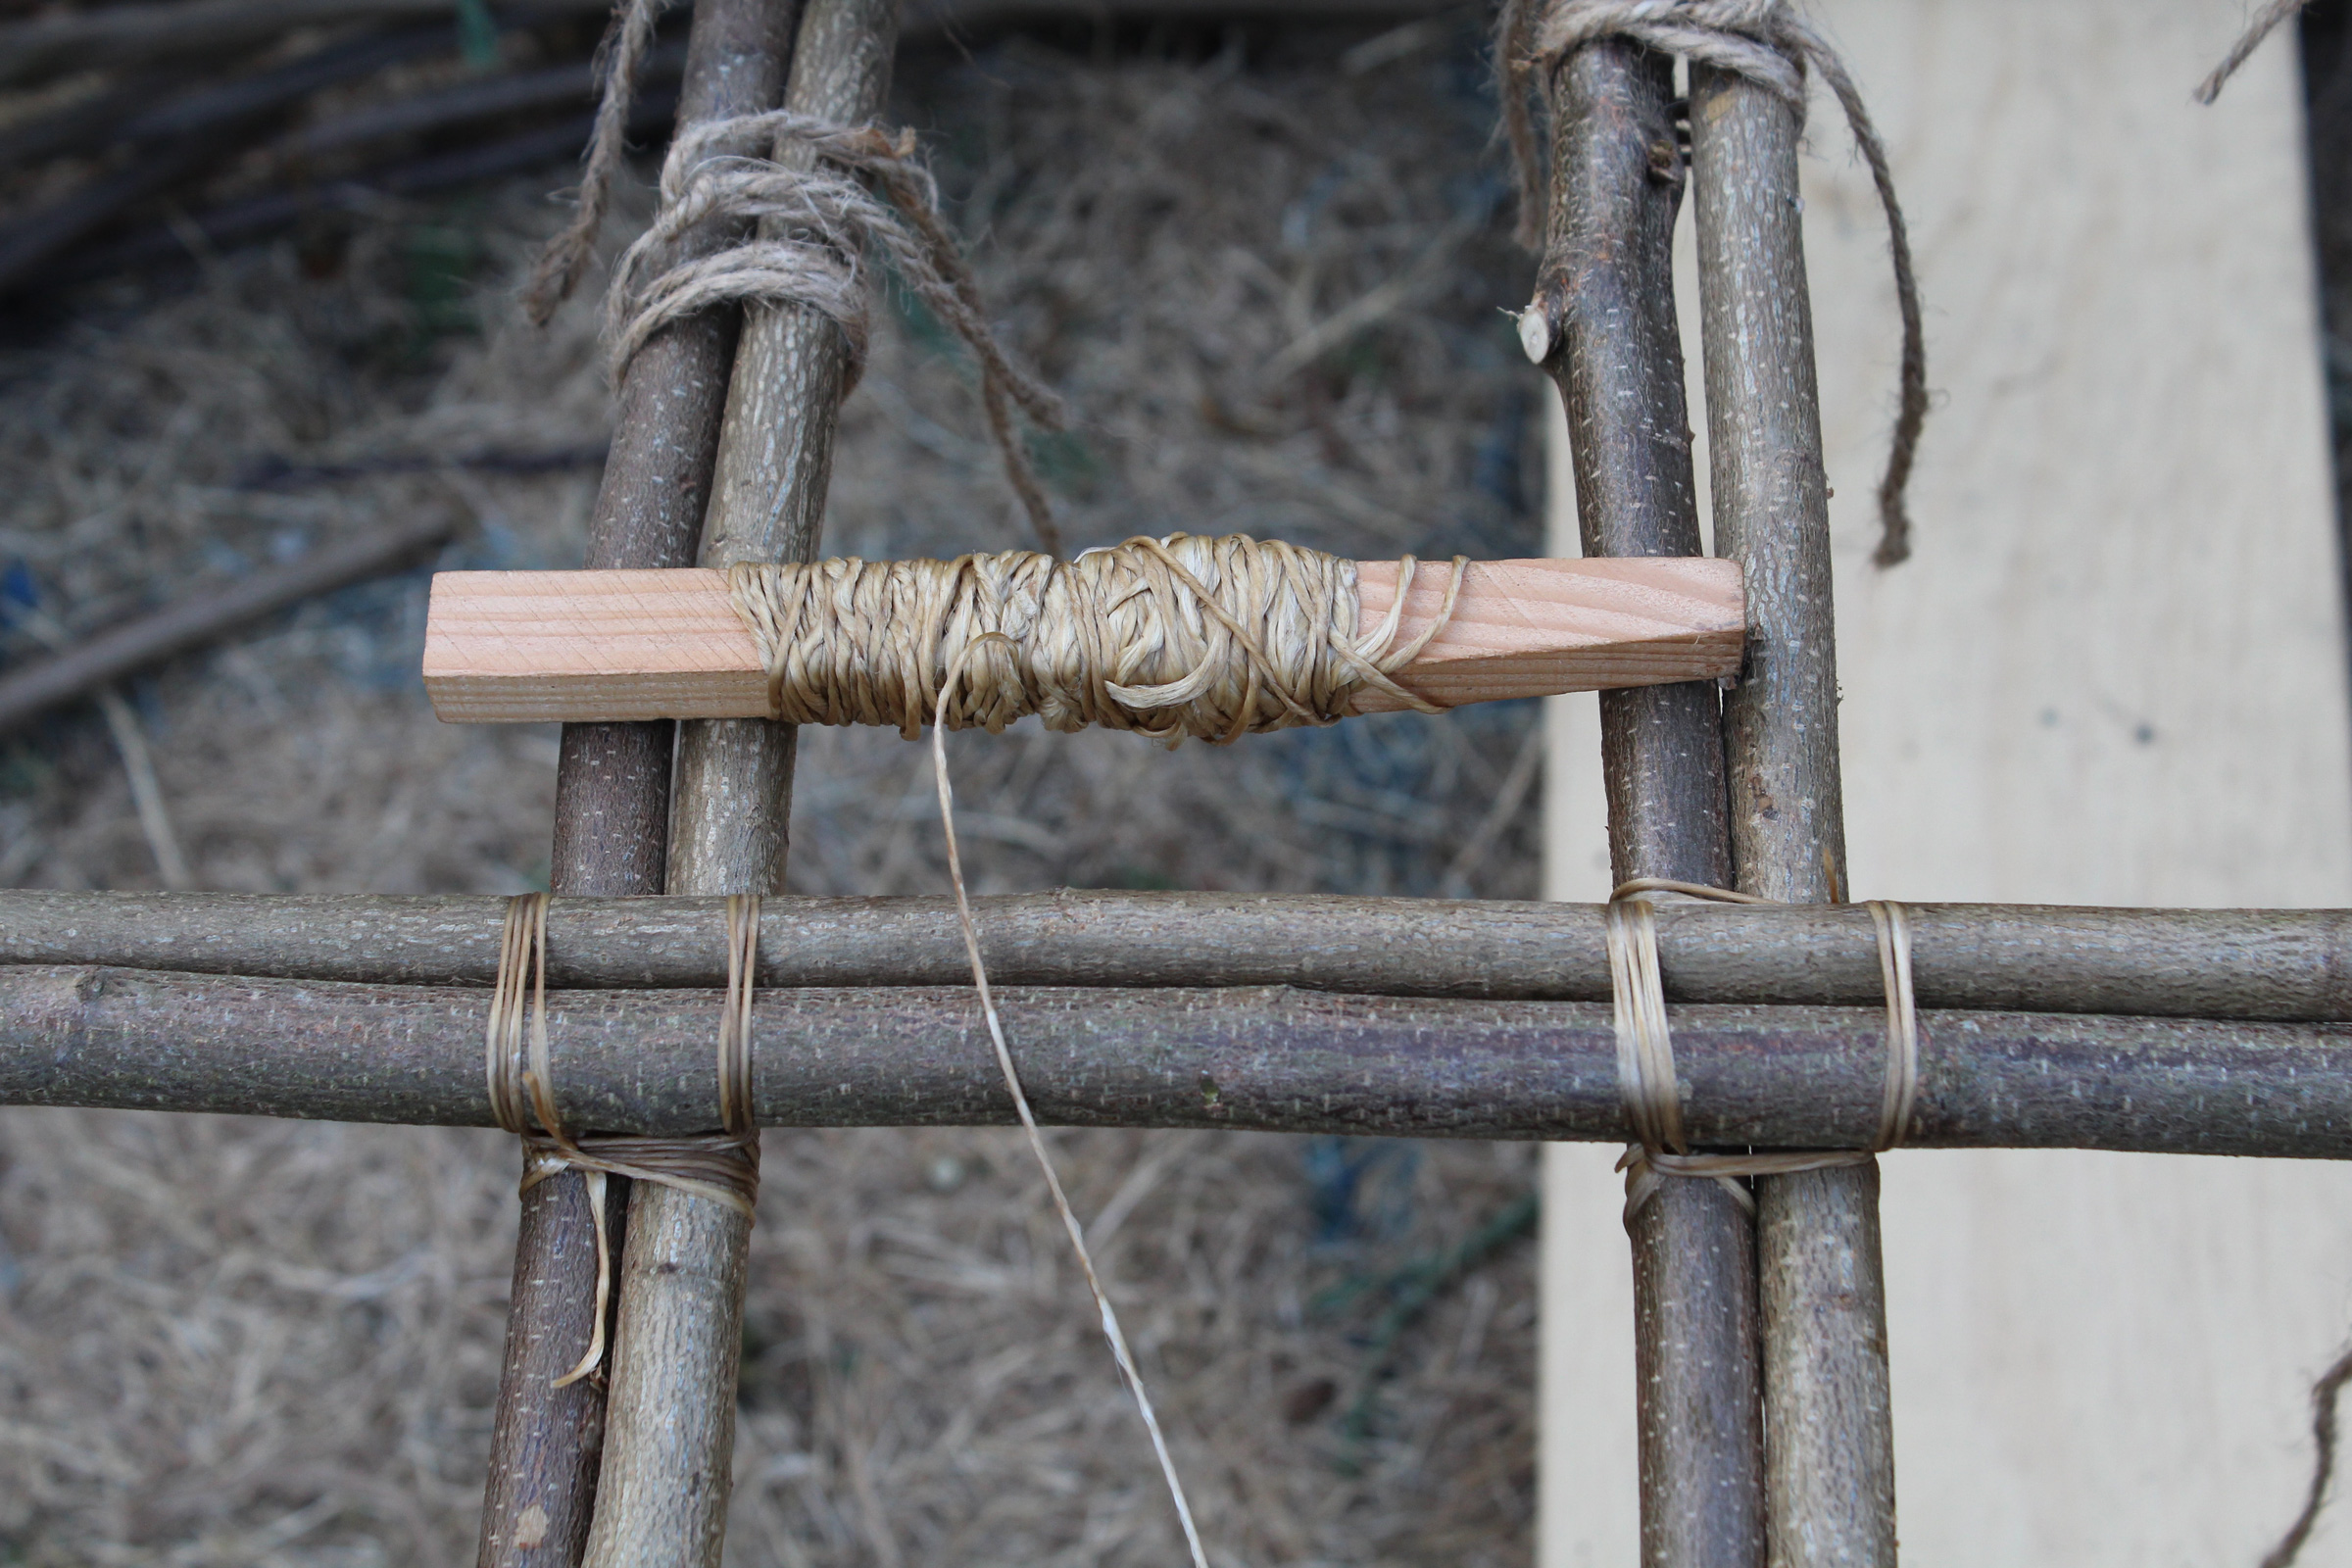
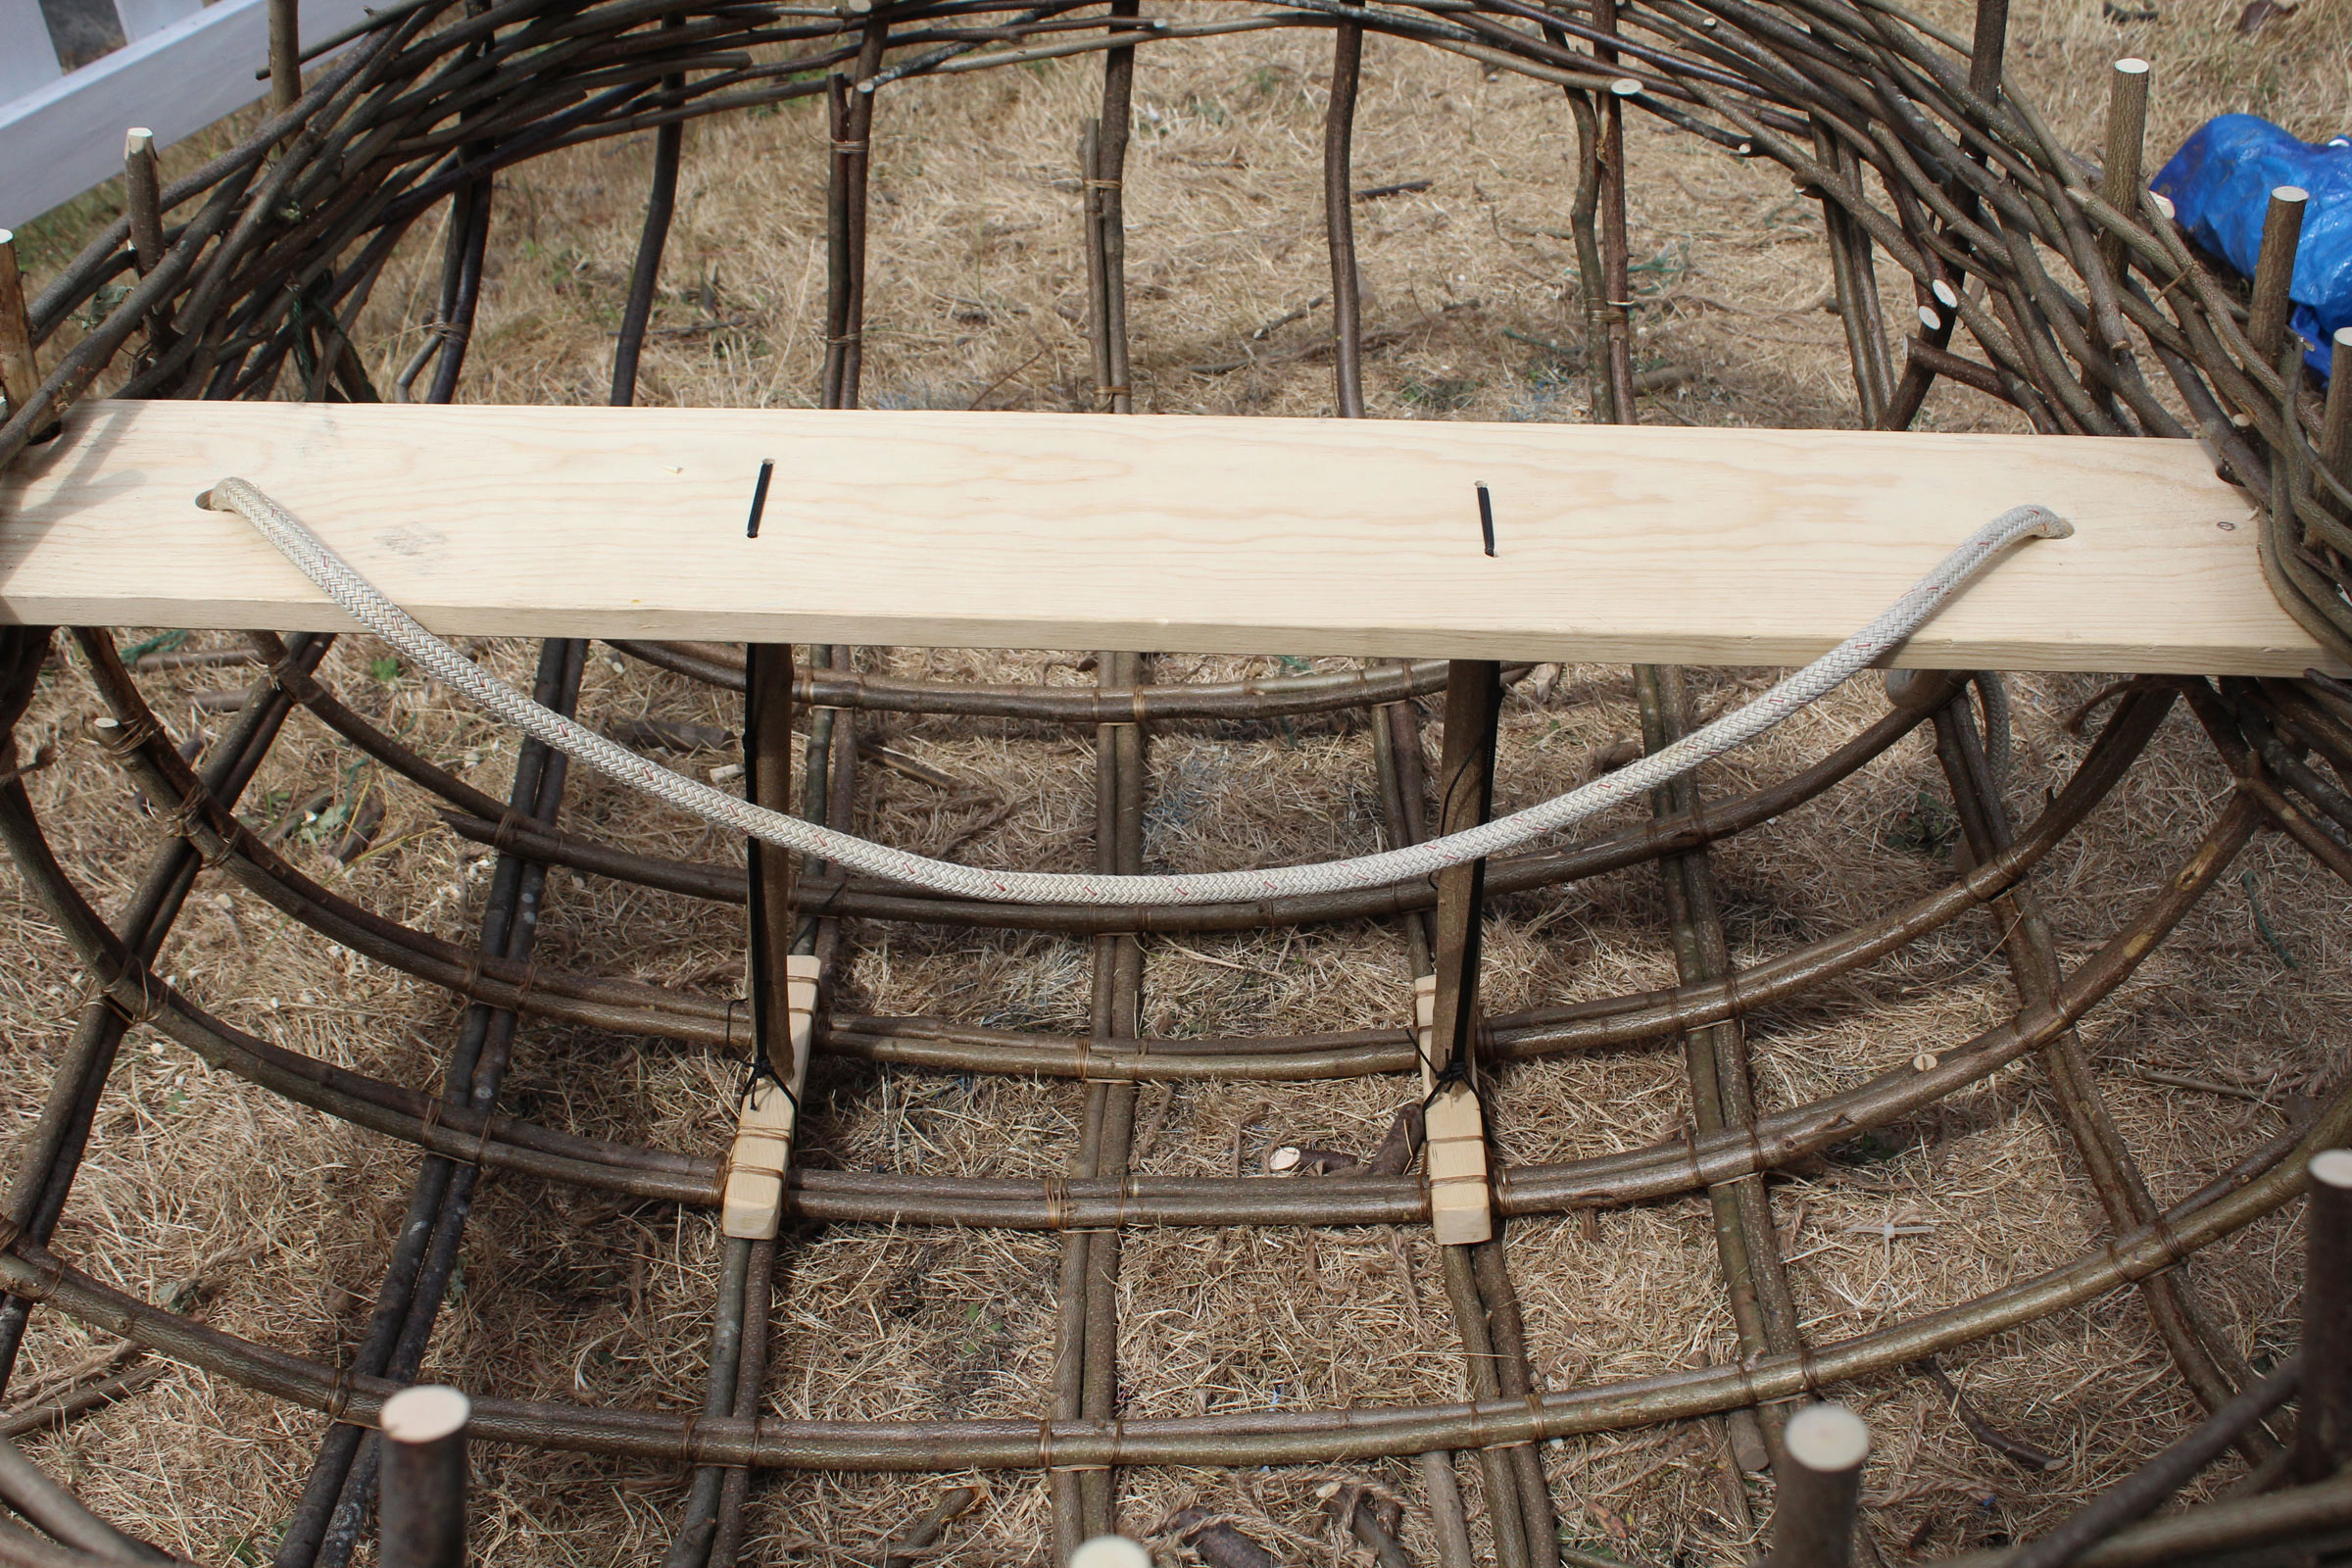
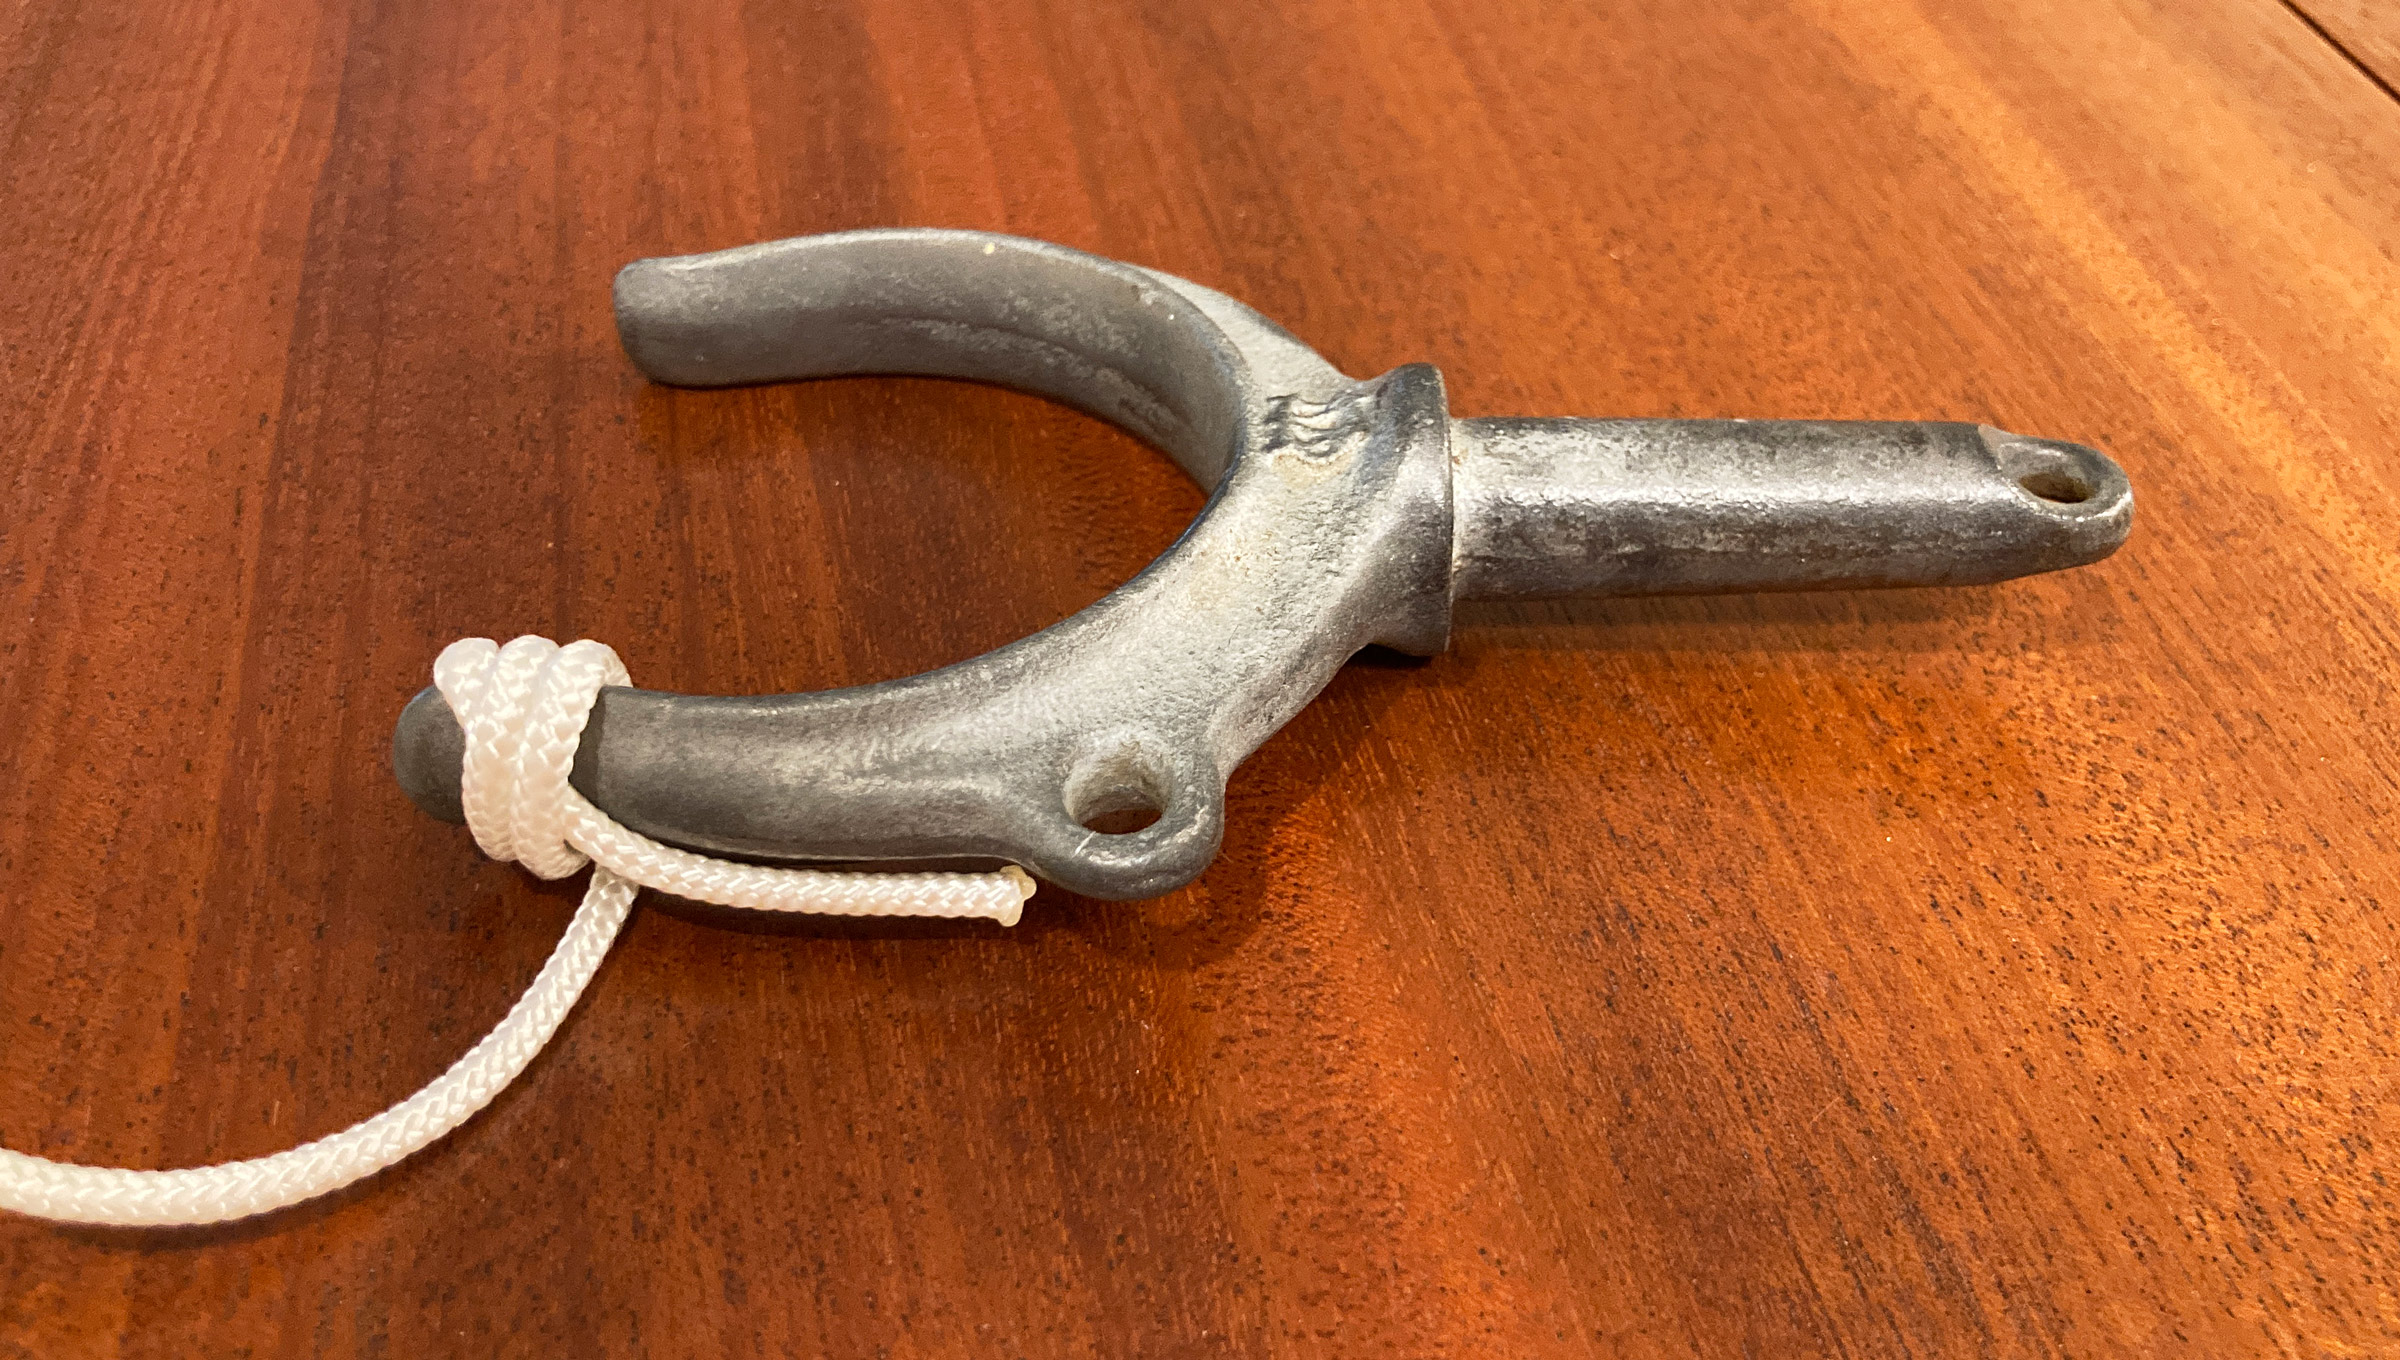
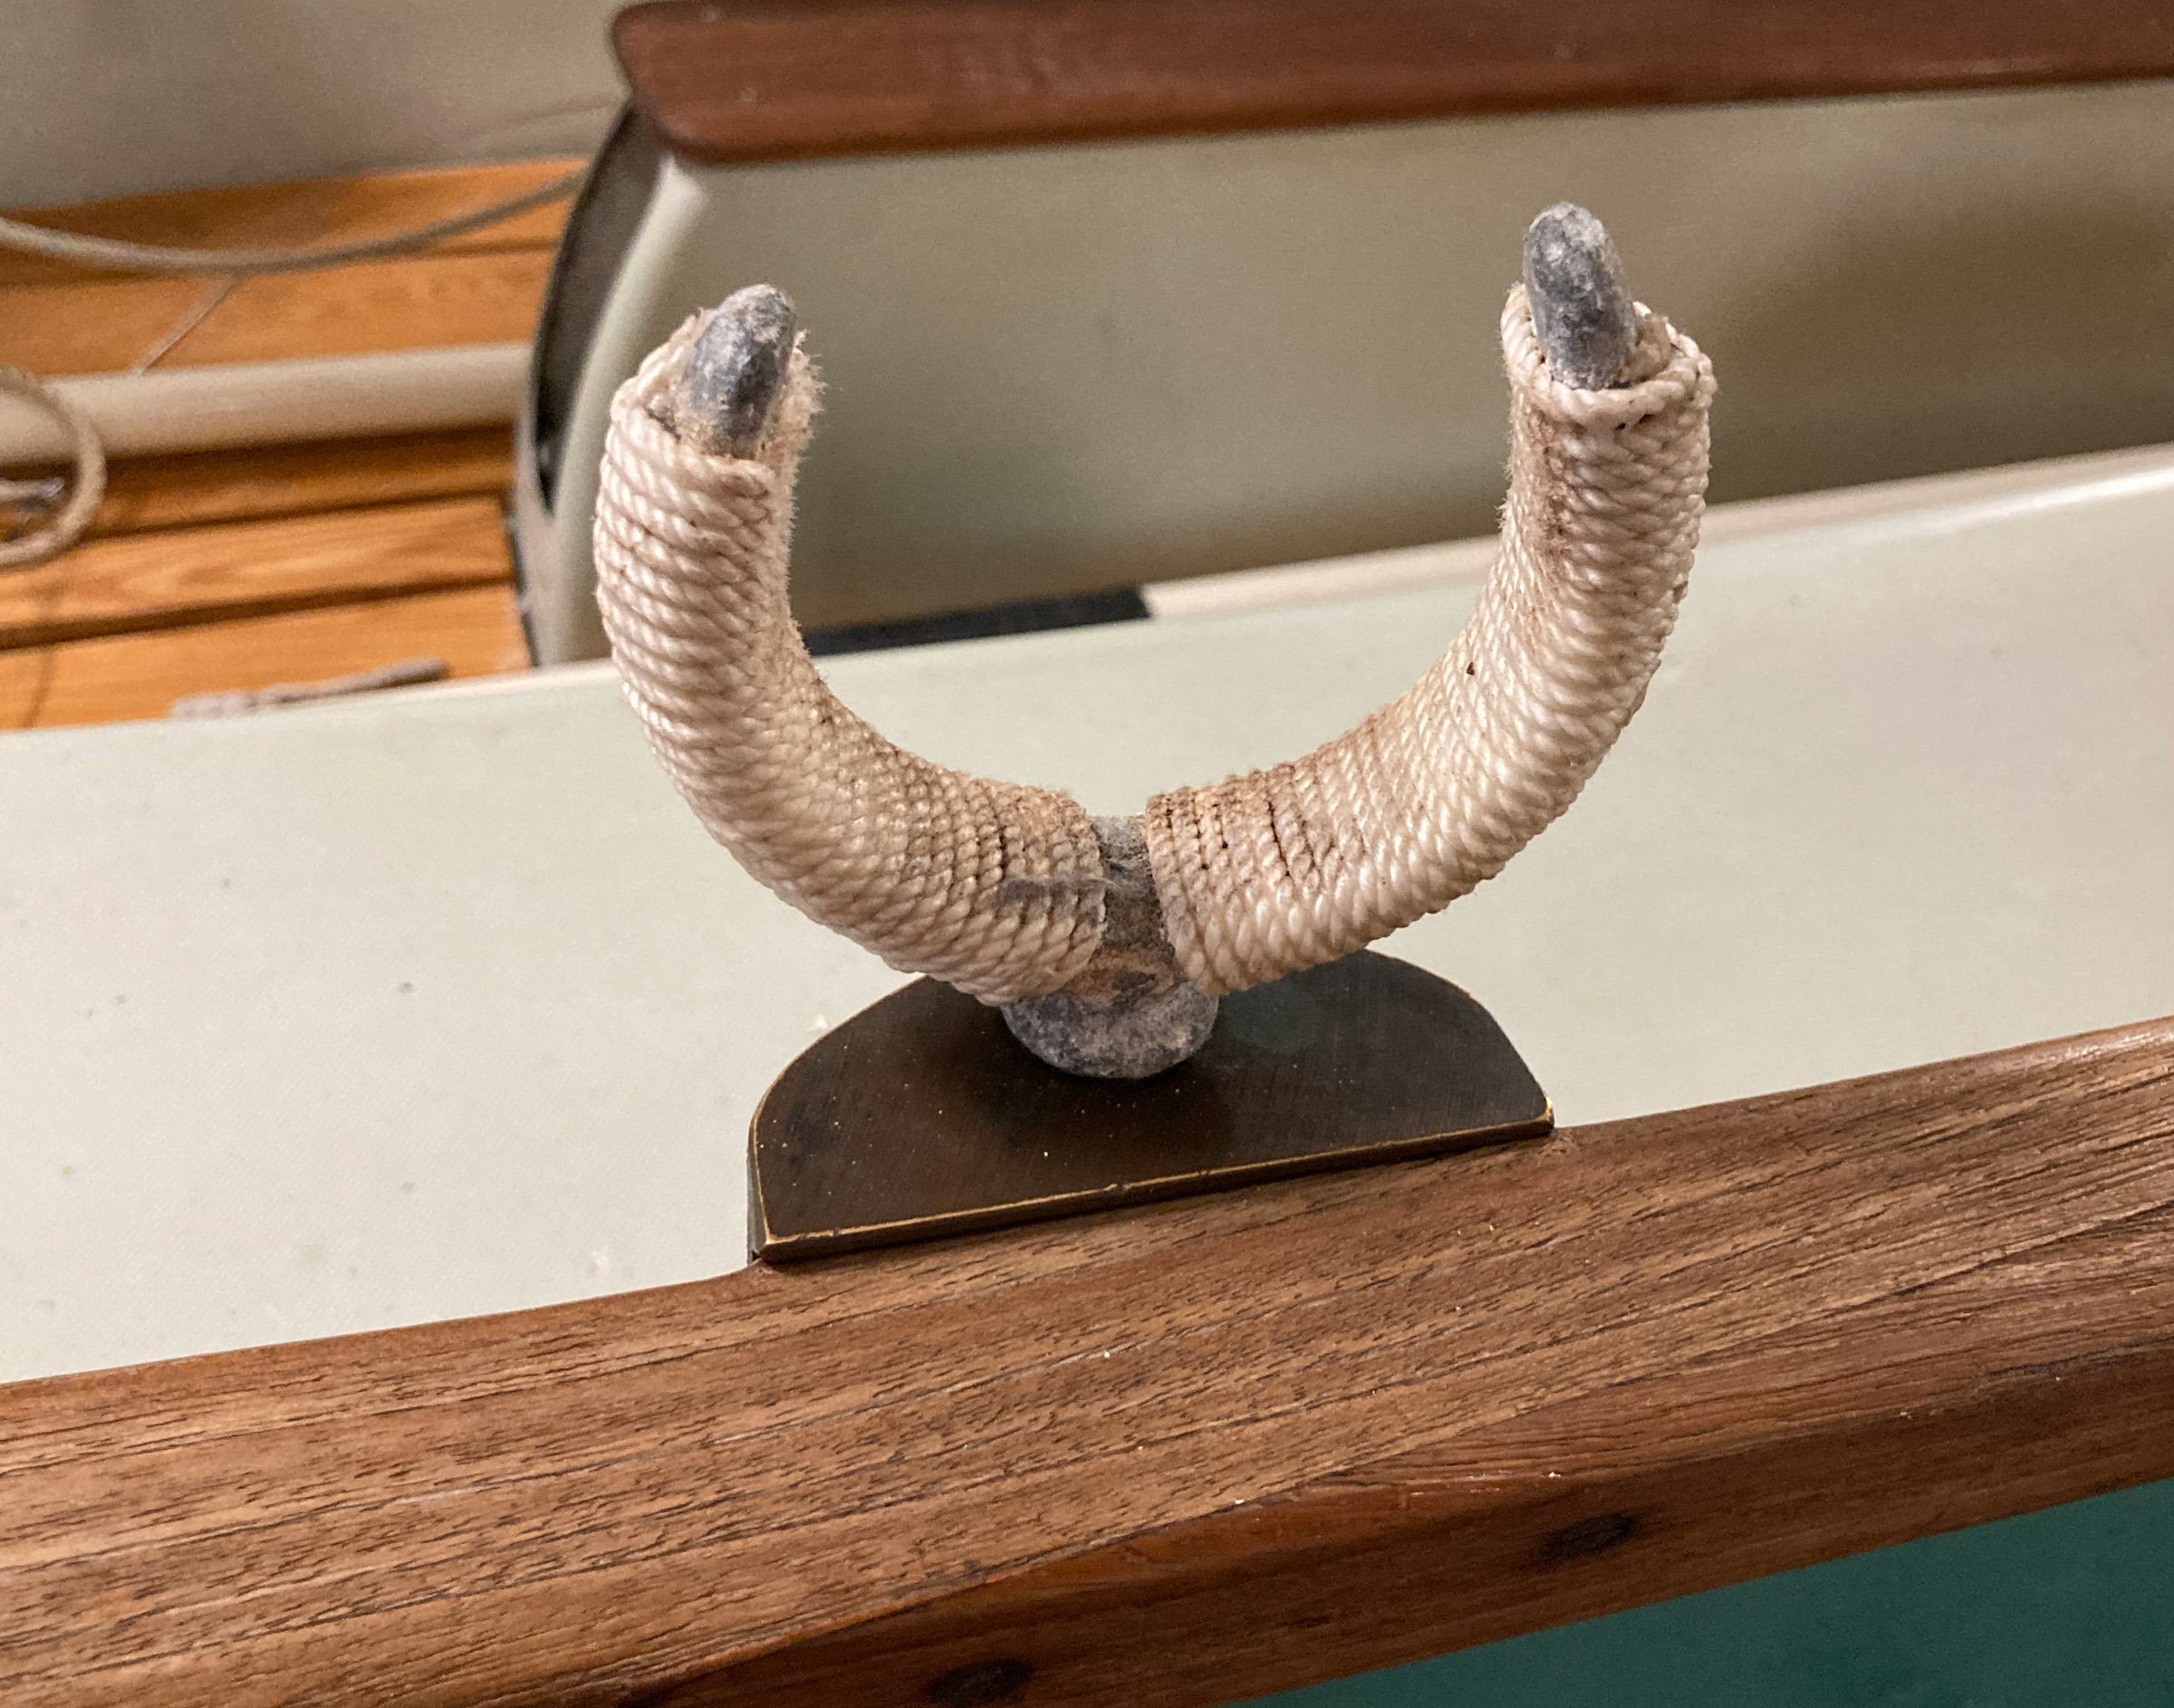
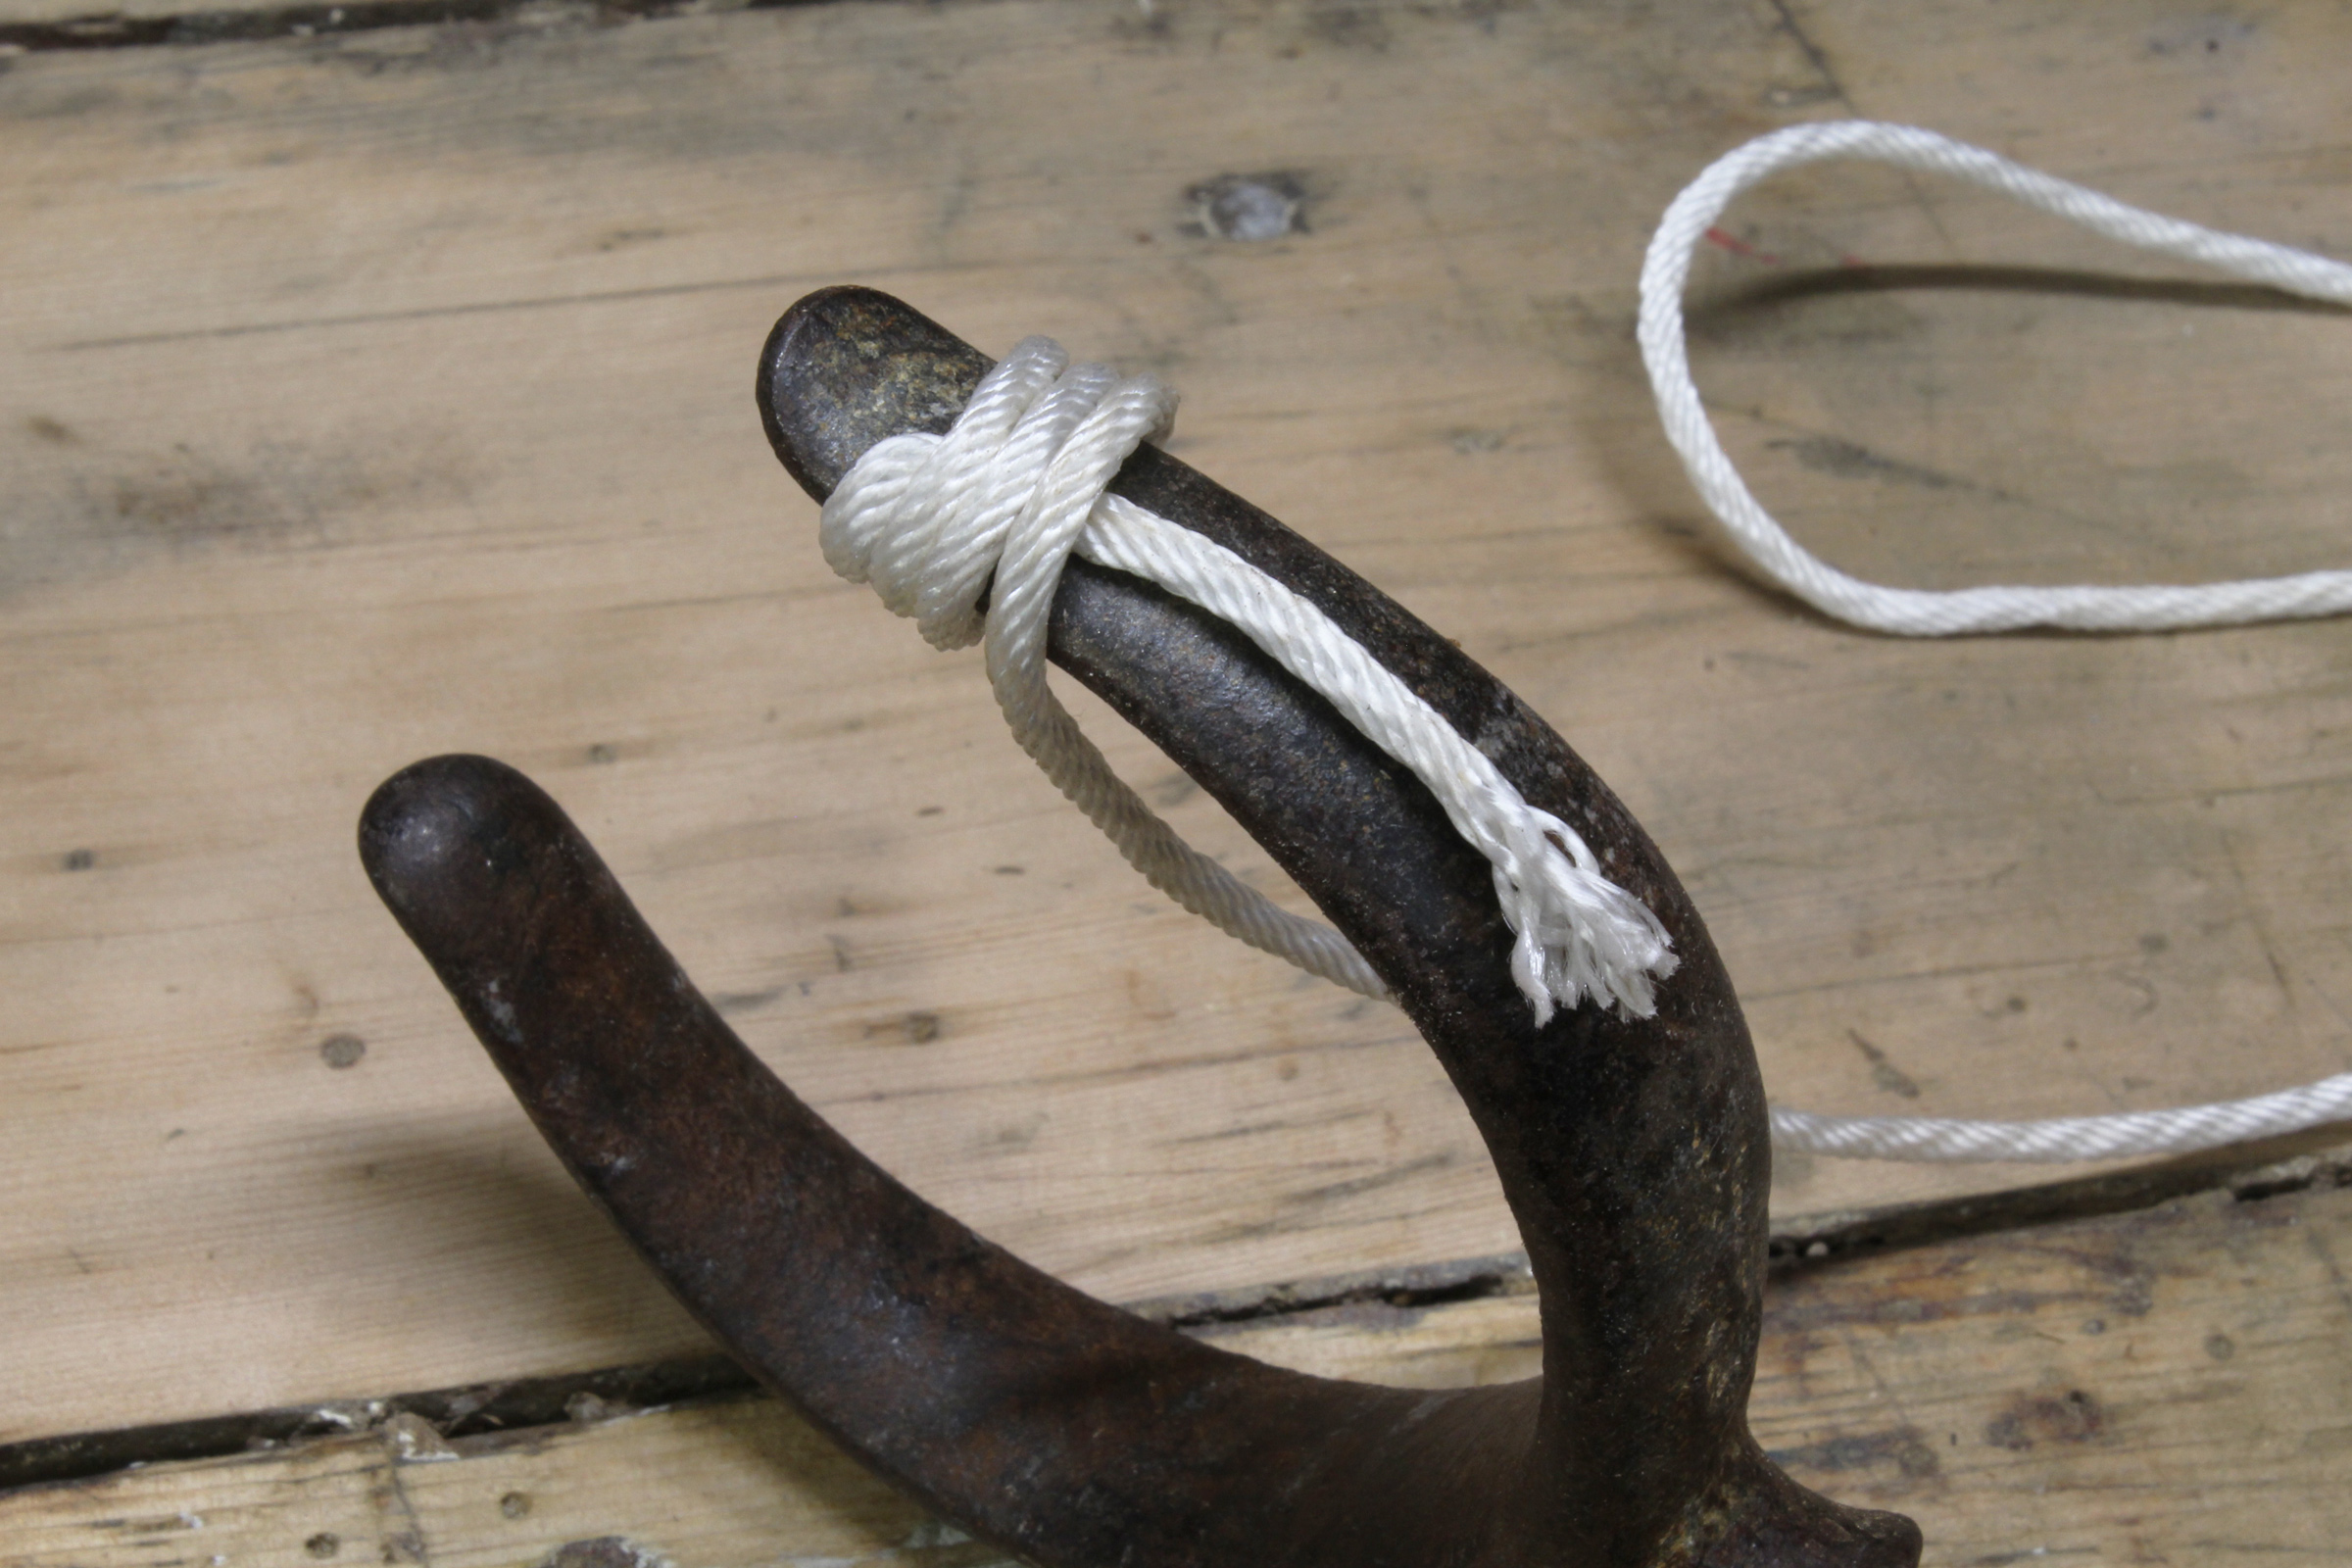
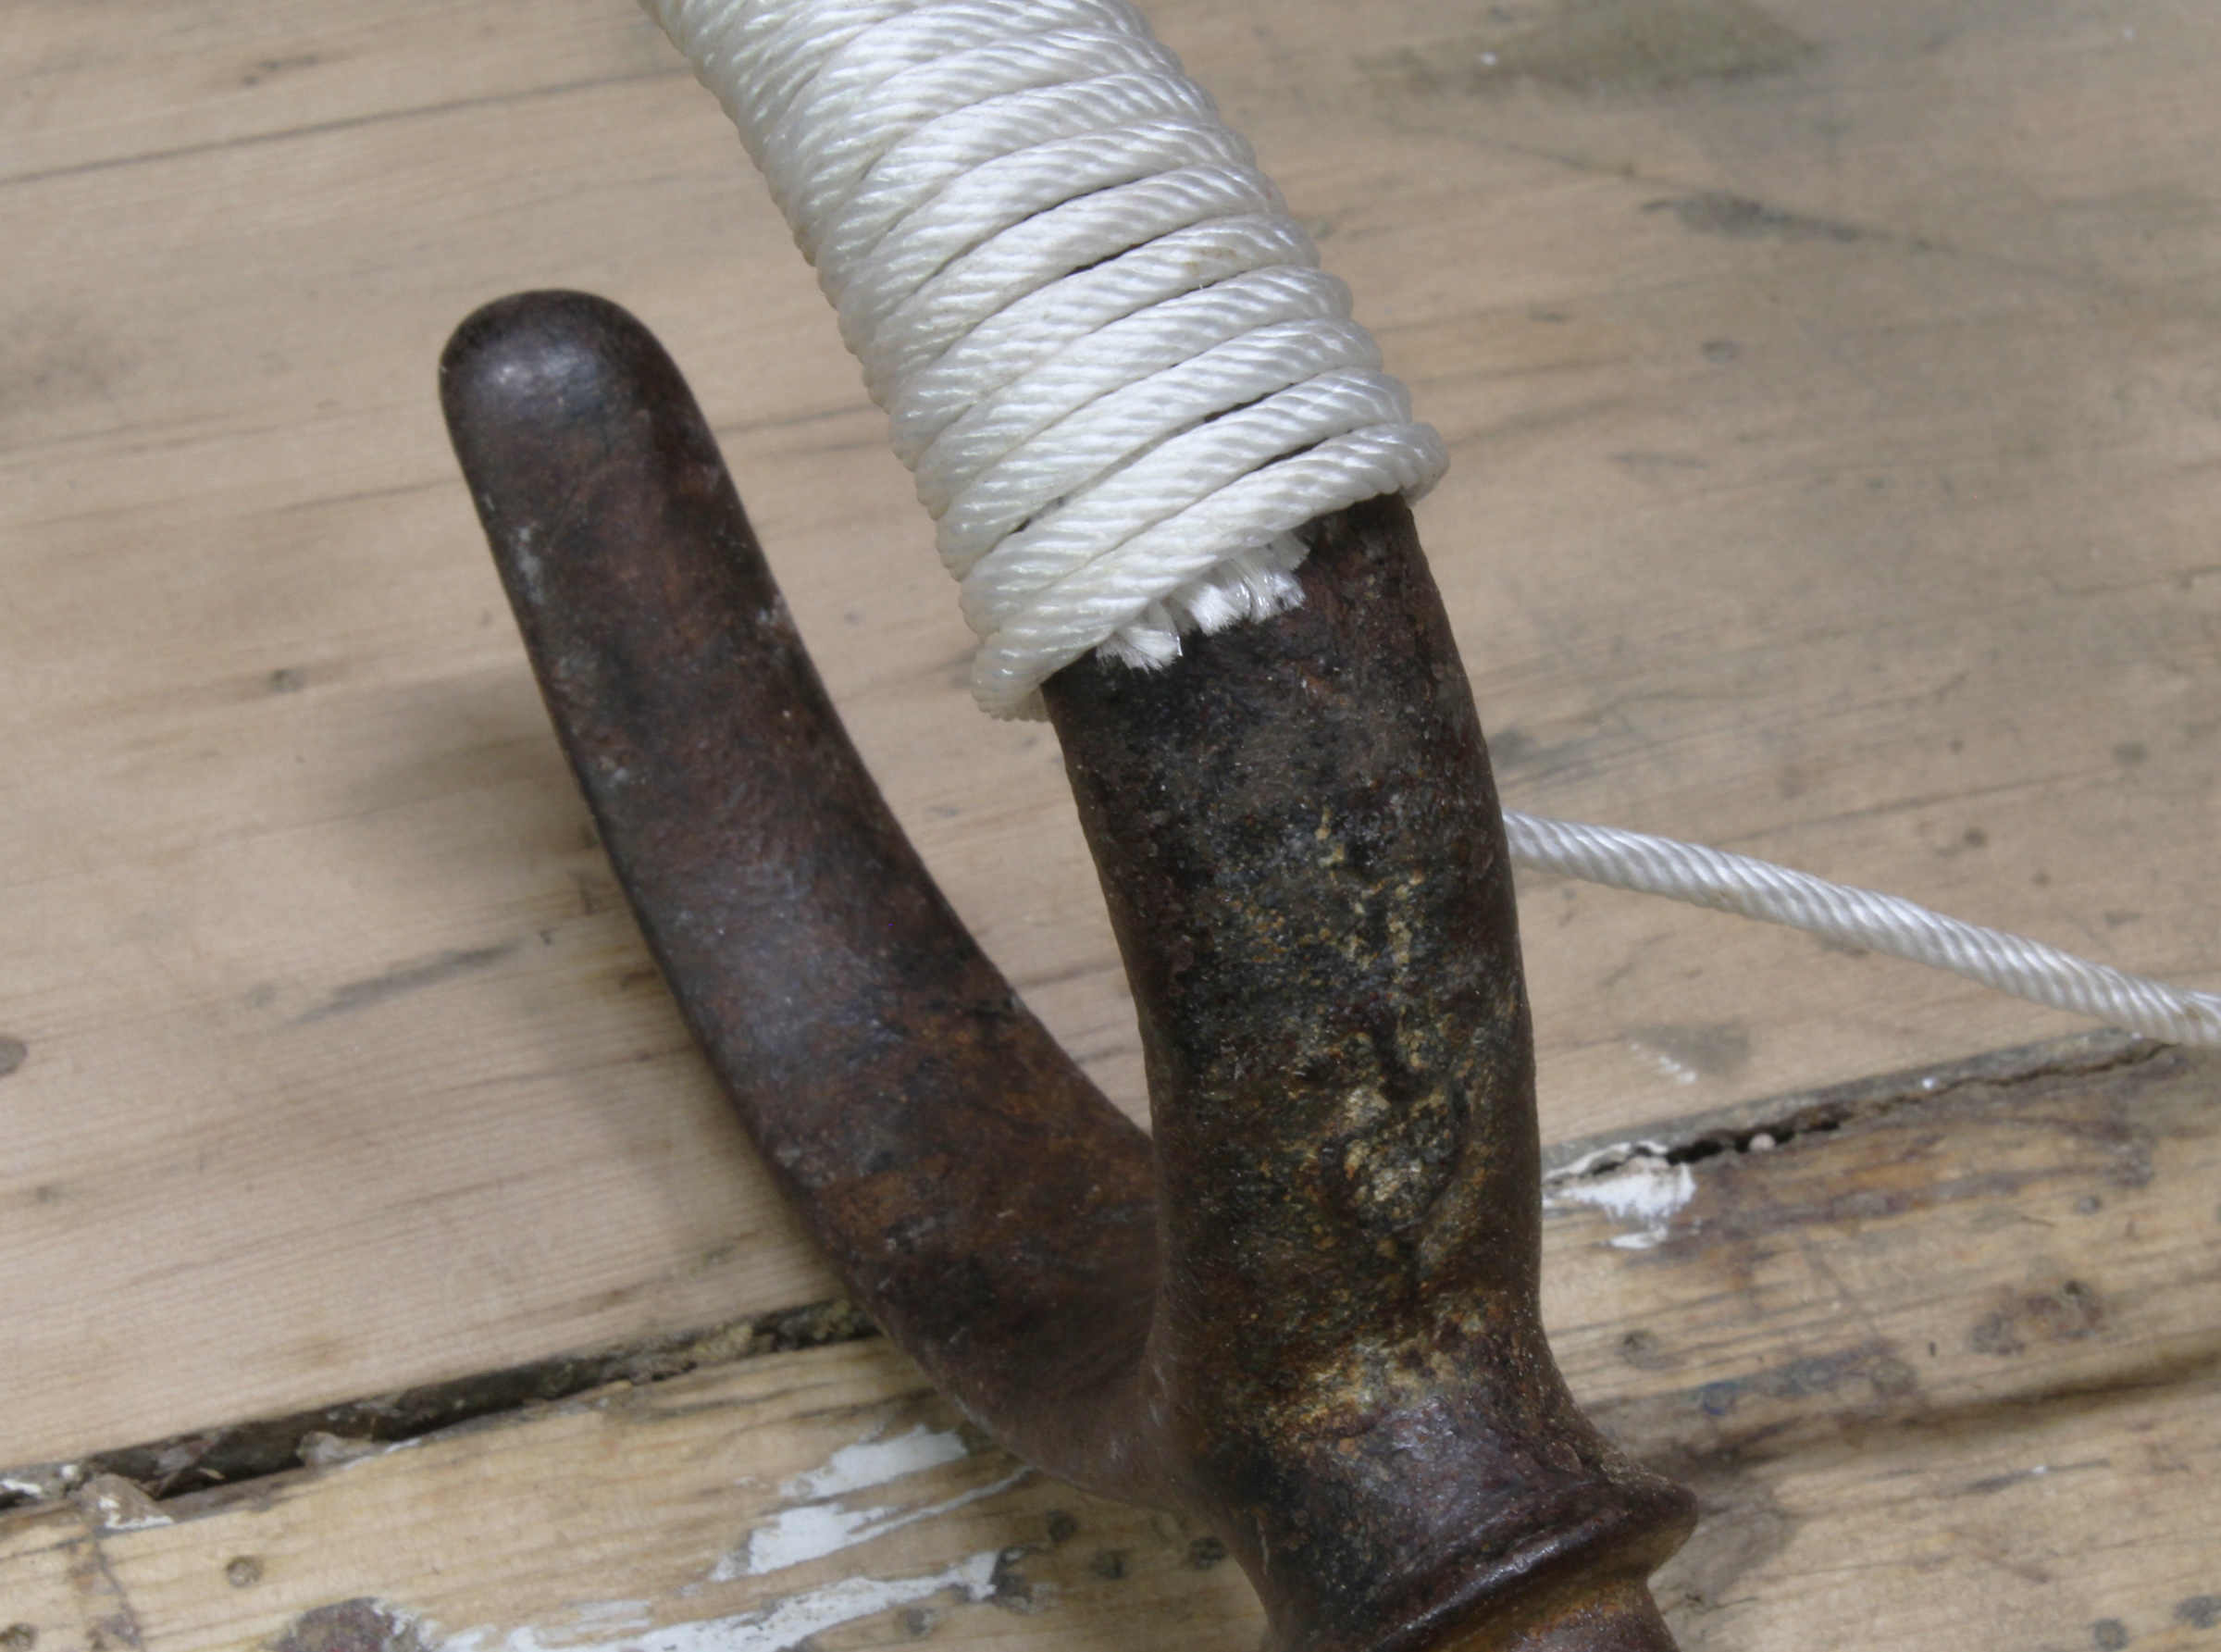
Coracle seats are usually supported by posts extending to the hull. I used two thick lengths of hazel that fit in blind 7/8″ holes in the bottom of the seat and in blocks that span the central ribs. A lashing from the hull to the seat, seen as the black lines on the seat, keep the posts in place and the flattened curve of the bottom from rounding itself away from the seat. The rope is for carrying the coracle. With the seat across the back, the rope is snug across my shoulders and chest.
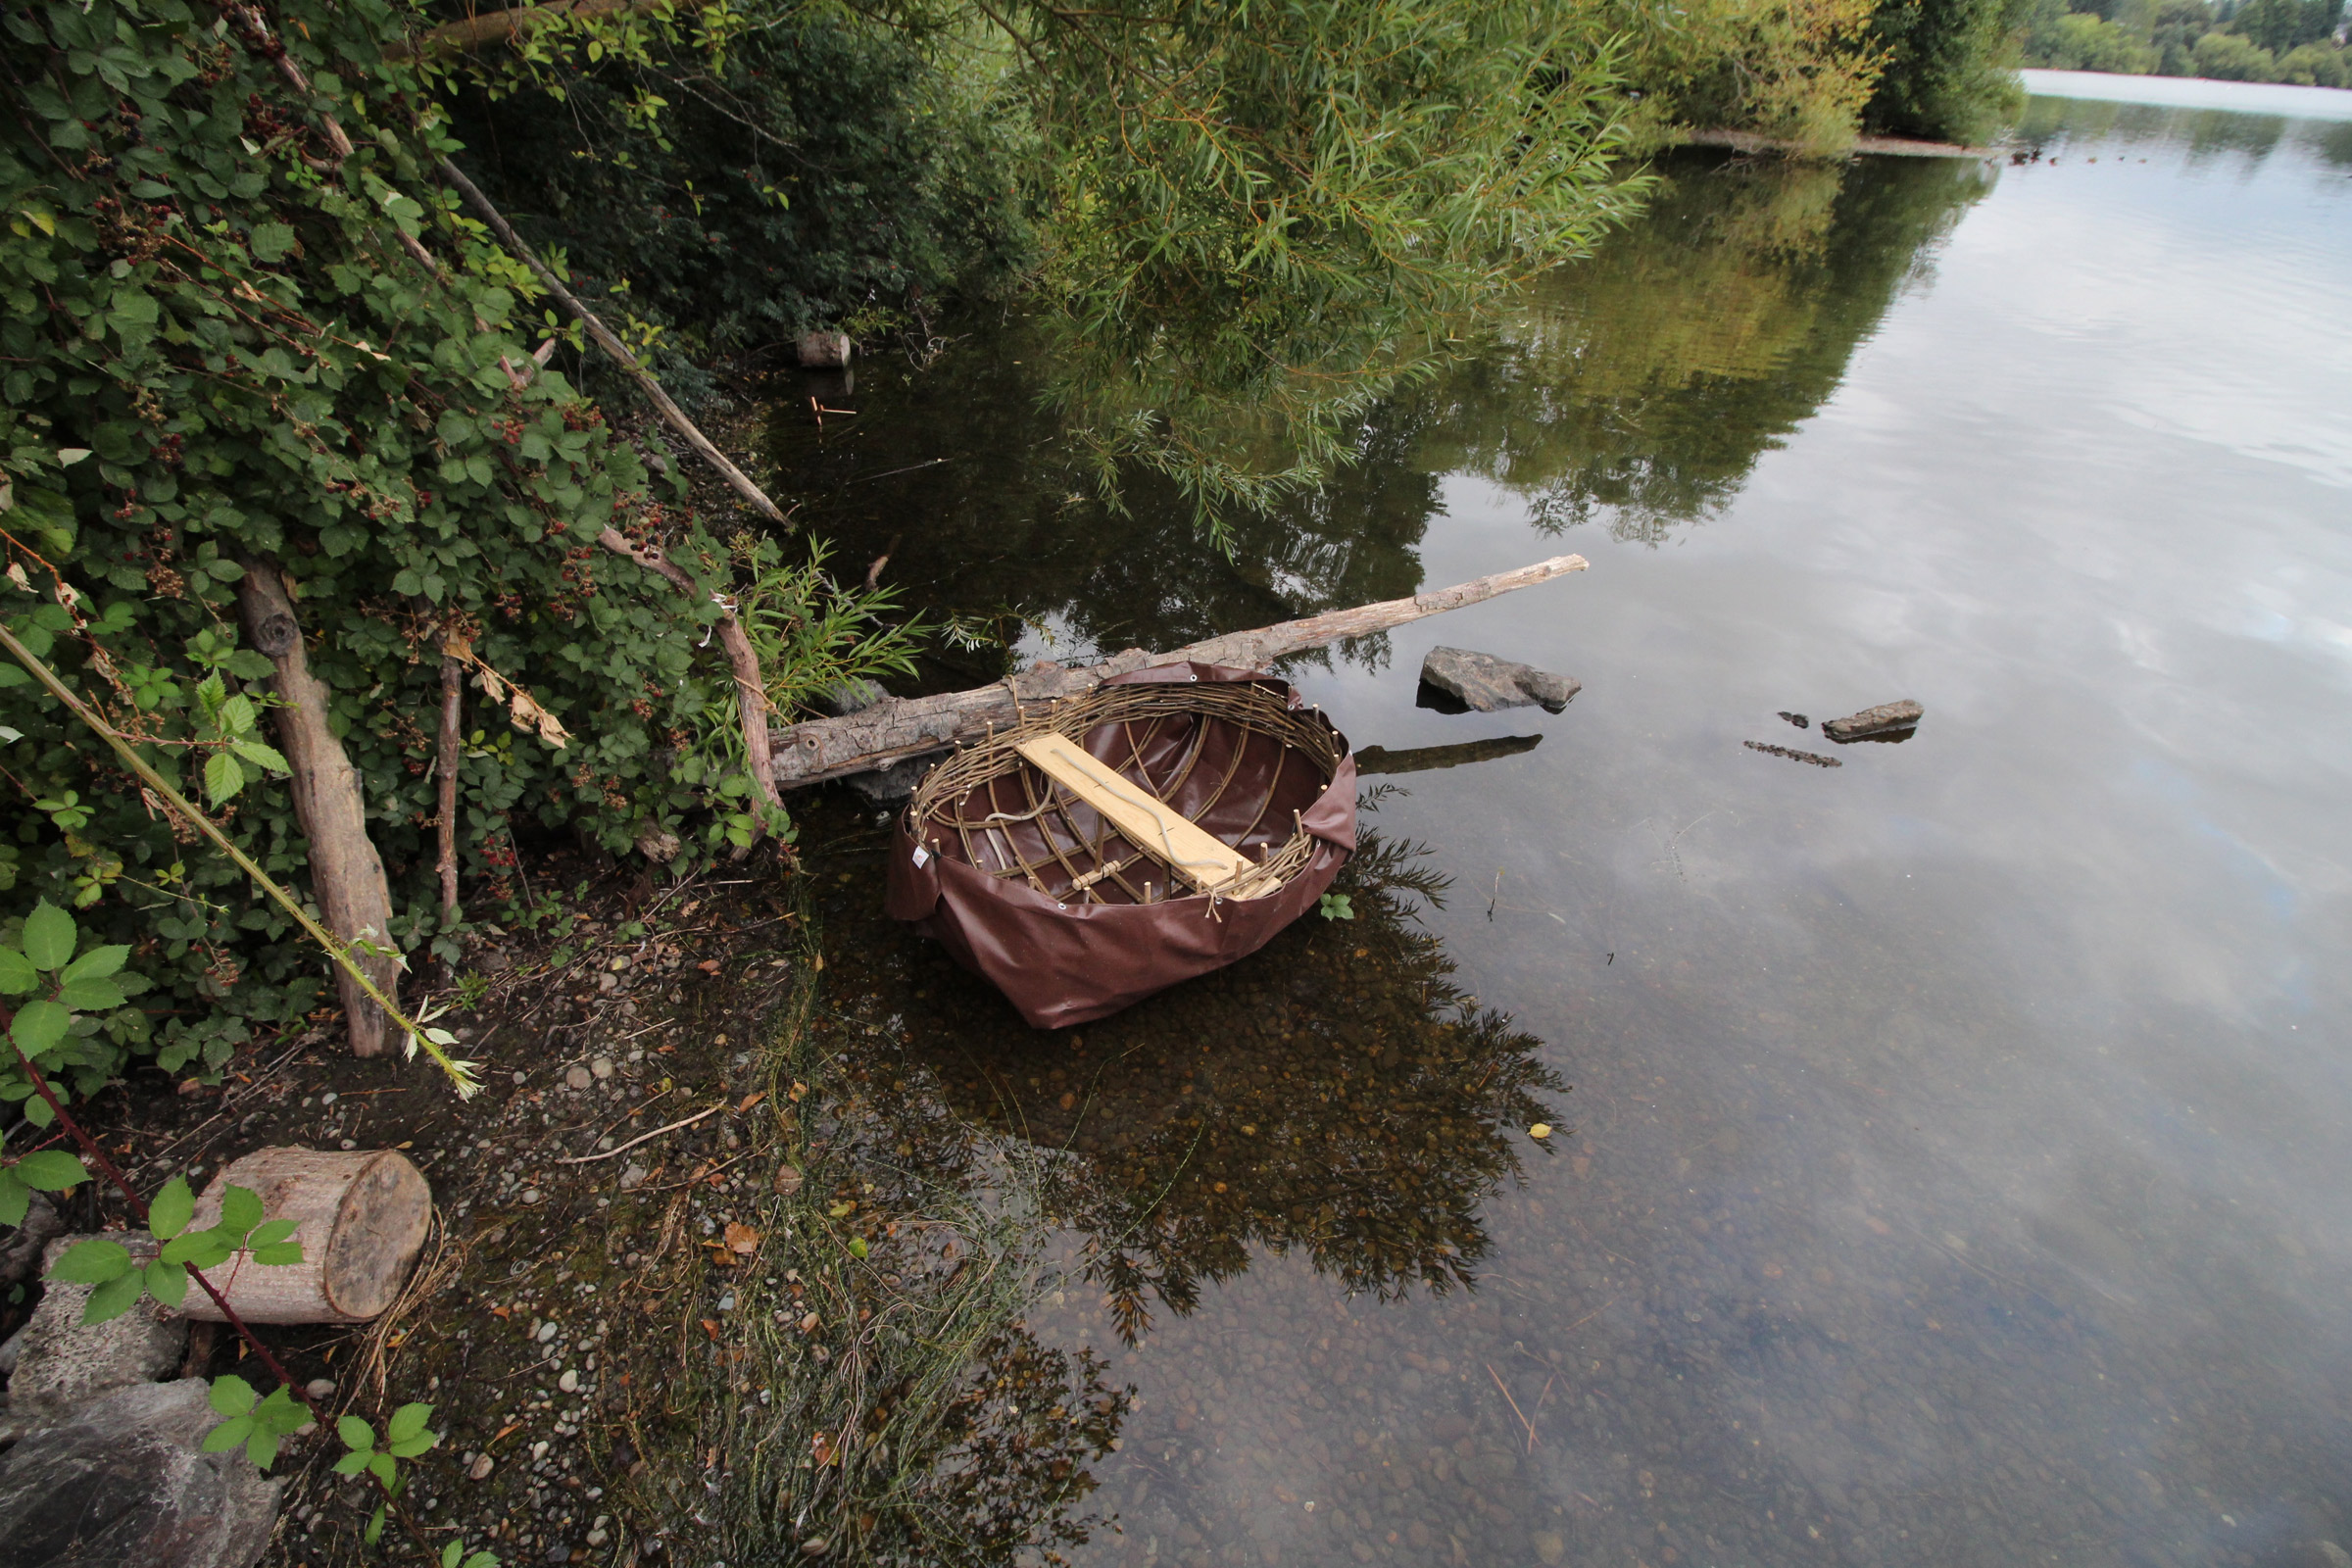
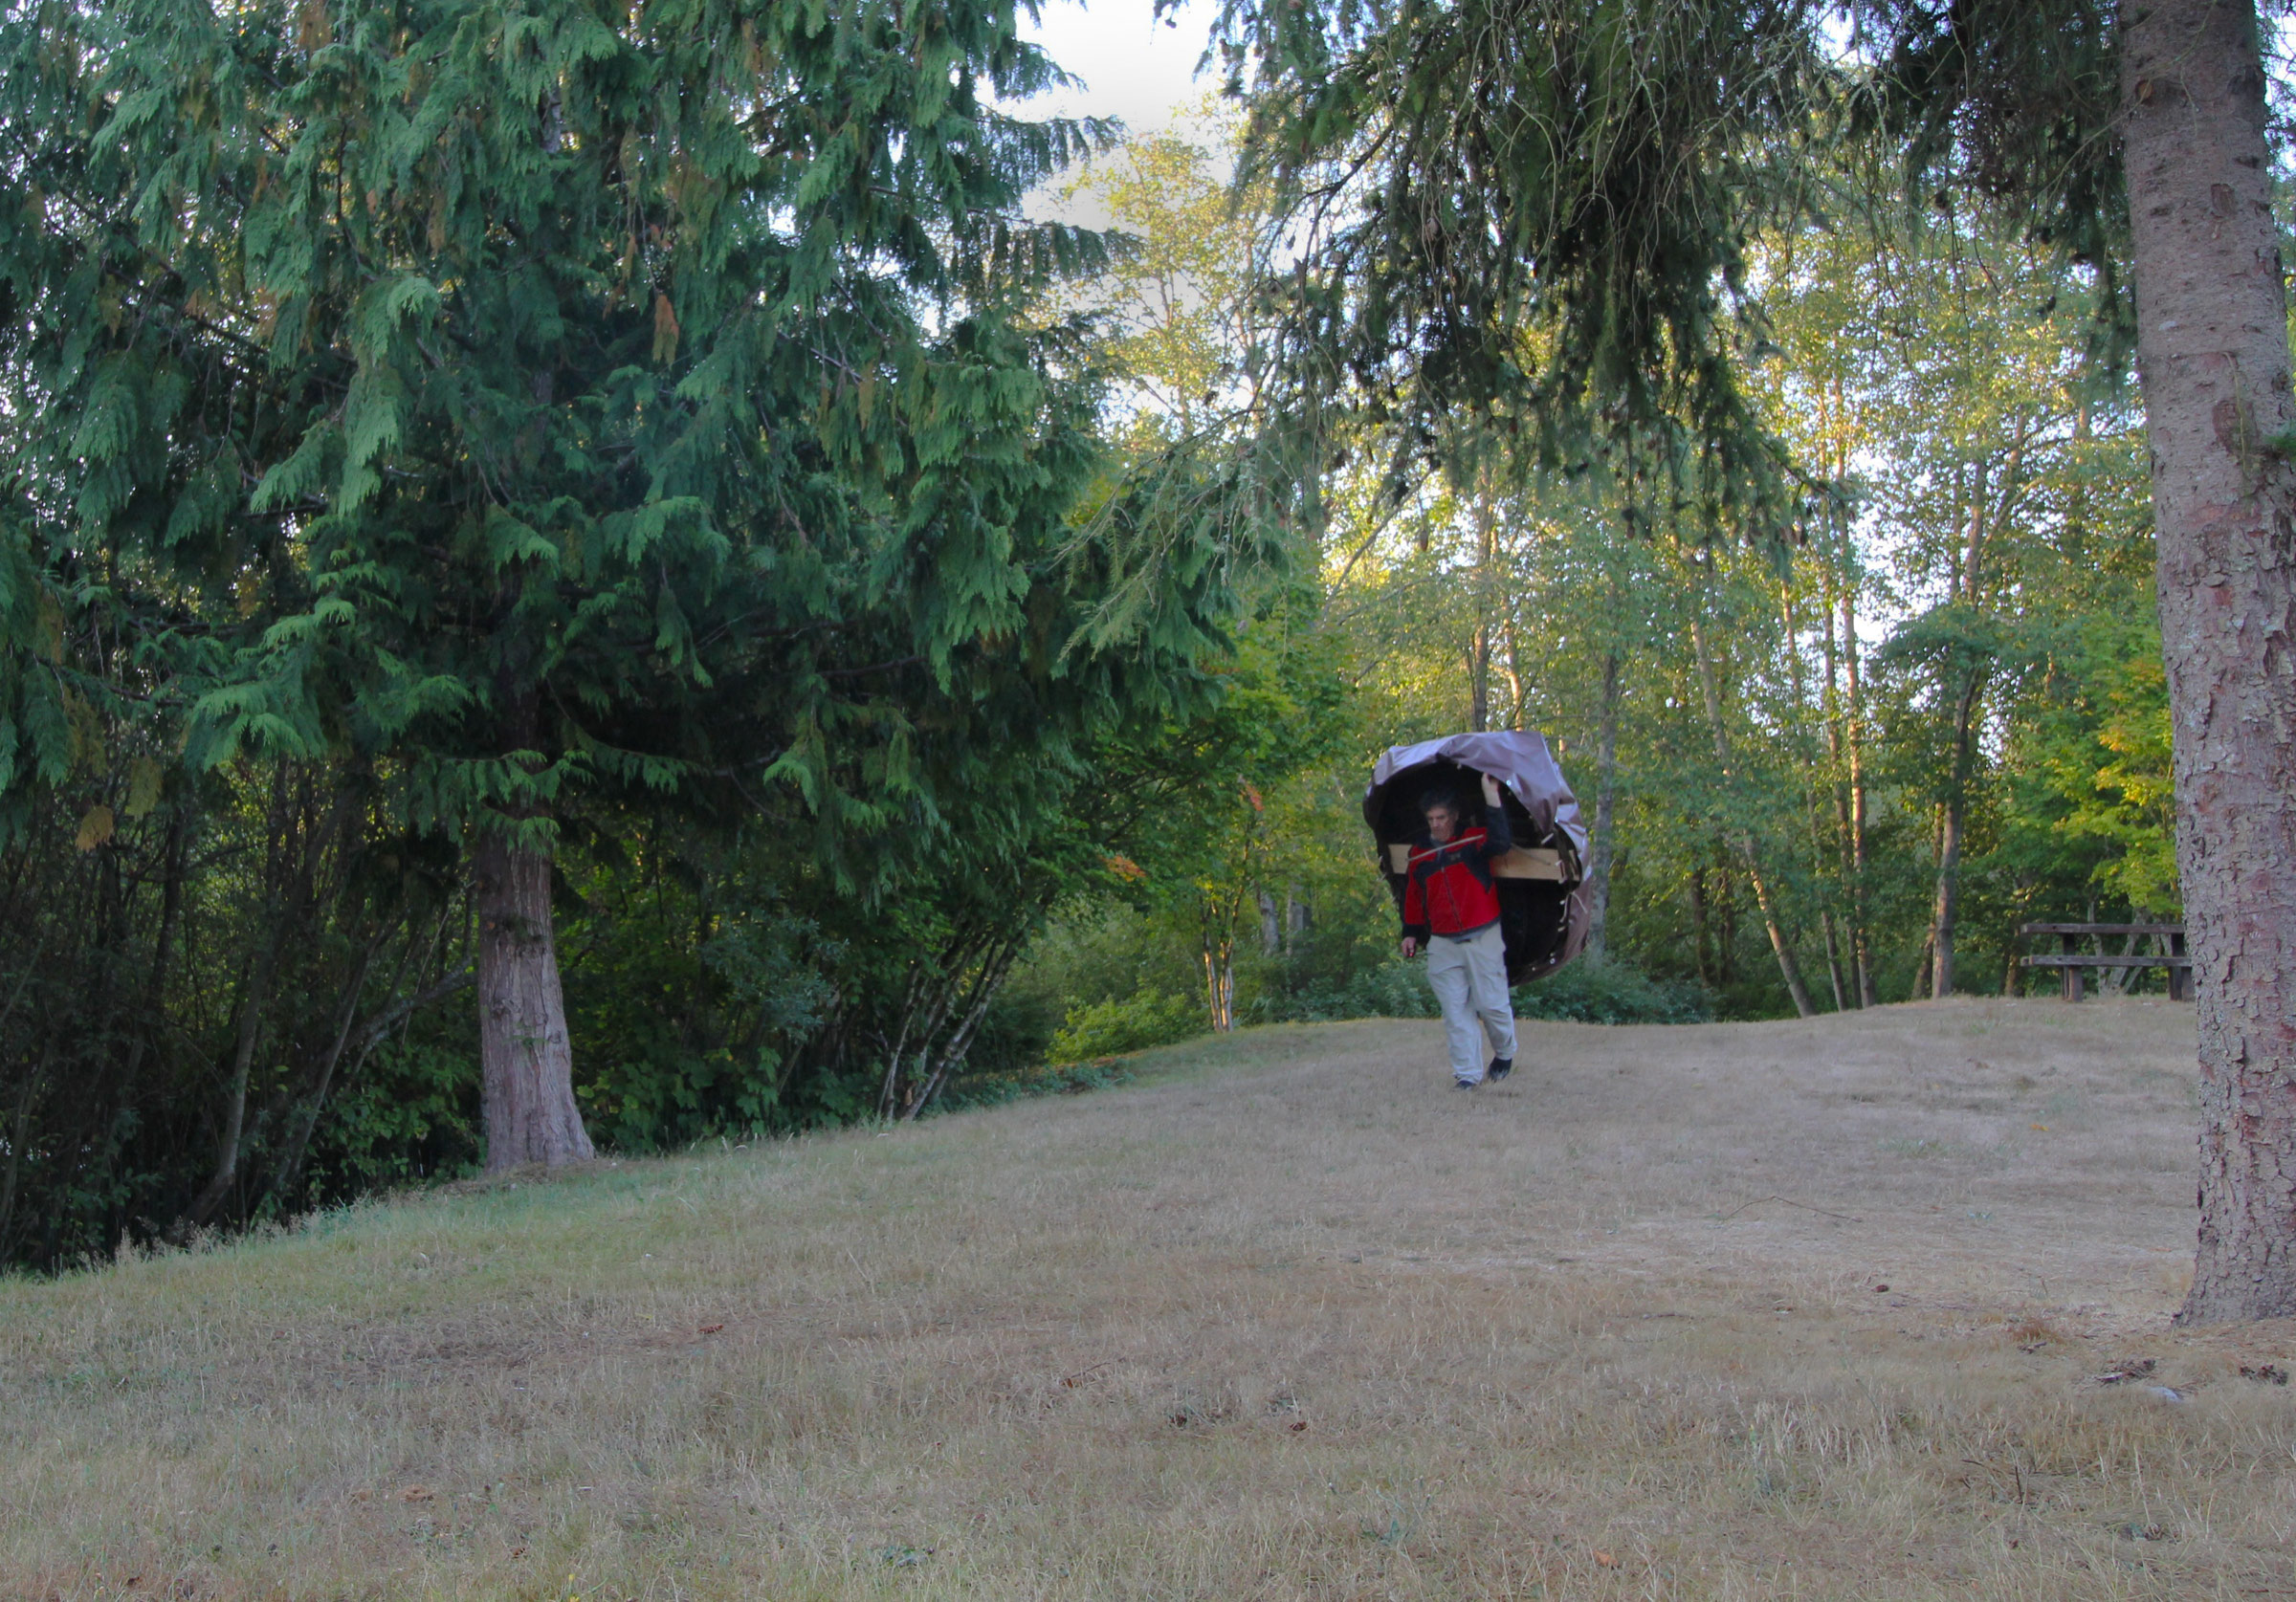
Coracles are meant to be portaged. Mine, with the temporary tarp skin, weighs just 34 lbs. so it wasn’t a burden to carry it the 100 yards across the Chase Lake Park from the truck to the pond.
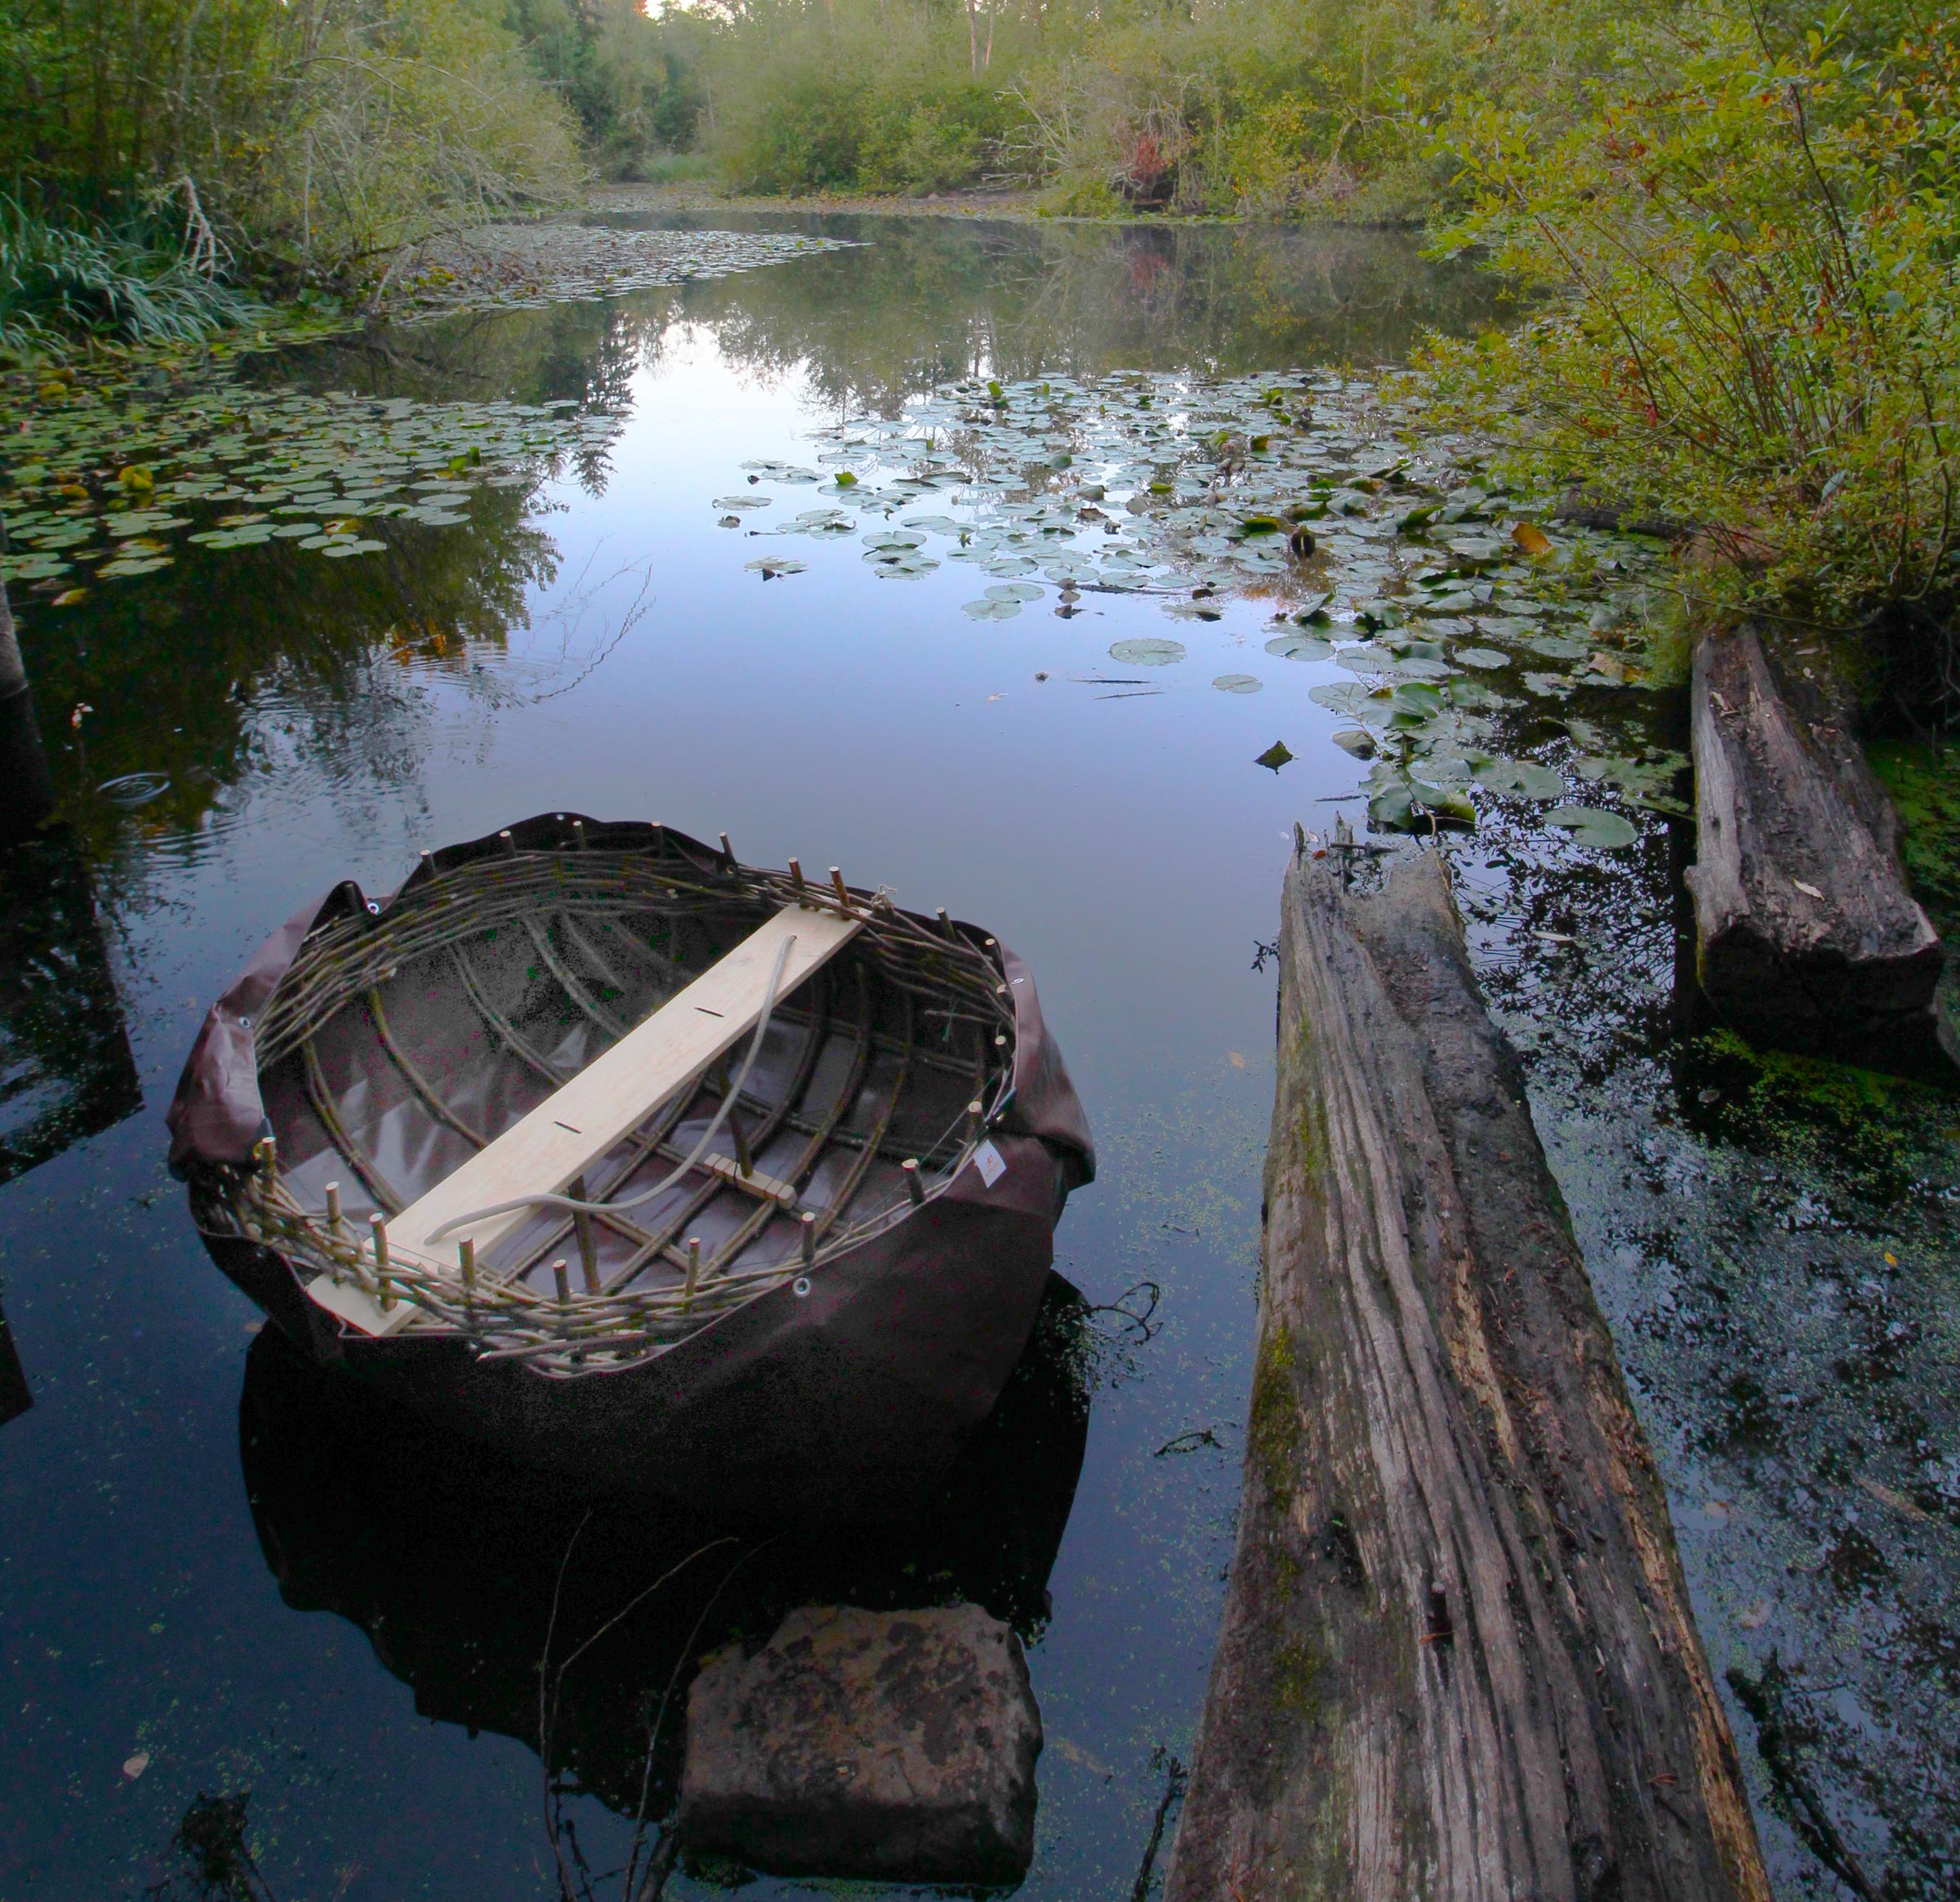
To get afloat in the newly finished frame I lashed a heavy-duty 16 mil poly tarp over it. A canvas skin coated with black roofing sealant will come later along with a paddle meant for coracles.
When I started building boats, I was driven to travel in them hundreds, even thousands of miles, from one point to another. Now, 43 years later, I’m looking for small places, where I can take my coracle to find the single point at its center and not pass it by.
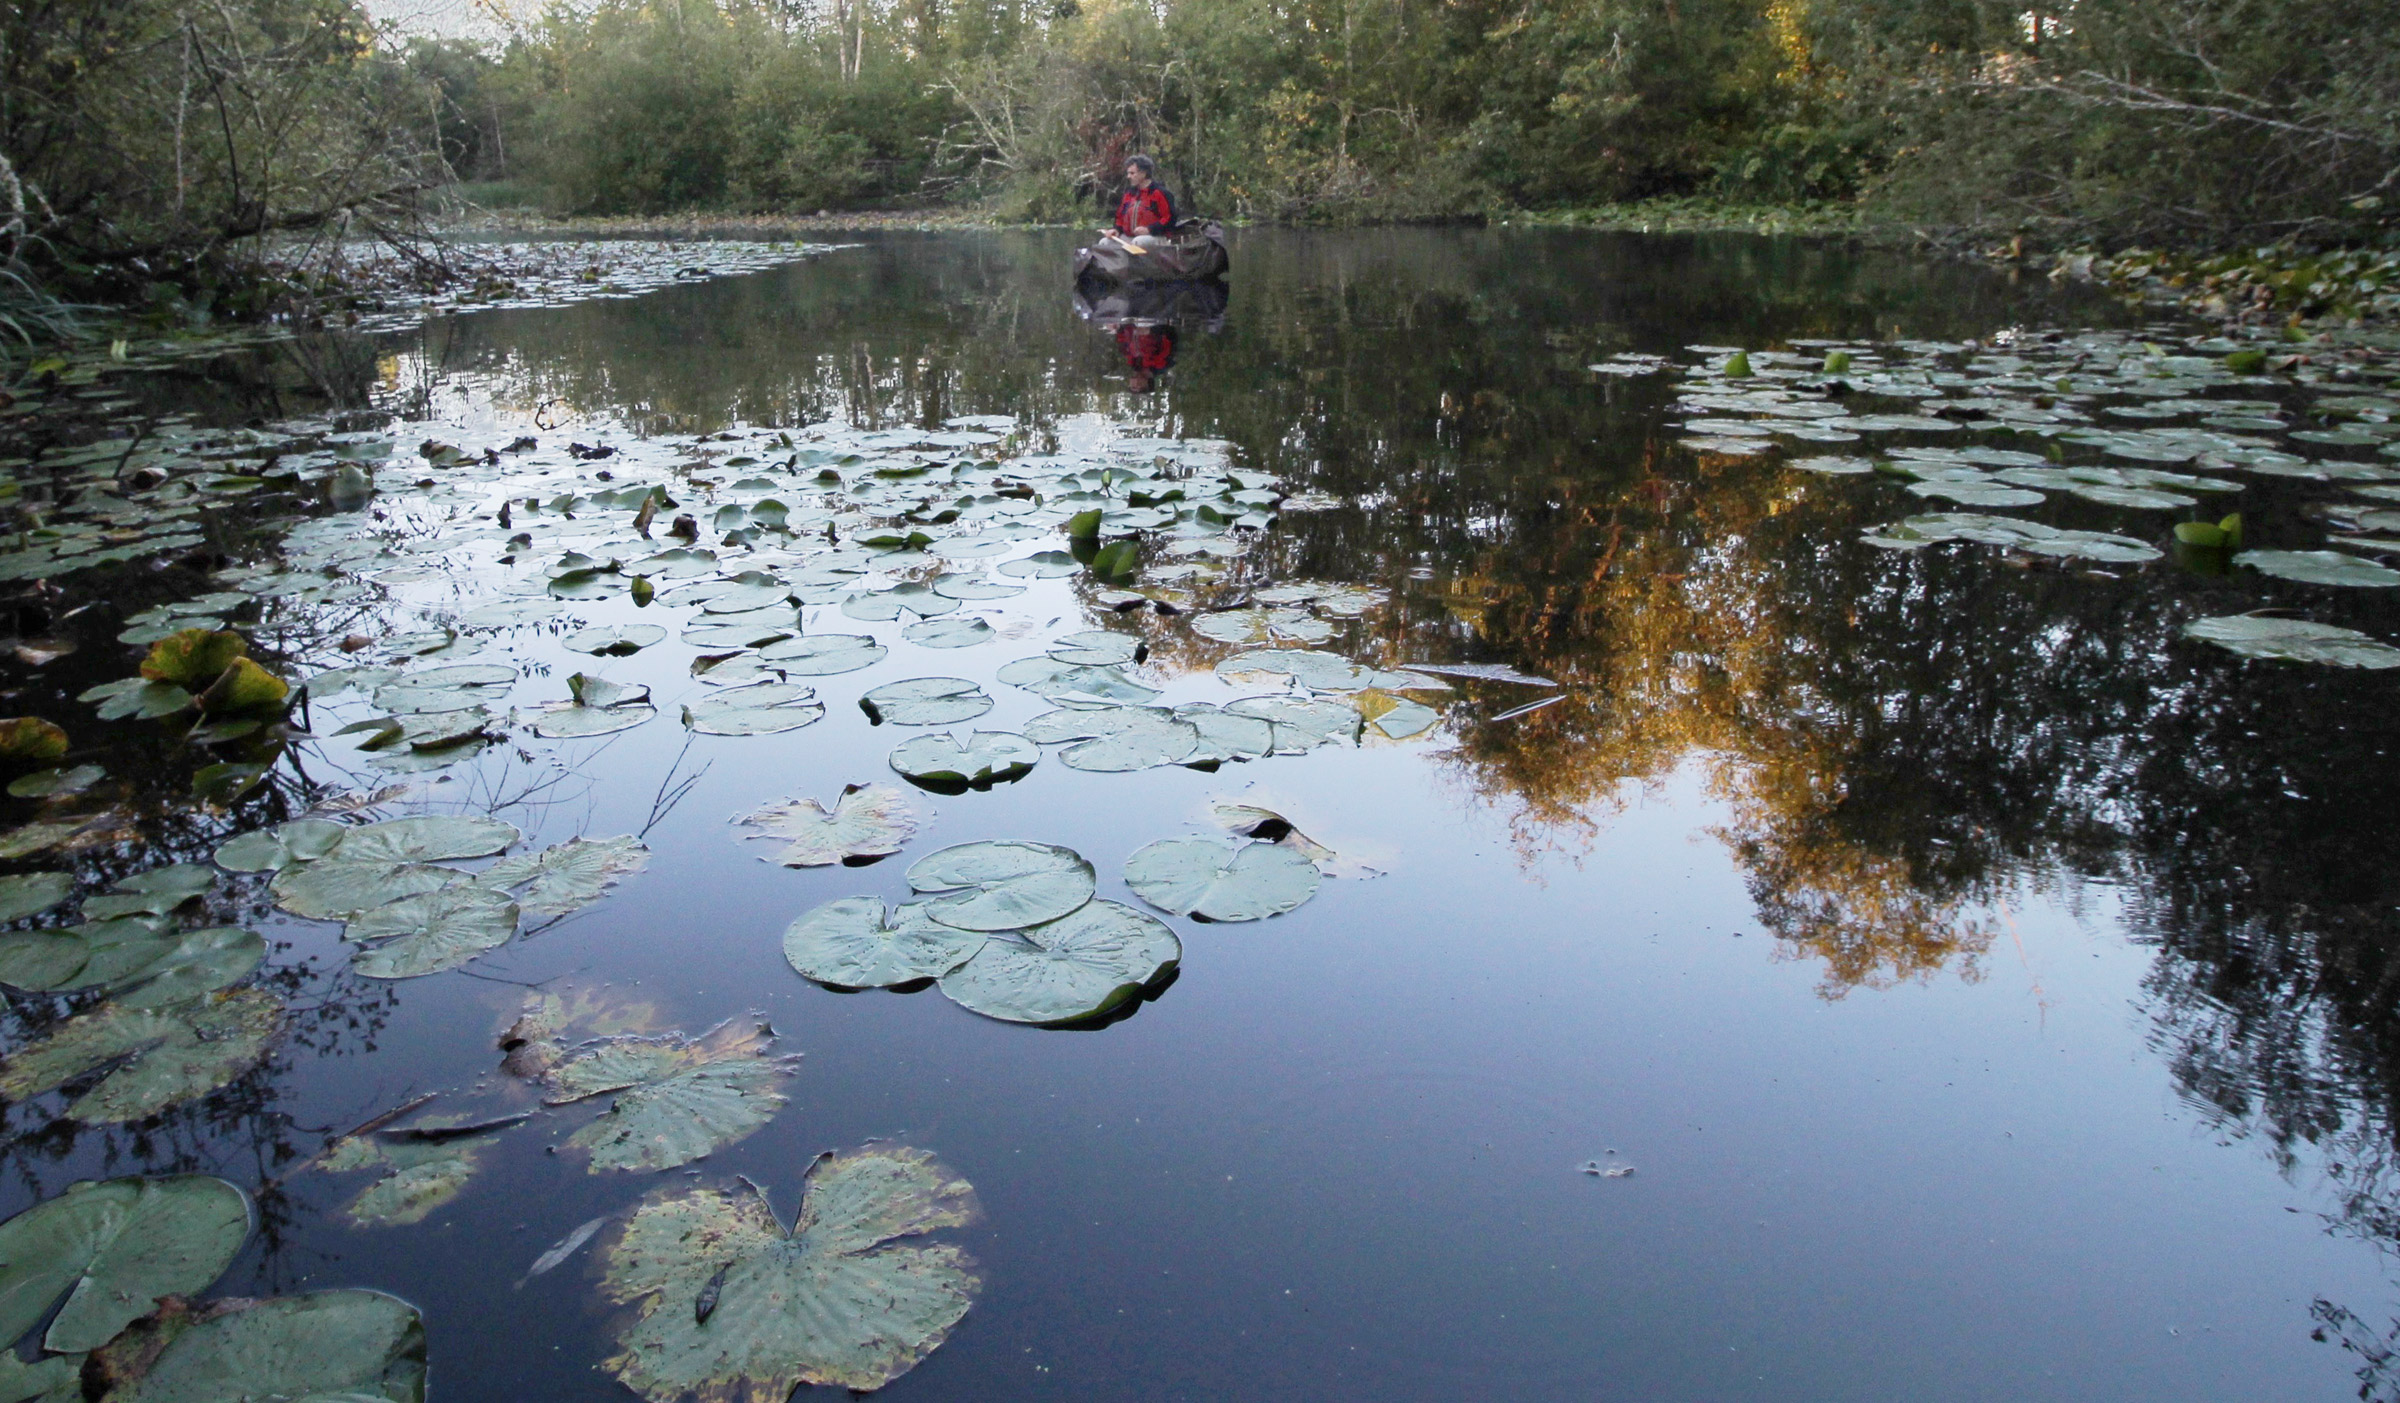
This project is not yet finished, but I’m already scanning Google Earth for nearby ponds and creeks where I can take my coracle, the smallest of small boats, to see what it can teach me about its ancient ancestors and the not-quite-as-old version of myself that I’ve become.
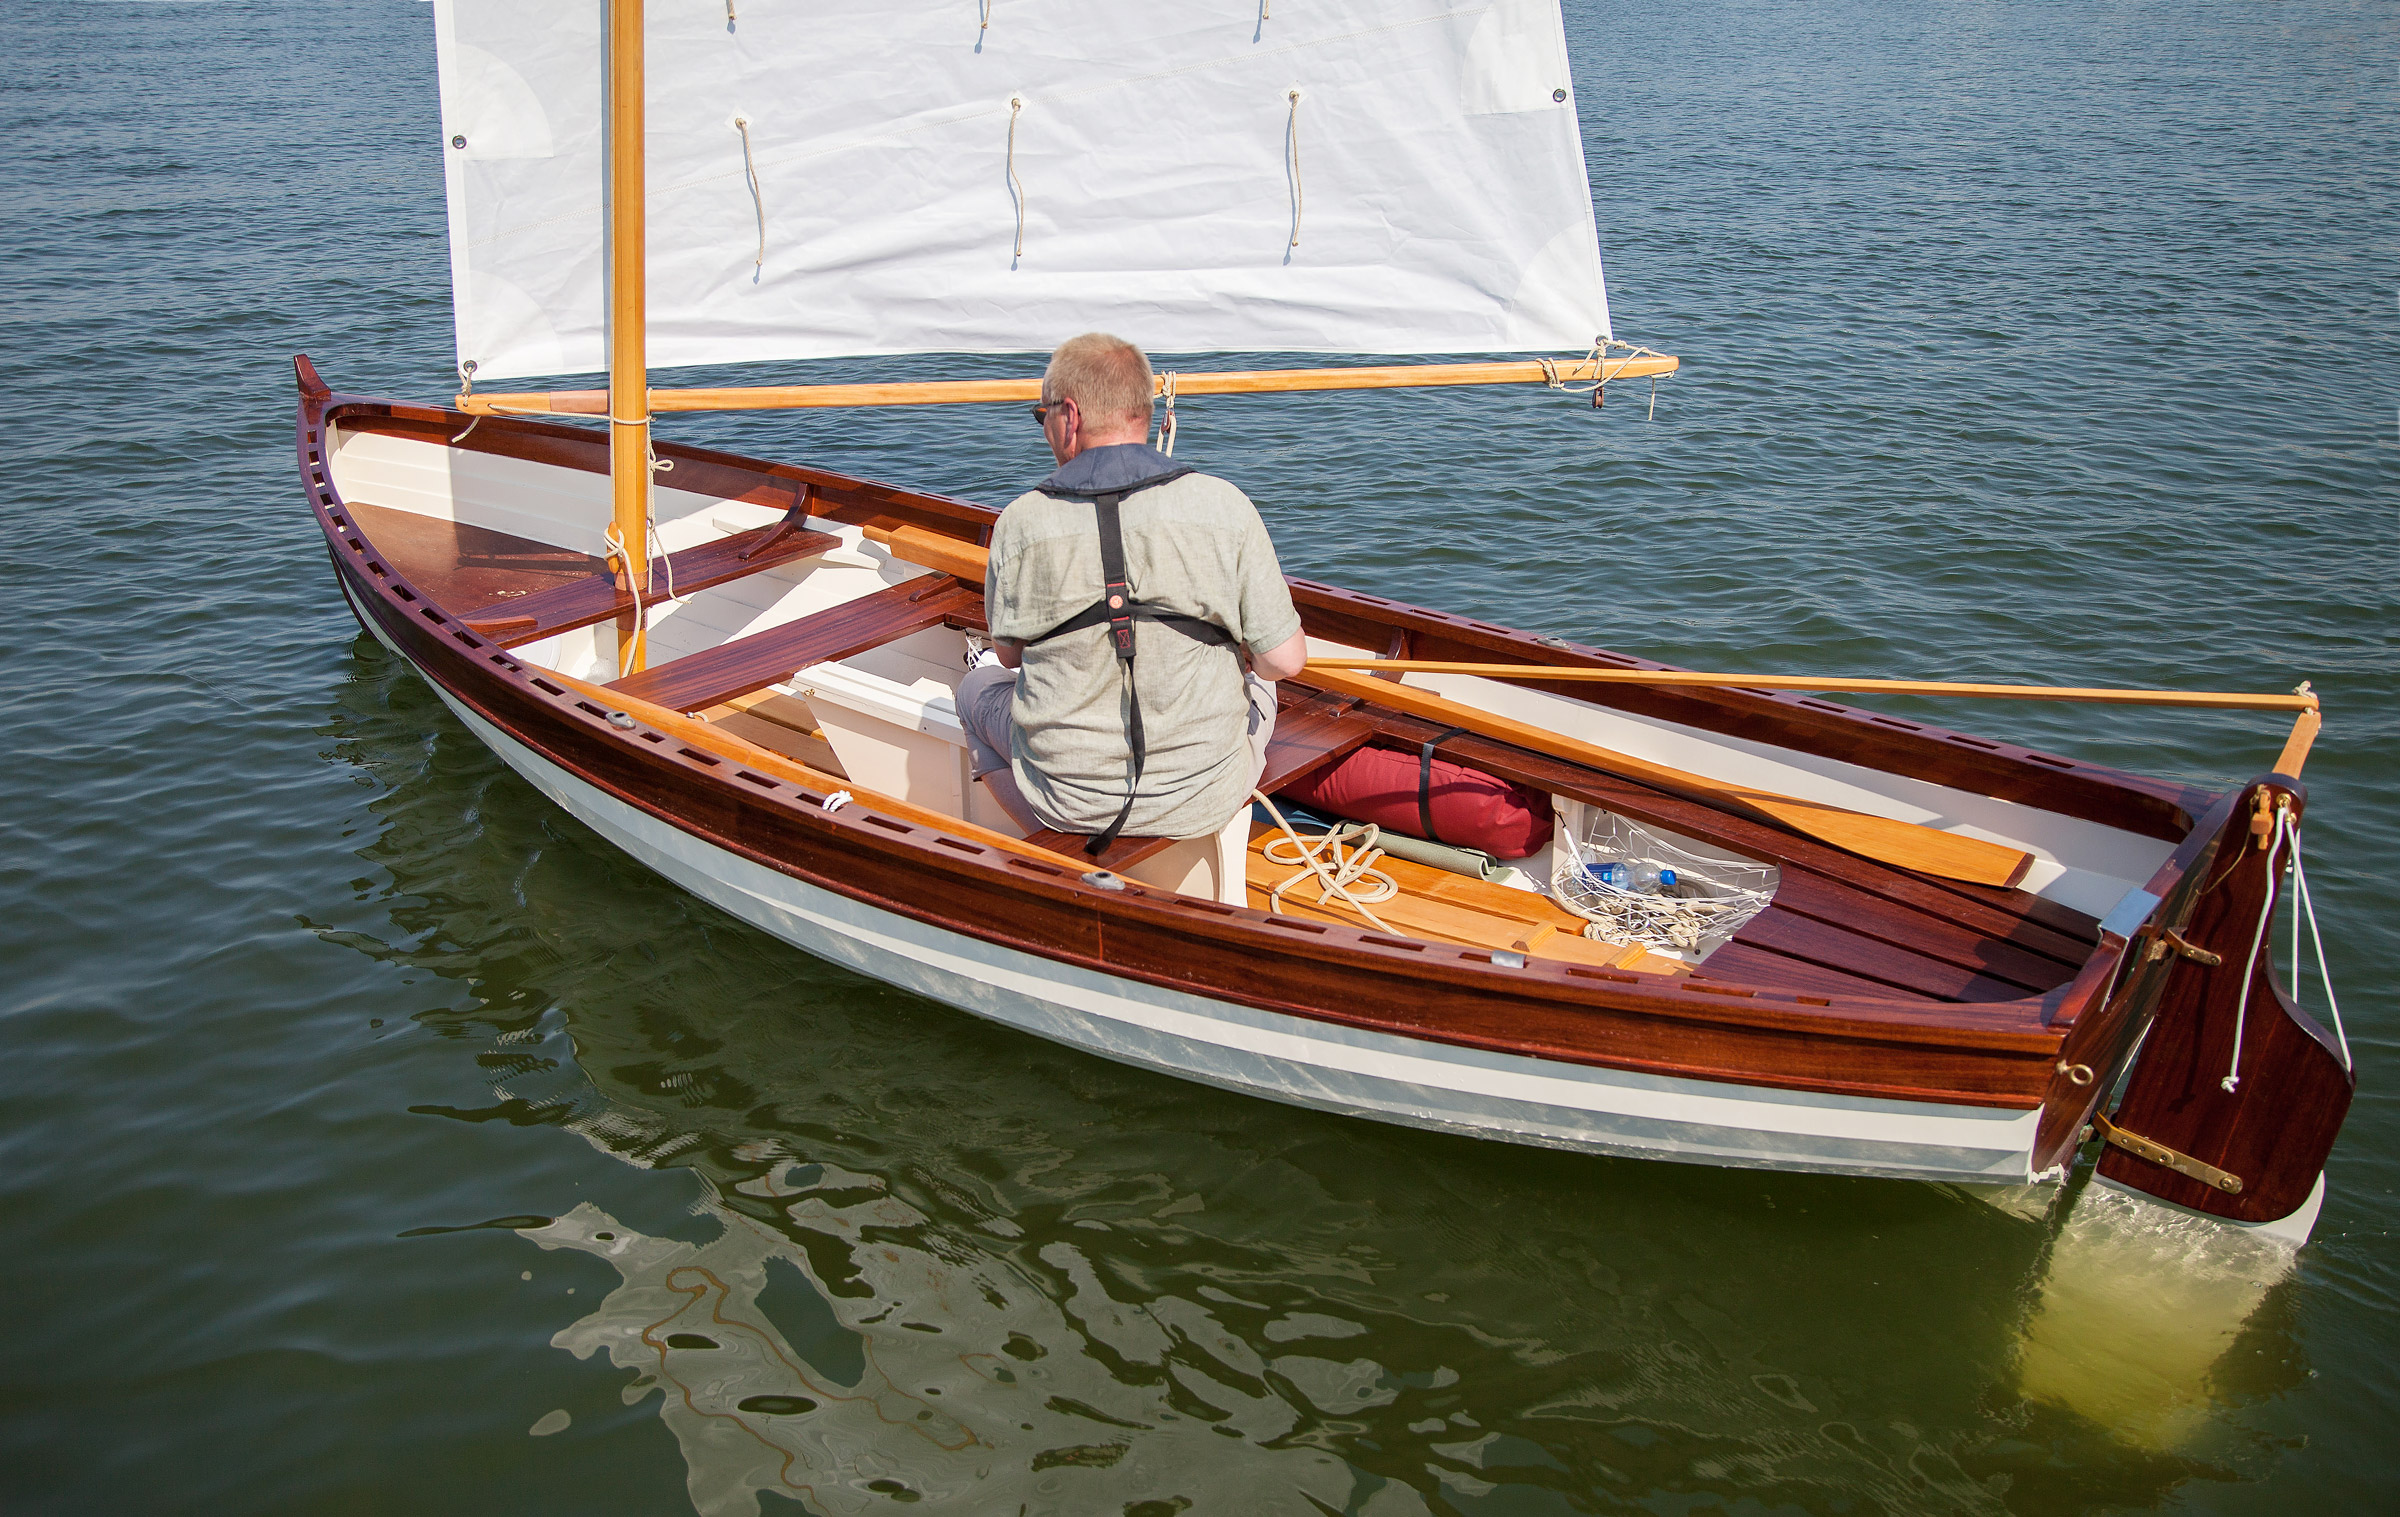
The Ellen 12 daysailer is a people magnet. At the ramps, people seem to come out of nowhere wanting to talk about it; in traffic they drive alongside and give a thumbs-up. Even out on the water, other boaters a quarter mile away will sail over just to take a closer look.
It is easy to see why. Designed by John Brooks in 1996, the Ellen sports classic lapstrake lines, a shapely transom, and a traditional spritsail rig. But the boat’s beauty is more than skin deep: it is a tidy performer that provides a confidence-inspiring, easily managed platform for joyful daysailing.
The Ellen is an attractive delight and seemingly the perfect small boat in many ways. Many amateur builders would jump right in if it weren’t for that one obstacle: lapstrake construction. It simply looks difficult, the kind of thing that separates the boatbuilder from the weekend carpenter. How does one gain the confidence to try it, particularly if one is learning the technique from a magazine article or book?
The plans for the Ellen from Brooks Boat Designs are on 12 sheets and include full-sized patterns for the molds, transom, rudder, and other parts. No lofting is required. The plans also cover the building jig that helps to simplify the epoxy-glued lapstrake construction. The book, How to Build Glued Lapstrake Wooden Boats, by John and his wife Ruth Ann Hill, is a 281-page compendium of information, referencing the complete construction of the Ellen in many examples. Detail is both the book’s greatest attribute and somewhat its obstacle. A reader can be daunted by the sheer level of detail and think the build is far too complex and will take too much time. That is really not the case. The authors simply care deeply about doing a high-quality job and showing you excellent techniques to get it right the first time. There is a lot to be learned from the book, but take it in doses. WoodenBoat magazine serialized the construction of the Ellen in issue Nos. 156, 157, and 158. Written by John and Ruth, the articles clearly present the proper construction sequence and contain some extremely helpful techniques.
Ed Neal
This model of the Ellen, built by the author, helped him become familiar with the construction processes before going to work at full-scale with expensive materials. The model includes three pairs of oarlock pads that are indicated by the plans.
To get comfortable with the process, I built a 24″ model of the Ellen using the construction drawing in the plans and following the magazine text. It was an excellent way for me to fully understand how the boat goes together and to learn skills such as how to spile a plank.
The Ellen is constructed from 6mm (1/4″) marine plywood planks. Okoume, meranti, or sapele BS 1088 plywood are all good choices. In both the articles and book, John details using a batten-guided circular saw for cutting out beautifully fair planks. The hull takes shape over a ladder frame that supports the stem, transom, and five molds. The forward three molds are mounted in a way that allows easy underside access to the lap joints for cleaning up epoxy squeezed from the laps before it cures. The plank laps are closed for gluing using a novel lap-clamping technique developed by the designer. Battens and drywall screws squeeze the laps tight, eliminating the need for mechanical clamps of any kind. Four pairs of sawn white-oak half frames set square to the planking add reinforcement to make a strong yet lightweight hull while being easier to fit than beveled frames set square to the centerline.
The plans present options for outfitting the interior depending on personal preference and intended use. The boat can be configured with a transom thwart and added sternsheets—“helm wings”—for sailing. It can be built with up to three thwarts to enable various seating arrangements for solo or tandem rowing. The thwarts can be made to be removable to open up space as needed for gear or sailing comfort.
Brian Hart
While the plans are drawn with three rowing stations, the author opted to install just two and made the aft station’s thwart removable to open up the cockpit for sailing.
Since I would be sailing the boat with an occasional passenger and needed to row it off the beach, I opted for a transom seat and one thwart, the forward thwart reinforcing the top of the daggerboard case to be my rowing position. I added an additional set of oarlocks and built a second thwart I could quickly install for tandem rowing. This configuration provided an open, uncluttered arrangement.
Rowing off the beach meant stowing the 3′-long daggerboard and the fixed-blade rudder until reaching deeper water. When ready, the daggerboard slots easily into the case and holds itself well in the down position. The tiller fits snugly atop the rudderstock assisted by a pin, and the unit can be easily dropped onto the gudgeons without fighting the blade’s buoyancy.
The complete boat with rig comes in at around 135 lbs. I built the boat in two-hour increments, typically 8:30 to 10:30 p.m., often three nights a week, and logged 531 hours of construction time over 18 months. Being very light and matched to a lightweight aluminum trailer, the Ellen can be disconnected from the towing vehicle and hand-maneuvered to a launch site. Once at the water’s edge, one strong adult can lift and pivot the stern off the trailer and then lift the bow to get it onto the ground or into the water. This flexibility opens up many more launch site possibilities since no boat ramp is required.
Rigging takes five to ten minutes, longer if you have to attend to someone who has fallen prey to the Ellen’s magnetic charm and come up to talk. There are no mast stays. Simply insert the mast through the partner, mount the sprit, rig the sheet, brail up the sail, stow the daggerboard and rudder, ready the oars, and you are good to shove off.
The boat rows easily out to deeper water where the daggerboard is dropped and the rudder mounted. The brail line which binds the sail and sprit to the mast is released, and with the 60.5-sq-ft spritsail set and drawing, the Ellen quickly responds and comes up to speed. The rounded bilges provide reassuringly smooth stability and the fine entry parts the water for a comfortable, easy ride through chop. In gusts the Ellen easily communicates her changing positions without lurching and warns early of being blown overblown. Sitting on a cushion on the floorboards, one can easily see what is happening on the leeward side of the sail. There is no boom to clunk your head.
Rowing solo from the thwart at the daggerboard case puts the bow down and lifts the stern. With the skeg only skimming the water, the boat skews about a bit. With the addition of a passenger or ballast in the stern, the boat trims out and tracks well. My main interest in the Ellen is as a sailboat, and the unobstructed interior provided by the single daggerboard case rowing thwart makes it much easier for me to move about under sail. It is a trade-off with tracking ability I willingly take.
Brian Hart
The Ellen performs well under oars, but for those who require a motor, the stern is designed to support the weight of a small outboard and its operator.
With the fixed-blade rudder, sailing onto a beach is a bit sketchy but thrilling. One has to mentally calculate decreasing water depth and distance to the beach and quickly pull the rudder out of the gudgeons at the last instant for the final uncontrolled coasting onto the sand. On a brisk day, brailing the sail, pulling the rudder, and rowing in under control is the better option. The Brooks/Hill book has a drawing and instructions for making a rudder with a pivoting blade.
Windward performance with the spritsail rig is decent. This is a boat designed for leisure sailing, not racing. Because the Ellen is so light, you need to keep a vigilant eye on wind and weather conditions. If winds are in the upper teens, the Ellen will be overpowered and have difficulty making progress to windward or crossing the wind. You will have to frequently spill wind by easing the sheet to stay upright. If you are adventurous and a bit daring, you might devise a method to reef the sail while keeping the sprit in position to hold the peak aloft. It is something you will definitely want to practice first in light winds.
Brian Hart
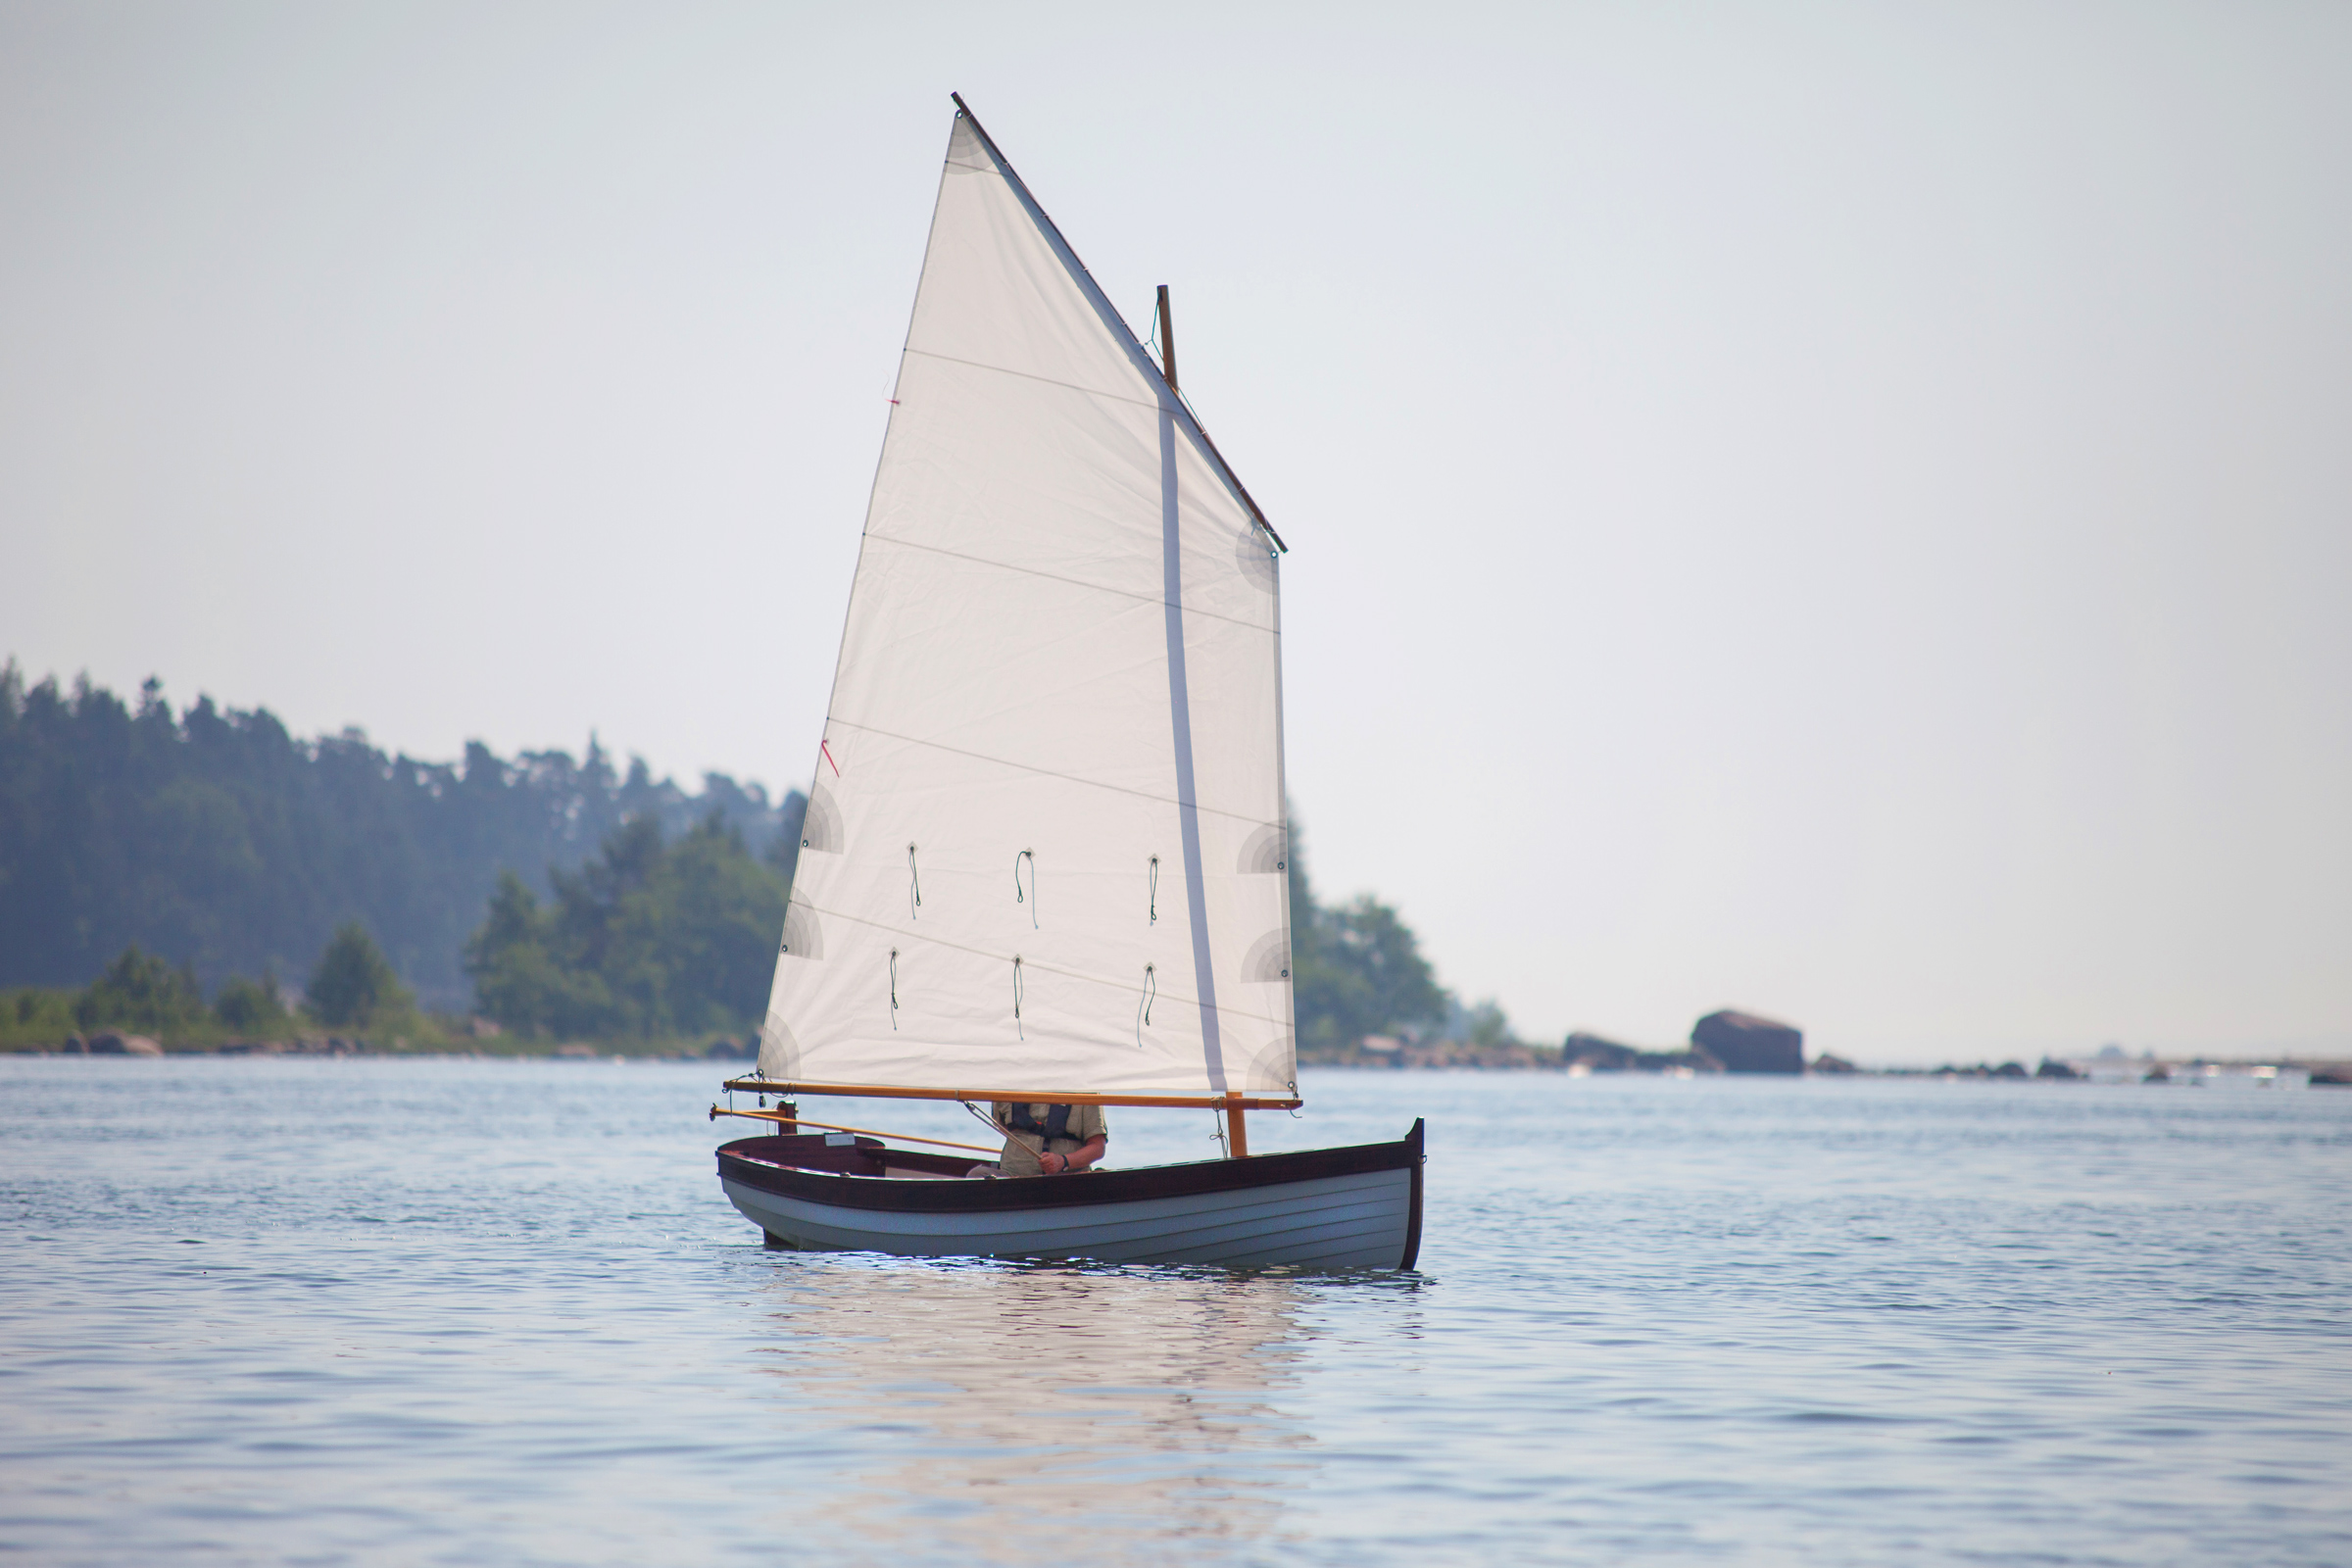
The sprit rig, seen here, is designed with a single horizontal reef. The optional sliding gunter rig has a vertical reef, which can be employed without dropping the sail. Note the brail here crossing the sail from throat to leech.
Brian Hart
With the brail pulled home, the rig gathers neatly around the mast, clearing the cockpit for rowing when the wind fails.
Building my Ellen was the most satisfying thing I had ever done. Although it has been nearly 20 years since its launch, it continues to hold that record for building satisfaction. Like so many others, I continue to admire its good looks. A close friend seeing the boat for the first time said, “You know, in 50 years that boat will be in a men’s clothing store with dress shirts piled in it!” I can only hope.
Ed Neal of Cleveland, Ohio, started his interest in woodworking as an eleven-year-old Boy Scout, whittling neckerchief slides. Twenty something years ago he came back from a wilderness canoeing trip in Canada wishing to add an outrigger to the canoe for additional safety. He went to the downtown Cleveland Public Library looking for a book that might be helpful. There he fell down the boatbuilding hole and has yet to surface. He is now the executive director of the Cleveland Amateur Boatbuilding and Boating Society.
Ellen 12 Particulars
[table]
Length/12′
Waterline/10′ 8″
Beam/48″
Depth, keel to sheer/18″
Sail area
Gunter/62.5 sq ft
Sprit/60.5 sq ft
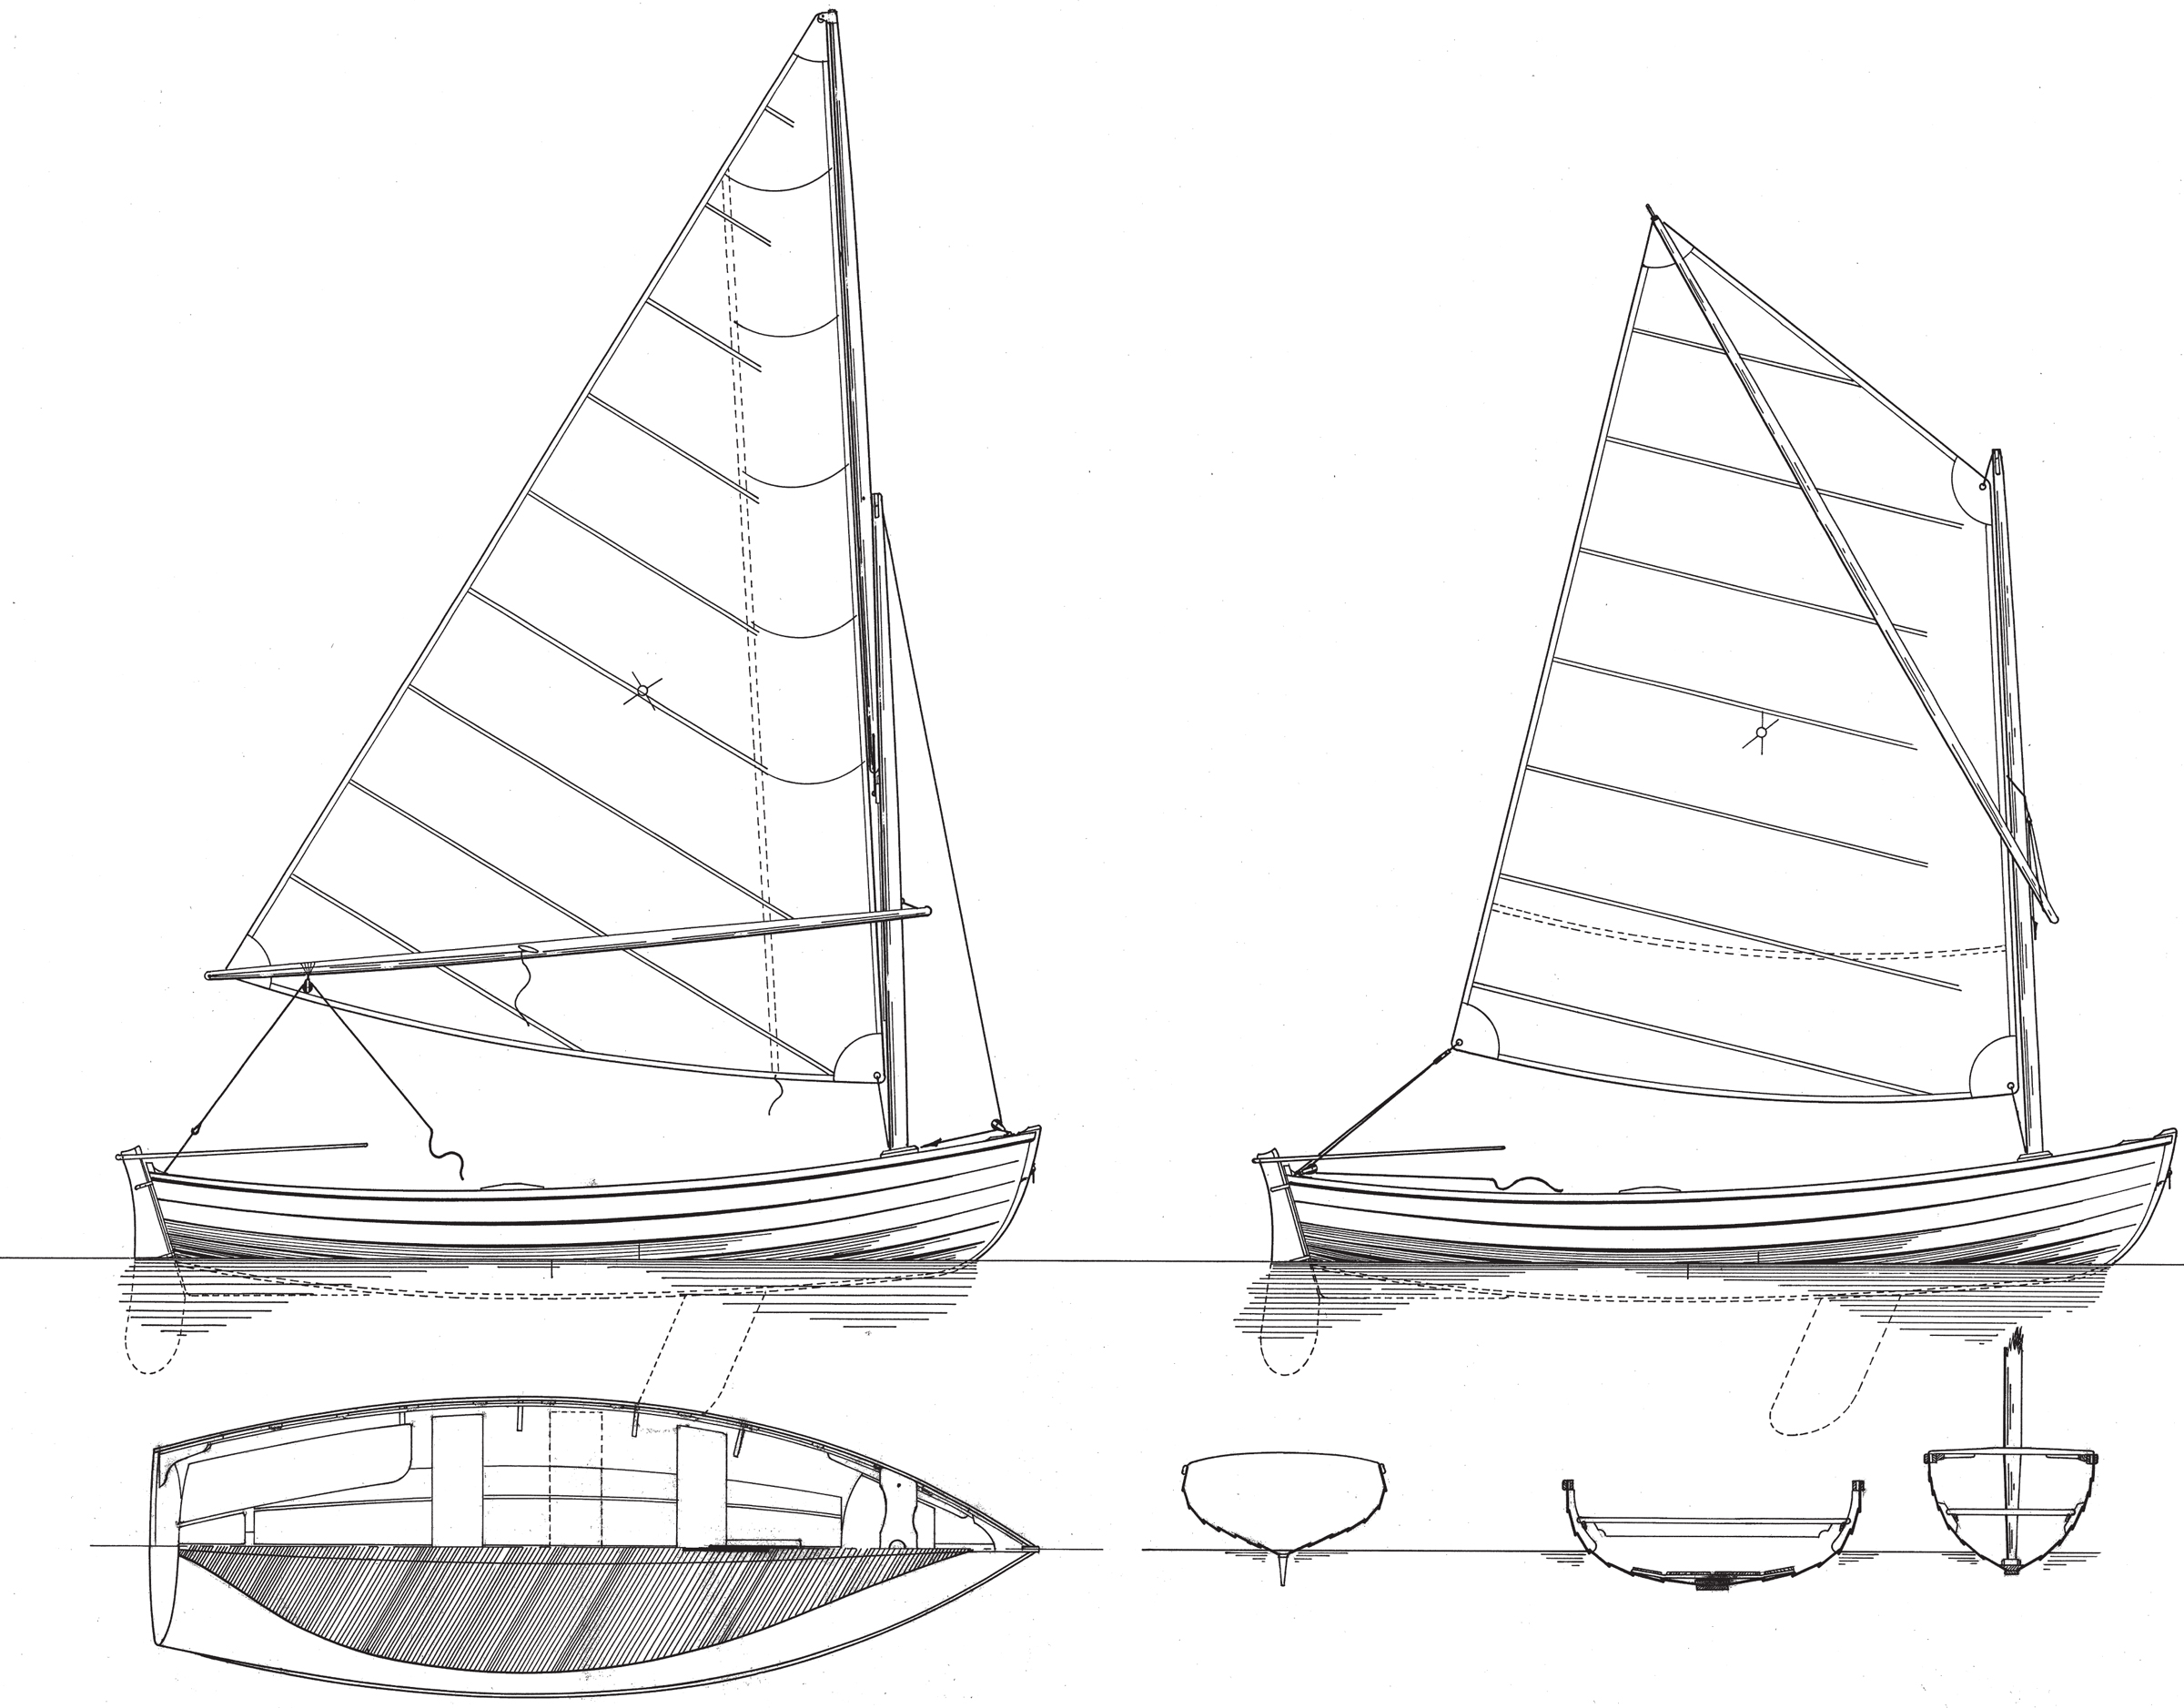
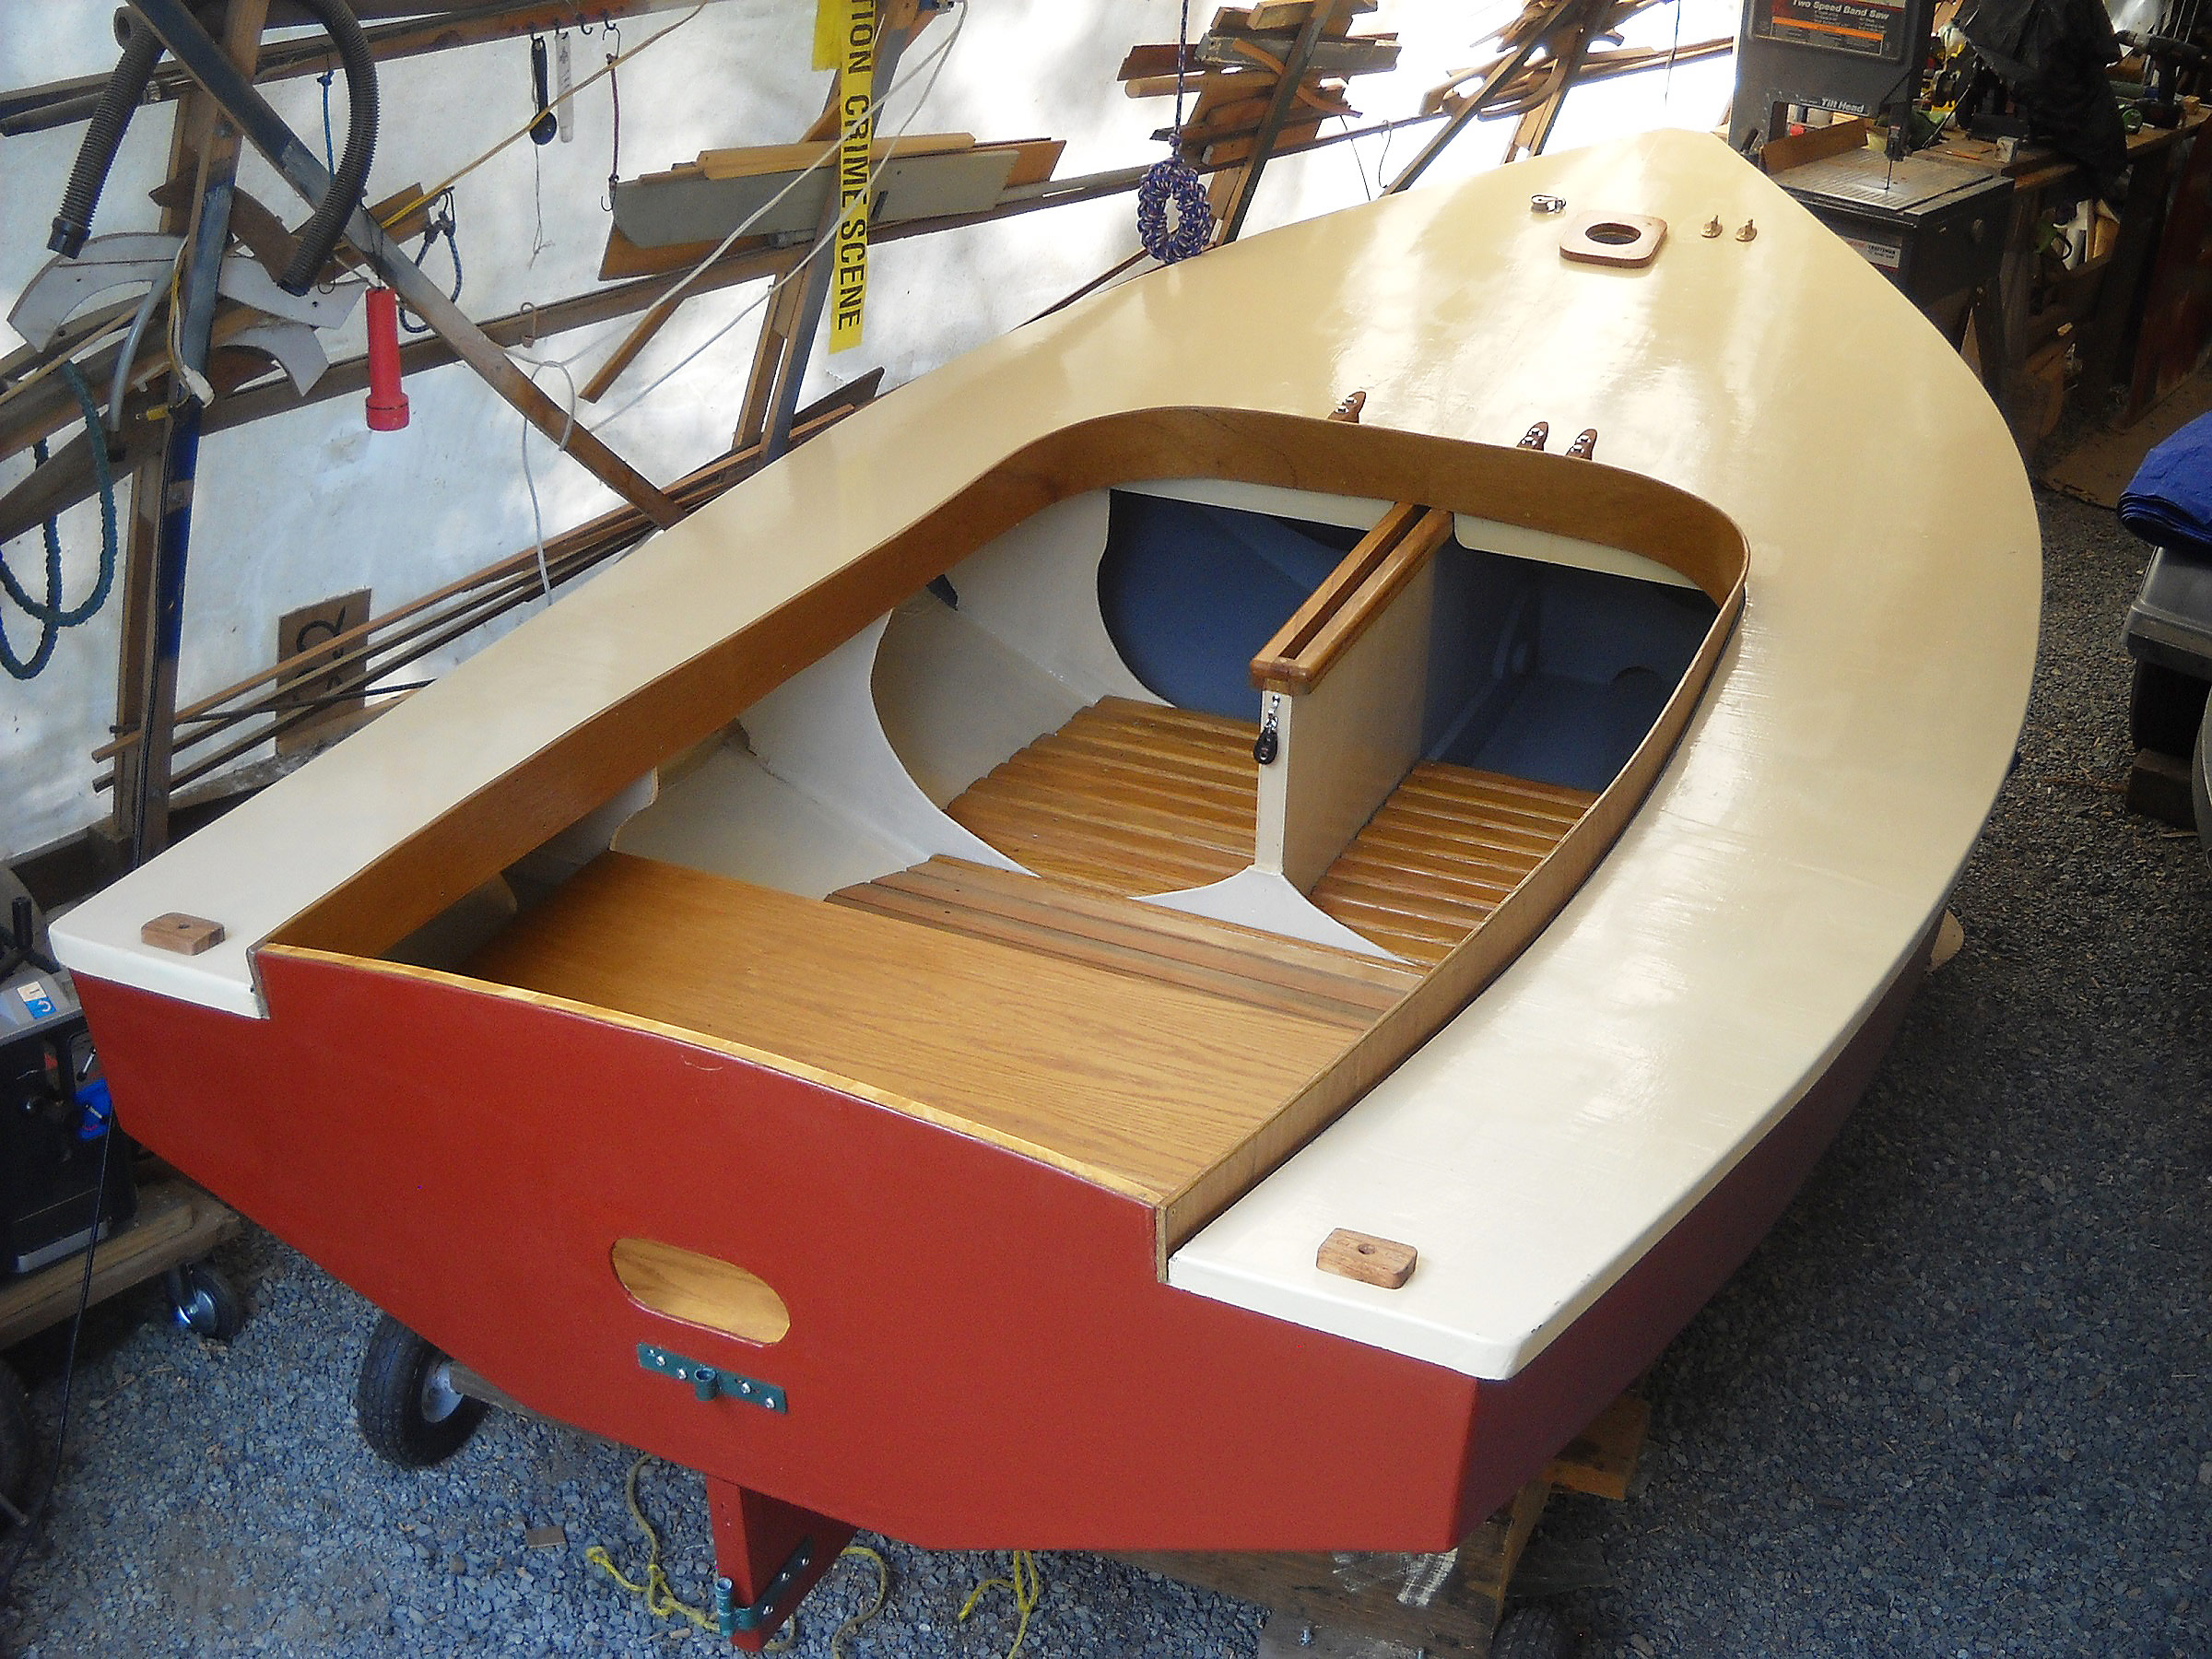
I built a Bolger Bobcat back in 1998 and, while I very much enjoyed building and sailing it, three years later I sold it as I turned my attention to another boat. I soon came to regret selling my catboat. This past winter, with space in the shop and no project to tide me over, I decided to build another one and purchased Harold “Dynamite” Payson’s Build the Instant Catboat. This 42-page building manual notes that the 12′ Bobcat was designed in 1985 by Philip Bolger for H.H. Payson and Co. as a hard-chined, tack-and-tape plywood adaptation of the carvel-planked Beetle Cat designed in 1921 by John Beetle of New Bedford, Massachusetts.
In his book, Payson lays out the project in great detail and with frequent humor. He includes multiple detailed drawings, photos, and step-by-step instructions, including rigging the sail and what type of line to use for the halyards.
The hull panels and permanent bulkheads are drawn out on sheets of 1/4″ plywood; all of the parts can be made with 10 sheets, including the deck panels, centerboard trunk, centerboard, and bulkheads. Payson recommends marine-grade or AC exterior plywood; I went with fir AC. The plywood I got was excellent quality, and I had no problems bending the panels into the shapes they needed to be. The manual provides measured drawings for the hull planking—there is no need for spiling the shapes from the building form—and goes into great detail on drawing and cutting out the pieces.
John Leyde
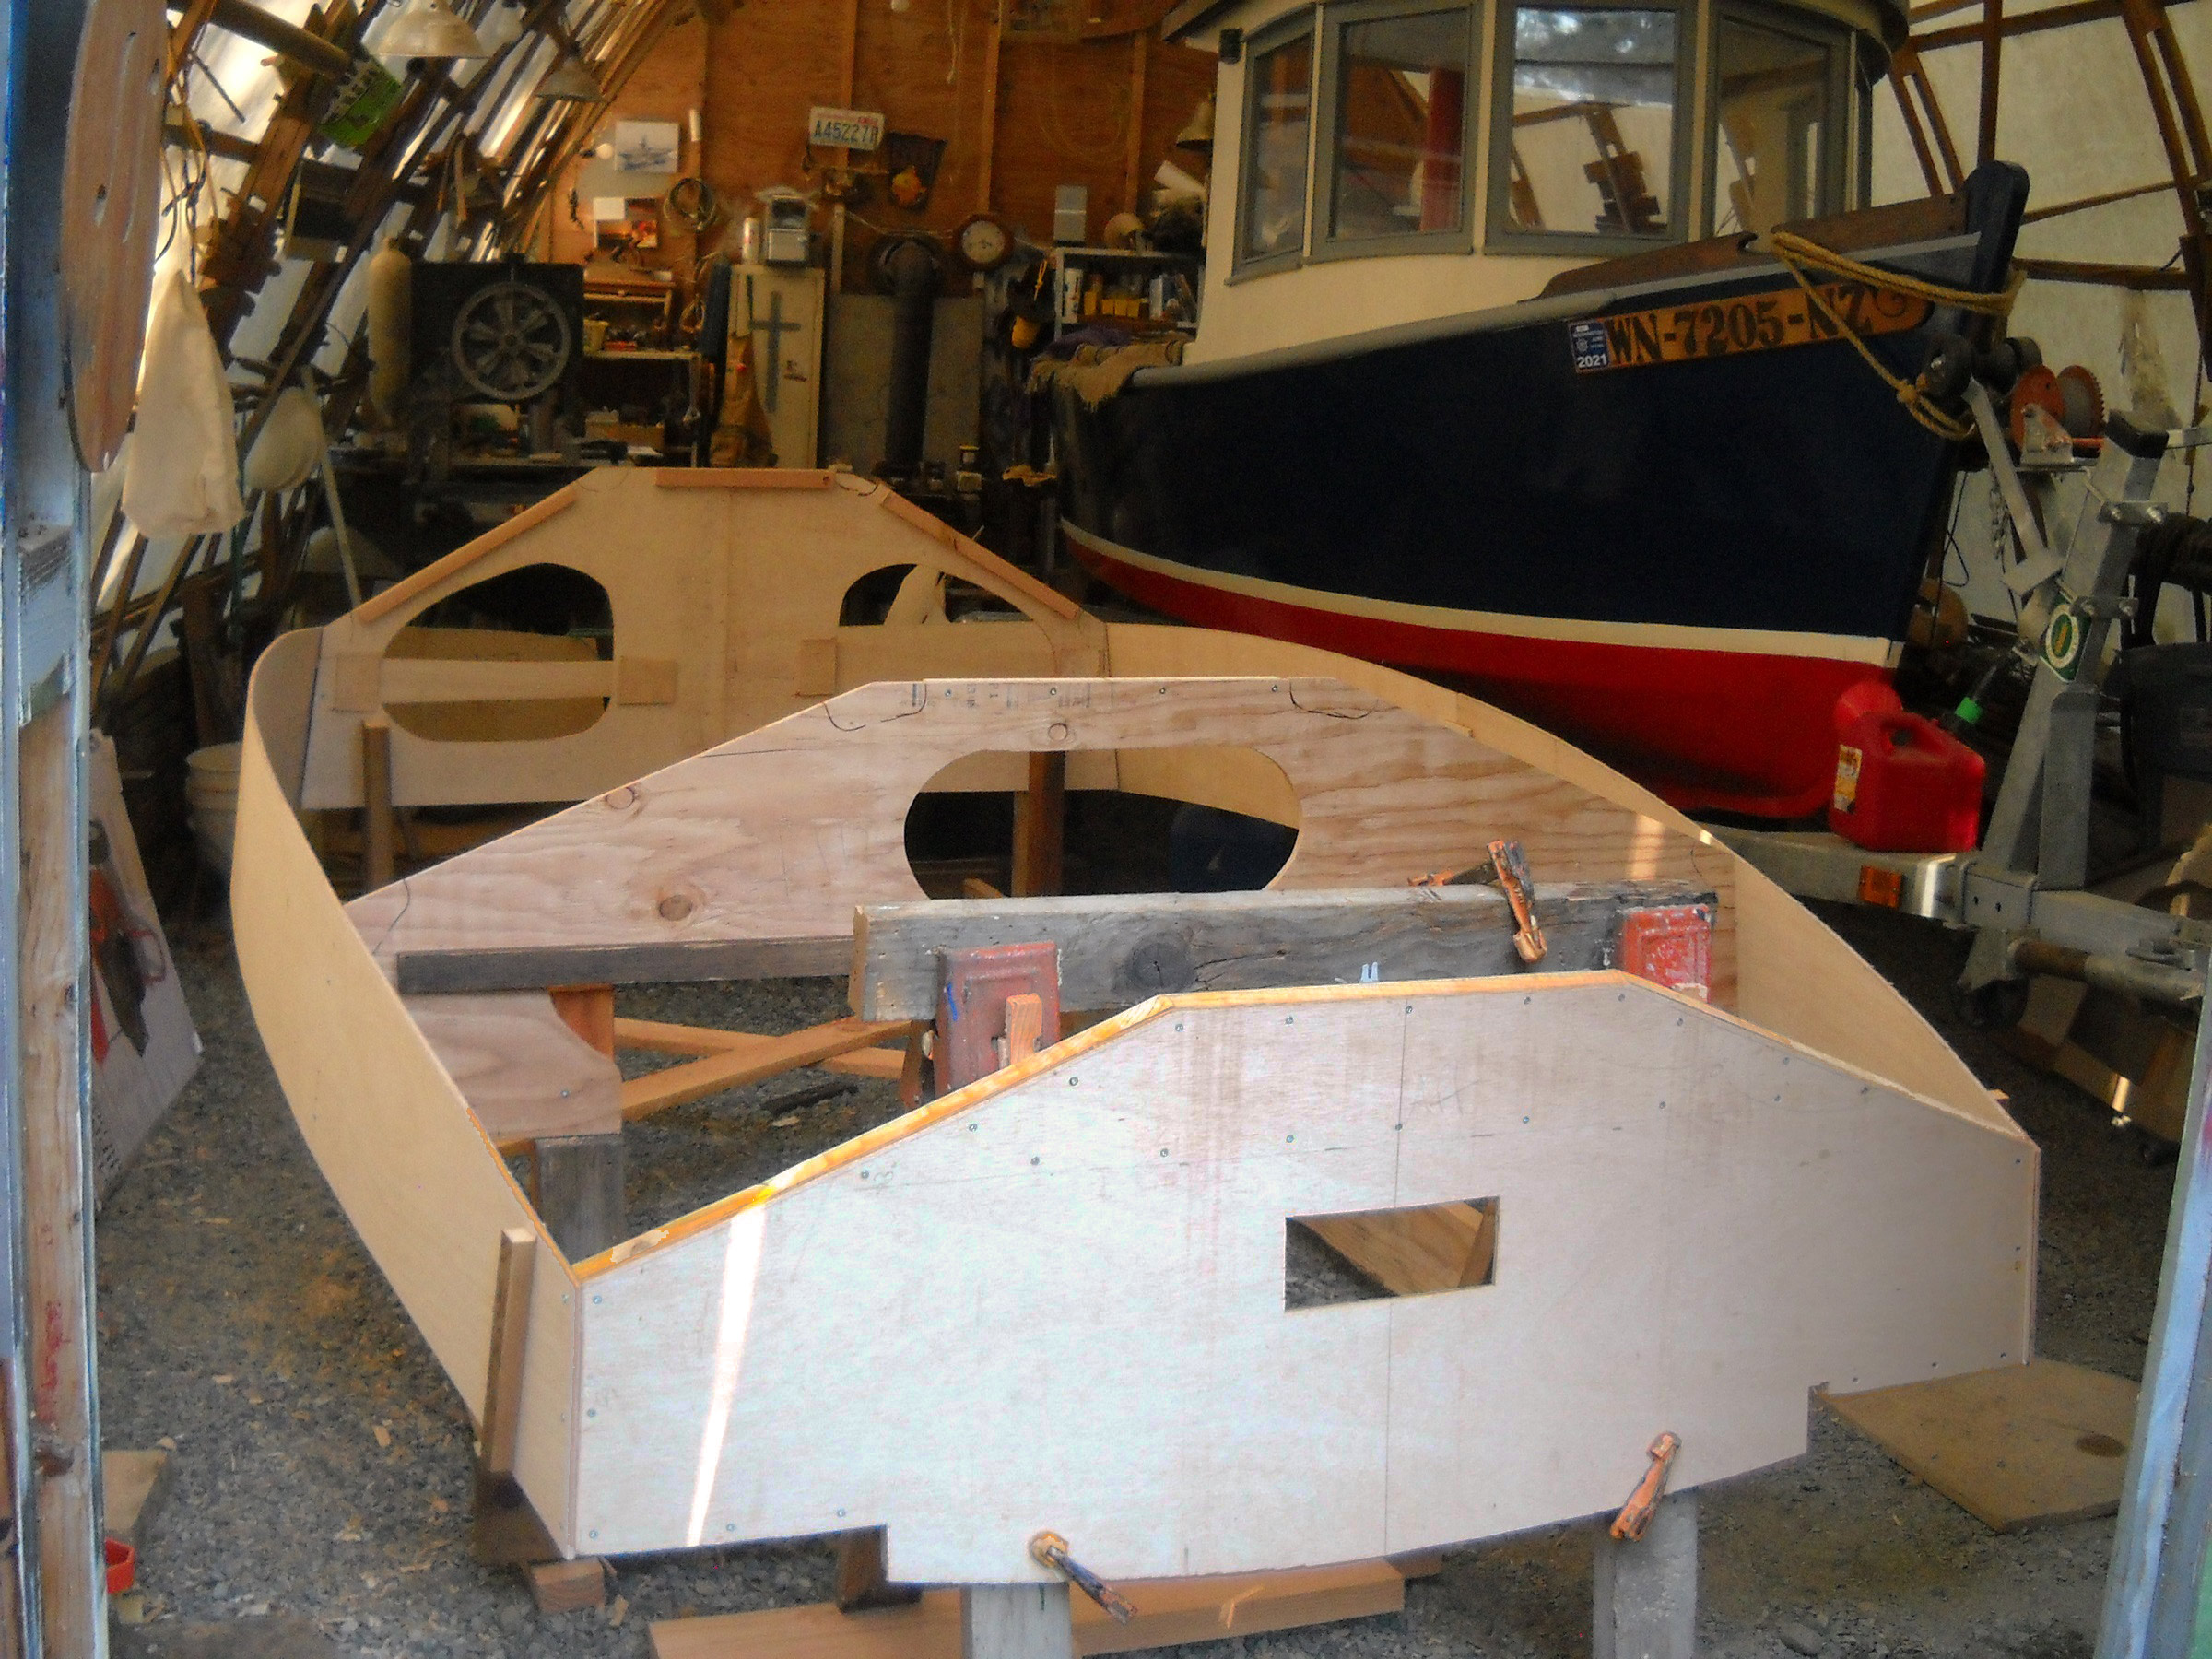
Assembly of the hull begins with the sides bent around the transom and two of the five bulkheads.
There are five bulkheads—designated A, B, C, D, and E from bow to stern—that serve as molds but are also permanent fixtures in the boat. Instead of setting all five up on a ladder frame, just bulkheads B and E and the transom are set up and around them the side panels bent by drawing their forward ends together. The rest of the bulkheads and the stem are then attached inside the side panels without requiring a ladder frame or strongback to support them. The bottom panel follows and is attached to the bulkheads.
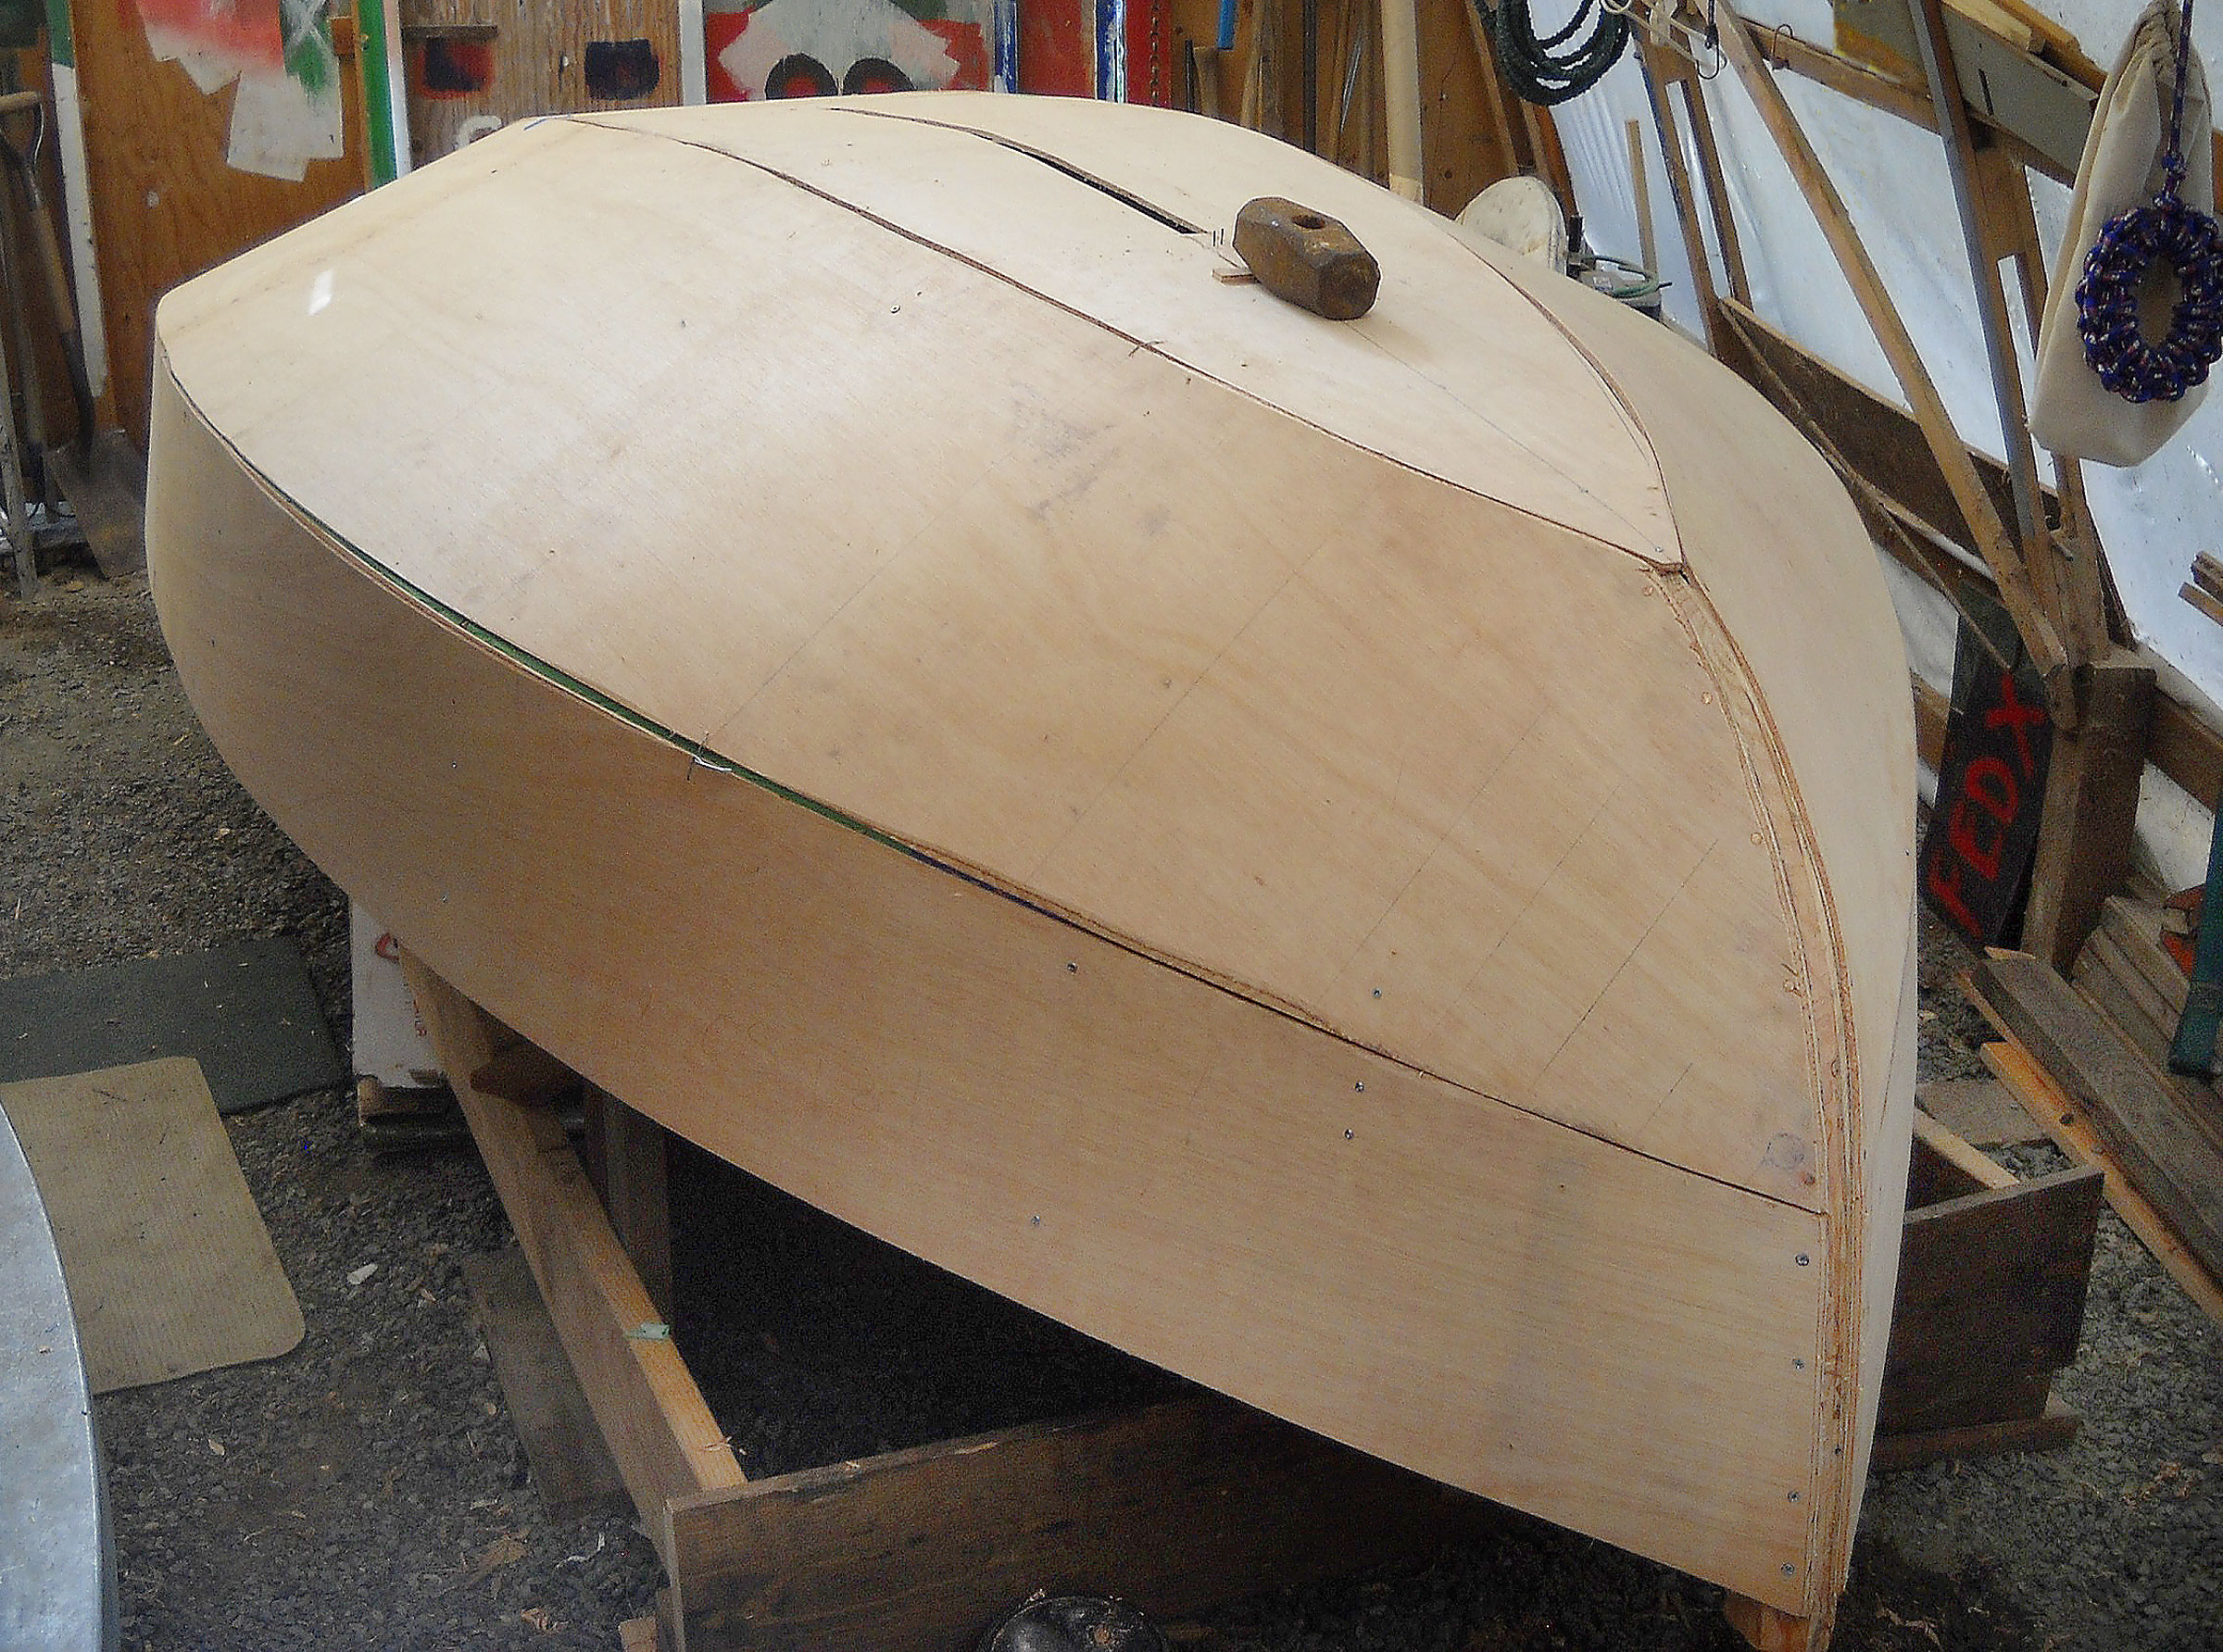
Attaching the bilge panels is the most difficult part of the hull construction due to their size, the compound curve at bulkhead A, and the twist to attach them to the stem. I applied towels soaked in hot water to the forward ends and was able to coax them into place without too much effort. Payson gives a good description and photos of the process and how he overcame the minor difficulty he had.
John Leyde
The forward ends on the bilge panels get “tortured” into a compound curve by gentle arcs on the edges of the forwardmost frame.
As the bottom and bilge panels are added, they are temporarily screwed to temporary cleats on the bulkheads, until the seams are secured with fiberglass tape and epoxy, first on the outside and then on the inside after the hull is turned over and the inside joints are taped. This completes the basic hull.
The solid stock the plans require for the rubrails, deckbeams, skeg, and floorboards is 1×2 or 1×4 lumber. I was able to repurpose a pine 2×10 and leftover lumber, resawn to the dimensions I needed. I laminated the tiller from two layers of maple.
Payson recommends flotation in the bow and under the decks aft. Before installing the deck, I fit 2″-thick insulation foam between the deckbeams and filled the section between the forward bulkhead and stem with it. The hull’s exterior and deck are covered in fiberglass set in epoxy.
John Leyde
Only the aft half of the centerboard trunk intrudes into the cockpit. The forward half is under the foredeck.
The plans call for a coaming made of 1/2″ plywood, installed in three sections joined with square corners. Bolger said of the coaming: “I haven’t duplicated the curved cockpit coaming of the Beetle Cat. I like the looks of it but it doesn’t seem to suit the style of the plywood boat as well, and there’s no functional advantage. It’s an economy in a shop with a steambox going all the time and a steady supply of fresh-cut oak coming in, but not so in a plywood-and-glue operation.” I thought that Bolger’s coaming looked too boxy, and laminated mine from three layers of 1/8″ mahogany plywood in one continuous piece with rounded corners. It was the only significant modification I made to the design.
The mast is 15′, the boom 13′6″, and the gaff 8′. The mast is built from two 3-1/2″ planks with 1/2″ spacers between them and tapers to 2-1/2″ the top 6′. The centers of the planks have a 1/2″-deep-by-1-1/2″-wide groove cut in them to make the mast hollow and save weight. I made several cuts with a circular saw and chiseled out the waste.
Norina Leyde
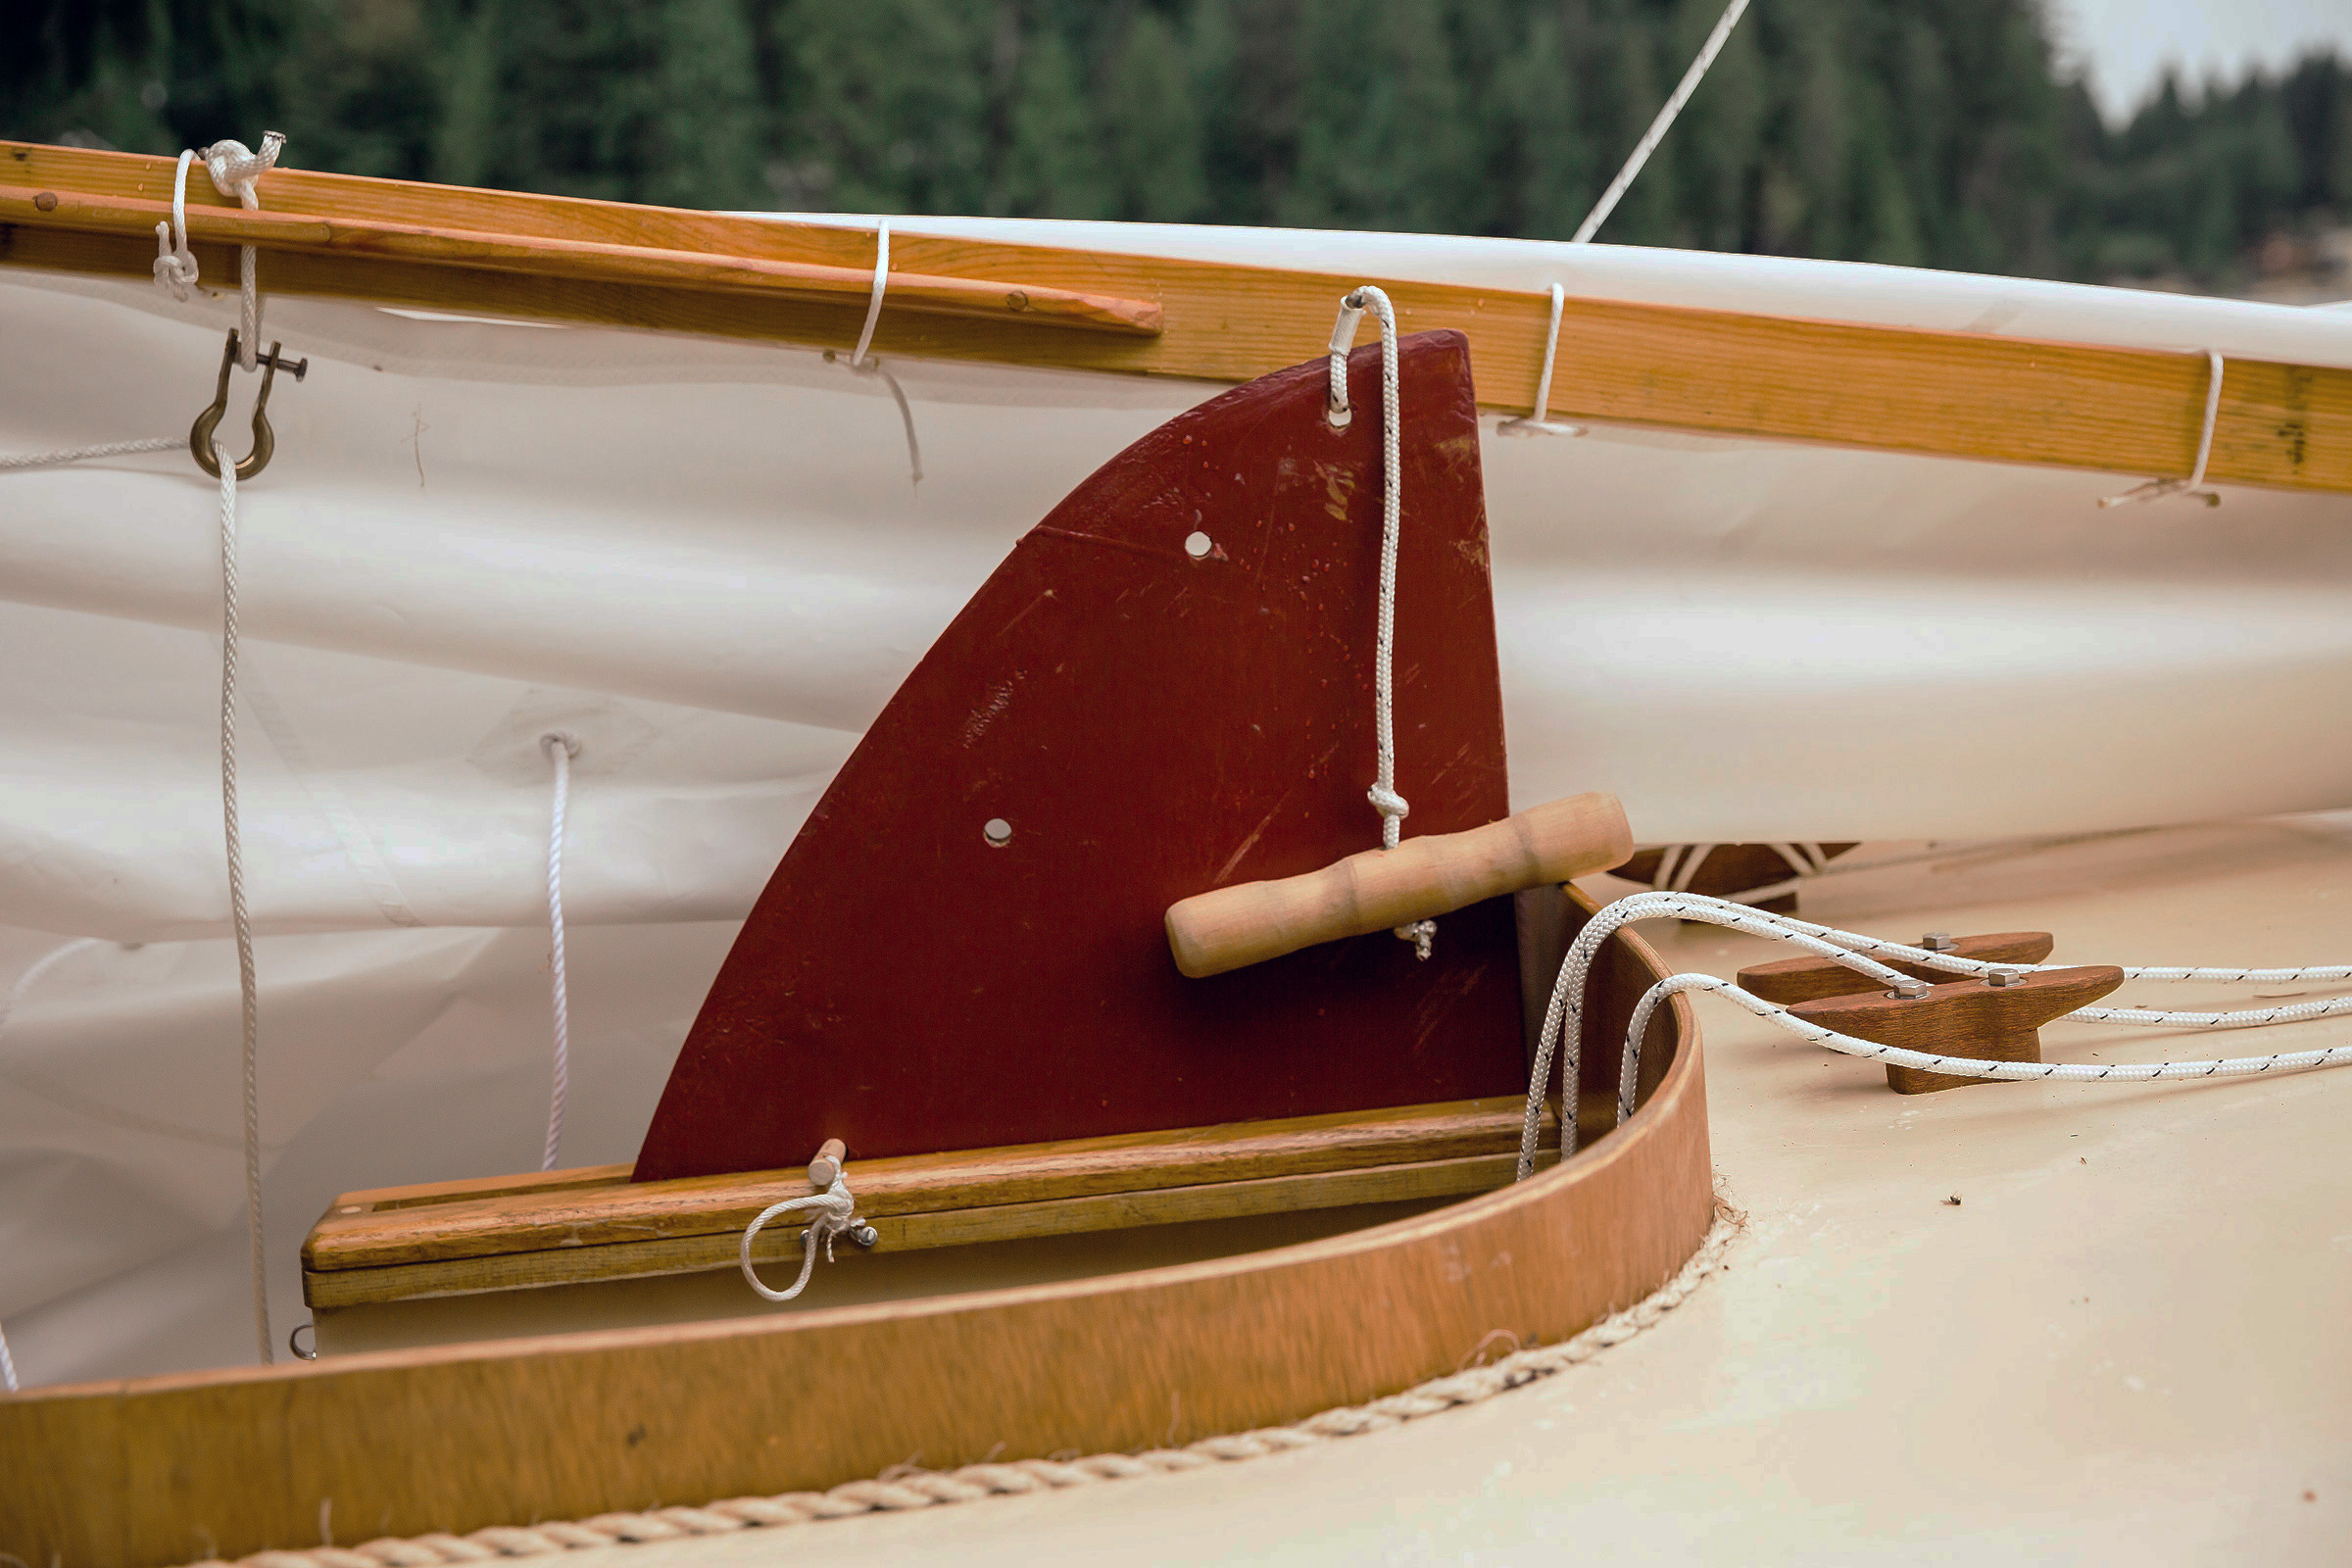
A lead weight in the centerboard pulls it down, and a peg in one of three holes holds it position for partial deployment. The toggle, on the end of an 8″ lanyard, is the final limiter. The curved coaming here is a departure from the square corners in the plans.
The Bobcat’s centerboard is made of three layers of 1/4″ plywood with a 6″ square cut out for weight—10.9 lbs of poured-in lead, according to the plans. In lieu of working with molten lead and its toxic fumes, I used lead shot, leftover from my reloading days, mixed with epoxy. The board, finished with a coat of epoxy, turned out well.
Norina Leyde
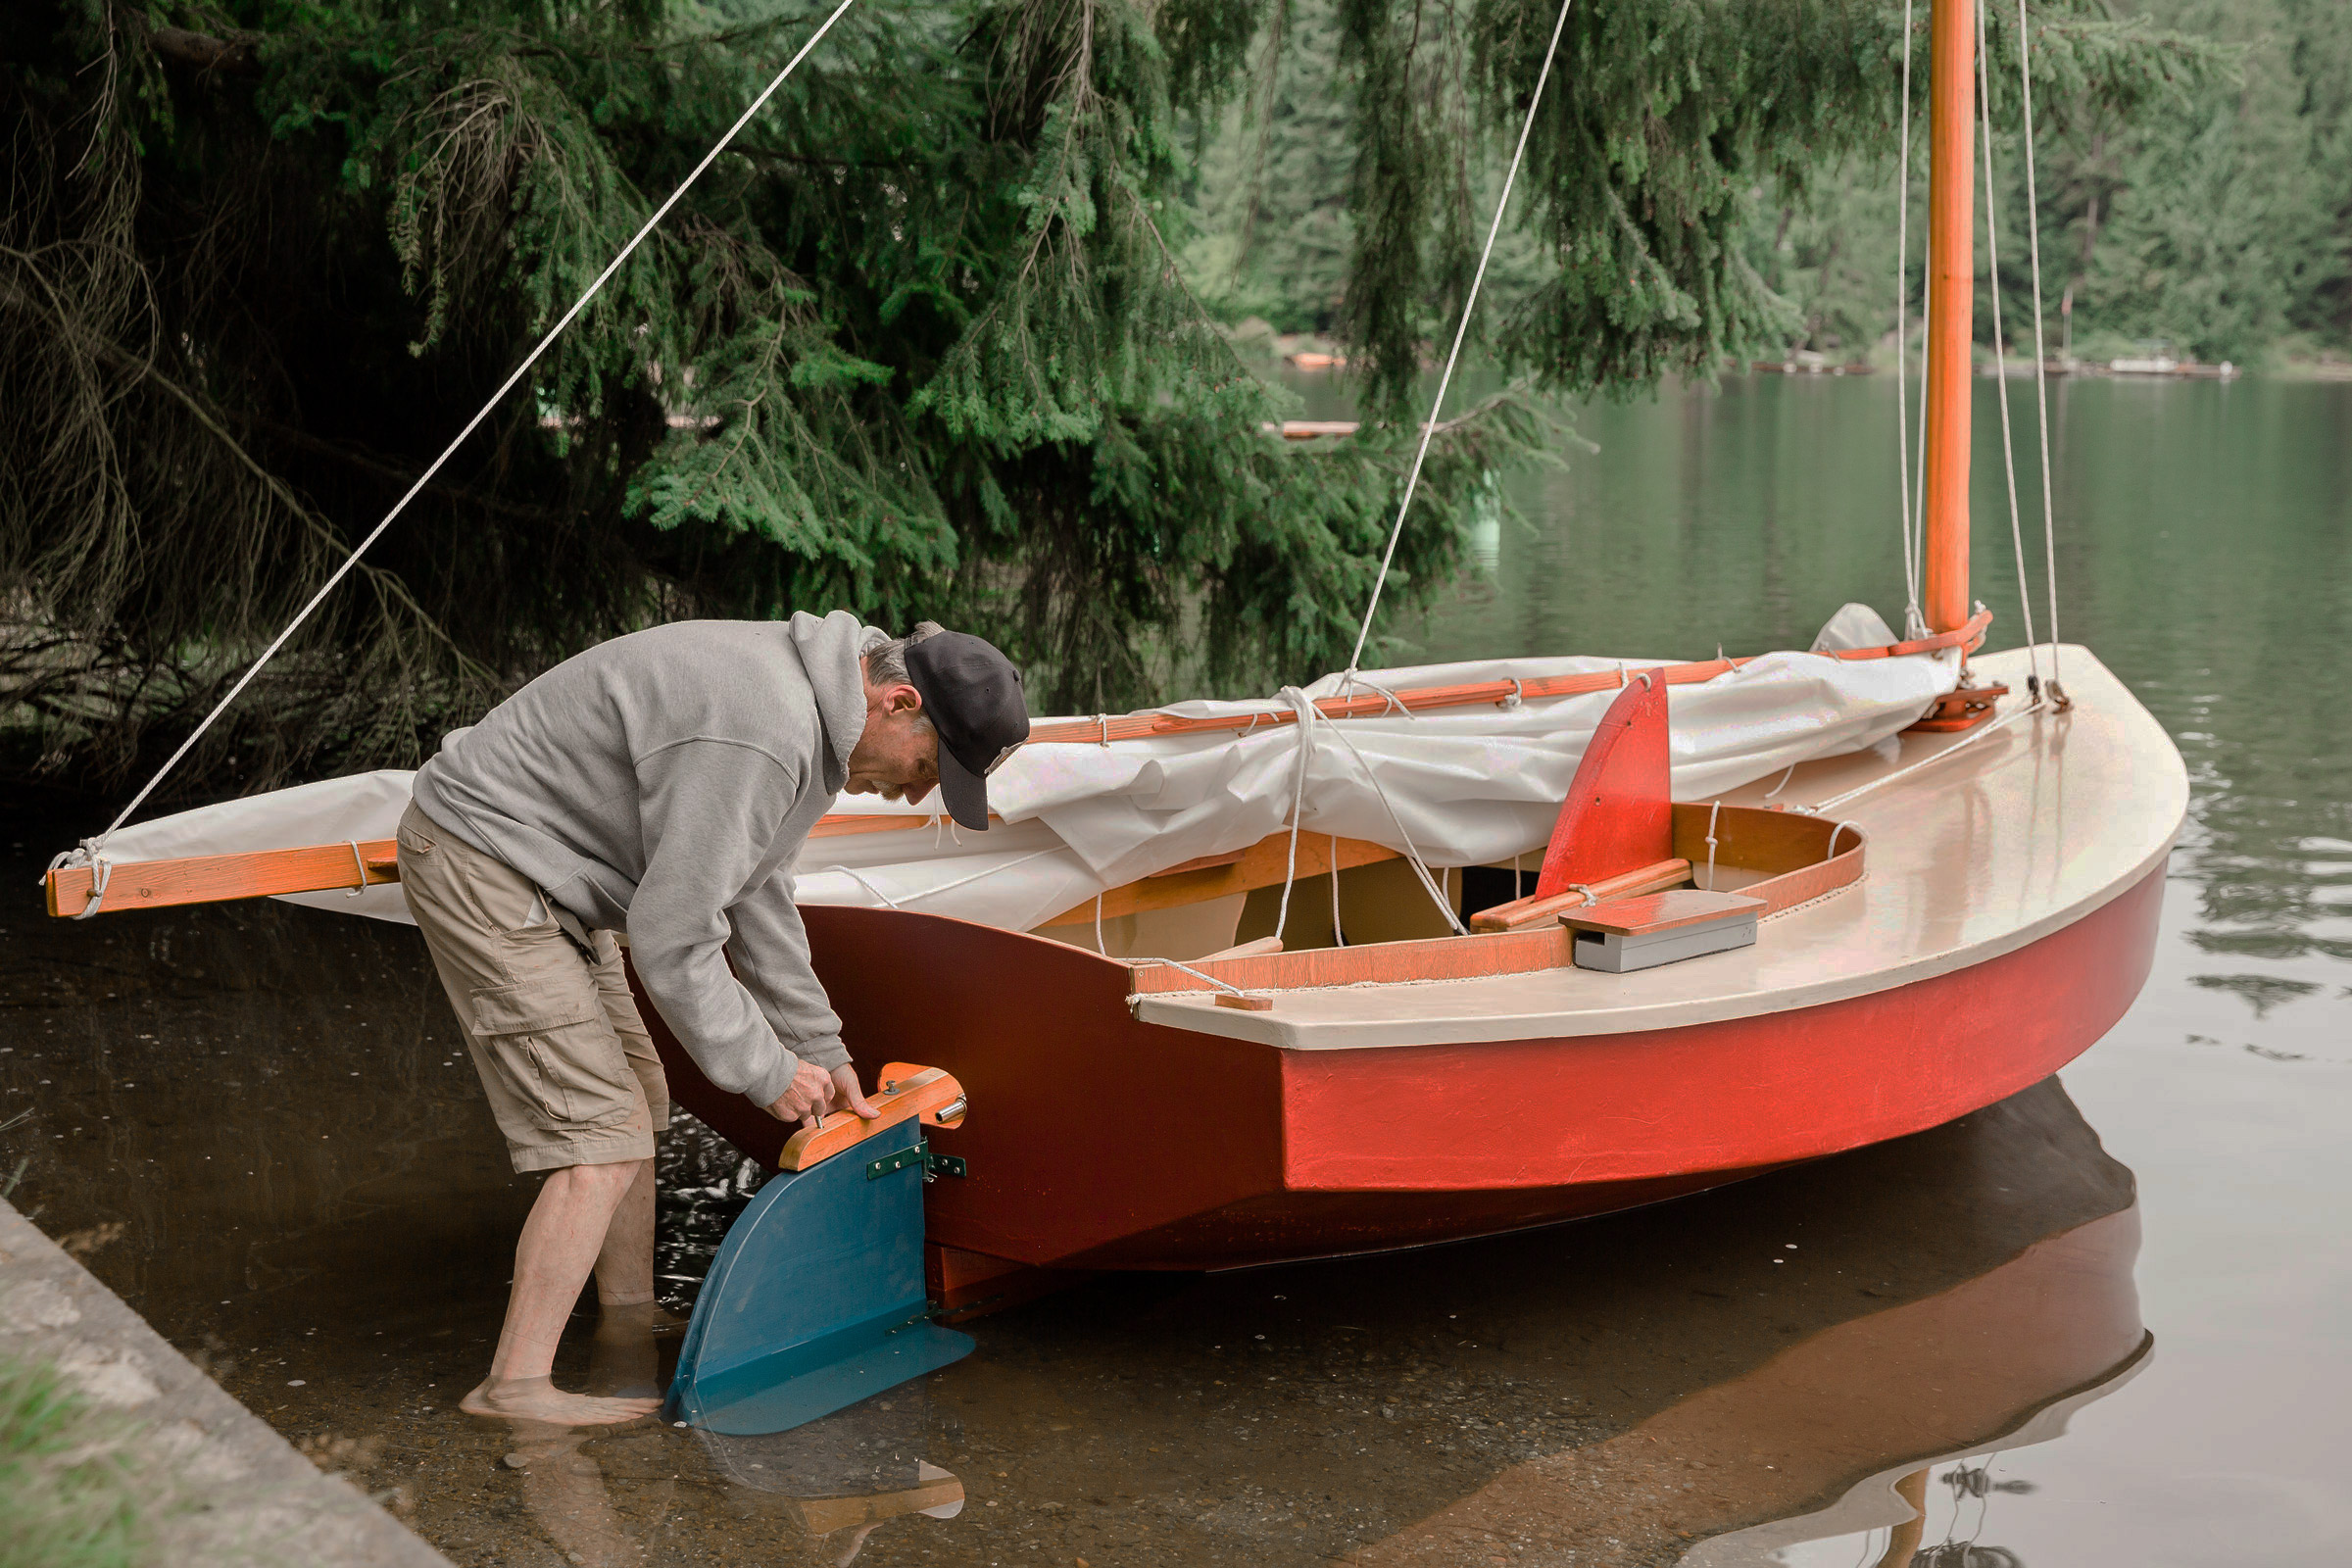
The barn-door rudder allows the cat to sail shallows and come ashore without being removed. Its horizontal bottom plate, seen here submerged, gives it a solid purchase when the boat is heeled.
The barn-door rudder is 24″ long, 16″ tall, and 1-1/2″ thick. I made mine of three layers of 1/2″ ply. Its bottom edge is even with that of the skeg and has a bottom plate that is 12″ wide and 23-1/2″ long. “Cats with shallow rudders,” wrote Bolger, “have a bad name for weathercocking against a hard-over rudder when they’re overpowered, but since I learned to put end plates across the bottoms of the rudders I haven’t had any complaints about this. It’s astonishing how shallow a rudder can be and still steer the boat, if the water is kept from rushing off the bottom of the blade.” Payson notes in his book that he hadn’t heard of this “horizontal foot” before seeing it in Bolger’s plans, but he was quick to approve of it: “I can vouch for its effectiveness on Bobcat, for her rudder holds right on when she heels over.” The plans call for a pair of brass or stainless straps on top of the rudder so the tiller can be quickly inserted through the transom and held to the rudder blade. Lacking a means to bend the metal neatly, I opted to bolt the tiller to the rudder.
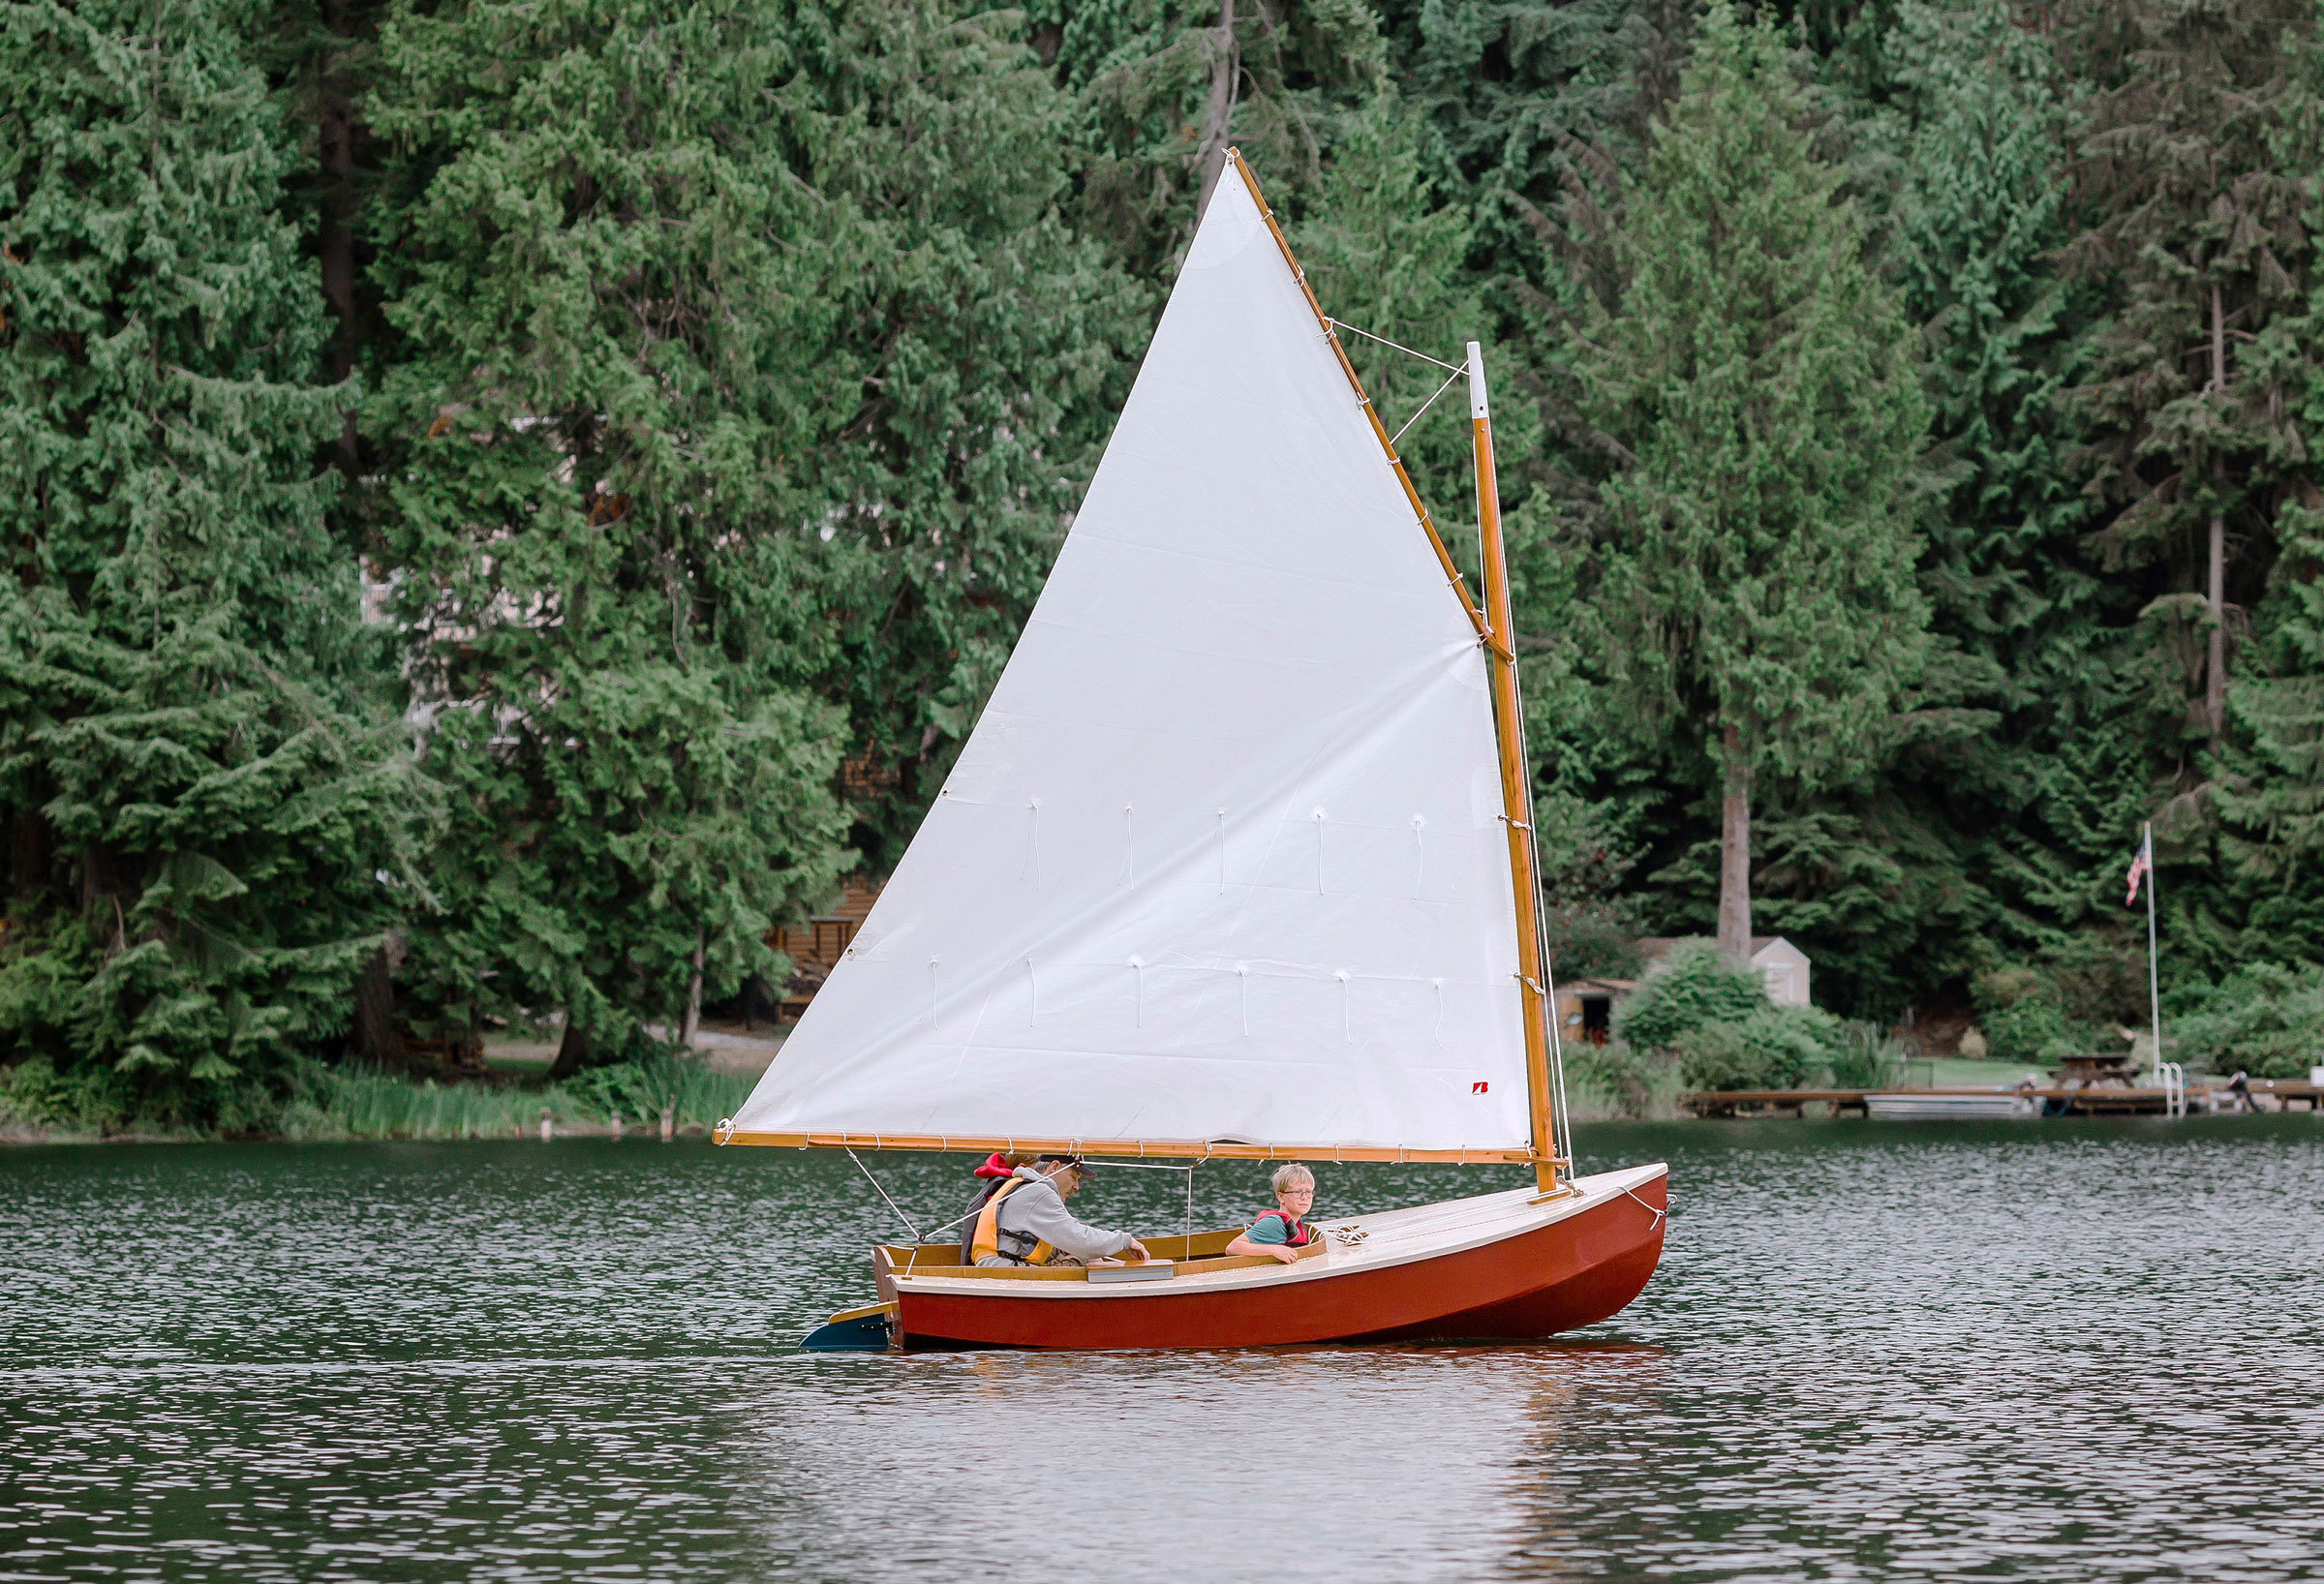
I have access to a lake a short walk from my home so I have not trailered this boat, but its light weight—I figure 250 lbs—shouldn’t be a problem for any automobile.
I can easily step the mast standing on the foredeck while the boat is afloat, and in about 20 minutes from start to finish I’ll have the boom, gaff, and halyards for the throat, peak, and topping lift in place. There is ample room in the cockpit for moving around, shifting weight, tending lines, etc. Standing to raise or lower the sail is no problem due to the stability provided by the wide beam.
The aft seat is large, but most of the time I sit on the floor or on the side deck. I built a pair of removable seats that slip over the coaming to make a more comfortable perch than the coaming’s edge. The low position of the boom blocks visibility to leeward, unless I’m sitting on the floorboards. There is a large area under the foredeck for storage with easy access.
Norina Leyde
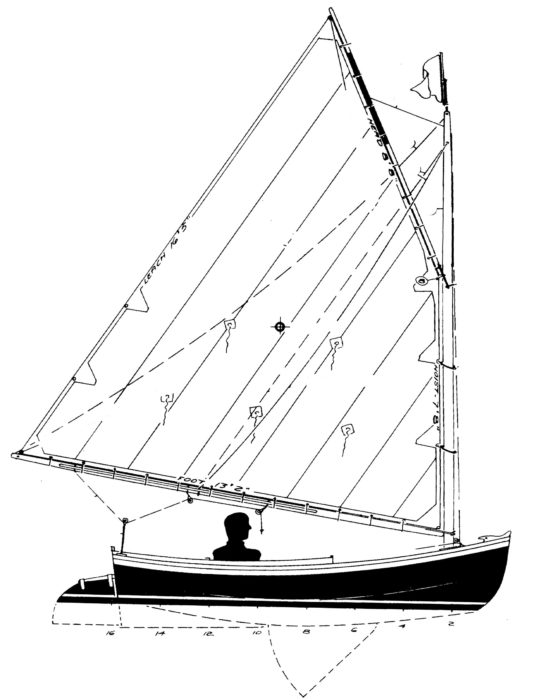
The Bobcat carries a 110 sq ft gaff sail. The two lines emerging from the masthead are the peak halyard and the topping lift.
I am very pleased with the Bobcat’s performance. For a 12-footer, it feels more like a big boat. The wide beam makes for a stable platform, and it is an excellent boat for a first-time sailor. It is surprisingly quick to windward. “A gaff sail like this can be cut as close-winded as a jib-headed sail,” according to Bolger. In my estimation, the catboat will tack as close as 30 degrees to windward. Coming about, it carries enough way to avoid getting caught in irons. It doesn’t seem to mind gusts; it just heels over only so far and stops, even when hit with a wind from a different direction, as happens in the lake I sail in. Typical of catboats, the Bobcat has a bit of weather helm which helps the cat round up in gusts. In a jibe, the gaff follows right along with the boom without any problem.
Accommodations for rowing—a seat and oarlocks—are not included in the plans, and rowing with a conveniently sized pair of oars is not possible due to the 6′ beam. I use a canoe paddle for auxiliary power; it is easy to store under the foredeck when sailing. I am considering integrating a small electric trolling motor alongside the skeg for auxiliary power. The boat’s light weight should make it easily driven.
I have a little over $2,000 invested in the boat, including the sail, which was the largest single expense and ordered from H.H. Payson Co. Their sailmaker has a five-month backlog, but I was advised that sometimes they find time for a quicker delivery to Payson’s customers.
I totally enjoyed building this boat again, and at no time had to sit in what Howard Chapelle calls the “moaning chair” to lament errors I had made. I’d an idea of what to expect, having built this boat before, but on the cover of Build the Instant Catboat is printed “A you-don’t-have-to-be-an-expert book.” And that’s true. Payson’s detailed instructions make the project well suited to a first-time boatbuilder with moderate woodworking skills.
John Leyde lives near Arlington, Washington, and is retired, having served 30 years with the State of Washington as an electronics technician. He has had a passion for boats from his earliest memories of rowing a boat on one of the nearby lakes. Being retired gives him lots of time to pursue his passion of shaping a pile of wood into a functional vessel. He has built 17 different boats since he built his first real boat in ’95.
Bobcat Particulars
[table]
Length/12′ 3″
Beam/6′
Sail area/110 sq ft
Weight/ approx. 250 lbs
Draft, board up /11″
[/table]
Plans ($45) and full-sized patterns ($105) for the Bobcat are available from H.H. Payson & Company. The boat goes by three different names: Bobcat, Tiny Cat, and the Instant Catboat. Small-scale plans and building instructions for Bobcat are included in Build the Instant CatBoat, by Dynamite Payson, available from H.H. Payson & Company and The WoodenBoat Store. The book’s small-scale plans were intended as illustrations only, not for reading text and numbers; the plans and patterns from H.H. Payson & Company are recommended for building the Bobcat.
Is there a boat you’d like to know more about? Have you built one that you think other Small Boats Magazine readers would enjoy? Please email us!
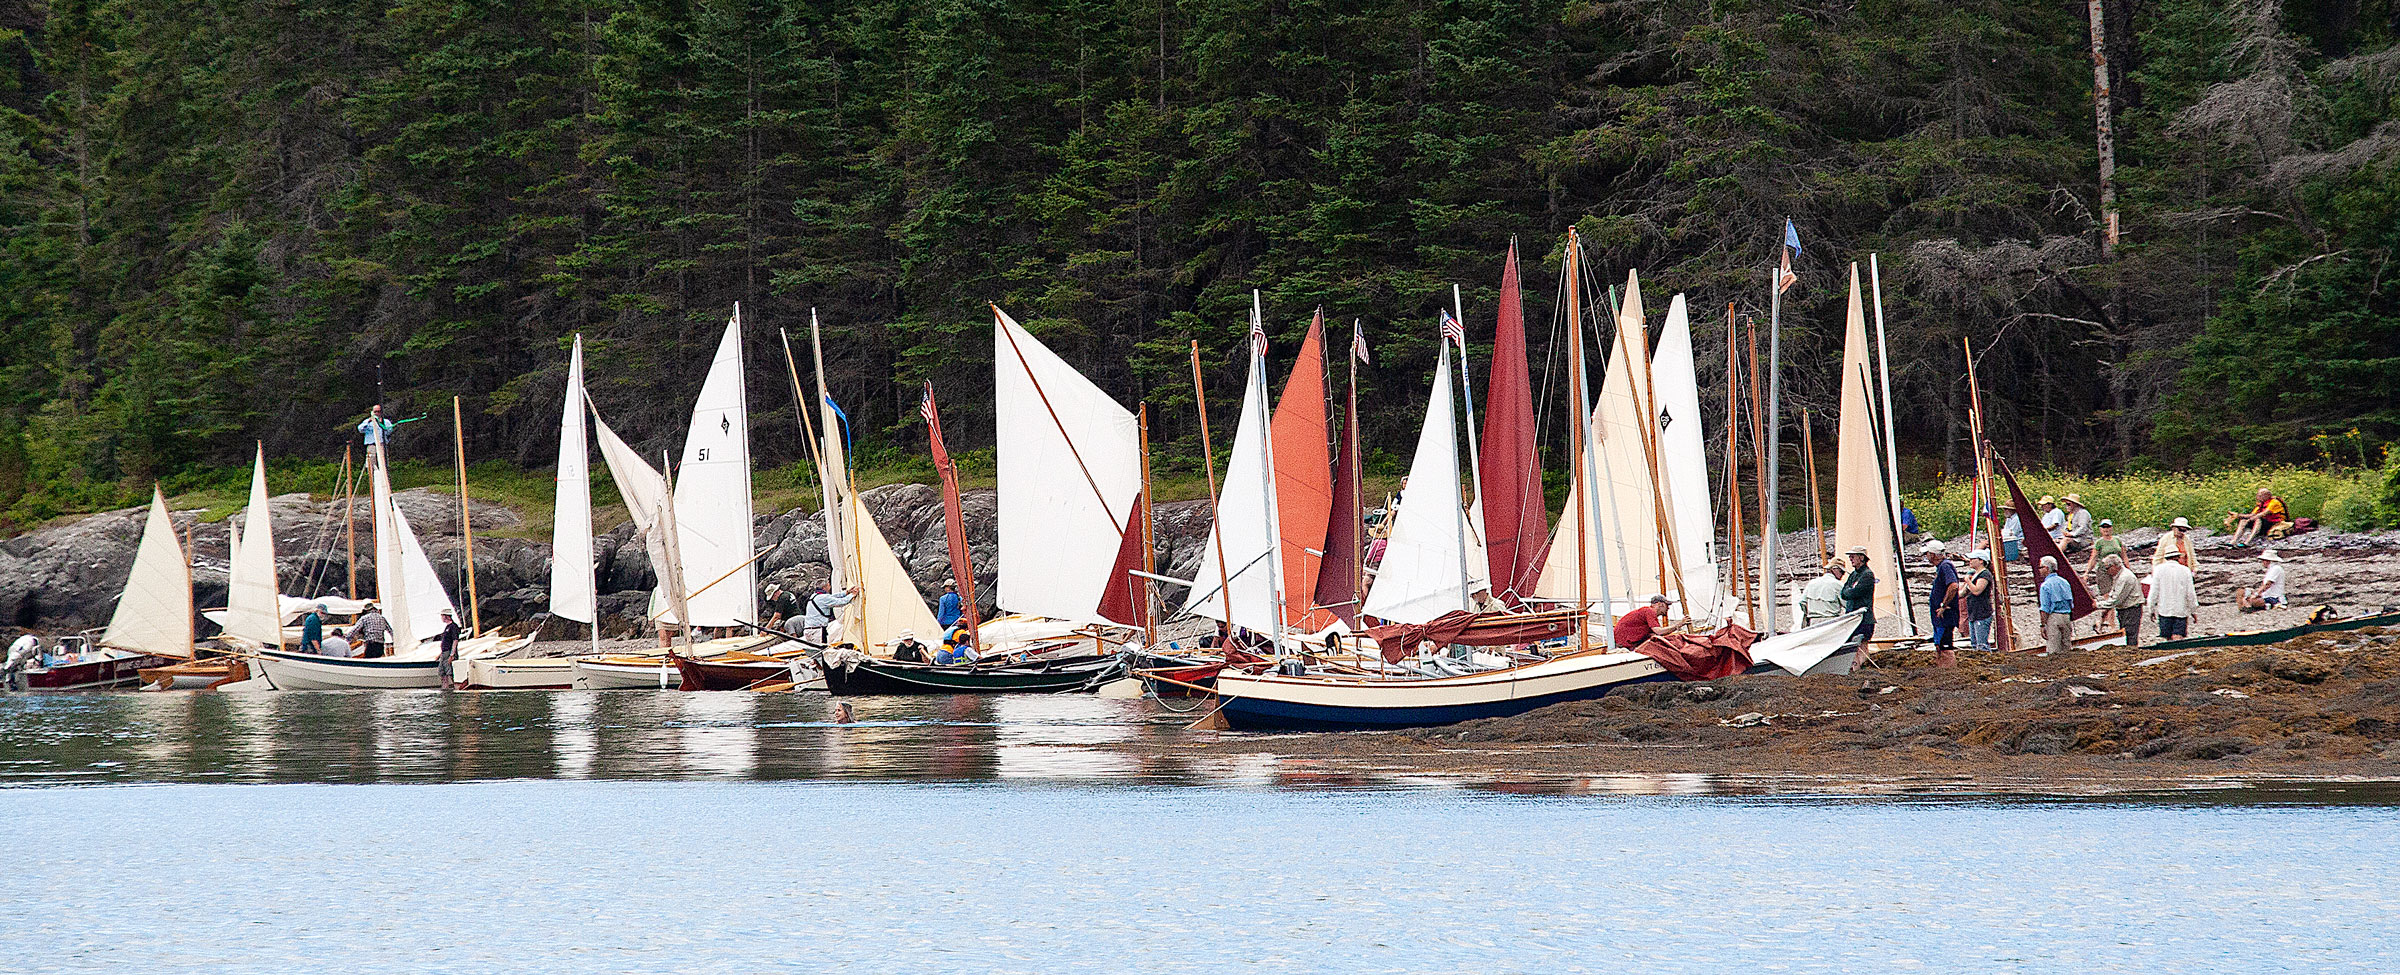
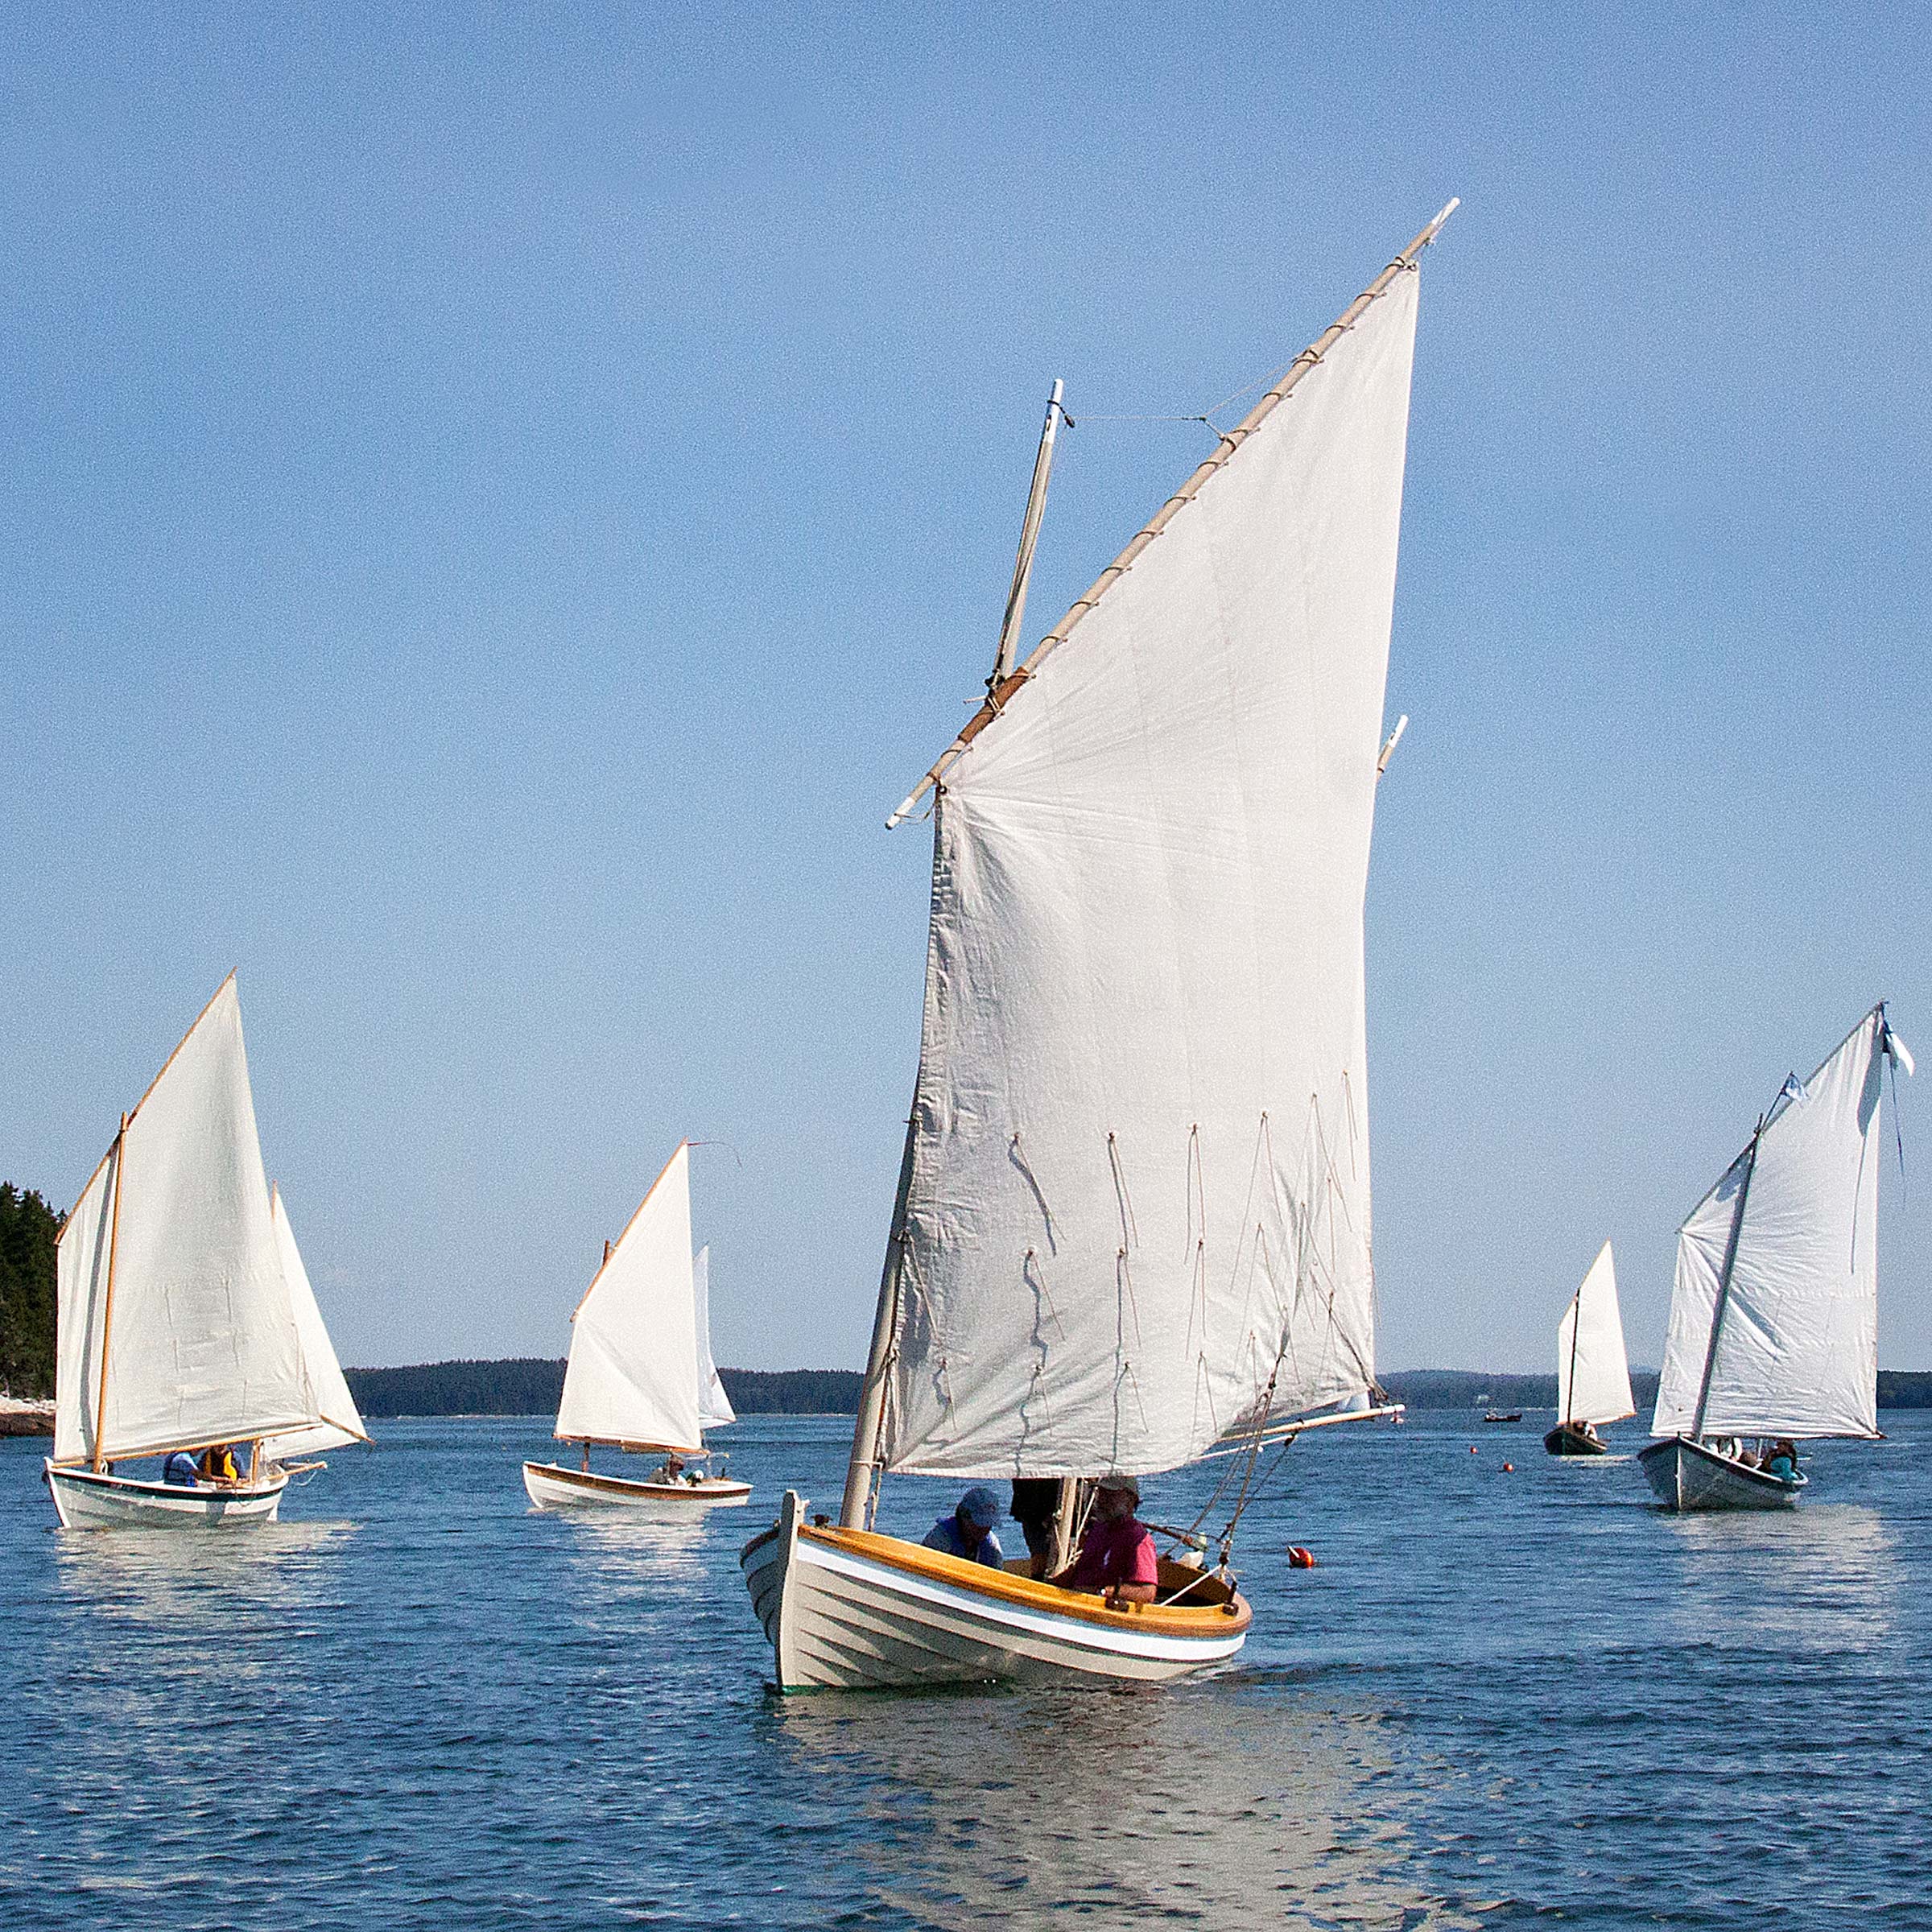
Launching a boat is an act of faith: you choose a design carefully, build it as well as you can, and maintain it faithfully, but in the end you never know where that boat will go and how the life you’ve given it will play out. So it is, also, with an organized event that gathers boats to sail and row in company.
Tom Jackson
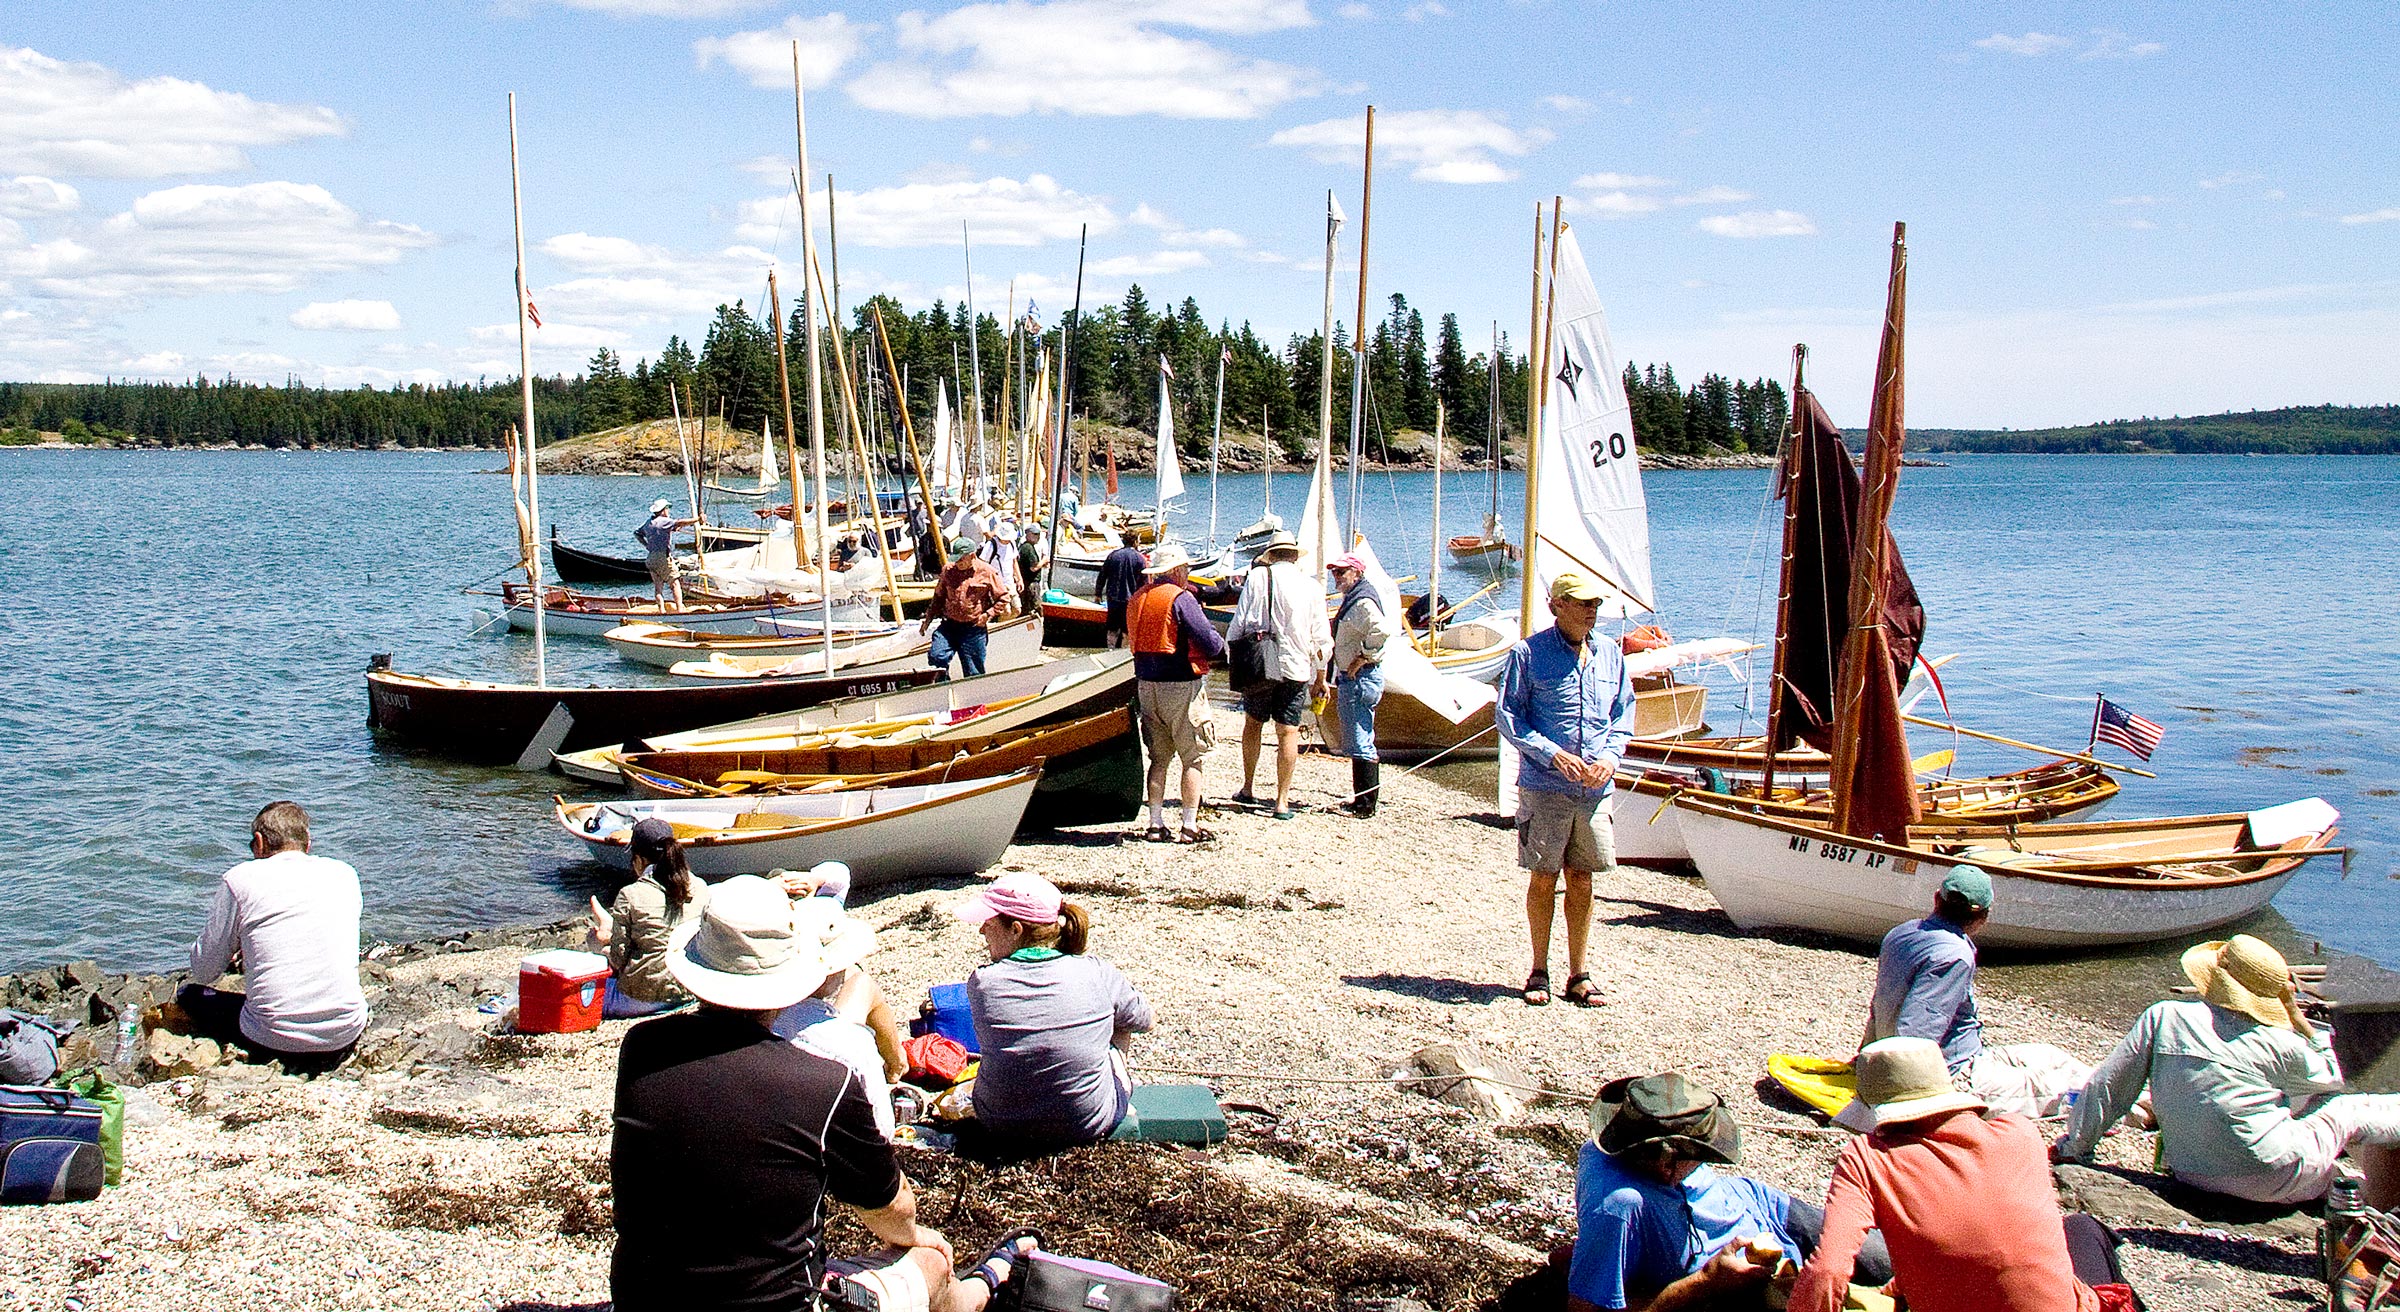
The Small Reach Regatta started off in 2006 as a very casual gathering of small-craft enthusiasts. These boats—representing about half the fleet—are, front to back, OCARINA, a Joel White-designed, stretched Shearwater owned by Jack and Susan Silverio; PUCK, a Harry Bryan-designed lapstrake plank-on-frame pulling boat owned by the late Bob Yorke and his wife Judith; an Oselver faering on loan to Wade Smith; and LITEN KUHLING, Ben Fuller’s Afjordsfaering on loan to Tom Jackson.
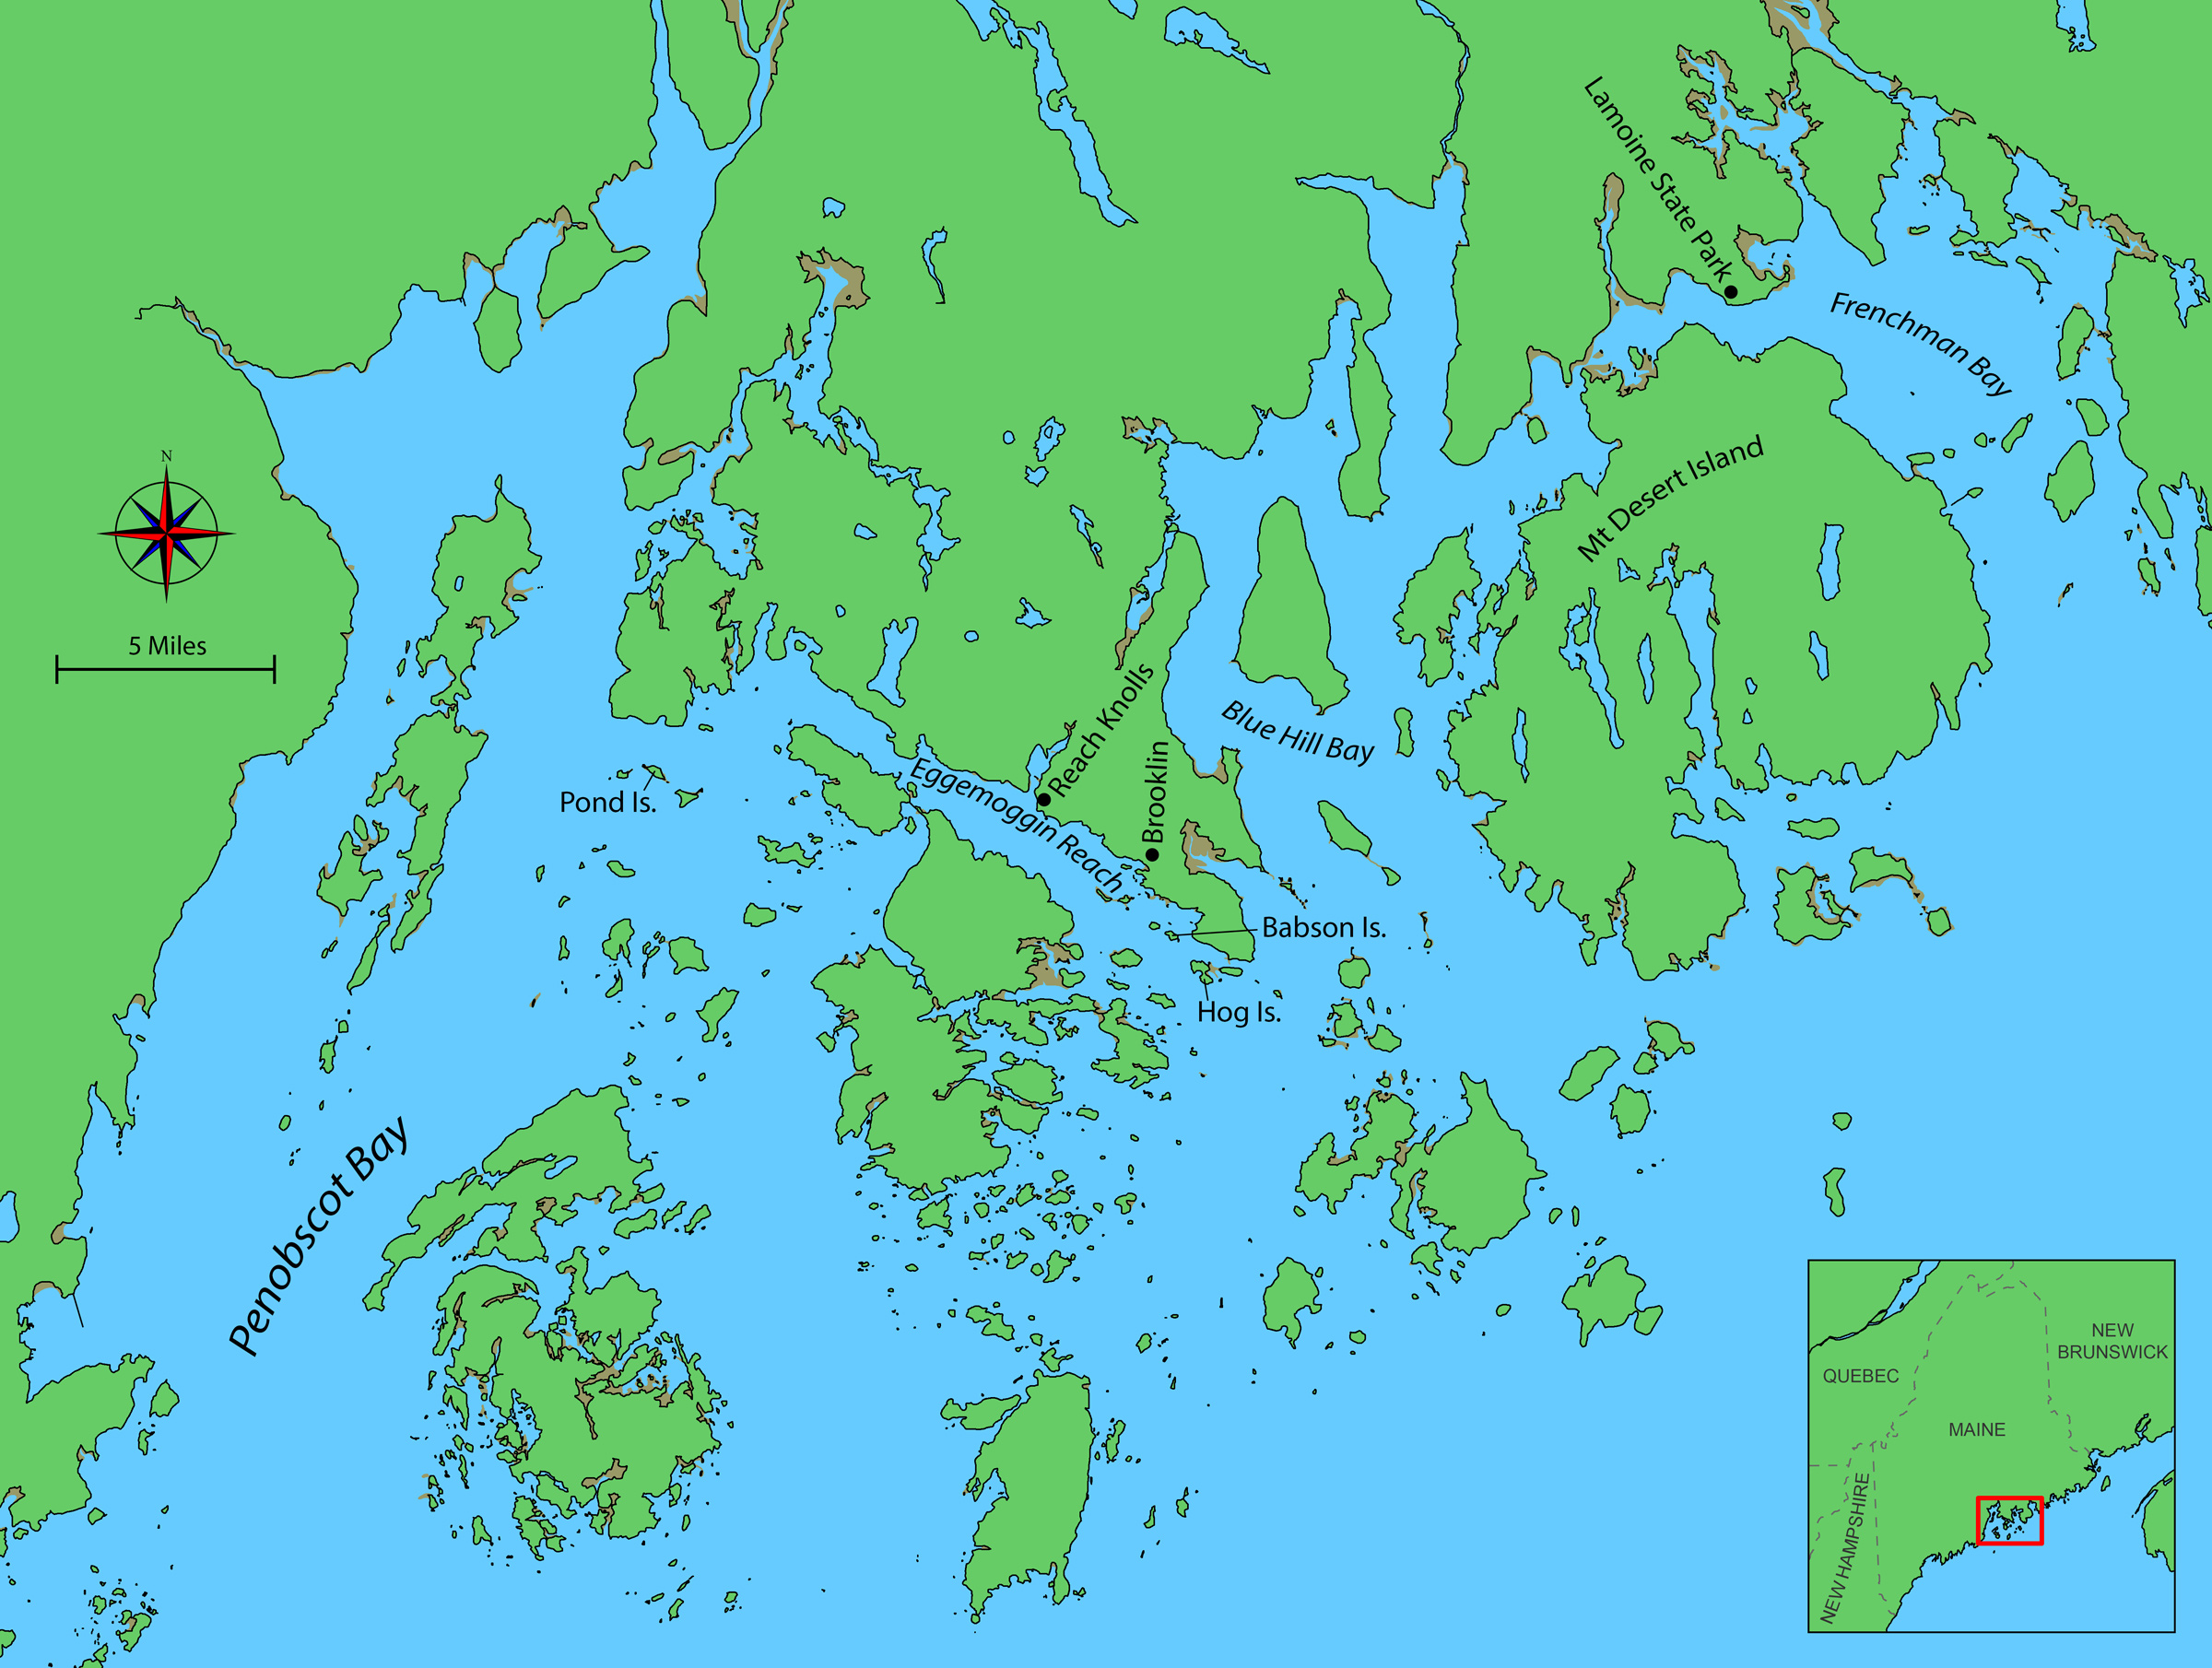
In 2006, I was among a group of small-craft sailors from around Penobscot Bay, Maine, who gathered to launch what became the Small Reach Regatta (SRR), a name reflecting its notion of sailing small boats in the same waters as the wooden racing yachts of the Eggemoggin Reach Regatta, founded in Brooklin in 1985.
A year before that first SRR, I had sailed in Raid Sweden, a week of sail-and-oars racing in the Blekinge Archipelago, which I wrote about in WoodenBoat No. 187. I came back eager to see something like that on our shores. I had big ambitions, but the practicalities of running such an event as volunteers soon became apparent to those of us in that initial group as we faced the down-to-earth realities of local geography and infrastructure.
Roger Siebert
.
We started small. News of our first gathering spread through a local email list, online connections, and word of mouth. In the first year, we had only about eight boats, but even then it was a wildly various fleet, from kayaks to faerings. We had heavy and light boats, plywood and traditional planking, oars-only or sail-and-oars types, and a variety of overall lengths.
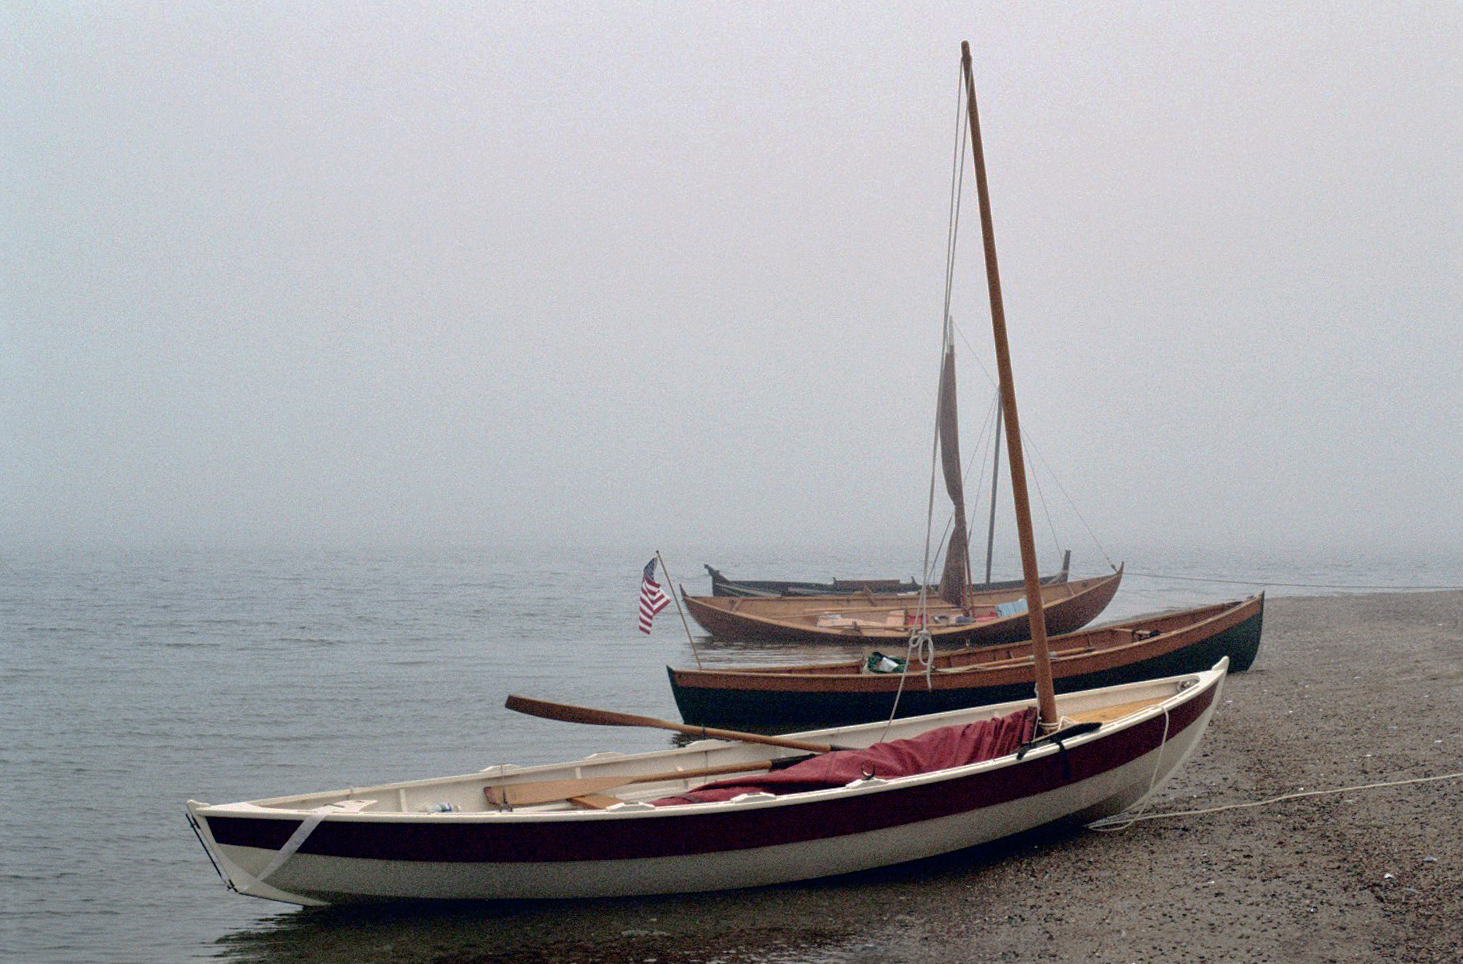
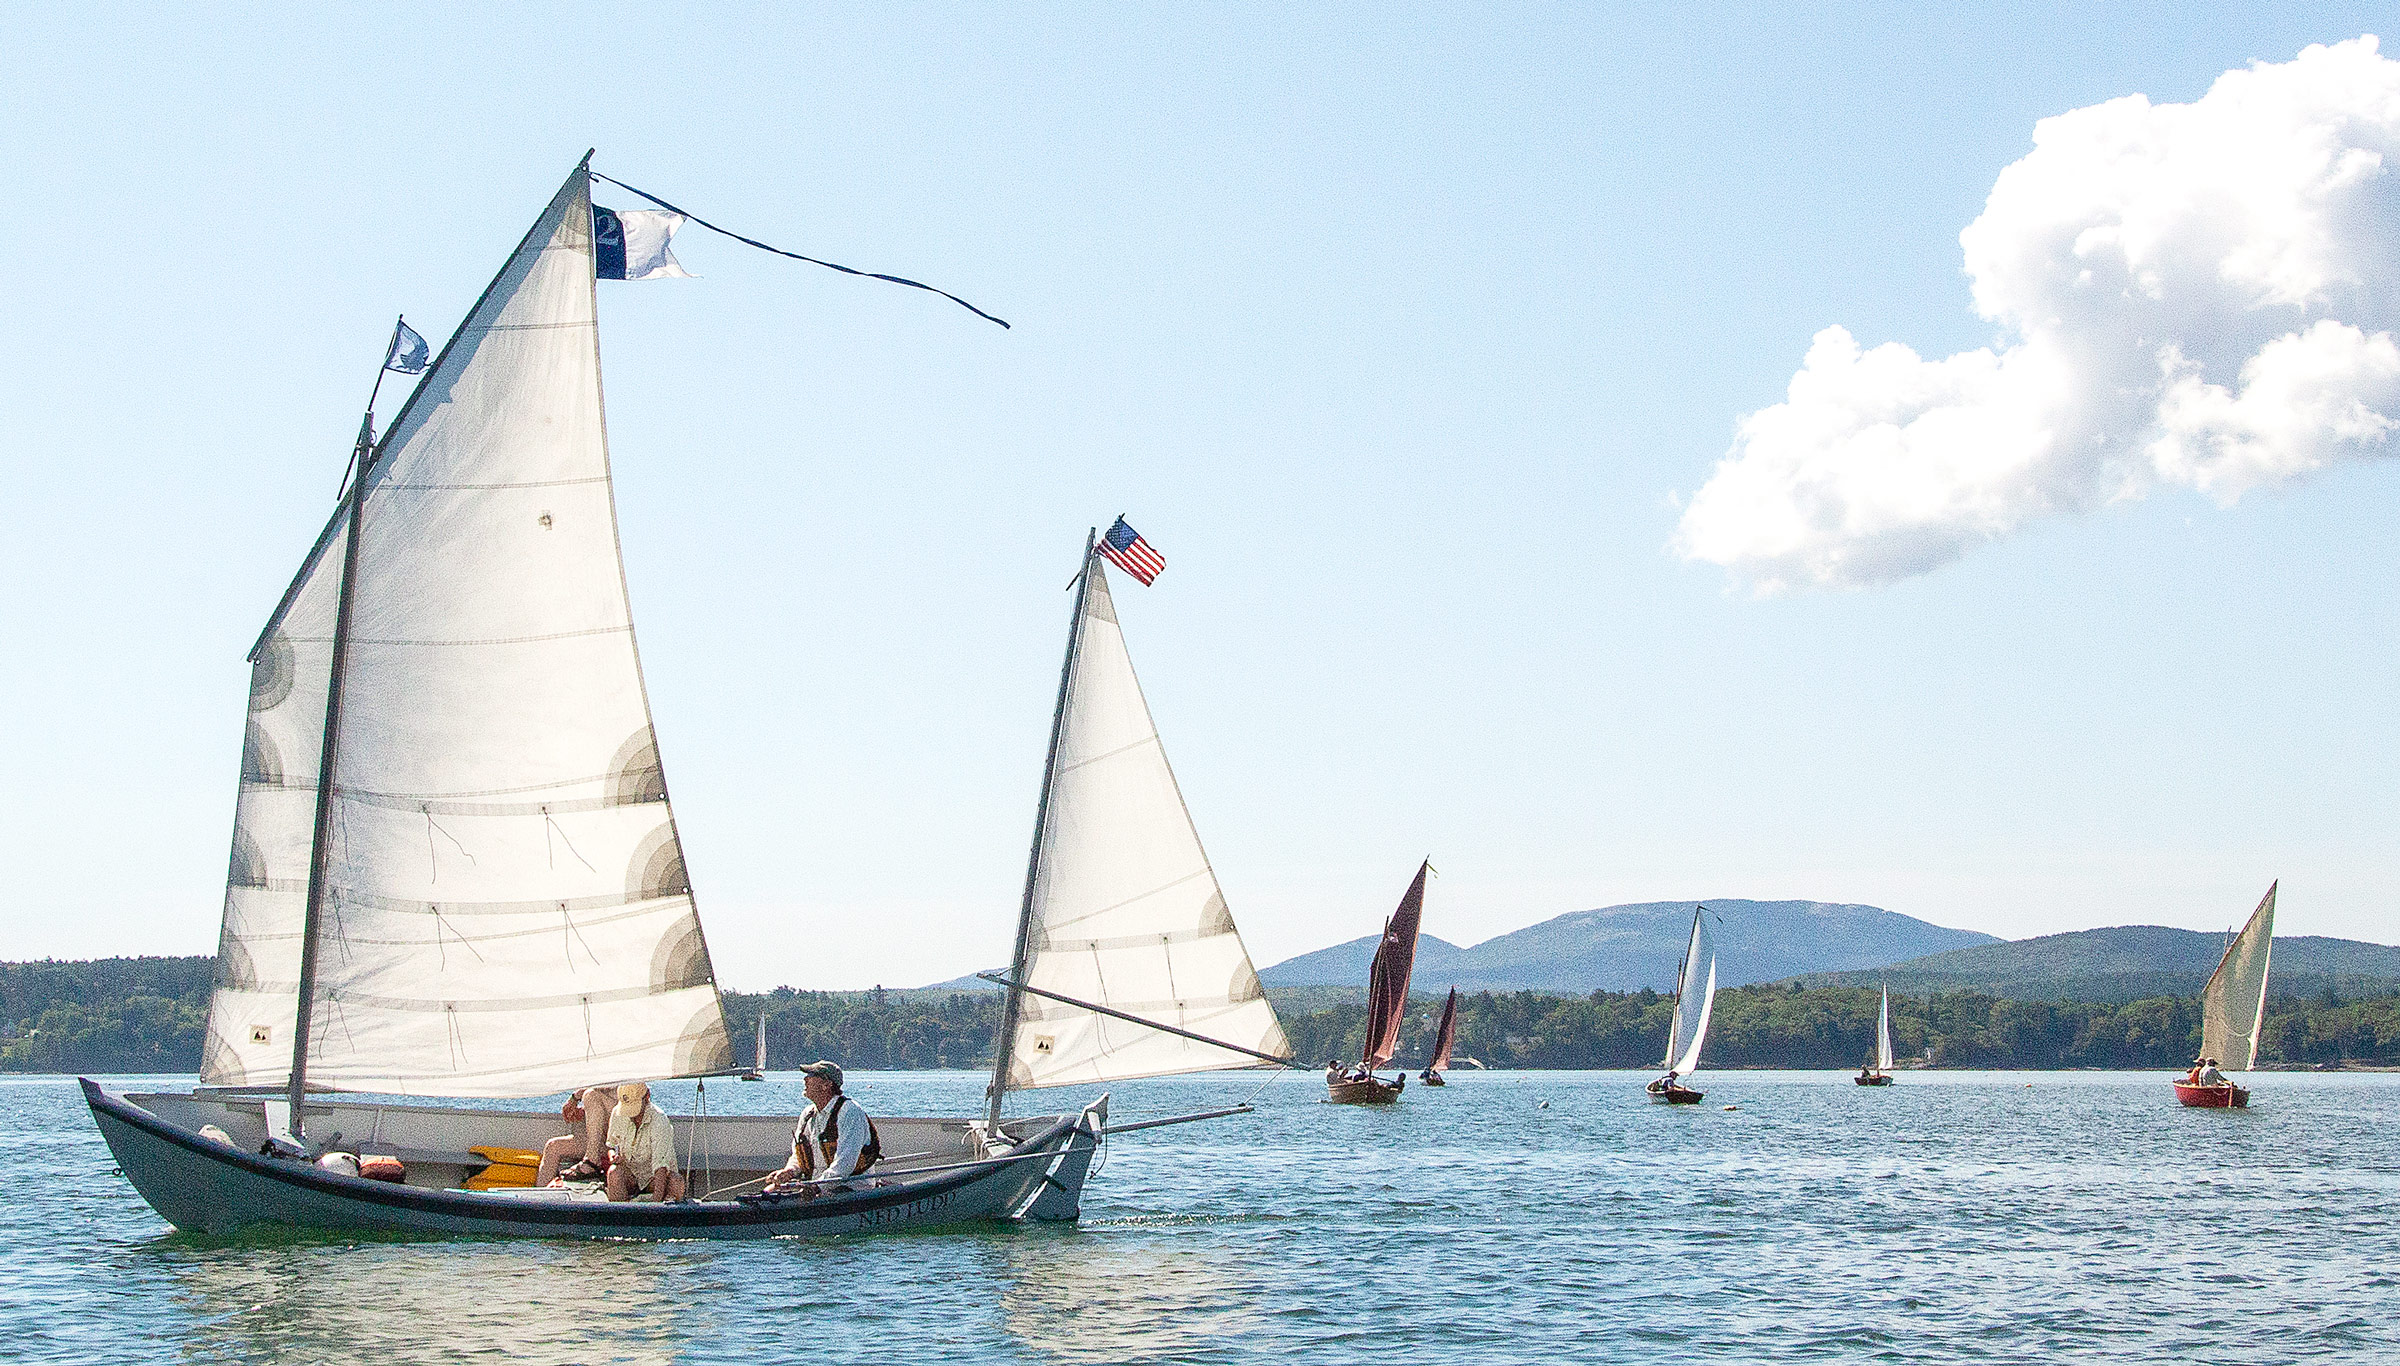
Courtesy of the author
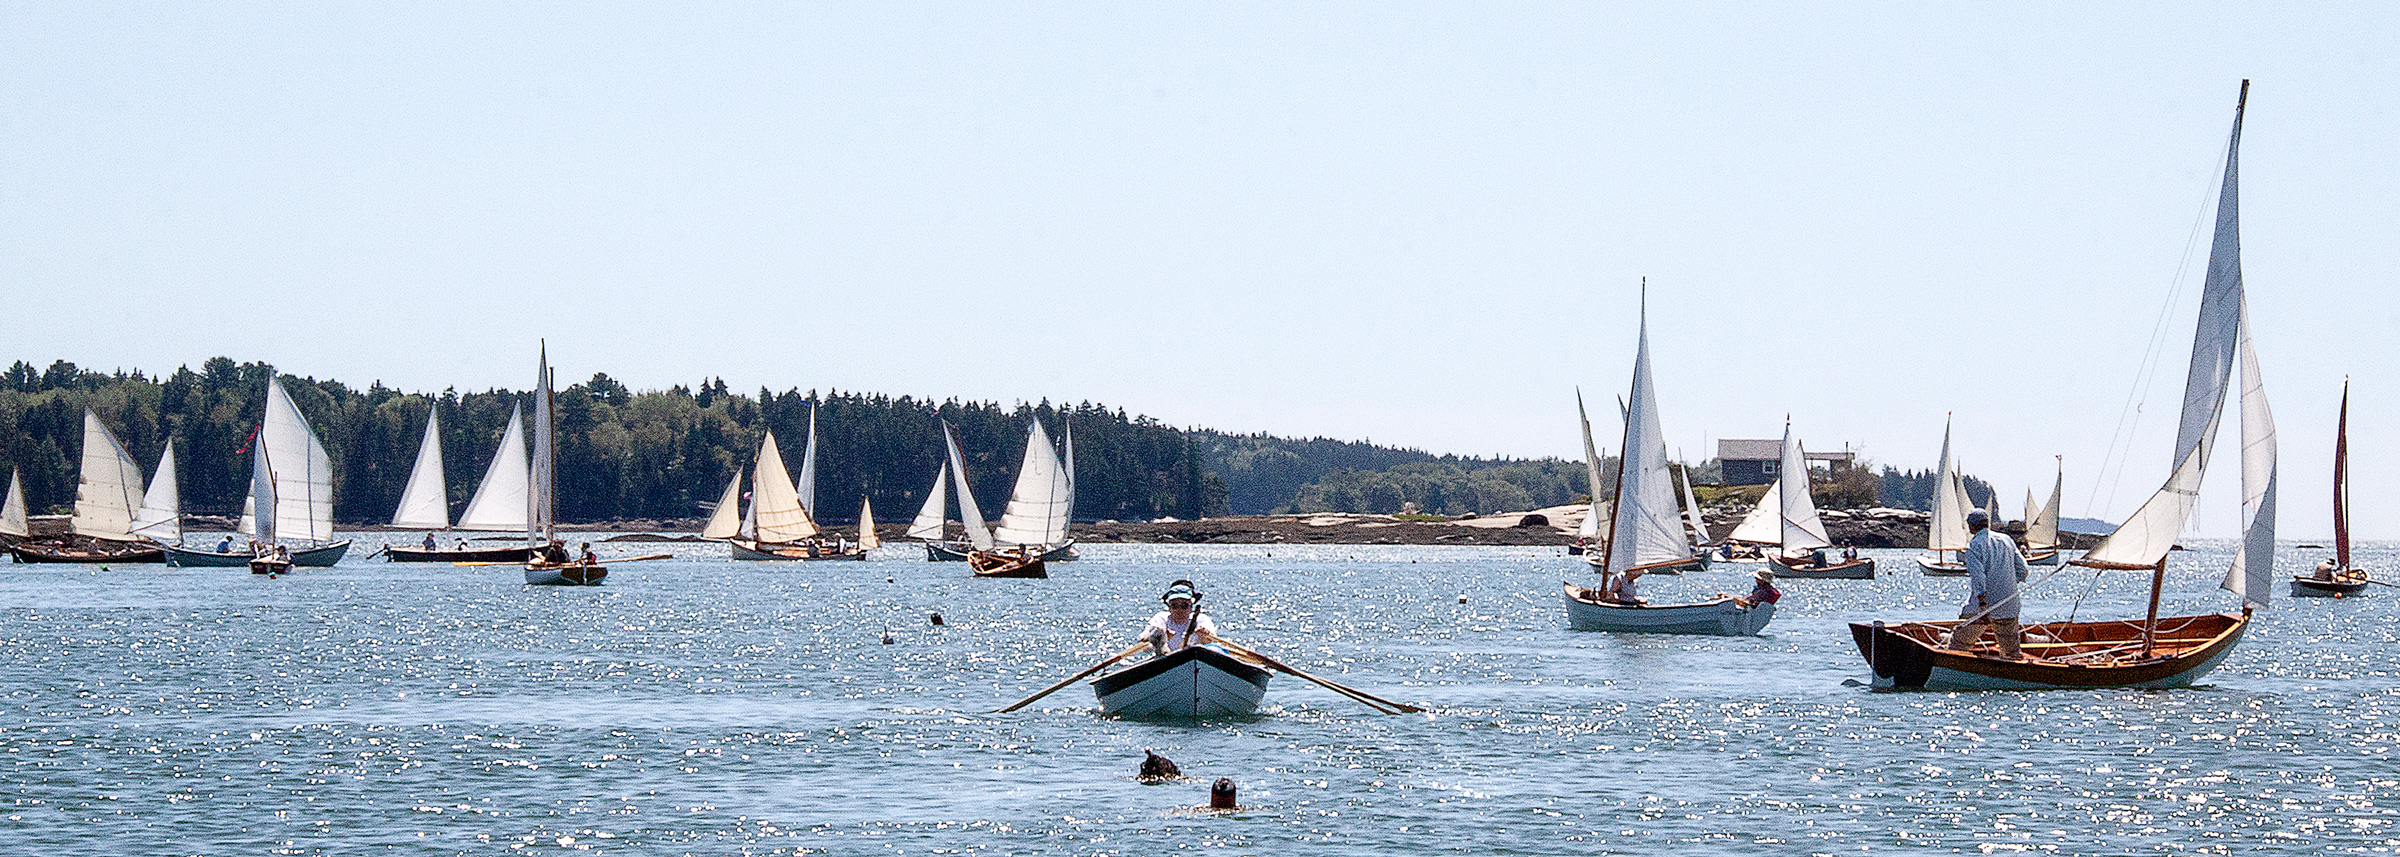
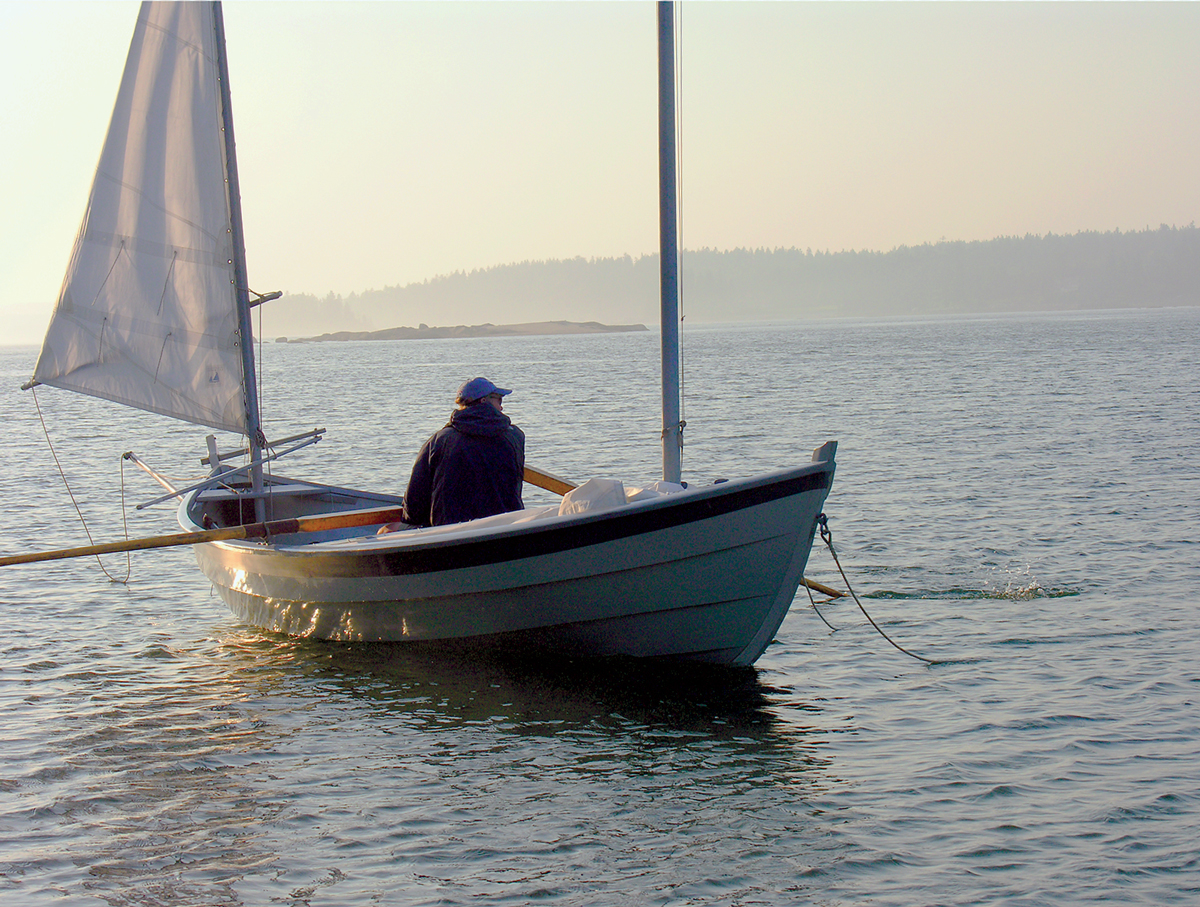
From the first year, the Maine coast’s propensity for fog was a continual concern for the SRR. With the possibility for light air and fog, the ability to row and remain self-sufficient was paramount.
We hauled out on a beach on Pond Island in Blue Hill Bay and over lunch talked about what this event could be. No doubt I regaled the group—as I am known to do sometimes—with fresh memories of Raid Sweden. Maine plainly didn’t have the advantages of large and accessible stone buildings maintained by a cruising association. But what it had in common with Sweden was a staggeringly beautiful coastline.
We asked ourselves what such an event would look like in Maine. Four of the people in that discussion—myself; David Wyman, a naval architect from Castine; Ben Fuller, a museum curator and maritime historian from Thomaston; and Jack Silverio, an architect from Lincolnville—remained part of our “core group” of planners for all 15 runnings of the SRR. (After a few years, Paul LaBrie of West Gardiner, and later Steve Brookman of Blue Hill, joined the core group. All of us became associated with the Downeast Chapter of the Traditional Small Craft Association, or TSCA. We quickly settled on limiting the fleet to open boats that can beach readily, with no motors.
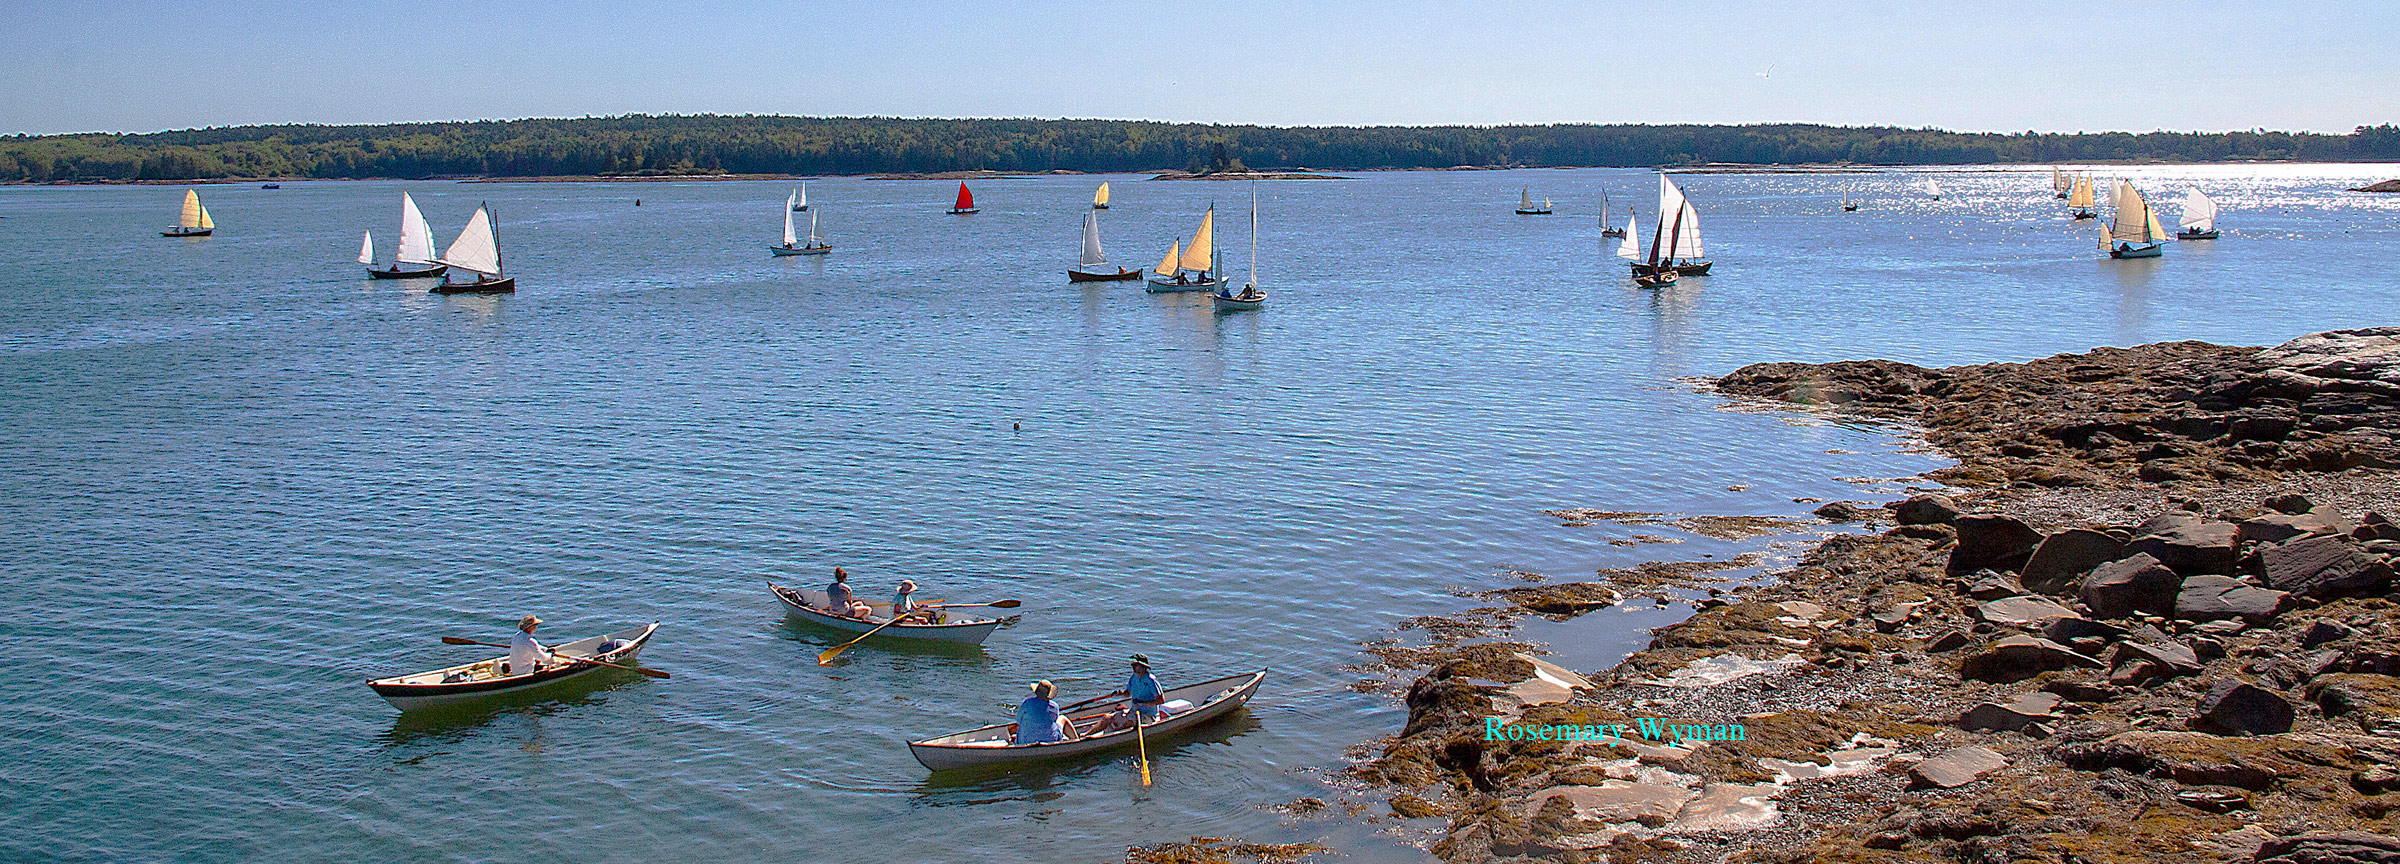
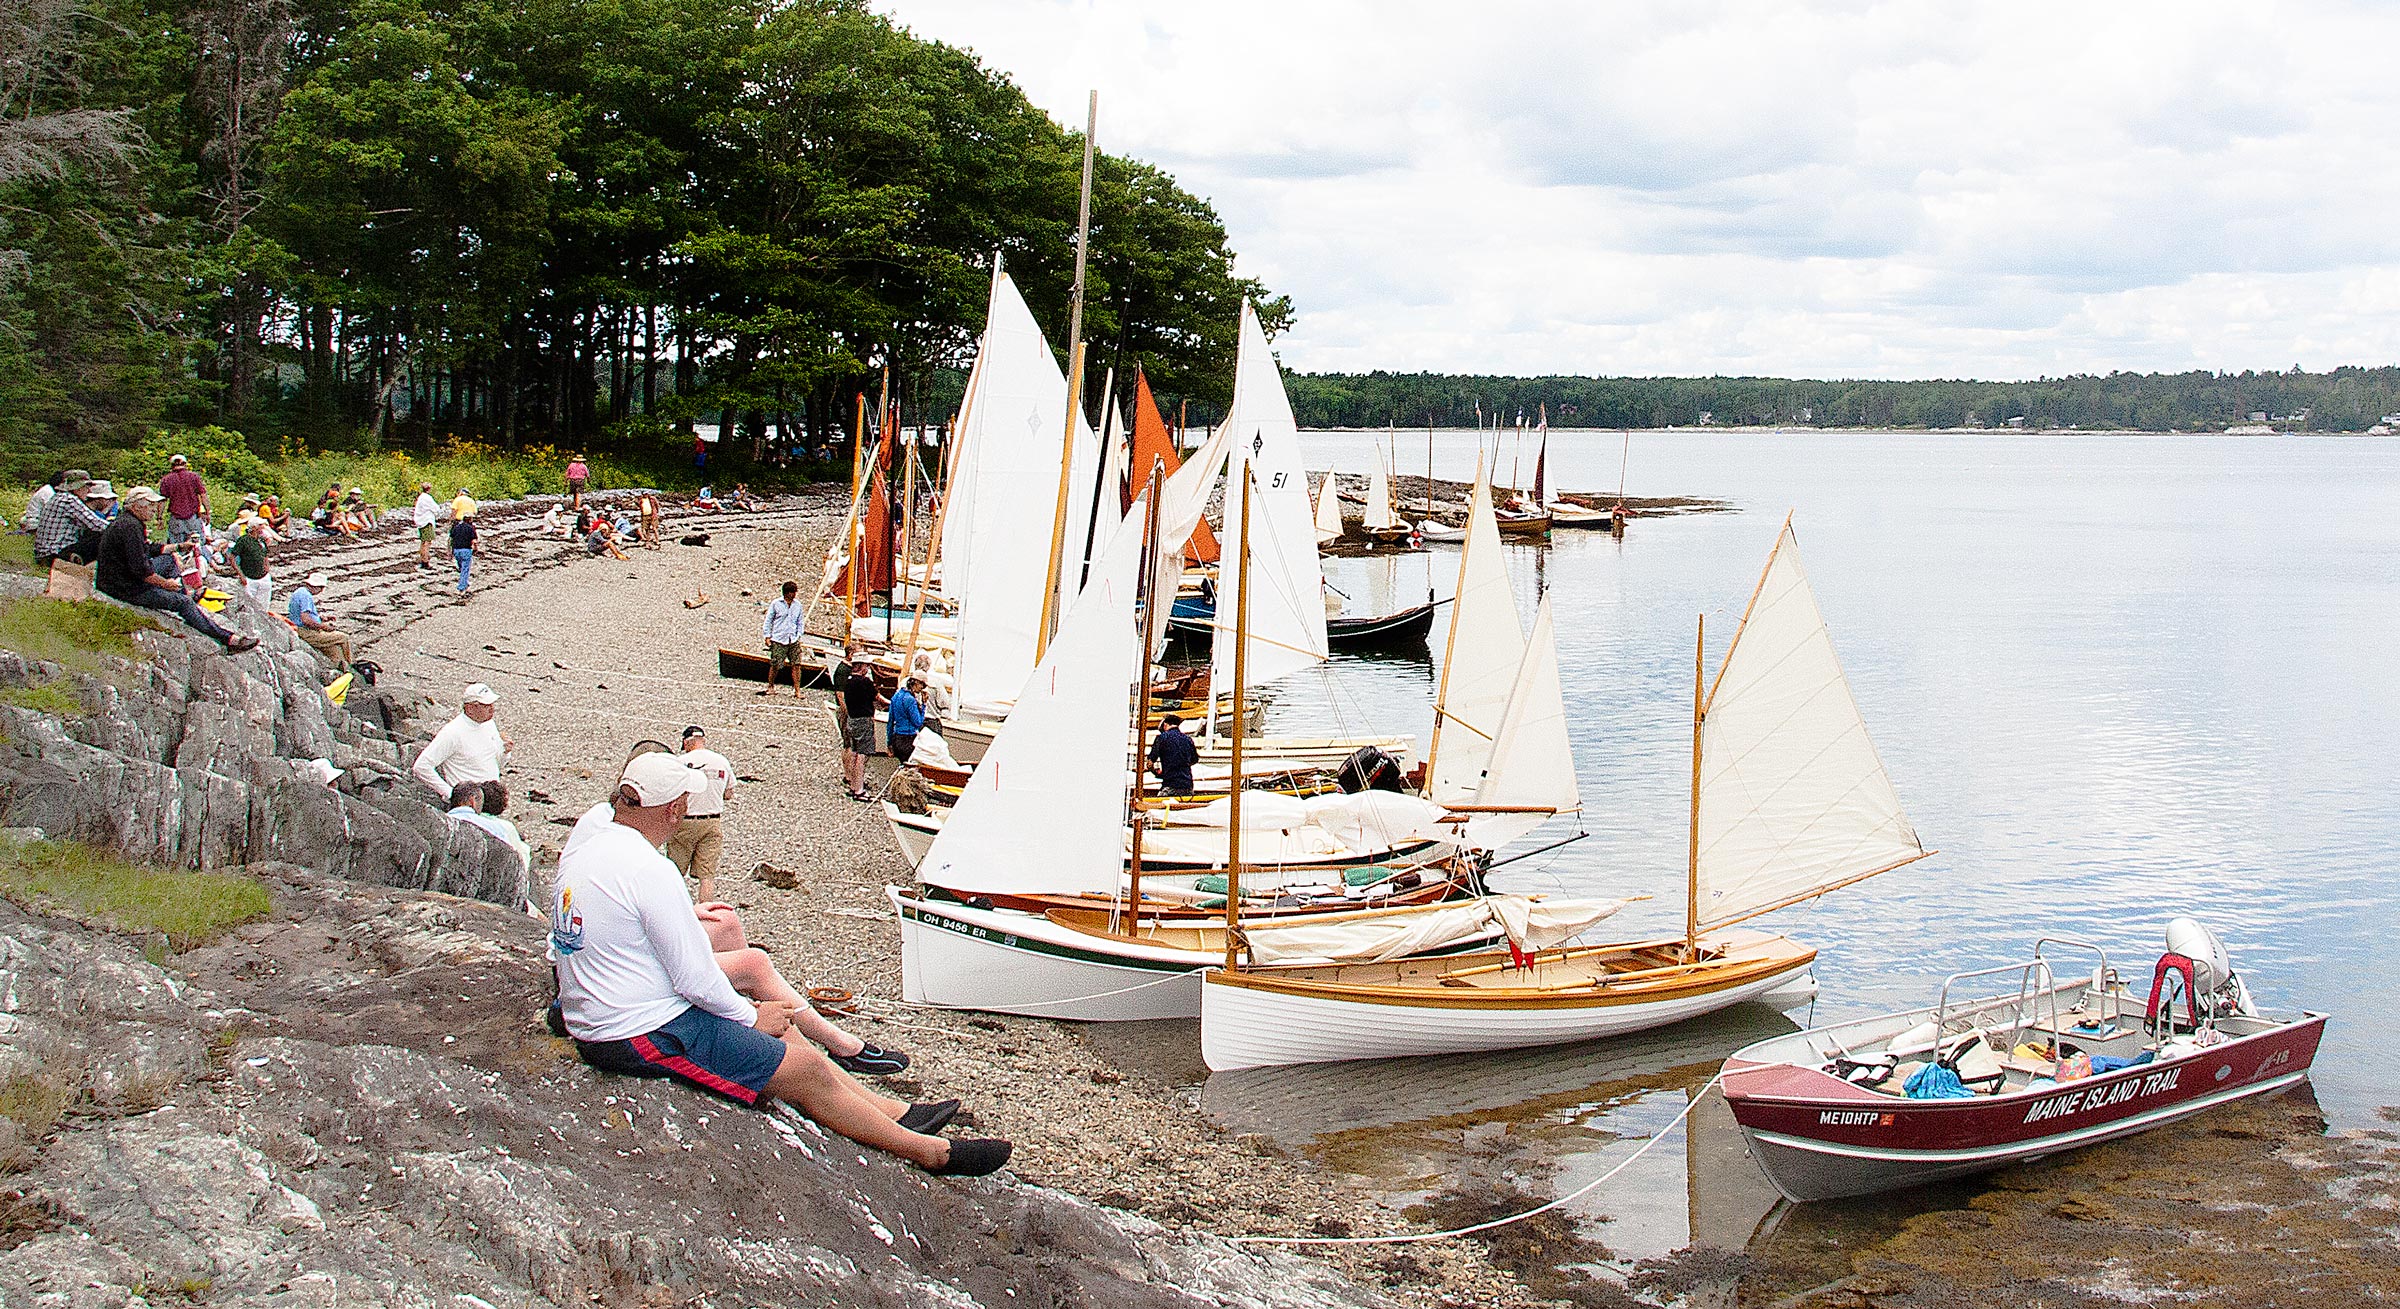
Rosemary Wyman
Having a fleet of chase boats, both for safety under way and to ferry people to and from anchored boats, was an essential part of the SRR. Every year, the Maine Island Trail Association provided the aluminum skiff seen here and volunteer skippers to take part. They were among a stalwart group of regular chase-boat drivers, most of whom used their own powerboats.
From the first, it became clear that Maine presented challenges to fleet sailing. The coastline has abundant charms, but large public facilities are not among them. One key asset was the Maine Island Trail Association (MITA), which manages the first water trail of its type in the United States and has long been an essential resource for a small-craft sailors on this coastline. Its sites are rustic, though, and can handle only small groups with no-footprint camping. Some conservation islands can handle large groups for day visits, but often only by permission. Some launching ramps in the area can be charitably described as “challenging.”
Any idea of a one-way, point-to-point “raid” with a large fleet camping through the islands fell apart on the issues of fresh-water availability and toilet facilities, without even considering such things as lodging, boat launching, or trailer parking.
Courtesy of the author
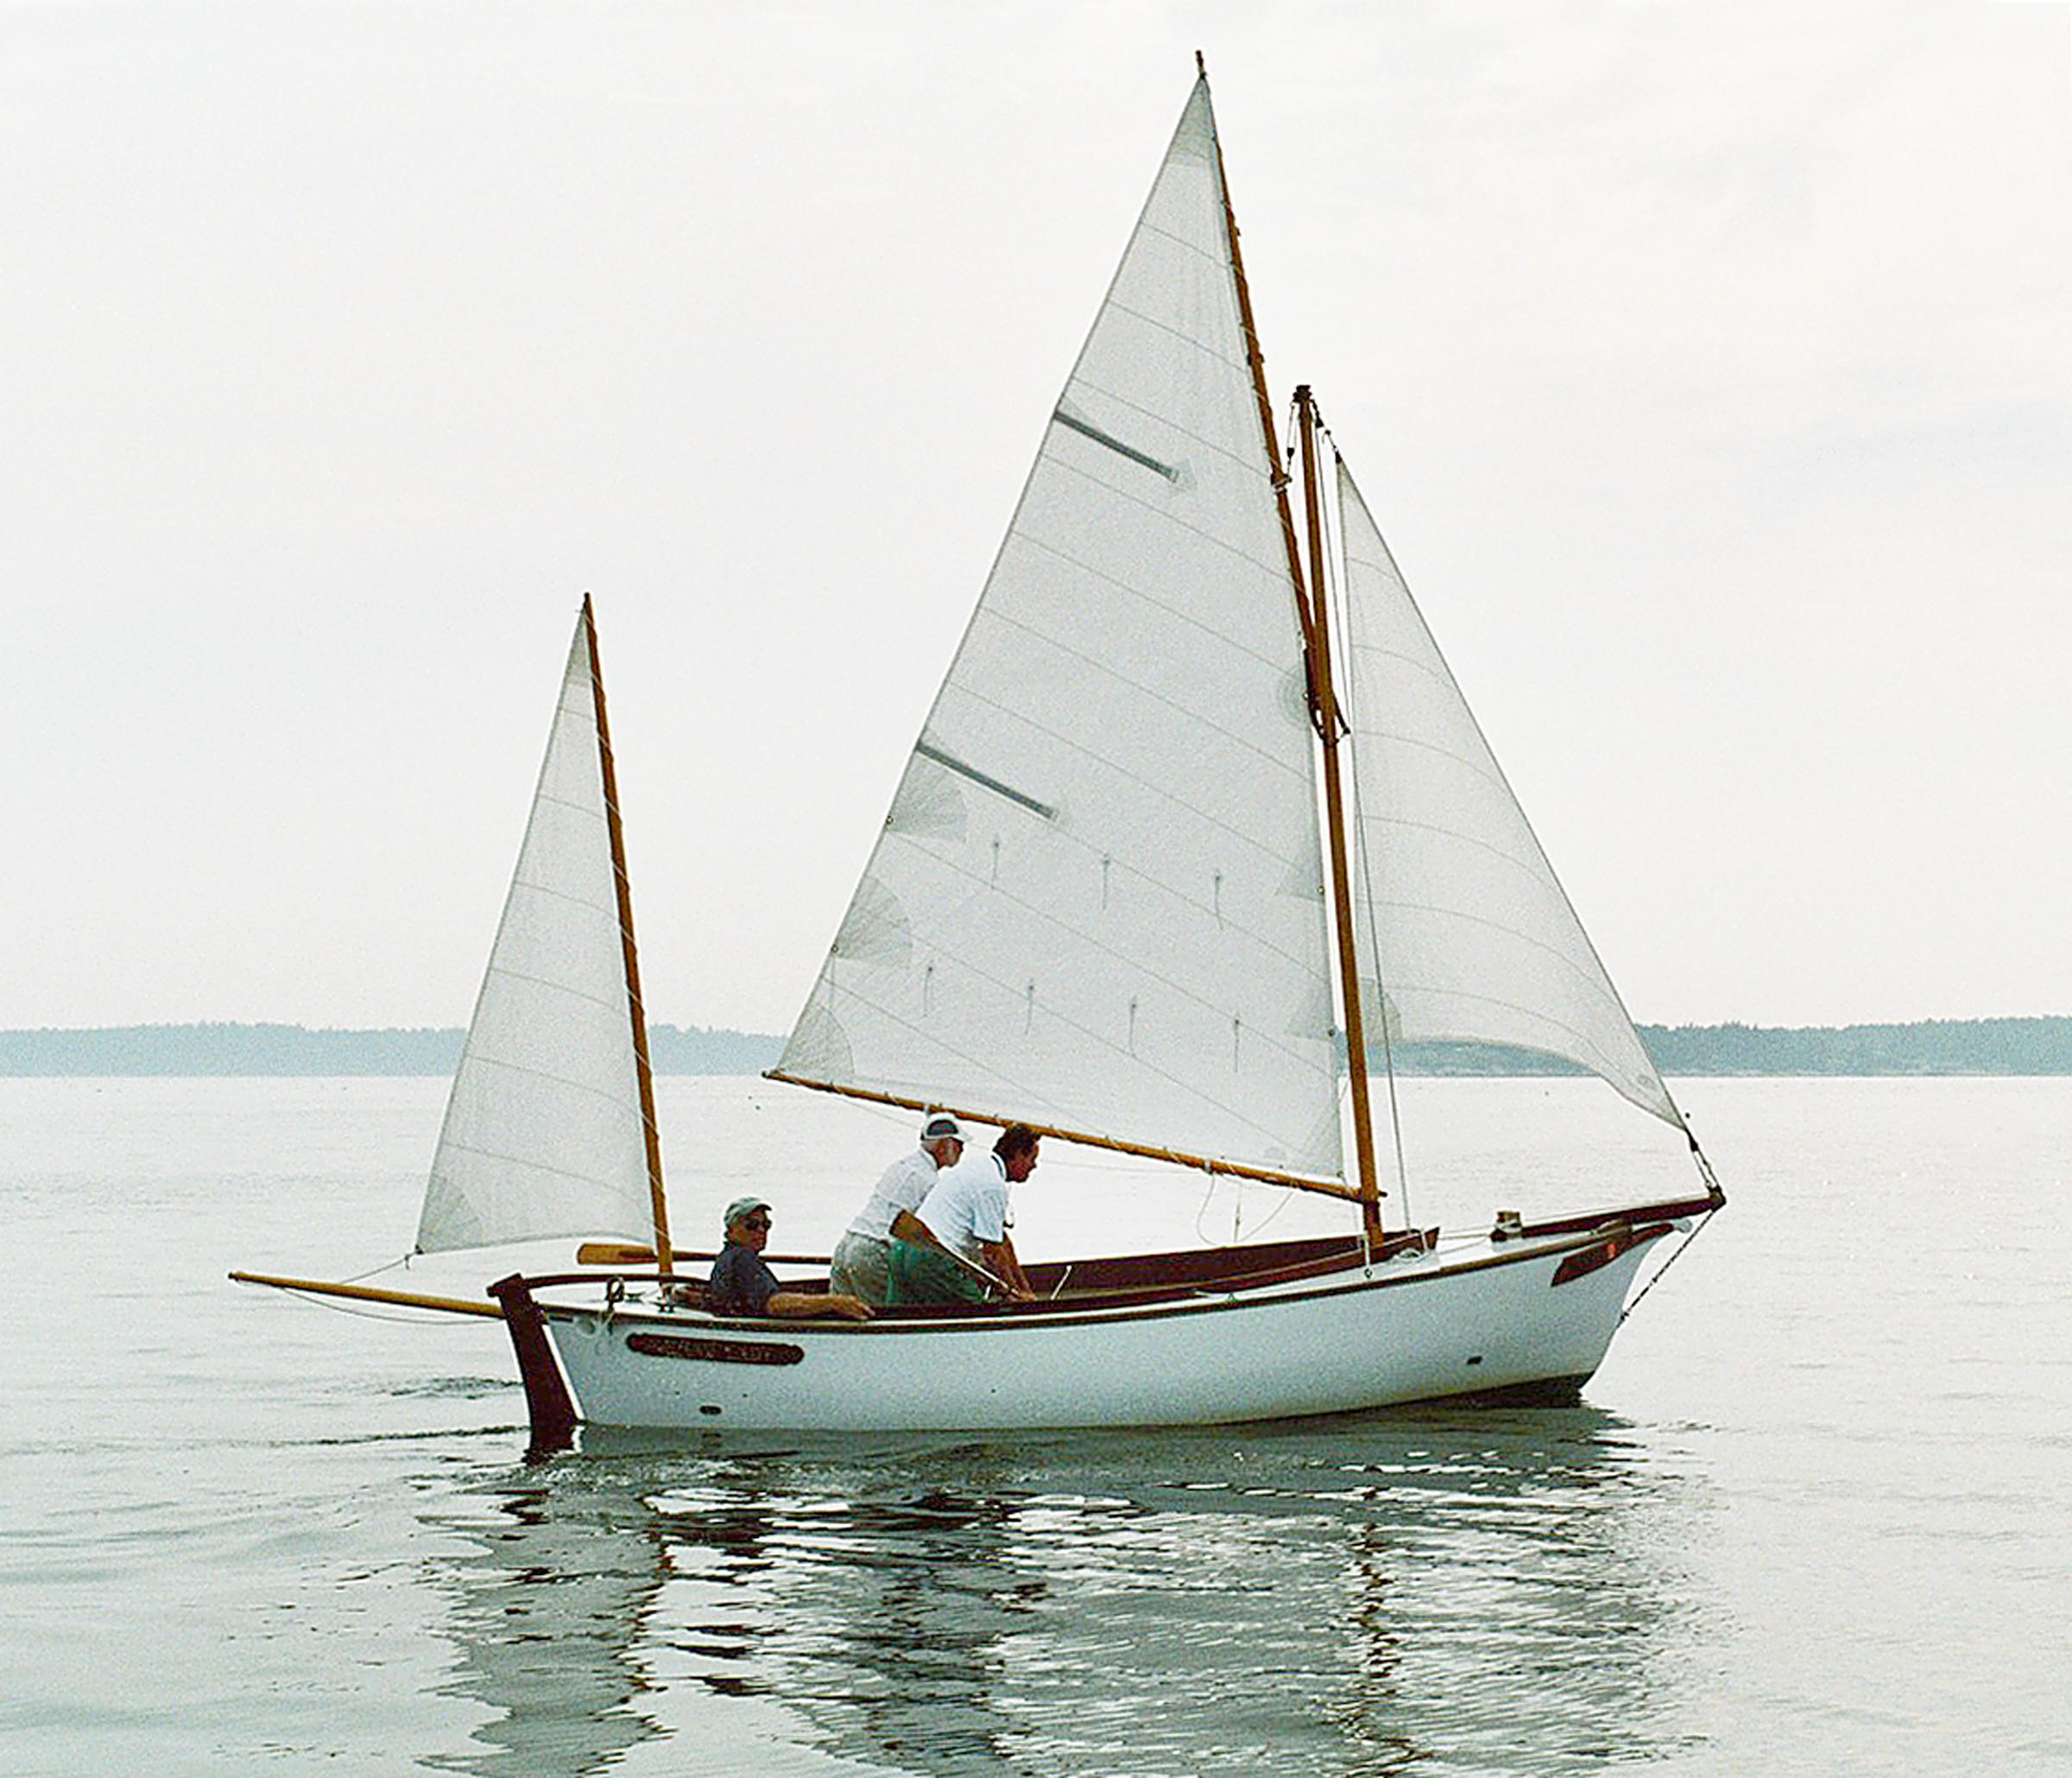
David Wyman designed and built his own yawl, ISLAND LADY. He became one of four people—the others being Tom Jackson, Ben Fuller, and Jack Silverio—from the first year who remained part of the SRR’s core planning group for 15 events over 16 years.
The European “raid” was dedicated to racing. From the start, our group was not—not in the least. I found that to be an initial disappointment, but I came to be overwhelmingly grateful that we didn’t have to deal with the added complication of racing logistics.
We quickly realized that sailing a projected fleet of 20 to 30 boats in our area would work best by finding a base camp. From there, we could set daysailing courses based on weather.
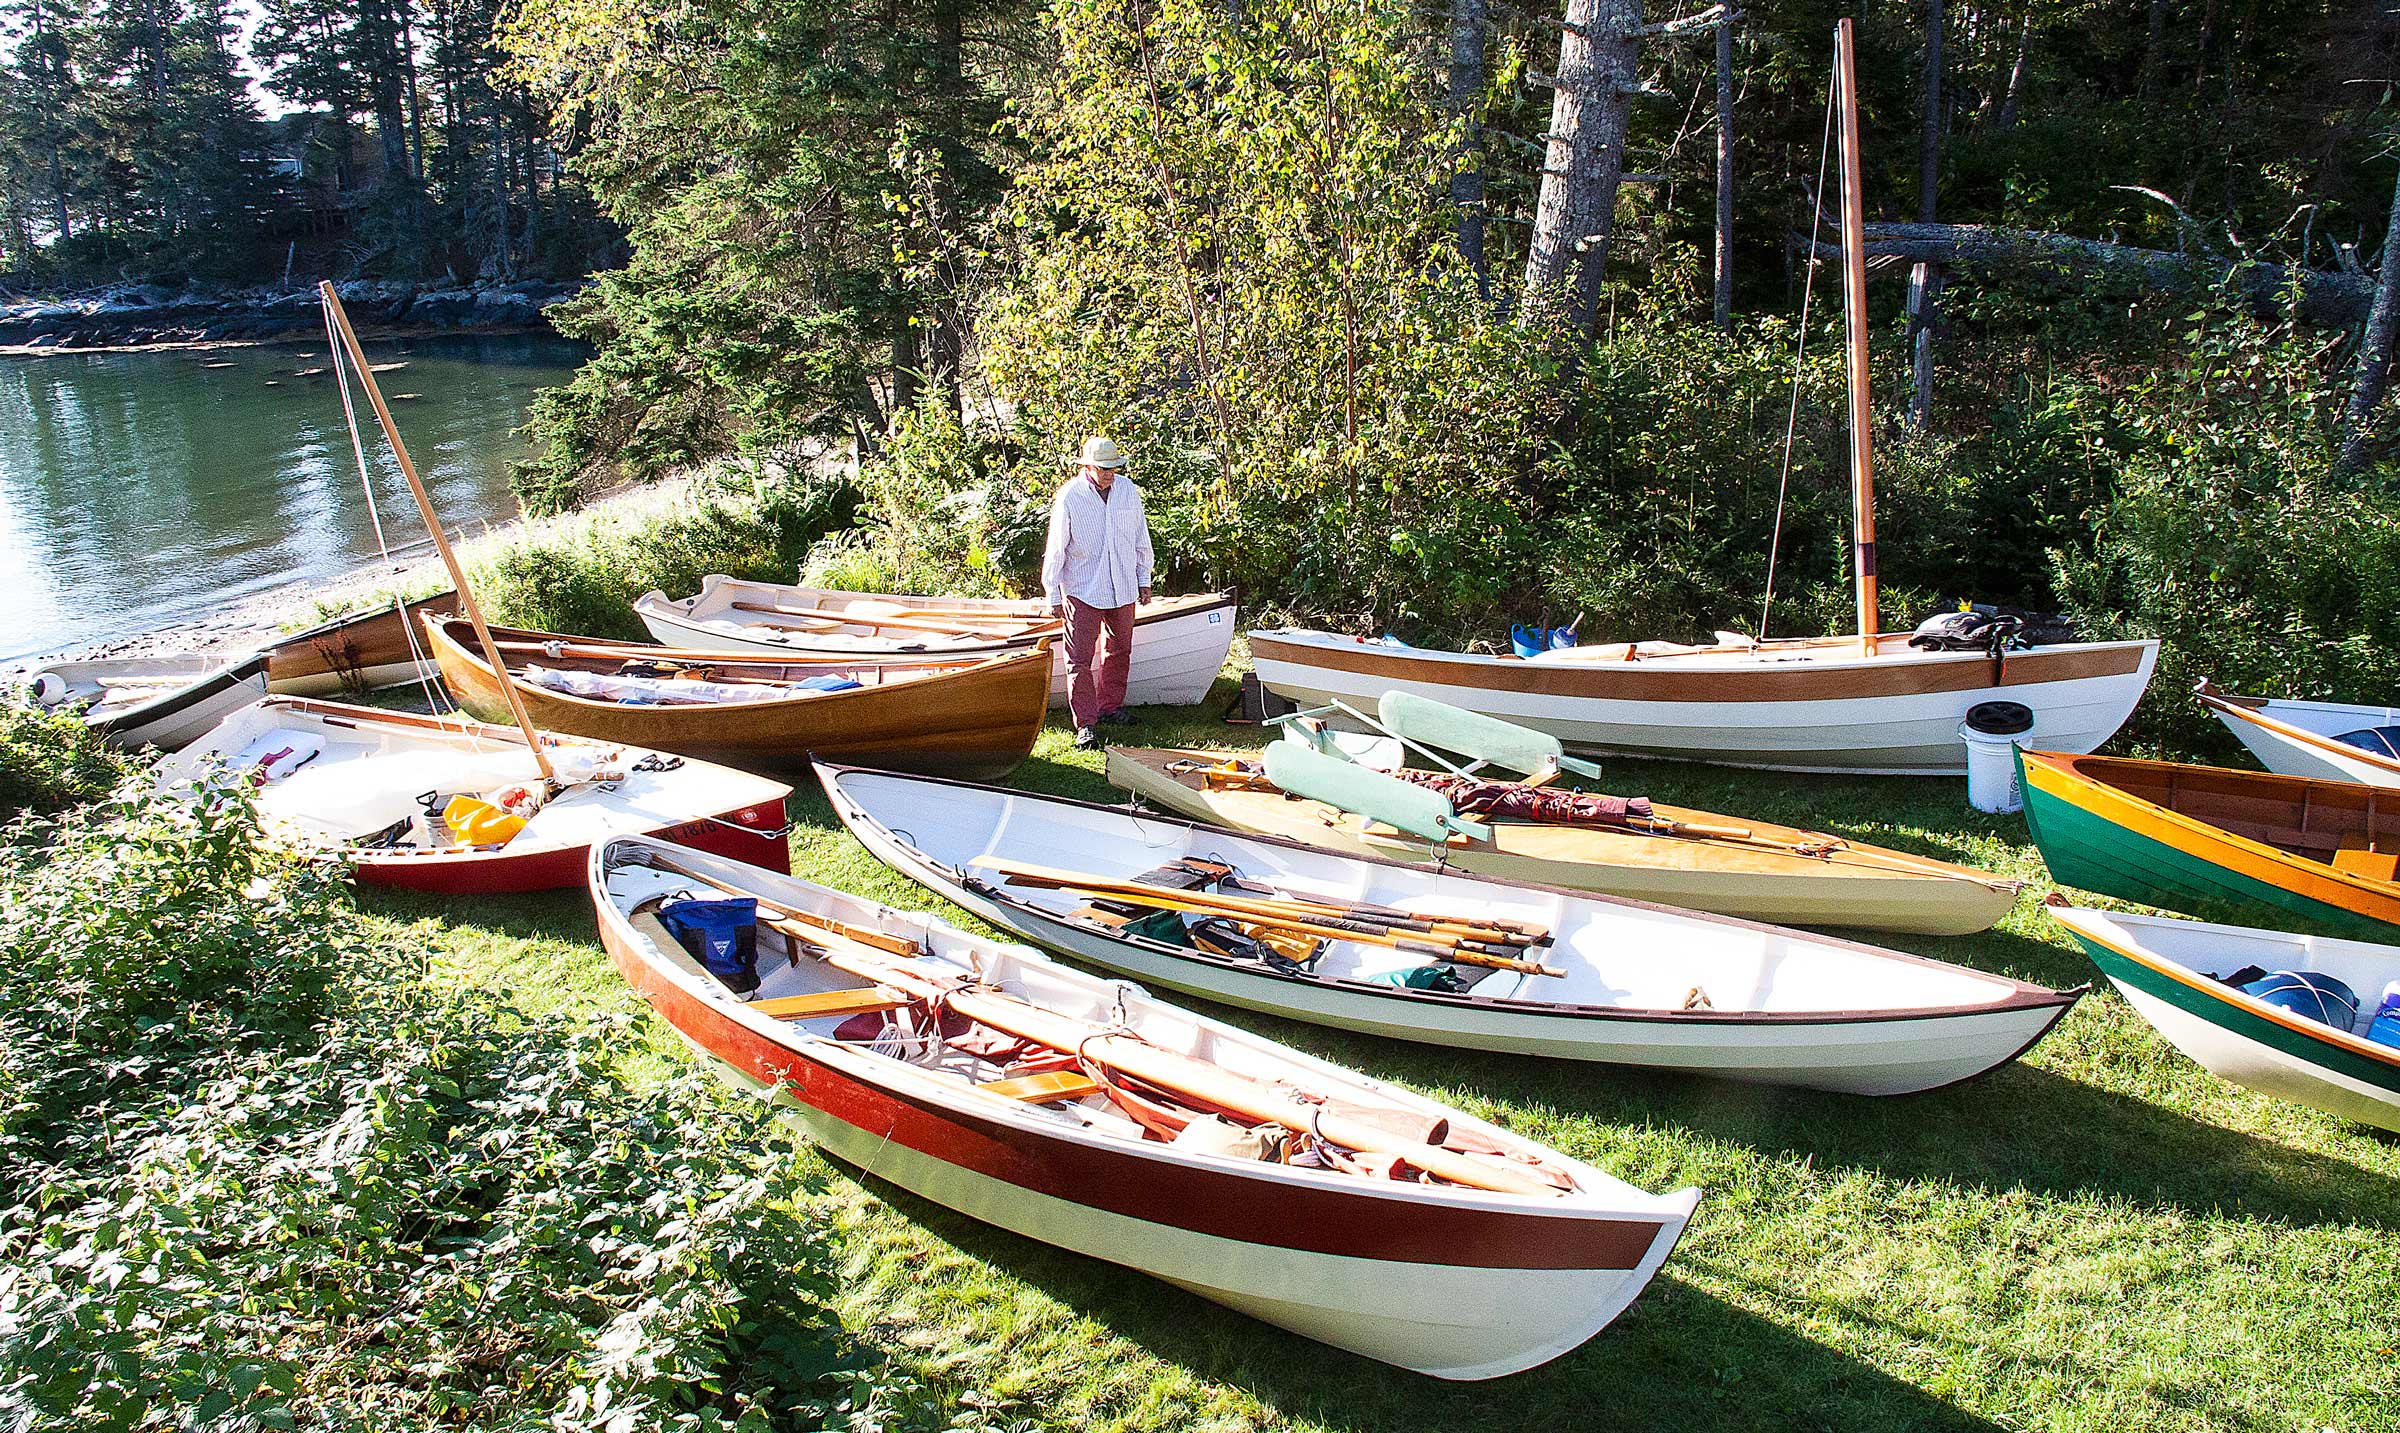
Rosemary Wyman
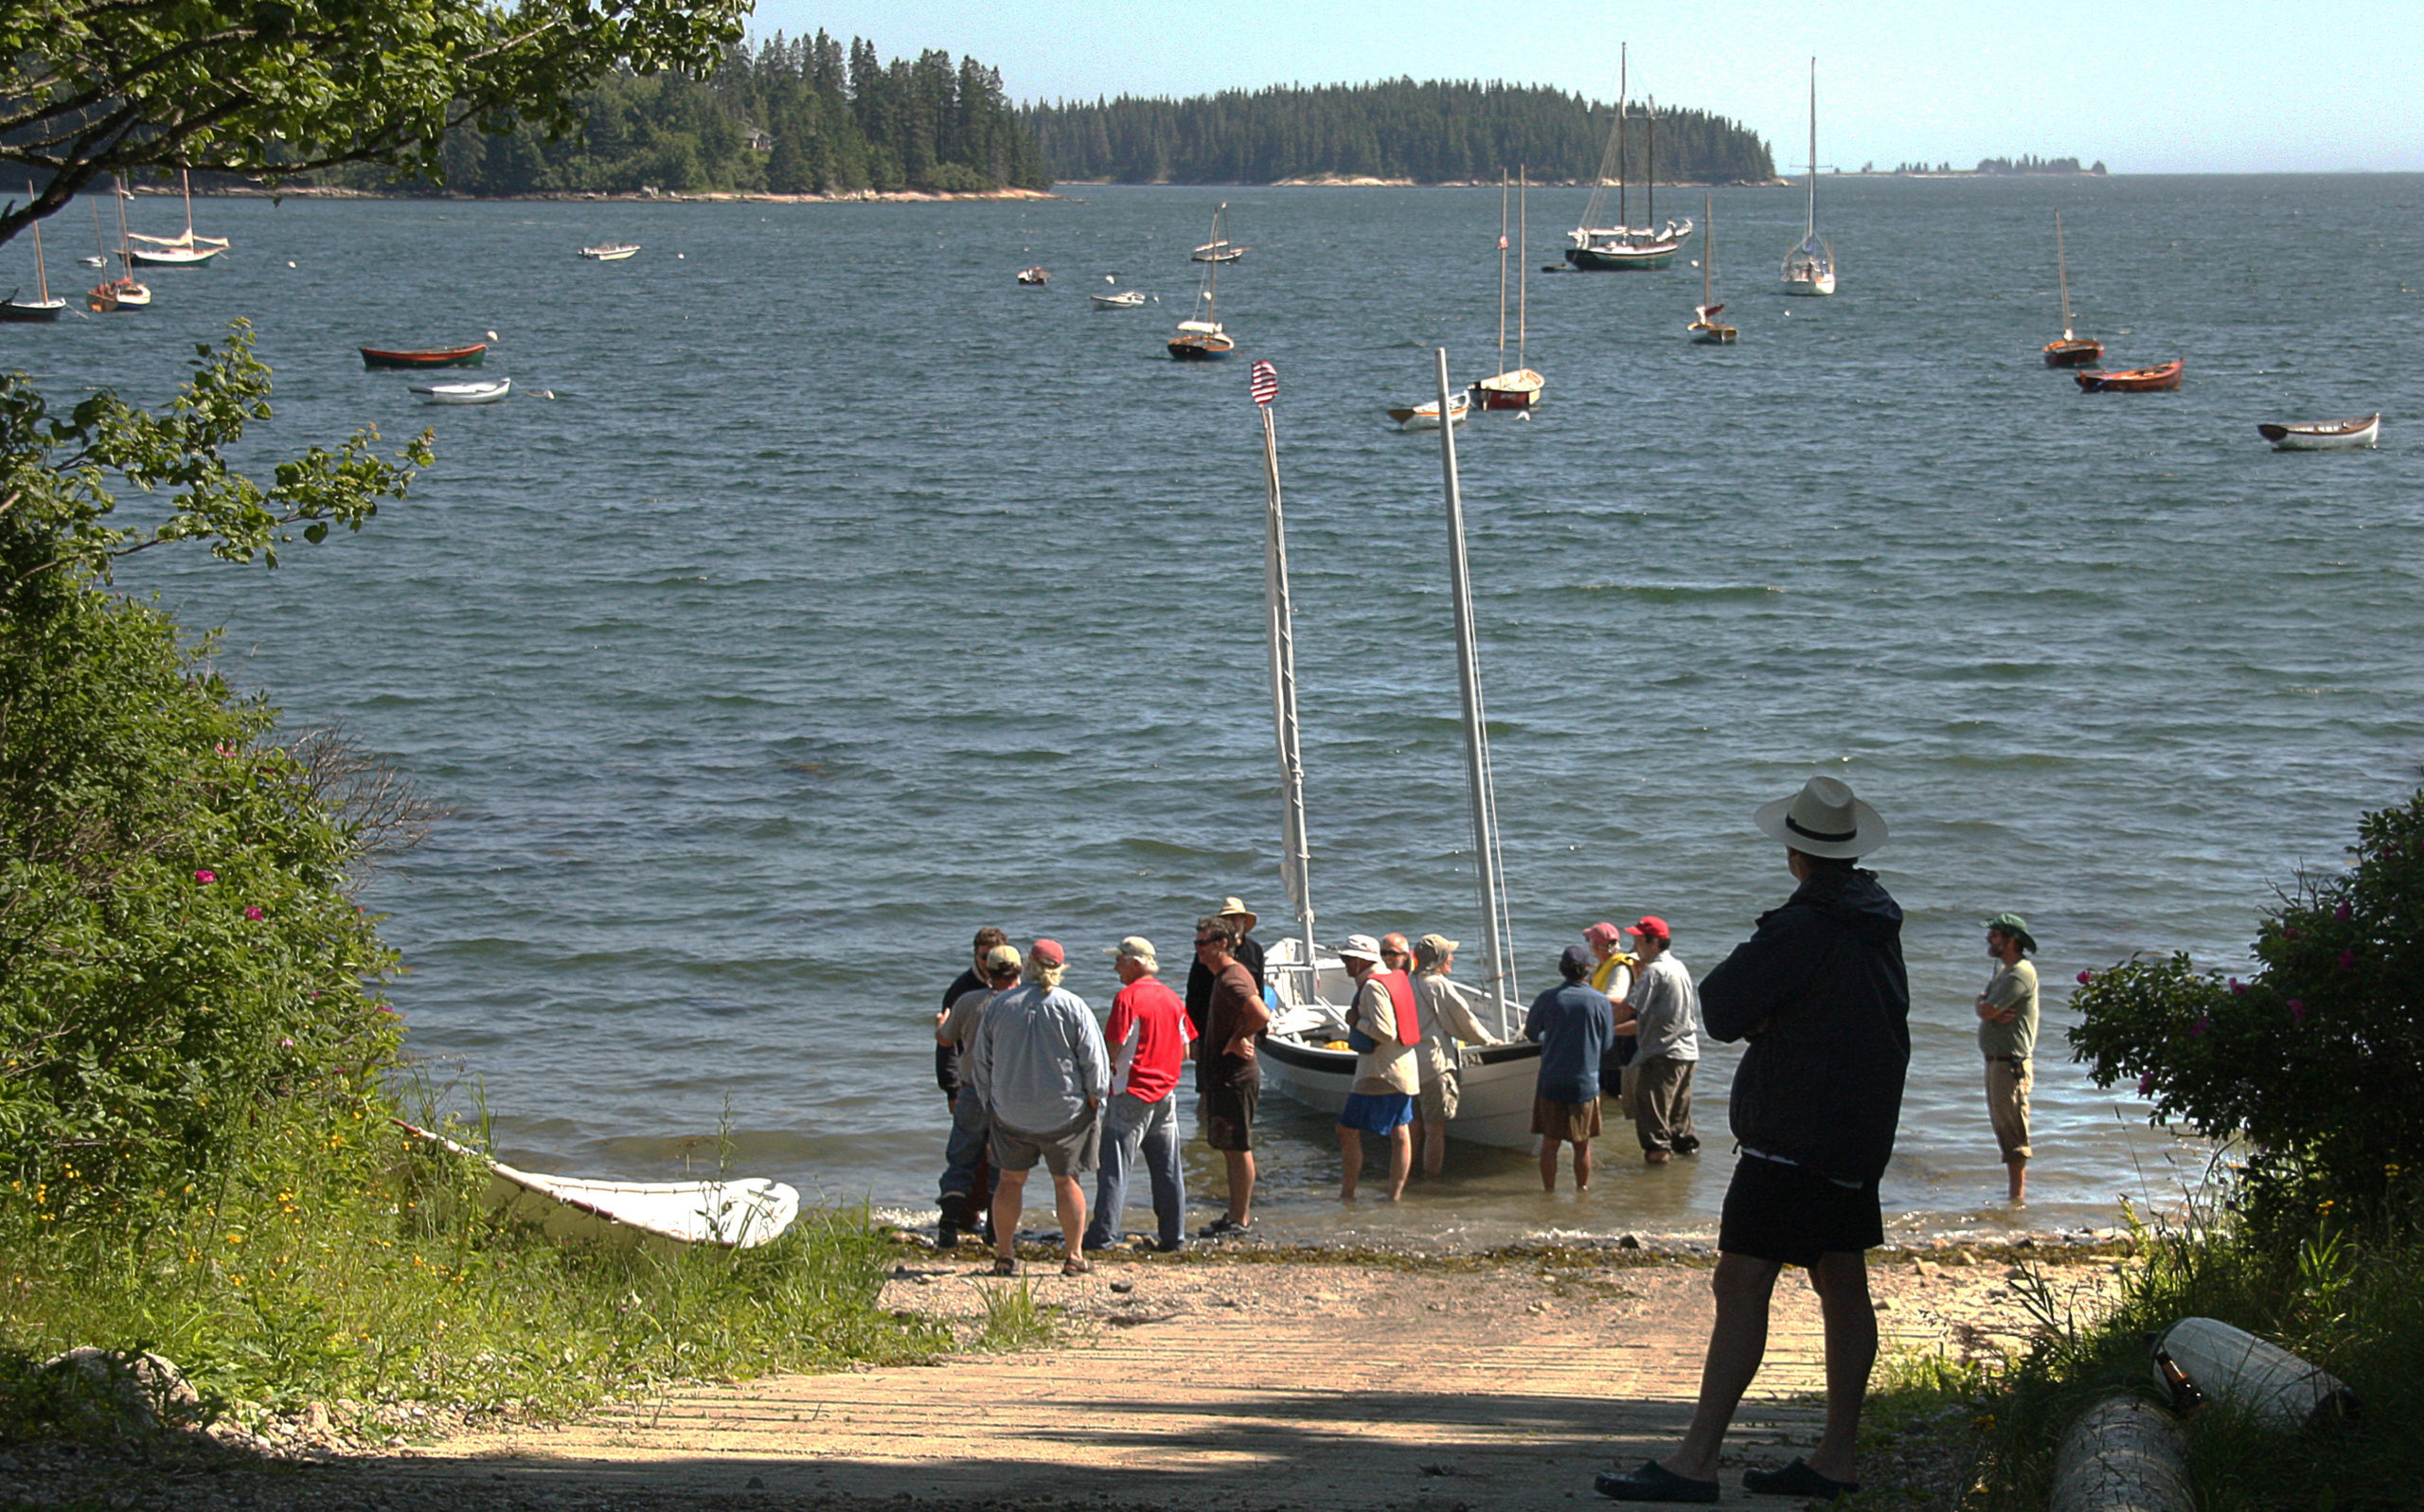
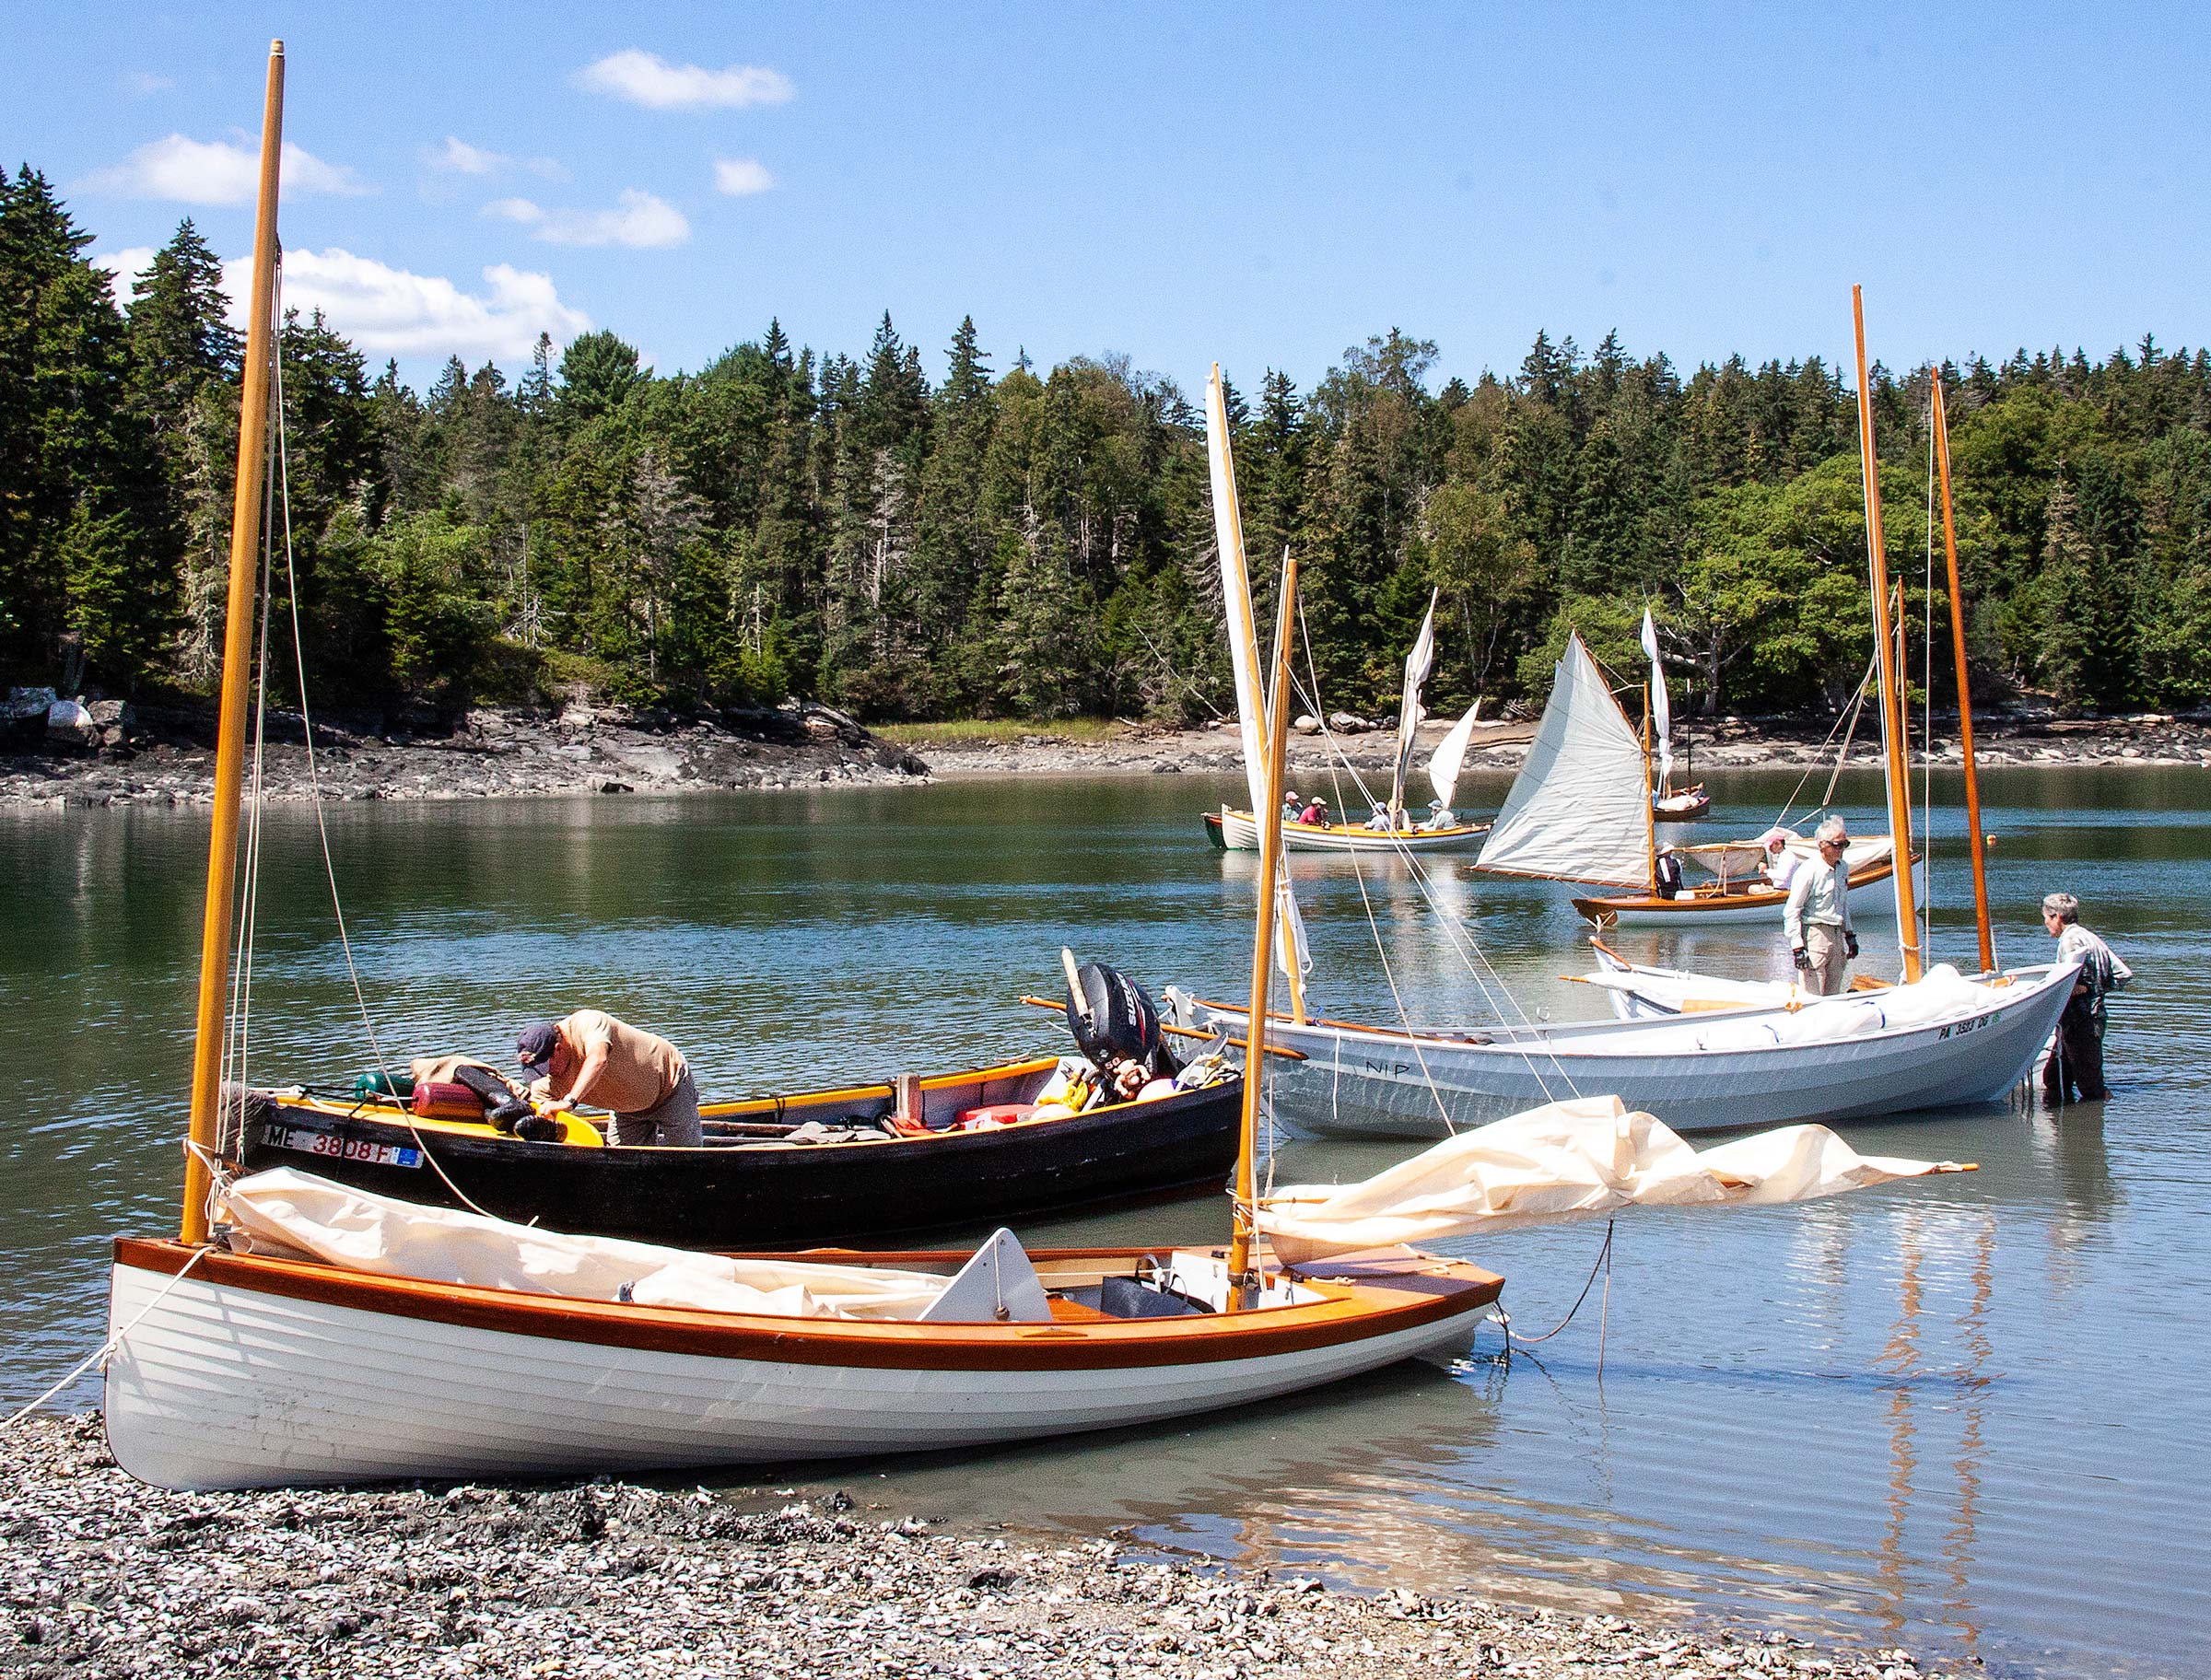
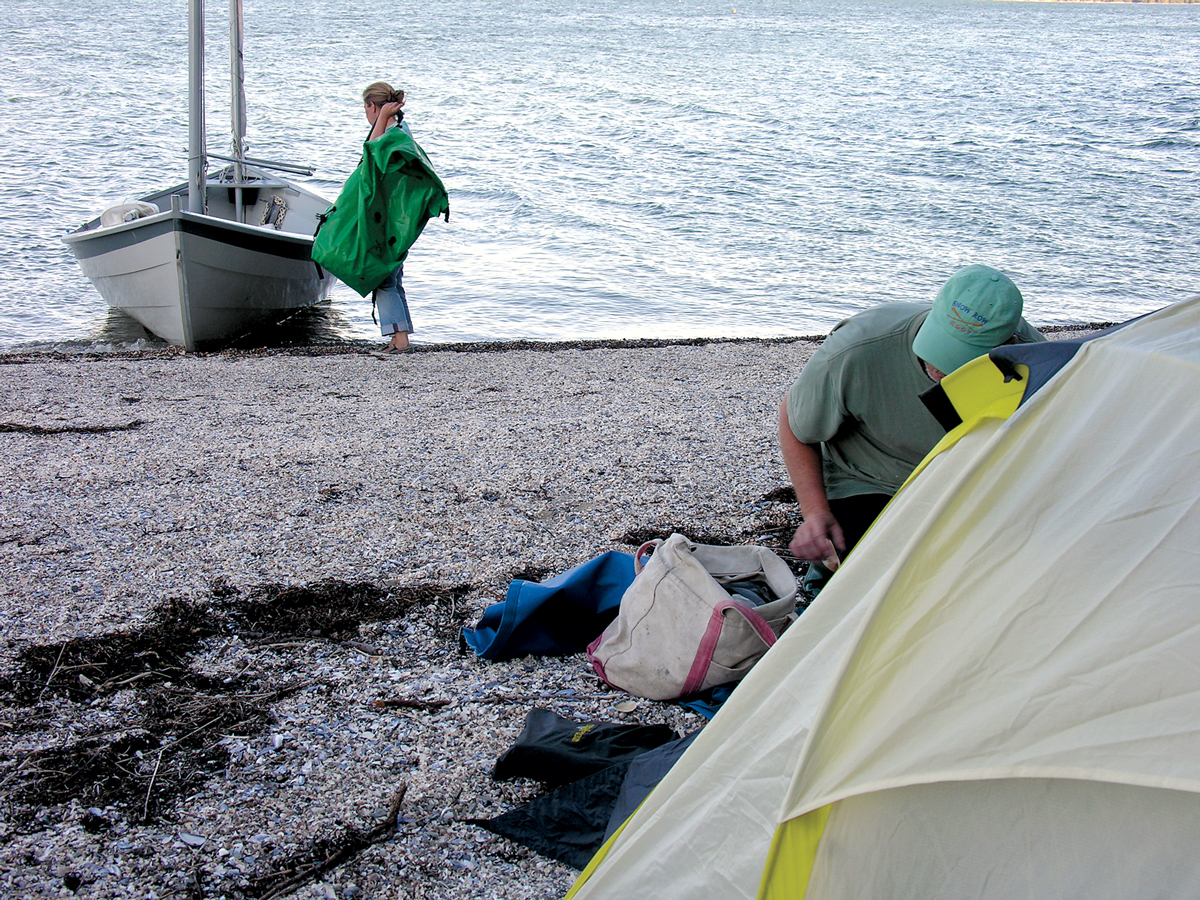
Volunteerism became a hallmark of the SRR, especially when boats had to be carried over rocky shores to soft ground.
We started out at WoodenBoat Publication’s grounds in Brooklin, although the SRR was never a WoodenBoat event. In 2010, we moved to the more commodious Lamoine State Park, which fronts Frenchman Bay near Mount Desert Island, home of the popular Acadia National Park. The state park was accommodating, but its launching ramp was shallow and the waterfront had only a narrow band of anchoring depth. After three years there, we moved for two more years to Hog Island Audubon Camp, a turn-of-the-last-century rustic inn on a 330-acre island in Muscongus Bay, west of Penobscot Bay. Audubon has owned the preserve, which is otherwise uninhabited, since the 1930s, and its trails and beaches are a delight. We had the entire island to ourselves for the SRR, with lodging in tents and in dormitories, a central dining facility, and a classic large central meeting room with a stone fireplace. One thing we learned from Hog Island, however, is that logistics for an island are exponentially more complicated than for the mainland.
Casting around for other likely locations, we found a great many that dialed exactly the right combination of excellent sailing waters, a decent launching ramp, a good anchorage, and ample campground capacity for a small group. Few could accommodate what had become a 40- or 50-boat fleet with tenting ashore. When we learned that a new private campground in Brooklin called Ocean Camping at Reach Knolls had opened and could accept our entire group, we jumped at the opportunity to return to our roots.
Courtesy of the author
Launching ramps can be challenging in some areas of Maine. At Atlantic Boat on Herrick Bay in Brooklin, a ramp that is good on most tides, with an adjacent beach, proved to be among several compelling reasons to keep the SRR in one place.
And there we settled. For the SRR days, we reserved the entire campground, which had room for growth. We also drew on the generosity of Atlantic Boat Company, a Brooklin boatyard with quite a decent launching ramp, plenty of trailer parking, a small beach for light boats, and an ample anchorage in Herrick Bay, which is at the threshold of Blue Hill Bay, Jericho Bay and Eggemoggin Reach, all of which we sailed.
Over the years, the fleet grew. In 2021, our 15th SRR and the one that we decided would be the last, we all gasped a bit when we initially had applications for 125 boats. But we knew that number would fall, as it always had before. The fleet, still the largest ever, finally settled out at 83 boats.
As the 2021 SRR came and went, people in the fleet and friends around town immediately started asking why, when it seemed so popular and successful, would we stop?
Rosemary Wyman
Haulout areas for lunch had to be chosen carefully. A sandspit at Sheldrake Island east of Frenchman Bay proved to be an ideal daysail from Lamoine State Park—but had to be vacated quickly on a rising tide.
First, we of the core group were all volunteers, and we were all 16 years older than we were when we started (counting 15 SRRs and a year off for Covid-19). Most of us were ready to move on, maybe to smaller sailing adventures that would liberate us from the need for administration. We were always strictly egalitarian, and we all paid the same entry fees, camping rates, and meal prices as everybody else. It was all for one, and one for all. But we didn’t see a rising cadre of new volunteers in the area. Many of our participants were from New England but they also came from as far south as Virginia and Florida and as far west as Michigan and Wisconsin. Those who seemed eager to volunteer seemed too far away. We were meeting every month, and even for some of us living in the area it was an hour’s drive to do so.
We were also nearing the capacity limits of the campground and the anchorage. None of us could envision going back to searching farther afield, and in any case we had already looked high and low. Hitting growth targets and setting records was never our “thing,” but we were always reluctant to impose limits on the fleet, knowing that with first-come, first-served protocols or some sort of lottery, some regular participants who had formed solid friendships in the group would inevitably have to be turned away. Either that or we wouldn’t be able to make room for new participants who helped to keep the event fresh for everyone.
Rosemary Wyman
Lamoine State Park, which overlooks Mount Desert Island, home of Acadia National Park, was home to the SRR from 2010 to 2012. The park had excellent facilities but a challenging launching ramp and only a narrow band of anchoring depth. One of its amenities was a large field where boats could be stored, allowing some 40 owners to do quick presentations about their boats.
We decided to end it on a high note. We set 2020 for the final year, but of course the pandemic scrambled that plan. We decided to hold the last event over until Covid-19 restrictions lifted, whenever that would be. We delayed the 2021 “go” or “no-go” decision as long as we could, then decided in late May to proceed for July 7–11.
As always, we scheduled three days of sailing. Under a cloudy sky on Thursday, we had good winds and no rain; many boats were single-reefed and some double-reefed. On Saturday, we had light air but ample sunshine.
On Friday, however, Tropical Storm Elsa brought a day and night of torrential rain and strong winds. We all spent much of the morning battening down our boats, spreading farther apart in the anchorage, and letting out more scope. That afternoon, Ben Fuller arranged a group tour of the fine small-craft collections at Penobscot Marine Museum in Searsport, where he had been the curator, and one of our participants, Gardner Pickering, led a tour of the CNC boat kit operations at his workplace, Hewes & Company in Blue Hill. Our longstanding caterer, Frank Bianco of Brooklin, gamely made the grill dinner work despite the downpour—even though most of us kept our sea boots and foul-weather gear on for dinner, seeing that the water that was ankle-deep even under the big tent. Despite the lack of sailing, the sodden dinner grounds, and the soggy campsites we had to settle into, I heard not a single complaint.
Rosemary Wyman
Lunchtime haulouts, a regular feature for the SRR, provided an opportunity for comparing boats in close quarters and they were a way to keep the fleet together.
Over the years, we had seen just about every kind of weather that summer in Penobscot Bay can bring—dense fog, sparkling clear days, flat calm, fine breezes, strong winds, thunderstorms. Everyone has favorite stories from the SRR, and one of mine came just after my crew and I landed in an exceptionally dense fog on a fine beach at Babson Island off Eggemoggin Reach. Willits Ansel, a shipwright I had written about and a man not given to using technology beyond a chart and compass, landed near us. He got his sailing dory squared away and then walked up to join us. “Tom,” he called out, “can you tell me where we were?” I could not.
At first, we had the idea that a group of boats could gather without much coordination. Every skipper was his or her own master, we thought, and we believed we could simply sail in company more or less as equals. We learned very quickly, however—in the second year, I think—that not all skippers were experienced with tidal currents, not all had ventured out or been caught out in high winds. Not all had anchored just off a rocky lee shoreline with gales predicted. Some didn’t know their reefing systems well, and a few not at all. Some had not much more than a paper clip for an anchor and a rubber band for a rode. We learned to set conservative routes. We sometimes chose rowing over sailing and stayed near shore. We were reminded that in the fog the sound of lobsterboat engines somewhere nearby can be extremely disconcerting to the uninitiated—and even to old-timers.
Rosemary Wyman
Bean Island in Frenchman Bay was a prime example of a conservancy island—one of many scenic islands in Maine that allow zero-footprint day visits but no camping—that gave SRR participants a personal connection to the Maine coastline.
We learned that when you invite people to sail in a scheduled event, you feel a great deal of responsibility not only for their safety but also for the quality of their experience.
We established a very effective chase fleet under David Wyman’s leadership. He recruited numerous powerboat owners of his acquaintance to join in over the years. He brought a boat of his own design to lead them; I took to calling him the admiral of the fleet. Sometimes he turned his boat over to others so he could sail a while. His friend Denzel Hankinson came year after year with his “a-bit-funky” but reliable power cruiser from Massachusetts; Grigg Mullens brought his Chesapeake Bay draketail from Virginia; Mark Ober drove his Pulsifer Hampton boat a long ways over from Sorrento on Frenchman Bay; every year MITA provided one of its capacious aluminum skiffs with a very game crew of volunteers. By the final running, the chase-boat drivers knew each other—and one another’s skills—very well. It was difficult to think of finding replacements for them, should any bow out. The chase boats ferried crews out to anchored boats and could give a tow if necessary. But they were not search-and-rescue professionals; in a really serious emergency—which we never had—their primary task would have been to render whatever assistance they could and hail the U.S. Coast Guard, whom we always notified of the event. In only one or two instances, a chase boat took someone ashore for a medical issue unrelated to sailing.
Rosemary Wyman
Above all, the SRR was about getting on the water in a variety of boats and rigs—although always with a healthy contingent of Iain Oughtred–designed Caledonia yawls.
We were serious about the safety gear we required participants to have. We had three capsizes over the years. Only one, when a boat turned turtle in the fog, was concerning. Another was towed into shallow water after the skipper learned he could not control water ingress through the top of his centerboard trunk. We didn’t require GPS, but we highly recommended it, and many who experienced the strange psychology of dense fog decided on their own to add a handheld GPS to their inventory. We always required VHF radios, set to channel 68 and close at hand, so that any problem could be reported to the chase leader. We had paperwork on everyone, skipper and crew.
We also advised having two anchors, one heavy and one light. People in the early days often showed up with light Danforths; by our 15th running, very few were asking anymore why we advised heavier gear, and most slept soundly knowing their boats were well anchored for the nights when they could hear the wind howling through the treetops in the campground. The morning after the storm in our final year, we didn’t have any serious problems in the anchorage. But even then, a few more skippers, especially solo cruisers, may have thought about high-grading their ground tackle.
We learned that some boats were not set up well for reefing in strong winds—and it did blow sometimes. Chase-fleet boats often stood by struggling boats to make sure they were safe and to extend advice or help. They could tow if necessary, but such times were rare. We expected people to want to be self-sufficient. We also asked skippers to have a plan for recovery after a capsize and to communicate the plan to their crews.
Rosemary Wyman
At the Hog Island Audubon Camp in Muscongus Bay in 2013 and 2014, logistics had to be adjusted to the realities of getting people, boats, and gear to an island. The hand-carry boats had to be closely packed in.
But something else happened, too: sailors began to learn from each other. Questions came up casually on the beach or over dinner or around a campfire, and solutions and ideas were liberally shared by all. In the course of this give-and-take, a lot of friendships were made, and sailors came to look forward to reuniting with the group as much as they looked forward to the actual sailing, and maybe more. Volunteerism started in the first year, when everybody needed help carrying boats down a very rocky launching ramp. Everybody chipped in. All for one and one for all. That ethic extended throughout the SRR, and the group amplified it in ways of their own.
By the end of the last SRR, a lot of education had taken place. Some of it was formalized; we did sessions on VHF use for those not familiar, Ben Fuller did a capsize recovery demonstration, we reviewed safety gear ahead of launching, we did a few presentations about emergency equipment. As we went on, fewer sessions were needed, and most of the learning happened person-to-person. Over the years, we all noticed an overall gain in competency with things such as anchoring, reefing, navigating, radio usage, capsize preparedness, and even sail trim. There were fewer and fewer instances of boats struggling on very windy days. People who brought their boats to the SRR often went home better mariners than they were when they came.
Rosemary Wyman
The author borrowed Ben Fuller’s Afjordsfaering for the first two SRRs, ending in 2008, when he launched his No Mans Land boat, FAR & AWAY, at center.
At the end, participants starting asking how we could keep it going, maybe by moving to a new state. My stock reply was this: “What do you need us for?” Our fondest hope was that more small-craft gatherings would emerge, that the idea would proliferate. All you need is good people, volunteers who bring individual strengths to the table.
One thing we learned was to simplify. In the early years, we had one four-wheel-drive pickup truck launching all the boats, which arguably may have been necessary at a rocky launching ramp. But that persisted longer than it should have; it dawned on us that at other ramps people could launch their own boats—after all, what did they do when we weren’t around? We stopped providing custom laminated charts, which took hours to produce, because charts were readily available. After trying to arrange vegetarian and special-needs menus, we gave up and said that if the menus didn’t appeal, people could arrange their own meals to suit their needs. We considered not doing meals at all, but my wife, Corinne Ricciardi, reminded me that if we did, it would be a vacation for me but not for her. We printed tickets for meals early on, but we ended up just taping a laminated list to a tent post so people could remind themselves of what they had paid for. Simplifying probably gave us the energy to go on through the 15th running instead of ending after the 10th, which some had been ready to do but stayed on, I think, mostly out of loyalty to the group.
Rosemary Wyman
With what appeared to be a sandspit actually turning out to be a mussel shoal, some boats remained at anchor and rafted up for lunch during one of the Muscongus Bay sailing days in 2013.
Other locations would have different problems, with corresponding solutions. Some problems would be uniform. We were loosely organized and independent at first, but we reorganized under the umbrella of the Downeast TSCA after we learned that if we did we would have insurance through the national TSCA. We thought about insuring also against, say, a hurricane warning that would force cancellation but leave us with fixed-costs and people asking for refunds. Instead, careful stewardship of resources, as taken up by Paul LaBrie, created a cash reserve that allowed us to essentially self-insure. We sold T-shirts with a logo by the artist Sam Manning; he and his wife, Susan, were regular participants. We ended up in such good financial shape that after the final SRR we donated $5,000 each to the Maine Island Trail Association, the Penobscot Marine Museum, and the TSCA’s John Gardner Fund scholarships.
Very often these days, events seem to take on an extreme-sports tenor, as if nothing counts unless you get dramatic GoPro video or Red Bull sponsorship. At the SRR, we were unwilling to put people at risk by inviting them to do more than they were comfortable with. We always welcomed families, and a few times we had three generations. We granted scholarships to youth programs, most memorably to Boston Family Boatbuilding. Having inexperienced people join the fleet reaffirmed the need to choose conservative routes and sailing conditions.
Rosemary Wyman
Although sailing craft were predominant, the SRR always had room for oars-only boats, often eight or 10 of them—and the rowing boats were often first to the haulout destination. The event never had absolute rules on minimum or maximum length, recognizing that in the right hands a small boat could be taken just about anywhere. The principle rules were the ability to beach and relaunch without assistance, the ability to row long distances, no cabin structures, and no motors of any kind.
But as we grew, veteran participants started looking for their own adventures. Some sailed independently before or after the SRR. My own favorite experience was sailing solo from Brooklin to Muscongus Bay—four days, and I never got off the boat. After that much time self-contained, I arrived at Hog Island ready for socializing, great daysailing, good food, comfort ashore with friends, and rounds of music in the central hall. Then I sailed two days home. That closeness with nature, depending entirely on your wits to judge wind and weather and decide courses, is an adventure in its own right. It’s better than day racing.
Rosemary Wyman
In the first years, 2006–09, the SRR started from the WoodenBoat School in Brooklin, seen here in the early morning light with the fleet intermingled with the school’s boats and visitors. Many of the SRR participants were school alumni.
We of the Downeast TSCA sail in company six or seven times a year, a commitment to getting out on Maine’s coastlines, rivers, and inland lakes that pandemic isolation only reaffirmed. More SRR participants, too, started to sail in company on the Maine Island Trail and elsewhere. Their experiences and friendships deepened as they found their own adventures. I hope they launch events with no idea where they’ll end up, keeping the spirit of the SRR alive and introducing others to what I view as a way of life.
To me, and I think to all of us, that’s entirely what the point of it all was.
Tom Jackson is senior editor of WoodenBoat magazine. He is a native of the Pacific Northwest but has lived 24 years in Brooklin, Maine, where he sails a 17′ 8″ No Mans Land boat and rows a Gloucester Light Dory, both of his own construction, and paddles an 18′ Old Town wood-and-canvas guide canoe.
If you have an interesting story to tell about your adventures with a small boat, please email us a brief outline and a few photos.
I’ve been rowing a Whitehall-type pulling boat for about 30 years now, and I nearly always row without an overlap of the oar handles. The ends of the handles just about touch when set square to the centerline. This is mostly because that’s the way I learned to row a fixed-seat rowboat 60 years ago. Other folks I know have been rowing for just as long with overlapping handles. But in a rowing “hard chance”—working against strong wind and current—I can use the better leverage on the oars provided by overlapping handles. Shifting the oars inboard also shortens the outboard end of the oar and quickens the stroke rate, helping to keep a steady forward momentum. The blades are also higher on the return stroke, better for clearing the chop. I could carry a second set of hard-chance oars, but then I’d have to make room for them and struggle with changing them out just when I need oar blades firmly planted in the water.
I figured the best solution would be to find a way to quickly “change gears” at the oar collars rather than having to change the oars. Having recently switched from leather to the adjustable plastic sleeves from Seadog—which I find present considerably less friction in the oarlock, making feathering nearly effortless—I realized I could simply snap on a second sleeve, reversed end for end, over the first to provide a second button farther outboard, a task that just takes seconds.
Photographs by the author
The off-the-shelf sleeve, left, is easily shortened then trimmed back to give it a snap-on, snap-off fit.
I shortened the second sleeve to a length of about 3″, which happens to leave just enough of the fixed sleeve exposed to bear on my Gaco oarlocks. If you use a different type of oarlock you may have to shorten the sleeve a bit more. The added collar shifts the oar handles inboard, bringing my hands right over each other.
I used a small backsaw to modify the second sleeves. (Someone braver than I could probably do this on a bandsaw, but you would want to cobble up a jig when cutting the sleeve to length to prevent it from rotating.) To make the sleeve easier to spread open to fit the oar, I widened the slot and cut the button back a bit.
With the adapter sleeve in place, its collar bears against the oarlock, shifting the oar inboard for greater leverage when a headwind requires it.
When the oars are used in their normal fashion, the adapter sleeve can be snapped on the loom out of the way and readily available.
In sea trials, I found that the overlap did indeed give me noticeably more leverage and the 3″ inboard shift of the oars significantly increased the stroke rate. Both lessen the strain when bucking a headwind. For me, there is only one downside. After rowing without an overlap for so long, I have to quickly adapt to an unfamiliar stroke with one hand leading the other. For a while, at least, I’ll carry a pair of gloves to protect my bruised knuckles during hard-chance rowing.
Jim Tolpin is a teacher and writer in the field of woodworking, and has lived by and boated in the waters around Port Townsend, Washington, for the past 40-plus years. As his bumper sticker says, “My Other Boat is a Whitehall.”
You can share your tips and tricks of the trade with other Small Boats Magazine readers by sending us an email.
We have a wide variety of small boats in our armada and, with our recent move to our new homeport in the Tidewater region of Virginia, we found ourselves in need of a cart for our kayaks and canoe. When we checked out the local kayak launch, we found that the ramp was too narrow for our Dynamic Dolly, but while we were there we spotted Railblaza C-Tugs being used by a kayak rental business. The C-Tug appeared to be just what we needed, so we ordered one online. Made in New Zealand, the tug arrived in short order from a Railblaza dealer in Houston.
Photographs by the authors
The cart breaks down into easily stowed parts. After the initial assembly, the straps will remain with the pads, and the kickstand will stay with one of the crossbeams. The toggles that hold the wheels in place are connected to the axles so they can’t get lost.
The C-Tug assembles and dismantles quickly without the need for tools, and the parts will fit in a small storage area. There are two crossbeams with stainless-steel reinforced axles, two hull pads, two wheels, a kickstand, and a webbing strap with ladder-lock adjusters and a cam buckle. The framework is made from UV-stabilized ABS, acetal, and nylon plastic. The assembled cart is 25.4″ wide at the wheels and stands 12.4″ tall. Its bunk pads are a rubbery UV-stabilized elastomer that provides a wide shock-absorbing surface to grip and protect the boat hull. They cover an area 19″ wide and 11.8″ fore and aft. The articulating hull pads can be easily adjusted to fit a wide variety of hull shapes. The 9′-long, 1″-wide polyester strap tightens down securely without deforming the hull; its die-cast aluminum cam-lock buckle is easy to manipulate when fingers are wet, gloved, or cold; and the large teeth engage the nylon strap securely. The puncture-proof wheels have a rubberized tread that provides excellent grip and a quiet ride for the tug across gravel and concrete. The 10.3″ by 3.6″ wheels may be the Goldilocks of cart wheels—not too big, and not too small; they rotate on 1″-diameter axles.
The C-Tug can carry up to 260 lbs. A raised center provides smooth rolling on pavement, and transverse treads keep the wheels rolling in sand, rather than plowing through it.
The assembled cart weighs 10 lbs and will carry up to 260 lbs. It is held up for loading by a handy kickstand and, with the boat strapped on, it is ready to cross rough and uneven surfaces without tripping the cart from its position on the hull.
Railblaza also offers a Sandtrakz wheel that is 12.3″ in diameter, with an additional outer rim that is flexible and compresses to create a longer wheel footprint optimized for soft sand. One other option to spread the load for heavier boats is a Double Up bar that can connect two C-Tugs.
The tug has no parts that will corrode, so it should hold up well in the marine environment. It’s a well-built, versatile transport system that not only eases getting boats from a parking lot to the water, but also comes in handy for moving boats around in home storage areas.
Skipper (Audrey) and Clark (Kent) Lewis mess about in their Armada of small boats in the Tidewater Region of Virginia. Their adventures are at their blog, Small Boat Restoration.
The C-Tug Canoe & Kayak Cart with standard “Kiwi” wheels is available from Railblaza for $149.99. It comes with a five-year warranty. The cart is also sold by outdoor retailers.
Is there a product that might be useful for boatbuilding, cruising, or shore-side camping that you’d like us to review? Please email your suggestions.
I built a Piscataqua River Wherry over the winter and, when I launched it this spring, I found the need to add a bit of ballast to trim the boat to its designed load waterline in order for it to track without undue effort and to reduce the quick rolling motion typical of wherry-type hulls. It turned out that I had gone a bit overboard in shaving weight by choosing lighter scantlings and plank thickness during the build and the hull came out very light—about 50 lbs or so underweight. After seeing the unintended consequences while rowing the boat, I put four, 10-liter/2.6-gallon water jugs (about 80 lbs) under the center thwart. While this did the trick, I looked for a permanent, more elegant solution. Using water for ballast instead of the more traditional approach of using beach stones provides a measure of safety should the boat be swamped, as water offers neutral buoyancy.
Jim Tolpin
The bags are stout enough to stand upright while being filled with water. The screw-on caps are tethered and have two parts. One opens the bag for filling with water (left) and the other, smaller cap leaves a valve with the bag (right) so it can be filled tight with air, orally inflated, or with water from a faucet or hose. To fill the bag with a hose, open the large valve and press the top of the bag flat against the bottom to expel the air. Insert the valve and hold the hose to the smaller opening. The valve will allow the bag to take on water until it is quite tight.
A quick search for water ballast bags online revealed a product I hadn’t thought of: water-filled weight bags that attach to a canopy’s support legs. The bags from Anavim, made of heavy-duty PVC, come with three heavy-duty Velcro attachment straps and a special fitting for filling. (The PVC is not a food-grade material and is not intended or recommended to be used to carry water for consumption.)
SBM
The blue bag has been filled by pouring-in water. The yellow bag has been filled with air using the valve to get it drum tight. The same degree of fill can be achieved by flattening the bag like the black bag here and using the valved cap to fill the bag with water under pressure.
The outer portion of the fitting has a one-way flap so you can inflate the bag to enable it to expand and stand up on its end for efficient filling, while the inner valve unscrews to accept a hose. If you don’t have access to running water, you can use a bilge pump or a bucket to fill the bag with the aid of a funnel. Each bag can hold 10 liters of water, about 22 lbs. To transport the bags in your car or boat to and from the launch site, you simply empty them and compress them to fit in a small canvas carry bag.
While I’ve been using the bags to add a bit of weight to the boat, they can also be used to correct a boat’s trim to get its best performance. As movable weight, the bags can also be used to adjust the trim for rowing in wind. Setting them in the stern to trim the boat down by the stern will help a boat track well on a downwind course; setting them in the bow will help hold a course to windward. The bags can also come in handy at camp to hold a tent in place when the wind is blowing, especially when the tent is set on sand or rock, where tent pegs are ineffective.
Of course, these bags can also be used as flotation bags. I added stretchers in my wherry’s bow and stern to attach them securely in place; each inflated bag adds about 22 lbs of buoyancy.
SBM
Anavim also makes saddle-bag types of water weight bags. Passages through the middle of the bag allow water to flow from one end to the other. They can add about 11 lbs of ballast in areas too small for the 10-liter water bags, and are great for anchoring camera tripods. The striped bags all have black backs, which can absorb the heat of sunlight to warm water for washing or bathing.
These bags appear to be well designed and constructed, and I’m delighted with how effectively they fit my need for a quick way to add ballast or buoyancy.
Jim Tolpin is a teacher and writer in the field of woodworking, and has lived by and boated in the waters around Port Townsend, Washington, for the past 40-plus years. As his bumper sticker says, “My Other Boat is a Whitehall.”
Canopy Water Weights are available from Anavim with prices starting at $23.98 for two to $49.98 for four in white, black, blue, and green. The Anavim store on Amazon offers the weights starting at $26.98 for two. The saddlebag design is priced at $26.99 for four.
Is there a product that might be useful for boatbuilding, cruising, or shore-side camping that you’d like us to review? Please email your suggestions.
Patrick Blake is 11 years old and a sixth-generation Blake boatbuilder. His third great-grandfather, Benson Blake, settled near Vicksburg, Mississippi, around 1834 and, while it’s not known what boats he owned, he did own a second home in Pass Christian, close by the yacht club there, the second oldest in the country. He raised his children as sailors, and the familial interest in boats grew with each succeeding generation.
Photos courtesy of the Blake family
Daniel, Nick, Andrew, and Patrick (left to right) gather in the shop where a scow is taking shape. Patrick chose the design for his boat from a book written by Boy Scout founder Daniel Carter Beard Carter in 1882, nearly a half century after the Blakes took to boats and boatbuilding.
Patrick’s grandfather, Daniel Blake, built about two dozen boats, including BOGLE, a 34′ Galway Hooker, JUBILEE, a 50′ steel paddle-wheeler, and MARY SAVAGE, a 31′ boat reminiscent of a 16th-century caravel. Patrick’s father, Nick, has also been drawn to building small wooden boats, among them CURLEW, a stretched New York Whitehall, and a faering with a flat, beachable bottom. Nick and Daniel both started early and small. Nick built a 7′ scow, HAPPY COCKROACH, when he was nine years old. Daniel was about eight when he built a similarly square-ended boat, but much narrower, like an old wooden horse-watering trough.
Patrick’s father, Nick, was 10 years old when he stood proudly in the 7′ scow he built and named HAPPY COCKROACH. He used it to ferry people to and from MARY SAVAGE, the caravel shown here that Patrick’s grandfather Daniel built and launched in 1990.
Patrick and his younger brother Andrew have spent a lot of time watching their father build boats in the family shop under their grandfather’s watchful eye. It was only natural for Patrick to get in on the action. We’ll let him tell his story.
I wanted to build a boat, because I heard about my father’s HAPPY COCKROACH, the boat he built when he was young. My grandfather was an avid boatbuilder, and my father built boats, too. I wanted a boat of my own to paddle around the waterfall pool on our land. I had been hoping to build a boat for a long time, and then we finally decided to make one.
I started looking through books on how to build a simple boat, and finally I found the plans for a small scow in The American Boy’s Handy Book by Daniel Carter Beard. I started thinking about what size I would like it, and what I could build quickly and use right away. I decided on a length of 5′ 6″ and a beam of 29-3/4″, because that’s what size boards we had in the shed.
The Blakes have a sawmill on their land and, as trees in their woods die or fall prey to disease, they’re felled, sawn, and stacked. As a good supply of air-dried lumber is always at hand, Nick notes, “Free time is all it takes for a Blake to start building a boat.”
Andrew lends a hand on Patrick’s boat. It’s likely he is already thinking about a boat he’d like to build for himself.
Afloat for the first time in the boat he built, Patrick is evidently and rightly pleased with his work.
My father wanted to make some sort of a punt thing that didn’t look too good (and looked like some sort of a papaya), while my grandfather and I wanted to build a scow. After a lot of arguing, Dad finally gave in.
We started with the sides. We made them out of a 10′ 6″ piece of 1″-thick, home-cut sassafras. We drew the diagram of the sides on the piece of wood, and cut them out with a Skilsaw and tablesaw. We planed them to 7/8″, and fastened them together with 3″ deck screws to two pieces of 28″ walnut on the ends. Then we put two sassafras boards on the ends above the walnut for extra strength.
Next day, we started on the bottom. We planned to make it batten-seamed. We made the bottom out of 5/8″ sassafras boards, 29-3/4″ long. We clamped each bottom board on, drew the length, cut it off, clamped it back on, drilled, took it back off again, caulked the edge of the side where the board should go, put the board back on once more, and fastened it down with deck screws.
Then we made the battens. For each batten, we took a piece of 3/8″ x 2″ sassafras, and cut it to length. Then we planed the edges, fit the battens in the boat, took them out, and put a bead of silicone down the seam where the bottom boards met. Then we put the battens in their correct places, and fastened them down with tiny brass and copper nails. Then we put a seat in, and the boat was ready to go.
We took her down to Bliss Creek and put her in the water. She floated well, and didn’t leak too much. I paddled her around the pool with an old oar that had been shortened. Then my dad paddled her across the pool, and my brother and I both got in and paddled around. Then we put her up on blocks on a hill by the creek. A couple weeks later some friends came over. My friend Will and I got into the boat and paddled around, but then Will’s little sister and my brother tried to get into the boat, too, and swamped it, so we had to drag it up on the shore and dump the water out.
After the first creek trials, the boat went back to the shop for paint and oarlocks. Boatbuilding often goes beyond woodworking to metalworking. Patrick was introduced to arc welding so he could build a trailer for the scow. Daniel built an electric car for Patrick and Andrew a few years ago. He had built a similar gas-engine car for Nick when he was in his teens.
After the sea trials with the unpainted boat, it was left outside to dry then brought back to the shop for finishing. Here, Patrick sands the wood smooth as Andrew look on at what is generally regarded as the least interesting part of boatbuilding.
A natural at painting, Patrick doesn’t have a spot of paint on him and the brush has been carefully dipped in the can stopping well shy of its ferrule.
The love of boats and the skills to build them has been passed down from Daniel to his son and grandsons, and the newly finished scow is the latest boat to take shape in his shop.
Arc welding takes a steady hand that comes only with practice. Patrick is getting an early start.
Andrew (left) and Patrick head off for a day on the water with the boat in tow on the trailer Patrick built. Their electric car was built by their grandfather, Daniel. When their father, Nick, was 15 years old, Daniel built a similar gas-powered car for him.
Master of the boat he built, Patrick has his ticket to a bit of Mississippi paradise, the aptly named Bliss Creek. This waist-deep pool at the base of the waterfall is a Blake family swimming hole.
I am very glad to have a boat to row about the waterfall pool, but it gives me a feeling that my paddles are too short. I need to make oars. I am not planning to build another boat soon, but I do want to fix up my great-uncle’s wooden houseboat, TELEPHONE. It is currently sitting on blocks on the old pigsty slab.
It’s in the Blake blood to build one boat after another, so we likely will hear from Patrick again. His brother Andrew may soon follow suit, and the two of them will keep the shop busy until it’s time to hand it over to the seventh generation of Blake boatbuilders.
Do you have a boat with an interesting story? Please email us. We’d like to hear about it and share it with other Small Boats Magazine readers.
Here’s a fine outboard skiff that will prove inexpensive, easy to build, and fast on the water.
Early on the finest Saturday morning in July, I found my way to a perfect small lake in central Maine. Hidden away in the green foothills, not twenty minutes from the blacktop parking lots and shopping mall bustle of Augusta, this secluded water offers a good home for Henry and Sam Whittemore’s Diablo skiff.
Sitting quietly at her mooring, BONITO, as the Whittemores call their boat, is striking. Designer Phil Bolger drew sweeping longitudinal curves into this skiff. These contrast with the hull’s sharp and angular transverse sections to make a strong visual statement. Either you will really like her looks (for the record, I do), or you won’t. She leaves little room for neutrality. The matter of her performance seems more certain: it is superb.
Photo by Henry Whittemore
BONITO’s Diablo design is derived from the Amesbury skiff—itself a dory-derivative. The plywood hull is easily built, and easy on the eyes.
Henry and Sam, father and son, built this skiff a few years back when Sam was an eighth-grader. Now he’s a sturdy high-school senior, and I weigh close to 200 lbs. But as the two of us climb aboard, the Diablo easily sur- vives our weight at the rail. Sam fires up the 15-hp Johnson outboard, and we idle toward open water.
Free of the harbor, he advances the throttle. Acceleration is instant and hang-on-tight impressive. As the young skipper throws the tiller over hard, the skiff banks easily into an incredibly tight high-speed turn. She leans reassuringly toward the inside of the turn like a well-piloted aircraft. In the morning calm, we cut sharply back and forth across the photo boat’s wake. BONITO handles the manmade waves smoothly and with absolute control.
A quick look at the hull described by Diablo’s body plan reveals the reasons for her prowess. The narrow (2′- wide) bottom, combined with substantial bilge panels that rise at an angle of about 26 degrees, offers low wetted surface when the boat is lightly loaded or when she rises up to plane as we open the throttle. Those well-angled bilge panels also ensure that this skiff banks predictably toward the inside of high-speed turns. The panel to the outside of the turn offers plenty of lift. There seems little danger that we might trip over a chine and capsize outward.
Photo by Henry Whittemore
Author O’Brien enjoys an outing with builder Sam Whittemore on a central Maine lake. The materials for this boat, BONITO, came from the local lumberyard.
When running at speed, Diablo shows considerable dynamic stability, but what about initial stability when she’s stopped dead in the water for fishing or working? Does that narrow bottom give cause for worry? Not really. She heels down some as we approach the rail, but then she stiffens firmly…and more quickly than we might have expected. Fishermen will like this friendly stability curve.
The hull’s straight bottom up forward mimics the Amesbury skiffs from which Diablo is derived, and its shape will help to ease construction. Bolger predicts: “It will stop her when it digs into the back face of a sea, but not intolerably since she has the exaggerated topside buoyancy to pick her up.”
After testing the Diablo prototype, builder Dynamite Payson praised the hull’s relatively full forward sections in Build the New Instant Boats (International Marine, 1984): “She can carry much more weight up there than a slim- mer craft of her size can, and with a following sea that’s pushing her along at a good clip, she won’t start to nose dive, either. Sure, going into heavy weather she is going to pound a little more, but…I can slow her down and wiggle my way over head seas….”
Photo by Henry Whittemore
BONITO is easily nosed onto a beach, and takes the ground standing bolt upright.
Payson, a commercial waterman before he began putting together boats, holds powerful feelings about having adequate buoyancy forward: “This bias of mine has its roots in my experience with various types of lobsterboats I used while working off Metinic Island. During the late ’40s and early ’50s, a trend developed away from the lower-powered, easily driven fishing boats toward [hulls with broader sterns]. There was an awkward time during that evolutionary period, before boatbuilders realized that if you put a big wide stern on a workboat and crowd the power to it, then you are damn well going to need more bearing forward to hold the bow up instead of getting it pushed down by the force of following seas piling up against the wide transom. During this transitional period, fishermen were trapped in boats whose combination of wide sterns and narrow bows made them mean to steer with any sea behind….”
We’ll build Diablo with sheet-plywood panels held together by composite joints. That is, we’ll cut the panels to shape following expanded patterns shown on the plans. Then we’ll assemble them with tacks (actually 18-gauge nails), which will hold the hull’s shape until we can permanently secure everything with fiberglass tape, epoxy, and filler.
This is the “tack-and-tape” building method. In theory it’s essentially identical to the simple “stitch-and-glue” technique that has produced thousands of home-built kayaks; but instead of twisting plastic or wire ties to join the panels, we’ll drive lots of small nails. Payson sees advantages: “You’re spared the need to drill holes to lead the wire through, and you don’t have to wreck your hands twisting the ends together…. I hate working with wire.” Neither method requires close fits or much beveling. Both methods demand considerable grinding and sanding if we’re going to achieve a yacht finish.
Henry and Sam built BONITO with 1⁄4″ and 1⁄2″ exterior-grade fir plywood panels. They used spruce framing lumber for the thwarts and trim…all from the local lumberyard. Although they worked precisely to the Diablo hull shape as drawn by Bolger, the father-son team modified a few details. They built a useful locker below the ’midship thwart. A nifty foredeck adds more room for stowage and flotation, without spoiling the graceful sheerline. Additional lockers and flotation will be found below the quarter seats.
Photo by Henry Whittemore
Options abound for the boat’s layout. Sam Whittemore and his Dad, Henry, found stowage space under the thwart and foredeck. A center console would work on this hull, too.
Might we consider other alterations? On occasion, some folks (often professional watermen) like to stand erect while driving boats of this type…for improved visibility and to allow their knees to act as shock absorbers. We could install a steering console, but I’d be inclined to avoid the expense and dead-stick vagueness of remote controls. Instead, a robust 3 1⁄2′-tall post installed somewhere abaft the ’midship thwart would give us a firm handhold when we’re standing and steer- ing directly with a tiller extension. These stanchions (sissy bitts, chicken posts, idiot bitts…call them what you will) cost little and spoil less space than consoles. Of course, we’ll employ them carefully and in reasonable sea conditions.
So, here you have an easily built skiff that performs as well as (or better than) its store-bought competition, and the Whittemores have proven it to be a rewarding family project. Go for it!
Diablo Particulars
[table]
LOA/15′
Beam/5′
Power, maximum/25-hp outboard
[/table]
A narrow bottom and wide, angled bilge panels combine to give Diablo an efficient planing surface and predictable banking in turns. She has great dynamic stability at speed.
The Diablo Boat Profile was published in Small Boats 2009. Plans and full-sized patterns for the Diablo are available from H.H. Payson & Company. Small-scale plans and building instructions for Diablo are included in Build the New Instant Boats, by Dynamite Payson, available from H.H. Payson & Company and The WoodenBoat Store. The book’s small-scale plans were intended as illustrations only, not for reading text and numbers; the plans and patterns from H.H. Payson & Company are recommended for building the Diablo.
Talk about tough acts to follow! What’s a boatbuilder to do when contemplating the sequel to a model that has long since become a legend in its own time? That’s the question Bill Womack and his crew at Beetle Inc. found themselves asking one day in 2006. Although the Beetle Cat is a big 12′ 4″ boat, it is still a little vessel in which skipper and crew are seated on the cedar floorboards. “What we were after,” said Womack, “was a traditional catboat with seats that would appeal to people who had grown up sailing a Beetle Cat but are now interested in a larger catboat.”
Womack turned the matter over to resident designer-builder for special projects, Bill Sauerbrey. Fresh from his creation of the 28′ C.C. Hanley catboat KATHLEEN (see WB No. 193), Bill soon concluded that a 14′ 4″ hull would be the smallest practical size to gracefully accommodate seats while also being large enough to distinguish itself from the venerable Beetle Cat.
Photo by Stan Grayson
The Beetle 14 (14’4″) is the big sister of the 12′ 4″ classic. Lest you think 2′ is not much of a difference, consider the designer’s observation that “You could fill two [original] Beetles with water and empty them into this boat.”
If adding 24″ to the length of a Beetle Cat doesn’t sound like much, think again. “It’s only 2′ longer than a Beetle,” Sauerbrey pointed out, “but it’s also wider and deeper and has more displacement. You could fill two Beetles with water and empty them into this boat.” Put another way, Sauerbrey reckons the 14 is about 80 percent more boat than a Beetle Cat.
The fact that a catboat has just one sail doesn’t mean there is anything simple about its design. Every proportion and detail, from centerboard location and size to sail cut, must be just right. Sauerbrey is well versed in the technical aspects of yacht design, but he also has a lot of practical experience in how all the various forces react on a centerboard hull powered by a single sail. This first-hand knowledge is a big plus for prospective owners of the Beetle 14. After extensive study of 14′ to 15′ catboats at Mystic Seaport and others for which he found drawings, Sauerbrey emerged with his own variation on the theme. The goal became a design that would avoid extremes and result in a fun-to-sail, solid-feeling yet responsive, and comparatively dry boat.
“The deadrise is more of an everyday catboat than a racing-oriented model,” Sauerbrey noted. “The latter would have a flatter bottom and tighter turn at the bilge. The Beetle 14’s comparatively round bottom is deeper than a Beetle Cat’s and puts more of the rudder in the water. This not only improves steering as the boat heels but means we could round off the rudder. This rudder won’t catch the mainsheet should it be allowed to run out and fall in the water.”
Whatever its shape below the waterline, the Beetle 14 has a distinct resemblance to the Beetle Cat. That’s largely because Sauerbrey used a stem profile similar to that of the smaller boat. Also, the white oak coaming evokes the Beetle Cat’s. The coaming is relatively low, which will make it possible for many sailors to sit on the rail with their feet on the seats and not experience any pressure on the backs of their thighs.
As Sauerbrey worked out the hull shape, he had in mind the practicalities of building as well as performance. “The shape works well in a production setting,” he noted. The frames involve no excessively tight bends, and the hull is built according to the efficient Beetle method with steamed oak frames formed over the mold. That mold now occupies its own production space in Beetle’s Wareham, Massachusetts, shop.
The Beetle 14’s hardware is a mix of Beetle Cat and new pieces custom made to patterns crafted by Sauerbrey. The masthead fitting, eyebolts for blocks, bow chocks, twin mooring cleats, rudder pintles and gudgeons come from the Beetle Cat. The stemhead fitting, mast band/gooseneck, and the optional boom pedestal (or “crab”) are unique to the 14. So is one of the rudder’s tiller straps. The halyard and sheet cleats and the bronze blocks are all one size larger than those of the Beetle Cat. I was impressed with the Beetle 14’s rig. For one thing, the proportions of all the Sitka-spruce spars—mast, gaff, and boom—look exactly right. Nothing is too large or too slender. Rather than design a gaff saddle, some of which work well while others are marginal and unable to resist forces that tilt the gaff to one side or another, Sauerbrey fitted the Beetle 14 gaff with jaws. The boom is rigged with a topping lift, an important feature on any catboat much larger than a Beetle.
Photo by Stan Grayson
As with the original Beetle Cat, the Beetle 14 is carvel planked in cedar on steam-bent white oak frames.
On a sunny day in mid-May, I joined Bill Sauerbrey and his colleague Mark Williams to check out the Beetle 14. We’d be sailing the waters off Osterville, Massachusetts, the very neighborhood in which the Crosby boatshops once stood. A gusty northerly wind had blown all clouds from the sky but suggested that a single reef in the 180-sq-ft sail would be prudent. (The sail has two sets of reefpoints versus the Beetle Cat’s one.)
I stepped gingerly from the dock onto the boat’s bow only to find that the Beetle 14’s foredeck is a very steady platform. Gear is easily stowed under the foredeck where a pair of flotation bags is located for that highly unlikely, “just-in-case” scenario. (The boat carries 500 lbs of lead ballast beneath the floorboards.)
A good way to begin judging a catboat’s functionality is to see if there is anything fussy about hoisting and low- ering the sail. The Beetle 14’s gaff ascended easily. I noted the absence of leathered gaff jaws or parrel beads. Predictably, Sauerbrey had reasons for each. He’s found the gaff balances well, remains perpendicular to the mast, and slides easily thanks to a coating of wax on the jaws. (On the boat we sailed, the mast had remained unmarked after many hoistings and lowerings.) As for parrel beads, there is no need. The hoops hold the sail close enough to the hollow mast that the line around the mast from one jaw to the other is purely a safety measure and pro- duces no friction. The sail, incidentally, comes down very smartly, which is especially reassuring when a boat is sailed on and off its mooring or float (or during reefing procedures).
Photo by Stan Grayson
The Beetle 14 has a hollow spruce mast; the sail is affixed to it via mast hoops. Rather than articulating on a mast-mounted gooseneck, the boom swings on a deck-mounted bronze pedestal.
Underway, the Beetle 14 felt neither overly stiff nor in any way tender. The beamy hull (6’10”) just heels a bit and then forges ahead. There was just the right amount of weather helm, a desirable safety trait that will make the boat want to round up in puffs while giving a pleasant overall steering feel. It was not until we turned for home and began beating up Cotuit Bay that we began to feel some wind-borne spray. Considering the weight of that breeze, the Beetle 14 proved a reasonably dry boat, certainly more so than its smaller sibling. According to Sauerbrey, who has sailed the boat extensively in a wide range of winds, the bow shape helps knock down some spray as the boat heels.
As we headed back to West Bay through the lovely Seapuit River, we found ourselves in the lee of Osterville Grand Island, and Sauerbrey suggested it was time to shake out the reef. He quickly tensioned the topping lift to support the boom, slacked off the clew reef pennant, and uncleated the tack reefing line and then the reef- points. Finally, Bill hoisted the sail to its full height. Now, despite an adverse tide, we tacked our way through the river, raising the foil-sectioned board when it scraped the sand and then lowering away in deeper water. Here was a catboat in its natural habitat, doing its thing to perfection.
As we headed north in West Bay, the wind shifted to the southeast and lost velocity, so we congratulated our- selves on not having to put right back the reef we’d just taken out. All along, I watched how the gaff and boom moved as we shifted from one tack to another. The boom, mounted on the optional pedestal rather than a mast-mounted gooseneck, put no pressure on the mast and both boom and gaff swung easily from port to starboard, creating no uneven strains to mar the sail’s shape.
Photo by Stan Grayson
The Beetle 14’s stern sections and barn-door rudder are reminiscent of the original Beetle Cat; the seats, visible here, aren’t (sailing an original Beetle, skipper and crew sit directly on the cockpit sole).
The battenless “Egyptian cream cloth” sail was developed by Bill Ribar—it seems almost everyone in this project was named Bill—of Doyle Buzzards Bay; he has extensive gaff rig experience. The sail is notably well reinforced at all corners and the tack and clew reef cringles. It was very responsive to tinkering with halyard tension on different points of sail. According to Ribar, the sail has a little less fullness than a Beetle Cat’s in order to enhance pointing ability. Whether one chooses to order this sailor talk to another sailmaker experienced in the ways of gaff rig, be advised that you get what you pay for in a sail. A well-designed sail built of quality fabric will hold its shape long after cheaper versions have broken down.
One sometimes hears the term “wholesome” used in regards to a sailboat. My overall impression is that the “wholesome” adjective perfectly fits the Beetle 14. This is an honest boat that is fun, rewarding, safe, good to look at, and small enough to be built of now scarce classic materials (a white oak keel, 5⁄8″ Atlantic white cedar planks over white oak frames, with domestically made bronze fastenings). Neither is the boat so big as to present a maintenance headache. The topsides are coated with an easily sanded Pettit semigloss, while earth-toned Kirby flat finish colors are used on deck canvas and the interior. Sauerbrey noted that the interior paint will age gracefully and can be maintained with light sanding and an occasional thin recoating. About the only thing I could think to add to the Beetle 14 might be a mast coat—Sauerbrey didn’t rule this out but noted that, without one, water is not trapped at the mast partner but instead passes freely into the bilge—and some cushions.
For those fortunate to live in an area of shoal waters and sandy bottoms, the Beetle 14 should provide many years of satisfying ownership. The $35,500 price is certainly competitive for a professionally built boat of 1,250 lbs displacement. The buyer of the first boat, seeking something with more comfort than his Beetle Cat and more liveliness than his centerboard sloop, liked his Beetle 14 so much that he ordered another.
This Boat Profile was published in Small Boats 2009; learn more from Beetle Inc.
BEATRICE is a modified Saint-Pierre dory—a type once common on the waters of Canada’s Maritime Provinces. Born on the islands of Saint-Pierre et Miquelon off the coast of Newfoundland (French possessions to this day), the Saint-Pierre dory was a local response to a French government requirement for cheap, durable, and safe fishing craft for local fishermen.
Taking the traditional rowing dories of the region as a starting point, the Saint-Pierre dory gained size and weight and evolved higher ends and greater freeboard. It also gained an engine—usually a single-cylinder “make-and-break” two-stroke coupled to an ingenious retractable propeller and shaft. The boats sometimes had forward cabins. BEATRICE is a further evolution of this concept, and was designed by David Roberts of Nexus Marine for construction in fiberglass-sheathed plywood.
Photo by Karol Wilczynska
David Roberts of Nexus Marine (Everett, Washington) modified the traditional Saint-Pierre dory for recreational use; New Zealander Alan Litchfield built his boat, BEATRICE, to the design, with modifications to suit local conditions.
“It’s brilliant,” says Alan Litchfield, who had BEATRICE built for use in his native New Zealand waters. Roberts, he says, has “taken all the core elements of a traditional Saint-Pierre dory and made a few minor modifications—more beam, lower freeboard, a wider transom—to create a great little boat that’s stable, predictable, and loads of fun. I wanted a boat I could trailer to places like the Kaipara or Hokianga [Harbours] where Karol [Wilczynska; his wife] and I could spend our weekends exploring.” Trailering, he says, “also saves us having to moor her or keep her on a marina berth.” She lives in the couple’s suburban driveway when she’s not being used.
With beam of 8′ 9″, the David Roberts–designed Saint-Pierre dory is 3″ over the legal trailerable limit in the United States. Therefore, a permit or a modest tolerance for risk will be required to get her home from the ramp in the United States. BEATRICE carries thick solid-mahogany rubbing strakes, which swell her beam to 9’6″ (2.9 m); in New Zealand, that’s not a problem, and Litchfield can tow BEATRICE behind his TD5 Land Rover Discovery with only a few restrictions. The boat has proven easy to launch and retrieve, although her flat bottom and lack of self-centering rollers mean that retrieving is a two-person job.
Photo by Karol Wilczynska
BEATRICE’s modifications from the original plans include a slightly raised house, triple skegs (rather than one) for handy beaching, and accommodations that include a private forward cabin.
Aside from the thick rubbing strakes, Litchfield and the boat’s builder, Randall Haines, decided on several changes to the plans, largely to accommodate New Zealand conditions and their own boating experience. While designer Roberts wasn’t totally thrilled with all the changes, he was always consulted and, according to Litchfield, his advice was heeded wherever possible.
Another change to the original drawings includes the addition of an enclosed, slightly raised wheelhouse, rather than the specified hardtop with side curtains. The ability to close off the helm from the cockpit turns the boat into an all-seasons cruiser—a plus because boating is possible year-round in New Zealand. Winter weather, however, is colder and wetter, while in summer the ability to get out of the sun is welcome. Canvas covers enclose the whole cockpit for cozy overnighting.
Litchfield and Haines raised the wheelhouse roof a fraction so he and Karol could enjoy standing headroom. The roof framing itself has been modified from longitudinal to transverse laminated frames. It has more curvature, for better water shedding, and is stronger: the roof easily supports a standing adult.
Roberts’s main concerns with changes to his original design revolved around increased weight up high, exacerbated, he felt, by Litchfield’s decision to move the galley from its forward position below in front of the helm bulkhead to the wheelhouse opposite the helm. BEATRICE’s galley is certainly very serviceable, although seating accommodation has been lost (Litchfield has compensated somewhat with a folding jockey seat), and the space once occupied by the galley has become a useful navigation station. Aft-facing seats were also added to the cockpit: an icebox lives under one and the LPG bottle under the other, nicely isolated from the cabin.
“Roberts designed the boat primarily as a day cruiser; we like to use her for extended trips, sometimes of a week or more,” explained Litchfield. “So the ability to close off the accommodation was important to us and we wanted more usable galley space, since we cook real meals aboard. I’m also nervous about gas bottles housed down below. In the plans [the gas] was all the way forward. I feel happier with it up on deck.”
Down below, Litchfield ditched the hanging locker, changed the head layout, and moved a bulkhead forward and took it only partway to the coach roof. He also dispensed with a plumbed head and opted for a portable chemical toilet instead. The main advantage of the new layout is that the forward cabin can be closed off for privacy. On overnight expeditions, the portaloo can be moved out to the cockpit.
Photo by Karol Wilczynska
Modern construction meets traditional appearance. BEATRICE’s framework, seen here, will be “planked” in marine plywood, which will in turn be sheathed in fiberglass set in epoxy.
The other major modification was necessitated by the decision to fit a larger engine than was specified. BEATRICE runs a 60-hp four-stroke Yamaha outboard in a box-well; a 50-hp unit was specified, but the model was no longer available. The 60-hp has a wider cowling than the 50-hp, requiring a wider motorwell. A wider well means less buoyancy aft. Other modifications included enclosing the spaces between the coamings/sidedecks and cockpit sole, and along either side of the engine, to make lockers. Breather holes were added to allow airflow below decks.
Changes to the outboard well design probably caused everyone the most concern. Indeed, early trials indicated BEATRICE was stern heavy, with water slopping over the well and through the scuppers into the self-draining cockpit. Performance was good with the bigger engine—8.5 knots at half throttle—but Litchfield was uneasy about water splashing onto his batteries, originally installed in front of the engine well. The solution was simple: the batteries were moved forward and down low in the boat under the chart table, close to the instruments and electronics, making a subsequent rewiring job much easier. Aware from the beginning of Roberts’s concerns about top weight, Litchfield installed the 100-liter fuel tank between the frames under the floor amidships. In the original design a much smaller tank is positioned under the helm seat. Acting in tandem with a 100-liter water bladder, also below the waterline, as ballast, he was confident the tanks would address any trim issues. There’s no more water slopping into the cockpit, and he reports BEATRICE’s motion to be very stable—stiff, in fact.
There are other, less visible, variations to Roberts’s plans: three solid timber skegs rather than one, so BEATRICE can take the ground with minimal damage, and substantial changes to the bow. Litchfield has added a bowsprit and fairlead, along with a Lofrans electric capstan. The bow area has been greatly strengthened with solid timber blocks, to cope with long periods at anchor and to accommodate the substantial ground tackle that’s mandatory when cruising in New Zealand.
Photo by Karol Wilczynska
With the hull inverted, BEATRICE’s motorwell and accommodations are built. The well seen here is larger than the one specified on the plans.
The Yamaha 60-hp gives BEATRICE a top speed of around 17 knots. A cruise speed of 8.5 knots is comfortable, and 7.5 knots at 2,700 rpm seems to be the best compromise between speed and economy. The box well takes up quite a bit of space, but the engine is easily accessible and can be tilted until the propeller is clear of the water. BEATRICE will run for 20 hours on 26.4 gallons (100 liters) of gas.
Atrip to Tiritiri Matangi Island in Auckland’s Hauraki Gulf showed up BEATRICE’s charm and also some of the idiosyncrasies of a dory design. With a flat bottom she behaves more like a dinghy than a launch, relying on her skegs to keep her on the straight and narrow. Underway she tracks well enough, but at low speeds she can be a bit tricky in a crosswind. I was surprised at how well she coped with short, steep seas in Tiri Channel, easily dealing with waves on the nose or slightly from the beam, provided the skipper adjusted her speed to suit the conditions. Litchfield has braved 40 knots and 10′ seas without incident.
Where BEATRICE really came into her own was in the calm waters of a quiet bay at Tiritiri Matangi Island. We nosed carefully inshore, one of us on the bow directing the helmsman through a maze of rocks and reef, to a beautiful sandy cove where we beached her on the sand. With the engine tilted up she draws little water, allowing safe inshore exploration. A flat bottom means she can take the ground—and she remains upright when she does so. These are traits the owners have found invaluable during their ongoing exploration of many of the country’s large, tidal harbors.
We enjoyed coffee and cake while watching the wildlife—marine and terrestrial—before rain and deteriorating sea conditions drove us back to civilization. Alan Litchfield and Karol Wilczynska would be stepping back aboard later in the day, happy to spend the weekend poking around Mahurangi Harbour and maybe Kawau Island to the north, regardless of the weather. BEATRICE is a busy girl.
A trailerable sailboat can be so much more than a daysailer. With a sense of adventure, a little thought, and a bit of gear, the same boat can beach-cruise far and wide for days, weeks, and even months on end. The capacity to cover great distances at highway speeds opens territory that the owners of large mooring-bound boats can only imagine wistfully as they spend the second half of each vacation returning to the same homeport.
Access to camping ashore is perhaps the trickiest element of beach cruising. Guerrilla camping may have its time and place, but I find I sleep a lot better knowing the caretaker or landowner isn’t on his way to roust me. The fact is that here in the East (my home grounds) we are blessed with many wonderful and legally accessible cruising grounds. Favorites I’ve sampled are the Maine Island Trail, Cape Lookout National Seashore, the Apostle Islands National Lakeshore, and Lake Champlain. Next up on my list are Florida Bay and the Keys and Lake Huron’s North Channel. I’ve not cruised the Pacific Northwest, but by its reputation I know that it presents a whole new world for exploration for me—as does Europe, too.
Photo by Matthew P. Murphy
Having landed at the beach, author Geoff Kerr gathers his dry bags and prepares to unload his Caledonia yawl, NED LUDD, and set up camp.
Beach cruising can be likened to luxury kayaking, with room for more wine. It might also be compared with car-camping—though without the nocturnal door slamming in the campground. The range of suitable vessels is limited mostly by your imagination. With seaworthiness suitable to your chosen cruising area, the ability to carry a load of gear and companions, and a reliable rig, you are off. The necessary gear can be simple and inexpensive, and much of it is probably already in your garage. Issues that range beyond the scope of daysailing are finding your way, staying safe, staying warm and dry, eating and sleeping well, and taking care of the boat. The following photographs and ideas will help you with your fireside planning for next season’s adventures.
Gear and Stowing It
What to pack is somewhat a matter of boat size and of personal style. Gear can range from ultralight, minimalist backpacking equipment to luxurious and even sybaritic excess. There are some important principles to consider when loading the boat.
Remember that you must still be able to sail and handle the boat once loaded. You’ve got to be able to get to the pump and the anchor, and you must be able to reef and row. Remember too that boating is a water sport, and therefore wet. Pack in dry bags or lined duffels (contractor-grade trash bags are a wonder), so that at the end of a day of “yeeha!” sailing your panda-bear pajamas are still warm and fuzzy. More and smaller bags make stowing easier, and a large tote bag can make trips from the boat to the campsite more efficient. Plan on compartmentalizing your gear; specify a food bag, a galley bag, a bedding bag, and such. Once they are loaded aboard, bags should be strapped in to prevent shifting or loss in the event of misadventure; those loaded dry bags make for a heck of a lot of flotation should you experience what the emergency-management folks call a “flooding event.” Drinking water is often a logistical issue when saltwater cruising. Bring more than you think you need, and consider collapsible jugs or bladders so the empties are out of the way.
Photo by Matthew P. Murphy
Once the boat is beached and the gear unloaded, beach camping is essentially the same as the woods variety.
Campsite
Once the boat is unloaded, camping is camping, and your favorite tent and sleeping bag, cooking gear, etc. will serve for beach cruising. Food tastes and styles are obviously personal issues. The biggest decision is probably whether or not to carry a cooler and try to manage chilled foods and ice. I find the cooler is the largest, heaviest, and most unyielding item in the boat, and usually make do with non-refrigerated provisions (just take more wine). Once that question is settled, take great food and eat well. Local customs should be acknowledged…carry a big pot, butter, and lemon and never miss a chance to pick up lobster, shrimp, or a freshly caught fish. It is also wise to have some ready-to-eat meals on hand in the event of a late arrival, foul weather, or bad luck with the local seafood.
Photo by Matthew P. Murphy
Good cooking equipment and good food are essential to successful beach cruising. If you don’t want to carry an icebox, be sure to check out your local options—such as lobster in Maine or crabs on the Chesapeake.
When planning a trip, give due consideration to the local rules. Each island on the Maine Island Trail has specific considerations and designated tent sites. National Park Service properties often require permits and perhaps an itinerary or reservations. The no-fire rule is a pretty common concept these days, as is a pack-it-out policy for not only garbage but for personal waste as well. The MITA guidebook, for one, offers several strategies for solid-waste management that serve the small boater well. Their recommended system utilizing newspaper and zip-lock bags is handy, effective, and innocuous.
While doing your research, always consult with and buy into whatever local organizations hold sway in the area. It is often their efforts that have rendered the campsites accessible, and your meager membership fee will help feed an intern. Spend a dollar or two at the local kayak shop as well, and don’t be shy about asking for local secrets. Play by the rules and think well of the locals.
Beaching
What to do with the boat when you camp ashore is the overriding logistical challenge in beach cruising. Kayakers simply unload and carry the boat above the high tide line. Many small boaters with enough crew can do the same, and a boat high and dry makes for the best night’s sleep. Check and understand the tide tables and local evidence, and always secure the boat to a tree, boulder, or anchor. Wind changes, spring tides, and boat wakes have a way of moving any boat not actually in the woods. Larger boats or solo sailors may have to resort to some mechanical advantage. Boats have been moved on rollers for years now…you probably have them aboard in the form of fenders. Pump them up before setting off. When shorthanded, consider packing a come-along or handy-billy tackle. Moving the boat then becomes a rigging challenge rather than a physical ordeal, and merits a toast when accomplished.
Photo by Matthew P. Murphy
If you don’t intend to sleep aboard or use an outhaul anchor, then you must beach your boat above the tide’s reach. This can be done using brute force or mechanical advantage.
Anchoring
Beaching the boat may not be a reasonable option. The boat may be too heavy, or more likely the shore may be unsuitably steep, rocky, or exposed. Anchoring off is a time-honored strategy, and perhaps the simplest. The goal is to have the boat be there in the morning. Ground tackle is often a volatile issue, having spawned books and lawsuits and much marketing hyperbole. My rule is that no anchor ever dragged because it was too big. The 30-lb fisherman anchor pictured may look like Popeye’s salvage, but it held my boat through a hurricane on Cape Cod one summer, so I cherish it and sleep well when I use it. Whatever style anchors you carry (yes, I cruise with two, just like the big boys), be sure that they are rigged appropriately with shackles, long, heavy rodes, and chain as needed. (Please note that marketing claims often tout anchors as lightweight, without acknowledging that they may require more than their weight in chain to make them reliable. Choose wisely.)
Photo by Matthew P. Murphy
“No anchor ever dragged because it was too big,” says the author. His 30-lb fisherman held his Caledonia yawl through a hurricane on Cape Cod. The anchor folds for easy stowage.
Stow your ground tackle in a manner that renders it immediately usable. I flake my long rode in a self-draining plastic laundry basket, making for a non-fouling easy-in/easy-out system. Mouse (wire) your shackles, double your knots, sound carefully, and set your anchor well. Also look around the boat and secure anything that might work or chafe or make noise in the night. My main-mast thumping in the partner has prompted a moonlight swim or two.
Note that working with heavy anchors in small boats does offer a few risks. Try to rig and handle ground tackle from amidships, keep yourself well inboard, rest loads on the rail to save your back, and learn not to mash your fingers. Never throw an anchor. You are not that strong, and others will laugh when you fall overboard. Besides, if you can throw your anchor, it is too small.
Finally…how to get ashore? In many civilized parts of the world, a quick dip will solve the problem very simply. In some areas with small tidal ranges you might even wade ashore. But, alas, the water is often cold and deep, and salt water leaves you sticky and makes for poor sleep. There is no reason that a beach cruiser can’t have a tender. Folk often utilize small kayaks, canoes, or dinghies. Our effort here towing a 7′ 6″ Nutshell with a Caledonia yawl was perfectly reasonable. I’d be more inclined, however, to include a good-quality, very small inflatable dinghy…somewhat above SpongeBob swimming-pool toy quality. Include a foot pump and a duffel bag, and you’ll have a reliable option without having to tow.
Photo by Matthew P. Murphy
If you’re to anchor your boat and sleep ashore, you need a dinghy or (in cold waters) a strong constitution and a bathing suit. The small Nutshell pram ( 7′ 6″ ) shown here tows surprisingly well behind a Caledonia yawl, but a small inflatable raft would serve in a pinch—and it would stow aboard.
Sleeping Aboard
An important consideration in beach cruising is the capacity to sleep aboard in a pinch. Having this failsafe in your back pocket, even if it is not luxurious, can be a salvation in the event that you run out of daylight, have no shore access, or find your planned campsite overrun by hordes of jabbering middle schoolers. One of my recent excursions was a barrier-island cruise along a 40-mile stretch where day use was allowed but camping was prohibited. Sleeping aboard after a day of fishing and assorted other frivolity made a multi-day trip possible, and rendered me lord of all I surveyed each evening. Your accommodations can range from a simple tarp to a custom-fabricated tent, and this is a great do-it- yourself opportunity. Pack carefully and efficiently, and you can even cook and eat aboard relatively small boats. Less is more when living aboard. I just throw in the same bag of gear I use for kayaking or backpacking and hope for moderate weather.
Photo by Matthew P. Murphy
A boat of appropriate size will accommodate its occupants for evenings aboard. A tarp will keep the dew off; a more elaborate tent will resist rain and bugs.
Haulout
A useful strategy that keeps the boat afloat and accessible and that doesn’t require a dinghy is to rig a haulout. It is especially handy where schedules and large tidal ranges combine to complicate departures. It does take some preparation and a bit of dedicated equipment, but nothing sophisticated or expensive. The top left photo demonstrates the essentials: a good anchor and rode, a haulout buoy, a seriously long haulout line (like 300+ feet), and a shore-end anchor.
Photos by Matthew P. Murphy
A haulout, in proper conditions, is an ideal mechanism for getting your unoccupied boat to deep water for the night. The wooden cross in the photos is the mooring buoy; one side of it secures the anchor rode, the other side secures the boat’s long leash—the 300’ haulout line—which is secured to the bow in the bottom right photo.
Once camp is unloaded, the boat is rowed out to beyond the low-tide line, and the main anchor is set with the rode made off to the fixed side of the haulout buoy (top right). Then one end of the haulout line is shackled to the bow eye, and the line clipped into a carabiner or shackle on the running side of the buoy (lower left). The boat is then rowed back to shore, paying out the line cleanly from the basket as we go (lower right). Once ashore, the bitter end of the haulout is also shackled to the bow, forming a continuous loop, and the boat is hauled back out to the buoy. A shoreside terminus is chosen (an anchor, boulder, or tree), and at an appropriate position a quick figure eight in the bight of the haulout line gives you a loop to shackle or tie into to lock the system, and the boat, in the desired place. The photo at left shows the whole shebang in use at extreme low tide. At high tide or any intermediate state, we should be able to pull the boat in to our dry feet and mount up.
Photo by Matthew P. Murphy
The whole shebang. The boat is riding on the fisherman anchor, which is underwater. The Danforth in the foreground secures the 300’ haulout line to the beach.
Dale Brevik, whose work is featured in this month’s Reader Built Boat feature, built a beautiful model of a classic mahogany runabout and was inspired by it to build the real thing. My approach to models has usually been the other way around; they follow the boats that I’ve built. Whether it kindles the flames of ambition or sustains the embers of memories, a model can augment the rewards of building and using a boat.
Building a boat inevitably creates a connection with it. The complexity of the work requires an investment of time, thought, and energy— it requires giving one’s self over to the boat. Then, when the boat is launched and put to use, the direction of giving is largely reversed. The boat sustains us in an environment that we can’t otherwise survive in, takes us places often inaccessible by other means, and may even cradle us while we sleep. Time aboard is time we take for ourselves, extraordinary departures from the immemorable experience of ordinary days.
I don’t have as much time for cruising as I did when I began building boats, but I often sit in the three boats with cabins, especially when it’s raining, while they idle on their trailers in the driveway and back yard. With tarps covering the windows, it’s easy for me to imagine being at anchor somewhere, safe and content. Models can evoke the same feelings and have the advantage of being small enough to keep in the house where I regularly see them while passing through a room. In those brief glimpses, they can bring back not only the memories of the cruises I’ve made in the boats they represent but also the sense of freedom and the feeling that there is room to breathe. I sold the first boat I made for cruising, the dory skiff I rowed and sailed north for a month along the Inside Passage. I also sold the Hooper Bay kayak, the only kayak I’d built that I could sleep in. I may sell other boats I’ve built for myself, but I won’t part with the models.
In 1979, I built a voluminous Hooper Bay style of kayak from western Alaska. It was about 18″ deep and 30″ wide amidship, large enough for me to slide into and relax during a light onshore breeze. The canvas skin rotted after about 5 years but I kept the frame until last year, when I sold it. I made this model in the ’80s while I was manning a booth at a 9-day boat show in Seattle, using a pocket knife for most of the carving and a popcorn popper to boil water for ending the ribs and coaming. The model keeps alive the memory of lying in the hull, watching the play of water and sunlight on the skin and breathing in the redolent mix of red and yellow cedar, linseed oil, and cotton canvas.
I didn’t build this sneakbox model for myself but for a dear friend, the late Walter Fullam, a man who changed the course of my life. An article he had written about American adventurer Nathaniel H. Bishop inspired me to retrace both of Bishop’s 19th century small-boat voyages. It was a pursuit that lasted 4 years and eventually led to my 30-plus-year career as an editor. I have only photographs of the model, but they remind me not only of the 2-1/2 months I spent cruising my sneakbox from Pittsburgh to Florida, but also of the decades of friendship with Walter and his wife Dorothy.
I paddled my plywood interpretation of the Greenland kayak for many years. I had equipped the full-sized kayak with a small batwing sail and often sailed in storms, reaching speeds over 10 knots. Racing ahead of waves was both exciting and restorative. At high speeds, bracing with the paddle was rock solid, so I didn’t worry about capsizing; I could trust in my kayak, my paddle, and my reflexes and let my mind go blank. When the kayak surfed wave after wave without letting up, I often found myself laughing, completely at ease.
My Greenland kayak model also recalls my daughter’s infancy. While I may look at models of my boats and imagine being aboard them, Alison is the only one who ever actually occupied one of them.
Several years ago, Rachel and I spent five summer days aboard HESPERIA while anchored in a small cove in the San Juan Islands. My seamanship was, at times, a comedy of errors, and as a reminder I made a cartoon version of the boat in a glass case. I have built the hull of a larger accurate model but have yet to outfit it with the foredeck, sailing rig, and cabin.
BONZO, an Escargot canal boat that my son Nate, a friend of his, and I built in 2009, has become an important family fixture. Alison, Nate, and I have taken the boat cruising and have had friends and other family members join us aboard for birthday parties, Father’s Days, Fourth of July fireworks, fish-and-chip lunches and pizza dinners, and entertaining out-of-town guests. Years ago, when I was still doing my own taxes, I’d take BONZO out on the lake to make the paper shuffling and number crunching less onerous.
Because BONZO’s cabin is where we most often gather, I made the model’s roof removable so the furnishings wouldn’t be hidden.
To better rekindle memories of nights aboard BONZO, the model has its own lighting.
Our family spends some time at a cabin in the Les Cheneaux Islands on Lake Huron in Michigan’s Eastern Upper Peninsula. In our fleet there we have a center-console 21′ Widebody Tolman Skiff that we finished building in 2011, a lug-rigged Arch Davis Sand Dollar that we finished in 2015, a rowing wherry, and an assortment of kayaks. Do we really need another boat? Peter, my 13-year-old son, wanted a small powerboat that he and his friends could take fishing and exploring; I was interested in a utility skiff for trailering to the lake to do work at the cabin. We both wanted a quick build, simple construction, and nice lines.
When I happened across the Sponge Docks Skiff 13 by Bedard Yacht Design, I was immediately intrigued by the simple, practical interior and the gently curving sheer and transom sides. The Sponge Docks Skiff can be purchased with a CNC cut file, and since I have a CNC router in the shop, the simple, quick build became even simpler and quicker. Peter and I had a project. We ordered the downloadable plans and received six plan sheets along with a building manual and, in lieu of the full-sized templates, a DXF cut file, which had all the pieces drafted and nested on sheets.
Photographs by the author
The three seating areas enclose buoyancy compartments and provide access to storage compartments.
The DXF cut file imported directly into my CNC programming software, and in a couple of evenings we had a stack of boat parts cut from 6mm, 9mm, and 12mm Hydrotek marine plywood. Prior to this skiff, I had built four boats using plywood, epoxy, and fiberglass with different building methods. I had previously only done a little bit of the stitch-and-glue construction that is used for the Sponge Docks Skiff, but the build process was straightforward and the instructions were clear. The Sponge Docks Skiff is built right side up sitting in a cradle consisting of three plywood sections that match the bottom. The long 9mm bottom pieces and 9 mm hull sides are joined with puzzle joints rather than scarf joints, simplifying the process.
After gluing the transom’s two layers of 9mm and one 12 mm together, all the pieces of the hull were ready to be stitched together on the building cradle. The CNC-drilled holes made the stitching process easy and the hull took shape quickly. Peter crawled under the boat to get all the hard-to-reach stitches! The seams were then epoxied together between the stitches, the stitches removed, and the seams filleted and fiberglass taped/epoxied. As the plans specify, before the seat tops were glued on, we filled the port and starboard seat compartments with some leftover hard foam construction insulation that we had. The center compartments of the forward, center, and aft seats are storage compartments. We would use bungee cords looped over a catch to keep the hatch covers secure.
Spray rails secured to the perimeter of the bottom turn the spay downward to keep the occupants dry.
As the plans directed, we covered the hull bottom with two layers and the sides with one layer of 6-oz fiberglass and epoxy. The hull was finished with inwales, outwales, a small foredeck, running strakes to protect the bottom, spray rails, and hardware.
The plans detail three chineflat rail options. The traditional option is square-sectioned wooden rails fastened to the bottom edges of the side panels, just shy of the radiused chines. The more modern option is a pair of rails with angled bottom faces fastened to the bottom, just inside of the chines. The rails can either be made with a PVC pipe or a square-sectioned wooden rail on the bottom panel with epoxy fillet on the inside face to create the flats that knock the spray down. We built the more modern option using the wooden rails on the bottom.
The skiff is normally built with solid inwales, but I prefer scuppered inwales. The boat can be rolled up on its side to drain water and dirt, and dry bags can easily be lashed or clipped through the scuppers. Rather than create the openings with dozens of small blocks, we used the CNC router to mill pockets in one side of the stock for the inwales.
The plans mention primer and paint without specific recommendations, but because the skiff would be used on a lot of rock beaches we used a roll-on truck-bed liner.
The skiff can take an outboard of 10 to 29 hp. To limit the top end speed to keep my son and his friends safe, we equipped ours with a used 15-hp two-stroke motor.
A 6″ draft and flat bottom make the skiff well suited for exploring thin coastal waters.
When we first used the boat to get to the cabin for a work party, we used our utility trailer to transport the skiff. Peter, a friend and I could easily slide the Sponge Docks Skiff off the cross bars we’d secured to the top of the utility trailer’s sides and into the water. We clamped the outboard on and we were ready to go. With the boat loaded down with tools and gear, we were, needless to say, stuck in displacement mode and not going to get on plane. After we moved the gear ashore, Peter could not resist zipping around in front of the cabin with a big grin on his face. When both he and I were aboard, the skiff still easily hopped up on plane. We neglected to bring a GPS, so we had no way to check the speed, but the boat felt plenty fast enough to me. That first mission with the boat was a success.
Powered by a 15-hp outboard, the skiff, with a solo operator aboard, can hit 22 mph.
We took the skiff out with a handheld GPS to record speeds. With Peter alone in the boat, it pops up on plane quickly and tops out at 22 mph. Top speed with Peter and his 13-year-old friend is similar. With just me aboard the boat also planes quickly and tops out at 21 mph. With me at the tiller and the two boys aboard, the skiff starts to feel underpowered with the 15-hp outboard. At wide-open throttle, the boat hits 13.5 mph and then slowly climbs over the bow wave and the speed creeps up to top out at 19 mph. The boat gets on plane quicker if I move to the middle thwart and let one of the teenagers drive. The skiff is nimble and quick in the turns. The rails on the bottom prevent the boat from skidding while cornering and the spray rails do a nice job of knocking down the spray.
The simplicity of the skiff makes it a good introduction to boatbuilding and powerboat operation.
I have no need to make the Sponge Dock Skiff any faster, and Peter is happy with its performance. He definitely enjoyed motoring with his friend around the islands and taking the boat out to go fishing. Every so often the boys would yell up to me “we’re going on a boat ride” and the two would take off. At the end of the trip, Peter summed up the experience with “the boat is awesome!”
The Sponge Docks Skiff has been an unequivocal success. The skiff was straightforward to build with clear instructions and accurate cut files. Building it with Peter was an opportunity to spend time with him working on an interesting and instructive project. Finishing the project was bittersweet for me, but for Peter, the only bitter part was how long it took to build. The final product is a great utility boat with nice lines, and Peter gets to captain a boat appropriate to his size and age. We anticipate many more productive and enjoyable days on the water with the Sponge Docks Skiff.
Sam Smith is an engineer, farmer, and builder living in the Great Lakes area. Boats and boat plans are his endless source of observation, study, dreaming, and building, and he and his family enjoy using the boats he has built to explore the great outdoors together.
Sponge Docks Skiff Particulars
[table]
Length/13′
Beam/5.5′
Draft/6″
Maximum power/29 hp
Dry weight/approx. 250 lbs
[/table]
The Sponge Docks Skiff is available from Bedard Yacht Design as plans—download $89.99, print $119—with optional DFX cut files for an additional $100. Complete kits are available for $1,999.99; wood components only for $1,199.99.
Is there a boat you’d like to know more about? Have you built one that you think other Small Boats Magazine readers would enjoy? Please email us!
Iain Oughtred’s 15′ 11″ Penny Fee is the latest and largest member in his line of classical rowing-sailing dinghies. All of them have roots in 18th-century ship boats and yacht tenders, which were relatively full in shape for good carrying capacity and had wineglass transoms to avoid adding drag when they were fully loaded.
My path to the Penny Fee started at a local boat show in 2020 where I met a couple looking for a sail-and-oar boat and someone to build it. They took me on as their builder, and together we started mapping out suitable candidates that would meet their criteria: modern glued-plywood construction, a relatively light hull, good rowing and sailing properties, and accommodations for occasional fishing. They also had in mind to use a small electric outboard, so a boat with a transom was preferred over a double-ender. The Penny Fee emerged at the top of the list of candidates. It has enough stability for an all-around boat and for fishing. Its longer hull promised more speed under sail and maybe even when rowing.
Photographs by the author
While the Penny Fee is easily sailed singlehanded, there’s room for a complement of four aboard.
I ordered the plans and, as always, Iain’s drawings were a treat for the eye and the soul. The Penny Fee set consists of eight sheets. There are offsets, lines, and a detailed construction plan followed by four options for the sail plan: single lug, lug yawl, gaff sloop, and gaff yawl. A measured drawing defines the centerboard; the shapes for two rudders—fixed and kick-up rudder—are conveyed with superimposed grids. Full-sized patterns are provided for the molds, stem, and transom. The plans do not include drawings for oars, but Iain kindly supplied us with drawings, and recommended an oar length of 9′ 10″.
In order to speed up the start of the building project, we decided to build from a CNC-cut kit supplied by Jordan Boats UK. The kit consists of 9mm plywood okoume planks (each in three pieces) and okoume building molds, and 9mm side panels for the centerboard case. The molds have notches on the outer edges for the planks to fit into, so no measuring and marking of strake locations is needed when fitting the planking to them. For scratch builders, the plank locations are all marked on the patterns for the molds, stem, and transom.
Jordan Boats prefers scarf joints to finger joints for appearance, strength, and simplicity of construction. The scarfs are cut by the builder and the kit provides an ingenious system for aligning the plank sections for gluing them. There are predrilled holes in the scarf joints and in the ends of the planks; a nail is driven through the holes, locking the scarfs in place. A string is drawn tight between the nails driven in the predrilled holes in the ends of the plank; once the string touches the nail located in the center of the plank, its sections are aligned properly. This worked well, but we still checked each strake visually for a fair curve, before letting the glue cure. Scratch builders will spile the planks from the molds.
The plans offer drawings for two rudders, one with a fixed blade and the other with a pivoting blade with lines to deploy and retract it.
The 1″-thick transom can be built from solid wood or by gluing up two pieces of plywood. We edge-glued three wide planks of khaya mahogany and cut the transom using the CNC-cut hardboard pattern that Jordan Boats supplied. The stem is cut and glued from three pieces of 2″-thick solid wood; for the stem and keel we used khaya mahogany. For accurate placement of the transom, the kit also included plywood brackets which are attached to the building frame and the eighth mold. Once the stem, keelson, and transom are in place and glued together, planking can begin.
The garboards get a fair amount of twist in the stern. By softening the plywood with rags soaked in hot water, the bend is easier to achieve. As mentioned in the instructions provided with the kit, some minor adjustments might be needed with the molds in order to make the strakes run smoothly. For us, this was the case with the first three strakes. After that, the rest of the strakes fitted the precut notches perfectly. Because the sheerstrake was going to be finished bright, it was cut from solid mahogany and we used the kit’s okoume strakes as patterns. Khaya mahogany was also used for the floors, rubbing strakes, inwales, knees, and the transverse and longitudinal thwarts. The bottom boards were cut from knot-free Oregon pine.
The Penny Fee is ordinarily equipped with a standard tiller, wich leads from the rudder head through a slot in the transom. The Norwegian tiller here was adopted because it provided clearance for an electric outboard set to port.
As the bottom boards are not connected to each other for support, they need to be substantial, 3/4″ thick, in order to retain shape when stepped on. The wooden cleats holding them in place may get kicked open from time to time, but our clients wished the floorboards to be easily removable, and we followed the plans.
The okoume hull was sealed with epoxy, painted with two layers of epoxy primer, and finished with two-part polyurethane enamel. For the sheerstrake, we chose a marine two-part saturating wood oil. The floorboards and thwarts were also sealed with epoxy before being finished bright. The Oregon-pine spars and oars were wiped down with linseed oil.
While the plans don’t include built-in flotation, at the clients’ request we added a sealed compartment in the bow, which doubles as a stepping platform and a forward seat. With two inflatable rollers strapped in the middle of the boat under the side seats and one buoyancy bag under the stern thwart there was more than adequate flotation in case of a swamping.
One distinctive feature of Penny Fee’s design is the high, arched transom, which has a hole cut in the center for the tiller. With an electric outboard installed in the transom most of the time, this Penny Fee was equipped with a Norwegian tiller over the transom. When the outboard is kicked up, it would interfere with the tiller.
With a beam of 63″, the Penny Fee feels big for a rowboat, but cruises easily at 3 knots.
I have been impressed by the solid feel and stability of Penny Fee. Lightly loaded, the transom is well clear of the water, promising good load-carrying capabilities without added drag. For a rowboat, it is on the larger side, and you can feel the weight and beam, but once you get the hull moving with a good pair of oars, it is easy to maintain 3 knots and, with a little more effort, the GPS can clock a steady 3.5 knots. Penny Fee has two rowing stations, the middle one being a natural choice if you are rowing on your own. At this station, the beam of the hull is widest, providing a little more leverage. The boat is fairly well balanced longitudinally, whether you use the center or the aft rowing station. As only one pair of oars was made, we did not test rowing with two, but you would certainly get more speed and range with two rowers.
While the lug-yawl rig has the mainmast partner well forward, the plain lug rig option puts the mast partner close to the first thwart, and the forward part of the boat gets a bit busy; when getting aboard, you have to step in carefully. The floorboards do not extend all the way into the bow, and the open area is a good spot for bailing out.
We conducted a capsize test and the Penny Fee, with the flotation installed, floated steadily on her side; righting the boat and getting back on board was a simple matter. Once recovered, the top of the centerboard case was still well clear of the waterline, and the stability was good enough for at least one person to move around in the boat and bail.
The lug rig is the simplest and the smallest of the rigs
Our first sail was in mild 8- to 10-knot winds, and with three people on board the balance was near perfect, with an almost neutral helm. The sail area seemed to be adequate, giving 3 to 4.5 knots depending on the point of sail. For more exhilarating sailing, the extra sail area of the gaff sloop or gaff yawl will give you more liveliness and more strings to pull. With the single lugsail, tacking is easy, and the boat turned about quickly enough and didn’t get caught in irons. On a second outing, the wind was even lighter, only 4 to 6 knots, but by trimming carefully and not pointing too high, the Penny Fee glided through the water effortlessly and even had enough speed and momentum for effective tacking. In this wind, if I let go of the tiller the boat had a slight tendency to turn away from the wind. I did not have the opportunity to sail in heavier winds, but the solid stability and modest sail area promise good handling and the ability to carry full sail in moderate breeze with ease.
Penny Fee is more a workhorse than a racehorse, and, for camp-cruising with two, the stability and roominess really come into play. Building a Penny Fee takes some effort, but the result is an able, traditionally stylish, and handsome vessel that will serve many uses well: rowing, sailing, fishing, or cruising.
Mats Vuorenjuuri is the father of three and an entrepreneur, making a living in graphic design, photography, and freelance writing. He is currently becoming a boatbuilder as well, offering boatbuilding and maintenance services through Nordic Craft. In recent years, he has discovered the simplicity and joy of small boats after sailing various types including sail-training schooners. He wrote about cruising the Finnish coast in his Coquina in our May 2016 issue and about a Lakeland Row in January 2017.
Penny Fee Particulars
[table]
Length/15′11″
Beam/5′3″
Depth/22-1/2″
Displacement/300 lbs
Skill level/Intermediate to advanced, no lofting required
Construction/Glued lapstrake plywood, traditional, cold-molded, and strip plank.
Sail area:
Lug/ 87 sq ft
Lug yawl/104 sq ft
Gaff sloop/104 sq ft
Gaff yawl/121 sq ft
This year, a helicopter developed by a team of young NASA engineers flew on Mars and became the first vehicle to fly successfully in the atmosphere of another planet. The technicians famously proclaimed the initial hop to be their “Wright Brothers moment,” and compared the Martian flight to the first sustained powered aircraft flight by Wilbur and Orville Wright in 1903. The eureka feeling of satisfaction stemming from such an accomplishment is difficult to describe to anyone who has never dreamed, planned, and surmounted obstacles to reach such a goal. I know that feeling.
In 1972, just after graduating from high school in Highland Park, Illinois, along with my friends Louis and Marty, I spent most summer Sundays racing 15′ Albacore-class sailboats at our local sailing club on Lake Michigan. One day, Louis and I stumbled upon the book The Forty-Knot Sailboat, by Bernard Smith, buried in the stacks of the Highland Park Public Library. The book, published in 1963, discussed the theory of hydrofoil sailboats, including their history and predictions for the future. While only a handful of experimental hydrofoil sailboats had ever been built by 1970, Marty, Louis, and I were inspired by Smith’s book and decided to design and build our own prototype hydrofoil sailboat. Our initial hope was to develop a class of hydrofoil sailboats that could become popular for racing and high-speed day-sailing.
Our budget was a mere $100. We were neither engineers nor boatbuilders, and high-tech lightweight materials such as carbon fiber had not yet entered the consumer market. Although these initial obstacles should have thwarted our plan, youth, idealism, and persistence kept us on track. We immediately set to work.
Photographs courtesy of the author
In this drawing dated July 16, 1972, Marty had sketched our prototype hydrofoil sailboat as he thought it might appear while cruising along the North Shore on Lake Michigan.
Marty, who later became a successful industrial designer, was a talented artist and sketched a few concepts that more closely resembled futuristic spaceships than any known watercraft. It was a start. Louis and I studied Smith’s book and joined, by mail, the Amateur Yacht Research Society in England to obtain its scientific publications pertaining to hydrofoil theory and design.
We decided upon a monohull with three lifting foils in a “canard” configuration. Rather than have the rudder and its foil in the stern, the most common arrangement today, our rudder and foil would be attached at the bow and the two main lifting foils would be located on either side of the hull, just aft of the center of gravity.
We were determined to learn foil theory and, for a while, even attempted to perform our own original research in hydrofoil shapes and wingsail designs. First, we constructed a test tank in the basement of my house by building a 7′-long wooden trough equipped with a plastic liner. We attached homemade plasticine hydrofoil models to one end of a rudimentary balance arm, which would pivot in a vertical plane around a horizontal axis mounted on the top of a classic Lionel model railroad car, which ran along a railroad track on the side of the tank. A long rubber band provided a repeatable force to pull the assembly through the water. The outside end of the balance arm was outfitted with a pen to mark its path on an 8′-long sheet of paper mounted horizontally on a board next to the tank. Each foil section we tested created its own unique tracing, giving us an indication of the foil’s lifting ability. We fiddled with Reynolds numbers (ratios of inertial and viscous forces) in the hope of scaling our data to full size. Needless to say, we never reached any meaningful conclusions from our crude experiments, but we had a great time trying.
Next, we decided to find a place to test some of our wingsail ideas. On a whim, the three of us drove to Northwestern University in nearby Evanston. It was early July, and the campus was a ghost town. We found our way to the deserted engineering building and boldly walked in through the unlocked front door to find a professor who might help us. The professors’ names were all painted neatly upon the frosted glass windows of the dark-stained wooden doors throughout the timeworn, traditional-style university building. Only one light was on. We knocked on the door. A gray-haired gentleman was surprised to have visitors, but instantly warmed when he learned that we were high school students with an interest in hydrodynamics and airfoil design.
He walked us through the empty building and into a dusty, cavernous room that housed a wind tunnel, dormant since the 1940s or ‘50s. Fortunately for us, he happened to be the professor in charge of this wind-tunnel lab. He demonstrated the circuit breakers that turned on the fan motors and showed us how to mount test models, equipped with strain gauges, inside the tunnels. Upon our request, and much to our surprise, he provided us with keys to the lab and granted us permission to come and go whenever we wished: day or night. Security in those days was based entirely on trust. Three enthusiastic high school boys probably represented a refreshing antidote to his dull, quiet summer. The whirring motors of an archaic wind tunnel in an abandoned lab filled with long-forgotten physics projects represented the greatest toy a teenager could imagine. Just having the key to a university building made us feel important.
We “played” with the wind tunnel a few times testing our 1:25-scale wingsail models, always wondering if some guard or faculty member would catch us conducting experiments as impostors. We were never discovered, but we also never managed to generate any useful data. Nonetheless, it was great fun to power-up the wind tunnel and watch our models flutter around through the small observation window.
As I was I carefully painting the frame of the hull with a wood sealer, I made a special effort to avoid my hair. The weight-saving holes in the bulkheads were carefully arranged to retain wood along the lines of stress.
As the summer progressed, we finished drafting plans and set to work constructing the hull. My parents graciously allowed us to commandeer half of our two-car garage for the project. We began by lofting the hull as a chalk outline on the concrete garage floor. Next, we constructed a 16′ structure of four 1″x 2″ pine longitudinal stringers with several rectangular 1/4’’ marine plywood bulkheads spaced along their length. To reduce weight, we cut multiple circular holes into each of the bulkheads. Despite trying to bend the 1 x 2s using hot water, we were unable to create the desired taper for the forward sections of the hull. Instead, we made several oblique scarf joints to form the proper curve. We affixed sheets of 1/4’’ plywood to the sides and transom
With the hull resting inverted on sawhorses, we shaped Styrofoam into a semicircular canoe underbody using a disc sander. We then applied fiberglass cloth and epoxy resin, as Styrofoam is dissolved by polyester resin, to cover the smoothly contoured foam. This long, narrow, slab-sided hull caught the attention of all passers-by on our busy street because it looked like a coffin more than anything else, and when asked, we generally told people that it was indeed a coffin. After a couple coats of white paint, the hull was complete.
While transporting the hull down the road to the beach for the initial float test, Marty and two friends stopped to wave to onlookers, explaining that we were heading to the lake to sink a coffin.
Excited, we transported the hull, protruding from the back of a friend’s station wagon, down to Lake Michigan to test the seaworthiness of our homemade vessel. When we walked it into the lake from the beach, it floated exceedingly high and was intrinsically unstable, with or without one of us aboard, immediately rolling onto its side if let go. But this did not deter us. We were delighted it floated at all.
Marty, another friend, and I cautiously walked the newly completed hull into the cold lake water at Park Avenue Beach in Highland Park, hoping that it would float and remain watertight.
Constructing the lifting hydrofoils came next. We decided to build surface-piercing, self-regulating foils rather than fully submerged foils. They would have dynamic stability without requiring moving flaps to adjust their position in the water. After considering several NACA (National Advisory Committee for Aeronautics) foil cross-sections, we decided for simplicity’s sake to use ogive sections: circular-arc upper-surface contours and flat undersurfaces.
I laid out the mahogany laminates of one of the main foils on my basement floor. Each strip is rotated 90 degrees from the ones next to it to alternate the wood grain to prevent warping.
In the early 1970s, Philippine mahogany was cheap and abundant, as well as beautiful. For strength, we chose to build our foils of long, laminated wood strips as one might do for a cutting board. The foils needed to be tapered, necessitating a complex cutting schedule for the 250 strips to be laminated. Through Marty’s father, we gained access to a woodshop, where we obtained enthusiastic assistance from an old German modelmaker named Arthur for a full day of ripping and tapering the mahogany. We painstakingly assembled the laminates and glued them together with resorcinol. We also laminated mahogany strips for the streamlined supporting struts. To provide additional lifting force in the event of an excessively deep submersion of one of the main foils, we also incorporated hand-contoured pine “safety-foils” into the complex main assemblies. We mounted these transverse foils well above the main foils to provide additional lift if the boat heeled enough to immerse an entire foil assembly.
A few people got wind of our unusual, intriguing project and volunteered their support. The father of one of our friends owned a pinball machine manufacturing company. He generously donated two large sheets of 3/32″ stainless steel which we used to reinforce the main foils. Louis’s brother-in-law gave us two 10′x 2″ aluminum electrical conduits to use as supporting beams for the port and starboard main hydrofoils. These conduits acted as the spars for the main foil arms. They mated to the hull through reinforced holes traversing the beam of the hull. The circular section of the conduits allowed the main foils and their entire assemblies to pivot about the transverse horizontal axis. Rotation of these conduit beams permitted adjustment of the foils’ angle of incidence, and enabled us to rotate the foils completely out of the water.
Louis held up the bow foil assembly on my lawn to show the head-on view. The center vertical element served as the rudder. The main foil is the lower and smaller V-shape and is made of aluminum. The larger foil above it is the safety foil, which was made of pine.
The most innovative feature of our hydrofoil sailboat was the bow foil. The vertical “rudder” was laminated mahogany. The V-shaped bow foil assembly was made of hand-contoured aluminum plates along with a V-shaped pine “safety foil” mounted above it. The entire complex was suspended by gudgeons mated to inverted pintles attached to the plumb bow.
I inspected the bow foil assembly after it was mounted on the inverted hull. Note that the foils and geometric center of the rudder were positioned aft of the pivot axis along the plumb bow. The foils and their support struts are painted white and the broad plane of the rudder is unpainted wood. The steering cables, attached to a transverse arm on the rudderhead, are visible emerging from the hull.
A retaining pin through each pintle helped to keep the rudder in place. The underwater portion of the rudder, with its V-shaped foils, was cleverly angled aft so that its center of resistance would be located aft of the vertical pivot axis on the stem giving it a caster effect for directional stability. We installed a vertical joystick in the aft cockpit and linked it to the rudder/foil complex at the bow by steering cables and pulleys.
One of our friends posed next to the hull and main foils assembled on the lawn. The large white Styrofoam float at the outboard end of the main foil was intended to prevent capsize and provide lateral resistance when the foils were rotated to the fully retracted position. These were ultimately abandoned as unnecessary.
We worked diligently through many long nights assembling, fiberglassing, and varnishing all the parts. The end of the summer approached quickly. It was time for the second launching, to test the hull and all the foils together, but—still without a sailing rig—a towing test made best sense. We erected a temporary wooden frame with a rudimentary mast “stump” to act as a towing post near the anticipated center-of-effort of the future sail plan.
Once again, with the help of many interested onlookers and friends, we transported the hull and the three foil assemblies from my house to the beach. Waves ranged from 1′ to 2′, higher than ideal. We carried the boat out into deep water. A small outboard runabout from our sailing club served as a satisfactory towboat. I climbed aboard our hydrofoil sailboat, secured the tow rope to the stump, and the test commenced.
At my signal, the tow boat shifted into gear and very slowly accelerated. A friend aboard the motorboat directed his Super-8 movie camera in slow-motion mode toward our hydrofoil. I signaled the boat to go faster. At about 4 knots, the bow rose majestically from the water. The vessel’s attitude resembled a long jetliner rotating for takeoff. I stepped forward in the hull to shift my weight toward the bow. As the tow accelerated more, the entire hull lifted free of the water. For the first time, we knew with certainty that the foils could provide sufficient lift.
I rode aboard the hydrofoil sailboat as it was being towed by an outboard runabout about ½ mile off the Park Avenue Beach in Highland Park. The hull lifted clear of the water, proving the effectiveness of the foils.
I then turned the hydrofoil to port to determine if the steering mechanism worked and to see how the craft behaved with the tow rope force directed from one side, 30–40 degrees off the bow. This side force, pulling near the center of effort of the anticipated future rig, simulated the forces of sailing and tested both directional stability and reaction to an applied heeling moment. Indeed, the vessel tracked well and the self-correcting forces created by the surface-piercing main foils prevented the boat from heeling. The hydrofoil cruised along parallel to the port side of the motorboat’s wake, but after a few seconds there was a great explosion. The pull on the temporary rig ripped the hull apart and one of the main foil arms failed, causing the flying hull to crash down onto the surface of the water.
The structural failure was a major setback, but the test had been a success. Watching the successive explosions of Elon Musk’s Starship prototypes now, in 2021, makes me realize that even with the crash, our prototype experiment was truly a success. Albeit on a smaller scale, our successes and failures were comparable to those experienced in multi-billion-dollar engineering projects. Like Musk says: “It’s weird if it doesn’t explode, frankly.”
Marty, left, and I proudly showed off the assembled boat as it rested on the lawn with a sailing rig cannibalized from an Albacore-class dinghy. The foils are rotated aft as they would be for launching. The rotating main beams and the lever arms for rotating the assemblies can be seen flanking the hull.
In the summer of 1973, Louis, Marty, and I reconvened to repair, improve, and further test our hydrofoil, this time with a sailing rig. Although we had great ideas for an innovative wingsail, simply reconfiguring and strengthening our vessel demanded our full attention given that we only had the three months of vacation to work on it. We fashioned aluminum deck braces to strengthen the undecked hull. After analyzing the forces that had led to foil-arm failure the previous year, we attached guy wires of slender stainless-steel cable for additional strength. We incorporated several other small modifications to the simple vessel that had marginally passed our first proof-of-concept test.
With no time to construct a wingsail, Louis, Marty, and I decided to cannibalize the mast, boom, and sails from one of our Albacores. We added a cross strut made of aluminum conduit—again, donated by Louis’s brother-in-law—to provide a wider base to anchor the port and starboard shrouds. Next, we provisionally assembled the entire craft on my front lawn to ensure that all the parts fit together and seemed sturdy. It was an exciting moment as we admired with pride and photographed our ungainly contraption.
We waited for a day when the lake was not too rough, but still had enough wind to induce our invention to rise above the waves. A handful of friends and curious sailing-club members got wind of our hydrofoil sailboat and most deemed this to be a madman’s folly. Some sailors at the club even ridiculed us. Nobody in the area had heard of, let alone seen, a hydrofoil sailboat. Naysayers consistently scoffed at us, declaring that the feat would be impossible. The mere appearance of our flimsy-looking assemblage of seemingly random materials elicited fits of outright laughter.
We had our own doubts, as well. None of us had seen a hydrofoil sailboat or even spoken with anyone else who had. We knew that we were on our own and had spent hundreds of hours climbing way out on a limb. It was an act of blind faith. I had trouble sleeping the night before the launch, as I reviewed in my mind every detail of the planned test. We started early in the morning, transporting all the components to the beach. We cautiously inserted the foil arm spars through the hull, stepped the mast, bent on the main, and hanked on the jib. Everything fit.
Marty and I, at right, were joined by two friends as we prepared to launch the hydrofoil for the sail test. The strut attaching the shrouds is visible beyond Marty’s left shoulder. One of the two lever arms that rotate the main foil assemblies can be seen between Marty and me.
A group of us walked the boat from the beach into deeper water. Marty swam to the bow and attached the bow foil and steering assembly, securing the pintles with their retaining pins. Our crude calculations indicated that the boat would work best with one person aboard. Accordingly, the three of us took turns hoisting the sails, adjusting the angle of incidence of the main foils, and attempting to sail.
Louis went first. The wind was light, at most 5-to-7 knots. The contraption sailed slowly but smoothly, proving that it could advance on all points of sail while in displacement mode. The rest of us watched eagerly from a Boston Whaler as a Louis maneuvered for about an hour without getting any lift from the foils.
Next came Marty’s turn with little additional success. The bow foil lifted the forward end slightly, but not much more. By the time my turn came, the wind had picked up to around 10 knots. I had trouble trimming the main and jib while simultaneously steering. I had Marty climb back aboard with me while I increased the angle of incidence of the main foils. We were getting desperate—time was passing and our naysayers were beginning to gloat.
While I was near the stern clenching the joystick and Marty sat amidships trimming the sails, the wind came up to 12 knots. The bow rose and Marty moved forward to correct the fore-and-aft trim, further optimizing the foils’ angle of attack. As he sheeted in both sails, I steadied our course on a beam reach. The boat accelerated smoothly in response. The hull pitched rhythmically in the chop. Distinct vortices formed along the trailing edges of the main foils.
Suddenly, as though by magic, the entire hull rose from the water and our boat shifted into another gear. The choppy ride instantly became smooth and swift as though gliding on ice. On the Whaler, Louis had the Super-8 camera rolling to document the event.
This photo, taken from Super-8 movie film footage, proves that our hydrofoil sailboat successfully flew above the waves. It was our Wright Brothers moment.
This flight only lasted a matter of seconds before another catastrophic main arm failure caused the hull to drop precipitously back to the surface. Nonetheless, we had done it! We had flown above the waves under sail with two people aboard. Louis, Marty, and I, as well as the two or three others who had witnessed the event were wildly ecstatic. During our simple proof-of-concept test, we had harnessed the forces of wind and water to accomplish a pioneering feat of physics. Although we never pursued our project any further, this event and the incomparable euphoria of our Wright Brothers moment live on as one of the greatest experiences in my life.
Mike Jacker is a retired orthopedic surgeon who lives in Highland Park, Illinois, with his wife, Laurie, their 30-year-old African grey parrot, Zeke, and their Brittany spaniel, Max. He cruises during the summer on Lake Michigan aboard JOLIBA, an Ericson 38, and also sails a Vanguard 15. In addition to sailing, Mike enjoys kayaking, flying sailplanes, boatbuilding, dancing, and photographing local wildlife. He recently published a book, Taken by the Wind, chronicling a year-long voyage to the South Pacific in 1976–77 aboard a 30′ sailboat before the advent of GPS.
If you have an interesting story to tell about your adventures with a small boat, please email us a brief outline and a few photos.
Oars can easily become damaged if they are not protected from metal oarlocks, and they are commonly outfitted with sewn-on leathers or slipped-on rubber sleeves. Skipper’s father, Cap’n Jack, chose a different approach: he liked to wrap the oarlocks with small-diameter cord as a method of protection. The cord is much cheaper than a set of sleeves or leathers, and wrapping is much faster than sewing—an oarlock can be wrapped in minutes—and won’t damage the wood in the way nailed-on leathers do.
The oarlocks on Skipper’s 1980 Drascombe Lugger have been wrapped with cord for almost 40 years now, and they are holding up great. The cord cushions the oar and provides a little friction to help keep the oar from slipping out of the oarlock. Another benefit of wrapping an oarlock is that it reduces rowing noise and, overall, the cord-wrapped oarlock looks very shipshape.
Photographs by the authors
The wrap starts with the end of the cord on the outside of one horn, squeezed tight by the first several turns.
We recently wrapped a set of Wilcox and Crittenden #1-sized locks with 1/8″ braided Dacron cord. Small-diameter braided or twisted cord can be used, as long as the diameter is sufficient to provide a protective surface for the oar and still leave clearance for the oar loom. It can be a bit awkward to wrap the oarlock while unwinding cord off of a spool or from a hank, so to get the right length, you can do a quick job of wrapping the lock according to the instructions here, leaving a 12″ or more at the tail end, and cutting the cord to length. For the permanent wrap, start over and pull the cord tight this second time.
Adjust the wraps to cover the inside curve of the lock while working around the stem and eye. The wrap here is finished with hitches and the end cut flush and melted.
The beginning or standing bit of the cord is captured by wrapping the first few turns of cord around it, and then the wrap is continued around the entire oarlock, taking time to evenly space the wraps and pulling the cord tight along the way. Getting from one horn and around the shaft to the other horn will work itself out with just a little fussing to get the inside part of the wraps to butt against each other. Once the bitter end of the cord is at the end of the opposite horn, the cord can be knotted underneath itself with a clove hitch or tucked back under the last few wraps with the aid of an awl. The tail end should emerge on the outside of the lock. After the excess cord is cut off, we melt the end of synthetic cord to make a small stopper knot to prevent unraveling.
A coat of Titebond III waterproof glue keeps the cord wrap from shifting or loosening.
We then work marine-grade varnish or waterproof glue into the exposed surface of the cord to help seal everything in place. Once the wrapping dries, the oarlock is ready for action.
With many types and sizes of cord to choose from, wrapping an oarlock is an inexpensive, fun, and easy project that can provide effective protection for your oars.
Audrey (Skipper) and Kent Lewis row, sail, and paddle an armada of small boats in the Tidewater region of the United States. Their adventure blog can be found at Small Boat Restoration.
Editor’s Notes
I mounted an oarlock in the stern of my Caledonia Yawl so I could use one of the oars that I have for rowing to steer if the rudder fails (again) or to scull the boat through tight quarters. For those two uses, the oar doesn’t rest with its leathers in the lock. I wrapped the lock with tape, but that didn’t hold up well in the saltwater and sunlight and didn’t offer the varnished oar loom much protection. I liked Cap’n Jack’s idea of wrapping the lock in cord and went to work. My galvanized lock has an inside diameter of 3-1/8″ and required 12′ of 1/8″ solid-braid nylon cord.
For the start of the wrap, the end of the cord should be cut and allowed to fray. Melting the end creates a hard knob that interferes with the wraps that would cover it.
The wraps have reached the frayed cut end and press it flat against the lock.
To finish the wrap, rather than use an awl to make space for the tail of the cord, I made a few turns over a loop of artificial sinew and threaded the cord’s end through it. Sailmaker’s twine would work too.
A little slack is required in the last half wrap to pull the tail end through.
A hard pull on the tail end will retighten the last wrap.
The tail end gets cut off in between wraps. Using a sawing motion with the knife will spread the fibers and flatten the end.
After pushing the wraps closed over the cut end, a dab of thin super glue will keep the cord end where it belongs.
With the lock now wrapped, I can use an oar for sculling or steering without undue damage to the varnished loom.
You can share your tips and tricks of the trade with other Small Boats Magazine readers by sending us an email.
For work and play, I wear rubber boots a lot. Some have knee-high tops, which are great at keeping out water but awkward when sitting; others are useful for walking through muck, but lack traction on hard surfaces. With two pairs at work, and two at home, I have choices when I go boating. But most often, I turn to one particular pair: the Xtratuf 15″ Legacy Boot. Truly tough and highly waterproof, they’re nonetheless almost as comfortable as a big pair of wool socks.
Made for deck work on Alaskan commercial fishing boats, these boots are designed to be strong and grippy, yet supportive enough for long periods of outdoor work. I wore my Xtratufs on a small-boat cruise along the Inside Passage every day for more than a month, with daily excursions over boulders, through cobble, and on barnacle-strewn beaches. The grip was equally good on natural surfaces as it was on deck, with one caveat: small shells and pebbles tend to get stuck in the tread, which can scratch wood floorboards and diminish the soles’ traction a bit. (On the bright side, picking pebbles out of the treads provides evening entertainment at anchor.) Two years later, the boots are still going strong, with barely a sign of wear.
Photographs by the author
The soles provide a good grip ashore and aboard though pebbles can get caught in the tread and require removal by hand.
The Xtratuf’s soles are pliable rubber with a flat, recessed-chevron pattern. They remind me of a high-top tennis sneaker, capable of gripping confidently on wet wood and nonskid deck material (unlike the cheap black utility boots with thick hiking-style tread used by many small-boat sailors). Xtratuf soles meet International Organization for Standardization safety standards for slip resistance, and have been laboratory tested on slippery surfaces, such as wet, soapy tiles.
The boot uppers are stiff enough to stand upright and flexible enough for comfortable walking.
The outside of the boots is constructed of multiple layers of latex neoprene, a synthetic latex that is strong, waterproof, chemical resistant, and pliable. Thicker laminated pieces around the toebox, and over the top of the foot near the ankle, provide structure. Xtratufs have enough stiffness to stay upright and feel firm around my feet, but they’re flexible enough to comfortably walk a mile or so from the boat and back.
Inside, the boot has a cloth-like lining and a removable insole with arch support. I’m pretty picky about my footgear, and these boots have always kept my feet happy and blister-free. So, what’s not to like? Some sailors may balk at the $135 price; but considering how long the boots last, and their high performance, a pair of Xtratuf Legacies may actually save you money in the long run. And, because you won’t be buying and disposing of two or three pairs of cheapies, you’ll be helping the environment, too.
Bruce Bateau, a regular contributor to Small Boats Magazine, sails and rows traditional boats with a modern twist in Portland, Oregon. His stories and adventures can be found at his website, Terrapin Tales.
Xtratuf Legacy boots are available through the manufacturer’s website for $135 and from many outdoor suppliers.
Building and maintaining wooden boats is dusty work, especially when power tools are involved. They can speed the work but they create a lot of dust, and none of it should be breathed in, whether it is from wood, glue, or paint. My thickness planer, jointer, tablesaw, and downdraft table have been connected to a dust collector with a 1-hp motor by 4″ hoses, but I’ve only recently added a system that works equally for the smaller tools. I had been relying on a shop-vac and the cloth dust bags that come with the sanders, but the shop-vac and its clunky 7′ hose aren’t convenient to use, and the bags on the sanding tools aren’t very effective.
I recently bought a Cen-Tec Quick Click hose and adapter set that solves both problems and now draws dust from my bandsaw, 6 x 48 belt sander, drill press, drum sander, 12′ disc sander, and random-orbit sander.
In my single-car-garage shop, the 16′ hose can reach all of the tools without moving the shop vac.
The hose that comes with the set I bought is 16′ long; lengths of 10′, 20′, and 30′ are also available. It has a diameter of 1-1/4″ and is made of supple lightweight plastic that is molded in a way that keeps the interior surface smooth to prevent clogging and to provide a largely unimpeded air flow. When I press the hose flat it springs right back with no indication of damage. The hose has a 2-1/4″ fitting on the vacuum end; a perfect snug fit for my Ridgid shop-vac.
The other end has Cen-Tec’s Quick-Click quick-release fitting, which accepts a number of adapters to fit different tools. The set I bought has five of them, and on each, a flexible blue ring has a pair of buttons that lock into holes in the hose-end socket. The adapters have split blue sleeves that can open or close a vent in the side, making it possible to adjust how much suction can be applied. I keep the vent closed.
The set included adapters with inside diameters, from left to right, 3/4″, 1”, 1-1/4″, and two 1-1/2″. At the far right is the reducer for dust ports compatible with shop-vac hoses.
The adapters have rubbery TPE (thermoplastic elastomer) collars in four sizes: 3/4″ , 1″ , 1-1/4″ , 1-1/2″ . Two of the five adapters that came with the set have a 1-1/2” inside diameter and for one of them, a hard plastic adapter from 1-1/2″ to 2-1/4″ will fit devices that accept the male end of a shop-vac hose; I use that fitting for my Delta 12″ disc sander and a drum sander and drill press I equipped with wooden fittings. While I could continue to use the shop-vac hose on those tools, I much prefer the convenience and easy handling of the Cen-Tec hose and the quick attachment of the adapters.
The 12″ disc sander has a shop-vac-compatible port and used one of the 1-1/2″ adapters and the plastic reducer.
For my drill press, a shop-made bracket was required to hold the reducer and one of the Cen-Tec adapters.
Other adapters fit my Ridgid random-orbit sander and Delta 14″ bandsaw. I can leave them in place and just move the hose to the tool I’m using. And the long, flexible hose, without an adapter, makes it easy to clean up errant dust all around the shop—without having to tow the shop-vac behind me.
The random-orbit sander is able to take the shop-vac hose, but it was just a nuisance. The Cen-Tec hose is smaller, lighter, and much more flexible.
The smallest adapter was a perfect fit for my 14″ bandsaw.
The chop saw used to make a mess of by work bench. Hooked up to the Cen-Tec hose, most of the sawdust generated gets collected.
The Harbor Freight 1 x 30 belt sander has a dust port that didn’t fit any of the adapters. I had a short piece of tubing that was a perfect fit for the inside diameters of both the port and the adapter. Note the vent in the adapter, here with the blue split ring leaving it open.
In the first week I had the Cen-Tec system, I did a lot of work with the random-orbit sander. The Ridgid sander has a dust-collection bag that unscrews, and the fitting will take both the 2-1/4″ or 1-1/2″ Cen-Tec adapters. I used the flexible 1-1/2″ adapter and was impressed with how effective the system was and how little the hose interfered with the operation of the sander. But after several hours, the TPE end split and could no longer stay connected to the tool. I was quite disappointed because I had thought I’d found the best system for the sanding tool I use most often. I noticed that the fitting that had split was a light gray, rather than the dark gray of the other adapters. I thought that might be an indication of a bad batch of TPE. I returned the set to Amazon and reordered. In the replacement set all of the fittings were dark gray and they’ve all held up well.
On many occasions in the past, I had done work without setting up the various dust-collection systems I’d had for each tool, simply because they were inconvenient. The Cen-Tec system has changed that, and my shop is now a safer, cleaner, and more efficient place to work.
Christopher Cunningham is the editor of Small Boats Magazine.
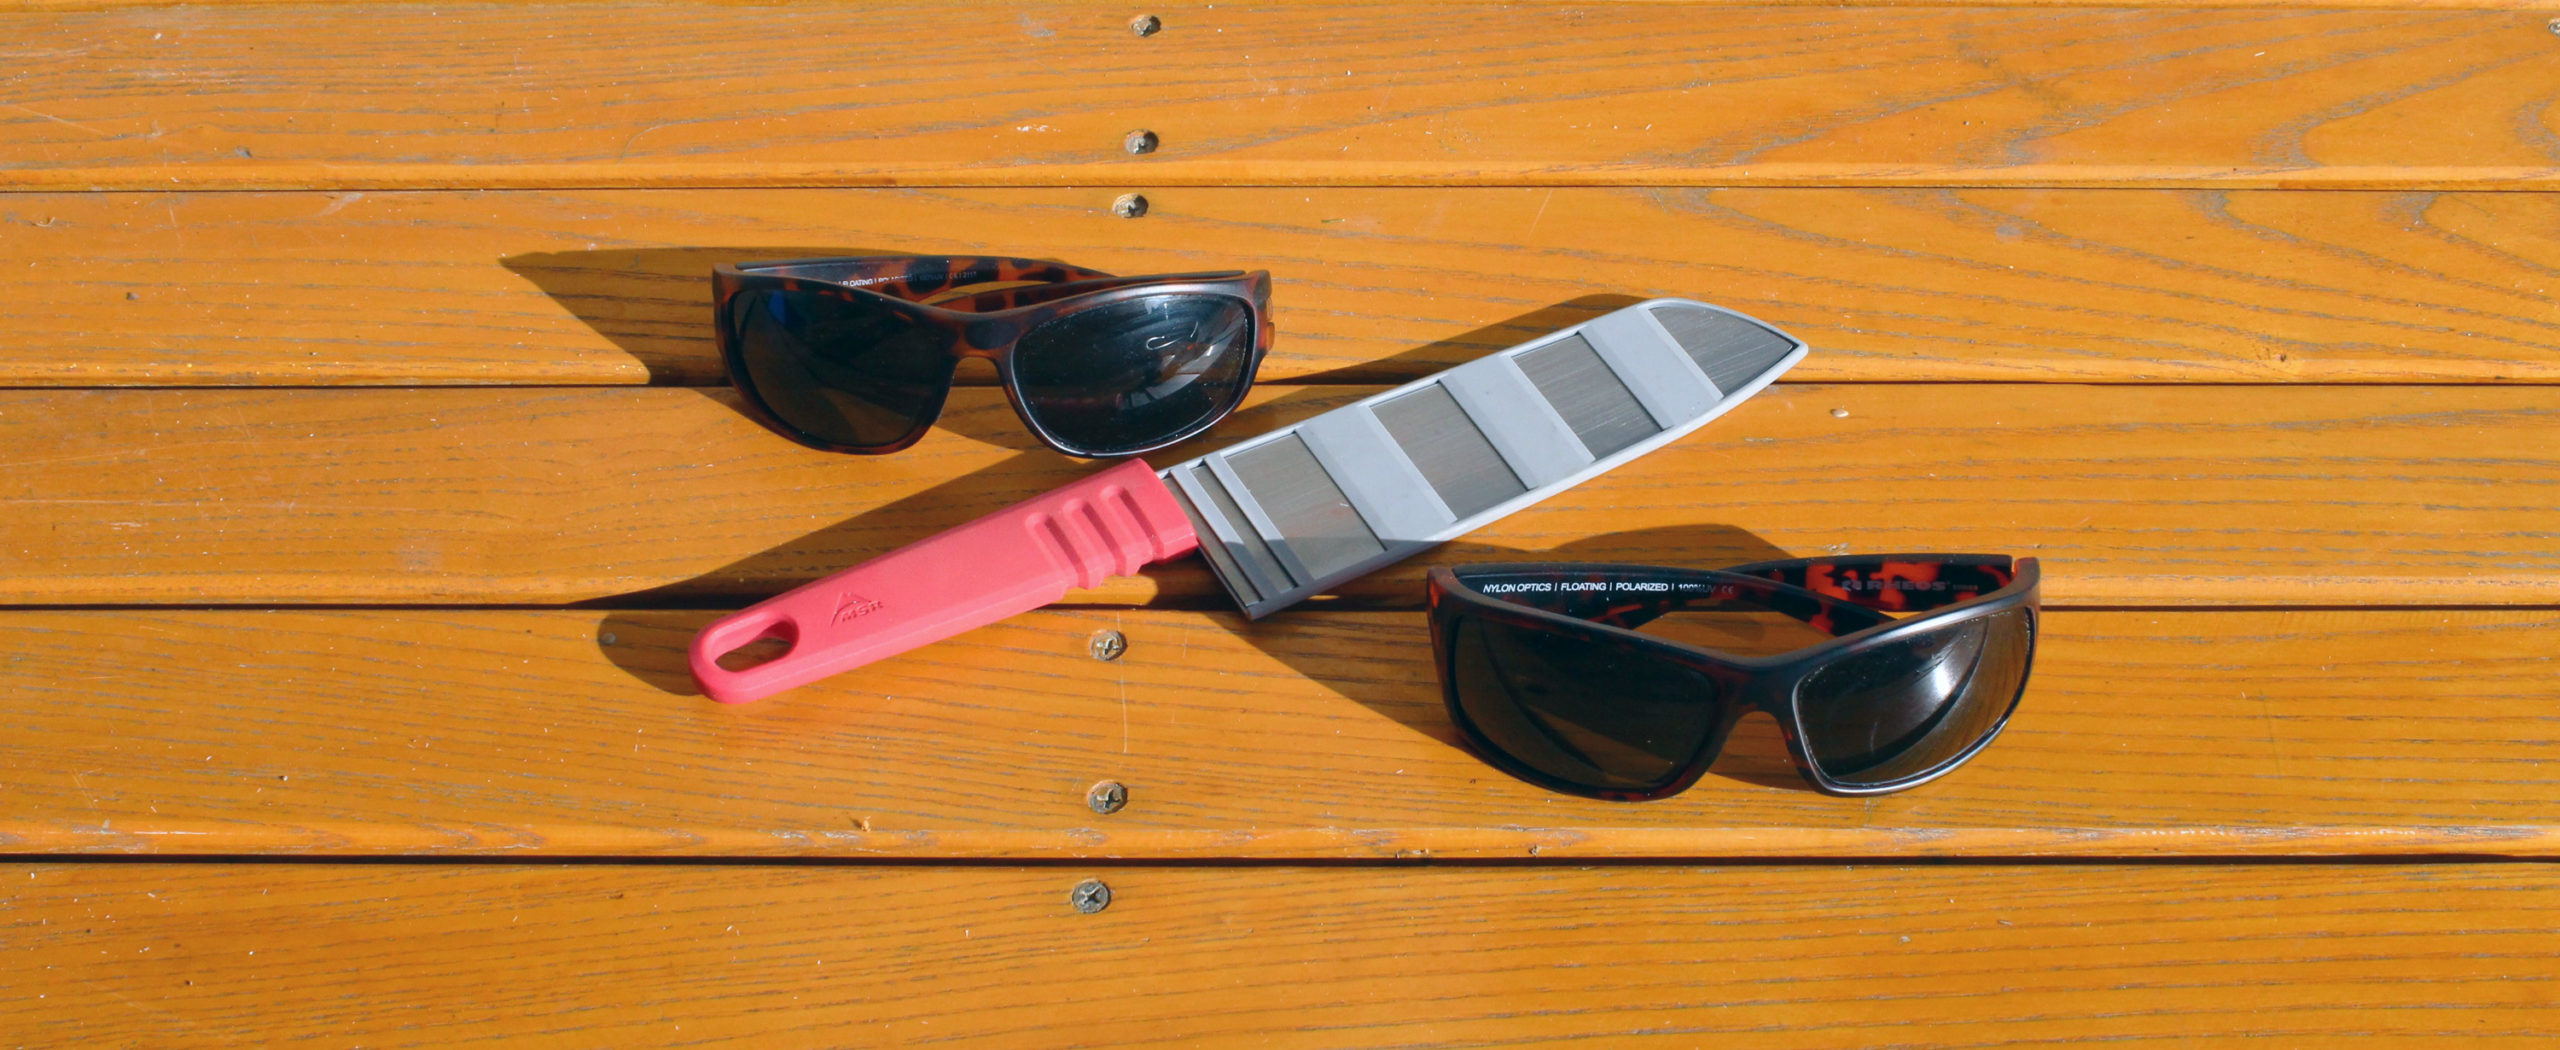
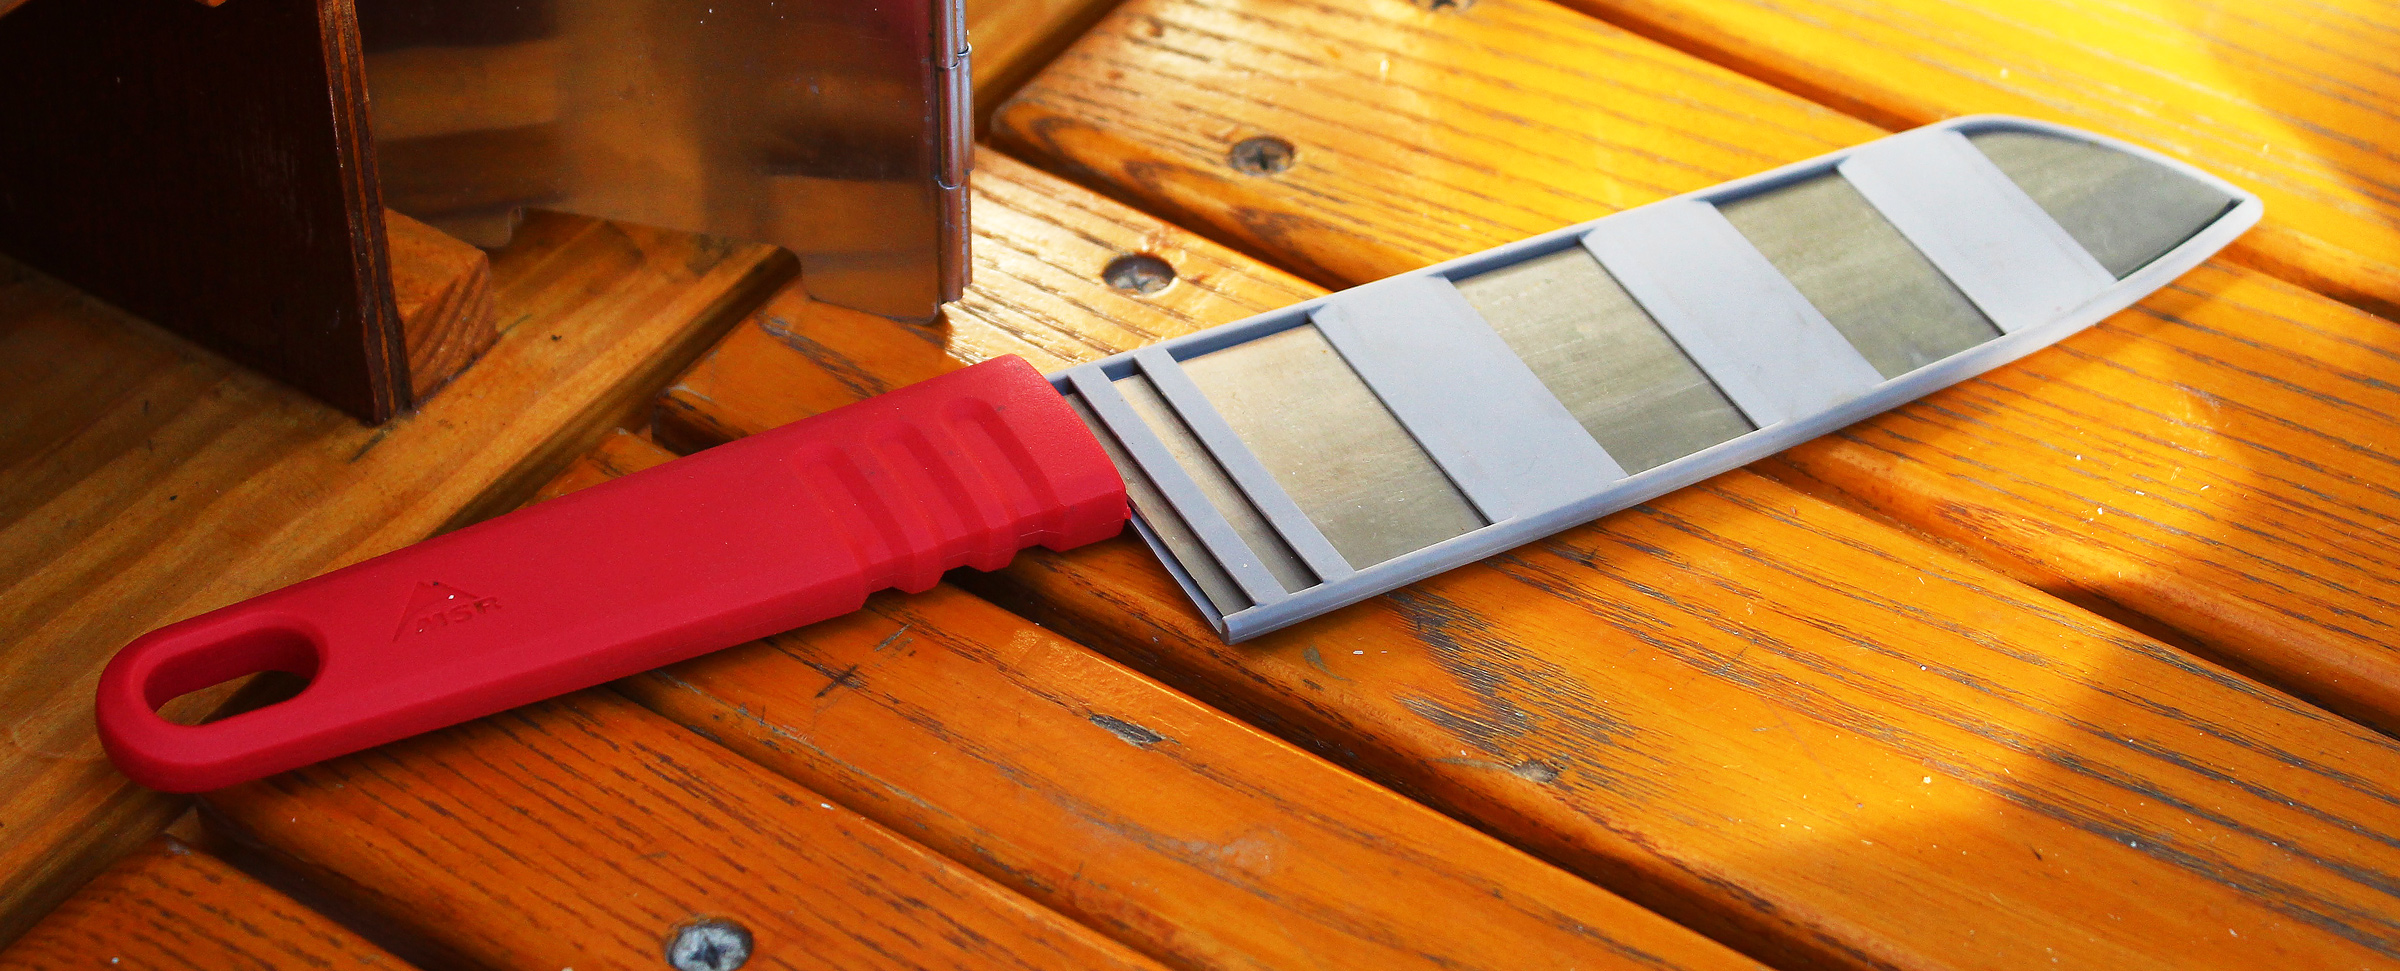
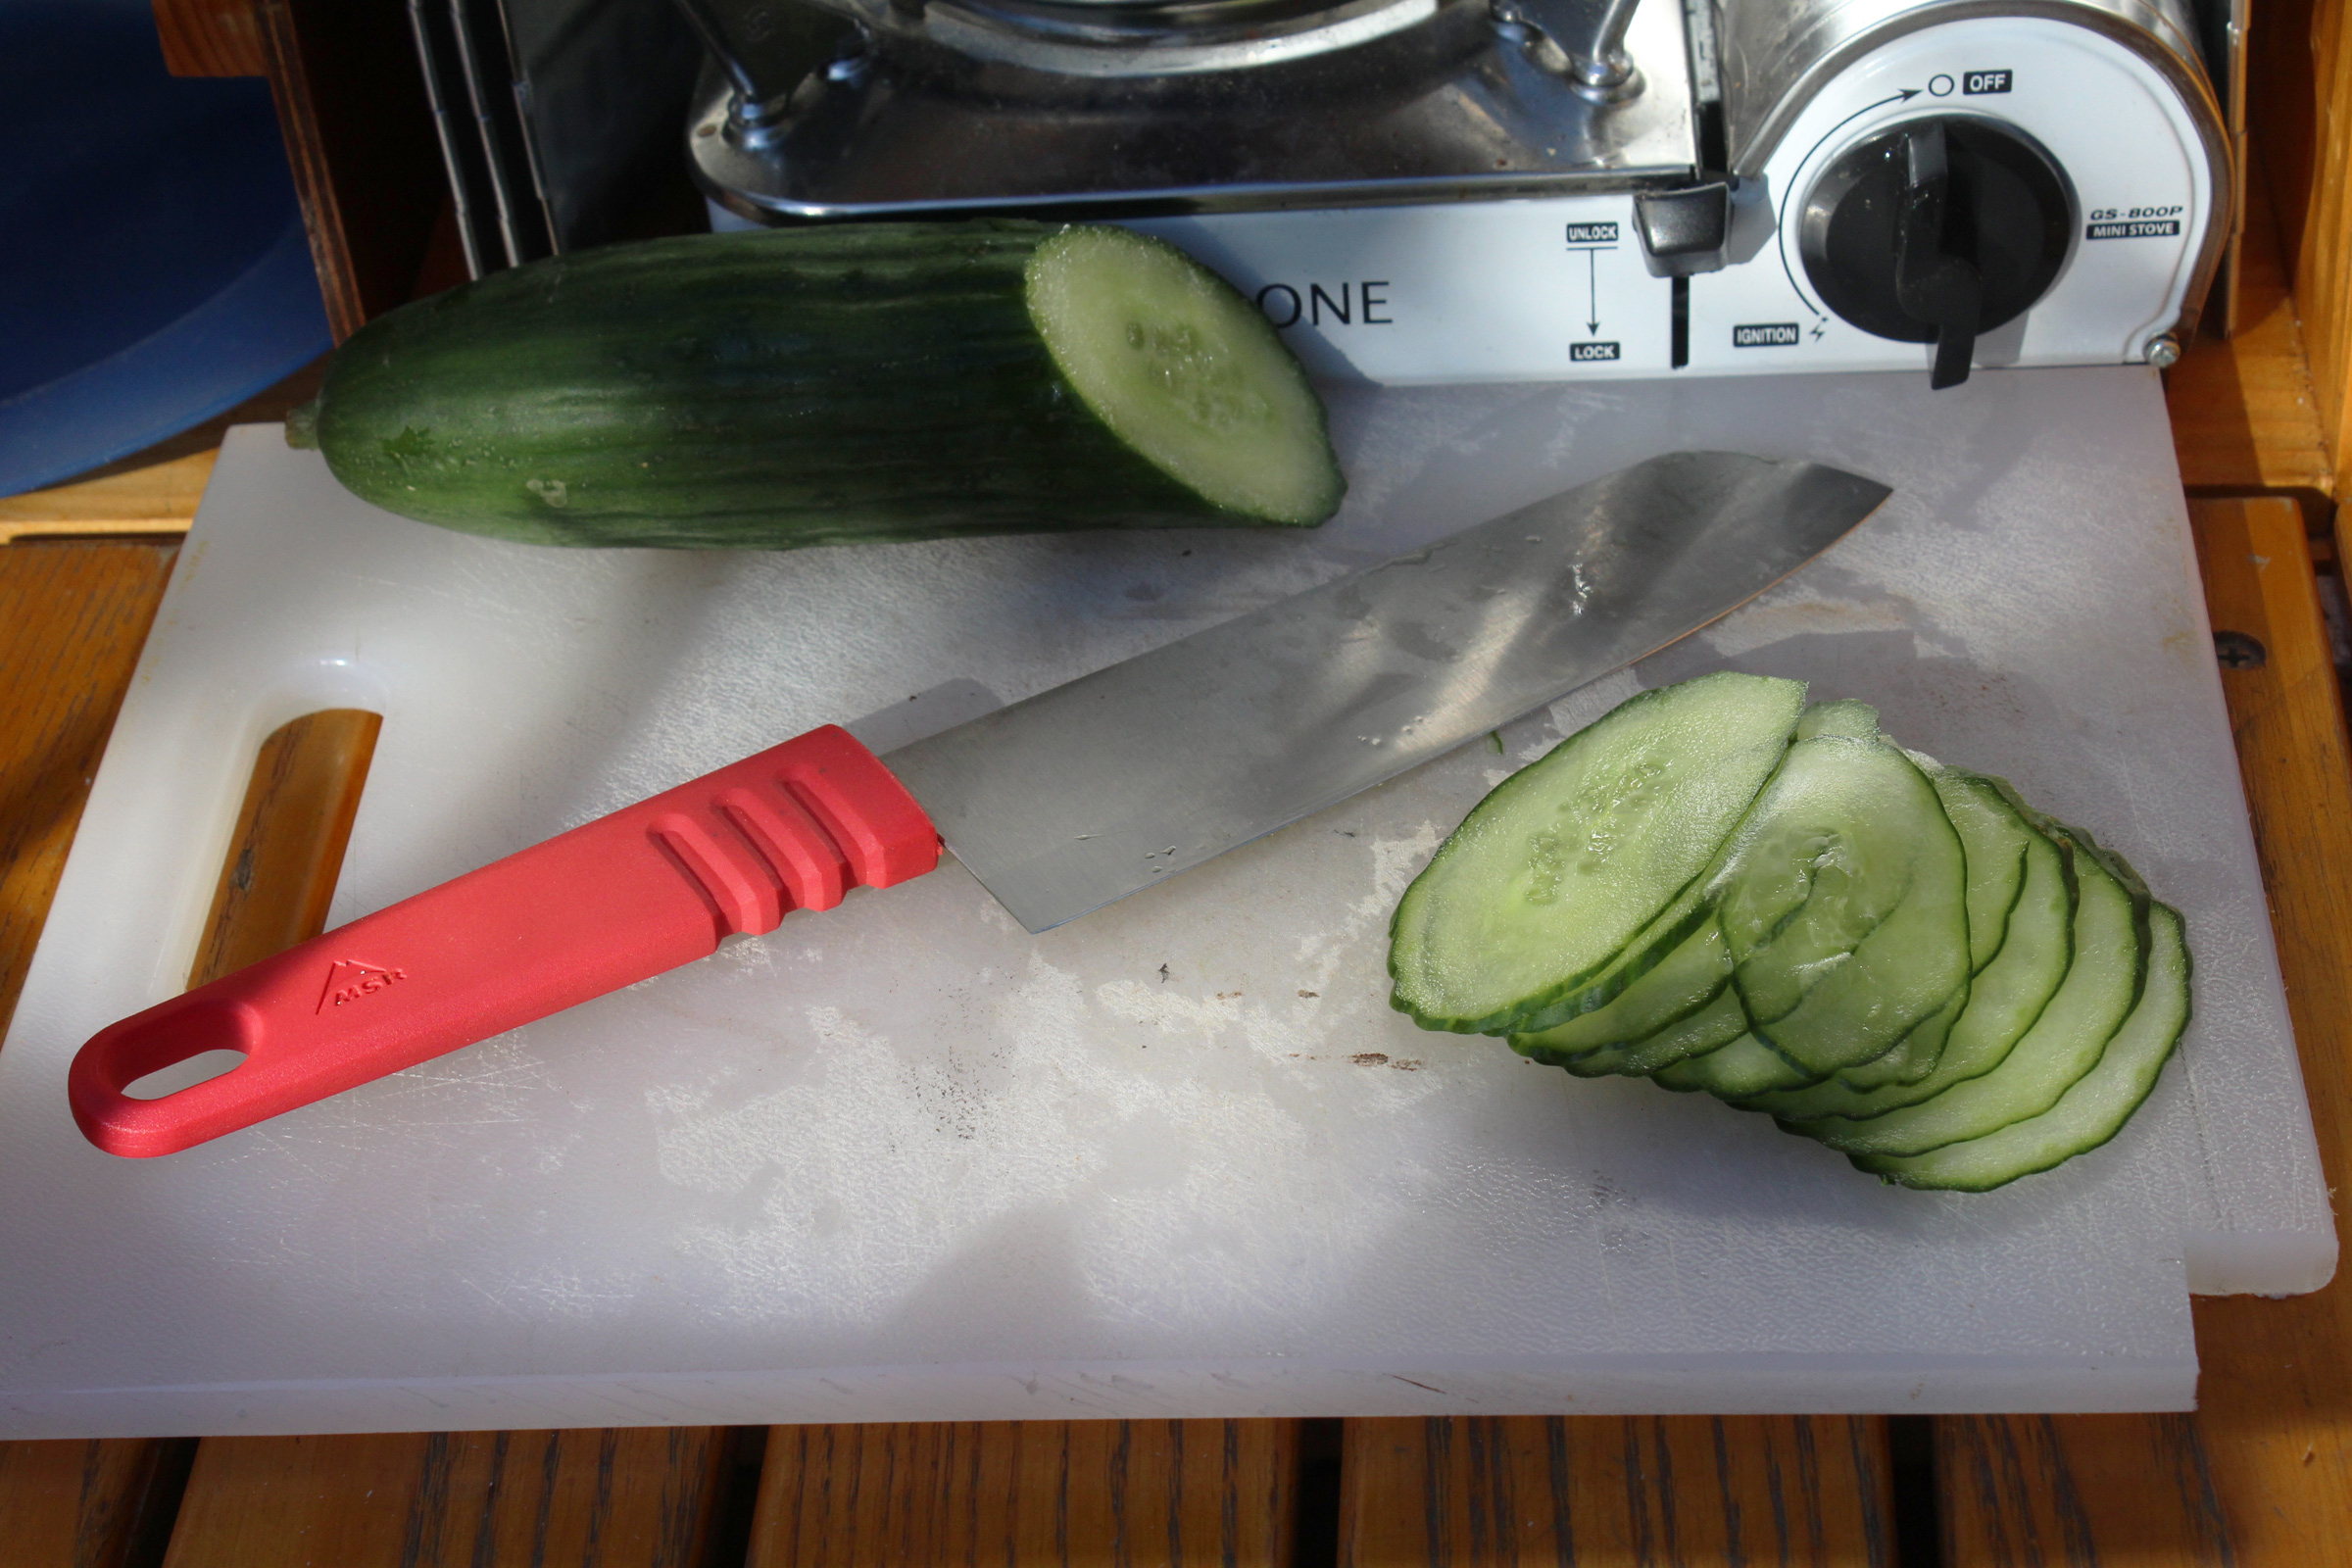 Photographs by the author
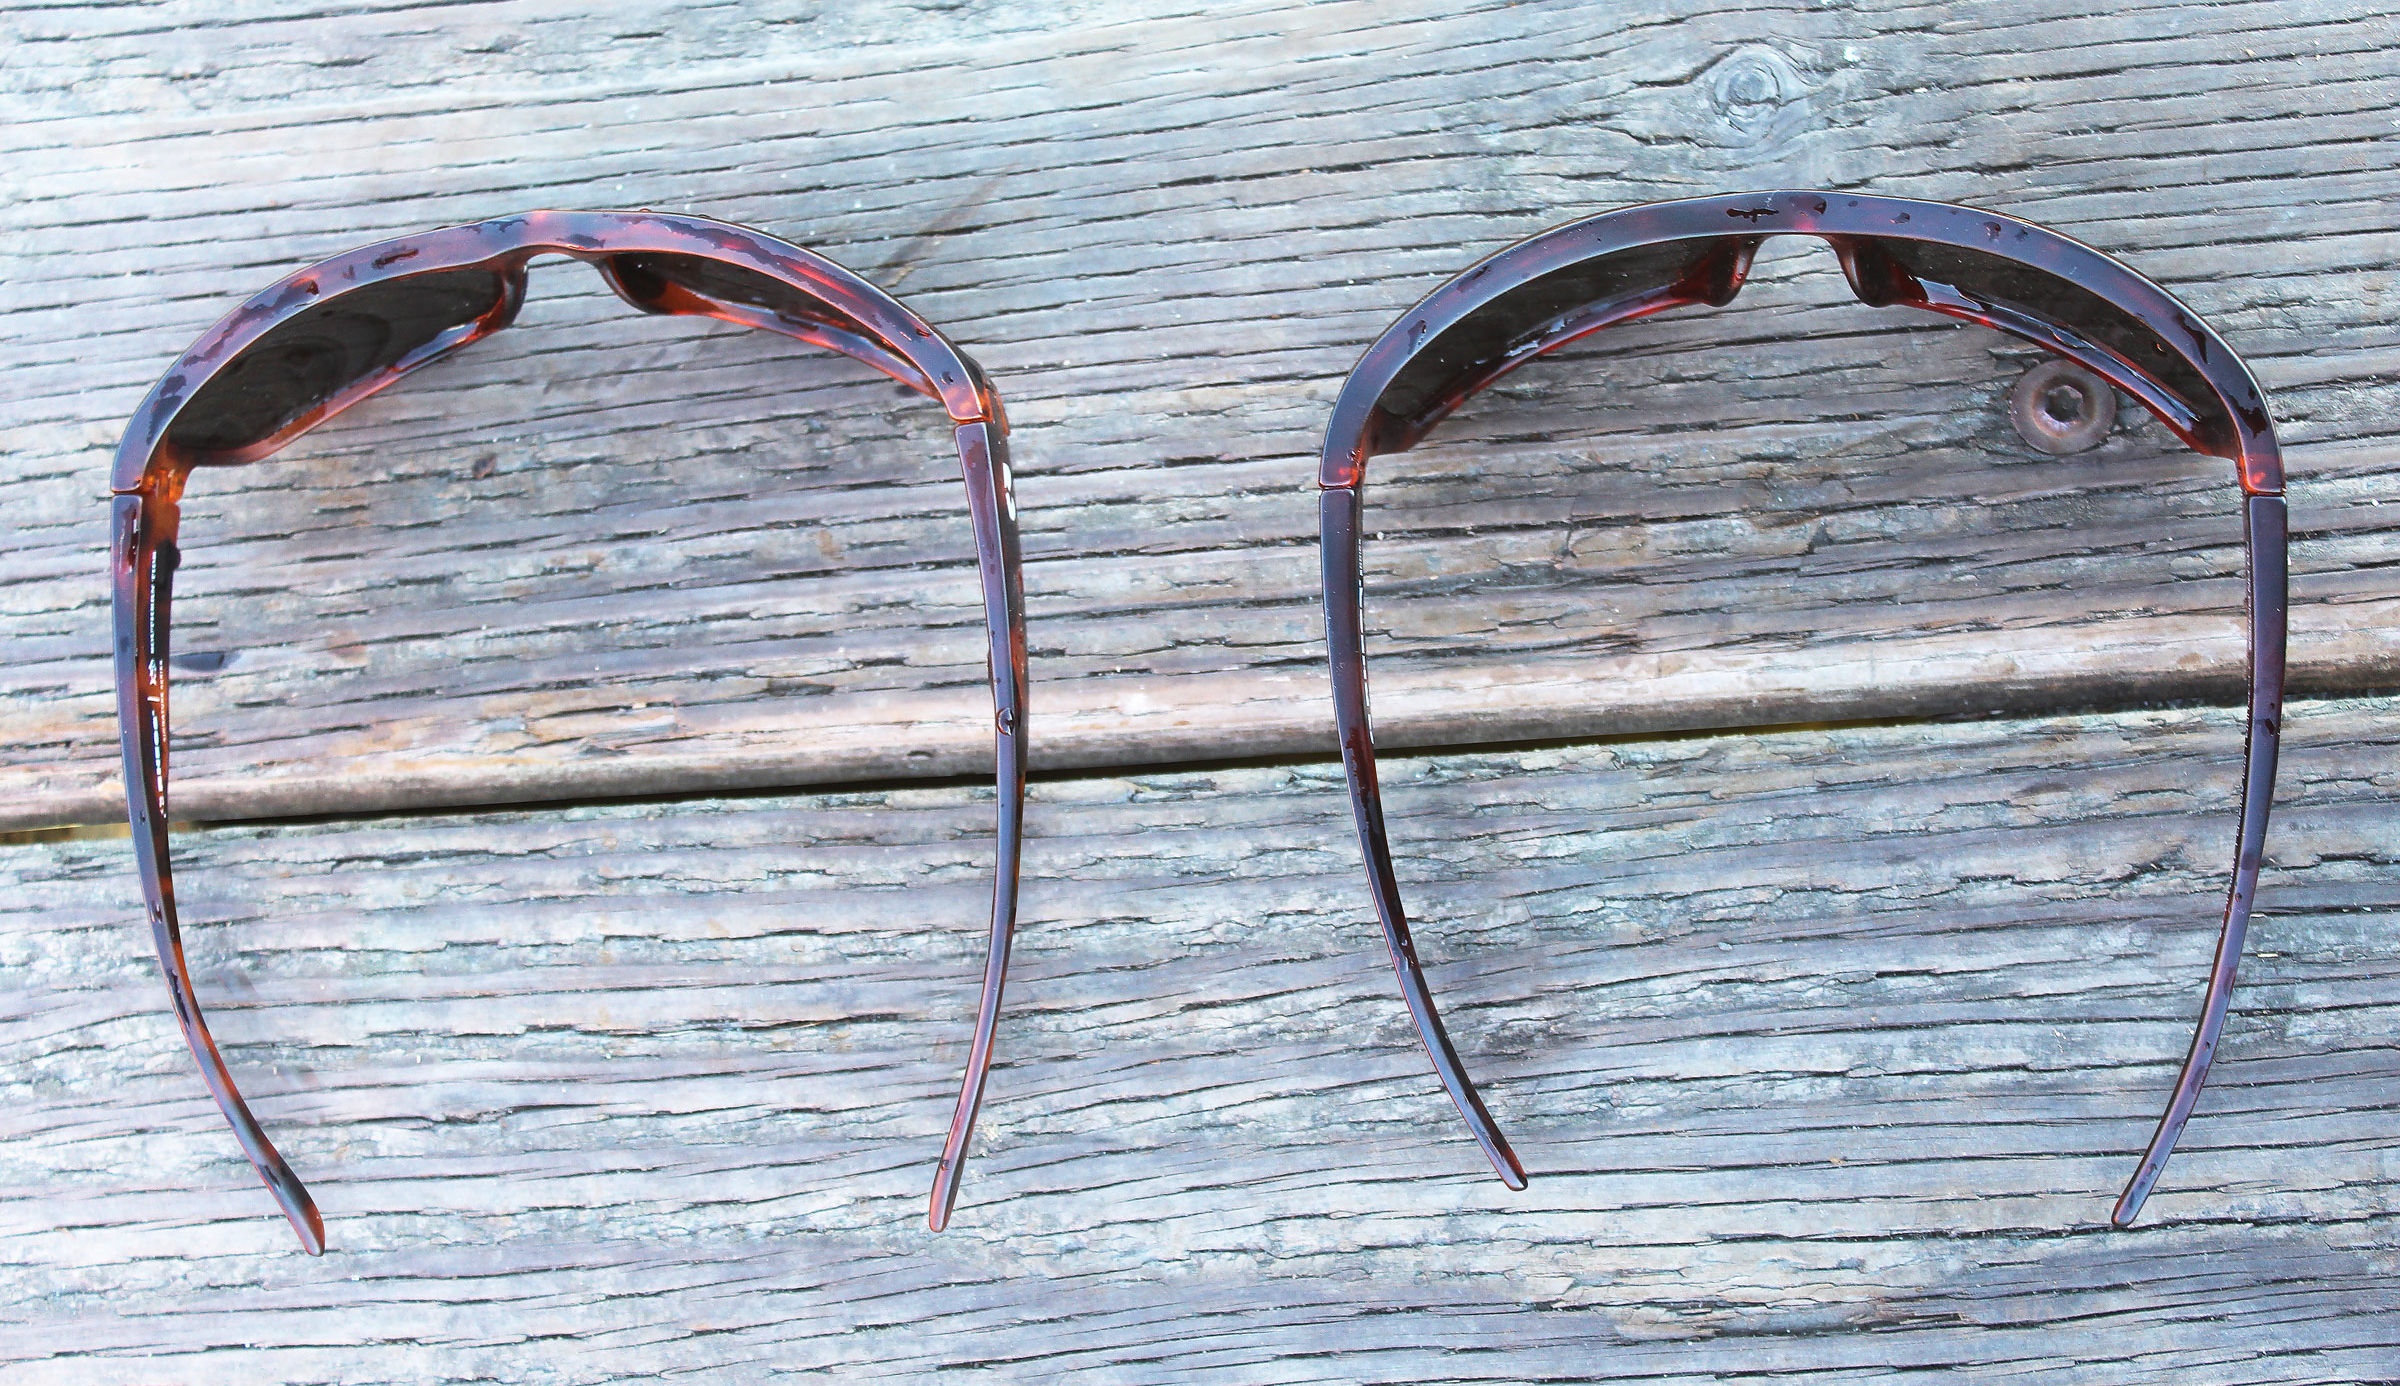 Photographs by the author