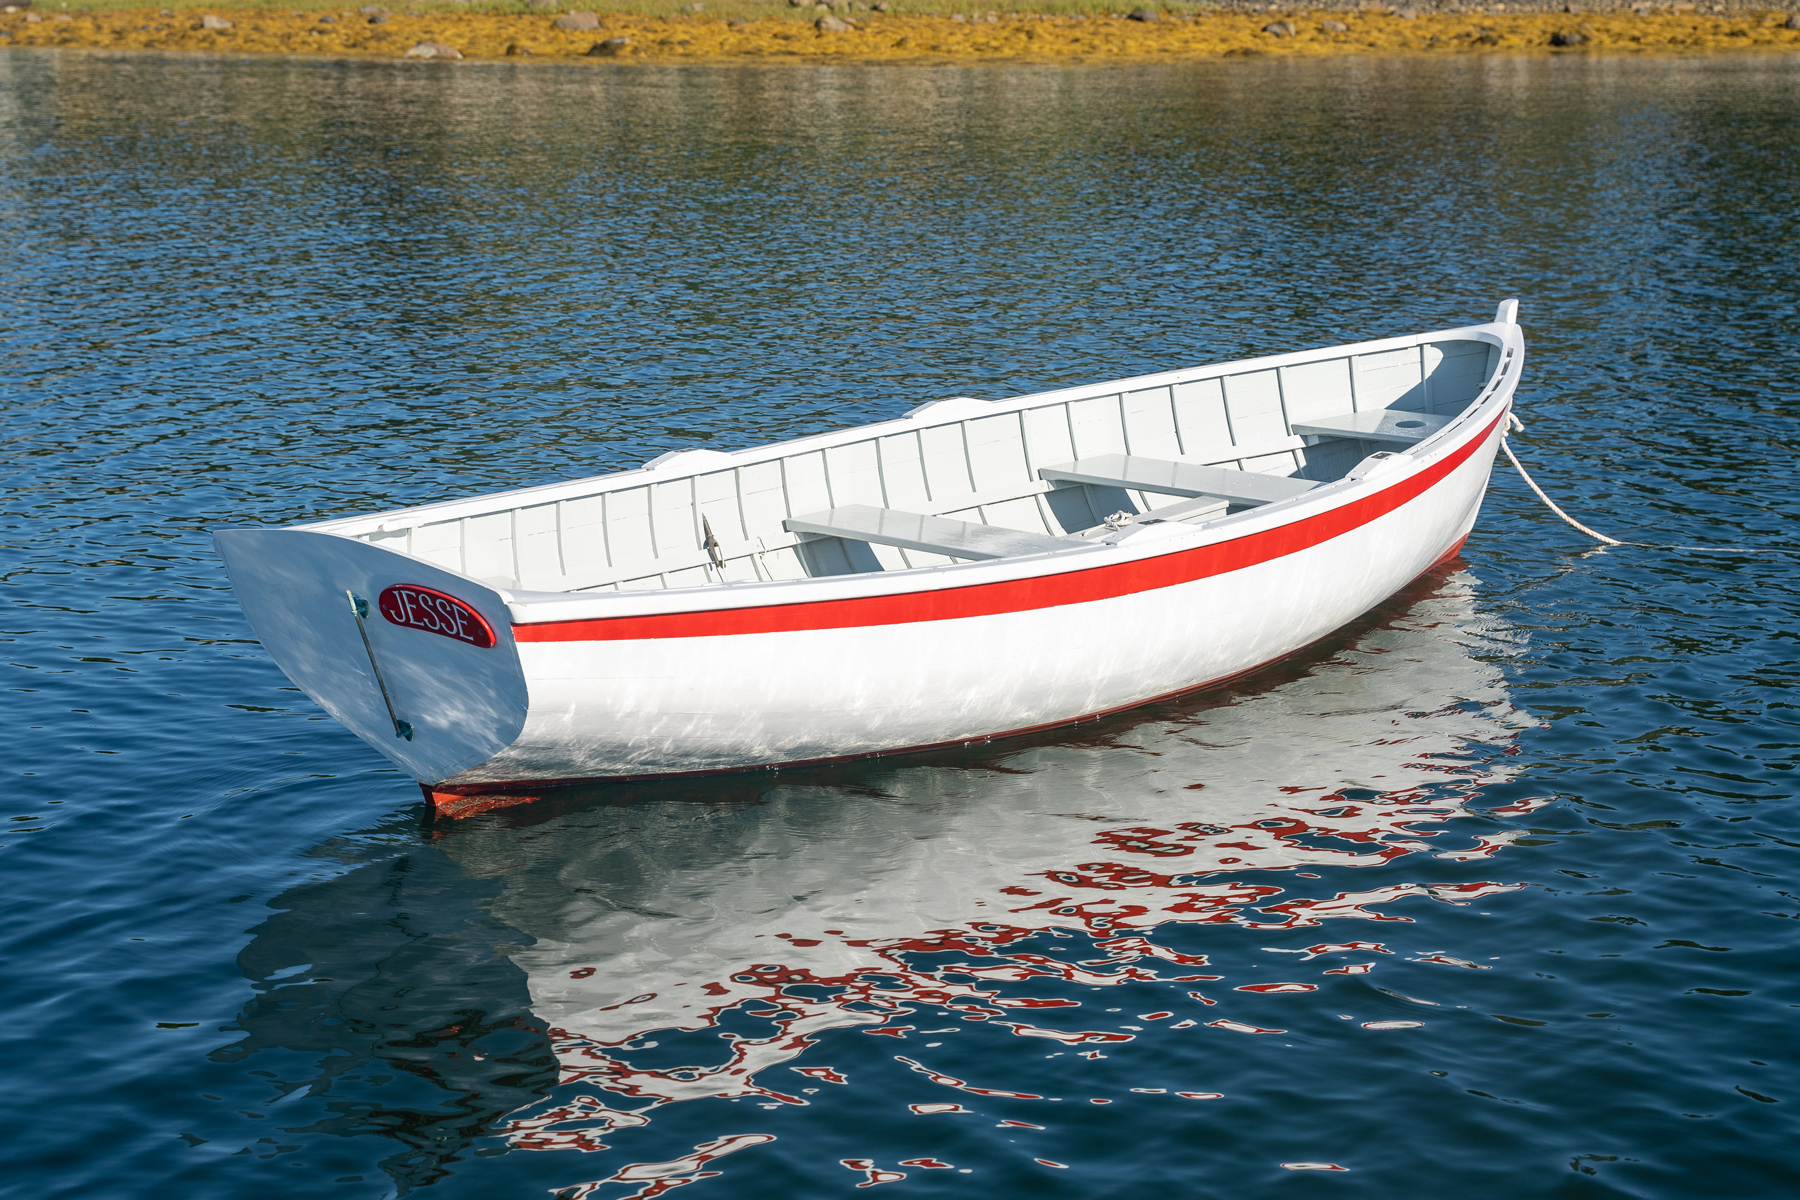
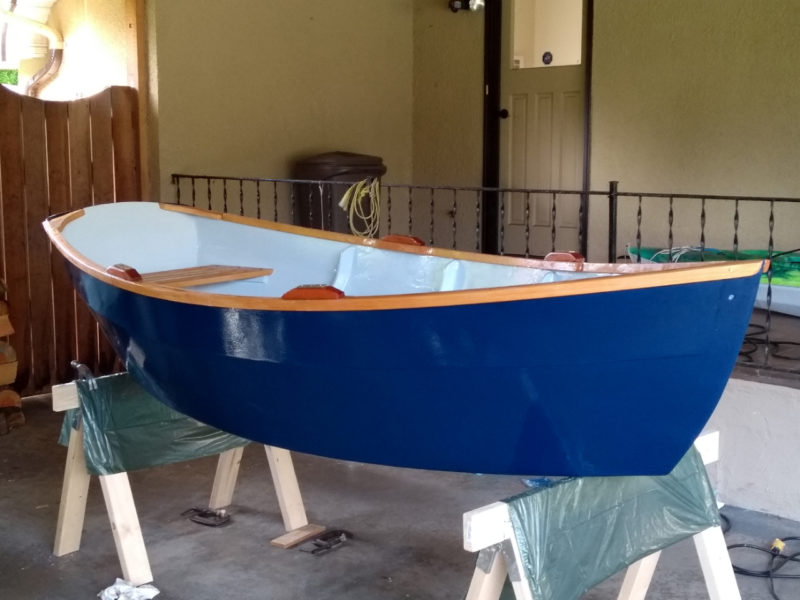
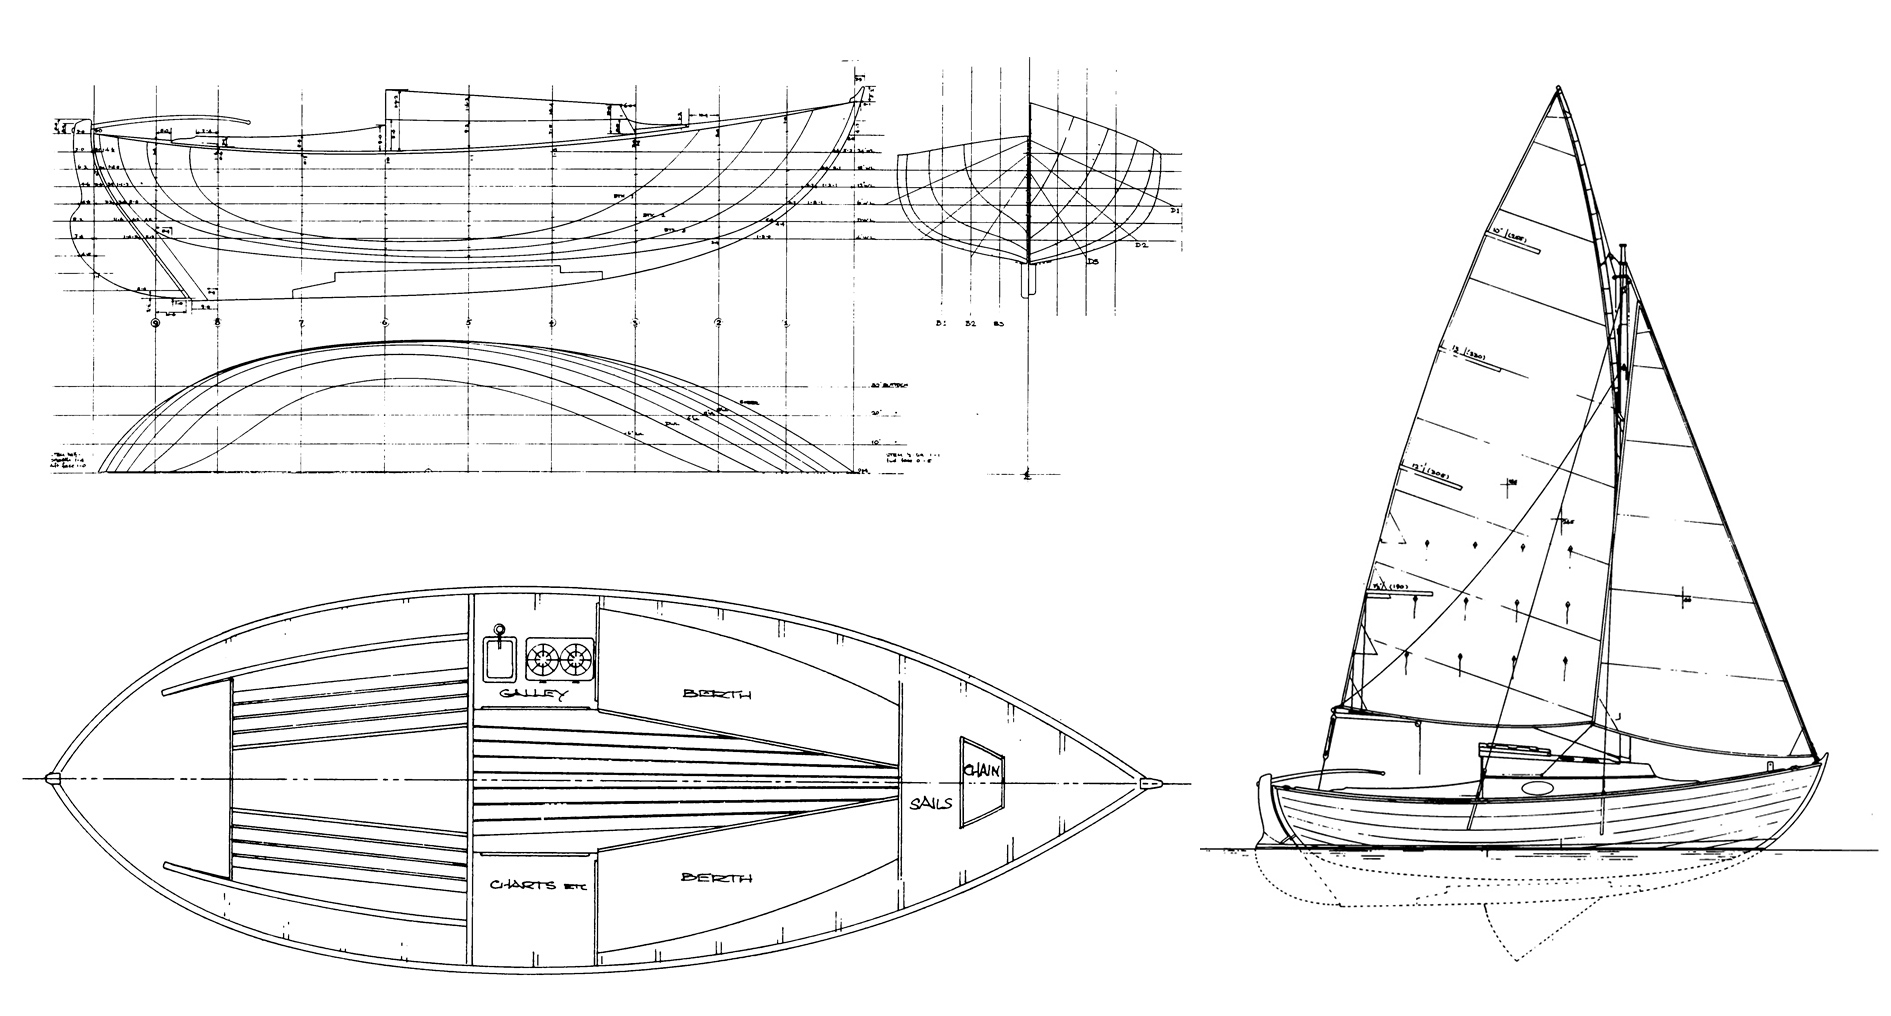
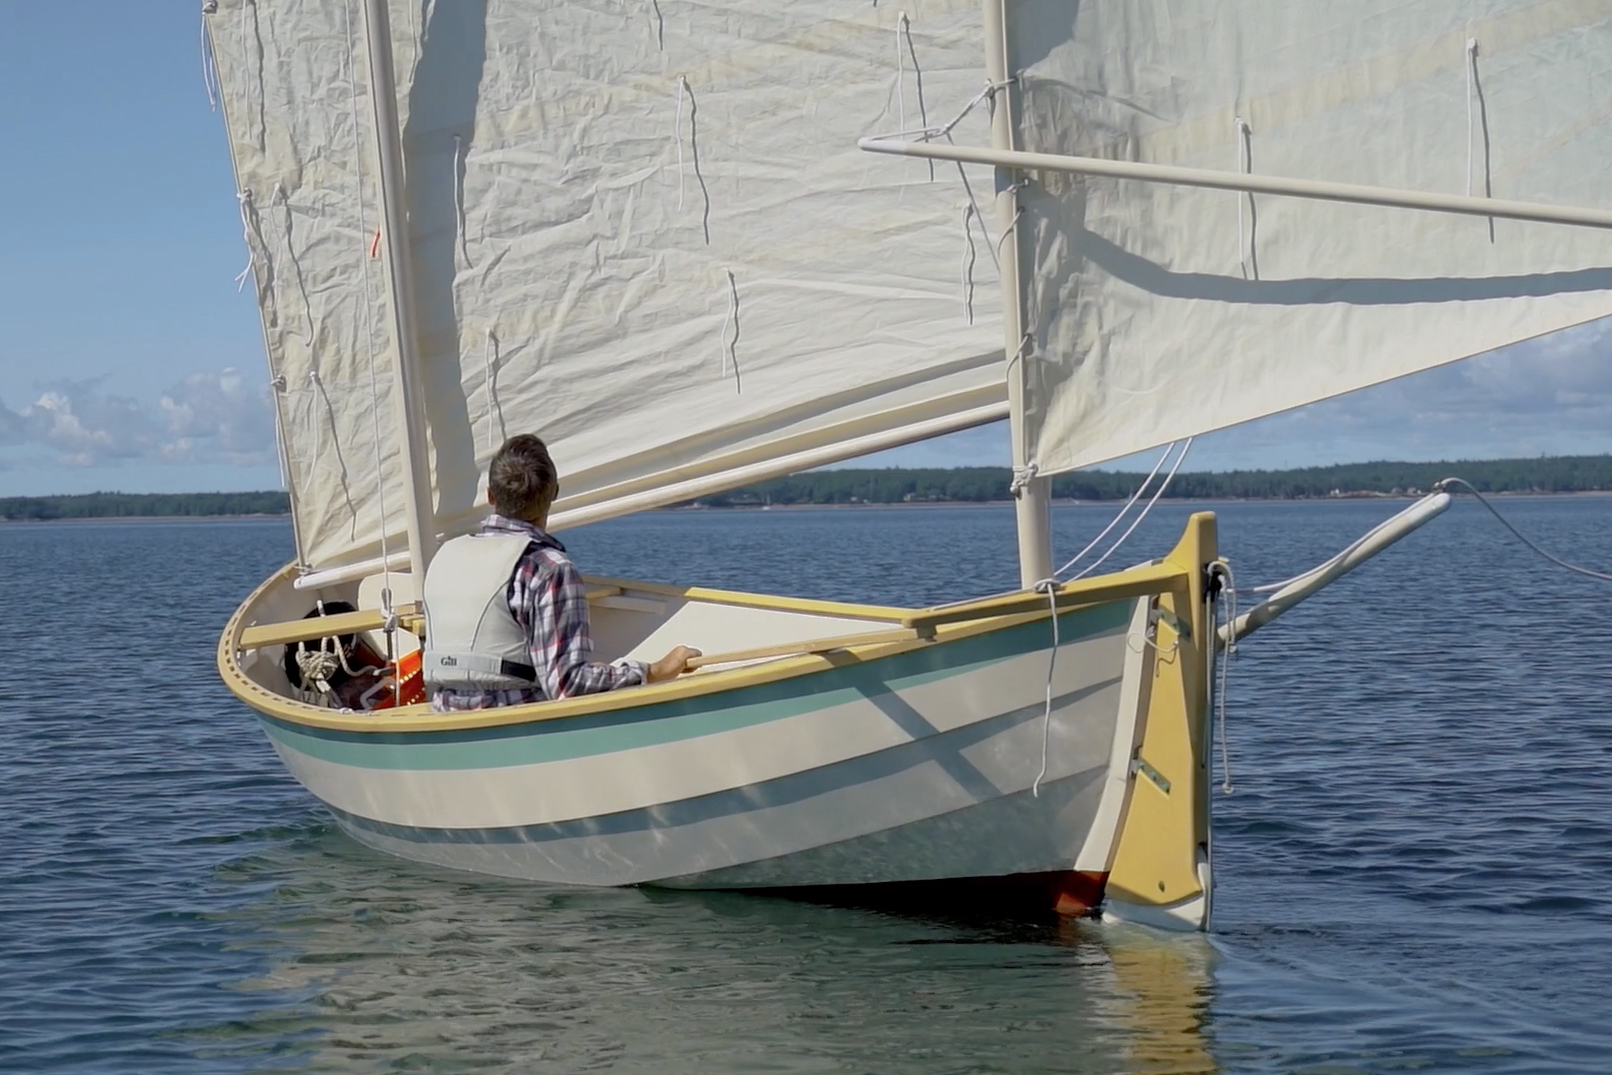
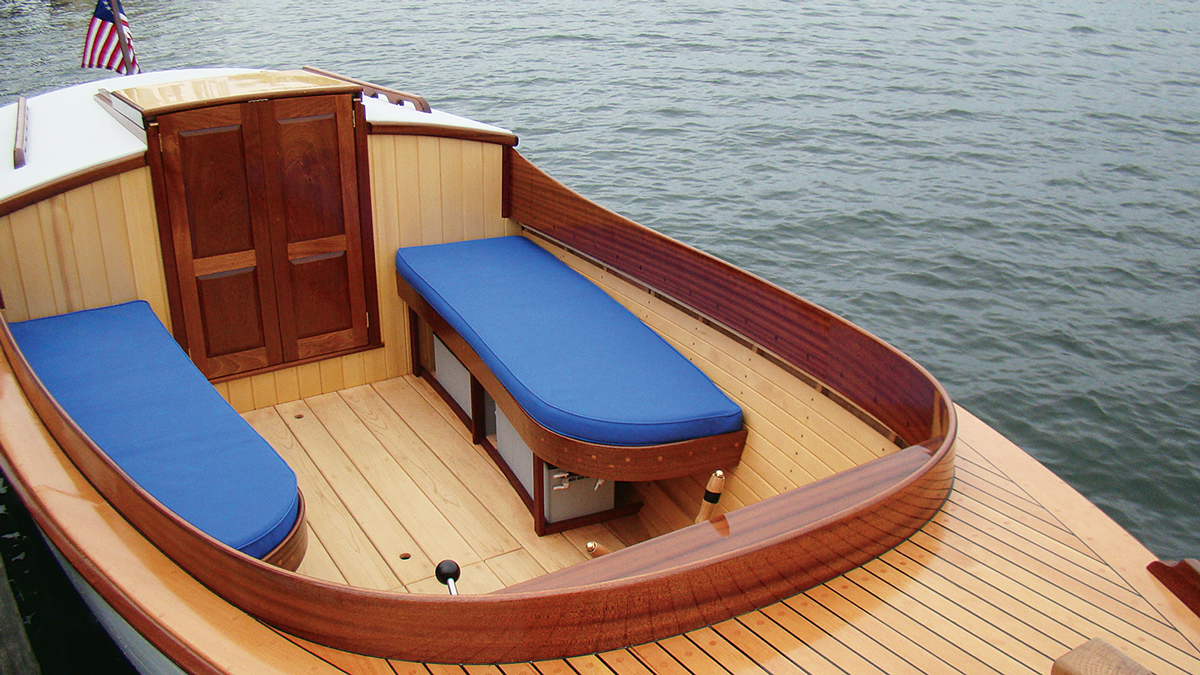
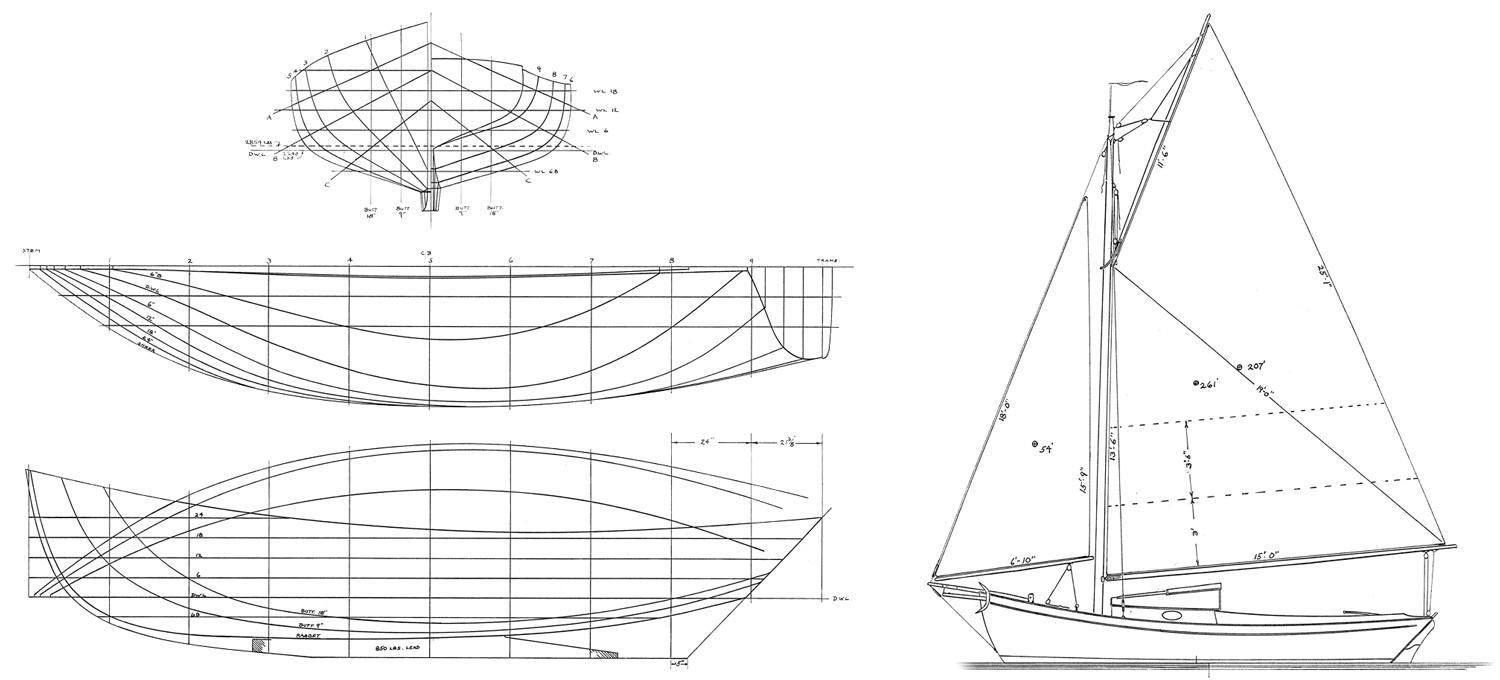
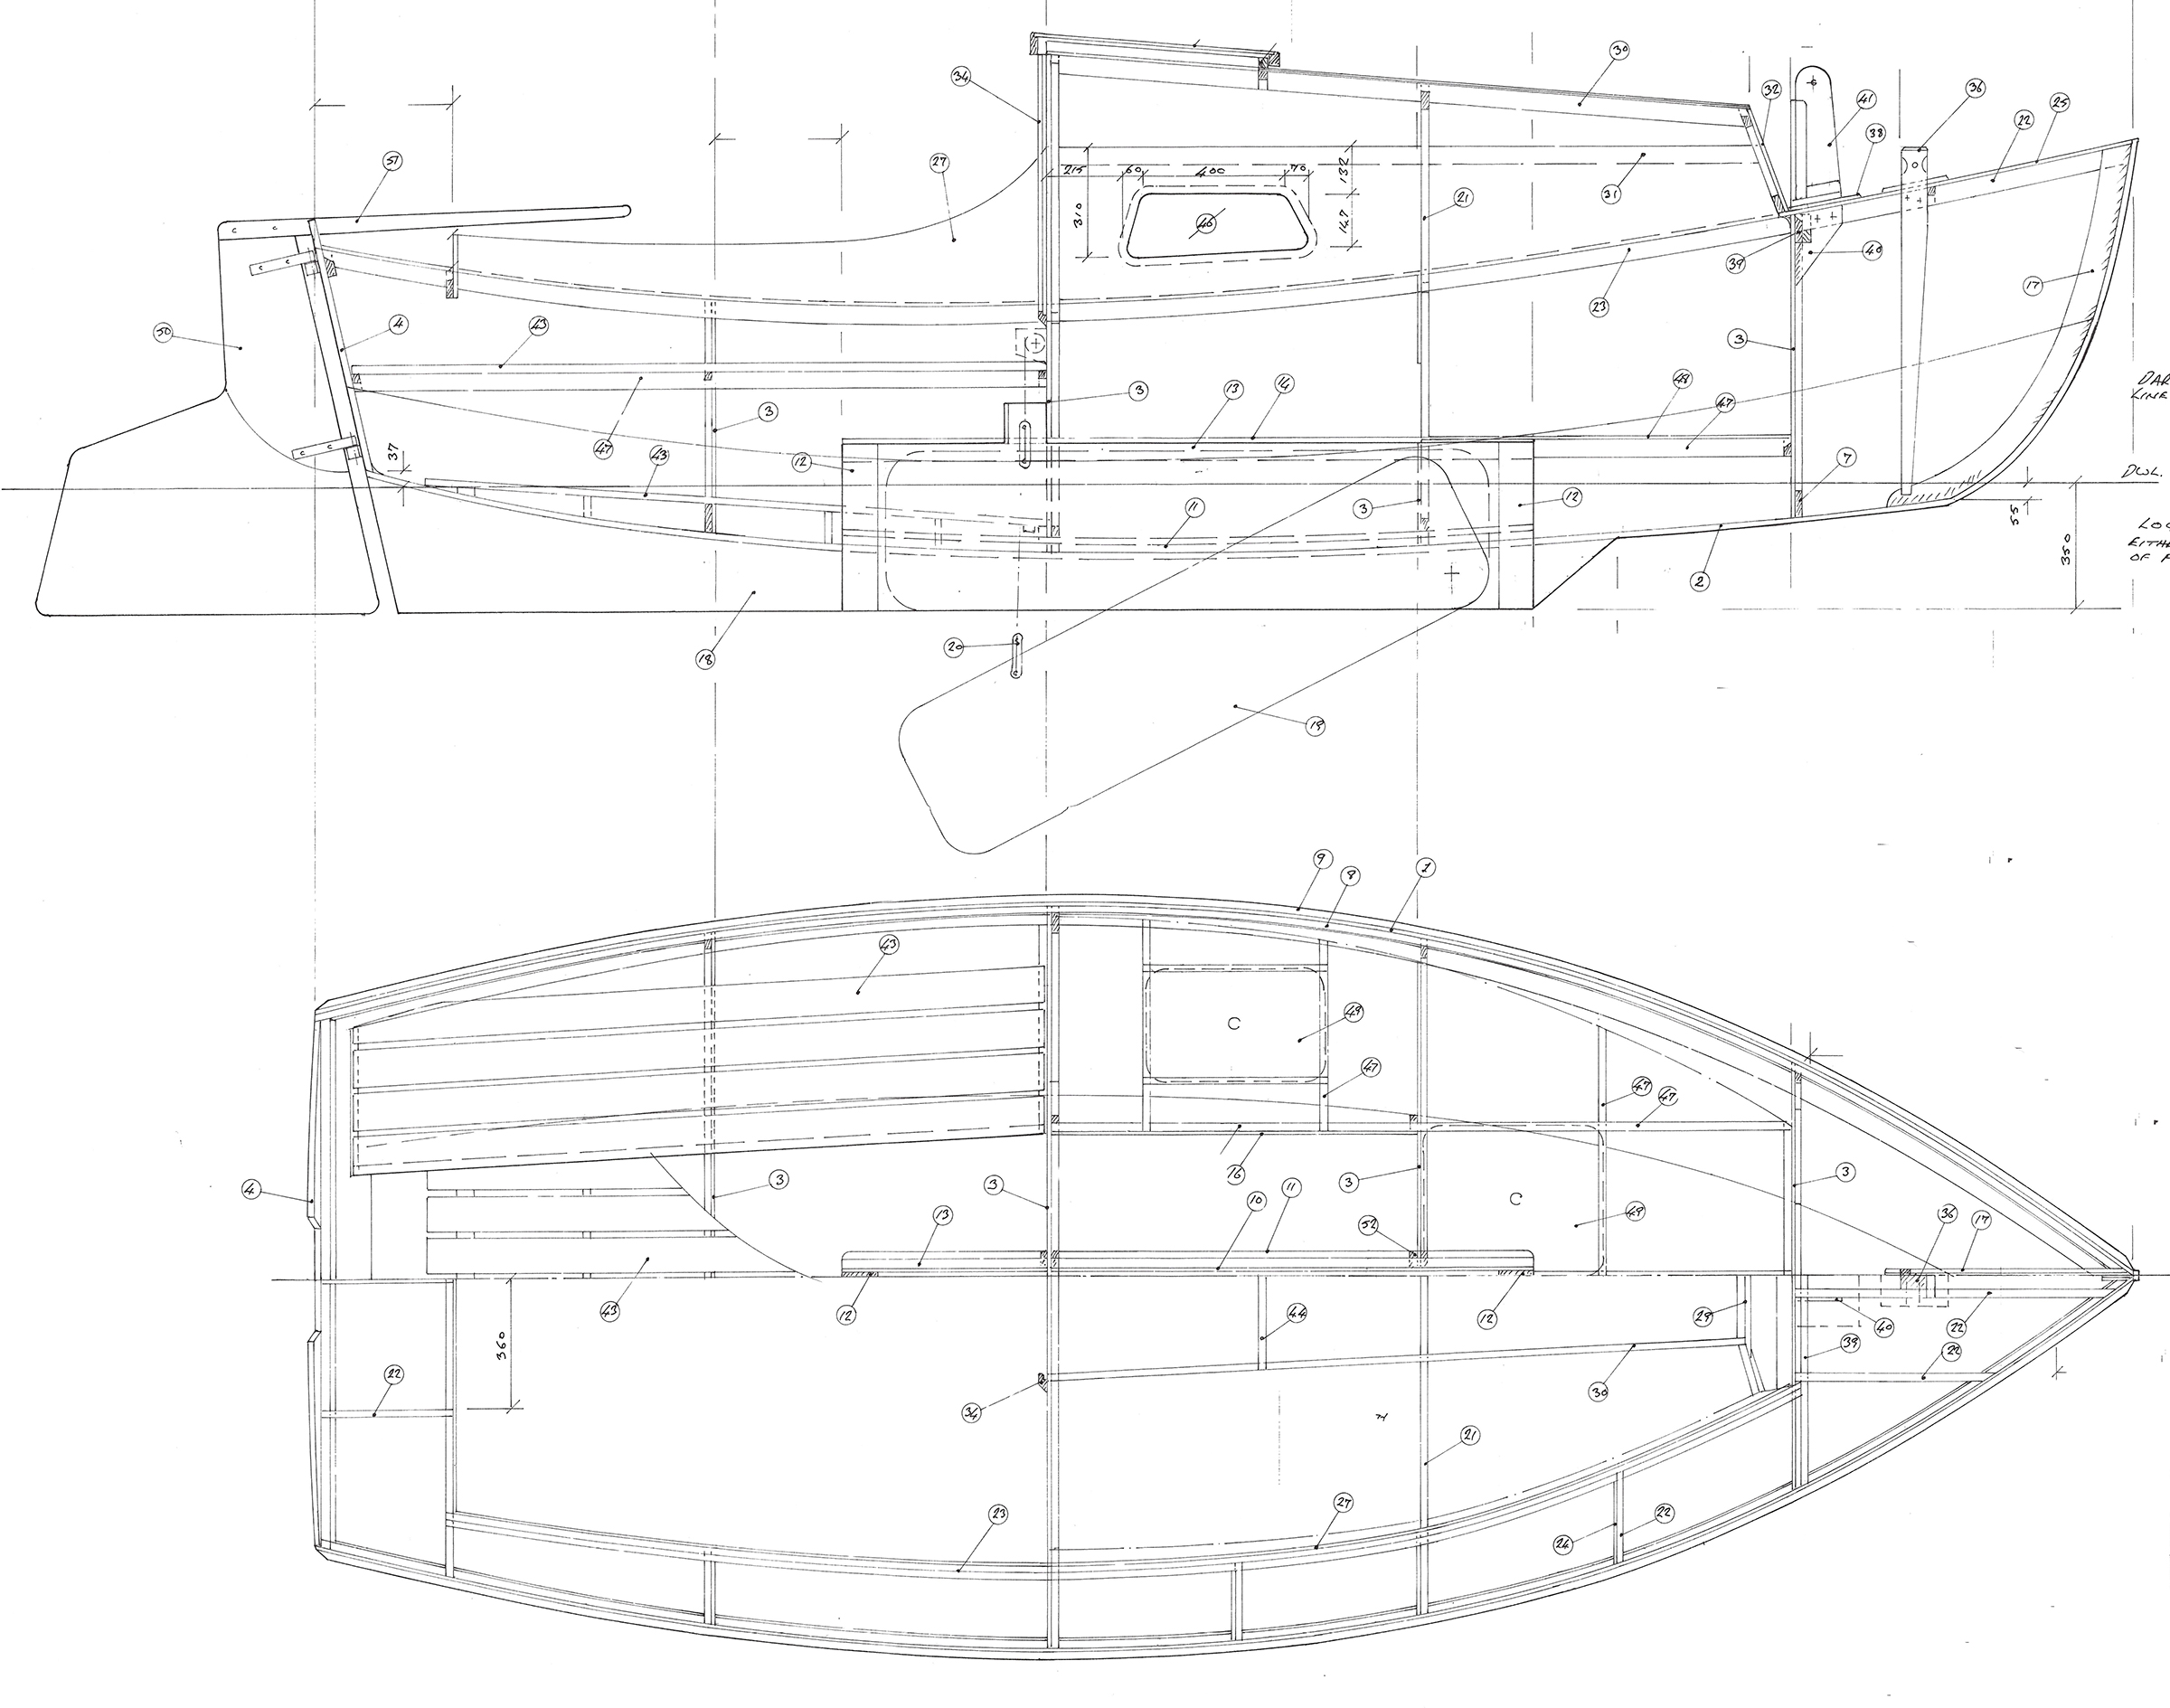
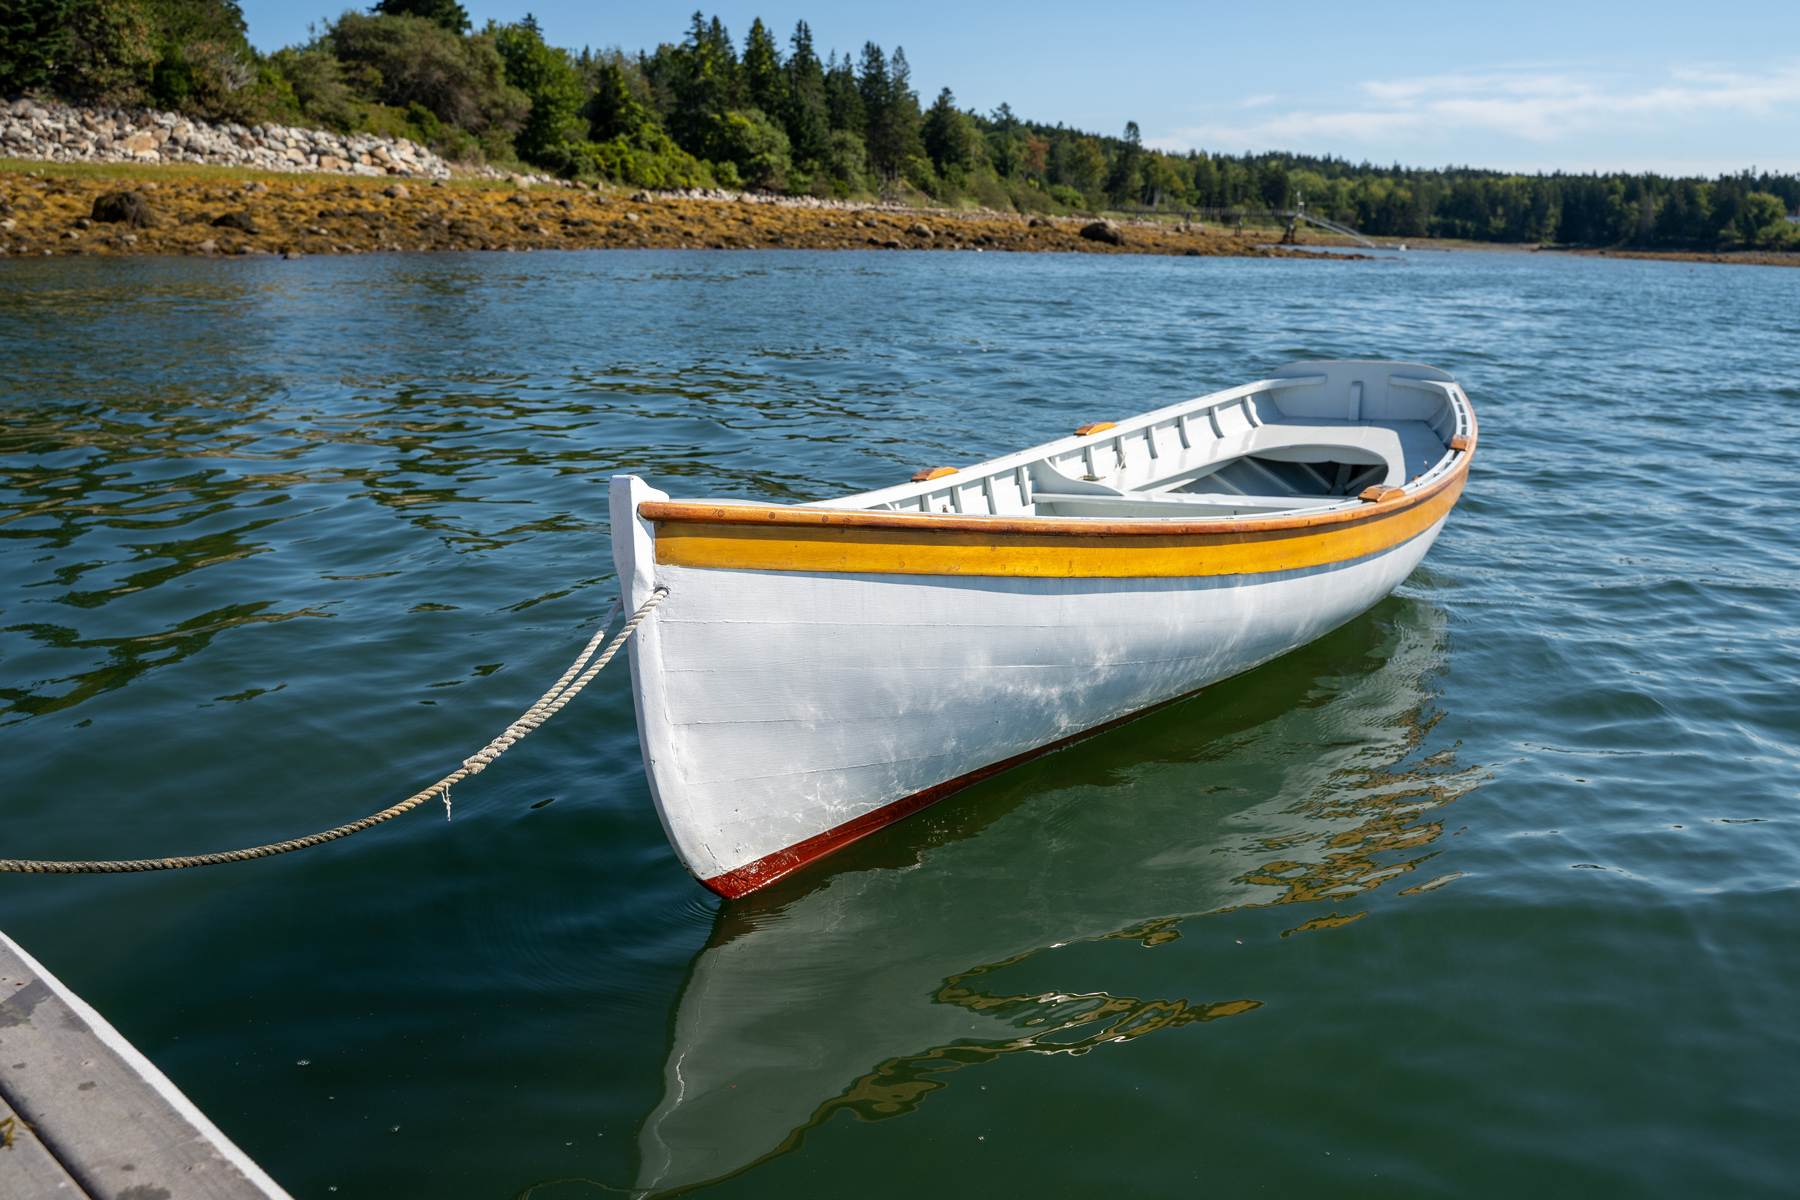
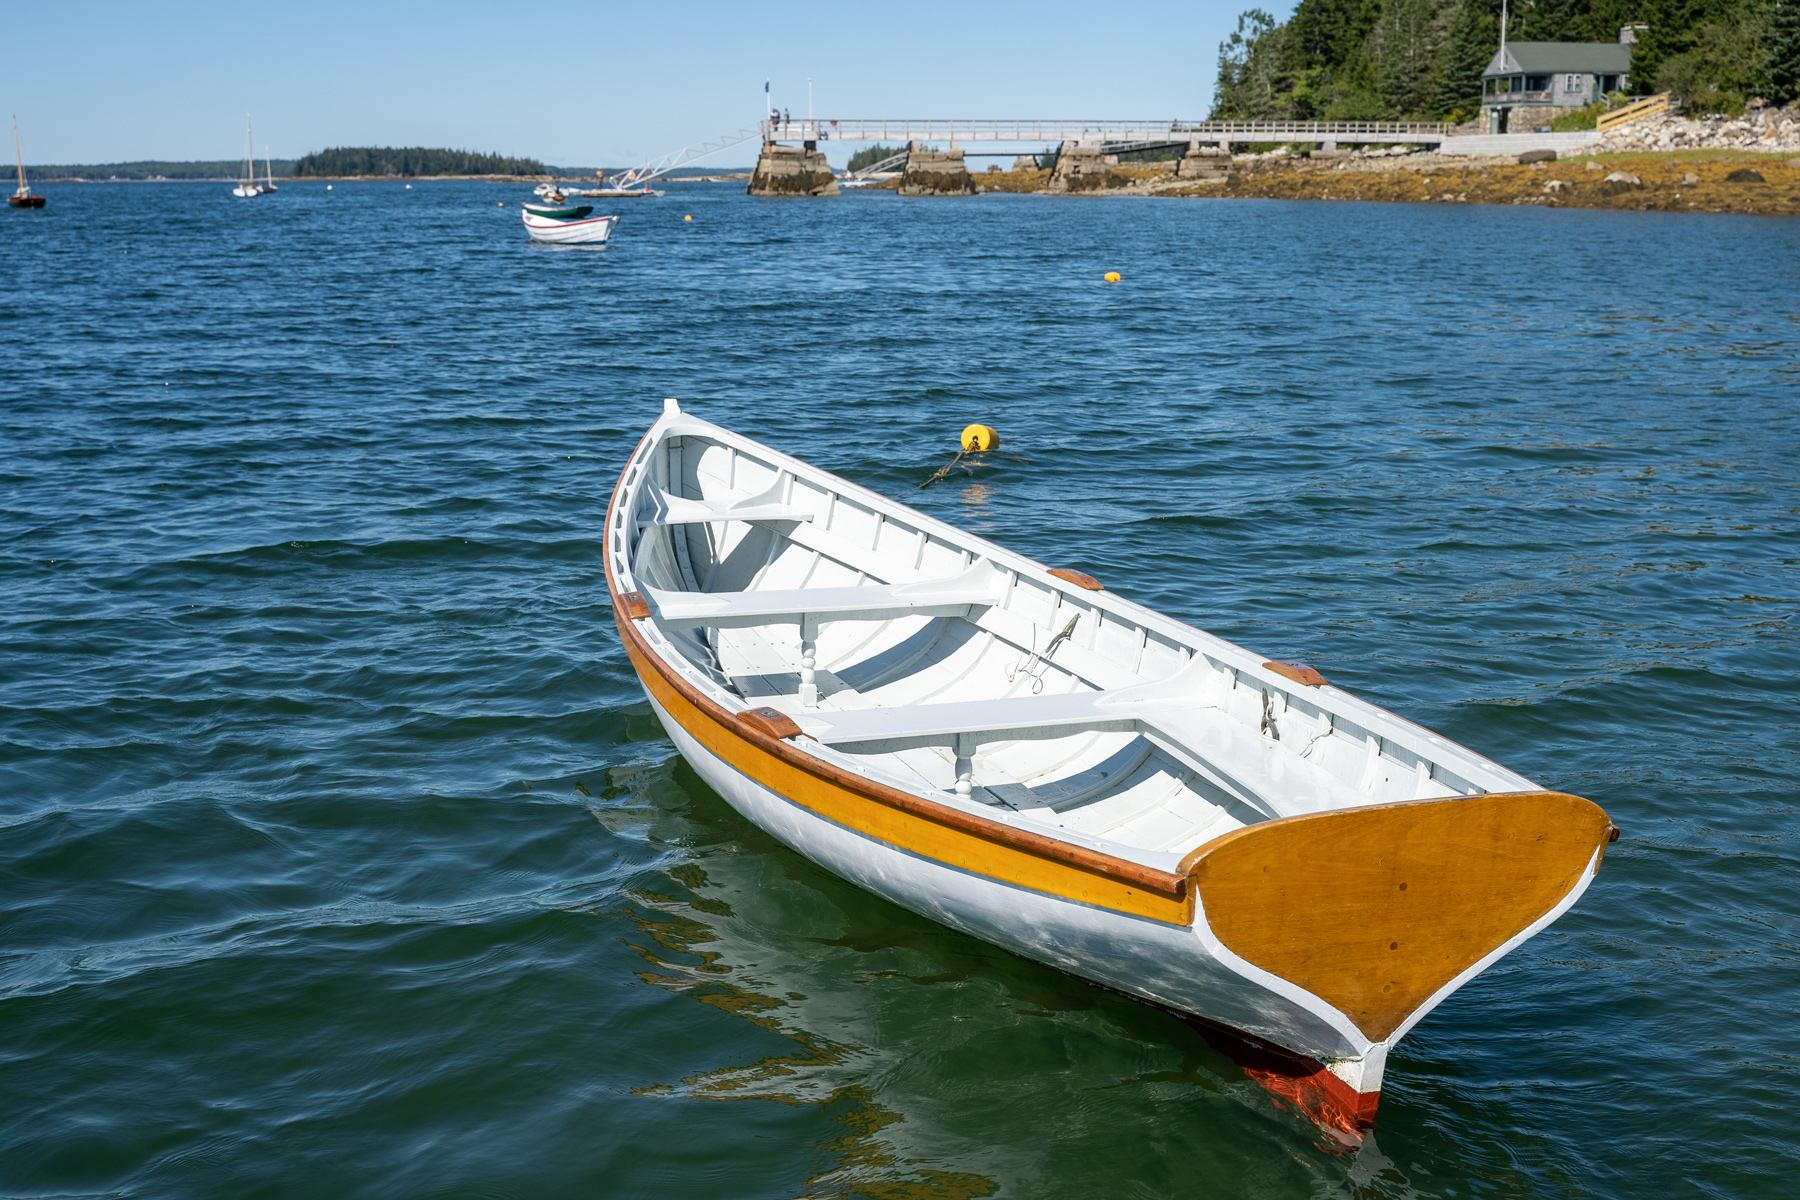
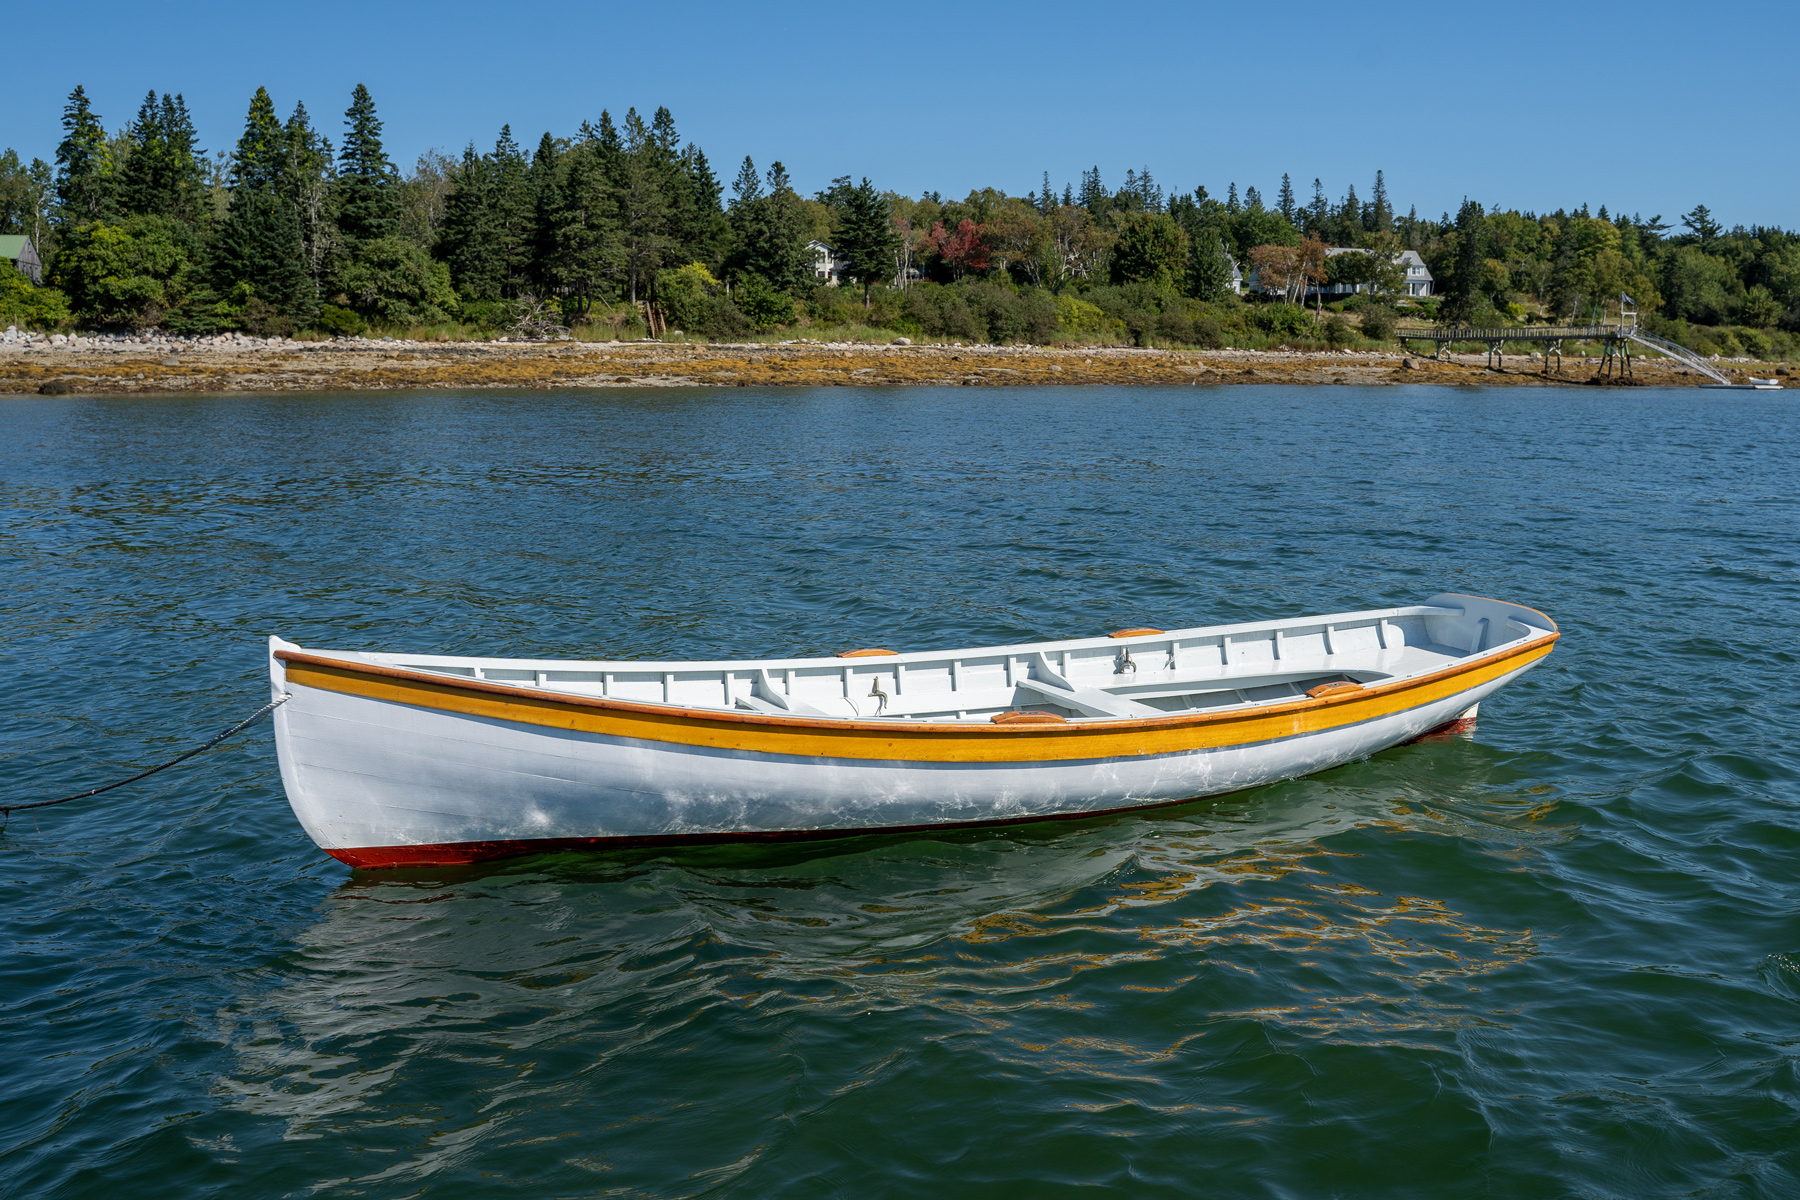
Built here at the WoodenBoat School, our Joel White & N.G. Herreshoff designed Catspaw Dinghy is an all-purpose boat that’s easy to row and sail. The Catspaw Dinghy is a popular boatbuilding project for amateur builders; it represents classic, small-craft construction.
Joel White’s Catspaw Dinghy is an adaptation of Nathanael Herreshoff’s Columbia Dinghy.
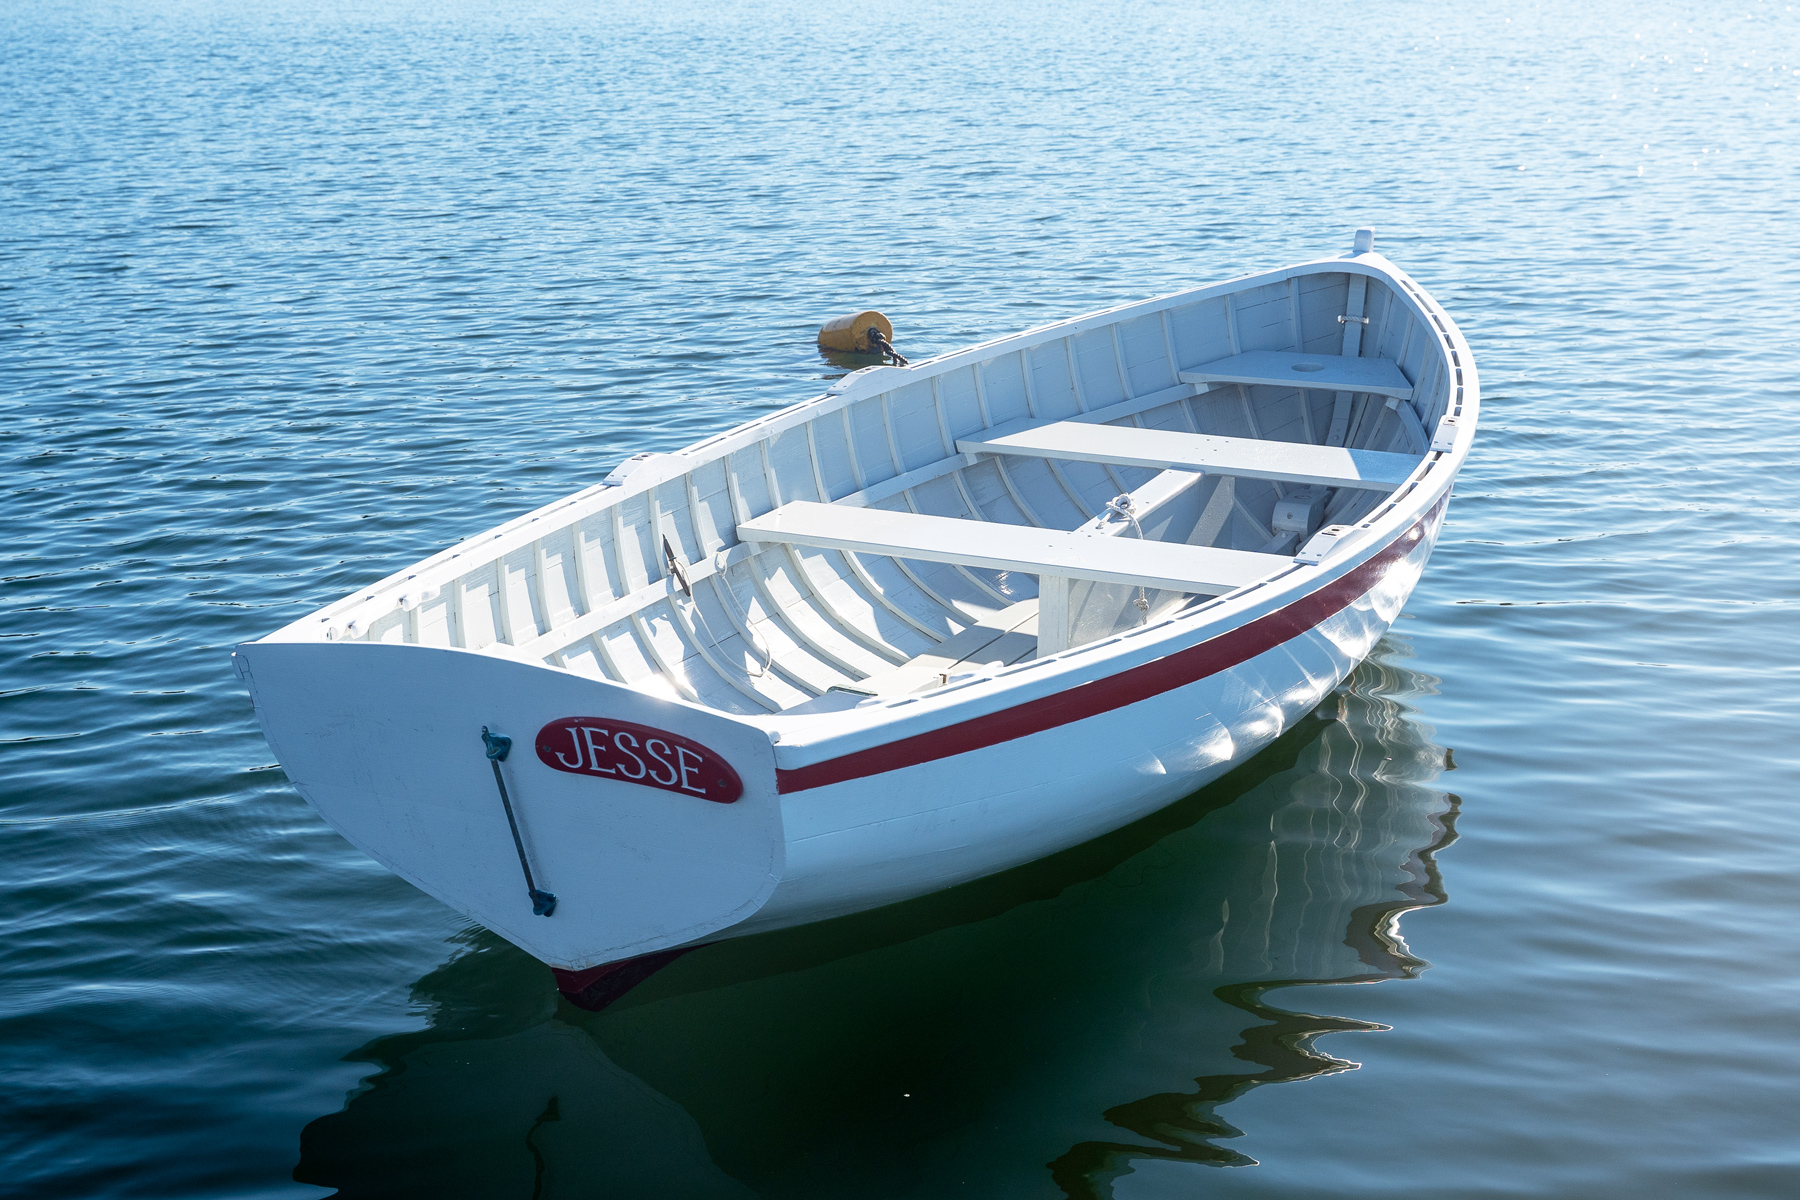
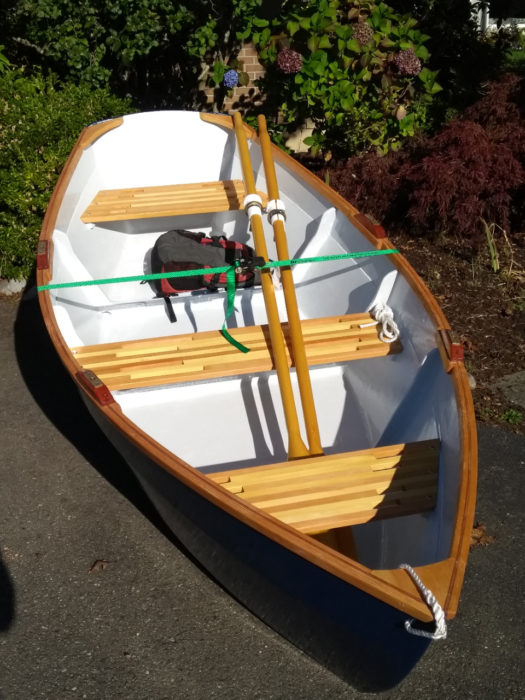
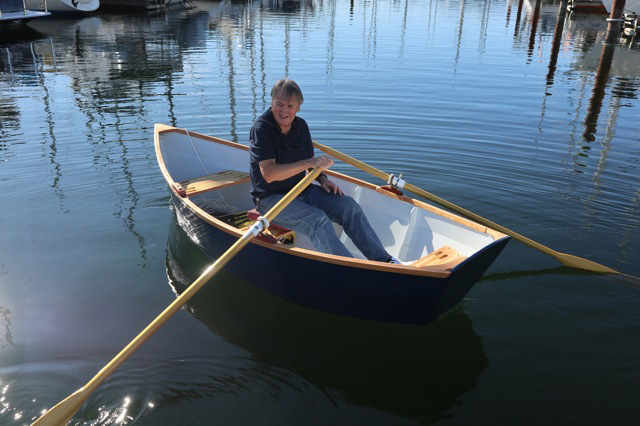
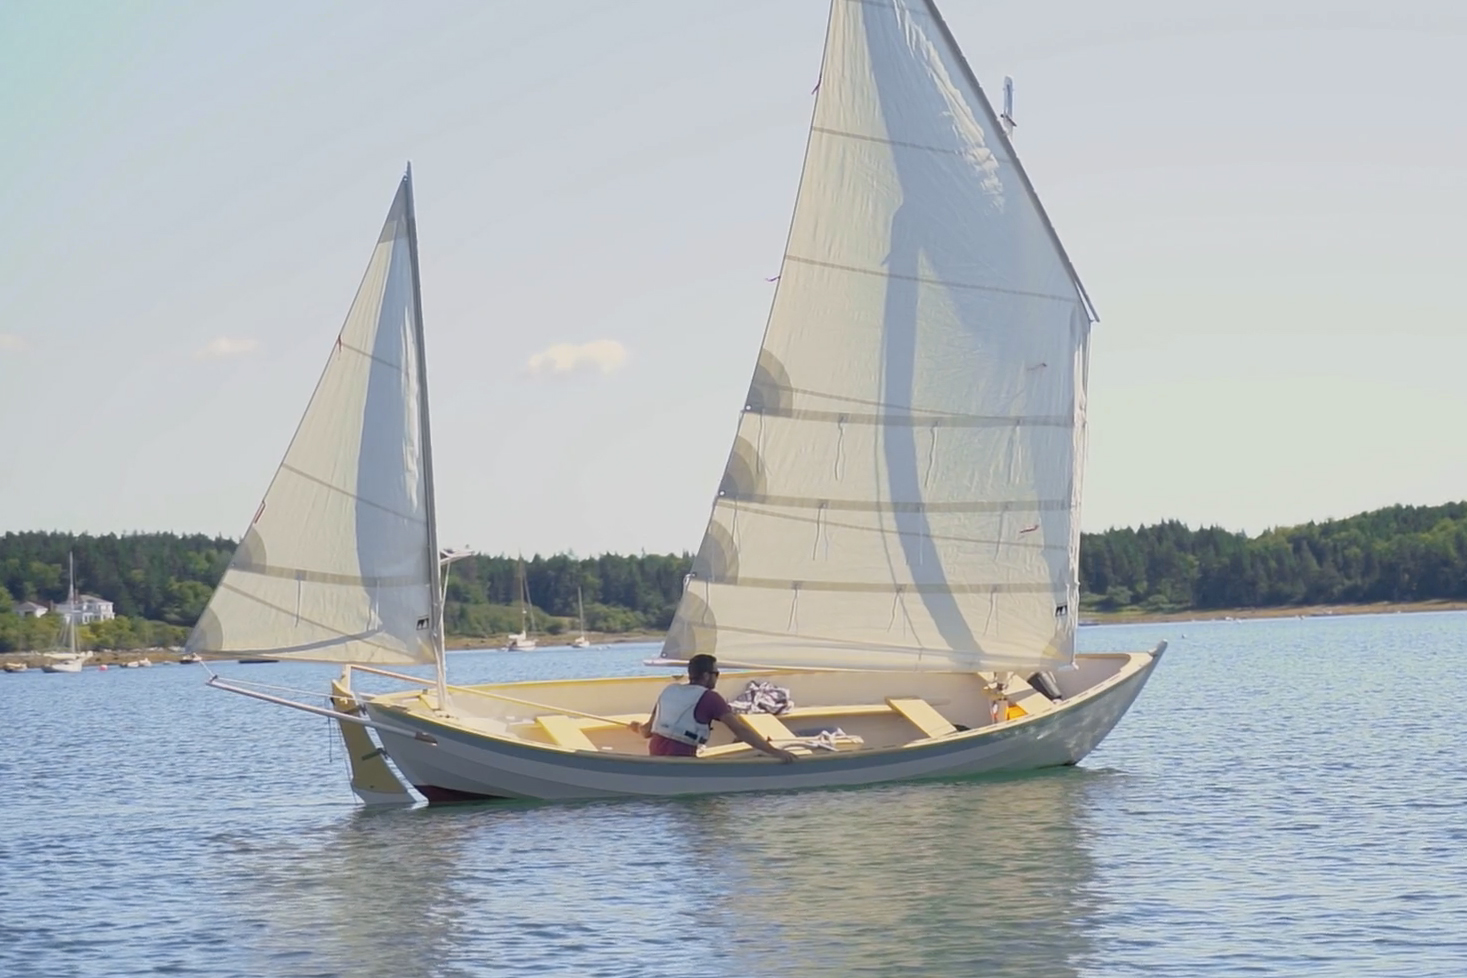
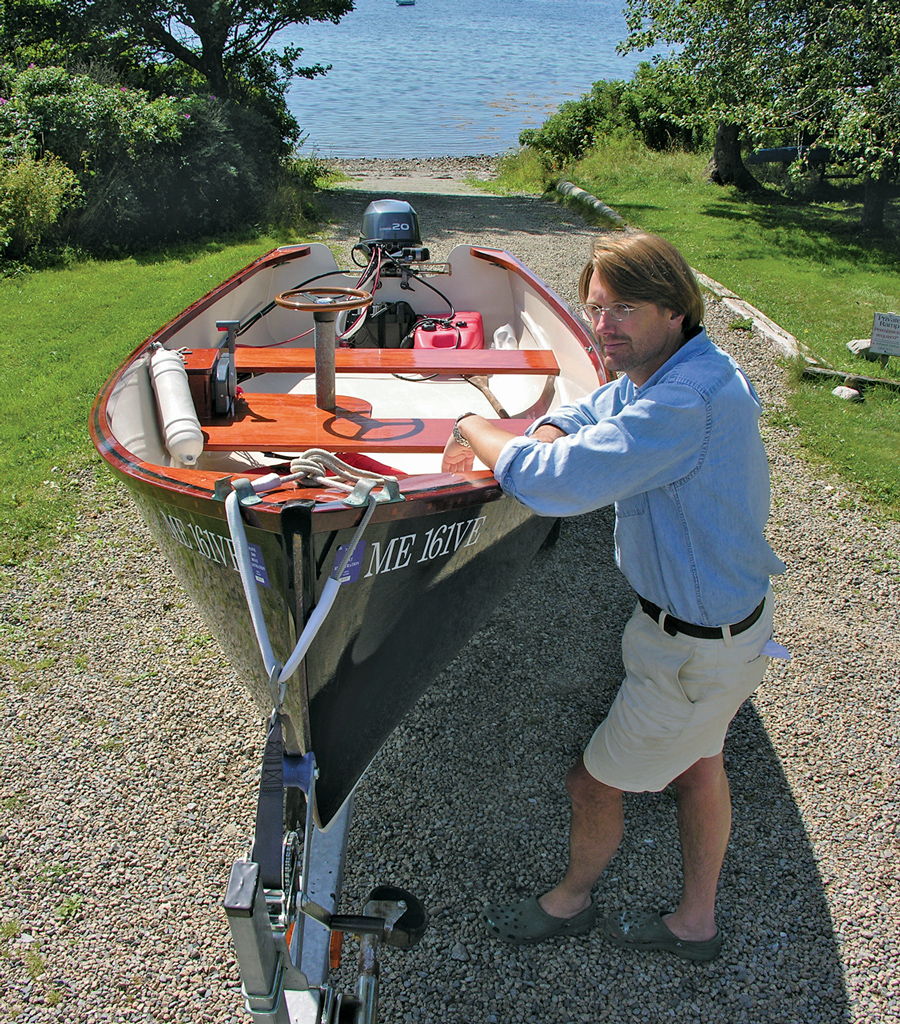
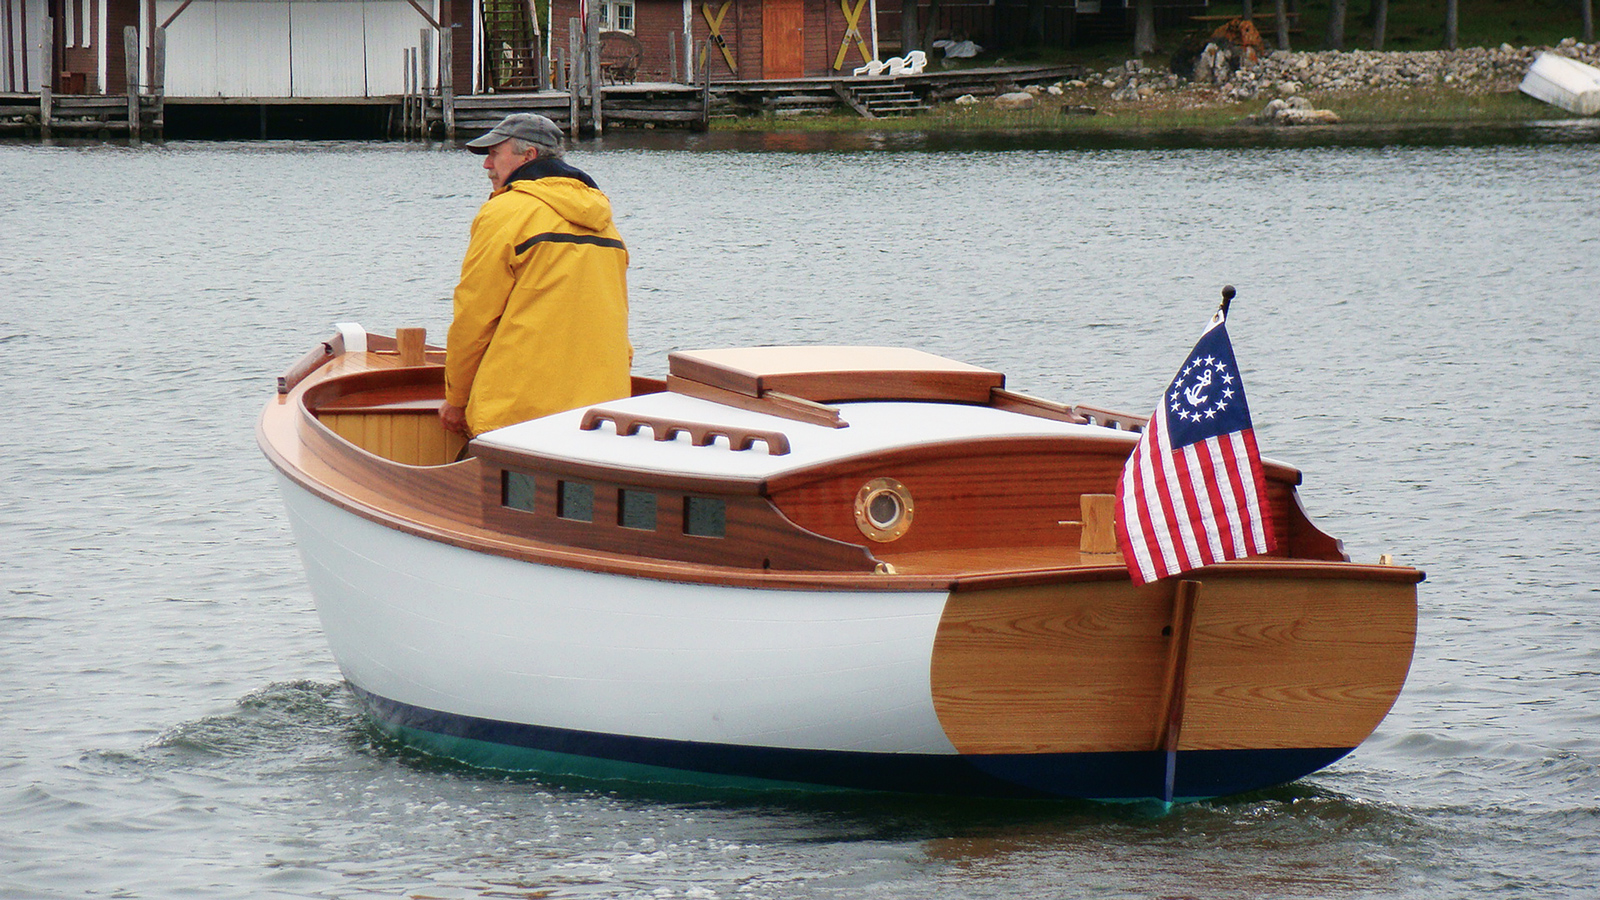
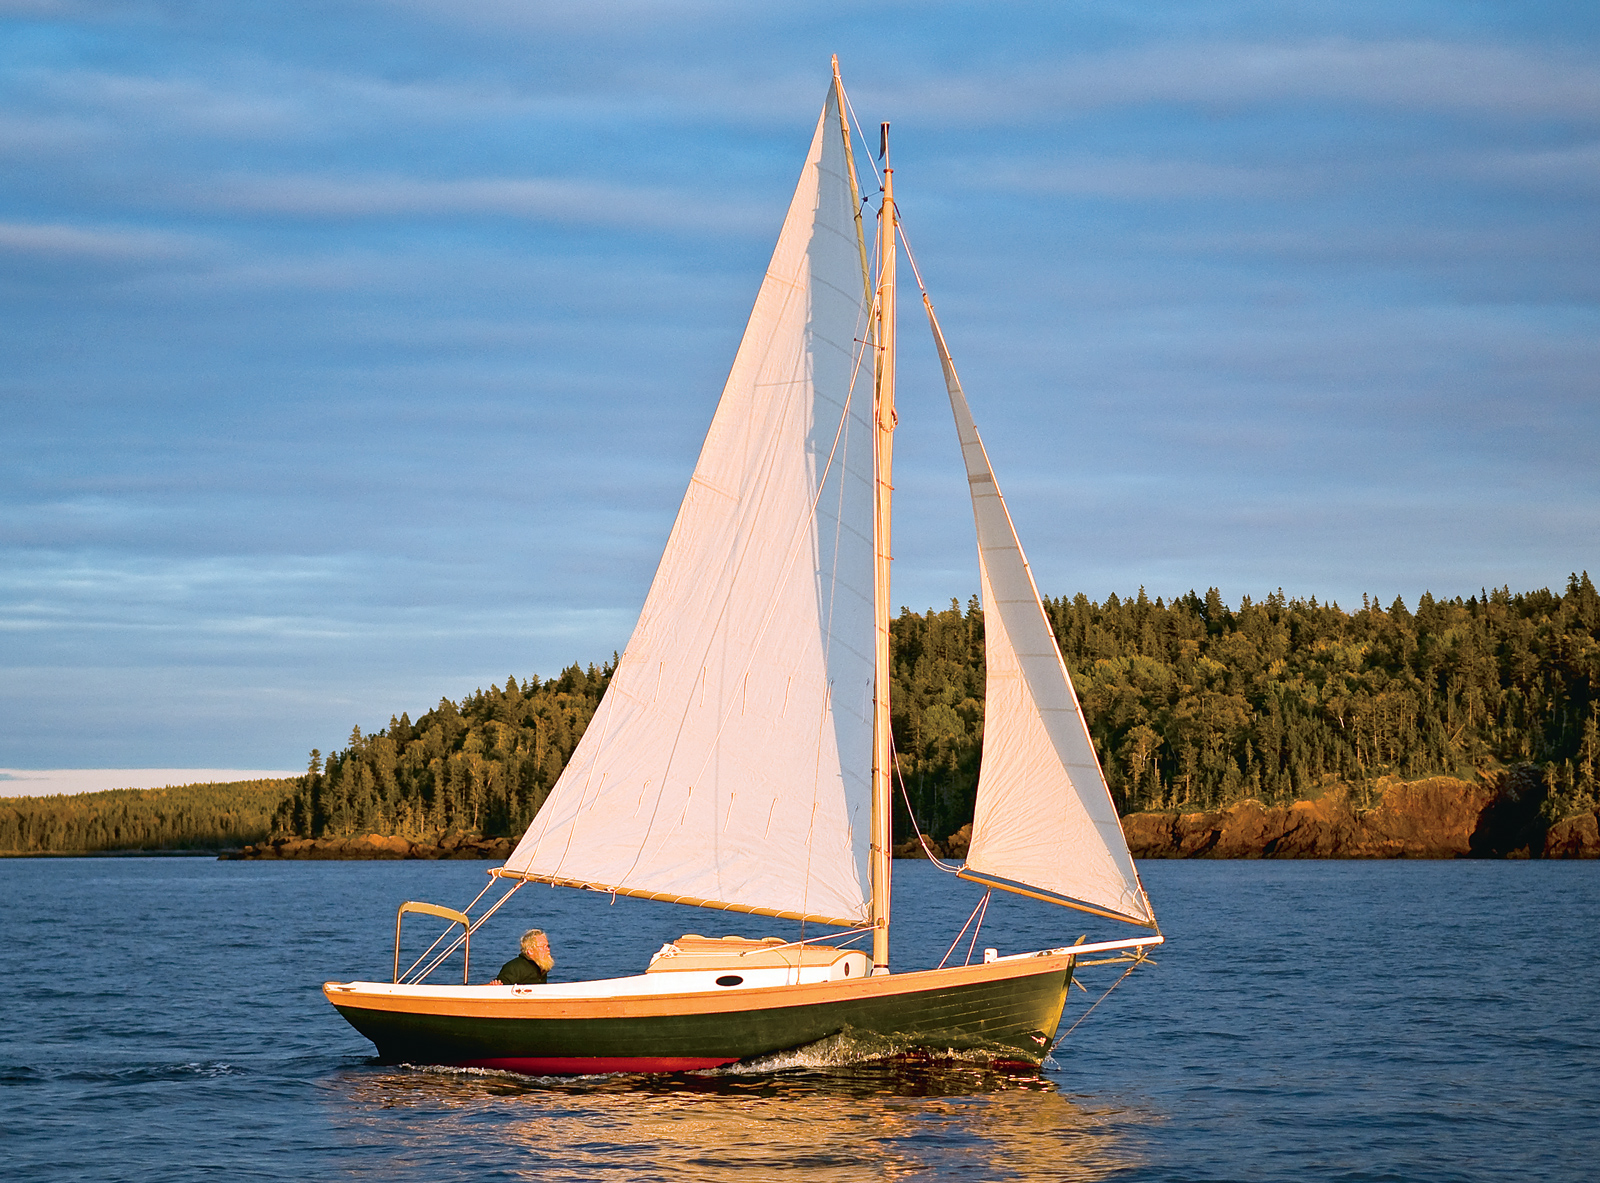
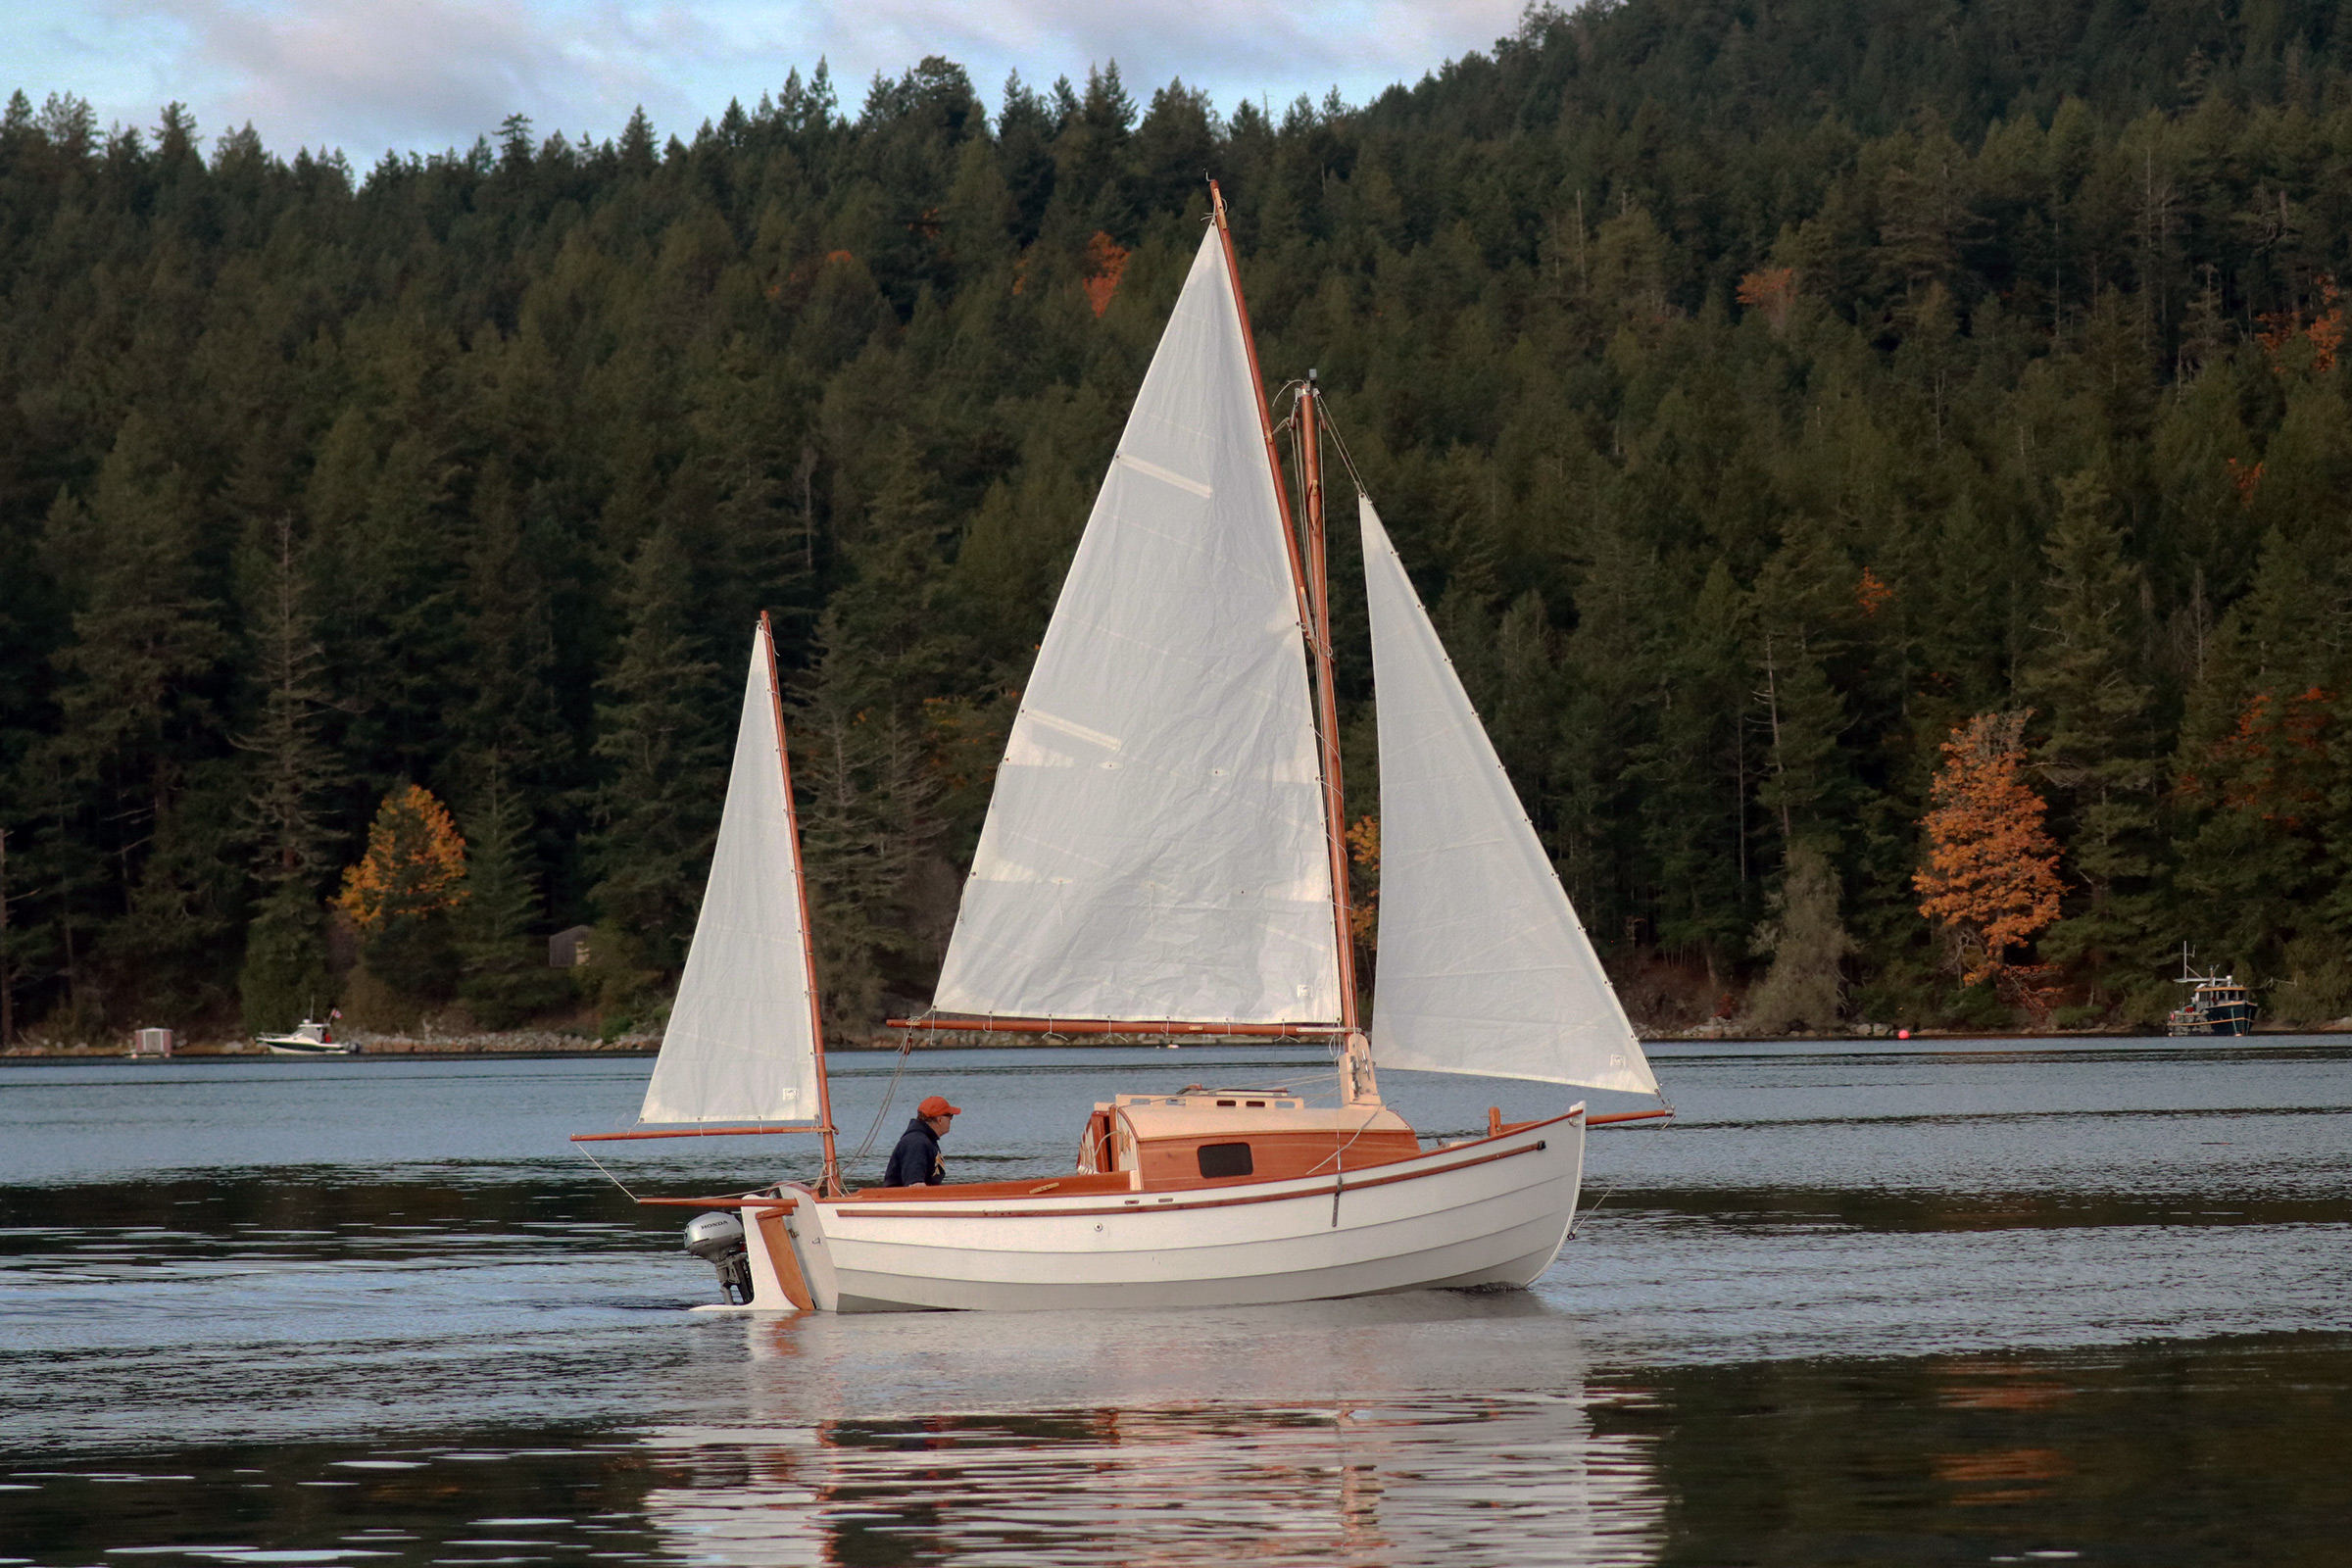
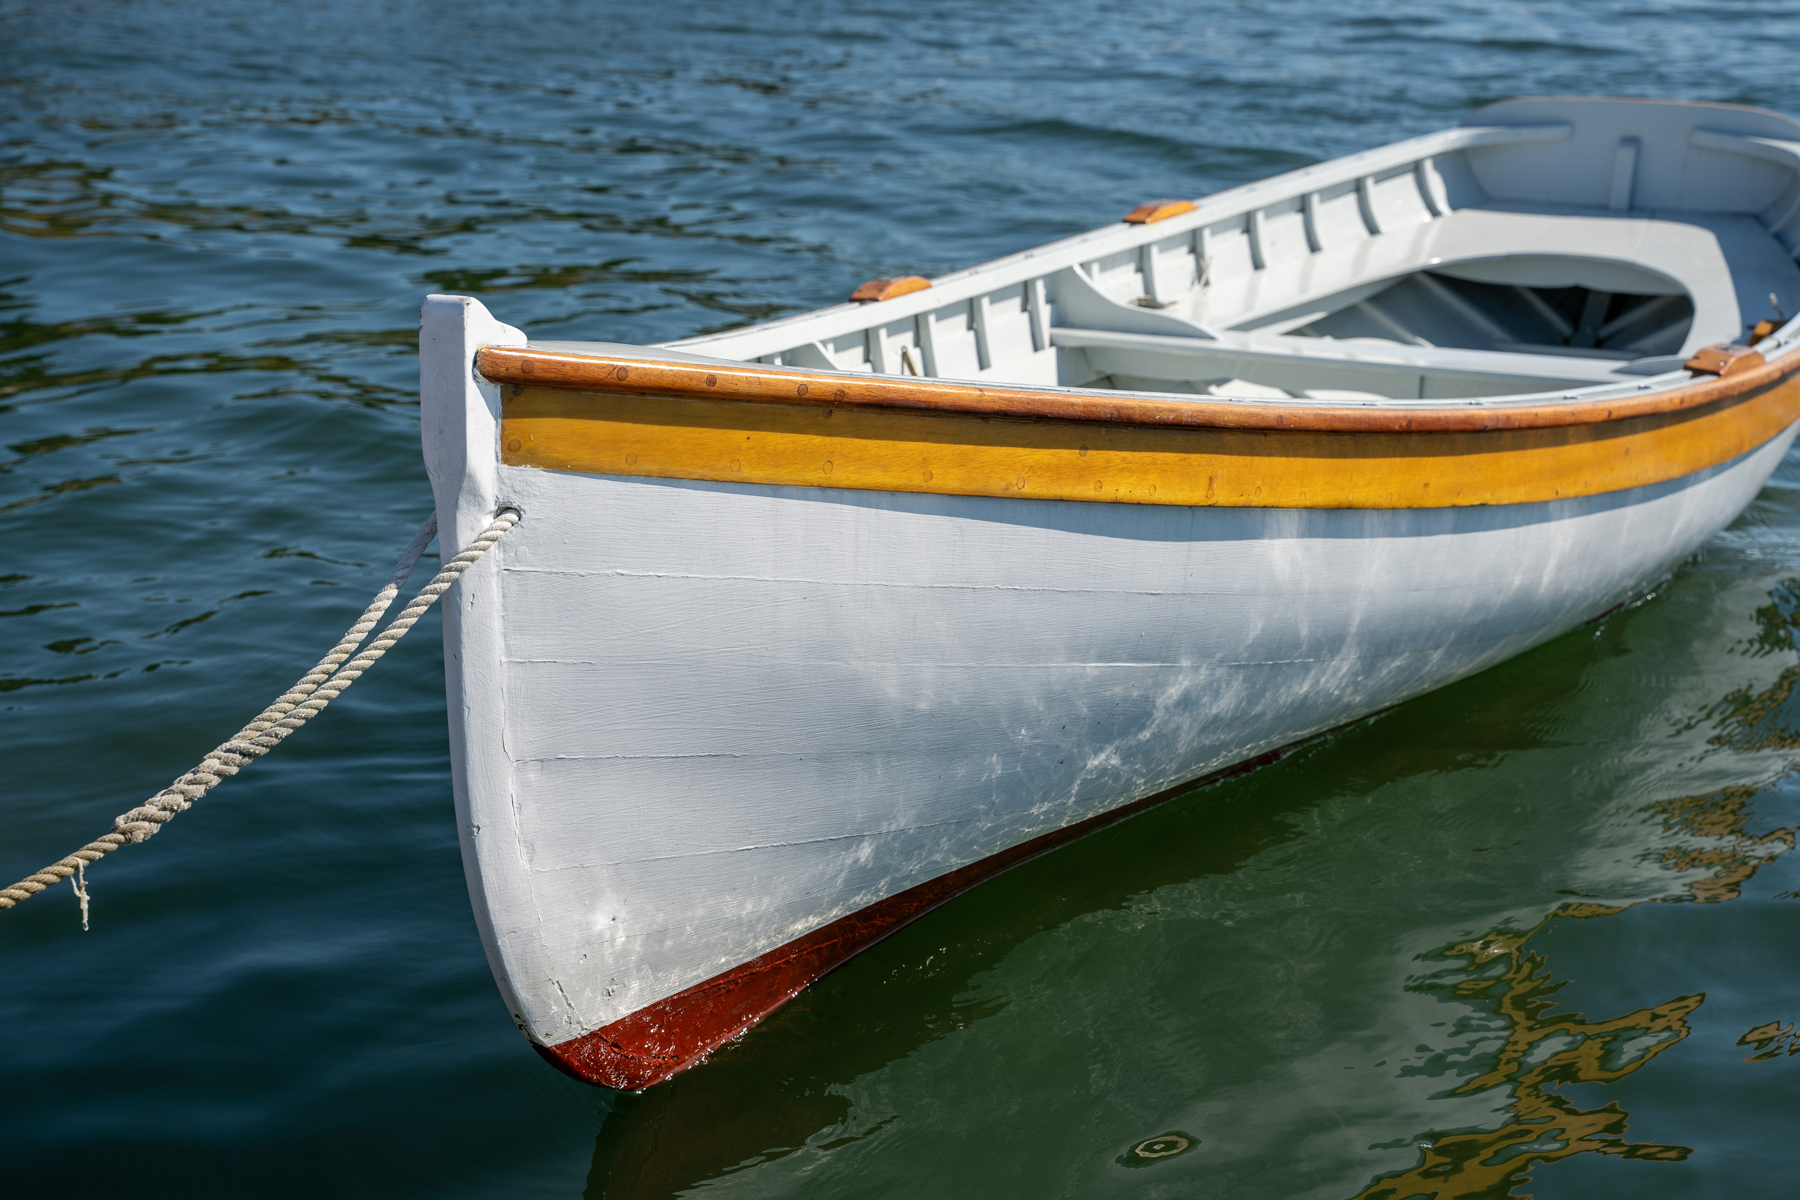
JESSE performs best under fairly sizable oars — 7½′ or better—and has two rowing stations.
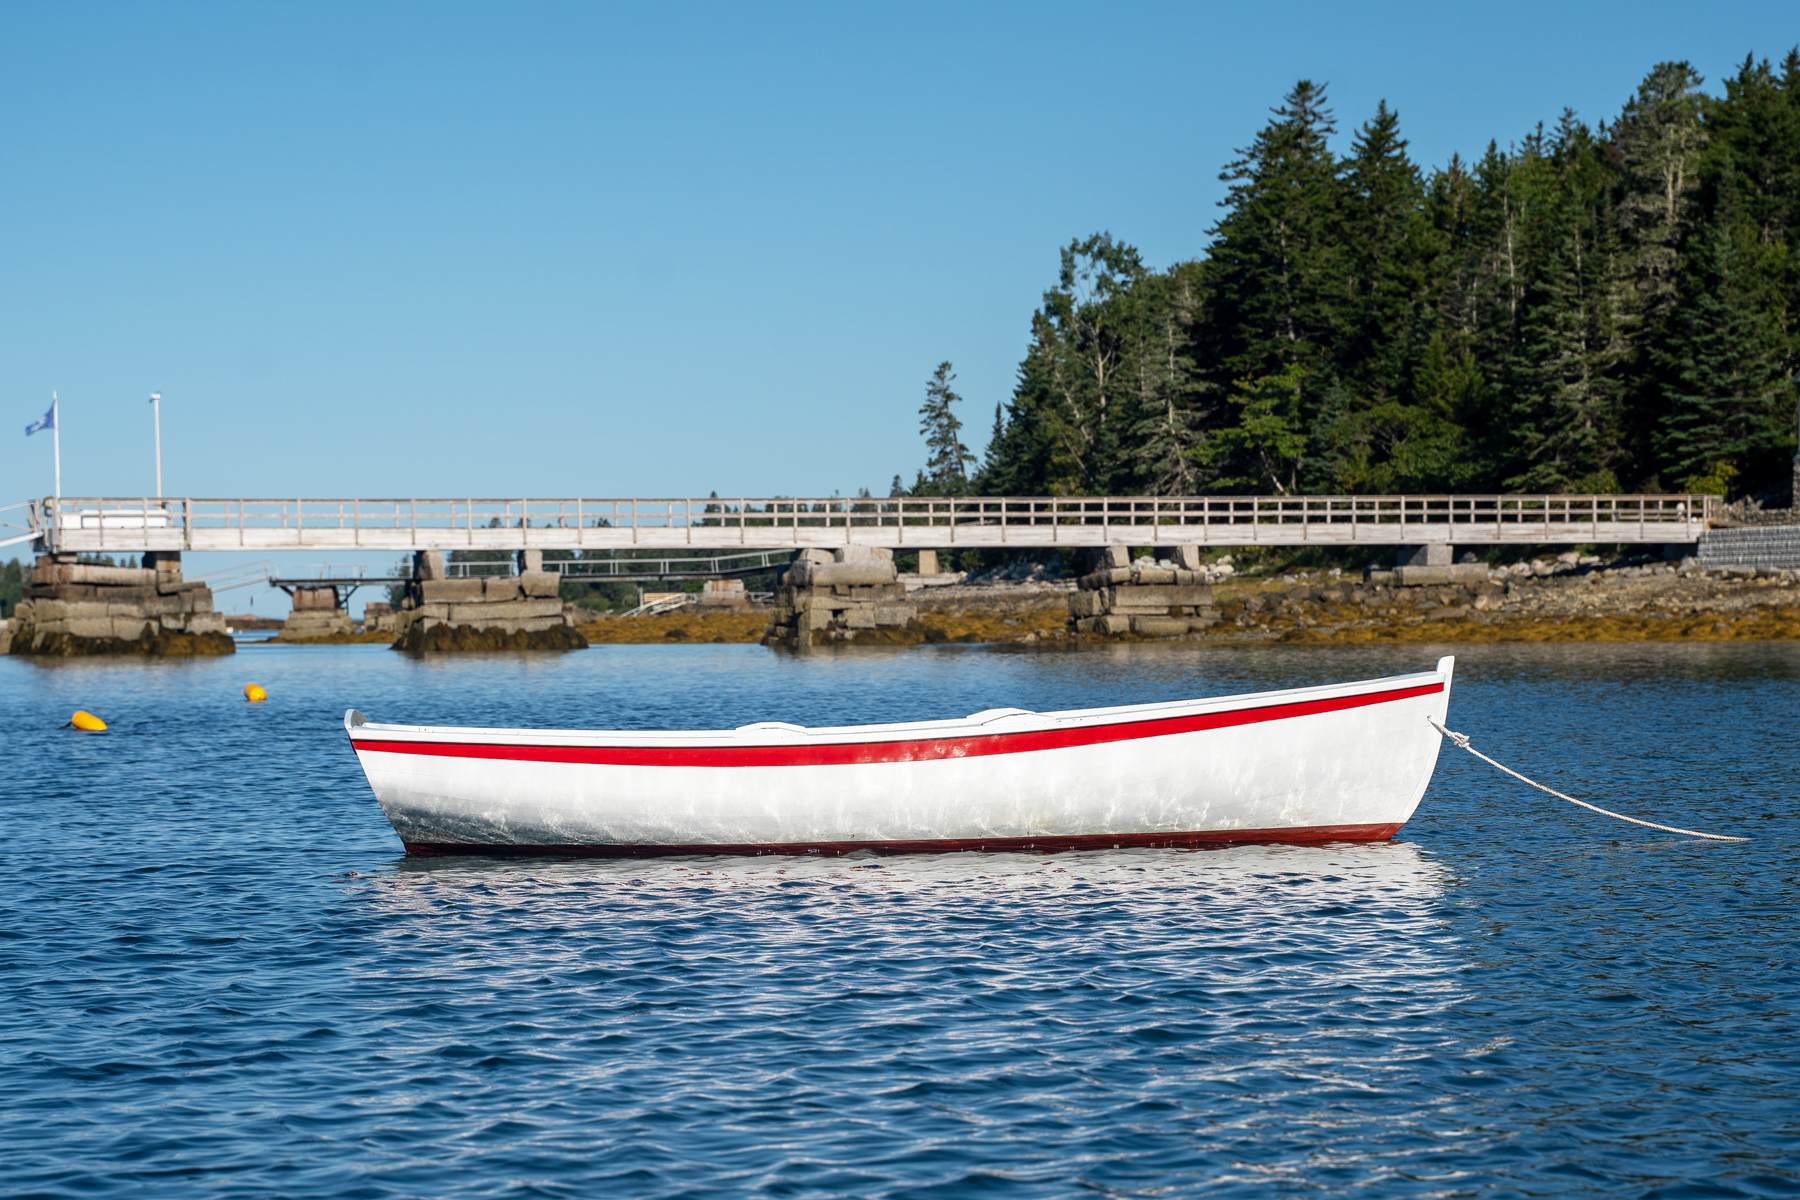
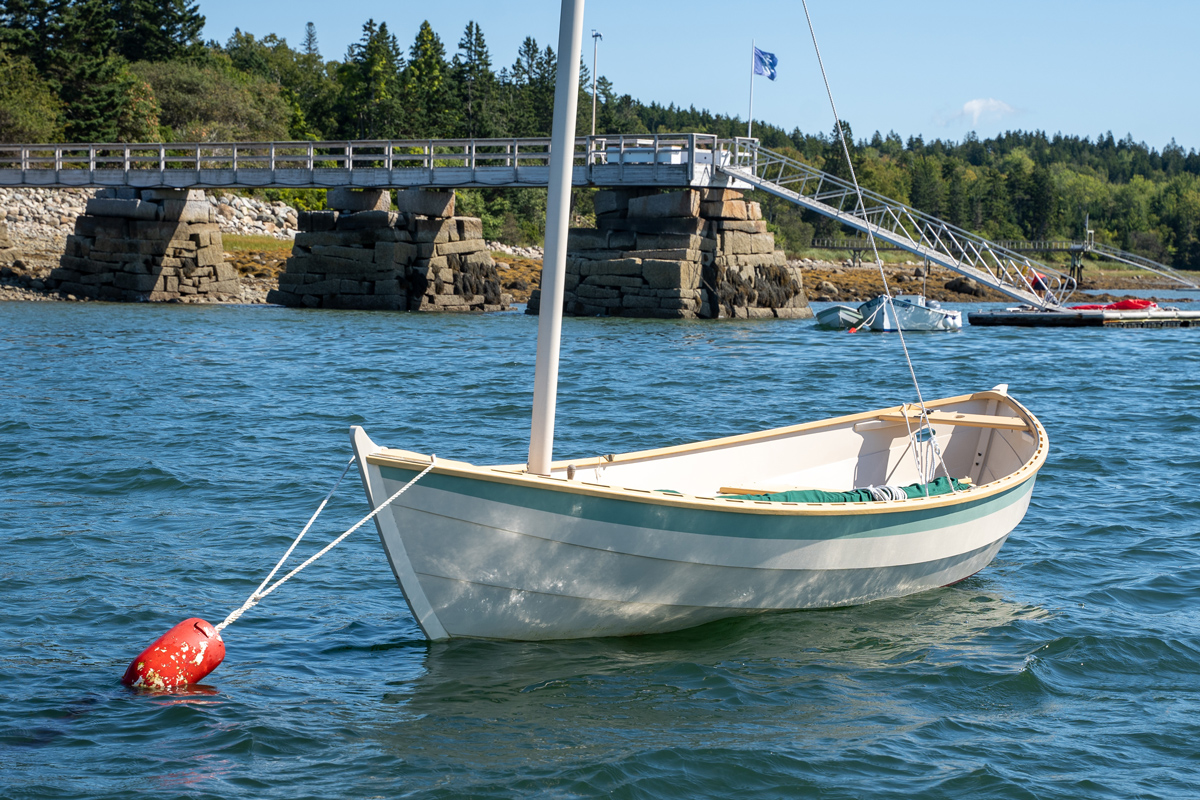
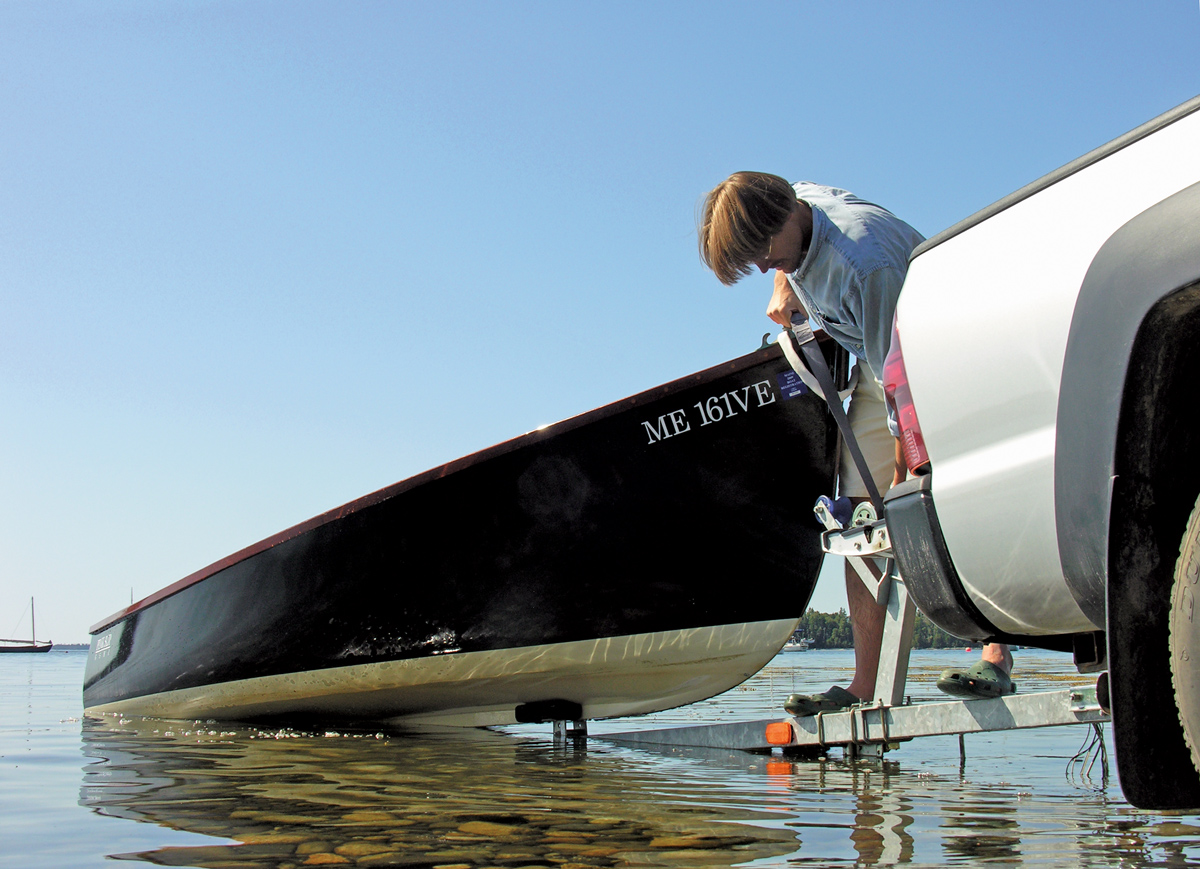
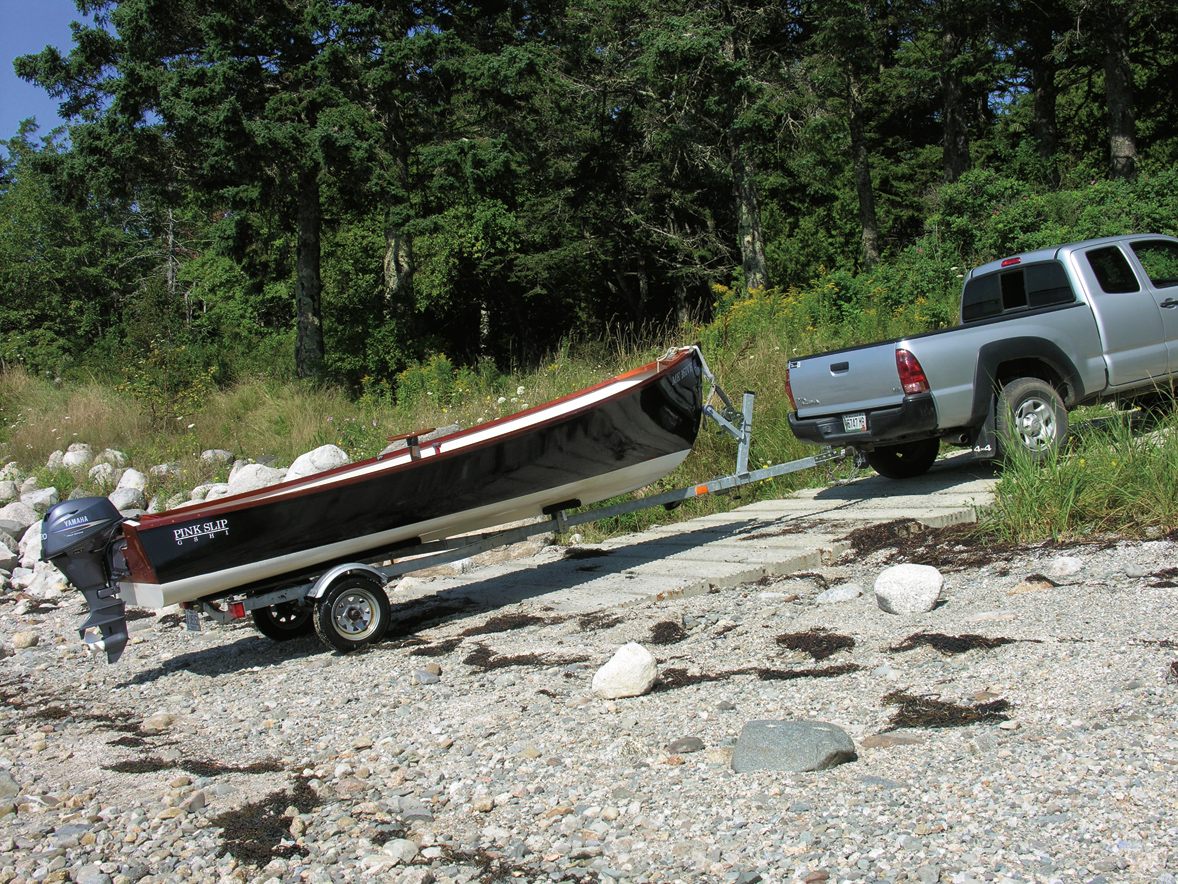
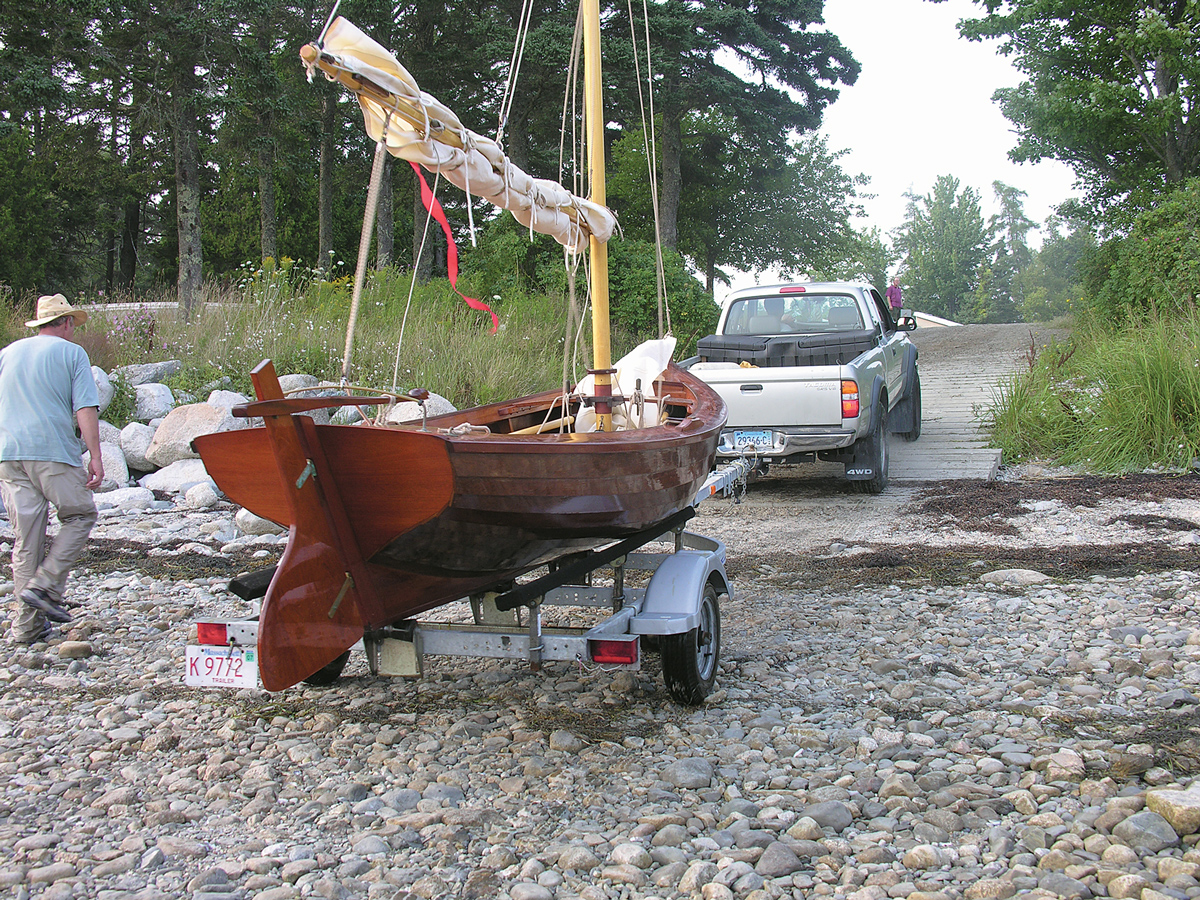
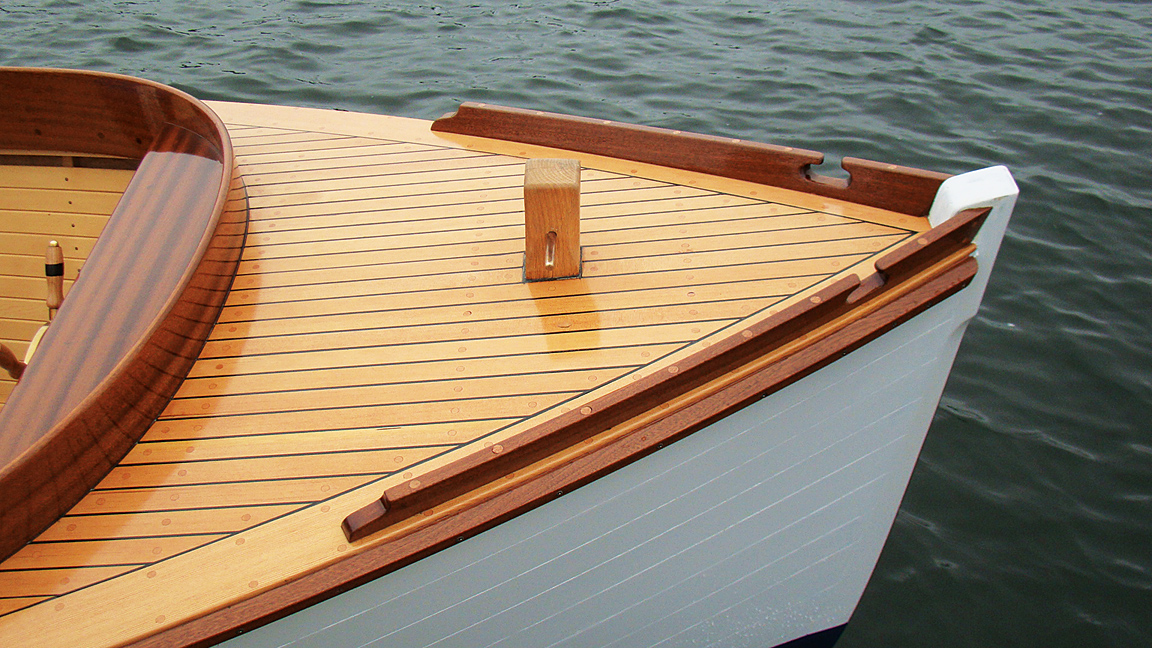
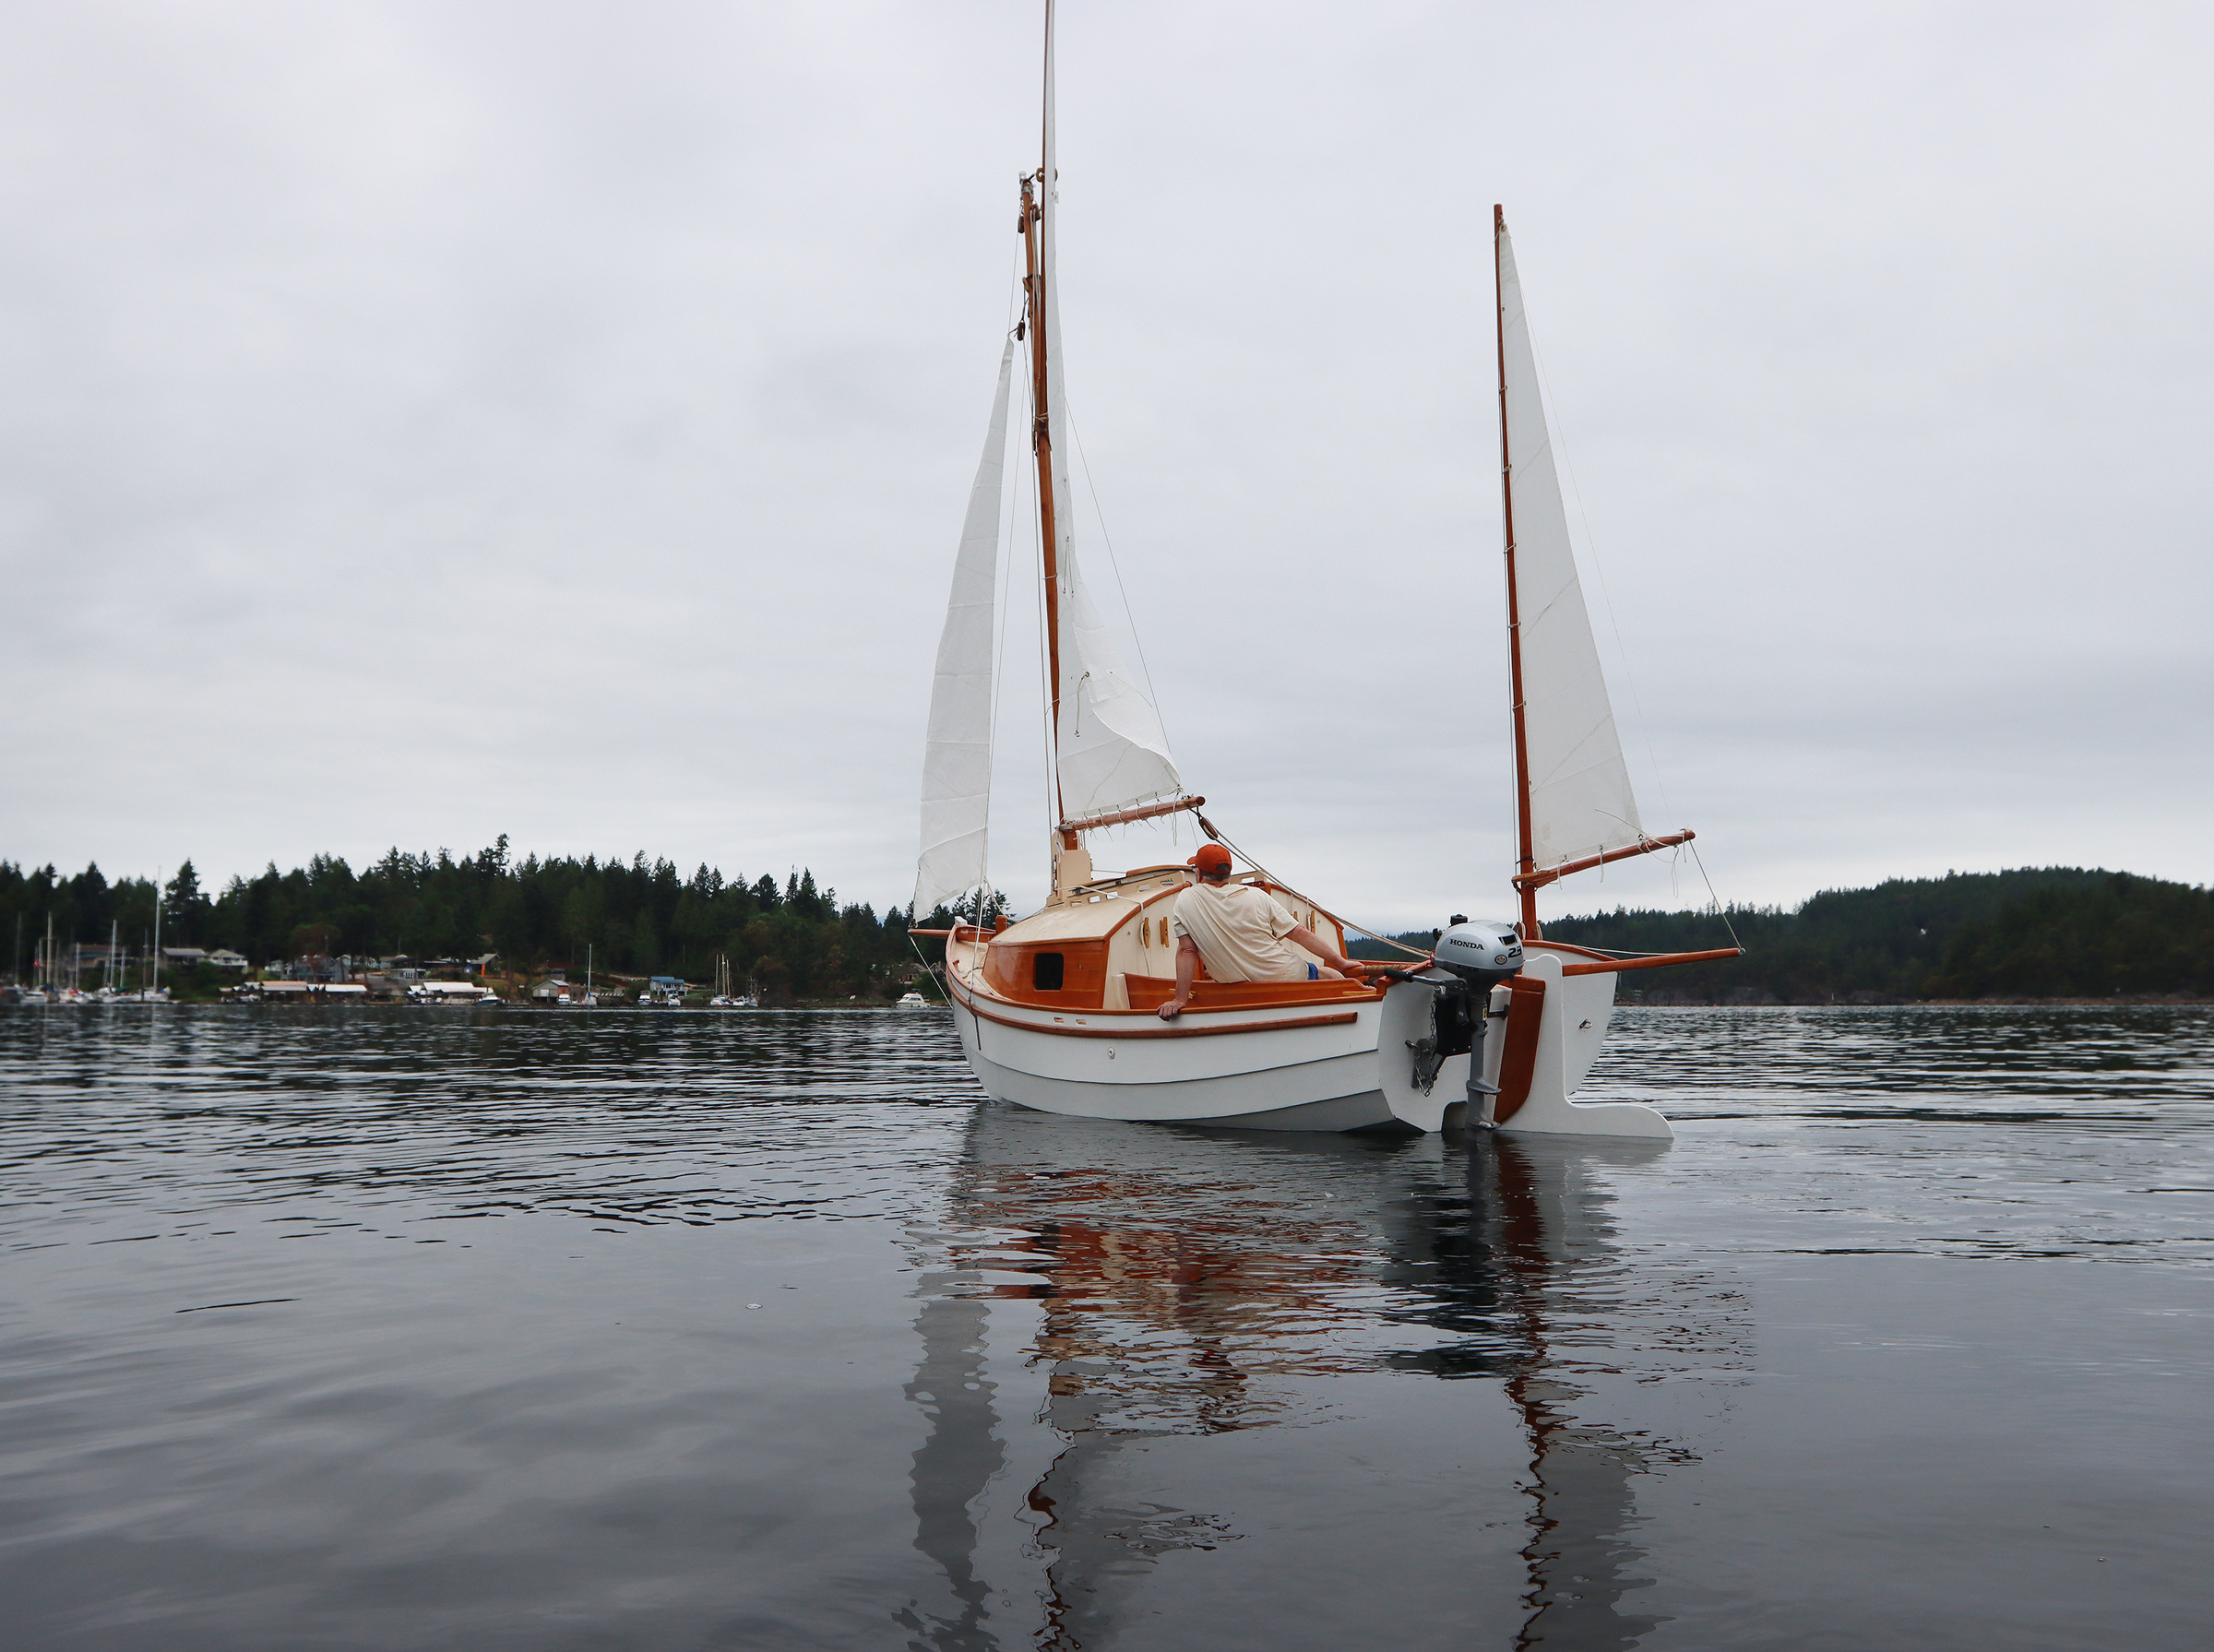
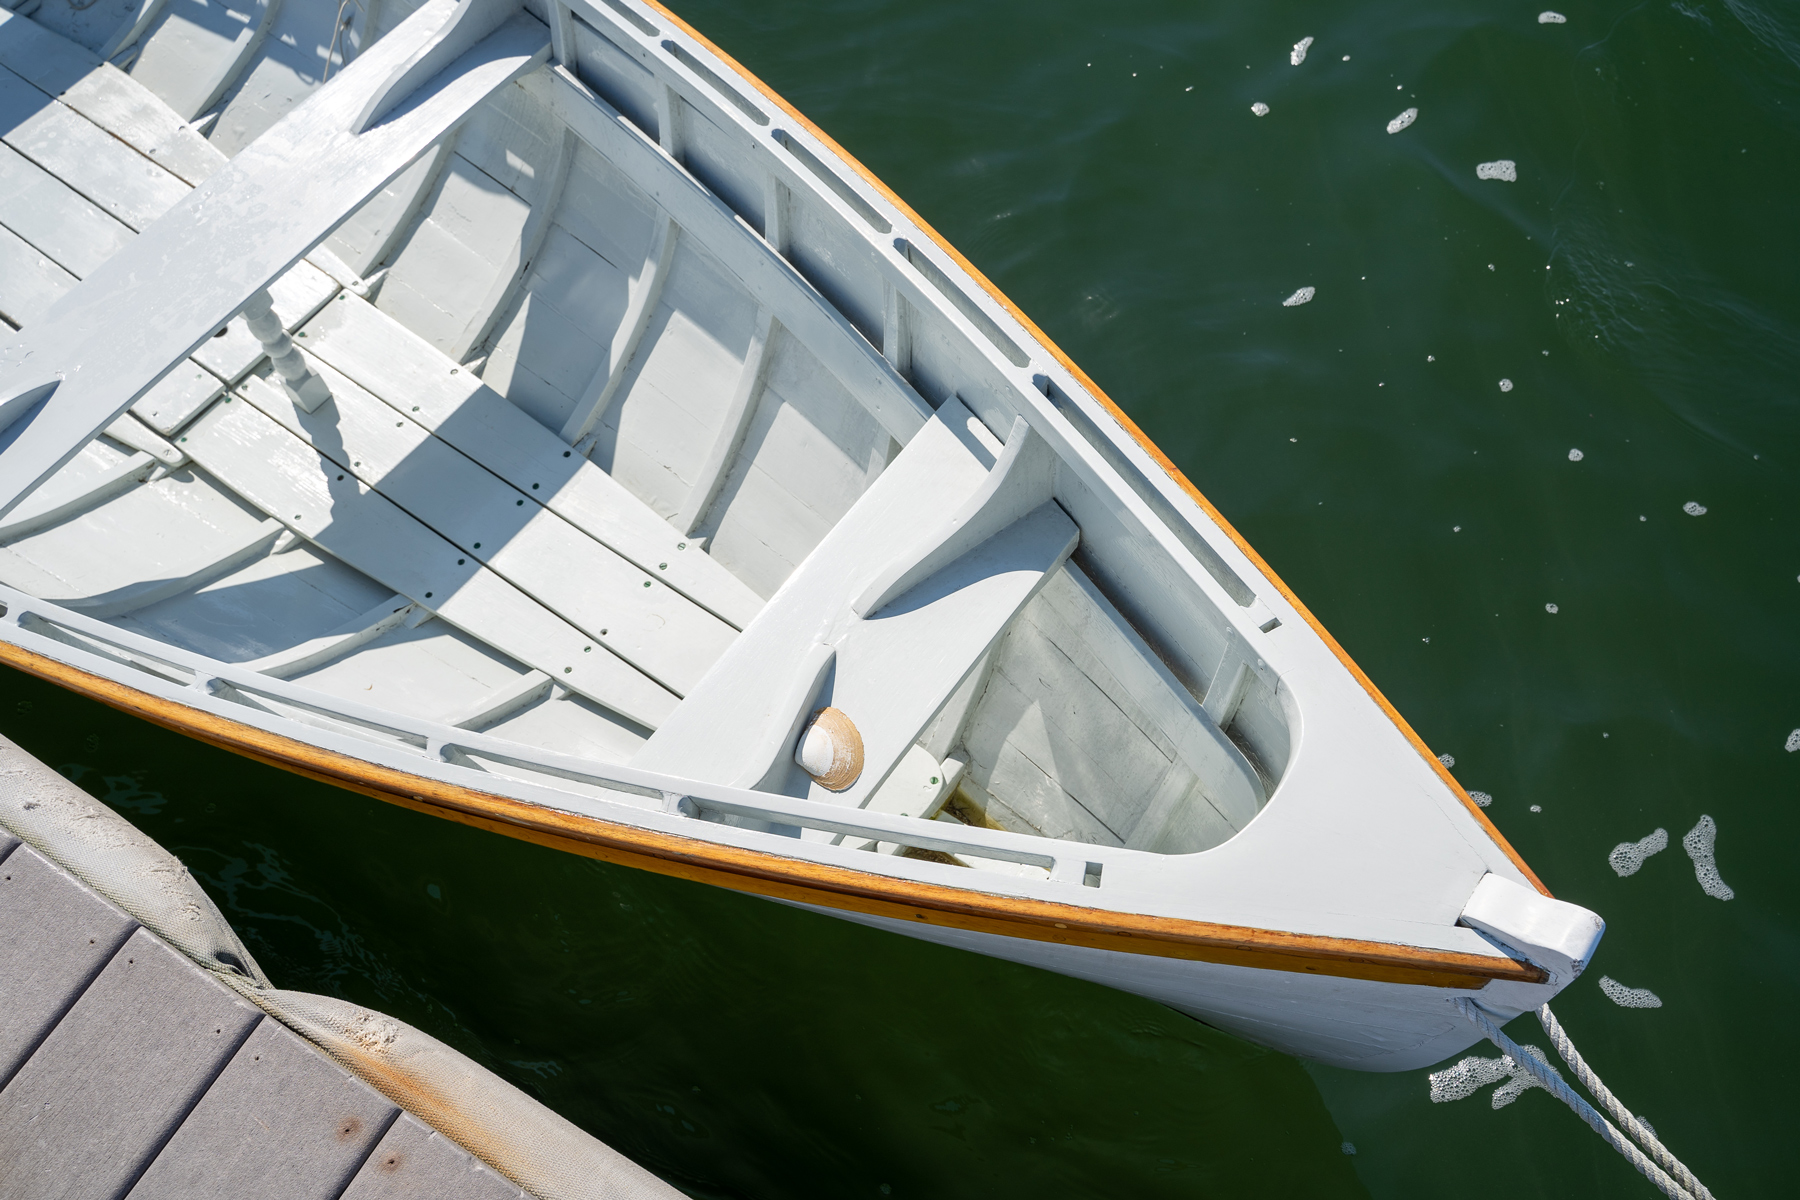
The Catspaw Dinghy is an easy boat to trailer or haul on the back of a pickup truck.
Plans for Joel White & N.G. Herreshoff’s Catspaw Dinghy are available from The WoodenBoat Store.
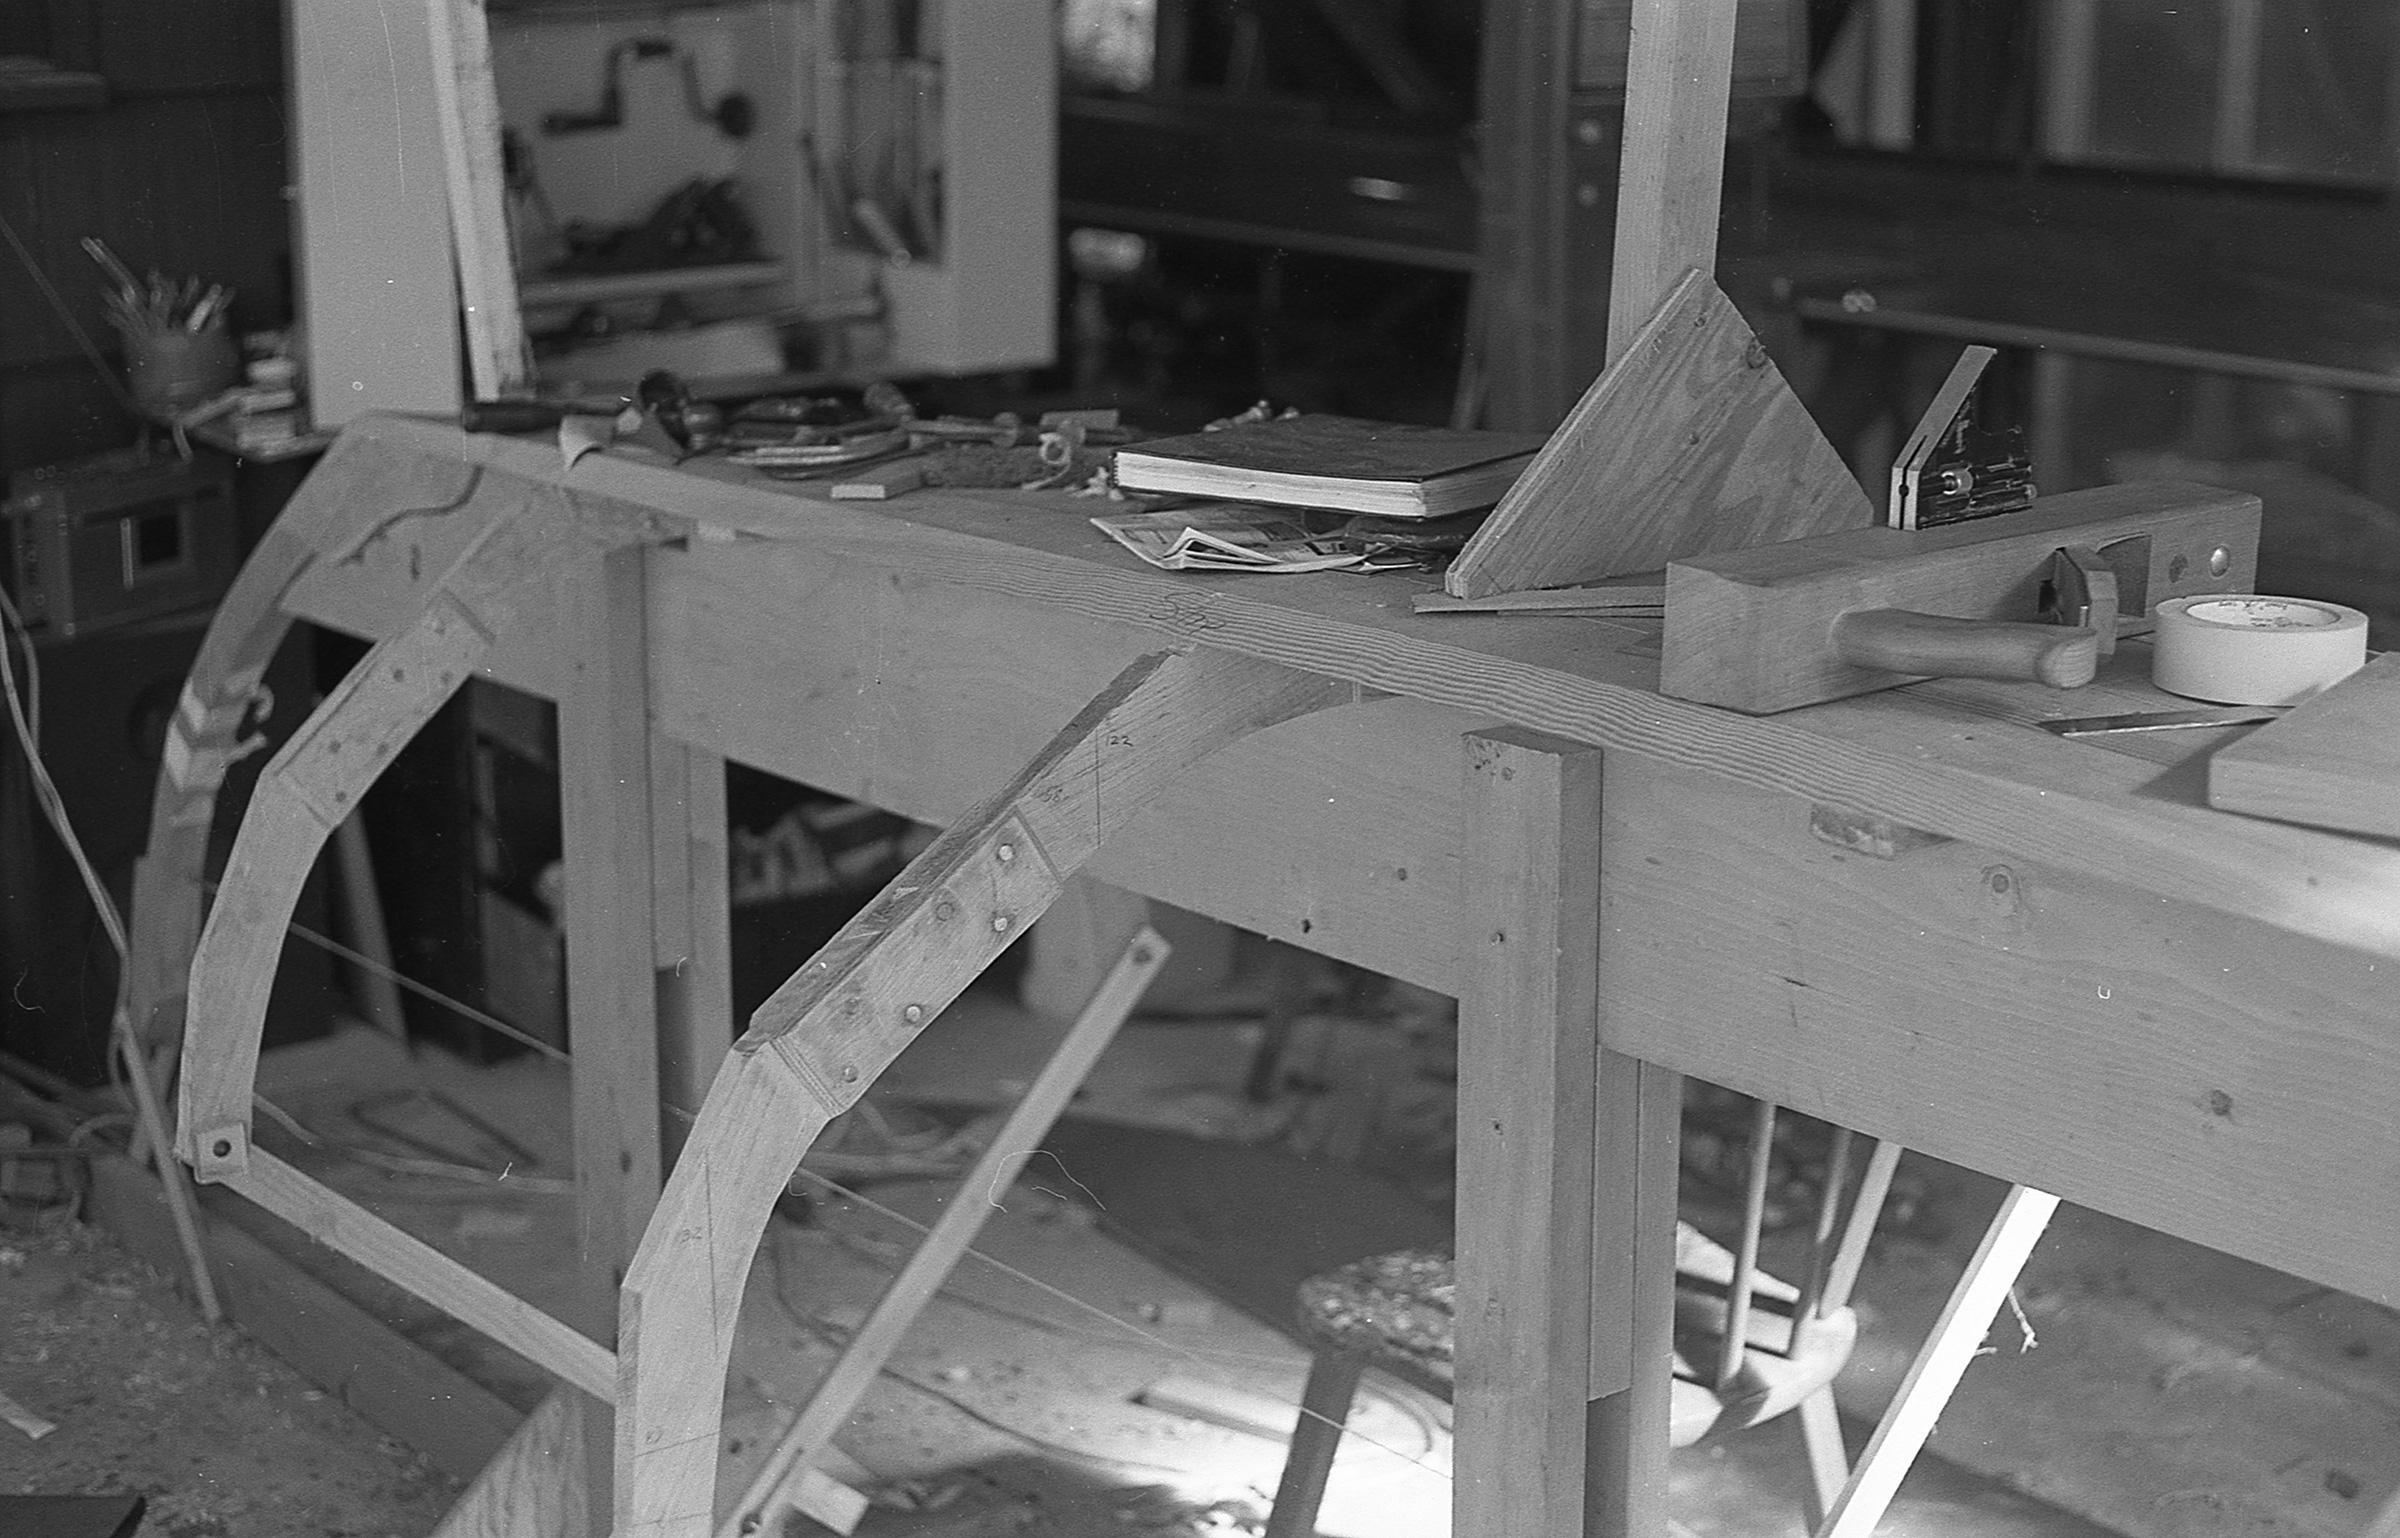
I was planning on being an artist. I took art classes during my last two years of high school, got my bachelor’s degree in art in 1975, and in the years that followed, continued drawing, and sculpted a couple of clay busts. Portraiture was the direction I was headed, but I got sidetracked by backpacking and bicycle touring. I eventually grew tired of lugging a heavy backpack and while on a bike tour from Seattle to Los Angeles and back, I got hit by a car in Salt Lake City and then repeatedly run off the road on California’s Pacific Coast Highway. That left boating—I wouldn’t have to carry anything, and the “roads” would be a lot wider. I read books on boatbuilding by John Gardner and Pete Culler and decided to build a Chamberlain-designed 14′ Marblehead dory skiff to cruise north along the Inside Passage. According to a note I made in a journal I was keeping at the time, I started construction on July 12, 1978.
While the kayak was the first real boat I built and launched, it was just a warm-up to this Marblehead dory skiff. The book resting on the upturned bottom of the boat is a blank book I started in 1973, while an art student on exchange to Smith, an all-women’s college in Massachusetts, and stopped making entries in 1980. In that time my focus had shifted from art to boatbuilding.
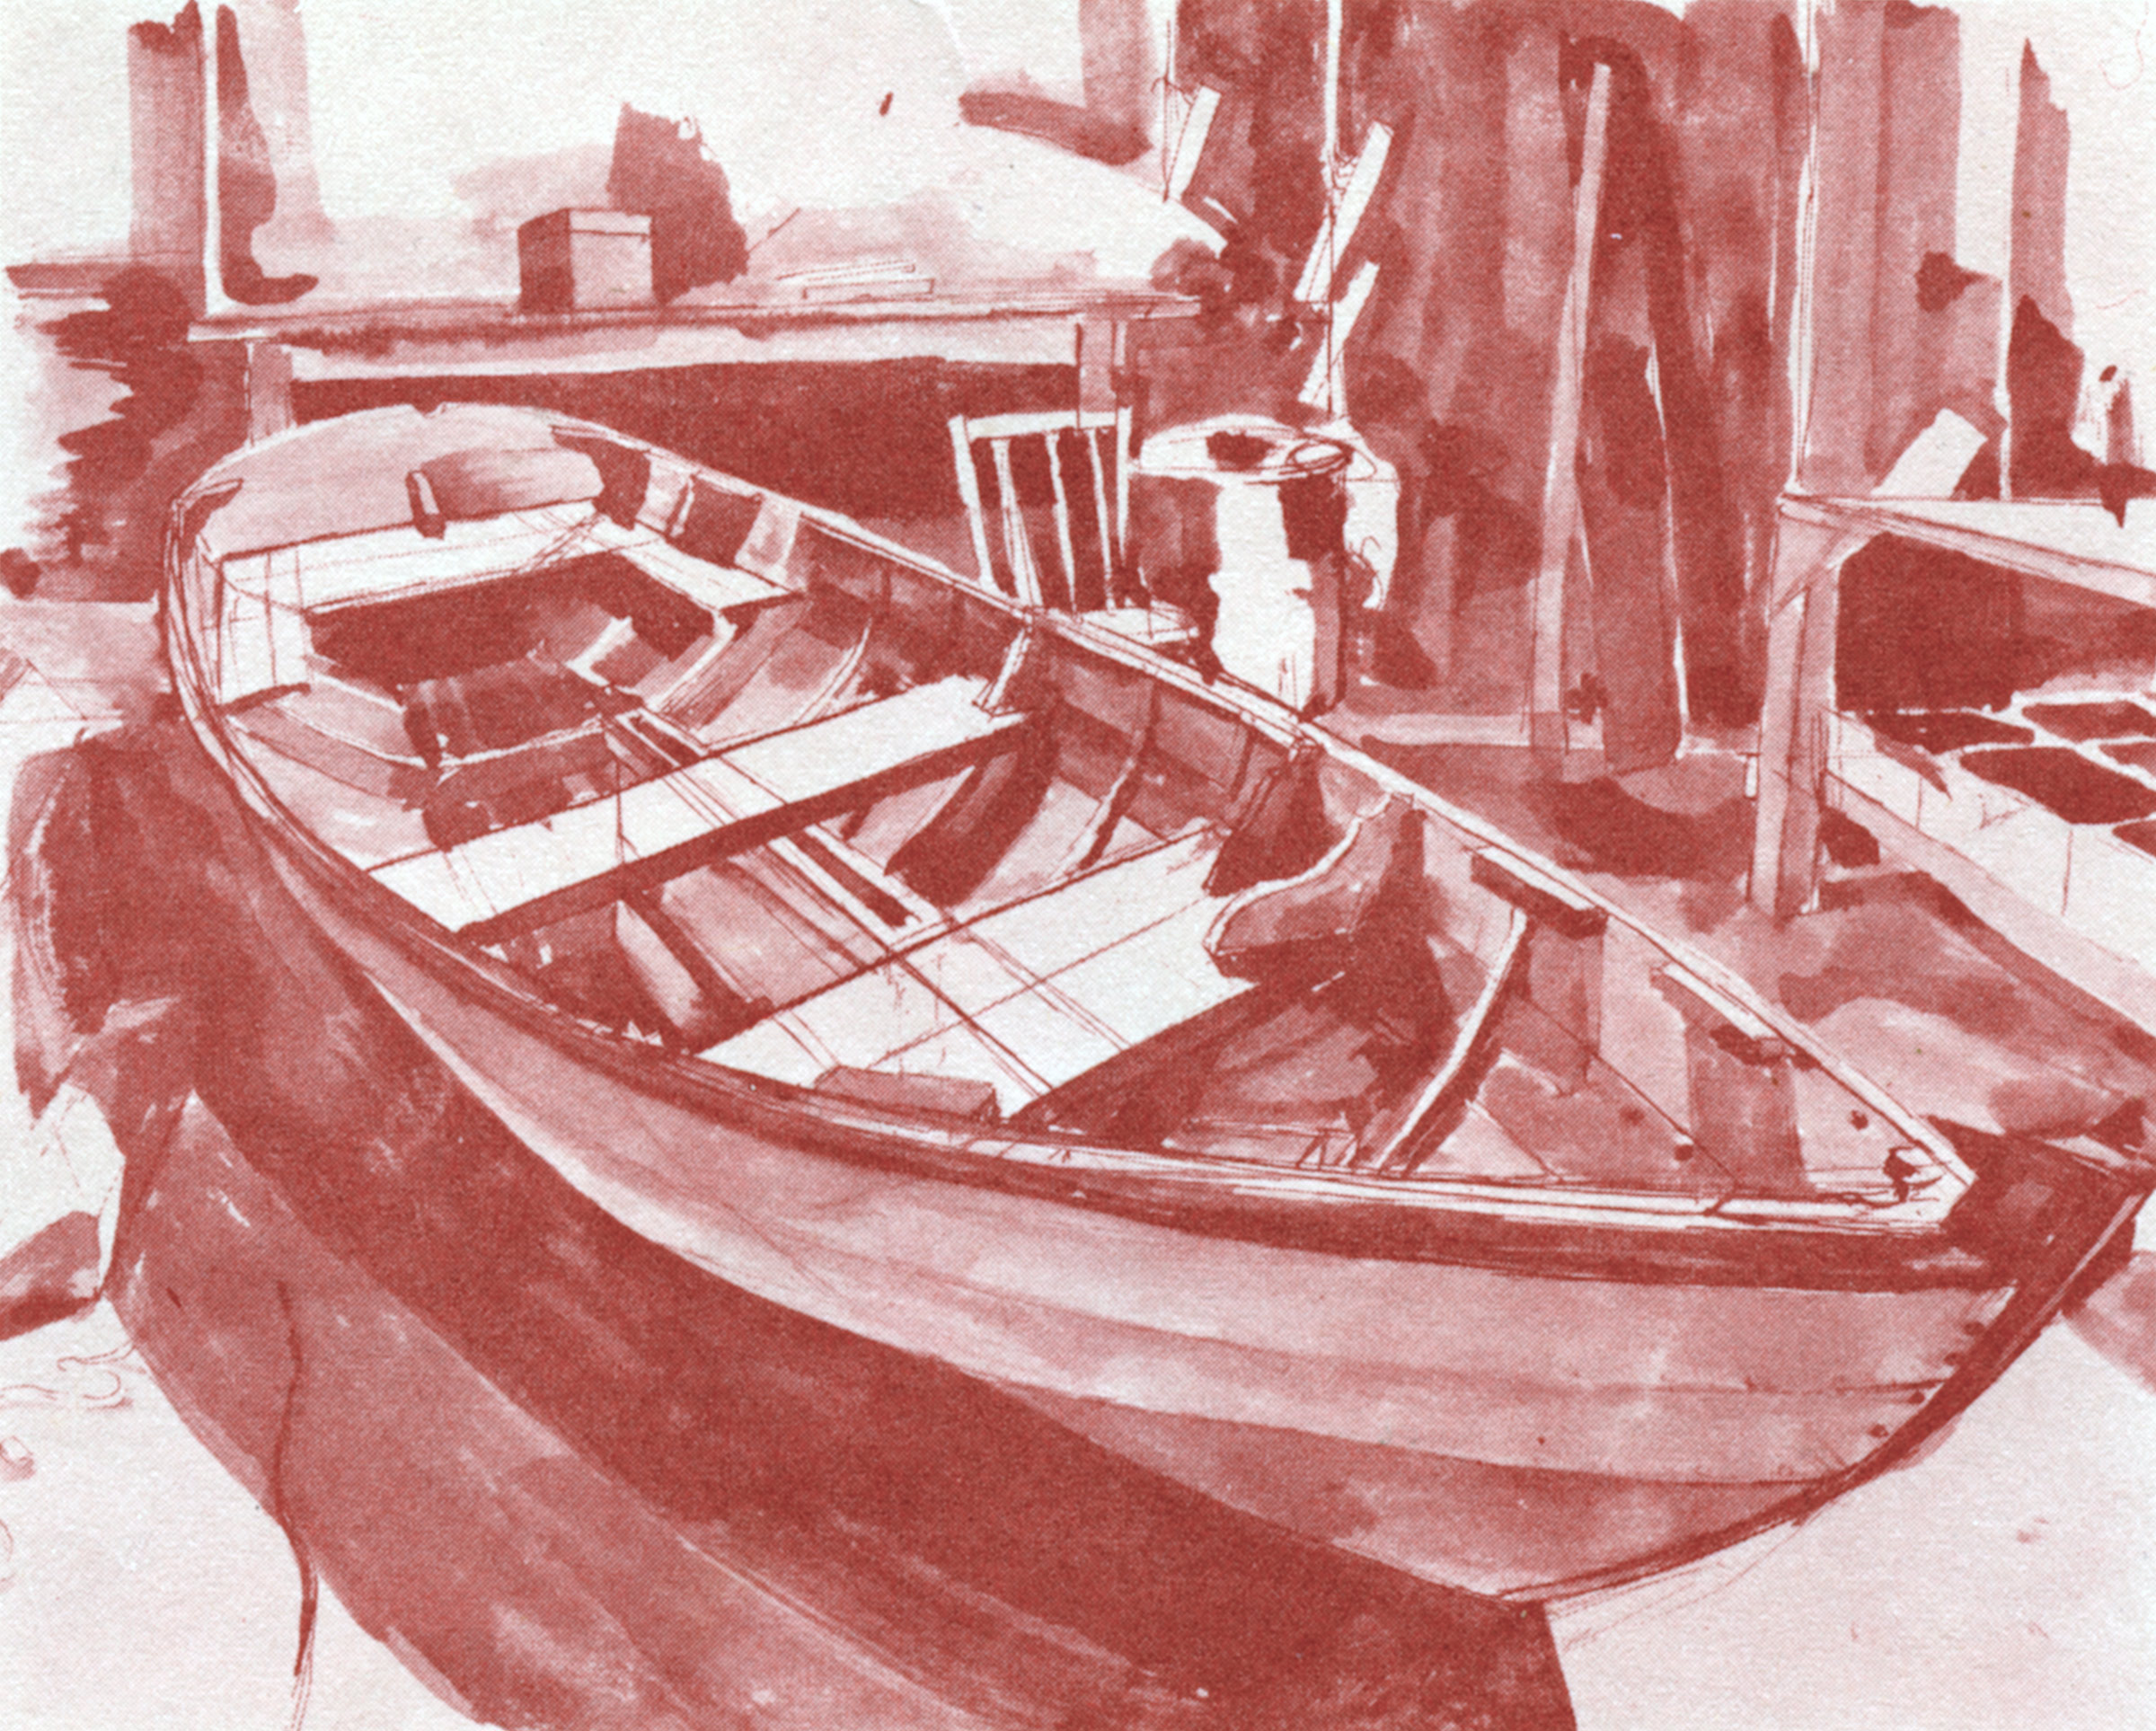
While I was building the dory skiff, I made this watercolor. It marks a moment in my transition from art to boats.
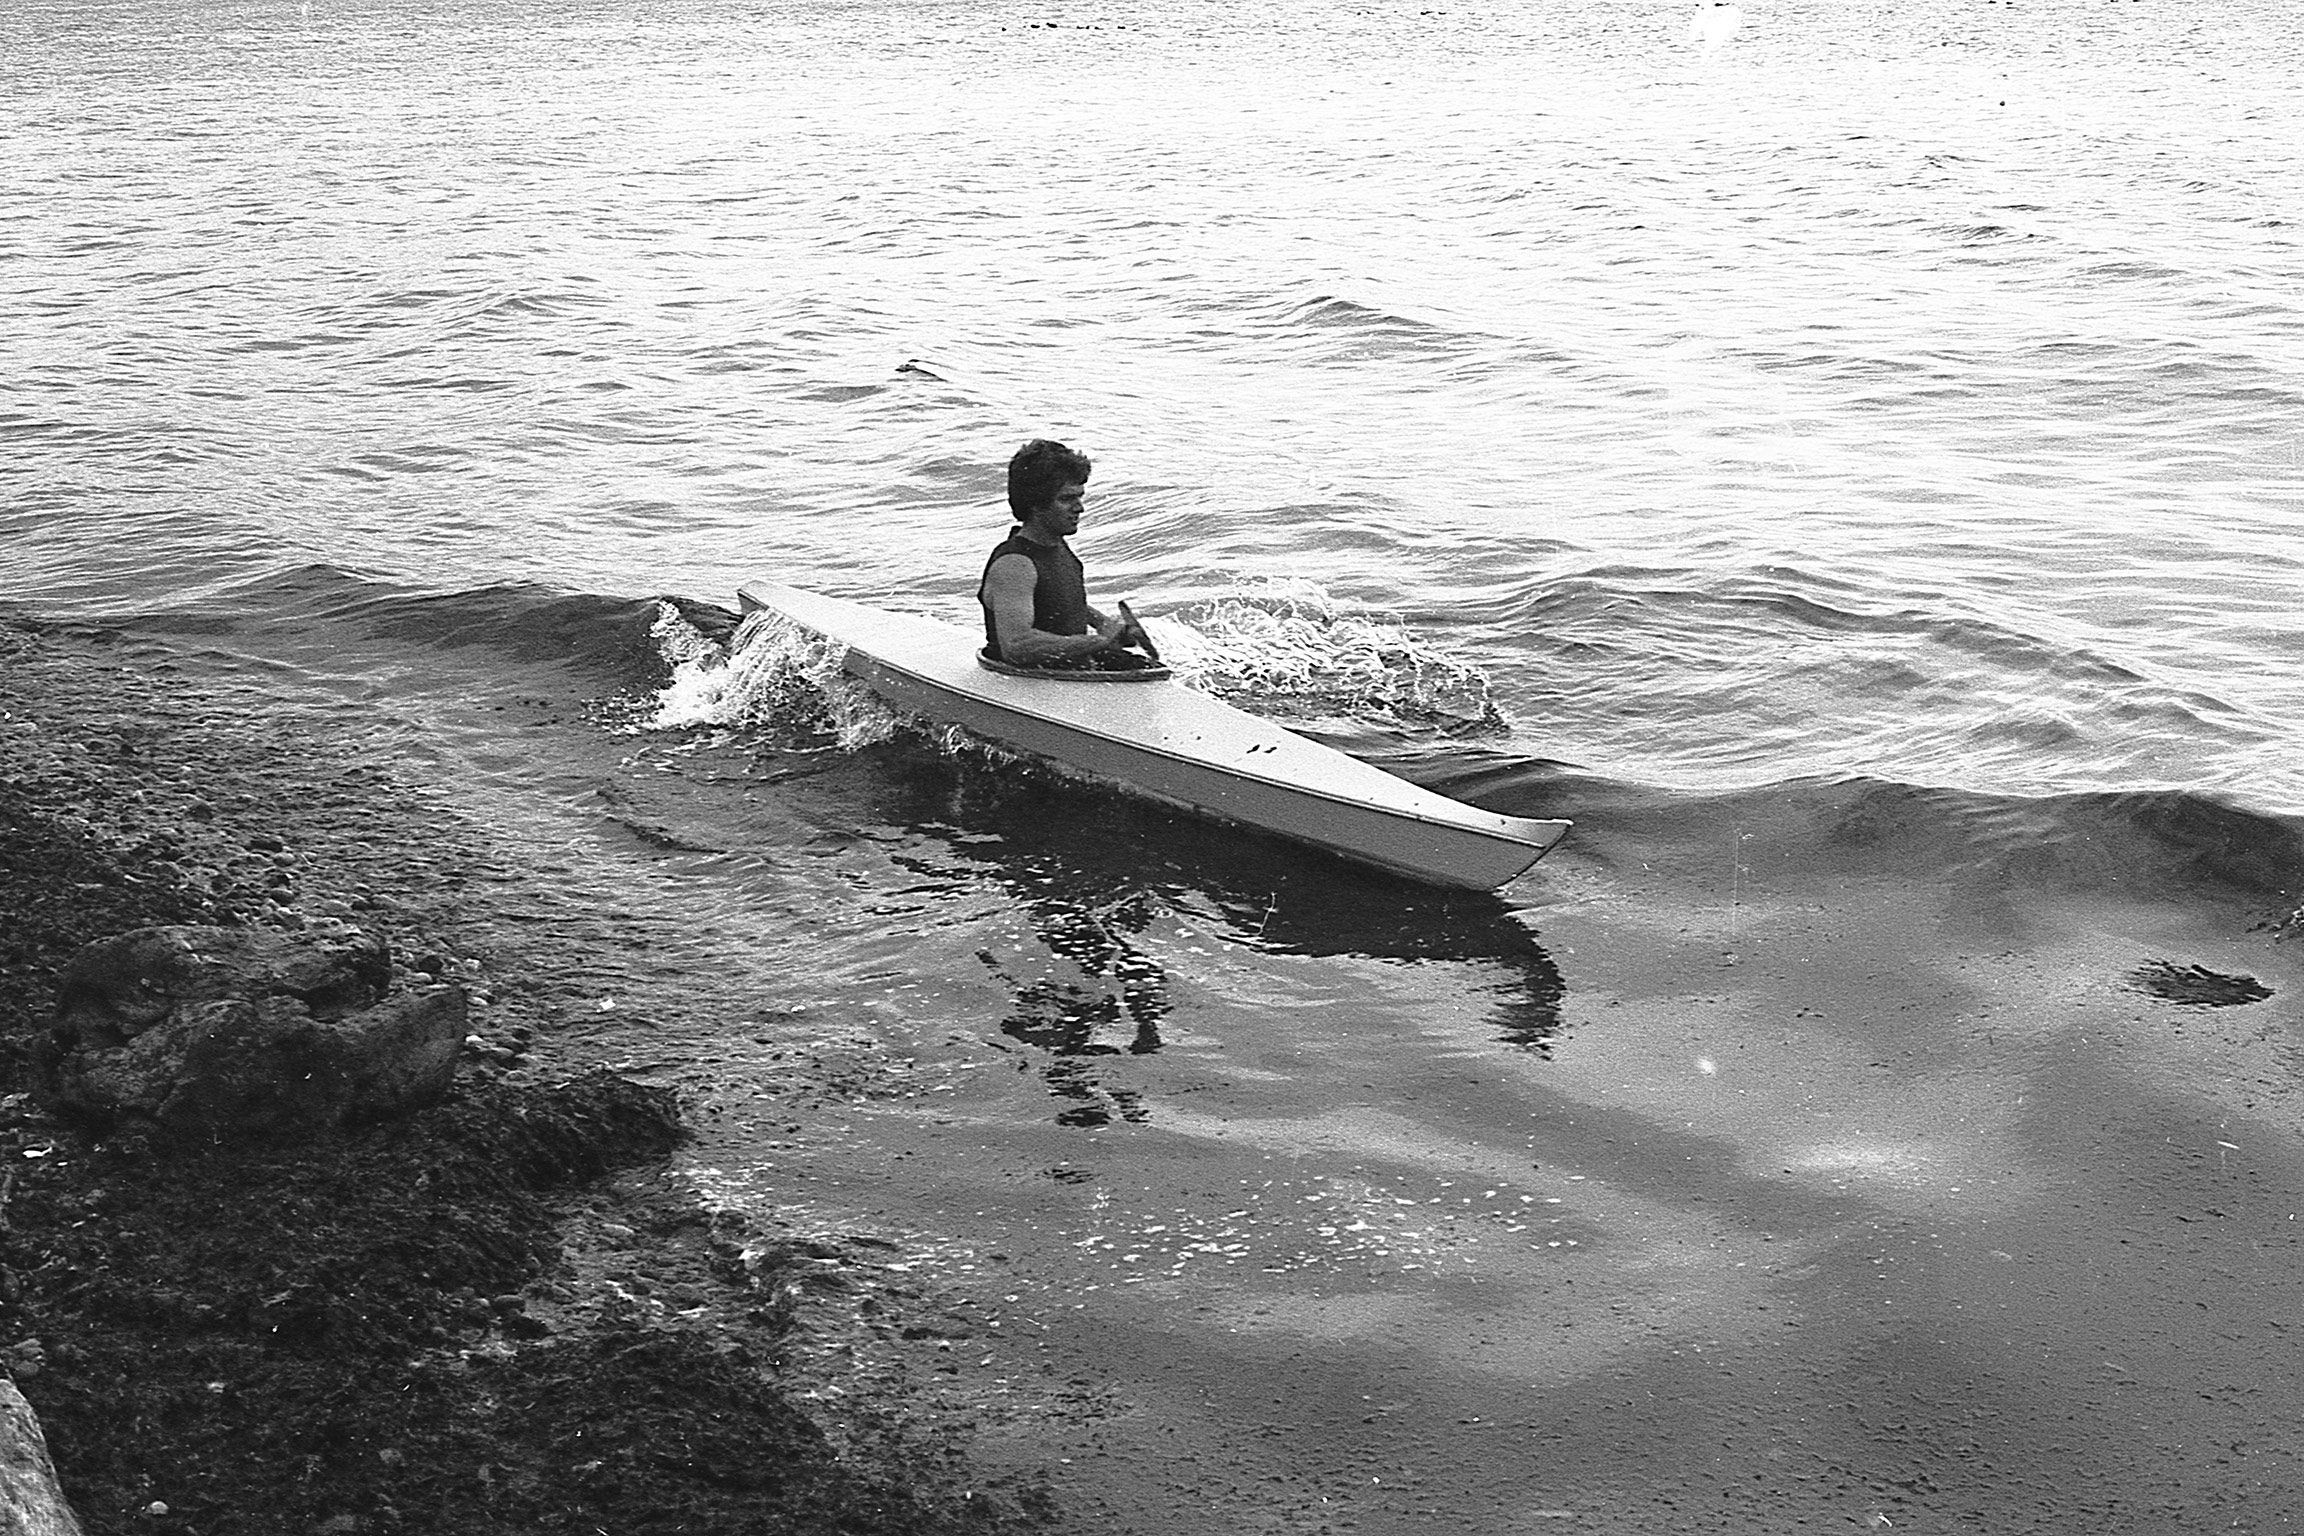
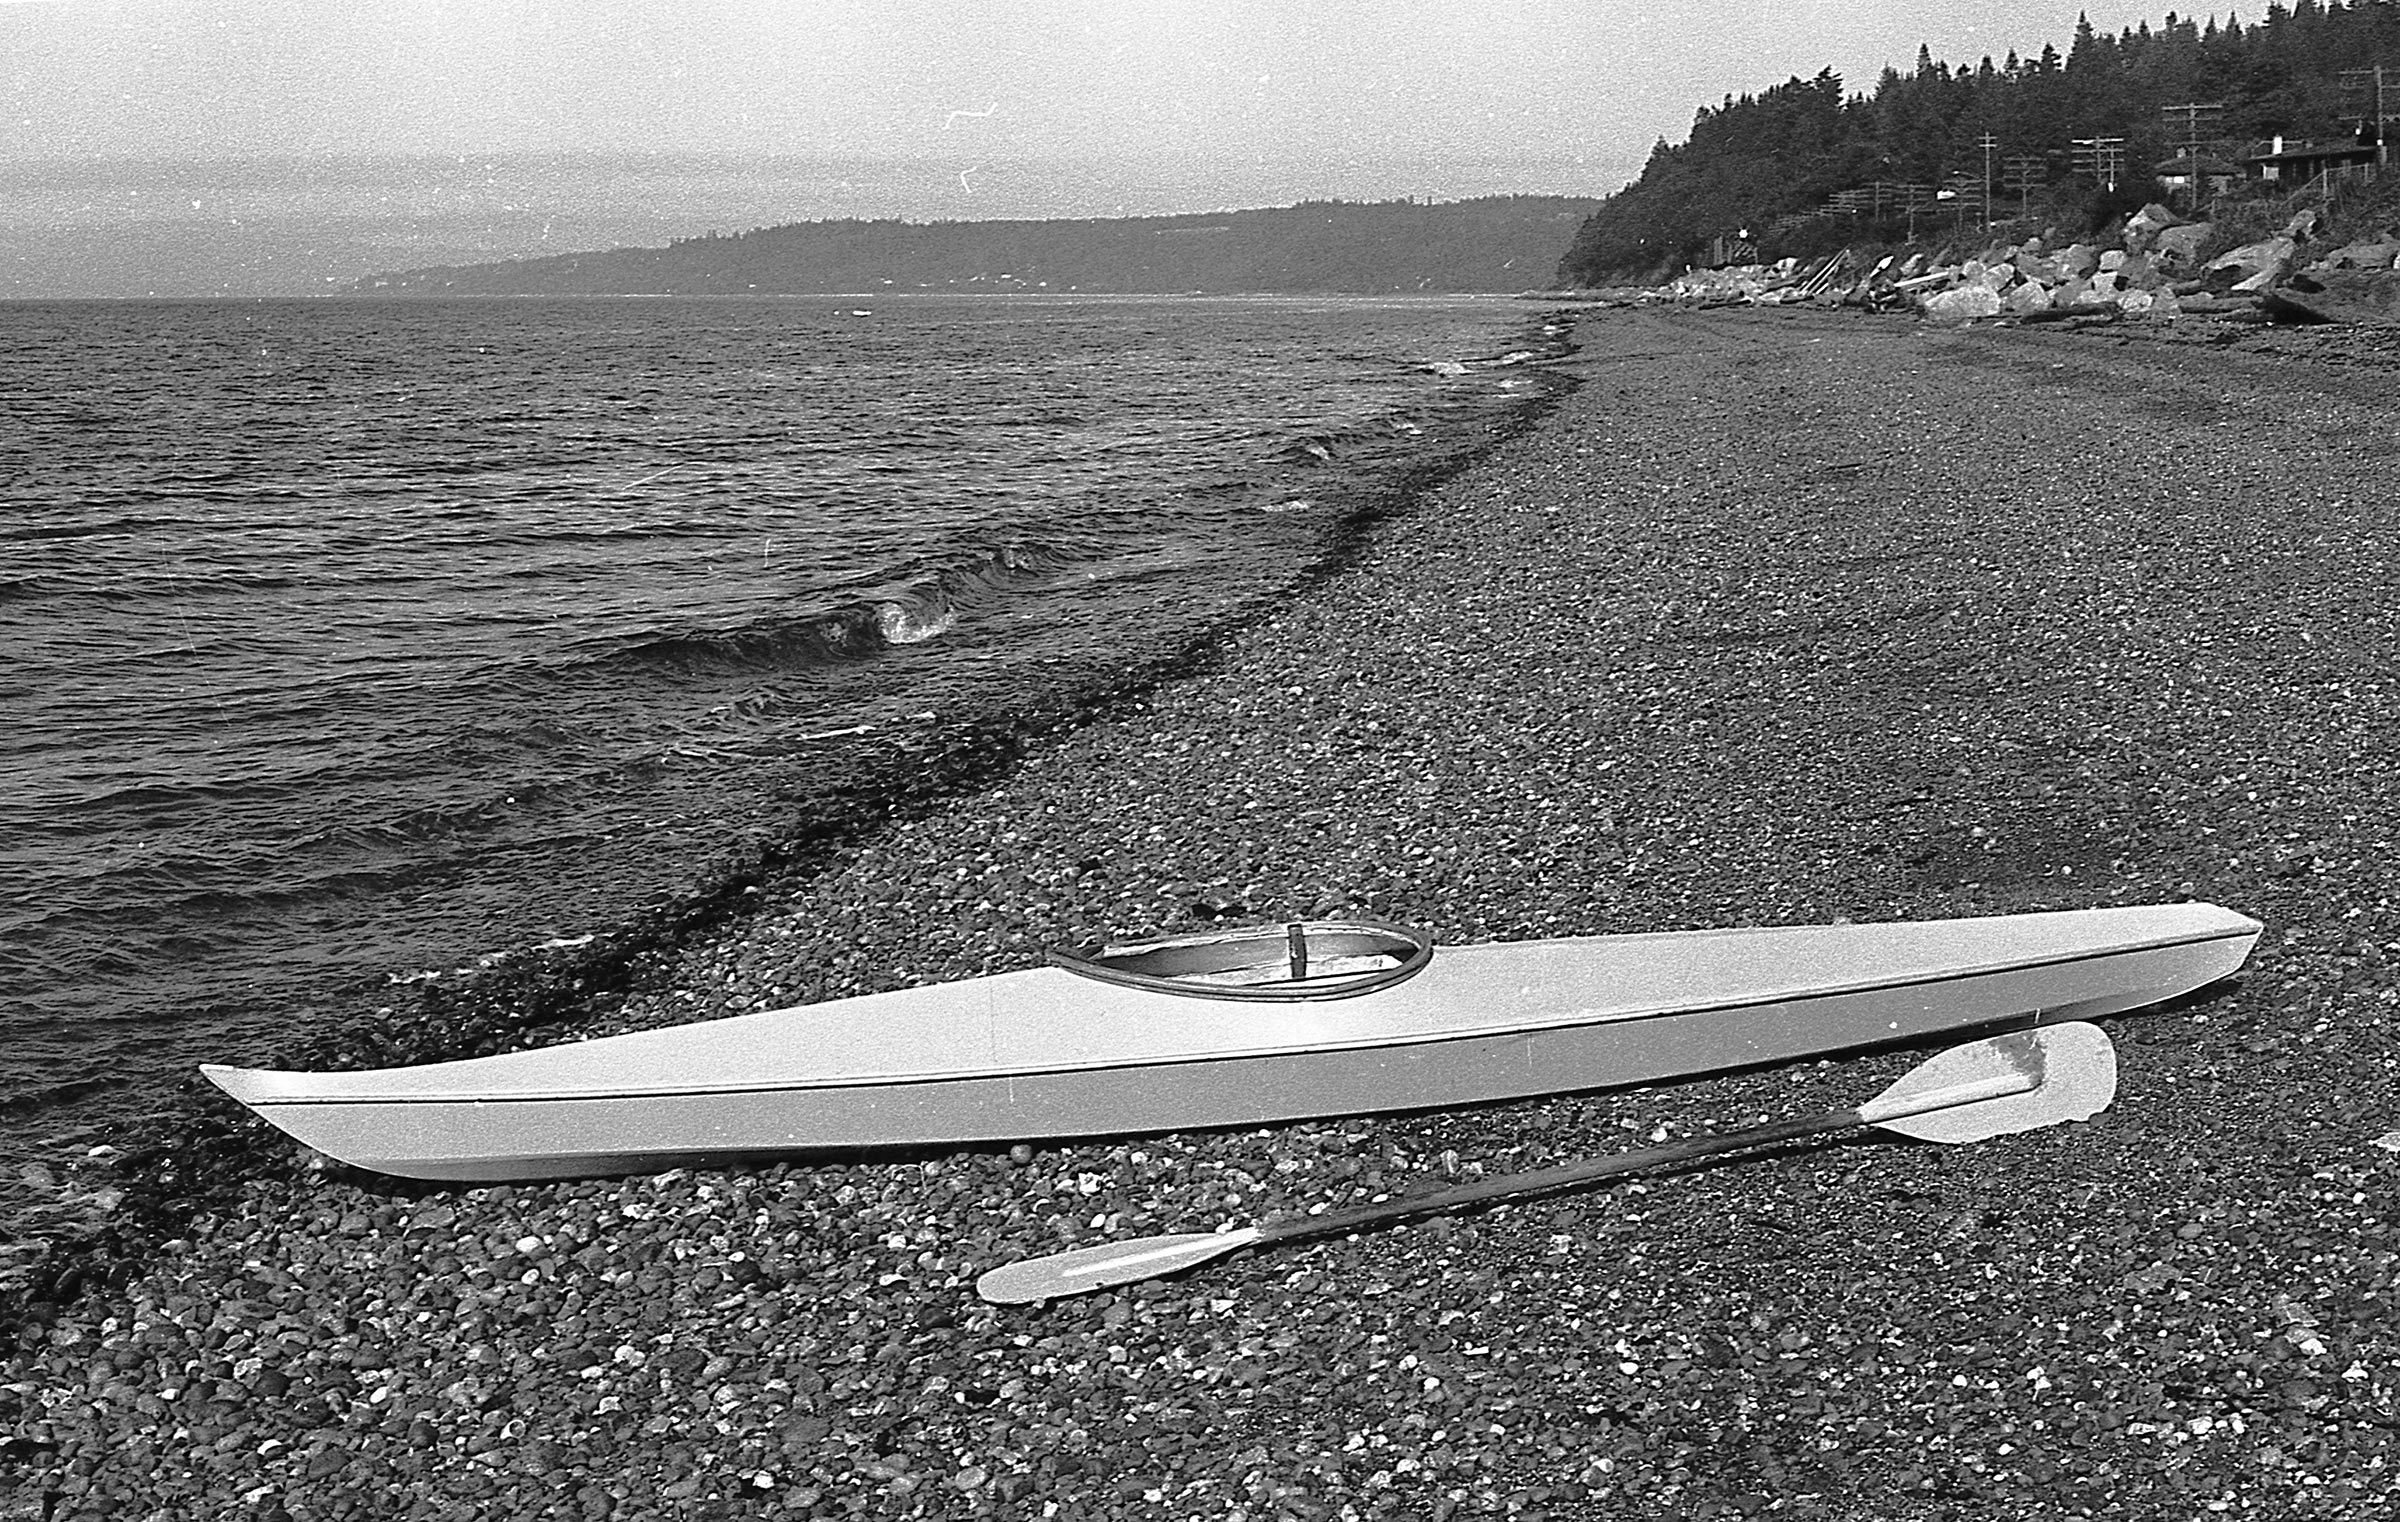
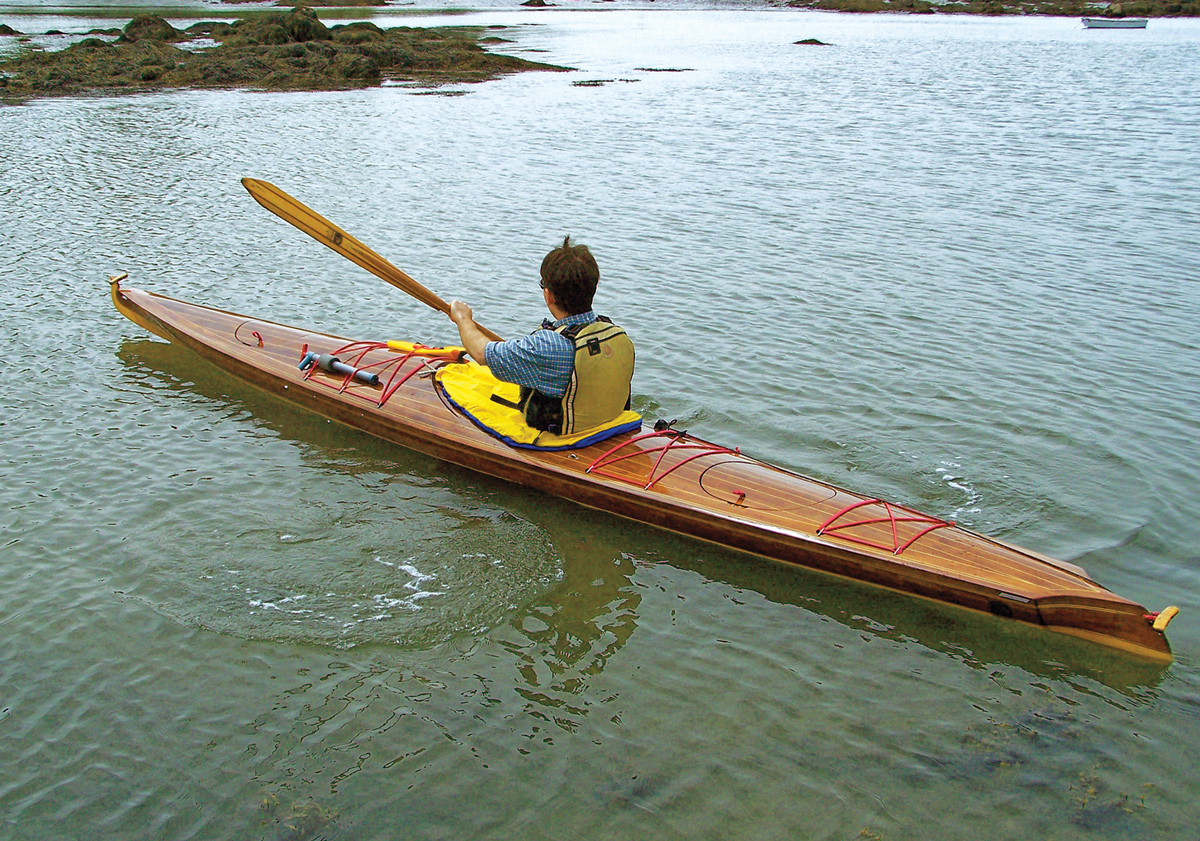
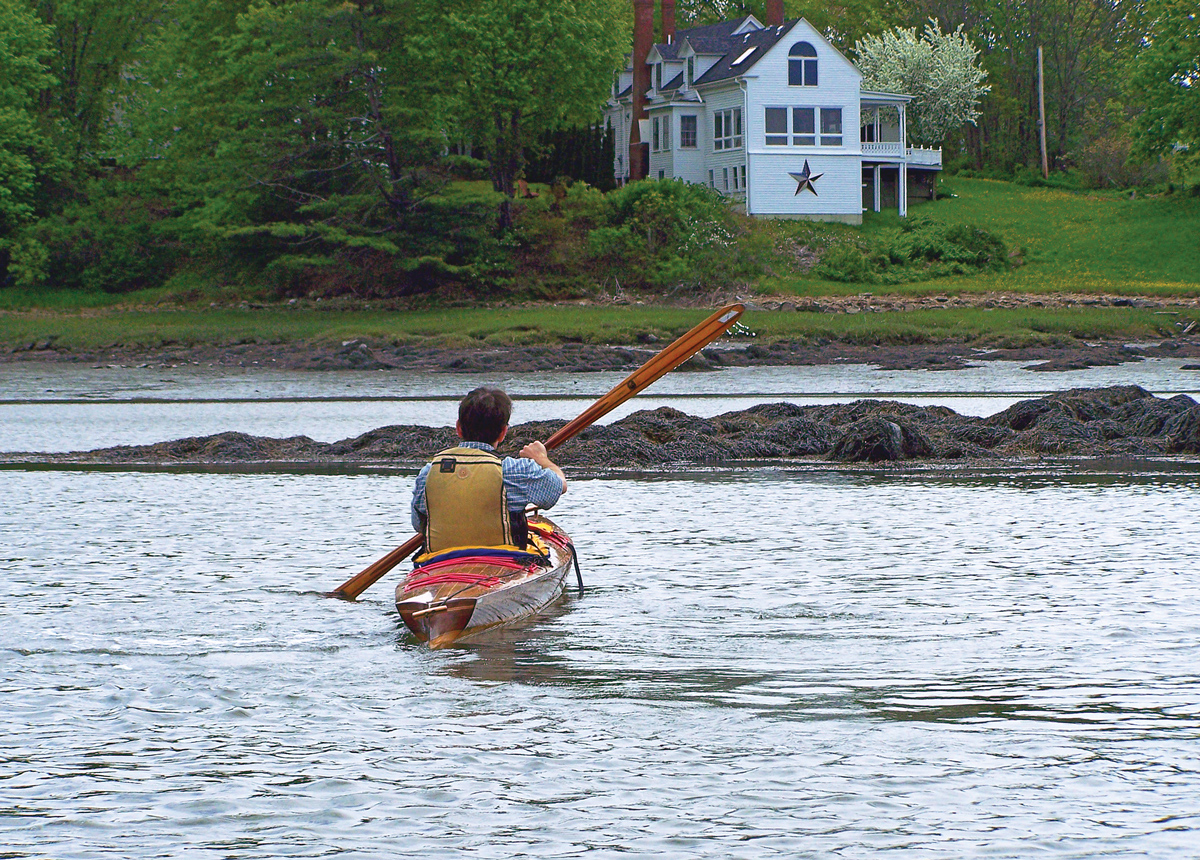
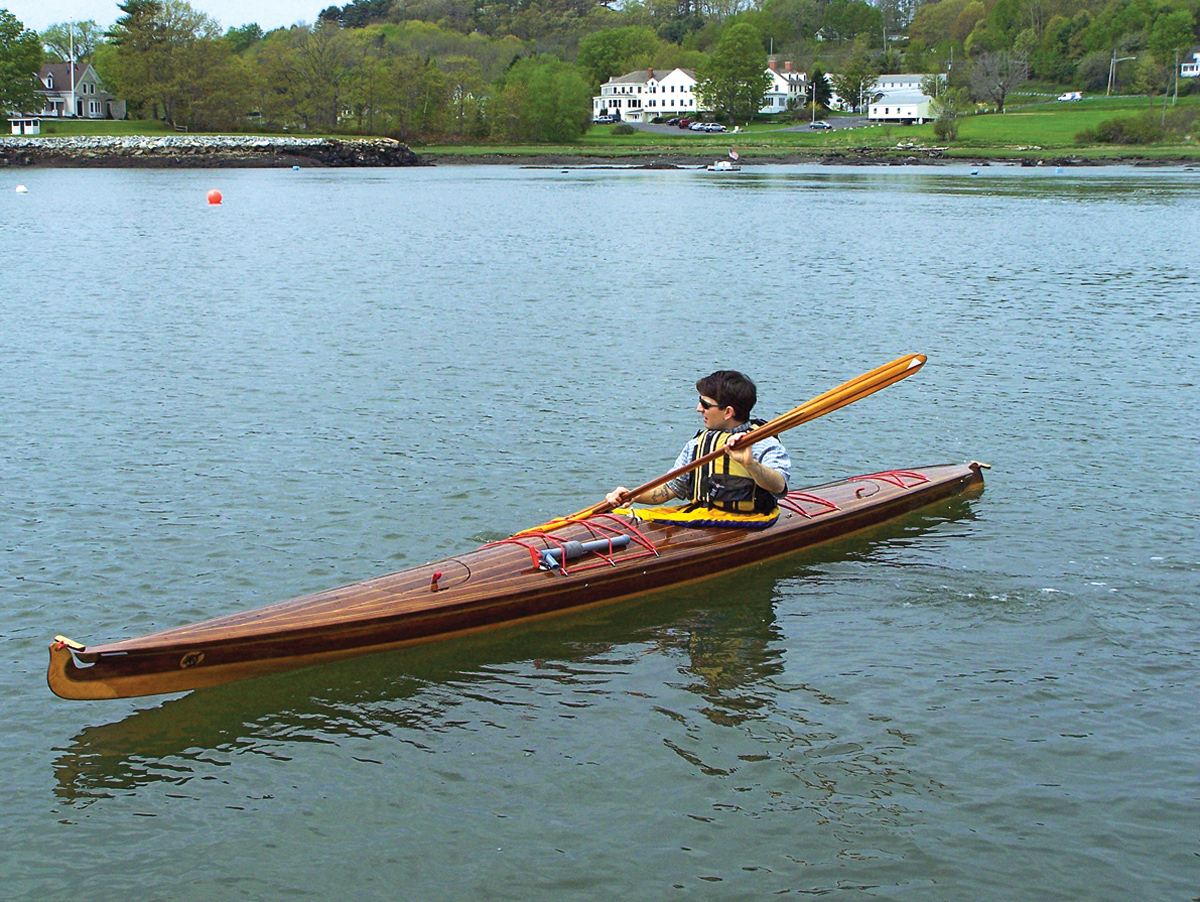
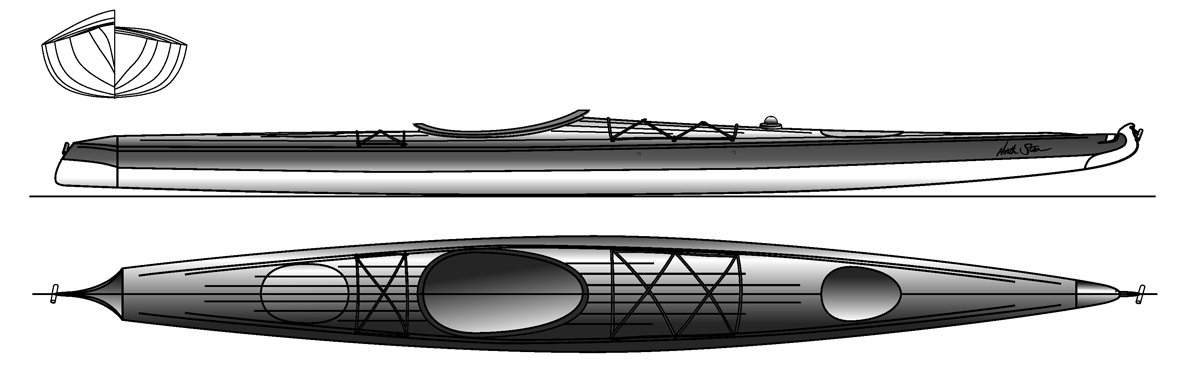
I knew that it would take me a while to build a traditional plank-on-frame boat; a skin-on-frame kayak would get afloat faster and give me experience on the water while I was building the skiff. I studied Chapelle’s chapter on Arctic kayaks in Bark Canoes and Skin Boats of North America, cursorily, and drew a kayak of my own design that was a mishmash of elements I’d picked out of the book. I’d watched my father build a fuselage-frame rowing wherry and designed my kayak for that method, using plywood frames and stems with longitudinals screwed and glued to them. I tacked a canvas skin to the frame and waterproofed it with tan Gacoflex, a liquid neoprene coating.
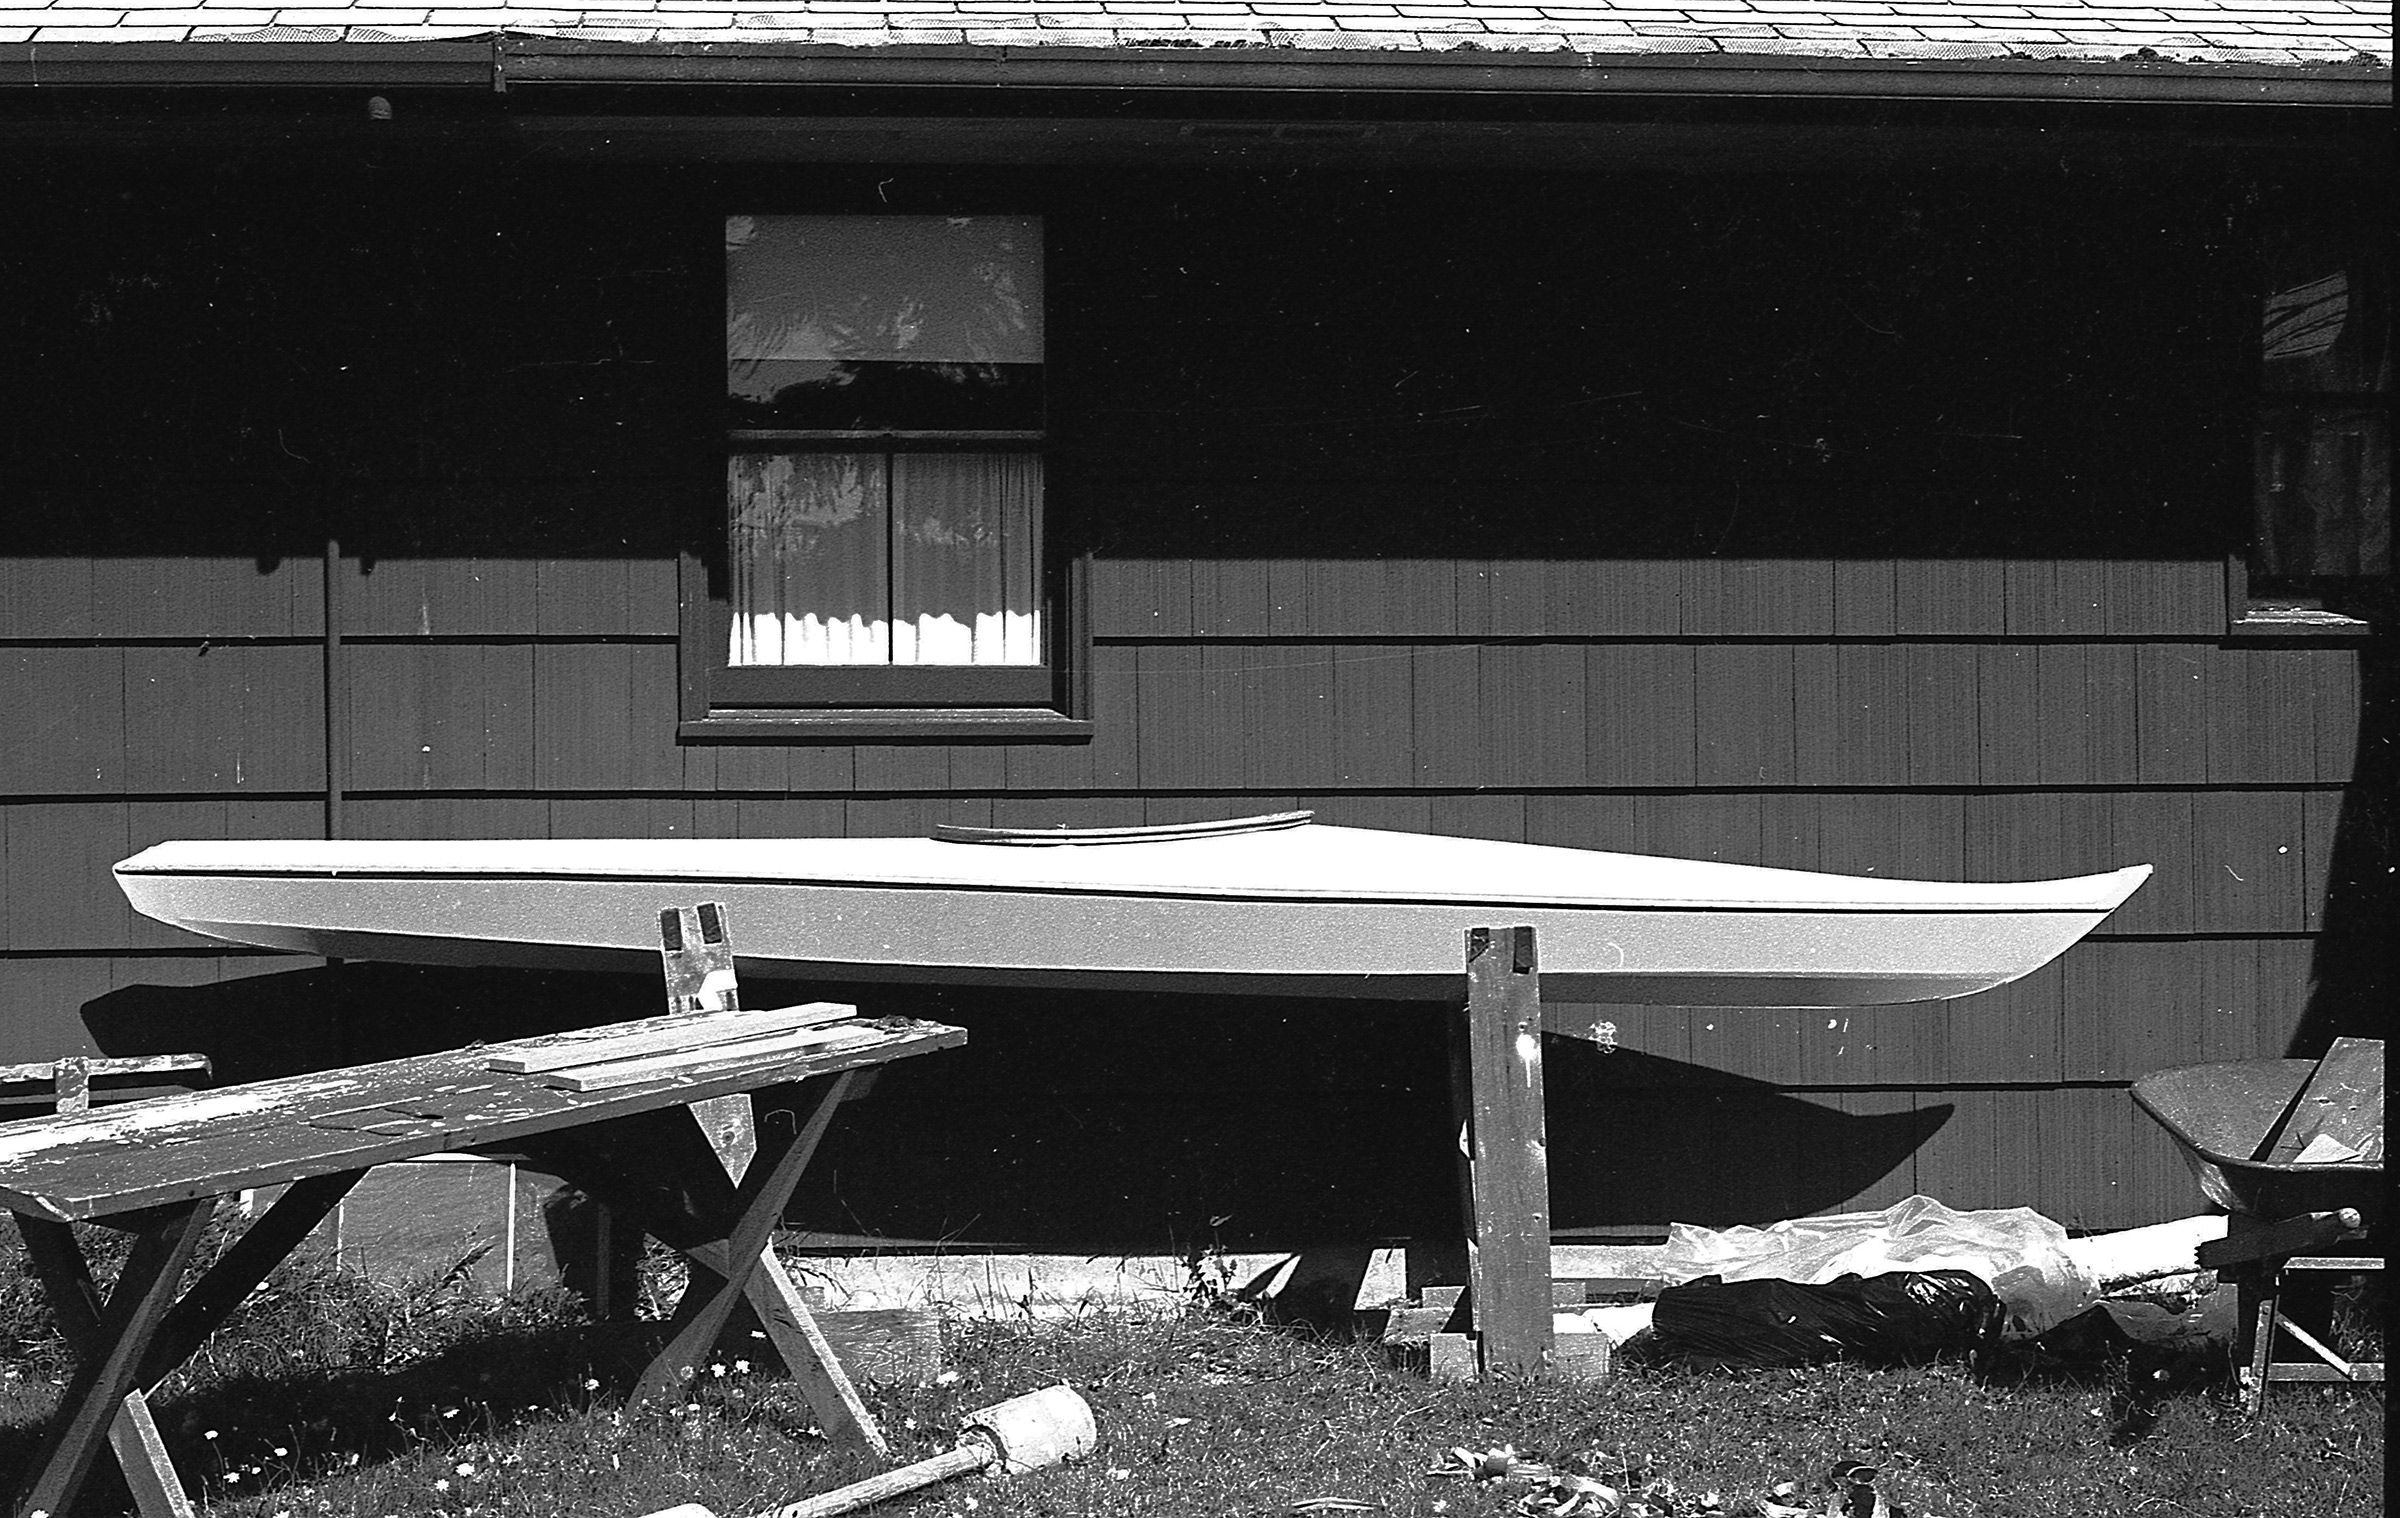
I finished the kayak in July of 1978. Sitting in the back of my boyhood home, it is surrounded by things that my father made: the racing-shell slings holding the kayak, the picnic table, and, resting on the lawn, a barbell that was a dowel set in cement in concrete drainpipe. I grew up believing that there was never a reason to buy the things we could make.
I launched the kayak on July 20, 1978. It wasn’t anything special, neither fast nor stable, but it got me on the water. I launched the dory skiff on a rainy afternoon on February 24, 1979. I christened it GAMINE after a winsome character played by Paulette Goddard in Charlie Chaplin’s 1936 film, Modern Times. The following year, in the summer of 1980, I fulfilled my dream of cruising the Inside Passage.
Skinny Beach, a 1-1/2-mile-long strip of gravel and sand between the railroad tracks and Puget Sound, was within walking distance from home and where I launched the kayak on July 20, 1978. The paddle was one my father made for whitewater kayakers at the school where he taught. It had fiberglassed 1/4” plywood blades set at right angles to each other. This beach supplied driftwood, mostly red and yellow cedar, for many future boatbuilding projects.
My kayak lasted a few years before the skin succumbed to mildew. By that time, I had learned a lot more about boats and could appreciate all the knowledge and skill that went into the design and construction of traditional craft. I tore the rotting skin off my kayak and took a chainsaw to the frame—an acknowledgement perhaps, of my lack of understanding of the wisdom carried by old boats. I turned my attention to building reproductions of Arctic kayaks and plank-on-frame working boats to see what they could teach me.
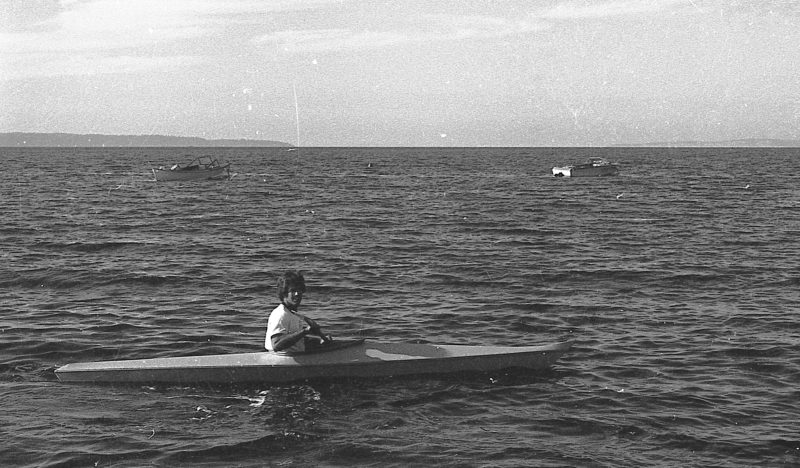
Getting the kayak afloat was the first step in preparing for cruising the Inside Passage with the dory skiff I was building. The Calkins-designed Bartender at left belonged to the family whose yard I crossed to get to the beach. The other boat belonged to a neighbor and was the waterskiing boat for the group of us who spent summers at Skinny Beach.
That blank book in which I recorded the dates of my beginnings as a boatbuilder starts with an entry dated November 1973. It has several sketches for silk-screen projects I was exploring for a serigraphy class I took during my junior year of college. A few pages in, I had sketched my left hand. Beyond that were drawings developing a system for perspective on the spherical surface of the Earth. A rough portrait of my mother is on the page preceding the spread with my first notes about my kayak and dory skiff. All of the drawings beyond that, without exception, have something to do with boats.
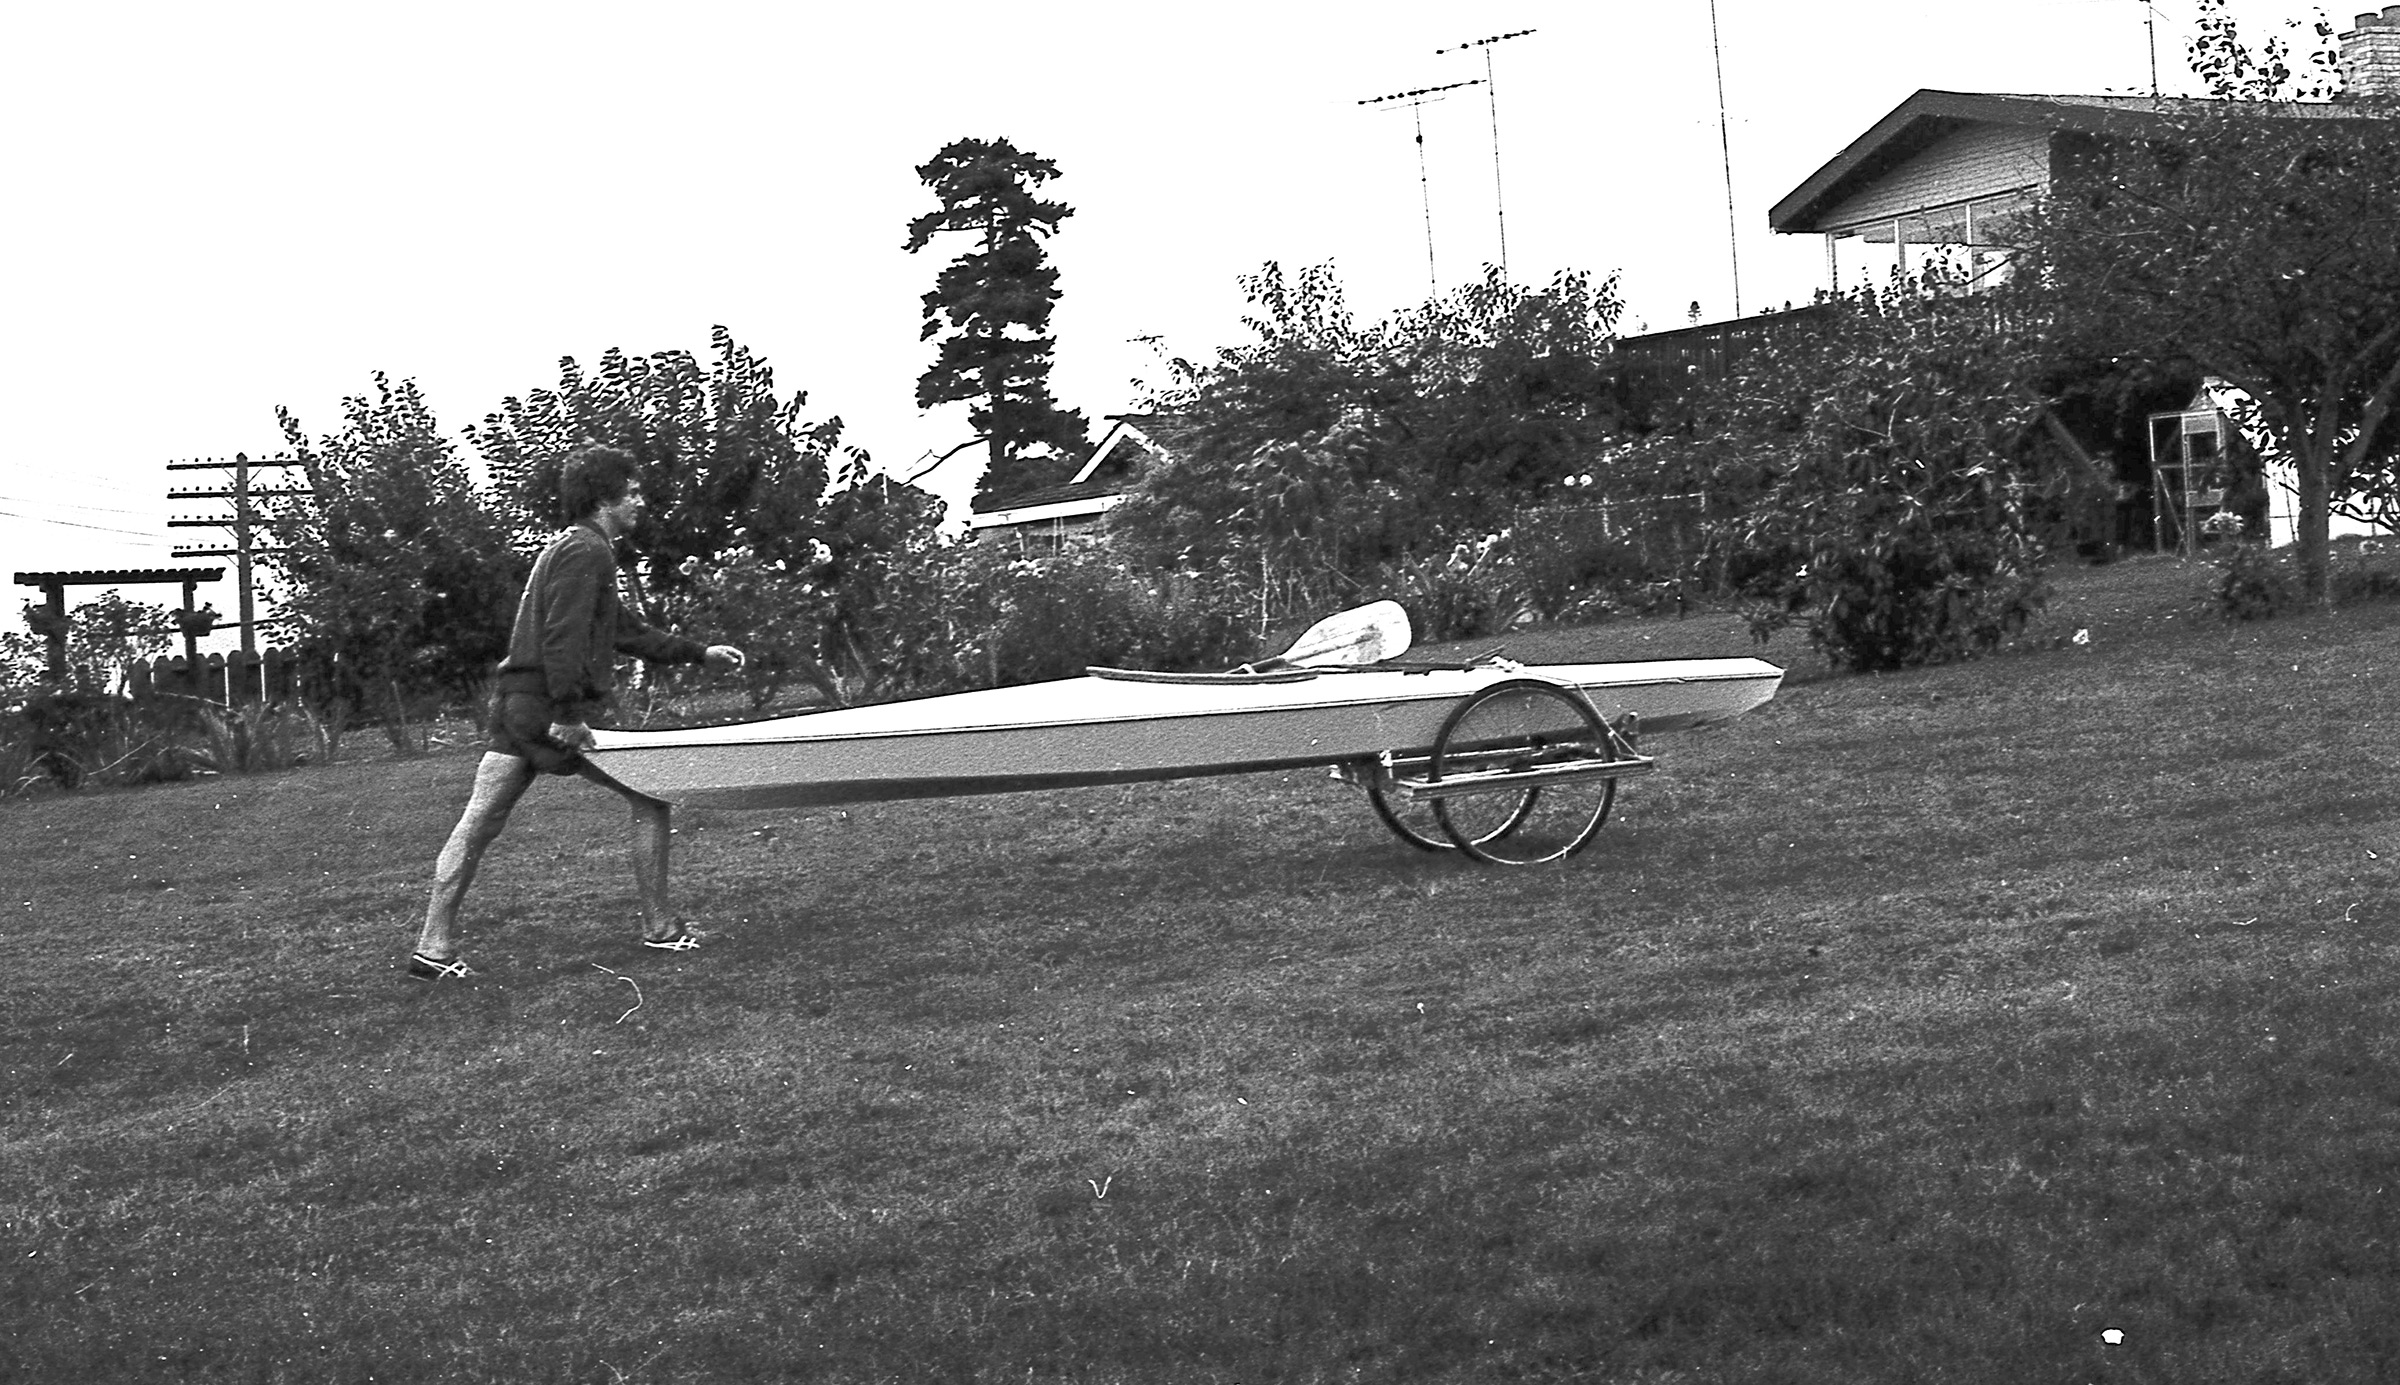
To get the kayak to and from the beach, I made a cart of bicycle wheels and a frame of scrap aluminum. It was just a ½-mile walk through the neighborhood. The phone pole and wires at left mark the border between the shoreside homes and Puget Sound.
The last entry in the book, dated March 31, 1980, contains this note: “The gunning dory [a boat I built for my father] is coming along well. Sanding, oiling, sewing, and rigging are all that remain.” The lure of building boats had hijacked my career as an artist. Today, here at my home, I have 17 boats that I’ve built. I may be reaching the point that I have enough of them and can devote some time to drawing.
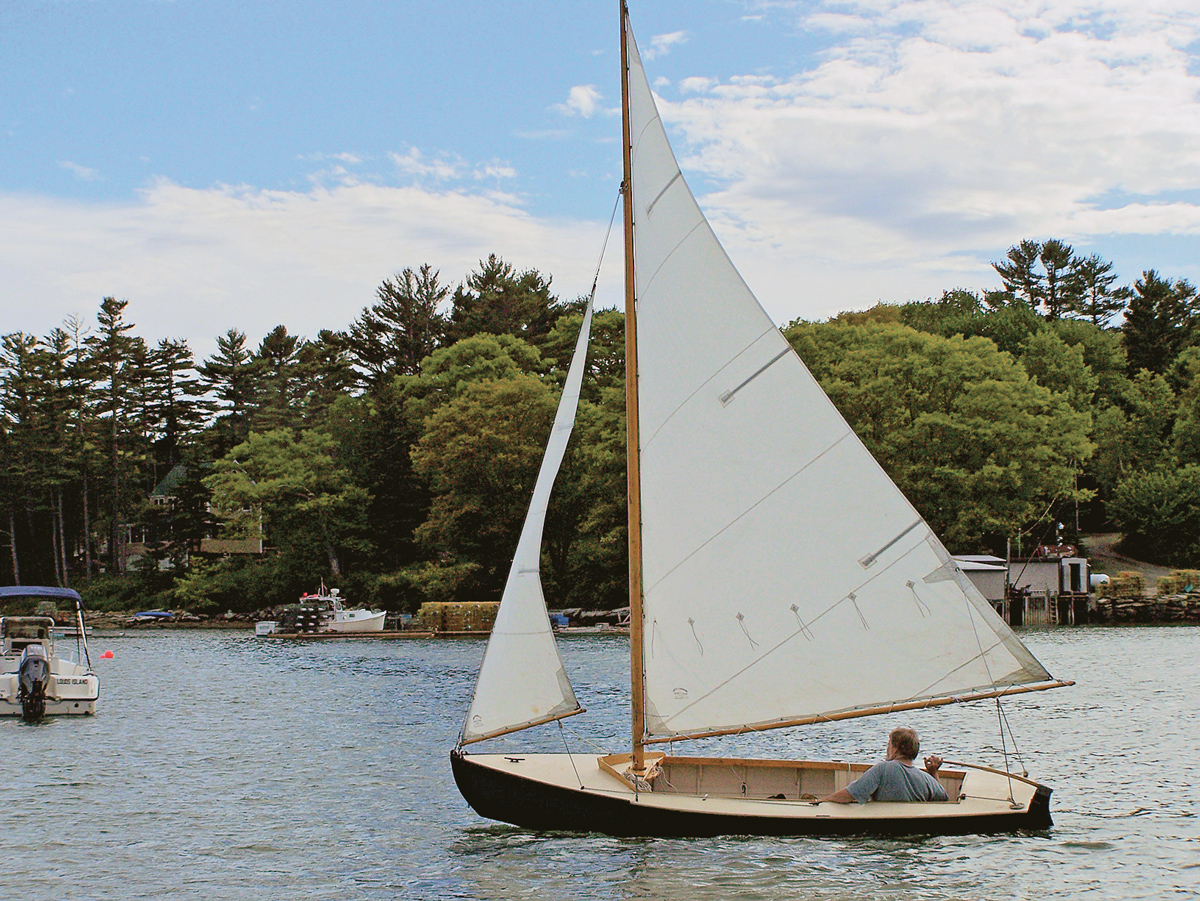
I am not a sailor. When I was a boy, our family had an aluminum fishing boat with a small outboard. Later in life I went sailing on a local lake with a friend on a Hobie Cat for an hour or two. That was the extent of my sail training. These days our family spends a few summer days at a cabin in Michigan’s Les Cheneaux Islands. Surrounded by crystal blue water, islands, rock beaches, and active teenagers, it was easy to conclude that a sailboat would be a welcome addition at the cabin despite our lack of sailing know-how. As a builder and wooden boat enthusiast, the decision to build a wood sailboat was not difficult.
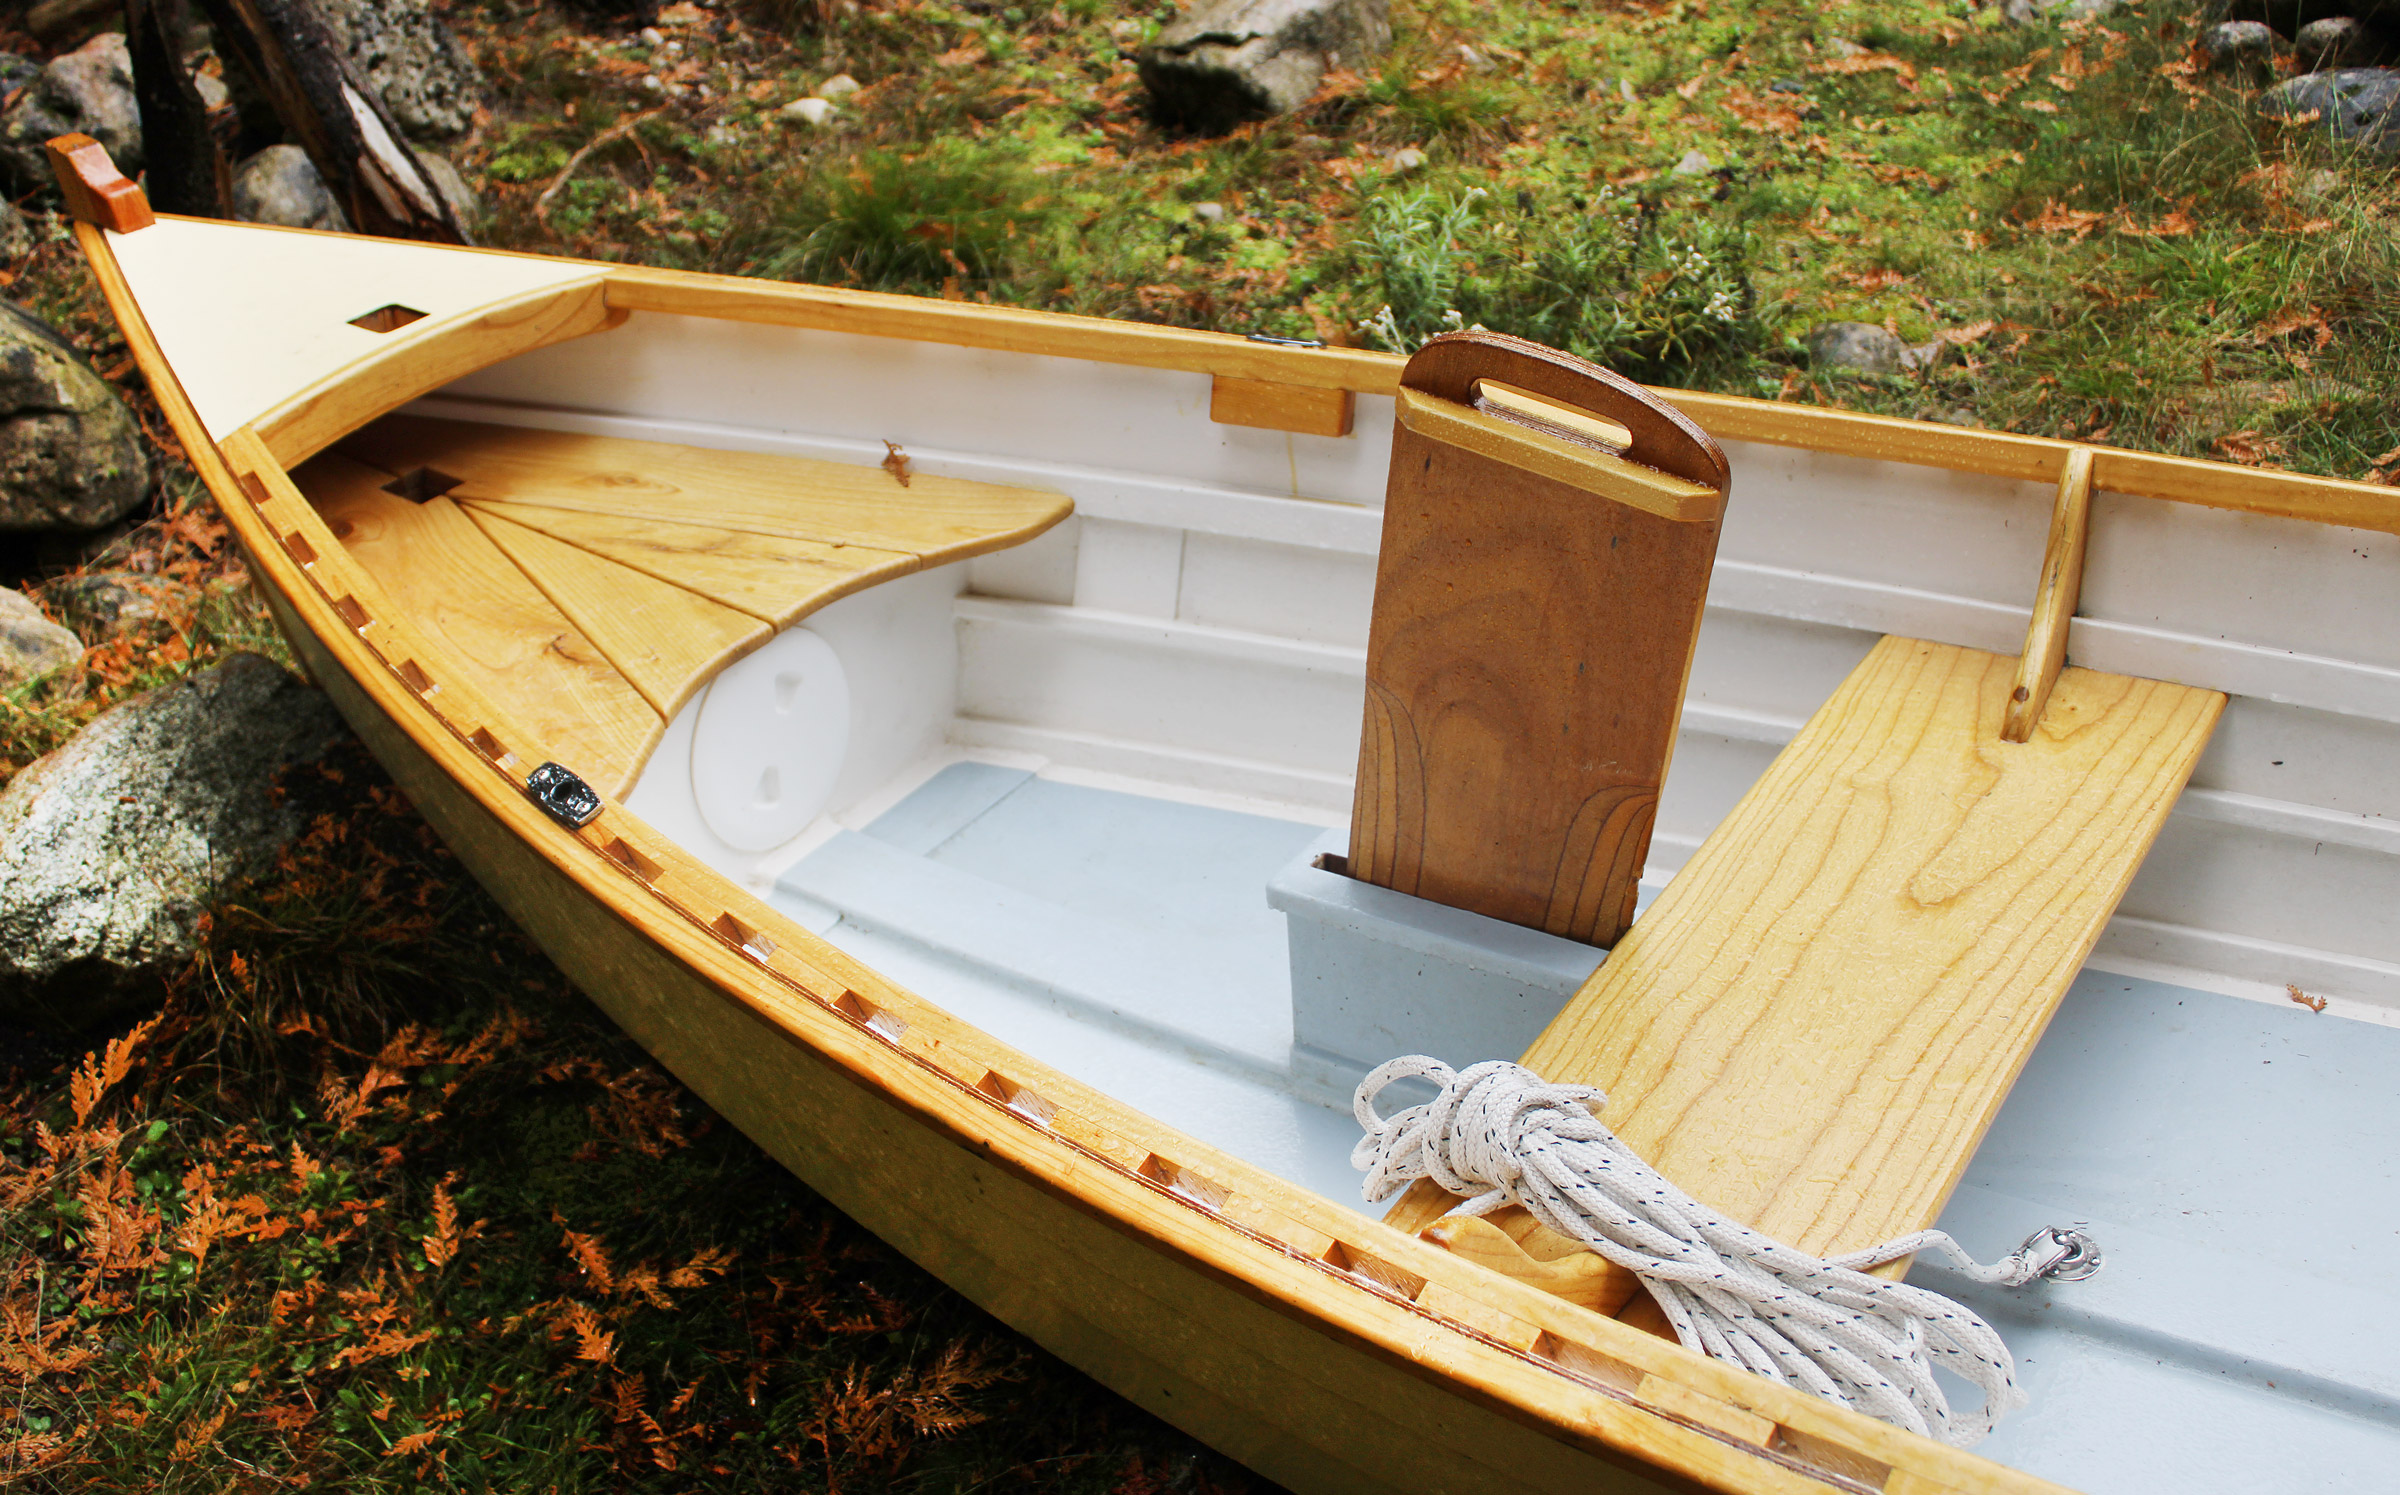
We chose to build the Sand Dollar from Arch Davis Design. It’s an 11′ flat-bottomed skiff that can be rigged to sail, rows well, and looks good with its plywood lapstrake sides. I had recently built a 21′ Widebody Tolman Skiff and was eager to try a different building method and to have a boat I could transport on the top of our vehicle. Limiting the number of boats we own is not a priority; limiting the number of trailers and the associated paperwork and maintenance, is. I was also excited about a boatbuilding project that would take much less time than the three years I spent on the Widebody.
Arch Davis designed the Sand Dollar for first-time builders, including those with no previous woodworking experience. As he notes, he took great pains with the lines, building a model to refine the shape. The result is a very pretty, practical little boat that will satisfy both the novice and experienced boatbuilder.
The Sand Dollar plans includes 16 sheets of drawings, a Mylar sheet with full-sized patterns, and a 75-page manual. Study plans, an instructional DVD, and various kits are also available. We found the building manual to be comprehensive with step-by-step instructions, drawings, photos of the building process, a list of required materials and tools, and even a glossary of terms that might be unfamiliar to a novice boatbuilder.
Photographs by the author
The center thwart and the flotation compartments’ tops are installed before the hull is planked, making it much easier to trim them to fit by planning them flush with the longitudinals.
The Sand Dollar requires three sheets of 6mm marine plywood—we used meranti — as well as lumber for the various other pieces. The boat is built upside down on a simple jig. The stem, transom, bulkheads for flotation chambers fore and aft, and two temporary frames are set up on the strongback, and the keel, chine logs, stringers, and seat risers are bent over them. (While the fore-and-aft framing members enable a much easier lapstrake planking process, we discovered after the boat was in use that the stringers and seat risers make the boat more difficult to clean. I normally tip the boat on its side to spray the debris and spiders out. The stringers and risers prevent the dirt and water from freely draining out through the open inwale.)
A sheet of plywood is laid over the assembly and cut to shape to become most of the bottom. The forward part of the bottom is joined to it with a 4″-wide plywood butt strap. The use of butt straps, applied while the pieces to be joined by them are on the building jig, simplifies the building process by avoiding the need to scarf plywood panels together.
The manual suggests installing the seats before the side planking so that the seat shape can be determined simply by scribing along the outside edges of the seat risers instead of having to measure and cut them to fit inside the boat, as you would if they were installed after planking. A mast trunk is installed between the keel and the forward seat top. After the seats are installed, which includes the tops of the flotation chambers, the sides are planked. The laps aren’t beveled, but gains are cut in the ends. Screws and epoxy join the planks at the chine, lap stringer, and riser. After the skeg deadwood is scribed to fit the bottom, it is fastened with screws and glue.
The hull is removed from the strongback and flipped over for installation of the center thwart’s knees and a small foredeck with mast partners. While the plans call for half-round guards at the bottom of the sheerstrake, we left them off and opted to install just the rubrails at the top. The sheer’s inner side is finished with an open gunwale using evenly spaced 2-1/2″-long blocks. The plywood tops of the fore and aft flotation compartments get dressed up with ¾″ lumber. The plans include drawings and instructions for both a centerboard and daggerboard case. We went with the more easily built daggerboard case.
The kick-up rudder has 1/2″ plywood checks and a 3/4″ lumber rudder blade. The manual advises shortening the top pintle to avoid having to get both pintles lined up over their respective gudgeons at the same time. The longer pintle goes in first, then the top one, and both come to rest properly on the gudgeons.
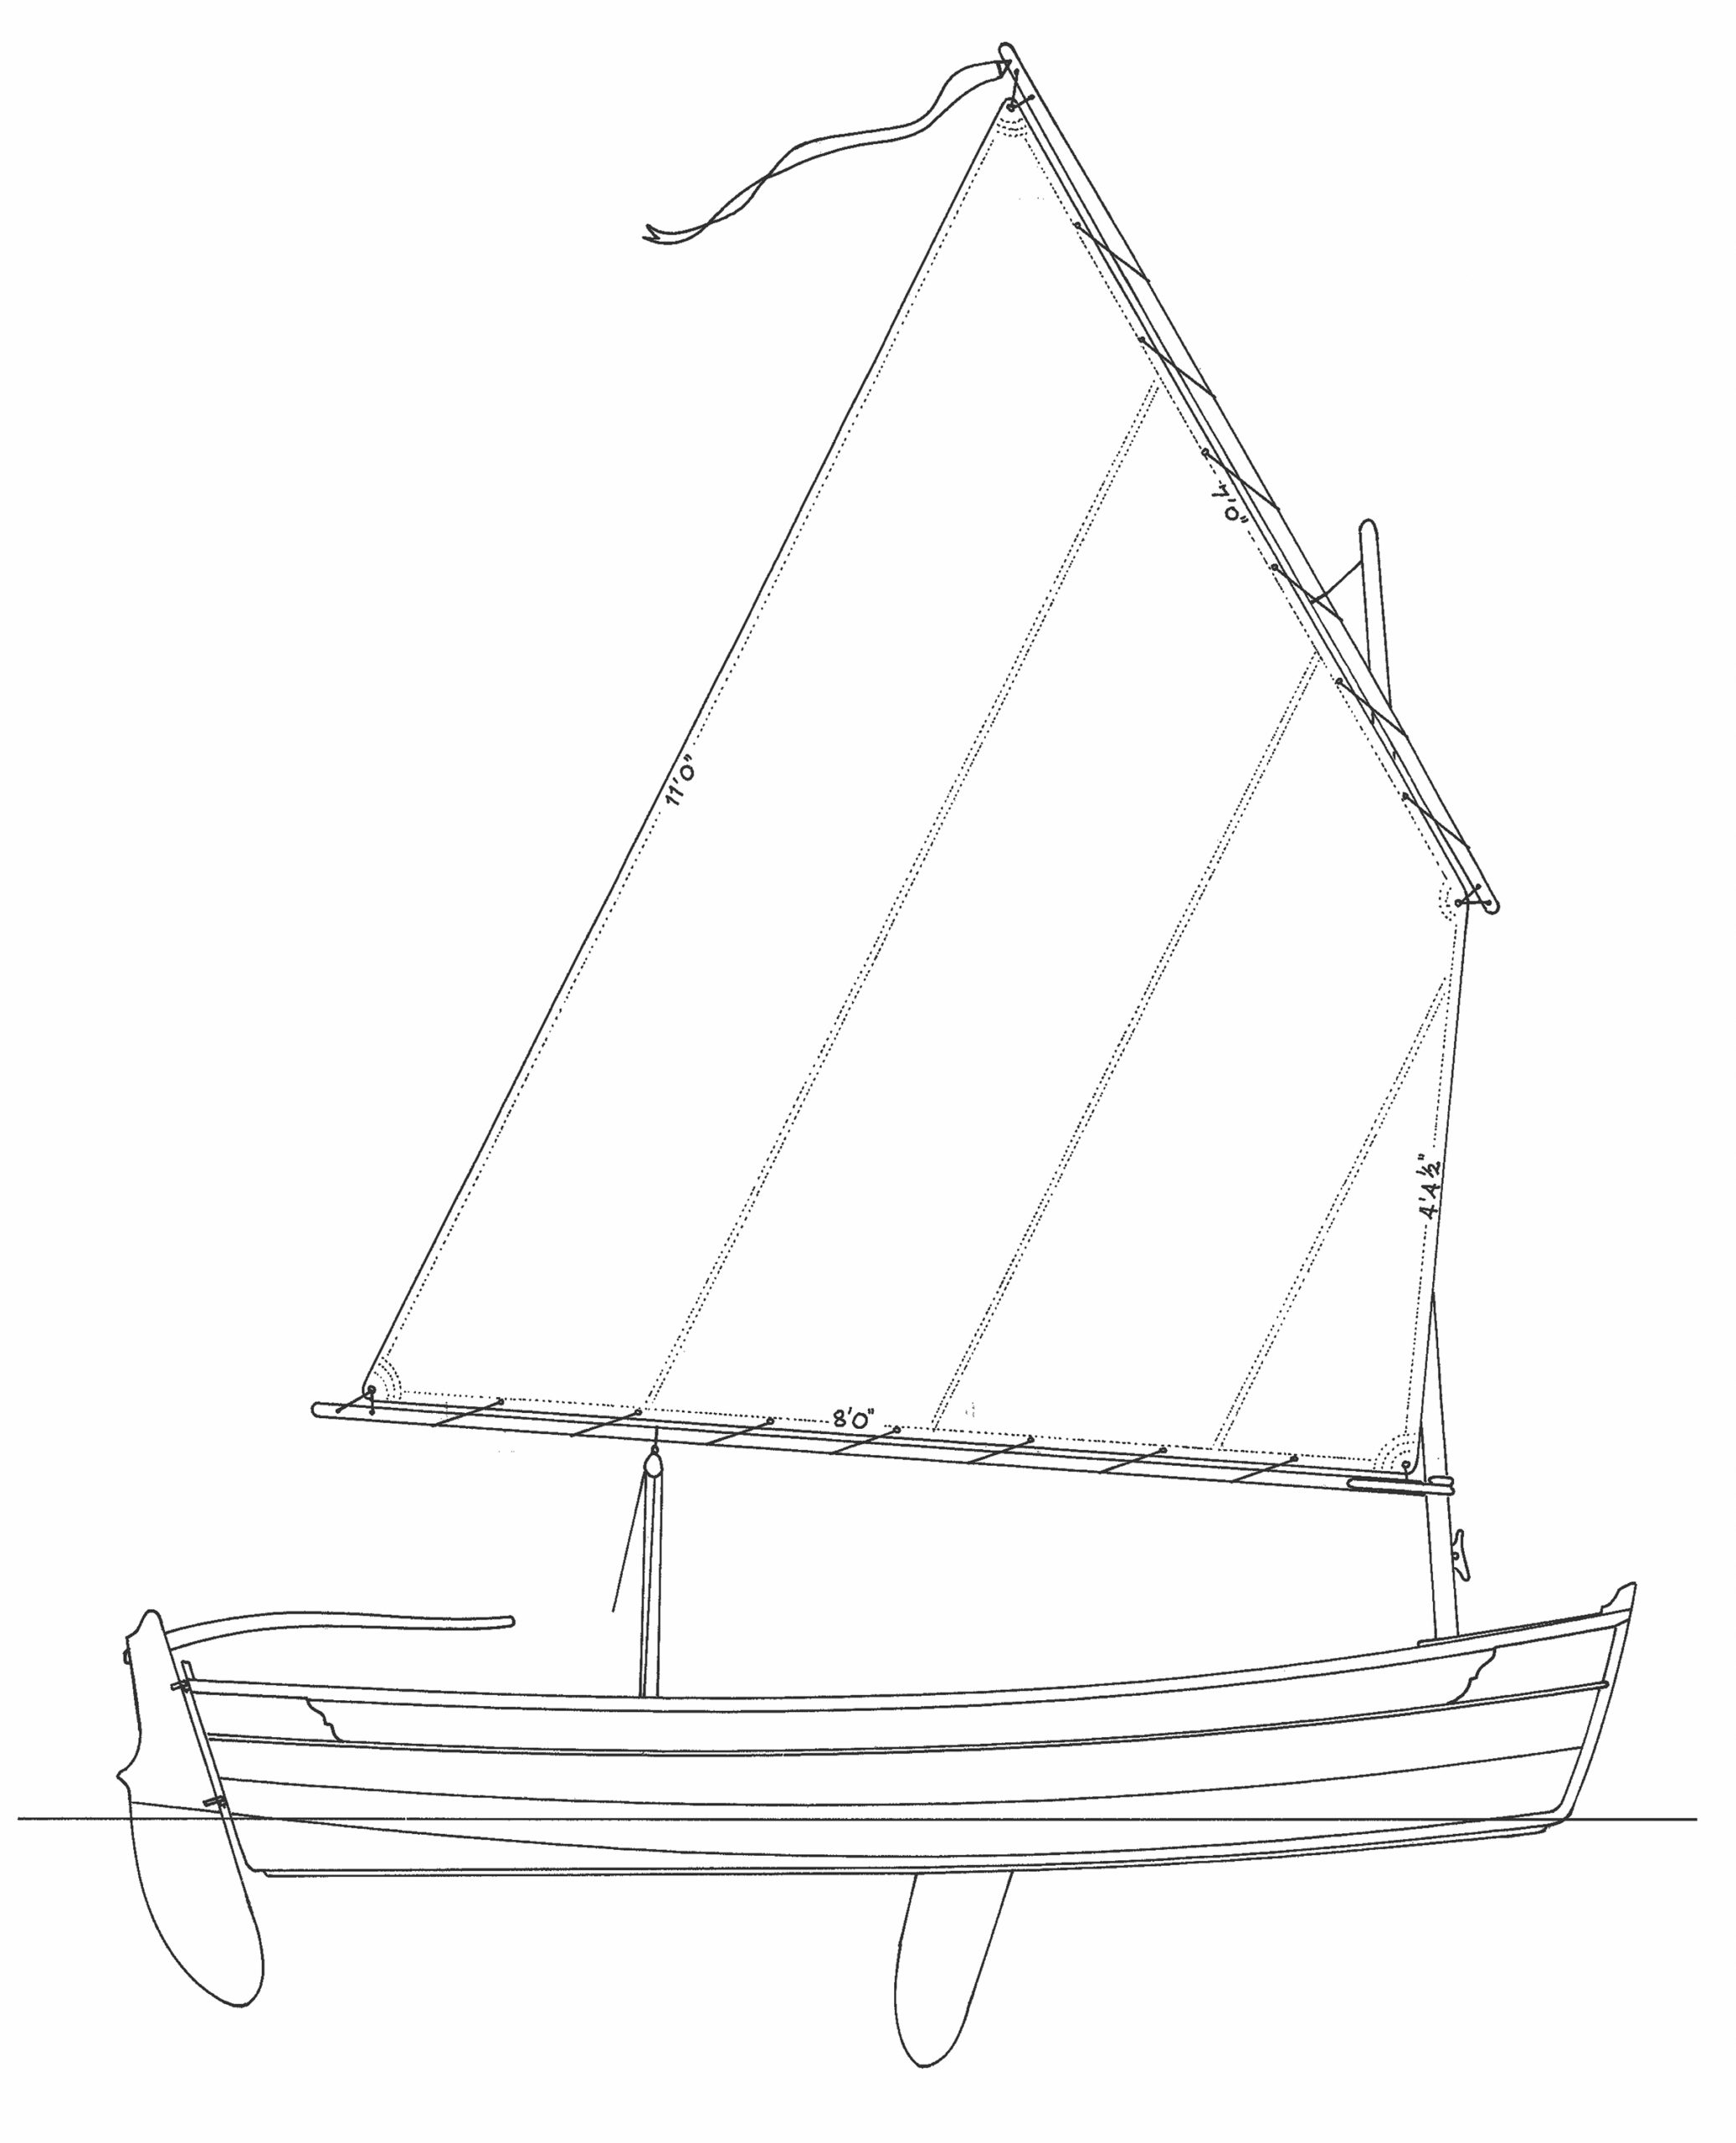
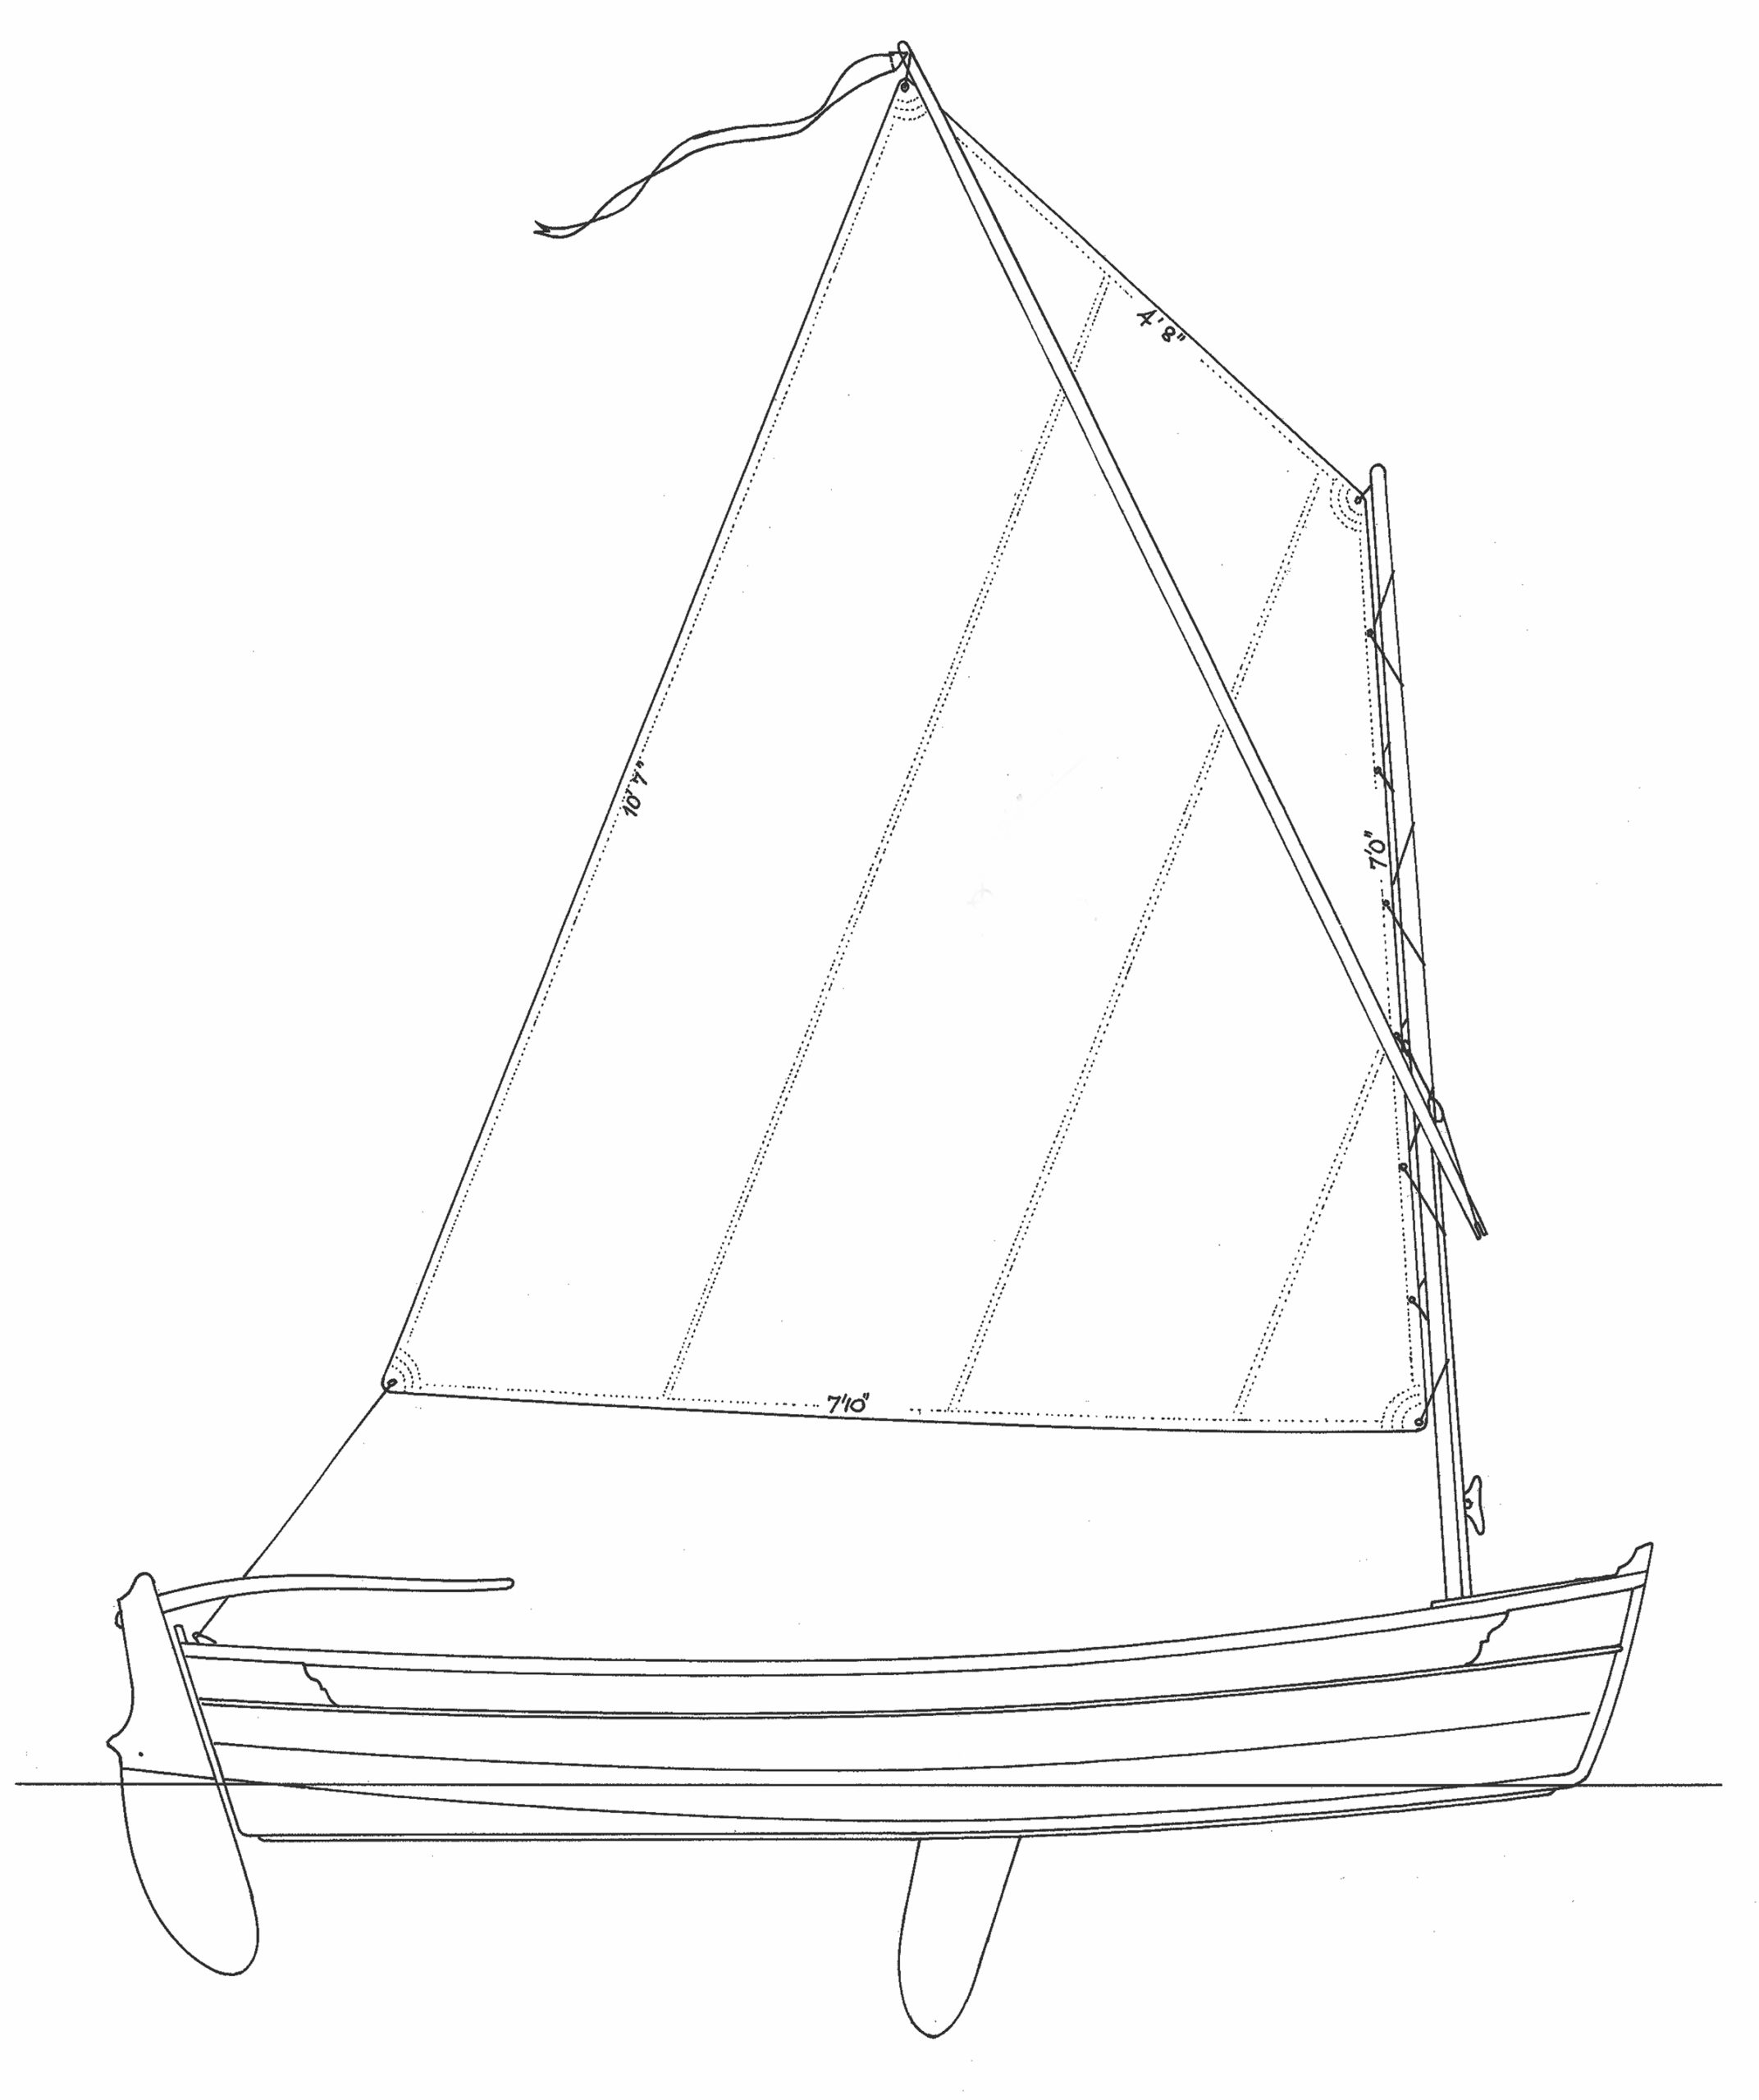
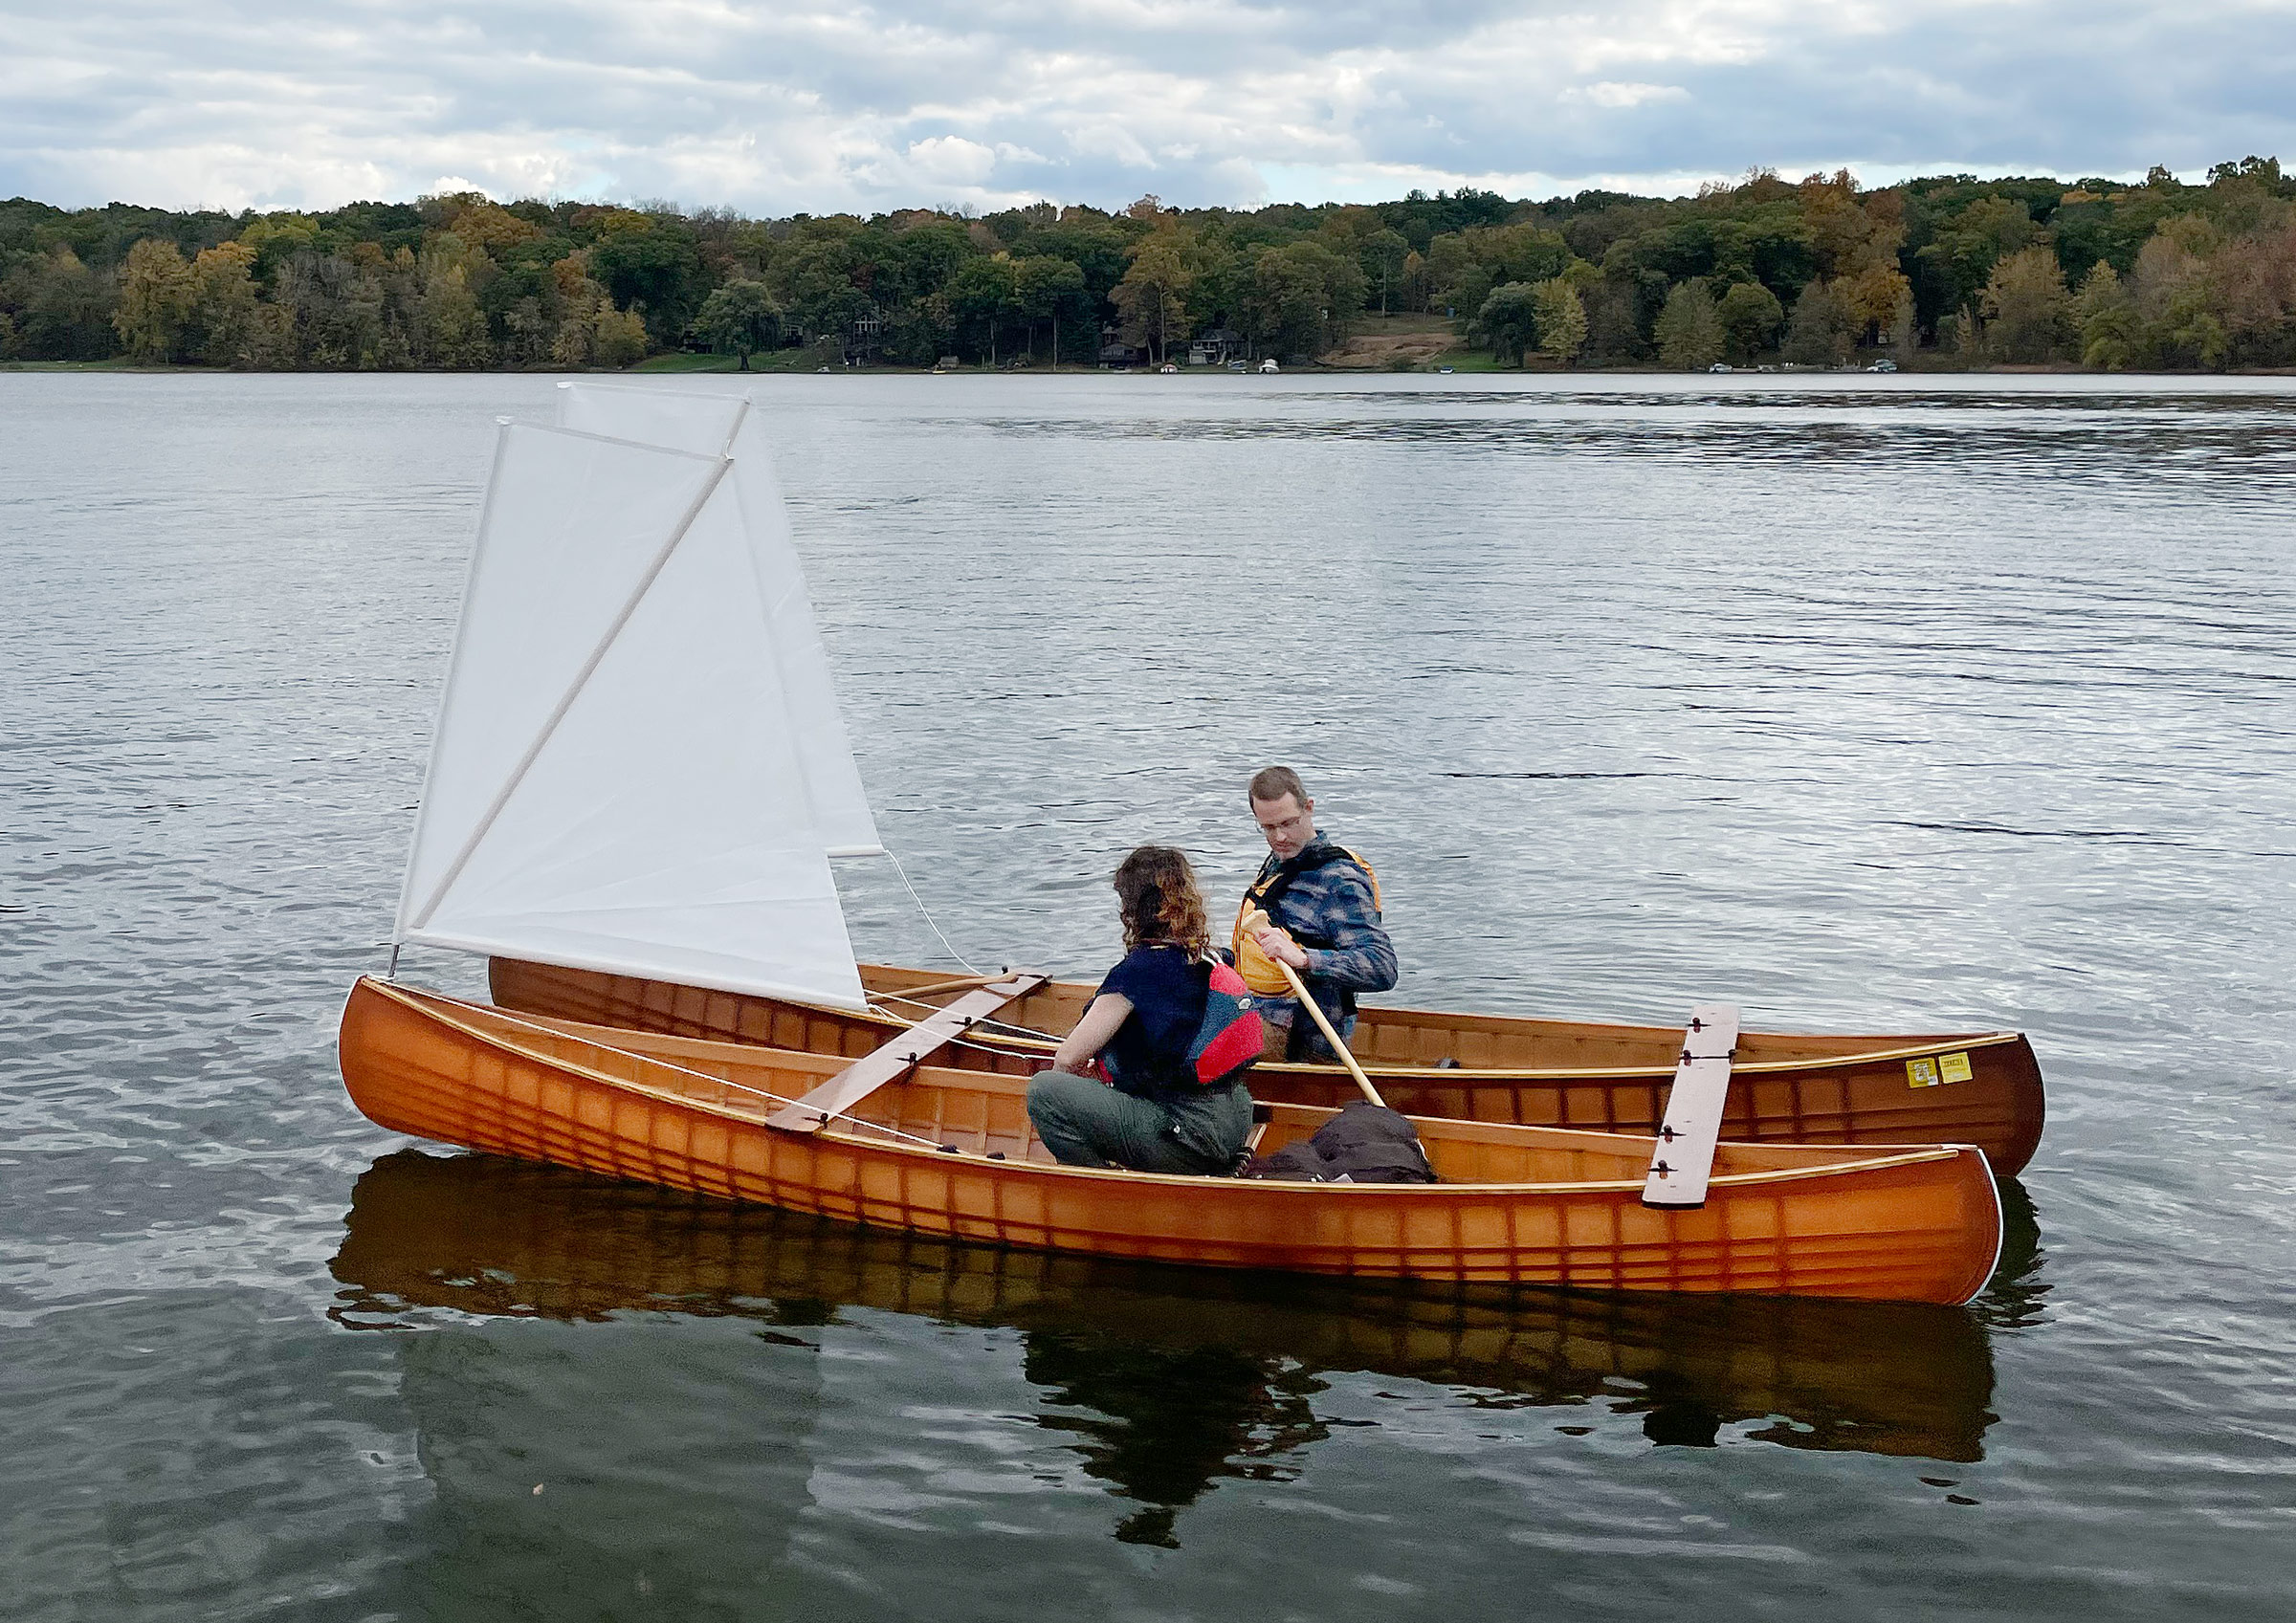
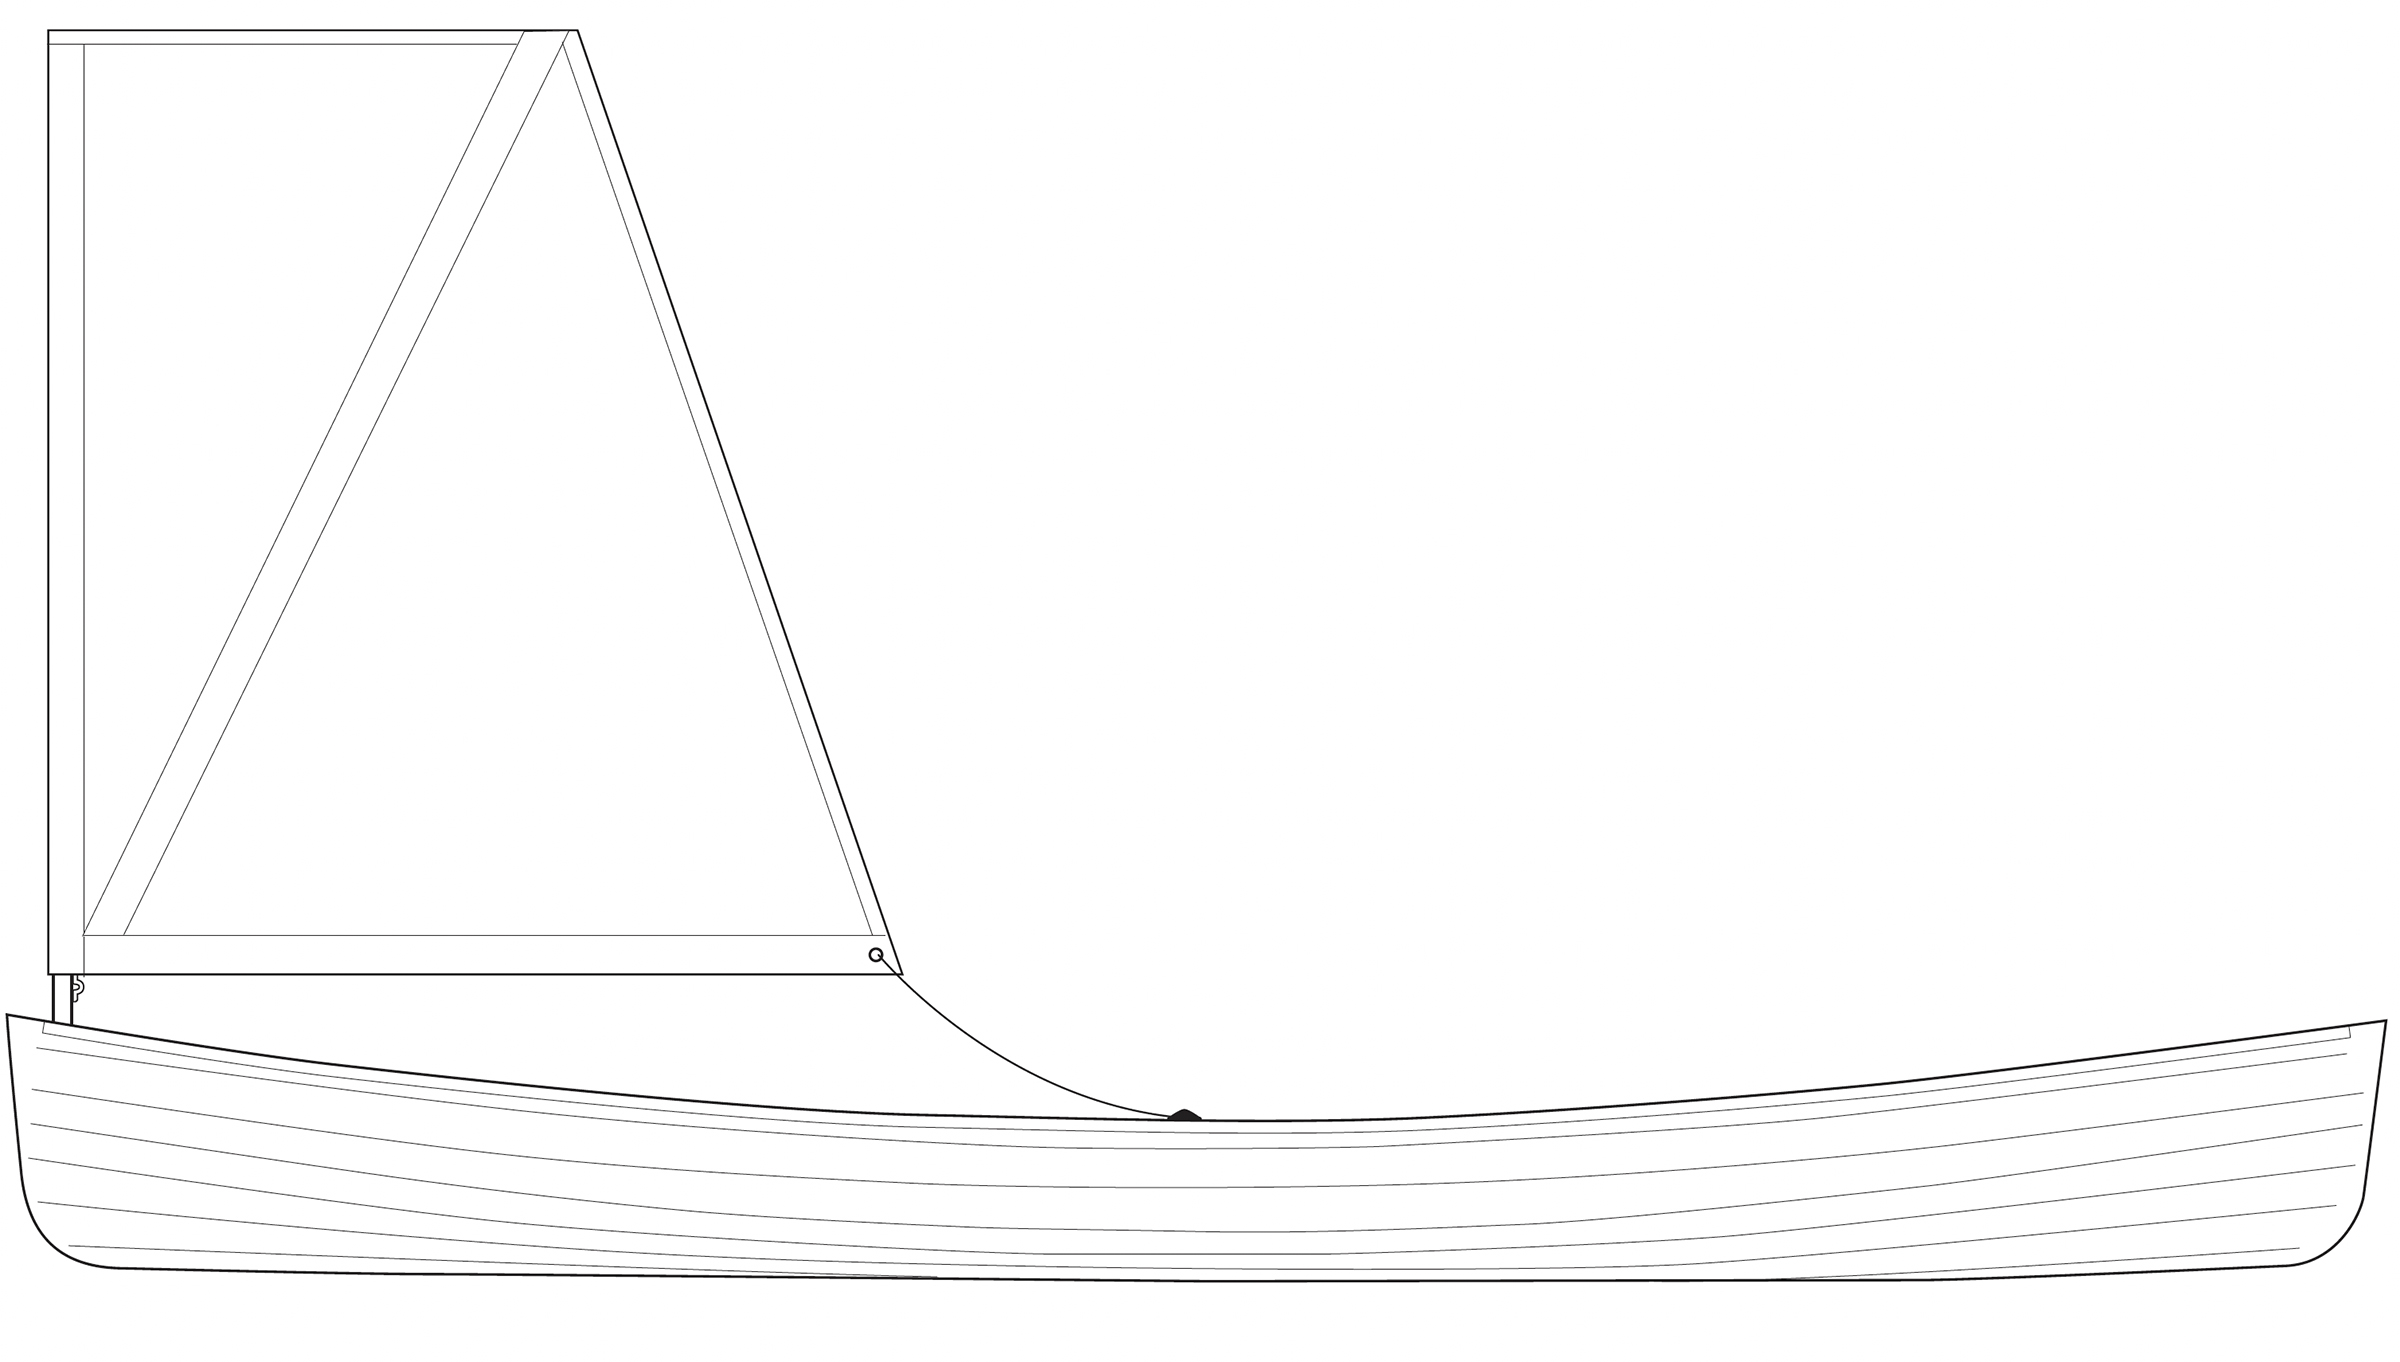
The drawings and instructions cover the making of the centerboard or daggerboard, kick-up rudder and its tiller, and spars. The Sand Dollar design offers a choice of a gunter rig, a standing lug rig, and a sprit rig. All three rigs have short spars and an unstayed mast. We went with the standing lug with a sail area of 49 sq ft. We opted to buy a sail kit from Sailrite and sew the sail ourselves. After sending the sail measurements to Sailrite, we received a kit with everything we needed and detailed sewing instructions. Once the sail was finished, the rigging was pretty simple. The sail is laced to the boom and yard, the mainsheet attached to the boom via a double block, and the halyard attached to the yard.
The plans provide drawings and instruction for a pivoting centerboard as well as the daggerboard shown here. The author opted for the easy construction of the daggerboard but would switch to the centerboard if he were to build the boat again.
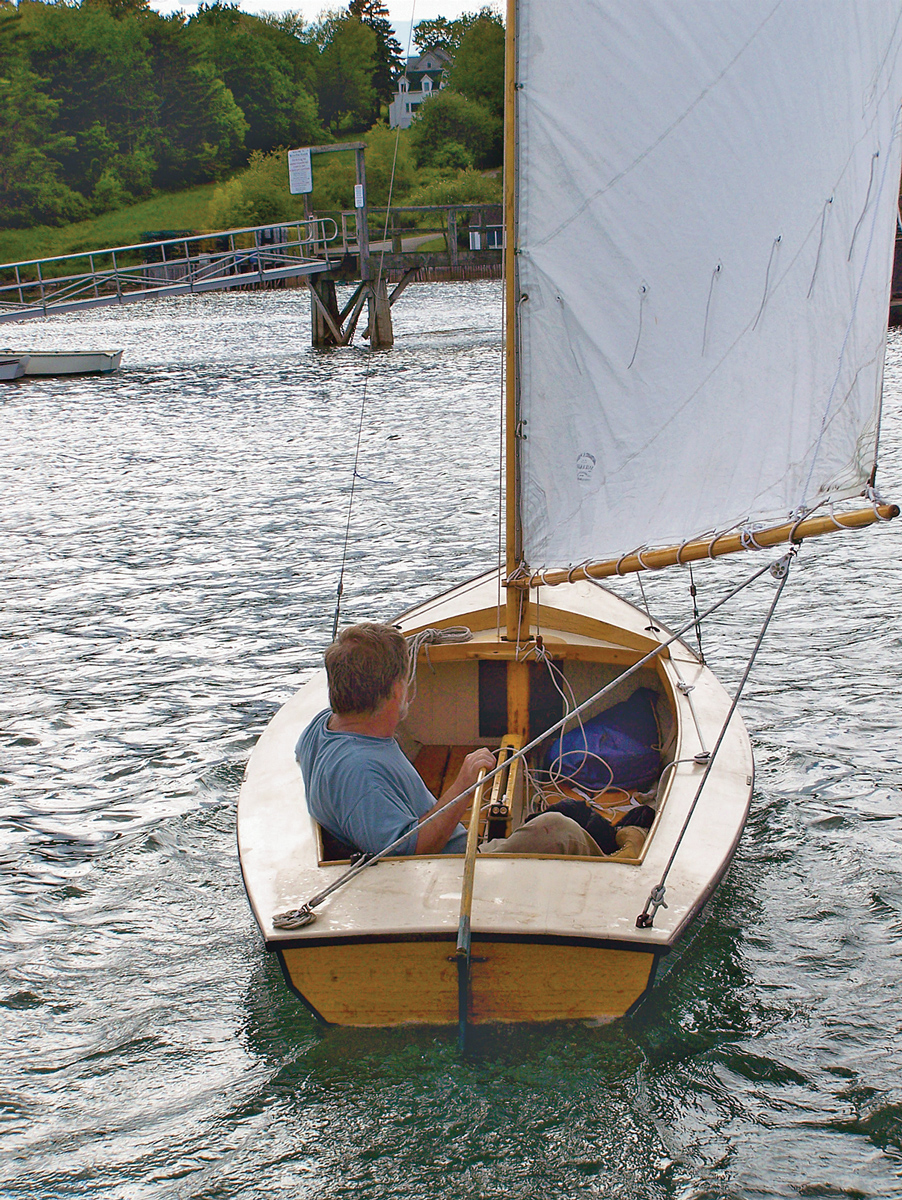
When we finished our Sand Dollar, we cartopped it to our cabin. For our family, the easy-to-use things are the ones that get used often and the Sand Dollar is definitely in the easy-to-use category for a sailboat. It takes two or three of us to carry it to the water. The sail, rolled up around the boom and yard, follow along with the mast, oars, daggerboard, rudder, and tiller. The sail is unrolled and the halyard is run through the sheave at the top of the mast. The mast is dropped through the foredeck and into the trunk in the bow seat. The yard is raised until the boom jaw hits the mast collar, and the sail is tensioned; the halyard is cleated off at the base of the mast. The mainsheet is threaded through the blocks and the rudder with its tiller is installed on the transom.
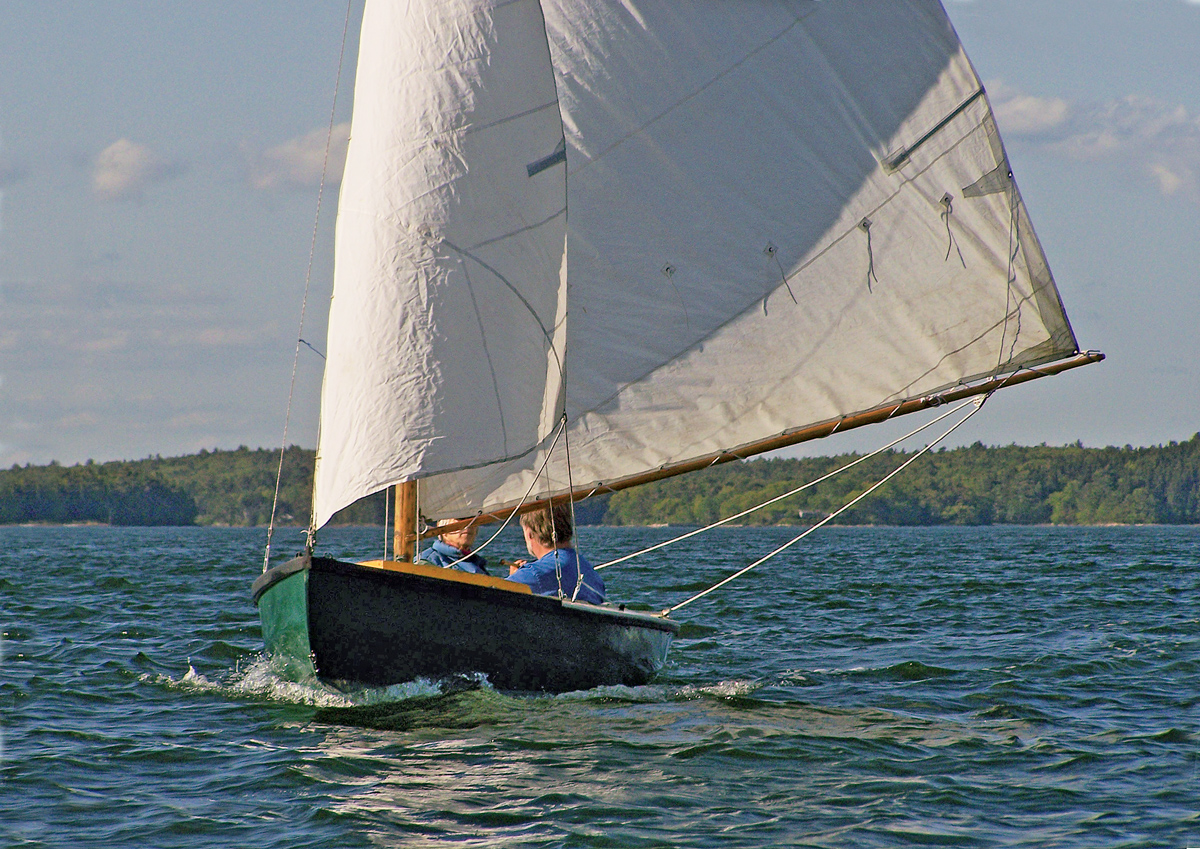
I do not have a lot of experience sailing other boats, but the Sand Dollar is quite responsive. When the wind gusts just a little, the boat heels immediately and feedback is quickly felt via the tiller and the mainsheet. In strong or gusty winds, it is easy to make quick adjustments to either the mainsheet or tiller. I have never checked its speed with a GPS, but for the way we sail it, it is certainly fast enough. I like to sail just fast enough to hear the water gurgle along the hull and feel a surge of power every now and then. At 11′, the Sand Dollar is a small boat. When I sail solo, I sit on the windward side of the center thwart facing aft with one hand holding the mainsheet and the other on the tiller. This works well. When I sail with one of the children, they sit in the stern and man the tiller. They have to be nimble to move around the tiller while coming about.
Three rigs are detailed in the plans: a sprit or a lug rig, both carrying 49 sq ft of sail, and a gunter rig with 55 sq ft.
When I took our teenage daughter for her first sail in the Sand Dollar—her first sail ever—we happened to execute a successful capsize test. We did our usual upwind leg and turned for the downwind run back to the dock. The sailing was going just fine until we suddenly had an accidental jibe. The boat ended up on its side with us swimming. The boat didn’t fully capsize so it was not difficult to right by pulling on the high gunwale while pushing down on the daggerboard. Once upright, it was full of water up to the top of the daggerboard trunk. The two flotation tanks provided enough support for us to get ahead of any water coming in the daggerboard slot. It did not take much bailing before the slot remained above the water level and we were able to scoop most of the water out. The episode was a little shocking at the time, but it was a good learning experience. We learned not only about accidental jibes but also how the Sand Dollar can recover from capsizes. If I were to build the boat again, I would opt for the centerboard rather than the daggerboard. We occasionally forget to insert the daggerboard after leaving the beach or to retract it when coming into the beach. Not having it inserted is not so bad and we do enjoy the surge of speed once we do deploy it. Forgetting to retract it coming into a rocky shore is an entirely different experience.
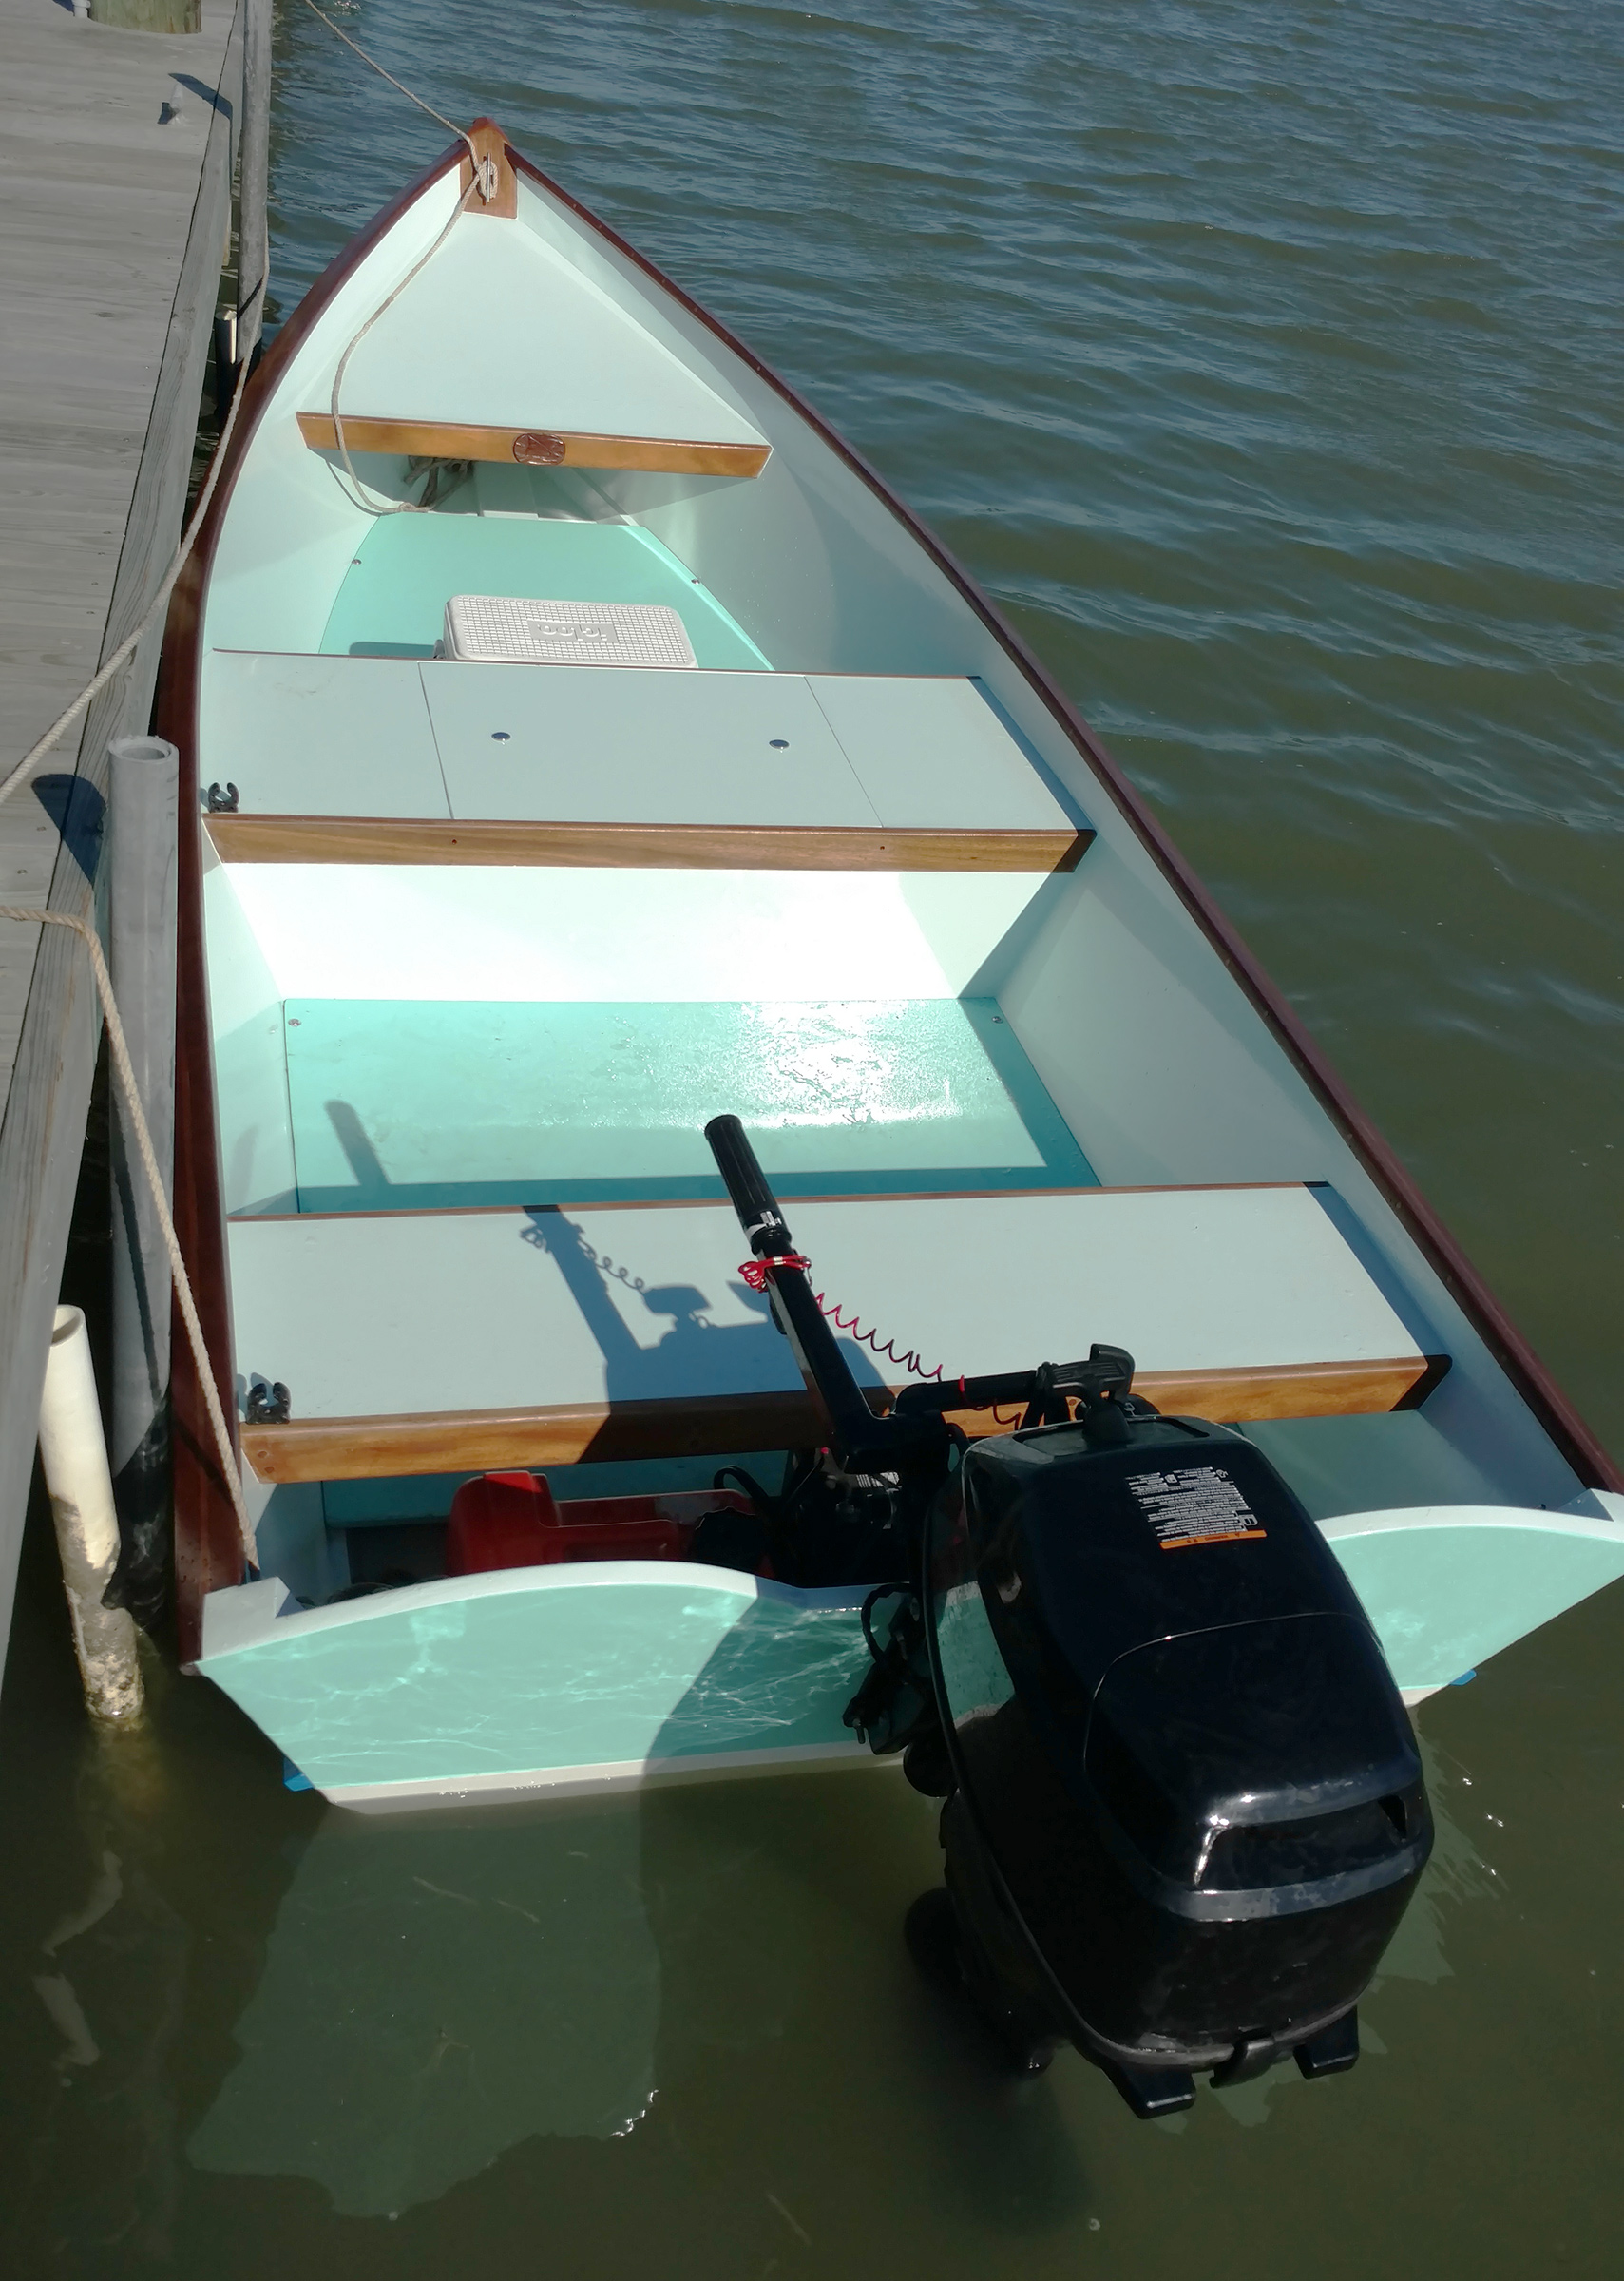
The Sand Dollar is designed with two rowing stations: one in the center for solo rowing and another in the bow for bringing a passenger along.
With a single rower, the boat is well balanced, tracks well, and the transom does not drag. The trim of the Sand Dollar, as with other small boats, is sensitive to weight placement whether rowing or sailing. The Arch Davis Designs description of the boat notes “you can put a small outboard on the transom if you wish,” but we have not, so far.
There are many features that make the Sand Dollar attractive to a builder or sailor. It is a well-designed, good-looking, safe, versatile, small skiff with well-thought-out and comprehensive building plans. It is easy to store and transport, and its simple rig is not intimidating to the beginning or young sailor. For our family, it provides a great way to spend a relaxing day on the water.
Sam Smith is an engineer, farmer, and builder living in the Great Lakes area. Boats and boat plans are his endless source of observation, study, dreaming, and building, and he and his family enjoy using the boats he has built to explore the great outdoors together.
Full-size plans for the Sand Dollar are available from Arch Davis Designs for $135. Arch Davis Designs also offers study plans for $12 and instructional DVDs which sell for $35. [The prices first presented here weren’t accurate. They have been corrected. —Ed.]
Is there a boat you’d like to know more about? Have you built one that you think other Small Boats Magazine readers would enjoy? Please email us!
The Port Aransas Skiff, or Port A Skiff as it is known, has been serving its namesake seaside community for well over a century—before either the town or the boat even had that name. Although the pass between San José and Mustang islands connecting the Gulf of Mexico with Corpus Christi Bay was named Aransas Pass by the 1830s, the town at the entrance of that pass wasn’t called Port Aransas until about 1910.
Skiffs built along the Texas coast in the early days differed depending on the conditions at each port or bay and the uses the skiffs were put to, so the various skiff designs were often referred to by the names of those locations. Some boats, however, took on names of unique design aspects, such as Port Mansfield’s long and narrow “Banana Boats” with their pronounced forward rise, or the names of those who built them, such as the “Bubba Skiff” version of the Port A Skiff.
The Port A Skiff was originally made of solid planks and sailed or rowed into the flats and shallows on the bay sides of San José and Mustang islands for duck hunting, crabbing, or using gillnets or trotlines. As workboats to bring heavy loads of fish home to both table and market, they were built stout enough to take a beating. The boats had rocker both forward and aft then, though with transom sterns, and their oars were about twice as long as the boat’s beam. Tholepins were often used instead of less economical oarlocks.
Starting in the 1880s, when the tarpon sportfishing industry took off in the area, the boats were also used to row clients out along and beyond the original Aransas Pass jetty to the islands’ gulf sides. Although tarpon are not particularly palatable, they fight hard, leap from the water with brilliant sunlit flashes of silver-dollar-sized and -colored scales, and can reach masses rivaling those of the people catching them. They can be so large, in fact, that landed ones sometimes drape across both gunwales of the boats, head hanging toward the water on one side and tail on the other.
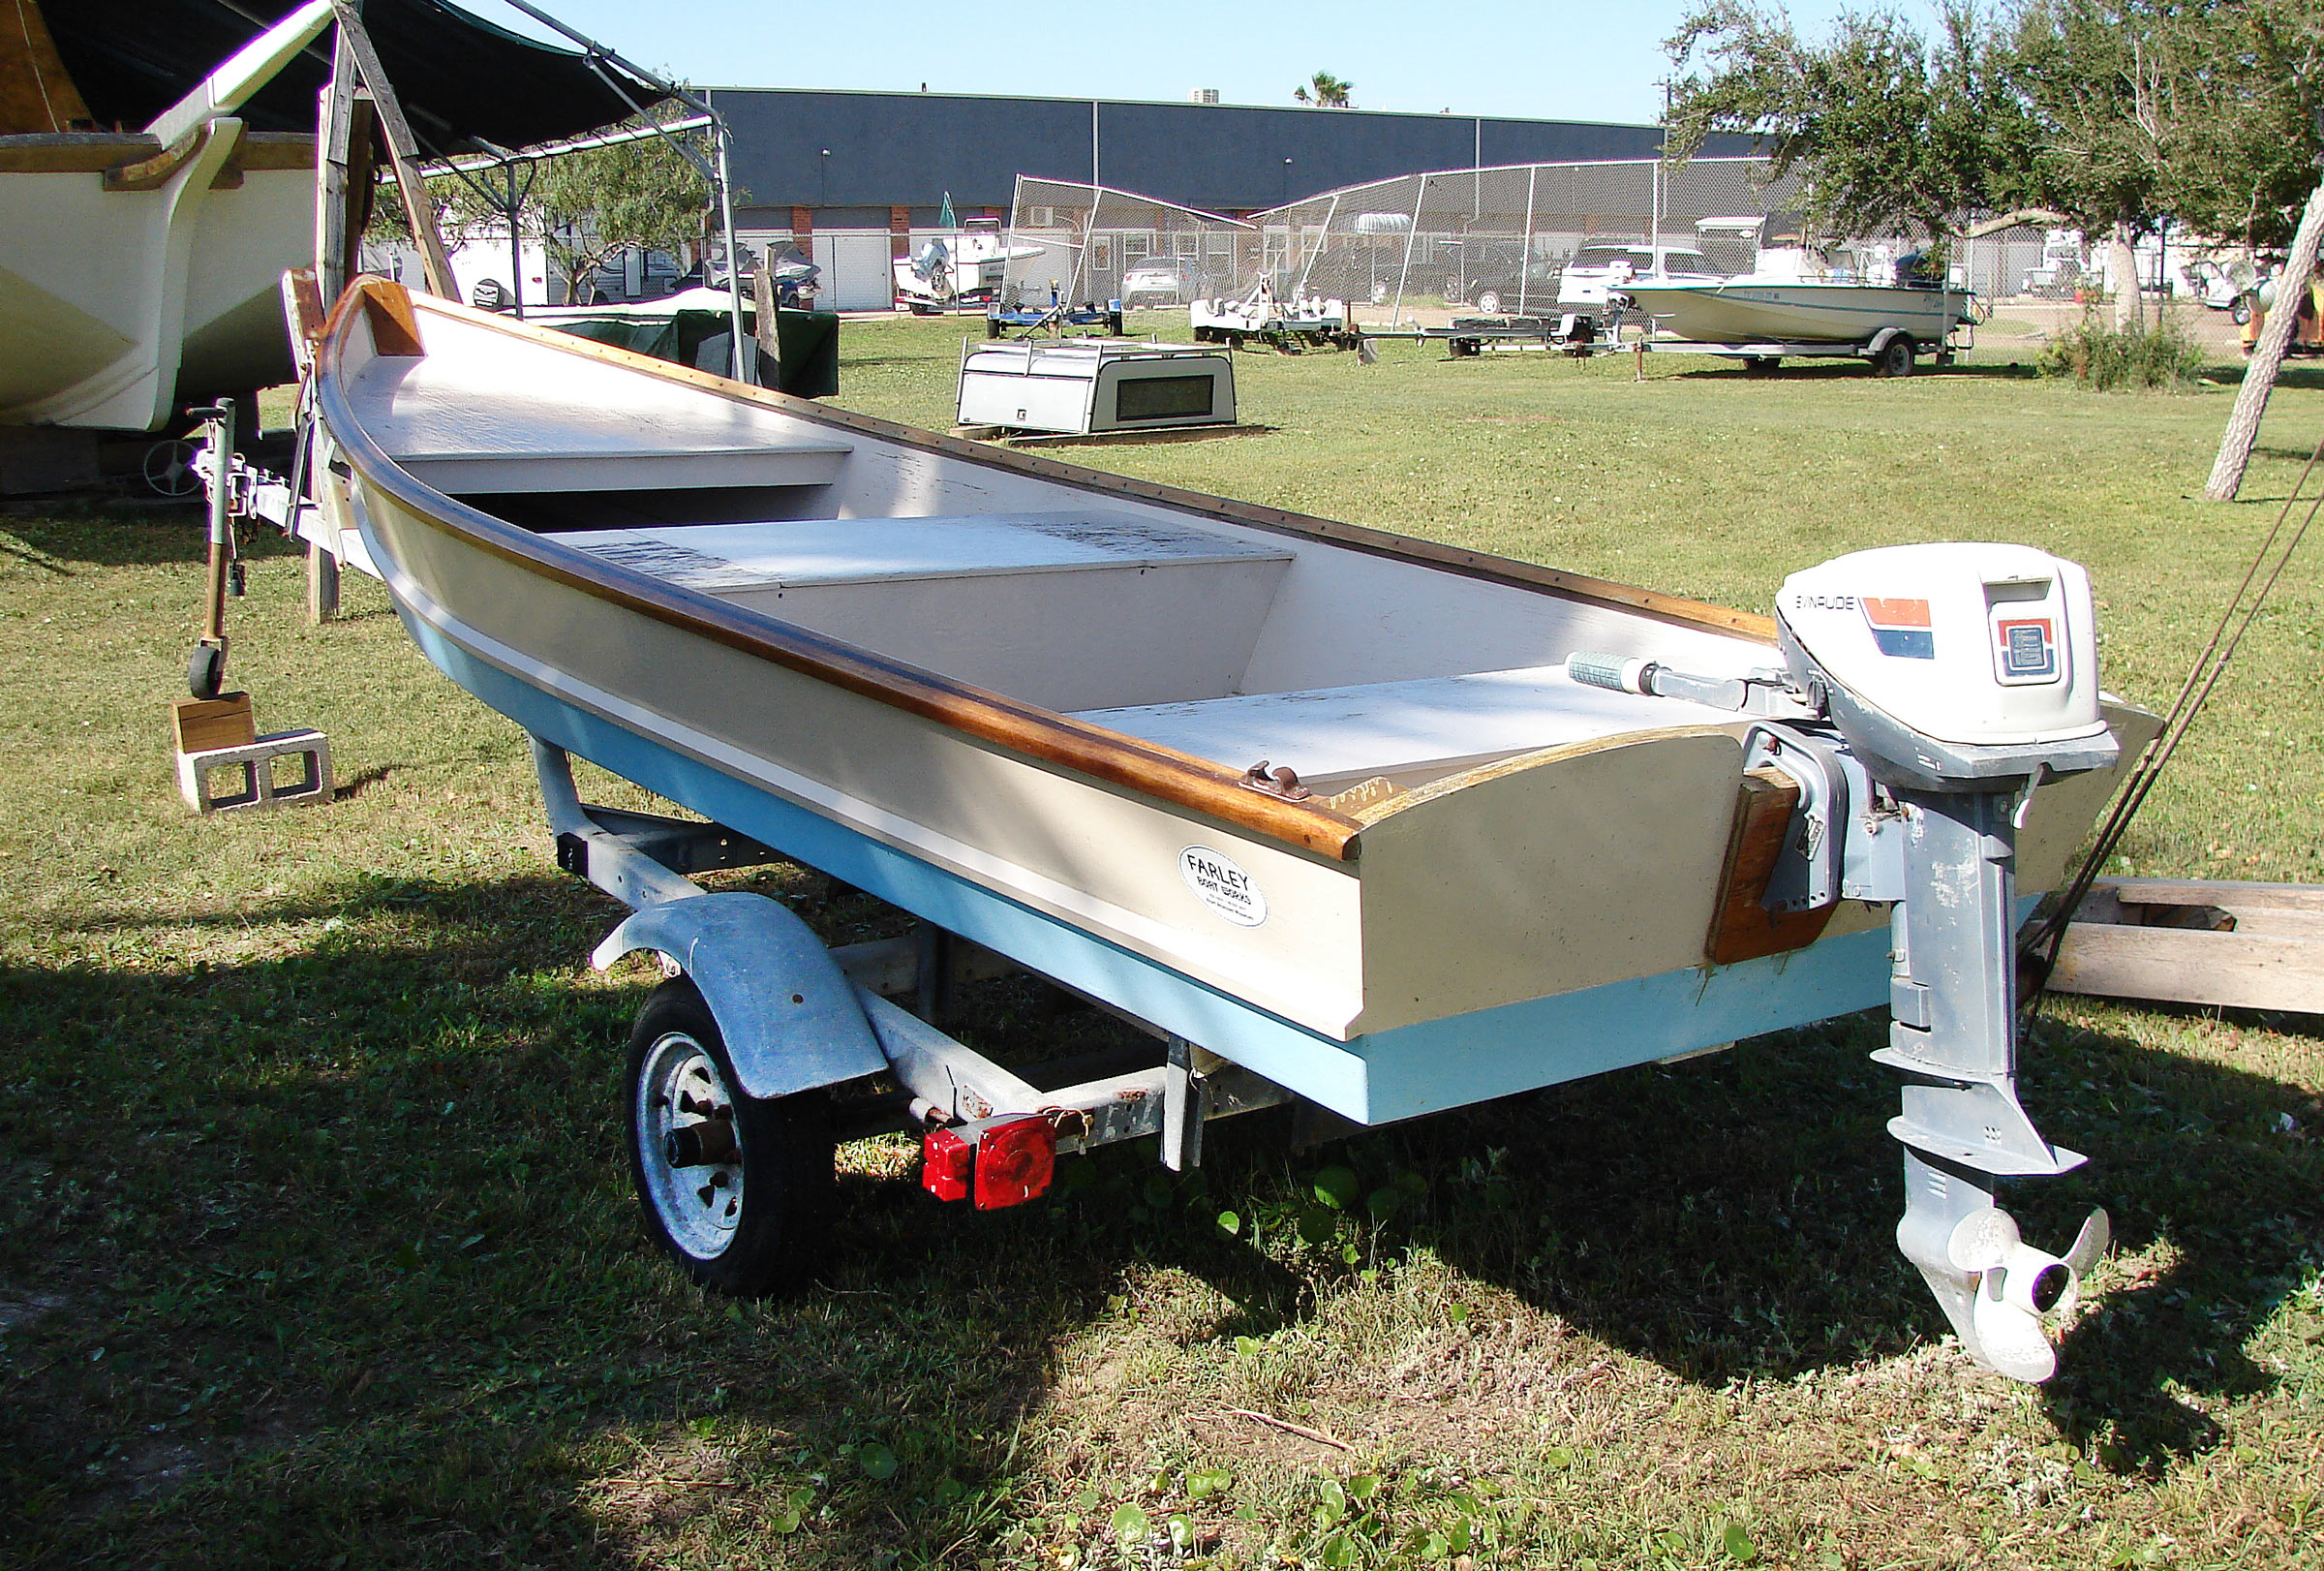
The Port A Skiff’s life as a tarpon boat ended by the 1920s, after Farley Boat Works opened in Port A and began building open-cockpit 16- to 28-footers with inboard engines specifically designed to take clients out for tarpon. The Port A Skiff continued to be used in the flats and bays, however, where the powerful inboard boats could not go, and indeed, once the tarpon population precipitously declined in the 1960s, the skiffs survived while the inboard tarpon boats did not.
The Port A Skiff was arguably the perfect boat for a coastal fishing town, easily built of common materials, handy under oar and sail, capable in local conditions, and simple and easy to maintain. They were designed and built locally, often on the beach or in a backyard, and have evolved alongside the inception of plywood and affordable outboards and the passage of legislation outlawing gillnets and otherwise limiting commercial fishing in the bays. Most notably, the skiff’s transom widened and its aft rocker flattened to support the weight of outboards and get on plane. The modern Port A Skiff is primarily a recreational boat used for duck hunting and for fishing for red drum, speckled seatrout, and flounder.
Many builders have contributed to the Port A Skiff’s evolution, not only with adaptations for incorporating plywood, fiberglass, and outboards, but also with personal touches. The first modern Port A Skiff was likely built around 1960 by John “Bubba” Milina Jr., a local fishing guide who built boats from the 1940s until shortly after the turn of the 21st century. In his younger years he sometimes visited Farley Boat Works to watch them build boats. The most famous version of the Port A Skiff, however, is likely the School Skiff, built from the late 1970s until about 1990 by the local high school shop class under the guidance of “Coach” Doyle Marek, who based his boats on Bubba Milina’s. Many of Coach Marek’s students, now adults, still have their skiffs.
In an interesting turn of events, after closing in 1973, Farley Boat Works reopened in 2011 as a nonprofit with the goals of preserving the historic shop and its surviving boats and teaching traditional local boatbuilding, and it is now where the Port A Skiff is almost exclusively built, at its Rick Pratt School of Wooden Boat Building. One of the shop’s first orders of business upon reopening was to invite Coach Marek to teach their volunteers how to build the Port A Skiff and ensure that the knowledge and skills necessary could be passed to yet another generation of boatbuilders.
Individual builders differed in opinion on subtle details, such as the exact shape of the stern or whether the splash rail should parallel the sheer or the chine. Someone with an educated eye can identify a Bubba Skiff, a School Skiff, or other variations of the Port A Skiff from such details.
The boat is not made from a set of plans or on a strongback—unless you consider the floor at Farley Boat Works a strongback—but from a few flexible measurements and experience and by eye, tweaked to suit the individual boat’s intended purpose. All the boats, however, stem from a single free-built system using two 16ʹ lengths of scarfed plywood, with one split into two 2ʹ-wide lengths for the boat’s sides and the second left 4ʹ wide for the skiff’s bottom. Mahogany is usually used for the stem, chine rails, gunwales and inwales, spray rails, and other framing; treated pine for the keel and keelson; and additional plywood for the transom, bow deck, center dry box, and rear seat.
Harry Martinez
The floorboards are made of 1/2″ plywood and are supported by the chine logs only, which allows the bottom of the boat to flex. A few screws and finish washers hold the floorboards in place and can be removed to get access to the bottom.
The side panel ends are cut at predetermined angles. The sheer is cut along a curve and the bottom remains straight. The sides are glued and screwed to the stem and then to the transom. The rake of the stem and transom rarely vary from boat to boat, and the straight rabbeted stems are crafted to create ample beam and buoyancy forward and still allow the boats to be built within the dry-bending limits of plywood.
A temporary stretcher frame pushes the tops of the sides out, giving the bottom its rocker and the sides their flare. Move the frame forward, and you get more rocker there and a flatter stern. The bottom edges of those sides should sit flat on that workshop floor from the transom to about half to two-thirds of the boat’s length going forward. The sides’ flare should create a beam of no more than 5ʹ 5ʺ, and the forward rocker should leave a 6ʺ to 9ʺ gap between the workshop floor and the forefoot.
Some builders choose to shorten the boat’s length to 14ʹ or stretch it to 18ʹ or widen the bottom from 4′ to 5ʹ, by adding a 6″-wide strip of plywood on either side. The bottom should not be widened more than that because it’s designed as a “floating bottom” that flexes when underway.
Another dimension some builders decide to veer from is the 20ʺ to 24ʺ height of the sides. This height, combined with the flare and splash rails, provides a bone-dry ride in most conditions. Lower sides, however, are an advantage for flounder fishing, which involves repeatedly stepping out of and back into the boat at night to wade with a multipronged spear and spotlight while trailing the boat by its painter. Poling and fly-fishing can also benefit by adjusting the sheer height to balance windage and prevent weathercocking while sneaking up on red drum.
In the earlier days of planing Port A Skiffs, a hook was added on the bottom at the stern to help keep the bow down when motoring. This could be achieved after fiberglassing the bottom, with a few additional layers of ’glass aft, each layer starting at the transom then ending several inches less than the previous one to build up the subtle hook. Or it could be achieved after the hull is turned bottom side up but before the bottom itself is added, by cutting a bit of a curve into the chine edges of the sides aft. Modern skiffs may leave the bottom flat aft and control the boat’s trim with trim tabs and the outboard’s trim function, which have the advantage of being able to impart the effect of a hook only when needed.
The standard Port A Skiff is a flat-bottomed boat and as such can pound in a chop, and the shallow waters around Port A ensure that pretty much any wave action comes in the form of a chop. Experienced skippers ease their speed and adjust their trim and angle of attack into the waves to make it a less bumpy ride. Although the boat’s splash rails, outer gunwale, and flaring sides keep the cockpit dry in most conditions, trying to nose the bow down too far in a chop can turn it into a wet ride, particularly with the lower freeboard of a poling or floundering version of the boat.
Roger Siebert
Hull number 2 is a basic model with seating in the bow and on two thwarts. The center thwart is supported by a pair of bulkheads and the enclosed space is accessed by a flush hatch.
Interior layout is one area of great variability, with some relying on an aft thwart and tiller, while others add console-mounted steering and controls to move the skipper’s weight forward and to absorb the impact of any particularly bad chop with the skipper’s legs instead of with jarred teeth and spines. Some owners also keep their fuel tanks beneath the foredeck to help with balance.
As another tactic to reduce pounding, recent builds of the skiff have added some V to the bottom, first in what can be considered the second generation of the modern Port A Skiff, adding the V only forward, where the bottom’s forward rocker is, but also more recently, in the boat’s third generation, all the way aft—albeit an extremely shallow V aft of the rocker to prevent losing one of the skiff’s greatest assets: its shallow draft.
Roger Siebert
TRIFECTA is a well-appointed contemporary Port Aransas skiff. The center console is equipped with instrumentation and a handhold. The outboard is operated with a tiller in the same manner as older skiffs, but with a much larger outboard.
The standard 16ʹ × 4ʹ Port A Skiff can plane with two people aboard with a 20- to 25-hp propeller-driven outboard. One problem with skinny waters, though, is that propellers and flats tear each other up. It’s troublesome and costly to constantly replace props and torn-up flats disturb an ecosystem that has historically provided boat loads—literally—of the very fish many recreational boaters are in search of.
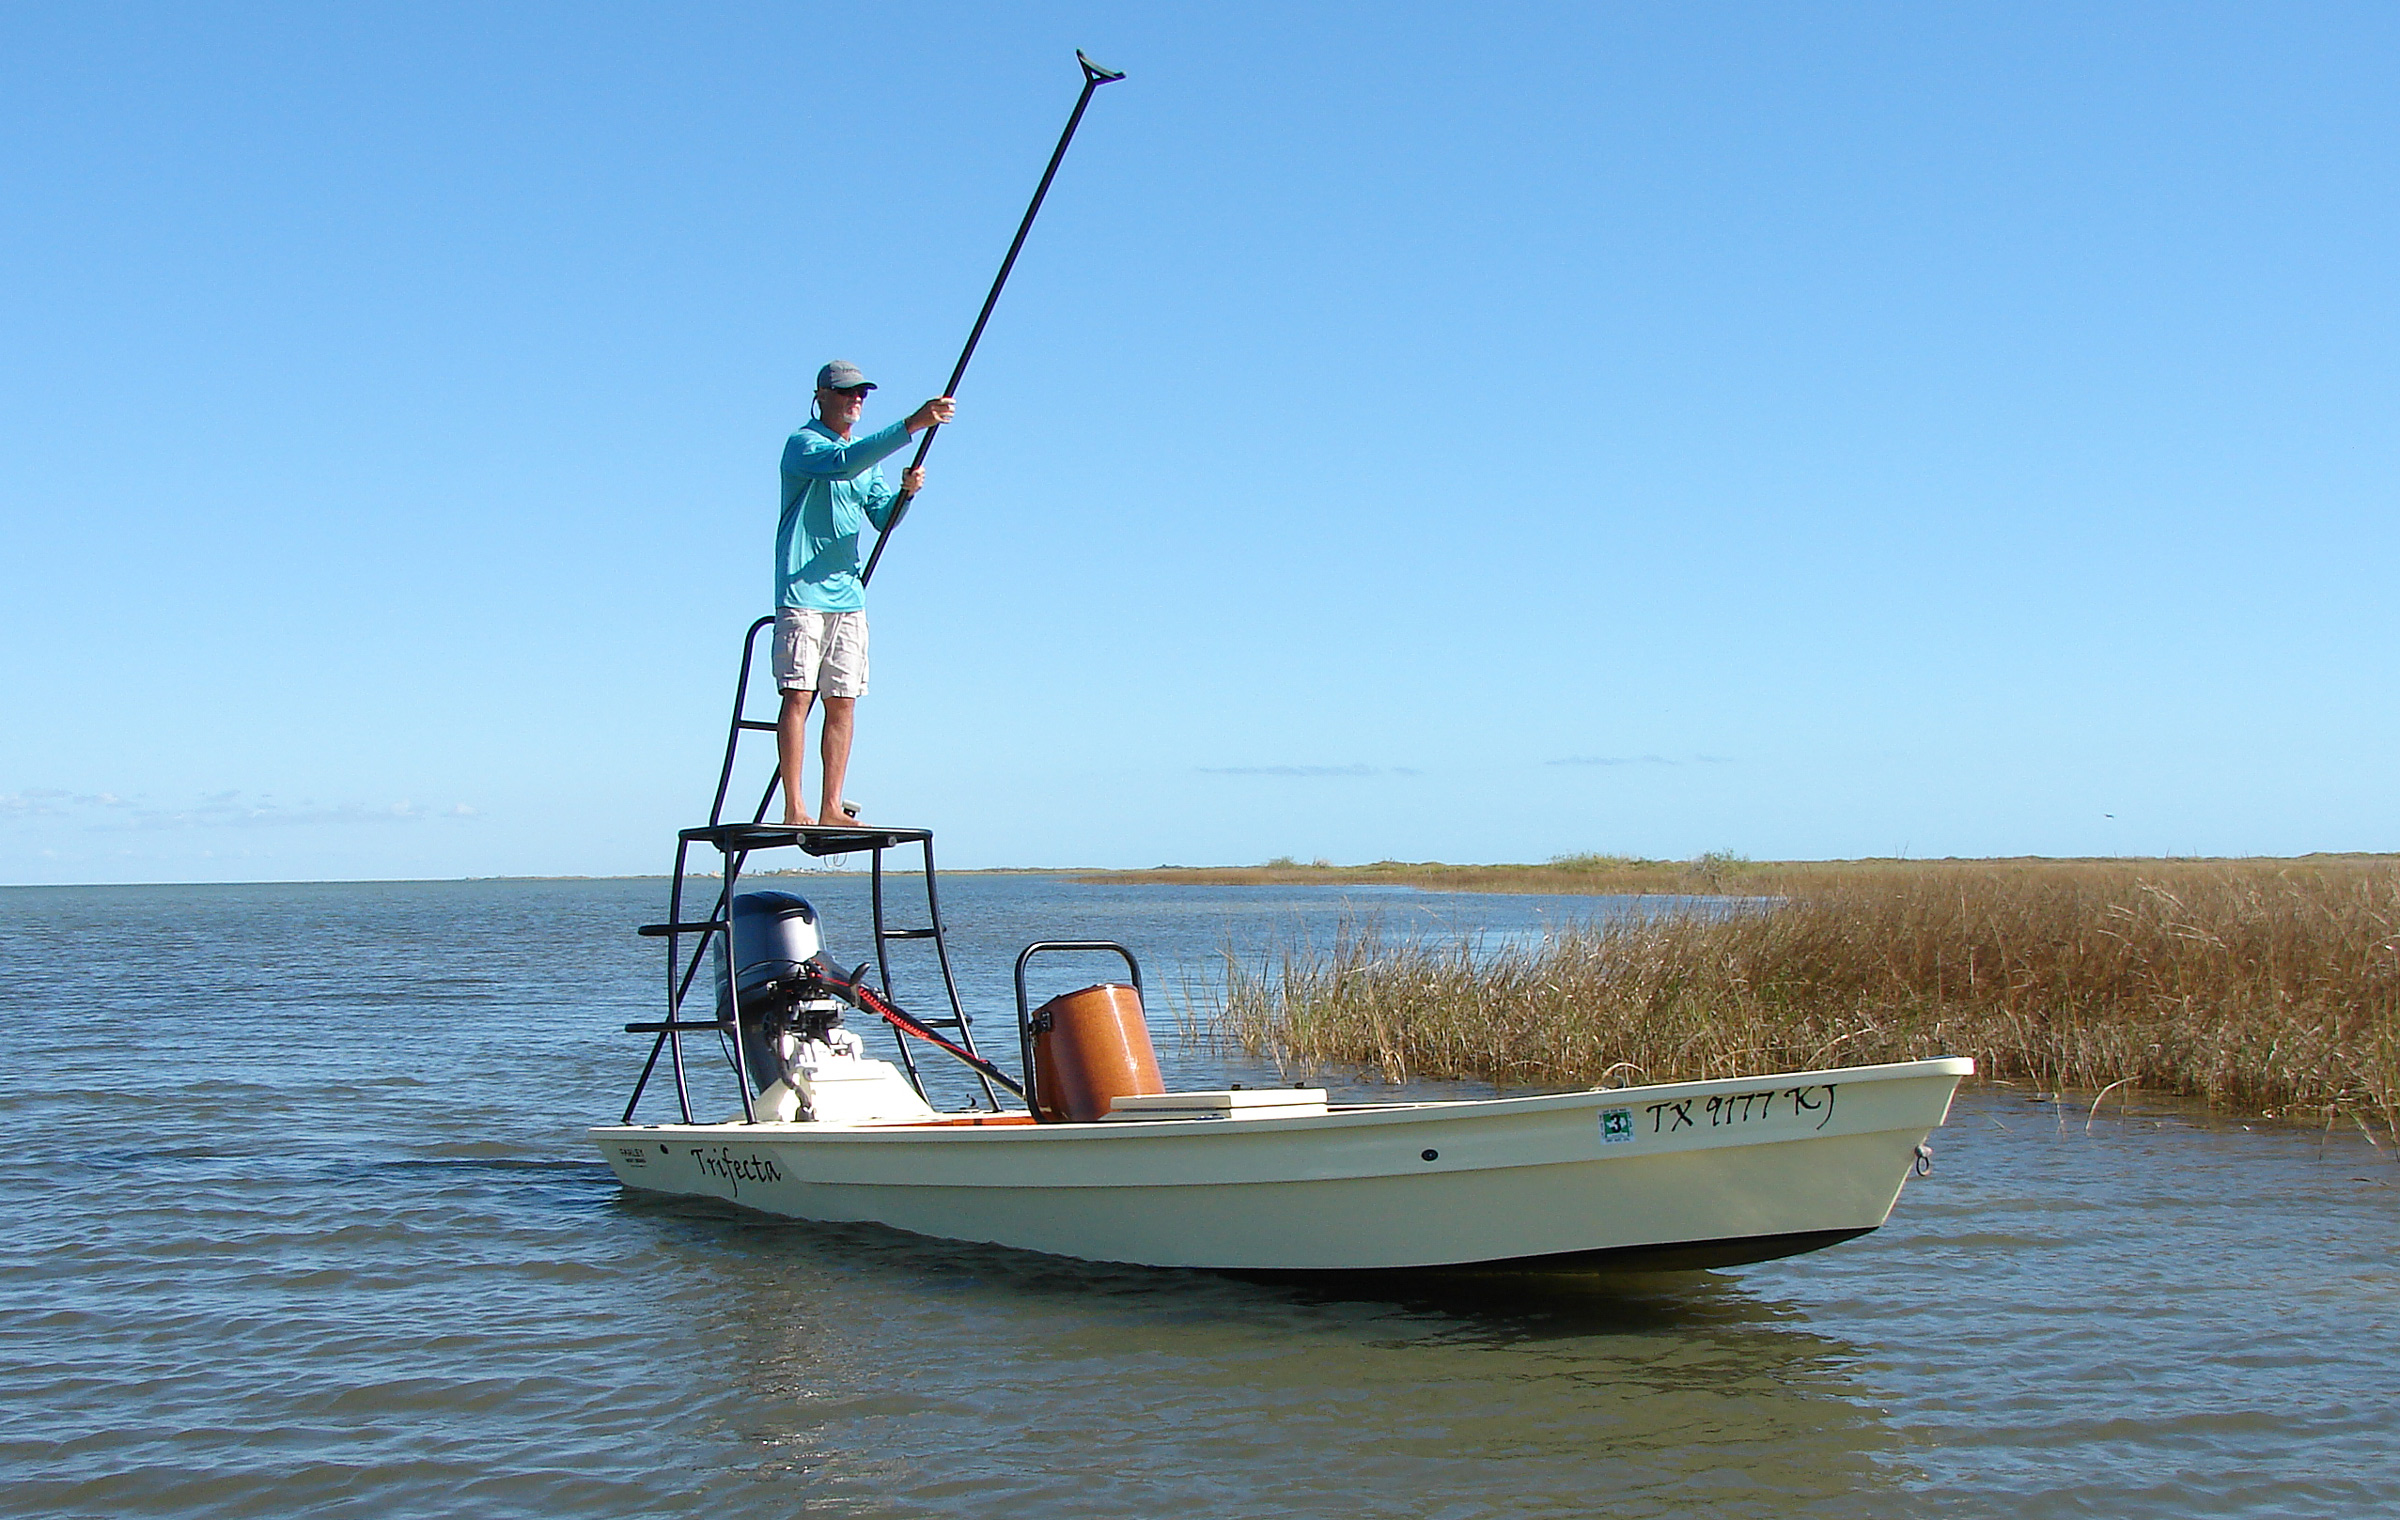
Second- and third-generation Port A Skiffs minimize this problem with a tunnel in the bottom aft, a recess that raises the midpart of the bottom of the transom and allows the outboard to be set higher. Or a boater can go even further and eliminate the prop and skeg entirely by opting for a jet-drive outboard. The aptly named TRIFECTA, the prototype third-generation poling version of the Port A Skiff, incorporates both. Without that skeg or the standard Port A Skiff’s 1ʺ × 6ʺ keel, though, the boat can tend to slide sideways during turns, so reducing speed and extra care while turning is in order.
With the load properly balanced and the outboard shut off and lifted or trimmed to raise the prop and skeg, the Port A Skiff can be poled in as little as 6ʺ of water. With a tunnel or jet drive, a skiff can cruise in close to the same depth and plane across even less. In fact, if the skipper’s not careful, the boat can come off plane in water shallower than it needs to get moving again. If that happens and the boat has that shallow V in the bottom, it can be heeled to float on either of its flat bottom panels and slowly accelerate in a tight circle until the boat lifts itself enough to get moving in a straight line again.
Roger Siebert
The tower in the stern provides a perch for poling and a better view of the fishing grounds. The outboard is equipped with a jet drive that adds little to the draft and isn’t bothered much by hitting bottom.
There is another price to pay for a tunnel or jet propulsion, in the loss of some efficiency, requiring more horsepower to get to the same speeds, but adding transom extensions can provide the necessary additional buoyancy to compensate for the added weight of a more powerful outboard.
Lighter stitch-and-glue plans and CNC kits for the Port A Skiff have been on Farley Boat Works’ wish list for some time, but in 2017 Hurricane Harvey destroyed their initial notes, and then the pandemic delayed restarting those plans. At present, the options for someone not already intimately familiar with the boat to build one is to use the manual from Farley Boat Works for the standard 16ʹ × 4ʹ version or to go to Port A and get started on the boat in their shop. The hull can come together in only a few days, and after ’glassing and painting the bottom, the hull can be trailered home for fitting out and finishing.
Building a Port A Skiff at Farley Boat Works has many advantages. For the cost of materials and about $100 a month, a boatbuilder gets ample space inside the shop for the project and access to the shop’s tools and, if desired, the guidance and assistance of the experienced volunteer staff. And in the process, you support Farley Boat Works and its parent organization, the nonprofit Port Aransas Preservation and Historical Association.
The Port A Skiff is actually many skiffs, its current generation only one of a long, still-evolving line of craft serving just as many purposes and served by just as many builders. It is a time-tested, highly adaptable boat that can take you into the skinniest of water, where you can hook or gig the same fish that the flats and bays have provided Port Aransans for nearly two centuries.
Roger Siebert is an editor in Austin, Texas. He rows and sails on local lakes and trailers to the Texas coast when he can.
Port Aransas Skiff Particulars
Length: 16′ to 18′
Beam: 5′ to 6′
For more information about the construction manual and arrangements to build the Port Aransas Skiff at Farley Boat Works, contact Ashley Harris, the Executive Director for the Port Aransas Preservation and Historical Association with oversight of The Farley Boat Works and The Port Aransas Museum and Maritime Museum. She can be emailed at ashley@farleyboatworks.org
Is there a boat you’d like to know more about? Have you built one that you think other Small Boats Magazine readers would enjoy? Please email us!
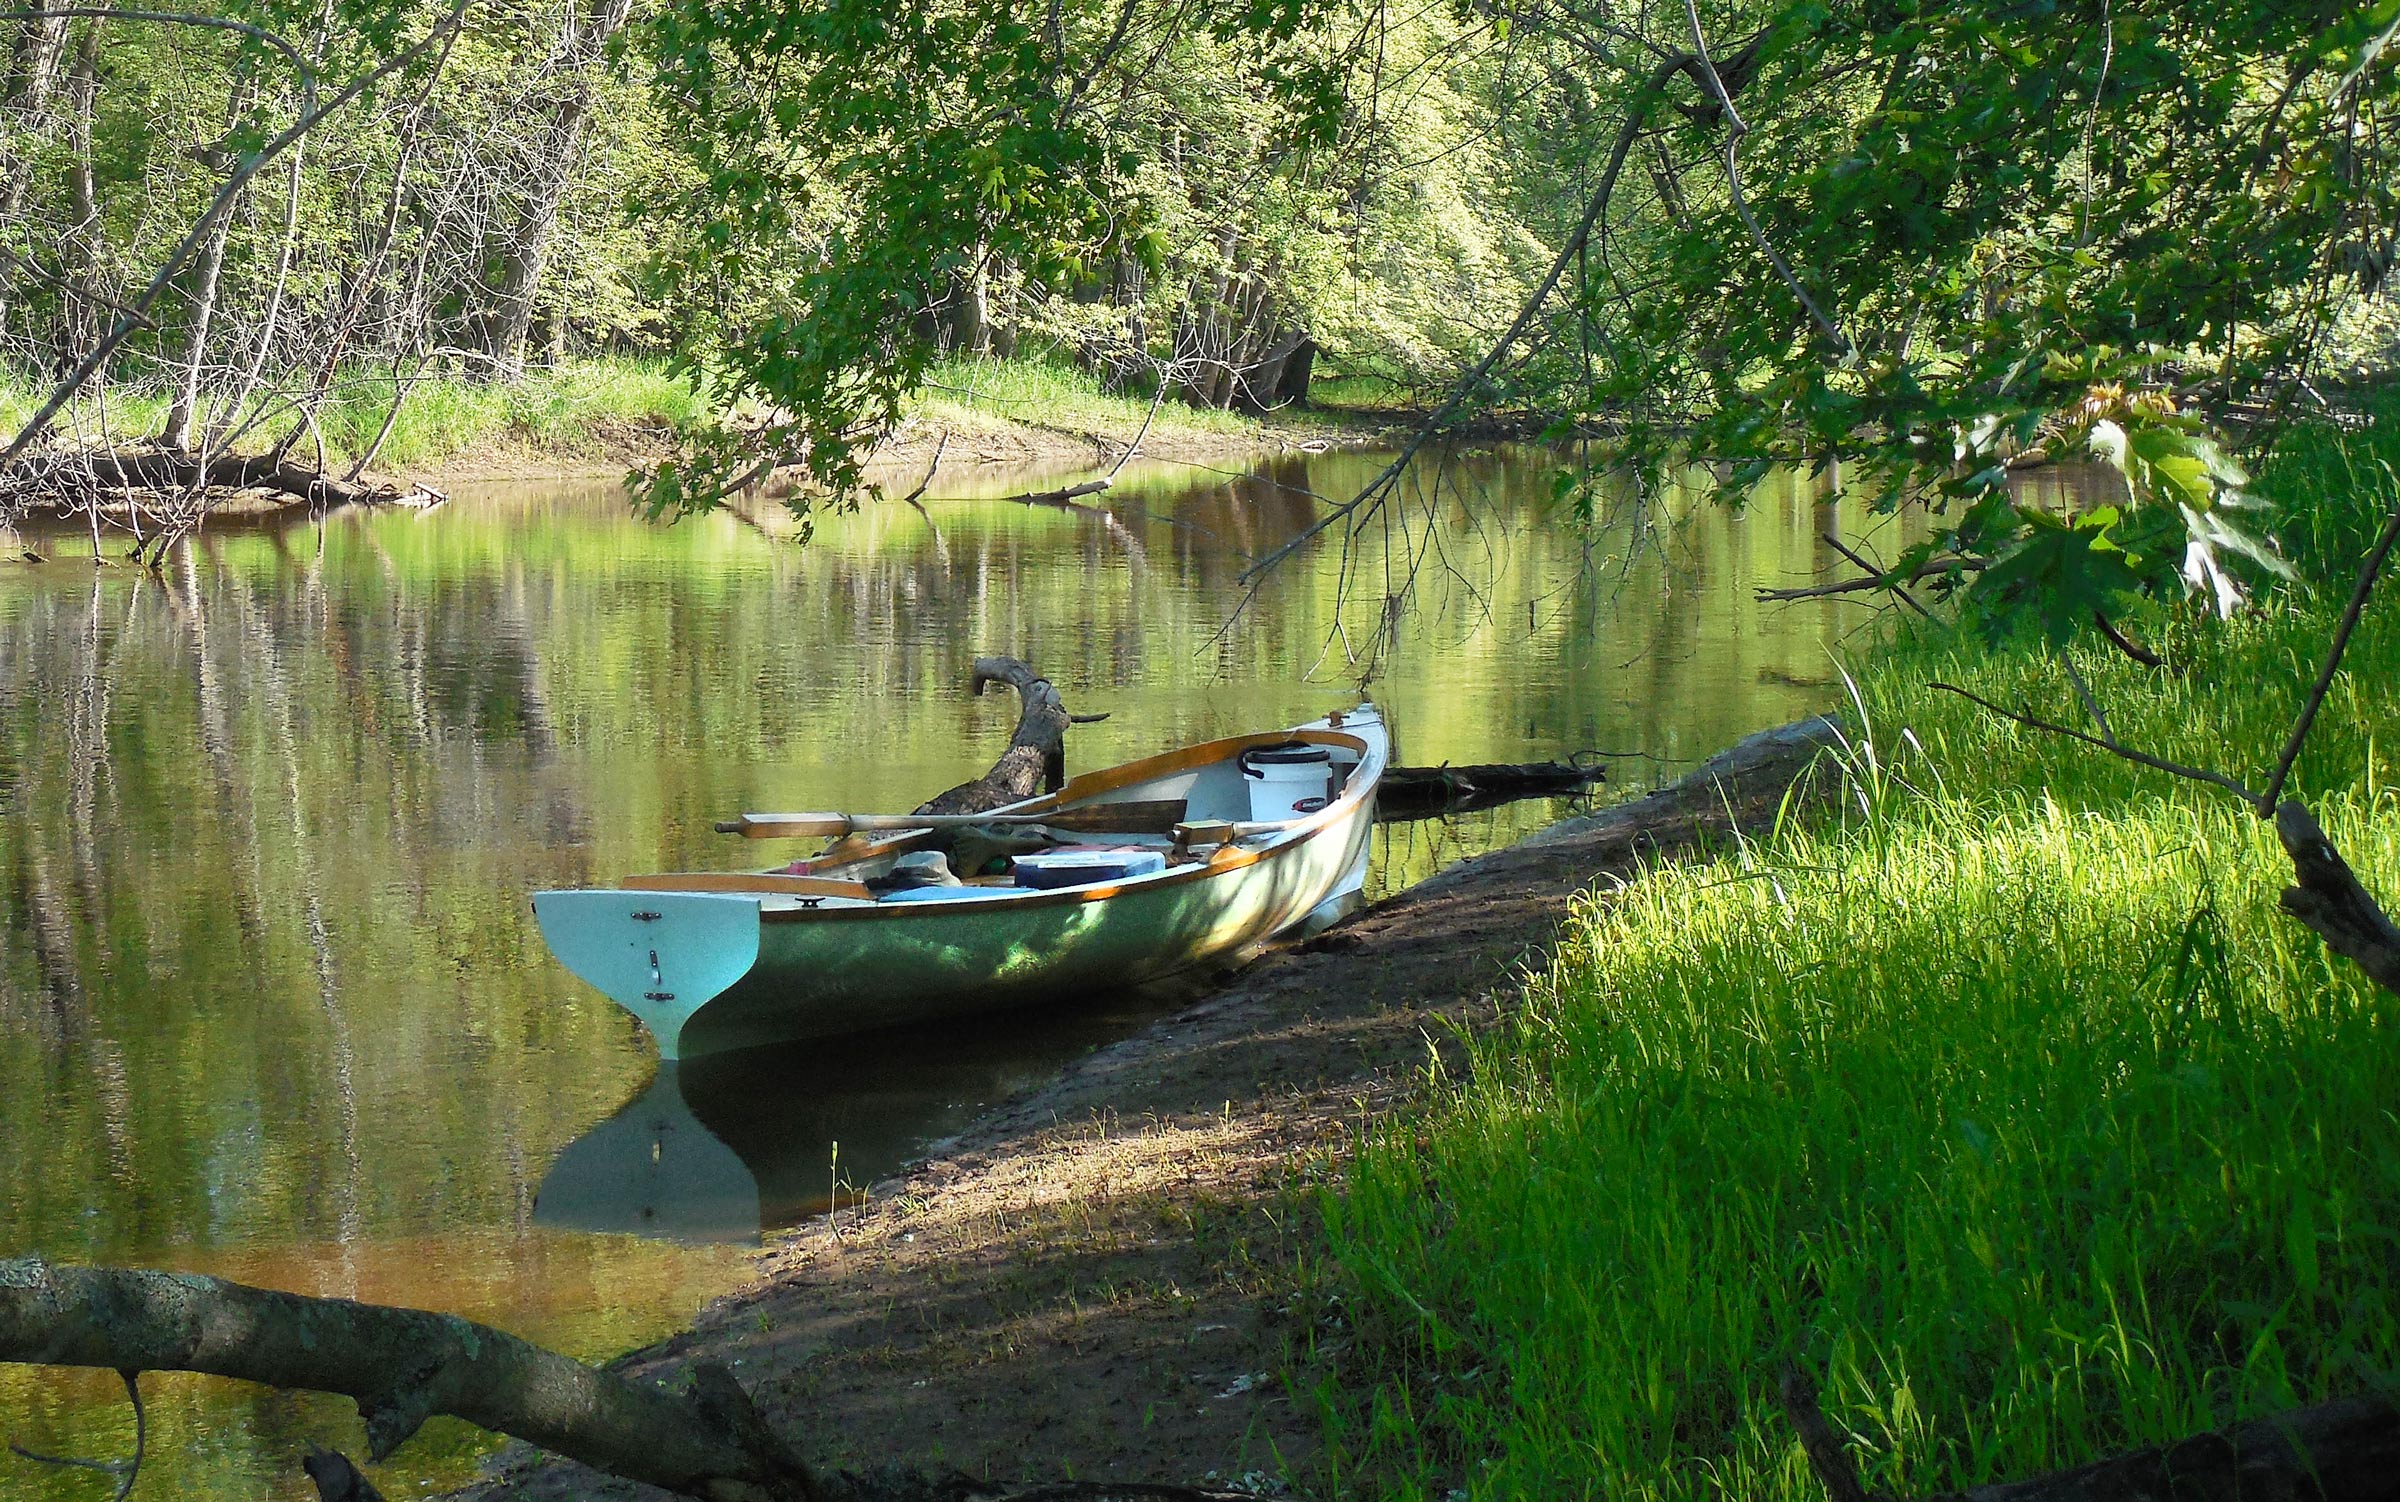
No one was around when I shoved off the dock in my wherry, and I was glad of it: the current from the tannin-stained water of Florida’s Carrabelle River pushed the boat back into the dock before I shipped the second oar. On the second attempt, I narrowly escaped the dock’s ragged, rusty metal corner and luckily got turned into the current with both oars in the water.
Photographs by the author
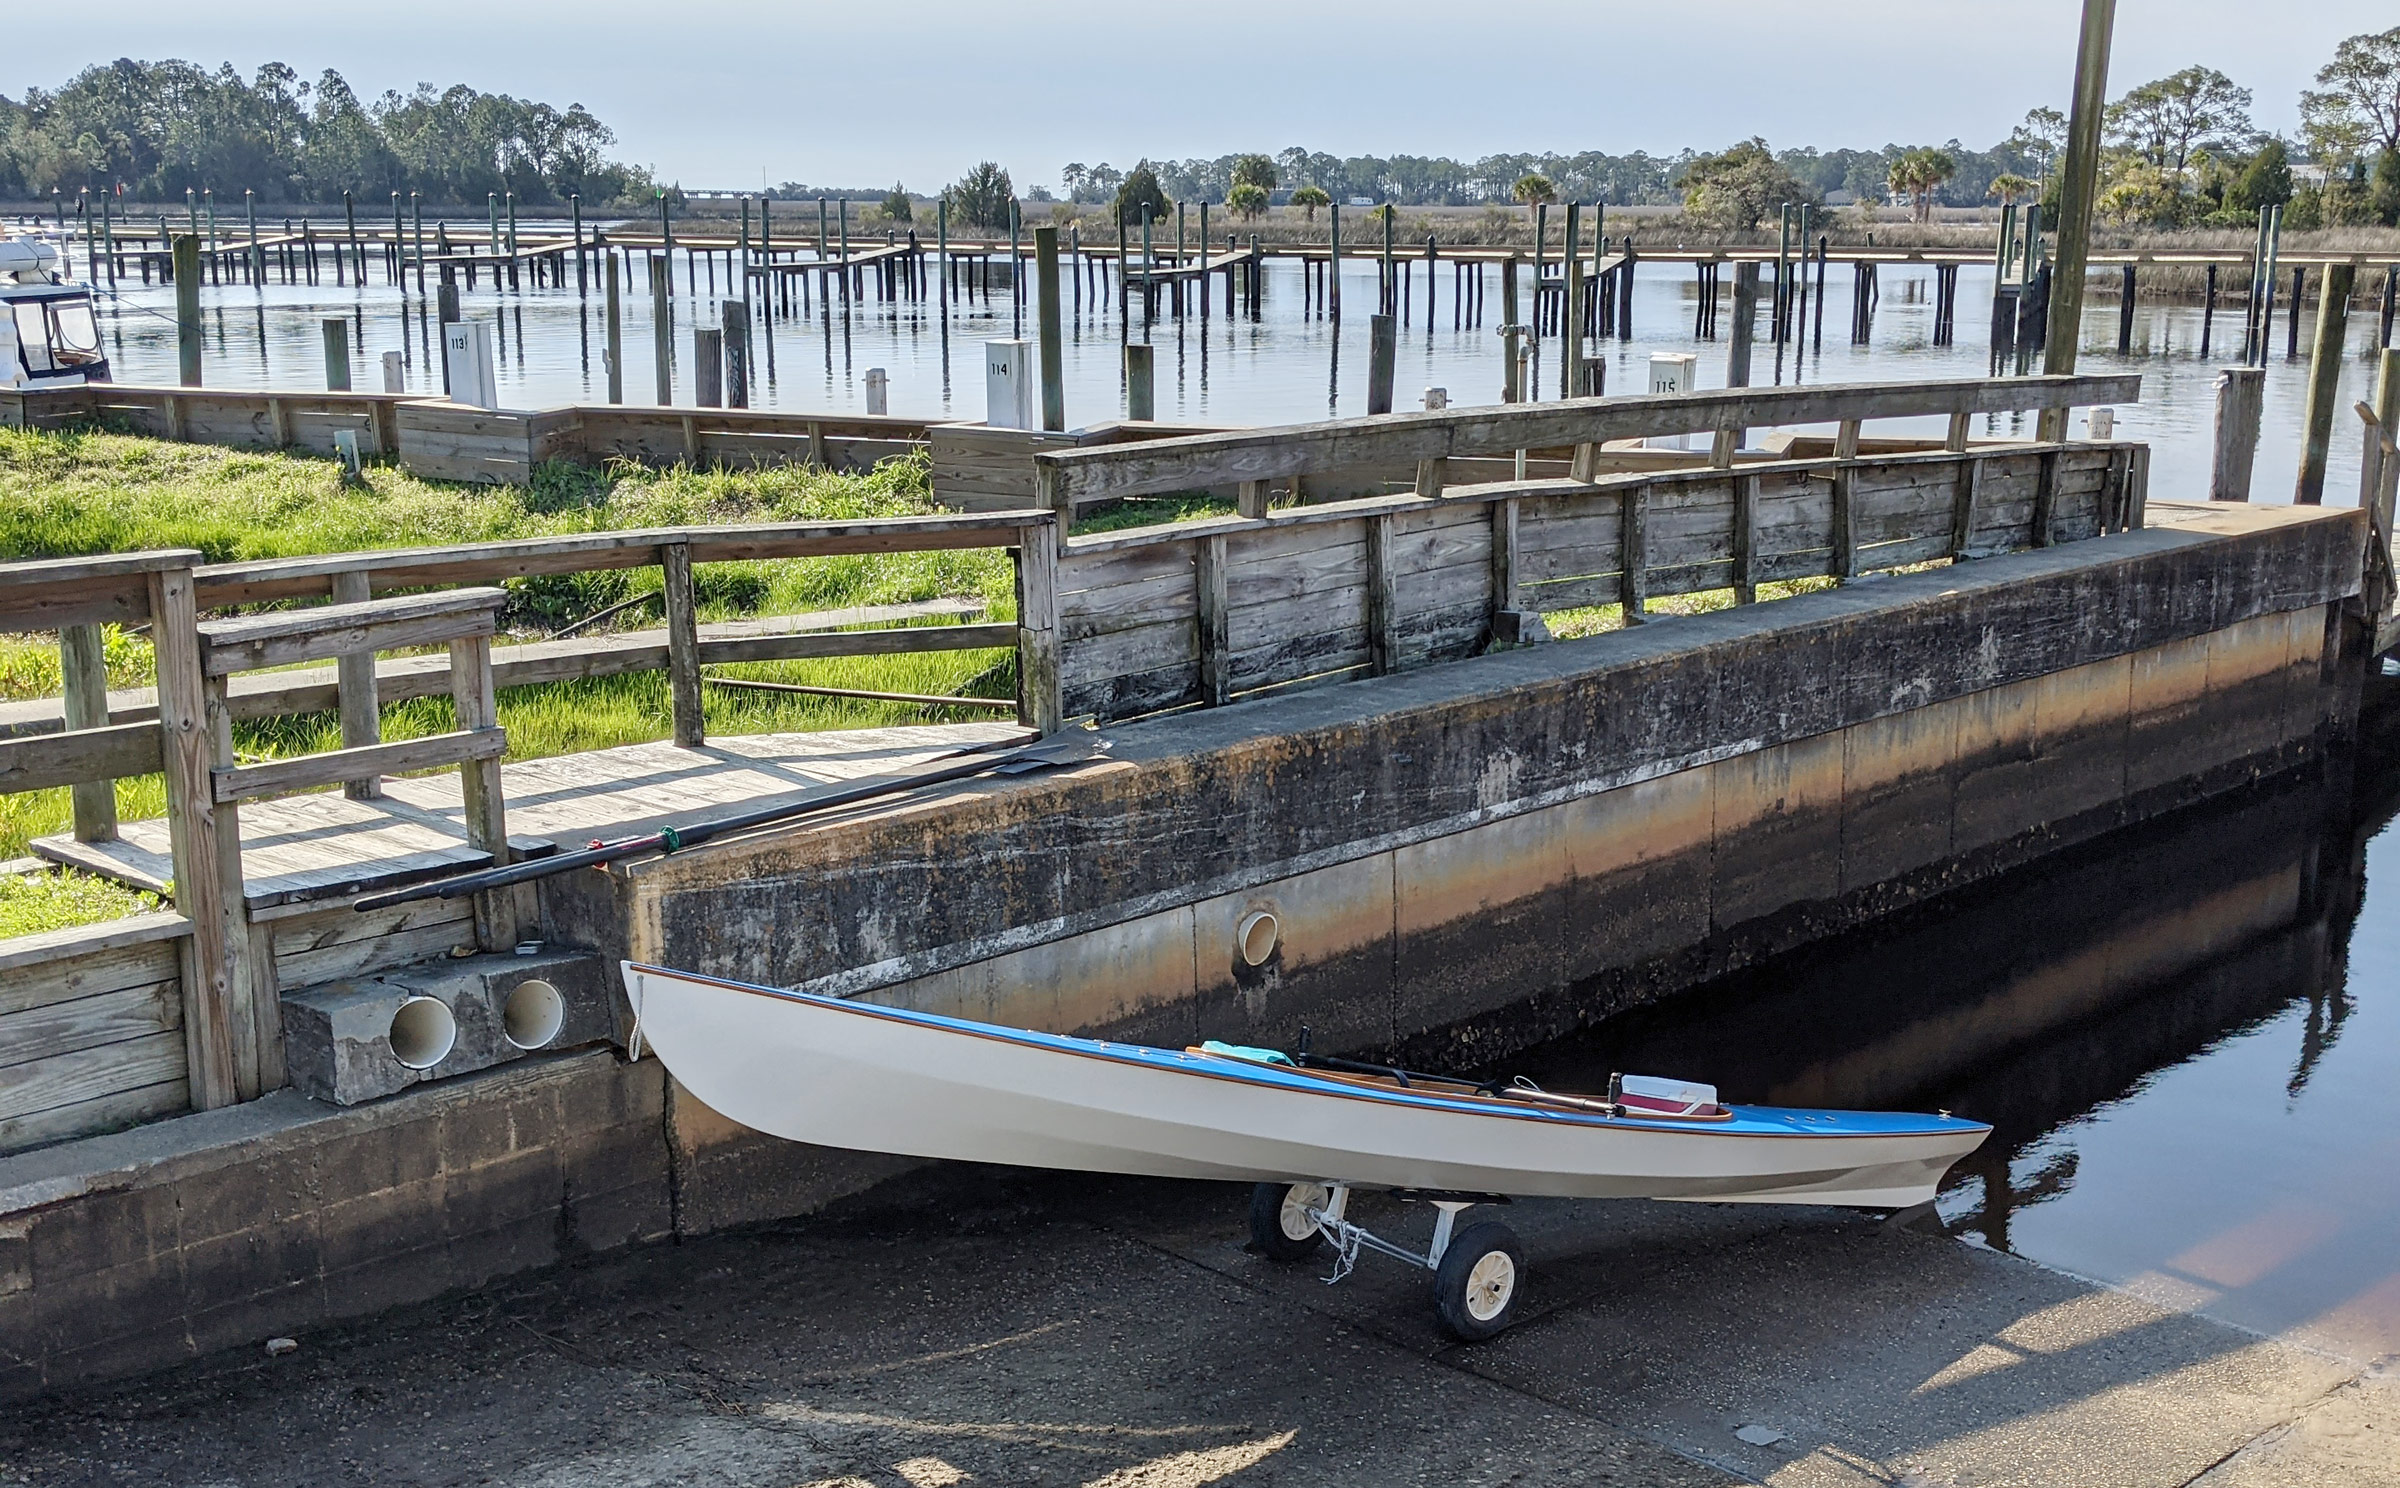
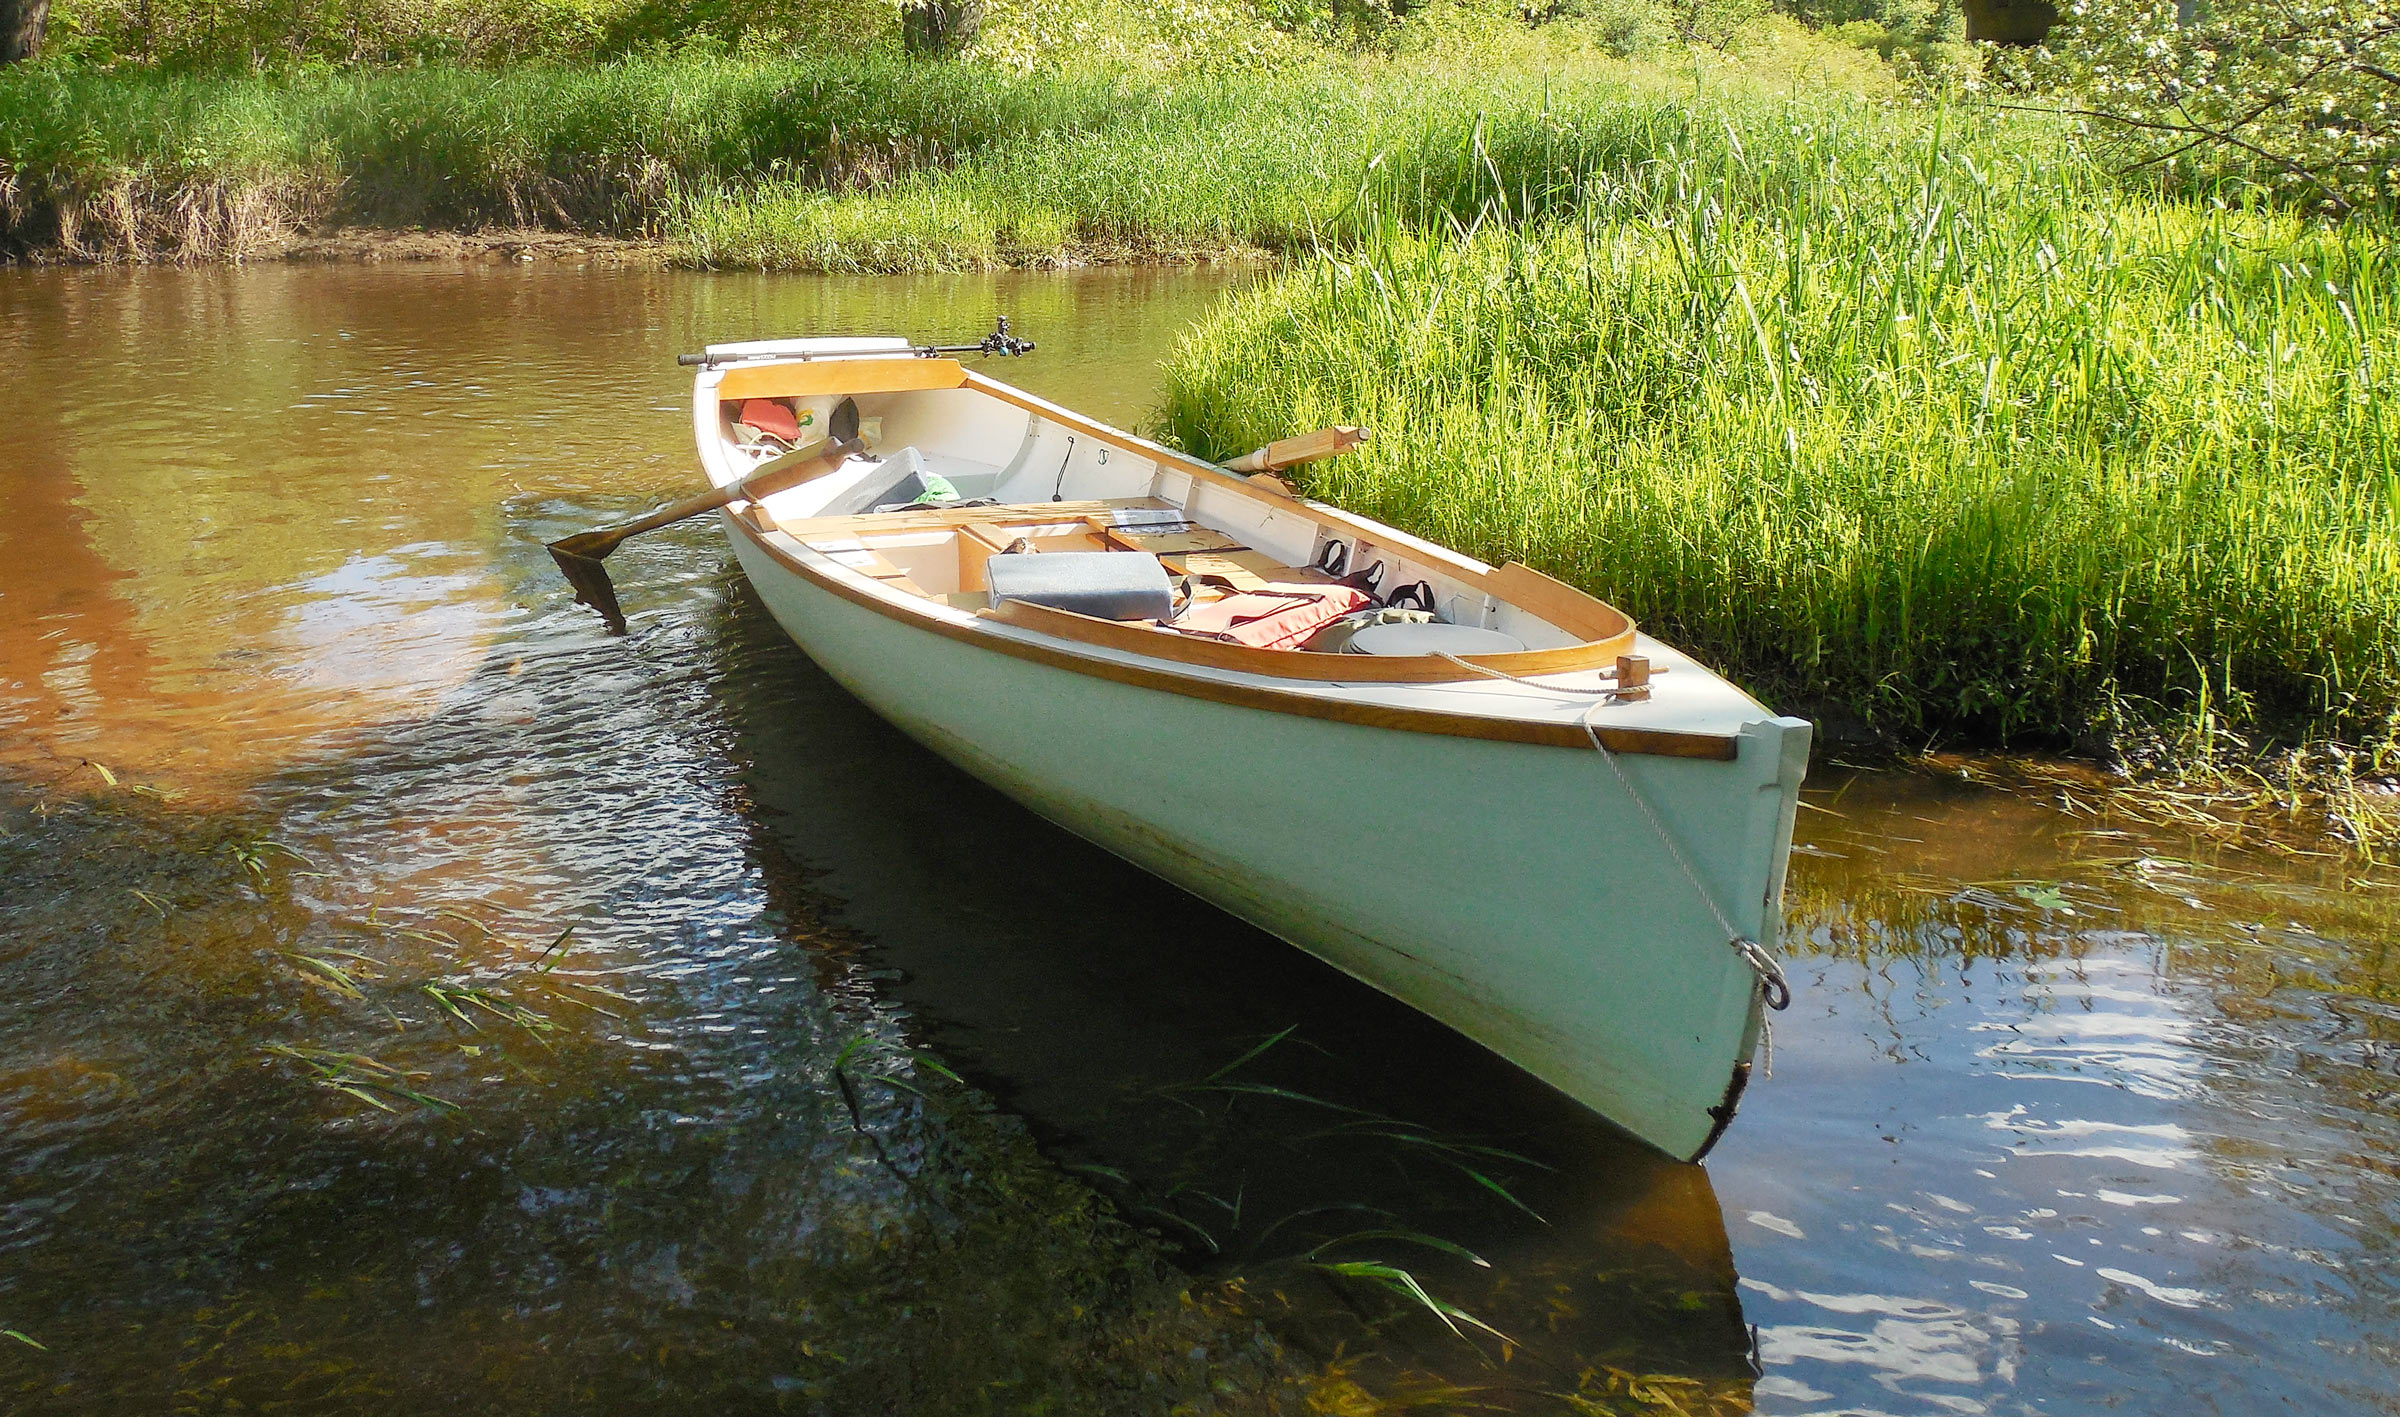
The boat is packed and ready to go at a ramp on the left bank of the Carrabelle River. It’s February and the marina is largely deserted.
The banks of the river were lined with wooden docks set parallel to the shore, like sidewalks along a street, with boats moored with their sterns to the docks. The small town of Carrabelle, with its low buildings and tree-lined streets, was in full view on my port side. Across the river was the wooded shore of Timber Island.
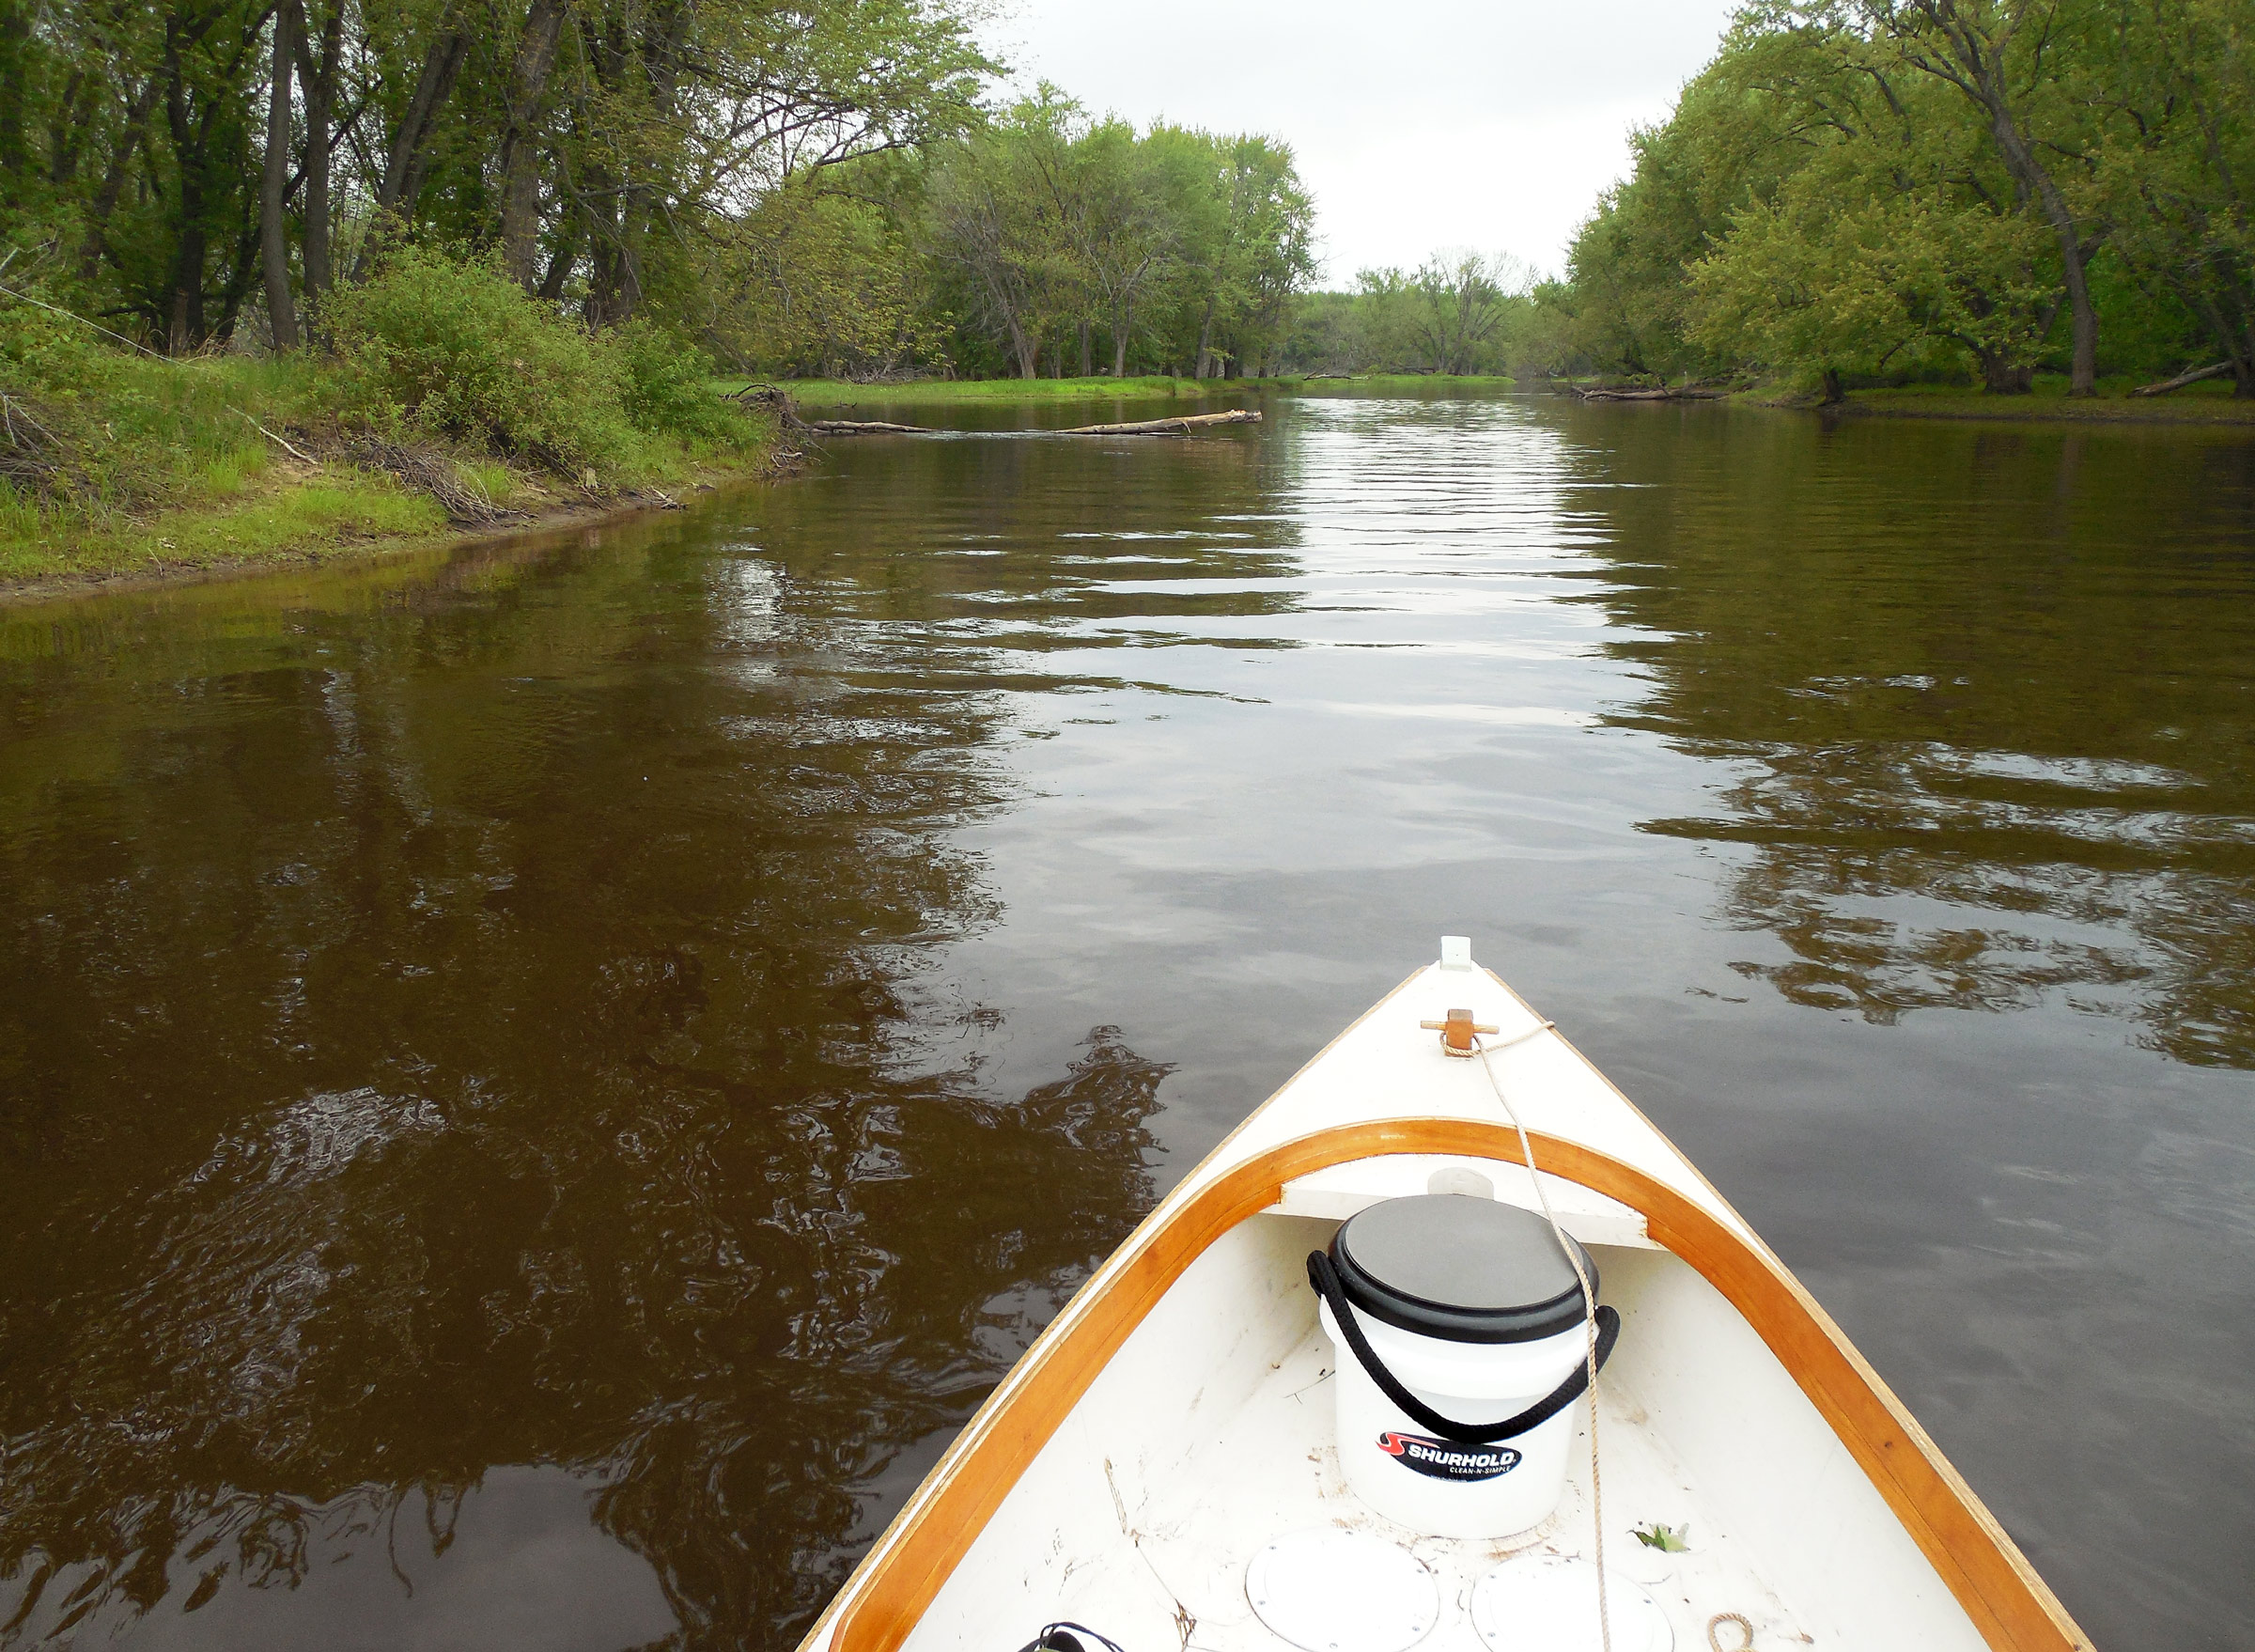
In 2014, as I was building my boat, an Expedition Wherry from Chesapeake Light Craft, I envisioned tucking my camping gear under the hatches and taking it cruising. For the boat’s first seven years, I rowed many places but always as day trips. This time, leaving Carrabelle, I had my tent, sleeping bag and pad, food, five gallons of water, and a five-gallon bucket full of oak firewood.
The heavily laden boat took longer to get to speed, but the dark current was pushing me along—I had lucked out and had an outgoing tide, which made for a quick row downriver. The channel buoys leaned away from the current and water mounded against the pilings alongshore. As I rowed, the sliding seat whispered, eddies spun from the tips of the oar blades, and the bright rays of February sunshine warmed my back; it felt good to be on the water. The river narrowed and the outboard skiffs slowed well before they passed me. I stayed out of the channel as much as possible and hugged the white sandbanks of the low-lying dredge-spoil islands at the mouth of the river.
Roger Siebert
.
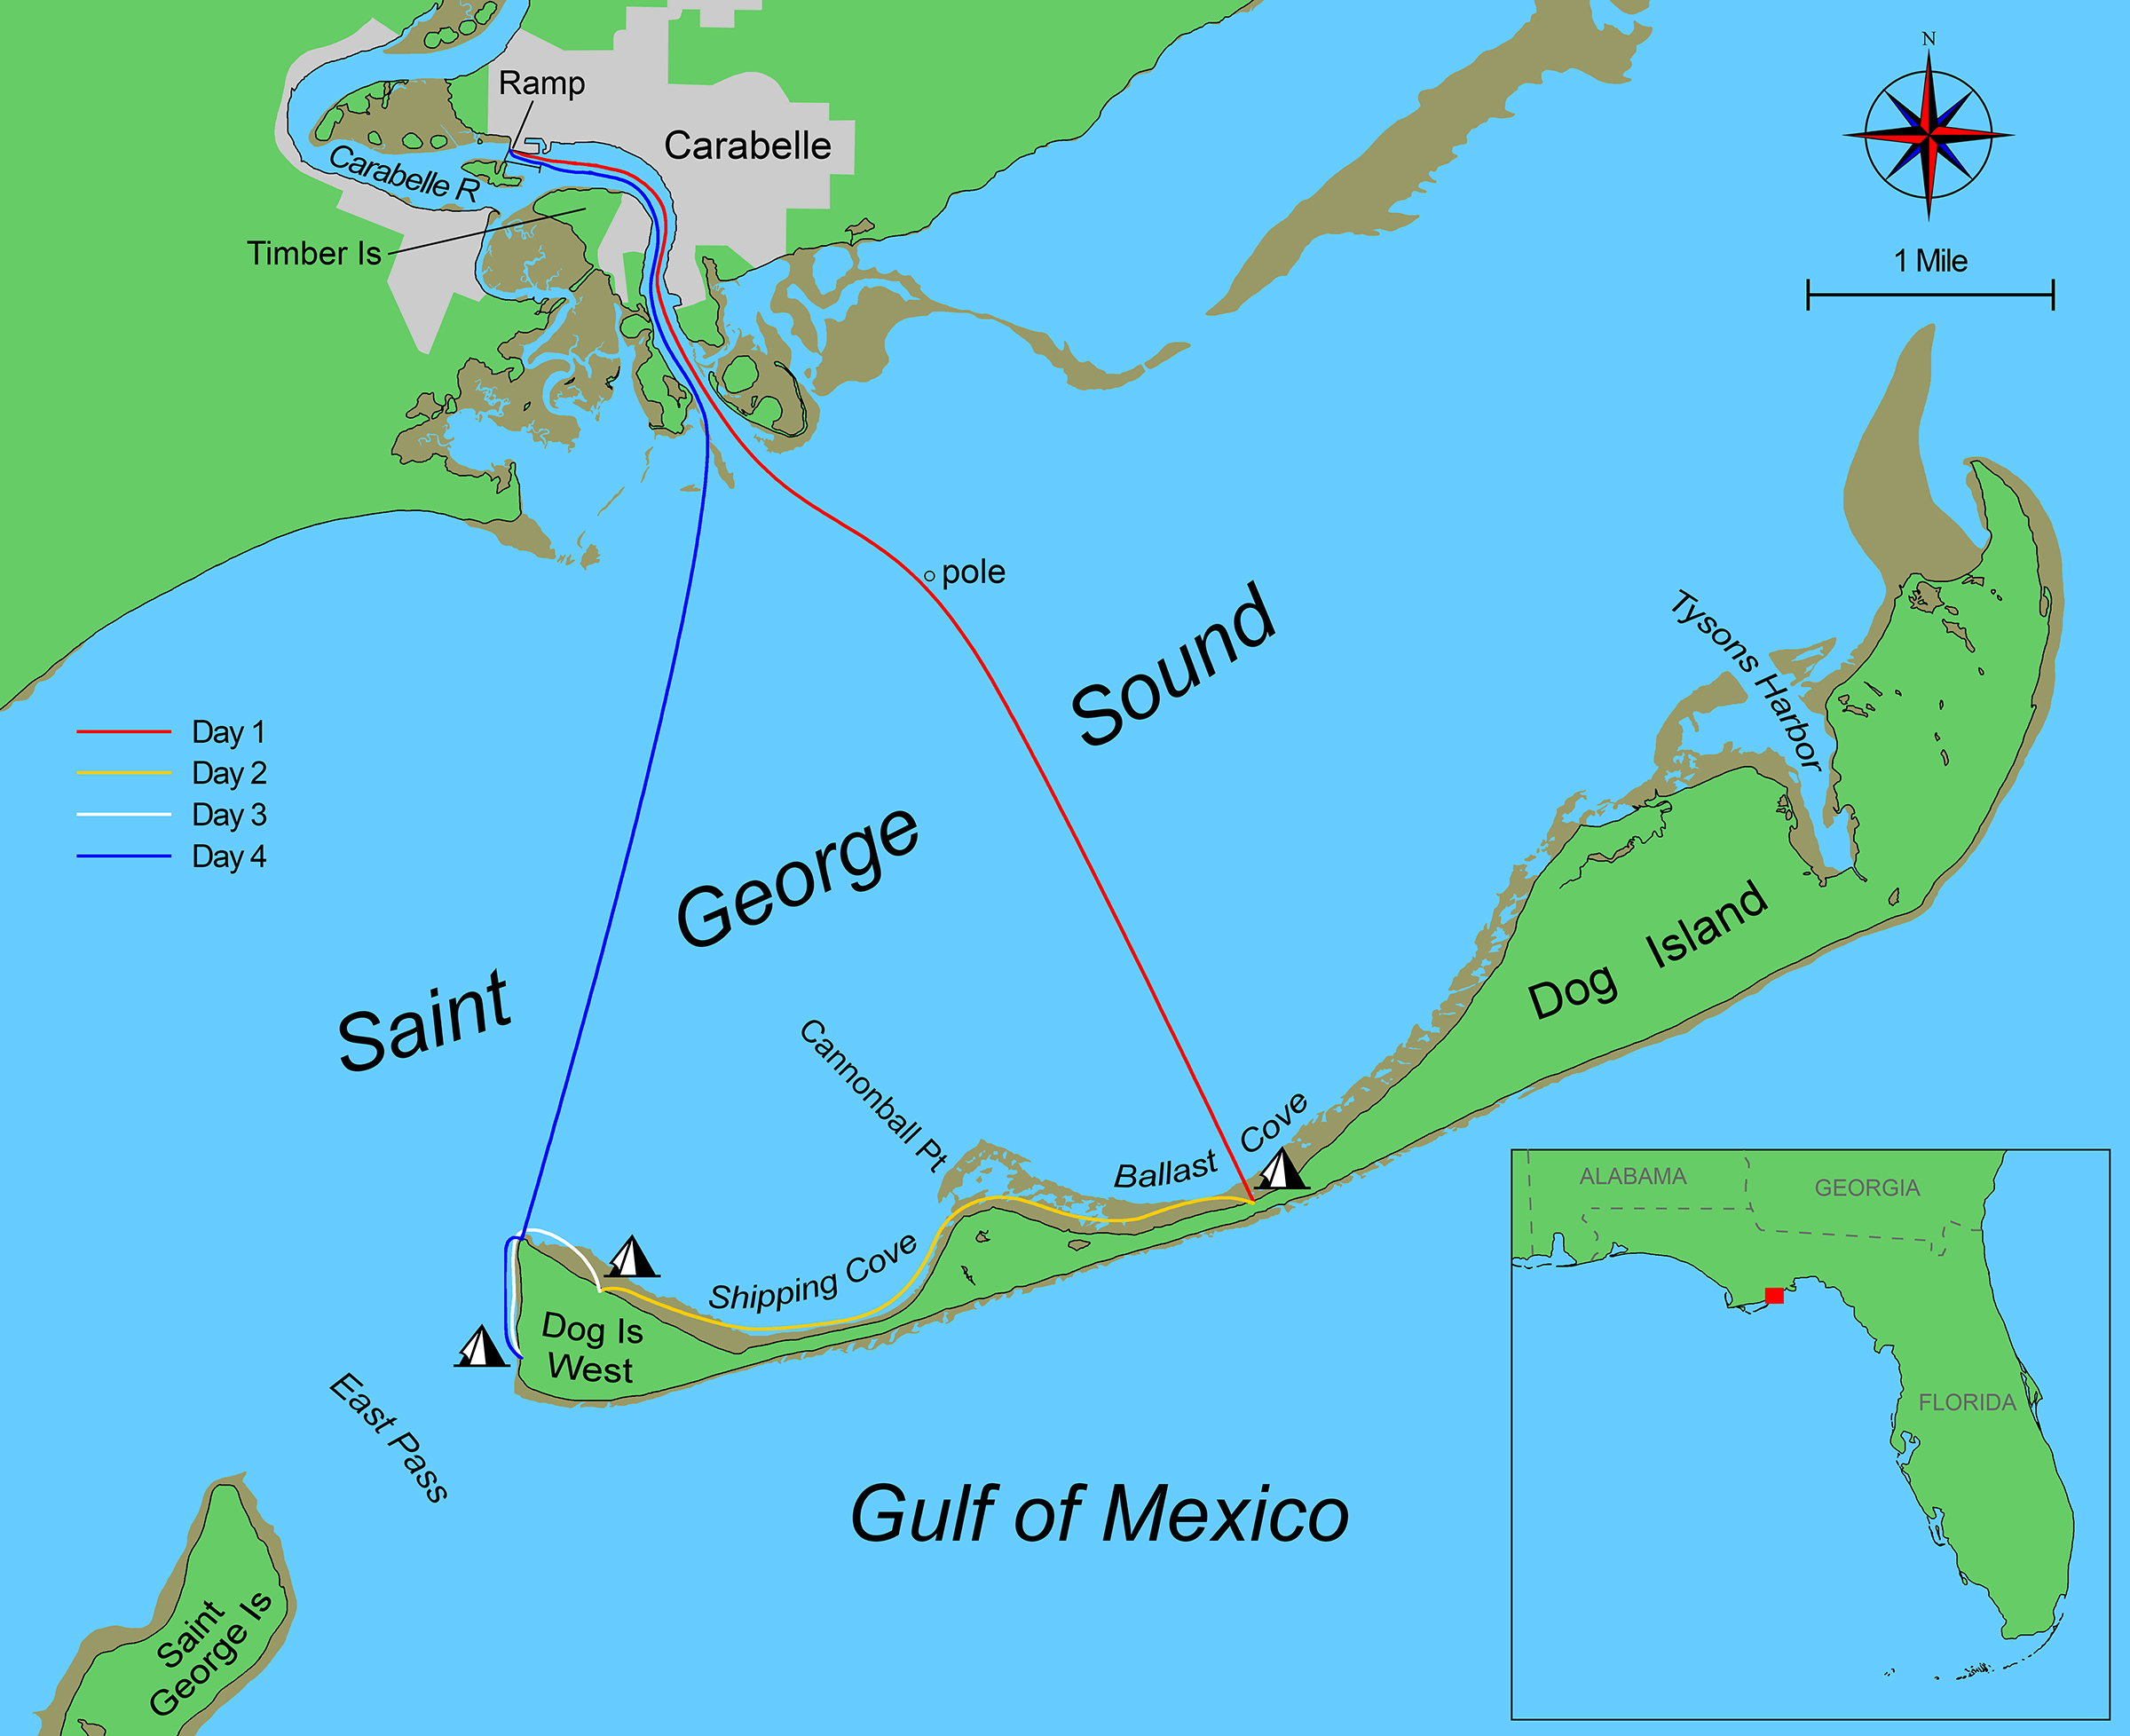
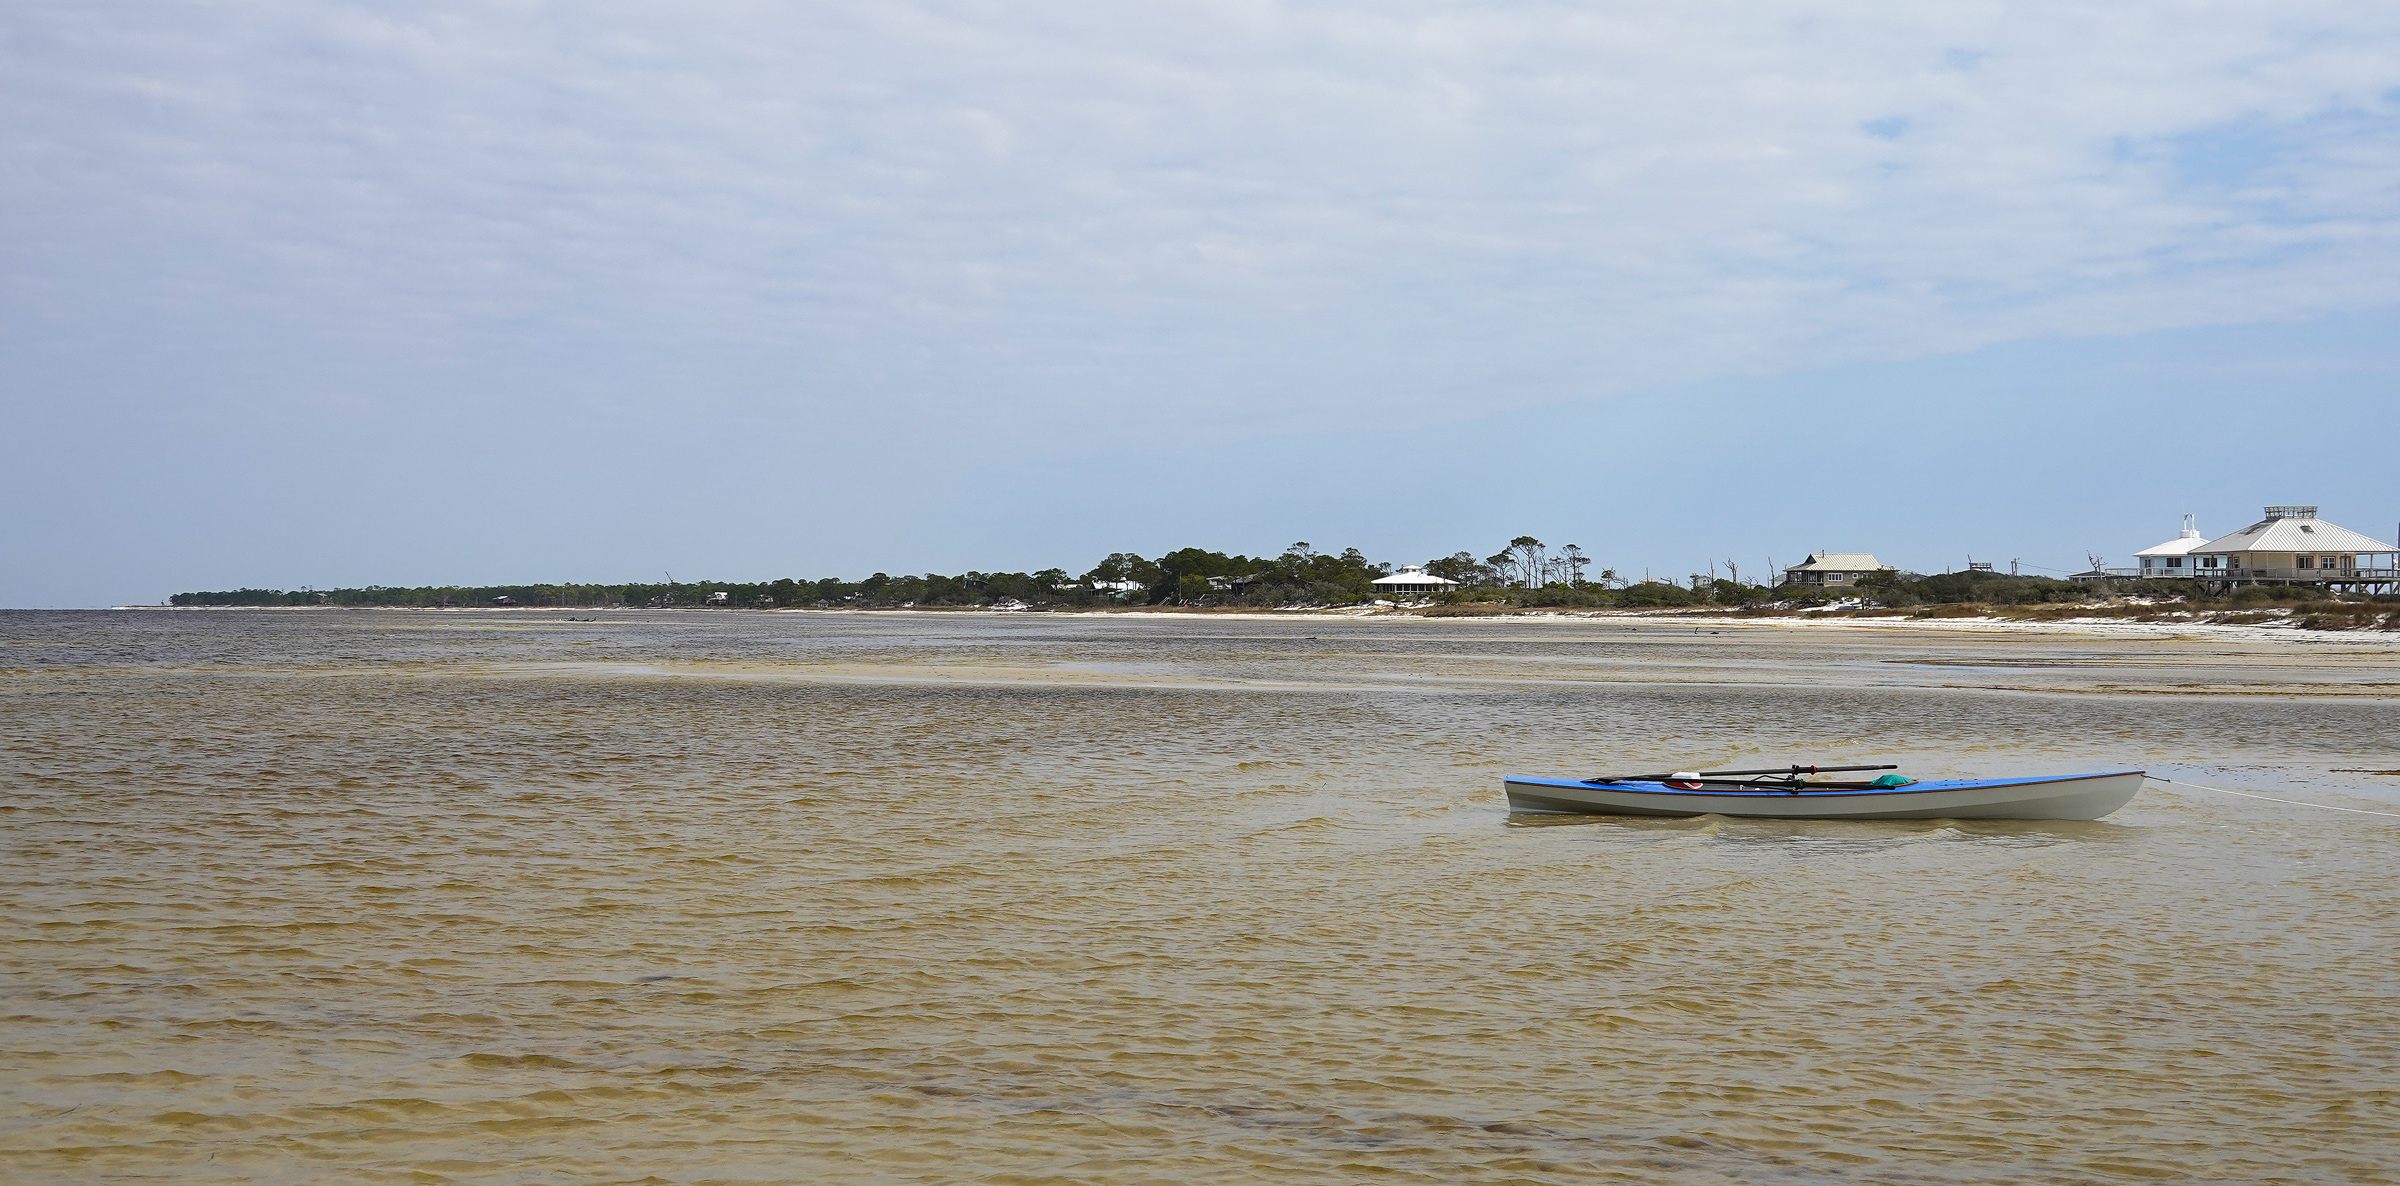
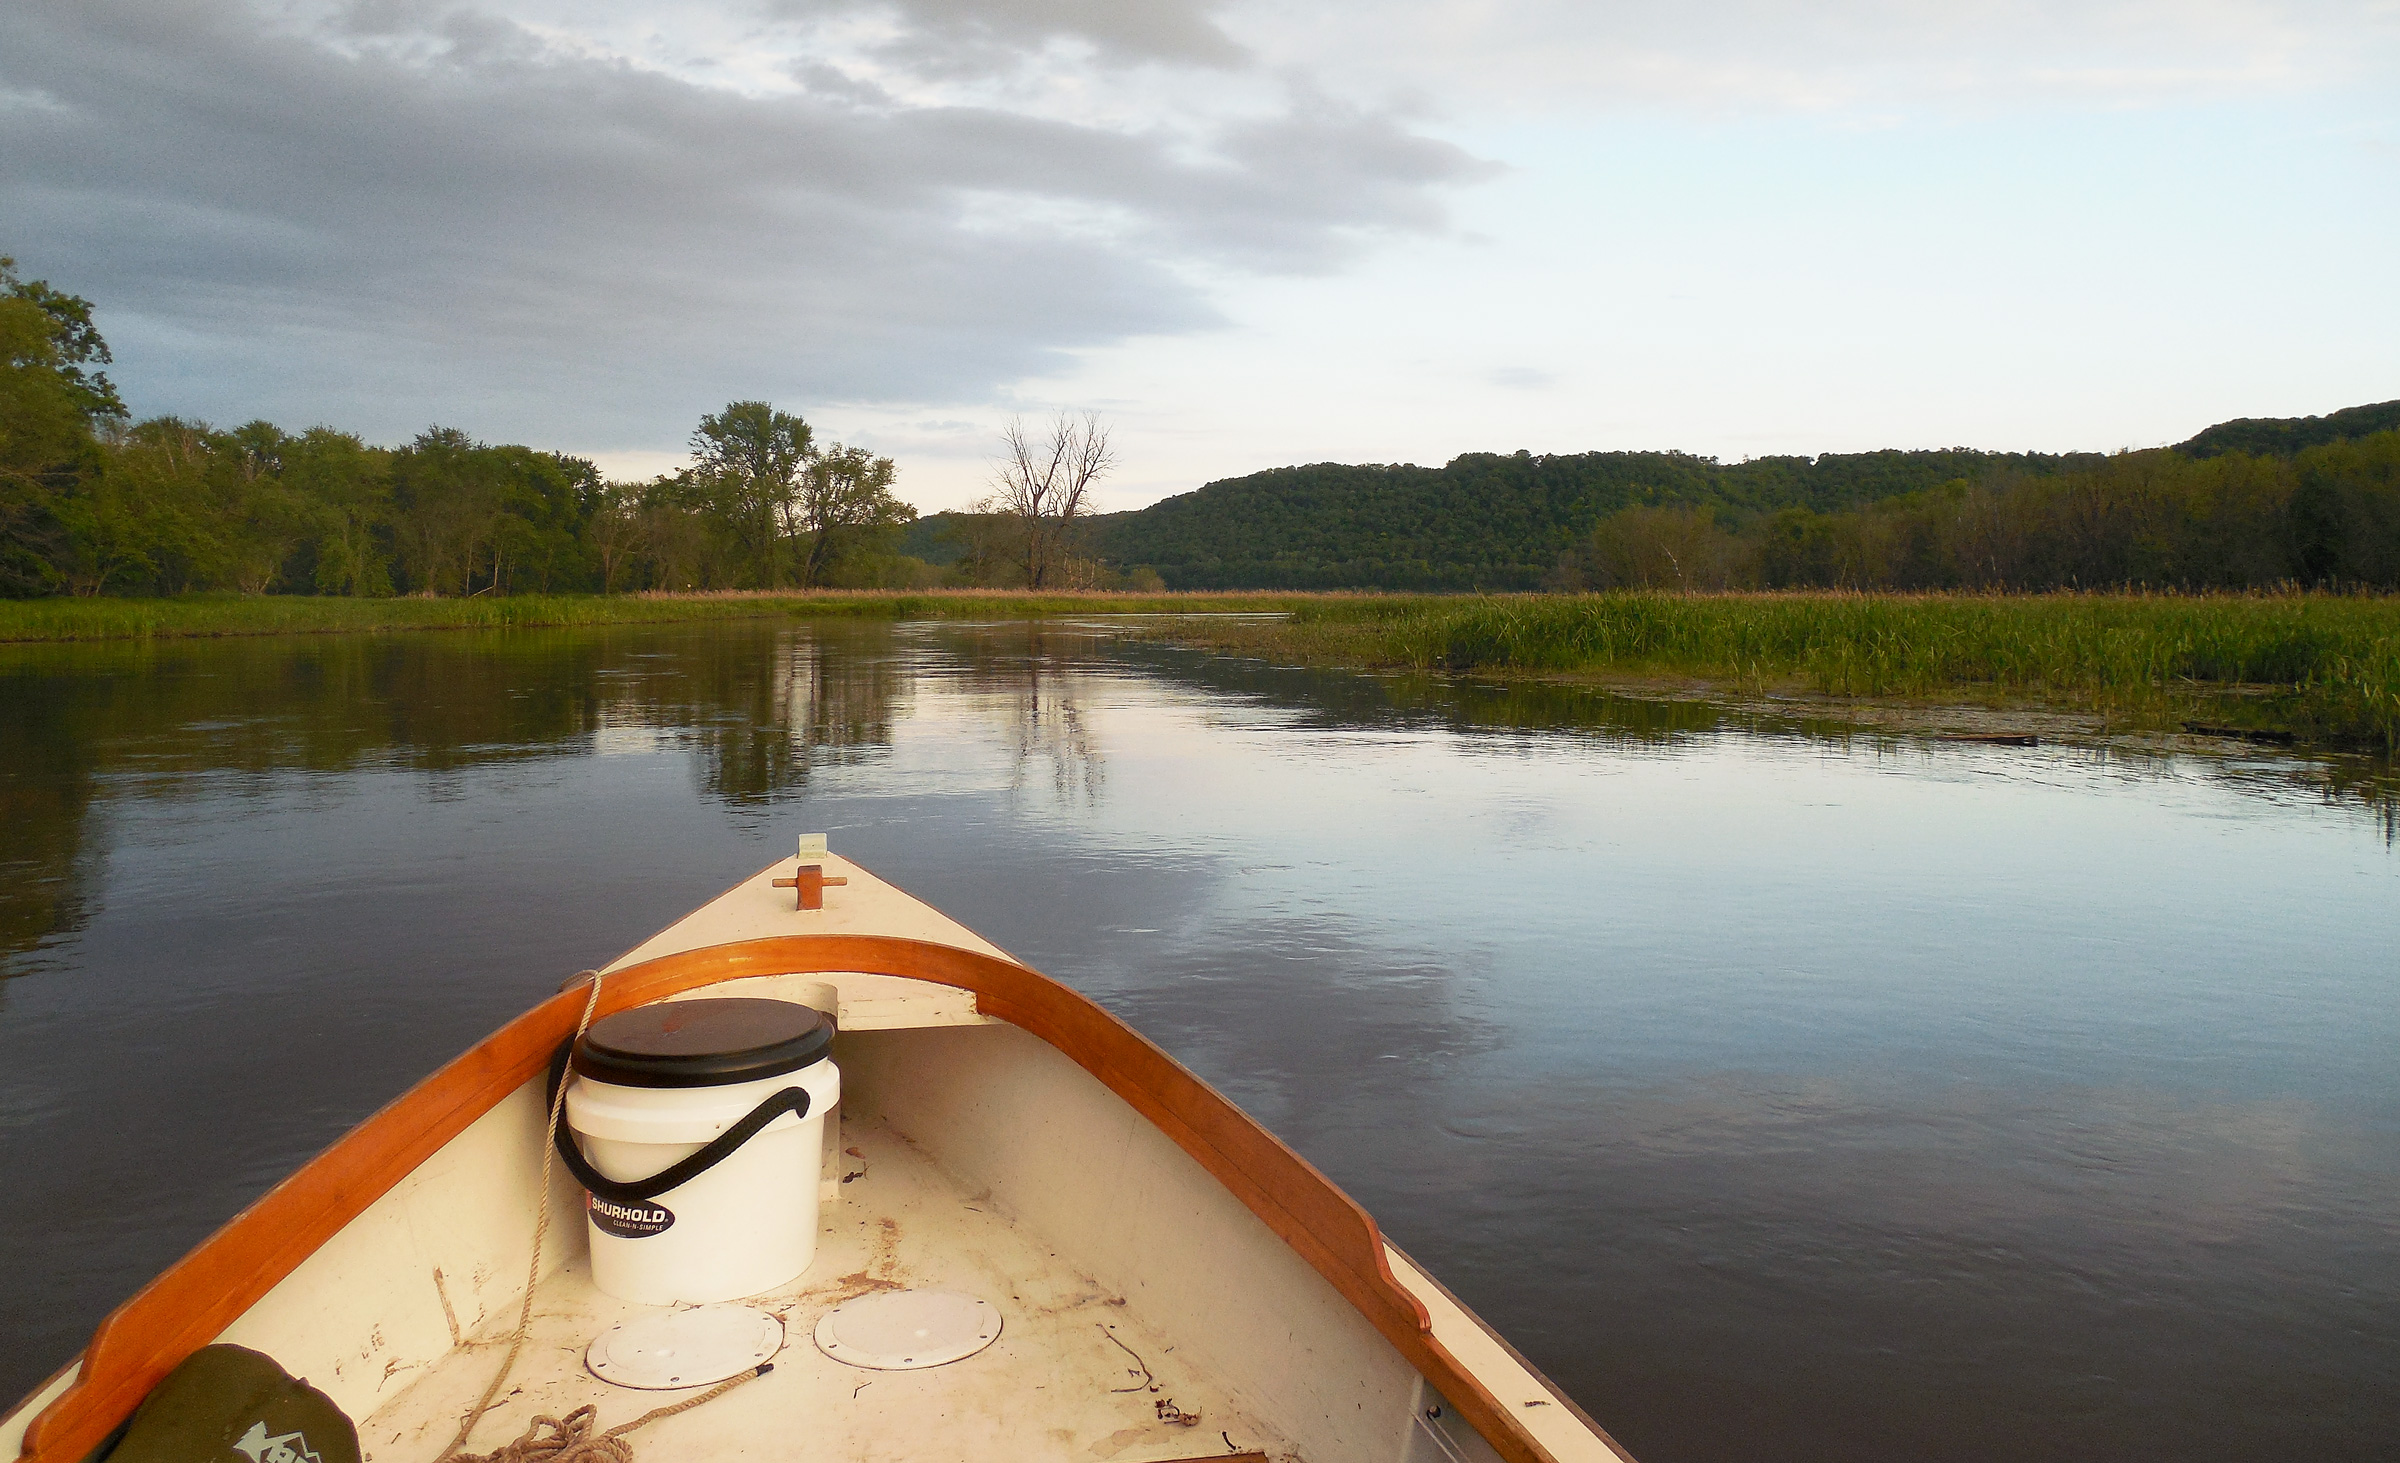
The open water of St. George Sound lay ahead, and I rowed out of the calm of the river into 12 to 16 knots of wind from the east. The bow started tossing a bit of spray and the boat moved around under me as if brought to life. To the southeast, 3-3/4 miles across the sound, Dog Island was a thin line on the Gulf of Mexico’s sharp-edged horizon. Dog Island and St. George Island farther south are two barrier islands nestled in the crook of the Florida Panhandle. Both had many options for camping and, once I reached them, I could plan the days as they arose according to the weather and my energy. I took off my hat and secured it to a line and put on my rain jacket. I checked to make sure my cellphone with a navigation app was secured in its waterproof case and tethered to the boat. I set a course for Dog Island, checked the compass bearing, tugged on the straps to tighten my PFD, and dug the oars in.
A dredged channel runs directly from the mouth of the river to East Pass, the 1-¼-mile-wide gap between Dog and St. George islands. I rowed clear of the channel markers to stay out of the way of other boats and settled into a steady pace. I quartered into the waves and wind, staying a little more upwind than I had intended to counteract the sideways force of the wind and waves. Waves pushed the bow around and I felt the wherry skitter under me. Once in a while, the bow would slap and spray splattered the back of my rain jacket and hood. The occasional spray didn’t feel cold yet; I still felt the warmth of the sun on my legs and jacket. I checked the sky and saw some high wispy clouds.
I had settled into a steady rhythm of oars, seat, and boat until, wham! In an instant, the boat slewed to port with a screech of metal, and a shudder of the rowing frame. An electric surge of adrenaline flushed through me as the boat came to an abrupt stop. What the…? A barnacle-encrusted post the size of a telephone pole loomed over me within an arm’s length. I knew that I was outside the clear passage assured by the dredged channel, but I didn’t expect this lone, unmarked and isolated navigation pole in the middle of open water, let alone to hit it with the outer 2″ of the port outrigger with the full force of a heavily laden boat.
Just barely visible in the center of the photo is the post I ran into. After the collision, I lost ground as the easterly pushed me back toward the mainland. Dog Island, my destination, hugs the horizon in the distance.
The 15-knot breeze and the 1′ to 2′ waves pushed me away from the post; the outrigger had left its mark, a swath of crushed barnacles with white bits of broken shell in a yellow smear of eggy innards. I craned around in the seat and scanned for damage. The boat was unscathed and the port oar and oarlock still seemed solid, but the outrigger’s stay was bowed up and the outrigger wing was bent back. With the oar blades in the water the boat was stable in the waves and chop, and I took a quick look around to make sure I was out of the way of other boats and wouldn’t get run over (and hoped that no one saw me row straight into a post). That was all to the good; the bad news was that I couldn’t swing the oar handle aft past the bent backstay and get the blade in the water at the catch. Using the Allen wrench that stays in a holder on the rowing rig, I reached out over the water to unbolt the stay. Waves dipped the whole operation—hands, wrench, bolt, and nut—under water but I removed the strut without losing anything. I tucked the oar handles under my knees to keep the boat stable and searched for a way to pry the backstay straight in the sturdiest parts of the rowing rig. I managed to reduce the bend by half and reinstalled it. I bailed the cockpit—the waves and chop had slopped a couple of gallons aboard—released the oar handles from my knees and began rowing. My repair had worked, and I avoided having to go home to explain a one-hour expedition.
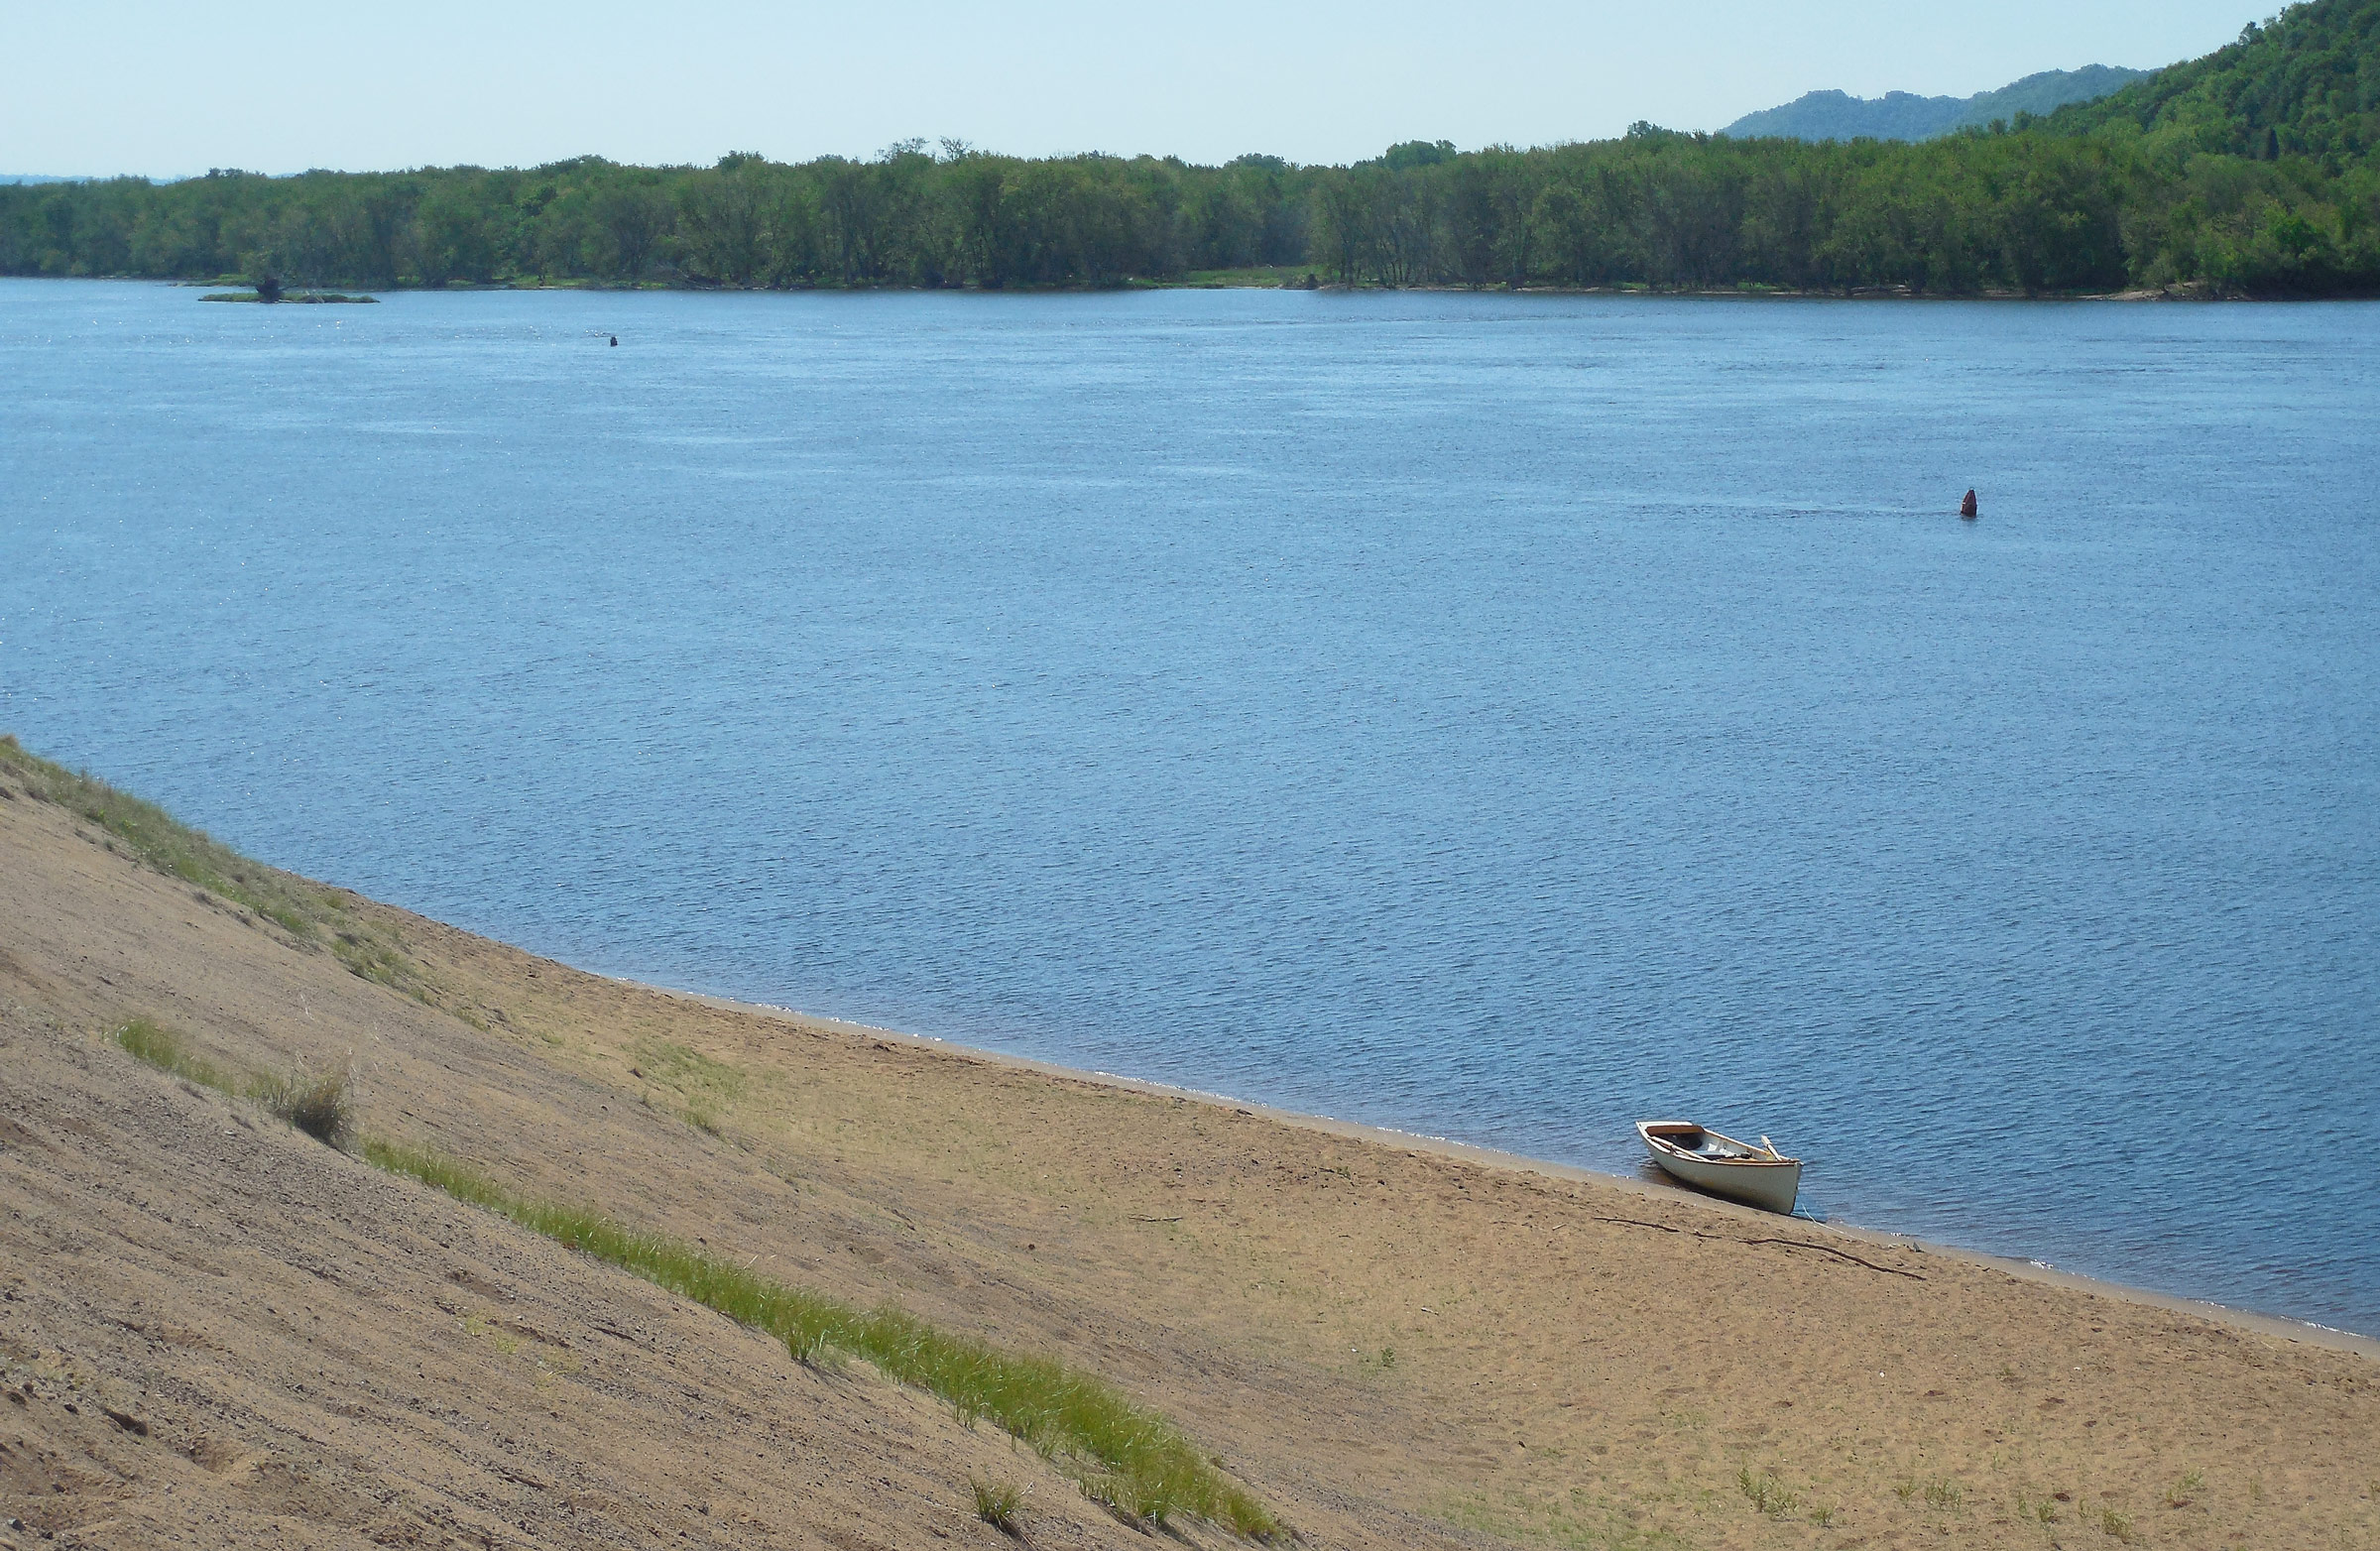
I reached the sandy shallows of Dog Island under a bit of blue sky and waded the boat around sandbars to get a couple of hundred yards west, away from the last of the houses on the eastern part of the island.
I tried to breathe again and rowed. The weather conditions and the bent stay made the rowing unpleasant, but I’ve been in much worse and I felt safe. I managed to get in a rhythm and sustain it even while I looked over the bow—frequently. The low profile of Dog Island started to look closer than the mainland, and I soon entered its lee and slipped out of the worst of the waves and wind. Ninety minutes and about 4 miles from Carrabelle, I wandered through some shallow areas against the island, hopped out of the cockpit, and pulled the boat up on a sandbar 10 yards off the shoreline, a gentle slope washed smooth by the waves leading up to dunes just a few feet high.
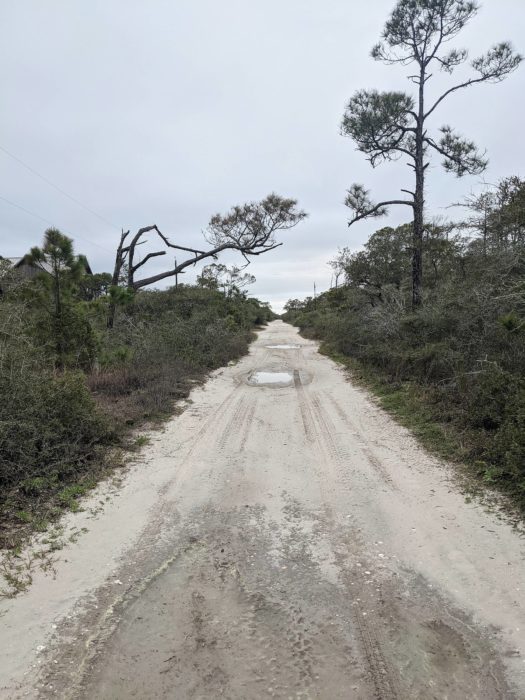
Power lines and poles run down the middle of the Dog Island, a half-mile long isthmus connecting the east end and the middle of the island. The open Gulf of Mexico is less than 100 yards away on the other side of the dune-like neck of land. The water in the lee, on the bay side of the island, was merely scuffed while spume was blowing off the waves on the Gulf side.
The sun was shining through a thin translucent veil of high clouds and the lee made a pleasant relief from the wind. I wandered to the deserted beach at Ballast Cove on the sound side of the 6/10-mile length of the ruler-straight sandy isthmus connecting the northeast and central parts of Dog Island. Sand dunes undulated across the island, rippled like wind waves on ocean swells, dotted with tufts of beach grass and low shrubs with webs of crooked stems. In the distance, scattered both east and west, a dozen or so houses stood on stilts. Two utility lines running the length of the island hung in long parallel curves, one above the other from poles without crossarms.
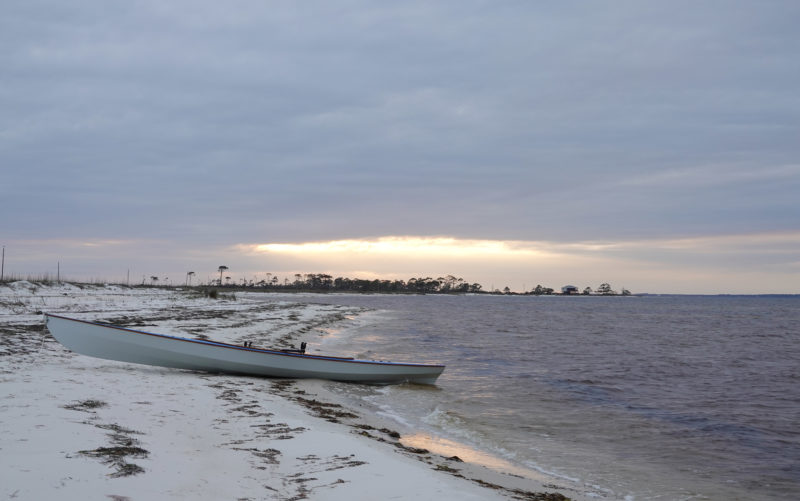
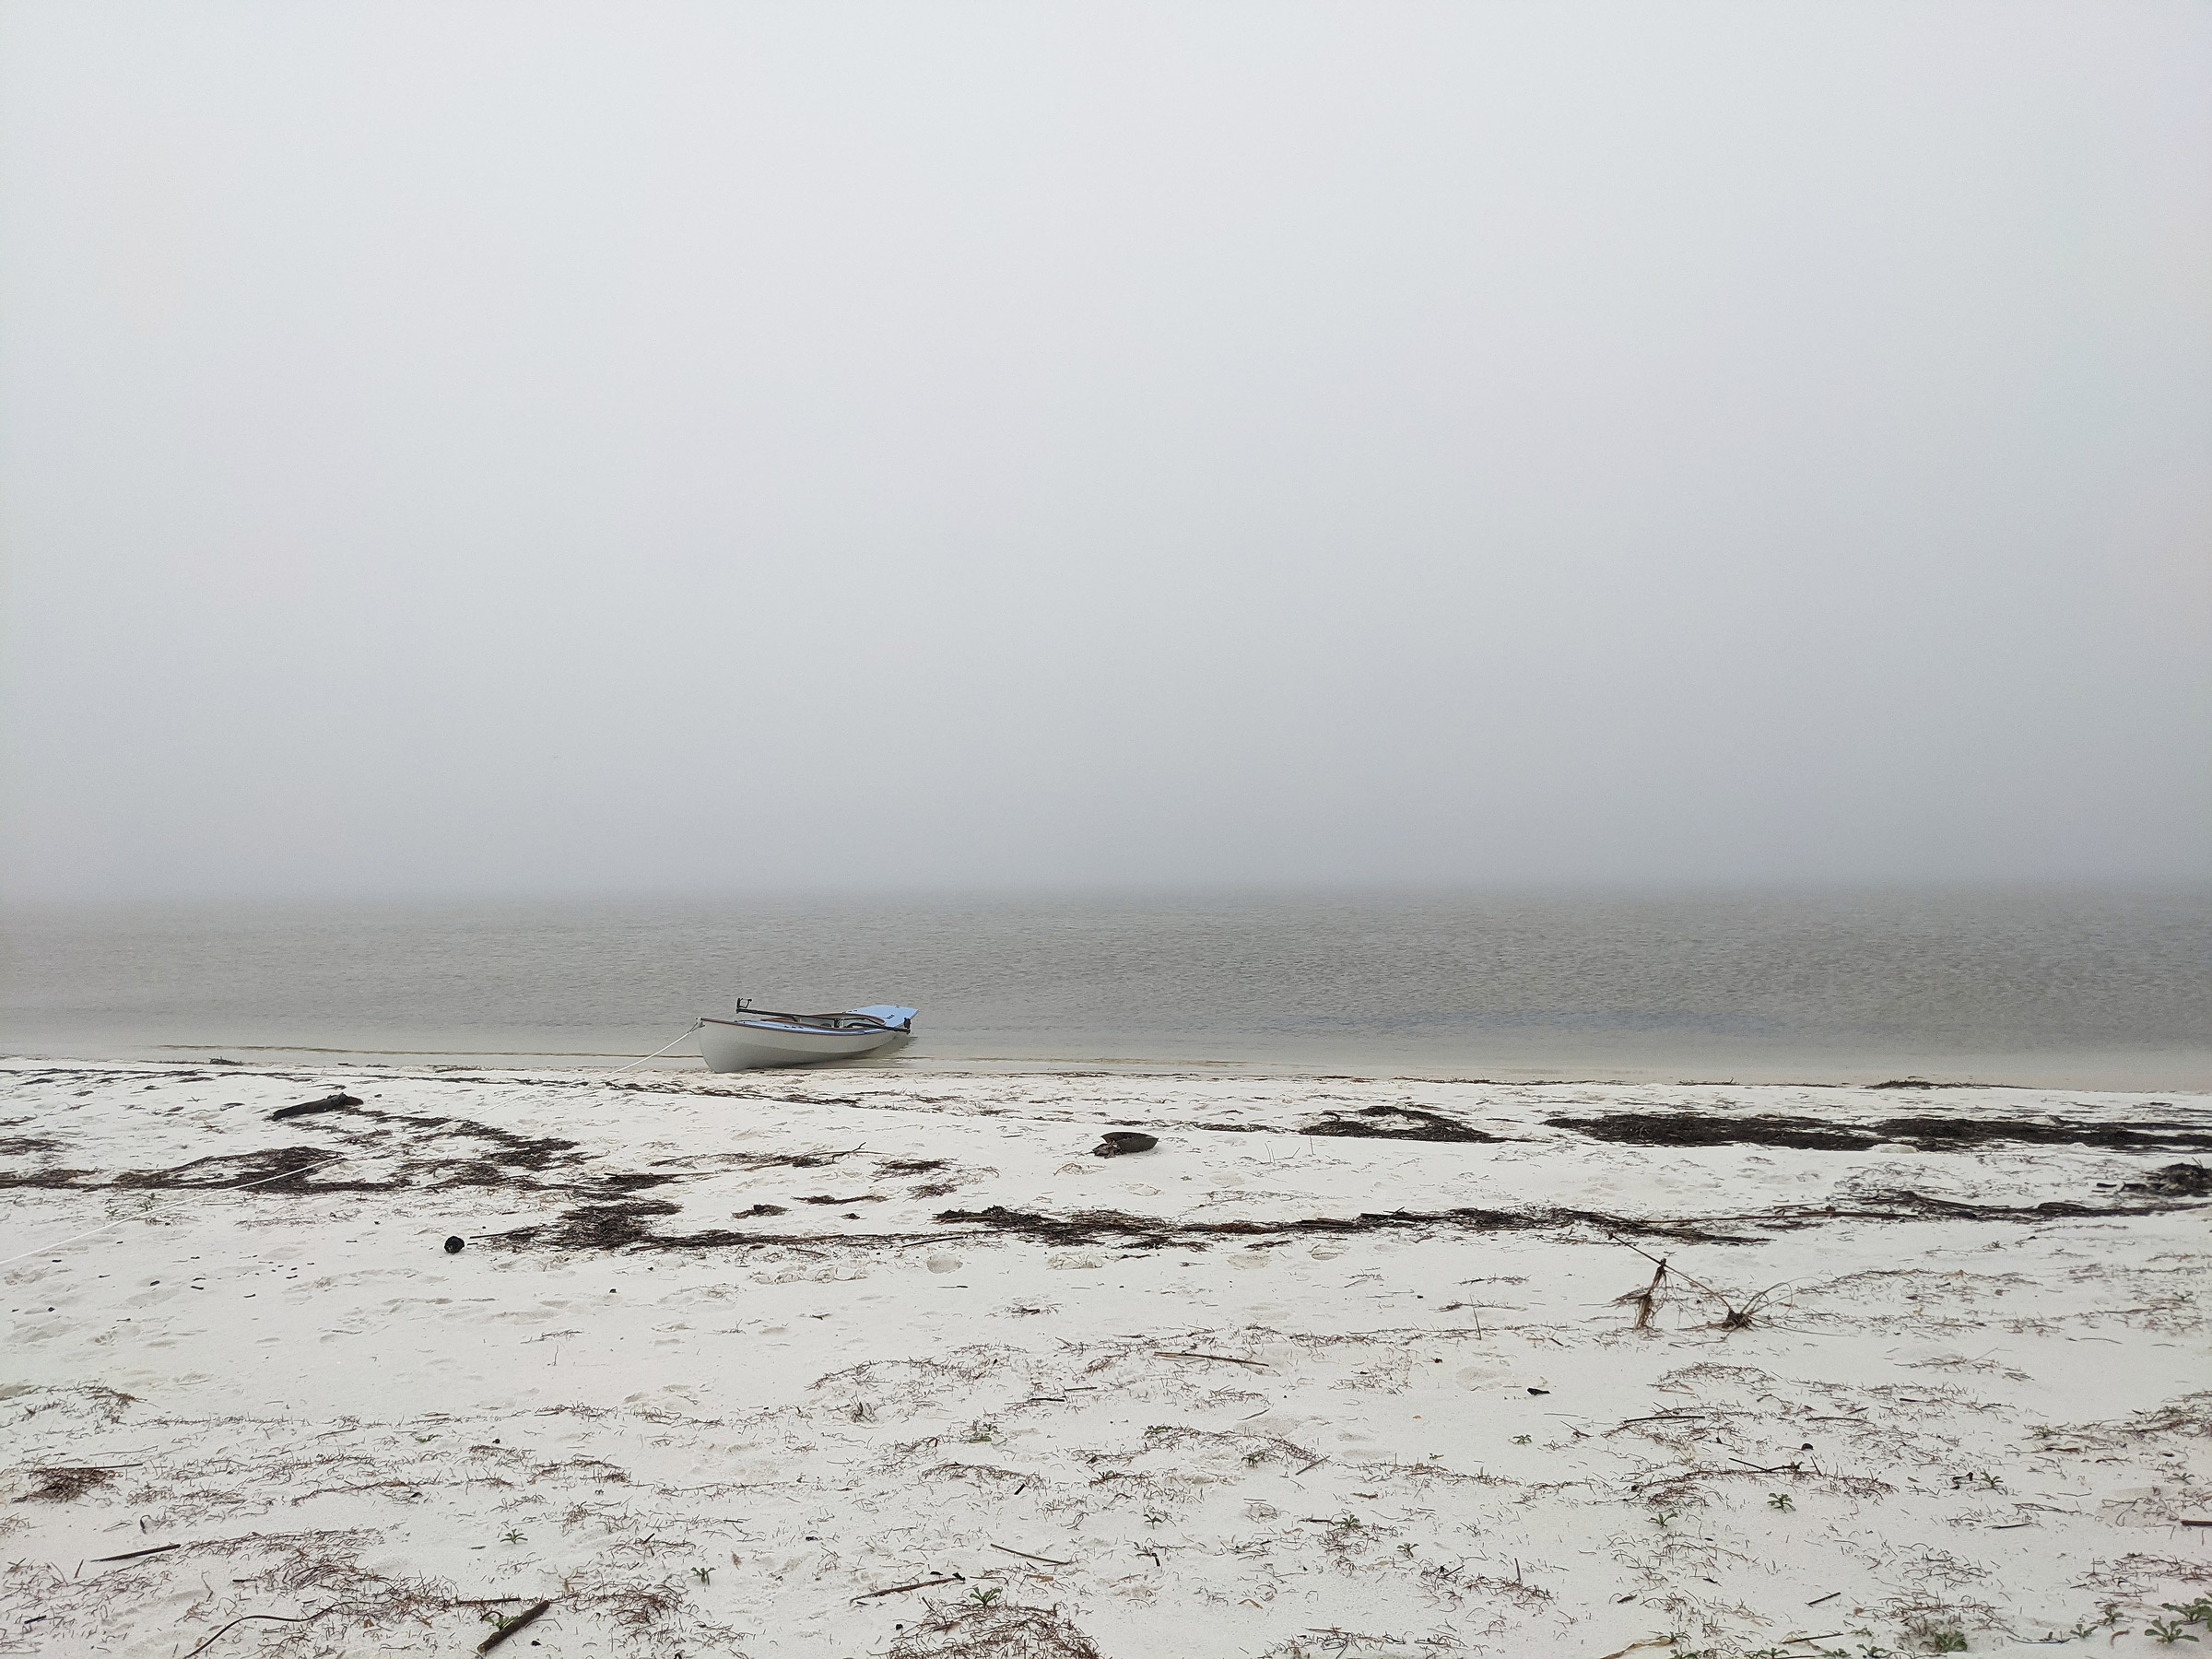
The tides were negligible, just inches between the high and low; tethered by the painter, the boat is set for the night at the water’s edge. Cannonball Point lies at the far end of Ballast Cove and the clouds are rolling in, ready to unleash a torrent of rain.
Whitecaps out in the sound coupled with plenty of potential tent sites convinced me that the 5-mile row for the day was good enough. I waded in cool, but not cold, knee-deep water along the shoreline, coaxing the boat down the beach around shallows and sandbars. About 100 yards from where I’d landed, I slid the boat out of the water on the shore’s white sand and planted my small anchor 50′ up the beach for a little insurance. I made camp in the lee of a chest-high dune and hauled my gear from the boat to the tent.
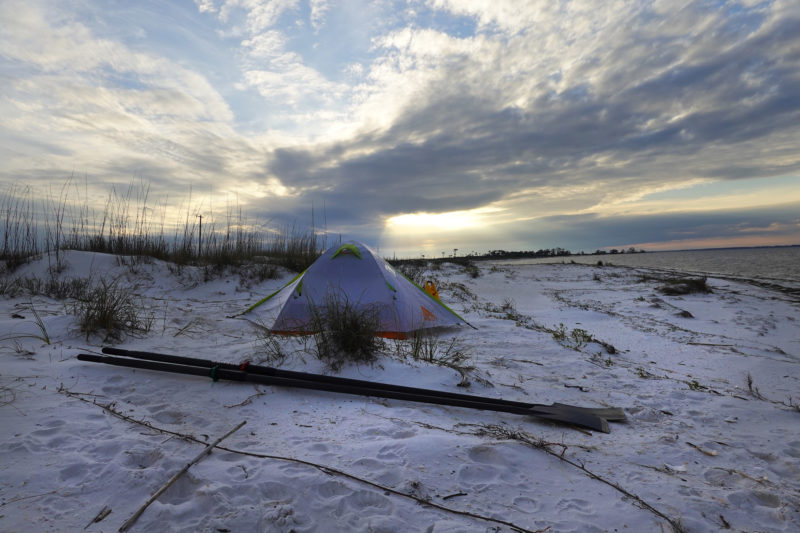
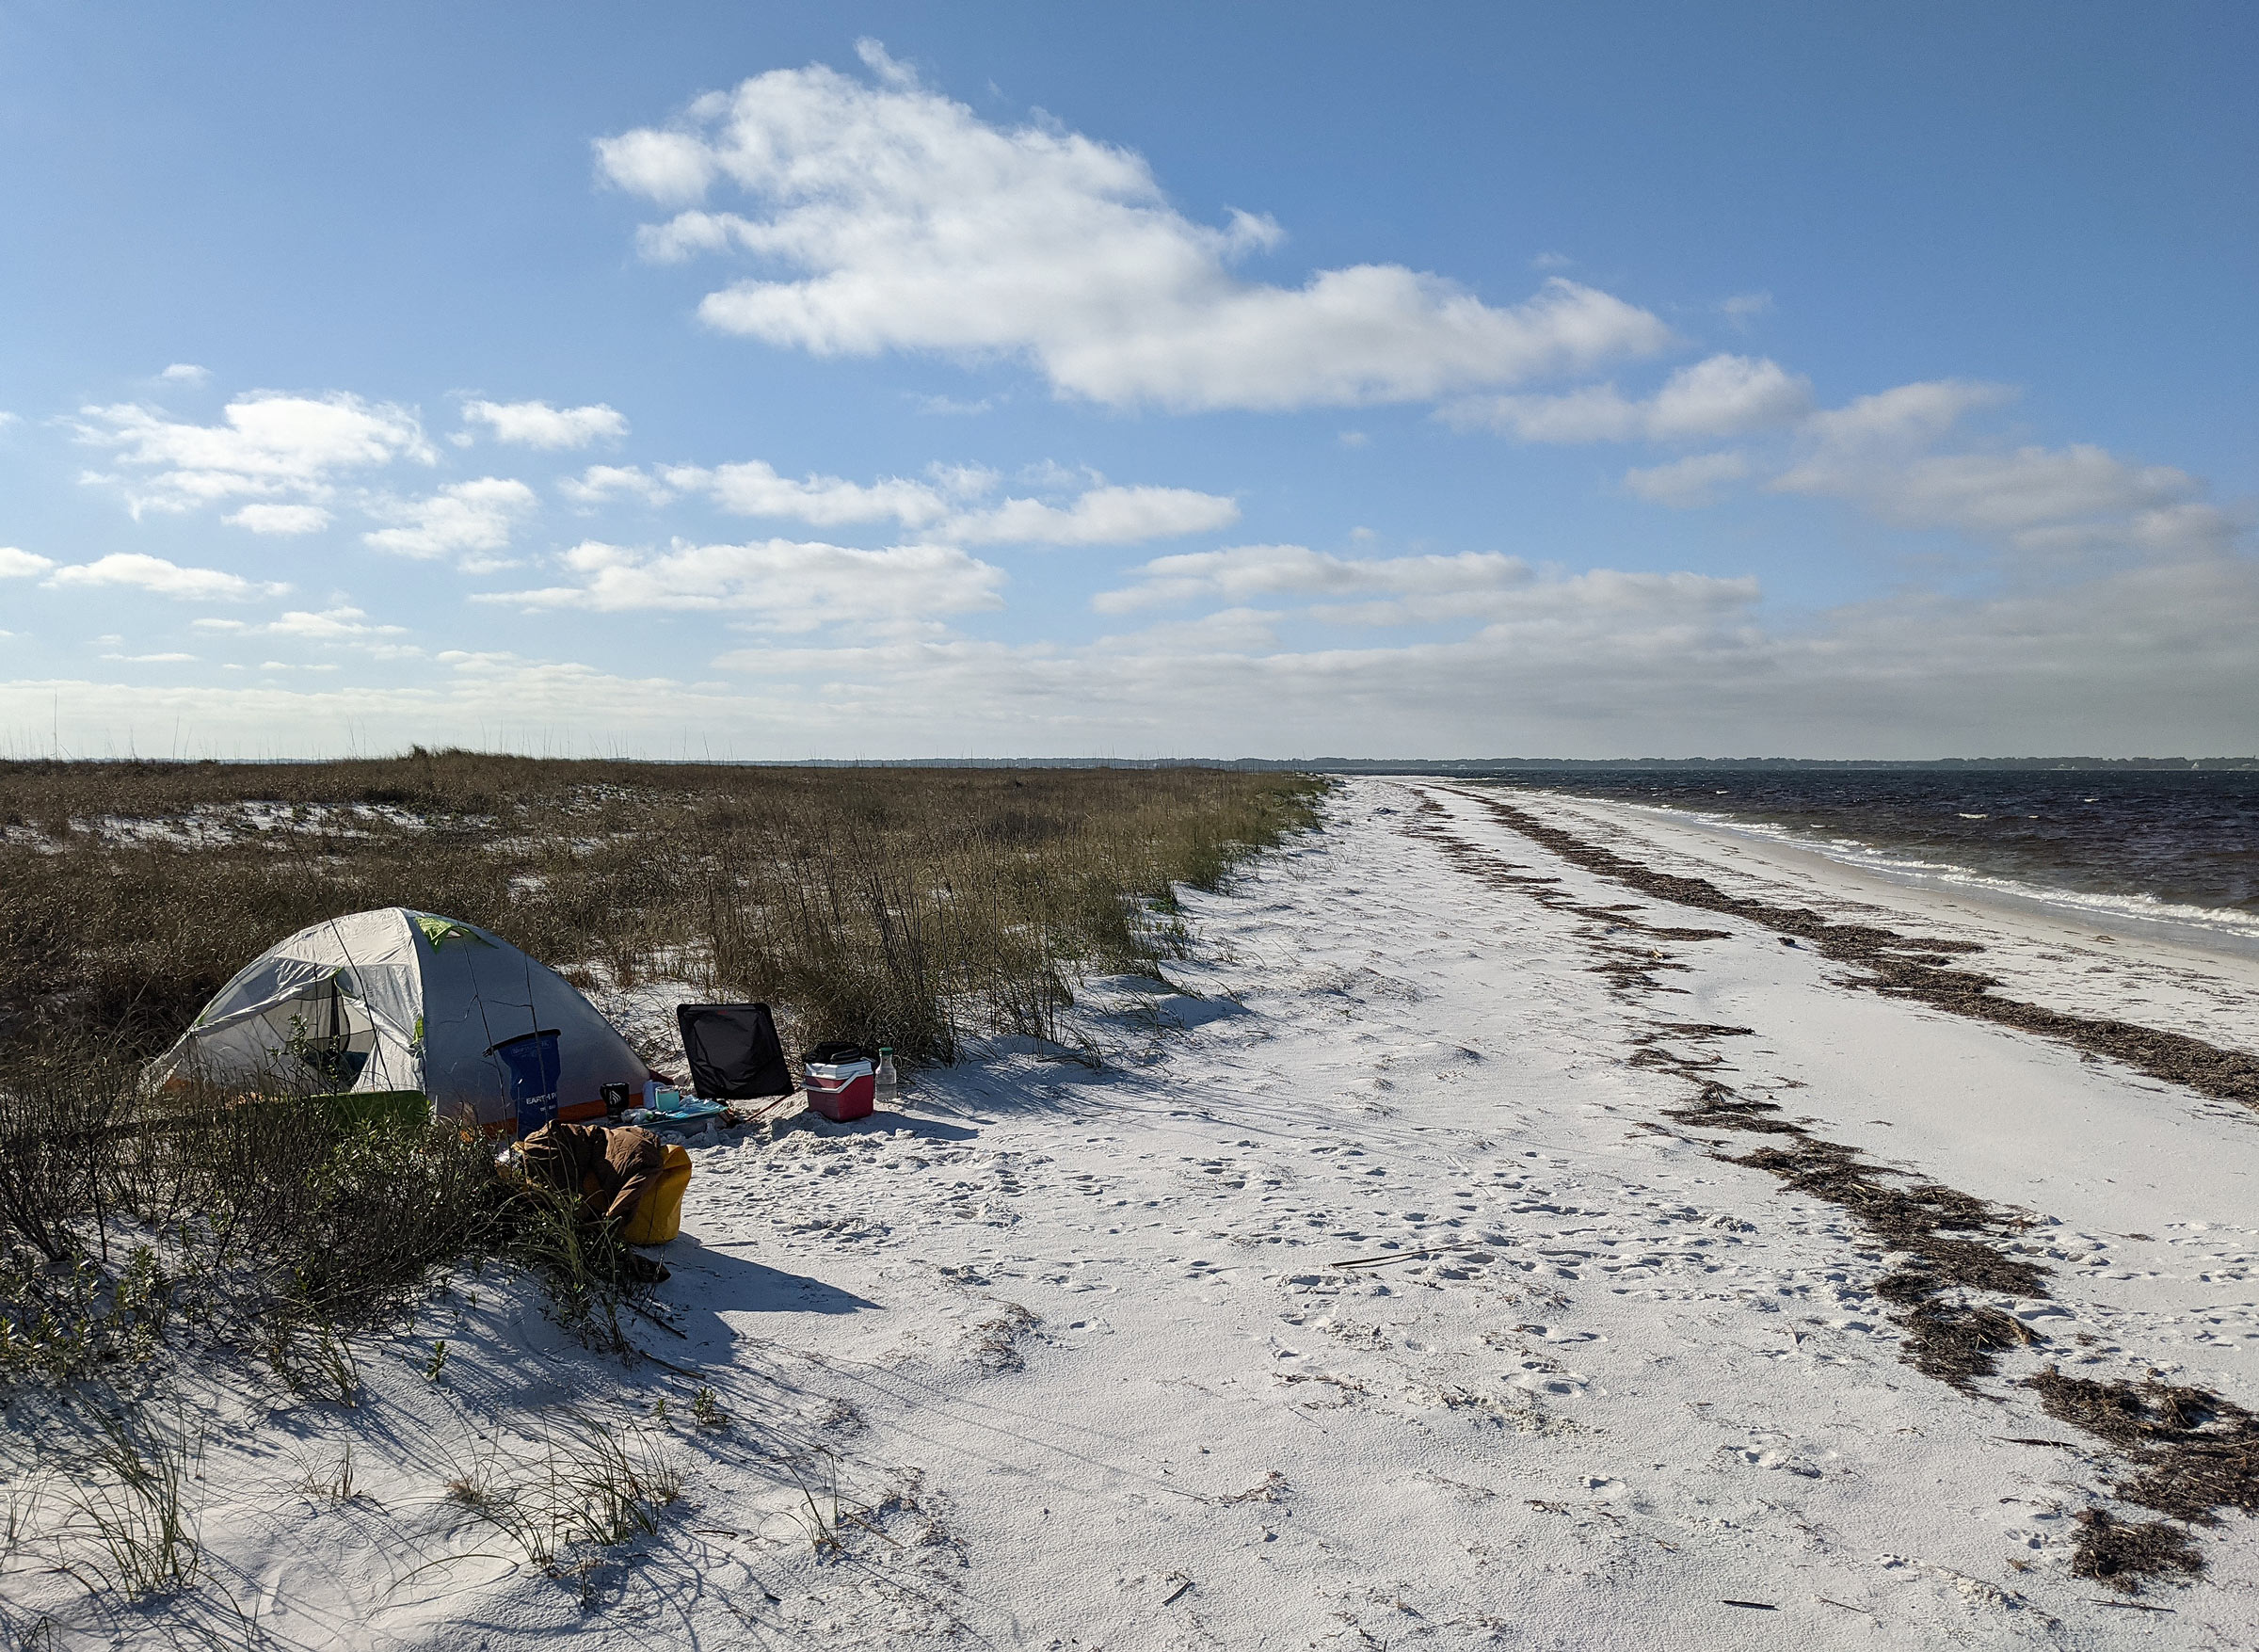
As the sun set on my first campsite, the wind was blowing from the southeast, but my tent was in the lee, sheltered by the dunes.
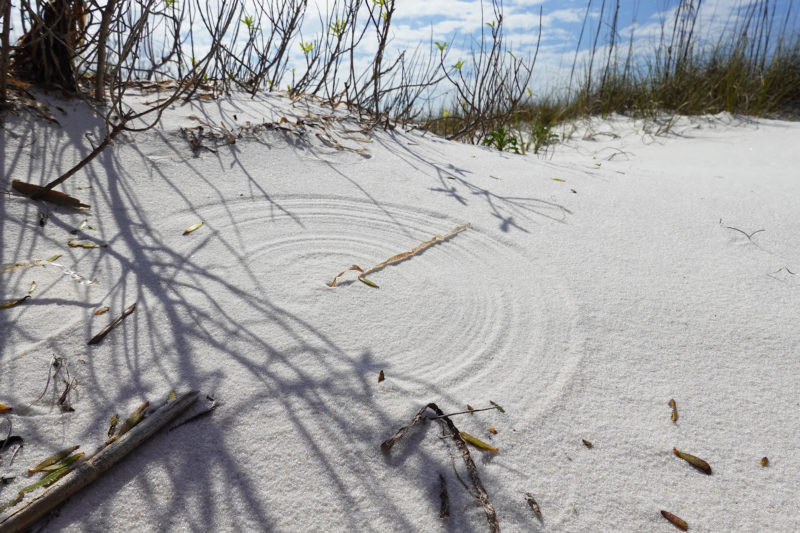
I walked across the island. It was only 110 yards to the gulf side—I counted my steps. Halfway across, the wind picked up and whipped the scattered dry grasses back and forth. Dry sand skittered back and forth on the sandy surface in no apparent direction. A broken stalk of dry grass was blown back, forth, and around making a perfect circle in the dry sand.
On my first walk across the island, I found this pattern of concentric circles traced in the powdery sand by a wind-whipped blade of dried grass.
My bare feet sank in the dry powdery sand. After the repetitive and restricted movement of the rowing rig, my legs enjoyed the freedom of wandering the dunes. The oceanside beach was steep, by Florida standards, where the highest point of land in the whole state is 345′. I was glad to still be wearing my rain jacket, which had blown flat against my chest. The surf was studded with foamy whitecaps and the wind was pushing the blue-green waves as high as 5′. A half-dozen light gray birds with black heads huddled behind quivering tufts of grass to find refuge from the wind, though their feathers ruffled in the gusts. Although I could see perhaps a dozen houses 200 yards away, there was not a person in sight. High clouds gathered and pushed across what was left of the pale yellow sunlight as the afternoon grew late. The warm pinks of sunset cast a faint glow through the thickening clouds. As the sky faded to gray, I put on a fleece shirt under my rain jacket, built a small campfire in the sand with the oak firewood I’d brought, and watched the night close in around me.
Through the long night, the wind carried the sound of the surf crashing on the ocean shore across the island; wind whipped the tent’s rain fly and a steady rain pounded on it. The noise kept me company in a wild kind of way. Worried about the boat, I checked it during the night by unzipping the rain fly and shining the flashlight through the midnight murk and falling drizzle. I didn’t get much sleep, but at least the tent didn’t make matters worse by leaking.
In the morning, the rain let up, but the fog rolled in. The wind had made for a rough night, and my mind was as gauzy as the bay.
At dawn, the rain diminished enough for me to reach out of the tent to boil water for coffee and a bowl of oatmeal. The wind had dropped to 10 to 15 knots, with the boat and me in the lee. The crash of heavy surf on the other side of the island still filled the air. I could barely see the boat, even though it was just 50′ away, and St. George Sound was lost in an opaque and seemingly infinite fog. I wasn’t interested in rowing blind and navigating with a compass, so I waited to see if it would lift.
With a liter of water and a couple of protein bars in my pockets, I set off on foot to explore the west end of the island. I had on my fleece pants, a couple of shirts, a rain jacket, and bare feet. On the gulf side, with a stiff wind behind me, the waves tumbled, roaring, on the beach and the wind rattled the hood around my face. I didn’t see any sign of another person anywhere, and there were no footprints in the sand other than mine and those left by a skittish flock of sandpipers. After I had walked about a half hour, the island widened a bit, bulging out 1/3 mile from the straight Gulf of Mexico shore to Cannonball Point, and then narrowed even further into another isthmus that separated the gulf from Shipping Cove with a 100-yard-wide strip of sand. I passed two houses set on 10′-tall pilings above the isthmus’s beach sand that stretched uninterrupted between the gulf and the sound. The island widened to the northwest again, forming Dog Island West, which curls to the north pointing back at St. George Sound and the mainland. As I turned the corner where the Gulf shore meets the shore bordering East Pass, gulls and pelicans were huddled in the lee of the blunt, 1/2-mile-wide wedge of sand dunes and brush that makes up the far west end of the island. I knew that St. George Island was somewhere in the distance to the west, just over a mile away, but I couldn’t see it through the fog.
Protected from the wind a bit, I warmed up as I headed north and continued around the western end of the island and back to the Shipping Cove side. The sky cleared a little to reveal the cloud-masked disc of the rising sun a third of the way up in the sky. But an hour later, as I was getting close to the campsite, the clouds turned slate gray and the pitter-patter of rain started. Raindrops dotted the sand and disappeared. I picked up the pace and arrived at my campsite with just enough time to organize lunch and dinner and stow my gear as best I could before the rain threatened to soak everything. As the rain fell harder, I gathered the drybags that had what I might need and retreated to the tent. It was 1:22 p.m. Fortunately, I had loaded six library books on my Kindle before leaving home, and with the wind whipping the surf into froth, and the rain drumming on the tent, it was looking like I might need more than one book to pass the time ashore. I started reading Jack, a novel about a tormented romance in a fictional Iowan town.
Overnight, the wind clocked 180 degrees, and my tent was out of the lee and in the northwesterly’s teeth. I had pulled the boat well up above high-tide line, so I worried less about it, but the wind howled across the island and the waves battered the shore. With every gust, the tent flapped, shuddered, and shook. The rain drummed on the rain fly. I spent another restless night, but I was dry and warm and the boat stayed where I had put it.
Friday dawned windy under a cloudy, drizzling sky. The wind persisted but the rain was letting up. I read more of the book, which transported me to join a tormented Jack and his girlfriend trapped in a cemetery. Their escape was going to be long in coming, so I returned to my own confinement and made coffee. Visibility across the St. George Sound was poor, and the wind was onshore and above 15 knots.
I walked east along the main road to the island’s transportation hub, a wooden ferry dock and a row of old cars parked on the sand in the midst of pines and stunted oak.
There would be no boating, so I got ready to spend the day on the island. I decided to walk Dog in the other direction. I headed northeast along a road of packed sand and broken seashells. This largest part of the island was a mix of wetlands and patchy forests of scrub oak and pines. Hills lumped up out of the sand. The houses were set back from the road to be close to the beach on the southeasterly side of the island. While none appeared to be occupied, most of them were neatly maintained. One house appeared to be little more than a pile of boards and old house fixtures pieced together on a plot with a view of the gulf. The sand track wended inland where several other sand roads converged.
The clearing in the woods is not a meadow but an airport. The grassy landing strip looked a little rough to me, but it only costs $10 to land here; $15 if you want to stay overnight.
I followed the widest track and passed a stretch where cars and trucks flanked the road leading past a garbage station and the entrance to the nearby Nils Pehrson Airport with its 1/2-mile-long landing strip of grass and sand to the ferry dock and the docks of the Dog Island Yacht Club. It was clearly the hub of the island but the only people I saw were a couple, at a distance, boarding their boat and heading north out of Tysons Harbor, the ¼-mile-wide notch that cut almost all the way through the largest part the island.
On the walk back to camp, a rusting 20-year-old Ford truck passed me, and the driver stuck his hand in the air for a wave. In the 6 miles that I walked, he was the only person I saw on the road.
When I reached camp, the northeast wind was still blowing over 15 knots. Grasses bent in the wind and the surf was pounding the sand, sending spray flying. My tent lurched away from the gusts. The sun was a circle of dusty white in an overcast sky but cast no shadows. The visibility was at least a mile, and I felt antsy. I struck camp with the thought of moving toward the southwest end of the island and finding a less windy place to camp. I took my time and packed carefully, balancing the boat with the load and launched without getting too wet. Only a few strokes into the sound, a wave sluiced over the whole boat and dumped 6″ of water into the cockpit. I stopped to bail; a frustrating task, as the rowing unit blocks easy access to the bilge for my gallon-jug bailer.
Clouds marched overhead, the wind gusted just shy of 20 knots, so it was a slog to get outside the surf driving the boat onto the beach. When I finally got far enough off the beach, I was able to turn with the wind and start to enjoy the rowing a little more. I rowed with the wind for 45 minutes from Ballast Cove, around Cannonball Point to Shipping Cove. A hundred yards from Dog Island West’s northwest point, I saw above the beach a dip between scrub-covered dunes where I might get the tent out of the wind. When I pulled ashore, the wind was sweeping the clouds away from the sun. I unloaded the boat and carried my gear to the sheltered spot I’d seen. I set my rain-soaked, sand-gritty gear out to air-dry.
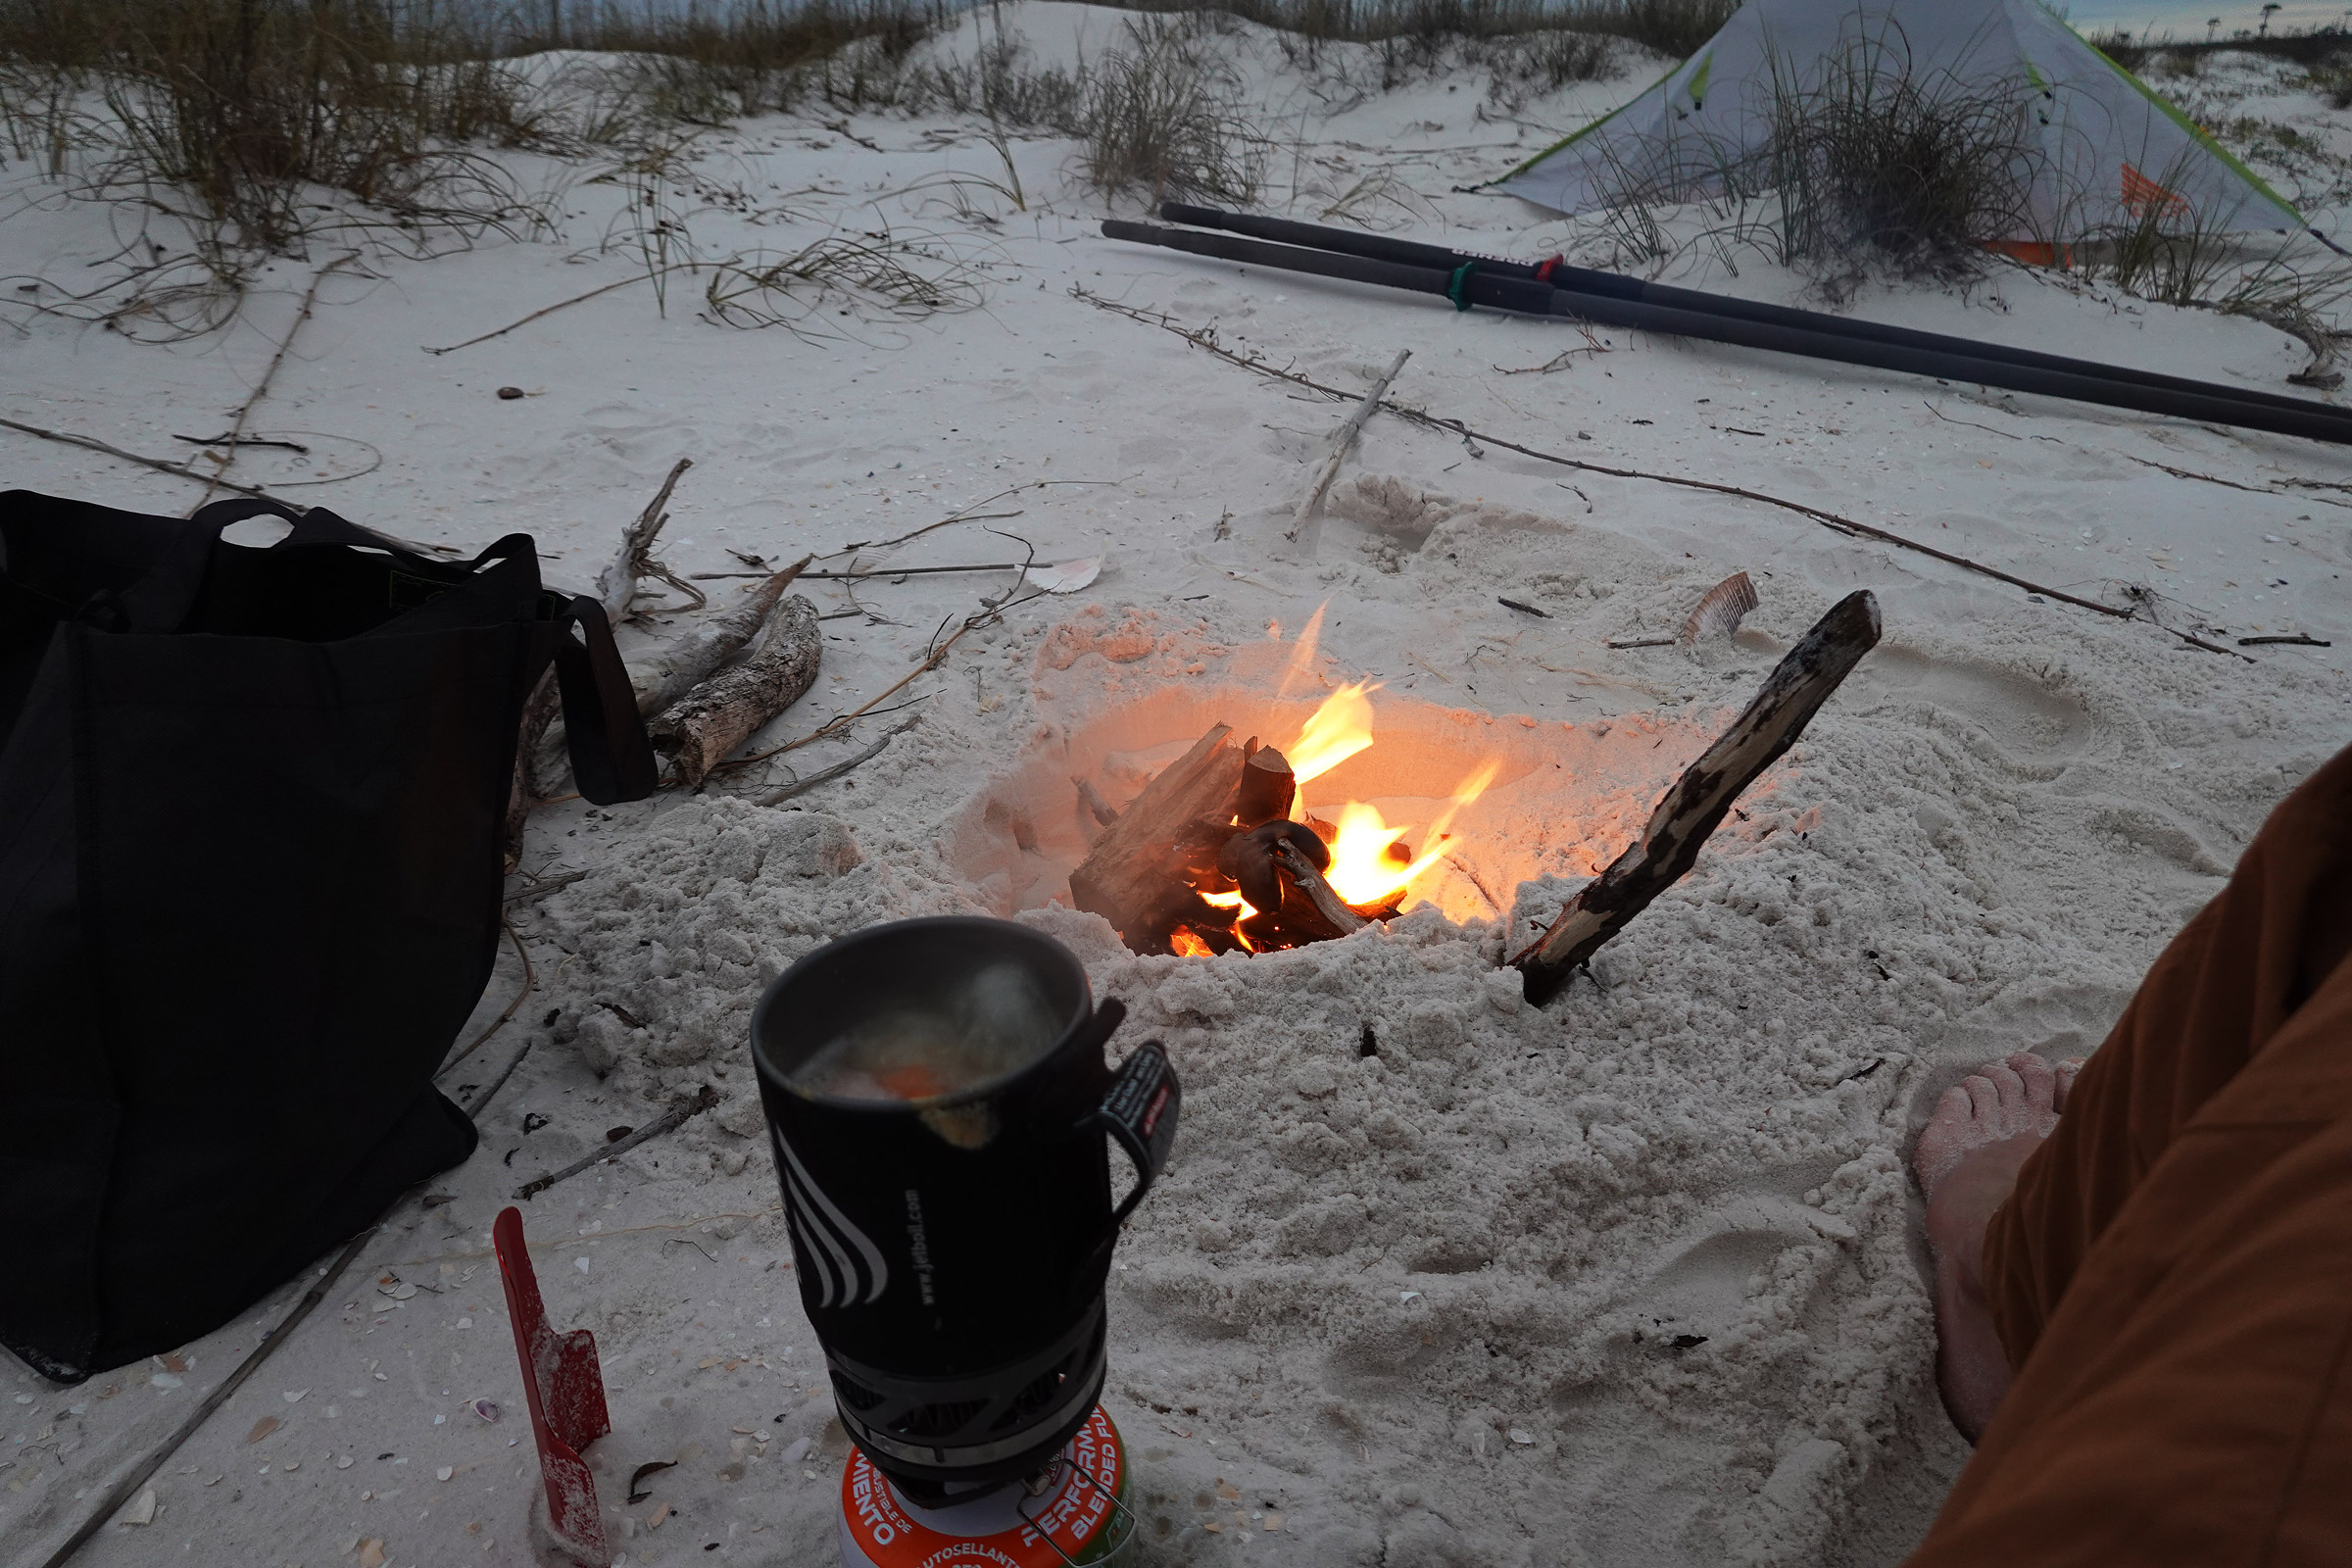
I dug a pit in the still wet sand and fired up more of my good oak firewood that had been kept dry in the wherry’s hold. After dinner—grilled salmon crumbled over freshly cooked pasta—things were feeling a bit more normal after all the rain, wind, and stifling humidity. The clouds had dried up and disappeared and the sun, suspended over the bright metallic blue water of St. George Sound, turned orange red as it slanted toward the horizon. It was soon gone, and Venus gleamed in the twilight, followed by stars, one by one. Before the campfire’s coals winked out, a half-moon appeared on the horizon and dimmed the stars with its glow. Under the clearing night sky, it was going to get much colder. I was already wearing all my clothes: four shirts, a down jacket, fleece pants, knit hat, and some cheap cotton gloves. I crawled into the tent and slipped into my sleeping bag wearing the whole ensemble and even then, I had to close the top of the bag around my head with just my face exposed to the chill. I stayed just warm enough to fall asleep and stay asleep through the night.
In the morning there was a bit of frost on the rain fly. It was still windy, and I stayed tucked in my sleeping bag until the sun came up. I got up—I didn’t need to get dressed— and had breakfast huddled behind the tent, out of the wind, with my hands wrapped around a cup of hot coffee and a bowl of steaming oatmeal in my lap.
Later that morning, I was pretty sure I could be more comfortable out of the wind if I pulled around the corner of Dog Island West. I broke camp and launched in waves as high as 3′. After shipping a water into the cockpit, I rowed around the northwest corner of the island into a utopian calm bathed in sunshine, with just enough breeze to keep the mosquitoes off. For an hour I rowed effortlessly while the boat split the still water and left a fan of ripples spreading in the lee. I found a sugar white sand beach at the southwest corner of Dog Island West. St. George Island was clearly visible to the west, 1-1/4 miles away across East Pass. The Gulf of Mexico waters to the south were variegated shades of blue, speckled with whitecaps tumbling and torn from the tops of the waves. I tucked the tent up against some waist-high dunes on the east edge of the peninsula and schlepped the gear farther than I wanted to between boat and camp. The effort afforded me a camp out of the wind and warmed by the bright warm sun. I spent the day doing what I need to do more of: idling. I took walks in both directions, looked for a cockleshell for my wife’s garden, and sat in my camp chair. In the lee, pelicans squabbled amongst each other and fluffed themselves. Some took flight, circled above the water and then made a screaming dive into the ocean. They came up, beaks-first, and with a little shake and neck stretch, down went their dinners.
At the second campsite, I tucked the tent in a little swale on a Dog Island West beach to keep it out of the wind. The sun had returned, but I could feel the temperature dropping fast. The point that separates Shipping Cove from East Pass can be seen at the far end of the beach, and the mainland lies about 3-1/3 miles away across St. George Sound.
That evening I was grateful for the well-protected campsite: I was out of the wind again and even a bit warmer than the previous evening. I burned the last of the firewood in a sandy hollow and watched as the sun cast beams of pinks and reds as it set. The stars unfolded once again across the sky, I picked out Vega, the Big and Little Dipper, Cassiopeia, Orion, and Castor and Pollux while the half-moon rose over the eastern horizon.
With dinner cooking on the camp stove, I soaked up warmth from the fire. After the sun set, the cloudless sky glowed an electric blue.
By sunrise, the wind was churning out of the east, and some waves were spiking tall enough that spume was blowing off their tops. The homeward leg to Carrabelle would be on a north by east heading, cutting across the easterly wind.
I struck camp slowly, as slowly as I could to wait out the wind and extend the time I could spend on the island. After a short row from my camp on the East Pass shoreline to northwest point of Dog Island West, I beached the boat and wandered up the dunes to see the crossing better. The higher vantage point revealed whitecaps, spume, and steep, short-troughed waves. I kicked around the sand dunes, wandered the beach, lay in the lee of 3′-high dunes, and soaked up the sun’s warmth, and waited. And waited. The weather continued to batter the sound. It may have been my imagination that it was getting better, but before the overcast sky became any darker, I double-checked the hatch covers, secured my gear in the cockpit, checked the rowing rig, tugged the straps on my PFD tight, and launched into the soup.
It not only looked miserable, it was miserable. Short, steep waves stopped the boat in its tracks. The largest swept over the boat. But I found that I could crab across the wind and waves just as well as row against the wind. Little by little, I made progress. The cockpit was swimming in seawater. I lost way too much ground each time I stopped to bail, but it had to be done or the volume of water sloshing in the cockpit would make the boat unstable. But I could put the oar handles under my knees with the oar blades just under the water to keep the boat secure and stable and free my hands for bailing.
Back at rowing, a little progress turned into more. And then a little more. When I had time to look, I was halfway across the sound. As I got closer to the mainland, the waves flattened out a bit and the wind eased. Hot from the exertion of rowing, I peeled off my knit hat and tossed it into the bottom of the boat. Dog Island grew more distant with each stroke of the oars and all but vanished when I rowed into the river mouth at Carrabelle.
This trip, as I had imagined it, didn’t have two and a half days of rain. It didn’t have five days of wind over 15 knots, or temperatures dipping to low 40s and even the upper 30s. I didn’t row nearly as many miles as I had imagined, ran into a pole, and bent up the outrigger. I met no one, but the sun, moon, and stars, the sand and the sea kept me company, and I returned to the Carrabelle boat ramp feeling every bit as renewed as I had hoped I would be.
Bill Hutton has been building, sailing, rowing, paddling, and driving small boats since he and his brother and father couldn’t get one of their “winter build boats” out of the basement one spring without taking out the double door and frame. In his 20s, he thought he was going to sail around the world in the BOC sailing race. That never came to pass, but he did sail solo from Elfin Cove, Alaska, to Victoria, B.C., nonstop, for practice. Over the years, in addition to small boats, he worked with mostly Native Alaskan students in Alaska schools, fished commercially for halibut and salmon, walked the mountains, ran some rivers, bicycled multi-day routes, and enjoyed adventures with his wife and family. He now lives in Florida for most of the year.
If you have an interesting story to tell about your adventures with a small boat, please email us a brief outline and a few photos.
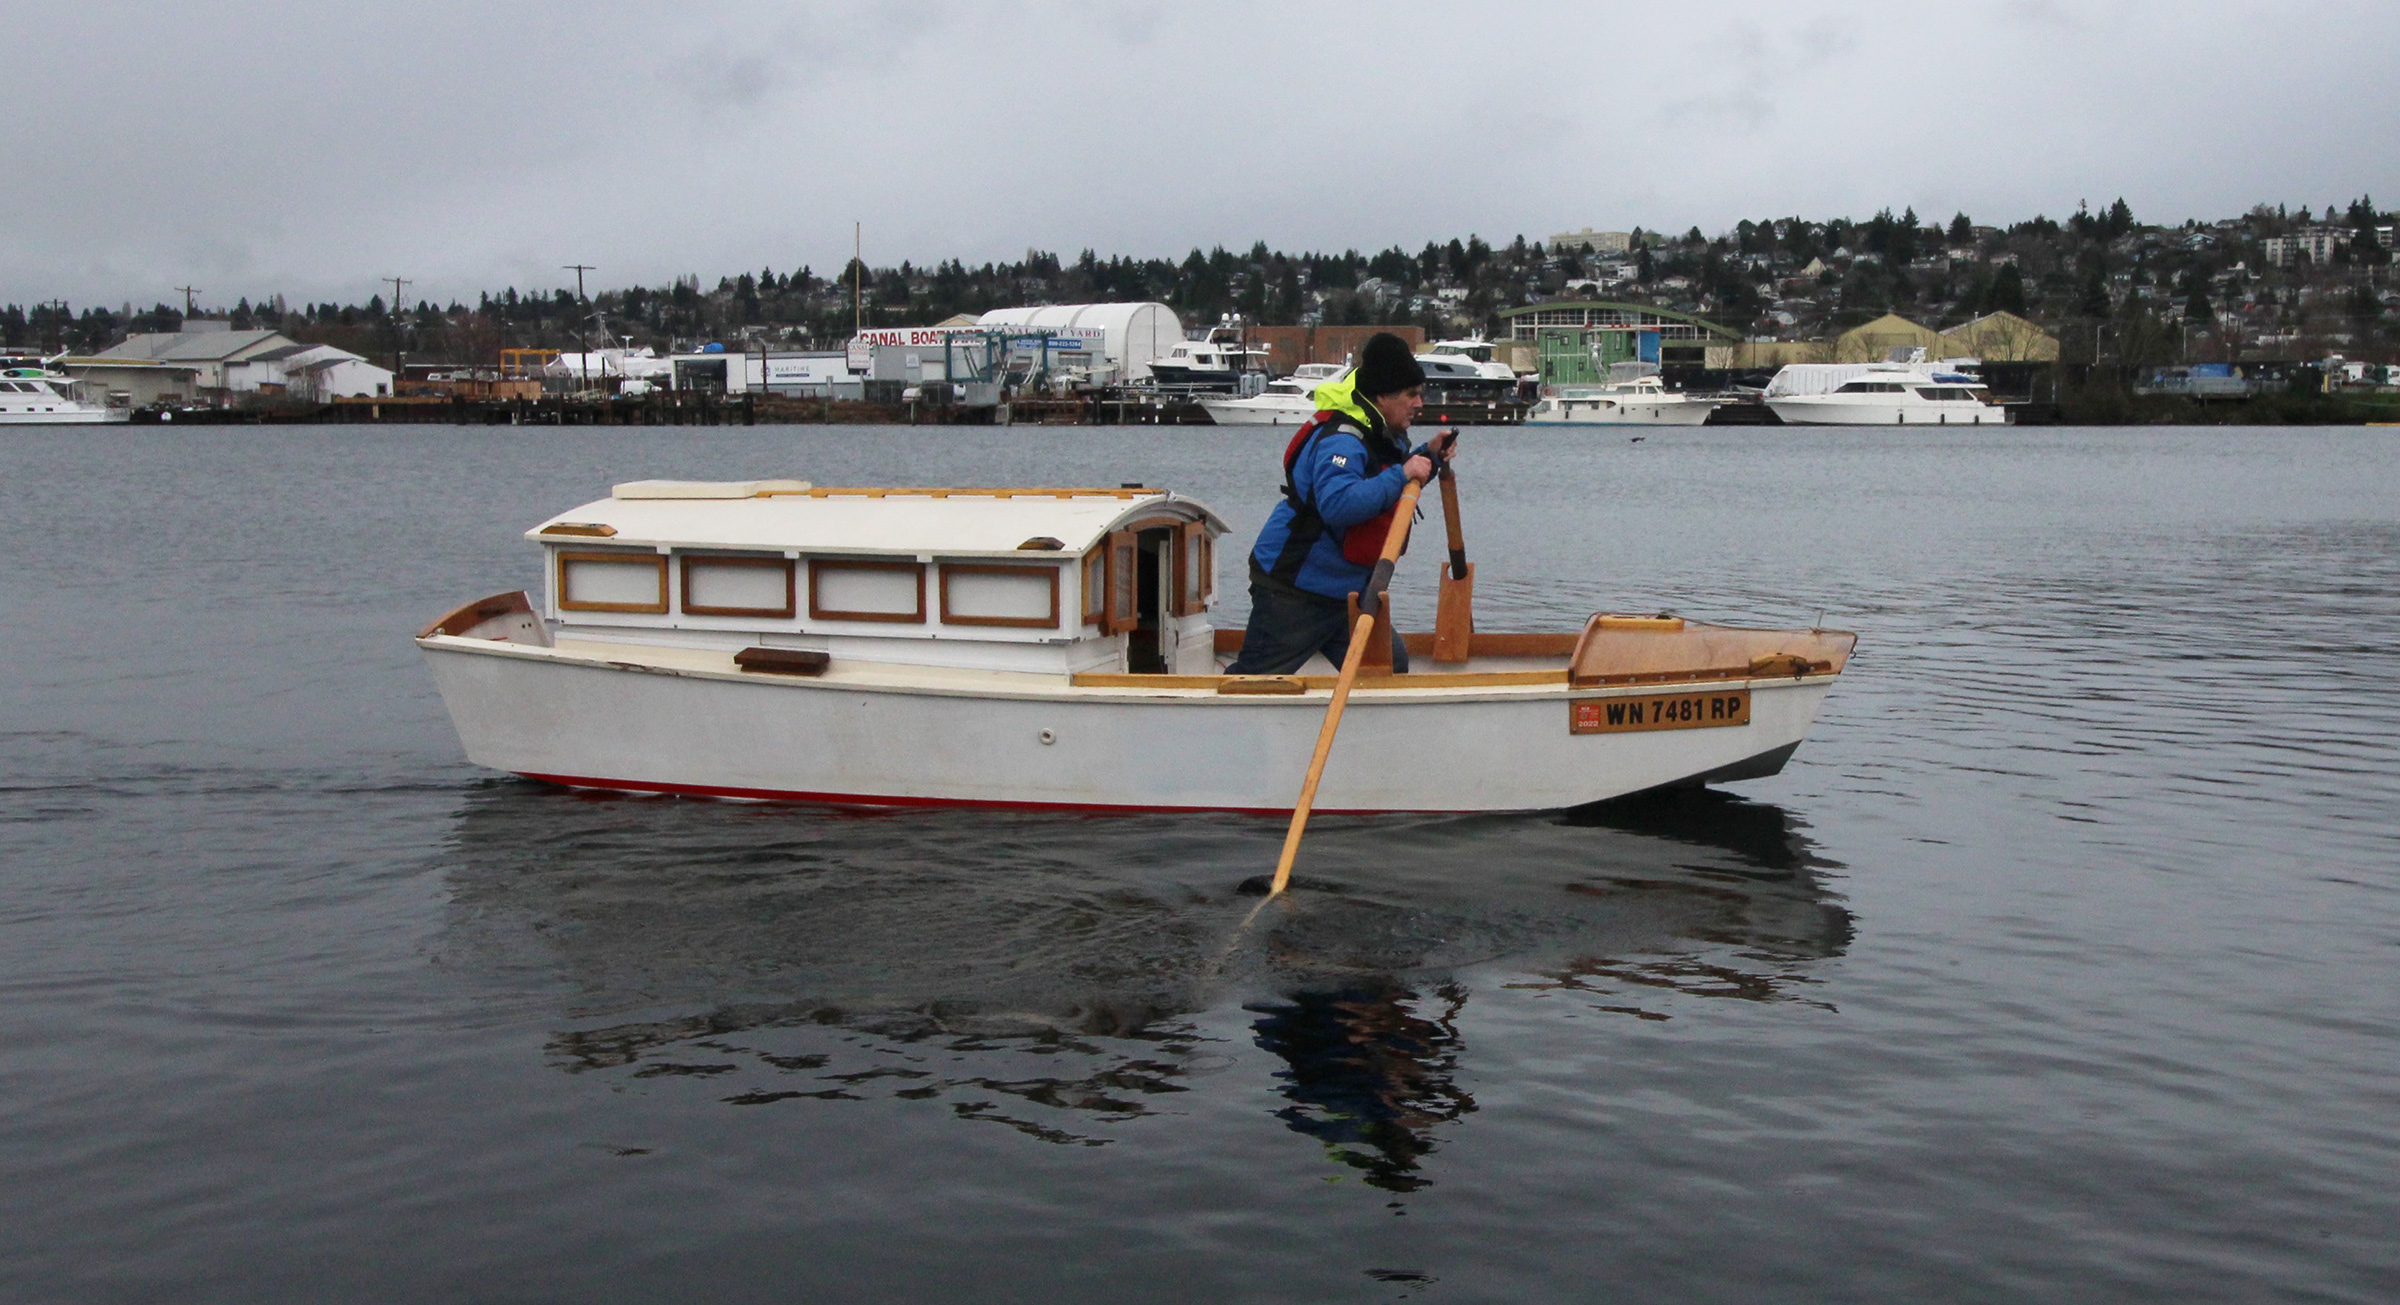
People need to see where they are going; racing-shell rowers and hockey’s defensive players are about the only ones that don’t. For the rest of us rowers, there are times and places where being able to see the path ahead is really certainly useful.
Rowing in tightly constrained water or in the midst of boat traffic is challenging unless there is a cox steering the boat. So, rowers in Venice’s narrow canals and in Louisiana’s winding creeks and bayous stand and row facing forward, while lobstermen in Maine who work around rocks and ledges and in narrow coves and inlets set up their peapods or double-enders to be rowed facing forward.
David Cockey
The two extended oarlocks on the left belong to the Ames peapod. The clearly different shapes suggest that they were designed by different companies. The tallest of the group is the Standing Oarlock Horn from Duck Trap Woodworking. It raises the oars 6” and like the Ames locks, it has a 3/4” shank. At right is a standard oarlock with a 1/2” shank.
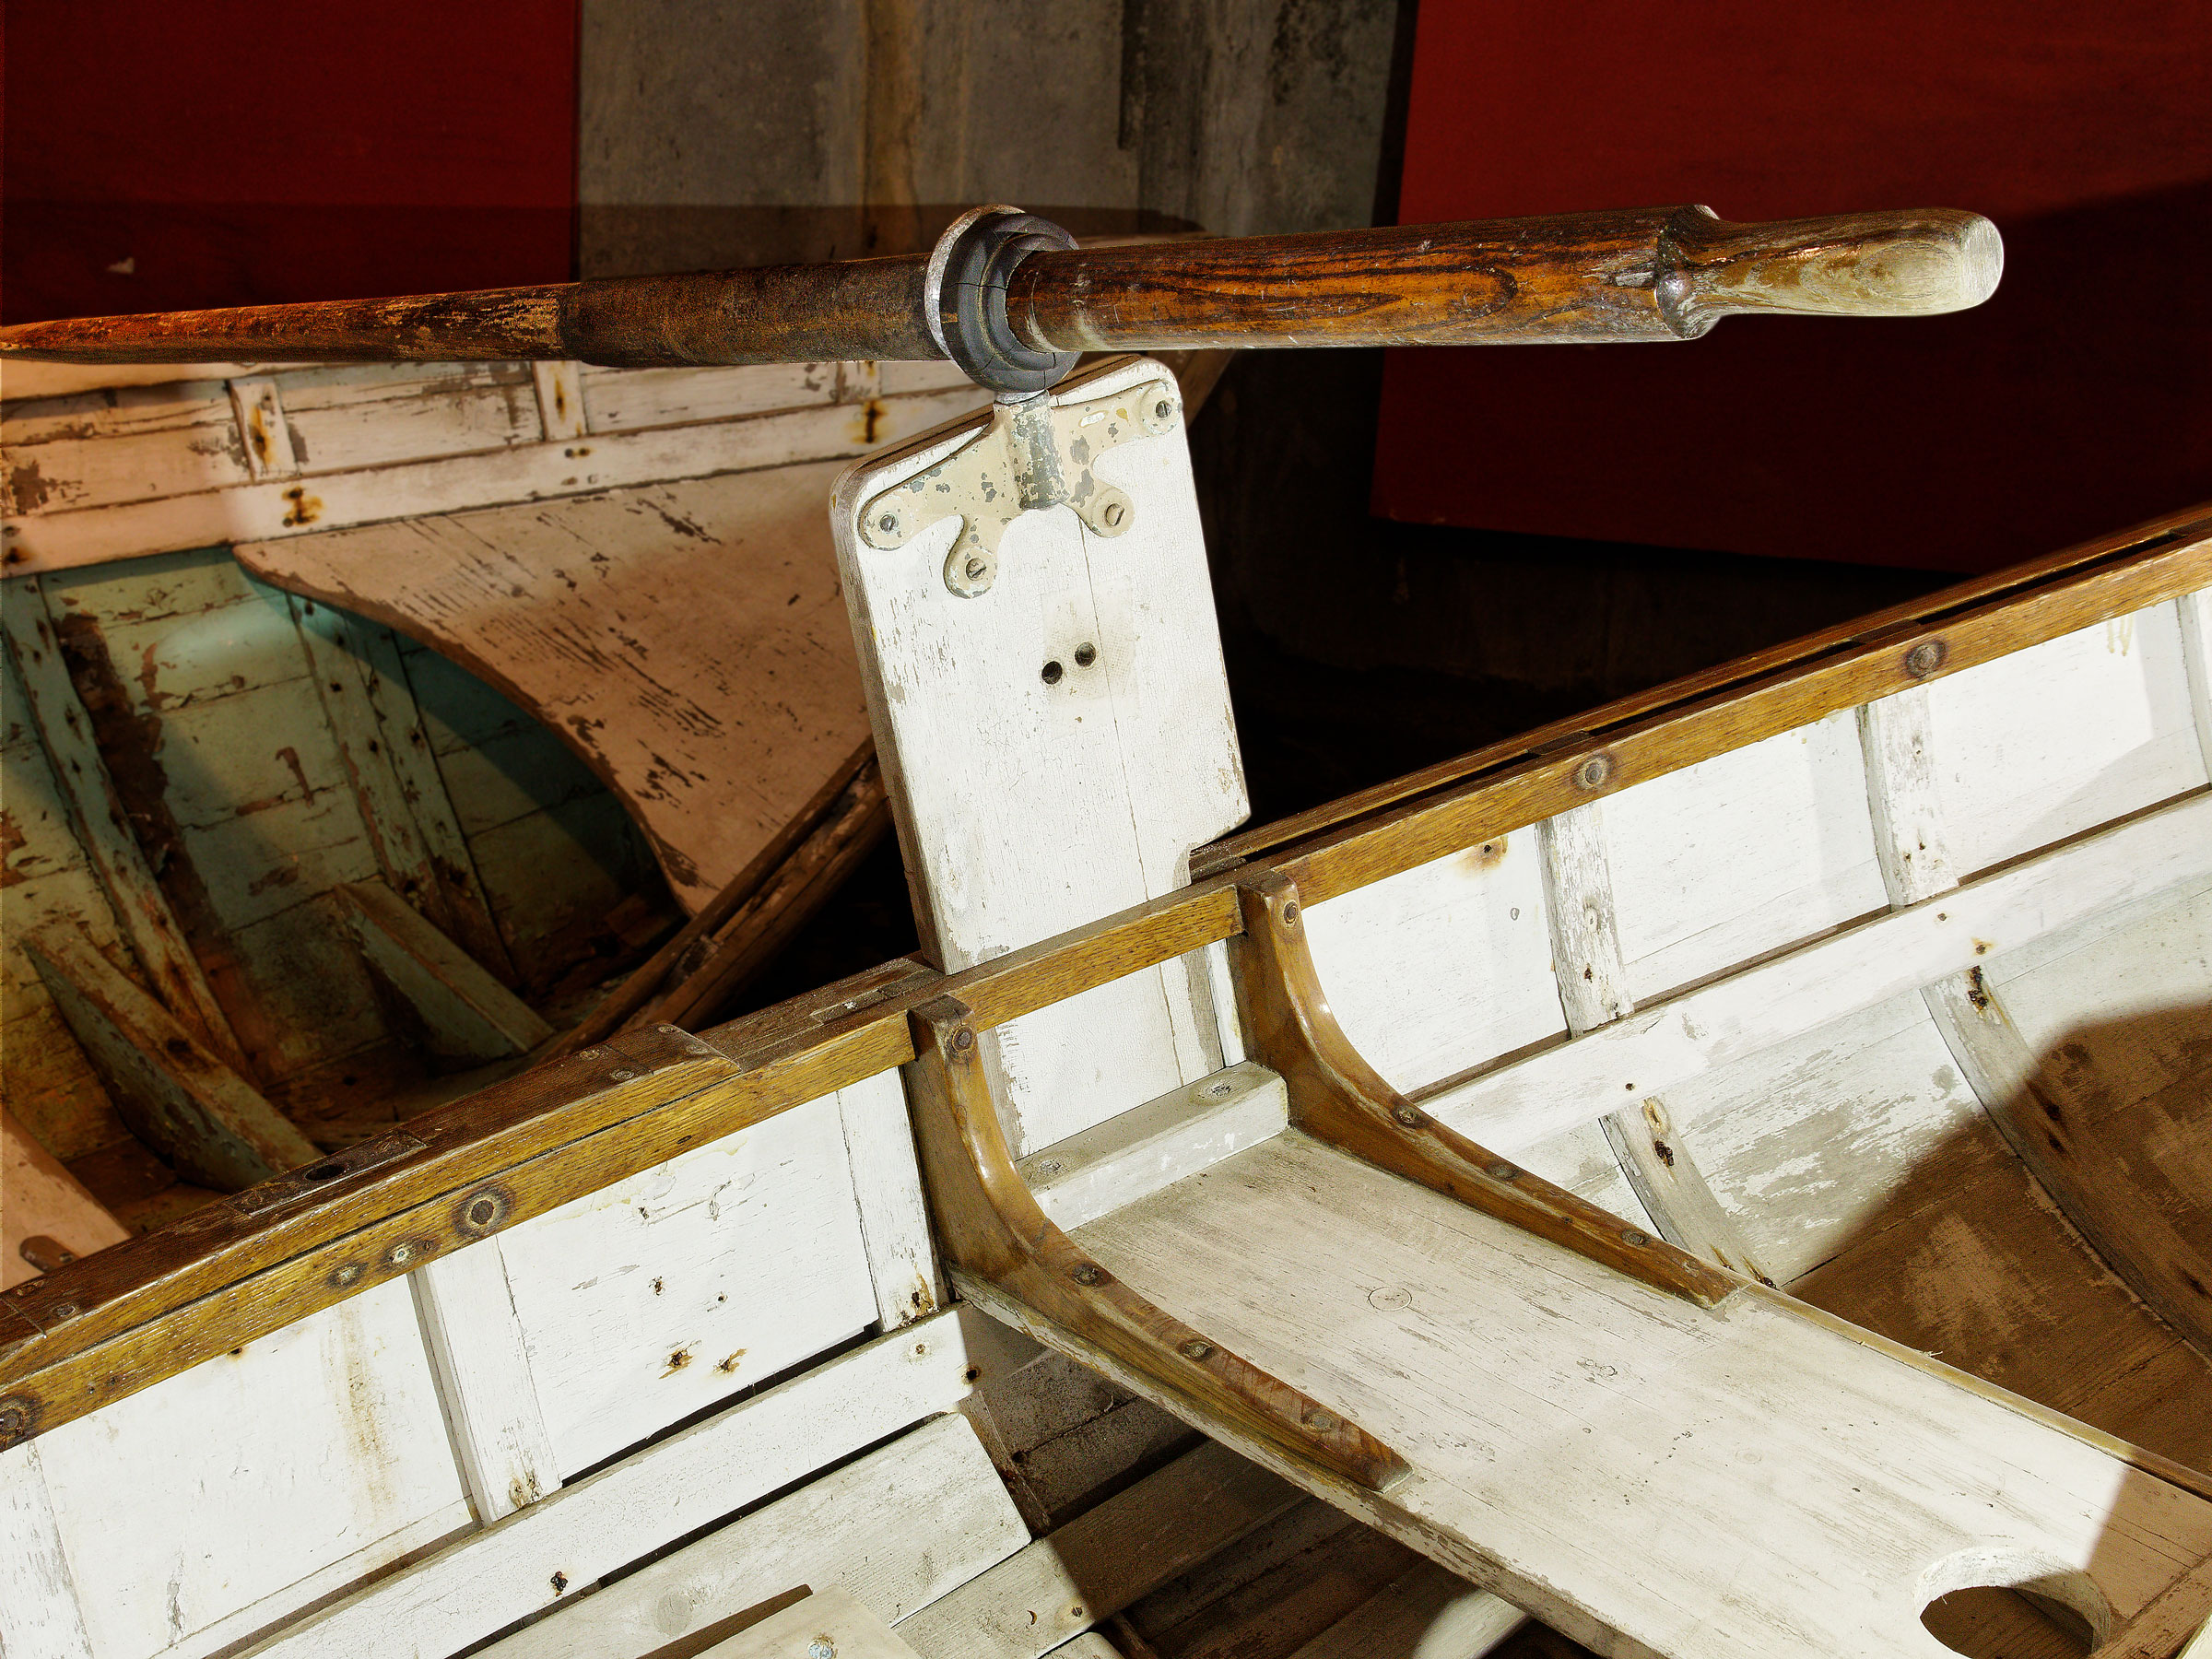
Among the peapods that David Cockey and I studied at Mystic Seaport Museum, Maine Maritime Museum, and Penobscot Marine Museum there were several set up for forward-facing, stand-up rowing. What looks to be the last of a long line of working peapods is at the Penobscot Marine Museum. It was built circa 1950 for Orren Ames of Matinicus Island and uses a type of oarlock with an extended shaft above the shoulder and a long shank below it. The oarlocks with the boat are not a matched pair and are evidently from different makers, suggesting that there must have been enough demand for more than one foundry and machine shop to make them. Ames had specified that the sockets for the oarlocks would be right over the central thwart. This position worked only for rowing while standing and facing forward; the boat can’t be rowed from a seated position while facing backward.The shank on each of Orren’s locks is turned to a ¾″ diameter and is 6″ long from the bottom end to the shoulder. The shank slips through a ¾″ hole in a metal plate on top of the rail, and its end is captured by a “step” made of a block with another metal plate with a ¾″ hole. The locks raise the oars 4” above the shoulder. Elevated oarlocks like these are still available from Walt Simmons of Ducktrap Woodworking in Lincolnville, Maine. They also have a ¾″-diameter, 5 ¼″-long shank and provide a 6” lift above the shoulder.
David Cockey
The Ames peapod has its only set of oarlocks positioned over the center thwart and could only be rowed standing up. The extended locks raise the oars 4” above the rail.
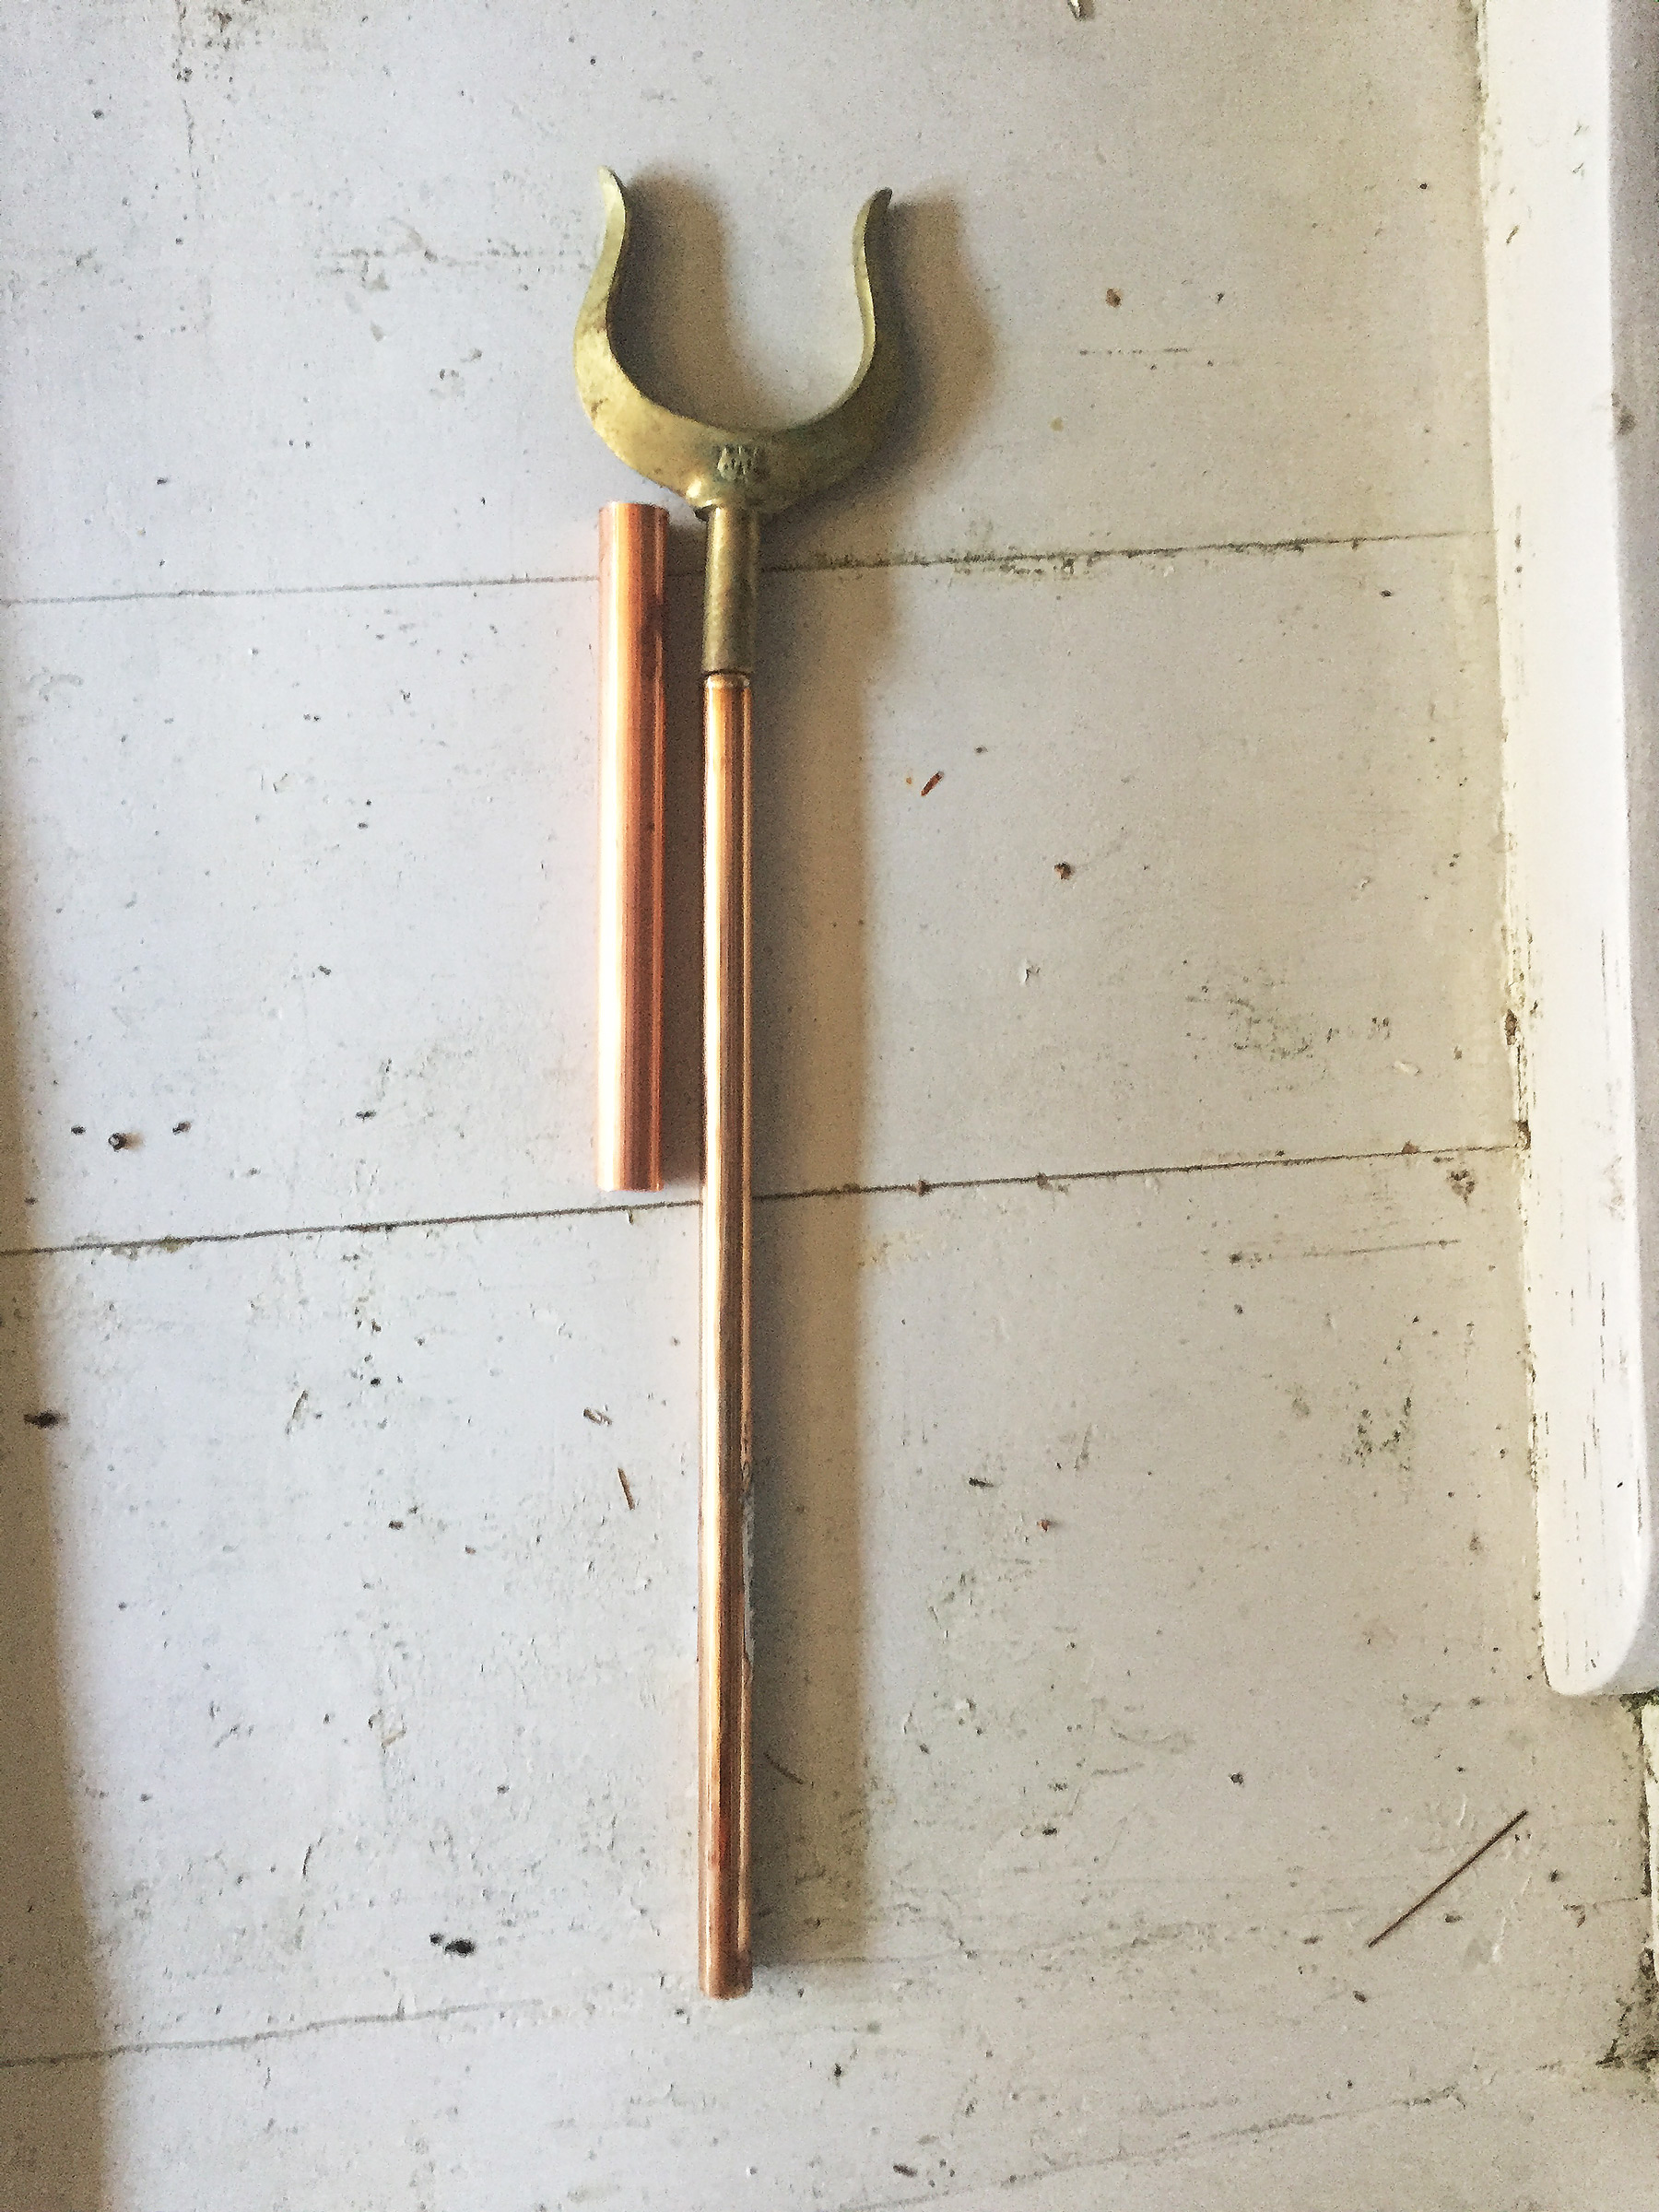
Simple, do-it-yourself elevated locks can be fabricated from pipe with a 1/2″ inner diameter that can take an oarlock with a ½″ shank. A ½″ rod is inserted into the bottom end of the pipe to serve as the extension’s shank. These pipe-and-rod extensions might not be as sturdy as a one-piece cast lock, but you could use iron pipe for the extension if you keep it painted. All tubes and pipes—whether copper, brass, or iron—available from a hardware store will have an inside diameter bigger than an oarlock, so you’ll need to use something like G/flex thickened epoxy to hold them together (unless you can drill and rivet them, which is what was done on the old ones). These extensions slide through an oarlock socket or through a plate on the gunwale; either way, there should be a “step” to capture the rod’s bottom end. The location of the step can be on a thwart on a boat with nearly vertical sides, otherwise it may be determined by the point at which the rod makes contact with the planking. A bronze bushing set in the wooden base can prevent the base from wearing away.
Ben Fuller
As a test of this extension, I clamped the 1/2″ bronze bar horizontally in a vice with 3 ½″ jaws then slid a 6″ piece of 1/2″ (nominal) copper tube onto the shaft. I had cut the eye off an oarlock which left me with 1-1/2″ bearing, so I had 4-1/2″ of shaft in the pipe. The vice jaws are 3-1/2″. With 45 pounds of lead hanging on the recurved area of the oarlock horns, I put a straight edge on the tube and could see no deflection. With the bit of slop in the system, I would have seen point loading at the junction of shaft and lock. Potting both shaft and lock in G/flex would take out the point loading. Sitting on my erg with a seat fixed and pulling with one hand, I peak at about 50 lbs with an average of 35 lbs per stroke while pulling as hard as I can, much harder than I would normally pull.
With the extensions in the oarlock sockets, you can do a trial light row to see if you like the fore-and-aft placement. You may decide you want to have a socket a little farther forward, perhaps over the seat like many of the lobstermen have them, to put the boat in better trim. Once you decide, you can add a new set of oarlock sockets.
David Cockey
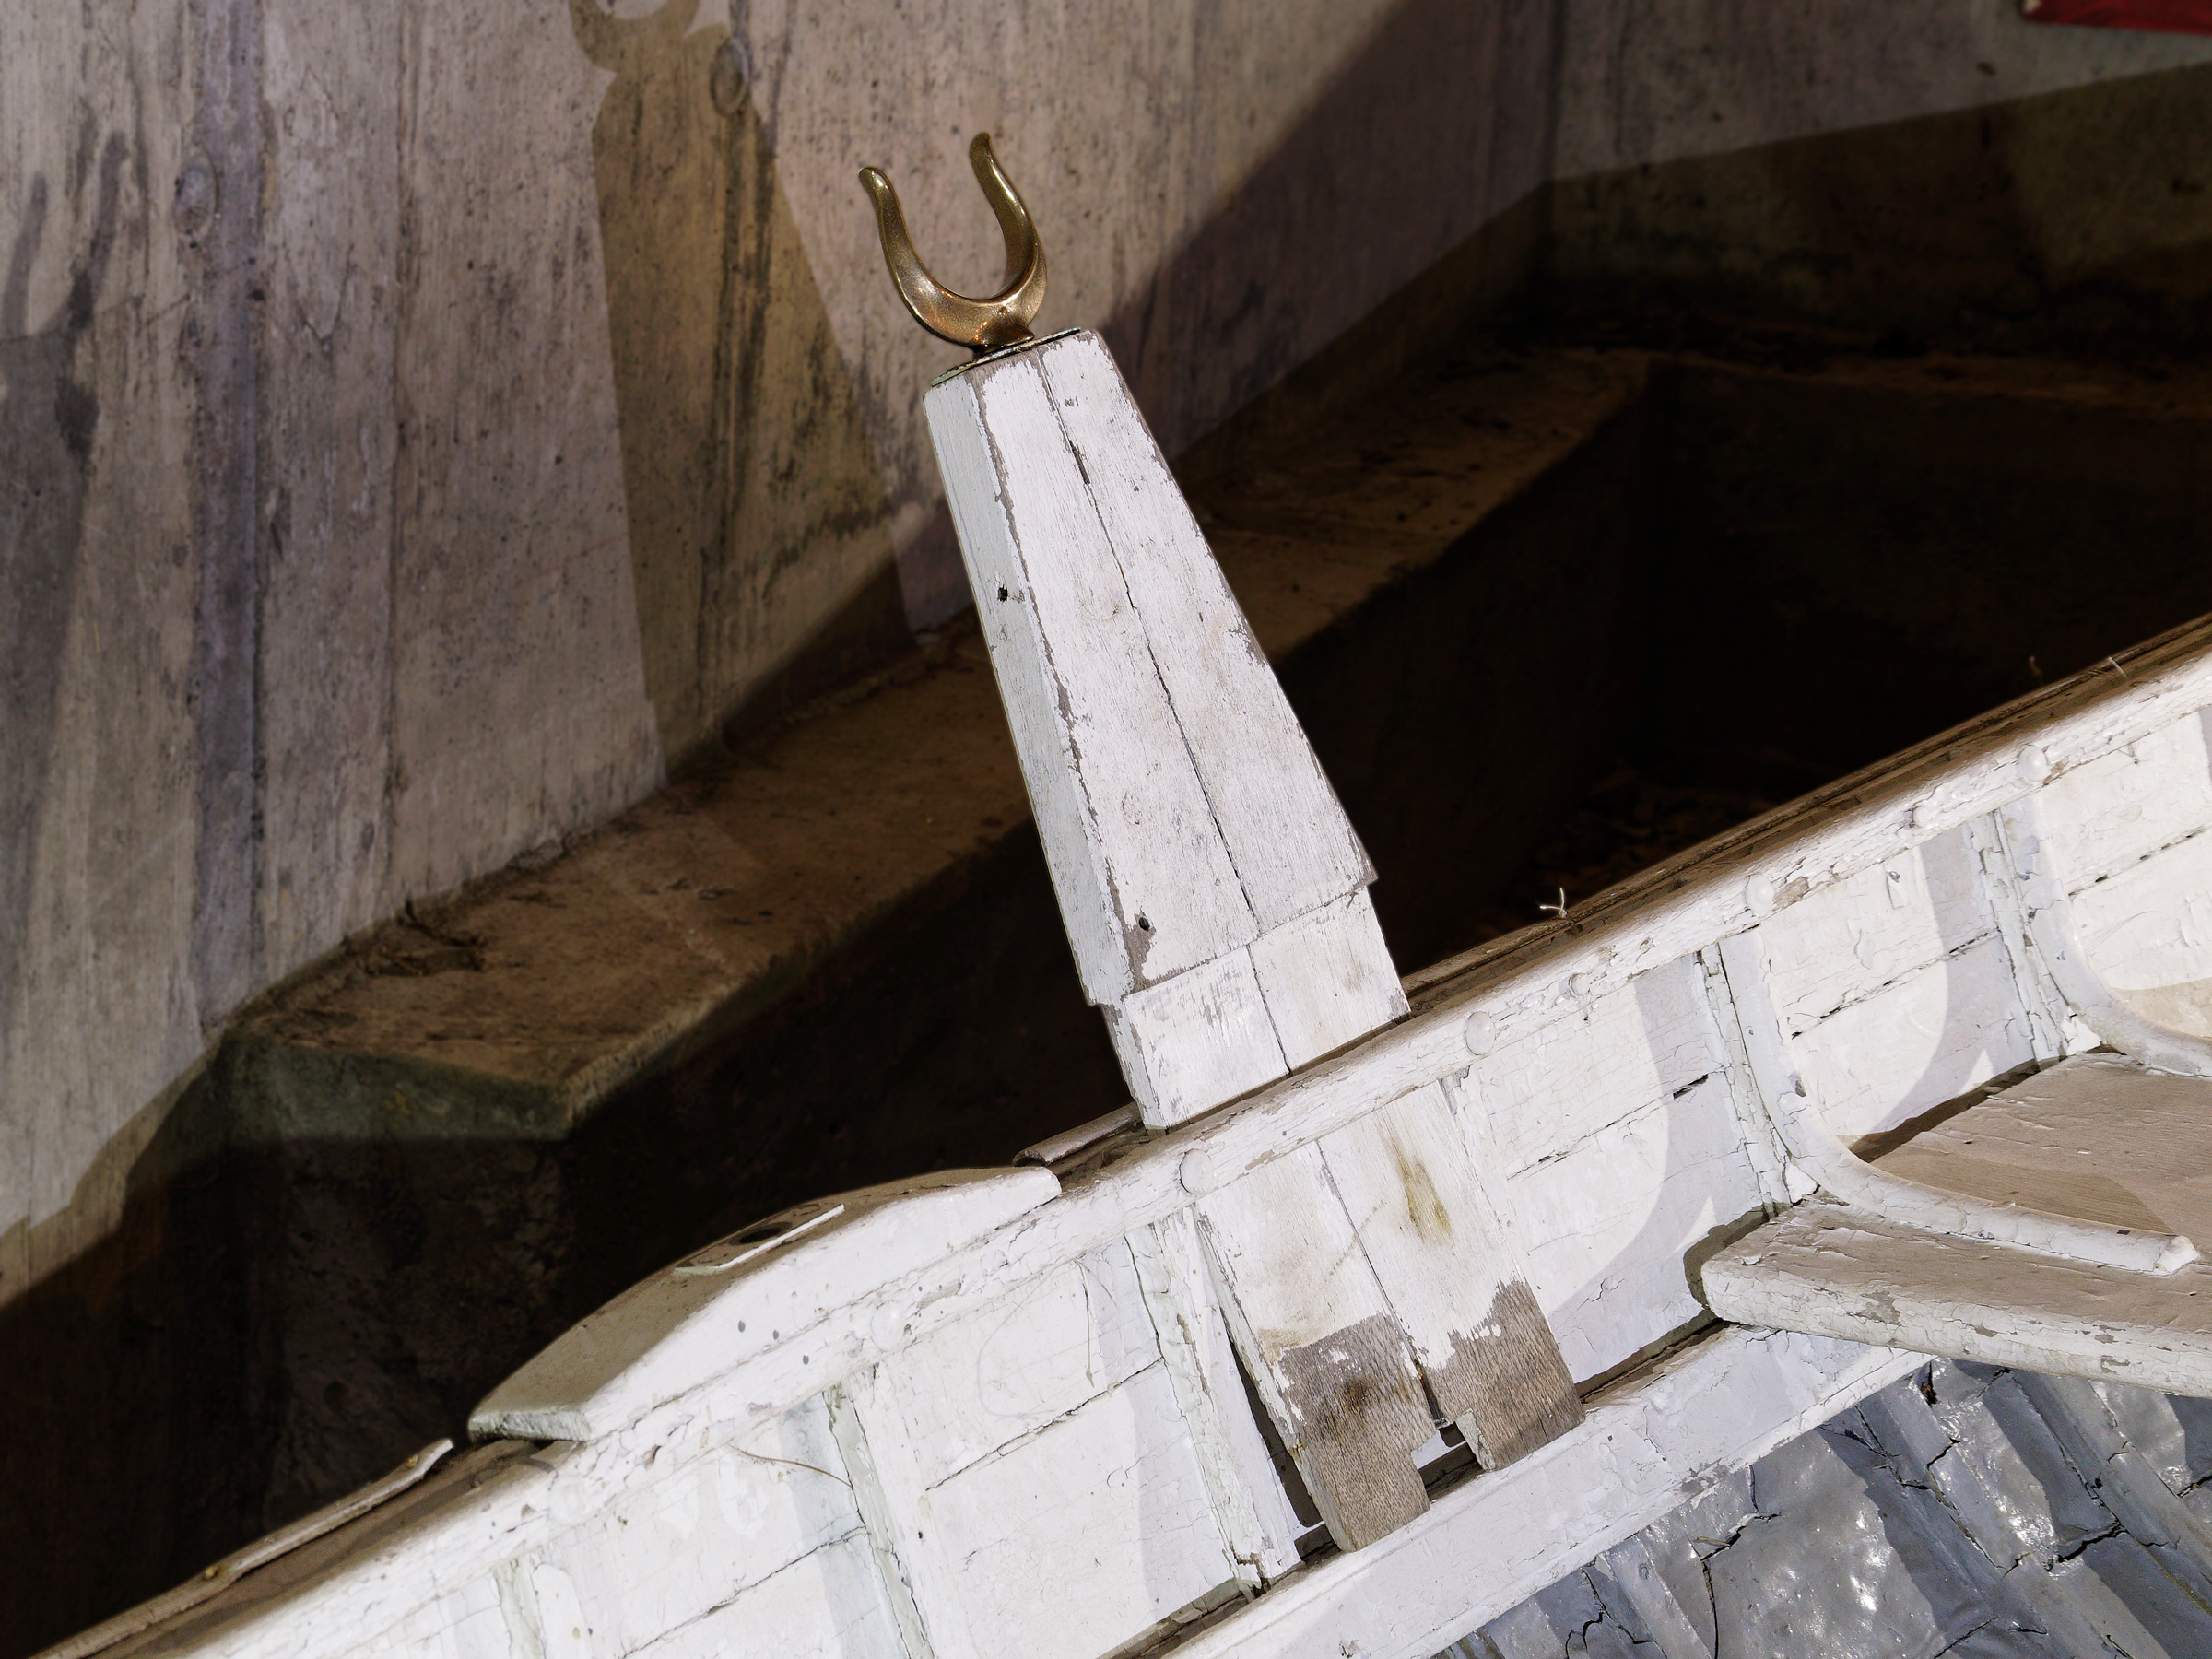
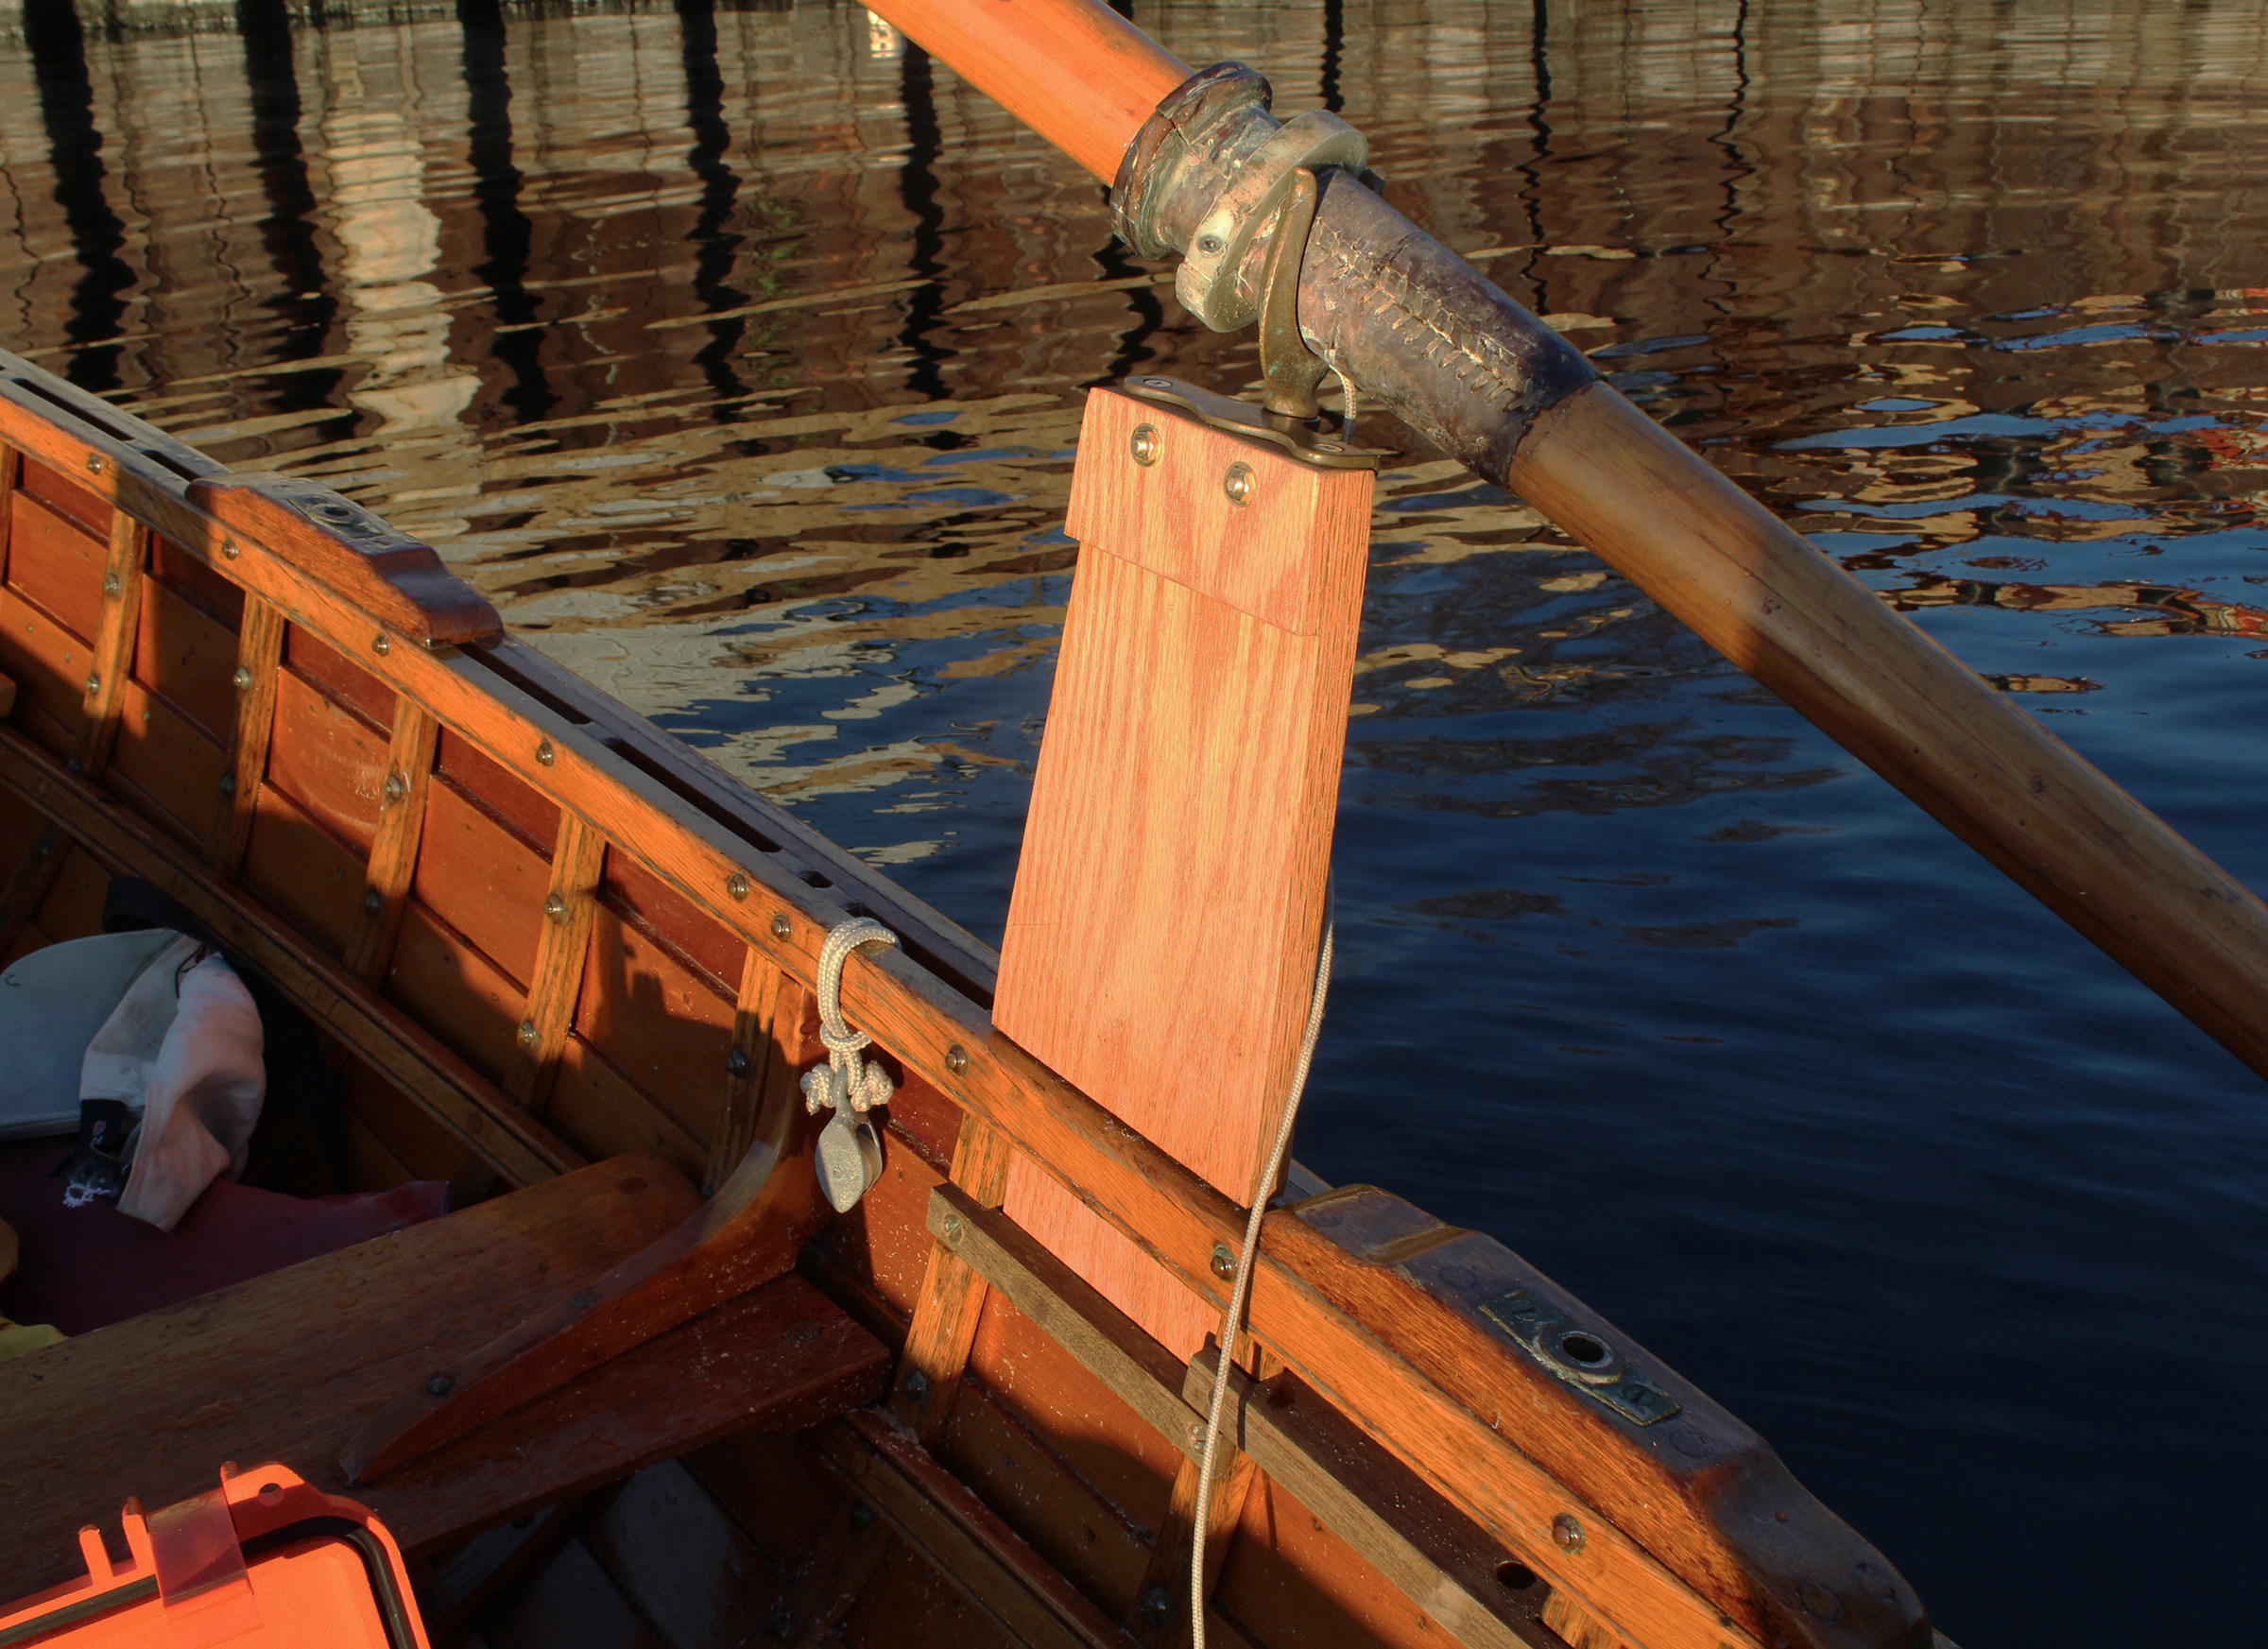
The wooden extension is fitted with a top-mounted socket and a standard oarlock. The “tenon” at its bottom slips between frames and between the inwale and sheer plank. It is curved to follow the sweep of the frames and clear the planking lap. When the tenon is fully inserted it tucks behind the riser and its shoulder rests on the rail.
Wooden extensions are also common. These usually need an inwale separated from the sheerstrake by frames or spacers to create a slot. The extension’s “tenon” is sized to fit in the slot and may be slightly curved to match the angle of the planking. The bottom can rest on a thwart, but some are shouldered so that they rest on frame ends and the inwale.
David Cockey
The wooden extension here is made for a side-mounted socket. Its tenon is most likely straight and follows the sheer plank as far as the lap with the next plank. A wooden cleat on the thwart keeps the tenon tight to the sheer plank.
The extensions, often made of oak, can be made wide enough at the top to take side-mounted sockets, or narrower to take top-mounted sockets. The height above the rail can vary; 8″ is the tallest we’ve seen in old peapods, but Maynard Bray, WoodenBoat’s technical editor, made a pair that has an extension 12″ above the rail of his peapod. He uses the same 7-1/2′ oars that he uses while sitting, but would prefer they were 1′ longer.
The choice of extensions, their height and mounting, is going to vary depending on your boat. The easiest modification is a fabricated metal tube and rod or cast lock system. A wooden extension could be easy to make for a boat with open gunwales, but a boat without slots between the inwale and sheer planks would need at least a wooden “partner” to hold the extension.
The oars normally used for the boat can also work with extended locks; you may have to pull the handles farther inboard, and that may pull the leathers away from the locks. If you have other oars, a pair 6″ longer may be a better match for stand-up rowing. Many of today’s rowing and sailing boats have high initial stability and are good candidates for stand-up push rowing, especially when the wind is light. You may enjoy the better view you get with your head high and looking in the direction you’re going.
Ben Fuller, curator of the Penobscot Marine Museum in Searsport, Maine, has been messing about in small boats for a very long time. He is owned by a dozen or more boats ranging from an International Canoe to a faering.
Editor’s Notes
Eager to follow Ben’s lead and do some stand-up rowing, I made three sets of extensions, two for my 14′ New York Whitehall and one for my cruising garvey.
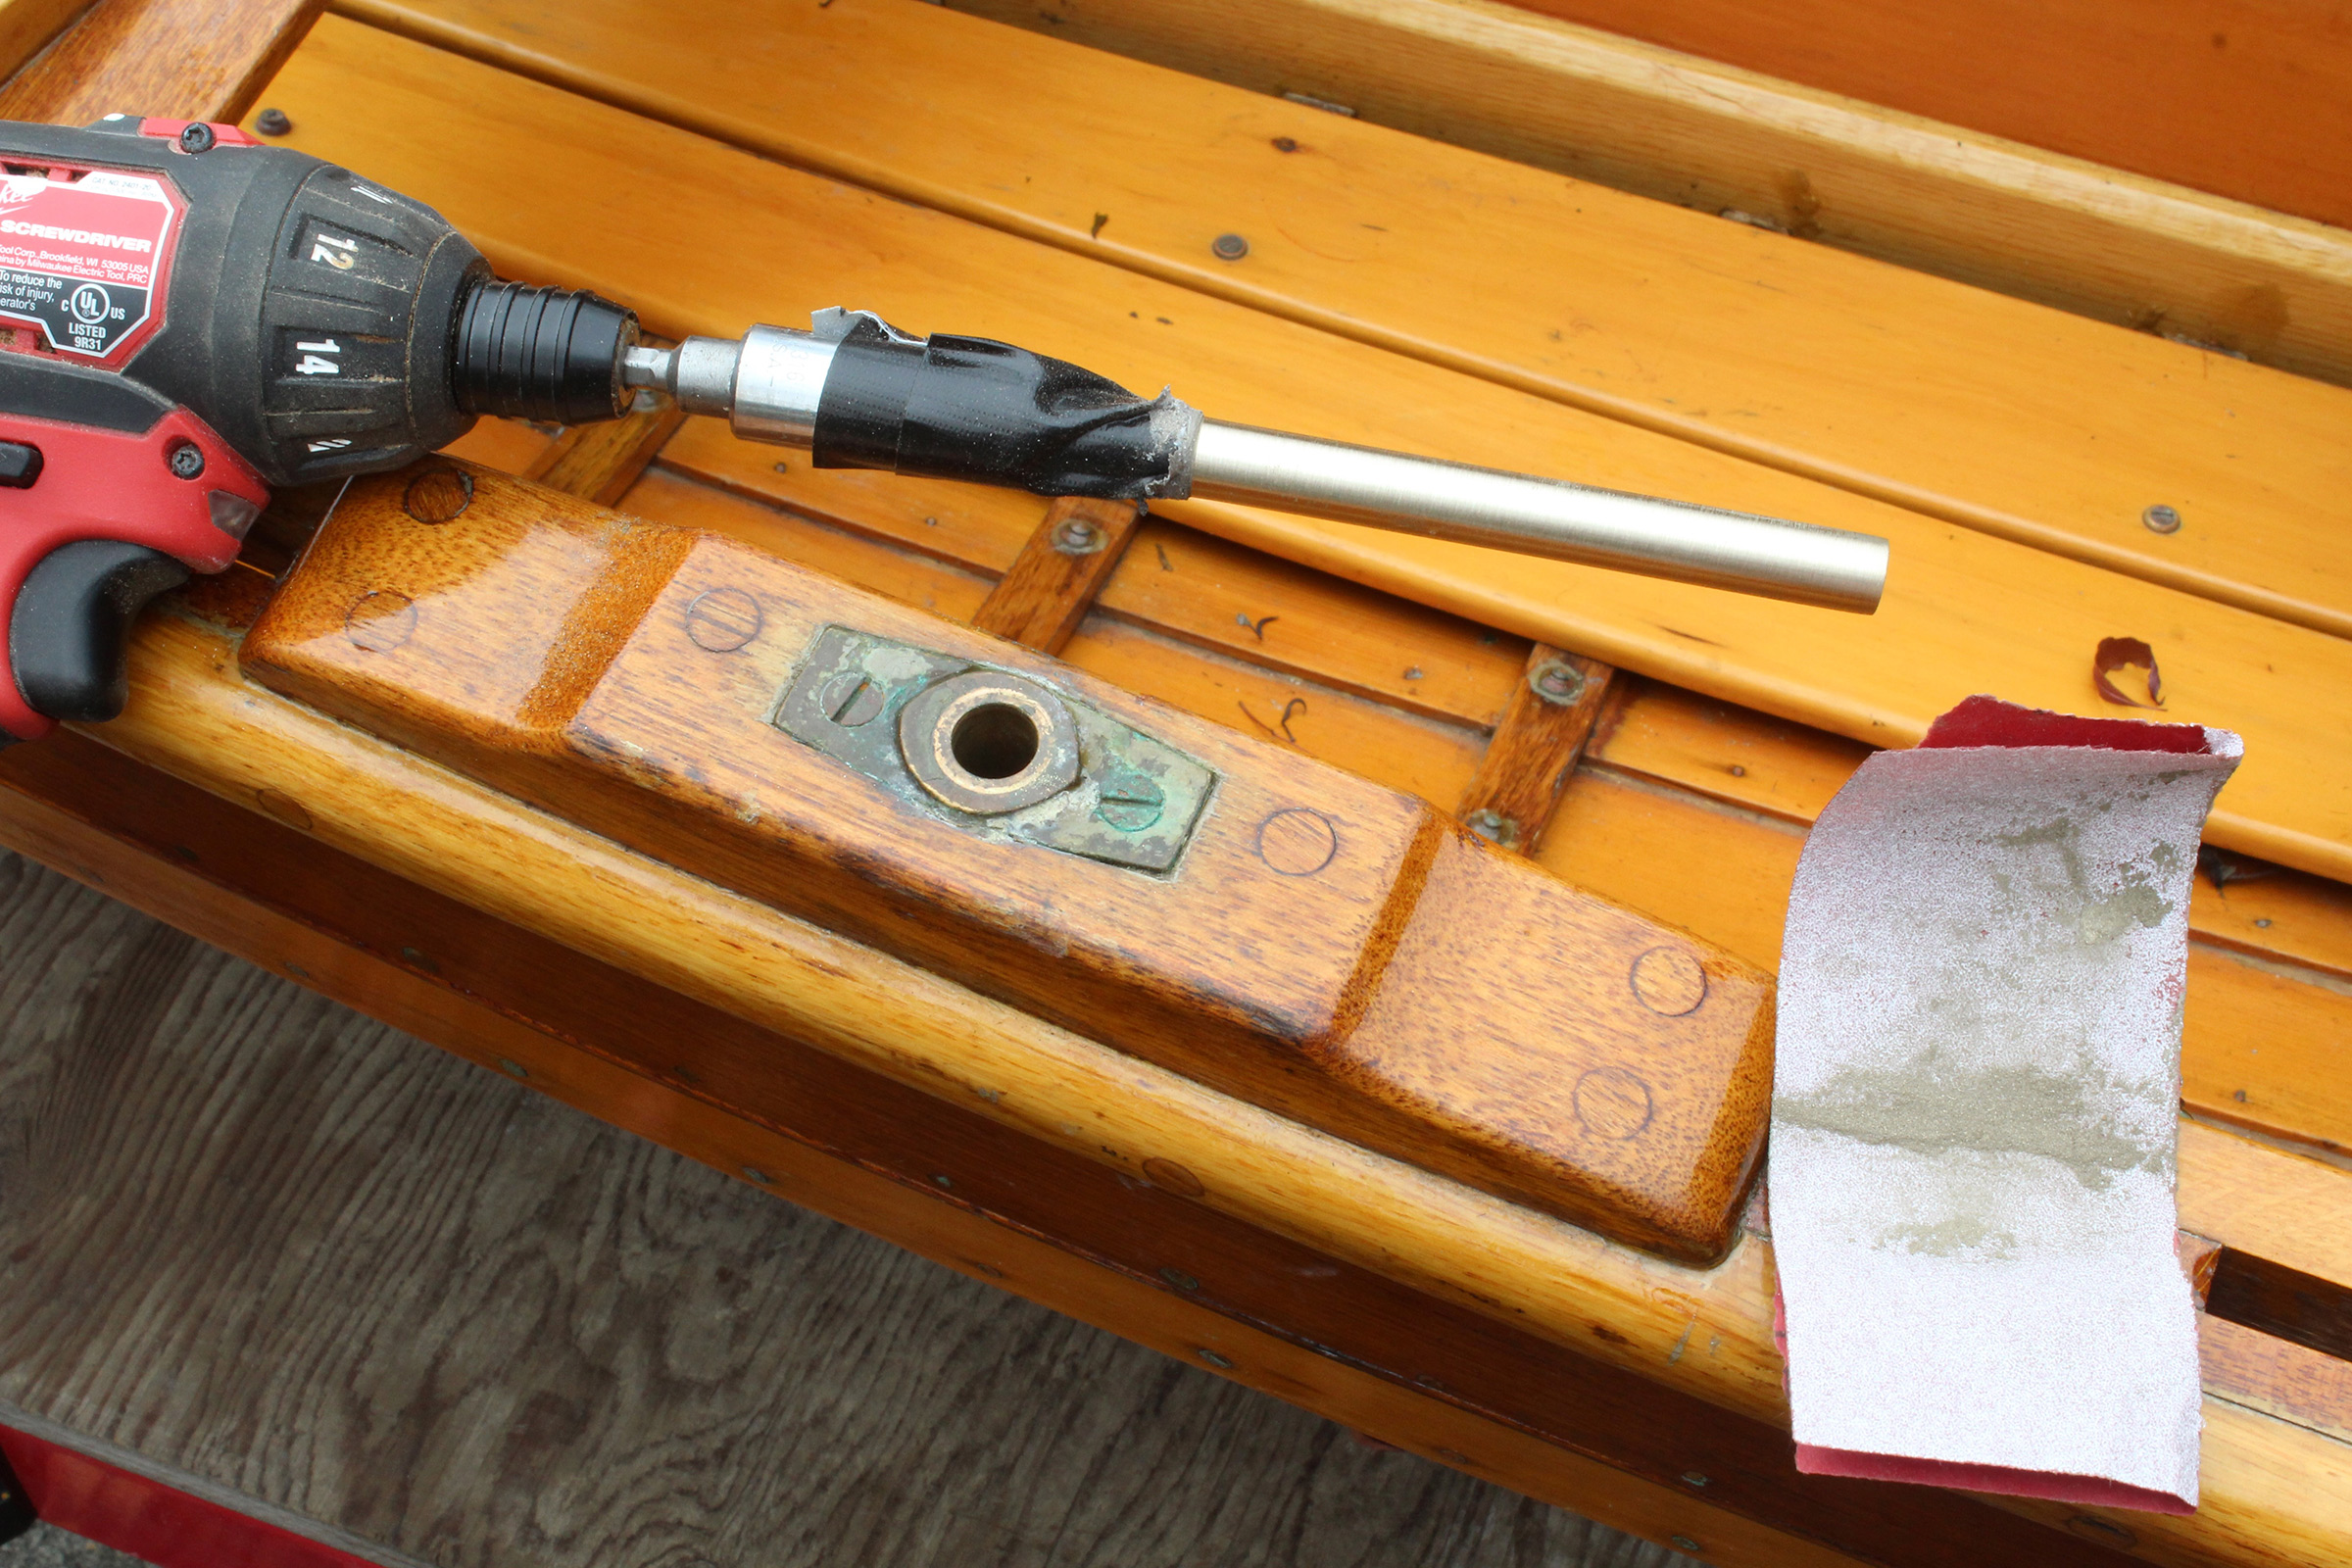
For the metal extensions to fit in the existing oarlocks, I found a good match with a 0.5″ bronze round bar and a brass tube with a 0.51″ inside diameter. I later found a 0.5″ brass round bar that would have cost a little bit less and should have worked, as well. The tube’s inside diameter turned out to be too small for the 1/2″ shanks of my locks, but that was easily remedied by drilling out a couple of inches of one end with a 1/2″ drill bit. The drill bit should have been a slip fit, but it shaved just enough from the inside to provide the right fit for the oarlock shank. The bronze round bar was oversized for the oarlock socket. I didn’t want to drill out the socket and make a sloppy fit for normal rowing, so I needed to trim one end of the rod to fit. A 1/2″ socket fitted to a hex-bit adapter and taped to the rod with Gorilla tape provided a way to spin the rod with a drill. A file was ineffective at removing metal, but a piece of 120-grit aluminum oxide sandpaper squeezed around the spinning rod worked very well. I did the trimming at the boat, and tested the rod frequently in the oarlock socket for fit. I left 2″ of the rod’s end in the socket untouched.
Photographs by Christopher Cunningham
To trim the 1/2″ bronze rod to fit the socket, I spun the rod with a drill and a 1/2″ socket. A folded half sheet of 120-grit aluminum-oxide sandpaper was effective in removing metal; you can see the bronze powder in the sandpaper.
All that was left was to join the rod and the tube. The specified dimensions should have made a slip fit, but the rod was too large for the tube. I put the rod in the freezer for a half hour and then heated the tube in boiling water in a stainless-steel cake pan set on the stove top. The cold shrank the rod while the heat expanded the tube and the changes were just enough to get a tight slip fit. I was ready with a hammer and a block of hardwood to protect the kitchen floor. I acted quickly and pounded the 2″ of untrimmed rod into the undrilled end of the tube. It took just a few seconds for the two pieces to lock together and, once they were both the same temperature, they were as good as welded.
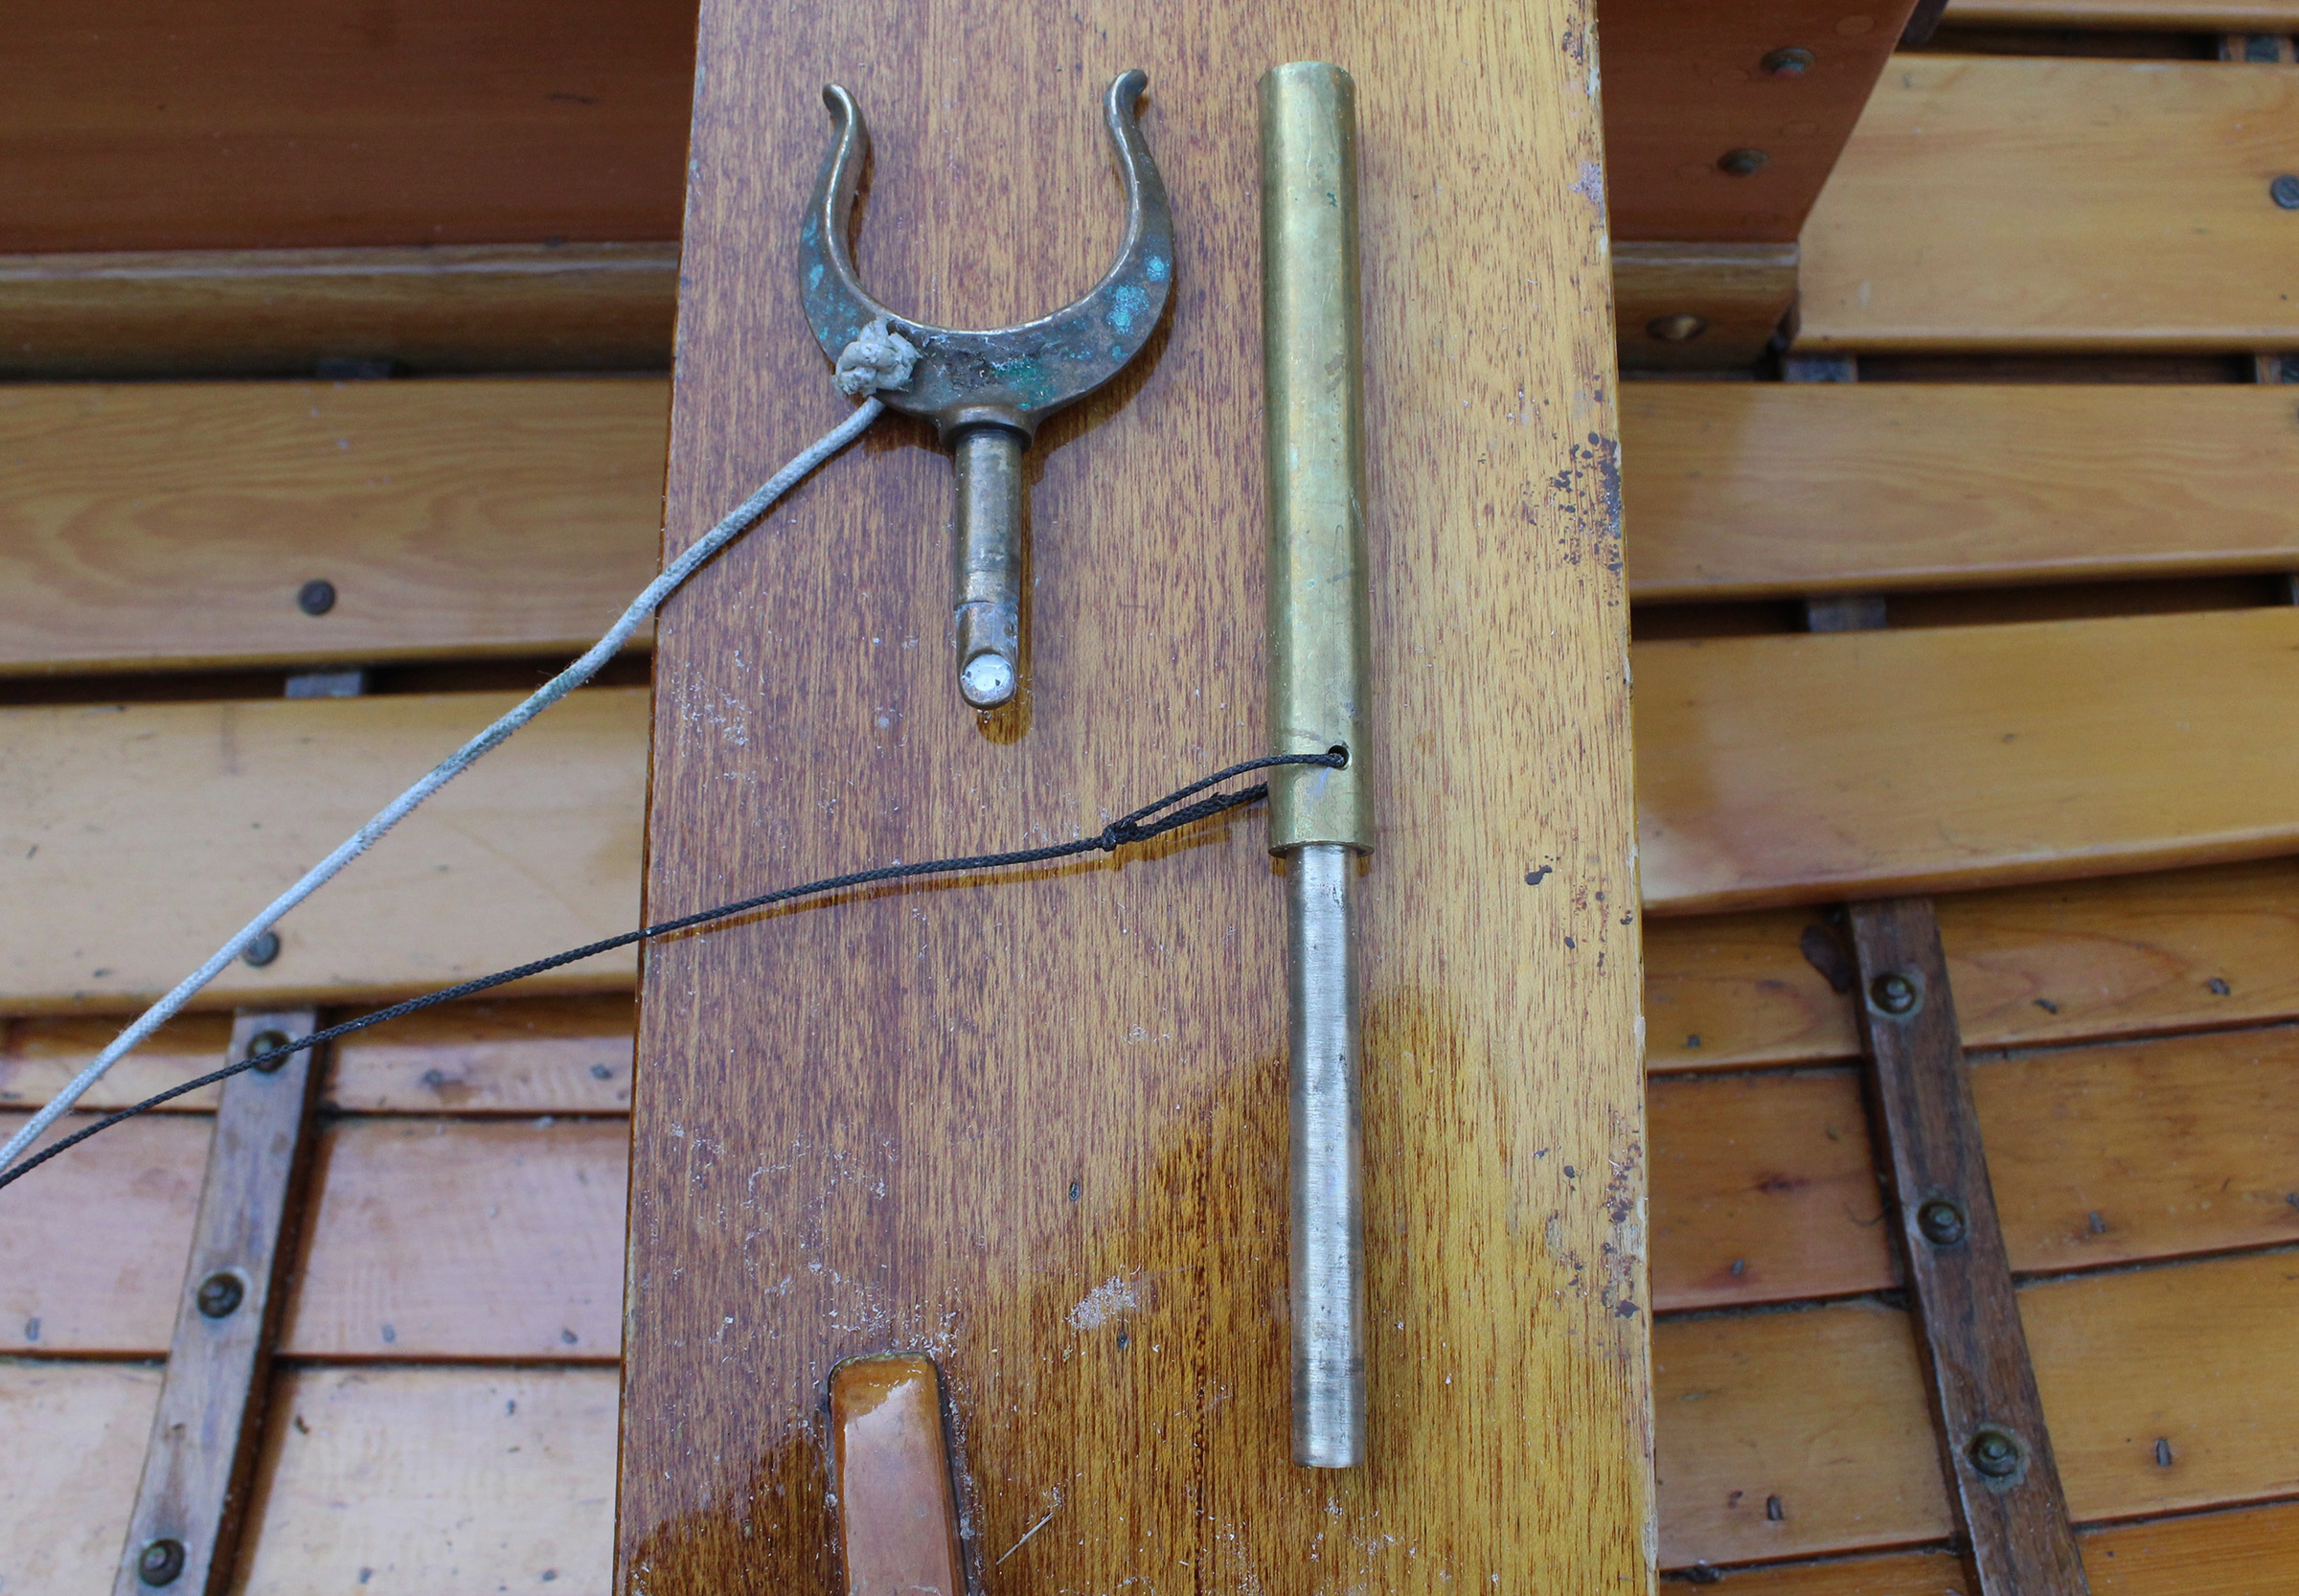
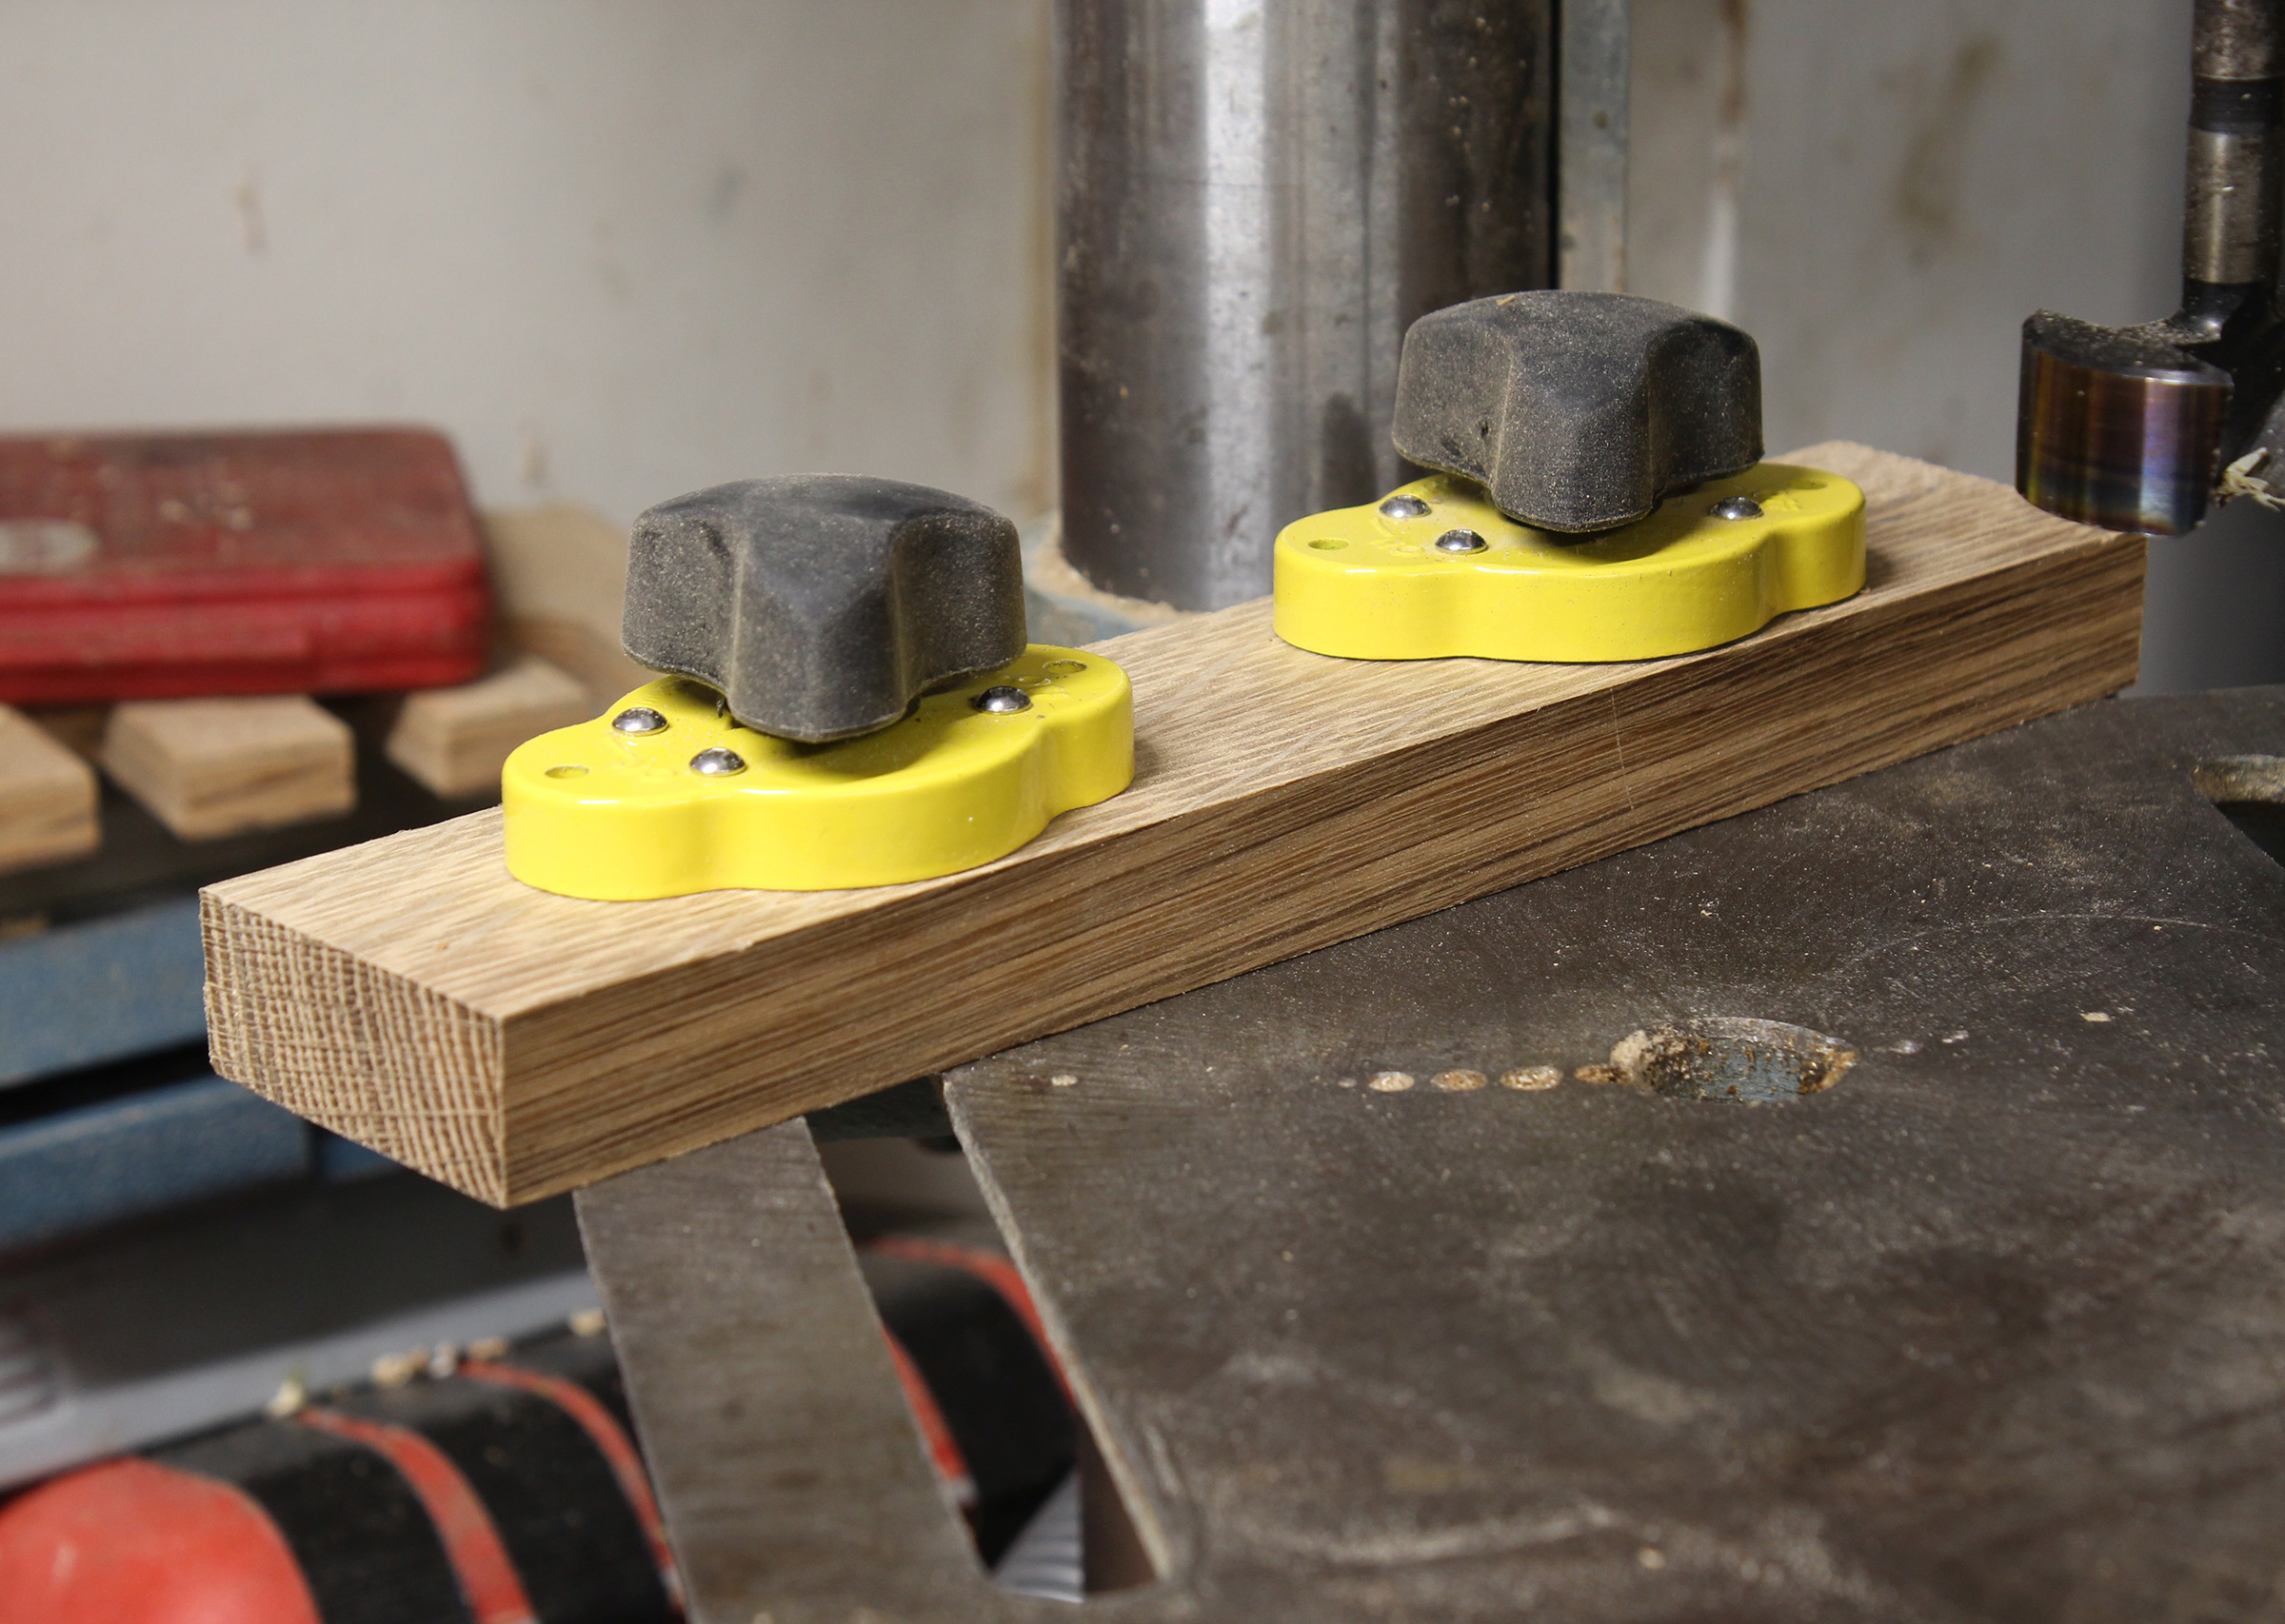
A hole drilled through the extension provides an attachment point for a lanyard.
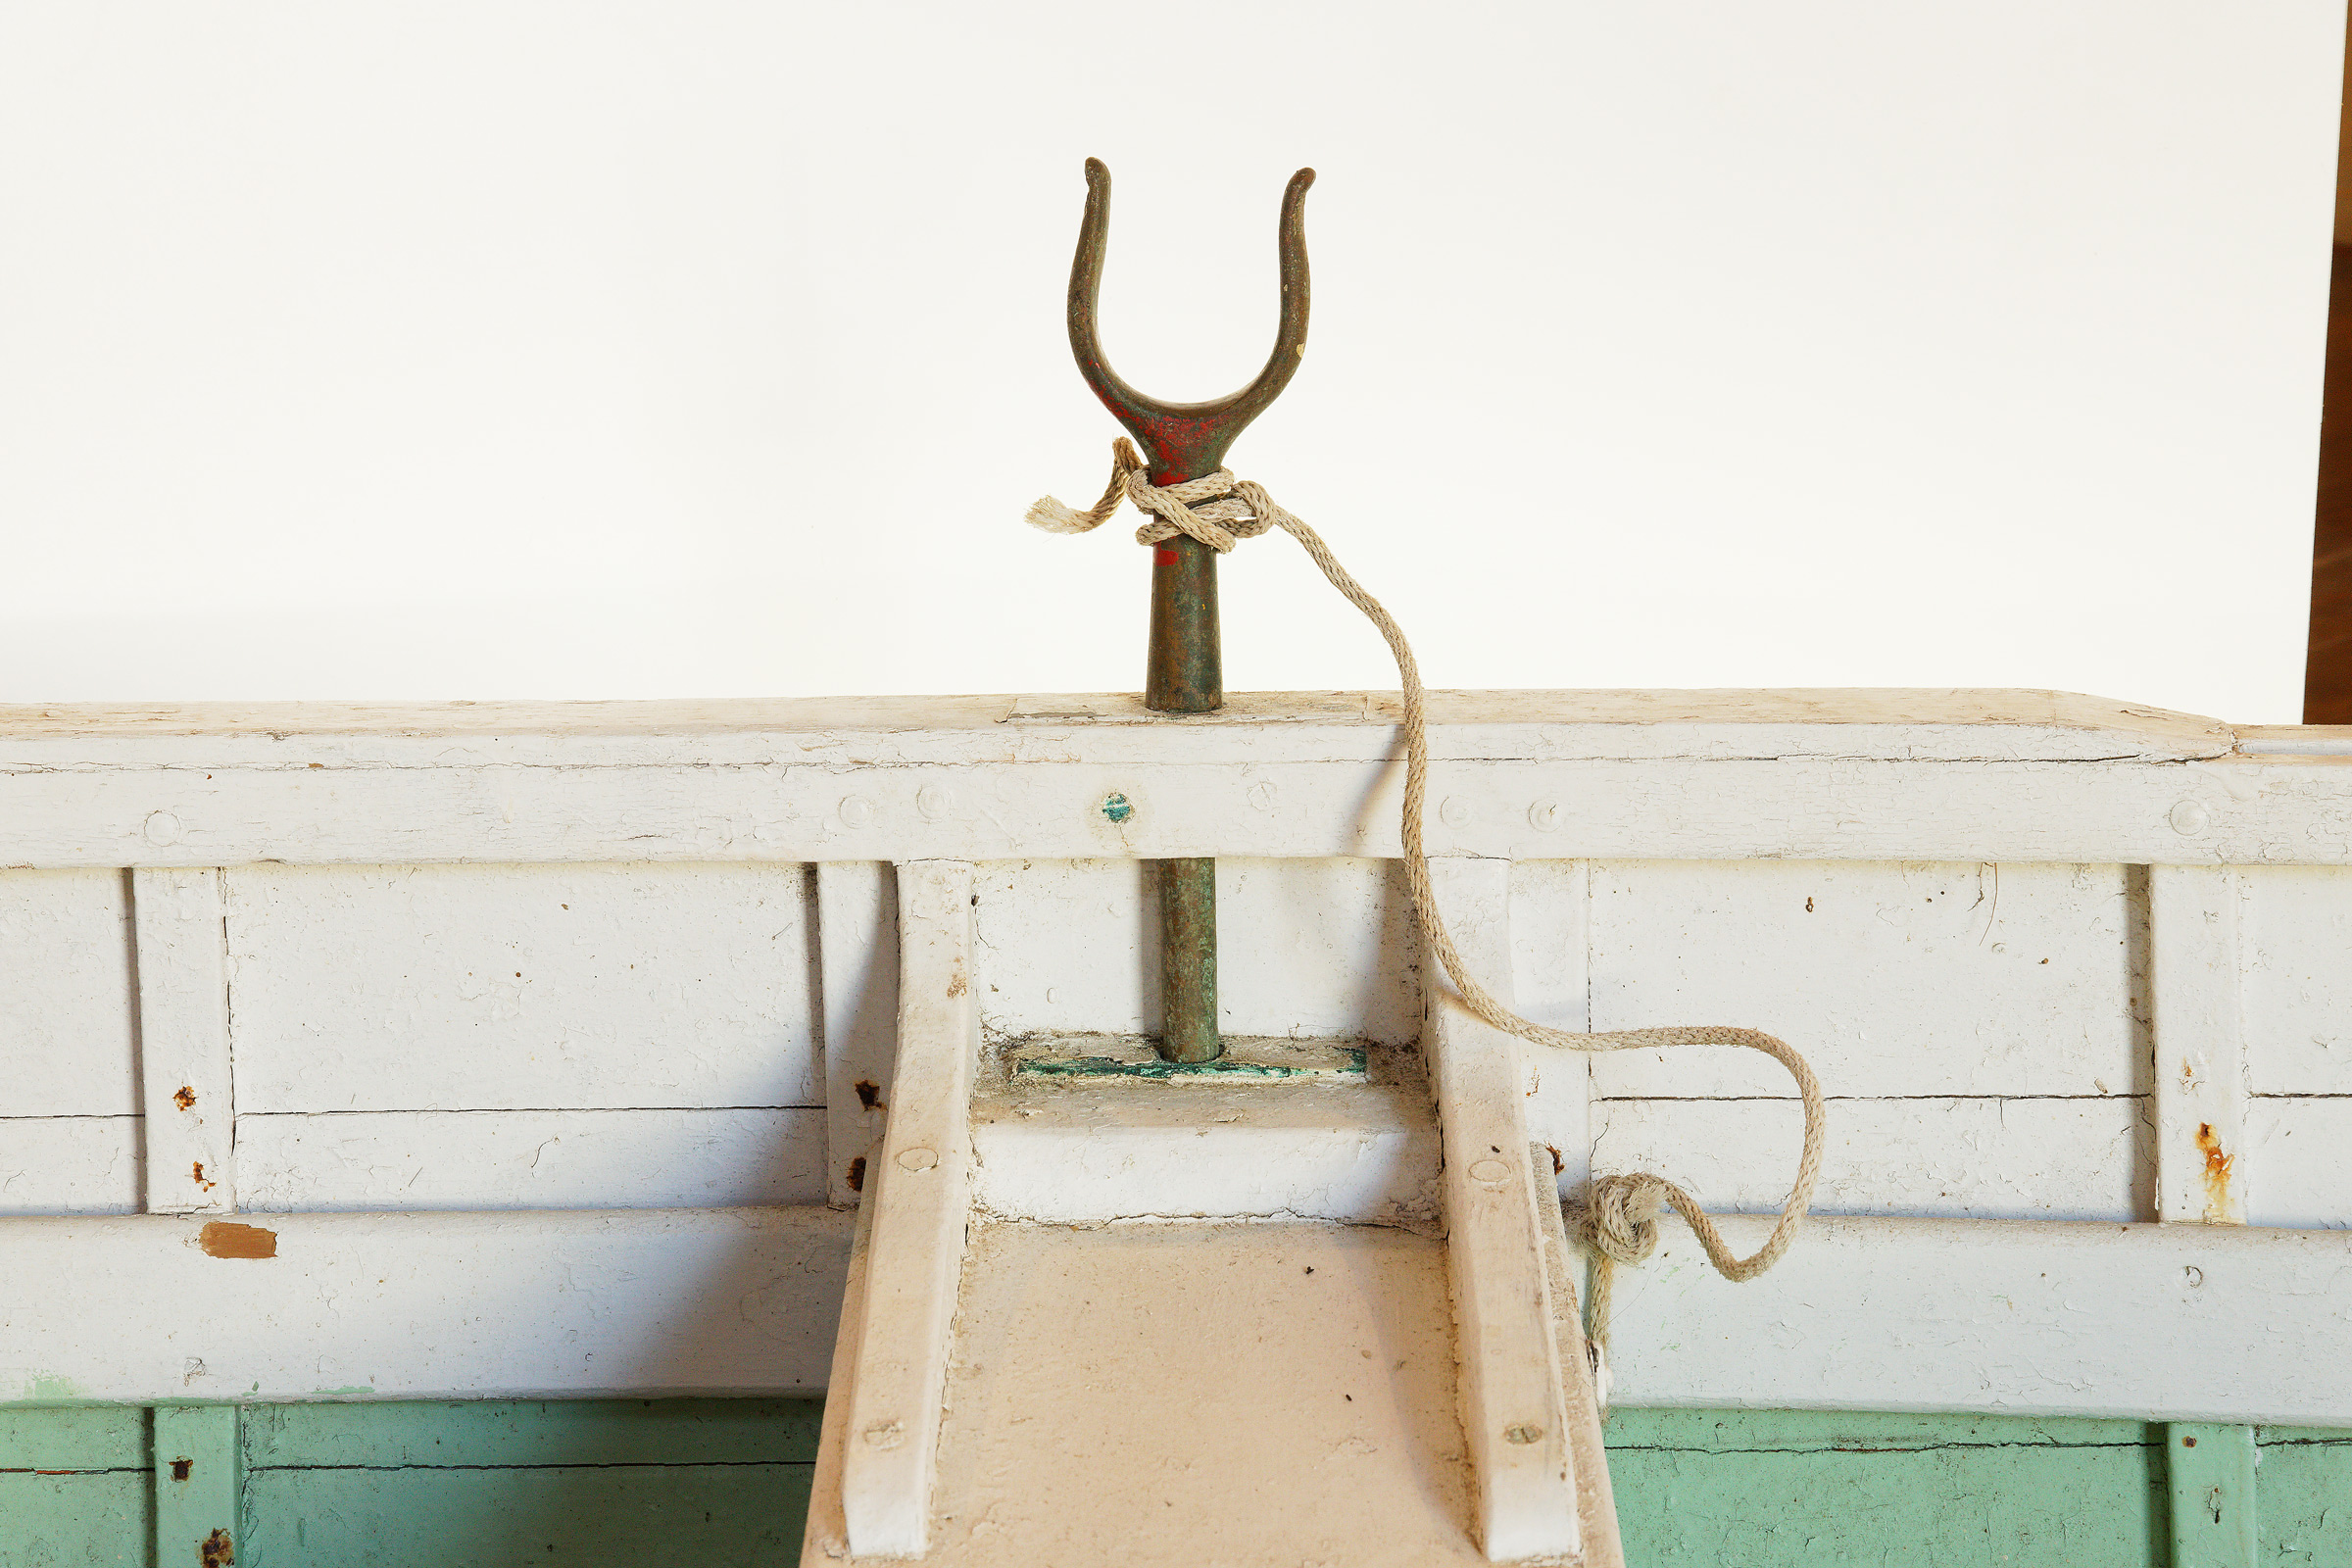
For lanyards to tether them to the boat, I drilled a hole through the new extensions at the joins. I fixed a piece of ipe to two steam-bent frames below the oarlock socket and drilled a 1″ hole in it to accept the bottom end of the shank.
I drilled a small hole in the oarlock for a lanyard. The cleat at the bottom of the shank is screwed to two frames and is shaped to hold the tenon against the sheer plank.
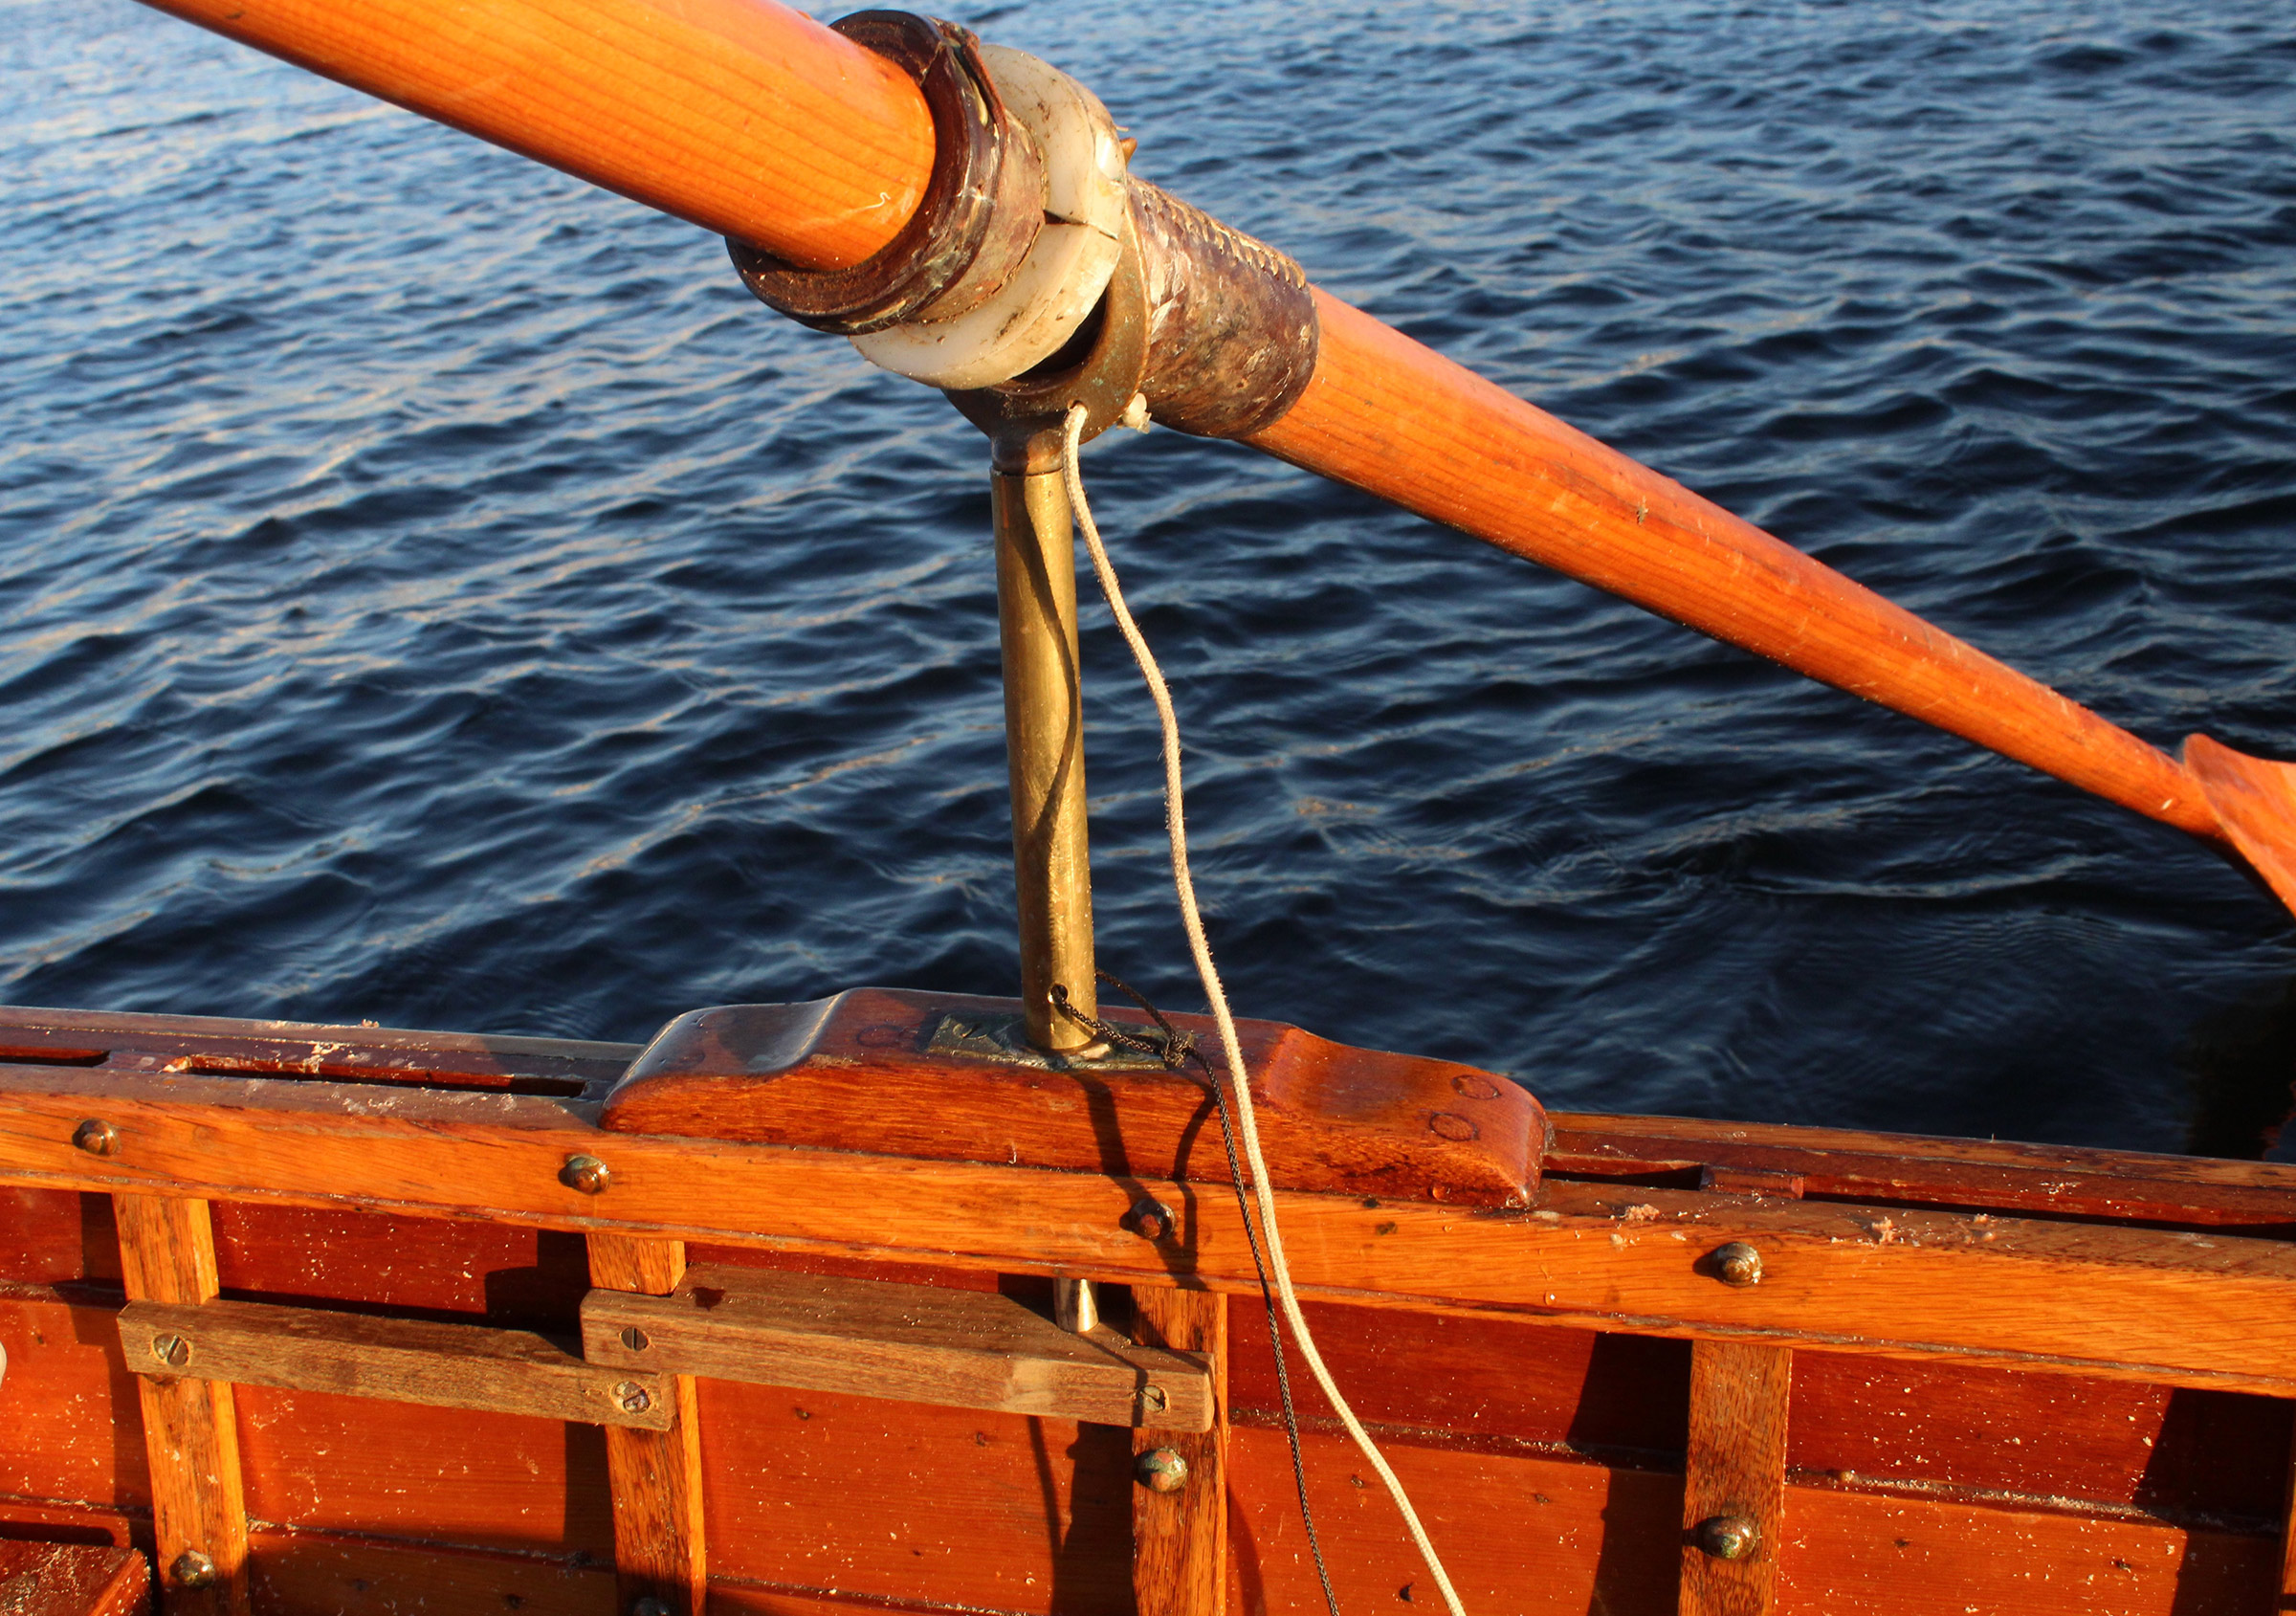
The shanks have a tight fit in the ipe, so the extensions are stationary, and the oarlocks rotate in the tubes. These extensions raise the oarlocks by 6″, the length of the brass tubes.
The top of the socket fitting has four holes for fastenings, and while the two holes in the side flange can take screws (visible here), two screws through the socket’s top flange won’t hold well in end-grain. I used machine screws instead wood screws and the nuts for them are captured in the two holes in the side of the extension.
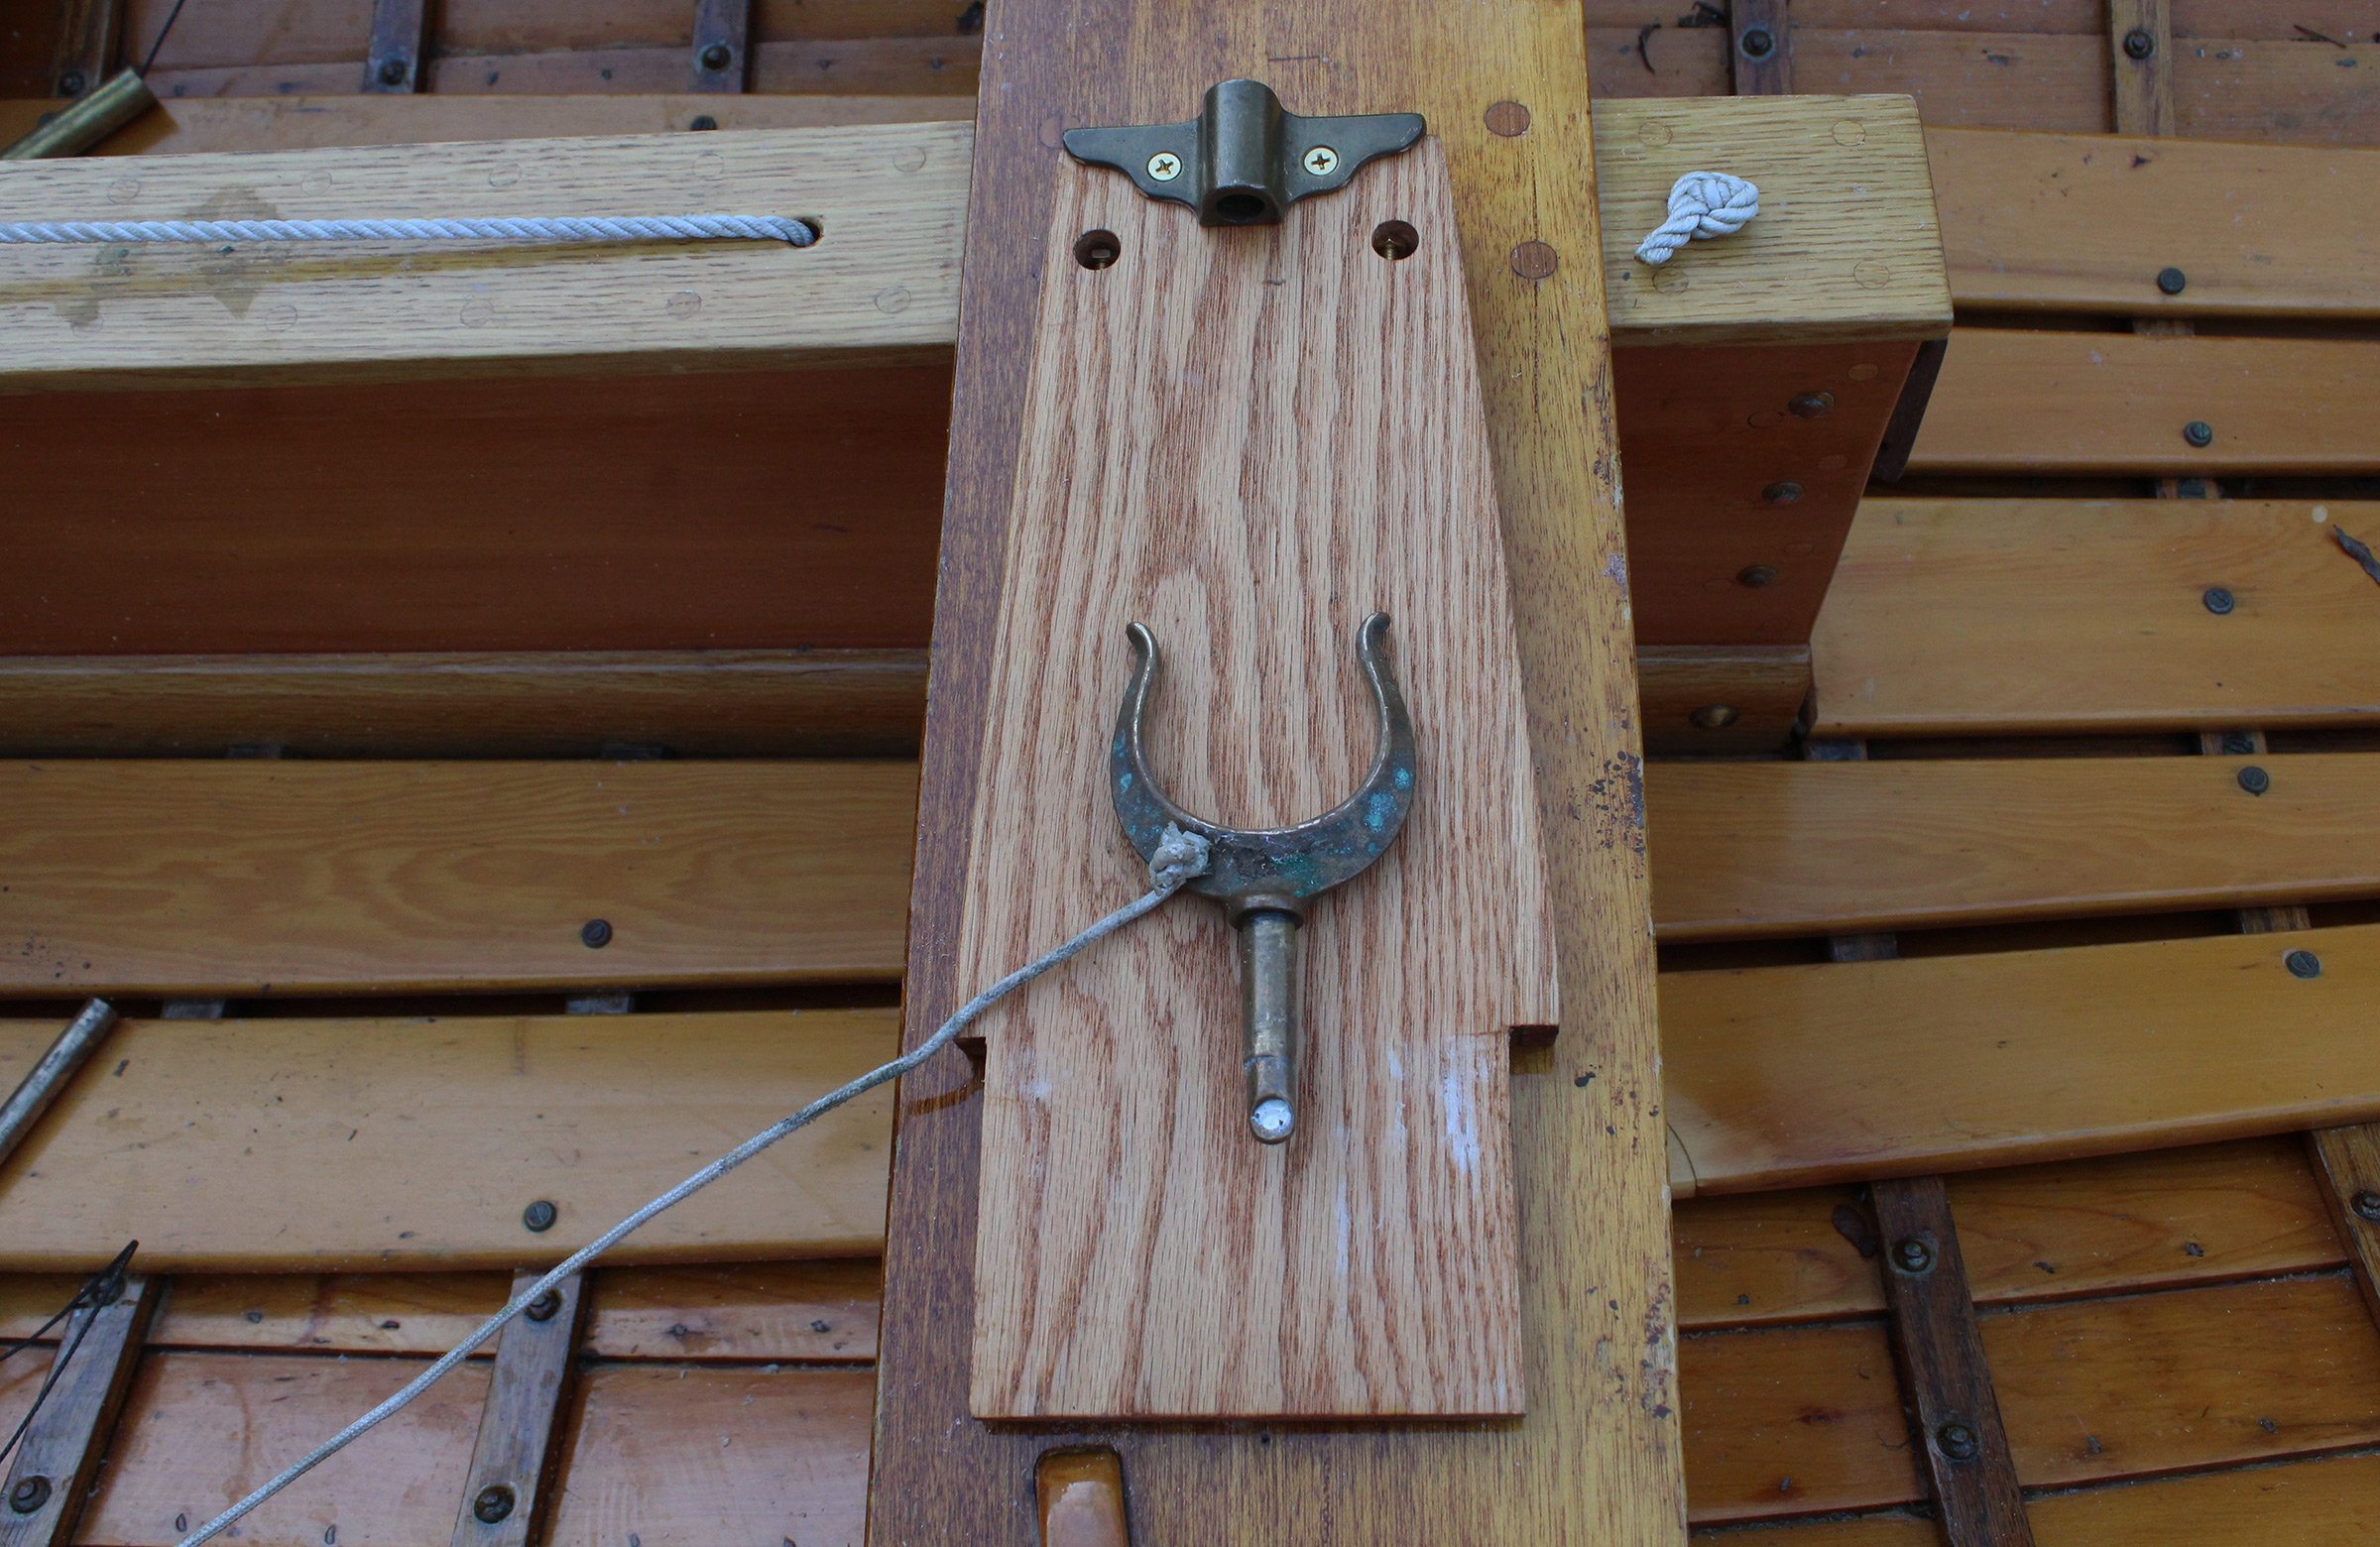
The wooden extensions I made for the Whitehall raise the oarlocks 10″ above the gunwale. The 3/4″ oak I had on hand was thinner than the top flange of side-mount oarlocks, so I glued a piece of oak to the tops to make them thicker. I cut straight tenons at the bottom of the extensions; they rest against the sheer plank and butt against the lap with the next plank.
At the top of the extension, I glued on an extra piece of wood to create the thickness required to provide a seat for the entire flange at the top of the socket fixture. The cleat at the bottom, screwed to two frames, is shaped to press the extension’s tenon to the sheer plank.
These tenons require cleats across the adjacent frames to hold the ends of the tenons in position. The alternative, seen in one of the photos in Ben’s article, is to cut the tenons to follow the curve of the frames, which has the advantage of allowing a longer tenon and a more stable extension.
Penobscot Marine Museum
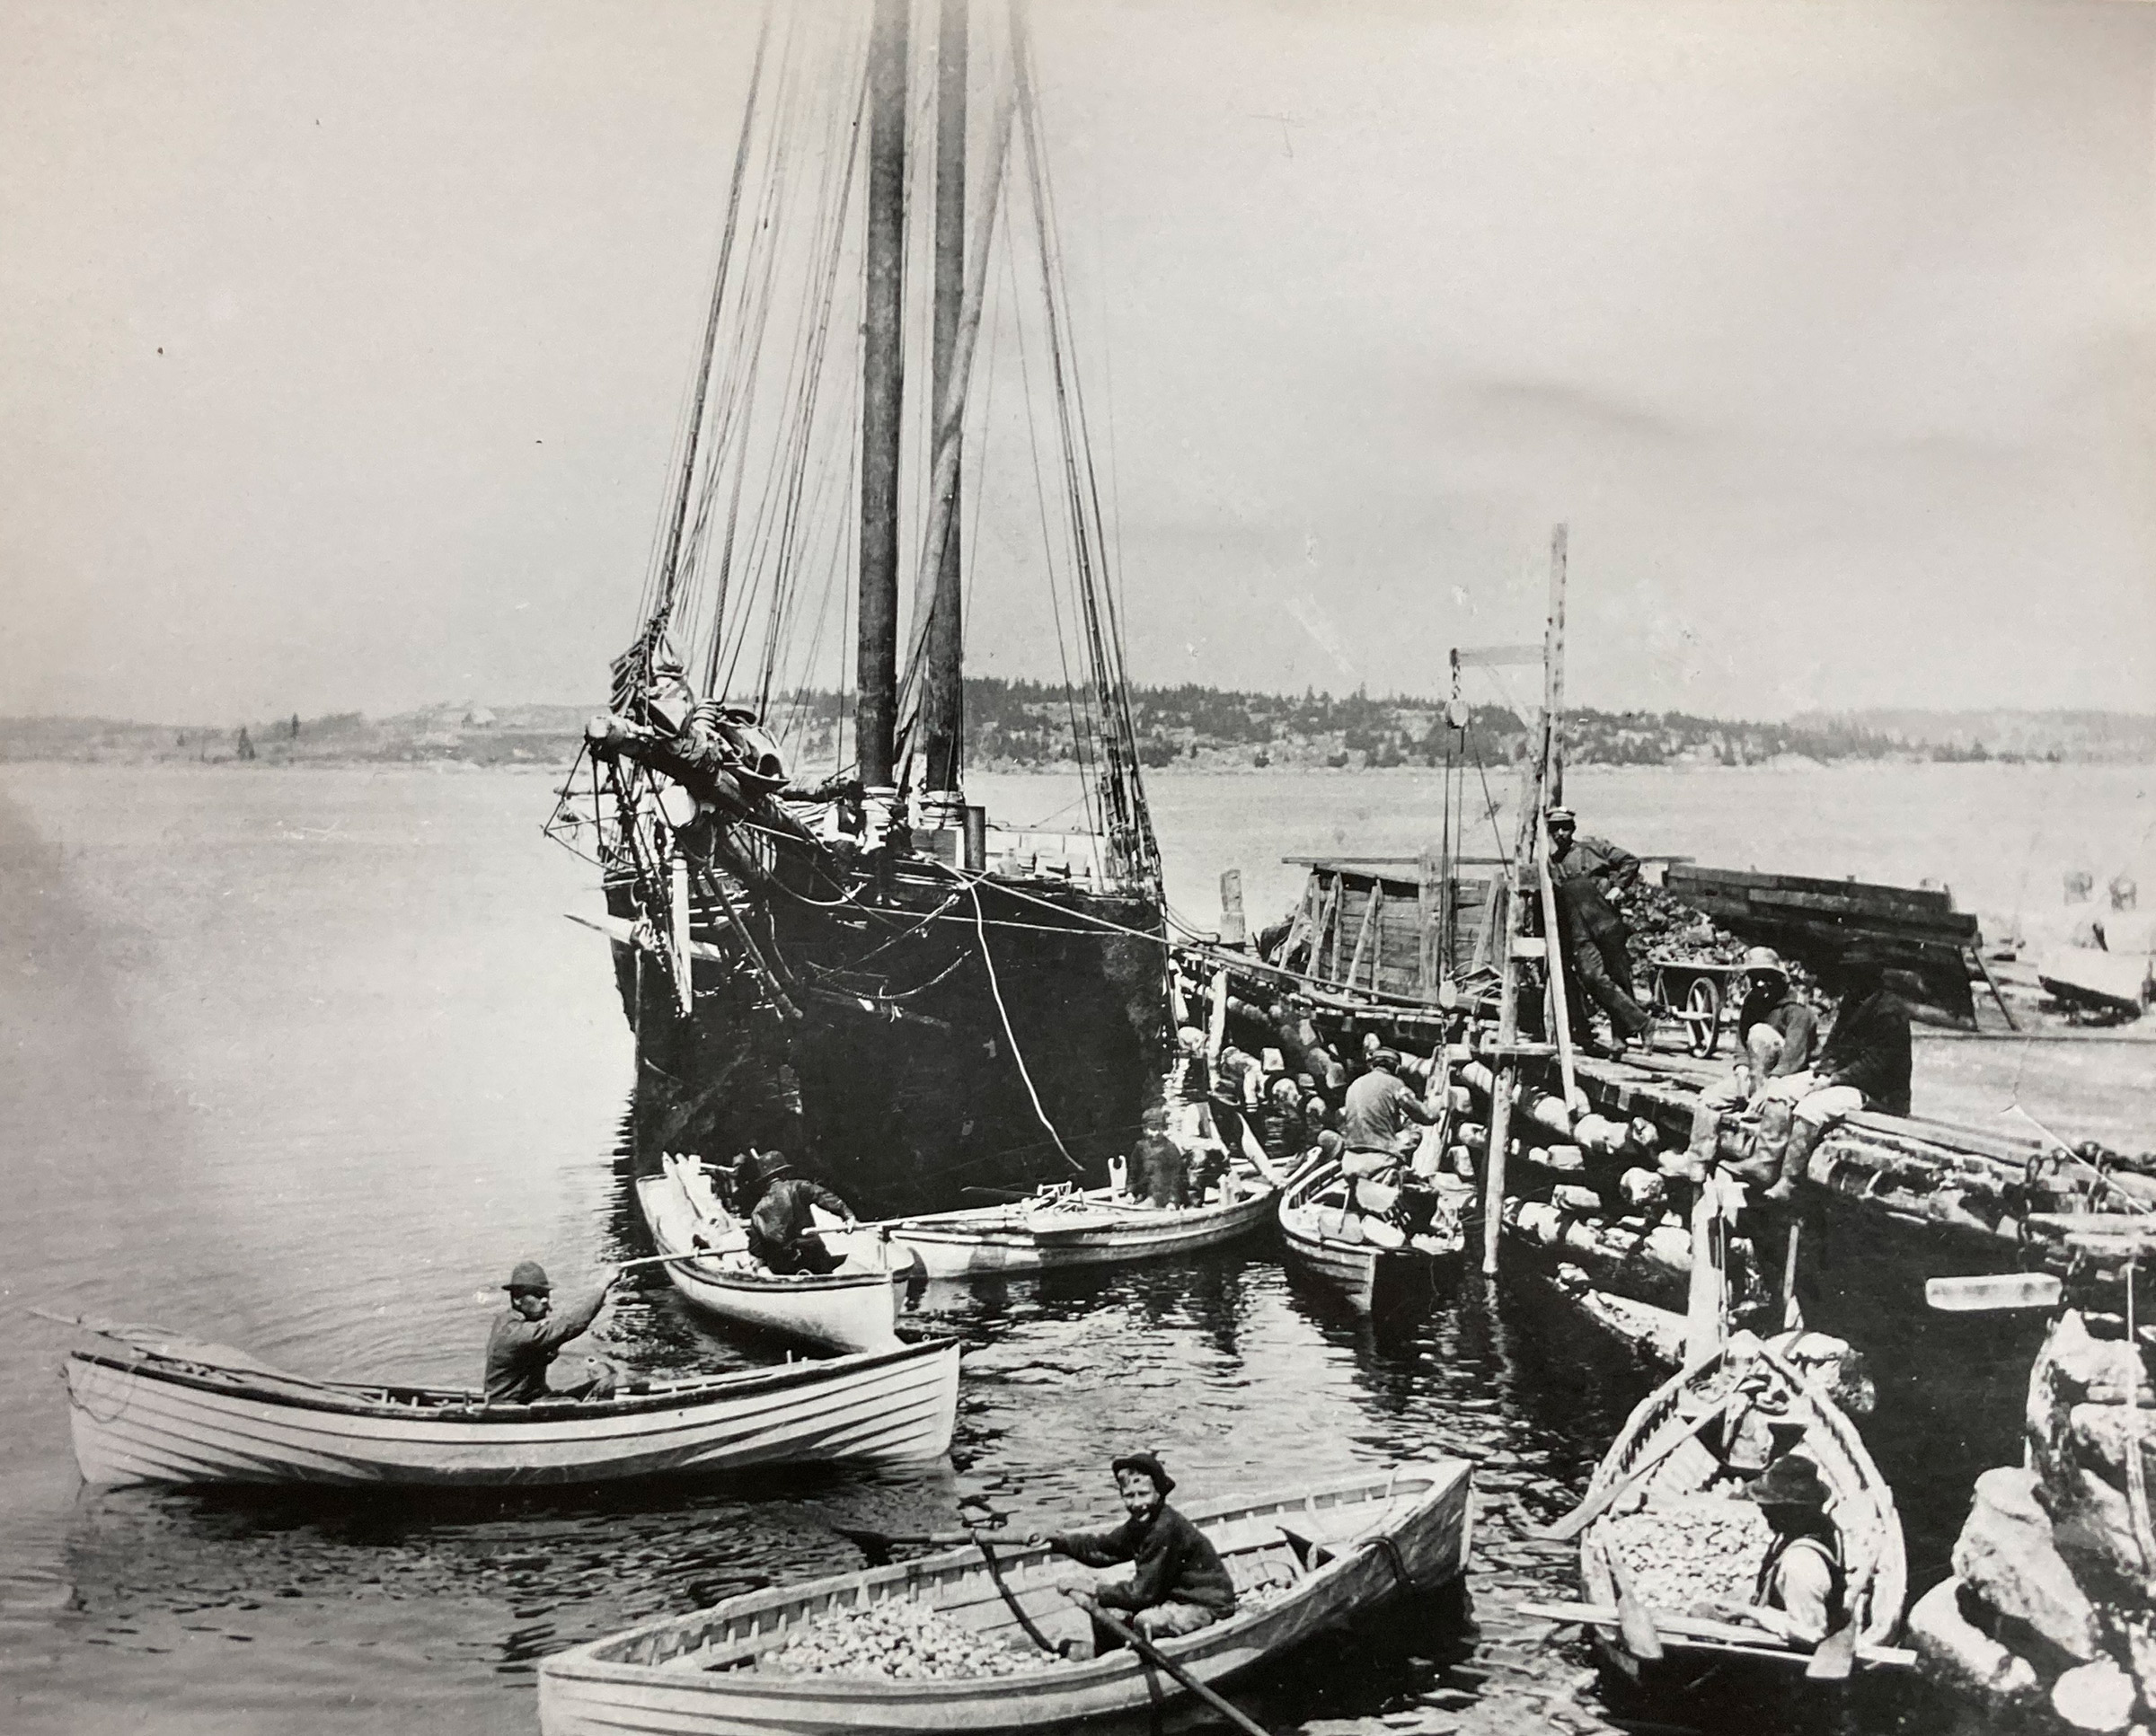
The text attached to this photograph reads: “Clam diggers and Schooner E. A. WHITMORE, at the Oceanville, Maine, clam factory dock. Photo taken in 1902.” In the center, silhouetted by the shadow of the schooner’s port bow, is a crab-claw-like extension, one of a pair on the skiff in the middle.
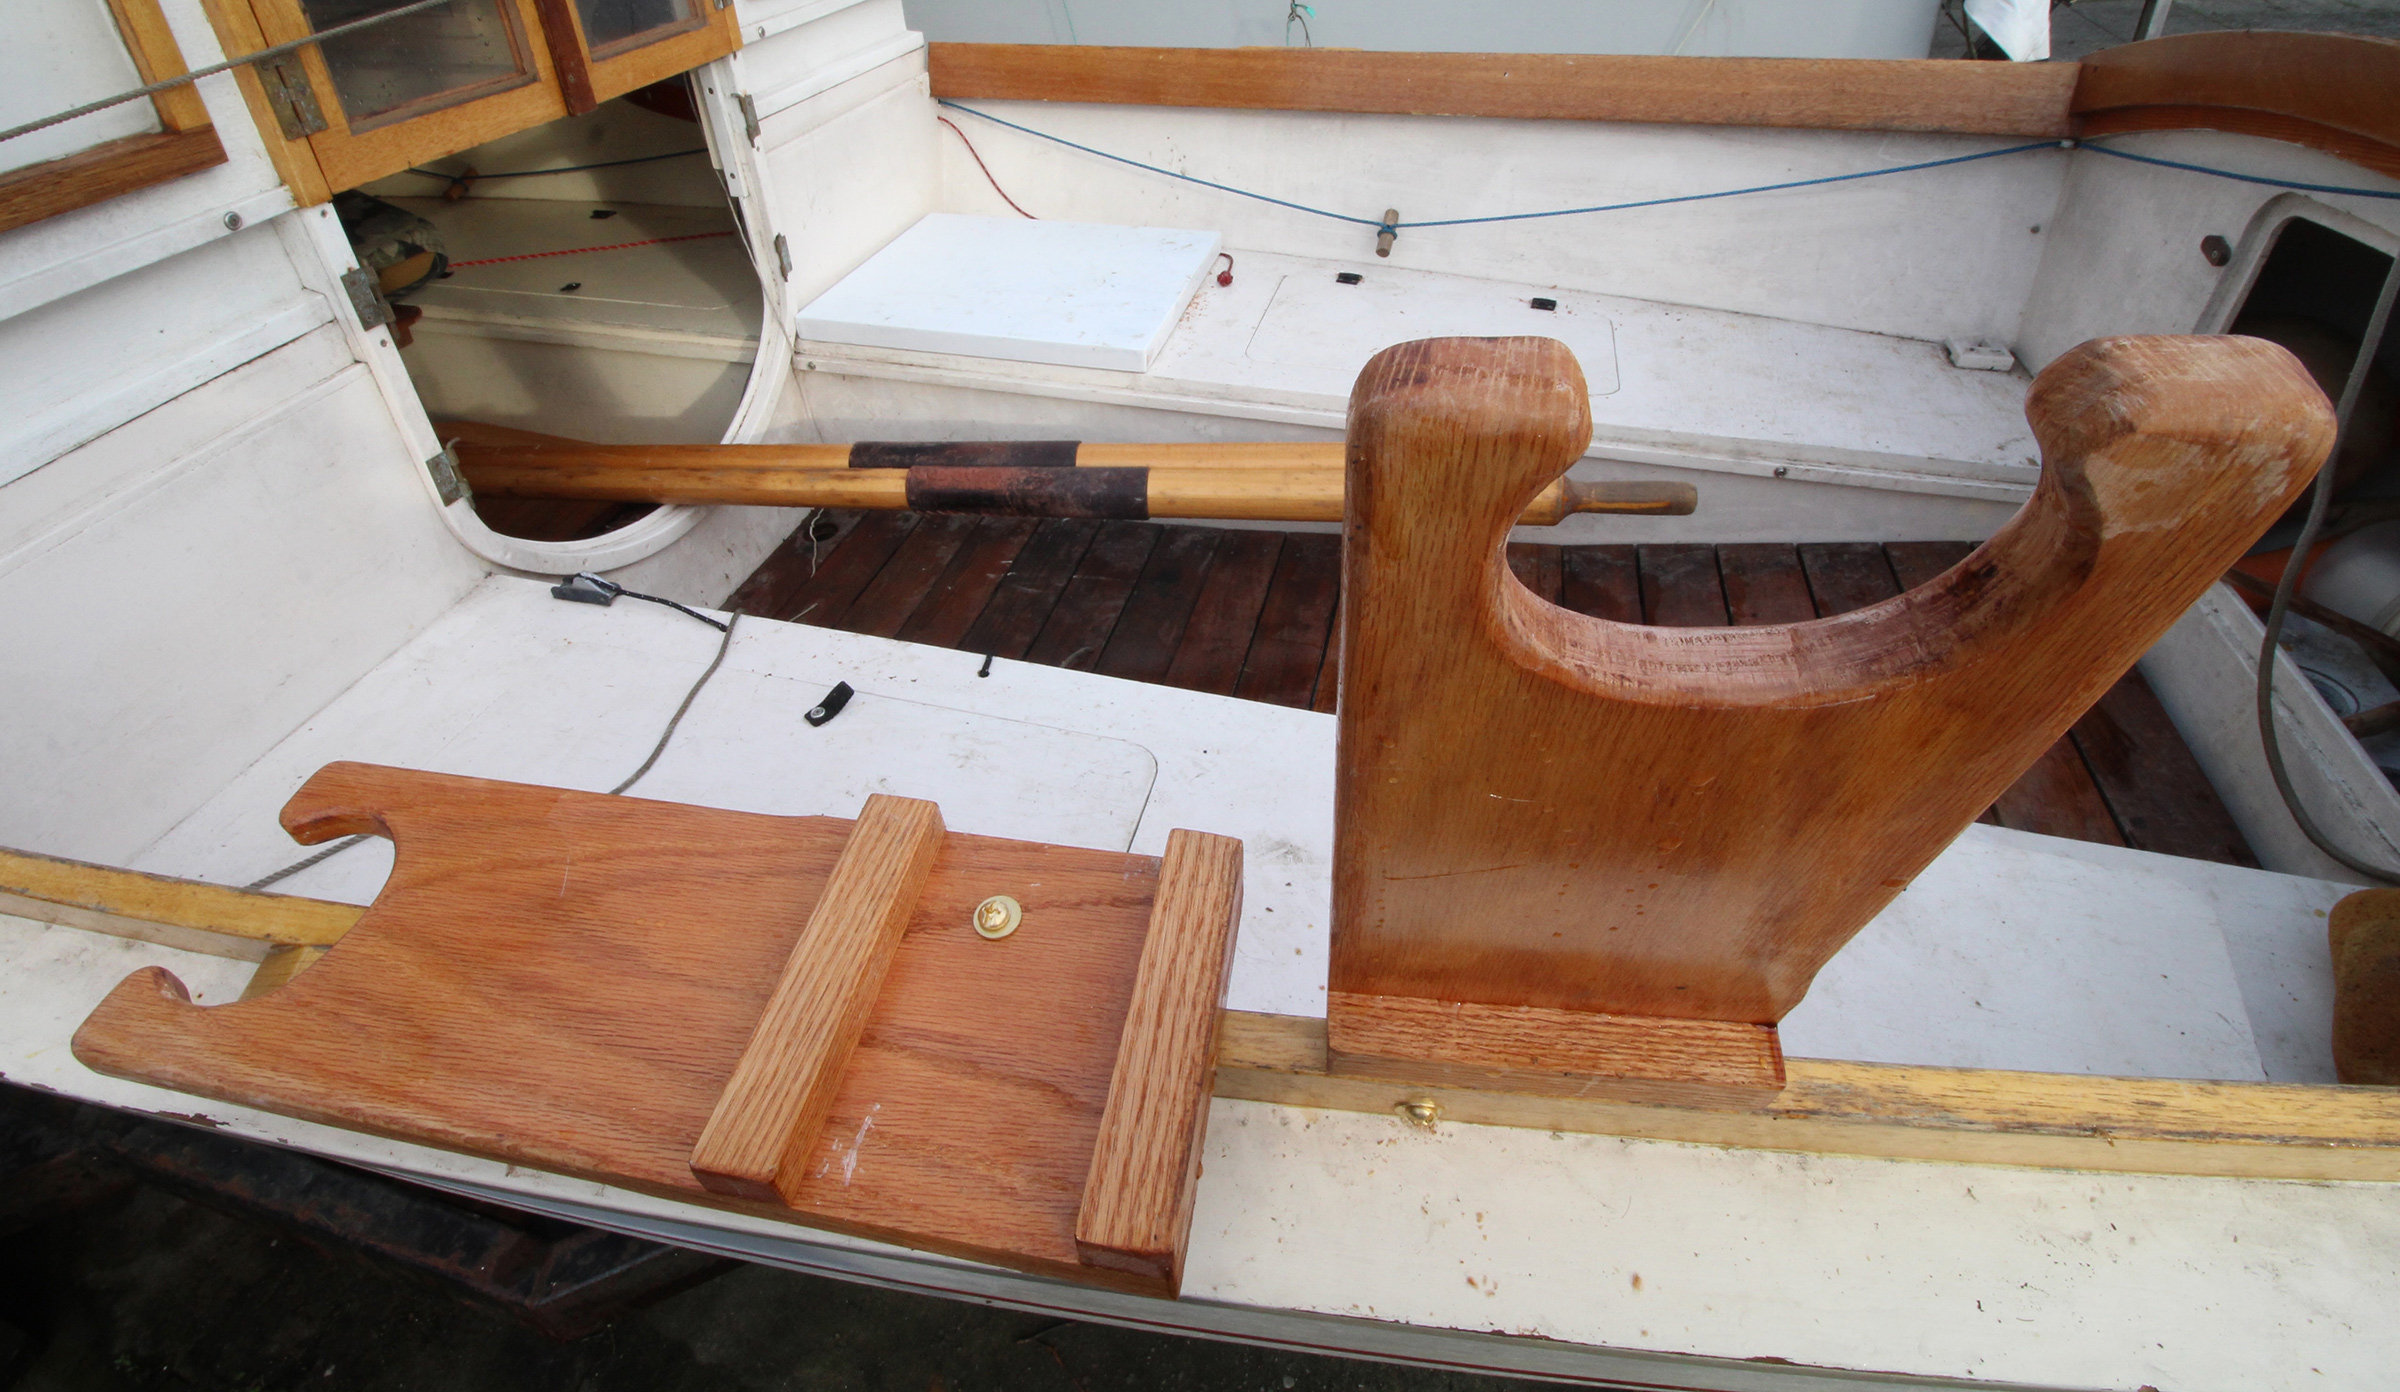
My third set of extensions was based on an old photo Ben sent to me. It was taken in Oceanville, Maine, in 1902 and shows a half-dozen skiffs clustered around the bow of a schooner. One of the small boats is equipped with extensions, apparently made of wood, with round notches, open at the top, to accommodate the oars. I made a similar set for my cruising garvey, HESPERIA. They are 3/4″ oak, 5-1/2″ wide and 16″ long. For oars that are 2-1/2″ in diameter at the leathers, I made an oval opening 3-3/8″ wide. At the bottoms, cleats glued on one side capture the cockpit coaming of the garvey, and 1/4″ brass bolts hold the extensions in place. The coaming is part of the gunwale and is structurally quite strong. These extensions raise the oars 8-1/2″ above the coaming.
The wooden extensions for my garvey have cleats across the bottom to fit above and below the coaming. Single bolts hold each extension in place.
The oars I use for the Whitehall are spoon blades, and while they worked with boat extensions, they felt a bit awkward. Extensions set the oars at a higher angle, causing the blades to be more vertical in the water. Spoons are designed for a stroke just below the surface of the water and parallel to it; they move a short distance sideways to get in and out of the water. The steeper angle of the oars changes the way the blades move through the water and how deep they’ll go, and the spoon blades seem to create much more drag when used with extensions. The jury is still out: I need larger oarlocks to fit the pair of straight-bladed oars that should work with the Whitehall extensions.
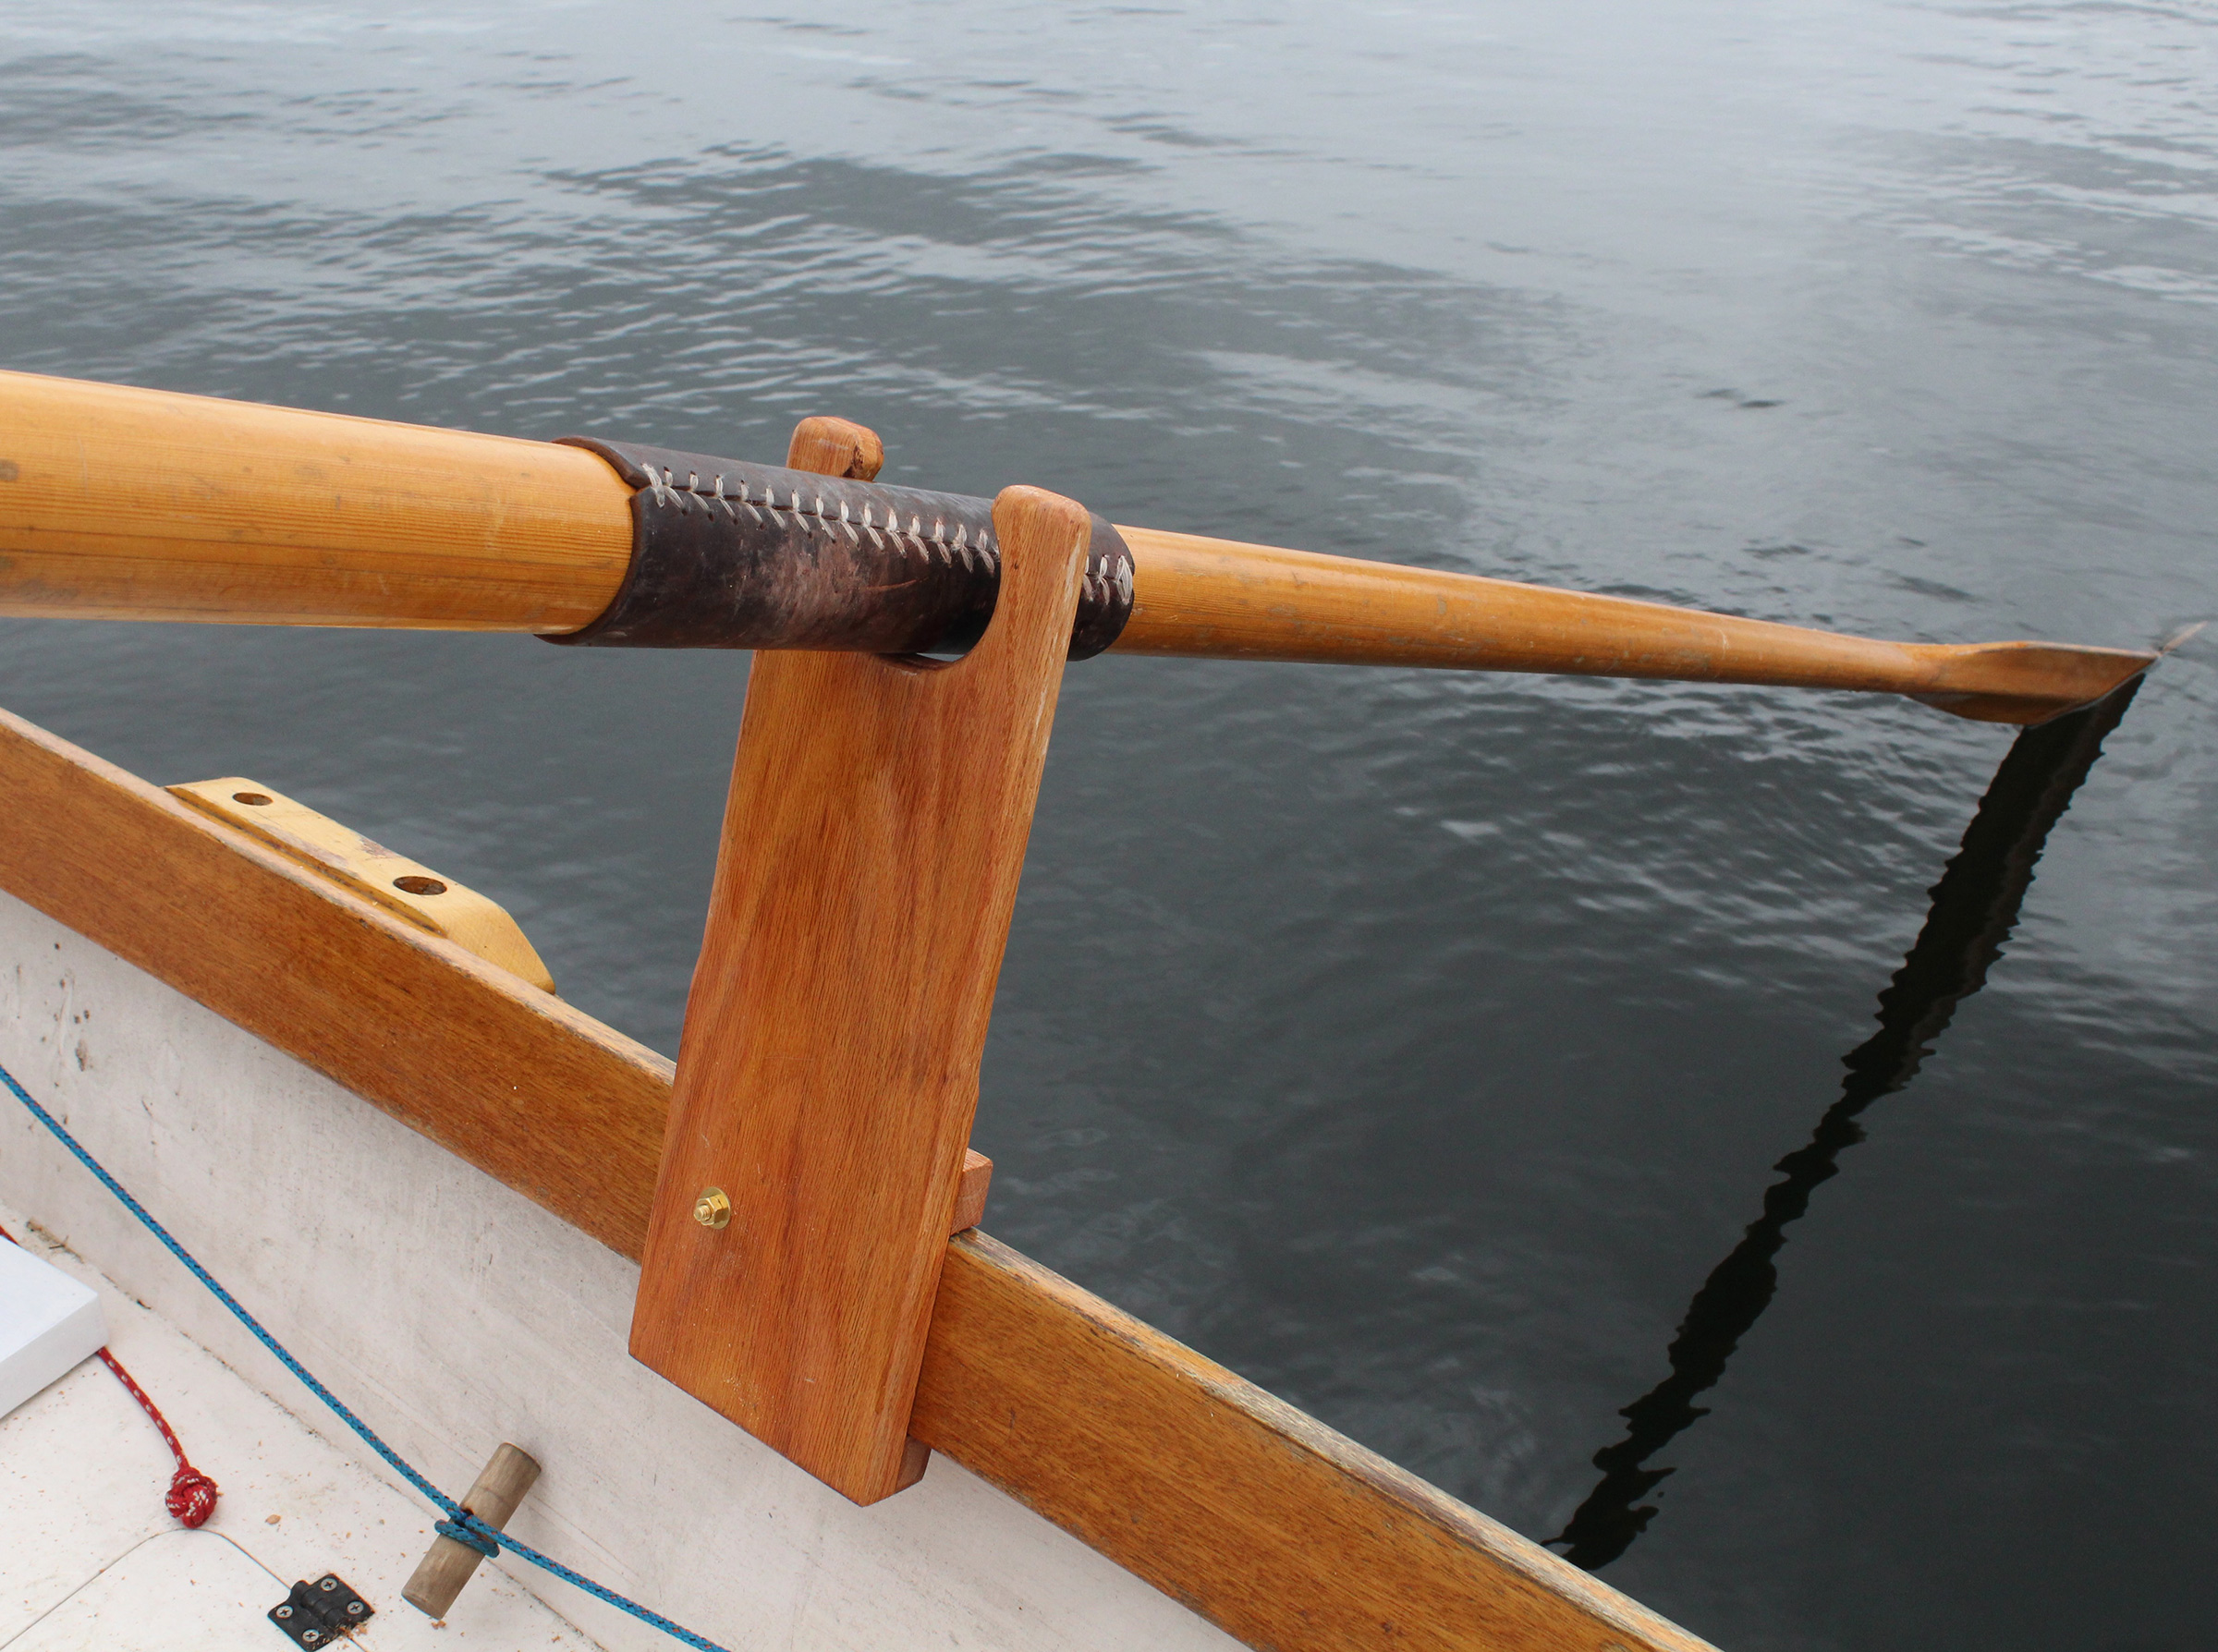
The oval opening provides enough room for the oar to swing.
The oars for my garvey have straight blades like the oars used by the peapods and other workboats equipped with oarlock extensions. Straight blades are often used with a dory stroke, in which the blades move through the water edge first and go well below the surface. That stroke is much better suited to the steeper angle of oars when using extended locks.
The oars I use with the garvey work well with the extensions. The long leathers, which are positioned to make contact with the thole pins while rowing from a seated position, also protect the oars while rowing with the extensions.
My wooden extensions work especially well with the garvey. It’s a stable boat with a beam of 6′, so it’s steady underfoot while I’m standing. The oval openings in the extensions allow the oars to swing through an arc more than adequate for a full stroke. Rounding the edges of the opening with a 1/4″ quarter-round router bit added to the range of motion. Getting the blades in and out of the water is as easy as it is when rowing while seated. At the catch and through the drive the handles are at shoulder level, and I just lean on them to provide power. Rowing in reverse is also uncomplicated and effective; I lean back and just hang by my arms from the handles. If the oar were to hit an obstruction, the extension doesn’t pivot like an oarlock does and could be damaged, but since I’m looking over the bow, it’s not likely I’ll run into anything.
The Garvey extensions are a great success.
You can share your tips and tricks of the trade with other Small Boats Magazine readers by sending us an email.
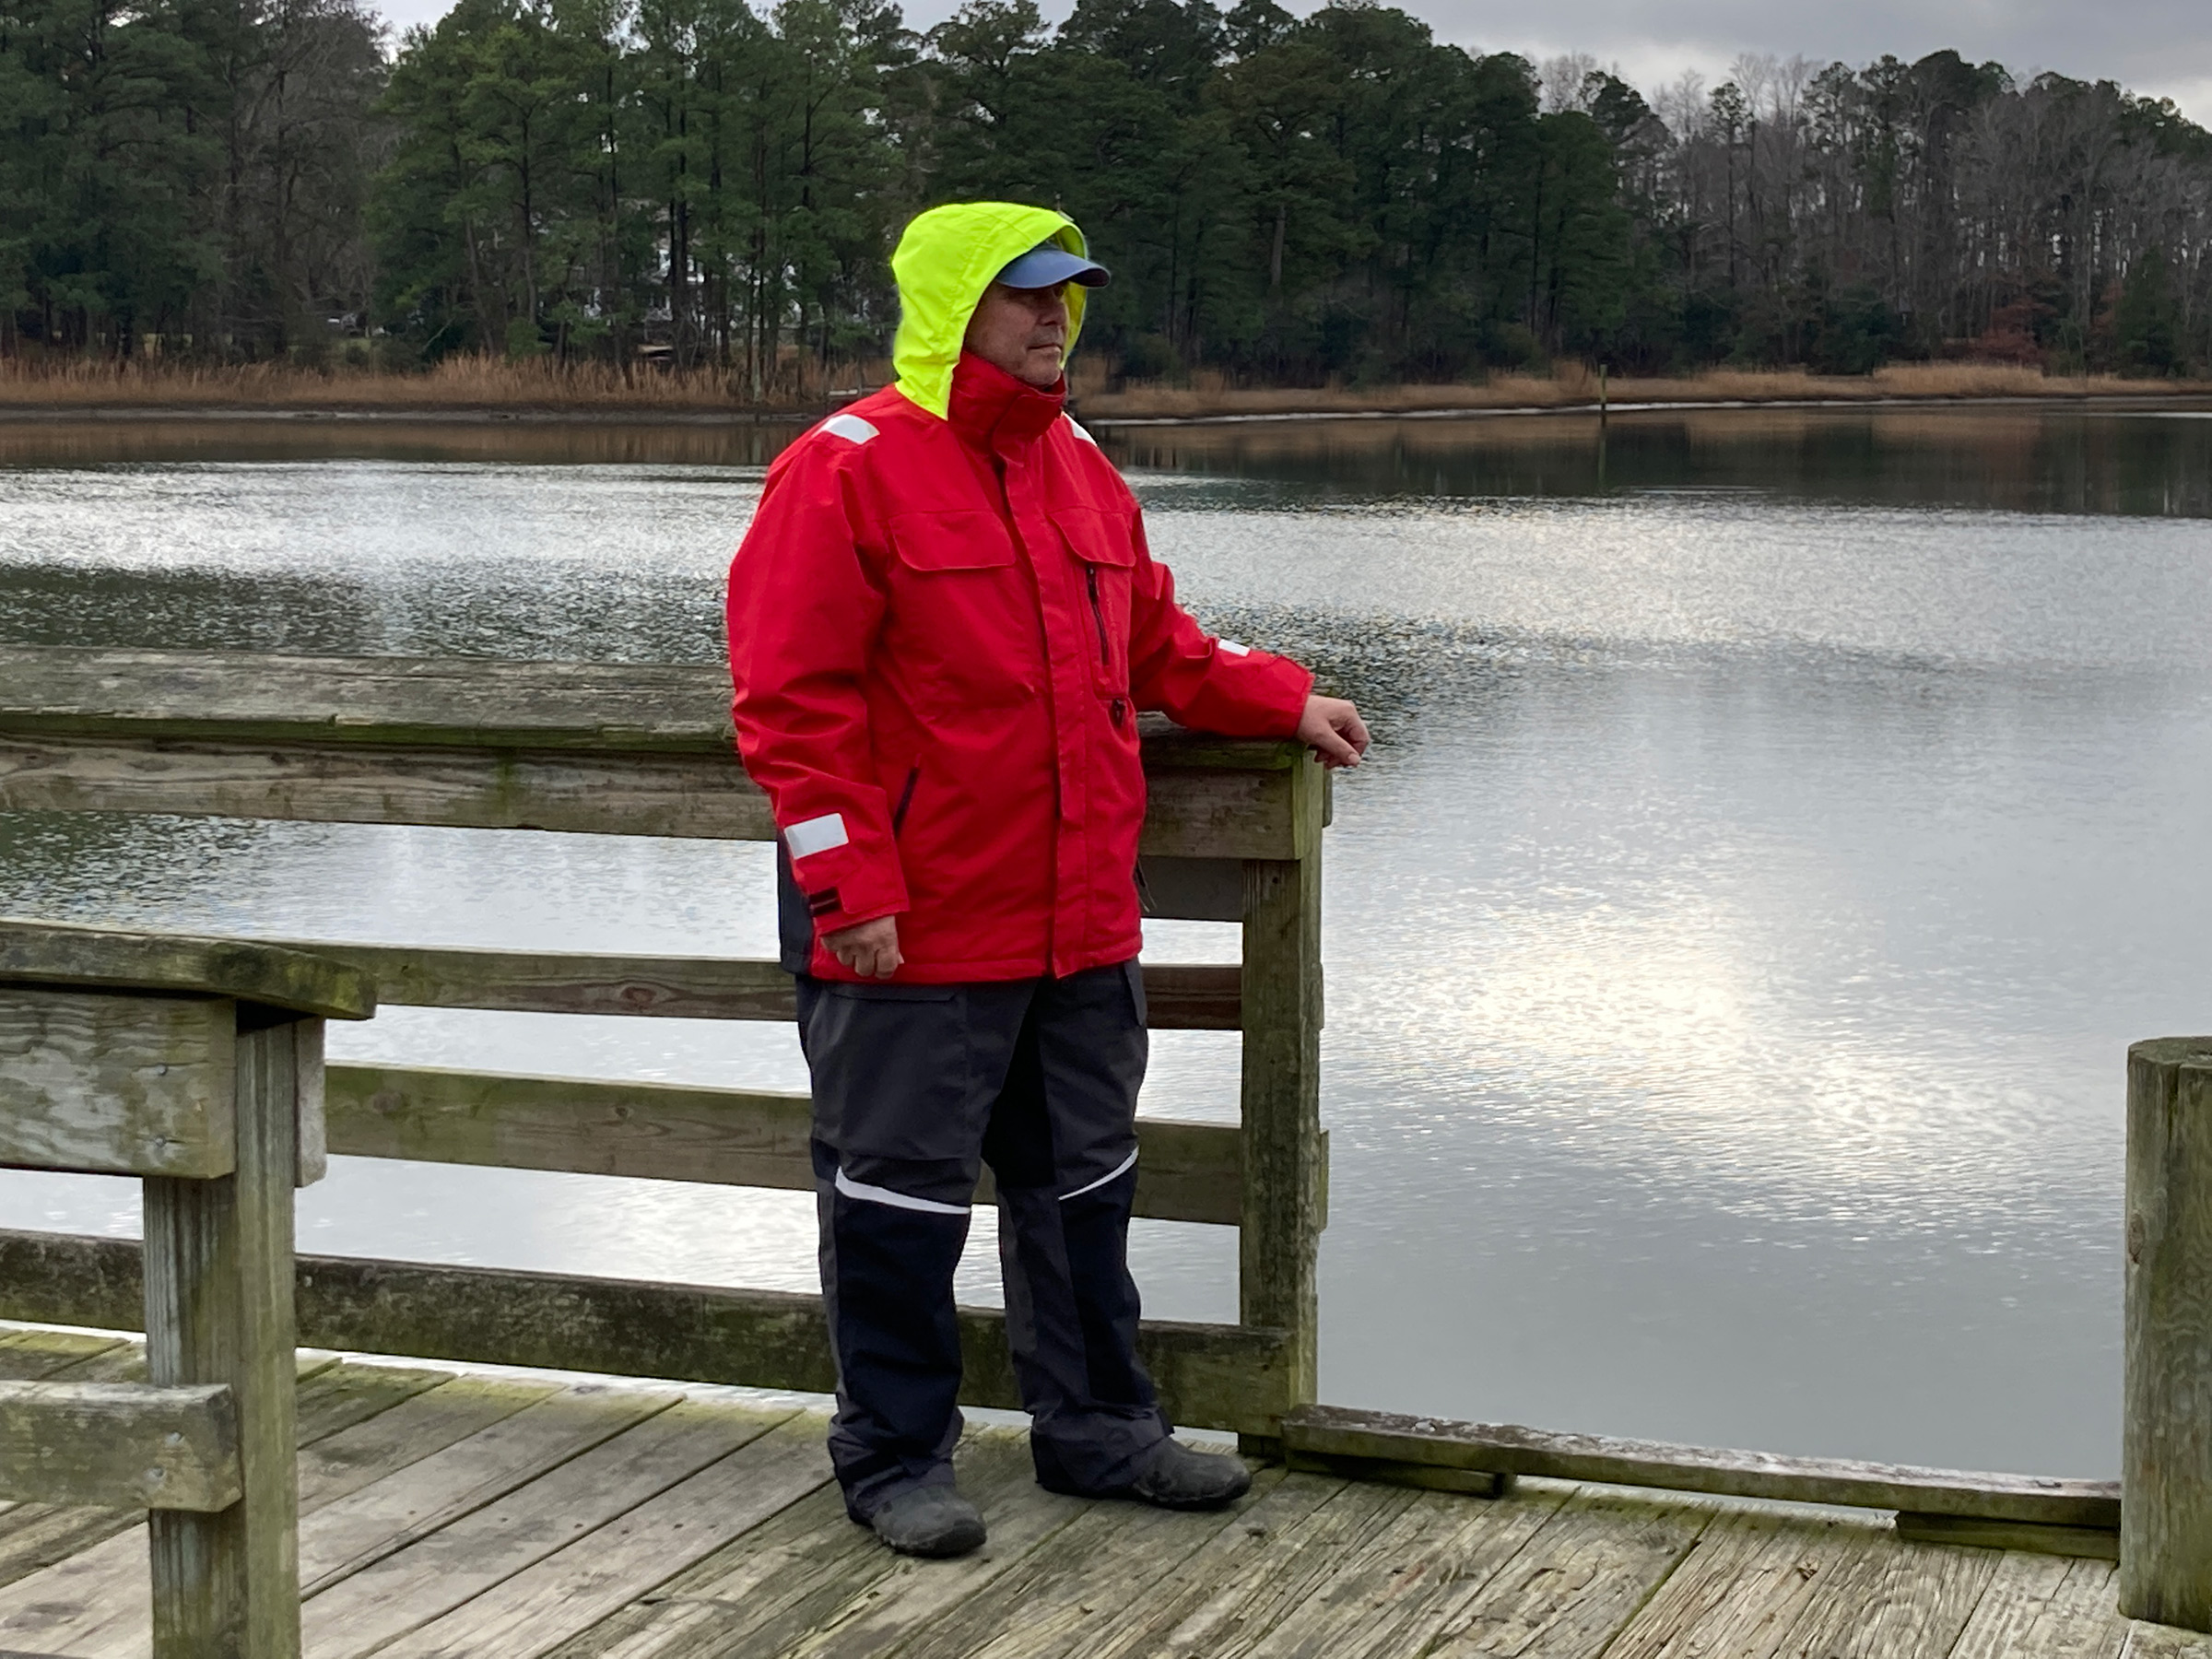
Audrey, aka Skipper, has always wanted foulweather gear, but the most common foul weather we had along the Florida Gulf Coast was withering heat and humidity. That all changed when we moved from the Panhandle to the mid-Atlantic coast. Now, wind and cold spray have become part of our maritime weather, and this year she got her first set of foulweather gear, the Third Reef jacket and bibs from West Marine. They worked so well that I got a set, too.
The jacket’s outer shell has two layers of nylon and a laminate of polyurethane. The combination is windproof, waterproof, and breathable. The nylon fabric has a soft feel and is very flexible. The jacket lining is polyester tricot mesh, which dries quickly and wicks moisture to aid in breathability. Inside the jacket, all the seams are taped to make them waterproof.
The zippers are YKK Vislon marine-grade, with Delrin teeth for low friction, and resistance to wear, UV, and corrosion. Pull tabs provide easier operation with gloves or cold hands. The front opening and pocket zippers are waterproof. The two-way front zipper optimizes ventilation, and opening the bottom end a bit prevents restriction when sitting or bending at the waist. There are five conveniently placed front pockets; four are large enough to reach into with a gloved hand and one on the chest is sized for a small smart phone. The waterproof pocket zippers also have large storm flaps with Velcro fastenings that make the flaps easy to open. There are pieces of retroreflective tape on the hood, shoulders, and wrists, although the women’s jacket does not have the tape on the shoulders. The large tail of the jacket is made from ballistic nylon and provides excellent coverage when seated.
Photographs by Audrey Lewis
The jacket’s front zipper is protected by a Velcro-fastened storm flap. West Marine offers the jacket in red (shown here), yellow, gray, and blue.
The high collar is lined with microfleece and houses a hood. The two-layer, high-visibility-yellow hood is large enough to wear with a watch cap underneath. It has an elastic cordwith slider for one-handed adjustment of the face opening, and a Velcro tab on the top to adjust brim placement. This adjustment keeps the hood in place when the wind is blowing. The hood turns with the wearer and doesn’t get in the way of over-the-shoulder glances. When not needed, the brim can be folded back out of sight. Inside the jacket there is an elastic cord -and-slider adjustment for the bottom hem, and similar adjustments for the waist cinch in both lower pockets. The outer cuff and inner liner sleeve have Velcro closures.
The jacket has an excellent tapered fit yet is sized to allow for wearing insulating layers underneath. Skipper is an experienced tailor with four decades of sewing experience, and she notes that the sleeves are cut like those of a good suit jacket, with a one-part upper sleeve and two-part under sleeve, which allows better mobility for tending to spars, hauling sails, and adjusting lines on our sailboats. The flat pockets and smooth outer shell prevent catching on cleats, oar handles, tillers, belaying pins, standing rigging, and the like. We found that the outer layer sheds water well. The jacket also has a nice weight and feel, is machine washable, and can be tumble-dried on low. There is a ring placed below the chest pocket to attach a lanyard for a whistle or an outboard motor’s kill switch.
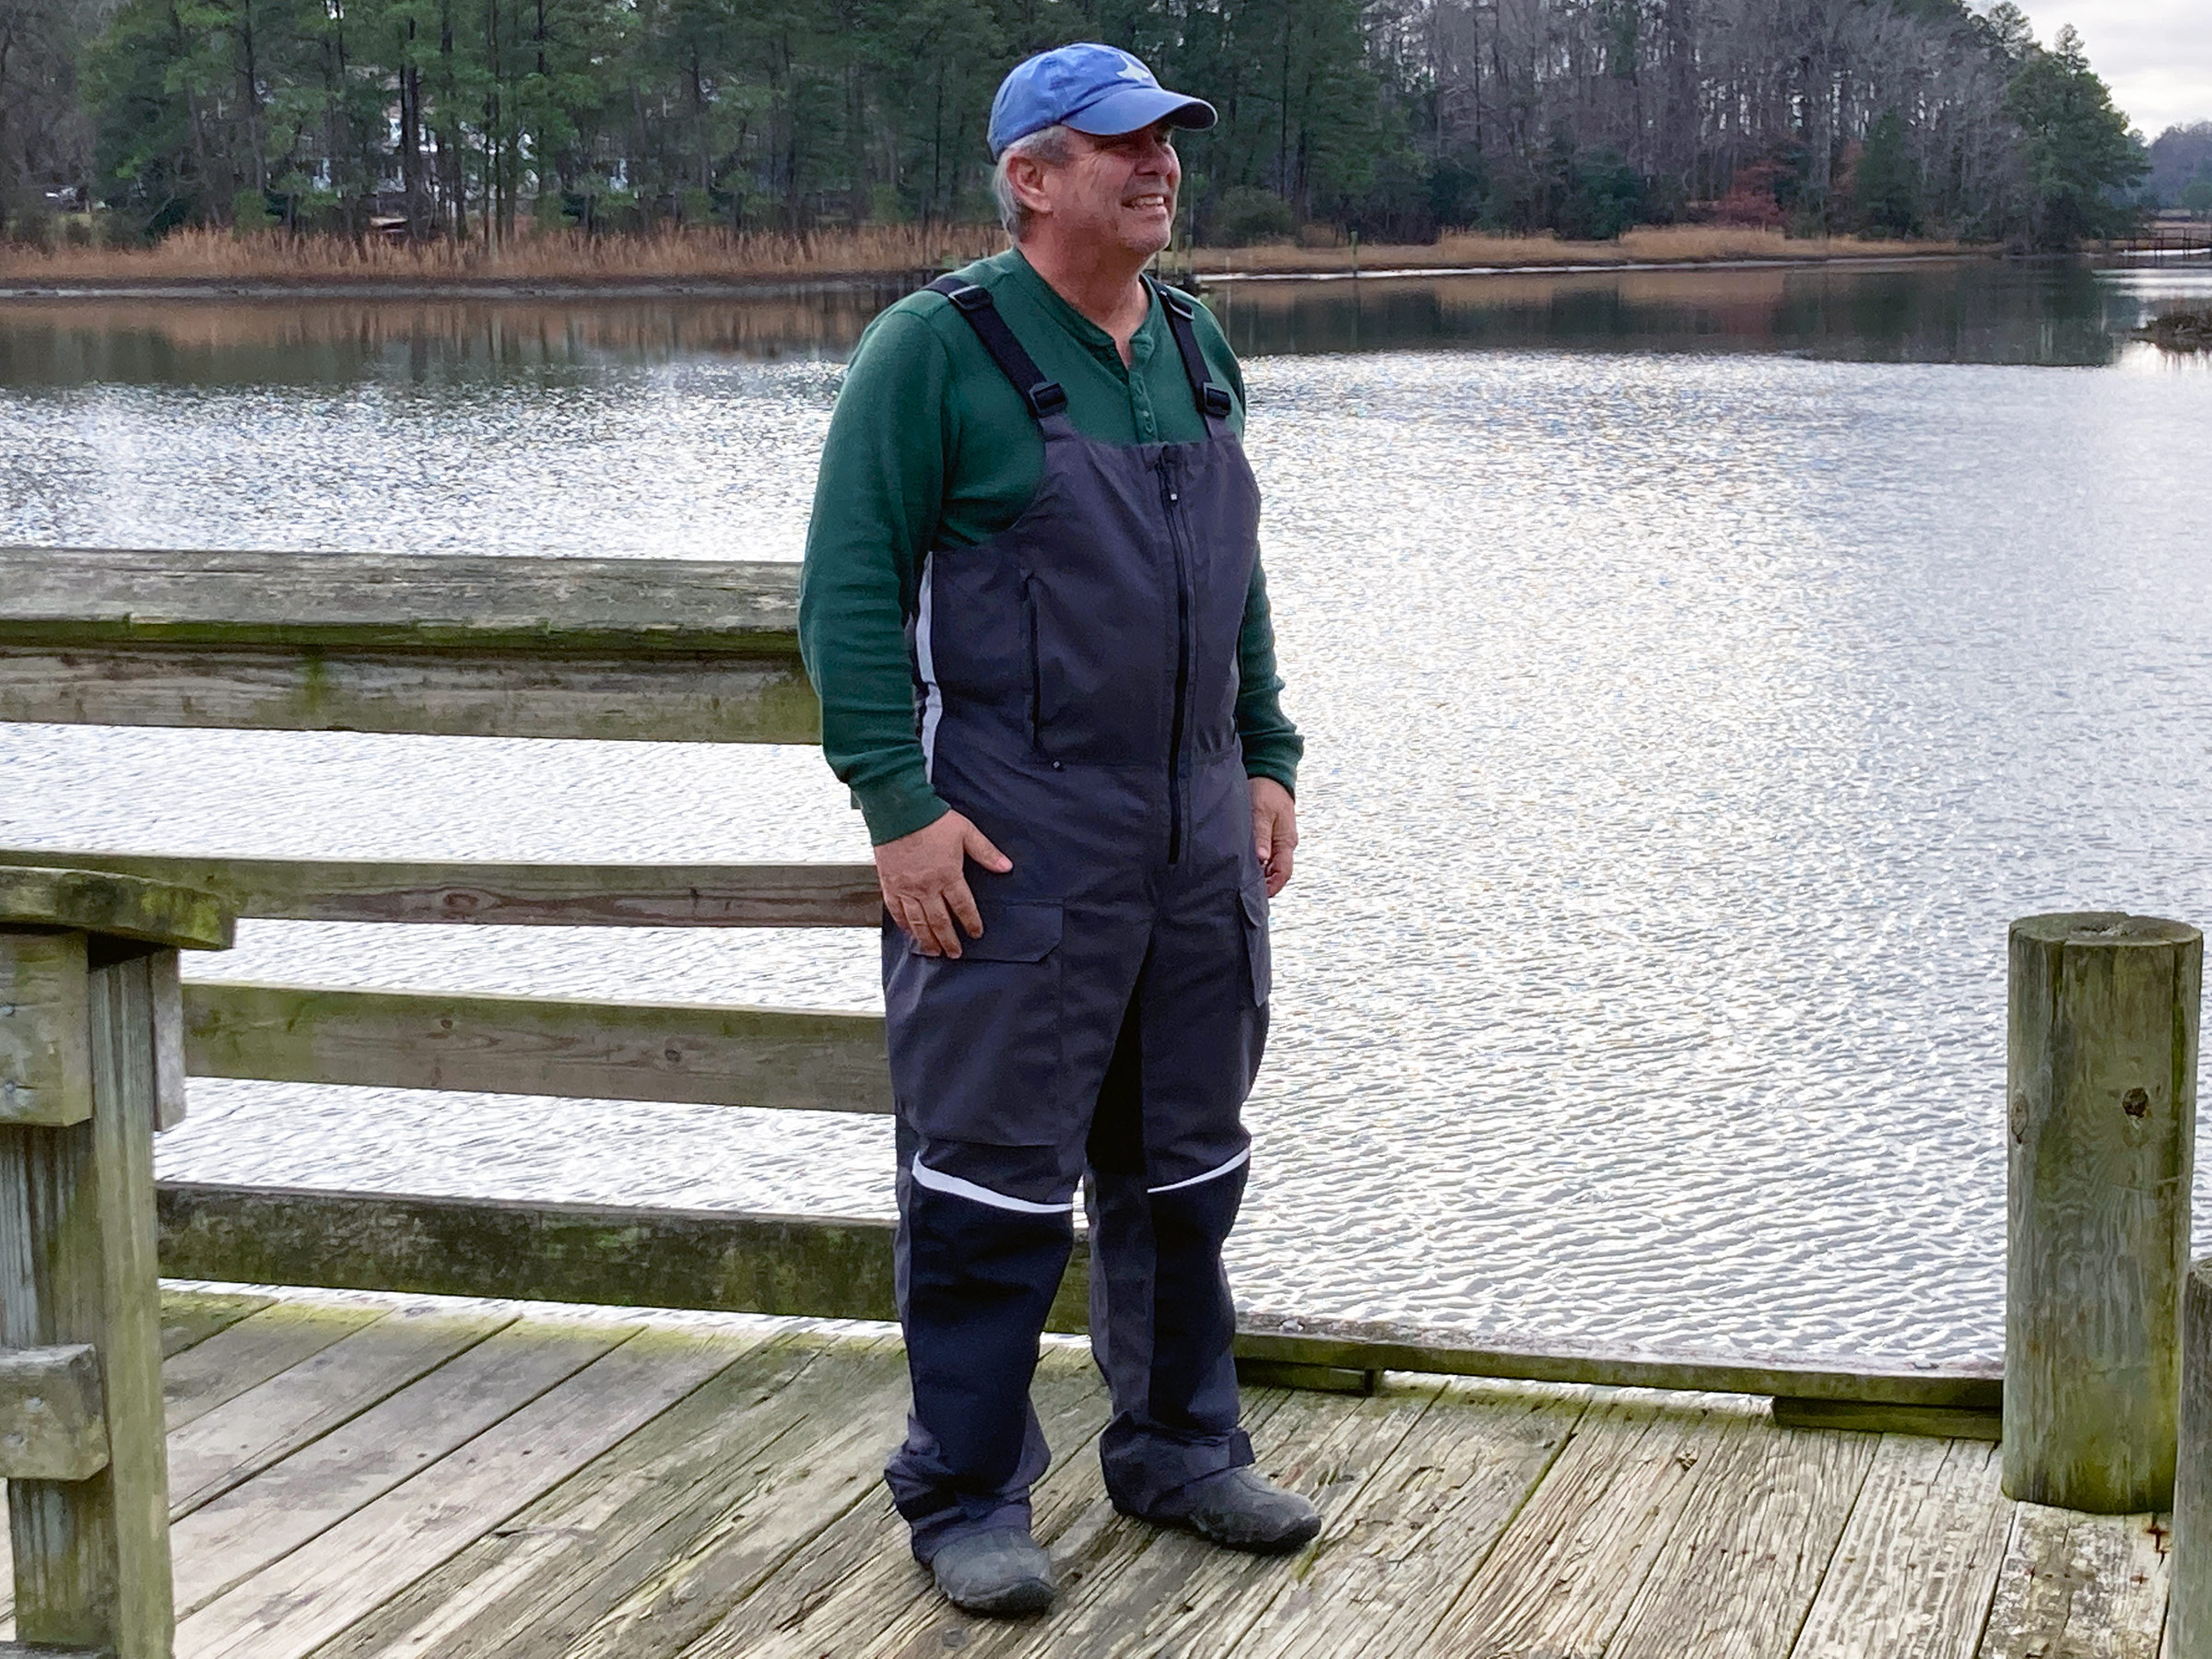
The bibs have hand warmer pockets with water-resistant zippers on the chest and cargo pockets on the thighs. The gray model is shown here; yellow is also available.
The Third Reef bibs are also made of waterproof, windproof, breathable nylon with taped internal seams. The wide elastic shoulder straps are adjustable and can be released from the bib front. There is ballistic-nylon reinforcement in the seat, knees, and cuff backs, as well as Velcro on the cuff closures, which open wide enough to fit over rubber boots. The YKK waterproof zippers used on the thigh pockets get extra protection from storm flaps. The women’s bibs have two side-entry zippers; the men’s bib entry zipper is placed on the front of the bib and is backed by a gusset. The generous cut of the material at the hips and knees aids range of motion, which comes in handy when shifting weight and balance while on board as well as while getting in and out of boats at the dock and on the shoreline. Retroreflective trim above the knees helps in low-light visibility. Unlike the jacket, the bibs are unlined, which promotes quick drying and reduces weight.
To simulate a downpour and windblown rain, I’ve had Skipper spray me with the garden hose while I wore the jacket and bibs and performed a variety of boating tasks—I even went into the cold shower with the gear on—and have found no leaks.
The Third Reef line of foulweather gear has many well-thought-out features and does not feel restrictive or heavy, which makes it comfortable to wear for extended periods and affords plenty of mobility for all types of boating. While our Third Reef gear is new to us this year, Steve, our retired U.S. Coast Guard friend, has had his Third Reef foulies for about four years, and he reports that there have been no leaks and that the materials are holding up well.
Audrey and Kent Lewis mess about along the mid-Atlantic coast in a variety of motor, sail, oar, and paddle boats from 8′ to 19′. They are planning future expeditions for the James, Chesapeake, Delaware, and Mobjack bays, and the Outer Banks. They blog their adventures at Small Boat Restoration.
Is there a product that might be useful for boatbuilding, cruising, or shore-side camping that you’d like us to review? Please email your suggestions.
Japanese saws—nokogiri—have long been favored by boatbuilders. Because they cut on the pull stroke, they can be made thinner, which makes the kerf smaller and the sawing easier. There are several types of Japanese saw, each for different purposes. My favorite has been the kataba, meaning “cutting on one side,” a small saw with a long rectangular blade. My first kataba saws had fixed blades set in wooden handles wrapped in rattan. The later versions had removeable blades, which was handy for storing the saw and for replacing the blade, but not while using the saw and needing to put it safely away between tasks.
Photographs by the author
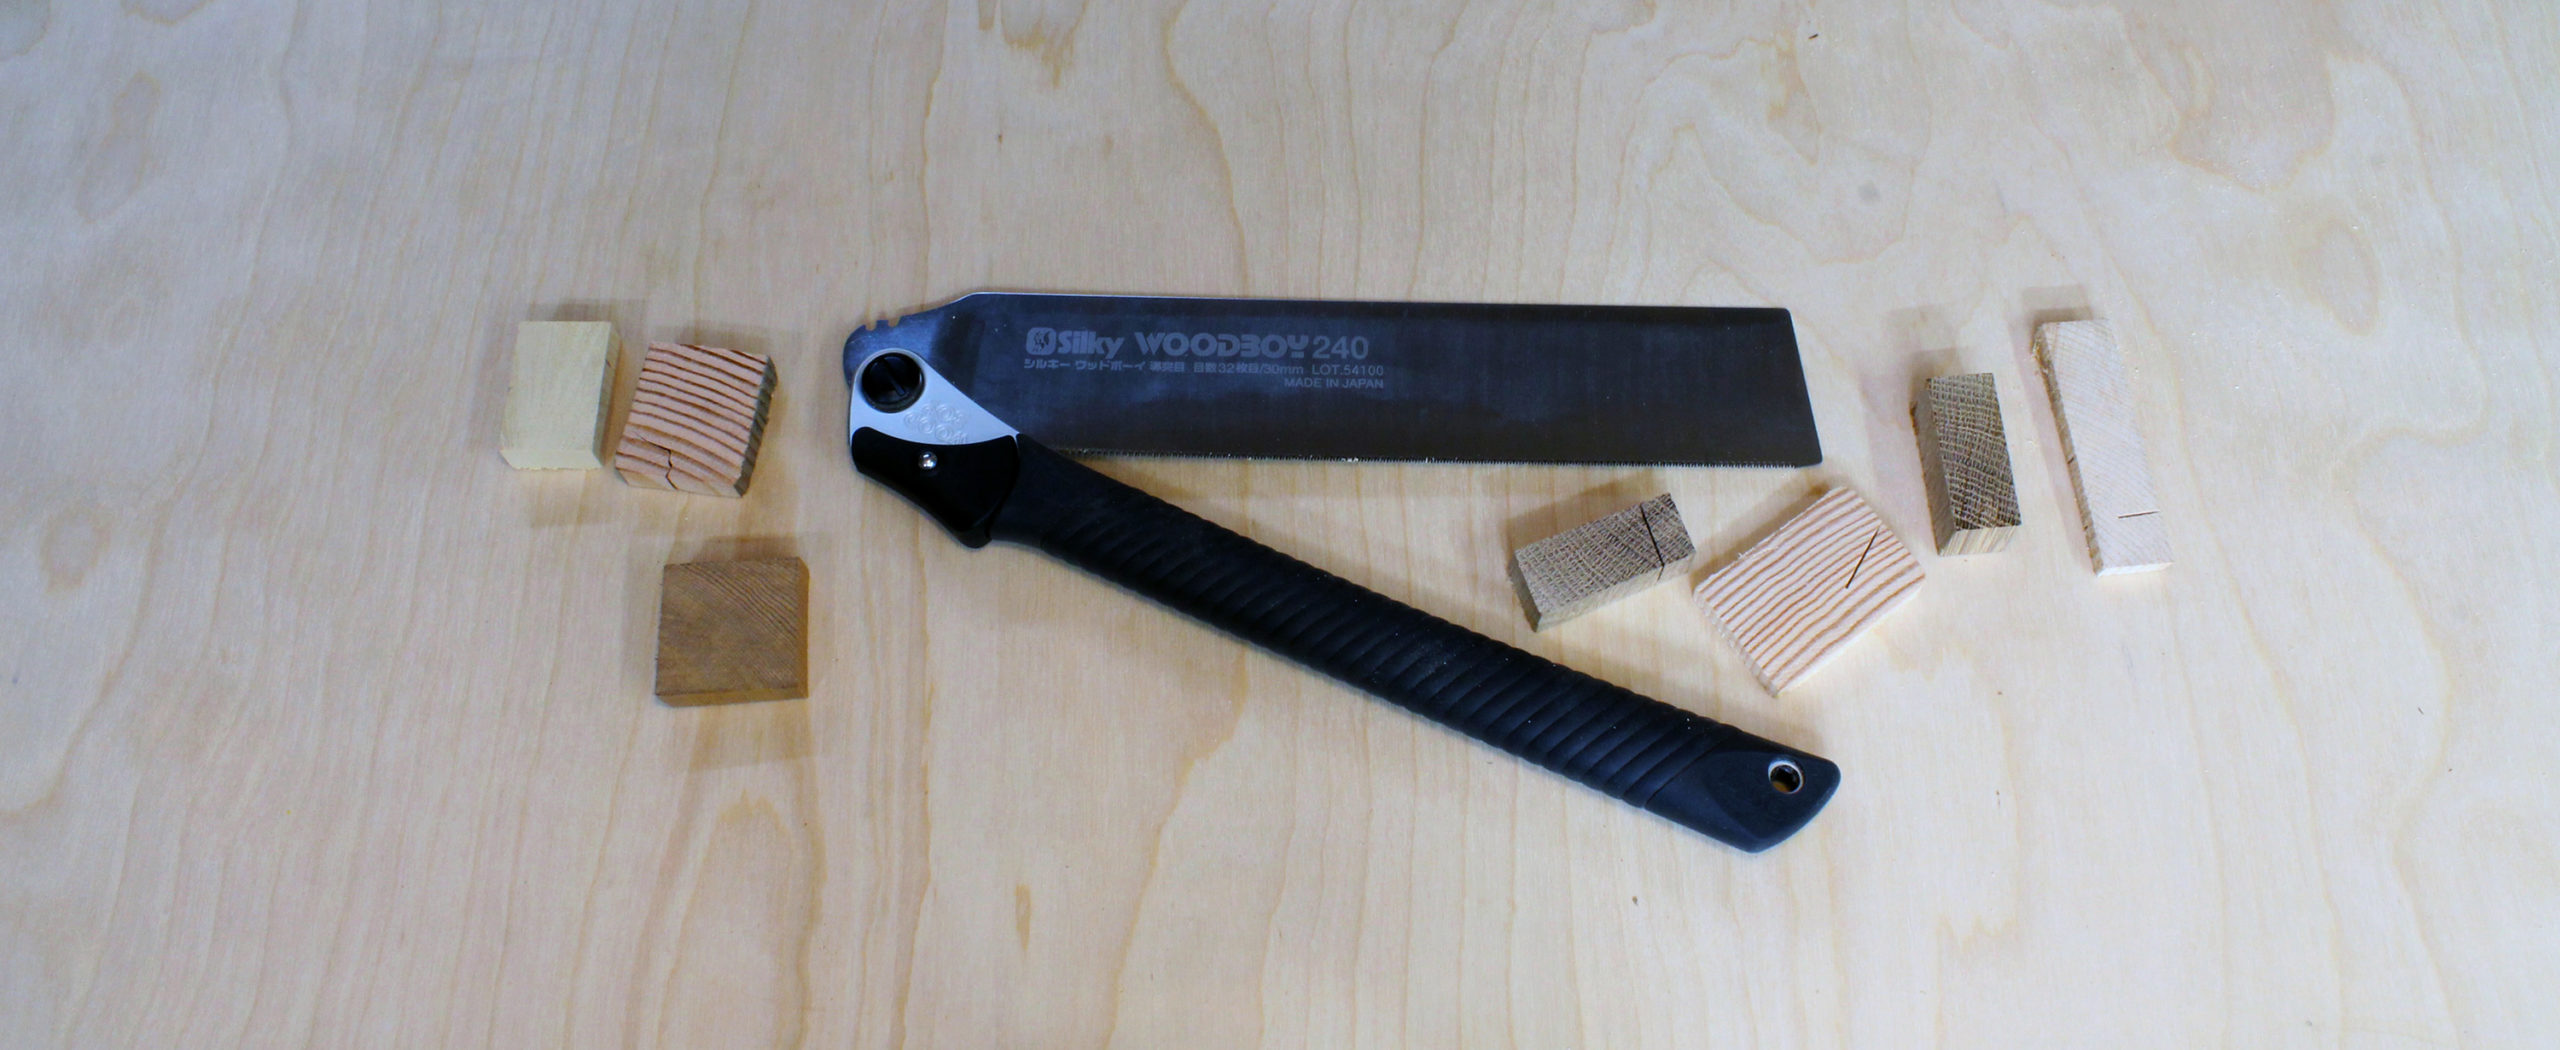
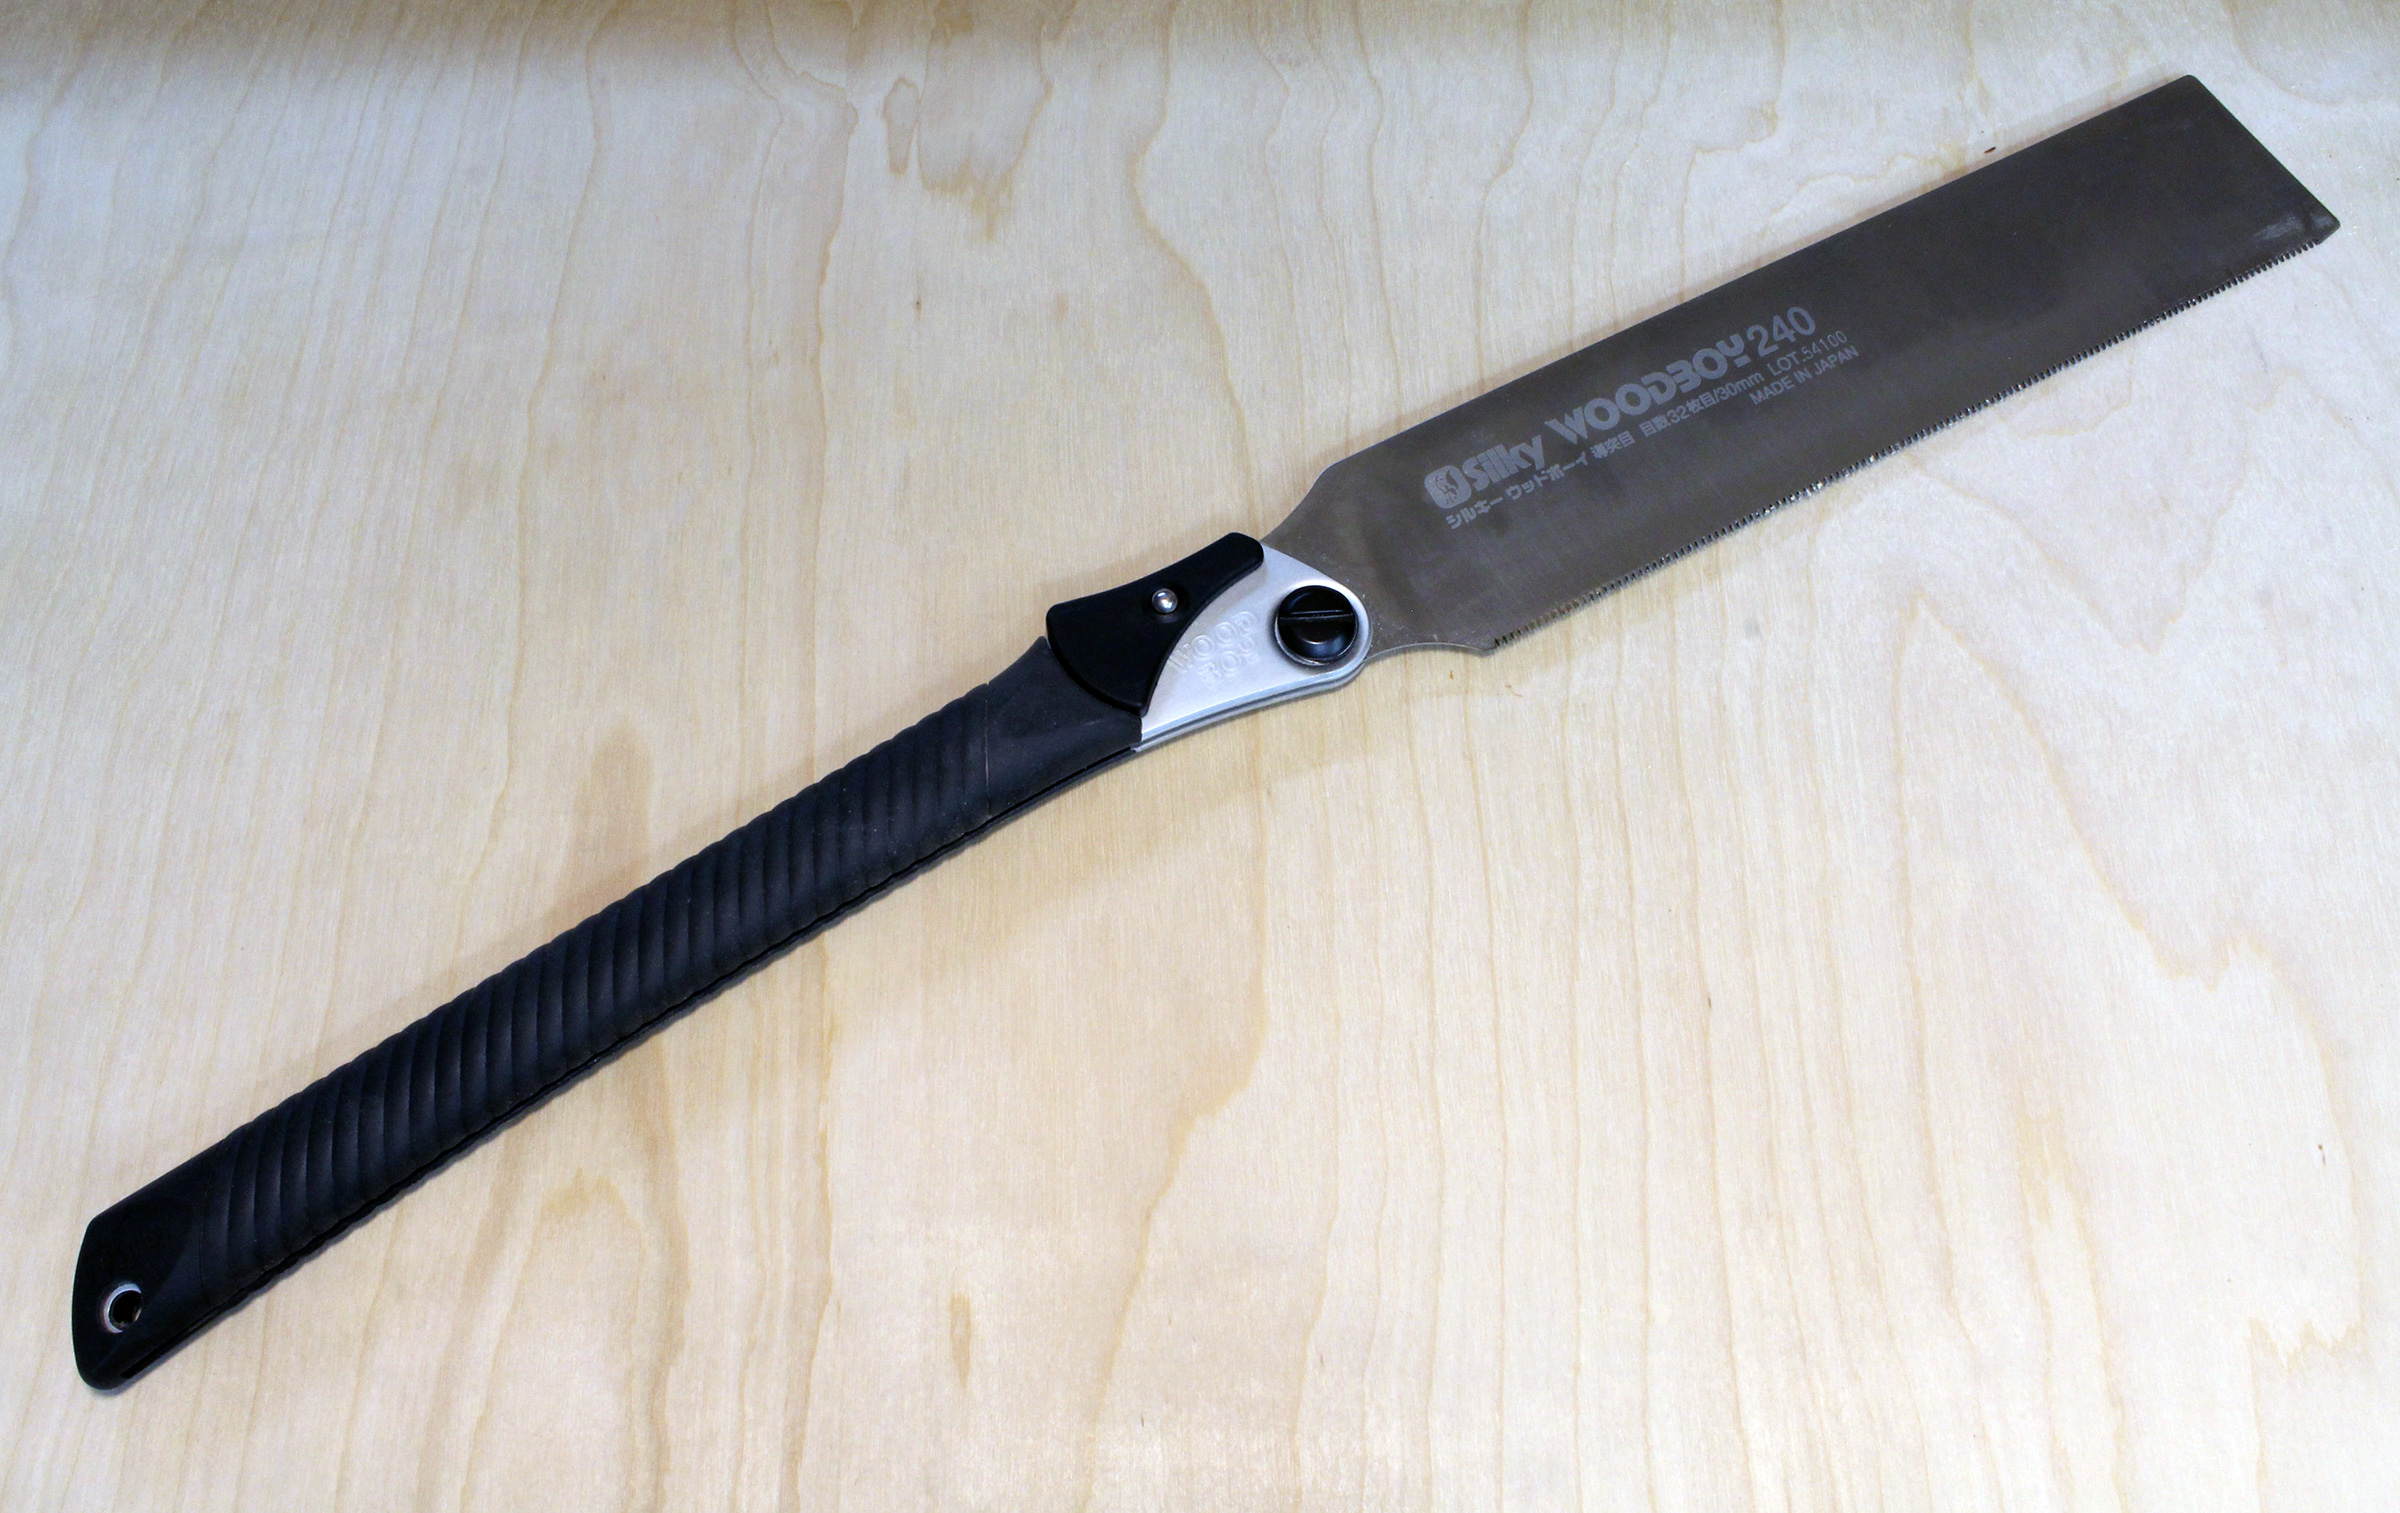
Extended, the Woodboy is 22″ long. The blade is in the straight position. A second setting angles the blade up from the line of the cutting edge.
The Silky’s Woodbay is an update of the kataba, with modern materials and new features. It’s a folding saw, and in a heartbeat it can go from 22″ long, with its blade extended and its teeth exposed, to 12″ folded, with its cutting edge protected from damage—and your hands protected from its sharp teeth.
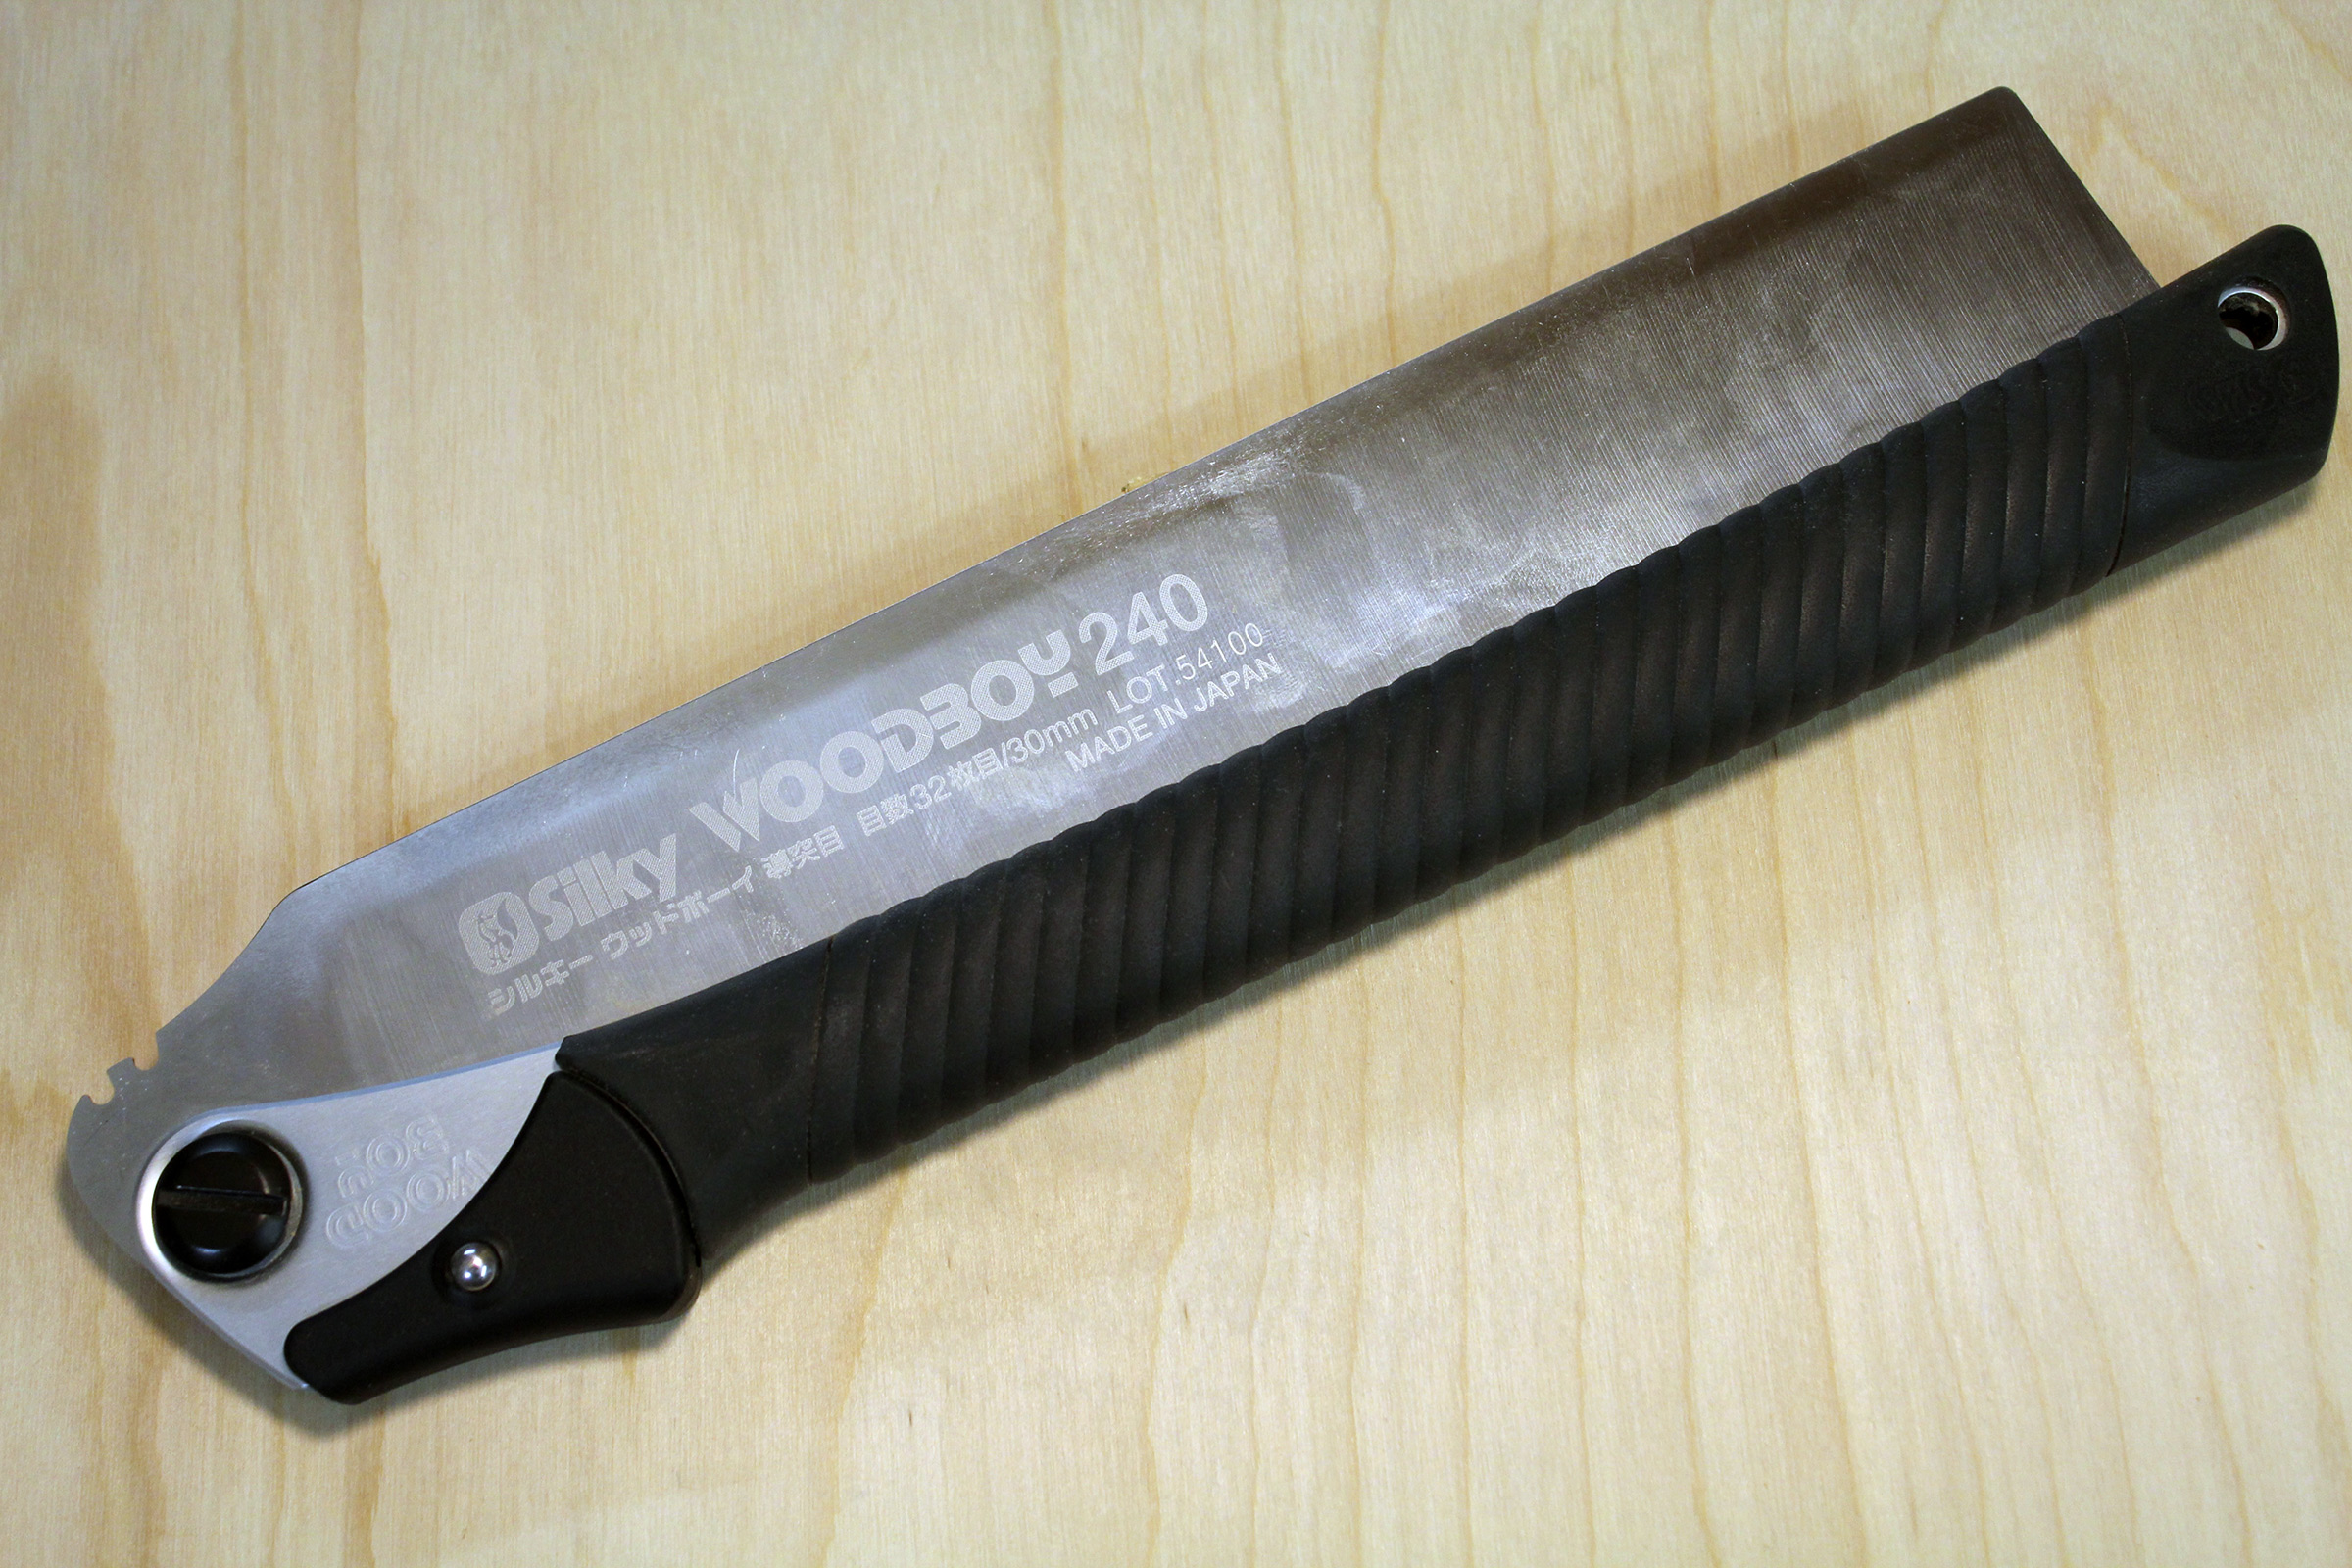
When the saw is folded, the saw easily fits in a pockets and its teeth are well protected.
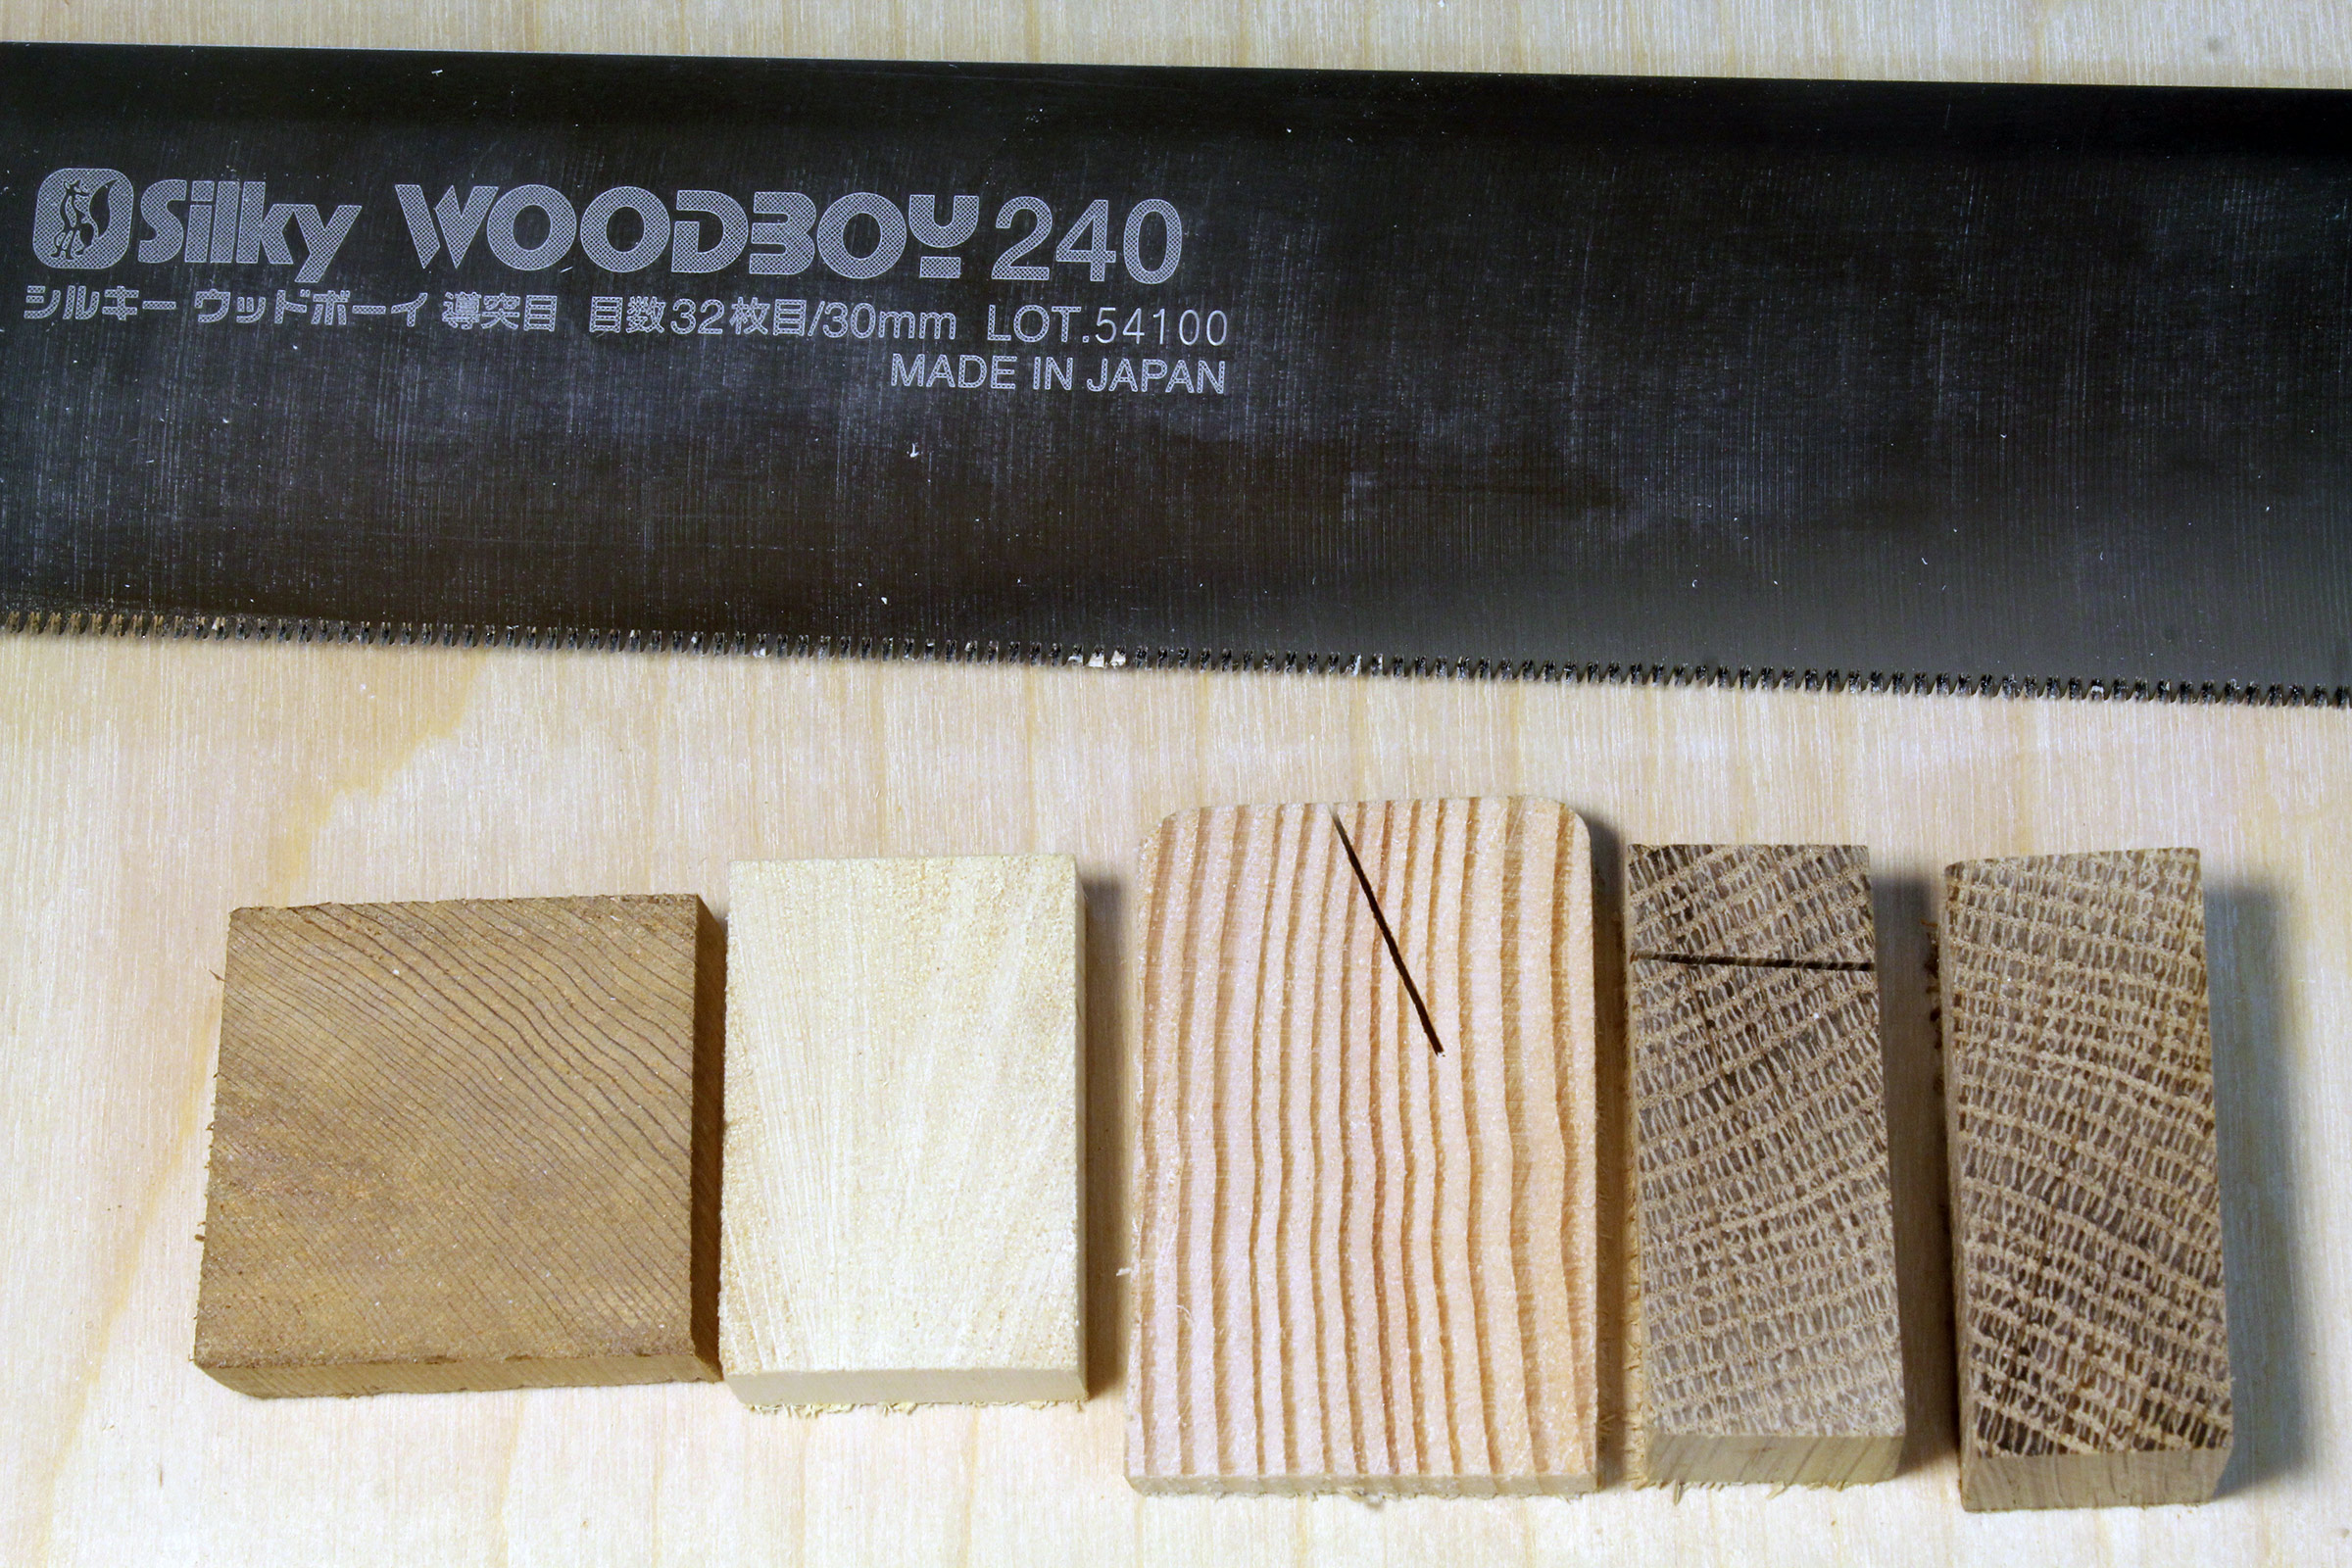
The Woodboy’s blade is 10″ long and 2-1/8″ wide. A fine, uniform pattern of arcs on the sides indicate that the blade was machined, so I took my digital caliper to it. The back edge is 1/32″ thick and the middle is thinned to 1/64″. At its cutting edge, the blade is 3/128″ thick, so even though there is no set to the teeth, the kerf made by the teeth provides enough clearance for the body of the saw. It won’t bind.
The fine teeth have no set and leave a smooth-sided kerf. The samples here are , from left, western red cedar, Alaskan yellow cedar, Douglas fir, and two pieces of white oak. Two of the pieces have kerfs from rip sawing.
There are 27 teeth per inch and they are shaped in the manner typical of Japanese saws. The gullets create tall, narrow teeth, and a bevel at the top of each tooth create a durable cutting point. The teeth are very sharp. I inadvertently brushed a knuckle across them and they didn’t just scratch me as I would have expected. They drew blood.
The teeth are evidently hardened and are an even match for a file. Neither one easily makes a mark on the other. The hardness of the steel and the diminutive size of the teeth make it impractical to resharpen the saw. Replacement blades are available. Unscrewing the pivot bolt to change blades takes on a few seconds.
The handle is aluminum, and its slot is lined with plastic to protect the saw’s teeth. On the outside of the handle there is a ridged rubber grip that is non-slip and comfortable to hold. A spring-loaded latch holds the saw open in two positions: parallel with the blade and angled up from it. The latter, according to Silky, is to provide clearance for the knuckles when cutting dadoes on wide boards. I may stick with my router and table saw for dadoes.
The saw does beautiful work and cuts quickly and cleanly through hardwoods and softwoods alike whether rip-sawing or cross-cutting. It leaves a very smooth finish with scarcely perceptible scoring and on ash and oak will leave a cross-cut end that is even shiny in places. The flexible blade is perfectly suited to trimming pegs and bungs. Pressing the blade against the wood’s surface with one hand and operating the saw’s slightly raised handle with the other, makes a flush cut without scoring the surrounding area. Folded, the saw fits in an apron or pants pocket so it doesn’t go astray.
My traditional kataba saws have served well for decades, but with the arrival of the Woodboy, it’s time for them to let the new kid take over.
The Woodboy is available from Silky for $66.99. Replacement blades cost $44.99. Other retail and online woodworking stores also carry the Silky line.
Christopher Cunningham is the editor of Small Boats Magazine.
Is there a product that might be useful for boatbuilding, cruising, or shore-side camping that you’d like us to review? Please email your suggestions.
Sean Russell grew up on the shores of Lake Ontario in a small beachfront cottage outside of Toronto. His bedroom window looked out over the lake’s ocean-like expanse of water and he recalls “that view was more valuable than anything. It opened up great vistas. I imagined you could set sail and arrive at the Caribbean or anywhere, for that matter.”
The cottage was remote enough from television and movies that books were the family’s main form of entertainment. His parents were voracious readers and his mother read a lot of books to Sean, so many that when he was 10 years old he decided he’d be an author someday.
Photographs courtesy of Sean Russell
The seats are glued-up 7/8″-square strips of fir and yellow cedar. The seats are slotted to make them lighter. Two adults could sit side-by-side on the center thwart so one of its strips is 2″ deep to provide extra stiffness.
That someday came and he published his first book, a fantasy, in 1991 at the age of 39. He later wrote a series of books—the Lt. Charles Hayden historical naval-fiction novels—about men-of-war in the age of sail. He created THEMIS, a fictional frigate, and could see it in his mind’s eye in great detail, but the ship existed only in his imagination.
The finished skiff tipped the scales at just 85 lbs.
He moved to Vancouver Island, British Columbia, and now lives in just a short walk to the water. His imagination turned to smaller boats, ones that he could actually build and use. He created hundreds of designs for rowing and sailing craft, at first drawing them by hand, and later with CAD programs.
In our May 2016 issue, he shared with us his SWEET PEA, an 8′ strip-built peapod. While SWEET PEA served as a tender for his sailboat, it wasn’t designed for that role, and Sean decided to design a new small rowing boat to replace it.
It would be a dory skiff, large enough to carry four adults, along with a propane tank, and groceries, and still have ample freeboard. It had to fit on the deck of the mothership between the mast and windlass, which set the length of the tender at 9′ 1-1/2″. For stability, the beam would be 4′ and the bottom would be 34″ across at its widest point. The plywood bottom, garboards, and transom would be assembled with stitch-and-glue construction, but to dress up the sides with another curve, the sheerstrake would be added as glued-lap plywood.
RIPPLE has two rowing stations so the boat can be properly trimmed with different loads aboard. The spruce oars were made by Barkley Sound Oars on Vancouver Island.
Some dory skiffs have the transom widened and the run flattened to accommodate an outboard, but Sean would have none of that. He even narrowed the transom and gave the bottom enough rocker to keep it from dragging. “We don’t like the sound of outboards,” he says, “and we don’t want to carry the fuel. And oddly, I like to row. Why one needs an outboard to go even 300 yards to the beach is a mystery to me, but then today’s tenders, most of which inflate, row terribly.”
Sean reports that his homemade dory skiff, RIPPLE, “is a robust, stable little craft and rows beautifully. I think it will make a fine tender and a great little boat for exploring anchorages.” Sean’s RIPPLE is about as far as a boat could be from his frigate, THEMIS, but while both spring from his imagination, only RIPPLE can truly carry him away from shore.
Do you have a boat with an interesting story? Please email us. We’d like to hear about it and share it with other Small Boats Magazine readers.
I picked up a Morris today at an estate sale…” writes an enthusiastic Wooden Canoe Heritage Association (WCHA) Forum user. Photos of a wood-and-canvas canoe with sweeping lines illustrate his entry.
“Nice find!” responds a voice from New York.”
“Thou shalt not covet thy neighbor’s stuff, but I’m going to anyway. Seriously nice boat,” rings another.
The posts roll on. “They are great boats!” And finally, “Can’t wait to see it on the water.”
Who was B.N. Morris, and why do his canoes inspire such reverence?
Around the mid-1880s, B.N. (Bert) Morris set up his wood-and-canvas canoe shop on the banks of the Penobscot River in Veazie, Maine. A few miles south in Bangor, a decade earlier, Evan Gerrish had become the first commercial builder of this type of canoe in Maine—and perhaps the world. E.M. White followed Morris. All three companies predated the arrival of the Indian Old Town Canoe Company, founded around the turn of the 20th century.
The early wood-and-canvas canoes were direct descendants of the Penobscot birchbark canoes and, as with their predecessors, their design was pure utility; these were workboats used by guides and lumbermen. While the bark canoe is built on the ground starting with the bark skin hull and rails, the wood-and-canvas boat uses a form (somewhat like a cobbler’s last) and begins with the ribs and rails—uniform larger-scale production being one of the goals of the method. At the time, forms, also known as building jigs, were used to build peapods and skiffs in Bangor, but Gerrish was the first to link the form with the wood-and-canvas canoe. Earlier, all-wood canoes were being constructed in Peterborough, Ontario, and Canton, New York, utilizing forms, but Maine builders are believed to have devised their method independently.
Rollin Thurlow has been building wood-and-canvas canoes since the mid-1980s. He has taken measurements from and drawn lines for this 17′ canoe, a classic that Bert Morris designed early in the last century.
Bert Morris was the first Maine canoe-builder to adapt his design for the growing recreational market. As the company departed from the sleek native design (narrow beam, sharp entry), his boats became wider, fuller, and more stable. They acquired the elegant upturned sheer that would become Morris’s signature. Each detail led to a boat of uncompromised quality: Straight-grained, quarter-sawn planks were nailed snugly together (done to minimize swelling and to maximize strength), each with the appropriate number of tacks in a staggered pattern so not to crack the 3⁄8″-thick ribs. Rib grain was chosen for strength as well as aesthetic fluidity, and each rib (of the closed gunwale design) was cleanly tapered to fit into its mating inwale mortise. Rail grain was matched; decks fit tightly…the list goes on.
Sadly, in 1920 a fire destroyed Morris’s enterprise. At the time, he had 75 employees and was one of the largest and most respected canoe manufacturers worldwide. After the fire and for the last decades of his life, Bert returned to his roots and operated a one-man shop from his home.
After World War II, aluminum canoes chipped away at the wood-and-canvas canoe’s popularity, and by the mid-1960s fiberglass ruled the market. However, in the mid-1980s, a few impassioned builders led a wood-and-canvas revival. Among them was canoe-builder Rollin Thurlow. He chose the Morris 17′ Model A as one of the designs to help lead the charge.
Rollin carefully fits a deck piece around a steam-bent coaming. The coaming will be let gently into the inwales. Although closed (capped) wales were the norm very close to the time of this canoe’s debut in 1910, this model has open wales that enable better drainage.
Bearded, jovial, and quick with a laugh, Rollin is a humble grandfather to the wood-and-canvas canoe movement. Thurlow and his longtime friend, canoe-builder Jerry Stelmok, wrote The Wood & Canvas Canoe in 1987, a historical and how-to text now a mainstay in the libraries of most who have since plied the trade.
Rollin remembers fondly when (in his basement) he built the form for the Morris 17′ Model A—having taken the lines from a boat of 1910 vintage. For him, Morris came to symbolize the height of that romantic era in wood-and-canvas design. If the evolution of the canoe, hundreds of years in the making, were a hot fudge sundae, then Morris would be the shiny cherry perched atop that sweet bed of human ingenuity.
To paddle a Morris is to connect with living history. I had that opportunity on a backwoods pond a few minutes from Rollin’s shop. Several quick strokes brought the Morris up to speed. The breeze in my hair and an emerald wake put a smile on my face. The Morris holds its line with gusto, courtesy of its slight rocker (1⁄2″) and external keel (standard issue—7⁄8″ wide, tapering to 3⁄8″). The Morris has a relatively full entry that causes the bow to ride over the waves rather than crash through them.
On that blue-sky day, I planted my knees against the ribs and rocked the hull to and fro as I glided over the quiet pond. The shallow arch of the hull (a compressed U-shape in section) gives the Morris stability without sacrificing comfort—it is an appropriate design for the average canoeist. I found it easy to pull a smooth vertical forward stroke along the edge of the gunwale, thanks, in part, to the 10 degrees of tumblehome. Open gunwales allow the boat, on land, to drain when rolled up on its side (before 1910, closed gunwales were the norm).
A traditional wood-and-canvas canoe is built on a sturdy form intended for mass-producing a single design. Here, ribs have been steam-bent over steel straps that wrap around the form—and planking has begun. Planks are fastened with small, solid brass canoe tacks that are driven through the planking and ribs, contacting the steel strapping below. This contact causes them to curl around and hook back into the rib from the inside, holding the plank fast to the rib.
The Model A was intended for general use. Its 17’1″ length overall allows for a nice blend of speed and legroom. Its 12″ depth provides some carrying capacity and enough freeboard to keep the waves at bay. The 33″ beam strikes a reasonable balance between performance and stability. At 85 lbs (dry weight), the Model A can be portaged by a single (albeit strong and determined) individual.
As I paddled, my eyes kept returning to the texture and shine of the hull’s cedar interior. The glow of the mahogany trim (rails, decks, thwarts, seats, and floor rack) and the long deck with its brass flag socket— dating back to canoe club days—give the Morris a regal finish (mahogany trim, exterior oak stem band, and long deck signify the Morris company’s Type Three finish).
A rather unique Morris detail is the cedar stem that splays (spreads) to 3″ at the heel. Stems of ash (7⁄8″ square) were the routine on other brands of canoes. It’s not completely clear why Morris deviated—perhaps because cedar is more rot-resistant than ash but, being softer, requires more girth.
Poling is a popular pastime among canoe enthusiasts.The Morris’s weight combined with her relatively flat bottom gives her good initial stability.This makes her an excellent choice for poling or for general use in calm waters.
This and the other details of a Morris canoe equate to a boat with lasting synergy. Subtleties such as plank fitting, matching grain, the shaping of trim, deck coaming, and copper seat spacers are independently easy to miss, but collectively they add up to the unique style of a Morris.
“The canvas can hide a lot of things,” said Rollin. “But Morris canoes are always good wood underneath— the quality, the shape, the fits were all excellent. Morris was paying attention.”
This attention to craftsmanship has found a kindred spirit in Rollin.
Peter Wallace, Rollin’s business partner and shop mate, poled around the pond in the Morris, his smiling yellow Lab keeping watch up forward. Peter reminded me of one of those starry-eyed sternmen floating the Charles River in Morris’s heyday. I imagined an onboard Victrola radiating love songs, enough cushions to keep the courtship cozy, and the canoe club pennant coursing in the breeze. Like those jubilant folks on the WCHA Forum, I too was entranced by a desire to capture a moment from another time; a time long ago and far away.
Rollin and I took one final spin. “A big part of a wooden canoe is just the appearance of it, the curves that a boat takes, the romance of it,” he said and then mentioned how wood tantalized his senses—the look, feel, and smell. “Maybe human development hasn’t progressed out of the woods that much, maybe we’re still attracted to wood that way.”
The upturned sheer (a signature of the Morris canoe) and long, sweeping decks are but a few of the elegant features that set this design apart from many other wood-and-canvas canoe designs. Construction drawings show information in quarters, rather than in halves, due to the canoe’s symmetrical ends. Body plan views show possibilities for two construction methods: stripping and traditional wood-and-canvas.
This Boat Profile was published in Small Boats 2010 — plans are available from The WoodenBoat Store.
Big enough to cruise in…small enough to trailer…” The world of boats abounds in designers’ earnest efforts to meet this Catch-22 challenge; a quest in which accommodations, size, weight, seaworthiness, and looks are more often than not mutually exclusive. Some designers produce marvels of ergonomics; some, triumphs of efficient construction. Rarely do they succeed on all counts, though. Then came Grey Seal.
Twenty-five years or so back in the mists, Iain Oughtred sojourned at WoodenBoat, and during his tenure as designer-in-residence he was challenged to develop a cruising boat for the home builder. He delved into the centuries of European traditional boats he had filed away in his well-traveled mind and soon latched onto a Norse-style hull, as it was roomy, “floaty” (seaworthy), and could be built in ubiquitous plywood. While in his mind he was working up a sort of double-ended Folkboat, the resulting Grey Seal design hearkens strongly to a smallish “spidsgatter.” These haunting Danish craft had their genesis as 19th-century rough-water fishing boats and, in the first decades of the 20th century, evolved into cruising boats and eventually into several racing classes of varied sizes (see WB No. 78). The practical result of Oughtred’s blended genetic and acquired memories is a robust, shapely, seagoing sailboat that lives within reason on its own trailer.
Grey Seal is noteworthy for combining grace, strength, space, and performance. The construction is glued lapstrake plywood (1⁄2″ planking) with deep though widely spaced laminated frames that make for a seemingly bulletproof hull. By “bulletproof” I mean that Oughtred made Grey Seal’s hull sufficiently rugged to carry a 1,200-lb lead keel, stand up to a large rig in a hard chance, and also hold up well under the indignities of trailering. Key to her seaworthiness and livability is that while double-ended, she carries her beam well aft to a magnificently shaped, very full stern, a tell-tale of this talented designer’s eye. He includes many options in his detailed plans (12 sheets!), offering both keel and keel/centerboard versions, marconi or gunter rigs, and a wide variety of interior arrangements. While intended for the home builder, this is serious boatbuilding, full of big, heavy, curvy things—and not for the faint of heart. WATERDOG, featured here, was built by Craig Hohm, a talented and dedicated amateur.
Photo by Geoff Kerr
Grey Seal is a comfortable pocket cruiser. Her double-ended shape, strong sheer, and lapstrake planking hearken to her Scandinavian influence. Glued lapstrake construction makes her accessible to the home builder.
Upon completion of a Fundamentals of Boatbuilding course at WoodenBoat School, Craig built a traditional Catspaw Dinghy, which remains a happy family member. Craig and his wife, Sue, were then tempted by the idea of a trailerable cruiser. Pull out your atlas and put your finger on their Penn Yan, New York, home. Now trace a circle of a one-day’s-drive radius…you can imagine their inspiration within the wide world of cruising waters in range of a week’s vacation. As they researched the possible designs then available, Grey Seal rose quickly and definitively to the top for one simple reason: To them, she was the most attractive boat of the lot.
In retrospect (always the safest viewpoint for a boat- builder), Craig had the skills, space, budget—and the moxie—to pull off what turned out to be a five-year project. He and I are in agreement that boatbuilding skills are but half of the personal resources needed to complete a project of this scope. The remaining portion is composed of some combination of patience and resourcefulness. In other words, managing the project is as important as carpentry skill. This builder knew when he needed help, and sought guidance not only from the designer, but also from cadre of third-party gurus. Moray McPhail at Classic Marine in the United Kingdom provided invaluable assistance in specifying and supplying the rigging, including designing and fabricating tricky custom pieces like the tabernacle. Douglas Fowler, of Ithaca, New York, put his subtle skills to work building sails for the sophisticated gunter rig. Triad Trailers in New Milford, Connecticut, collaborated on a custom trailer designed not only to fit the hull but also to ease the challenges of launch, recovery, and storage. Craig also availed himself of the advice and assistance of professional boatbuilders, picking their brains at local and regional shows when deciding on procedures and products.
Six years of sailing WATERDOG have confirmed for Craig and Sue that their choice of design and concept of the boat’s use were good
calls. Having the best of both worlds, the boat spends the sailing season in a slip at a Keuka Lake marina just minutes from their home, a swan among the carpeted party barge toads. The Hohms can be underway for an impulsive sunset cruise in moments or, with just a couple of hours of prep and rigging, WATERDOG can be secure on her trailer and ready for a vacation cruise. Adventures to date include cruising Lake Champlain, the Thousand Islands, Lake Ontario, and the North Channel.
Photo by Geoff Kerr
House sides flow forward, past the cabin. Looking aft, the coaming also flows beyond its border.These exten- sions provide good toeholds, and their varnished surfaces lead the eye to a thoughtful interplay between painted surfaces, which contribute to WATERDOG’s stunning profile. A bright toerail completes the picture.
The tow package, which approaches 6,000 lbs, pulls readily behind a standard-sized, four-wheel-drive pick-up. A V-8, yes, but certainly not a monster truck, and well within reason as an everyday vehicle in the North Country. While trailer brakes are standard with a rig of this size, other keys to the rig’s success are the load- distribution bars which spread the tongue weight more evenly among front and rear wheels of the tow vehicle. This boat, its trailer, and a mildly oversized door in one bay of the Hohms’ garage allow WATERDOG to “hibernate” between seasons.
My singular impression of Grey Seal in the flesh is of a serious small ship. This vessel is a fully realized, full-featured cruising boat with adult-sized components carried on a small hull. She somehow manages to be robust yet graceful, and compact without looking “cute.” She is stoutly rigged without seeming overburdened. Hardware and rigging are sized and laid out for seaworthiness without looking too “epic,” one of Moray MacPhail’s particular fears. Her accommodations are spartan but functional. The Hohms have two individual berths that serve for seating and sleeping, each one fitted with a lee-side catch-all; a simple galley with a critically important gimbaled stove; and a full-sized marine head, installed without space-hogging partitions. Their choices make for open, weather-tight, and homey living for two.
The cockpit is an important domestic space on a boat of this size, doing double duty as the saloon. WATER- DOG’s custom “chuck wagon” awning encourages use of this space during wet and—as important—hot and sunny weather. While up to four adults could spend a comfortable day aboard, the boat is best thought of as a cruiser for only two, who will find her comfortable for serious, shall we say, medium-term cruising.
Photo by Geoff Kerr
WATERDOG offers a “cozy” sleeping space for two and a basic galley at the companionway. The gimbaled propane single burner attached to the stan- chion between berths makes getting the morning coffee an easier reach for the bleary-eyed.
Craig chose to include a two-cylinder 10-hp diesel that turned out to be a bit of a squeeze. (Oughtred’s drawings provide only the merest indication of engine details.) Consequently, WATERDOG’s mechanicals took a full year to spec, lay out, and install. With that struggle now behind, the reliable, amply sized auxiliary not only extends the Hohms’ cruising range and their ability to meet a schedule, but provides some peace of mind should conditions get dicey.
Some final thoughts about the options included in the design and the choices made for WATERDOG: Craig and Sue have found little or no difference in the boat’s sailing ability with the board up or down, so I’d be tempted to simplify construction and build the keel version which, being only slightly deeper, really wouldn’t make much difference in trailering or in cruising.
The rig options don’t really seem an option to me. The gunter rig is so much more attractive that, in my opinion, the marconi drawing should be discarded! Besides its good looks, the gunter rig’s shorter mast has less windage at anchor and is easier to step and unstep.
The Grey Seal design probably marks the upper limit of the “Small Boats” concept. Even a patient home builder will spend a considerable amount of capital to realize this dream, and having one professionally built will up the ante, big-time. She may well be worth it, though, for this superb vessel is as lovely and as capable as anything I could ever imagine. She captures the Norse spirit—but in an eminently accessible form.
Grey Seal’s lines promise a hearty, buoyant, and able boat. That hint of hollow aft in her waterlines contrib- utes to the lightness in the look of her stern.
This Boat Profile was published in Small Boats 2010 — plans are available from The WoodenBoat Store.
Rob Macks is a boatbuilder who is also a sculptor and educator. He has been building canoes and kayaks for more than 20 years, doing business as Laughing Loon Custom Canoes & Kayaks in Jefferson, Maine. His North Star design is a strip-built kayak that he has offered since 1993. It is based on the baidarka, a construct of the Aleut kayakers for their forays into the Bering Strait and other northern waters. Traditional baidarkas are skin-on-frame, and most builders conform to that building method. The initial structure devised by the native people involved strips of wood and bone lashed together with sinew and then covered with walrus skin. A modern version typically has a wood frame with a canvas “skin” sewn on, although George Dyson, who wrote a groundbreaking book on baidarkas and is a significant figure in Rob’s life, builds them using bent aluminum tubing for the frames and heat-shrink Dacron for the skin.
Rob’s desire to build the North Star actually was kindled by George Dyson, a scientific historian and kayak designer. In listening to one of his lectures, Rob was awed by Dyson’s description of the baidarka’s handling and speed. Inspired, Rob gave serious study to the type, which included hours and hours poring over anthropological drawings and making many pilgrimages to museums. Eventually, Rob came up with his own interpretation of this ancient watercraft.
Photo by Serafina Carlucci
Basing his design on the baidarkas (skin-on-frame boats) used by Aleut paddlers, sculptor and boatbuilder Rob Macks developed the North Star kayak, a stripped version of the type.
Rob tweaked the traditional design while staying true to its spirit. With length overall of 18′ 4″, a beam of 22 1⁄2″, and a weight of about 40 lbs, the North Star is quite a bit larger than a native Aleut kayak (which is between 16′ and 16 1⁄2′ LOA). The bigger size provides more stowage and carrying capacity, and also makes the boat more suitable for a larger paddler. The cockpit is a touch farther aft, but well positioned over the center of balance, which makes for convenient portaging. Rob has added quite a bit of rocker compared to the traditional design to make the longer boat turn easier. Hatches are set into the deck and held there with magnets to maintain the sleek form while still giving easy access to stowed gear.
The bifurcated bow and the pinched-off stern are the most noticeable elements of the North Star’s baidarka heritage. The bow serves two purposes: to cleave the waves in preparation for the more subtle and rounded hull shape that is to follow, and to keep the boat tracking straight through wind and waves. Forward of the cockpit the boat is full-bodied, like a fish. As you move aft of the cockpit, the stern begins to terminate relatively soon in a pinched-off shape that acts like a fixed rudder in a following sea. The short stern is also helpful in maneuvering, and reduces windage and the boat’s inclination to “weathercock” (veer into the wind).
Laughing Loon was the first—and may remain the only—company offering Aleutian region baidarka-style sea kayaks as hard-shell “strippers.” Rob’s style of stripping differs from other builders who use the method.
Photo by Serafina Carlucci
The “popsicle stick” paddle offers many advantages to the sea kayaker. A small hollow on the power face of the blade keeps the boat moving while its slender form spares it from being caught by sudden gusts. It’s also handy when the paddler needs to grab the blade for better leverage.
First, he uses 3⁄16″-thick strips as opposed to the conventional 1⁄4″. This is a small difference, but he contends that the addition of epoxy and fiberglass cloth gives the hull plenty of strength. The thinner strips make for easier bending and also make the boat somewhat lighter.
Second, Rob uses Northern white cedar below the waterline because of its extreme flexibility, while above the waterline he uses less (but sufficiently) flexible Western red cedar and Northern white spruce.
Finally, he uses a heat gun to ease his strips into all the beautiful shapes that he needs instead of torturing them into submission. The wood’s lignin is reinvigorated by the addition of the heat, resulting in an easier bend and one that will stay put when let go. This boat is perhaps a little more work and more time-consuming to build than other ’yaks, but as I have heard said, “slow is smooth, and smooth is good.” Rob believes that any builder, even a tenacious amateur, can successfully build the North Star, and he estimates that fast builders can do the job in only 300 hours.
Photo by Serafina Carlucci
While construction of the curvaceous North Star will present some challenges, the sight of her variegated strips under varnish and her agility in the water will make it all worthwhile.
Rob treated me to a paddle in the North Star on the Damariscotta River. There were not many huge waves this day, but we would have current to play with.
Stepping into the kayak, I was surprised at how much flex there was in the wooden hull despite its being sheathed in epoxy and ’glass—perhaps it’s because of that missing 1⁄16″ in the thickness of the strips.
Turning comes from a combination of leaning and utilizing the paddle to get a longer lever arm. The paddle—a work of art in its own right—is an essential part of how this kayak works. Looking nothing like modern paddles with their large blades and carbon-fiber looms, this one is a short, light, spruce popsicle stick–shaped affair that isn’t inclined to be blown about as you use it. The slightly hollow, power face of the blade has just enough surface area to keep the boat moving. If you need more thrust for a particularly sharp turn, you offset the paddle by moving your grip toward one end to create a longer lever arm. Of course, you can do this with any paddle, but the nice thing about these paddles is that you can offset them more because your grip can encompass the narrow blade, which fits nicely in your hand.
As mentioned earlier, the North Star can accommodate larger people (it’s best for people who are around 6′ tall). It is slightly too large for me. So for people of smaller stature, Rob also offers the Fire Star (17′ LOA, 21″ beam, 35 lbs), a scaled-down version of the North Star.
Both of these boats are based on a time-tested design and are meticulously constructed with high-quality materials. Rob has a passion for his designs and a sincere desire to get people building them. He encourages success through a wide variety of teaching aids that cater to different learning styles. His 88-page instruction book has more than 200 photographs of the building process. His website is also filled with tips and techniques that range from how to rip the strips to what type of glue to use and why. He is also very accessible and personable.
The warmth of the varnished wood playing among all of those compound curves makes the North Star a real head-turner. But for Rob, a lot of this is about fun. He enjoys the creative process as well as the building and the helping. Having something beautiful to behold and make use of in paddling into a snug harbor at the end of a day is an amazing reward, but to Rob, that’s just the icing on the cake.
The North Star’s slightly compressed U-shaped sections strike a happy medium between stability and minimal wetted surface.The profile shows a generous amount of rocker—which reduces wetted surface even further and improves agility.
During the last quarter of the 19th century and the beginning of the 20th century, Nathanael Greene Herreshoff designed some of the most complex, graceful, and ultimately successful racing and pleasure yachts in existence. Part of his genius was to also apply these same design skills to smaller and simpler craft such as the Fish class, the ubiquitous Buzzards Bay 121⁄2, and the object of my affection (and this discussion), the Biscayne Bay 14. Apparently, only about a dozen of these sailing skiffs (model 908) were ever produced by the Herreshoff Mfg. Co., all in the 1920s.
After retiring (for the first time) in 1998, I built a pair of Biscayne Bay 14s (BB14s): mine, named MR.BILL, and one for a friend. My habit of building two at a time came from my own apprenticeship in the 1970s with master craftsman Gary Kincaid. This approach spreads the costs, shares skills and space, and can offer you a willing companion for adventures after launching day. I recommend the concept of “building buddies.”
My decision to build a BB14 was based on its heritage, performance, low cost, and ease of transport. Another plus is the optional use of modern materials to create a strong hull that can be day-sailed directly from the back- yard to the water. The choice has proven to be a good one for me. During the past decade, MR. BILL has sailed waters ranging from the Gulf of Maine to Buzzards Bay.
Photo by Darin Carlucci
The Biscayne Bay 14, designed by N.G. Herreshoff, is a delightful, low-cost daysailer that transports easily and is a good performer. Jim Austin built his for exploring Muscongus Bay, Maine, with his wife, Darcy.
The plans for the BB14 as sold by WoodenBoat are complete and are backed up by an optional handbook taken from step-by-step construction articles, including lots of helpful photos. There is the choice to build the boat with a fixed keel, which would probably improve windward performance over the shallow keel/centerboard option that we chose. With the centerboard, MR. BILL nests snugly onto a small trailer for easy transport.
Although perfect as a singlehander, the BB14 often carries my wife as well as me over the waters of Maine’s Muscongus Bay, allowing us to explore the mouth of a small creek, run up on the beach for a picnic, or slide gracefully down the faces of ocean swells coming in past Monhegan. But don’t be fooled: this idyll comes at a price. The BB14s were designed for the warm, shallow waters of Florida, and there they will perform wonderfully. However, up in New England, you must pick your weather carefully and be prepared for a refreshing splash or two when beating to windward. I’ve added a V-shaped coaming forward of the mast to aid in deflecting the icy water before it reaches me or the cockpit. Since we chose the centerboard option, the next time I retire we could easily tow MR. BILL south to a place where the temperature more closely approximates our age.
Photo by Darin Carlucci
The Biscayne Bay 14 is a great design to build as plans indicate or to modify according to individual use.
Construction of the shallow keel with centerboard slot is challenging. The shape is well defined in the plans and a mold is not too difficult to build, but if you’ve never melted lead before, it could be a daunt- ing prospect and best left to a professional. For the rest of you pirates, there’s treasure in old chimney flashing, used tire weights, bits of plumbing—or an old, abandoned iron bathtub in which to melt all this material. The process of casting is well detailed in easily accessed articles and books (see WB No. 89).
The hollow mast is fun to build as described in the plans. I used carefully chosen and dried lumberyard spruce 2×4s, 2×6s, and 2×8s, as they make a strong, light-weight stick, which has never failed me in years of hard use. There are other spar-building techniques such as “bird’s mouth” (see WB No. 149) that can be used if you love more complex geometry.
The BB14 design calls for a watertight compartment forward of the mast. As a longtime builder, I dislike parts of a boat that are inaccessible. As a long-time sailor, though, I love the idea of flotation in small boats. My solution was to create a space under the foredeck with an opening and an air bag. The bag can be inflated during use, and deflated and removed for inspection and maintenance. I keep a small picnic anchor and rode in the same space, which helps add a little weight forward to keep her nose in the water when going to windward.
To build my BB14, I used marine-grade Okoume plywood, local oak and spruce, bronze fastenings, and epoxy. My favorite tool for cutting plywood is a 31⁄2″ 9V-battery-powered circular saw outfitted with a plywood blade (for a thin kerf). The saw’s lightweight makes it quite handy, although you may want a backup battery for extended cutting. Finish was mostly marine paint with some show-off varnish on spars and coamings. All these materials have held up well with proper annual maintenance.
Photo by Darin Carlucci
With lots of sail area in the mainsail, she will perform well under the main alone for those times, such as sailing in harbor, when using the jib is a bother.
When arriving at a launch site, it takes me about 20 minutes to step the mast, bend on the sails, hang the rudder, grab the picnic basket and the PFDs—and off we go. I sewed up a boom tent to keep the rain out when the boat is stored outside and to cover the cockpit while underway on the road. I found an old jib that makes a serviceable 120-percent genoa for use when there are two people on board in light air or when the fever of competition overcomes my natural caution. The self-tending jib shown on the drawings is efficient and effortless in operation, but there seems to be a little too much weather helm in these dense northern breezes, so the larger jib is helpful for balance as well as speed. Another alteration I made was to provide additional support for the side decks. My playing weight is close to that of an NFL running back, and when the breeze pipes up it’s fun to hike out and get the most out of the boat; that’s when I’m thankful for the stronger deck.
I’ve enjoyed how well this design works if built exactly as the plans specify; at the same time, the boat provides a simple platform that begs for experimentation. Things I would never do to a Buzzards Bay 121⁄2 are fun to try out on a BB14 just because it isn’t too pedigreed to alter. After 10 years, MR. BILL has evolved to be quite different from my friend’s boat. Each has been customized by her owner. I owe a lot of fun and adventure to the genius of Capt. Nat—and to my many “building buddies.”
The Biscayne Bay 14’s well-drawn plans show why this daysailer is so inviting to build. The sections indicate that planking can be applied with a minimum of twist, and construction details provide an abundance of information to the builder.
This Boat Profile was published in Small Boats 2010 — plans are available from The WoodenBoat Store.
Built here at the WoodenBoat School, our Iain Oughtred-designed Caledonia Yawl, SWIFTY is a handsome and versatile double-ender, guaranteed to turn heads on any waterfront. She’s comfortable to sail in a stiff breeze and dazzles in light air and to windward.
With well-balanced, relatively high ends, this lean and long yawl shows considerable reserve buoyancy above the waterline throughout her length.
In steady winds she’ll safely sail heeled over, her crew central and sitting up to windward.
The push/pull tiller may take some time to get used to but it works perfectly. Pulling the tiller forward will turn the boat to port.
To assure positive tacking, simply back the mizzen to the inside of the turn as you come about.
Plans for Iain Oughtred’s Caledonia Yawl are available from The WoodenBoat Store.
For many people, trailering a boat is a good—and perhaps the only—way to get out on the water. Unfortunately, the trailer is often the very last thing the builder thinks about. After spending all that money and time building the boat, it is tempting to economize by buying a cheap, too-light rig. That’s a bad idea. A too-small trailer is not only short-lived, it’s also dangerous.
Like building the boat, the business of trailering begins with planning. The first step in formulating the plan is to check the tow rating of your vehicle to get an idea of how large a trailer you can haul. It’s best, however, to take those ratings with a grain of salt, for almost any vehicle will haul a glued-lap Whitehall a few miles over moderate terrain to the local launch ramp; such a scenario is unlikely to test the mettle of your automatic transmission’s cooling system or your radiator, or to push your tires to their limit. It’s quite another thing, however, to attempt towing your brand-new mahogany-planked Haven 12-1/2 (see page 90) with a 1978 Subaru through the Rockies in summer. In this case, a bit more consideration needs to be given to tow-vehicle selection and upkeep.
Photo by Matthew P. Murphy
A proper towing vehicle, a trailer well-matched to the boat and properly maintained, and a good grasp of procedures, are the elements of safe trailering. Here, Aaron Porter prepares to haul his Jericho Bay Lobster Skiff.
For example, an old friend, Bruce Armstrong, regularly takes his 20′ Tolman Skiff with outboard mounted from Southern California to Lake Powell in September. He reports running 70 mph in 100-degree heat, climbing 5,000′ grades in company with dozens of 18-wheelers. Bruce, noting “failure is not an option,” drives an industrial-strength 2001, 245-hp High Output Cummins powered Dodge 4×4 rated to tow 13,500 lbs.
While Bruce’s rig might be overkill for your situation, there are still many factors to consider when setting up for trailering. The following are some things to consider as you formulate your plan.
Photo by Matthew P. Murphy
Carpeted bunks distribute the weight of a hull evenly, and allow the boat’s position on the trailer to be adjusted without damage to the bottom.
What Size Trailer?
Once you’ve determined your vehicle’s towing capacity, the next thing is to determine how much your boat weighs. For a small boat, if you don’t trust the weight specified in the design, this can often be done with simple bathroom scales. Another way to go is to place the boat on a borrowed trailer and take it to a truck scale. Bring the boat back home and weigh the trailer alone. Subtract this weight from the total boat-plus-trailer weight to give you the actual weight of the boat.
U.S. federal law requires that a trailer display its “Gross Vehicle Weight Rating” (GVWR), which is the total weight of boat and gear. When figuring the weight of the loaded trailer, be sure to include the boat, engine, gasoline (6 lbs per U.S. gallon), water (8 lbs per U.S. gallon), and gear. A useful margin of safety is that the total weight be no more than 85 percent of the GVWR. For larger boats, a tandem-axle trailer might be considered. They track better and are less prone to fishtail than single-axle trailers. Also, the extra wheels offer safer handling in case of a blowout.
Just as the trailer must be properly sized to the boat’s length and weight, the boat also needs to be properly braced, or cradled, by rollers and bunks—as least as well as when storing the vessel for winter. Boats are used to being uniformly supported by the water. When it’s out of the water, the boat has all the strain taken up at just a few places. Traditional wooden boats need more support than fiberglass ones. If necessary, augment the manufacturer’s standard equipment with homemade structures. Firehose-covered removable bunks will go a long way toward protecting the hull against the stress and strain of over-the-road travel; generally, they’re better than rollers, which tend to point-load a planked wooden hull, and thus cause damage. Outboard-powered wooden boats present a special problem, as the weight of the overhanging engine can stress the hull and even hog the keel. The transom should be directly and fully supported by a full trailer cross member.
Tongue Weight
Tongue weight is the weight of the trailer’s tongue at the vehicle. The general rule is that it be 10 percent of the total combined weight of boat and trailer. Too much weight on the tongue puts excessive stress on the towing vehicle’s suspension. Excessive tongue weight can also cause steering problems by reducing the weight on the vehicle’s front wheels. Conversely, if there is too much weight on the after portion of the trailer, it can sway and get twitchy, weaving back and forth. Weight can be adjusted by moving the boat back and forth, checking it with a scale.
Photo by Matthew P. Murphy
Before going down the road, the boat’s position on the trailer should be evaluated; 10 percent of the total trailer-plus-boat weight should be on the tongue.
Trailer Hitches
There are four classes of hitches; these are rated according to the weight (GVWR) they will be pulling. The ratings are as follows:
Class I: ……………………………………. 2,000 lbs
Class II: ………………………………….. 3,500 lbs
Class III: …………………………………. 5,000 lbs
Class IV: …………………………………. 10,000 lbs
Galvanized or Paint?
Unless the trailer is used only in fresh water, galvanized trailers will last longer and require less maintenance. Regardless of whether the trailer is galvanized or not, a thorough rinsing with fresh water after each saltwater immersion will also extend the life of the trailer. When rinsing, pay particular attention to the axles, which tend to rust more quickly than the trailer frame.
A Fitted Cover
A dandy trailer accessory is a fitted travel cover. This will keep the boat’s interior clean of road dirt during transit, saving cleanup time before launching. And, like those interior luggage compartment covers in passenger vehicles, a travel cover will also help keep expensive boat bits safe from prying eyes at rest stops.
A cover—especially a canvas one—is also great for helping to keep a wooden boat tight while it’s parked in the yard. Canvas ventilates when it’s dry, allowing fresh air in; when wet, the canvas swells a bit, keeping rainwater out.
Photo by Matthew P. Murphy
A surprising amount of debris can be kicked up by highway travel. A well-fitted and -secured cover will guard against this.
Wheels and Tires
A tire or bearing failure going down the road at high- way speeds is bad news, yet in the rush to get going, often the running gear of a trailer is overlooked. To that end, let’s take a look underneath.
If you are buying a new trailer, consider one with larger wheels, as they do not have to work as hard as smaller ones. If you have purchased a used trailer, start by inspecting the tires. Do they have enough tread? Are they inflated properly to the manufacturer’s specifications? Inspect them for rot, cracking, and cuts. If in doubt, replace the tires. Trailer tires have thicker sidewalls than automobile tires. Be sure the previous owner did not mix bias-belted and radial tires; the trailer won’t track properly in this case. Take a look at the wheels: Salt water can raise the dickens with trailer rims. If they are rusty, give them a wire-brushing and look closer. If the wheel is too corroded and porous, it may not properly hold air. After cleaning, give the wheels a good coat of protective paint.
Photo by Matthew P. Murphy
Wheels and tires should be inspected for rust and cracks. The example we see here is fine for a yard trailer, but questionable for over-the-road service.
Over time, when launching, water can infiltrate the protective cover over the wheel bearings and cause them to wear or fail. It’s a good idea to annually jack up the wheels (one at a time) to check the bearings on the hub. Place a hand on either side of the wheel and rock it in and out to check for movement. There should be a slight amount of play, but if it is excessive the bearing may need to be adjusted or replaced. Some trailer owners use an aftermarket wheel-bearing protector like the “Bearing Buddy,” which is designed to keep a slight pressure of grease between the inside of the hub and the outside environment; this deters water infiltration into the axle hub. Bearing upkeep requires a couple of shots of grease before every trailer submersion. Savvy long-distance towers like my friend Bruce carry spare sets of bearings, tubes of grease, and adequate tools on long trips; they might also carry an entire hub-and-bearing assembly with them, mounted on a spare wheel and tire, ready to install by simply removing the cotter key and axle nut. Before going on a long tow, give the bearings one last inspection.
In many U.S. states, trailers with a GVWR of 1,500 lbs or more are required to have brakes on all wheels. If your trailer has brakes on the wheels, they, too, should be inspected. If you haven’t done this task in a while, it would be worthwhile taking the rig down to the local garage for the job.
Going Down The Road
With the inspections complete, we’re ready to hit the road. Before heading out, be sure the boat is properly tied down. At the bow, the winch cable and a safety stop line should be in place. There should be transom and ’midship tie-downs as well. Trailer hitch safety chains should be inspected. These chains should be attached to the towing vehicle with strong S-hooks or shackles. The chains should be crossed. They should be long enough to permit tight turns yet short enough to suspend the trailer tongue and keep it from slamming into the pavement if the hitch fails. Everything in the trailer should be properly stowed to prevent it flying out en route. Inspect the lights to confirm that they are, indeed, working. Check the wheel lug nuts and bring along your trailer jack, wheel nut wrench, breaker bar, and chocks. And don’t forget the roadside warning devices—reflective triangles, flares, etc. You’ll be glad you did.
While on the road, make a habit of checking on the trailer via the rear-view mirrors. Drive at moderate speeds and avoid sudden stops. You have probably doubled your customary wheel-base length—a good thing to keep in mind when passing or pulling through an intersection. Make wider turns at curves and corners. Because your trailer’s wheels are closer to the inside of a turn than the wheels of your tow vehicle, they are more likely to hit or ride up over curbs. Slow down when traveling bumpy dirt roads or when crossing railroad tracks. And allow more space for braking.
Stop and inspect the boat and trailer at regular intervals. Check the tie-downs and tire pressure. Feel the wheel bearing cover; it’s okay for it to be warm, but not hot. Inspect the hitch; it may need to be retightened. Are those lights still working?
Photo by Matthew P. Murphy
The Jericho Bay Lobster skiff is almost ready to travel. It’s well secured at the bow, but awaits a final stowing of gear. The hull will need to be secured to the trailer, too.
Launching the Boat
A warm summer day can cause the local launching ramp to be a busy place, complete with lots of different kinds of boats and the corresponding personalities of those who own them. One thing they all have in common is that they all want to get into the water at the same time. It pays to be as organized as possible to expeditiously back the trailer into the water, pull the empty trailer out of the way, get loaded up, and clear the ramp.
Launching a boat is akin to landing an airplane: You are transitioning from one medium to another. If there is going to be a problem, this is a likely place for it to happen. So, it’s always good to plan ahead.
If you are new to backing a trailer, practice in a parking lot or field before getting to the launching ramp. While not difficult, it does take a bit of getting used to—whether you use mirrors or are able to crane your head around to see what is going on. Our man Bruce recommends the following: “When ready to start backing your rig, place your steering-wheel hand on the bottom of the steering wheel, look at your trailer in the rear-view mirror, and turn your hand in the direction you want your trailer to go as you engage reverse.” Back slowly, and if the trailer starts to jackknife, simply pull ahead a bit to realign the trailer and start again.
Launching your vehicle along with the boat is always considered poor form. It has been done. To avoid such an inconvenient situation, check the parking brake. Does it actually work, or is it merely ornamental and used only at vehicle inspection time? Try it on a steep hill. Putting a vehicle in “park” on a ramp and leaving the engine running is a seriously bad idea. Newspapers carry stories on a regular basis of cars driving off without their astonished owners who had dutifully “put their car in park”—on a level surface. It’s better to turn the engine off, with the transmission in park (or on a manual transmission, in first gear if the vehicle is pointed downhill, and in reverse if pointed uphill). If in doubt, have wheel chocks at the ready for insertion behind the rear wheels.
Remove all tie-downs and have everything (especially life jackets) ready to go, on the boat, before heading down the ramp. Have as much gear on board as possible, rig the mast (if you have one), have docklines and fenders ready, and (if it has one) test the boat’s engine ahead of time—especially if this is the first trip of the season— even if it ran great last fall. Disconnect the trailer-light coupling. Oh, and don’t forget the drain plug.
Photo by Matthew P. Murphy
With mast stepped and sails rigged—and after a careful check for overhead power lines—the straps are removed and the boat is backed to the water. Proper backing of a trailer takes some practice; it’s wise to rehearse in private before taking to the stage of the launching ramp.
Boyhood dreams inspired by the sleek motor launches and yachts passing by his eastern Michigan home on the St. Clair River during the Roaring Twenties must have sent ripples of excitement through young Nelson Zimmer. Years later, as a naval architect, Zimmer recalled the lovely lines of the vessels from his youth when he designed his 21′ 3″ utility launch (see WoodenBoat No. 43)—a throwback to the prosperous days of bathtub gin, jazz, Henry Ford’s Model T, and Charles Lindbergh’s transatlantic flight.
Standing on the pier at the Great Lakes Boat Building School (GLBBS) in Cedarville, Michigan, located on the Upper Peninsula’s southeastern shore, a newly built Zimmer utility launch is secured alongside, waiting for sea trials among Les Cheneaux Islands—French meaning “The Channel Islands”—in northern Lake Huron. She has a comely shape and a graceful sheer, which is accented by white-painted topsides and a bright transom and deck. Interior surfaces are also finished bright.
Photo by George D. Jepson
The Zimmer utility launch, designed by Great Lakes area designer Nelson Zimmer, can comfortably carry six to eight passengers. At the Great Lakes Boat Building School in Cedarville, Michigan, instructor Pat Mahon and students built this launch over the course of a year.
At 20′ on the waterline, with a 7′ beam, 1′ 7″ draft, and displacing 3,467 lbs, the fetching, unballasted launch, with its round-bottomed displacement hull, is ideal for cruising among Les Cheneaux’s 36 islands and their sheltered channels and bays within the Straits of Mackinac. Steeped in North American history, the islands—offering an abundance of wildflower meadows, cedar shores, and wetlands—are the ideal environment for the launch.
Photo by George D. Jepson
The Zimmer launch was originally designed for diesel power, but Mahon calculated that the weight of an electric alternative power source meets designed displacement specifications and uses less space. Less bulk leaves more room in the cabin for napping or ducking in out of the rain.
Photos by George D. Jepson
Well-steeved bulkheads and steam-bent sapele coaming and seat details are among the many finely crafted components that imbue this gentleman’s launch with her classic ambience.
The Great Lakes Boat Building School chose the Zimmer launch as their class project, because she fit the needs of the school’s traditional boat building curriculum. Other factors were the boat’s overall appeal and Nelson Zimmer’s having spent his career as a Great Lakes boat designer. The school’s lead instructor, Pat Mahon, and a team of students built the boat over a year’s time.
Zimmer’s plans for the utility launch call for “advanced” boatbuilding skills. Before beginning work, students completed the first quarter of the GLBBS’s basic woodworking and small-boat building class—which involved the construction of two small skiffs—from lofting to launching. This gave them the skills needed to take on this more complex project. “All aspects of boat construction are first discussed during lectures and then practiced in the shop,” said Mahon. Although this launch was designed for carvel-planking on steam-bent frames, she could be given a cold-molded hull. This may be a good alternative, especially for freshwater use.
Photo by George D. Jepson
Pat Mahon and the GLBBS chose the Zimmer launch as a school project for the many traditional boatbuilding lessons she would provide to their students. She is carvel planked on steam-bent frames but could be built using cold-molded construction.
A variety of woods were used for her construction: purpleheart (keel), white oak (stem, horn timber, shaft- log, sternpost, transom, frames, and floors), solid red meranti (planking), Douglas-fir (deck frame, housetop beams, and decking), yellow cedar (ceiling, bulkheads, and housetop), solid sapele (house, coaming, and rubrails), and Northern white cedar (sole).
Although the boat generally was built according to Nelson Zimmer’s plans, “we made a few changes from the original construction [so that] they fit the methods we like to teach,” said Mahon. “The only significant change [to the hull’s construction] was to add a keel batten over the keel to make a rabbet for the garboard. The original used a beveled keel with no rabbet.”
Zimmer originally specified a 6–8-hp single-cylinder diesel, which would have been a dependable engine when compared to gasoline power. However, Mahon opted for electric propulsion. Elco Electric Launch Company of New York donated the motor and systems components to the GLBBS.
Either type of power would work well in the boat, depending on its intended use and the availability of re-charging facilities for the electric alternative. “The goal is always to meet the designed displacement,” said Mahon. “I calculated that the electric system weighed about the same as the original diesel engine and fuel tanks.” She floats on her designed waterline—an important measure of success.
A 48-volt, six-battery setup, installed under the cockpit flooring, powers the 4-hp electric motor for five to seven hours on a charge. The Group 8D batteries, which are available from marine suppliers, can be recharged over a period of approximately 14 hours with 110-volt electrical service, which is commonly available at marina docks.
Speed depends on how heavily she’s loaded; the launch will run up to 6 knots if kept light. The estimated cruising time at 75 percent power, with two charged battery banks, exceeds six hours. At 50 percent power, with two battery banks, the time increases to approximately 10 hours.
Although electric power may be sensible given the cost of oil and oil-based fuel in today’s world, being dependent upon the availability of electrical outlets may reduce range. Stops must be well planned to avoid hours of charging at inconvenient times or, worse, losing power altogether. She would make for a cumbersome row ashore. Yet she’s well suited to these relatively calm waters, which are dotted with marinas and offer plenty of mainland and island shoreline.
The launch is ideal for day-running from a dock or mooring, or transporting passengers and supplies between shore and an island. She provides a stable platform in a chop and is friendly to fishermen because of her silent running and relatively flat wake. The launch can be trailered, albeit with some difficulty and risk of drying out.
It is an unseasonably chilly early June afternoon, under pewter skies, when we step aboard. A light breeze sends ripples across the gunmetal blue waters of Cedarville Bay. The electric engine is switched on, and nothing more than a hushed hum disturbs the silence. Lines are cast off, and the slender launch slips ever so quietly into the harbor. Cruising off LaSalle Island, we pick up speed, with the swish of water along the hull the only discernible sound.
Photo by George D. Jepson
Though comfortable to operate, the Zimmer launch’s forward helm is unusual and requires practice for those who are used to steering from amidships or aft.
Steering from forward is a novel experience, with nearly 18 feet of boat behind me. Docking and maneuvering in close quarters or traffic requires practice for the uninitiated or those used to steering from aft or amidships. Answering the helm during sweeping turns to port or starboard, the launch’s motion is minimal. Maneuvering alongside the dock, she slips easily between forward and reverse.
The Jazz Age may be long past, but Nelson Zimmer’s legacy to new generations of wooden boat builders, designers, sailors, and admirers lives on. The Great Lakes Boat Building School has paid a befitting tribute to Zimmer, who, like the majority of the school’s students, grew up on the Great Lakes. In building this poetic launch, with all the skill and effort expended to bring her to life, it is clear that the school, now in its third year of operation, aims to engender many more like him. I think Zimmer, who crossed the bar in 2007, would be pleased.
Want to Build the Zimmer Utility Launch Yourself?
Get to know the Zimmer utility launch design first by reviewing the study plan. We review the basics and the line drawings like the ones below, and give you a direct link to where you can purchase the full set of plans.
The Zimmer launch’s buttock lines, rising to clear the waterline aft, will make her easy to drive at low speeds, while moderate deadrise contributes to giving her a comfortable ride in a chop.
Conceived at first as an 18′ open family daysailer for the Bryan family, this boat ended up growing a couple of feet in length and 6″ in beam to become a small cruiser with a cabin and overnight accommodations for two. N.G. Herreshoff’s Buzzards Bay 12 1⁄2-footer played a part, as those familiar with that design can readily see. These fine little boats have long captivated Harry and his wife, Martha, because they both grew up on the shores of Buzzards Bay, Harry in Westport and Martha in Padanaram and Naushon Island. Four of the original 121⁄2-footers of 1914 still sail from the island.
Joel White’s centerboard adaptation of the 12 1⁄2-footer’s larger sister (the Herreshoff Fish class), known as the Flatfish, also came into play since Harry’s new boat was more her size. For cruising, however, he needed something just a mite different. KATIE, built over a couple of years and launched in 2008, is the result.
Photo by Benjamin Mendlowitz
Inspired by N.G. Herreshoff’s Buzzards Bay 12 1⁄2-footer and Joel White’s Flatfish, this 20′ cruiser, designed and built by Harry Bryan, cuts a handsome profile underway.
KATIE and Joel White’s Flatfish measure close to each other in hull and sail area, with KATIE being lighter by about 500 lbs, and narrower on deck by 6″. Harry gave her more freeboard and a larger cabin, and opted for a bowsprit for ease in handling and carrying the anchor. Her shorter forward overhang results in about a foot more waterline length. The big difference, and one sought for in her design is shallower draft. With centerboard raised, the Flatfish draws 2′ 2″, but KATIE is shallower by 6″!
The Bryans’ New Brunswick home fronts on a cove that dries out at low tide, so Harry devised a nearly neutral-buoyancy cradle for KATIE that supports her and holds her upright while grounded. That’s why her keel is built level, without the usual drag, or downward slope as it approaches the rudder. It’s a setup that opens possibilities for others having access only to tidal waterfront. At only 2,400 lbs, this boat also offers a chance for distant voyaging as it can be towed many miles behind the family car or pickup to reach the mecca of one’s choice. Once there, you can overnight or go longer and enjoy exploring an entirely new area. Camping onboard while on the road makes sense and saves on motel costs. With a level keel to sit on, she’ll look just right on a standard flatbed or boat trailer without requiring special blocking to level her waterline. A couple of people should be able to step or unstep her 65-lb, 25′ mast without the aid of a crane.
There can be no doubt of a boat this shallow needing a centerboard, but Harry kept it small and shaped it, and the trunk in which it lives, to be as unobtrusive as possible. The trunk is so short and so low that it seems like a convenient footrest in the cabin. The higher, aft part of the trunk runs up under the bridge deck, out of sight and completely out of the way. Interestingly, but not surprisingly for one who values native cedar and avoids plywood, Harry has designed a cedar-cored, fiberglass-and-epoxy-sheathed centerboard.
Photos by Bryan Gagner
Two berths that run up under the foredeck provide comfortable refuge for short-term cruisers. The centerboard trunk, made as unobtrusive as can be, doubles as a companionway step or a footrest.
KATIE’s accommodations are minimal to be sure, but she’s set up with all the short-cruise essentials: Two berths run up under the foredeck and, aft, serve as settees over which there’s full sitting headroom. Against the cabin’s aft bulkhead on both sides are shelves and lockers that can be tailored to suit whatever galley gear a person chooses to carry or build in, while farther aft under the bridge deck on each side of the centerboard trunk is space for provisions and more cruising gear. Way forward, beyond the berths, is a platform for additional stowage under which (under hinged flaps) the anchor rode lives.
The plans show an afterdeck and bridge deck that are slightly higher than the fore-and-aft cockpit settees that run between them. But, in this first boat, the Bryans decided to bring all to a common height to encourage outside sleeping and napping. Storage spaces are located under the afterdeck and at the forward end of the cockpit, under the overhanging bridge deck, where gear will stay reasonably dry.
Because the cockpit is made deep for comfort and is therefore not self-bailing, rainwater collects there. But the bulkhead is watertight, so the cabin remains isolated and dry. In the future, to take care of the rain, Harry plans on an awning or a solar-powered bilge pump.
Photo by Benjamin Mendlowitz
Robust construction details like her square-sided, no-nonsense bowsprit and heavy toerails inspire confidence that she is well built and seaworthy.
How does KATIE sail? By observing her in moderate conditions when we photographed her last fall, I’d say fast and fine, completely under easy control the entire time. From the designer/ builder, here’s how Harry describes it: “The helm is perfect in the conditions we had for the photo shoot. Martha and I had her out in a puffy nor’wester and found that a single reef did much to ease the helm. Ultimately, if the helm should prove heavy, 8″ or 1′ added to the bowsprit and a larger jib should balance things. These are probably just the worries of a new parent hoping his baby isn’t defective in some way. She seems fast even before the wind is strong enough to ripple the water.”
The bowsprit adds shippiness forward, particularly with an honest-to-God stock anchor hanging from it, ready to be dropped instantly and retrieved without depositing mud on the deck. The gallows aft also gives a clear impression that this is a serious cruiser despite her small size. You have no worry about the boom whacking you on the noggin when lowering the mainsail; the boom gallows takes care of that and provides a secure support for the boom while tying in a reef. It’s a great, but largely unappreciated feature.
Photo by Benjamin Mendlowitz
At 2,400 lbs, KATIE is easily trailered and her 65-lb mast can be stepped and unstepped by two people, making her the perfect little getaway cruiser for adventures near and far.
KATIE has no engine installed. There’s a big, curved sweep (oar) in two pieces that can be used either for sculling or for single-oared rowing, with the rudder offset to compensate. Harry has also equipped KATIE with a self-contained Torqeedo electric outboard motor (see review in WB No. 205). Knowing Harry, and having a good idea of how well KATIE moves under sail, I doubt if either will ever see much use.
KATIE’s firm bilges, moderate deadrise, and decidedly “shippy” sheer relate the influence of N.G. Herreshoff’s Buzzards Bay 121⁄2 while her underwater profile indicates her kinship to Joel White’s keel/centerboard Flatfish. KATIE will prove a fine legacy to her forebears.
This Boat Profile was published in Small Boats 2010 — for more information, visit Bryan Boatbuilding.
Fritzie Sparks, my best friend’s mother, was fond of saying “Stress is the thing,” whenever the topic of illness came up in conversation. She’d tap the tips of her fingernails on the table or countertop to drive the point home. That was back in the ’70s, and it was just one of those things teenagers would find amusing about parents, but now that I’ve drifted into the older generation she once occupied, I can better appreciate her wisdom. In my teens the only things I recall being stressed about were acne and getting better grades than Mike Sharmin and Doug Shaffer, my high-school rivals. Now I have a long list of worries from an ongoing pandemic and pants growing ever tighter to meeting work deadlines and living in a 100-year-old house in an earthquake zone that’s bracing for the “big one.”
For the past month, as the gloom of winter’s coming has darkened the skies of shortened days, I’ve chosen to take refuge not from the rain but in it. I’ll put on a couple of pile jackets, a knit hat, and my cagoule and sit in the back yard on a boat cushion set on an upside-down 5-gallon bucket—an orange one from Home Depot. The raindrops falling on my hood sound like salt sprinkled into a paper bag.
With the sides of the canopy pulled up, I can row with enough shelter to keep my head and hands dry. Even though I have good rain gear, I feel less soggy with a roof over my head.
I recently read that the sound of rain has a soothing effect that’s related to an elevated level of alpha waves generated by the brain. It’s a response that is also associated with meditation. I’d first heard of alpha waves when I was in college in the late ’70s and I was swept up in two trends that made short-lived marks on my generation: Earth shoes and Transcendental Meditation. I wore a pair of the first model of those shoes—with lowered heels and wide, squared toe boxes that looked like cartoon duck feet—when I took an off-campus class in TM. In my early practice of TM, I reached the bottom of the bubbles, as my instructor called reaching a state of thought-free wakefulness, just once. Having experienced that state of quietude and then being unable to reach it again, I meditated only sporadically in the years that followed.
The Ship Canal where I often row has a few out-of-the-way places where I can sit in the Whitehall and enjoy the rain.
Now, when I hear rain outside of my study and see the bright scintillas of rain on the garage’s flat tar-black roof, I’ll sit in the rain and do a 20-minute session of TM. The double dose of alpha waves seems to work. In the rain, I get to the bottom of the bubbles with a reassuring frequency.
I move the canopy aft to make a cozy nest on the floorboards surrounded by the sternsheets.
On my first cruise up the Inside Passage, I frequently rowed for hours at a stretch and would often fall into a meditative state, listening to the metronomic rhythm of the oars. The memory of those pleasant days prompted me to switch my rainy-day practice from my orange bucket to the lapstrake Whitehall I’d built in 1983. I made a canopy for it not just as shelter from the rain but also as a resonator for it, to gather more sound than my cagoule can.
Snug in the stern, I had a cup of hot peppermint tea and a slab of banana bread with walnuts and dates, still warm from the oven.
When I go rowing on Seattle’s Ship Canal, the rain and mist mute sound and color. The wail of cars and trucks rolling across the metal grate of the bascule bridge adjacent to the launch ramp is no more than a murmur, and the trees and buildings on hills flanking the waterway appear as if dusted with soot and ash. On the smooth surface of the water, raindrops make their chain-mail pattern of interlocking circles. I row with the sides of the canopy slipped up on the hoops and the rainwater pools in the folds overhead. With just an easy effort at the oars, I warm up in a few minutes and I can take my gloves and hat off, unzip my jacket to cool off, and still stay dry.
There are a few sections of shoreline that aren’t occupied by wharves or marinas where I’ll stop and tether the boat to a piling or nudge it onto a sandy shore, before lowering the canopy to better capture the rain’s soft sounds. I sit in my boat, quiet, alone, and out of worry’s reach.
Canopy Construction
A reader asked how I made the canopy. I bought a lightweight 6′x7′ tarp (finished size 70″ x 86″) made of 210D Oxford and two 10′ lengths of 1/2″ CPVC water pipe. The CPVC pipe is more flexible than PVC pipe and more tolerant of temperature extremes. The 1/2″ nominal size has an outside diameter of 5/8″. The Whitehall has a beam of 50-1/2″ and a 86″ length of pipe (equal to the long side of the tarp)created an arch with the headroom I needed for rowing.
The pipes are the same length to the canopy will be taller where the span between gunwales is narrower.
Here the 2 1/2″-wide sleeve for the pipe is evident. The tan-colored rectangle below the corner of the tarp is to hold the tarp up when visibility to the sides is required. The blue cord is threaded through the the pipe and tied around the inwale.
I made a sleeves for the pipes by folding each of the long sides back 2-1/2″ and sewed the hem. The in the middle of the sleeve’s edge I used a hot knife to cut away a semicircle of fabric. The hole is needed for the guy lines that will pull the tops of the arches to the ends of the boat. Pulling directly on the pipes instead of a grommet or webbing loop is the only way to get a smooth canopy.
A section of the sleeve is cut away so the tensioning line can be tied around the pipe. A taut-line hitch tied close to the canopy makes it convenient to make adjustments.
To secure the pipes to the Whitehall’s open rail, I threaded a 1/4″ braided line through each pipe, cutting the lines about 6′ longer than the pipe. With the lines through the pipes and the pipes in the sleeves, I tie one end of each line around the inwale and snug the pipe up against the rail. The extra length of the line lets me thread its other end through the open rail before flexing the pipe. I can then pull the line to bring the pipe’s end to the rail. I had initially thought I’d put rods in the ends of the pipes and then set the rods in the oarlock sockets, but that limits where I can put the canopy. The cord is much more versatile and unbreakable. I tie other cords to the pipe at the top of the arch where I cut the semicircle of fabric away, taking a few wraps around the pipe for friction. I loop the other end around something in the boat and use a taut-line hitch to position the arch and tension the tarp.
The rubber slider holds the tarp up at any height.
I had a piece of 1/2″ thick soft rubber that I cut into 1-1/2″ squares and drilled with a 5/8″ Forstner bit. Slipped over the ends of the pipes, they hold the tarp sides up when I need to see out.
With the canopy set up in the stern, I can row from the middle or forward rowing station and carry a passenger curled up, under cover, in the stern. The line from the top of the forward arch is looped around the inwale on the starboard side, out of the way for rowing.
With the pipes and lines rolled up in the tarp, the bundle can be bent into place for storage rather than laid straight and flat on the floorboards where it would be underfoot.
Years ago, I had built and sailed a 14′ flat-bottomed skiff, but the time had come for something with more capacity, capability, and comfort. A few times my wife Ramona and I had been caught in rough conditions that made me feel more than a bit uncomfortable, and I didn’t feel confident heading out to distant shores with the little boat. And sleeping under a tented boom, well, I’d had enough of that. Still, it was nice to have a boat I could tow home and store in the garage where I could keep it in good repair.
Selway Fisher’s Ptarmigan 17, as drawn, met most of my needs and could be adapted to suit the rest. The options detailed in the plans took care of my wants, and the design appears to accommodate amateur builders with a range of skills and requirements. There are drawings for both stitch-and-tape and glued-plywood lapstrake construction. You can also choose between a simple catboat rig and a yawl rig. With all the options for customization, I wouldn’t be surprised to see 10 different boats built from the same set of Ptarmigan 17 plans.
Pat Beninger
The glued-plywood lapstrake construction accentuates the hull’s curves. Stitch-and-tape construction without the laps is an option included in the plans.
The boat’s optional yawl rig had piqued my interest. I liked the idea of sailing under a balanced helm if the conditions got too serious, and I thought that the smaller mainmast on the yawl rig would be a bit lighter to lift. The combination tabernacle-equipped mainmast, small cabin, and ease of trailering led me to finally choose this design.
The building package comes with seven sheets of construction plans and a 14-page booklet of instructions. Dimensions are metric. A concise building schedule outlines each step of the build with recommendations on the choice of plywood, instructions on using epoxy, and what fastenings to use. There’s a section on how to lay out and draw the side panels on the plywood, and how to draw curved elements using a grid pattern. Measured drawings for the molds, stitch-and-tape side panels, bottom panel, and stem are clear and easy to follow. You do not need to do any lofting to build this boat. There are detailed drawings and instructions on stitching and filleting. The plans are complete with details for building sub-components such as rudder, centerboard and trunk, and the tabernacle. The plans are cross-referenced with the instruction booklet and provide the recommended scantlings.
There are instructions for building an outboard well or a transom cutout. All specifications for the standing and running rigging are listed. For builders interested in making their own sails, there’s even a reference to a Selway publication on that topic. The booklet is light on details for the four-strake, glued-lap plywood version; however, there are several good books available on the topic.
Both of the Ptarmigan 17’s sail rigs are gaff-rigged. The single-mast catboat rig carries a sail area of 139 sq ft and includes the dimensions for an optional 24-sq-ft jib. The yawl rig’s total sail area is a little smaller at 135 sq ft, with a main of 79 sq ft, a jib of 36 sq ft, and a leg-o’-mutton mizzen of 20 sq ft. There are two reefpoints drawn on the mainsails. With the yawl rig you can douse the mainsail in high winds and sail with a balanced helm under jib and mizzen. The yawl—with bowsprit and boomkin —is almost 23′ in sparred length. The mizzen is self-tending and only requires attention when coming off the wind. The plans do not specifically address tackle, but we made our own blocks in keeping with the overall look and feel of the boat. There are several good articles on making your own blocks in various publications.
I found the plans for this boat detailed, complete, and accurate, and while a few questions did arise, they were quickly answered via email. When I started this build, I found many ways of keeping safe and saving time; the project took me five months of full-time effort.
The boat tows well behind an SUV or pickup truck, and the trailer does not require brakes for the boat’s 1,300 lbs. The flat bottom and shallow 6″ keel help keep the weight low in the boat. For trailering, I keep the bowsprit attached and secure the mast in a cross-framed 2×4 support; the gaff, boom, and mizzen are supported and strapped to the frame and the forward ends pass through the companionway.
Rick Crook
The yawl rig has an 18.9 sq ft mizzen, a 78.8 sq ft main, and a 36.6 sq ft headsail.
With some practice, the yawl can be rigged and ready to go in about 20–25 minutes. It saves time to tag the rigging to help remember where the stays go and in what order they go on. The mast is lifted with its three stays, three halyards, and the topping lift set in place. The foot of the mast is secured in the tabernacle. Lifting the rigged mast requires some effort but is manageable and made easier with the help of someone pulling on the headstay. I secure the jaws of both the gaff and the boom using 1/8″ braided nylon cord with several parrel beads threaded on. I lace on the sails, add the rudder and motor, take off the securing straps, and I’m set to launch. When hauling out at the ramp, I have a 2,000-lb single-speed hand-operated winch that handles the boat with ease. The boat always seems to attract a crowd filled with compliments, comments, and questions.
Steve Cormack
The plans call for open slats for the cockpit seating and sole. The builder’s modification to plywood enclosures provides convenient storage.
The 5′x 6′ cockpit will accommodate four but is most comfortable with one or two. With two, there’s plenty of room to hoist the sails and move around when coming about. The helmsman has a clear view forward of the small jib over the cabin. The mainsail is high enough off the cabin roof to have a clear view to port and starboard. All sheets and halyards are led aft into the cockpit and can be easily handled without the need for winches. The throat and peak halyards need a hefty tug. The plans call for 7mm (3/8″) halyards, which I find easy on the hands. The 65″ x 25″ footwell is 17″ deep. The trunk is 4″ wide and its cap is 12″ above the cockpit sole. It extends into the footwell 20″ and passes through the main bulkhead to within a foot of the forepeak bulkhead. The steel centerboard is raised and lowered with the help of a worm-gear winch that is operated from the cockpit. With the board down, the boat draws 3-1/2′.
Steve Cormack
The cabin has bunks for two. The centerboard trunk divides the footwell between them.
The cabin interior is 6-1/2′ x 5-1/2′ and is 52″ high at the crown. There are two bunks that run the length of the cabin and are 26″ at their widest. For sitting there is good headroom and ample legroom in the footwell between the bunks. Storage compartments are built into the underside of each bunk. It’s a simple interior, but it keeps you dry. The yawl cabin has a support post under the tabernacle that is about 16″ abaft the forepeak bulkhead. The tabernacle in the catboat version is supported by the forepeak bulkhead. The plans call for a sliding plywood hatch over the companionway, but I chose to make mine with a plexiglass top for added light in the cabin. There are two 12″ x 16″ windows on the cabin sides. If you wish to build a self-righting boat, the instruction booklet calls for adding buoyancy under the cockpit benches and forward of the forepeak bulkhead. An additional 160 lbs of lead can be bolted to the floor as extra ballast.
The boat’s 1,300-lb weight gives the feeling of stability—it is not tippy when you step aboard—and will carry through when tacking in light air. The Ptarmigan 17 was designed for inland lakes, estuaries, and coastal areas, and I have never felt uncomfortable in these waters. Adding one or two larger sails both on the jib and mizzen would be nice to have for sailing downwind and in lighter wind conditions. In windy conditions, the first reef goes in when the winds approach 20 knots. Anything above this and the main is doused and tied off. Even in these conditions the boat has never left me feeling unsafe; it feels stable and there is no need to put the rail in the water. The ride is generally dry, with little spray. Passengers in the cockpit can sit close behind the cabin to shelter from the elements. The rudder is shallow and extends 3’ beyond the transom. It controls the boat well in all conditions.
Steve Cormack
While the builder ultimately chose to use an outboard bracket, his Ptarmigan 17 has a built-in motorwell appropriate for a small outboard. The opening of the well is visible at the bottom of the transom.
The plans and notes describe an optional motorwell, set to starboard, but do not specify the size of the auxiliary outboard motor. A 2.5-hp is all Ramona and I need to get into and out of the harbor, or back home when the wind dies. I built the motorwell to house an electric trolling motor but found that I needed more power, so I switched to a small gas motor that I set on a transom-mounted bracket. The motorwell could easily accommodate the 2.5-hp outboard.
When I decided to build this boat there wasn’t a lot of information on how the boat would perform. A few pictures and a description by the designer were all that I had. My experience with a smaller boat helped refine my requirements for the new boat, which the Ptarmigan 17 met: capable of crossing the larger lakes in almost any condition, easily towed behind our pickup, and equipped with a dry bed to crawl into at night. I did make some modifications, such as building a self-draining footwell and building fiberglass-covered benches to drain the rainwater over the side. To provide more storage space, I extended the forward ends of the side benches, covering the centerboard trunk with more seating. Now I can leave the boat unattended at a mooring without having to worry about the cockpit filling with water.
If you’re looking for a small cruising sailboat to explore far and wide, that you can easily trailer and store at home in between adventures, then you should take a close look at the Ptarmigan 17. Just be ready for the many admirers you’ll meet along the way.
Steve Cormack is a self-taught amateur builder with a workshop in Pender Harbour, British Columbia. He started building boats nearly 40 years ago and has completed several small plywood kayaks and strip canoes. In addition to the Ptarmigan, he has built a Handy Billy motorboat (which he uses for day trips), and a Selway Fisher Blackswan 22 for cruising. He is currently finishing a 32′ Lake Union–style dreamboat based on a Katherine 30, designed by William Hand Jr.
Ptarmigan 17 Particulars
[table]
Length/17′
Beam/6′ 11″
Hull depth amidships/2′4.5″
Draft, board up/1′2″
Draft, board down/3′5″
Sail area, cat/139 sq ft
Sail area, yawl/135 sq ft
Maximum headroom/4′6″
[/table]
Plans for the Ptarmigan are available from Selway-Fisher (£195 print, £175 PDF) and Duckworks ($236 print or PDF).
Is there a boat you’d like to know more about? Have you built one that you think other Small Boats Magazine readers would enjoy? Please email us!
Kids grow up, and grow out of not only their clothes, furniture, and toys, but also the boats you build for them. Who knew? The first boat I built was a cedar-strip double-paddle canoe which could carry one of my kids and me comfortably. However, I had four kids at home. I built a second boat, a small skin-on-frame kayak, from plans for one of my daughters when she was a teenager. My two youngest daughters were the most interested in paddling, so the kayak worked well for several years until they outgrew it.
I wanted each of them to have their own boat to help them develop their paddling skills and independence. I could have built them each a cedar-strip, but I knew from experience that skin-on-frame would cost less, be ready sooner, and most importantly be something they could each easily carry on their own.
When I ran across a YouTube video of Brian Schulz of Cape Falcon Kayak using his 66 Canoe system to build three skin-on-frame canoes that nested together, I was immediately sold. I’d be able to transport three boats without having to purchase a larger vehicle or a trailer.
The 66 Canoe design is not simply a set of plans for a handful of different static models of various sizes, but rather a video class to guide the builder through a series of decisions about length, beam, depth, rocker, sheer and cross-section to create a custom-built canoe to meet the builder’s needs, all without the need for making and modifying molds. Brian gave the system its name after he found the double-paddle pack canoe that the pack canoe that inspired it involved 66 percent of the time, cost, and weight of one of his skin-on-frame kayaks.
Photographs by and courtesy of the author
Sitting in the canoe may seem more comfortable at first, but the kneeling position seen here provides more stability by keeping weight low and affords more control of the canoe.
His detailed plan sets and video courses are an interesting and very effective way to build compared to building from plans or even during an in-person workshop. I chose to build three solo canoes, and used the medium, large, and extra-large sizes recommend by Brian for nesting. I did’t have any hull-design expertise, so I just used his dimensions for my canoes, though. I reduced the beam of each by just 1″ built all three concurrently, which saved some tool-setup time, and allowed me to practice a task on my boat, before completing the same step on my daughters’ smaller boats.
I used western red cedar for the longitudinal members and stems, ash for the outwales, and white oak for the ribs. For steam-bending, Brian highly recommends white oak that has not been kiln dried. He notes a couple of sources that will mill and ship suitable-quality bending oak. I located a mill in my area of southern Michigan where I could pick out white-oak boards that were sawn just a day or two earlier.
The extra-large canoe can easily carry two paddlers.
Brian is continually innovating and shares his new developments almost immediately on his Instagram account, and once developed, works it into the plans and videos. After I finished my boats, he announced a method to incorporate some mild tumblehome into the design, and shared the results and methods.
The basic skills and operations for the 66 Canoe build are relatively simple, and while I have built both a cedar-strip and a skin-on-frame boat before, neither of those builds had the level of detailed instruction as in the Cape Falcon Kayak instructional videos.
The construction process begins with laminating three boards together to shape the stock for the gunwales in the vertical profile curve of the sheer. The two gunwales are then rip-sawn from this lamination; the rib locations are marked out on them and cut with a plunge router. Spreaders shape the gunwales in plan view, either symmetrical (maximum beam amidships) or asymmetrical (maximum beam forward or aft of center).
Stems and keel are lashed on and the amount of rocker is set. Then, based on the measured beam, sheer, and rocker at each rib location, Brian has a formula for calculating the lengths of the rib stock. A story stick records each measurement for easy transfer to the rib stock. The videos eliminate any confusion, as every step of the process is shown plainly. The rib-length formula can be tweaked slightly to create different hull shapes, which are explained in the plans. Since I was building three canoes, I stuck with the default formula on my extra-large canoe and then tweaked it slightly for my daughters’ canoes to give them a slightly fuller and flatter shape for extra stability.
The sailing rig’s mast is designed to be easily and quickly raised and lowered. While under sail, the canoe can be propelled as well as steered by the paddler.
With the videos providing guidance, steam-bending was simple. Brian explains how long to steam your particular bending wood and demonstrates how to bend the ribs without using forms to achieve the necessary shape in each area of the canoe. It’s easy to detect and correct asymmetry by eye. Any remaining small deviations are faired by lashing the stringers on immediately after steam-bending the ribs.
The amount of rocker can be adjusted slightly while lashing on the keel and finishing the stems. After the seat-mounting blocks are added, the frame is sealed with oil and allowed to dry. I used Corey’s Pine-Tar Boat Sauce; Brian strongly recommends a skin of 9-oz 840 X-TRA Tuff Ballistic Nylon and the two-part urethane coating also offered at The Skin Boat Store. The skin can be colored for a traditional appearance and the coating is very tough.
Stem bands of brass or plastic are added to protect the canoes’ most vulnerable parts of the skin from abrasion. I had used acetal-copolymer but later switched to a moisture-resistant HDPE on the middle-sized canoe to improve its tracking due to that material’s taller profile.
Seats can be installed right against the bottom of the gunwales, or a bit lower using spacer blocks. I use 1.25″ spacers in the extra-large canoe, and 7/8″ in the large. Dropping the seat in the medium canoe, the smallest of the three, makes it difficult to fit my size-11 feet underneath while in the kneeling position, and could create a safety issue.
To protect the lashings from abrasion, I use a closed-cell foam pad in the bottom of the canoe as recommended. Flotation is provided by securing 4″-diameter foam noodles along the insides of the canoe with ball-bungees, which can be easily removed to nest the canoes.
When boards are attached to the gunwales to create a catamaran configuration, the space between the canoes can allow for paddling between them.
Other optional items include a small pop-up sail, boards to catamaran canoes together, and a rowing outrigger and oars. I’ve made and used the sails and catamaran boards but have yet to make the rowing setup. I logged about 180 hours of construction time for three canoes, catamaran boards, and sails.
The ability to nest the three canoes and transport them on top of my compact hatchback is wonderful. The nested canoes made it possible to take all three plus my cedar strip on a trip from Michigan to Grand Teton and Yellowstone parks.
While it’s easiest to load the canoes with two people, I am able to do it alone because my vehicle has a low roof and the canoes are so light. At the boat launch people watch amazed as we pull off canoe after canoe from the roof. It takes 8 to10 minutes to install the seats and flotation in the two larger canoes.
I’ve paddled all three boats in the fully upright seated position, but mostly now only do this when the boats are connected as a catamaran. I just enjoy the kneeling position more.
The performance of my three nesting canoes is just graduations of stability and speed. Which one is just right probably depends on your size and weight. Brian had the three medium/large/extra-large variants listed as having ideal paddler weights of 125/175/225 lbs with maximum capacities about double each of those weights.
I’m 6′2″ tall and about 180 lbs, and I knew that the largest canoe was probably a bit too large for me, but I didn’t want to make the smallest canoe much narrower than 27″ for my youngest daughter. This is one of the trade-offs for the ability to nest the canoes. There is a 2″ minimum difference in width in order for the full-sized canoes to nest inside each other (1.5″ minimum for pack canoes). Similar minimum differences apply for length.
To my surprise, when paddling by myself, I found that in most conditions I enjoy paddling the smallest of the canoes. I thought it would be too unstable, but in the kneeling position the canoe is stable enough for me to feel confident and is very quick with a nice glide. It tracks well, as would be expected with my weight in this smaller boat.
The middle-sized canoe is a bit more stable and slightly slower, and the largest canoe marginally more so on both counts. And because it’s so lightly loaded with just paddler and no gear, the largest canoe can be more difficult to handle if the wind picks up. The largest canoe will likely be perfect for canoe-camping, something that my older daughter and I are eager to try out, and it will be the one that I build the rowing outrigger for first. Its stability and size make it ideal for this option.
The middle-sized canoe has more rocker than the largest canoe, a result of my experimenting with a bit too much progressive rocker at the ends. I immediately detected its loose tracking, but that was easier to correct than too little rocker. I improved its tracking with slightly thicker stem bands.
While I have only paddled the canoes for one season, I have not pampered them. I routinely run them up onto sandy or gravel beaches and treat them as I would any piece of outdoor gear: with respect to my investment of time and money, but not agonizing over every scratch or bump. They have shown no significant signs of wear yet. The lashed construction and tough, flexible skin absorb and spring back from impact rather than cracking as a more rigid hull might.
I built catamaran boards for the canoes, which allow me to connect two or even all three together. The speed seems marginally slower, but steering is easy. The minimum 18″ space between the connected canoes allows for paddling between them. This is an amazingly fun way to paddle together. The canoes essentially become a high-performance raft with excellent stability. You can see and chat with your companions face-to-face, rather than looking at their backs as in a tandem canoe.
The catamaran arrangement is very well suited to using the optional sailing rig.
I made sails for all three canoes of about 1.2, 1.6, and 1.7 square meters, following Brian’s video instructions and plans. I have no experience in sailing, but in my few sea trials the sails are a fun way to catch a downwind breeze and, when a nice, sustained gust comes along, it certainly pushes us at least as fast as workout-level paddling. I haven’t had much sailing on a reach likely due to my inexperience. In the catamaran configuration, and with over 3 square meters of combined sail area, a nice downwind run is pretty darn fun. My next project for the canoes will be making the oars and outriggers that are covered in another one of Brian’s courses.
The 66 Canoe plans and the video-course method of instruction are far more thorough than a book or plans only, and would be an excellent approach for a first-time builder. Brian’s system allows you to stick with a basic, general-purpose canoe, experiment with a sleek racing design, or a wide and stable fishing canoe. Access to his extensive experience is icing on the cake.
They are among the lightest canoes available and more durable than people assume. They nest together for easy storage and transport, and garner compliments wherever we go. They allow two of my daughters and me to paddle together or independently, and to explore sailing, and canoe-camping. It will be quite a while before we outgrow these canoes.
Adam Eckhardt of Flatrock, Michigan, has been a maker of things all his life. Prior to these three 66 canoes he built a Guillemot Kayaks MicroBootlegger and a Yostwerks Sea Pup kayak.
The Skin-on-Frame Canoe Building Course from Cape Falcon Kayak is a 12-hour online video course. It includes a downloadable 30-page PDF plan and licensing for the purchaser to build unlimited canoes for personal use.
Is there a boat you’d like to know more about? Have you built one that you think other Small Boats Magazine readers would enjoy? Please email us!
As always, there had been a rough sketch of a plan: a 7- or 8-mile row, heading generally northward through the meandering sloughs and backwaters of the Chippewa River delta, the largest contiguous floodplain forest in the Midwest. From there, it would be an easy float down the main river channel to its junction with the Mississippi. Two or three nights aboard, a wandering pilgrimage through 30 square miles of river bottom forest and wetland bisected by only a single road. No need to pack the sailing rig—oars alone would do.
The more I thought about it, the better it sounded. With no charts available, I downloaded a set of detailed topo maps, printed them at 2″ to the mile, and ran them through a laminator. A bit smaller than restaurant placemats, and stiffened nicely by the laminating, they’d be perfect for one-handed use in a small boat—a trick I filed away for future trips. Even better, the maps seemed to suggest that the route I had imagined might actually exist. From a launch ramp 50 yards off the south side of Highway 35, a reasonably open channel paralleled the road eastward for a mile or two, snaking back and forth beneath a series of bridges before entering a thin but apparently continuous ribbon of river leading farther north.
Photographs by the author
Many of the channels leading north from Highway 35 were so shallow that I could stop FOGG, my Don Kurylko-designed Alaska, in midstream, with no need to tie to shore. Sandbars and shallows were so frequent that wading upstream while pulling the boat behind me often turned out to be the only way to make any real progress.
This channel—Buffalo Slough—ran generally northward along the eastern edge of the delta for several miles, swooping through a series of bends and hairpins and pond filled backwaters to connect with another winding channel—Little Buffalo Slough—that diverged from the 300-yard-wide main channel of the Chippewa 10 miles upstream from the river’s confluence with the Mississippi. I’d anchor there, behind a half-mile-long island at the entrance to the slough, and then have an easy downstream row on the Chippewa. After a second night somewhere near the river’s mouth, I’d close the loop with a rambling track through the lower delta: up Government Light Slough to Smith Slough and on to the ramp, maybe. I didn’t overthink it. A certain degree of ignorance is a necessary component of these ventures, the best plans only vague brushstrokes to be filled in later, a new revelation at each stroke of the oars.
Heading south and into the delta, my route passed broad stretches of reeds and marsh grass at the upper reaches of Smith Slough, one of the widest channels in the Chippewa River delta. With the current giving me a substantial boost on this leg of my trip, I had ample time to stop ashore.
But there are plans, and there is reality. After two hours of rowing back and forth beneath the highway after launching from the ramp, I had failed to find the entrance to Buffalo Slough. Instead, I found a series of obscure channels blocked by downed trees, low water, and strainers, any one of which might have been Buffalo Slough. I hadn’t been able to go farther than a hundred yards up any of them to find out.
Trying to bring a boat like FOGG up Buffalo Slough was ridiculous, really. The channels were barely wide enough for oars as they were twisty, and thickly overgrown. It was the kind of delightfully pointless and uncomfortable outing I might have invented for myself as a kid, when every drainage ditch was a potential adventure, and every thicket an incitement to exploration. Long shallow stretches forced me to wade upstream, pulling the boat behind me like a dog on a leash—hard-earned, sweaty, knee-deep-mud-and-crawling-through-branches yardage. I had to climb ashore and line the boat through a few tight spots where logs or low branches prevented the use of more conventional tactics. This wasn’t a river—it was a forest. Craggy-barked cottonwoods lined the shore, with well-spaced silver maples, basswoods, and ash trees farther inland. Birds were singing everywhere, only occasionally visible as they flashed from tree to tree. Squirrels chattered loudly, scampered off when I got too close, and chattered some more.
Roger Siebert
.
No matter what my carefully assembled maps might have suggested, the sloughs and channels here were shifty things—erratic; devious; not to be trusted. The few inlets that weren’t blocked completely grew steadily narrower and shallower as I fought my way upstream, until all that was left was a trickle of muddy water between undercut banks. I finally gave up, leaving the boat firmly aground in a side channel to explore on foot.
Tall maples and basswoods broke the late afternoon light into a rustling green-gold shiver overhead, and the damp sand of the slough bed was a jumble of tracks: the split-wedge marks of white-tailed deer, web-footed beaver prints, and the peace-sign slash of blue heron feet. The forest floor was pure floodplain and flat as a parking lot, too damp and shady to support much undergrowth—only a scattering of mayapples, and a few trilliums just starting to open into bright three-pronged stars. Farther into the woods, knee-high ferns brushed my legs with a feathery shushing at each step. Circling back to the boat, I found more tracks in the riverbed behind it: the rail-straight line of a keel dragged through the sand, and my own barefoot prints at the water’s edge.
I eventually abandoned the idea of finding Buffalo Slough and headed downstream instead, planning to anchor a few miles south of the ramp in Smith Slough, or Government Light Slough, or some nameless adjacent backwater at the edge of the delta. I’d spend the night just above the Mississippi River and come up with a new plan for tomorrow.
It was still a few weeks to the summer solstice when I started my trip, but days were already growing longer. With more than 16 hours of daylight, I was in no hurry to find a campsite, so I pulled in here to watch two beavers on the opposite bank.
Now that I’d given up on finding a northward route, the channels grew wider—the size of small rivers, and easily rowable—and my map seemed accurate enough. The Burlington Northern rail line ran through the delta on a series of bridges and causeways, and the first bridge I passed under provided a reliable fix to confirm my admittedly hazy dead reckoning. I knew where I was, mostly, if not where I was going.
I let the boat drift along at a moderate pace, using the oars more for steering than for propulsion, stopping ashore wherever I felt the urge, or could find a relatively mud-free landing. Other than constant birdsong and the intermittent rumble of passing trains, I was caught up in a wide and rivery stillness: the faint drip of water off the oar blades, the hush of the current rippling along the banks, the breeze stirring through wide expanses of reeds at the water’s edge. After 2 or 3 miles, I pulled into a quiet backwater 20 yards wide, a still pond tucked beside the channel like a mirror sinking slowly into the mud. A few cottonwoods lined the bank, 40′ tall and leaning far out over the water. Their reflections broke into wavering ripples as the boat glided toward shore. I slid the bow up onto a low island at the edge of the pond and stepped out into thick mud.
Sleeping aboard FOGG involves a fair amount of gear shuffling to arrange the platform and tent, but it opens the door to overnight trips in areas where dry land isn’t available, or where shore camping is prohibited. While a kayak would have fared better in the shallow channels north of the highway, the added comfort of an onboard sleeping system more than makes up for a heavier, less maneuverable boat.
Even well back from the river, where bright green shoots of new grass created the illusion of a carefully tended lawn, the bank was too muddy for tenting. My camp chair, a recent and dangerously hedonistic concession to comfort, sank a few inches into the earth when I sat down, and wouldn’t settle onto an even keel. The “lawn” quickly became a cattle-pen quagmire of muddy footprints as I unloaded my gear. After a supper of rice and red beans, I dragged the boat to a level position, barely afloat at the edge of the pond, and set up a thwart-height platform and small tent for sleeping aboard. I scraped most of the mud off my feet—or some of it, at least—and crawled inside at full dark. I woke again well after midnight to see a foggy glimmer of sky just visible through the leaves, and a bright half moon caught in the treetops.
By morning, after a long scrutiny of maps in the flickering light of a dying headlamp the night before, I had decided on a new plan. I’d continue down Government Light Slough to the Mississippi—less than a mile now—and then upstream past the mouth of the Chippewa River and into the western arm of the delta, an inkblot swirl of channels, oxbows, meanders, and sloughs that might allow me to piece together a loop after all. Fortyacre Lake, Chimney Lake, Swinger Slough: a devious back-channel route leading to the western bank of the Chippewa River a few miles upstream, almost a mirror image of the route I’d originally intended. From there, I could continue down to the Mississippi, up Swift Slough, maybe, and get back to the car.
Shortly after leaving my first camp, I entered Government Light Slough, which connects Smith Slough to the Mississippi River. The floodplain’s fluctuating water levels are evident here, with bare muddy banks suggesting low water levels—probably the reason I hadn’t been able to work my way upstream to Buffalo Slough the day before.
I was happy there was still the chance for a continuous loop, however irregular and wandering it might prove. The thought of returning the way I had come would seem like a defeat, and a lost opportunity. But did the loop I saw on paper actually exist in the ambiguous and twisty delta? I had no idea.
The first leg of the day’s journey went quickly. Within 20 minutes of starting out, I reached the end of Government Light Slough and entered the Mississippi. Behind me, flat forest; ahead, wide open water, and the tall bluffs of the Minnesota side. Blue skies, bright sunlight—startlingly bright after the channels of the delta. I rowed 400 yards across the river to the mile-long ribbon of Drury Island and beached the boat as a passing barge tow sent its wake crashing onto shore. Once it was past, I headed upstream again. The current here was sluggish, and it wasn’t difficult to keep the boat moving.
Just past the western tip of Drury Island, a line of high dunes came into view on the Wisconsin shore, steep slopes of bare sand rising 70′ from the river, half again as tall as the cottonwoods lining the bank beneath. Fake dunes, I knew. The Chippewa River runs through the sandy soils of northern Wisconsin for almost 200 miles, draining an area roughly the size of Connecticut. Much of the sand it carries drops to the riverbed where the Chippewa empties into the Mississippi. Fifteen thousand truckloads of that sand are dredged from the Mississippi River here every year and piled onto the bank in a Sisyphean effort to maintain a 9′ channel depth for commercial traffic.
I couldn’t resist a climb to the summit of the sandpile. I beached the boat, buried an anchor on shore, and headed up the slope. The sand was rough and grainy on my bare feet, and I slipped backward at every step, losing momentum, but the sun-warmed sand was already too hot for me to stop moving. When I finally reached the top, I found a barren topography of sand stretching 500 yards from east to west, far above the floor of the delta. To the south, on the Minnesota side, steep bluffs rose 500 feet above the Mississippi, capped with a thin layer of pale sandstone. To the north, the sand heap dropped abruptly to the Chippewa’s floodplain, offering a view into the forest canopy from above, leafy and green with early summer growth. A bald eagle launched from a tree below me, climbed into the sky with a ponderous rhythm of wingbeats, and angled across the river toward Minnesota.
I had visited these dunes just downstream from the mouth of the Chippewa River years before, on a weeklong trip aboard a rented houseboat. While FOGG doesn’t offer the same level of comfort—no flying bridge or hot tub—I wouldn’t be paying $450 to refill the fuel tank at the end of the trip, either.
I returned to the boat in a series of gravity-boosted leaps and bounds that carried me an improbable distance downslope at each step, nearly sending me tumbling headlong a few times. I was tempted—briefly—to climb up again for another go. Instead, I shoved off and continued upstream.
After rowing another half mile up the Mississippi’s eastern bank, I beached the boat at the mouth of the Chippewa River, set up my camp chair under a canopy of cottonwoods on a stretch of flat, firm sand, and read a few pages from George Birkbeck Hill’s Johnsonian Miscellanies, Volume II, a collection of wide-ranging anecdotes and aphorisms related to Dr. Samuel Johnson, one of the leading literary figures of 18th-century England. As an English teacher and writer, I had always felt a nagging obligation to learn at least something about him, so when I found the book in a dusty corner of a used book store, I bought it. With Volume I missing, I could appease my conscience without the bother of reading the whole thing. Besides, a collection to dip into at random seemed better suited to my lack of ambition than James Boswell’s 1,500-page opus, The Life of Samuel Johnson, which sat beside it on the same shelf. Perhaps most important of all, Johnsonian Miscellanies cost $4.50; the Boswell was priced at $65. A little learning may be a dangerous thing, but drinking deep seemed prohibitively expensive.
Some kind of waste-disposal system is essential for responsible camping, especially close to water. I use a simple plastic bucket with double-layer anti-odor liner bags that can be disposed of in the trash at the end of the trip. As an added bonus, the bucket makes a comfy footstool.
As it turned out, the unhurried pace of the 18th-century prose and the book’s lack of a continuous narrative thread seemed to mirror my erratic wanderings and ill-defined goals quite nicely, though I doubted Dr. Johnson would have thought much of my trip—at least, not if Hill’s portrait caught the true measure of the man: “He thought that that happiest life was that of a man of business…and that in general no one could be virtuous or happy, that was not completely employed.”
It would have been a nice campsite—level sand for tenting, plenty of shade, and a sheltered harbor for the boat—but the western arm of the delta lay just across the Chippewa River, and I was still fixed on the idea of a loop. A mile of rowing, maybe, would get me to Fortyacre Lake, the first possibility that looked worth exploring. I packed up my chair and the book and shoved off.
Fortyacre Lake went about as expected, a series of winding passages that were more forest than river. There were overhanging branches and leaning cottonwoods, side channels too overgrown or too shallow to enter, a few herons wading the reedy shallows, and finally, a dead end. I ate a late lunch aboard, grounded comfortably on a sandbar, and returned downstream to the delta’s edge to find Chimney Lake.
Fortyacre Lake looked like a dead end on the map, but I figured it would be worth checking out anyway. Despite my best efforts, though, shallow water prevented me from getting more than halfway up the channel before I had to turn around.
Here I had better luck. The channel leading into the floodplain was hidden behind a screen of reeds, and took some finding, but it kept going. Soon enough I was into a corkscrewing creek that I guessed must form the downstream end of Swinger Slough. I rowed from the aft thwart facing forward so I could weave around sandbars and downed trees without needing to turn my head to see where I was going, but it was a trade-off. The current was fast enough to require strong rowing, and pushing on the oars limited my power.
I was in no hurry, though. It was only about 3 miles along the slough from the entrance to Chimney Lake to the main channel of the Chippewa River, and the absence of downed trees and brush made up for the slow pace of upstream rowing. I pulled into a quiet corner of the woods at the foot of a railroad bridge—another definite position fix—and walked the tracks for a while, balancing on the rails as long as I could, looking for cast-off railroad spikes. The railroad causeway was the highest ground for miles, a long straight line slashed through the forest. Eventually I returned to the boat for lunch—or was it supper? I didn’t care.
The Burlington Northern rail line crosses the Chippewa River delta at the point where Chimney Lake fades into Swinger Slough. As I rowed under the bridge, a swarm of barn swallows dive-bombed me repeatedly. After a narrow escape from the birds, I pulled ashore for a break. Having made it this far, it seemed likely that I’d be able to reach the Chippewa River to complete my loop.
By 7 p.m., with plenty of daylight left, I made the turn into the upper arm of Swinger Slough. From here the route paralleled Highway 35 eastward to the Chippewa River, less than a mile ahead. By now, though, I understood that distance was not a relevant measure in the floodplain. After all, the dirt ramp I had launched from was just 2 miles farther down this same road. Through all my river wanderings, I had been covering an as-the-crow-flies distance of less than a mile per day.
FOGG, however, was no crow. No matter how twisty the channels were, I had no choice but to follow them. From here, though, it would be a straight run to the main channel of the Chippewa River. There was a fierce current against me, but with the end practically in sight, I kept rowing east along the highway, up Swinger Slough—until, with the bridge over the Chippewa River in sight 100 yards ahead, a series of downed trees blocked the channel from bank to bank.
Just after sunset, I emerged from Swinger Slough and re-entered the upper reaches of Chimney Lake. While I had an easy time here on the upstream leg, I wandered off course on the return trip, and ended up rowing through a wide expanse of water so shallow that FOGG’s keel was dragging through the mud.
Was the channel completely blocked? I didn’t want to believe it. It had taken me all afternoon to make it this far; I wouldn’t believe it. But there it was: three leafless and spindly fallen trees, spaced a boat length apart, just tall enough to stretch all the way across the slough—roots on the north bank, treetops on the south. Another dead end.
And yet, it might just be possible to drag the boat over the first tree, where the base of the trunk dipped low in the water. Once the idea had planted itself in my head, it proved hard to abandon. I rowed closer. Yes, it might be possible. I tested the depth with an oar—waist deep. It was probably stupid to try. FOGG weighs well over 300 lbs loaded, and I could barely flip the empty hull for painting, even with my wife to help me. But here I was, in sight of the Chippewa River, the last easy link of the loop.
It wasn’t easy. I managed to climb into the water and shove the bow up onto the first log, then scrambled over to the upstream side of the downed tree. The water there was neck-deep, with no firm footing to pull from. Fine. I climbed up beside the boat and manhandled FOGG farther onto the log. From there I see-sawed the boat up and down, and back and forth, walking it across the tree trunk the way you’d move a heavy cabinet across the floor, hoping the Douglas-fir backbone was strong enough to hold the hull together despite the wrangling. It must have been 10 minutes before the boat finally slid free on the upstream side of the log.
I had cleared the first obstacle—the first of three. And the next tree, higher out of the water, would be harder. I rowed up to it—awkward to do with so little room for the oars and with such a strong current flowing—and tested the depth. My 8′ 8″ oar sank all the way to the handle before touching bottom. There would be nowhere to stand for the initial heave up onto the tree trunk.
The bridge that crossed the main channel of the Chippewa was just ahead, a few yards off the right-hand bank. I could even read the green and white highway sign planted on the shoulder near the crossing: Chippewa River. It seemed a cruel blow to force an ending here.
Best to do a bit of scouting before committing to one option or the other, I finally decided. I tied the boat to the tree and climbed ashore. “Ashore,” I immediately discovered, consisted of a broad field of stinging nettles stretching 100 yards along the bank. I was wearing shorts and sandals, and a thin T-shirt. But the river was just ahead, so I waded into the nettle patch, crushing down the stalks with my feet, stomping a path. Nettles sprang back with each step to needle my legs and arms, burning and prickling my bare skin.
I finally reached the end of the nettle patch, hot, itchy, and tired. My survey from the slough bank proved that it would be nearly impossible to wrestle the boat over the second downed tree—I had known that all along, really—and the third tree was even worse. For a moment I had the mad thought of crossing the channel, dragging the boat onto the southern shore—it was cattails and reeds there, and relatively flat—and rolling it past the downed trees along the marshy ground, using my plastic boat fenders as rollers. In the end, it wasn’t prudence or foresight that saved me, but only the discovery that I had left the fenders back at the car. It would be an ignominious defeat, then, with just enough time to turn downstream and find a campsite before dark.
Where there’s a will, there’s a way. Except, sometimes, there isn’t.
The return trip—after I had dragged the boat back over the downed tree—was an easy downriver ride. I let the current carry me along mostly unaided, using the oars only for occasional course corrections. What had taken me several hours on the northward leg took less than an hour on the way back.
Even so, I had turned around none too early. The sun was almost hidden beneath the treetops as I emerged at Chimney Lake, with only a narrow arc of white-orange showing at the skyline. Soon it was gone altogether. I rowed past the delta’s shadowy wall of trees as the evening faded to a purple twilight. The surface of the water grew dark, a pitch of blackness interrupted by the glimmering reflections of the first stars appearing overhead.
I spent the night at the mouth of the Chippewa River, at the campsite I had found earlier. Flat sand, tall cottonwoods, a convenient downed log for a supper bench—perfection, or close enough to it. I sat for a long time outside the tent listening to the chuckle of water as the river slid by, and the murmuring of the cottonwoods, and the long sad whistling of passing trains along the Minnesota shore. Bats swooped and dodged at the water’s edge, and the stars seemed to pulsate with a distant hum. The boat rocked gently just offshore, the painter a long pale swooping curve from bow to riverbank. Somewhere a fish jumped and fell back into the water with a splash that seemed bigger than it should have been.
On the final morning of the trip, I got off to a slow start, brewing a batch of coffee—a rare treat—and taking my time packing up. The magic of a small boat is that you’re never far away from a quiet corner where you can spend the night unnoticed.
“Life must be filled up,” Dr. Johnson insists—a remark that had stuck in my head from the pages I’d read earlier that day—“and the man who is not capable of intellectual pleasures must content himself with such as his senses can afford.”
It didn’t seem like such a bad bargain to me.
Tom Pamperin is a freelance writer who lives in northwestern Wisconsin. He spends his summers cruising small boats throughout Wisconsin, the North Channel, and along the Texas coast. He is a frequent contributor to Small Boats Monthly and WoodenBoat.
If you have an interesting story to tell about your adventures with a small boat, please email us a brief outline and a few photos.
For some of us, the end of the boating season is the time to turn our attention to the maintenance of our small outboard motors. In our fleet, we have three motors ranging from 2-1/2 to 25 hp, and with the coming of winter we need to make sure they will run properly next year after sitting idle for several months.
SBM photographs
A bucket full of fresh water is sufficient for flushing the cooling system without the need for hose-fed muffs clamped over the motor’s intake.
Putting the outboard away for the winter begins with some basic maintenance. Flush the cooling system as you normally would by running the motor with either the lower unit in a bucket of fresh water or muffs clamped on the lower unit’s water intake with a hose supplying fresh water. Flush the motor long enough to ensure that water circulates through the entire cooling system. Running the motor will also warm the oil, making it easier to drain the oil for the change that will follow. Our 25-hp motor has a thermostat, so we have to run the motor long enough for the thermostat to open to let warm water flow out of the discharge port. Once finished with a flush, keep the outboard vertical for a bit and let the water completely drain out of the port, so that there is no water left inside to freeze over the winter.
The crankcase-oil drain plug for this outboard is set deep in a recess in the engine bottom. Be ready to capture the old oil when the bolt comes free.
Collect the old oil in a bucket and wear gloves to keep it off your hands.
While the engine is still warm, but not hot, open the crankcase drain port to drain the oil. A four-stroke’s oil must be changed every 100 hours, or annually. See the motor’s manual for what type of oil the engine requires and how much it takes to fill it. Two-stroke outboards do not have oil in the powerhead crankcase and don’t require an oil change, but the spark plugs can foul quickly due to the buildup of the oil that is mixed with the fuel. Spark plugs are cheap, and they should be changed during your winterizing maintenance.
Here the gear oil is flowing from the lower unit’s drain hole. The translucent green oil has none of the milkiness that would indicate water intrusion. Note the bolt siting on the anti-ventilation plate. Before it goes back into the vent at the top of the lower unit, the red gasket should be replaced with a new one.
The lower unit is refilled with gear oil from the bottom up. You can buy a hose that will connect the threaded lower unit fitting to the container of fresh oil, but a pump is easier to use. Note the green gear oil puddling on the anti-ventilation plate, indicating that the lower unit is full.
The lower unit’s gear oil must also be changed every year, or every 100 hours. There are two gasketed bolts: the top one is the vent only; the bottom is for draining and filling. Check to make sure the drained fluid is not cloudy, which would indicate water intrusion and that the propeller-shaft seal may need to be replaced.
Remove the prop to check for fishing line wrapped around the shaft. This prop is fine; there are just a few strands of weeds to clear.
Propellers must be removed at each service interval because the shaft needs to be lubricated and the shaft forward of the prop must be inspected for fishing line that isn’t otherwise evident and can damage the seal.
A gas siphon costs about $10 and is a quick and safe means of emptying the outboard’s fuel tank.
Gas degrades with time and is a common problem for outboards that have been improperly stored without being serviced first. Drain the gas with a siphon or hand pump (don’t invert the motor to pour it out) or run the motor to fuel exhaustion. Drain the carburetor, as well. The internal jets and orifices in small carburetors are sensitive to the gummy residue created by stale gas. Fuel that has been left in the tank for several months also loses some combustibility and will not make a motor happy come time to start in the spring. Remove the drain screw at the bottom of the carburetor bowl to drain any remaining fuel.
The bowl at the bottom of the carburetor has a drain for emptying remaining fuel before the motor sits idle over the winter.
To prevent corrosion inside the motor, consider using marine fogging oil for the cylinders if the motor is to be laid up for extended periods. The pressurized spray is injected into the air intakes while the motor is running and then, with the spark plugs removed, into the cylinders; pulling the starter cord distributes the oil.
The water pump is easily accessed by unbolting the lower unit and pulling it down until the driveshaft is free from the powerhead. A reluctant lower unit can be gently removed by placing a block of wood on the narrowest part of the anti-ventilation plate, close to the motor’s midsection, and tapping it with a hammer. Here, a new impeller has been slipped down over the driveshaft. The old impeller, set on the plate, has seen better days and four of its fins are permanently bent. The tip of a fifth was recovered taking the pump apart. The water intake needs to be checked to see if the sixth fin is hiding there.
The water-pump impeller should be changed every three years, whether it looks serviceable or not. The rubber vanes lose flexibility and effectiveness with age. The impeller maintains the water flow that is essential to cooling the motor, and nothing can kill a motor faster than excessive heat. Service manuals and YouTube videos are available online to illustrate the process of removing the lower unit to access the water pump for a variety of makes and models. Removing the lower unit also provides an opportunity to lubricate the mounting bolts so they don’t permanently seize in place with age and corrosion. You can also lubricate the lower unit’s driveshaft so that it does not freeze into the powerhead’s driveshaft. All threaded fastenings should be coated with a marine-grade Tef-Gel anti-seize compound.
The tip of the grease gun is pointed at a one of the Zerk fittings that need a new application of waterproof grease.
Check the steering and tilt mechanisms, and use a grease gun to lubricate points as needed. Look at throttle linkages, especially the mount’s retaining hardware, for general condition and corrosion.
The new fuel filter in the foreground will replace the existing filter behind it. Pinch clamps on the fuel line make the change easy.
The in-line fuel filter (or water-separator filter, if there is one), should be changed every 100 hours or annually. It is essential to keep fuel as clean as possible.
The sacrificial anode comes off with the removal of a single bolt. This one still has plenty of metal and just needs a bit of cleaning.
Check the sacrificial anode on the lower unit and clean it if it is scaly; replace it if a significant amount of it has eroded.
Make sure that the motor’s exterior gets a freshwater rinse; when it’s dry, touch up any paint chips, and put a coat of wax on the powerhead cover. Coat exposed metal inside the motors with Green Grease, a true waterproof grease, and treat external metal surfaces as needed with a corrosion preventative such as WD-40 but take care to not spray it onto rubber components. For rubber fittings and seals use a synthetic-based grease, not one that is petroleum-based.
When all of the winterizing has been done, the outboard is ready for hibernation. It’s best stowed upright on a sturdy stand.
Four-stroke outboards must be stored either vertically or lying down in the position shown in the manual. If you lay them on the incorrect side, the crankcase oil can get through the air intake and fill the cylinder, causing hydraulic lock and damaging the motor. Two-stroke outboards can be stored in any position. If possible, stow the motor on a sturdy stand and protect it with a non-abrasive cover in an area where critters can’t get into it, lest the motor become a food cache for mice and squirrels, who also like to chew on wires, or attract the wasp-like mud daubers, who are known to plug cooling-system discharge ports. If your motor uses a battery, put it on a smart charger.
With our three motors well taken care of, when the next nice day rolls around in the springtime, we will be ready to head out on the water, confident in the health of a vitally important propulsion system.
Audrey and Kent Lewis mess about with their small armada in the Tidewater Region of southeast Virginia. Steve Baum is a U.S. Coast Guard veteran who spent a career on the water surrounded by ships and small boats, and then embarked on another career with the U.S. Army Corps of Engineers to ensure that our waterways are safe for boating.
You can share your tips and tricks of the trade with other Small Boats Magazine readers by sending us an email.
To do efficient and accurate work on a table saw, there are several accessories required beyond the miter gauge and the rip fence that ordinarily come with it. To secure feather boards, stops, and special fences, I’ve used clamps to hold them in place, but the undersides of the table and its extensions didn’t have flat surfaces to accommodate clamp jaws. The same problem makes it difficult to clamp accessories to my bandsaw and drill press tables. When I happened upon Magswitches on the web, they seemed to be the perfect solution, promising they could “secure custom jigs & fixtures anywhere on your table top” with just the twist of a knob.
The Magswitch company’s wide array of devices are built as magnets that can be turned on and off. Most of the products are meant for industrial use; the smallest of them, called MagJigs, are designed for the home woodworker. Inside the steel housings of a MagJig are two cylindrical magnets, one fixed to the housing and the other rotated by the knob at the top of the device. When the poles of the magnets are set north to north, south to south, the magnetic field is activated; when the poles are set in opposition, their magnetic fields almost entirely cancel each other. The steel housing takes care of the rest, and a MagJig that is turned off won’t even pick up fine steel filings.
Photographs by the author
The MagJigs I bought include two 60s (upper left), one 95 (lower left), and a pair of 150s with a universal base and reversible feather board.
I bought three sizes of the MagJig: the 60, 95, and 150. The pair of 150s came in a Starter Kit with a Universal Base and the Reversible Featherboard. There is one more in the MagJig series, the 235. The numbers for each device refer to what the company calls its “magnetic hold force” in pounds. That force is for pulling the MagJig straight up from the surface and will vary with the thickness of the ferrous metal it’s attached to. A thin sheet of steel won’t capture the magnet’s entire field and the MagJig won’t have its full holding power. The cast-iron top of my table saw might not capture the entire magnetic field either, but because it is where I’d use the MagJigs, that’s the holding power that matters to me.
I tested the listed holding power using a hanging scale suspended from a boom vang. In all cases, the MagJigs let go at forces less than listed. Those listings might be more accurate on a thicker table, which can capture the full depth of the magnetic field.
To test each MagJig, I used a digital hanging scale to see how much force it would take to pull the MagJigs off my table saw. I threaded a loop of nylon line through the magnet’s two mounting holes and used the scale connected to a boom vang to pull the MagJigs straight up from the table saw. The 60 popped off at an average of 31 lbs, the 95 at 62 lbs, and the 150 at 106 lbs. So for my purposes, the MagJigs all fell short of their nominal strengths.
The holding force that applies to the uses of the MagJig are lateral. I arranged the boom vang and the hanging scale horizontally to see how much force was required to slip the MagJigs sideways.
When using MagJigs for fences, guides, and feather boards, the holding force that matters is not vertical but lateral, so I anchored the vang to a point level with the table saw top. With a loop of cord around the base of each MagJig, I used the vang to pull it sideways. The 60 slipped at 9 lbs, the 95 at 16 lbs, and the 150 at 22 lbs. The company recommends that the MagJigs be used in pairs to keep forces from rotating them, so I made a loop for the feather board fixture with its two 150s holding to the table saw top. It slipped at 40 lbs.
I use the MagJig 95 to hold devices that I don’t need to count on to stay put. Here it is used to keep a vacuum hose in the drill-press table.
For practical applications I found the MagJig 95 and 150 useful in the shop. The 60 just had too little hold force; the note on the packaging—“secure custom jigs & fixtures anywhere on your table top”—overstated its abilities. The 95, fitted to a block of 3/4″-thick oak, made a useful stop for light work on the drill press. It also worked to hold a bracket for a vacuum hose. The 95’s packaging had a picture of a pair of them used with a feather board, a use I’d recommend only for light work.
The feather board arrangement can resist about 40 lbs lateral pressure. The MagJigs are partially over the miter slot, but still have a firm hold on the table.
The 150s, with their base and feather board, lived up to my expectations. They hold the feather board in place with enough pressure to keep the workpiece against the rip fence. The feather board offers stiff resistance to kickback, but I could pull the workpiece backward (with the saw turned off). The feather board I made from a 2×4 doesn’t let the workpiece move backward.
The back of the universal base can be used as a fence for the bandsaw.
To use the base as a fence on the drill press, I had to use 1/4″ plywood under the workpiece to prevent tearout when drilling. The 3/4″ plywood I usually use is just as high as the base.
The universal base, with the MagJigs in place and the feather board removed, has a straight back edge that can be used as a fence on the cast-iron tables of my bandsaw and drill press. My favorite application of the base is as a guide for ripping on the bandsaw. I can saw to my drawn pencil line until I have the angle of the workpiece set to accommodate any blade drift and then set the base and activate the magnets with one hand.
A shop-made fence uses the 150 MagJigs and its minimal size is better suited to the small drill-press table than the universal base is.
The universal base with the MagJigs does have limitations. The placement of the device is limited to the area of the table it is being applied to. The base takes up some extra room, especially when the back side is used as a fence. You can make your own jigs with 3/4″ stock. The 150s require a 40mm hole, and a Forstner bit of that size is available with some MagJig sets. I used a 1-1/2″ Forstner bit and elongated it by drilling the first hole, shifting the wood by about 3/32″ and drilling again to shave off one side of the hole.
I’m not sure what I’ll do with the MagJig 60s. I may put a bridle and a cord on one to fish for drill bits that roll off the wall side of the workbench. Their bigger brothers will answer a higher calling in the shop.
Christopher Cunningham is the editor of Small Boats Magazine.
Here in Seattle, Washington, boating season officially opens on the first Saturday in May with a grand parade of decorated boats. Thousands of people turn out for the celebration. The end of the season closes without fanfare, and only a few of us keep boating as the months of cold and rain set in. Even in midwinter, the weather here isn’t often cause for misery as long as you dress properly.
Feeling the chill often stars at the extremities: the feet, hands, and head. Protecting these areas from weather has been the mission of Sealskinz since the company’s founding in 1996. Their waterproof, windproof, and breathable socks, gloves, and hats are designed and manufactured in Great Britain. I started using Sealskinz socks in 1998, and they have performed well and held up for many years of sea kayaking and bicycling.
I have a new pair of Sealskinz socks now as well as their gloves and a knit beanie. They are all composed of three layers; the inner and outer layers differ with the article, but the inner layer of all is a membrane that is waterproof, windproof, and breathable. While there are outdoor fabrics with the same characteristics, Sealskinz products set themselves apart with a membrane and fabrics that stretch.
Photographs by the author
The inside-out sock shows the thicker knit at the toe and heel. What appears to be a seam along the length of the sock is a small pucker of the knit on the membrane beneath it. It flattens when the sock stretches and is soft to the touch.
Sealskinz socks come in ankle length, mid length, and, my favorite, knee length. I find boots awkward for boating and prefer to wear low-cut boating shoes and let knee-high socks take care of keeping my feet dry. Apart from the cuff, the Sealskinz knee-highs have a seamless inner layer with a merino-wool blend in a continuous knit that varies in thickness from toe to heel to cuff. The uppers have a tight, nubby knit for warmth; the toe and heel have a thicker layer of looped yarn for cushioning and extra warmth. The outer layer is nylon with elastane. The socks slip on easily, fit snugly, and there’s enough stretch to tuck pant legs comfortably into them. In the cold and rain they’re very pleasantly warm, and they keep my feet dry while wading at the launch ramp.
The inside-out glove shows the seamless knit of the interior. The tabs on the cuff were used to secure the gloves to packaging. They are soft and seem strong and might serve to tether the gloves.
The Waterproof All Weather Ultra Grip Knitted Gloves are made of materials like those in the socks but have a finer knit. Like the socks, there is a seam at the cuff, but by some miracle of knitting machinery, there are no other seams. The seamless, stretch construction provides a noteworthy advantage over gloves sewn of non-stretch fabrics. The gloves don’t bunch up or crease, creating pressure points that can lead to discomfort and hot spots. The palm and fingers have small dots of rubbery substance for a non-slip grip without compromising the stretch of the fabric. When rowing on a rainy day, I have a comfortable grip on the handles with just as much grip as I have with bare hands. The tips of the thumb and index finger on both left and right gloves have a speckled gray material that is compatible with touchscreens. They work best when fingertips are pushed well into the ends of the gloves.
The beanie is especially warm for a knit cap. Like the socks and gloves, it is machine washable and requires no special detergent.
The knit acrylic exterior of the Waterproof Cold Weather Roll Cuff Beanie Hat looks just like an ordinary knit beanie, but it has the protection of the Seaskinz membrane. The interior layer is a polyester fleece. The hat is deep enough that it can cover my ears with the cuff, and although the cuff is sewn front and back, the sides can be unfolded for even more coverage. I have other beanies, but they’re not as warm and not effective when it’s raining or a strong wind is blowing; the Sealskinz beanie offers good protection no matter what the weather is doing. You can add to its uses with the LED-equipped version of the hat. It has an opening in the cuff that holds a USB-rechargeable headlamp.
These Sealskinz products have made my outings in the off season much easier to enjoy. They are well designed, perform well, and, if my previous experience with their ’90s-era socks is any indication, can last a long time. Christopher Cunningham is the editor of Small Boats Magazine.
AMERICAN BEAUTY is a Whitehall Tender that was built by students at the WoodenBoat School and designed by the Rice Brothers from East Boothbay, Maine. Back in the 1800s, Whitehalls were used as a commercial craft, ferrying materials and crew to shore from large schooners and square-rigged ships. Eventually, the Whitehall entered the recreational world and remains a favorite of amateur boatbuilders to this day.
AMERCIAN BEAUTY’s bow
AMERCIAN BEAUTY
AMERICAN BEAUTY in Brooklin, Maine
Rowing AMERICAN BEAUTY
AMERICAN BEAUTY slices through the water
AMERICAN BEAUTY profile
Subscribe For Full Access
Flipbooks are available to paid subscribers only. Subscribe now or log in for access.