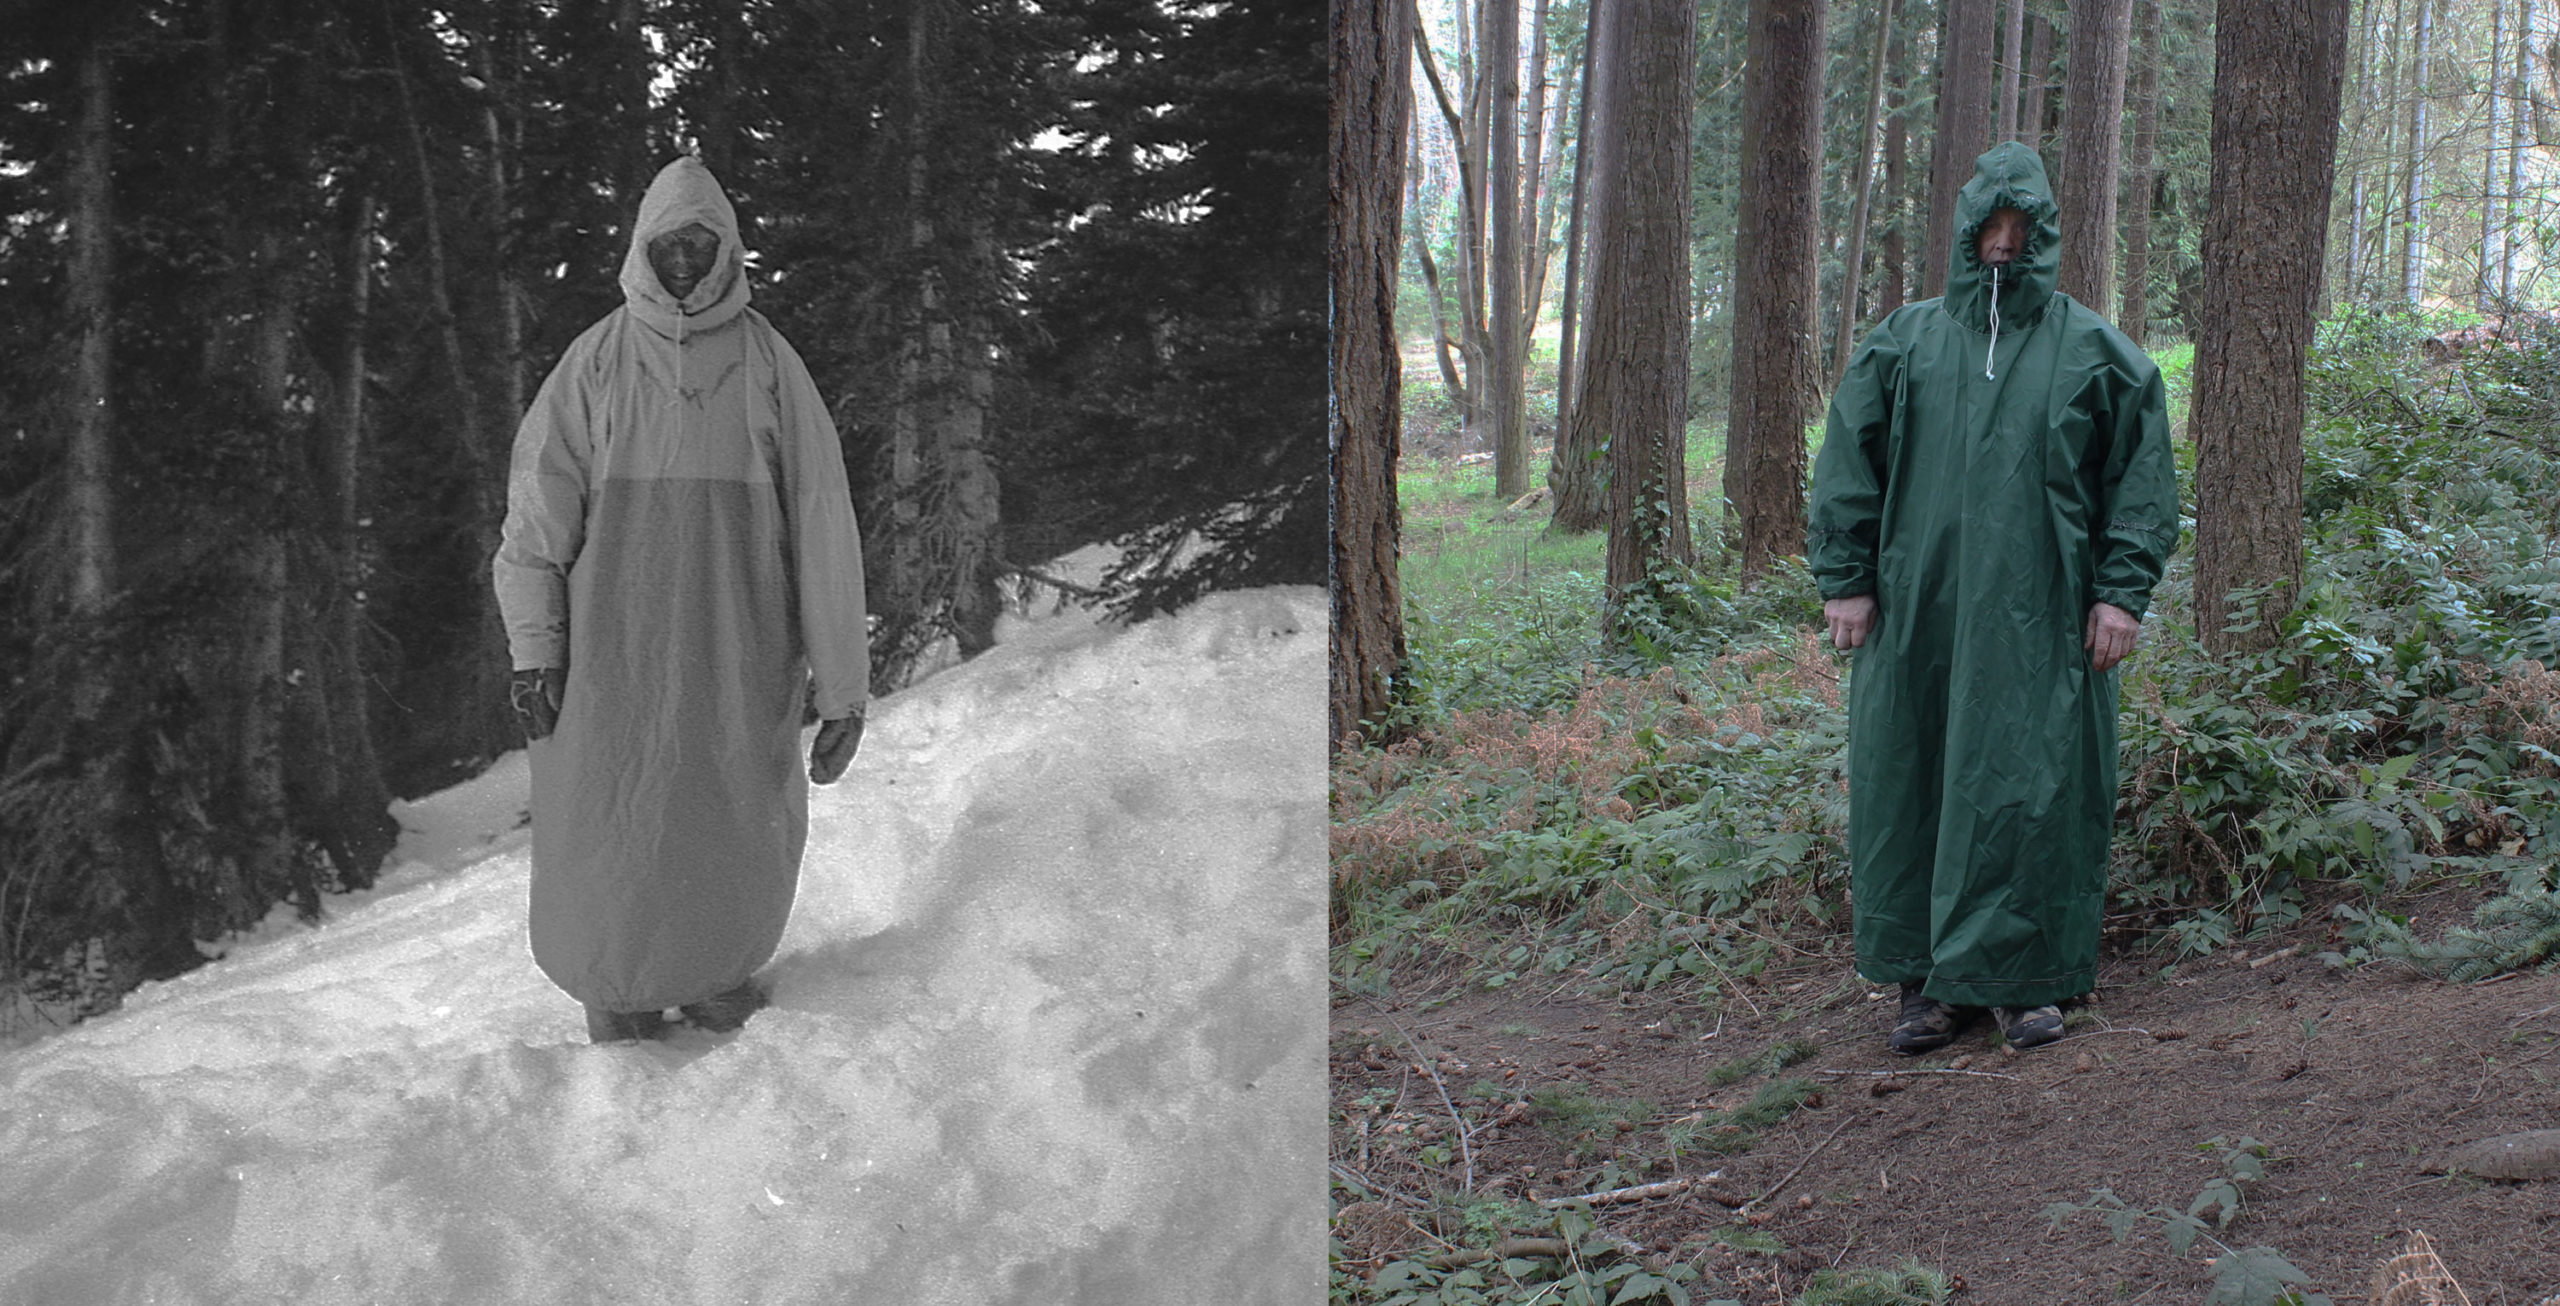
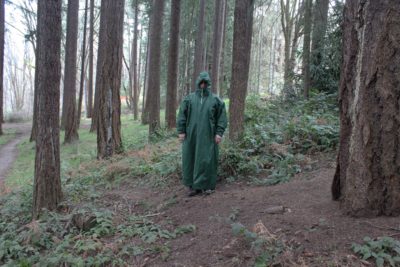
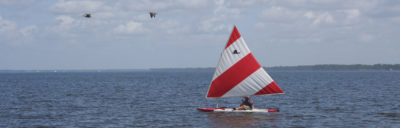
 Mark Bonanno, left; the author, right
I made my first full-length cagoule, left, in 1977 for a snowshoe hike and later used it for winter boat cruising. This year, I decided it was time for a new one, right.
In a journal entry dated January 4, 1977, I wrote: “I made a cagoule last week,” but I don’t now recall where I got the idea to make an oversized, full-length cagoule. A cagoule is a lightweight pullover rain jacket that’s usually only thigh length. There may have been something similar to my long version on the market 40 years ago, but I can’t find anything like it on the Internet now, which is unfortunate because it’s quite useful in cold and wet weather.
My cagoule proved its worth on the outing that began on that cold day in 1977. My friend Mark and I embarked then on a snowshoe hike across the Cascade Range from Western to Eastern Washington. Temperatures dipped to 20 degrees, and the cagoule was especially valuable in camp when we weren’t warmed by hiking. In the evenings I’d sit with the bottom of the cagoule drawn up under my feet, the hood tight around my face, and my arms drawn in from the sleeves into the warm bubble of still air inside.
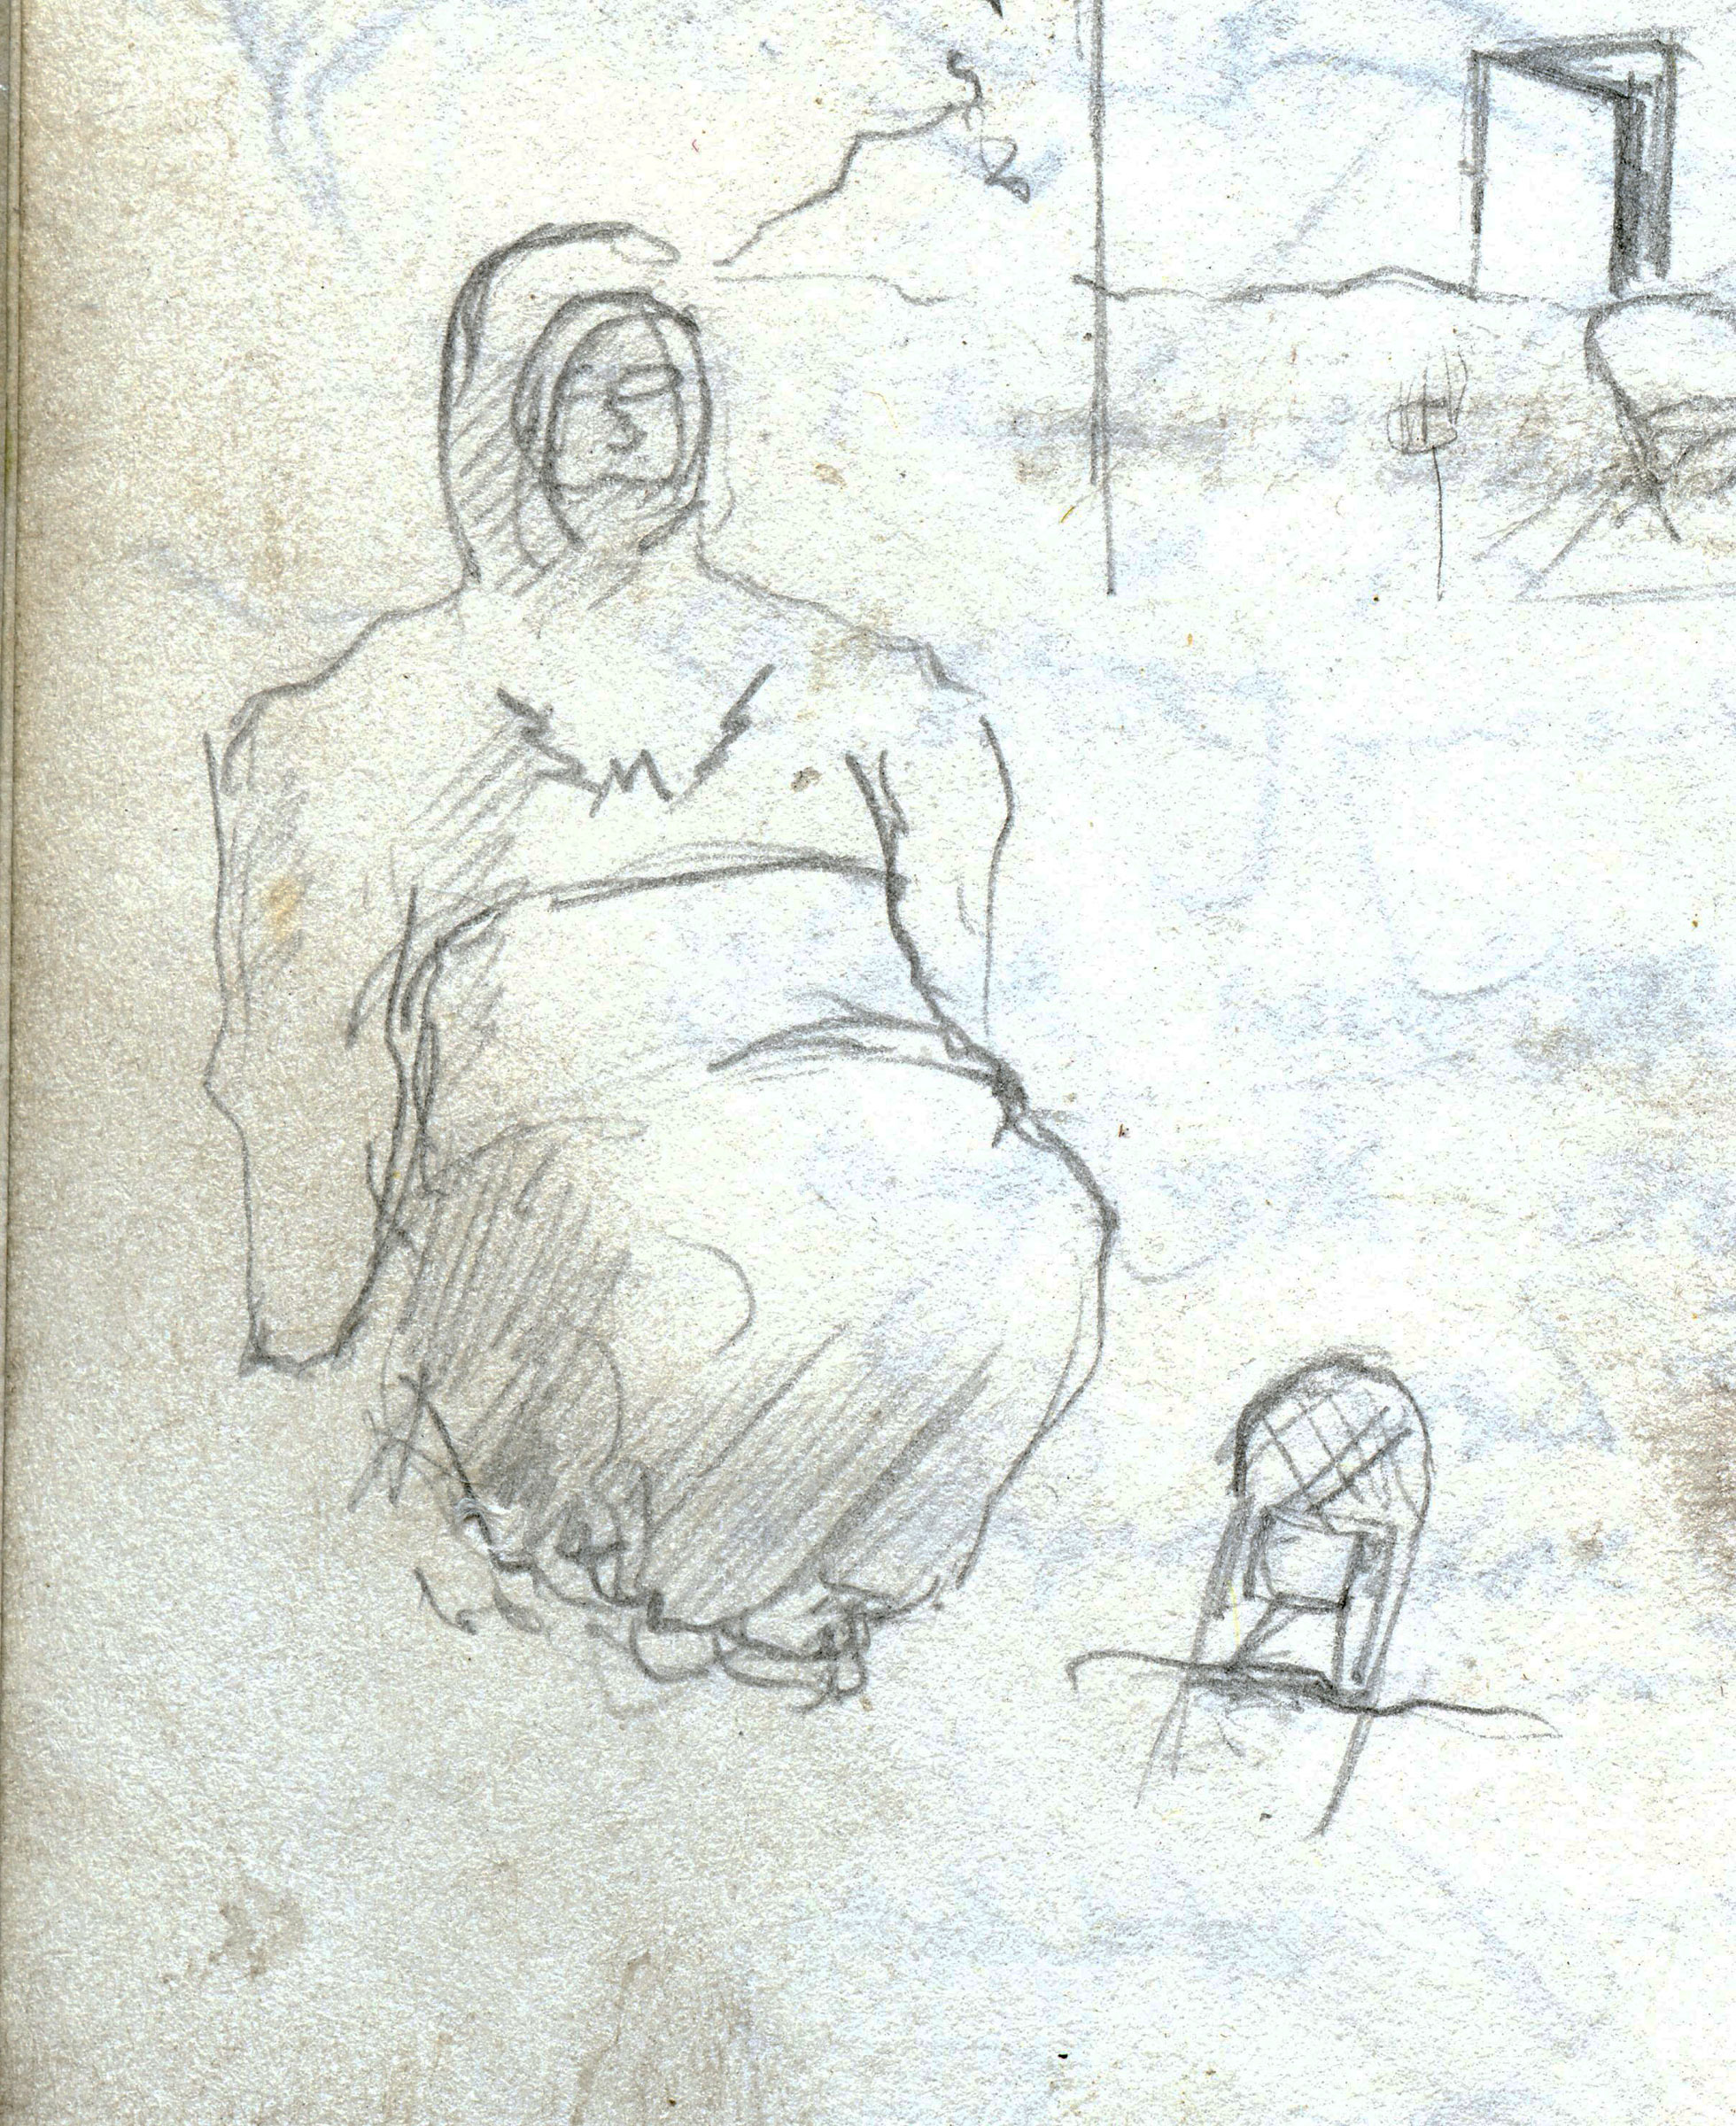
I was so pleased with my new cagoule during that 1977 snowshoe hike that I made a sketch of it in my journal. It shows the sleeves hanging limp because my arms are tucked inside. One snowshoe is stuck in the snow and the cagoule is tucked around my feet.
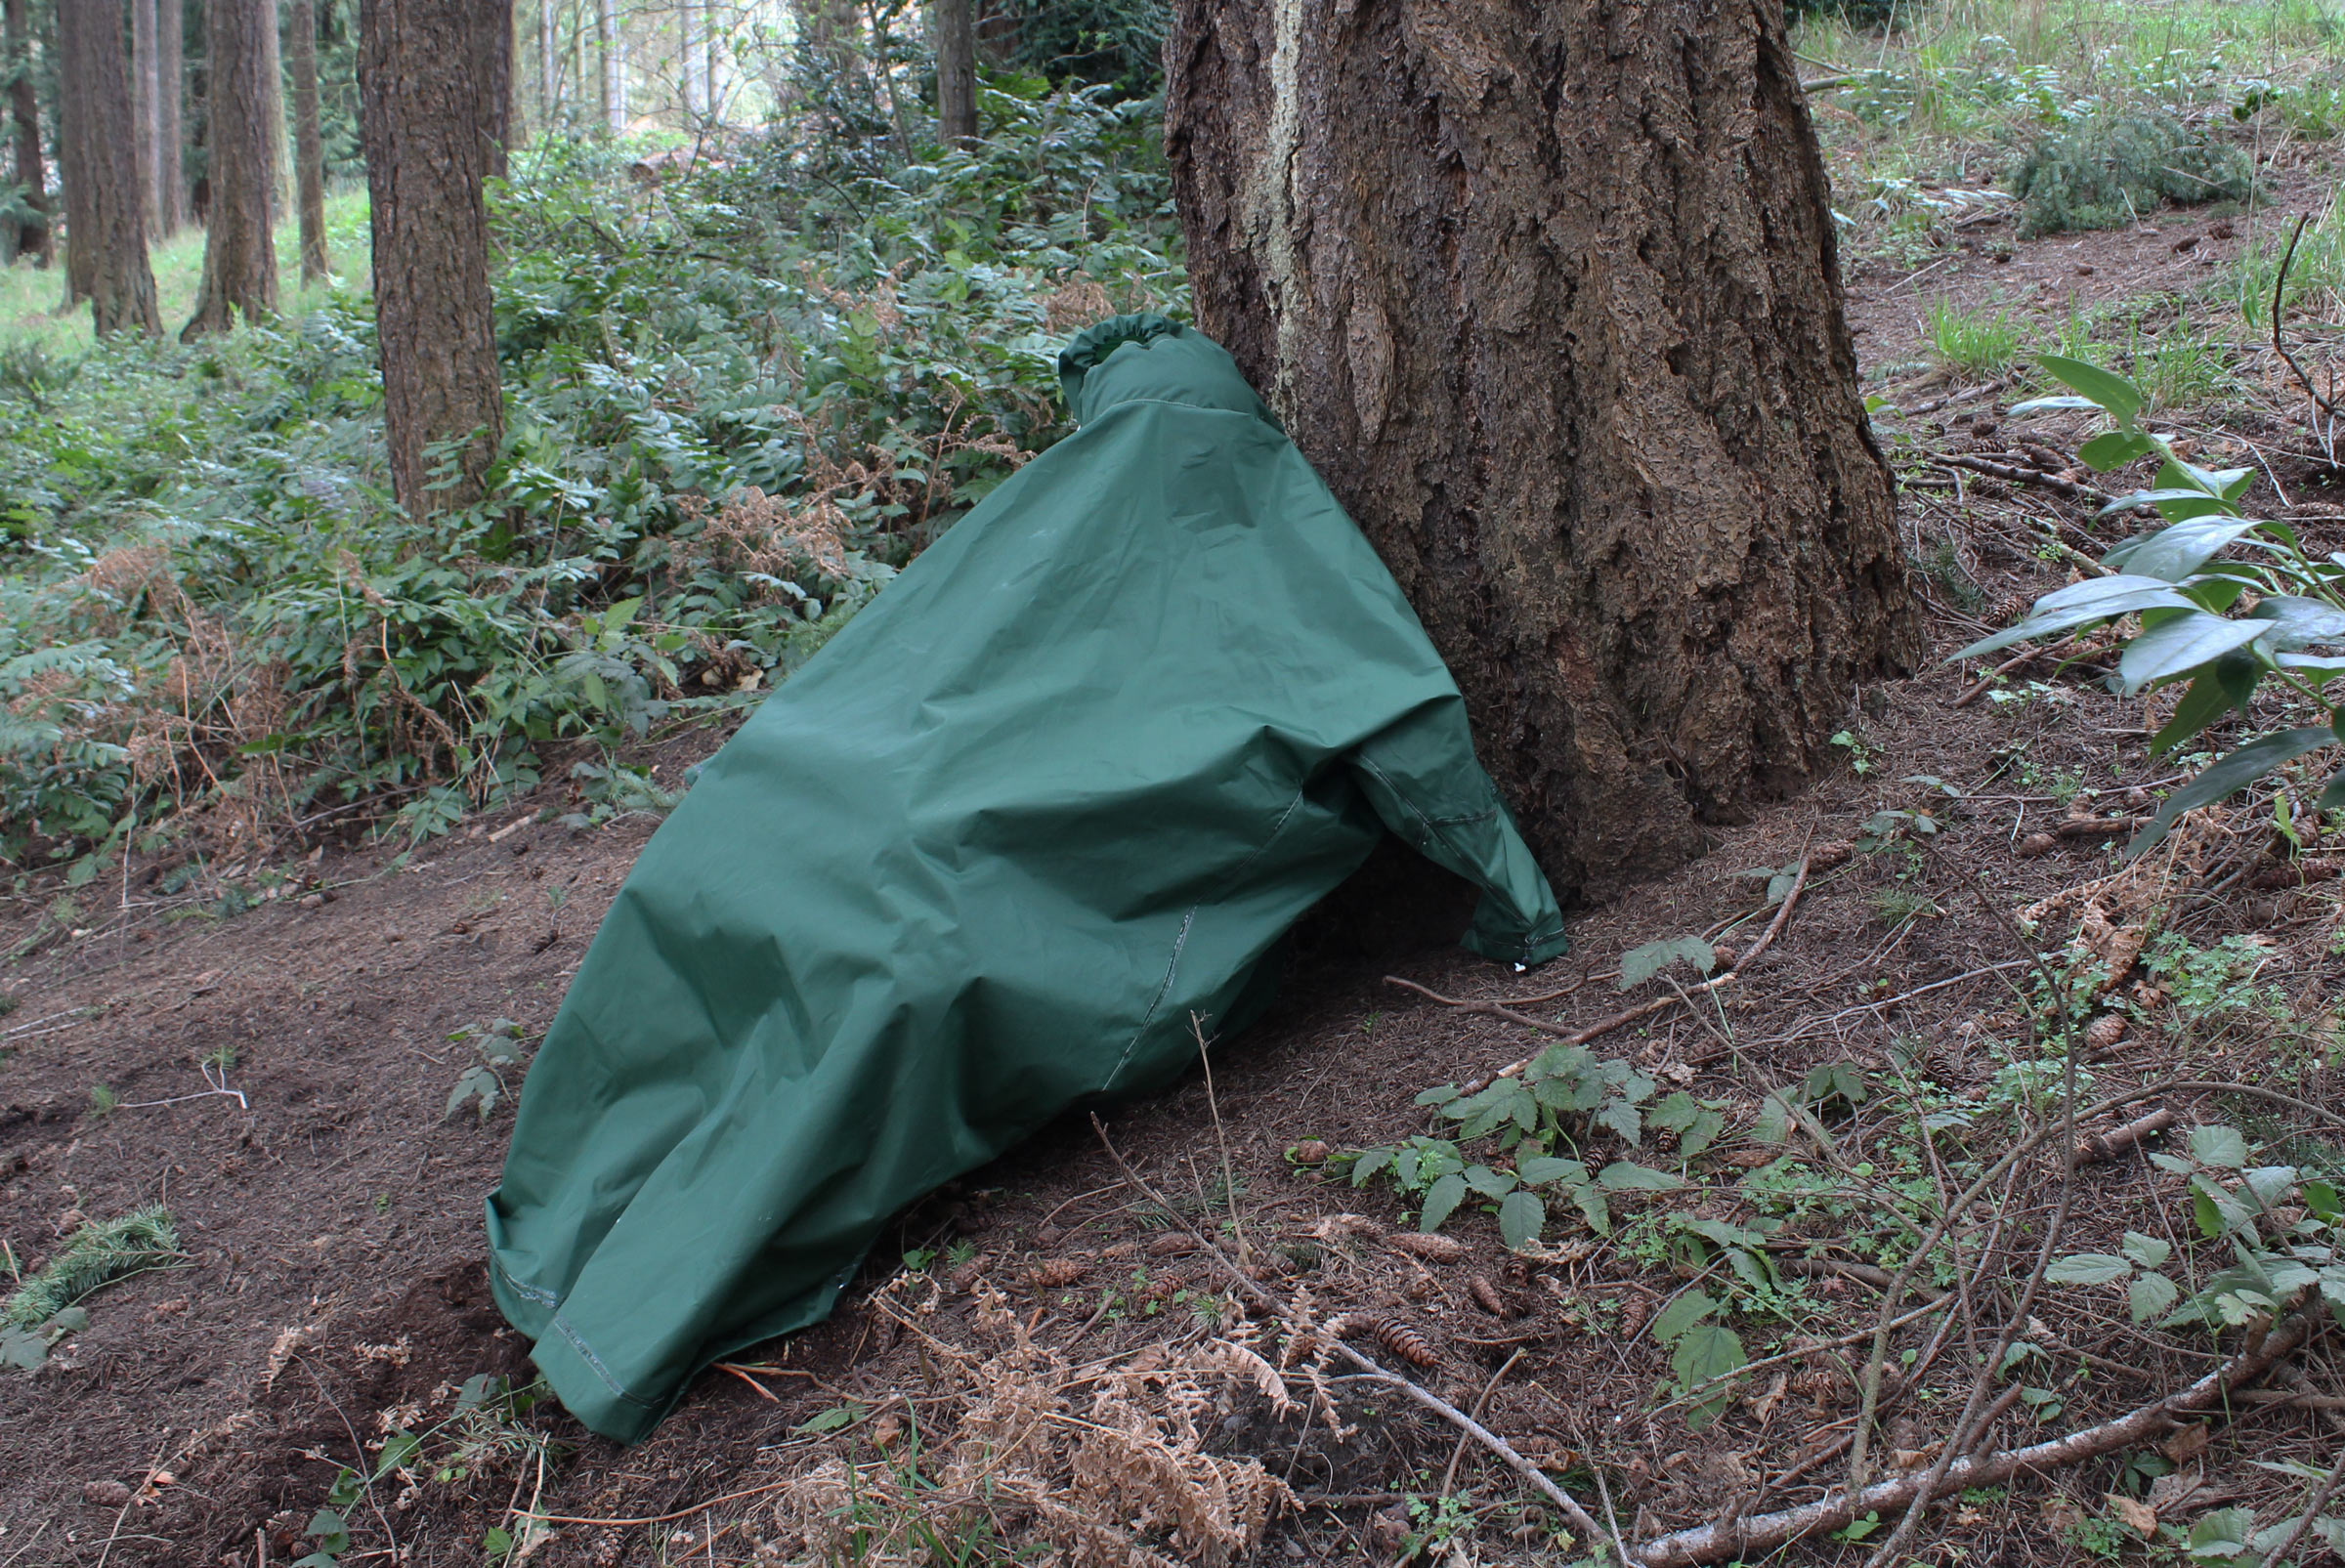
For taking refuge from the weather, my cagoule worked very much like a bothy bag, which is an emergency shelter, usually for two or more people, that slips over the occupants with the bottom opening tucked underneath them. When you’re in a bothy bag, you can read, take notes, check the weather, anything you can do in a small tent, but for anything else you have to leave its protection. With a cagoule, you can pop your head into the hood, and put your hands and feet outside; you’re then able to move about and tend to chores and still be warm.
 Photographs and drawings by the author
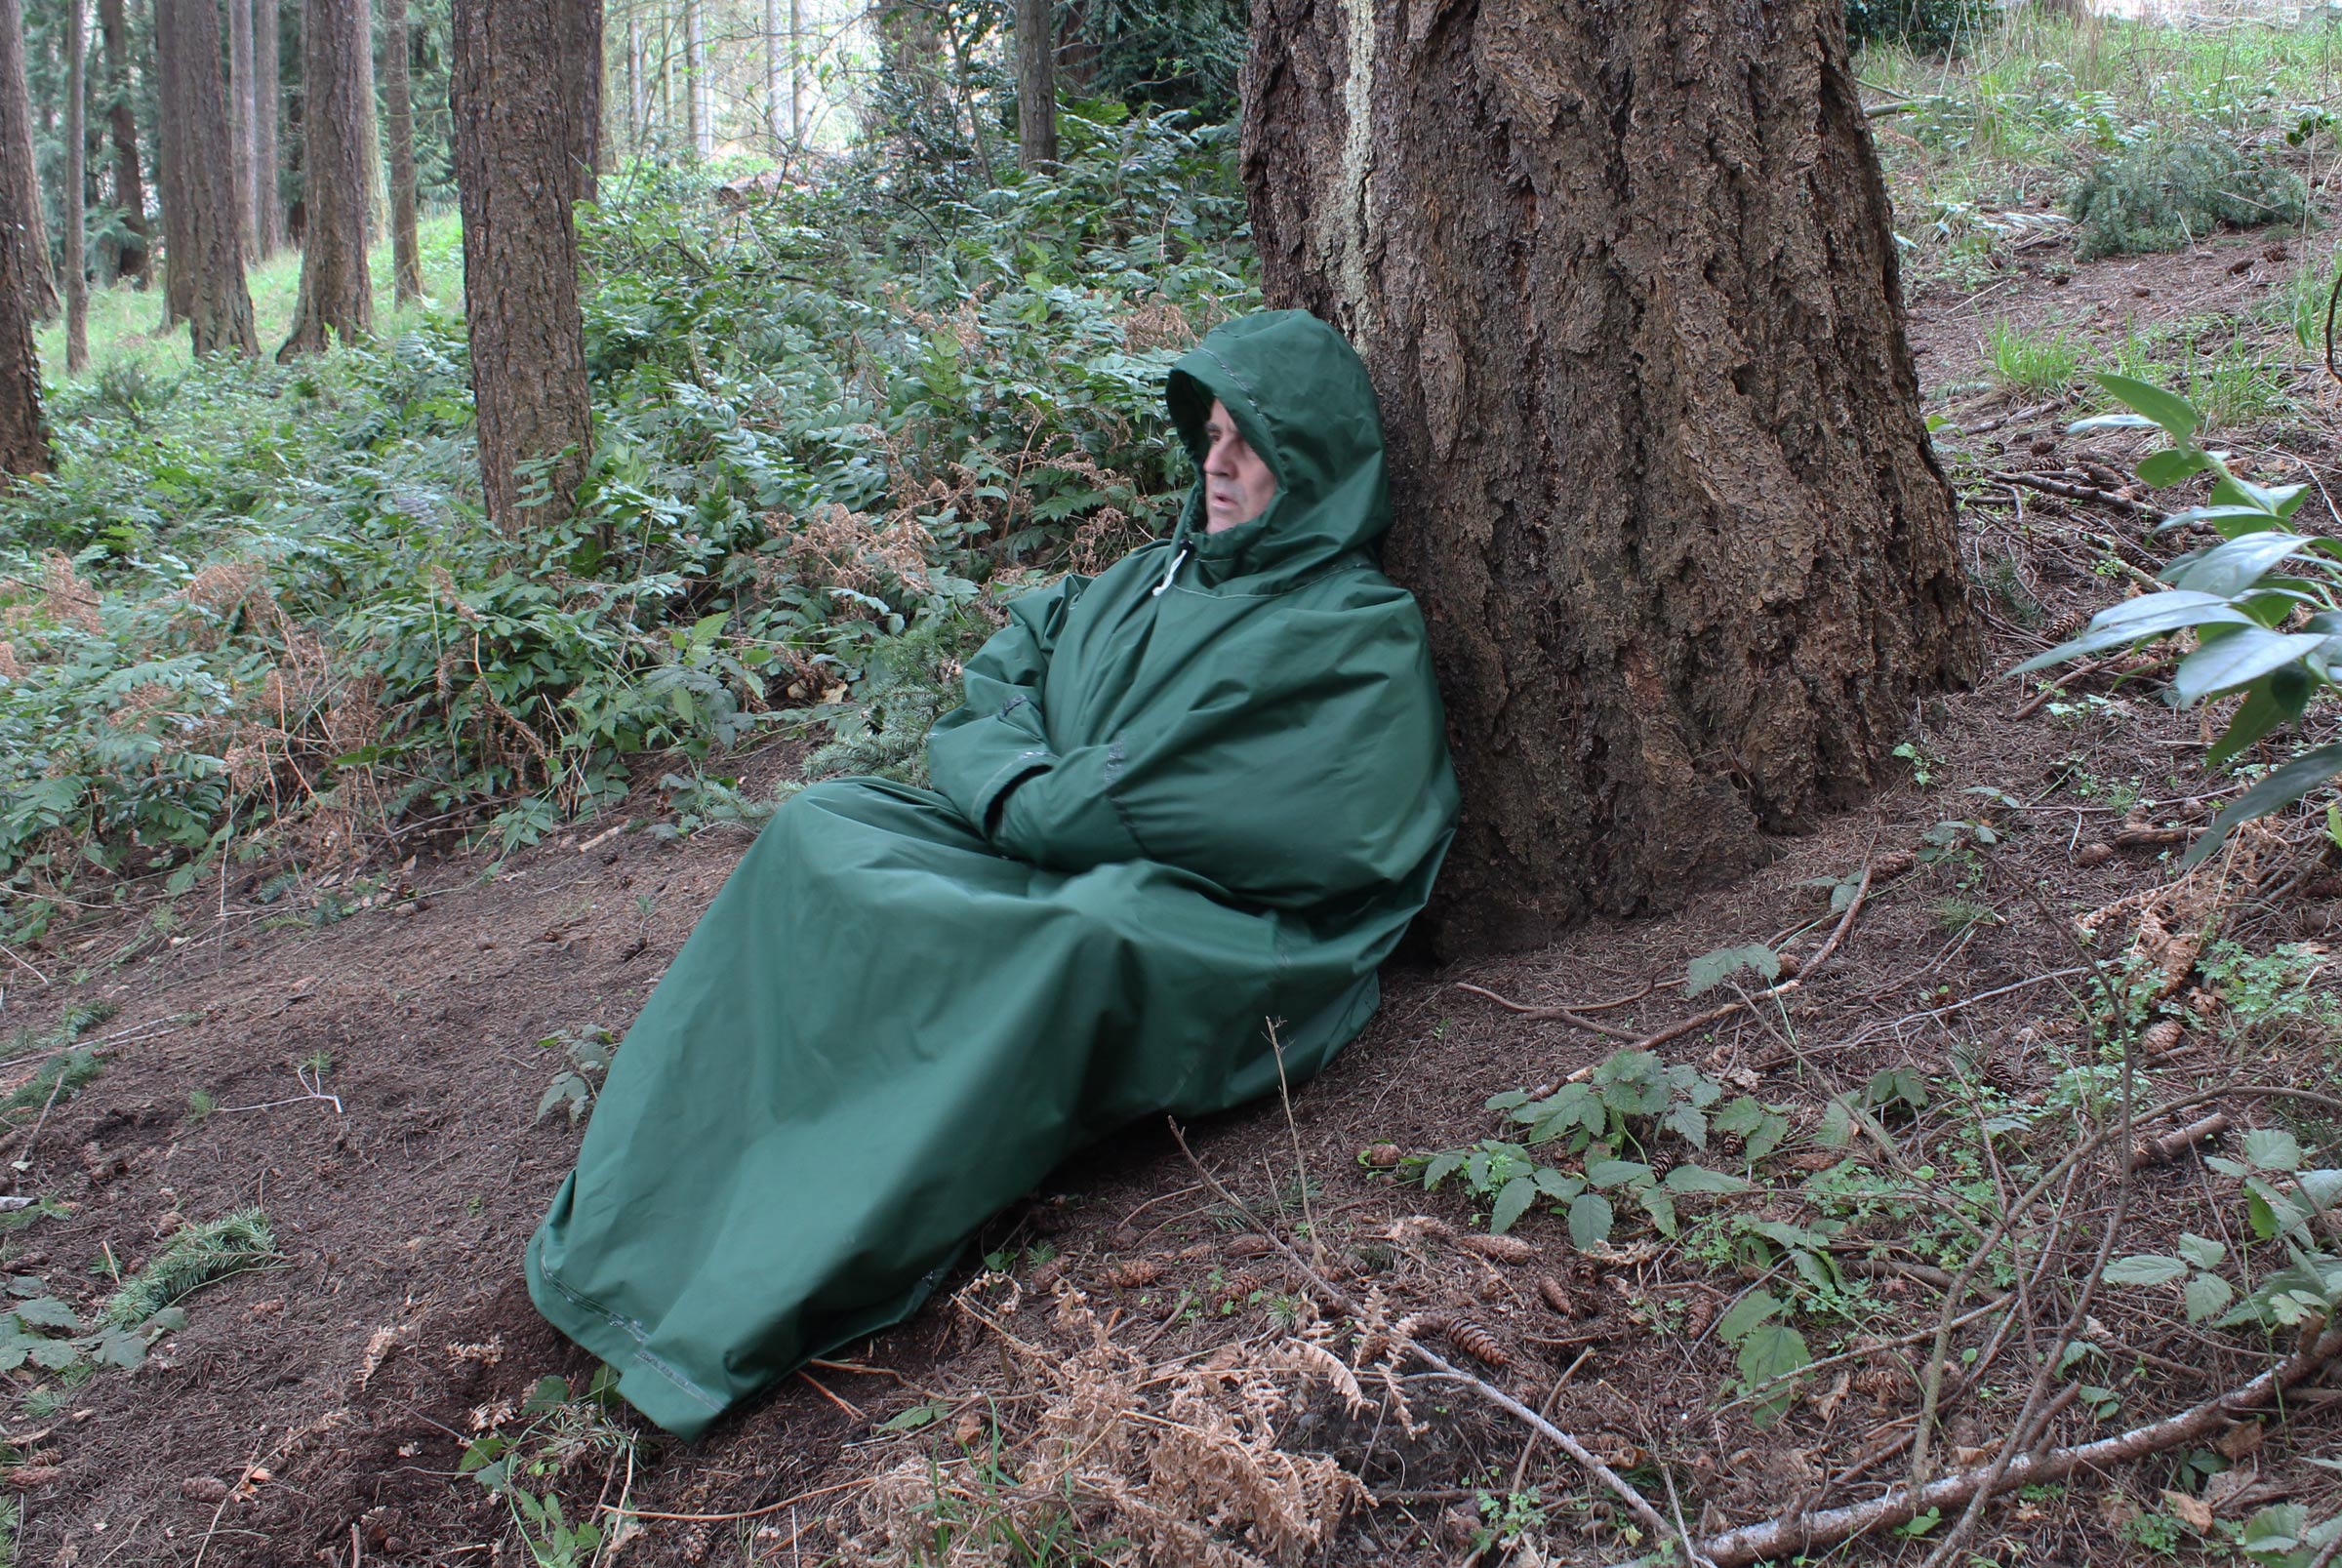
My cagoule’s width makes it easy to spread out while seated and its length covers the feet.
A full-length model eliminates breezes and helps keep feet warm, but for climbing stairs or steep terrain and stepping over thwarts, the hemline needs to be hiked up. The belt of a backpack or a PFD can hold extra fabric up, or you can tuck the excess fabric into the front of your pants. The cagoule has a generous width to make it easy to slip arms in and out of the sleeves and to keep it loose while sitting down—if it’s too narrow, it stretches tight across the knees, creating cold spots.
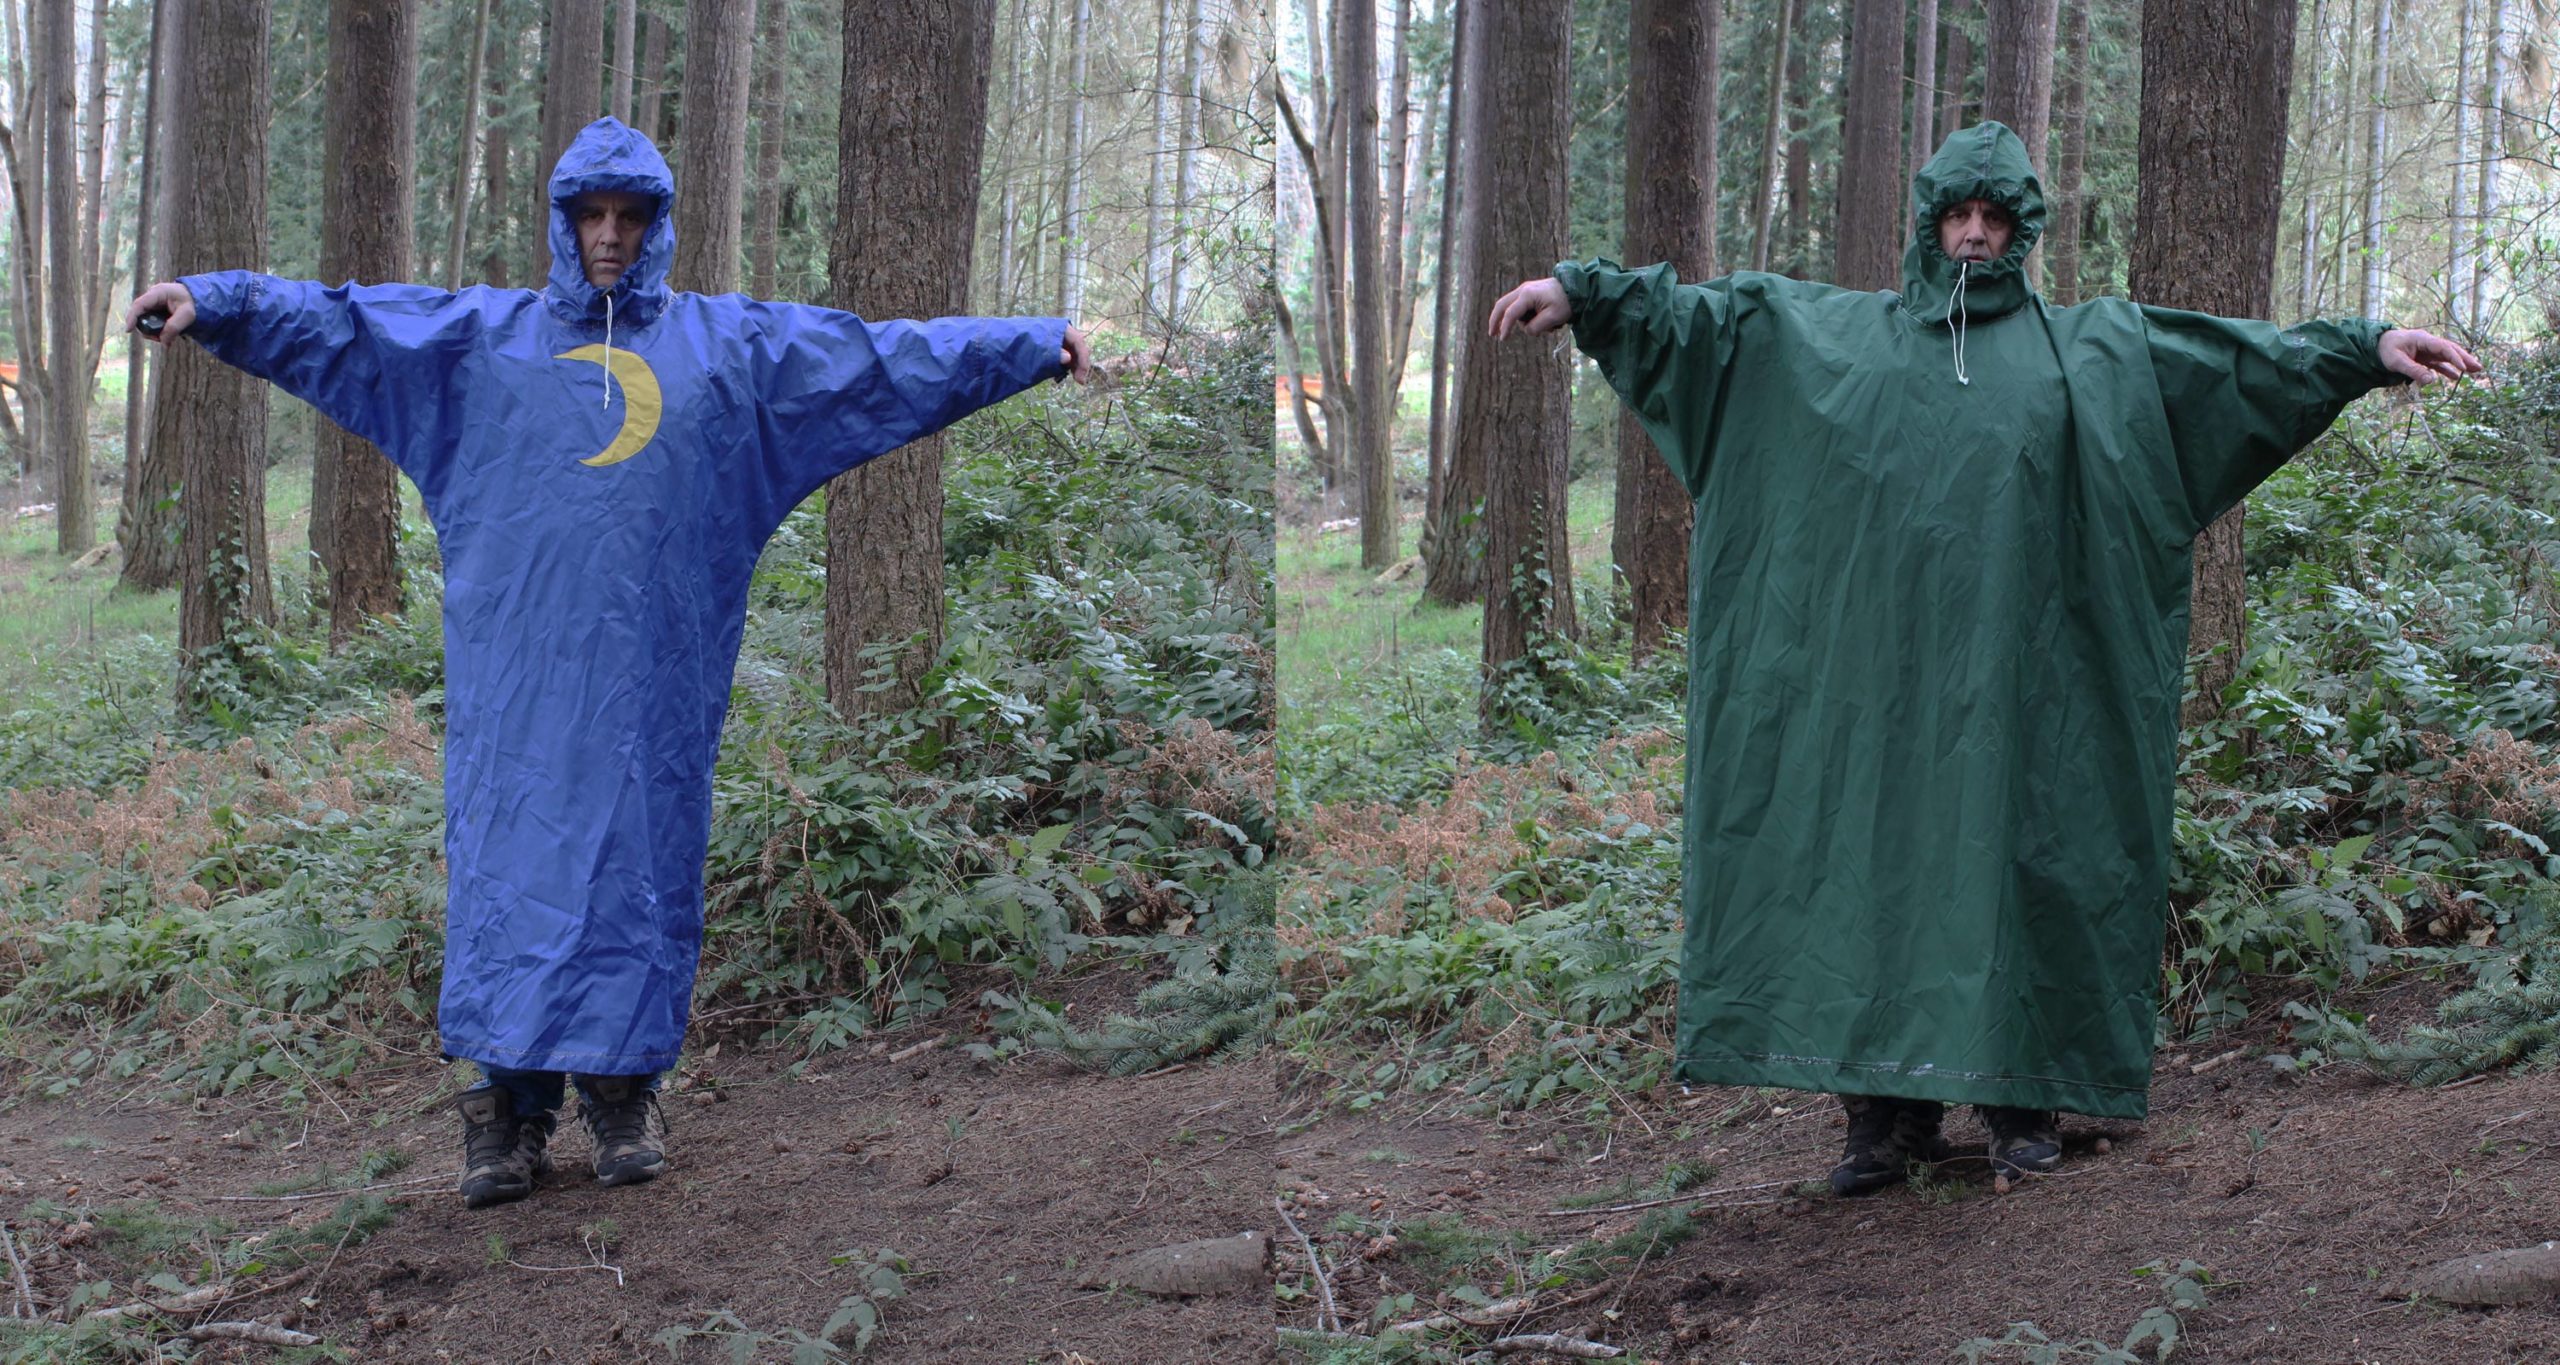
The first of my two recent cagoules, left, was cut full enough for walking, but was a bit tight for sitting. The second has plenty of width and is much more versatile.
I lost track of my original cagoule, so I recently re-created a pattern and sewed up two new cagoules. The first was a bit tight over my knees when I sat down with it on, so I added to the girth of a second cagoule; it measured up to the pleasant memories of the original. Sitting out in the weather, I can be quite comfortable. Wearing just a light pile pullover over a T-shirt —what I wear in the house—and a knit cap prevents cold spots where the shoulders and the hood make close contact with the cagoule. With the hood opening drawn tight around my face and my hands pulled in, it can be 20 to 30 degrees warmer inside the cagoule than outside. On one 37-degree night I measured 67 degrees inside the cagoule.
A little reading or journalling? Tuck inside.
Making a cagoule doesn’t cost much or take a lot of time. Four yards of 200-denier coated cloth cost $20, and I spent another $10 on thread, cord, toggles, and seam sealer. Working from a pattern I made of plastic sheeting, I progressed from raw fabric to a seam-sealer-ready cagoule in a single Saturday.

On a sunny day with a chilly northerly blowing, my new cagoule kept me quite warm. The generous circumference kept it slack around my knees and the length accommodated my feet.
When my son saw the finished cagoule, he said there would be a market for it at football and soccer games in open stadiums. The fans are unexpected kindred spirits to boaters and camp-cruisers, just other people who sit out in the weather and want to keep dry and warm.
Making a Cagoule
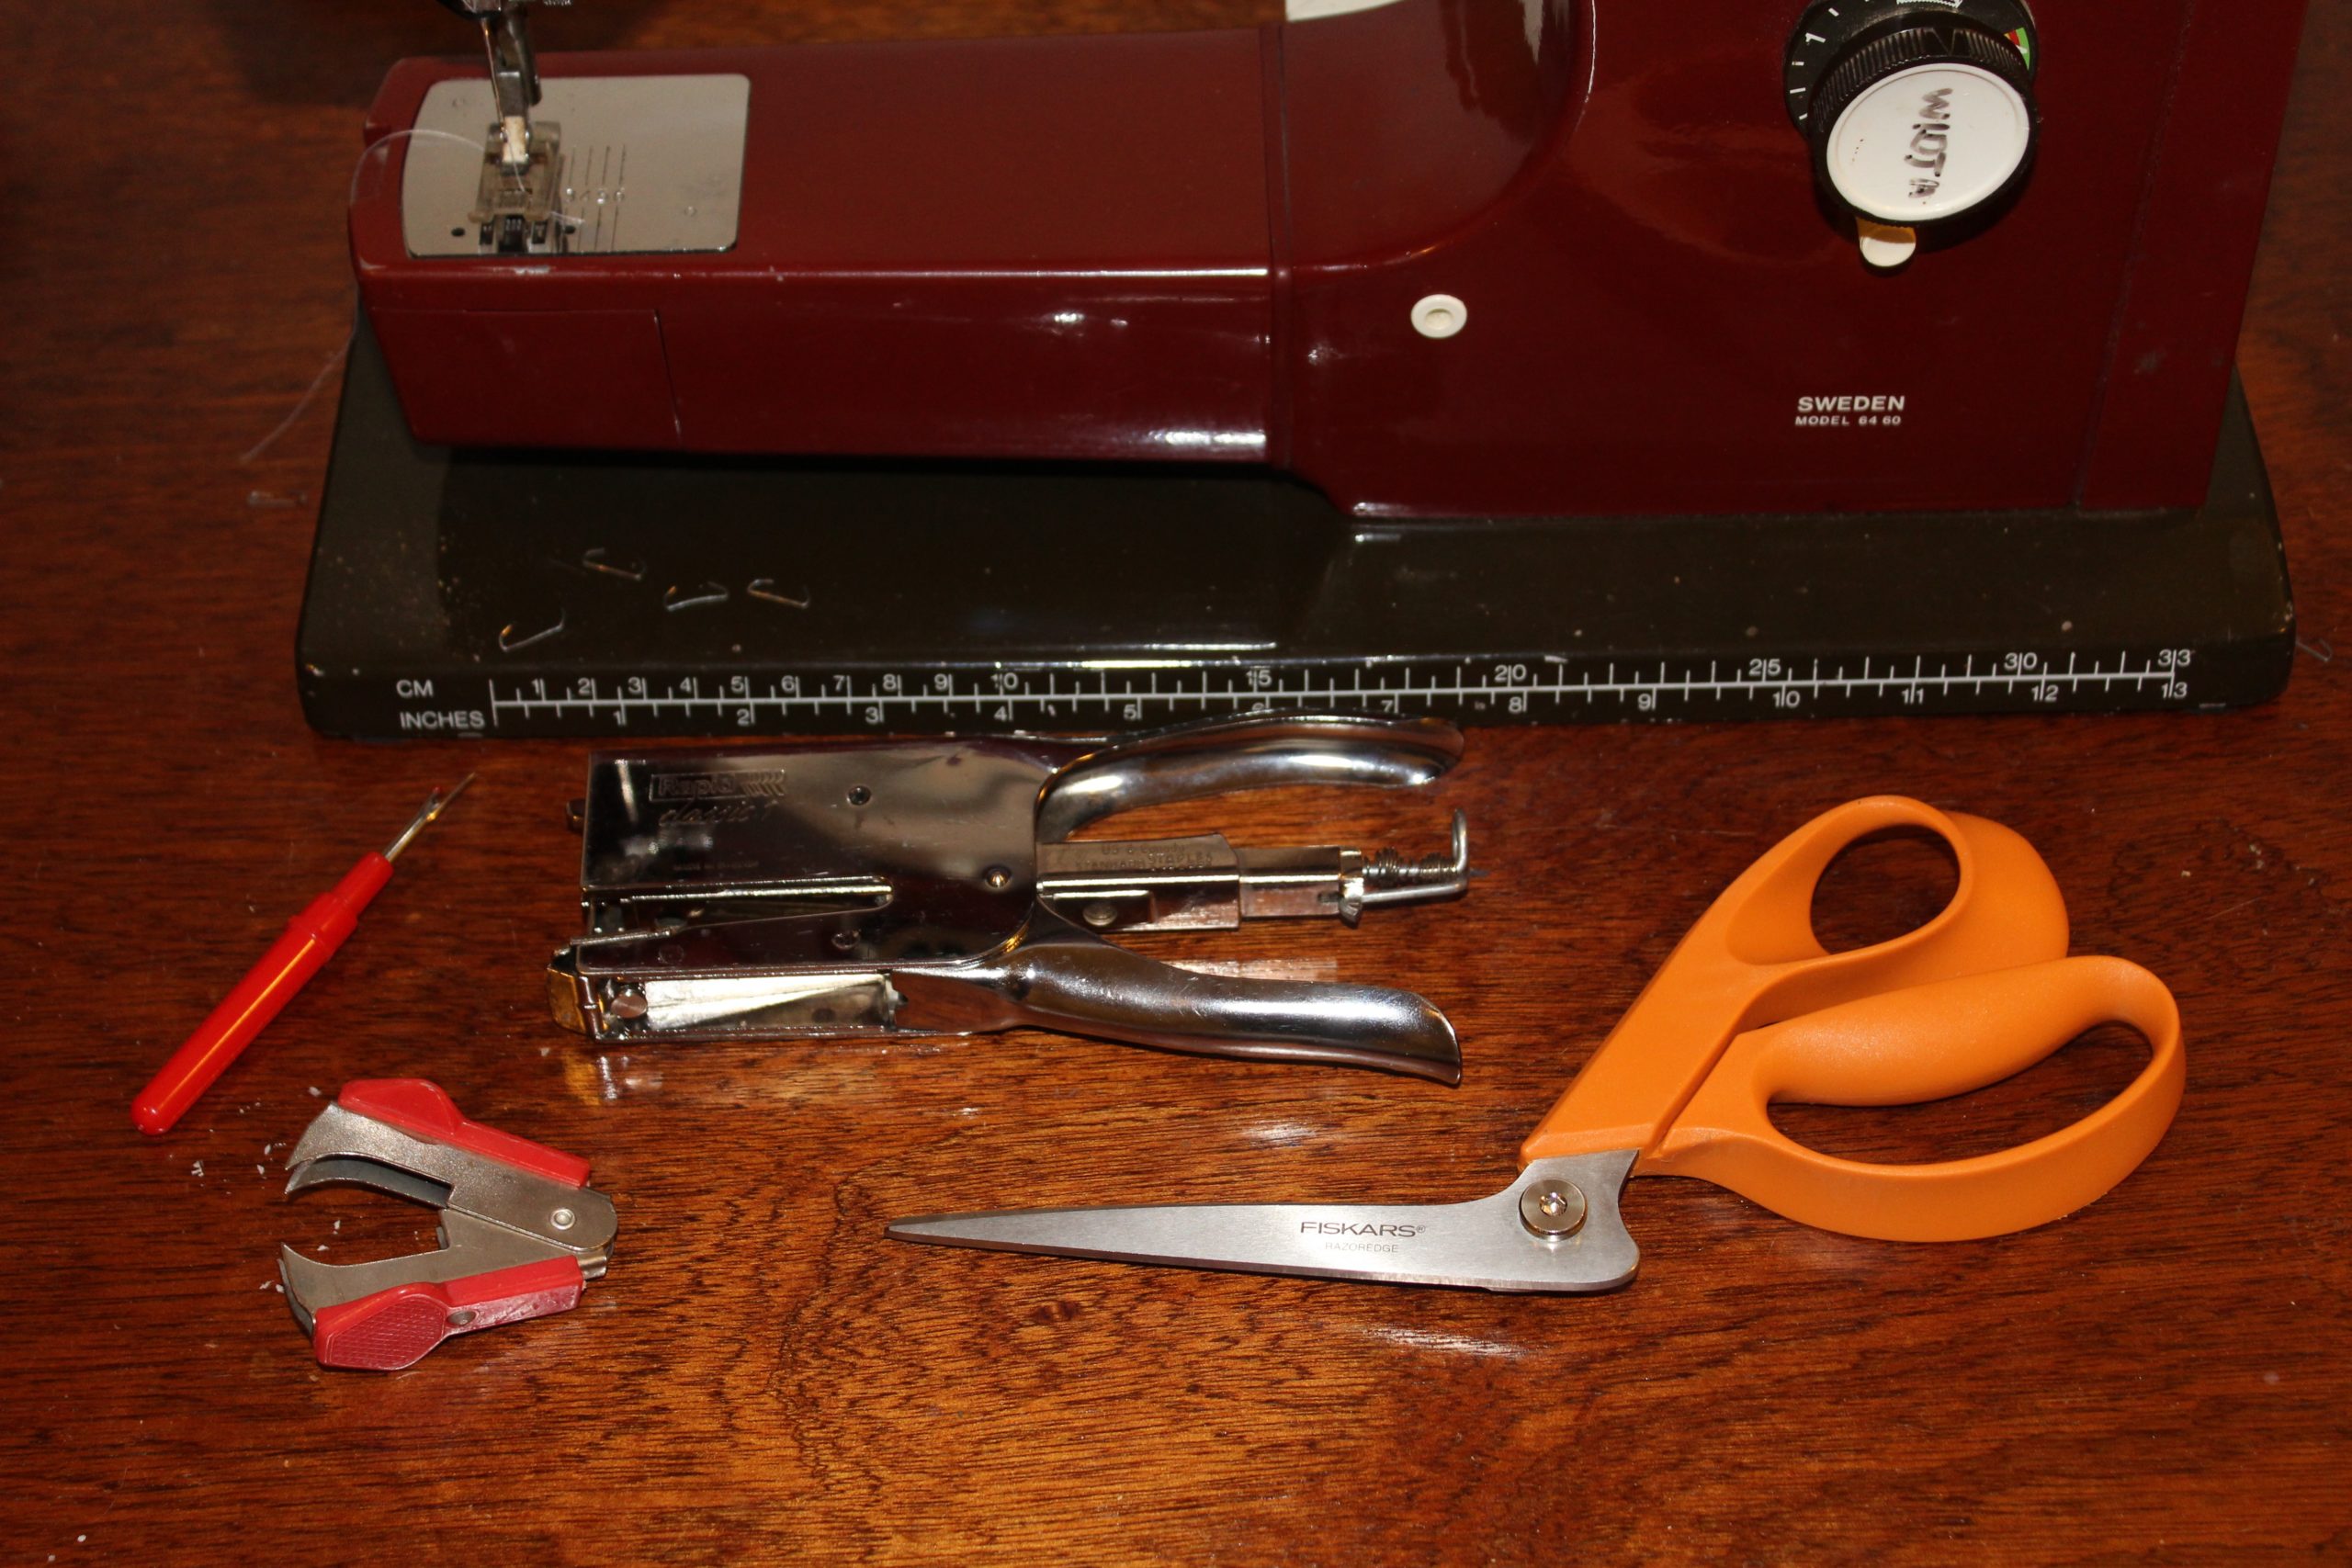
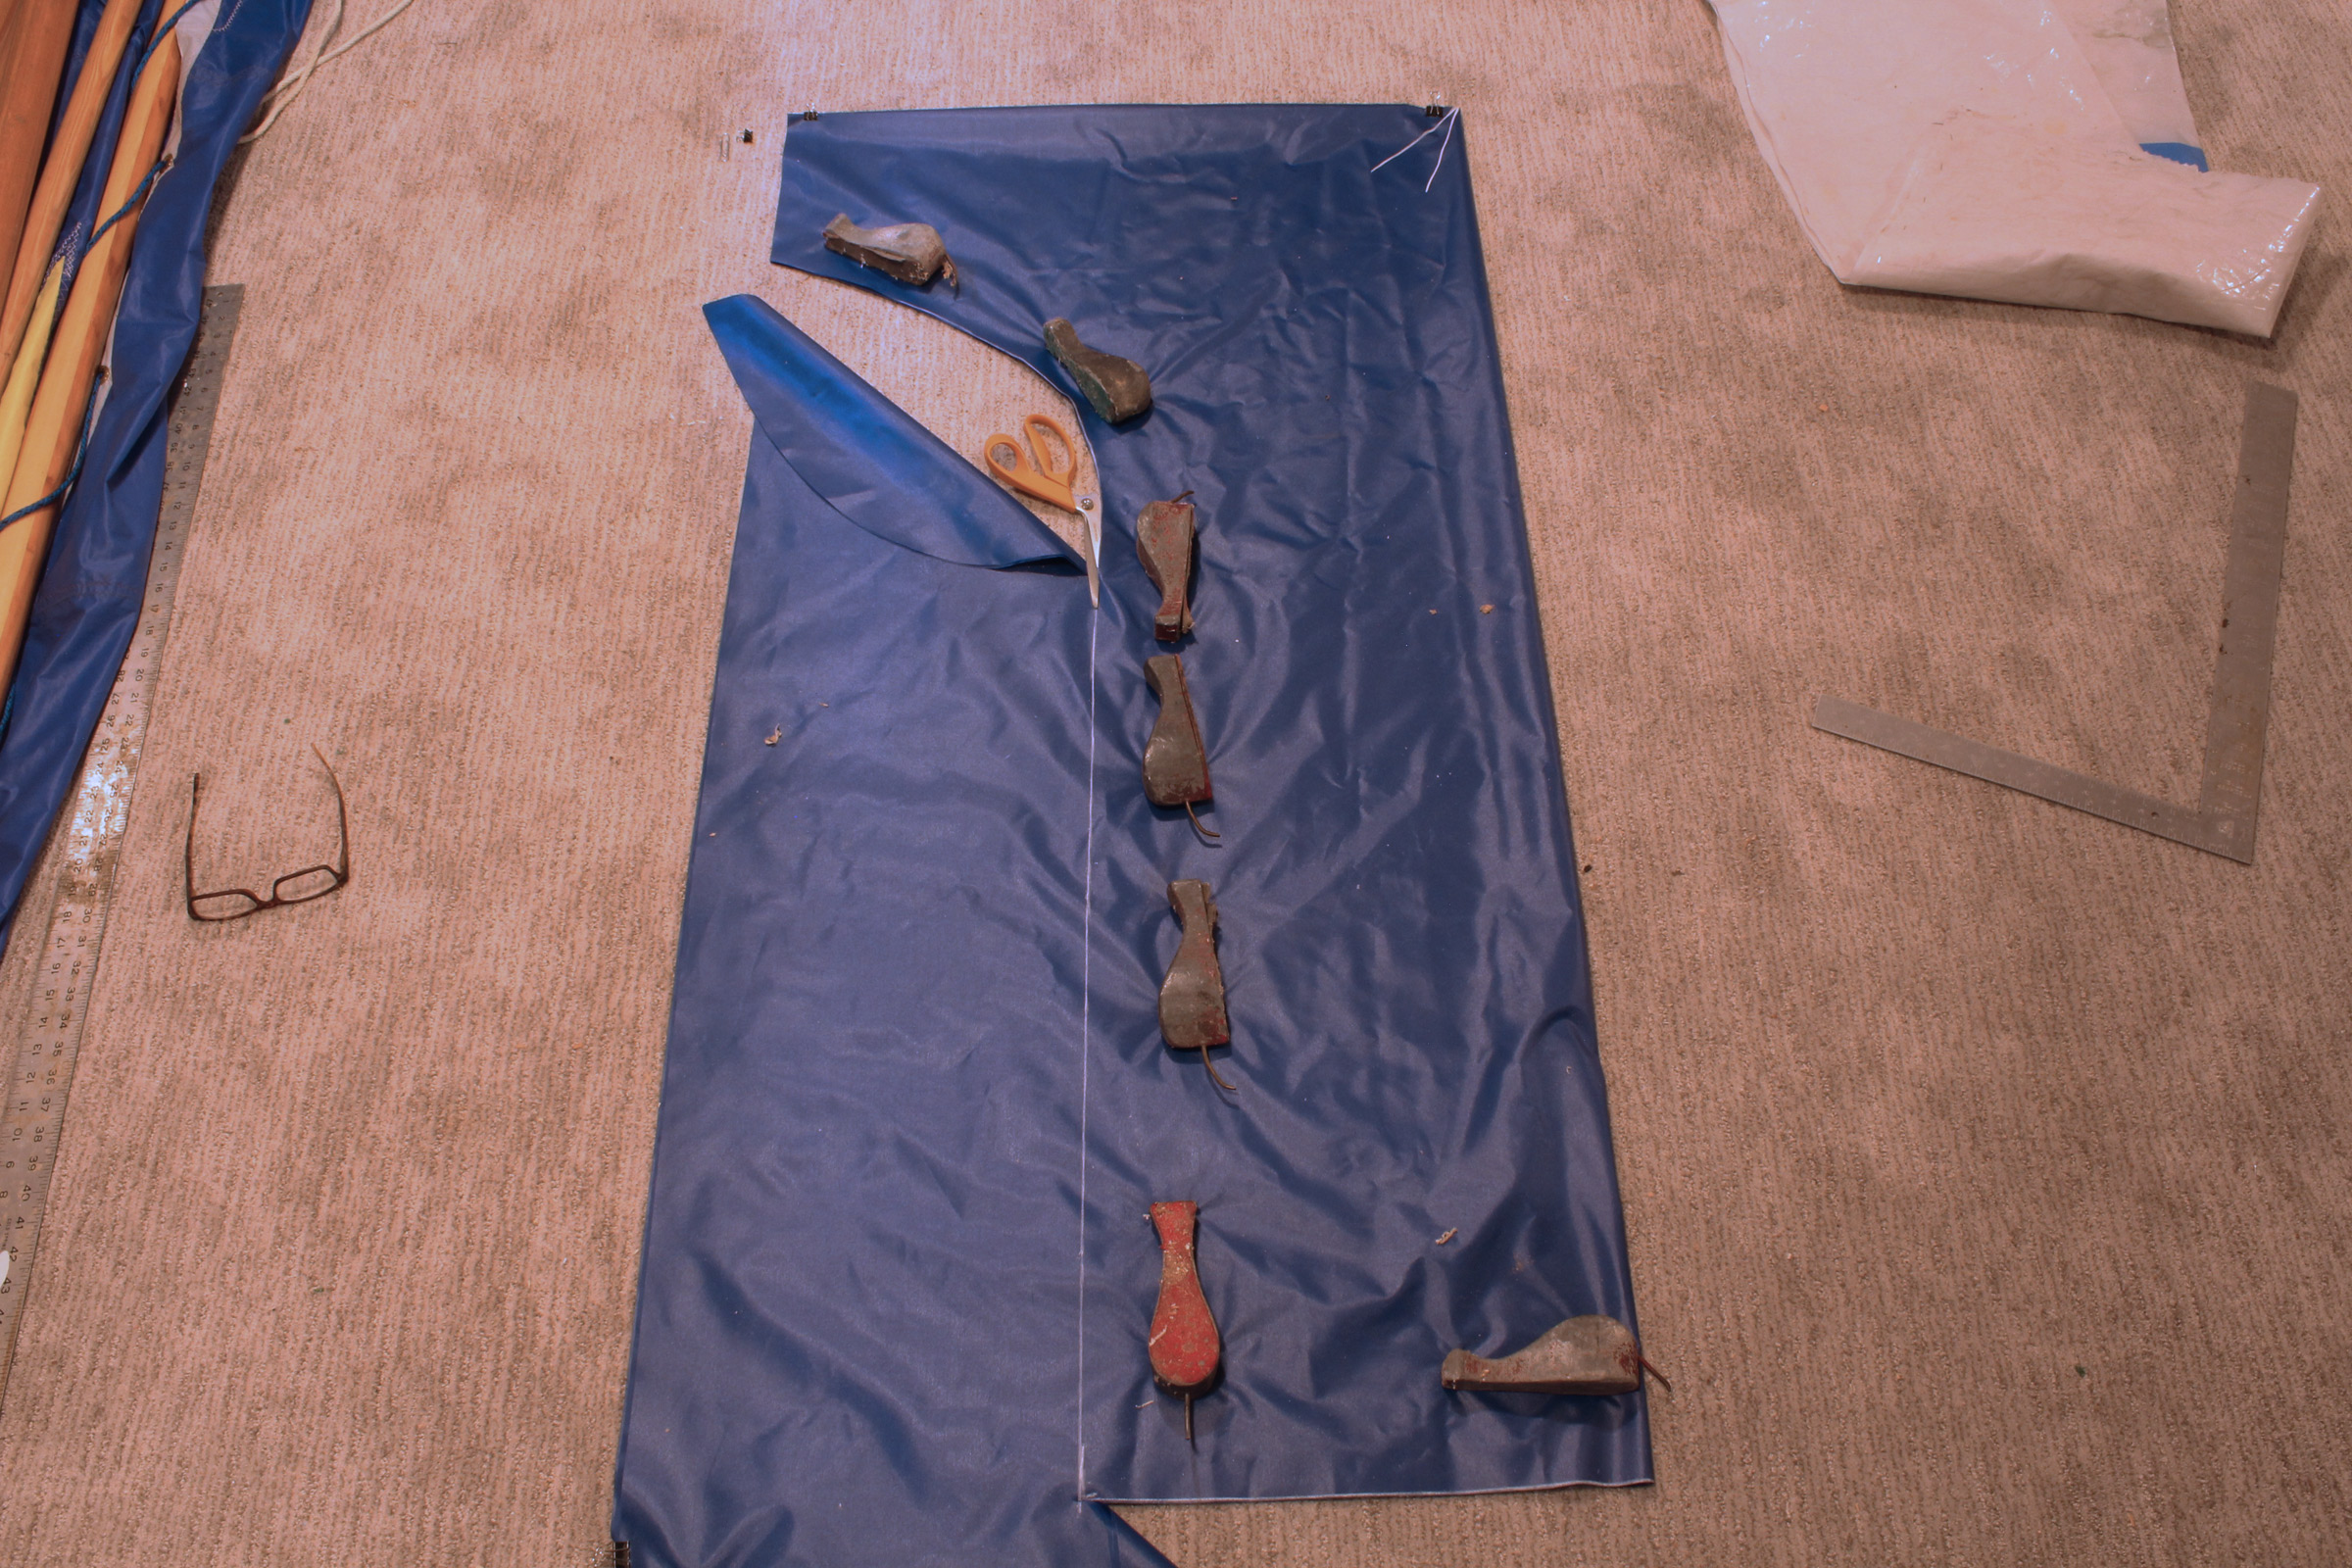
The tools I use for the job include a sewing machine, of course, and a seam ripper—I rarely get through a project without sewing something I have to undo. The plier stapler is much faster than pinning and the pinching type of staple remover is best for fabric. The Fiskars scissors with offset handles are well suited for making the cut of the folded body’s four layers at once without having them slip out of line.
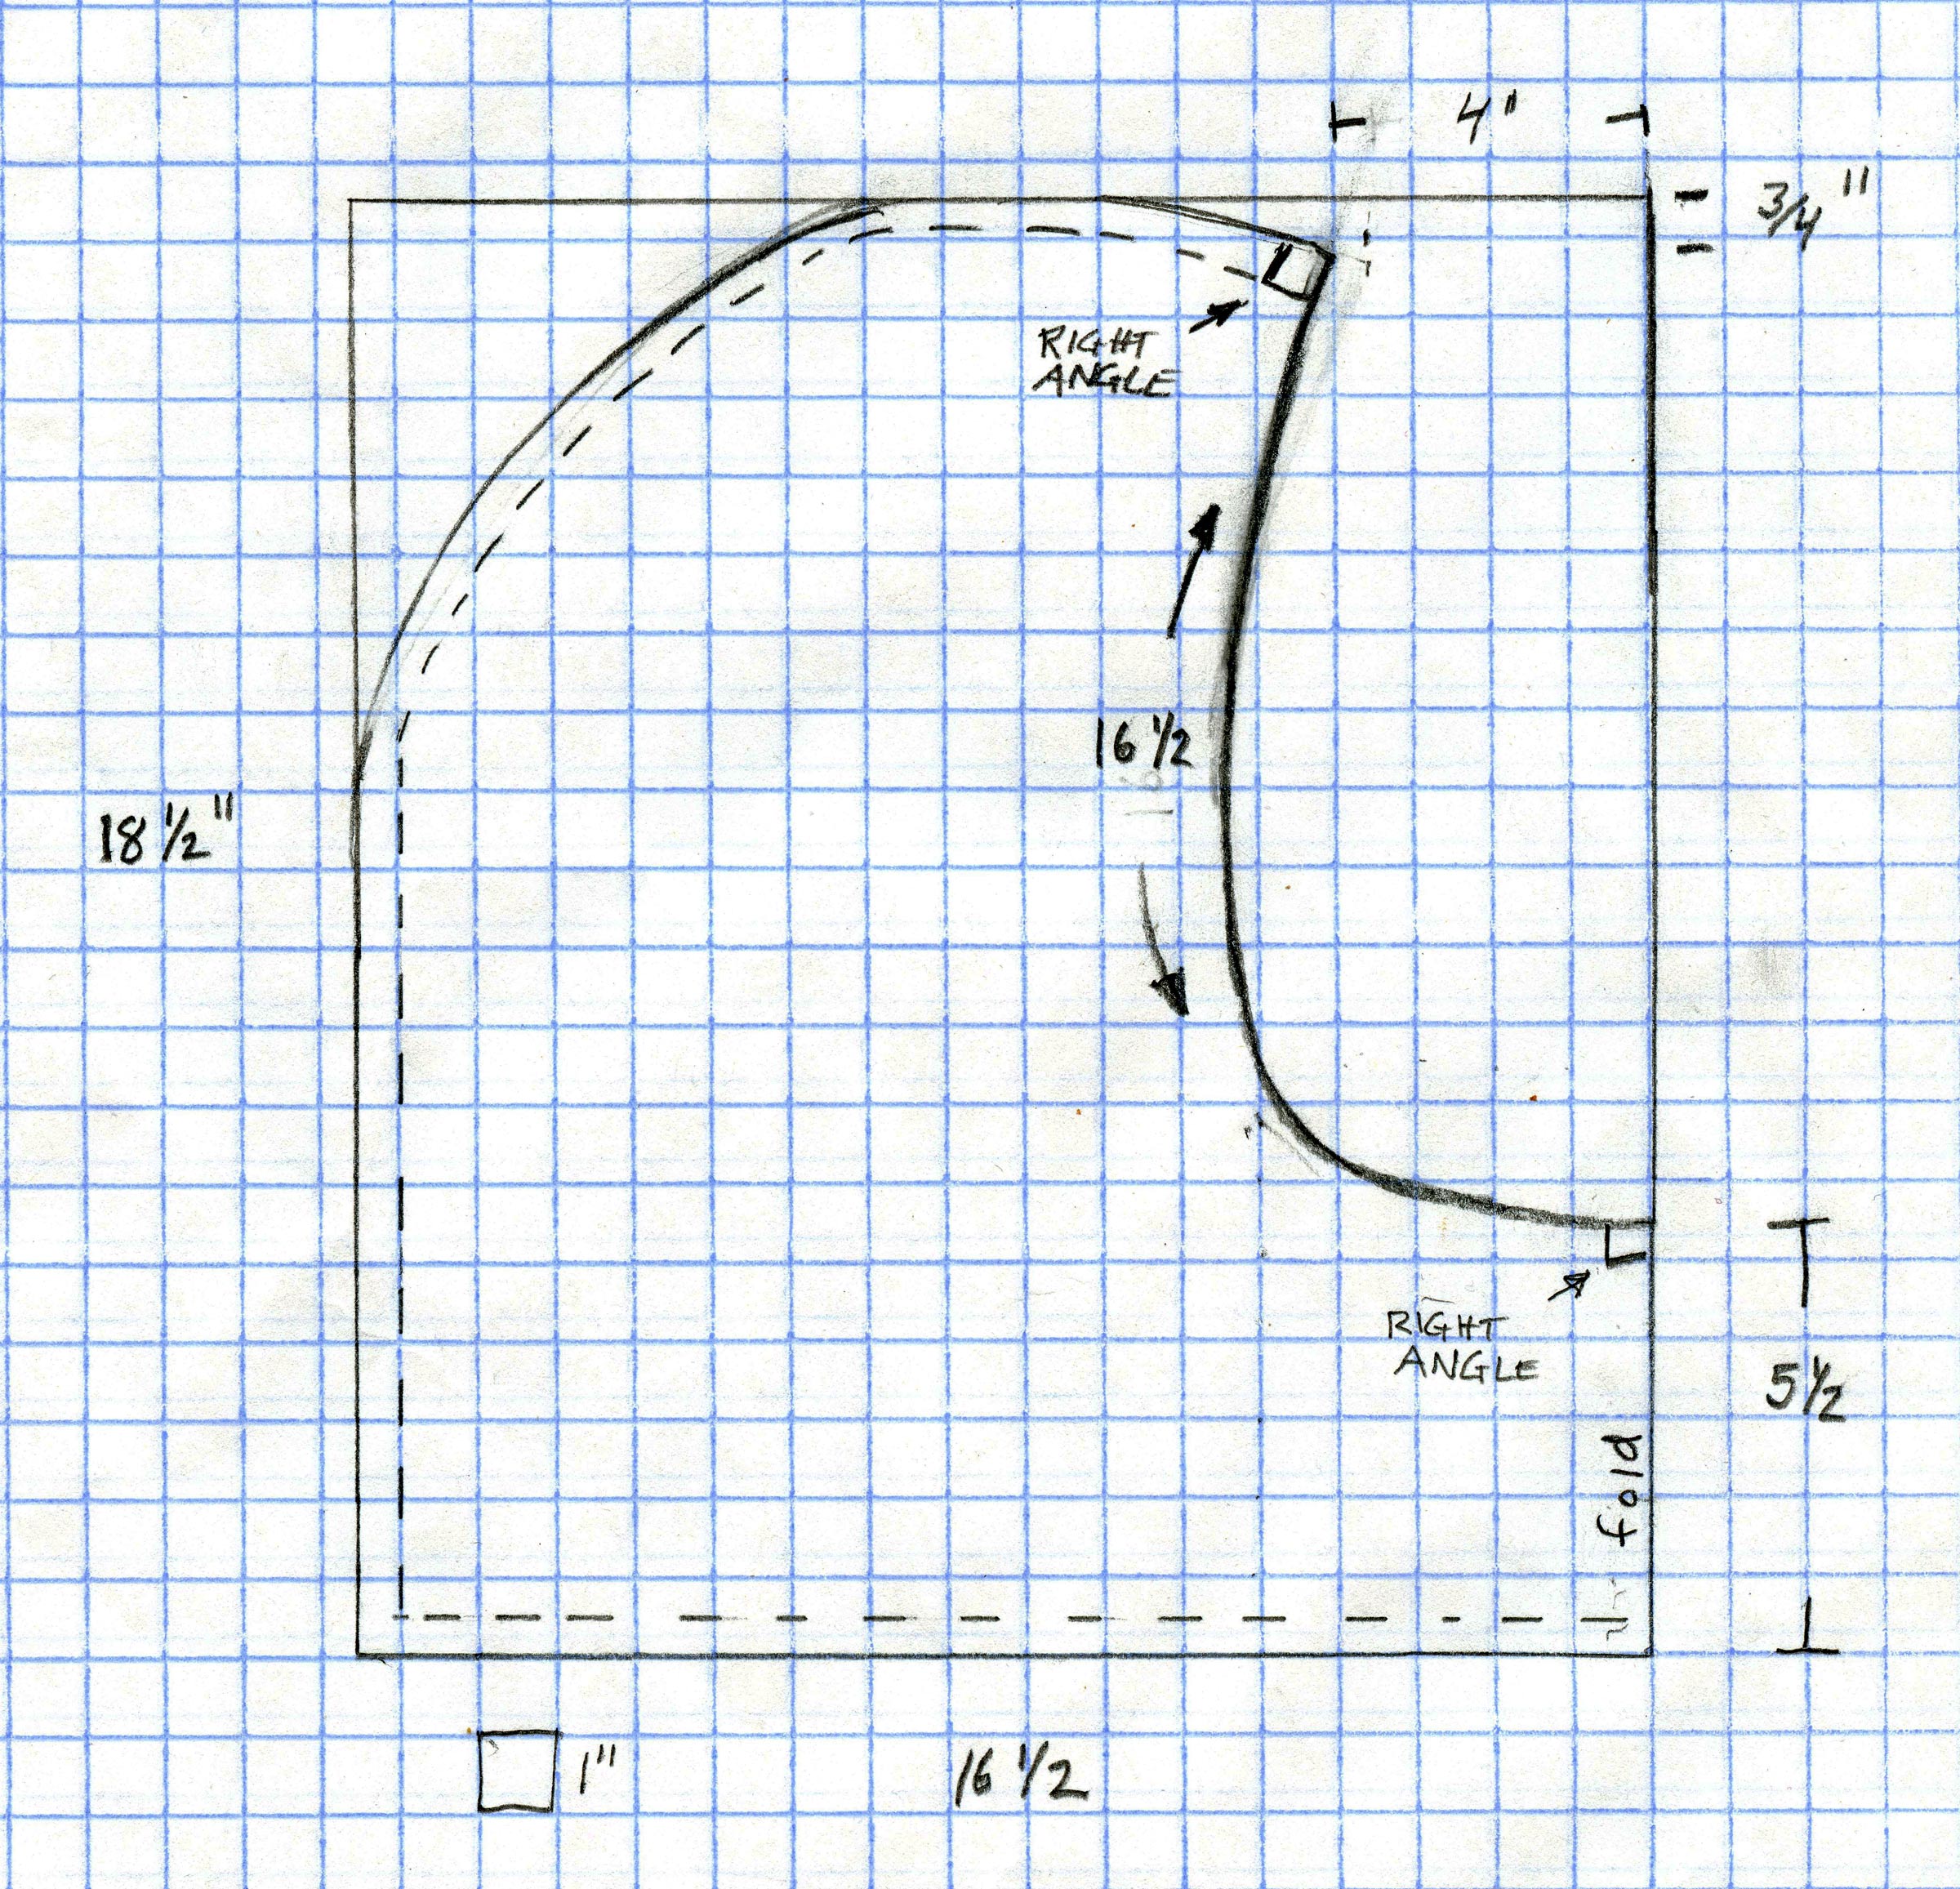
This is a one-size-fits-all hood. I have a 7-3/4 to 7-5/8 hat size, on the border between XL and XXL, so the hood should have plenty of room for most. The opening at the bottom measures 16 -1/2″, with seam allowance, which will fit the 10″ circle you’ll cut into the cagoule body. The face opening is the same size, so you can push the hood back off your head. The right angles at the ends of the face opening will create a straight line between the hood halves when the hood is opened up for sewing the draw-cord sleeve on.

The fabric for the hood gets folded back 16-1/2″ and the chin of the pattern is set on the fold. After cutting the fabric, sew the hood from the back to the top of the face opening.

Here the back of the hood has been sewn and the staples can be removed. All of the seams are topstitched, leaving the edges exposed. The fabric’s coating will keep them from fraying. Open the hood, fold the seam allowances to one side, and topstitch them.

You can use this pattern using a few dimensions to size the cagoule to yourself. For the height, drape a light cord over your shoulder and note where it touches the floor in front and behind you. Half of that length of cord is the Height indicated on the drawing. The Width of the pattern is the Height x 0.35; making the full width 70 percent of the Height, which will make the finished cagoule quite roomy. The Span sets the lengths of the sleeves. Put your hands together in front of your chest, arms outstretched, palms together, and fingers pointing away from you. Measure from fingertip around your back to fingertip. The folds at the cuffs and the hem are 2″ wide, stitched with a 1/2″ seam allowances, and creating 1-1/2″ draw-cord sleeves.

For a custom fit, you can make adjustments to a plastic-sheet version, assembled with tape and staples, before cutting fabric. The 6mil sheeting I used was easy to work with.
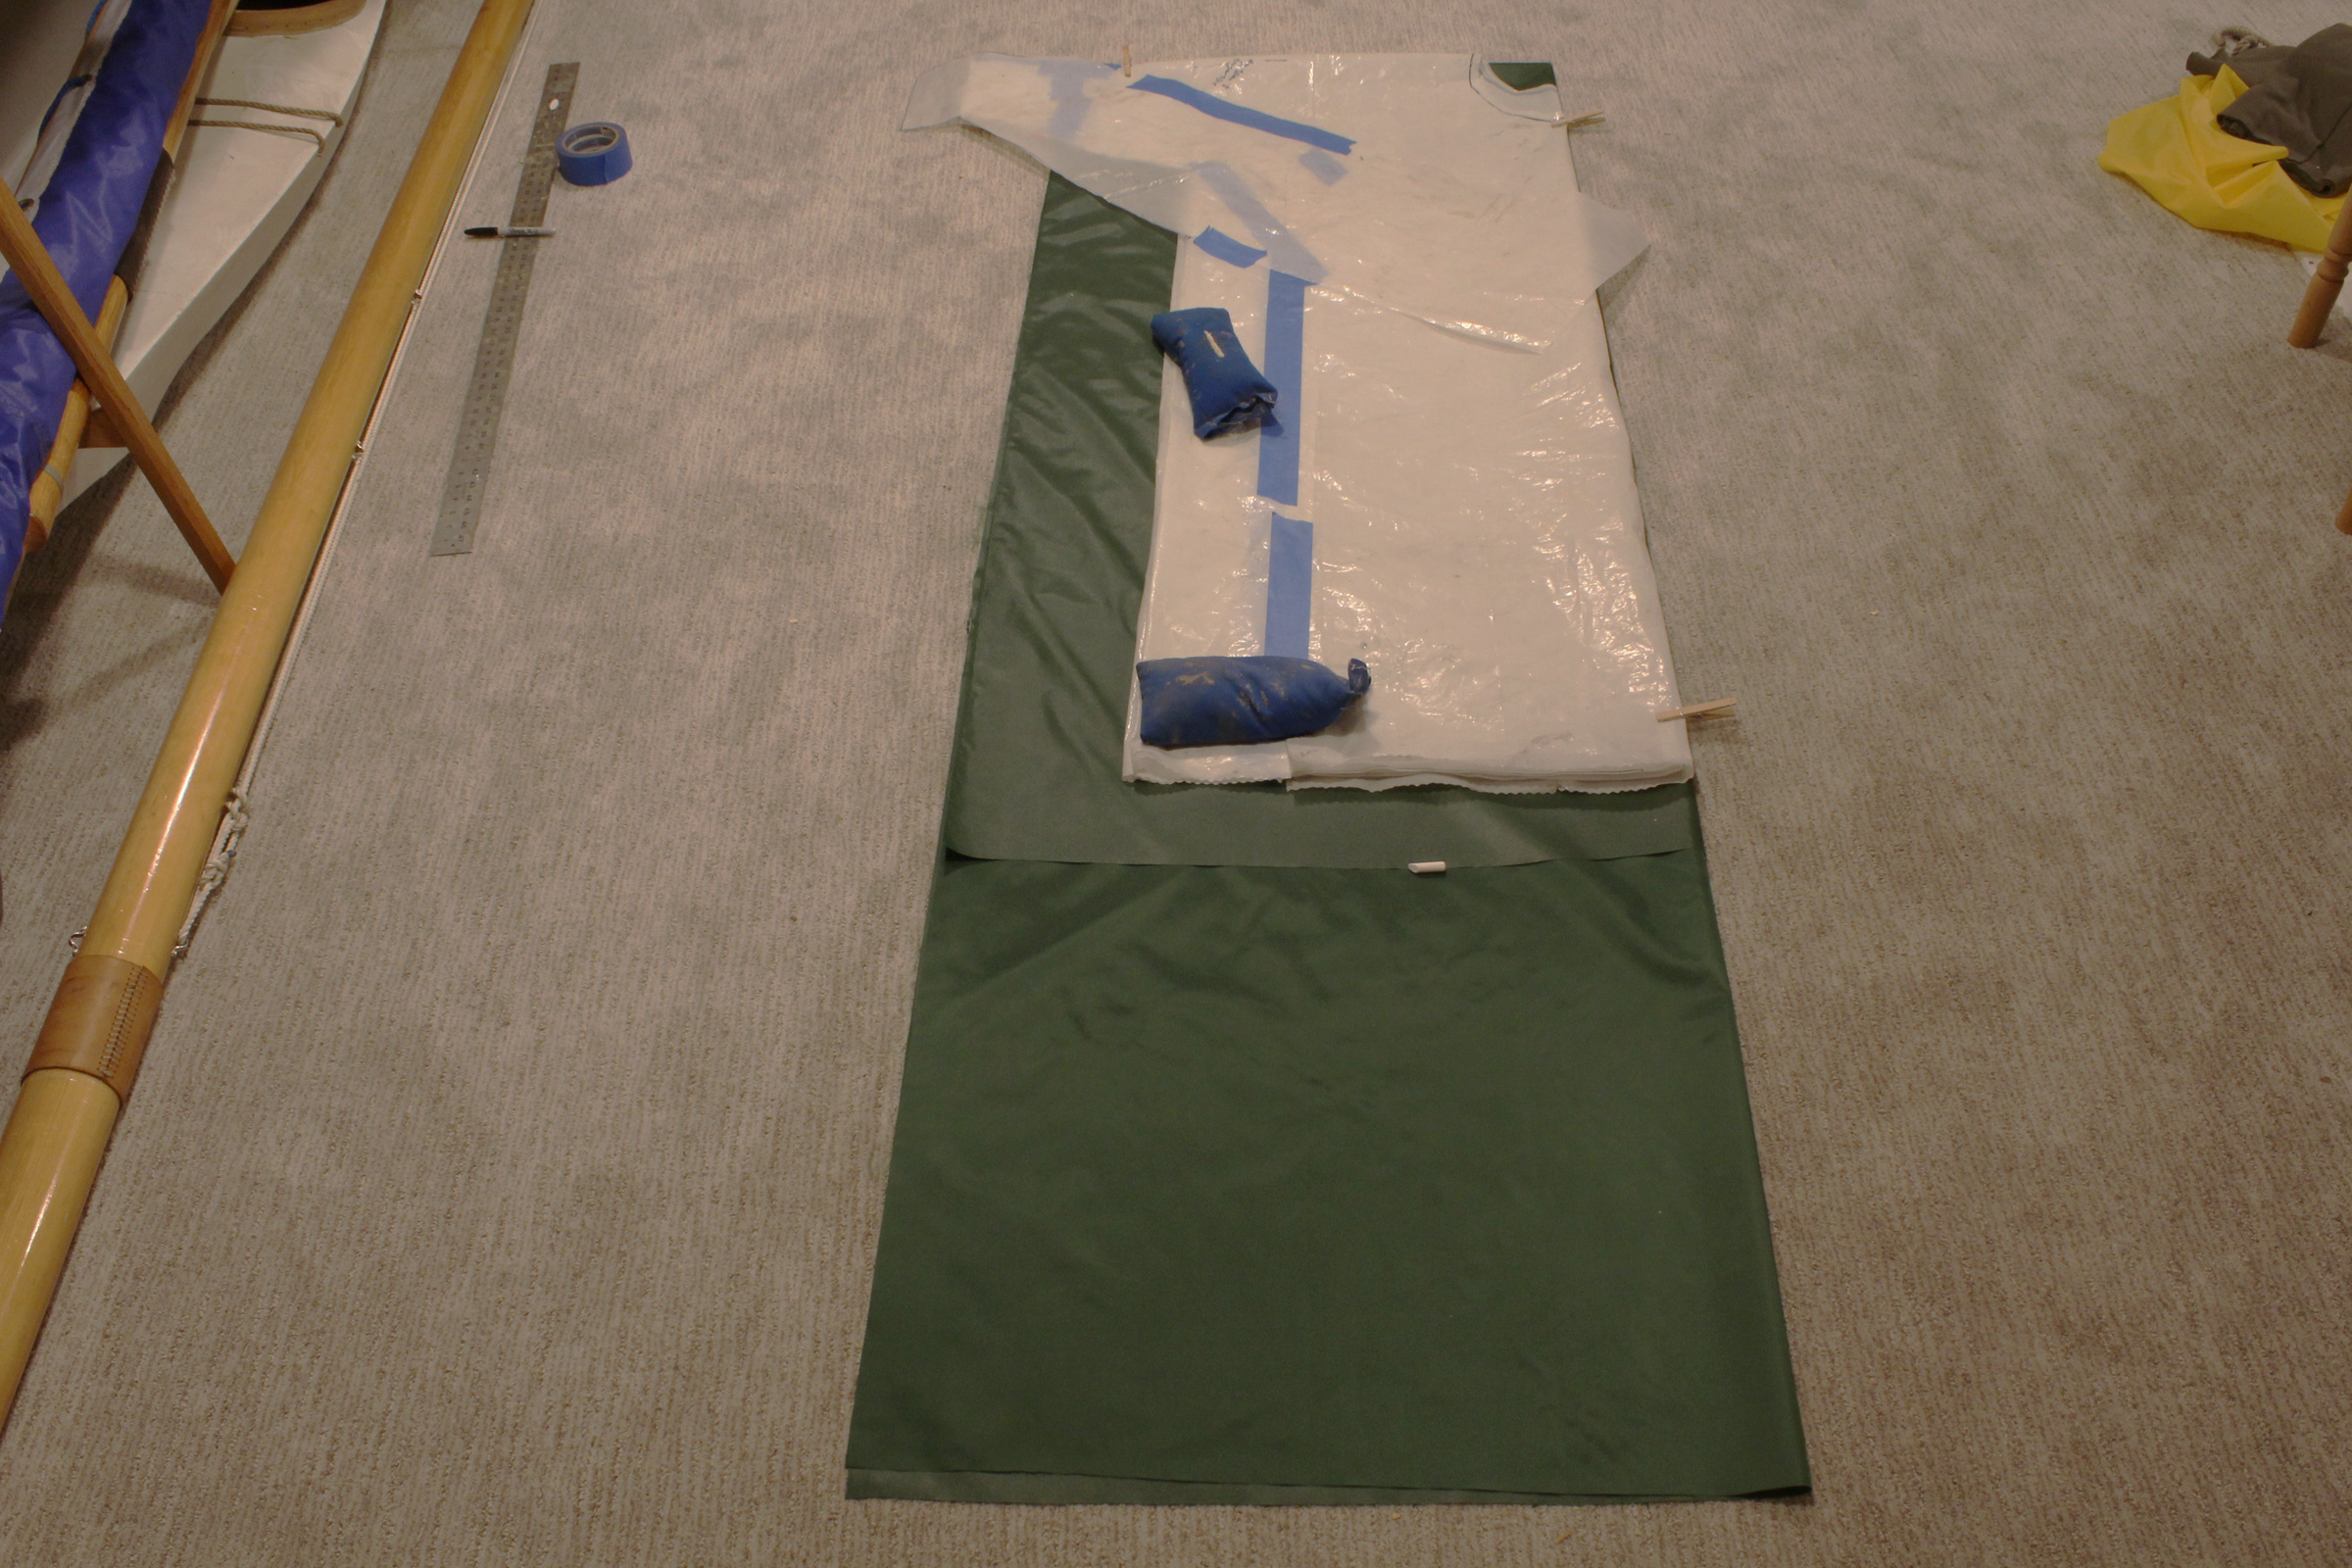
You can use the pattern provided above or use your plastic-sheeting prototype, folded in quarters, as a pattern. Fold the fabric in quarters.
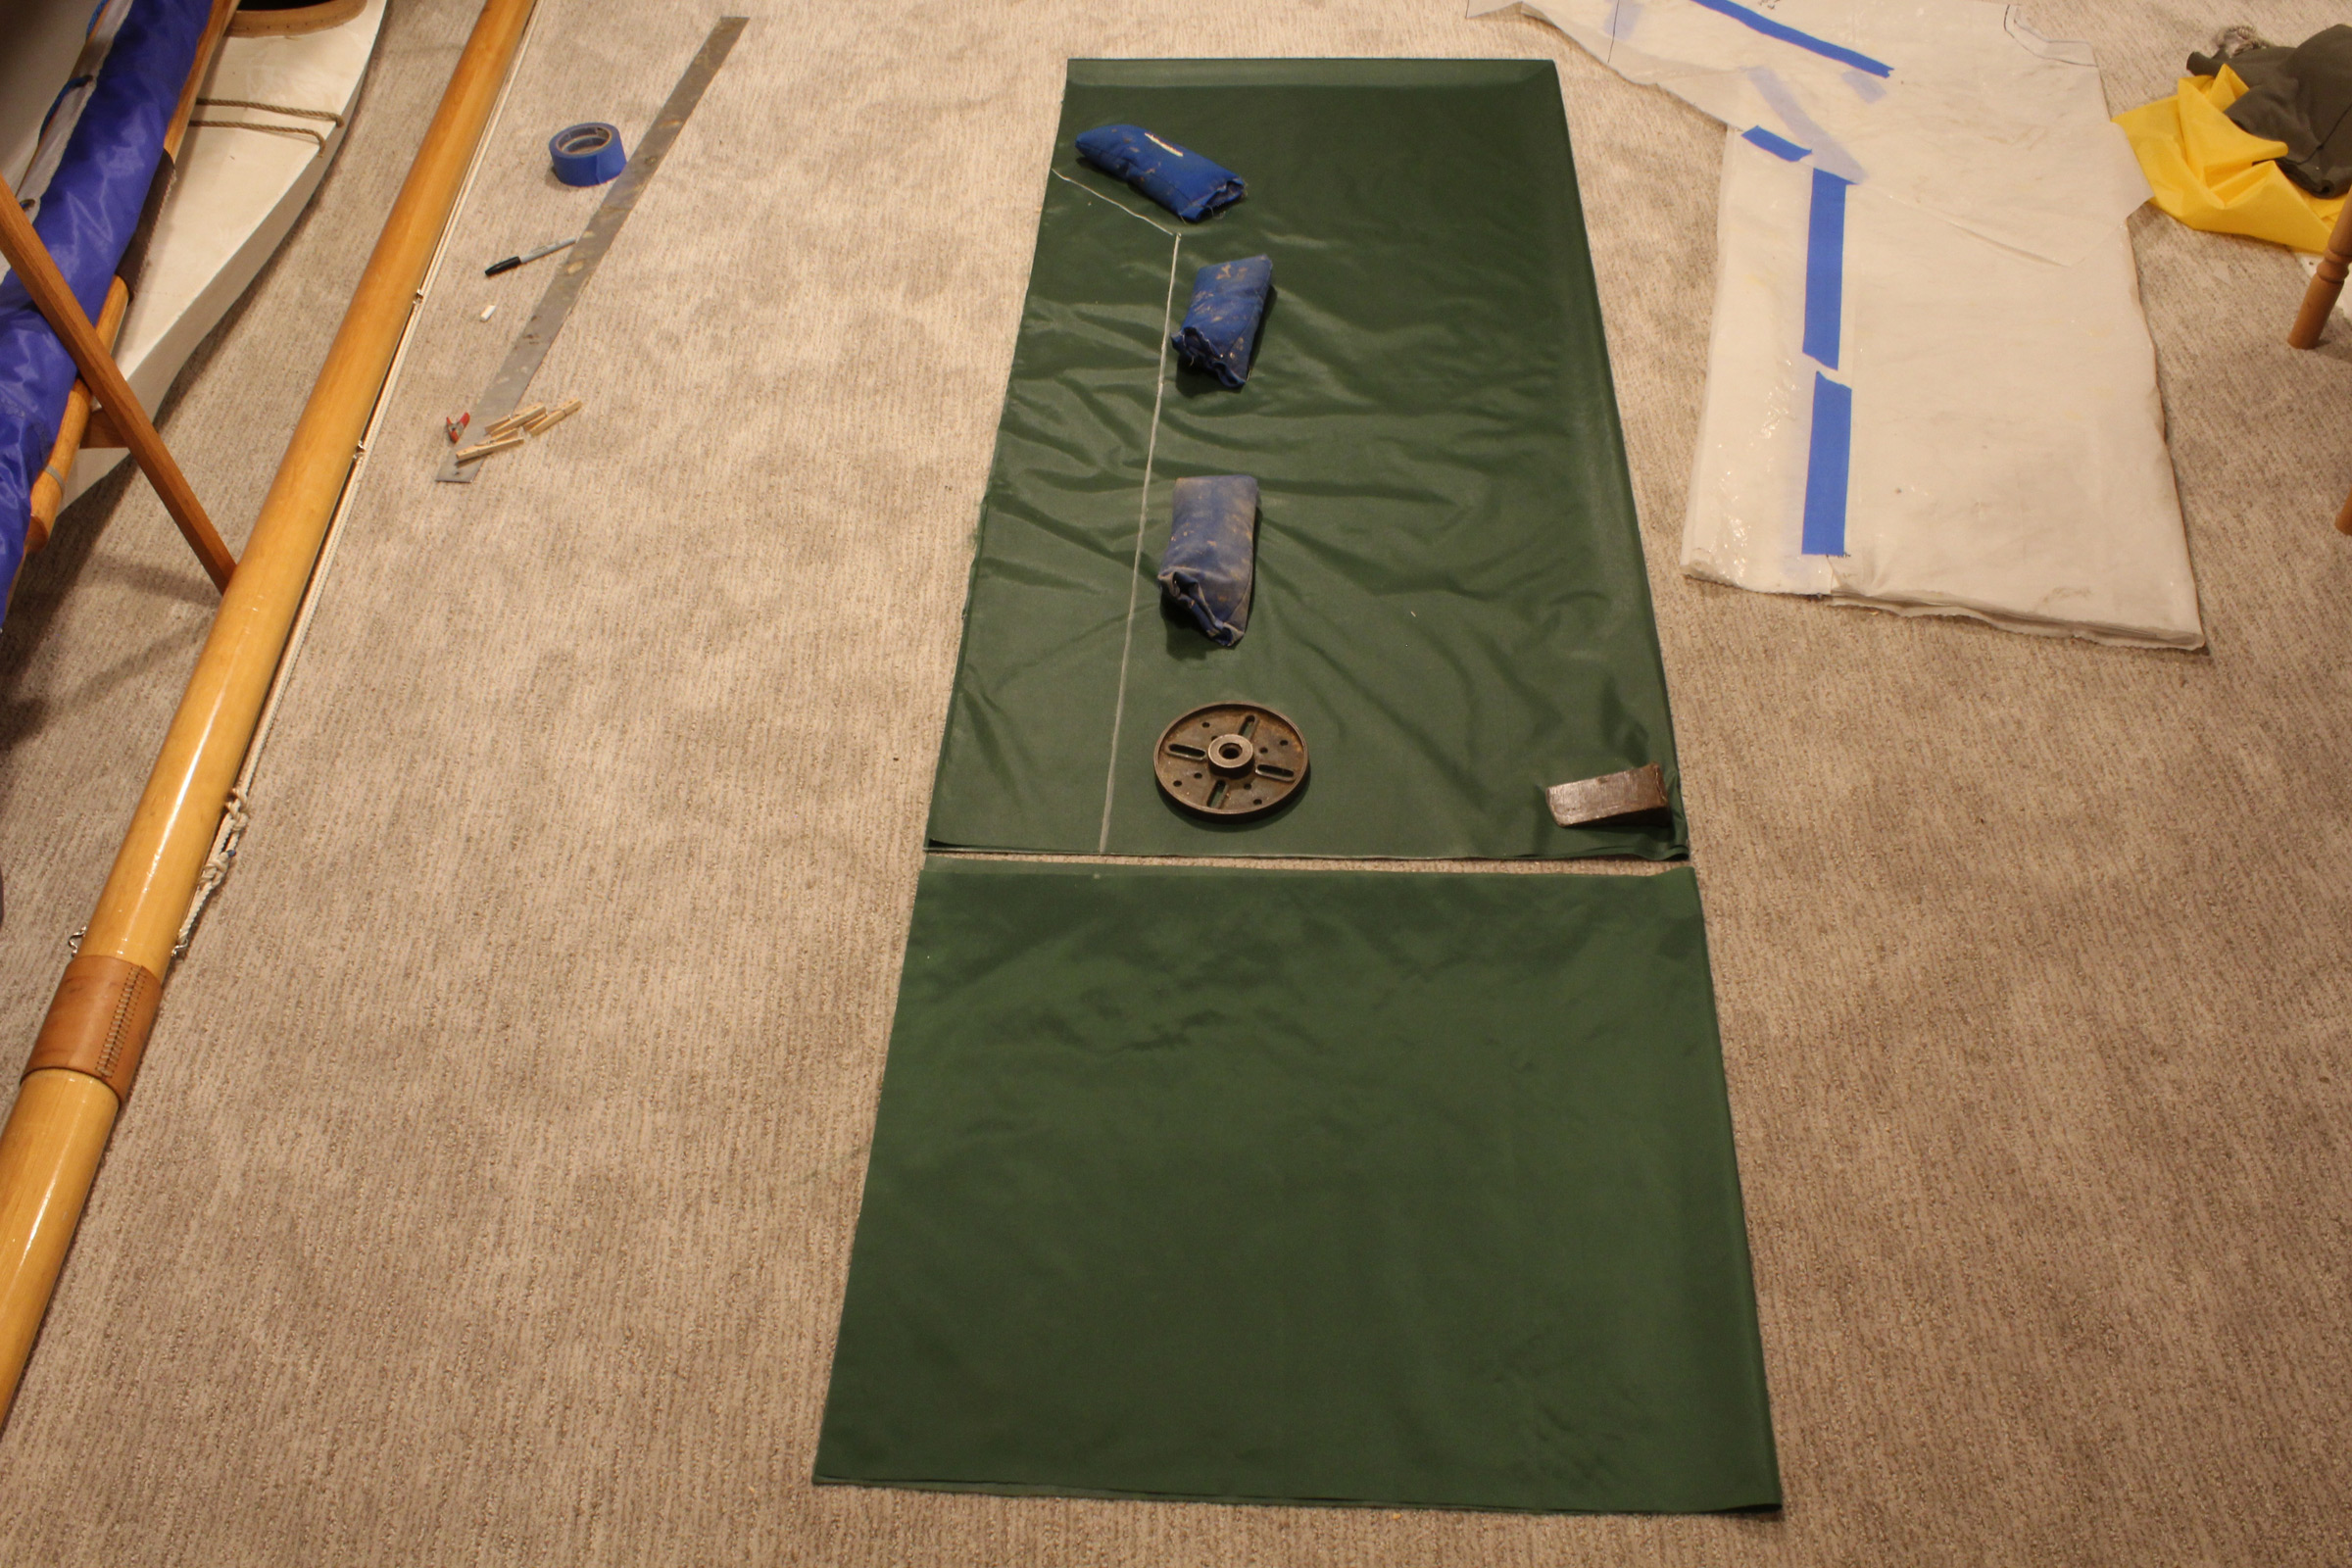
Weight the fabric so it won’t shift as you cut it. The excess length has been trimmed here.
Here’s where the scissors with the offset handles prove themselves. They won’t lift and shuffle the fabric as regular scissors will, so you can cut all four layers at once with accuracy. Note the curve in the armpit from sleeve to waist (I forgot that when I cut the green cagoule) and the marks at the upper right corner marking the midpoint of the cagoule.
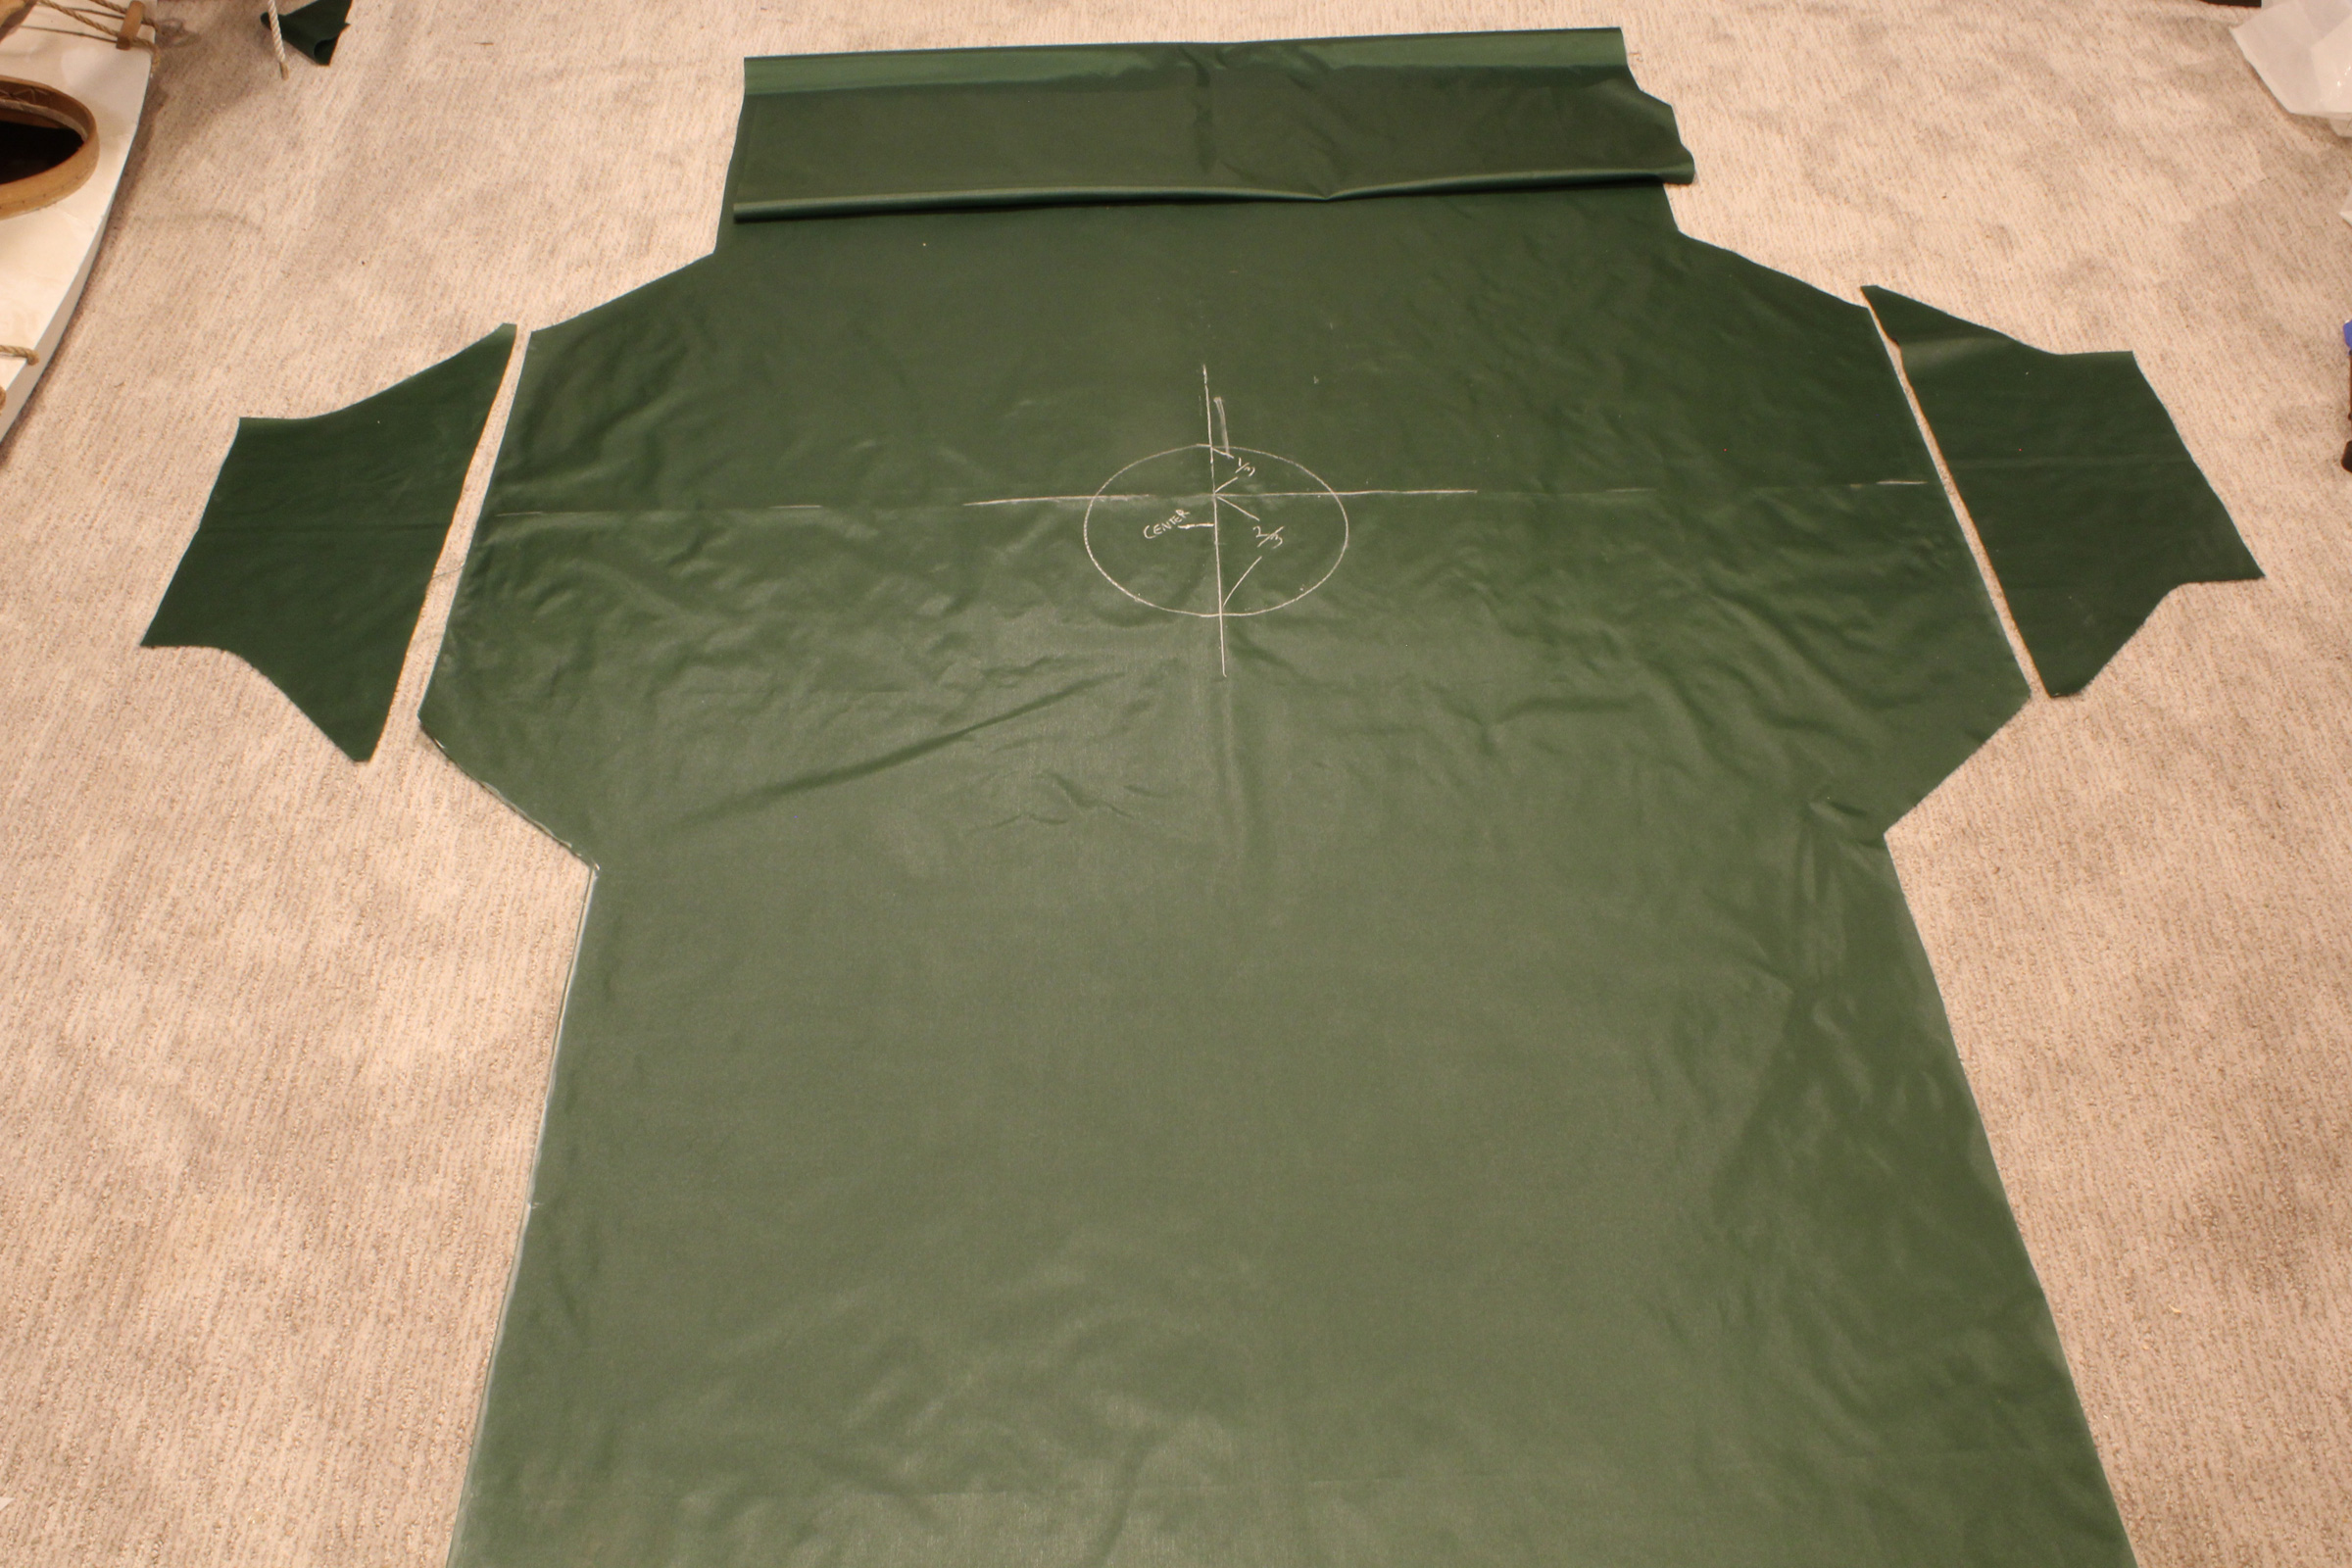
Open the body to add the sleeve extensions and to draw and cut the hood opening.
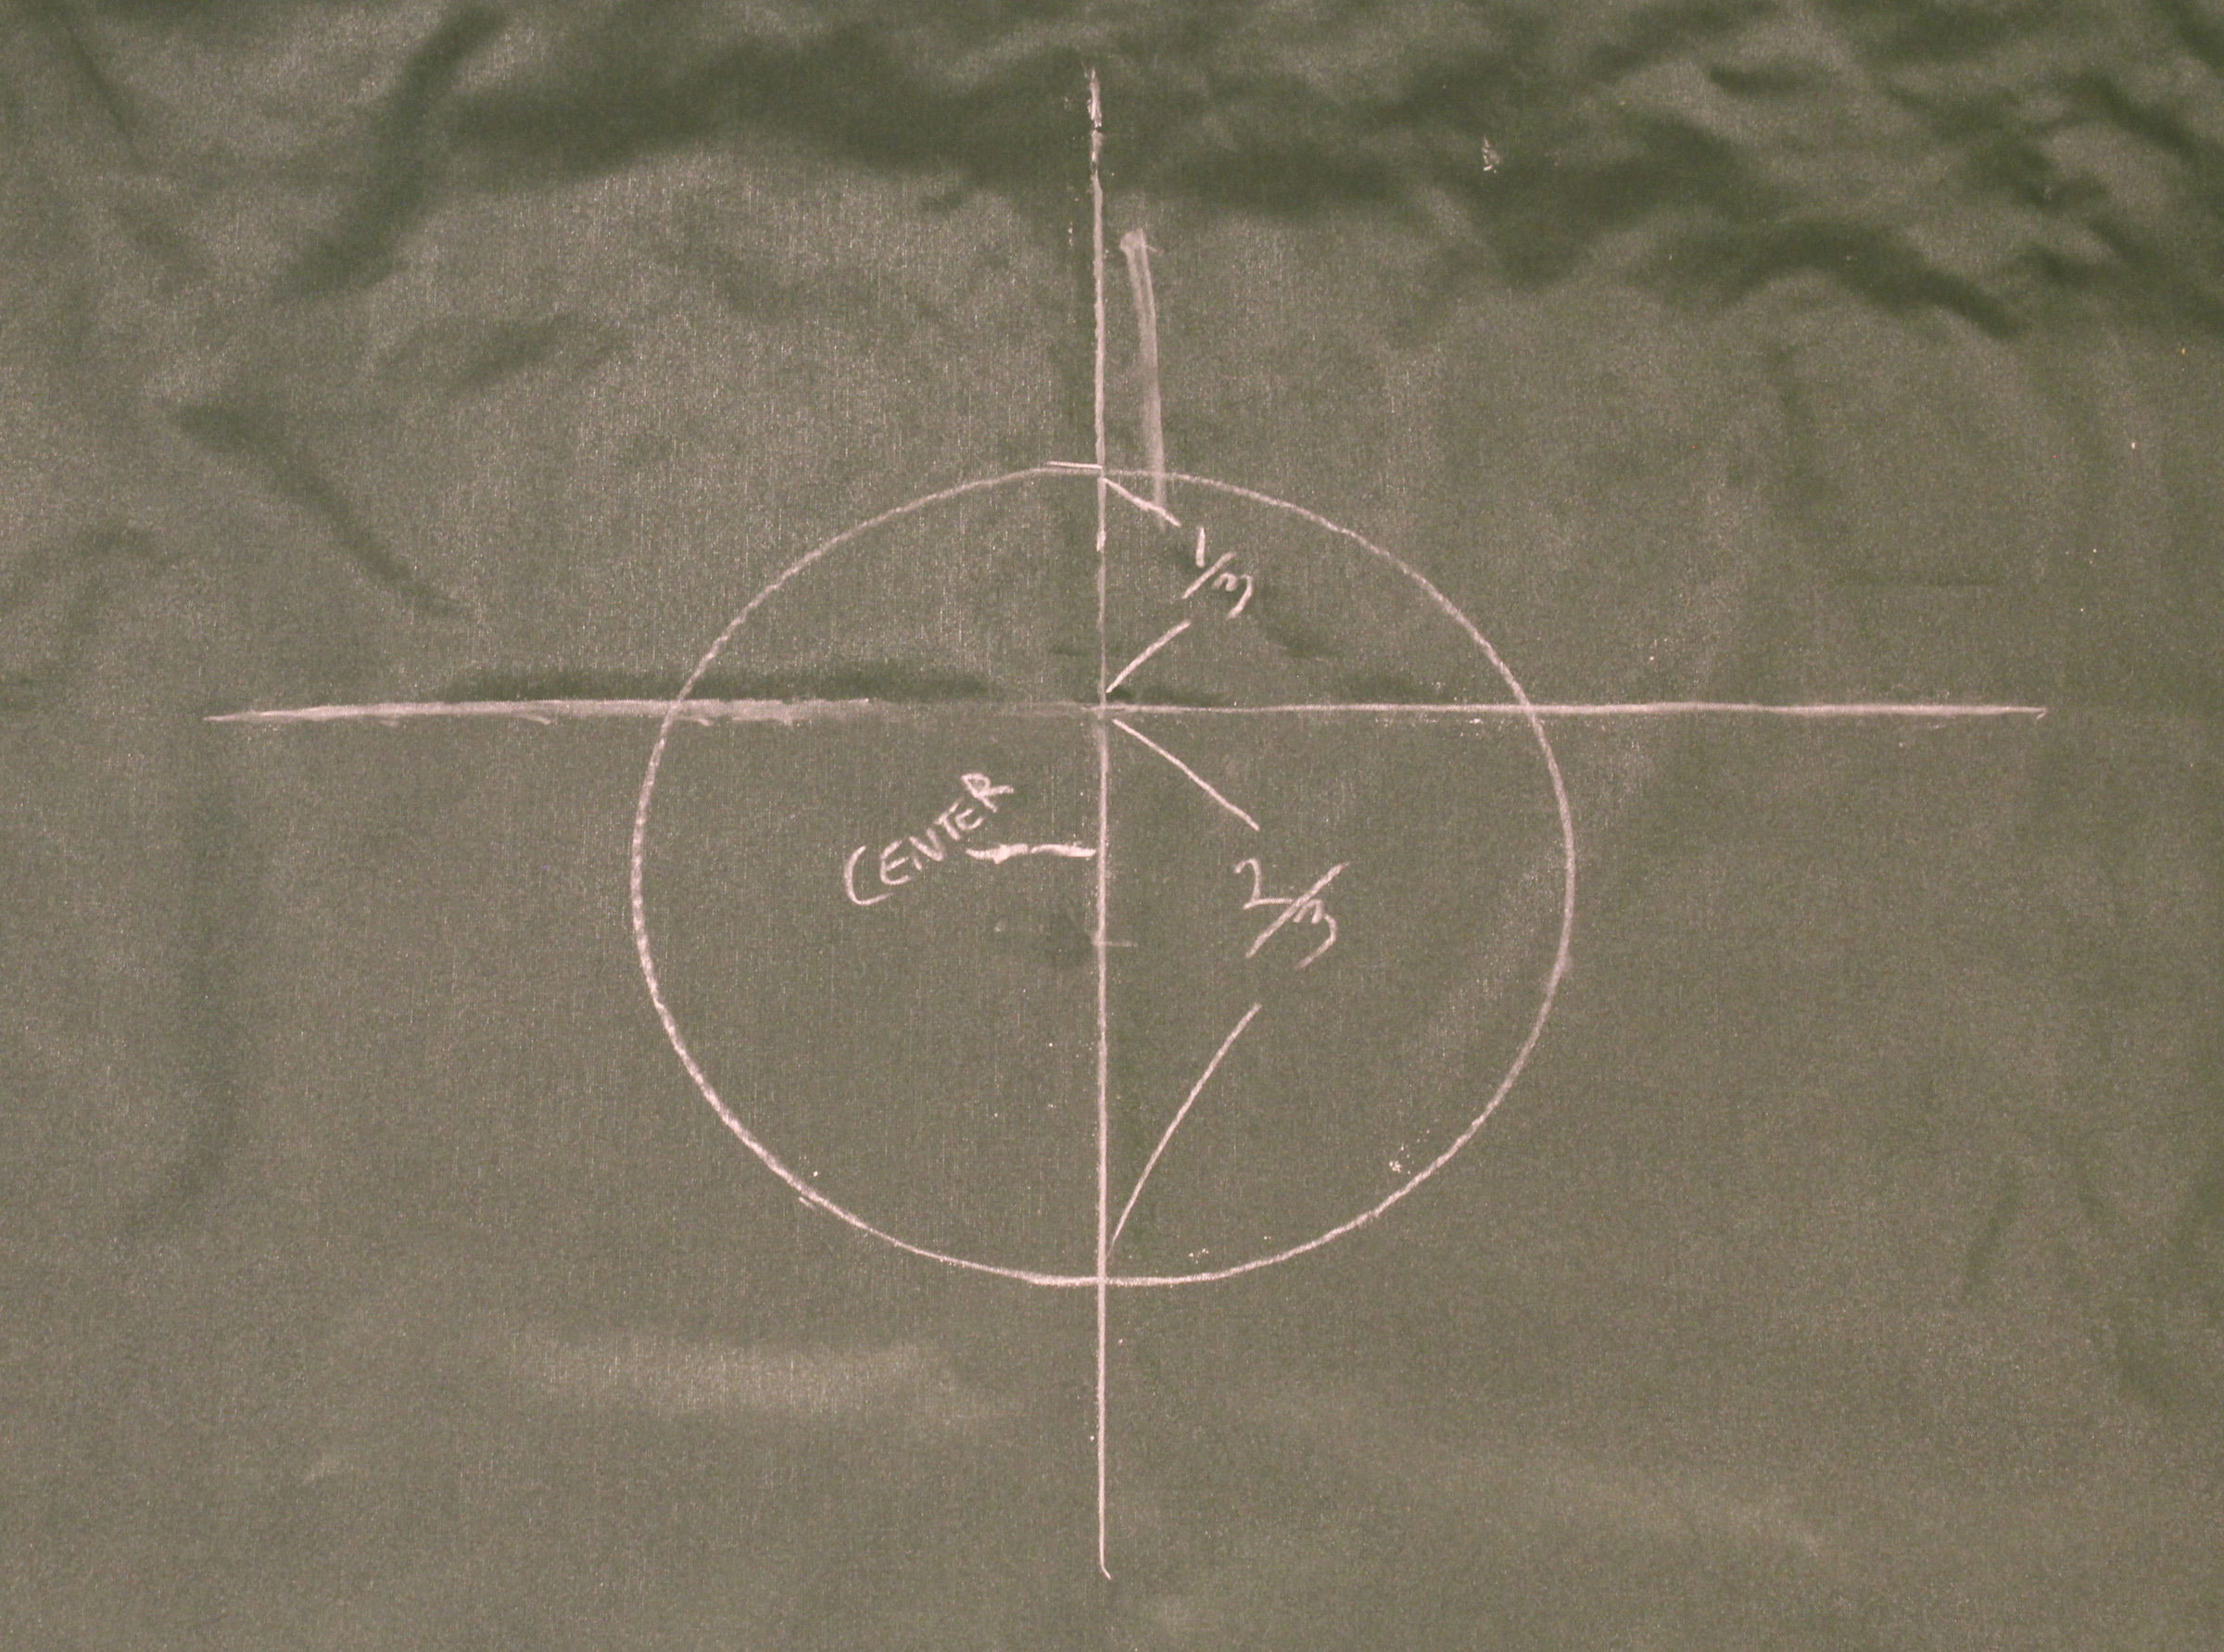
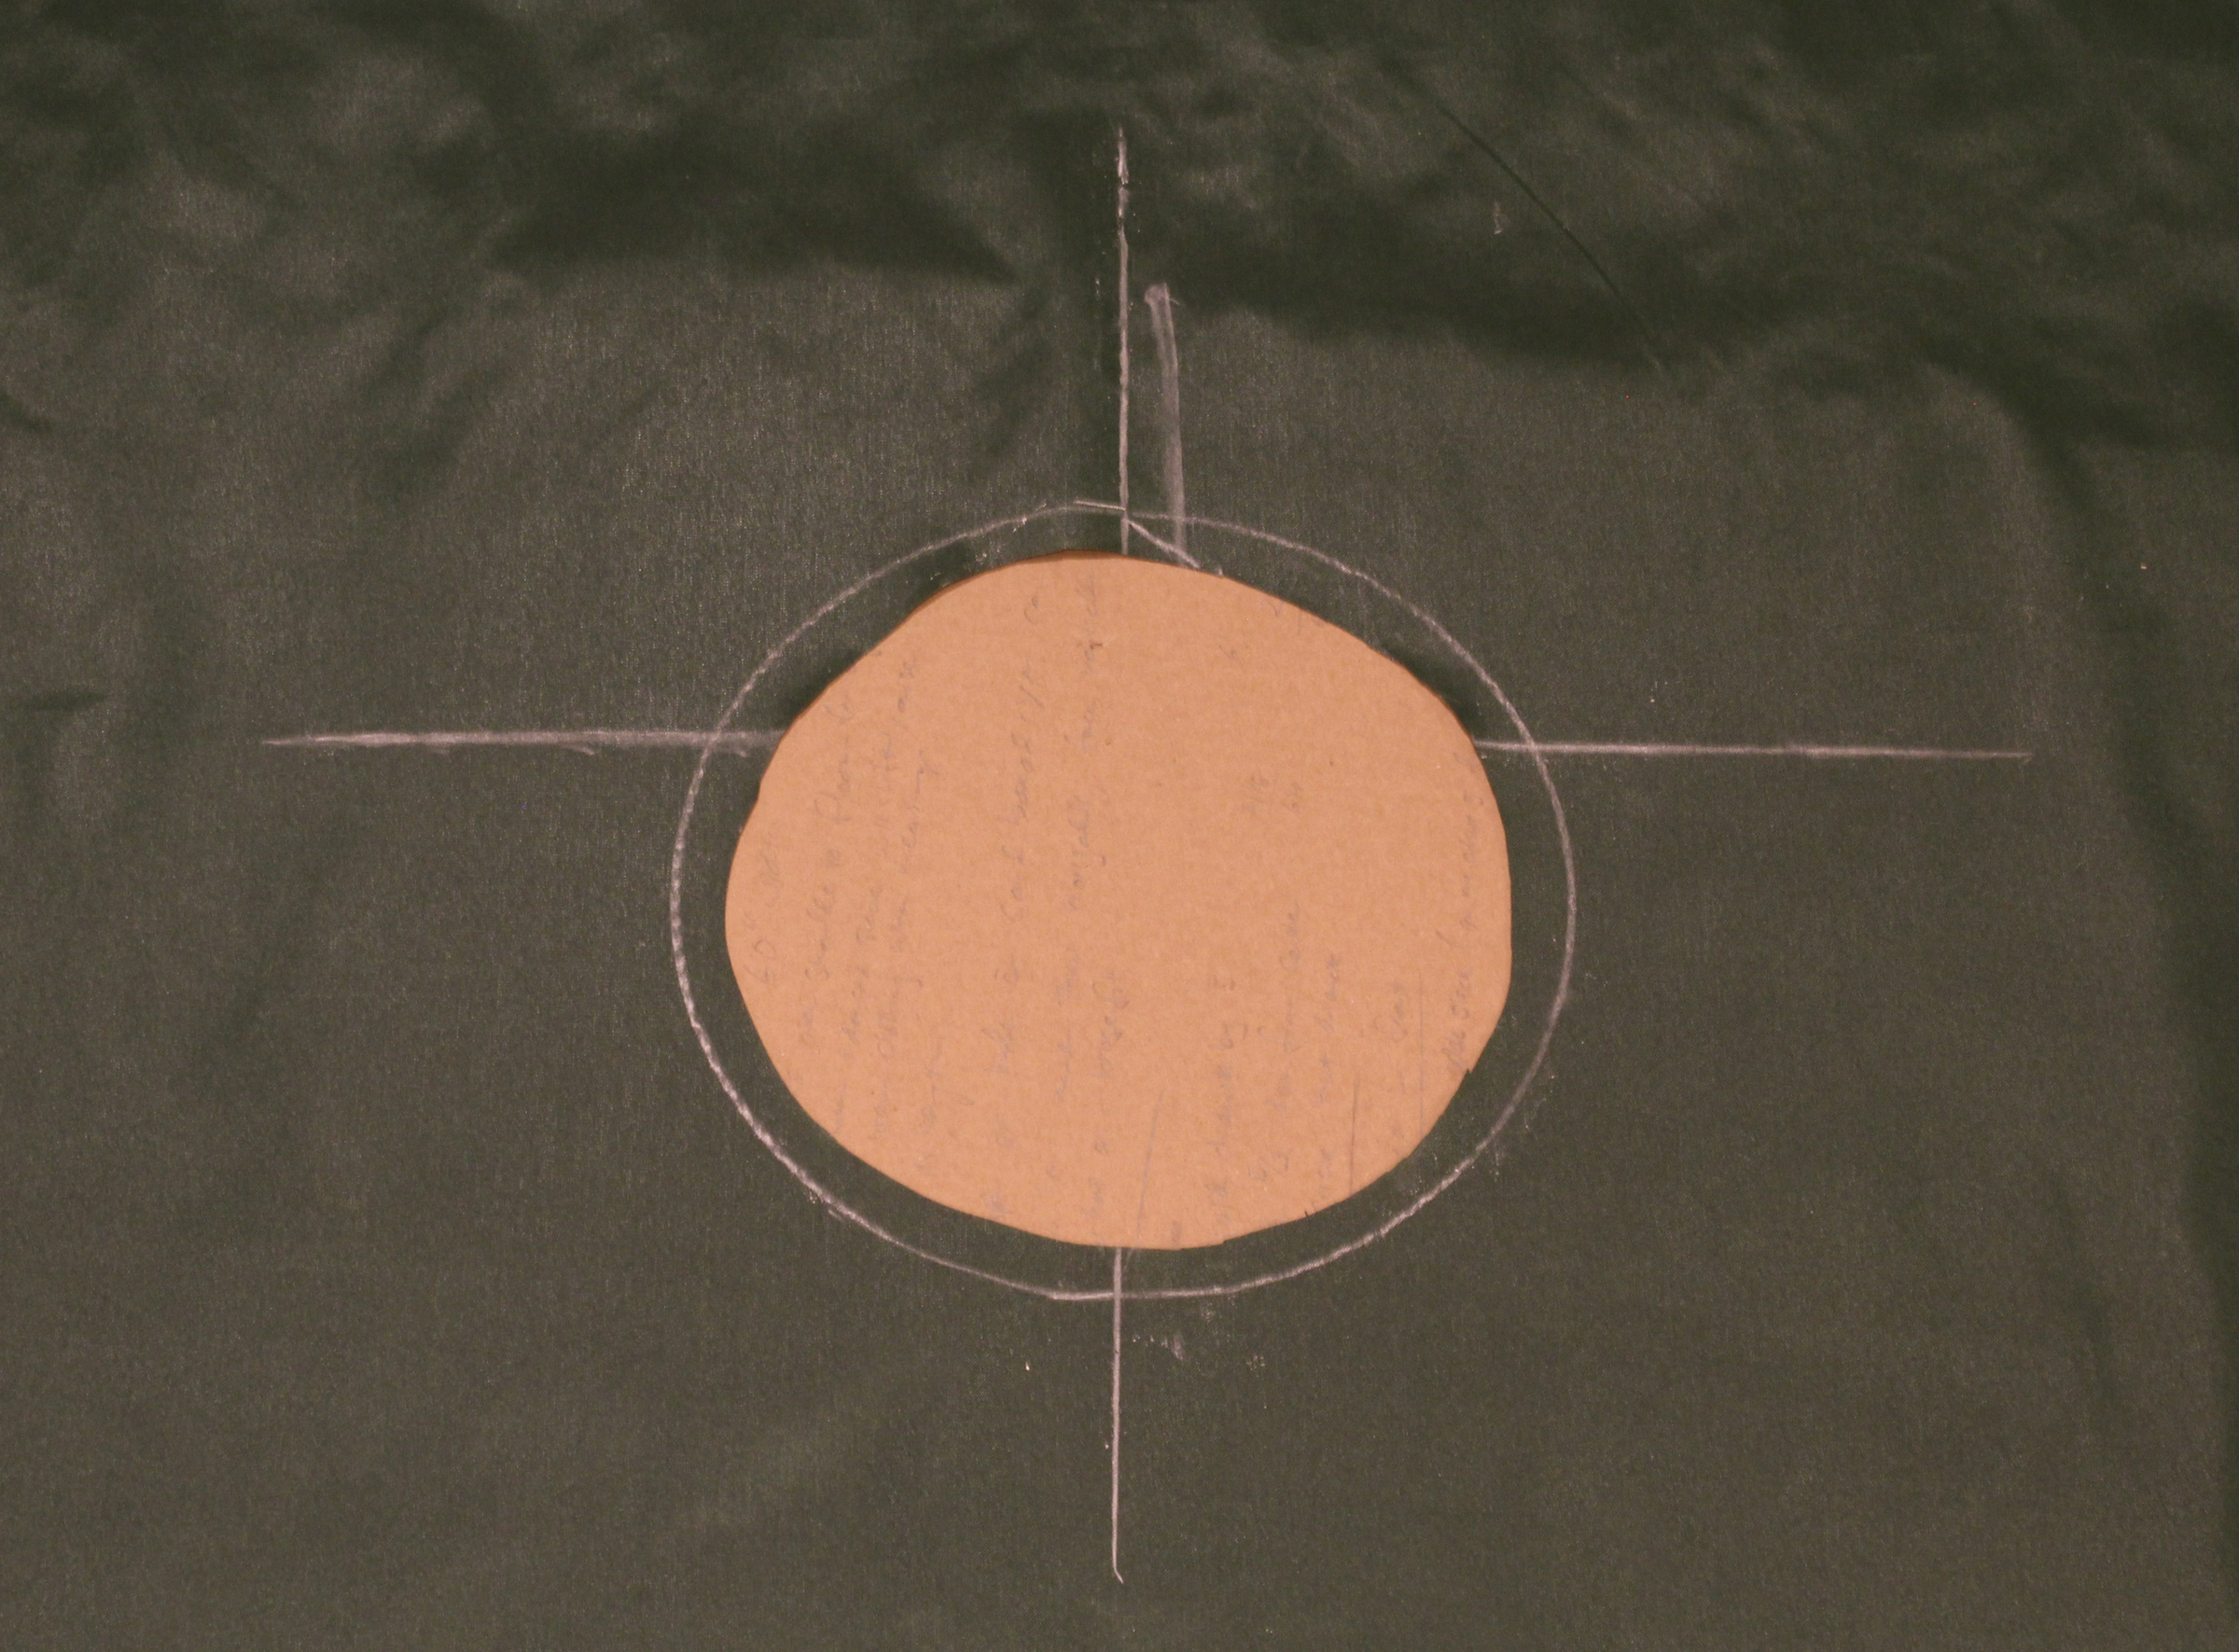
The crossing straight lines are centered on the midpoint marked with the fabric was folded. The hole for the hood has a diameter of 10″. It is set toward the front with 1/3 of the opening on the back side of the shoulder fold and 2/3 on the front side. The center of the hole is 1-3/4″ away from the cross’s midpoint.
Cut 1/2″ inside the drawn line.
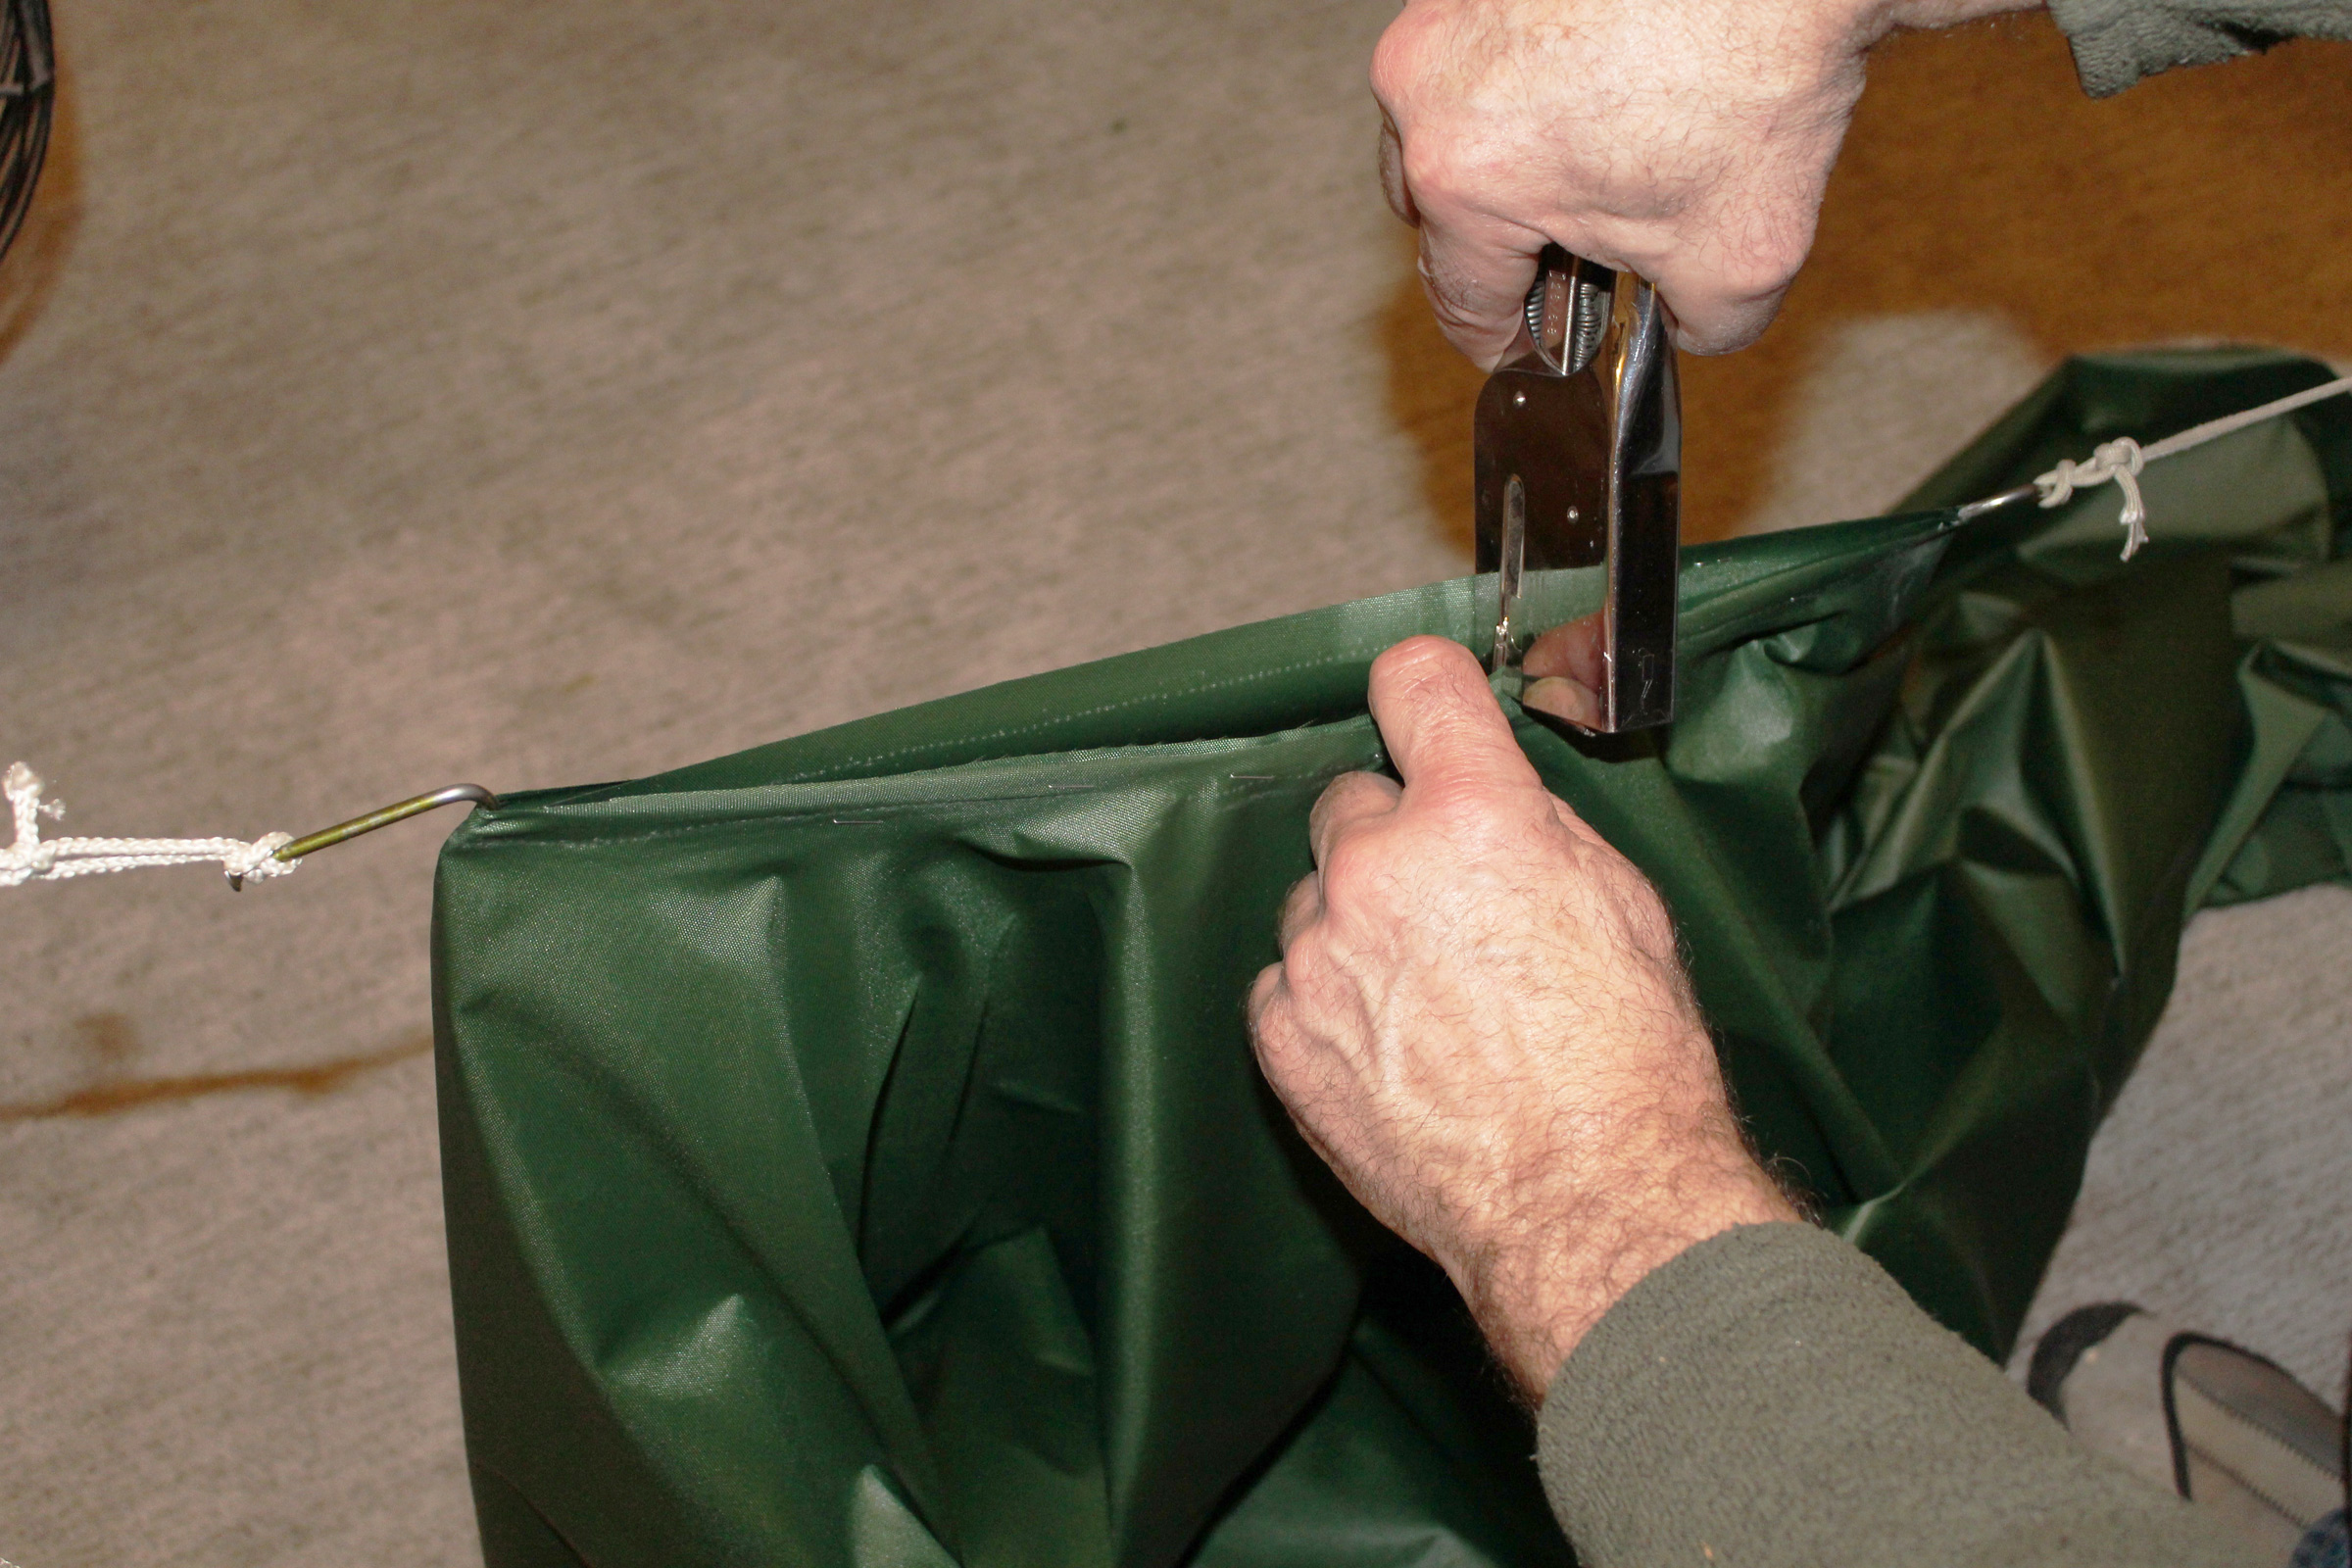
Stapling or pinning the hood opening to the hole with the fabric slack is nearly impossible. I made two sailmaker’s hooks with a couple of 16-penny steel sinker nails, tied some cord to them, and pulled the hood and body tight against each other. Then I could mate the edges and staple them together, uncoated faces pressed against each other.
The sleeve extensions are sewn on and trimmed to the pattern. You can see the inside surface of the topstitched seam here, with the seam allowance flaps folded flat and sewn.

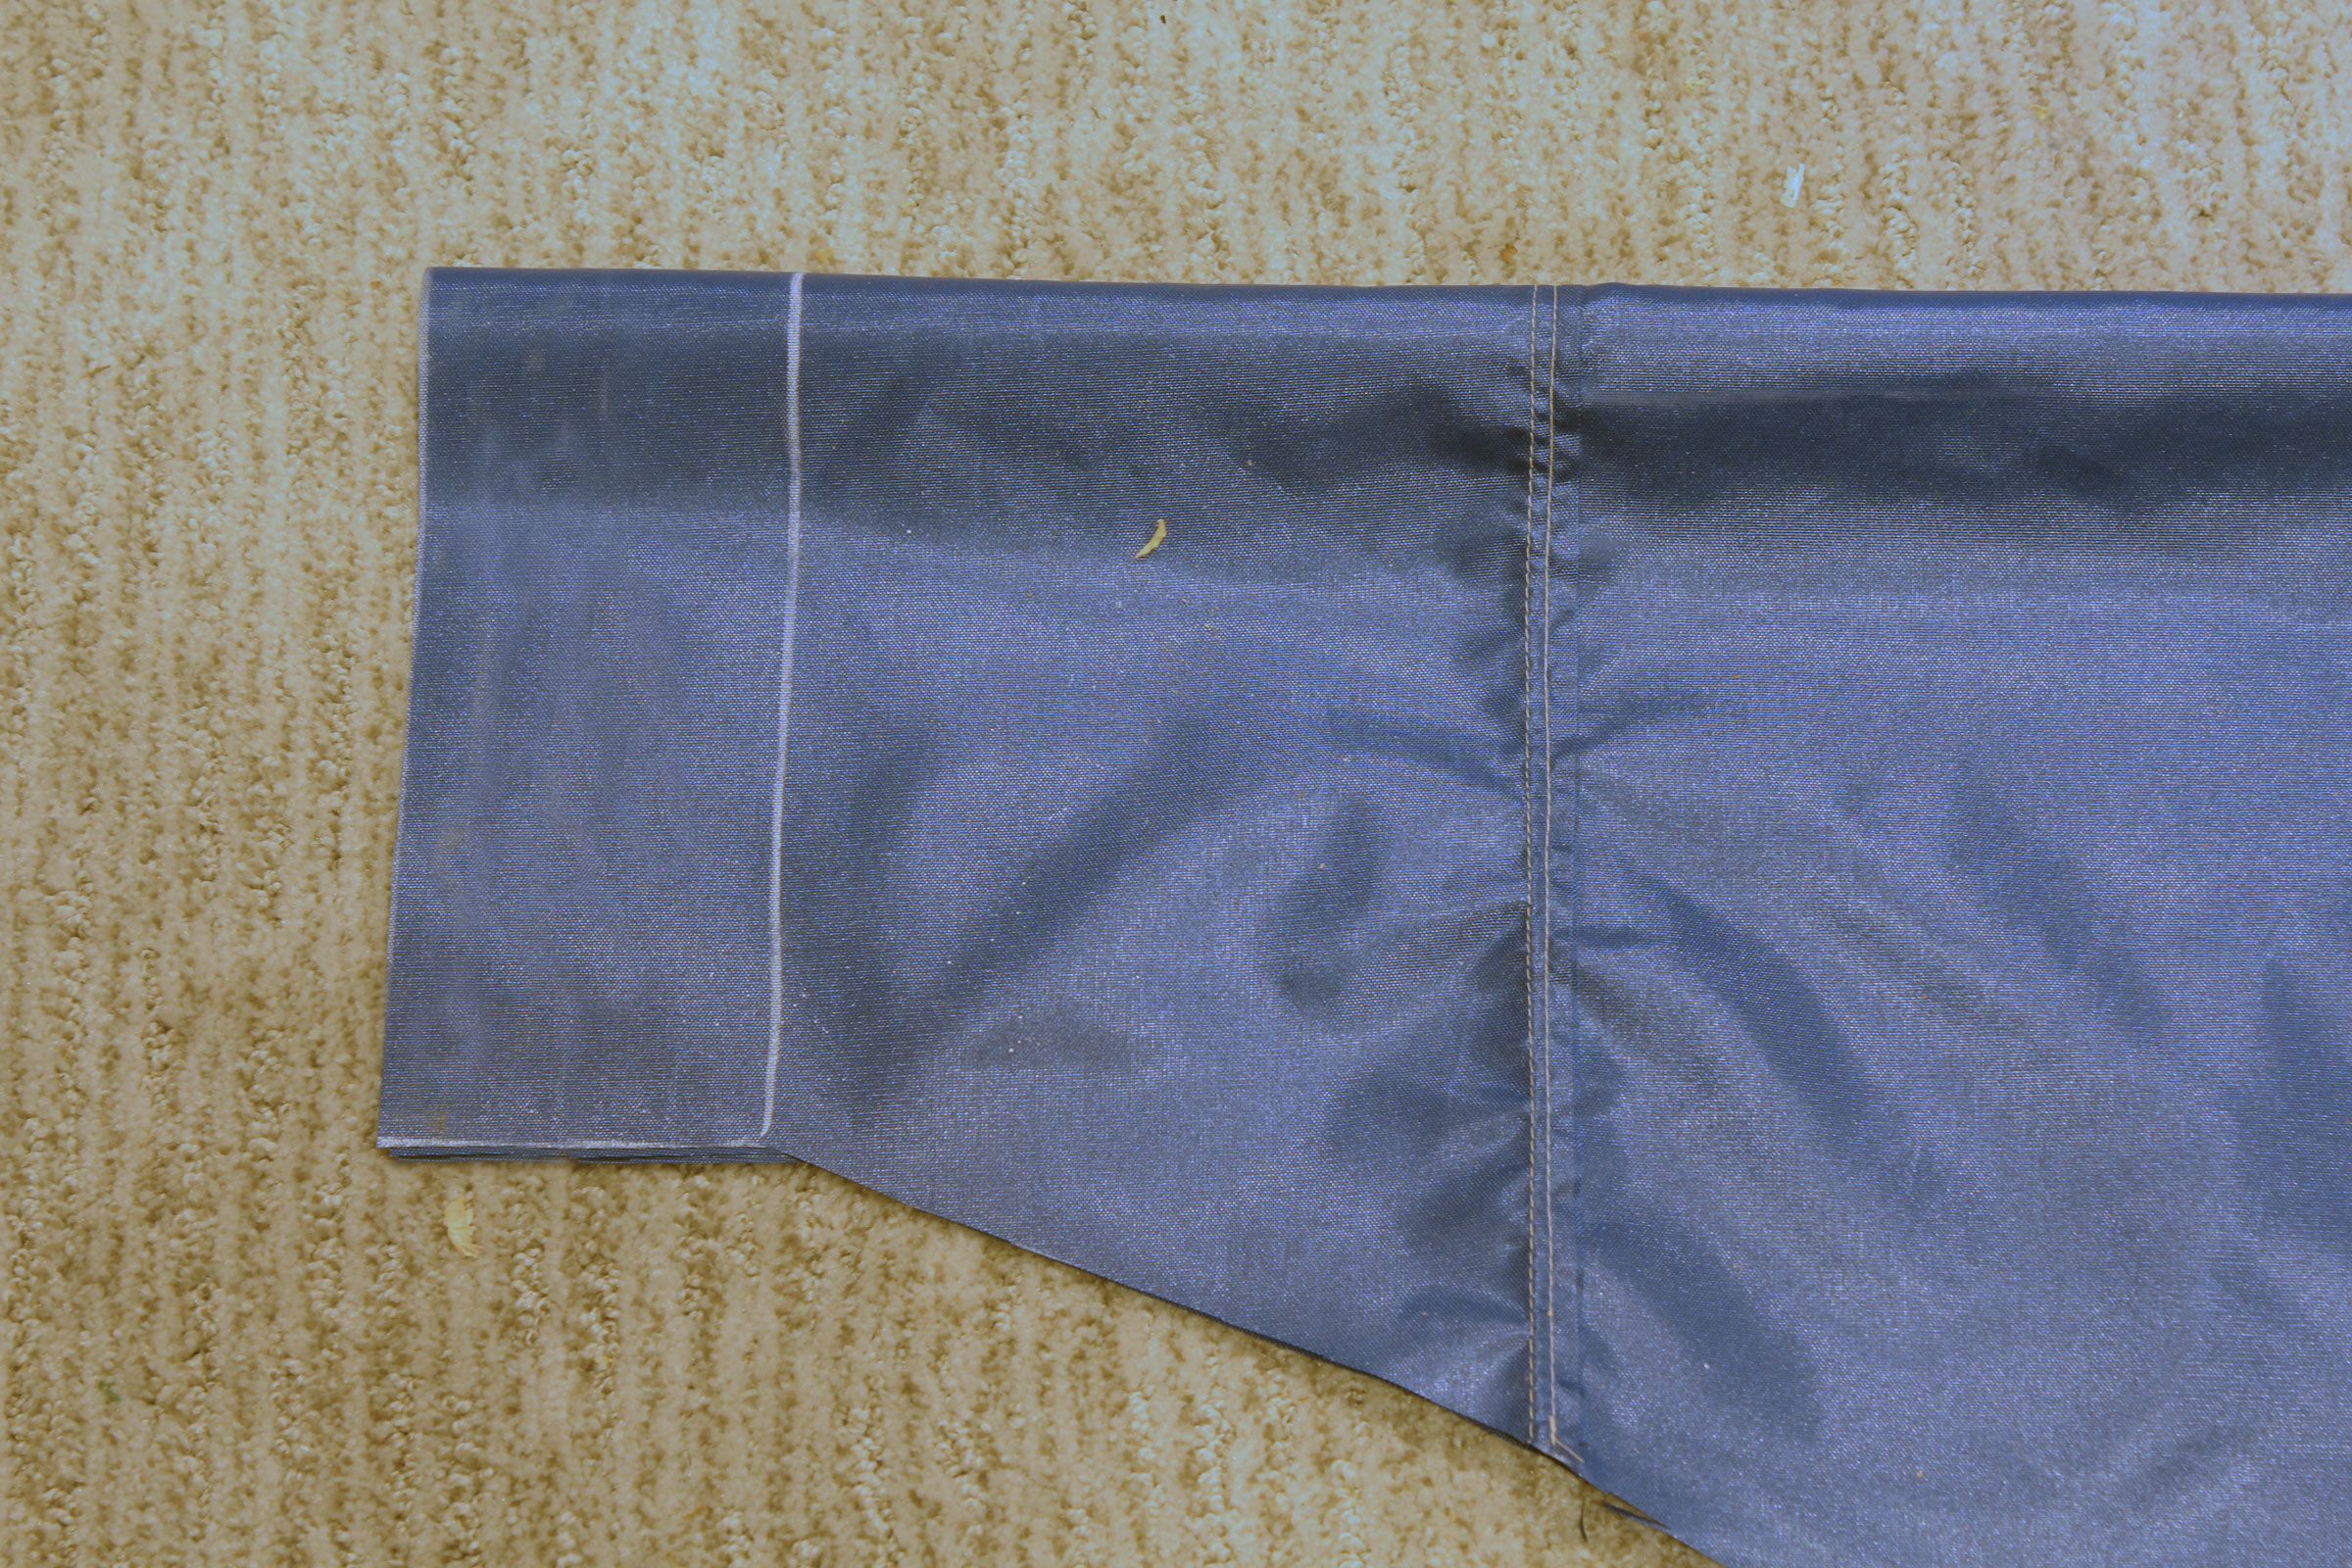
The sleeves for the drawcords on the cuffs at the bottom of the cagoule and its arms get their edges folded back at an angle.
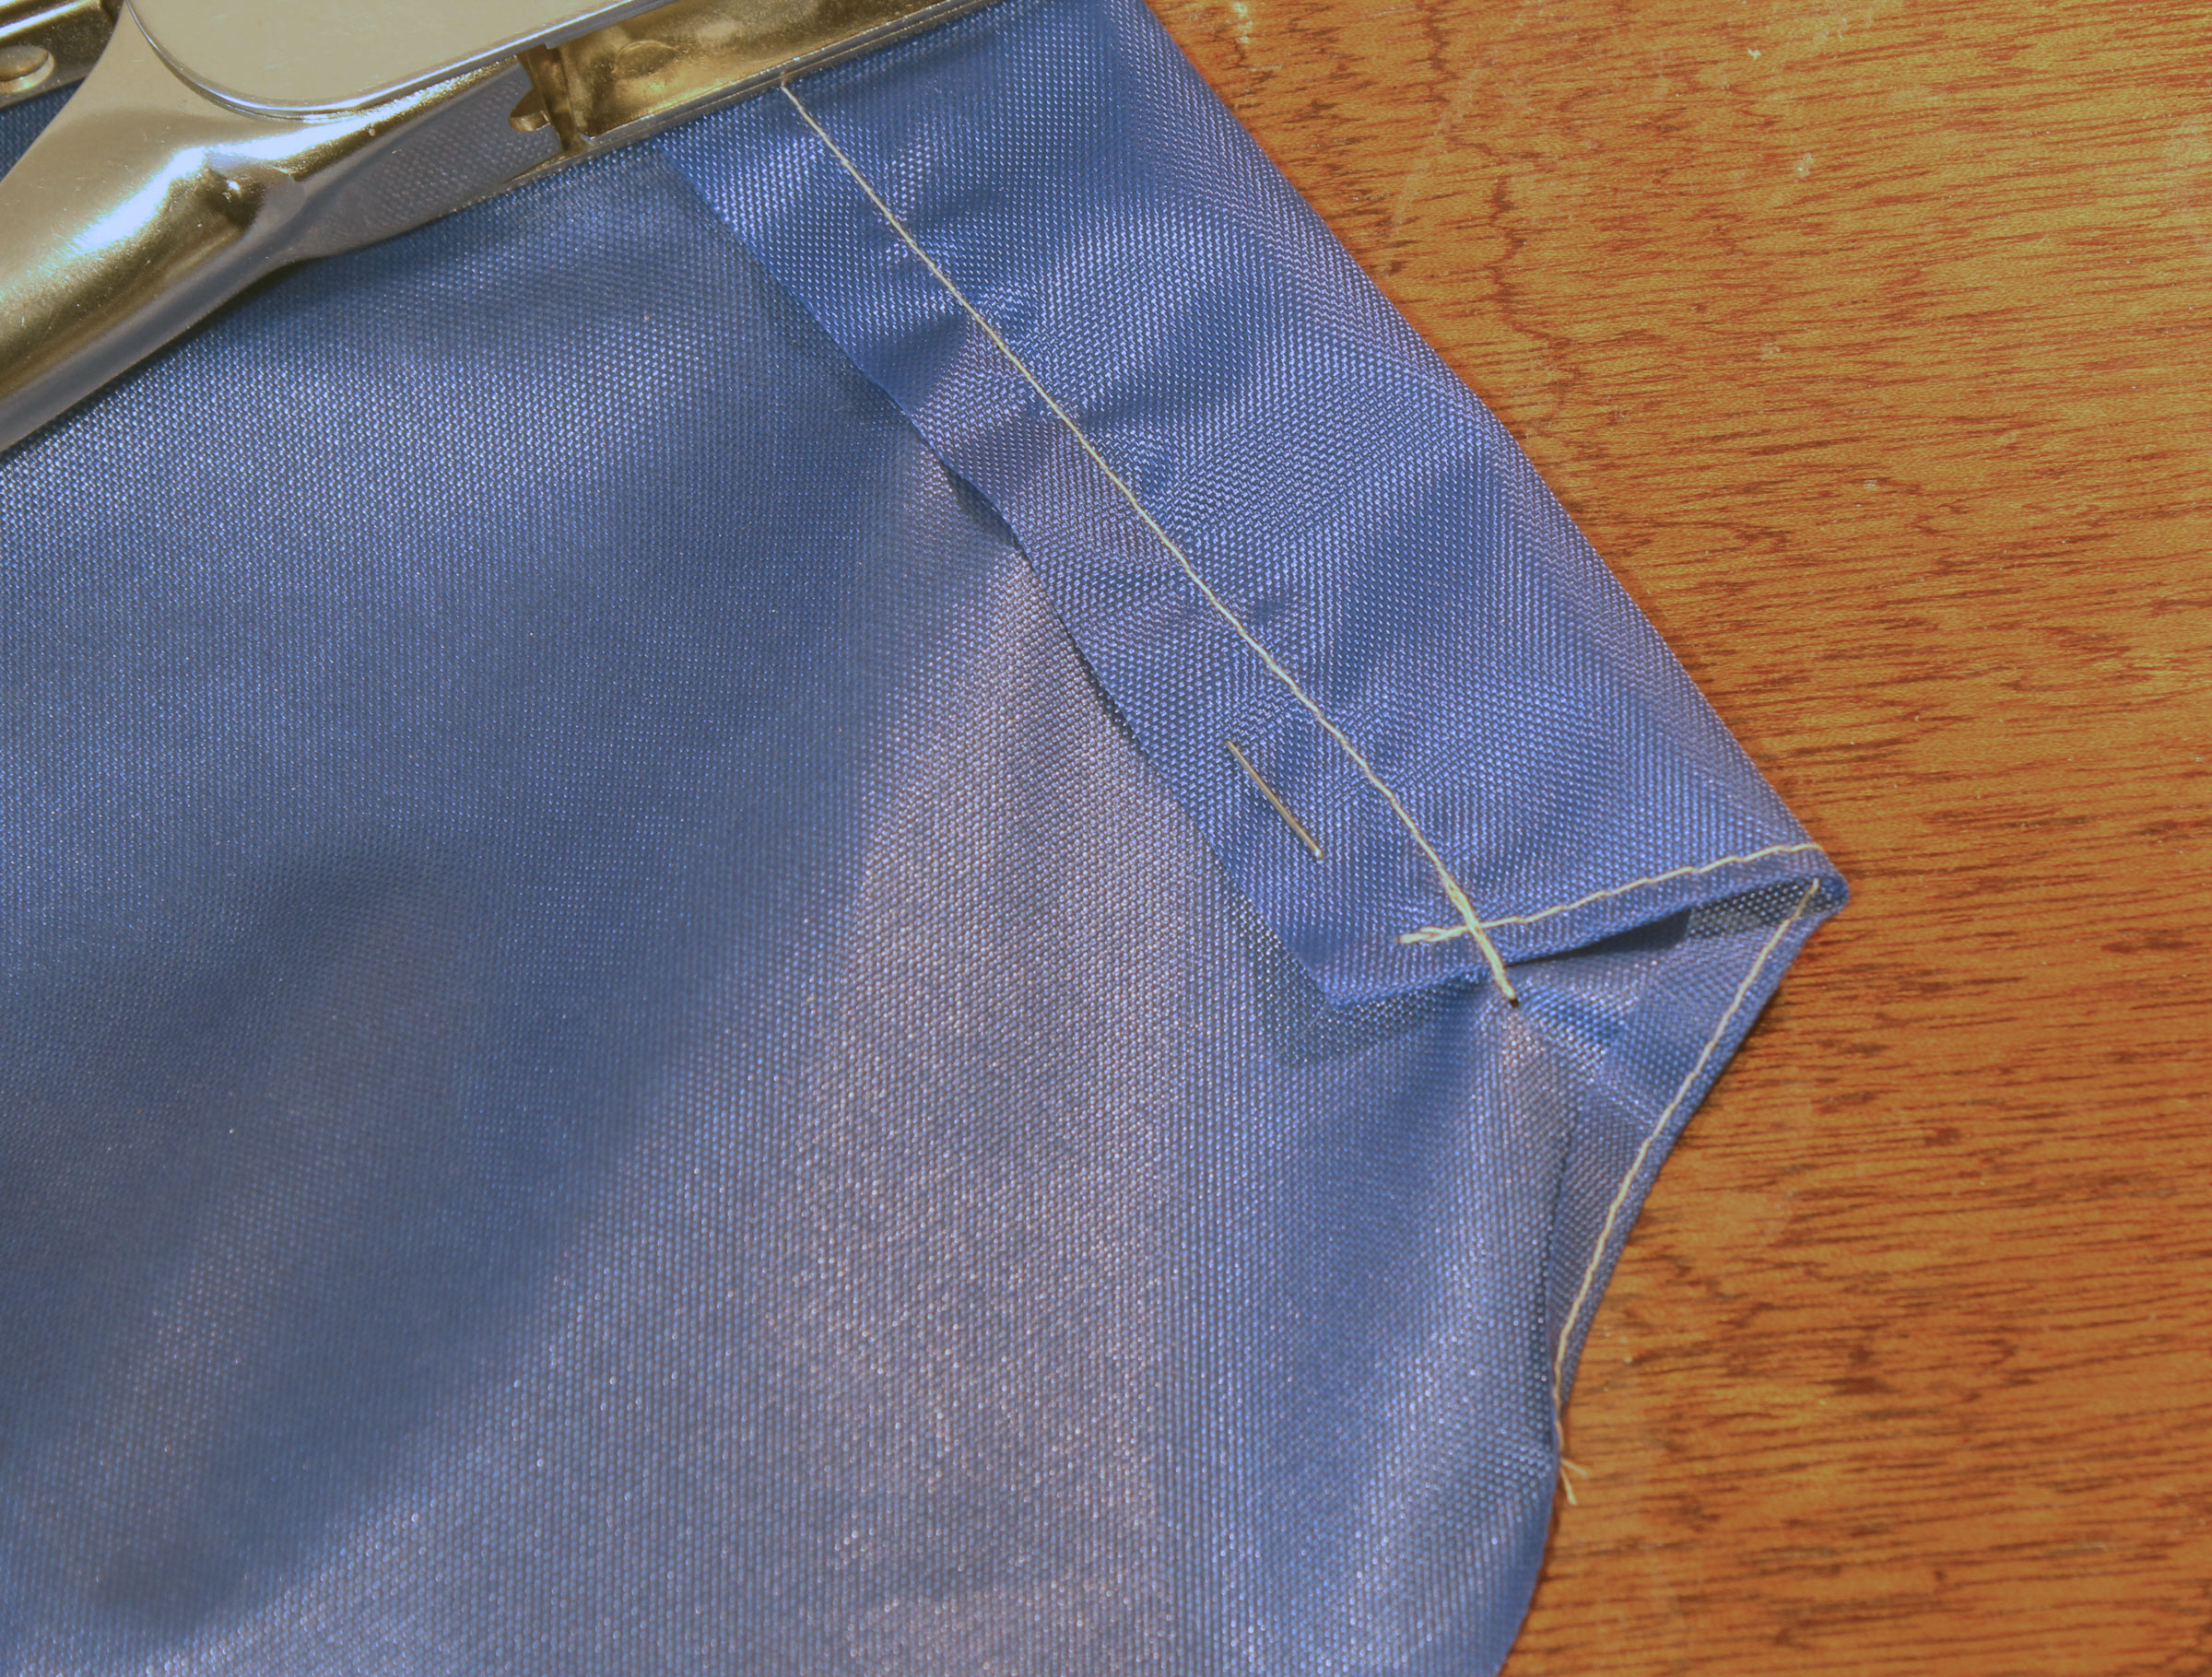
The draw-cord sleeves are then folded and sewn. The the drawcord opening at the bottom can be put at one of the side seams.
From here, the cagoule can be folded so the sides can be stapled together with coated sides out, sewn, and topstitched. Seal all of the seams. I used SeamGrip +WP. Let the sealer dry overnight. ![]()
Christopher Cunningham is the editor of Small Boats Magazine.
Afterword:
A cagoule that’s cut very wide, like the green one here, works great for privacy when changing clothes or using a porta-potti. While the crescent-moon on the blue cagoule pictured above suggests the latter, it’s a design from my third great-grandfather’s private signal.
A couple or readers asked about condensation in the comments below. I mostly use the cagoule for relaxing in camp or as an extra wind-proof layer in very cold weather. I went out rowing on March 29 and was getting chilled by a brisk headwind. The air temperature was about 50 degrees F, not especially cold, but the wind was cutting through my fleece jacket. My cagoule was handy so I slipped it on. I was working hard for about a half mile against the headwind and worked up a sweat. I could feel the moisture in the sleeves of the jacket while I was rowing so when I reached a lee and dropped my anchor I took the cagoule off. The inside of its sleeves was somewhat wet. The jacket and the cagoule dried in a few minutes and I put the cagoule back on for relaxing in the boat. The waterproof/breathable jacket tucked away in the boat would have been a better choice for the rowing, saving the cagoule for the anchorage.
You can share your tips and tricks of the trade with other Small Boats Magazine readers by sending us an email.

Nicely done. I have been considering making a new poncho, but I like this much better. The use of staples is so much more convenient than pins. Great project.
I think you’ll find the cagoule is a step above a poncho. I used an army surplus ponchos when I was kid backpacking with my father and recall that they were breezy and in the rain I couldn’t do much with my arms without getting them wet or having the poncho in the way.
Unbelievable, Chris, you never cease to amaze. Not only do you have the imagination to come up with these useful projects, but then you actually take the time to figure out how to do them right and then you apparently keep a journal or map them out well enough so you can actually reproduce them later. Again, all I can say is: unbelievable!
Looks awesome. Whichever model I build, I’ll def have a moon on it!
The crescent moon comes from the private signal that my second great-grandfather, Frederic Cunningham, and his cousin, Charles Dabney, flew over their merchant ships in the mid 1800s. The yellow moon was used to identify ships returning to Boston from the Caribbean, and a white moon on the blue field was flown by ships returning from the Mediterranean.
You might like to try the seam basting tape available from Sailrite. It holds pieces in place for sewing. I can’t imagine sewing a sail without it. I’ve used it for all kinds of projects, including leather. Plus the tape stays in the seam, no removal process.
Like you, I use the Sailrite double-stick basting tape for sewing sails. The other thing I use for holding fabric for sewing is Sulky spray. I use it for small projects like flag sewing. It disappears after a while and leaves no residue.
In the early 70’s I had a North Face cagoule. It was made from GoreTex for breathability. If I recall, it used Velcro strips to shorten the “skirt” look to a waist-long parka. On a fishing trip to Arivaca lake in southern Az., I got caught In a rain shower. No problem, just drop the skirt, find a large rock and sit in my personal “tent.”
Some jerk broke into my truck and stole the radio and the cagoule and I was never able to find another. Thanks for the how-to!
Cheers,
Ray
I’ve had North Face, Sierra Design, Sierra West and L.L. Bean cagoule since the 1970s; good ones are almost impossible to find these days. Also used a green one (similar to the DIY one here. Also wore it to Arivaipa Wilderness Canyon in AZ, and used it as a toboggan, tucking it under me and sliding down a snowy slope in the Cascades from a remote hot spring as it was getting dark, with a bear chasing us. They were indispensable in the 6 years I lived in Seattle & traipsed about all over the Puget Sound. I’ve got a yellow one (ugh, only one I could find online a couple of years ago, but wore in France & was mistaken for the Gilet Jaune demonstrators), & a black one rolled up in my car for emergencies.
An old paint-splattered blue one I wear on plein-air painting trips around N. California. But I’ve never been able to find as perfect a one as the dark green one (I think from L.L. Bean) that I used as an insta-sled that snowy night. It had armpit vents, the perfect-sized kangaroo front pouch, and was just right sized for tucking into (like your article) crouched under a tree in the rain.
A cagoule can indeed make a good toboggan. I used my original one on a climb of Glacier Peak during the descent to make a quick passage over snow fields in penguin fashion.
When I was at mid 20s, I was working at a prepress house 9 AM to 12:30 AM for six, seven days a week. I bought a old faded mariner jacket at midsummer for $3 and it saved my life, I got stuck in snow storm at 2:30 AM and I was middle of highway; the truck and the jacket saved my life. After the night, I learned one person had been frozen and died at the same location. I am still securing minus 42 Celsius degrees sleeping bag, two emergency shelters, and I will add the cagoule above to my collection.
Umut
Istanbul
Do you find that waterproof cagoules have a problem with moisture condensing on their insides — especially when you’ve pulled your head inside?
Also, I wonder if using a seam basting tape would make the subsequent sealing of the seams more difficult?
Mais uma roupa de E.T. Embora esta seja “home made”
[Translation from Portuguese:
Another E.T. outfit. Although this is “home made”]
I had one of those old cagoules also and I’m amazed they aren’t being made anymore.
I like the larger size of yours. It is far more functional than a trimmer cut.
Following the clothing cuts in the arctic, with a very loose fit, you should be able to billow heat and moisture out easily.
With a belt of cord, it should tame the potential of taking off in the wind like you’re in a wingsuit.
This article is a great service. Thank you for it.
I’ll be making one.
Fantastic. The cagoule looks like it would be really useful in Australia, both for sailing and also hiking in winter. The plans and description of each step are detailed and easy to understand. I’ll be making one soon. Thanks a zillion, Christopher.
Cool! Though curious about condensation.
Something similar here, but a bit (!) pricier:
Hilltrek Ventile Poncho
You can stick you hands out of the sides of a poncho, but it’s a loose and long opening that doesn’t seal the sides from the weather. When you reach out in rainy weather, you either get your coat sleeves wet or you pull the sides of the poncho over whatever you’re handling. The Hilltrek has a way of joining the left and right sides around in front for a cozy seal, but it’s a tight fit and limits what you can do.
Condensation has never been a problem with my cagoules. There is plenty of open space inside and enough air circulating to keep water from condensing. One layering trick I use is to wear a waterproof/breathable jacket under a waterproof/non-breathable outer layer. If I’m then active enough to create a lot of moisture, it migrates away from me and accumulates between the two outer layers where it’s not a problem.
One of our readers asked about a cagoule that could be purchased. I haven’t been able to find a manufactured version of the cagoule on the web. The closest thing is Exped’s Exped BivyBag Duo UL. It is longer and would need to be hiked up with a belt for walking. The sleeves are shorter and the hood is a tube. The US branch of Exped no longer has the Biybag Duo on its website but the Austrian branch has it on their website. Amazon lists the Bivybag for sale for $129. Neither of these links will lead to good photos of the Bivybag Duo, but you can get a good look at it on an Exped Youtube video.
My spouse subscribes and he described this garment to me this a.m. He couldn’t remember what it’s called and I made a stab using my creaky French – ‘Is it a cagoule?’ – thinking I knew the term from somewhere. Still don’t know how I knew, but was excited to see that the machine you used is a Husqvarna Viking 6000 series red model. I have one and when the sailor/rower in the family asks for his own cagoule, I’ll have no problem making one. Funnily, I’ve made a voluminous flannel nightgown and also a black muslin Grim Reaper cowl using an almost identical pattern!
Chris – what a treat to see this! I am another who favored a cagoule in the early seventies. Mine was ankle-length, from Holubar Mountaineering in Colorado. A simple drawstring in the bottom hem facilitated shortening to mid-thigh length for hiking, and climbing, although on warm rainy days I often let it hang loosely full length and simply wore nothing underneath. I can’t count the number of alpine bivouacs I made in it – hands down the best multi-function bivy-sac I’ve owned. And it was generously enough fit that I did in fact use it as a bothy once when caught in a summer rainstorm on a wall climb in Zion canyon in ’75. Unfortunately, it was equally effective as a body-bag, and ended its career in the late seventies on a mountain rescue mission turned body retrieval. Your article just may have convinced me to break out the ole sewing machine again. I am mystified that alpinists these days meander along blissfully unaware of such a fabulously functional piece of kit. Feel stupid for not having made another decades ago. Certainly now that modern waterproof/breathables have largely resolved the issue of condensation, it seems a no-brainer. Thanks for the inspiration!
I fell off the stern of a boat in the San Francisco Bay one summer in a cagoule over a pile jacket and it kept me warm until I was fetched out of the sea, then (after getting dry clothes on) it was a windbreaker on the way back to shore, keeping me from hypothermia. The good old ones (unavailable anymore) had waist cords sewn in so you could pull it up & tighten the waist, then let the top flop over so the length was mid thigh +/- if you liked, freeing legs for hiking up & down steep slopes. I’ve often thought I should start a company making them to the high standard they used to be. Anyone want to go into business?
I’m amazed I have to keep telling people how versatile and wonderful they are, useful in so many situations. Most people think they’re maybe just for kayakers, or have never heard of them.
Dear Chris,
I am writing with thanks for your article on the DIY Cagoule. It was a central inspiration and reference for a cagoule that my friend Daniel W. Fletcher made for my music video.
Daniel is a menswear designer and used your pattern to make the cagoule you can see in the YouTube link below. (I asked him to customize it to be double headed.)
https://www.youtube.com/watch?v=oUPpJTWfUsQ
I hope this is a welcome if somewhat unconventional adaptation.
All the very best,
Orlando
Brilliant article. You’re so right, the ’70s cagoule was a sensible bit of kit for all the reasons you state. You also strike me as a thoroughly practical person who knows what he’s talking about.
I like using my big d.i.y. ponchos for the very same reasons. Instant bothy bags. I tame them with attached belts & snaps, etc., but have often thought about making a cagoule for constantly windy conditions.
Just found your plans, thank you so much.
Now, if only I could buy material again from in Germany. (Can’t cuz of Brexit).
Kokatat have their Hydrus storm cag and Hilleberg have their Bivanorak…
Rivendell Mountain Works does make a cagoule.
https://www.rivendellmountainworks.com/shop/heritage-cagoule/
Using your mouse, highlight the page under where it says Description, or Select All. For some reason, they used white text on a white background.
It looks great. But I will probably make my own.