I am not a sailor. When I was a boy, our family had an aluminum fishing boat with a small outboard. Later in life I went sailing on a local lake with a friend on a Hobie Cat for an hour or two. That was the extent of my sail training. These days our family spends a few summer days at a cabin in Michigan’s Les Cheneaux Islands. Surrounded by crystal blue water, islands, rock beaches, and active teenagers, it was easy to conclude that a sailboat would be a welcome addition at the cabin despite our lack of sailing know-how. As a builder and wooden boat enthusiast, the decision to build a wood sailboat was not difficult.
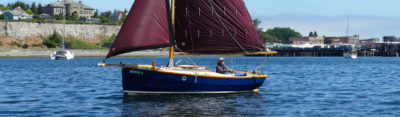
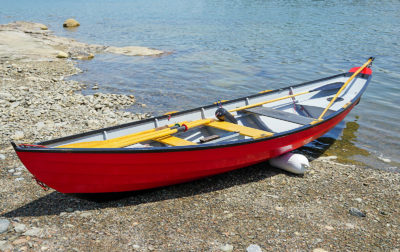
We chose to build the Sand Dollar from Arch Davis Design. It’s an 11′ flat-bottomed skiff that can be rigged to sail, rows well, and looks good with its plywood lapstrake sides. I had recently built a 21′ Widebody Tolman Skiff and was eager to try a different building method and to have a boat I could transport on the top of our vehicle. Limiting the number of boats we own is not a priority; limiting the number of trailers and the associated paperwork and maintenance, is. I was also excited about a boatbuilding project that would take much less time than the three years I spent on the Widebody.
Arch Davis designed the Sand Dollar for first-time builders, including those with no previous woodworking experience. As he notes, he took great pains with the lines, building a model to refine the shape. The result is a very pretty, practical little boat that will satisfy both the novice and experienced boatbuilder.
The Sand Dollar plans includes 16 sheets of drawings, a Mylar sheet with full-sized patterns, and a 75-page manual. Study plans, an instructional DVD, and various kits are also available. We found the building manual to be comprehensive with step-by-step instructions, drawings, photos of the building process, a list of required materials and tools, and even a glossary of terms that might be unfamiliar to a novice boatbuilder.
 Photographs by the author
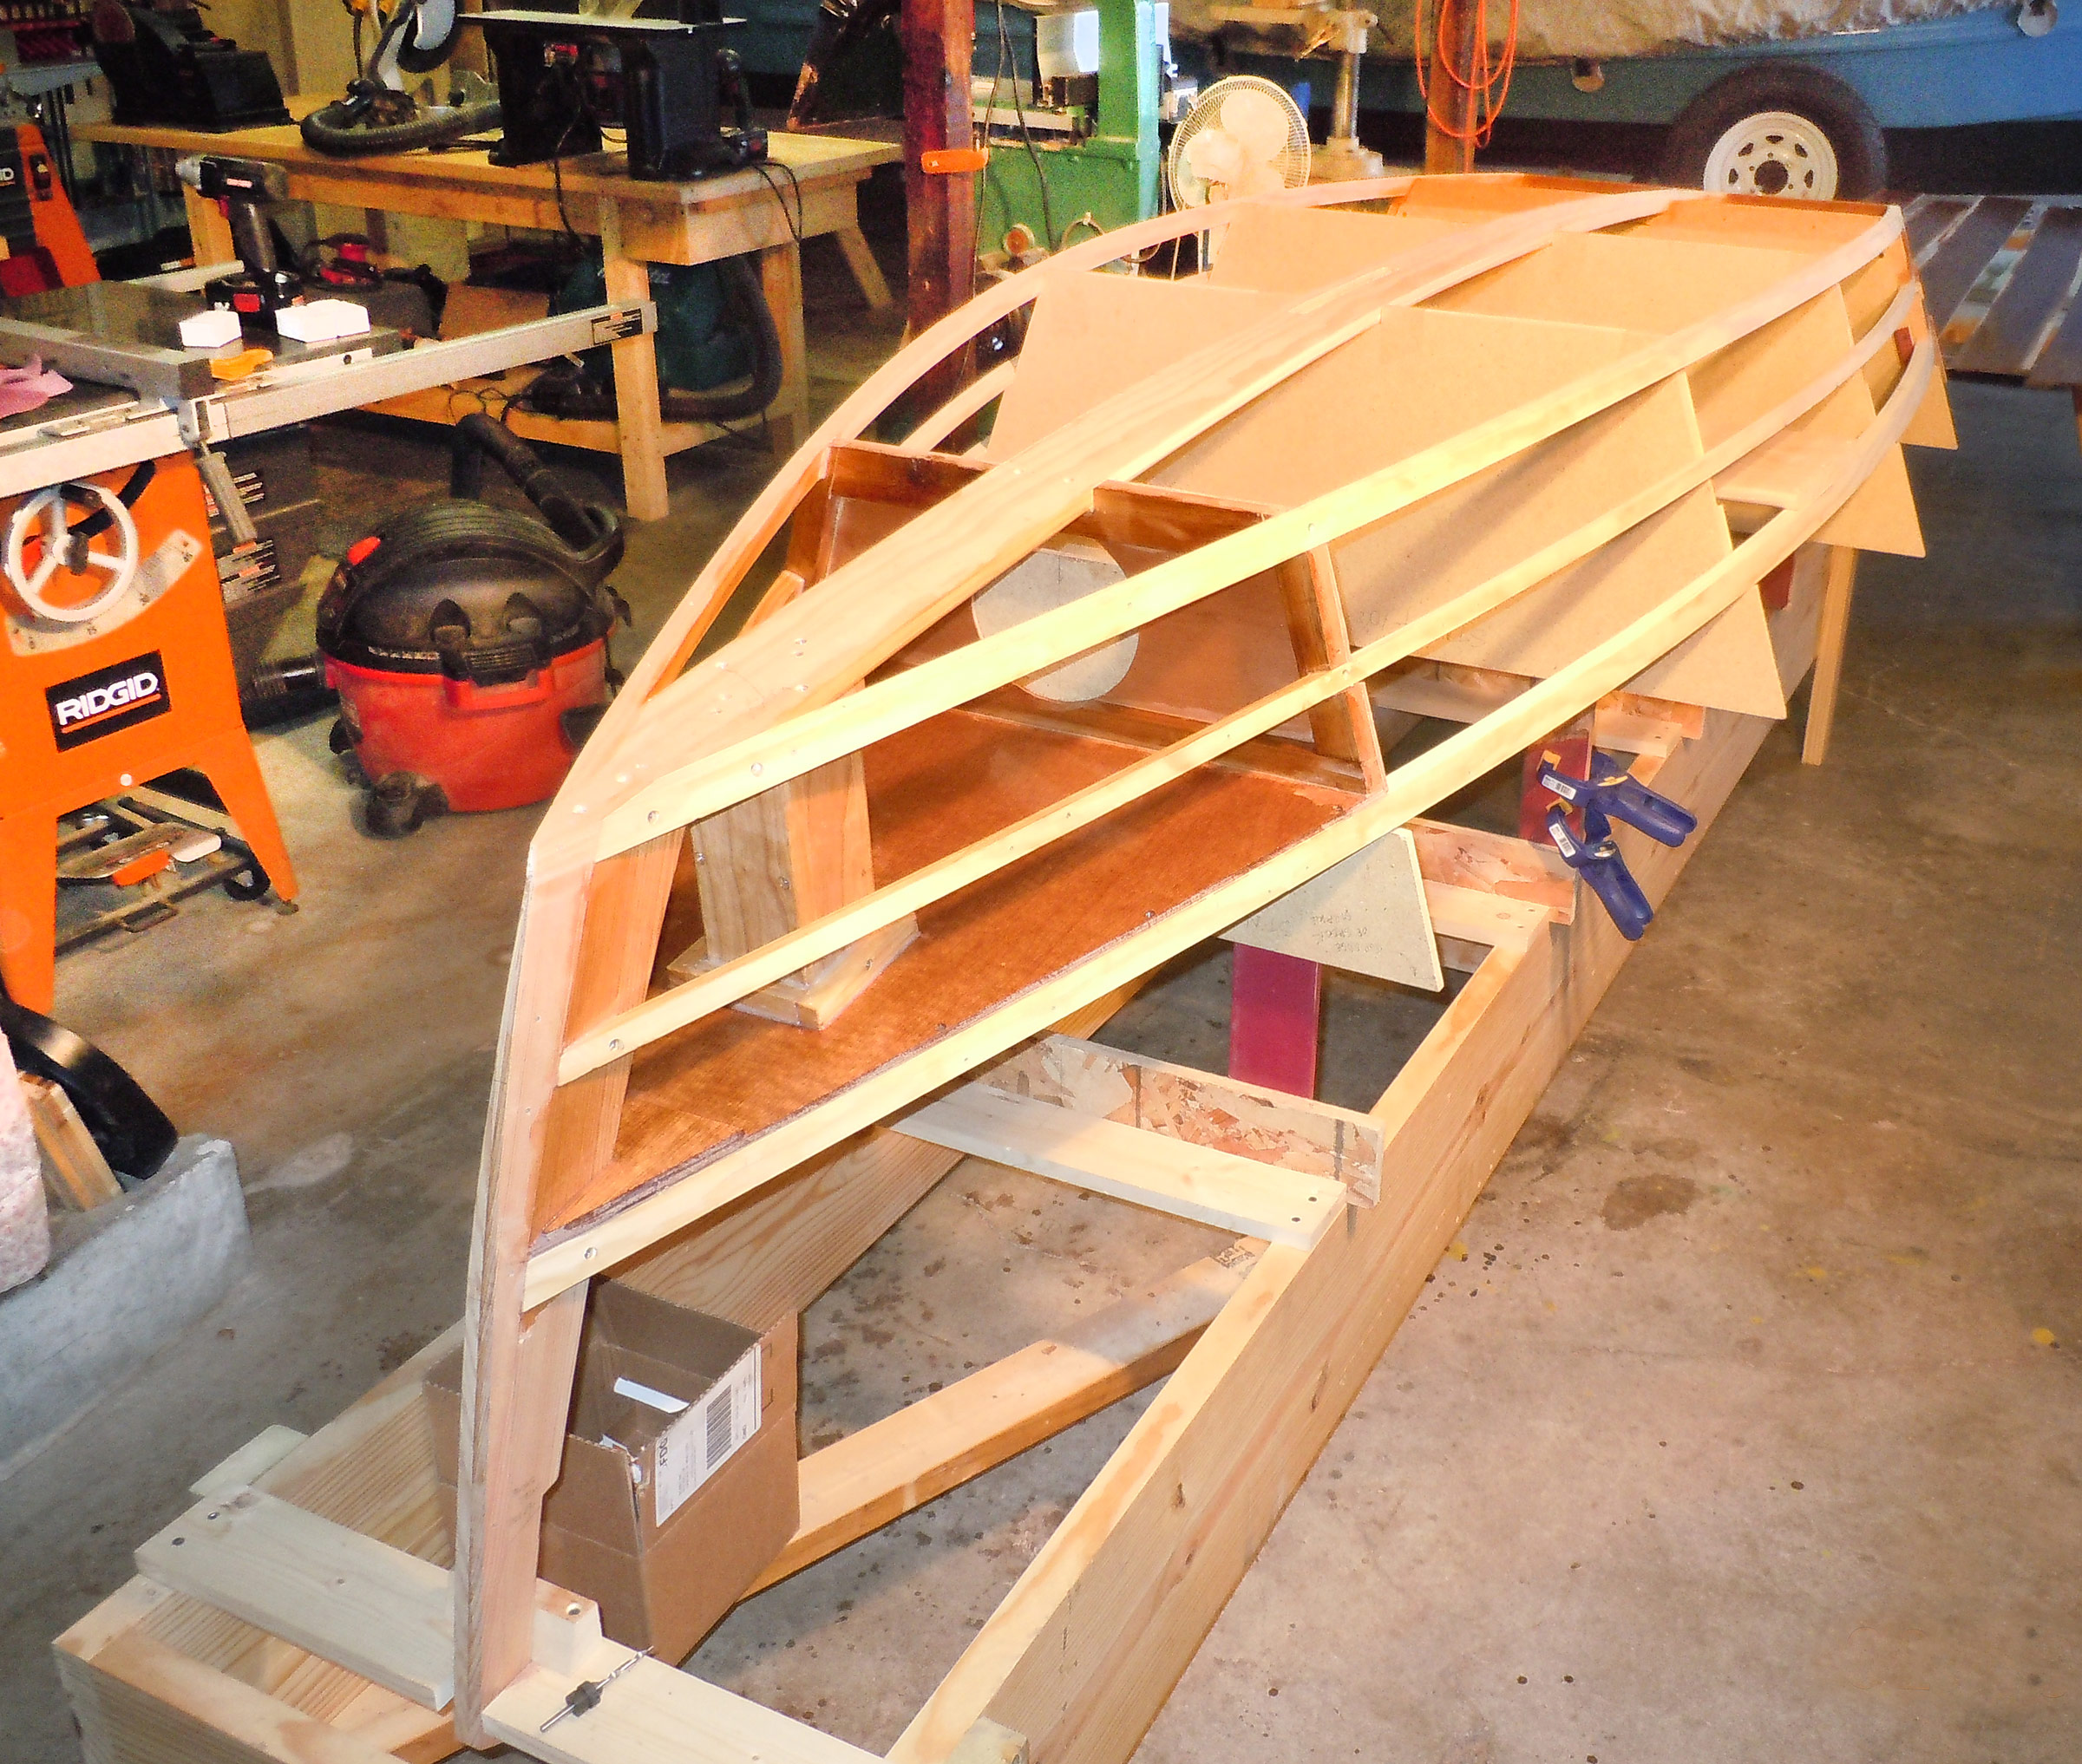
The center thwart and the flotation compartments’ tops are installed before the hull is planked, making it much easier to trim them to fit by planning them flush with the longitudinals.
The Sand Dollar requires three sheets of 6mm marine plywood—we used meranti — as well as lumber for the various other pieces. The boat is built upside down on a simple jig. The stem, transom, bulkheads for flotation chambers fore and aft, and two temporary frames are set up on the strongback, and the keel, chine logs, stringers, and seat risers are bent over them. (While the fore-and-aft framing members enable a much easier lapstrake planking process, we discovered after the boat was in use that the stringers and seat risers make the boat more difficult to clean. I normally tip the boat on its side to spray the debris and spiders out. The stringers and risers prevent the dirt and water from freely draining out through the open inwale.)
A sheet of plywood is laid over the assembly and cut to shape to become most of the bottom. The forward part of the bottom is joined to it with a 4″-wide plywood butt strap. The use of butt straps, applied while the pieces to be joined by them are on the building jig, simplifies the building process by avoiding the need to scarf plywood panels together.
The manual suggests installing the seats before the side planking so that the seat shape can be determined simply by scribing along the outside edges of the seat risers instead of having to measure and cut them to fit inside the boat, as you would if they were installed after planking. A mast trunk is installed between the keel and the forward seat top. After the seats are installed, which includes the tops of the flotation chambers, the sides are planked. The laps aren’t beveled, but gains are cut in the ends. Screws and epoxy join the planks at the chine, lap stringer, and riser. After the skeg deadwood is scribed to fit the bottom, it is fastened with screws and glue.
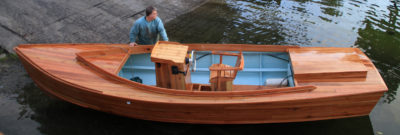
The hull is removed from the strongback and flipped over for installation of the center thwart’s knees and a small foredeck with mast partners. While the plans call for half-round guards at the bottom of the sheerstrake, we left them off and opted to install just the rubrails at the top. The sheer’s inner side is finished with an open gunwale using evenly spaced 2-1/2″-long blocks. The plywood tops of the fore and aft flotation compartments get dressed up with ¾″ lumber. The plans include drawings and instructions for both a centerboard and daggerboard case. We went with the more easily built daggerboard case.

The kick-up rudder has 1/2″ plywood checks and a 3/4″ lumber rudder blade. The manual advises shortening the top pintle to avoid having to get both pintles lined up over their respective gudgeons at the same time. The longer pintle goes in first, then the top one, and both come to rest properly on the gudgeons.
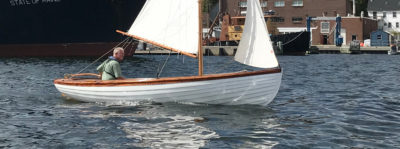
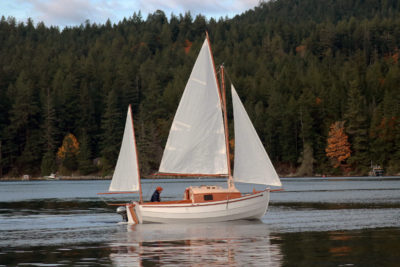
The drawings and instructions cover the making of the centerboard or daggerboard, kick-up rudder and its tiller, and spars. The Sand Dollar design offers a choice of a gunter rig, a standing lug rig, and a sprit rig. All three rigs have short spars and an unstayed mast. We went with the standing lug with a sail area of 49 sq ft. We opted to buy a sail kit from Sailrite and sew the sail ourselves. After sending the sail measurements to Sailrite, we received a kit with everything we needed and detailed sewing instructions. Once the sail was finished, the rigging was pretty simple. The sail is laced to the boom and yard, the mainsheet attached to the boom via a double block, and the halyard attached to the yard.
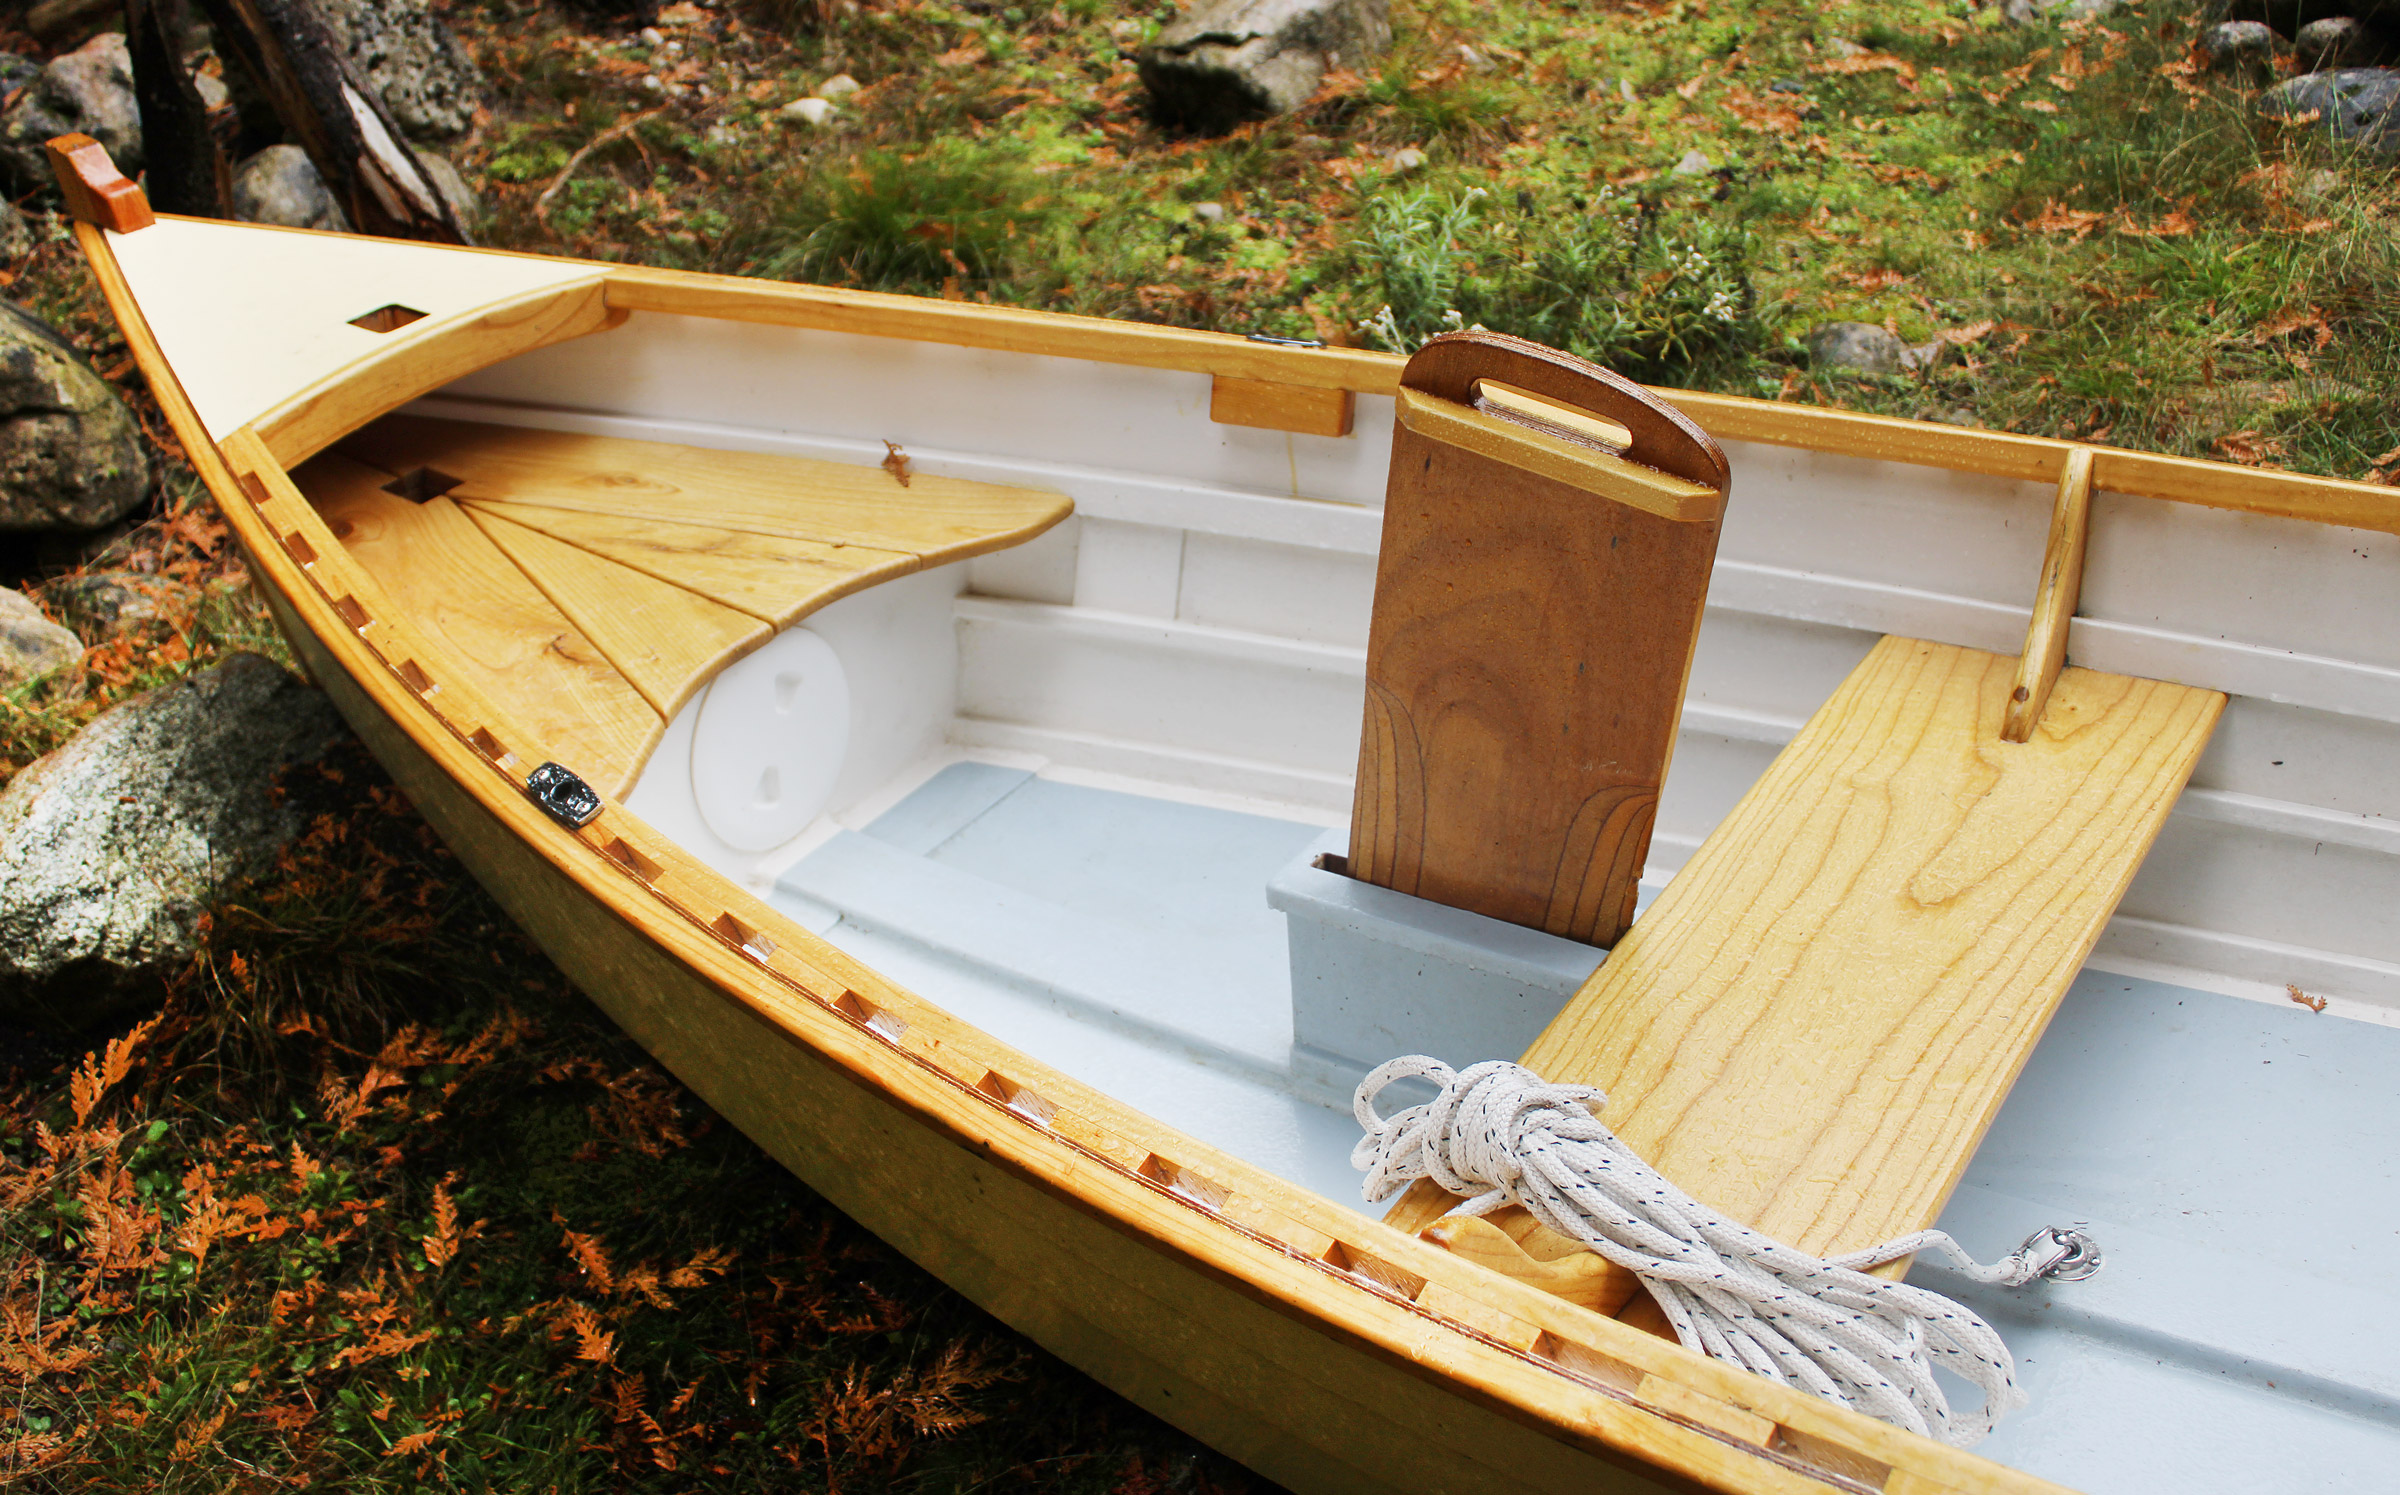
The plans provide drawings and instruction for a pivoting centerboard as well as the daggerboard shown here. The author opted for the easy construction of the daggerboard but would switch to the centerboard if he were to build the boat again.
When we finished our Sand Dollar, we cartopped it to our cabin. For our family, the easy-to-use things are the ones that get used often and the Sand Dollar is definitely in the easy-to-use category for a sailboat. It takes two or three of us to carry it to the water. The sail, rolled up around the boom and yard, follow along with the mast, oars, daggerboard, rudder, and tiller. The sail is unrolled and the halyard is run through the sheave at the top of the mast. The mast is dropped through the foredeck and into the trunk in the bow seat. The yard is raised until the boom jaw hits the mast collar, and the sail is tensioned; the halyard is cleated off at the base of the mast. The mainsheet is threaded through the blocks and the rudder with its tiller is installed on the transom.
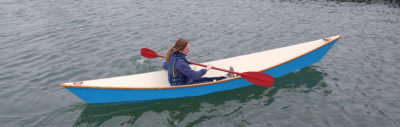
I do not have a lot of experience sailing other boats, but the Sand Dollar is quite responsive. When the wind gusts just a little, the boat heels immediately and feedback is quickly felt via the tiller and the mainsheet. In strong or gusty winds, it is easy to make quick adjustments to either the mainsheet or tiller. I have never checked its speed with a GPS, but for the way we sail it, it is certainly fast enough. I like to sail just fast enough to hear the water gurgle along the hull and feel a surge of power every now and then. At 11′, the Sand Dollar is a small boat. When I sail solo, I sit on the windward side of the center thwart facing aft with one hand holding the mainsheet and the other on the tiller. This works well. When I sail with one of the children, they sit in the stern and man the tiller. They have to be nimble to move around the tiller while coming about.

Three rigs are detailed in the plans: a sprit or a lug rig, both carrying 49 sq ft of sail, and a gunter rig with 55 sq ft.
When I took our teenage daughter for her first sail in the Sand Dollar—her first sail ever—we happened to execute a successful capsize test. We did our usual upwind leg and turned for the downwind run back to the dock. The sailing was going just fine until we suddenly had an accidental jibe. The boat ended up on its side with us swimming. The boat didn’t fully capsize so it was not difficult to right by pulling on the high gunwale while pushing down on the daggerboard. Once upright, it was full of water up to the top of the daggerboard trunk. The two flotation tanks provided enough support for us to get ahead of any water coming in the daggerboard slot. It did not take much bailing before the slot remained above the water level and we were able to scoop most of the water out. The episode was a little shocking at the time, but it was a good learning experience. We learned not only about accidental jibes but also how the Sand Dollar can recover from capsizes. If I were to build the boat again, I would opt for the centerboard rather than the daggerboard. We occasionally forget to insert the daggerboard after leaving the beach or to retract it when coming into the beach. Not having it inserted is not so bad and we do enjoy the surge of speed once we do deploy it. Forgetting to retract it coming into a rocky shore is an entirely different experience.

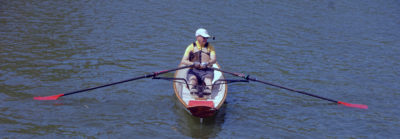
The Sand Dollar is designed with two rowing stations: one in the center for solo rowing and another in the bow for bringing a passenger along.
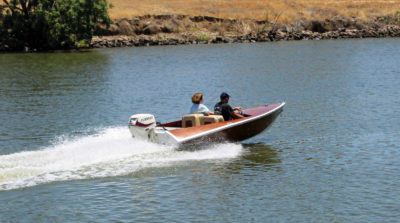
With a single rower, the boat is well balanced, tracks well, and the transom does not drag. The trim of the Sand Dollar, as with other small boats, is sensitive to weight placement whether rowing or sailing. The Arch Davis Designs description of the boat notes “you can put a small outboard on the transom if you wish,” but we have not, so far.
There are many features that make the Sand Dollar attractive to a builder or sailor. It is a well-designed, good-looking, safe, versatile, small skiff with well-thought-out and comprehensive building plans. It is easy to store and transport, and its simple rig is not intimidating to the beginning or young sailor. For our family, it provides a great way to spend a relaxing day on the water.![]()
Sam Smith is an engineer, farmer, and builder living in the Great Lakes area. Boats and boat plans are his endless source of observation, study, dreaming, and building, and he and his family enjoy using the boats he has built to explore the great outdoors together.
Sand Dollar Particulars
Length: 11′
Beam: 3′ 10″
Draft (board up): 5″
Draft (board down): 1′ 11″
Hull weight: 95–120 lbs

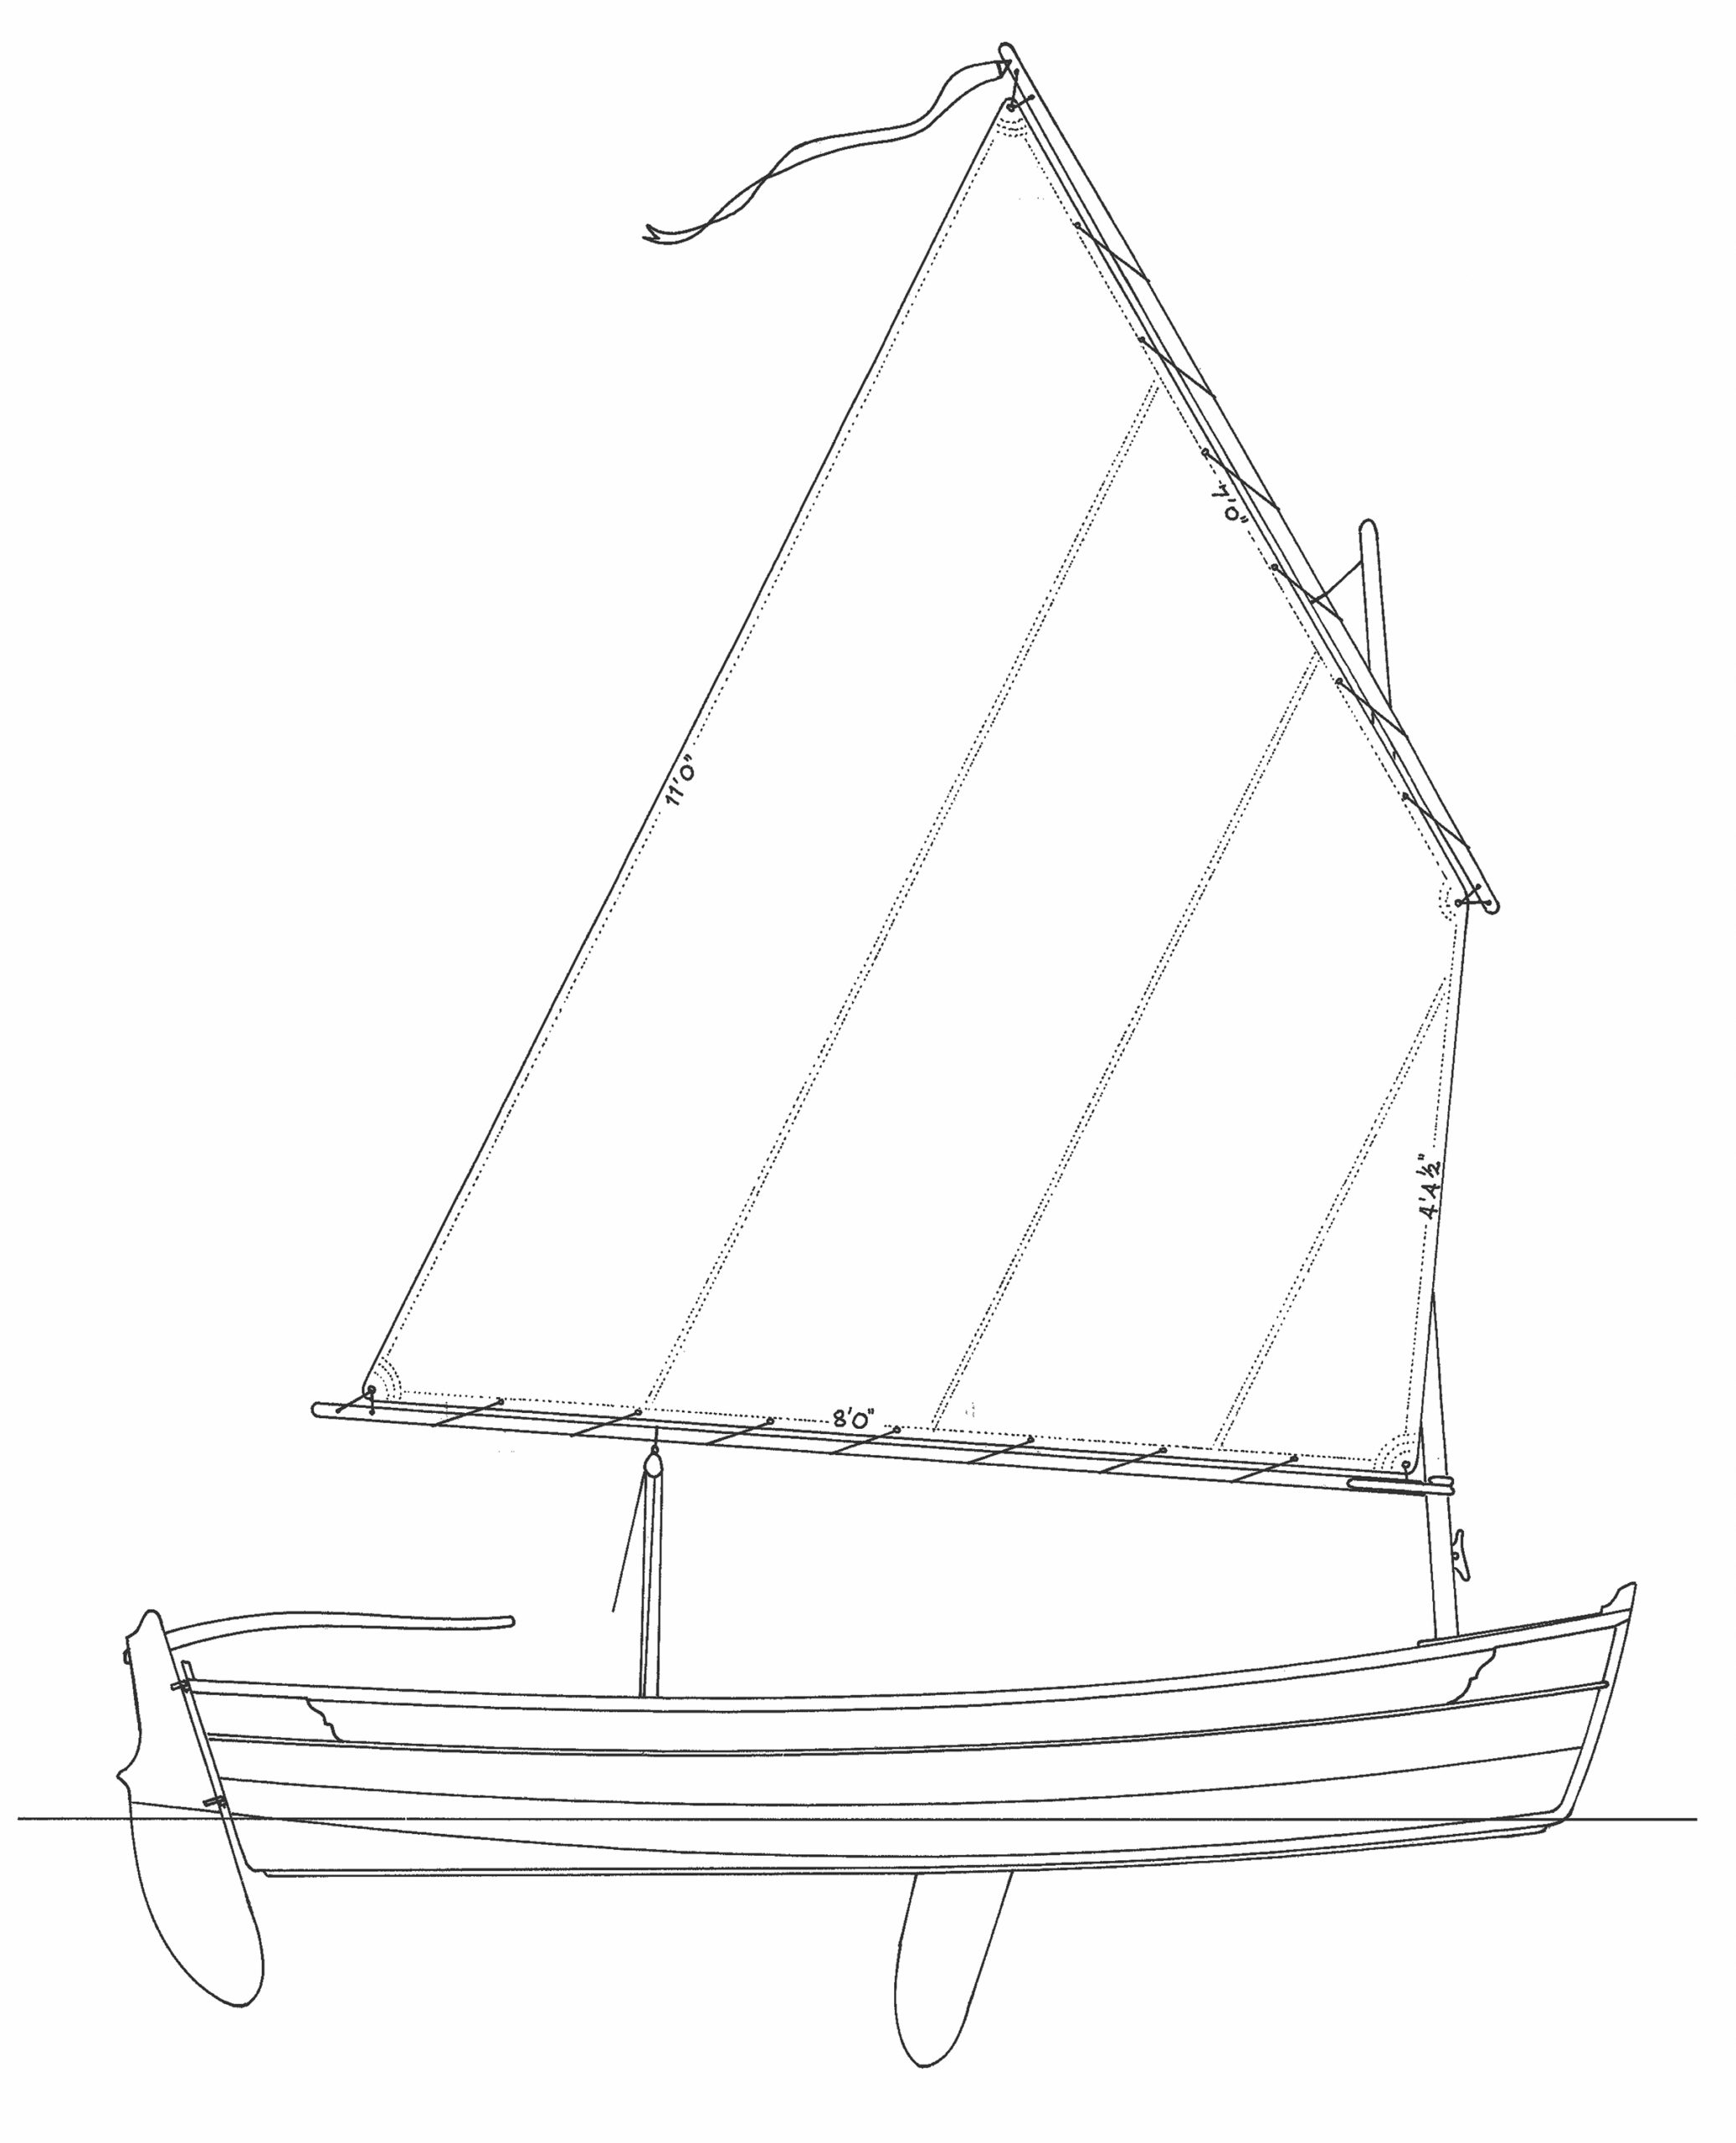
Lug
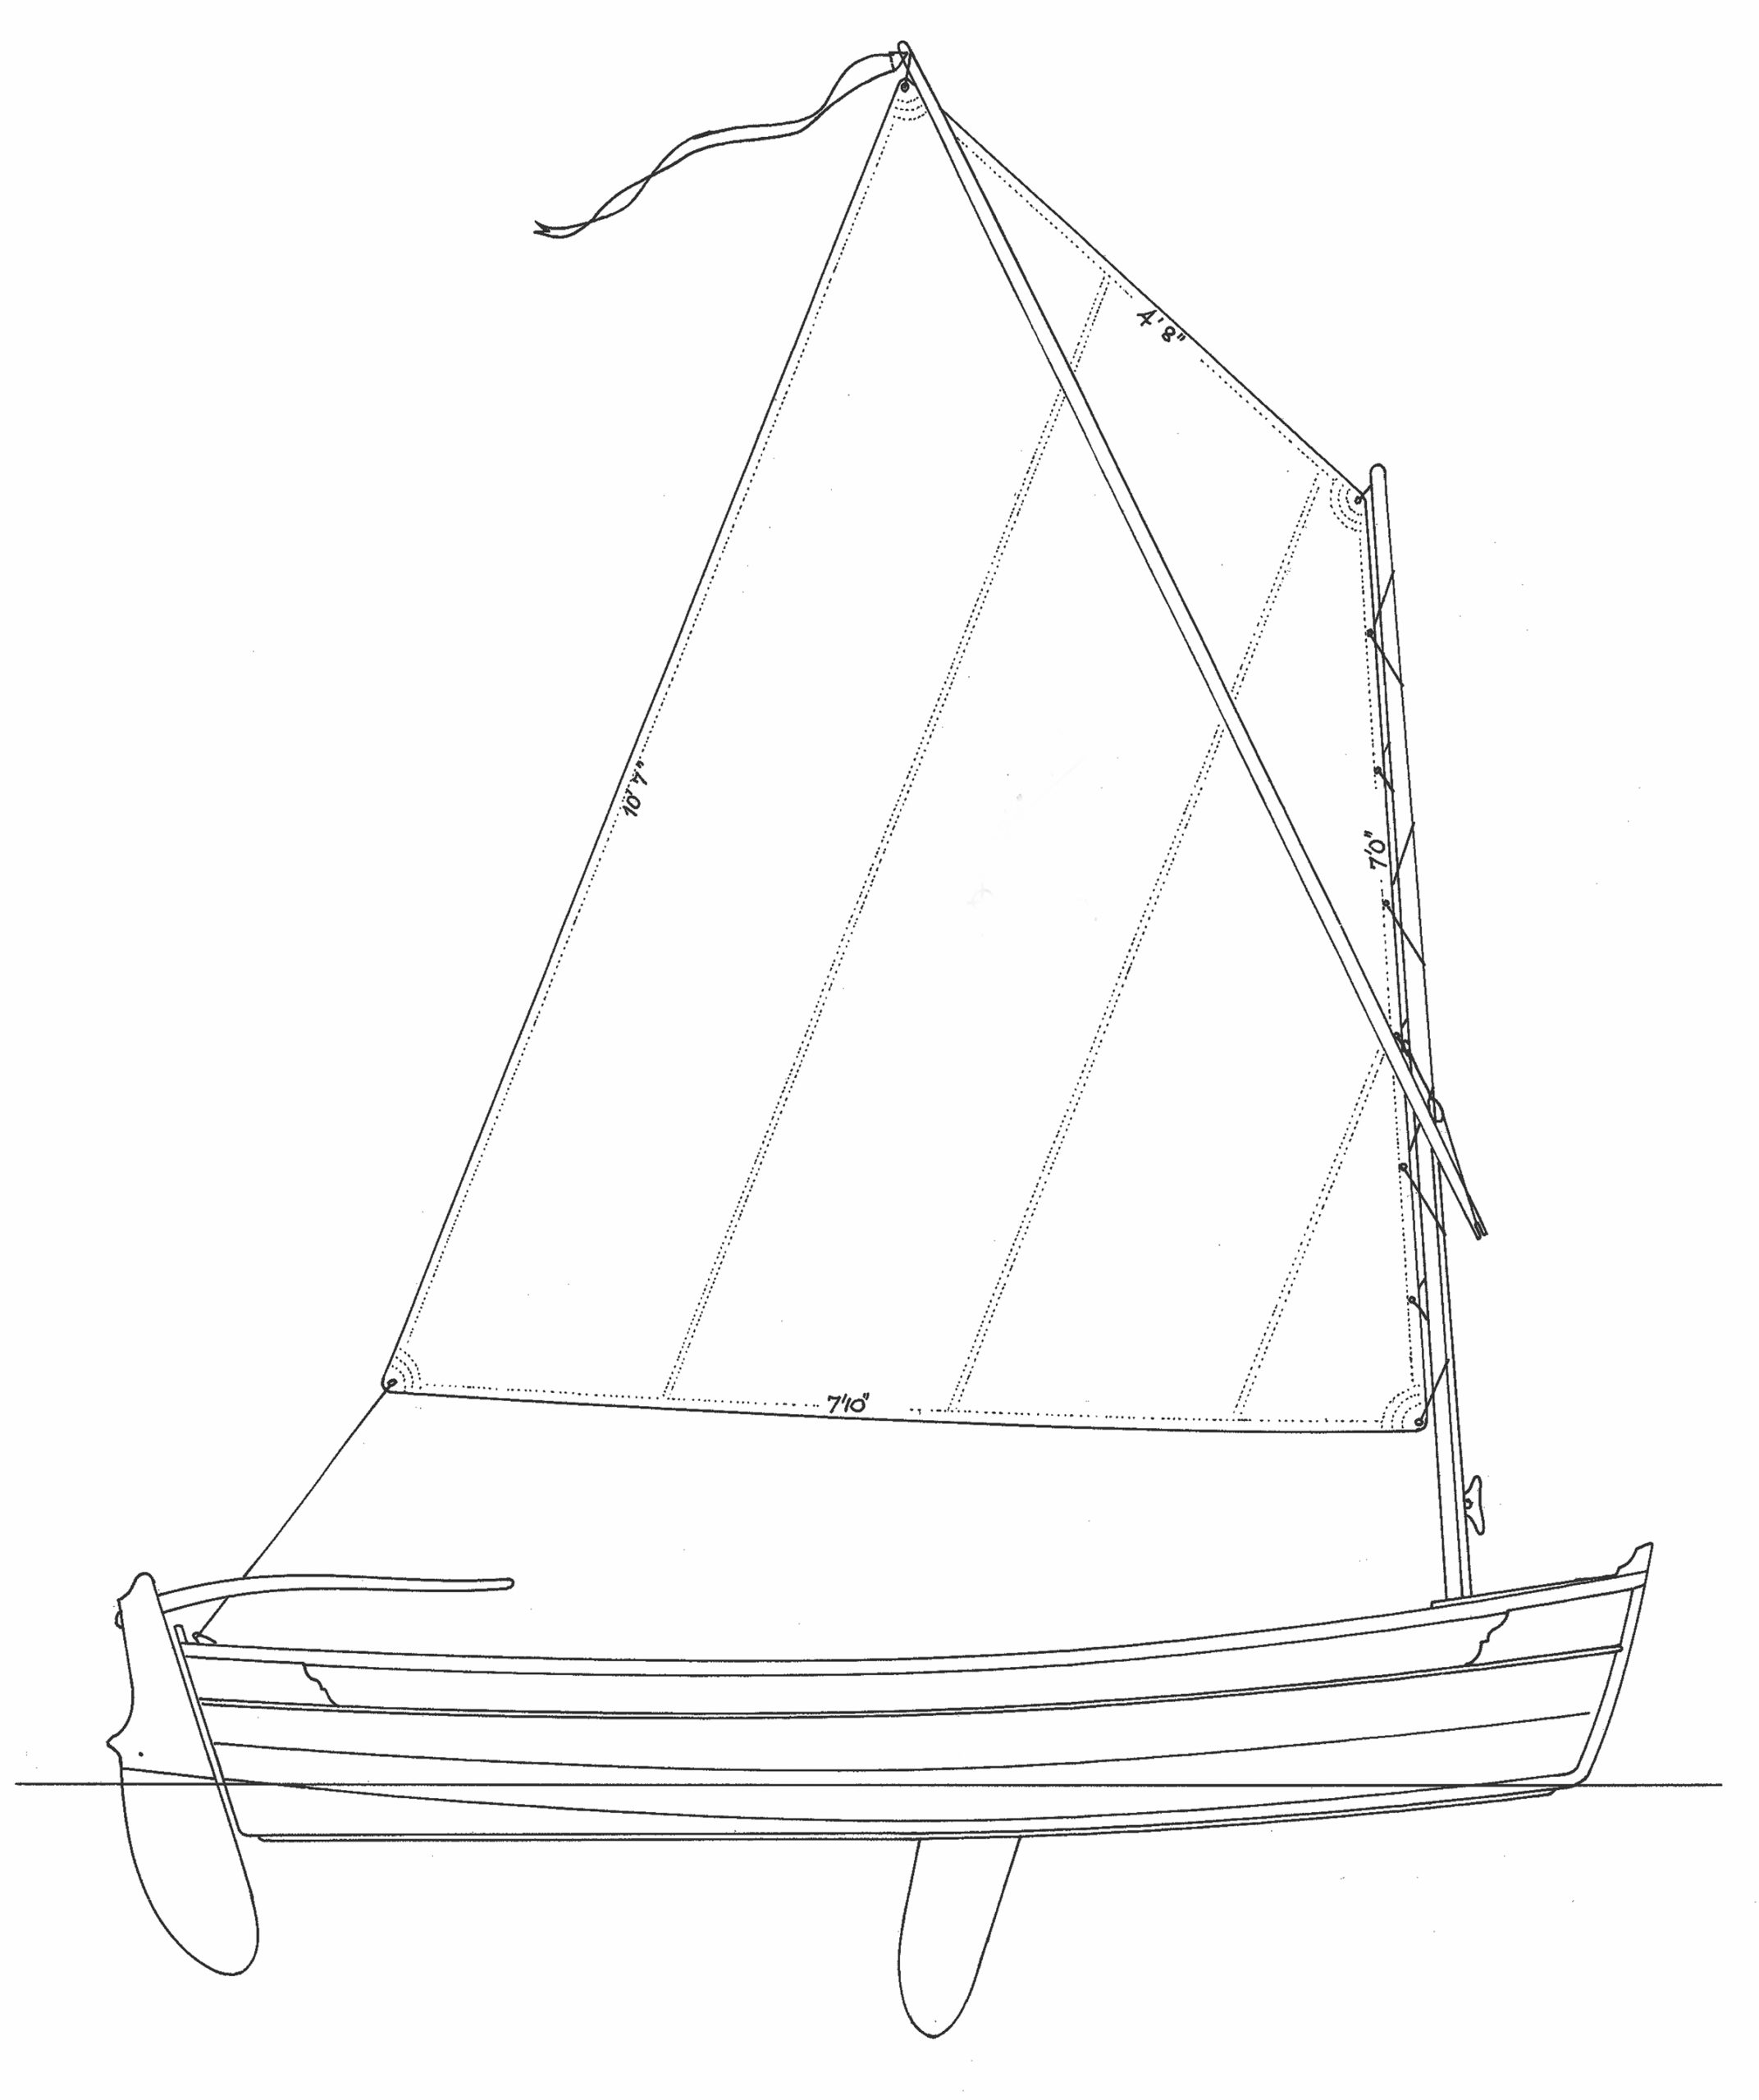
Sprit

Gunter
Full-size plans for the Sand Dollar are available from Arch Davis Designs for $135. Arch Davis Designs also offers study plans for $12 and instructional DVDs which sell for $35. [The prices first presented here weren’t accurate. They have been corrected. —Ed.]
Is there a boat you’d like to know more about? Have you built one that you think other Small Boats Magazine readers would enjoy? Please email us!


I’ve forgotten my daggerboard as well. Embarrassing. Keep it together with the rudder. Maybe a bag that has slots for rudder, tiller and daggerboard. There are ways to help a daggerboard around rocks, but they need to be incorporated in the build. If you rake the head ledge of the trunk forward and use a simple rope loop up handle the board will kick aft ( the top goes forward) when you hit something. Something that most designers don’t know about. Same thing with a centerboard; if the head ledge rakes forward you can pull the centerboard up using the top corner and the board can go vertical.
I think I recognize Government Bay in one of those pictures based on the boat house in the background. Could I be right?
We also frequent those waters and I will keep an eye out for your great Sand Dollar next year.
Beautiful job!
I built the Sand Dollar 25 years ago. It was my first build and after I got over the fact that it didn’t need to be perfect, it was a lot of fun to build. I thunk I had seven types of wood. I didn’t put a dagger board in because I was only interested in rowing. However I have used a 5-hp motor on it which pushed it to 16 knots in calm water. I still need it but haven’t used it a bunch of years.