Closed up against rain or cold, the tent is cozy without feeling cramped. The attached flap of PVC vinyl provides a place to take shoes off to keep dirt out of the tent.
If you learned “Waltzing Matilda” in grade school you might recollect that the song is not about a dancing girl, but about a “jolly swagman camped by a billabong under the shade of a coolibah tree.” The coolibah tree is about the only thing in the song that is what it sounds like, a tree. Waltzing is Aussie slang for traveling on foot and Matlida is slang for a bedroll, or swag. The swagman was a drifter who had fallen on hard times and was looking for work. The song was written in 1895, and these days the term swag has come to mean a portable sleeping shelter falling somewhere in size between a bivibag and a tent. They’re common in Australia, and have recently crept into the North American market.
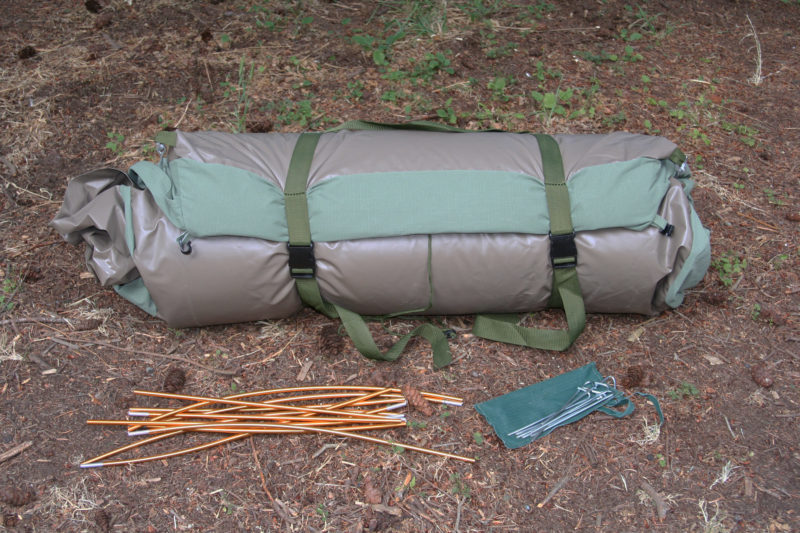
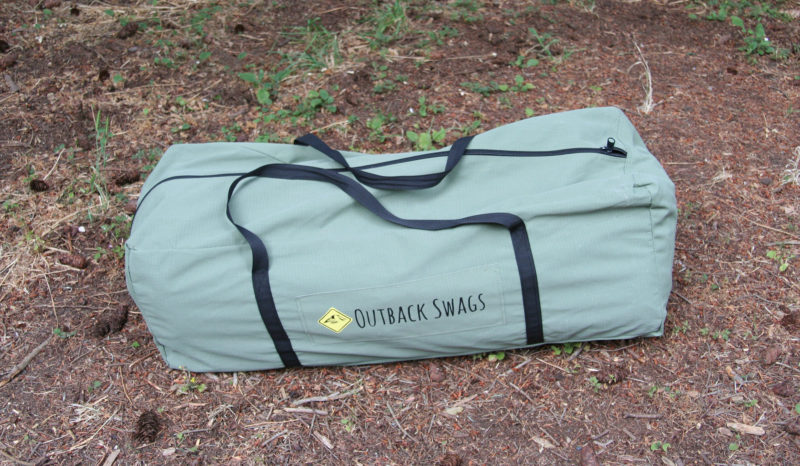
The swag has webbing and buckles to keep the tent and mattress tightly rolled up.
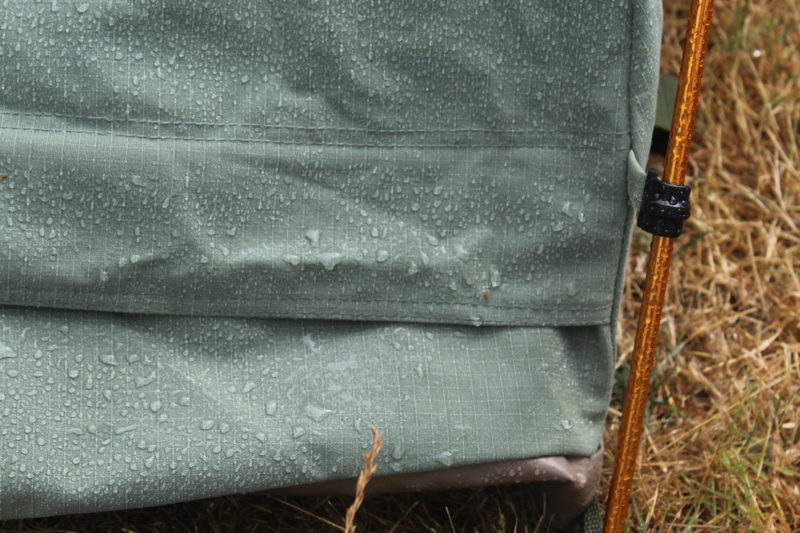
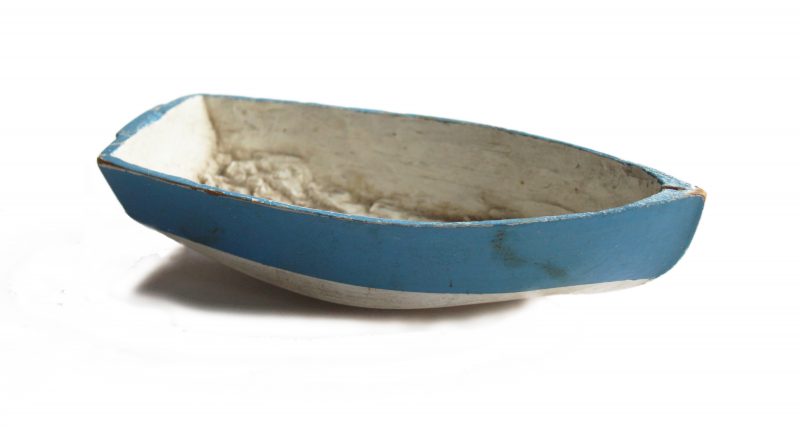
Like drifters, many of us who cruise in small boats need a place to sleep, and a swag tent could be an option worth considering. The Pioneer Swag Tent is made of 12-oz ripstop canvas made waterproof by its tight weave and durable water-repellent (DWR) coating. I poured a quart of water into a bowl I formed with the fabric and left it there for a couple of hours. No water seeped through, and the underside of the fabric felt dry. The rain that fell on the tent overnight beaded up and rolled off.
The instruction included with the swag notes: “All canvas camping equipment should be seasoned. This is when you wet the fabric to let it swell around the stitching. This will make the stitching seams waterproof.” The fabric has been treated with a waterproofing product to make rain and dew bead up and roll off.
The bathtub floor is made of coated vinyl and rises up about 1-1/2″ to meet the canvas top. An extra piece of the vinyl is sewn on to serve as a foot mat. It’s a nice touch that keeps grit out of the bed and stinky shoes out of the tent. I tucked my shoes under the mat and they stayed dry on the night it rained.
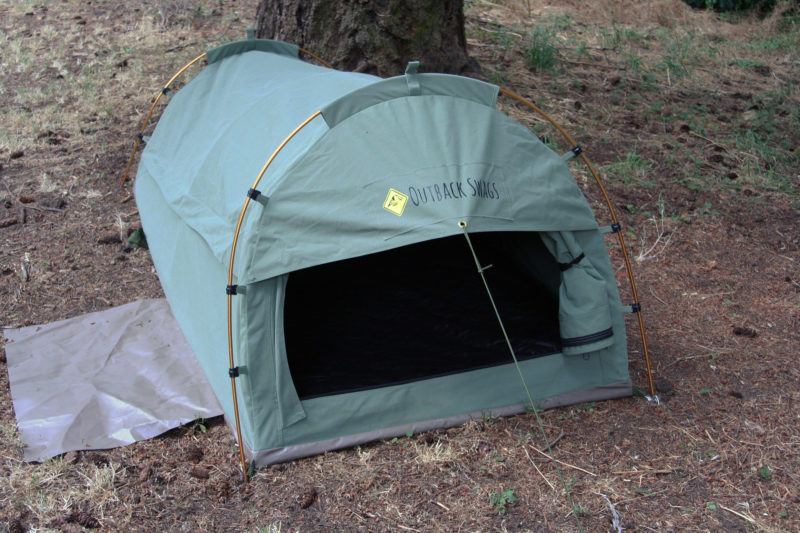
Three sectioned aluminum poles support the tent. Guy lines to two tent pegs pull the canopy tight. Another four pegs anchor the corners of the floor.
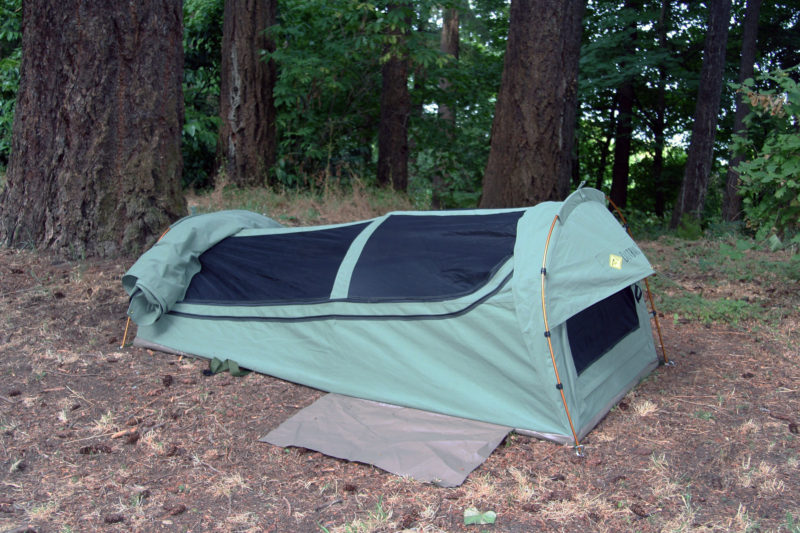
Rolling back the canvas top exposes the bug netting and allows a cooling breeze to flow through. The netting can be rolled back as well for entry and stargazing.
The top of the tent unzips and rolls back to uncover a nearly full-length bug mesh that also unzips to uncover the interior space. The head end of the tent has a doorway with a bit of an awning over it and provides another way to get into the tent. I had enough room in the tent to crawl in through the end doorway head first—easier than backing into it—and I turned around once inside. The tent is 7′ long and 3′ wide, slightly longer and narrower than an American TwinXL bed. At the head end the inside space is 31″ high, 17″ at the foot.
The door at the head end of the tent is rolled up to the right. The opening was a tight squeeze as an entry, but a reasonable option in a downpour. I could crawl in faster head first and then turn around inside. The guy line wasn’t a significant obstacle.
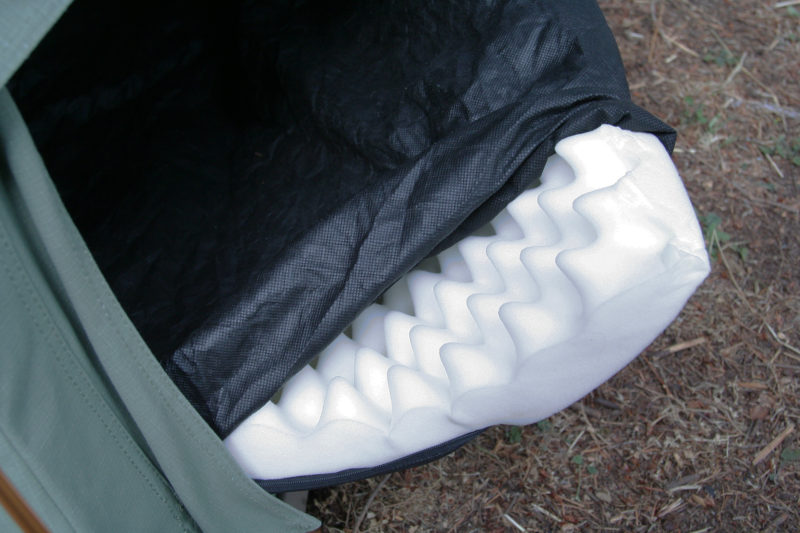
The mattress is egg-crate foam with a non-woven fabric cover, equipped with a zipper to make it removable for washing. The foam is 2” thick and surprisingly comfortable. I’m used to self-inflating sleeping pads that allow me to set a level of inflation that keeps my hips and shoulders off the ground, so with just 2” of foam, I expected to ground out and feel pressure points, but I felt evenly supported and remained comfortable through the night.
The 2″ egg-crate foam, zipped into a washable cover, is surprisingly comfortable on hard ground. I preferred having the textured side down.
There are two pockets inside the tent—one canvas and one mesh—for storage of glasses, a flashlight, and other small items. The tent comes with a zippered duffel made of the same rip-stop canvas as the tent and it’s made oversized to accommodate a sleeping bag. I’d recommend a waterproof duffel or dry bag for carrying the swag tent in an open boat to keep it fully dry and to serve as flotation.
In a timed trial, I set the swag tent up in 3 minutes and 45 seconds and then got it knocked down, rolled up with a sleeping bag and pillow in it, and zipped into the duffel in 3 minutes 47 seconds. The duffel measures 36″ x 14″ x 14″.
The duffel has some extra room beyond what the tent and mattress require, so the swag tent can be rolled up along a sleeping bag and pillow inside and still fit. While the duffel is bulky, it takes up as much space as the four or five separate bags the gear might ordinarily occupy.
The first two nights I slept in the Outback Swag Tent were at the end of summer days with temperatures in the high 80s. With canvas covers the top and the end unzipped, the mesh allowed a cooling breeze to make it easy to fall asleep. On the rainy night, I kept the top cover zipped up and opened the end door for fresh air. On all of the nights I slept in the swag tent, I was just as comfortable as I would have been in my bed at home and I even slept longer.
In the middle of a cool morning, with the temperature at 60 degrees and a bit of a breeze blowing, I stepped into the swag tent for a nap and zipped up the cover. I felt warmer immediately just being out of the breeze. I didn’t have the sleeping bag with me, but I didn’t need it. The small enclosed space and the insulating properties of the canvas are good measures against the cold. In 20 minutes the temperature inside the swag tent had gone from 60 degrees to 78 degrees, warm enough to nap comfortably without a sleeping bag.
The nights I slept in the Outback Swag Tent, I was just camped in the back yard. After one night in it I had the information I needed and could have gone back to my bedroom, but I liked the cozy space and slept well. The Outback Swag isn’t meant for backpackers. At 18.7 lbs for the tent, mattress, poles, stakes and duffel, it’s heavy by backpacking standards, but it’s also heavy duty and should hold up to a lot of hard use providing years of comfortable camping.
Christopher Cunningham is the editor of Small Boats Monthly.
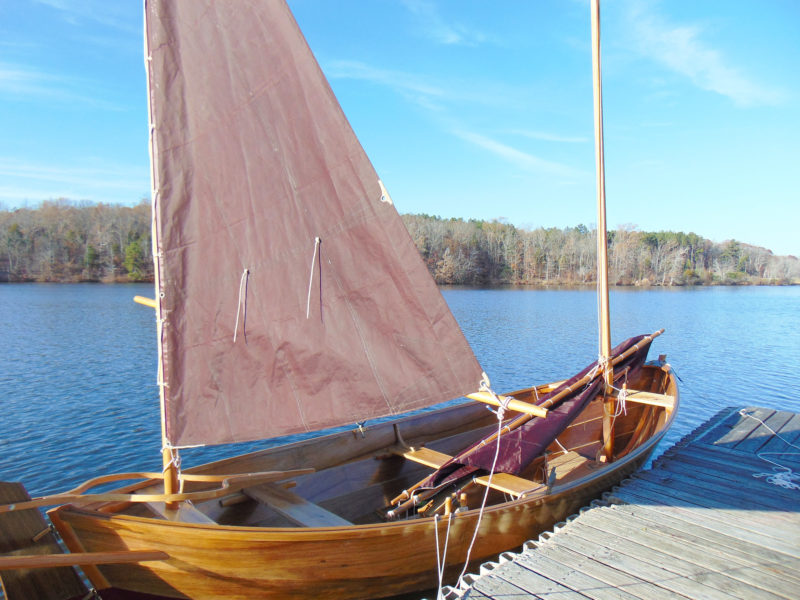
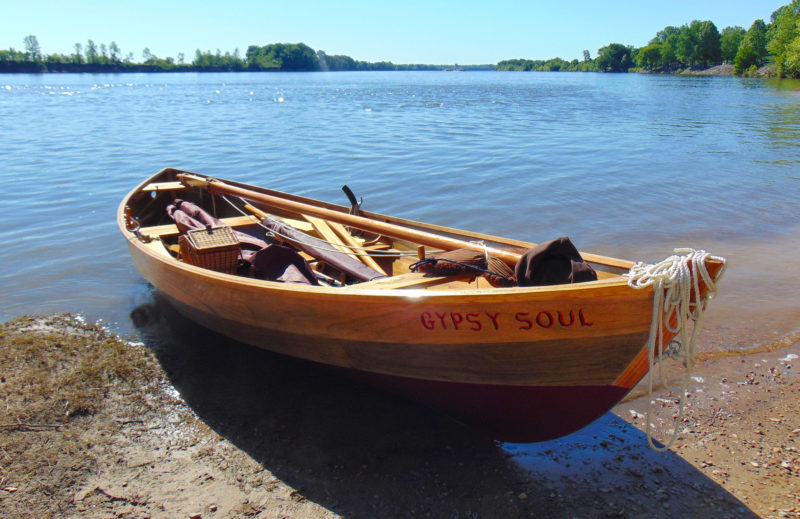
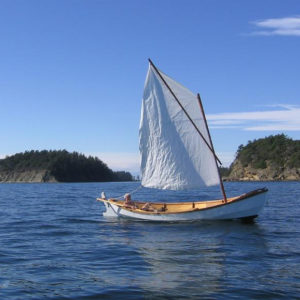
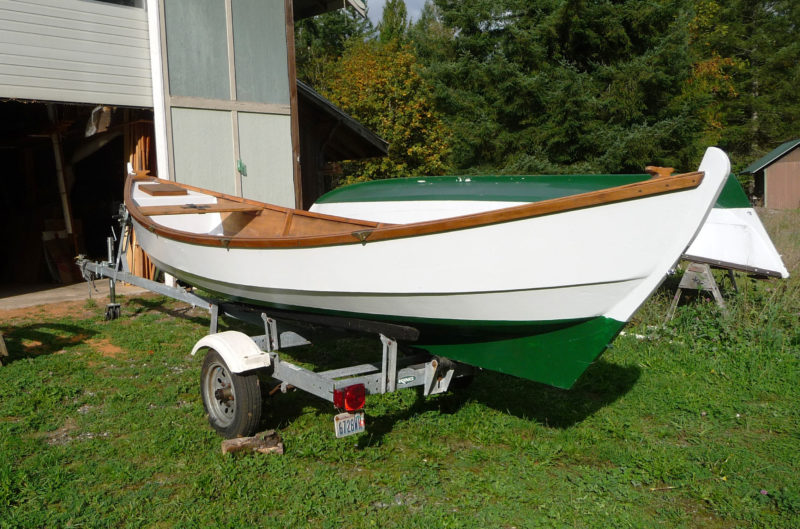
GYPSY SOUL brightens up a dreary winter landscape.
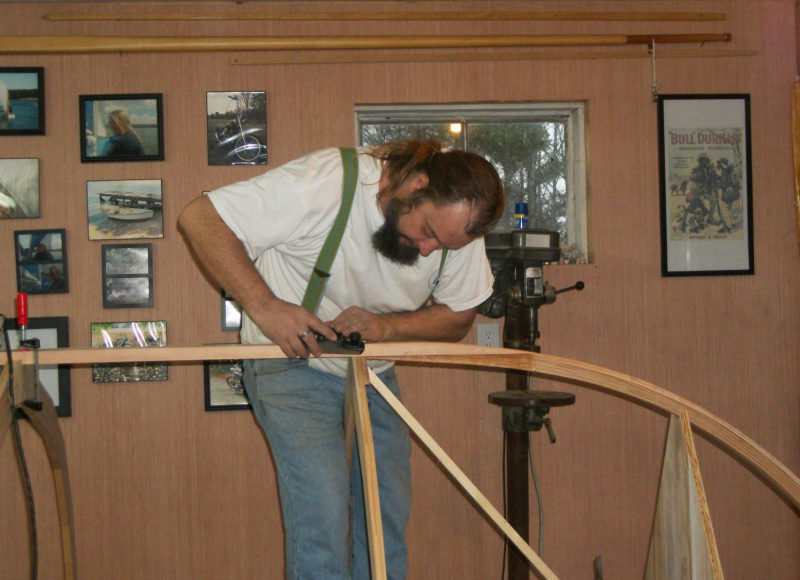
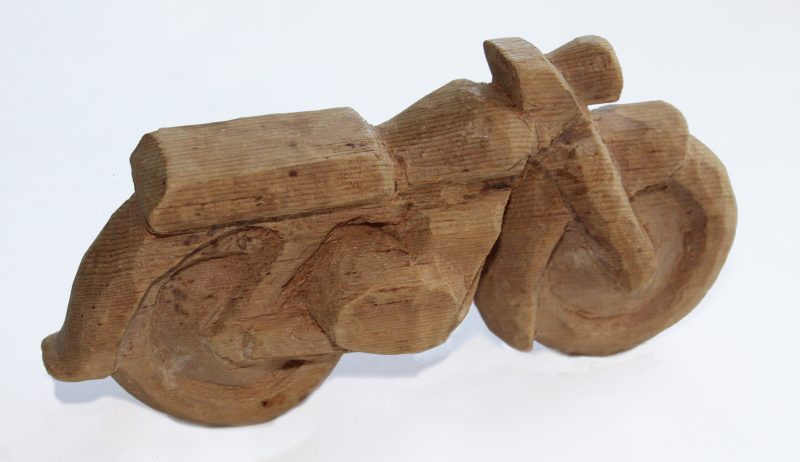
Scotty Pugh of Sardis, Tennessee, grew up riding dirt bikes and later indulged his passion for motorcycles as he collected vintage Harley-Davidsons. But a ride gone wrong landed him a hospital trauma ward for a week and he was forced to consider something else to focus his interest upon. “Wooden boats,” he thought, “will keep me entertained.”
Scotty’s shop was an old rural grocery store that was part of his childhood. He couldn’t stand to see it torn down, so he bought it and rebuilt it as his boat shop. The photographs on the wall are a mix of motorcycles and wooden boats.
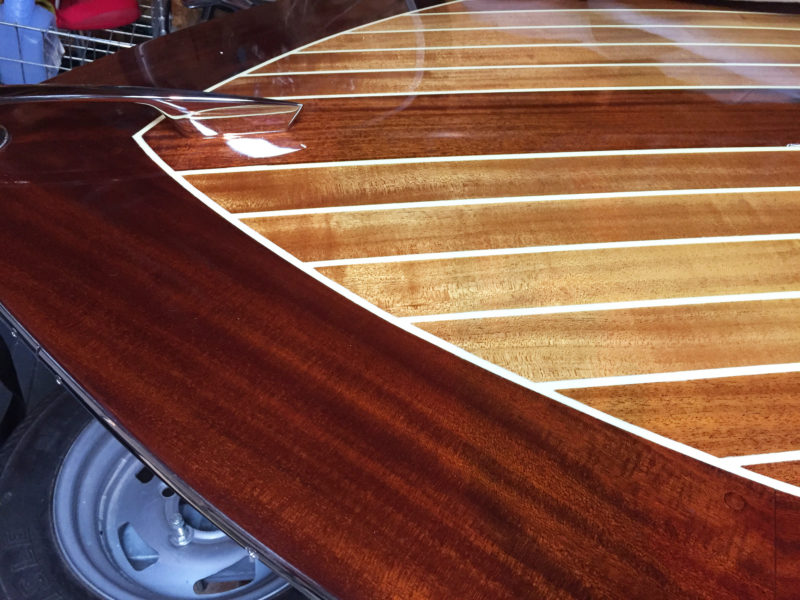
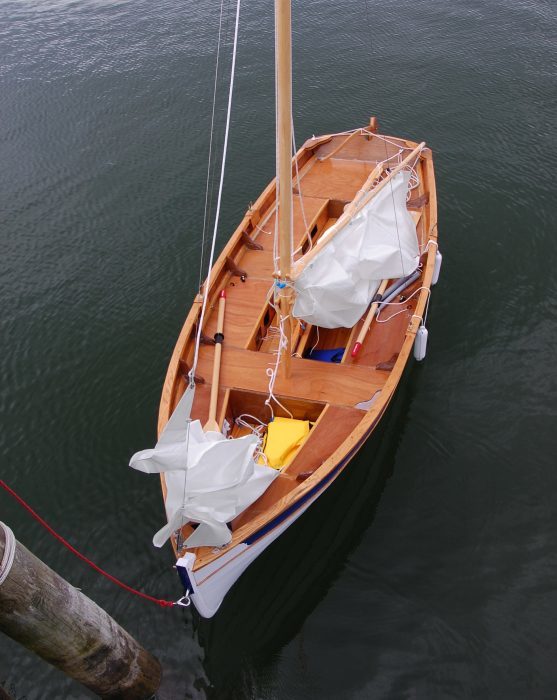
After he built his first small wooden boat there was no turning back. GYPSY SOUL, a Caledonia Yawl, is his fourth boat. While he had acquired a lot of the necessary skills building the first three boats, “the road to building the yawl was not without some curves and potholes.” Work was interrupted when he was installing floorboards and “acting like I was 20 again, inflamed a muscle in my hip and mashed a sciatic nerve. That took me down for couple weeks.” While work on the yawl was slow, it was not without its daily rewards. “The more I’m buried in technology at work, the deeper I bury myself in wooden boats at home.” Scotty’s career has been in the highly technical field of robotic welding, so he counts the time he spends with a hand plane as meditation.
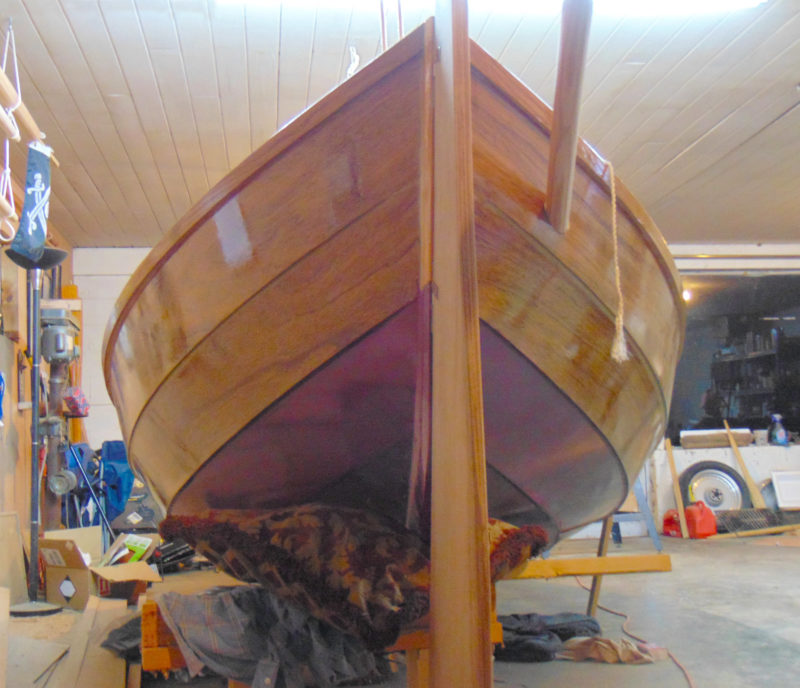
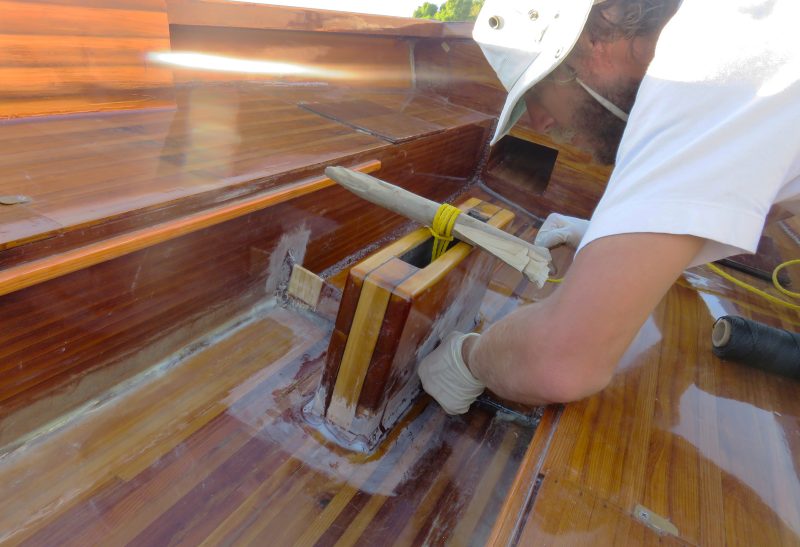
As engineer and longtime woodworker, Scotty is, by his own admission, “a bit ticky about correctness, so construction took awhile.” His tidy work with the epoxy fillets paid off in the bright-finished boat.
Scotty spent five years building GYPSY SOUL, often working with Juilio, his sweetheart at the beginning of the project and his wife by its conclusion. One cold morning in December last year, Juilio called from work: “If I can get the afternoon off can we launch the boat?” The yawl was not quite finished, but close enough that it was ready to sail. Scotty called his parents to announce the plans to launch, and his 83-year-old mother insisted that they wait for her to get to the ramp. She warned him that if she wasn’t “standing on the dock when the boat hit the water there would likely be adjustments to the will.” Scotty agreed to delay the launch long enough to give his parents time to get to the lake. “Pop has some neat old tools,” thought Scotty, “so it wasn’t worth the risk to rush.”
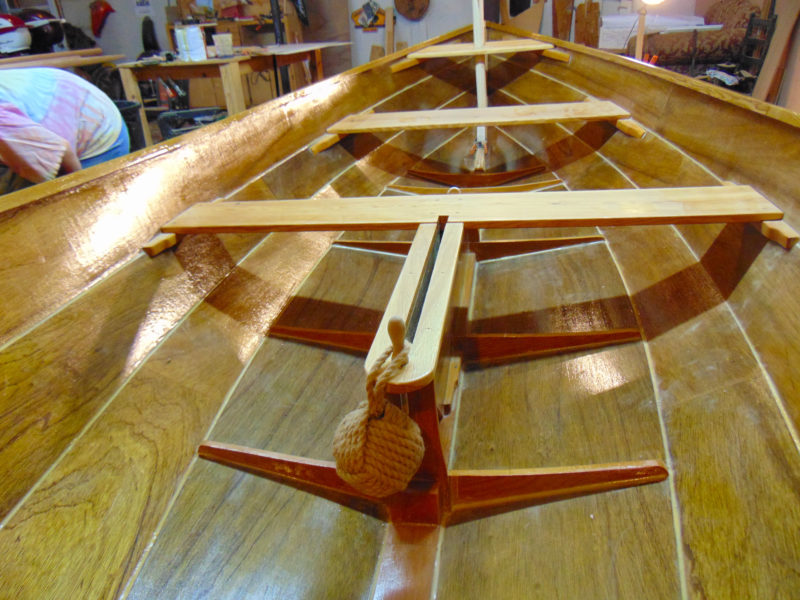
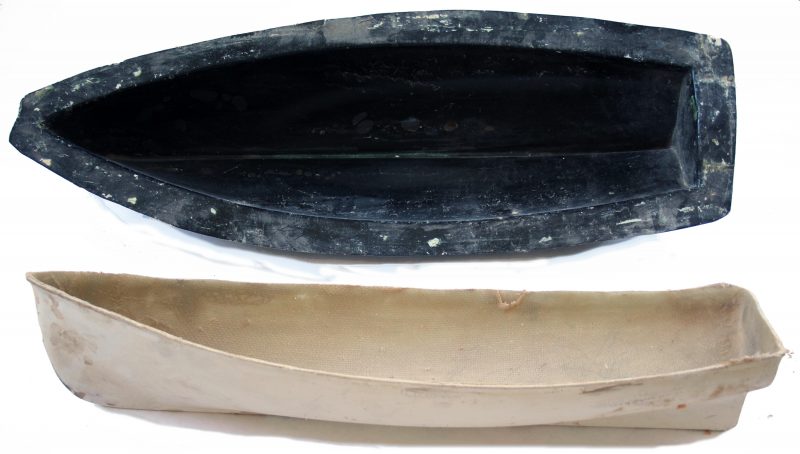
The most recent version of the Caledonia design calls for seven strakes; Scotty opted for the original four-strake hull.
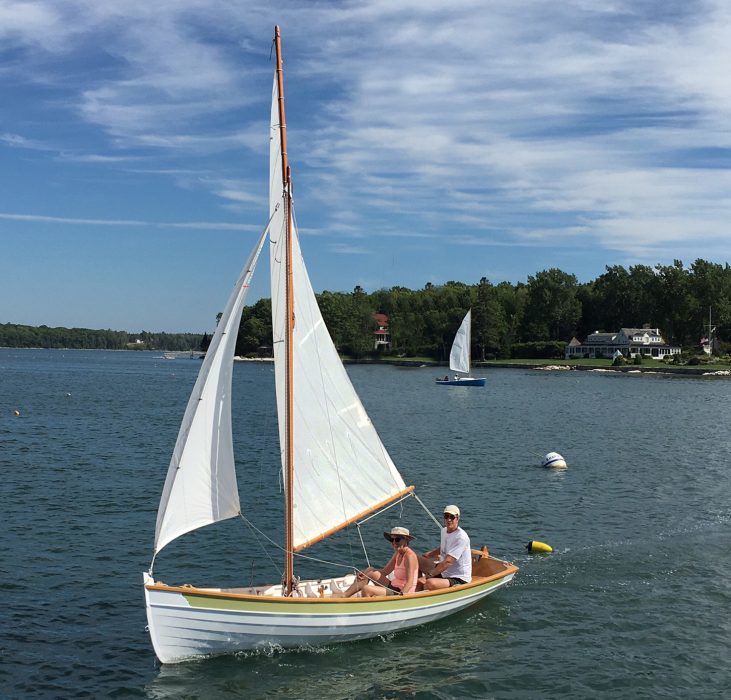
At the ramp, GYPSY SOUL slipped into the water for the first time. Scotty and Juilio hadn’t sailed a lug rig or a mizzen before, but hauled in the main sheet and took off. “We peeled off into a close-hauled beat, sailed across on a beat, and back on a run. Upwind she is a filly! On a reach you could pull a water-skier. What wonderful big-block power those sails gather. Downwind, stable, light on the tiller, a wonderful gurgle of chines underwater.” His mother, who had never seen a boat sail, said, “When the wind took that boat, the way it moved was like magic.”
Scotty has two cat-rigged boats and two sloop-rigged boats, but the Caledonia’s lug rig with the mizzen is his favorite by far.
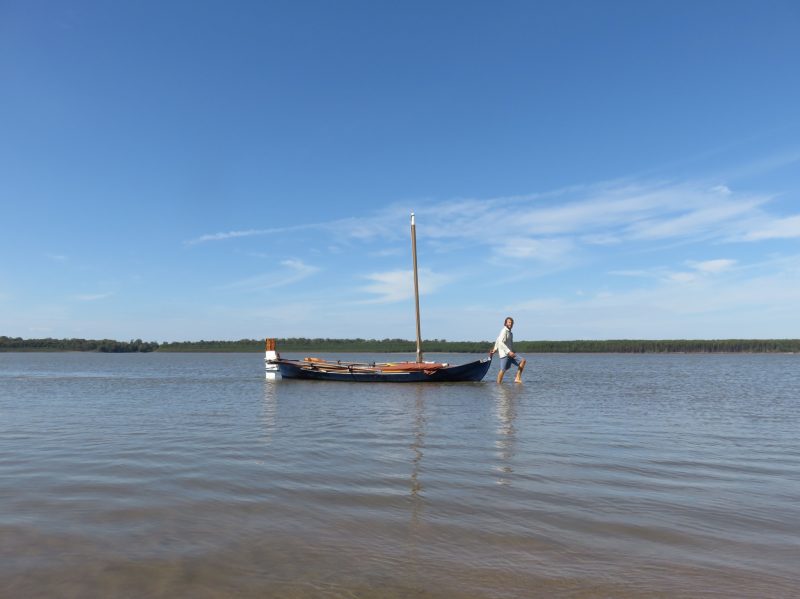
Since the winter launching, Scotty and Juilio have sailed many of the lakes and rivers of West Tennessee, and while GYPSY SOUL’s home waters are well inland, she’s not landlocked. Scotty and Juilio have entertained the idea of driving 45 minutes from home to launch in Pickwick Lake, make their way to the Tennessee Tombigbee Waterway, and in a week’s time sail out into the Gulf of Mexico.
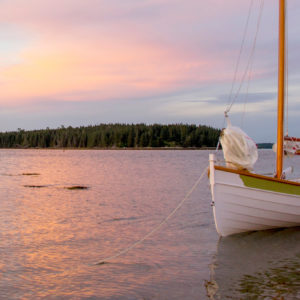
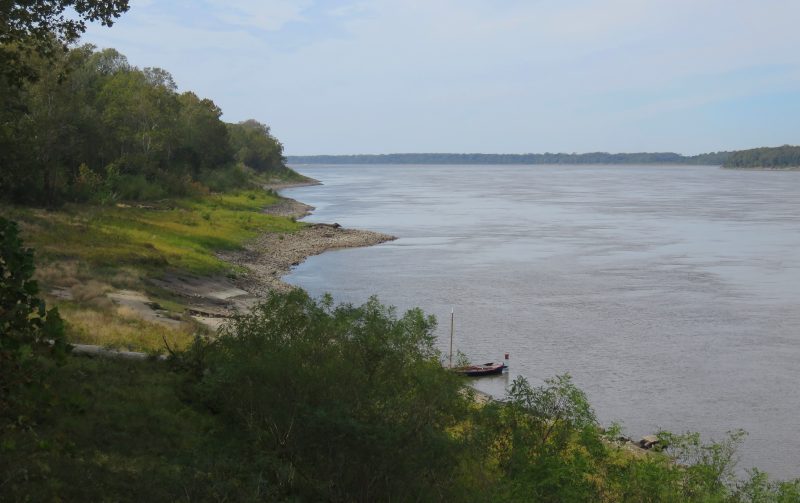
GYPSY SOUL does most of her sailing on the Tennessee River, but she was built with island-hopping the Florida Keys in mind.
After a 25-year career, Scotty is ready for an early retirement so he can devote his time to boats. “I don’t want to build wooden boats for a living, but for the poetry of it.” While there will be other boats, GYPSY SOUL is tied to an important time in his life. “I had my house rented to pretty young gal who turned out to love classic literature and history. I taught her to sail, we built GYPSY together, got married, and the small-boat thing fits us and our lives perfectly. I may be buried in GYPSY.”
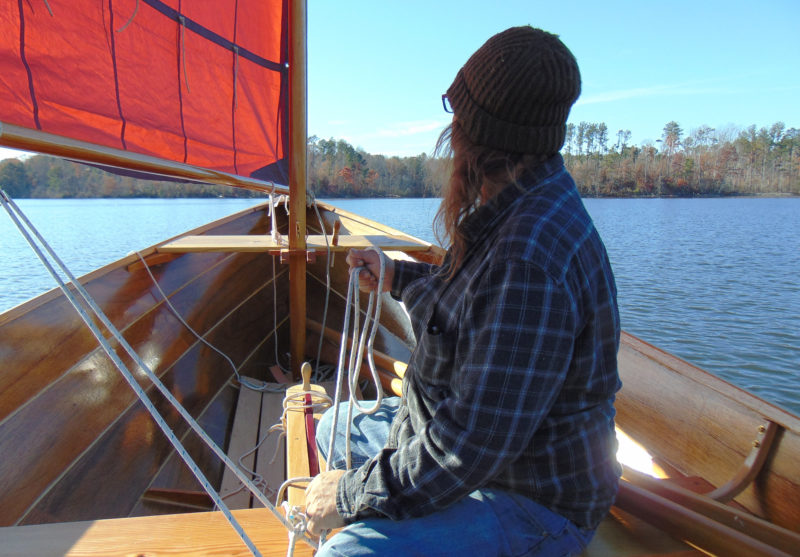
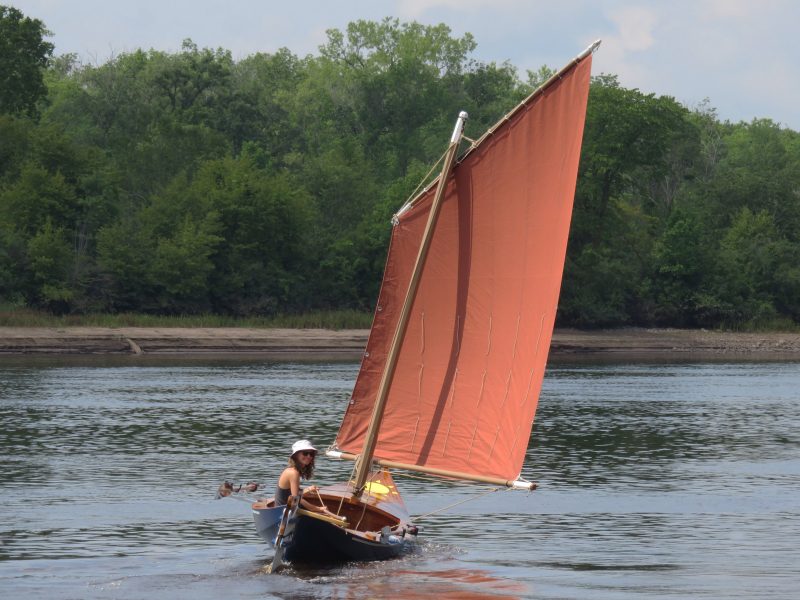
When Scotty taught Juilio how to sail, she was quick to pick up the skills and “the touch.” She’s handling the main sheet here, but Scotty notes: “She’s the best helms man or woman I’ve ever sailed with.”
Have you recently launched a boat? Please email us. We’d like to hear about it and share your story with other Small Boats Monthly readers.
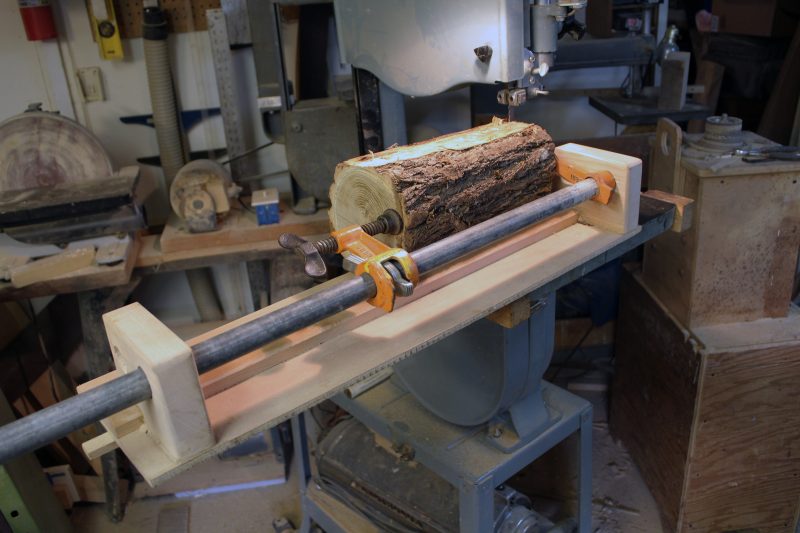
A few years ago I adapted my W.P. Stevens-designed decked lapstrake canoe for sliding-seat rowing. The canoe has taken well to oars and outriggers and now makes better speed than with a pair of paddles, but it’s no longer so easy to see where I’m going. Out on open water I can look over my shoulder occasionally and not worry about running into something, but I prefer getting my exercise on the flat protected waters of Seattle’s ship canal where I have to keep an eye out for tugs, barges, pleasure craft, and racing shells, as well as often erratic rental kayaks and electric launches. An occasional glance forward isn’t enough to spot and keep track of everyone, so I never get to settle into a steady rowing rhythm. I’ve tried those little mirrors that clip onto glasses, but they didn’t work for me. I never was able to develop a knack for getting my head aimed in the right direction.
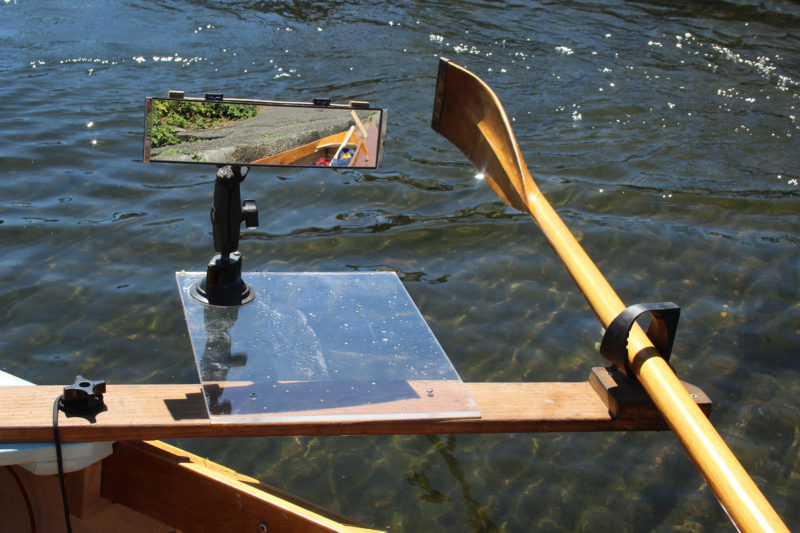
The side mirror, during a trial with a suction cup on a piece of acrylic sheet screwed to the port outrigger, gave me a blind starboard side and left me guessing where I was headed.
I happened to have an inexpensive (around $10) wide-angle mirror that I use for backing my car up to a trailer hitch. It’s designed to clip on to a car rearview mirror, but will just as easily clip to a piece of plywood. My first attempt for a forward-view mirror for my canoe was to mount the mirror on my outrigger. Although the mirror wobbled a bit as the outrigger flexed, it was steady enough during the recovery to get a good view. But while I could see forward, it wasn’t readily apparent where I was headed. I saw the bow in the mirror at an angle and had to imagine an extended centerline to guess where I was headed.
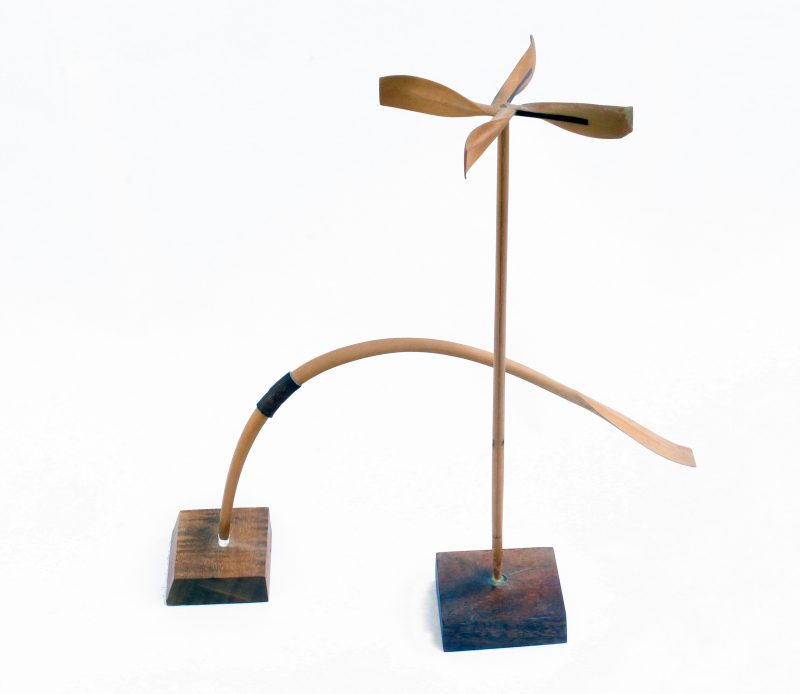
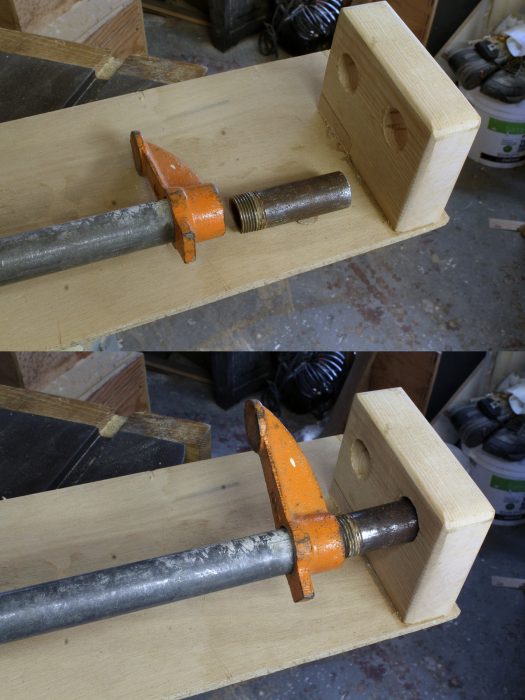
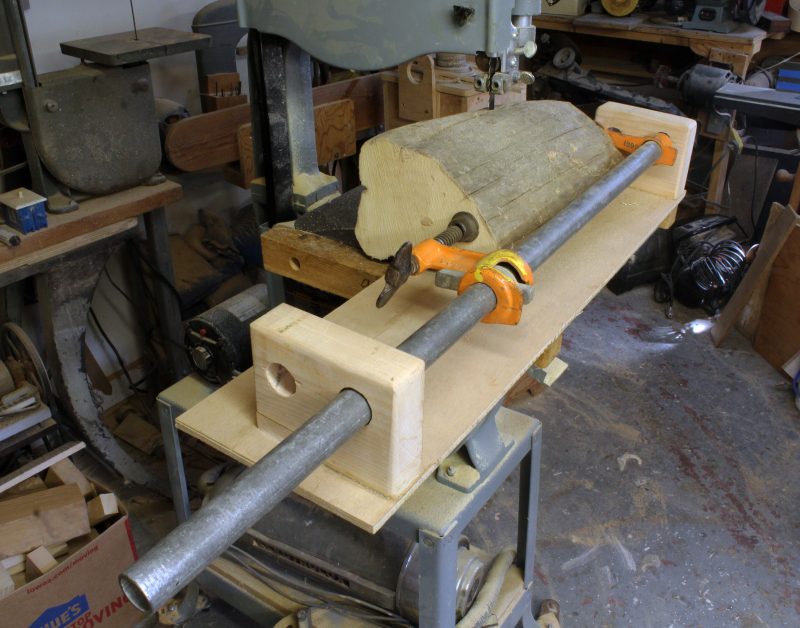
The fitting at the top of the dowel provides vertical adjustment for the mirror.
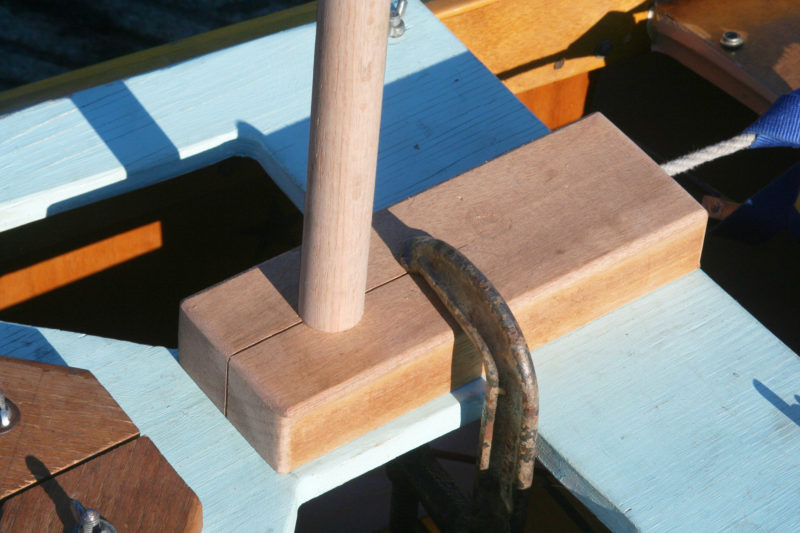
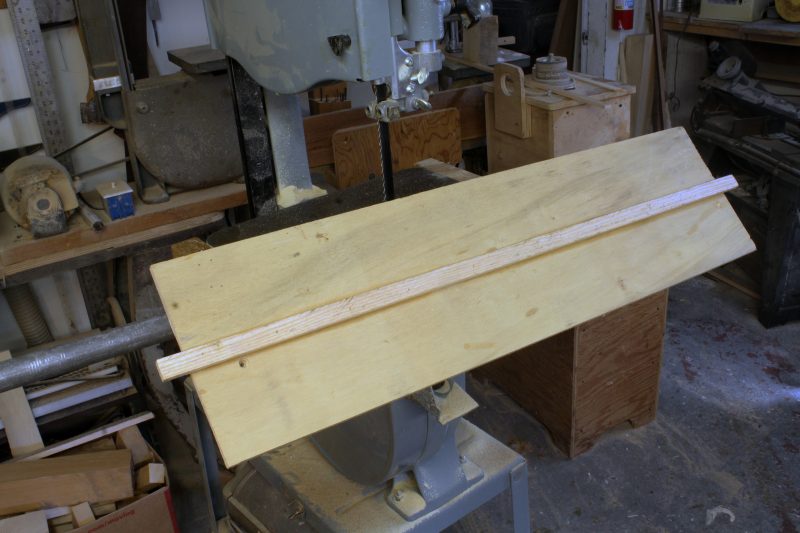
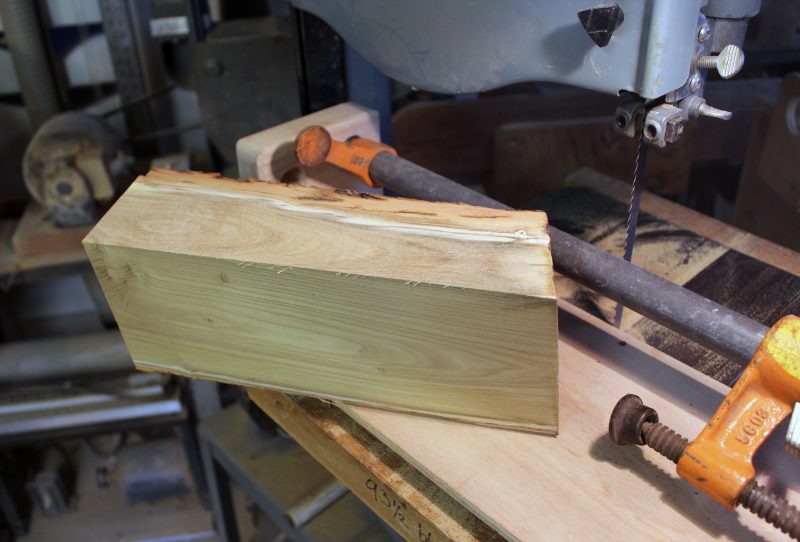
We had done a Reader Built Boat article on a boat designed in Finland for racing; it was equipped with a mirror set on a short “mast” on the centerline, aft of the rower. I thought it looked rather clunky but decided to give it a try. I used a 3′ length of 1-1/4″ oak dowel for the upright and a block of mahogany with a matching hole for its base. I cut a slot in the top of the dowel for one leg of an aluminum angle and screwed the other leg to a piece of plywood cut to accept the rearview mirror.
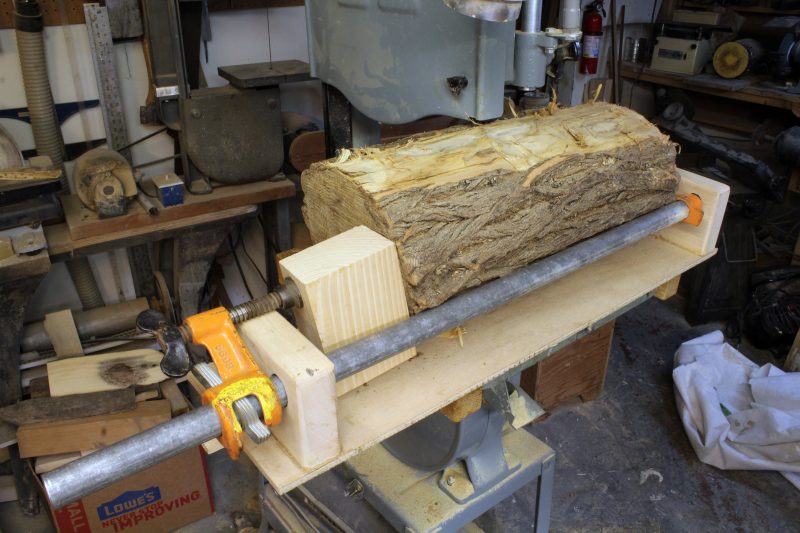
The saw kerf through the hole makes the fit snug without binding the dowel so it can be rotated to aim the mirror. I’ll get rid of the clamp after I screw the block down.
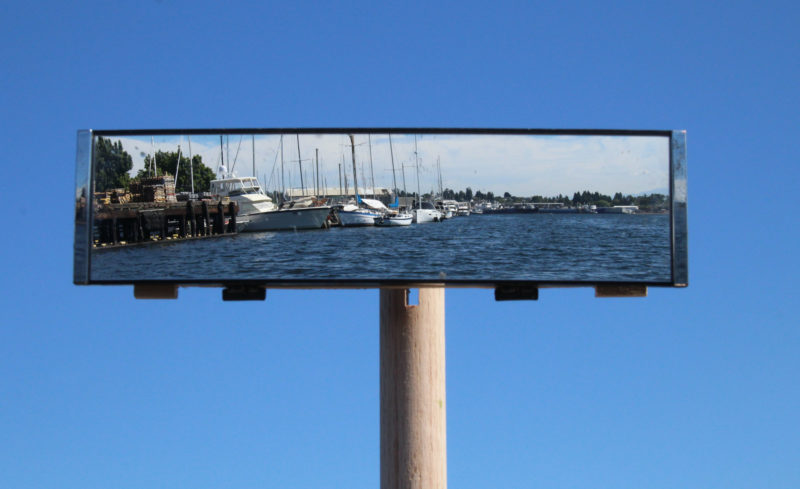
I clamped the block to the plywood base for my outriggers and the setup did indeed look clunky, but I got the mirror aimed and headed out rowing. The mirror, measuring 11″ by 3″, isn’t very tall, but it offers a nearly panoramic view forward, and although the convex curve of the mirror shrinks things, I could see even small objects like ducks quite easily. With the 3′ dowel, the mirror is just high enough to see over my head—any lower and I’d get distracted by my hat moving about. The mirror quivers a bit at the catch, but that’s not a problem. Any rolling of the boat will cause the mirror to move side to side, but the image remains stationary.
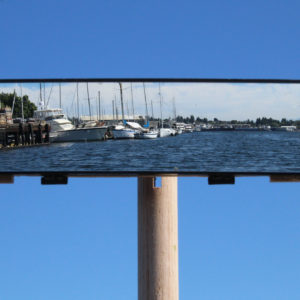
The wide-angle mirror shows what’s ahead as well as enough of a view to the side to hold a course at the right distance from shore.
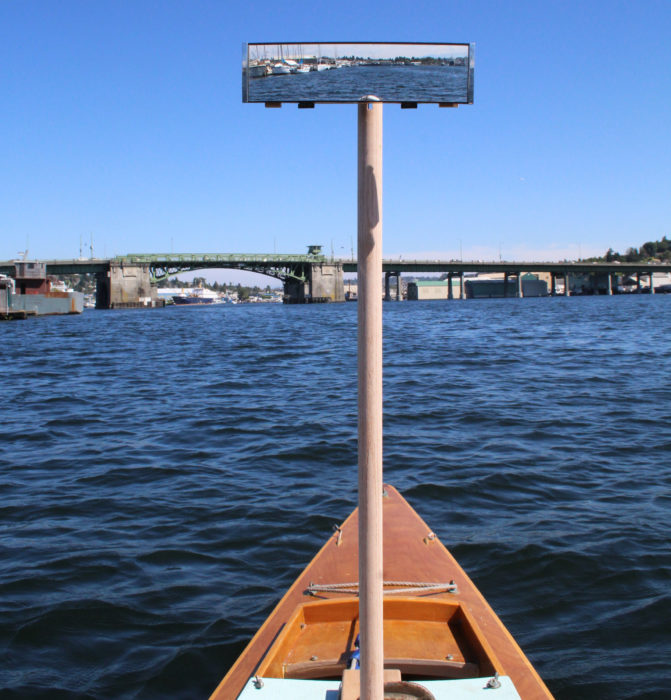
Because the mirror is centered on the boat, there’s no guessing what I’m headed for: my course will take me right to whatever is in the middle of the mirror. The wide-angle view makes it easy to row along a shore or a marina and keep a safe and steady distance. I can even row with confidence down the narrow space between parallel piers or docks.
I had anticipated that I’d have to shorten the dowel, but I like having it tall enough to keep the top of my head out of the mirror image.
The dowel, of course, is right in the middle of my line of sight over the stern, but that’s a small price to pay for the improved view forward. I still check over my shoulders now and again, but I can row at a steady pace without having to ease off to twist my spine to look over the bow. The mirror is almost as good as having eyes in the back of my head.
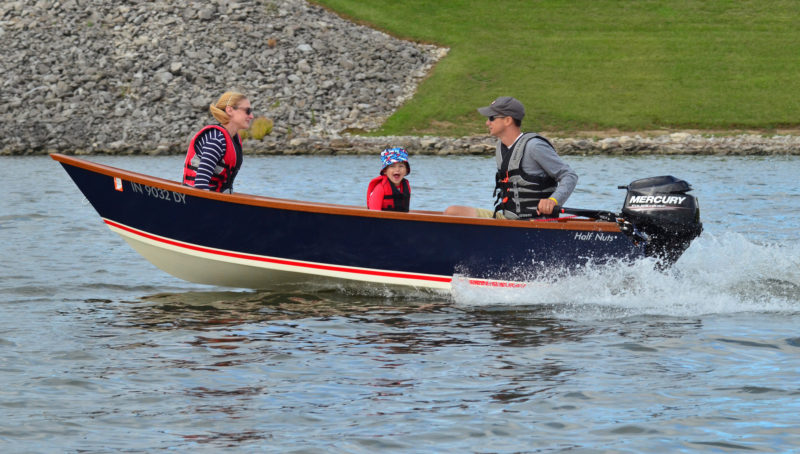
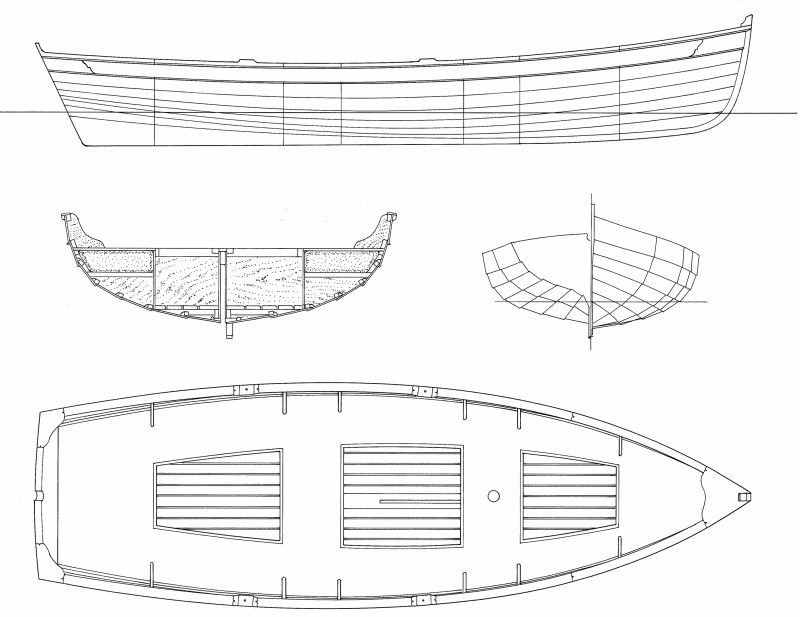
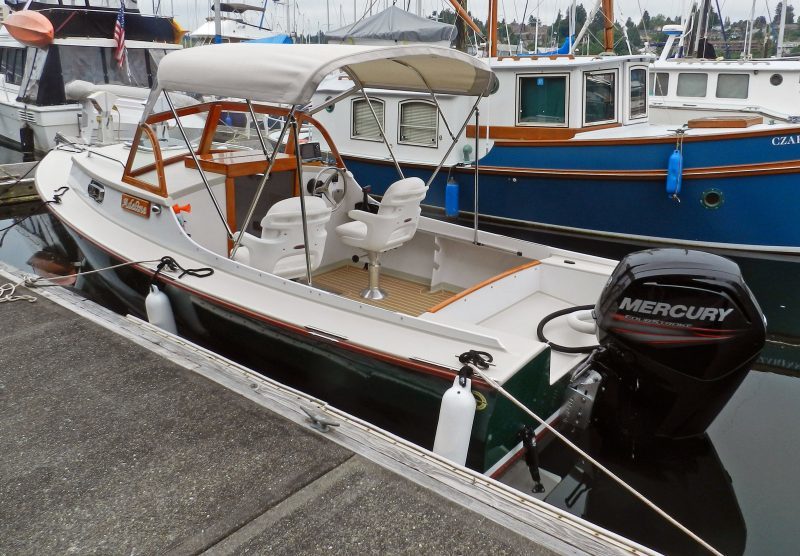
I have been told that one should build the boat that best suits the nearest body of water—that’s the way to get the most use out of it. My closest body of water is a reservoir that limits powerboats to 10-hp engines, and on any given weekend sailboats, kayaks, and aluminum fishing boats abound, but there are no big powerboats. I didn’t take the advice and built a classic runabout with a 40-hp motor. The closest water without a horsepower limitation is at least an hour’s drive away, boat and trailer in tow. Seven years later, and now with a toddler in tow, it is nearly an all-day event to take the runabout out and we are using it less and less. I found myself longing for a vessel to take advantage of the manmade lake just 10 minutes from home, so I began searching for an outboard skiff design that could handle our family of three with 10 hp or less. I discovered that there are many choices among small power skiffs between 12′ and 17′, and just deciding what to build turned out to be quite the exercise. I wanted something that stood out and found what I was looking for in the Tango Skiff.
Brad Boelke
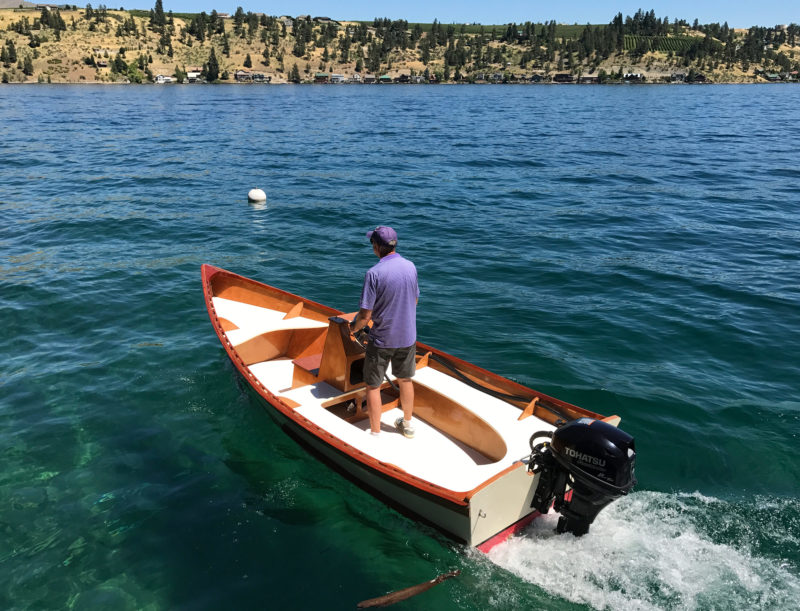
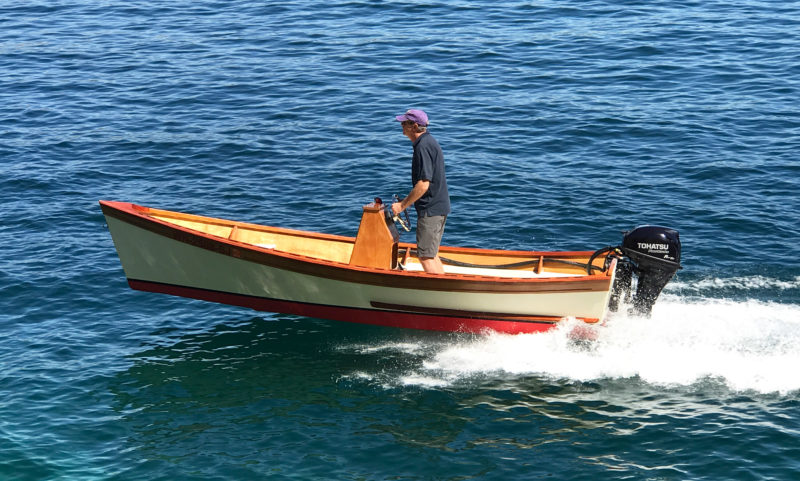
The transom extensions flank the motor, supporting its otherwise cantilevered weight and bringing the Tango on plane faster.
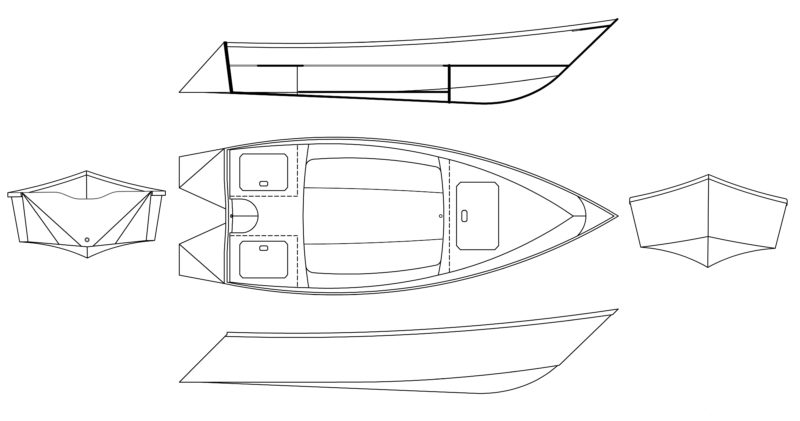
The Tango Skiff has interesting hull extensions that create an attention-grabbing geometry aft of the transom. The additional running surface and buoyancy of the extensions appealed to me because of my previous experience with small outboard-powered boats. When operated solo, many of them with a conventional transom will squat under the weight of the motor and the skipper and set the bow pointing skyward.
The Tango Skiff is a modern design that evolved in the early years of the new millennium as designer Hank Bravo experimented with a way to overcome the squat by adding volume and planing surface behind the motor. His 12′ prototype, powered by a 3.5-hp outboard, jumped on plane and ran 20 percent faster with the extensions than without and he didn’t need to shift his weight forward or carry ballast when running solo. Tango Skiffs continued to evolve from that first 12′ boat and are now available in 12′, 13′, 14′, 15′ and 17′ versions.
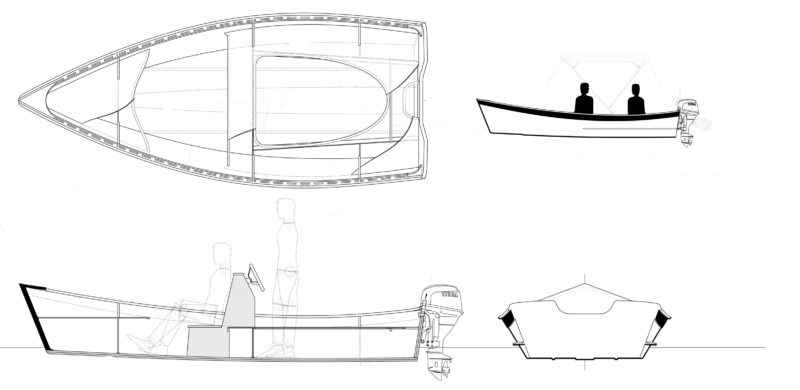
I chose the Tango 13 because it would fit in the “half” section of my two-and-a-half car garage. My big runabout, and, most importantly, my wife’s car, also still fit in the two garage bays. The Tango Skiff measures 13′ from the bow to the end of the extensions.
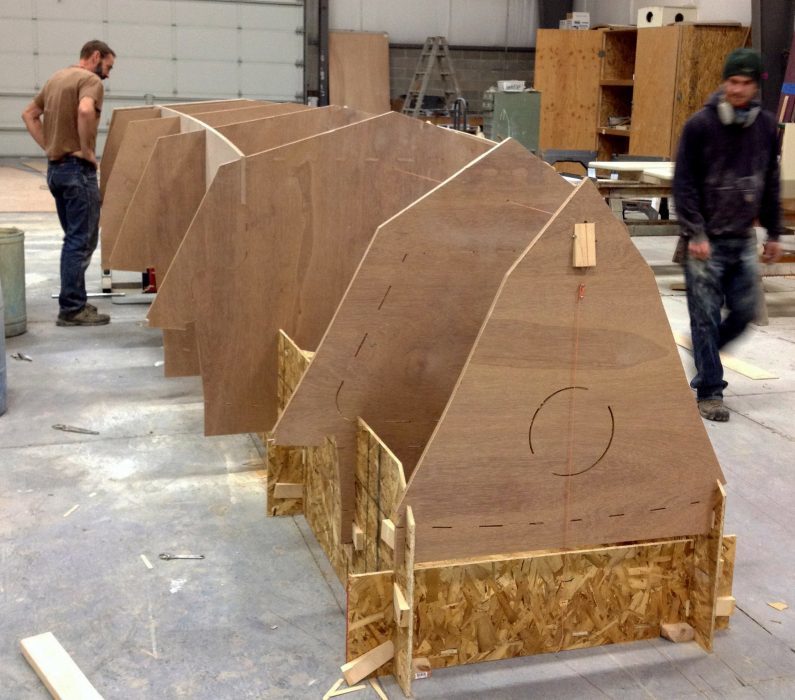
The plans for Tango Skiff come in PDF file format; no full-sized, printed patterns are provided. The shape of each part is transferred to the plywood using a grid scale shown on the plans of 1 grid square equals 1” square. Many parts are cut oversize and trimmed to fit during assembly, which helps eliminate much of the fear of not transferring something properly. The instruction manual included with the plans has lots of helpful color photos and a detailed materials list.
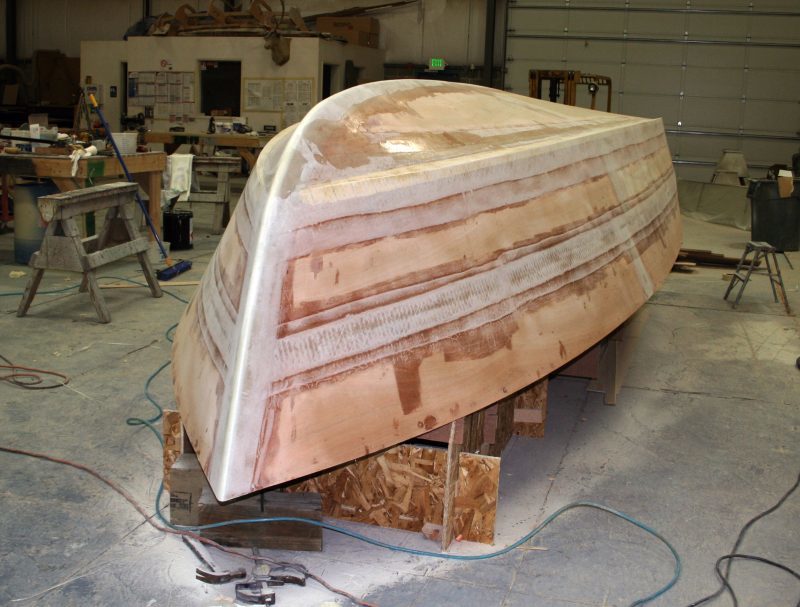
The Tango Skiff 13 is built entirely from five sheets of plywood, three at 1⁄4″ and two at 3⁄8″. I think the most daunting part for a new boatbuilder is scarfing plywood panels together. I overcame this by doing half-lap joints that I cut with a router instead of true scarfs. I found this much easier especially on 1⁄4″ ply. By February the project was ready to move to the garage for assembly, but it was still too cold for epoxy, so I waited until April to do more work.
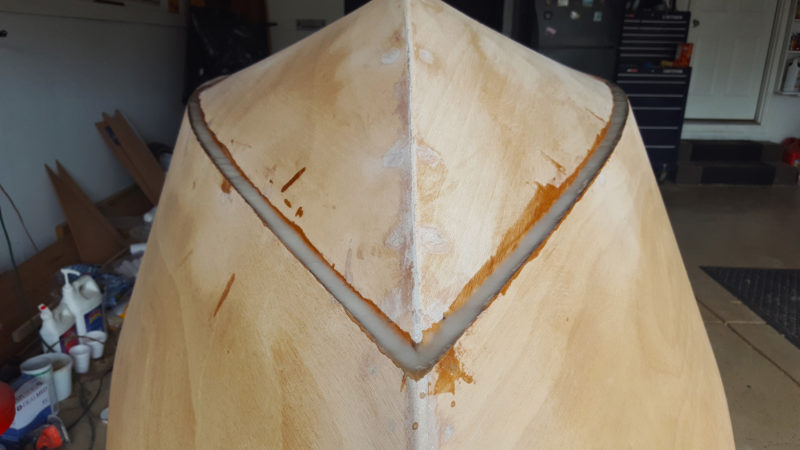
Once the project was moved to the garage the assembly went quickly. Assembly is just like any other stitch-and-glue boat. The panels are stitched together and epoxied, the stitches are removed, fillets are made, and fiberglass tape is applied to the seams then a lot of sanding follows. There is one interesting departure from the normal stitch-and-glue process: a built-in chine step. It is formed when the side planking laps past the bottom planking in the forward third of the chine. This creates a void, which is then filled flush with thickened epoxy. In the finished boat, this functions like a sprayrail to keep the occupants dry.
Chris Atwood
At the bow, the edges of the bottom and side panels are not butted together, as typical in stitch-and-glue construction. The side panels overlap the bottom panels; when the open angle between them is filled with epoxy, it creates a step that will knock down spray.
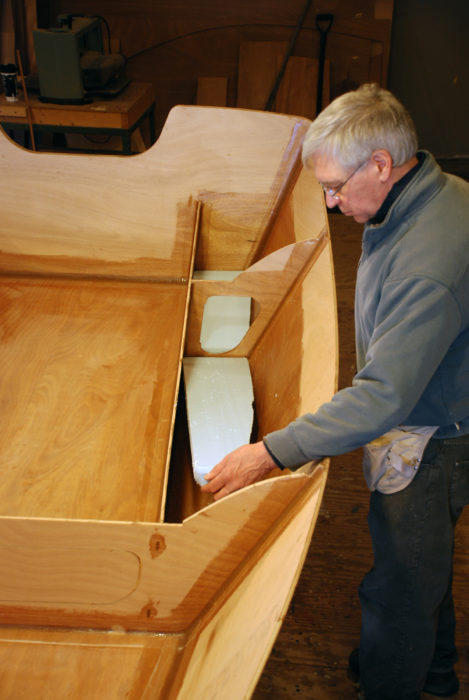
The hull gets stitched together with cable ties around a center half-bulkhead, then the bow and stern compartments and the seats they support are added. I found the center seat flexed more than I liked when I sat on the forward or aft edge, so I added small knees beneath it for support. Two triangular panels are stitched to the extensions of the bottom panels to create the distinctive stern.
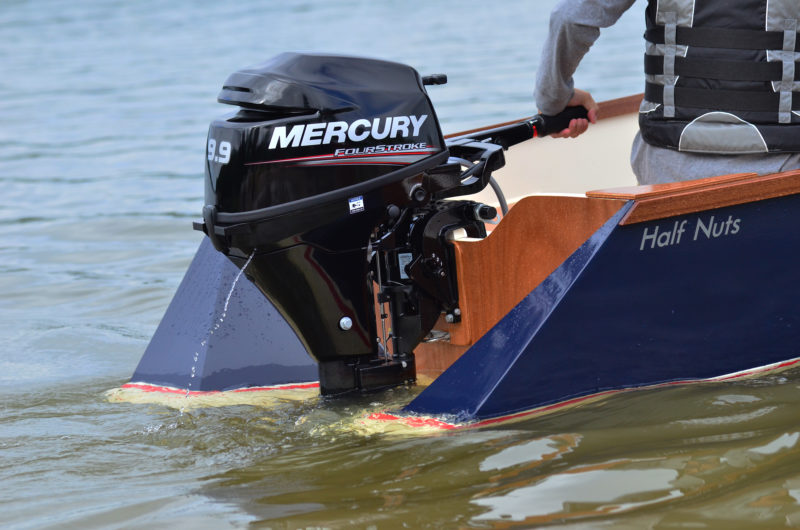
The Tango Skiff 13 calls for a 6-hp motor, which is a nice fit for the boat, but I purchased a 9.9-hp, which, at 84 lbs, weighs 24 lbs more than a 6 hp. I emailed the designer about this change and while he recommended sticking to his 6-hp maximum motor size he suggested beefing up the transom. To help with the added load and strain, I added a 3⁄4″-thick laminated knee to tie the transom to the bottom of the boat, added an additional layer of plywood to the transom, and added 3⁄8″ knees to tie the top of the transom to the gunwales.
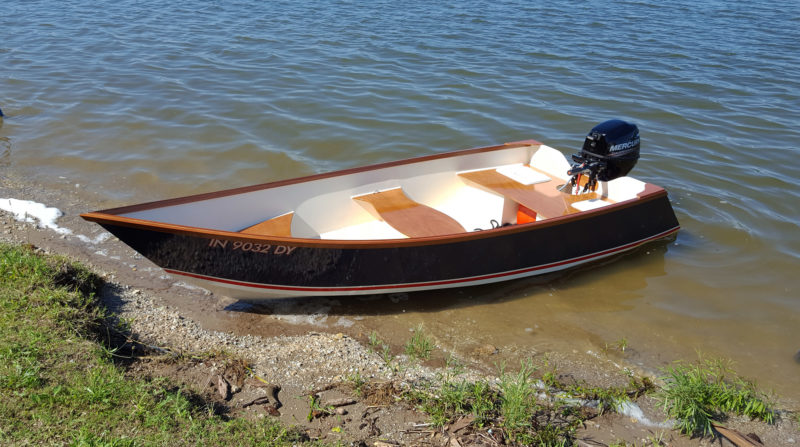
The only lumber required other than plywood is the material for the rubrails. The plans actually call for the use of plastic material sold at home-improvement stores as exterior trim, but I substituted African mahogany. I used Interlux Brightsides paint—Hatteras White on the bottom, Flag Blue on the sides, with a boot stripe of Fire Red. I launched the boat after 140 hours of construction. We christened it HALF NUTS.*
Chris Atwood
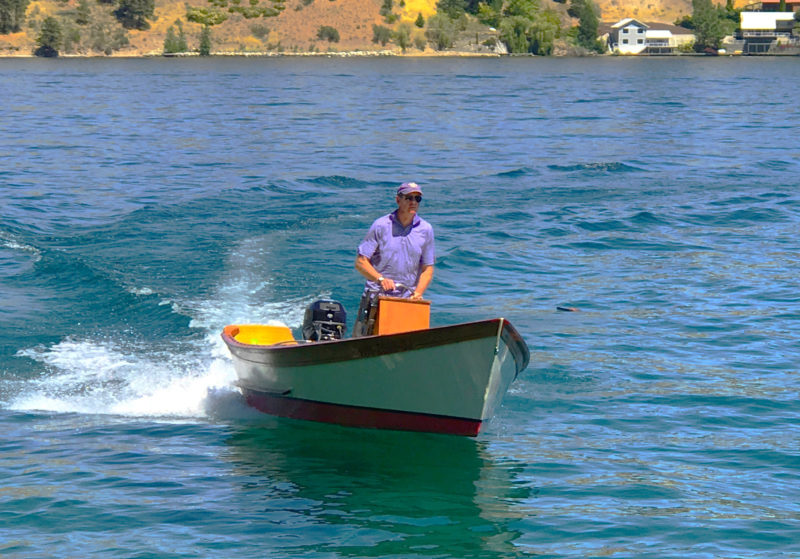
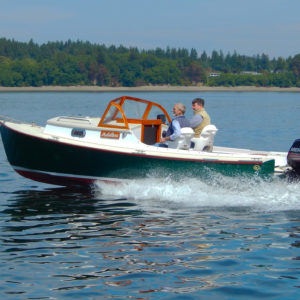
With a hull weight of about 130 lbs and an engine weight of 84 lbs, the Tango 13 draws only a few inches.
The Tango Skiff 13 sits lightly in the water, drawing only a few inches; the added flotation of the extensions aft of the transom clearly helps offset the weight of the motor. I was curious about lateral stability with the relatively narrow beam of 4′ 8″, but the boat is quite stable for a vessel of these dimensions. I believe the extensions contribute to this as well.
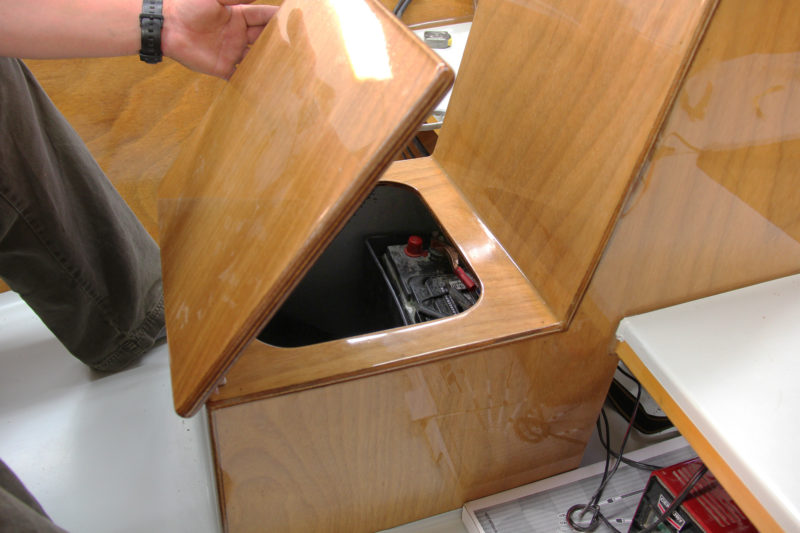
I really like the contour the designer put into the seats; it adds another elegant touch to what is mostly a simple boat. The fore and aft seats of the TS13 provide ample storage underneath with hatches for everything needed for a day trip to be stored out of the way. The plans come with an alternative seating arrangement combined with a center console if you prefer. Another great built-in feature is the fuel tank tunnel in which the aft seat bases are divided into two separate compartments with space between them for the fuel tank. A 3-gallon tank fits nicely there and provides plenty of range.
Brad Boelke
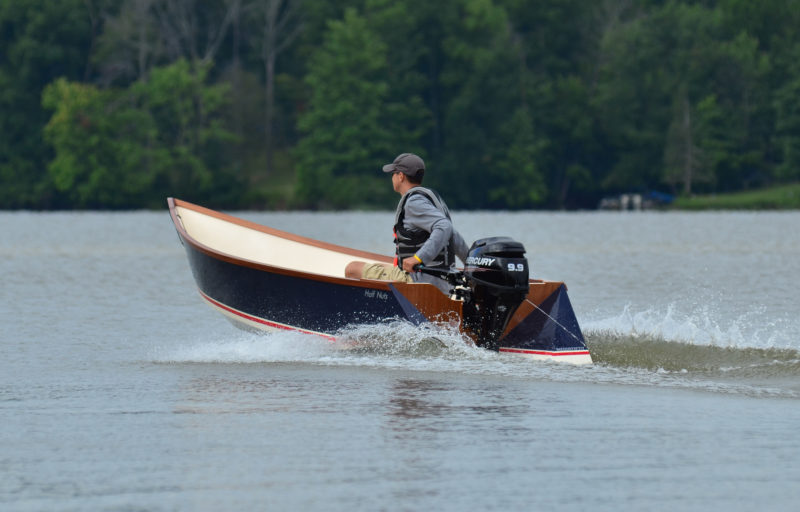
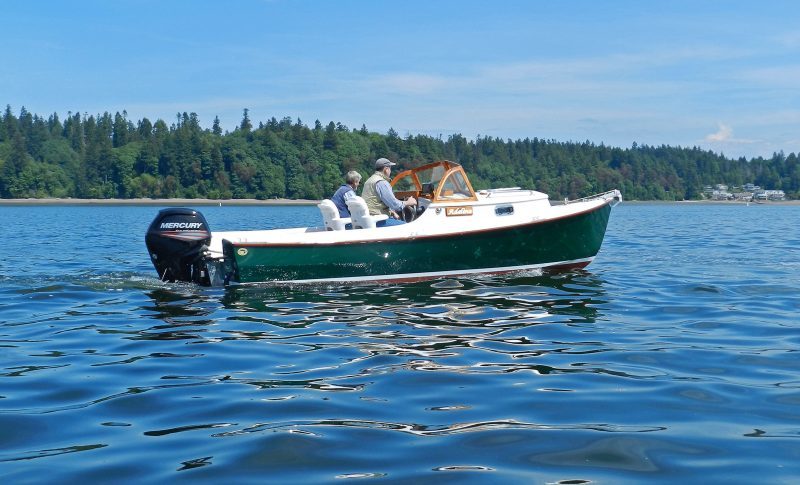
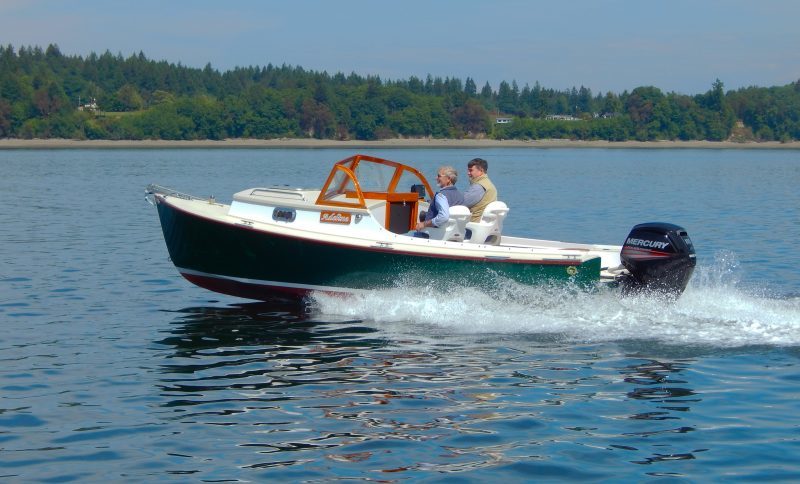
With only its skipper aboard, this Tango, with a 9.9-hp outboard, more powerful than the 6-hp motor recommended by the designer, can reach a speed of 24 mph.
The Tango, thanks in large part to the stern extensions, has very little bow rise when coming on plane and will stay on plane at speeds as low as 11 mph. With just myself onboard the boat feels very light; it seems to more ride over the water than cut through it. On a windy day the boat is so light you can feel the wind trying to push the vessel off heading as the gusts come and go. Another effect of the hull extensions is that the skiff corners flatter than similar boats. There is no skeg to provide lateral resistance, so the boat tends to skid slightly in high-speed cornering, but backing off the throttle slightly will bring the bow down enough to carve a nice corner without skidding.
In slow-speed maneuvering there are no surprises and the extensions allow more than enough room for the tiller to be turned nearly hard over. The anti-ventilation plate of the motor sits just below the bottom of the extensions so there is never any worry about the prop contacting the hull. While I have not yet had the boat out in any serious chop, it rides right over small boat wakes and slowing to the minimum planing speed allows the bow to cut right through larger wakes. The little Tango feels solid for such a light stitch-and-glue skiff.
Brad Boelke
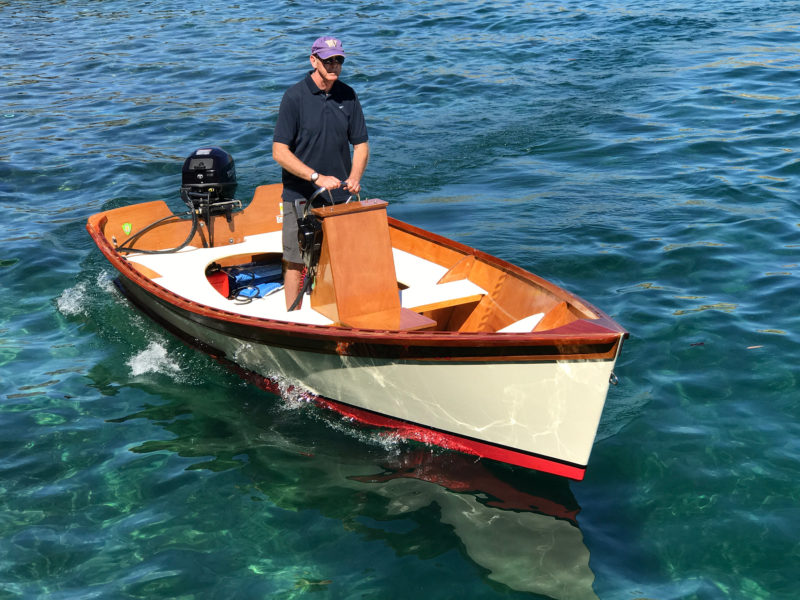
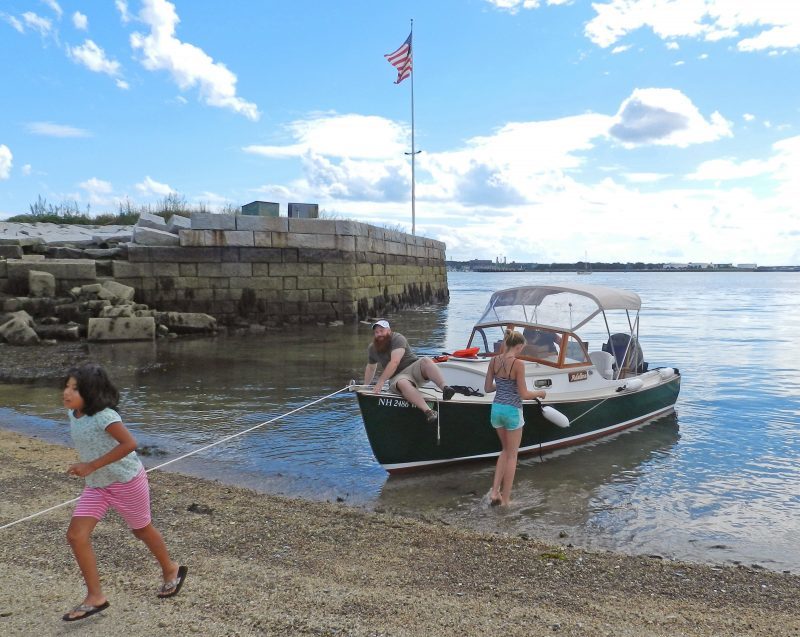
With a family of three aboard, there’s plenty of room and capacity to take on almost another 200 lbs.
I clocked the maximum speed at 24 mph with just a slight porpoise when riding solo at full speed, which I could attribute to the transom angle. When built per the plans, is only about 8 degrees; not angled enough for the prop shaft to be positioned perfectly parallel the bottom of the boat without shimming the motor. With my 35-lb son onboard the porpoising is eliminated and the boat hits 23 mph. With our family of three onboard (totaling about 310 lbs—maximum capacity is 500 pounds) top speed only drops to 21 mph which is rock-steady and comfortable to cruise at all day long. You can really cover a lot of water in a short time at 20 mph, so I am very happy with the decision to go with the 9.9-hp motor. It is almost too much motor when I’m solo, but add even the lightest passenger and it is perfect. My only concern with it is trailering over our rough highways and for that reason I use a transom saver to transfer some of the motor’s cantilevered weight to the trailer while transporting. If towing a long distance I may elect to unbolt the motor and remove it from the transom.
With sizes from 12′ to 17′ there is a Tango Skiff for just about anyone. It’s a wonderful multi-purpose boat that is simple and quick to build, and can be made to look elegant as well. The Tango Skiff 13 fits the bill perfectly as a small, lightweight boat for a young family or for older kids learning to handle an outboard. For more utilitarian purposes, most people would want at least the 14′ version. We look forward to exploring more waters with our Tango Skiff.
*The name HALF NUTS is a play on the boat’s diminutive size and a reference both to our rambunctious three-year-old son, for whom this boat is meant, and my surviving testicular cancer. My wife bought me the plans for my birthday in August 2016 and I planned to begin the build January 1, 2017 so that our three-year-old son and I could enjoy the boat the following summer. In November 2016 I was diagnosed with stage-III testicular cancer at age 35. My world was turned upside down, but in the back of my mind I still wanted to start this project at the first of the year. It turned out to be great therapy. I wasn’t even strong enough to drive a car in the beginning of the build, but with the help of my father, we drove the five hours, round-trip, to pick up the BS1088 plywood in January as planned. We got right to work, and in my basement I transferred and marked each part on the plywood. My Dad cut them out with my sabersaw as I was too weak from chemo to cut a straight line or stand for long. After we had all of the pieces cut we had to wait until spring for the temperatures to rise enough to use epoxy. I had major surgery at this time to remove what was left of my cancer and it took a couple months to recover. I am now cancer free.
Chris Atwood is a 35-year-old corporate pilot and flight instructor, a metastatic testicular cancer survivor, and repeat boatbuilder having previously built a Glen-L Zip runabout and a CLC Wood Duck kayak.
Tango 13 Particulars
Length: 13′
Beam: 4′ 8″
Weight: 130 lbs
Capacity: 500 lbs
Cost: $1,600 (plus motor and trailer)
Time to build: 140 hours
In his profile of the Tango 13, the cites the unique transom extensions that help bring the boat on plane faster. Follow this technique to add transom extensions yourself using 9mm okoume plywood.
Is there a boat you’d like to know more about? Have you built one that you think other Small Boats readers would enjoy? Please email us!
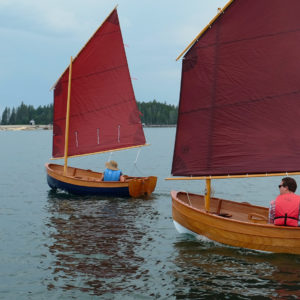
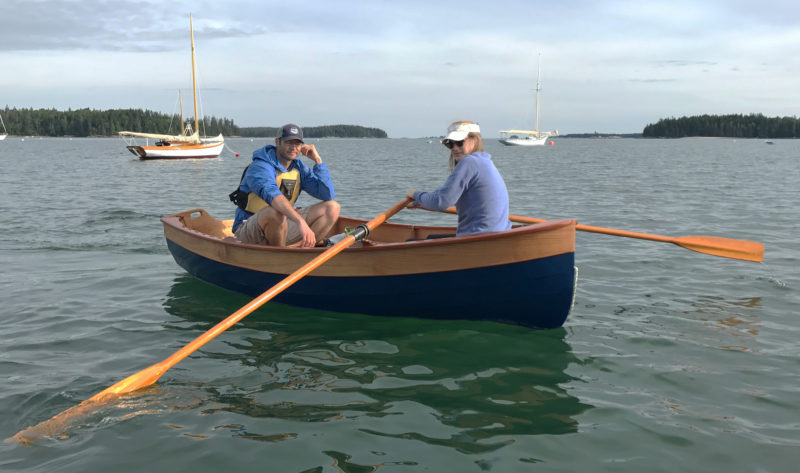
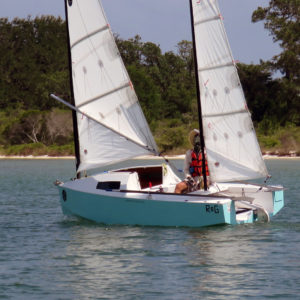
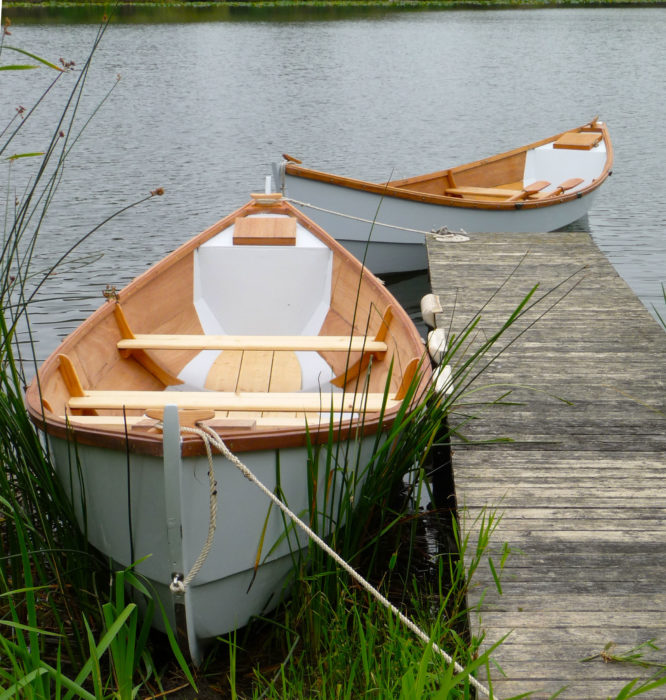
When John Harris of Chesapeake Light Craft (CLC) came to WoodenBoat School here in Brooklin to lead a six-day class in building his newly designed Tenderly Dinghy and brought two finished boats with him, I jumped at the opportunity to see the progress as he taught, and to take the finished boats for a spin in Great Cove.
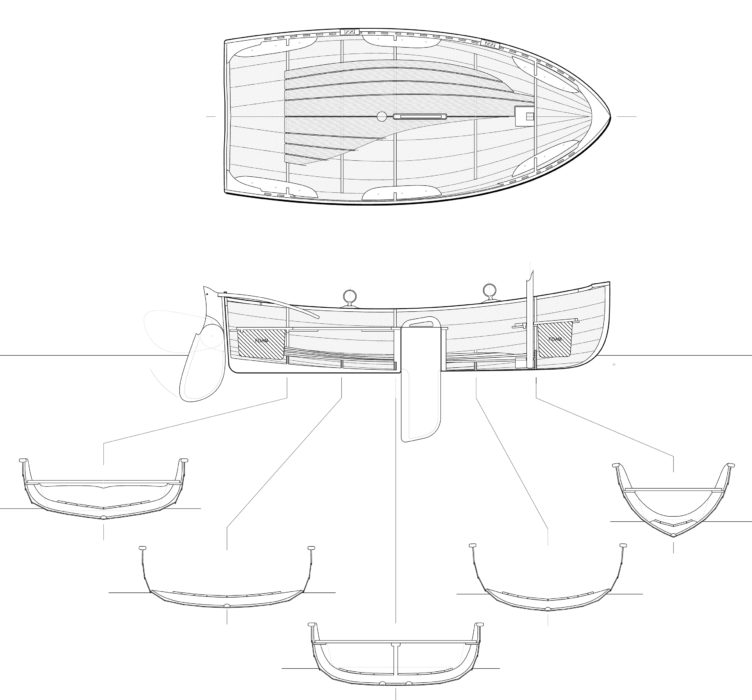
While Harris didn’t draw inspiration from any one particular lapstrake design, the general English clinker day boat aesthetic is apparent. He was looking to do justice to a vision from Swallows and Amazons in a kit boat with attributes that would make for a great dinghy—plenty of volume, good to row, and a worthy daysailer. Harris aimed for a salty-looking design with good stability and carrying capability, and achieved that in a boat 10′ long with a beam of 52″ and a payload limit of 425 lbs. “At a more technical level, what I was pursuing was the most shapely boat I could manage in an amateur-construction context,” said Harris. “Tenderly has a lot of shape for a stitch-and-glue boat. The really full bow in plan view transitions seamlessly into a hollow waterline.”
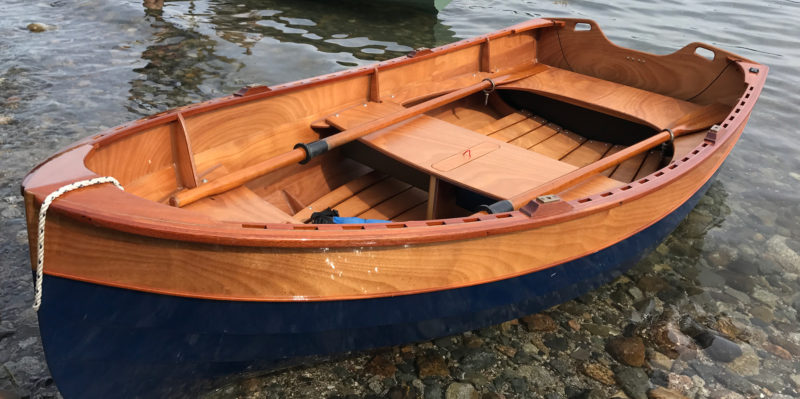
A few details elevate the Tenderly from a simple kit boat to classic lapstrake heartthrob. The open gunwales, the breasthook and quarter knees, the bead wale, and lovely sheerline belie her mostly plywood construction. When the eight optional floorboards are added, which make for more comfortable seating in the bottom of the boat and drier gear, the very finished appearance is the icing on the cake. What a looker.
Anne Bryant
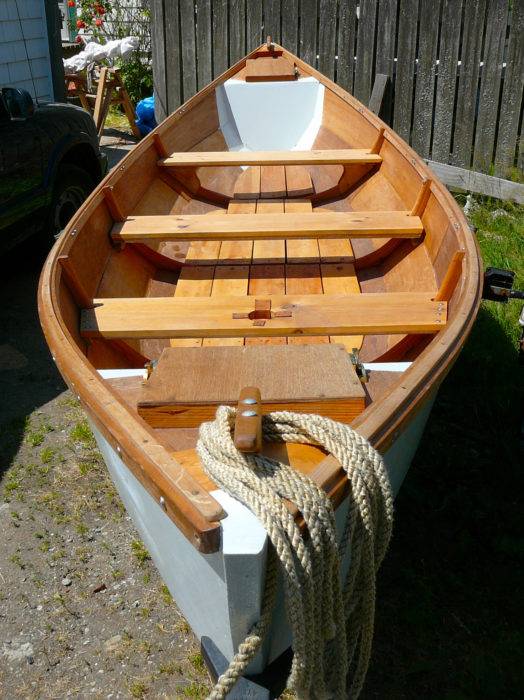
The transom and the full bow offer room to stow proper oars. Handholds in the transom ease the tasks of handling the boat on a cart and launching into a chop from a beach. Note the plug closing the daggerboard trunk.
The recommended 8′ oars fit inside the boat when shipped, which is a great advantage. Oftentimes, tenders have to give up 6″ to 12″ of oar length to make the oars short enough to stow in the boat. With a guest or two and some groceries in your Tenderly on the way to your boat at anchor for a sundowner, you’ll be glad to have the proper oar length.
Aaron Porter
Floorboards come in handy as dry, comfortable seating for sailing in light air; the sturdy aft thwart extends forward into the boat and acts as a perch for when bigger wind requires weight to counter the boat’s heeling.
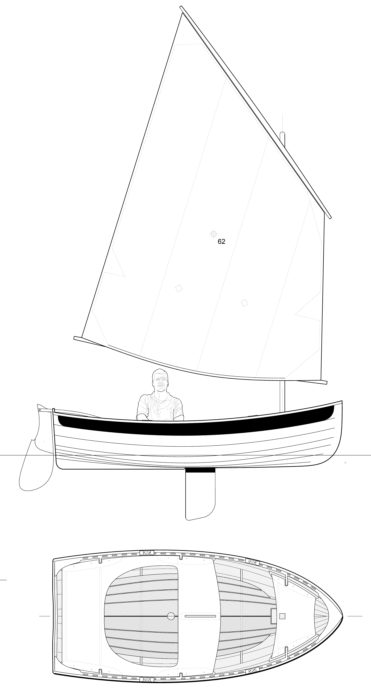
The Tenderly has a lug rig. It is an easy rig to handle, set up, and stow onboard should this be a tender for a larger vessel and need to have its rig fit inside. She’s also got nice bit of sail area, 62 sq ft, and needs very little hardware to deploy it: a couple of small cleats do the job for the downhaul and the halyard, which runs through a dumb sheave—a hole—in the masthead. The head and foot of the sail are lashed to the yard and boom with 1/8″ line. I suppose one could add a jam cleat to the aft edge of the daggerboard trunk for the mainsheet that could effectively free up a hand should you need it.
Aaron Porter
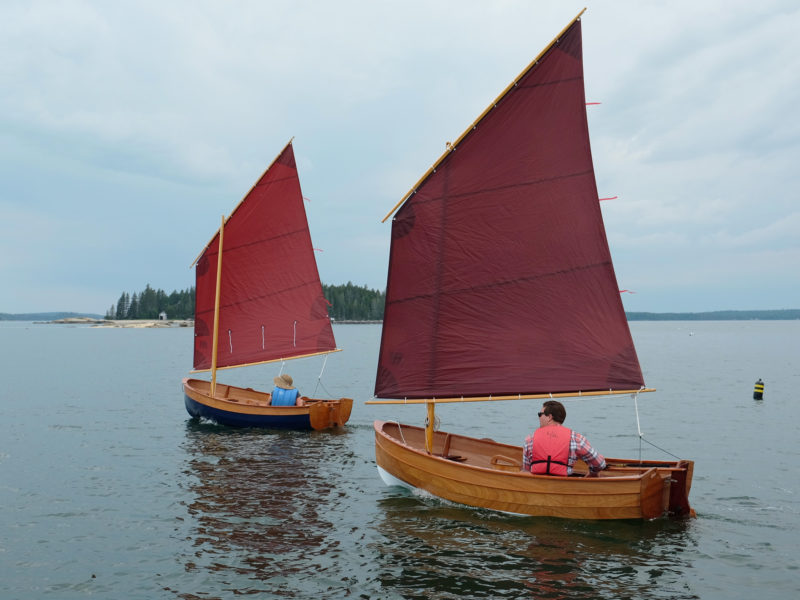
While the Tenderly is well suited for solo sailing, the CLC web site notes it has “plenty of sprawling room for two adults or a bunch of kids” while under sail.
In Harris’s Build-Your-Own Tenderly class each of the seven students began their own boat on Monday and the following Saturday had the assembly complete to take home for finishing. The Tenderly kit employs CLC’s LapStitch construction method, which eliminates the traditional setup of molds on a ladder frame, so builders can quickly assemble the hull around three full frames and two partial frames; tabs on these pieces fit in precut slots in the planks to assure proper placement and alignment. The transom, quarter knees, and breasthook are installed after all of the planks have been stitched together.
Anne Bryant
The LapStitch hulls go together quickly. The serpentine line aft of amidships is made up of the interlocking puzzle joints that join the plank sections.
The seven boats were well underway when I visited on day two, and the builders, most of them beginners, had already gone from a stack of kit pieces to stitched-up hulls. With the hulls flipped upside down, cyanoacrylate glue, dripped into the laps between stitches, would hold the pieces together when the wires were removed and before epoxy could be dribbled into the laps between planks. On the third day the hulls were flipped upright and given the first epoxy fillets and a layer of fiberglass on the interior up to the top of the fifth strake.
Anne Bryant
Fiberglass is cut into wide strips to fit between the frames. The ‘glass on the inside covers five of the seven strakes; ‘glass on the outside covers four.
On day four the hulls were flipped and the bottom four strakes were ’glassed with 6-oz cloth, and the skeg and bead wales were epoxied in place. Builders installed the daggerboard trunk, center thwart and mahogany inwales, outwales, and spacers on the fifth day and finished the interior installation on the sixth. The boats were then ready to take home for paint and varnish and putting the sailing rig together.
The class was an accelerated process with long days in the shop; a builder working at home on the sailing version with daggerboard trunk, rig, rudder, etc. could spend about 150 hours building the Tenderly. The 250-page building manual is geared for the amateur builder and has many color photographs and well-thought-out instructions.
Anne Bryant
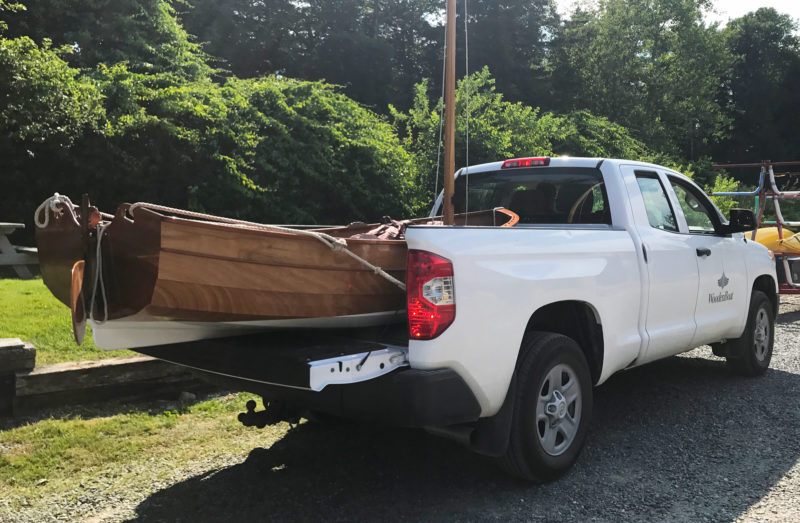
The Tenderly will fit in the bed of a full-size pickup truck. State laws may limit the how far a load can project (4′ is common) and may require flagging.
With a hull weight of 100 lbs (130 lbs rigged), the Tenderly was an easy two-person lift to get it into a pickup truck; the 52″ beam gave just enough clearance between the walls of the bed. A dolly made it possible to move the boat around solo.
Anne Bryant
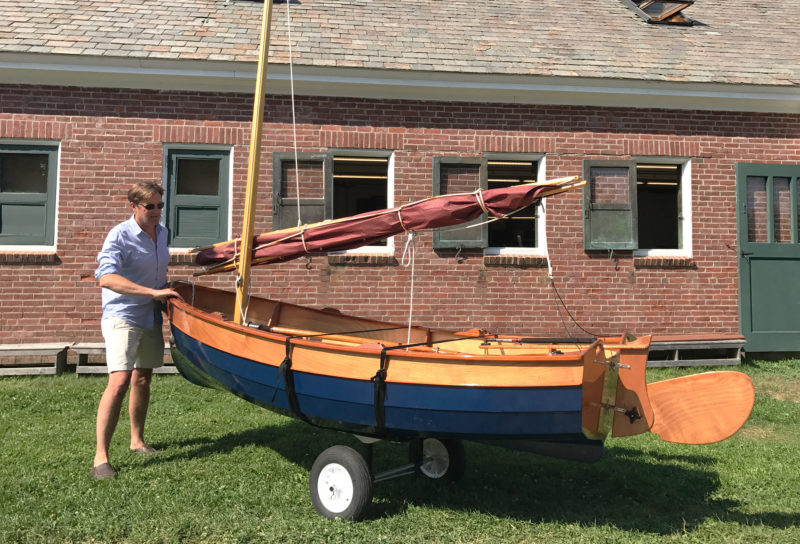
With a cart, the Tenderly is easy to move around singlehanded.
Empty and with the daggerboard up, the Tenderly only draws a few inches, which is great when you’re launching from a rocky beach. It hovered lightly in very thin water, and as I hiked a leg up to get aboard, then shifted my weight across the gunwale, it was stable even though I didn’t plant my foot directly in the middle of the floorboards. As a cruiser who appreciates a dinghy that is easy to load, board, and launch from a beach, I find this high degree of stability a necessity.
Anne Bryant
When rowed solo, the Tenderly picks up speed quickly. The cap on the daggerboard slot helps keep the rower’s seat dry.
I rowed the dinghy over to the dock and it took off like a shot with just a couple of strokes. I think the flat bottom, sharp entry, and light construction were working with me; it responds quickly and well to turning strokes when approaching the dock or making a sharp turn.
Anne Bryant/Clint Chase
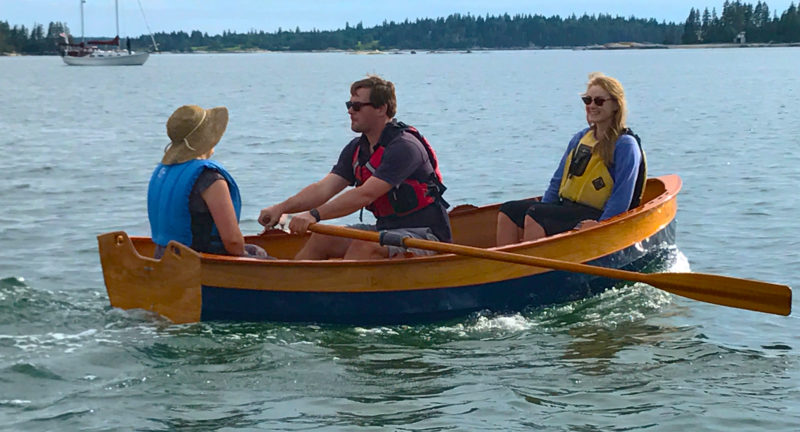
With a capacity of 425 lbs, the Tenderly can take three on board and still maintain good freeboard for rowing.
The wind was light when I headed off from the dock under sail. The Tenderly moved right along and I immediately felt safe and sound as I tacked, even though I didn’t shift my weight speedily to the windward side. The Tenderly’s stability was forgiving through my quick tacks, and it stood up as I took my time to move from the lee. The lug rig doesn’t go to windward exceptionally well, but this is a daysailer for leisure and fun and the sailing performance is perfect for that.
Aaron Porter
The standard kit includes a mast step and the daggerboard trunk; the optional sailing kit includes CNC-cut plywood for the daggerboard and rudder, blanks for the spars, and a Dacron sail.
The next day, I went out again with Andrew Breece, the publisher of WoodenBoat. I sat in the aft thwart and Andrew sat at the forward rowing station. With two people aboard there was good trim and balance, and the dinghy hummed right along.
We rowed out to Andrew’s yawl, MAGIC, to pull the Tenderly along for a while to see how it towed. Andrew said that he could feel very little drag as we towed the dinghy at about 2 to 3 knots while leaving the mooring field. We increased our speed to about 5 knots, and to feel the drag for myself, I pulled on the painter to see how hard it would be to get the Tenderly closer. It was sitting high in the water and came without complaint or too much effort.
courtesy of Chesapeake Light Craft
Under tow, the Tenderly behaves itself and runs true.
When we returned the Tenderly to the dock, there were a few people looking to try it out. Our friend Megan picked up another school instructor, Clint Chase, to bring him back to the dock from a mooring he just tied a skiff to. He did the tricky shift from one small boat to the other, then leaned over the Tenderly’s gunwale to retrieve his gear from the skiff. The Tenderly’s stability kept the maneuver from being awkward or dicey. Megan rowed from the forward station while Clint, a tall gent indeed, sat aft. Well balanced, the Tenderly picked up speed despite the load. Megan didn’t have a problem staying on or changing her course.
Anne Bryant
The forward rowing station maintains the boat’s trim while it’s being rowed with a single passenger.
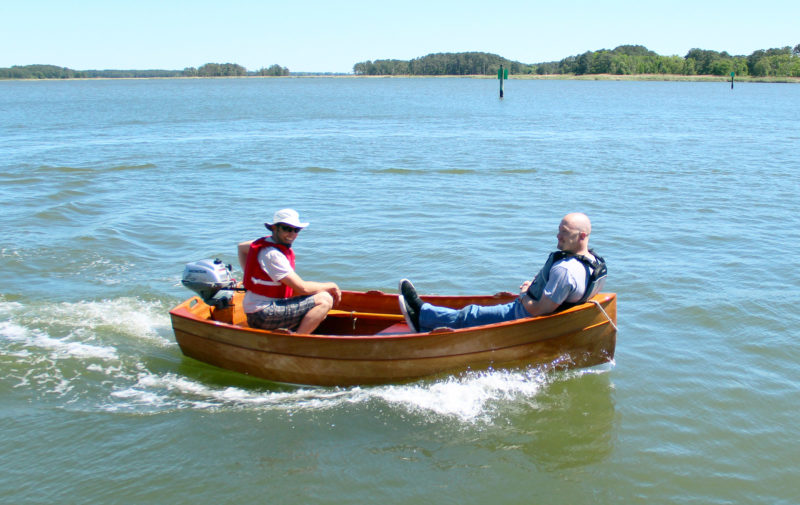
We weren’t able to get our hands on a manual-recommended 2-hp motor. Given the smooth towing and the nice balance while rowing, I’d say that a bit of speed and some weight aft is going to be just fine.
courtesy of Chesapeake Light Craft
The Tenderly is rated to take an outboard motor of up to 2.5 hp.
The Tenderly is a boat that is easier to build than some of CLC’s other kits, performs extremely well, and is a stable pickup truck of sorts, able to cart around your guests and your provisions. All of us here at WoodenBoat who got aboard it are still talking about how much fun we had. The Tenderly is a stout, seaworthy, and accessible design.
Anne Bryant is WoodenBoat’s Associate Editor.
Tenderly Dinghy Particulars
[table]
Length/10′ 0″
Beam/52″
Weight, bare hull/100 lbs
Weight, rigged/130 lbs
Payload max./425 lbs
Sail area/62 sq ft
Outboard/2.5 hp, max.
[/table]
The Tenderly is available as a kit ($1,699) and as full-size plans ($125) from Chesapeake Light Craft. Add-on kits include sailing components ($1,199) and floorboards ($215).
Is there a boat you’d like to know more about? Have you built one that you think other Small Boats Monthly readers would enjoy? Please email us!
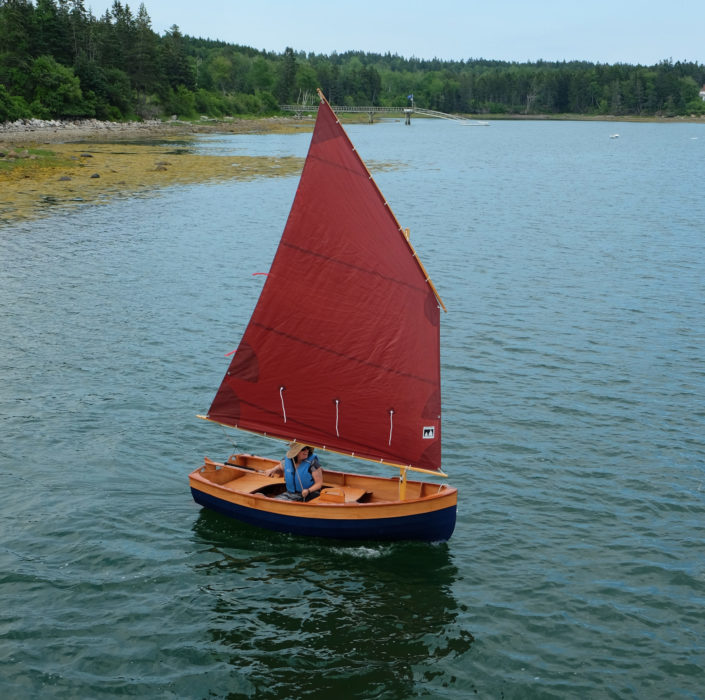
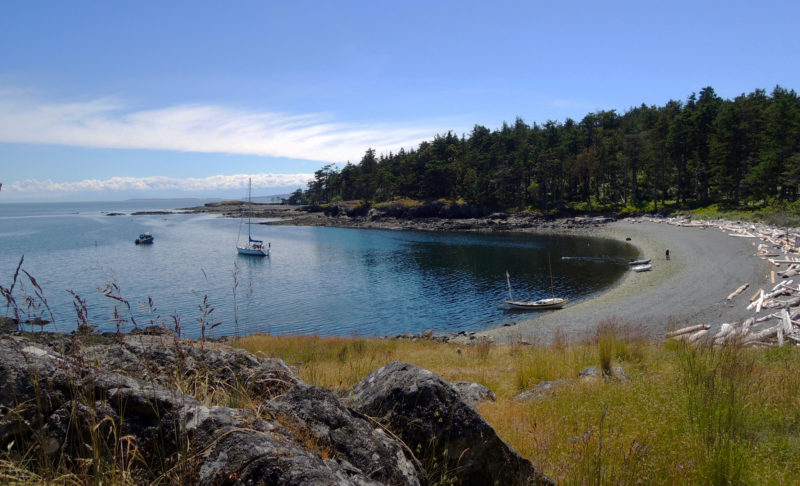
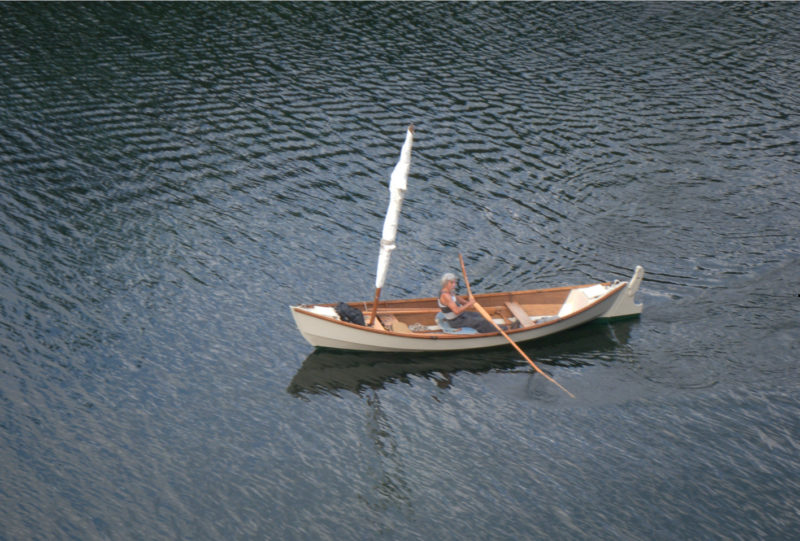
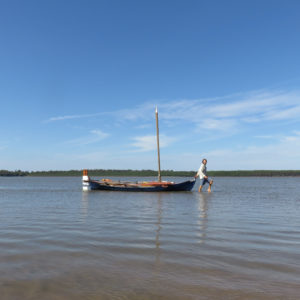
From the 1,900′ summit of Mount Maxwell on Salt Spring Island, my wife and I looked out over dozens of emerald islands spread out all along the southern horizon. With their forested slopes and rocky shores, these islands are the broken edge of the land, where a continent buckles under an ocean. I opened my sketchbook and drew each hill and bay, and each shadowed shore rising from a silvery sea. We had caught a glimpse of British Columbia’s Gulf islands while aboard the ferry on its hurried passage from the mainland to Vancouver Island, but as I drew the outline of each island I couldn’t help but yearn to trace their contours in my own boat, following my own route on my own schedule.
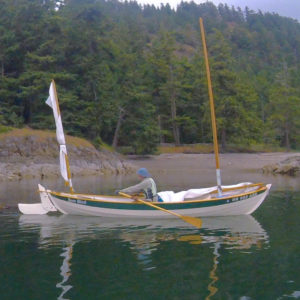
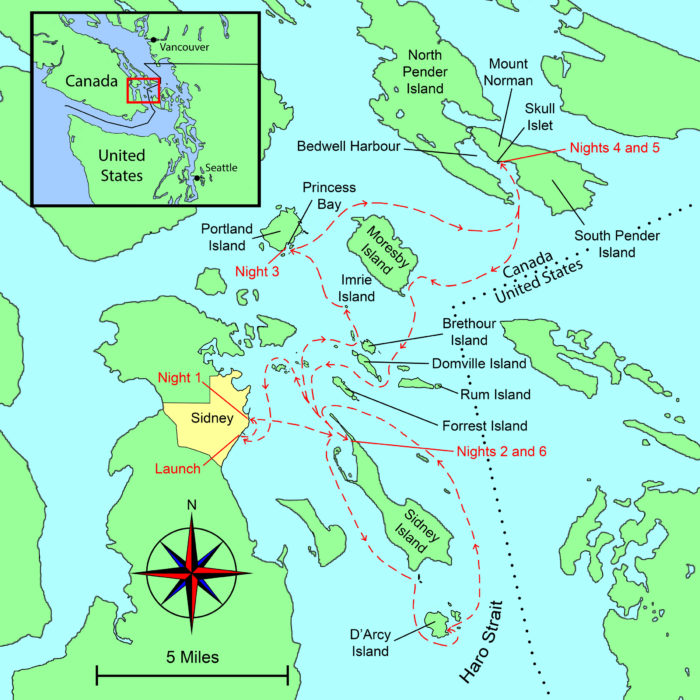
Three years later I slid ROW BIRD, my 18′ Iain Oughtred Arctic Tern, into the waters bordering the town of Sidney on Vancouver Island. I was launching very late in the day—I’d just finished a 200-mile drive from my home in Portland, Oregon, followed by the two-hour ferry ride—but I didn’t mind. Ahead of me I had a week to cruise among the islands I had drawn from the heights of Mount Maxwell, now visible, 8 miles to the north and looming over Sidney’s shore. The southern Gulf Islands, scattered to the east, promised an ever-changing horizon along with the pleasures and challenges of new anchorages.
Roger Siebert
.
I usually sail with friends, but this would be a solo trip with the freedom to do as I pleased without negotiating routes, times, or decisions. If I wanted to spend two nights in a secluded campsite or to row all day, I could. My travel would be limited only by the tides and winds and my goal was to shake myself free of electronic leashes, bolt from thoughts that tie my brain in knots, and find my freedom in the present moment.
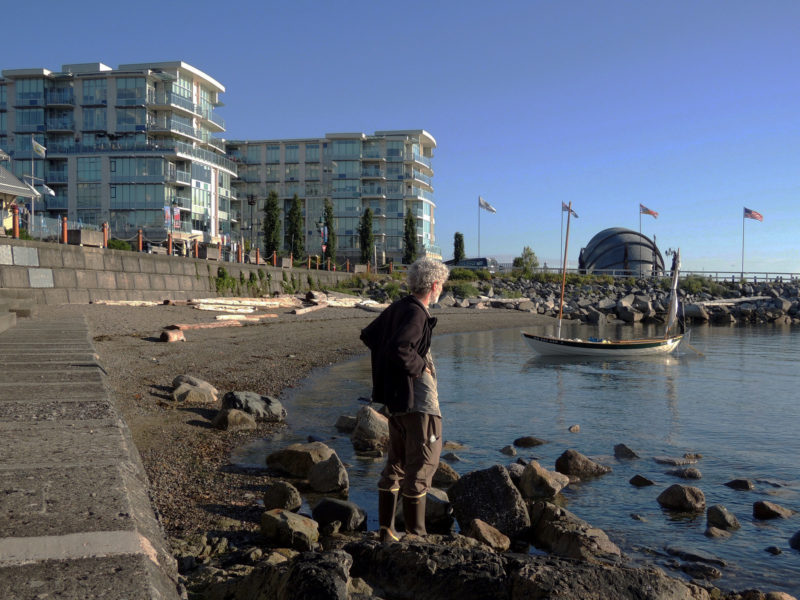
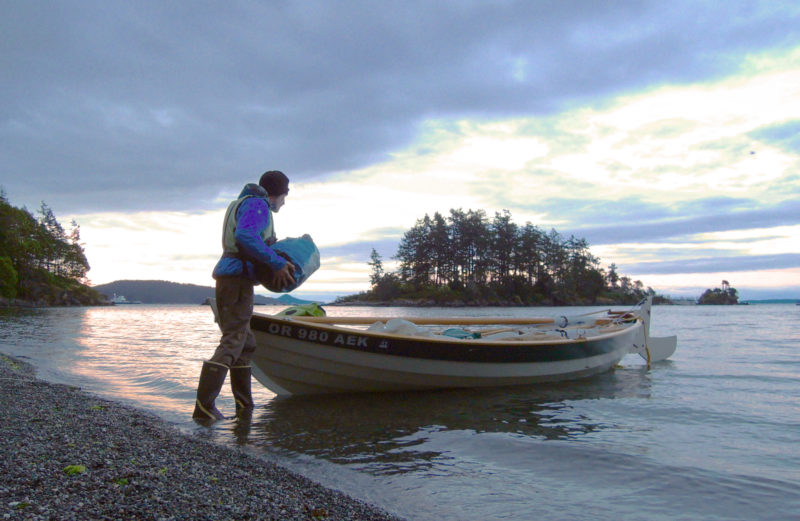
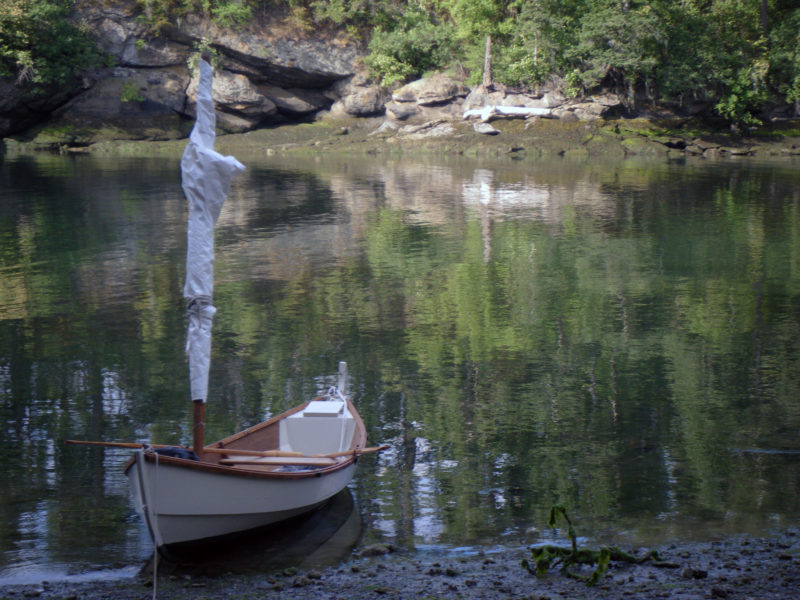
The sun had started to set, but the air was still a balmy 65 degrees and the honey-colored water was placid and inviting. It was mid-June, and Canadian kids were still in school, so the flood tide of summer tourists hadn’t started. ROW BIRD was the only boat on the water. With no wake but my own, there was barely a ripple to be seen in any direction. I rowed a half mile north along Sidney’s suburban edge to a cove I’d found while studying satellite photographs on my computer back at home. It had just room enough to allow my boat to swing at anchor between a commercial dock, the boulders protecting a waterfront trail, and a tattered, creosote-stained pier.
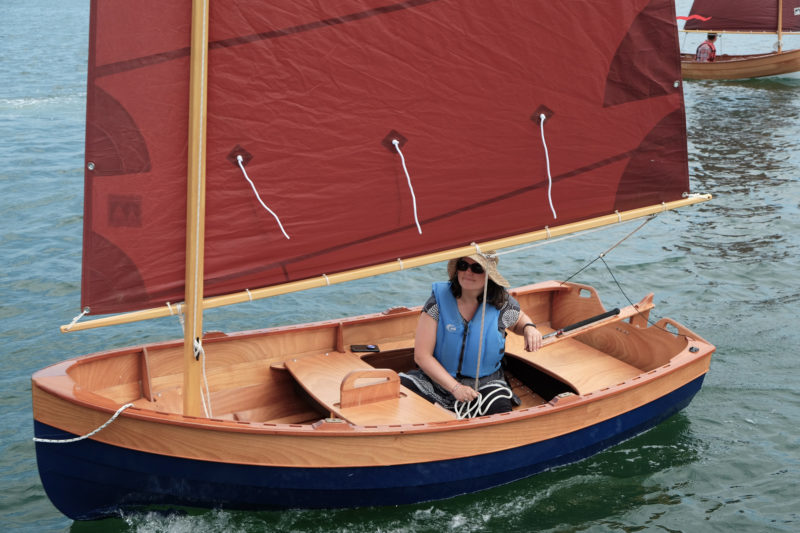
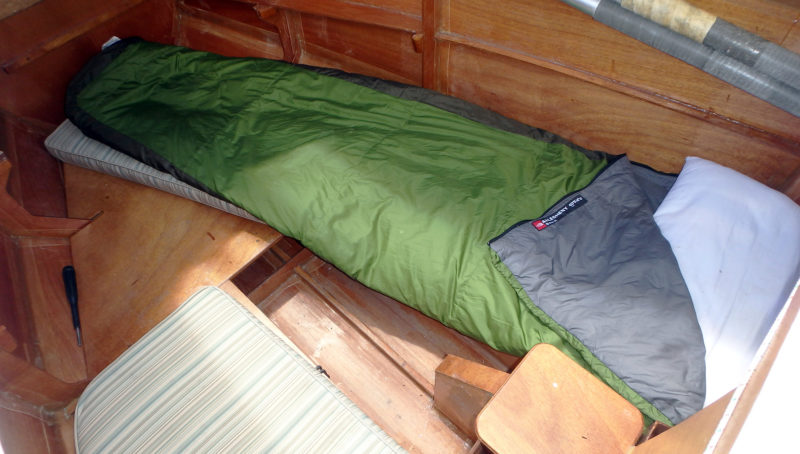
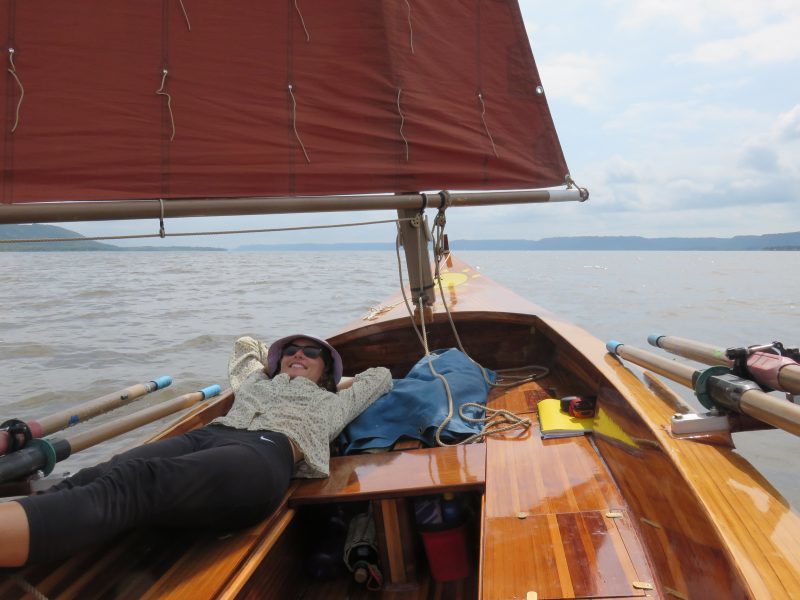
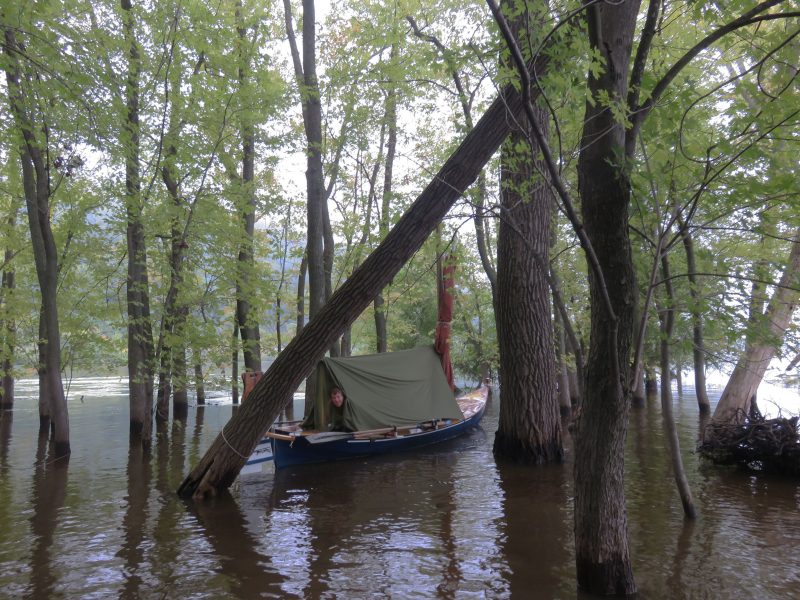
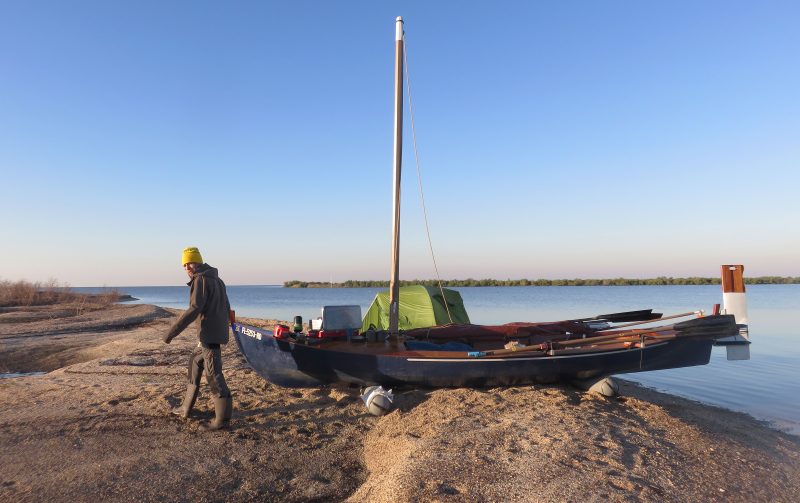
As I set up my cockpit tent, three pairs of walkers on the trail stopped to watch me preparing to spend the night aboard. I stretched my nylon cockpit tent between ROW BIRD’s masts, and tied down the rib-like battens that make the whole thing look like a Conestoga wagon on the water. With my sleeping bag unrolled on the floorboards, my pillow and book at the head of my bed, I lay down with a view of waterfront hotels and condos illuminating the edge of town. People watching me from shore must have thought a small open boat would be cramped place to spend a night, but being aboard ROW BIRD felt right; after years of camp-cruising, I knew every inch of the boat, and her familiar motion in the water made it easy to make myself comfortable and content.
photographs and video by the author
Although lacking facilities developed for small boats, downtown Sidney made an easy first overnight and a convenient stop for anything I needed. Within a five-minute walk of the water I found two grocery stores, lots of restaurants, and shops.
I awoke earlier than I’d hoped, thanks to an early-morning delivery truck rumbling by. Soon after the sunlight hit the water I brought the boat to shore, and three people approached. A young couple who love to kayak told me about their favorite stops in the islands. Then a silver-haired woman in an exercise outfit asked where I was headed, and when I told her of my plans, she spoke of her own small-boat adventures through the islands and stared wistfully at the islands a few miles away.
The tide was rising, so I set a 4-lb claw anchor off the stern with an Anchor Buddy, rowed ashore to set my 8-lb Danforth-style anchor on shore and let the elastic stern line pull the boat into deeper water. With ROW BIRD afloat, I headed for Beacon Avenue, Sidney’s main shopping street, and bought a cup of coffee and a pumpkin scone; I was ready to start my journey.
After stowing my anchors in their canvas bags, I took to the oars. I set a course 8 miles south-southwest for D’Arcy Island and listened to the weather report on my VHF radio. In Canada the weather is announced in both English and French, so the broadcast cycle is twice as long as what I was used to. Impatient to get to the English version, I struggled to translate French and convert metric measurements, reaching back to rusty skills acquired in high school. A high wind advisory had been issued for Haro Strait, the dog-leg channel separating B.C.’s Gulf Islands from Washington State’s San Juan Islands.
The wind would be a problem for me because D’Arcy lies in the middle of the 7-mile-wide north-south leg of the strait and is exposed to an uninterrupted 20-mile stretch of open and often rough water to the south. Not quite 3/4-mile long and 1/2-mile wide and without any well-protected anchorages, D’Arcy sits apart from the rest of the Gulf islands and its isolation helped shape its history. For three decades, ending in 1924, it served as a leper colony for Chinese immigrants; during Prohibition it was a hideout for bootleggers smuggling whiskey into the States. Now part of the Gulf Islands National Park Reserve, D’Arcy was high on my list of islands to see, but with the wind predicted to build over the next few days, I had a small window to get there and back.
I should have hustled if I really wanted to explore D’Arcy, but I found the rocky shores of Sidney and James islands were less developed and more enchanting than the San Juan Islands I was familiar with. And no one was out on the water. Wherever I looked, if I saw boats, they were way out in the distance.
I had to navigate rocks, islets, and tidal currents, keeping an eye out for the many ferries that use Sidney as a hub. They generally stay on a defined route, but some of the passenger ferries reach speeds of up to 30 knots and can sneak up in a hurry if you’re not paying attention.
After three hours of rowing and slow, close-hauled sailing, I approached D’Arcy’s north end—a craggy, coarse shoreline behind offshore rocks and beds of hose-like bull kelp. A few fragments of lichen-encrusted concrete walls, the remnants of the leper colony, stood eerily at the edge of the forest. The wind was patchy as I neared the kelp beds, so I raised the centerboard and took to the oars. Kelp wrapped itself around the blades like spaghetti spun on a fork, forcing me to stop every few strokes to free my oars.
The large logs lining the shore of D’Arcy Island are a testament to the strength of the winds and storms that hit the exposed southern shore. Visitors arriving by kayak and other hand-carried small craft can take advantage of a primitive campground near the cove, but I had no safe place to anchor if the water got rough.
I rowed the mile around the west side of the island and arrived at the southernmost point close to low tide. Bony fingers of jagged granite stretched into the water. Even for a small boat, this was a treacherous place to maneuver; every few strokes I had to look over the bow for unseen rocks. After several moments of uncertainty, I spotted a silvery mast behind a rocky outcropping and knew I’d come to a place more suitable for landing.
“Ahoy,” I called to a deeply tanned man relaxing in the cockpit of the sloop, “how’s the anchorage here?”
“Fine now,” he answered. “But I was anchored out here recently, and that time it was too rough to go ashore and too rough to leave. I didn’t sleep so well.”
If the wind that had been forecast didn’t kick up I could spend the night anchored here near the gravelly beach, so, hoping for the best, I pulled the bow of my boat ashore and set an anchor near the beach wrack from the last high tide. I spent a few hours exploring D’Arcy’s brushy trails and drawing in my sketchbook, but late in the afternoon, the treetops above me swayed as the predicted southerly front arrived. Thinking of the sailor’s recent experience, I decided that staying could make for a dicey situation. I boarded ROW BIRD and headed north for the more sheltered waters that the other Gulf Islands could provide.
Although I had been looking forward to spending a quiet night at D’Arcy, I wasn’t disappointed by the change in plans. I had no specific route to follow, just a list of places I wanted to see, and the weather, tides, and currents would guide me. Content to go with the flow, I felt a greater sense of freedom than I would have had if I’d held tightly to a fixed itinerary that put me at odds with the elements.
The locals warned me that Sidney Spit can get quite crowded during the summer when the passenger ferry is bringing visitors from the mainland, but I arrived in the off season and it was very quiet.
The front’s early wind provided a gentle push and I sailed northward on a broad reach, winding my way through a series of rocky islands, uninhabited but for the scores of seabirds I could hear calling in the distance. Sidney Spit on the north end of Sidney Island’s was the one bit of island coastline that was free of rocks, but I was unsure about it as a place to go ashore, having read that it can be as crowded as Coney Island on a hot summer weekend. But when I approached the slender mile-long neck of sand at the north end of the island that evening, just two people were strolling the beach; a quiet group of kayakers had settled in at the campground, and a few larger craft were tied to the mooring buoys, and floating above a vast eelgrass bed. The dock was empty—I’d have it all to myself. At dusk, voices in the distance softened, then grew quiet, and the only sound was the wind ruffling my cockpit tent.
Just before dawn I was awakened by a raft of river otters foraging and splashing around the docks; I got up before the sun was in the sky, and the light scattering of clouds indicated a clear day ahead. I intended to head northeast toward the eastern Gulf Islands that back up against the rough waters of the Strait of Georgia. The first step was to make the 8-mile passage to North and South Pender, a pair of islands separated by a slender 30-yard-wide gap. During the night, the flood tide had flowed into the 100-mile-long strait and in the early hours of the morning all that water retreated on the ebb, straining through the passages between the Gulf islands. I tried to time my departure to coincide with the slack tide’s still water and catch the flood that would push me much of the way to the Penders, but my start was a bit too early, and I made it only about 4 miles.
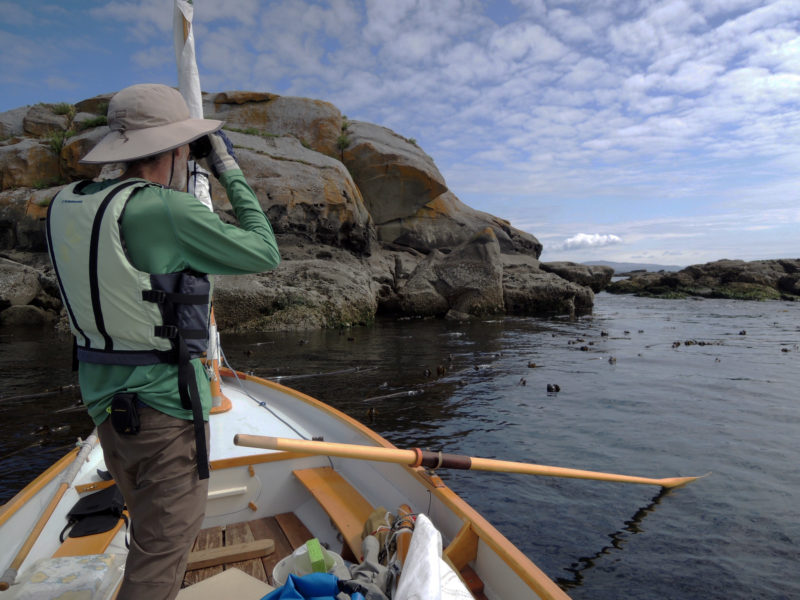
Traveling by a shallow-draft boat let me get in among the kelp and massive rocks to watch intertidal life and seabirds. I made a temporary anchor by wrapping the painter around a few thick stalks of kelp.
I had to tie my boat in a patch of kelp off Imrie Island, a 70-yard-wide grassy islet, and wait out the last of the ebb. It was a peaceful place to be—the kelp dampened the waves and the patches of smooth water between its stalks provided a clear window to the underwater world. Milky white jellyfish the size of saucers pulsed below, and dull-green fish hid in the kelp fronds. Oystercatchers with their bright blood-orange hued beaks paced about their stony nests on the outcroppings of lichen-tinted rock surrounding Imrie.
By the time the tide turned and the flood began to work in my favor, an intensely puffy headwind was blowing from the northeast against the current, causing steep choppy waves with a height that matched to ROW BIRD’s freeboard. Each time ROW BIRD started to move, there was a moment of quick acceleration, then heeling, followed by spray splashing over the gunwale. When I stopped to put another reef to the mainsail, I drifted toward half-submerged rocks. Setting the newly shortened sail again just in time, I slid away from the rocks.
The sound of water on the hull made it seem like ROW BIRD was rushing forward, but in the sloppy waters our actual speed was a crawl. Keeping the boat flat was the main thing on my mind, but after a few minutes, I realized that if I was going to make forward progress, I’d need more sail up, so I stopped and let a reef out. I hauled the main up again and while the chop persisted, this time there was almost no wind. Seconds later it reappeared, shot the boat forward and only by hiking out, something I never do in ROW BIRD, was I able to keep the rail out of the sea.
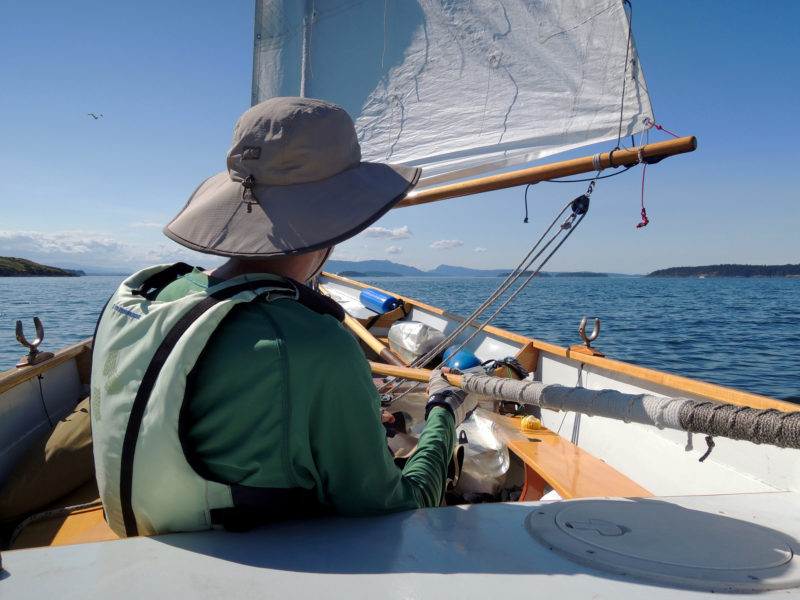
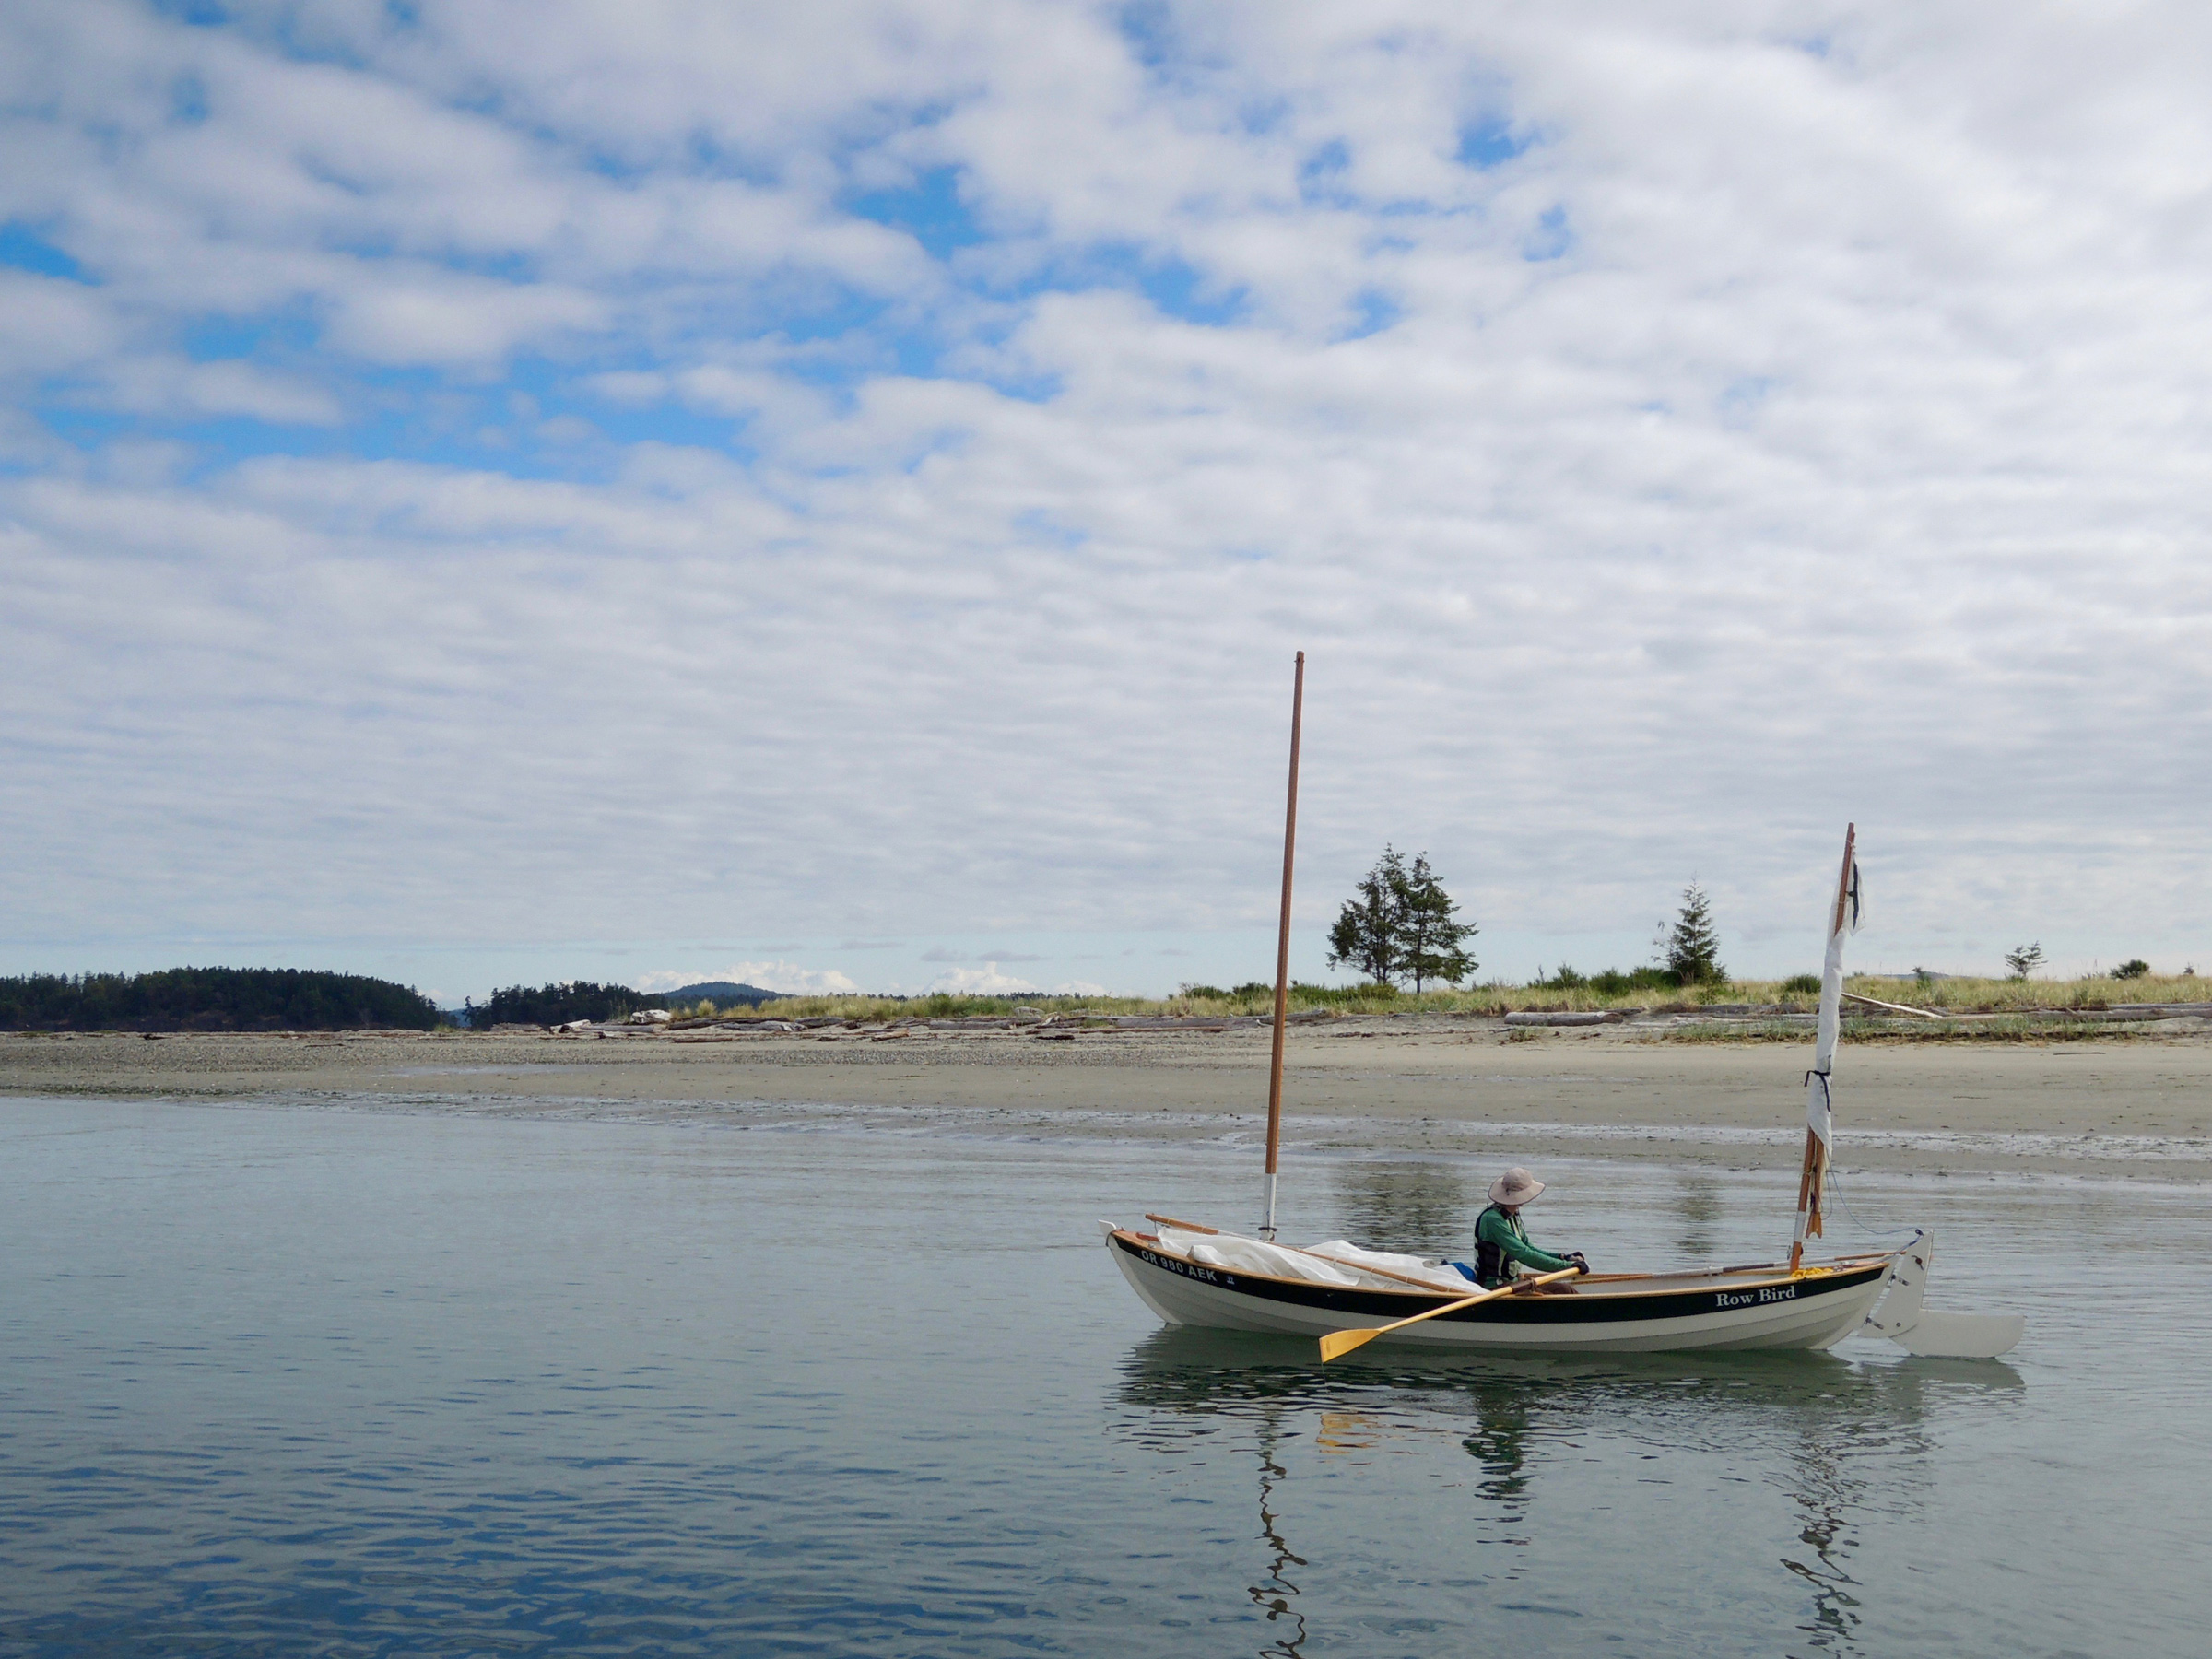
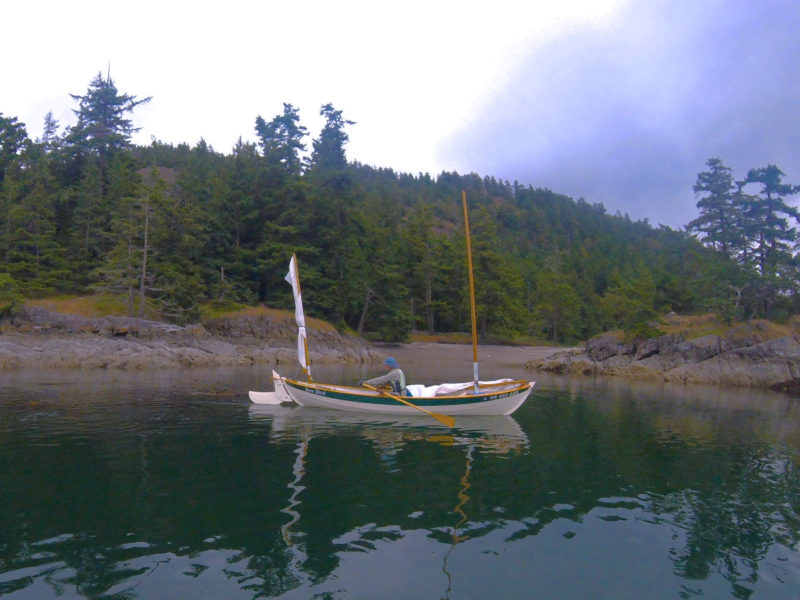
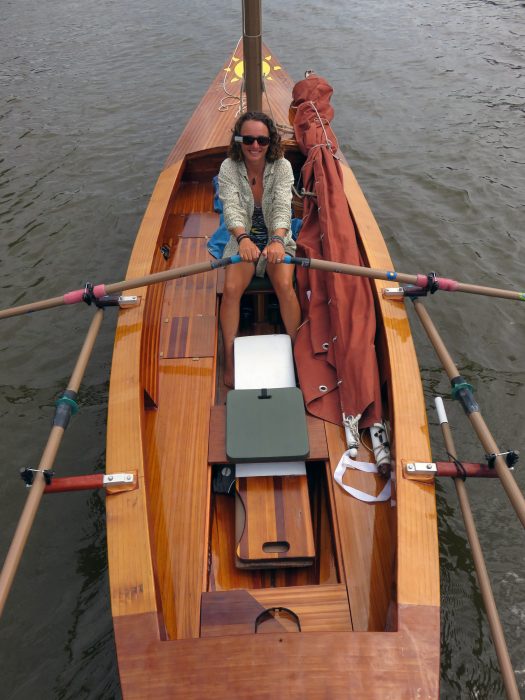
The winds were irregular but never entirely absent, so I usually rowed with the masts up, ready to take advantage of any breeze that might pipe up.
I had to concede that the water was too rough, so I abandoned Pender as my destination for the day. Portland Island was about 3 miles to the northwest, and I figured I’d find easier going in the sheltered coves on its south shore, so I steered for Princess Bay, the island’s biggest anchorage. Initially, I couldn’t see the ¼-mile-wide anchorage even though I was looking right where it should be, but as I got closer the islets that masked its entrance seemed to separate themselves from the island creating openings that had looked, just a few minutes earlier, like an unbroken wall. The water in the bay was still and flat, sunlight glinted off the smooth water, and crooked, weathered trees clung to the rocks at the edge of the bay.
I set my anchor and started cooking dinner. ROW BIRD’s cockpit is snug but the floorboards have room enough for my kitchen activities. Sitting cross-legged, I tended my camping stove, which I set near the centerboard trunk. I mixed couscous in a dried lentil soup mix, added water, slowly stirred and simmered it to a thick, mortar-like consistency. Then I turned the stove off, covered my concoction and waited until the pot cooled enough to hold in my bare hands. As I ate I was warmed by a small south-facing cliff that radiated the heat it had gathered from the day’s sunlight.
The anchorages at Portland Island range from open bays with sandy bottoms to steep, rock-bound coves. Ferries, like the one just coming into view at left, leave wakes known as “ferry wash” and can cause rolly conditions. It’s best to get the boat off the beach before the wake hits and, at night, to anchor with a stern line tied on shore to keep the bow facing the wakes.
The next morning I got up early to catch the flood tide toward the Penders, hopeful I’d reach the pair of islands this time. I put my drysuit on but the cool gray sky chilled me, and as I emerged from Princess Bay, a breeze from the southwest filled from behind. The tidal atlas indicated that a shift in the current’s direction lay ahead and I anticipated bumpy sailing.
Through my binoculars, I saw dark ripples in the water and low-lying rocks near the northwest edge of Moresby Island. Rounding the dark line a few minutes later, instead of the sailing getting gnarly, the wind abruptly died, and I took to the oars, leaving the sails up, and “motorsailed.” When smooth, leaden water between Moresby and Pender islands stretched as far as I could see, I dropped the sails and continued rowing. I set a course across 2 miles of open water toward the Penders and lost myself in the rhythm of the oars.
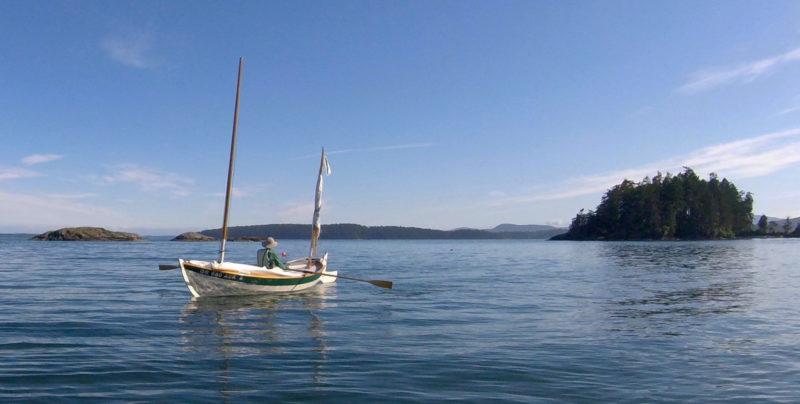
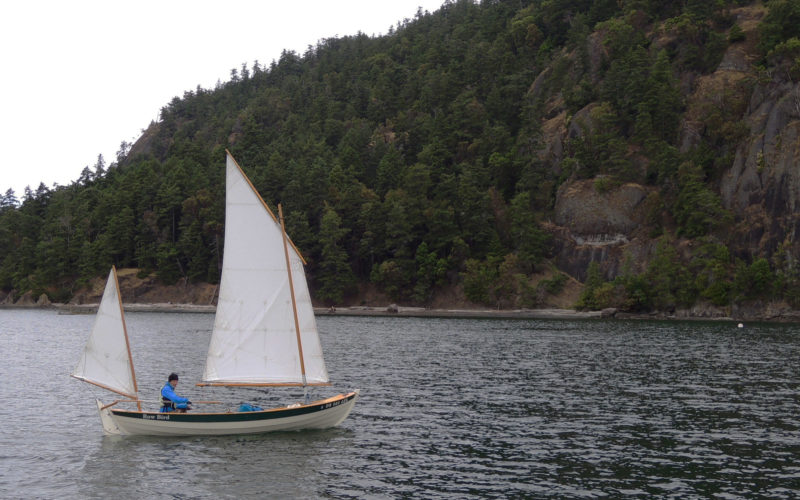
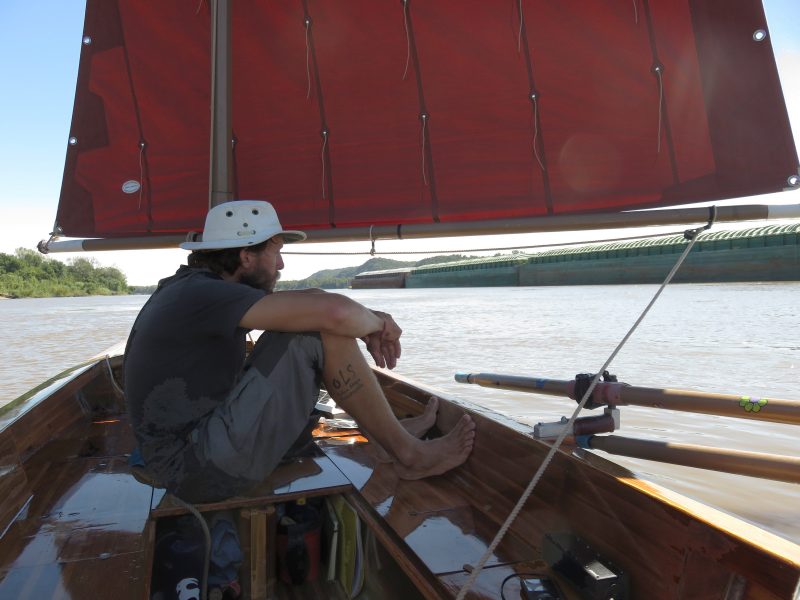
ROW BIRD handled the changeable spring conditions well, including calms, lumpy seas, and strong winds. The mizzen sail is a useful safety feature for heaving-to.
The pale rocky cliffs of North Pender shimmered in the tiny ripples around ROW BIRD as I drew near the island. Pigeon guillemots, soot-black but for white patches on their wings and comical cherry-red feet, came and went from their nests in the cliff’s hollows 50′ above me. Then, with a quarter mile left to go before making the entrance to Bedwell Harbour, a 2-1/2-mile-long inlet between the two islands, I felt myself being pushed back. An unanticipated current seemed to be pouring out of the harbor. The flood should have been flowing in by this point, pushing me into the harbor, but I was being moved south away from the island. I pulled hard on the oars to keep myself from being carried toward open water. I crept through the current and eventually glided into slower moving water on the opposite side of the mile-wide entrance.
I poked along the north shore of South Pender Island, weaving around huge boulders rising from the water—arranged as if they were in a Japanese stone garden—and skirting the towering hills that rose from a gray band of deeply fissured rock. The breeze was light and fluky, but after the hard pull on the oars, I couldn’t be troubled to row to the campground, so I raised the main and mizzen and sailed slowly up Bedwell Harbor.
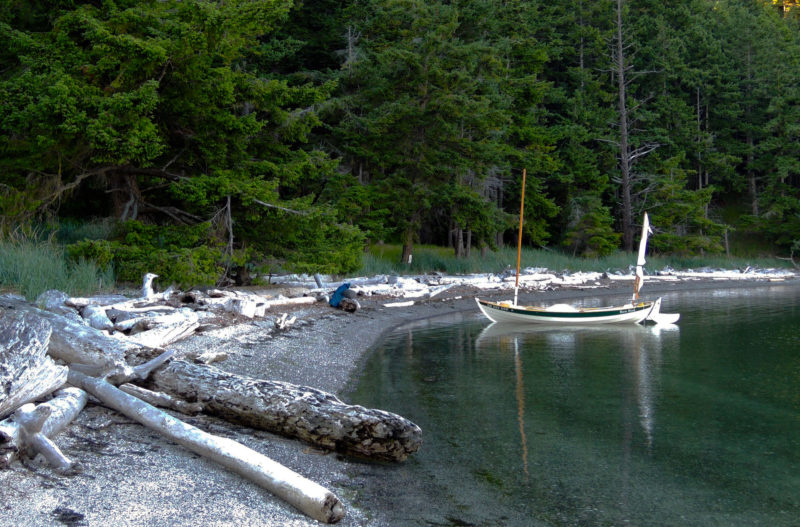
The Beaumont campground by Skull Islet, like others in the Gulf Islands National Park Reserve with protected beaches and easy access to well-maintained tent sites and trails, are geared toward small boats.
I came ashore at the Beaumont campground on the shore of South Pender. ROW BIRD was the sole boat there; the whisper of the wind in the trees was interrupted only by the calls of birds. The beach was a shell midden, white with countless bleached fragments of shells that crunched underfoot.
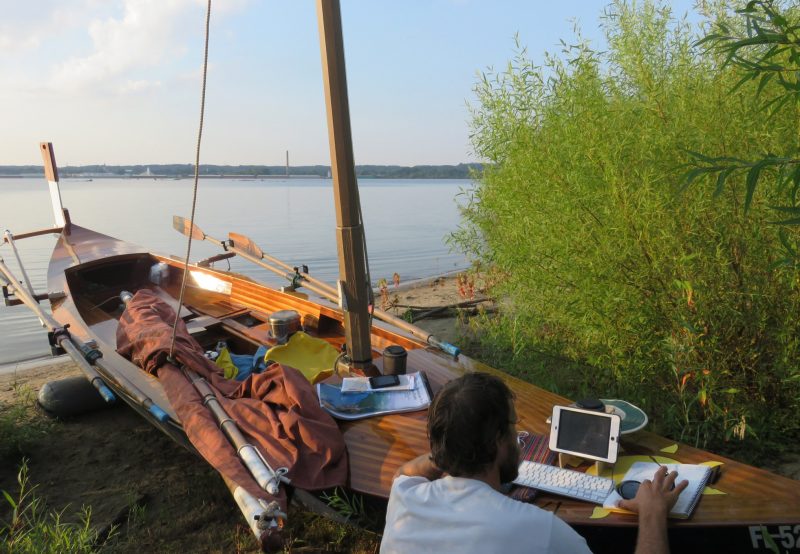
After I set up my tent, I walked the steep Mount Norman trail. By the time I reached the 800′-high summit, the highest point on the Penders, my shirt was soaked in sweat despite the cool air. From an observation deck above the trees, I stared out at the islands below, tracing my route to the campground below and envisioning where I’d go next as I drew the scene in my sketchbook.
First Nations people in British Columbia still use parts of the National Park Reserve for traditional hunting and gathering and some areas, such as the burial ground on Skull Island (seen off the bow), are closed to the public as a sign of respect to the local tribes.
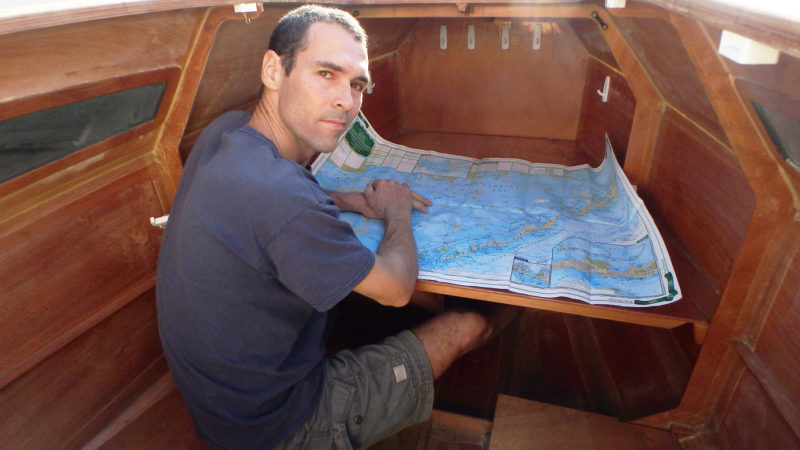
At dawn the next day, I sat on the shell beach looking over to Skull Islet, a round, 60-yard mound of slanted rock strata crowned with a dozen trees that was a burial site for First Nations people. The harbor waters were tranquil, but the weather radio predicted a strong storm two days out, and I knew I’d have to run for home or hunker down. I reviewed the tidal atlas to see where I could go with my remaining two days. Its arrows marked the flow of water through the islands that would push me north, south, or east—all the wrong direction—so I’d likely need both days to get safely back to the ramp at Sidney.
I spent the day at camp, and the following morning I headed homeward through the choppy waters of Haro Strait. Once I cleared the 2-mile ope- water crossing, I hugged the south shore of each of the Gulf Islands I came to. The intricate shorelines, rocky outcroppings, weather-worn shingled cottages, and meadowy pockets offered much more to see than the open water the shortest course would have taken me through. None of the islands—Moresby, Rum, Brethour, Domville, Forest—offered a good place to anchor for the night, so by late afternoon so I had decided to return to Sidney Spit for my final night.
The plip-plop of rain on my tent started slowly as the morning sky lightened. I sat on the floorboards, tidying up the cockpit, reluctant to don my raingear and head back to Sidney and bring an end to the trip. Low clouds blocked the sunrise. I eventually got underway and despite the drizzle, decided to loop around some of the islands closest to the town of Sidney before heading to the dock.
The Gulf Islands are in Vancouver Island’s rain shadow. While the west coast of Vancouver may receive more than 120″ of rain a year, the east side can receive less than 35″ annually.
ROW BIRD slid through the still, rain-flecked water as I rowed past the end of the spit. A half mile later the flag on my mizzen, a navy blue silhouette of a bird in flight on a white field, flickered about, so I set sail. As the wind grew, the hull started to hiss as it cut through the water. Close-hauled, I traveled past a cluster of rocky islets called the Little Group. When spray started to splash aboard and darker clouds approached from the south, I sensed that the full force of the predicted storm was coming. Soon, I had to feather the mainsail to handle the gusts as ROW BIRD bounced along parallel to the Sidney waterfront. I was in control for the moment, but I knew that with the rising wind, it was time to head in.
Two hours later, having put ROW BIRD on her trailer, I stood overlooking the cove where I spent my first night in Sidney. The flags along the edge of town snapped and blew straight back. Eastward, whitecaps covered the water between the shore and the nearest islands.
I ducked into a café for a cup of tea. As I flipped through my sketchbook, I paused at the drawing of the islands I’d made with pencil and pen, brush and watercolor at South Pender on the summit of Mount Norman. I had sailed the archipelago and now knew something of those islands, rocks, and coves. I’d traced their edges with ROW BIRD’s wake and filled the space within their outlines with my footsteps.
Bruce Bateau, a regular contributor to Small Boats Monthly, sails and rows traditional boats with a modern twist in Portland, Oregon. His stories and adventures can be found at his web site, Terrapin Tales.
If you have an interesting story to tell about your adventures with a small wooden boat, please email us a brief outline and a few photos.
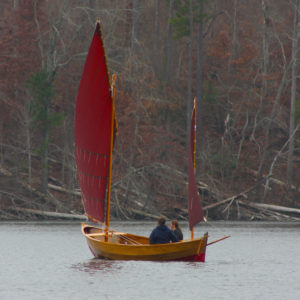
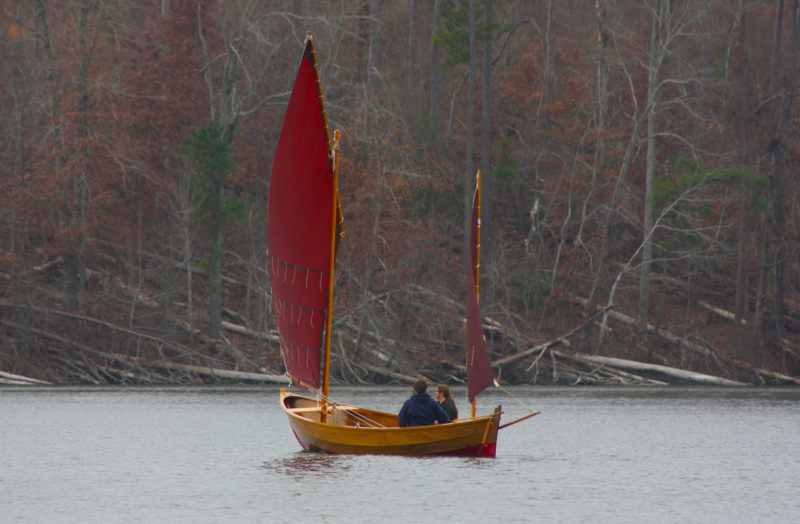
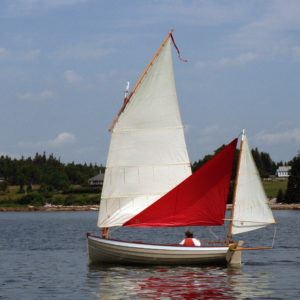
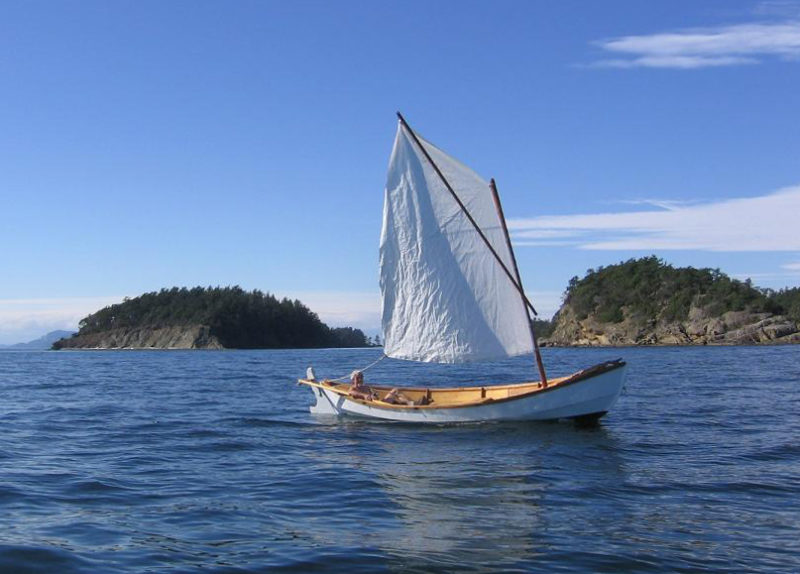
The author’s red mizzen staysail was designed and made for WAXWING, his François Vivier-designed, lug-yawl rigged Ilur. Sailmaker Stuart Hopkins writes about this sail: “We drew a 40-sq-ft sail to be tacked on the weather rail forward and sheeted to the leeward rail aft. We cut it rather flat from 3-oz polyester (instead of nylon) ‘storm spinnaker’ cloth, in the hope it will prove useful even with the wind a little forward of the beam, and keep its shape in slightly stronger winds.”
My camp-cruising boat is rigged as a lug yawl, with a powerful and well-behaved pair of sails that is ideal for solo sailing. My cruising grounds tend to have very light morning winds during the summer months, and despite my boat’s ample sail area I have looked for ways to improve light-air performance. Enter the mizzen staysail.
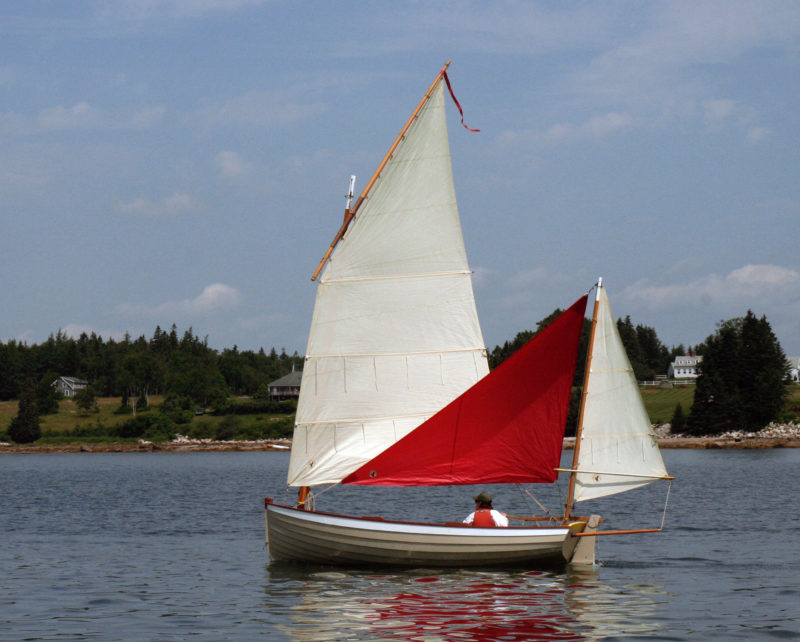
I first saw one in use on the Maine coast, where Harris Bucklin and his wife Barbara were flying one in ghosting conditions on their Ian Oughtred-designed Caledonia yawl. The blue sail was not only eye catching, it was also a demonstrably effective bit of sailcloth, providing a notable gain in speed over several other Caledonia yawls sailing in company with them.
When I contacted my sailmaker, Stuart Hopkins of Dabbler Sails, he was enthusiastic and replied “I’ve had four yawl-rigged boats through the years, and every one of them had mizzen staysails—lovely, useful things.” A few weeks later I had taken delivery of the new mizzen staysail and was out on Lake Champlain in 5–7-mph winds, doing sea trials aboard WAXWING, my Vivier-designed Ilur.
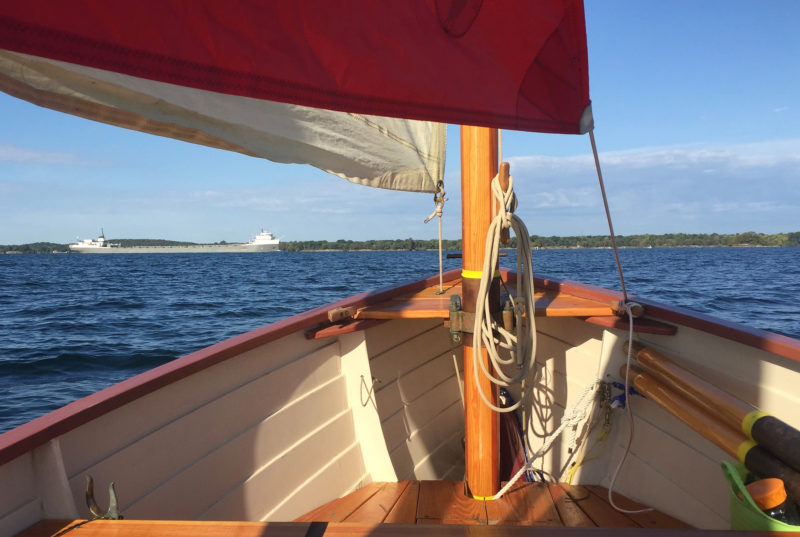
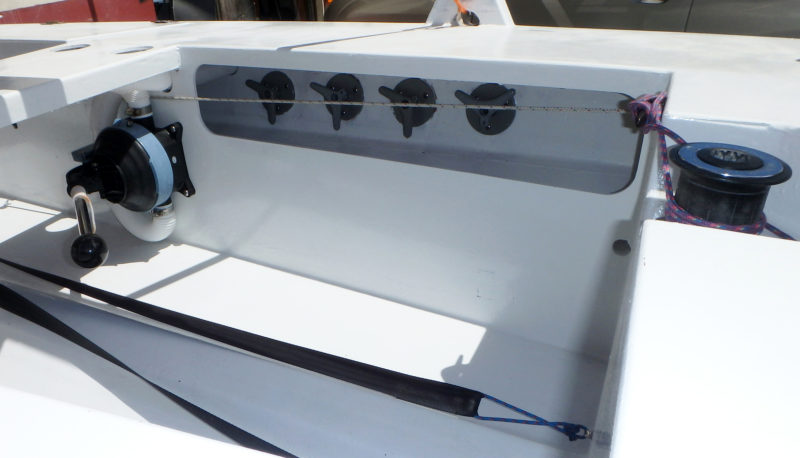
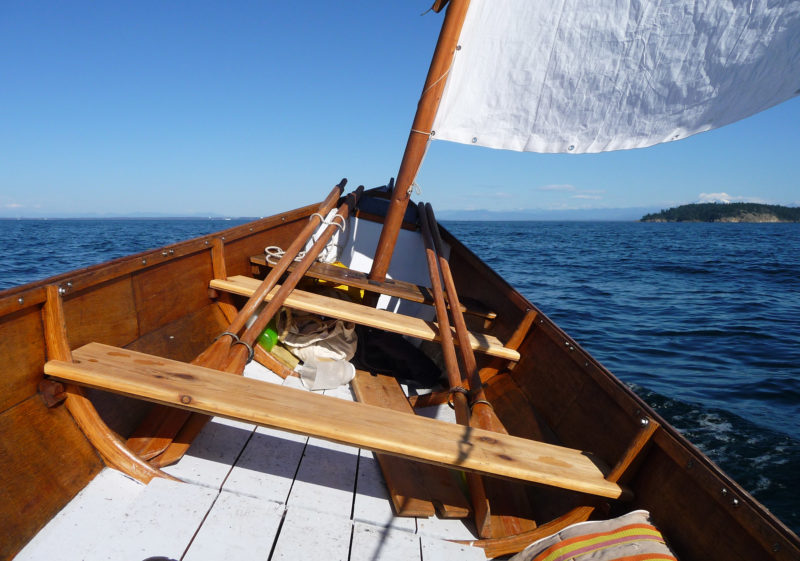
The staysail is 40 sq ft of 3-oz cloth, which represents a 30percent increase in sail area over the original rig’s 133 sq ft. Deployment is straightforward. I had lashed a small block to the head of the mizzenmast, and placed a halyard cleat on the mizzen step. I already had four small horn cleats, one at each corner of the cockpit, which are normally used when setting up my boom tent for camping aboard. Once the boat settles in on a reach, I hoist the staysail by its halyard, and take the tack line forward to the cleat on the windward gunwale. The staysail sheet runs from the clew, passing through a low-friction thimble on a Dyneema loop aft that’s dropped over the leeward cleat on the aft gunwale. The staysail sheet can be secured with a small clam cleat within easy reach while I’m at the helm.
John Hartmann
The mizzen staysail’s tack is tethered to the windward rail, here secured to a cleat originally installed for the boat’s overnight canopy.
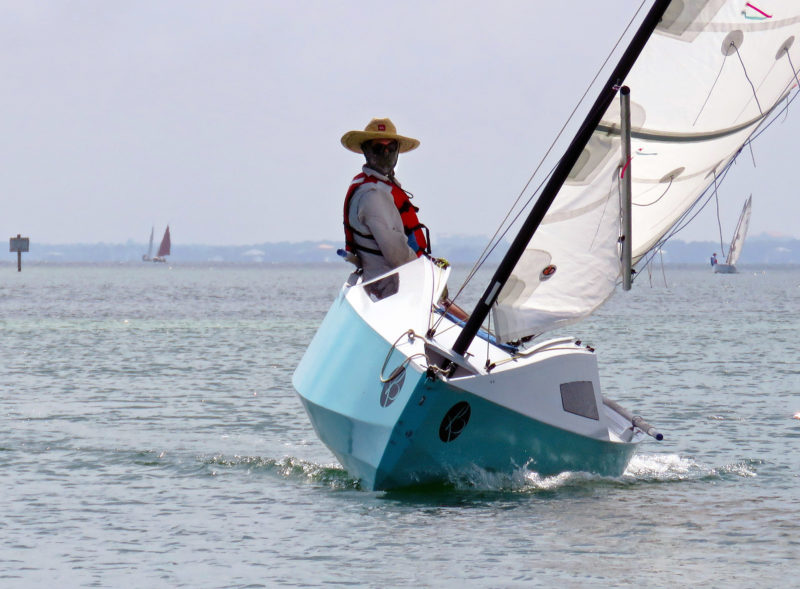
Over a series of trial runs with and without the staysail set, the new sail translated into a roughly 10 to 15 percent gain in speed as measured by GPS. The increased speed is noticeable even without GPS. When shooting pictures for this piece, my friend Christophe was the photographer. He sails a Sea Pearl, which has about the same sail area (136 sq ft) as my boat, but with a waterline line almost 6′ longer than the Ilur, usually leaves WAXWING well astern. I was ahead of Christophe as we started out, and I set the mizzen staysail. A few minutes later, the Sea Pearl was still well astern. Christophe hailed me: “Hey, luff up and let me catch you!” I think he might have said that to make me feel good, but the staysail was clearly making a real difference.
My staysail is a low-aspect sail, and doesn’t add noticeable heeling moment to the boat; it doesn’t affect the balance of the helm significantly either. It is a reaching sail, and in the 3-oz fabric, is stiff enough to manage sailing as far upwind as a close reach.
Tacking is easy, even singlehanded. With the boat balanced to sail hands-free, I walk forward, uncleat the tack line, and return aft. I then bundle the staysail to the mizzenmast, and come about. Once the new heading is established, I unbundle the staysail and go forward again to cleat the tack line to the new windward cleat before returning to the helm and trimming the staysail sheet.
The mizzen staysail is a beautiful, effective, and easily managed addition to a yawl or a ketch rig’s quiver. It isn’t a sail I’d deploy in close quarters or when short-tacking in confined environs, but on a longer light air reach, it is indeed a lovely, useful thing.
John Hartmann lives in central Vermont. He built his Ilur dinghy, WAXWING, to sail the 1000 Islands region of the St. Lawrence River, Lake Champlain, and along the coast of Maine. He details the Pythagorean mooring system he used at Nubble beach in the Technique article in our November 2016 issue.
More on Mizzen Staysails
Christopher Cunningham
The editor’s mizzen staysail for his Caledonia Yawl was made from a jib he had salvaged. Angling the foot up for clearance was the only modification required. The jib’s cut had a bit too much luff curve for the sail’s use as a mizzen staysail and loses power when on a close reach. As Stuart Hopkins suggests above, the sail should be cut rather flat with only a slight curve in the luff.
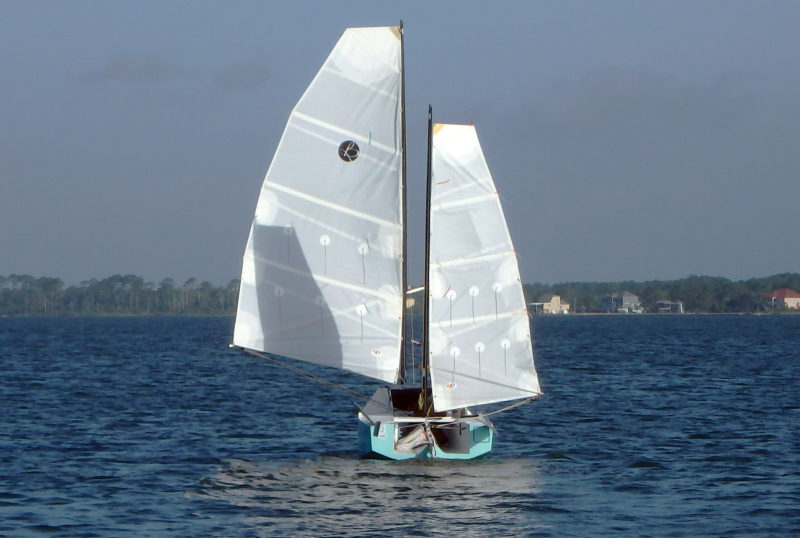
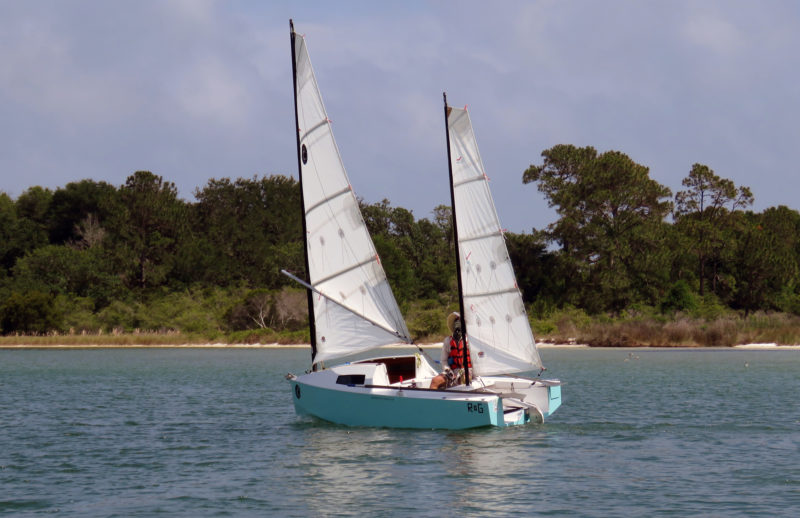
Marty Loken
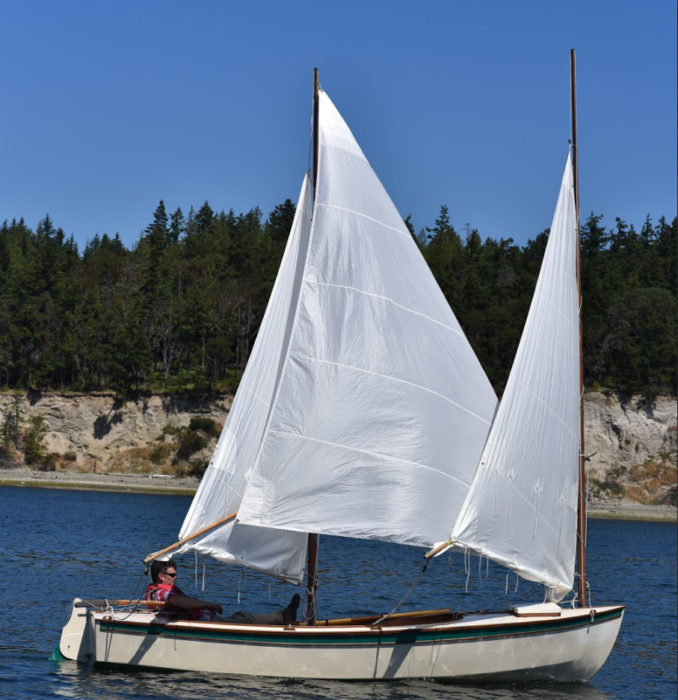
The cat-ketch rig of this Core Sound 17, with its tall mizzen mast, allows flying a large (85 sq ft) mizzen staysail. Drawings for this mizzen staysail call for a nearly straight 17′ luff, 6″ of round in the 12′ 8″ foot just forward of center, and 6″ of hollow in the 13′ 7″ leech just above center. Here the main and mizzen are still reefed after the wind eased and the mizzen staysail went up.
You can share your tricks of the trade with other Small Boats Monthly readers by sending us an email.
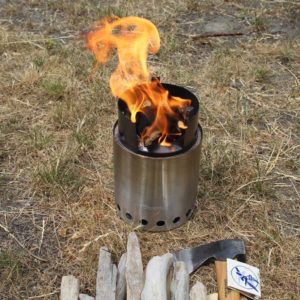
The stove takes some tending to keep it going, but small sticks are all that it requires.
There was a time when a campfire involved clearing the duff from a patch of ground and making a ring of stones. As pleasant as that might have been, it left a scar on the land, both in a circle of scorched earth and butchered trees, living and dead, for firewood. Charcoal tended to get scattered around good campsites, leaving its mark on clothes and camping gear. When I saw the Solo Stoves on the web they looked like a good way to enjoy the benefits of a campfire without being so hard on the natural landscape.
I bought the Titan model, measuring 8″ tall and 5-1/16″ in diameter, advertised as suitable for two to four people. The Lite is the smallest model, listed as a solo backpacking stove for one or two people, but I didn’t need something so compact and could afford to carry a large stove aboard. The two larger stoves, the Campfire (9.25″ x 7″) and Bonfire (14″ x 19.5″) models, are more than I need. A lot of outdoor gear is designed with backpacking and light weight in mind, but the Solo Stove is made of stainless steel at about 1/40″ thick and is just as sturdy as the kitchen cookware that I’ve bashed about for decades.
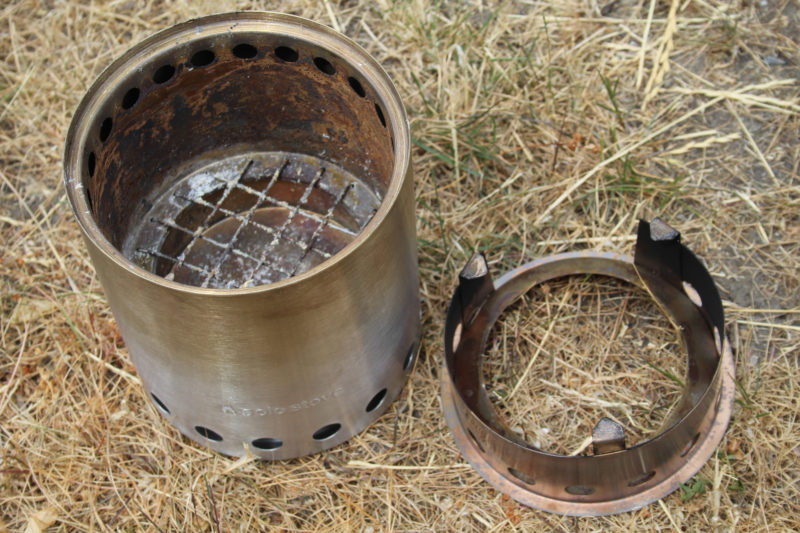
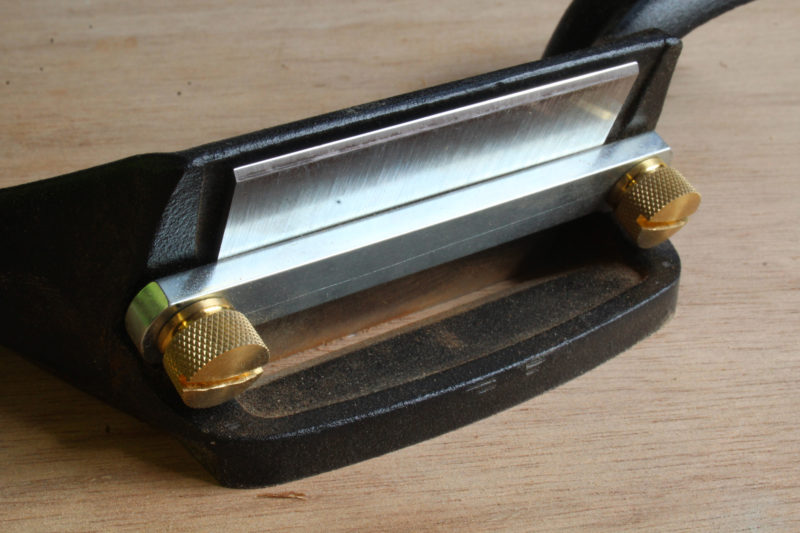
Air enters the stove through the row of holes at the bottom. Half of the air enters the burn chamber through openings hidden beneath the flange supporting the grate; the other half rises between the stove’s inner and outer shells, being heated as it goes, and emerges from the row of holes at the top of the burn chamber. The cookware support is at right.
The stove itself is 5-5/8″ tall and 5-1/16″ in diameter. The cookware support brings the overall height to 8″. There are sixteen 1/2″ holes around the base of the stove. Some of the incoming air travels across the bottom of the inner liner of the stove to a central hole and then to a vent set below a heat-resistant nichrome wire grate that supports the firewood and lets ash pass through to an ash pan. The rest of the air travels upward between the outer and inner walls, getting heated as it goes, and through twenty-two 3/8″ holes at the top of the burn chamber. According to the manufacturer, the heated air results in “a more complete combustion and a hotter fire with less smoke.”
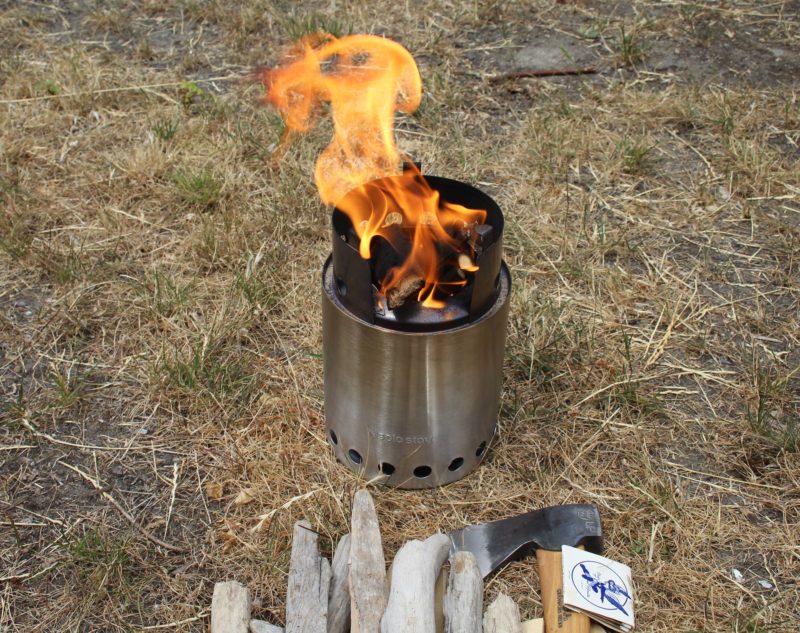
The stove is easy to light and doesn’t take any careful arrangement of tinder, kindling, and firewood. Kindling should be about 3″ long to fit into the stove. A bit of crumpled newspaper, protected from wind by the walls of the stove, catches fire quickly and gets the kindling going. I chopped sticks as thick as my thumb to 6″ lengths. That initially left one end sticking out of the stove, but as the lower end burned away the sticks would fall into the burn chamber.
When the fire is going strong there is indeed very little smoke and what does emanate from the stove dissipates a couple of feet above the ground. The visible effect of the secondary-combustion airflow is to concentrate the flame as it flows through the opening at the bottom of the pot support. With a full load of wood burning and no cookware in place, there is a satisfyingly hypnotic flame flickering 12″ high. That’s bright enough to bathe a campsite in a circle of appealing and useful amber light.
At night, the Titan Camp Stove puts up a flame bright enough to illuminate a campsite.
With pot on the support, flames licked the sides, blackening them with soot. I put a quart of water in the pot and the punky driftwood and old yellow cedar, which had lost most of its fragrant and flammable resin, brought the water to a boil in 8 to 9 minutes. The large burner on my electric range, set on high, took 4 ¼ minutes to get a quart to boil in the same pot.
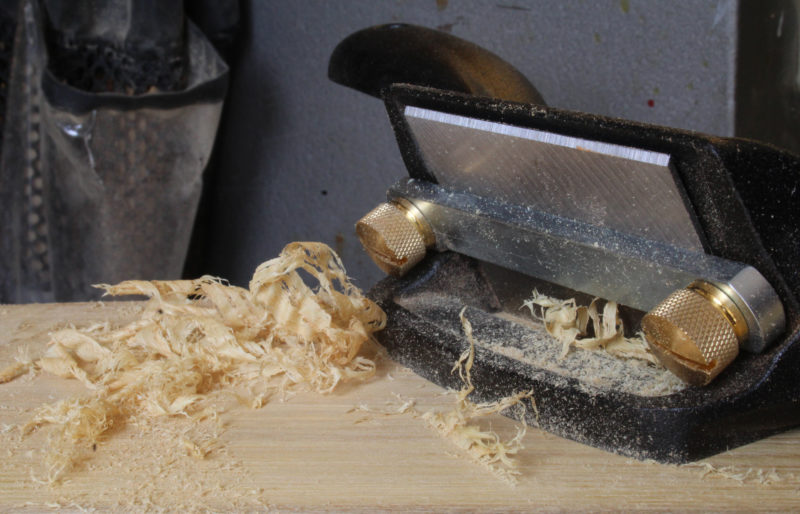
The bottom of the stove is wide enough to provide a fairly steady base for cooking as long as the ground it’s on is level and flat.
Keeping a fire going in the Titan camp stove did require having wood ready to load into the stove every few minutes, but not so often that it felt like a nuisance. Tending the fire would fit right in with minding the cookpot. As for gazing into the flame, there’s still plenty of time to slip into that relaxed state between re-stoking.
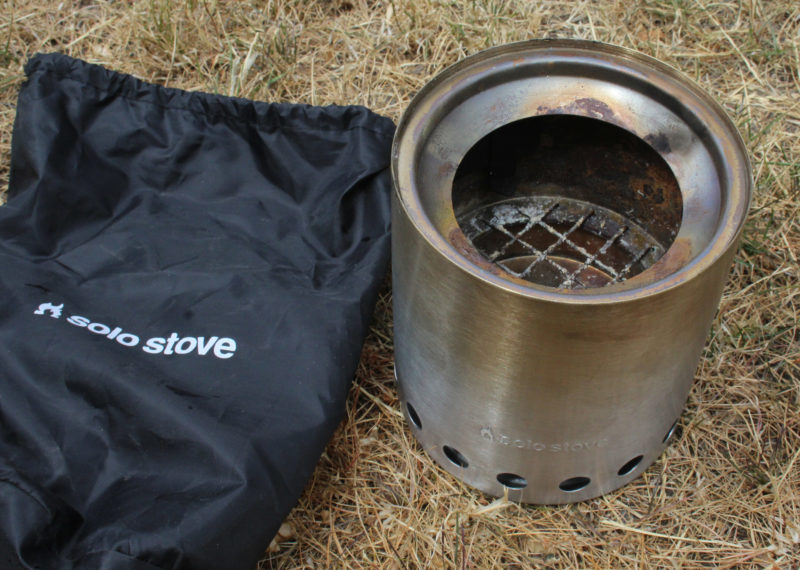
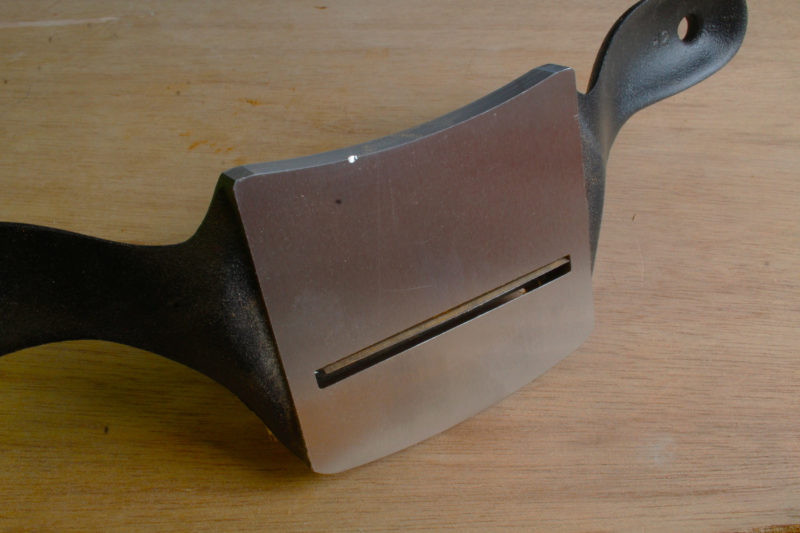
Left to burn themselves out in the Titan, each of the fires I set left only a couple of tablespoons of powdery ash and a few peanut-sized coals in the ash pan. The stove’s double wall kept the bottom of the stove from getting hot; the dry grass that I’d set the stove on showed no trace of scorching. The interior surfaces of the stove got a bit sooty, but the exterior, though colored by the heat, remained soot-free and easy to put away in the included stuff sack without making a mess of my hands.
Soot accumulates only on the inside of the stove, so handling it after it has cooled down won’t blacken your hands. The included stuff sack keeps the two pieces together.
The Solo Stove Titan has a minimal impact on the environment, both in fuel it consumes and the traces it leaves behind. It’ll cook dinner and when the meal is over, it will provide the flickering firelight we have been enjoying for tens of thousands of years.
Christopher Cunningham is the editor of Small Boats Monthly.
Thanks to reader Marty Stephens for suggesting this review.
Solo Stove sells the Titan model for $79.99 through their web site and a network of dealers.
Is there a product that might be useful for boatbuilding, cruising or shore-side camping that you’d like us to review? Please email your suggestions.
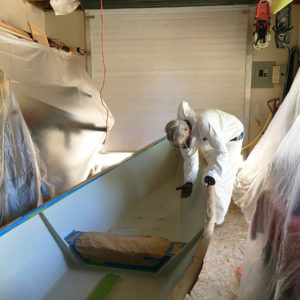
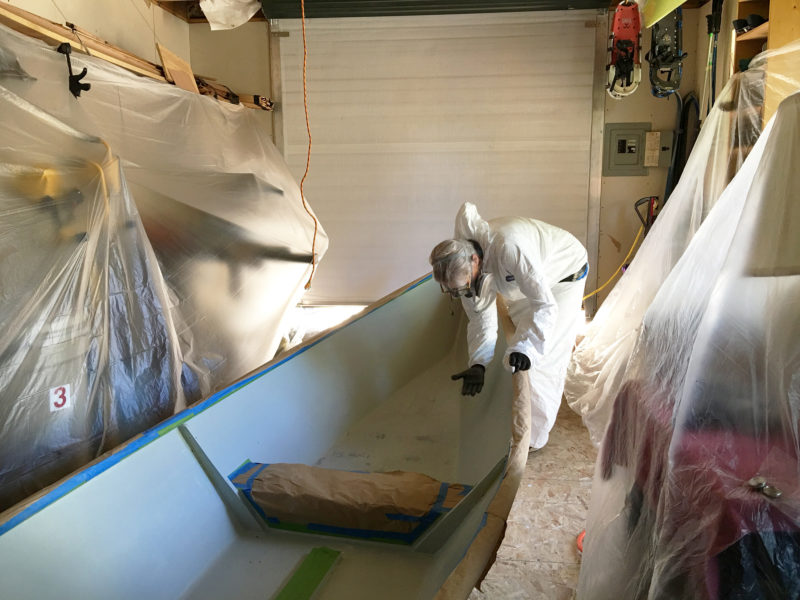
The author was equipped to spray the truck-bed liner, but while that produced the desired results, she decided that rolling the coating on would be quicker and less expensive.
The first time I saw truck-bed liner paint as the interior finish of a pulling boat was while reviewing Sam Devlin’s Duckling for Small Boats Monthly. Thick for durability and textured for traction, it immediately made sense to me. I grilled Sam about where to find the thick coating, how to apply it, how long it lasts, and if there were any fading or chalking issues with the product he used. I row year-round in the San Juan and Gulf islands, where long hours of exposure to the summer sun and gravelly and sandy beaches mean my boats get hard, grinding use. The bed liner won’t stop an errant sharp knife point from puncturing it, but it will handle anchors and anchor chain, the bottoms of coolers transferred from a sandy beach, and gravel stuck on the bottom of rubber boots. Sam has even used truck-bed liner on the exterior of some small boats where a durable finish is more important than a perfectly flat one.
Black is the longtime standard color for truck-bed liner paints, but too dark for my taste and too hot in the summer sun, so I surfed the web looking for a do-it-yourself tintable bed liner. Some manufacturers—Duplicolor, Plasticoat—make water-based bed liners that may be easier to work with, but my research suggested they produced poor results. I went with Monstaliner, a tintable aliphatic hybrid urethane polymer that can be rolled or sprayed, and ordered a couple of free paint chips from among the 39 colors available.
I chose a light slate gray color that will, combined with the pebbly texture, reduce most of the glare I used to get from the previously high-gloss surfaces in my rowing dory, MAC. It is also guaranteed to have 100 percent UV permanent color for a minimum of five years. The online application instructions are detailed and complete. Monstaliner comes in a kit that includes textured rollers, masking tape, abrasive pads, and more—just about everything you need to do the job—but I already had all of the prep materials and was equipped to spray it on, and so just bought the “coating only” kit with the coating, tint, catalyst, stirring stick and mixing paddle for an electric drill.
Proper surface preparation and careful taping are a universal requirement for applying any coating. The supplied instructions reminded me that the time spent on application is only a fraction of the time prepping and cleaning up. After taping gunwales and those surfaces I didn’t want to spray, I scuffed the remaining painted interior surfaces with Scotchbrite pads and vacuumed up the fine dust, followed by a wipe-down with a rag and MEK (methyl-ethyl-ketone). Bed liners have a high VOC rating so I suited up with goggles and a respirator and got lots of ventilation going in my shop. Just before spraying, I ran my gloved hand along the inside of the hull to make certain it was dust-free.
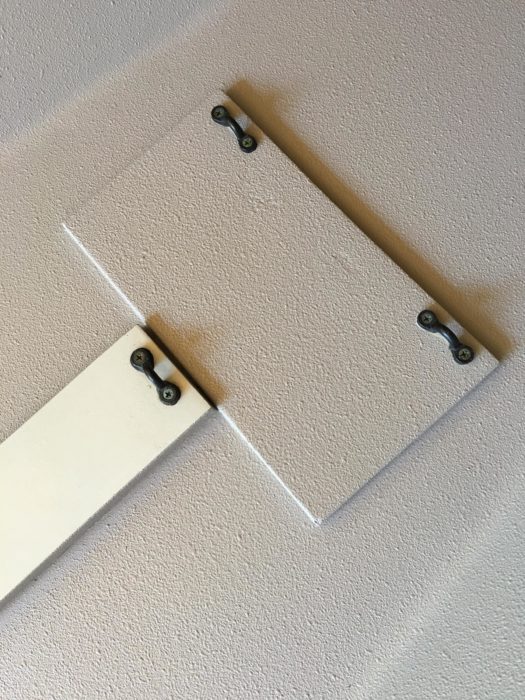
Whether sprayed or applied with textured rollers supplied by the manufacturer, the truck-bed liner paint creates a thick coating with a textured non-slip surface.
Following instructions, which called for over 10 minutes of constant mixing with the paint paddle in my cordless drill, I added tint, then catalyst, to the bed liner paint. To apply the coating, I used a gravity-fed spray gun and a 1½-gallon hopper connected to a 10-gallon compressor at 120 cfpm (cubic feet per minute). I used a a 1/8”-diameter texture tip on the spray gun—the larger the diameter on the tip, the more texture on the finished surface. The 10-gallon capacity of the compressor made it easier to do long sweeps with the sprayer without the compressor motor constantly running.
I went through a lot of nitrile gloves—the coating that got on them got sticky rather quickly. An hour after finishing the first coat I repeated the process. Cleanup took gallons of MEK and acetone. If you get the kit with the disposable rollers, a quart of MEK or acetone should suffice—much kinder to the environment. In retrospect I would have saved time, money, and solvent if I’d bought the kit and rolled the finish on.
The coating is quite thick, concealing imperfections and wear and tear in a well-used boat.
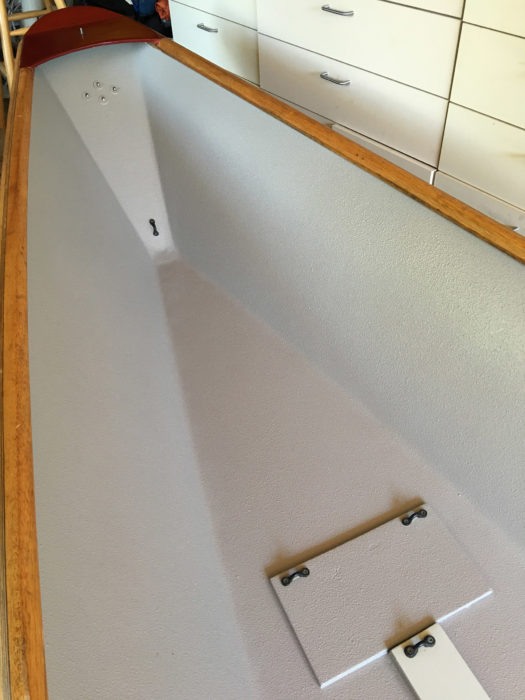
The results speak for themselves. Spraying all interior chines, corners, and edges prior to the sides and bottom effectively softened and hid 15 years of dings, scrapes, and small gouges that I had filled, sanded, and painted in previous years. I could see them before spraying, but they are now under a uniform, consistent, and virtually impermeable surface. The marked contrast between MAC’s unrefinished seat and the new bed liner reminds me of how worn my old boat was looking. I plan on fastening a varnished mahogany plank on top of the old plywood seat to complement the gunwales. With my old dory given a new and very appealing finish, I look forward to taking an overnight rowing/beach-camping trip with my 11-year-old grandson and seeing how the truck-bed liner holds up to the sand and gravel we’ll bring aboard when launching from the beaches.
Monstaliner is only available from the manufacturer and shipped only to the US and Canada. A gallon of base coat plus catalyst for spraying runs $128.60 and the tints, sold in one-pint cans, cost $18.50 to $48.75. A gallon roll-on kit costs $145.40.
Is there a product that might be useful for boatbuilding, cruising or shore-side camping that you’d like us to review? Please email your suggestions.
Bruce Holaday got an early start with boating. His father ordered a $50 pram from the Sears & Roebuck catalog and turned Bruce loose with the boat on a clear-water lake in Indiana. Bruce spent his boyhood summers in the company of ducks, turtles, muskrats, and fish. The experience of independence and of being in command of his own vessel stuck with him; the prospect of a grandchild got him thinking about his childhood and the important role a boat played in his growing up.
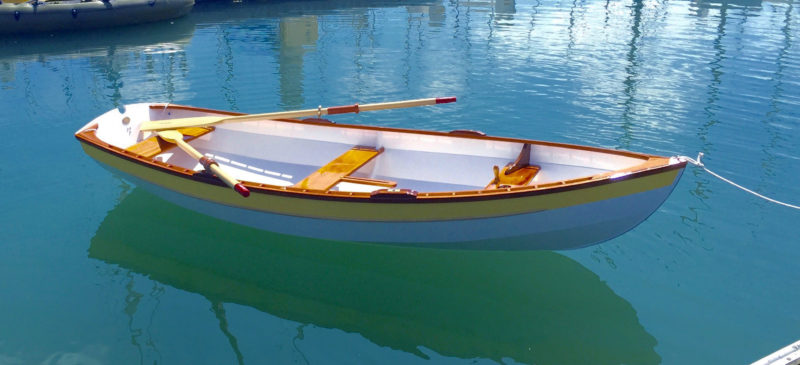
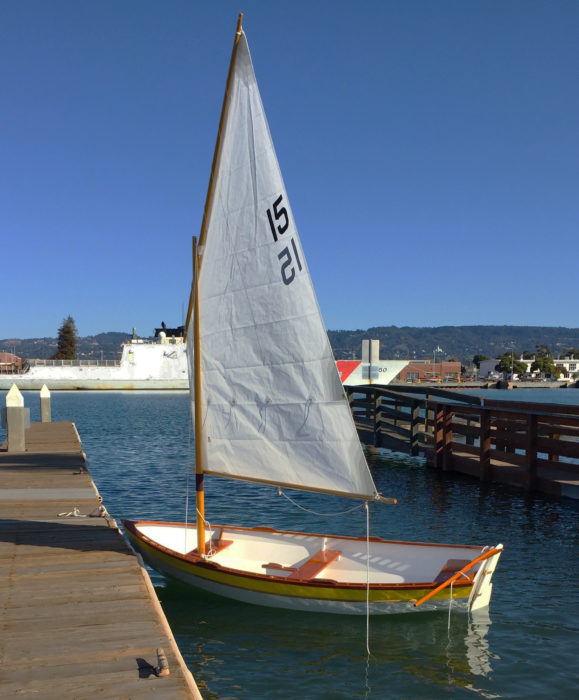
Bruce, now living in Oakland, California, and the director of an environmental non-profit, wasn’t a skilled woodworker so he decided a kit boat would the smoothest sailing to a successful build. He found Joel White’s Shellback Dinghy in the WoodenBoat Store catalogue and ordered a kit for the sailing version of the boat. The Shellback is 11′ 2″ long, has a beam of 4′ 5″, and carries a standing lug sail. In the past quarter century it has earned a reputation as an easy boat to row and sail. With a recommended capacity of 1 to 3, it could carry grandparents and an infant grandchild, and would be a good boat for a young boy or girl to strike out on his or her own as Bruce did when he was a child.
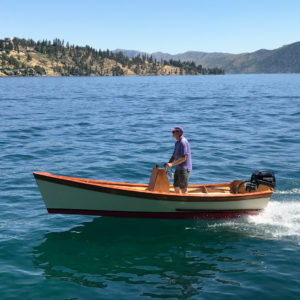
Bruce sails the boat from a ramp across from the Coast Guard base in Oakland.
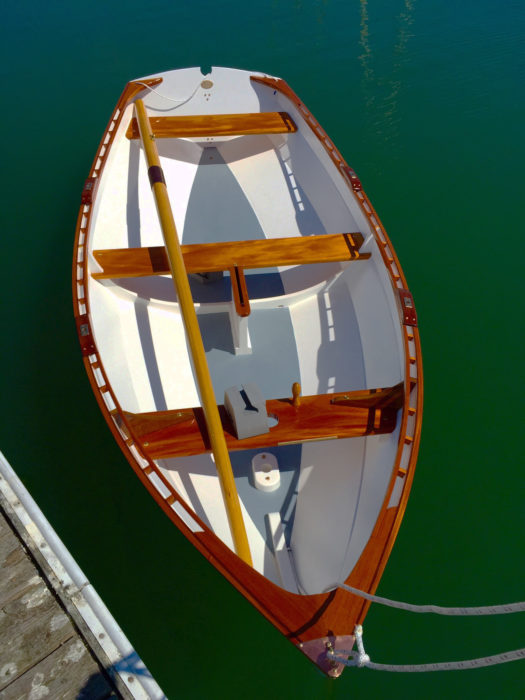
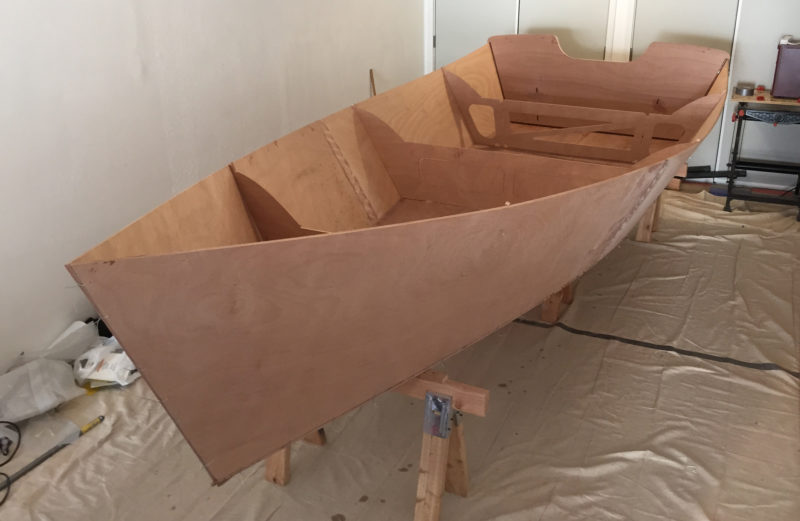
The kit had all of the pieces shaped and ready to assemble, but Bruce found many ways to make the boat distinctive, from a brass name plate inside the transom to a copper plate on the breasthook to surround the painter’s padeye.
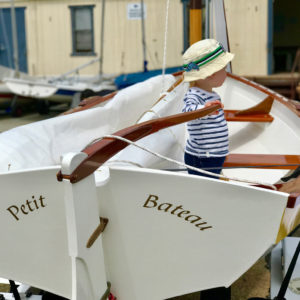
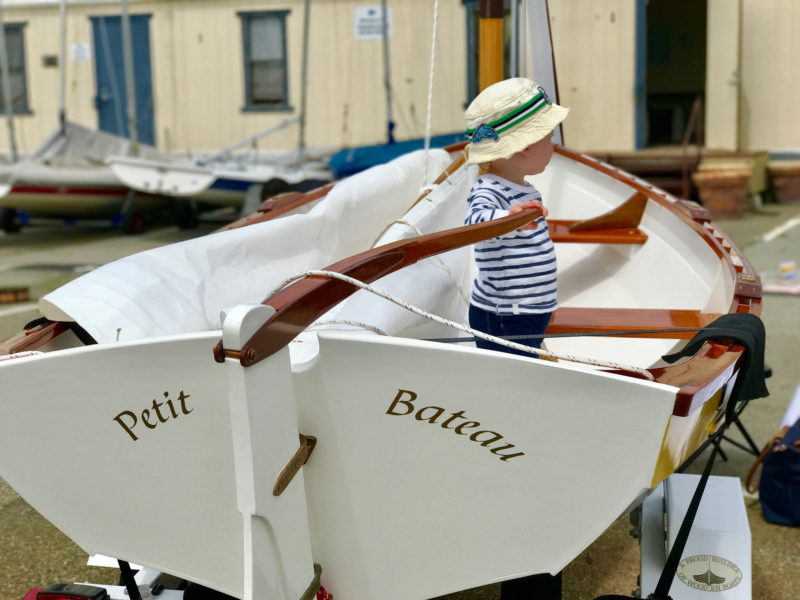
The launching of PETIT BATEAU preceded the arrival of a grandchild, by a long shot.
Bruce launched the boat and christened it PETIT BATEAU, but he was a bit ahead of the grandchild schedule. Without the boat to occupy his free hours, he felt boredom settling in and cast about for another project. He settled on writing a children’s book about the boat the fun of being a young skipper. He found a publisher in South Bend, Indiana, not far from the lake where he first took command of the Sears & Roebuck pram.
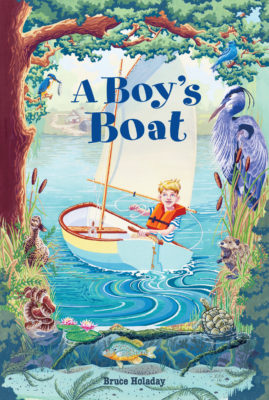
The book, A Boy’s Boat, was published in March, 2017. Bruce describes the book as “the story of eleven-year-old Jack and PETIT BATEAU, the 11-foot-long dinghy that Jack’s grandfather made for him. During Jack’s summer of learning how to row, sail, and scull the boat, he comes to know all the creatures of a small cove, the joy of warm sunny mornings on the water, as well as the darker shades of nature and the challenges they present for a small boy and his small boat.”
While this is the scene Bruce has been hoping for, the boy is not a grandson. It’s his office manager’s son.
There is no grandson Jack. The book, like the boat, is ahead of the grandchild schedule. Bruce’s daughter is engaged to be married in October, and the arrival of a “Jack” or a “Jill,” if here is to be one, may still be a long way off. He may have to come up with something else to stave off boredom. PETIT BATEAU can keep him company while he waits and hopes.
Building my first boat was a means to an end. I had done a lot of backpacking and bicycle touring but I’d grown tired of lugging a heavy pack on the trails and dodging cars and trucks on the roads. I imagined that with a boat I could travel with lots of gear and have a plenty of elbowroom, so I studied charts and set my sights on cruising north to explore the long inlets of British Columbia. I didn’t have the money to buy a boat so I had to build one. I read Gardner’s Dory Book and Building Classic Small Craft and ordered plans for a Chamberlain dory skiff. My parents let me set up a temporary workshop in the back yard, and after I had an enclosed space and a workbench hastily knocked together with construction lumber, I was ready to get started on the skiff.
I had a lot to learn about building a boat. I was 25 and I’d been using tools for quite a while and thought I was a fair woodworker. Before I turned 10, I had built a couple of forts in the back yard, in my early teens I made two bunk beds for myself and a bunch of skim boards, and at 17 I built a plywood diving helmet and a pump to supply it with surface air. But the skiff, with its curves and wide array of unfamiliar materials posed problems I hadn’t anticipated. When I started shaping the stem, for instance, I was convinced that white oak couldn’t be planed. I worked on it with files as if it were metal until I learned how to put proper edges on my growing collection of woodworking tools. I also mangled a lot of bronze boat nails hammering them into undersized pilot holes thinking the small holes would provide a better hold. With all the trouble I had, I often wondered what I had gotten myself into, but when the planks went on the curves emerged, and the frustrations began to loosen their hold on me.
Eventually I finished the skiff and rowed and sailed it north up the Inside Passage, calling it quits after 700 miles when the weather window started to close. I’d spent a good part of a year building the boat and only a month putting it to its intended purpose, but I wasn’t left feeling that I’d made a bad bargain. I could have continued using the skiff to cruise the waters of Washington and British Columbia, but I was drawn back to boatbuilding. I erected another temporary shed in my parents’ back yard and built a gunning dory for my father. Then I started building boats for my friends. I was looking at plans instead of charts; the means had become an end.
I got a commission to build six flat-bottomed rowing skiffs for a summer camp, three one year, another three the next. The repetition meant that the work got easier—I knew exactly what I needed to do—but I couldn’t put my heart or my head into it. An important element was missing. What engaged me more was building some thing new and unknown, a boat more complex than those that preceded it. I built a lapstrake Whitehall and upping the ante kept me on the left side of the learning curve where I could be more engaged in the work. But sometimes that led to unhappy consequences.
Learning “on the job” was giving me valuable experience, but it was often getting me into trouble, and having things go wrong was costly. Hammering the last nail in the hood end of a plank halfway up the port side of the Whitehall, I split the plank. The Port Orford cedar I was using was not only expensive, it was rare. I couldn’t afford to lose any of it. I also had a lot of labor invested in the plank; by the time I got to nailing it into the stem rabbet, I had already scarfed its two pieces together, shaped it, beveled its edges and fastened almost its entire length. Tapping that last bronze boat nail in was supposed to finish the job, but the plank buckled and a split started slowly working its way aft. There was nothing I could do to stop it; I had to let go and let the split run its course. I threw myself down on the dirt shop floor and pounded my fists against the packed earth.
What happened was exactly the result I would have predicted if I had put an ice pick in the pilot hole and pried it open. The hood end needed to be steamed to take the twist without relying on the nails. The mistake I had made was in not thinking things through before I embarked upon a task. When I made a mess of things like that I would end my day annoyed with myself and discouraged with boatbuilding. My last moments of wakefulness in bed would be colored by the failures I’d experienced during my day in the workshop. At some point I shifted my thinking as I drifted off to sleep and focused on the work ahead rather than behind. Anticipating and solving boatbuilding problems became my nighttime routine and usually steered me clear of trouble in the shop in the day that followed. It was also a very reliable way to fall pleasantly asleep no matter what distressing things might have happened during the day.
My replica of the Gokstad faering was my most challenging project. I had only a small set of lines to work with—no offsets, no construction details, no instructions. Almost every step required a lot of pondering in advance of execution. The stems are carved to include the upswept ends of the planks. The Viking builders, I imagine, just started with a crooked trunk and took an ax to it. I needed to take a more methodical approach and it took me over a week to come up with one. I wasn’t in the shop when I found the solution—I was in bed. On the lofting, the shape of the stem was created from the baseline up and the centerline out. That wasn’t giving me the information I needed. I eventually used a common problem-solving tool: approach the problem from the opposite direction. My point of reference wasn’t going to be the centerline but the outside face of the block of wood I’d carve to make the stem. I laminated the block, drew the lofted profile on the outside faces and then drilled holes along the plank-edge lines, setting the depth of each holes from a line indicating the face that I’d drawn on the lofting. I chopped away wood until I reached the bottom of the holes and I had my stems rough out.
The Gokstad faering has only three strakes and the planks are long, wide, and heavy, and I couldn’t manage them quickly enough to steam them and then get them clamped on the building jig fast enough to bend and twist them effectively. That became another problem to ponder while I was falling asleep. The solution was another simple reversal: instead of bringing a steamed plank to the boat from the steam box, I’d bring the steam box to the boat. I made a lightweight steam box out of insulating foam that I could slip over the end of a plank that was clamped in place to the middle of the building jig. I’ve used foam steam boxes ever since—I even wrote an article for WoodenBoat about it—and I have a problem to ponder to thank for that.
I built and outfitted my Caledonia yawl in the difficult time of a divorce and working out a new interior arrangement for the boat was my refuge at the day’s end when I needed to guide my thoughts in a way that gave me peace of mind. I continued the habit with my most recent boat and heaped up a long list of problems to solve: a pop-top cabin and doors that worked with the top up or down, a sink with running water, a heat exchanger for hot running water, an indoor rowing station, etc. While I could argue that many of the ideas I had for the boat were to make it more comfortable for cruising, I had come to enjoy drifting off to sleep with three-dimensional puzzles turning over in my head. I no longer think about boatbuilding problems as impediments to getting a boat finished. They are opportunities for solutions that I’ve learned to savor.
There are a lot of troubling things going on in the world today, the kinds of things that can keep me up a night. I have more boats than I have room for, but I need my sleep. I’ll have to make room for one more.
Moving back home to Eastern Washington after being away for decades required that I get a boat. Lakes Coeur d’Alene, Priest, Chelan, and Roosevelt, together with the Columbia and Spokane Rivers, needed to be re-explored. Alright, as my wife correctly noted, “required” is too strong a word. Nonetheless, the move gave me a good excuse to buy or build a boat.
My requirements were simple. The boat would have to be light enough to tow behind our four-cylinder SUV, small enough to fit in the garage, and capable of getting two of us and our gear the 50 miles from the south end of Lake Chelan to Stehekin on the north end and back again in the afternoon when the lake gets rough.
Although there are many affordable aluminum and fiberglass boats that would serve my purpose, I wanted something distinctive. Fond memories of my uncle’s 16′ Thompson Sea Coaster, with its lapstrake hull and mahogany deck, prompted me to look for a small wooden boat to restore, but I didn’t find one nearby. While searching for an old boat, I came across the Peeler Skiff, a 15′ plywood kit boat from Chesapeake Light Craft.
Although I am proficient in the use of hand tools and have built a model, I’d never built a boat before. Before purchasing a boat kit I studied the thorough and well written Peeler Skiff construction manual, read posts on the Chesapeake Light Craft’s Builder’s Forum, and watched YouTube videos about stitch-and-glue construction, roll-and-tip painting, rotary steering installation, and striking a straight waterline.
Fred Corbit
The kit parts are assembled using cable ties rather than copper wires. The aft frame’s center section is precut so it can be removed after it is no longer needed to stiffen the frame during construction.
Eventually, I became confident that I could build a Peeler Skiff and bought the kit. I was able to build the boat in my 12′ x 20′ garage—adequate room for building, flipping, and painting the boat. The garage is heated so I was able to build the boat during the winter using the MAS epoxy with non-blushing slow hardener supplied with the kit. I kept the garage around 60 degrees Fahrenheit as recommended for curing of the epoxy.
My inexperience with boatbuilding caused me to waste some epoxy, and as a result, I had to order more epoxy than what came with my kit. The extra epoxy allowed me to practice laying down good fillets before applying them to the boat.
There were some new tools I bought that turned out to be useful in construction, including a Shinto rasp, a Japanese saw, and a set of rifflers for smoothing fillets in tight corners. Because I was a novice at applying epoxy, and there were many high spots that had to be leveled, the tool I used most was my orbital sander connected to a shop vacuum for dust collection.
The plywood pieces in the kit are precisely cut on a CNC machine. Pieces to be joined to form long panels had tight, curvy puzzle joints. The bulkheads had tabs that fit in slots in the bottom to assure proper position and alignment, and the aft flotation-compartment sides also had tabs to fit slots in the transom and center bulkhead. Pre-drilled holes in the panels further assured properly positioned pieces.
Courtesy of Chesapeake Light Craft
Foam cut from sheets provides flotation without poured foam’s propensity for creating rot.
The skiff has three flotation compartments, one in the bow and two in the stern under the side benches. Together these compartments, filled with stacks of sheet foam shaped to fit, provide 1200 lbs of flotation in the event of a swamping.
The boat has to be flipped a few times during construction, so it is wise to enlist the help of some strong friends and to have sturdy sawhorses ready. During the holiday season, I had several family members over to my house to watch football and we flipped the boat during halftime.
While the hull was upside down, the extra epoxy I purchased made it possible to add an optional second sheet of 6-oz fiberglass on the bottom as recommended in the manual. The doubled ‘glass, covering the 3/4″ thick plywood bottom, the 3/4″ thick doubler over the center seam, and the two skids, made a stiff bottom.
Courtesy of Chesapeake Light Craft
The center-console option adds a seat with a backrest and a storage compartment for battery.
In a basic Peeler Skiff, the skipper sits at the stern and steers with the outboard’s tiller, but I much prefer, and strongly recommend, the center-console option. With it, the boat looks good and drives nicely. The center console brings the weight forward to help keep the bow down, provides a seat and backrest for a passenger, and incorporates a storage compartment that I use for my battery. On the console, I deviated from the construction instructions in once instance. Instead of using wood screws to hold down the top, I permanently affixed stainless steel hanger bolts in the console and used stainless steel washers and cap nuts at the top. The change provides an attractive accent that matches the steering wheel and gives me easier access to the steering system than I’d have with wood screws and finish washers.
Merilee Corbit
The skipper has a non-skid surface to stand on; for longer runs there’s room to set up a folding chair.
The various paint and varnish options had me scratching my head, but what I selected has worked out well. For the bottom, I used Petit ViVid antifouling paint directly over sanded epoxy. For the finish coats and boot stripe, I put Interlux Pre-Kote primer on the sanded epoxy and then applied Interlux Brightside. Where my passengers and I would stand, I added Interlux Intergrip in the final coat of paint for a nonslip surface.
For my brightwork, I used Interlux Schooner Varnish. I think the varnished woodwork is what prompts many of the compliments the boat gets. I painted the bottom, transom and some of the horizontal surfaces in the interior, but the natural wood shows on the interior’s vertical surfaces, center console, splash rails, sheer strakes, breasthook, quarter knees, inwales, and outwales. The varnished okoume, with the interesting puzzle joints, is a beautiful sight.
The instructions estimate a construction time of about 200 hours. It took me about 250 hours to get from kit to launch, not too far off the mark considering the extra layer of glass on the bottom and the center console construction.
Merilee Corbit
The fuel tank rides just in front of the transom. The motor is bolted on to give it a solid, permanent mounting.
The Peeler Skiff, at around 325 lbs, is a very light boat. It is approved for up to an outboard motor up to only 15 horsepower, so I purchased a 15-hp Tohatsu with a 20″ long shaft, an electric start, and power tilt. My motor came with well designed remote controls that I attached on the starboard side of the center console. With one hole drilled in the forward corner of the main seat and holes drilled in the starboard bulkheads, I neatly routed the control cables to the motor. Because I had selected a motor that was within the Peeler Skiff’s Coast-Guard rating, I was able to have the Tohatsu dealer install it. The shop mechanics appreciated my new boat and took pride in their work, which made me comfortable when they were drilling the holes for motor mount bolts into the shiny transom.
Merilee Corbit
The center console brings the weight of the helmsman and the battery forward to improve the Peeler’s trim.
The 15 and 20 hp Tohatsu motors weigh the same, and I was tempted to put on a 20 hp motor for a little more speed. I’m glad I didn’t cheat—while I may have gotten away with using 20 horsepower when the water was smooth, I go fast enough with the 15 horsepower motor and feel comfortable loaning my boat to friends and family even though some of them are novice boaters. With 15 horsepower, with two of us aboard, and loaded with gear and gas, my Peeler Skiff quickly gets to a plane and moves along a smooth lake at 18 mph. At that speed it only uses about one gallon of gas per hour.
The boat always feels solid even though the flat bottom does cause me to pull back on the throttle to minimize pounding when the water is very choppy. At those times, I think the extra sheet of fiberglass really pays off.
Merilee Corbit
The Peeler carves through turns without skidding and banks enough to make it easy for the skipper to remain standing.
The boat rides a bit bow-high; I installed a small hydrofoil stabilizer on the cavitation plate of my motor to help keep it down. When turning, the boat is steady and does not skid around. At all times the boat feels stable, even when the people on board move around or when they shift to one side to put out the fenders while docking.
My Peeler Skiff was fun to build, looks great on a trailer and on the water, and performs as well as I hoped it would. It has now taken me on dozens of trips and has attracted numerous admirers. It is the rule, not the exception, that I get compliments about the boat at every launch ramp and gas dock. I would build another Peeler Skiff if only I had another excuse.
Fred Corbit grew up around small boats in Eastern Washington. As a preschooler, his mother would put him in a life jacket and let him alone to row a small wooden boat that was tethered by a long line to a dock on Lake Chelan. Later he learned to drive his uncle’s Thompson outboard skiff, and when he went off to college he sailed Lasers and Hobie Cats. When he began a career as a lawyer in Seattle, he raced J-24s and Soling sailboats, and kayaked on Puget Sound. He and his wife now live in Spokane where he is a United States Bankruptcy Judge.
Peeler Skiff Particulars:
[table]
LOA/15′ 2″
Beam/6′ 3″
Hull weight/325 lbs.
Rated capacity/4 persons or 840 lbs. (1000 lbs. persons, motors, gear, 15 hp motor)
We met the RoG microcruiser by JF Bedard at the Cedar Key Small Boat Meet on Florida’s Gulf Coast. First seen, she was scooting confidently east toward the bright white beach of Atsena Otie Key. The wind was variable over the southwest quadrant and puffing up between 25 and 30 knots. Whitecaps appeared, died, then hackled up again. The RoG tore along, heeled to the puffs, but its pilot started the mainsail sheet and it stopped instantly, waiting upright and stock still like a gun dog for a command, mannerly and calm. The mainsheet came in and the RoG rushed for the beach again.
Lucie Laliberte
When inclement weather threatens, the cabin can be enclosed and protected with a fabric covering.
JF Bedard (Jean-François—he’s formerly of Montréal) created the RoG as a graduation project for Westlawn Institute of Marine Technology. An abbreviation for “River of Grass,” RoG is a nod to the Florida Everglades and the Everglades Challenge that JF endured aboard the prototype. His microcruiser shows its digital heritage as a complete, compact solution to a set of intelligent parameters, which were imaged, examined, balanced, and revised in the abstract of an advanced computer’s algorithms before a single stick was cut.
RoG is constructed in stitch-and-glue fashion with 6-mm Bruynzeel marine plywood throughout. The hull, three bulkheads, and two ring frames present themselves as a solid unit of obvious strength; each member is epoxy-bonded to support its neighbors. The plywood elements themselves provide 300 lbs of buoyancy; a further margin of safety is provided by two compartments, one set low in the bow and the other in the stern under the cockpit footwell, enclosing 5-1/2 cu ft of foam for an additional 340 lbs of buoyancy.
JF Bedard
The cabin table drops down to extend the side benches into full-length bunks.
RoG was designed, in some part, for the 300-mile Everglades Challenge, a Florida thin-water endurance voyage, but for less grueling adventures the RoG is a charming miniature cruiser. It is just 15′ 3-1/2″overall, 5′ 9″ in the beam, yet it has a deep, comfortable, private cabin with built-in bookshelves forward, obviously designed for a contemplative sailor. The cabin has sitting headroom and offers a chart-sized nav/dining table that drops down to seat level to form two full-sized berths, which are 6′ 3″ long, 24″ wide at the shoulders, and 16″ wide and the head and feet.
JF Bedard
The cabin provides sitting headroom and a table for dining and navigation. Here the RoG’s designer, JF Bedard, takes a look at a chart of Florida Bay.
Aft of these bunks is considerable storage in the spaces under the cockpit seats and footwell for bedding and cruising gear. A pair of large, fixed acrylic windows and a big, airy companionway hatch reaching to the foot of the mainmast dispatch any claustrophobia. The hatch cover is poly-canvas, supported across its breadth by two sprung battens, and when furled, the mainmast and the commodious anchor well in the bow are within easy reach.
JF Bedard
The anchor is secured to a bow roller, and the well in the bow has room for the rest of it along with the rode and chain. The well has a canted bottom and a scupper to drain water overboard.
The mast tube has a drain that opens to the cabin, rather than creating a through-hull fitting and the risk that poses. The drain remains plugged until water can be drained into a bucket. The bottom of the well is angled to drain water through a scupper in the starboard side.
Lucie Laliberte
The RoG running wing-and-wing shows the open transom that makes the cockpit instantly self-draining.
The cockpit is generous: four sailors would not be crowded, with room for a fifth hanging in the big companionway. A fore-and-aft centerline ridge stiffens the cockpit sole and adds height to the rudderhead assembly. It’s a comfortable footrest when the RoG is heeled; hiking straps provide an additional connection to the boat. The high freeboard, the open stern, and the absence of a coaming and toerail make the cockpit feel vulnerable initially, but RoG’s good manners dispel the sense of risk.
Michael Johnson
As the RoG works in light air and into the lee of islands, the oars can be kept in their locks, ready for rowing when the sails aren’t filled.
Oarlock blocks are integrally mounted at the outboard edge of the cockpit, placed so a seat on the bridge deck, just forward of the cockpit, is your rowing station. The sweeps would be awkward to stow aboard a small boat, but JF provided a transom hatch through which a pair of oars up to 10′ 6″ long can be tucked out of the way and out of sight, resting in oval slots in the frame beneath the starboard cockpit seat and extending into the cabin.
JF Bedard
When the oars are not needed, they can be stowed out of the way under the starboard deck. The cover for the access hatch is retained by an internal bungee cord.
When JF is sailing RoG, however, he keeps the sweeps mounted in their locks with their blades secured by cords at the transom. This sleek, flyweight hull should row easily in anything but a stiff headwind that retards her high-freeboard resistance. During the Everglades Challenge JF could row at 2.5 knots over a long stretch, around 5 miles, and push harder for a short while to bring the RoG up to 3-1/2 knots. Having the rudder down and a bit of centerboard down helps with tracking on a longer passage.
The centerboard pendant is served by a self-tailing winch set in a recess at the forward end of the cockpit seating platform. With the board up, the boat takes 6″ of water, 46″ with the board down, with 50 lbs of lead at the board’s extremity.
The RoG is rigged as a cat-ketch with 150 sq ft of fully battened sails, 100 sq ft in the main and 50 sq ft in the mizzen. The tapered masts are of carbon fiber, unstayed and equipped with glued-on sail track. The snotter-tensioned, aluminum-tube sprit booms are angled downward and self-vanging. Simple 2x-advantage downhauls are obvious and quick. The mainmast’s foot is close at hand from the companionway hatch so the skipper has a firm footing for mainsail work. Main and mizzen sheets, along with mizzen halyard, downhaul, and snotter converge at the handling bridge/mizzen partner bisecting the cockpit athwartships. The main’s halyard, downhaul, and snotter are secured with cam cleats at the aft edge of the cabin.
In the Cedar Key puffs we took our tucks. Topping lifts keep the booms from dropping when the halyards are eased to a marked position to lower the sails. The downhaul’s hook gets reset and retensioned in a reefing grommet on the luff. A dedicated outhaul brings a leech grommet to the sprit, and the snotter is adjusted to tune the sail’s shape.
The sheet leads for main and mizzen are well placed and tacking is effortless: the tiller goes across behind the mizzenmast, the sails assume their duty on the new heading. JF’s GPS tracking indicates the RoG tacks through 90 degrees and better.
On and off the wind, the tiller was gentle and obedient, easily managed by two fingers. One of Bedard’s touches is a tiller line that loops around the perimeter of the cockpit, under the bridge deck, and across the cabin, just beneath the companionway molding. With this connection, the pilot can make course corrections from anywhere in the cockpit or even from the cabin’s interior.
In strong wind, the sheeted-home mizzen occasionally caught the RoG in irons. This is a stumble for many yawls and ketches, and can be avoided if one slacks the mizzen sheet as a craft passes the eye of the wind. As we paced his microcruiser this way and that in the heavy puffs, challenging and besting bigger boats, JF showed me RoG’s “automatic” heave-to. He started the mainsheet and, once again, the boat stopped, its sheeted mizzen managing the boat’s attitude without a swoop or heel.
JF Bedard
A pump, tucked under the mizzen partner, moves water in and out of the ballast tanks. Four valves direct the flow to and between the port and starboard tanks. The centerboard winch is visible at right.
The RoG is designed for water ballast stabilization in heavy weather. We had no ballast aboard but felt no lack of stability. JF prefers to keep the RoG light and lively and seemed reluctant to utilize the ballast option in anything but serious seaway. In that event, a diaphragm pump on the port side of the cockpit, with the help of four Y valves in a locker, moves water into, out of, and between two ballast tanks. Each has a capacity of about 9 ½ gallons—80 lbs—and is set amidships about 16″ off center and extends along the bottom then up the side up to the sheer the bottom. Filling the windward tank adds 80 lbs, which improves performance in a breeze, and filling both tanks increases overall stability and adds momentum to plow through a chop, giving the RoG the characteristics of a heavier, deeper boat.
Michael Johnson
When the breeze picks up, up to 80 lbs of water can be pumped into the windward ballast tank to help counter heeling.
Tiny and eager, it’s like a terrier when she planes; 9 knots is not uncommon. Reefed down in whitecaps and heavy puffs, we were steadily advancing, with negligible leeway, at 6 knots.
RoG is phenomenally light at 450 lbs with the sailing rig and is eminently trailerable, easily singlehanded, but is in no way a skittish craft. There is some gravitas built into the lines and rigidity in its tiny dimensions.
The virtue of the RoG is JF Bedard’s balanced design judgment. The RoG is one of a new generation of vessels appearing fully realized, not by a massive mainframe at MIT, but by laptops—a democratization of invention. Aesthetics and structure are tightly interlocked. The digital designer changes a curve of the bilge, and immediately, changes in buoyancy and wetted area are computed and shown. Optimal solutions are possible over hours rather than years of trial and error. Better solutions depend on how you ask the questions; what are the priorities?
The little RoG is a constellation of compromises, but Bedard has weighed each bargain between technology and function with delicate attention, striving for a happy solution. He’s intelligent, technically sound, confident, and he adds a human factor of delight in sailing as a dance with nature. Before giving himself over to the water life, he was a successful professional musician. The dance comes naturally.
Jan Adkins is an author and illustrator living in Gainesville, Florida. He is a frequent contributor to WoodenBoat magazine and the author of over 40 books. “Getting Started in Boats” is a regular feature he does for WoodenBoat.
RoG Particulars
[table]
Length/15′ 3.6″
Beam/5′ 9″
Draft, board up/6″
Draft, board down/3′ 10″
Displacement/975 lbs
Weight, fully rigged/450 lbs
Sail area/150 sq ft
[/table]
The orange areas are flotation compartments; the black areas are water-ballast tanks.
The cabin can sleep two. Note the oar handles extending into the cabin.
Bedard Yacht Design offers the RoG as plans and full-sized templates at $239 and as a complete kit, with around 140 CNC-cut Bruynzeel plywood pieces, for $2,549.
Is there a boat you’d like to know more about? Have you built one that you think other Small Boats Monthly readers would enjoy? Please email us!
In the autumn of 2011 Erik Schouw-Hansen and I were discussing our next adventure. In 2010 we had sailed together to the Shetlands—Erik crewed aboard my 31′ sloop on the first leg of a voyage from Norway to the Caribbean and back. We were both born and raised on the west coast of Norway, so for our next trip it was natural to look westward across the North Sea to the Shetland Islands. We wanted to try something new and settled upon rowing a small, open boat across the North Sea the following summer. We set mid-June the following year as our deadline to be ready for departure, and from that point we would wait for favorable weather conditions.
In Norway the faering is well known, and has proven its seaworthiness over many centuries. It was a natural choice for us, and we set our sights on finding one suitable for the crossing. After asking around, I heard about a newly built Sunnmørsfæring that would meet all our requirements. I called the owner, Leif Reidar Røv, and to our good fortune, he was enthusiastic about our adventure and was more than happy to lend us his boat.
Henrik Yksnøy
In the early spring we put a fresh coat of oil on the boat while preparing for the crossing. After we launched it, the seams tightened up as the wood swelled, but the boat still took on some water during the trip.
The faering was built by the boatbuilder Jakob Helset in Bjørkedalen, a small village on the northwest coast of Norway famous for boatbuilding. Hundreds of boats from faerings to replicas of Viking ships have been built here.
Leif’s faering is 17′ long and a bit fuller in the bow than most other faerings, but this suited us well, as our equipment list continuously grew longer and the space we needed grew larger. The keel was a bit deeper than those of traditional faerings, making it a better sailing boat, and adding a huge benefit: the ability to keep on a steady course while rowing in strong wind and big waves. The trade-off was that it wasn’t as good a boat for beach cruising, but we intended to launch, just once, in Norway, and land, just once, in the Shetland Islands.
We were off to a good start after finding the boat and bringing it back to my home in Volda, but there were a lot of things we needed to do over the winter. One of our most important preparations was to have covers made for the boat. They would be crucial in providing shelter and a measure of comfort on board. The cover at the stern would be a sleeping shelter. The cover over the bow would protect the gear and drinking water stowed there.
Erik Schouw-Hansen
Before departure, we tried to figure out where to store all our gear and how to distribute the weight. Here Henrik was checking the fit of the aft part of the boat where we slept during the crossing.
For our safety equipment, we brought a life raft, two satellite messengers, a handheld VHF, two survival suits, and flares. The range of the VHF would not be very far when while seated in a faering at sea level, so we would have to rely on meeting up with other vessels in transit to get updated weather forecasts.
We had to prepare ourselves as well, and spent many hours in the gym and swimming pool. During the spring, we also did some rowing in the faering. Our longest training trip lasted six hours, but six hours does not get you very far in the North Sea. It would have helped if we had rowed even more, but Erik lives in Bergen, a seven-and-a-half-hour drive from Volda, and he wasn’t able to spend many hours rowing with me in the faering before we left.
Henrik Yksnøy
While the faering was docked at a marina in Henrik’s hometown of Volda, we rigged the tarp decks for the first time, and prepared the open boat for ocean rowing.
We weren’t the first to set out on this crossing in a faering. Ragnar Thorseth, a Norwegian adventurer, crossed the North Sea alone in a faering during the summer of 1969. Olav Lie Gundersen and Tommy Skeide repeated the feat in 2005 in a type of Norwegian faering called a geitbåt; then, after reaching Shetland, they continued the voyage and rowed all the way to the Faroe Islands.
We did not have to wait long for our window of suitable weather. On the day we finished getting our gear collected and were ready to leave Volda, the weather report looked promising. We put the faering on a trailer, packed our things in it, and drove south to Florø, the most westerly town in Norway and the closest we could get to Shetland for our departure. The straight-line distance from Florø to Shetland is about 200 nautical miles. I am the optimistic one of us, so I guessed we’d make the crossing in four or five days; Erik put his money on ten days or more.
Erik Schouw-Hansen
At long last we were on the North Sea and heading to Shetland. It took a long time for the Norwegian coast to disappear below the horizon.
We were ready to launch at 4:00 am on Wednesday, June 20, 2012. We had been awake for 20 hours already, and I was tired and exhausted. We remembered most of the important things on our list, but managed to forget the tiller. I knew exactly where I had left it back home, but to drive seven hours home and seven hours back to pick it up was out of the question. From now on, every hour was valuable; we had no time to lose. We had to take this weather window, as it could easily be the only chance this summer.
We made a new tiller, improvised from a piece of wood and some pieces of thick steel wire we found in the harbor. It didn’t look as nice as the one we left behind, but it was functional.
We weren’t off to a great start, but the conditions were perfect. The seas were calm and there was a light breeze from east, just as forecast, and a light drizzle as well, but we only cared about the wind and the waves and hardly noticed the rain.
Erik Schouw-Hansen
Henrik gave our cobbled-together tiller a try. It served our needs, as we didn’t steer actively, and kept the rudder in a fixed position to keep us on track. In an attempt to avoid tendonitis, I tried some wrist braces in the beginning of the trip, but after the burn on my wrist, I had to take them off.
We wanted to take full advantage of the good conditions, so we rowed together for 20 hours straight. I could hardly stay awake, and desperately needed some rest. To get a chance to sleep, we started rowing on shifts, six hours on and six hours off. The wind was picking up, still from the right direction, over our stern, and we were making good speed, on average, 10 nautical miles for every 6-hour shift. That put us on par with our best estimates. If we could maintain a pace of 40 nautical miles per day, we could make it to Shetland in only five days.
Roger Siebert
.
It was a physically demanding task to close the distance to Shetland, but in spite of the hard work, neither of us had an appetite and we hardly managed to eat. It may be that the movement in the boat was making us a little seasick, and the exhaustion of rowing for hours on end made us long for sleep more than food. That first day we ate less than a meal, a few snacks, and a little chocolate.
Our meals were dehydrated and needed only boiling water to prepare them—simple enough, but a wave caught me off guard, and I poured hot water over my left wrist. It was a serious burn, and the only thing I could do to treat it was to reach over the side of the boat and hold my hand in the cold North Sea water. Our first-aid kit was well stocked but obviously had its deficiencies; some treatment for a burn would have been highly appreciated. After a while the pain subsided and I was back in the routine, rowing toward Shetland.
Erik Schouw-Hansen
All of our navigation was done with a handheld GPS. Here Henrik was using it to check our position and measure the distance left to Shetland. The gloves he was wearing were a crucial part of our outfitting.
We rowed through the night and in the dark passed the first offshore oil and gas platforms, our first milestone. This meant we were getting somewhere. We were definitely in the North Sea where there are quite a few platforms, and keeping the required distance away from them was at times proving to be difficult, as the wind was determining our course more than we were.
It was hard for me to motivate myself as we rowed away from the Norwegian coast. The high mountains followed us for days—they just wouldn’t disappear—and it seemed as though we made hardly any progress. That was one of the drawbacks of rowing rather than sailing—we were always looking backward. I had to remind myself to turn around occasionally and look over my shoulder to make sure the coast was clear. One time I turned my head and found an oil-rig supply vessel just a few hundred yards away. I hadn’t even heard it, and I didn’t think they noticed us until I called them on the VHF. In swells, fog, and rain, a faering is difficult to spot, and a small boat made of wood rarely shows on a ship’s radar.
On the second day, Erik had a visitor while he was rowing. A whale as long as the boat swam alongside us for a few seconds. Erik was shouting, both thrilled and frightened; I was in my sleeping bag and scrambled out as fast as I could to see what had raised the alarm. Erik doesn’t always get “port” and “starboard” correct, so I was looking in the wrong direction and just missed seeing the whale.
Henrik Yksnøy
For the first days of the trip, the sea was quite flat and made the rowing easy. Here the sun had just gone down, and Henrik was preparing for the night watch.
After a while, it became difficult to separate one day from another. We did most things without thinking, and we hardly spoke to each other. When we changed shifts, we talked briefly about the distance achieved, strength and direction of the wind, and not much more. We did not have much energy left for small talk. I had the graveyard shift, from midnight to 6 a.m. Even though it was summer and we rowed in high latitudes, it was quite dark during these hours. It was cold as well, but the rowing helped keeping me warm.
After three days of mild weather, the wind freshened and the waves grew larger; we needed to pay attention to the waves, making sure we took them from the right angle. The wind helped us make good speed, but it was not comfortable anymore. Back home, we wouldn’t have launched the faering in these conditions, but underway we didn’t have a choice. Fortunately, we were familiar with the boat by then and able to manage it through the rough water.
In the growing waves and generally cold and wet conditions, we got into our dry suits and would remain in them, for safety’s sake, for the rest of the crossing. They were not very comfortable to wear, and even worse to row in. Sealed up inside the suits day and night, we were perpetually clammy.
Henrik Yksnøy
Halfway into the crossing, the wind had picked up and we needed to get into our survival suits.
After we crossed into the United Kingdom’s territorial waters, we rowed up close to a U.K. Coast Guard vessel. Over the VHF radio, they told us that we would have a few days of easterly winds, followed by a northerly gale. Erik and I calculated that we would reach Shetland before the weather took a turn for the worse.
Only 12 hours from the Shetland coast, Erik was rather cheerful when his rowing shift ended and he headed off to sleep that night. His high spirits surprised me because he is quite seldom so cheerful. During my watch, the wind picked up and I struggled to make progress. With the wind and the waves coming from the north, I had no choice but to turn the faering downwind in an attempt to ride out the gale. When Erik woke up, his good mood vanished when I told him we were still 12 hours out, headed due south parallel to the coast of Shetland, and not any closer than we had been when he went to sleep.
Erik Schouw-Hansen
The waves had picked up and made the rowing much harder for Henrik during his shift at the oars. Erik was sitting in the cabin, not yet able to sleep in the rough conditions.
Erik took his shift at the oars, and I lay under the tarp during my six hours off, hardly getting any sleep as there was a too much movement in the boat. There was no need for my sleeping bag, as we were still wearing our dry suits. When I looked out from under the tarp, I saw Erik struggling at the oars to the keep the faering headed downwind. Whenever the boat slipped away from him and veered into a broach, the cresting waves would break over the gunwales and pour into the boat.
The rudder helped keep the faering on track, but the new tiller was a bit short and difficult to reach from the rowing thwart. Although we didn’t use the rudder to steer the faering on the waves, we were be able to control the boat with the oars.
We had had water in the boat all along, but at this point we were carrying a couple hundred liters. As the boat got heavier, its handling changed and was more difficult to control, reacting more slowly to the oars and taking longer to get back on track. During our hours off we bailed, but our efforts hardly seemed to produce any results—there was still a lot of water sloshing in the bottom, and we needed to stop bailing and take some time off to rest.
Erik Schouw-Hansen
Erik took this self-portrait at sunrise. The quarters were quite close with the “cabin” in the stern right at his feet. Erik, who stands about 6’ 6” tall, struggled to find a place to lie down and stretch out after his rowing shifts were over.
When it came my turn to row, Erik and I had to switch positions. With the aft tarp up, there was only one seat free for rowing, and during the switch the faering was at the mercy of the waves. We had to make the move fast while reacting to every wave coming at us. The wind had picked up during Erik’s watch, and in his six-hour shift he had learned to deal with the waves. I had never rowed in waves like this, so it took some time to learn how to manage the oars and control the faering in these conditions.
The boat broached a couple of times, and more water came aboard. We were not pleased with the situation. Erik was not lying down to rest, but sat at the opening of the tarp, afraid of being under it in case we were to capsize. His fear, however, was no match for his exhaustion, and he didn’t sit there for long. He soon disappeared under the tarp, completely spent.
Erik Schouw-Hansen
During the final stage to reach the coast of Shetland, we rowed together for 20 hours to avoid missing landfall. We had spent almost a week within the confines of the faering.
Erik took a new turn on the oars, and after 18 hours of our trying to control the boat in the gale, it was my watch again. I studied the GPS, and saw that we would soon pass the whole length of Shetland; the next landfall would be the Orkneys, Scotland, or England.
During my next watch, it felt like the wind didn’t have the same strength as it had only a few hours earlier. The waves didn’t break in the same way and they didn’t slam against the hull with the same strength. Still, it was not possible for me to turn the boat to put it on a course toward land. To prevent us from passing Shetland altogether, I pulled out our sea anchor and threw it over the side along with 50 yards of rope, and attached the line to the stern. The sea anchor made the movement in the boat more tolerable, and, according to the GPS, reduced our southward drift. That was very reassuring as we by this time had already passed the latitude of Shetland’s capitol city of Lerwick, situated about 18 miles to the north of the island’s southern extremity.
We been carried south by the wind for the previous 24 hours when it was Erik’s turn at the oars again. I woke him up and we discussed our strategy and next course of action. The wind had calmed even more, and we could clearly see the coast of Shetland for the first time. Sighting land gave us some necessary motivation. This was our chance to reach the coast.
Henrik Yksnøy
The sea had calmed and Shetland as within sight, but there were still hours of rowing left.
We took down the aft tarp; no one would sleep now until we reached the shore. We pulled out the second set of oars, and rowed together. There were still swells from the north, making the rowing a struggle. We rowed for 30 minutes, then took a five-minute break. It was a pleasure to get off the thwart for five minutes, but even more painful to get back up on it. We had seat pads on the thwarts, but they didn’t help much anymore. I constantly had to change my position. I was so tired that Erik often caught me just dipping my oars in the water.
We were terrified at the thought of the wind picking up again and blowing us farther away from the island. Luckily, the wind was slowly dying until it suddenly went completely calm. In the still air, we could see more and more details of the coast. After a few more hours of rowing, we managed to distinguish the small island Bressay from the mainland, and we knew that Lerwick was not far away.
We took our last five-minute break just outside the guest harbor in Lerwick, and I was relieved, satisfied, proud, and completely exhausted. We arrived at the dock at 3:00 a.m., having been on the North Sea for six days and 23 hours. The final stage, where we rowed together, had lasted for 20 hours.
We made the faering fast and when we stood up, we struggled to stay on our feet, and had to sit down on the dock to keep from losing our balance. The pub had just closed—just as well for us—but some fellow Norwegians coming from the pub found us and took us aboard their sailboat. After a short celebration, we got the sleep we had longed for.
Erik Schouw-Hansen
In the harbor at Lerwick, Henrik took a last look at the faering aboard the Norwegian topsail ketch SVANHILD. We spent a few days in Lerwick while SVANHILD took our boat back to Florø.
We spent a few days in Lerwick, and had no plans for the return to Norway, either for us or for the boat. Our only goal had been to get to Shetland. But it didn’t take us long to cross paths with the captain of SVANHILD, an old galleon from Florø, the same town where we started our voyage. Luckily for us, the captain was happy to bring the faering home to Norway.
We spent some great days in Lerwick, enjoying the Shetlanders’ hospitality—especially that of Charlie Hunter who took us into his home, where we got everything we needed to recover from the voyage.
A few days later, Erik and I took the ferry to Scotland and flew home across the North Sea. Looking out of the window and down on the ocean, I was happy to be flying.
Henrik Yksnøy was born in 1987 in Volda, Norway, and grew up on and by the sea. His home is surrounded by mountains and hikes the high country year-round. His interests include hunting, fishing, sailing, and kayaking. He earned a bachelor’s degree in Economics and Administration, and a master’s in Supply Chain Management from Norway’s Molde University College. Henrik works as Senior Associate in a business consulting firm.
If you have an interesting story to tell about your adventures with a small wooden boat, please email us a brief outline and a few photos.
All of the wood on the deck of the author’s boat is African mahogany. The kingplank and covering boards were cut from stock that was the lightest in color, and dye made them the darkest pieces.
My outboard runabout, WORK OF ART, often stops people in their tracks when they see the deck with its beautiful, natural-looking wood color with sparkling grain highlights. No one has guessed that much of the wood under the varnish has been dyed.
The deck planking is African mahogany, and I was hoping to find some dark pieces for the perimeter covering boards and kingplank, and lighter boards for the rest. While I did find a couple of boards wide enough and long enough to do the perimeter covering boards, they were especially light in color, the opposite of what I wanted.
I was reluctant to use stain, as it tends to muddy variations in color and mute the wood grain. After doing a bit of research, I decided to get the darker color using dye; it would provide the contrast I wanted for the perimeter and kingplank while creating a clearer grain appearance. Water-based dyes, once dry, are compatible with epoxy and varnish.
With the dye plan in mind, I resawed the mahogany to book-match the planks, and after cutting them to shape, I epoxied them to the deck’s plywood substrate, taking care with the epoxy so as not to contaminate areas to be dyed.
The Vintage Cherry dye transformed the very light mahogany—a cut-off is shown here— into a rich, dark color that enhances the grain.
I used some cutoffs to test a few water-based dyes. There are several brands available; I chose to use dyes from General Finishes. Their Medium Brown was too dark and subdued, but the dye in Vintage Cherry was just dark enough to provide the contrast I was looking for and had a pleasing ruby-red hue. I epoxied the sample to get some gloss to approach the final appearance, and I really liked it.
After a penultimate sanding of the deck, I wiped it down with a wet rag to raise the grain and then sanded the bare wood for the last time with 220-grit. I masked the areas that were to be left undyed with plastic sheeting and blue painter’s tape. Wearing latex gloves, I applied the dye with a cloth rag to the perimeter boards and the kingplank, 3′ to 4′ at a time. The instructions are to apply a “liberal amount of stain” to saturate the wood surface on manageable sections, then wipe off the excess before moving to the next area. The dye is very watery, so as with any shop chemical, use appropriate protective equipment for yourself or surrounding areas that might get splashed.
After the dye dried, I had one area that was a bit blotchy, likely caused by epoxy squeezed through a long crack in the board near its end. With some sanding and reapplication of dye, I was able to get consistent color in the area. The instructions recommend letting the dye dry 3 to 4 hours or up to 10 in cool, humid conditions. I let it dry overnight, and the following day I applied the first coat of epoxy to seal the wood, smooth the surface, and bring up the shine.
The next step for the deck involved masking the plank edges, then filling the faux caulking seams between planks with thickened, white-pigmented epoxy. Then I applied about five coats of clear epoxy over the entire deck to build the surface and smooth it over. Five coats of varnish completed the deck finishing process.
The contrast between the decking, covering boards, and kingplank brings out the color of both undyed and dyed wood.
A water-based dye makes for a remarkable finish while enhancing the clarity of the grain. The outcome was beautiful beyond my expectations, and in hindsight, I believe the effect of using dye significantly contributed to creating a boat that is a standout in the boat shows that I have entered.
Art Atkinson retired from Ford Motor Company after 31 years as an engineering supervisor at Body Engineering. He is currently the manager for Bloomfield Village Association in Michigan. Woodworking has been his hobby since high school and prior to building boats he made musical instruments, furniture, and kitchen cabinets. His review of the Glen-L Squirt pictured here appeared in our June 2016 issue.
Thanks to Small Boats Monthly reader Bosco Plana for suggesting this article.
General Finishes wood dyes are readily available from numerous outlets. The current (2026) retail price for 1 pint of Vintage Cherry is $25.79.
You can share your tricks of the trade with other Small Boats Monthly readers by sending us an email.
The Veritas Cabinet Scraper has some subtle but significant improvements that make it easier to use than its predecessor.
A card scraper, held by hand, works well for small jobs and fine work, but it is hard on the thumbs, tiring in the long haul, and can get quite hot. My English-made Stanley #80 cabinet scraper does the work of holding its blade at the right angle and bending it, so it’s an easier tool to use. I’ve had mine for decades, and it’s my tool of choice for the rough work of scraping newly epoxied joints and for finishing surfaces where the grain in a board or between boards is oriented in different directions. The #80, introduced in 1898, was produced in numerous versions; Veritas makes many of their own versions of workshop standards, including the #80, so I was curious to see what they did to improve upon it.
The Stanley #80 has been a standard woodworking tool for well over a century.
The first thing I noticed was the weight. The Stanley weighs 22 oz, the Veritas 32.4 oz. The Veritas casting is thicker and the contours are a better fit for the hands. The tops of the handles feel good in the palms and the recesses underneath the Veritas handles, not so deep and wide as they are on the Stanley, are more comfortable for the fingers. More significant are the coves for the thumbs. In the Stanley, they’re not contoured to fit and the glossy finish is quite slick, so I have to grip the tool tightly. The Veritas’ matte finish and textured surfaces aren’t at all slippery, and the contours keep my thumbs in place so I can use a more relaxed grip.
The the tool’s body guards fingers from the top of the blade, making it safer to use.
The Veritas blade is made of harder steel than the Stanley’s. I’ve been doing quick sharpening of the Stanley blade with a file, but that same file slides across the Veritas steel without digging in. That harder steel is better worked with sharpening stones and holds an edge longer.
On this piece of locust, the scraper produces thin shavings and some coarse dust.
The body of the Veritas is taller than the Stanley’s and its blade shorter, so the cutting edge, when not in use, doesn’t extend beyond the tool. I’ve never cut myself on the exposed upper edge of the Stanley, but it does make me nervous. The corners are especially dangerous. Having the upper edge guarded on the Veritas is a good safety measure.
The bottom of the Veritas scraper is machined smooth and flat. The bright spot on the upward edge is a dent that was the only damage after dropping the tool on a concrete floor. The ding may have been caused by another tool that fell off a work table at the same time. Both survived without breaking.
When I accidentally dropped the Veritas on my shop’s concrete floor I yelped, because that could have been the end of it. The cast metal in my old planes and spokeshaves won’t take sharp impacts well, and I’ve lost a few tools to my clumsiness. The Veritas did get a small dent in the edge rather than a chip, a good sign that the metal isn’t brittle.
The left side of this mahogany board was sanded with a 220-grit disk on a random-orbit sander. The right side was smoothed with the Veritas Cabinet Scraper. The gloss is evident at top and the matte patches show that the the scraper is leveling the surface.
In use, the Veritas has a solid feel and dresses wood surfaces to a smooth, even, and glossy finish. The quality of the edge I put on the blade is perhaps the most significant factor, but the Veritas’ greater mass makes it much quieter than my Stanley. All the changes Veritas made improved the feel of the tool.
Christopher Cunningham is the editor of Small Boats Monthly.
Stay-Afloat is a soft, sticky, wax-like material made of treated petroleum byproducts.
"A leaky boat never sinks,” or at least that is what my father led me to believe when he kept a 27′ carvel-planked sloop at my hometown’s marina. If you know a boat’s likely to take on a bit of water, you’re going to keep an eye on it and be prepared to do something about the leaks. If you’ve been lulled into complacency by a boat that doesn’t leak, a little unexpected trickle of water could lead to a sinking. A small boat kept on a trailer isn’t going to sink while it’s idle, but leaks can occur when it’s in use, so it’s a good idea to be prepared to fix them.
Stay Afloat is soft, sticky wax-like material meant to fix small leaks of the sort I get with my older lapstrake boats. None of my boats had suffered enough damage to let water aboard, but that’s a possibility worth preparing for.
To test the effectiveness of Stay Afloat I wasn’t about to poke holes in any of my boats, so I made a gizmo that could simulate leaks. It’s a plywood box with a piece of 7″ plastic drainpipe connected to it. The FAQs on the Stay Afloat website say: “Stay Afloat has been tested…at 3 meters deep for 24 hours with no compromise. It also depends on how much material you use and how big the damage area is. Common sense: the bigger the hole the more you use.”
My leak-testing device created pressure equivalent to that of 26″-deep water.
Stay Afloat’s documented testing depth of about 9′ provided much more underwater pressure than a small boat’s leak would be subject to. The pipe I had on hand, 26″ in length, would create less pressure than their test, but more than the draft of any of my boats would. The 26″ water column might represent a worst-case scenario of rough water. I kept the hose running during my tests to keep the water level from dropping when the test leaks were opened up.
I got my first test of Stay Afloat as soon as I filled the pipe with water. I had caulked the plywood box seams and the pipe-to-plywood joint, but there were several leaks. I smeared Stay Afloat wherever there was a leak and soon had my device watertight.
Cracks, mimicked by saw kerfs from 1/32″ to 1/8″, were easy to seal even with the full pressure. A thin crack was fixed with a swipe or two, wider ones needed a bit more. A 3/4″-diameter hole held the Stay-Afloat fix, even when applied with a geyser of water issuing up from the hole and with the full pressure from the 26″ water column. A 1-1/2″ hole was another matter. The Stay Afloat wasn’t stiff enough to keep from bulging up after being applied, and ultimately tore away from the sides of the hole. Putting a patch of cloth over the Stay Afloat didn’t help, but a flat piece of wood or metal did. The rigid patch provided more surface area to create an adhesive bond strong enough to hold the plug in place.
Soap, water, and a rag are recommended for cleaning your hands after using Stay Afloat. It is very gooey stuff, and a rag is necessary to rub it off. Stay Afloat is incompatible with adhesives, paint, and varnish, so a permanent fix for a leak stopped with it starts with the complete removal of the stuff from the damaged area. The website’s FAQs recommend that surfaces be scraped clean, then wiped down with an acetone-soaked rag.
After scraping a test piece to remove an application of Stay Afloat, it still repelled water, as I expected. With a single wipe-down with acetone, water still beaded up, but after three wipe-downs the water soaked into the wood grain, a sign that the wood was ready for permanent repair. That test was with a flat, easily accessible surface; properly repairing cracks and fractured plywood would likely require the removal of wax-contaminated wood. For leaks that occur while a traditionally planked boat is swelling up after a long period of dry storage, the Stay Afloat stays quite malleable and will squeeze out as the seams close.
This wax toilet ring has a color similar to beeswax, but as with Stay-Afloat, the material commonly used is a blend of petroleum byproducts.
When I was researching Stay Afloat, I saw it was being compared to the soft wax ring used to seal the connection between the bottom of a toilet and the drain in the bathroom floor. I had recently remodeled a bathroom in my home and so had a spare ring. The waxy material is like Stay Afloat in nearly every aspect except color, and performed as well. The wax, separated from the plastic fitting that it surrounds, weighed a bit over 5 oz, so a $7 ring comes out to be a bit cheaper than Stay Afloat (the math comes to $19 for 14 oz—about $6 less than Stay Afloat for the same amount). However, you’d want to carry three rings worth because a single ring wouldn’t cover a series of leaks, then you’d need a container for them and have the very messy task of freeing the “wax” from the plastic rings.
Stay Afloat is a good way to seal leaks from the inside of a small-boat hull whether they’re chronic or sudden. Having a jar of it handy, along with a few patches of plywood, would prepare you for putting a quick stop to water getting through the hull.
Christopher Cunningham is the editor of Small Boats Monthly.
Seen here in the protected waters of Matia Island, IRONBLOOD slips along easily under oar power.
"After moving ashore from my first schooner, and having acquired a wife and a small son,” writes Michael Colfer of Bellingham, Washington, “I realized I needed a smaller boat.” He started his search for a boat appropriate to his new life by building a Nutshell pram. It proved too small, so he next built Pete Culler’s Good Little Skiff. Christened SHAMROCK and rigged with a spritsail, it served well for cruising the San Juan Islands and camping ashore on state park campgrounds, but while the skiff did well sailing the protected waters within the archipelago, Michael wanted a boat capable of taking on some more challenging weather in the more exposed areas around the archipelago.
Michael Colfer
The augmented keel and skeg improve upon the faering’s sailing abilities without obstructing the boat’s interior with a centerboard trunk.
In his search for a more seaworthy beach cruiser capable of carrying more gear, Michael found his way to faerings and variations on the theme by Joel White (16′ Shearwater), Iain Oughtred (14′ 11″ Elf and others), and John Atkins (18′ 7” Valgerda). All three of these designs were inspired by Hardanger faerings of southwest Norway and had similar shapes below the waterline.
Michael Colfer
Michael built two boats to his design: IRONBLOOD (at the end of the dock) for himself, and a then unnamed faering for his son. The plan was for the two to sail and row the Inside Passage, but family obligations took precedent. After sea trials, the second faering was sold.
Michael bought plans for the Shearwater and although White’s dimensions and drawings make it possible to build without lofting, he lofted the lines and began making some modifications that would make the boat well suited to all Puget Sound waters. He added freeboard throughout and extra height to the ends to provide a dry ride in steep chop. To keep these modifications from increasing the width along the sheerline, he made the sheerstrakes closer to vertical. His changes brought the length to 17′ 3″.
Michael Colfer
Easily removable thwarts and broad floorboards provide room enough for bedding down at anchor.
He wanted to improve upon the boat’s sailing abilities but didn’t want a centerboard trunk cluttering up the boat’s interior, so his keel is deeper than that of the Shearwater, adding only a little at the bow and increasing the depth to 7″ at the stern for additional lateral resistance. The change was also meant to protect the rudder, making its removal unnecessary when landing on beaches.
Michael Colfer
IRONBLOOD is quite at home in the San Juan Islands, both in the quiet coves and in the passes that funnel tides and winds.
Michael added storage compartments fore and aft for dry storage of his cruising gear. The aft compartment has a sloped bulkhead to make a comfortable backrest when taking the helm while sitting in the bottom of the boat. The three removable rowing thwarts clear the interior for a night spent aboard at anchor. The floorboards provide a flat, level platform for sleeping.
Robert Bumpus
The loose-footed sprit sail makes sailing about as simple as it gets. Light summer breezes make for unhurried passages between islands.
Michael christened his faering IRONBLOOD, drawing upon the meanings of his surname, Colfer: col is a Gaelic word for blood, as in blood relative, and fer is the French for iron. IRONBLOOD would be at home in the fjords of Norway, but sails the waters of Puget Sound. She can carry enough gear for a week’s beach camping for two, makes way under oars well, and is stable and smooth under sail, making very little leeway.
Michael Colfer
Waters along the northern perimeter of the San Juan archipelago can get quite choppy—winds from the north and northwest have 15 nautical miles of fetch. The higher ends and freeboard keep the going drier. Here IRONWOOD is bound for Matia Island.
Michael says that IRONBLOOD “will run like a scared rabbit for hours at a time given the right conditions.” The increased height at her ends keeps her dry in a chop as he intended.
He writes: “I have had her now for 12 years, and even though I am sure I will build other small boats, I doubt that I will ever sell IRONBLOOD. She is perfect for me.”
Have you recently launched a boat? Please email us. We’d like to hear about it and share your story with other Small Boats readers.
My father passed away three years ago at the age of 91, and I certainly won’t need Father’s Day this month as a reminder to think about him. My home is filled with things that he made; the ones I value most he whittled from bits of wood.
As a young man he carved half models of sailboats he grew up with. To pass the time while he was in boot camp at the Marine Corps base on Parris Island, South Carolina, he whittled figures: a Mohican with a tomahawk, Toad from The Wind in the Willows, a Scotsman in a kilt drawing his sword. When my sisters and I were young he whittled toy boats for us; when we were older and went backpacking he carved spoons and dolphins at camp.
My father whittled this man on a stool, with a block of wood in one hand and a knife in the other, from a piece of sugar pine in the 60s.
My father passed away three years ago at the age of 91, and I certainly won’t need Father’s Day this month as a reminder to think about him. My home is filled with things that he made; the ones I value most he whittled from bits of wood.
As a young man he carved half models of sailboats he grew up with. To pass the time while he was in boot camp at the Marine Corps base on Parris Island, South Carolina, he whittled figures: a Mohican with a tomahawk, Toad from The Wind in the Willows, a Scotsman in a kilt drawing his sword. When my sisters and I were young he whittled toy boats for us; when we were older and went backpacking he carved spoons and dolphins at camp.
During one summer vacation in Marblehead, Massachusetts, he carved a nude female torso in mahogany. I was not yet 10 and didn’t think much of it until he brought the work-in-progress into the kitchen during my lunch and asked Mom to raise her arm. He studied her armpit, compared it to the carving, and after that I felt awkward about that sculpture, knowing it was my mother I was seeing.
The living room of the house I grew up in smelled like Alaska yellow cedar. My father was a crew coach for most of his adult life and he was forever whittling small oars to give as awards for his rowers. He did the work with a jackknife, a set of five small carving chisels, and small bits of sandpaper. The fragrant shavings and wood dust fell on his lap and on the large, brown, braided rug that my grandmother made. That rug was not hard to vacuum, but the grass-green shag carpet that replaced it in the ’70s didn’t give up the shavings so easily.
I don’t remember when Dad gave me my first pocketknife, but I do remember being sent to the principal’s office when I used it to sharpen a pencil in my second-grade classroom. I had to wait there for Dad to make a special trip to pick me up. When he arrived, he got an earful from the principal, Mr. Garrison, who considered the knife a weapon instead of a tool. Afterward, as we walked from the office to the car, Dad sidled up to me slipped the knife into my hand and said: “Just keep it in your pocket.”
I took to whittling when I was still quite young, and Dad let me learn about sharp blades through experience. I got my first gash, now a crescent-shaped scar across my left thumb, while I was whittling a piece of pine with an X-acto knife. I happened to be swinging on the swing set in the back yard at the time. I gave up trying to swing while using cutting tools, but I still nick myself. I was in my late 30s when a sharp carving knife split the tip of my thumb on Halloween. The trick-or-treaters, in the spirit of the night, weren’t fazed by the bloody rag I had wrapped over the wound when I came to the door with a bowl of candy.
In my 20s I took to whittling oars like Dad did. I didn’t have quite so strong a connection to crew, but I was drawn to the sculptural shape of spoon blades, particularly at the throat, where the central ridge of the blade meets the roots of the edges and the crest of the loom. Set upright in mahogany bases, the oars were, like those my father made, simple but pleasing bits of sculpture.
I remember Dad carving half models of the boats that he owned—a lapstrake Herreshoff Amphi-Craft dinghy and a Tumlaren sloop—and I followed in his footsteps carving half models of my boats. I made model boats and oars as gifts for friends and family, and took special pleasure in giving them to my father.
After he passed away, many of his carvings and all of the carvings I’d made for him came to be displayed in my home. They don’t merely remind me of him; they remind me how much I have wanted, in many ways, to be like him.
My grandfather kept MOLLY MAY at Marblehead Harbor. Dad grew up sailing her and made this half model.
Another half model carved by my father
The upright oar at the back is one Dad carved as an award. The blade is painted in the colors of Lakeside School in Seattle, my high school and where Dad was an English teacher and crew coach. The two oars in front of it are sweeps, mementos of Noble and Greenough, the Boston-area school where Dad first took up crew. The middle two oars are sculls he never finished. The two in front are fixed-thwart oars that I made.
I carved this oar last year for Sherri Cassuto, an Olympic silver medalist who had been coached by my father, as what I hoped would be a pleasant distraction while she was hospitalized.
One summer Dad carved three toy boats for my sisters and me. I got this 6″-long tender with an outboard-ready transom. All three were painted for use in the bathtub.
I don’t recall if I painted this tiny skiff or had Dad do it. I don’t think it meant that I would have rather had an aluminum toy boat.
I wasn’t allowed to play with this peapod. The hull is just a shade over 1/32″ thick and it glows when I shine a flashlight through it. Dad hollowed out the inside with just a pocket knife and while the surface has a bit of texture to it, the flashlight shows that the thickness is uniform throughout. It’s a daring piece of woodworking.
Dad would char the dolphins to smooth the knife marks and darken the wood.
Dad owned a Knud Reimers-designed Tumlaren for many years and sold it after I built a gunning dory for him. I have his half model to remember the sloop by.
When I was 12, I briefly strayed from the path.
Dad instructed his crews to “finish on a bent oar,” so I made a bent oar for him. He also discouraged his crews from spending time on an ergometer because the exercise machine fosters bad rowing habits. I made an “Ergomet-oar” for him with spinning blades that would solve the problem.
I often carved boats without any existing design in mind. I bought some crooked knives to make carving out the interior easier and cleaner.
Video by Ed and Zach Heaton
As a gift to my father, I made a half model of the Gokstad faering I’d built and rowed up the Inside Passage.
After I read Paddle-to-the-Sea to my son, he wanted a canoe of his own.
To make a toy cabin cruiser for me Dad carved a plug for from a block of mahogany. To me as a young boy, it was just a means to an end. Now it’s a work of art that I keep on display in my home.
The 15″ cabin cruiser, made from the mahogany plug, has a motor powered by four C cells. It’s over a half century old and still works.
I carved this 17″ Whitehall for myself and as a plug for fiberglass copies.
After I carved the Whitehall, I did as my father did and made a mold from it. I made several ‘glass Whitehalls as bathtub toys for my kids and my sister’s kids. An outwale finished the rough upper edge of the hulls.
On April 20, 2017, Dick Wagner passed away at home at the age of 84.
I first met Dick in 1976 or 1977 at The Old Boathouse, a small-boat livery he and his wife Colleen were running out of their floating home on northwest corner of Seattle’s Lake Union. In their watery “back yard” Dick had a handful of pulling boats; I rented a White Bear skiff a few times to take a girlfriend out rowing on the lake. I was then recently graduated from college and wasn’t quite sure what I would do with my life. I had done quite a few backpacking and bicycling trips through my teens, and in 1978 decided I’d do some long-distance cruising in a small boat. I didn’t have enough money to buy a boat, so I started reading up on boatbuilding. That same year Dick and some other devotees of wooden boats created the Center for Wooden Boats and put on the first Wooden Boat Festival.
The community that Dick was instrumental in bringing together played a large part in steering me toward a life devoted to small boats. The Center was a place where I could meet with others interested in wooden boats, and the festival was an event where I could learn from experienced builders. The beautifully crafted boats I saw there set the standard for the boats I would build.
When I brought the first of my boats to the festival, I wanted my work to pass muster with the other boatbuilders there whose craftsmanship I admired. And when I found myself on the receiving end of praise for my work, I was even more inspired to make every boat I built better than the one that preceded it. The festivals became the highlight of my summers. Dick orchestrated them with efficiency and grace and I was happy to repay in some small measure the opportunity he had provided me by staying after the festivals closed to help clean up the site.
As I gained experience in small-boat cruising, Dick invited me to contribute articles in Shavings, the Center’s newsletter, and he even ran the story of my first long cruise in a special edition that was distributed at the festival. He also asked me to do presentations at the Center’s monthly Third Friday Speaker Series.
My early travels in small boats were just personal adventures, but Dick showed me that they had more value than I had placed upon them. I doubt that the trajectory I took when I first started building and traveling in wooden boats would have taken me as far had it not been for the boost I got from Dick and the Center for Wooden Boats.
The Center has remained an important part of my life for almost 40 years, and even now, when I’m out paddling or biking, I’ll often stop to visit. There may not be anything new to see from one week to the next, but I feel the same fondness for the place as I do when I stop by the house where I grew up. In recent years, I would often find Dick there. He had handed over the day-to-day running of the Center to others quite some time ago, but I suspect he was there for the same reasons I was. It was always a pleasure to cross paths with him. He had aged well and exuded a fatherly warmth.
His passing is certainly a great loss to our community, but the effects of his vision, his wisdom, and his generosity will be felt for generations to come. I am just one of the innumerable people who are deeply indebted to him.
Our family of five has been sea kayaking and canoeing for several years around the islands and coastline of Maine’s mid-coast. Paddling took us where we wanted to go, but on some days when a breeze came up and we were fighting headwinds home, I started to think about a larger boat, one that would sail well to weather and would row easily when the wind died. I wanted it to have some of the simplicity of our kayaks or canoes and allow us to continue day-trip exploration and overnight adventures.
Buzz Bilik
The gunter rig comes into its own in a 10-knot breeze and the boat can get up to 6 knots and better.
I wanted a boat that would fit the Maine-coast aesthetic, be light enough to launch easily, and could remain watertight after prolonged dry storage, so I focused on glued plywood construction. The length had to be around 18′, small enough to fit in our barn, alongside the kayak fleet, yet big enough to feel safe and comfortable out in open water.
It didn’t take long for the Penobscot 17, designed by Arch Davis, to get to the top of my list. Even at a first look it seemed the perfect blend of all my requirements, and it was beautiful from any angle. The sweeping sheer, the shapely wineglass transom, and the almost-plumb bow made the Penobscot 17 look like it was designed a century ago.
Elliott Arons
The gunter rig requires standing rigging—a forestay to a stemhead fitting and shrouds to the forward pair of oarlocks—but both the schooner and the ketch rig have freestanding masts.
My wife bought the set of Penobscot 17 plans as a Christmas gift to me. The plans package is great, with everything laid out very clearly. Eight large bluelines detail every stage of the construction, and two large Mylar sheets provide full-sized patterns for the stem, transom, bulkheads, centerboard, and trunk, rudder, and other parts. A lengthy spiral-bound book covers much of the building process and includes a complete materials list.
The Penobscot 17 is not a project beyond most craftsmen with moderate experience. Over the years I’ve built furniture, stitch-and-glue kayaks, and skin-on-frame kayaks, and I’ve restored cedar-and-canvas canoes, so I felt comfortable tackling the building. I figured a good year working part-time would result in a nice boat. I was familiarizing myself with the project when I discovered a beautiful Penobscot 17 for sale online on the WoodenBoat website. After speaking with the builder, Jim Schlough, by phone and seeing a few pictures, I knew it was built as well or better than I could have, would probably cost less than I might have spent to build my own, and would get us out enjoying the boat a year sooner.
We’ve sailed PISTACHIO for two seasons now and have not been disappointed. Launching and retrieving the boat by trailer is easy, either working alone or with my wife. We can step the mast, get her rigged, and be on the water in 15 or 20 minutes. We keep the boat on a mooring during the summer, but she would be easy to put in and take out on a daily basis if needed. We pull PISTACHIO with our Subaru Outback, which has more than enough power for a boat and trailer of this size.
Elizabeth Root
The boat has two rowing stations and can be rowed tandem, but the author, seen here rowing solo, found the boat was so easily driven that he stopped bringing a second pair of oars.
The Penobscot 17 has two rowing stations and rows easily from either. Although there aren’t any foot braces, I haven’t felt the need for them. It would be simple to attach some to the floorboards if we were so inclined. In a departure from the plans PISTACHIO has dedicated fittings for the shrouds, leaving the forward oarlocks available for rowing, but if the mast of our sloop rig is up, it doesn’t allow the forward rower to lean back to finish the stroke with full power. The ketch and schooner rigs are rowed solo from the forward station when the masts are in place. The boat rows well enough with one person at oars that we quit bringing the second pair along.
Rick Kapellen
The side benches and thwarts, all on the same plane, provide unlimited seating options and an easy conversion to a roomy sleeping platform.
The cockpit layout provides a generous seating arrangement in what’s more a deck with footwells than thwarts and benches. The seats along the sides and stern are particularly good spots to lie down and take a nap while at anchor or even while underway. The boat easily fits one to four people; when waters are calm, we’ve had as many as six or seven adults aboard while I’ve been rowing, and it’s very stable and solid. With a 15′ 8″ waterline length and pretty substantial skeg, the boat tracks beautifully. Once up to speed, PISTACHIO cruises without a lot of effort on the oars. I haven’t measured her speed while rowing, but it is not appreciably slower than our kayaks.
Davis drew the Penobscot 17 with three rigs: gunter sloop, ketch, and schooner. PISTACHIO is set up with the gunter sloop rig, which is the only stayed rig of the three layouts. It has two shrouds and a forestay. The mast simply slides through a hole in the forward deck and then drops into a square step on the keel. All the middle bulkheads have open cutouts for storage, so it’s easy to see the foot of the mast to make sure it lands securely. It’s simple to raise the main and jib and be underway in a couple of minutes.
Our Penobscot 17 cruises along in light air and really gets going with 5 to 10 knots of wind. In a 10-knot breeze she easily makes 6 to 8 knots according to GPS. We have only one set of reefpoints in the main, so we haven’t been out in much over 15 knots. I think it would be good to add a couple more reefs for when winds unexpectedly get stronger.
The seating options are quite varied, and there’s never a problem shifting weight across the boat to respond to gusts and lulls, or to fine-tune fore-and-aft trim. The boat is unballasted and doesn’t have an exceptional amount of freeboard, so a good puff can put a rail down near or in the water. A friend took the helm of PISTACHIO last summer and dipped a rail for a bit, which created a bit of excitement for us, but the boat didn’t capsize, and to my surprise not much water came aboard. The boat seems to like to roll up on her curves and stay there. The Penobscot 17 is built with substantial foam under the seats and watertight compartments in the bow and stern. There have been very few times I’ve felt we were at much risk of capsizing.
Courtesy of Rick Kapellen
In light air, the Penobscot 17 can still make satisfactory headway.
On most points of sail the boat tracks and stays on course, likely because of the fairly large keel/deadwood and centerboard. The tiller is attached to the rudder with a very simple mortise-and-rope lock and requires just a very light touch. The rudder blade is pretty large, and although it does kick up, it’s simple to lift off and stow, so I tend to do that when beaching. The rig is very well balanced, and I’ve noticed almost no weather helm. We’ve been in some short 2′ chop and bigger swells, and even when beating into the wind, things stay dry inside. It’s a comfortable ride most of the time.
The Penobscot really excels while cruising among small islands. It is so simple to drop the sails in the lee of an island, pop the oars in, and row ashore. Schlough designed a simple boom crutch that pivots off the port end of the aft bulkhead. It keeps the boom off the centerline of the boat and gives the rower room to sit comfortably with the boom and sail off their right shoulder.
With her shallow draft we usually pull up to a beach, unload, and then let her float off the beach with an anchor or tied to shore. As for leaving her on a beach, I think using a couple of fenders as rollers would work to get her up or down, but with plywood bulkheads and a lot of hardwood trim, she does weigh a few hundred pounds. Depending on angle and make-up of the beach as well as tide heights, it could be harder to pull her around on shore. With the round bilge and deadwood, she will want to lie to one side as well. Usually the anchor seems simple, so we go that route.
I feel the Penobscot could be a good camp-cruiser, and I’ve been thinking of designing a boom tent for sleeping aboard. The footwells could easily be covered to create sleeping platform for two people. The Penobscot 17 can carry quite a load of camping equipment. There are open compartments under the transverse seats which provide spots to tuck gear, although water can slosh through these, so it’s good to stow things in dry bags. There is also stowage under the perimeter seats, but it is a bit more limited. Some cargo netting could work well to hold things in place there. We usually keep some gear in dry bags in the footwells also.
Jim Root
The keel and the deadrise will set the hull over on its bilge if the boat is dragged up on the beach, so anchoring is preferred for stops ashore.
I’ve been really impressed with the Penobscot 17. It sails and rows well and is easy to trailer and store. Almost every time we’re out, someone stops and asks about the boat, and I’m always a bit sad to say we did not build her, but I am proud to be the owner of such a beautiful boat.
Jim Root has posted videos of his Penobscot 17 rowing and under sail (1,2,3). He makes his home in Barrington Hills, Illinois, where he works in communications and advertising. He has a passion for painting and has a second home in Round Pond in mid-coast Maine where he finds subjects for his paintings of landscapes and boats. You can see his paintings at his website.
Penobscot 17 Particulars
LOA/17′0″
LWL/15′ 8″
Beam/5′ 4″
Draft, Board up/9.5″
Draft, Board down/3′ 0″
Weight/260 to 300 lbs
Sail area
Gunter rig/132 sq ft
Ketch/118 sq ft
Schooner/139 sq ft
The Penobscot 17 is available as a plan set, which includes full-sized patterns and a building manual, for $200. A bulkhead kit, including the six bulkheads, transom, stem, and plans, costs $975. Other kits are available from Arch Davis Designs.
Is there a boat you’d like to know more about? Have you built one that you think other Small Boats Monthly readers would enjoy? Please email us!
Having owned several larger cruising boats, I thought a simple, lightweight, and easily trailerable boat would be great way to downsize. For years, I’ve admired the designs of Sam Devlin, and I even owned one of his cruisers. When I stumbled upon the Pelicano 18 design, the classic look, along with Sam’s lyrical Design Notes, sucked me right in.
It’s remarkable that he created such graceful lines using only six flat plywood panels. The Pelicano might be a perfect starter boat, but for me the attraction was its economy and simplicity: it can be stored on a trailer without marina fees, haulouts, and storage. There is no pesky bottom growth, no through-hull fittings, no oily bilges, no systems to troubleshoot, and nothing to winterize.
Devlin Designing Boat Builders
In the Devlin shop, the first Pelicano 20 takes shape on a form of interlocking pieces of oriented strand board. The plywood bulkheads and frames appear solid here, but openings, interior shapes, and deck and cabin-roof contours have been partially cut by the CNC router.
The Pelicano hull shape was inspired by Mexican pangas—long narrow skiffs that are easily driven with modest outboard power and typically operated off the beach. With this in mind, Devlin designed the Pelicano to handle frequent beachings and to rest upright on her body with minimal tilt after a fallen tide. The stem-to-stern hardwood keel covered with a full-length stainless-steel shoe can take the wear. This boat is made to hit the beach.
Devlin Designing Boat Builders
The sharp entry and deep-V sections forward soften the ride in choppy water.
I found online pictures of beautiful Pelicanos built by the owners, but the boats were often multi-year projects. We wanted a boat sooner than that, and we were well aware of the reputation of Devlin’s factory-built boats for quality and attention to detail. We talked Devlin into building us a stretched version of his Pelicano 18 to gain a bit more space in the cockpit, and the result, our 20′ 2″ ADELINE, was the first Pelicano 20. The design has now been added to Devlin’s line of plans and kits.
For the do-it-yourselfer, Devlin’s stitch-and-glue method offers builders a straightforward way to construct a beautiful and seaworthy craft with basic tools. The building starts with a series of frames that form the mold for the exterior panels, and these frames become an integral part of the finished boat. You can start from scratch cutting panels to shape using the offsets provided in the set of plans, or you can order a kit with the panels CNC-cut to size.
Henry Clews
With its keel protected by a full-length stainless-steel shoe, the Pelicano is meant to come ashore on gravelly beaches.
Our Devlin-built Pelicano 20 is a real jewel. We were impressed when we first took the boat out for sea trials. Even with that big 115-hp Mercury outboard hanging on the stern, she floated perfectly on her lines, and performance turned out to be nothing short of breathtaking. We saw top speeds of over 35 mph, but more importantly, she cruised 20 mph quietly and effortlessly at half-throttle. Handling was excellent, with just the right amount of banking on the turns to keep you centered in your seat.
A sharp entry helps the Pelicano 20 handle choppy water with aplomb. The pronounced, full-length keel also cuts the water before it hits the hull, thus minimizing pounding. The ride might not be as cushy as it is with a deep-V hull, but the trade-off here is efficiency. The aft portion of the hull transitions to a very shallow V section that provides a large, nearly flat surface aft. The shape allows the boat to get on plane more easily and with minimal bow rise, while contributing to the boat’s stability.
The Pelicano 20 can cruise effortlessly at 20 knots with a 70-hp motor, while a similar-sized deep-V would require much more power and use more fuel. With a V-hull, the water is pushed out to the sides so there’s less lift. Many small deep-V hulls plow along with their bow high in the air and don’t plane below 15 knots. The Pelicano’s superior performance can be attributed to its light weight, a benefit of its stitch-and-glue construction.
Jim Perkins/Devlin Designing Boat Builders
The Pelicano 20 can get on plane with very little bow rise so there is no awkward speed where visibility forward is obscured.
Unlike many small planing boats, the Pelicano 20 has very little bow rise as she planes, which means you can run the boat very comfortably at any speed. ADELINE is fitted with hydraulic trim tabs, which are not really necessary for this boat but have been handy for leveling the hull when two heavy people sit on one side. They are also useful for lowering the bow for a better ride when pushing into a heavy chop.
One of the best features of this boat is easy trailering. To save on shipping costs, I towed the boat back home to New Hampshire from Washington State, crossing the country with our modest, mid-sized SUV. The Pelicano 20 didn’t require a heavy-duty pickup truck for towing. Total height on the trailer, when hitched to our car, is 7′4″, just right for storing the boat in our garage. This can be dropped to less than 7′ by lowering the trailer tongue, should that be necessary to get through a lower garage door. Our trailer also has a folding tongue that shortens its length by 30″ and brings it even with the bow of the boat.
Since then, ADELINE has put in many road miles. I have launched and retrieved her single-handed on a number of occasions; her light weight makes it easy to recover the boat with a simple hand winch. I estimate that with the 115-hp outboard, she weighs in at just under 2,000 lbs. Total towing weight, including trailer, is about 2,500 lbs.
While Devlin offers the Pelicano 18 and 23 in three versions—the bassboat, a shrimper with a hardtop over the helm, and an open fisherman with a center console—the Pelicano 20 is currently offered only in a bassboat configuration with a roomy cabin and a windshield for the helm. There’s room below for a small portable toilet and a V-berth big enough for two 6′-tall occupants.
Henry Clews
The cabin can comfortably accommodate two adults for nights at anchor.
Although several builders of the Pelicano 18 have added a shelf with a small sink and a fresh-water pump, we have not done so on ADELINE. Our boat has storage shelves over the bunks on either side and small storage lockers beneath. Up forward there’s an open storage area where we store life jackets, miscellaneous gear, and the portable toilet when it is not in use. Ahead of this open locker there’s an access port to the anchor-rode locker. The cabin has two stainless-steel, opening ports with screens, and a large overhead hatch that provides good light and ventilation.
Access to the forward cabin is through a sailboat-style companionway. The top is hinged, and folds against the windshield where there’s a brass hook to secure it. To close the entrance, two mahogany plywood panels are dropped in vertically, and the hatch folds down on top of these; it can be locked with a hasp.
The side decks are wide, allowing easy access forward. All the deck surfaces have a nonskid coating. Devlin has artfully worked the nonskid treatment around every cleat and deck fixture. At the bow there’s an anchor roller and a capped stainless hawsepipe to guide the anchor rode down into the locker below.
Henry Clews
The cockpit has room for two folding deck chairs, making comfortable seating for four while underway.
We added a folding canvas top with a large clear panel above the windshield, which allows full vision forward while standing at the helm, plus side panels and a back canvas that provide full enclosure of the helm and cockpit. We have two adjustable helm chairs and a pair of rod-holders along each side of the cockpit—simple notches cut in the plywood frames.
The cockpit is not self-draining; the floor is not high enough above the waterline to make this viable. Instead, water on the cockpit floor drains aft into a small well where it is then removed by an automatic electric bilge pump. When the boat is on the trailer, we open the transom drain plug. With the canvas cover in place, no water collects in the boat; rain is shed off the sides and aft into the self-draining outboard splash well.
In the center of the cockpit floor, just aft of the companionway, is a watertight hatch that provides access to the bilge and battery compartment. The 18-gallon fuel tank is tucked aft under the outboard splash well and is translucent so you can see the fuel level. There’s also an electronic fuel gauge. We figure we have a range of about 80 miles at fast cruise and quite a bit more if we run at a more leisurely pace. Over our first summer, ADELINE averaged 5.4 mpg.
Jim Perkins/Devlin Designing Boat Builders
Powered by a 115-hp outboard, the Pelicano 20 should achieve speeds of 40 mph. Designer and builder Sam Devlin is at the helm.
Being able to take this boat overland has opened up many possibilities. We have access to many beautiful inland lakes that used to be off-limits to our larger boat. We can trailer the boat from New Hampshire to Ontario’s beautiful Georgian Bay. By boat, a trip like this would require the better part of an entire summer to complete. We have very much enjoyed the versatility and portability of this little cruiser. Everywhere we go with this boat, on land and on sea, we get stares, comments, and thumbs-up; a lot of pride comes with such an uncommon and beautiful boat.
Henry Clews and his wife recently moved from New Hampshire and now make their home in Jensen Beach, Florida. They write extensively about their travels by boat on their blog, Sno’ Dog Log.
It was a quiet Sunday morning, August 15, 2016, and a thin fog, lit only by the dim glow of dawn, was lingering over the glassy water of Wisconsin’s St. Croix River. The sun had not yet risen and the only sounds were birds singing in the wooded valley and the whisper of the river. The sun began to lighten the sky as it came above the tall cliffs looming over the river, and its first rays caused the fog to slowly dissipate and reveal bright green trees. My life partner Kyle Hawkins and I had gathered with his parents and mine and his sister at the river’s edge to launch SØLVI, the 20′ faering we’d built in a shed in my parents’ side yard.
Holding the painter, I waded up to my knees while gliding the boat off the trailer. After we said our goodbyes I hopped aboard, took my position at the oars and Kyle shoved us off. We drifted while waving goodbye to our families, then rowed until they were just specks on the shoreline. Ahead was a long river of unknowns—a journey under oars and sail from Wisconsin to the Gulf of Mexico.
We rowed SØLVI downstream together. The water’s surface was calm and blue, reflecting the luscious green of trees thick with leaves on the shorelines, yet we were enjoying our new boat as much as the landscape. Building it had consumed hundreds of Western red cedar strips and 1,400 hours of work over three months, and now the endless hours of sanding were paying off as the wood glowed in the midday sun, the varnish glistening, color radiating from each strip.
Photographs by Danielle Kreusch and Kyle Hawkins
A smile of running satisfaction came over me on our second go of Lake Pepin, the largest lake on the Mississippi. Our first attempt pitted us a against a strong headwind. We had to give up the fight, retreat, and wait to try again. Our patience was rewarded the next day with 30 miles of easy sailing.
We raised the sail even though the breeze was quite light. My chafed beginner’s arms and hands appreciated the break as we drifted leisurely down the river and the current moved us more than the wind. Nine miles downriver from the launch, Kyle spotted a break in the trees with patch of flat sand. We set up camp and enjoyed a glass of red wine by the campfire. We were both unaccustomed to rowing, and our muscles ached as we lay down in the tent. Sleep came quickly.
We covered about 8 to 10 miles a day for the first few days, and as we became comfortable rowing long hours we averaged 17 miles a day. The St. Croix River meanders 150 miles between Wisconsin and Minnesota and brought us through a few towns—Osceola, Stillwater, Hudson— but we had 10 days’ worth of food and water aboard so we rowed on by, preferring the quiet of the river valley, where we were surrounded by towering cliffs and dense forest.
As we were closing in on Prescott, Wisconsin, and the end of the St. Croix, we were rowing into the evening against 15 knots of wind and being chased by a thunderstorm. Kyle and I pulled hard on the oars as we went under first the highway bridge, then the railroad bridge, at the mouth of the St. Croix, marking the start of our journey on the Mississippi River. The deep blue water below us became murky until it faded into an opaque brown.
Quickly pulling up on Prescott Island, we found that we were sinking into deep muck surrounded by poison ivy. It would be getting dark soon, and with the thunderstorm approaching, we did our best to secure SØLVI on the muddy shoreline and set up camp while avoiding the poison ivy.
After we broke camp the following morning, I took my place at the oars and Kyle pushed us from the black mucky shoreline. I carefully guided us around the fallen trees and pointed the bow into the south wind. We rowed together for a few minutes before we could see our first lock and dam. Kyle stowed his oars while hailing the lockmaster over the VHF radio. At the same moment, a large towboat was working downriver which forced us to maneuver quickly to the other side of the channel to get out of the way.
With wind howling, small wavelets splashing, and a fast current, we eagerly waited for the okay to enter the lock. At the sight of the green light and the sound of the horn, Kyle and I rowed cautiously in. Lines were handed down to us, and we relaxed a bit while the lock slowly lowered us down. The large doors creaked open and we rowed past the cement walls and back into the open river. We heard the voice of the lock master come over channel 16, “Row, row, row your boat…,” his raspy voice sang. Laughing, we looked back and waved to the gray-haired man watching us from above.
At De Soto, Wisconsin, the flooded Mississippi River had us taking refuge under our boom tent. We waded through a nearby drainage tunnel that took us under a railroad to a lively pub where we enjoyed our first cold brews of the trip.
By the end of our third week, Kyle and I were covering 20 to 30 miles a day. On good days more than half of those miles were under sail, but when there was either too little wind or wind in the wrong direction we spent our days rowing.
We left camp and rowed into the chilled, fog-covered river, crossing the Wisconsin/Illinois border as the sun was rising and. As we made a turn out of a small side channel the wind howled, and instantly we felt the oars get heavy. We worked against a 15-knot headwind, staying close to the shore to avoid its full strength.
Two weeks into the journey and SØLVI was still so shiny! My faithful bicycle mirror, clipped to my sunglasses, guided the way. We kept our life jackets at our feet, ready to grab, for the entire trip.
Two hours later, we were 10 miles downriver, still tugging hard on the oars. Kyle checked the chart, and noted a series of sloughs that ran parallel with the main channel. At our first opportunity we veered left into a narrow slough. This provided a welcome reprieve and we meandered through a slender waterway covered with a canopy of trees. Unfortunately, none of the sloughs lasted long, and each time we poked our bow out into the main river, the wind pushed relentlessly against us.
Camped on an island across from Fort Madison, Iowa, we found a cellular hotspot that gave us internet access in a beautiful setting. Kyle checked the weather and responded to some emails while I set up camp and prepared for dinner.
While Kyle was busy making lunch, I continued to row us downriver. If I set my oars down for a split second, the wind would push us back upriver. We were exhausted and fed up with the fight against a wind gusting to 20 knots when Kyle spotted a large tree slowly drifting downriver, quickly rowed over to it, and looped our painter around the mostly submerged trunk. Giggling at our strange tow, I stowed my oars as the log pulled us down river at a fairly consistent 2 knots, not quite as fast as the 3 knots we had been making rowing into the headwind, but a great relief that gave our arms a rest and lifted our spirits.
The constant commercial traffic of the Mississippi kept us on our toes. Here, near Memphis, southbound barges slid by at 7 knots, nearly silent until the three-engine tow came along side us, black smoke lingering behind it.
Our confidence and strength grew as we voyaged down the Mississippi. We became comfortable making 30 miles a day, and mud and mosquitoes became our new normal. The river grew too, as we cleared the last lock and dam near St. Louis and entered the lower Mississippi. Many of the towboats there pushed rafts of over 40 barges, more than three times the size of the rafts we’d become accustomed to.
Kyle and I found a pleasing rhythm in our days; the river and its shoreline became our home, the people along the way became our community, and sailing, rowing, and caring for SØLVI was our job. Each night we’d haul SØLVI ashore on a sandbar, quickly turn it into a temporary home by stringing up clotheslines to air clothes and sleeping bags, laying out a kitchen around a campfire, and setting up our tent. Each morning, as we pushed SØLVI off the beach, we’d look back at the footprints we’d left behind, knowing those would be gone with the next rain or rise of the river.
After a long muggy day of rowing 33 miles near the Kentucky/Tennessee border, we landed on one of the many massive sandbars that the line the lower Mississippi River. We pulled SØLVI up on inflatable rollers, and hauled her a good safe distance from the water. Kyle drove a stake to secure SØLVI for the night and we each went our own direction in our wordless routine. I grabbed the tent, sleeping pads, and bag; Kyle headed for the driftwood on the far end of the sandbar island. The sun descended over the riverbank, and the sky glowed orange, yellow, and pink. I grabbed the ground tarp, gave it a couple shakes, and let it flutter to the area of sand that would be our home for the evening. Spreading the ground cloth, tent, and fly was like making the bed at home.
When fish leaped from the orange-tinted river I would stop to watch their rings of ripples drift downstream and then realize I was standing stock still as if time had stopped. In spite of my halting progress, within 30 minutes the empty sandbar was transformed into a temporary home. I placed our books and notebooks in the tent and walked over to the smoking fire pit Kyle had dug into the sand. I plopped down in my folding chair and opened cans and measured rice for a dinner of burritos. Hours slipped by as we enjoyed a warm meal, then glowing embers, and then a clear, starlit sky.
The Lower Mississippi is surrounded by farmland, but it is isolated by levees that create a sense of solitude and independence. Kyle and I were grateful for our little boat for getting us so far.
"Do you feel that?” Kyle’s sleepy voice asked in the predawn morning. Rubbing the sleep from my eyes I sat up, still cocooned in our double sleeping bag. I felt a cool breeze rush across my face through our open tent doors. A northerly wind. I imagined what it would be like to have a full day of running downwind. Kyle and I packed up camp, made breakfast, and prepared SØLVI for the day; we both moved a bit quicker than usual, eager to take advantage of the favorable wind.
An hour later, I was in my rowing seat as Kyle pushed us off the sandbar. I untied the tiller as Kyle heaved on the main halyard releasing our tanbark sail from where it had been resting during the last windless week. Now the wind was blowing at a consistent 8 knots from directly astern and we were on a stretch of river between Missouri and Kentucky that was fairly straight, with only small and subtle bends. A luscious green shoreline surrounded us on both sides and as I watched the trees go by the sound of water rushing under SØLVI’s hull filled my ears as we cruised down the middle of the empty river.
Kyle lay on his back playing his harmonica, improvising gentle tunes for a quiet morning. With each gust SØLVI surged forward. As the sun made its way across the blue sky, the wind picked up and we put in a reef. We passed under a bridge where a man in a lift was working—he stopped what he was doing to wave and watch as we sailed by below him. By 4:00 p.m. we had covered over 30 miles under sail and were ready to camp. We dropped the sail and rowed to the left bank where there was a break in the trees and a small sandy beach.
A few days after reaching Tennessee, we rowed around the south-pointing tip of Mud Island, a nearly 3-mile-long peninsula really, into the small inlet between Memphis, Tennessee, and the river. Having no idea where to stop or put the boat, we headed for a small cluster of masts a half mile to the north. A small sign indicated we had arrived at the Memphis Yacht Club. We secured the boat at the fuel dock, grabbed our water jugs and a few dollars for ice, and went to inquire about a place to stay for the night.
The woman working at the yacht club stared at us and our boat quizzically for a moment before showing us the hose and ice chest. When we asked if we could spend the night in a slip, her surprised response was, “Can you sleep on that thing?” After I explained that our boom tent and sleeping boards converted the boat into a compact and cozy liveaboard, she gave us the okay. We rowed SØLVI into an oversized slip and arranged docklines.
A few minutes later, a man who was staying on a massive yacht a few slips down came and introduced himself as Captain Mark. He had lively blue eyes, a friendly smile, and a very firm handshake. He asked about our boat and our journey. After a few good laughs (and after making sure we had indeed come all the way from Wisconsin), he volunteered to drive us to the store to resupply our groceries. At other towns we had walked as many as 4 miles to get to a grocery store, so we gladly accepted his offer.
After shopping, we put several full bags in the back of Captain Mark’s truck, grateful we wouldn’t have to carry the load in my backpack. Later that afternoon we walked into Memphis, the first big city we had visited since leaving Wisconsin 1,200 miles upstream. I caught myself gaping at all the cars, people, noises, construction, and tall buildings. Even the smell of the soap on my hands after using a public restroom was overwhelming.
Kyle and I kept wandering and ended our evening at a small cafe on Beale Street listening to the blues harmonica. It was dark by the time we retreated to the boom tent covering SØLVI.
Two days south of Memphis, a blustery southern wind had kicked up. Rowing into it was so exhausting that we decided to sail, tacking back and forth across the river. While tedious, it provided a reprieve from the slow grind of rowing into the strong headwind. Fall was approaching and the number of towboats making their way upriver for the autumn harvest increased, adding other obstacles. When a tow was coming our way we dropped the sail and rowed out of the channel. Even with the frequent interruptions to sailing, we passed the morning maneuvering downriver rather effectively.
The sun was sitting just above us as a tow was making its way upriver, so we hugged the inside channel markers, thinking we could safely continue sailing just on the edge of the deep water. The towboat made a change of course that we hadn’t anticipated, so to stay clear we moved just outside the channel. SØLVI came to a sudden stop to an excruciating sound of wood splitting and water rushing into the boat. I shouted at Kyle, “Water’s coming through the daggerboard trunk!”
Thirty miles South of Memphis, we hit a submerged wing dam and Kyle was soon surrounded by all our floating belongings. Despite my constant bailing I was unable to get the water below this level. Fortunately everything within the lockers stayed nice and dry.
We had struck a wing dam, one of hundreds along the Lower Mississippi River. They are rows of piled rocks sticking out from shore to hold the river in its course and keep silt from accumulating in the channel. During low water the wing dams are exposed, but at normal river levels they may be hidden just below the surface of the muddy water.
The current, running only about 2 knots, was a powerful force pushing against SØLVI. We dropped the sail and struggled to pull the daggerboard free. Kyle hopped out and got SØLVI to heel enough to free the board; I bailed frantically while he got back aboard. Bailing seemed useless as the water didn’t seem to go down, but it never rose above the seats—SØLVI had plenty of built-in buoyancy, enough to keep us afloat. My heart was racing as Kyle rowed us to the nearest sandbar.
We came to a halt and got out to haul SØLVI up onto the bar. We inspected the damage. Kyle grabbed the daggerboard and began to laugh. “I guess I overbuilt this,” he said. “It was supposed to break, not the trunk.” The board was mangled but otherwise intact. We were both laughing as we put our gear on the sandbar.
We had enough fiberglass and epoxy in the repair kit to fix the damaged trunk during a forced stay on a Mississippi River sandbar.
Kyle laid out fiberglass, epoxy, fumed silica, gloves, and mixing cups, then with a look of satisfaction said, “We can fix the boat right here.” We made camp, and over the course of three days put SØLVI back in working order. We added piece of cedar driftwood as a support beam with the hopes of preventing the daggerboard trunk from breaking again.
We always carried enough food and water to tide us over in case of emergencies, so we enjoyed the layover. At night, after hours of repairwork, we sipped a bit of red wine and played Frisbee, taking full advantage of being shipwrecked.
Rowing along one afternoon we heard the soft, kind voice of an older gentleman from the shore: “Do you guys want to come visit?” We spent the afternoon on the deck of his cabin, eating lunch and enjoying the view; one of the many joys the leisurely pace of life on the river encouraged. We camped on the Mississippi side of the river, downstream from Helena, Arkansas.
Our repair held, and we continued downriver and crossed the Arkansas/Louisiana border. Keeping away from the large tows was beginning to wear on us, so to avoid the even heavier ship traffic from Baton Rouge to New Orleans, we decided to take a route less traveled: The Atchafalaya River. This distributary is 137 miles long and would take us to Morgan City, a Mississippi River delta town just 25 miles from the Gulf of Mexico.
Just south of Vicksburg, Mississippi, we made camp early to celebrate Kyle’s 30th birthday. We stayed the next day to weather some rain and high winds. This was the only time someone asked us to leave a campsite along the river. The island’s caretaker was polite and let us stay until morning, but claimed they had suffered vandalism and theft at the hands of campers.
Eight river miles north of Baton Rouge, we took a right turn off the Mississippi and entered the locks at the Old River Dam. As we were lowered, the old lock creaked and groaned in the early-morning quiet. The lock gates opened to the largest wetland in the United States. Muddy shores were covered in green marsh and cypress trees; alligators basked in the sun. With the wind behind us we set sail and maneuvered down the middle of the river, and didn’t see a single boat the entire day.
The Atchafalaya river was a great treat after the heavy commercial traffic on the big Mississippi. Camping could be a challenge because of the often endless mud banks, but this spot was nearly perfect.
The wind followed us and as the sun settled on west bank, we searched under a pastel-streaked sky for a place to camp. Mud lined the river as far as we could see, so as Kyle rowed us toward shore, I slipped on my rubber boots. I stepped into the deep mud and we maneuvered SØLVI onto a roller, but neither of us wanted to haul our gear across the mud, so we decided to sleep in the boat. We had become quite accustomed to spending nights aboard the boat and slept quite well.
Along the Atchafalaya we saw bobcats, eagles, and more alligators. Except for a few fishing boats, we had the river to ourselves and let SØLVI drift wherever she wanted to during our lunch breaks. We reached Morgan City in mid-November, and surged down the last stretch of the Atchafalaya at a steady 6 knots with a 35-mph wind behind us.
This camp on a crushed-shell beach at the mouth of Oyster Bayou was our last night in protected waters before we ventured out into the Gulf.
We spent the night anchored in a marsh and woke to a still, muggy day. We rowed across a bay surrounded by tall cypress trees, each stroke bringing us closer to the Gulf. The smell of salt was in the air as we turned out of Fourleague Bay into Oyster Bayou and caught our first glimpse of the Gulf of Mexico. The sun was setting over its broad arc, and a pair of dolphins swam alongside SØLVI. Two more burst from the water, airborne. We camped on the edge of Oyster Bayou, and when we crawled into the tent, sleep came fast as the Gulf swell gently broke on the shoreline.
Kyle and I spent the next five days cruising eastward along the open Gulf and hiding behind barrier islands when possible. Our only company was that of dolphins and pelicans. Crossing 6 miles from Isles Dernieres to Timbalier, SØLVI rose on the Gulf swell as we sailed on a beam reach across open water. We made camp on the inside shore of this uninhabited barrier island, then took a walk to the Gulf side. As the sun descended we stood together with our hands clasped, the endless horizon stretched out in front of us.
From Timbailier we made a 16-mile crossing under oars to a sandbar near Port Fourchon, and landed on the beach just as a dark thunder cloud moved in off the Gulf. The next morning Kyle woke me, saying enthusiastically, “Rise and shine! Twenty-one miles of open Gulf today. Let’s go!” It was still dark as we packed up and wolfed down breakfast.
The wind was blowing from the east-northeast as we rowed out into the Gulf; we raised the sail and turned east with the main sheeted in tight. I sat to windward while Kyle pinched into the wind as much as possible to keep our heading. SØLVI pounded into 3′ waves and spray swept over the boat. At midday the wind made a shift to the north and we enjoyed a beam reach, and sailed parallel to the shoreline. Twenty miles later, we were a mile offshore, south of Grand Isle, Louisiana. The wind had all but vanished in the midday heat, so we dropped the sail to let SØLVI drift. Salty, sweaty, and smelly, we plunged into the water and swam around our boat’s scarred blue hull.
We rowed to Grand Isle refreshed. It was the evening of November 25, the setting sun was casting an amber glow on the houses lining the beach. Inside the breakwater, we floated for a few moments and looked out into the Gulf, the sun reflecting on SØLVI’s worn varnish.
After checking in at a marina and converting SØLVI into our tented home, we went searching for some cold drinks and warm food to honor our longest open-water crossing. We opened the iPad for our weather and route research while enjoying some pizza on a patio overlooking the marina. Kyle let out a heavy sigh. The forecast threatened weeks of blustery winds, 8′ to 12’ seas, and severe thunderstorms.
We had hoped to continue island-hopping eastward and eventually make it to my parents’ home in St. Petersburg, Florida, but with large exposed areas between islands, I knew high seas and 35 to 40 knots of wind would even impact the waters behind the barrier islands. Continuing on in SØLVI was neither safe nor feasible.
We retreated to SØLVI where we had a restless night of sleep; the wind picked up and shook the boom tent loudly. The following morning we sipped hot coffee while arranging to ship SØLVI to St. Petersburg. Kyle was scrolling through flight options to get us home while I sat across from him checking the forecast as though it would magically change. We had planned to make it from Wisconsin to Florida under our own power, and I was still determined to do that. “Let’s walk!” I exclaimed.
Kyle was unenthused, but I could tell by his smile that he had another plan. Two days later, SØLVI was on a trailer and on her way. A shiny new tandem bike was delivered to us. SØLVI had done her part, carrying us safely for 2,000 miles, and over the next three weeks DAISY, our tandem bike, carried us the 500 miles to Florida where our family picked us up just in time for Christmas.
While our five-month, 2,500-mile voyage didn’t go exactly as planned, Kyle and I reached Florida together—our bodies, minds, and partnership stronger than we could have ever imagined.
Danielle Kreusch grew up in Salt Lake City, Utah and spent a lot of time hiking and camping in the mountains. After moving to Florida to finish her BA in Psychology and Child Development, Danielle met Kyle Hawkins, who took her sailing on their third date. For the last few years they’ve been living aboard their 35’ Ben Bow cutter and cruise with it whenever possible. This river trip was their first small-boat excursion, and they have both fallen in love with the idea of continuing to travel in small boats like SØLVI.
Shortly before embarking on our voyage I took my first solo sail on SØLVI on the upper St. Croix River. This section of the river was Kyle’s boyhood playground.
SØLVI
Bearing a Norwegian name meaning Sun Strength, SØLVI is a faering designed by John Harris of Chesapeake Light Craft. The 19′ 8″ by 4′ 6″ hull was designed for stitch-and-glue plywood, but SØLVI is strip-planked. While strip-planking is most often employed for rounded hulls, SØLVI maintains the chines of the original design. Before fiberglass was applied, Kyle draped blankets on top of the upside-down hull and space heaters beneath it to heat the cedar. The blankets and heater were removed and the fiberglass and epoxy were applied. As the cedar cooled and contracted, the wood’s pores pulled the epoxy in. Deck panels were stripped as flat panels and ‘glassed on both sides before being installed on the boat.
While Harris’s drawings included a pivoting centerboard and rudder blade, SØLVI has a daggerboard to reduce the intrusion into the cockpit. The damage to the trunk that occurred on the Mississippi River was caused by a lateral impact, so a pivoting centerboard may have suffered some damage as well, though the larger area of a longer trunk’s connection to the hull might have fared better.
SØLVI’s outriggers are made of solid 1″x1″ aluminum, 8″ long at the forward rowing station and 13″ long at the aft station. They’re equipped with Concept2 oarlocks. The all-carbon oars are also by Concept2 and originally had hatchet blades. Kyle replaced those blades with more traditionally shaped ocean-rowing blades to make them better suited for rough water. Danielle’s oars were shortened by 6″. In retrospect Kyle would have made the blades 1″ narrower to make them easier to pull during long hours of rowing.
If you have an interesting story to tell about your adventures with a small wooden boat, please email us a brief outline and a few photos.
The wood I like best for cleats, snotter thimbles, and parrel beads is locust, and I get all I need for free by the side of the road after a wind storm. Making the first cuts on the bandsaw used to be the part of the process that made me rather nervous.
The worst of the winter storms here in Seattle produce some very good wood for salvage. High winds drop a lot of limbs from my neighborhood’s hardwood trees and wind-whipped waves bring fresh driftwood to the local Puget Sound beaches. City crews often cut locust, cherry, and alder windfalls into short lengths and leave the wood in the roadside brush; yellow and red cedar occasionally get added to the driftwood that piles up above the high-tide line. Some pieces of wood are too good to pass up—I’ll often collect locust for cleats and parrel beads, and yellow cedar for carving and modelmaking.
The hardest part of putting this found wood to good use is making the first two cuts to turn round logs and irregular driftwood into dimensional lumber. I’ve freehanded pieces through the bandsaw, but the cuts aren’t straight, and working unstable round shapes on a bandsaw scares me. I found some gizmos on the web—bandsaw log milling sleds—that make the job of getting straight cuts on logs a lot easier.
The hardwood runner glued to the bottom of the plywood fits the miter gauge slot in the bandsaw table. The extra bit extending beyond the plywood makes it easier to locate the runner in the slot.
The sleds are guided by a hardwood strip milled to slide in the miter-gauge slot on the bandsaw table. A piece of plywood serves as the sled’s base. I used 9mm plywood, thick enough to do the job without taking up too much of the bandsaw’s capacity. On top of the plywood I secured two blocks of ash, each with a couple of holes to fit a pipe clamp. The diameter of the pipe is just over 1″, so after drilling the holes with a 1″ Forstner bit, I had to use a rattail file to open them up to get a slip fit.
A short length of pipe is added to the tail end of the clamp. Loosening the foot of clamp makes some of its threads available for the extension.
The fixed jaw of the pipe clamp is threaded onto the end of the pipe, and by backing the pipe off halfway I could thread in a short length of pipe to provide an extension to slip into one of the 1″ holes in the ash blocks.
Running the sled through the bandsaw trims the slightly oversized base to size and after that, the pipe clamp is taken apart and reassembled between the two blocks. With the driftwood or windfall clamped in place, I’m ready to saw.
Trimming bark away from the top and bottom is sometimes required to provide clearance. This first iteration of my sled had a 3/4″ x 2 1/2″ stiffener. It turns out that it wasn’t necessary and only got in the way, so I removed it. This locust log shown has been drying for a few years.
Bandsaw blades can drift to the side when using a fence that is parallel to the blade or when using the miter slot as a guide, so I minimized that three ways: I centered the blade on the crown of the bandsaw wheels, used extra blade tension, used a sharp blade, and went with a slow feed rate to minimize deflection caused by pressure and heat.
The piece of Alaskan yellow cedar driftwood has exceedingly fine grain, around 100 rings per inch. Wood gathered from a beach often has sand driven deep into the cracks; the grit can quickly dull a blade.
My sled is short because the wood I mill will be used for small pieces; fire-wood lengths are what I often find. Shorter cuts make blade drift less of a problem. The blade might go 1/32″ into the sled or veer away by as much but that’s not enough to worry about.
This piece of locust was a bit long for the clamp in its normal configuration, so I slipped the moveable part off and set it outside of the block. A bit of scrap wood bridges the gap. After I trimmed the bark from two sides, the log measured about 7 1/2″. To get enough clearance I removed the bandsaw’s upper guide.
Removing the upper guide adds 1″ of additional clearance.
With the upper guide removed, I temporarily bolted a piece of hardwood to the back of the upper blade guard. It is sized to just touch the back of the blade when it is centered on the wheel. I didn’t bother with installing blocks at the sides of the blade. Using a slow feed rate and applying very little pressure on the blade allowed it to cut with a minimal drift.
After making the first cut, the newly sawn flat surface is placed on the base of the sled for the second cut. With two cut surfaces at right angles to each other I can continue milling with the sled or move the work to the tablesaw.
Having made two cuts with the sled I can continue working using the usual fences on the bandsaw or tablesaw.
The sled has turned my bandsaw into a mini-sawmill, and I can work salvaged wood faster and with greater safety.
Christopher Cunningham is the editor of Small Boats Monthly.
You can share your tricks of the trade with other Small Boats Monthly readers by sending us an email.
Back in the ’70s, I used to make some of my own raingear, at first using coated nylon, then switching to Gore-Tex when it was introduced in the last half of that decade. The early versions of the waterproof, breathable fabric didn’t keep me dry in a prolonged downpour, so I often wore a yellow Helly Hansen slicker over my Gore-Tex jacket. More than three decades later I still have that slicker, and with the exception of two very small tears, it is still a great raincoat.
As much as I relied upon that old standby in the wettest weather, it was high time to see what Helly Hansen is making now. So, during this especially rainy spring here in Seattle, I’ve been wearing Helly Hansen’s Newport Coastal Jacket and Newport Pant. The shells of both are made of “Helly Tech,” Helly Hansen’s breathable waterproof fabric. All the seams are sealed with transparent tape fused to the fabric. Both garments were completely waterproof.
The pant legs were just barely large enough to be coaxed over my size-13 shoes and mukluks, but the mesh and light nylon fabric lining got hung up on the toes and heels. It may be easier to pull the pants over smaller footwear, but for me it was best to slip the rain pants on over my stocking feet or do as firemen do—slip the pant legs over the boot tops before putting the boots on. Velcro cinches at the cuffs to hold them tight around the ankles and keep the fabric from getting under heels. More Velcro cinches at the waist keep the pants in place just as a belt would.
The high bib provided an extra layer of warmth around my core.
Because the pants don’t just hang from the suspenders, it was easier to sit or crouch. The pockets, one over each thigh, were a whole lot easier to access, especially when sitting, than conventional pockets located closer to the waist. Patches on the seat, knees, and cuffs reinforce the areas of greatest wear. The zipper is long and protected in front by a Velcro-lined flap and in back by a large gusset. The gusset provided extra warmth and was loose enough to be pulled out of the way to get to the fly of base-layer pants.
The high, fleece-lined collar protects the neck and conceals the hood.
The jacket has a high collar with fleece on the inside. When the front zipper was all the way up, the fleece wrapped around my neck and came up to my nose. It was toasty-warm. The hood tucked inside the collar is made of a highly visible breathable/waterproof fabric and has a mesh liner. An adjustable elastic cord at the back pulls the sides of the hood back for a wider field of view, and another cord around the face opening tightens the fit to keep out wind-driven spray and rain. The hood moved with me so I had good visibility when looking over my shoulder while rowing. Quite by accident, I discovered that the collar itself can be inverted to become a second inner hood for extra warmth.
The collar wasn’t designed to serve as an inner hood, but it fit well when inverted and was especially warm.
Each wrist cuff has an inner layer of stretchy rubberized fabric that created a seal to keep water out when I was reaching overhead. The protective outer cuff could be tightened up to keep it clear of my hands while I was working, or loosened so I could pull my hands in out of the wind. Both cuffs are adjustable with Velcro patches that will accommodate a wide range of wrist sizes.
The jacket has two waist-height pockets with top-loading cargo pockets that have beneath them side-opening hand-warming pockets with fleece linings. The side-opening breast pockets are also lined for warmth.
There are SOLAS retroreflective patches on the shoulders, on the forearms, and at the top front of the pants bib (which are covered up when wearing the coat). Both the jacket and pants have loops for hanging on a hook to drip-dry. The loop on the back of the pants is at waist level, which is great for hanging on lower hooks.
The hood moved with my head so my view wasn’t cut off when I looked over my shoulder.
When I’ve taken the Newport jacket and pants out rowing in the rain, they’ve kept me dry, and got only a bit clammy, not sweaty, inside when I was rowing hard. The jacket offered nothing to snag while I was rowing, and none of the Velcro’s prickly hook side came in contact with my skin.
Some of my rainy-day chores around the house were as good as any to test the cuffs. During thunderstorms, tending to plastic tarps over the four boats I have in the yard is always good for getting a bit soggy. I also unclogged a downspout, the part that angles under the eaves from the gutter to the side of the house, which guarantees a good soaking. Working overhead on the downspout usually makes a funnel out of an ordinary coat sleeve, but the inner cuffs only let a trickle run down to my elbow. The sleeve’s liner absorbed the water, and a few minutes after I’d cleared the downspout, the breathable outer shell had allowed the moisture out and I was dry again.
I’m in no hurry to retire my old yellow Helly Hanson slicker—I have a shot at getting a half century of use out of it—but for boating, it was clear that the modern materials and design that Helly Hansen put into the Newport jacket and pants are a quantum leap forward in protection, utility, and comfort.
Christopher Cunningham is the editor of Small Boats Monthly.
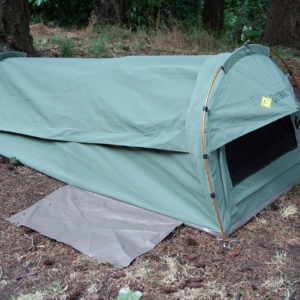
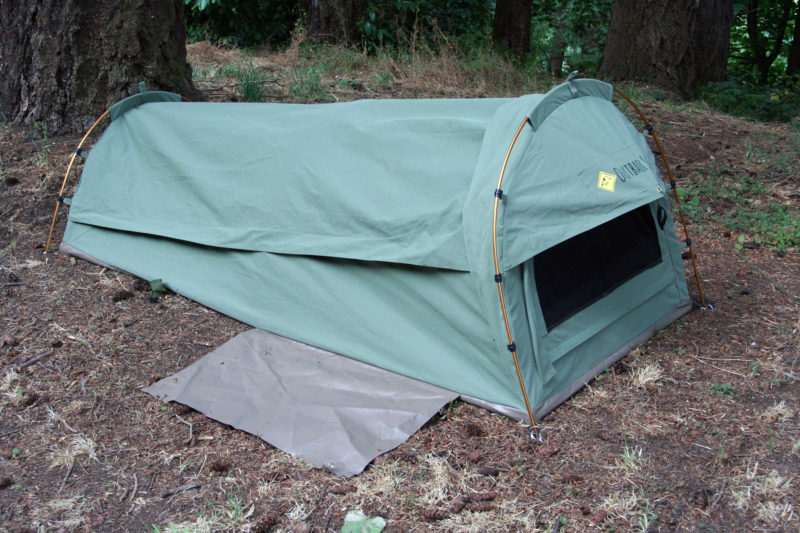 photographs by the author