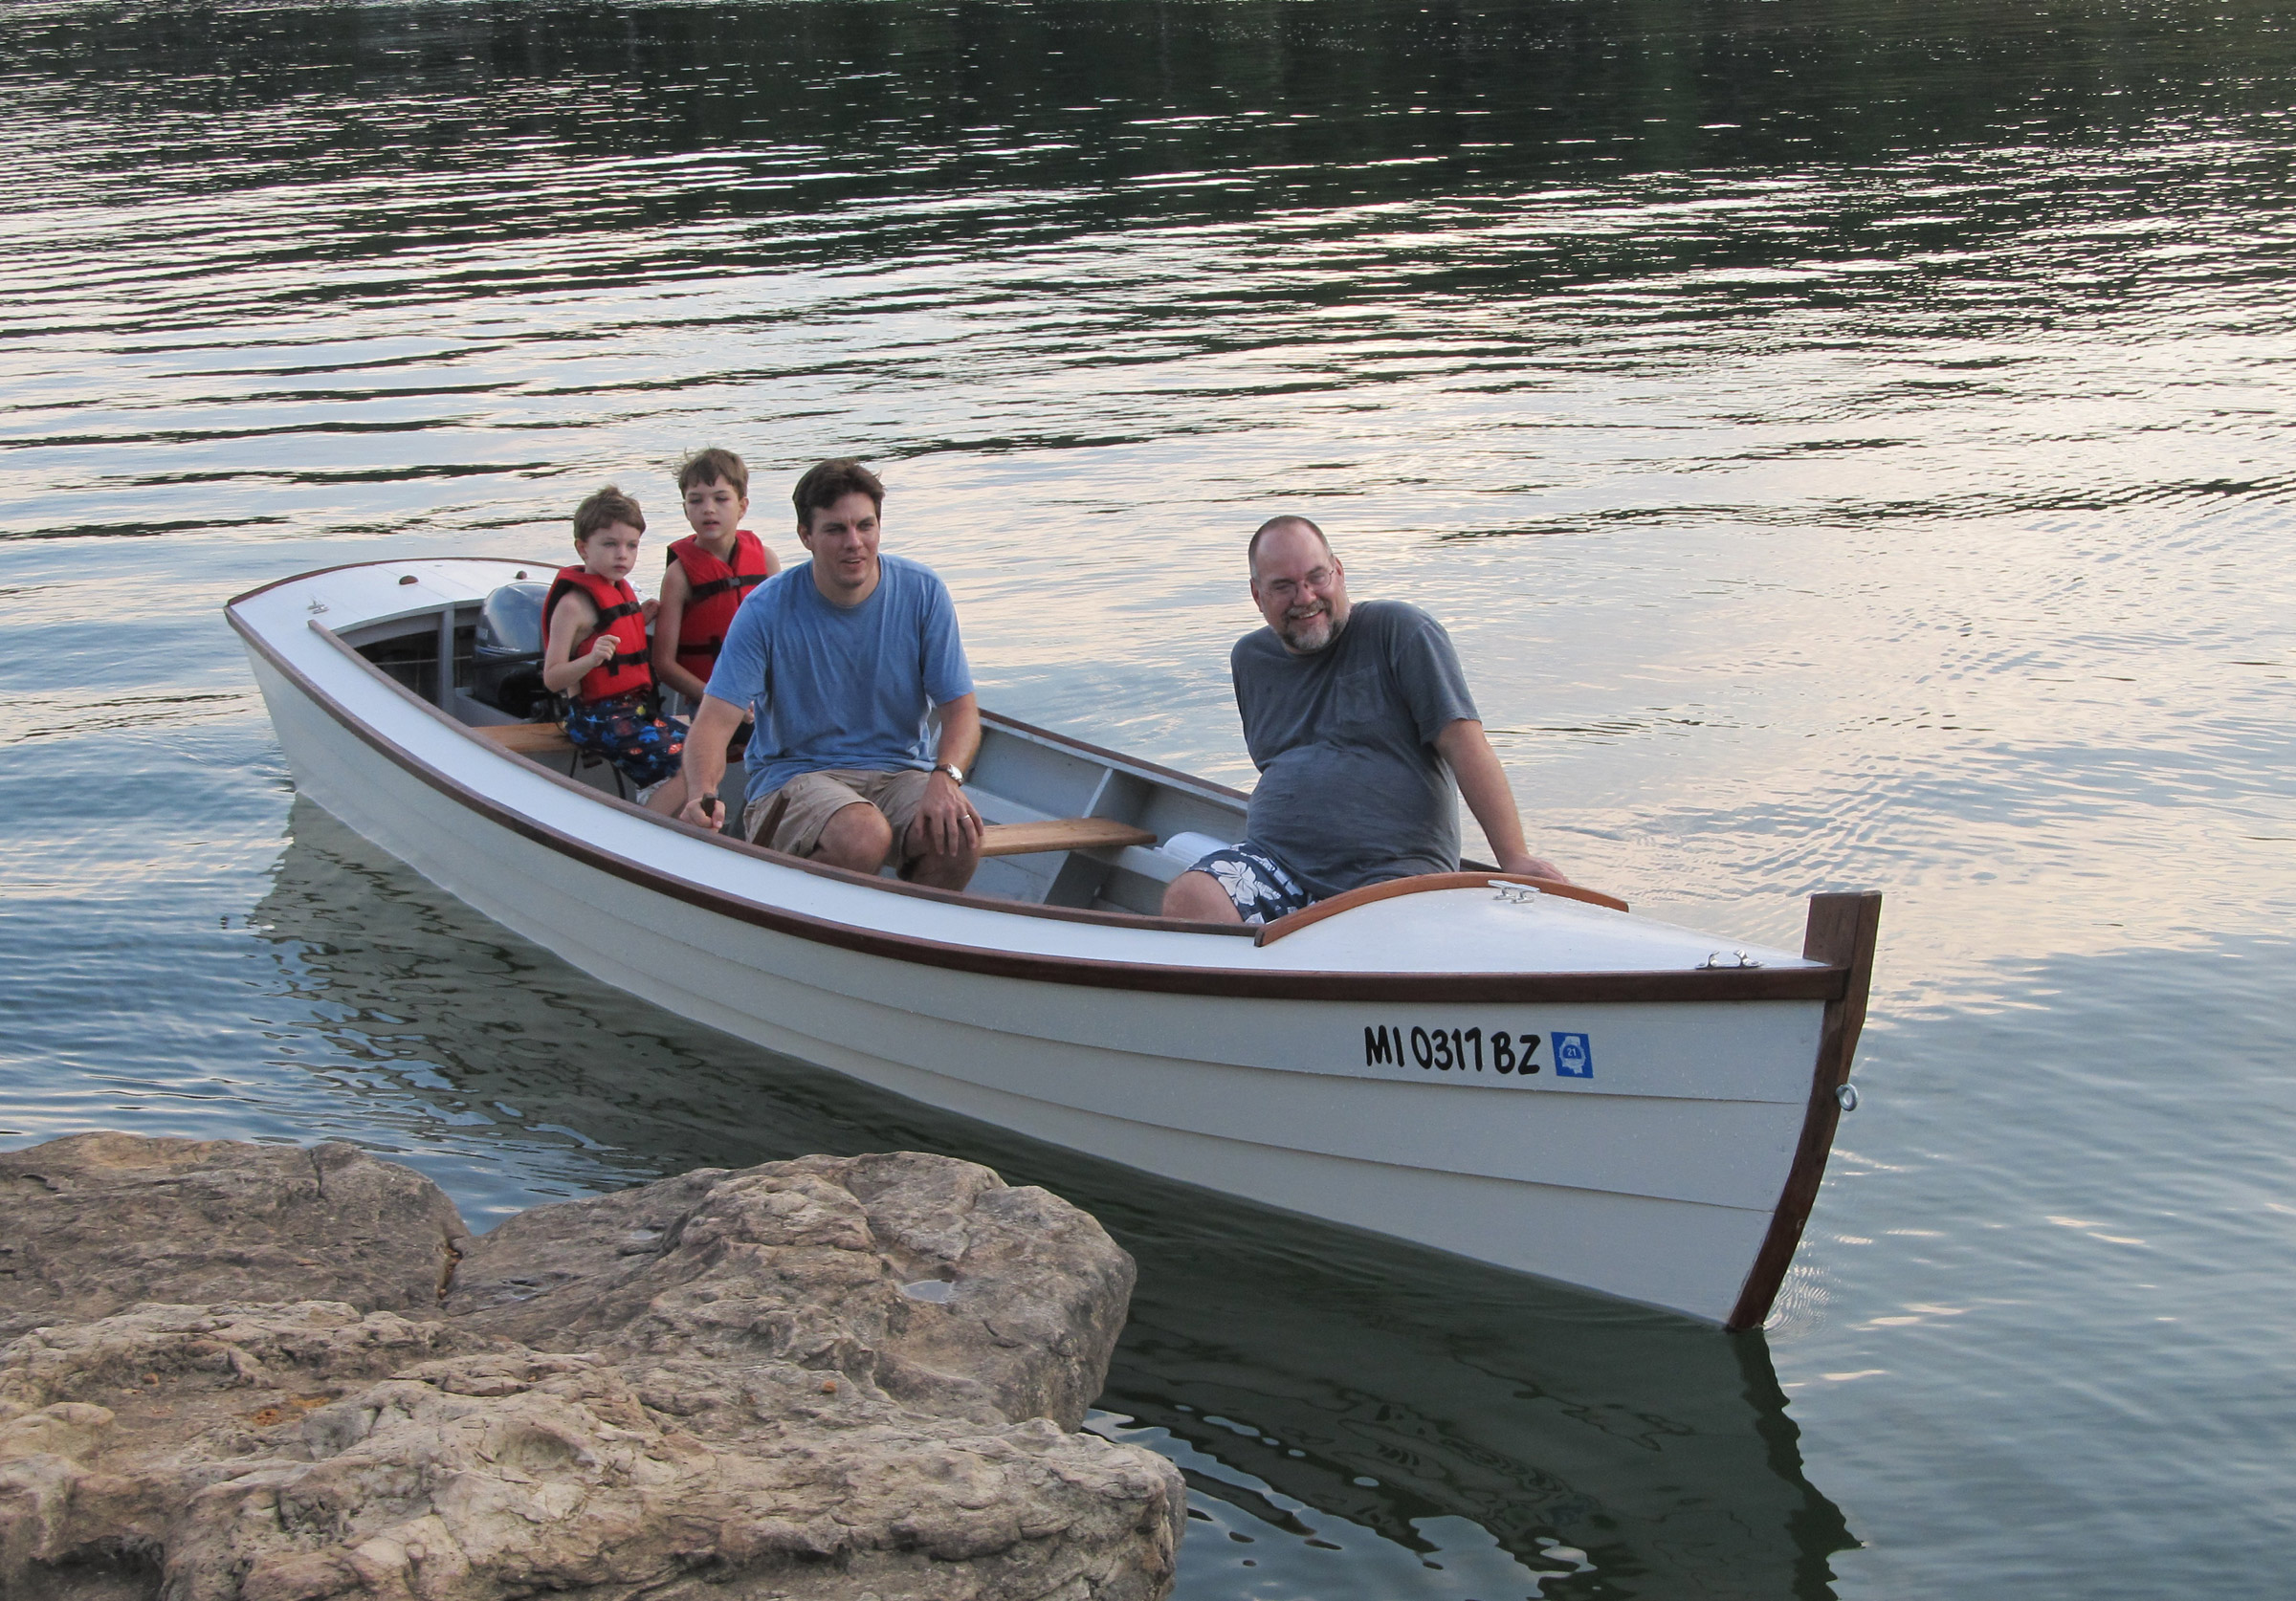
The old personal flotation device (PFD) that I had with me for about 6,000 miles of small-boat cruising between 1980 to 1987 was given to me by my next-door neighbor. He said it was the type used by longshoremen working the docks. Like all PFDs of that time, it had no pockets.
I got a lot of use out of this PFD on my cruises, but all it ever did was keep me a bit warmer and help explain my grubby appearance when I walked into town: “I’m not destitute; I’m boating.” Here, I’m two months into a wintertime river voyage. Behind me is my sneak box, hauled into an abandoned house in Louisiana that had half fallen into the Pearl River and lost its living room’s riverside wall.
My recollection is that the Coast Guard or Underwriters’ Laboratories would not approve pockets because they could be filled with lead shot and sink a PFD. I couldn’t carry anything on my old PFD, and even if I had pockets in a jacket, they’d be covered by the PFD. Sewing pockets on a PFD would void its status as an approved flotation device, so I later sewed up a vest with pockets that I could wear over my PFD. Shortly thereafter, in the ’90s I think, PFDs with pockets were given approval and came on the market.
I met a Coast Guard rescue swimmer, a guy whose job is to jump out of helicopter to rescue boaters in distress. He said something that stuck with me: “If the gear you need is not on you, you don’t have it.” The bulging pockets on his PFD and dry suit proved the point. I was doing a lot of sea kayaking then, and a capsize was something I had to be prepared for. In a worst-case scenario I’d have to contend with losing my kayak, and my survival and rescue would depend on what I had on me.
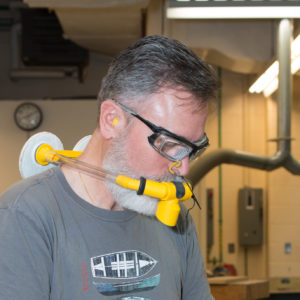
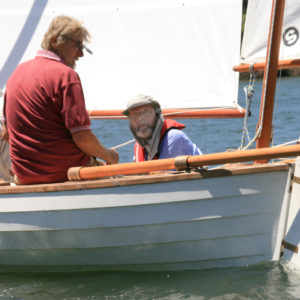
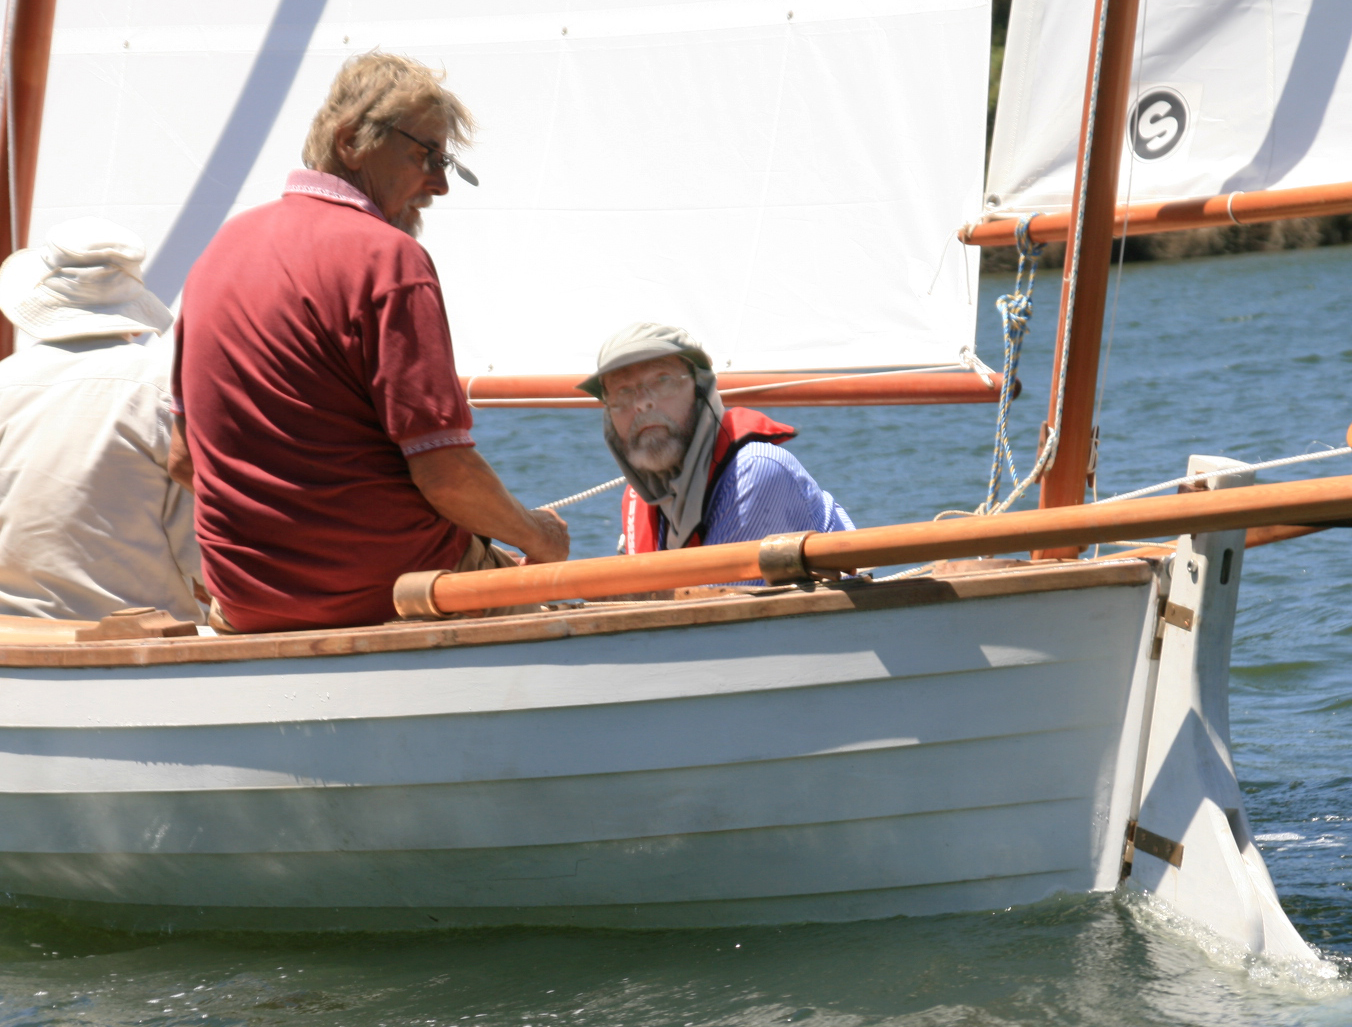
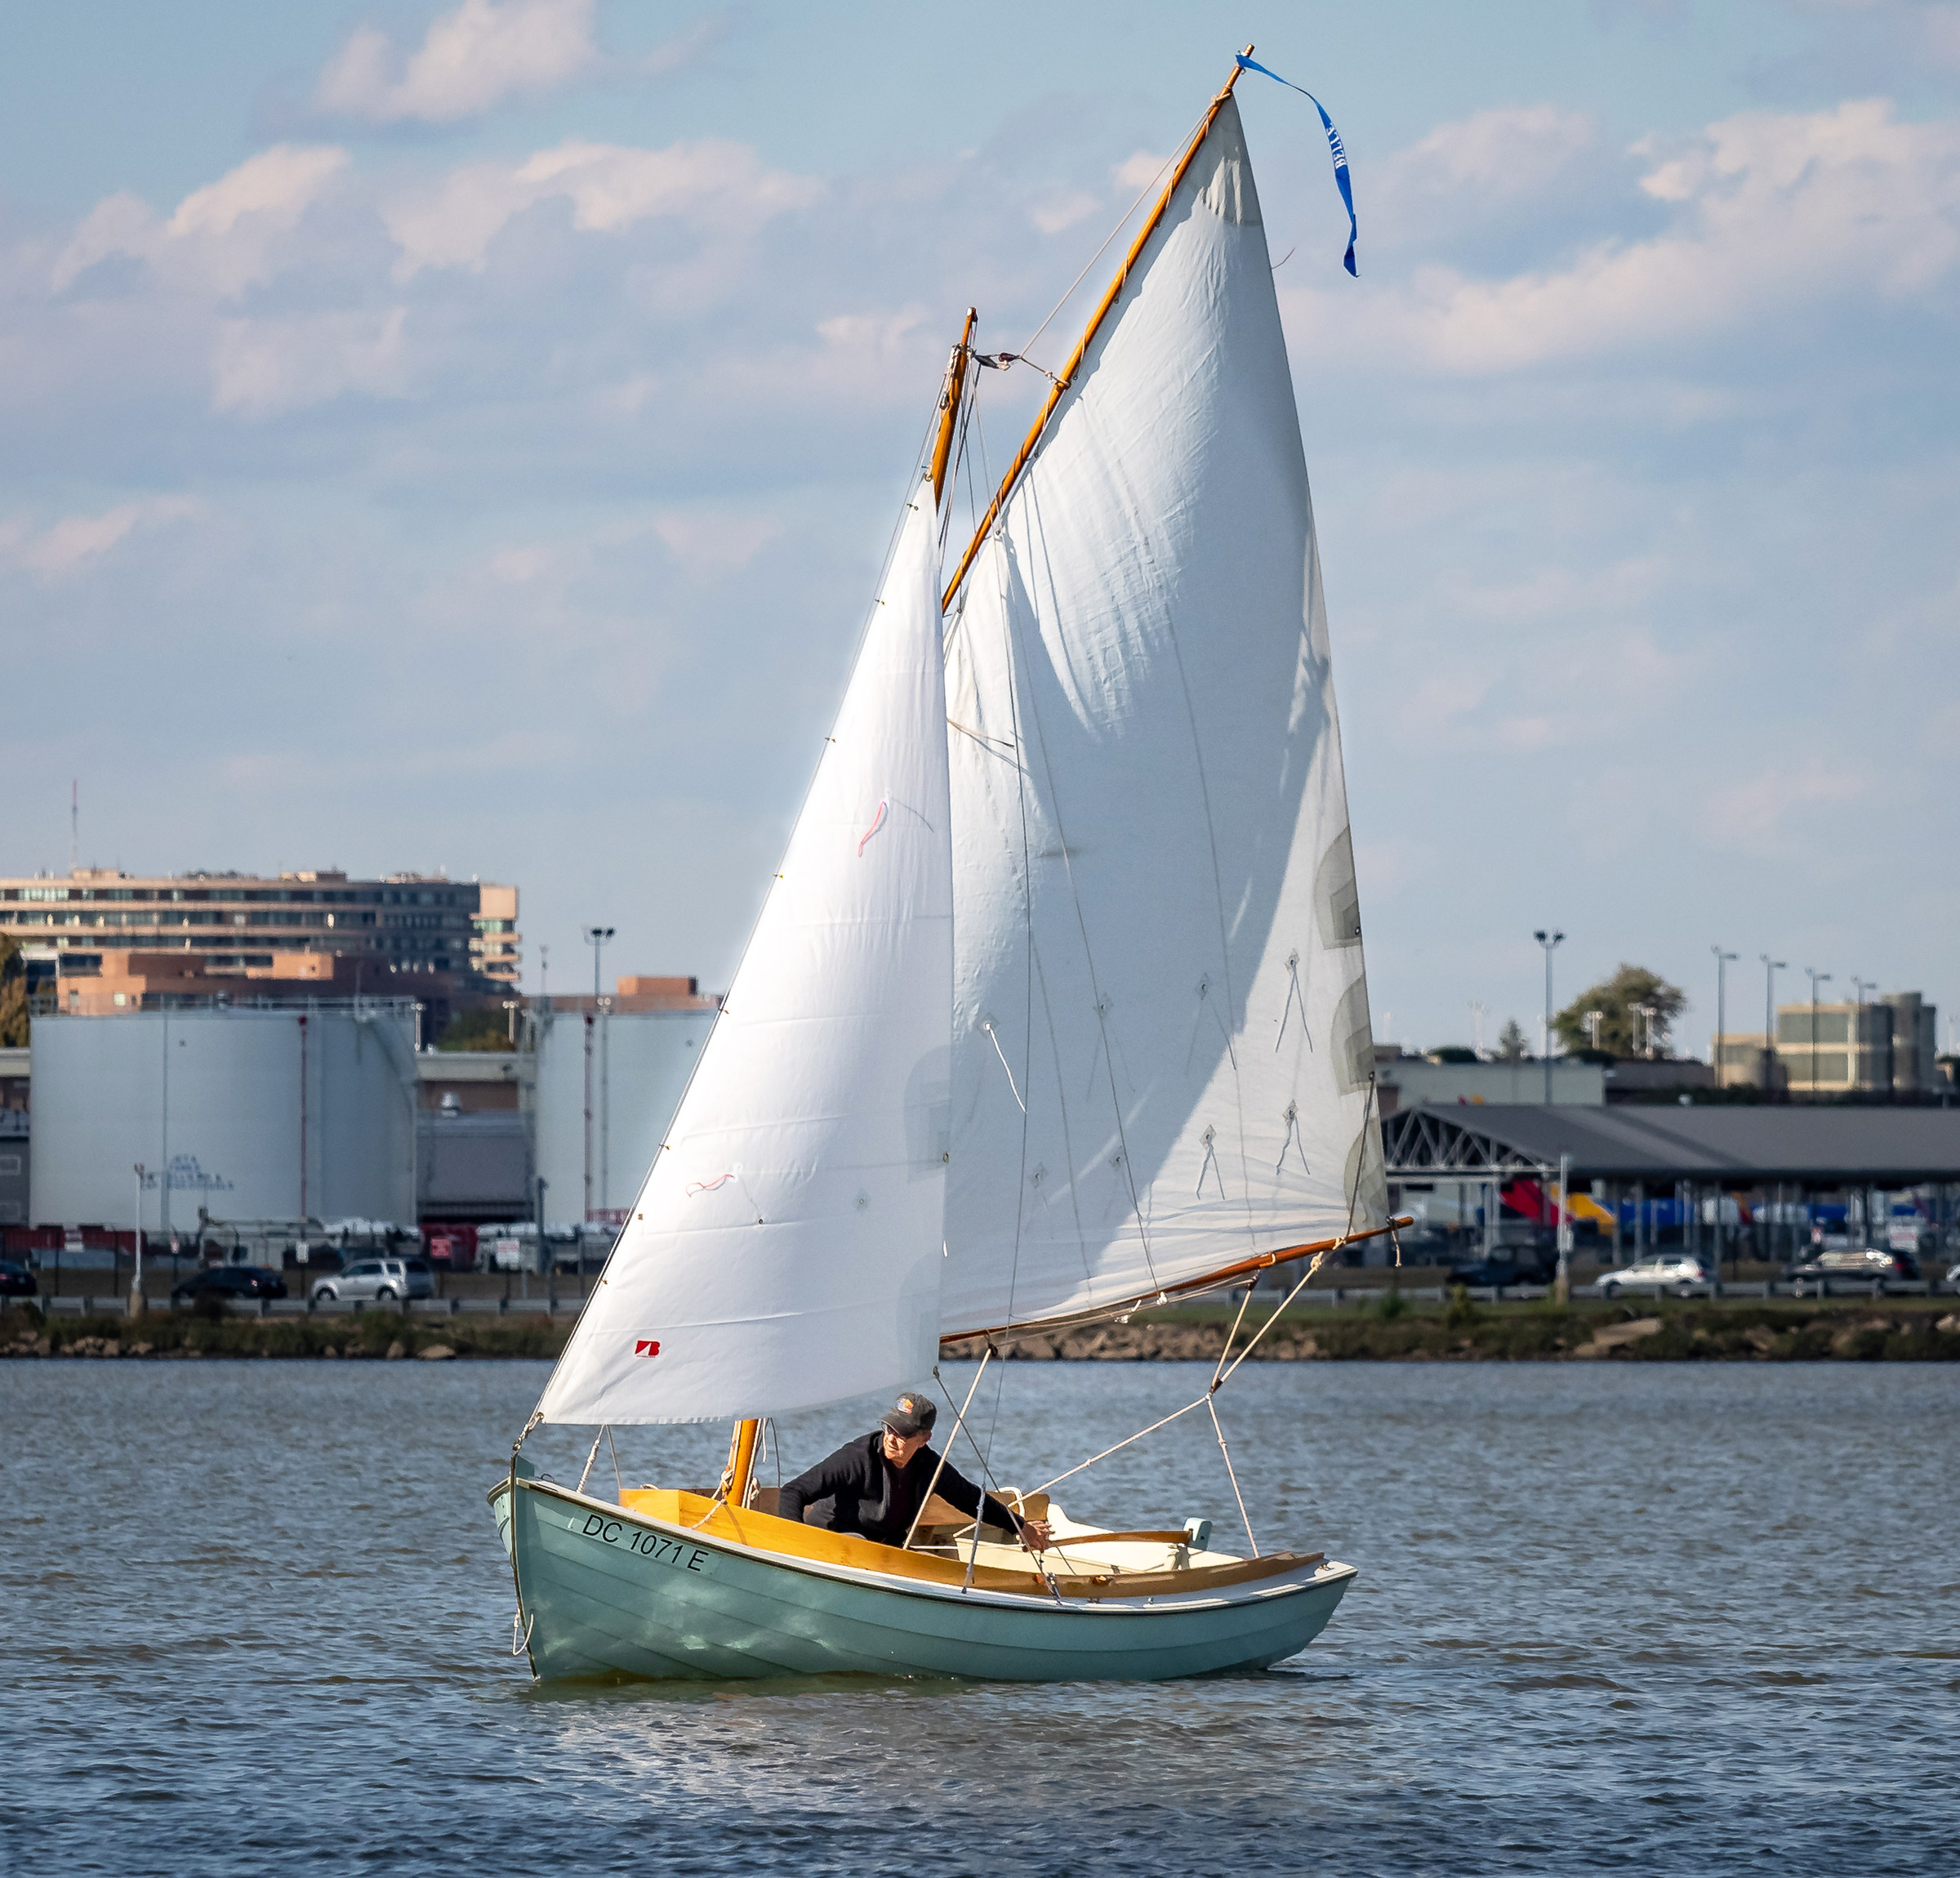
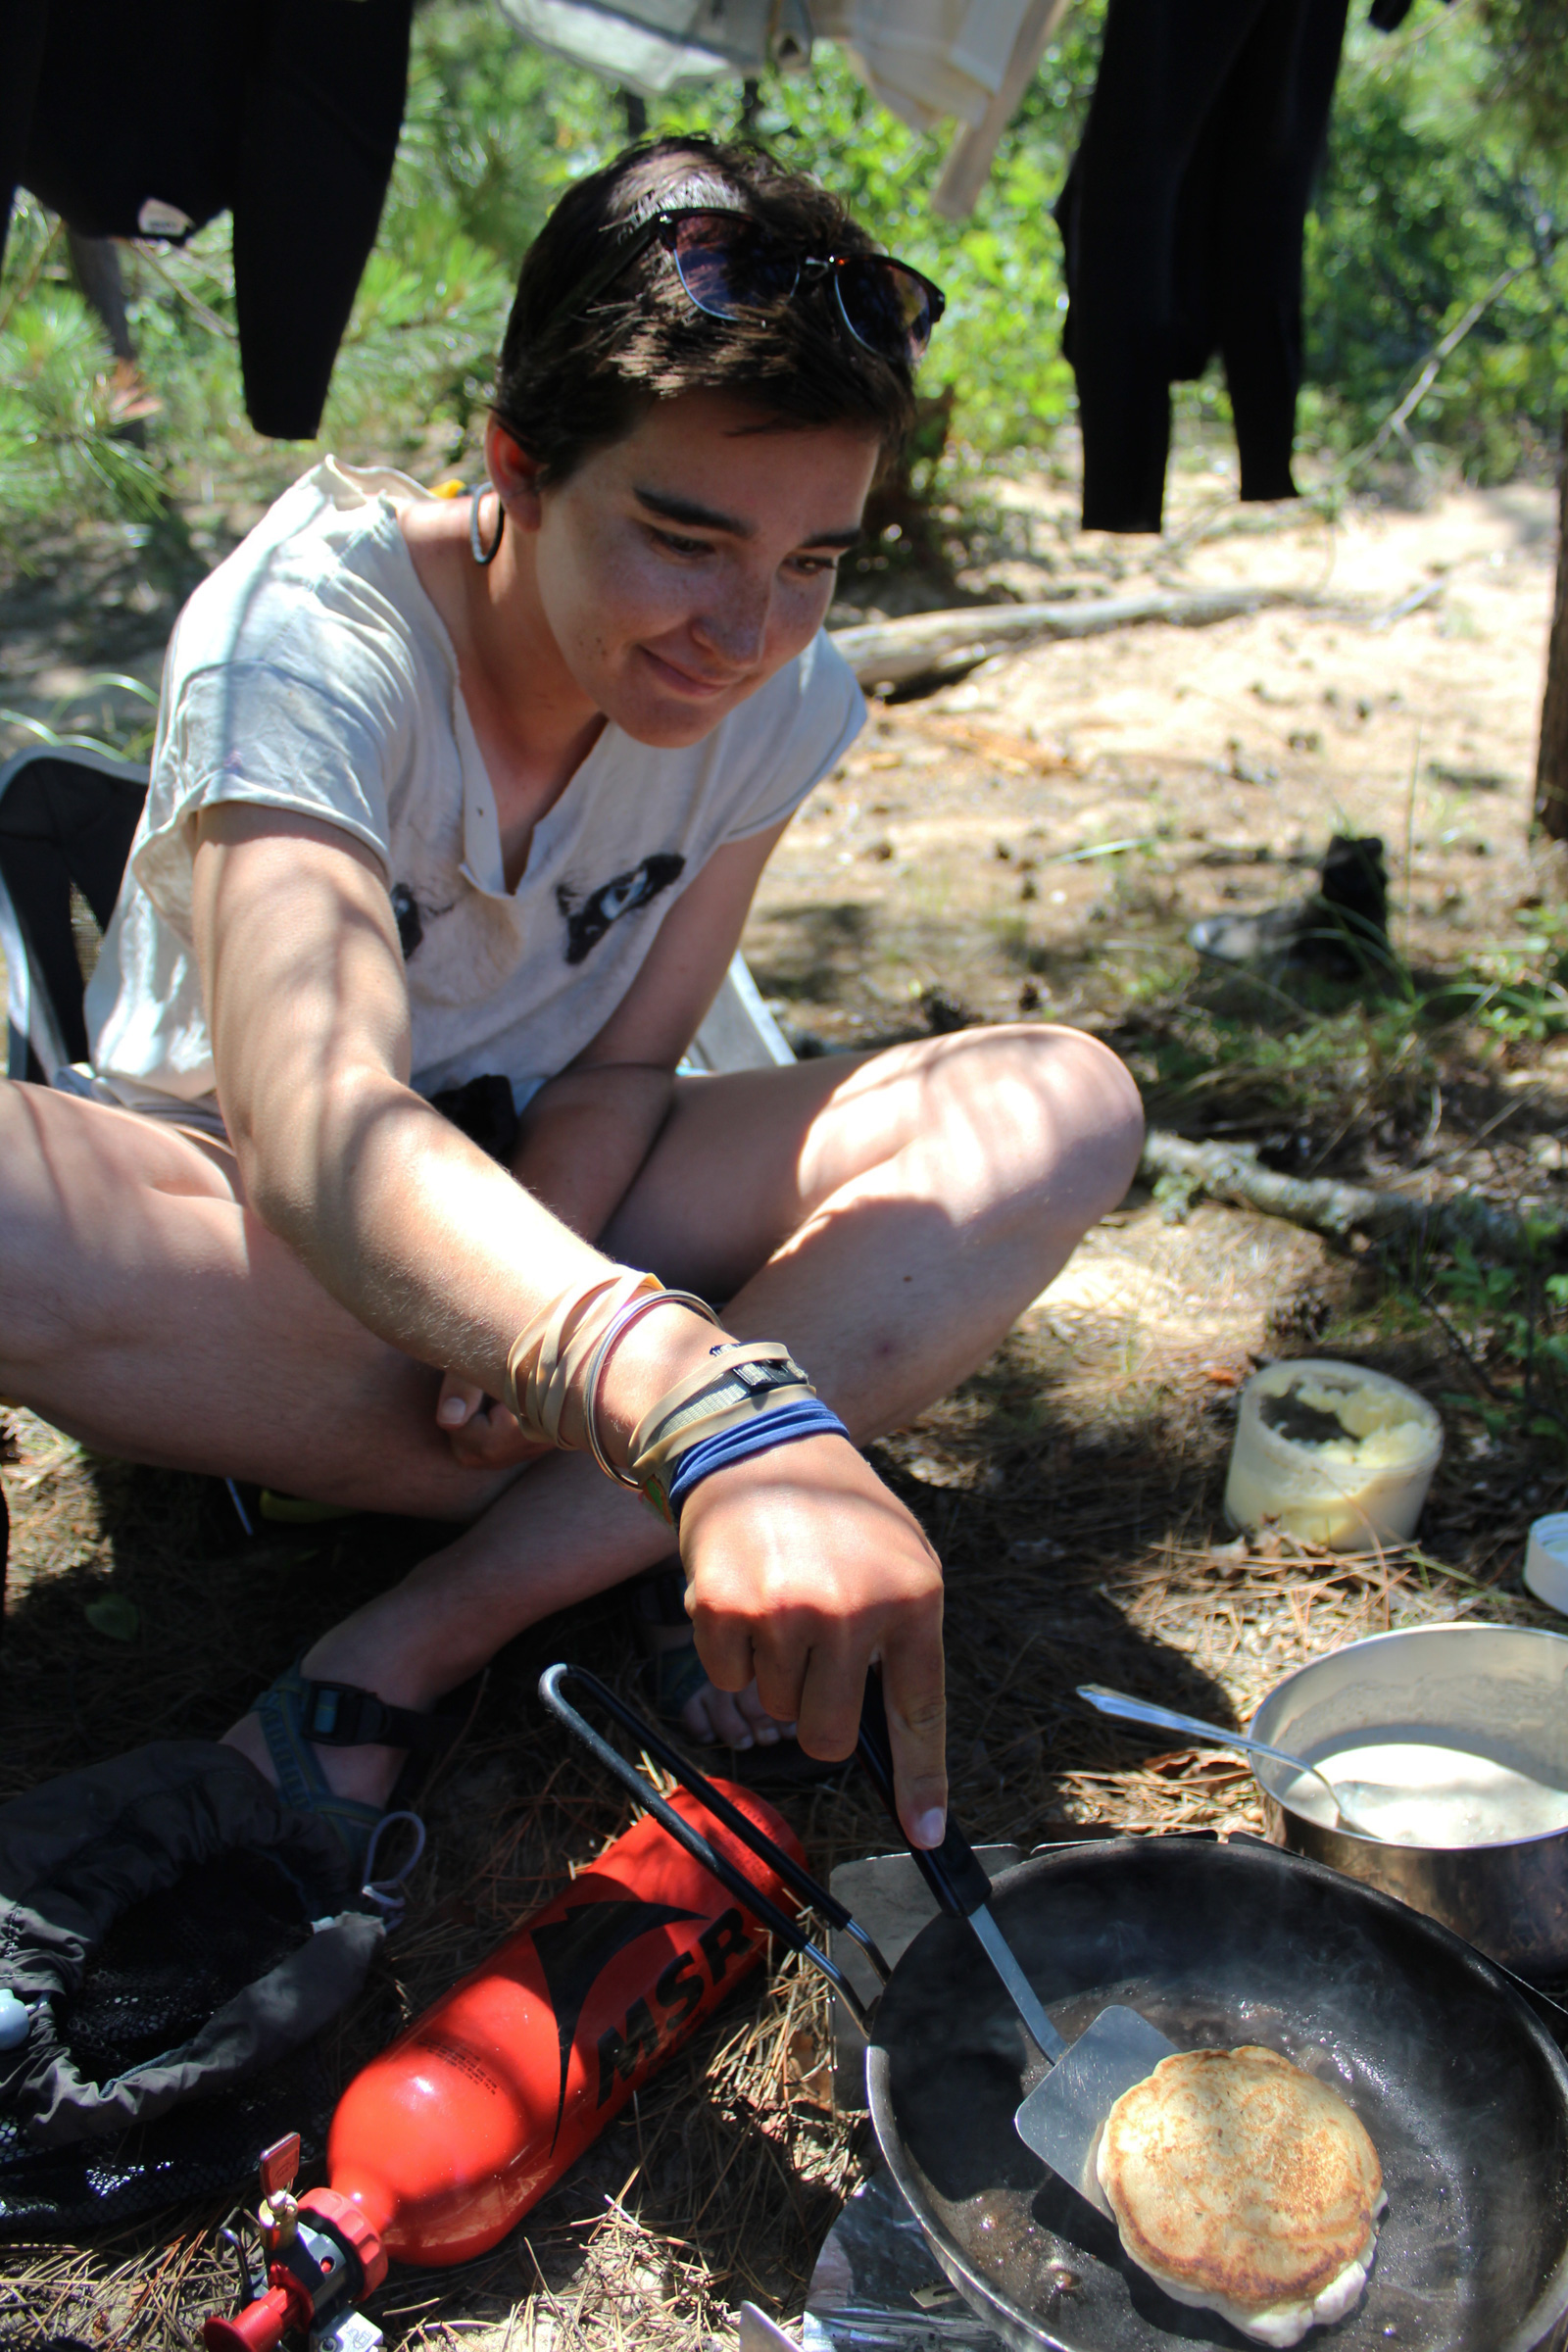
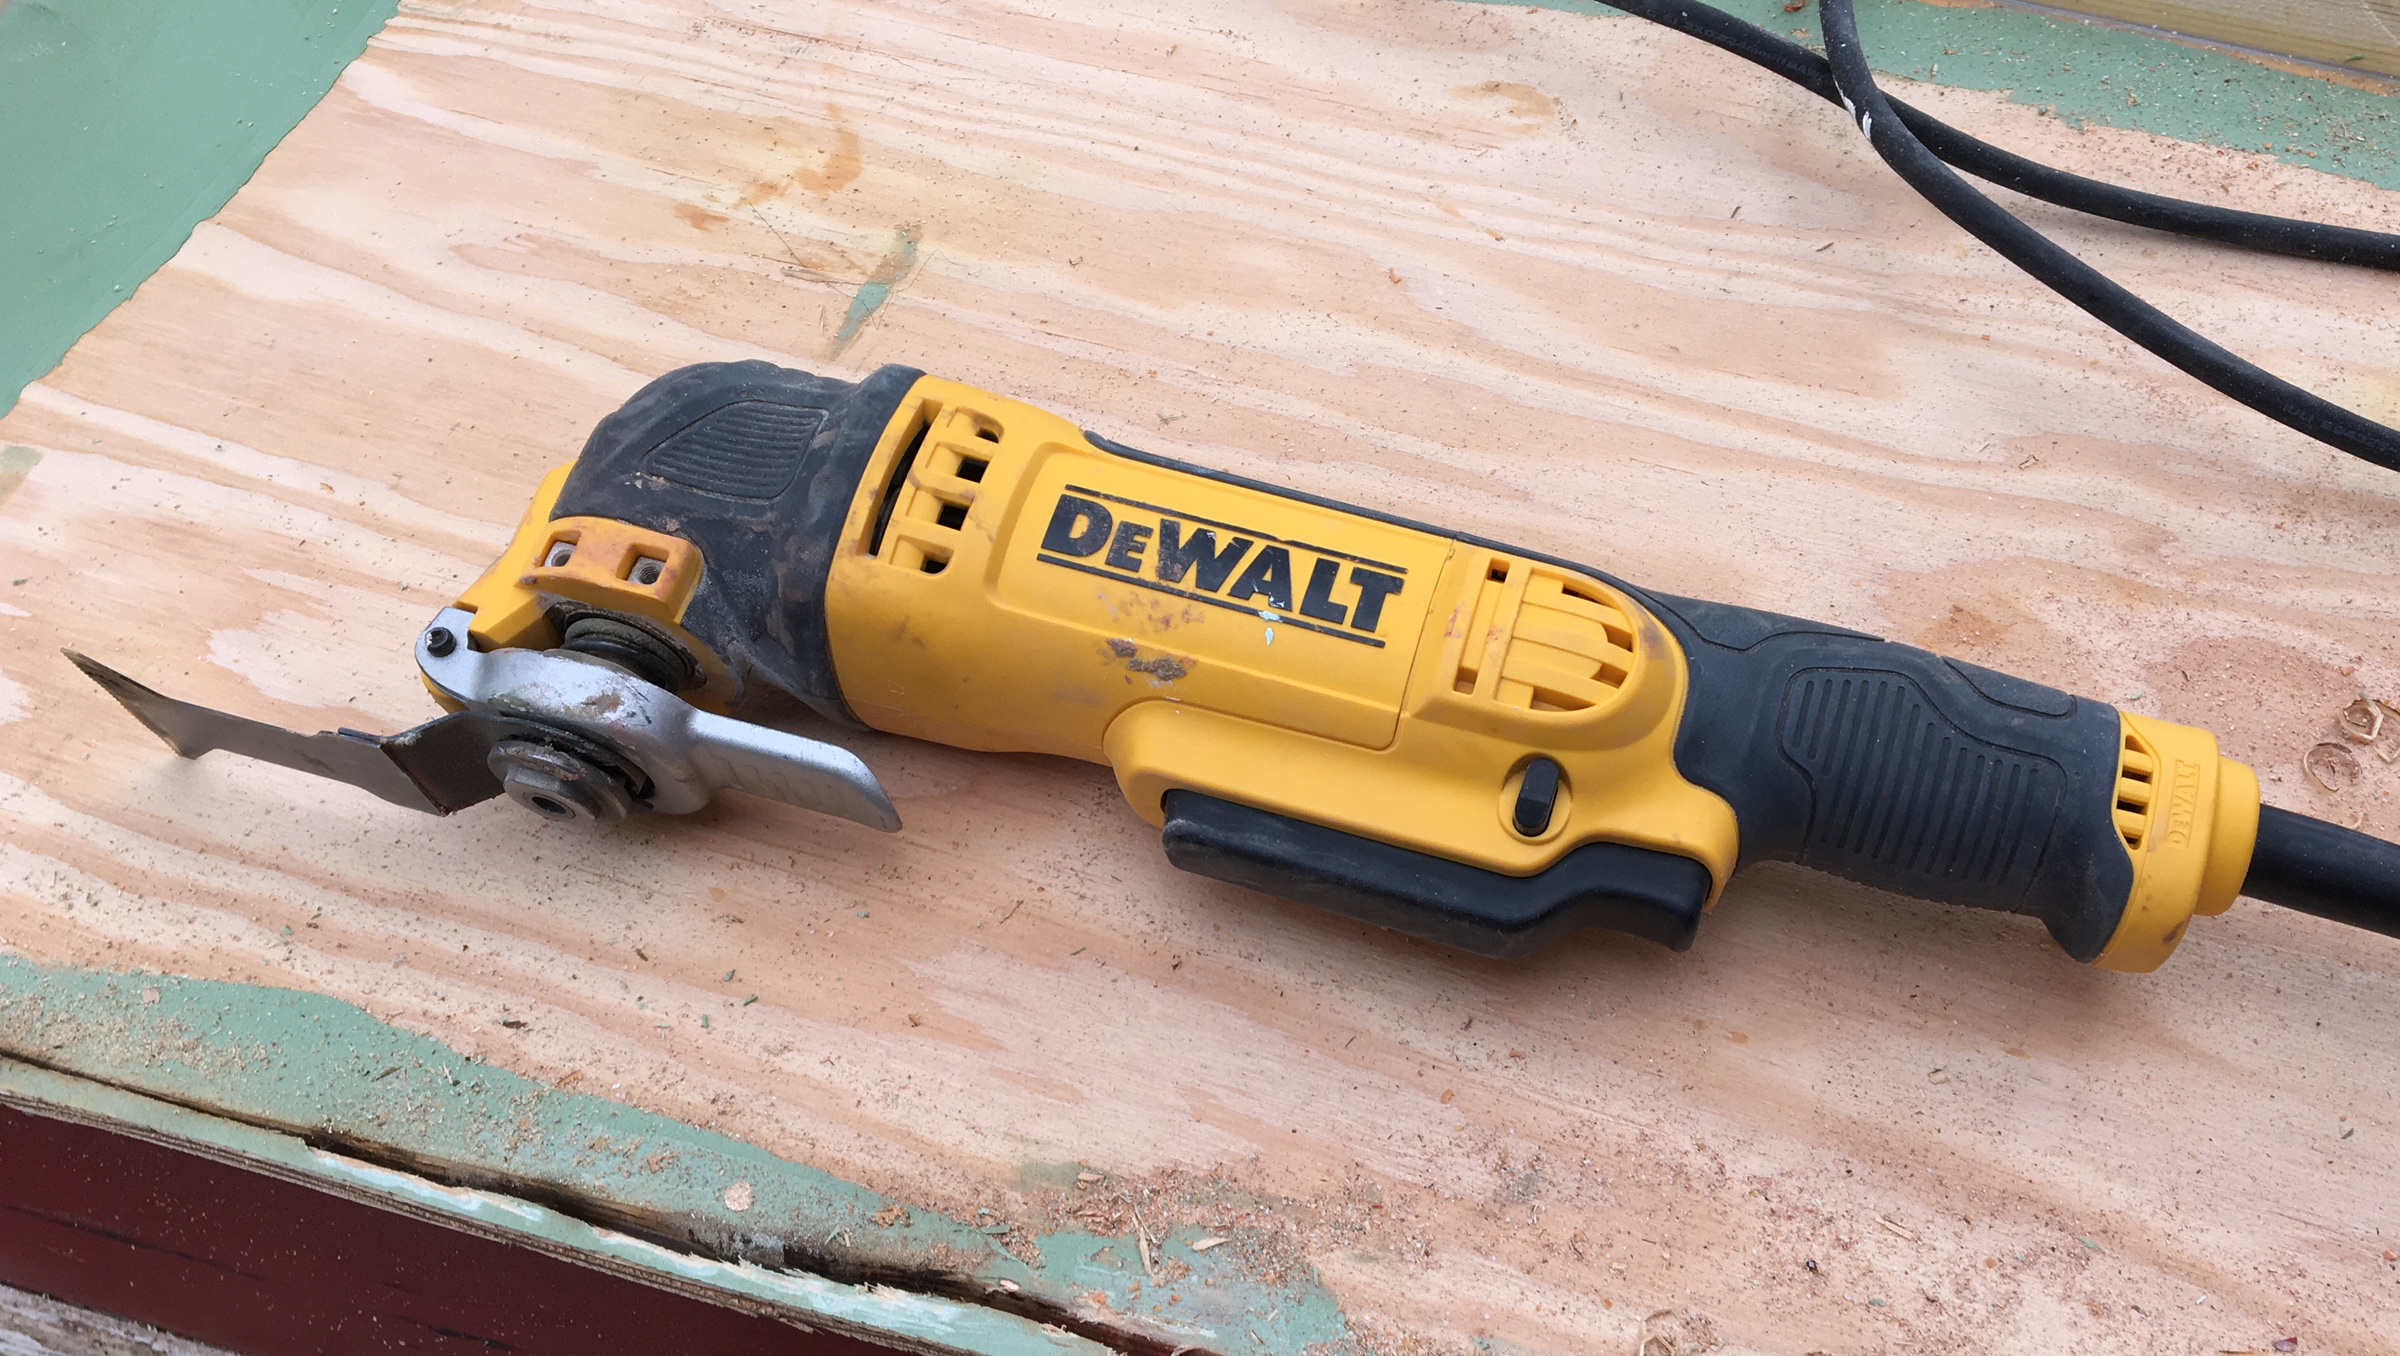
When I’m wearing my PFD, it appears I have only two items with it, a VHF radio and a rescue knife, but it carries much more.
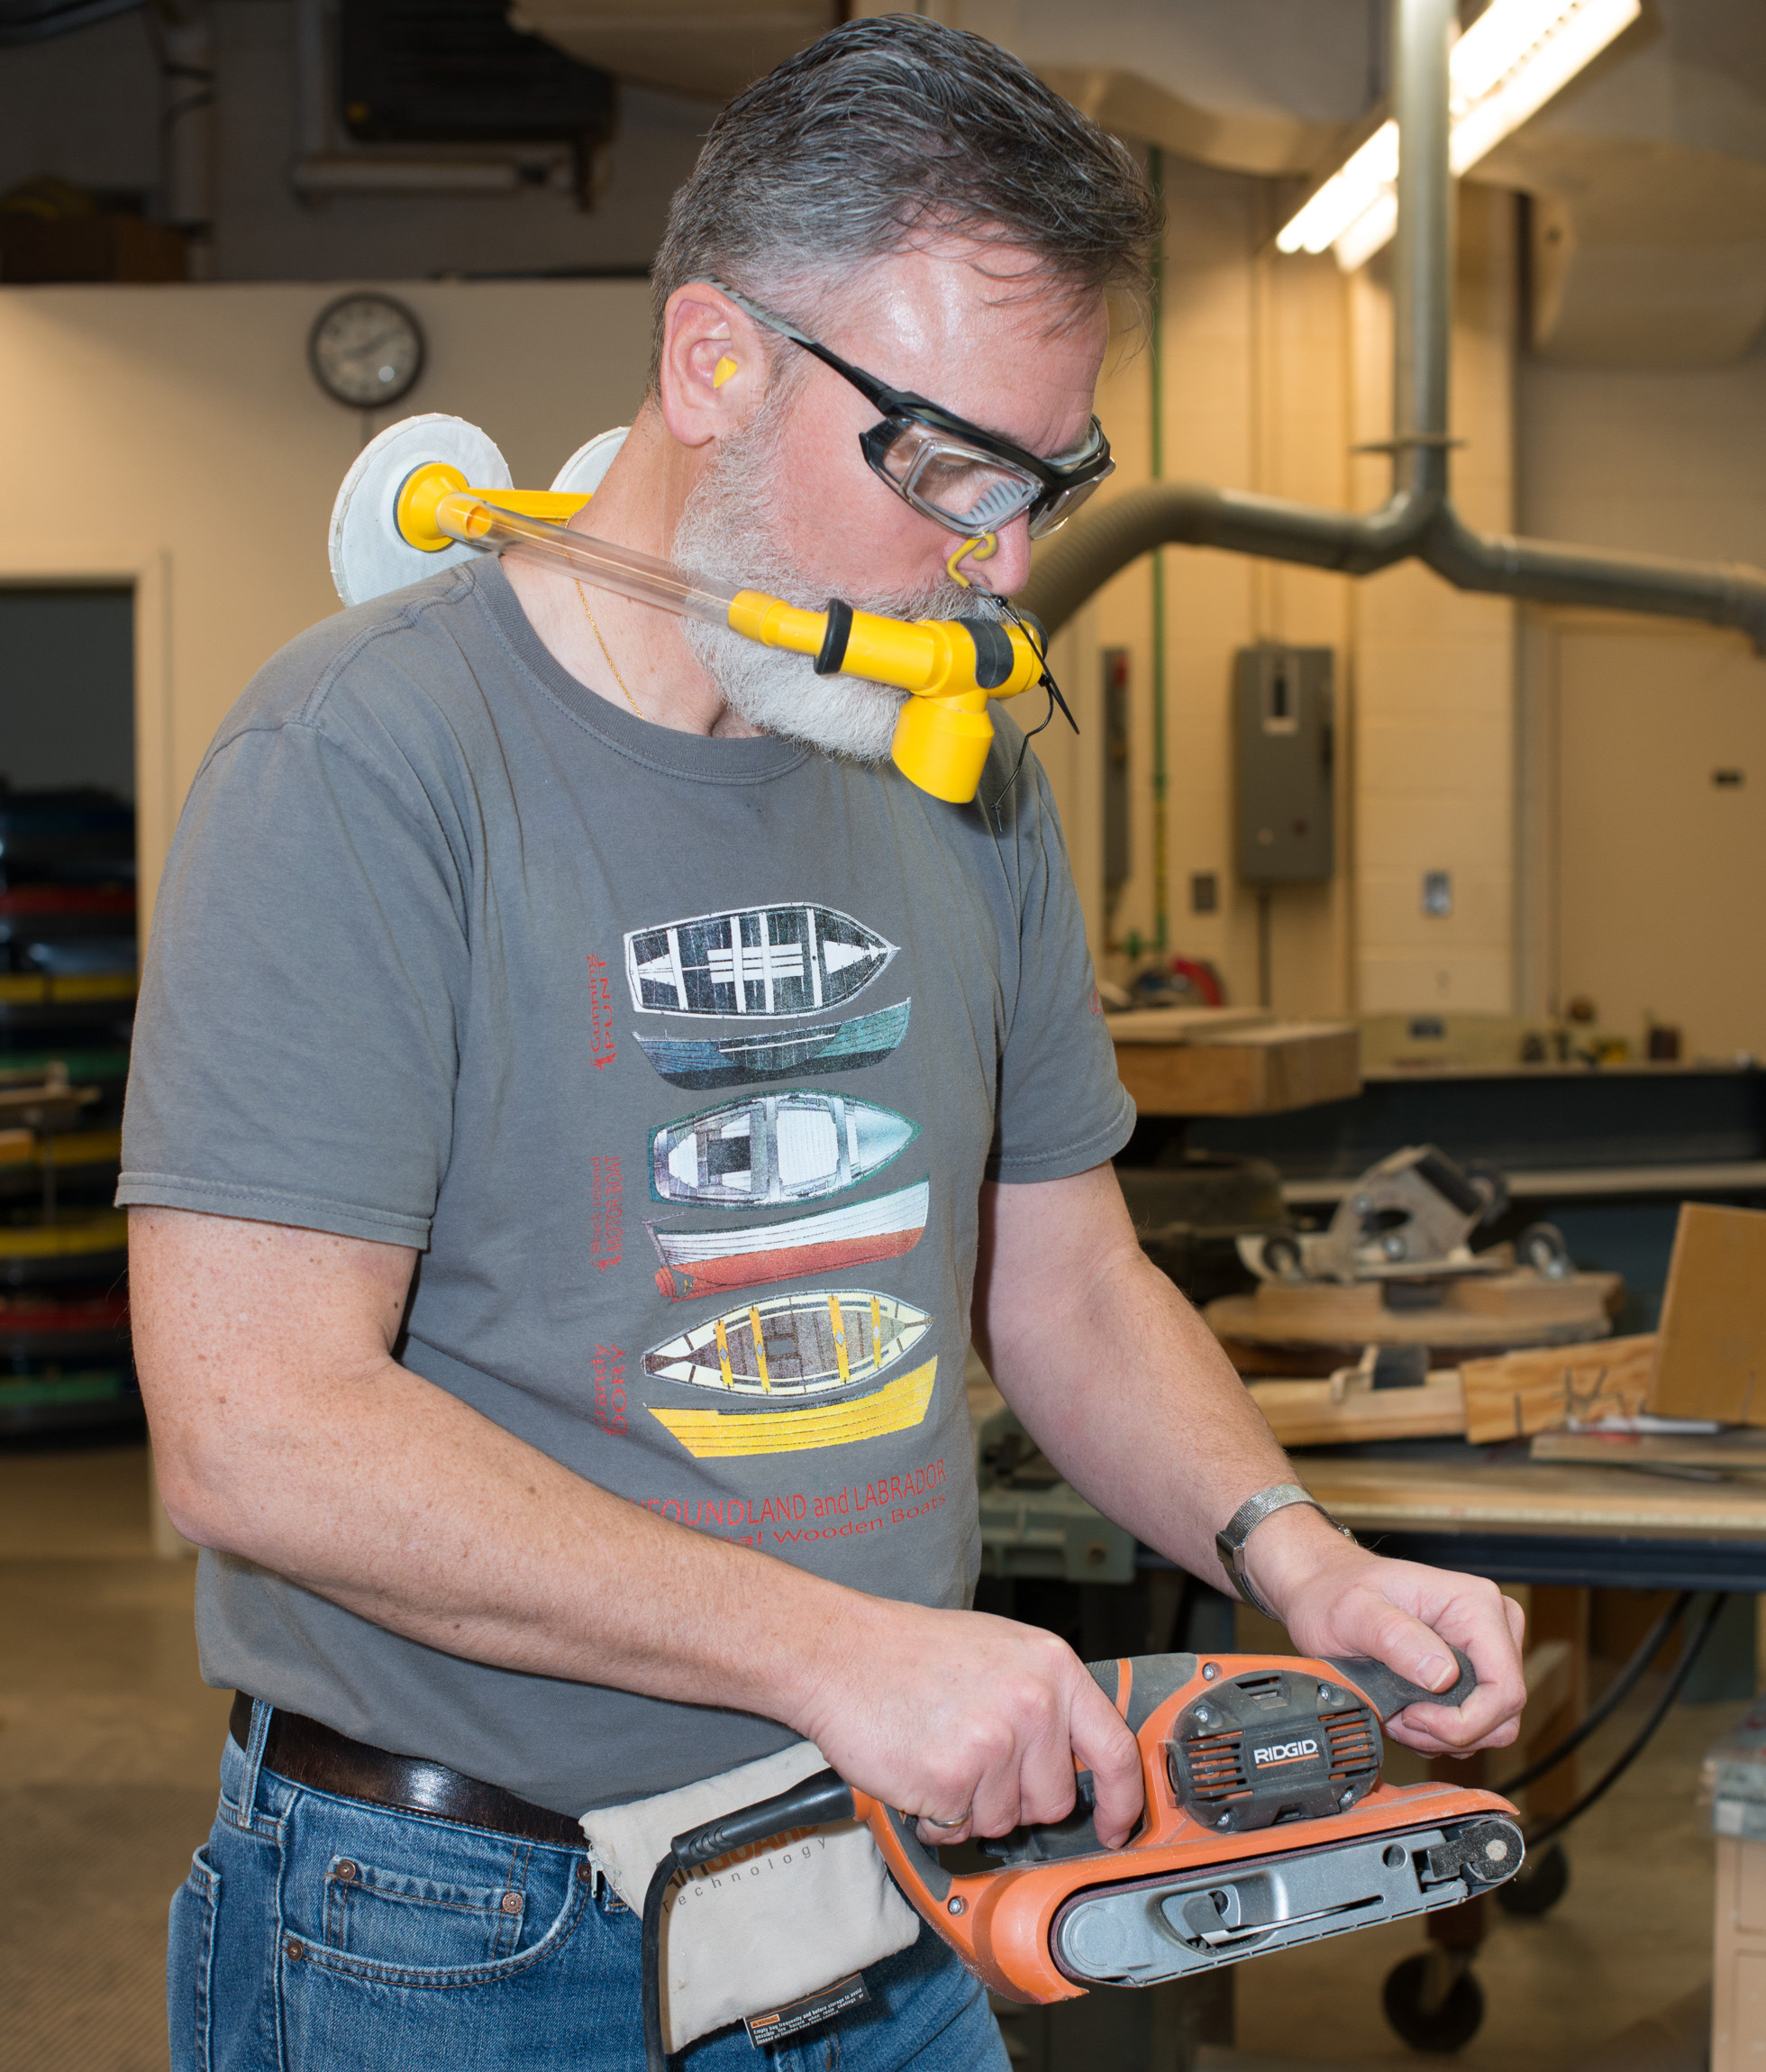
The PFD I’ve been using for the past several years is the Guide model from Kōkatat. It does much more than keep me afloat. It has a top-loading electronics pocket on the right, a side-loading, stretchy mesh pocket on the left, and small top-loading pocket behind the zipper; all of the pockets have rings sewn-in to anchor tethers. The two lash tabs on the front of the PFD and one on the back provide places to mount gear on the outside of the PFD. There are retroreflective patches on the front and back for night search visibility.
My current PFD, shown above with everything tucked away, has what I need as well as to help someone in need.
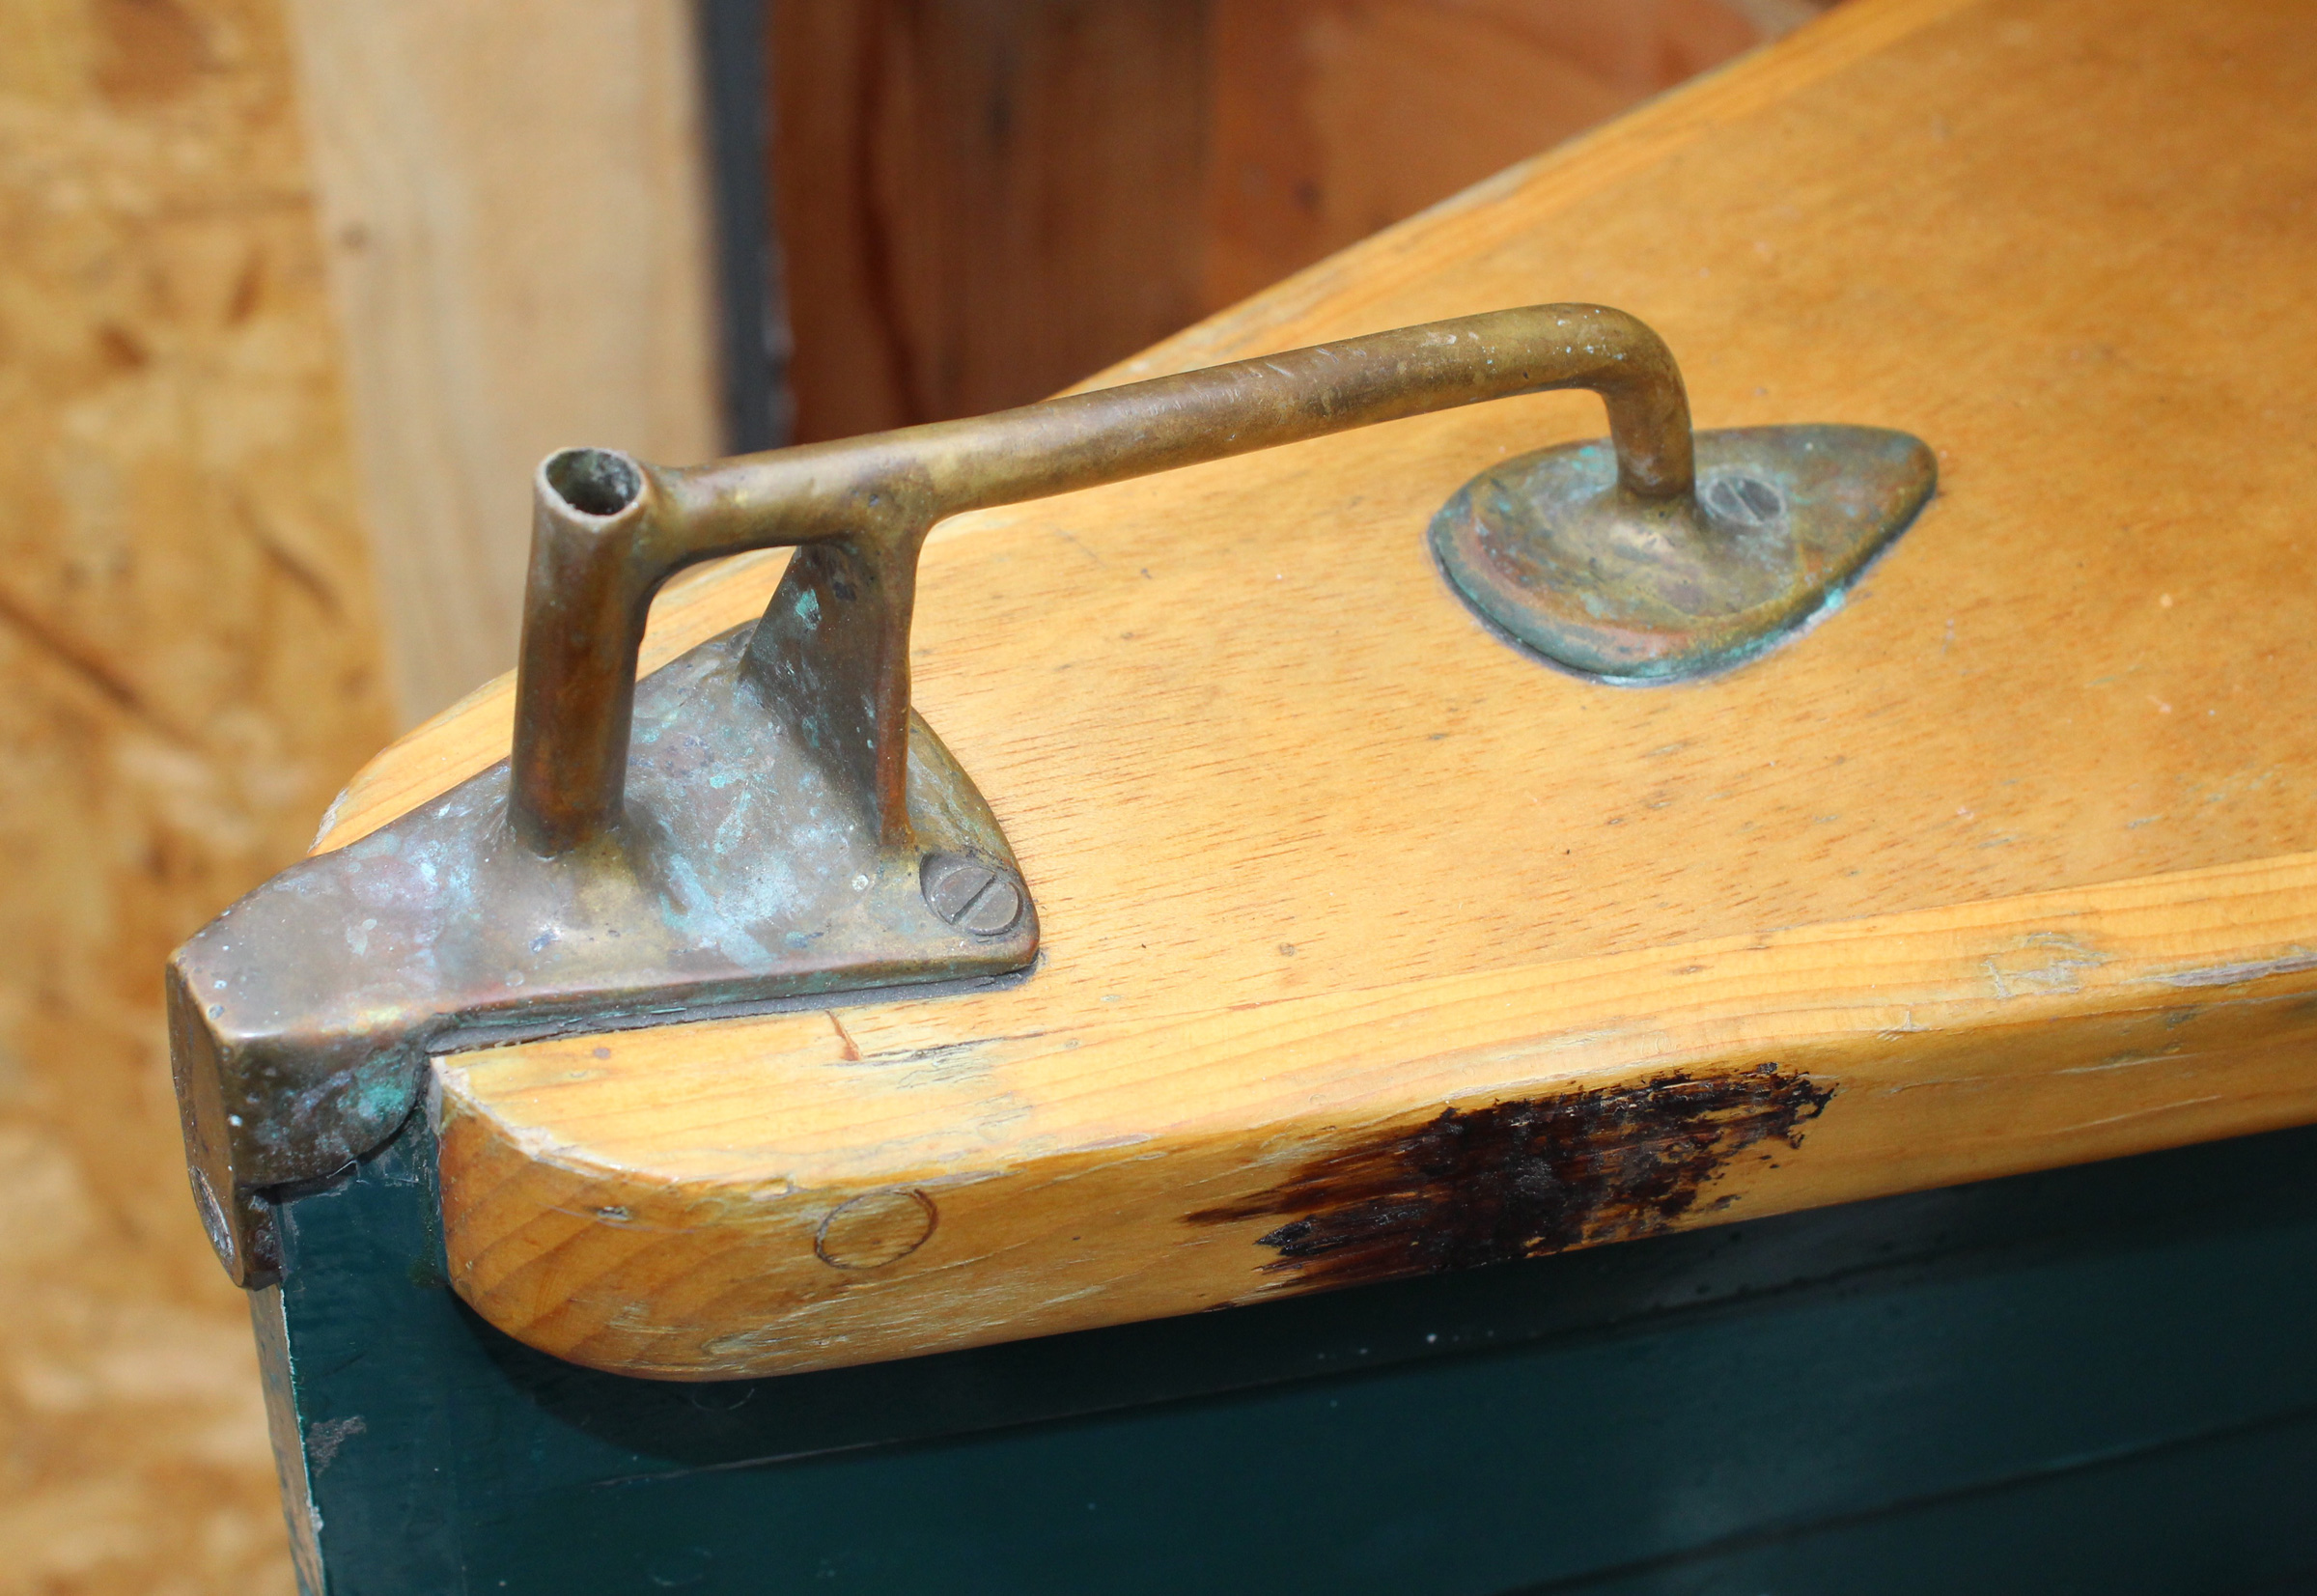
The PFD has a belt with the quick-release buckle; it’s part of a towing system for use while kayaking. I don’t need to tow with my PFD when I’m aboard my other boats, so I’ve taken the O-ring, the towline, and the towline’s pouch off. The towing belt, by the way, makes the PFD a rescue vest, classified as a Type-V, special-use life jacket, though all the other features are available on the more common Type III recreational vests.
On the back I have a PFD light and pouch for my Sea Seat.
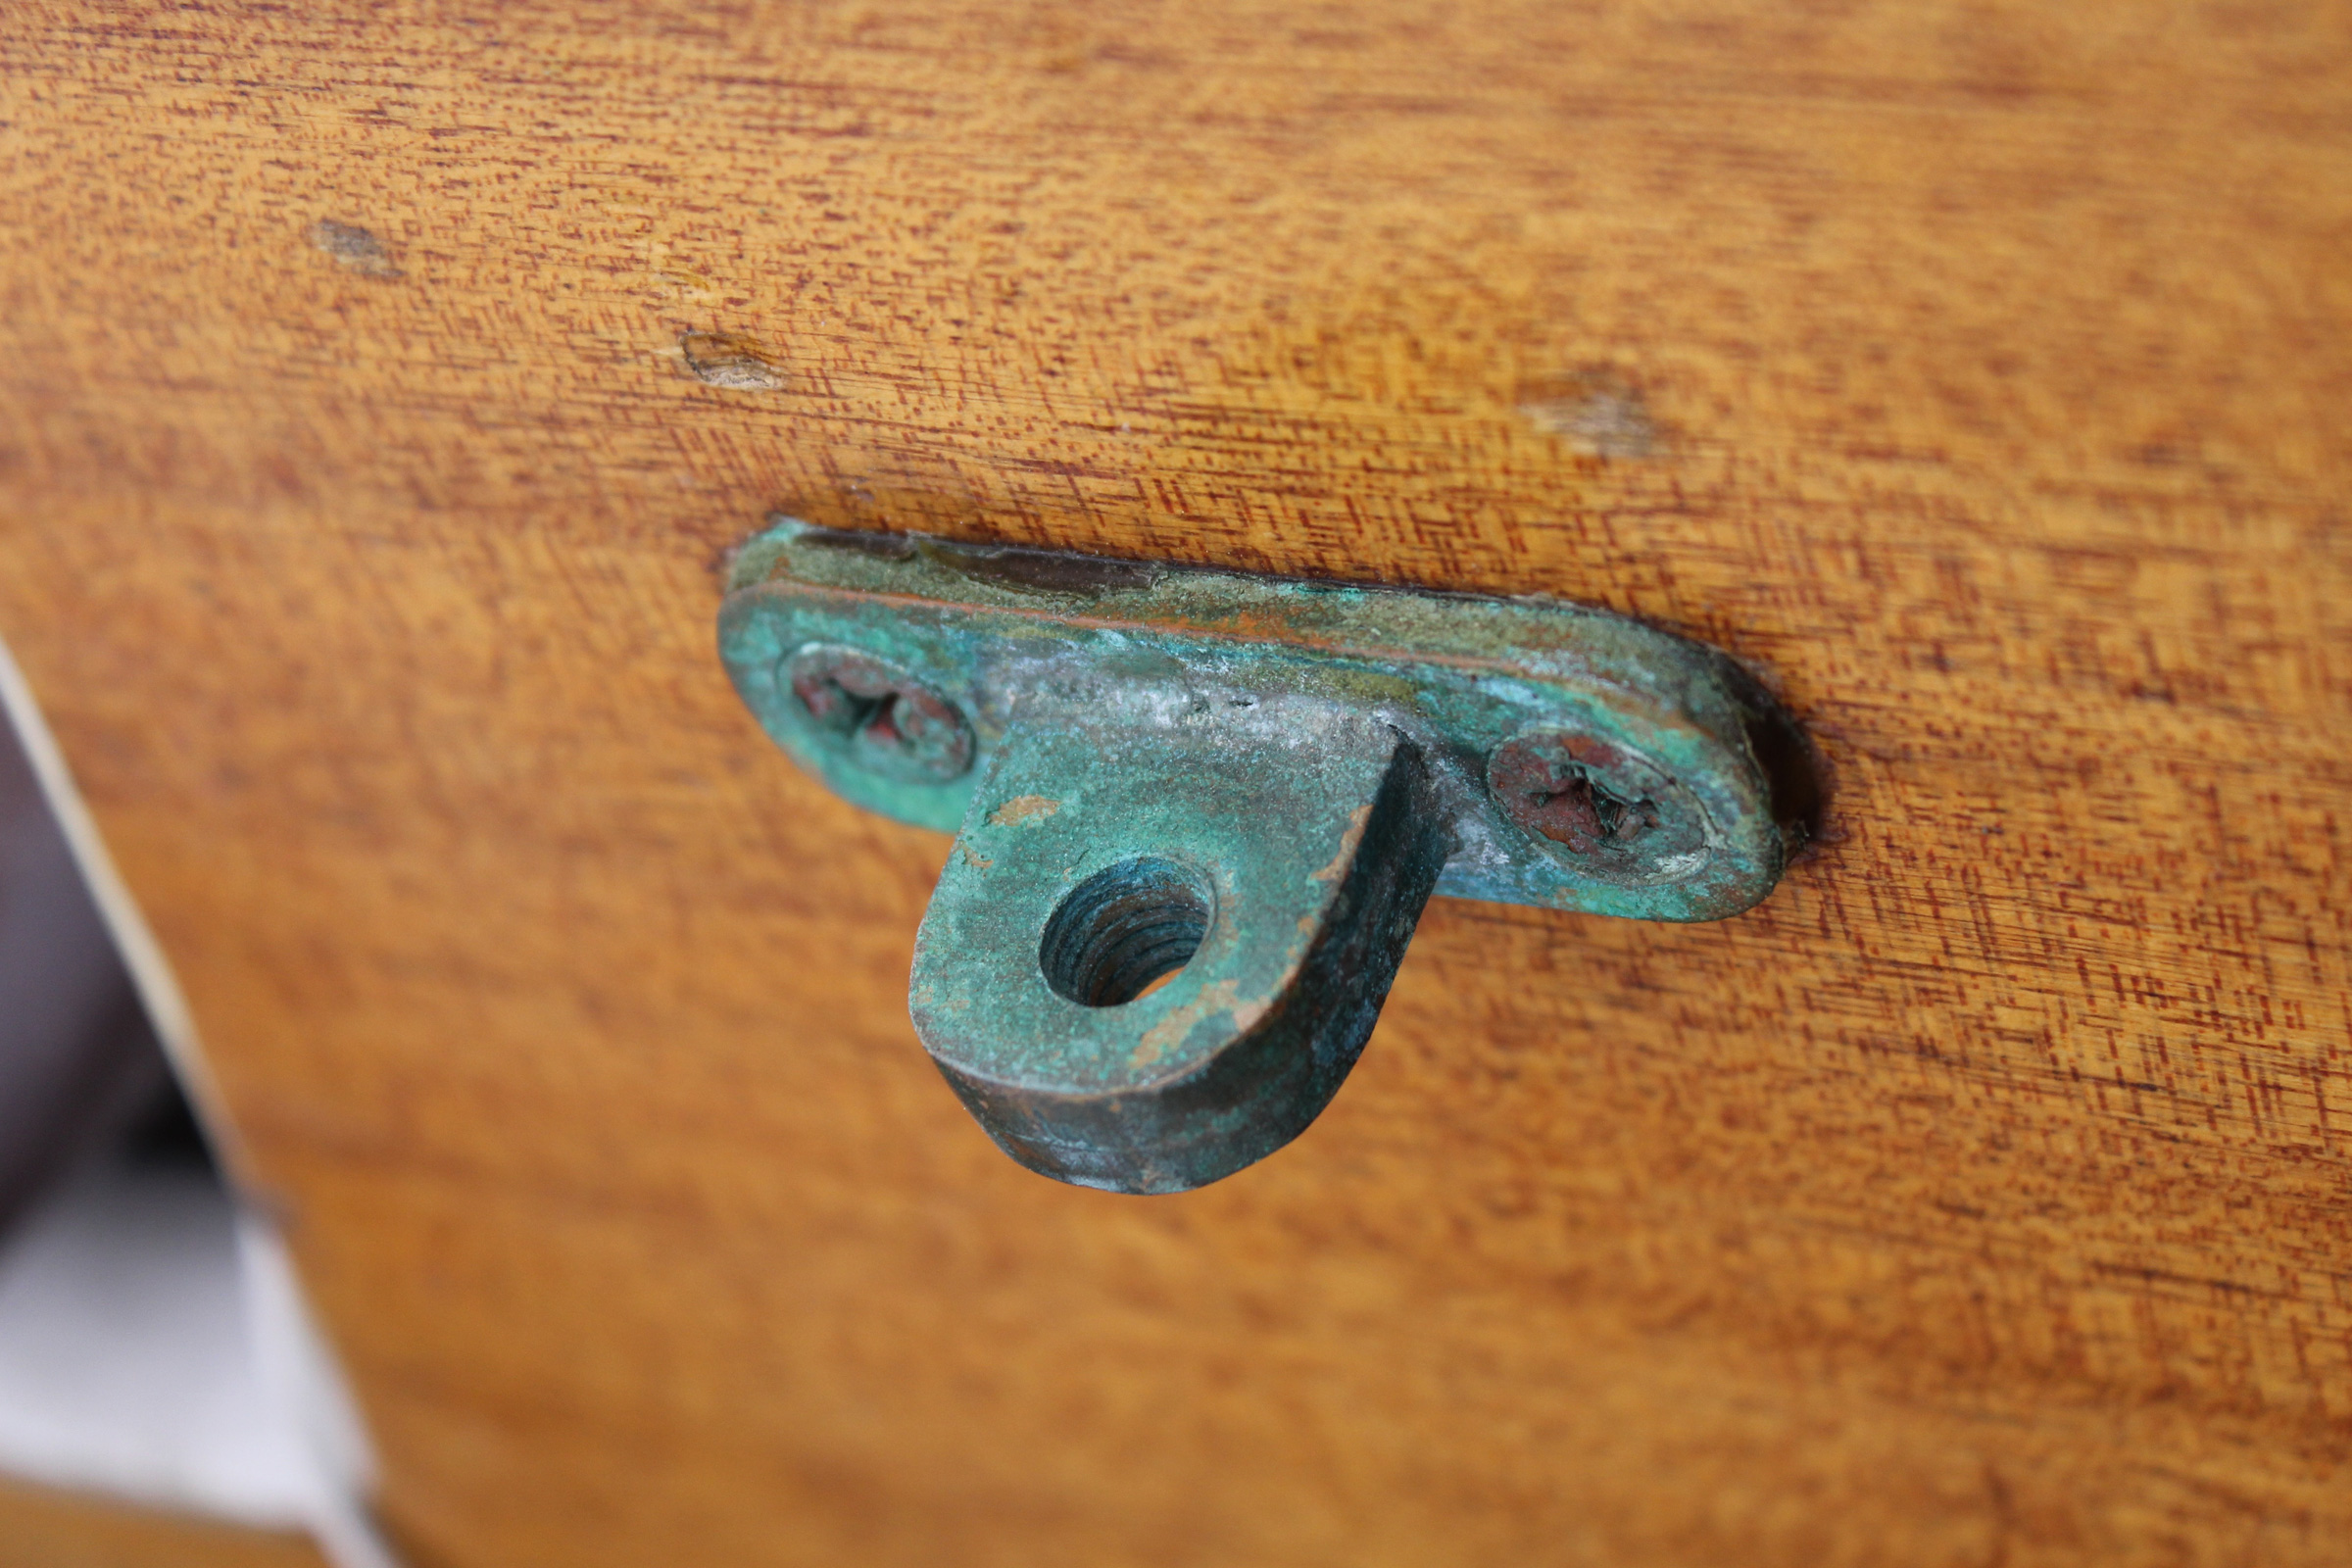
I added an accessory pocket to the back of my PFD, anchored to the shoulder straps and belt loops. Its Velcro-secured top flap has its own retroreflective patch.
Here’s what I carry aboard my PFD: The electronics pocket holds a handheld 6/2.5/1-watt VHF radio. It’s waterproof (IPX7) and floats. In the mesh pocket are a signal mirror, a flashlight, and a rescue laser light. I used to carry a set of three aerial flares, but switched to the laser because the pyrotechnics burn for just a few seconds and have to be replaced every three years.
I also keep a spare car key and an expired driver’s license in the mesh pocket. The license is laminated plastic and waterproof, and has my name, picture, and address on it. On the back of the license I’ve written my phone number, in case I misplace my PFD and someone finds it, and phone numbers for emergency contacts.
The lash tab above the left pocket has a rescue knife in its sheath. The knife blade is made of rust-proof H-1 steel. It has a blunt combination serrated/plain cutting edge, and a line and bungee cutter on the spine. My whistle is tethered to the shoulder strap above the knife.
The small pocket concealed behind the front zipper carries a rust-proof folding knife with a plain blade. It has a large hole in the blade so I can open the knife with one hand. The PFD has buckles and the belt holding it in place, so it’s safe to open the zipper to get to the knife.
I’ve done a lot of sea-kayak self-rescue practice while wearing my PFD, and when I scramble over the aft deck I haven’t had any trouble with the gear on the vest front snagging deck lines.
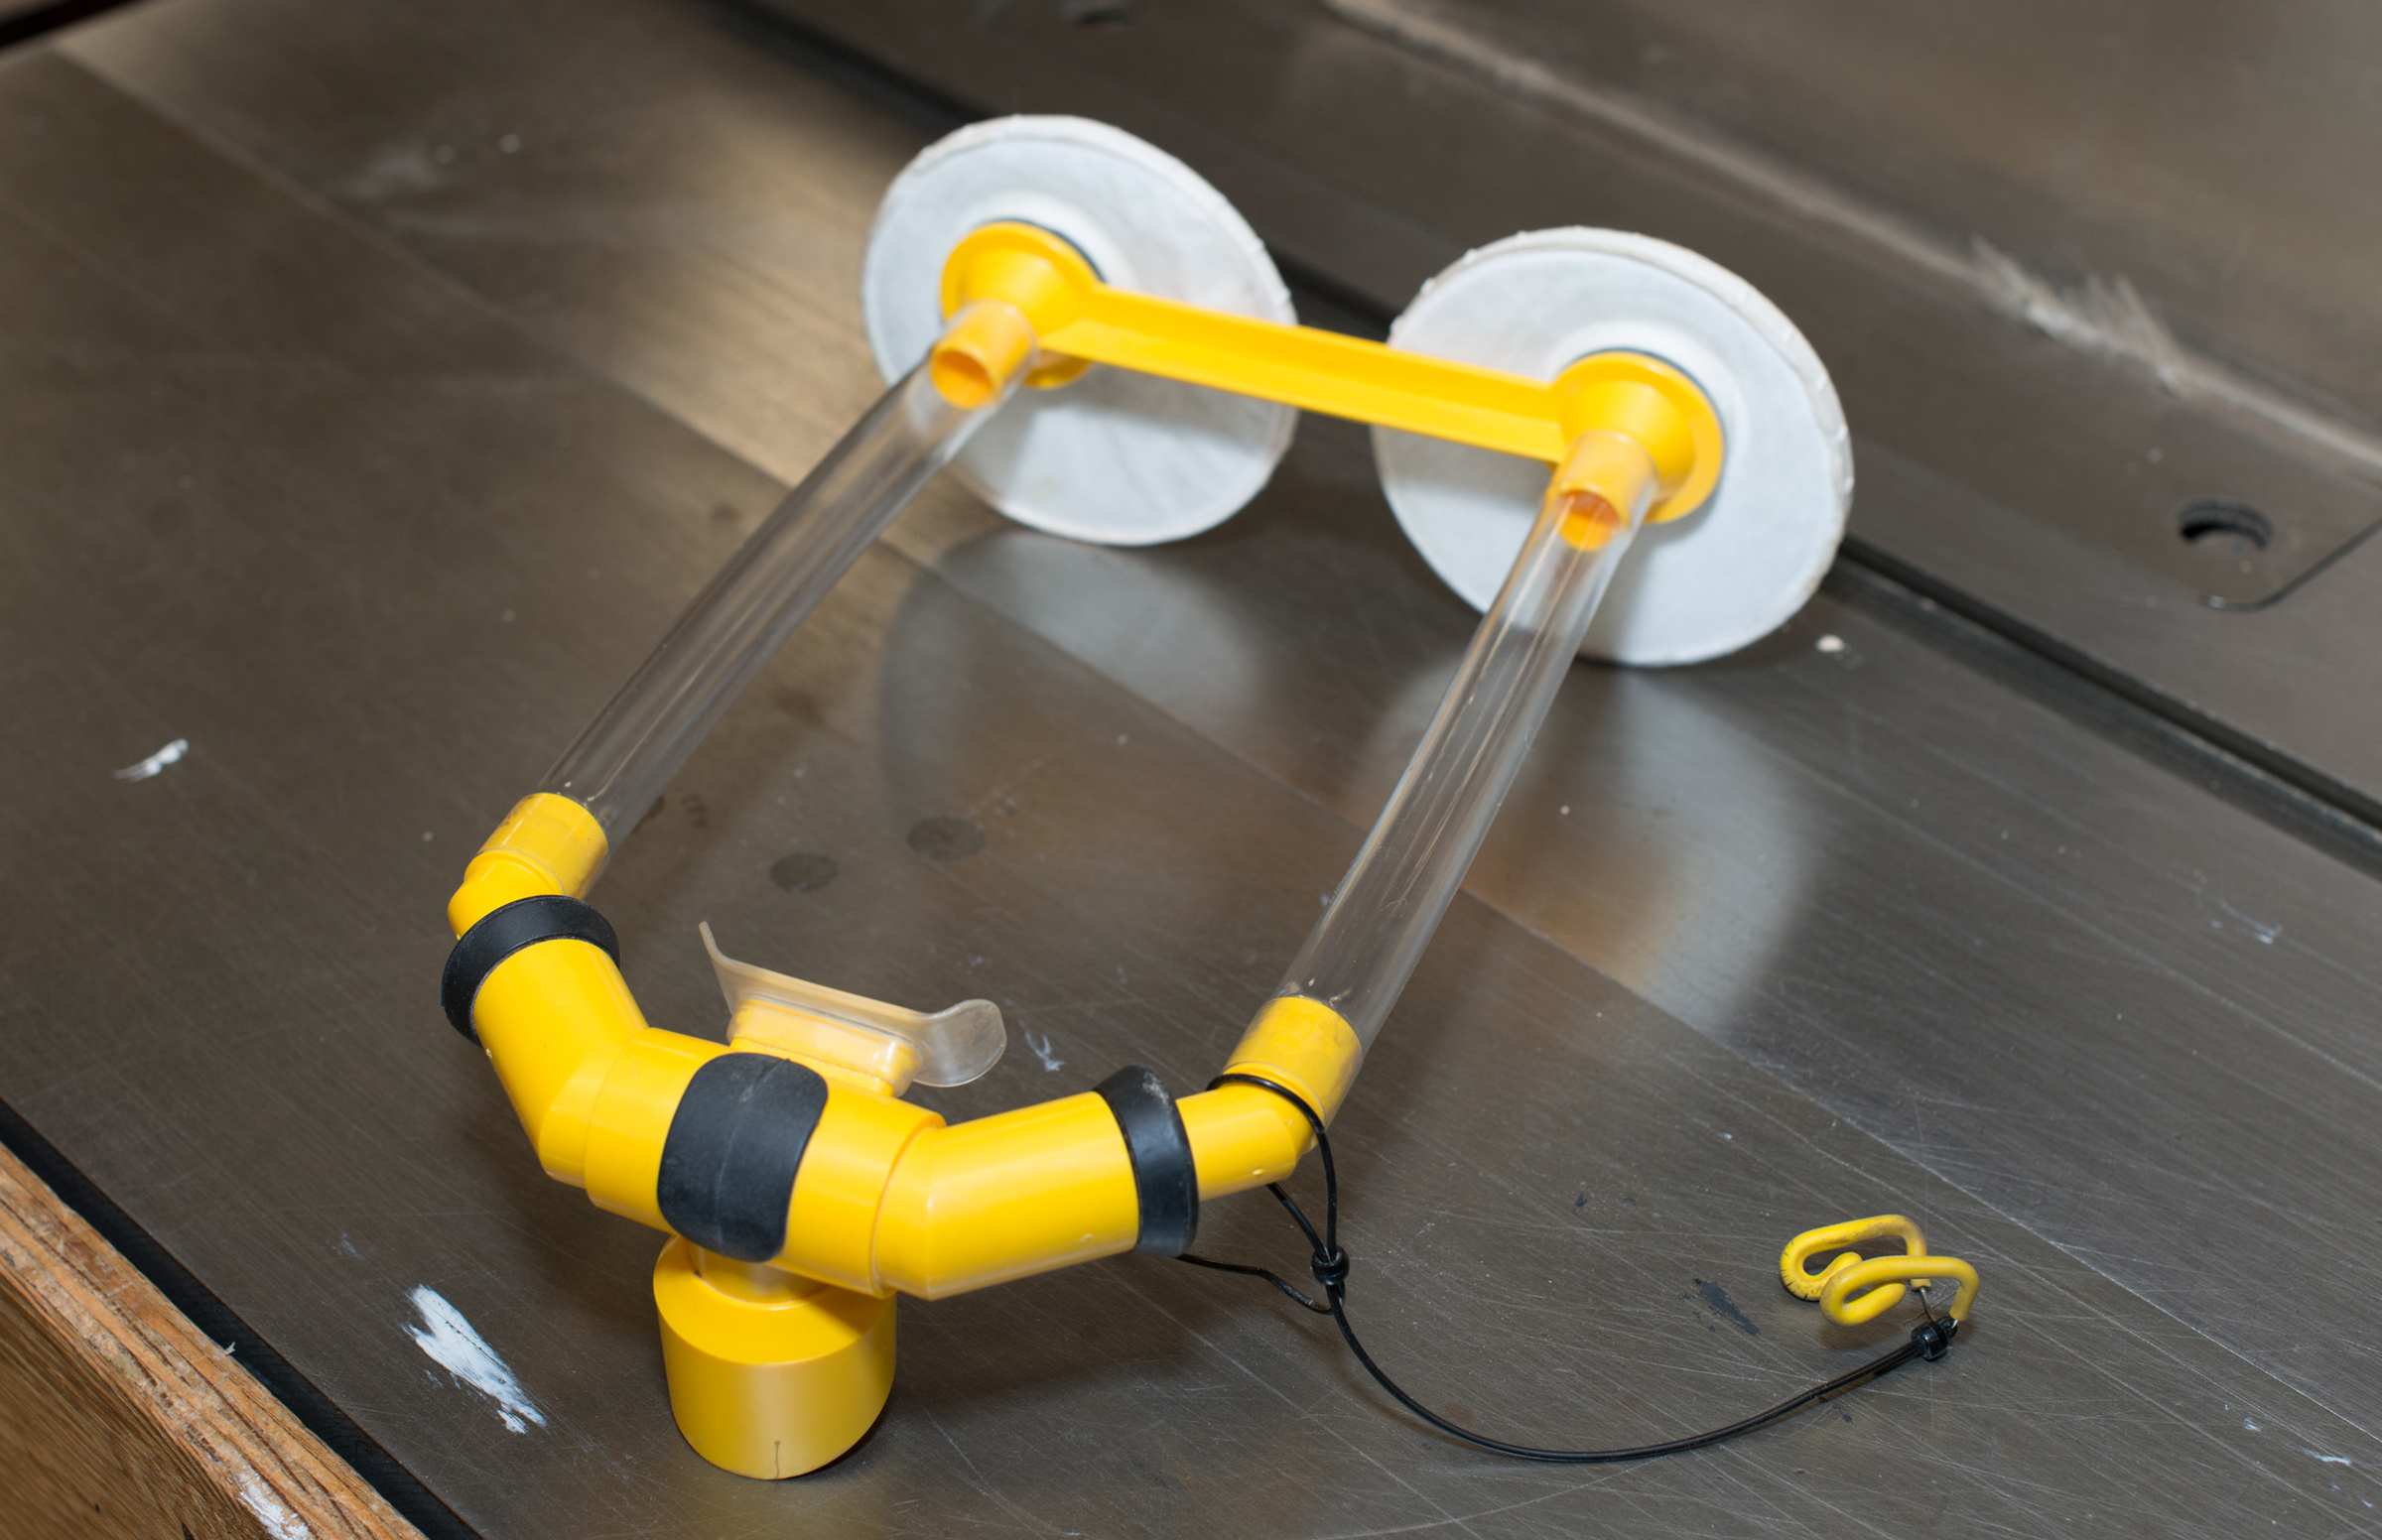
The Sea Seat, pulled from the PFD pouch by its tether, takes about 60 breaths to inflate. It’s then big enough to support me, seated upright and mostly out of the water.
The pouch attached to the back holds a Sea-Seat, a 38″ x 40″ inflatable “personal survival raft for cold water.” (The Sea Seat, dating back at least to 1986, has been out of production for decades and as far as I can tell, its Canadian patent—1550108—has expired, just in case someone is thinking of reproducing it.) The raft is orally inflated and has a depression in the middle to provide a stable place to sit. I clip the Sea Seat’s tether to my right shoulder strap, and giving that a hard tug will pull the folded seat past the pouch’s Velcro closure. I’ve practiced with the Sea Seat in breaking waves, and I’ve been able to inflate it easily and get aboard. Sitting in the depression, I’m fairly stable, even in whitecaps, and I’m mostly out of the water and my hands are free to tend to tend to distress calls and signals.
The lash tab on the left side of the back has a small PFD light that I can turn on my reaching back and twisting the top.
I carry my smart phone in a waterproof case that is tethered to the left shoulder strap; the phone gets tucked down inside the front of the PFD where it’s out of the way and well protected. My waterproof (IPX7) GPS is tethered to the right shoulder strap and also tucked inside the PFD.
The XL Guide PFD has almost 17 lbs of buoyancy, and mine keeps me afloat even with all the gear I have attached to it. It not only tips the odds more in my favor but also puts me in a position to help others more effectively. I never regret wearing it.
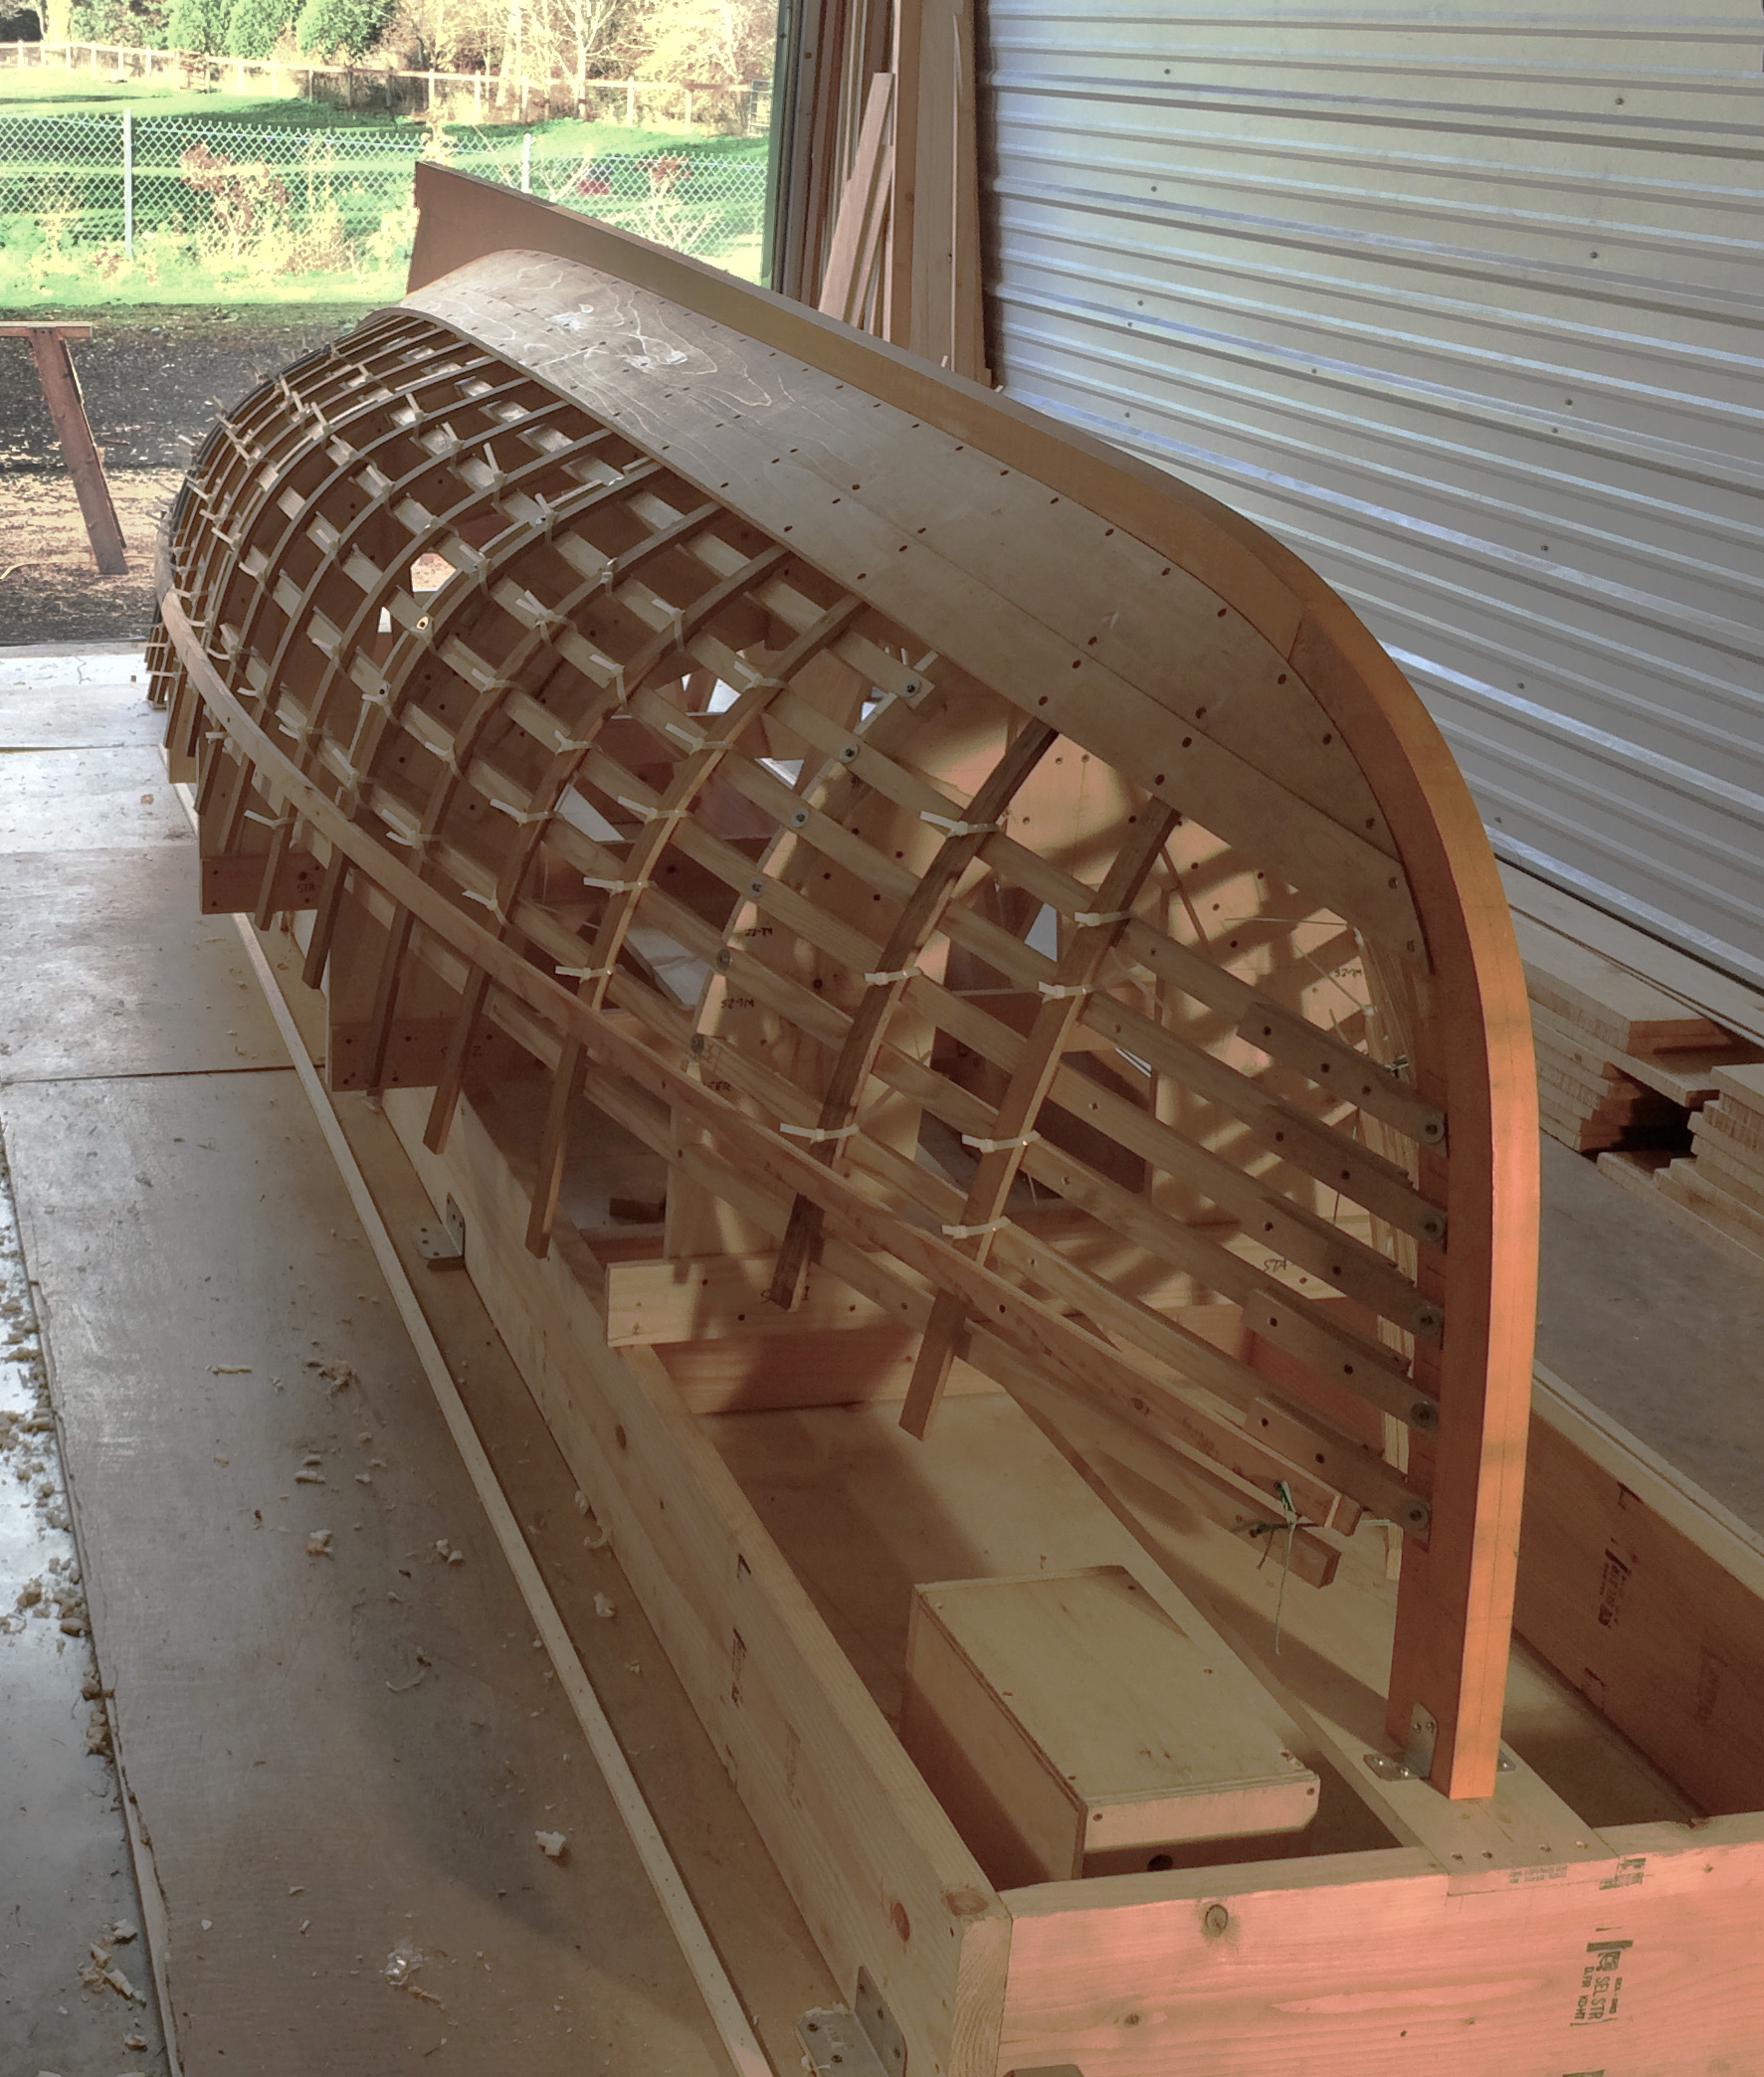
One of the better-known trailerable boats in Southcentral Alaska is the Tolman skiff. Designed by the late Renn Tolman of Homer, Alaska, in the early 1990s, the three models of the skiff have become a common sight in Alaskan waters. The beautiful power-dory-inspired lines and stitch-and-glue construction made the design very popular for new builders. Even those with little or no woodworking skills can take on these easy-to-build boats.
Renn’s book, Tolman Alaskan Skiffs, details three models: the Standard, a 20′ open skiff; the Widebody, a 21′ 4″ version of the Standard with a console, a cuddy cabin, or a pilothouse; and the 22′ Jumbo, a cruiser that can support a full cabin with pilothouse. In recent years, the Jumbo, stretched by many builders to 24′, with its comfortable overnight accommodations, has been the most popular of the three Tolmans because of its usefulness in Alaskan coastal waters. Although the skiffs were designed for that area and the Pacific Northwest, they have been built and used from the California coast to the Florida flats and other parts of the world.
The plans for the Jumbo and the two other models are in Tolman Alaskan Skiffs. The book has no shortage of drawings and pictures to build by; it’s also an enjoyable and interesting book for those who have been contemplating building their own boat and need bit of inspiration and encouragement. The author takes the intimidation out of getting started by eliminating the lofting and supplying all of the measured drawings required, including those for the bottom, sides, shelves, and transom with options for the transom depending on the motor chosen.
Photographs by the author
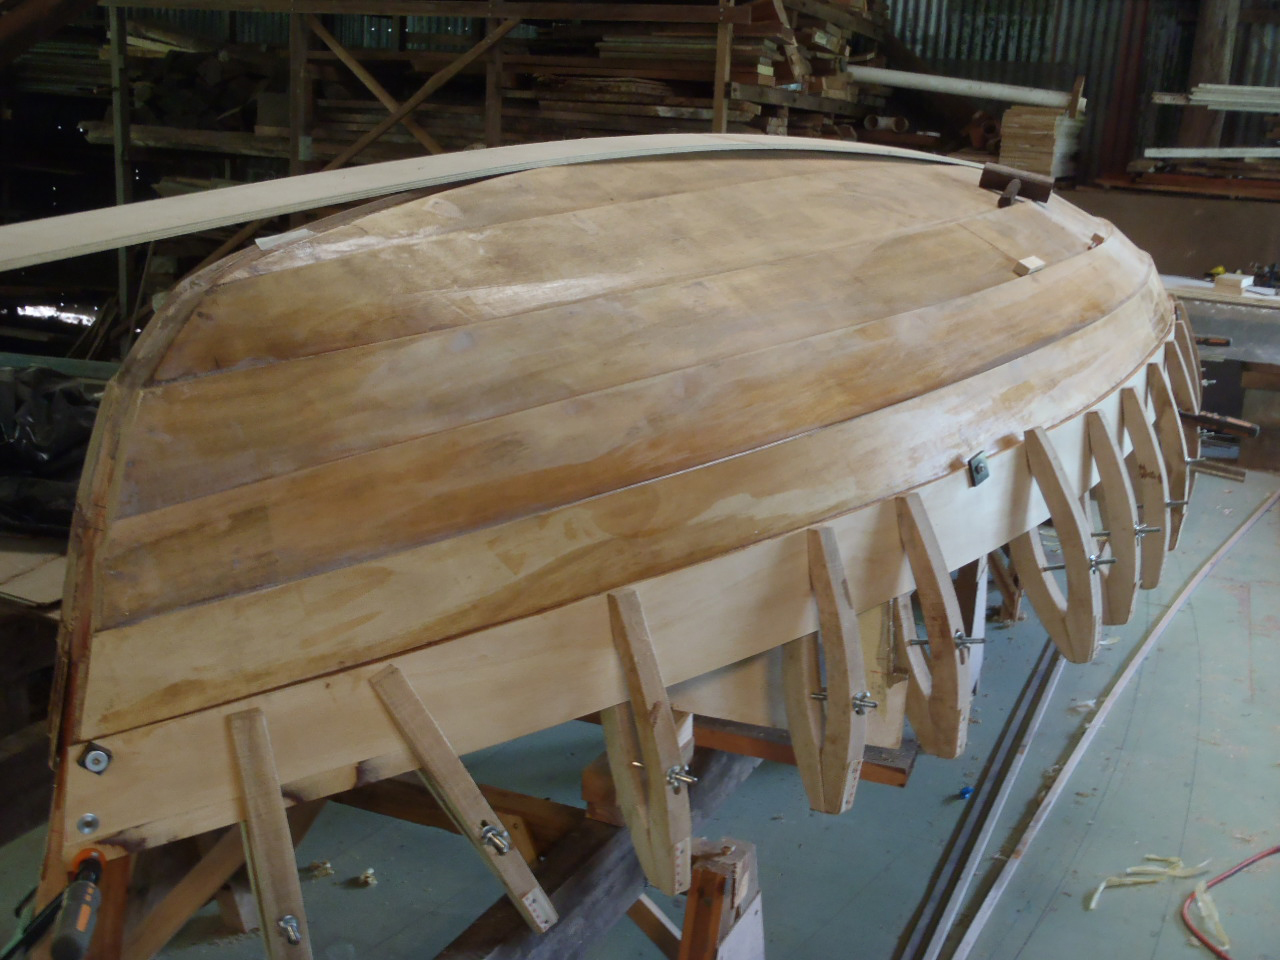
At this stage of the construction, the bottom panels have been assembled, including the second layers of 1/4” plywood at the bow and the chine flats. The 4” chine flat at the left is clearly visible at the edge of the bottom panel. The first side panel has been installed with the help of screws and fender washers.
The hull is built with standard marine or okoume plywood, and the step-by-step instructions make it easy to scarf the plywood sheets together for the bottom and side panels. By stacking the plywood in stair-step fashion, all scarfs are cut at once using a hand planer and a belt sander. Once smoothed, the scarfs joints are aligned and epoxied together to form the long panels. Each bottom panel starts with one length of 1/4″ plywood forward and two lengths of 1/2″ plywood aft. The 1/4″ plywood offers easier bending at the bow. The interior faces are flush with each other; the exterior surface temporarily leaves half of the bevel on the 1/2″ plywood exposed. The two full-length bottom panels are then stitched together and mounted on forms at the proper deadrise.
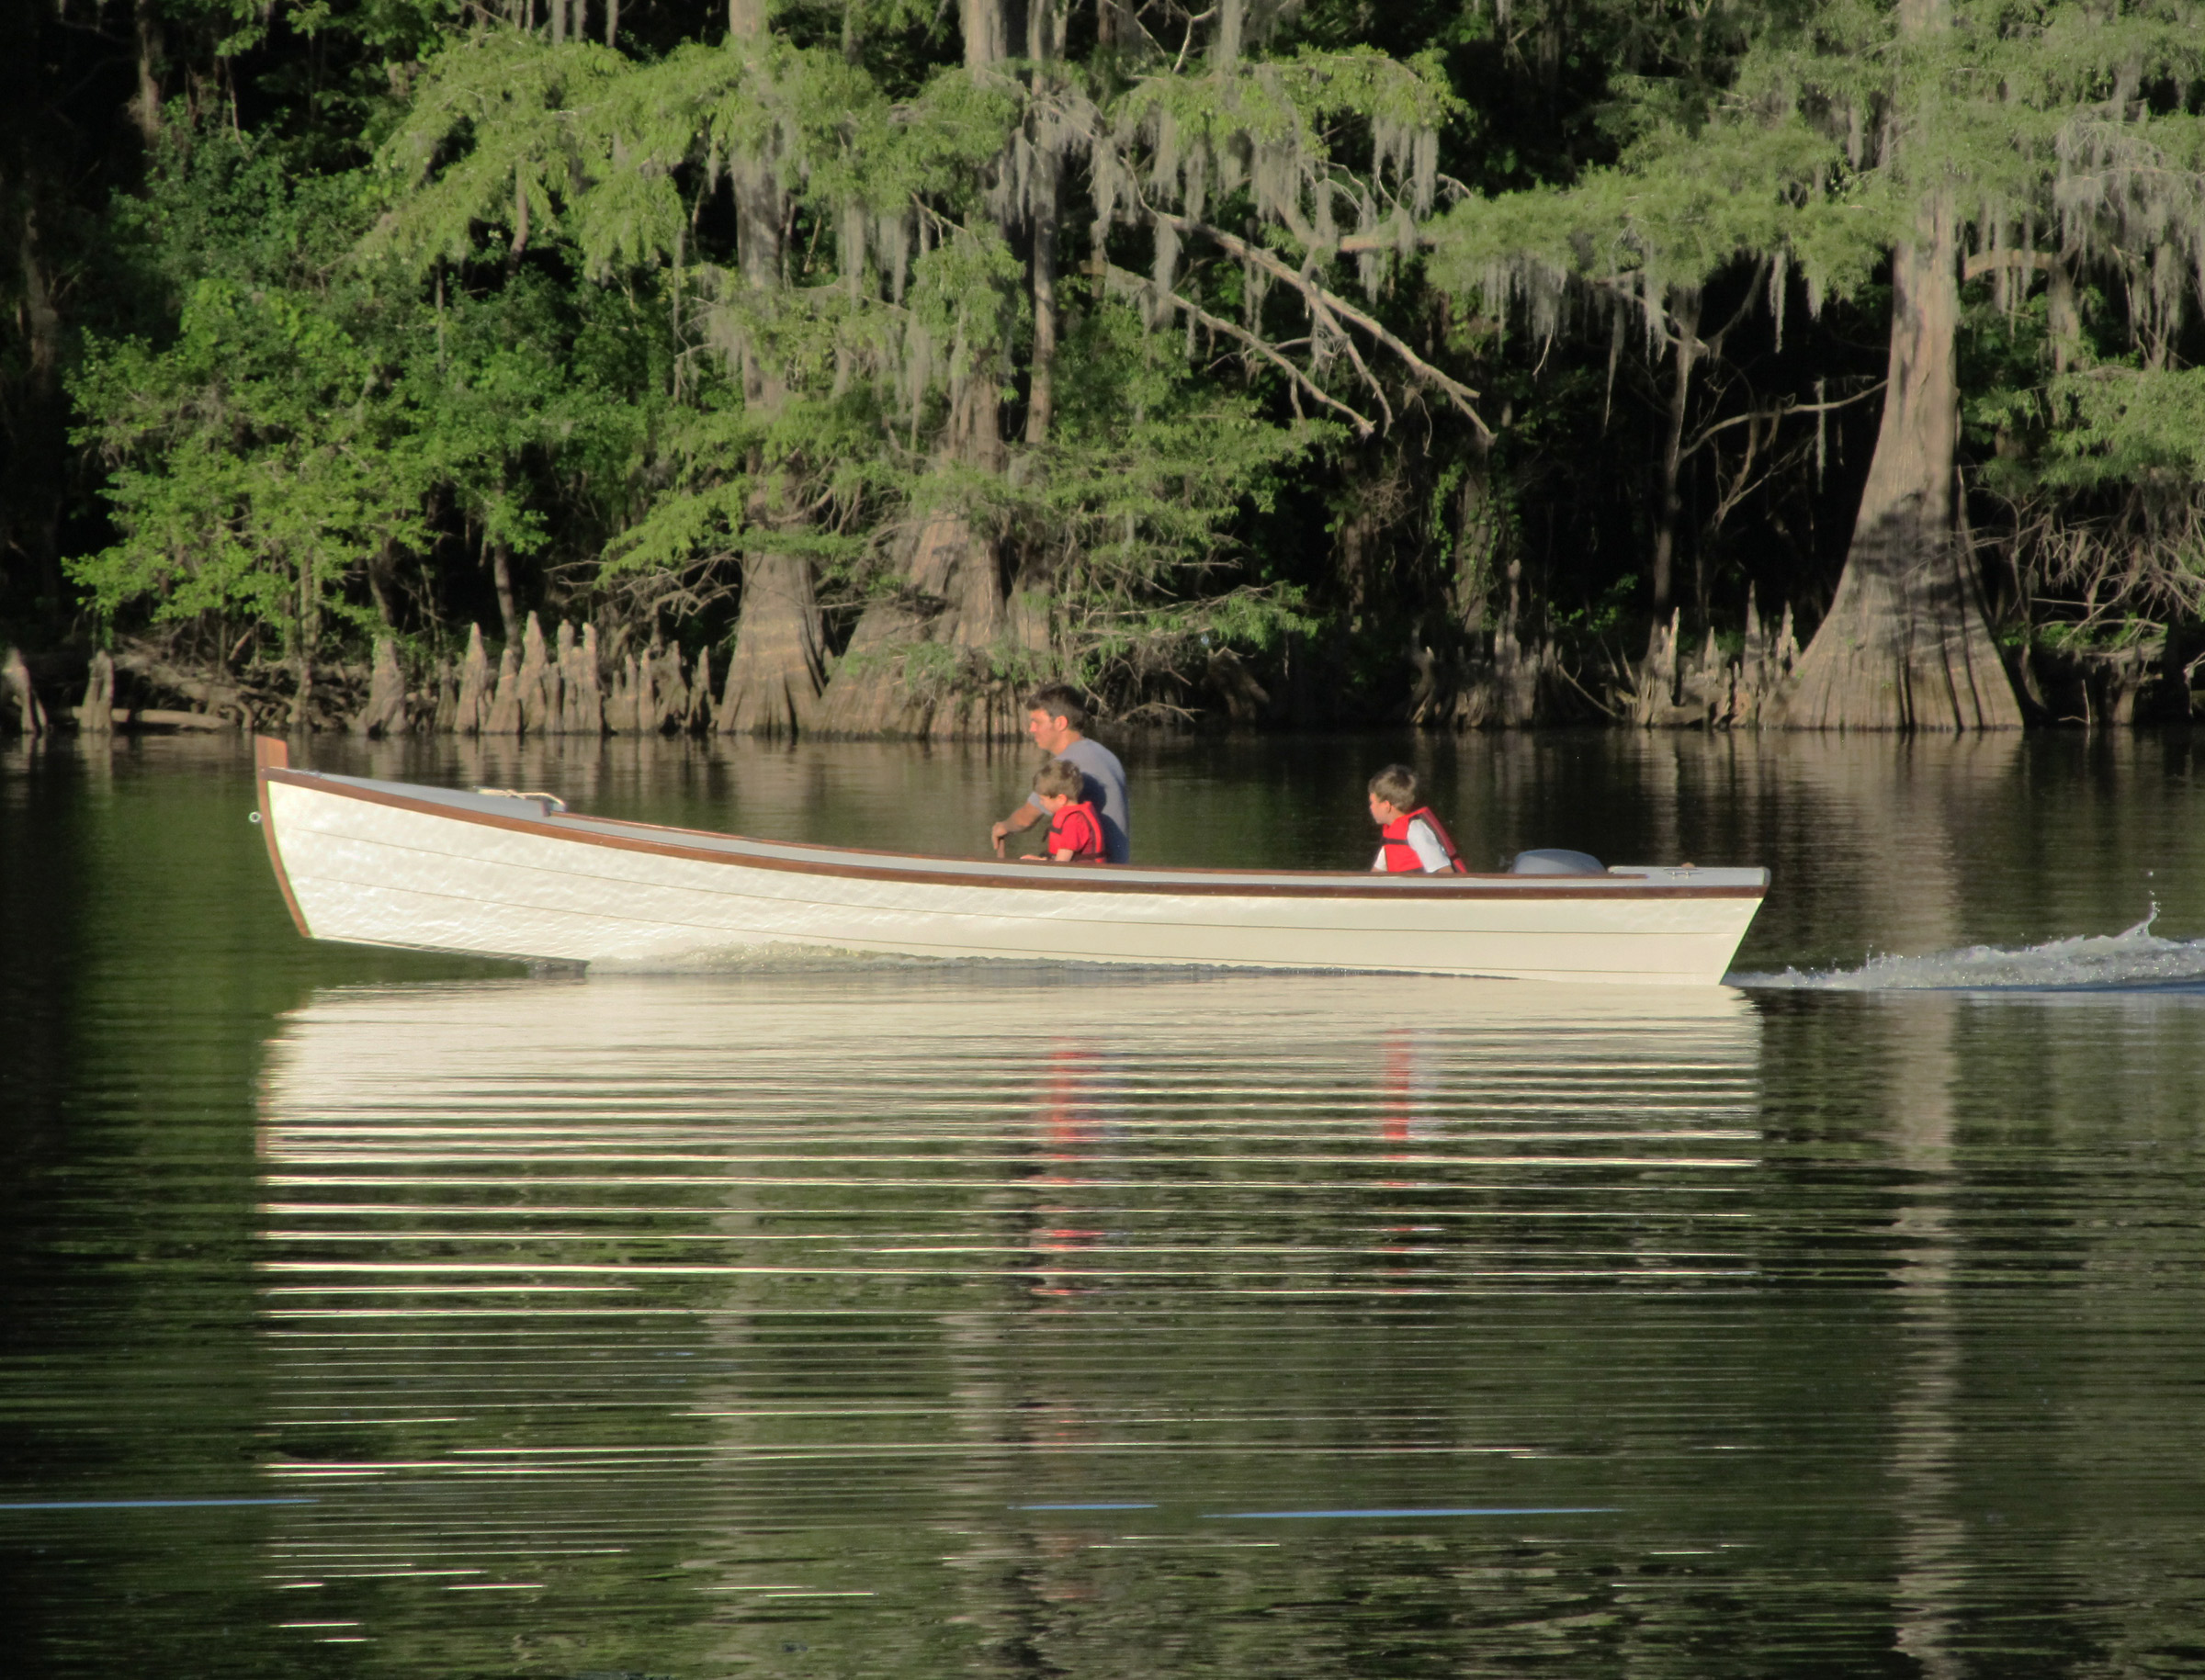
With an outboard of 115-150 hp for power, a Jumbo can fly along at up to 35 knots.
The bottom has narrow chine flats. One of the well-thought-out features of the Jumbo design, they provide lift at speed and keep the spray down. The flats are stitched and glued in place and then the bottom panels are taped, fiberglassed, and epoxied on the interior side. The bottom assembly is then set aside while the other components are completed. Two 2” x 14” longitudinal stringers are cut from laminated veneer lumber (LVL) beams, the kind used in residential construction; they provide great strength to the hull and support the cockpit sole. LVL beams are easier to cut and stronger than dimensional lumber that was used in earlier Tolmans.
Next, the transom, stringers, shelves, and stem are secured upside down on the building frame, followed by epoxying the previously assembled bottom panels to them. Now is when a second layer of 1/4″ plywood is applied to the bent 1/4″ plywood portions of the bottom panels, bringing the forward end of the hull to a 1/2″ thickness. The entire hull is then covered with fiberglass cloth and epoxied. Spray rails are added to the side panels and a durable UHMW polyethylene shoe is installed to protect the keel . At this point, the hull can be removed from the building frame, turned over, and the installation of the selected cabin option can begin.
The Jumbo can sleep up to three adults comfortably. Many builders depart from the cabin arrangements provided to meet their individual requirements.
While the book includes detailed instructions for building optional accommodations such as a cuddy cabin with bunks, a wheelhouse, steering stations, cabins, and various seating arrangements, many builders design their own. Measurements are given for placement of the bulkheads to obtain the best balance and usefulness depending on cabin and deck configuration. The instructions offer suggestions for the placement of the gas tank, storage lockers, and anchor well.
Everything the novice builder needs to know is in the book. Material lists, tips for working with fiberglass cloth and epoxy, setting up shop, and tool selection are all covered. The hull can be built in about three months, but adding a cabin and other features will make it a longer project.
A Jumbo with the full cabin will sleep two or three adults and makes an excellent craft for weekend or even weeklong adventures. I built my Jumbo ten years ago to take advantage of more deck and living space than the Widebody I’d built a few years earlier could provide. With 8’ between front and rear bulkheads and 6′ of deck space, there is always plenty of room for fishing and room inside when the weather isn’t at its finest.
Most builders power the Jumbo with a single four-stroke outboard in the 115–150-hp range, which allows it obtain speeds up to 35 knots. I chose a Suzuki 140-hp four-stroke, which made for a very well-balanced and quiet ride, and a 9.9-hp high-thrust auxiliary motor. The Suzuki has never left me stranded, but the 9.9, which pushes the boat at about 5 knots in calm water, could get me home if it did.
The Jumbo’s transom is strong enough and wide enough to take two powerful outboards, providing more security, though many have a main outboard and a trolling motor.
The transom is stout enough to handle twin motors for those who want that extra security. Fuel economy is outstanding and ranges from 3 to 5 miles per gallon, depending on load and motor choice. This allows adventurers to reach those places that may be a stretch for a larger boat that consumes much more fuel. Using Renn’s recommended placement of the gas tank under the rear deck, my Jumbo has a range of 250 miles or more.
Driving the Jumbo is always a pleasure. Although this boat feels well balanced and performs well on calm seas, it is also right at home in a 3’ or 4’ chop. There will be little pounding in choppy water, which is to be expected with such a light boat. The hull has a 12-degree deadrise at the transom, increasing toward the bow, which gives it a comfortable ride. The flaring sides, characteristic of a Tolman, contribute to its seaworthiness. The boat comes up on plane very easily, carves turns nicely, and tracks well. It is perfect for sport fishing, exploring, or edging up to a beach for beachcombing or for offloading passengers and camping gear. Jumbos are easily trailered with a heavy-duty pickup, although tandem trailers are needed for the larger stretched versions with heavier cabins.
The Jumbo will get 3 to 5 miles per gallon of fuel, and its range with the recommended fuel tank is over 250 miles.
My Jumbo turns heads when trailering, and I’m often approached with questions about it at fuel stops and in harbors. With its good looks, fuel efficiency, and being fun to build, it’s easy to see why the Tolman designs have become so popular. Online Tolman forums have become quite popular and are helpful for discussing all parts of the building process; long-term friendships have developed through building and using these boats. If you’re looking for a boatbuilding project that will produce a great-looking and good-sized boat in a reasonable time frame, look no further than the Tolman Jumbo.
Neil Andrews is an IT professional who loves adventuring in Alaska and lived there for 30 years, raising his family and building boats in his spare time. Although now residing in Arizona, he continues to explore Alaska and enjoy boating in Prince William Sound in the summer.
Jumbo Particulars
[table]
Length/22′ to 24′
Beam/8′
Beam at chine/6′
Weight/less than 2000 lbs
recommended power/115-150 hp
[/table]
Renn Tolman’s book, Tolman Alaskan Skiffs, is available from the WoodenBoat Store, Duckworks, and from the publisher, Kamishak. West Coast Boat Works of Bend, Oregon, provides kits for the Jumbo and the two other Tolman Skiff models. The Saltwater Workshop of Buxton, of Buxton, Maine, also provides kits for all of the Tolman Skiffs.
Is there a boat you’d like to know more about? Have you built one that you think other Small Boats Monthly readers would enjoy? Please email us!
Designing a small boat that can be rowed easily, is stable in a variety of sea conditions, and is a pleasure to look at has challenged generations of builders and trained marine architects. The most successful results have evolved as one designer has influenced the next until something perfect, or close to perfect, emerges.
John Hartsock grew up rowing a variety of small boats, and his experiences with the best of them led him to regard their designers as being “wonderfully intelligent people with an intuitive feel for hull shape and a willingness to communicate with one another.” As an engineer and computer programmer, he was convinced that a superior rowing boat could also be designed from a set of mathematical equations. His conviction eventually led to the 14′ Cosine Wherry. Its similarity to a Whitehall rowing boat is both a nod to the designers and builders of the 19th century, and confirmation that his mathematical approach to design worked. John’s detailed explanation of his approach can be found in WoodenBoat, May/June 1991, or at Concrete Canoe.
Paul McCuish
The author’s Cosine provides a clear view of the hull’s interior. The strips in the bottom of the hull run parallel to the keel; those forming the topside are parallel to the sheer. The transition is at the turn of the bilge.
The Cosine Wherry is 14′ 2″ long with a beam of 52″ and should weigh about 100 lbs when built to the plans. It is strip-planked with 1/4″ x 3/4″ red cedar, and sheathed inside and out with fiberglass cloth and epoxy. Building time is at least 200 to 250 hours, though that will vary considerably depending on the builder’s experience, whether or not the strips are purchased or milled from solid planks, and how much detail is put into finishing touches. For my Cosine, I cut my own strips, sawed my own hardwood veneer for the transom, and laminated an outer stem that is not in the plans.
The guide I used for the construction of my boat was Rip, Strip, and Row: A Builder’s Guide to the Cosine Wherry, written in 1985 by J.D. Brown in partnership with John Hartsock, Bob Pickett, and Erica Pickett. The Picketts were highly regarded proprietors of a marine-lumber company in Anacortes, Washington; they sold materials and kits and were a source of help for many builders. Rip, Strip, and Row takes the beginner builder from selection of materials, with a detailed cut list, through construction of the mold, planking and fiberglassing the hull, to finishing the interior. The inexperienced builder will appreciate the attention to detail in constructing the building form. This is the stage where precision is a must: get the form exactly right and laying the strips is a pleasure, like piecing a jigsaw puzzle together, rather than a battle to force pieces into place.
SBM
In this Cosine Wherry, built by Richard Davison of San Diego in 1992, the thwart knees, included in the original design, strengthen the gunwales, reducing flex when the boat is rowed hard.
Rip, Strip, and Row was written almost 35 years ago and is no longer in print. There are a number of online sources for the book, but be sure to ask if both large pages of the patterns are still in the envelope attached to the inside of the back cover. An alternate source for both the plans and a builder’s guide is Ray Klebba’s White Salmon BoatWorks (link below).
Builders will want to use additional sources to take advantage of newer techniques and approaches to construction. I appreciated Susan Van Leuven’s Woodstrip Rowing Craft: How to Build, Step by Step (published in 2006, it’s also out of print but available from many on-line booksellers). She details the project from molds to launch as she builds two cedar-strip rowboats. Her Rangeley Lakes boat is similar to the Cosine Wherry, and following her steps saved me a lot of head scratching, especially during the final stages of piecing together the interior. Rip, Strip, and Row is not big on interior details and leaves much for the builder to decide: whether to add a seat in the bow, how best to build the rubrails, how to fit the stern seat, etc. Woodstrip Rowing Craft provides excellent guidance for these kinds of details.
SBM
At each of its three rowing stations, the Davison-built Cosine has adjustable foot braces described in Rip, Strip, and Row. While the book states they “aren’t necessary, but they are handy,” foot braces are an important addition for rowing with power and control.
When you build a cedar-stripped boat, you’ll need to decide whether you’ll use bead-and-cove strips or square-edged strips, and whether or not you’ll use staples to hold the strips to the molds or go without staples to avoid the rows of small holes that turn into dark specks in a bright-finished boat. Having built a cedar-strip kayak some time ago, I felt confident building the wherry with square-edged strips and without staples. I collected old inner tubes from a friend’s bicycle shop—they’re great for squeezing the strips tight to each other while the glue dries.
Square edges required a lot of crawling under the partly stripped hull to inspect the gaps between strips on the inside. The outside joints are visible and not difficult to make tight, but it’s easy to go too far with the plane and take away too much wood on the inside. It’s worth the time spent checking and fixing these gaps on the hull’s interior, because in a varnished boat that’s what you’ll be looking at once you get rowing. Working with square-edged strips saves time routing the beads and coves and avoids the unpleasant discoveries of gaps that show up between them when you begin fairing the hull.
SBM
The editor, here rowing the Cosine solo, could easily lope along at 3-1/3 knots, sustain 4-1/2 knots at an exercise pace, and hit 5 knots rowing all-out.
Hartsock designed the Cosine Wherry to be light. At approximately 100 lbs, he could carry it down the beach on his shoulders or hoist it onto a cartop carrier. I had originally planned to flip mine upside down on top of planks laid across my utility trailer. My wife, however, has had enough of wrestling boats around, and insisted that we buy a small boat trailer. That set me free to make changes which would add a few pounds but result in a more solid boat. I changed the transom from 1/2″ to 3/4″ plywood, and the 1/2″ plywood stem to a solid hardwood stem. I increased the width of the fiberglass cloth so that it extends farther toward the rubrails than the plans called for.
I used sapele hardwood for the skeg, the small keel strip, the seats, and the rubrails. The sapele rails required steaming, but once fastened they stiffened up the hull very nicely, and will take a beating that softwood rails would not withstand. Once the breasthook and thwarts were fitted snugly, the hull seemed stiff enough that I chose to not add thwart knees shown in the plans. I may add them later, even if only because they look good, and leaving them out seems a little lazy.
Paul McCuish
The Cosine trims well with a rower at the forward station and a passenger in the stern.
Rails, thwarts, and all the other solid wood pieces were given one or two coats of epoxy before receiving four to six coats of varnish. The sanding alone makes me wonder how anybody could build this boat in 200 hours.
The only oars I had were an old pair I’d bought years ago at a hardware store. A neighbor convinced me that the wherry deserved good oars and urged me to make a pair to Pete Culler’s drawings in Boats, Oars, and Rowing. I found a nice piece of yellow cedar for the project; spruce or pine would have worked as well. The oars were a pleasure to make, and would prove essential in getting the best performance from the wherry.
SBM
The editor, rowing with his son in the stern, brought the Cosine up 2-1/2 knots without much effort, held 3-1/2 knots with an aerobic effort, and peaked at 4-1/3 knots in a short sprint.
On launch day, the Cosine was all I could have wished for. It does not in any way seem heavy with the hardwood bits and pieces I’d chosen to add. It slips through the water with hardly a ripple, tracks beautifully, and maneuvers like a charm. A rower sits on the middle thwart while rowing alone, and on the forward rowing station when a passenger’s in the stern sheets. The drawings include a third station aft so that two could row together, but it’s generally only my wife that I boat with, and we chose to avoid the “marital turbulence” that might result from rowing in tandem. Perhaps I’ll add the third station when I add the thwart knees.
SBM
With two people rowing the Cosine wherry, there is plenty of room between the stations so it’s easy to avoid a clash of blades. The editor and his son held 4-1/2 knots with a moderate effort.
The Cosine Wherry is wonderful to row. There is no mention of a sail or a motor in the book, and the builders who have outfitted a Cosine for sail agree that she rows well but are less enthusiastic about how she sails. And clamping an outboard on the transom would be, in my opinion, just rude. Perhaps the most convincing testament to how the wherry handles a variety of sea conditions is the repeated success that a Cosine named MAGGIE has had in the annual Great River Race, a 21.6-mile rowing race on the Thames River in England. MAGGIE has placed near the top of the 300 entrants for several years, and won first in her class and first overall in 2010 and 2013. While I won’t be entering any races with my Wherry, it is nice to feel the water slip away so easily beneath me when I lean hard on the oars.
Paul McCuish’s first boat was a 10′ lapstrake rowboat that he received for his tenth birthday. It was much older than he was, and he spent more time stuffing the holes in it with rags torn from old blue jeans than rowing it. Since then he has always had a boat or two, most of them old enough that he learned a bit about building from having to keep them afloat. He’s a retired teacher, but he has worked as a carpenter and as a cook on a boat out of Haida Gwaii, British Columbia, Canada. The Cosine Wherry is his second cedar-strip vessel. The first was a One Ocean kayak designed by Vaclav Stejskal. He can use them both year-round where he lives on Vancouver Island.
Cosine Wherry Particulars
[table]
Length/14′ 2″
Beam/52″
Design displacement/500 lbs
Weight/under 100 lbs
[/table]
Plans for the Cosine Wherry are available from White Salmon BoatWorks for $135. They include full-sized drawings and an instruction book. White Salmon Boatworks, located in White Salmon, Washington, also offers kits and finished boats. Oyster Bay Boats builds Cosine wherries in Madeira Park, British Columbia.
Is there a boat you’d like to know more about? Have you built one that you think other Small Boats Monthly readers would enjoy? Please email us!
My friends John and Helen and I toasted my departure with wild blackberries. Our farewells said, I climbed aboard KIMCHI, the 12′ Salt Bay skiff I’d built with John’s guidance. I pulled on the oars, slipping away from the dock into the John Day River near Astoria, Oregon. The sky was a gray sheet and the water like glass, murmuring softly as KIMCHI picked up speed.
I’m really a sailor, not a rower. But that morning the weather decided that, like it or not, I was going to be a rower. I didn’t mind, since there was no sun to warm me and I wanted to work up an appetite. It was flood tide, and the John Day River, which feeds into the Columbia just 12 miles before that broad river reaches the Pacific, was flowing in reverse. Once I was on the Columbia itself, the tide would be in my favor as I headed east, but I had a mile to row against a nearly 2-knot current before I reached the John Day’s mouth at Cathlamet Bay. A derelict railroad bridge marked the gateway between the two, and with a final sprint I pushed through the narrow channel between its pylons and onto the edge of the estuary’s 5-mile-wide expanse.
Roger Siebert
.
Leaning on the oars, I drifted with the now favorable current, slowly making my way to Portland, and my home. KIMCHI slid over submerged marshland, as minnows and weeds alike swayed to let her pass. They moved with a sleepy lack of concern, as if they would not have moved at all if the water displaced by the hull didn’t push them aside. I was glad for the stillness, catching my breath while the river itself was inhaling deeply.
After drifting a while, I set to rowing again. As I left the shallows and began traveling the channels between the sandbars and the southern bank of the river, the small black head of a harbor seal popped up from the water a few hundred feet from the boat. The seal followed me most of the morning, resurfacing every few minutes, its head swiveling like a periscope until it caught sight of me again. Each time, its dark, marble eyes held me in an unwavering gaze. Then I would blink and the seal would vanish seamlessly back into the water.
The morning passed with steady rowing on a quiet river. Around noon, the sun came out, burned the fog away, and brought the wind. It happened in a matter of minutes, and the world of gray was suddenly light blue. I stowed the oars, keeping them in the oarlocks and sliding the handles all the way to the stern where I strapped them to the quarter knees. I unfurled the bundled sail and spars, stepped the mast, and set the boom and sprit. A quick haul on the boom vang and the snotter to snug them up and cleat them, and in 60 seconds I had the sail flying. I settled into the stern, took the tiller and the sheet, and KIMCHI scooted along in the building breeze.
Photographs by the author
Her sail set for the midday breeze, KIMCHI rests on the beach at Jim Crow Sands. To the northeast, across the shipping channel, lies the Washington shore. Most of Jim Crow Sands is dredge spoil, pumped up from the bottom of the channel.
Within an hour it was blowing 7 or 8 knots from the northwest. The landscape had a new skip in its step, trotting past me where before it had ambled. As I sailed along, I spotted unusually bright white sand on the bank of an island and turned north toward it, sheeting in from a run to a beam reach. KIMCHI entered the shallows around Jim Crow Sands, a mile-long sandbar that stretches east from Pillar Rock Island. Ten yards offshore I slid forward and pulled the leeboard up from the starboard side. The rudder, rigged with a bungee downhaul that allows it to kick up, could fend for itself.
When the boat eased to a stop, I stepped off into a few inches of water and my right leg suddenly plunged up to the knee in the sand, water erupting around it with the release of trapped air. I nearly fell on my face, my left leg still in the boat at ground level, the right buried in the porous sand. After the initial shock, I rolled up my pants and stepped out of the boat with my left leg. The ground held firm, so I pulled my right leg out of the sand and stepped with it again. Everything seemed fine. I placed my third step with more force and my leg sank to the shin in a flurry of bubbles. When I finally reached solid ground, I set off running down the beach, much to the disapproval of the Canada geese and ducks attempting to enjoy their respite on the shore. They squawked, waddled, and flapped a few disorderly wingbeats to put some distance from me. I thought better of disturbing the birds and returned to the boat. The sun had burned the clouds away entirely, and a fresh northwesterly rattled the sail and spars as the boat rested on the shore.
Departing Jim Crow Sands, I decided to avoid the shipping lanes to the north of the island and take a back route around a cluster of scrub-covered islands to the east. My chart showed that the channels between them would become shallow but clearly passed through to the river. With an 8-knot tailwind pushing KIMCHI, I sailed down the first major artery, whipping past a row of ramshackle houseboats along Woody Island. I followed a narrowing course between Goose and Tronson islands; the tall marsh grass lining it drew closer. The channel was only 20′ wide when my concern grew, but there was still clear water in front of me.
I rounded a bend, and the last stretch of water ended in a wall of marsh grass swaying lazily in the breeze. I steered into the nearest bunch of grass to stop the boat, and soon the drag of the reeds held KIMCHI in place. I used an oar to turn the boat around and bring the bow back into the wind. I tried sailing back out of the channel, but after two tacks, I wound up right where I’d started. Sailing out wasn’t going to work. I struck the sail and set the oars in the locks. Rowing, I covered more ground, but if I stopped for an instant the wind pushed the boat askew and back the way I’d come. I had sailed a full mile down this winding, narrowing pathway and decided if there was some other way out, it would surely be better than backtracking. While I stood up and looked around, the wind pushed KIMCHI against the reeds.
The main flow of the river was only 100 yards away but separated by thigh-high grass and who knew what else. Still, crossing seemed better than backtracking. A little to the northwest was a tiny streamlet that extended partway into the marsh. I crossed and rowed in and the boat filled it entirely. Grass rasped on the hull as I rowed, and the oars found purchase more against the roots of the plants than the water. With each pull I plowed through the water lilies that grew in the center of the stream. This worked for 30 yards, until the thickness of the growth brought KIMCHI to a stop. I stood, pulled the oars out of the locks, and poled the boat forward. I used both oars and stood in the middle of the boat, and applied almost as much downward force as I did upward force, as if I were attempting to pole-vault over the bow. This got me through another 30 yards of marsh.
The trail of water lilies marking deeper water ran out. I had followed them as far as I could because they meant easier passage, growing where it was too deep for the grasses, but I had reached the point where all that stood between me and the rest of the Columbia was just that: grass. So once again, I stowed the oars, pulled on my water shoes, and stepped out into the soup.
Cutting a furrow through the grass, the skiff proves itself an amphibious vessel. For the overland trek, all of the gear was just dumped in the boat.
My foot landed on a cluster of grass and the roots supported my weight—I hardly sank in at all. I tiptoed to the bow from root cluster to root cluster, and grabbed the painter. For the last 40 yards, I towed the boat across the grass.
I had at last reached flowing deep water again. I paused to catch my breath. The swath of crushed greenery behind me looked like a giant snake had slithered through the marshland. I walked around to the back of the boat, pushed it forward until only the stern clung to the grass, and with a final shove, launched into the current and dumped myself on my back into the cockpit. I was exhausted and happy to be on my way once more, under sail and drenching summer sun.
Ready to sail again after our unexpected hike, KIMCHI perches on the edge of the channel to the east of Goose and Tronson islands.
I made 20 miles that first day, marshland detour and all. The wind stayed steady through the evening, and I sailed into the Elochoman Slough Marina in Cathlamet, on the Washington side of the Columbia River. My boat was half the size of the next smallest in the marina, and could have been a tender for many of them. I pulled into an empty slip next to a 35-footer and tied off. It was dusk, and the many campers and locals paid me no mind as I made my way to a picnic bench and fired up my camp stove. One bowl of corn chowder and two instant ramens later, I plodded back down the gangway and fell into the boat, where I pulled on my sleeping bag and quickly fell asleep on the foam pads I had tied into the bottom of the boat.
Before my departure from Elochoman Slough Marina on the second morning, I spread my gear out to get organized for the day. I do a lot backpacking and I never slept better in the woods than I do in the foam cushions in the bottom of the boat.
The morning of the second day was much like the first: calm, gray, and cool. Rather than immediately set out rowing, knowing I would likely spend most of the morning fighting the current, I decided to wander into town, so I went off walking. Twenty minutes later, back at the marina, I decided I could wander the town a second time before the wind picked up.
To my dismay the taco joint and brew pub were still closed, even on my second walkabout, so around 9 a.m. I got to rowing again. Within the first hour the sun was out and the wind was up, almost a perfect mirror of the previous day.
Lying supine in the stern is the most relaxing position for me and the most stable for sailing. Removing the rowing thwart and setting it in the bow gives me more room to stretch out. Cloud cover kept the sun off me while I sailed toward the east end of Puget Island after leaving Cathlamet.
Soon the wind had surpassed the first day’s, blowing close to 15 knots astern as I sailed the last leg of the channel between Puget Island and the Washington bank to reenter the main channel.
At the east end of the island, I let the sail luff and looked both ways before crossing the shipping lanes. Two osprey chicks eyed me from their nest atop a daymark.
Where the channels converge the river is almost a mile wide. There were no obstructions and the wind was over 15 knots. Small whitecaps frothed as I sailed among them. My dinghy-racing blood was up, and I angled KIMCHI to run with the swell. Keeping my weight low and aft, I kept my left hand on the mainsheet ready to pull it from its cleat.
KIMCHI started surfing. She slowed in the troughs as I tweaked the rudder in anticipation of the approaching waves, turning the boat a few degrees off the direct path of the crest. As the wave behind me caught up with the boat, lifting its stern, I lunged forward and the boat raced down the face. The rush of water hissed while KIMCHI surged forward. As the wave finally outpaced me and the bow lifted, I glanced over my shoulder and prepared for the next wave.
The sand bar on the east end of Puget Island is almost 40 miles from the mouth of the river but not beyond the reach of the tides. I had pulled KIMCHI 15’ from the water’s edge, but within just five minutes the incoming tide had nearly floated her off.
The day whipped past in a gusty, blue-sky blur. I stopped for lunch at Cooper Island, on a beach so broad that it must have been made of dredge spoil, much the same as Jim Crow Sands.
Around the next bend, I passed the Beaver Generating Plant, a natural gas–powered facility. Beyond a fence that came almost to the river, the thrum of turbines emanated from the stark, metal-clad buildings.
From the power plant I sailed along the slough between Crims Island and the Oregon bank, emerging upriver on the sandy end of the wooded isle. A dragonfly hitched a ride for the length of the slough, sunning itself like a figurehead on the bow. In the main channel next to the island a cargo ship lay at anchor, splitting the river down the middle. The name DARYA SATI, painted in white letters each as tall as my mast, stood stark against the red-and-black hull. In the lee of Crims the wind had calmed, so I bobbed toward the ship with the remaining few knots of breeze pushing KIMCHI. At the ship’s stern, the gap between the hull and the rudder was large enough for me to sail through. I was tempted to try it, but imagining KIMCHI being churned into kindling brought me to my senses.
I left the shadow of the DARYA SATI behind me and sailed along the south shore of a 4-mile-long finger of land pointing downstream from Longview, Washington, passing Willow Grove Park, a stretch of beach backed by a straw-colored lawn and scattered trees. Sunbathers and power boaters were out in full force.
The wind, unhindered, blew through with the steady 15 knots it had sustained all day. I sailed southeast, upriver, to Barlow Point and entered a straight, wide-open corridor between the industrial riverfronts of Longview on the Washington side and Rainier on the Oregon side. It was a noisy, busy gauntlet to run. On either side, timber yards lined the river with towering stacks of Douglas-fir trunks 60’ long. Docked cargo vessels waited to be loaded with the mountains of logs. A tugboat chugged past, the skipper giving me a nod as he steered around a mooring buoy the size of a city bus.
The late afternoon sun shone with a burnt-orange glow, and I knew I needed to find a spot to camp. After passing the tug, I spotted the landmark on the Oregon bank that I had been looking for, a pink stucco building with a terra-cotta-tile veranda roof. It was my friend’s favorite Mexican restaurant in Rainier.
I had made 25 miles that day and had eaten only two energy bars. I beached beneath the restaurant’s patio and hauled KIMCHI above the high-water mark. I climbed up the embankment, sat down at a table, and ordered a steaming burrito. After dinner, I went for a stroll around Rainier’s waterfront before returning to the beach. I slept in the boat, my gear spread across the sand beside it.
I woke on the third day to an easterly wind and clouds looming in the eastern sky, and knew I would spend most of the day getting wet and getting nowhere. I launched in the chill air and immediately started rowing. In about an hour I made it a mile upriver along the Oregon bank, drifted back half a mile crossing the river, and remade the lost ground along the shore just west of Cottonwood Island. I had aimed for the downriver end of the island because of the narrow, slow-moving channel separating it from the Washington mainland, ideal for making progress upriver with as little resistance as possible.
The Cowlitz River flows into the Columbia at the north end of Cottonwood Island. After the morning’s first fit of rain I was not at all dry but I stayed mostly warm by walking KIMCHI through the shallows between the island and the Washington shore.
As I approached the channel, it began to rain, and all of the weekend fishermen anchored along the Washington bank reeled in their lines and motored off. It was the middle of August, our sunniest month, so I had brought no rain gear. I shoved everything I could into the dry bag—map, snacks, water bottles—and piled my foam pads into a vertical stack in the stern so not all of them would get so wet. I put on my life vest for warmth and to keep some of the rain off me. I continued rowing—against the wind, against the current, and pelted by plump summer raindrops. I would have been miserable if it weren’t for the heat generated by rowing. A harbor seal followed me up the channel along Cottonwood. He appeared to be staying drier than I was.
About halfway down the 4-mile channel, the rain abated and I dried off a bit. My pants, which had been soaked through to the skin, slowly turned splotchy with dry patches. I bailed out the water in the boat and then, just as I was exiting the channel to return to the main body of the river, another bank of clouds reared up to the south. They dragged gossamer sheets of rain from their bellies over the hills on the Oregon shore. From afar, the gray veils were beautiful. As they reached the river the hiss of rain on water filled the air, soft at first, then growing as the clouds continued their northward advance. I resigned myself to another drenching.
Tuning out my surroundings, I set to the task of rowing like a yoked ox. It wasn’t until I was a few yards from an industrial loading dock that I looked over my shoulder to see where I was going. With a 90-degree pivot and two quick strokes I shot between its concrete pylons and into the echo under its deck. I spent an hour under there, tied off to a pylon, wringing the rainwater from my clothes and sponging the last drops from the boat with a small piece of foam that had ripped off one of my pads. A pair of ducks swam around KIMCHI. Calm followed the rain, and as it cleared, the whole width of the river shone like a liquid mirror.
In the early afternoon, the sky cleared and the wind lazily drifted back to the northwest. It had yet to build to more than a few knots, but I sailed south in the desultory breeze up the narrow part of the river south of town of Kalama, just before Martin and Goat islands. A stern-wheeler chugged by downriver, carrying a full load of tourists, cameras and binoculars dangling from their necks.
There was no other traffic upriver or down, so I decided it was safe to sail across the channel to the Washington side. It was slow going, but there was just enough wind that I didn’t think I needed to strike the sail and row. I was halfway across the river when I noticed a red buoy about a half mile upriver of me. It puzzled me because this buoy was right up against the Washington side of the river; the far side of the shipping channel was only 150 yards from the Washington shoreline, and I was smack in the middle of it rather than almost across.
Downriver I heard the unmistakable deep rumble of a cargo ship’s engine and the waterfall rush of the bow pushing through the water. I had been bobbing across the river thinking the path was clear, and now this rusted 750’ red-and-gray behemoth had rounded the corner of Sandy Island and was bearing down on me.
The skies had cleared a bit by the time I reached the anchorage in the middle of Martin Island, but an inch of rain had fallen that morning, so I spent the evening drying my gear.
I jibed as fast as I’ve ever jibed, and aimed straight for the Washington bank. The wind was still light and shifty, but I felt confident I had enough breeze and time to get clear. Whoever was at the ship’s helm must have noticed me too, and steered slightly to the west, away from me and toward the channel’s Oregon side. The ship churned passed with just 100′ between us. I looked up at the bridge, and saw, hazy through the bridge windows, someone in a white shirt and black cap looking down at me with a pair of binoculars. I reached up and waved. The crewman’s arm shot up in response, and we held the gesture for a beat as if saluting. The ship continued on its way, and I on mine as I sailed up the slough between Martin Island and the Washington shore. I entered the island’s small cove, a snug anchorage I had spotted on my map earlier that day. There were already five boats anchored there and among them were two floating docks maintained by local yacht clubs. Thick, tall walls of brambles heavy with blackberries lined the shore. I ate my fill before settling in for the evening.
August is the peak of blackberry season and the brambles are scattered all along the river shore. I made many pitstops to pick them, and some were monstrous and I could easily make a meal of the them.
I made my way to the more welcoming of the two docks, the one with the tiki hut strung with lights. I tied off, set up my kitchen, and cooked instant ramen. As evening set, I ate and watched cows grazing along the shore and lights flickering on in the anchored yachts. Despite the lousy start, I had covered close to 15 miles.
The next morning dawned cloudy, but the air was warm and lacked the cool bite that had heralded the easterly storm the day before. There wasn’t any wind, so I started the morning by rowing. As I left the cove, a faint buzzing noise come from the sky, but with no apparent source. The buzzing grew louder, and from behind the trees of the more southerly Goat Island the pink fabric wing of a paraglider appeared. He was taking advantage of the still morning air, and buzzing about with a caged propeller strapped to his back. The buzzing softened as he cut back on the throttle and spiraled slowly down to the meadow on Martin Island. His feet scraped the grass and I thought he would land, but he revved the motor and swooped back into the sky. I continued rowing and followed the slough along the Washington bank of the river.
It was an uneventful morning, apart from a brief tangle when I rowed KIMCHI’s mast into a fisherman’s line that had been cast from a cliff along the bank. With a dead stop and reverse I extricated myself from the monofilament snare. By noon, the wind still hadn’t turned up, so I continued rowing. I rowed the 5 miles from Martin Island to St. Helens and stopped on the shore of Sand Island, a 2/3-mile-long wooded isle across a narrow channel from St. Helens Marina. It’s a well-appointed city park and I was happy to take advantage of the facilities. But while I was using the restroom, some kids wandering around were drawn to my boat. I was walking back to KIMCHI just as they climbed aboard. When they noticed me approaching, they jumped out but I smiled and asked if they’d like to ride in the boat as I towed them through the shallows. They climbed back in, but before I could get the okay from their parents they were called back to the dock; it was time for them to return to the mainland. The kids leaped out once more, leaving KIMCHI with a wealth of sand.
At low tide, this sand bar stretches downriver from Sand Island. St. Helens, visible on the left, is close by. The island looks quiet here, but on this Sunday afternoon it was teeming with hikers and kayakers.
After crossing to the public dock at St. Helens, I consulted my chart. I had covered a lot of ground and was ahead of schedule, so I had some time to kill and took a break to see the town. Things were off to an exciting start when the river current swept a large powerboat against the walkway that bridged the two floating docks. A half dozen boaters appeared as if from thin air, and with much grunting we shoved the 2-ton boat upstream and hauled it into an empty slip. The boat’s crew gathered their wits and made a second launch, this one successful with the application of more throttle.
At the south end of town, on the edge of a vacant concrete-paved lot, I met a chatty local named Howard. Lugging a massive jug, he paused at the foot of a stairway made of railroad ties set into the hillside, then slowly climbed the steps, watering the plants that grew alongside them. Once he got to talking, he forgot about the plants entirely and told me about the old Boise Cascade veneer plant that used to sit on the lot and had shut down in 2008. He recalled in vivid detail the plant in operation, trucks hauling in the debarked logs, machines peeling them layer by layer like so many onions, and barges swinging wide with their loads of veneer around the point of Sauvie Island, just 1/2 mile upriver where the Multnomah Channel meets the Columbia. The site didn’t look like much now, just a bare fenced-in lot with a rusted dock.
I had my eye on the Multnomah Channel, the narrow, winding 22-mile-long distributary from the Willamette River. The wind had filled in while I was ashore, and so in the late afternoon I set sail from St. Helens and said farewell to the Columbia and entered the 200-yard wide mouth of the channel. A mile in, Scappoose Bay split off from the Multnomah, and I slid along its bifurcated entry, with the dwindling northwesterly nudging KIMCHI along.
When I arrived at the bay’s only marina, 1-1/2 miles in, it was nearly dusk and there was no place to dock, so I rowed farther into the bay. It quickly shallowed, and in about 1′ of water I stopped, pulled my oars from the locks and plunged them blade-first into the mud. With the oars serving as stakes, KIMCHI, snugly tied to the looms, was prevented from swinging in the wind.
After dinner, I settled in for the night. In the dark, I checked the knots around the oars one more time, and laid back in the boat. The light evening breeze flowed over the top of the gunwales, carrying the smells of mud and grass. It was cool, but in my sleeping bag I was comfortable, and soon fell asleep. It had been another day, and another 12 miles.
When I woke on the morning of my last day, I was glad to find KIMCHI had not pulled free from the mud and drifted into the weeds. I backtracked out of Scappoose and rowed into the Multnomah Channel. Judging by the weather, the Columbia likely had plenty of wind. The channel, on the other hand, only received the irregular dregs of the wind, tumbled over obstructions along its narrow and winding path. I made my way in fits of rowing and sailing, and eventually got tired of setting and striking the rig every 30 minutes. I decided that unless the wind rose above 5 knots, I was going to row.
Multnomah Channel felt like a small town’s main street, compared to the highway of the Columbia. The southern half is lined with houseboats and the residents lounged on their porch decks, waving as I passed. A leather-skinned woman in a red bikini riding in an outboard-powered rubber dinghy passed me twice, as if she was out on a trip to the grocery store for milk.
By midafternoon, the wind had withered in the August heat. I took my shirt off to stay cool while rowing, but the air was sticky with heat and humidity. By the time I passed under the Sauvie Island Bridge, I was practically in Portland. The wind picked up above my 5-knot threshold, so I set the sail and donned my shirt.
The St. John’s Bridge, the first on the approach to Portland, was bathed in the afternoon light as I sailed up the Willamette River. It was a downwind run, so I pulled the leeboard up and set it in the boat just forward of my feet.
Just 1-1/2 miles beyond bridge I reached the Willamette, my home river, and the last leg of my journey. I passed under the St. Johns Bridge, the first of 12 that I’d pass under sailing through Portland, and stopped on the left bank at Willamette Cove. A sign on the shore said the site was toxic with industrial waste once dumped there. The woman walking her dog, the man with the camera, and the teenagers ambling across the sand didn’t seem to mind this, but I decided against spending the night there. It was nearly sunset and I still had more than 5 miles to travel up the river.
I took my last rest stop of the voyage at Willamette Cove. The sun was setting and the western bank of the river was already in shadow. I had just a 9 more miles to the voyage’s end at the Willamette Sailing Club.
With my running lights on, I set out from the cove. I was worried about sailing through the industrial part of Portland, which lay ahead, but I didn’t see another boat on the water. It was not until darkness had fallen completely, that I saw anyone else.
The city lights sprang up around me as I left the rougher part of Portland’s riverside behind me and sailed through the downtown district. Pedestrians crossing the Hawthorne Bridge stopped and waved as I passed beneath them. WILLAMETTE STAR, a 100′ dinner-cruise ship, swung wide around me and starburst flashes from the diner’s cameras sparkled beneath the steady glow from the city.
It was nearly 10 p.m. when I reached the Tilikum Crossing Bridge. The reflections of its lights glowed orange and undulated on the slow-moving water. The best wind of the day filled in from the north, bringing KIMCHI alive. I left the city lights behind and sped down the inky waters of the southwest waterfront. At 10:10 p.m., in the pitch dark, I slid into the docks at the Willamette Sailing Club. The day’s 25 miles brought me to the end of a nearly 100-mile voyage. I derigged KIMCHI and stowed her under buzzing fluorescent lights.
Torin Lee lives in Portland, Oregon, and wears a few hats at a local solar installation company. On summer weekends he teaches at the Willamette Sailing Club. He learned to sail in college, racing Flying Junior dinghies. He still enjoys racing with the club fleets, and got the boatbuilding bug from the folks at Portland’s RiversWest Small Craft Center.
If you have an interesting story to tell about your adventures with a small boat, please email us a brief outline and a few photos.
The Angler’s Loop (horizontal cords) and the Zeppelin Bend (vertical cord) will hold in bungee cord without coming undone or jamming.
Bungee cord is very useful stuff aboard a boat, but the precut bungees, fitted with metal hooks or plastic balls on the ends, are not always well suited to the applications I have in mind. The stretch of the cord itself might accommodate the length required for a particular job, though if the bungee is on the short side, the extra tension makes it hard to work with, and if it’s too long, making extra wraps to take up the slack takes time, often when there’s good reason for haste. I’ve never liked the metal hooks because they often snag things, and the plastic balls sometimes get loose and whip around like a monkey’s fist on a heaving line.
Most of the knots meant for rope don’t work with bungee cord. A sheet bend, even a double sheet bend, will come apart if you push the joined lines together, and a bowline will start to undo itself as quickly as it’s tied.
To make bungee cords for specific uses, I’ve used hog rings to create eyes in bungee cords and covered up the rings and the tail end with heat-shrink tubing. I don’t carry any of the equipment to do this work in the field, so if that were the only way to fabricate custom cord, I’d be stuck with what I’ve had the foresight to make at home. And the hog rings I have are sized for thick bungee cord; I’m not aware of hog rings small enough for 1/8″ bungee.
There are two special knots that do work with bungee cord, and while they are a bit more complex than a sheet bend and a bowline, they hold themselves together and can be easily untied.
The Zeppelin Bend
The Zeppelin Bend will securely tie two bungee cords together. As its name suggests, the knot was used by the crews of lighter-than-air ships to join together two lines and hold under great strain without breaking or becoming hopelessly jammed. To add a bit of bungee cord to a rope, or to make a ring of bungee cord like an oversized rubber band, the Zeppelin Bend is the one to use.
The Angler’s Loop
The Angler’s Loop is the bungee equivalent of a Bowline. I’ve read that it was used when fishing line was made of gut of some sort, which must have been slippery and stretchy. Learning to tie the Angler’s Loop is the first step, and the next is learning to tie it with the loop the right size and the tail end neither too long nor too short. That just takes a bit more practice. With a Bowline, it is easy to tie the loop to something; after you thread the line through that, you just carry on tying the knot as usual. To tie the Angler’s Loop to anything, the thing gets involved in the tying and has to slip through the first loop you make.
A spritsail, wrapped around its mast, gets bundled with the boom and sprit. The bungee with knobs on the end takes an extra wrap, and then is too tight to connect the ends easily. The bungee with the hooks take an extra wrap too; the hooks engage easily enough but can dent the soft spruce spars and snag things. The homemade toggled loop, cut to fit, is quick and easy to apply, and won’t dent spars or snag.
For a stopper knot, the common Figure-8 works well with bungee cord and is useful for making toggled loops. I like plastic-pipe toggles better than the plastic balls used on commercial products. The pipe toggles are easier to engage with the bungee under tension and less likely to slip free.
With a toggled loop at the throats and an adjustable loop above the leathers, two pairs of oars become an easily carried bundle.
I get long lengths of bungee cord in an assortment of diameters cut from spools at my local marine supply store and stock them my shop. I cut off whatever I need, making allowances for the length taken up by the knot, melt the ends’ woven sheaths to keep them from unraveling, and in a couple of minutes I have just the right bungee for the job.
Christopher Cunningham is the editor of Small Boats Monthly.
Working with bungee cord
Tying the Zeppelin Bend:
The Zeppelin Bend starts with two mirror-image overhand loops. Think P and 9.
Flip the right loop vertically.
Slide the the flipped loop under the other loop. The working ends are on the outside of the loops, top and bottom.
The top working end goes through both loops from underneath.
The bottom working end goes through the loops from the top. Notice how the cords create two interwoven half-hitches.
With the bend drawn up tight, the working ends will stick straight out.
Tying the Angler’s Loop:
The Angler’s Loop starts with an underhand loop, the working end under the standing part.
The working then crosses over the standing part…
…and makes an underhand loop under the standing part.
The working part crosses over the intersection and is held there.
The loop at the left will be pulled over the top of the working end…
…and passed through the first loop.
As the second loop is pulled through, pulling the standing part will draw the first loop tight and into the knot.
Cinched up, the bungee will stay put and the knot will stay tight.
Tying the Angler’s Loop as a Tether:
To tie a small bungee tether to an important bit of gear, like the knife here, start with the underhand loop, as usual, and then thread the cord through the item at the start of the second loop.
Make the left underhand loop, with the working end below everything.
The working end then crosses over the top.
The knife gets threaded through the first loop…
…and pulls the second loop through the first loop.
After the Angler’s Loop is tied, you can shorten the working end and tighten the loop through the gear by chasing the slack out from the working end, through the knot, and into to the standing part.
Anchoring a Bungee Tether:
To anchor a tether, slip an Angler’s Loop through the ring.
The object to be tethered, here a folding knife, gets slipped through the Angler’s Loop.
With the knife through, the rest of the tether, including the knot at the base of the Angler’s Loop, is pulled through.
Pulled up tight, the Angler’s Loop makes a Lark’s Head Knot around the anchor ring.
Tying Bungee to Rope:
The Zeppelin Bend will work for tying rope (left) to bungee cord (right).
Bungee Bands:
A length of bungee, with its ends tied together in a Zeppelin Bend, makes an oversized “rubber band.”
Loops with Toggles:
Short lengths of plastic pipe get two holes drilled in one side. The bungee ends, threaded through the holes, can be tied off with a Zeppelin Bend or with Figure-8 stopper knots. The Figure-8s require some extra length in working end to allow for the knot’s travel as it is pulled tight once inside the pipe. The Figure-8s will be very difficult to untie.
An Adjustable Toggle:
For an adjustable cinch, cut a short length of plastic pipe and drill a hole in the back near one end and another on the opposite side near the middle. With a sharp knife, cut an elongated V from the middle toward the end opposite the hole in the back. Undercut the sides of the V so the outside edges will be tighter than inside edges. Tie a Figure-8 in one end of a bungee cut to length, then slip the other end through the hole with the V and out the end of the pipe. Then thread the end of the bungee through the hole in the back from the outside, tie a Figure-8 in its end, and pull the knot tight inside the pipe.
You can share your tips and tricks of the trade with other Small Boats Monthly readers by sending us an email.
The foil-puncturing tool pivots in and out of a recess in the red frame. The cartridge-tip cutter is the circular hole to the right of the spring.
For years we used the common caulking guns that go for a few bucks at hardware stores; we assumed one caulking gun was like any other and accepted that dispensing thick caulks and adhesives just takes a lot of effort. That was until we starting using the Newborn High-Thrust Model 250 caulk gun.
The 250 has an 18:1 thrust ratio, compared to the 6:1 or 8:1 thrust ratios of the cheap caulk guns from home-improvement stores. The 250 takes standard 10-oz cartridges and has a heavier feel and the construction is higher quality; the powder-coated frame and zinc alloy handle should hold up well. As with most caulk guns, it has a cartridge-seal puncture tool so you don’t have to go looking for a nail long enough to get to do the job, and a built-in tip cutter that will cut a cartridge tip off square or at a slight angle. If you need an angled opening at the tip, a utility knife is the tool for the job. The 250 has a handy ladder hook on the tail end of the plunger, which we use to hang the gun on our tool shelf so it doesn’t go missing during a project. The hand grip has a nice ergonomic design to it, making it easier to hold and squeeze. The 250’s revolving frame allows the cartridge and its tip to rotate as needed for ease of application at different angles to the work.
The tips for mixing two-part epoxy increase resistance to the flow of the material, but the 250’s high thrust ratio makes it easier to dispense.
The high-thrust gun is well suited for use with thick caulks and adhesives and with mixing tips for two-part epoxies. With our previous caulk gun, I could barely force resin and hardener through a mixing tip, and at times I had to use both hands to squeeze the trigger to get a dribble of mixed epoxy to appear—very disheartening when we were looking at dispensing four tubes of epoxy.
Our best test of the Newborn 250 is to load it with a tube of two-part epoxy that is thickened for filling gaps and making fillets. When I squeeze the trigger, even with minimal force, the gelatinous epoxy flows through the mixing tip. The action on the handle is smooth, and the force required easily just half that of a regular gun. The challenge now is to keep from squeezing the trigger with abandon and dispensing the material too quickly.
The 250 has a trigger-release lever at the back to take the pressure off the plunger and stop the flow from the cartridge. For thinner materials that require less thrust than the 250 applies, there are drip-free guns that have a plunger that springs back automatically when you relax your grip on the trigger.
With the Newborn 250 it will be very easy to work through several tubes of thickened epoxy on our current wooden restoration project. We are delighted to have found a tool to make this task much easier.
Kent and Audrey Lewis, aka Skipper and Clark, sail, row, paddle and motor a fleet of small boats, with boat repair and restoration being another necessary hobby, which they document on their blog.
The Newborn High-Thrust Model 250 is available from several online retailers with prices starting around $23.
Is there a product that might be useful for boatbuilding, cruising, or shore-side camping that you’d like us to review? Please email your suggestions.
The LivWild saw has highly visible straps and a cutting tooth on every link.
It’s my father’s fault. For years, during my summer vacations from grade school he’d load our station wagon, a 1956 Ford Ranch Wagon, with a 42″ one-man crosscut saw, a splitting maul, and a half-dozen wedges, and we’d head for the beach. Back then, rafts of logs were towed by tugs up and down Washington State’s Puget Sound, and a lot of logs got loose. The beaches were thick with driftwood that never made it to the sawmill. Dad and I went after the red cedar, sawing it to length and splitting it for fence rails and slats. After a few summers, the whole lot around our home was surrounded by red cedar, over 150 yards of it.
So, I picked up an unshakable habit of combing beaches for useful driftwood. I gather red cedar, yellow cedar, Port Orford cedar, Douglas-fir, and spruce, and use it in my boatbuilding and making everything from musical instruments to Shaker boxes. I have my father’s crosscut saw, but it’s not practical to carry aboard a small boat. That’s when I take a pocket chainsaw. It’s compact enough to carry even when I’m out kayaking—if I find something good, I’ll tow it. I once sawed an 8′ length of yellow cedar from an especially fine-grained log, and towed it 1-1/2 miles by kayak back to the launch site.
Back in the ’60s, I used twisted-wire pocket saws for backpacking and they were fine when I only needed wood for campfires and to do some whittling. They didn’t last long before they broke. I now use chain-style saws, and the latest version, the Camping Pocket Chainsaw from LivWild, works great. It has a 28″ chain with 37 teeth, the same kind used on motor-driven chainsaws. Every link is a cutting tooth, with adjacent teeth facing in opposite directions. The handles are bright orange 1″ webbing, lessening the likelihood that I’d inadvertently leave it behind.
Some versions of the pocket chainsaws, like the Saber-Cut, have teeth facing in both directions, but, like a power chainsaw chain, have gaps between teeth.
I put the LivWild saw up against the two other pocket chainsaws I’ve been using. The Saber-Cut Chainsaw from Ultimate Survival Technologies has a 25″ chain with 11 cutting teeth, one every third link. The backs of the intermediate links have the fin-like extensions meant to engage the drive-sprocket teeth of a power chainsaw. They serve no purpose in a pocket chainsaw.
The Pocket ChainSaw has wire loops that use bits of driftwood for handholds.
The other saw, the Pocket ChainSaw from Supreme Products, is 28″ long and has its own style of links and teeth. Each of the 62 links has two symmetrical teeth, bent to the outside to provide clearance in the kerf. The teeth are stamped but not filed, so they have chisel edges like a ripsaw’s. I took a triangular file to the teeth to give them a sharp-points like the teeth of a crosscut saw. Pocket ChainSaw cuts a kerf that’s 1/8″ wide, half that of the other saws. To make the saw fit into its can, the loops that attach to the end of the chain are removable and require small foraged sticks for handgrips.
In recent beach trials, the LivWild saw got through a 2-1/2″ driftwood limb in 17 seconds and the Pocket ChainSaw took 14 seconds. The Saber-Cut did fine for 8 seconds, but then started to grab. I gave up on it after 37 seconds. That last bit of the limb had a tight radius, about ½”, and the widely spaced teeth got hung up on the sharp turn. The Saber-Cut has fared better on larger logs where the last bit of wood to cut through is small enough to be broken, but doesn’t cut as smoothly as the LivWild.
Having ruled out the Saber-Cut for general use, I compared the LivWild and Pocket ChainSaw on the end of a log about 7″ thick. The LivWild got through in 50 seconds, including a break to get myself positioned more comfortably. It took me 127 seconds to get the job done with the Pocket ChainSaw, including a half dozen breaks to catch my breath. It seemed that the saw couldn’t clear the sawdust quickly and it clogged the kerf, adding a lot of resistance.
Beavers chewed this red cedar down, but the LivWild saw couldn’t take much of a bite out the wet wood.
On a recent rowing outing I found a red cedar that had been felled by beavers. The trunk was about 10” in diameter and the wood was still green and wet. The LivWild easily cut branches about 3″ thick, but on the trunk it only got through the bark and about 1/4″ of sapwood. After the chain was buried in the kerf, the teeth began to grab and it wasn’t worth the effort to continue. I don’t often find freshly fallen trees, so I wasn’t overly disappointed by the LivWild’s limitation. It works well on driftwood large and small and will be my steady beachcombing companion.
Christopher Cunningham is the editor of Small Boats Monthly.
The LivWild pocket chainsaw, with nylon pouch, survival booklet, and mylar blanket, sold through Amazon for $22 was not available at the time of publication. There are a number of nearly identical saws with teeth on every link: a 24″ 33-tooth with pouch and survival bracelet, a 24″ 33-tooth with pouch, and Jusstech’s 24″ 33-tooth with pouch, fire starter and two paracord bracelets. The Pocket ChainSaw with storage can and handgrips is available for $24.
I ordered the Justech kit to confirm that the saw would be a good substitute for the LivWild saw. The chain is 4” shorter—not an issue for any logs up to 8” in diameter—and cuts just as well. The saw comes with a pouch, a 2-3/4” ferro rod with steel scraper, and two 9” paracord survival bracelets, each with a whistle, compass, and fire starter built into the buckle. Both the large and small fire starters ignited dry paper tinder with a few scrapes of the rod. At $17 for the kit it’s a good value.
Is there a product that might be useful for boatbuilding, cruising, or shore-side camping that you’d like us to review? Please email your suggestions.
In profile, CHIPS bears a strong resemblance to the Herreshoff 12-1/2, one of the boats that inspired Carl’s Block Island 19 design.
Carl Kaufmann, at 92, likes to keep busy. He has a workshop at both of his homes, one on Block Island, Rhode Island, and the other in Mystic, Connecticut, and has built boats ranging from a 34-lb cedar racing shell to a 12-ton, 40′ yawl. If that weren’t enough to fill his days, he makes beautiful mandolins and guitars, 15 so far, and regards himself as a between a beginning and an intermediate luthier. He’s drawn more to building instruments than playing them: “After years of trying—well, maybe not trying very hard—all I can do,” he writes, “is stumble through ‘Me and Bobby McGee’ and ‘Don’t Think Twice.’”
These two guitars and the mandolin are examples of Carl’s skills as a luthier.
The list of boats Carl has built from scratch includes the Sparkman & Stephens yawl, three Graeme King rowing shells, a Butler and Hamlin 26’ centerboard sloop, an 11-1/2′ Alden X dinghy, an 11′ 2″ Shellback dinghy, a 14′ Atkin skiff, and an 8′ pram of his own design. He built a plywood pram and a 17′ Thistle-class sloop from kits. Ownership of the boats has been shared among his son, Eric, two grandchildren, and a great-grandchild—she’s only three, but her skiff is ready whenever she’s ready to row.
There was a place in the family fleet for a daysailer, and Carl considered building to an existing design. He looked at the Herreshoff 12-1/2, but it was too small and perhaps not as fast as he had in mind for his new boat. He also considered Herreshoff’s 21′ Fish Boat and Chuck Paine’s 21′ Pisces, but these were keel boats and Carl preferred something not quite so deep. He kept looking around at other designs, but nothing quite felt right, so he decided to draw his own design. Although he had made his career in journalism, his education was in naval architecture and marine engineering. So, he drew up his Block Island 19, a centerboarder with an overall length of 19′, a waterline length of 15′, a beam of over 7′, and a draft of just 2′ with the board up. An 1,100-lb lead keel would bring the boat weight up to 2,500 lbs, “an extremely light boat,” he notes, for its type, more substantial than a 12-1/2 but substantially lighter than the Fish Boat or Pisces. For the rig he drew a generous gaff mainsail and a small self-tending jib on a traveler. For construction, carvel and lapstrake—either traditional riveted seams or glued plywood—were options, but Carl settled on a three-layer composite hull.
With the drawings finished, Carl began construction. He built the hull on ten 1″-thick molds, a structure strong enough to allow him to raise it and the hull with a chain hoist when planking was finished and turn it right-side up. The steam-bent frames were wrapped hot around the molds, which were undersized to accommodate the frame stock. The first layer of planking was 5/8″ cedar strips, nailed and edge-glued with Aerodux resorcinol, an update to the pre-epoxy standard. Like its predecessor, it is quite tenacious and even boil-proof, but is more forgiving of small gaps in the seams between planks.
Prior to painting, the inner layer of strip planks was evident. The two additional layers of diagonal planking made up the full thickness of the hull, almost 7/8″.
About 70 strip planks went into each side of the hull for that first layer, and after it was sanded smooth and fair, Carl applied two layers of thin cedrela, a variety of mahogany also known as Spanish cedar. The planks, just shy of 1/8″ thick, were not rotary-cut as plywood veneers are, but quarter-sawn from timbers by a horizontal bandsaw mill. The stock was 12″ wide or more, so Carl cut it into strips 3″ to 5″ wide, spiled them, and applied the two layers at opposing 45-degree angles. Nylon staples, driven by an air gun and set just below the surface of the mahogany planks, held the planks while the epoxy cured and then remained in the hull. The planks weren’t required to take a reverse curve to fair into the keel, so the staples were enough to push the cedrela tight to the form.
The completed hull was leak-proof, light, and so stiff that it required few ribs to strengthen it. The exterior surface was quite smooth after the last layer of planks went on and required very little sanding prior to rolling the hull upright.
Carl had the lead keel cast—in a mold he made—by a Connecticut boatyard with a foundry. It has a slot for the centerboard and was connected to the hull’s oak keel, without any deadwood in between, by bronze bolts that run through the heavy oak floor timbers.
The hull’s three layers of planking required minimal framing.
The interior work—installing floors, framing, and bulkheads—was all pretty straightforward, but the deck framing was more difficult. Like any large open-cockpit boat like CHIPS, it requires a lot of carlins and half beams, and the shelf and sheer clamp need to be sturdy because the load on the deck is not supported by an inherently strong arched beam spanning from sheer to sheer.
The coamings were designed to serve as comfortable backrests so they were steam-bent over a jig with crosspieces cut with 5-degree slopes.
The coamings posed an interesting challenge. Carl had some beautiful, broad South American mahogany, wood that demanded a bright finish, so it had to be handled carefully every step of the way. The 9″- to 10″-wide coamings would meet at a point forward and be angled outward at 5 degrees to serve as comfortable backrests for people sitting on the boat’s side benches. Carl decided to make each full-length half of the coaming in two 3/8″-thick layers.
He started with a doorskin pattern and a bending jig, which had cross pieces angled at 5 degrees to meet at a peak in the middle. He steamed the shaped mahogany pieces, applied them to the jig, and left them to cool. After they had dried, he installed them in the boat, and when everything fit properly, he removed the four pieces, applied epoxy to the interior surfaces of each pair, and reinstalled them to cure in place. He could then remove them to do any finish work required before permanently installing them. The coamings alone took somewhere between 50 to 75 hours of Carl’s time.
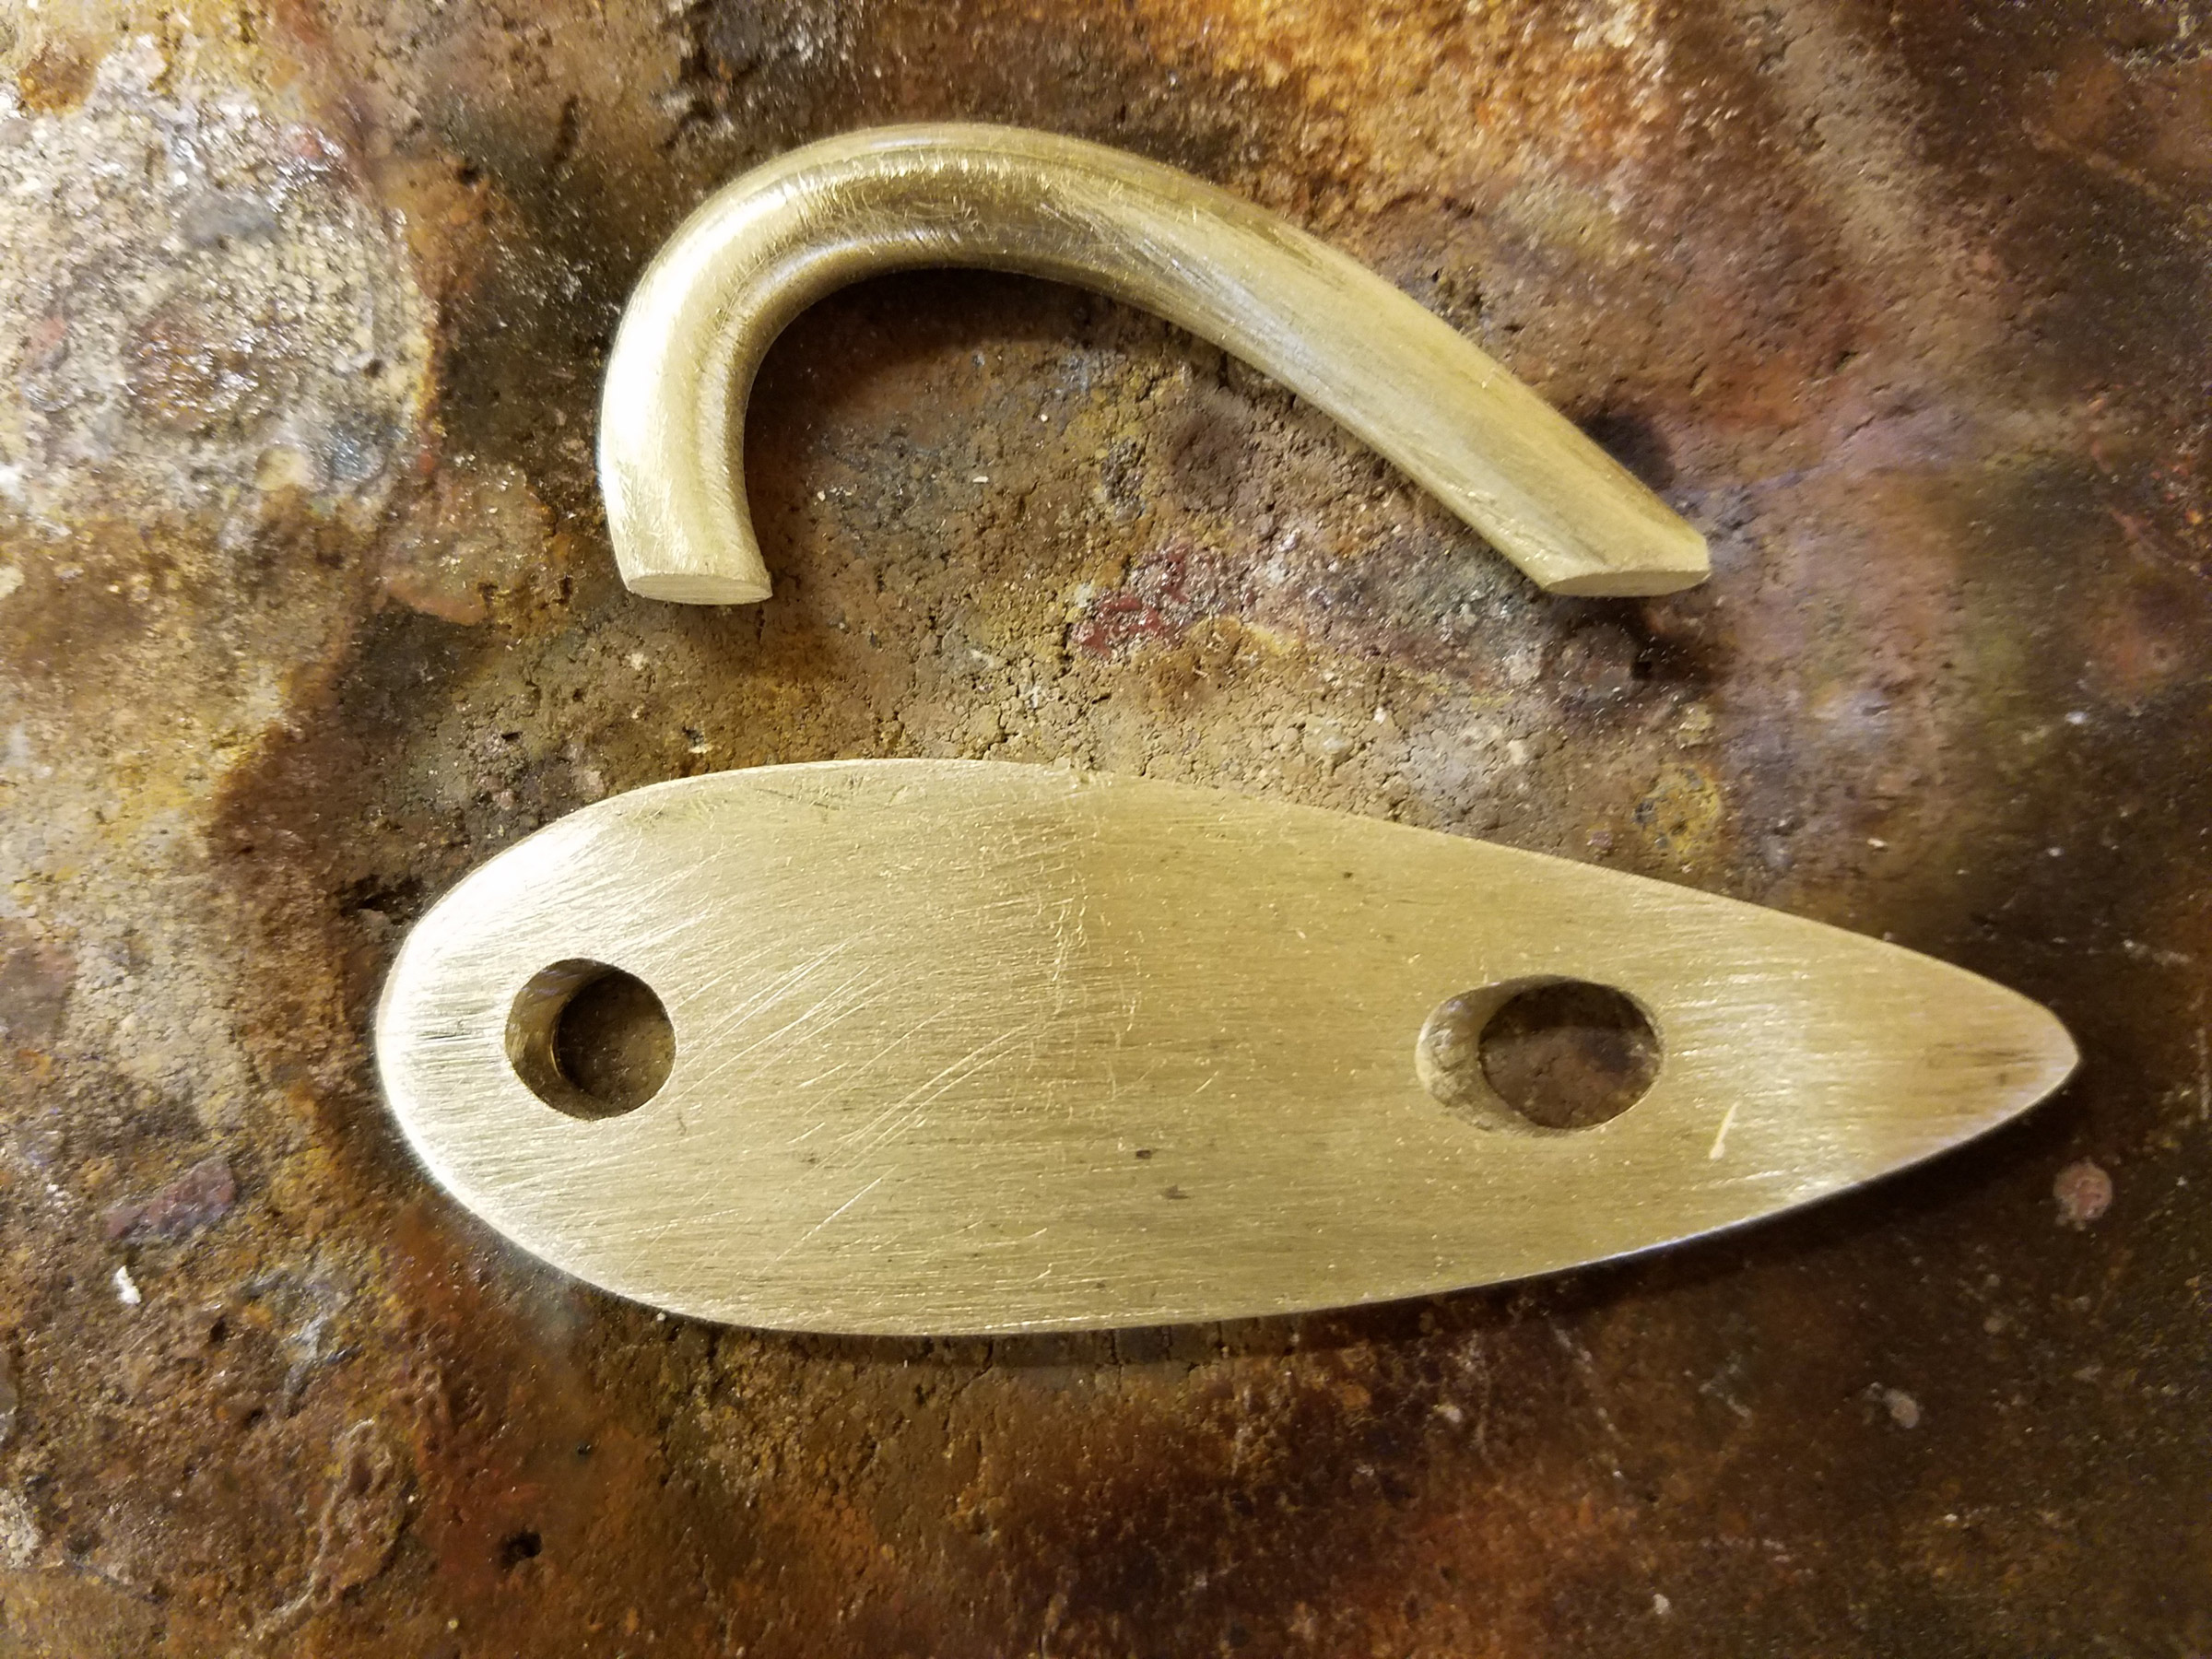
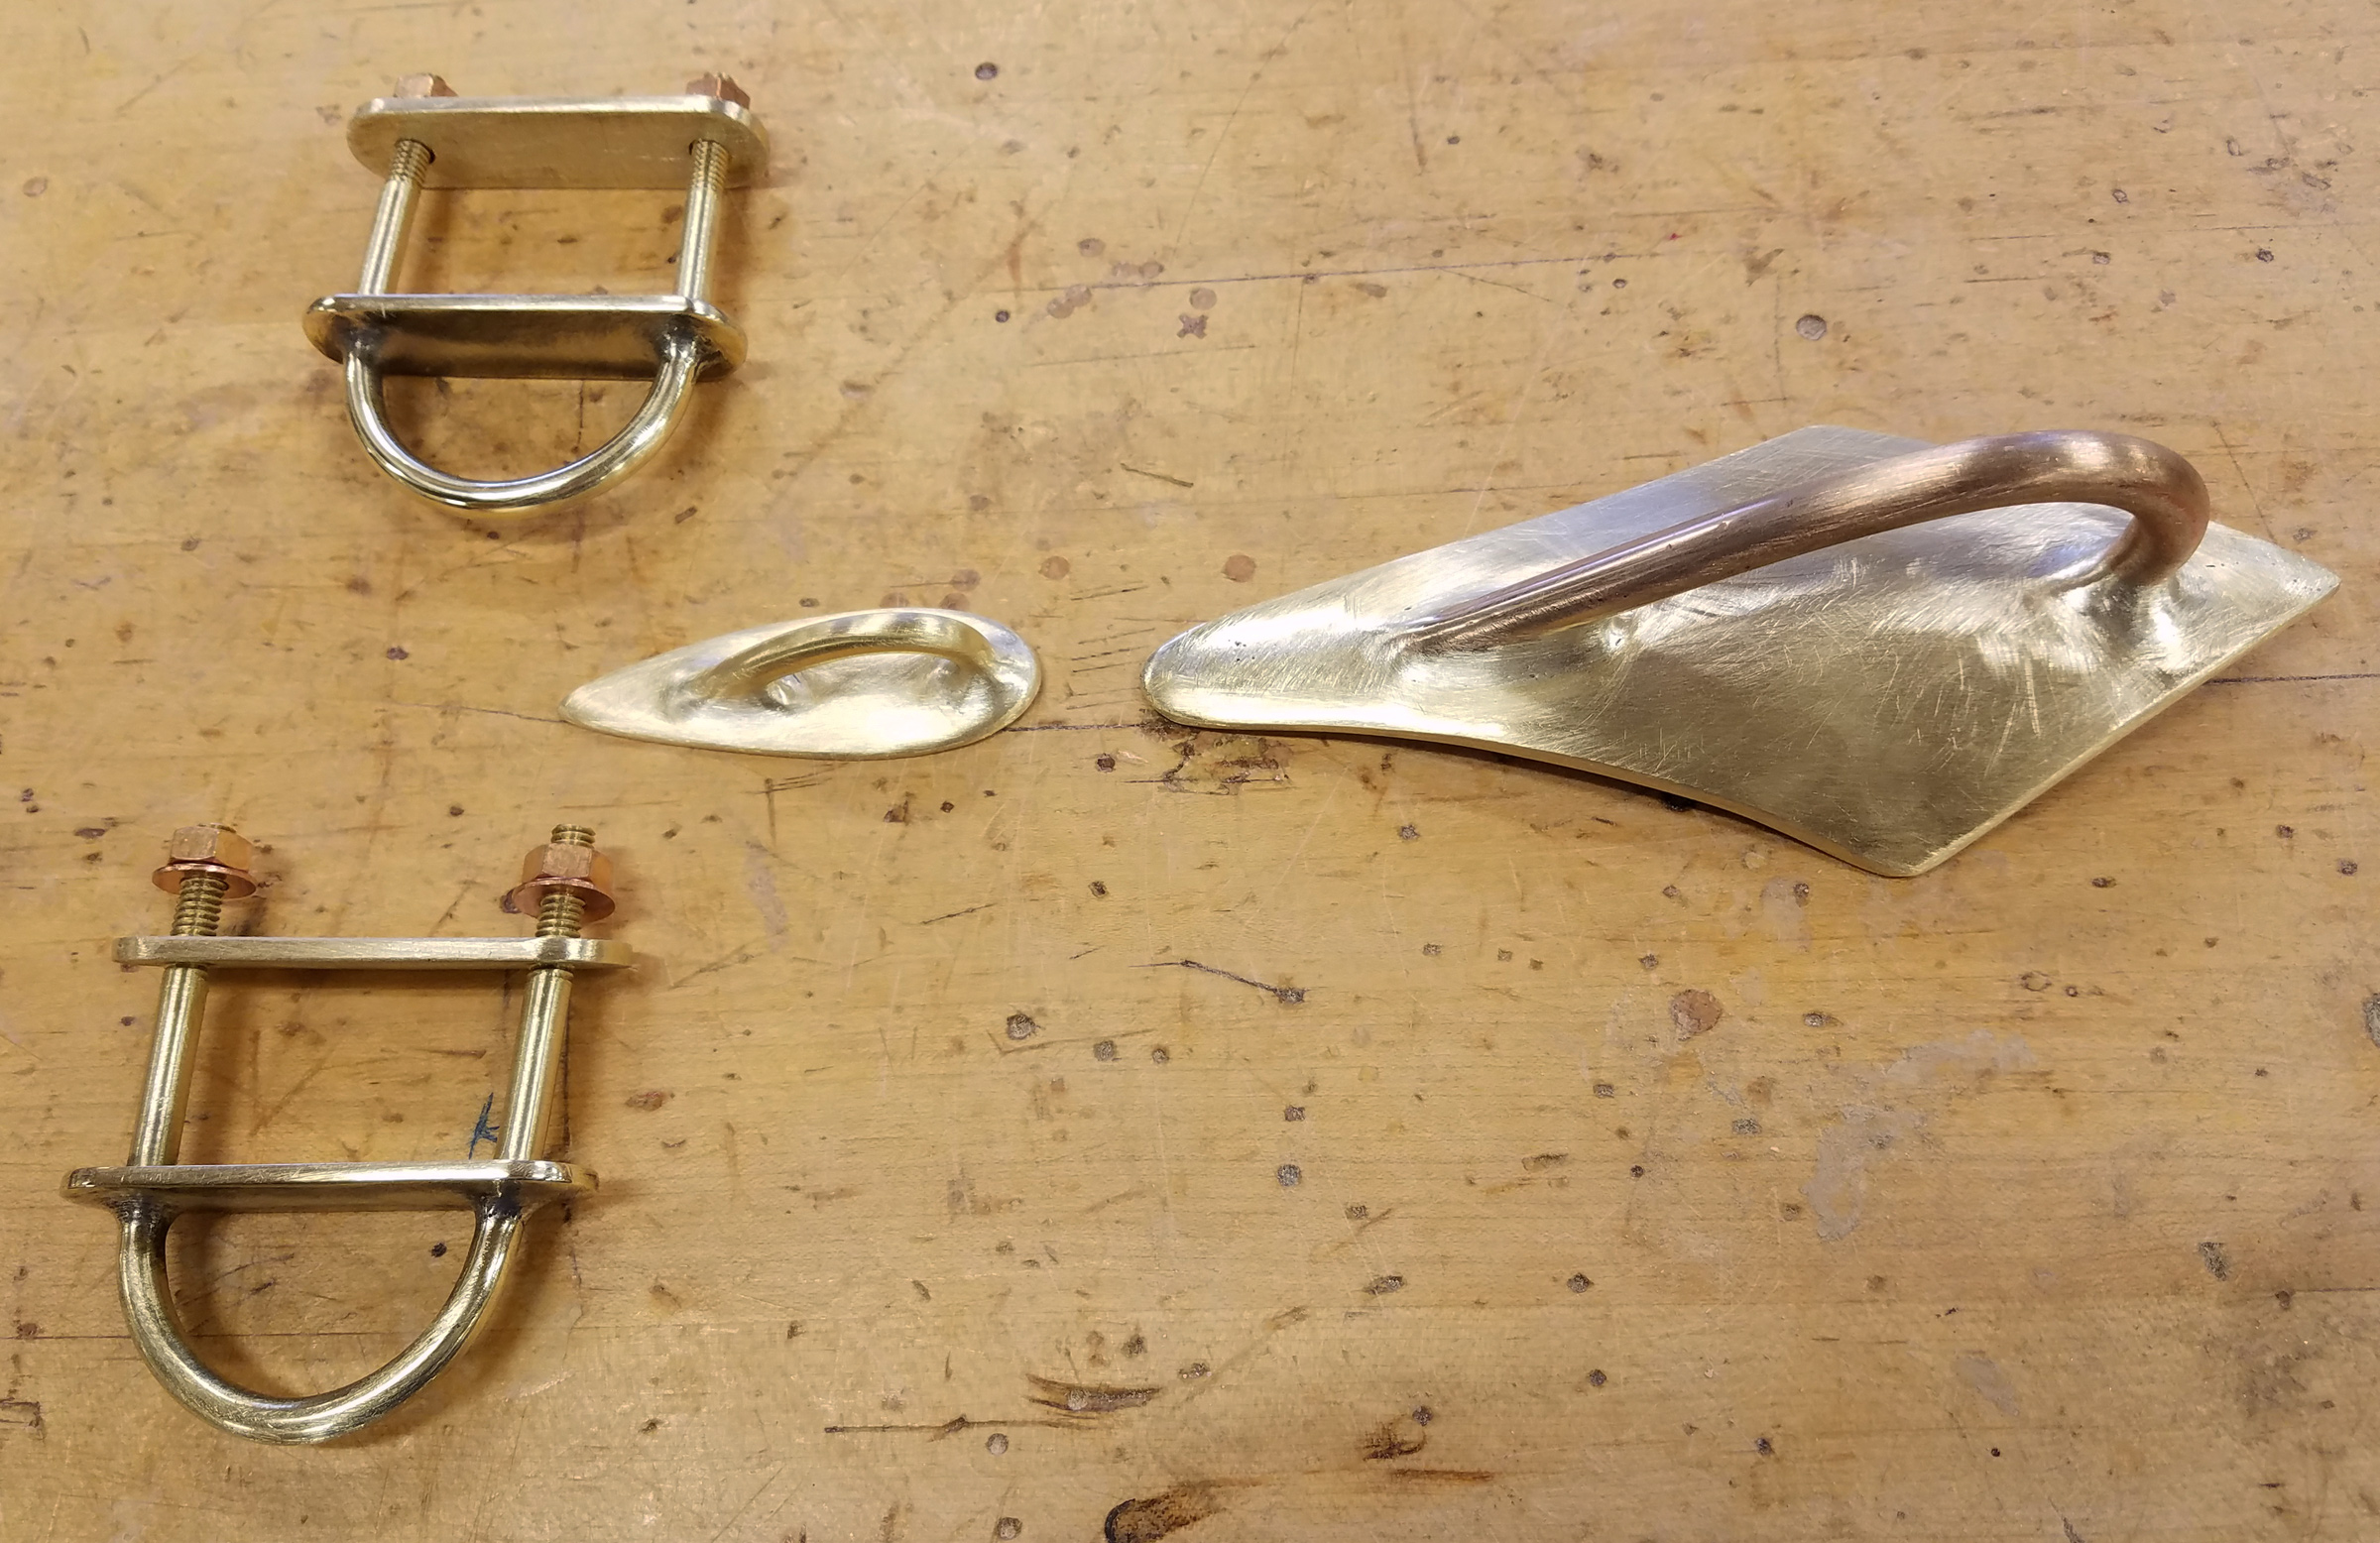
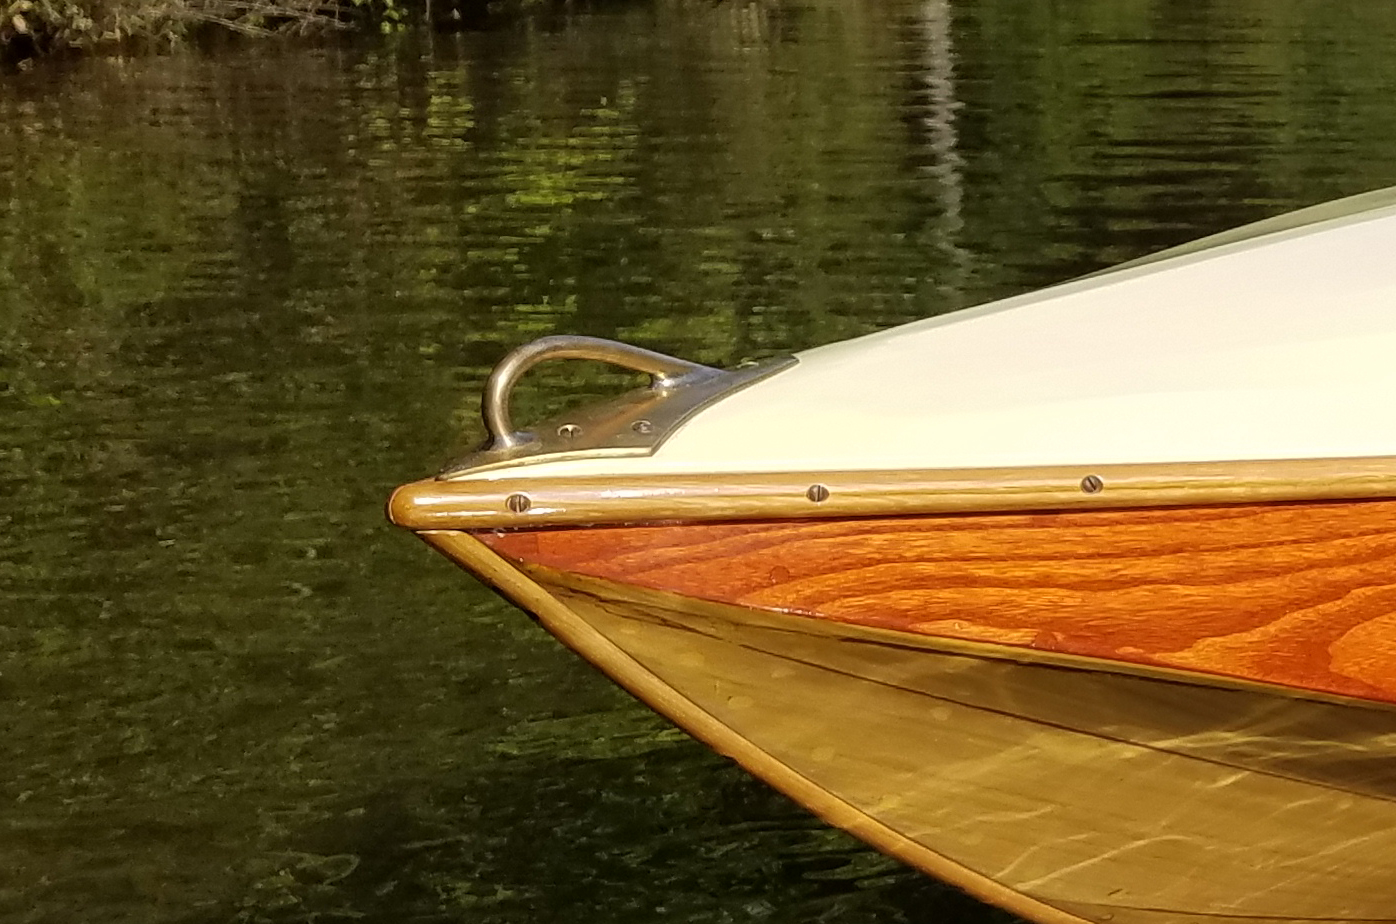
CHIPS has plywood decks, sealed with epoxy prior to installation, and covered with Dynel everywhere but the foredeck, where Carl used canvas because Dynel wide enough to cover the foredeck in one piece wasn’t available. Carl used some of his South American mahogany for the seats, to be bright-finished, of course, and tried his hand at wood-turning to make supports for them. Some of CHIPS’s bronze hardware was cast from patterns Carl made, and he got a Mystic Seaport rigger to teach him how to splice wire so he could make his own standing rigging.
Carl made the mast hollow to save weight. He used this same bird’s-mouth construction for the gaff and jib boom.
The mast is made of Douglas-fir, and the gaff and jibboom are Sitka spruce, all made hollow with bird’s-mouth construction. The boom is a box beam, made from Sitka spruce salvaged from a much larger box-beam boom that had been abandoned at a shipyard. The boom is relatively heavy compared to the other spars, but Carl likes to have a bit of weight pulling the foot of the sail down. It tensions the leech and keeps the gaff from falling off the wind.
Carl didn’t build the boat with accommodations for an outboard, so for auxiliary power, he uses a single long oar. With the oar set in one of the two oarlocks, he rows on one side, facing forward and standing. Steering with the tiller between his knees, he makes about 2 knots. The generous sail area can take advantage of very light breezes, so he has yet to row very far.
Sitting on her trailer, CHIPS shows her modest draft.
CHIPS has a few sailing seasons to her credit now, and Carl can imagine a few tweaks he’d make. He’s giving some thought to adding a side mount for an electric outboard. While under sail, the motor and bracket would stow in the bilge. CHIPS has a light weather helm and a longer centerboard case located farther aft would help, but that’s a project for a second Block Island 19. Giving CHIPS a small bowsprit would achieve the same end, but the weather helm isn’t so much of a problem that moving the sail area forward is really necessary. Carl has mused about an alternate rig, marconi instead of gaff. Downwind speed would suffer a bit, upwind speed would improve—perhaps a wash in a day’s sail, but an interesting experiment that would require no change to the boat beyond switching the spars, shrouds, and forestay.
The forward ends of the coamings support the roof of the cuddy.
Musings aside, Carl has been pleased with CHIPS. She performs well, and the high-peaked gaff makes her quite weatherly for a gaffer. Downwind, CHIPS is “extremely fast,” says Carl; “you pull up the centerboard and that big mainsail really goes.” Carl made CHIPS’s run a bit flat rather than full so she isn’t dragging a big quarter wave that would slow her down. Off the wind, she has kept pace with 420 Class Dinghies—up until they get enough wind to put them on plane. “She’s dry, easy to handle, and she snap-tacks in a jiffy. We couldn’t be more pleased with her performance in choppy weather; when she’s properly set up, she sails herself.”
Carl took pride in CHIPS’s connection to her Block Island birthplace and had her sails made by an island sailmaker.
If Carl enjoys building boats a wee bit more than sailing and rowing them, just as he prefers making guitars to playing them, there’s a good chance he’ll find a reason to build another. Come winter, when the fleet is hauled out, he’ll have to have something to keep him busy.
Have you recently launched a boat? Please email us. We’d like to hear about it and share your story with other Small Boats Monthly readers.
If you spend a lot of time in a boat you can’t help but notice how fascinating water can be whether it is in constant motion or utterly still and all but invisible. There are some things that water can do that you don’t often see. I recently came across a YouTube video about an unusual phenomenon: a spike wave. The description with the video notes: “Gav and Dan go to an ocean simulator to film a wave that does not occur anywhere in nature….” That may be true of the perfectly formed three-story-tall spike wave created by a sophisticated test tank at the FlowWave Ocean Energy Research Facility at the University of Edinburgh in Scotland, but spike waves do exist. I’ve kayaked with them shooting up all around me.
There is a smaller version of the spike wave that you’ll see every time it rains. A raindrop falling into a puddle will punch a depression into the surface of the puddle, and when the water rushes back to fill the void, a spout of water will rise briefly from the center. That little geyser is called a Worthington jet. It often happens so quickly that you don’t get a good look at it, but on occasion the size and speed of the raindrop will create a larger, more persistent jet.
I made a pinhole in a paper cup and let drops fall into a soup bowl full of water.
The impact of the drop creates a depression rimmed with a crown of smaller droplets. This is the beginning of the splash.
The rebound of the depression caused by the falling drop creates a miniature spike wave called a Worthington jet.
I had spent a rainy night on Wheeling Island, just across the Ohio River’s main channel from Wheeling, West Virginia. When I got underway the following morning, the air was still and the river was flat and disturbed only by fat, heavy raindrops. The brown river water was tattooed with expanding concentric rings of tiny ripples and where each drop fell a crystalline column of water nearly 2″ tall and almost 1/4″ in diameter. Covered with them, the river was a tidy, shimmering, lawn of glass.
While a Worthington jet relies on a falling droplet to form a circular rebounding wave, the enormous spike wave at the FloWave test tank was produced by 168 wave-generating paddles around the tank’s circumference all pulsing simultaneously. That’s not something that has an equivalent in nature, but if enough waves come from several different directions to meet at a single point, there can be a spike wave.
On the crossing to Koločep, Zeljko (center), Radovan (right), and I had only a swell from the southeast to contend with.
In 2005, Zeljko Kelemen had invited me to do some sea kayaking among the Elafiti Islands on Croatia’s Adriatic coast. Zeljko and I set out with Radovan, my guide and translator, from Zaton, a village 3 miles north of Dubrovnik, and made the 1-1/2-mile crossing to the island of Koločep in a 10′ swell from the southeast and 20 knots of wind. Zelkjko landed on the island, and Radovan and I continued toward Bezdanj Point, the island’s blunt and rocky southern extremity.
As we approached Bezdanj Point (far left), Radovan and I began to feel the effects of a second set of waves coming from the southwest.
Beyond the point we paddled into a southwest swell that we had been shielded from on the other side of the island. The swells slapped into the 100′-high dun-colored cliffs on Koločep’s west coast, climbed up their sheer faces, and slipped back into a mile-wide open bay like water sloshing in a bathtub. Reflected waves came at us from all angles, and my kayak was swinging like a marble rolled in a mixing bowl. When I was in the troughs, surrounded by curved walls of water on all sides, even the cliffs, just 100 yards to starboard, vanished behind wave after wave. From the crests, I saw a throbbing sawtooth sea tearing at the horizon.
The shapes moving across the surface could hardly be called waves. There were no discernible patterns, only random mounds and hollows that changed so quickly that the water couldn’t keep pace. Waves heaved upward in tall steep-sided pyramids that turned into ropey fathom-tall columns of silvery water suspended for a moment in midair. Spike waves. When they fell, they slipped downward, intact for a moment, and then disintegrated into white froth.
FloWave Ocean Energy Facility, The University of Edinburgh
When all of the wave-generating paddles on the circumference of the tank act in unison, the tank can create a spike wave that will shoot up to the ceiling.
The quad-spike wave (1 minute, 20 seconds into the video) generated at FloWave was very much like what I paddled through. I asked the senior experimental operator at FloWave about those spike waves occurring in nature. He replied: “I’m afraid I don’t know much about where spike waves occur in nature. However, if you have waves from different directions combining (perhaps due to reflected waves), I could see it being feasible that this would produce spike-like waves due to localized areas of very steep waves, especially in choppy conditions.”
My backyard wave tank
I made a quick-and-dirty wave tank to see if I could generate spike waves. For one series of trials I made a wall of concrete pavers in an eyeballed parabola. For other trials I removed the concrete and pivoted the walls to the top and right to make waves. With waves coming in two directions and rebounding in the two opposing directions, I was able to create lots imperfect spike waves and one perfect spike wave. It rose up straight and symmetrical about 15″. It caught me by surprise and I didn’t have the camera recording at the time. Below are some of the waves I did capture on video.
I wish I had taken photos of the spike waves I paddled among in Croatia, but it was all I could do to keep my kayak right-side up and my breakfast down. I’d like to see those waves again, but I hope not to be in a boat when I do. I’d rather row through a flat plain of Worthington jets.
For anyone interested in seaworthy small boats for cruising or daysailing, John Welsford’s designs are hard to beat. There are several elements that combine to create what I think of as a typical Welsford boat: a narrow flat bottom, lapstrake sides over sawn plywood frames, high volume with generous freeboard, half-decked with sealed chambers for built-in buoyancy, rugged construction, and an appealing, pugnacious character inspired in part by the traditional small boats of Great Britain and northern Europe. There are few double-enders in his design catalog, despite their popularity among home builders, and that makes the Sei (pronounced “say”—named after a species of baleen whale) a welcome addition.
John’s impression of today’s popular double-ended rowing and sailing boats around a 15′ size, wasn’t entirely positive. He thought the type could have more stability, be less prone to pitching, and perform better under oars and sail. As he does with many of his designs, John looked to traditional hull forms for inspiration.
Photographs by the author
The 76-sq-ft lug sail provides ample power for sailing in very light breezes.
His research led him to southern Norway’s Hardangerfjord region, where small, beamy double-enders were used for inshore fishing and general transportation. Historical photos of these Hardangerfjord boats served as a starting point, but the Sei is a modern design. “The Hardangerfjord boats look quite similar,” Welsford says, “but the Sei is lighter by at least 50 percent, and slightly wider—a sailing boat that will row rather than a rowing boat that will sail.”
Like many of Welsford’s small-boat designs, the Sei combines a relatively narrow and flat bottom panel with three strakes of glued lapstrake planks over 1/4″-plywood frames. The hull is built upright on a simple waist-high jig, a feature that will be appreciated by anyone who has ever crawled under a boat to clean up dripping epoxy while planking. Unlike other popular Welsford designs like Walkabout and Pathfinder, the Sei doesn’t use permanent stringers along each plank edge—the plank laps themselves produce adequate strength and stiffness, as well as a lighter boat.
With so little structure, the Sei would be a straightforward, relatively simple build well within reach of first-time builders who are willing to learn as they go. Dimensioned drawings are provided for most of the boat’s components, so lofting isn’t required. The plans provide full-sized templates for the rudder and daggerboard, which have foil sections designed to produce good hydrodynamics.
While the Sei is not a cartopper, the hull is light enough that I could easily pull it by myself onto a dock, or slip it back into the water. The light lapstrake hull has internal structures—sealed buoyancy chambers fore and aft, rowing thwart, daggerboard case, and mast partner—that provide additional stiffness. I had been wanting to sail a Sei ever since I watched a video clip of the little double-ender on YouTube. In it, John is at the helm, seated low in the boat with the tiller over his shoulder, weight well back for optimal trim, and the Sei is running easily downwind. The balance lugsail, a rig featured in many of John’s small boats, is sheeted square to the hull to catch the following wind, and the boat is moving well and passes another lug-rigged boat, a Welsford-designed Saturday Night Special, on a parallel course. The SNS is fast and designed specifically for speed off the wind; it’ll start to plane in anything much above 10 knots of breeze. But in the conditions captured in the video, the Sei is easing ahead of it. There isn’t enough wind for the SNS to really get up and go, but still, I thought, the Sei might be worth a look. I paid a visit to John in New Zealand not long afterward, and got my chance to try it out.
Designer John Welsford, seen here at the oars, rows several hours every week for exercise. He designed the Sei to row well not only for auxiliary power, but for pleasant outings when the sailing rig is left ashore.
The Sei is an excellent performer under oars. I spent a morning rowing up a tidal estuary, slipping along with barely any effort. The tide was dropping, leaving the edges of the river shallow enough in places that the blades of the oars were hitting the bottom on each stroke, but that was no challenge to the Sei’s 6″ draft. With the mast, rig, and rudder left behind, the boat was well under 200 lbs. I felt like I was riding a windblown leaf. The Sei is nimble and quick for easy maneuvering—pull one oar and it spins 180 degrees—and yet it tracks well, thanks to the keel and skeg. The ergonomics are well suited to long rows. The rowing thwart is positioned for proper fore-and-aft trim and is high enough to be comfortable seating. I could have gone on rowing all day.
With its flat bottom and wide beam, the Sei was stable enough in flat water for me to stand up in and move around with reasonable care. That’s a big asset for cruising, where long days aboard may be required. And with no transom, the boat shouldn’t drag too much with a passenger in the stern seat. Plans call for 8′ 6″ oars, which will move the boat efficiently and still stow aboard without much fuss.
The Sei carries its beam well aft, which, combined with the fine entry, creates a noticeable fore-and-aft asymmetry. “When sailing a small boat, the crew weight tends to be aft of ’midships,” Welsford says, “so it pays to have the boat’s center of buoyancy in the right place to support this weight. This gives a very fine entry and a fatter stern, which much reduces pitching while sailing upwind, and also makes the boat more stable.” And, with the beam much narrower at the waterline than at the gunwale, the center of buoyancy moves very rapidly as the boat heels, quickly increasing the resistance to further heeling. Despite the Sei’s flat bottom, the fine entry minimizes pounding, and thanks to “some trickery with the rocker” as John explains it, the boat leaves hardly any wake—a sure sign of a slippery hull.
The daggerboard, seen here partially raised for less drag on a downwind run, is within easy reach of the sailor and its short case doesn’t overly compromise the seating area.
Of course, any lightweight unballasted boat can be capsized, even one with as much inherent stability as the Sei. In his capsize testing, John confirmed that the sealed buoyancy compartments in the bow and stern will keep the boat afloat, while foam blocks strapped under the rowing thwart provide enough additional lift to make the Sei easily recoverable from a knockdown, even in conditions likely to cause a capsize in the first place. The boat’s buoyant wooden mast and yard prevent turtling—another advantage of the balance lug rig.
I didn’t have the chance to take the Sei out cruising, but I did manage to wrangle a couple of hours at the helm under sail. With the unstayed mast and simple balance lug rig, setup time was minimal. Ten minutes after backing the trailer down the launch ramp and sliding the boat into the water—a task made easy by the flat bottom—the boat was ready to sail.
Sitting in the bottom of the boat is comfortable and provides a good view forward under the boom.
John went out first and sailed a few laps through the many boats moored nearby, jibing and tacking quickly in the narrow waterway. When it was my turn, I shoved off into knee-deep water, hopped aboard, and settled in with the sheet in one hand, tiller in the other. The boat was moving almost before I sheeted in. In just a few seconds the water was deep enough to lower the daggerboard and drop the rudder completely.
The mooring field was tight, and my attempt to avoid it by edging along the river’s edge ended abruptly when the daggerboard struck the sandy bottom and brought the boat to a grinding halt. No problem—I simply pulled the board halfway up, let the boat slide free, and headed back toward deeper water. Negotiating the obstacle course of moored boats proved simple, too, despite fickle winds that brought sudden gusts from all directions. The Sei slalomed nimbly through the moorings, tacking and jibing reliably, and accelerating quickly. With just a hint of weather helm, a light touch on the tiller was enough to steer by, even in the gusts.
In such a small, light boat, the helmsman should sit on the bottom to keep weight low and centered. I found this perfectly comfortable, leaning back against the hull, and with the boom safely overhead, visibility was excellent. With no long centerboard trunk to get in the way, it was easy to switch sides at each tack. Though I normally prefer a pivoting board, the daggerboard, with its shorter trunk, is definitely the most workable option for the crew.
The Sei has a fine entry and its greatest beam is aft of center where it can better support the weight of the crew.
As with all of my favorite small boats, the Sei’s controls—halyard, downhaul, sheet, and tiller—are simple. The balance lug rig relies on a powerful downhaul to maintain luff tension, and as a result, the Sei’s 76-sq-ft lugsail is largely self-vanging. It’s safe and controlled when jibing, and easy to reef. For a small sail-and-oar boat, I wouldn’t want any other rig.
Like all double-enders, of course, the Sei is small for its length compared to a transom-sterned boat. While it’d be comfortable to take a passenger or two while rowing, and the hull could easily handle the weight, a Sei would quickly start to feel crowded under sail. While you might be able to fit someone else in now and then, I’d prefer a bigger boat if hauling passengers were a priority. It’s as a solo boat that the Sei really shines. You could easily haul enough gear for a week or two of solo camp cruising.
All too soon I had to head back to the ramp, but I’d seen enough to know that the Sei was a worthy addition to the John Welsford design catalog. Simple and lightweight, good-looking and well-proportioned, easy to launch and recover, quick to rig, a joy under oars, and a delight to sail, this is a boat that ticks all the right boxes. With a boat like the Sei, there’d be no excuse not to get out on the water, even if it’s only for an hour or two. If the 10 minutes required for rigging is too much, grab some oars and leave the rig behind. If you have more time, load the Sei up for a week on the water. Either way, you can’t go wrong.
Tom Pamperin is a freelance writer who lives in northwestern Wisconsin. He spends his summers cruising small boats throughout Wisconsin, the North Channel, and along the Texas coast. He is a frequent contributor to Small Boats Monthly and WoodenBoat.
In 2011, in anticipation of retiring after a career as a research engineer, I decided I’d build wooden rowing skiff. I wanted a boat with traditional lines—particularly one with a vertical stem and a wineglass transom—and an easily driven hull, so the waterline would have to be longer than 12′. The 17′ Whitehall I found in the catalog of designs from Glen-L was just what I wanted.
I ordered the plans, and the package I received included full-sized patterns for the molds, transom, stem, breasthook, and knees for the transom and thwarts. A table of offsets is provided, but the full-sized patterns make the offsets and lofting unnecessary. The 1/8-scale drawings show the plan and overall profile, keel profile, construction details, and lines.
For transferring the drawings to the wooden stock, I ordered carbon transfer paper from Glen L. I recommend asking Glen-L for rolled drawings, otherwise you’ll receive folded drawings. The creases in the patterns made it difficult for me to obtain precise sectional shapes. The carbon paper came with a good tip: Coat the inside of the station forms with white paint before transferring the section drawings. This way the builder always knows what controls the complex curves of the Whitehall design.
Joe Titlow
Glen-L advises against lengthening the Whitehall from its designed 16′ 11″, but approves shortening it 10 percent to 15′ 3″ by reducing the mold spacing.
The Whitehall is composed of 120 planking strips bent cold over molds. The instructions suggest the hull can be stripped with hardwoods (Honduras or Philippine mahogany) or softwoods (western red cedar or Sitka spruce). The plans estimate a mahogany Whitehall will weigh about 350 lbs. My boat, STELLA, has a cedar hull with spruce trim and weighs slightly over 200 lbs. A light skiff has many advantages. It can accelerate more quickly, go faster, and be more responsive—all of that adds to the fun. At launch sites it is easy getting the Whitehall on and off the trailer, and two can easily carry it.
The instructions note that the builder can choose to use traditional glues, such as resorcinol or marine epoxy. This is just an indication of the bygone era when the instructions were written. Marine epoxies are today’s obvious choice.
I cut my planking stock from 24′-long 2×14 cedar boards. The strip construction for the Whitehall differs from the method widely used for canoes and kayaks. The strips are thicker and glued together with epoxy rather than carpenter’s glue, giving the hull greater strength, resistance to water, and durability. I put a resaw blade on my bandsaw and made 1/2″ x 3/4″ strips. The Glen-L instructions briefly discuss the option of milling bead-and-cove planking strips. Based on my experience, this is an essential step. Unlike flat-edged strips, the mated beads and coves almost snap into place, aligning themselves and closing the gaps. While you can buy bead-and-cove strips ready-made, the cost of the size of strips required for the Whitehall was prohibitive. I used a shaper to mill 5/16″-radius bead and cove profiles.
SBM
The Whitehall was designed for fixed-thwart rowing, but its long waterline and easily driven hull make a sliding seat a fitting addition.
The instructions mention the option of covering the completed planked hull with fiberglass cloth; I found additional advice in The Gougeon Brothers on Boat Construction. I applied 4-oz cloth with five coats of epoxy inside and out, resulting in a composite structure with a bending strength that is many times that of the cedar alone and abrasion resistance for trailering and landing on gravel beaches. The Glen-L plans recommend painting the hull, and while marine enamels will do the job, the beauty of the wood is lost. I finished my Whitehall bright, protecting the epoxy with a high-grade marine varnish.
During construction I did some things differently than called for in the plans, but I do not see these changes as fixes for shortcomings in design. I believe the aim was to keep things simple to encourage amateur boatbuilders to take on the project. Here are the refinements I made, none of them essential, and all mean more work.
Joe Titlow
Even when lightly loaded, the Whitehall gives up very little waterline length.
I chose to do the strip-planking according to what the Gougeon company calls the “Master Plank Method.” It starts with the first strip laid on the midpoint between the sheer and the centerline of most of the molds (running fair across those nearest the bow) and results in a hull with the run and grain of the planks emphasizing the sheerline, which is only important with a bright-finished hull. It looks great, particularly in the bow and stern areas.
The planking strips near the keel have to run straight, so I did a “Gougeon Double Run,” which meant switching to strips applied parallel to the keel and making the transition between the two areas along a fair curve. [Editor’s note: The strips closest to the keel take quite a twist from ’midships out to each end. While the author worked all of the strips cold, steaming the ends, or wrapping them with rags and pouring boiling water over them, would help the ends come home with less strain.]
Ray Putt
The Whitehall’s long straight keel is about 3″ deep and assures straight tracking. At speed here, very little wake is showing at the bow, an indication of the boat’s fine entry.
The Glen-L design shows eight laminated thwart knees 3/4″ thick. I made several knees to this design and while they were strong enough, they looked undersized on a 17′ skiff. I ultimately made the thwart knees, transom knees, and breasthook all 1″ thick, a small refinement, perhaps, but one that looks right aboard the Whitehall.
The instructions mention foot stretchers; while they’re important to a powerful stroke, I had in mind from the beginning adding a sliding seat. To support the tracks, I installed two parallel beams, secured under the three rowing-station thwarts and notched to sit flush with their tops. The beams also support the tracks for the racing-shell stretchers. This enhancement with the foot stretchers is essential for getting the maximum performance with the sliding seat.
Ray Putt
As with most rowing boats with wineglass transoms, the stern is depressed with a passenger in the stern sheets and the rower amidships and coming up to the catch. Even so, the bow remains low and the hull is not badly out of trim.
I launched STELLA in August 2015. Between receipt of the Glen-L plans and first launch, I spent 1,500 hours on the project, more than half of that fairing, ’glassing, sanding, and varnishing. I spent $10,448 on the materials to build the boat.
When I pulled on the oars the first time, I was amazed and delighted with the performance of the Glen-L design. The Whitehall is easily driven, runs straight, and is stable, although initially tender. A solo rower (or sculler, more properly) can easily sustain 4 knots. The Whitehall has a beam of 4′ 6″, appropriate for oars 8′ to 9′ long. Mine are 8′ 6″. For tandem fixed-thwart rowing the stretchers are removed and then two rowers can sit on the thwarts between the tracks. It’s lots of fun with two pulling, and there’s plenty of distance between the fore and aft rowing stations to avoid a clash of blades. I have seen pictures of other 17′ Whitehalls rowed with three at the oars, so it’s possible, though we haven’t tried it. It comes down to a question of elbows and knees.
Glen-L notes that the Whitehall can carry six; we’ve only had four adults aboard in reasonable comfort and safety, but there is room for two more.
Now that we have the Whitehall, members of my family would rather row than walk on the beach, a sure sign of a good design. The boat is not too big to use as a dinghy for a larger vessel, or too small to provide a workable platform for scuba diving and snorkeling.
The light weight of my Whitehall makes it easy to move off and on the trailer. The stock trailer I bought and modified for the boat weighs about 300 lbs, so the load is an easy tow with my Mini Cooper Sport. The month following the launch of the Whitehall, christened STELLA, my wife and I trailered the boat 1,300 miles from southern California to the Wooden Boat Festival in Port Townsend, Washington. We were delighted with the positive reception the boat received by attendees and by rowing aficionados in particular. We’ve made the trip three more times since then. The Glen-L Whitehall is a great boat and a real crowd pleaser.
Joe Titlow is a retired research engineer, working primarily in the aerospace industry. Besides building small boats, he constructs small buildings and furniture for his wife, two daughters, and grandchildren. Joe has owned and raced a 27′ Soling sailboat for many years, and he has been a member of the San Francisco Yacht Club for 40 years. Throughout his career he has maintained a professional interest in the dynamics of sailing vessels.
Whitehall Particulars
[table]
Length/16′ 11″
Beam/4′ 6″
Hull depth forward/2′ 6″
Hull depth amidships/1′ 10″
Hull depth aft/2′ 2″
Weight/ about 350 lbs
Displacement at 9″ waterline, four aboard with average weight of 150 lbs/945 lbs
In a clearing rain and soft mist LITTLE JOY slid through calm water to the middle of the Mississippi River, about 2 miles below Lock and Dam #1 in Minneapolis, the highest navigable on the Mississippi River. The river, here at Hidden Falls, is only 100 yards wide, clear and cold, with a gentle but steady flow. With a smile for my wife Xiaole, who was seated comfortably in the stern, I put my back into it, rowed out to mid-river, and caught the current that flows south to the Gulf of Mexico.
Photographs by Xiaole and David Hudson
After a 1,100 mile road trip from Philadelphia, we put in a Hidden Falls Park on the southern fringe of Minneapolis. The river was hardly looking like the Mighty Mississippi I’d imagined.
Our plan, well my plan, was to row/sail down the entire 1,800 miles of the Mississippi River in a 17′ dory I built in my backyard. Xiaole (pronounced Shihow-luh) wore a bulky, bright orange PFD. She is not the strongest swimmer, and we debated whether she should even come along. We eventually settled on having her come along for just the first week.
After just 3 miles of rowing, the tall office buildings of St. Paul appeared around a bend in the river, rising right along the eastern bank. Steel barges, 35′ wide and 200′ long, were tied on both sides of the river. A towboat just as big, with twin exhaust stacks and a square bow, idled next to them.
As we approached the first of the four bridges in downtown St. Paul, the river was quiet and we were at ease. Beyond the fourth bridge, the traffic of tows and barges would demand our close attention.
We moved with caution and worked our way past the barges and towboat. Two narrow channels ran underneath two successive bridges. A towboat underway now and pushing two barges passed us in the left channel. More barges and towboats slipped by as we put downtown St. Paul behind us.
Downstream from the city, the banks became heavily tree lined, and we made our way between small wooded islands and past the mouths of numerous back channels. A pair of bald eagles, perched high on a leafless tree, peered down on us. This was more like it, but what wasn’t more like it were the pleasure boats. It was Labor Day Sunday and they were out in force, enjoying the last weekend of summer. There were cruisers and houseboats, pontoon boats and jet skis, and even some I would call yachts. The one thing they had in common were motors and speed. Pulling with our oars at 3 mph, we felt we did not belong.
We took a break on a muddy beach just below St. Paul. This section of the river is quite narrow and crowded with tows.
Camping spots were plentiful among the islands and wooded shores, but unfortunately, the good ones were occupied with the pleasure boaters spending the night on the river. We finally managed to find a small grassy spot on a point of land, set up the tent, and eat some noodles with the last of the evening’s light. We had gone less than 22 miles on our first day, far less than I’d planned, but I was satisfied. We were off. Soon after we zipped the tent door shut, I fell asleep, exhausted.
We pushed off by 7 a.m. the next morning and rowed into a side channel warmed by the newly risen sun. The pleasure boaters were all still asleep and we had the river to ourselves. Several flocks of white pelicans flew low overhead, their white bodies bright against the blue sky. A turtle, balanced on a log, basked in the morning sun, then slid into the river as we drew near. An immature bald eagle, big but lacking the white head, flew past as another sat high in trees and surveyed the river.
Roger Siebert
.
We rejoined the main channel after passing through Baldwin Lake as the pleasure boaters began to wake up and head home. Roaring engines followed by 2′-high wakes would make me break my rowing rhythm. I would turn LITTLE JOY square to the waves and ride them out. Eventually, at the sound of the engines, my chest would tighten.
It rained on and off throughout the afternoon, but we made 35 miles and called it a day at Prescott, Wisconsin. Heavy rains were expected that night and through the next day so we left LITTLE JOY at a small marina, free of charge, and walked to the only motel in town. I was happy with the mileage, but I was exhausted and the motorboats added a new level of anxiety. “Are we too old for this?” I asked my wife. “We are not too old,” she said with a reassuring smile.
Not far from Prescott, Xiaole sought a little cover on a mid-river island during a violent summer storm. After the first three days, we encountered little rain.
The clouds were dark and heavy the next morning, and we set out in a light rain. We decided to make a run for a casino resort about 11 miles away. We could hole up there for the night when the storm came through. Right away the rains increased and got so heavy we pulled ashore and stood under the trees. A′’-long northern water snake slowly emerged from the trees, slinked onto the sand, and lay there near our feet.
We rowed off the river into Sturgeon Lake, tied up at the Casino marina, and spent the afternoon and night warm and dry in a hotel room as we watched the rain come down in torrents. It rained over 5” overnight and in the morning, the gear we left in LITTLE JOY floated in 8” of bilgewater. I started to bail.
The sky, now a brilliant blue, shimmered off the clear surface of the river. Still at the oars, my wife not yet ready to take a turn, I rowed easily down the middle of the river. There were no pleasure boats, no whining outboard motors. The Tuesday after Labor Day brought peace and quiet.
I enjoyed the warmth of the summer sun on my back and the company of my wife as we wound our way mile after mile downriver to Lake Pepin. At 20 miles long and 2 miles wide, it’s the largest lake on the river. The north wind that had brought clear skies was hard from the north, straight down the lake.
LITTLE JOY has a simple lug sail. I had sailed before: exactly three times, in light wind, and not competently.
Lake Pepin was big enough to try a little sailing. It was fun, fast, and exciting. Unfortunately, I was new to sailing and my sailing skills weren’t up to the task. This was the first and only time I tried sailing on the river. The bluffs all around were a common sight from Minnesota down to Iowa.
I hoisted the sail and pulled in the mainsheet. Off we went straight down wind. I squatted low on the middle thwart and Xiaole hung on tight in the stern as we flew over choppy waves down the middle of the lake. With growing confidence but ample anxiety, I guided LITTLE JOY 10 miles and aimed for a small point of land jutting out just north of Lake City. I hit it perfectly…by which I mean I hit it. The rocky beach was being pounded by small waves and, combined with the strong wind, bashed my boat against the rocks. I got Xiaole out of the boat and safe on land.
The campground was actually a half mile upwind. I took the sail down and worked my way back by pulling the boat along the shore and by rowing. Hok-Si-La Campground was empty, and we set up camp protected from the wind by the trees lining the edge of the beach. The exposed sandstone of the 400’ bluffs on the far side of the lake glowed in the warm light of the setting sun. As the wind died down, Xiaole and I ate noodles and eggs and watched the stars come out over the lake.
Xiaole used the paddle to contribute to our downriver progress. It wasn’t very effective so she didn’t use it often but enjoyed paddling when she did.
The next day we reached the south end of the lake, rowed along the 1/4-mile-wide river to Wabasha, and spent the night on a sandy beach 6 miles downstream from town.
The next day was leisurely, spent entirely on the river, covering 26 miles and ending camped on the tip of an island shaped like a crooked finger pointing upstream. We were on the river early the next day. Winona was just 3 miles away, and we left without breakfast.
Five miles upriver from Winona, Fountain City is typical of many river towns, nestled under the bluffs and stretched out along the river.
The current was moving 3 mph as we approached Winona, so I rowed LITTLE JOY to the shore just upstream from the dock. Xiaole was ready with a line. Approaching the cement dock, I spun around and pointed the bow upstream as we got close. The current carried us past as Xiaole threw the line around an oversize steel cleat and tied us off.
As we set out for town, I had my heart set on pancakes. After a search of the main street, we came up empty. We settled for an artsy coffee house, and I had to content myself with an enormous cinnamon bun and a cup of coffee. After days of noodles and fried eggs gritty with sand, this would have to do.
Great white cliffs begin at the confluence of the Illinois River and the Mississippi at Grafton, Illinois, and run 10 miles down toward Alton, Illinois. The Great River Road, a National Scenic Highway, was my companion on and off and runs right below the cliffs here.
Xiaole’s leg of the trip was over and she caught a bus to head back home. I walked back to the river alone. Fifteen miles downriver, I pulled ashore and made camp on an island directly across from Great River Bluffs State Park. Sitting alone on the sandy beach, I dined on fried chicken and cold iced tea from the resupply I did in Winona. Steep tree-covered bluffs rose before me topped by two 500’ peaks, the highest 200′ of each were sheer, exposed rock faces of dolomite. The cliffs run on both sides of the river, north and south, for dozens of miles; they closed in on the river as night fell.
Rising with the sun I stretched and let out a moan. My back was stiff. I’m 55 years old and a stiff lower back is nothing new. To add to that, four months ago, I separated a rib swinging a golf club and I wasn’t sure it was completely healed.
I took a break in a spot of shade to give my back a much-needed stretch. This beach was exceptional though not uncommon for a camping spot. Minnesota and Wisconsin both provide, free of charge, sandy open beaches for camping and day use. This would change as I got to the states farther south.
The two-man backpacking tent I set up on the beach is barely big enough for one person and a few overnight items, so I left most gear outside or on the boat. Packing up was easy except for the stooping to set up and tear down the tent—my back made it slow work.
I rowed in silence. With Xiaole gone, the aft seat was now empty, and beyond it is an expansive view of where I had just been.
I had rearranged the gear to trim the boat and stowed the sail away for good—the river was too dangerous for my sailing skills. I frequently looked over my shoulders, left then right, looking for obstacles. There were plenty. Fallen leaf-bare branches, uprooted stumps, and even entire trees floated past. Channel buoys, concrete channel markers, wing dams, river-wide dams, and bridges all stood immovable and the river wrapped around them.
It was a dangerous game to play, but I passed through this spillway and underneath the massive pivoting gate. Looking upstream, as here, it is easy to see the drop to the downstream side of the dam, but when I approached a spillway from the upstream side it was hard to determine the water level on the far side. It could have been a dangerous 6’ drop. The water level was very high because of the heavy rains in the upper Midwest, so many dams had the gates raised to let the river flow through unimpeded.
I was lost in the routine, daydreaming, when Bang! I was thrown forward then back, whiplashed and jolted. A shamrock-green steel buoy, as round as an oil drum and rising higher than my head went by in slow motion, scraping along the gunwale. I quickly headed to shore to inspect the damage.
Other than a small dent on the bow and a long green paint smear on the port gunwale, LITTLE JOY was fine. I, however, grumbled to myself for allowing such a potentially dangerous thing to happen. The Mississippi River, starting at the Gulf of Mexico all the way up to Minneapolis, is dotted with hundreds of red and green channel markers. Looking over the stern I’d see the wake left by LITTLE JOY’s passage through the water, and it was easy to forget the water itself is moving. Buoys, while they’re fixed to the bottom, appear to be charging upriver like submarines with only their sails showing. I had hit one head on, but it felt like it had run into me.
I passed the Effigy Mounds National Monument, where hidden in the woods are earthen mounds in various animal forms built by native people in the first millennium.
After nine days on the river I’d traveled 172 river miles and crossed the border from Minnesota into Iowa. That was only on the right bank—I still had Wisconsin on the left bank—but still, it was reassurance that I was getting somewhere.
Marquette, Iowa, is a village of only a few hundred people that lies in the shadow of one of the 130 bridges that span the Mississippi. After rowing under the bridge, I pulled up to a floating wooden dock where I met a man with a bushy blond mustache, cargo shorts, and high-top work boots. He gave me dock space, a giant cup of coffee, and pointed me to a place I could finally get a pancake breakfast.
Back on the river, I had a view of the bridge that carries US-18 across the river. Its single powder-blue steel arch stretching high above the deck for the roadway blended in with the cloudless sky behind it. Beneath the bridge I got a glimpse of a tow heading downriver toward me.
The bridges spanning the river come in many shapes and sizes and include many old, low railroad bridges that have a lift or a swing section that has to be moved to allow bigger boats to pass. This more modern highway bridge at Marquette is prettier than most. The tow seen here under the bridge would soon pass close by.
On the Upper Mississippi a “tow,” as it’s called, usually consists of a towboat and a set of barges, three abreast and five end-to-end that are cabled together into a rectangular raft. Each barge is 200′ by 35′, so a 15-barge tow with a 200′ towboat is 1,200′ long. I learned that the thousands of tons of cargo a tow carries is equivalent to a railroad train 3 miles long or a convoy of trucks 35 miles long.
The towboat, its two diesel engines whining, steered under the bridge close to the Iowa side following the marked channel. When it was a mile away, I moved tight to the Iowa shore knowing the tow would be back in the middle of the river when it passed. Ten yards from shore I sat and waited. The water along the shore was emerald green, covered by duckweed; round leaves no larger than 1/4″ floated on the surface in large mats, extending unbroken for hundreds of feet.
The bank at the river’s edge rose sharply about 10′ above me to a railroad. I heard a distant rumble and within minutes a freight train roared toward me. The engineer leaned out of the cab window of the red Canadian Pacific locomotive. Our eyes met and I waved. He gave me two short blasts of the horn as the train thundered by.
Just then the tow reached me, and its 100′-wide three-barge bow pushed the river out of its way with blunt brute force. I waved to the pilothouse high above the deck. No one waved back. I turned LITTLE JOY, moved away from the shore, and headed straight into the churning wake. LITTLE JOY rode over the waves with ease.
Tows passed me up to three times a day. They were going both upstream and down, and I kept an eye on the ones coming upstream, behind my back, even though once spotted there was plenty of time to get out of the way.
The next day I rowed 27 miles and stopped at a charmless county park at Mud Lake on the Iowa side of the river. I tied LITTLE JOY next to a concrete boat ramp. I stood, stretched my back and walked to a campsite under some large shade trees in easy view of the ramp. Still stiff from the day’s row, I hobbled around the end of an 8′ white panel fence separating the marina from the campground to see about keeping LITTLE JOY there for the night and maybe getting a hot meal.
This was the best camping spot in Illinois. I normally didn’t pull LITTLE JOY completely out of the water but the earlier waves forced me too here. My high-class bumpers are made from blue pool noodles.
I hadn’t shaved or washed my clothes for two weeks and could hardly stand up straight as I crossed the paved parking lot to the marina. I must have looked more indigent than adventurous, and I wasn’t surprised when a pickup truck came through a tall chain-link gate and stopped. “Can I help you find something?” said a fit man wearing a golf shirt and neatly groomed hair. “The restaurant?” I said. “Yeah that’s closed. I thought I would save you the trouble,” he told me as he waited for me to leave. I could see that everything was closed up but I stood there for an extra-long moment before turning around and hobbling back.
High water sometime made finding a suitable campsite difficult. This narrow beach by the water’s edge ended up being one of my favorites. The beer can and others were left by a previous occupant. Some people just don’t get it. Overall the places where I camped were clean and free of litter.
In the morning, I crawled out of my tent, relieved myself on the marina’s white fence, and as I zipped up I heard over my shoulder, “Hey is that your boat?” I nodded. “You can’t leave it there,” said a man in jeans and a forest-green ranger shirt. I explained that the man from the marina hadn’t been very friendly, and soon the ranger and I were having a friendly conversation about my trip. “That’s a really beautiful boat,” he said, then told me that kayaks and canoes stop here once in a while making the trip but he’s never seen a rowboat here.
He mentioned, more than once, that he thinks about doing a trip like mine, but work and family and…you know. I’d had that longing look before and it always made me grateful I’d had the opportunity. I wondered if the ranger would ever pursue his own adventures.
The first night I spent on a sandbar, I was camped barely 2’ above the water line and hoped the river wouldn’t rise while I slept. Lock and Dam #20 is downstream in the distance.
Four days out of Winona, I reached Guttenberg, named by the German immigrants who settled there in the 19th century. I opted for a night off the river at a cozy riverfront inn. I had not had a day’s rest since I started two weeks ago, so I stopped in Dubuque and got a hotel room. Two nights on a hotel bed helped my back some, and I was ready to get back on the river. I made my way another 17 miles the next day and spent the night on an Illinois island near Wise Lake. The following day I rowed towards Sabula, Iowa, the only Mississippi River town situated on a mid-river island.
“Where you headed?” asked a shirtless man with a ginger mustache and straw hat. He was at the helm of a well-maintained, well-appointed pontoon boat. Three other people were sitting comfortably under a huge bimini top. I was envious. It had reached 90 degrees Fahrenheit the past three days and the heat was sapping my strength. “Need a place to stay? Maybe a shower?” he asked. Within minutes LITTLE JOY was tied to his boat and I climbed aboard. We made the 5-mile trip downriver past Savanna on the left bank and Sabula on the right to their home.
“Is being towed going to bother you?” The skipper’s wife, Dee, asked as she offered me an ice-cold beer and a soft seat under the shade. “Yes, it will. Very much,” I replied downing the beer. Dave, behind the wheel, said, “It’s all part of the adventure.” He told me that he and his brother canoed the Mississippi a few years back starting in Lake Itasca and ending 800-plus miles later, right back at his home on the river.
The shower, laundry, air conditioning, pizza, beer, and a comfortable bed were small pleasures that I enjoyed all the more for having gone so long without them. While the only offer I took to stay overnight was made by Dave and Dee, there were others who extended invitations. Five third-shift workers from a local Nestle plant arrived at my island beach, their beach, actually, at 7:30 on a Friday morning to throw a Frisbee and have a beer after work. One offered his home to me if I stopped on my way by the next day. Pleasure boaters, townspeople, fellow river travelers offered me water, beer, food, a car ride or even a tow. Many just asked about my general well-being…almost always prefaced by “You’re doing this alone?”
Industrial complexes like this one were a common sight whether for agriculture, coal, stone, etc. Barges are pulled alongside, filled, and then sent down river. I was fascinated by the undulating white clouds being pushed by the coming storm, but not so fascinated by the violent but brief storm they brought. I took shelter on the leeward side of a tiny island.
The days passed and I rowed 25 to 30 miles a day. I passed Davenport without stopping. I passed Muscatine, once the pearl button capital of the world, past Oquawka, Nauvoo, and Keokuk, but stopped for the night in Hannibal, Missouri, to enjoy the hometown of Mark Twain. I had passed through 20 of the 27 locks and accompanying dams of the upper Mississippi. They are part of the 9’ channel project to allow commercial navigation all the way to St. Paul.
The Lock and Dam #19 at Keokuk is one of three dams that produce electricity. At the time it was built in 1913, its powerhouse was the largest in the world. I stayed well clear of spillway and took the lock; it lowered me 28’, the biggest drop of the trip.
In the morning, I rowed to a mid-river island a few miles downstream from Hannibal. My back was killing me and I couldn’t sit comfortably in the boat. I pulled LITTLE JOY ashore and stretched out on a small sandy beach, warming myself in the sun. My back had been bothering me again for several days, and the miles I had been making were less than I’d hoped for. I began to rethink my plan to reach the Gulf of Mexico.
A towboat chugged by the island pushing a 1,000′ tow. It was only a couple miles to Lock and Dam 22. I knew by the time I got there, the lock would be tied up for a couple of hours as the raft was separated divided into halves and passed through the 600′ lock in two operations. It would be a long wait for my turn.
When I approached the lock, the tow that had passed me was waiting at the entrance; I studied the 3,000′-wide dam, a long, dark line that stretched from the Illinois side out well past the middle of the river. Tight against the Missouri side were the concrete structures of the lock, and between them and the dam was a spillway with 13 bays, each spanned by steel-plate arches above gates that control the flow of the river.
This tow, bound upriver, is pushing a load of rock, probably for a riverside town’s levee.
I lingered above the lock for 20 minutes, but grew tired of waiting. I cinched my PFD and crossed the river upstream from the lock side over to the dam. The water level was high, and I thought I could maybe haul the boat over the dam.
The dam at its lowest point was still showing 2′ above the water, and about 7′ down to the water on the other side. I could not drag the boat over it. I surveyed the spillway. I had rowed LITTLE JOY through two spillways back upstream on the Mississippi, each time knowing it was a stupid idea. The river, a half mile wide above the dam, squeezes through a spillway less than a quarter mile wide, and waves and swirling eddies roar furiously through the gaps. An abandoned barge was wedged cockeyed in one bay, and branches and snags were piled up in others. I took it as a warning and decided to cross back over and just wait my turn at the lock.
I cinched my PFD even tighter and rowed upriver. I managed to travel a few hundred yards, then aimed at a spot just above the lock entrance. The river rushed past and picked up speed as it funneled toward the spillway. I pulled hard, angling the bow upstream. I passed by the openings of the spillway, and when I reached the protection of the lock wall I paused, caught my breath, and called the lockmaster on my VHF radio.
“Lock and Dam No. 22, this is southbound rowboat. I’d like to lock through.”
“Okay skipper, we’ll try to get you through after the southbound tow,” he replied.
When the upstream gates opened for me, I went in. LITTLE JOY floated alone in the middle of the enormous 600′-long, 110′-wide chamber like a toy in a bathtub. Rough, age-worn concrete walls 20′ high and two sets of matching battleship-gray steel gates sealed me in. The water began to drain.
“Hey!” came a voice from atop the wall. “You better have a plan when you leave. There is a 3-by-5 tow waiting to come through.” I had seen the 15-barge raft out in the channel on the downstream side of the dam when I rowed past the spillway crossing to the lock; I wasn’t concerned.
The downstream gates opened, revealing a 15′-high wall of steel blocking my exit—the blunt overhanging bows of the three lead barges. The deckhands on the tow yelled something and laughed. Unsure if the tow was moving, I pulled hard for a small opening between the concrete wall and the steel side of a barge. It was just wide enough for me to pass through.
I shot out into the churning water below the spillway. The towboat fired up its engines and began to move into the lock. I caught my breath, laughed with relief, and let the current carry me. The river, again half a mile wide, swirled lazily. Low, green, tree-covered bluffs ran along both shores. A bald eagle soared low along the treetops. There was not another boat in sight; astern, the dam slowly disappeared behind a bend in the river.
One of the largest beaches I saw in Illinois stretched several hundred yards with almost every foot of shoreline occupied on a beautiful Sunday afternoon. The question most often asked here was: “Hey, doesn’t that have a motor?”
A few miles more downriver I heard the growl of outboard engines. It was a sunny, hot Sunday in late September and weekenders were back out. I had reached St. Louis’s sphere of affluence. I had also reached a decision. I would stop in St. Louis and the end of the trip. My back pain was unbearable and I feared the lower Mississippi would prove to be even harder going.
I stopped in the late afternoon at large sand bar where other boaters were set up for a day on the beach. As the sun neared the western riverbank, they began to leave to make their way back to their marinas. As I set up camp, one of the last of the boaters, a woman in a one-piece bathing suit, came over. She was followed by three men with round bellies and a touch of sunburn. We had the usual conversation, they admired my boat, which made me stand a little straighter, then offered me a big bag of ice, a luxury I gratefully accepted.
“Do you have an anchor?” one guy asked.
“Nope. I’ll just pull it up.”
“Better anchor it. A barge will come by and wash it away.”
“Hope the critters won’t get you.”
“You know, if you set up over there, nobody will mess with you.”
I smiled. “Nah. Nobody will mess with me.” I was hairy and shaggy, dirty and smelly, hungry and lean. Nah, nobody would mess with me.
The marina at Alton, Illinois, is just upriver from St. Louis. The last lock and dam on the river, 1.5 miles downstream, was in view and another 5 miles from the lock, around the next bend was the confluence with the great Missouri River. The marina was full of fancy sail and power boats. The harbormaster gave me a small space for a large fee so I could leave LITTLE JOY for three days and a well-deserved rest, while I retrieved my truck and trailer from Minneapolis. Before heading to the airport, I walked along the St. Louis riverfront where the Gateway Arch, the symbol of St. Louis, stood glistening in the light of the setting sun. I climbed up to the walkway of the Eads Bridge, the same bridge that I crossed two summers ago on a cross-country bicycle ride. The same place where I saw the Mississippi for the first time. I walked out to the middle of the bridge. The river stretched south in a long, wide ribbon and glistened in the setting sun. I looked down. The river was no longer green, but brown with Missouri River mud and swirling around the gray stone pier below. Now doubled in volume, the Mississippi River from there flows unimpeded by dams for 1,200 miles to the Gulf of Mexico.
As cars flashed by on the other side of a low cement barrier just a few feet away from me, I raised my arms and let out a yell, “Yeahhh!” I did not complete what I set out to do, but I covered 650 river miles in 30 days. It was more than enough; I could go home.
David Hudson is a happy corporate refugee. As a teenager, he spent countless summer days rowing a 10′ aluminum pram around a small New Jersey lake. Later he cruised the Atlantic and Mediterranean atop the deck of a U.S. Naval helicopter carrier. Downsizing since the Navy, he has spent time exploring the rivers and lakes of New Jersey, New York and Ontario in a canoe. Putting his woodworking skills to a test, he built his 17′ dory, LITTLE JOY, and can be found, along with his wife Xiaole, rowing it up and down the Schuylkill River outside of Philadelphia.
If you have an interesting story to tell about your adventures with a small boat, please email us a brief outline and a few photos.
Screws can hold work pieces together in areas where clamps can’t reach, and fender washers spread the pressure over a wide area, minimizing the damage to the wood and helping prevent splits in lumber.
In our shop we have a lot of tools that have come to good use when working on wooden boats. One of the least conspicuous is a pile of small zinc-plated fender washers.
With oversize diameters and small holes, fender washers were developed for working on automobile fenders where the sheet metal would be distorted when pressed by smaller washers. I can’t remember where we came across the idea to use them in working on wooden boats, but I am glad that we did. We often encounter tasks that are beyond the reach of clamps, and a fender washer and a screw can pull parts together, like bending a plank into position on a frame, stem, or transom.
Peter Sibley
Bar clamps might reach across the side decks to secure the sheer guard for gluing, but screws and fender washers are a more economical approach, less expensive even than stainless or bronze screws that would be left in place after the glue cures.
We’ve tried to close gaps between pieces using the wood screws that will be the permanent fastenings, but found that method fraught with problems. The heads of wood screws can bury themselves, damaging the workpiece and then becoming difficult to remove without lifting and splintering the top fibers of wood. And the conical underside of a flat-head screw can act as wedge and split a plank end. The finer threads of silicon-bronze or marine stainless-steel screws may not bite as well into softer wood, and while those screws can be used to hold parts together, they’re not well suited to closing gaps. A screwdriver can also cam out of the slot in a softer bronze screw head, requiring replacement of the damaged screw. To avoid these problems, we use fender washers with drywall or deck screws as temporary fastenings while we drill for and install the permanent fastenings.
Peter Sibley
Screws and fender washers are especially useful holding the hood ends of plywood planks to the stem while epoxy cures.
Fender washers are especially useful when working with softer hardwoods. We once needed to pull a cypress plank tight to a frame during a repair and first tried using a single silicon-bronze wood screw, but the screw buried itself under the surface, did not have enough bite to pull the plank, and stripped out of the frame. We then tried using several bronze wood screws to distribute the load but ended up shearing some of them, and nothing is more fun than dealing with half a screw in a frame while the plank is not pulled tight. When we switched to a fender washer and a deck screw we fared much better. A deck screw’s star-drive head has an exceptionally secure hold on the driver bit, and the longer, coarser threads of the deck screw bit right into the frames and pulled the plank tight. Once the cypress plank was properly positioned and the permanent fastenings were installed, we removed the deck screw and used that hole for another permanent fastening. In some cases, we’d fill the hole with thickened epoxy or a wooden plug.
Peter Sibley
Screws and washers kept molten lead from seeping between layers of plywood for a centerboard that will later be epoxied together and sheathed with fiberglass.
We also use fender washers when working with plywood panels. The washers prevent damaging the layers of ply while the panel is being shaped to the molds and fastened. Without the washer, the screw head might crush the multiple thin layers of plywood, either leaving a lot of damage to finish, or even compromising the integrity of the panel. A rough-cut panel can be left on a mold for a few days to help preset a bend, making final installation easier. If the plywood is reluctant to make a bend you can help it along by covering it with towels, pouring boiling water over them, then covering it all with plastic sheeting to hold the heat. Use zinc-plated or stainless-steel washers—plain steel will stain the wood black.
A fender washer and a screw don’t cost much, under 50 cents for the pair, and a handful of them can get you through jobs where clamps can’t be used or you don’t have enough of them.
Kent and Audrey Lewis used quite a few fender washers during the restoration of their 1880s Mississippi River Skiff BARBASHELA and their 1950s Alcort Sailfish ZSA ZSA. More information on their continuing adventures can be found on their blog Small Boat Restoration. www.smallboatrestoration.blogspot.com
You can share your tips and tricks of the trade with other Small Boats Monthly readers by sending us an email.
Having the filters behind the user keeps them farther from the tool so the don’t have to deal with the worst of the dust.
Until I tried the Resp-O-Rator by Duxterity of Graham, North Carolina, I’d been using disposable dust masks and traditional respirators for years, but with my full beard, they didn’t seal properly against my face. My nose-blow tissue test always showed that I’ve been inhaling a bunch of dust. On top of that, I use prescription safety glasses, and both dust masks and my half-face respirator caused my glasses to fog up and ride high, so I often chose what I thought was the lesser of two evils—inhaling dust instead of risking an eye injury—and skipped the mask.
Some guys grease their beards with Vaseline to get a good seal with a respirator, but my beard is long enough that I just can’t grease it up enough for a proper seal. When I did try, the Vaseline inevitably migrated to my hands, tools, and whatever I was working on, and the mask became a slithery mess. Even with a shorter beard, I wasn’t going to go to that trouble for a quick, it’ll-only-take-a-second job.
The Resp-O-Rator, an odd-looking device with twin snorkels connected to disposable dust filters, isn’t compromised by a beard. The mouthpiece goes between lips and teeth, and the attached clip clamps your nostrils shut. To assemble it, a quick push and twist attaches the 4-1/8″-diameter filters to the tubes, and it’s ready to put on by removing one of the tubes from the mouthpiece, wrapping it around your neck, and reconnecting it.
Mike Franz
Inside the fixture equipped with the mouthpiece there are valves that keep the air-intake tubes free of exhaled breath.
Since my lips make the seal with the mouthpiece, I don’t need to worry about getting a proper seal against my beard. My safety glasses don’t fog or ride up. When I release the mouthpiece, the whole thing drops, completely hands-free, taking the nose clip off with it, and the Resp-O-Rator hangs comfortably around my neck where I can just let it ride until I need it again. With one hand, I can pop the mouthpiece back in and install the nose clip in less than 5 seconds, and I’m ready to go again.
The mouthpiece includes one-way valves to make sure you are not just rebreathing exhaled carbon dioxide. About the only downside is that condensation does occasionally drip from the downward-facing exhaust port. The large, replaceable HEPA filters pull air through both front and back faces, so it’s easy to draw air in through them. Their filtering efficiency is listed as over 99.97 percent, [removing particulate] down to 0.3 micron in diameter for a respirator rating of 100. The common disposable dust masks with two elastic straps are rated 95, or 95 percent of particles of at least 0.3 micron—assuming they have good contact to the face. The Resp-O-Rator is not suitable for filtrating aerosols, volatile organics, or particulates that contain oil, but neither are disposable dust masks.
If you are sporting a full beard, there’s a pretty good chance you aren’t getting a proper seal even with a certified mask, and for those without beards, you may find the Resp-o-Rator gives you a better seal than a dust mask’s elastics and metal nose clip. And on a hot day, not having half of your face in a wet rubber respirator can be a welcome relief. The Resp-O-Rator works well with glasses, and it’s comfortable and convenient enough to let it hang around your neck ready to be used instead of sitting on the shelf. When I’m in my shop, I’m always wearing my safety glasses and when I’m about to start creating dust, my Resp-O-Rator is the first thing I reach for.
Geoff Coley of Medicine Hat, Alberta, is a mechanical engineer whose first cedar-strip canoe was followed by a cradle boat for his first child. That was in the early 1990s; he is now working on boat No. 7 and dreaming about building a double garage so No. 8 can be just a wee bit bigger.
The Resp-O-Rator by Duxterity is available from Duckworks for $42.50 and from online retailers.
Is there a product that might be useful for boatbuilding, cruising or shore-side camping that you’d like us to review? Please email your suggestions.
The lights come with suction cups, as seen here, or with clamps.
Small-boat cruisers rarely travel at night intentionally, but sometimes we get caught out late or we need a predawn start to catch a favorable tide, like I did while rounding British Columbia’s Cape Caution last year. Between sunset and sunrise, we need navigation lights to comply with Coast Guard regulations and to ensure we are seen by other boaters. As our boats rarely have a built-in power supply, portable, battery-powered lights are a good solution.
There are a number of configurations that meet the regulations for unpowered boats under 20′, but for several years I have used two lights, a bow light and a stern light, from Innovative Lighting in Iowa. They are built with a molded body protected with shock-resistant neoprene; one light has a combined red and green lens and the other has a white lens. Their LEDs are powered by four AA batteries. They can be bought with either a screw-clamp mount or a suction-cup mount. I have the clamp mounts and clamp the bow light to the top part of my stem right forward. The stern light has an 18” pole with a clamp on the bottom, which I fasten to my transom. With both clamps, I use additional pads of nonskid material to provide extra grip and protect finish.
SBM
This suction-cup version of the bow light holds well to the arched-but-smooth varnished surface of this Whitehall’s breasthook. A tether secured to the treaded insert at the back of the light’s case provides security if the suction cup loses its grip. In testing, this light was left on for 80 continuous hours. At the end of that run, the intensity of the light had grown dim, but at 72 hours it was still clearly visible at 1/4 mile.
I made two modifications to fit the lights to my boat, FIRE-DRAKE. The bow light clamp, from the factory, is a parallel to the light, so if I were to apply the clamp to the sides of the stem head, the light would point to one side, rather than forward. To solve the problem and put the light at a right angle to the clamp, I filed a shallow notch in the housing and refastened the clamp bracket. The white light for the stern shines 360 degrees, which meets the requirements for powerboats and anchoring, but 135-degree visibility is required for sailboats and rowboats. I made a mask of Gorilla tape to cover the forward two-thirds of the lens, which isn’t elegant, but does the job and preserves my night vision when rowing.
The lights feel robust and have an O-ring that waterproofs the assembly where the lens screws onto the one-piece battery compartment. The push-button power switch has a soft rubber cover. The clamps are powder-coated aluminum U-channels with a fine-threaded coated steel screw and end pad.
To me, the lights appear at least as bright as built-in 12V powered lights, but I don’t have independent confirmation from other boaters how far they can be seen. I also don’t know how long the batteries will actually last, and the manufacturer makes no claims, but I have used them for an entire night a couple of times. I suspect that the life is likely in the dozens of hours at least, possibly hundreds.
The lights are rain-proof, but I discovered, accidentally, that if submerged in seawater for too long, the waterproofing does not keep the water out and the innards can corrode. It’s a good practice to take the batteries out of devices you won’t be using for an extended period, lest they leak and cause corrosion. I now keep the lights in a dedicated dry bag until I need them and take the batteries out between cruises. Having eliminated these operator errors, the Innovative Lighting units have been reliable.
Alex Zimmerman is a semi-retired mechanical technologist and former executive. His first boat was an abandoned Chestnut canoe that he fixed up as a teenager and paddled on the waterways of eastern Manitoba and northwestern Ontario. He started his professional career as a maritime engineer in the Canadian Navy, and that triggered his interest in sailing. He didn’t get back into boatbuilding until he moved back to Vancouver Island in the ’90s, where he built a number of sea kayaks that he used to explore the coast. He built his first sail-and-oar boat in the early 2000s and completed his most recent one in 2016. He says he can stop building boats anytime.
The running lights are available from Innovative Lighting for $31.98 each and from marine and online retailers for as low as $26.22.
Is there a product that might be useful for boatbuilding, cruising or shore-side camping that you’d like us to review? Please email your suggestions.
Peter stands behinds JIM, its sails newly raised and sitting on the trailer he built. Above him is the sign on his shop that reads: “Optimists only beyond this point.”
Peter Sibley and his wife Carole live in Murwllumbah, New South Wales, a dozen miles from Australia’s east coast, 19 miles if you go by boat down the Tweed River. Peter had set out to build a French pilot cutter that he had redesigned with the help of the late yacht designer Ed Burnett of Devon, England.
Wanting to do as much of the work as possible in his own shop, he started with logs, and that required some special equipment. He had once run a sawmill business, and for transporting logs, he had designed a gantry crane that he mounted on a flatbed truck; once he had the logs at his shop, he slabbed them with a horizontal bandsaw mill that he’d built, complete with hydraulic controls. To make his own bronze hardware for the cutter, he set up a separate foundry with a large furnace and made his own wooden patterns.
Peter had laid the keel for the cutter and was fully invested in the project when he had to bring it to a sudden and unexpected stop. One of his daughters was taken ill, and he and Carole devoted themselves to the care of their daughter and her children.
Peter still had bits of free time to devote to boatbuilding, but he needed to scale back. He shelved the cutter project and tossed around various designs as alternatives on the Woodenboat Forum, where over the past 18 years he has made over 74,000 posts and was recently elected BROTM, Bilge Rat of the Month, by his friends who inhabit The Bilge, the forum’s no-holds-barred venue. Peter didn’t find anything that was just right, so he commissioned Antonio Diaz to create a new design, the 24′ Kathleen Gee, a stout-looking little yawl drawn in the tradition of the small coastal cruisers by C.P. Kunhardt, author of Small Yachts: Their Design and Construction.
Life’s demands, as they often do, grew and occupied more of Peter’s time, and the Kathleen Gee, with a displacement of 10,000 lbs, was too ambitious a project to take on. He looked for an even smaller boat and found himself drawn to the lug-rigged yawls popular among camp-cruisers. He ultimately settled on an 18′ 4″ canoe-yawl, Jim, designed by Paul Fisher of Selway Fisher in Melksham, England. It was designed for stitch-and-glue plywood construction, but Peter preferred the more traditional look of lapstrake, so Paul advised building the design in glued lapstrake and drew up a lug sail in place of the gunter mizzen.
Duncan Gibbs
With a crew of friends aboard, Peter takes JIM’s helm for the boat’s first sail.
Peter began work on his Jim in 2012. He put his pattern-making skills to use and had bronze rudder and stem hardware cast from wooden patterns he’d made specifically for the boat.
As 2015 drew to a close, Peter had nearly finished the build, but the project was brought to a sudden halt. Peter was given a diagnosis of an aggressive brain cancer in its final stage. He had surgery on the tumor, but not all of it could be removed. Peter received a dose of chemotherapy and radiation, but his prognosis was grim. He was given six months to live.
A sign hanging in the front of Peter’s boatshop reads: “Optimists only beyond this point.” Peter applies that directive not only to his boatbuilding, but also to living. Six months came and went. Peter needed a trailer for the canoe-yawl. None of the commercial trailers available would have been a good fit for the boat’s pronounced rocker or the hull’s wineglass cross-sections aft, and Peter wasn’t going to settle for something that didn’t meet his high standards he sets for himself and his work. He built a trailer, from scratch. Late last year, three years after his diagnosis, an MRI revealed that the tumor had grown again and was inoperable. Another round of chemo and radiation was administered, but another MRI in January showed the tumor hadn’t been stopped by the treatment.
Duncan Gibbs
On her launch day, Peter’s canoe yawl performed beautifully and looked right. The Jim was originally drawn with a leg-o’-mutton mizzen, but the lug mizzen provides a more pleasing pairing.
After such a long struggle, to get the boat so close to the finish line and fail wasn’t an option, so two old boatbuilding friends, Nick White from Conrad Blocks and Keith Davis from Pelican Slipway, came down from Brisbane to Northern New South Wales and readied Jim for a preemptive launch. There were some cleats that had yet to be installed and the deck was ’glassed but not painted, otherwise Peter’s Jim was ready to sail. On February 13, a group of his friends gathered to rig, launch, and take Peter, now very weak, for the maiden voyage of JIM. Peter said, “The process of building was really enjoyable!” In spite of his condition he was clearly enjoying the sailing too. He had an enormous grin when he was grasping the tiller and commanding his little ship.
Duncan Gibbs
Peter Sibley, craftsman
In a recent post to the forum, Peter wrote: “I suppose it’s to be expected…. The end story after a life of reasonably high energy and the ability to do most of what I wanted to achieve. The medicos have made it plain there is no way back from a glioblastoma, they don’t go away. I’m disappointed that the game is up, but I’m 69 so can’t really complain. Here was NEXT BOAT, someone should build her!”
With gratitude for the example Peter set by his devotion to boatbuilding and to family.
Thanks to Peter’s friend, Duncan Gibbs, for his help with this story.
Editor’s note, May 28, 2019: We received word that Peter passed away on this day.
Peter’s Shops
Peter Sibley
The foundry has its own building, set apart from the wood-filled main shop.
Peter Sibley
The foundry’s furnace sits on a mobile frame that has a swing arm for the lid and a device to lift the furnace’s top half for easier loading.
Peter Sibley
The hardware for the boat started as wooden patterns to be molded in sand and cast in bronze.
Peter Sibley
The rough castings were ready for smoothing, drilling, and polishing.
Peter Sibley
For smoothing bronze castings, Peter uses a linisher/belt grinder that he built with plywood wheels.
Peter Sibley
After smoothing this gudgeon on his linisher, Peter drilled holes for the bolts. The next step was to push this shop-made broach, as it’s called, through the holes to make them square and hold the heads of carriage bolts.
Peter Sibley
After the broach has done its job, the hole is ready for carriage bolts.
Peter Sibley
The finished fitting for the bow painter is a strong and elegant piece of hardware.
Peter Sibley
The boatbuilding shed is filled with lumber Peter milled with his horizontal bandsaw.
Peter Sibley
When he was running a sawmill business, Peter made this gantry crane to pull logs up on his flatbed truck.
Peter Sibley
The bandsaw mill Peter built has hydraulic controls for easy operation.
Peter Sibley
The Jim nears completion. The table saw on the boat’s starboard side was mobile to make it easy to orient it for crosscutting or ripping.
Peter Sibley
The table saw is supported by four ball bearings that ride in slots on top of a wooden frame fitted with casters. A threaded rod, spun by a drill as needed, pulls the machine, and the bearings ride up the slopes cut in the slots, lifting the table saw from the floor.
Peter Sibley
Peter’s homemade planking clamps are tightened with wing nuts on bolts. To spin and tighten the wing nuts quickly, he put a slot in a piece of steel tube to straddle the wings and put a rod in the tube’s other end to fit a cordless drill.
Peter Sibley
The cleats for the canoe yawl were beautifully sculpted.
Carole Sibley
Peter’s friends are bonded together by something stronger than epoxy. From left to right: Gary Pick, Bruce Moffatt, Duncan Gibbs, Peter, and Tom Weiss
I was in my early teens when I bought a propane torch. I just wanted to burn things, but my father found it useful for more constructive uses, like making a case for drill bits. He always had racing shells in the garage, repairing them for crews in the Pacific Northwest, and the torch came in handy for making replacements for missing stretcher bolts. He’d file a small flat on a brass washer and set it in the slot of a brass machine screw, slip a 1″ length of copper pipe over the screw threads, and solder everything together with paste flux and lead-wire solder.
Dad used my propane torch to make this drill-bit case from a short piece of brass tubing. It rattled around in his tool box for nearly a half century and the bottom, soldered with lead, finally fell off. With a new bottom silver-soldered on, it’s good for at least another 50 years.
This is my replica of the stretcher bolts that my dad was making when he was repairing racing shells back in the ’60s.
When I built my first boat, a dory skiff, I didn’t consider making any metal fittings. I bought bronze pintles and gudgeons for the rudder but opted for oak tholepins over oarlocks and made all of the cleats out of hardwood. A few years later, a cruising canoe I was building needed a rudder, so I made one out of a discarded aluminum street sign, bent in a vise and pop-riveted together.
I made this aluminum rudder for the cruising canoe I built in 1983. The rudder held up pretty well, but the canoe, made of laminated paper—in the spirit of Nathaniel Bishop’s Voyage of the Paper Canoe—required constant repairs to keep it afloat during a 2,500-mile retracing of Bishop’s voyage.
Another one of my earlier metalsmithing projects was a stove box for my MSR model G stove. Made of aluminum sheet, brass hinges, and pop rivets, it contained and protected the flame, held the pot, and kept the fuel bottle secure on the outside of the box. The lid had wings that could serve as a wind break to keep the pot warm. The box made it possible to have hot lunches while underway, a great improvement in the quality of life aboard an open boat in unpleasant weather.
It wasn’t until I moved to Washington, D.C. and landed a job at the Smithsonian Institution that I learned I could do more with metal. I was hired by the National Museum of African Art as an exhibits specialist, part of the crew making display cases and installing artifacts. For a few weeks I assisted contract workers brought in to make mounts to support the objects that would be put display. They used brass rod and flat-bar, annealing it to make it pliable and joining pieces with silver solder with an air-acetylene torch. I learned a lot watching them work, and after they left I did much of the mount-making for the museum.
The museum staged an exhibition of the work of sculptor Sokari Douglas Camp and filled the main gallery with her life-sized metal figures. Many of them were motorized: a dancer stomped his feet, a small girl clapped her hands, and a boat stroked with six oars. During the last stages of the installation, one of the sculptures failed, and Sokari asked me to weld the broken part. I’d never worked with an oxy-acetylene torch, so to be on the safe side, I wheeled the museum’s welding rig outdoors to the loading dock, read the instruction manual, and made the repair without setting the museum on fire.
These brass rudder fittings for my lapstrake canoe were silver-soldered in 1988.
While I was working for the Smithsonian, I was living in a home just outside of D.C. and building a tandem decked canoe in the basement. It is said, “To a man with a hammer, everything looks like a nail,” and with my access to the museum’s metal shop, all of the fittings I needed for the canoe looked like metalsmithing projects. I made gudgeons for the rudder, a grab handle for the bow, and pad-eyes for the anchoring the sailing rig.
The handle on the bow of the canoe had to be silver-soldered in stages, as not all of the joints could be worked at the same time. The first joints were soldered with hard silver solder so they wouldn’t melt when the brass was heated for the second set of joints and soldered with medium solder with a lower melting point. The last joints were done with easy solder with a still lower melting point. The tube at the front is for a staff to fly my family’s private signal.
When I left D.C. in the late ’80s and returned to Seattle, I made a soldering station around an air-acetylene torch a friend I’d built a boat for had once used to make jewelry. I got a job making mounts for the Seattle Art Museum and continued making hardware for boats I built and for making simple tools.
The brass gudgeons on HESPERIA’s transom have a patina of verdigris, just like the Statue of Liberty. The projecting part is made up of two layers of brass soldered together for strength and to reduce wear. I made these fittings in 2011.
HESPERIA’s rudder had matching gudgeons instead of pintles. Brass loses some of its temper when heated for soldering and a projecting pin would not likely have adequate stiffness. A brass rod, heated only on one end to bend it, runs through all four gudgeons. I mounted the rudder gudgeons here on the the rudder’s forward edge, and through-bolted it to nuts inserted in the mortices. My plan was to fill the mortices with oak plugs, but I never got around to it.
To make a tool for reefing seams, I heat the tang of a file until it is cherry red and then bend it into a hook. A grinder and belt sander shape and sharpen the point.
In 2007, an elderly friend of mine passed away and his family wanted to find good homes for some of his tools. I was given his oxy-acetylene welding equipment. I didn’t do anything with it until my son and his friend built BONZO, a 19’ Escargot canal boat, and we decided it needed a wood-burning stove for winter outings. I scanned the web for small stoves and found some meant for using in canvas wall tents, but they were expensive and too large for the space we had available in the boat. I had the torch and a large sheet of 1/16″ steel, so I decided to figure out gas welding.
Every angle that can be bent is a joint that doesn’t need to be welded. To make straight, tight bends, I made a sheet-metal brake, using the frame of an electric drain-pipe rooter as a base, a few pieces scavenged from a retired boat trailer, and odd bits of mild steel. Gas welding put it all together.
The weld I’d made for Sokari was only 1″ long, so I didn’t know that a long seam required tacking to keep pieces aligned. Consequently, some of the edges I welded are far from straight, but as things went wrong, I did more research and applied what I’d learned. In time I got the hang of heating the steel and feeding welding rod into the liquefied metal. When I ran out of the few rods I had, I straightened wire coat hangers and welded with them.
HESPERIA’s wood stove, shaped to fit in the cabin corner, was my second gas-welding project. The seams are not perfect, but much straighter, thanks to tack welds. A mica window in the door lets the firelight illuminate the cabin at night. The vertical pipes at left are parts of a heat exchanger that supplies the sink, set in the opposite corner, with hot water. The exchanger is made of copper pipes silver-soldered together. The cabin roof has been lowered here; it is raised while at anchor.
Gas welding turned out to be a great pleasure. Seen through the dark lens of welding goggles, the molten metal, like lava, glows and flows, leaving a trail of overlapping crescents. After making BONZO’s stove, I made two more, for my cruising garvey, HESPERIA, and my teardrop trailer.
A few years ago I bought a cheap arc welder. I’ve never been able to do even a spot weld with it—the rod just sticks to the metal—but I haven’t given up on it. Arc welding is just another challenge of metalsmithing. Like soldering and gas welding, it might just open up another world of possibilities.
There she was, Miss April in the 2015 Calendar of Wooden Boats. Benjamin Mendlowitz had photographed her at the golden hour, at anchor, with the water around her ever so slightly rippling. That was the first time I saw BELLE.
After 35 years of racing on Chesapeake Bay, I was looking to downsize from my 26′ racing and cruising sloop. My crew had grown older, and none of us were willing to do the foredeck duties while careening around the marks. I was looking for something a bit more manageable for one or two people. I always liked the lines of some classic gaff-rigged daysailers such as the Herreshoff 12-1/2 and its relatives, but I wanted something that was lighter and trailerable. At 16′— and with those looks—BELLE seemed to fit the bill.
After I saw the photograph in the calendar, I searched up BELLE and found that Dan Gonneau, the designer/builder, had written a blog post that was a stream-of-consciousness diary about his inspiration for exactly the kind of small boat I was looking for. It sketched out the big decisions, the tiny details, and the material choices that went into the boat, and the craftsmanship that infused her every plank, frame, and joint. Classic lines with a modern aesthetic—I was hooked!
Tom Sliter
The removable rowing thwart is shown here in place, spanning the centerboard trunk. A bulkhead just forward of the transom serves as a backrest and creates an out-of-the-way space for stowing an outboard. The 8′-long cockpit and berth-wide benches offer, with the addition of a boom tent, overnight accommodations.
Dan was working as a boat carpenter by day and thinking about his ideal small boat by night. Over the course of about two years at the D.N. Hylan yard (now named Hylan and Brown Boatbuilders) in Brooklin, Maine, Dan put pencil to paper—no CAD here!—and BELLE took shape. It wasn’t his first construction, but I think it’s his best.
His forethought shows in many ways. The cockpit, for instance, has 8’-long seats with usable storage space underneath, and the centerboard trunk is unobtrusive. The cockpit is functional but not cluttered, with everything you need and nothing you don’t. I’ve sailed with four adults on board and the boat performs well, maybe even better than when solo, and there’s still plenty of room and comfort. And a soft-sided cooler fits perfectly behind the trunk.
Tom Sliter
The steambent coamings give the boat a classic look and are set at an angle that provides a comfortable backrest.
Our BELLE, the first built to the design, has an attractive color scheme—light blue/green hull and an off-white Dynel deck. The interior has weathered Port Orford cedar floorboards and trunk cap with everything else painted gray-green. By limiting the brightwork to her red oak coamings, cypress/western red cedar cockpit seats, Douglas-fir spars, and not much else, the emphasis is on the boat’s clean, simple lines. It also means not too much varnishing in the spring.. BELLE’s whole is indeed more than the sum of her parts. The boat and trailer fit in the garage during the off-season, with a full 3/4″ to spare!
Its size means that you’re closer to the water— literally and figuratively. One of my first sails was in the fall and was a magnificent introduction to the pleasure of a small boat. I was gliding through flat water in a little creek where most trees had shed their leaves. As BELLE parted the patches of fallen leaves now grouped on the water, I could hear the slight rustle as they brushed against the underside of the lapstrake hull. Now that is getting back to nature and close to the environment, which is what I think of as the essence of small-boat sailing.
Tom Sliter
The hull, according to the designer, “has a hint of Cape Cod catboat in her, shallower and a bit beamier than a modern row/sail design without being anywhere near as extreme as a true Cape cat. The extra beam increases her initial stability.”
My wife, who is a self-described “happy passenger” on the 26-footer, has become enamored of BELLE; she finds it more inviting, less intimidating. The controls are within easy reach and are more easily managed. And while BELLE is sensitive to weight shifts, the 126 sq ft of sail, 6′4″ beam, and low center of gravity steady her well.
Rigging the boat is pretty straightforward. The 15′11″ mast is of hollow bird’s-mouth construction and weighs less than 20 lbs, so lifting it into the deck partners and setting it on the step presents no major difficulties. All halyards are cleated to the mast, which simplifies rigging. A wire forestay and two Dyneema side stays connect in less than a few minutes, and the mast is ready to accept the boom, gaff, and mainsail. The jibsheet jam cleats are set on chocks secured to the coaming.
Tom Sliter
The designer notes: “No ballast is required for this design, but if you sail solo a lot you might find 40 lbs or so of lead shot (or some such) tucked up in the bilge forward might help balance the helmsman’s weight aft. But this is strictly optional and should be investigated after launch, if at all. That said, this is an unballasted, partially decked boat, and she is best suited to protected or semi-protected waters.”
BELLE is a beauty to sail. Unballasted and weighing only about 550 lbs, she flies off the wind. And downwind, wing-and-wing, with the centerboard raised, she is a positive demon. Upwind, it’s been a learning experience for this old marconi-rig helmsman. The main has a relatively high peak and it seems sensitive to peak halyard tension. However, I’ve found that if I bring the peak up so that the leech is straight and then back off just a bit, BELLE exhibits good performance into the breeze. To help things further, I put a little bit of a foil shape on the centerboard which had originally been a flat panel made of two layers of 3/8″ plywood, rounded along both ends. I think the smoother flow helps her get a better bite to windward. And since she’s now on a trailer, I’ve replaced the bottom paint with a smooth enamel, which I’m sure gives her an all-around boost in performance.
BELLE’s broad garboards have no deadrise amidships, and that flat surface makes the boat easy to load on a trailer and should be good for pulling the boat up a beach on rollers (though I have yet to try that). It does contribute to a bit of slap on the bottom going upwind in a chop, but with a bit of heel the boat will cut through the water more like a V-shaped hull.
Debbie Sliter
The gaff sloop rig carries 92 sq ft of sail in the main and 32 sq ft in the jib.
BELLE has watertight compartments fore and aft. The bow compartment, occupying the space below the foredeck, is designed so that the bottom of the mast can fit snugly in the boat when trailering with the top nestled in the sculling notch in the transom. The boom and gaff fit securely on the cockpit floor. Beneath the seats there is ample storage space for fenders, lines, and gear. The storage isn’t waterproof—what can drain out through a limber can also come back in—but it’s very handy. To keep things dry, I use small gear hammocks under the foredeck.
The sculling notch in the transom, for those so disposed, is set off to starboard. The oarlocks are set in chocks on the coaming, and with the wide beam and high placement of the locks, 10′ oars would be required. Unfortunately, the ramp and dock I’m now using are not really amenable to such long oars and it can get a bit congested, especially when the two college sailing teams hit the water. So, I’m using paddles for maneuvering around the docks, which works pretty well for short distances.
Tom Sliter
A wire forestay and a pair of Dyneema side stays support the mast.
For longer distances, I need auxiliary propulsion. Fortunately, between the end of the cockpit and the transom (above the aft watertight compartment) is an open space designed to store a small outboard motor. Initially I thought that a 2– to 3-hp gas outboard would be about right, but further reflection on having a gas can aboard, combined with the smell and noise, brought me around to trying an electric trolling motor. The boat is actually designed with space and weight allowance for a battery under the foredeck, forward of the mast. I installed a 35-amp deep-cycle, lead-acid battery and used about 15′ of 8-gauge wire under the side decks with a master switch, quick disconnects on the battery end, and a heavy-duty connector to the motor. The motor is rated at 46 lbs thrust and moves the boat quite well at about three-quarters throttle. I can get just shy of 4 knots at full throttle. According to the motor’s manual, I should get about 45 minutes at full throttle and 2 hours or so at half throttle. This arrangement has worked well for a year. If I need more range, there is space for a second battery. One unexpected benefit is the tranquility that comes from nearly noiseless propulsion. You can almost forget that you’re under power.
BELLE attracts more than her share of acknowledgments on the water, on the trailer, and even in the garage. When you receive compliments from an admiring kayaker or fisherman, sailing a beautiful boat brings more benefits than just the satisfaction of wind and water.
Tom Sliter has been racing and cruising sailboats on the Chesapeake Bay and environs for the past 45 years. He insists that it’s the one thing that helped him retain his sanity during 35 years working on Capitol Hill. These days, Tom teaches sailing with DC Sail and is also a US Sailing race officer. His non-nautical time is spent as a member of a local fine art photography gallery. Tom’s wife Debbie notes that with BELLE around, the usual springtime scent of mulch in the garden has been replaced with the bouquet of varnish.
Belle Particulars
[table]
LOA/16′
Beam/6′2″
Draft/9″
Hull weight/approx. 550 lbs
Ballast: optional, 40–50 lbs in bilge
Sail area/126 sq ft
Outboard/2-hp gas or electric trolling motor
[/table]
The Belle is available as a finished boat from Belle Boats, Shelter Island Heights, New York. Prices begin at $31,900.
Is there a boat you’d like to know more about? Have you built one that you think other Small Boats Monthly readers would enjoy? Please email us
Up the coast of Maine and just over the Canadian border lies Deer Island, New Brunswick. The island has a long-standing tradition of first-rate boatbuilding, and the late Lindon Parker did much to uphold it. In the 1940s he likely started with a half model that he had carved to design and build what is now known as the Parker Dinghy. “Dinghy” may not suggest the elegance of this boat, whose shape is clearly linked to the small working craft of the area. Powered by oar, and used, among other things, to tend herring weirs around Deer Island, they were typically carvel planked and had a moderate beam, relatively steep deadrise, and a generously raked transom. These elements produced a hull with the ample reserve buoyancy needed to tend the nets.
Plans for the Parker Dinghy are available from Harry Bryan, a wooden-boat builder in Letete, New Brunswick, one of two places with ferry service to Deer Island. He writes: “Deer Island was known for well-designed dinghies, when good performance was valued by local fishermen. A family from Colorado who summers on a small island off Deer Island bought one of Lindon Parker’s boats, and because they used it for only a week or two every year and stored it in a shed, it is in good condition and one of the last surviving Deer Island dinghies. We did some minor work on the boat in 2002, including removing 27 lbs of paint. Retired biologist and boatbuilder Mike Strong and I took the lines off the boat with a fundamentals class at WoodenBoat School. Mike went on to build the boat and I drew up the plans.”
Opening photograph by Steven Businger, above by Cyrus Dworsky
Builders on Deer Island favored carvel planking for small boats, but the Parker Dinghy could be easily be built with either traditional or plywood lapstrake planking.
The plans are a single 18″ x 23″ sheet with lines, offsets, construction drawings, and scantlings—all the information a boatbuilder with intermediate skills needs to build the boat, and nothing extra. There are no patterns included, so the boat requires lofting. The plans call for steam-bent frames and carvel planking typical of the small boats of the area, though one could certainly use lapstrake or glued-lap-plywood construction.
Having had my sights set on building a plank-on-frame rowboat in the 12′ to 16′ range, I was immediately sold on the Parker Dinghy when I saw her lines. I ordered the plans and set about lofting the boat and picking up all the patterns for the backbone and transom as well as building the five molds required. The plans call for woods all native to New Brunswick, a nod to the way Lindon Parker would have built them, and perhaps to Harry Bryan’s belief in using what’s around you. I was building this boat in the Pacific Northwest and had a different array of wood species to choose from. I found a nice piece of tight vertical-grain western larch for the keel, deadwood, and sternpost. Though it’s a softwood species, it is quite hard and rot-resistant.
Ferdi Businger
There are three thwarts in the dinghy, but only two are rowing stations. The boat was originally skippered by a solo rower, who took the center or forward thwart as boat trim required.
The one departure that I took from the construction plan was adding a keel batten to provide a solid backing for the garboards as well as a secure place to bed and fasten them. This can go a long way toward keeping that leak-prone seam watertight. As drawn, the rabbet in the keel would have been too shallow for most of its length to provide much of a landing for the garboards. The 3/4″ x 3″ keel batten was cut from western larch, bedded in 4200 and screwed to the top of the keel and deadwood at the apex line (the innermost corner of planking as it enters the rabbet). Joining the keel and keel batten at the apex line allowed me to rough out the bevels for the rabbet very easily while the two pieces were separate; it needed only small adjustments once it was time to plank.
In the construction plan, the stem is drawn as a natural crook running right down to the keel, joined by an overlapping stem knee. I wanted to stick with this detail if possible, as it is structurally superior if done right, and the process presented the intriguing challenge of finding a suitable piece of wood. It just so happened that a friend had recently been given a load of black locust branches from a blowdown, and was nice enough to let me bring my stem pattern over and have a look. I found a branch with just the right shape. If I hadn’t been able to obtain a natural crook I would have either laminated a piece to suit or I’d have assembled a stem, knee, and gripe as is commonly seen.
Lexi Heiser
The keel isn’t deep but it’s long, good for tracking but slowing the dinghy through tight turns in confined spaces.
I set up the molds on the strongback at a convenient working height, and proceeded to affix the backbone and transom to the setup. Building the boat upside down in this fashion puts accessibility and gravity on your side. I chose to line off the plank locations at this point, before installing the ribbands. The plans show eight planks per side, and that proved to be the right number with strakes neither too wide to accommodate the curvature of the boat, nor too narrow to be practical. Once the plank locations were lined off, I notched the ribbands into the molds, spacing the ribbands in between the planking marks so that they could remain in place as planks went on. With the ribbands set into the molds, the frames would be bent on the outside of the ribbands rather than the inside. This eased the process of bending the frames, as I could push them down around the ribbands instead of having to feed them inside the ribbands and pull them from the outside until I could secure them to the ribbands.
The 1/2″ x 1-1/4″ white-oak frames were steam-bent from rail to rail over the top of the keel batten for most of the boat; toward the ends of the hull, frames were installed in halves. I used zip ties to hold the frames to the ribbands temporarily, eliminating the need to put any unnecessary screw holes in them. Once this was complete, it was time to start planking.
Ferdi Businger
When traveling with a single passenger, the rower takes the forward station to achieve the best trim. The dinghy here is outfitted with oarlocks, but the original boat had tholepins.
The western red cedar that I acquired for planking stock wasn’t long enough to get planks out of single boards, so I elected to scarf two boards together to make up the length. A 12:1 scarf and a good marine-grade epoxy makes a very strong bond, and eliminates the work of fitting and fastening butt blocks which would have been required otherwise. The other advantage I found was that I was able to scarf the boards together on varying angles to accommodate the shape of the plank, and keep the grain running in the right direction as much as possible.
This boat planked up fairly easily, not having any real extreme shape to accommodate. However, here was enough twist leading into the stem that the hood ends of the garboards and the following several planks required steaming. I did the steaming in place with a polyethylene bag slipped over the first few feet of the plank and an electric steam generator. Specific plank-to-frame fastenings were not specified in the plans, so I used copper rivets for both because they are a reliablefastening and because the 1/2″-thick frames wouldn’t provide enough depth for screws to get good bite.
Once the planking was complete, I flipped the hull right-side up and finished off the rivets. Up until then the planks were held to the frames by the nails alone, now it was time to apply the roves, nip off the excess, and peen the cut ends.
The Parker Dinghy’s interior is finished off simply. There are three thwarts and the sternsheets. The ’midship and forward thwarts are the two rowing stations. They are set up not for two people to row together, but for one rower to choose a position to achieve proper trim when a passenger or load is carried. Though the plans show tholepins, I decided to go with common bronze oarlocks. Tholepins surely would have done the job just fine, but I prefer the solid connection of an oarlock in a socket, and think it looks a little nicer as well. I painted all surfaces with the exception of the transom, which is varnished on its outer face. The topside and interior paint is an alkyd enamel from George Kirby Jr. Paint Co., which looks good and provides great protection for the wood.
Ferdi Businger
With three aboard, the dinghy rests lightly on the water with only a bit of the transom immersed.
Rowing the Parker Dinghy is a wonderful experience. It’s refreshing to see a boat that is aimed purely at rowing, rather than one that has to function as a sailboat and motorboat as well. Without having to accommodate different modes of propulsion, it really excels at its intended purpose.
When rowed solo, the boat carries the rower at the ’midship rowing station; when carrying passengers in the sternsheets, the forward station is employed. With just one person aboard the boat it may feel a little tender; however, what it lacks in initial stability is made up for in secondary stability—the deeper you push the bilge in the water, the more stability you gain. With even just one other passenger aboard, the hull will settle down in the water and stiffen up considerably, a characteristic that harks back to the design’s net-tending roots.
The Parker Dinghy’s deep keel diminishes quick maneuverability but makes the boat track beautifully. A pair of 8’ oars keep it moving along nicely, and are suitable for either rowing station. The Parker Dinghy is a fairly large boat to be rowed by one person, but I have found that it gets up to speed quickly and carries its momentum well, requiring less effort from the rower once underway. In a chop and through large boat wakes it has proven to be dry, and really gives the feeling of a small boat that will keep you safe.
There are few, if any more enjoyable ways to explore a coastline than aboard a well-designed rowboat, and the Parker Dinghy is the perfect little craft for the purpose, whether going solo or loaded up with family and friends.
Cyrus Dworsky grew up lobster fishing out of Stonington, Maine, first with his father, and continuing on for much of his life. He’s always had a strong interest in boat building and boat design, as well as a love for the ocean and sailing. After living in the Pacific Northwest for several years and attending the Northwest School of Wooden Boatbuilding, he turned his focus more seriously toward boatbuilding, and has now moved back to Stonington. He currently has a 12’ yacht tender under construction.
Sometimes Lake Superior feels like an inland sea, and sometimes, just a lake. In this muddy campsite, hemmed in tight by pines, maples, and birches, it felt like the northern Wisconsin lakes that Sophie and I had canoed when we were growing up. Superior is usually separated from the forest by yards of stones or sand, but today a thin, pebbly beach only a few feet wide separated our little clearing from the roiling lake. Paddling along the shore, we had seen a narrow gap in the trees and suspected it might be a pathway to a campsite. Beneath the tangle of undergrowth, clayey ground had turned soupy with mud. We found a little cleared patch in the woods with a stone fire ring and a few stumps for sitting. A short pathway led from the clearing down to the water.
photographs by Uma Blanchard and Sophie Goeks
Sophie stretched out her back after the first day we had spent padding from breakfast until dinner. We bunked down here on a tiny spit of wooded land near the Brule River in Wisconsin. There was a rest area just through the trees, and we could hear cars occasionally whizzing by on the county road. This little beach’s wealth of firewood would have made a fantastic bonfire, but we intended to keep our presence under the radar.
This meager clearing was where we would have to weather the first big storm of our 1,200-mile circumnavigation of Lake Superior. Sophie Goeks and I, like idiots, had set out on May 25, 2016, from Little Sand Bay on Wisconsin’s Bayfield Peninsula, only a week or two after the ice had cleared. We had finished our final papers and exams in college during the early days of May before putting in. Now, 10 days into this journey, we prepared for the windy hail and rain storm the weather report said was coming our way. We pulled in around 10 a.m., just before the weather got nasty. We set the tent up in the middle of the scrubby clearing and ate a few handfuls of fatty nuts before crawling into our sleeping bags in our tent to try to get warm. Temperatures were in the low 40s, and it had been drizzling since we retired to our tent—I was chilled to my core.
I did a mid-morning slide onto a beach for break just outside of Port Wing, Wisconsin. The airy blue patches peering around the spring’s lurking thunderheads were a merciful break from May’s relentless thrashing.
From one of the dry bags Soph pulled out one of the half dozen novels we had in our library. It was a battered romance novel featuring chefs at competing Italian and French restaurants who inevitably fall in love, and predictably, spatulas fly. Soph and I traded off reading aloud in half-hour segments. It was our version of watching soaps all day.
Sophie waded her kayak, an Pygmy Arctic Tern 17 that she built for the trip, ahead of surf to a thin strip of beach at Wisconsin Point. It was the last Wisconsin beach we could land on before passing Superior Entry Light, here in the distance just above the kayak’s bow, and entering Minnesota. The reddish hue of the water is our last reminder that we were still in Wisconsin—where the clay soil dissolves into the water.
Around 2 p.m. we crawled out of the tent, Soph fired up the stove while I coaxed smoke from a smoldering pile of soggy sticks in the fire ring. With butter melting in the pan, Soph wrapped thick chunks of cheese and venison in tortillas and fried them in butter. I made peanut-butter and Nutella quesadillas to complement. Out in the cold, I had abandoned all of my nutritional standards. I knew we should have been eating a balanced diet with fibers, proteins, and complex carbs, not just fats, but it was body over mind, and my cravings had nothing to do with fruits or vegetables.
Superior Entry Lighthouse marked our first border crossing of the trip—it became ceremony that occasions such as these were celebrated with a Snickers bar. In the background, a ship prepares to finish a journey to Duluth across the treacherous middle of the lake.
We gorged ourselves, crawled into the tent only to emerge every two hours to repeat the process. I was so, so cold. I had only three pairs of wool socks to my name out here: one pair that I wore with my drysuit, now crusty with dried sweat, another one pair for wear around camp, and a pair I used only when I’m settled in the tent. But the day before, my camp socks had been so miserably wet and icy, I stepped outside wearing my tent socks and my soggy tennis shoes drenched them. The air was too cold and too humid to evaporate moisture; I resigned to my chilled and clammy state.
We went on like this for three days as the storm hovered over us. We had run out of books to read and had talked about everything under the cloud-blindered sun. We even wondered aloud why we hadn’t quit the trip even though it had been the least fun I have had in a long time. We decided that if we could just hang in for a month or so, things would get better, and we’d be able to carry on for the entire 1,200-mile circumnavigation of the lake.
Roger Siebert
.
Minnesota
Early in June, we forged along through the chilly weather. Leaving Wisconsin’s familiar, muddy ledges behind, we spent a harrowing day paddling past Duluth’s dozens of miles freeway-lined shore.
By the time we settled into Minnesota’s North Shore, the wild storms of the late spring had given way to kinder days. A day or two before reaching the northern outpost of Grand Marais, we slept easily in the crisp cold of a clear star-speckled sky. We woke at 5 a.m. to the beep of my watch alarm and before I pressed the button to turn it off, Sophie was already out of her sleeping bag and stuffing it into its compression sack. The long, loud hiss of air by my ear as she rolled and deflated her sleeping pad drove me out of my bed.
At nightfall on a cold Minnesota evening, we ate dinner while gazing across the lake at an ever-so-faint strip of land that was the Wisconsin shore we’d been traversing a week ago.
Dressed and busying herself outside, Sophie unrolled the tarp burrito that contains all of our kitchen equipment and “smellies.” I emerged to pack up my gear and take down our tent. Two weeks into the trip, we were a quick team. While she boiled water and unearthed our plastic sacks of oats, nuts, dried fruit, and brown sugar, and I piled all our gear near the water. By 5:25 a.m. we were sitting down for a breakfast of oatmeal and watching the newly risen sun’s rays grow brighter over the lake. A few dozen gulls squawked and wheeled above the treetops at the waters’ edge. With everyone else still slumbering, they were free to play. Breaking the silence, I said to Sophie, “I’ve never felt so in touch with birds, as being awake and near the water at this hour.”
In 20 minutes’ time we had packed our boats in exactly the way we did each morning. Every space inside my hatches was tightly packed with gear. A large nylon bag held neoprene gloves, sunscreen, and a woolen hat was attached to my front deck. On my stern deck a large Pelican case kept our camera safe, and a 3′ PVC tube strapped across my rear hatch cover held the rolled maps for the lake’s whole coast.
By 6 a.m. we were slipping across exceptionally glassy water, paddling in silence. The water felt frictionless. The shore was lined with cliffs, with homes perched on the ledges high above the water. At this hour, yards and decks were quiet, and there was no one to be seen. After an hour an intermittent breeze dragged dark patches across the silvery water. Soph and I were reluctant to break the silence, and kept to our routine of paddling fastest before taking our first snack break.
Massive, decadent homes—some surrounded by well-appointed lawns, hedges, and flower gardens, others nestled deep into the trees—dotted the shore, and while they were separated by enough land to give their residents privacy, there was nowhere we could get off the water without stepping in someone’s yard. We found one strip of beach along Highway 61 and paddled ashore for a break. We had our lunch on a park beach that was crawling with picnickers. There was no outhouse and I hadn’t found anywhere to duck out of sight, so by the time we got back to the kayaks I was doing a little bathroom jig.
The wind picked up, as it almost always did right after noon. It had become customary for us to get off the water by 2 p.m., and by 1 p.m. it was already clear we wouldn’t making much headway, so we began looking for a beach to hide ourselves away. After an hour of searching we rounded a steep point of land ragged with fissured rocks and found a little beach pushed up against between a 50’ sheer cliff and an equally high, steep wooded hill. It was the first spot with no vacation home in sight. While Soph held the kayaks, I scampered into the woods to relieve myself. After we carried our heavily loaded boats out of waves’ reach, I explored the crevices and overhangs under the cliff. Sophie scoped out the shore in the opposite direction.
We paddled into a quiet evening in the calm after the storm. The sunset against a speckled sky took our breath away as we drifted toward Grand Marais, Minnestota, to resupply. The distant, lumpy landscape casts a contemplative spell as we prepare for the rugged Canadian portion of our journey.
“Oh crap! There’s a staircase!” Sophie’s voice came from around the corner on the side of the beach backed against the wooded slope. I joined her at the base of the wooded slope and saw in dismay a steep, wooden staircase, nearly ladder-like, climbing up the slope. These treacherous staircases are common on the north shore where people build on properties looking out over the lake. Storms pound these stairs in the winter, and we had seen many smashed staircases splintered on the beach. Sophie and I climbed the stairs to ask permission to camp on the beach.
A climb that had us breathless led us to a striking modern house, hidden in the pines. It was built almost entirely of glass, and inside we saw tables and ceiling beams clearly made from reclaimed wood, sprawling marble countertops, and sculptural Scandinavian furniture. As we peered in to admire the deluxe interior, I noticed a squirrel perched on his hind legs on the deck staring in with us. With my wild hair and stinky armpits, I felt as if I were just another curious animal. Sophie and I checked the other side of the house and discovering faint tracks in a crushed gravel driveway. The residents were likely weekenders only, but to be on the safe side I left a note sharing the details of our journey and thanking them in advance for the privilege of spending the night on their beach.
We descended back to the lake level and began unpacking. From the after compartment I pulled out our 2-quart Dutch oven—still crusted with last night’s devil’s food cake—the hard little ball of my compressed sleeping bag, and the tent poles. I slid each arm through the handle-loops of a few dry bags, hooked fingers on a Nalgene-bottle loop and stuff-bag strings, and trudged up the rocky shore, placing each step with care to find solid footing. Sophie and I liked the challenge of carrying all of gear from the kayaks in a single load. Halfway up the beach, the bags on my left side start sliding off. I lifted my left arm and rushed toward the campsite, moving as fast as I could while battling to keep my hold on the pieces of gear piled on and hanging off my body.
After setting up camp, we kept out of sight in the woods until darkness, hoping that the homeowners wouldn’t come home and decide to walk down to the beach. Like many nights on this populated stretch, I never quite settled into a deep sleep during the night, waiting for morning to get away before our trespassing was noticed.
The North Shore, Canada
We left Minnesota behind on a humid, overcast day, and paddled up the Pigeon River, a muddy meander that separates Minnesota from Western Ontario’s inconspicuously similar wooded border. We made a short hike up to the highway, had our passports scanned, and carried on to the Canadian part of the trip.
My rugged kayak, a Perception Shadow, rested on the rocks at the only accessible stopping place during this late afternoon paddling along wild St. Ignace Island’s southwestern side. Spindly pines, lichen-spattered basalt, and clean, clear water were the norm in the north reaches of the lake.
“Sorry, Sophie! I broke the rule again!” Sophie paddled ahead of me and, intently focused on keeping her momentum against the gusts, ignored my apology. We both knew this wind was my fault. It came in walls, and ragged chop broke just over my kayak’s bow. Desperate for a moment’s rest, I set my paddle shaft across the pool of water sloshing across my spray skirt and leaned forward to steal a drink from the water reservoir on my deck. A solid gust caught the blades of my paddle and thrust the shaft against my gut and the swallow of water went right down my windpipe. I hacked it up with a few wracking coughs, and in those few seconds, I’d been pushed backward at least 15 yards. Sophie, a full 100 yards down shore, gestured emphatically toward a rock the size of a modest RV and whitewashed with guano. It looked like the only possibility to tuck into a lee and regroup.
We spent days sitting on the Canadian Pie Island waiting to do the 6-mile crossing of Thunder Bay to the majestic Sleeping Giant. It is said that that the formation looks like a giant sleeping on its back. Looking from right to left, we could see the outline of a head, followed by shoulders, down to a hip, bent knees, and feet. The formation rises over 1,800’ high, and even across 6 miles of water it is an imposing figure.
I strained toward it. The waves were pushing higher, lapping at the horizon and often obliterating Sophie from sight. With the passing of each peak, I sucked in a breath for the dizzying roller-coaster drop into the trough. Each of the steep-sided crests held my kayak in a moment of teeter-totter equilibrium with the ends suspended in the air before my bow smacked down with a force that vibrated through my legs and shot spray up into my face. When I reached the lee of the seagull-infested rock, the air was still but rank. On its windward side, the rock’s height stood 10’ above the water, with a sheer vertical face standing bold against the wind. Its leeward side pitched downward to the nearly flat shelf of rock which ended in a gentle slope into the water. Protected from the wind, I dragged my nearly swamped kayak ashore and plopped down on an ottoman-like rock next to Sophie. Bursts of wind cresting over the top of the windward side of the rock just skimmed the top of my head, tugging at locks of hair.
“When will you learn?” she sighed. If the old mariner’s superstition about commenting about fine weather is true, I was to blame for the wind we had been struggling against.
We’d had three days in a row of nearly tropical weather on Lake Superior with only a gentle breeze, just enough to cut the heat from a blazing sun unimpeded by clouds. The still water was unclouded and rocks 50’ beneath us radiated kaleidoscopic color. Ripples lapped against round basketball-sized cobbles piled on steep slopes. Those rocks at the water’s edge were milky white, speckled in gray, and black. Higher up pumpkin-colored lichen dotted the stones. We’d had a few days like this; it was easy to forget that headwinds, rain, and storms were possible; and soon after I had commented on the fair weather, “Well, this is just about as amazing as it could get.” What had been a light breeze became a stiff wind and the summer haze blurring the horizon turned into a thick slate-gray roll of clouds.
Cooking and eating good food allowed us to settle into life along the lake’s perimeter rather than hold our breath until it was over. We mixed warm water and flour to create thin dumpling wrappers, which we filled with spiced and sauced mixed vegetables and textured vegetable protein. We didn’t hold back on the oil.
The rock Sophie and I were sitting on lay at the midpoint of the mile-wide opening to a horseshoe-shaped bay. A quarter mile away, the spindly spruce and fir trees lining the bay were tightly huddled together in a forbidding palisade. The spaces between tree trunks would be too small to walk through let alone set up a tent. We’d have to land on the cobblestone beach that lay downwind of us and find a place to make camp. A wall of billowy thunderheads charged toward us; it was time to make a dash to shore and hunker down.
Superior was showing her wild side while we weathered a fantastic storm on Simpson Island.
With the wind and waves at our backs we made good speed surfing toward shore, even though we did as much work bracing to avoid broaching as we had while paddling. But reaching the beach buried in the bay appeared to be easy compared to the landing that was ahead. Soph and I perched 40′ offshore. About every four seconds a tall wave pounded the line of imposing rocks, washed up the beach, and receded. The thump of water on rock reverberated in my chest. I tried to coordinate the best landing procedure with Sophie, but the wind carried my words away. I shouted that I would go in first and then catch her as she approached. Swallowing my fear, I rode swells in, sharply inhaling each time they lifted my stern above my head. I landed with a thump on the rocks, bolted out of the cockpit, and dragged the kayak up the shore, a 40′ slope that resembled a rock slide.
We spent a night perched on an uneven rock plateau high above the water in Pukaskwa Provincial Park. With no beaches in sight we had clambered up the vertical and jagged rock pile. After passing items up one by one then slowly lifting empty boats up upon the rock, we pitched our tent on the least lumpy patch of rock.
I rushed back into the breaking waves. Chest-deep in froth, I felt my legs squeezed by the water. I gave Sophie two thumbs in the air. She reached forward with her paddle and surged forward. A wave hurled her straight for me and I darted to the right, threw myself over her front hatch. I grabbed her deck lines. While I steadied the kayak, she popped her spray skirt, and hopped out. Together we carried her kayak up the ankle-breaking cobbles.
With both boats safe from the waves, we climbed up the hill to scout a place for the night, and perhaps for a few days to come. I hopped from rock to rock, ever ready for those that might roll underfoot and make me fall. Tearing a ligament or cracking a bone would end the trip. At the top a nearly level plateau, lichen-splattered rocks spanned a few dozen yards to a forest of spindly trees. We made our kitchen in a spot with juniper bushes to shield us from the wind and a few trees to support a tarp over our heads. A few dozen yards from the kitchen, we found a patch of rocky ground for the tent. While I was stretching the kitchen tarp tight, Sophie began setting up the tent. Moments later she yelled, “The tent’s got me!” The wind had wrapped it flapping around her head and torso and then picked up the fly and sent it tumbling like a plastic bag blown down a city street. I ran after it and snagged it before it got away. I got Sophie untangled and the two of us got it set up. There was little sand or soil for staking it down, so we collected a few heavy rocks and tied the tent’s corners to them. With the wind now gusting at 30 knots, we took shelter under the wildly flapping tarp over the kitchen and hurriedly prepared a dinner of dried vegetable alphabet soup. Eager to escape the violence of the storm, we ate quickly and tightly wrapped our food bags and cooking equipment in a tarp and weighted the bundle down with rocks. Sophie ran for the tent ahead of me, and we plopped down on the hard, lumpy tent floor.
Goofing around in our little tent, we laughed until bedtime rolled around at 7:30 p.m., well before the sunset. We were joined by Kayaking Barbie, given to us by a dear kayaking friend. Though she could not join us, her Barbie, with plastic kayak, was with us the whole trip, sometimes shoved far up a bow hatch, sometimes bungeed proudly on a foredeck.
Over our heads, the dome of the tent was pressed sideways by the wind, and its wall edged toward Sophie’s head. Seeing the fabric quivering violently over her face I her I started to giggle; Sophie rolled over, laughing into the tent floor.
When we listened to the weather report on the radio, we heard: “Severe storm alert. Mariners seek cover. Squall warning. Winds gusting 45 to 55 knots.” We nestled into our sleeping bags and I spent the night drifting toward sleep, only to have cracks of thunder send adrenaline surging through me.
On a sunny bluebird day, the cliffs in in Ontario’s Lake Superior Provincial Park towered over Old Woman Bay. Gentle swells lapped at the wall of rock, making a rhythmic thunking sound.
I slept, on and off, for 16 hours that night, and Sophie and I stayed put, pinned down by the storm for two days. In the wee hours of the morning on the third day Sophie was awaken, perhaps by a sudden silence. She peeked out the tent door and saw a rippled lake. The weather report was for “winds light and variable, building to 15 knots northeast by 10 a.m.”
“Screw it,” Sophie said, “we’re going.” We packed in the dim predawn light and were back on the water, underway again, spooling miles along the Lake Superior coast.
The Upper Peninsula, Michigan
As the summer days ticked by, Sophie and I grew stronger. When the weather would allow, we’d do 30-mile days. The small, widely spaced communities and uncertainty of finding nutritious dried food at their stores meant we had to carry two to three weeks’ worth of food in our boats. With heightened metabolisms, our food disappeared quickly. With full bellies and ever lightening boats, we took advantage of the warm winds and made quick time back to the American border.
We made a sunrise departure along the St. Marys River, eager to leave gritty Sault Ste. Marie, just a few miles east, in our wake.
We rounded the corner at Sault Ste. Marie, crossing back into the U.S., and suddenly our months of traveling east into the morning sun were behind us. It was late July now, the weather had become hot, and the prevailing westward wind had begun, blowing into our faces all day long. The landscape had changed too, from sheer rock cliffs to endless sand dunes. The gentle slopes of the beaches were so gentle that we spent all day paddling 50′ offshore, floating above endless rippled sand with only inches of water between my rudder and the bottom. Mild wind in these extensive shallows meant dumping surf nearly every day and for the first time, our landings and launchings were determined by how manageable the shore break was.
We stopped to eat lunch while watching a lazy August storm roll by. An unusual layer of pebbles covered the hardened sand on this beach that has extended, uninterrupted, from Crisp Point Light on the Upper Peninsula of Michigan for days of paddling.
After we had rounded Whitefish Point, a dagger of land pressed into Lake Superior’s eastern neck, and we paddled far out from land where lurching rollers pushed us forward. In the morning, we had come ashore at Whitefish Point Lighthouse, making our first human contact in a week, and a few miles farther on decided we needed to stop for lunch. We assessed the miles of beach ahead. The beach ran as a 50’ flat before rising sharply into a grassy dune-wall that climbed steeply 30′ to what looked like open, sunny woods full of towering pines.
I looked for a stretch of shore where the shore break was less violent. The sun warmed my skin and the light wind carried the scent of pine. Sophie, bobbing next to me in the gently rolling waves, was smiling as her whimsical spiky hair danced in the breeze. On this beautiful summer day, the white churning surf skirting the edge of the beach reminded me of the tumbling water I loved to roll around in as a kid at the beach. I turned to my grinning paddling partner, “What the heck, I don’t think there’s really an ideal landing zone here, and sand is a gentler reception than the rocks we’re used to. Shall we go for it?”
Sophie cooked a sumptuous lunch of blueberry pancakes on our blissful “vacation” day on the Upper Peninsula of Michigan. Although she has scabs on her legs and sunburnt patches on her neck, she has a smile on her face.
I am usually the more conservative paddler, and conditions I would describe as gut-wrenching, Sophie calls a good time. Pleased by my unusually gung-ho attitude, she agreed and we approached our landing. It was fine until a few boat lengths from shore and my stern was kicked high and my bow was plowing into the sand. I ripped my spray skirt off the coaming, shimmied out of the cockpit, and rolled my body tightly out the side, landing hard on the sand beneath the swirling foam. I leapt up and hauled my boat to dry ground.
Sophie, about 100′ up the shore from me, was riding a wave in. As she got into shallow water, another wave hurled itself on her as she was slipping out of her cockpit. Soph and her kayak were tossed upward and dumped on the hard sand beneath the wash. She got to her feet and dragged her kayak out of the water.“
So, I guess we are sleeping here, huh?” Neither of us would dare venture back into that surf to leave anytime soon. Sophie, sitting on the sand, only grunted in reply, clearly hangry and annoyed by our circumstances. I set her up with a bag of pecans and raisins, and trudged up the high dune to scout the woods above.
As the sun set on our “vacation” day, the boats took a well-deserved rest. The surf that marooned us here had calmed down for the evening and stayed that way through the twilight hour. This was what we had come to know as the evening lull—a time each day when the lake seems to relax, the tension eases, and waves begin to lap, rather than slap, the shore.
Tall pines with sparse branches stood dozens of feet above me toward the sky, and the hard-packed sandy forest floor was carpeted with umber needles and dappled with sunlight. A broad open space was covered with low scrubby bush. Jackpot. Under each leaf hung clusters of dark little wild blueberries. Deeper in the forest I found fields of blueberry bushes. I sprinted back toward the lake, vaulted over the dune ledge, and tumbled down through the sand to tell Sophie about our home for the night.
All along the Michigan shore, these little blue zingers abounded. We ate them by the handful and made blueberry pancakes, blueberry scones, blueberry crumble, blueberry bread, blueberry cake, blueberry jam, and blueberry granola.
Sophie and I shuttled all of our gear up the dune-ledge, kayaks included, and set up our tent on a patch of bare ground nestled among blueberry bushes. I hoped that any bear in the area would find plenty of berries to eat without having to harvest those near us. Sitting by the edge of the bluff looking out over lapis lake waters, we made a lunch of blueberry-packed pancakes fried in butter. Under a cloudless sunny sky, cooled by a steady west wind, we lazily cleaned our plates and put a pot over our leftovers on the camp stove to fend off nosy chipmunks. I put on my wetsuit and Sophie retrieved a book before heading down to the beach. She sat down, curled her toes in the sand, and opened her book to read. As I headed to the water to play in the surf, she called after me, “Go easy or you’ll get a cramp!” For these three months, we had been each other’s family. We were best friends, sisters, and parents to each other.
When we returned to our camp, I tied my hammock between two broad-canopied pines, climbed in, and lost myself in a Barbara Kingsolver novel while the wind rocked my nest. Sophie disappeared into the blueberry bushes, re-emerging nearly an hour later with our dented tin pot full of blueberries. She set herself up in our kitchen, and with her sun-cracked hands, kneaded together chunks of butter, flour, oats, some baking powder, and sugar until she had a soft, sticky mound of dough. As she folded in the tart berries, the dough became streaked with purple berry juice.
Together we baked the scones in the Dutch oven over a little fire. In about two weeks, we would return to where we started, Little Sand Bay, completing an 86-day, 1,200-mile circumnavigation of Lake Superior. We’d leave this camp behind, but we’d have a lifetime to savor the memory of sharing sweet, fresh-baked scones at the edge of a lake that spans the horizon.
Uma Blanchard is a guidance counselor who works with high-achieving teens who will be the first in their family to go to college. As a Chicago resident, Lake Michigan is Uma’s new playground and she spends her weekends either teaching kayaking classes or out and about on her own Midwestern outdoor adventures. She is longing for the day when she has a garage, and is able to begin amassing a healthy collection of boats.
Sophie Goeks is a second-semester senior at Northern Michigan University, where she studies mathematics. She is spending her free time admiring the ice on Lake Superior and dreaming of new adventures when the weather warms. She hopes to spend some quality time in the Boundary Waters this coming summer, breaking in the canoe she is currently building.
If you have an interesting story to tell about your adventures with a small boat, please email us a brief outline and a few photos.
The transom U-bolts, wheel, and foredeck fittings added to the vintage look of the 10′ runabout.
While building a Crandall Midget Flyer 10’ runabout, from plans published in the January 1938 issue of Motor Boating, I wanted a bow handle, a foredeck fitting, and transom tie-down U-bolts that were appropriate to the period. I wasn’t able to find anything on the market, so I decided to make my own, and instead of shaping wood patterns and having a foundry sand-cast them, I would fabricate them myself with brazed brass and bronze. Another hobby of mine has been building fillet-brazed, lightweight steel bicycle frames, so I’d use some of the same techniques.
Important safety equipment includes a respirator to scrub vapors and fumes and goggles or glasses with Shade 3 lenses for protection from infra-red radiation.
By using a brazing alloy that would build up in fillets at the intersections, the resulting radiused transitions would have the appearance of custom-cast fittings. After some experimentation with different alloys, I found that Harris Safety-Silv 45% Silver Brazing alloy, purchased in a coil of 1/16” wire, produced a nice fillet with a golden color that is a good match for brass, though not quite so dark as bronze.
The brass parts of the small padeye are cleaned up, ready for assembly and brazing.
I started by making the bow handle from brass plate 1/8″ x 2″ x 24″ acquired from Hamilton Marine. The 3-1/2″ x 6″ base had to be shaped to fit the camber of the white oak breasthook under the fabric deck, so I hammer-formed the two halves of the plate over a curved section of heavy steel. To silver-braze the two halves together, I set them on a firebrick and coated all areas where the brazing was to occur with GFM Type U Silver Brazing Flux. I use a small Meco Midget oxy-acetylene torch, with the acetylene’s regulator set at 4 psi and the oxygen’s at 10–12 psi. These settings have worked well with other torches; the pressures are set with the valves opened slightly. After lighting the torch, starting with the acetylene, I bring up the oxygen and adjust it to get a gentle, quiet, neutral flame, just off-feather of the outer cone. It is important that the area for brazing is heated slowly so that the flux is not burnt or blackened. The flux will first turn to a chalky white and then, as it reaches the proper brazing temperature, it will become clear.
The bow handle, fully assembled and given generous fillets of Safety-Silv 45 brazing alloy, is ready to be cleaned, shaped, and polished. At right is the mini oxy-acetylene torch.
I hold the torch at a 45-degree angle pointed in the direction the work will progress and position the brazing alloy at an opposing 45-degree angle. A puddle is created when the brazing alloy comes in contact with the adequately heated metal; after creating the initial puddle, you dip the brazing alloy into the molten material–either the heated metal or the puddle of molten brazing material–as you travel along. Don’t try to melt the brazing alloy with the flame. Heat control is critical—apply only enough heat to melt the brazing alloy and not the brass. The part should also be positioned and repositioned so that there is always a valley for the molten material to flow into and create a radiused transition.
Cleaned up, the parts show the smooth transitions created by the fillets of brazing alloy.
When the brazing is finished, the residual flux will be a very hard, glassy coating that needs to be removed. Let the part cool to room temperature, then place it under a faucet of hot running water and scrub off the flux with a brass-wire brush. When the brazing was done I did some additional contouring and shaping to the base plate before fitting the curved handle.
The wheel began with spokes being brazed to a hub. The drawing shows the structure of the wooden rim.
I used 3/8” bronze rod for the curved handle. It was too rigid for my handheld tubing bender, a General #153, so I heated the rod with the torch to a dull red and bent it while it was still hot. The next step was to drill the holes in the base plate for the handle to fit into. Sheet brass really catches the flutes of the drill bit as it exits the back side, so use extra caution when drilling it.
The bow handle’s base plate is curved to fit the breasthook that lies beneath the stretched and painted canvas deck.
After inserting the handle into the holes in the base, I used the torch and flowed fillets in around the joints. The final profiling of the fillets can be accomplished by using a small round file, followed by 80- and 150-grit emery cloth and working through the various grits of sandpaper to 600-grit. Parts can be polished with a buffing wheel and buffing compound.
I also made a small deck fitting and transom tie-down U-bolts with 1/8″ brass plate and some 1/4” brass rod. The bolt ends were threaded to accept 1/4-20 bronze nuts.
Using a brazing allow to build fillets provides a way to create flowing transitions between joined pieces; the result, with practice, is elegant metalwork that can pass for cast without the investment of the equipment required for melting and pouring metal into molds.
Mark Kaufman is a technology and engineering education teacher at Garden Spot High School in New Holland, Pennsylvania. He has been fascinated with boats and boatbuilding since his childhood days of boating with his family on Pennsylvania’s Allegheny River. As a teenager he built his first boats, a wood-and-canvas Trailcraft canoe and a Minimost hydroplane. Over the years, many of his high-school students have built skin-on-frame Greenland- and Aleutian-style kayaks. Mark has also taught classes on building these types of kayaks at WoodenBoat School since 2010.
Editor’s note: For a simple method of fabricating parts with brazing alloy and silver solder, see the review of the Bernzomatic TS 8000 in this issue.
You can share your tips and tricks of the trade with other Small Boats Monthly readers by sending us an email.
A few years back, I was watching my carpenter friend fix the trim around a door. A section of it was rotten, and I imagined he would replace the entire piece, but instead he pulled out an amazing tool, made a plunge cut straight into the trim, and removed only the rotten section. The tool was an oscillating multi-tool, and I quickly started thinking of the potential uses for boatbuilding and repair.
The multi-tool has a side-to-side rotating blade that swings just 1.6 to 5 degrees at up to 23,000 oscillations per minute. Its speed can be controlled for different materials: slower for metals and faster for wood.
Kent Lewis
The DeWalt multi-tool has aa variable speed trigger switch and a quick-release device for a rapid, tool-free change of blades.
Blades for multi-tools tools come in different shapes and materials for use with metal, fiberglass, or wood. We found a semicircular blade handy for reefing out caulked or glued seams and also for scribing and trimming a bevel along plank edges. The plunge-cut of oscillating saw blades allow us to precisely remove areas of rot and neatly trim the surrounding wood for dutchman repairs.
The blades are small, have a small range of motion, and can be attached at different angles, so the tool can reach into tight spaces or around corners. For long, straight cuts a blade guide is a useful attachment; it can also be used as a depth stop .
We’ve used the oscillating multi-tool to put scarfs into planks, doing those repairs while the planks were still attached to the boat. With a blade designed to cut through wood and nails we can cut through fastenings in the laps between planks.
If you’ve enjoyed using Japanese handsaws, there are multi-tool blades with teeth cut in the same way; they’re well suited for working with hardwoods.
Oscillating multi-tools do more than cutting. Triangular sanding pads can do sanding in small spaces that other sanding tools can’t reach, even all the way into corners; scraper blades speed up paint and excess epoxy removal.
Kent Lewis
The built-in light comes in handy for working in tight, poorly lit spaces.
When we went shopping for a multi-tool we did our research and settled on DeWalt’s DWE315. It has a system that allows fast blade changes, without having to use a tool. We switch blades frequently when we work on seams and planks, and having to use a tool to change blades slows the work down and risks losing the fastening screw and washer. The DeWalt comes with a universal adapter, meaning we can use the full array of blades available, no matter which of the half-dozen fitting attachment configurations might have. We like the long 10′ cord and the LED work light on the tool. The DeWalt has a variable-speed control trigger—rather than a switch as on some other models—and continuous-on trigger lock. The powerful 3-amp motor has been up to all the jobs we’ve done with the tool.
The teeth of wood-cutting blades can get dulled quickly by some materials; a dull blade will cut slowly and may even begin to smoke. Ridge Carbide makes a blade sharpener that is a stack of fifteen 3″ metal-cutting discs, separated by 1/16″ rubber washers on a 3/8″ arbor. We put one on our electric drill to sharpen burned-up blades in minutes, saving the time and money that comes with a trip to buy new blades. With sharp teeth, the work is easier and goes much quicker.
Bosch, Dremel, Fein, Hitachi, Porter Cable, and Rockwell all manufacture oscillating multi-tools. You may find one of them that is a worthwhile addition in your shop.
Kent Lewis and his wife Audrey maintain a fleet of small boats in Northwest Florida. Current boat works projects include restoration of a wooden Sunfish and new build of a diamond-bottomed catboat. Their adventure blog is www.smallboatrestoration.blogspot.com.
The DeWalt DWE315 is available from several stores and online vendors. It comes as a kit with blades, accessories, and case for prices as low as $119.
Editor’s note:
I bought Dremel’s Multi-Max 6300 (superseded by the Multi-Max MM30) to diminish the misery of sanding the interior of my bright-finished lapstrake Whitehall. With its narrow strakes and closely spaced steam-bent frames, there were hundreds of index-card-sized patches of planking to sand, and I didn’t want to subject my fingertips and knuckles to that kind of torture. The Ryobi Detail Sander 1000 I’d bought a few years earlier turned out to be a disappointment; it rattled in my hand so badly that it was painful to use and all that wasted motion made for inefficient sanding.
Christopher Cunningham
My Dremel Multi-Max has proven useful for jobs around the house and with my little fleet of boats. With the sanding attachment, I use both ready-made sandpaper patches and homemade ones I cut from sanding discs. The two blades at right are universal blades with holes to fit most models of multi-tools.
With the Dremel I feel a slight bit of buzz in the tool, and the motion is almost entirely directed to whatever accessory is attached to it. It doesn’t have all of the features that the DeWalt 315 does. There is no light, no variable-speed trigger, and no quick-release system for the blades; it has an on-off switch and a dial for varying the speed. The attachments are secured with a bolt and washer. (I lost the washer and had to trim a bolt washer to replace it.) But the DeWalt tops out at 22,000 oscillations per minute through an arc of 1.6 degrees, while the Dremel peaks at 23,000 opm through 3.2 degrees, giving it faster sawing capabilities. The Dremel’s wider angle also makes for more aggressive sanding; the DeWalt may do finer work.
The Dremel’s triangular sanding pad came in quite handy for sanding the Whitehall. It has a hook-and-loop attachment for sandpaper (the Ryobi used adhesive sandpaper—a nuisance in my book) and I don’t often buy the expensive made-to-fit sandpaper, I just cut out triangles from the 5” discs that I buy in bulk for random-orbit sanders. With a bit of Velcro, a worn-out saw blade also makes a good sanding tool.
Christopher Cunningham
To get around having to stock and pay for the sandpaper pads for the Dremel’s sanding attachment, I covered a worn-out oscillating saw blade, bottom and top, with the hook part of self-adhesive, hook-and-loop fastening tape. For sandpaper, I cut rectangles from sanding disks, often disks that I’ve already used on a random-orbit sander. Their perimeters may be worn, but the centers still have some working life left in them.
The day before I wrote this, I installed a new kitchen counter and sink. The side panels of the cabinet underneath the sink prevented me from seeing, let alone reaching, the channels on the bottom of the sink’s flange that hold the clips that would secure the sink in place. With the Dremel I made plunge cuts in the tight space I had to work in and quickly removed the sections of 3/8” plywood that were in the way. No other hand tool or power tool could have done the job so easily. In earlier remodeling projects, I used the Dremel to trim the bottom ends of door trim prior to installing laminate flooring. While neither of these projects involved boats, they demonstrated the ability of an oscillating multi-tool to do quick work in cramped spaces and at inconvenient angles.
Is there a product that might be useful for boatbuilding, cruising or shore-side camping that you’d like us to review? Please email your suggestions.
Just last year I was hoping to write an article very much like Mark Kaufman’s on making custom hardware, and the approach I had in mind was to make the process and the equipment required more accessible. I happen to have acetylene torches, but they’re expensive and not common equipment in the workshops of amateur boatbuilders. I was hoping ordinary propane torches would provide the heat required for using the silver solder I’d been using for years. Silver solder, like the 45% silver brazing alloy Mark uses, creates a very strong and long-lasting bond and is easy to use. I tried using a single propane torch to solder two short pieces of 1/4″ x 1″ brass bar together without success, then I used two torches, and then two torches with the brass surrounded with fire bricks to retain the heat. I couldn’t get it hot enough to melt the solder and I gave up on writing the article.
photographs and video by the author
The yellow trigger turns the gas on and ignites it. Turning it clockwise a quarter turn locks it in the off position and depressing the silver-colored button above it locks it in the “on” position. The black knob on the opposite side controls the flow rate of the fuel.
When Mark’s article arrived, I was inspired to give it another try. I reread Harry Bryan’s article, “Silver Soldering: A straightforward technique for joining metals,” in WoodenBoat’s July/August 2010 issue. I followed his advice and bought Bernzomatic’s TS 8000 torch with a canister of MAP gas. (The article also mentioned Bernzomatic’s TS 4000—a similar torch without the trigger and at a lower cost, but it doesn’t deliver as much heat.)
The TS 8000 has some very nice features that are a great improvement over my ordinary propane torches. A finger trigger starts the gas flowing and ignites it with a piezo-electric spark. Releasing the trigger stops the flow of gas, extinguishing the flame. That’s safer and less wasteful than a propane torch, which has a valve to control the flow of gas. The TS 8000 has a valve for adjusting the rate of flow, but you don’t need to turn it to light or extinguish the flame. The trigger has a safety lock to prevent the torch from being turned on either inadvertently or by curious young hands. The trigger also has a “run-lock” button to keep the torch operating without having to keep your finger on the trigger. The cast-aluminum body of the torch provides a comfortable grip that’s more secure than holding a gas cylinder.
The TS 8000 will burn both propane and MAP-Pro gas (propylene)—the cylinders for both have the same threads. Propane burns at 3,600° (all temperatures in Fahrenheit) and MAP-Pro at 3,730°, just 3.6% hotter [This calculation of percentage isn’t appropriate. See Comments below. Ed.]. (Acetylene with oxygen, by the way, burns at 5,800° to 6,300°.) I have three grades of silver solder with different melting points: Hard at 1,425°, Medium at 1,390°, Easy at 1,325°. With those numbers, it seemed to me that a propane torch would have been adequate for silver soldering, but it’s not the temperature of the flame that makes silver solder melt and flow into a joint, it’s the temperature of the metal. While the flame is heating the workpiece, the workpiece is absorbing some heat but losing some to radiation, conduction, and convection. To get to the temperature at which a solder will flow, the torch has to deliver heat at a rate that exceeds that of the heat loss.
The TS 8000 delivers that heat. While the opening at the tip is about the same size as that of a small propane torch, the TS 8000 has a much larger flame. It’s also louder and the grip becomes very cold, both indications that it consumes fuel faster and delivers more heat.
Even with propane, the TS 8000 did very well with silver soldering. I could get a 1″ square of 1/4″ brass silver-soldered to a 5″ length of the same material using hard solder. That’s the cooler flame working the highest-temperature solder on a workpiece larger than what I usually make.
I did another test, heating 1″ lengths of 1/4″ copper rod. With a propane torch, the copper came up to a dull glow and maintained its shape with no signs of melting. The TS 8000, burning propane, melted the copper until it turned into a ball, and, when burning MAP-Pro, it turned the copper into a ball that must have been less viscous because it rolled off the fire brick.
After reading Mark’s article I bought some Safety-Silv 45. It has a solidus temperature (below which it is solid) of 1,225° and a liquidus point (above which it is liquid) of 1,370°. Acetylene with oxygen burns at 5,800° to 6,300°. I was pleasantly surprised to see the Stay-Silv flow quickly into the joint between two pieces of brass bar and then built up a fillet as I fed more of the brazing alloy into the joint. Capillary action pulled the liquid alloy up the sides of the vertical piece. I’ll be switching from silver solder to Safety-Silv 45 for my future boat-hardware projects.
I’ve been impressed with the features and the performance of the Bernzomatic TS 8000. It will do a wide range of projects that fall between a propane torch and an oxy-acetylene torch, and for most of my projects I’ll be able to use it with propane at one-third the cost of MAP-Pro gas.
Christopher Cunningham is the editor of Small Boats Monthly.
The Bernzomatic TS 8000 is available at many hardware stores and home-improvement centers and from online retailers. The torch alone can be purchased for about $45, or as a kit with a canister of MAP-Pro gas for about $55.
Some tips on silver soldering
The materials for silver soldering include silver-solder wire, a firebrick for a work surface, paste flux, and a torch. Here the TS 8000 is attached to a propane 1-lb bottle, the kind I use for some of my camp stoves. The more slender 14.1-oz propane bottles also work. The firebrick is very soft and it’s quite easy to saw of a bit of one end to serve as a backstop to reflect heat back to the work piece.
With the areas to be soldered well coated in flux, these pieces of brass are ready to be soldered. I use cross-locking tweezers on a third-hand base to hold parts—as flux melts, pieces tend to shift if they’re not kept in place.
When heating the parts to be soldered, the smaller piece will heat up faster, so aim the flame at the larger piece. When the metal is heated red-hot, it radiates a lot of infra-red rays, and it’s important to wear protective eyewear with a Shade 3 rating to block the infra-red and serve as safety glasses. A respirator is also required. The flux here has melted and looks like water drops. The tip of the solder wire will melt quickly when touched to the metal and flow into the joint between the pieces of brass.
This cooled gudgeon needs cleaning to remove glassy flux and black scale.
Rather than sand the newly soldered piece, you can use a pickling bath to remove the flux residue and black scale. The commercial product I used to use was probably sulfuric acid; lately I’ve been trying a less noxious bath. It’s 1 cup of white vinegar, a tablespoon of salt, and 1/2 cup of hydrogen peroxide. I use a Pyrex bowl and microwave the solution before using it, stopping shy of boiling. While the bath is not quite as effective as what I’d been using, it does make a good start on cleaning up after soldering or brazing.
This is a test piece of brass after soldering.
And this is after soaking in the pickling bath. The flux residue is gone and much of the blackened brass has been removed.
With a bit of sanding and buffing the new gudgeon is ready to go to work. Sanding with 220-grit and higher leaves an acceptable finish, but I like to use a cotton buffing wheel charged with emery for the finishing touches. It gives the metal a nice soft feel.
I hadn’t used silver solder on steel, so I thought I’d give it a try using the same flux, solder, and torch on a scrap of the 1/16″ sheet steel I used for my wood stoves. The result, shown here cleaned and polished, looked great.
To test the strength of the solder, I put the triangular piece of steel in a vice and used the other piece to pry the right-angle joint open. The silver solder held with no signs of failure.
Is there a product that might be useful for boatbuilding, cruising or shore-side camping that you’d like us to review? Please email your suggestions.
Boatbuilding is in Nick Blake’s blood. He’s the fifth generation of Blakes to build at least one boat since the Blakes settled in Mississippi in the 1830s. Not long after he launched his 16′ Whitehall, CURLEW, he began mulling over building another boat. He and an old high-school friend had chartered a boat to go fishing off the Gulf Coast. The trip rekindled his interest in fishing—in his teen years he’d fished the Florida coast in OTTER, a 16′ flatiron skiff that he and his father, Daniel, had built from pine boards. It was powered by a 5-hp Johnson outboard, which provided enough speed to get to and from the fishing ground faster and more reliably than sailing or rowing could. CURLEW wasn’t well suited to outboard power, so a new boat was in order.
photographs by Julia Blake
The bottom was planked fore-and-aft with seams backed up by battens.
Nick set his sights on a larger version of OTTER, long and slender, easily driven, capable of cruising at 10 knots while carrying 600 lbs. He enlisted his father, who had many more boats to his credit, to help design HERON, as the new boat would be called. The two spent the summer of 2017 studying flat-bottomed skiff designs for inspiration and borrowed elements from Pete Culler’s Long John and William Atkin’s Ration and XLNC. With the shape they wanted in mind, Nick and Daniel got to work, starting with a quarter-scale lofting of what would be a 20′6″ skiff.
HERON was built upside down, but instead of building the hull around molds supported on a ladder frame, the Blakes made the permanent frames long and fastened their ends to the shop floor. All of the lumber for the boat came from trees grown on their land and was sawn into flitches with their bandsaw mill. Most of the boat was sassafras; the shoe protecting the bottom was done with locust for its durability, and the stem and trim were walnut for its rich color.
Patrick and Andrew take a critical look at the work done by their elders.
The sides were done in lapstrake on jogged frames. The bottom was planked fore-and-aft with batten seams, as Atkin had indicated for his Ration. Nick and Daniel had done plywood and cross-planked bottoms with previous boats, and Nick remembered that OTTER, with her cross-planked bottom, leaked after spending time out of the water and he had to soak the boat for a few hours to get the seams closed up before launching. Plywood bottoms, of course, eliminated the seams, but would be best protected by fiberglass and epoxy, materials Nick preferred to avoid. The batten-seam construction promised a watertight, traditional hull.
Nick and Daniel install trim as the boat nears completion in the shop they share.
Nick also remembered that OTTER was never in good trim when he took her out alone. Without a passenger in the bow to counter his weight and that of the motor in its narrow stern, the boat would squat and lift the bow out of the water. A wider transom would have helped, but “fat transoms,” Nick says, “are a curse of outboard motorboats, and their owners for that matter.” HERON was built with a well to bring the motor’s weight forward. To use a narrow stern and keep the buoyancy surrounding the motor as high as possible, Nick built the slot aft of the well quite narrow, wide enough for the motor’s lower unit to kick up, but too slim to allow steering with the motor. A rudder built into the aft end of the well would take care of the steering. The rudderpost runs inside the transom and is capped with a quadrant that takes the steering lines.
The longer lever is a whipstaff for steering; the shorter one is the throttle. Coming up through the thwart is a knob for the shifter. The arrangement takes up much less space than a wheel mounted on a console.
Placing the helm at the center thwart moved the pilot’s weight forward, a second measure to keep the boat in trim. The steering lines from the rudder are connected to a whipstaff, a similar smaller lever controls the throttle, and a knob set in the thwart controls the shifter.
The rudder occupies the aft end of the motor well. This particular iteration didn’t work as expected. The sixth iteration did.
Nick and the boys get HERON up and running on the oxbow lake near their home.
All of the Blake-built boats get their first trials on a small oxbow lake near the family home. During HERON’s first outing, it quickly became clear that the rudder wasn’t up to the demands of the boat. The hard chines at the stern and the immersed edges in the motor-well were great for tracking, but they resisted turning. Nick tried a half dozen different rudder blades, varying both size and shape. The ones that worked best were the ones that extended the deepest, but that made them vulnerable to submerged objects. The solution was to make a long blade that could pivot over obstructions. The first one he tried had a lead weight to keep it extended, but when HERON was at speed, it would swing to horizontal and lose its grip on the water. The second relied on friction to hold it down. Two lock washers created enough spring-like compression on the blade to hold it down, even at speed, but allowed the blade to pivot. Soon after he equipped HERON with this version, Nick ran the boat over a submerged log, and both motor and rudder kicked up, neither damaged.
Hand on the whipstaff, Nick takes HERON out for a solo trial.
On a later outing, Nick, his wife, and sons Andrew and Patrick took HERON out on a backwater slough. All was going well as the boat motored along until fish started jumping around them. Two 10-lb grass carp leaped up out of the water and landed in the boat. Flopping wildly, they splattered mud, scales, and blood everywhere. Andrew, the younger son, wasn’t at all happy to have the uninvited guests aboard.
HERON kept busy with family and friends on a vacation stay on the shores of an Arkansas lake.
Nick, his wife, and their two sons took a vacation and trailered HERON to Greer’s Ferry Lake in Arkansas. Nick took the boat out for several trials: outings with his family and fishing trips with friends. When he was the only person aboard, HERON did almost 14 knots; with three adults aboard with fishing and picnic gear, she cruised at about 11 knots. At times, the wind kicked up a bit of a chop, but HERON’s narrow bottom didn’t pound against the waves. At the end of the vacation she had logged 5 hours of running time and had sipped only 3 gallons of fuel. She was, Nick concluded, “well behaved, made decent speed and was stable and burdensome—a worthy successor to OTTER.” And Andrew is happy to get aboard HERON as long as there are no carp.
Have you recently launched a boat? Please email us. We’d like to hear about it and share your story with other Small Boats Monthly readers.
My workshop is a one-car garage in the basement of my 91-year-old house. It’s a cramped and cluttered space, but I manage to get a lot done in it and I simply enjoy being there. Almost all of the time I spend in my shop I’m alone, but it’s far from being a lonely place. In the midst of my tools, I’m surrounded with reminders of people I’ve cared for. Every tool has some usefulness, but the ones that have stories to tell are the ones that I value most.
I have, of course, many of my late father’s tools, but there is one that stands above the others. It’s the Stanley No. 100 ½ round-bottom squirrel-tail plane he used for shaping the blades of racing sculls. He had dropped it on his shop’s concrete floor and the tail had broken off. It wasn’t a tool he could easily replace, so he asked our neighbor, Bob Clare, if it could be repaired.
Bob, who was known to many as “Scrap Iron,” owned the two houses across the street; he and his family lived in one and his shop occupied the other. Both back yards were filled with metal scrap, some heaped on the ground and some propped against racks and towering high overhead. Bob brazed the tail back onto the plane, and while it’s a bit crooked and the repair looks like it was made with gobs of drab gold clay, he saved the plane.
In that plane I see my father at work in the garage, surrounded by the racing shells he was repairing, and in the repair I see Bob with his grease-blackened hat cocked back on his head and hear his cackling laugh. His shop caught fire once, and when I saw the smoke, I ran over to help. When I arrived, he was dragging a metal cabinet out the front door. It was full of flammable solvents and he had put it right inside the door for just such an emergency. (I, of course, put my cabinet full of solvents and paints just inside the garage door that opens to my shop.)
Bob had already turned the water on for the garden hose, but there was no spray nozzle on it. I was trying to put the nozzle on, but, with the water running, I couldn’t get the threads engaged. Bob calmly took the hose, folded a kink in it to stop the flow, and screwed the nozzle on so I could douse the flames. That repair is all I have of him. If the Stanley 100 ½ ever disappeared, no other tool could ever fill that void.
From top to bottom: the drill press from my grandfather-in-law, my mother’s tape dispenser, the divider I bought second hand, a spring-loaded center punch from my departed friend Phil Thiel, my father’s Stanley plane, the saw my father used to cut driftwood logs for the split-cedar fencing around the house, and the metric ruler my grandfather used while he was a civil engineer.
My mother also has a presence in my shop and I am always reminded of her by the tape dispenser she used in the print shop Dad and I built for her in the back of the house. I also have the universal plane and the full set of blades that she bought at a yard sale. She thought it was worth taking a gamble to pay all of $5 for it, hoping I might have a use for it. I did, and cut the beads on my dory’s seat risers with it.
The smallest of my three drill presses is dedicated to stirring epoxy. It is covered with cured residues as if encrusted with coral, but every time I use it I’m reminded of my grandfather-in-law, Bob Altick. He liked to tinker, and once he made several ingenious pendulum letter scales for determining postage. In his late 70s his health was failing and he gave his tools to family members. I got the drill press. He died in 1988, but I’ve mixed a lot of epoxy since then and he’s never long from my thoughts.
Hanging on a pegboard is a 10” steel spring-joint divider, the very first tool I bought when I decided to build a boat and needed to tool up for lofting. I bought the divider in 1977 for $6 in a second-hand tool store. The two-story clapboard building the store occupied was torn down decades ago and replaced with a welding supply shop; it was torn down and replaced with a pumphouse for a sewer main. The divider has a brass ball on the end of the screw and a threaded brass knob for adjusting the span. The knob spins so freely that it’ll travel a full inch along the screw if I give it a good flick with my thumb. Every time I use it I can see my 24-year-old self, looking for a direction to take in life and finding one in boats.
Recent purchases, from left to right: an angle grinder, the 1×30 belt sander, and a biscuit-plate jointer. For all three of them, I paid just $106.
With the 1×30 belt sander I reviewed in this issue now sitting on my workbench, I’ve been thinking about the other tools in my shop that were just ordinary purchases. In spite of all I’ve accomplished with them, I don’t have the same connection to them as I have to the tools that have stories to tell. My 14” Delta bandsaw, for instance, has been an essential workhorse for me for 30 years, but I have no memory of where I bought it and I could easily replace it and not give it a second thought. On the other hand, I clearly remember when and where I found my old 10” Homecraft bandsaw: trout-speckled with rust, it was standing along the road I used to drive to work. It had a “Free” sign taped to it, so I stopped and loaded it into my car. Vic, the woman who put it there, is a friend of mine and the bandsaw had belonged to her father. There is only that one bandsaw with that story.
I eventually realized that the 1×30 belt sander did have a story to tell, but it was one I wasn’t paying attention to: its price. I had been pleased, at first, with the how little it cost, but began to wonder about all of the parts and labor that went into it for just $39.99. Manufacturing moves to places where labor is cheap and manufacturers there may not be required to protect them workers and pay them well. If that’s a tool’s story, I’d rather pay more and support manufacturers who take good care of their people. After all, the tools in my shop, however I came by them, are the company I keep.
Subscribe For Full Access
Flipbooks are available to paid subscribers only. Subscribe now or log in for access.
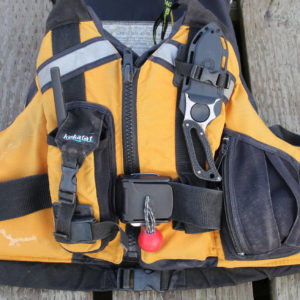
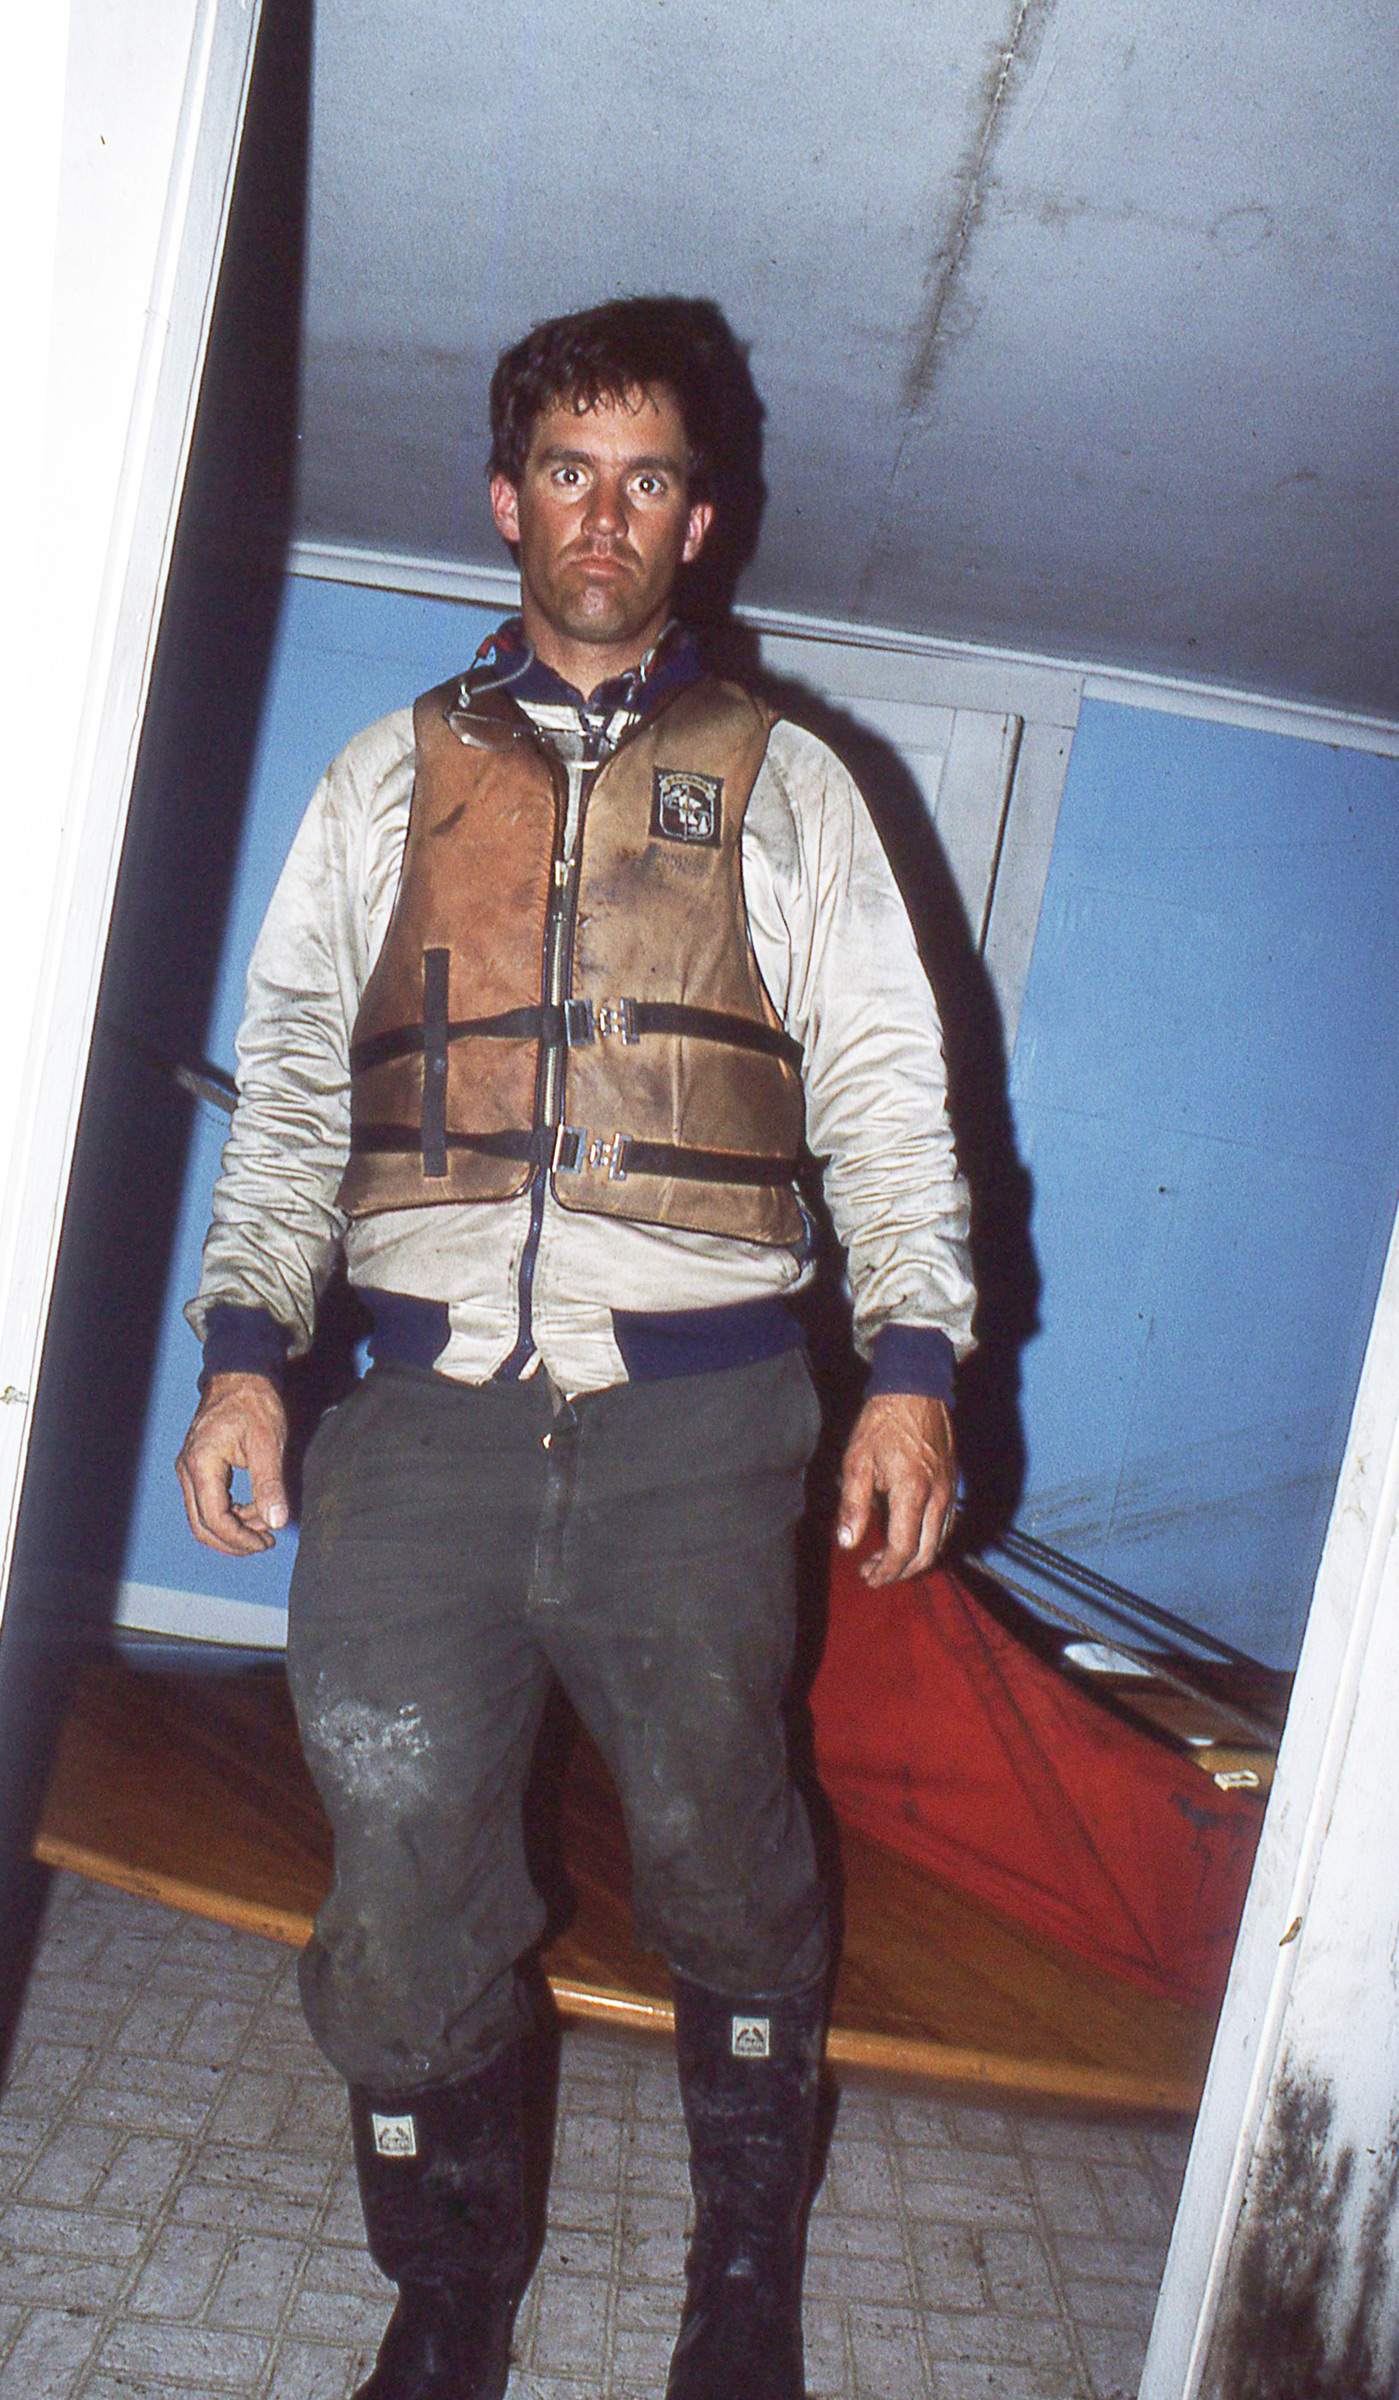

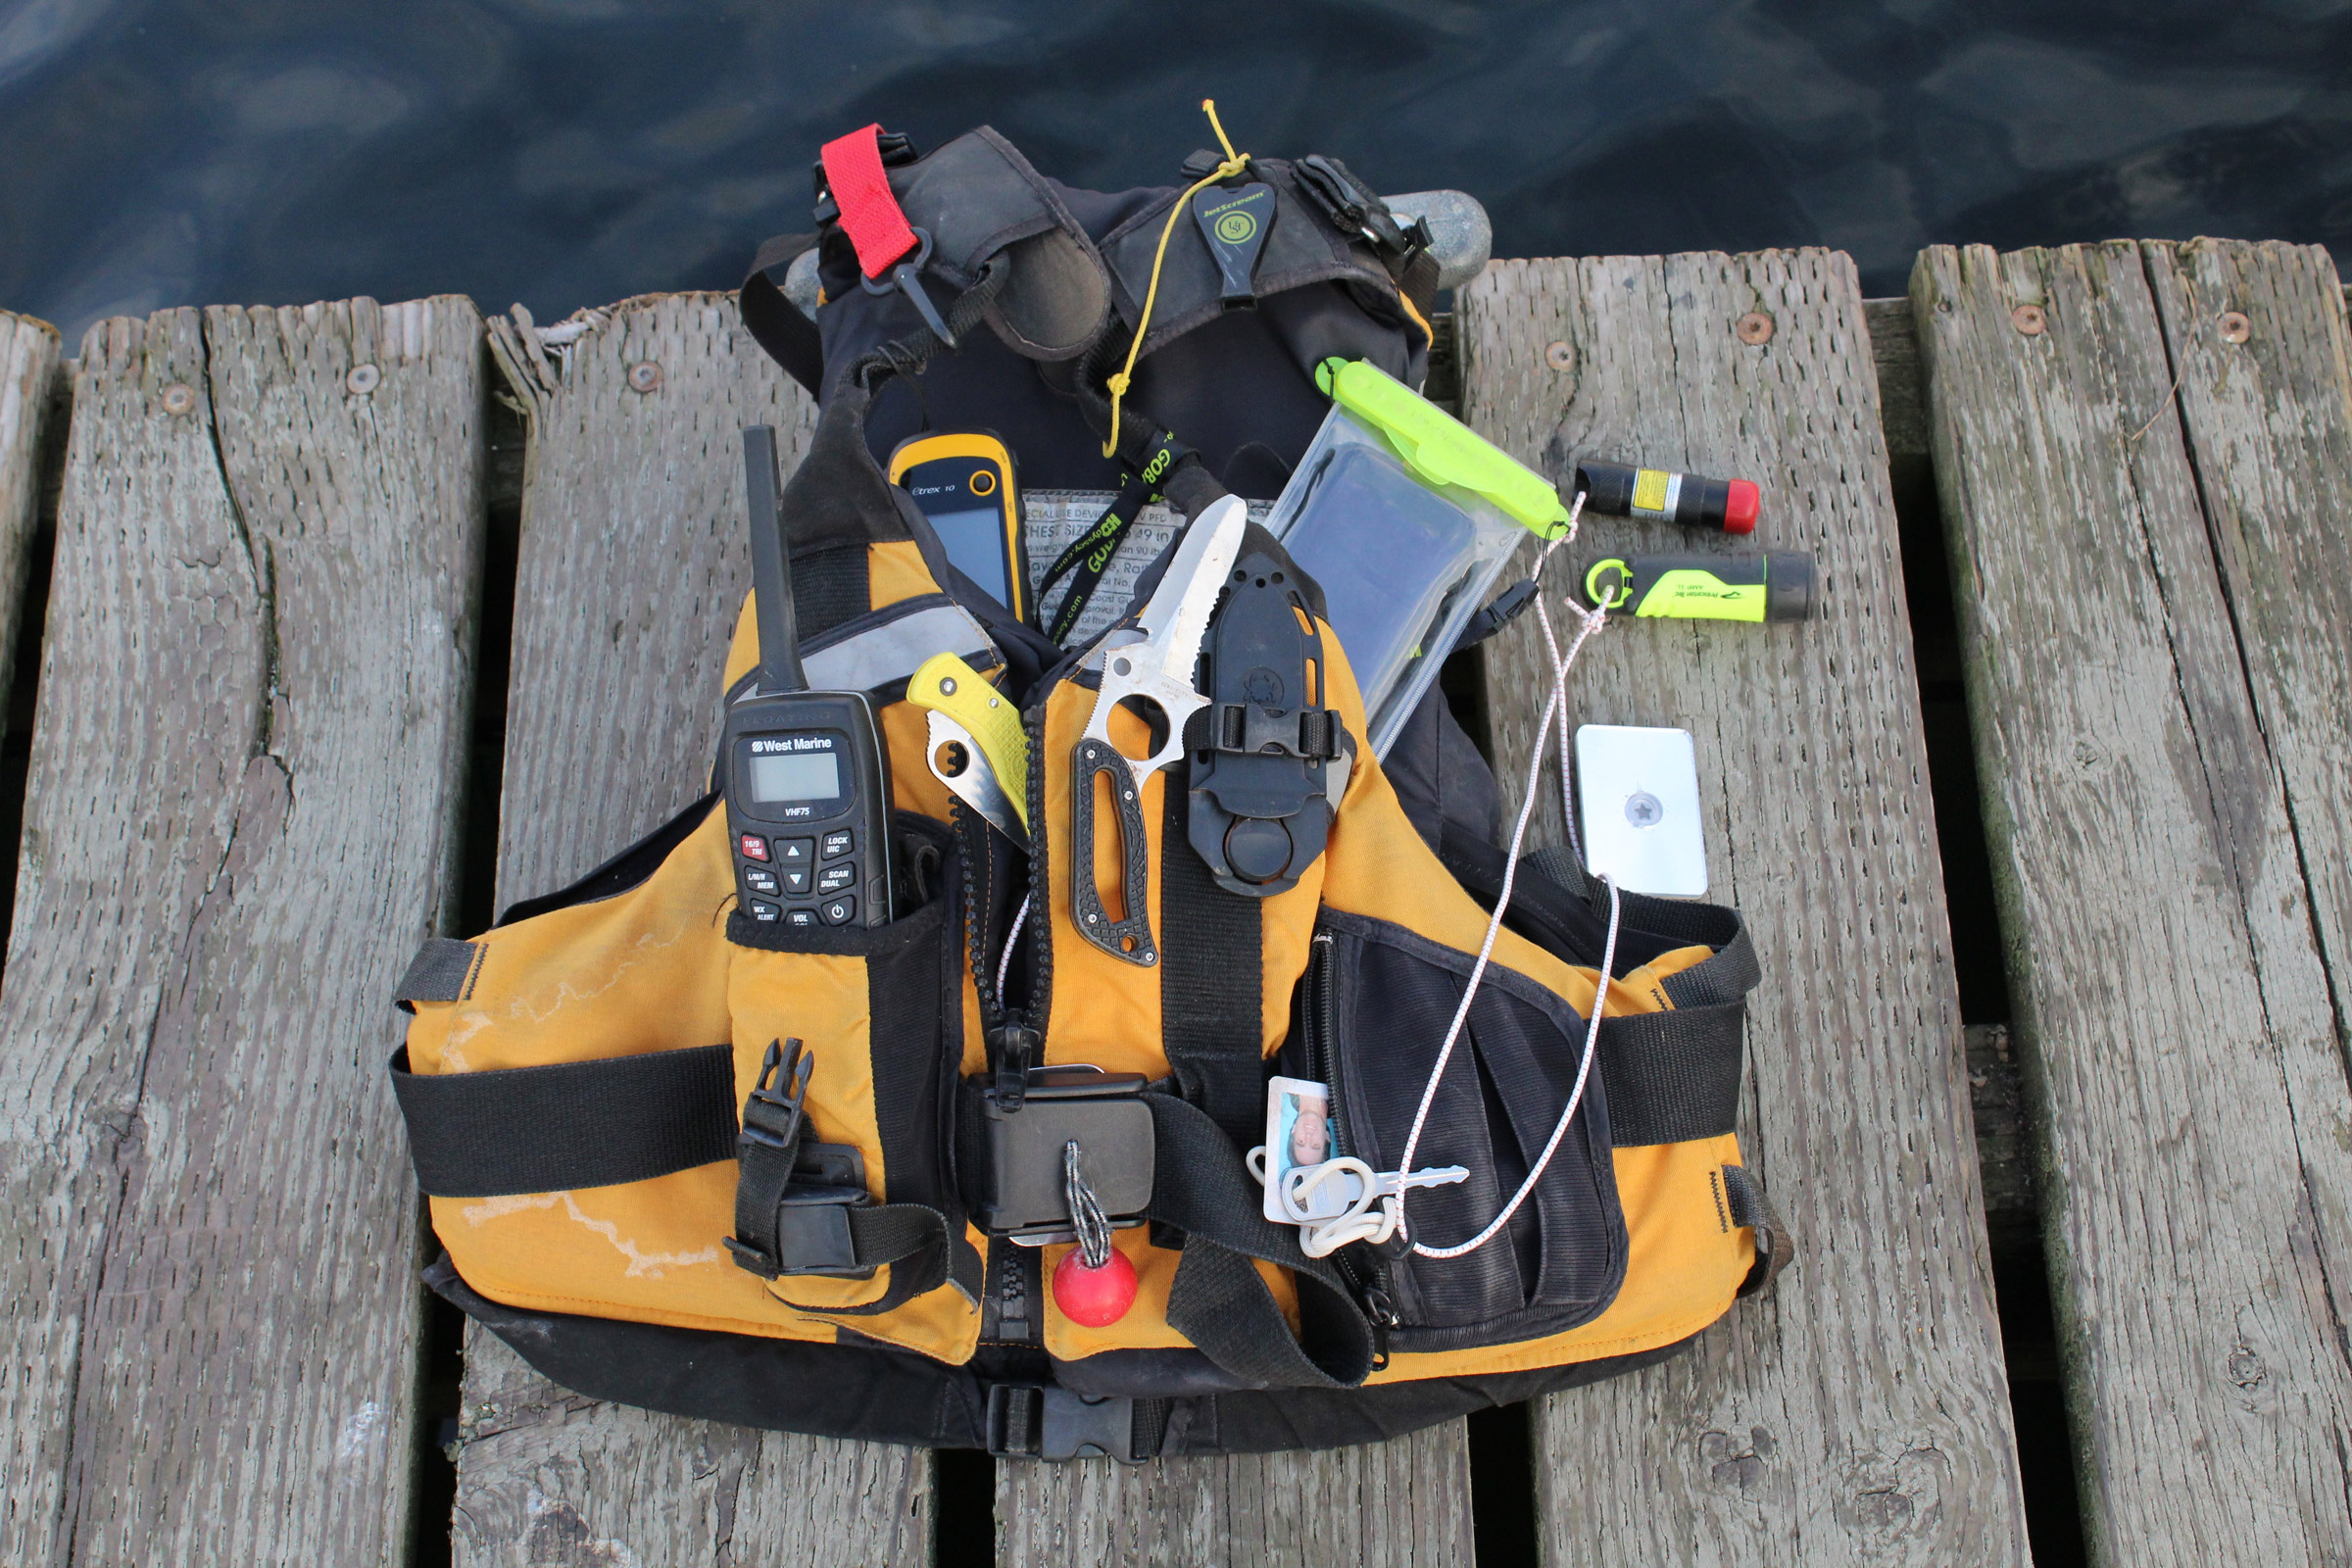
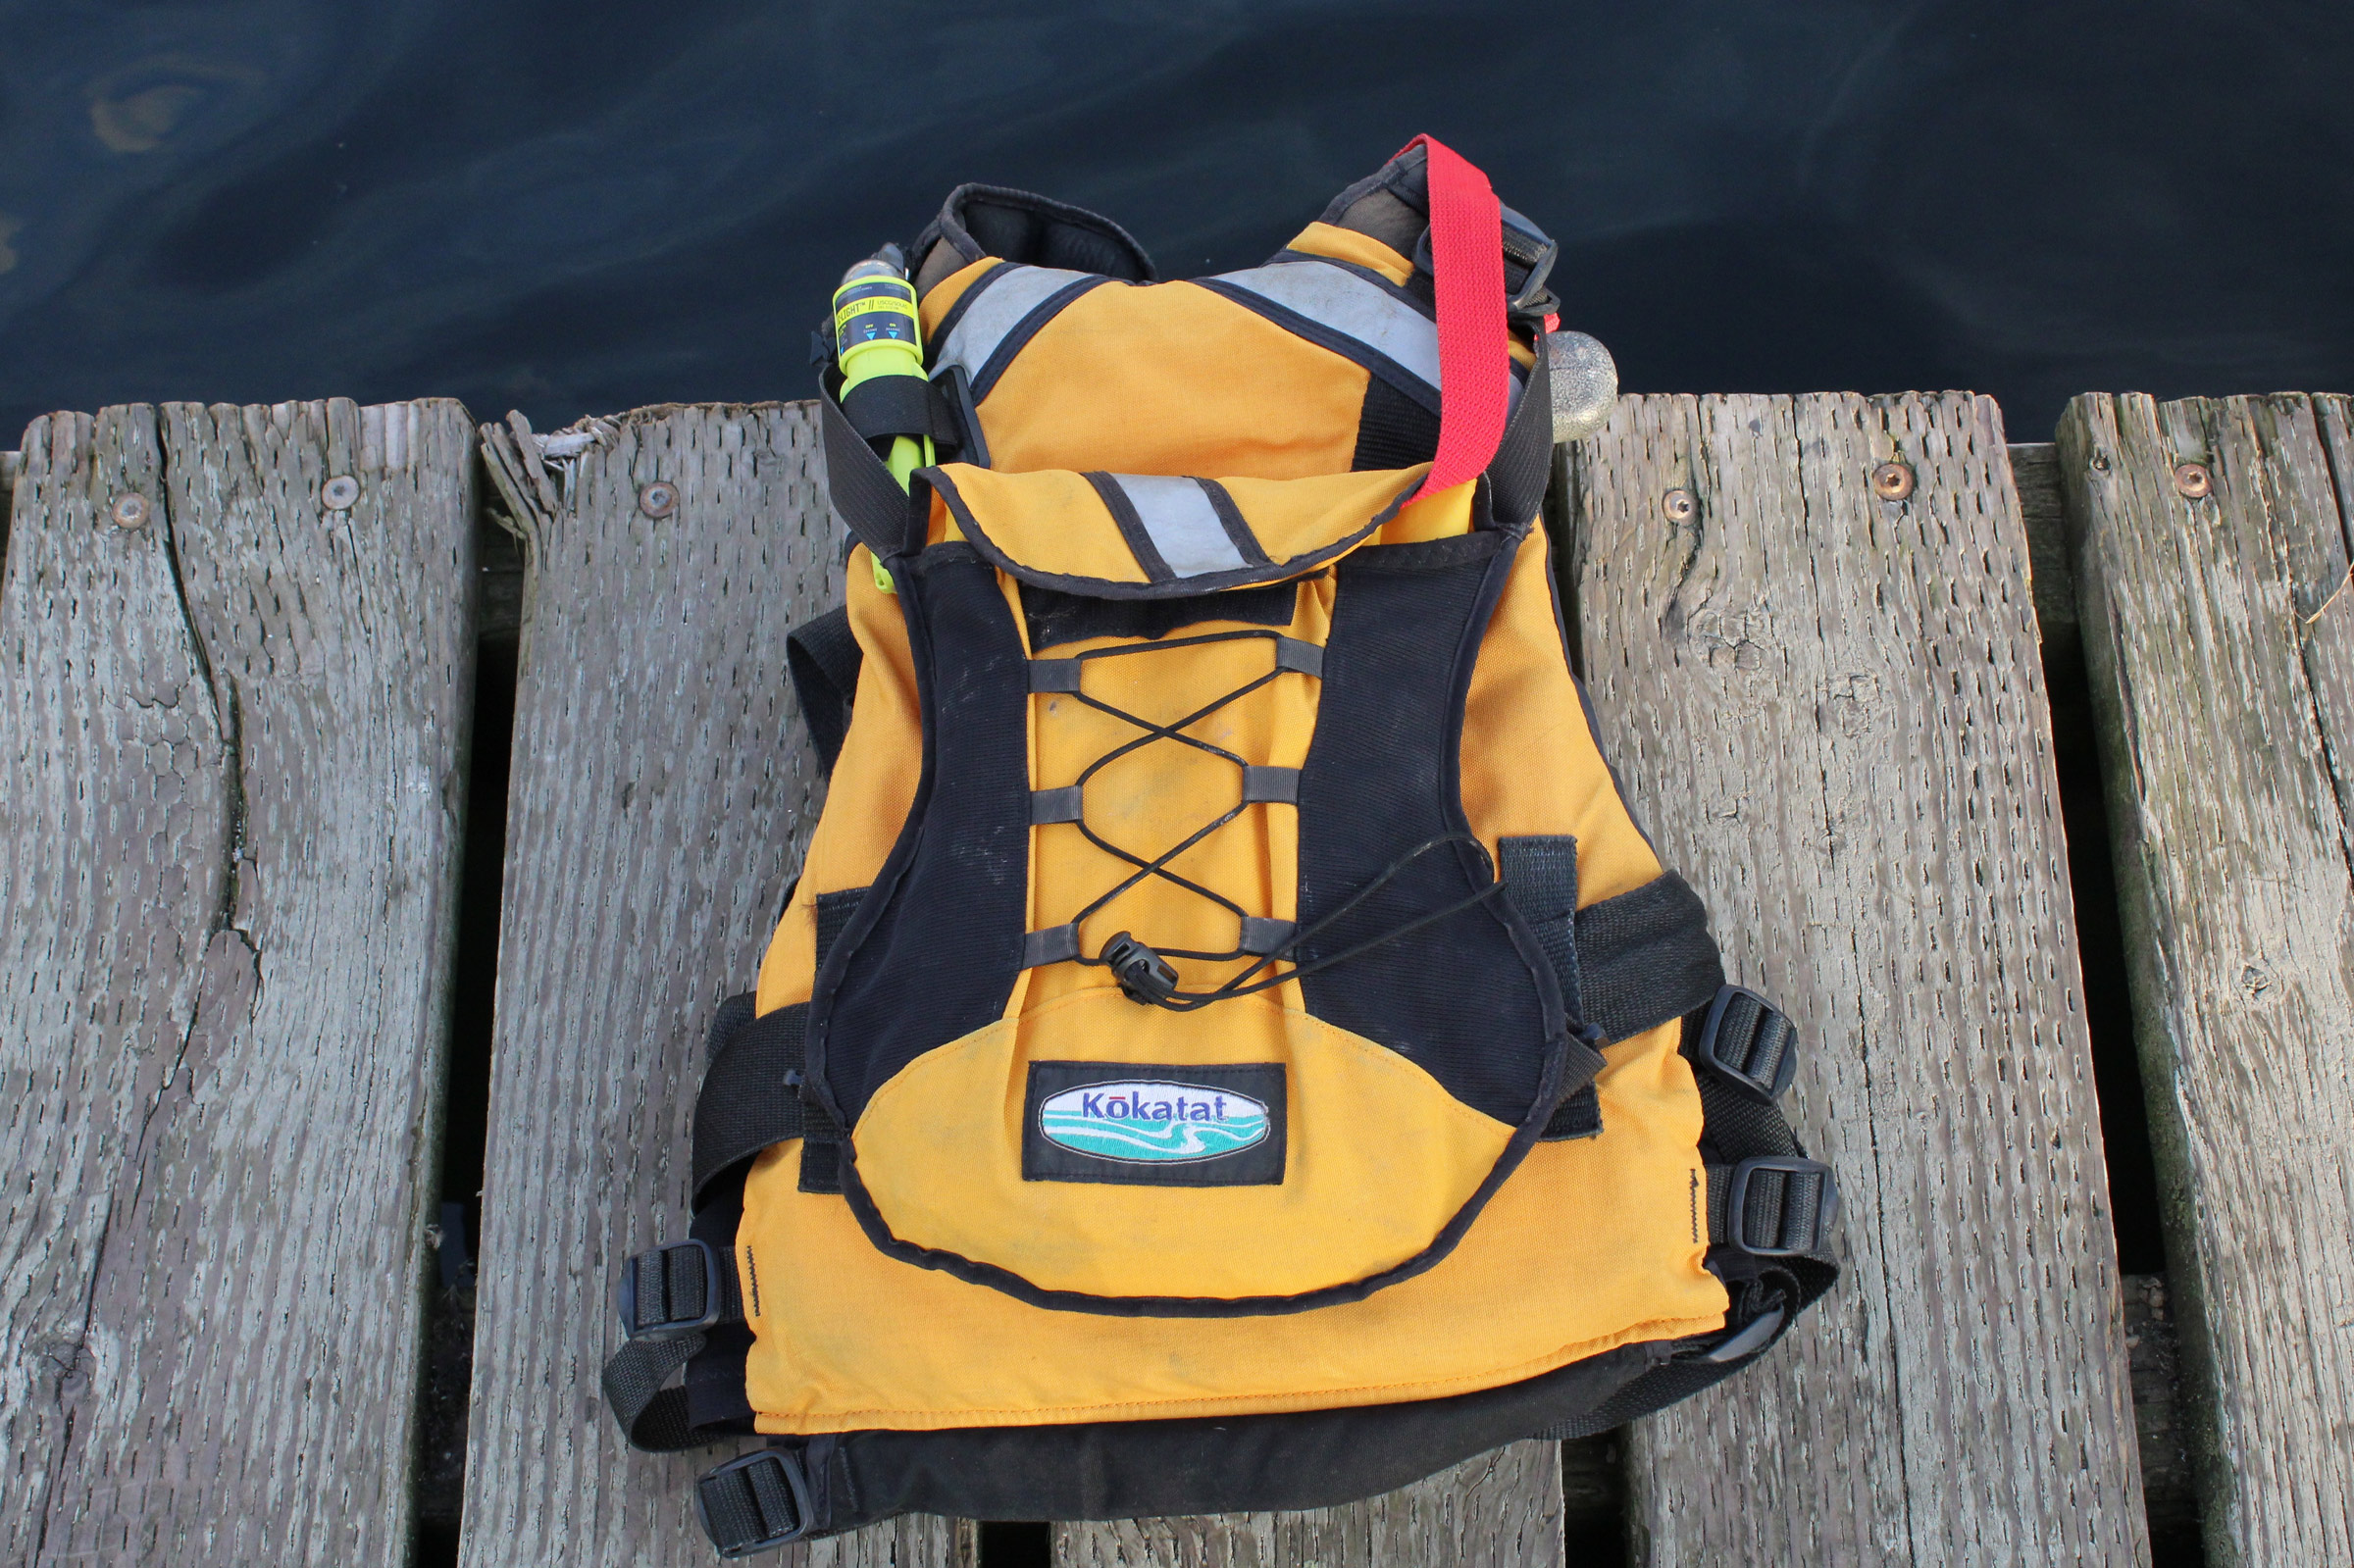
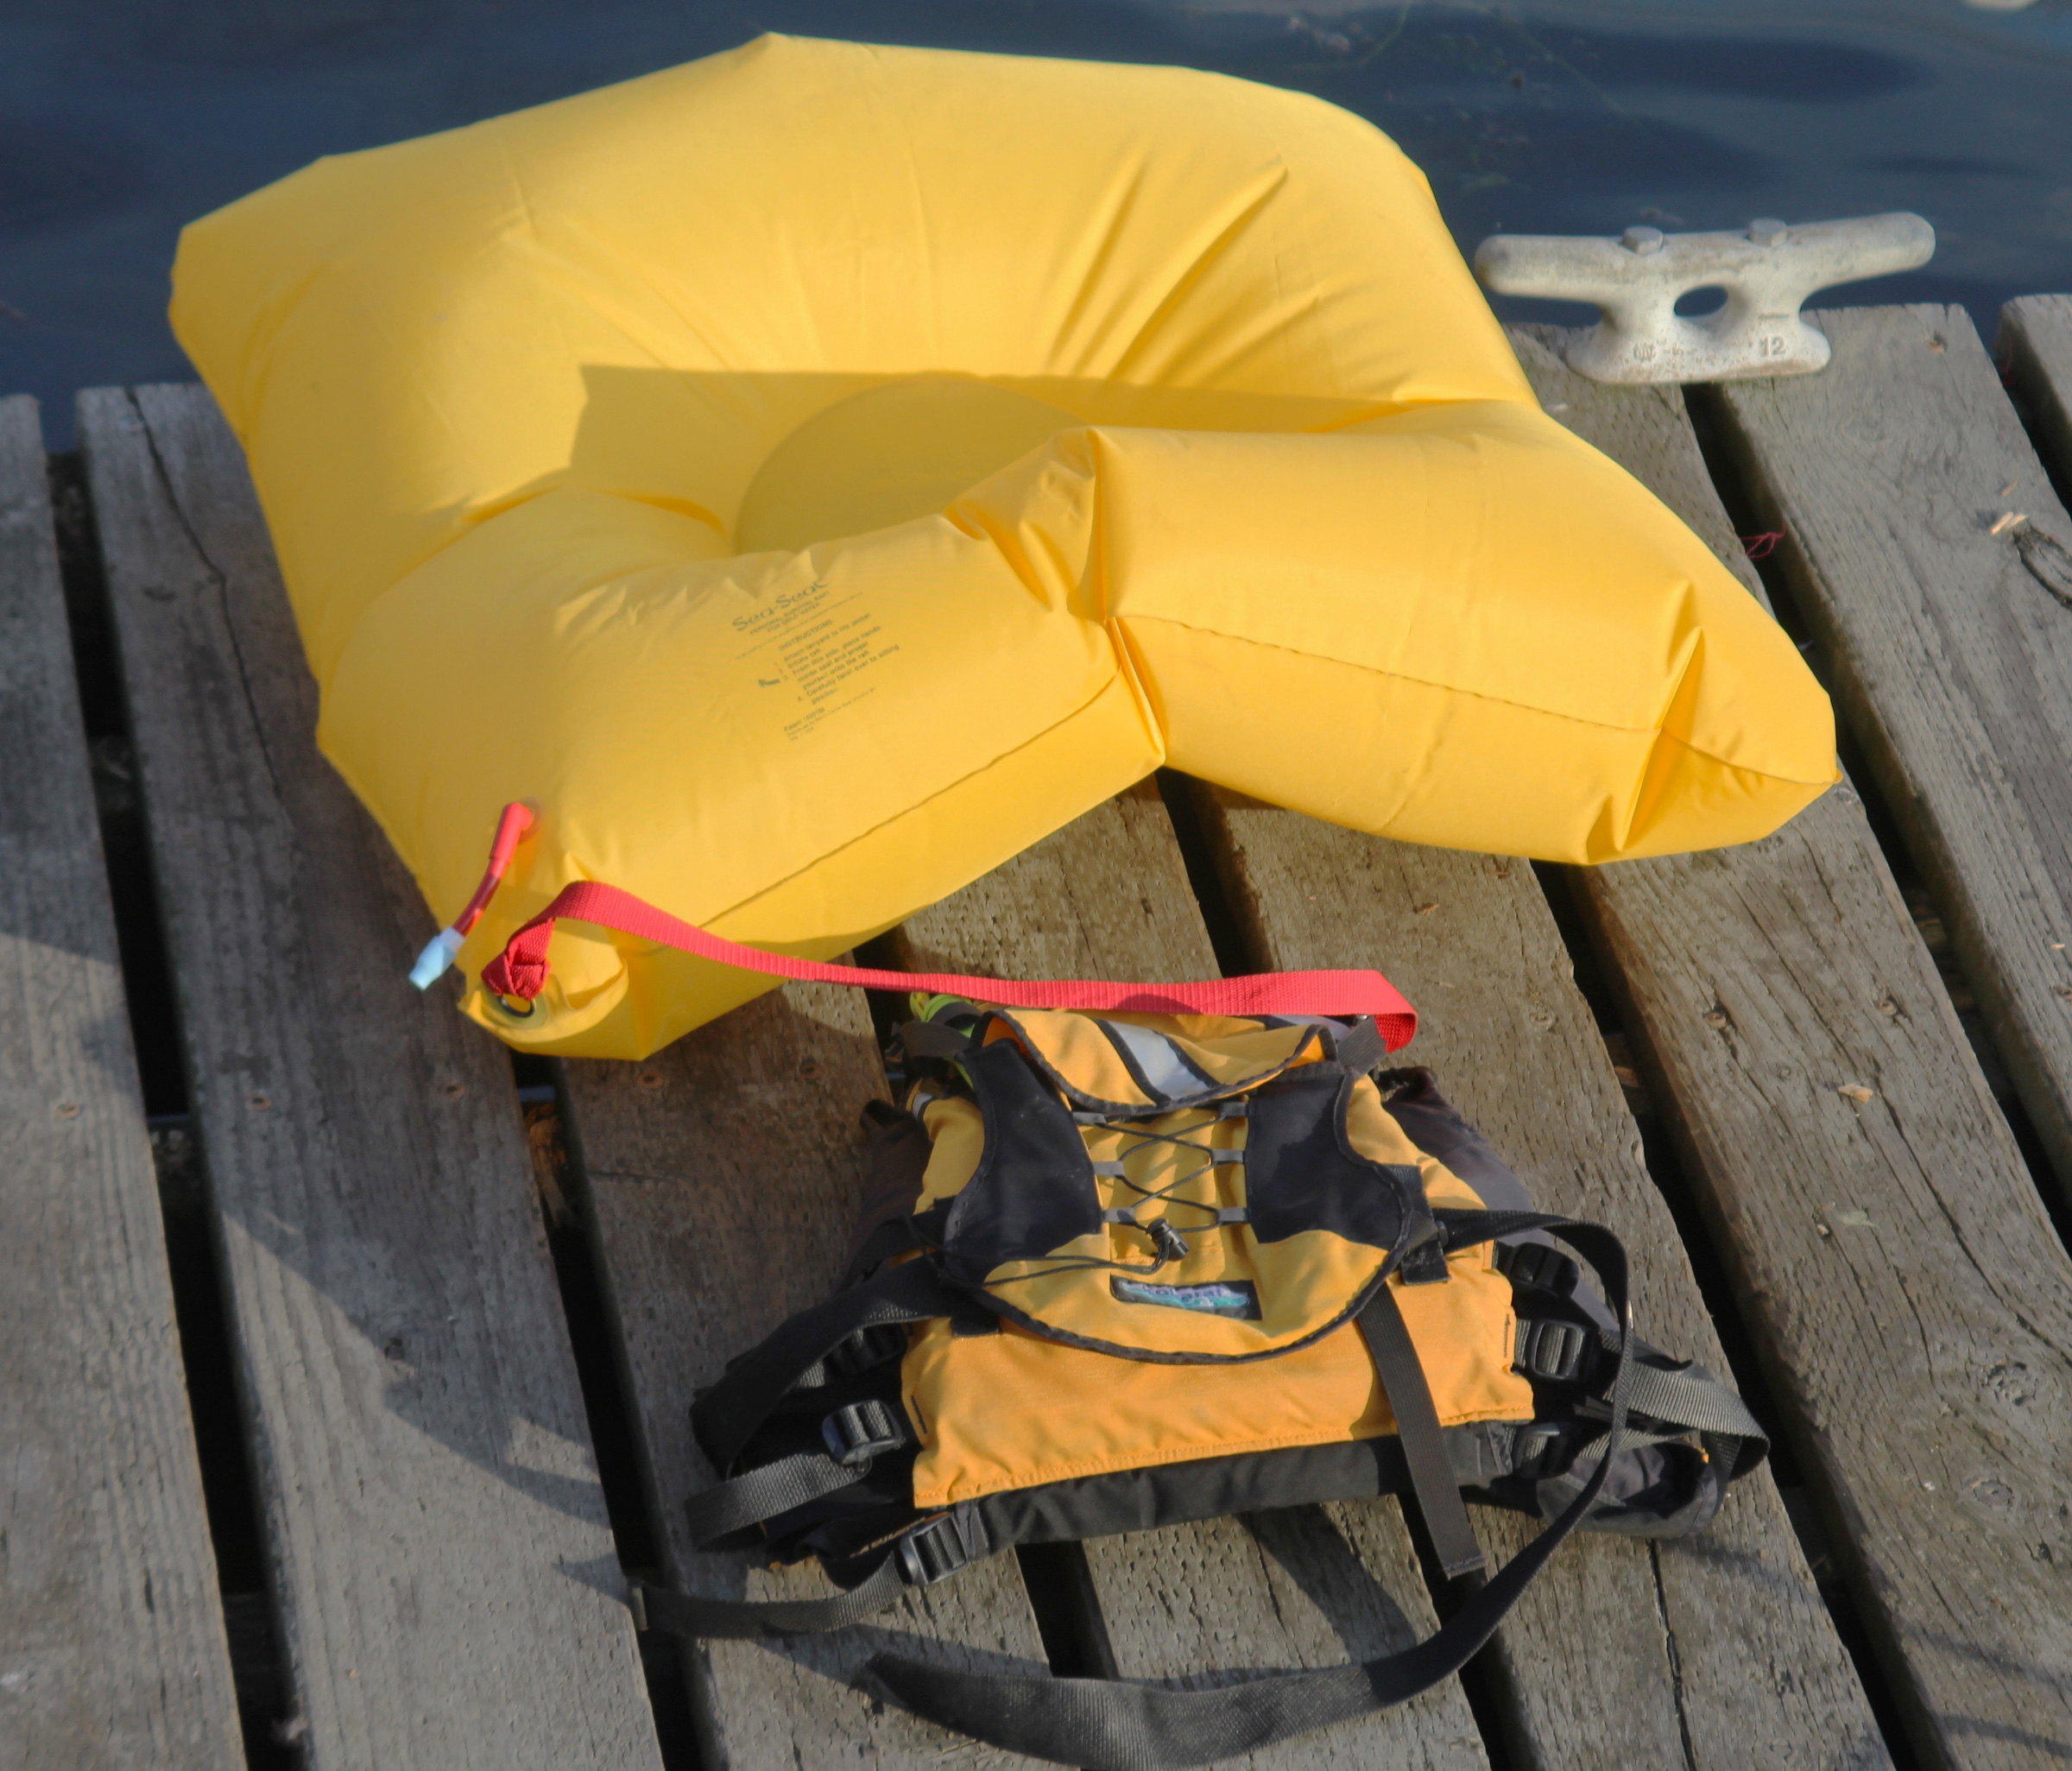

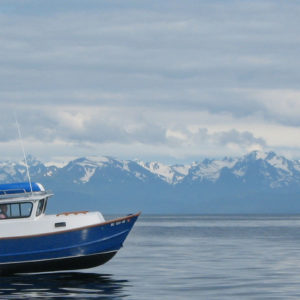
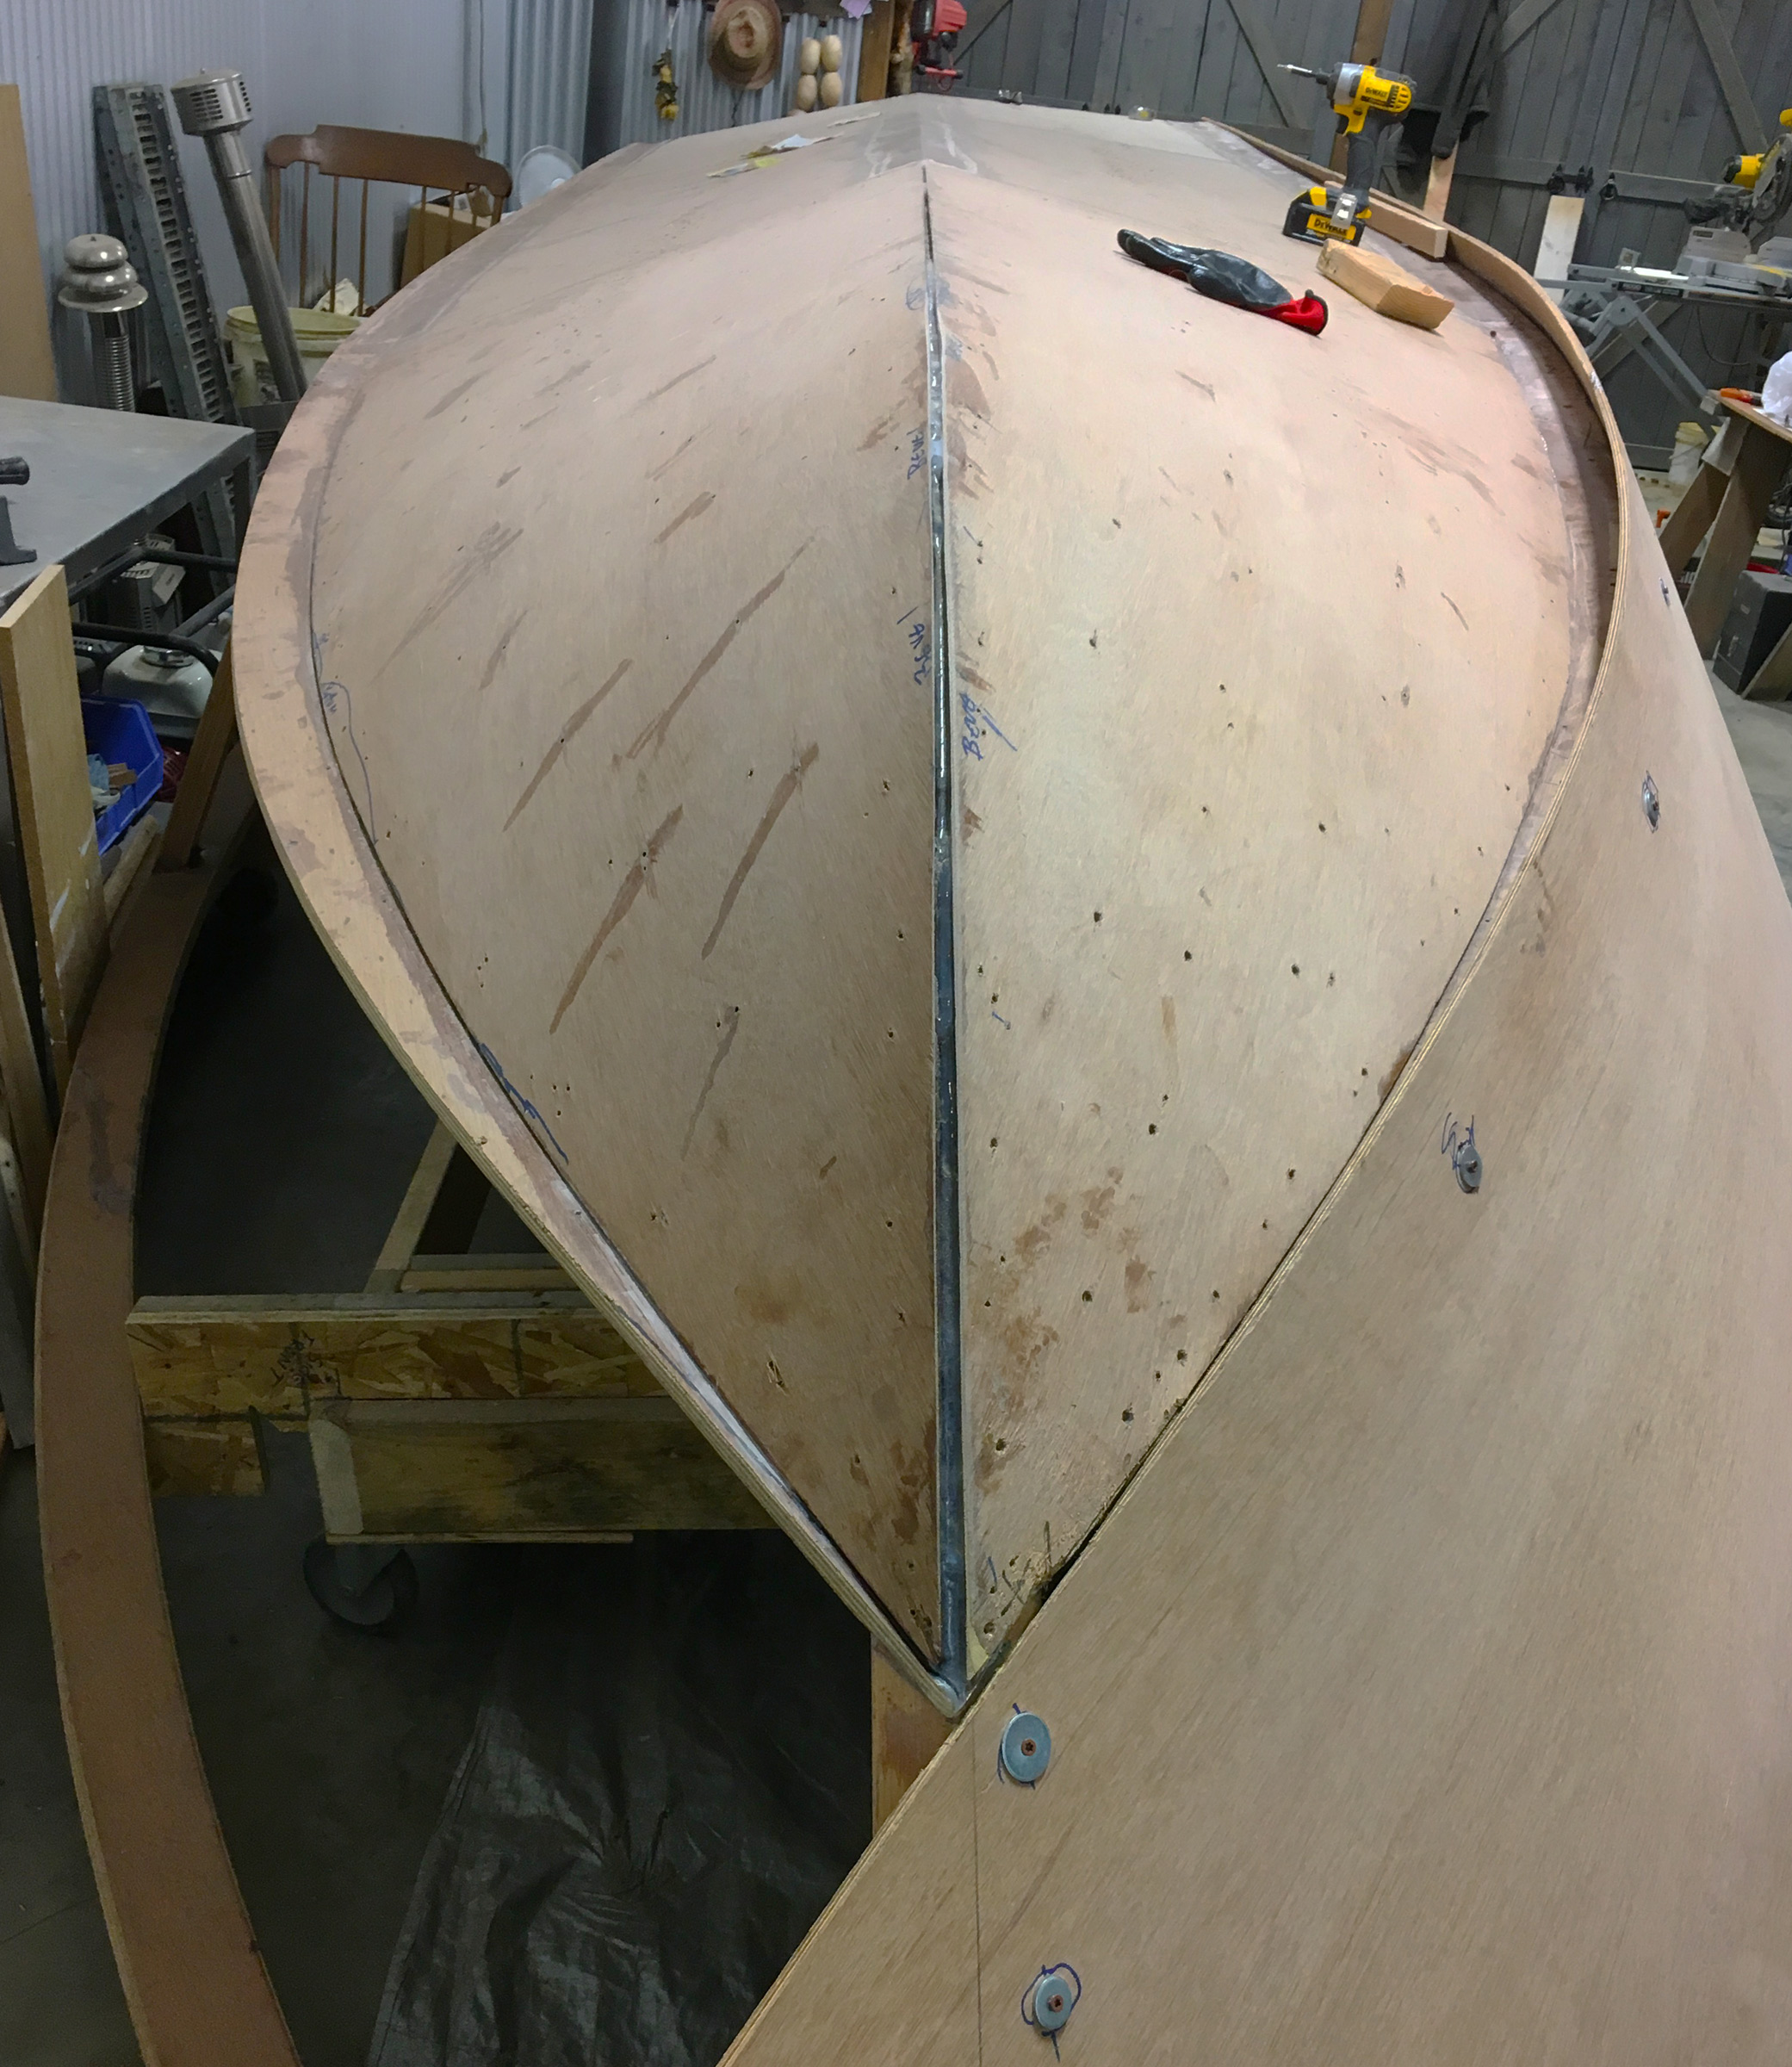


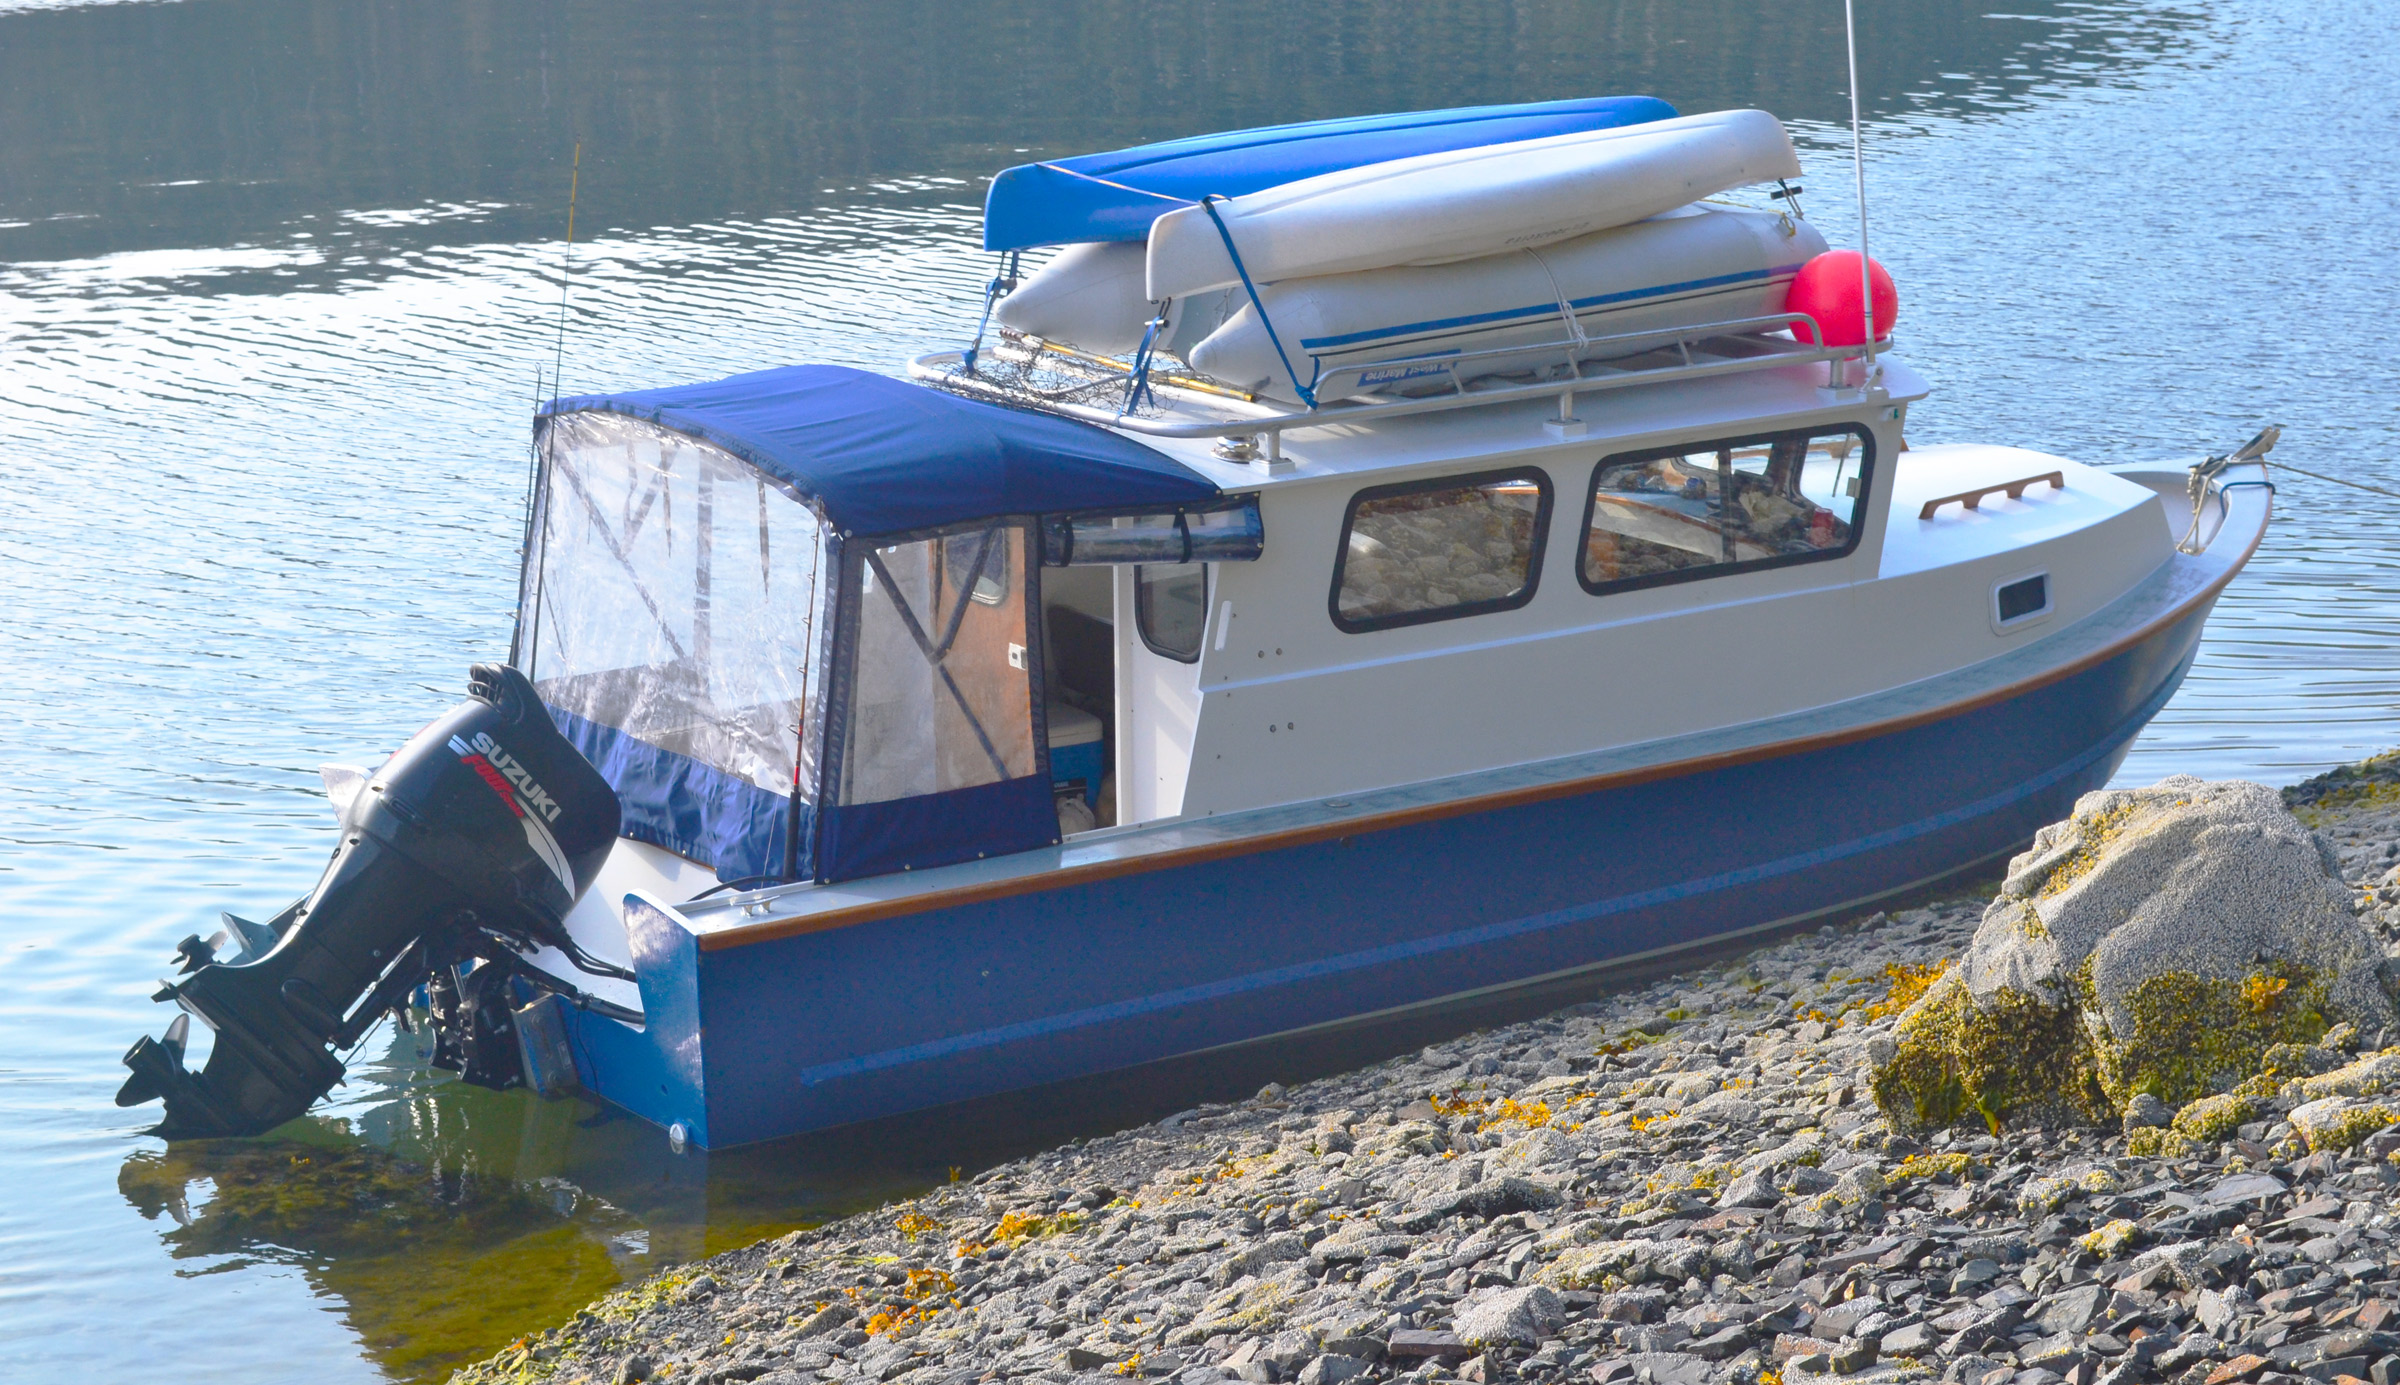
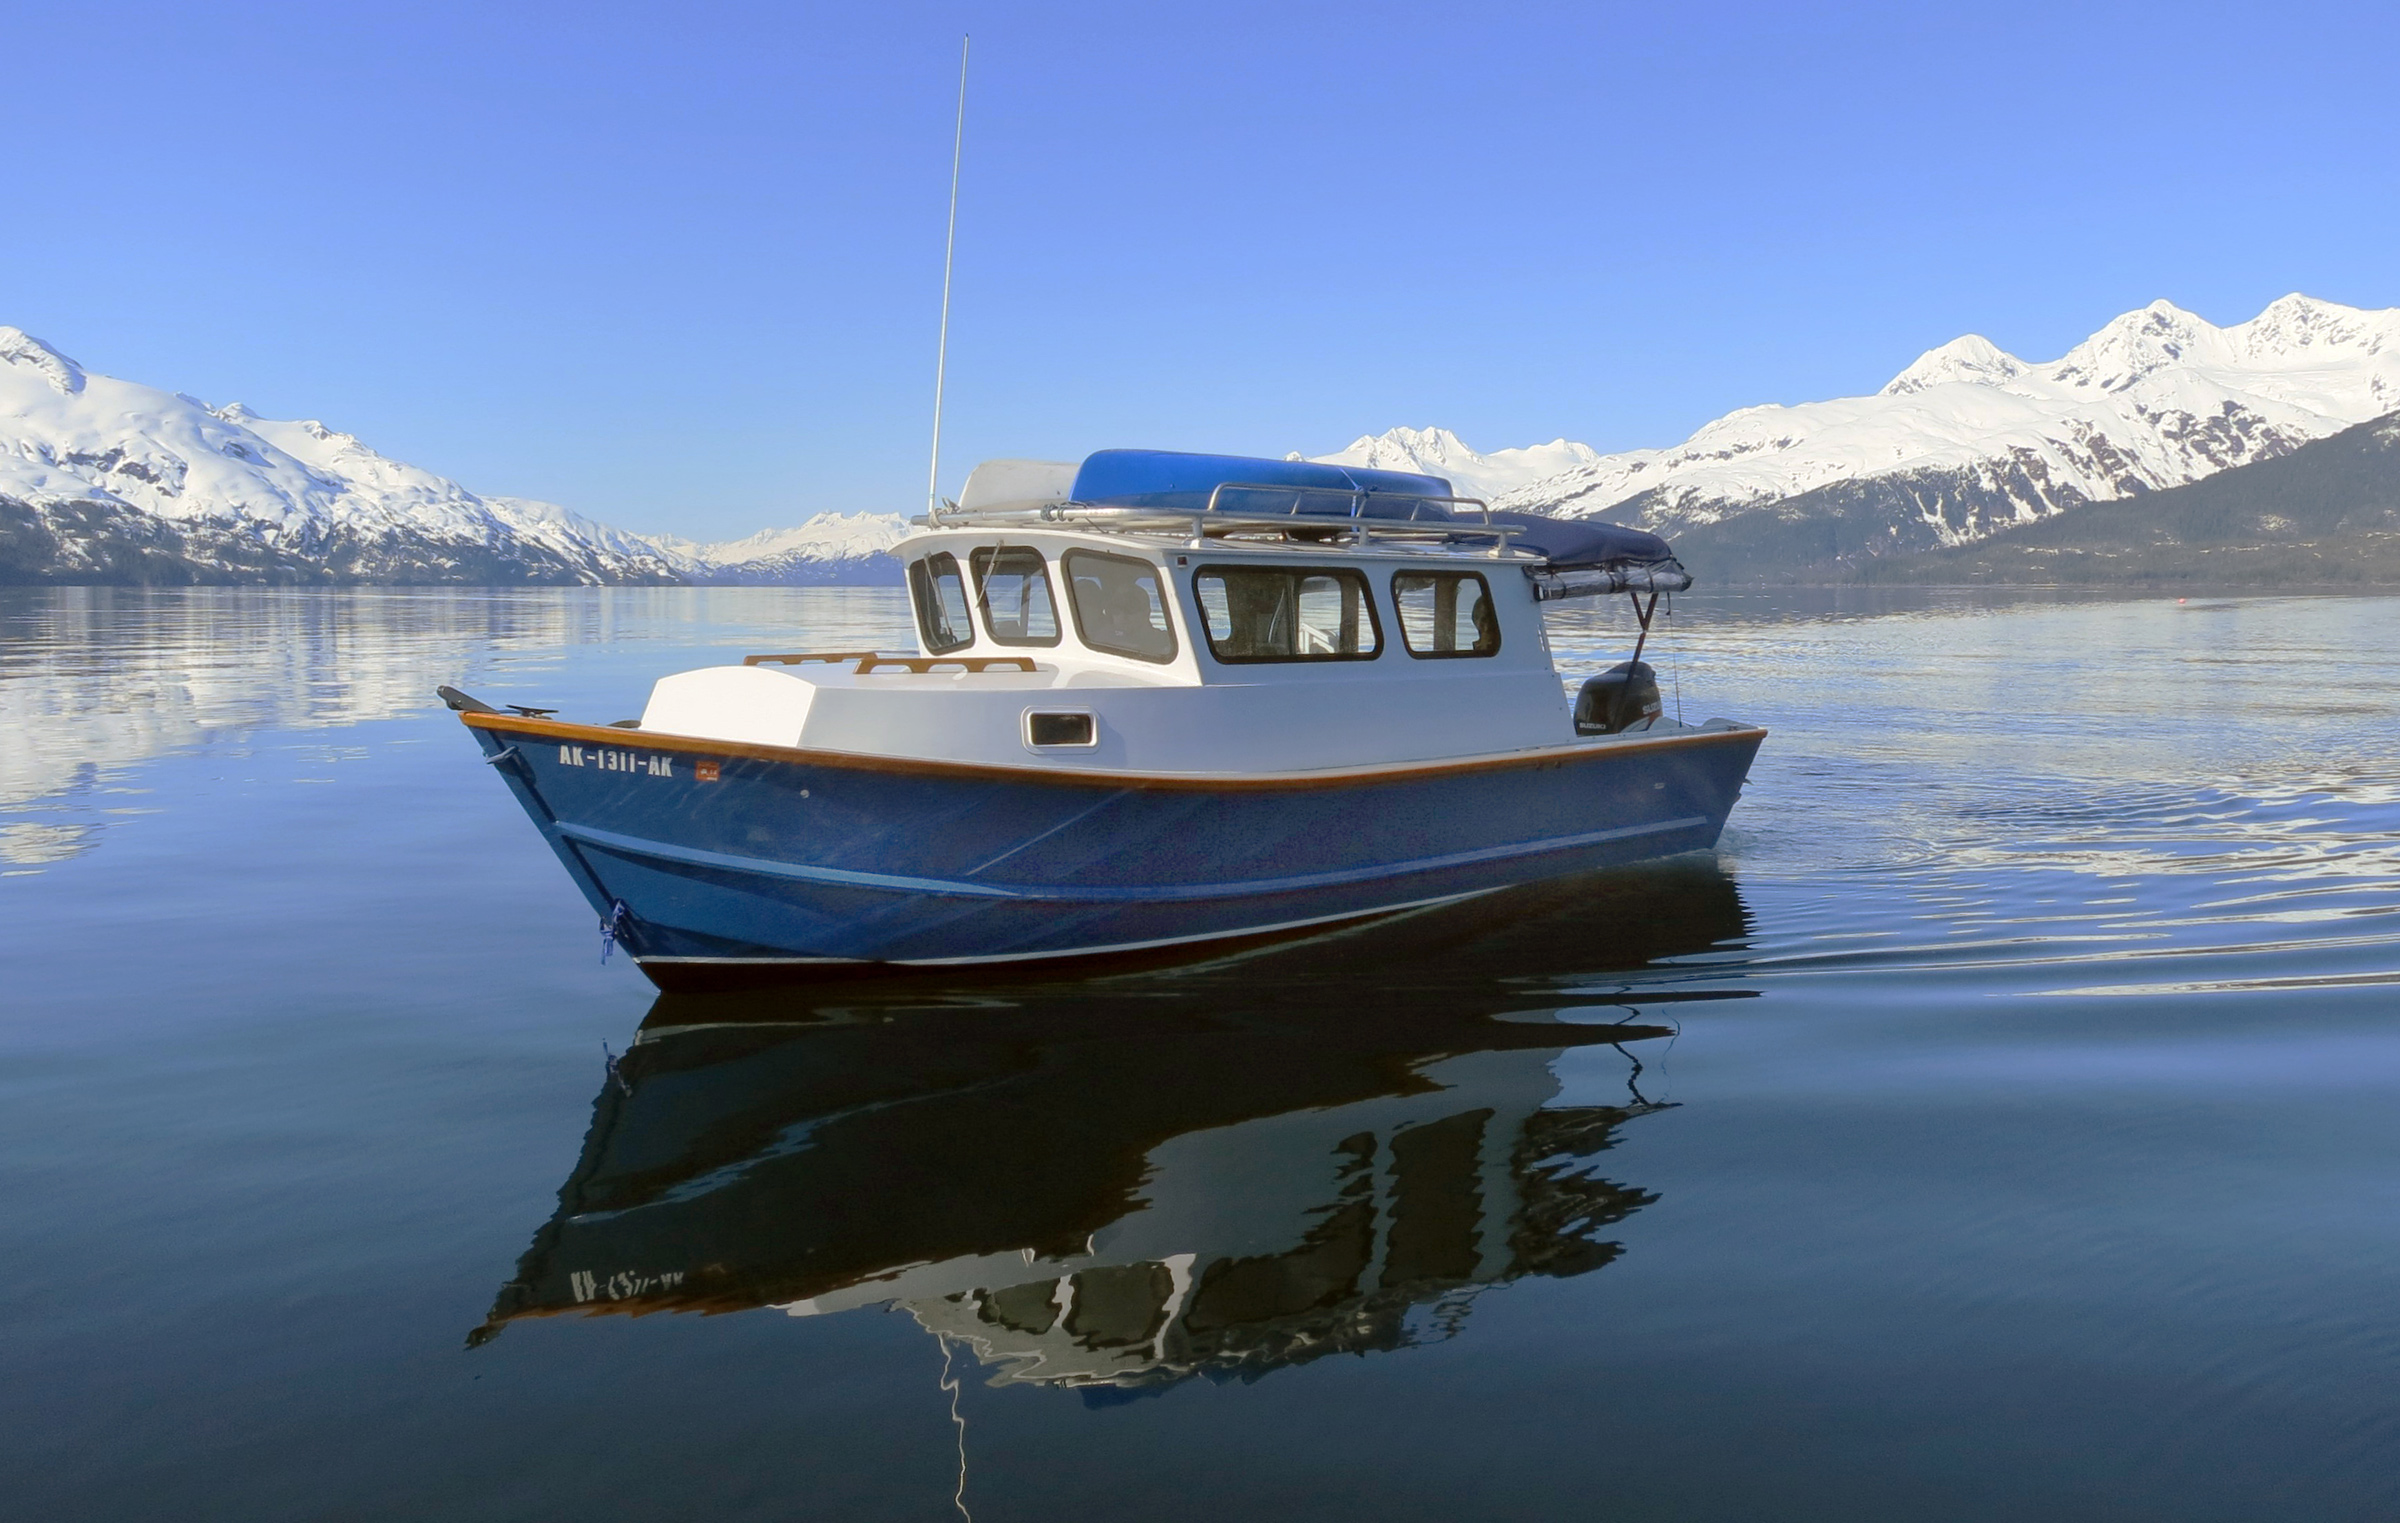
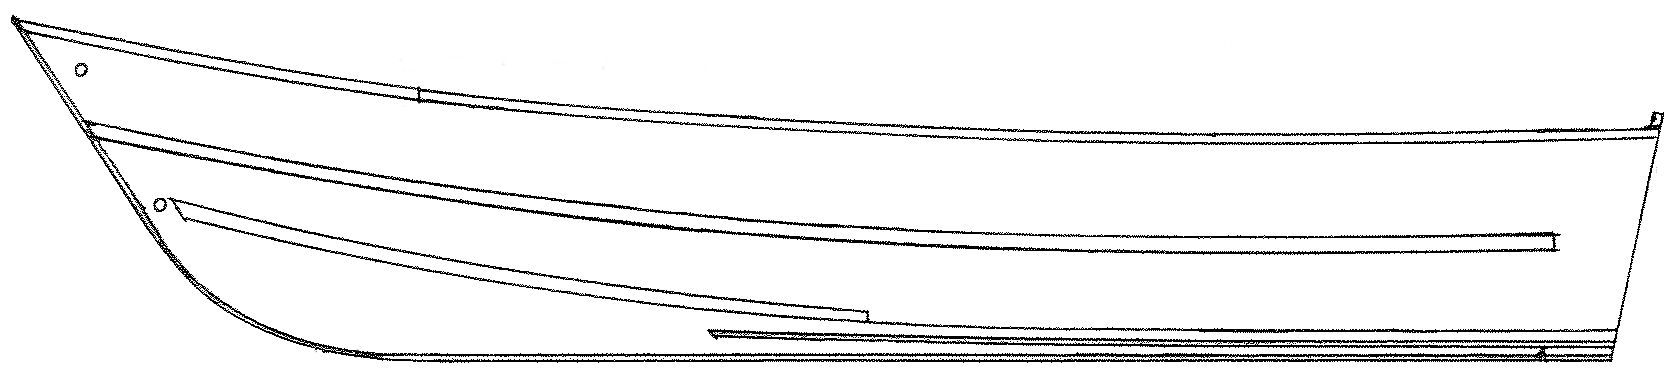
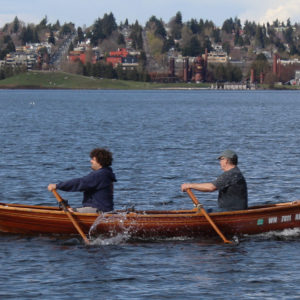

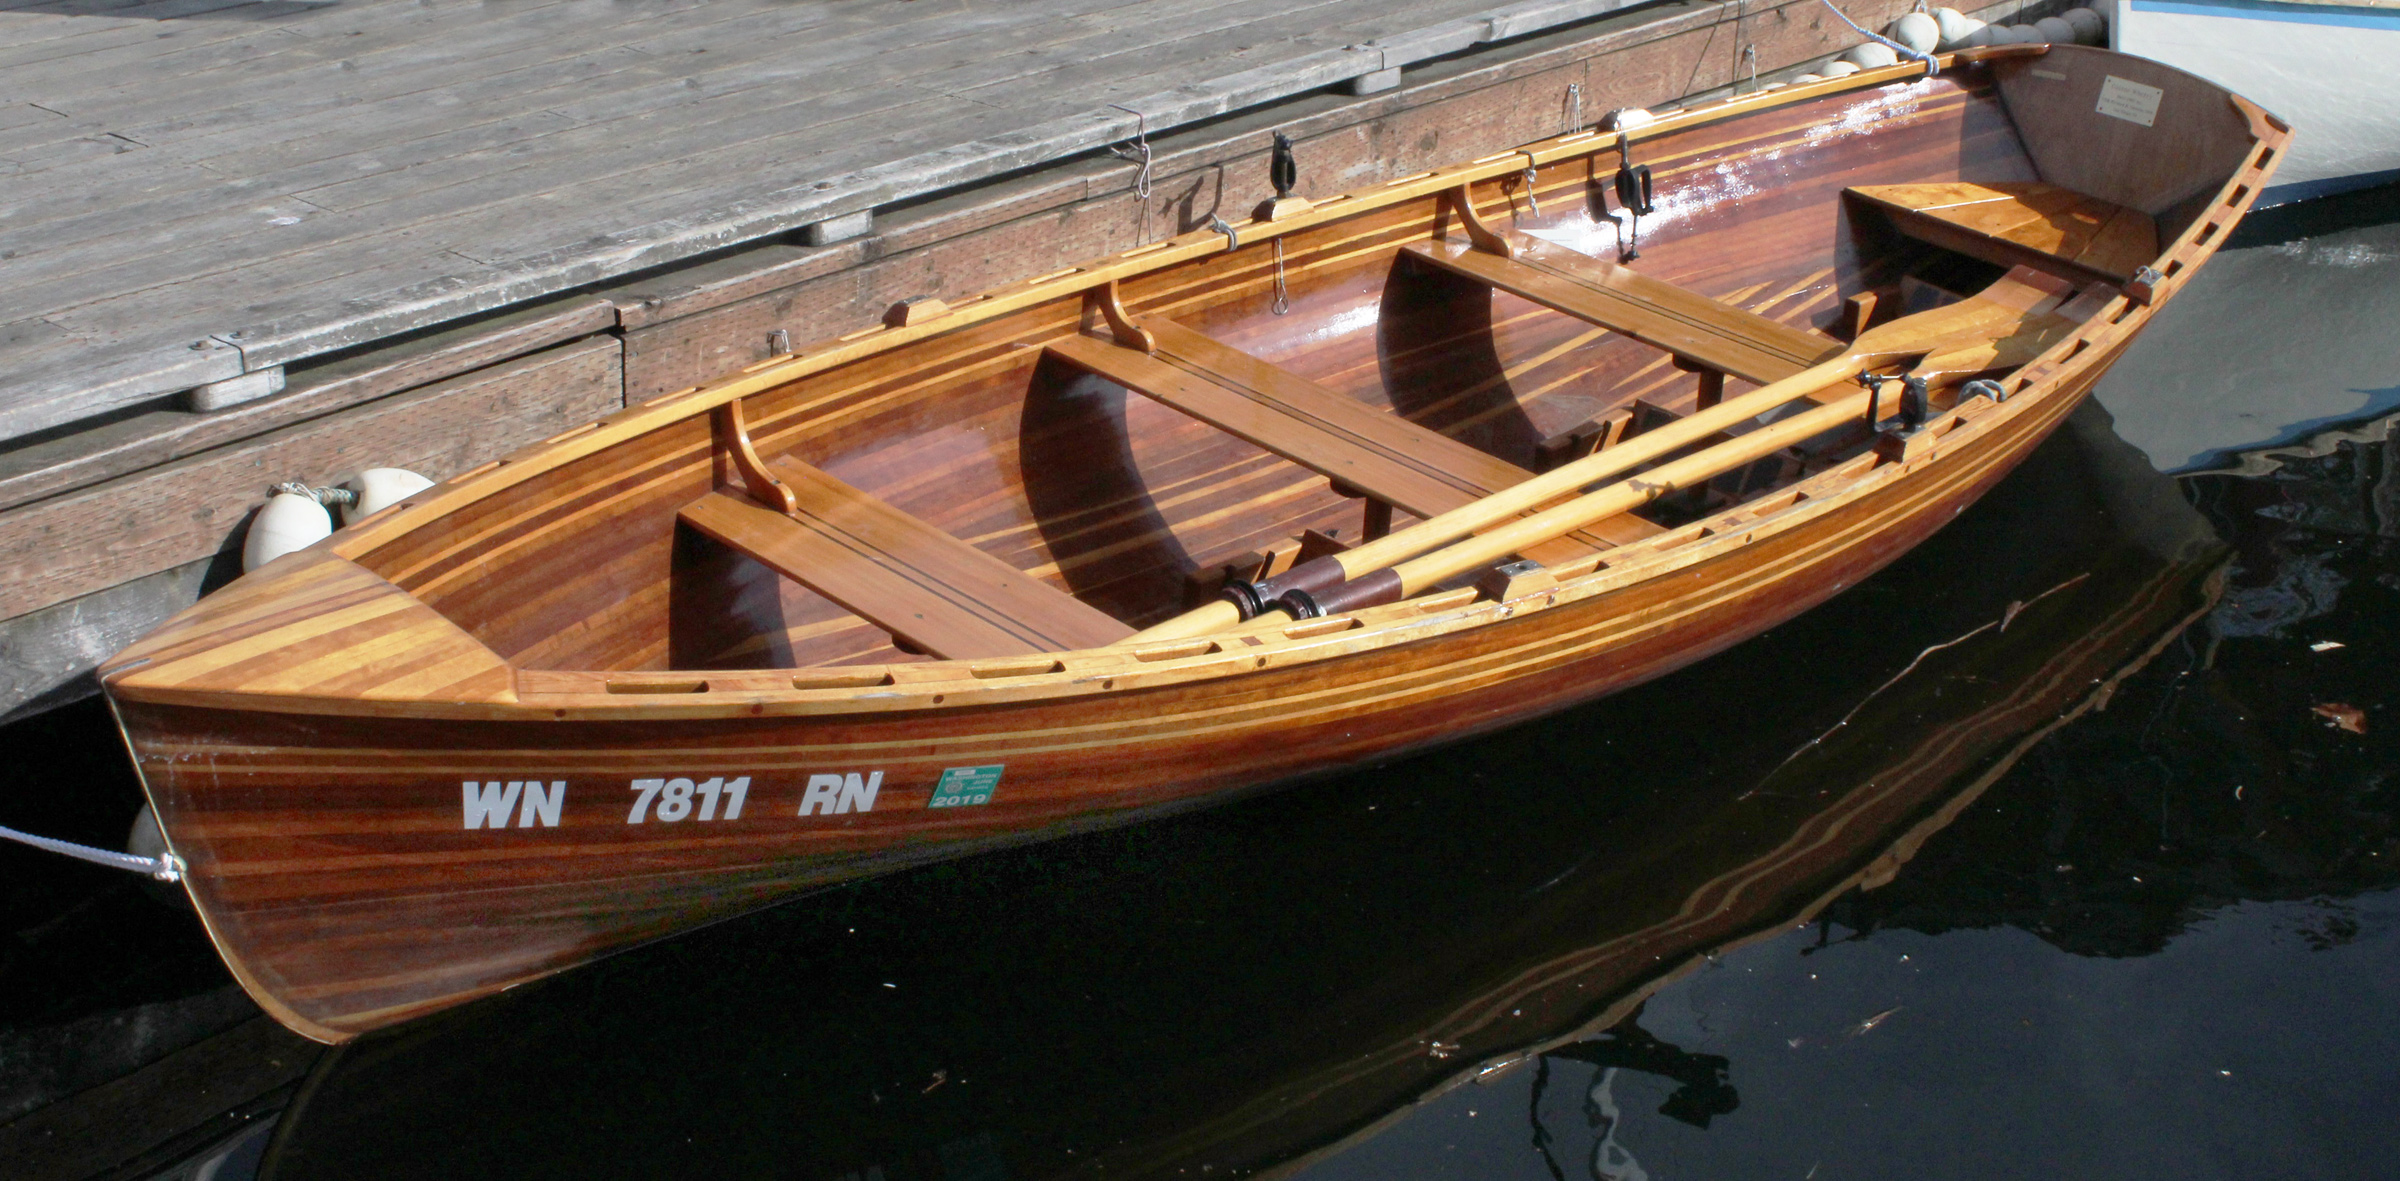
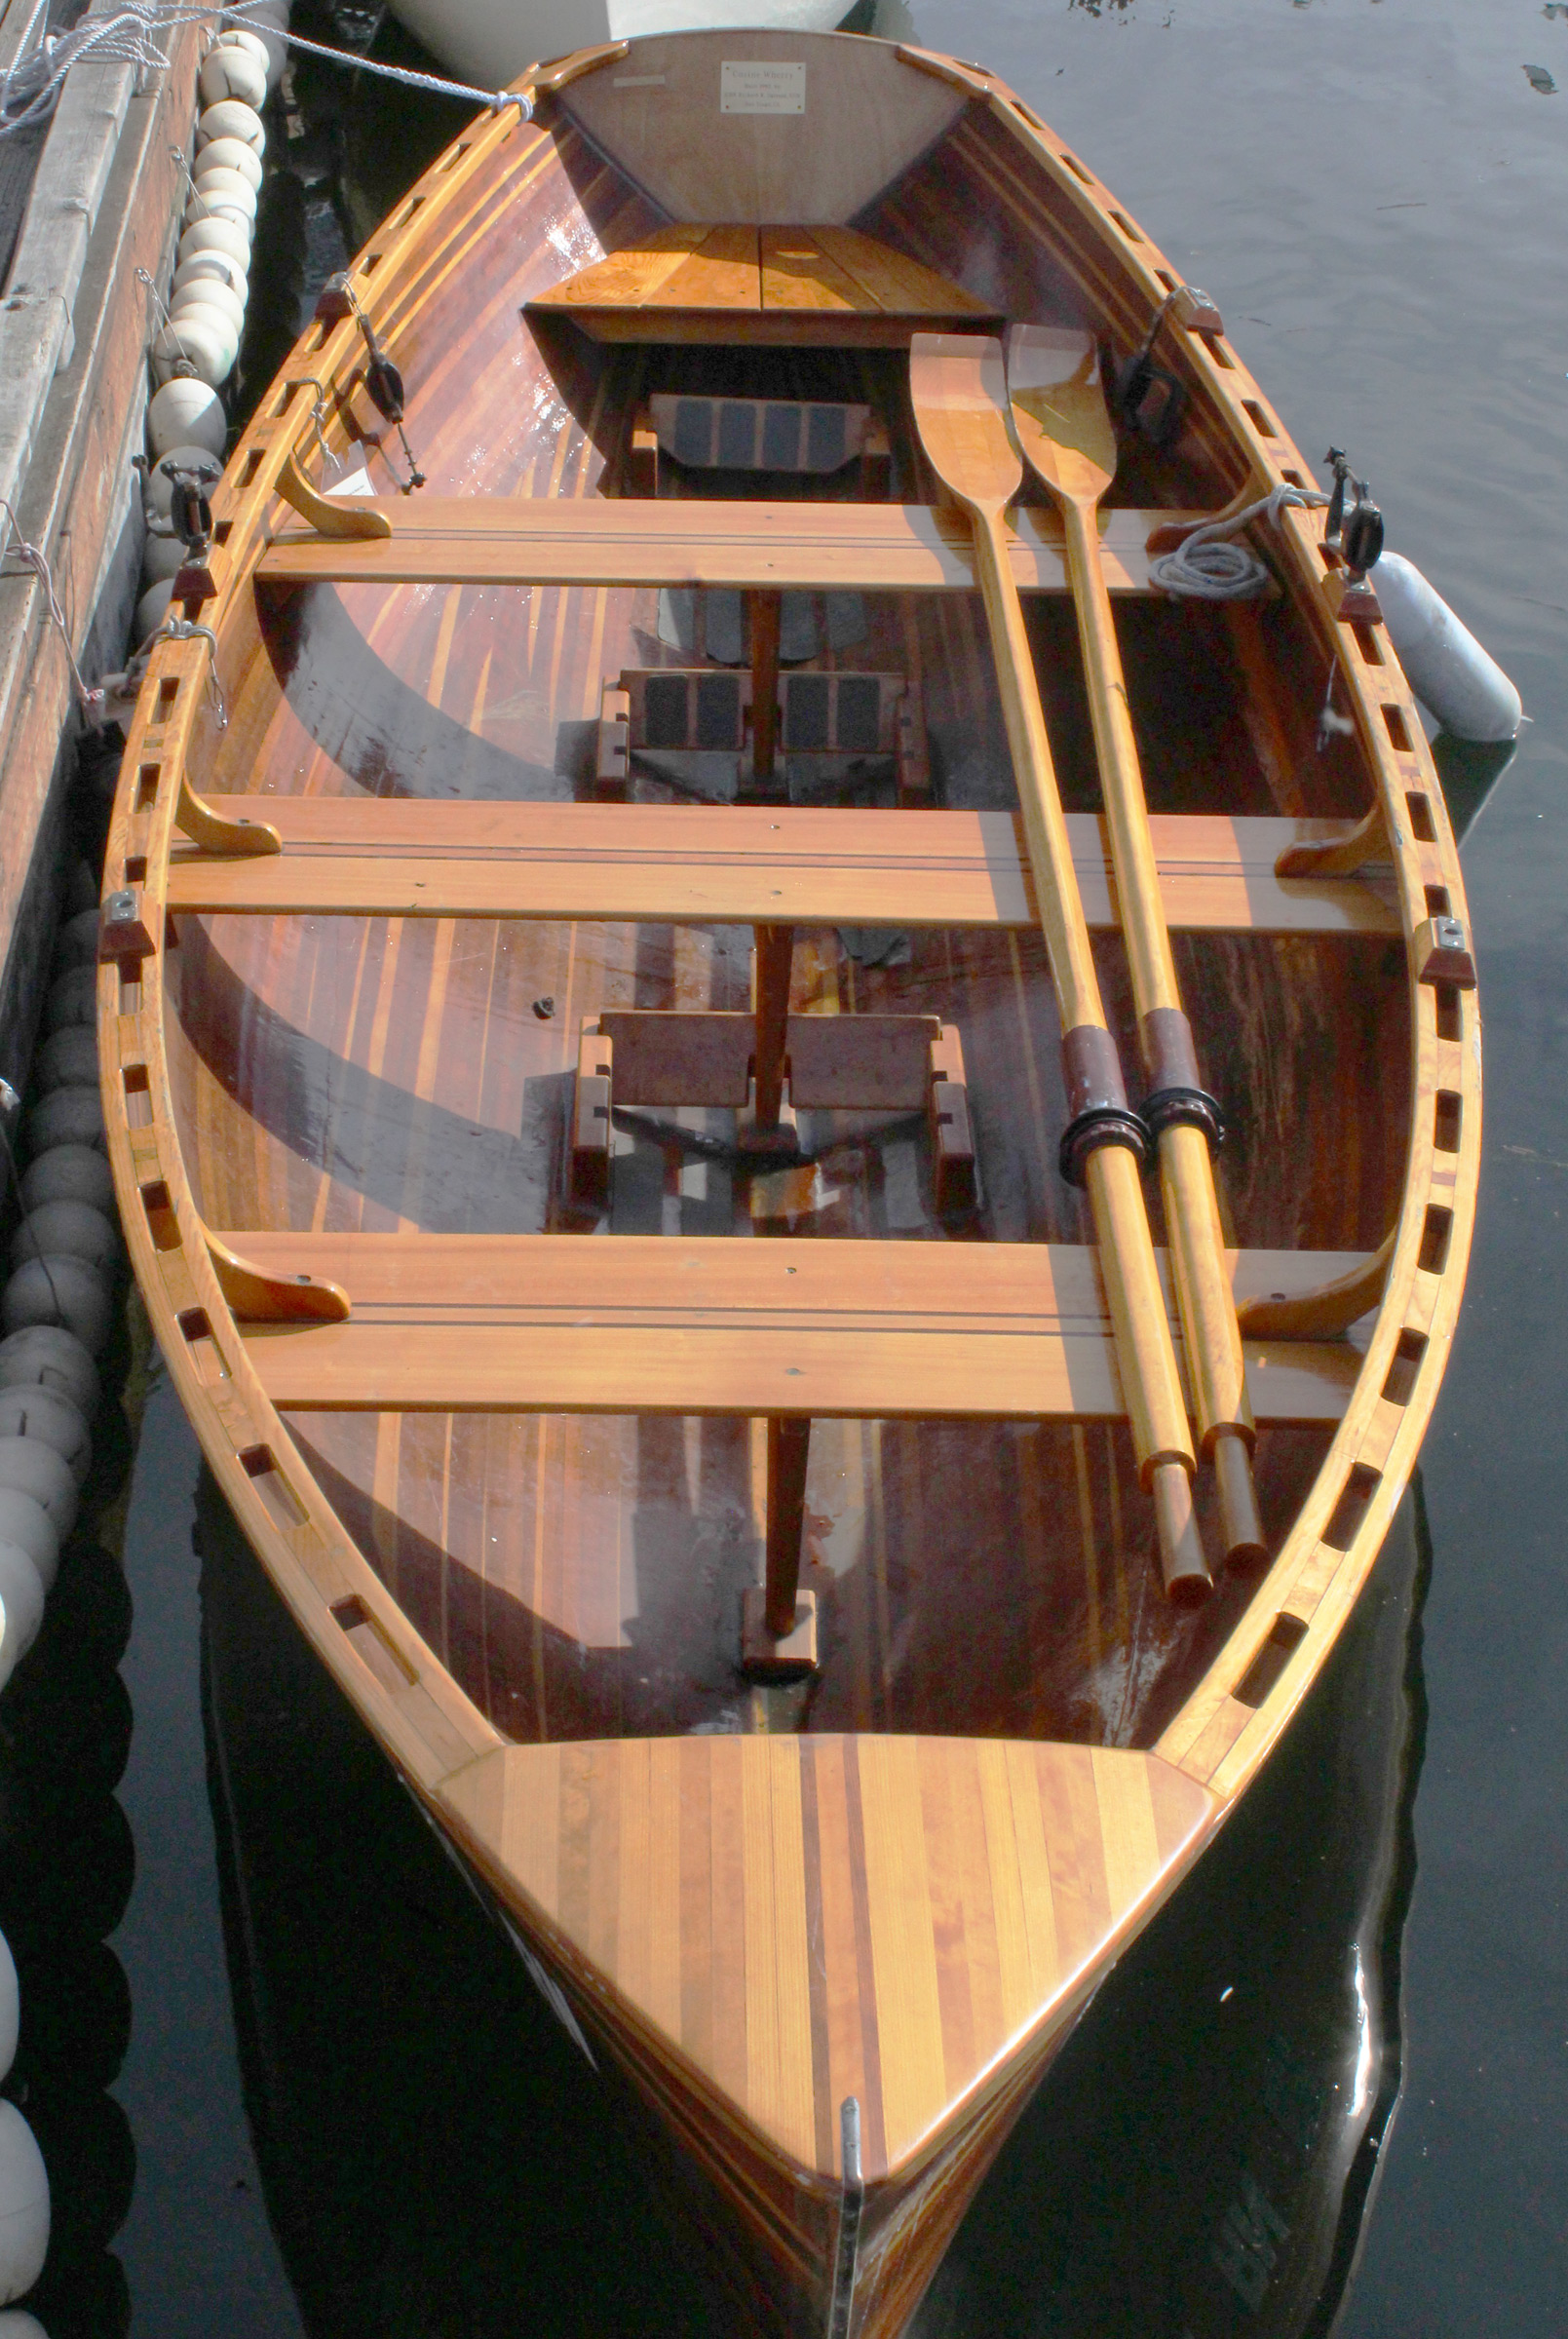
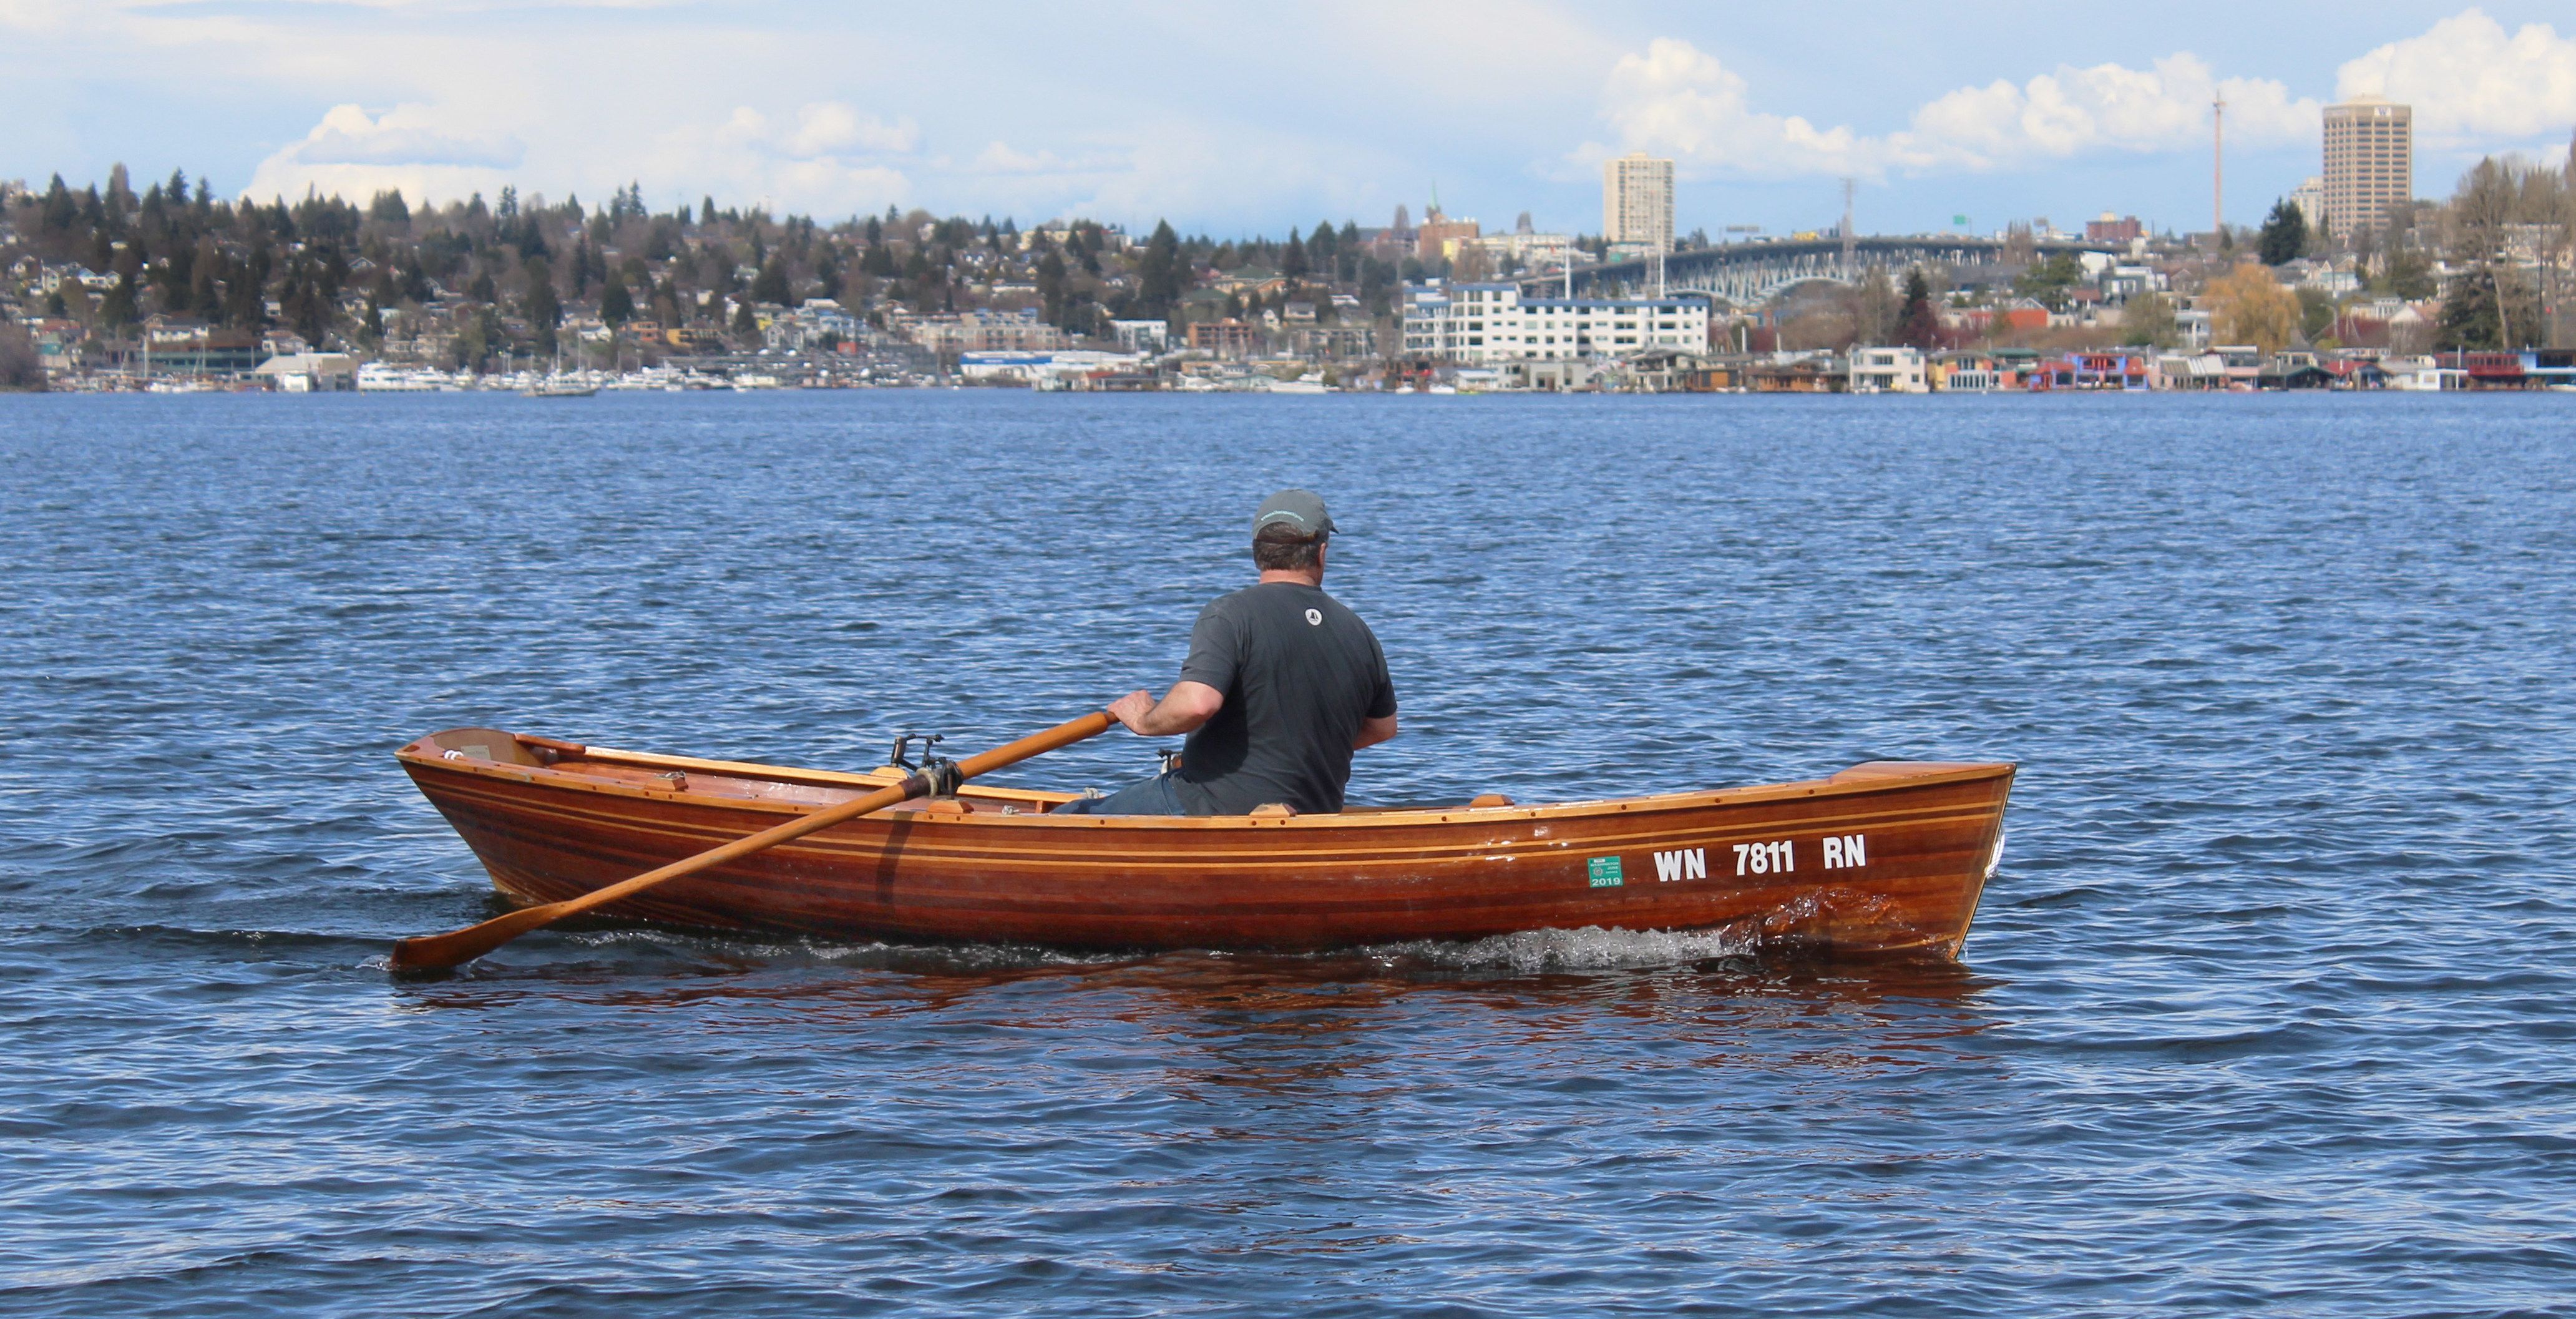
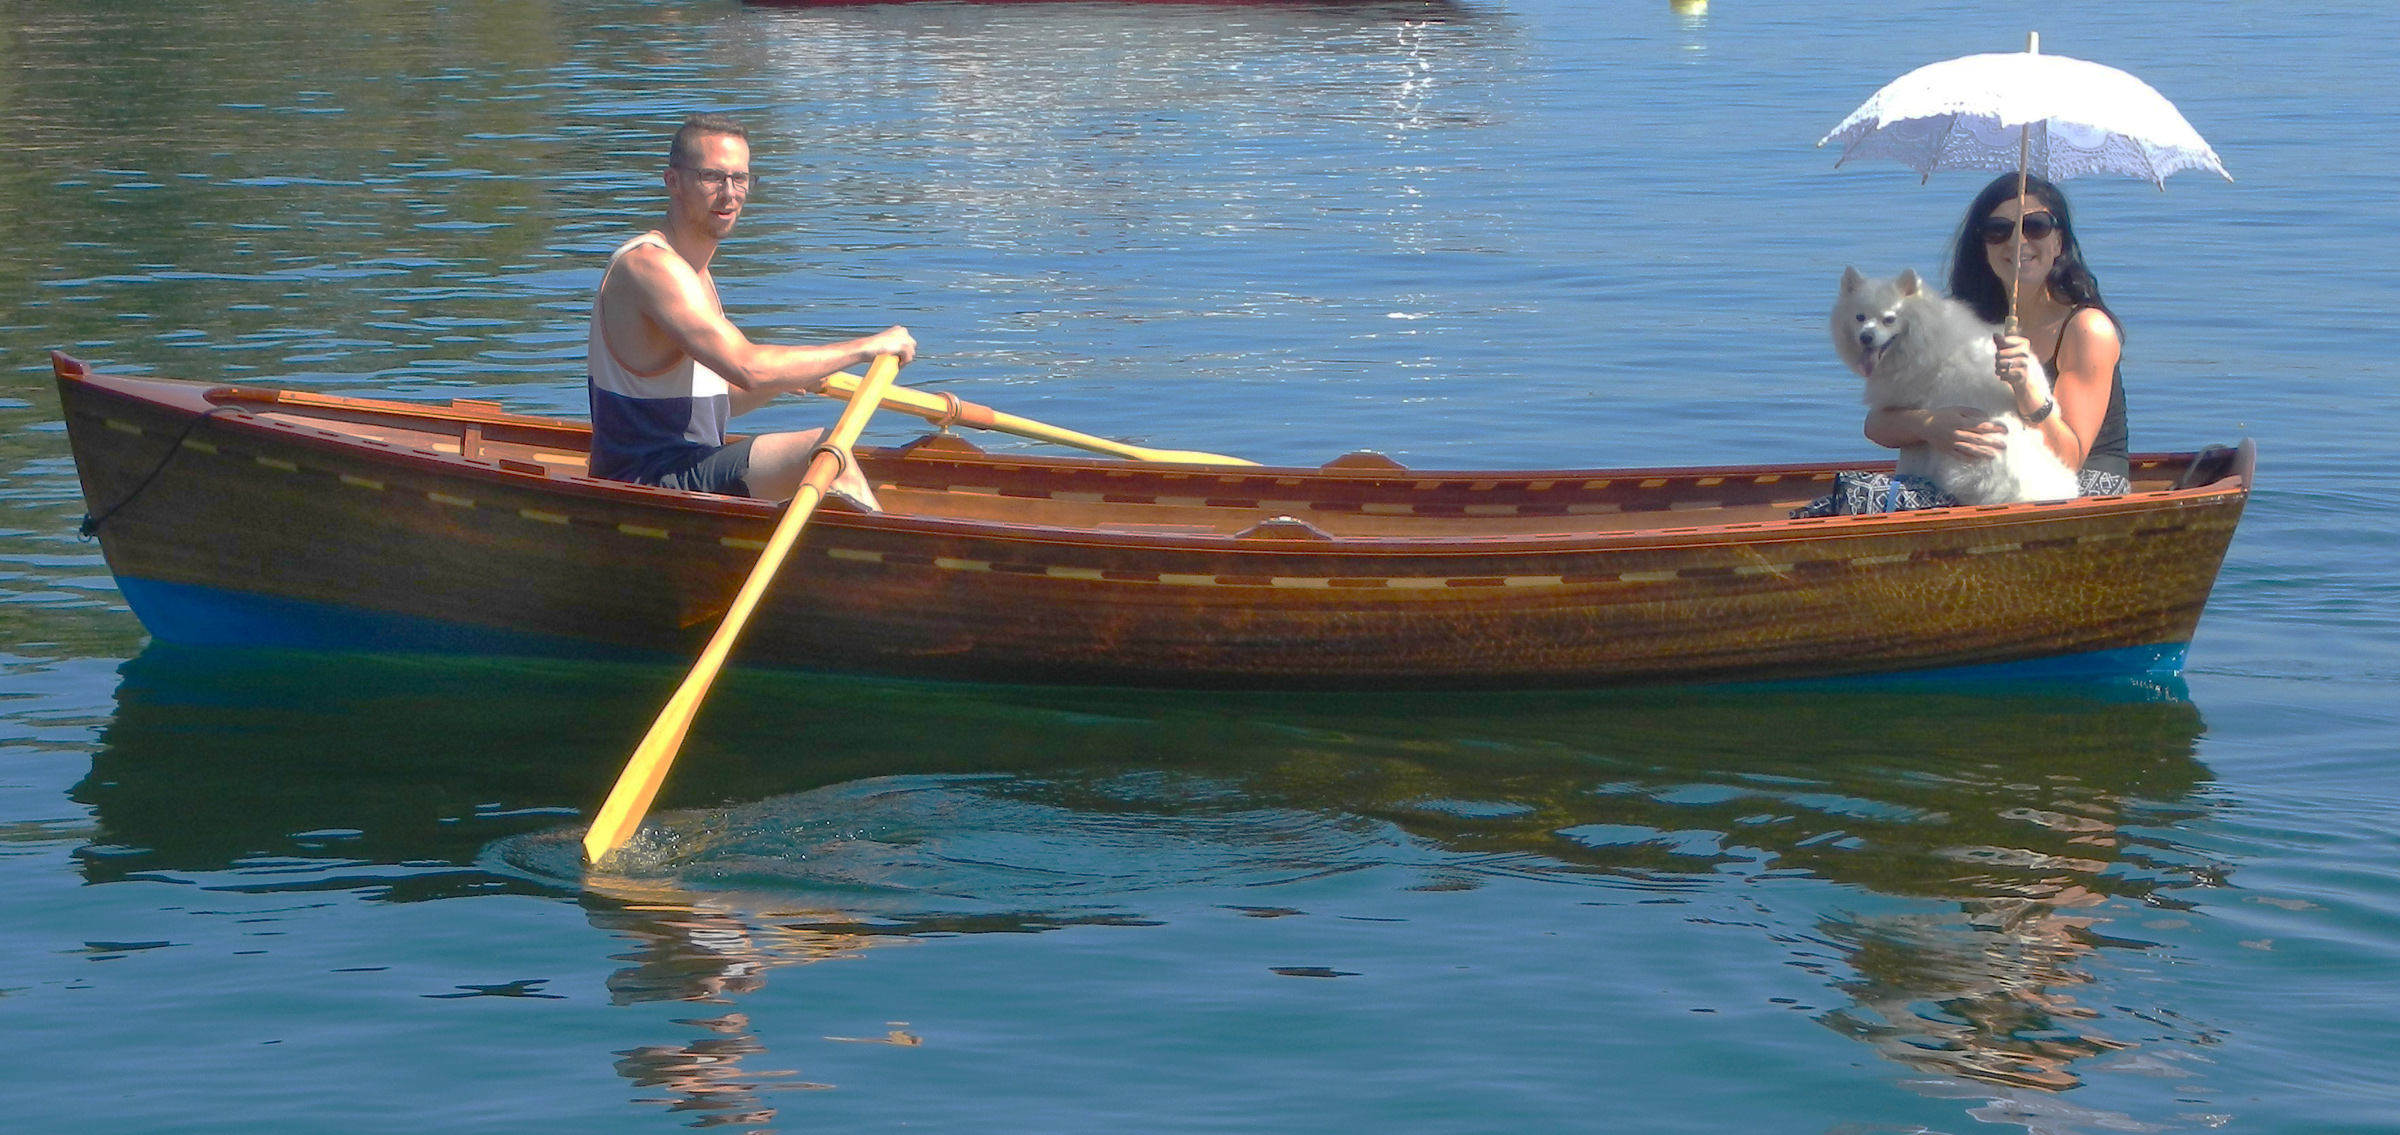


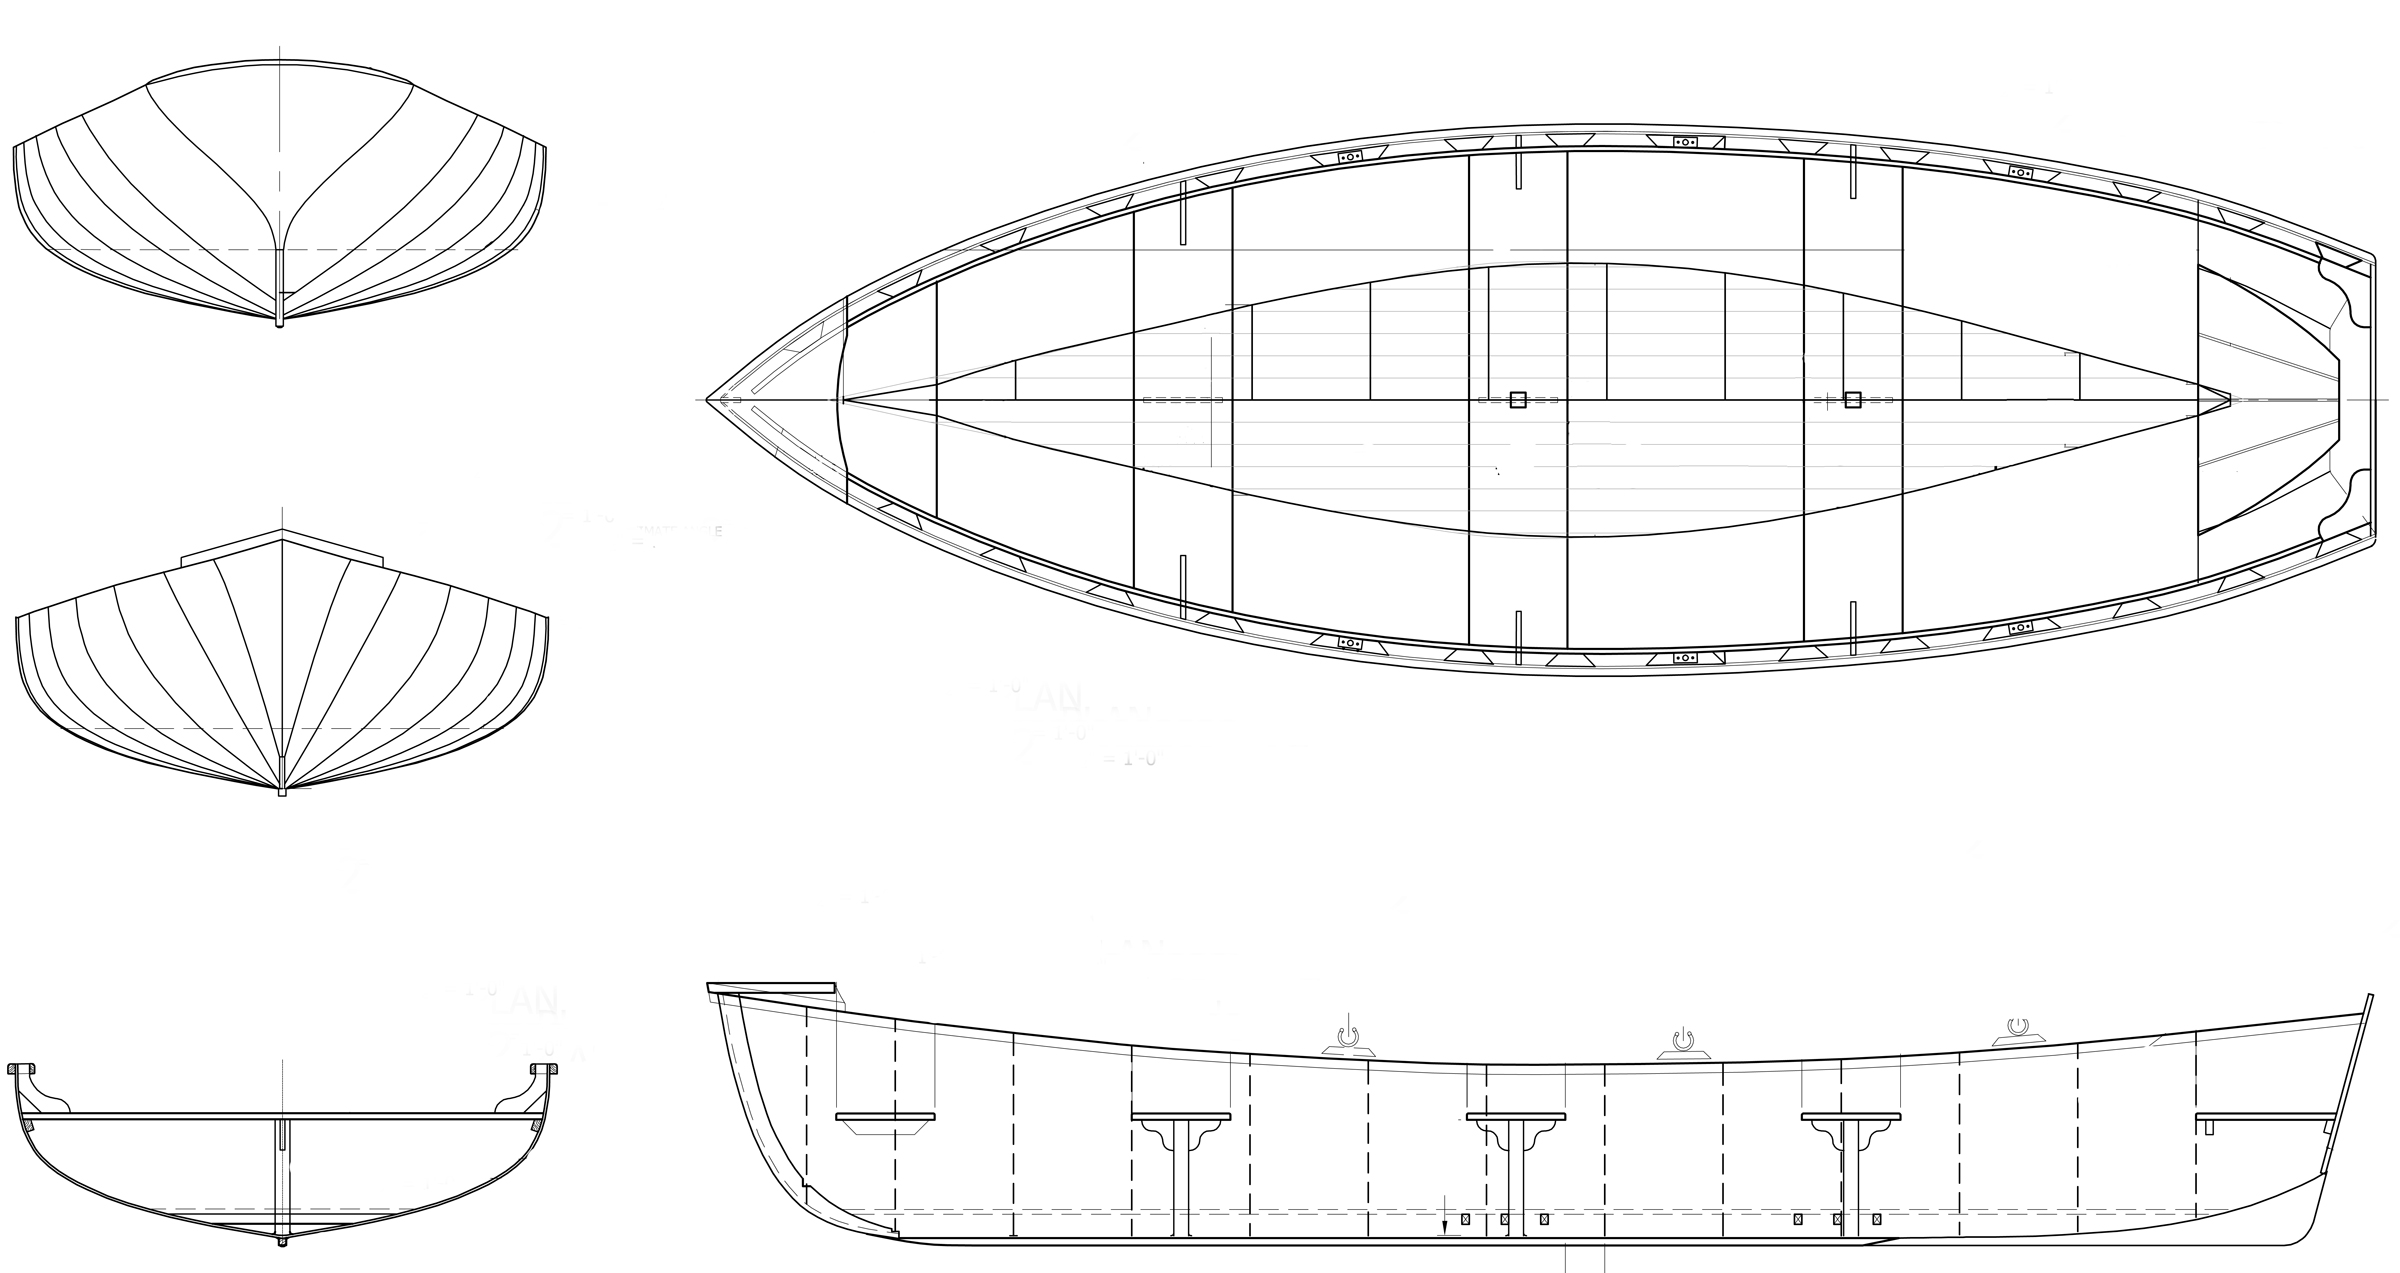

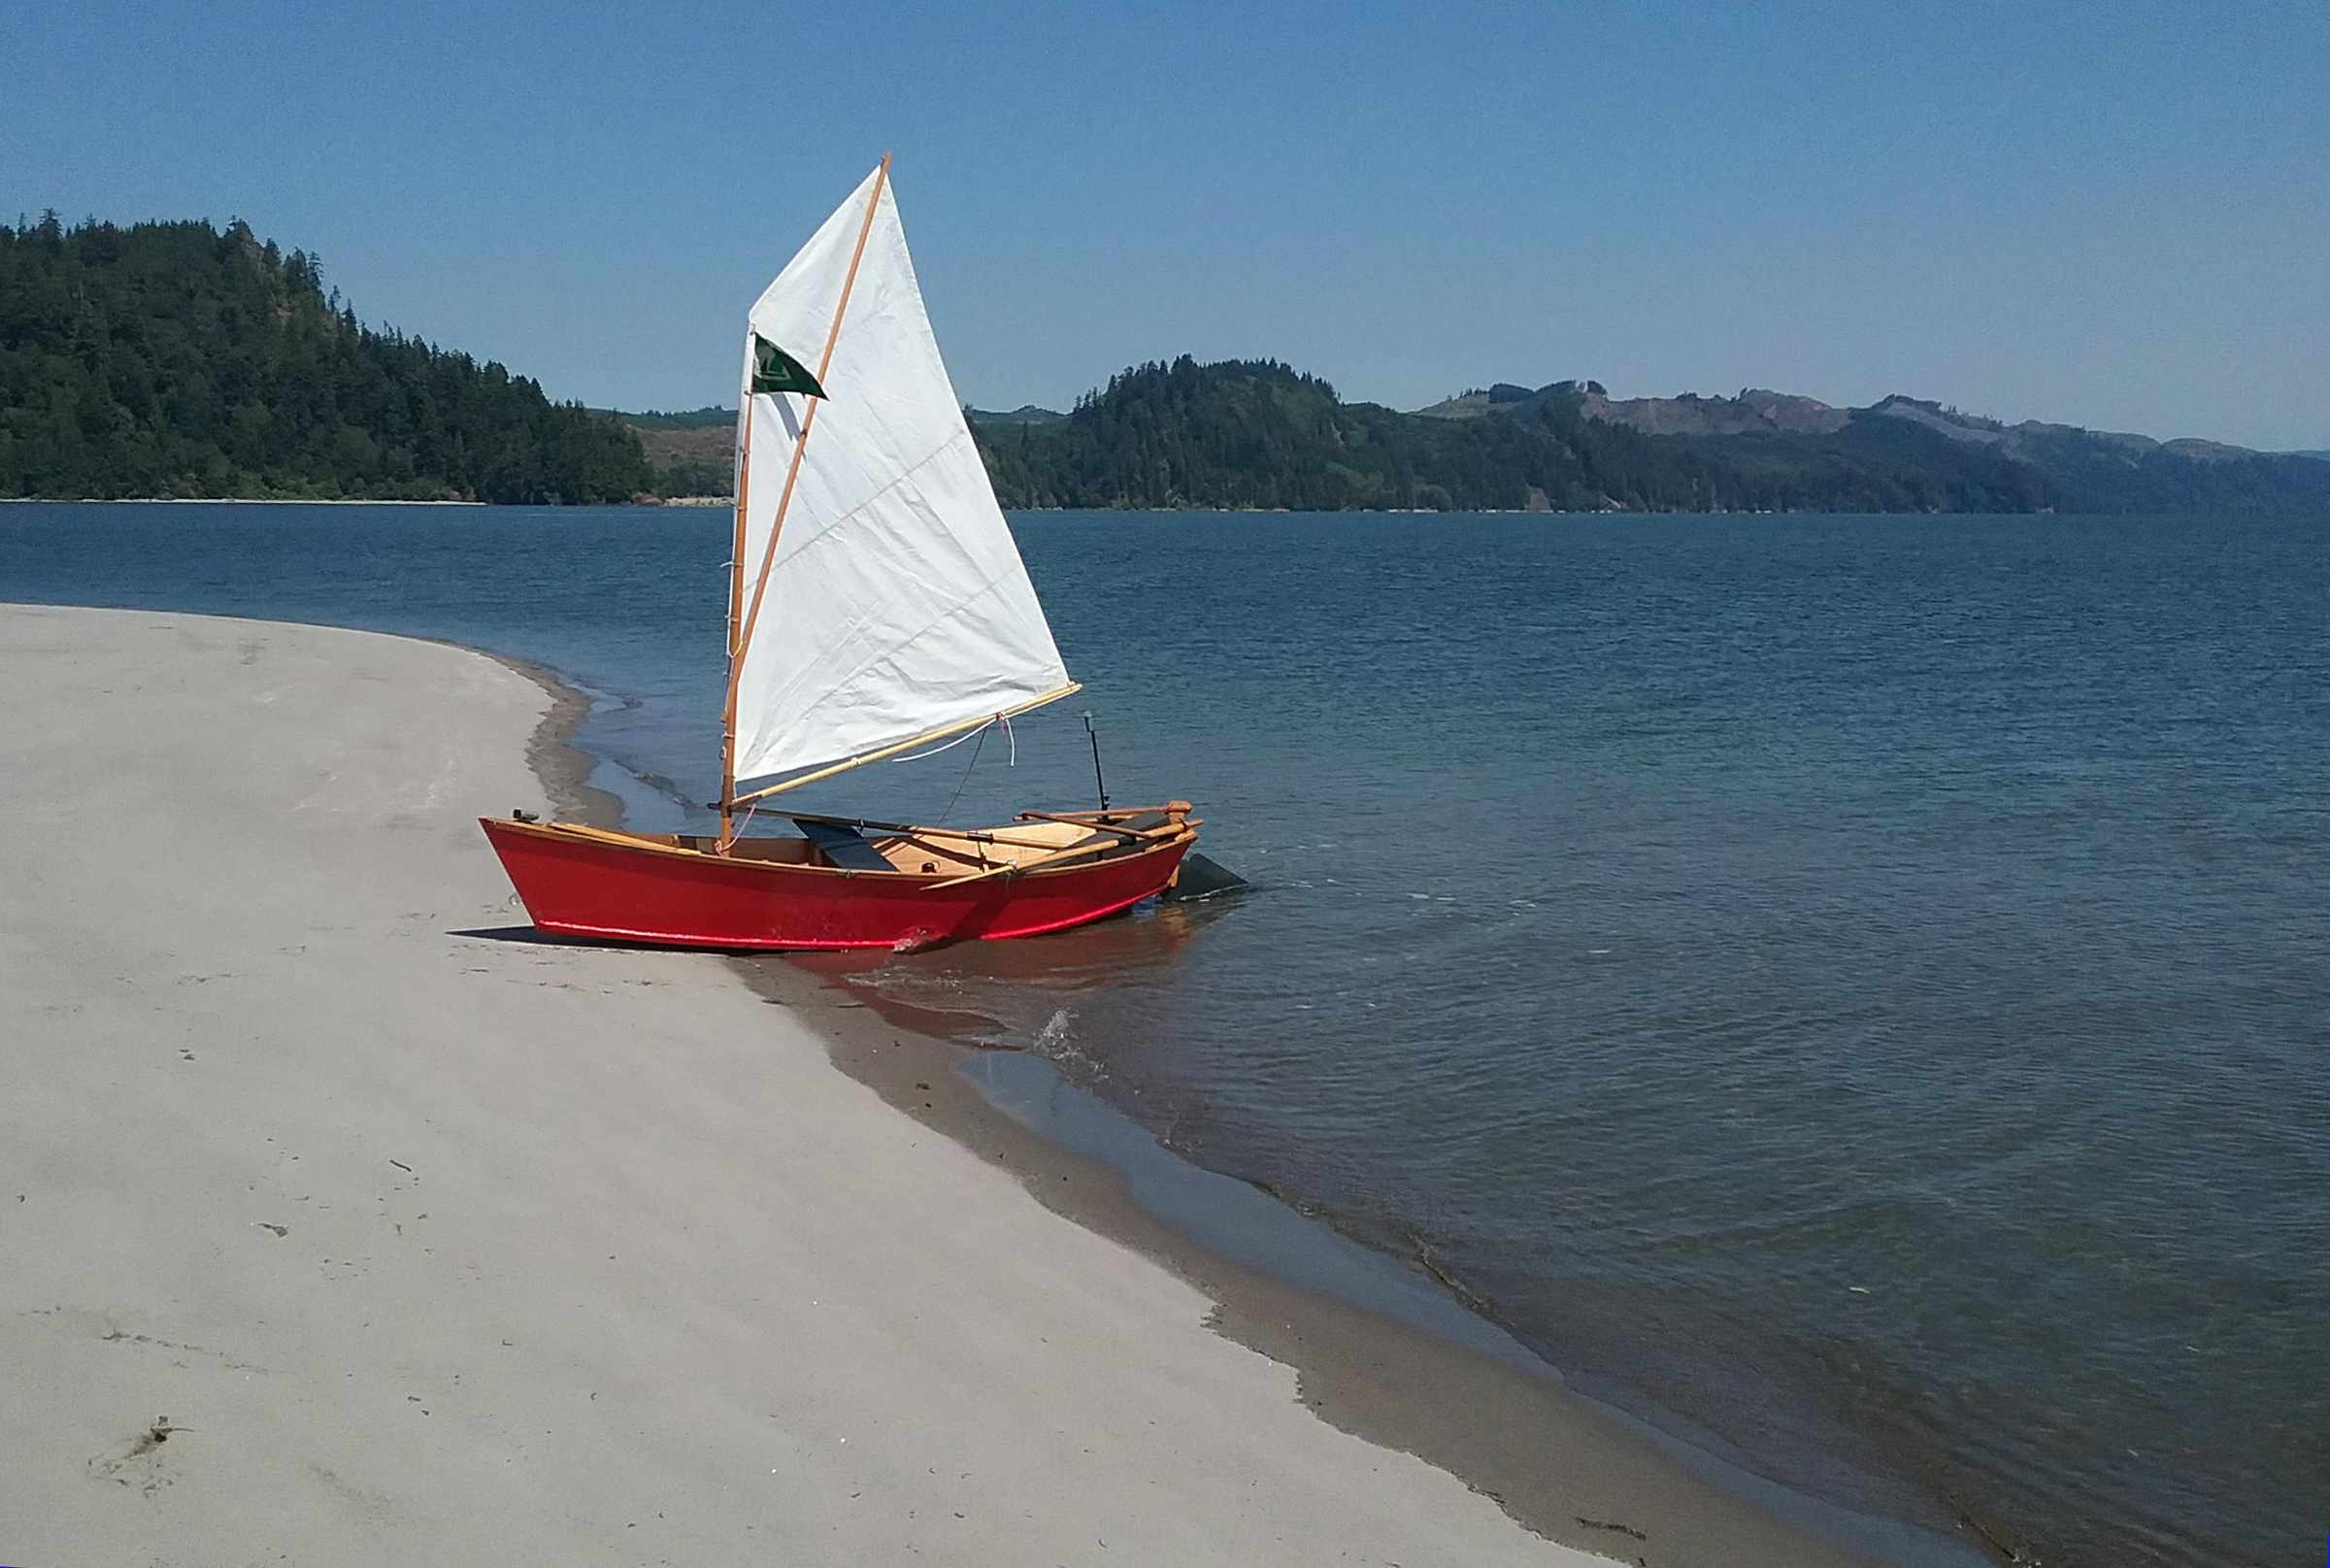
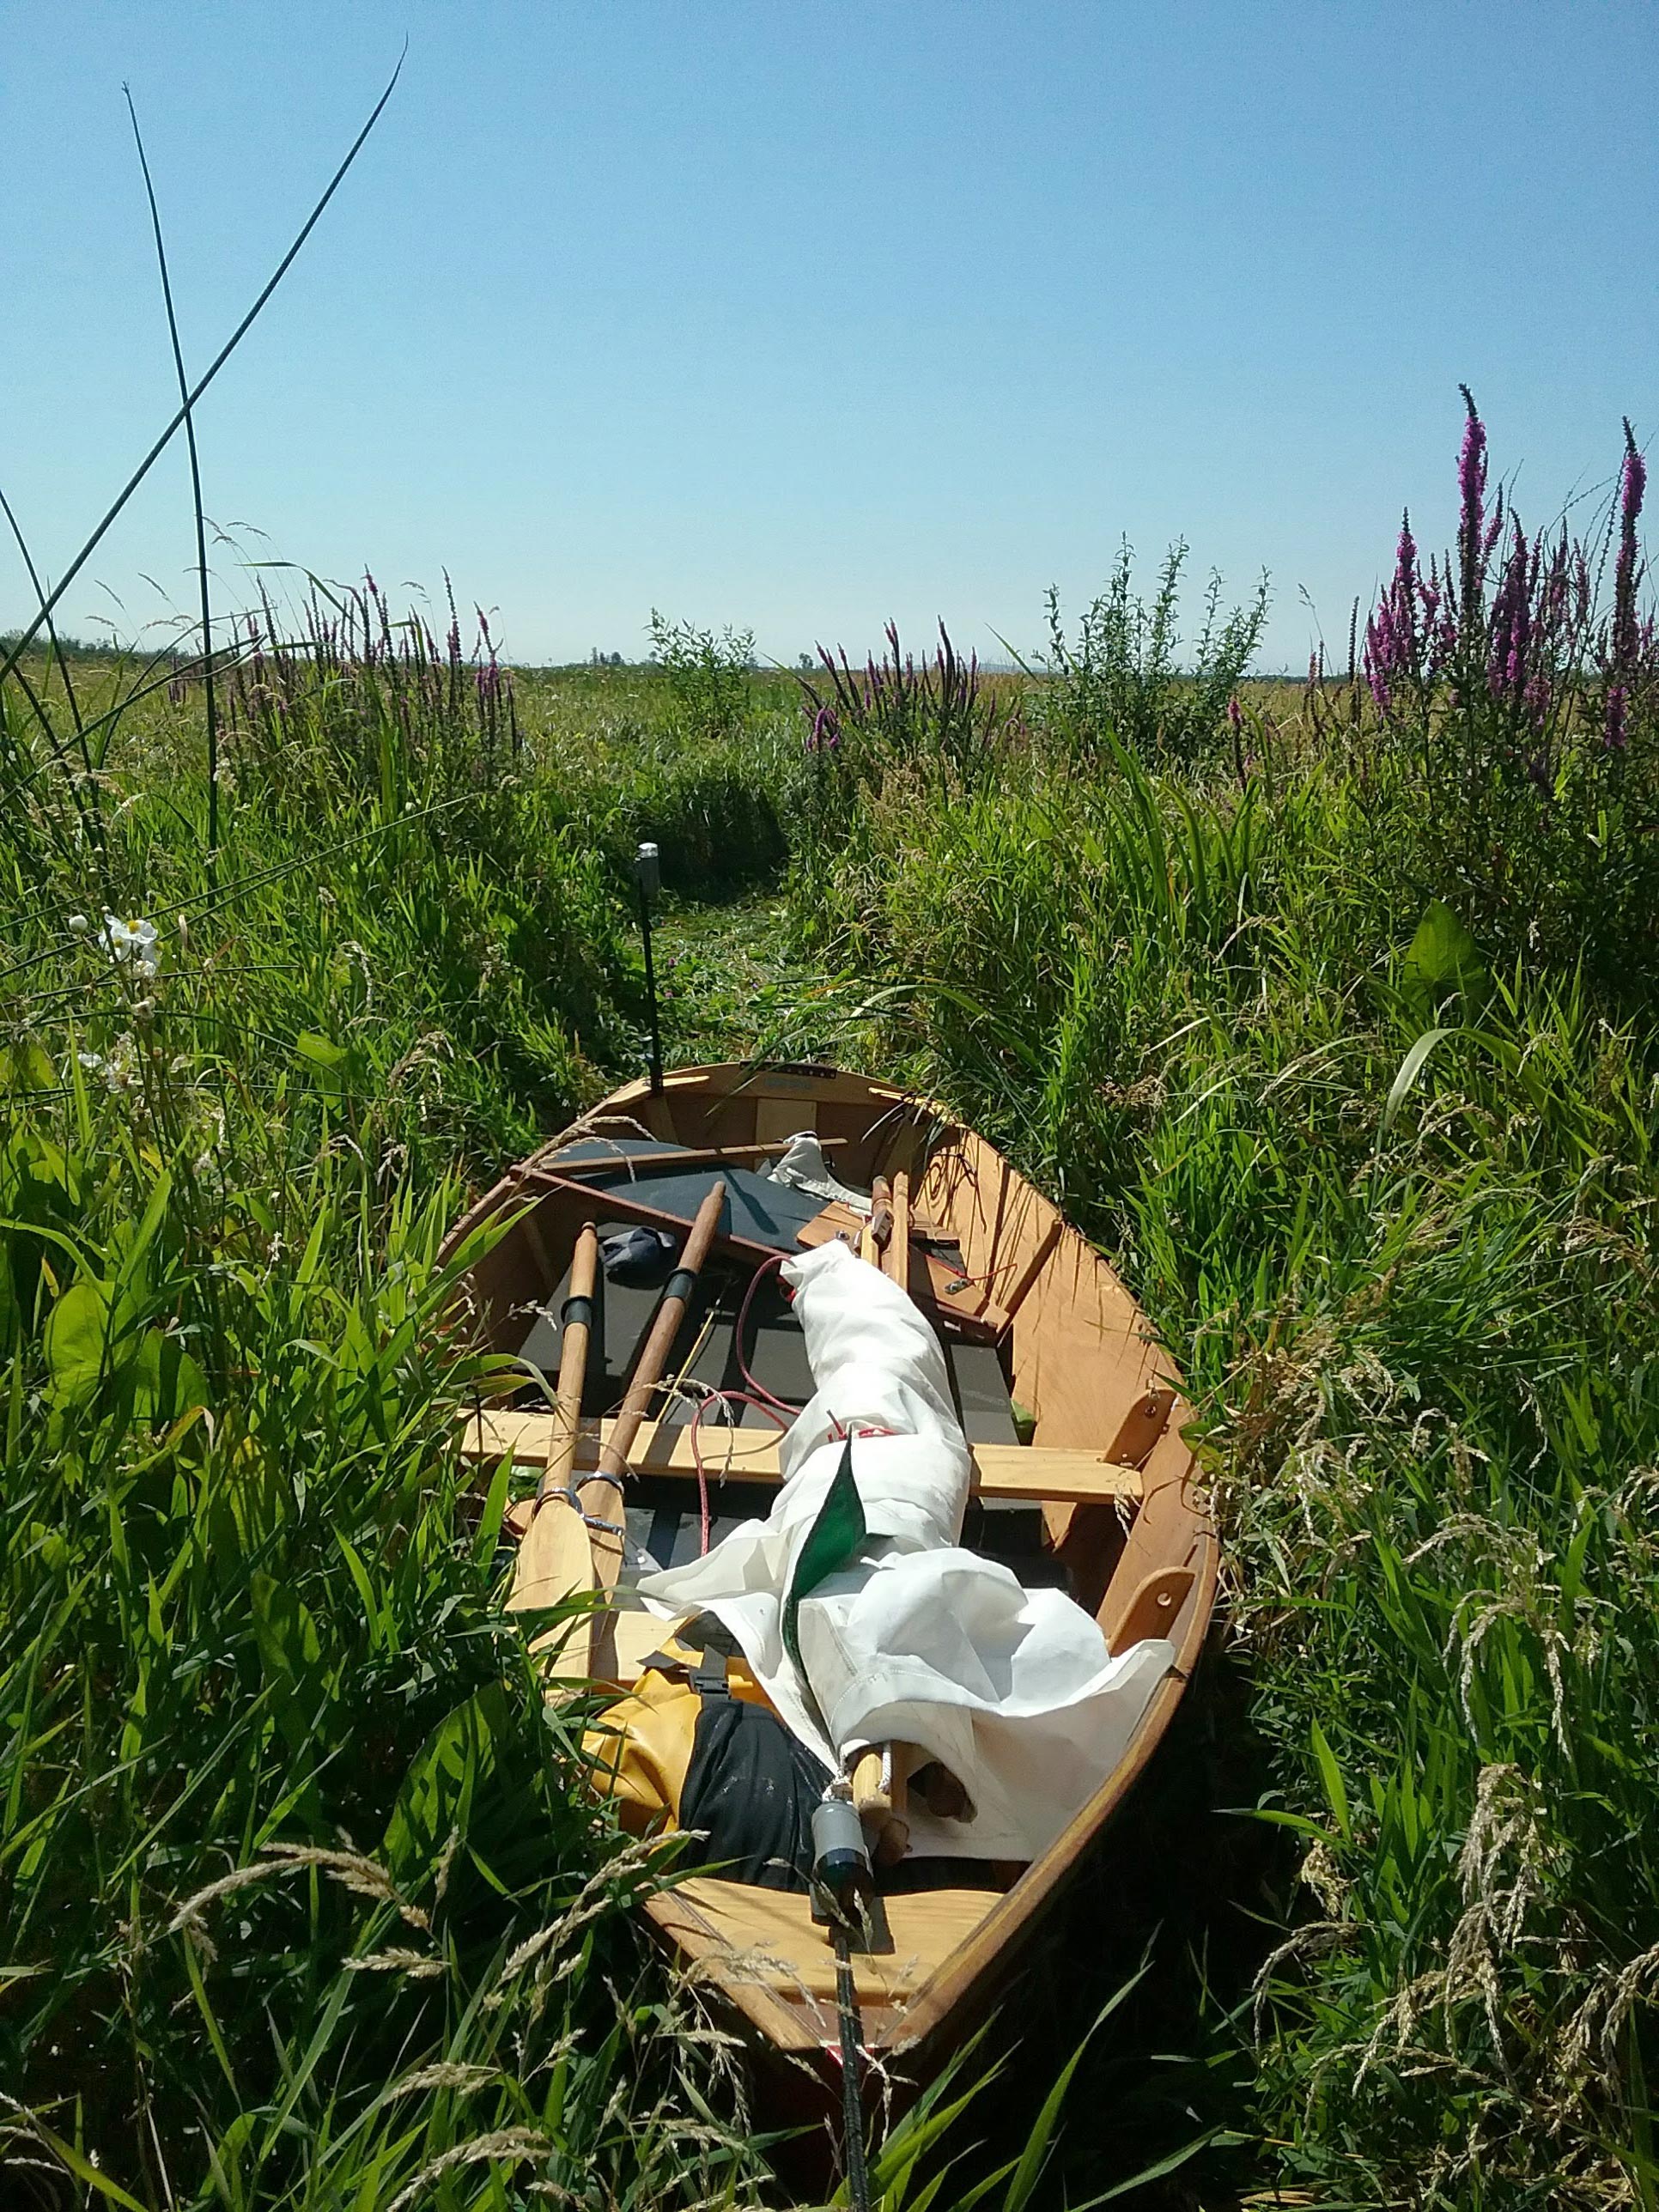

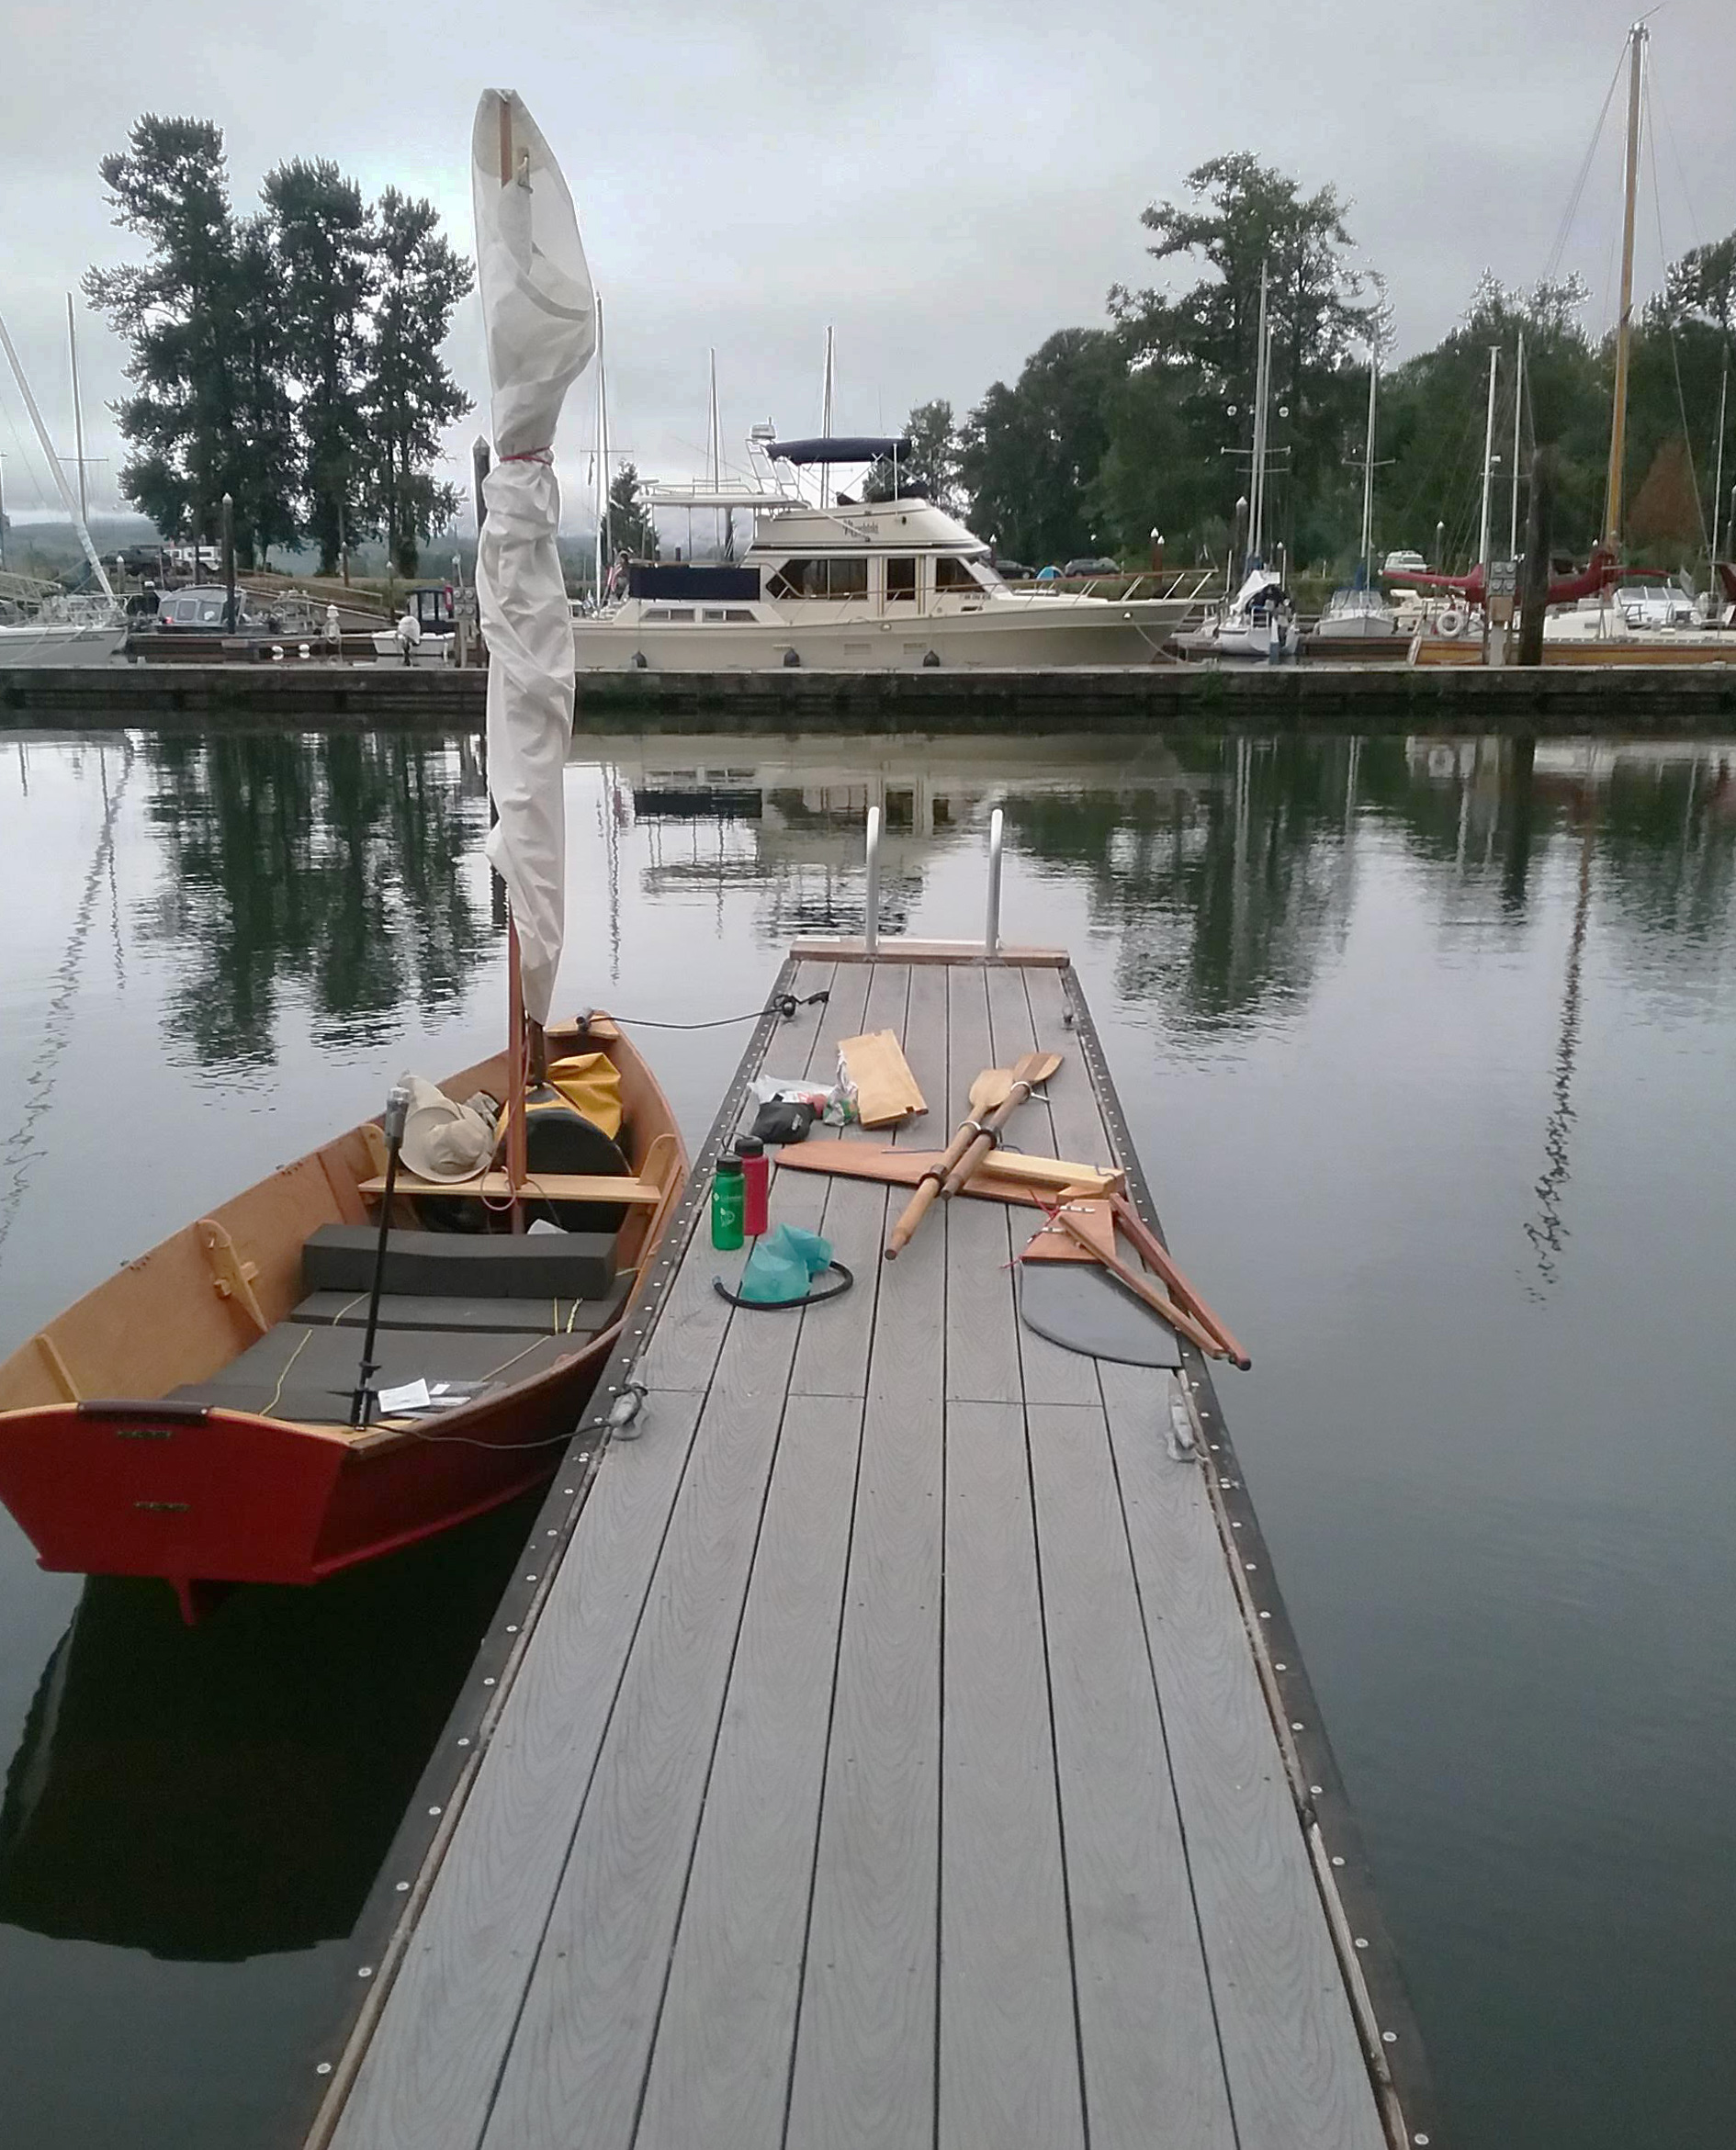
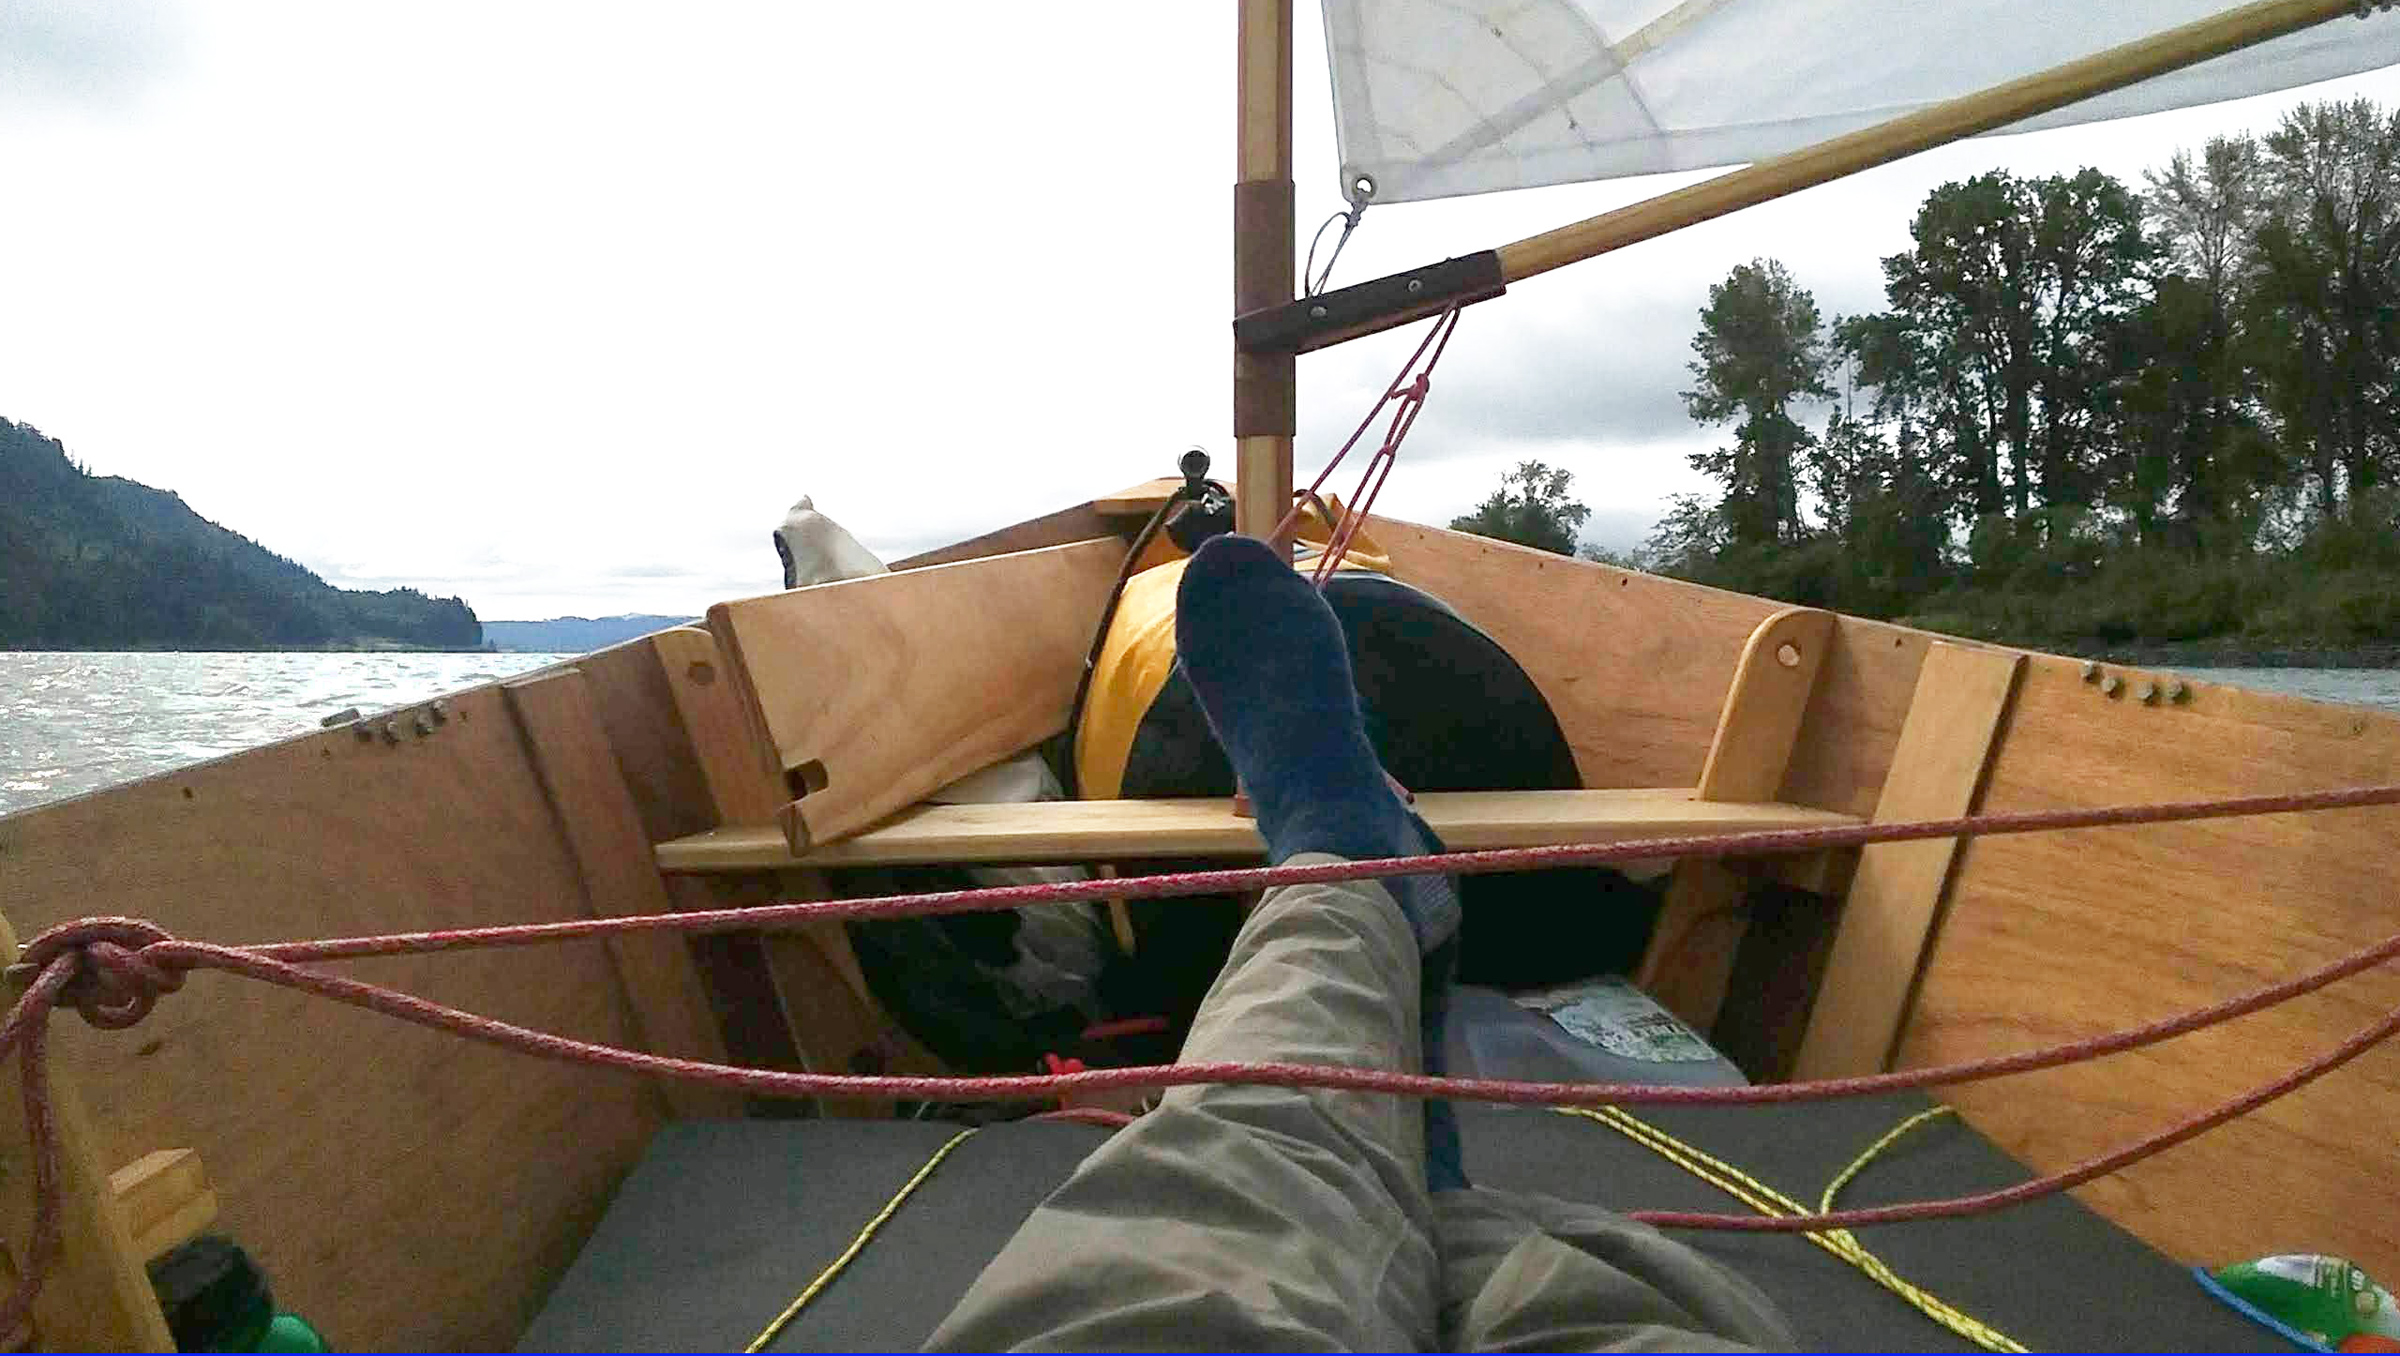
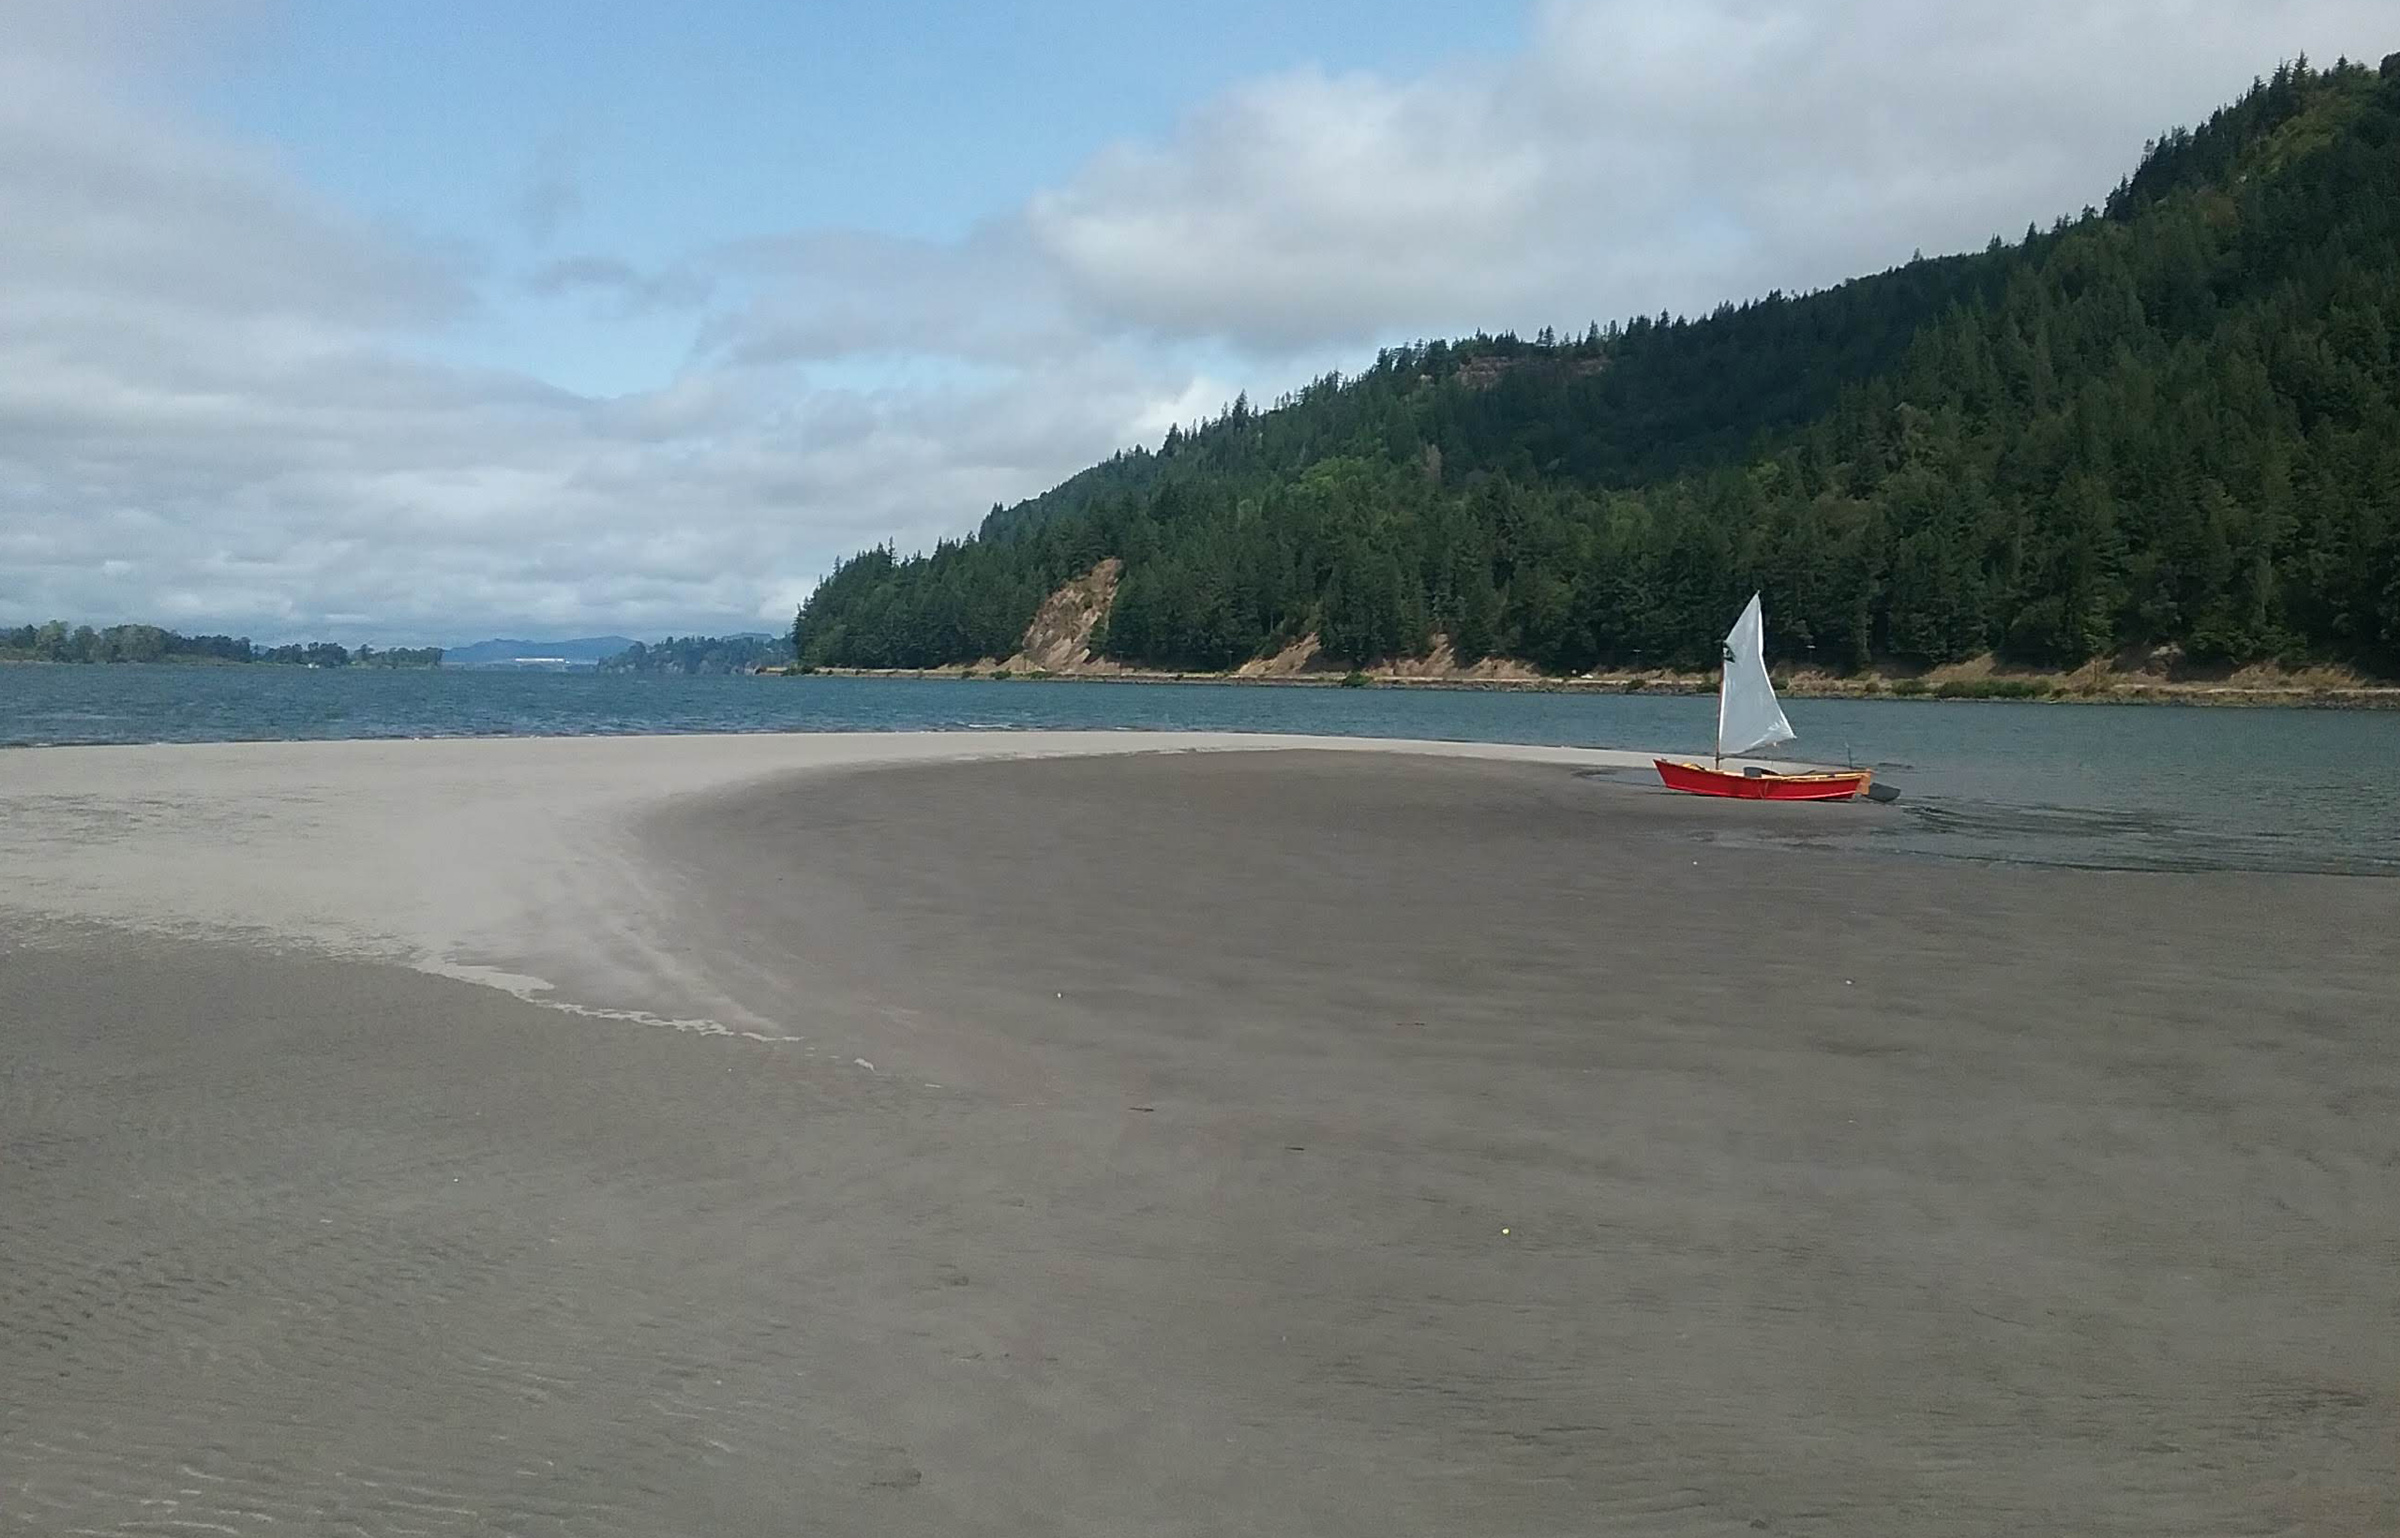

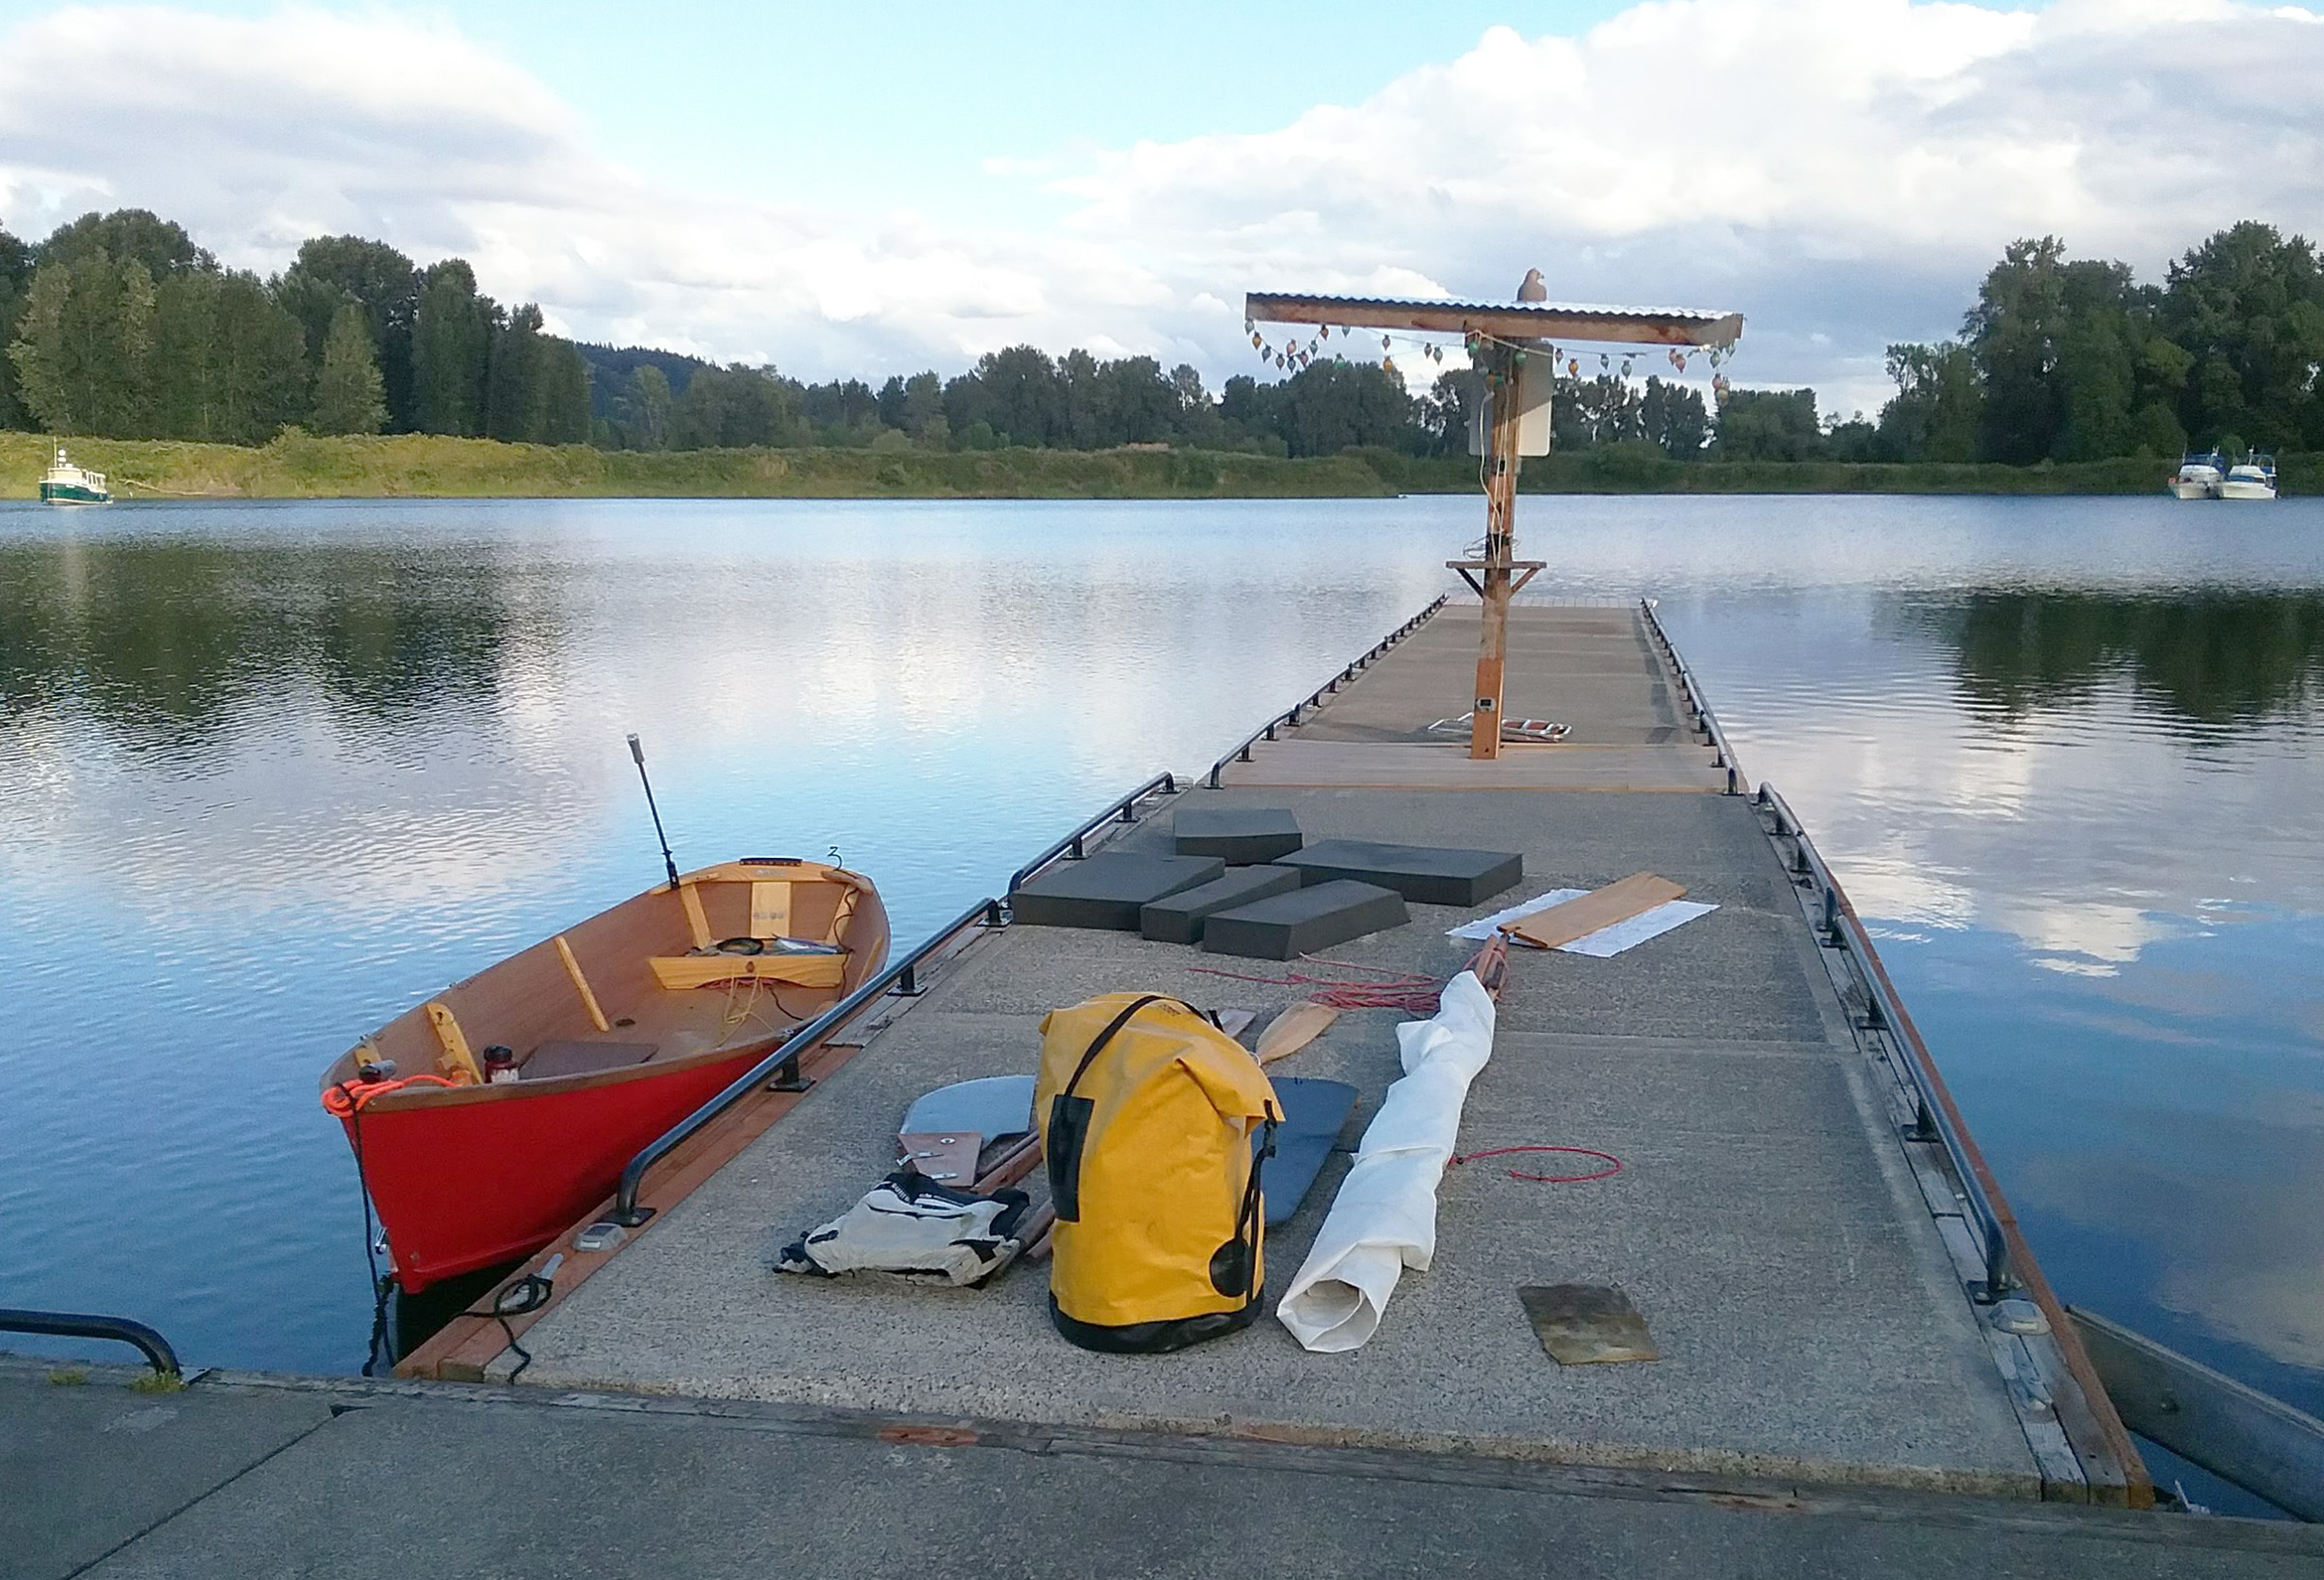

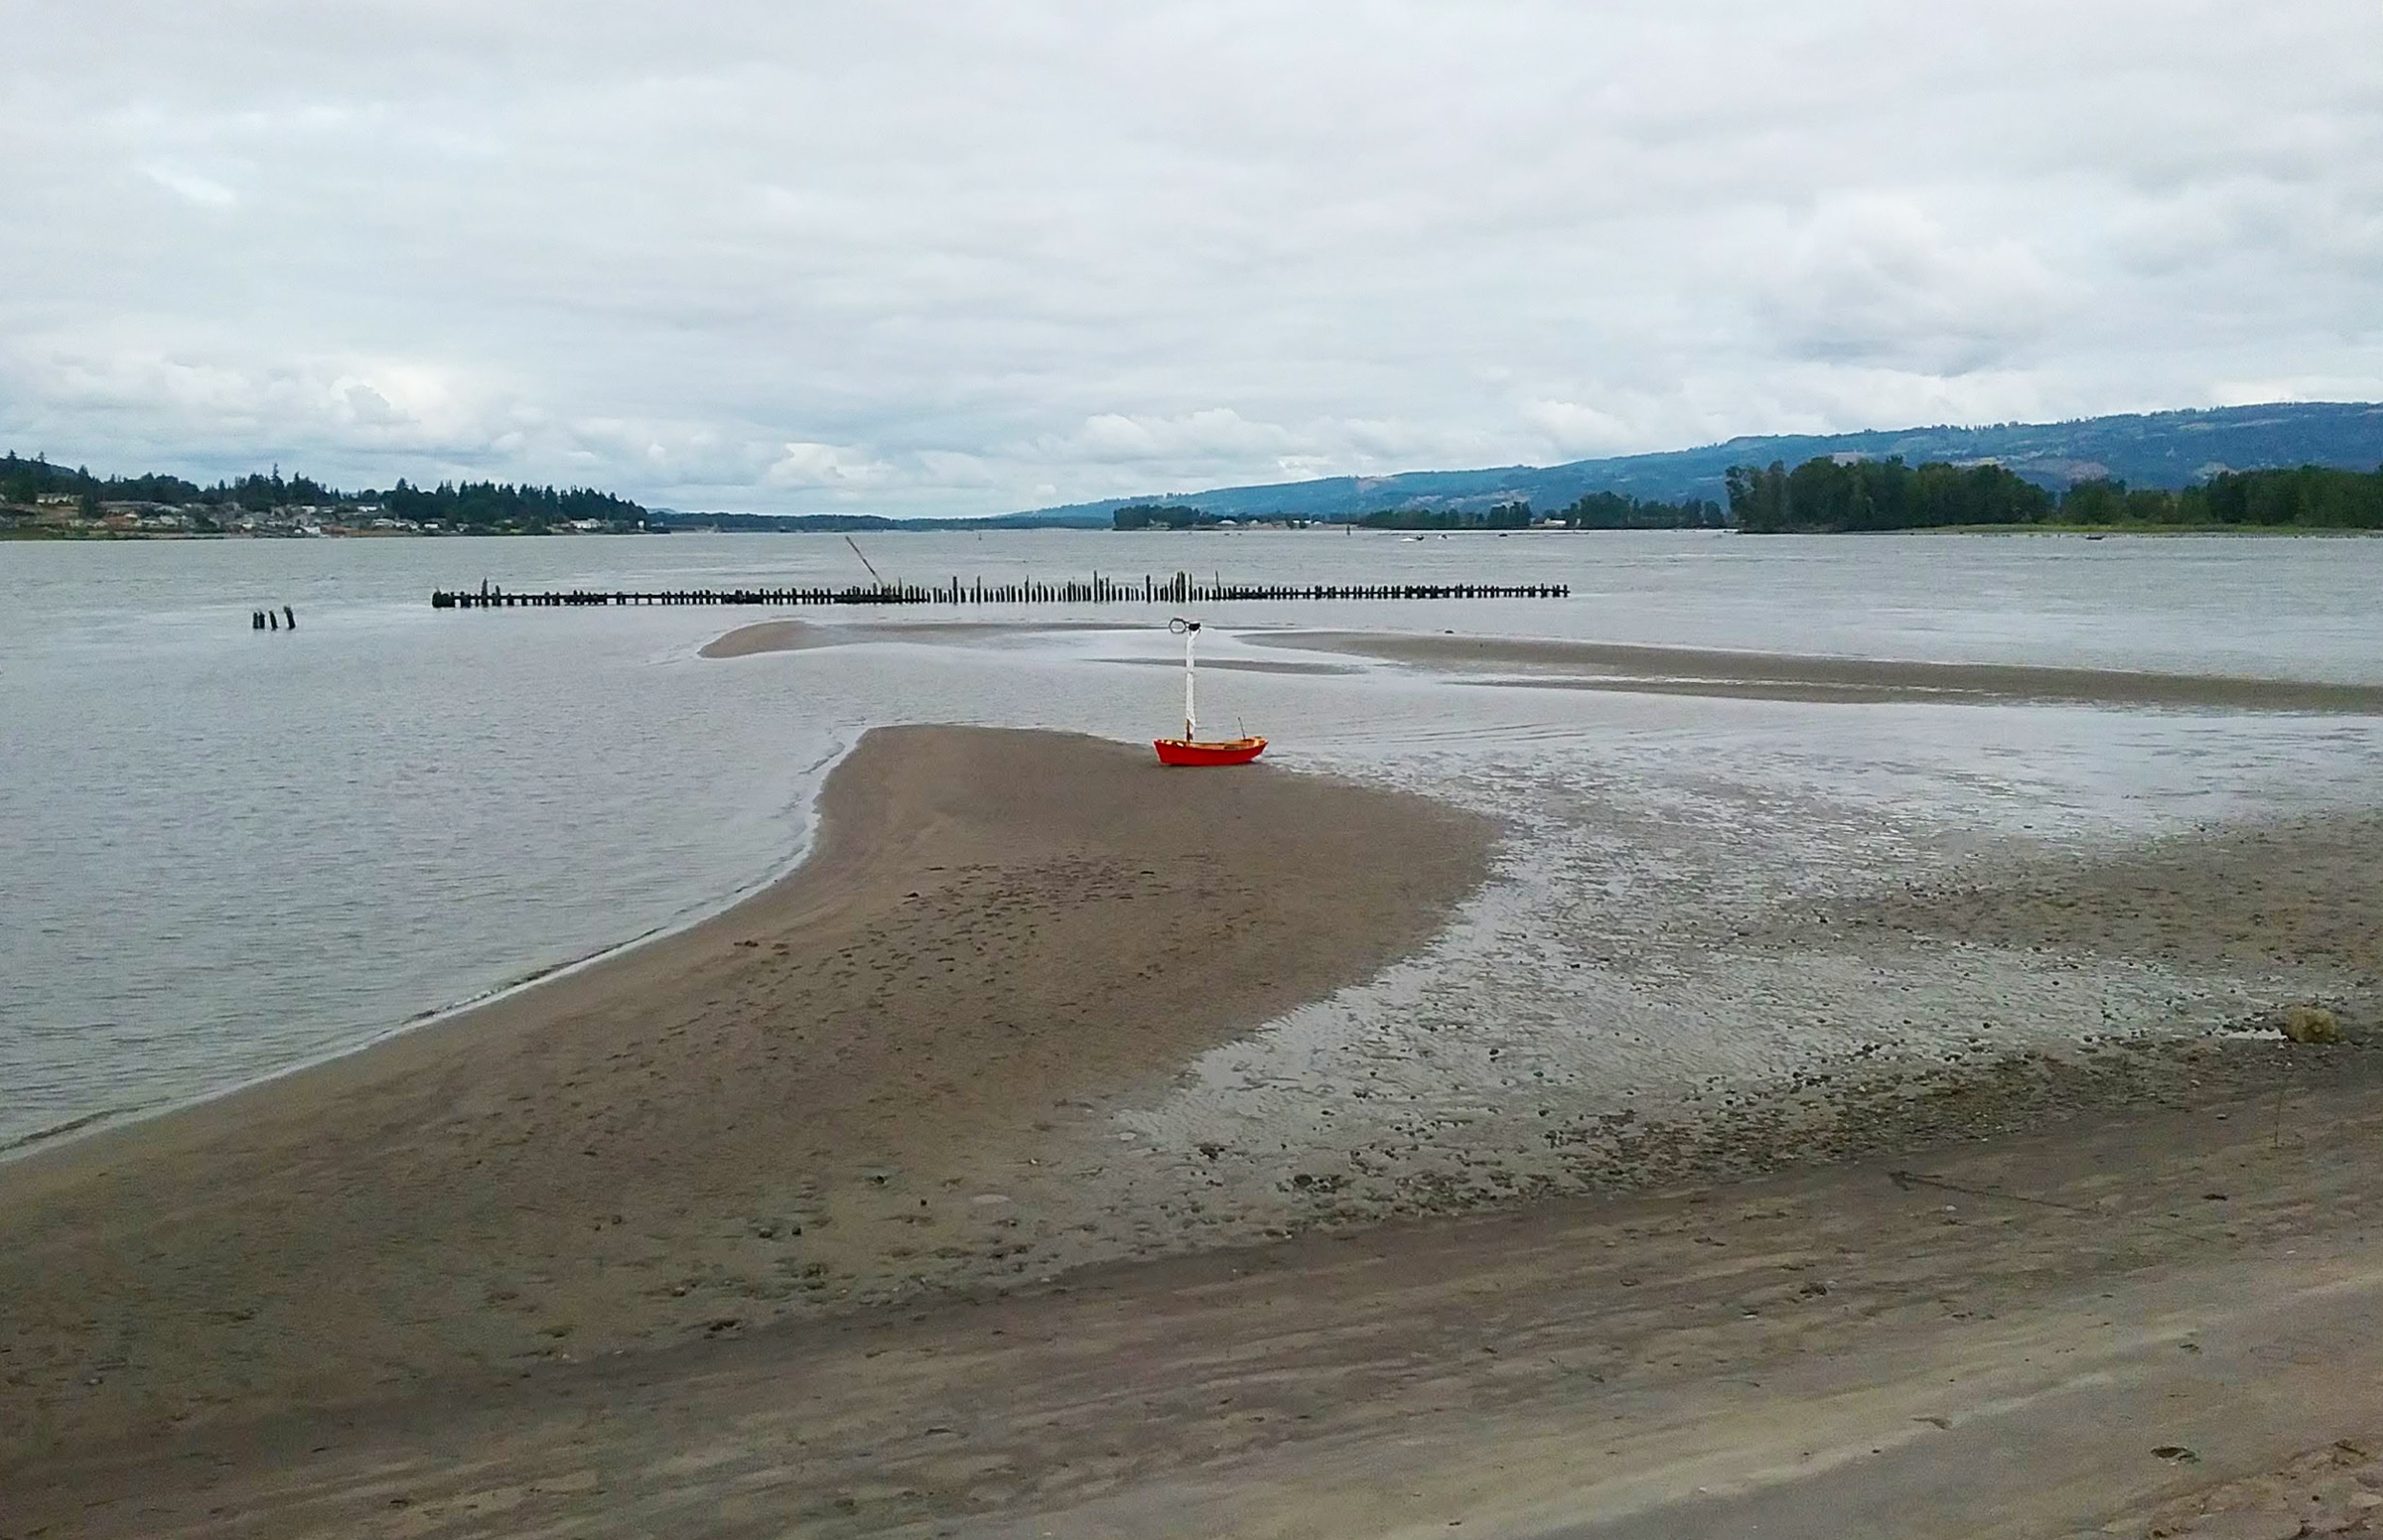

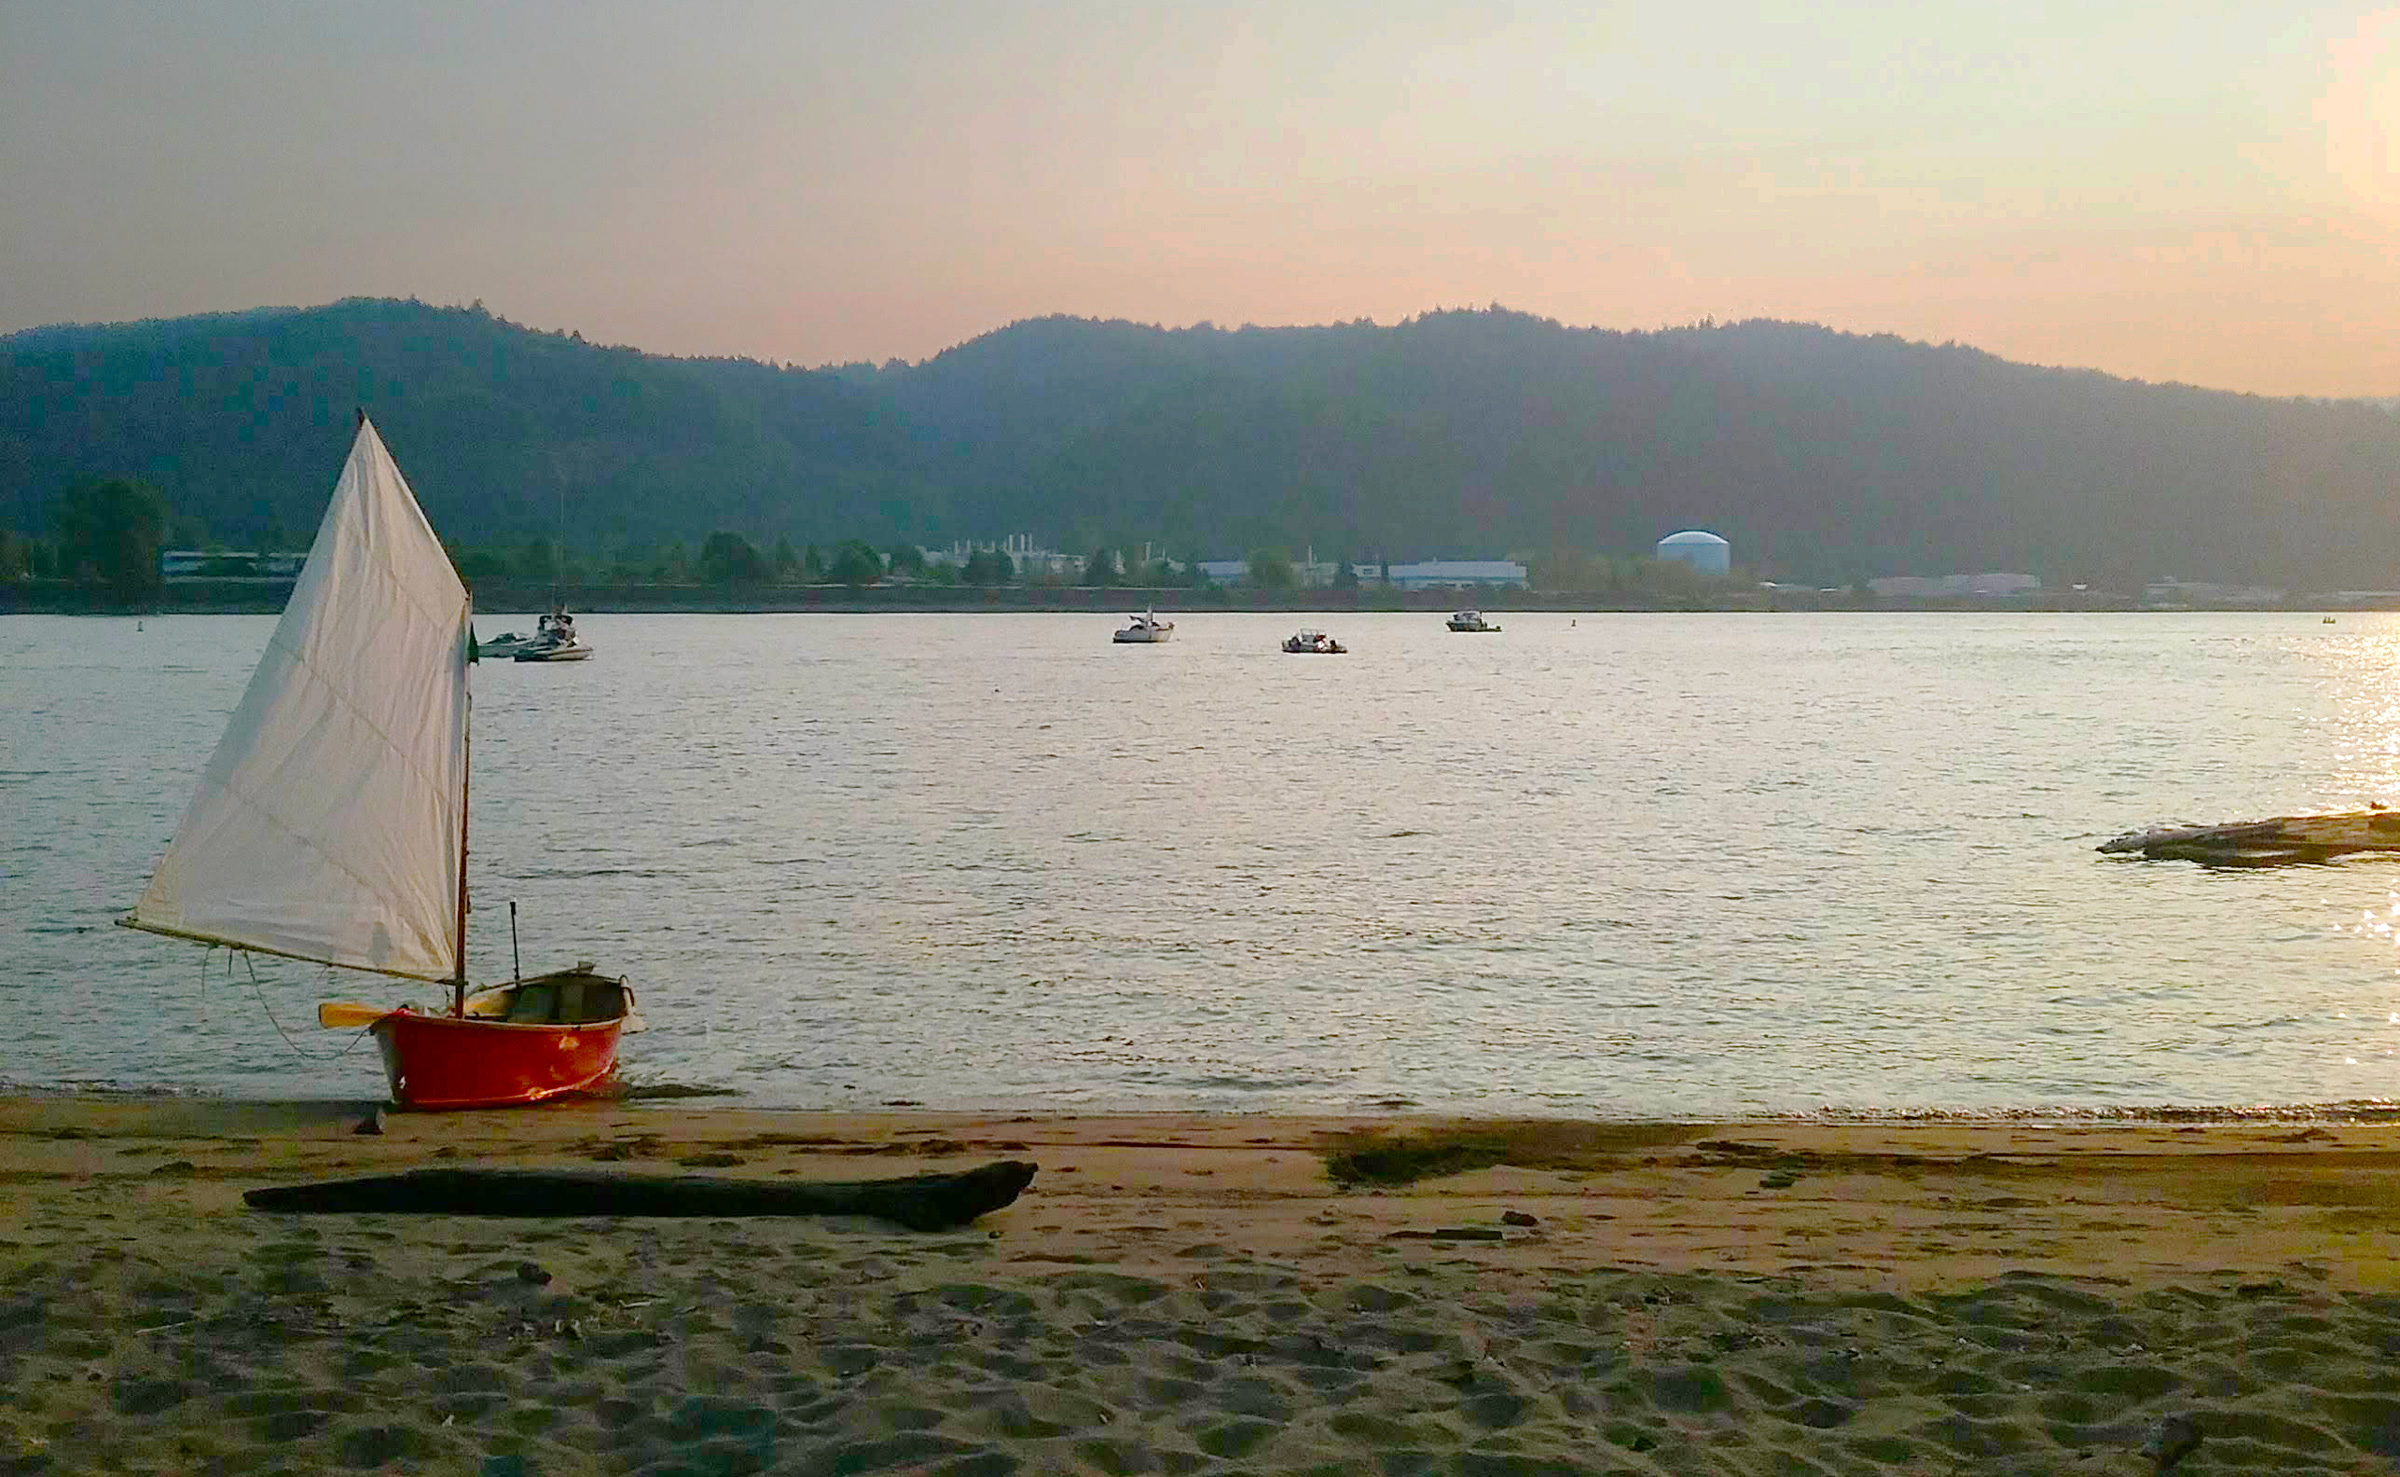
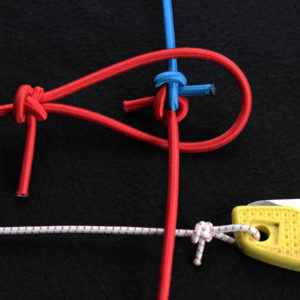

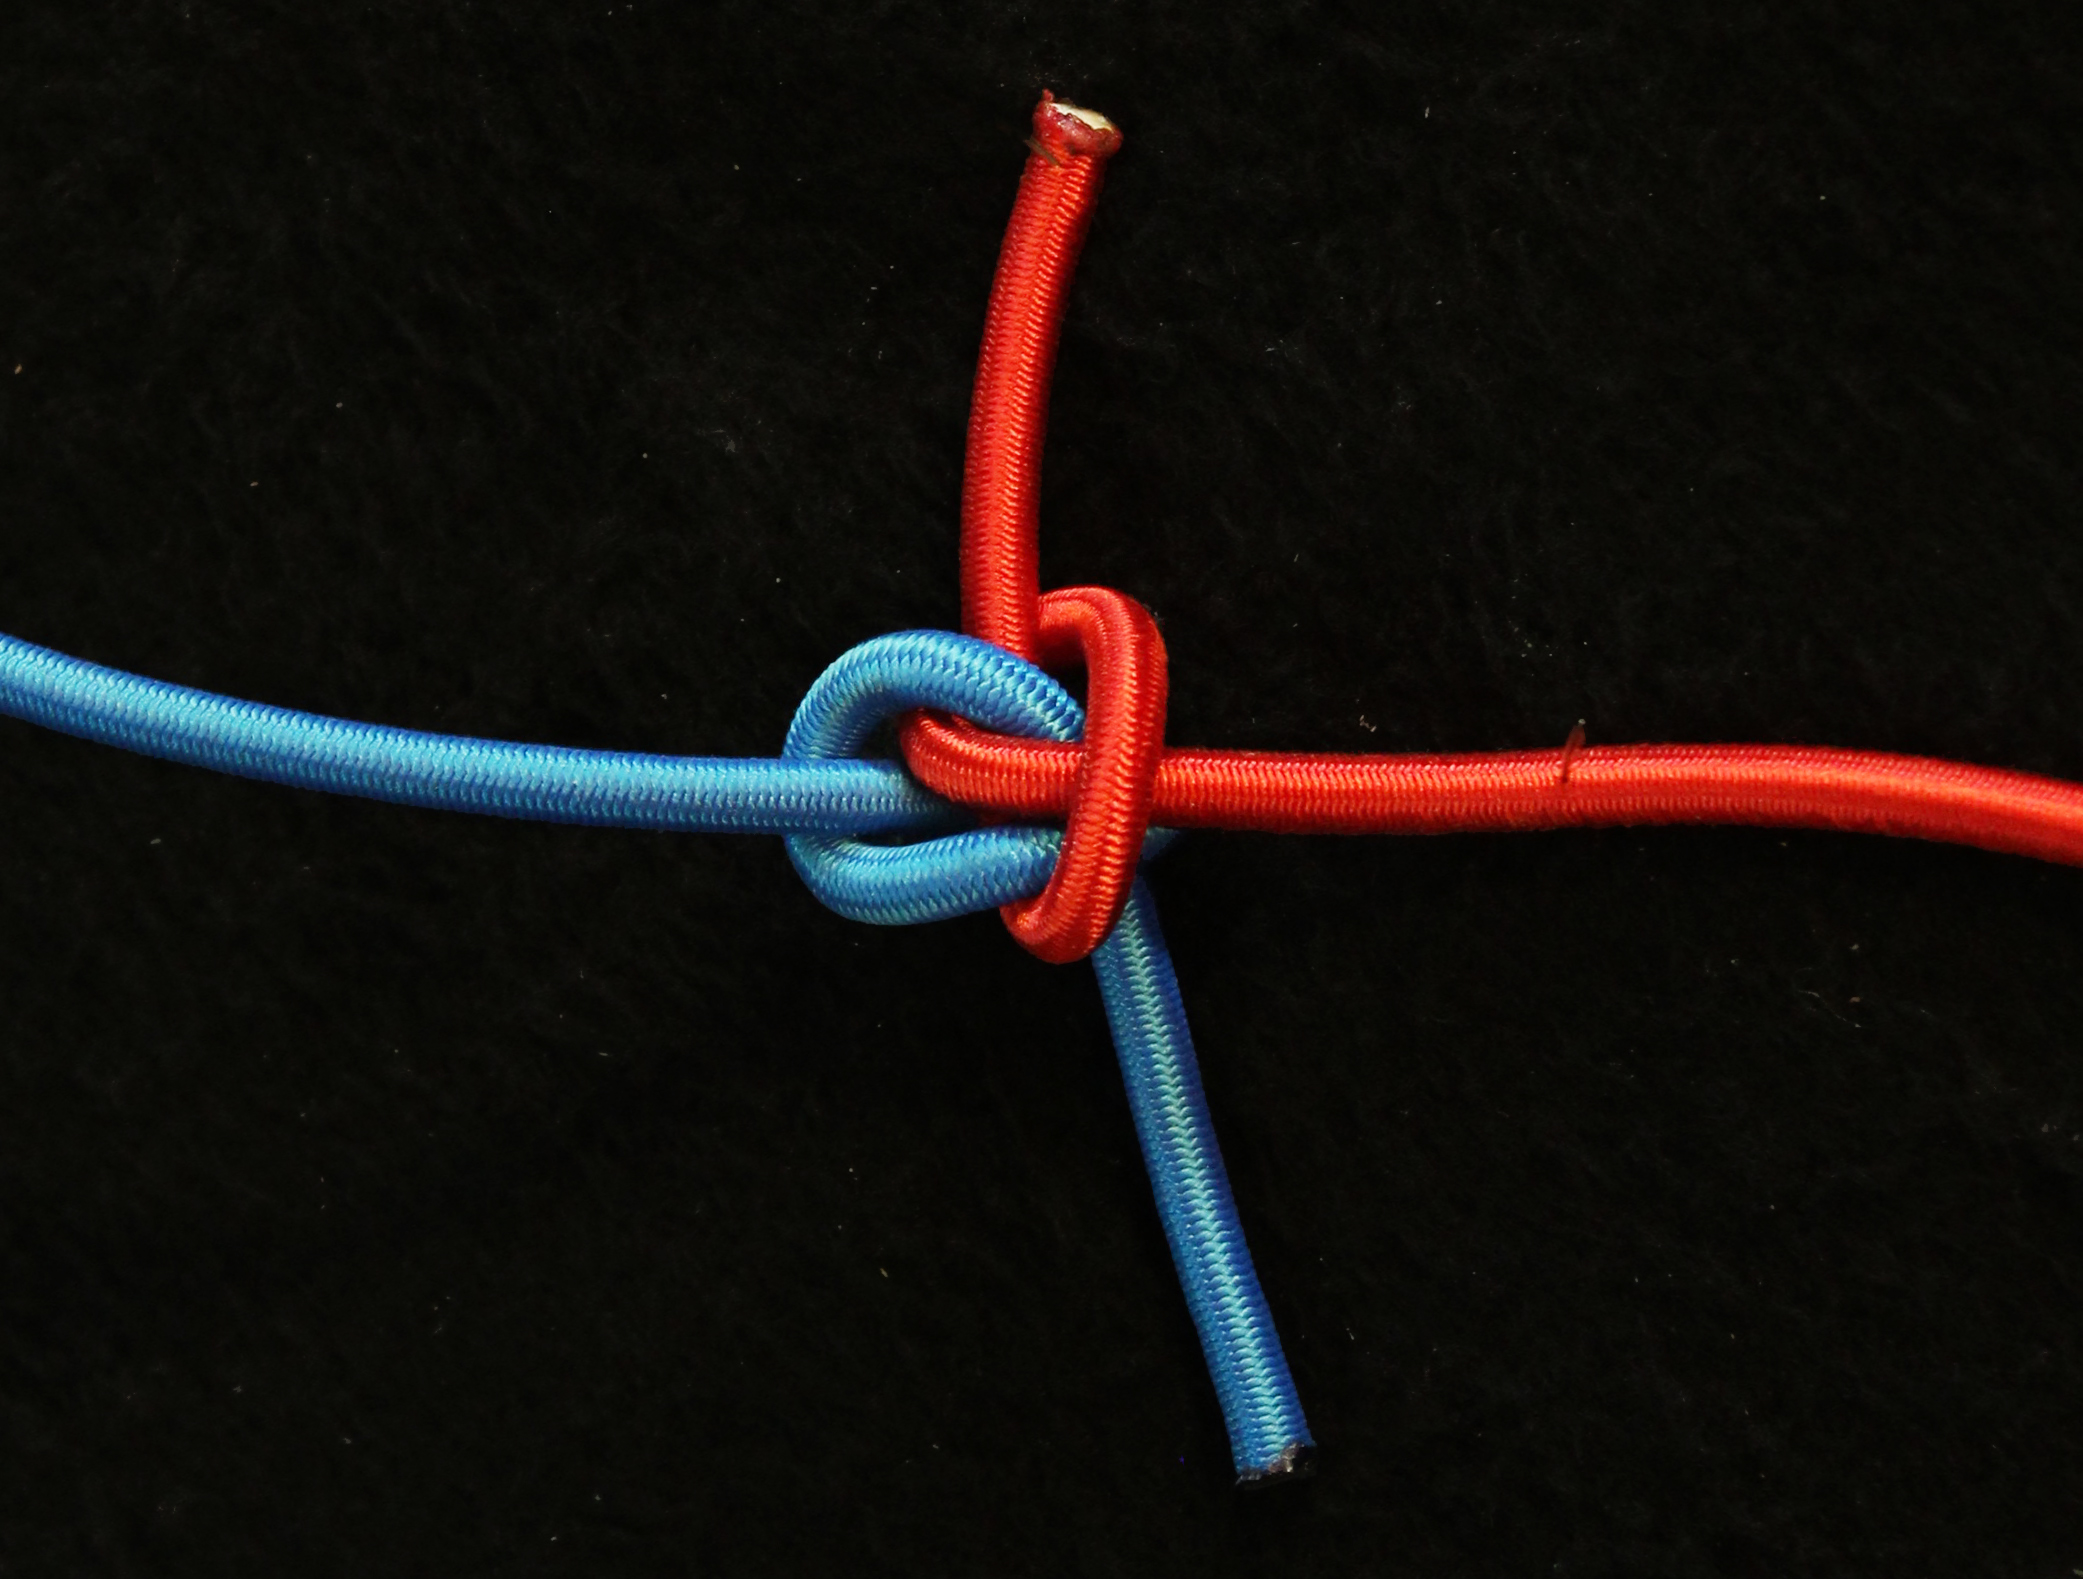
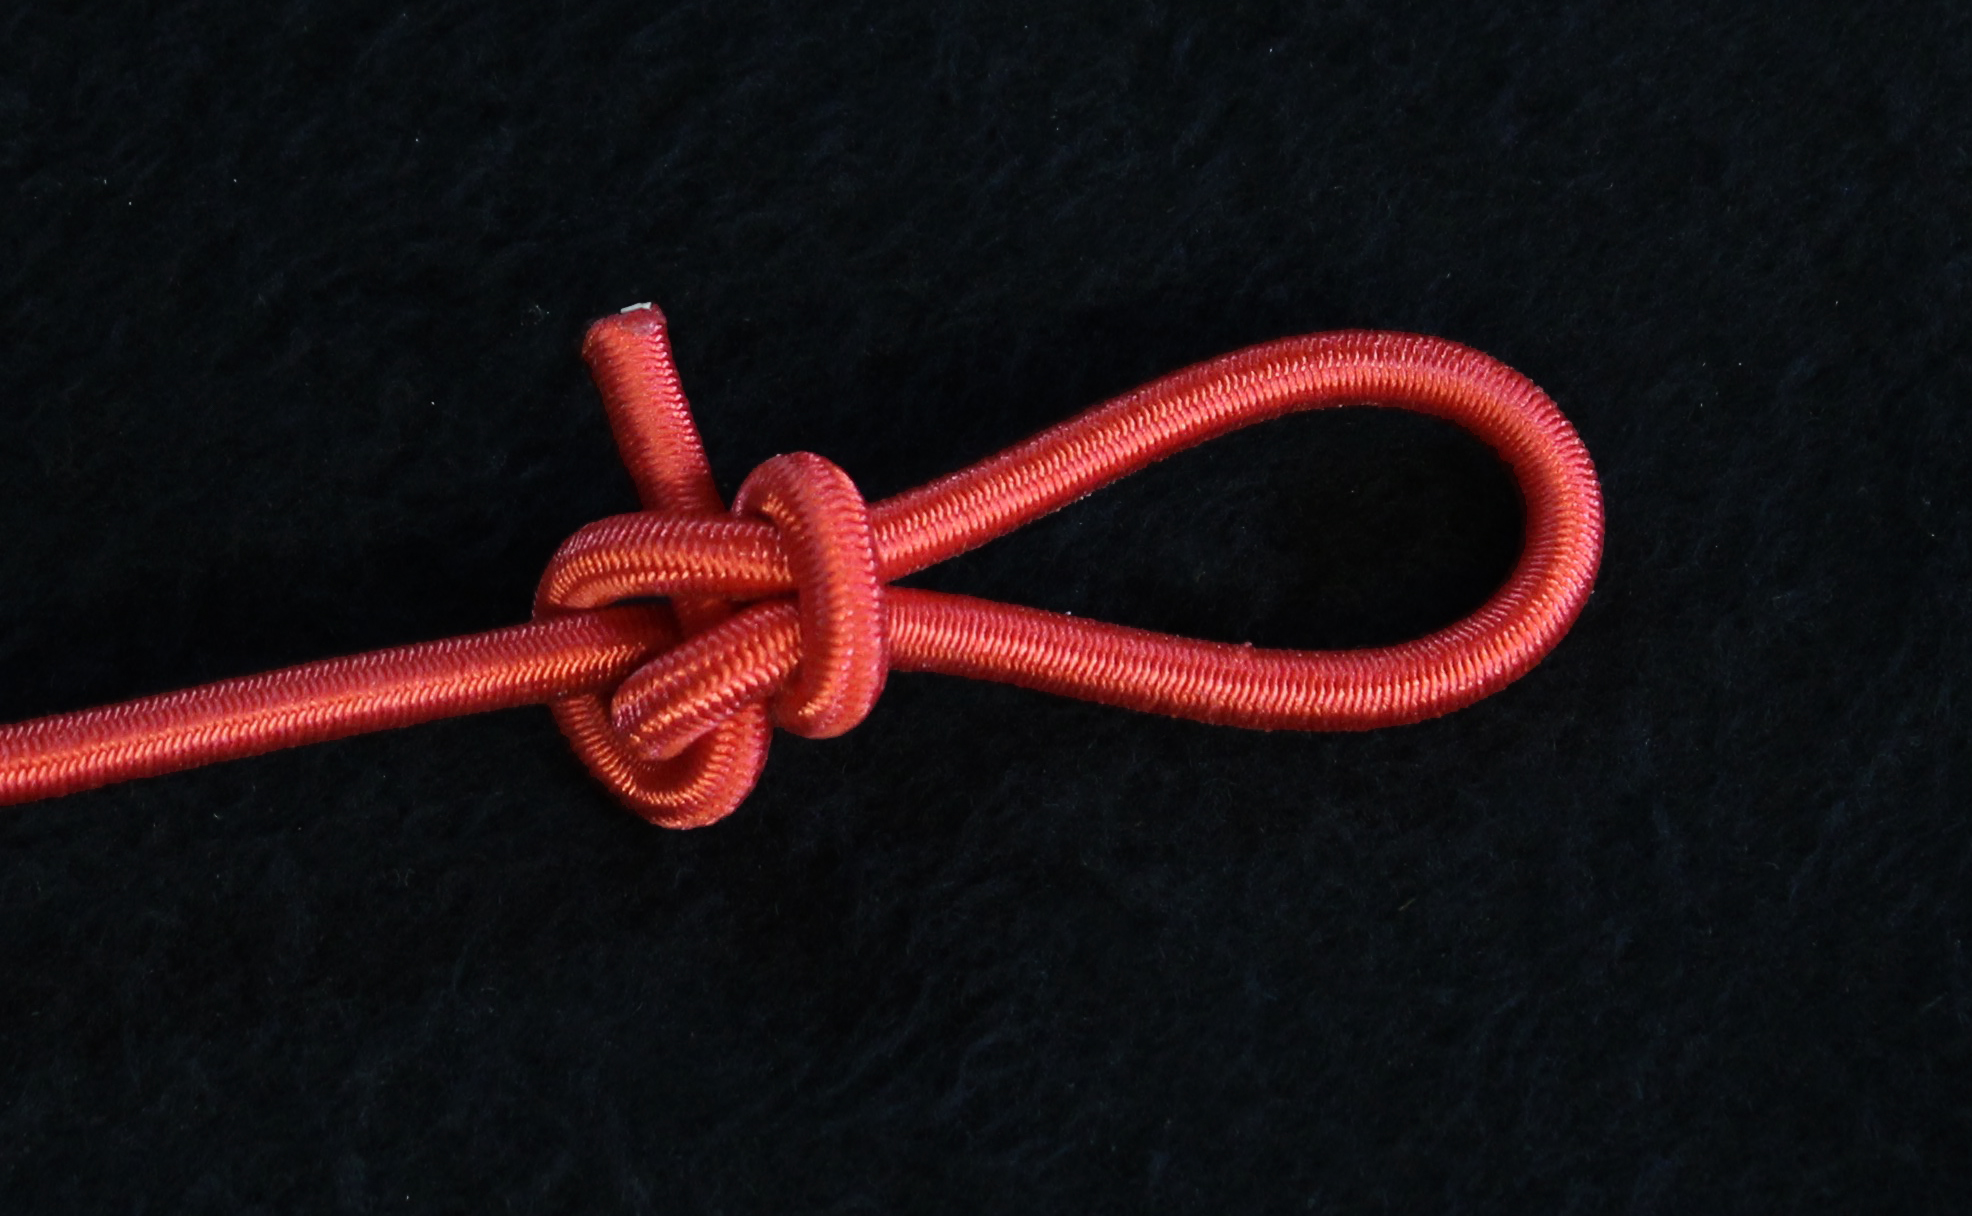
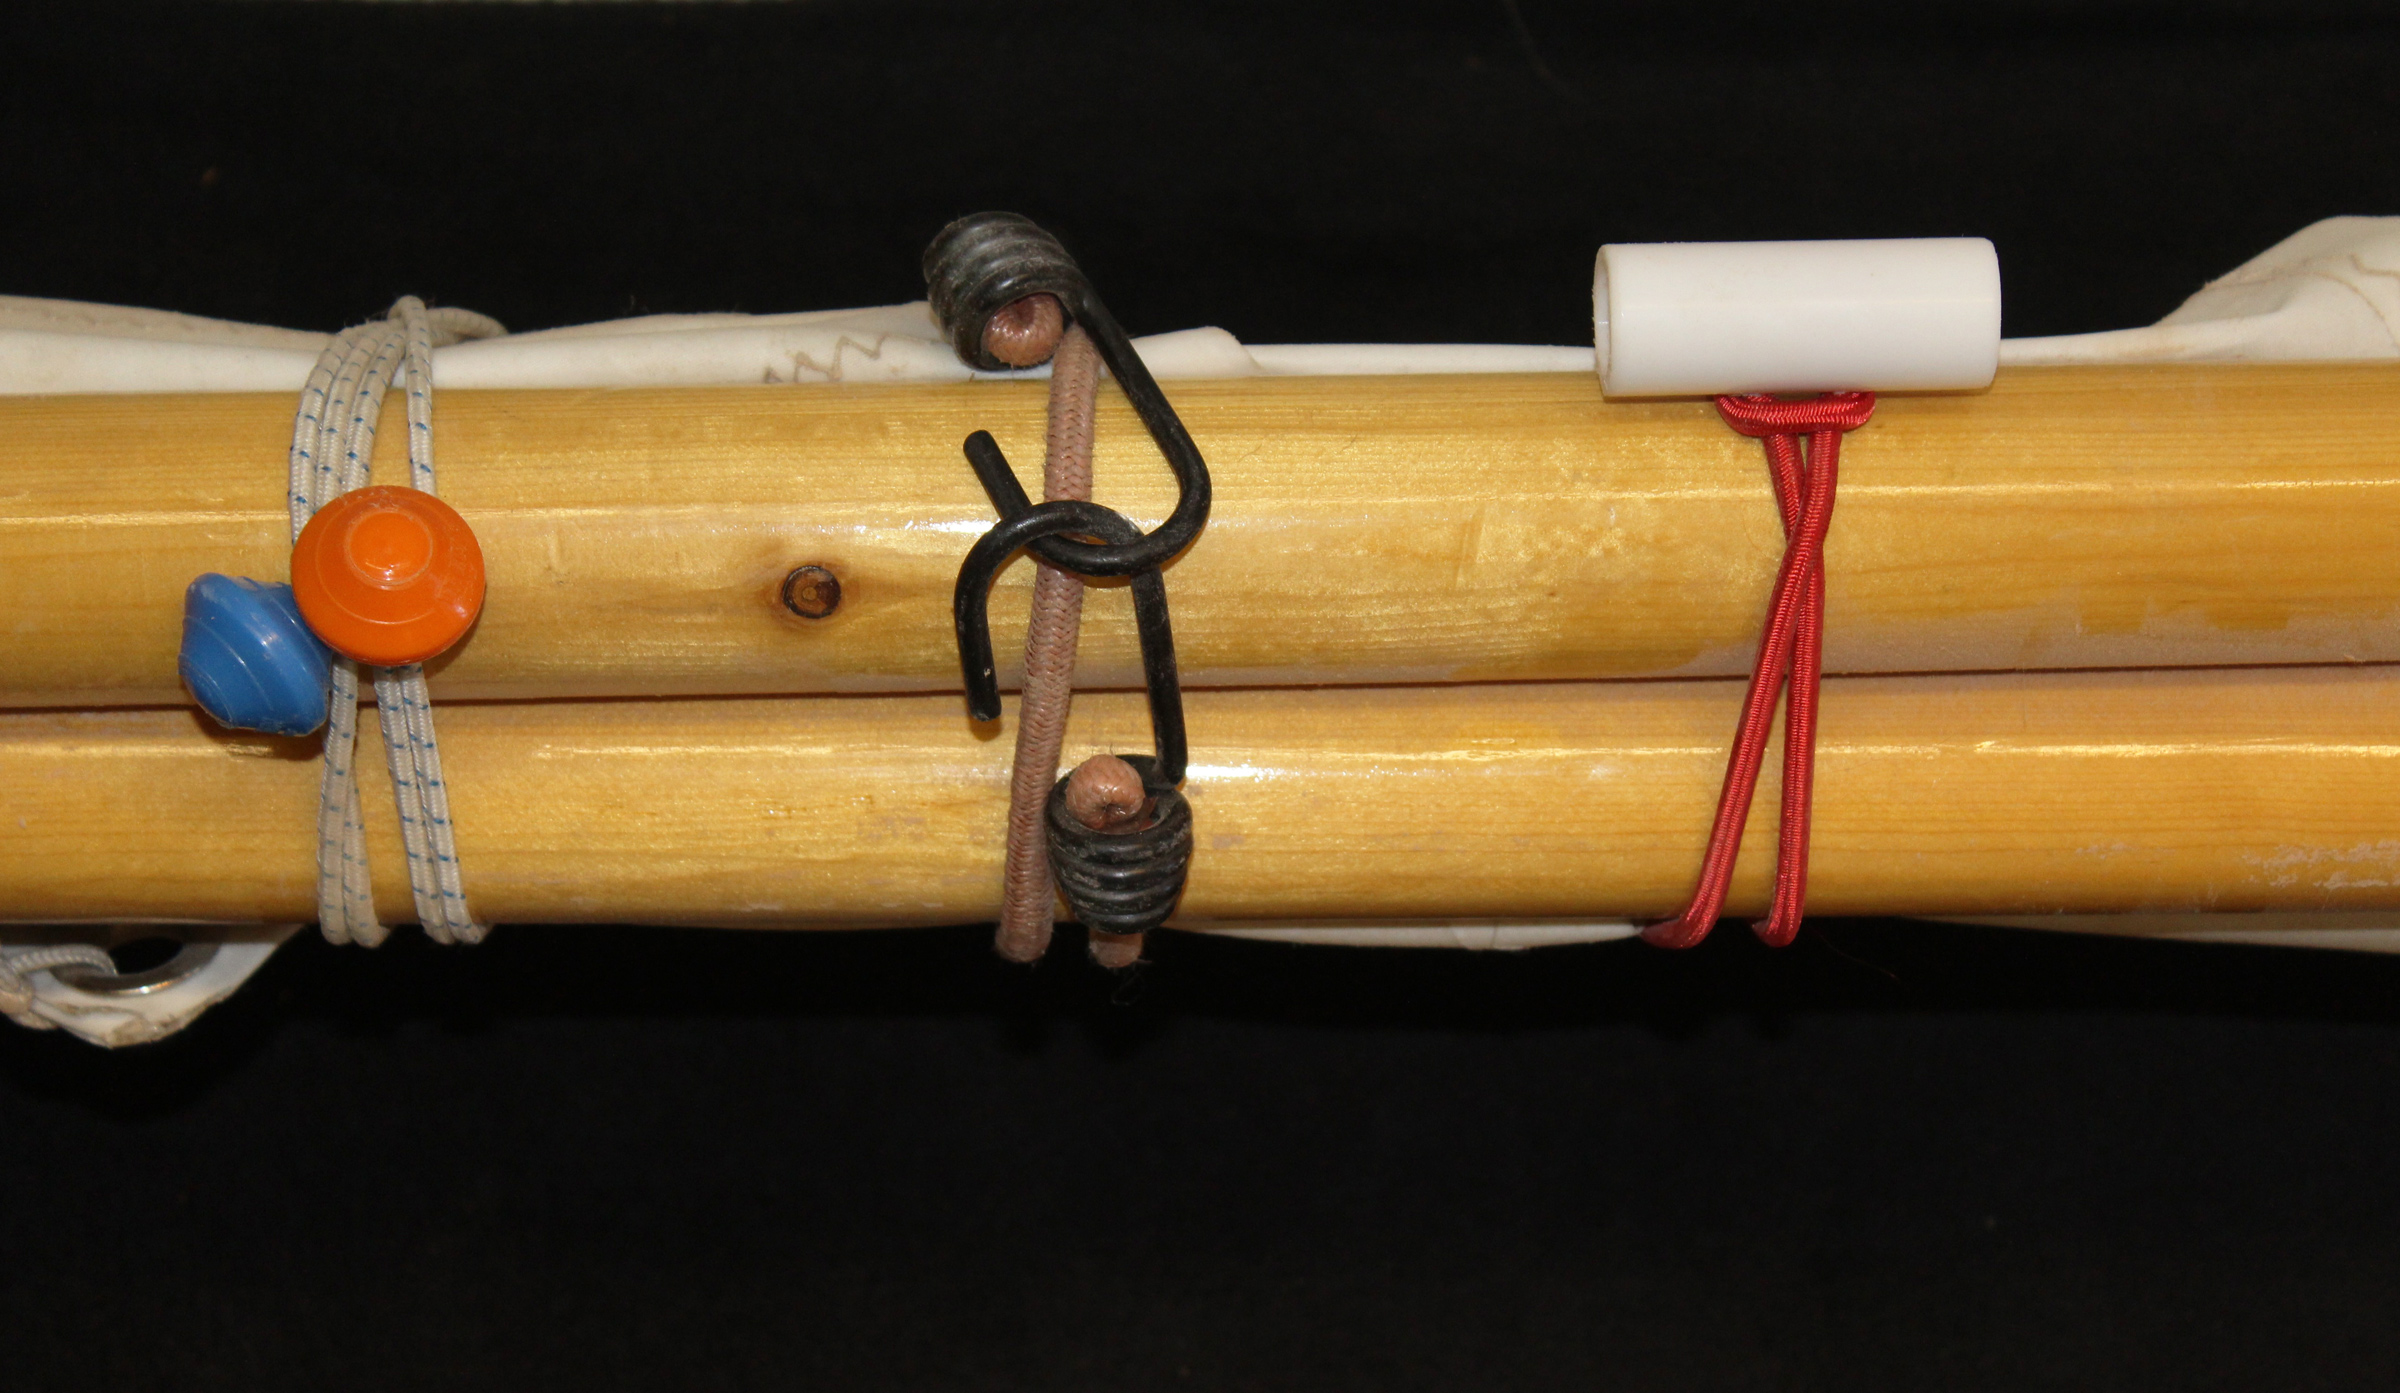
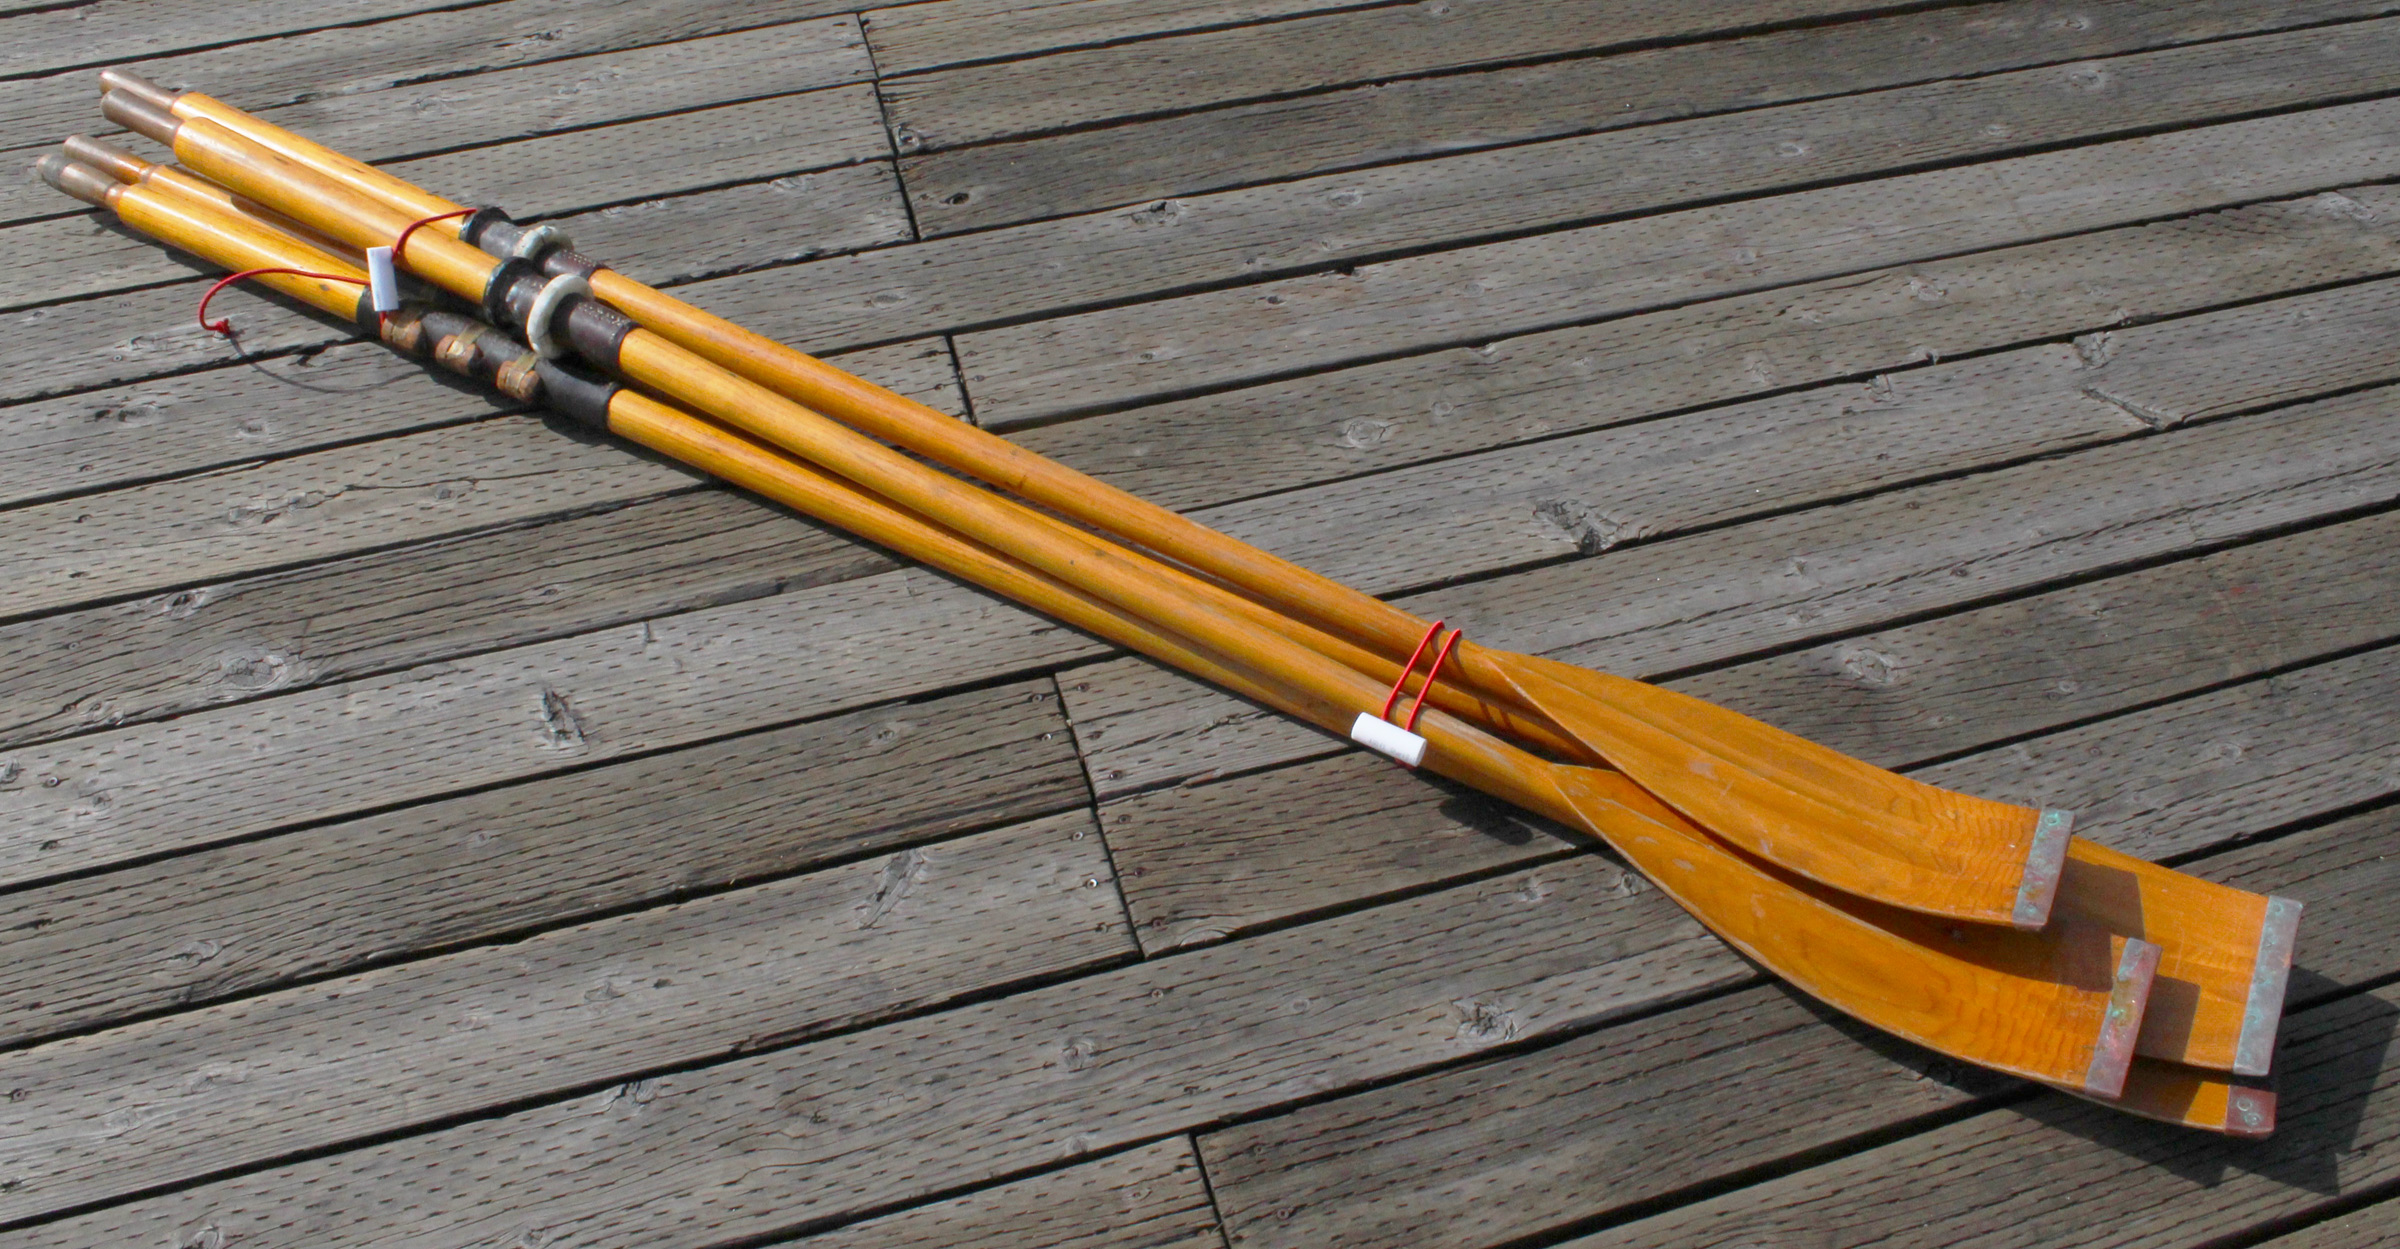
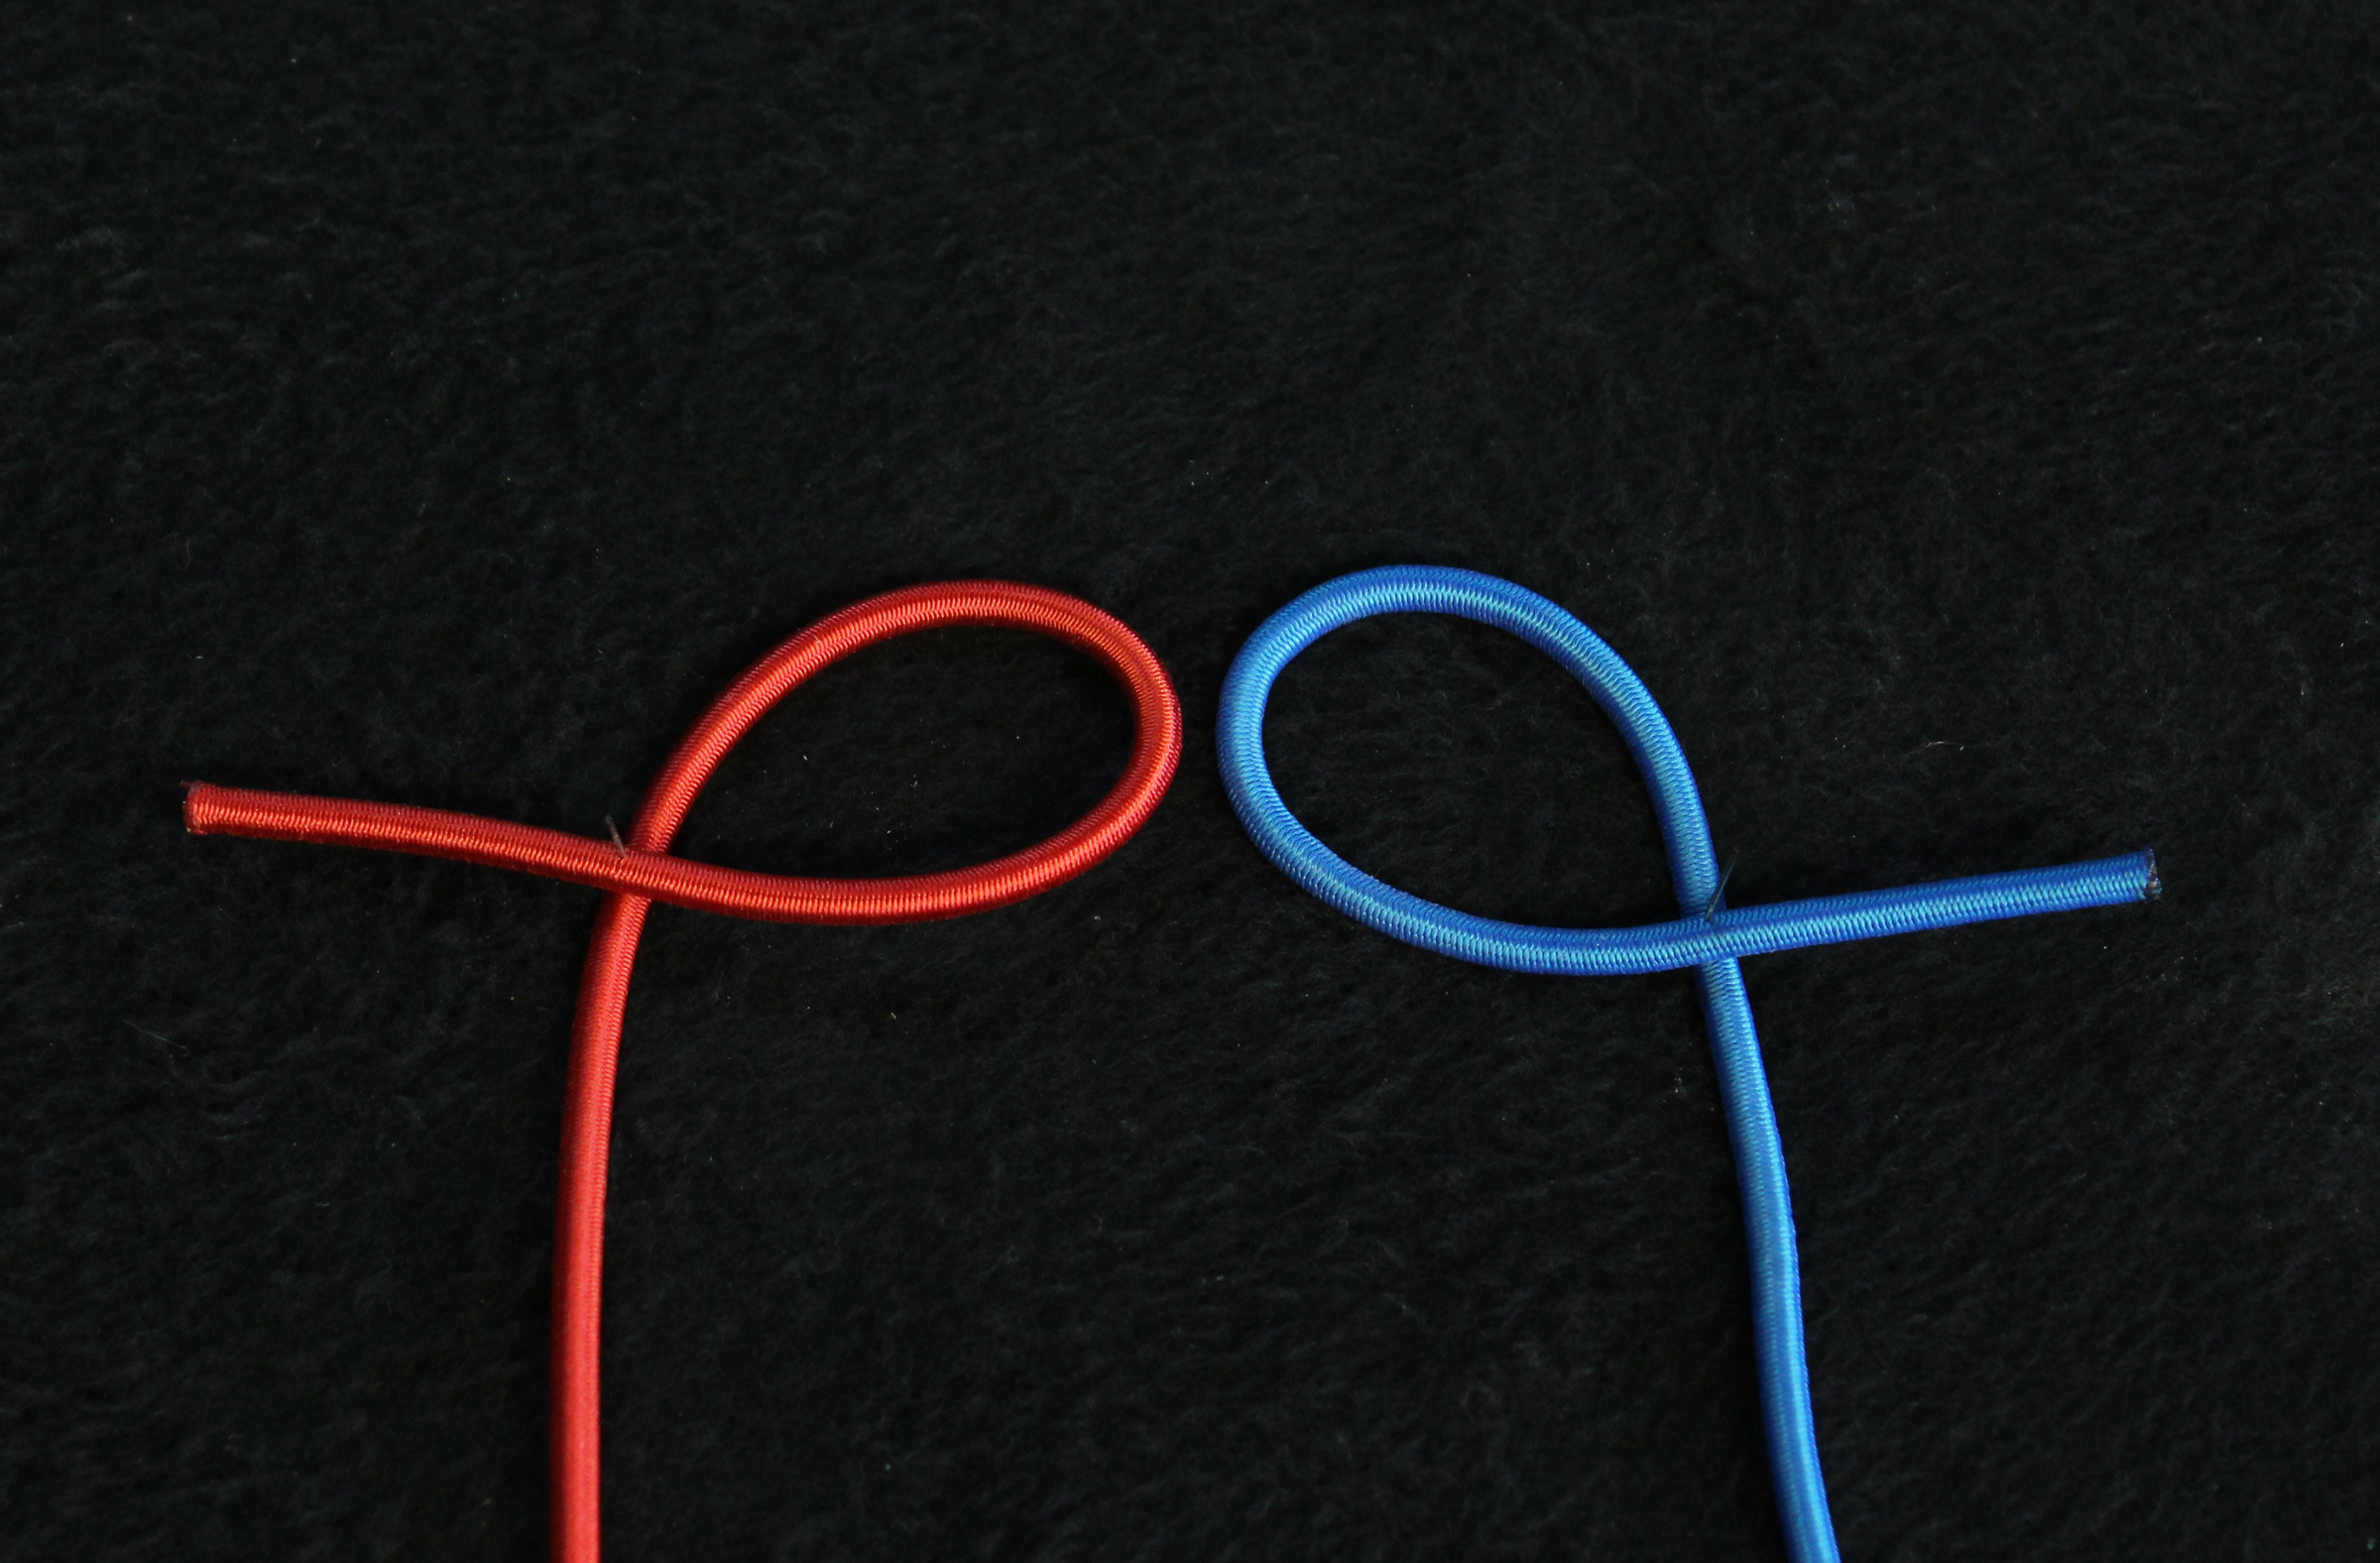

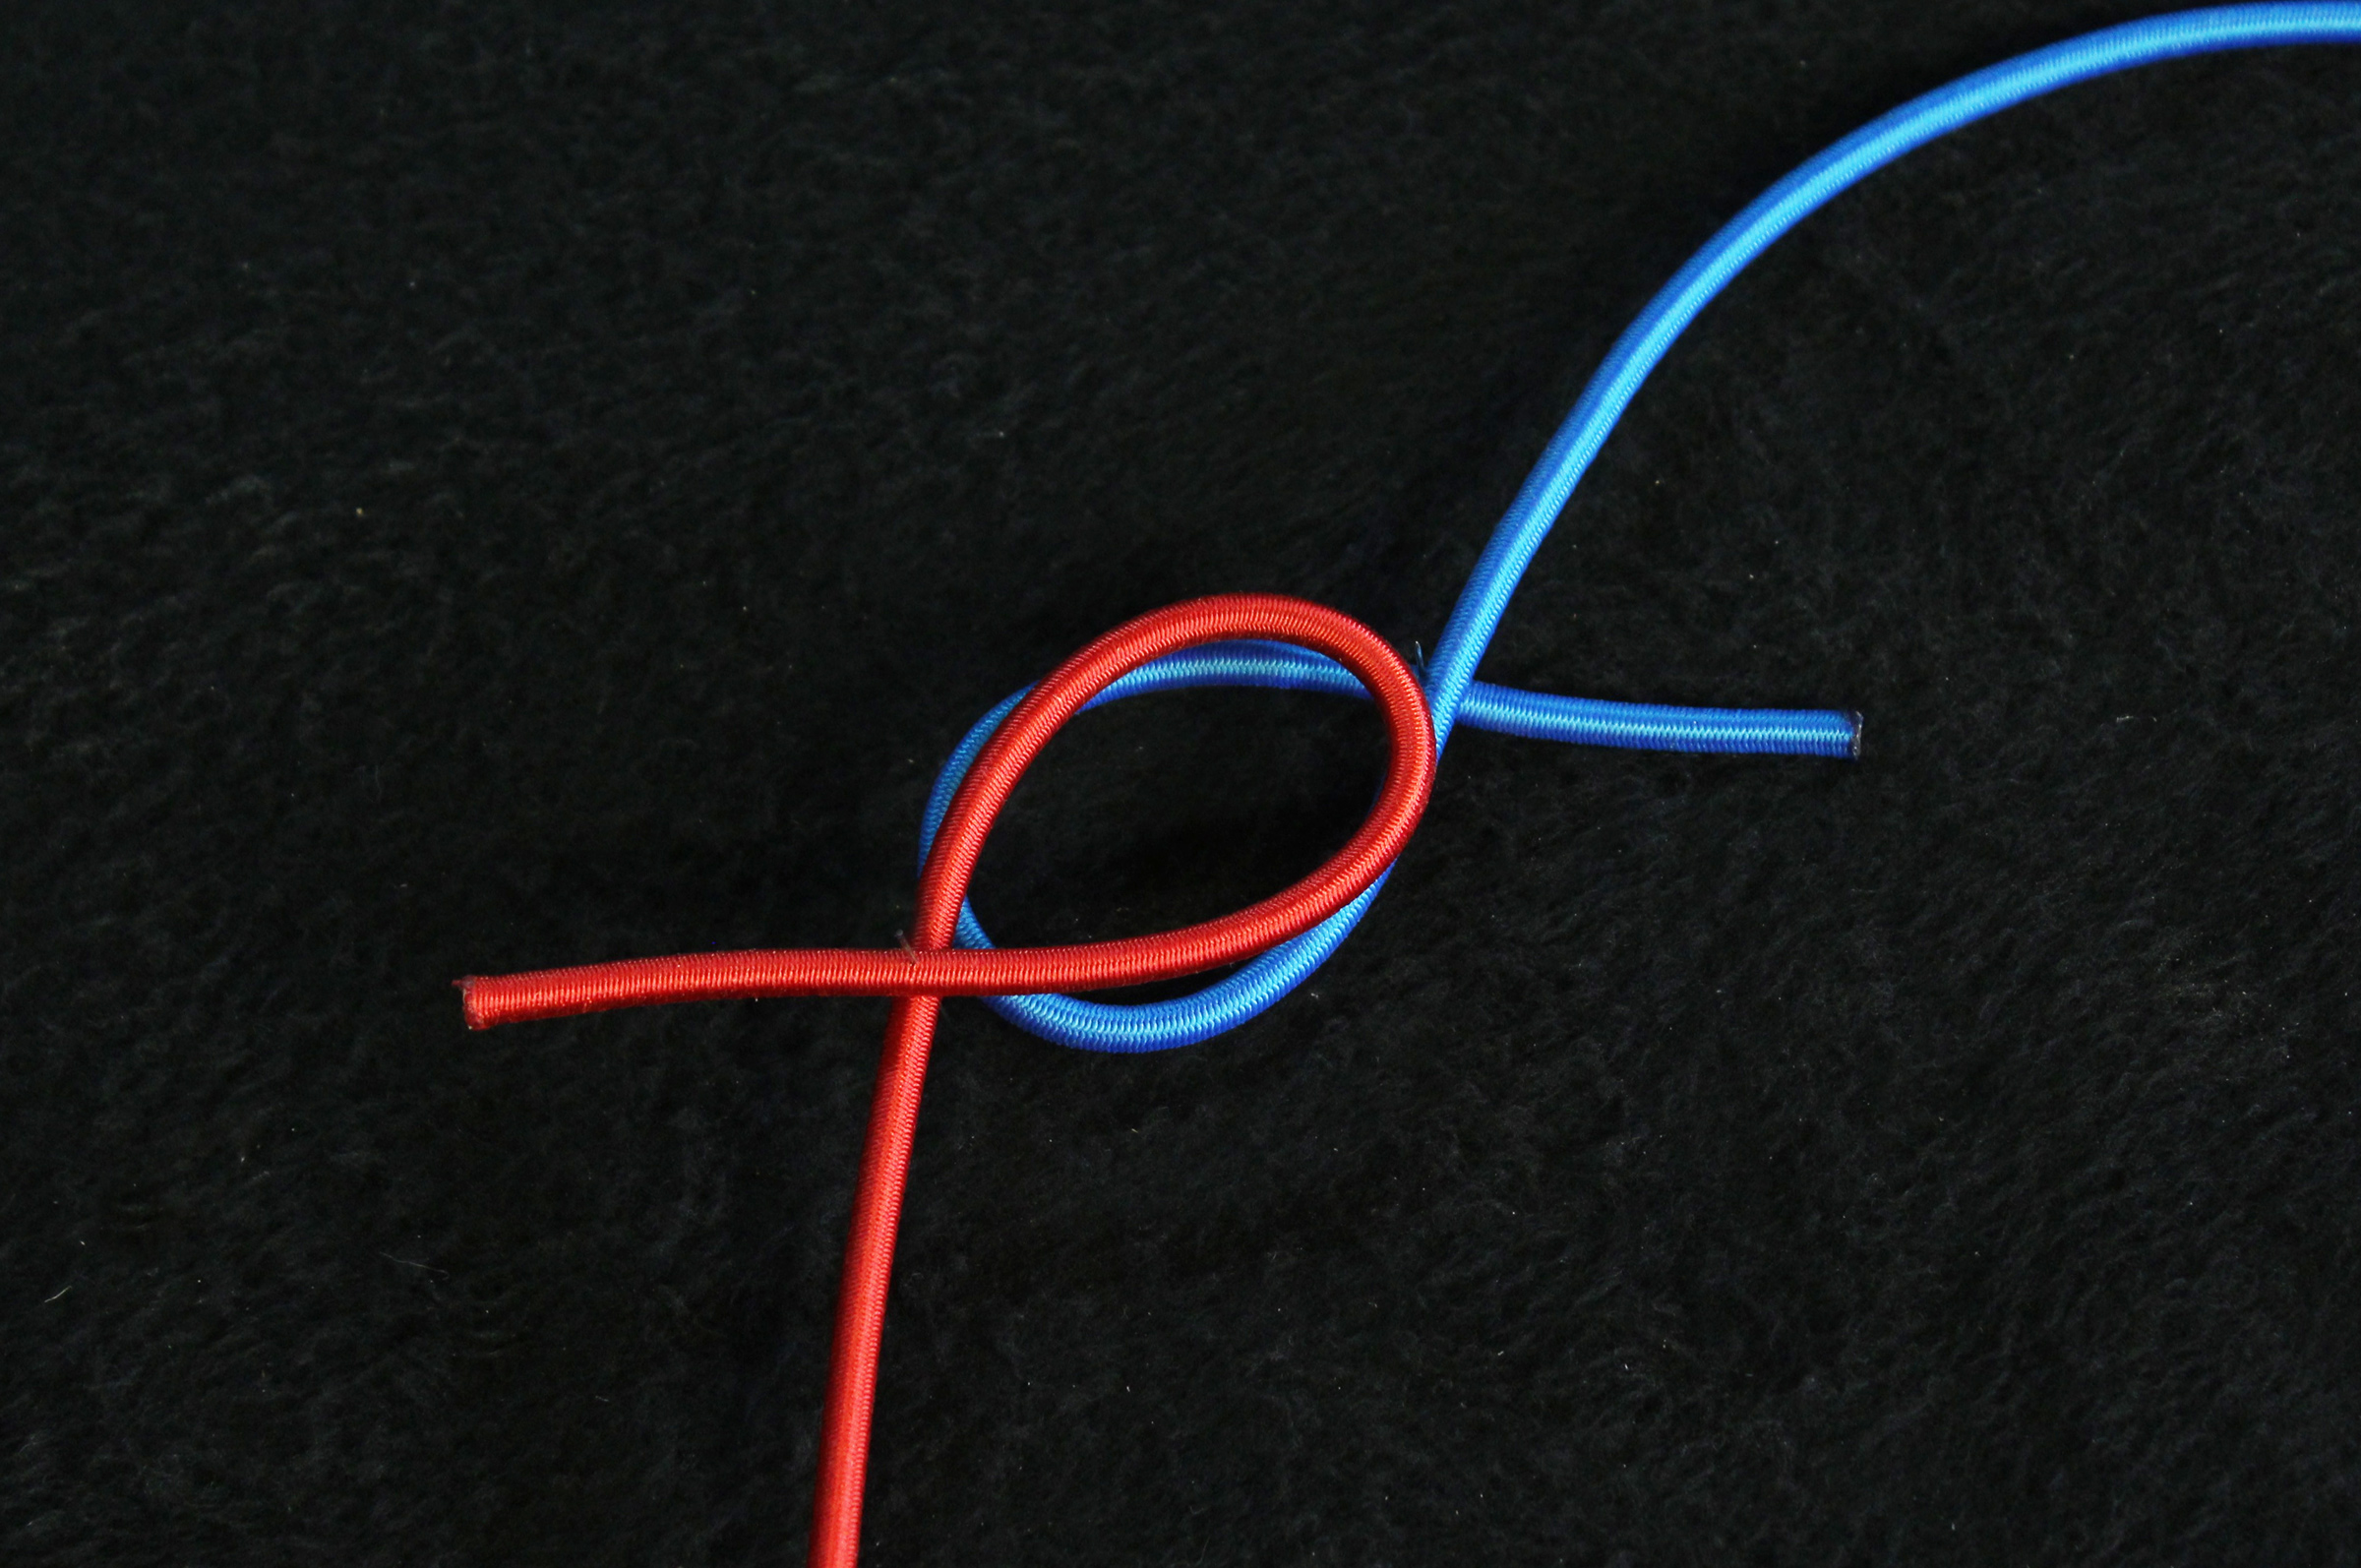
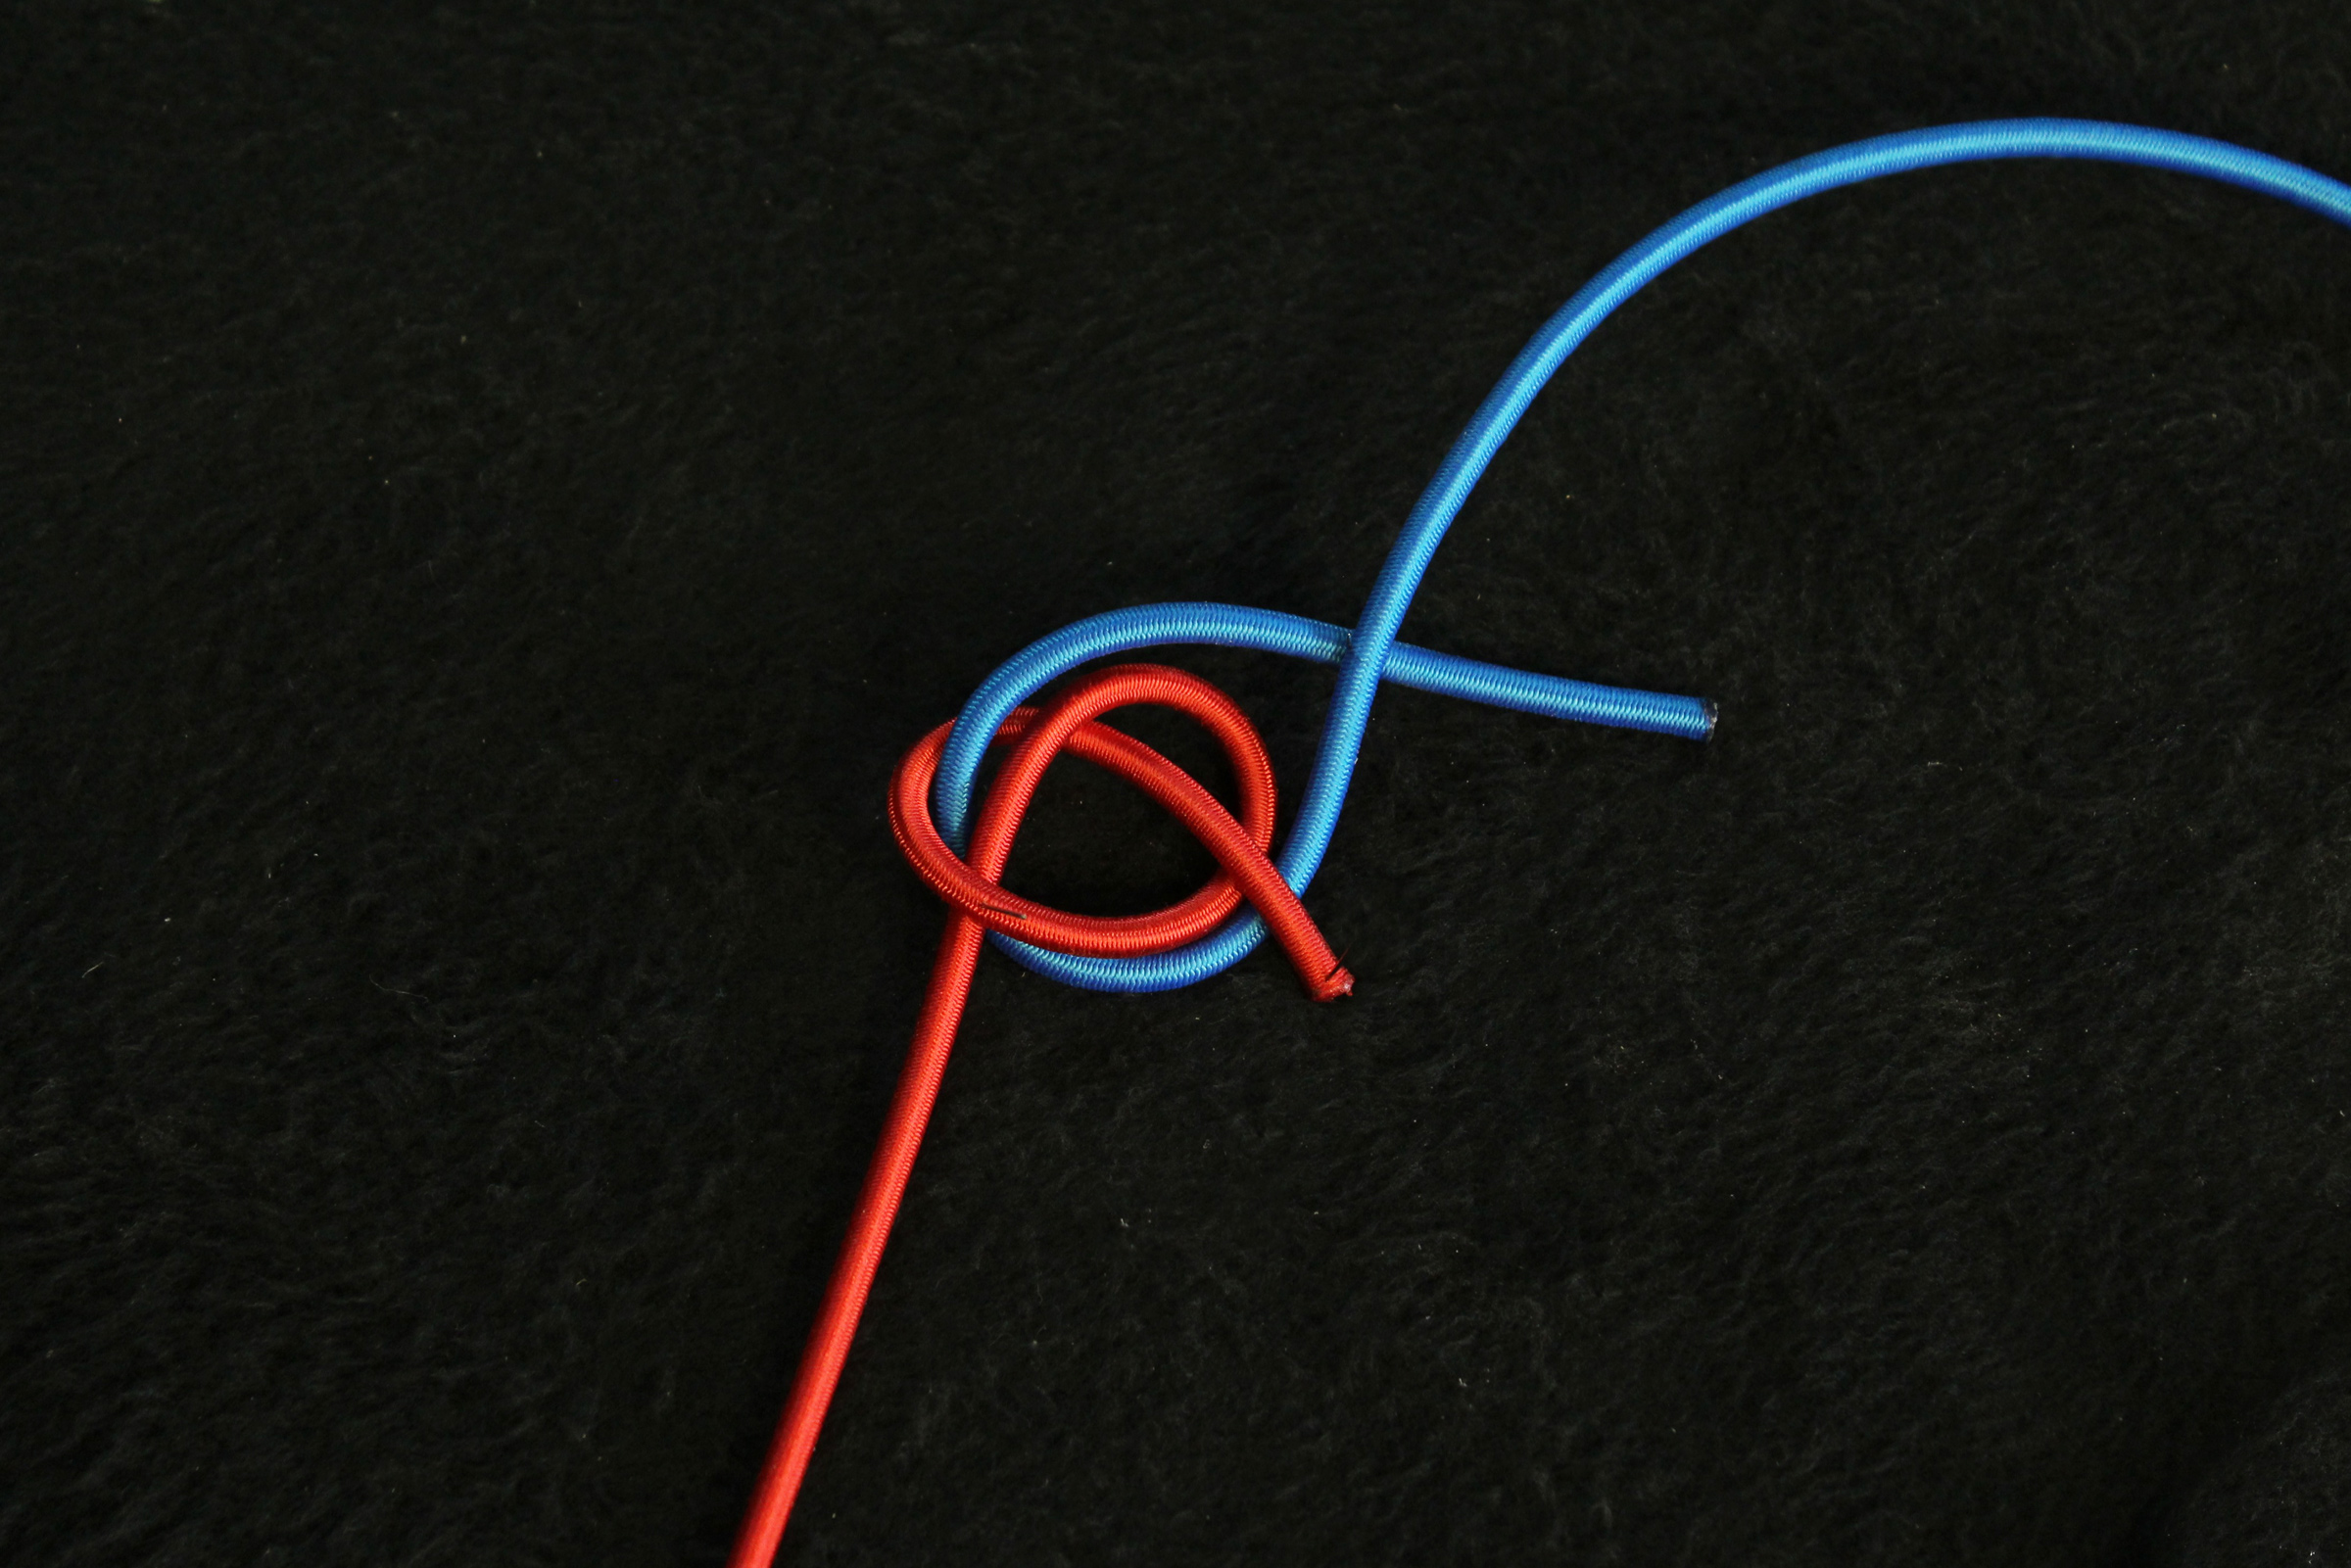
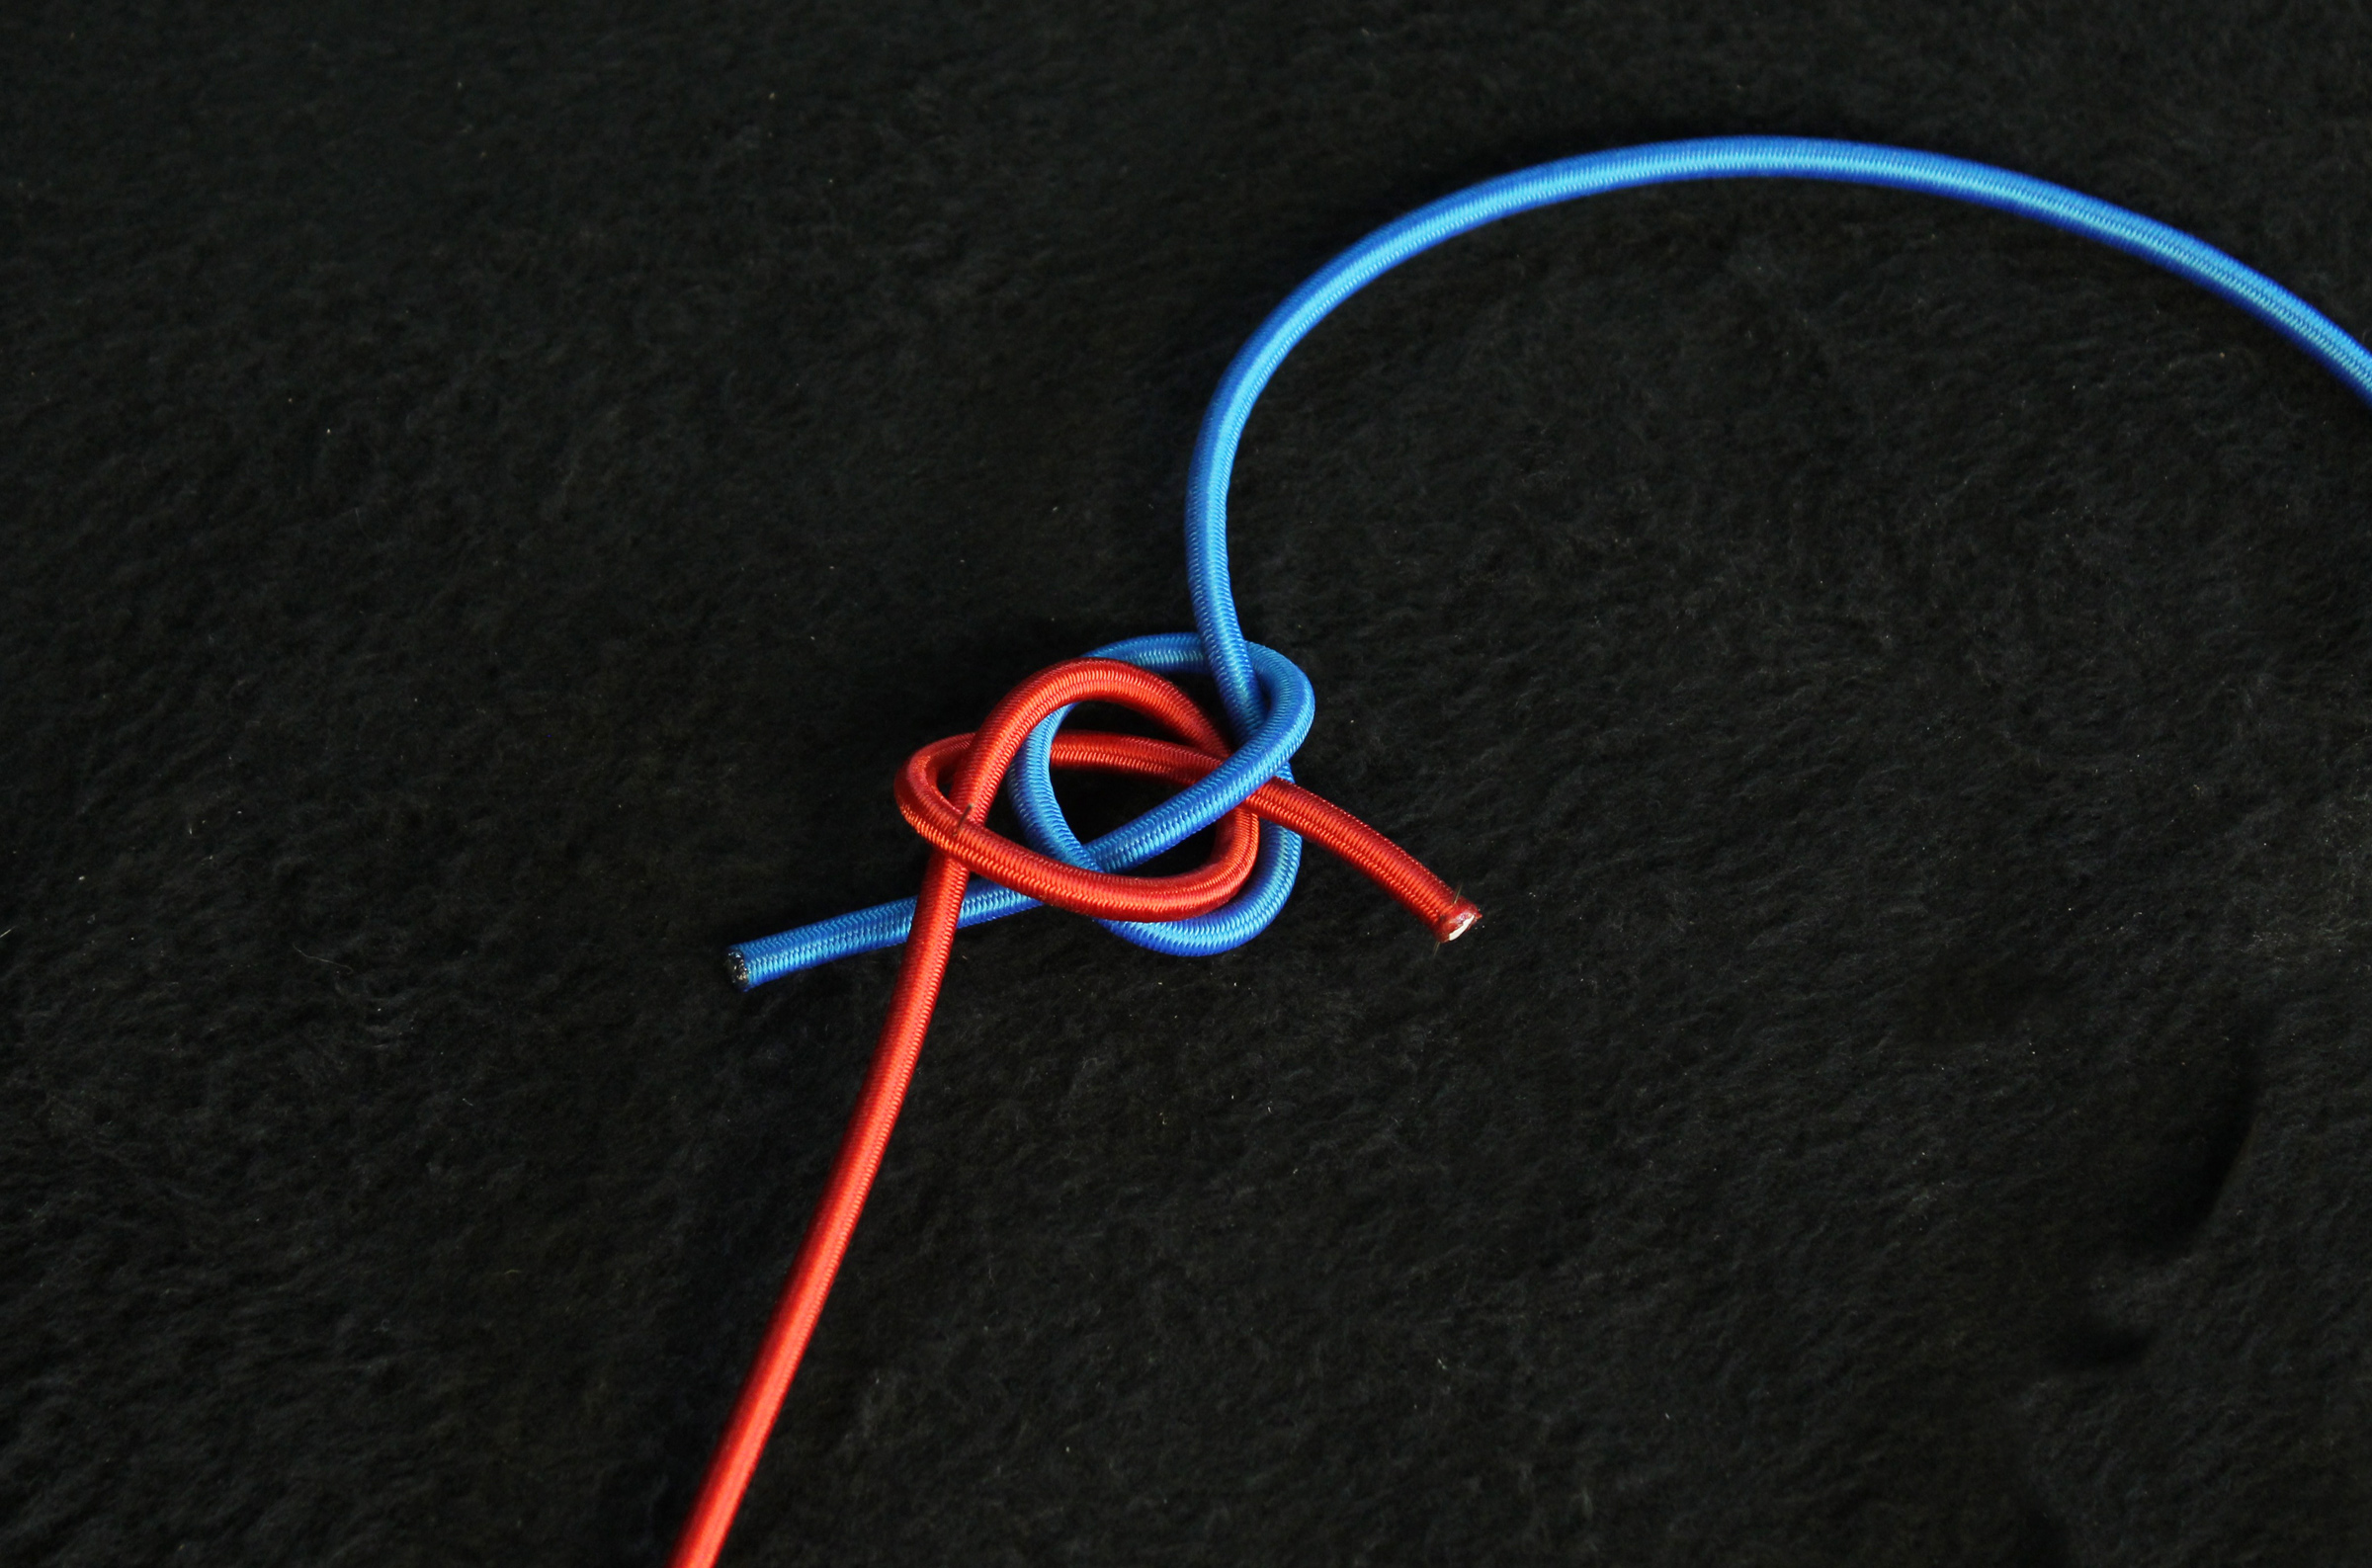
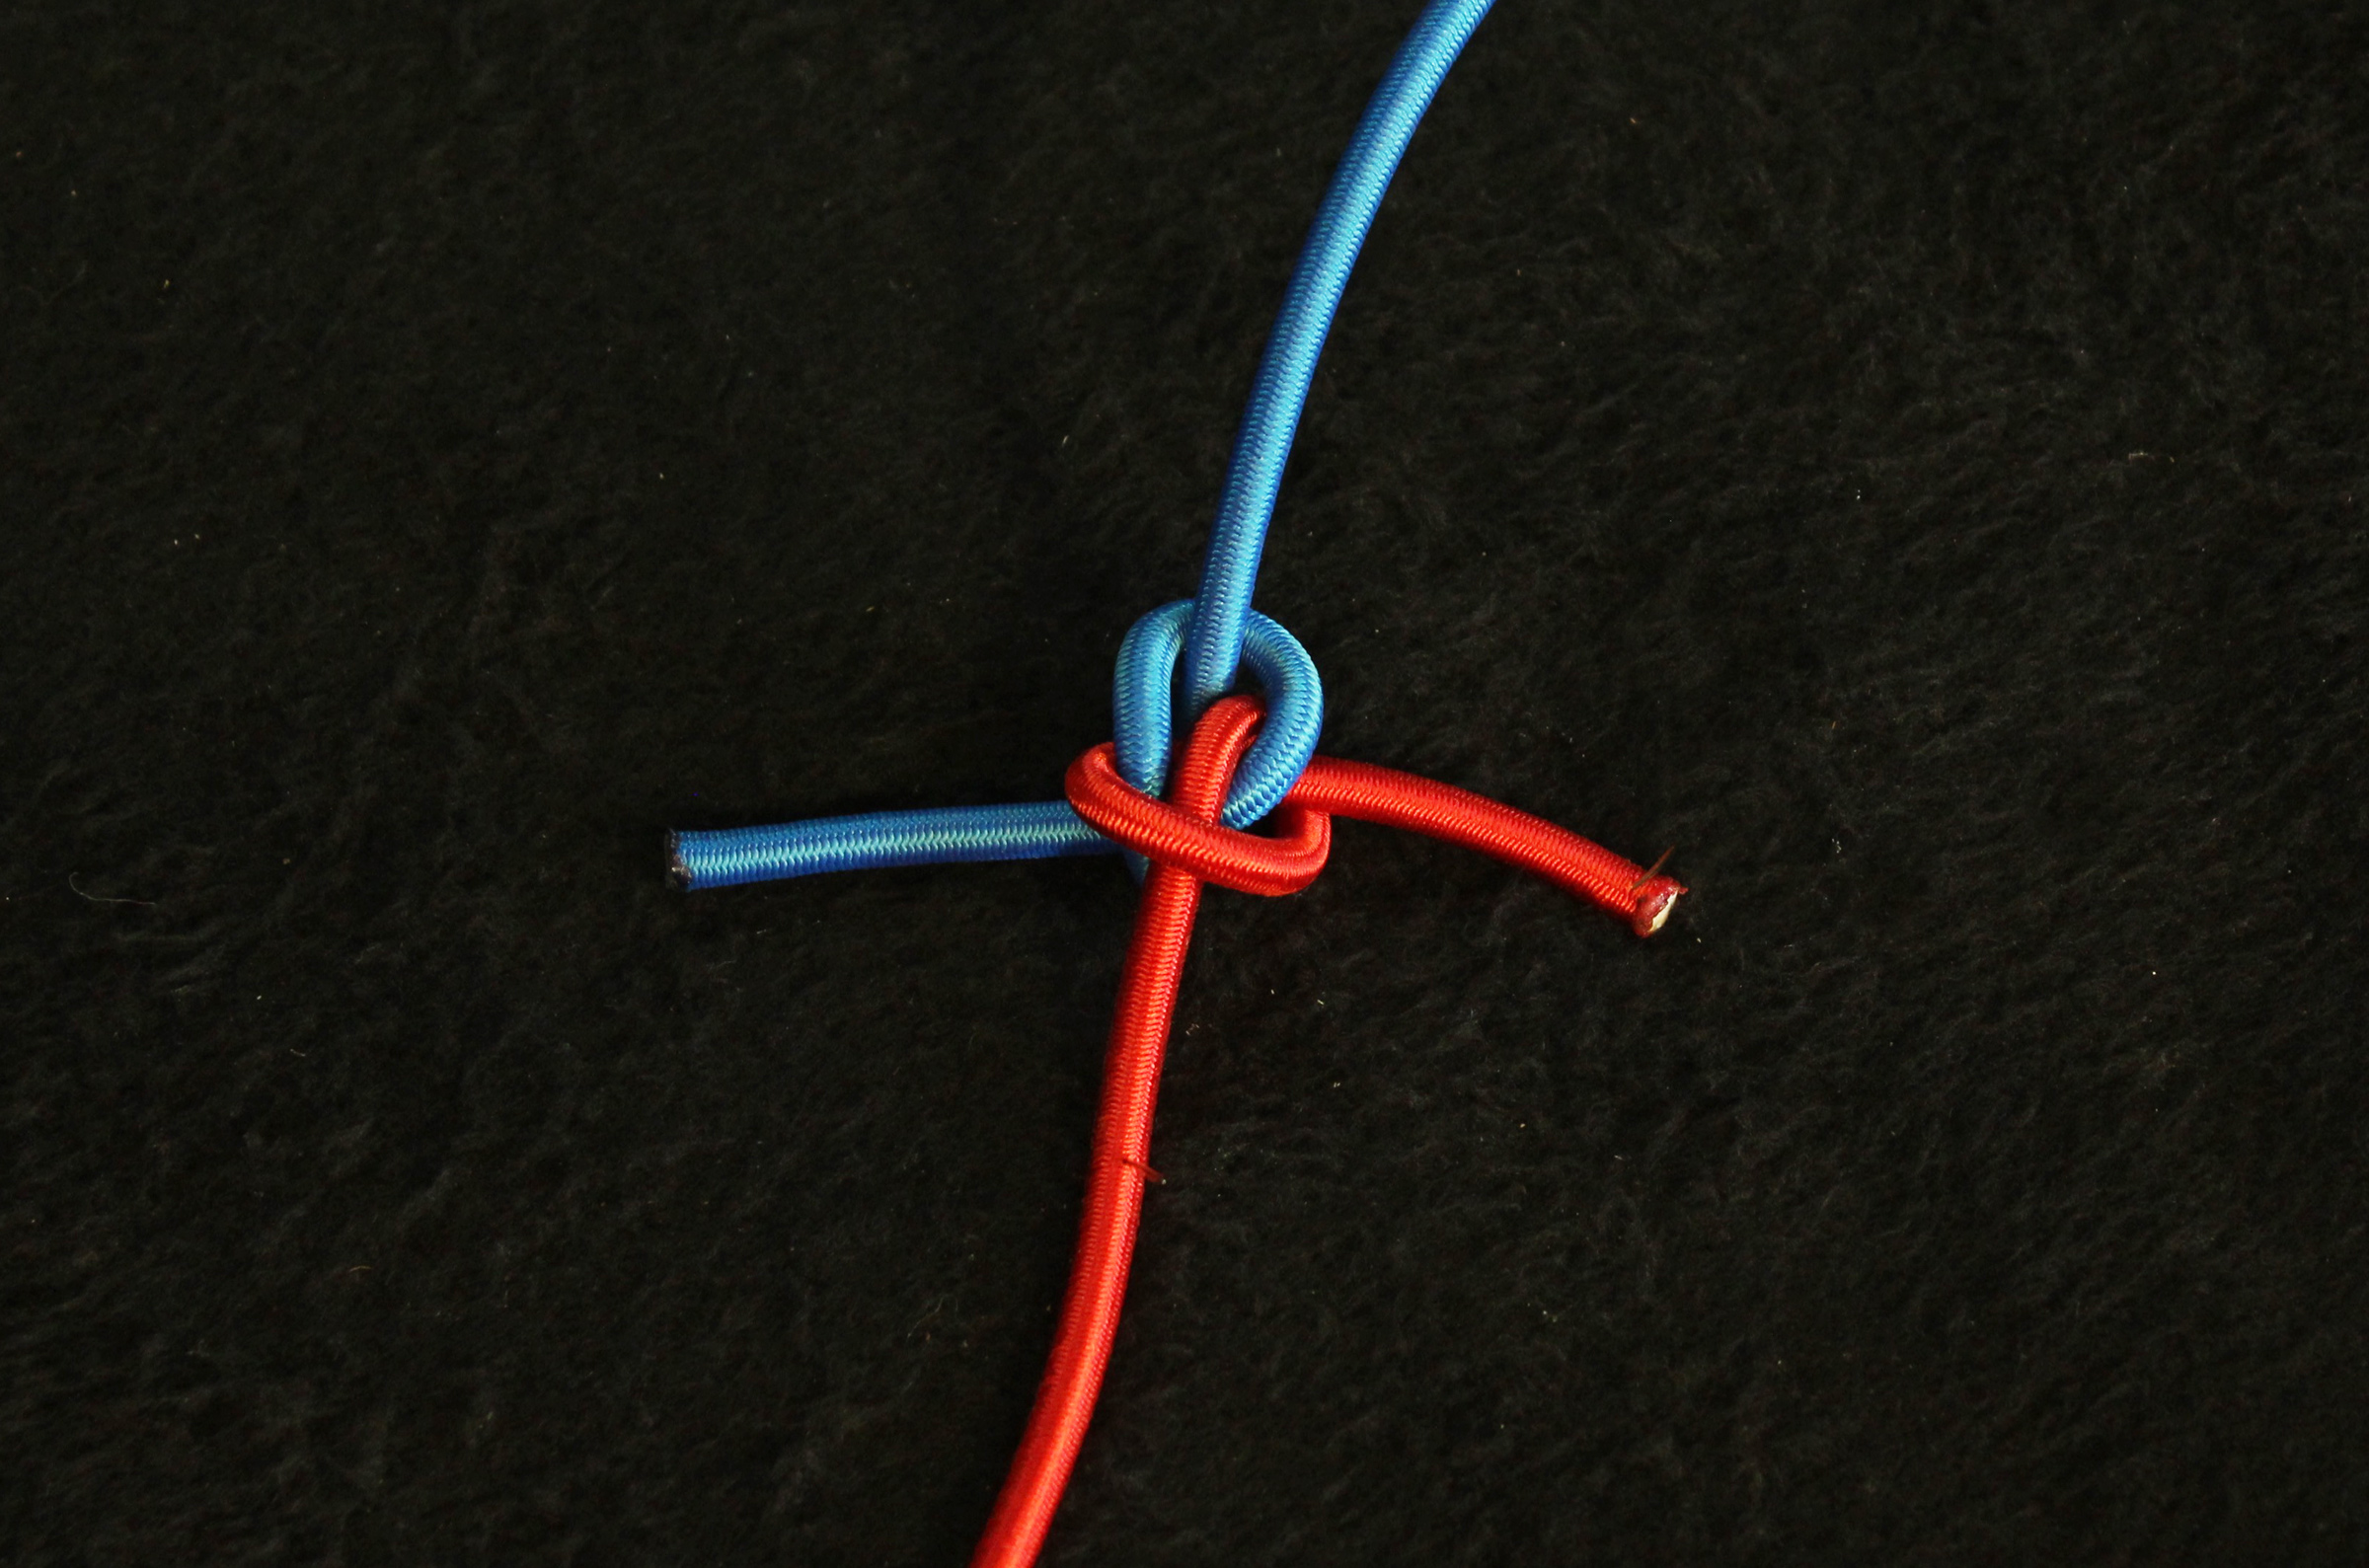

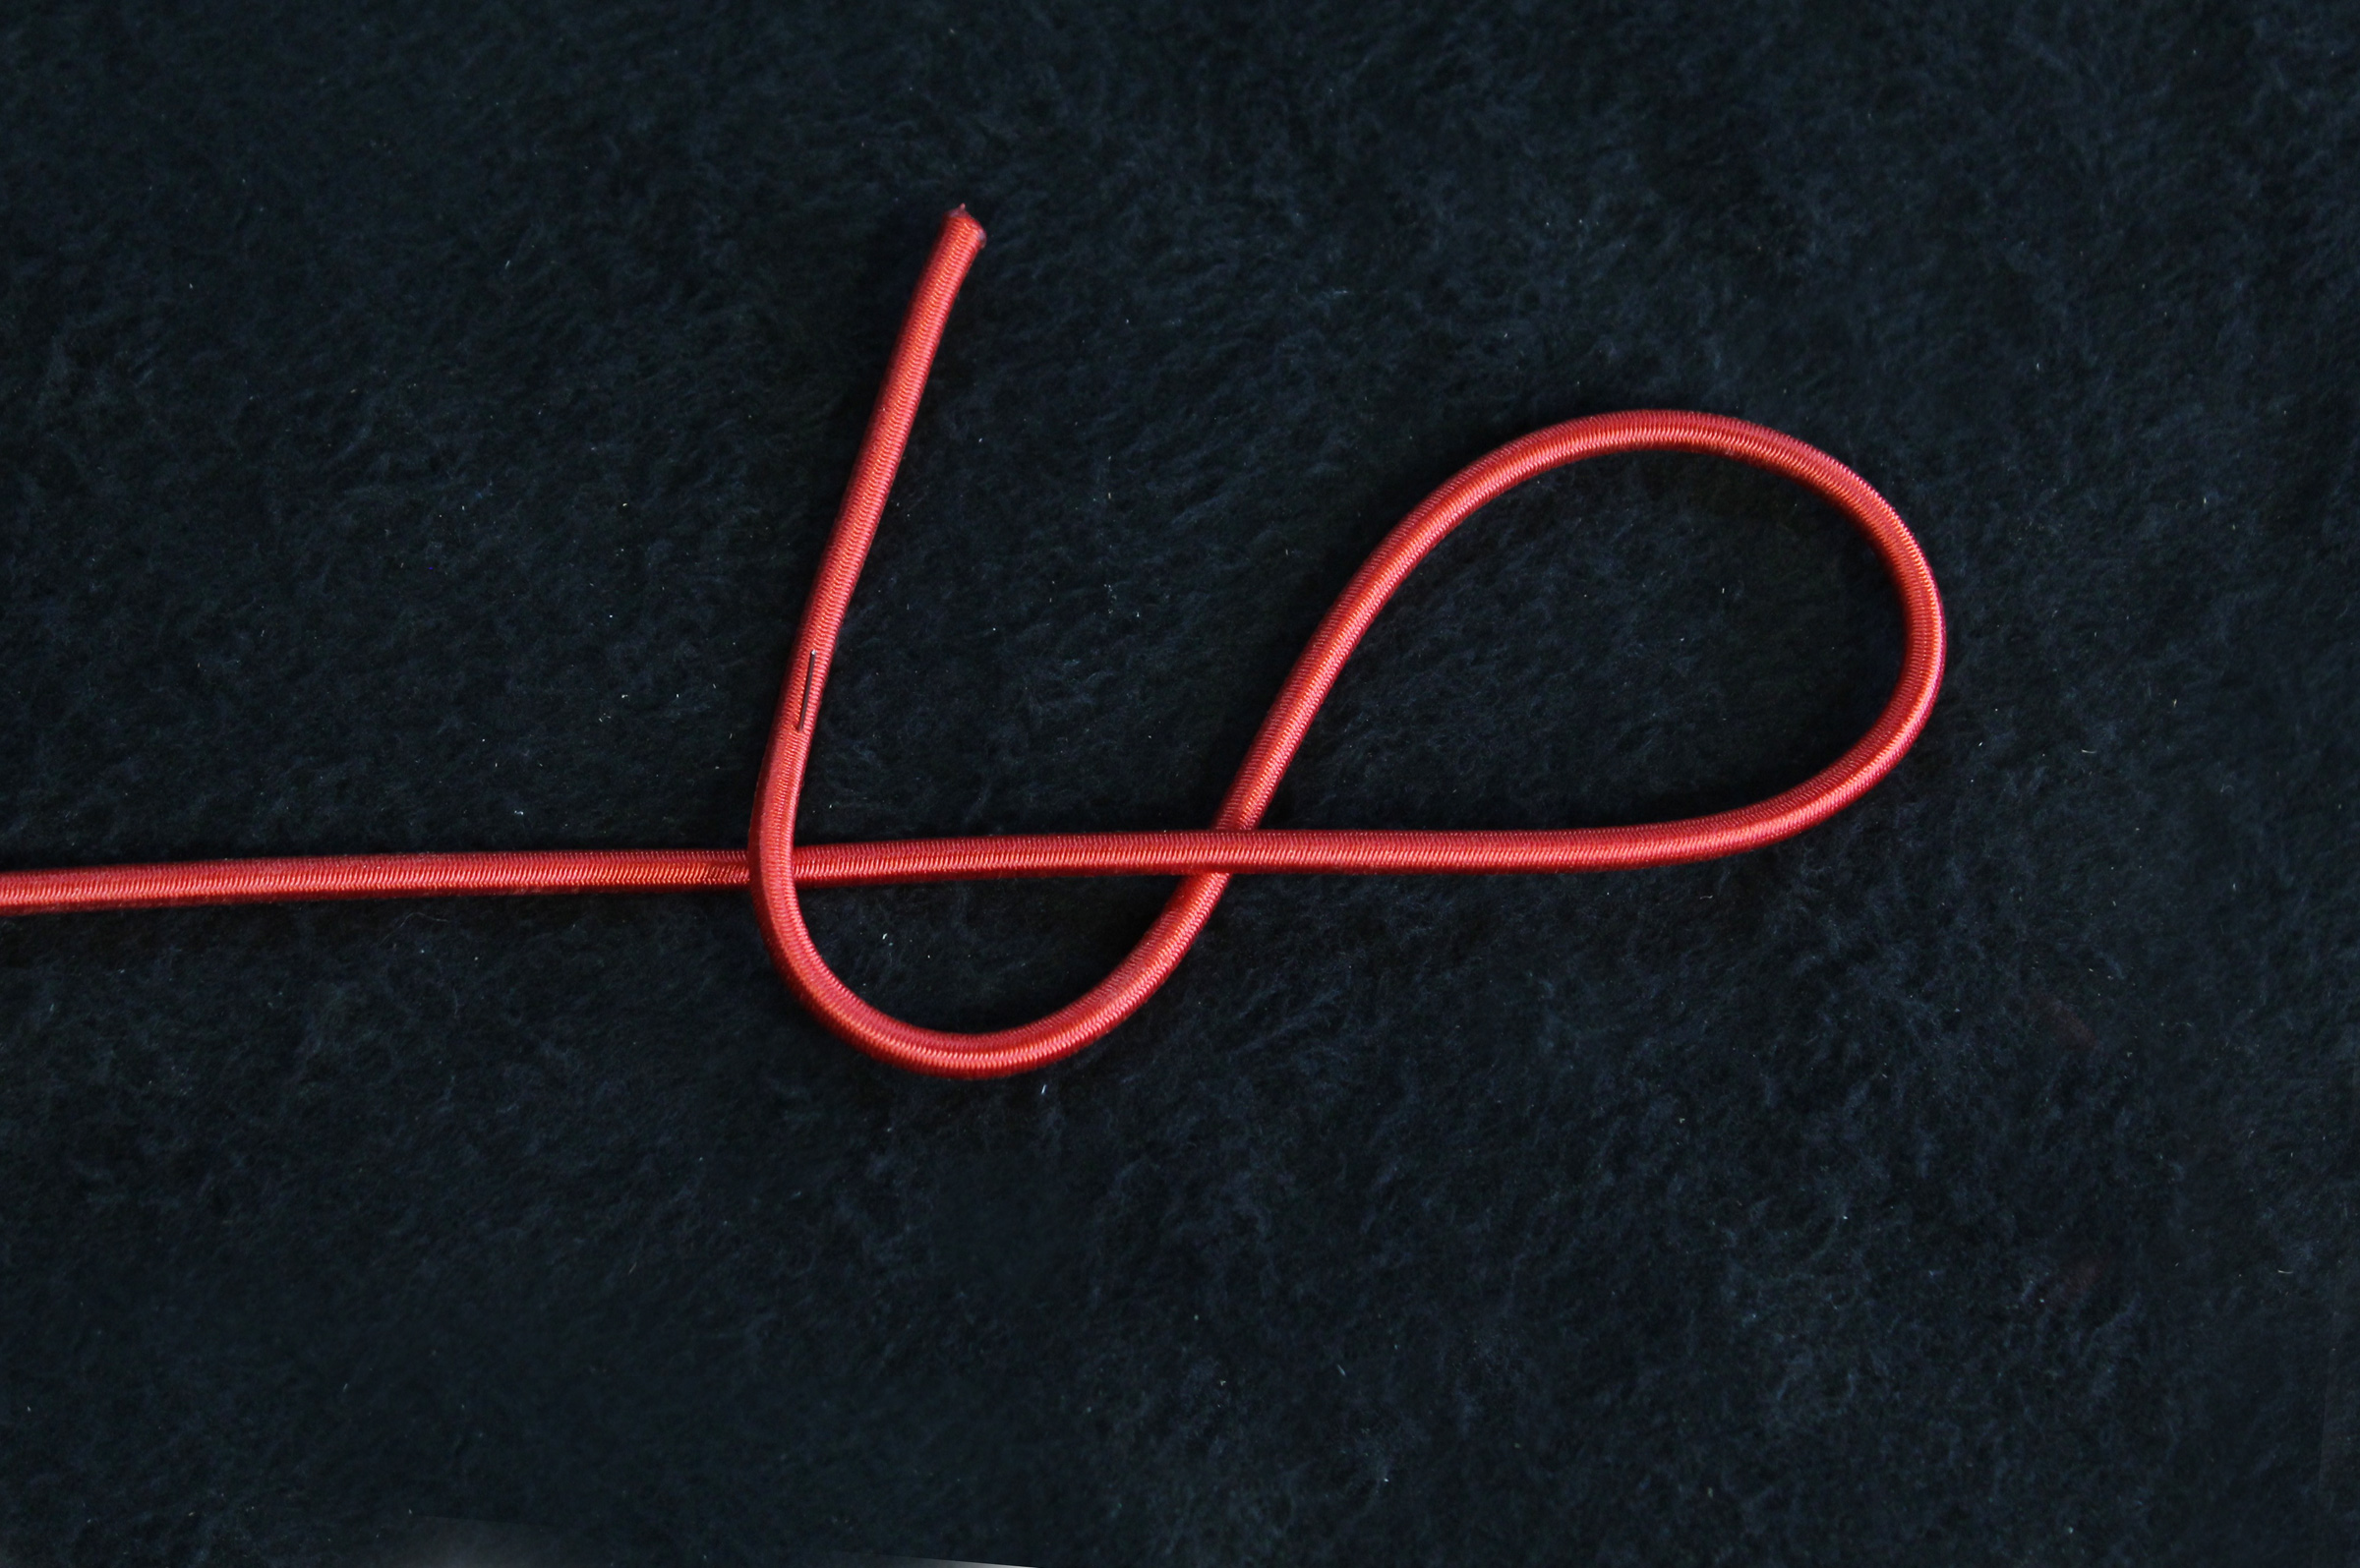
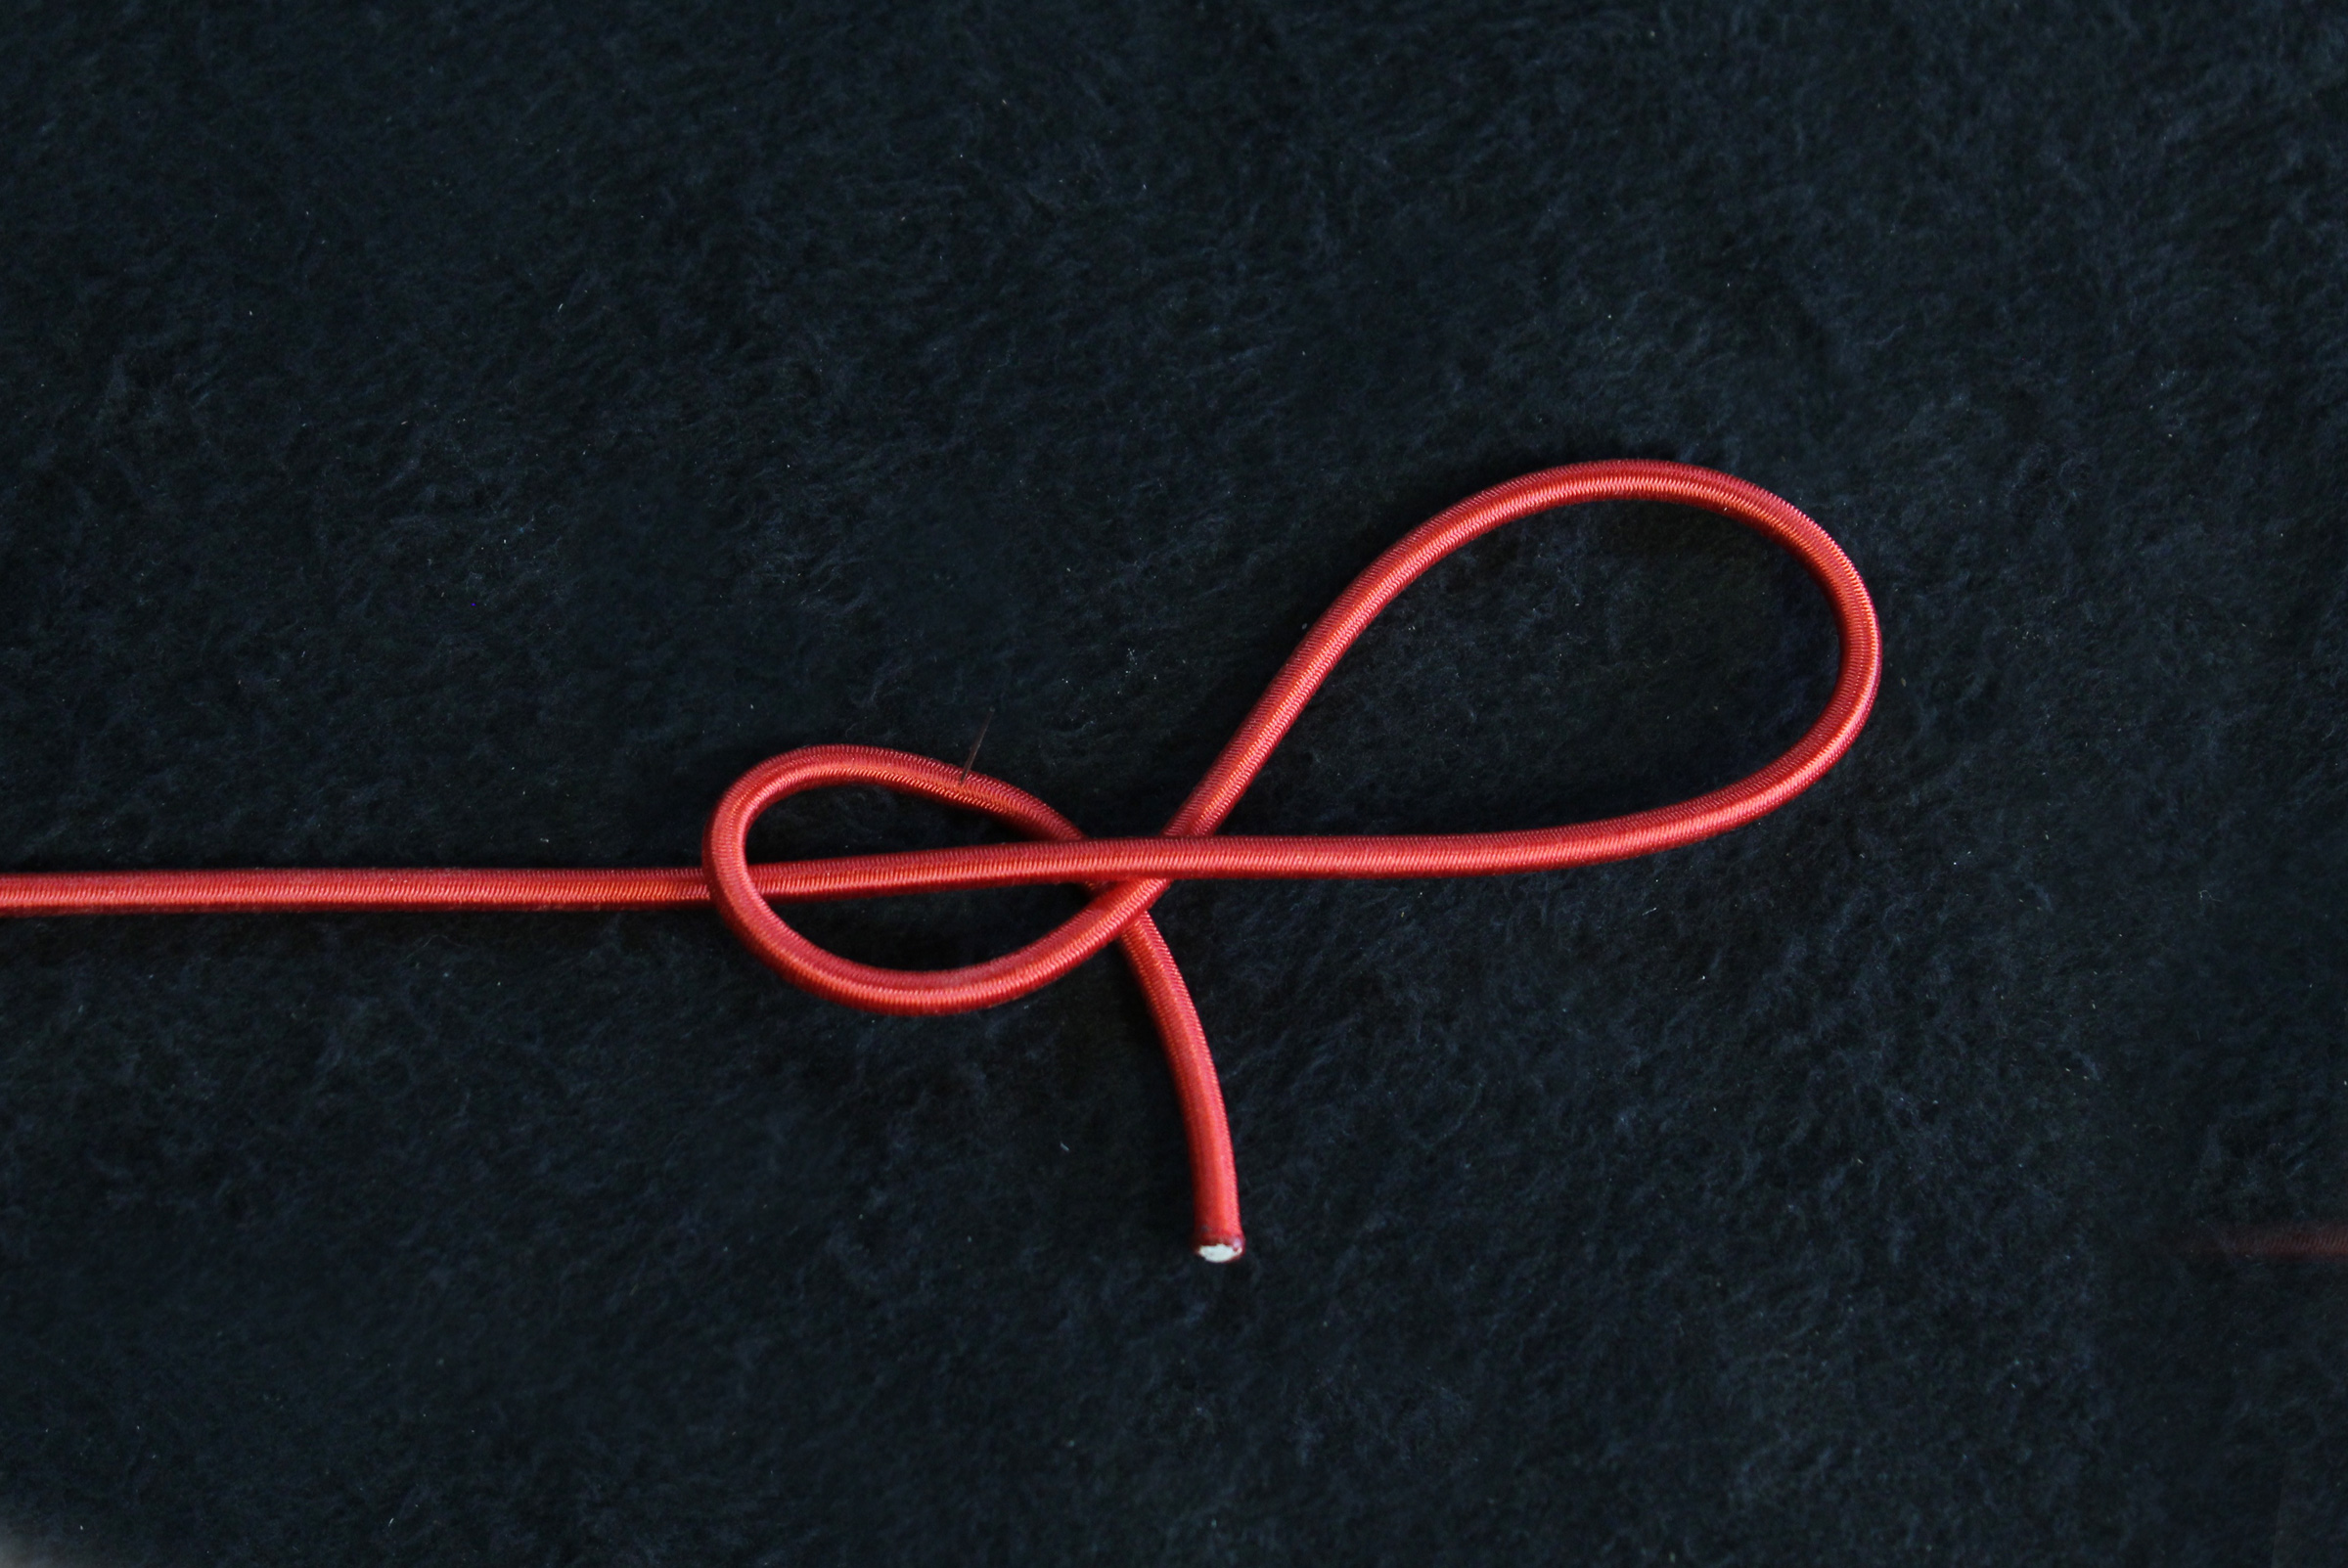
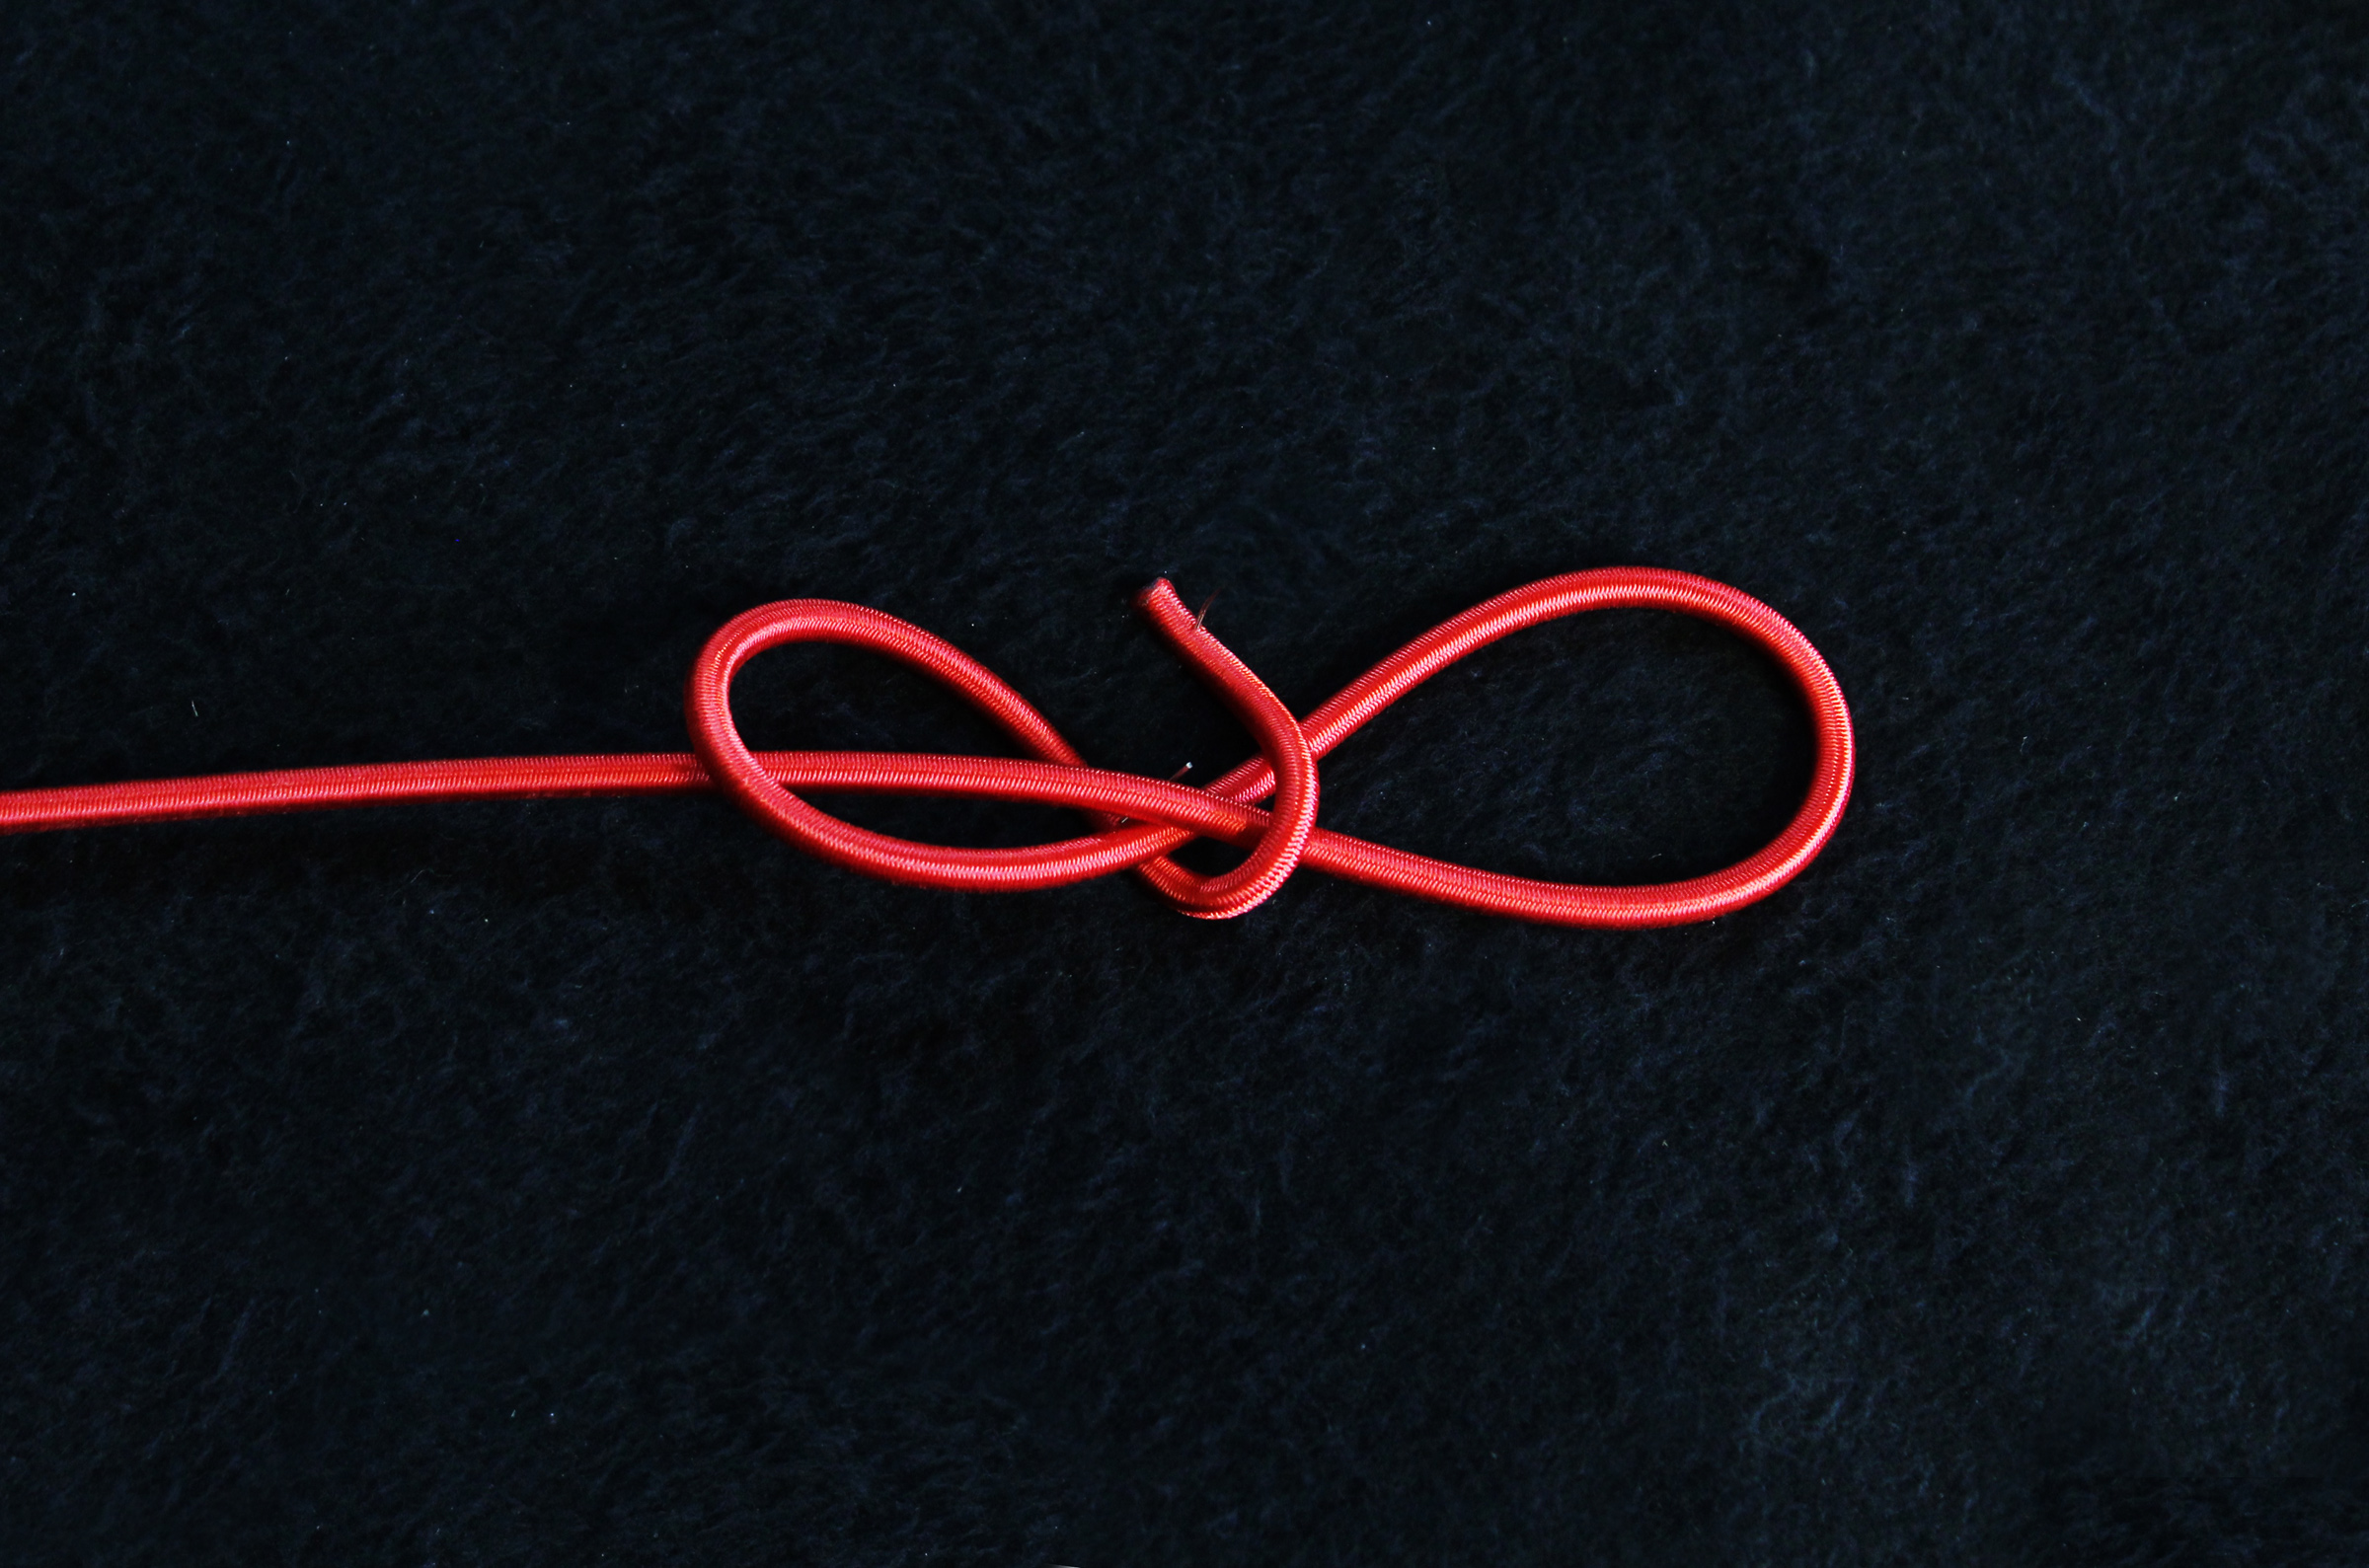
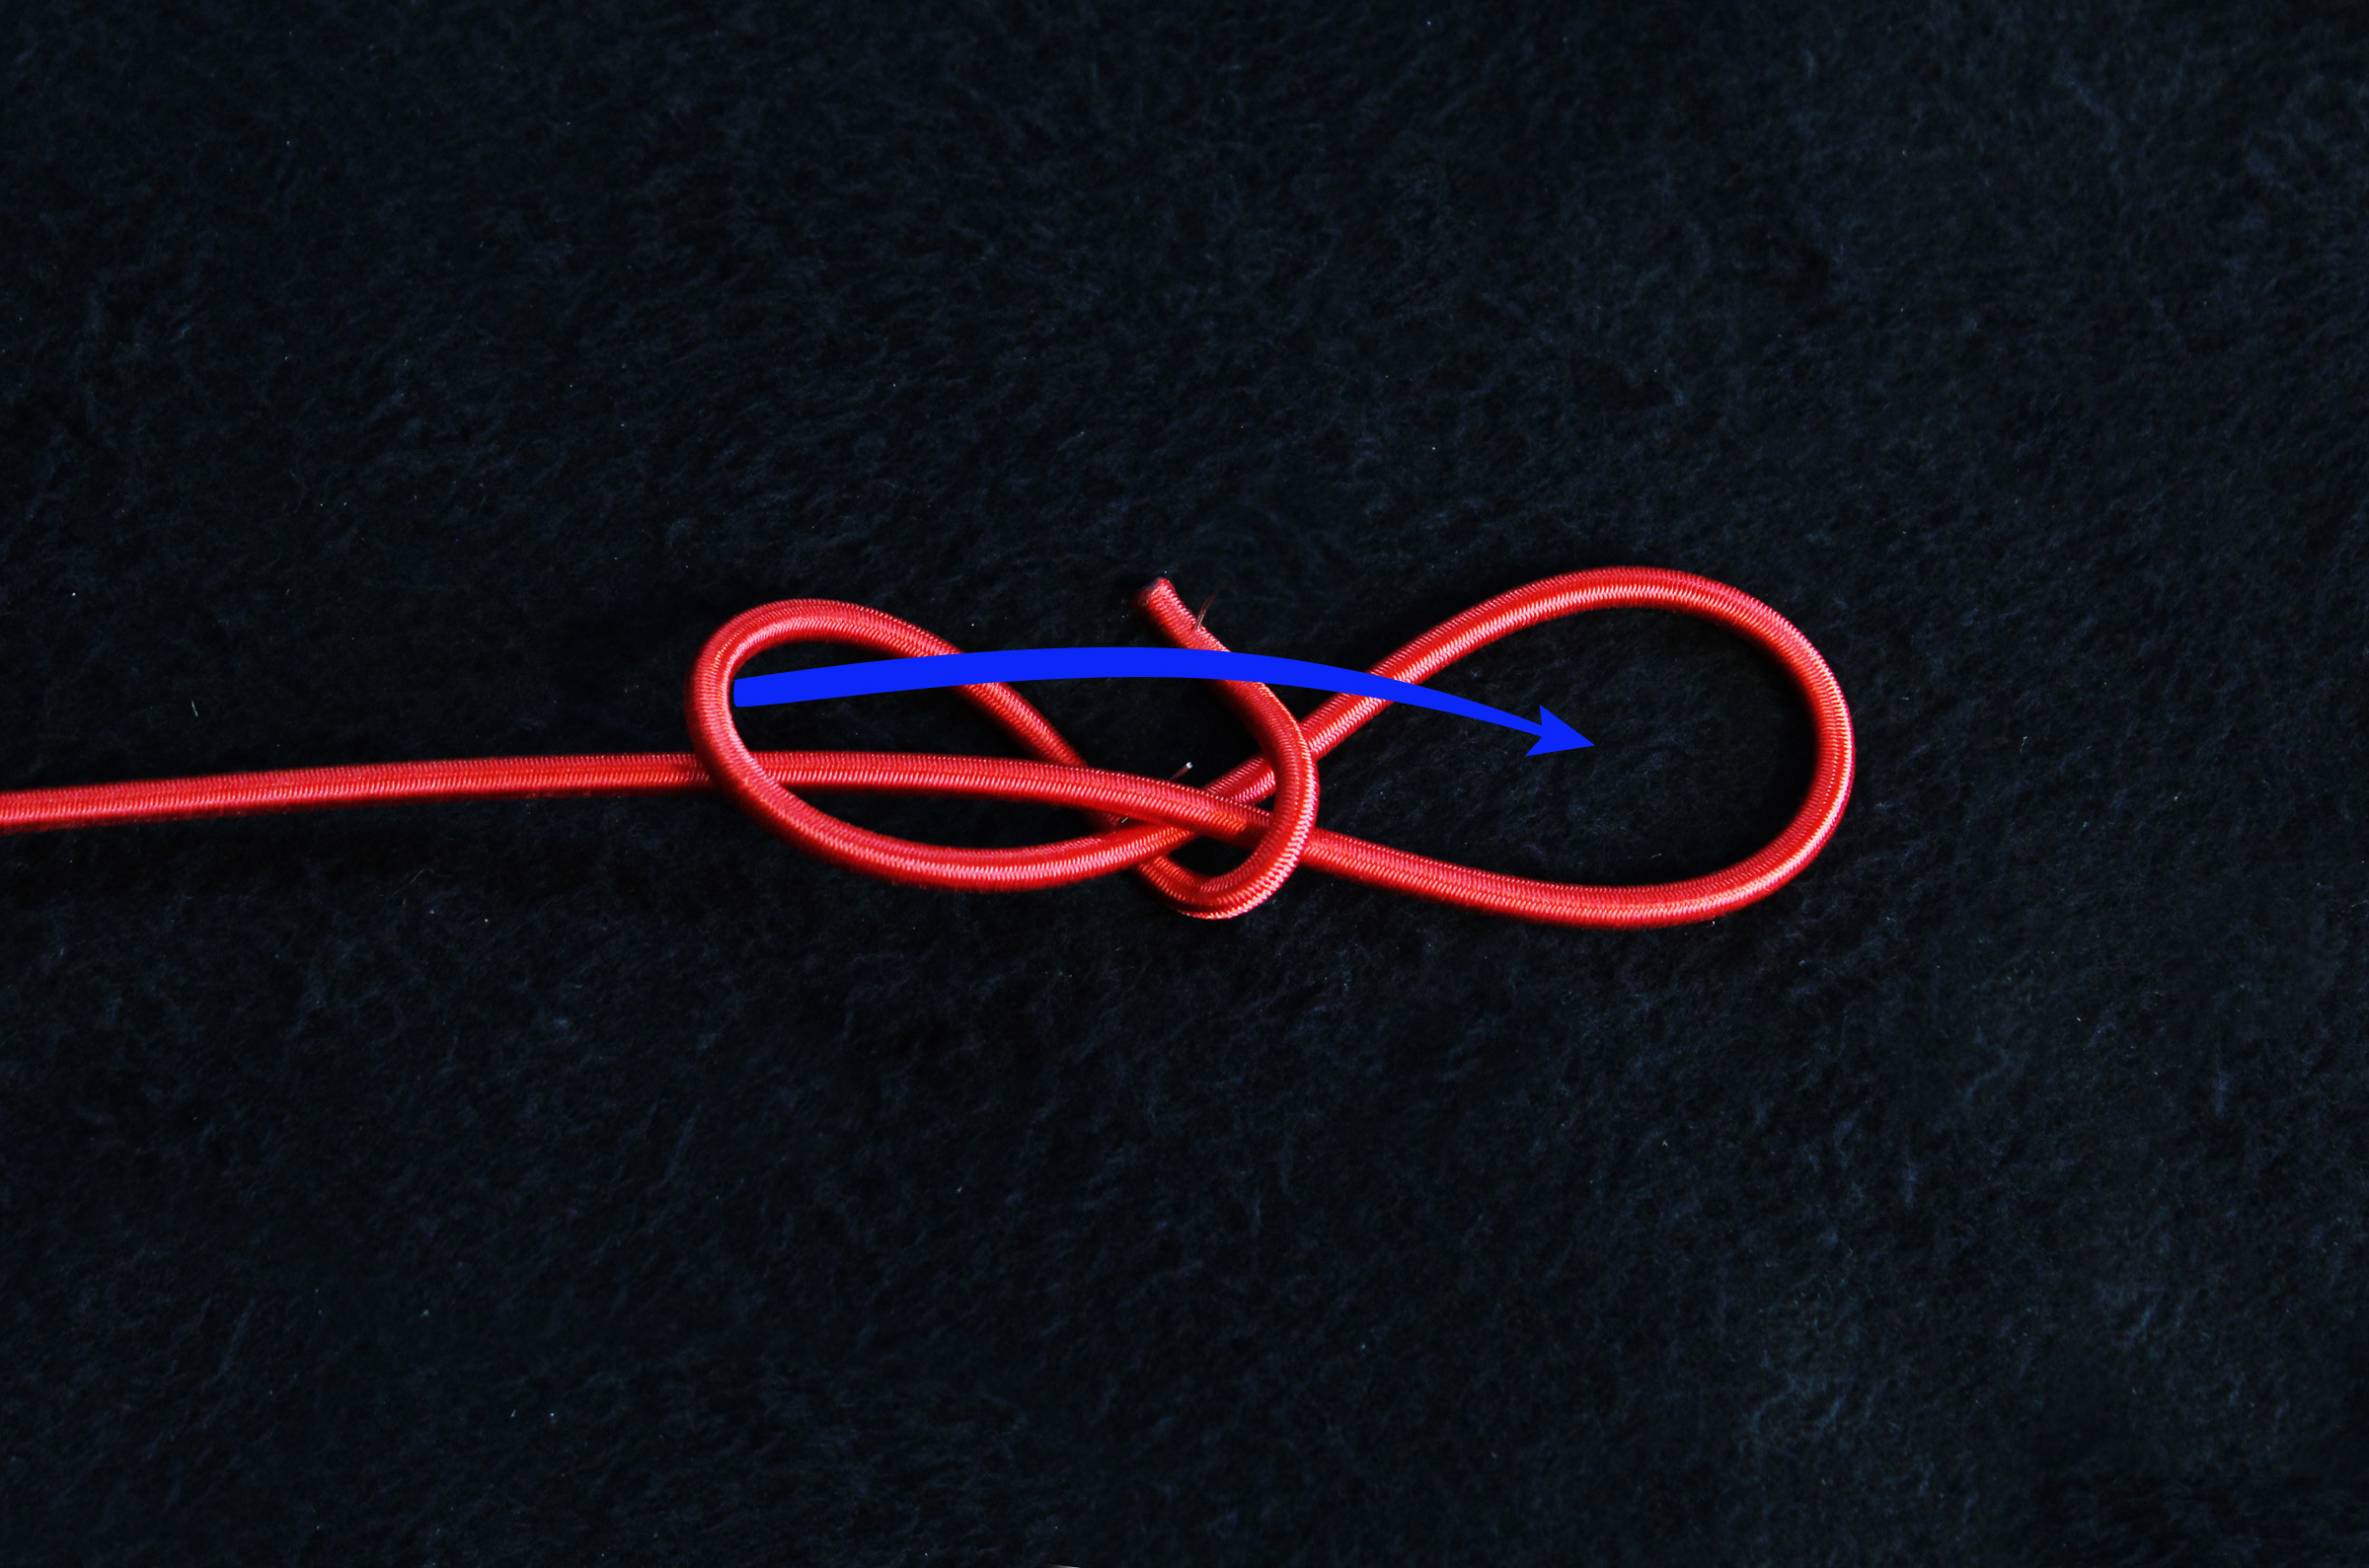
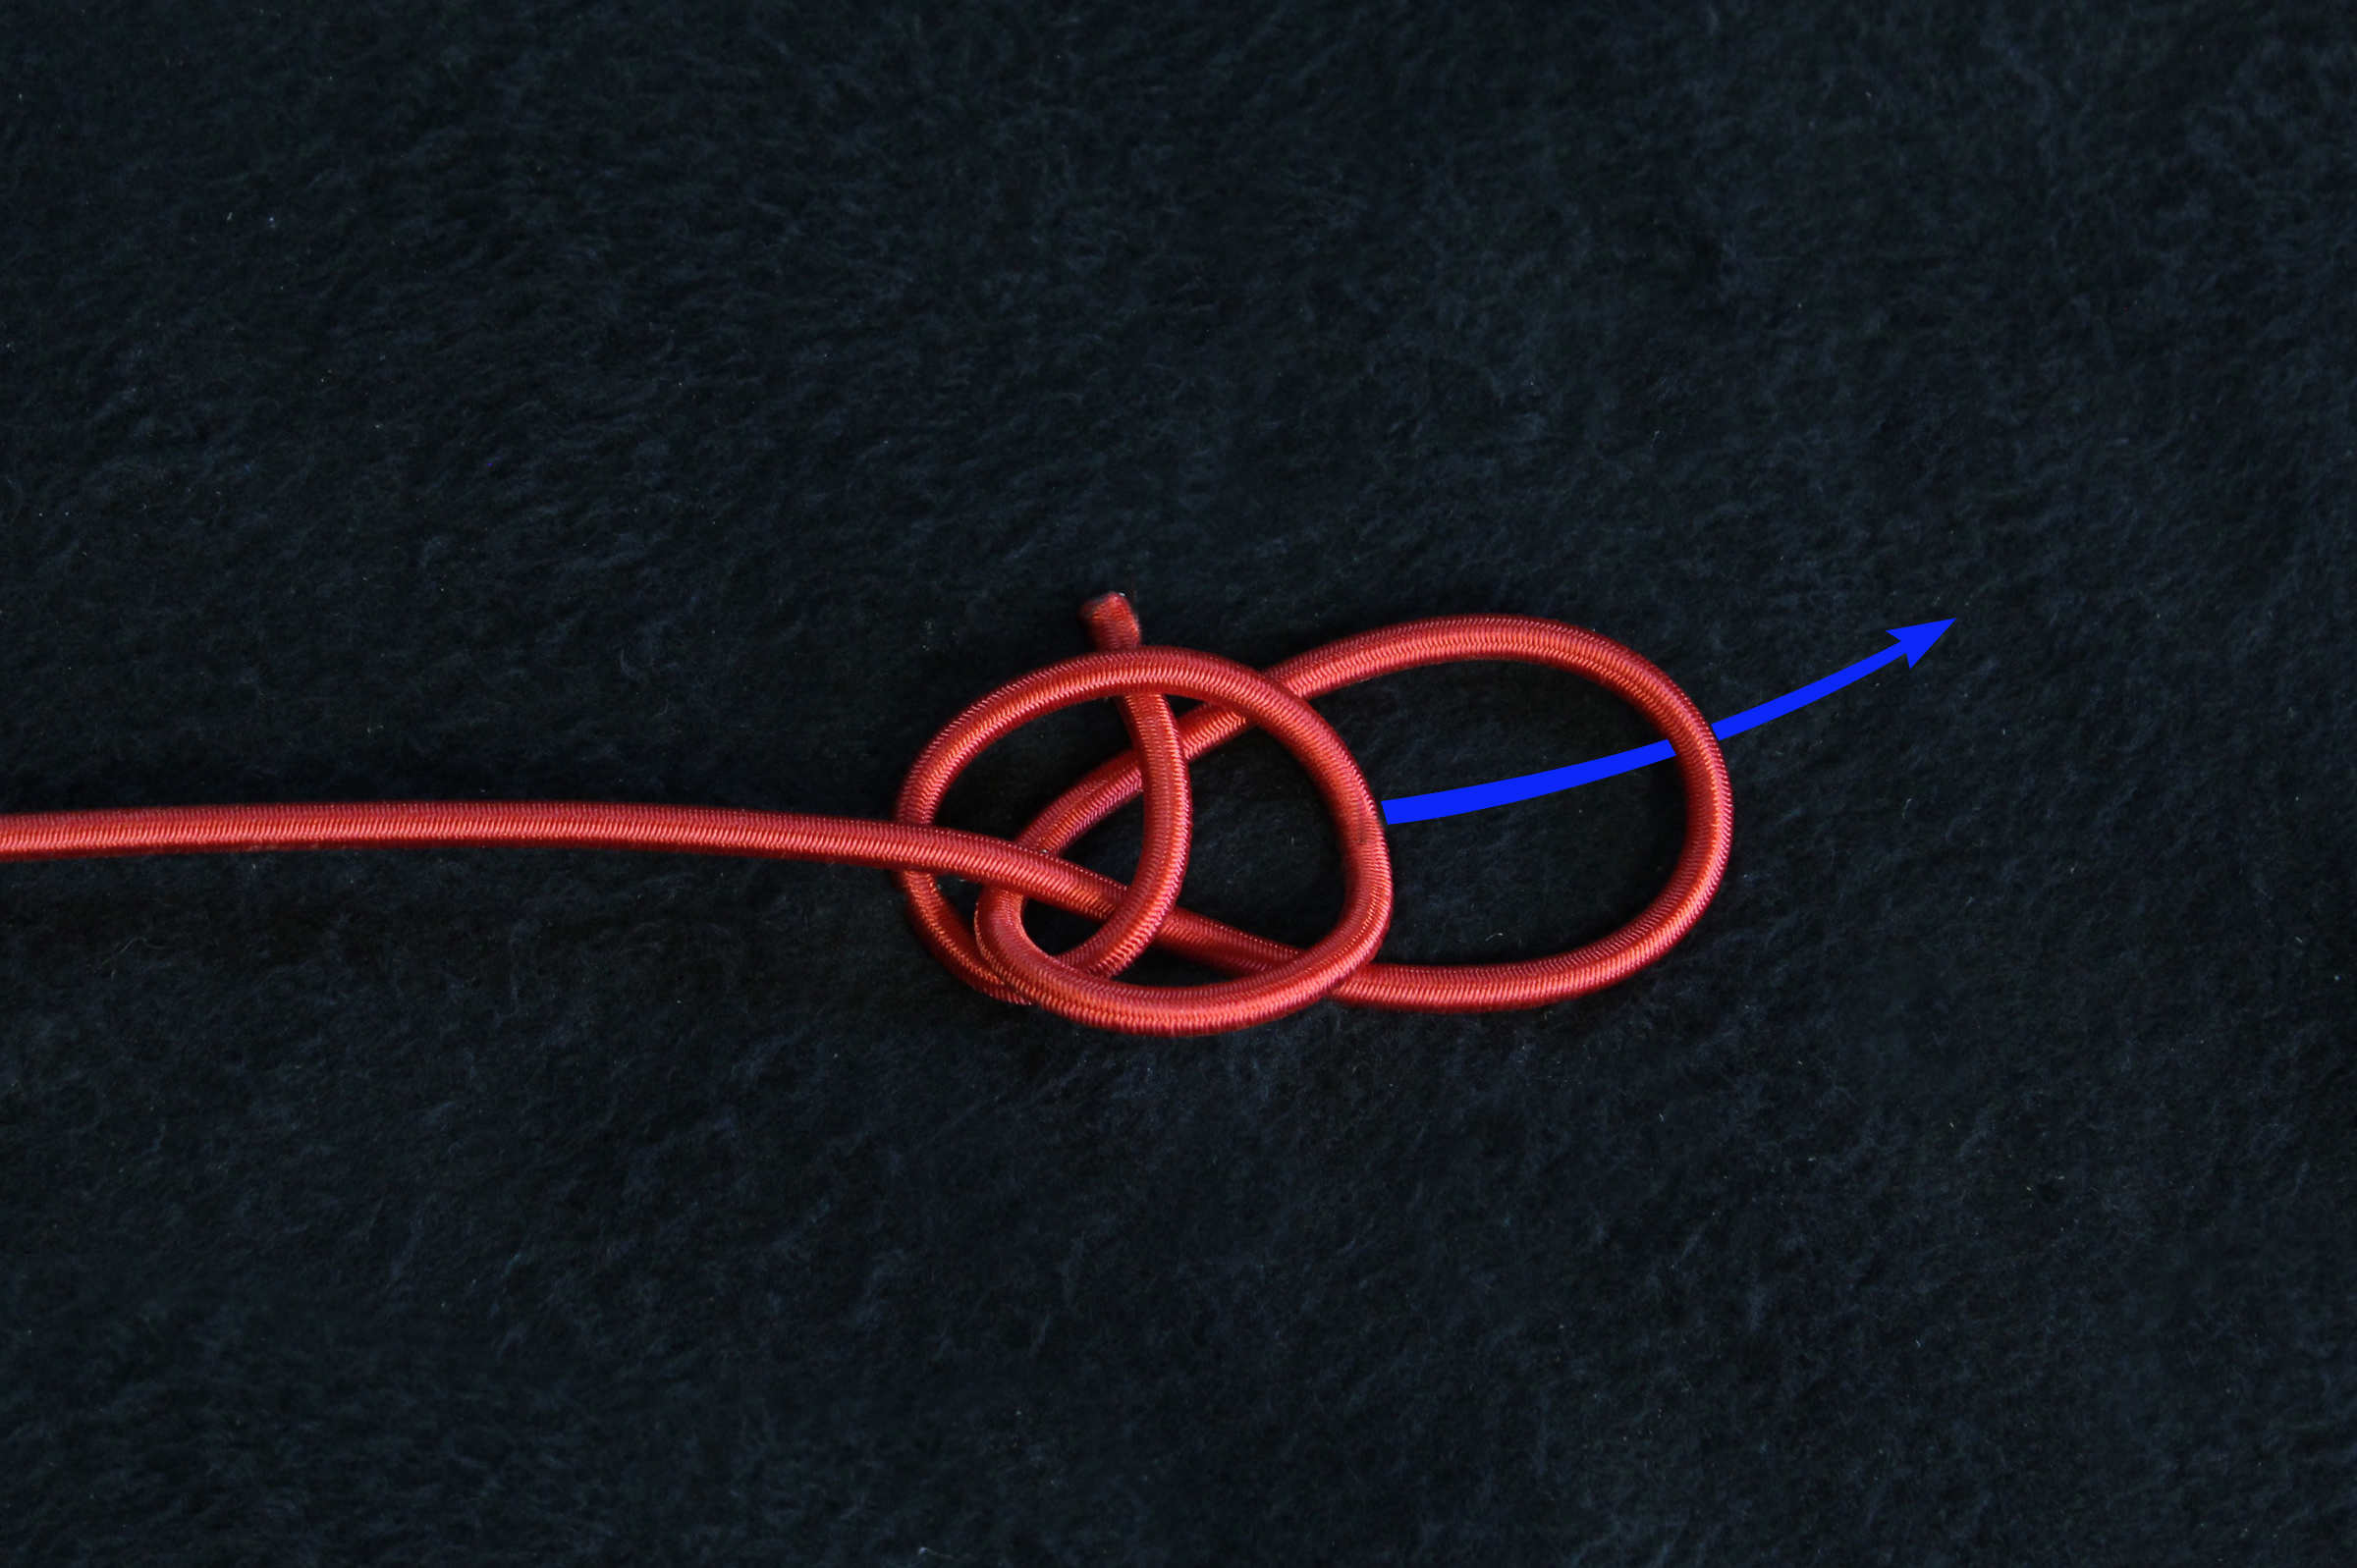
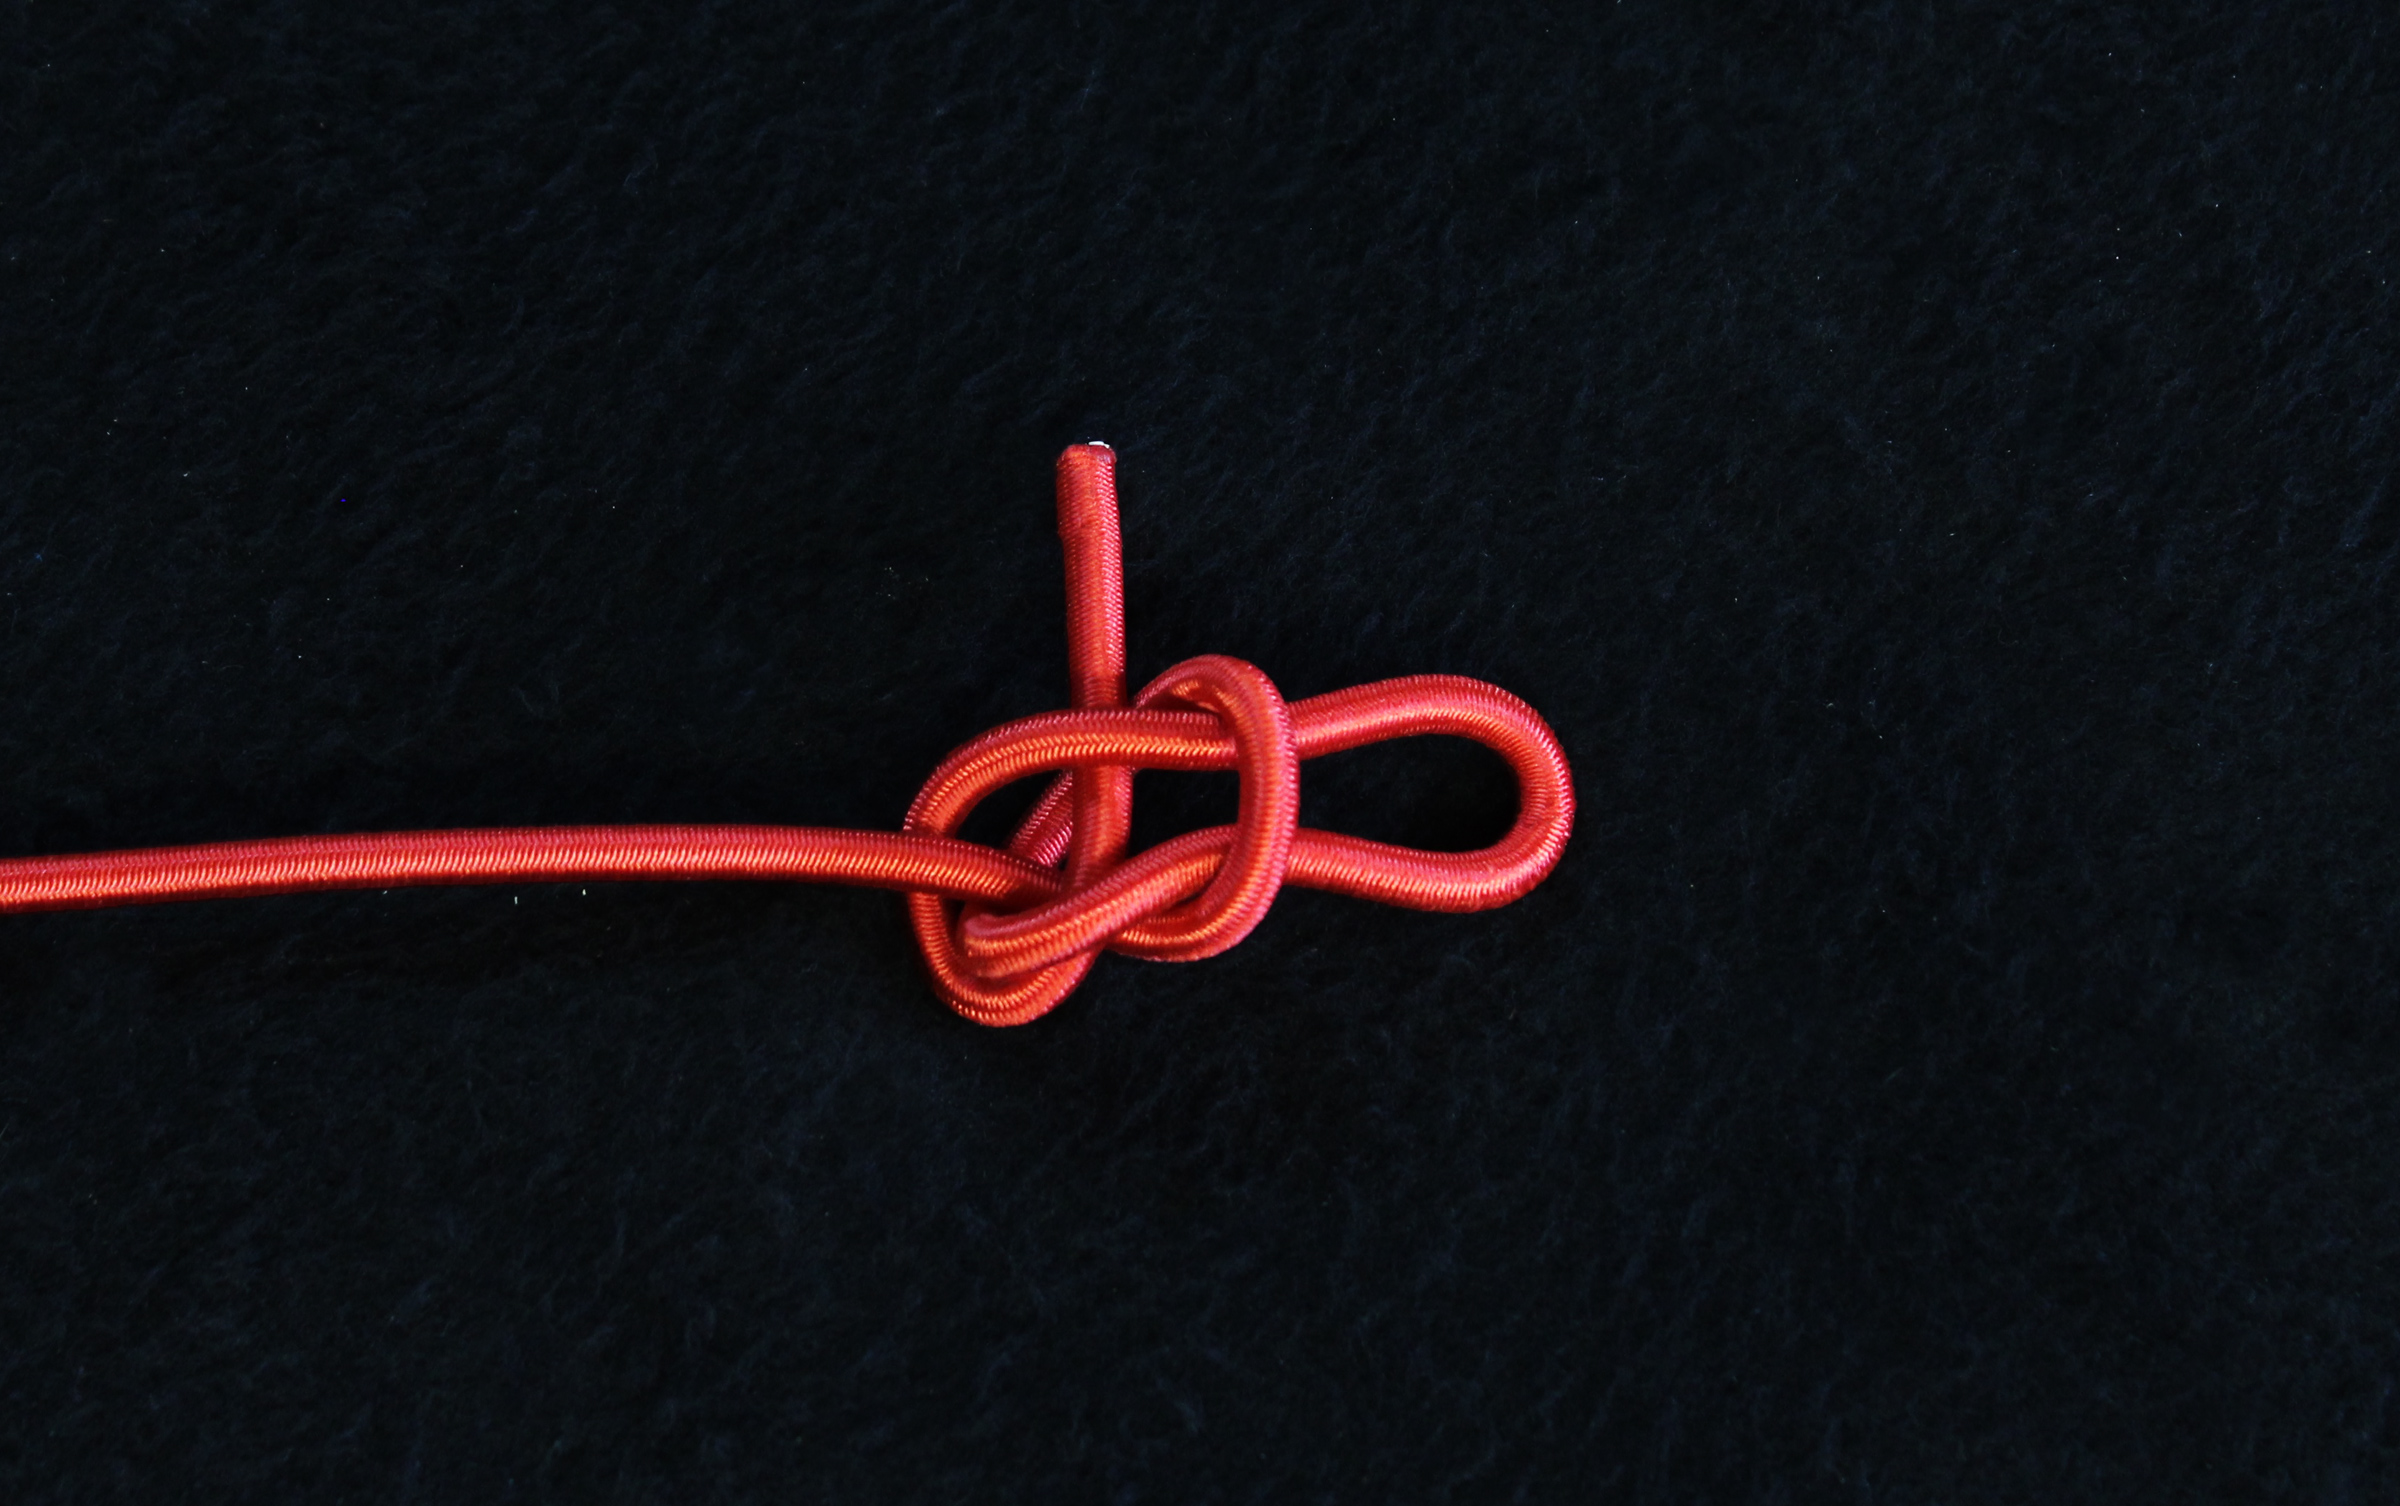
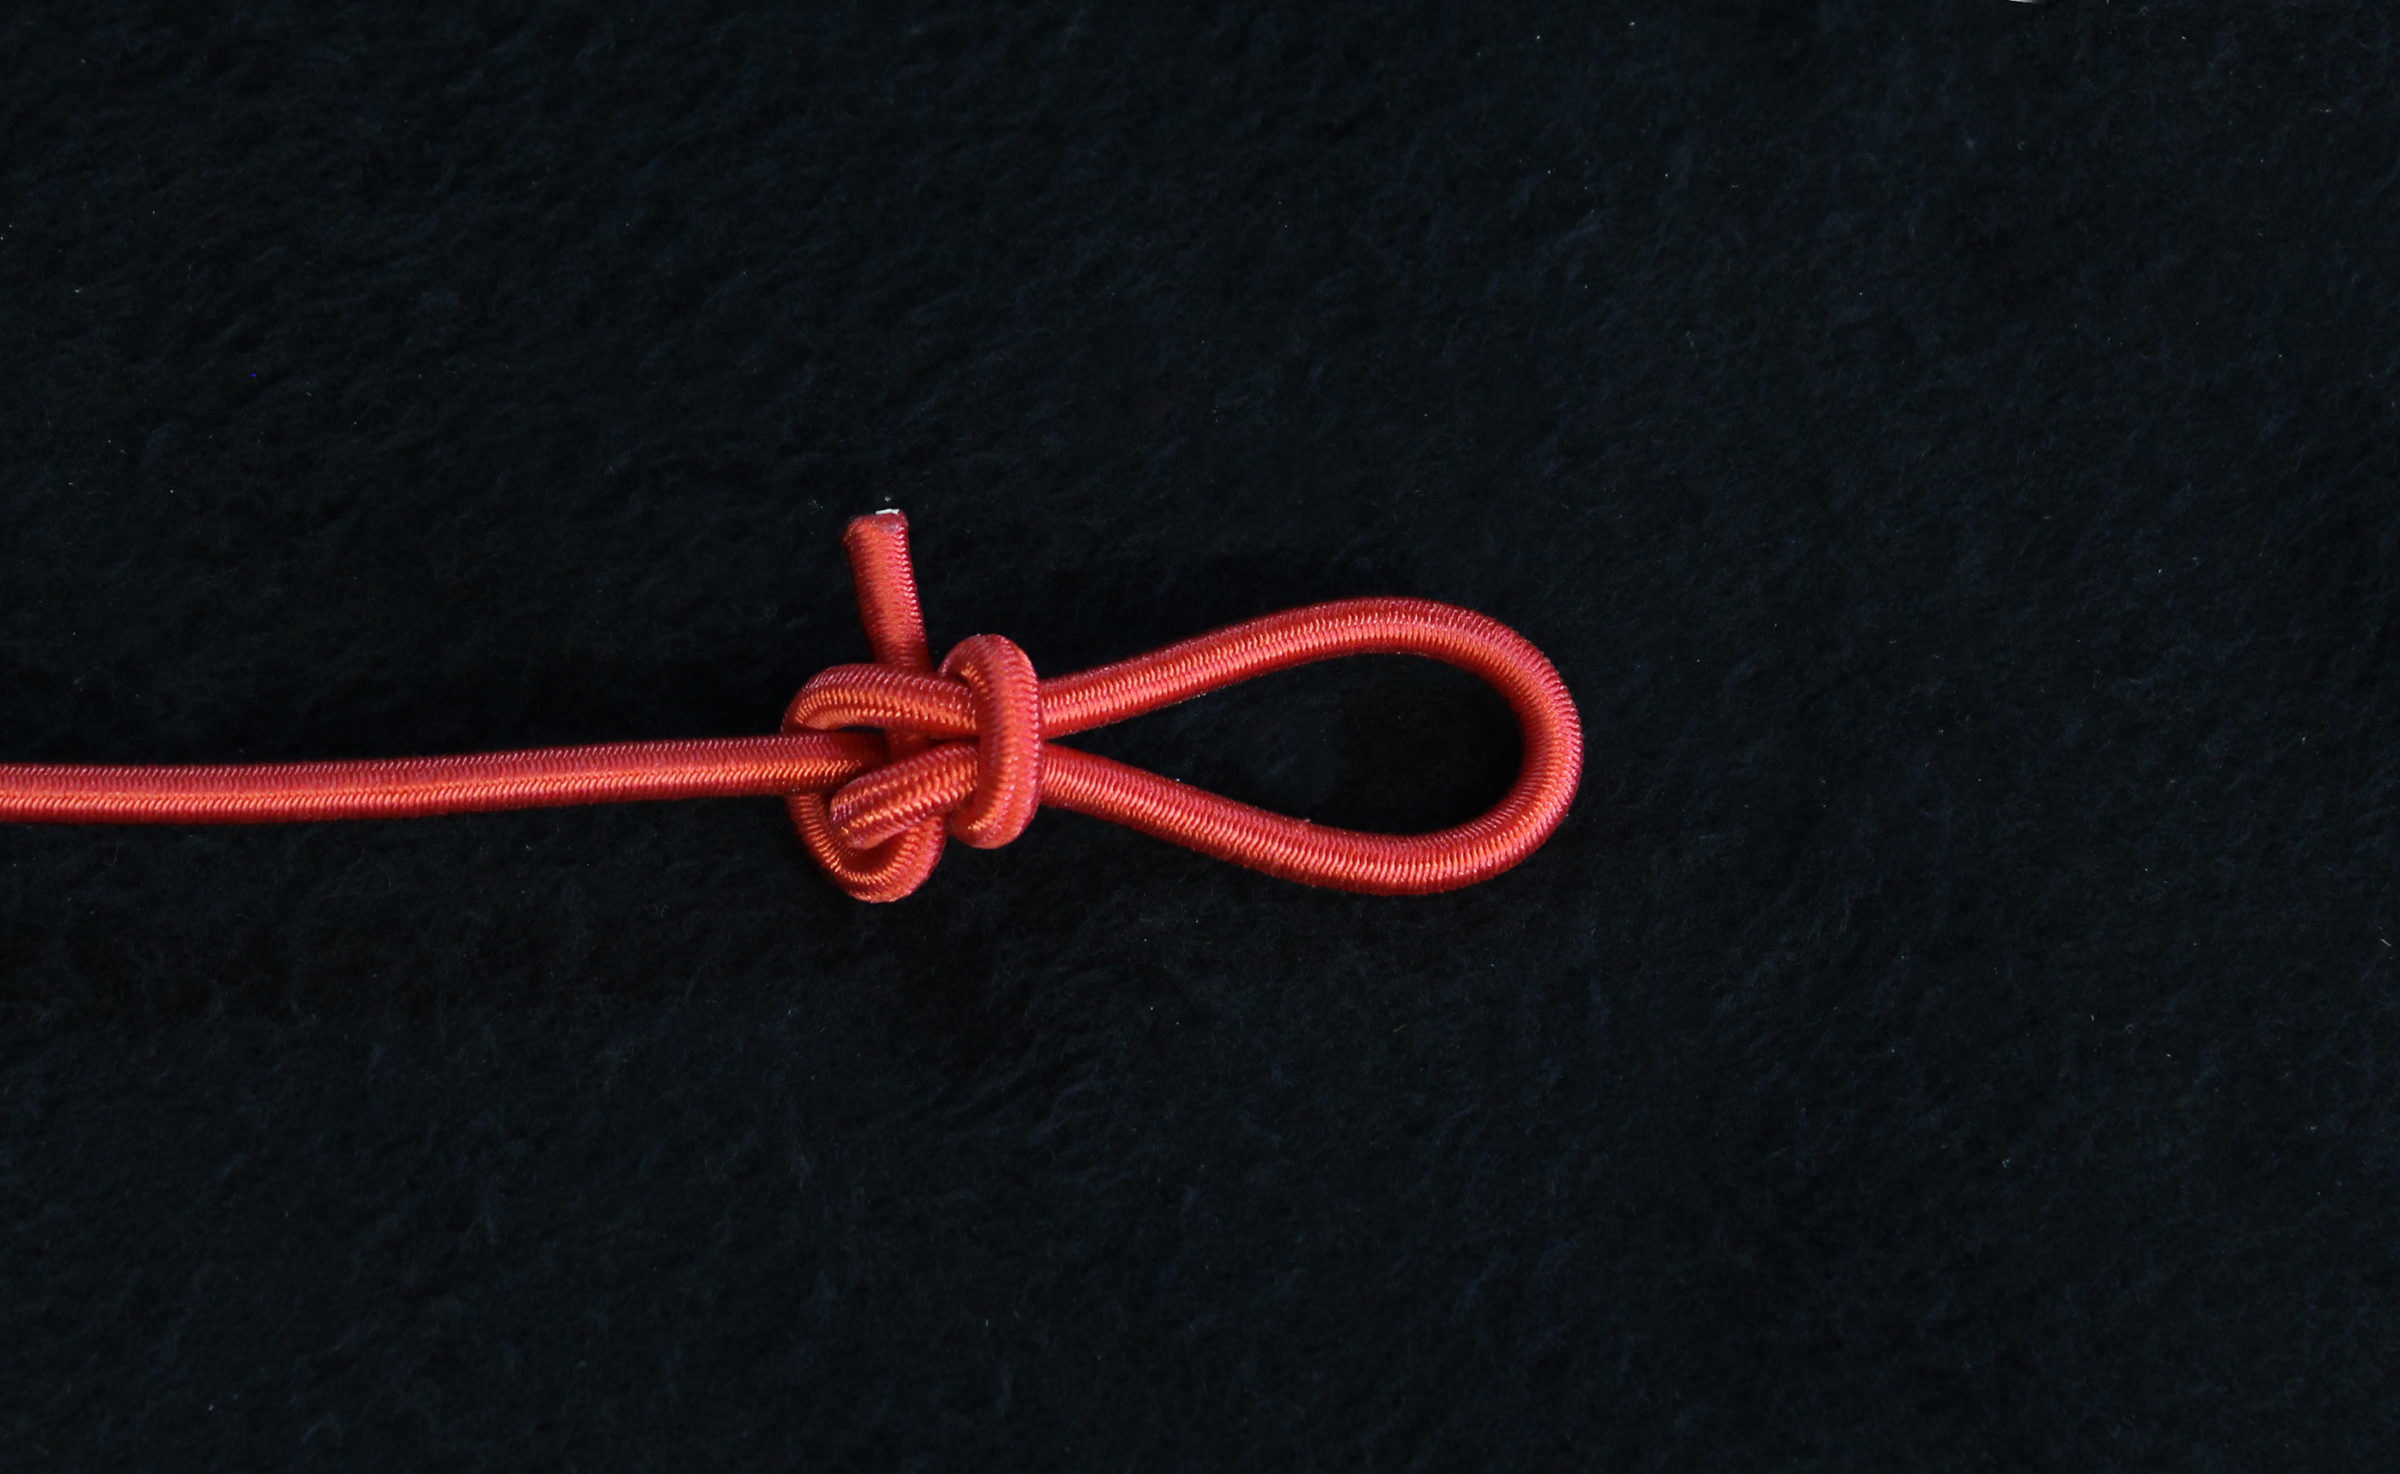
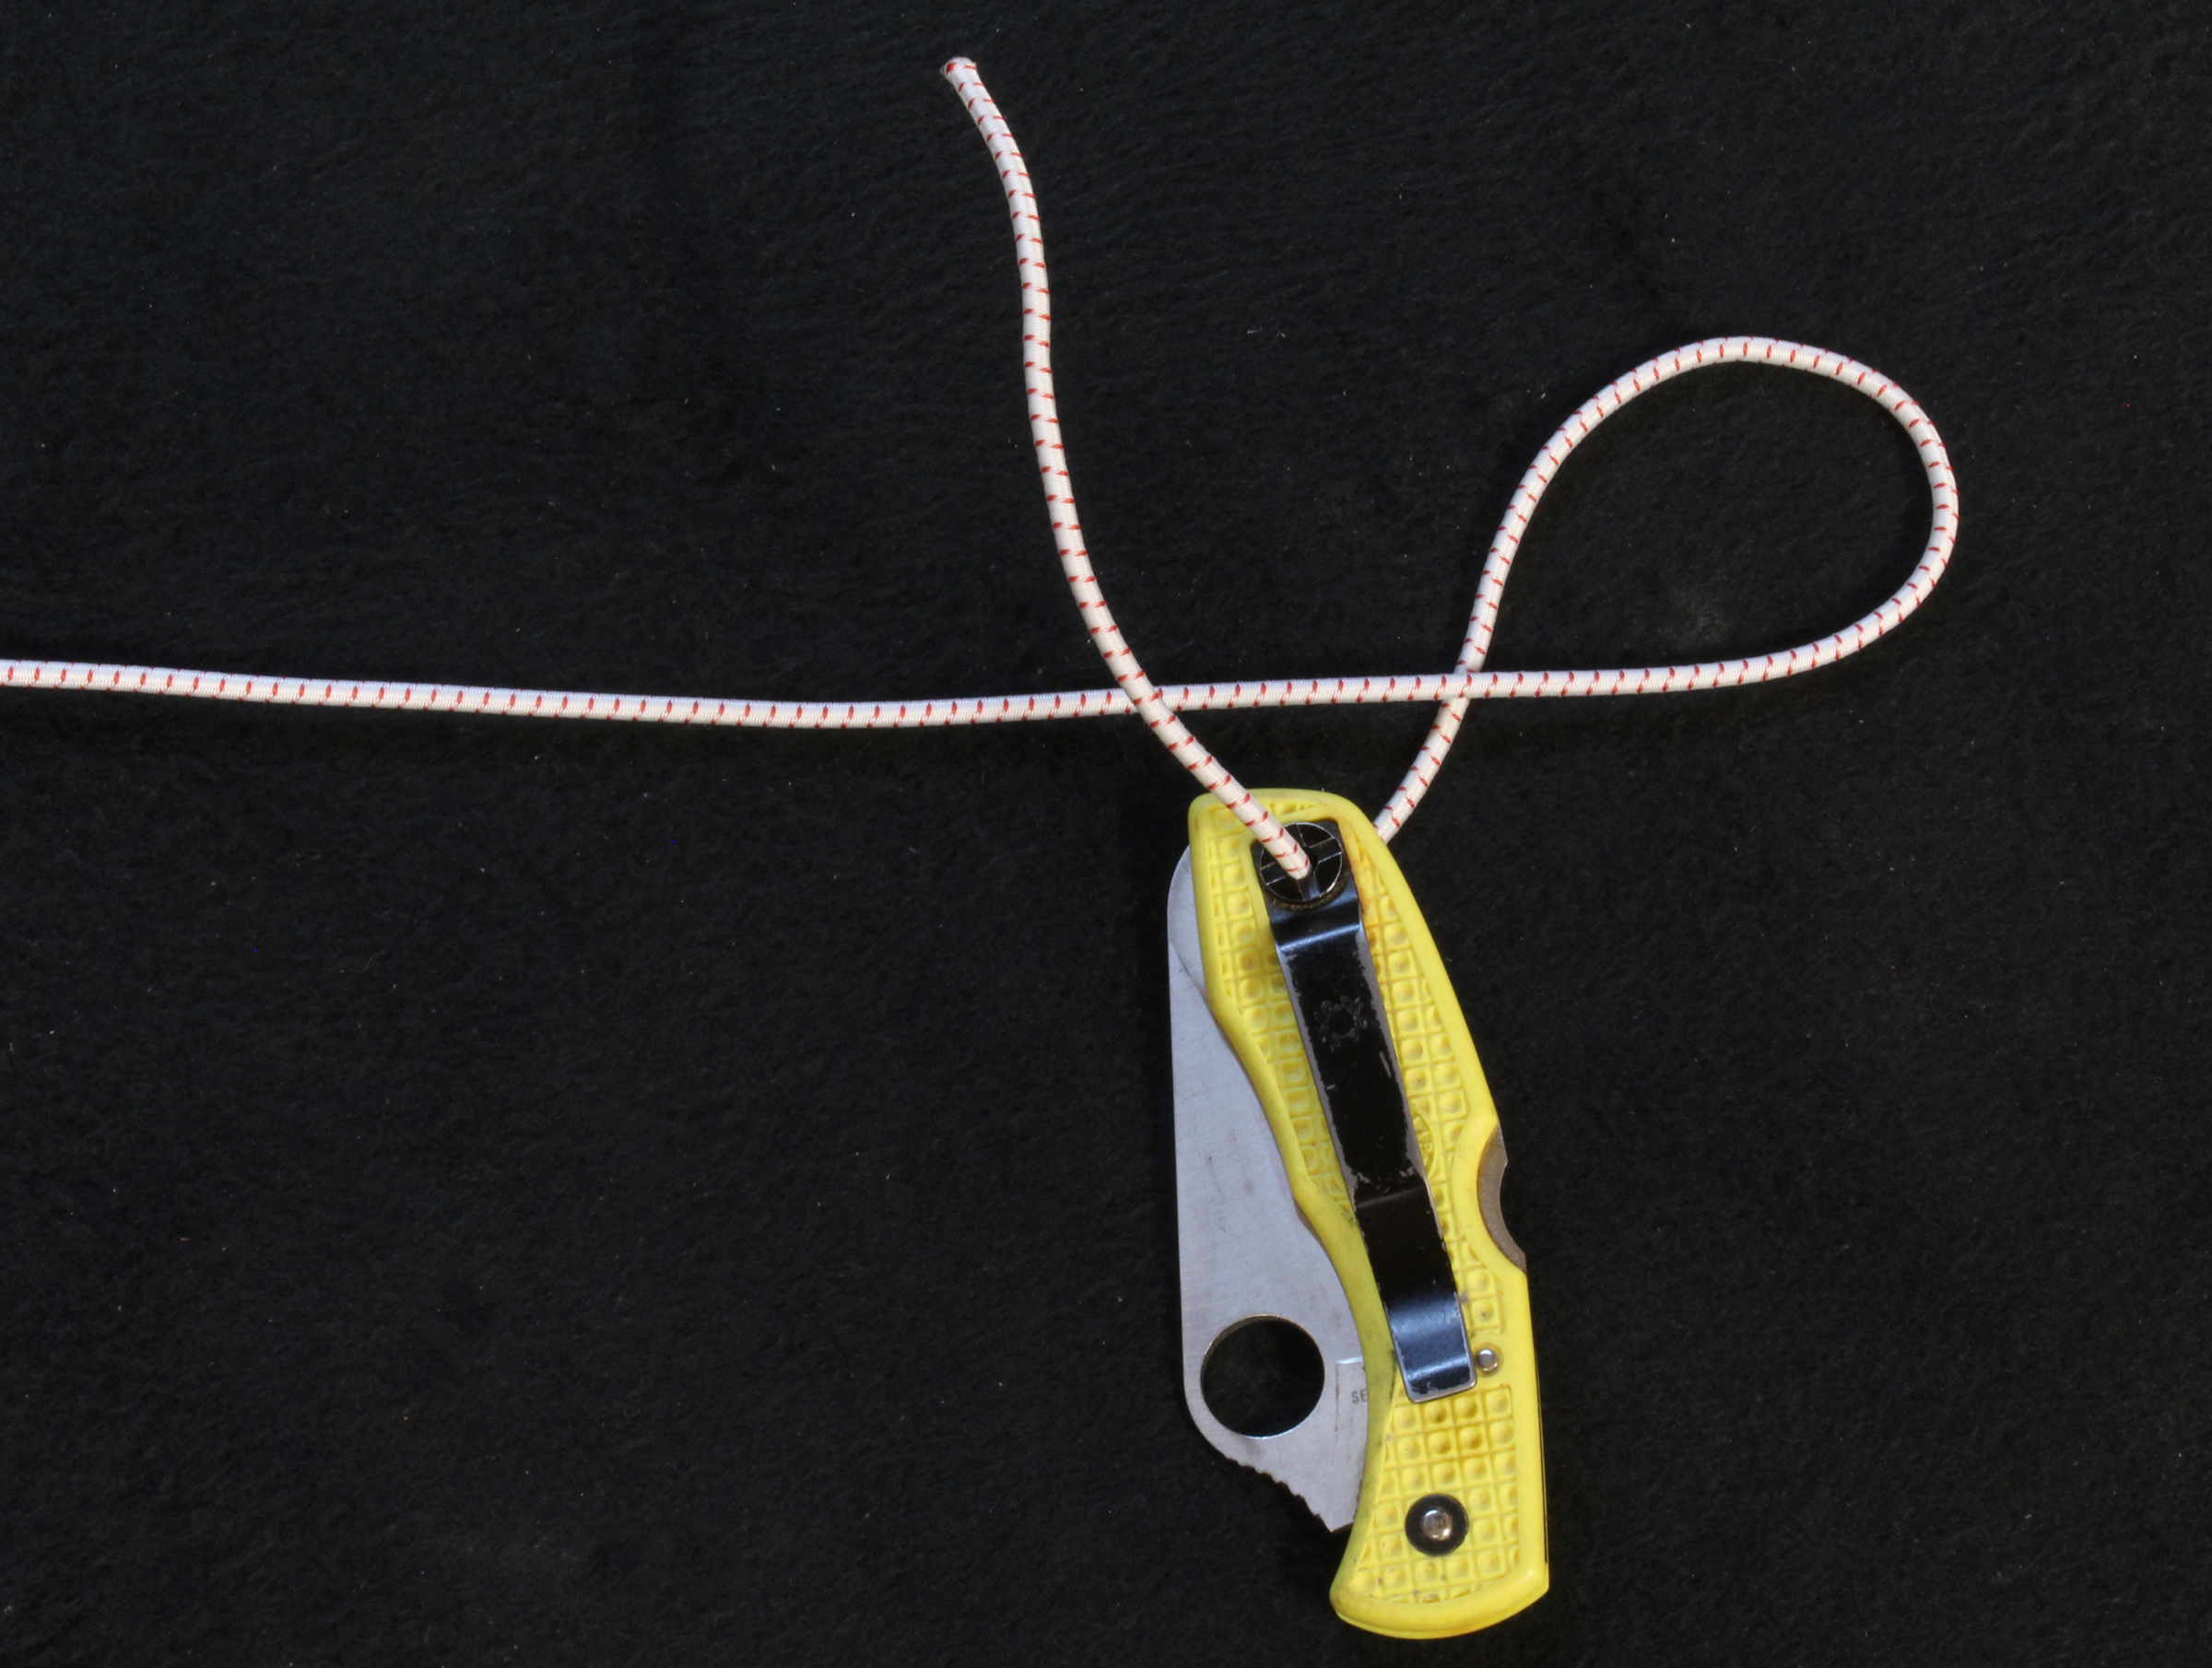
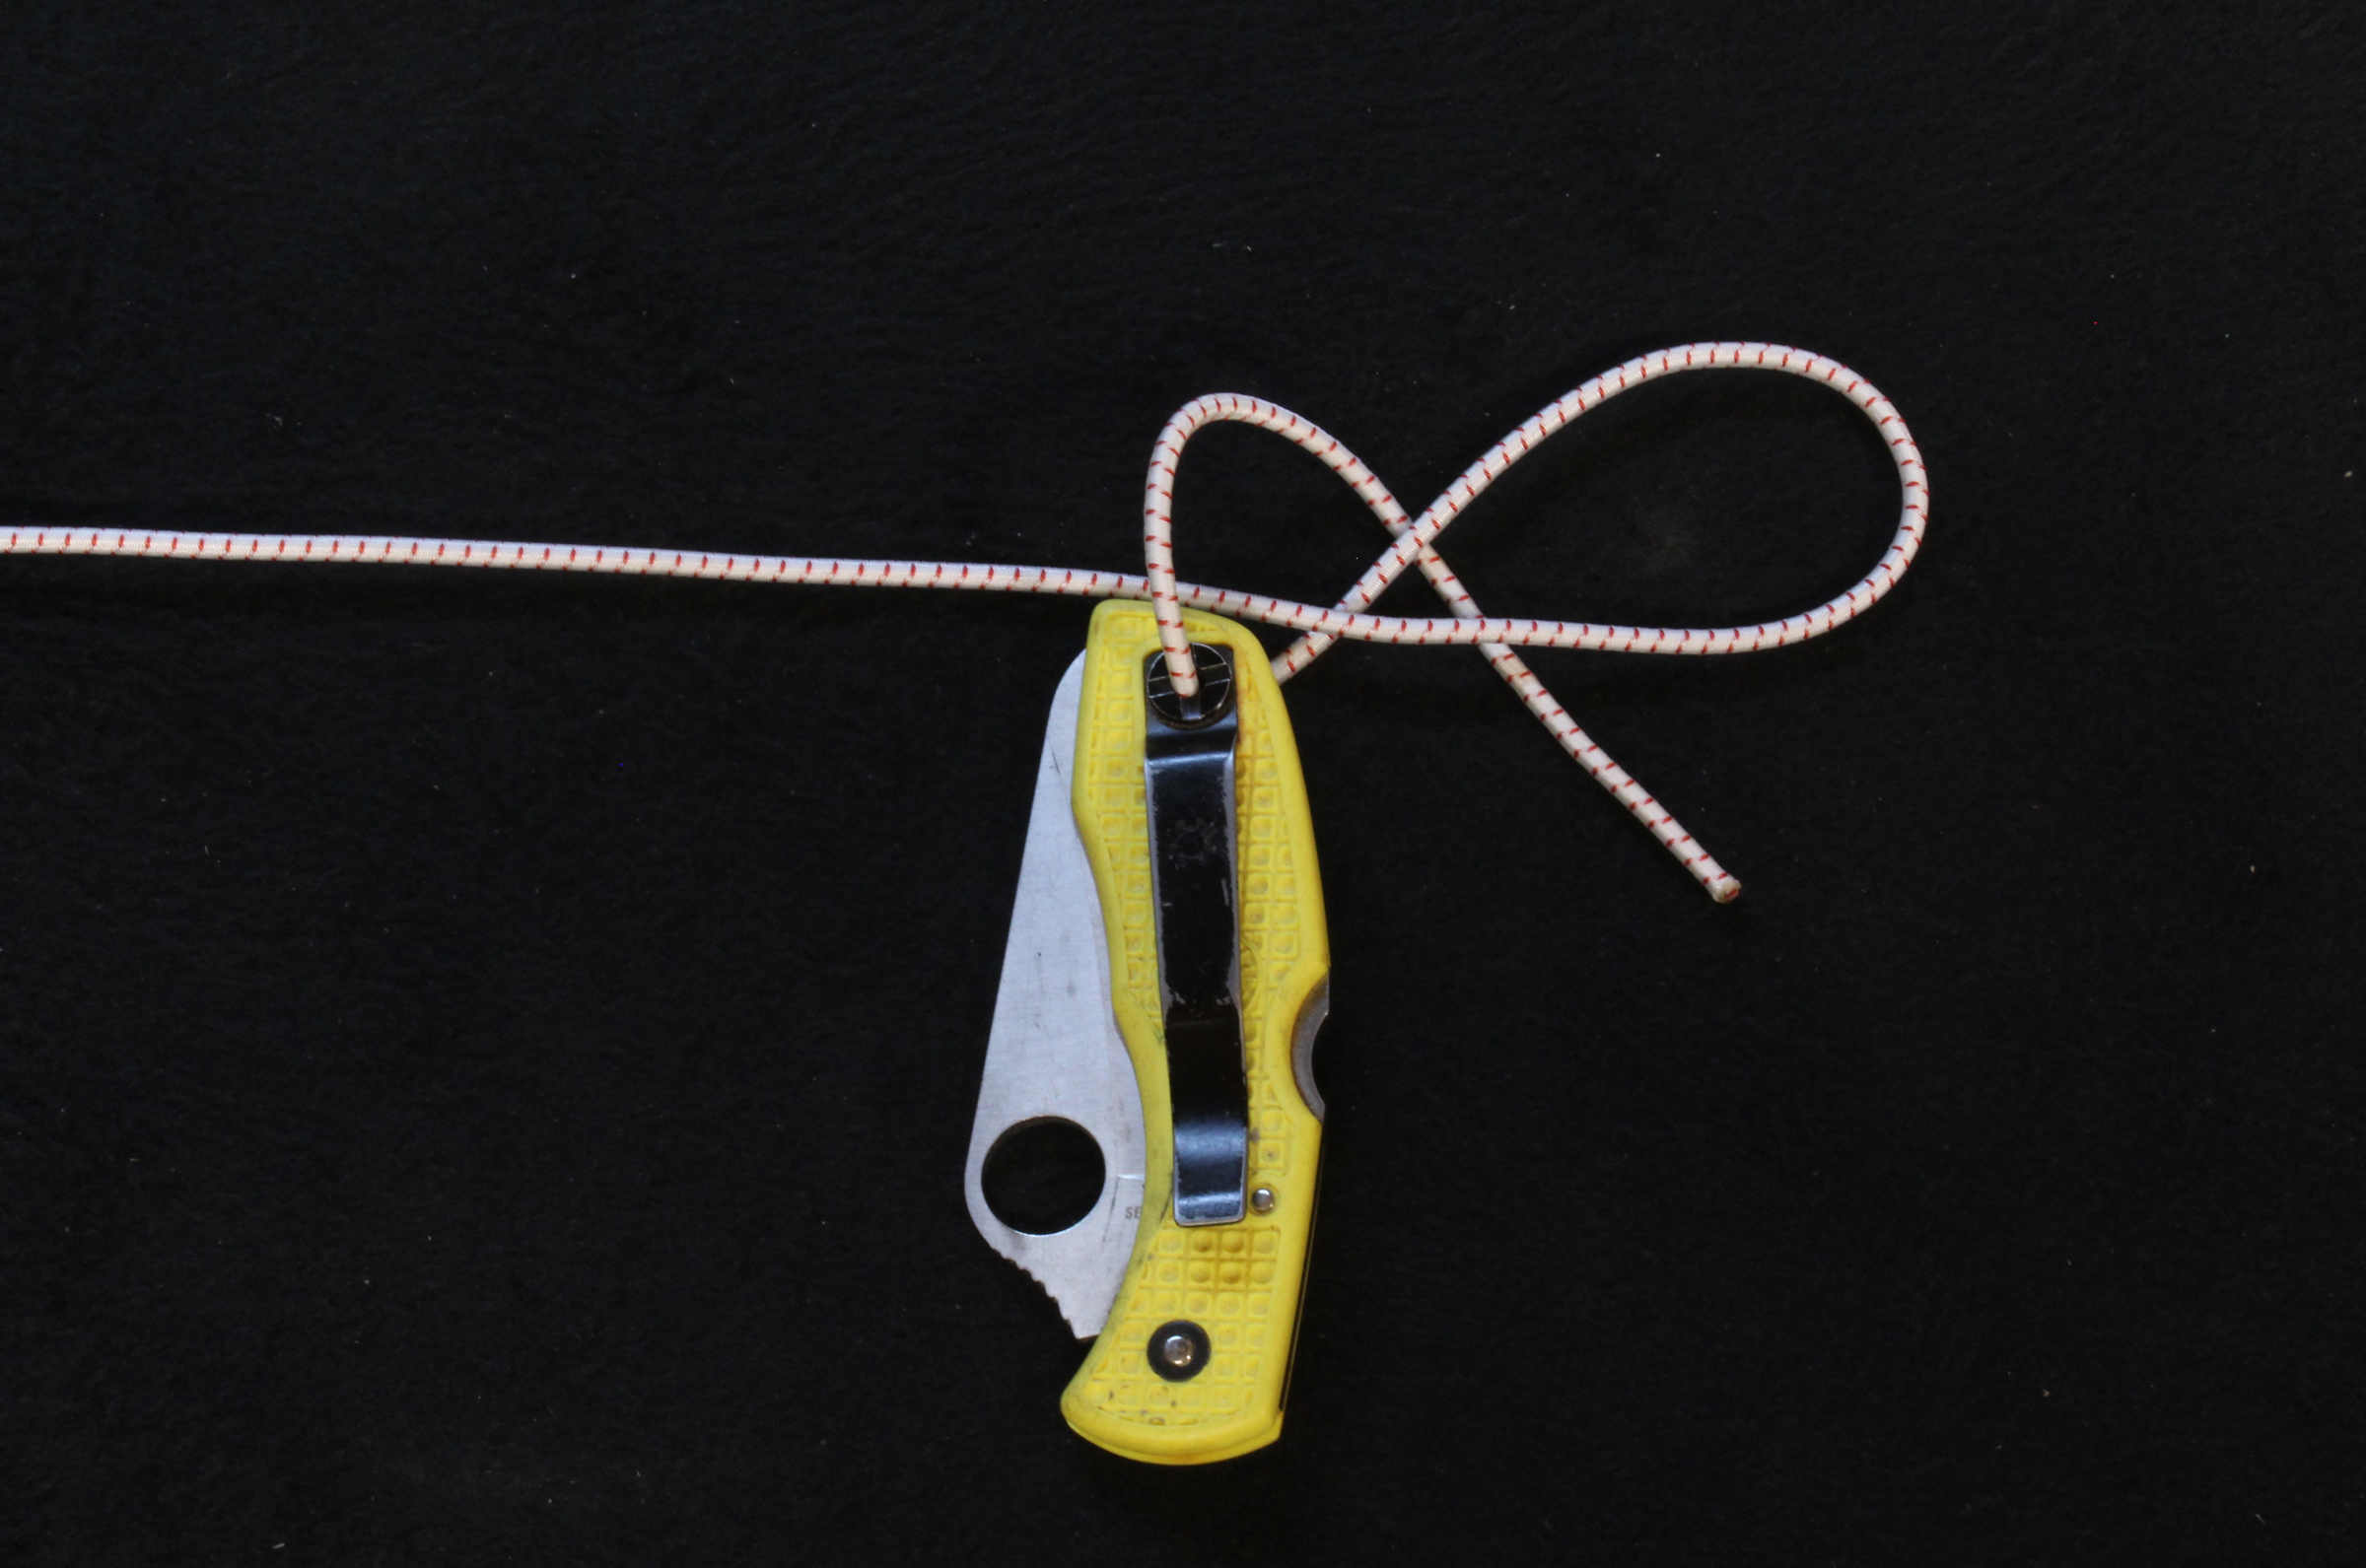

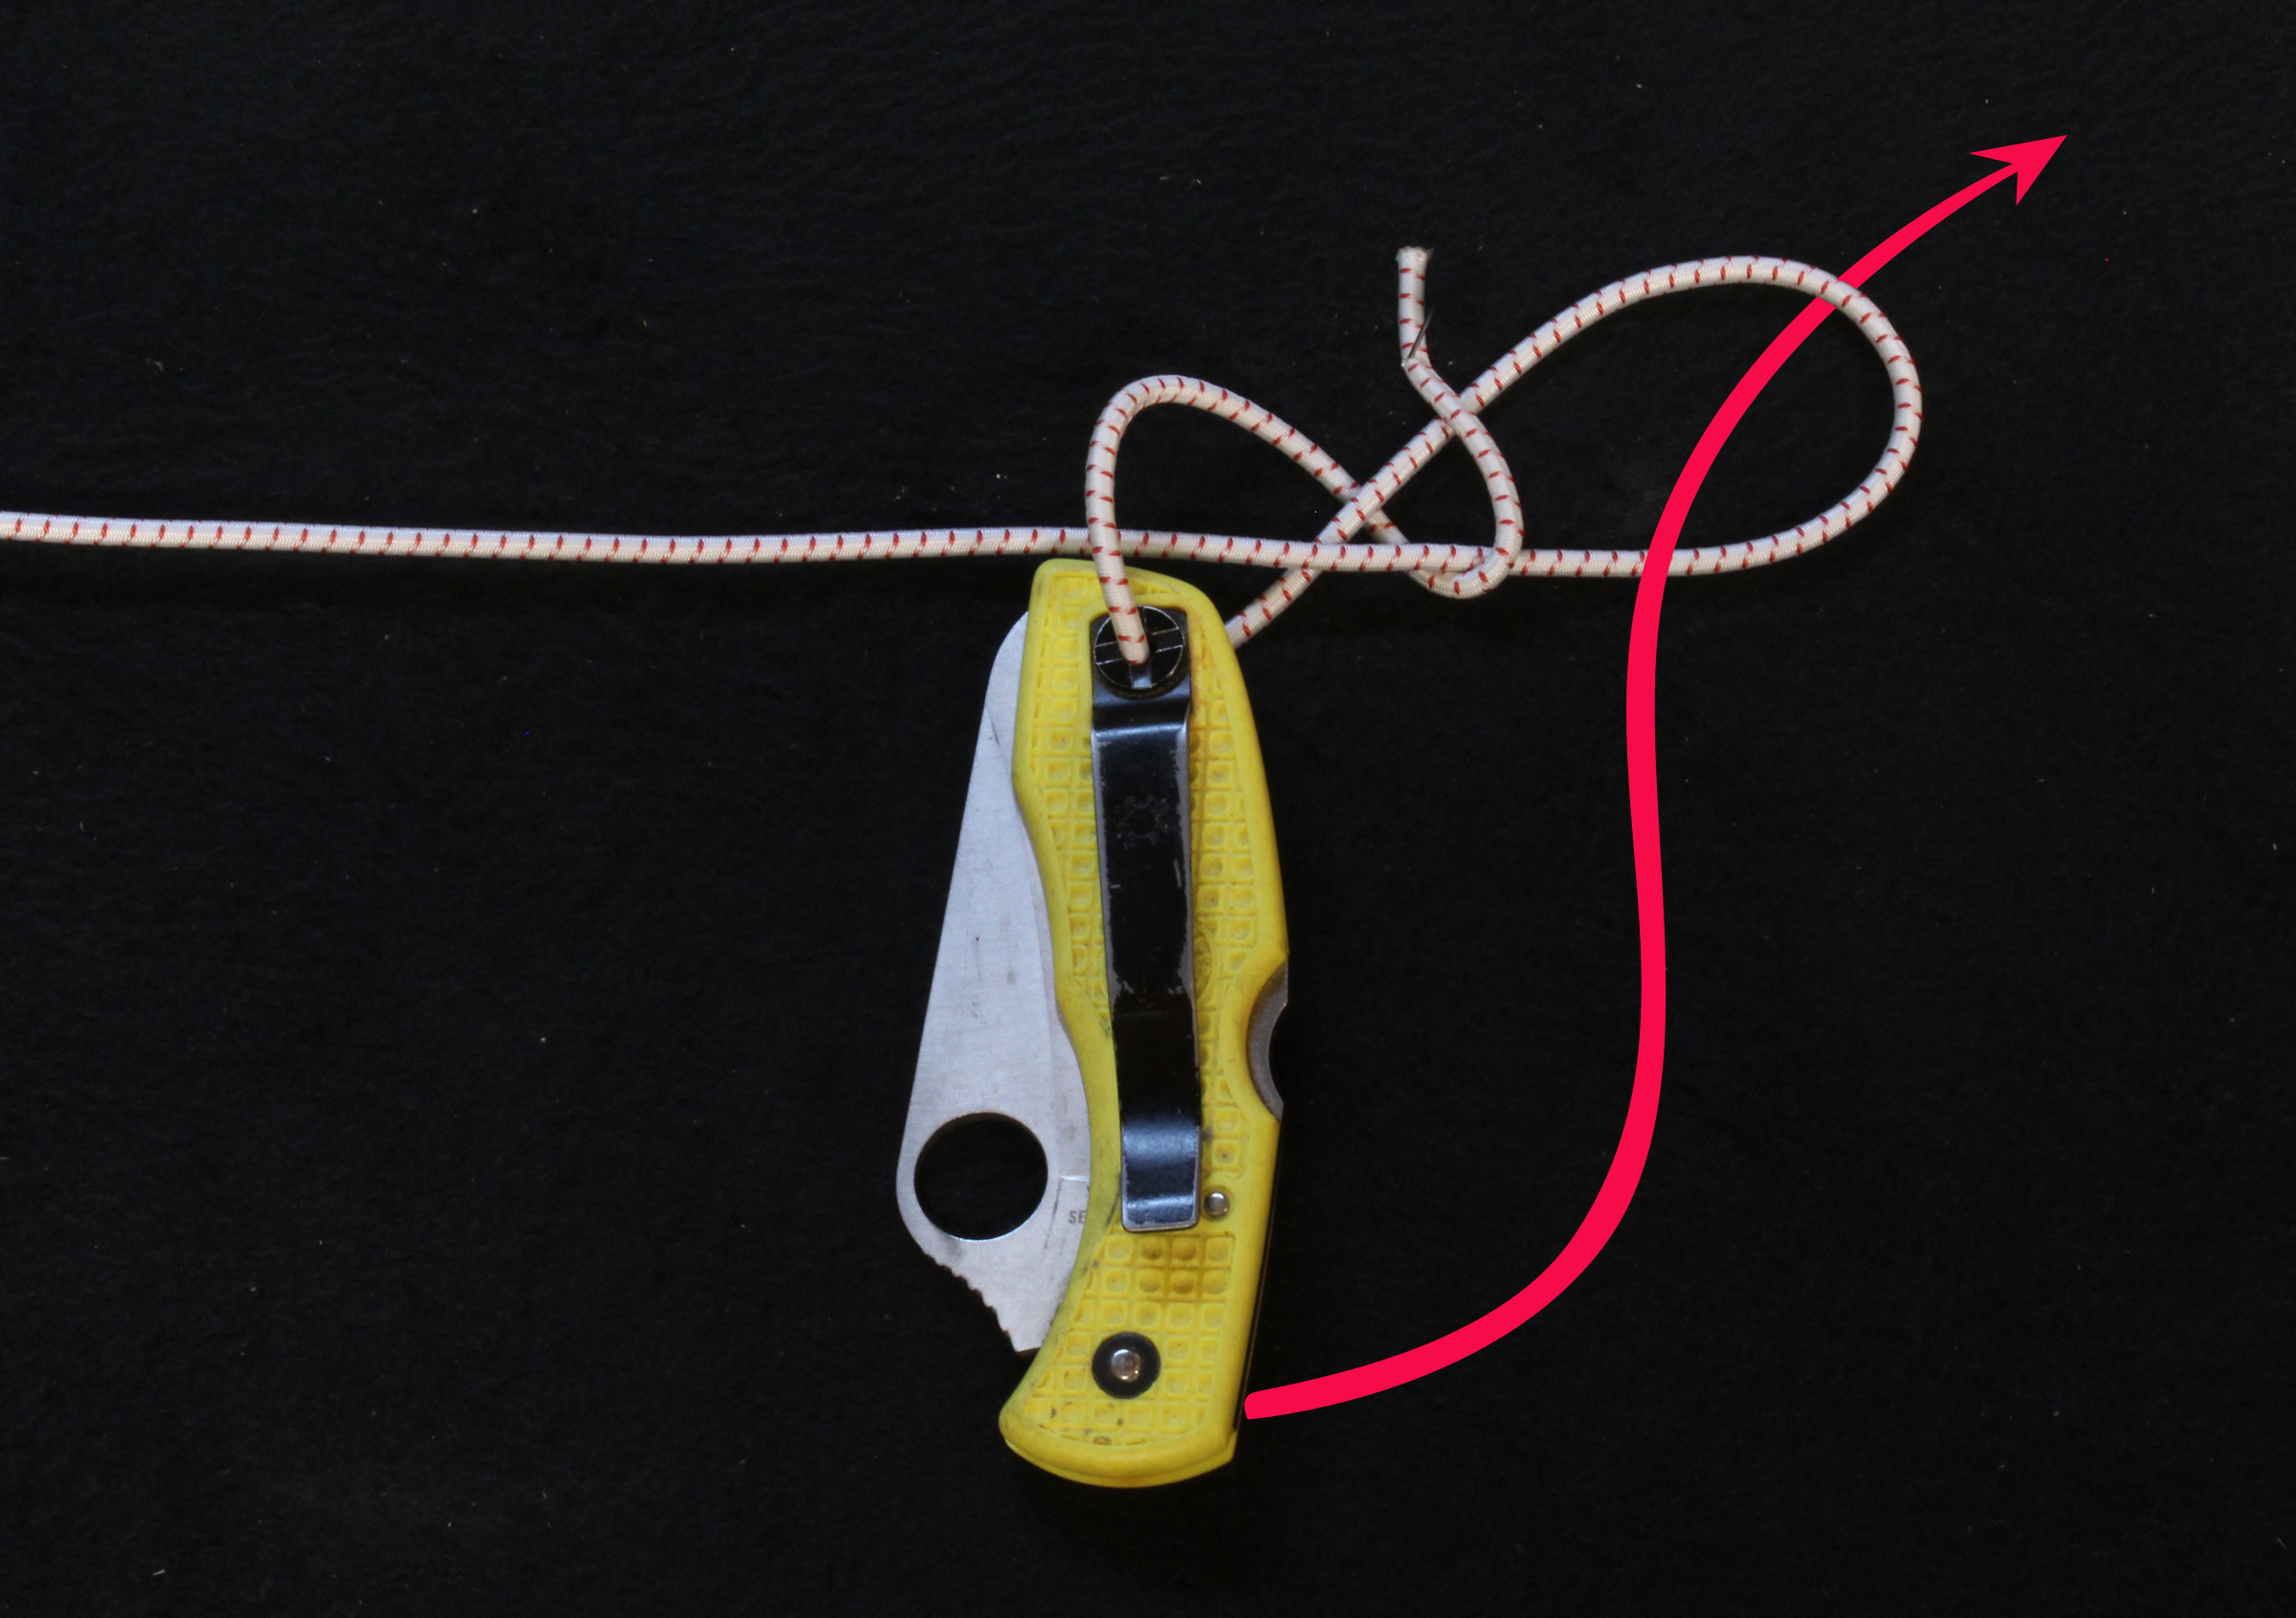
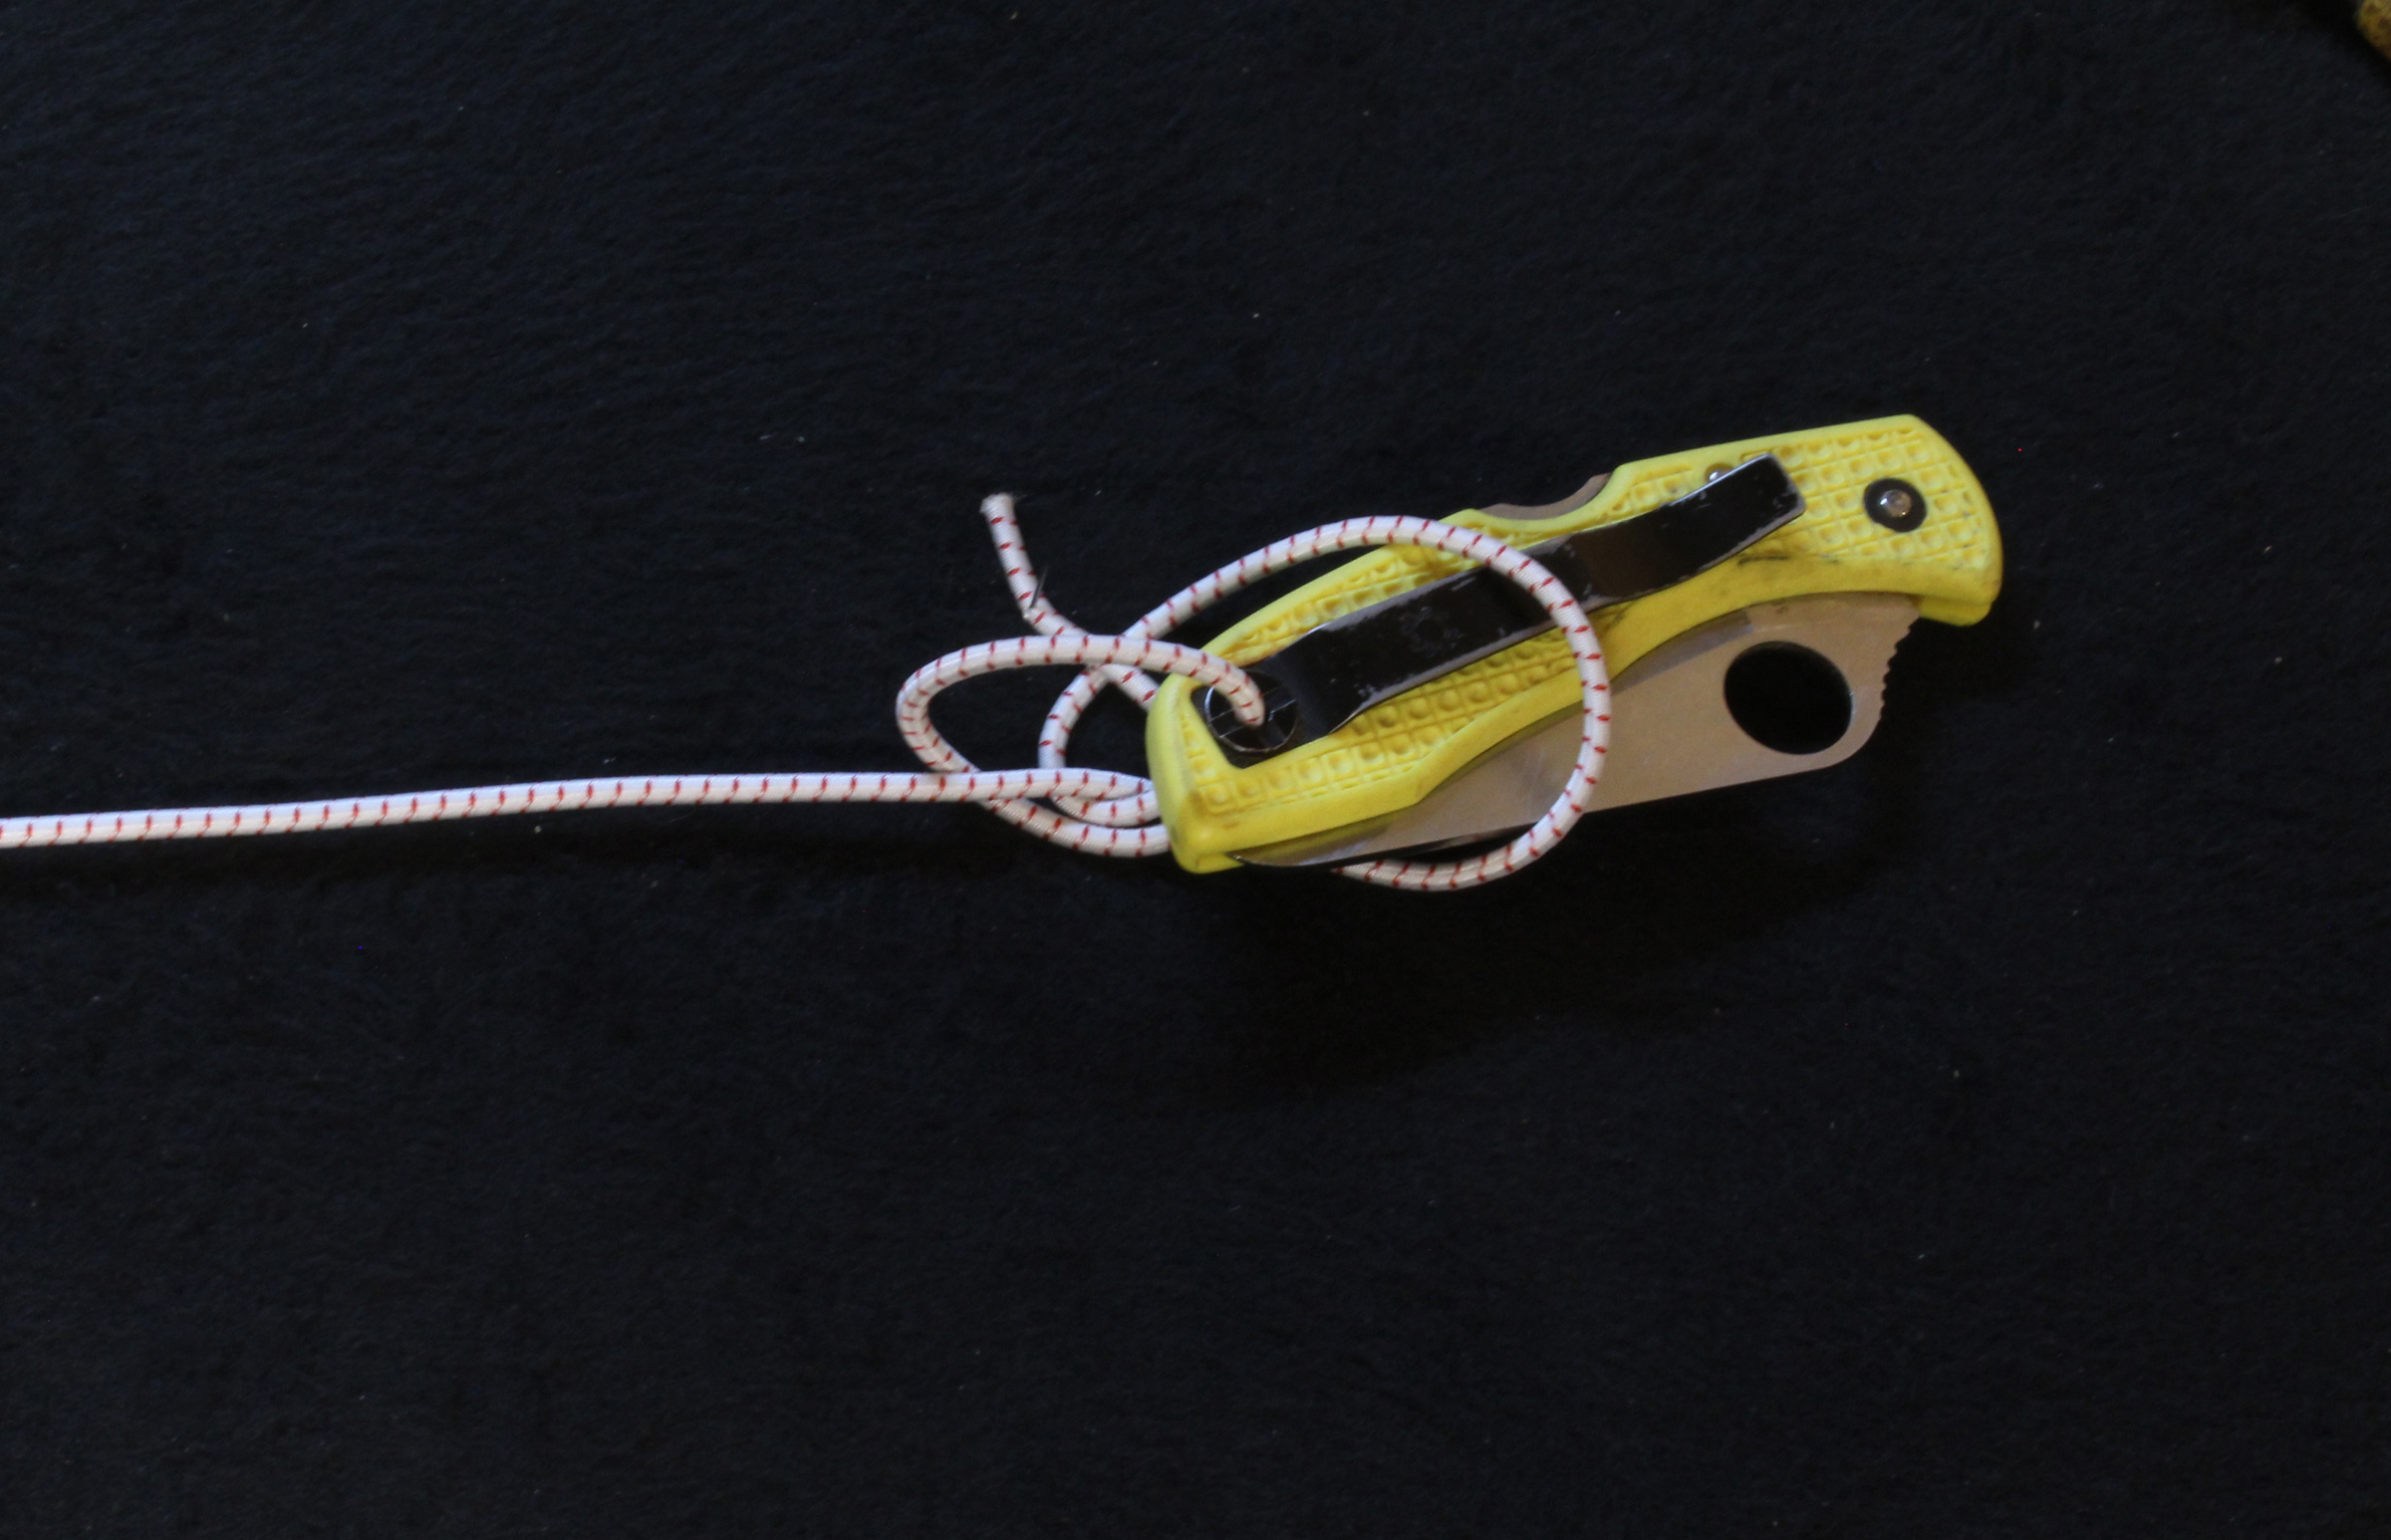
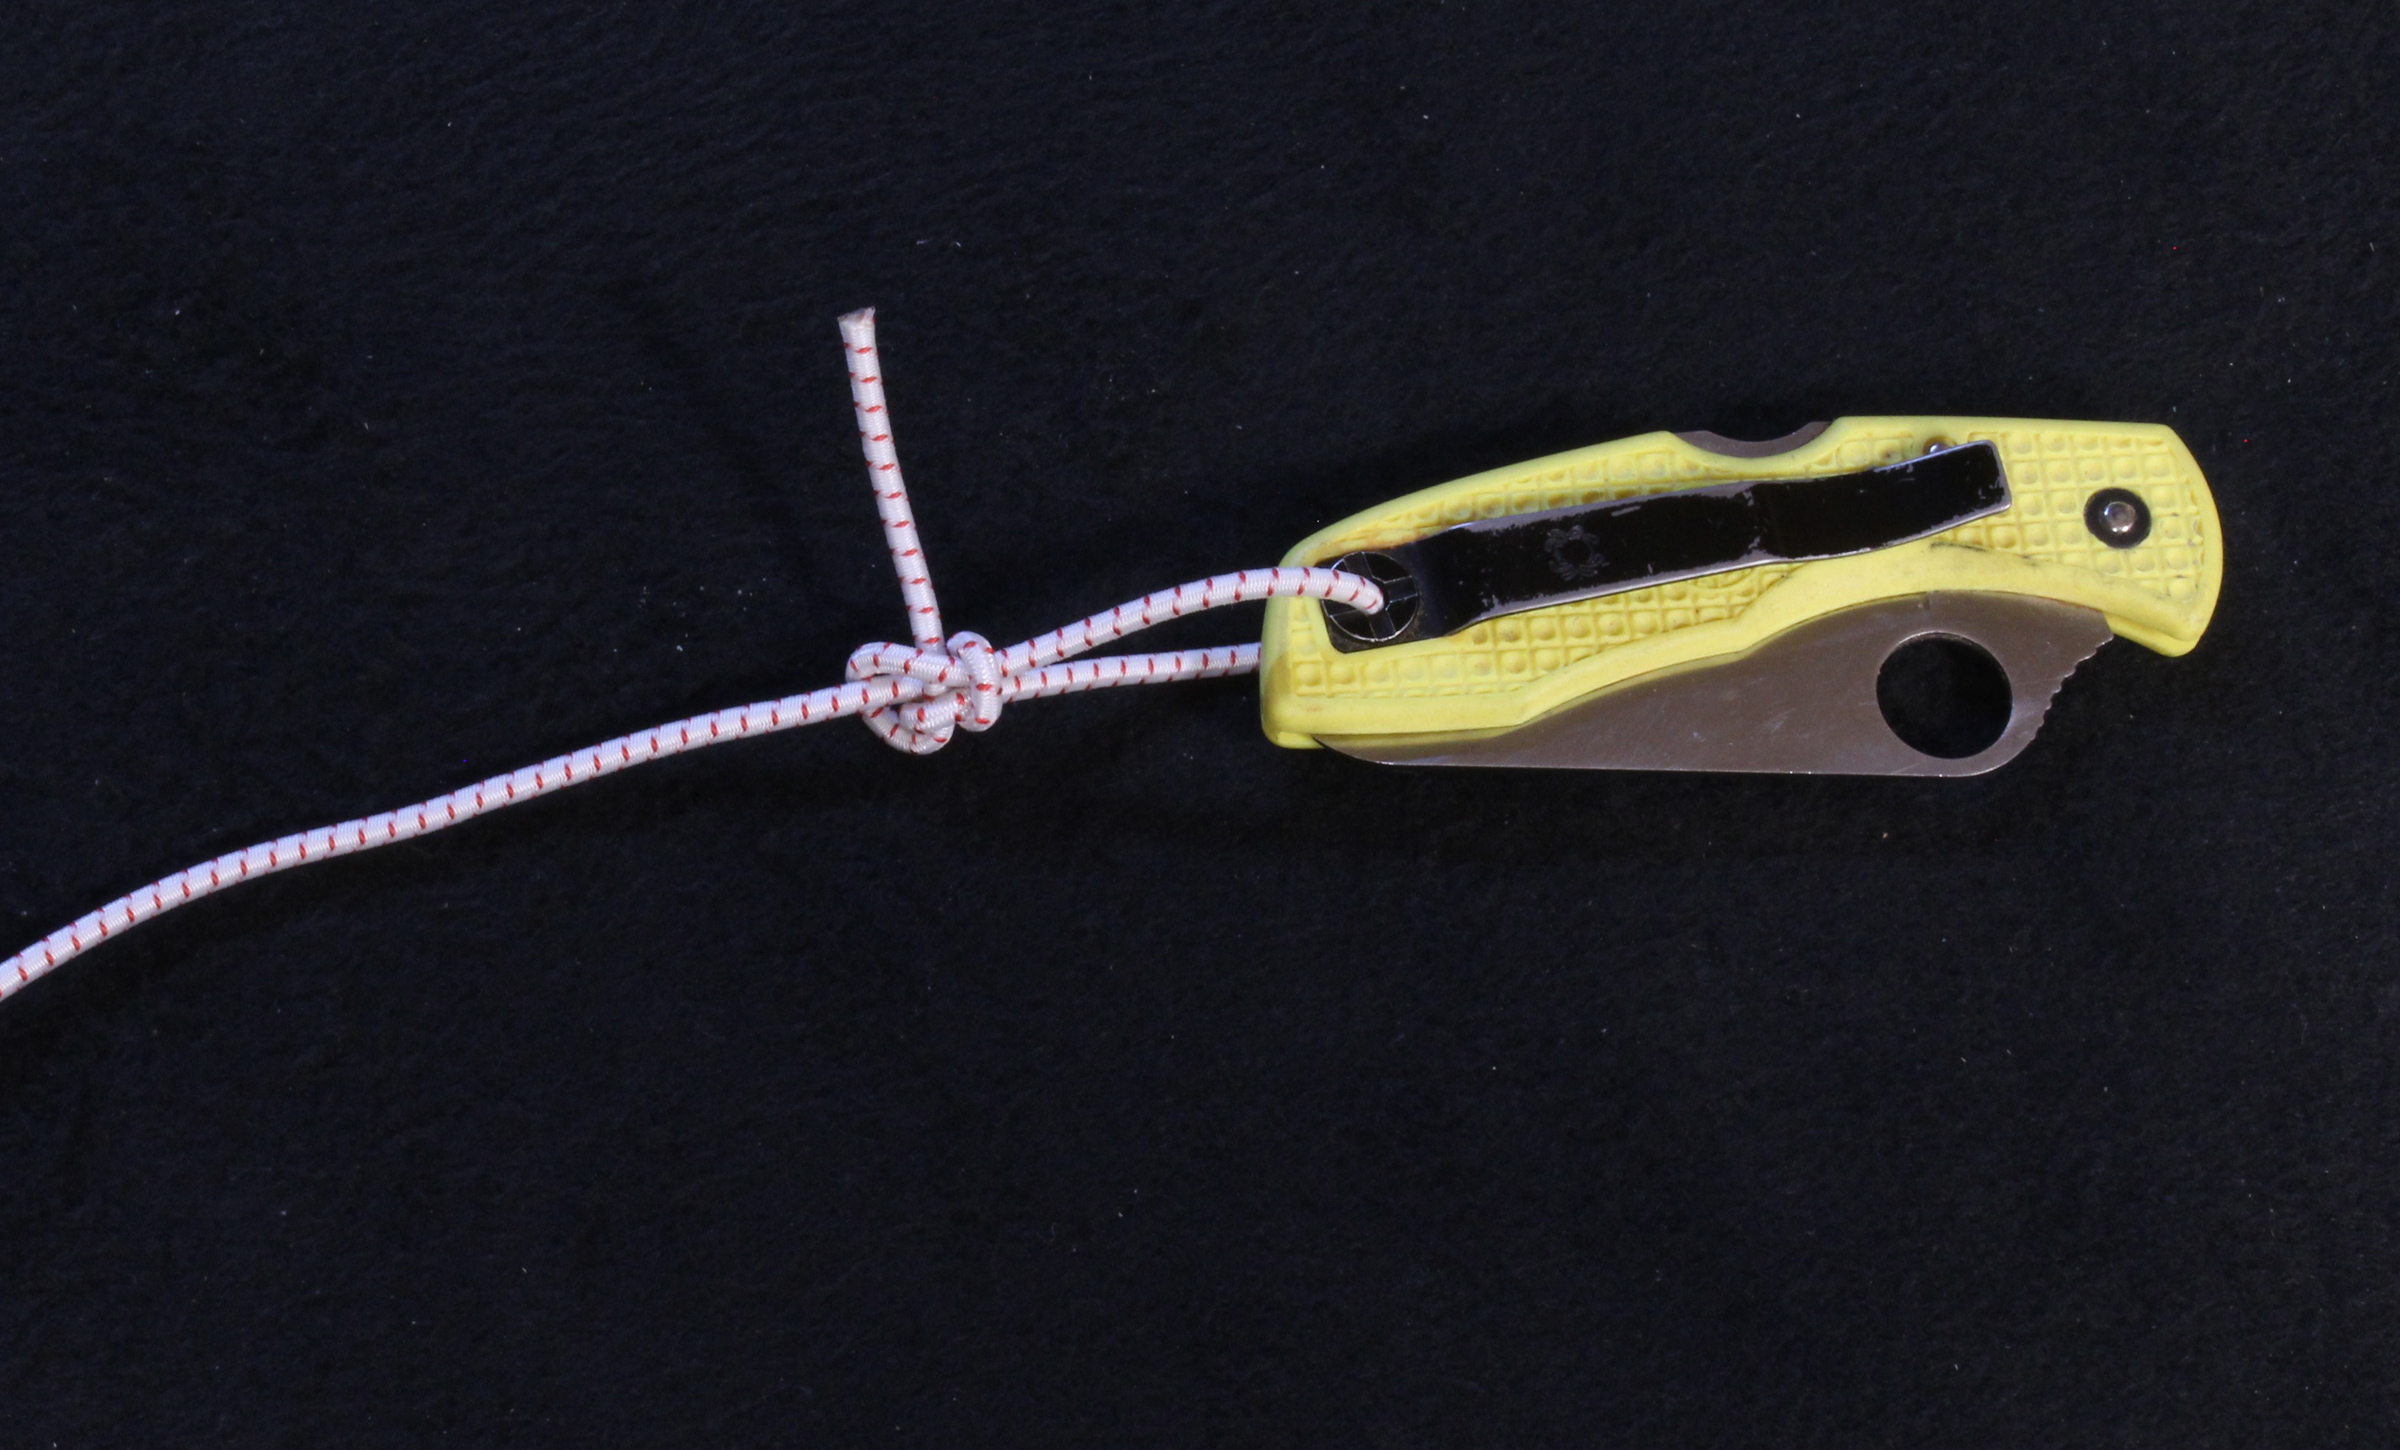
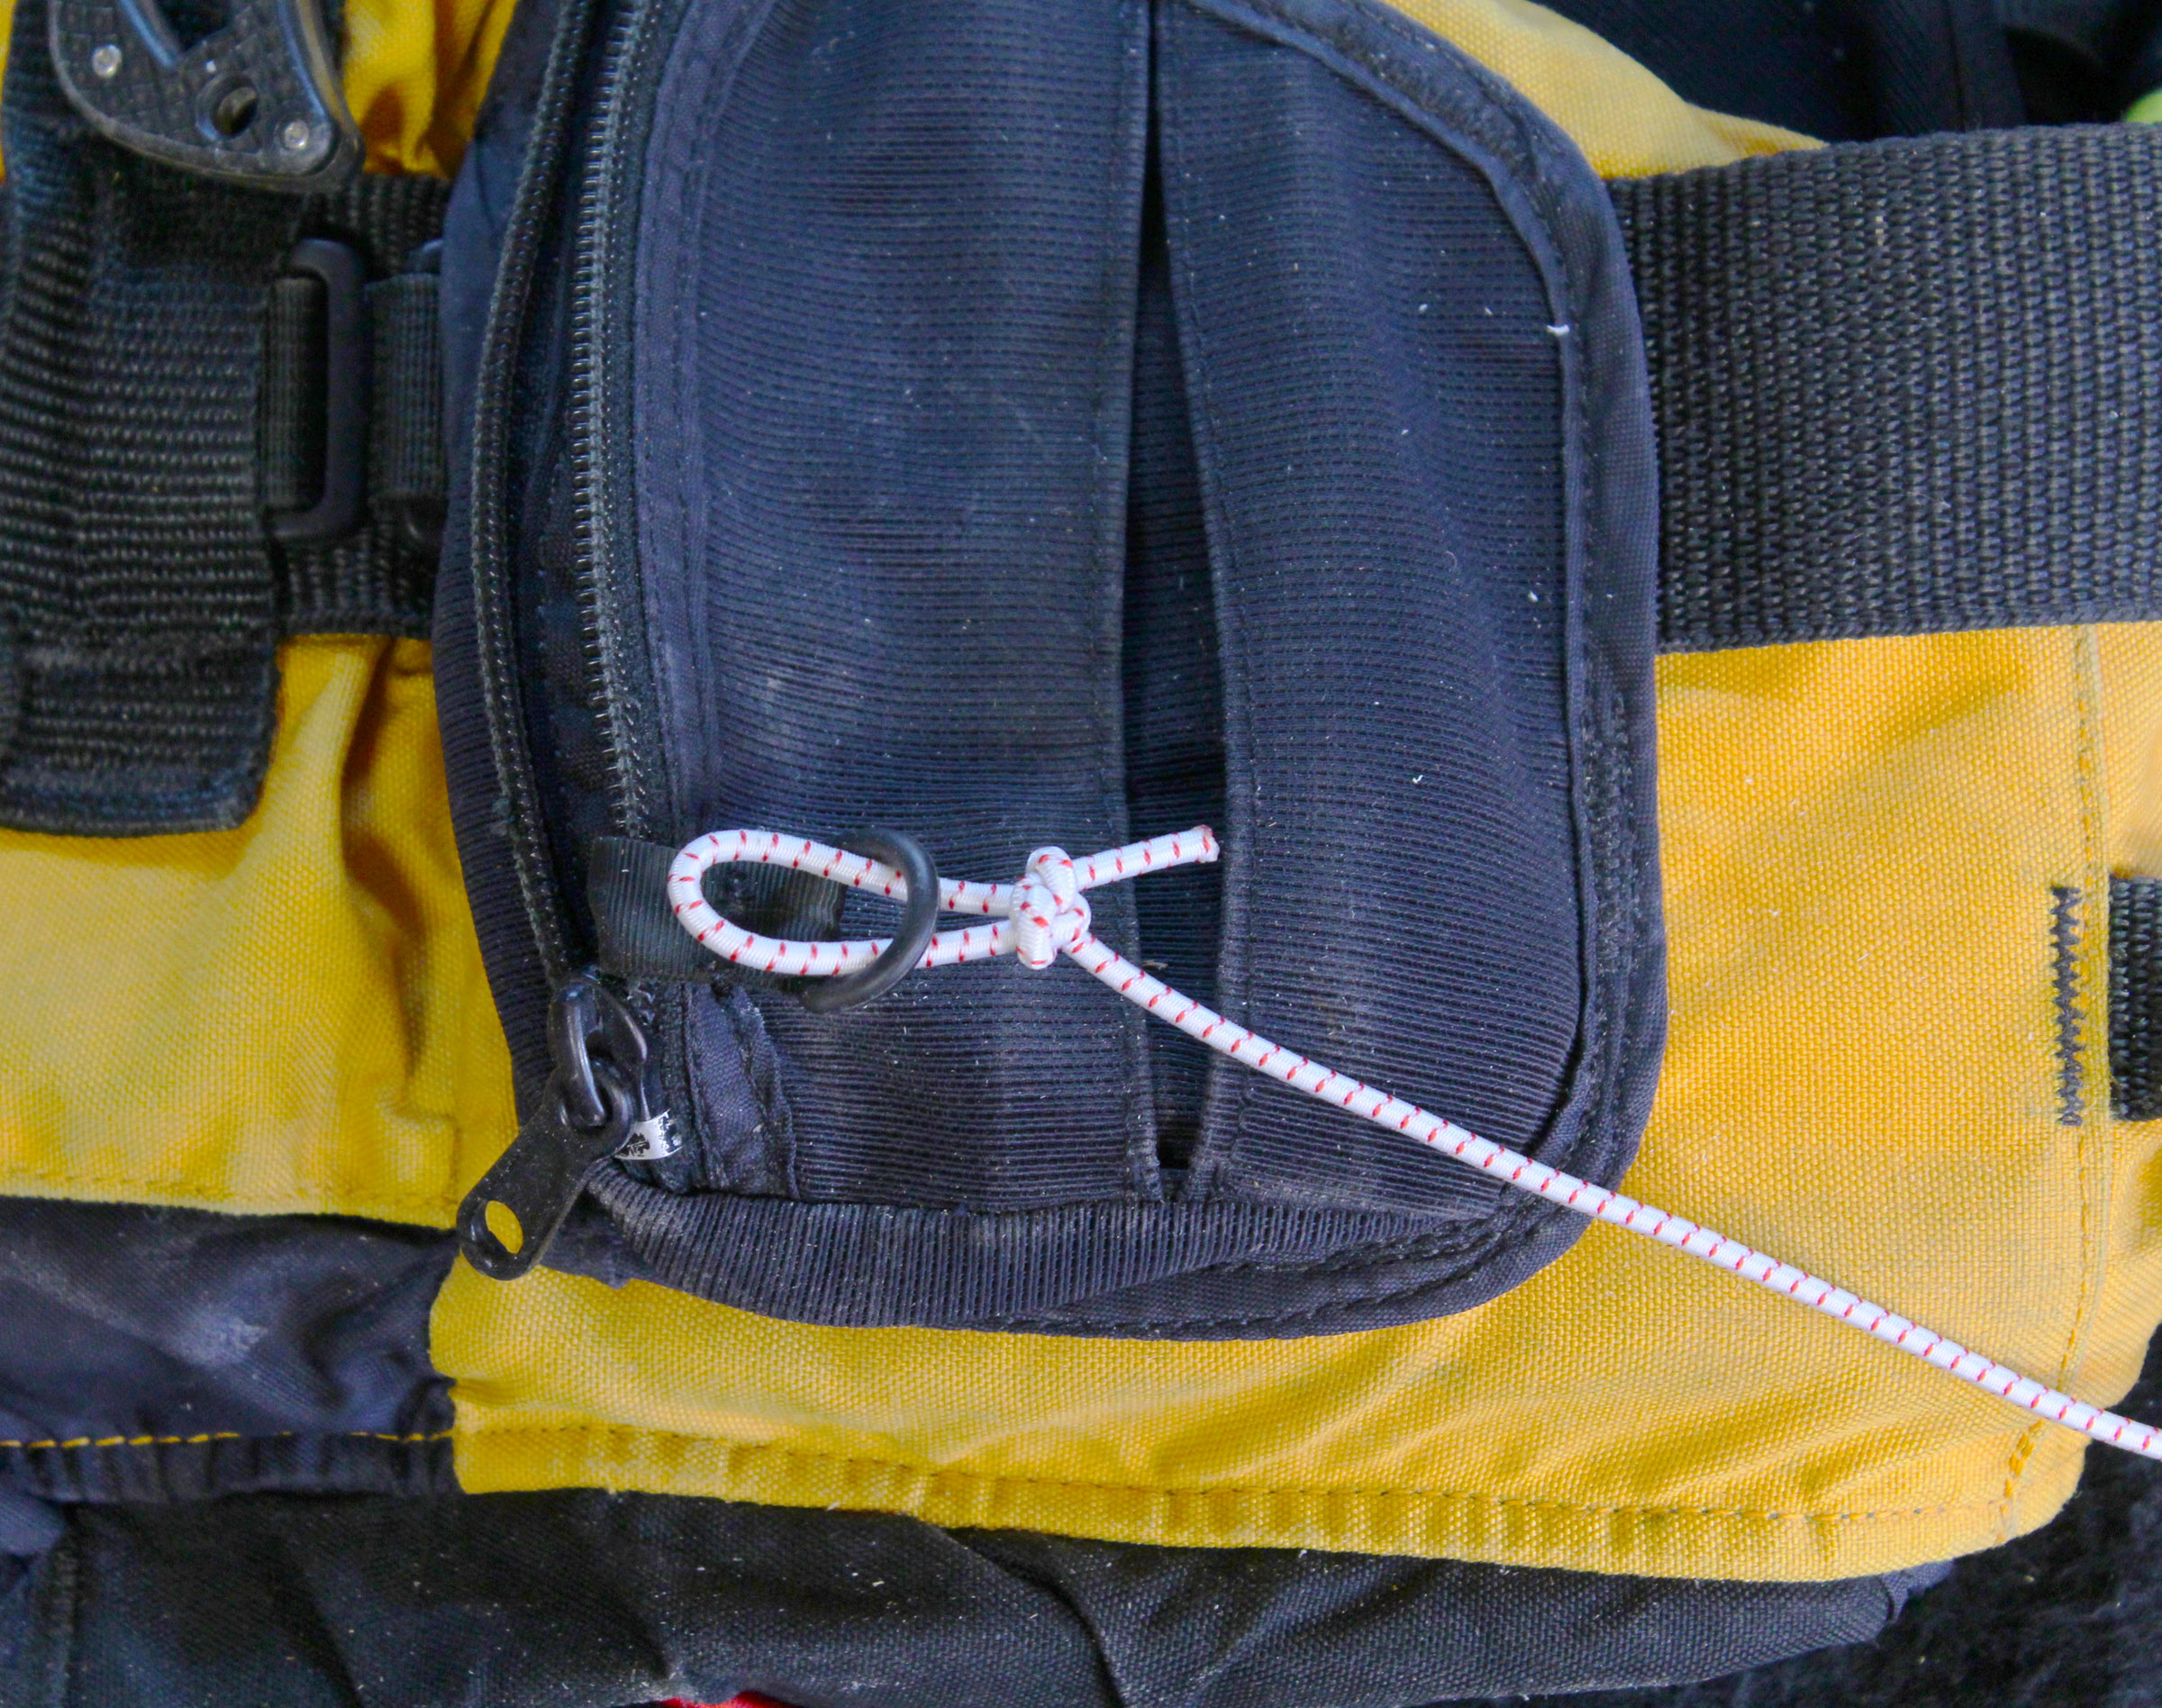
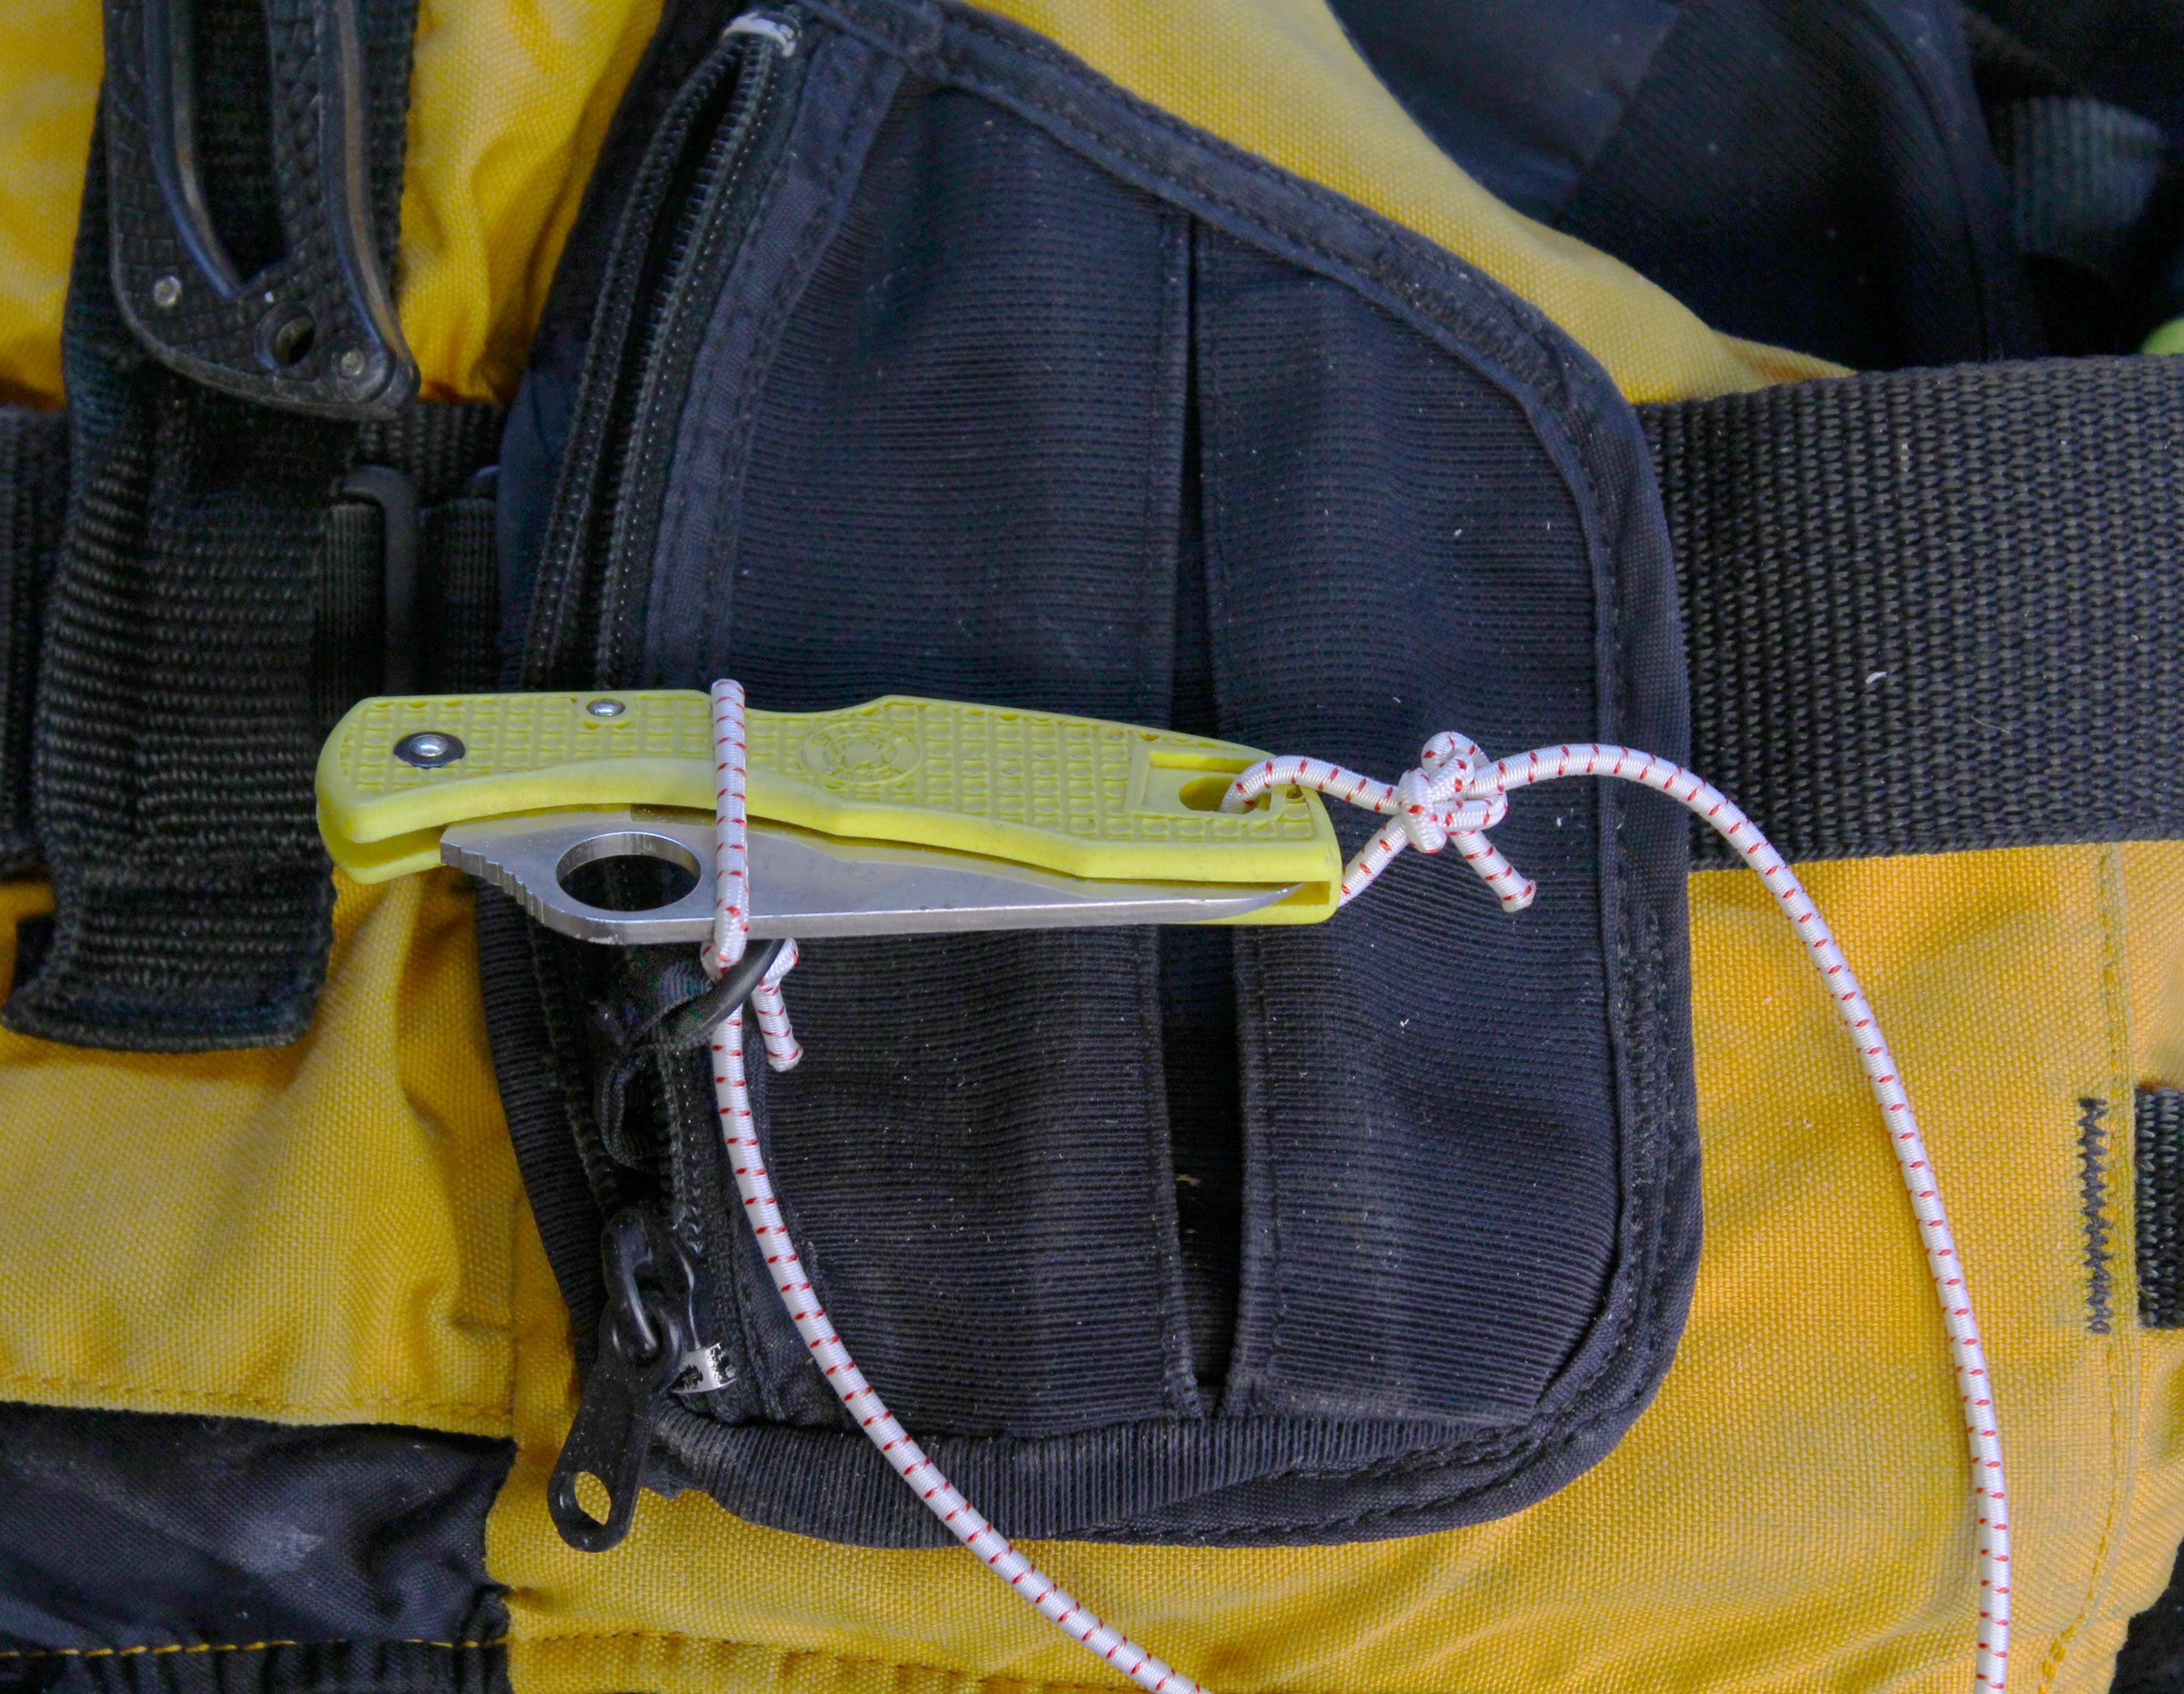
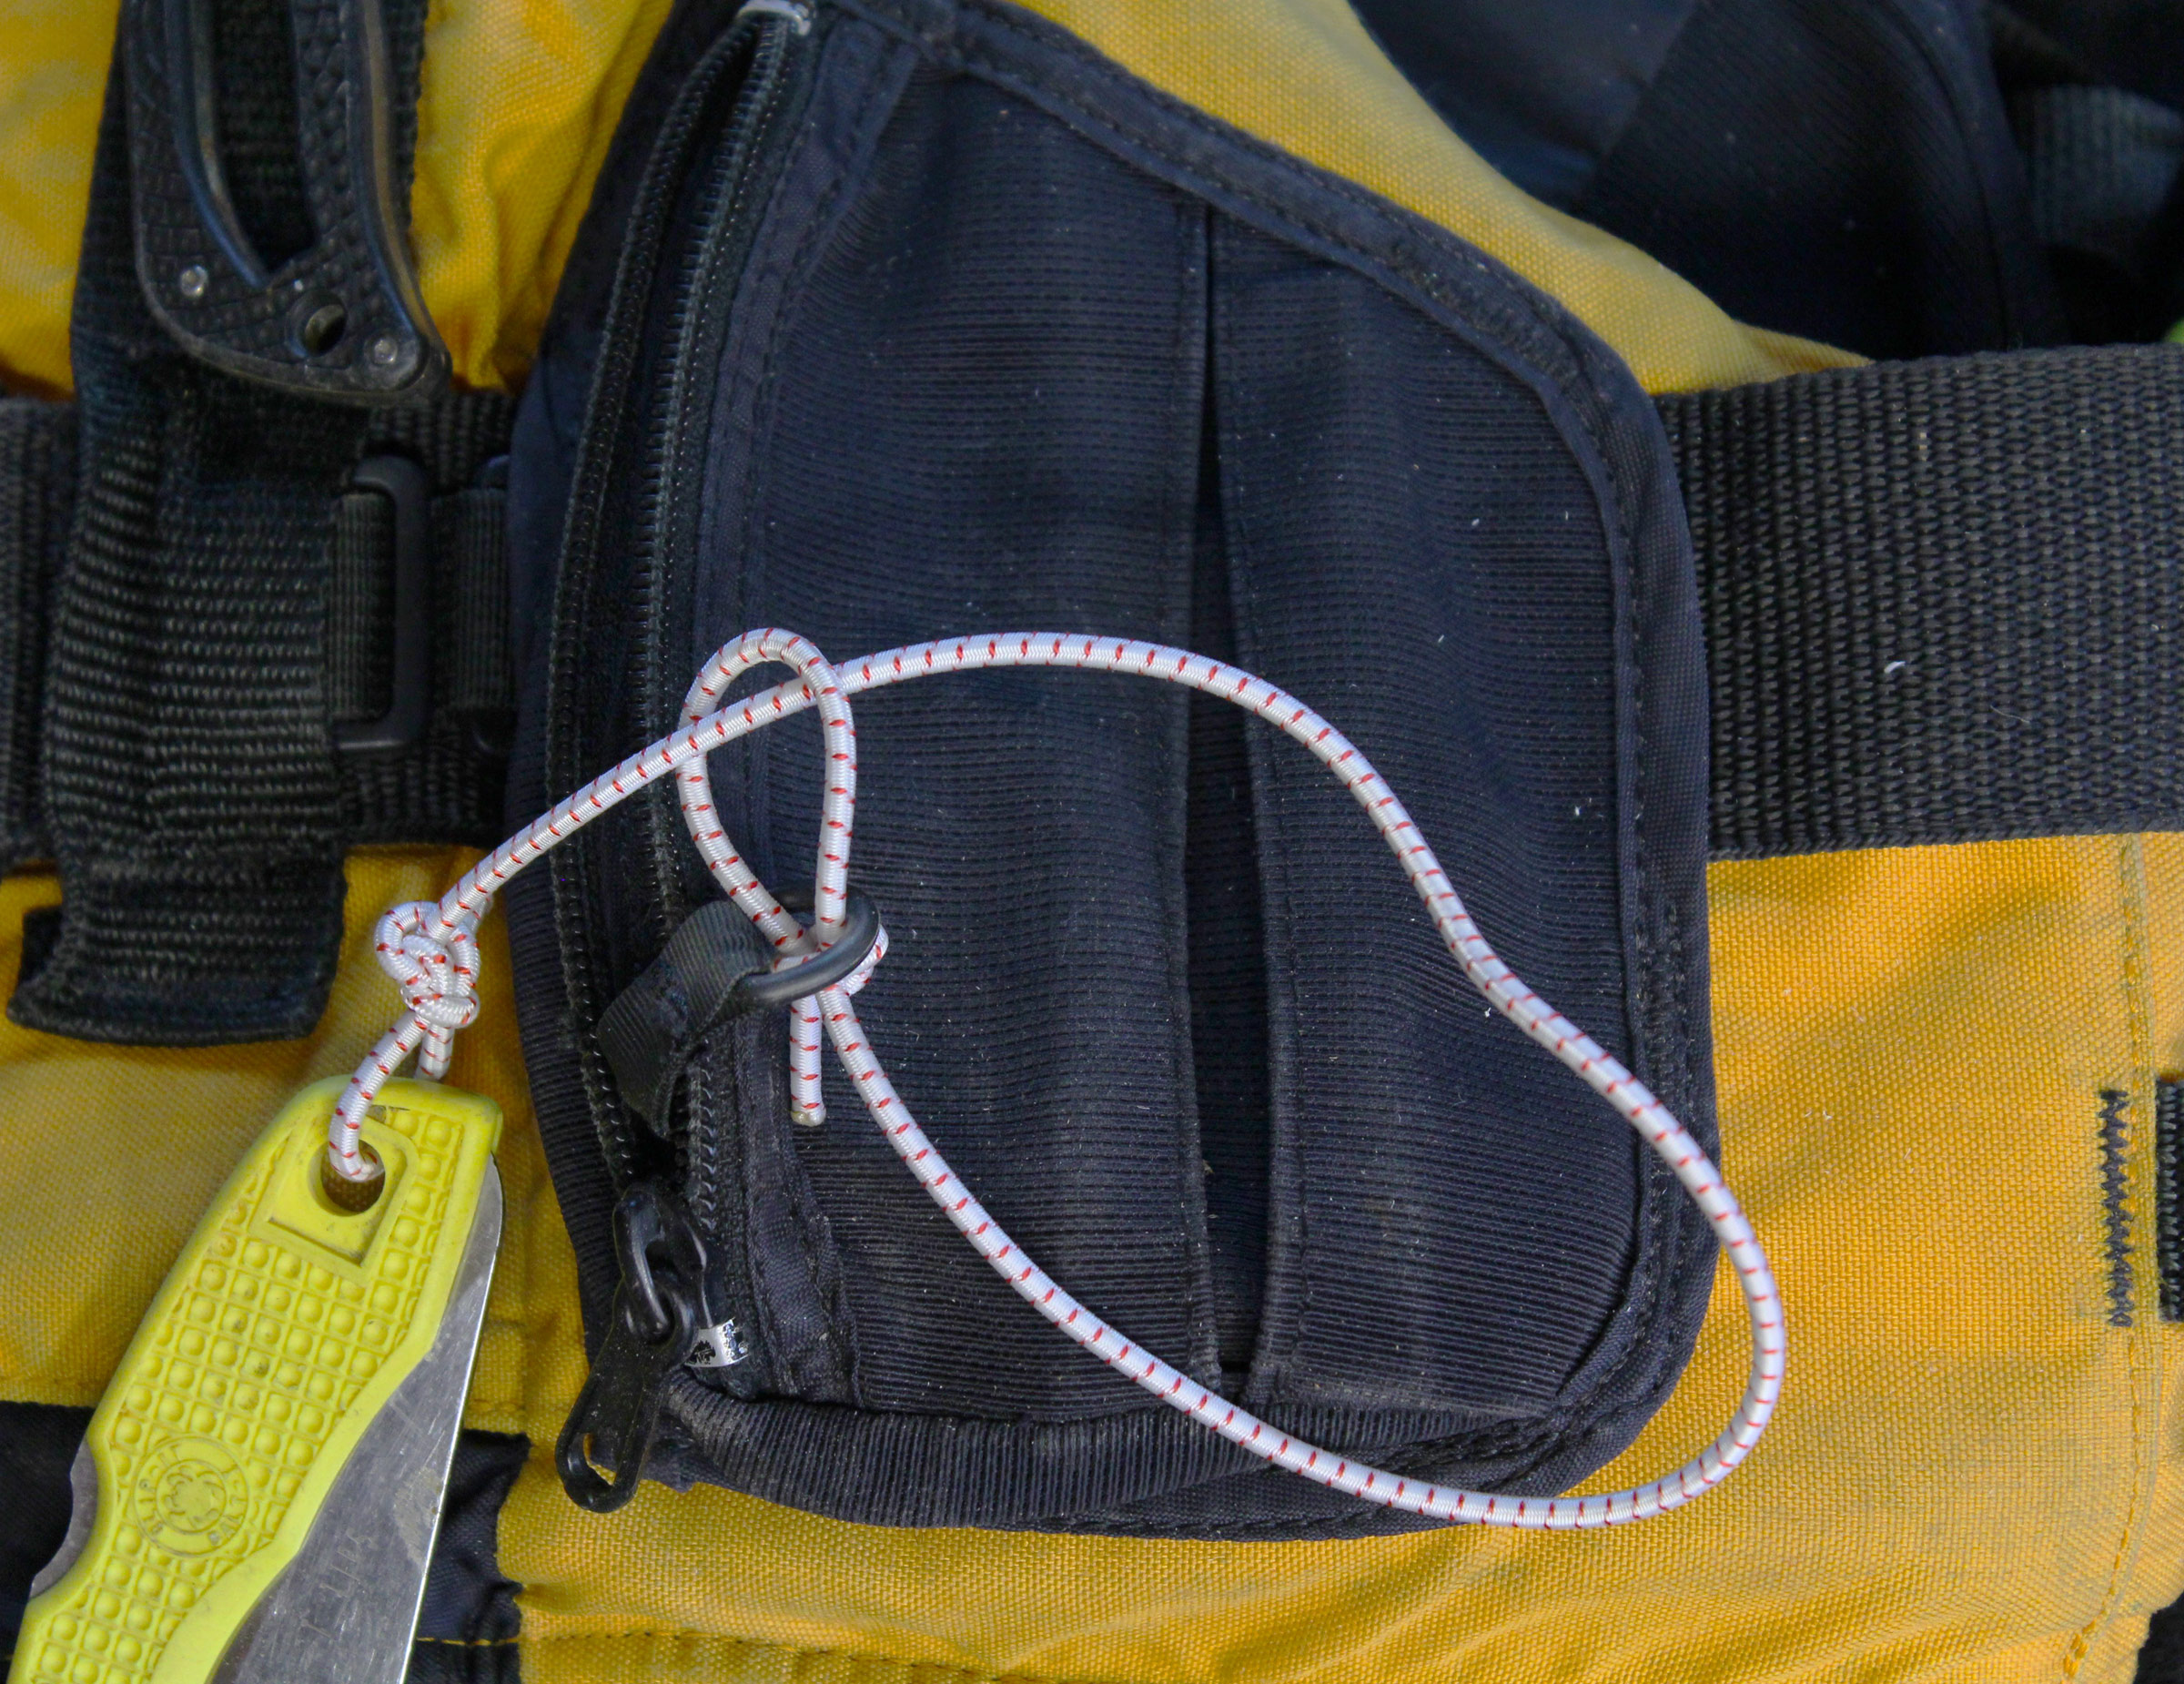
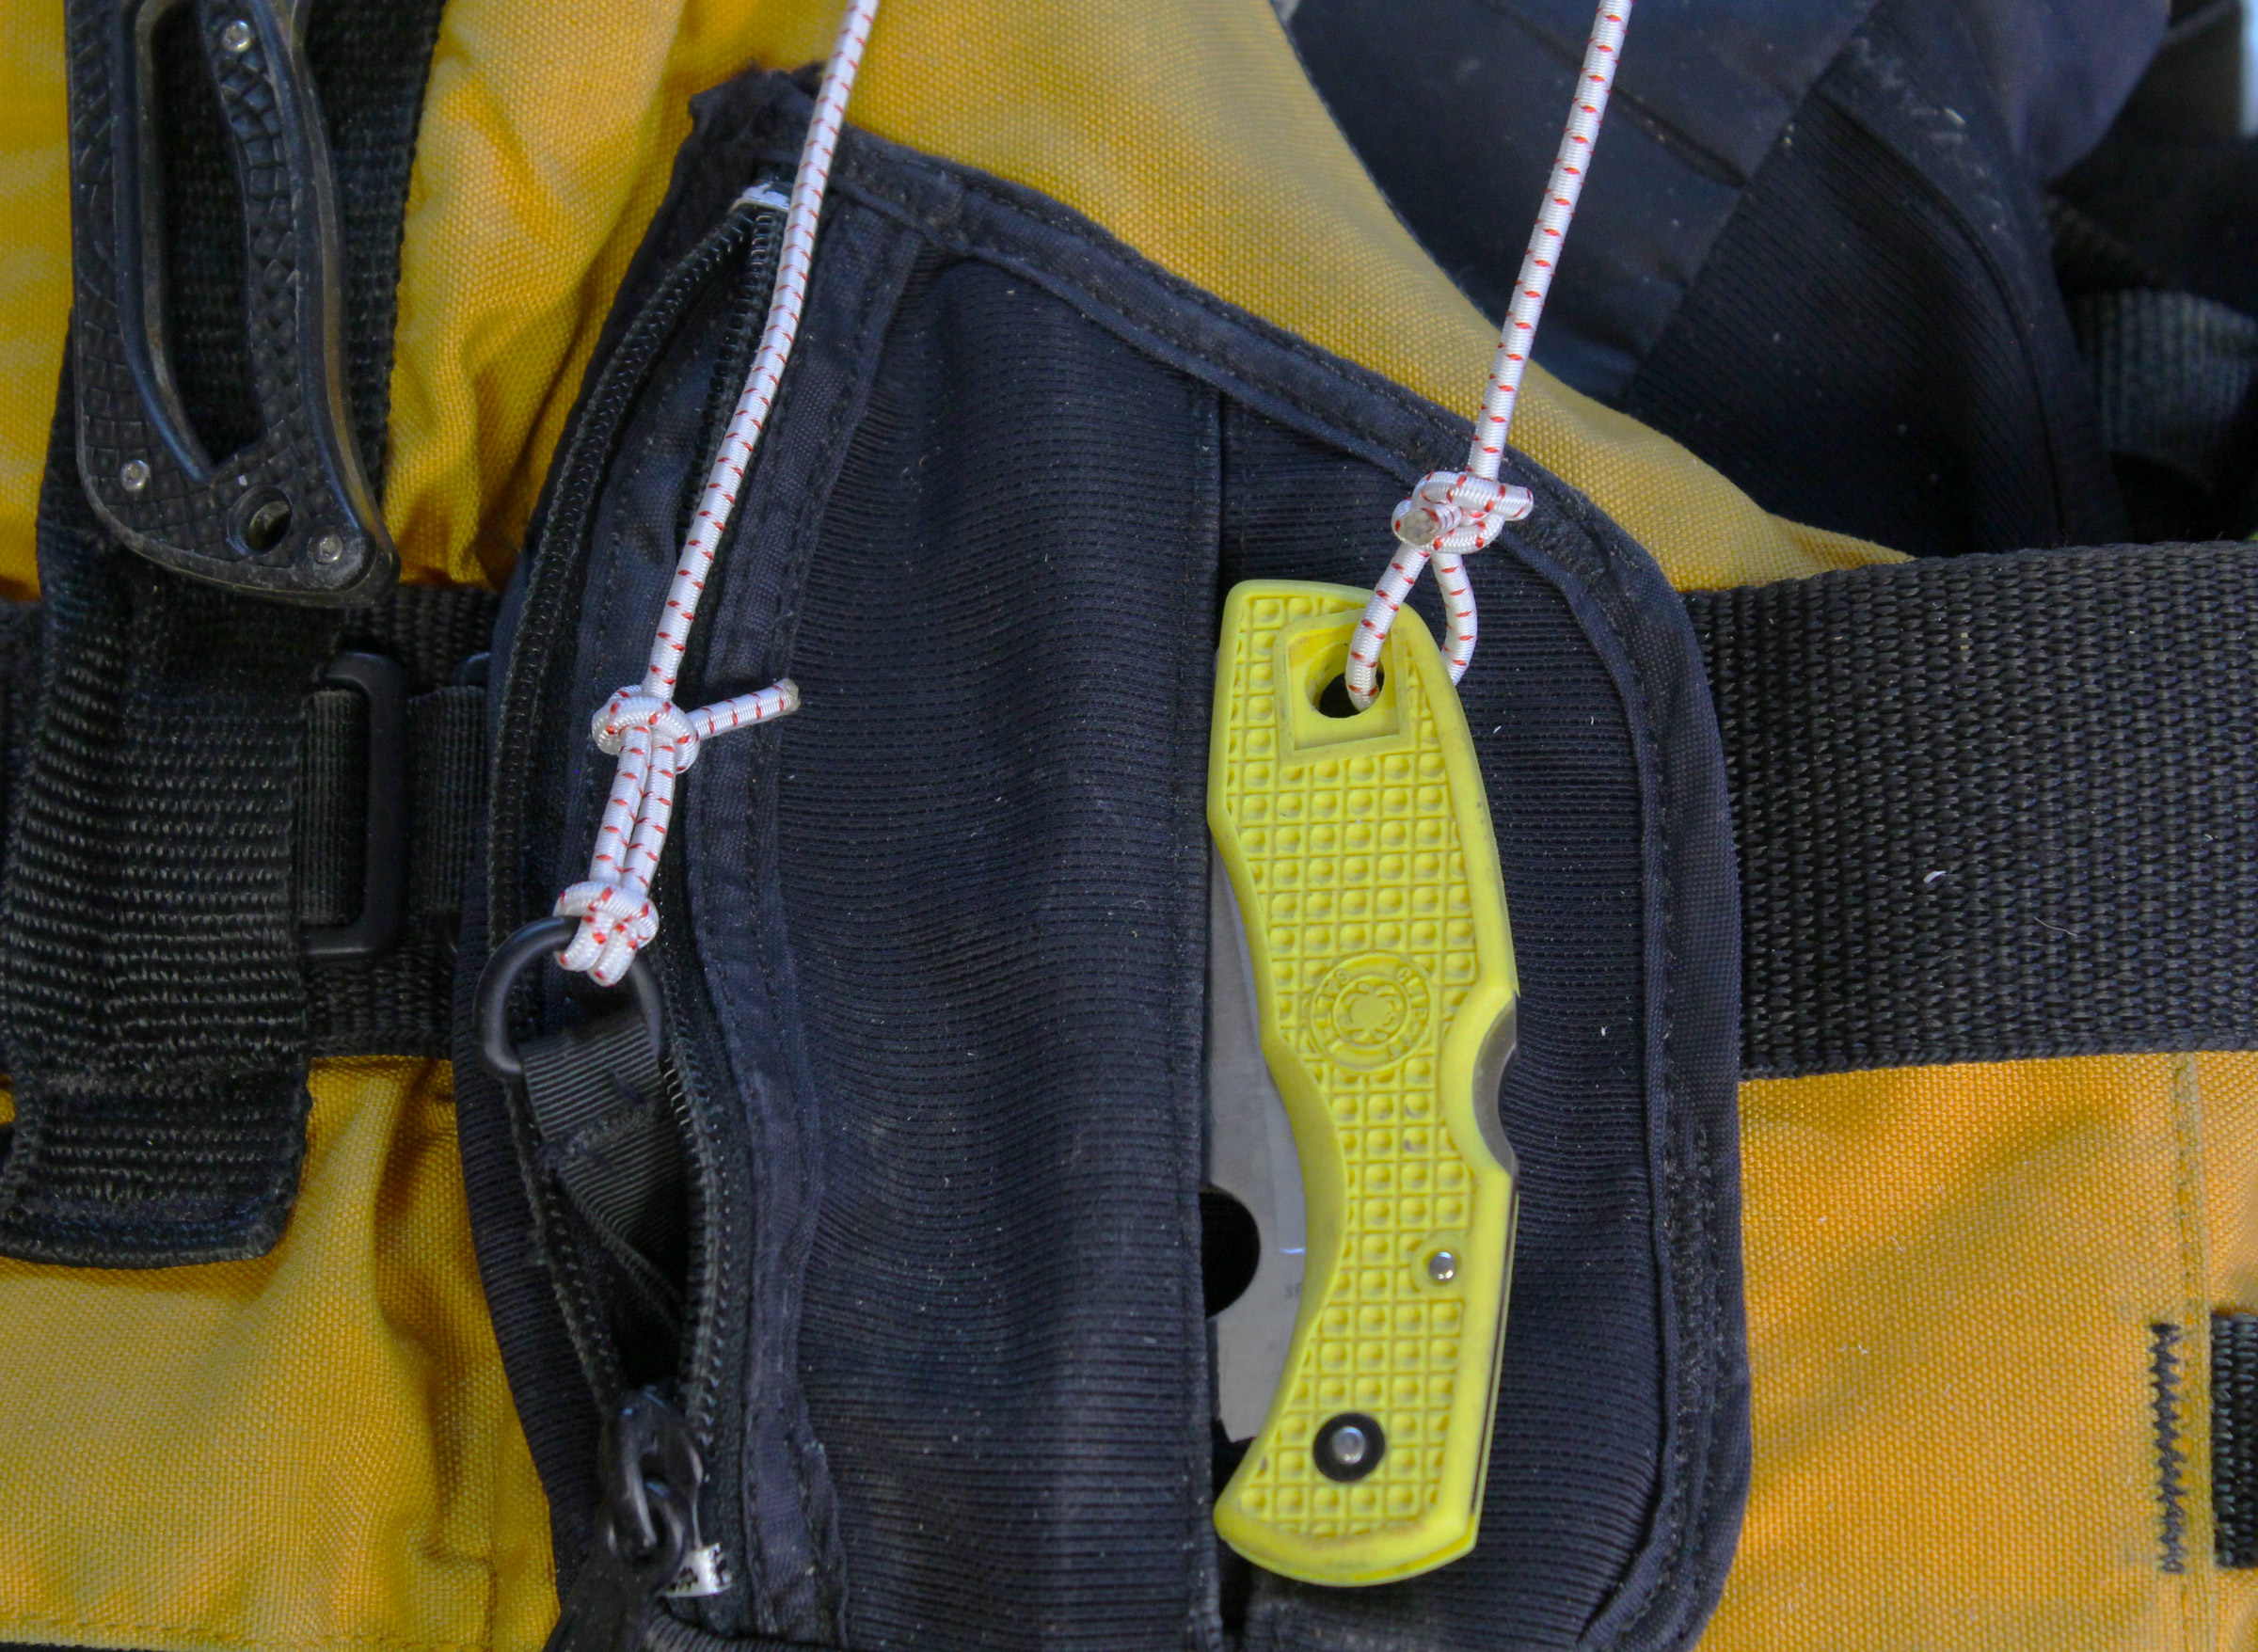
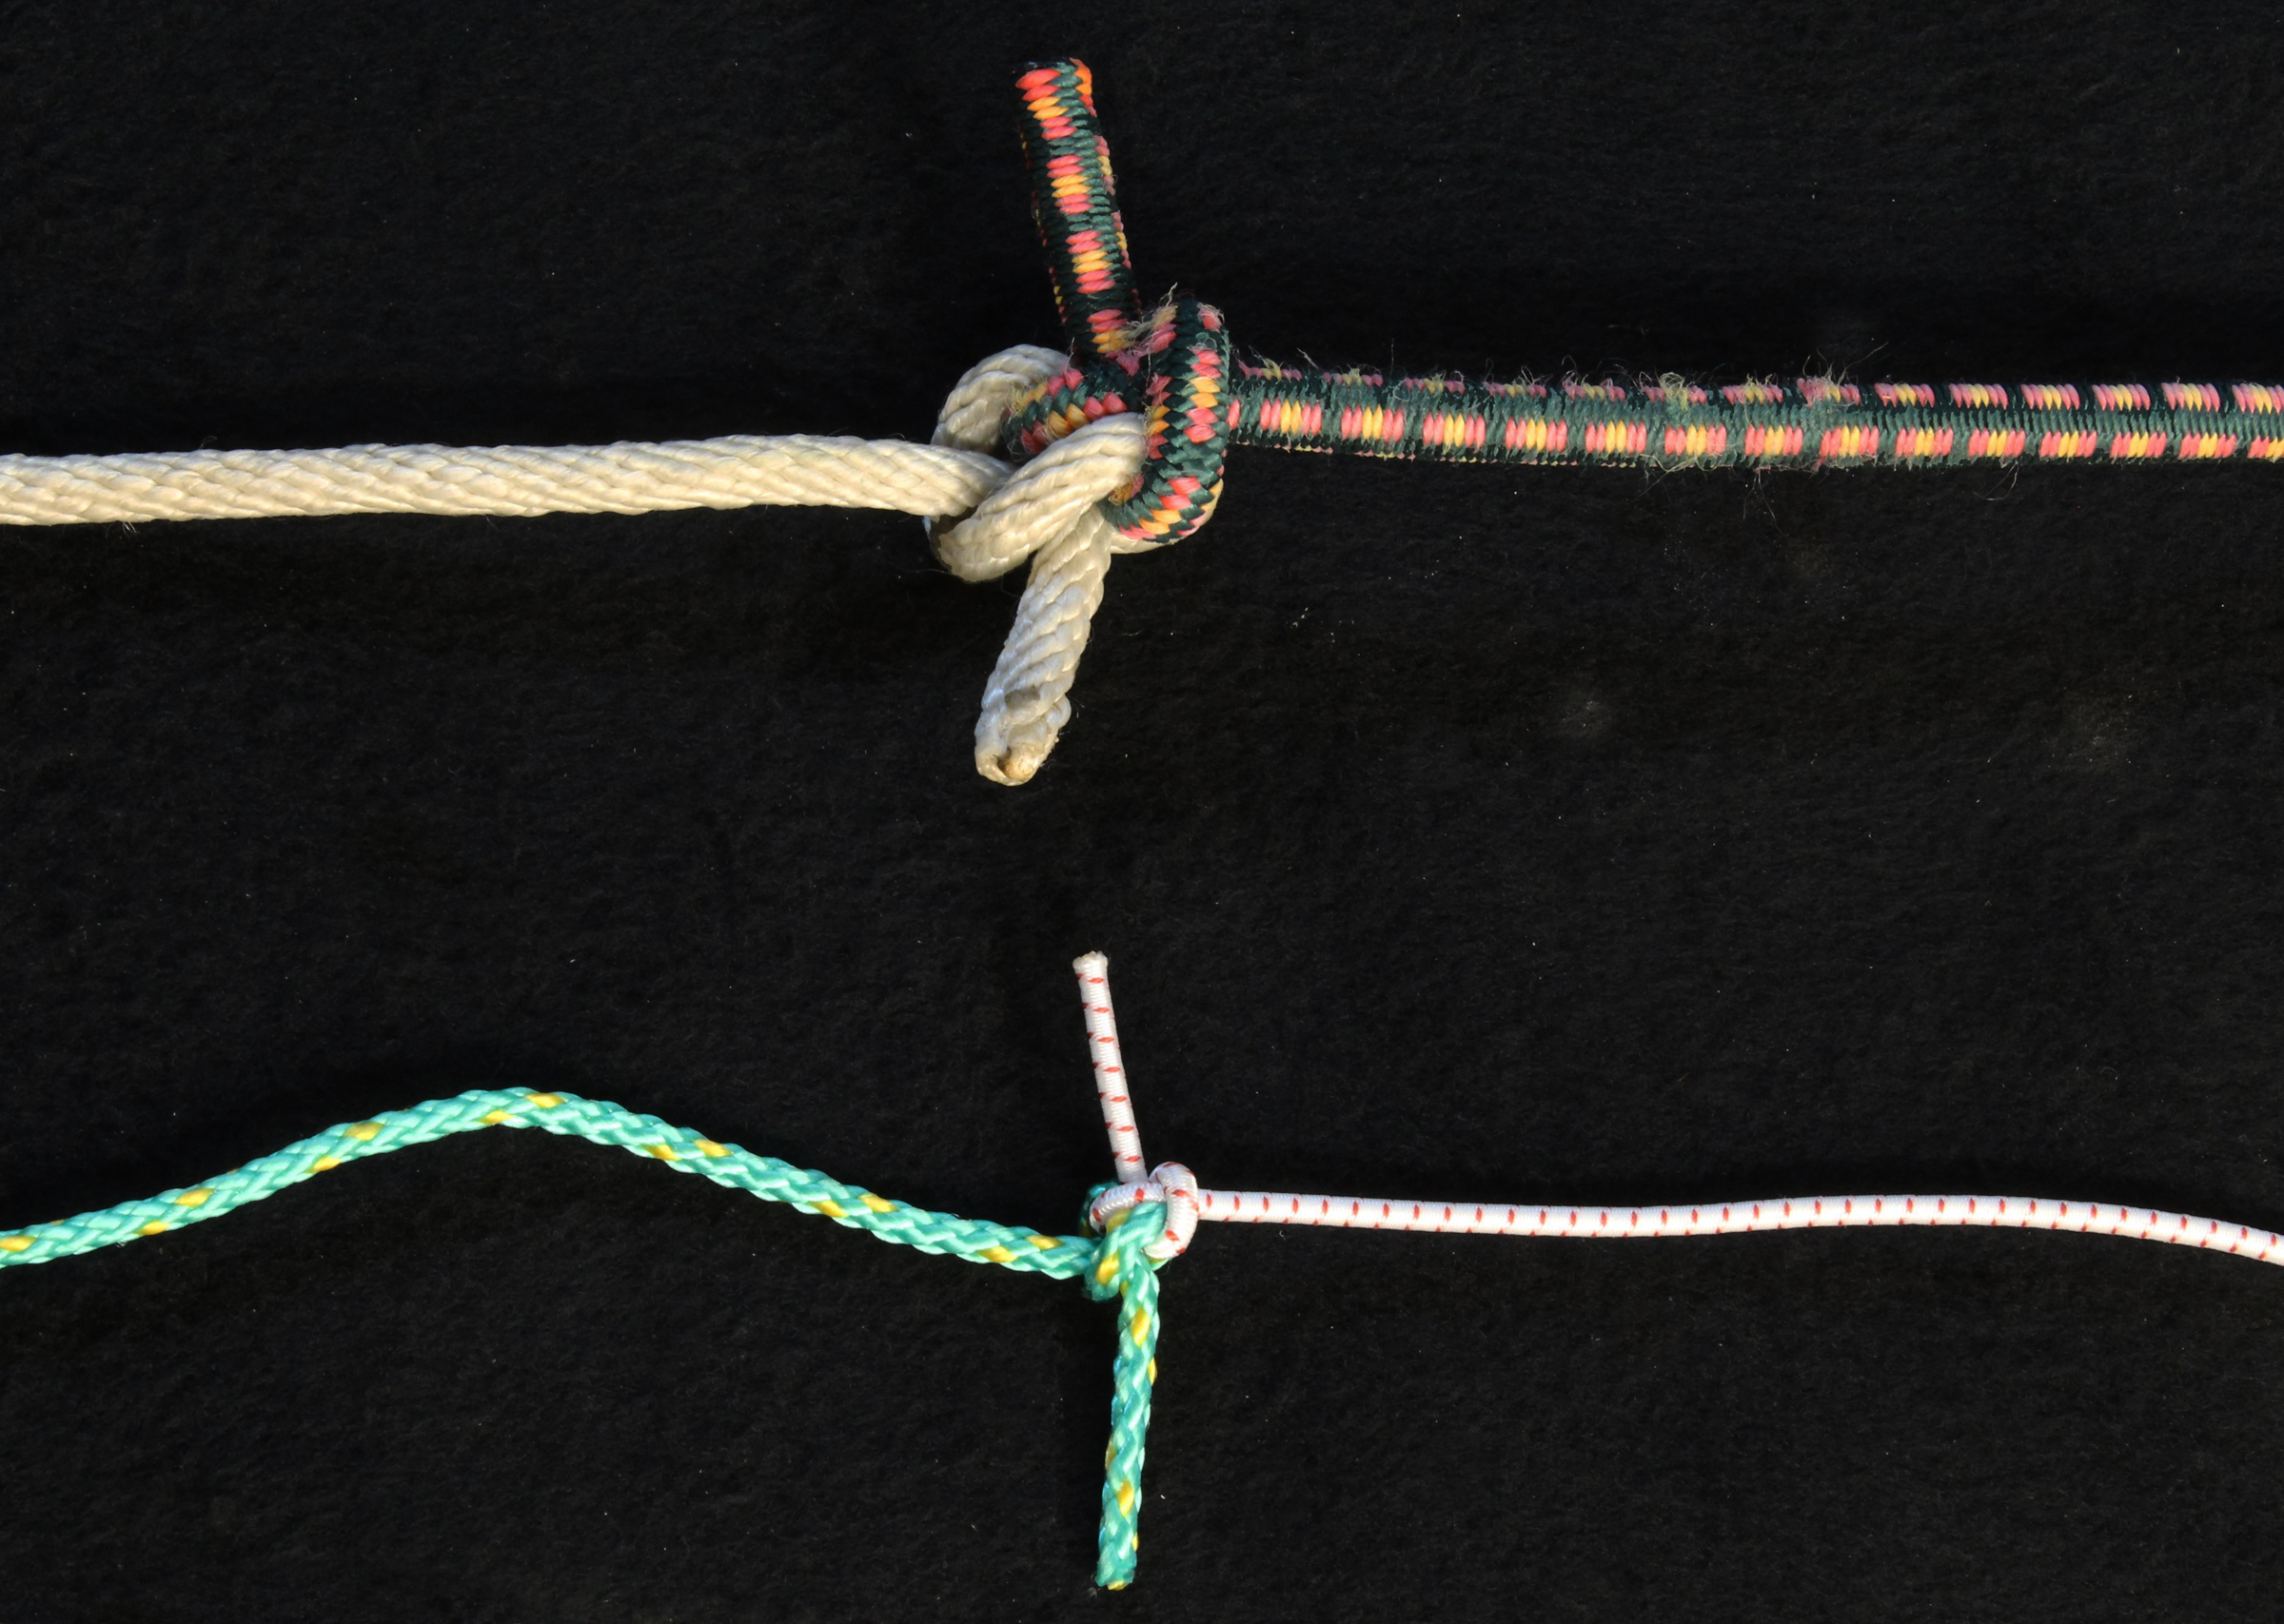
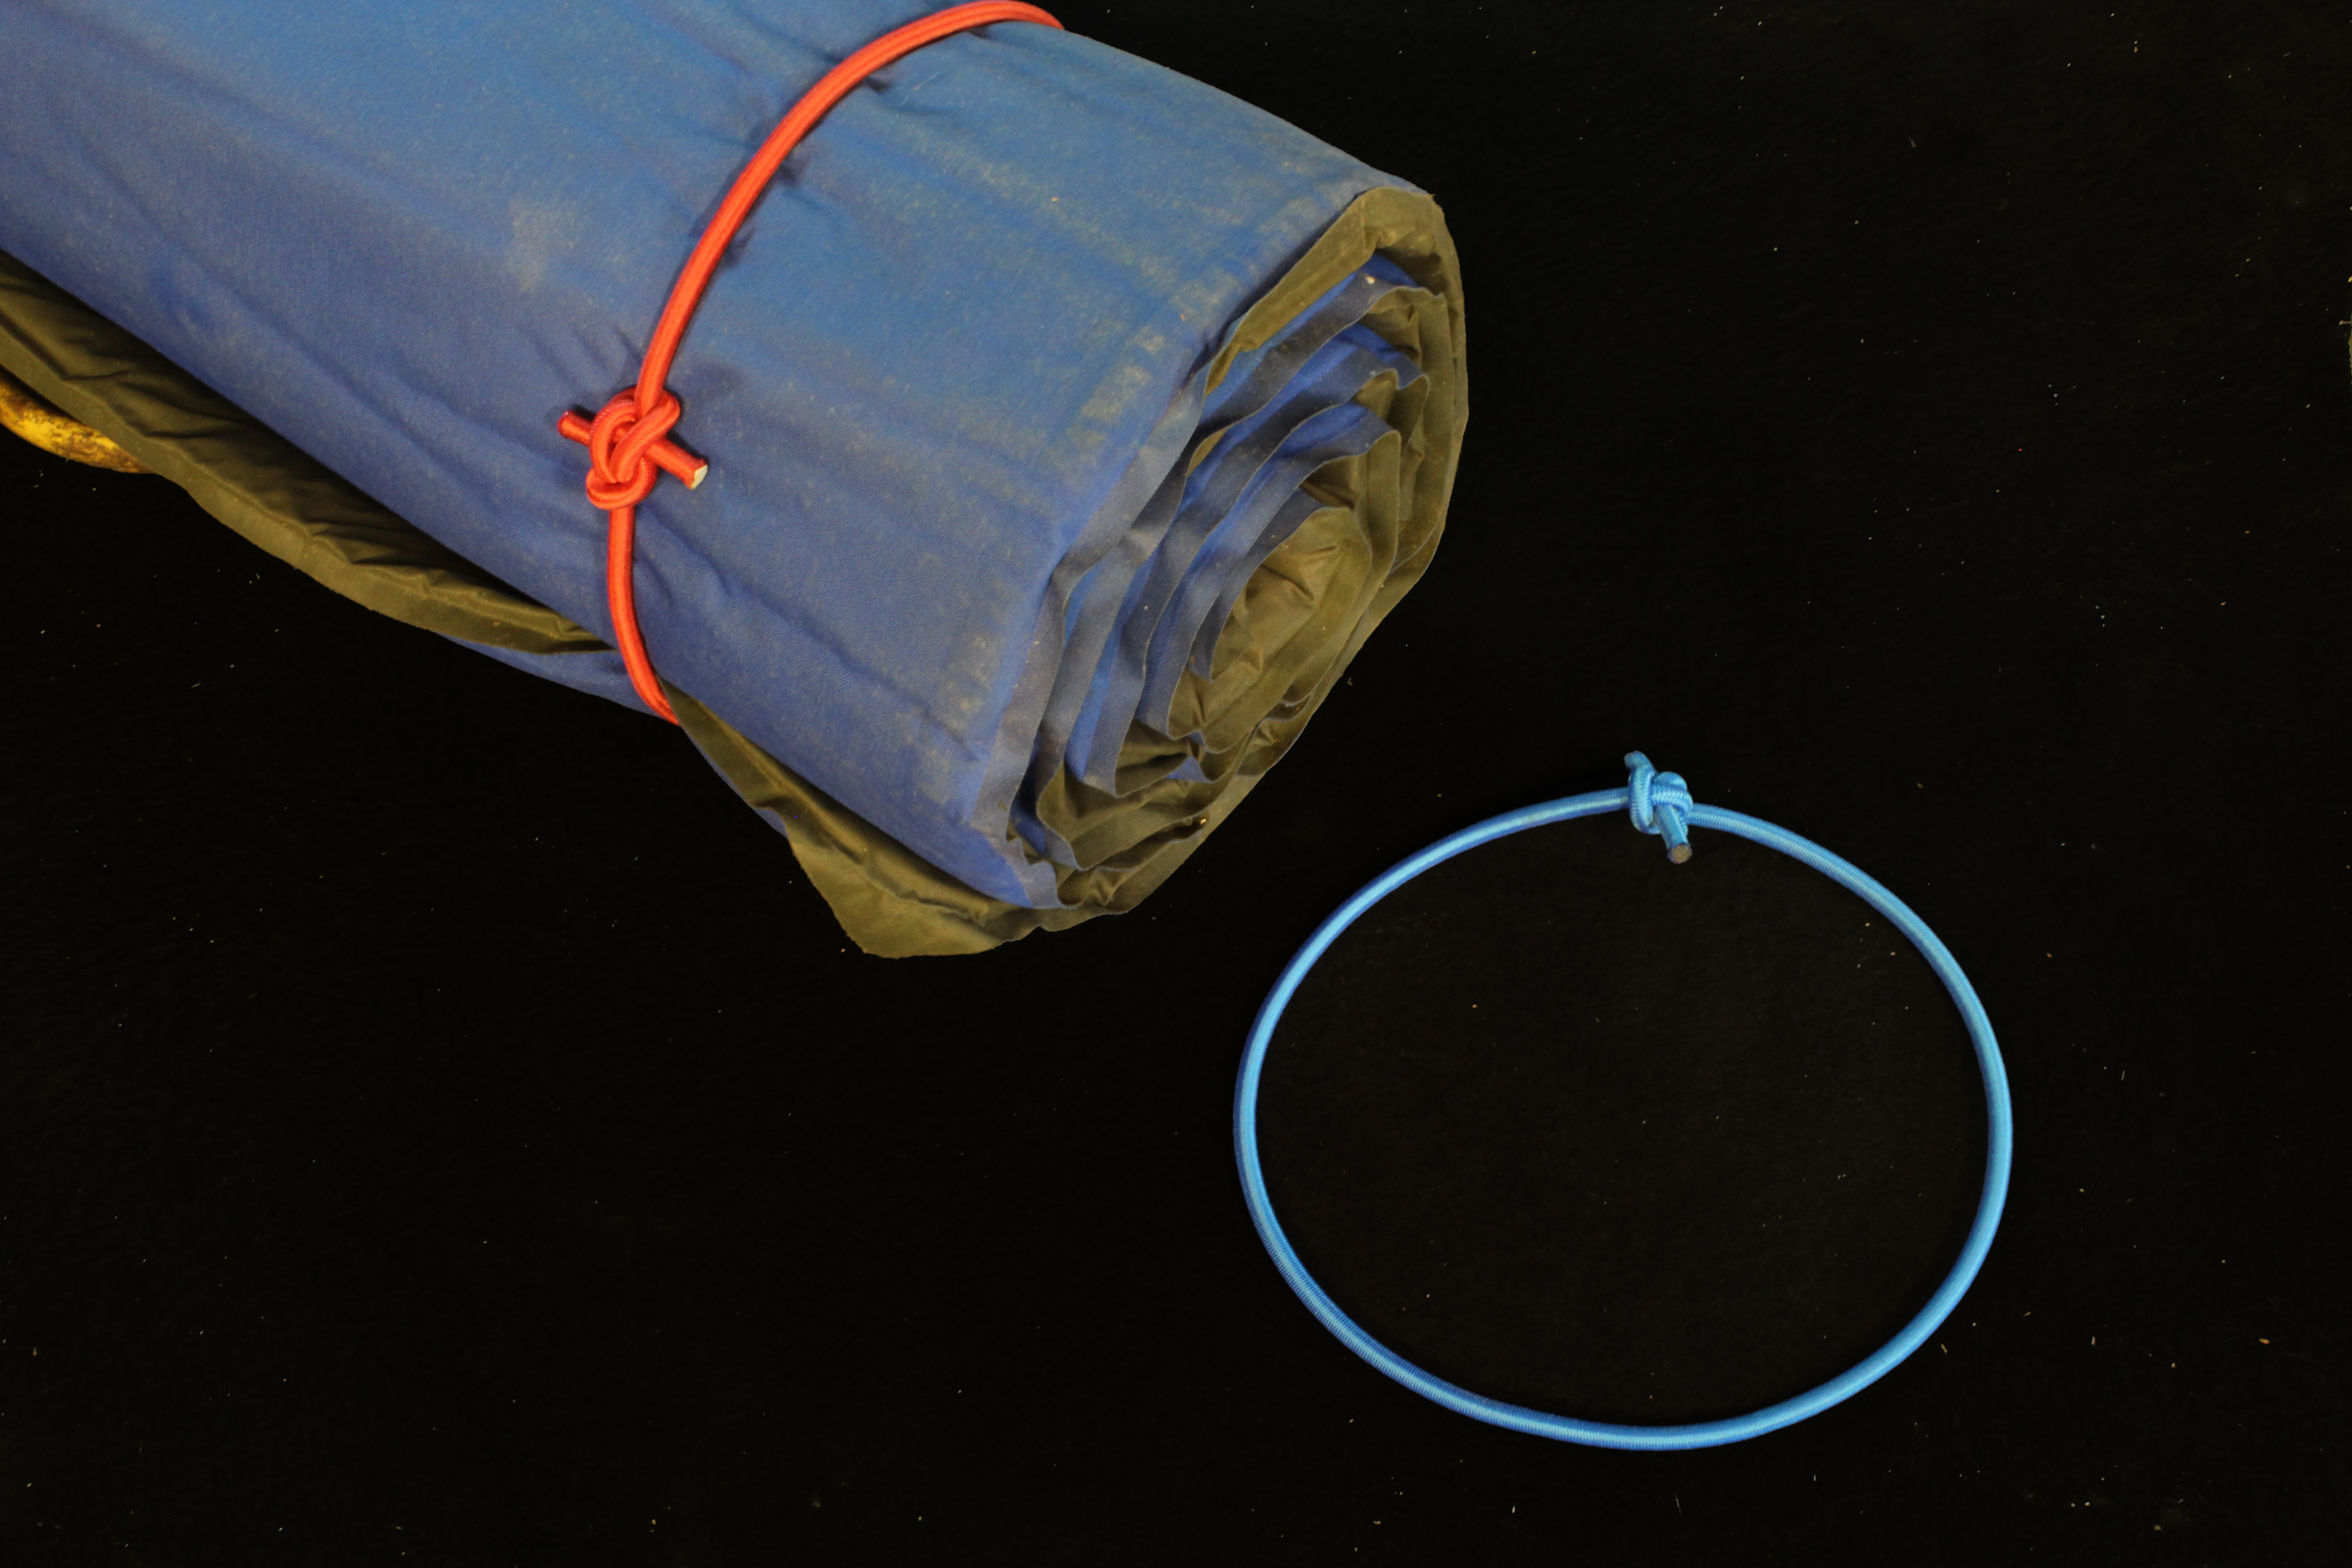
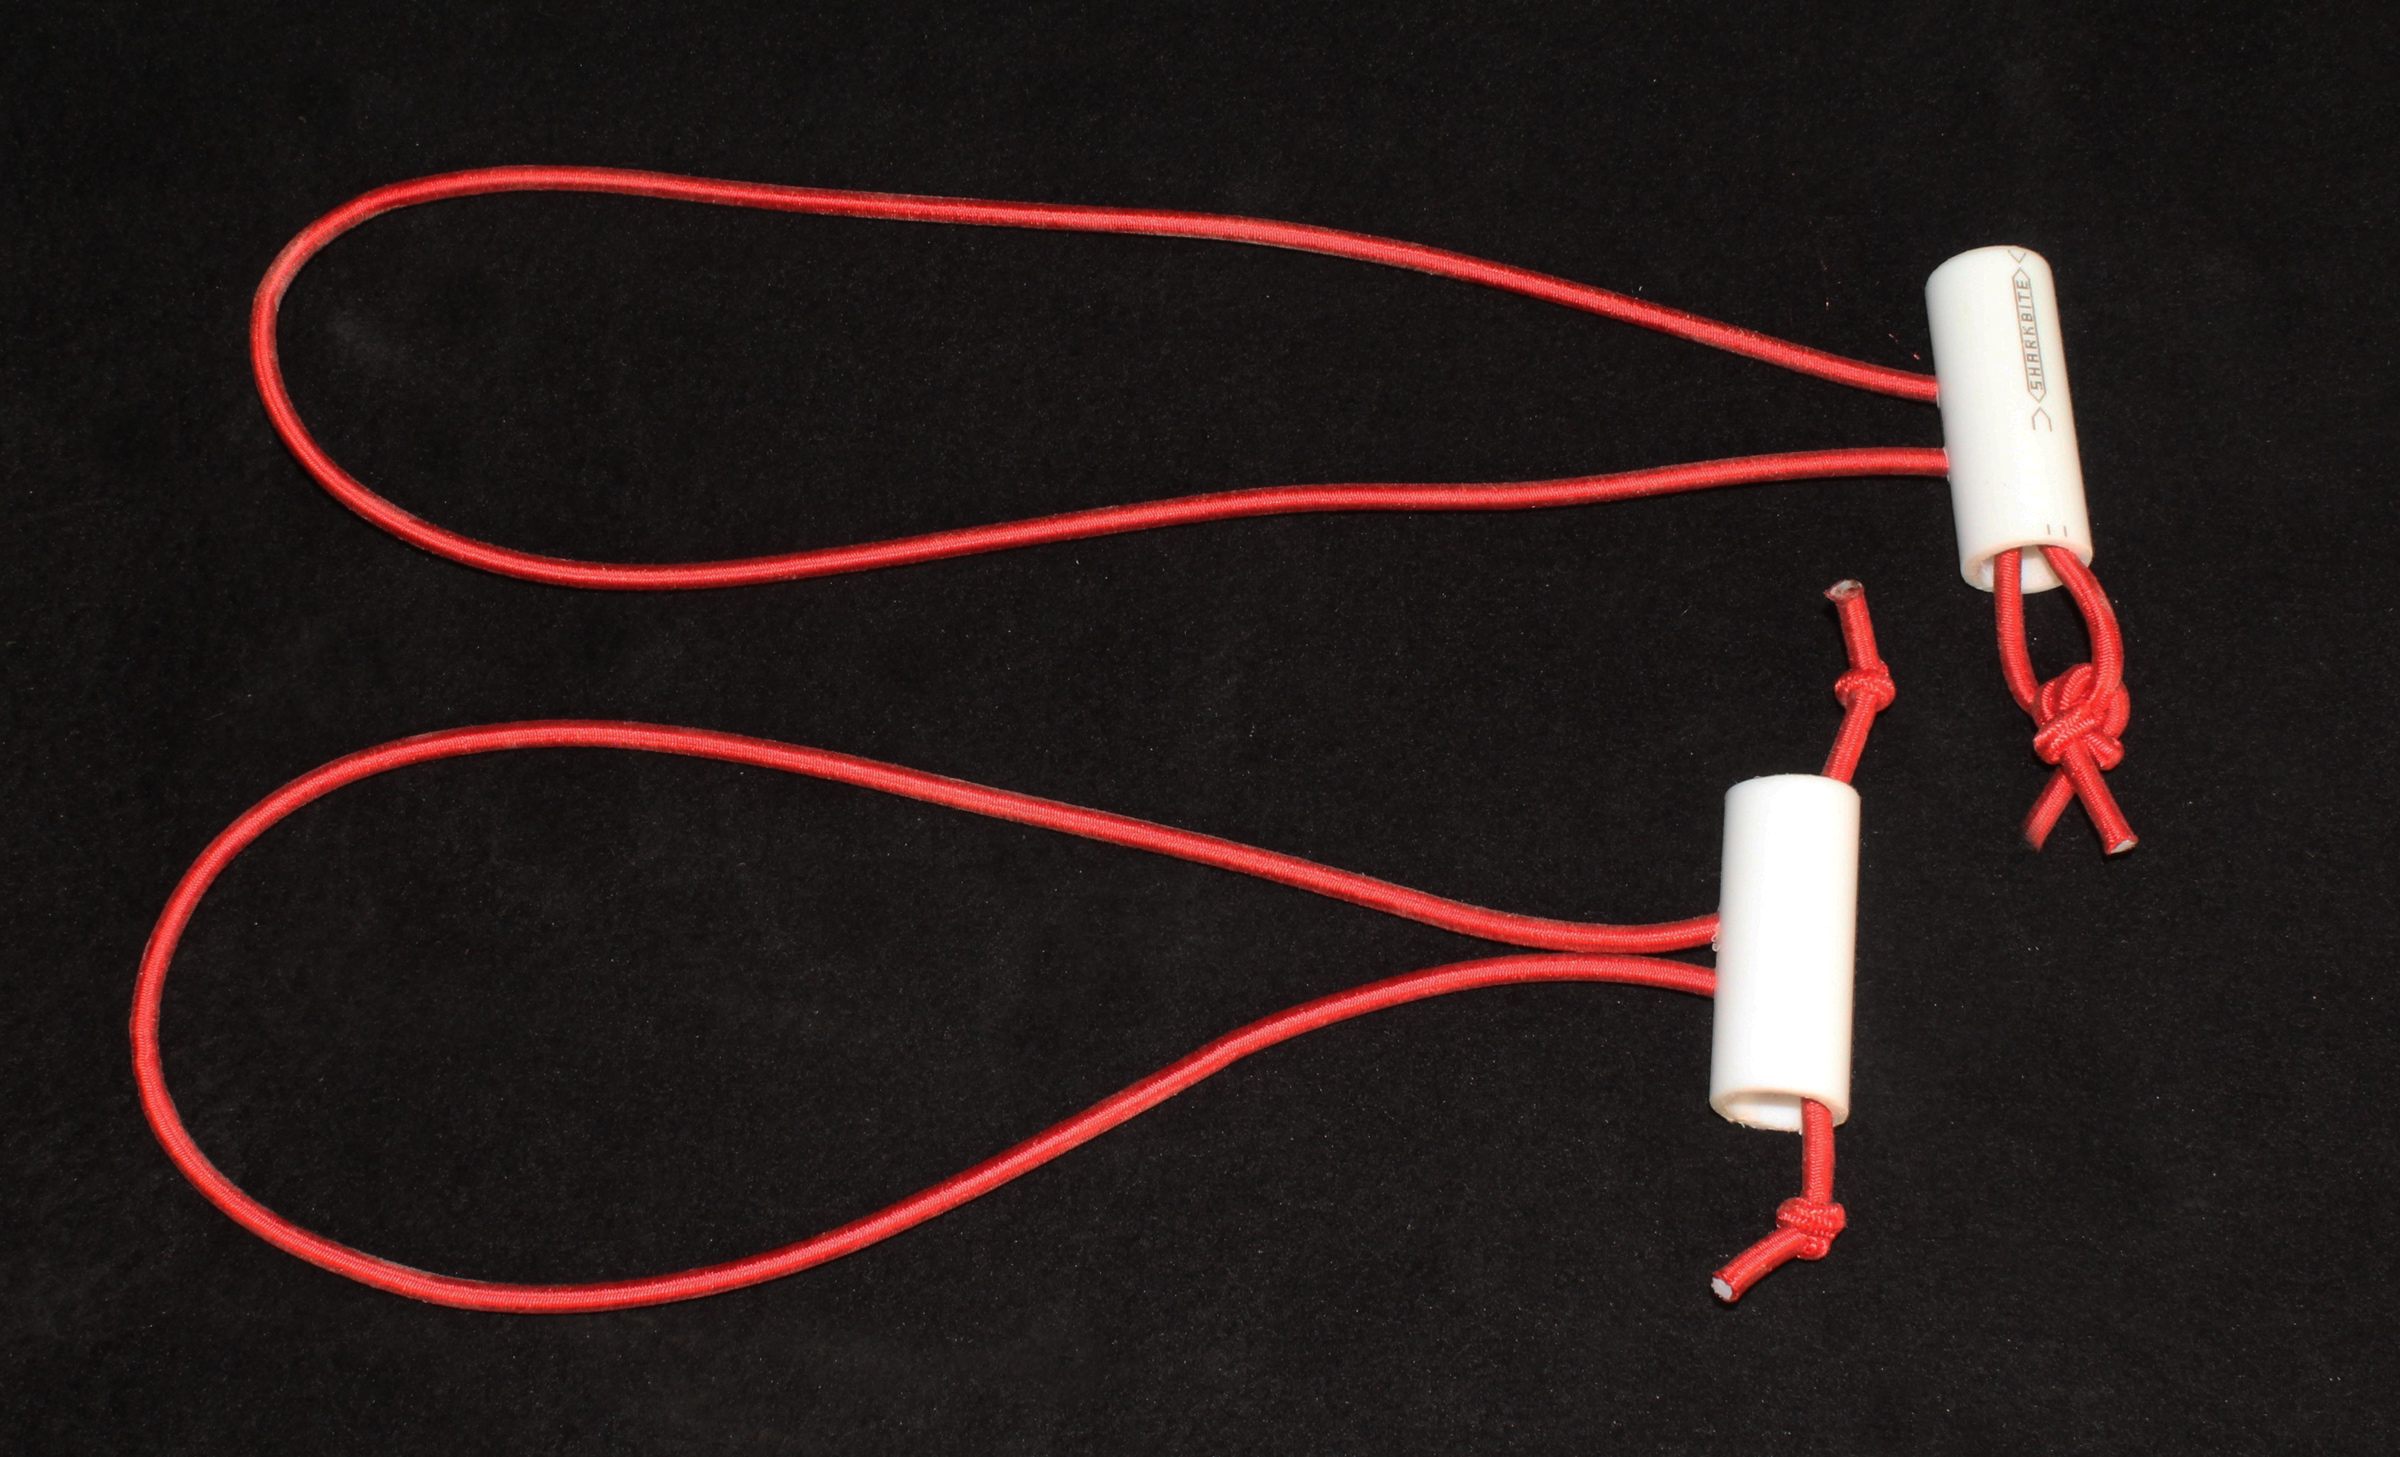
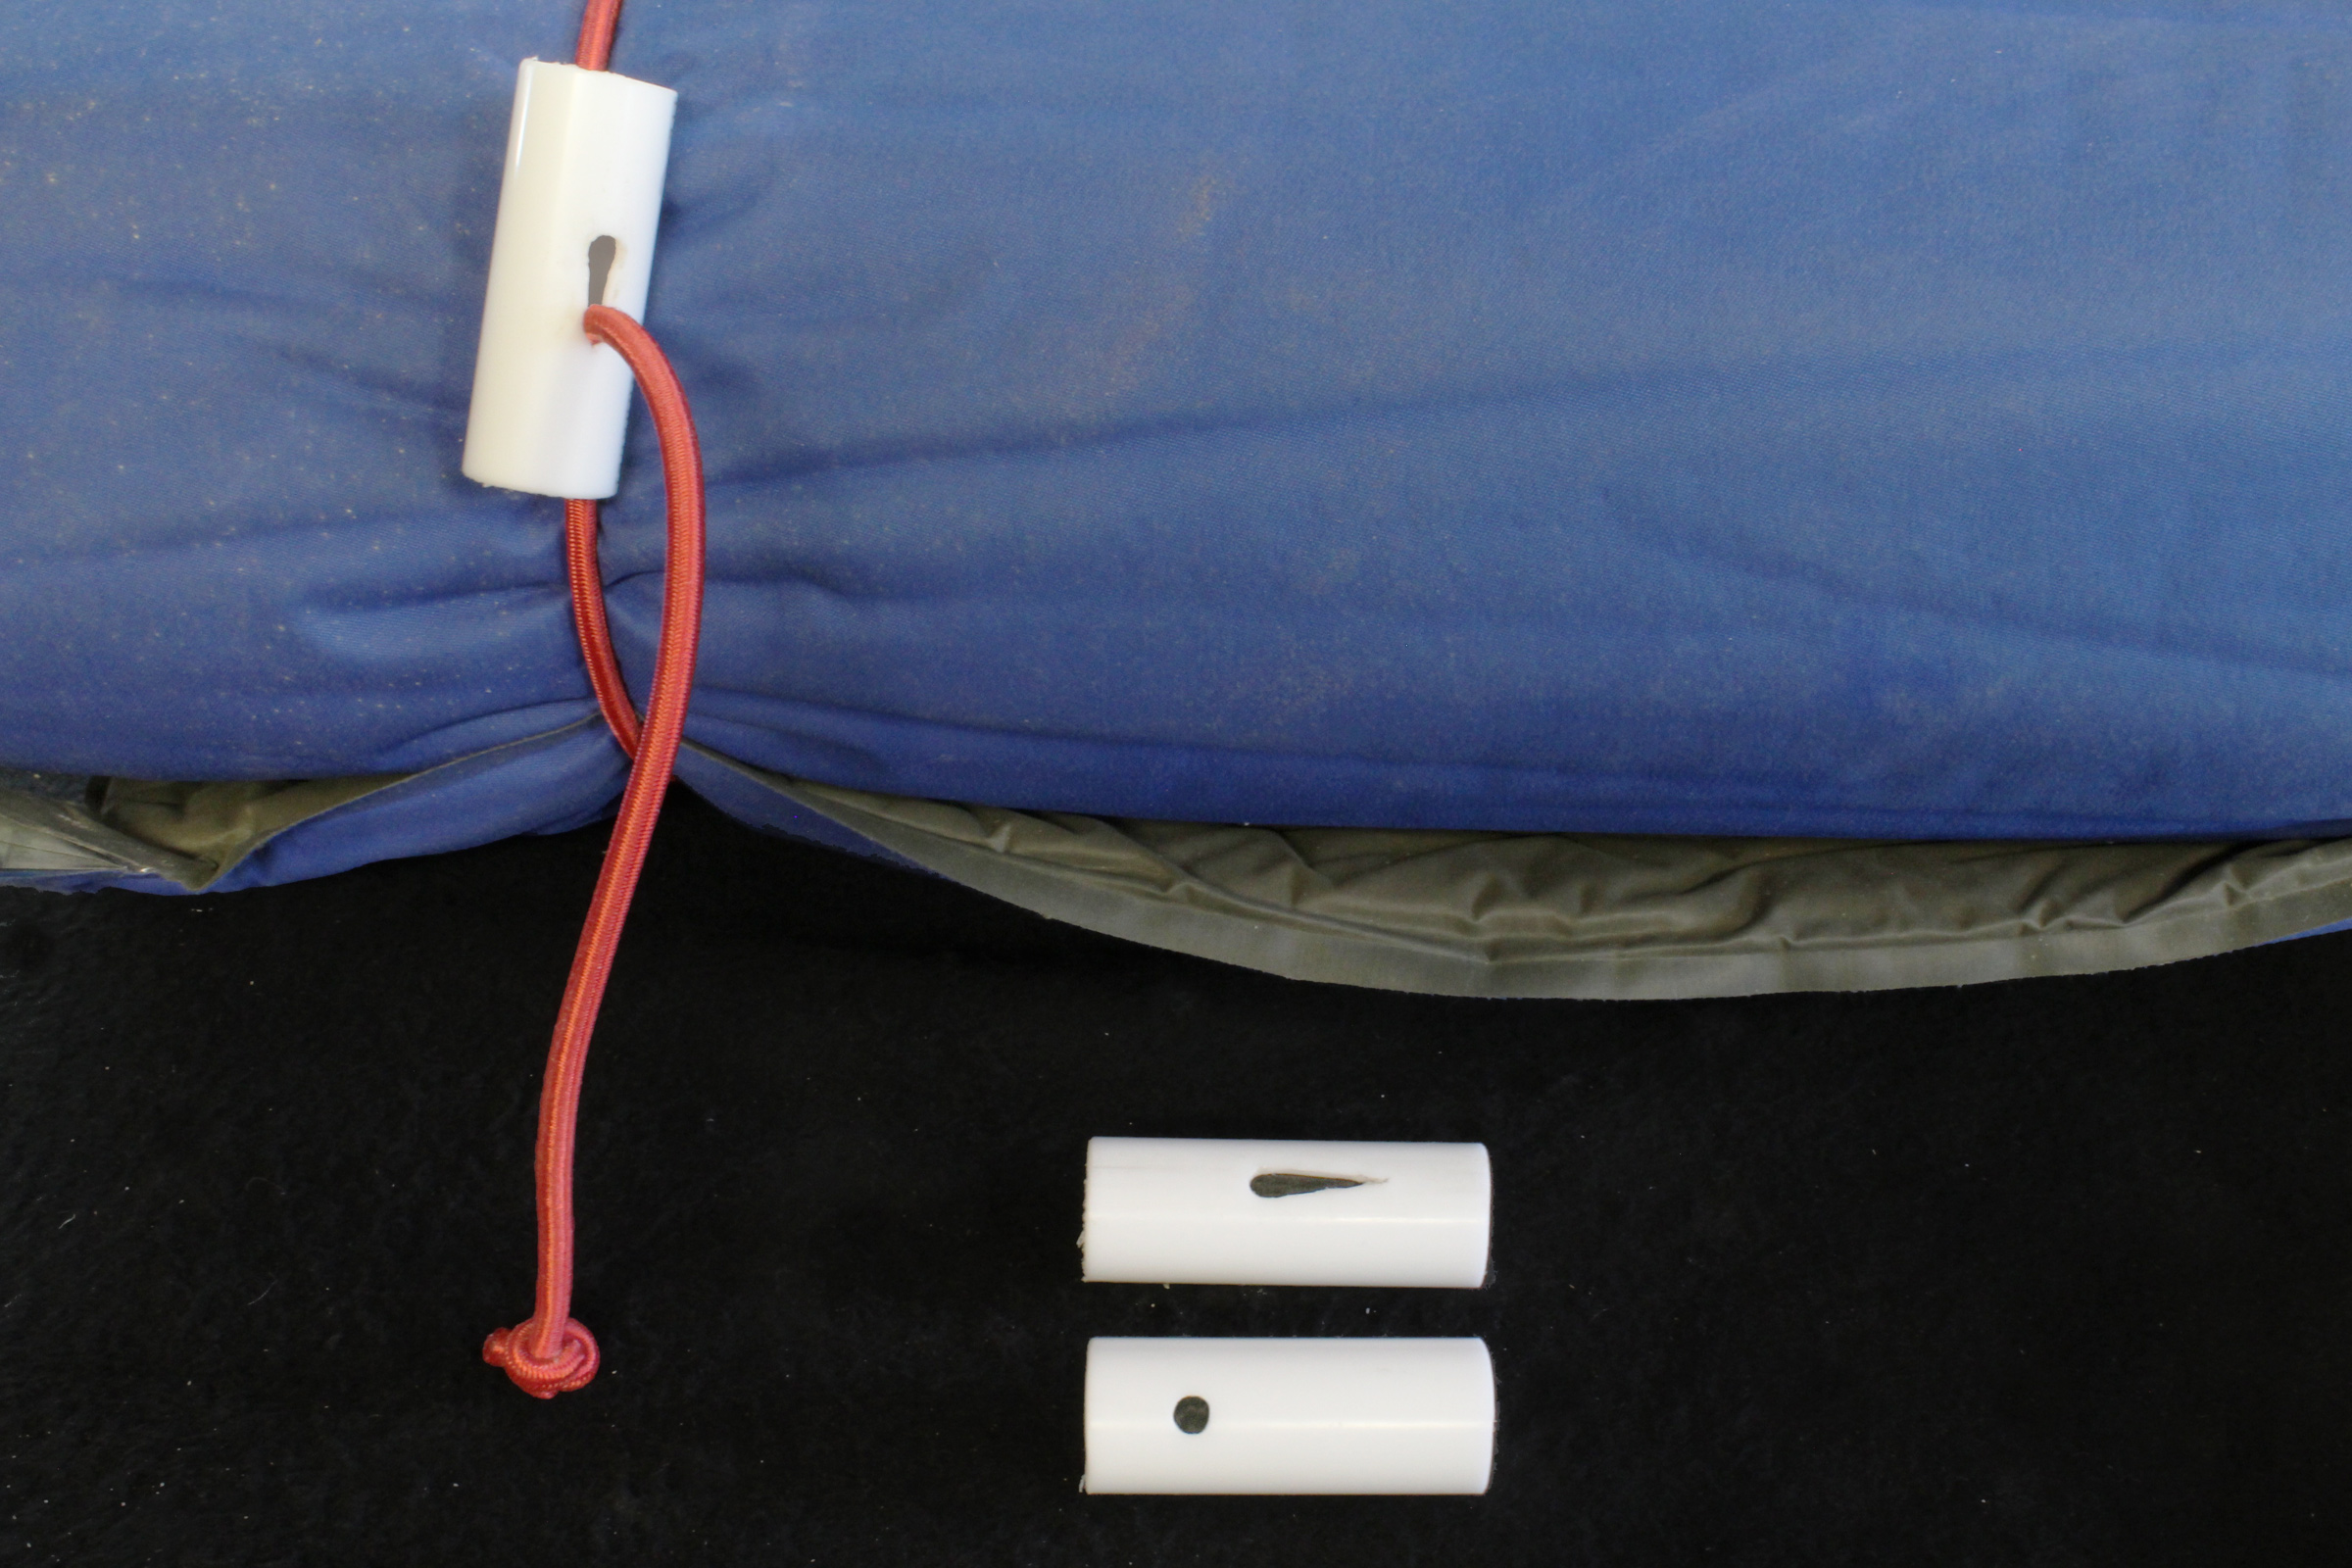
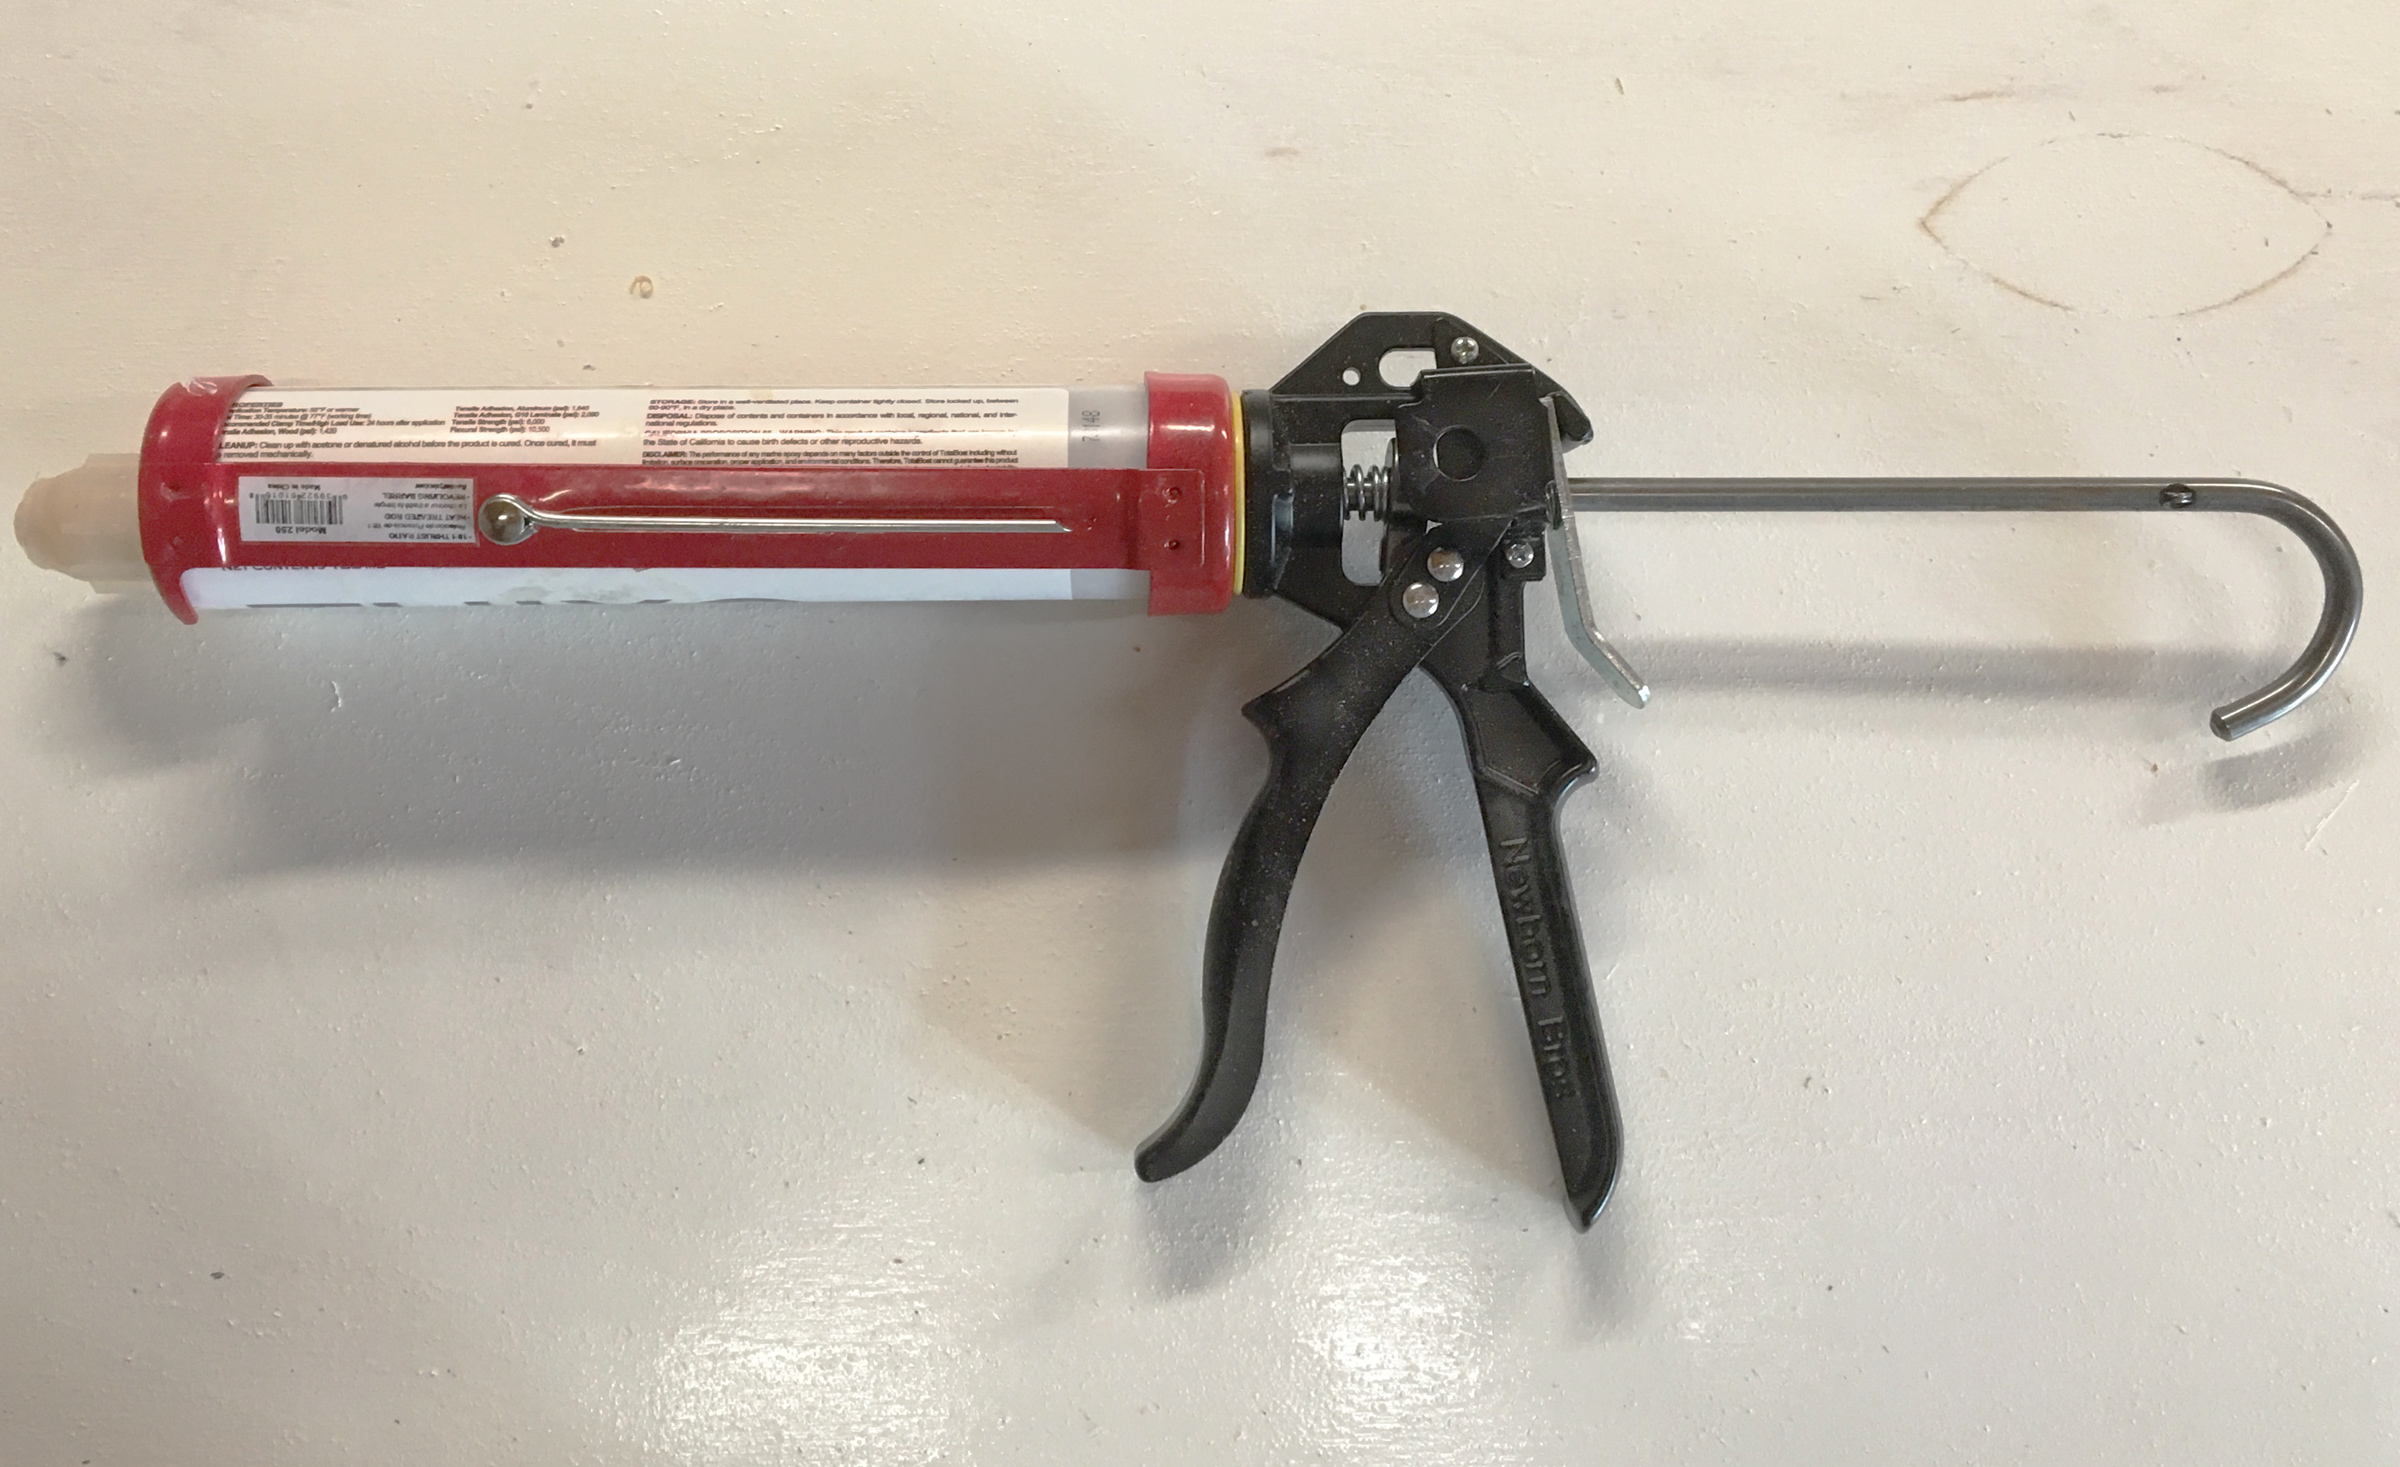
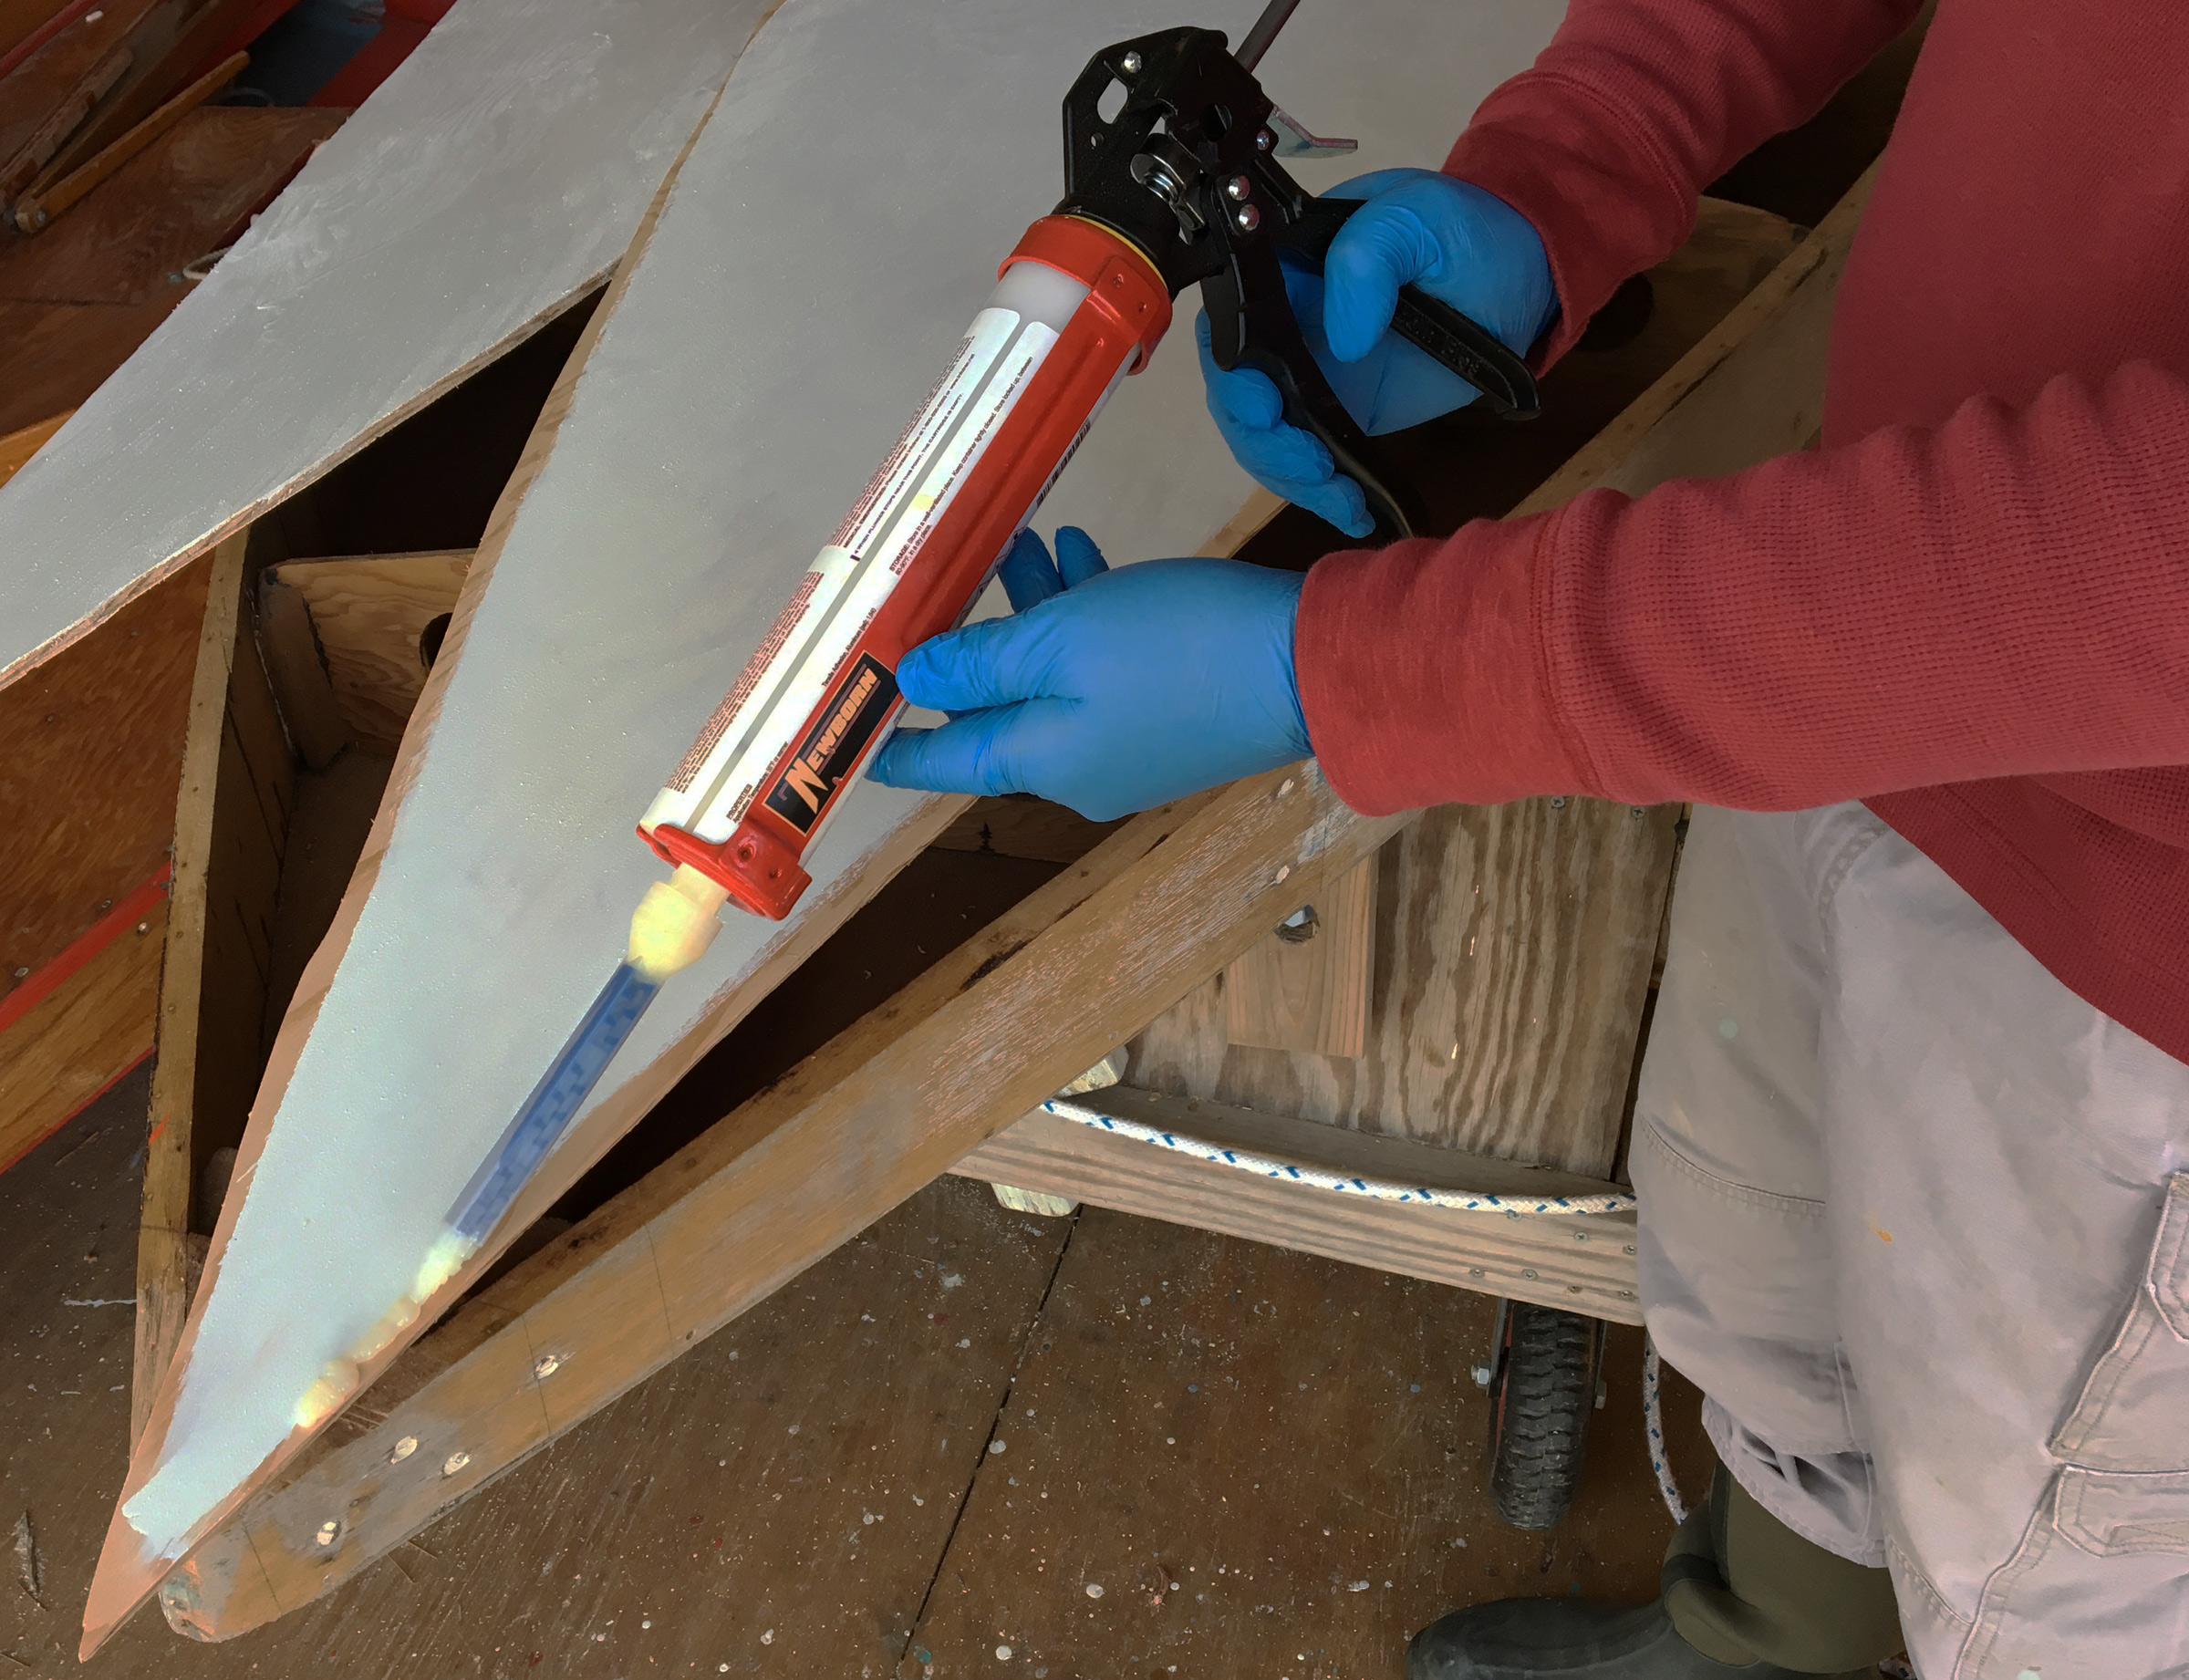
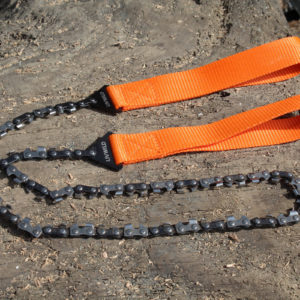
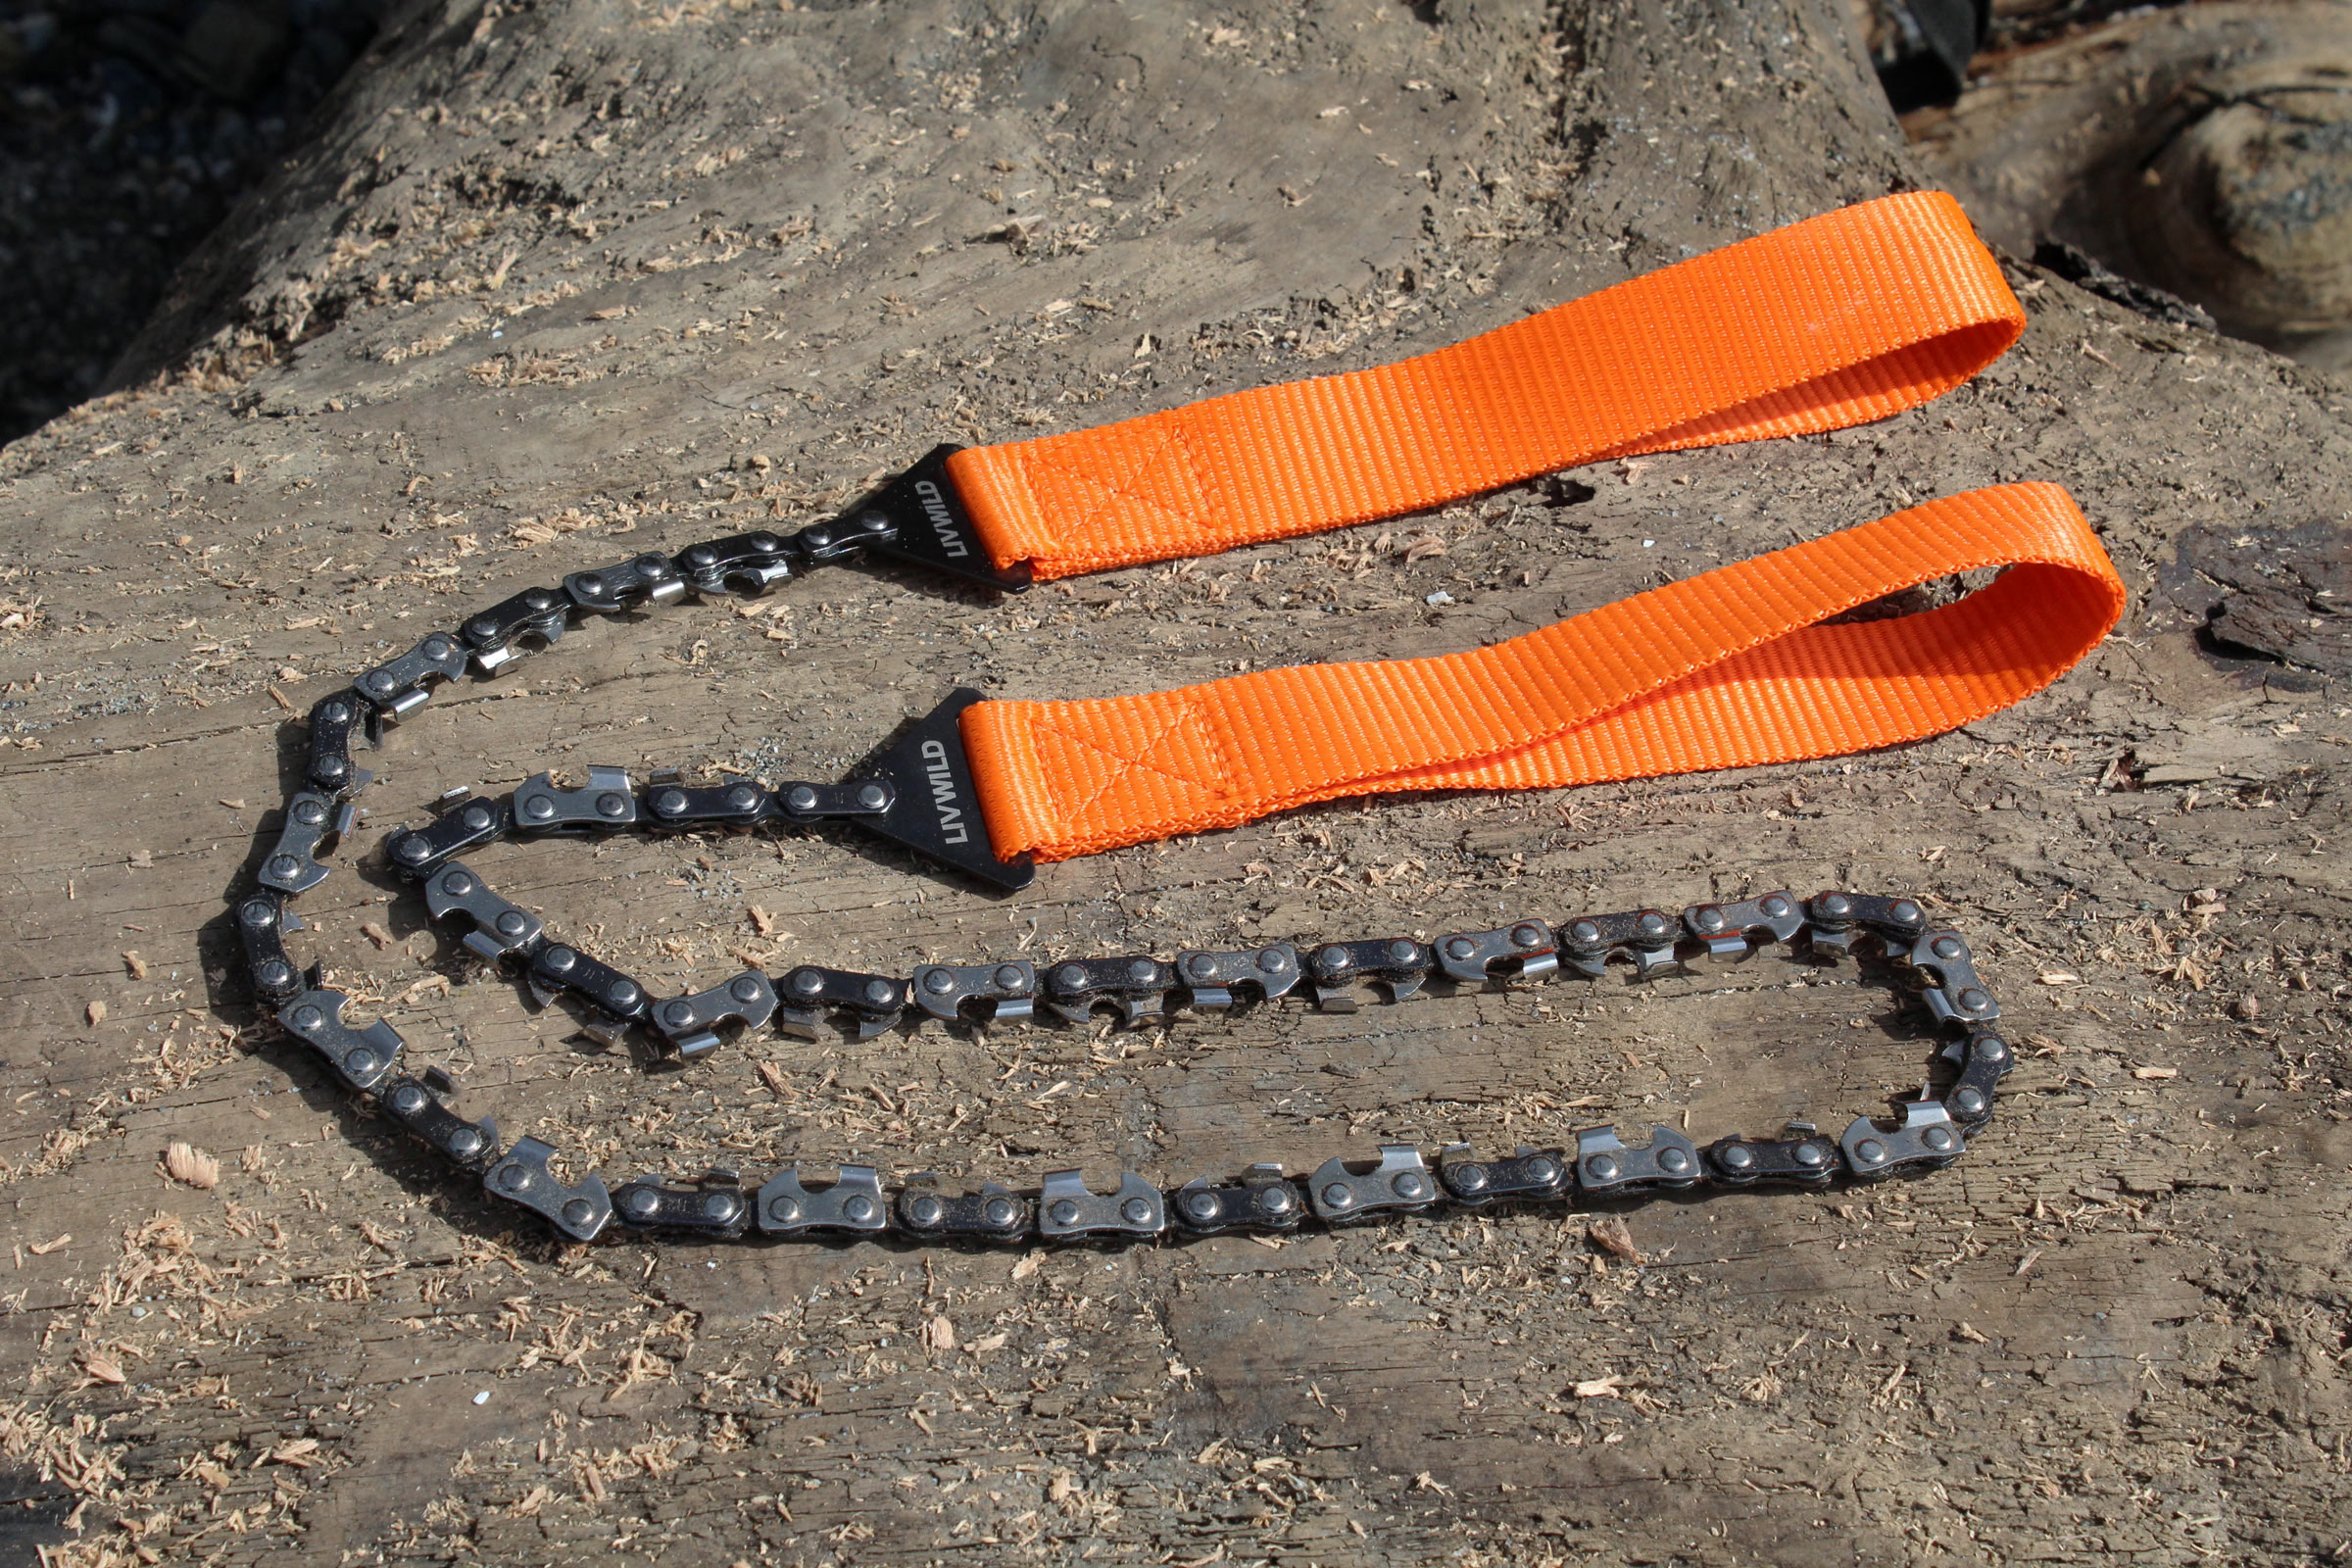
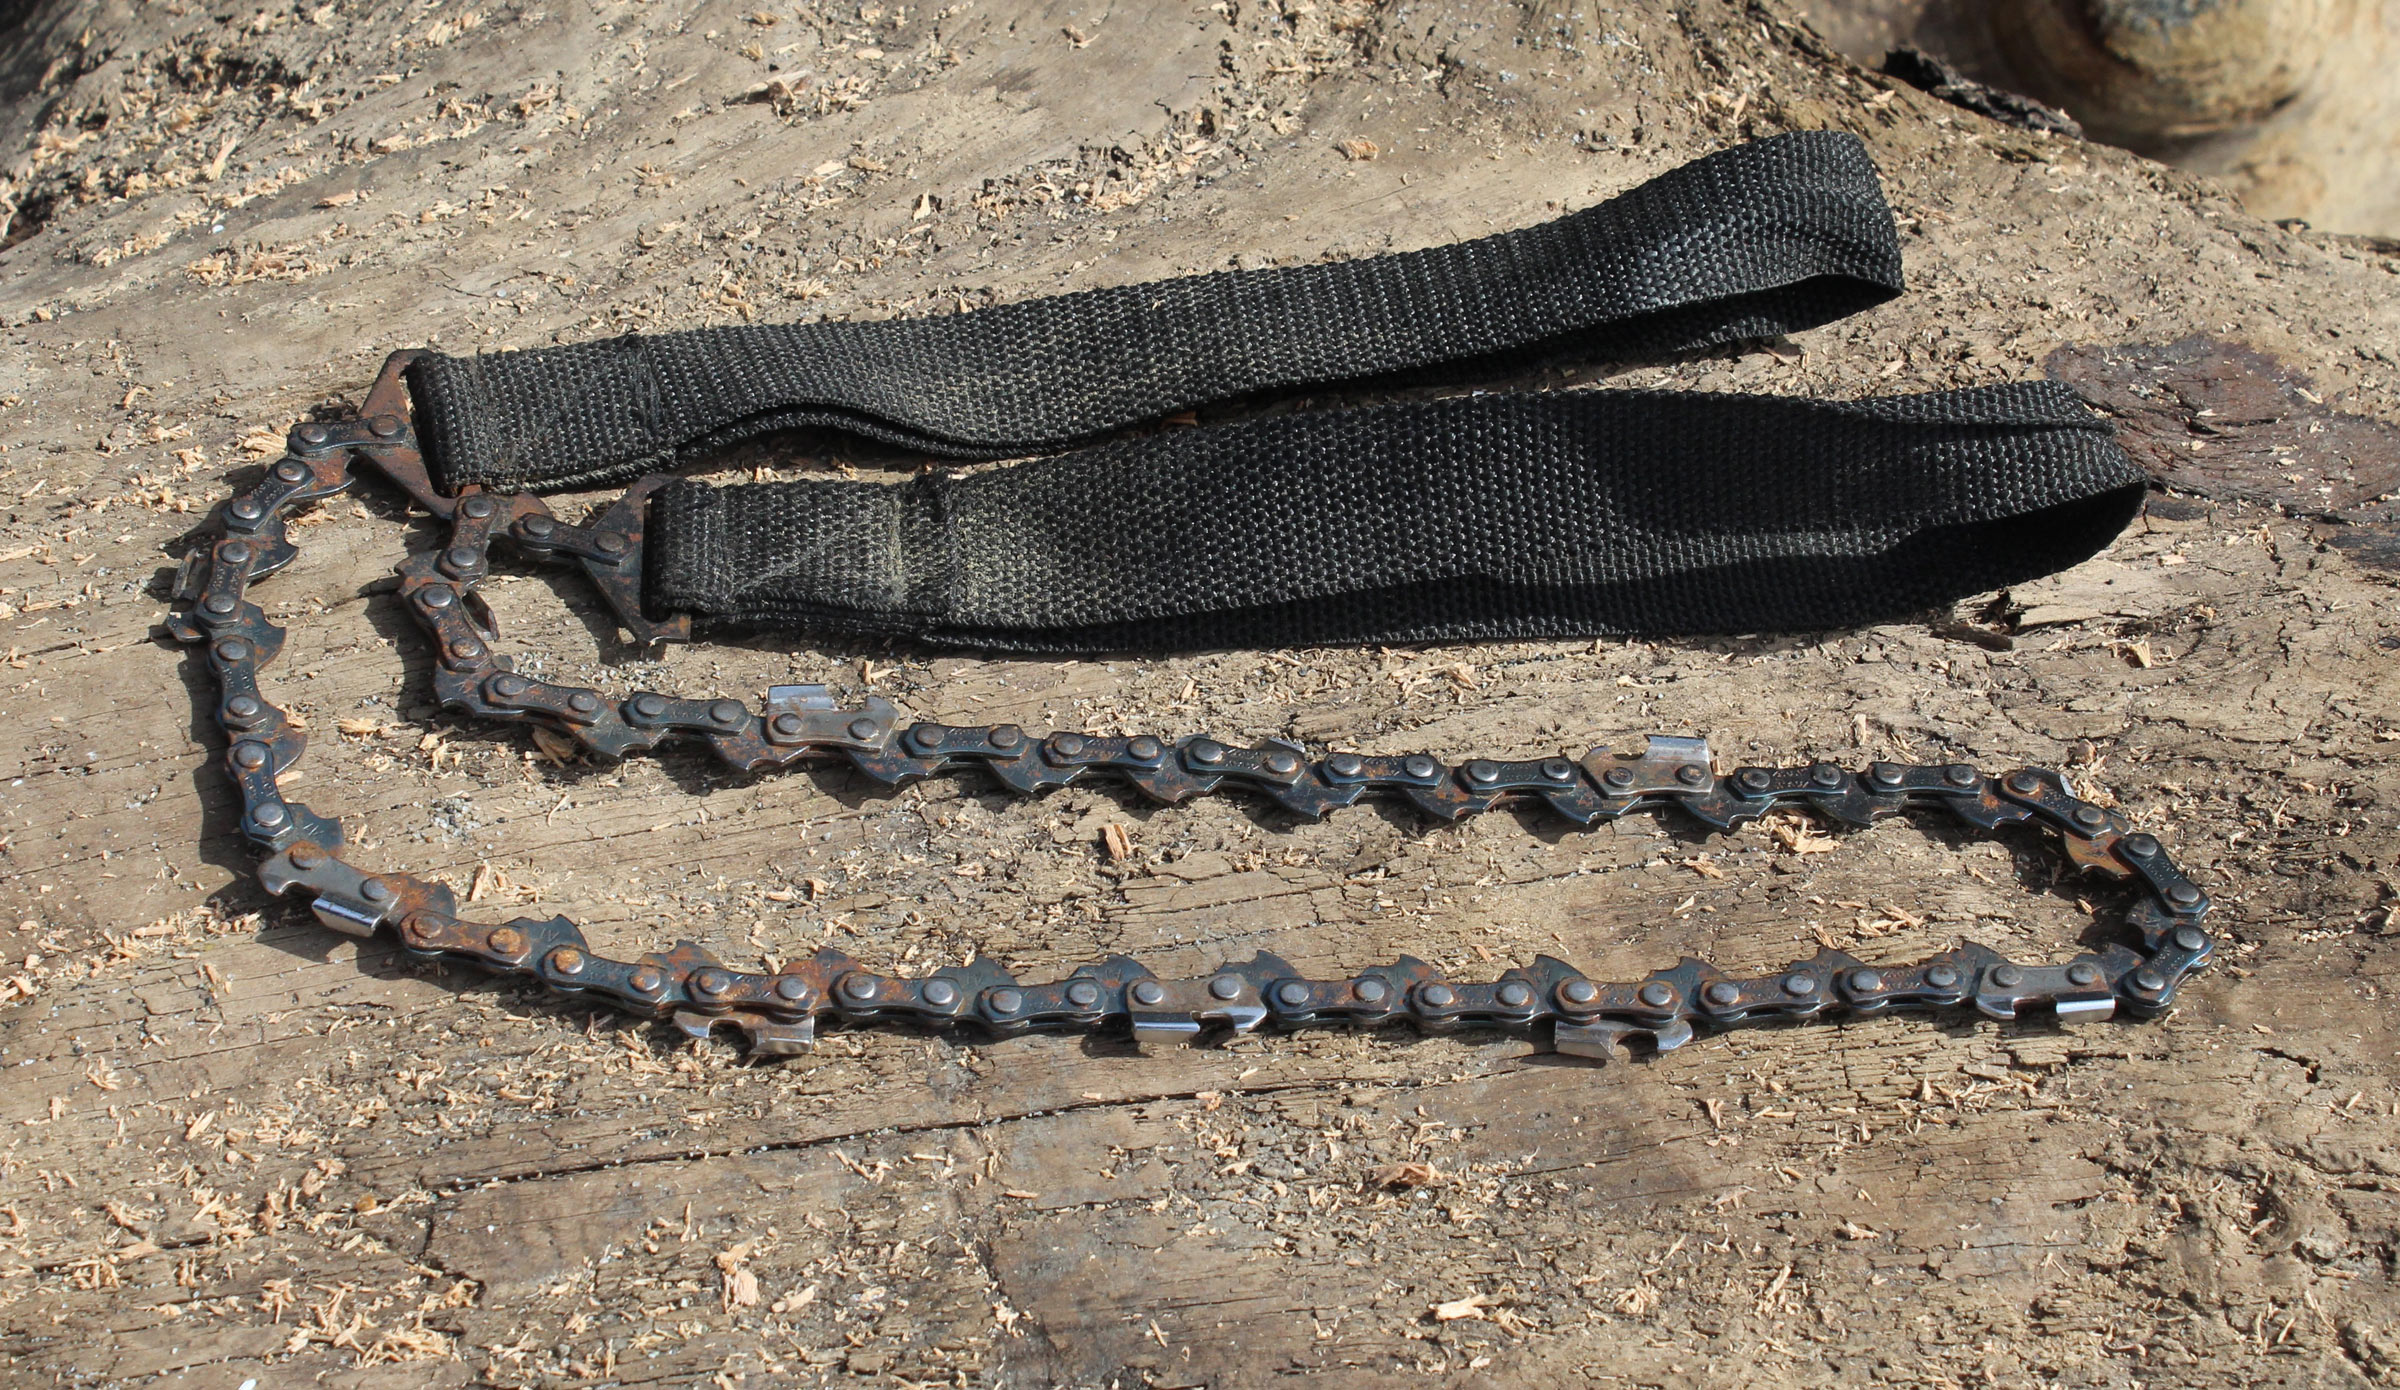
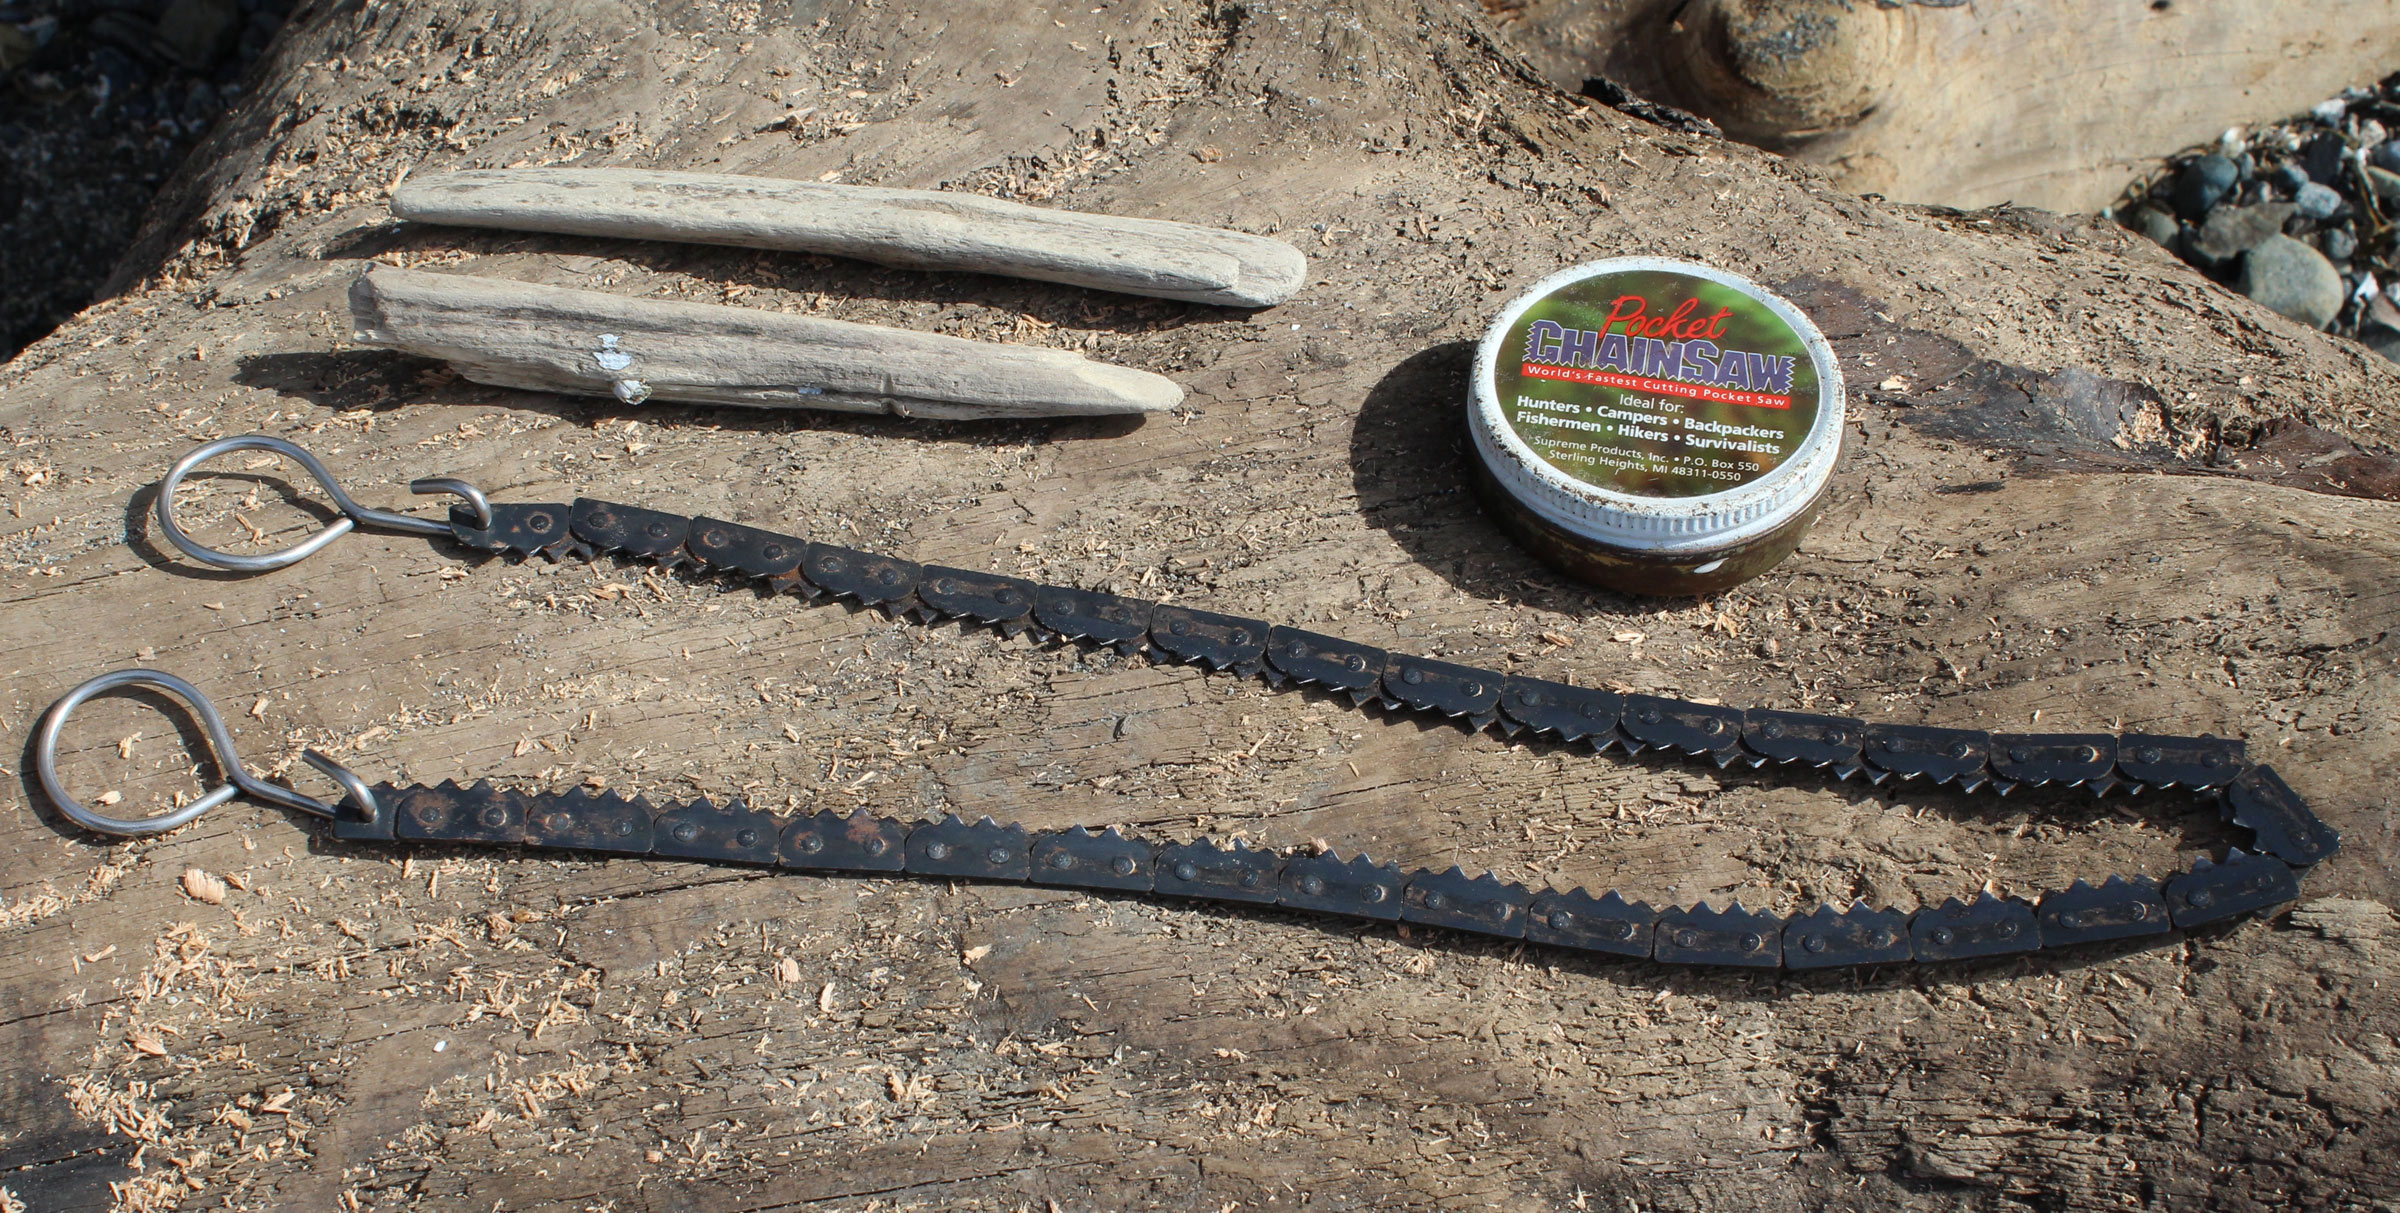

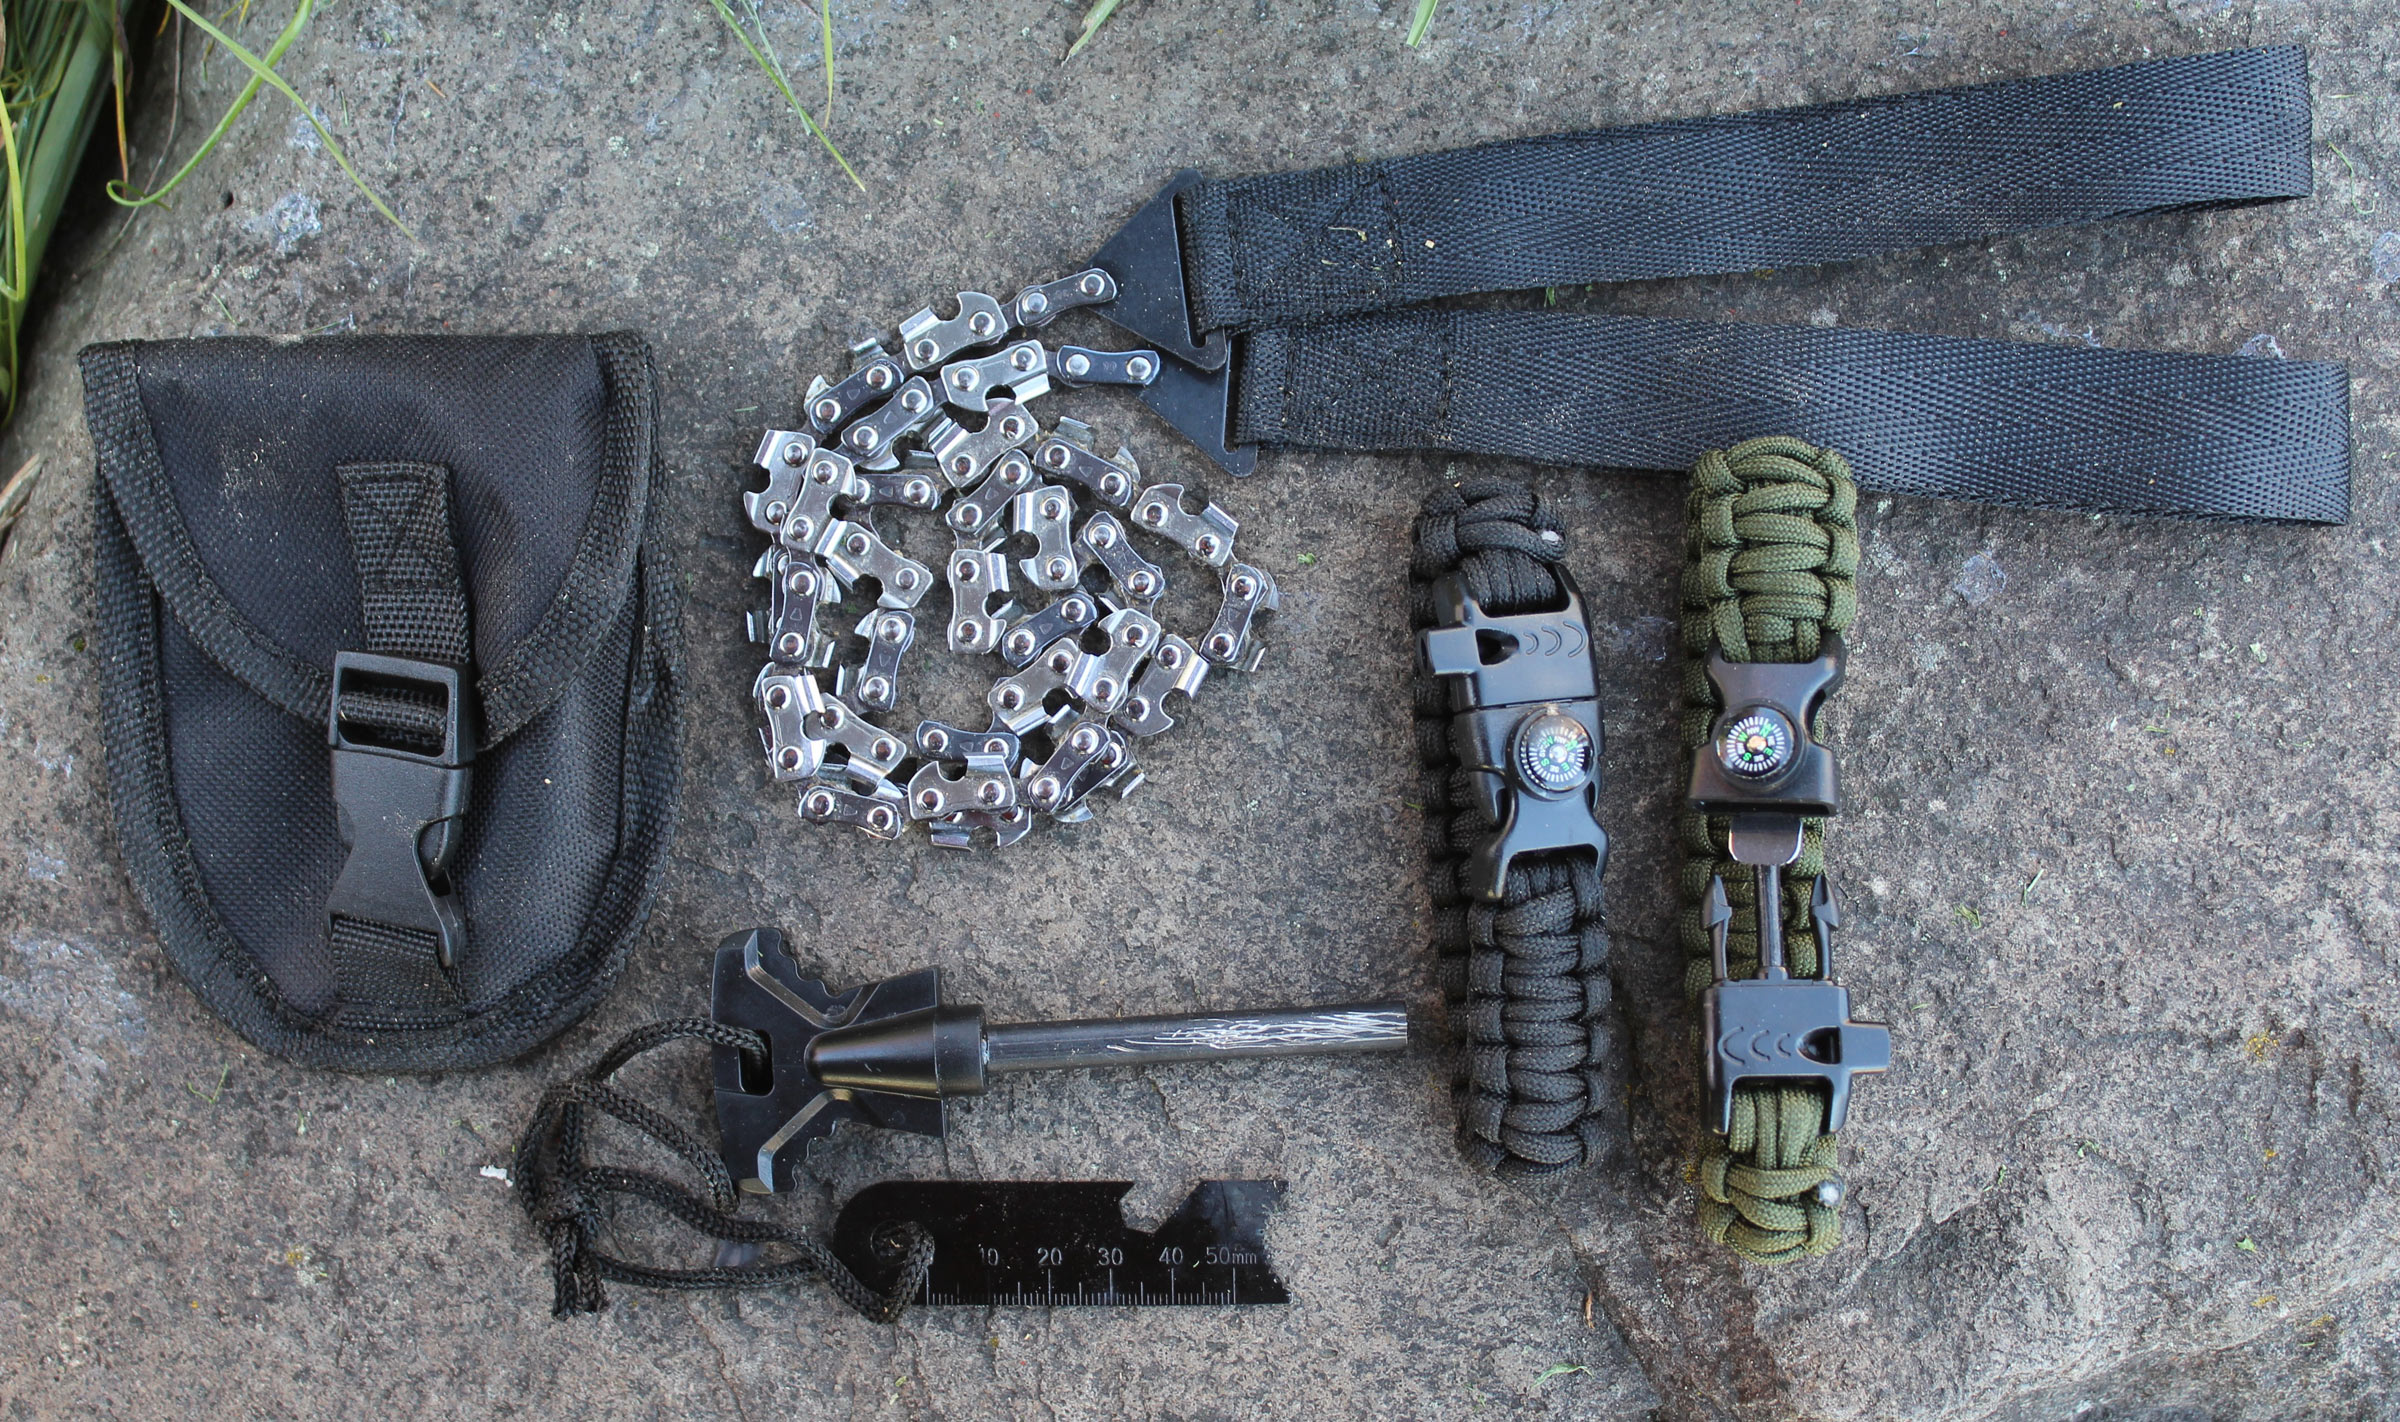
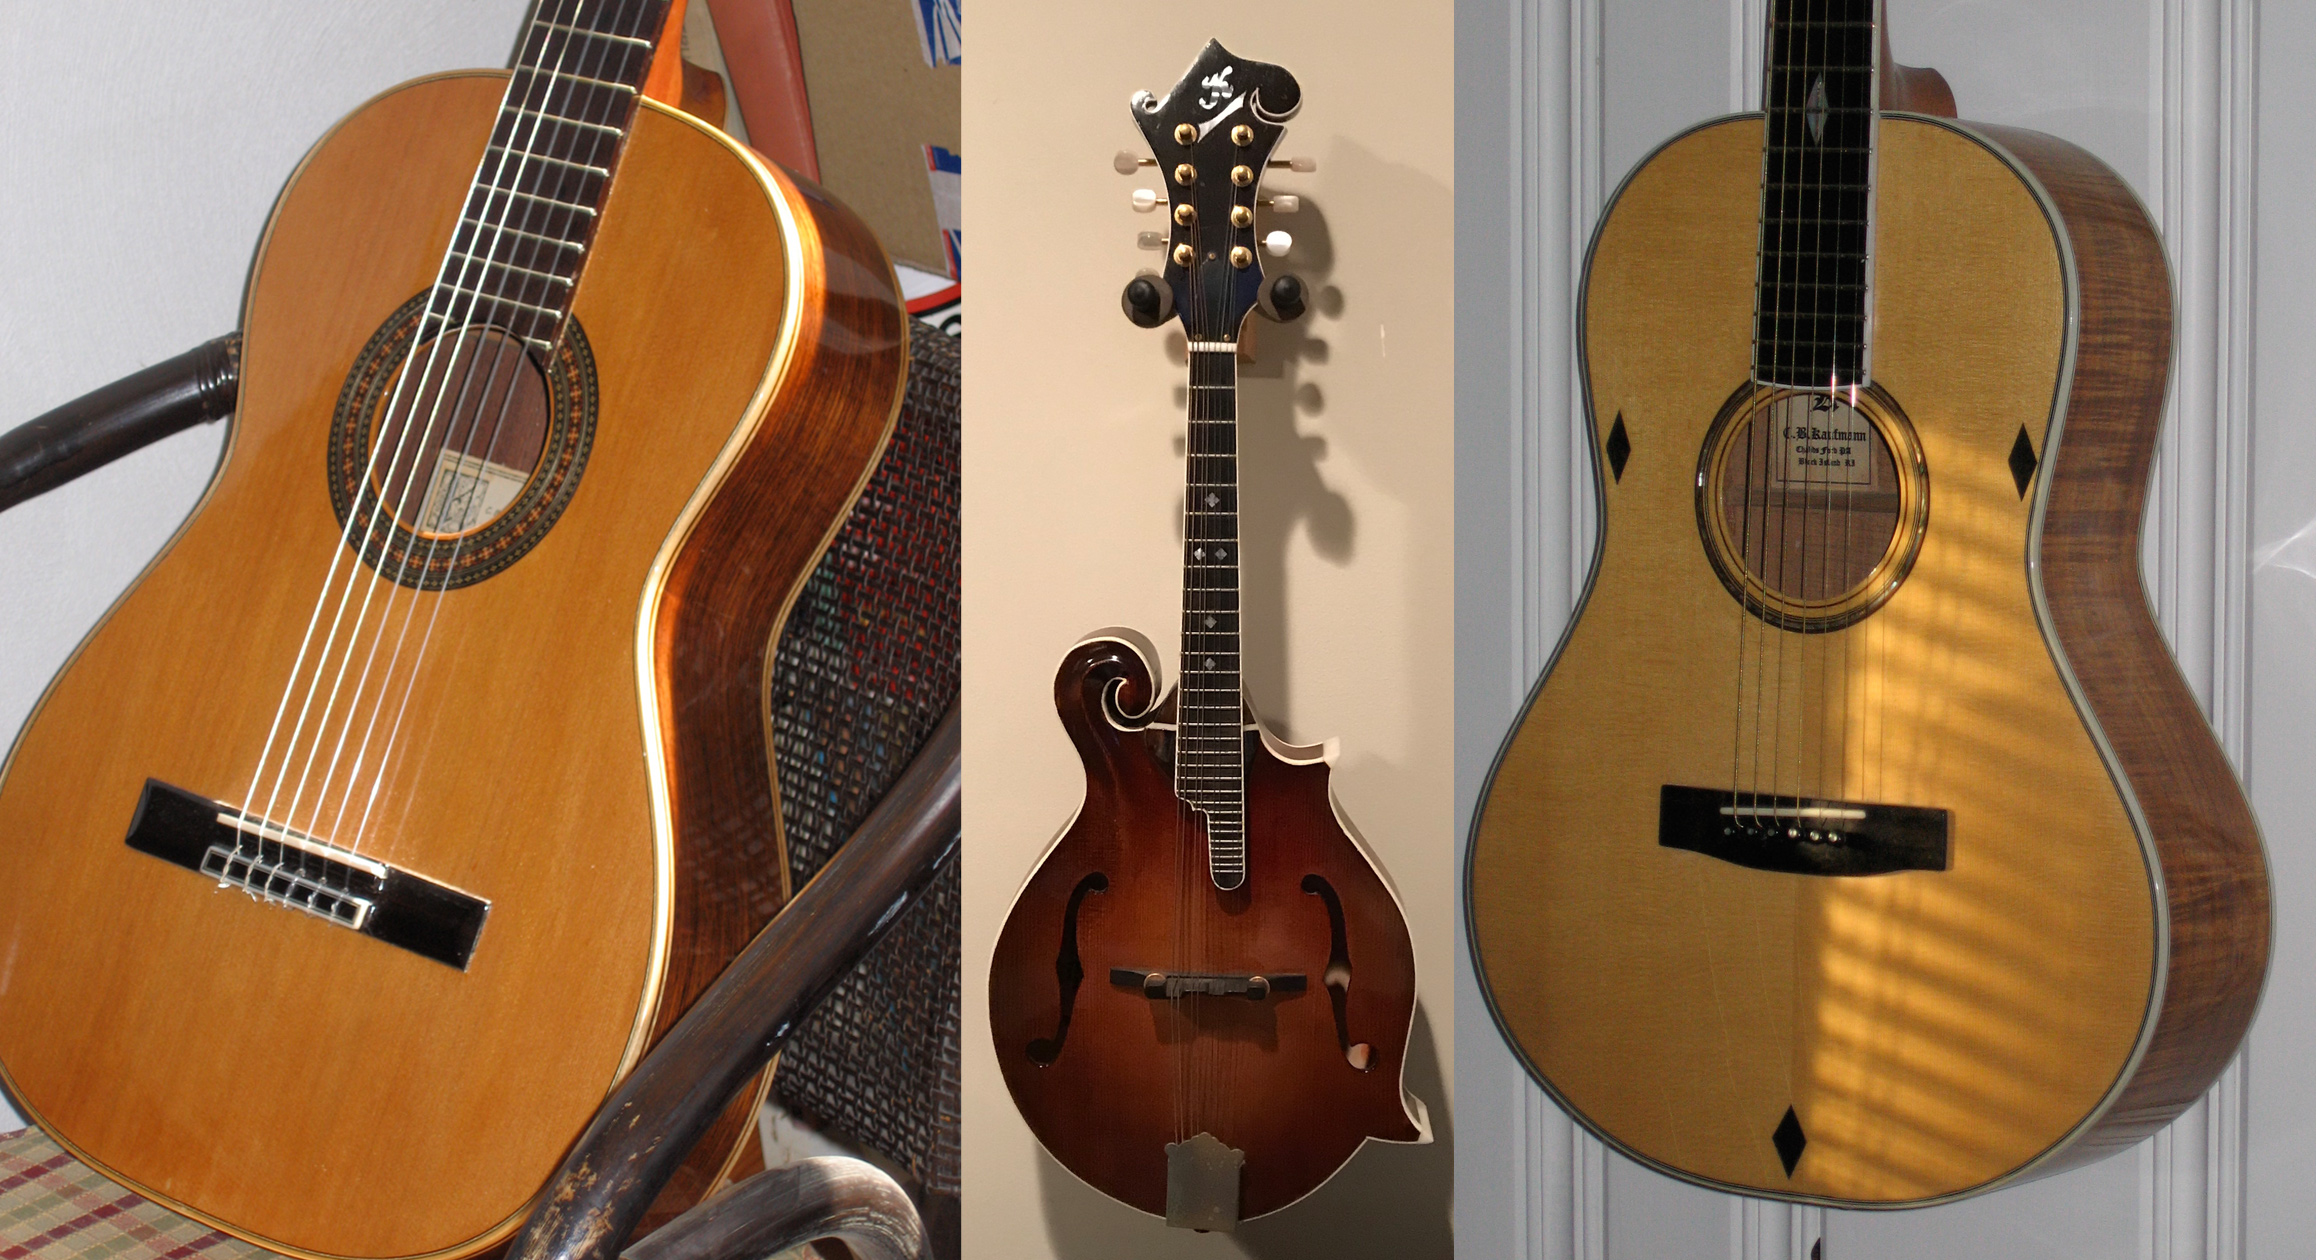
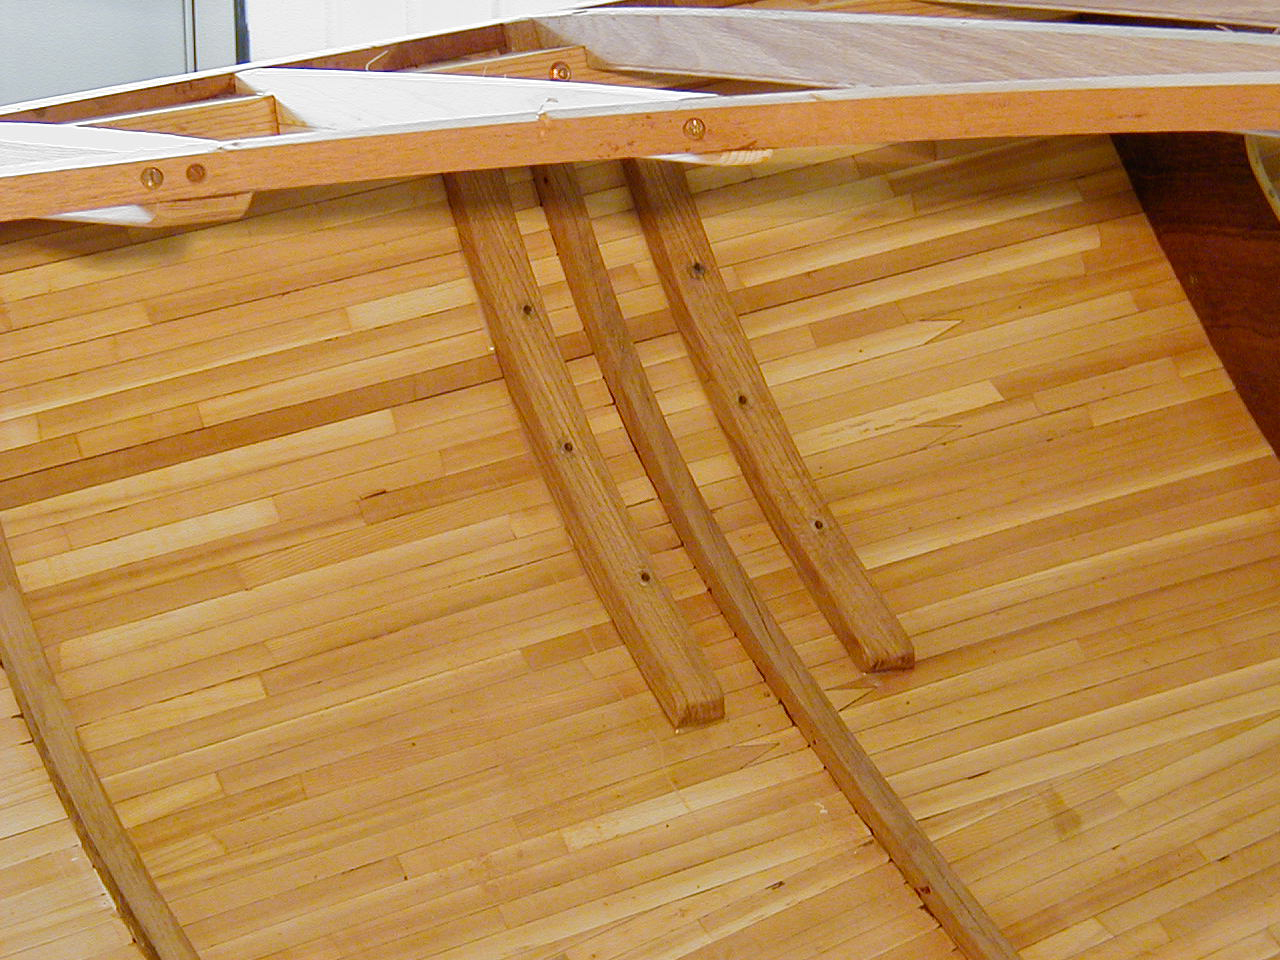
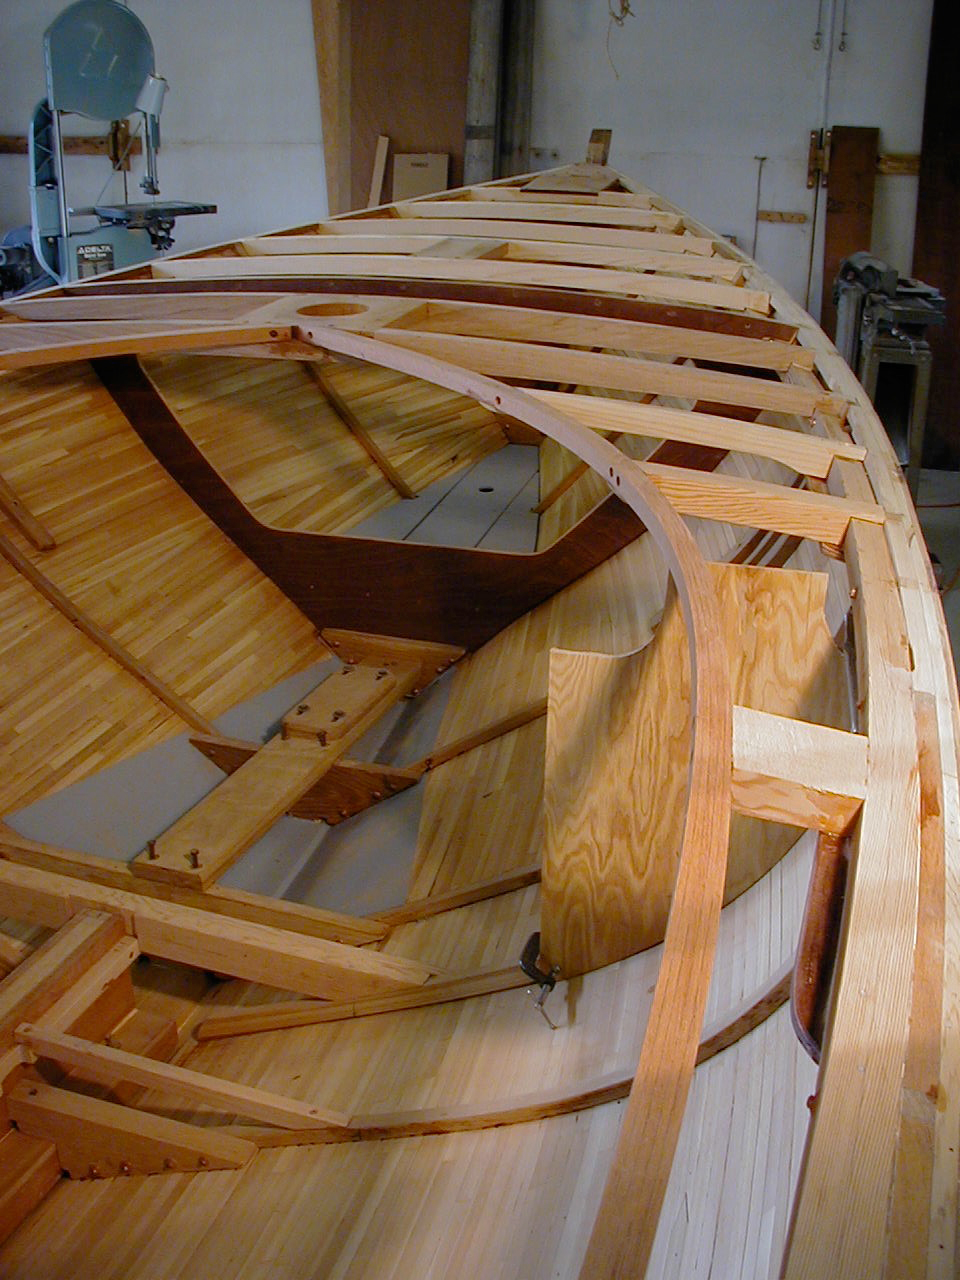
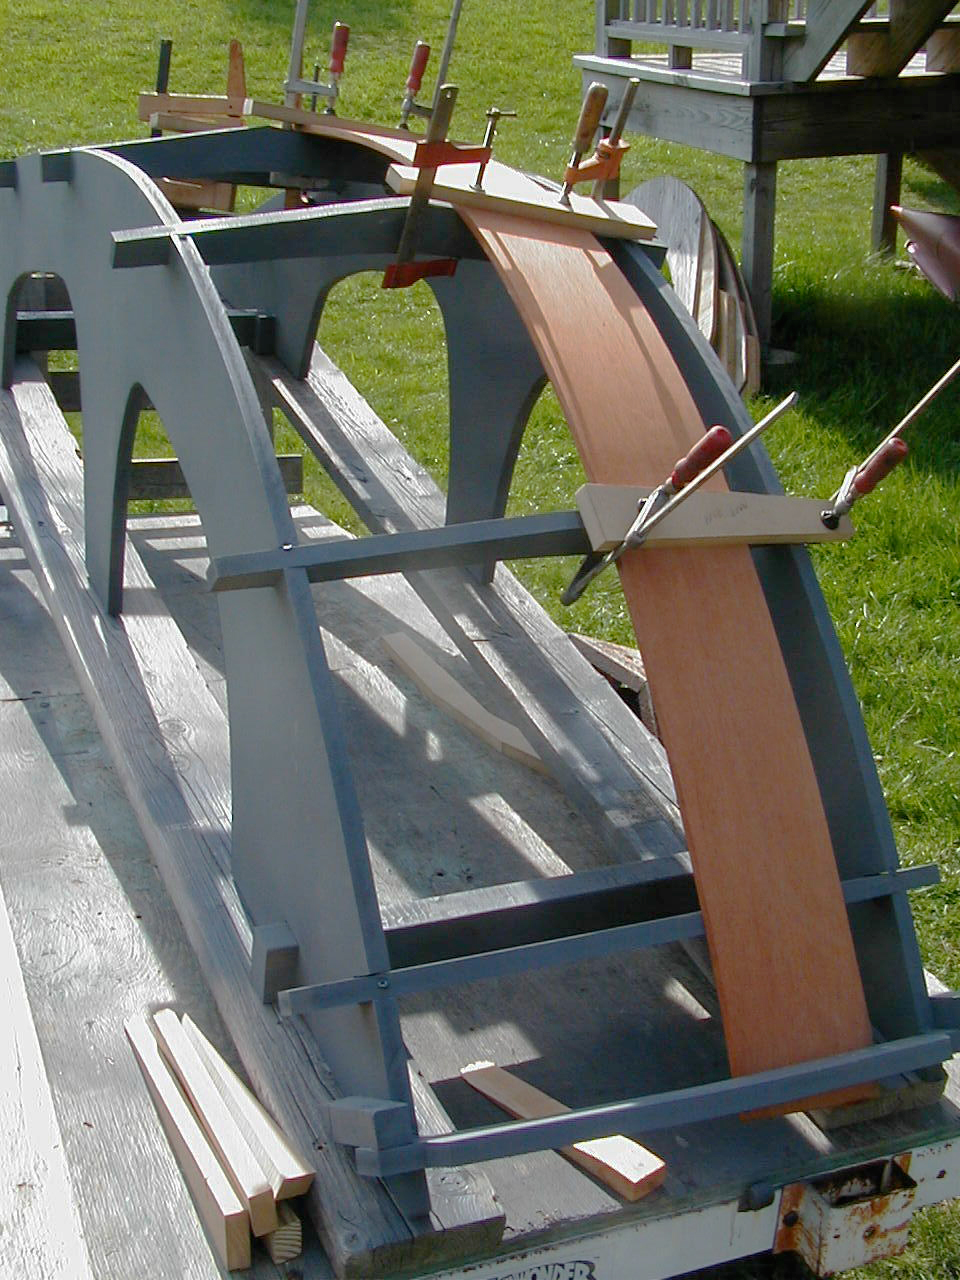
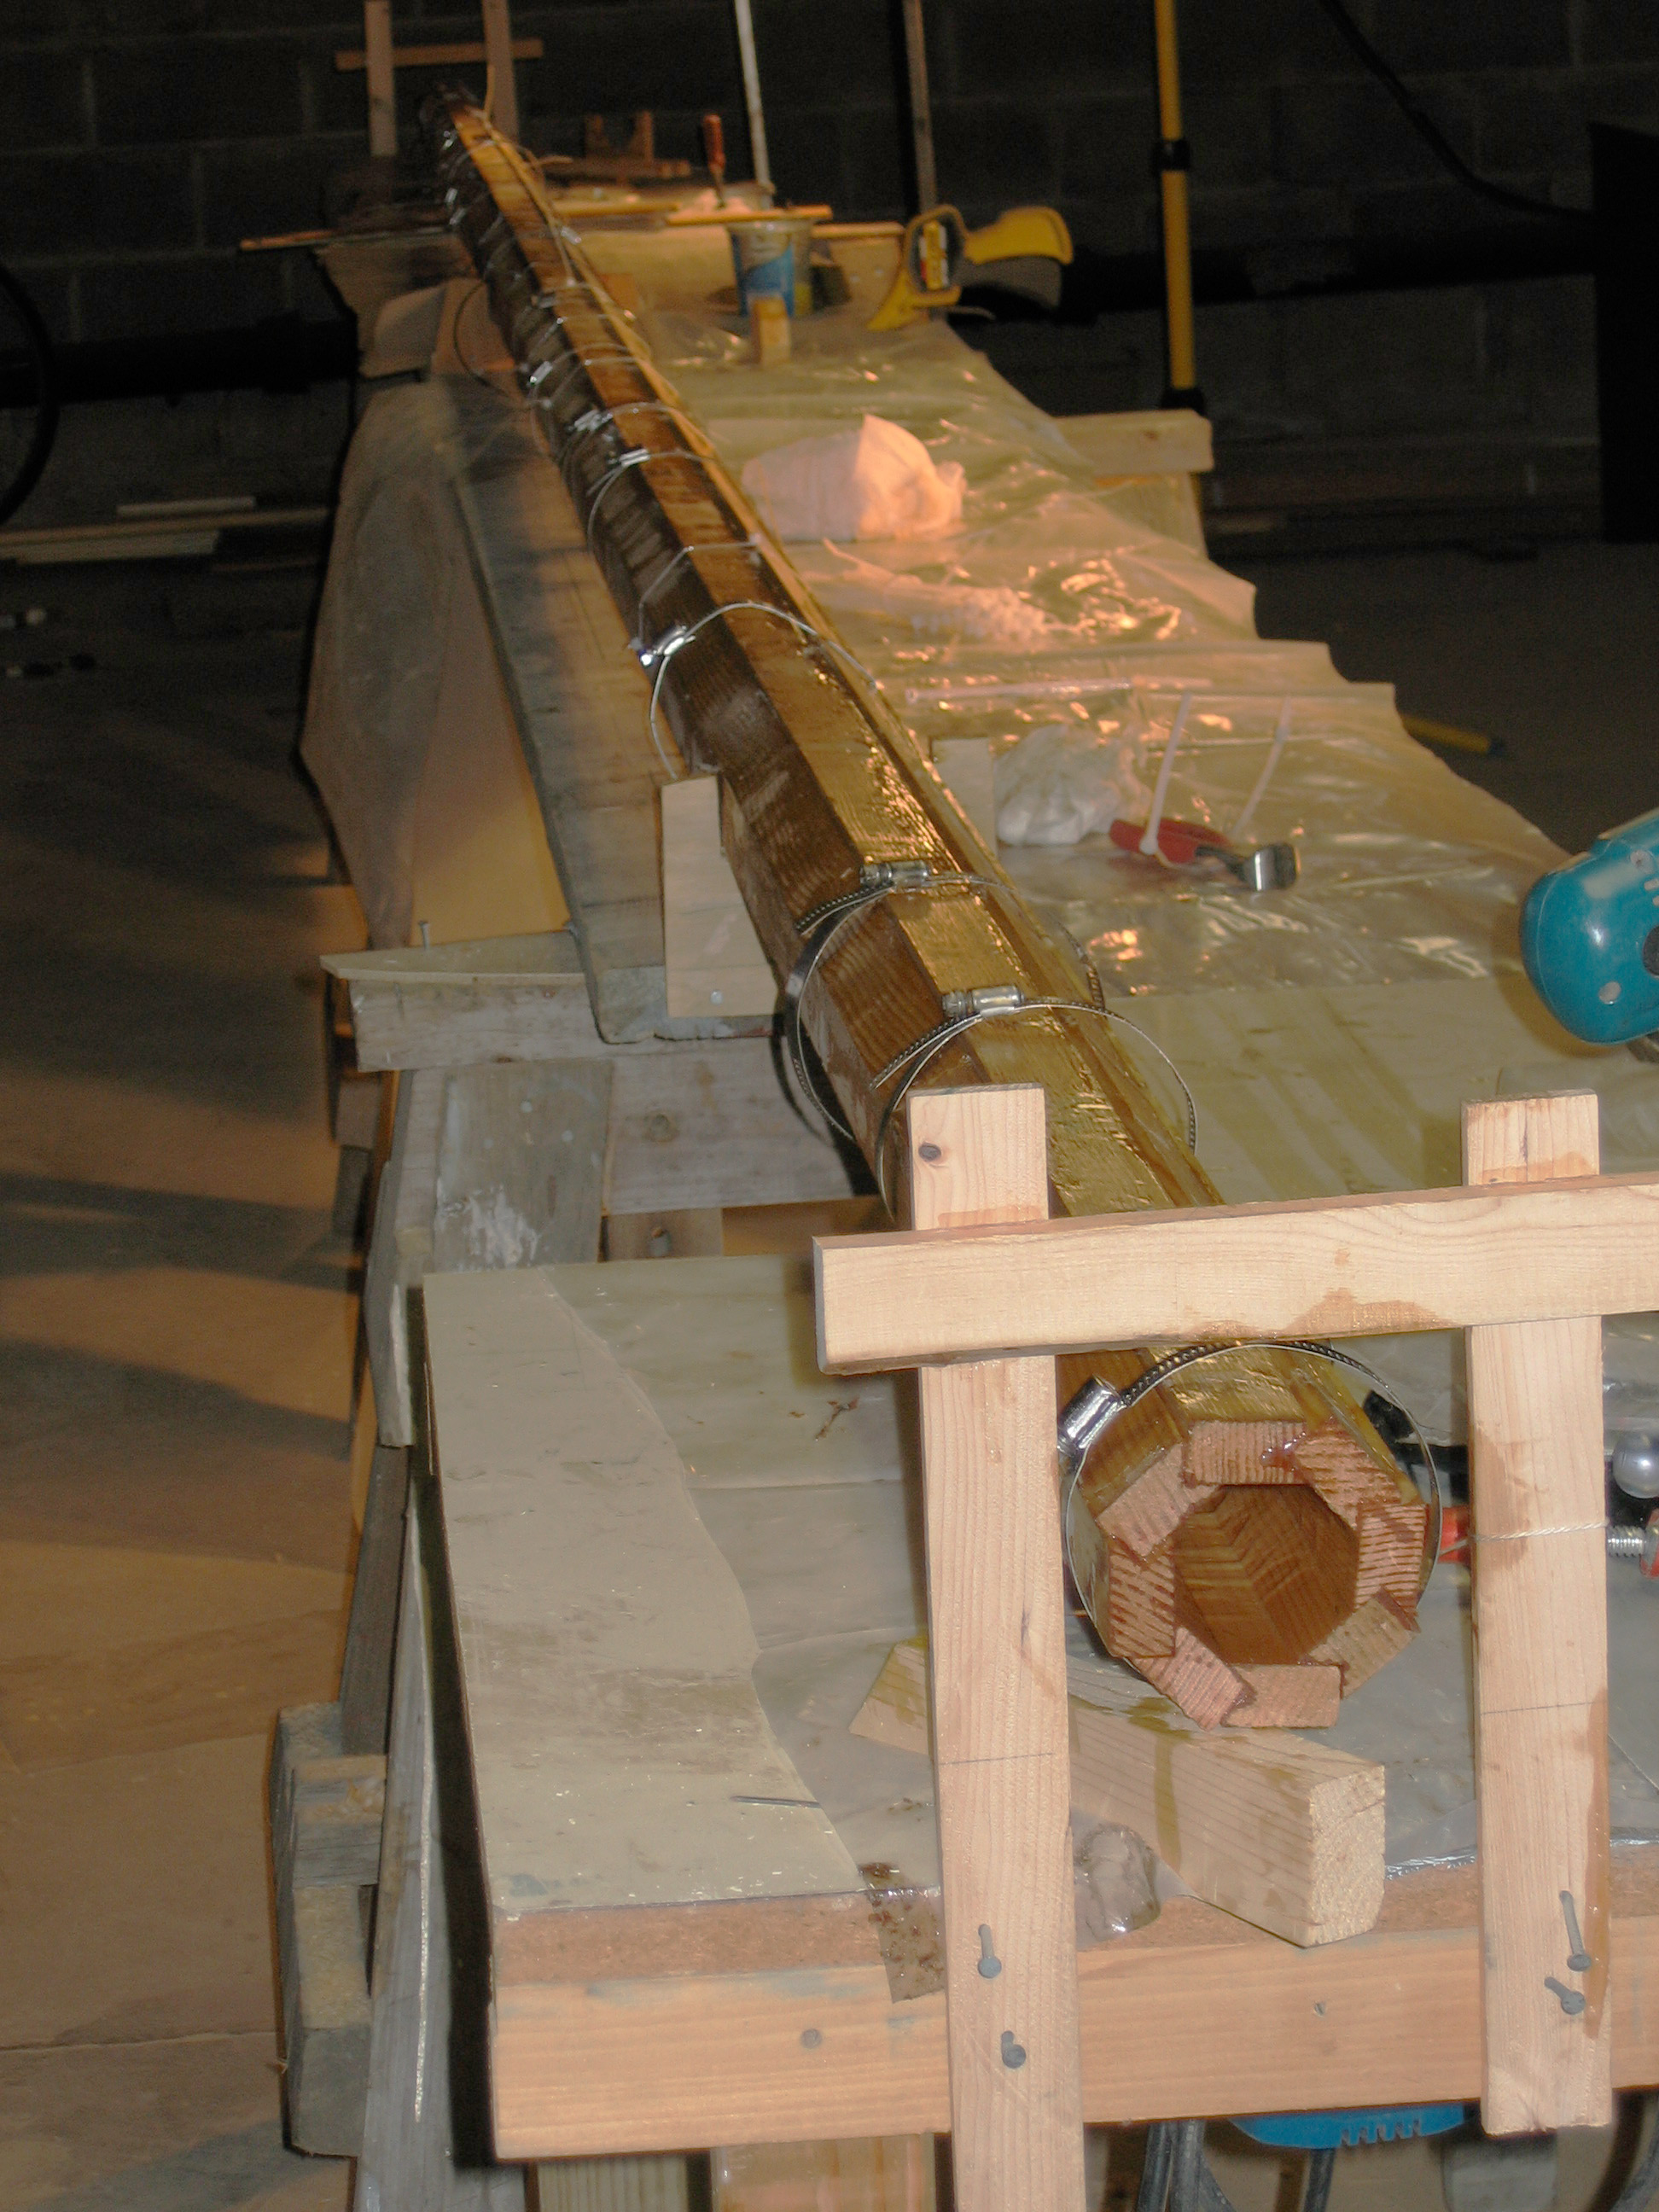
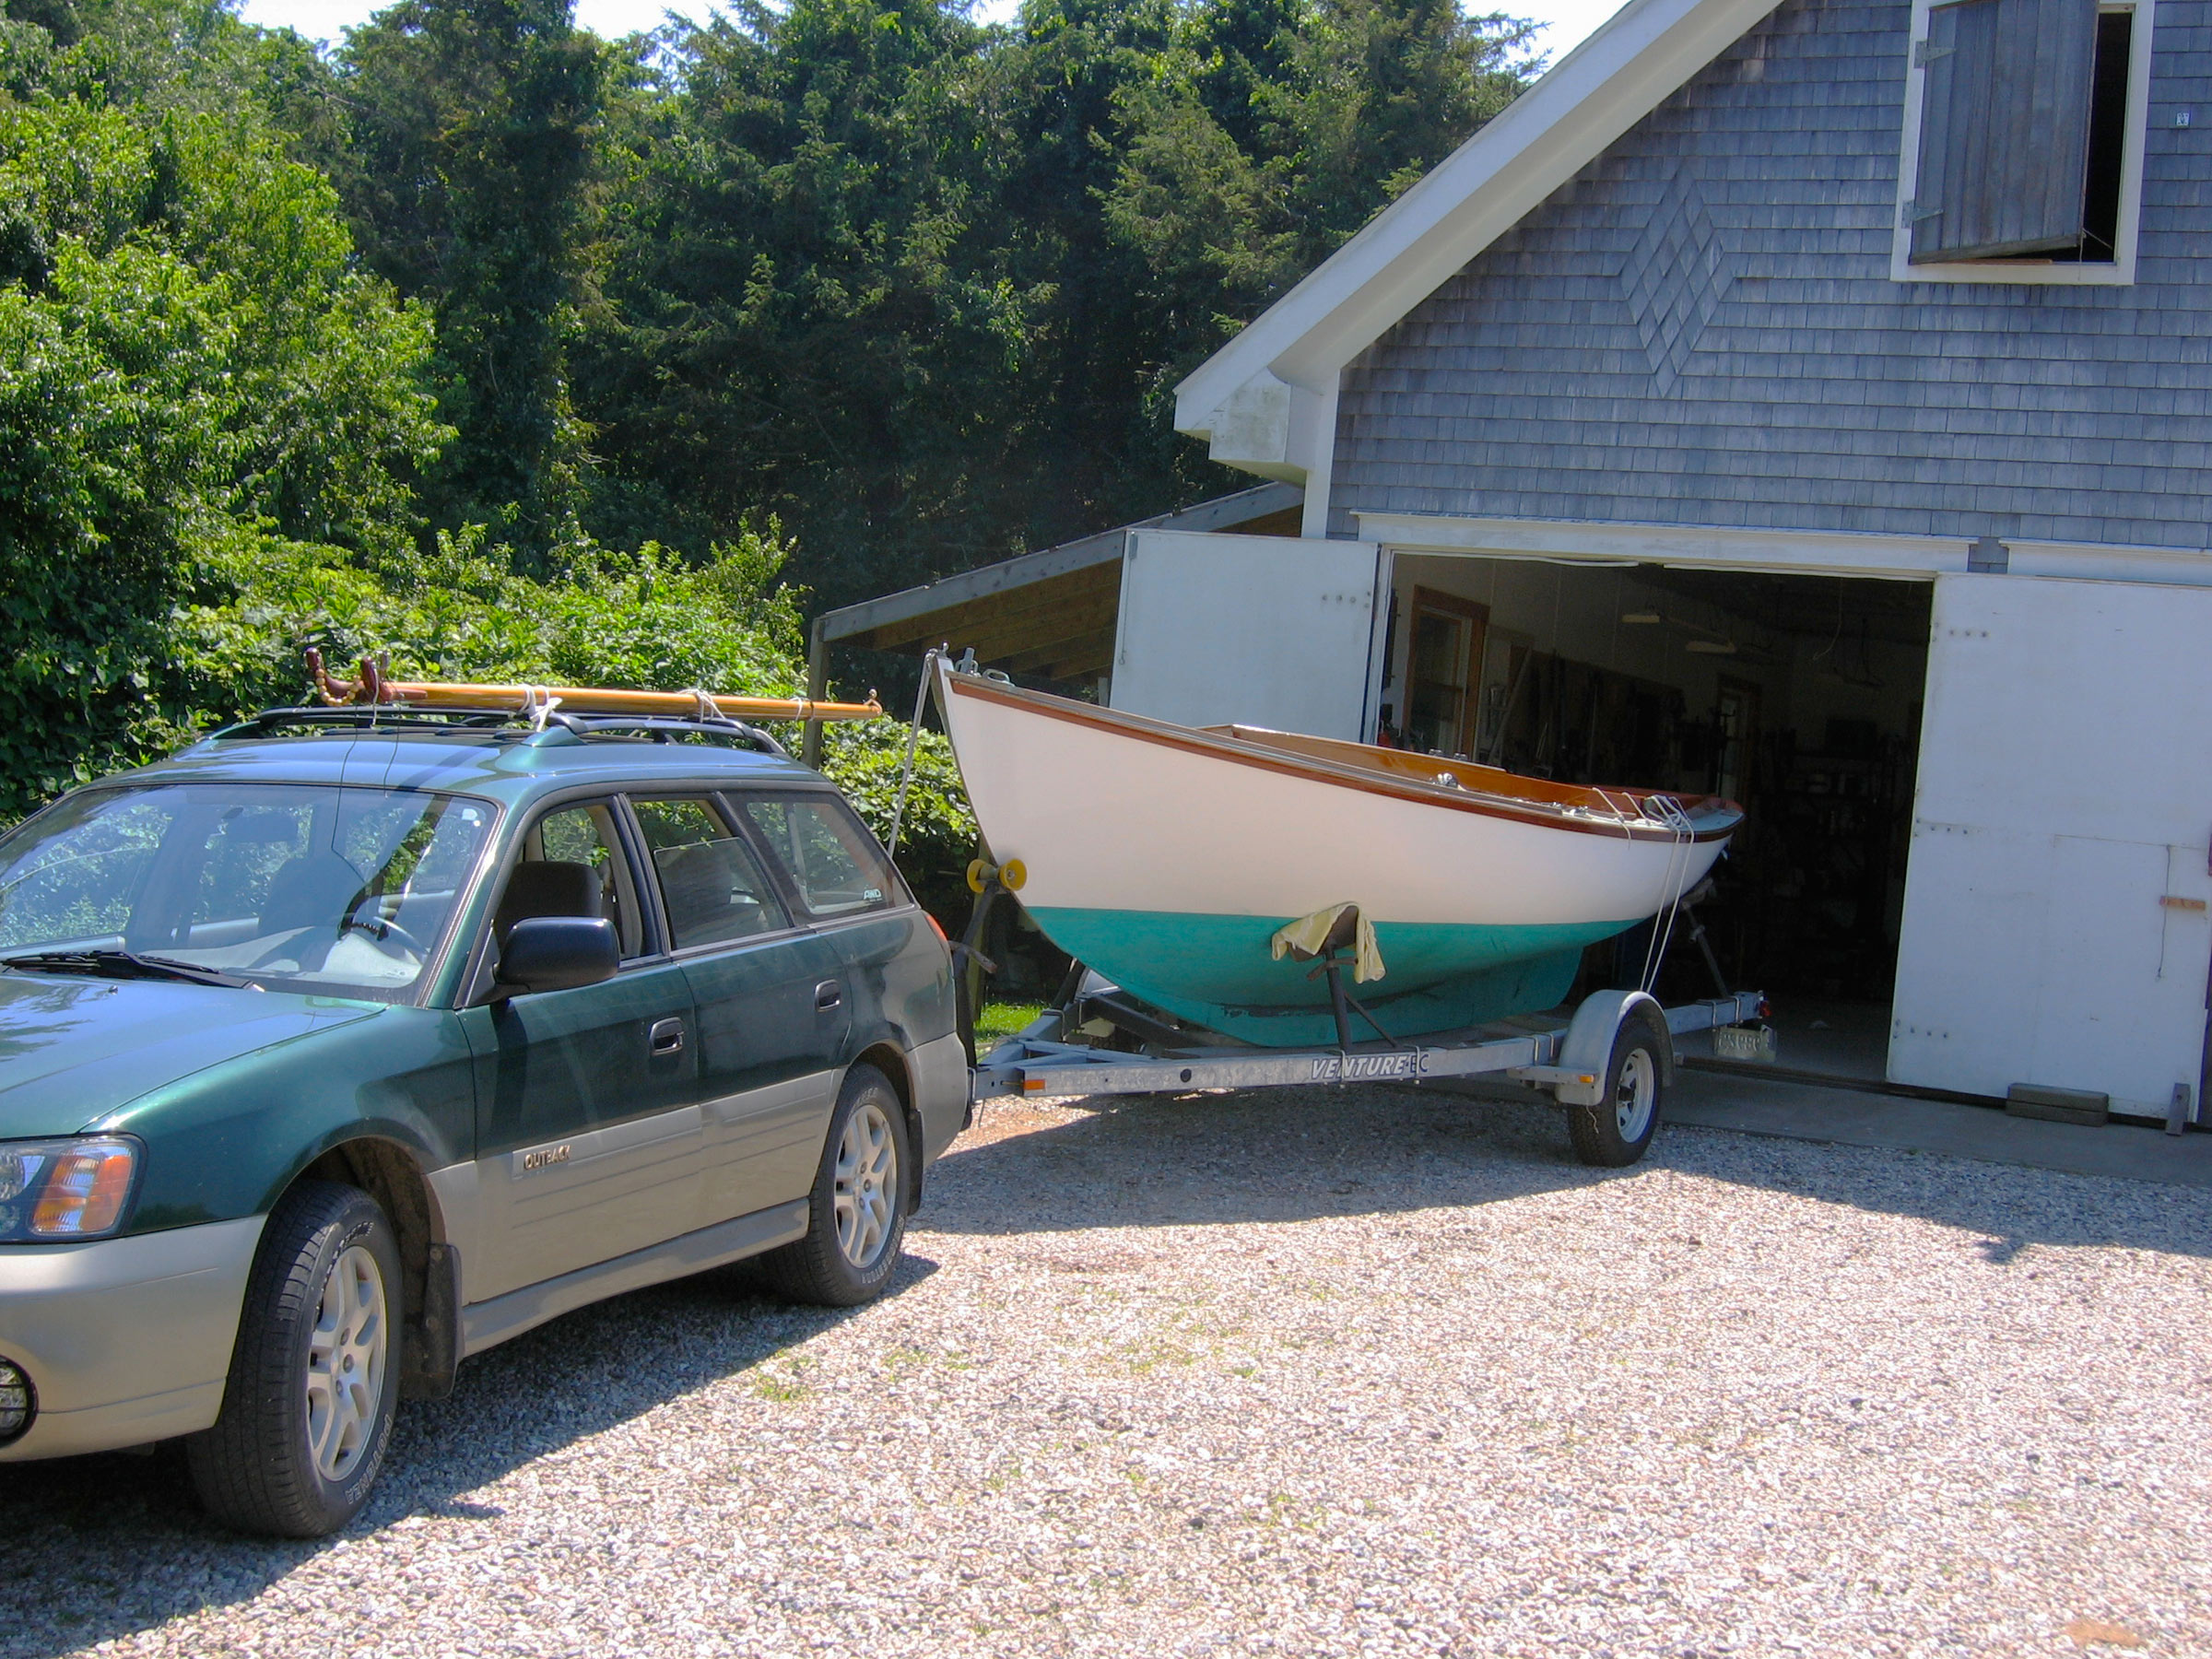


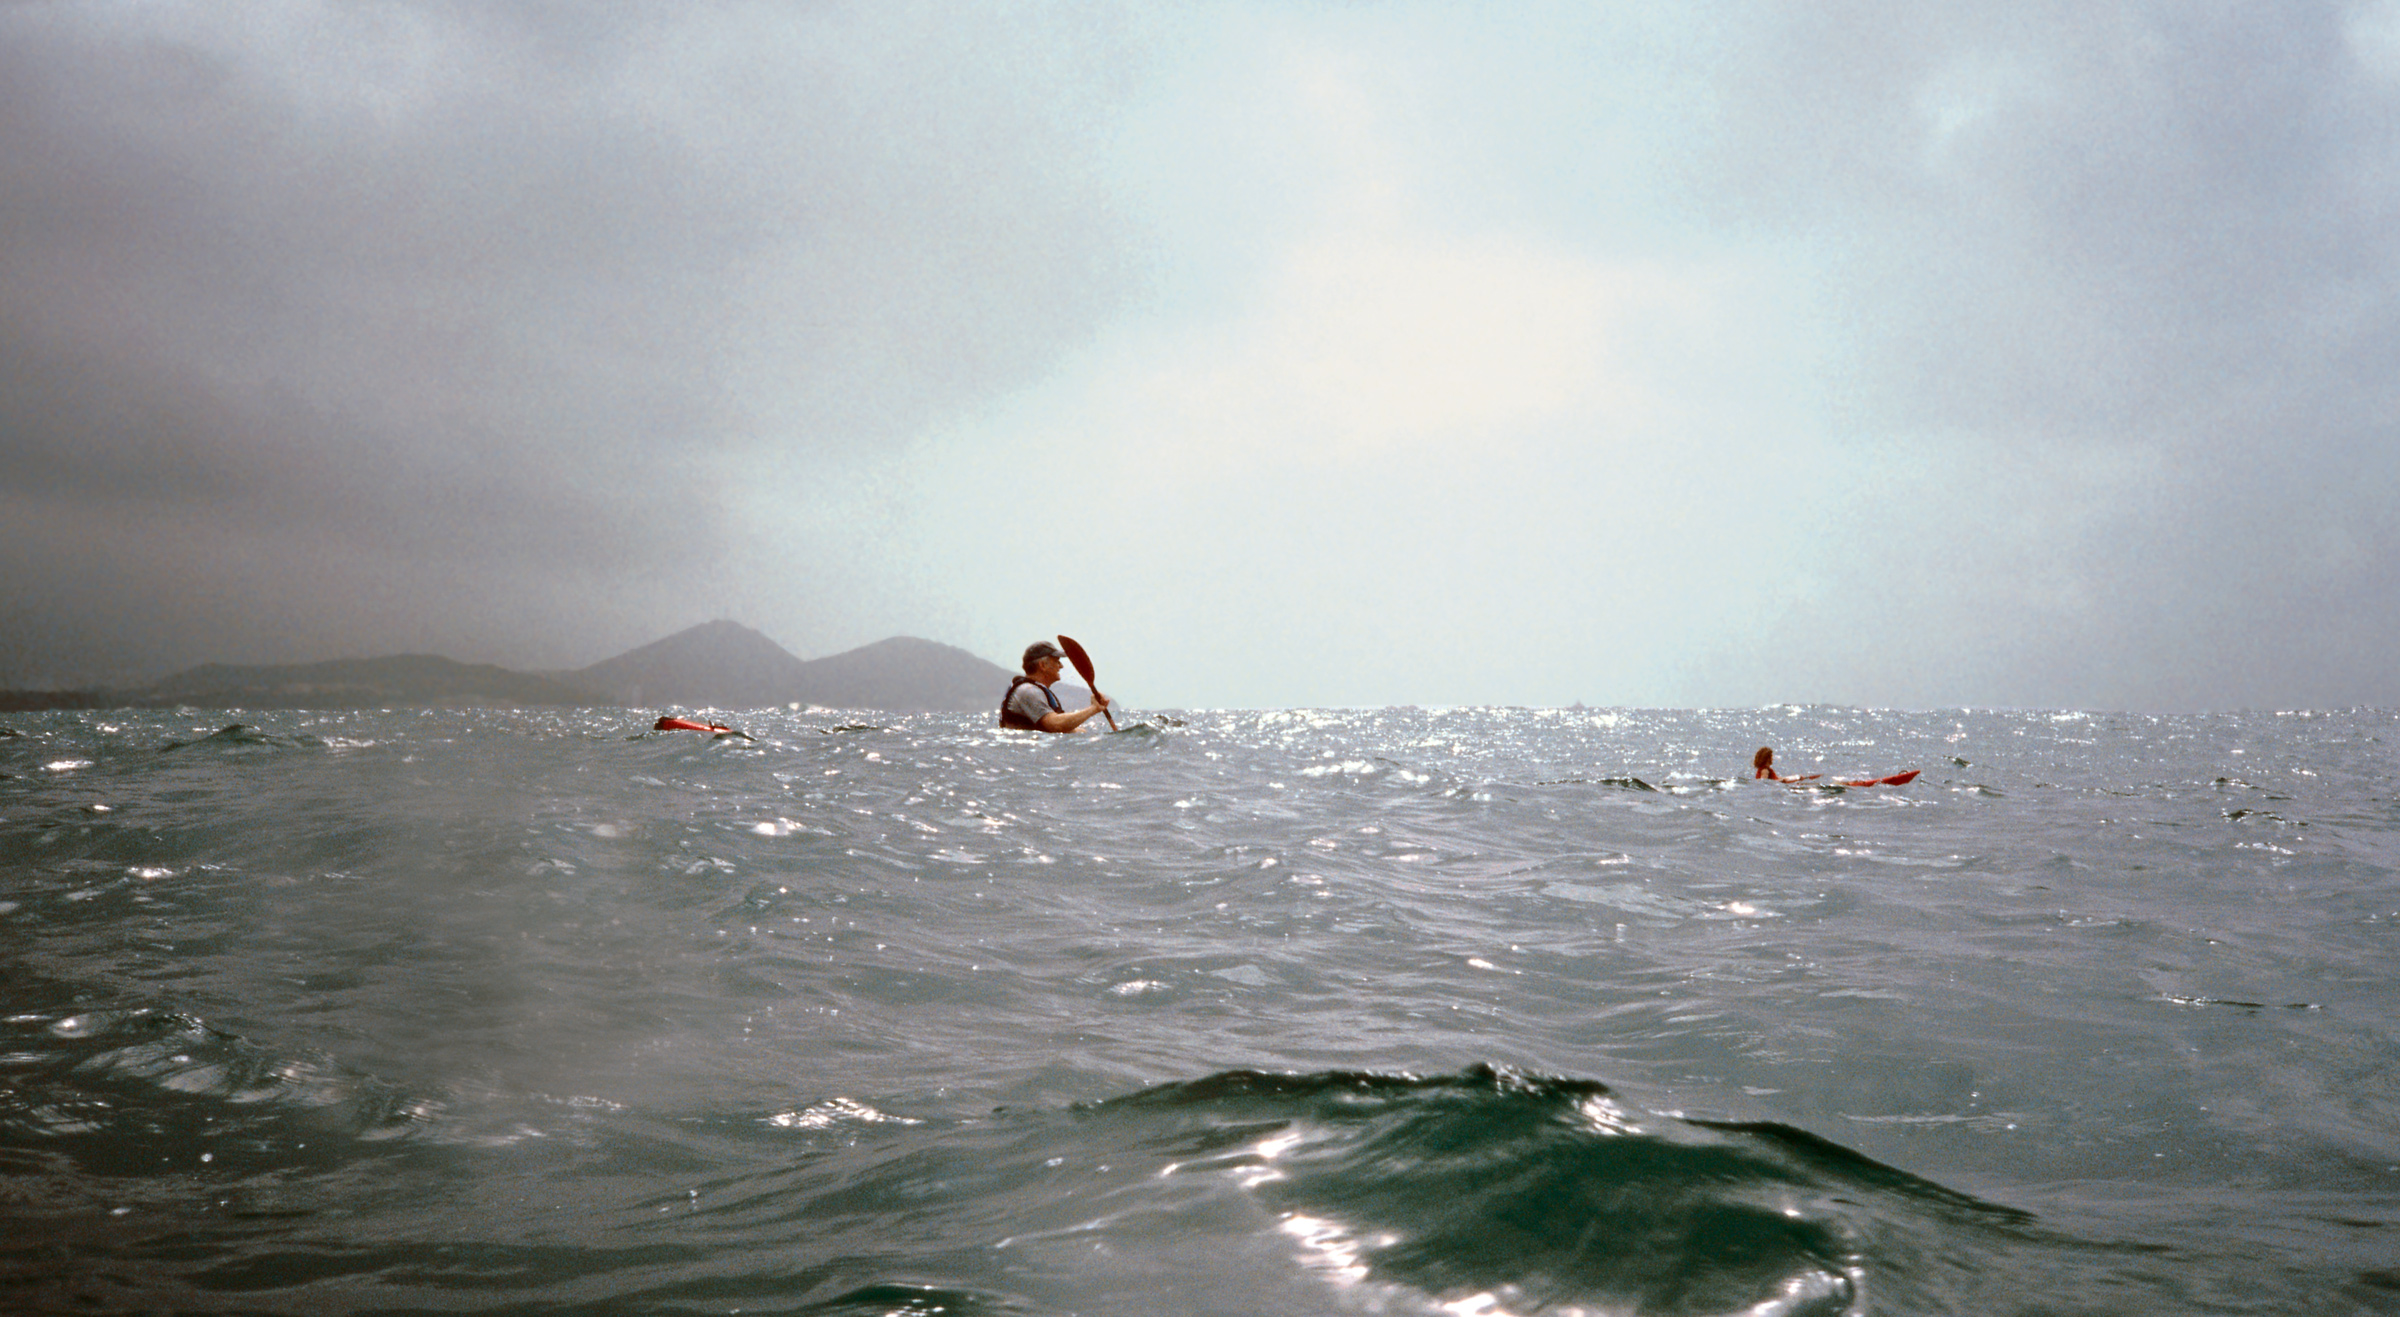
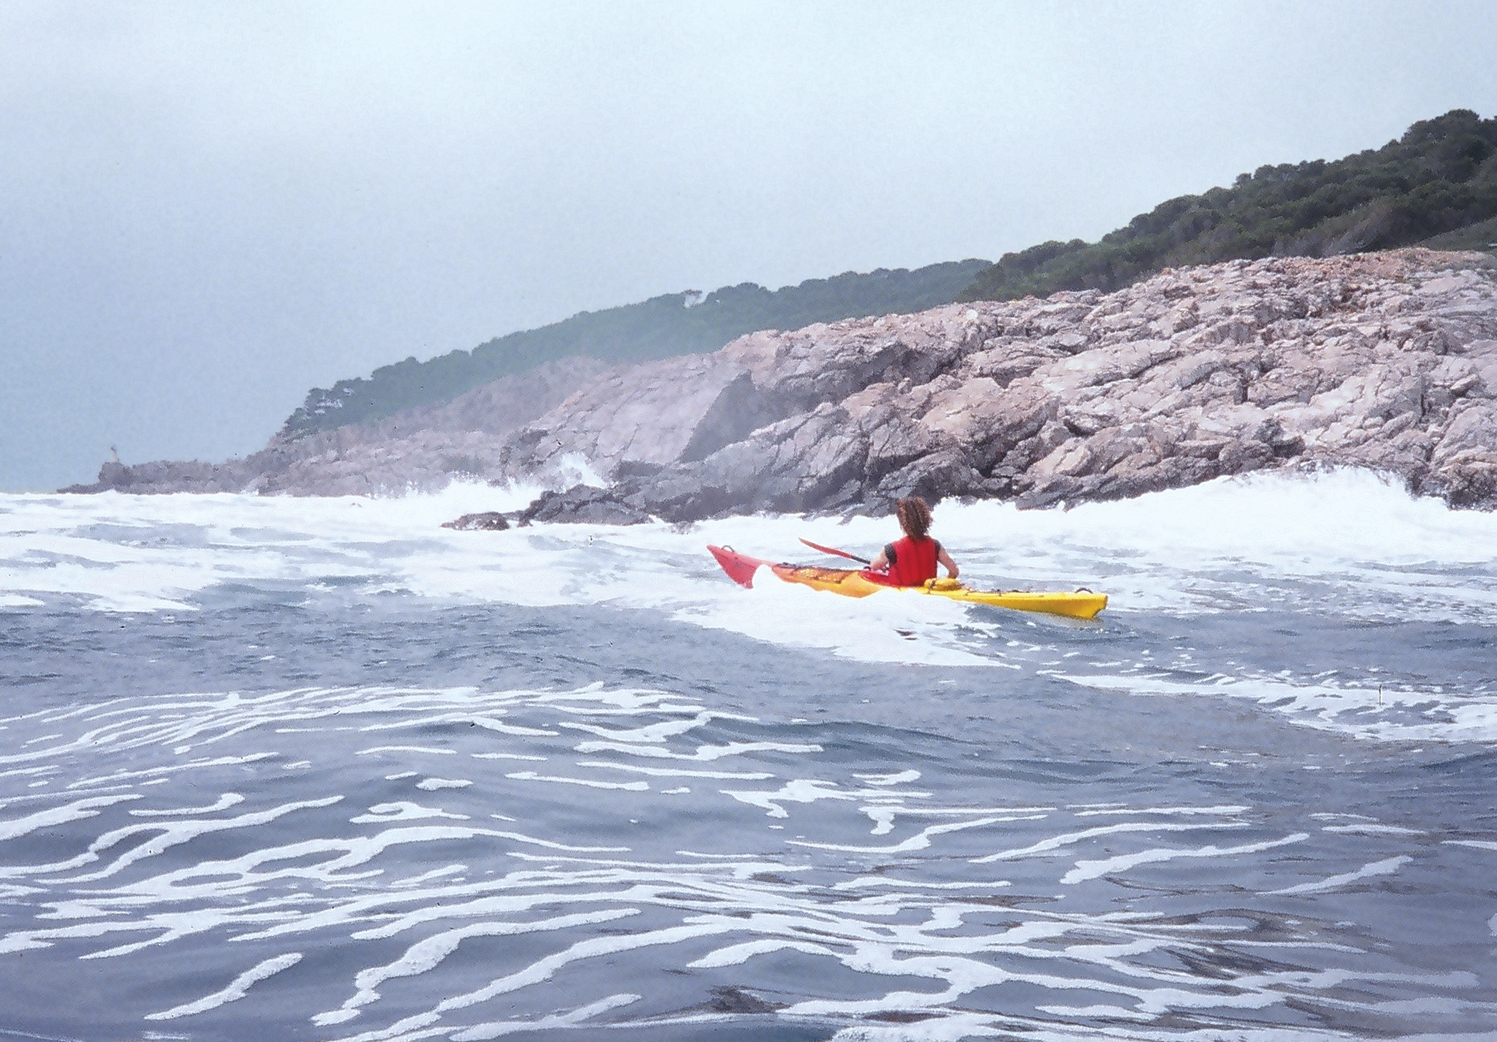

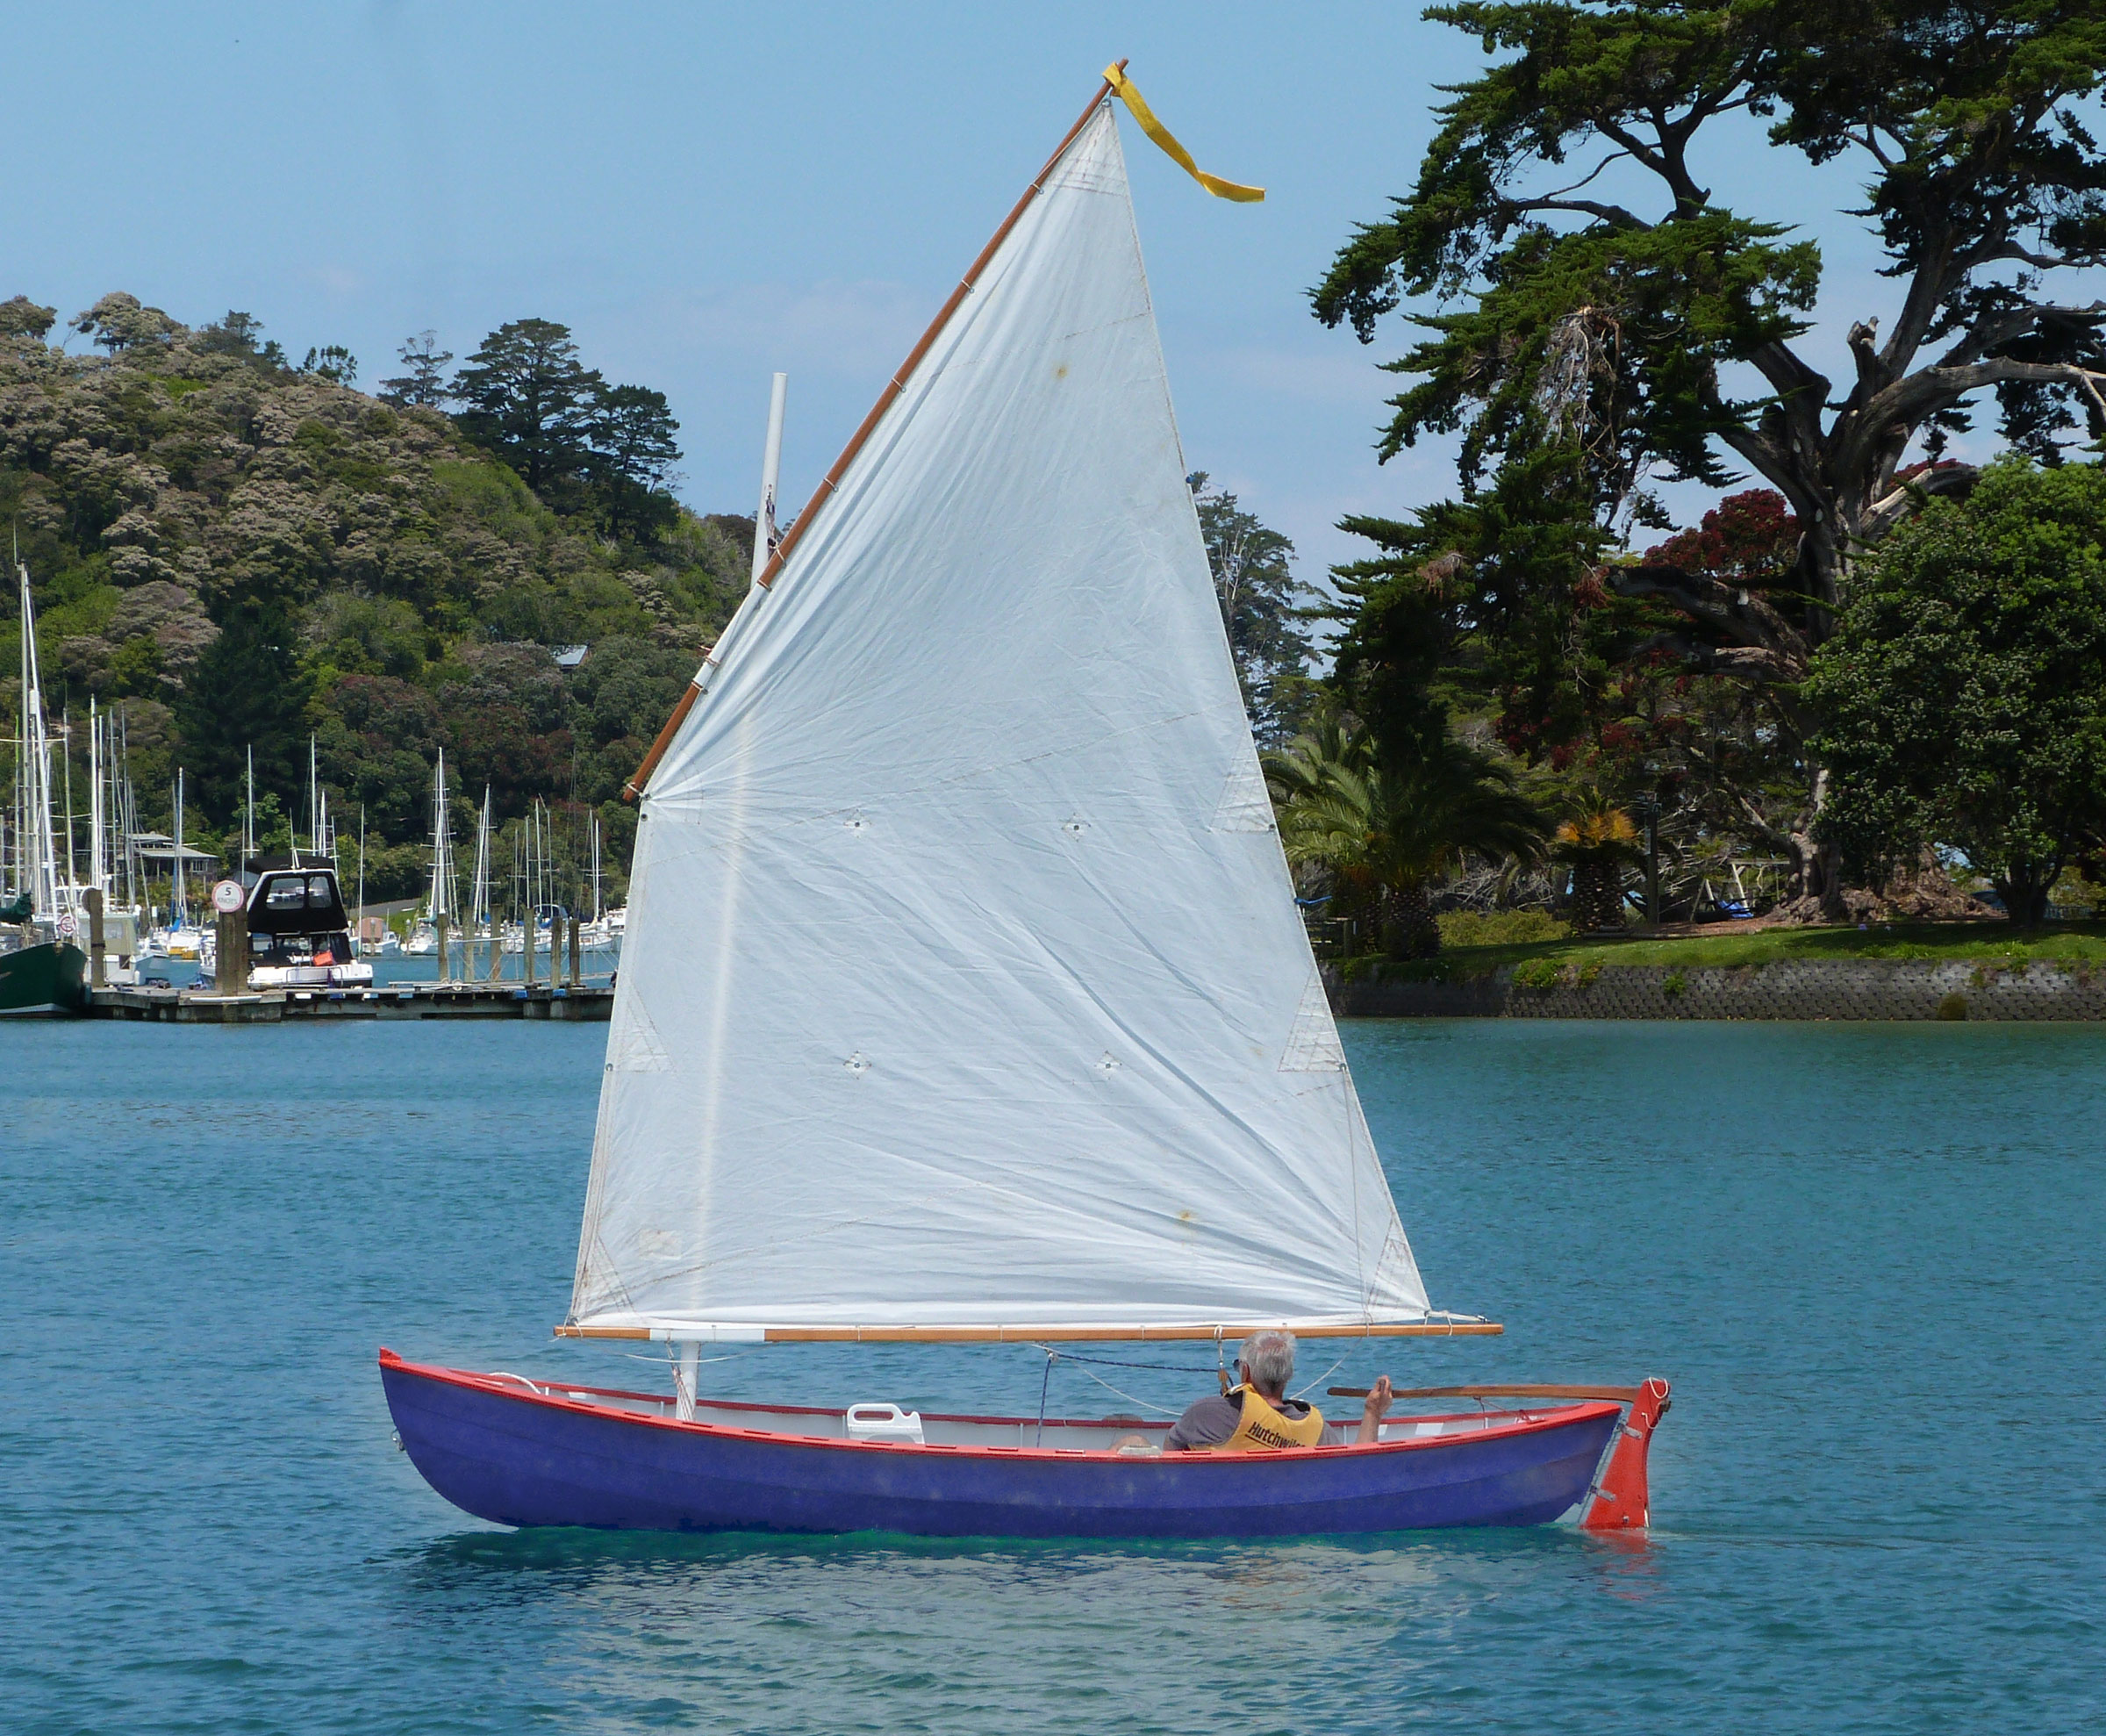
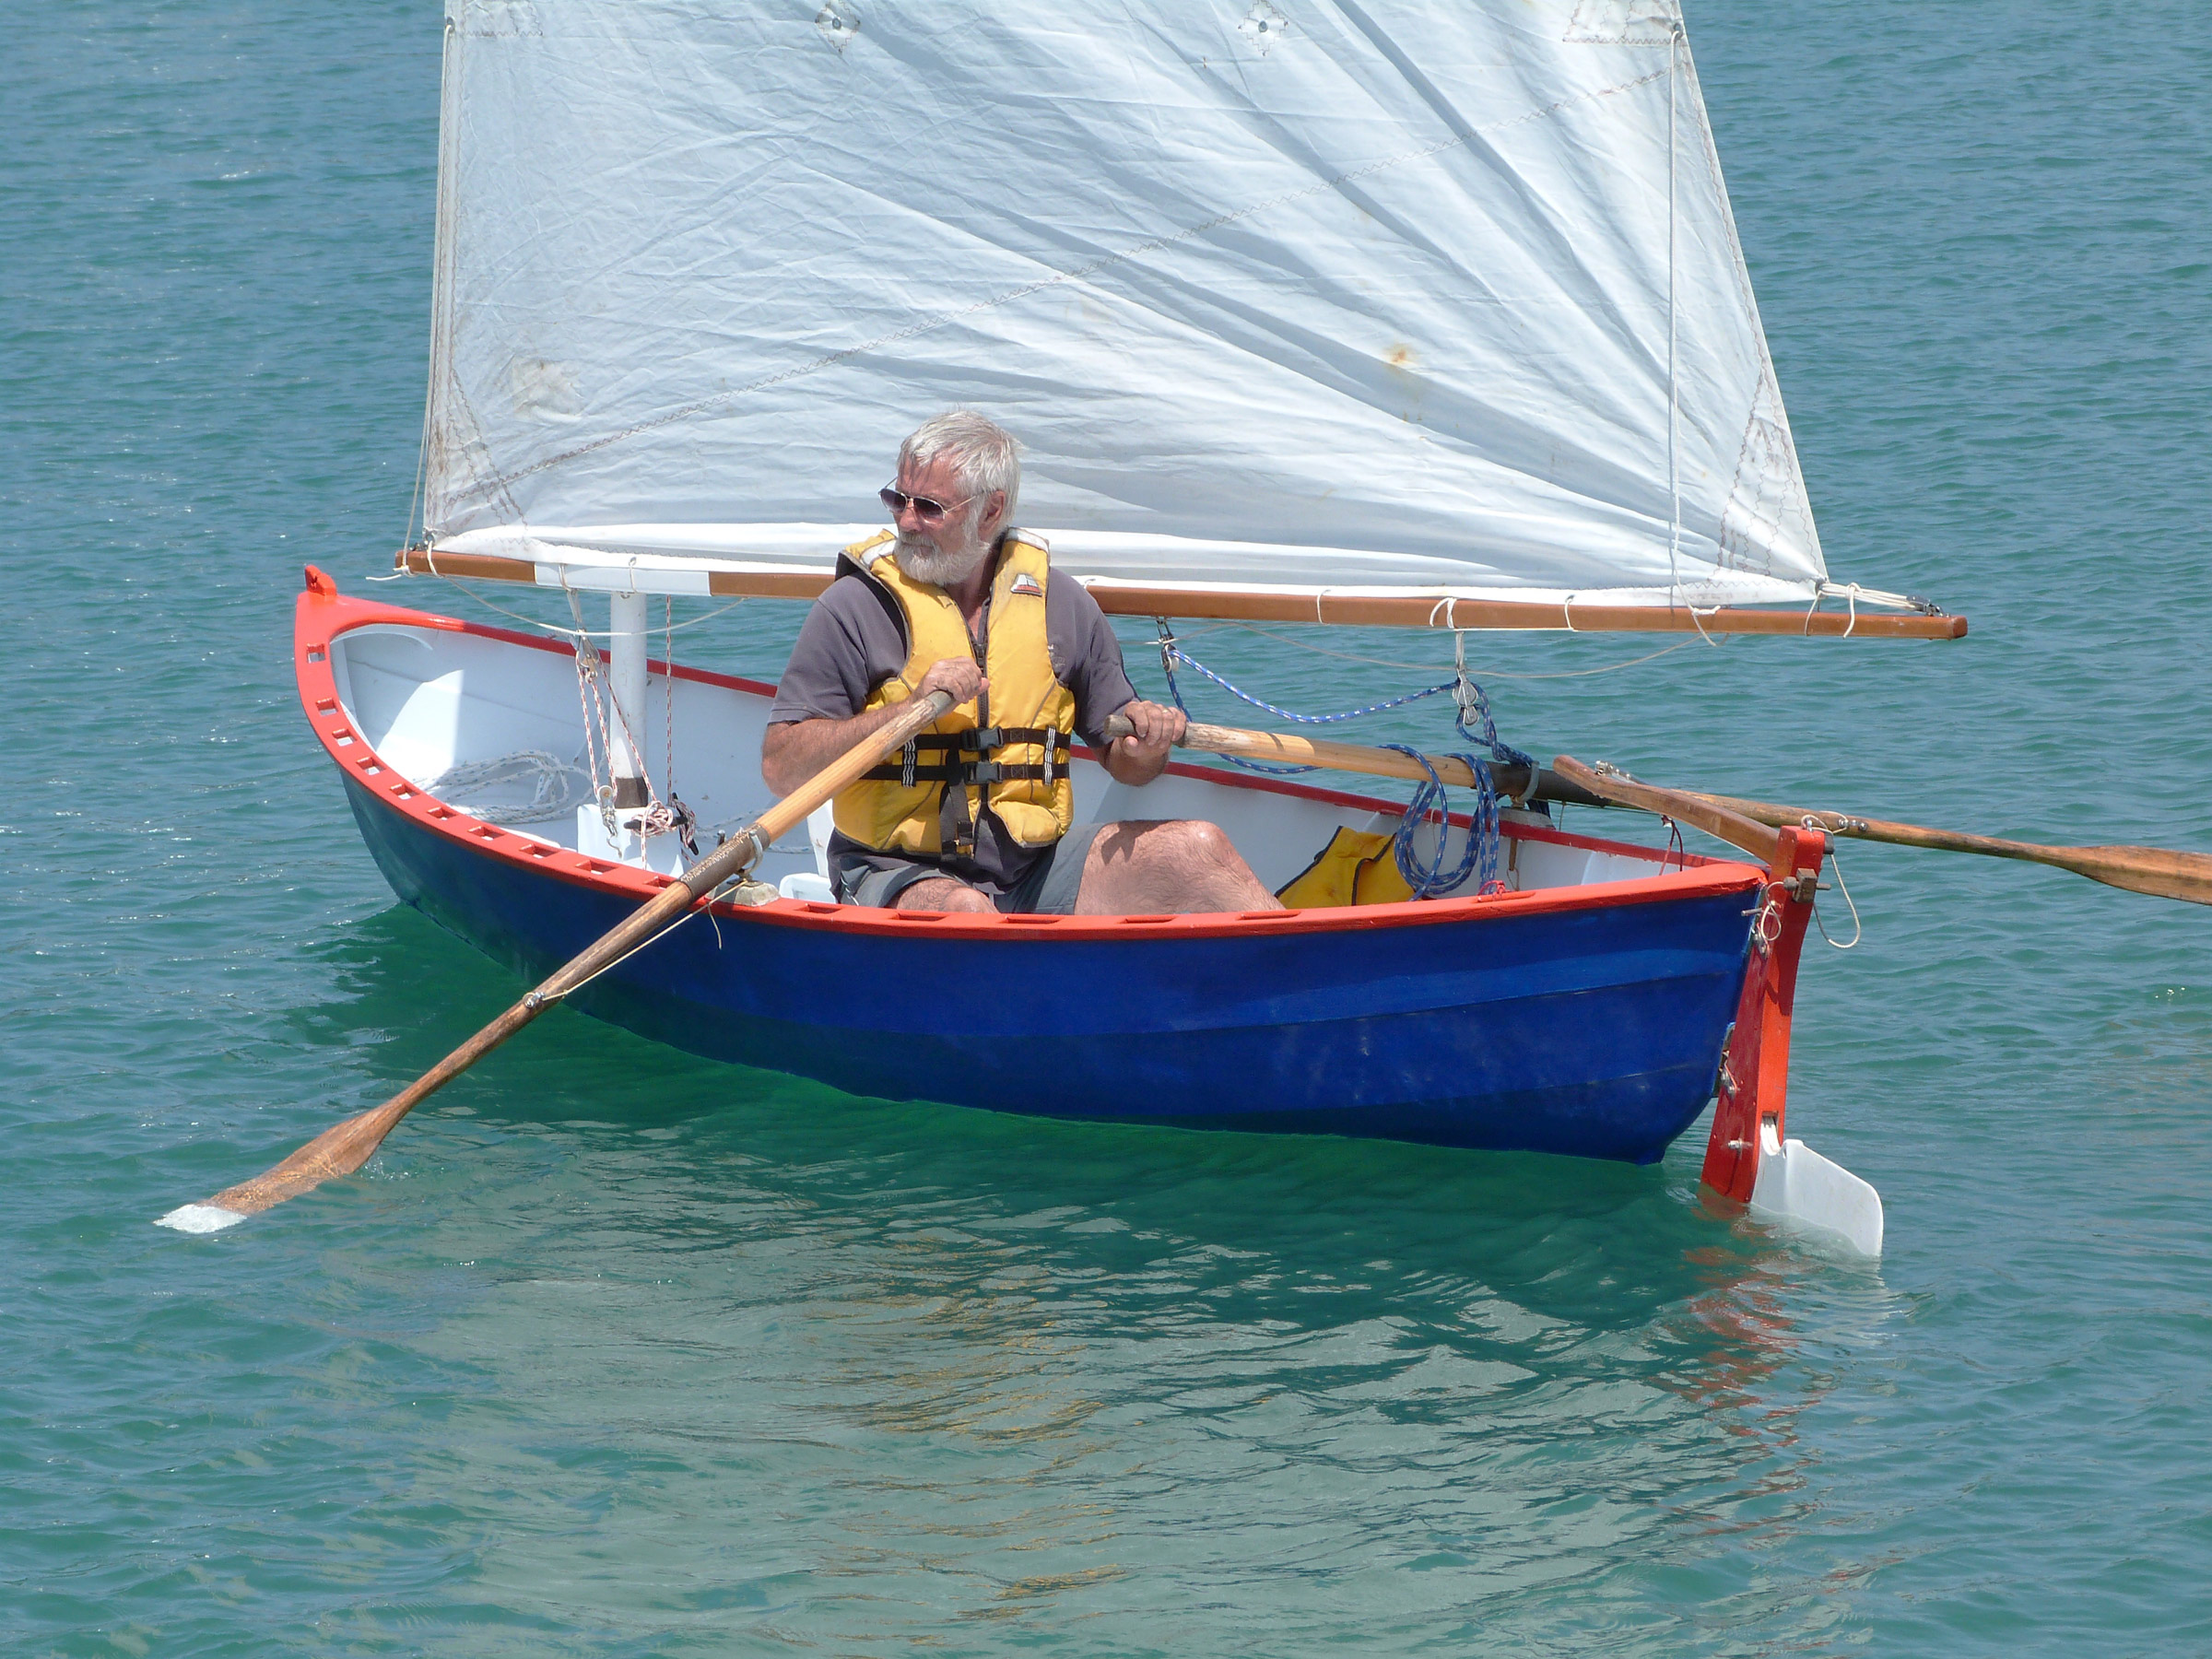
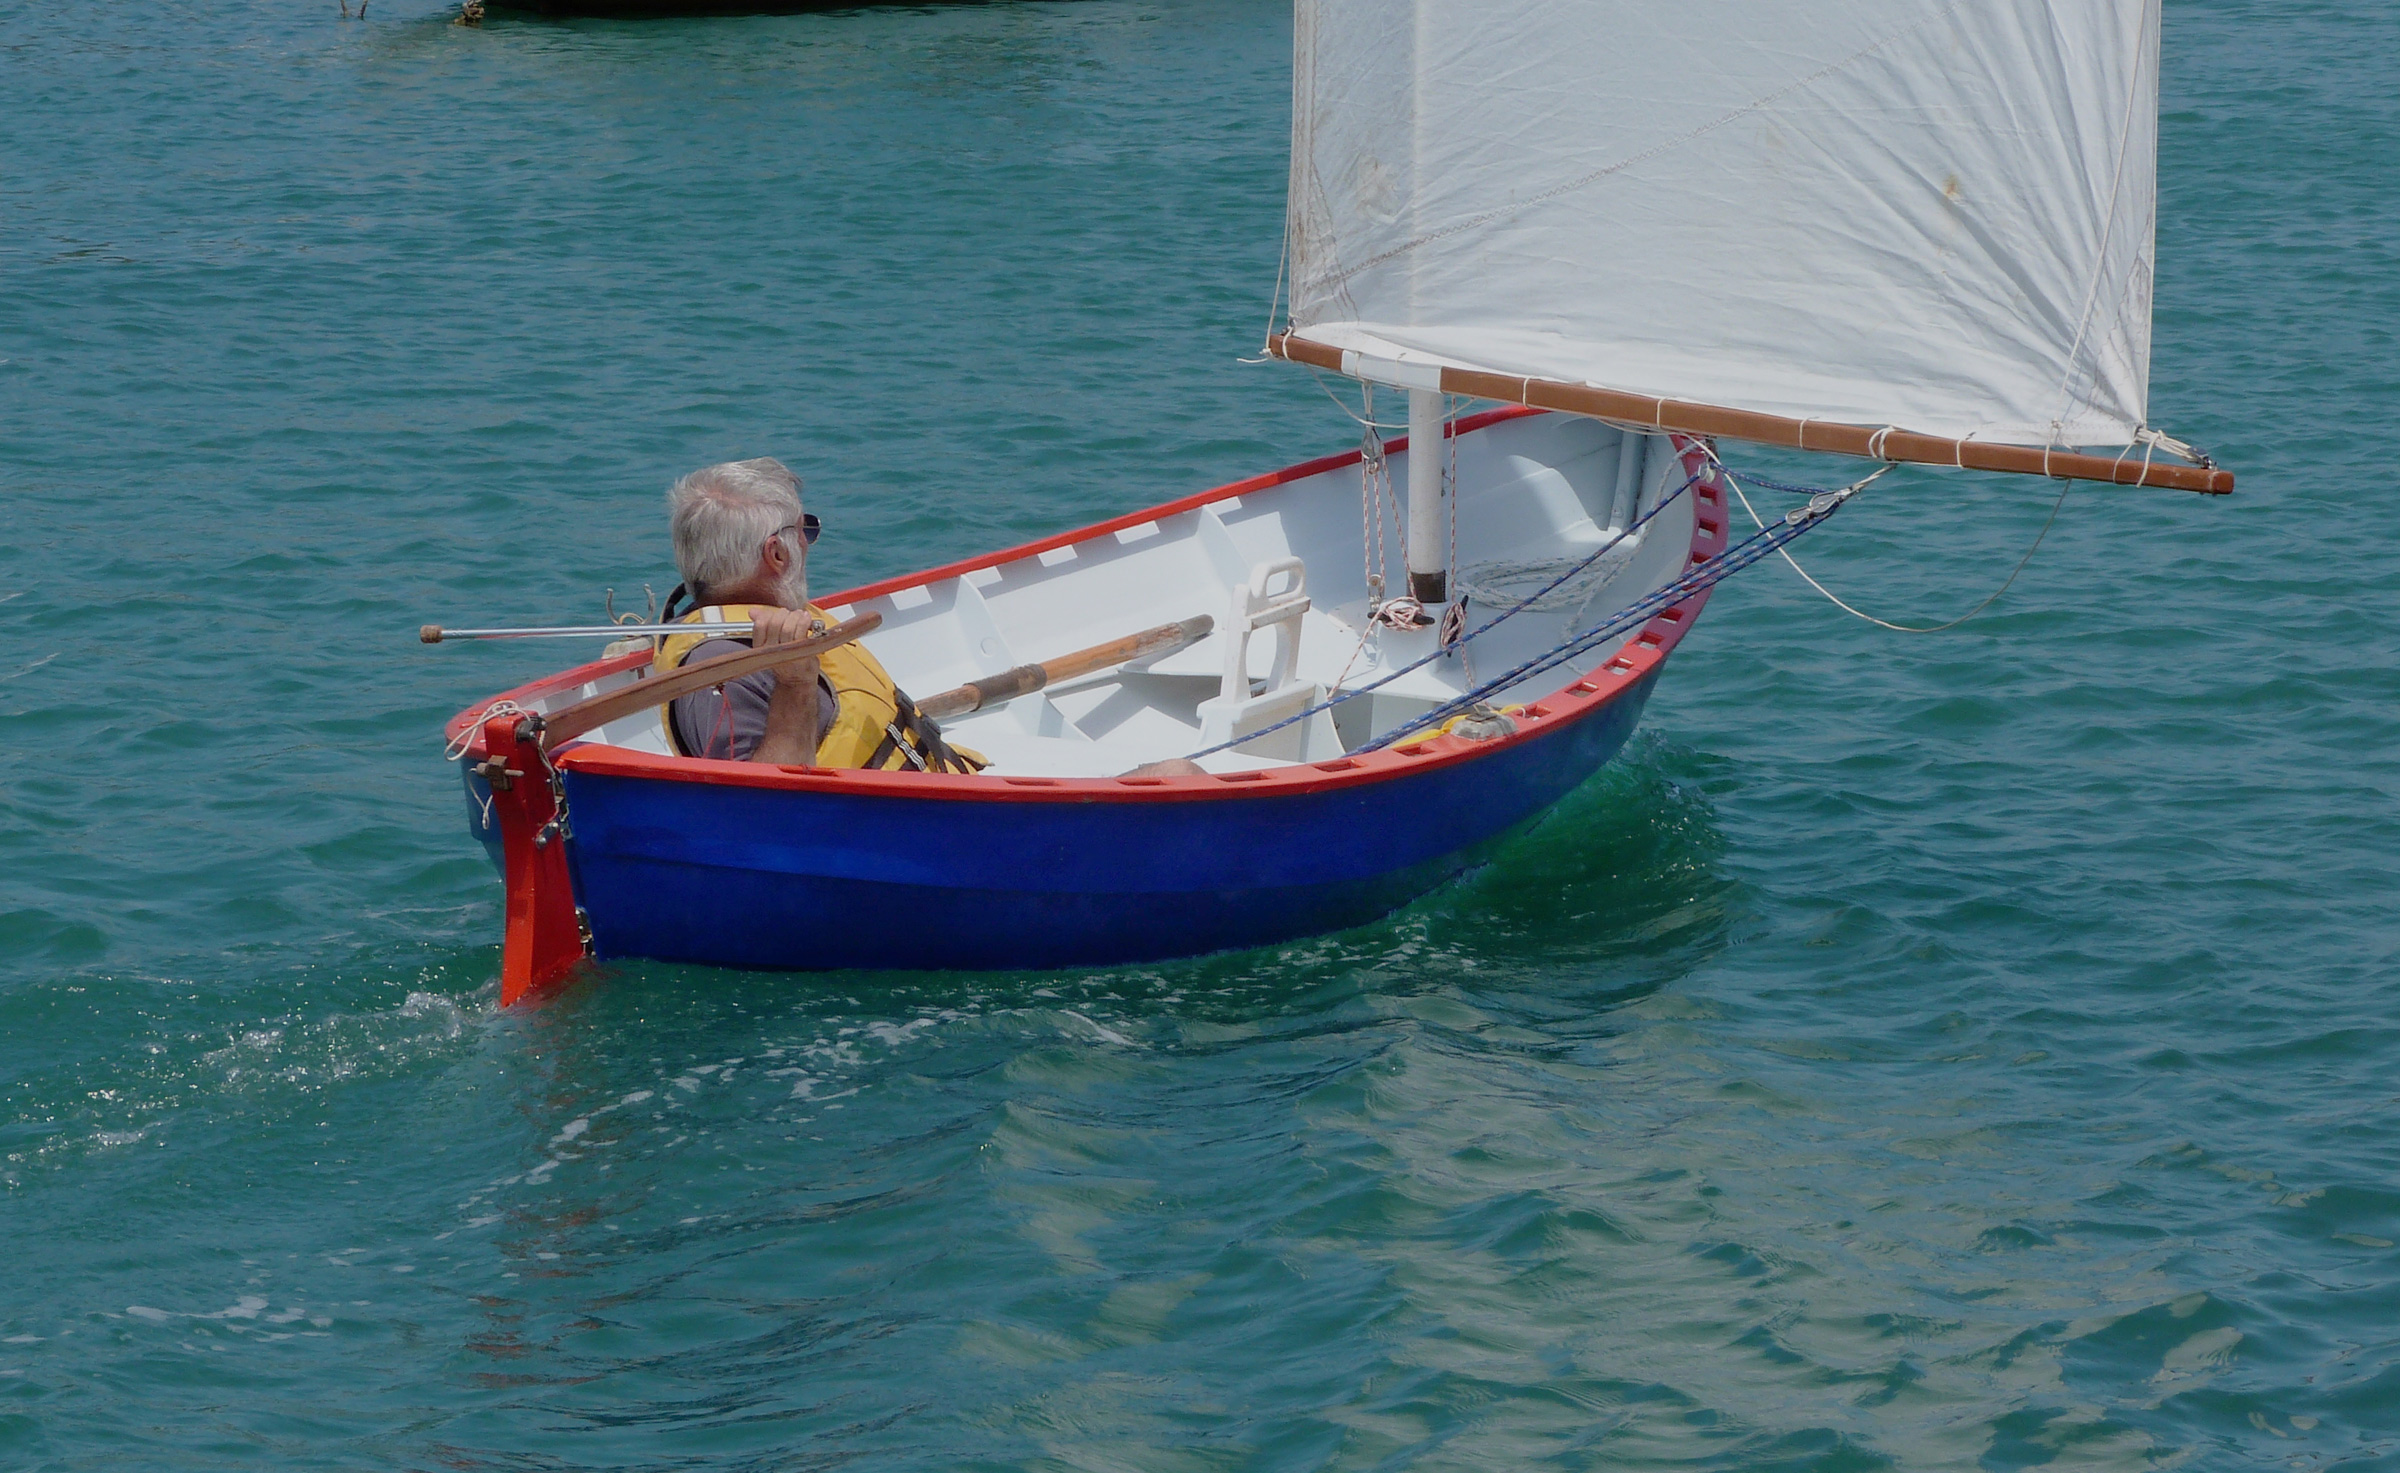
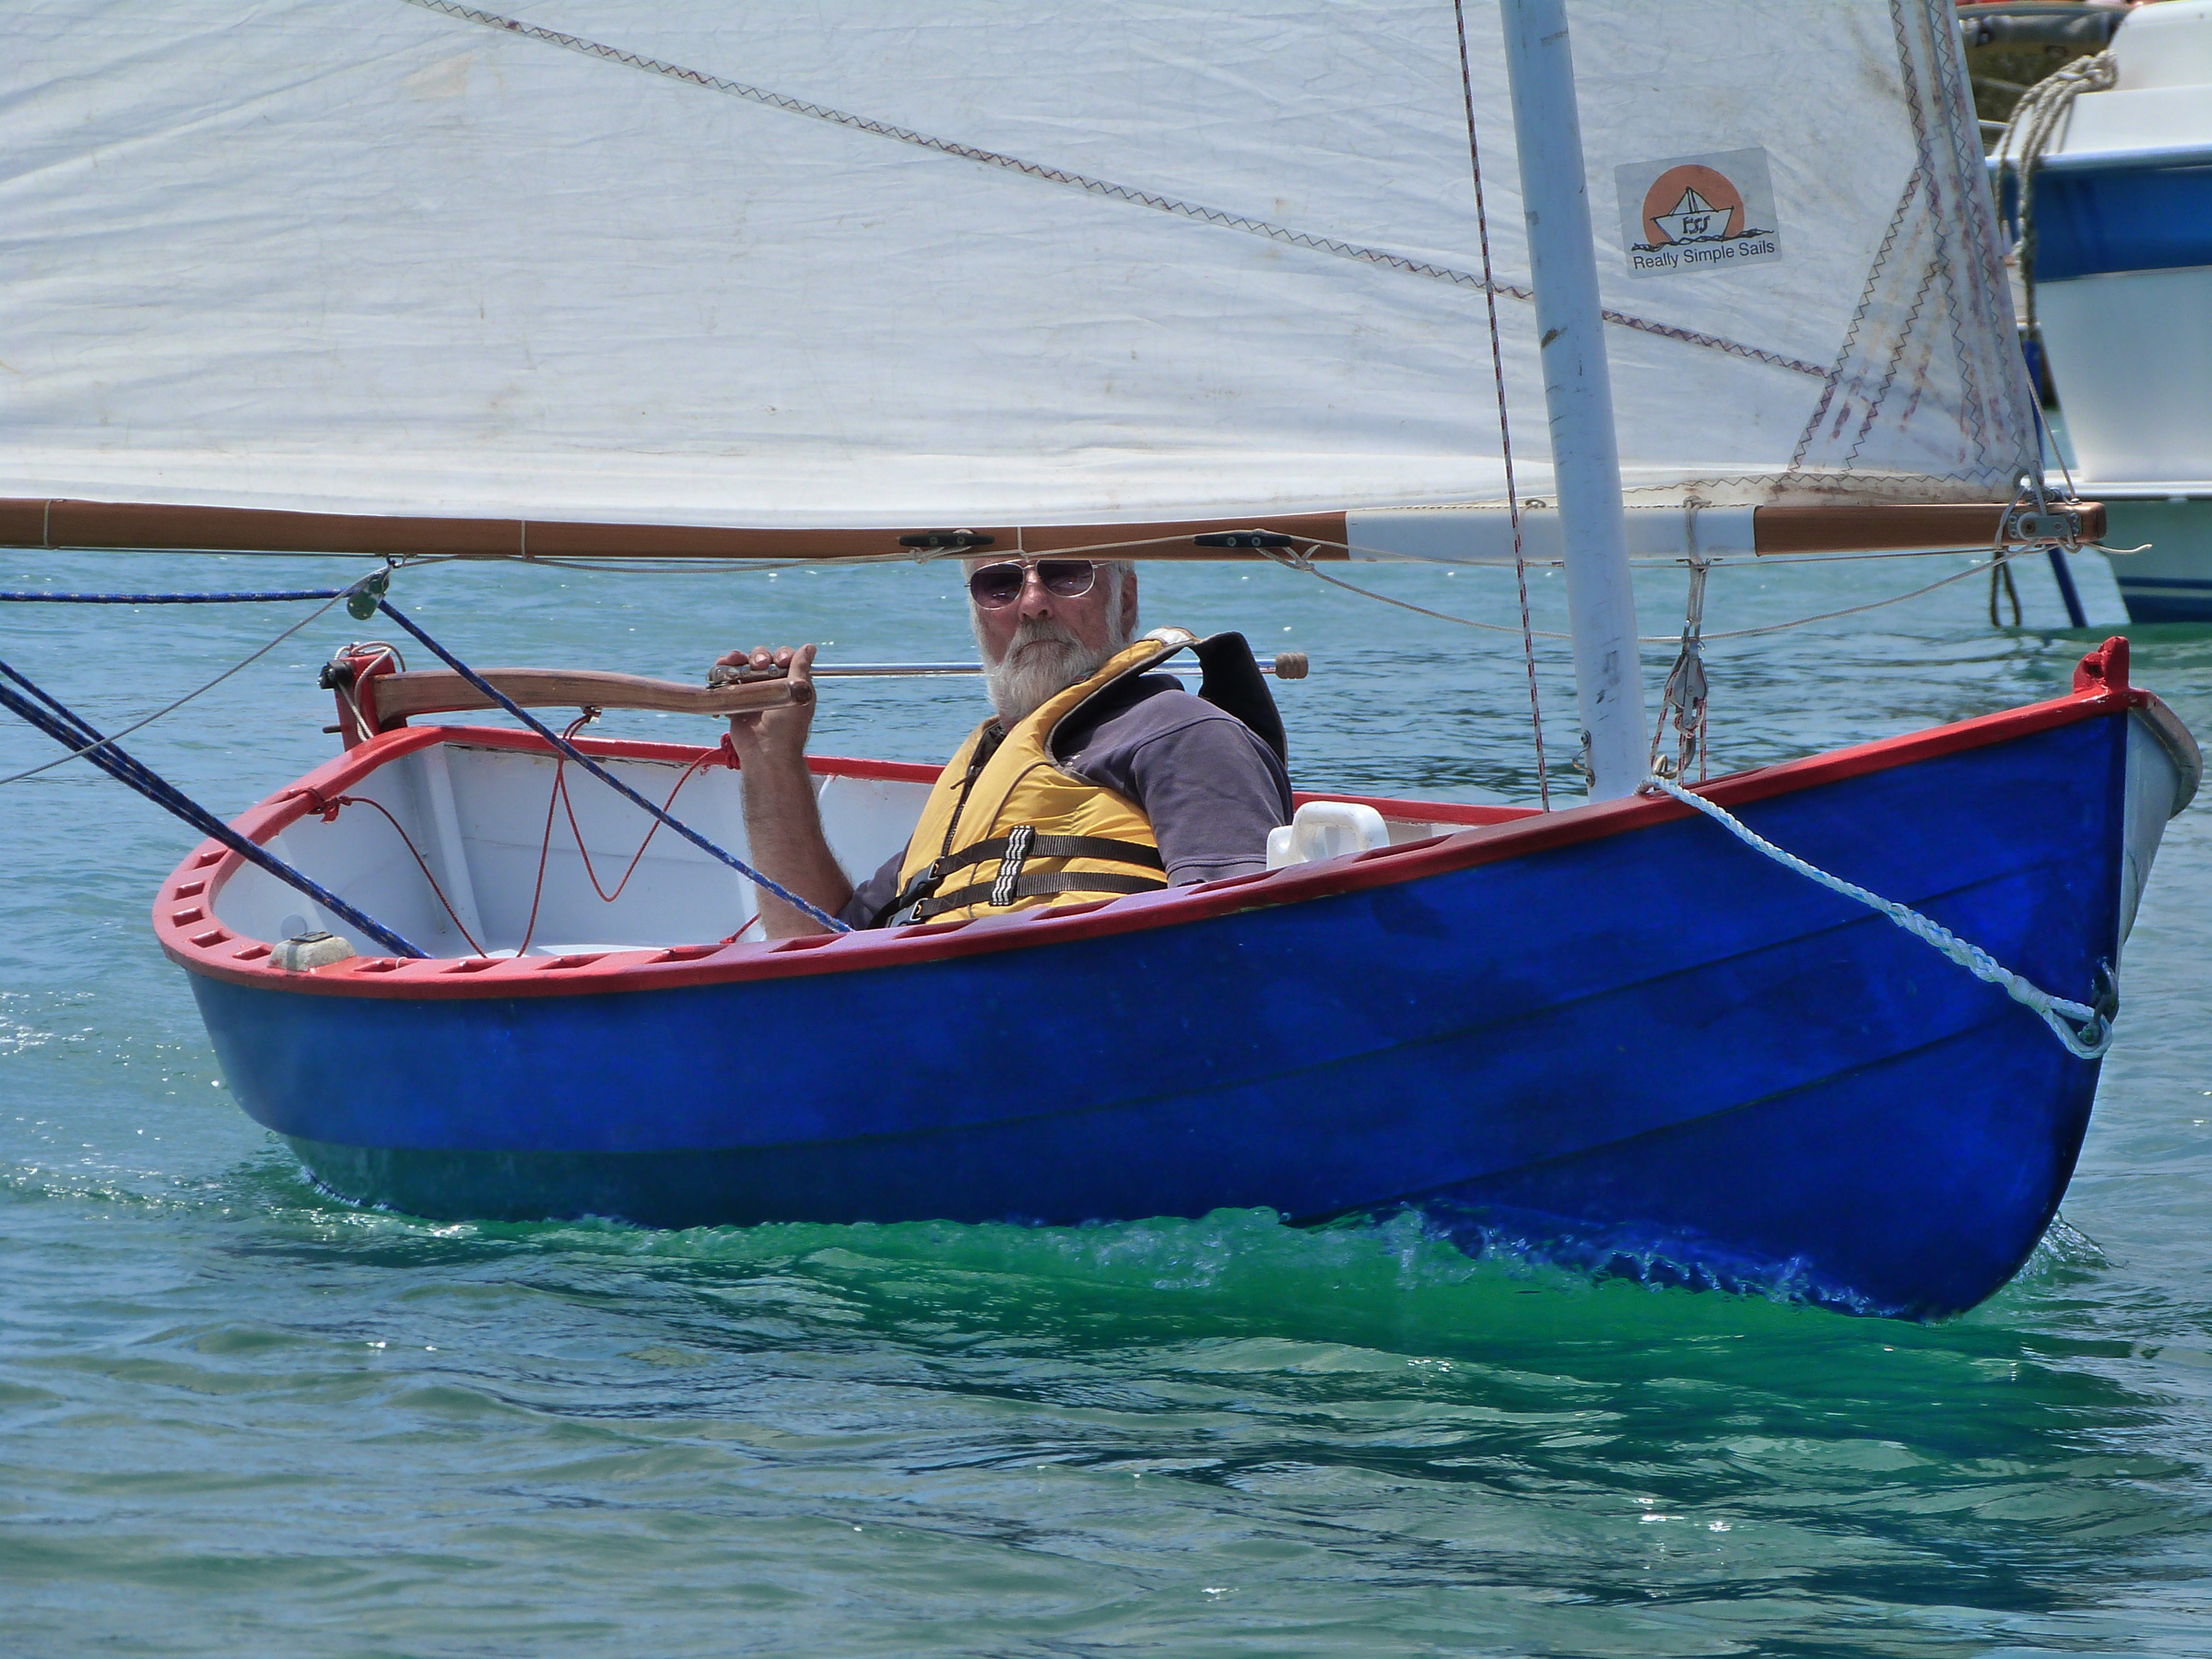
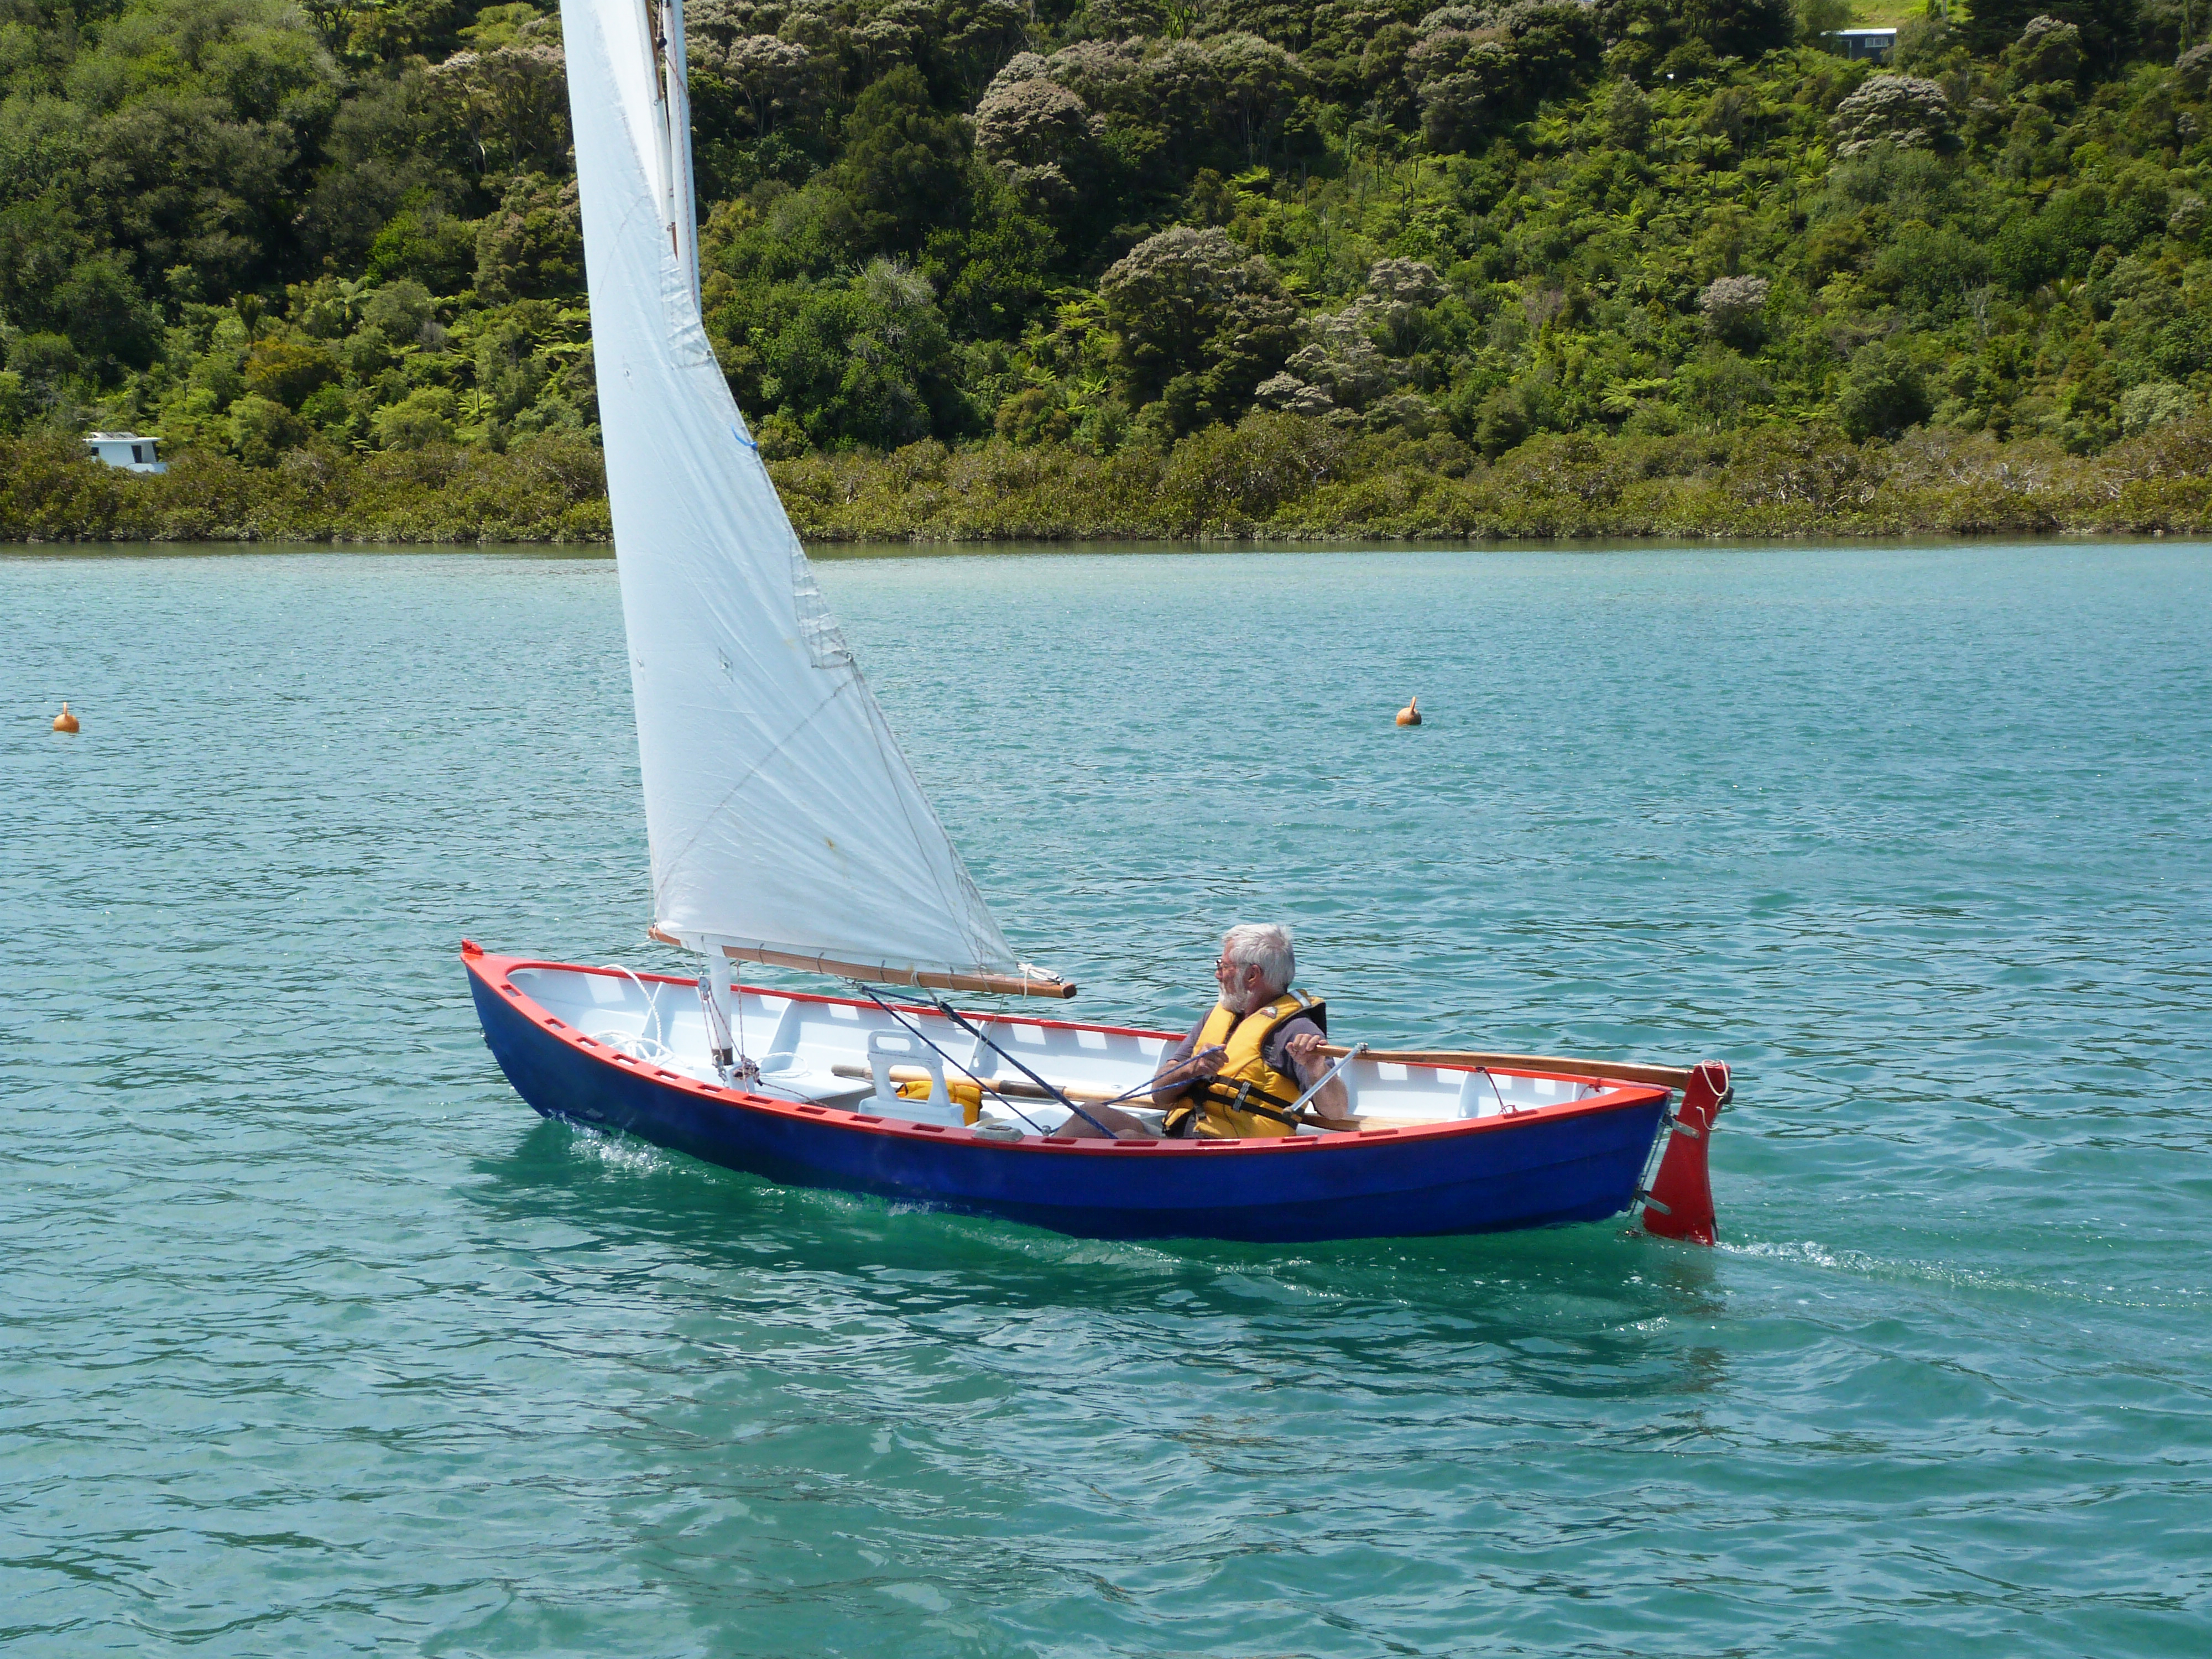
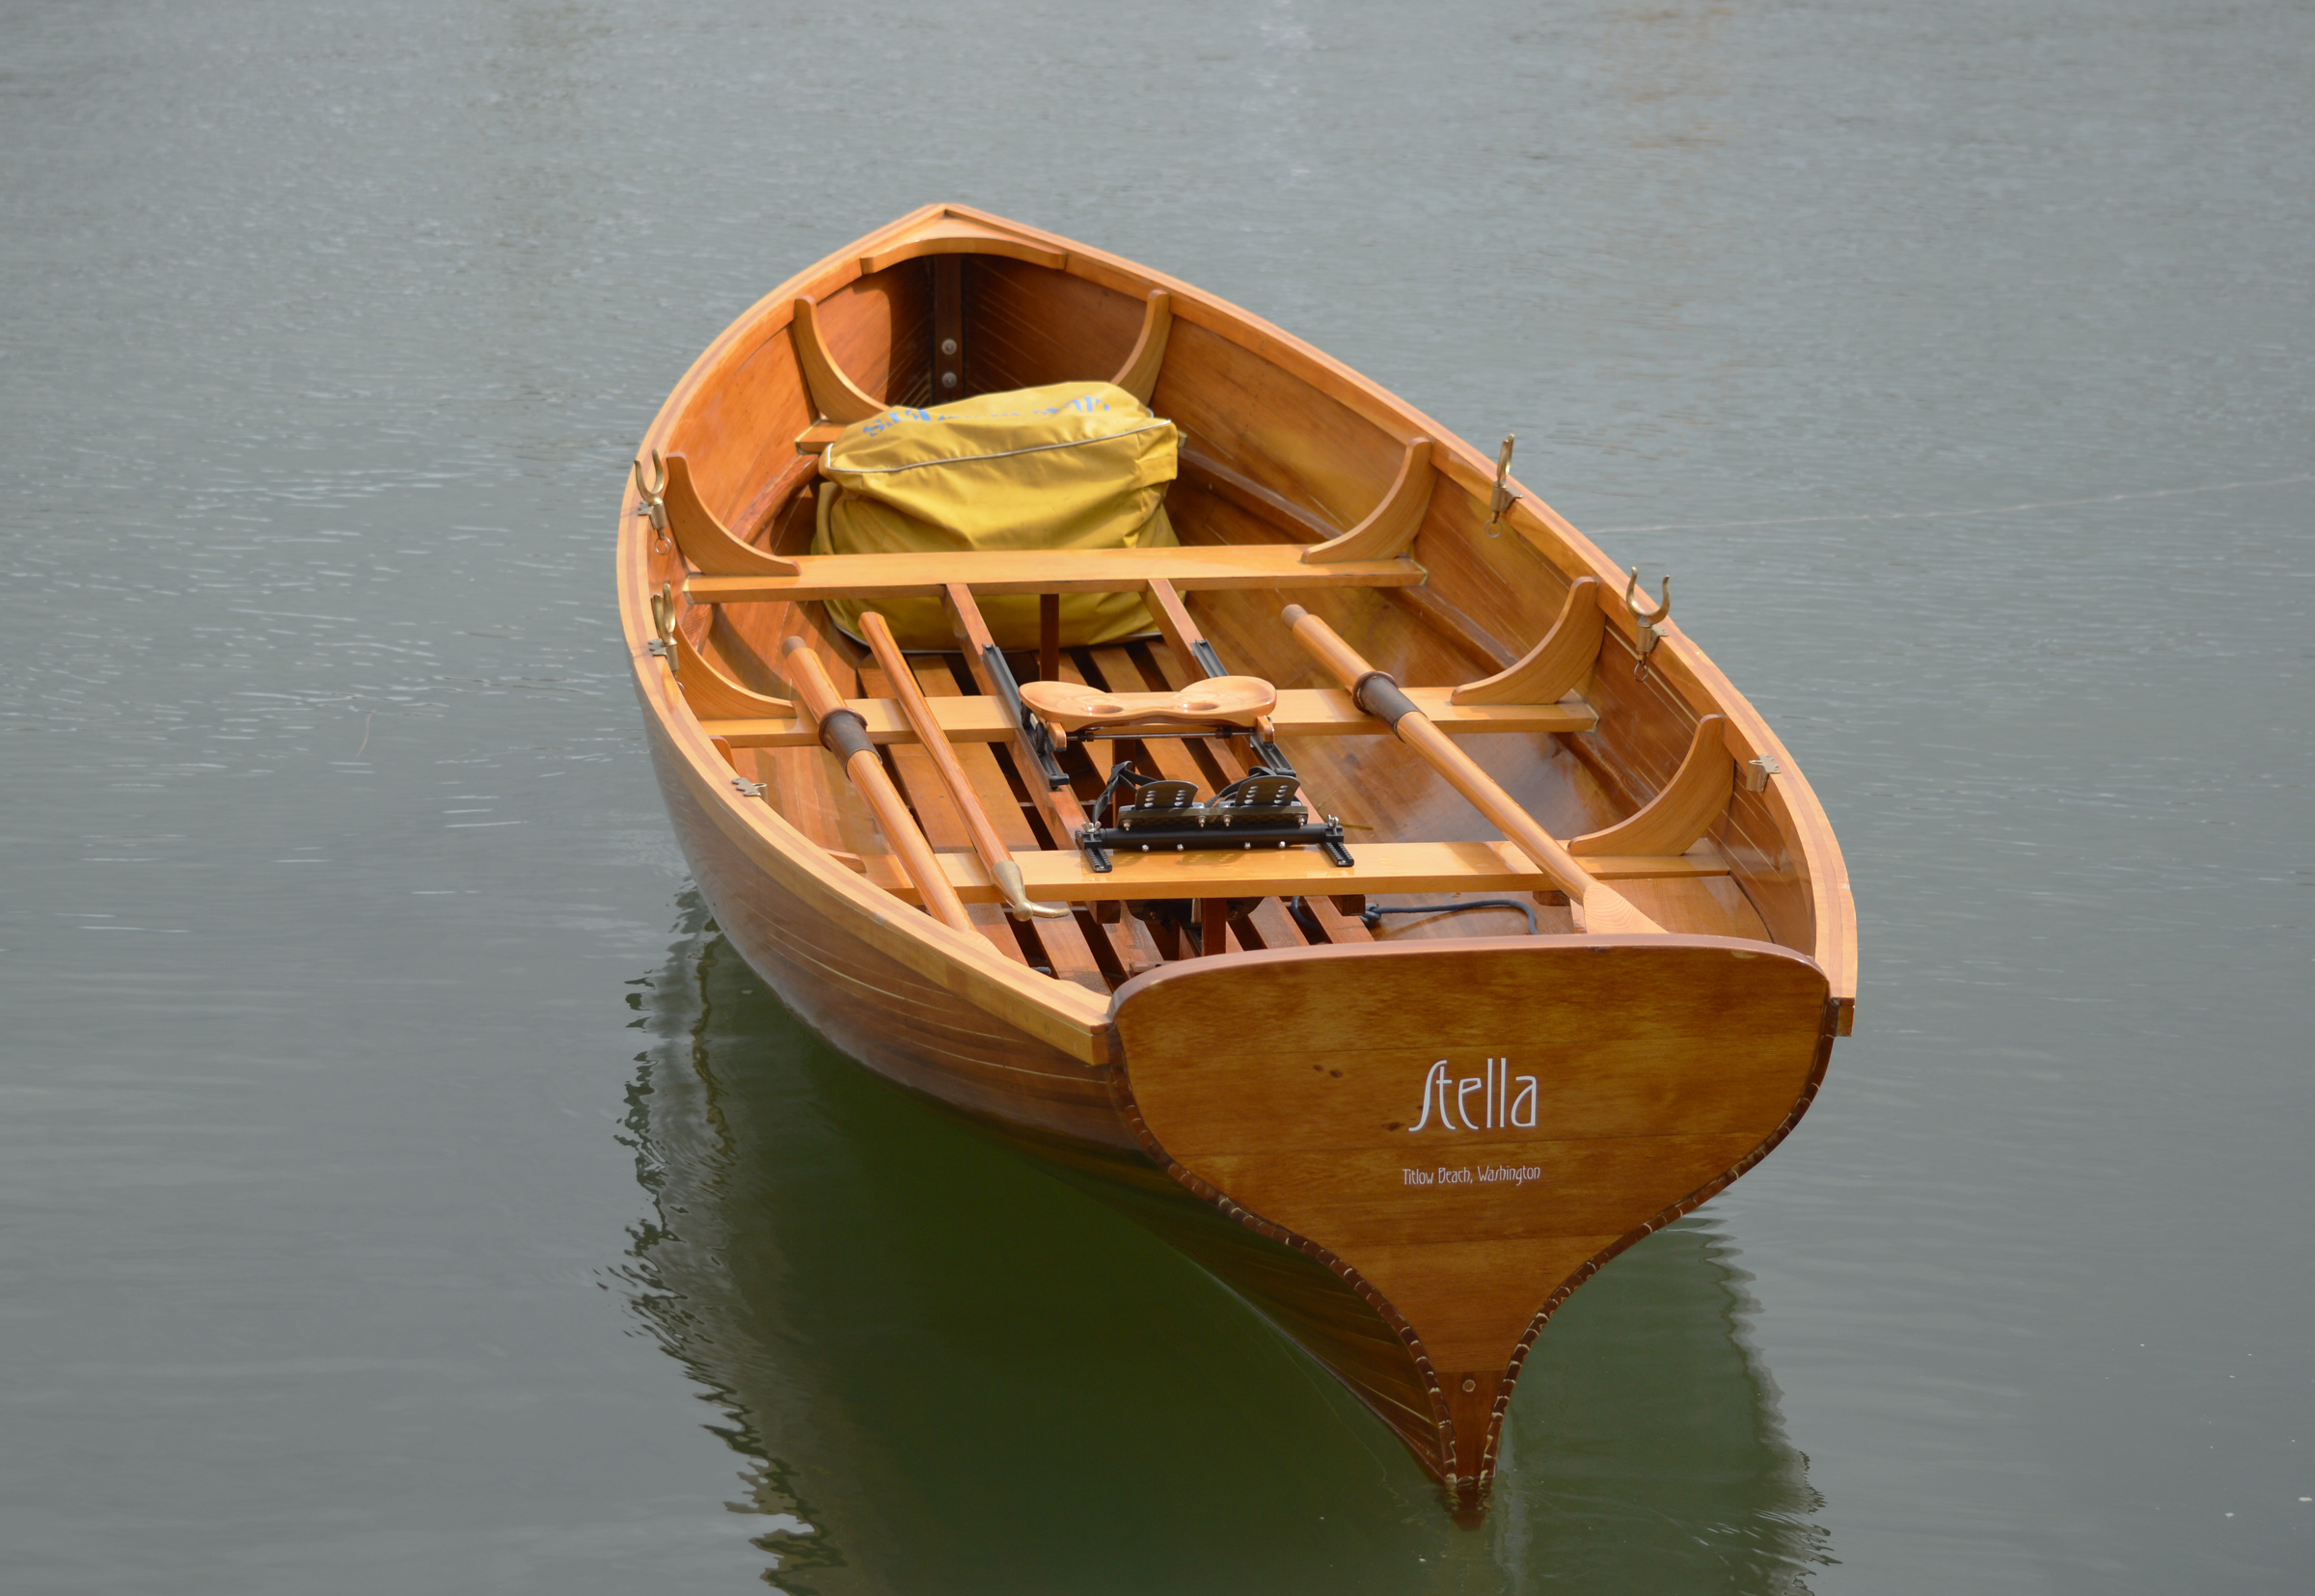
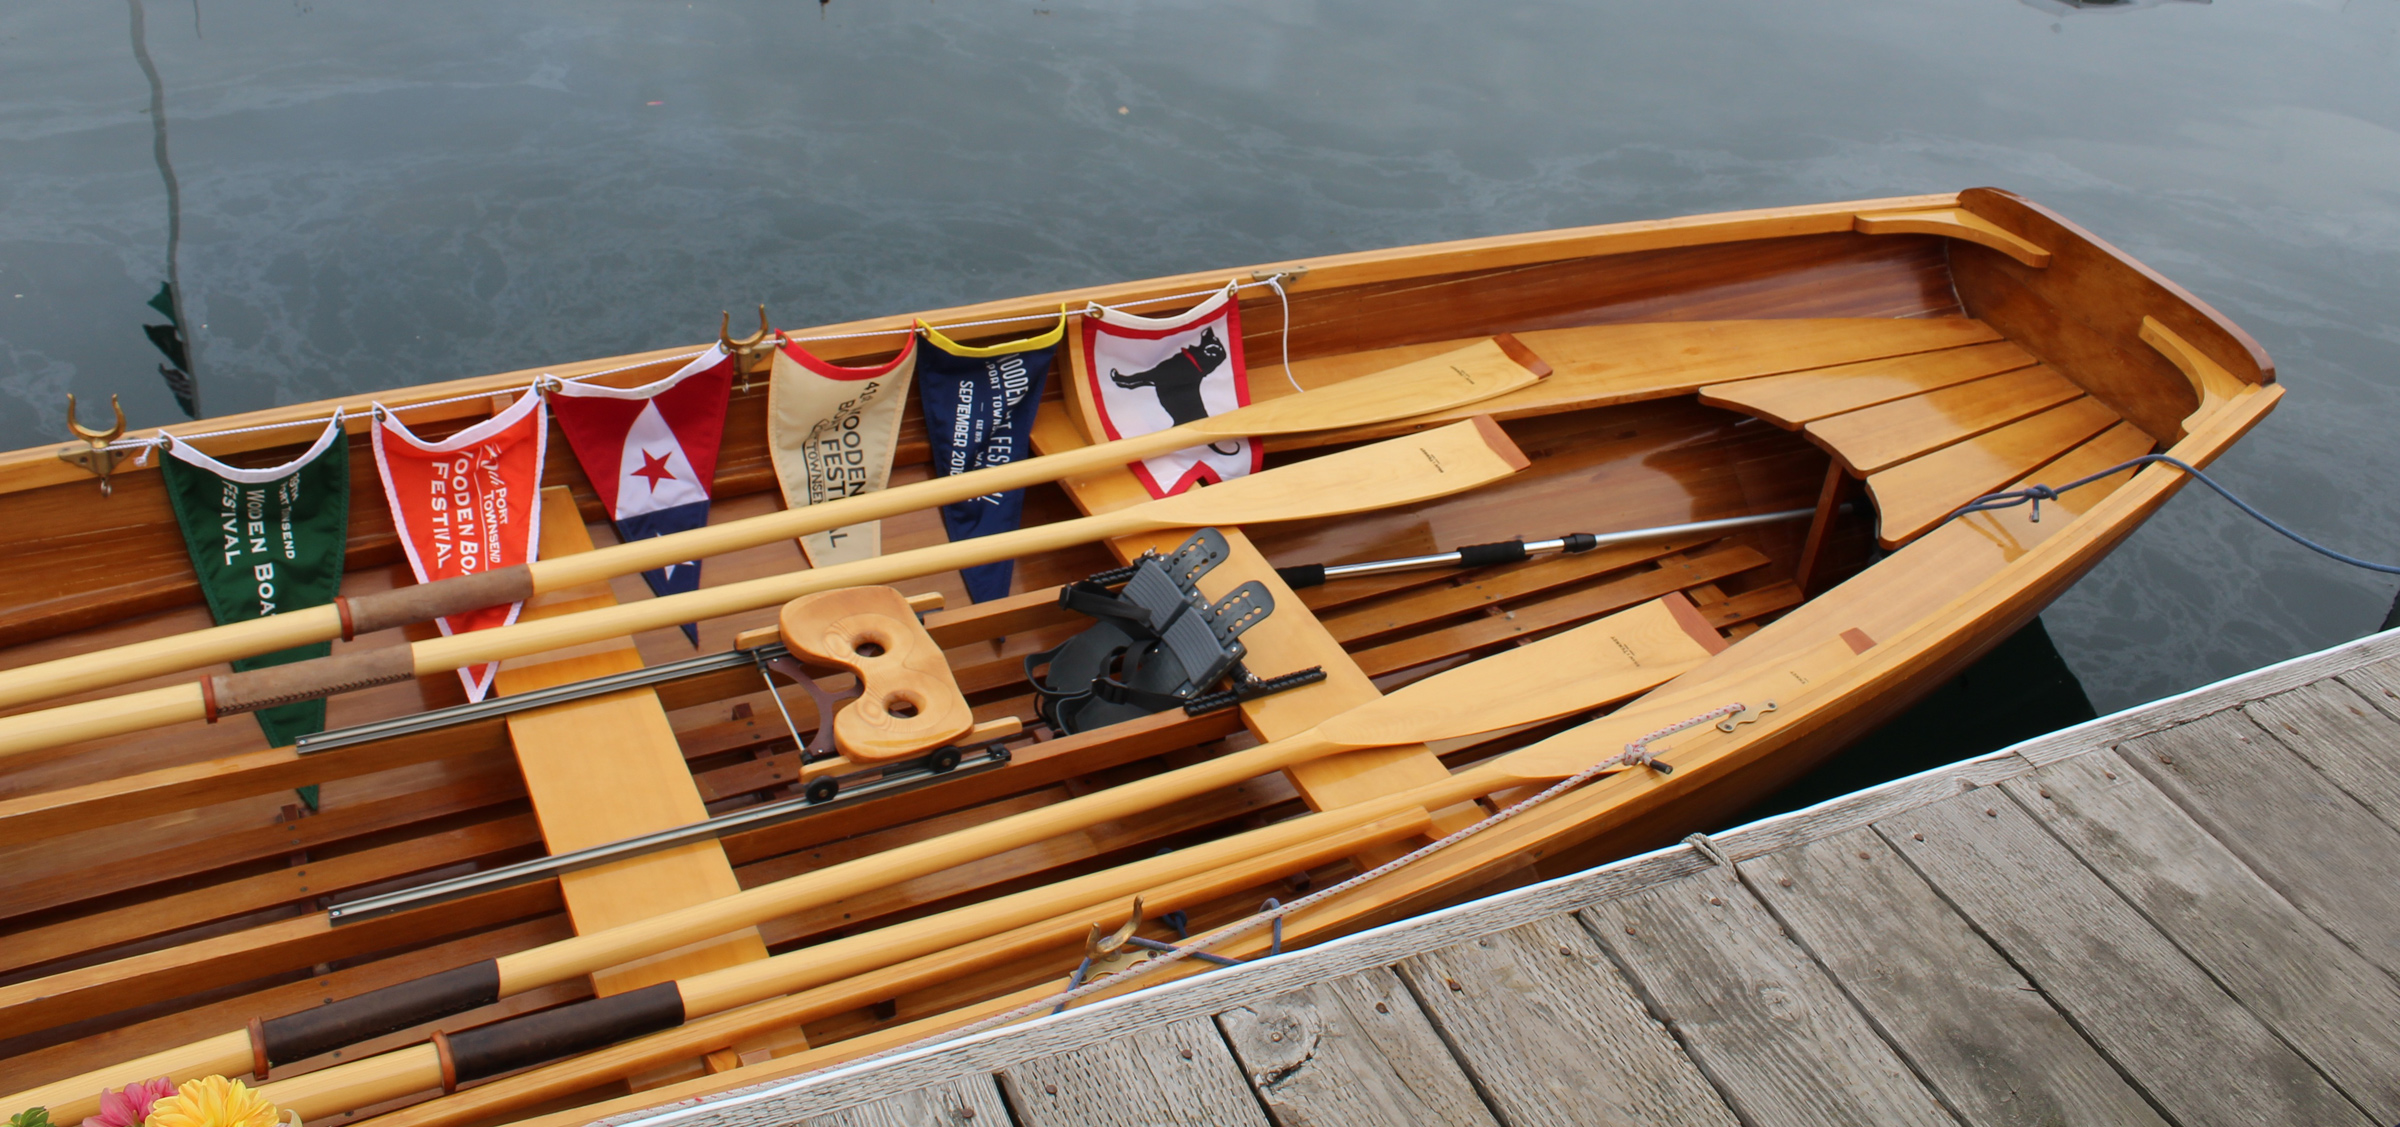
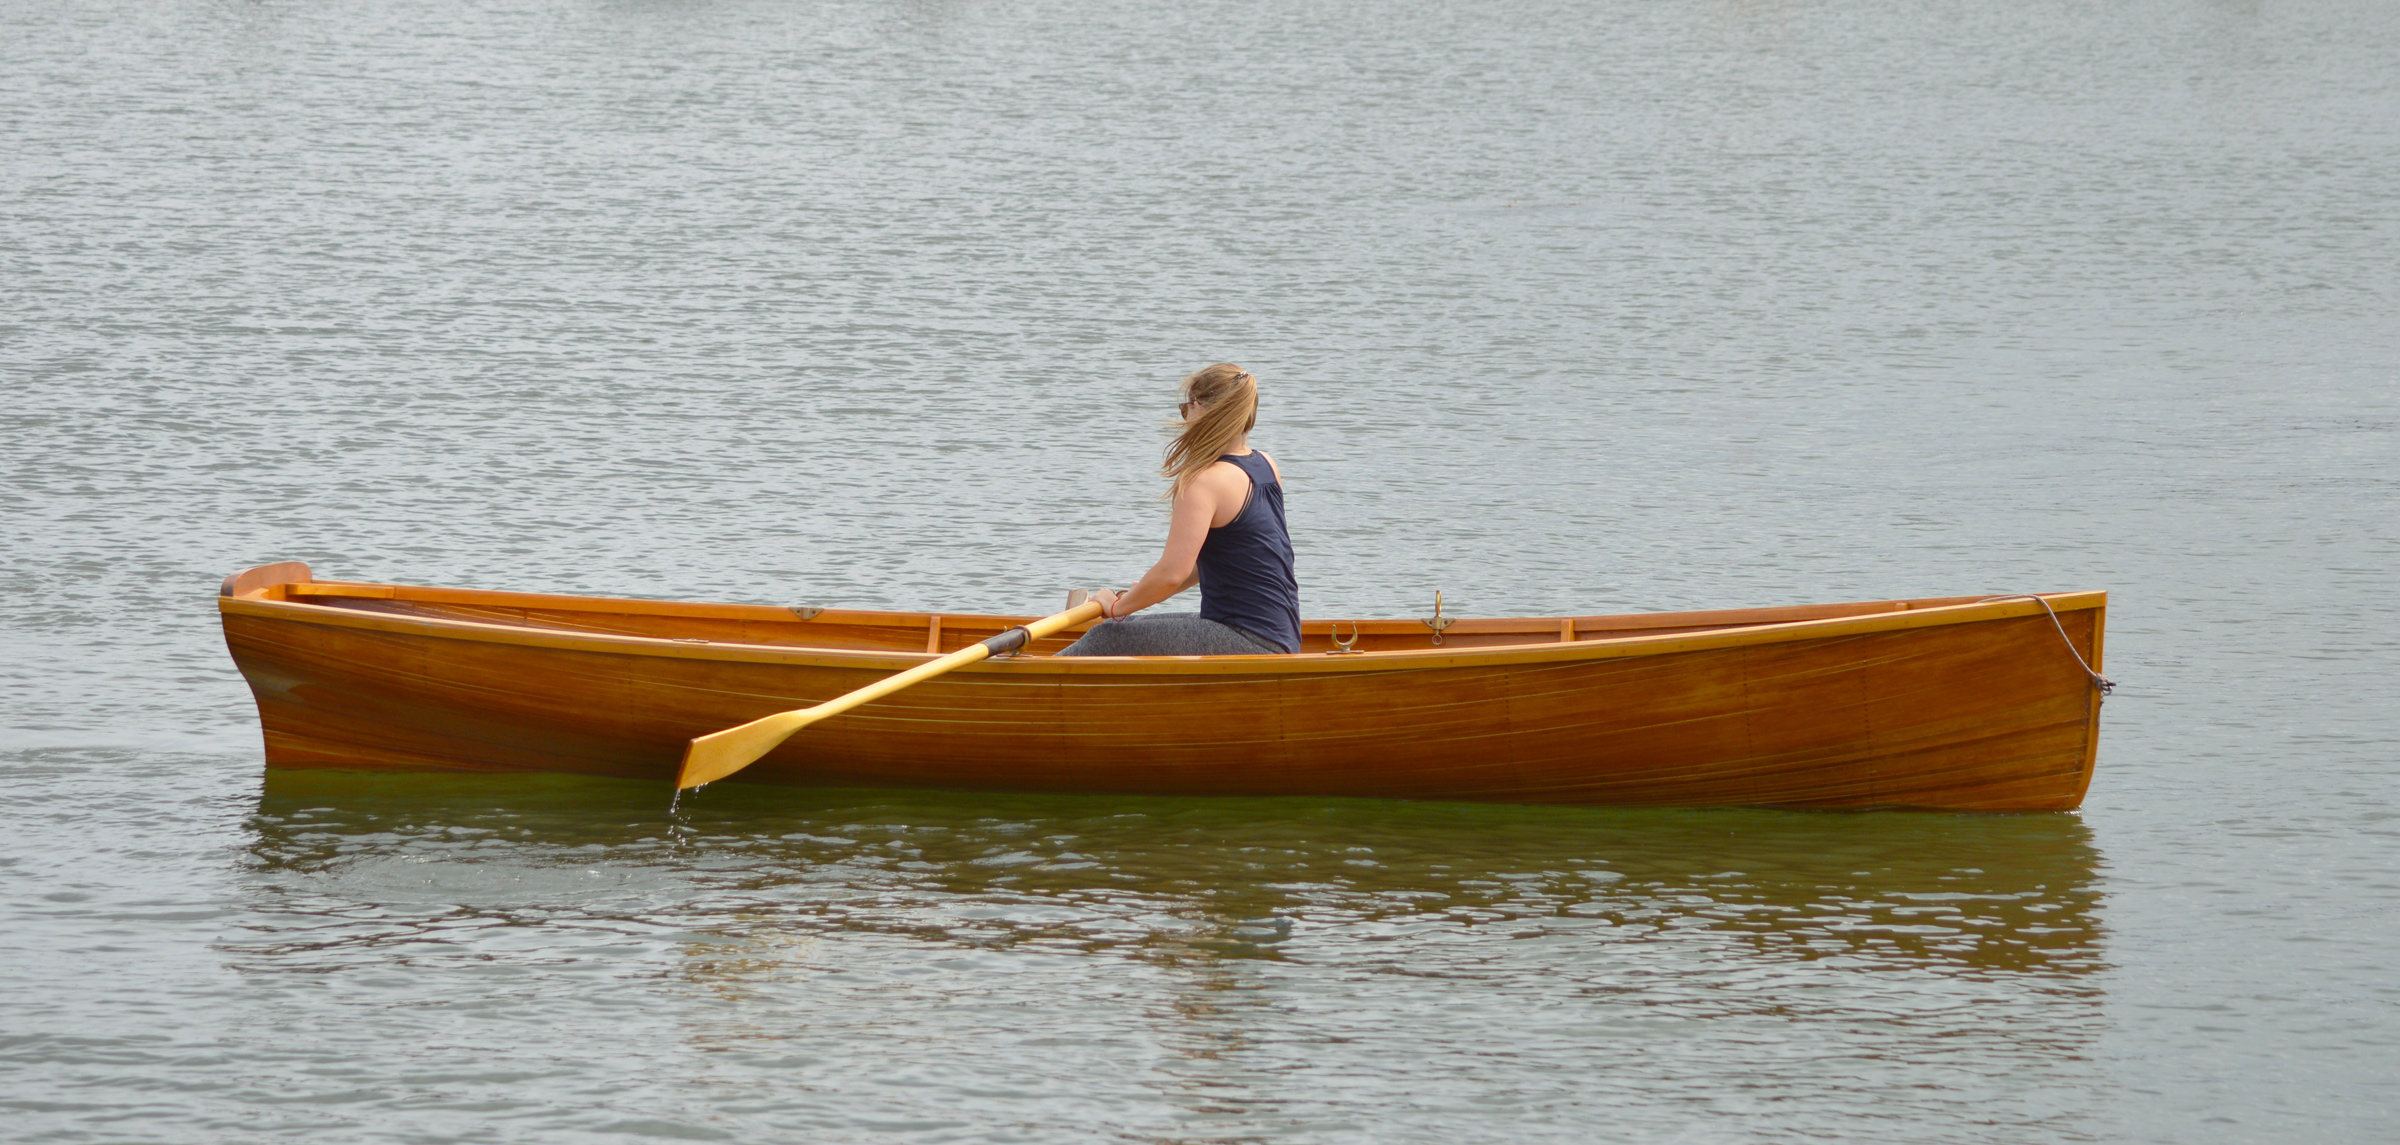
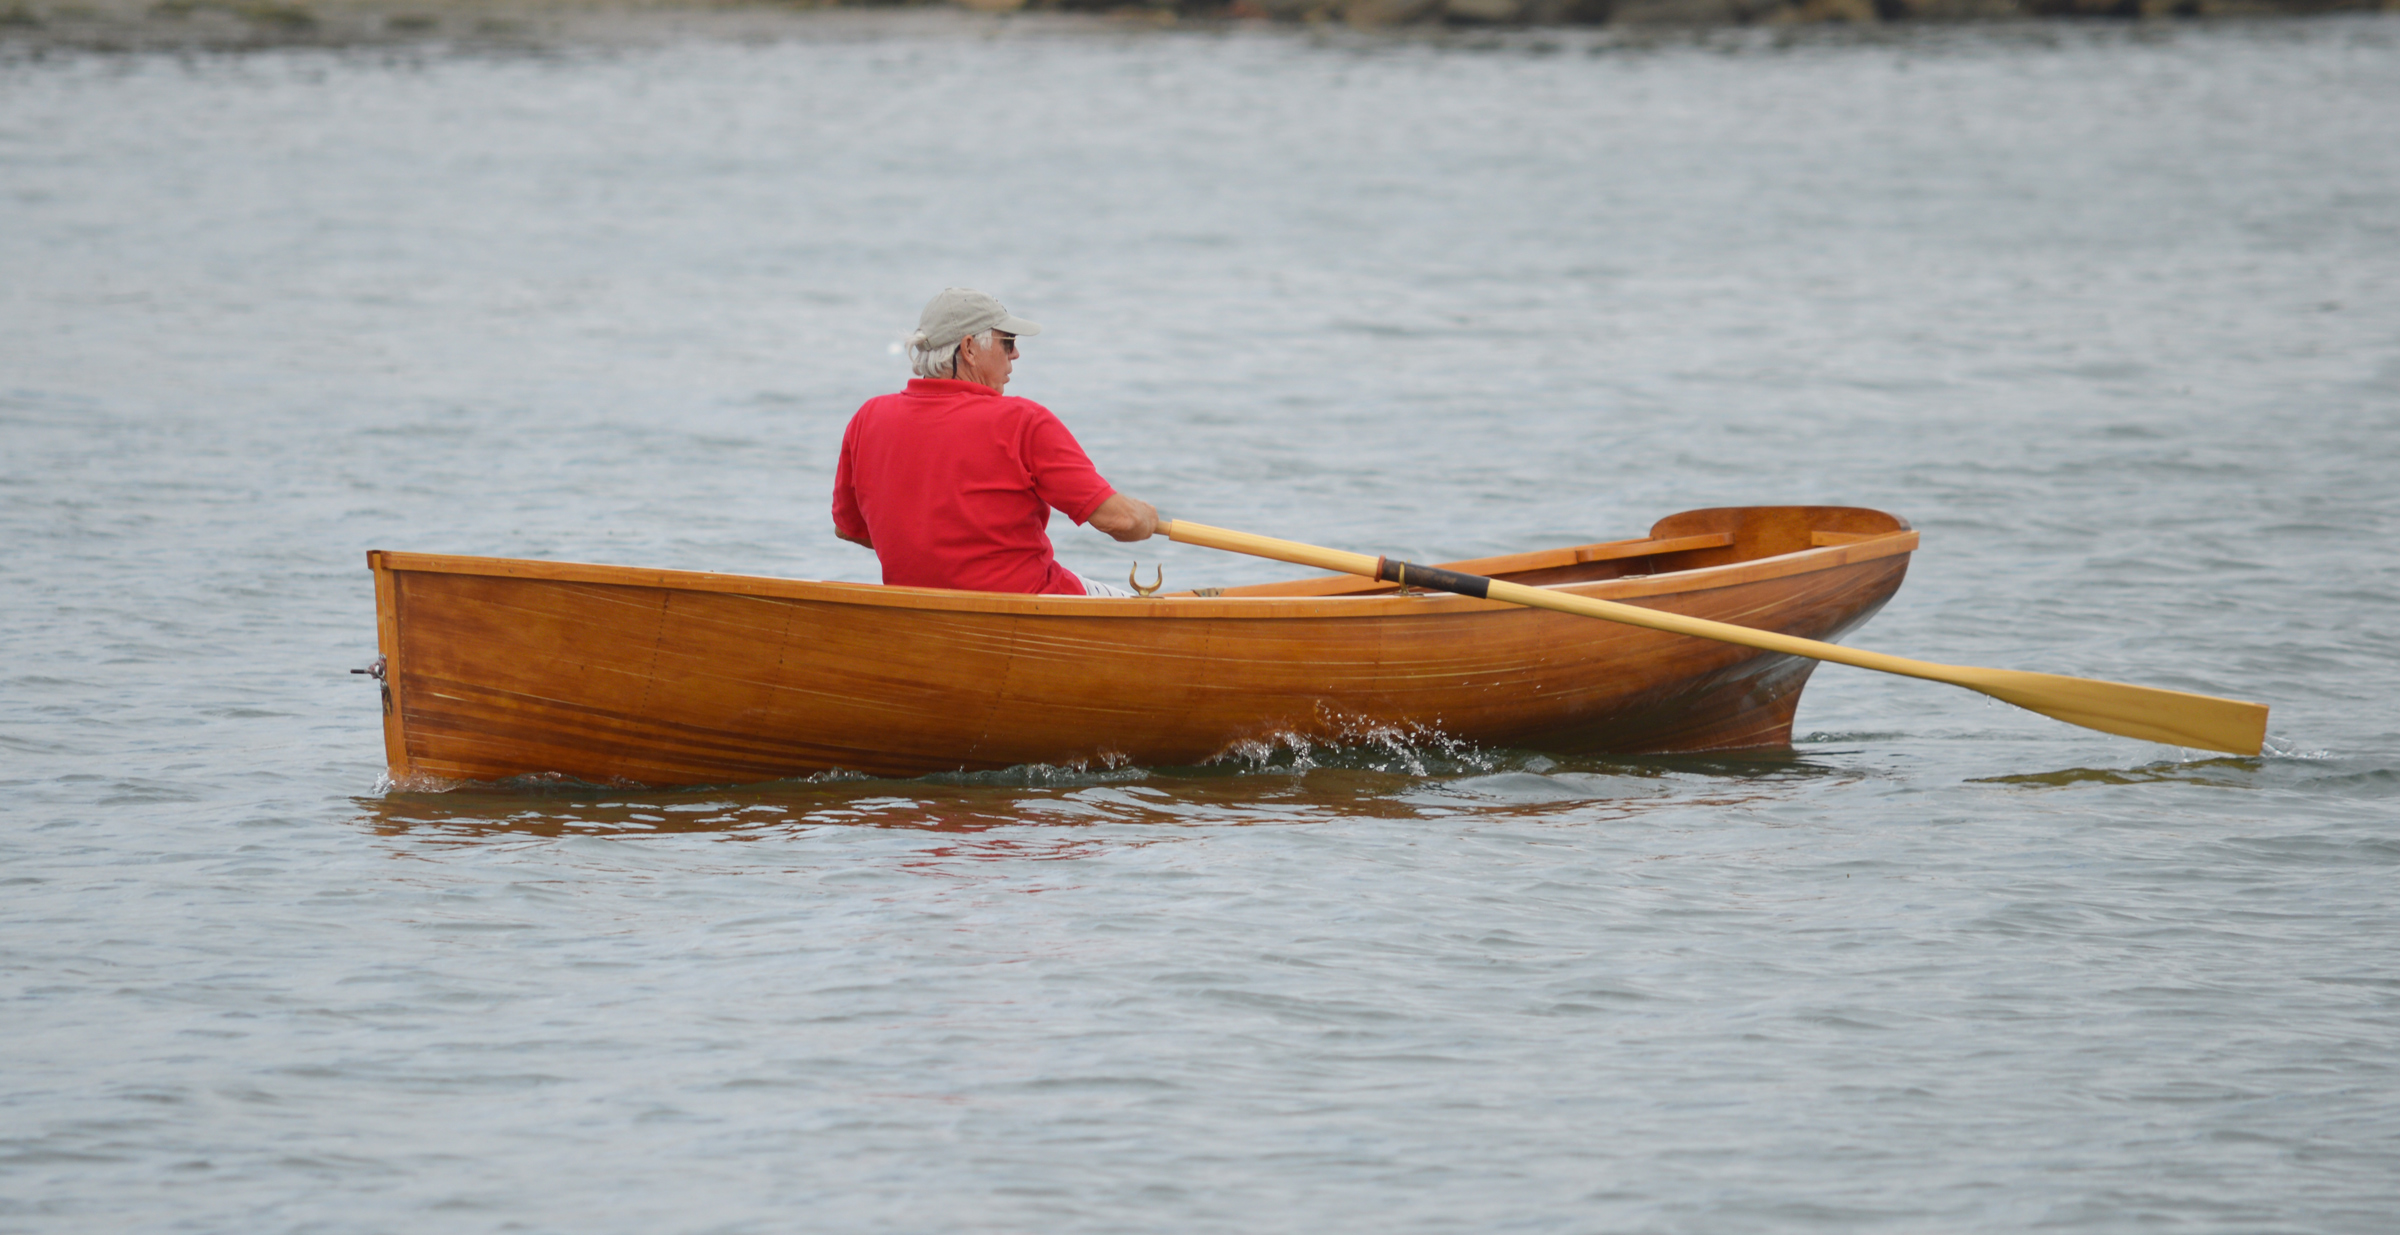
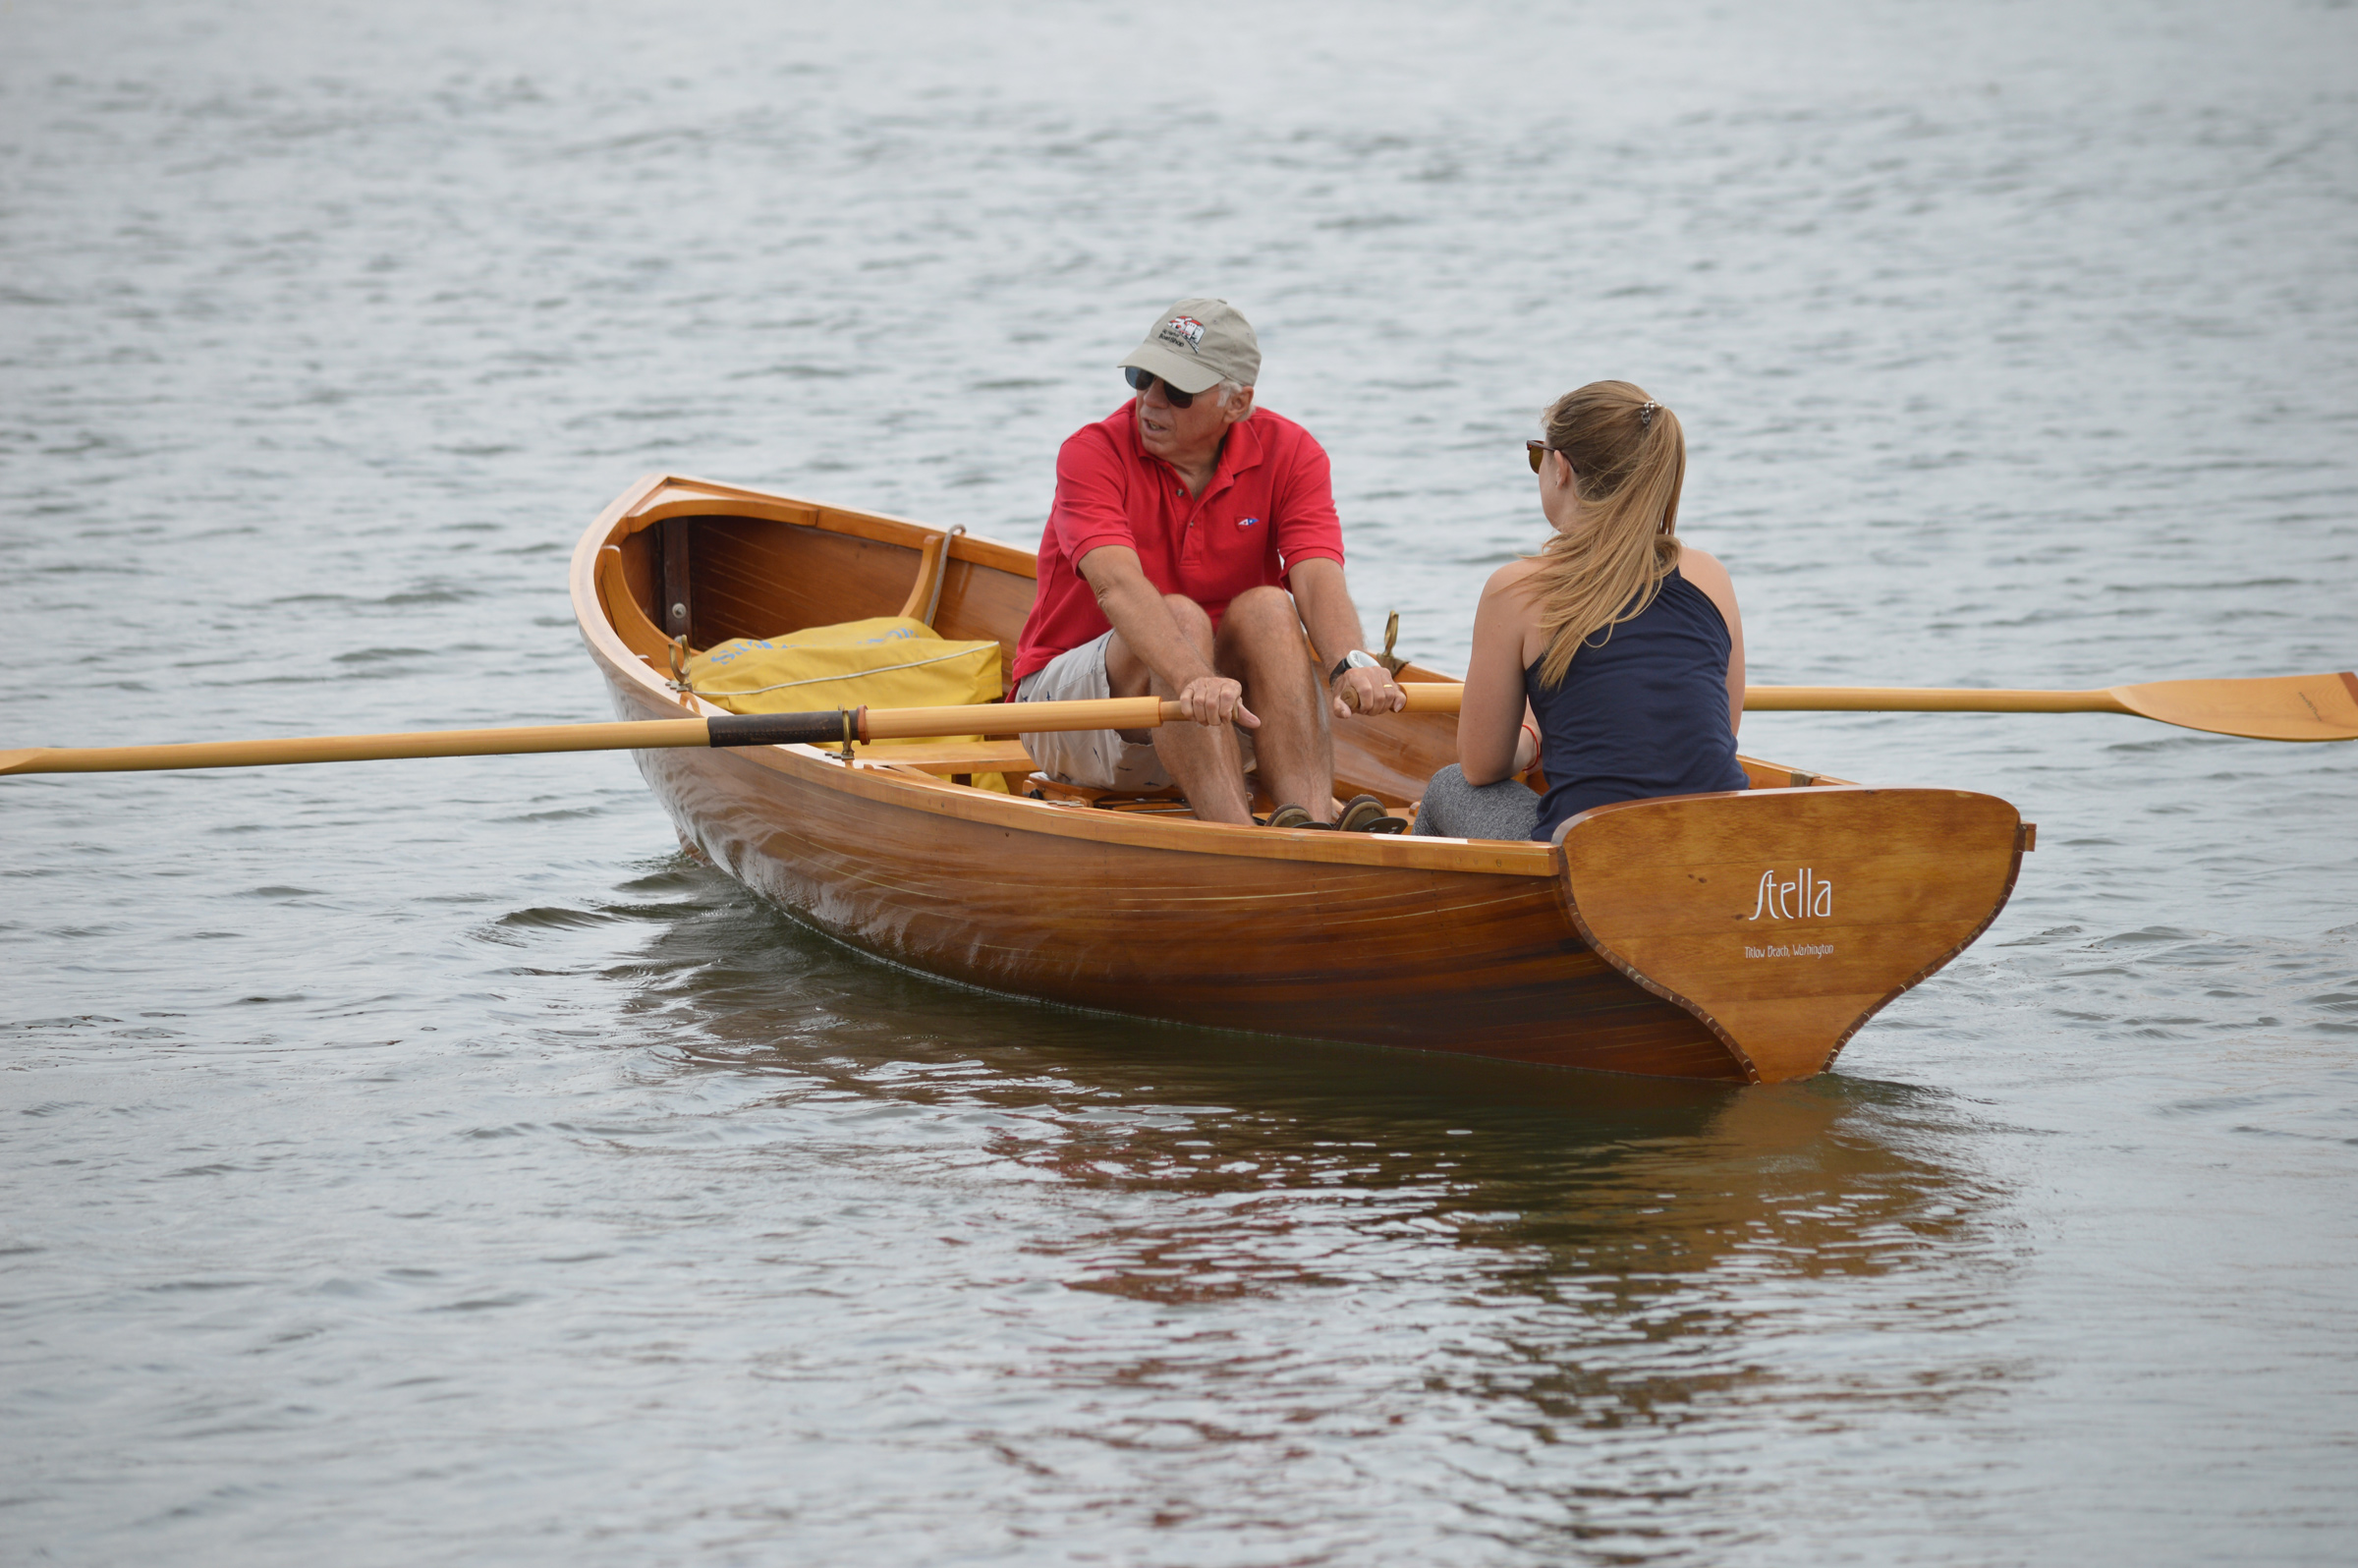
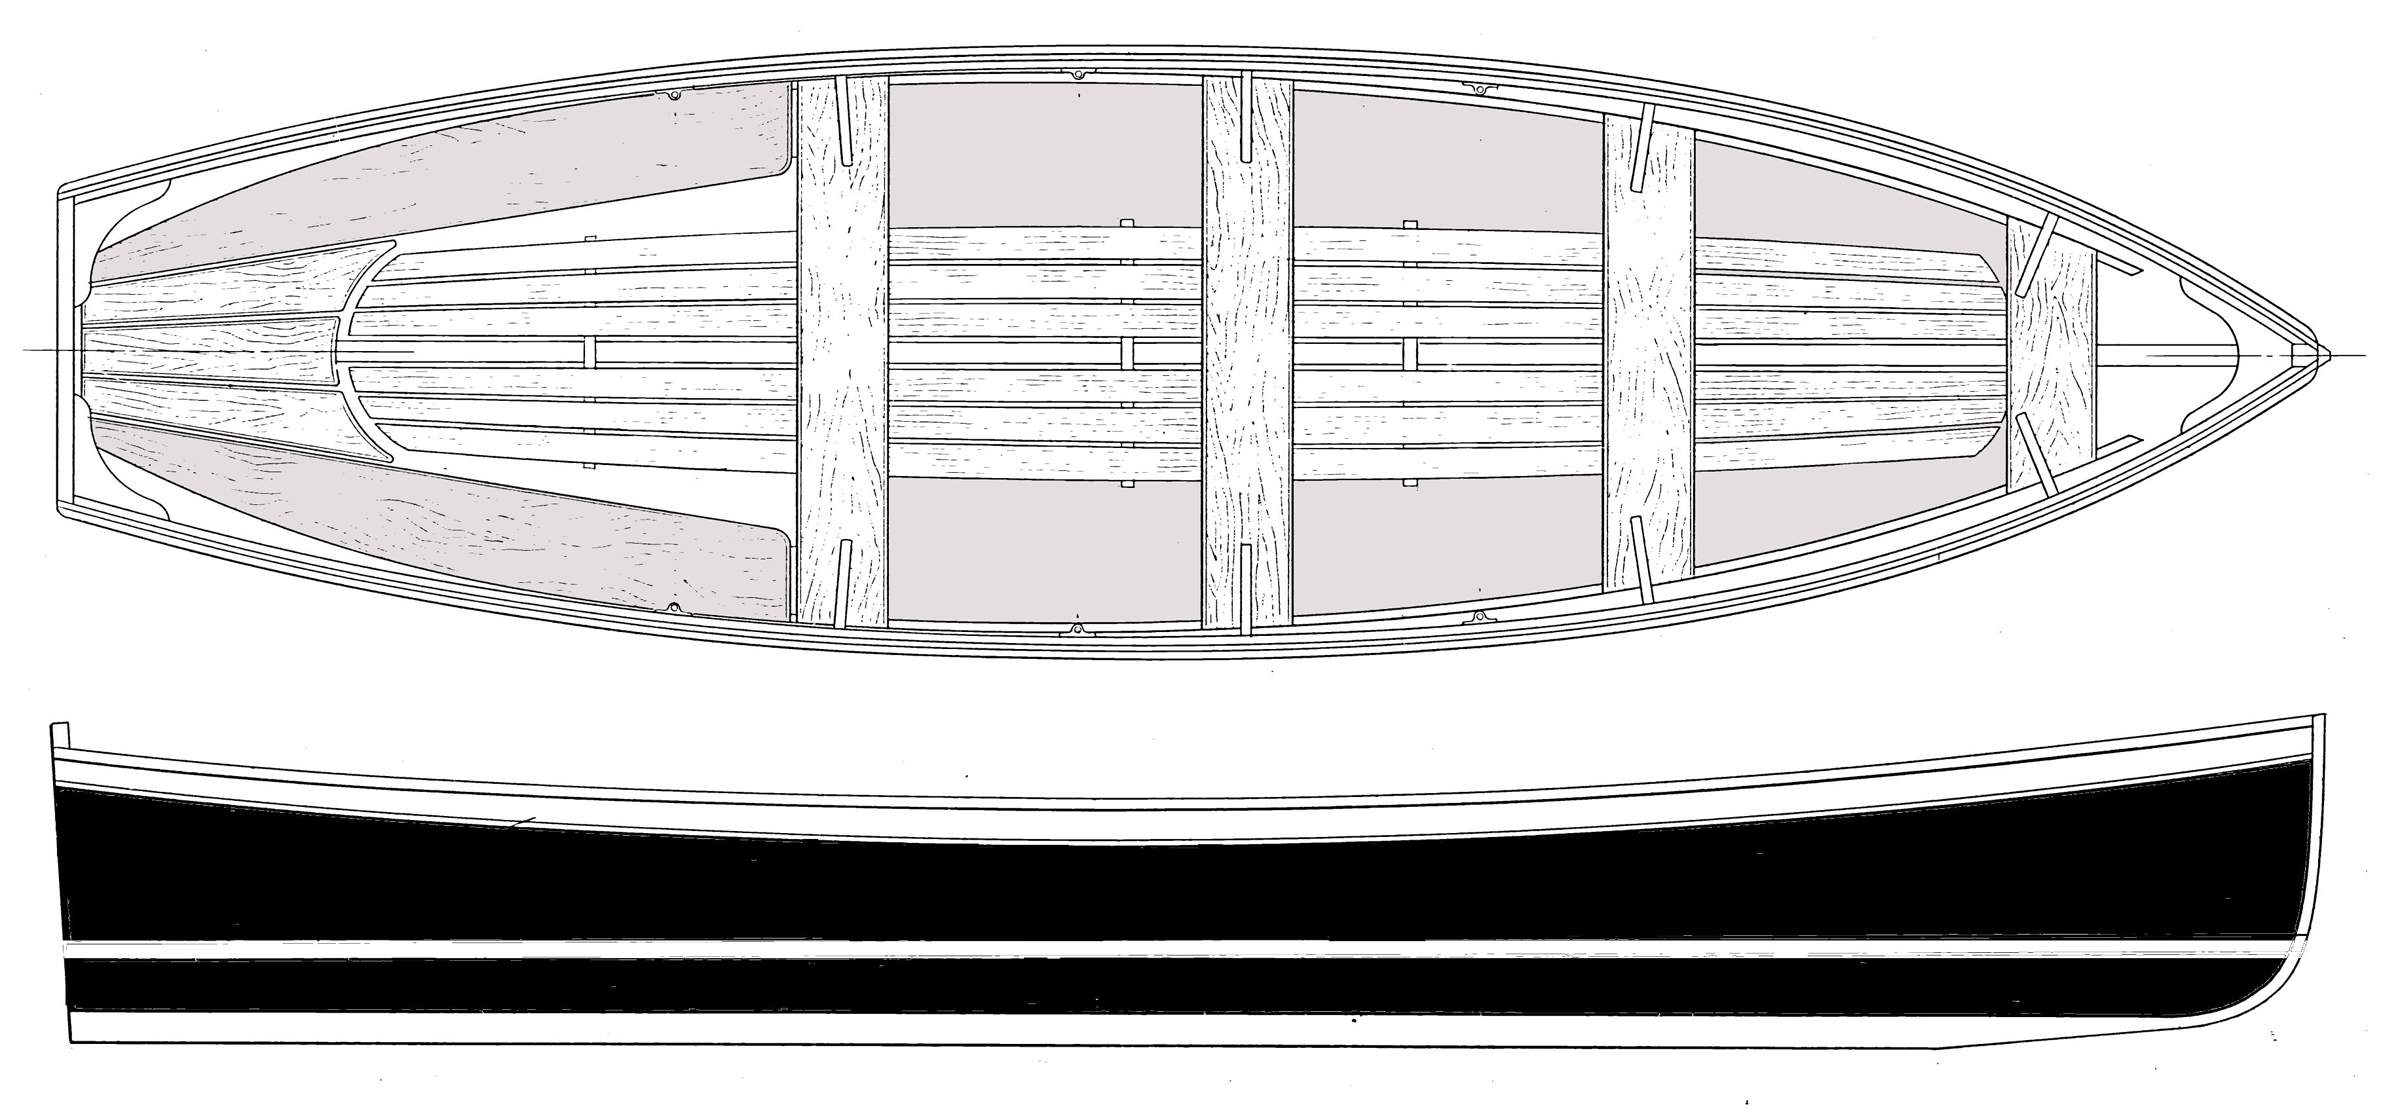
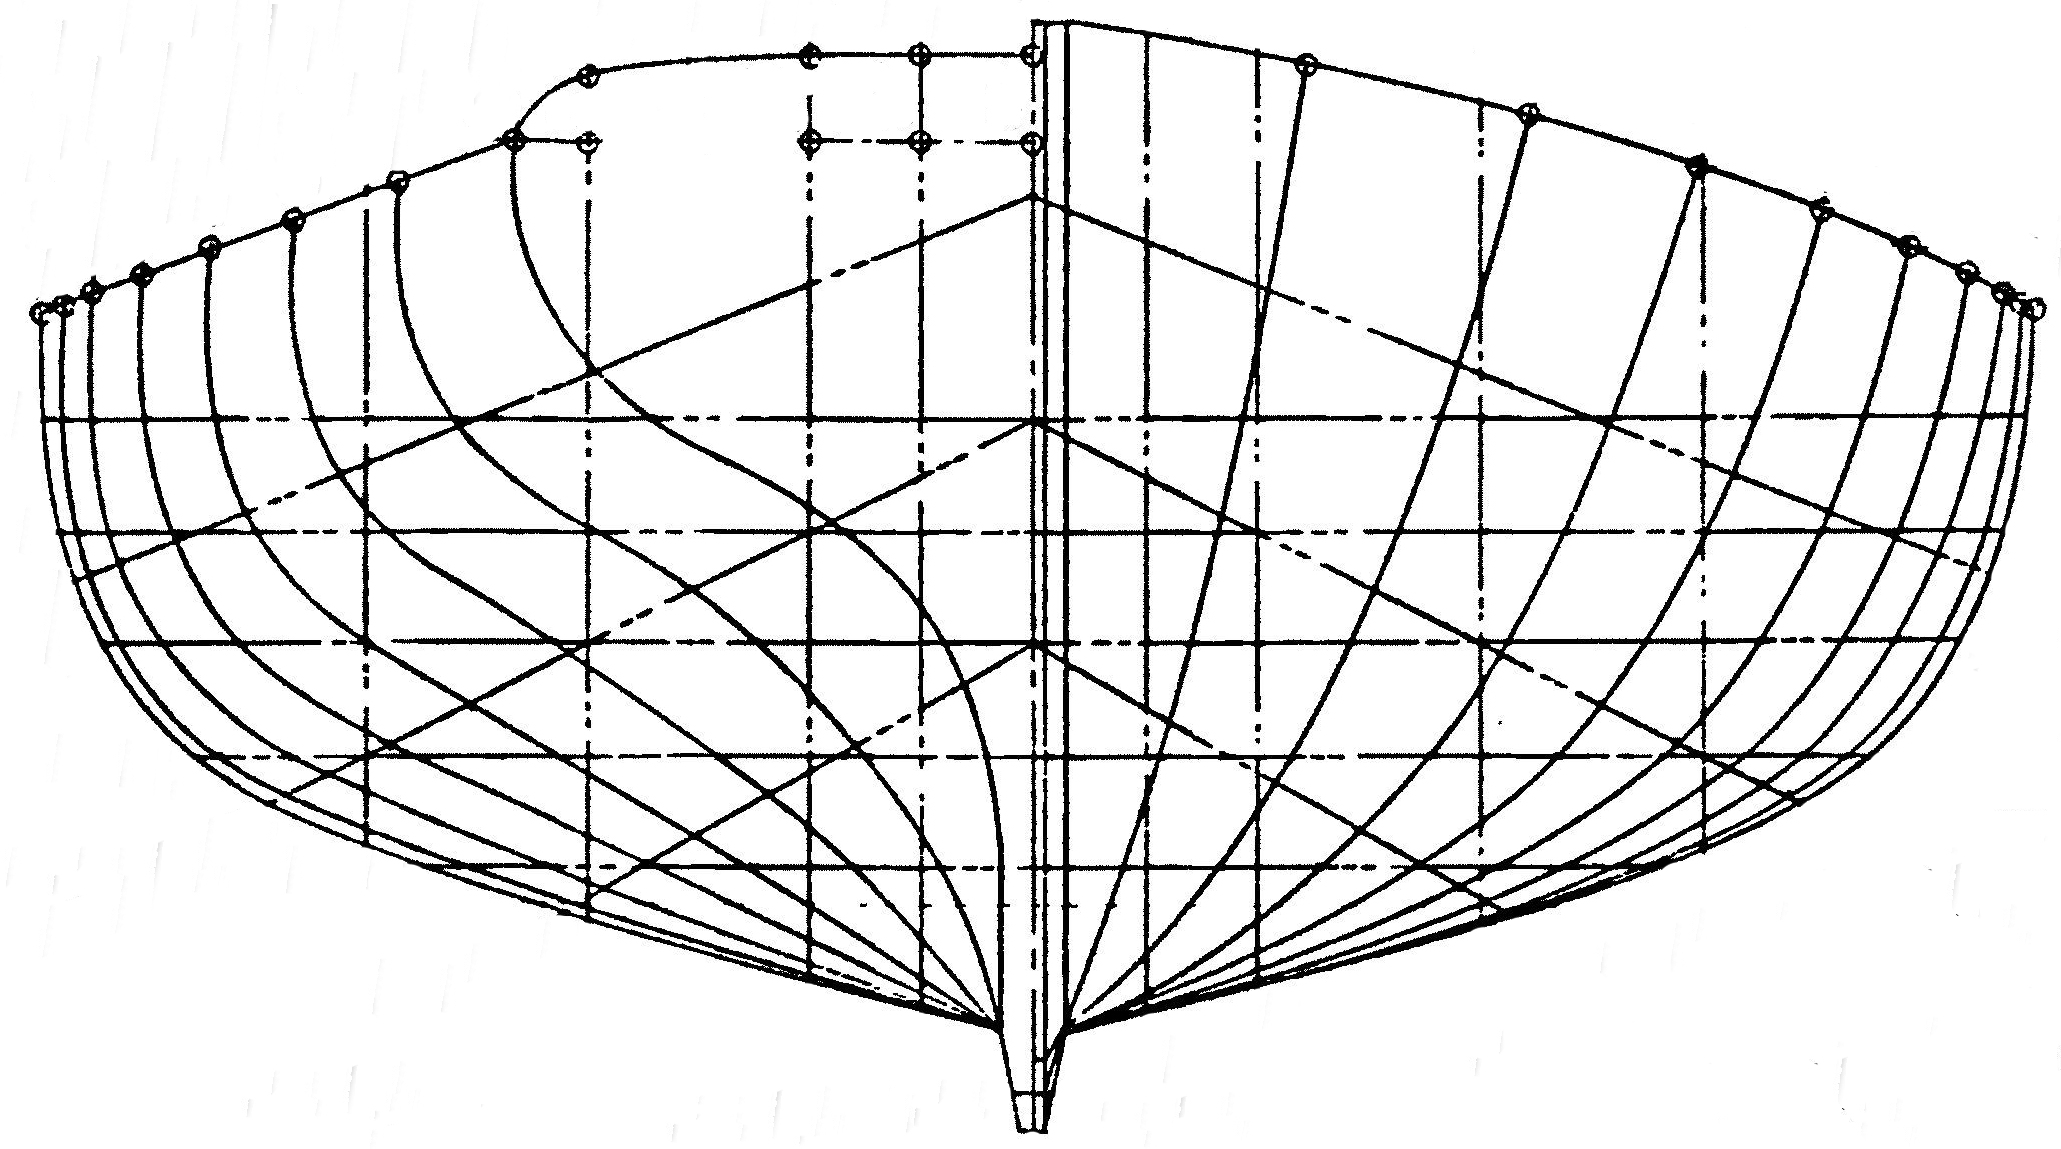

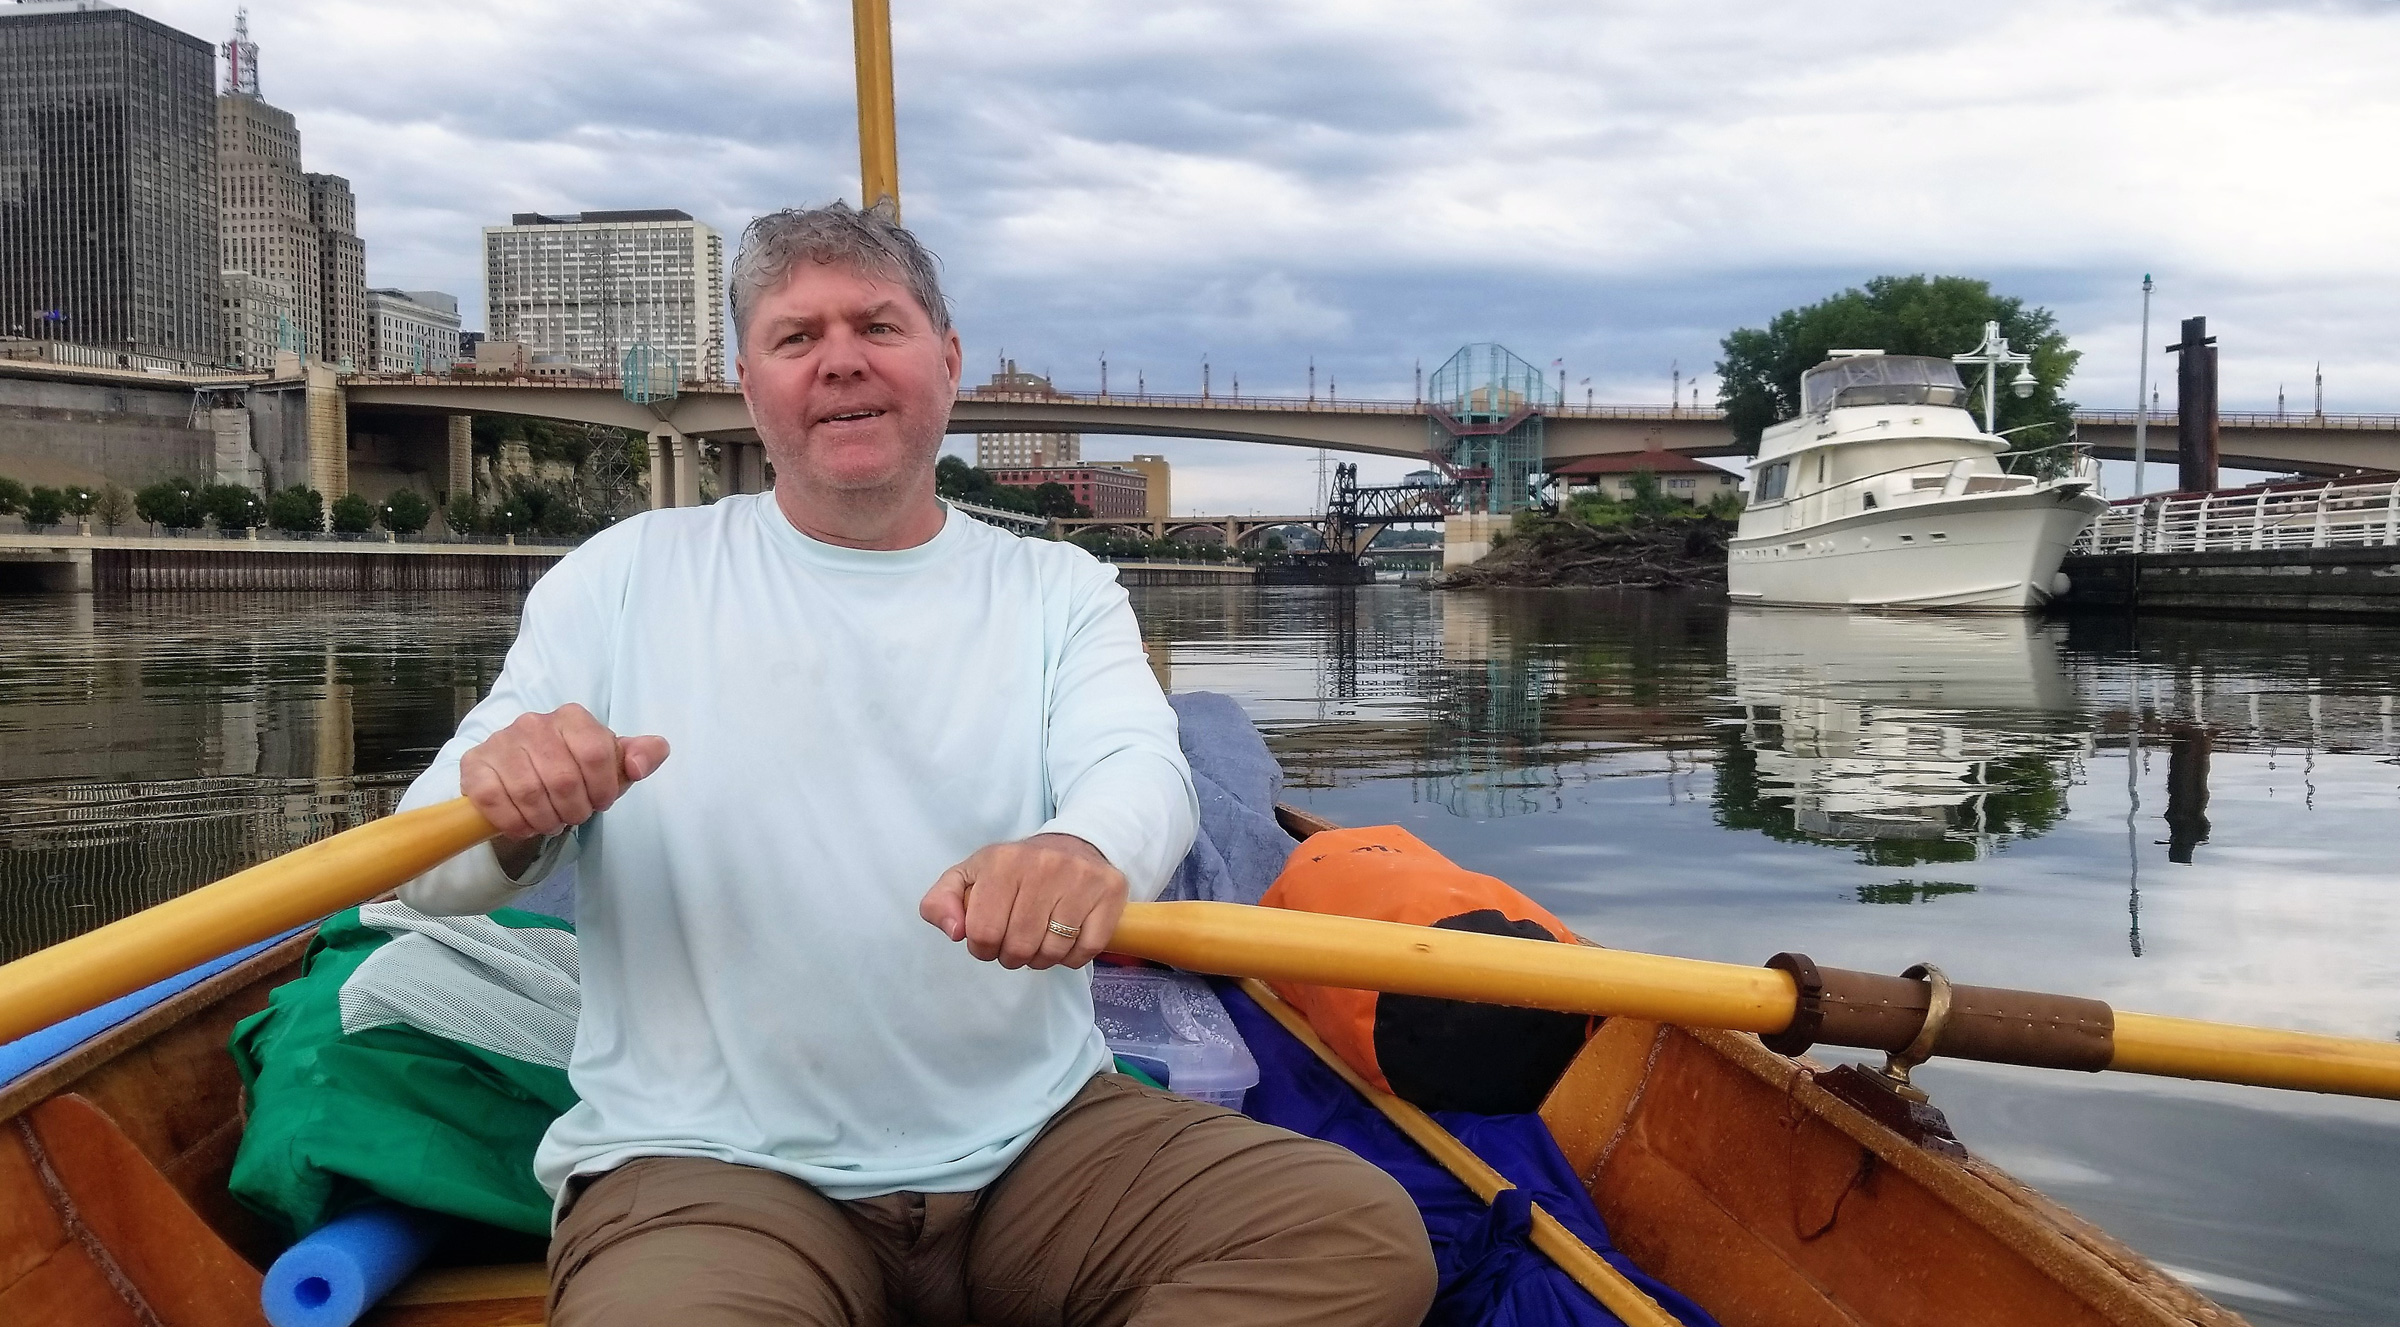


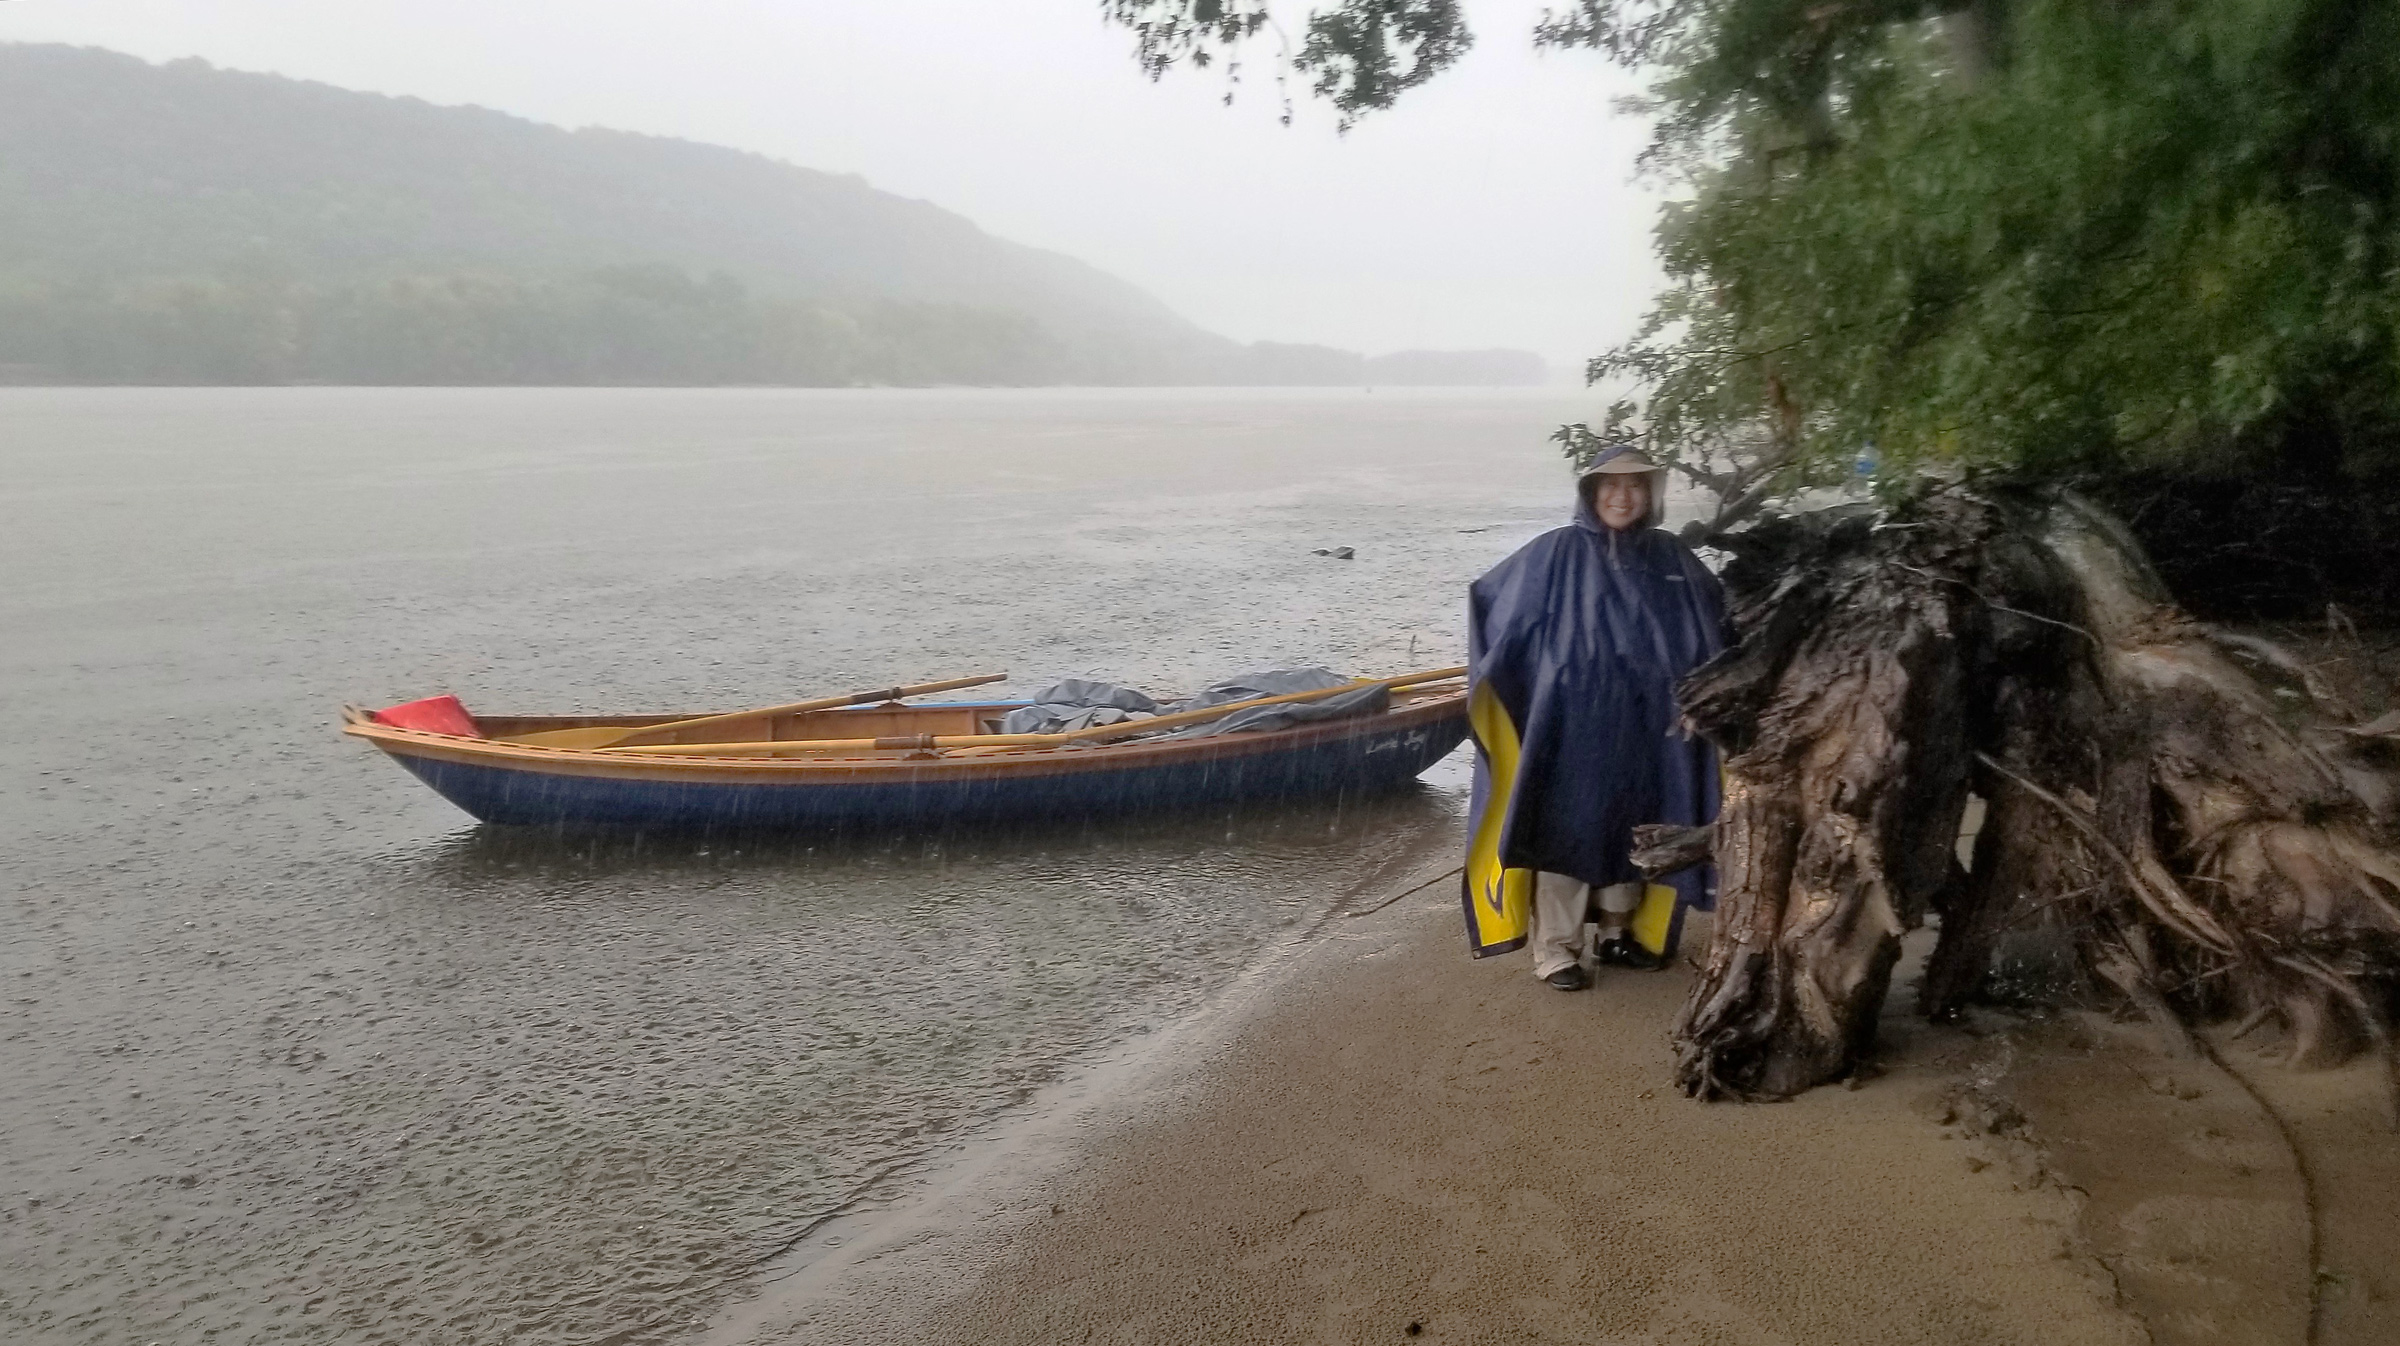
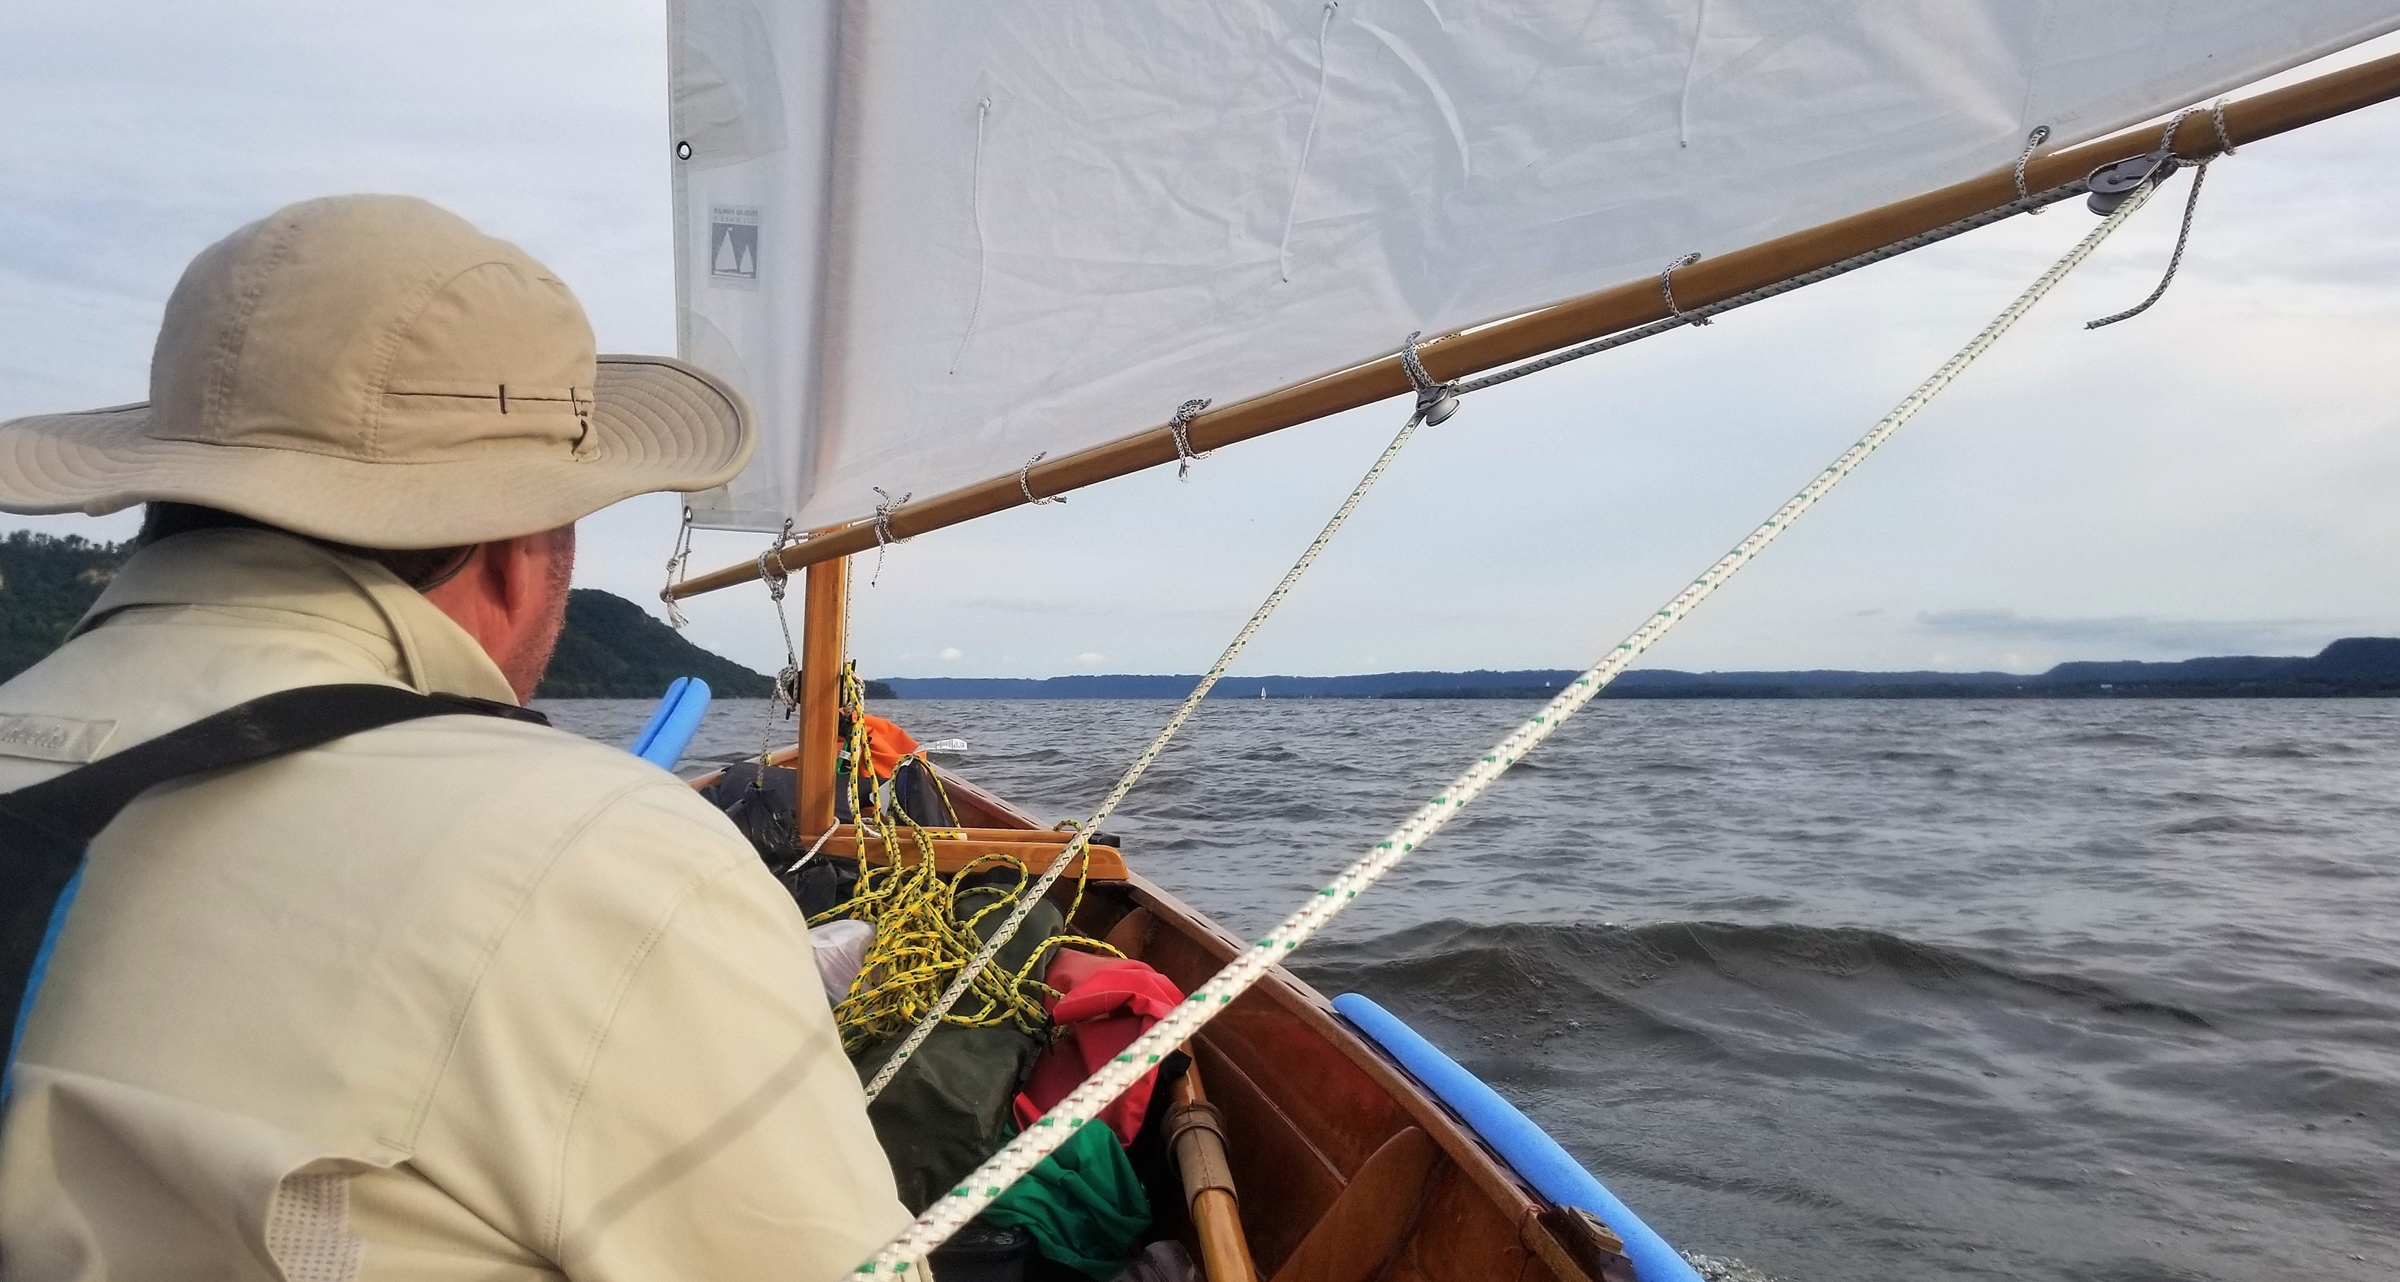
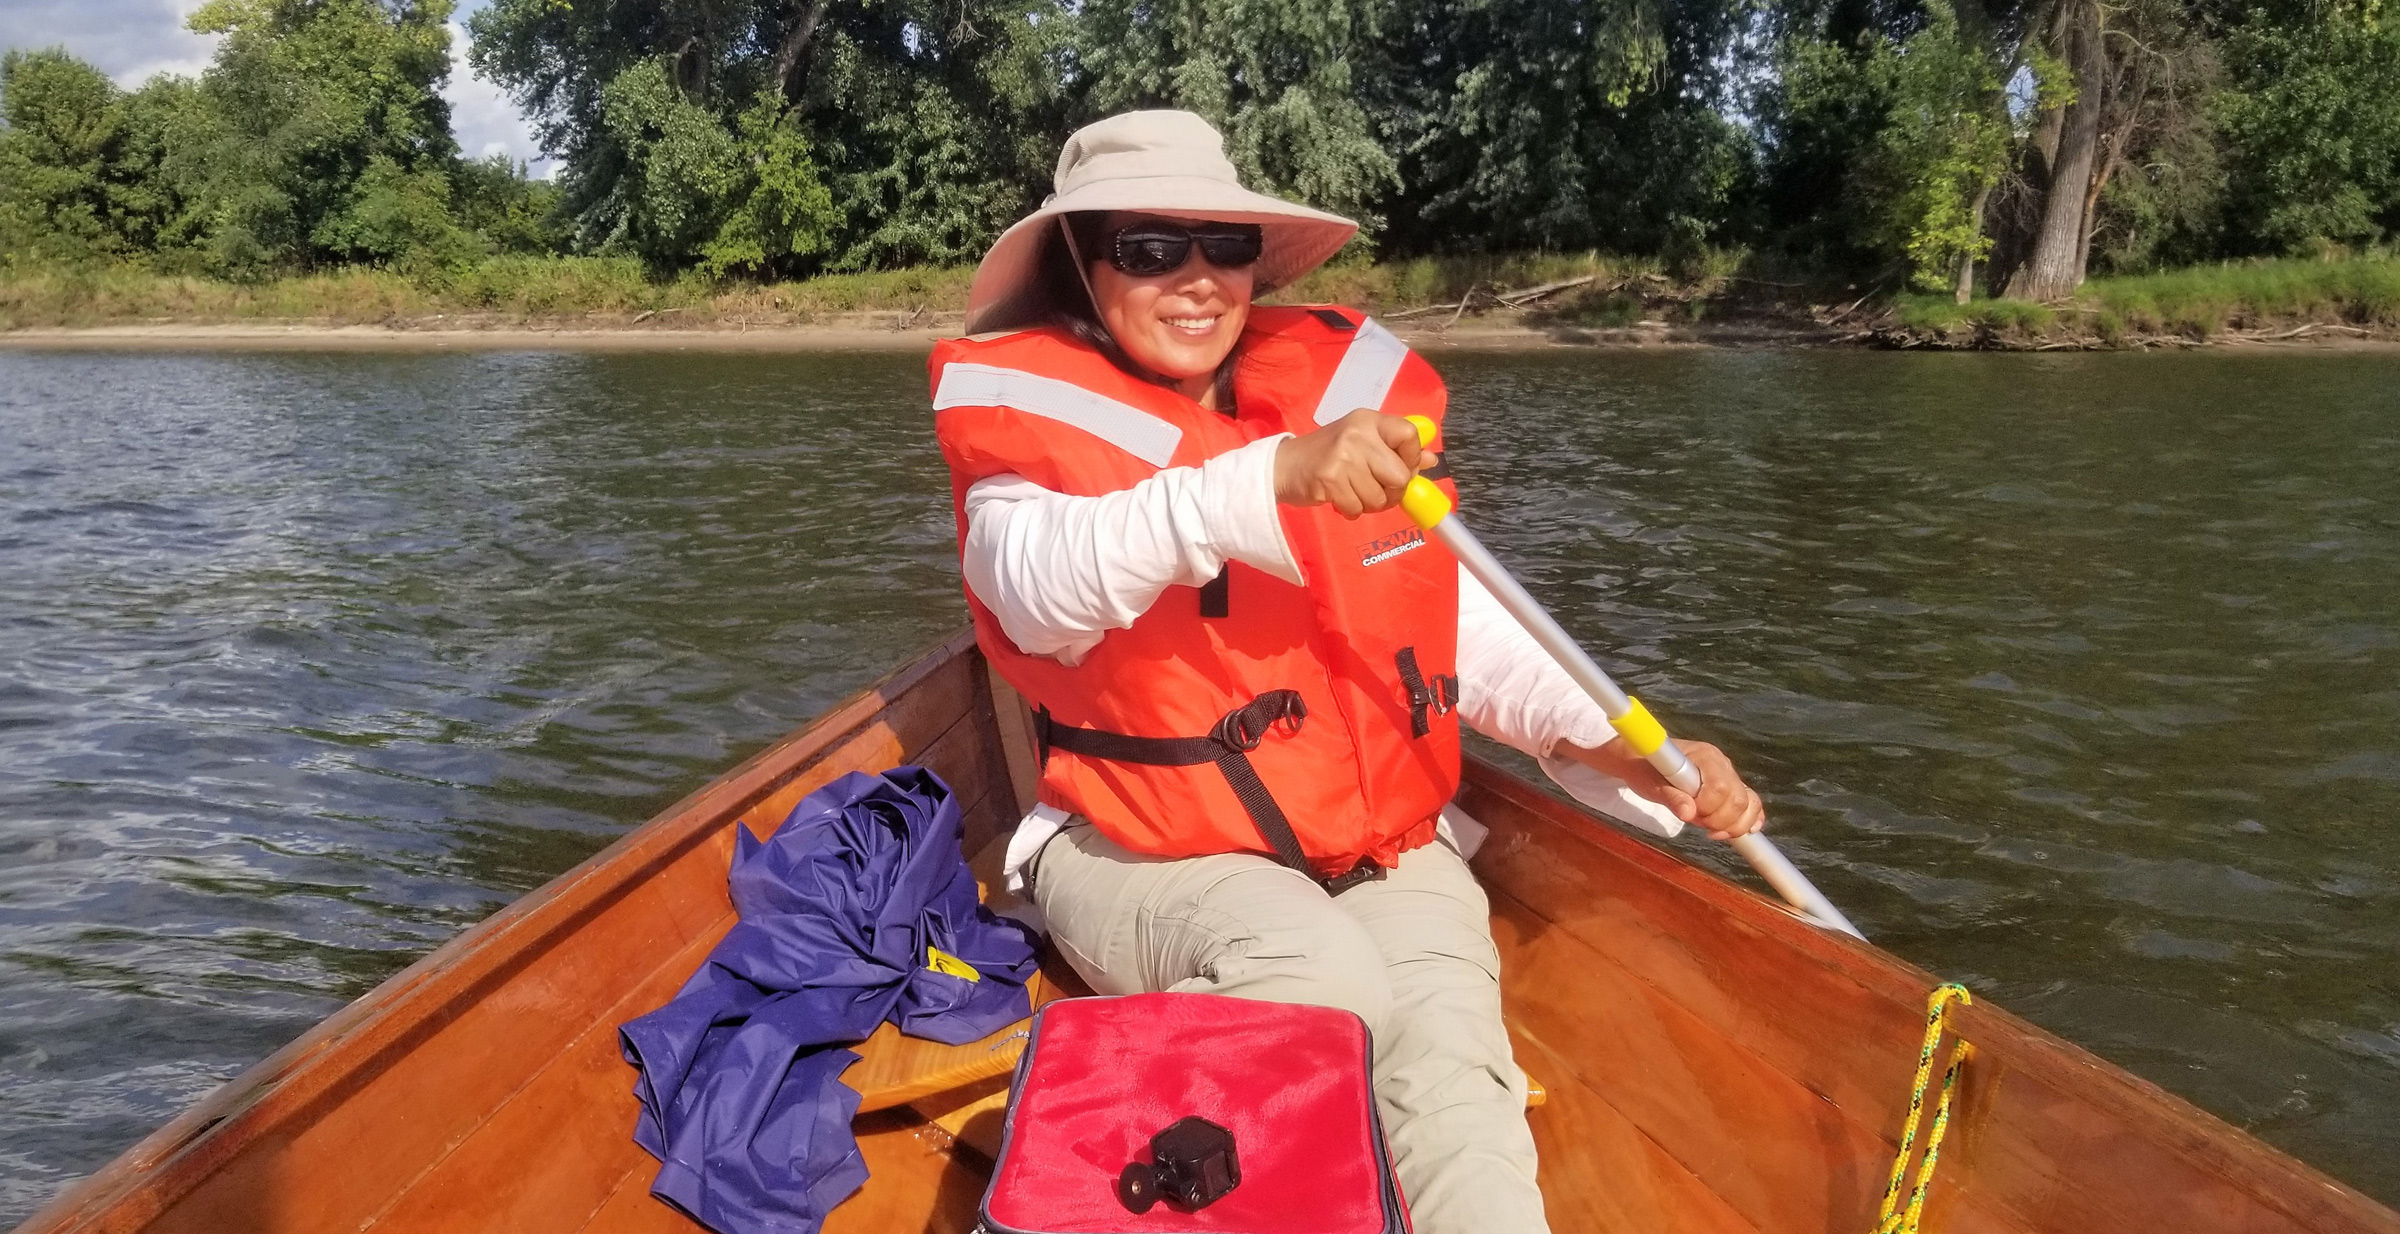
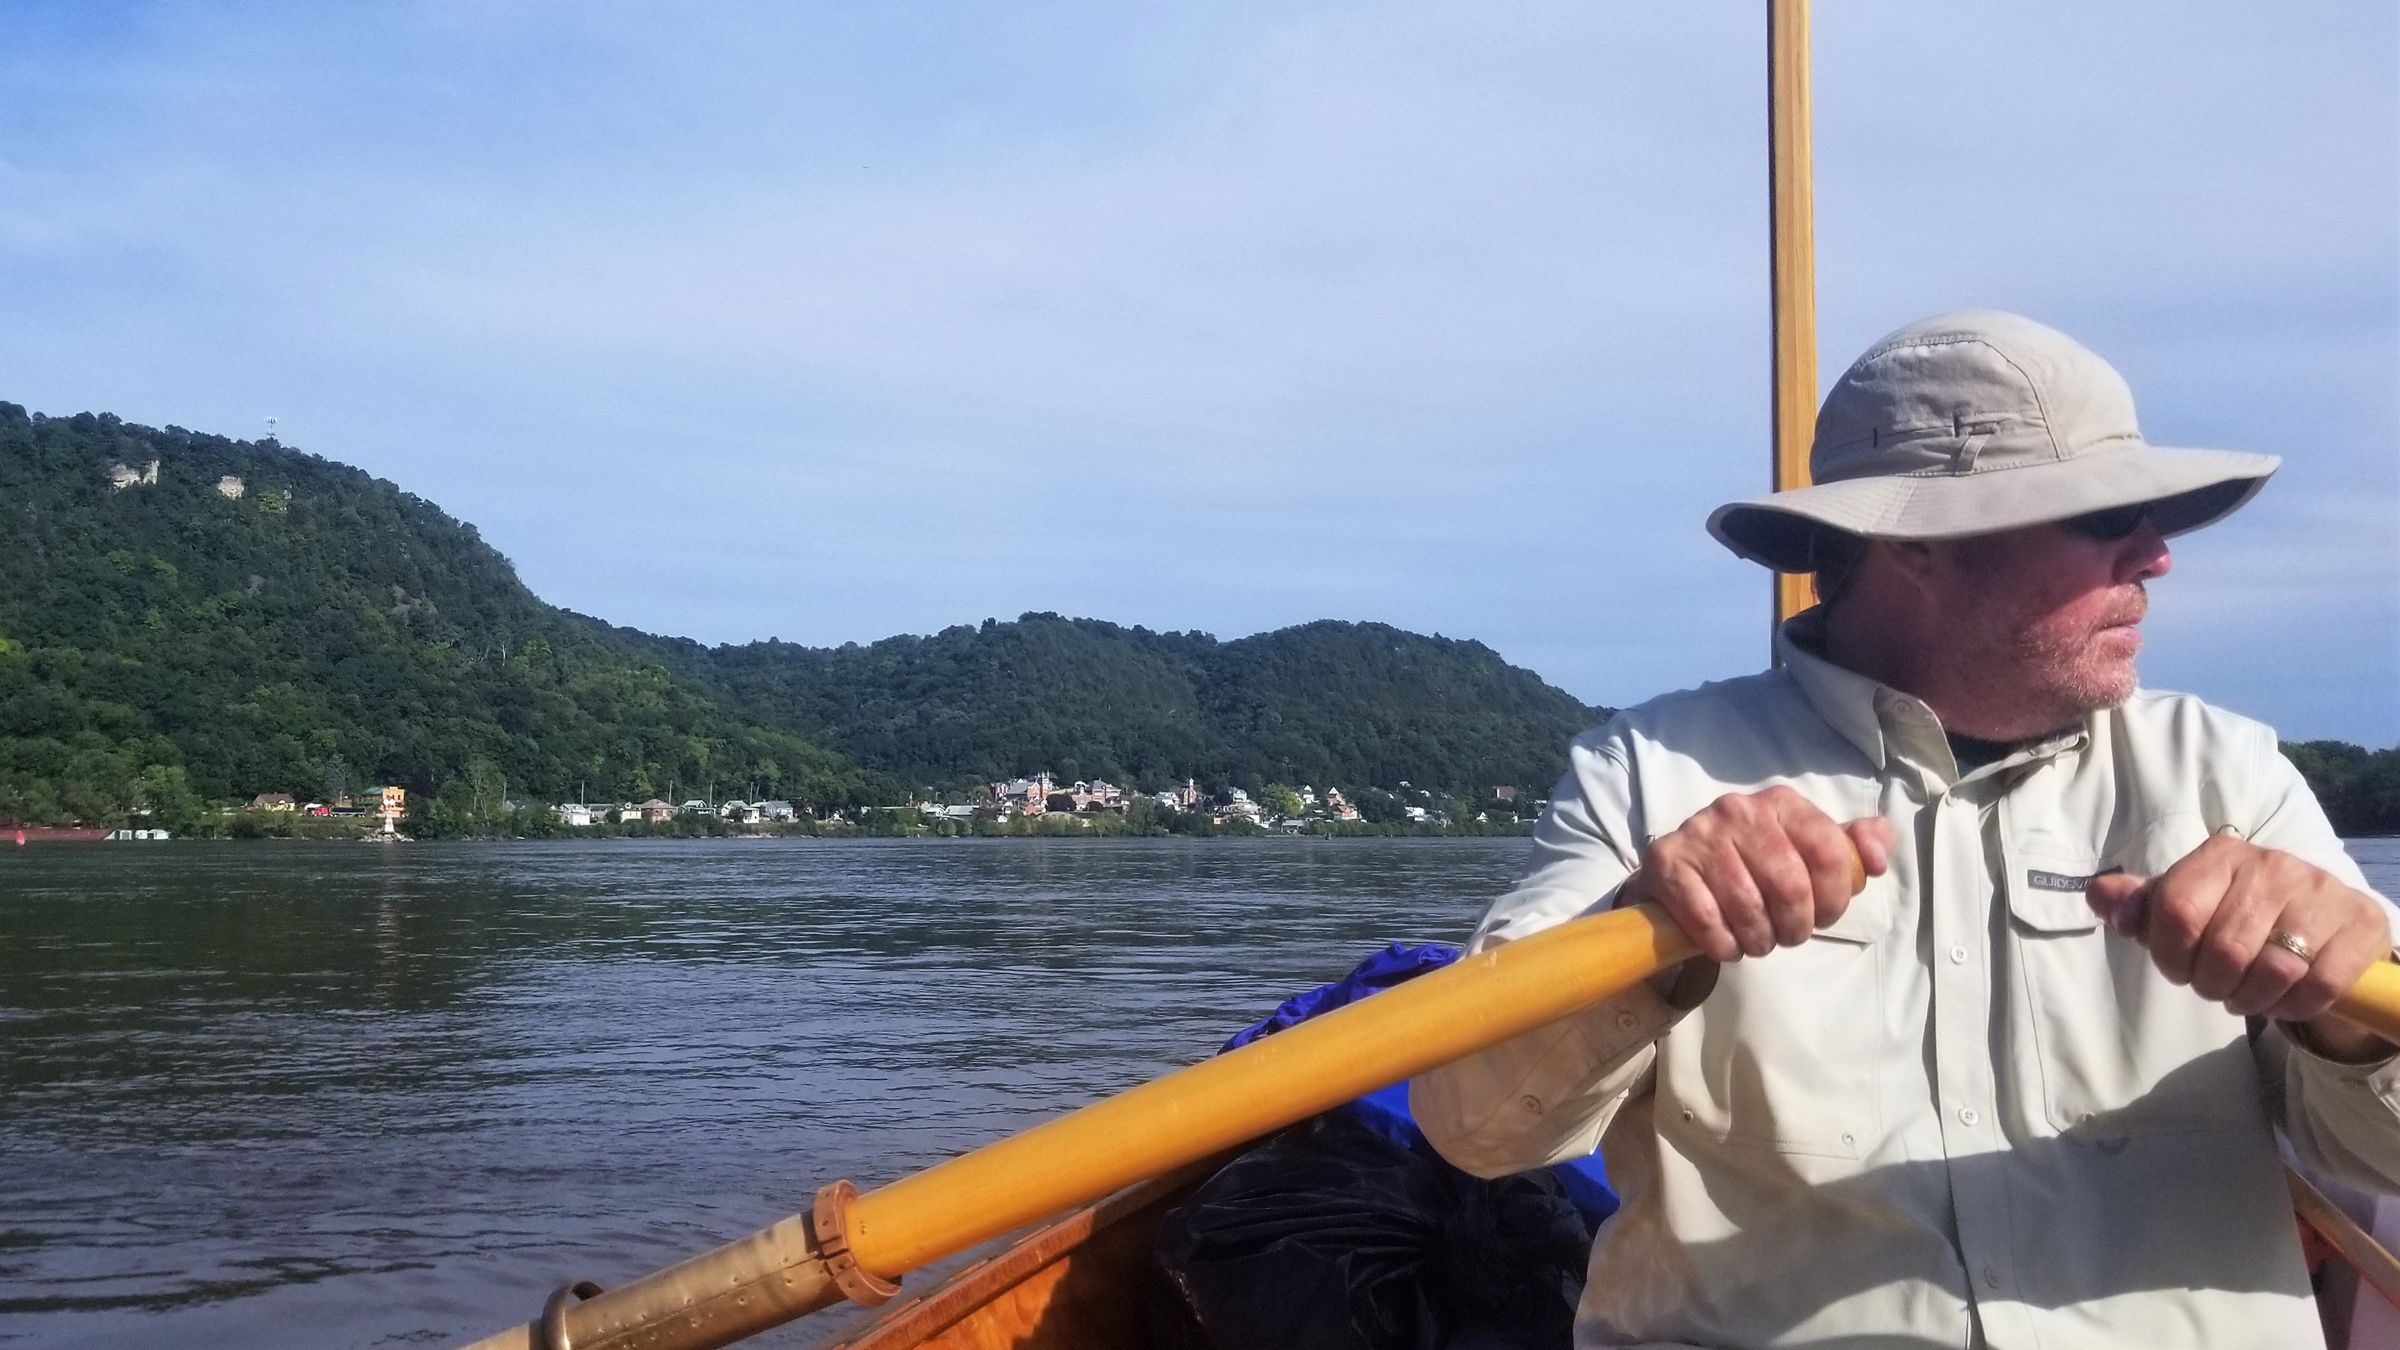

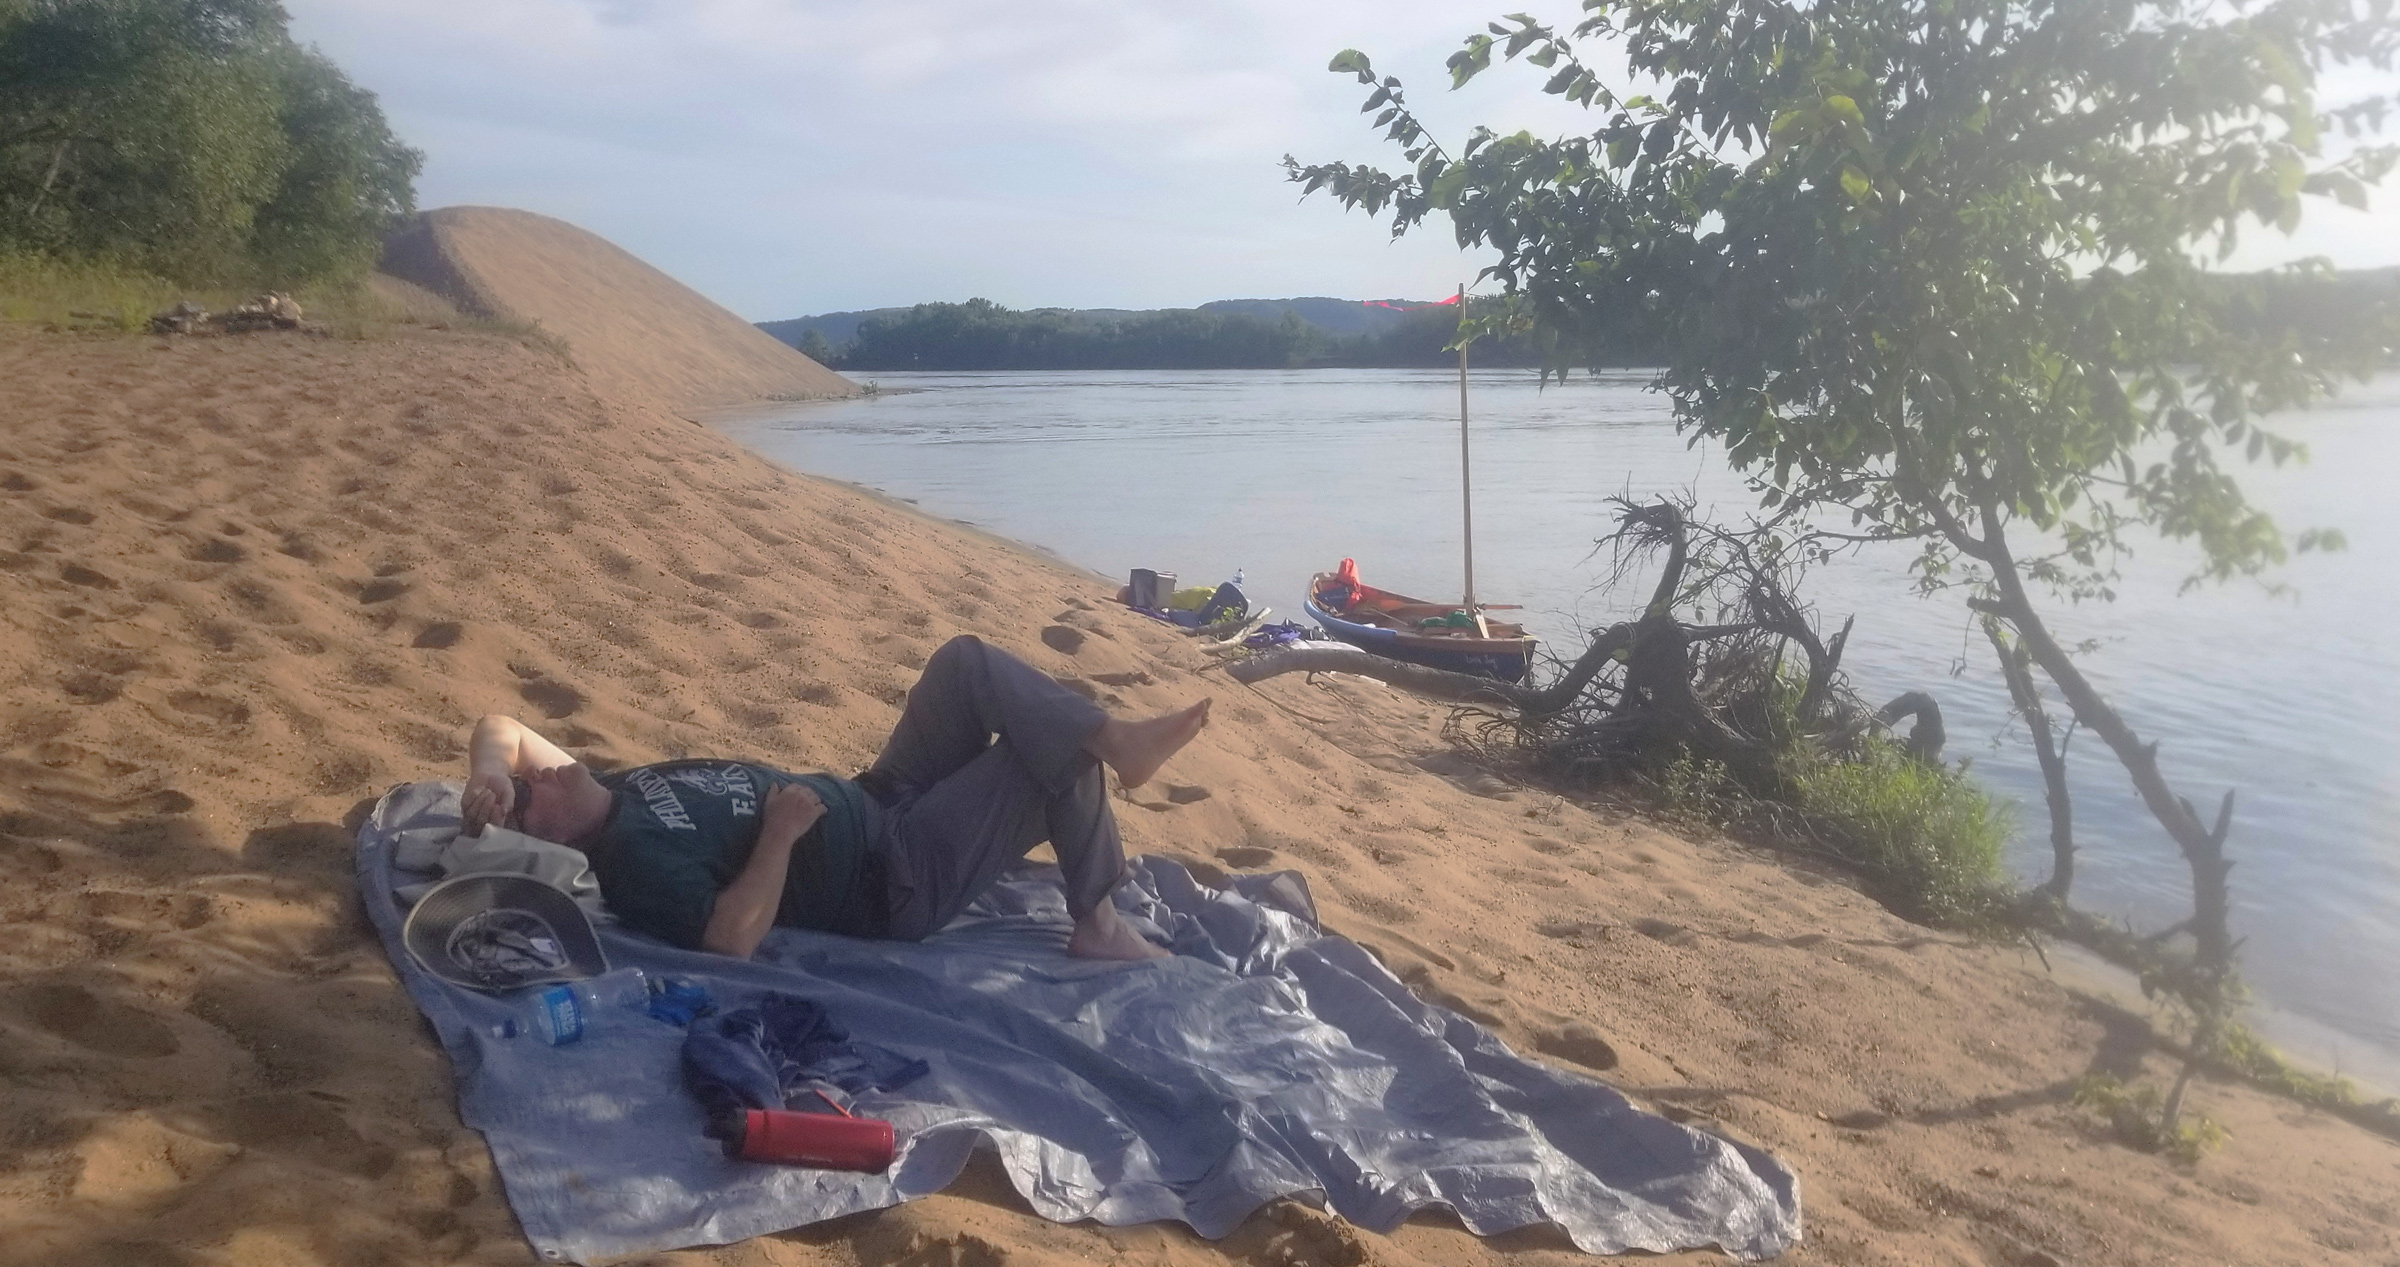
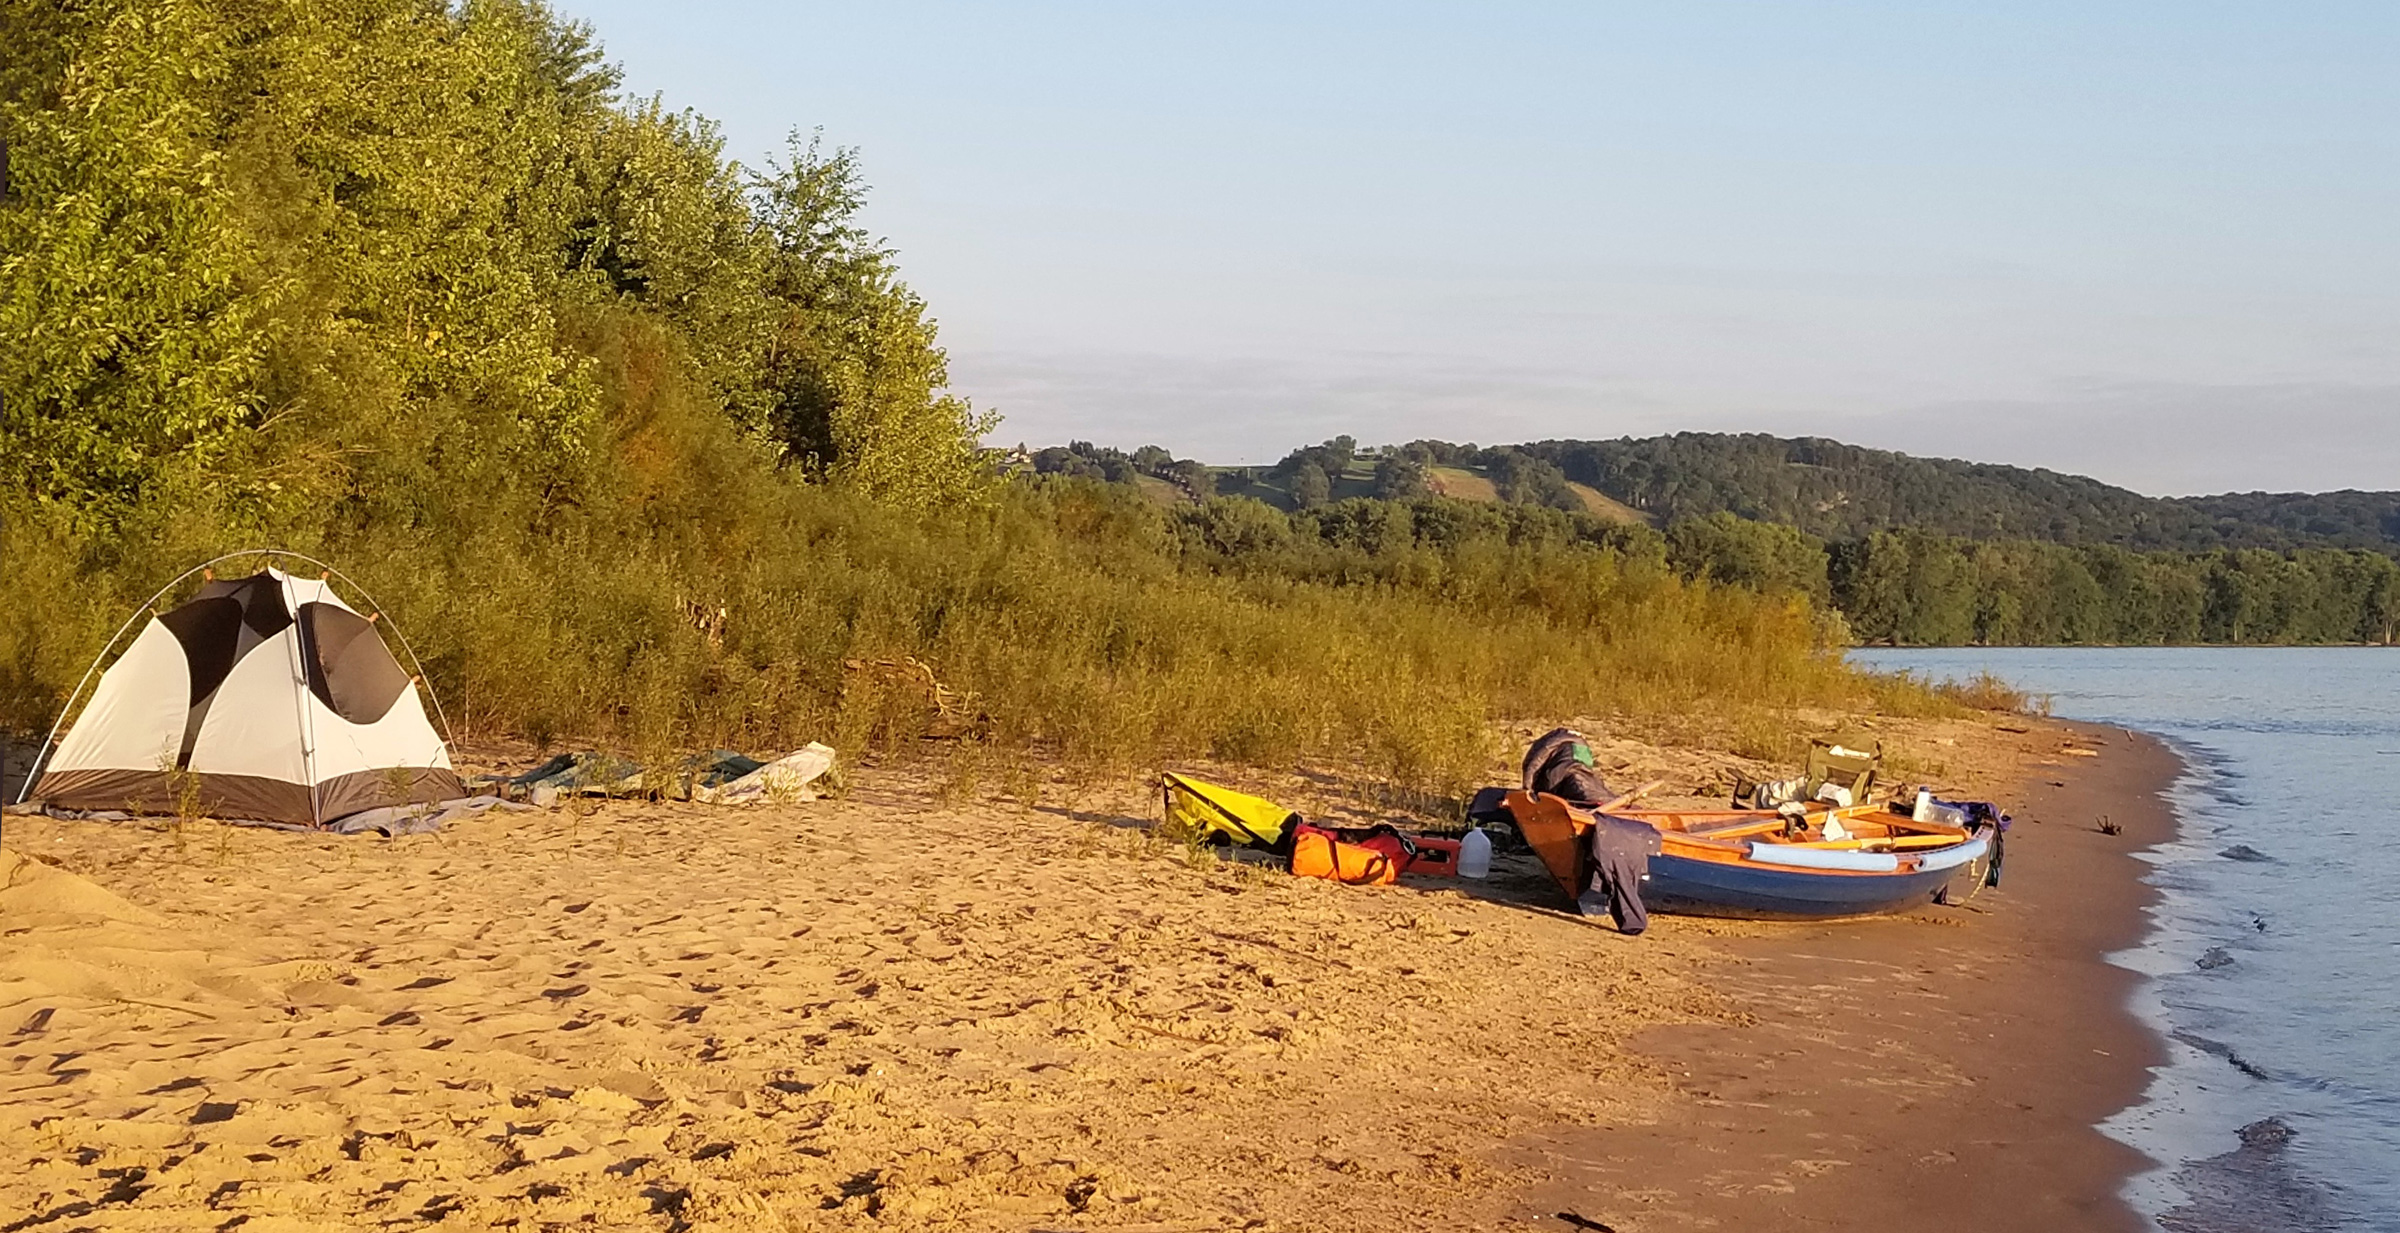
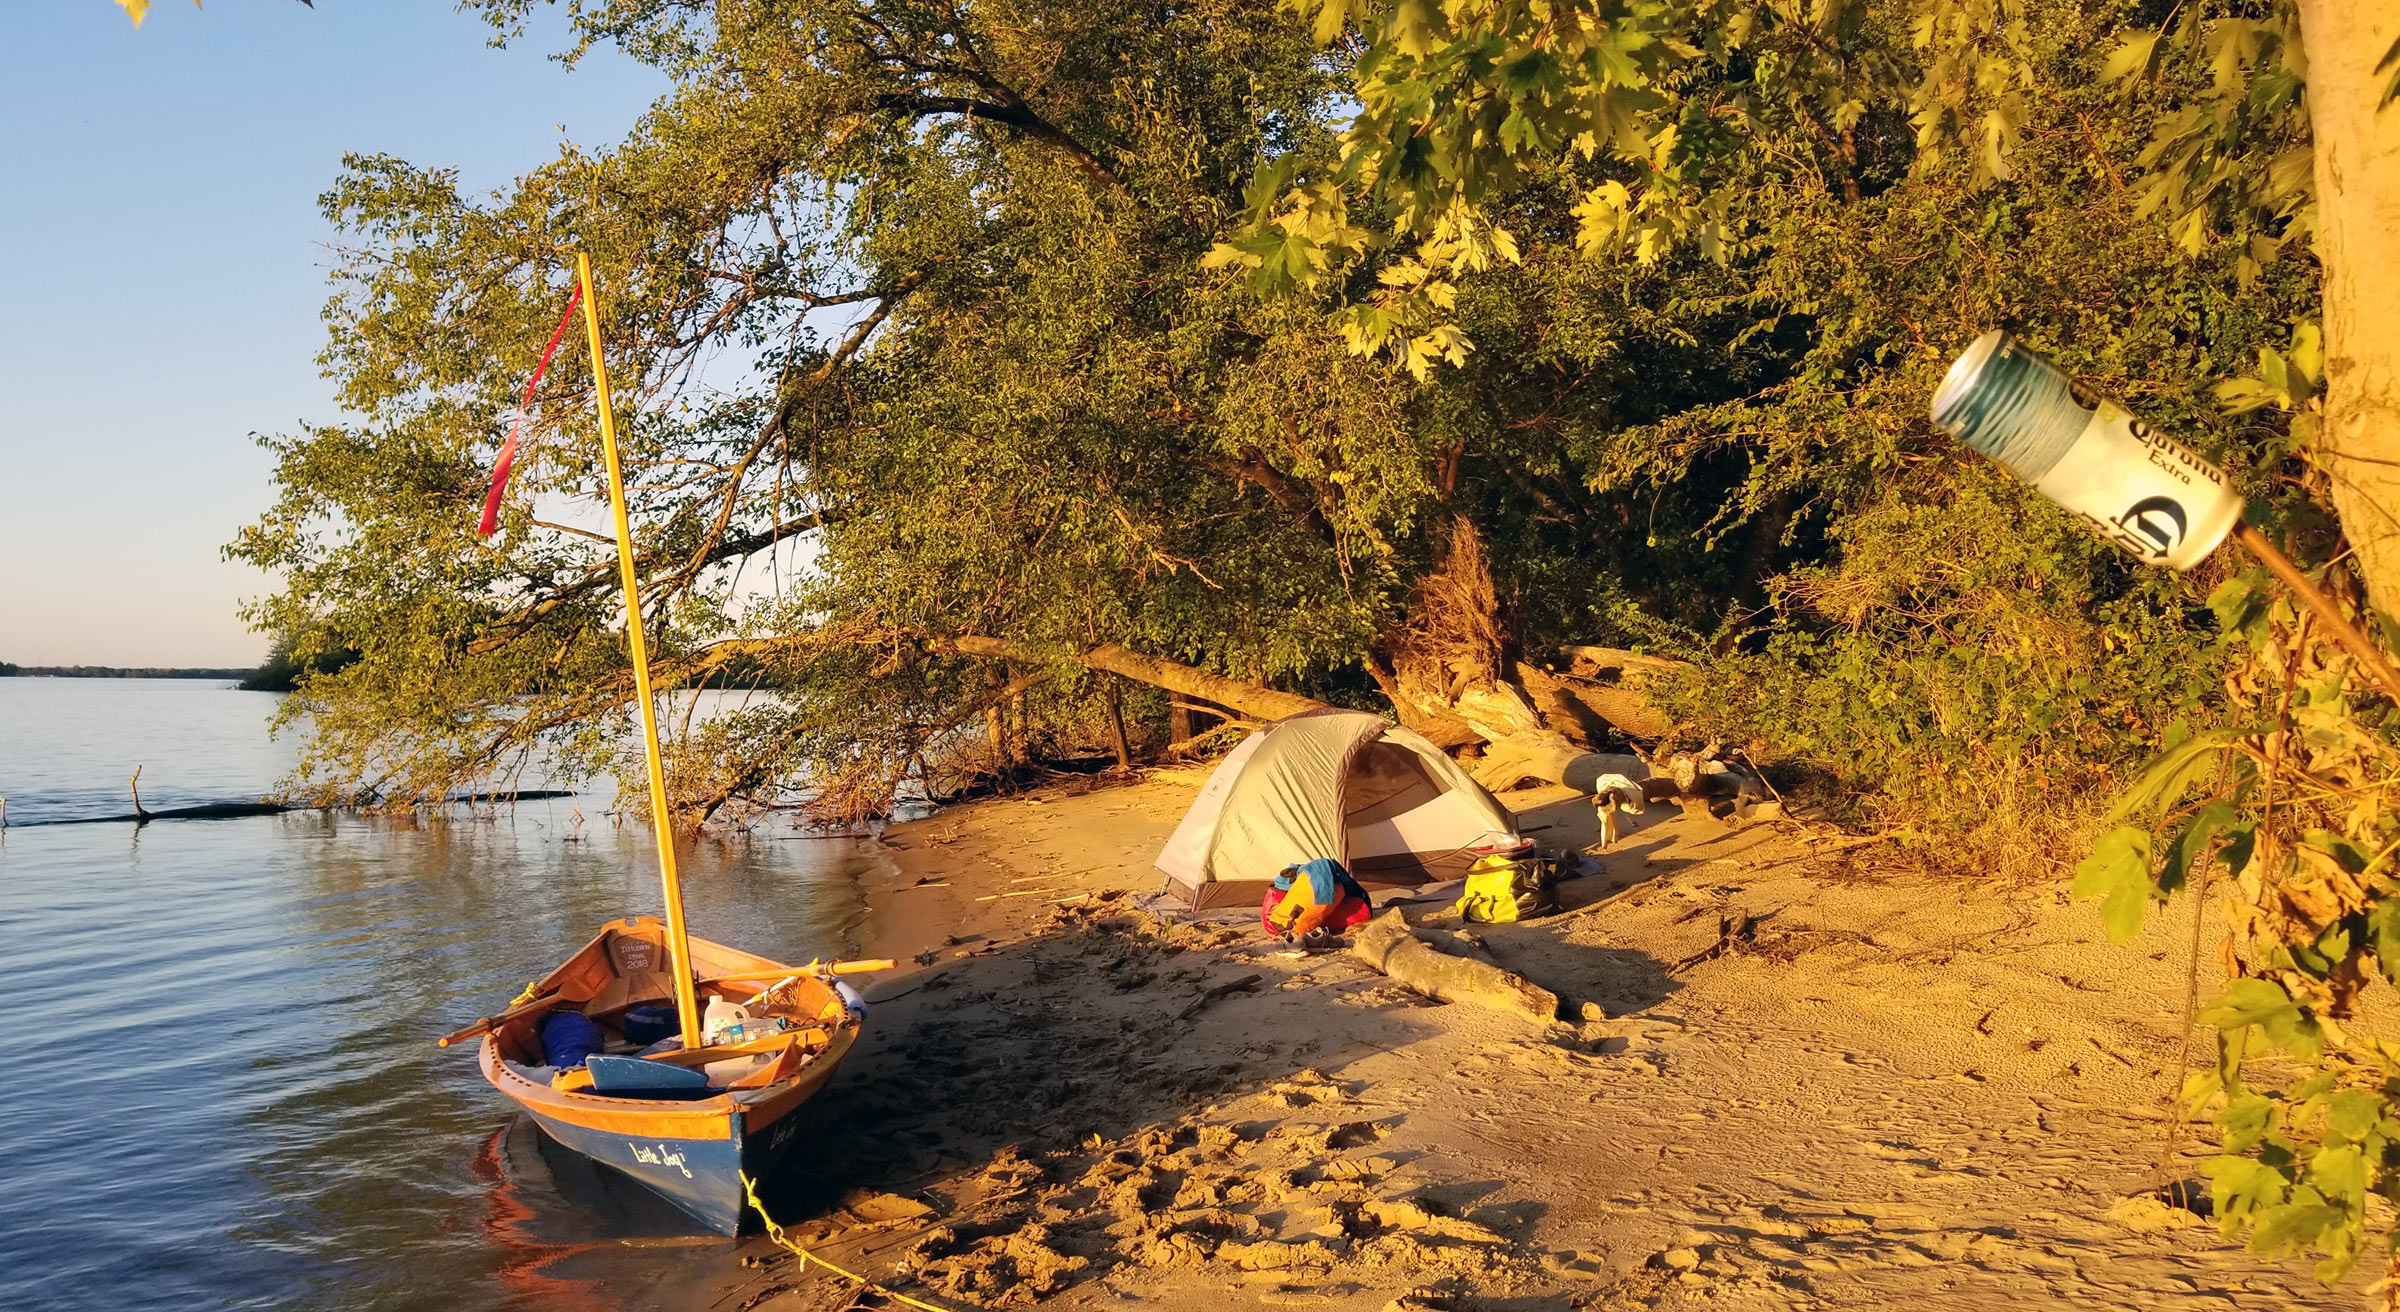
![The first night I spent on a sandbar, I was barely 2’ above the water line and hoped the river wouldn’t rise while I slept. Lock and Dam #20 is downstream in the distance. [between Keokuk and Hannibal]](https://smallboatsmonthly.com/wp-content/uploads/2019/02/MissRiver5957web.jpg)