Up the coast of Maine and just over the Canadian border lies Deer Island, New Brunswick. The island has a long-standing tradition of first-rate boatbuilding, and the late Lindon Parker did much to uphold it. In the 1940s he likely started with a half model that he had carved to design and build what is now known as the Parker Dinghy. “Dinghy” may not suggest the elegance of this boat, whose shape is clearly linked to the small working craft of the area. Powered by oar, and used, among other things, to tend herring weirs around Deer Island, they were typically carvel planked and had a moderate beam, relatively steep deadrise, and a generously raked transom. These elements produced a hull with the ample reserve buoyancy needed to tend the nets.
Plans for the Parker Dinghy are available from Harry Bryan, a wooden-boat builder in Letete, New Brunswick, one of two places with ferry service to Deer Island. He writes: “Deer Island was known for well-designed dinghies, when good performance was valued by local fishermen. A family from Colorado who summers on a small island off Deer Island bought one of Lindon Parker’s boats, and because they used it for only a week or two every year and stored it in a shed, it is in good condition and one of the last surviving Deer Island dinghies. We did some minor work on the boat in 2002, including removing 27 lbs of paint. Retired biologist and boatbuilder Mike Strong and I took the lines off the boat with a fundamentals class at WoodenBoat School. Mike went on to build the boat and I drew up the plans.”
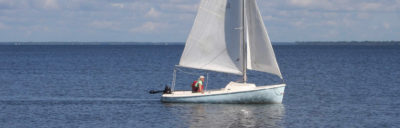
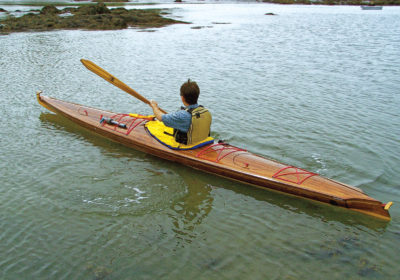
 Opening photograph by Steven Businger, above by Cyrus Dworsky
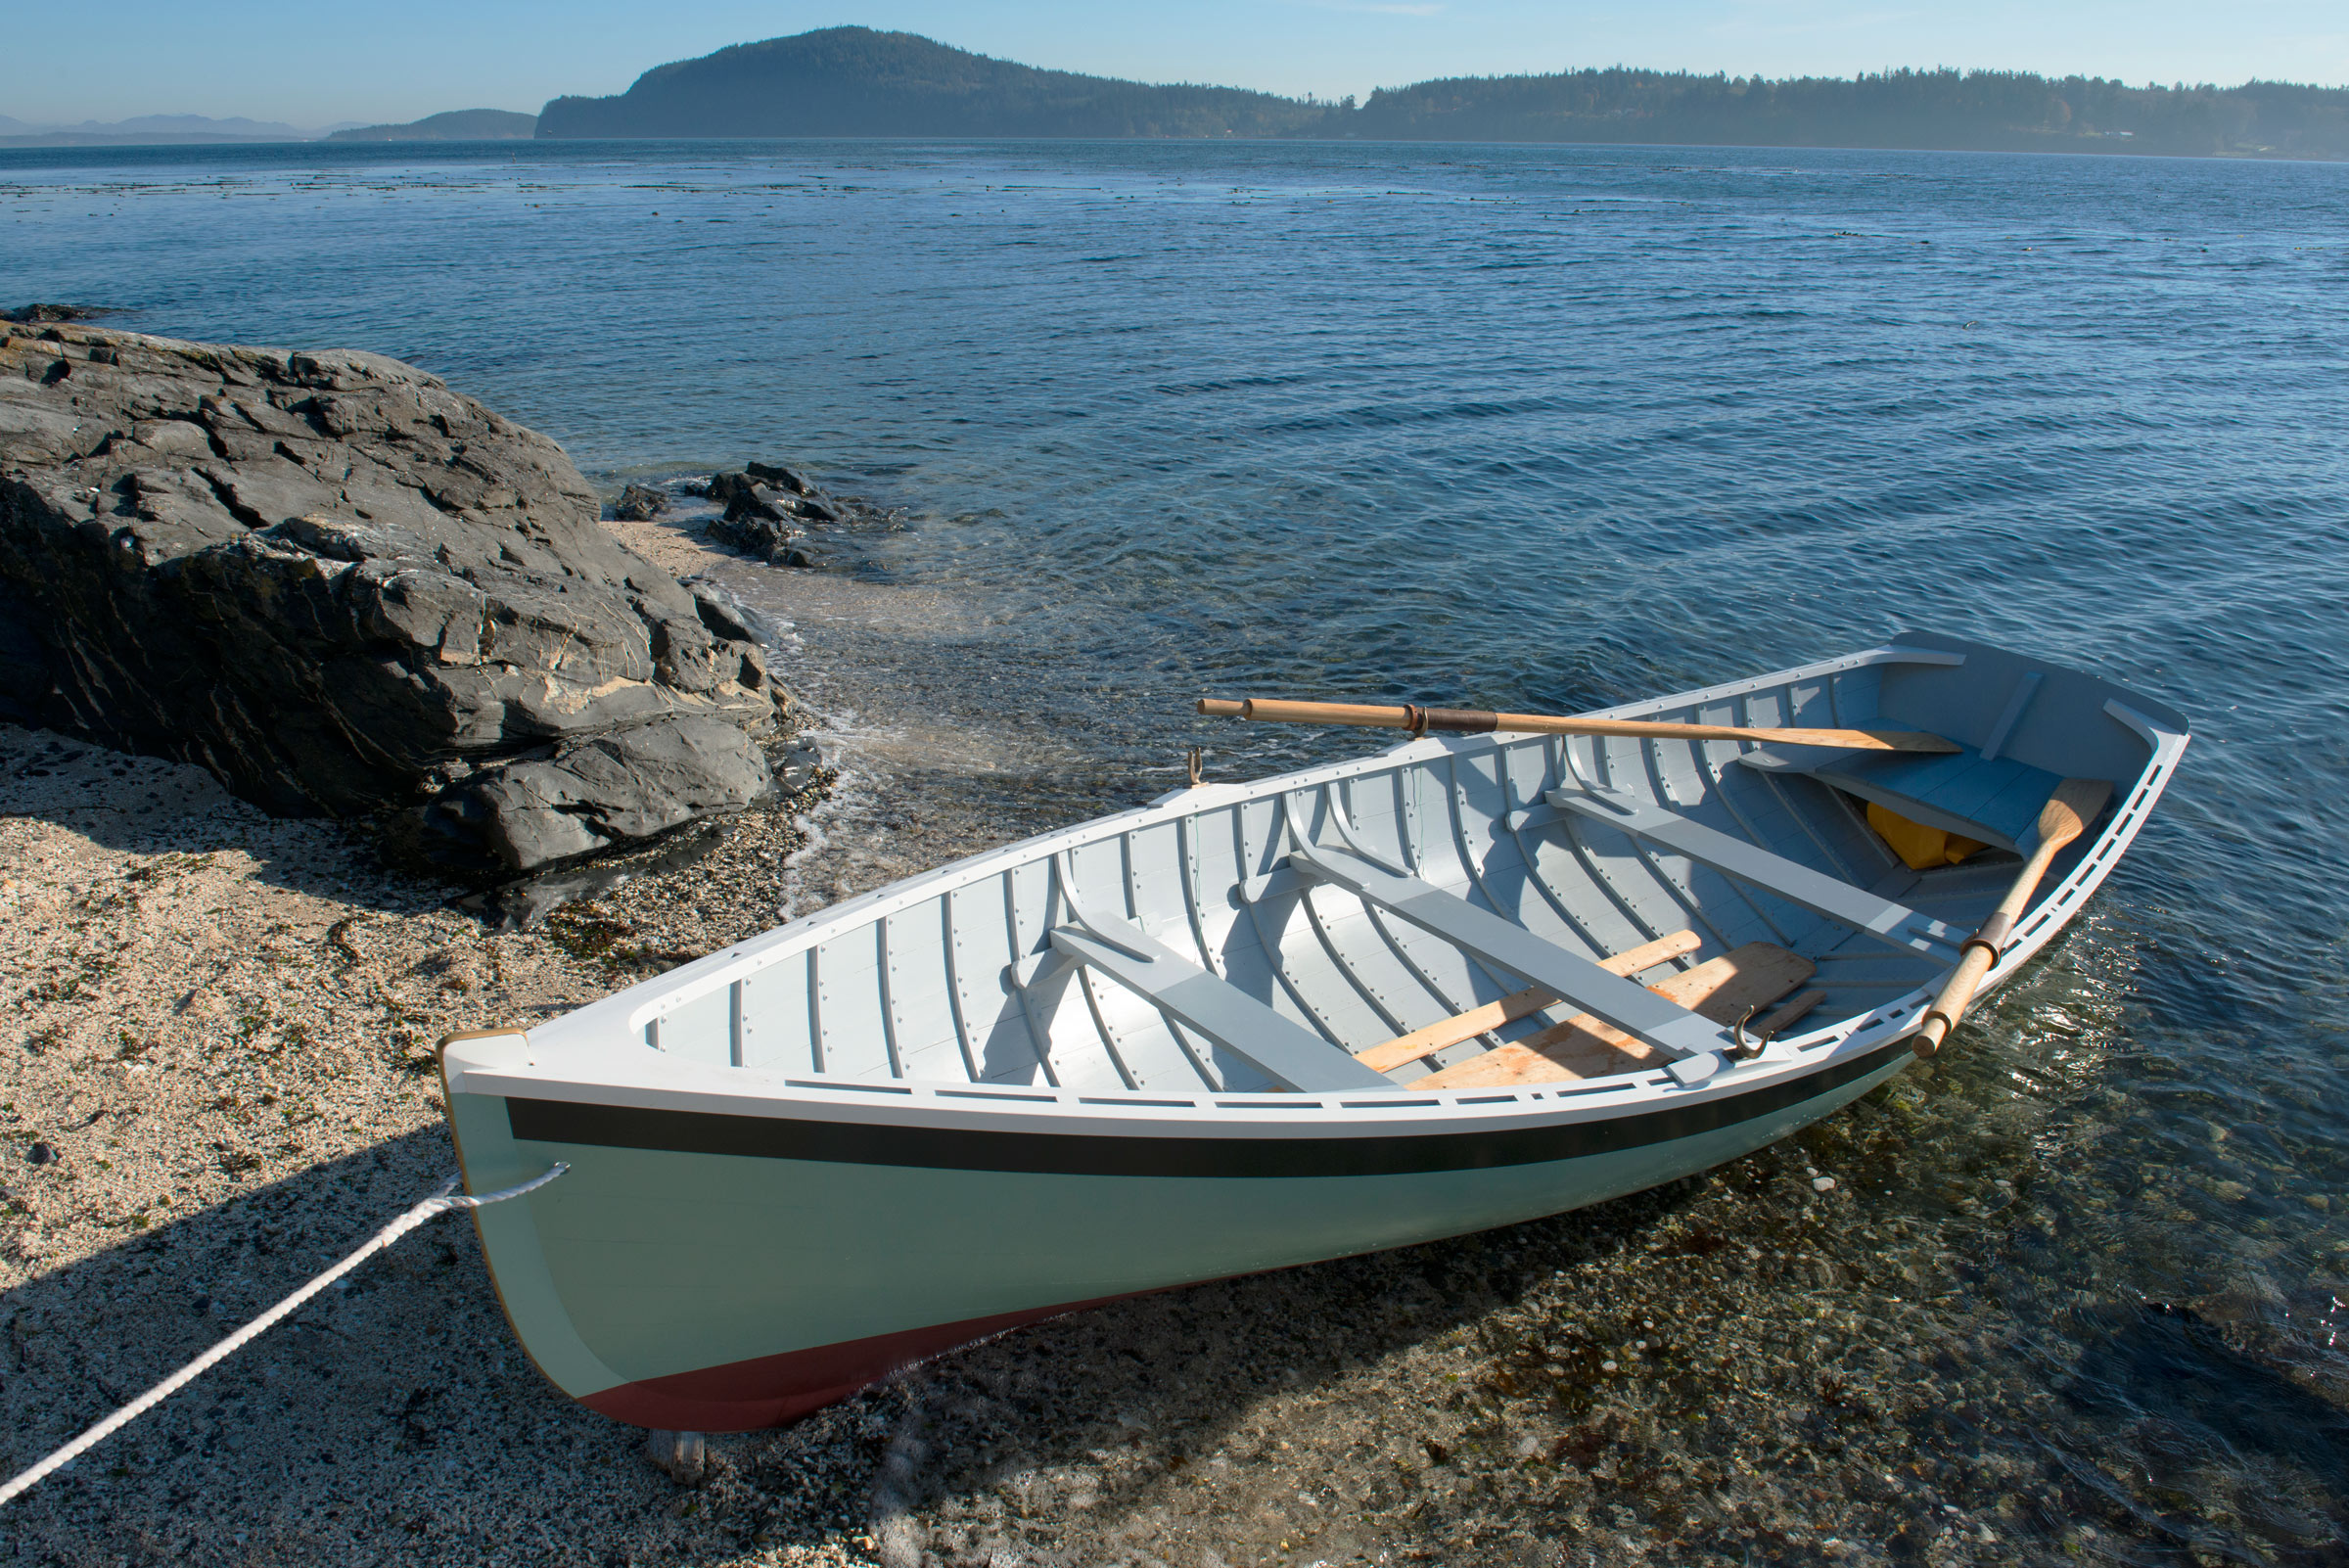
Builders on Deer Island favored carvel planking for small boats, but the Parker Dinghy could be easily be built with either traditional or plywood lapstrake planking.
The plans are a single 18″ × 23″ sheet with lines, offsets, construction drawings, and scantlings—all the information a boatbuilder with intermediate skills needs to build the boat, and nothing extra. There are no patterns included, so the boat requires lofting. The plans call for steam-bent frames and carvel planking typical of the small boats of the area, though one could certainly use lapstrake or glued-lap-plywood construction.
Having had my sights set on building a plank-on-frame rowboat in the 12′ to 16′ range, I was immediately sold on the Parker Dinghy when I saw her lines. I ordered the plans and set about lofting the boat and picking up all the patterns for the backbone and transom as well as building the five molds required. The plans call for woods all native to New Brunswick, a nod to the way Lindon Parker would have built them, and perhaps to Harry Bryan’s belief in using what’s around you. I was building this boat in the Pacific Northwest and had a different array of wood species to choose from. I found a nice piece of tight vertical-grain western larch for the keel, deadwood, and sternpost. Though it’s a softwood species, it is quite hard and rot-resistant.
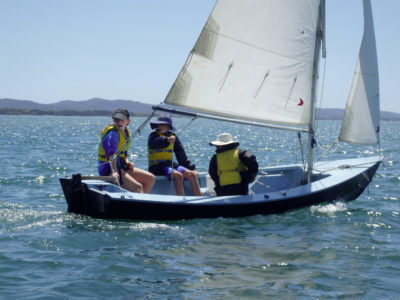
 Ferdi Businger
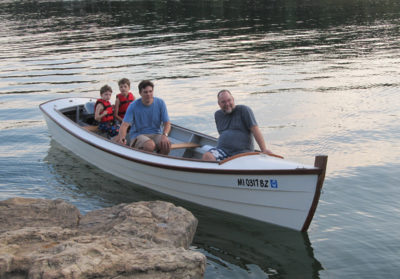
There are three thwarts in the dinghy, but only two are rowing stations. The boat was originally skippered by a solo rower, who took the center or forward thwart as boat trim required.
The one departure that I took from the construction plan was adding a keel batten to provide a solid backing for the garboards as well as a secure place to bed and fasten them. This can go a long way toward keeping that leak-prone seam watertight. As drawn, the rabbet in the keel would have been too shallow for most of its length to provide much of a landing for the garboards. The 3⁄4″ x 3″ keel batten was cut from western larch, bedded in 4200 and screwed to the top of the keel and deadwood at the apex line (the innermost corner of planking as it enters the rabbet). Joining the keel and keel batten at the apex line allowed me to rough out the bevels for the rabbet very easily while the two pieces were separate; it needed only small adjustments once it was time to plank.
In the construction plan, the stem is drawn as a natural crook running right down to the keel, joined by an overlapping stem knee. I wanted to stick with this detail if possible, as it is structurally superior if done right, and the process presented the intriguing challenge of finding a suitable piece of wood. It just so happened that a friend had recently been given a load of black locust branches from a blowdown, and was nice enough to let me bring my stem pattern over and have a look. I found a branch with just the right shape. If I hadn’t been able to obtain a natural crook I would have either laminated a piece to suit or I’d have assembled a stem, knee, and gripe as is commonly seen.
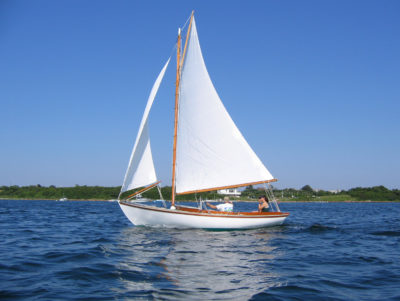
 Lexi Heiser
The keel isn’t deep but it’s long, good for tracking but slowing the dinghy through tight turns in confined spaces.
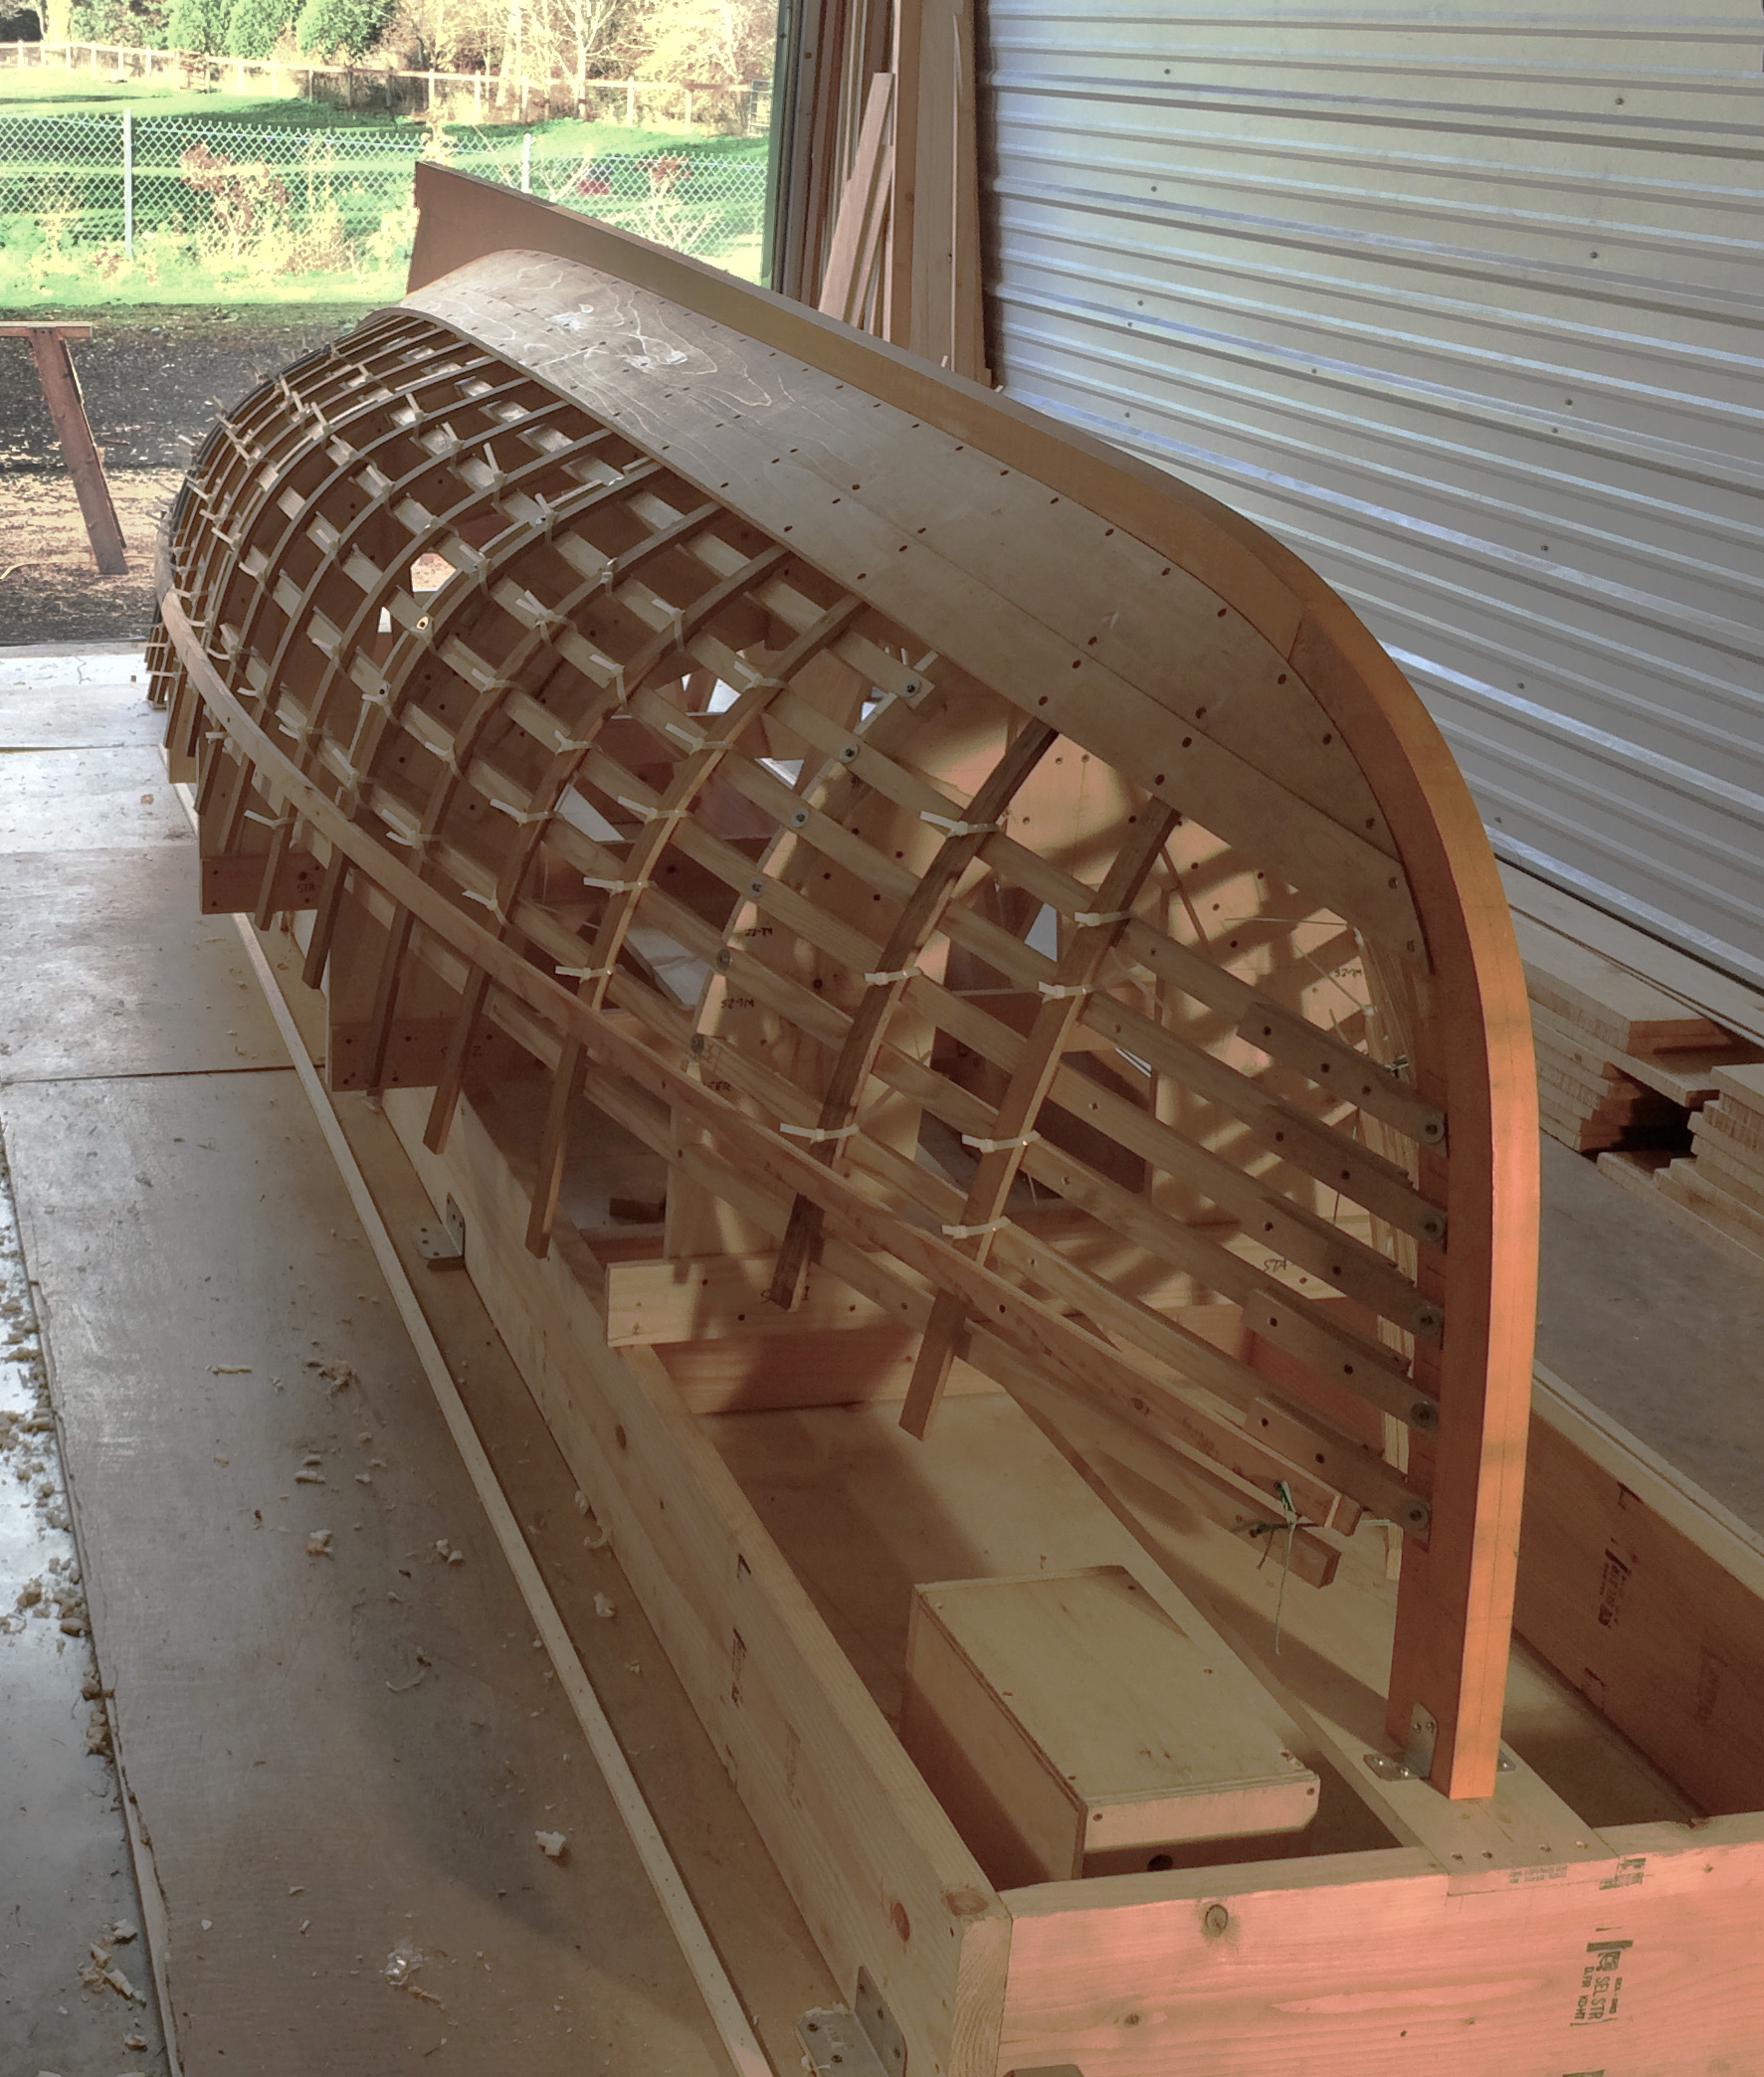
I set up the molds on the strongback at a convenient working height, and proceeded to affix the backbone and transom to the setup. Building the boat upside down in this fashion puts accessibility and gravity on your side. I chose to line off the plank locations at this point, before installing the ribbands. The plans show eight planks per side, and that proved to be the right number with strakes neither too wide to accommodate the curvature of the boat, nor too narrow to be practical. Once the plank locations were lined off, I notched the ribbands into the molds, spacing the ribbands in between the planking marks so that they could remain in place as planks went on. With the ribbands set into the molds, the frames would be bent on the outside of the ribbands rather than the inside. This eased the process of bending the frames, as I could push them down around the ribbands instead of having to feed them inside the ribbands and pull them from the outside until I could secure them to the ribbands.
The 1⁄2″ × 1 1⁄4″ white-oak frames were steam-bent from rail to rail over the top of the keel batten for most of the boat; toward the ends of the hull, frames were installed in halves. I used zip ties to hold the frames to the ribbands temporarily, eliminating the need to put any unnecessary screw holes in them. Once this was complete, it was time to start planking.
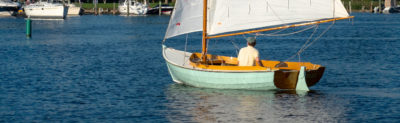
 Ferdi Businger
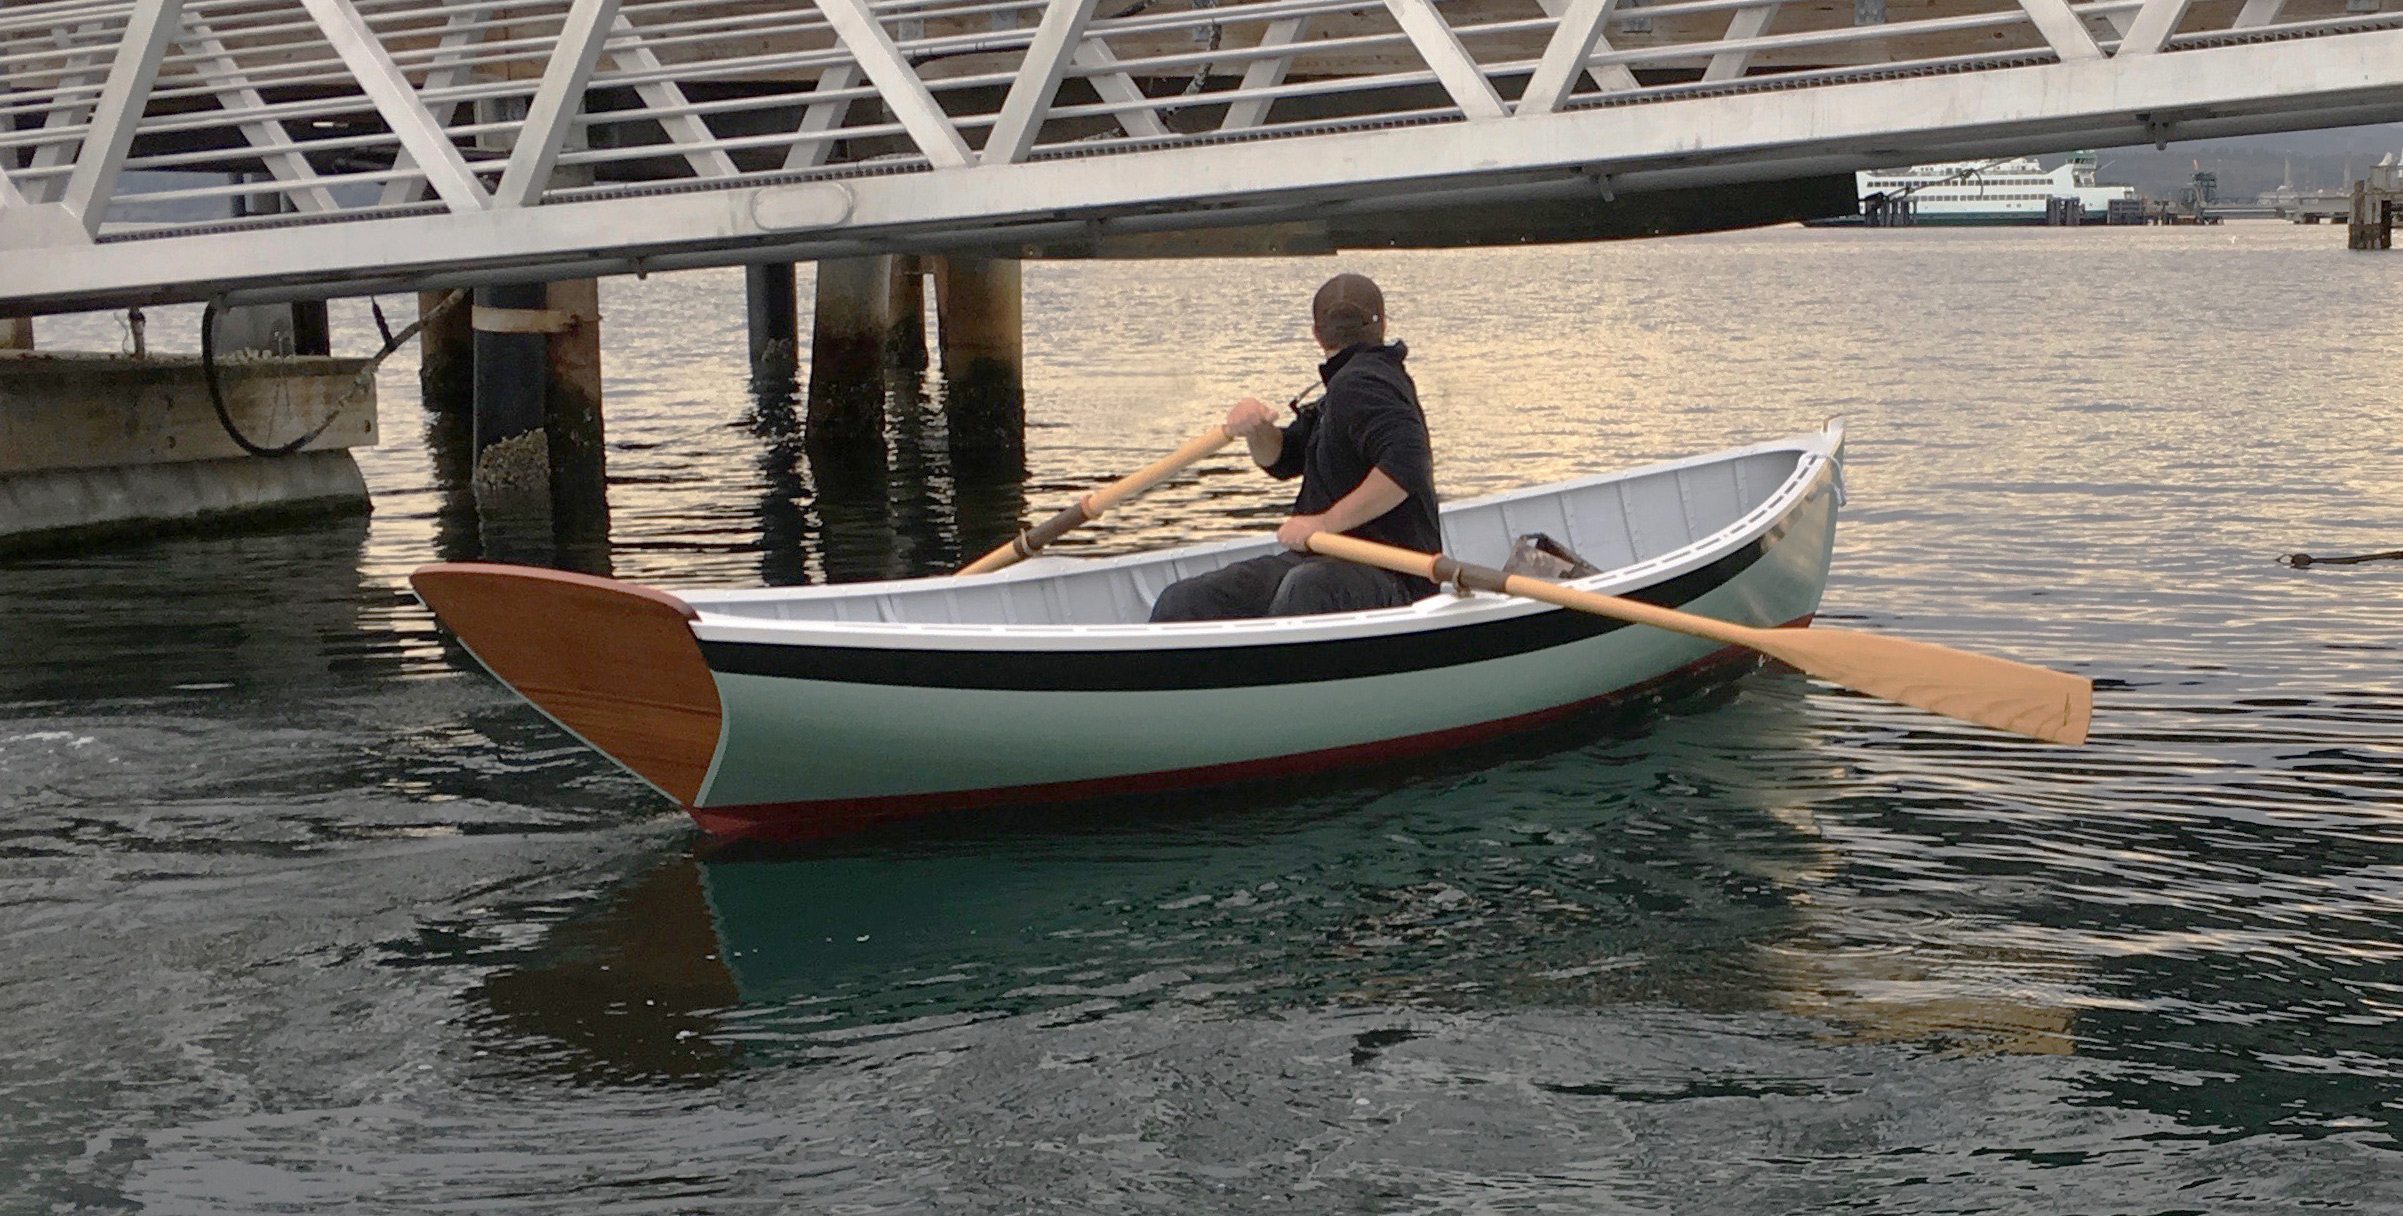
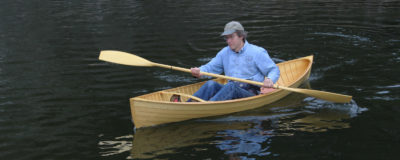
When traveling with a single passenger, the rower takes the forward station to achieve the best trim. The dinghy here is outfitted with oarlocks, but the original boat had tholepins.
The western red cedar that I acquired for planking stock wasn’t long enough to get planks out of single boards, so I elected to scarf two boards together to make up the length. A 12:1 scarf and a good marine-grade epoxy makes a very strong bond, and eliminates the work of fitting and fastening butt blocks which would have been required otherwise. The other advantage I found was that I was able to scarf the boards together on varying angles to accommodate the shape of the plank, and keep the grain running in the right direction as much as possible.
This boat planked up fairly easily, not having any real extreme shape to accommodate. However, here was enough twist leading into the stem that the hood ends of the garboards and the following several planks required steaming. I did the steaming in place with a polyethylene bag slipped over the first few feet of the plank and an electric steam generator. Specific plank-to-frame fastenings were not specified in the plans, so I used copper rivets for both because they are a reliablefastening and because the 1⁄2″-thick frames wouldn’t provide enough depth for screws to get good bite.
Once the planking was complete, I flipped the hull right-side up and finished off the rivets. Up until then the planks were held to the frames by the nails alone, now it was time to apply the roves, nip off the excess, and peen the cut ends.
The Parker Dinghy’s interior is finished off simply. There are three thwarts and the sternsheets. The ’midship and forward thwarts are the two rowing stations. They are set up not for two people to row together, but for one rower to choose a position to achieve proper trim when a passenger or load is carried. Though the plans show tholepins, I decided to go with common bronze oarlocks. Tholepins surely would have done the job just fine, but I prefer the solid connection of an oarlock in a socket, and think it looks a little nicer as well. I painted all surfaces with the exception of the transom, which is varnished on its outer face. The topside and interior paint is an alkyd enamel from George Kirby Jr. Paint Co., which looks good and provides great protection for the wood.
 Ferdi Businger
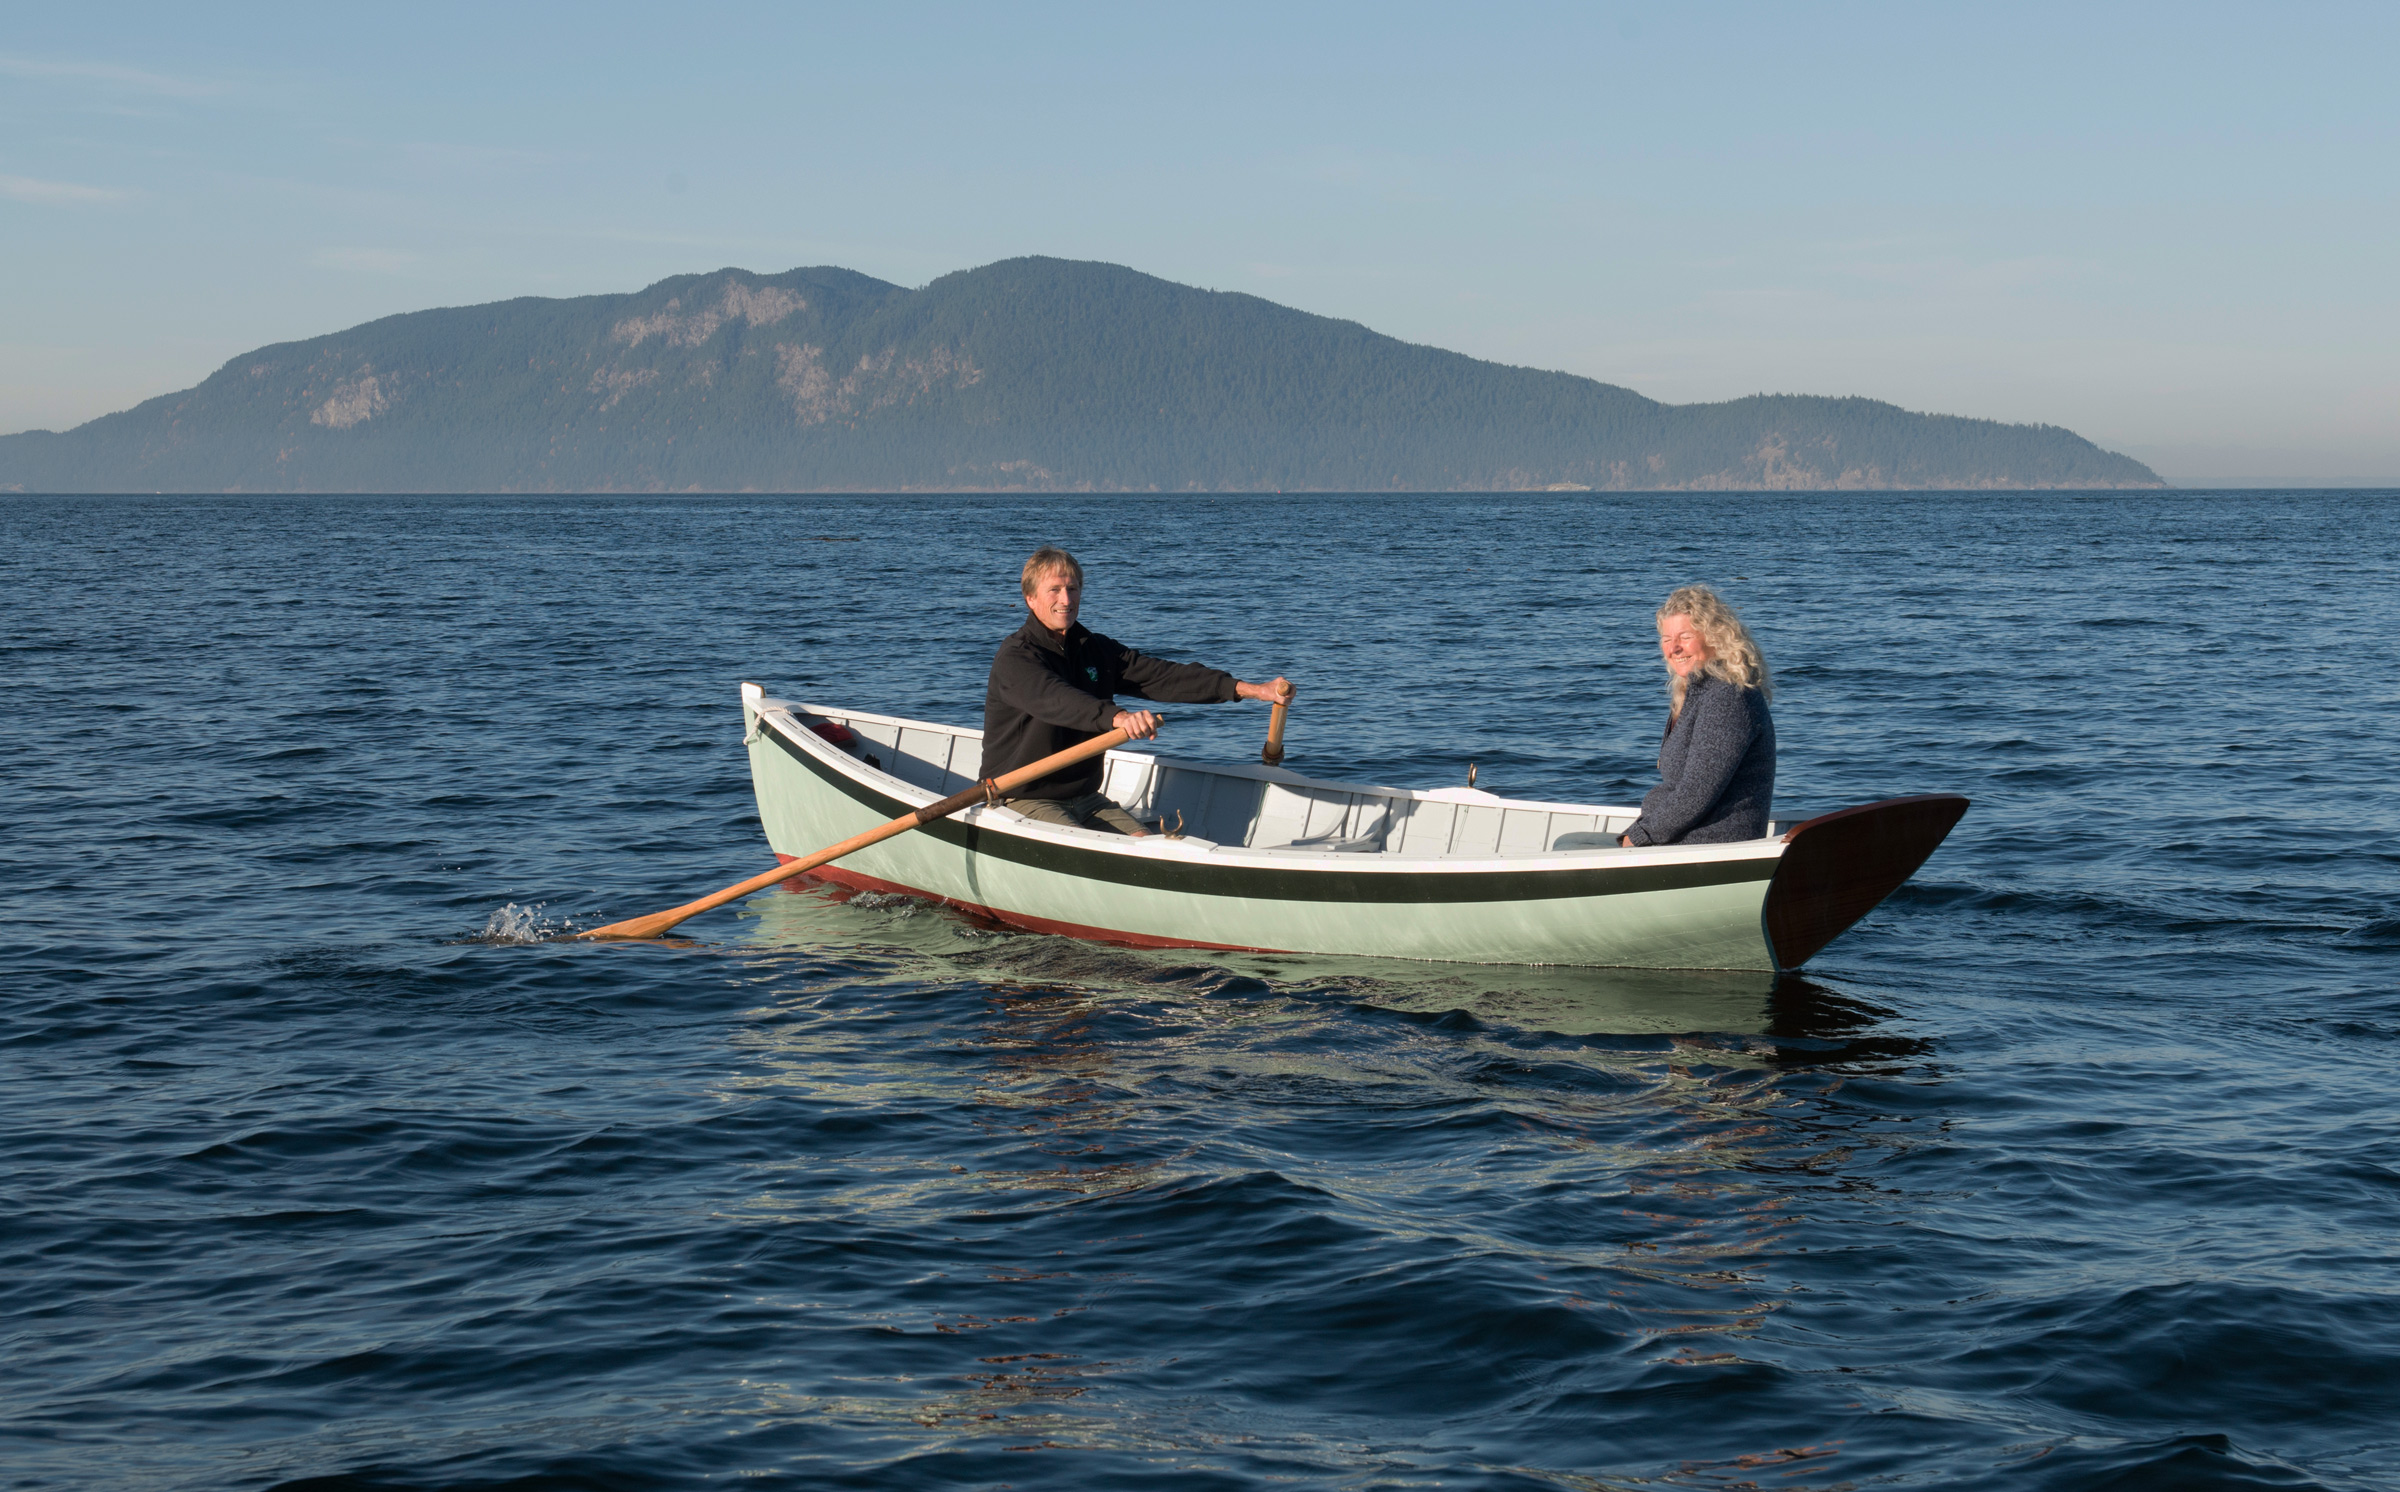
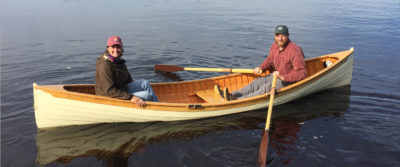
With three aboard, the dinghy rests lightly on the water with only a bit of the transom immersed.
Rowing the Parker Dinghy is a wonderful experience. It’s refreshing to see a boat that is aimed purely at rowing, rather than one that has to function as a sailboat and motorboat as well. Without having to accommodate different modes of propulsion, it really excels at its intended purpose.
When rowed solo, the boat carries the rower at the ’midship rowing station; when carrying passengers in the sternsheets, the forward station is employed. With just one person aboard the boat it may feel a little tender; however, what it lacks in initial stability is made up for in secondary stability—the deeper you push the bilge in the water, the more stability you gain. With even just one other passenger aboard, the hull will settle down in the water and stiffen up considerably, a characteristic that harks back to the design’s net-tending roots.
The Parker Dinghy’s deep keel diminishes quick maneuverability but makes the boat track beautifully. A pair of 8′ oars keep it moving along nicely, and are suitable for either rowing station. The Parker Dinghy is a fairly large boat to be rowed by one person, but I have found that it gets up to speed quickly and carries its momentum well, requiring less effort from the rower once underway. In a chop and through large boat wakes it has proven to be dry, and really gives the feeling of a small boat that will keep you safe.
There are few, if any more enjoyable ways to explore a coastline than aboard a well-designed rowboat, and the Parker Dinghy is the perfect little craft for the purpose, whether going solo or loaded up with family and friends.![]()
Cyrus Dworsky grew up lobster fishing out of Stonington, Maine, first with his father, and continuing on for much of his life. He’s always had a strong interest in boat building and boat design, as well as a love for the ocean and sailing. After living in the Pacific Northwest for several years and attending the Northwest School of Wooden Boatbuilding, he turned his focus more seriously toward boatbuilding, and has now moved back to Stonington. He currently has a 12’ yacht tender under construction.
Parker Dinghy Particulars
Length: 14′ 8″
Beam: 4′ 7″
Weight, approx. 175 lbs
 Lindon Parker
.
Plans for the Parker Dinghy are available from Harry Bryan for $12, plus $10 shipping and handling. Inquire for pricing on finished boats.
Is there a boat you’d like to know more about? Have you built one that you think other Small Boats Monthly readers would enjoy? Please email us!


Great salty-looking boat!
I think I’ve seen this boat. Lovely job, very handsome. Sweet lines. Easy indeed through the turn of the bilge.
Hi,
I just came across this article and was pleased to see it! I am the great granddaughter of Lindon Parker and my middle name is Lindon! I am hoping to get a few copies of this magazine for relatives. I was not aware that this design was an exclusive Lindon Parker. Thank you for this wonderful article.
Hi Laurie,
It’s good to hear from you. Small Boats is an online publication and you can send links to the article to whomever you wish:
https://smallboatsmonthly.com/article/parker-dinghy/
The article was chosen for inclusion in our print annual, Small Boats 2020, which you can buy from the WoodenBoat Store.
Christopher Cunningham, Editor
Hi Laurie,
Thanks for your comment! I’m Cyrus, the builder of this boat. I’m thankful to your great grandfather for building such a beautiful design! To be honest I’m not positive that this boat was exclusively designed by Lindon Parker, but it seems that at the very least he helped to give them recognition by building a good number of them. I live on the coast of Maine and would love to take a trip up to Deer Island sometime to see the area where these types of boats were used and built. I hope to build more to this design in the future.
All the best,
Cyrus Dworsky