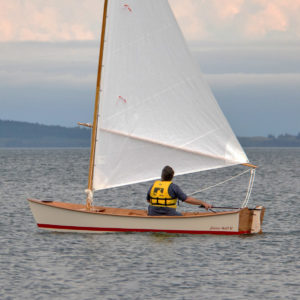
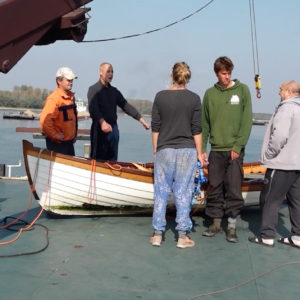
I grew up with a peapod. It was 6″ long and my father had whittled it, probably before I was born. It was one of the many models he had made that taught me to appreciate the beauty of the forms of boats. I was especially fond of this delicate double-ender, but despite having built real boats for decades now, I never built a peapod. I very much liked the type, but I was unwilling to tackle the challenge of carvel planking. So, when I saw the John Harris–designed Lighthouse Tender Peapod from Chesapeake Light Craft (CLC), I was eager to row and sail this adaptation of the classic type, updated to easy-to-build plywood construction.
Christopher Cunningham
The plywood adaptation of the peapod has a combination of lapped planks on the upper strakes the edge-joined planks on the lower strakes. The smoother bottom is easier to cover with fiberglass and less vulnerable to abrasion.
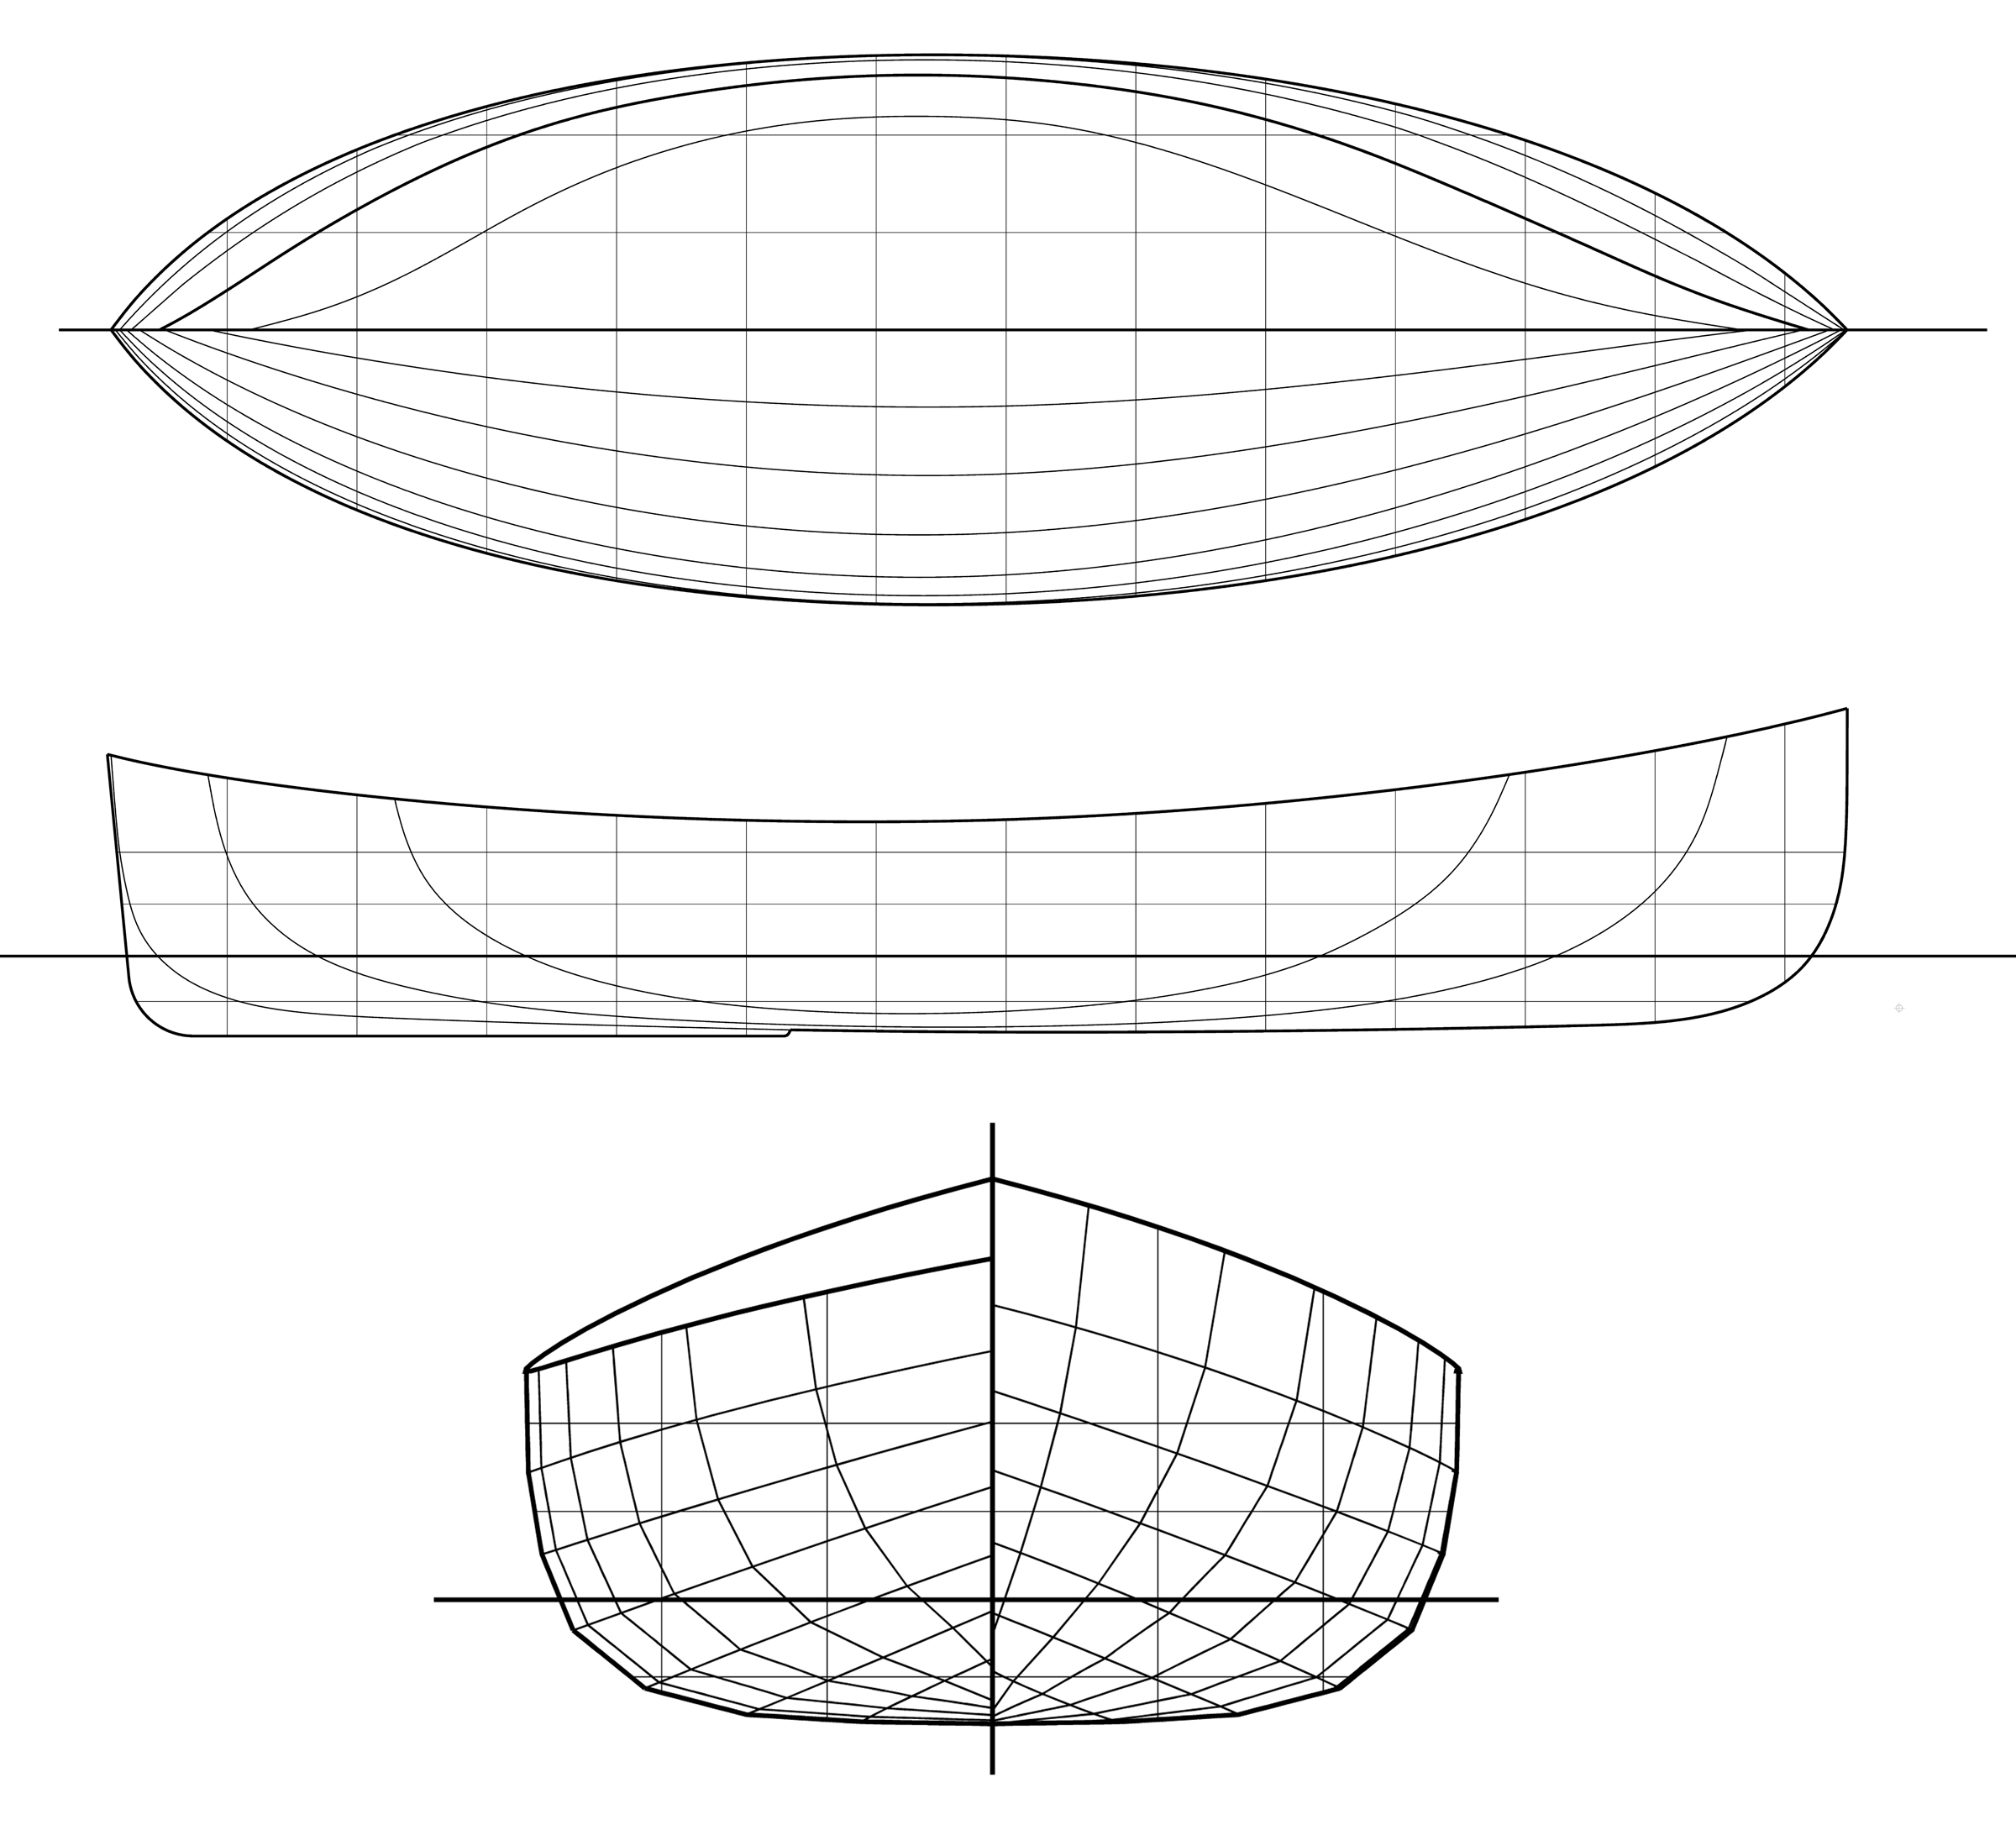
John had taken his inspiration from a working peapod built in around 1886 in Washington County, Maine. It was the same peapod I had been drawn to in American Small Sailing Craft. Author Howard Chapelle notes that particular peapod was, when the lines were taken off in 1937, the last of its kind ever built Its type was used for lobstering near Jonesport up to about 1938. John’s Lighthouse Tender Peapod has a shape very similar to the original working boat; the chief differences in the new boat are a sternpost that is nearly vertical rather than raked, and the absence of a keel, which allows his boat to sit upright on the beach.
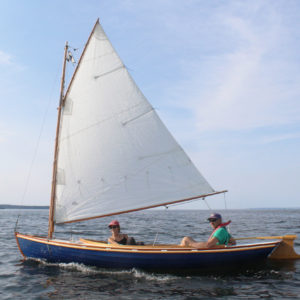
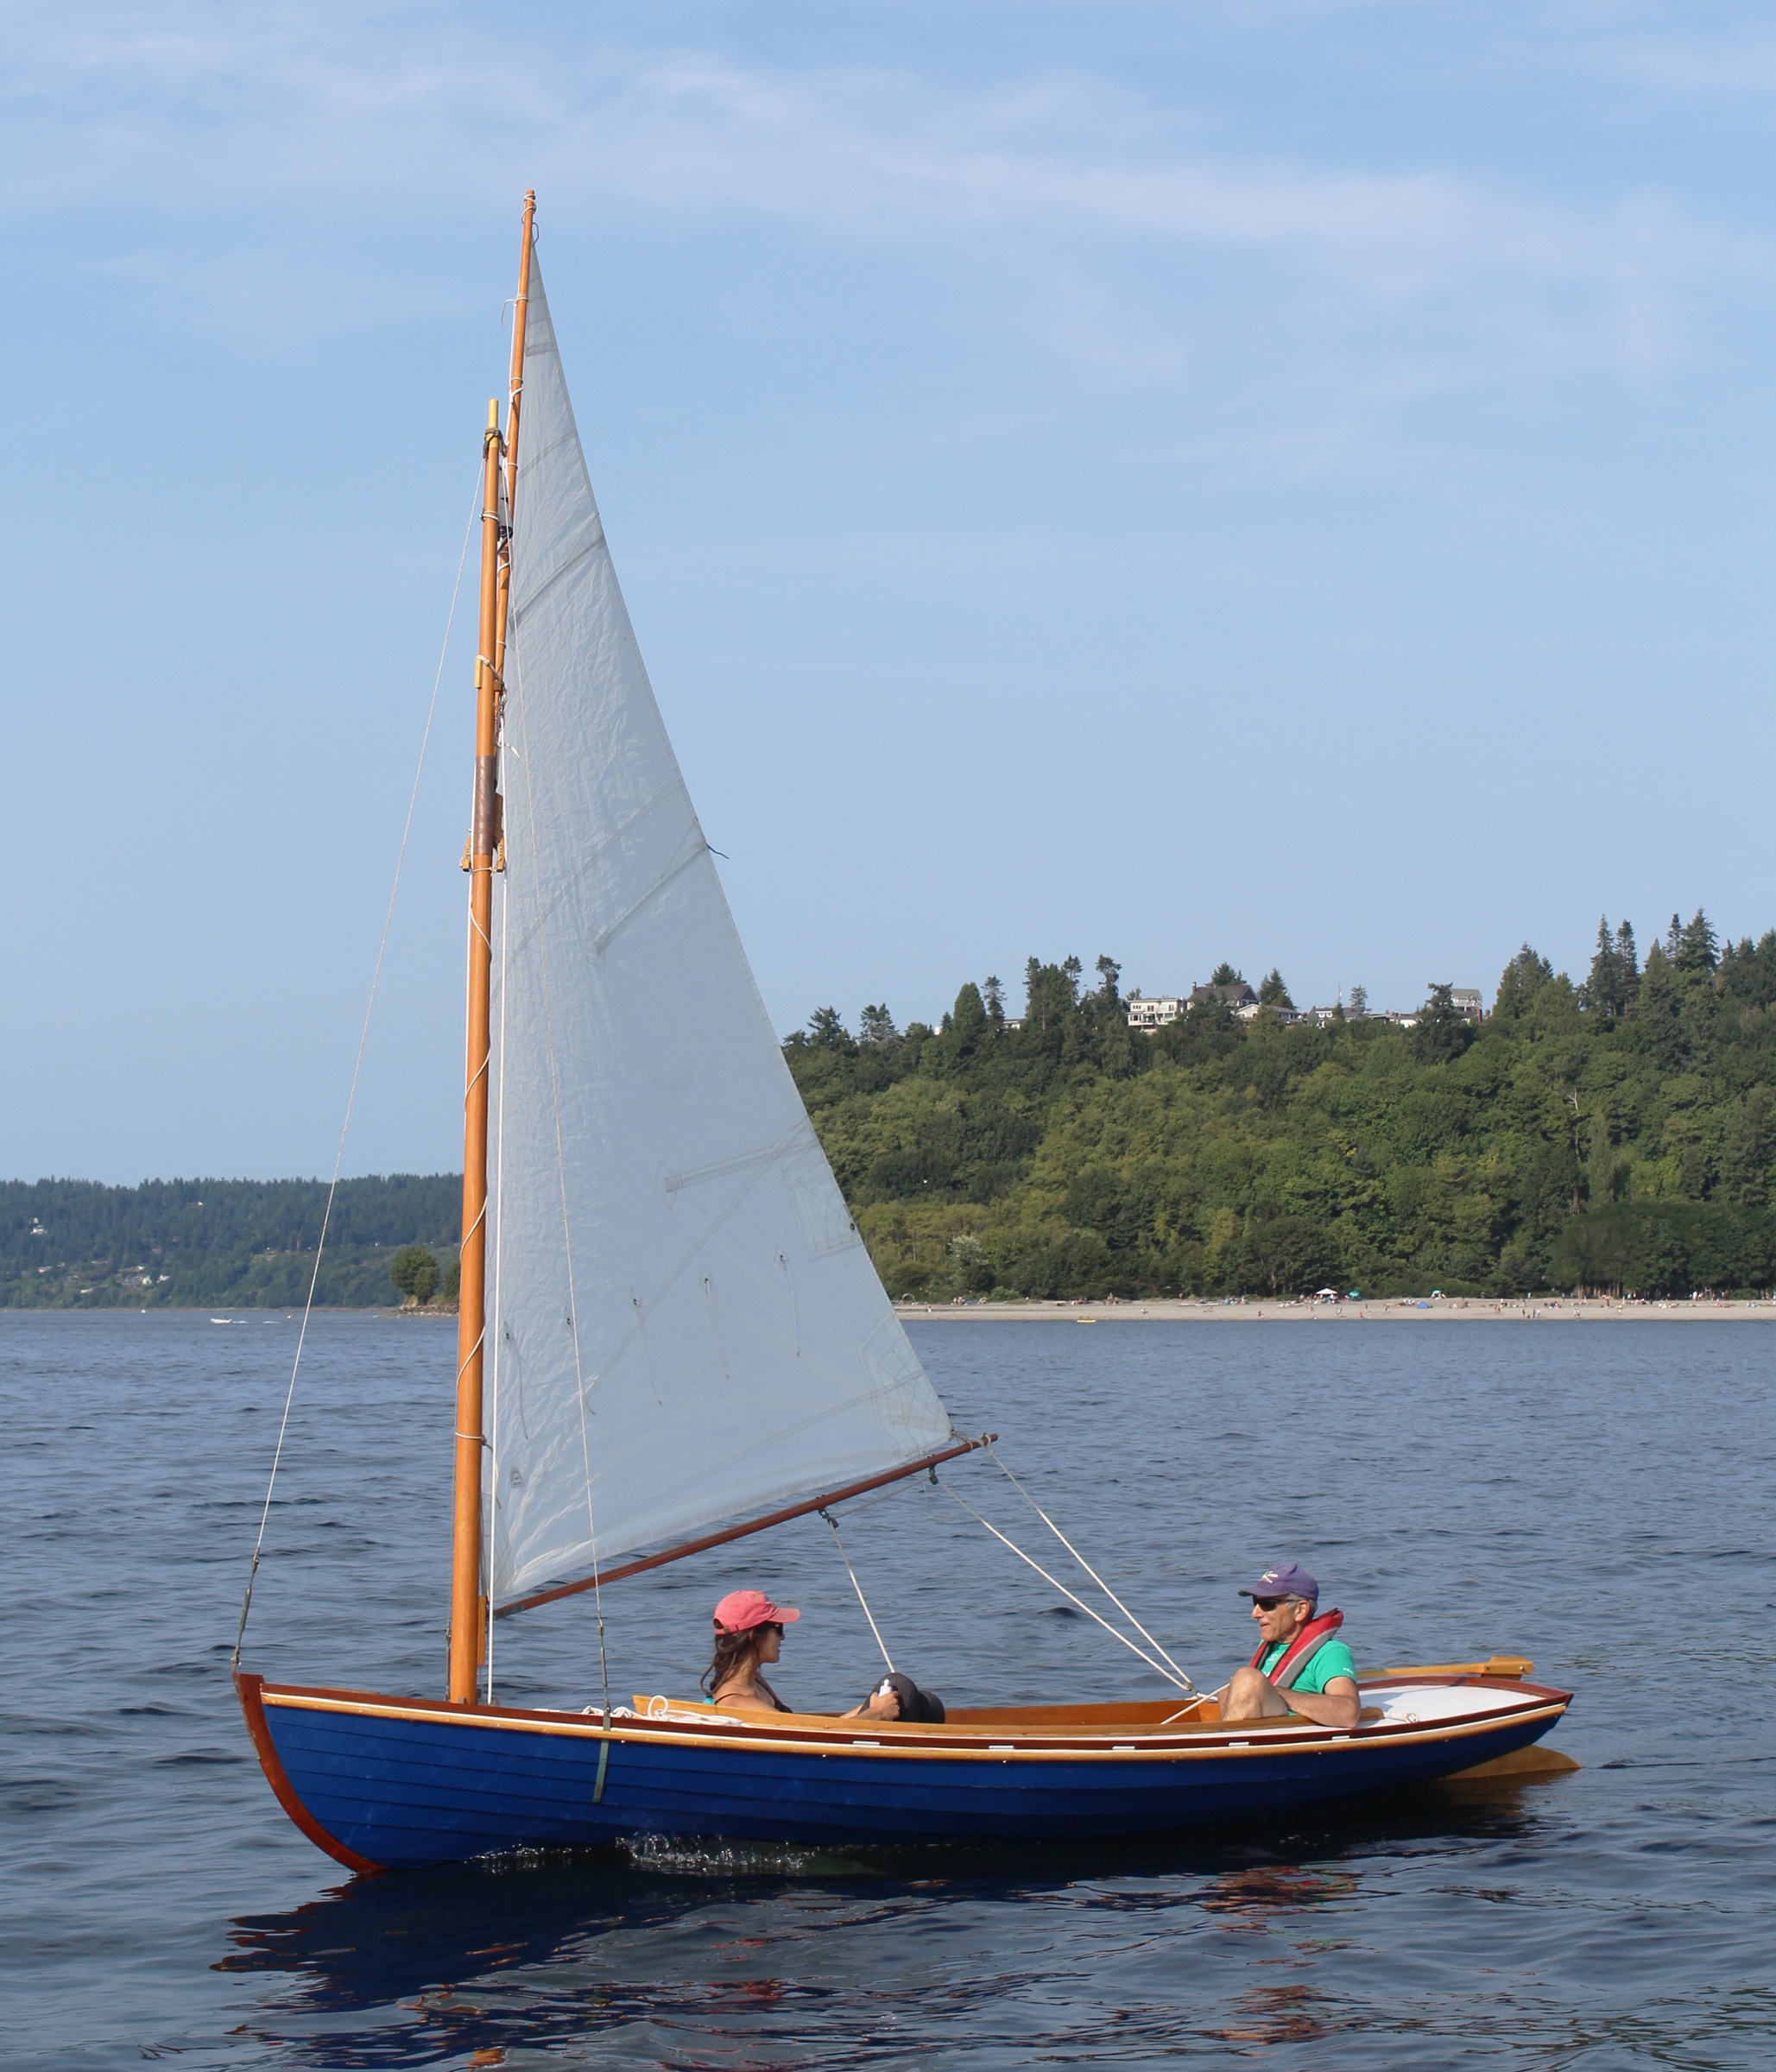
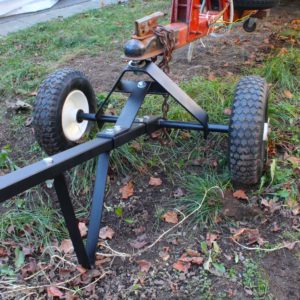
The boat, built from a kit, is 13′ 5″ long with a beam of 52″, and is a combination of CLC’s LapStitch construction and standard stitch-and-glue. The three upper strakes are LapStitch, with overlapping edges, which cast shadows that highlight the curves of the hull. The lower three strakes are edge-joined, making it easier to apply fiberglass to the bottom and avoid the vulnerability of proud plank laps. The combination of different seam types isn’t as visually jarring as it might sound. I didn’t notice it until I crawled under the boat while it was resting in slings.
Christopher Cunningham
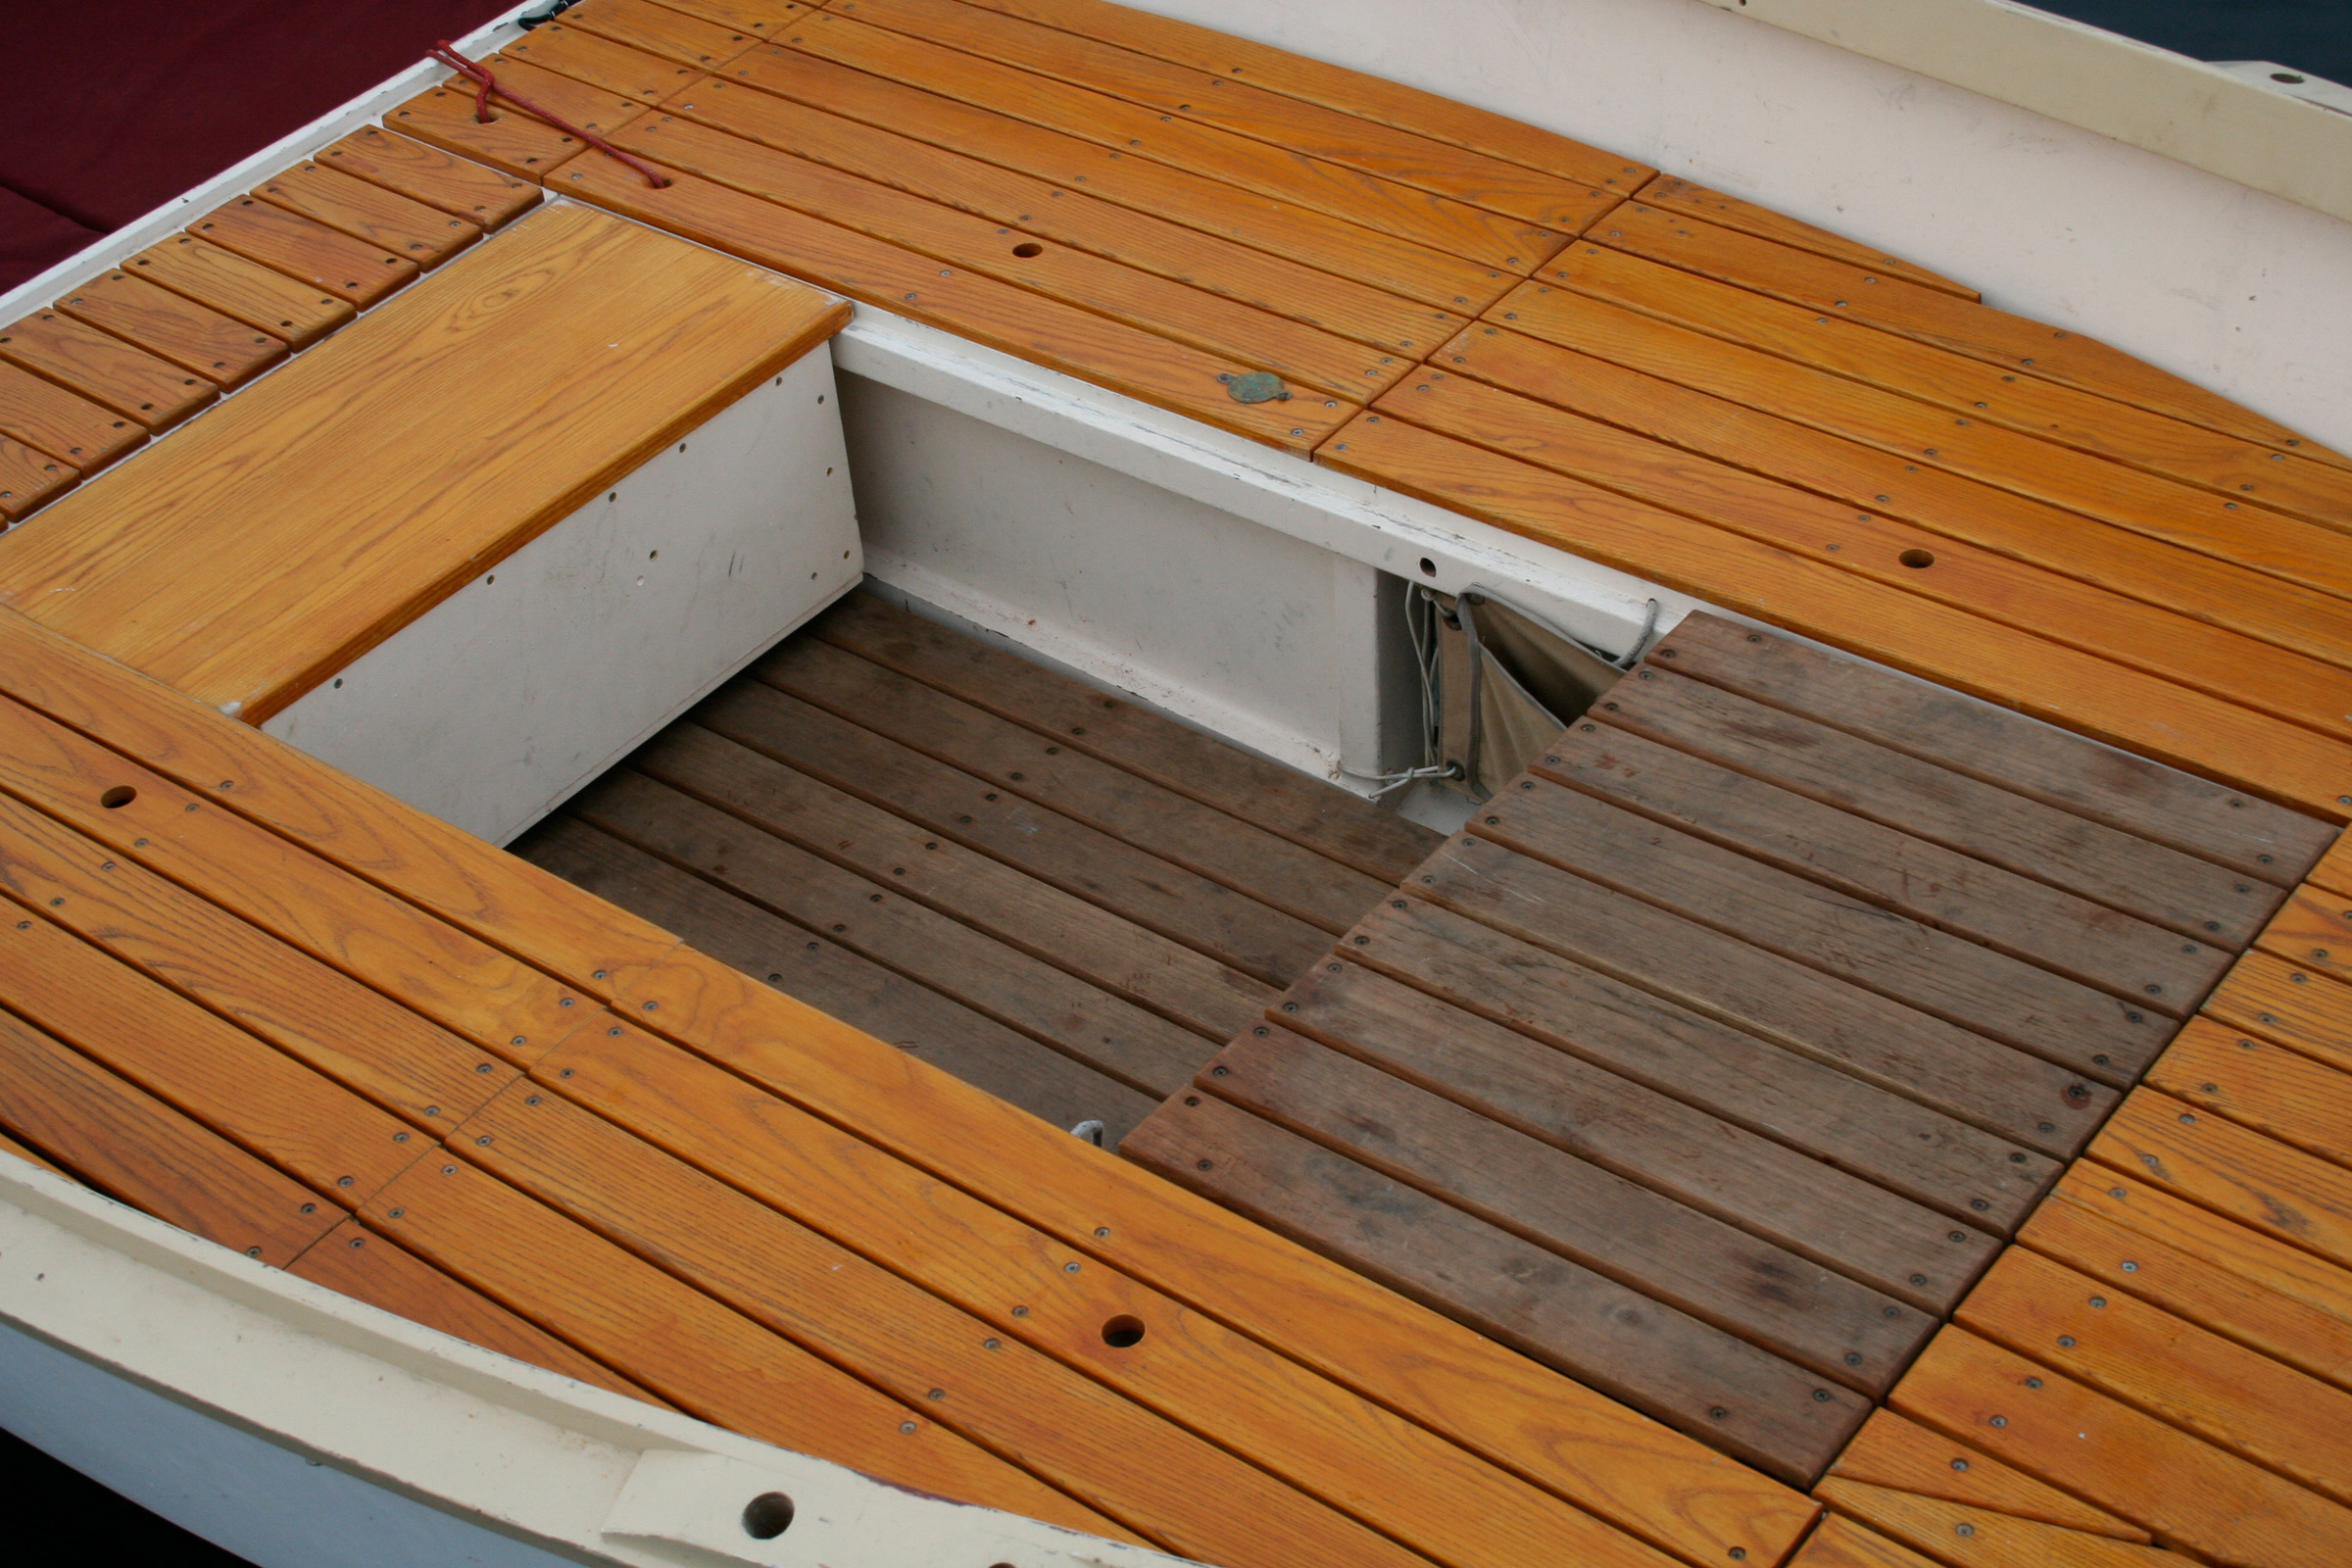
The thwarts are joined by plywood side pieces that aren’t intended as benches, but rather as part of a system that stiffens the hull for sailing. A block of flotation foam, painted black, hides in the shadow under the bow seat.
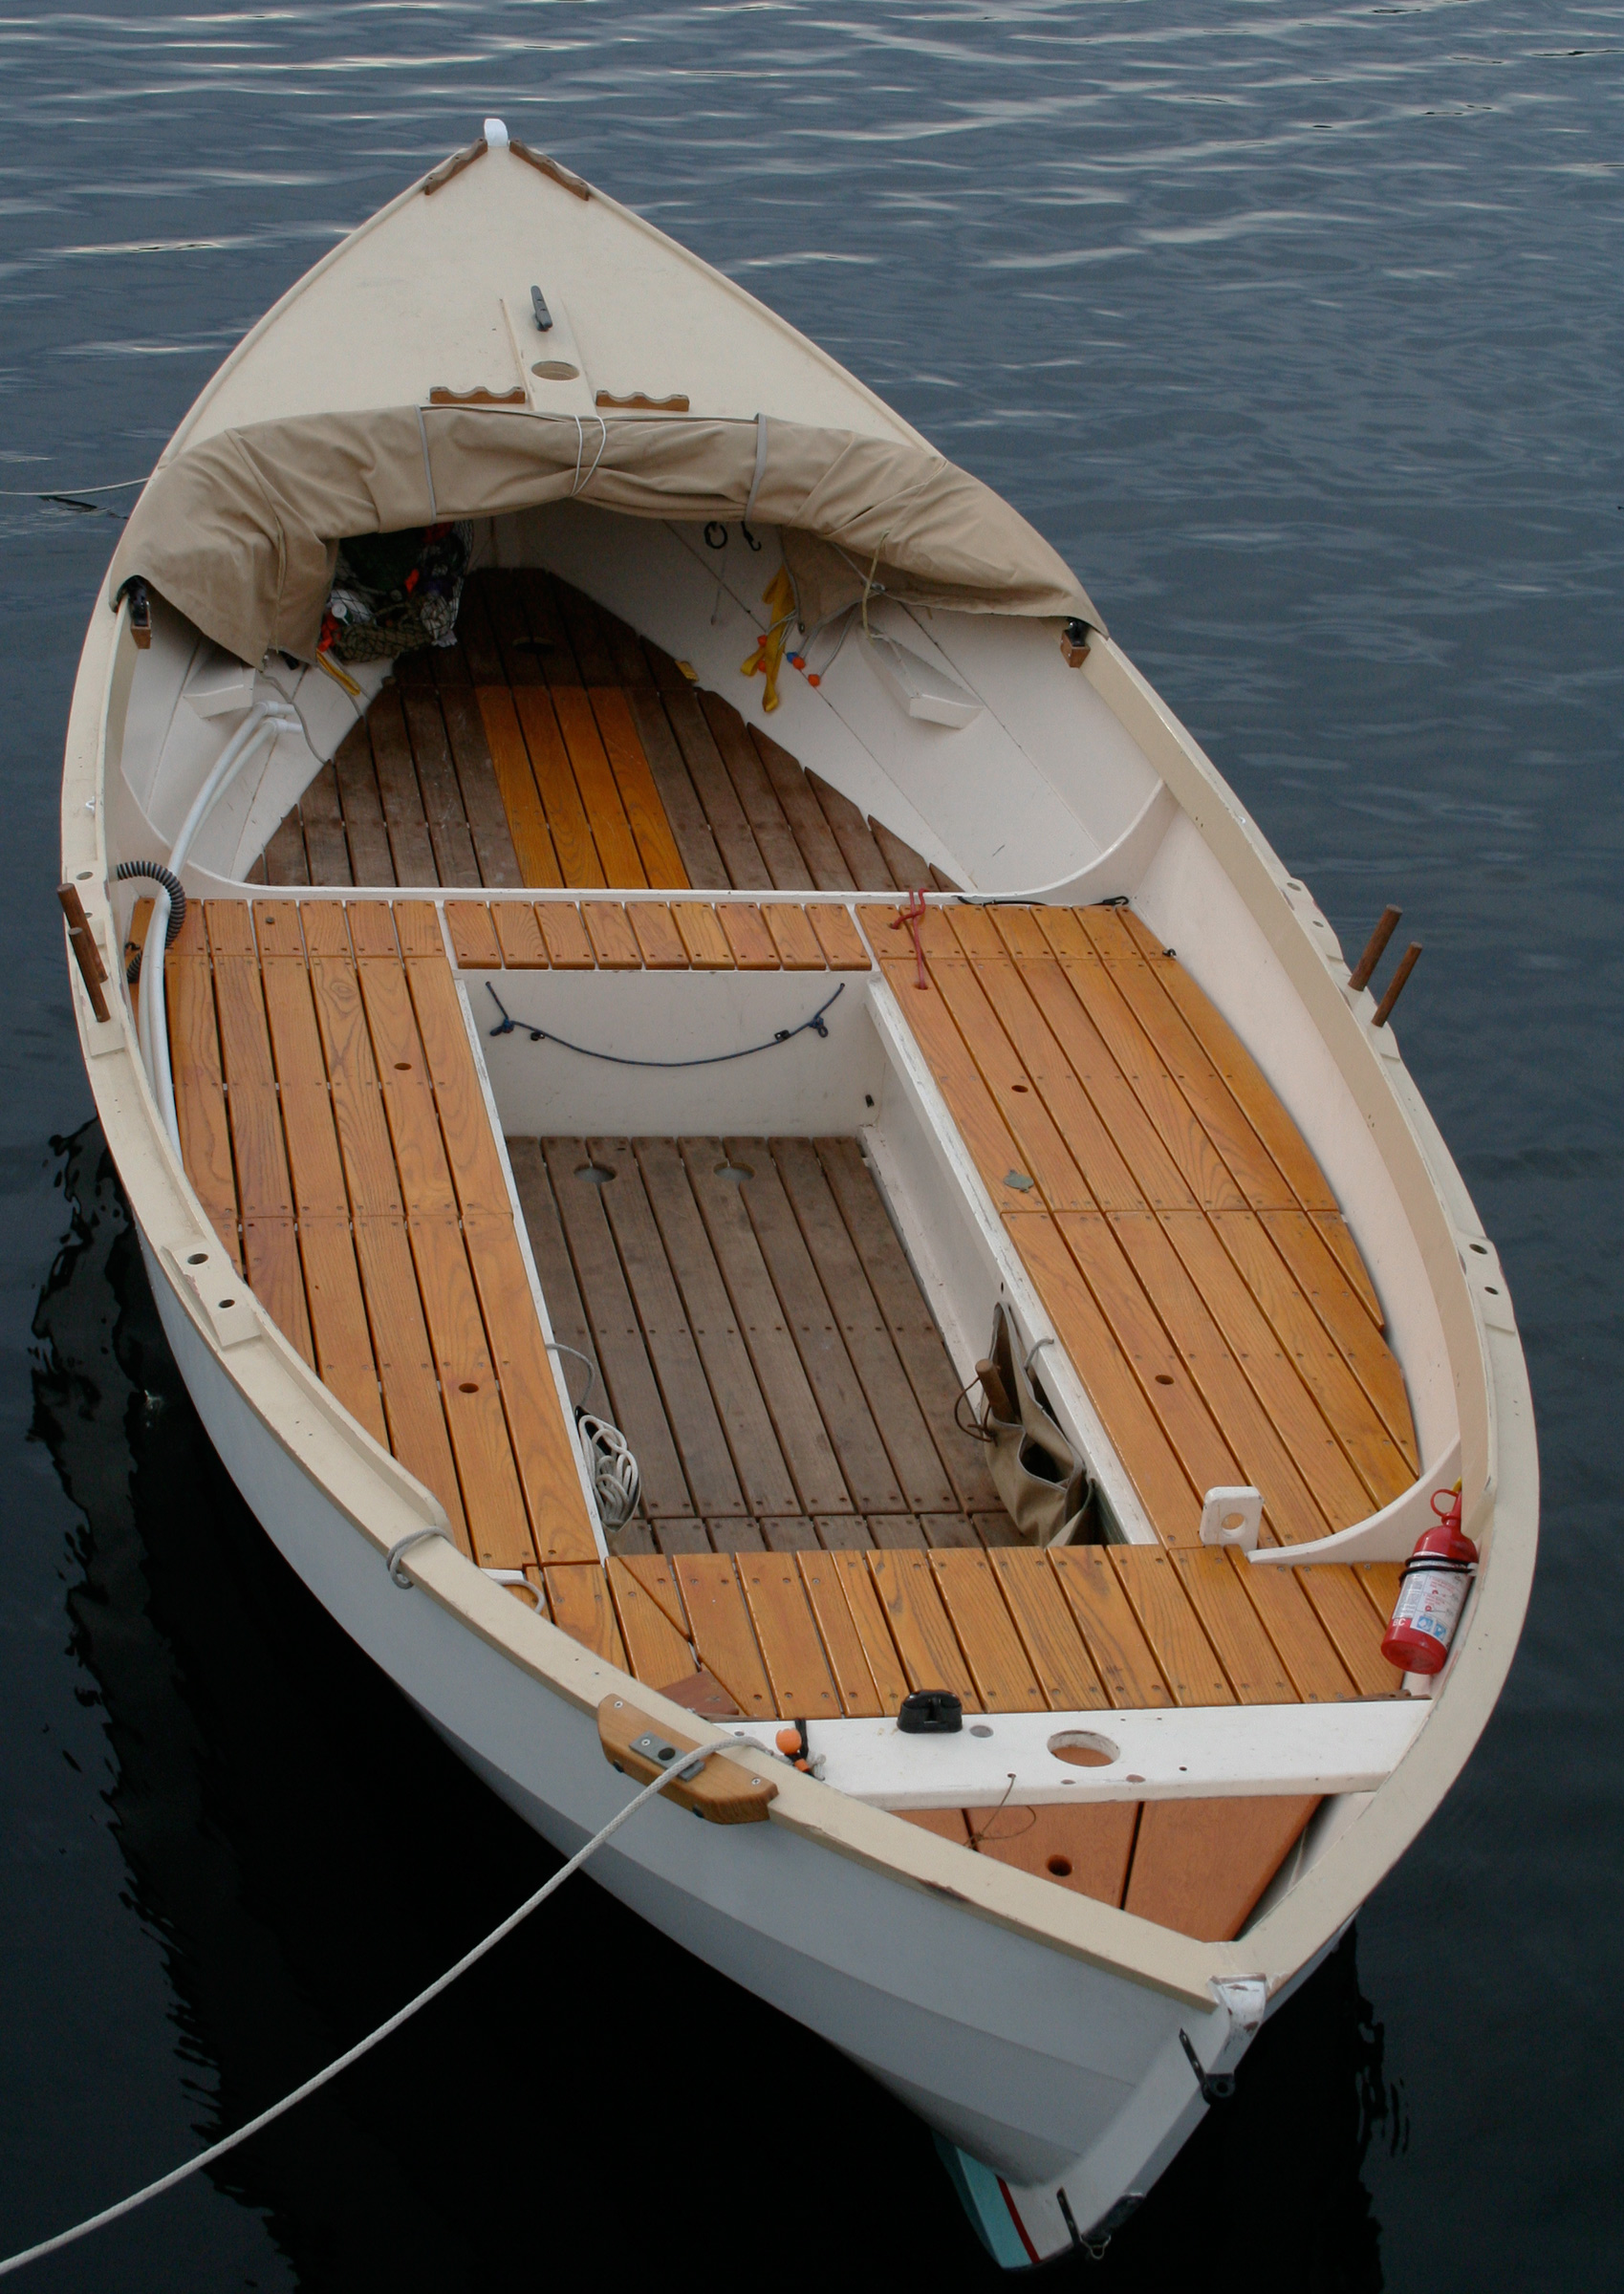
The seating arrangement includes stern sheets, a center thwart, and a seat forward that incorporates a mast partner at both its aft and forward edges. The three seats are made contiguous by narrow extensions that are somewhere between side benches and lodging knees. The combined structure, bolted together, gives the hull the stiffness to resist the torsion created by sailing forces. The plywood pieces are not glued to the hull, so they can all be removed for refinishing when the time comes.
Fixed underneath the seats are blocks of foam for flotation. The foam is painted with a flexible coating that resists chipping and wear. The coating is black and surprisingly inconspicuous in the shadows cast by the seats. The floorboards are fastened to the frames with stainless-steel screws and finishing washers so they too can be removed for maintenance. Aft of the centerboard trunk is an opening in the floorboards for a bilge pump.
Christopher Cunningham
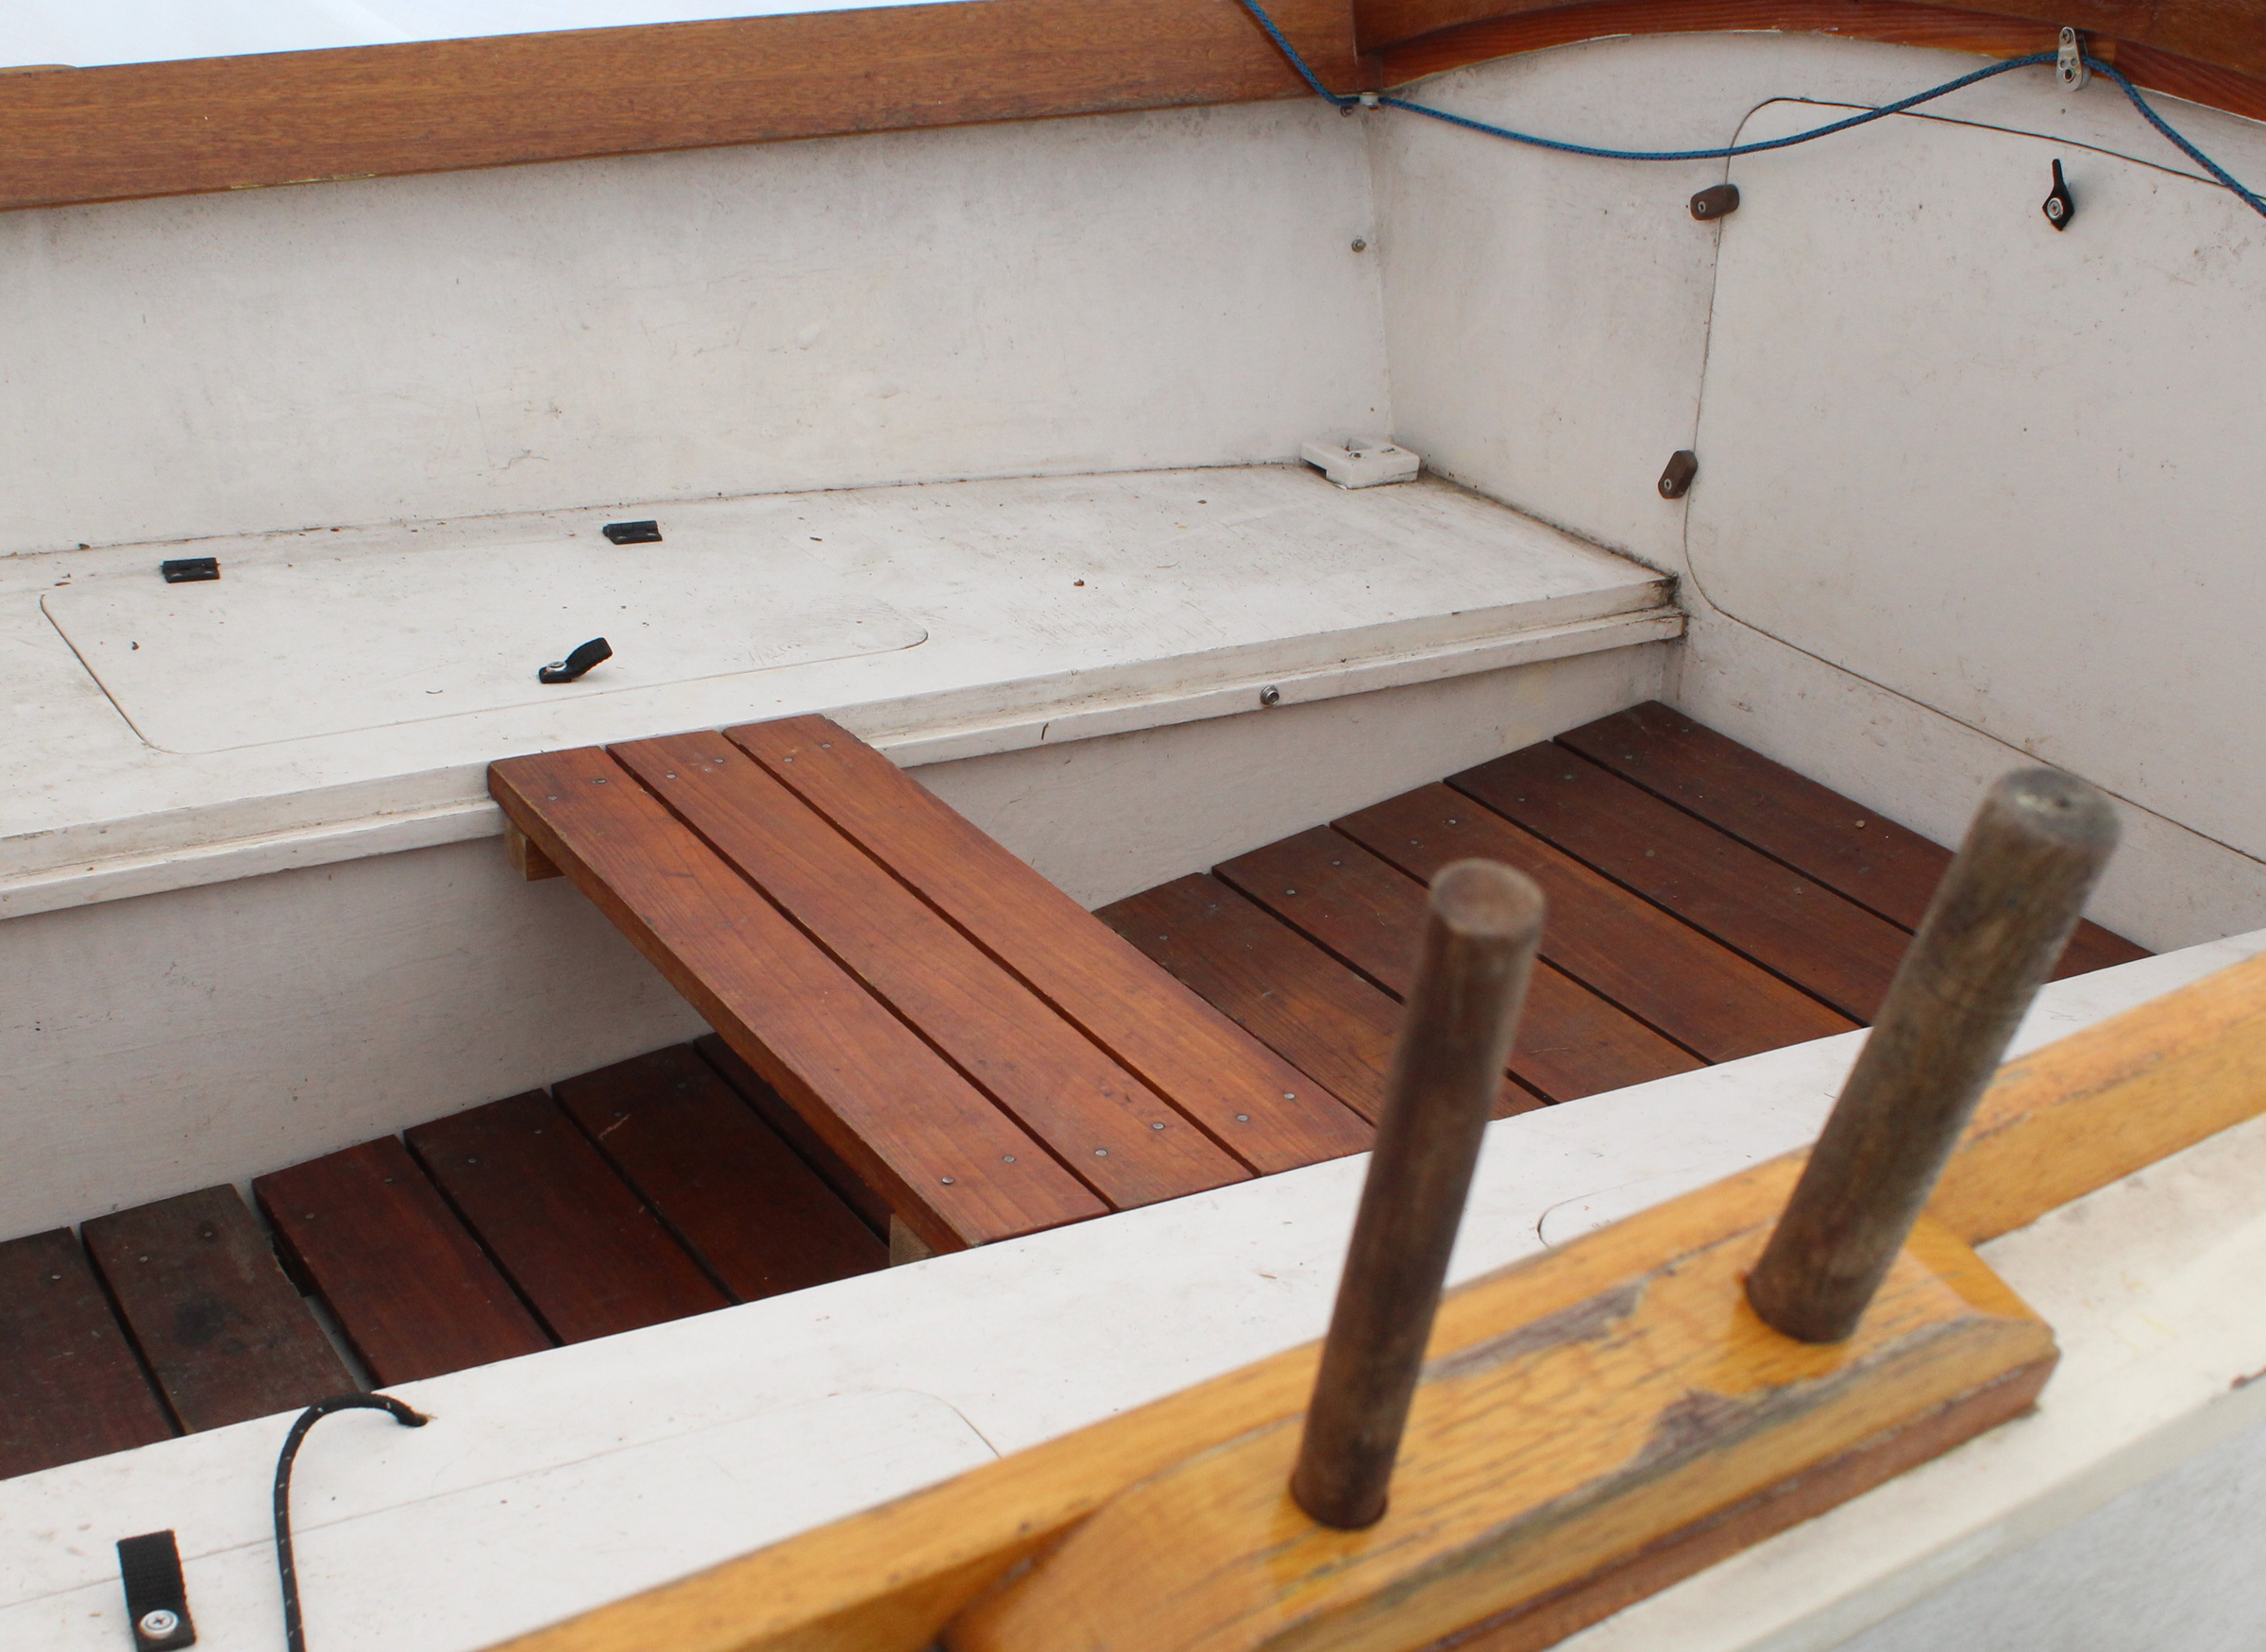
The lever that operates the centerboard has loops of bungees to hold it in position. Note the black flotation blocks under the thwart.
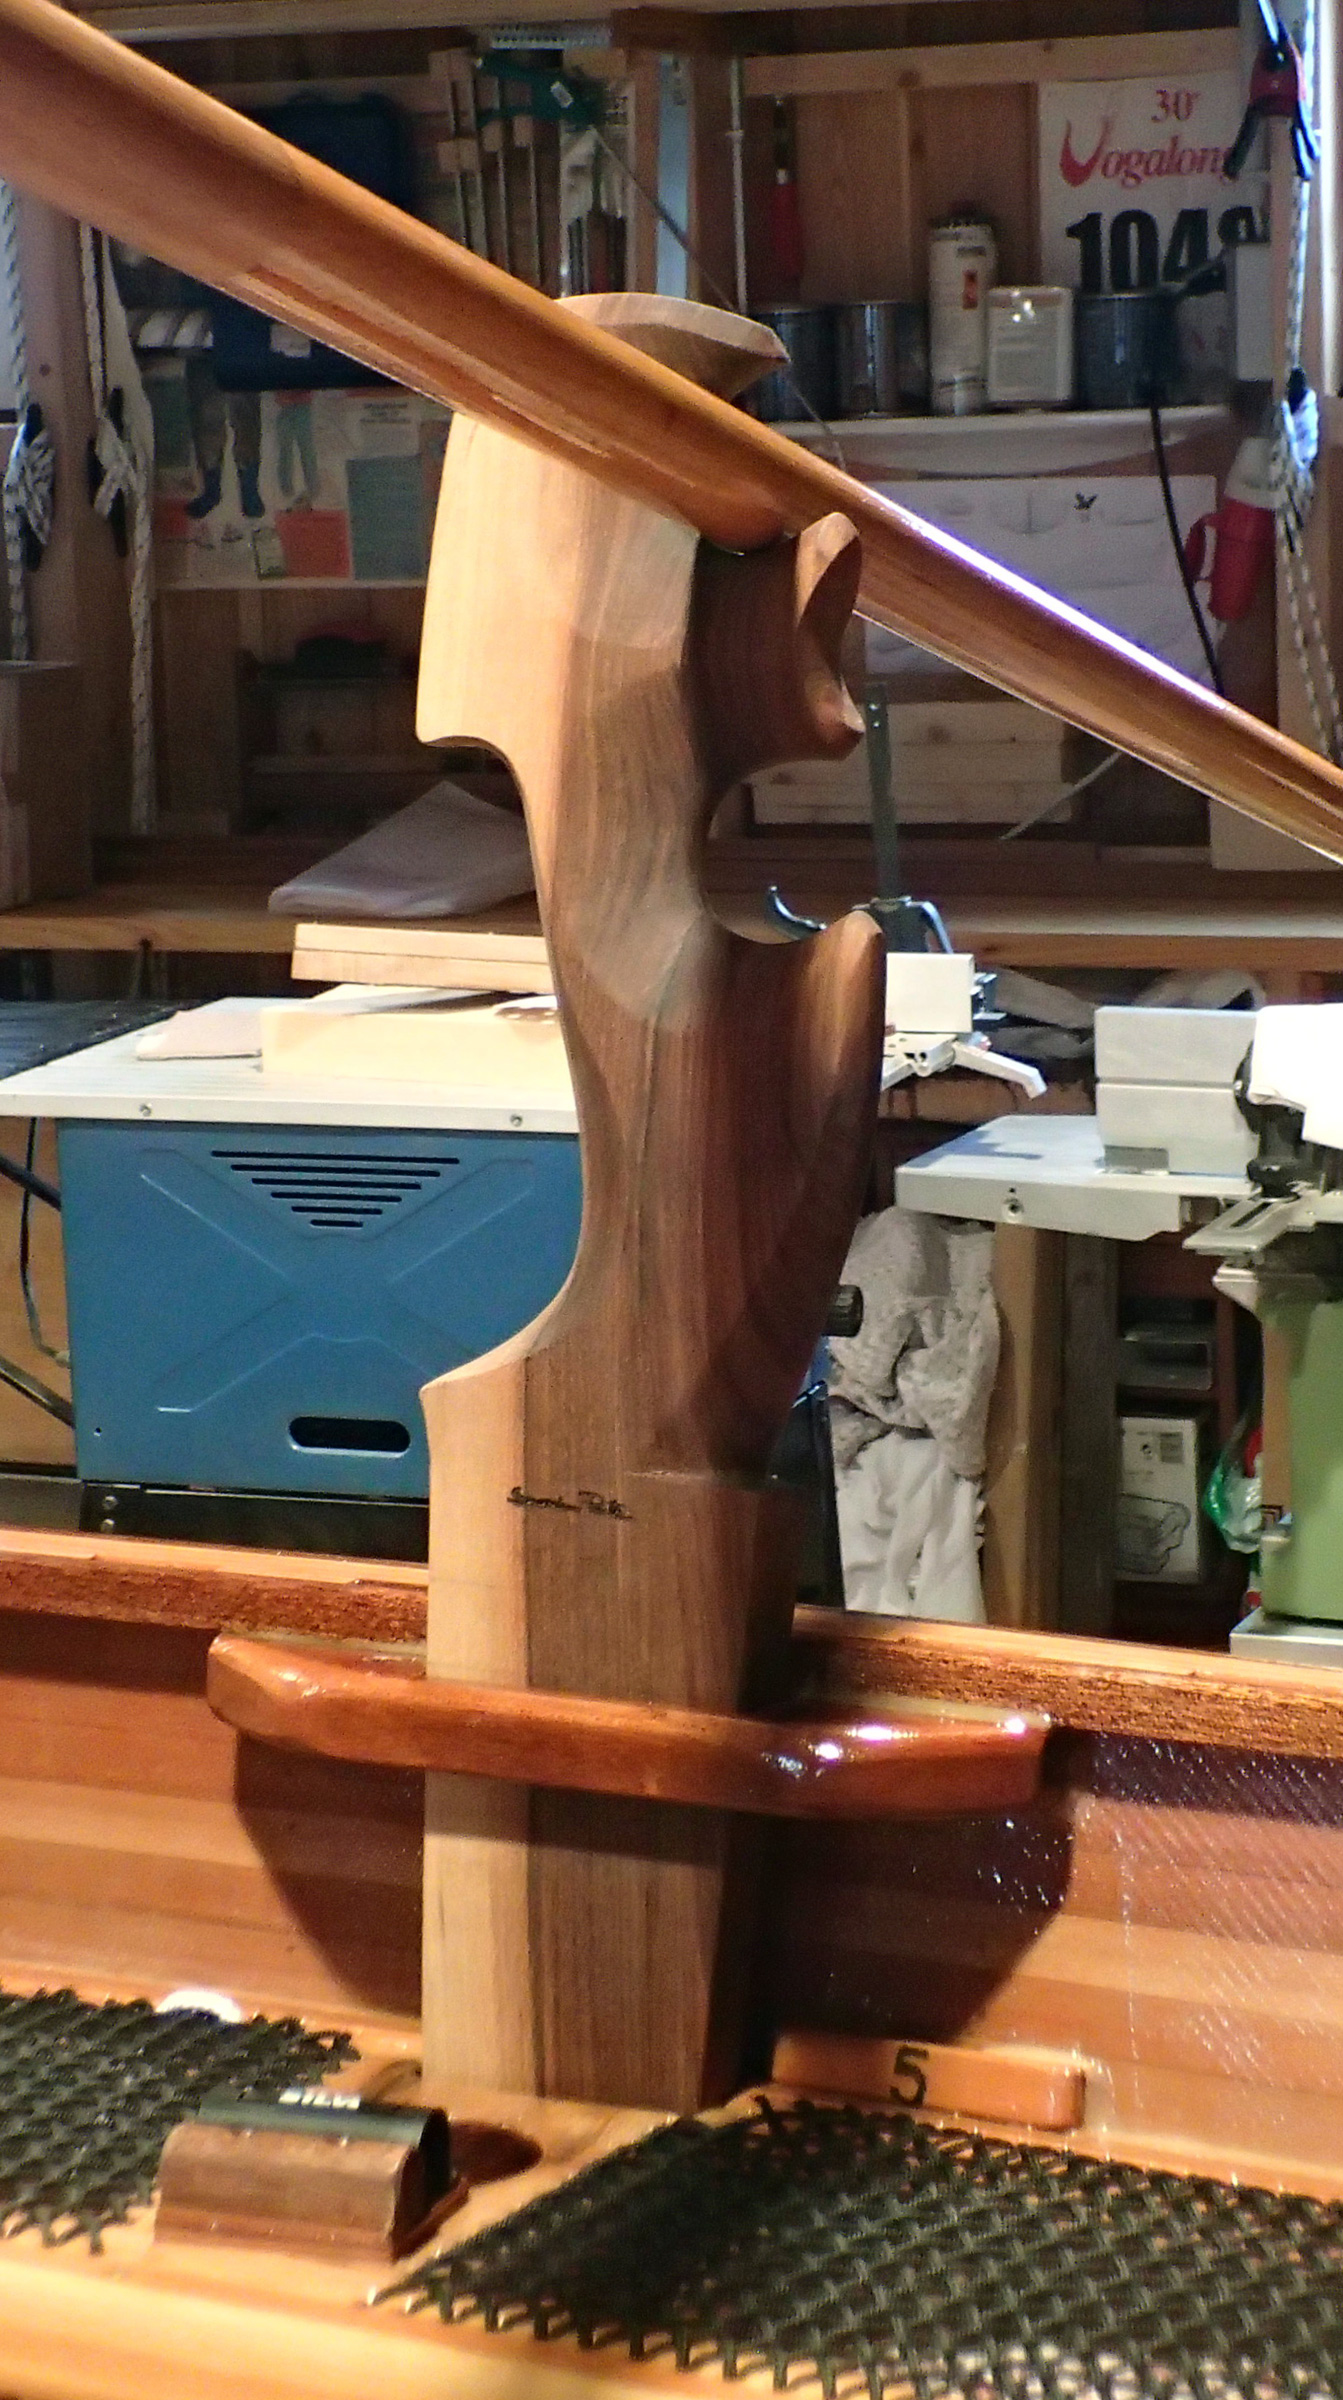
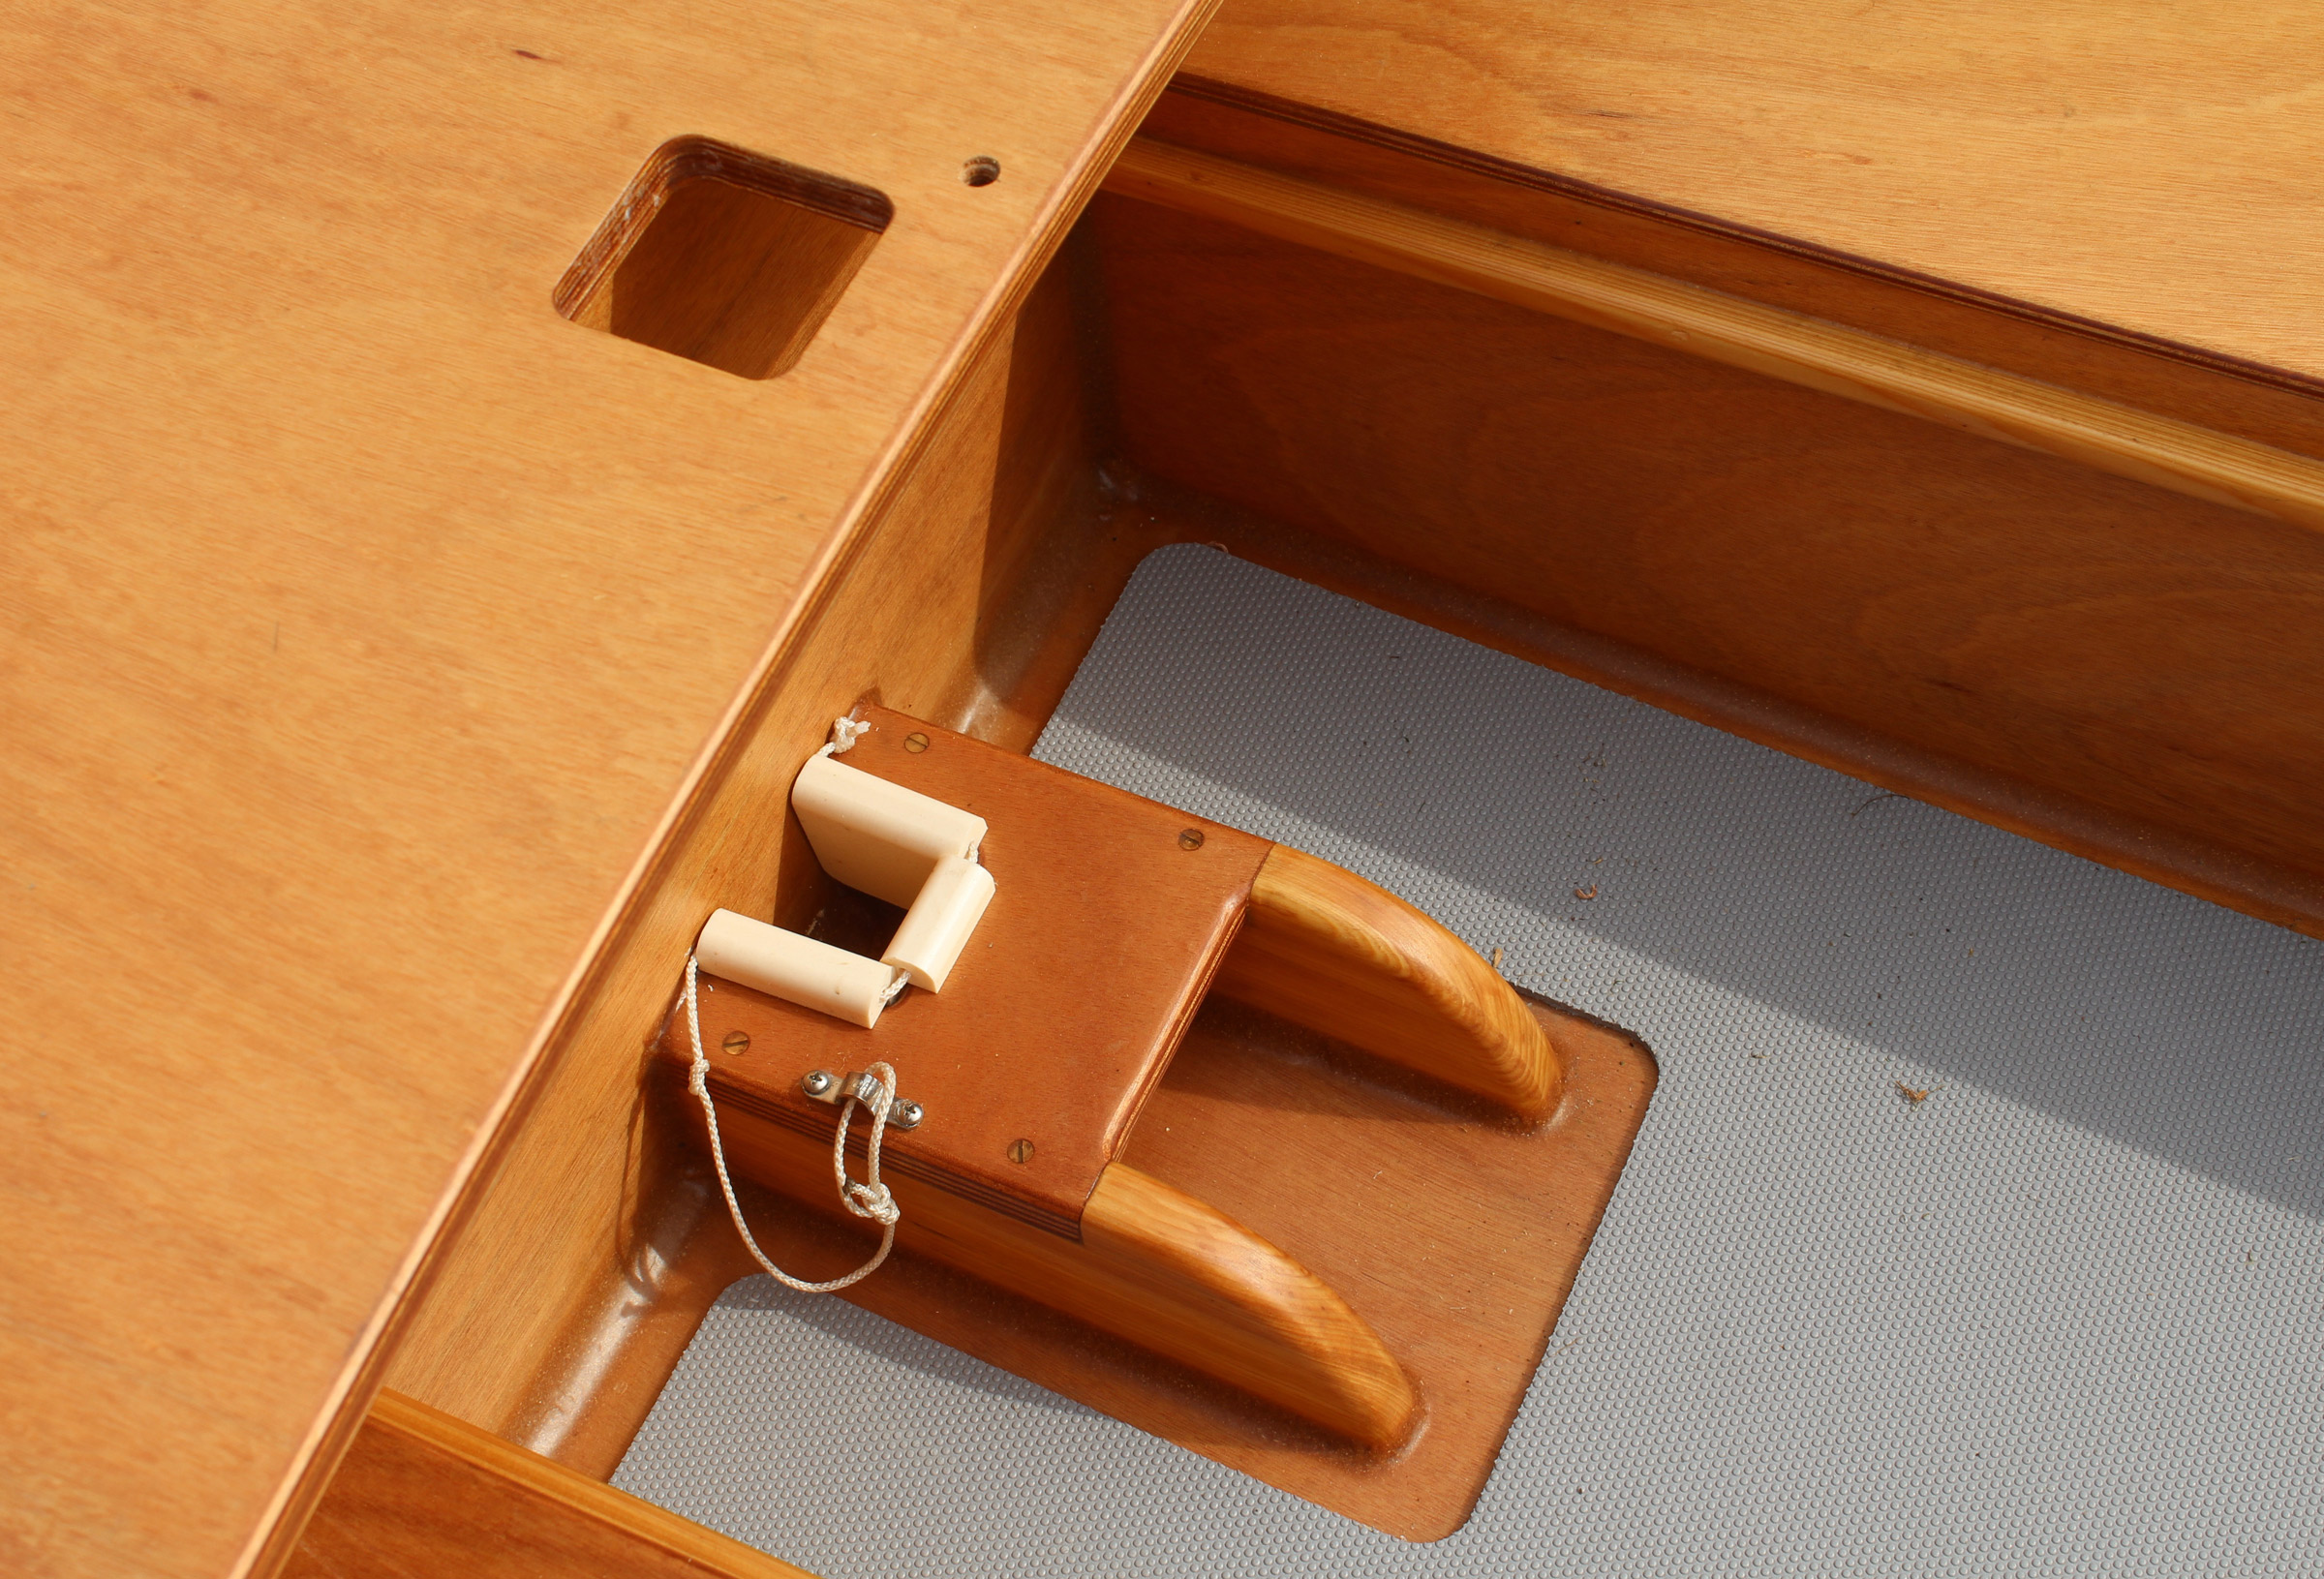
The centerboard is braced by the center thwart and extends forward from it with an open slot for the lever that raises and lowers the board. Bungee loops slip over the lever to hold the board in position with some give if it strikes an obstruction while the boat is under sail. The rudder has a kick-up blade with a bolt and a star knob that adjusts the friction that holds the blade down or up. The skeg extends about 6″ abaft of the after stem before it curves upward. It allows the gudgeons to line up vertically, so the rudder is easy to attach while the boat is afloat and is more effective for steering than a rudder that pivots on an angled axis. The rudderstock has a fixed arm extending to starboard for a Norwegian tiller that reaches around the mizzenmast. I’d prefer a removable arm to make the rudder more compact when stowed, though that arrangement is more complex to build and would have to be much heavier. A cord connects the tiller and the arm, providing a very simple, flexible joint, which is kept from getting sloppy by tensioning the cord in a clam cleat at the forward end of the tiller.
Christopher Cunningham
The rudder stock has a fixed arm for the attachment of a Norwegian tiller, which works around the mizzen.
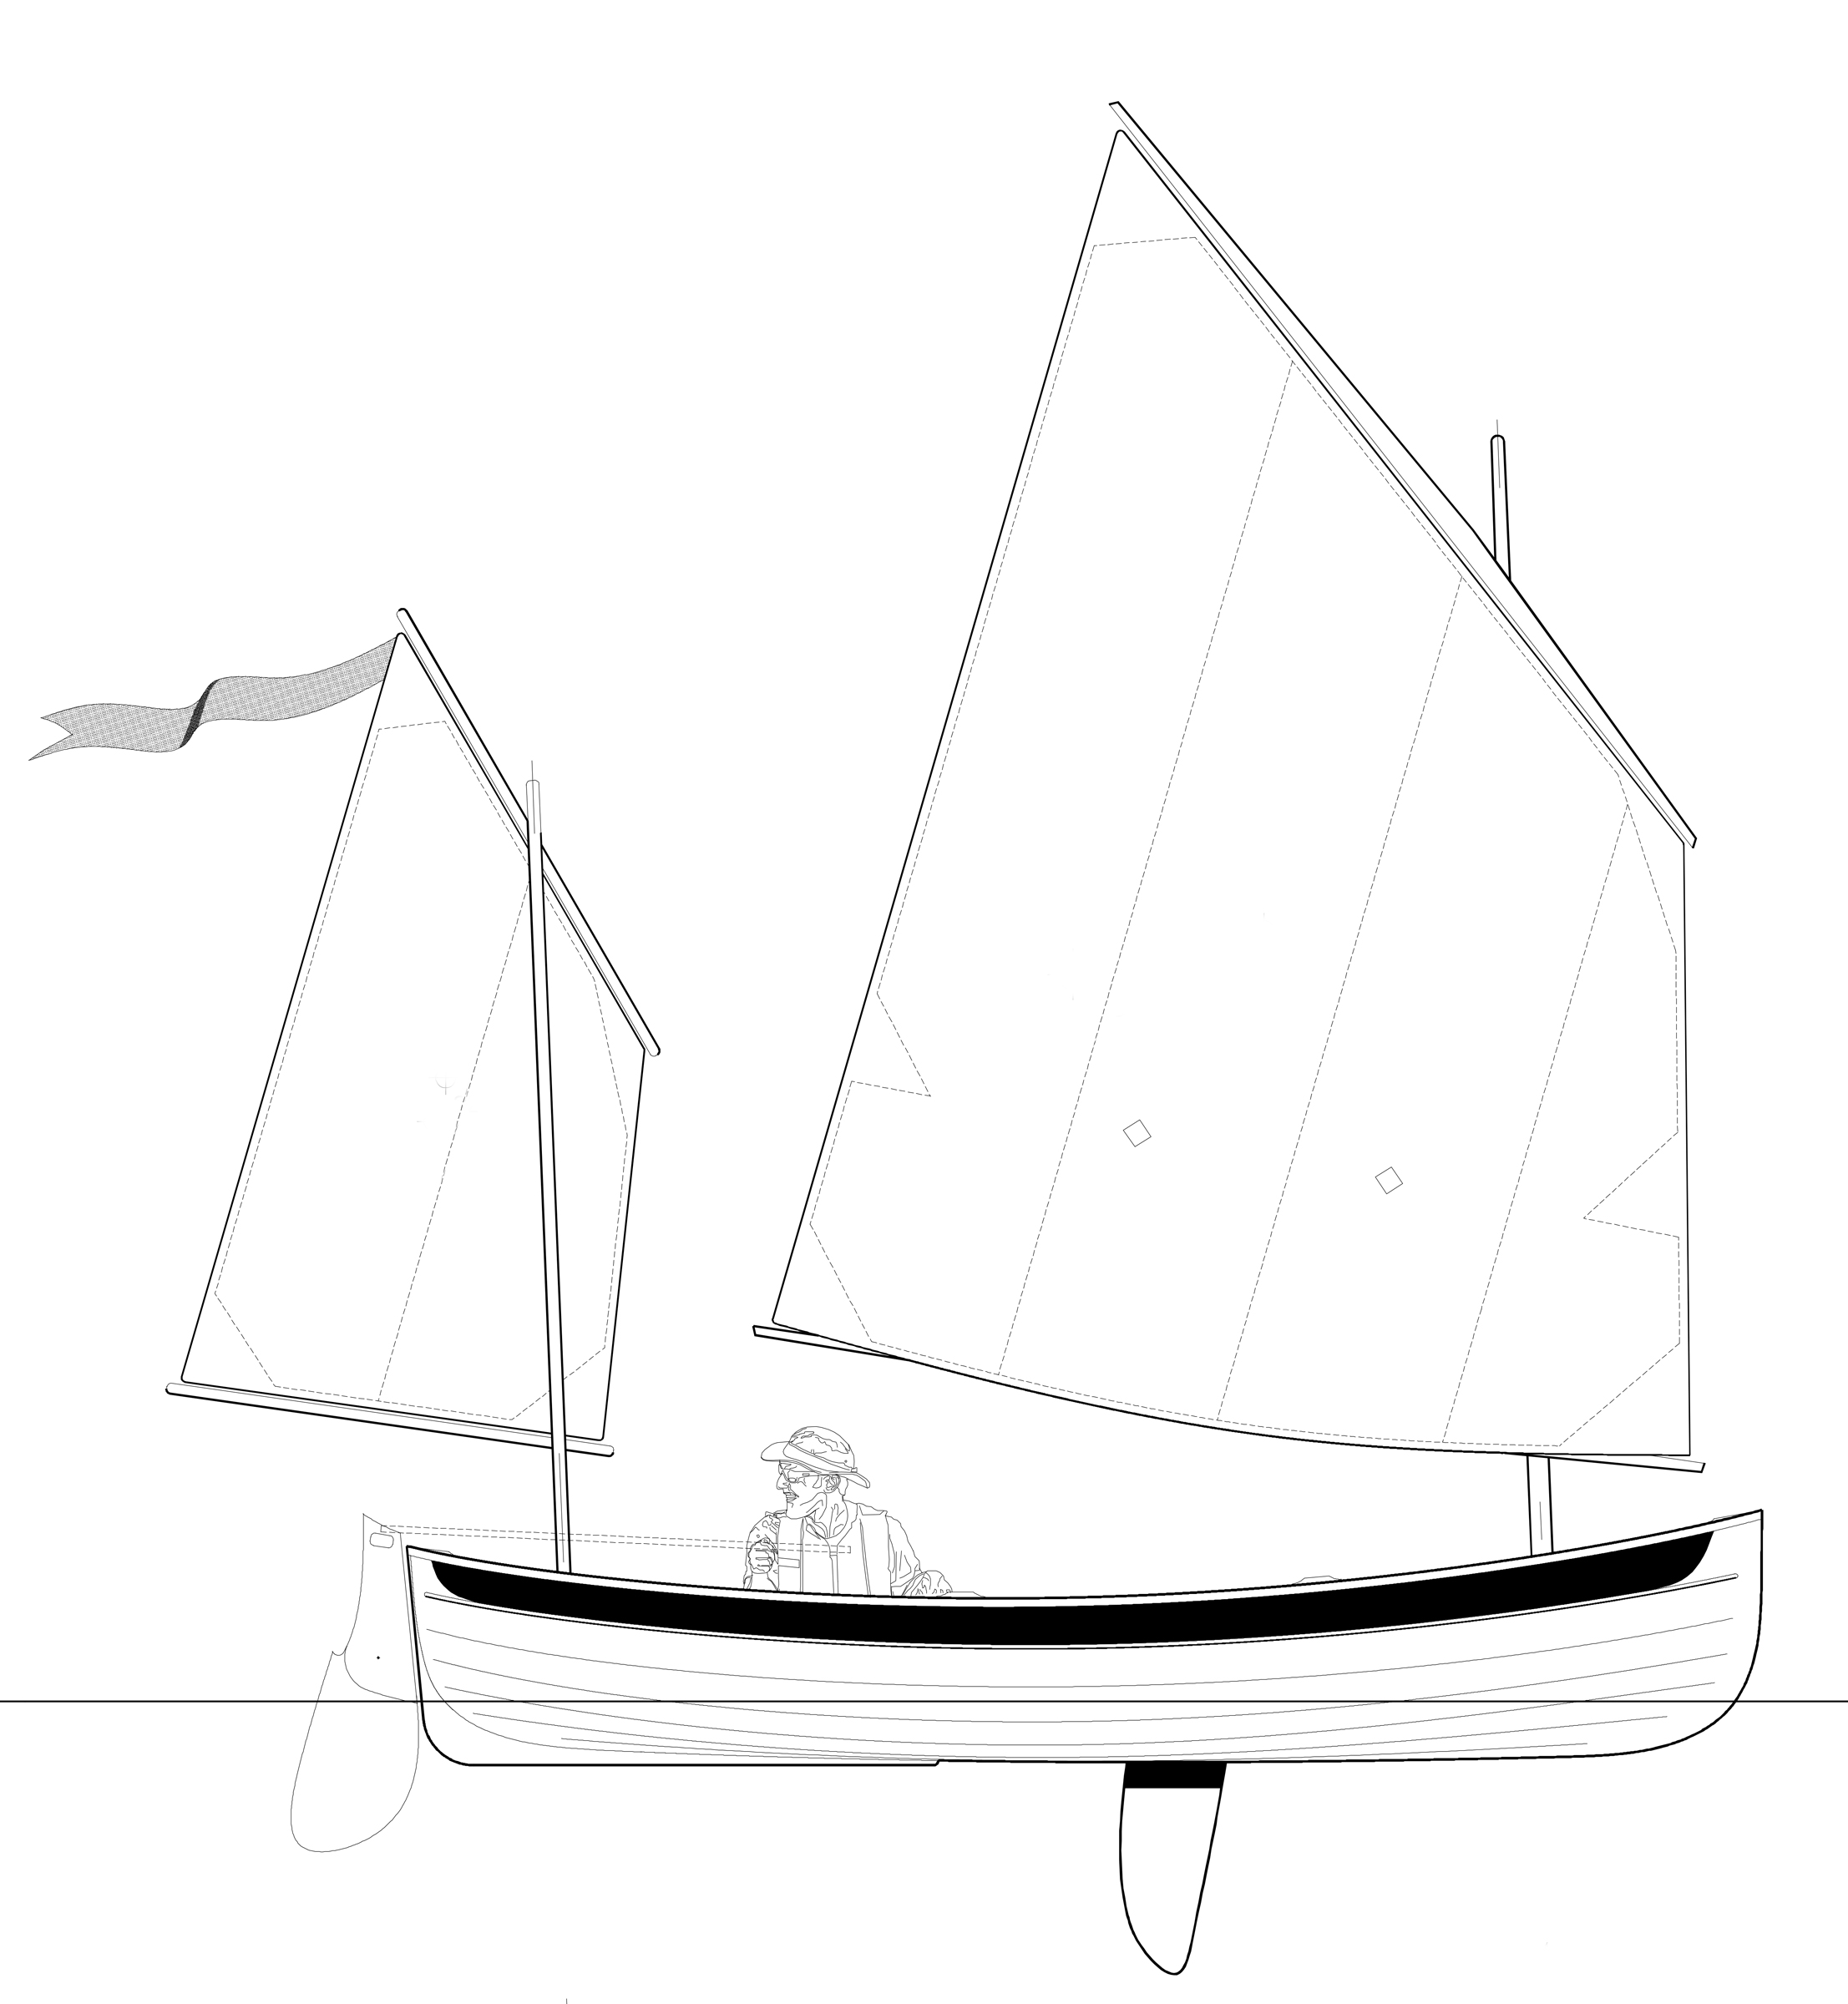
The spars are all rectangular in section with rounded corners. They’re tapered to minimize weight and achieve a pleasing appearance. The mainmast is laminated with three pieces of fir, and the mizzen is a single piece of spruce. In the kit they arrive with precut scarfs ready to be glued together. The main is a balance lug sail, loose-footed, and has an area of 73 sq ft. The mizzen is also a balance lugsail with its foot laced to the boom and has an area of 22 sq ft. The Peapod has an optional rig, a cat-rigged balance lug with an area of 79 sq ft.
Christopher Cunningham
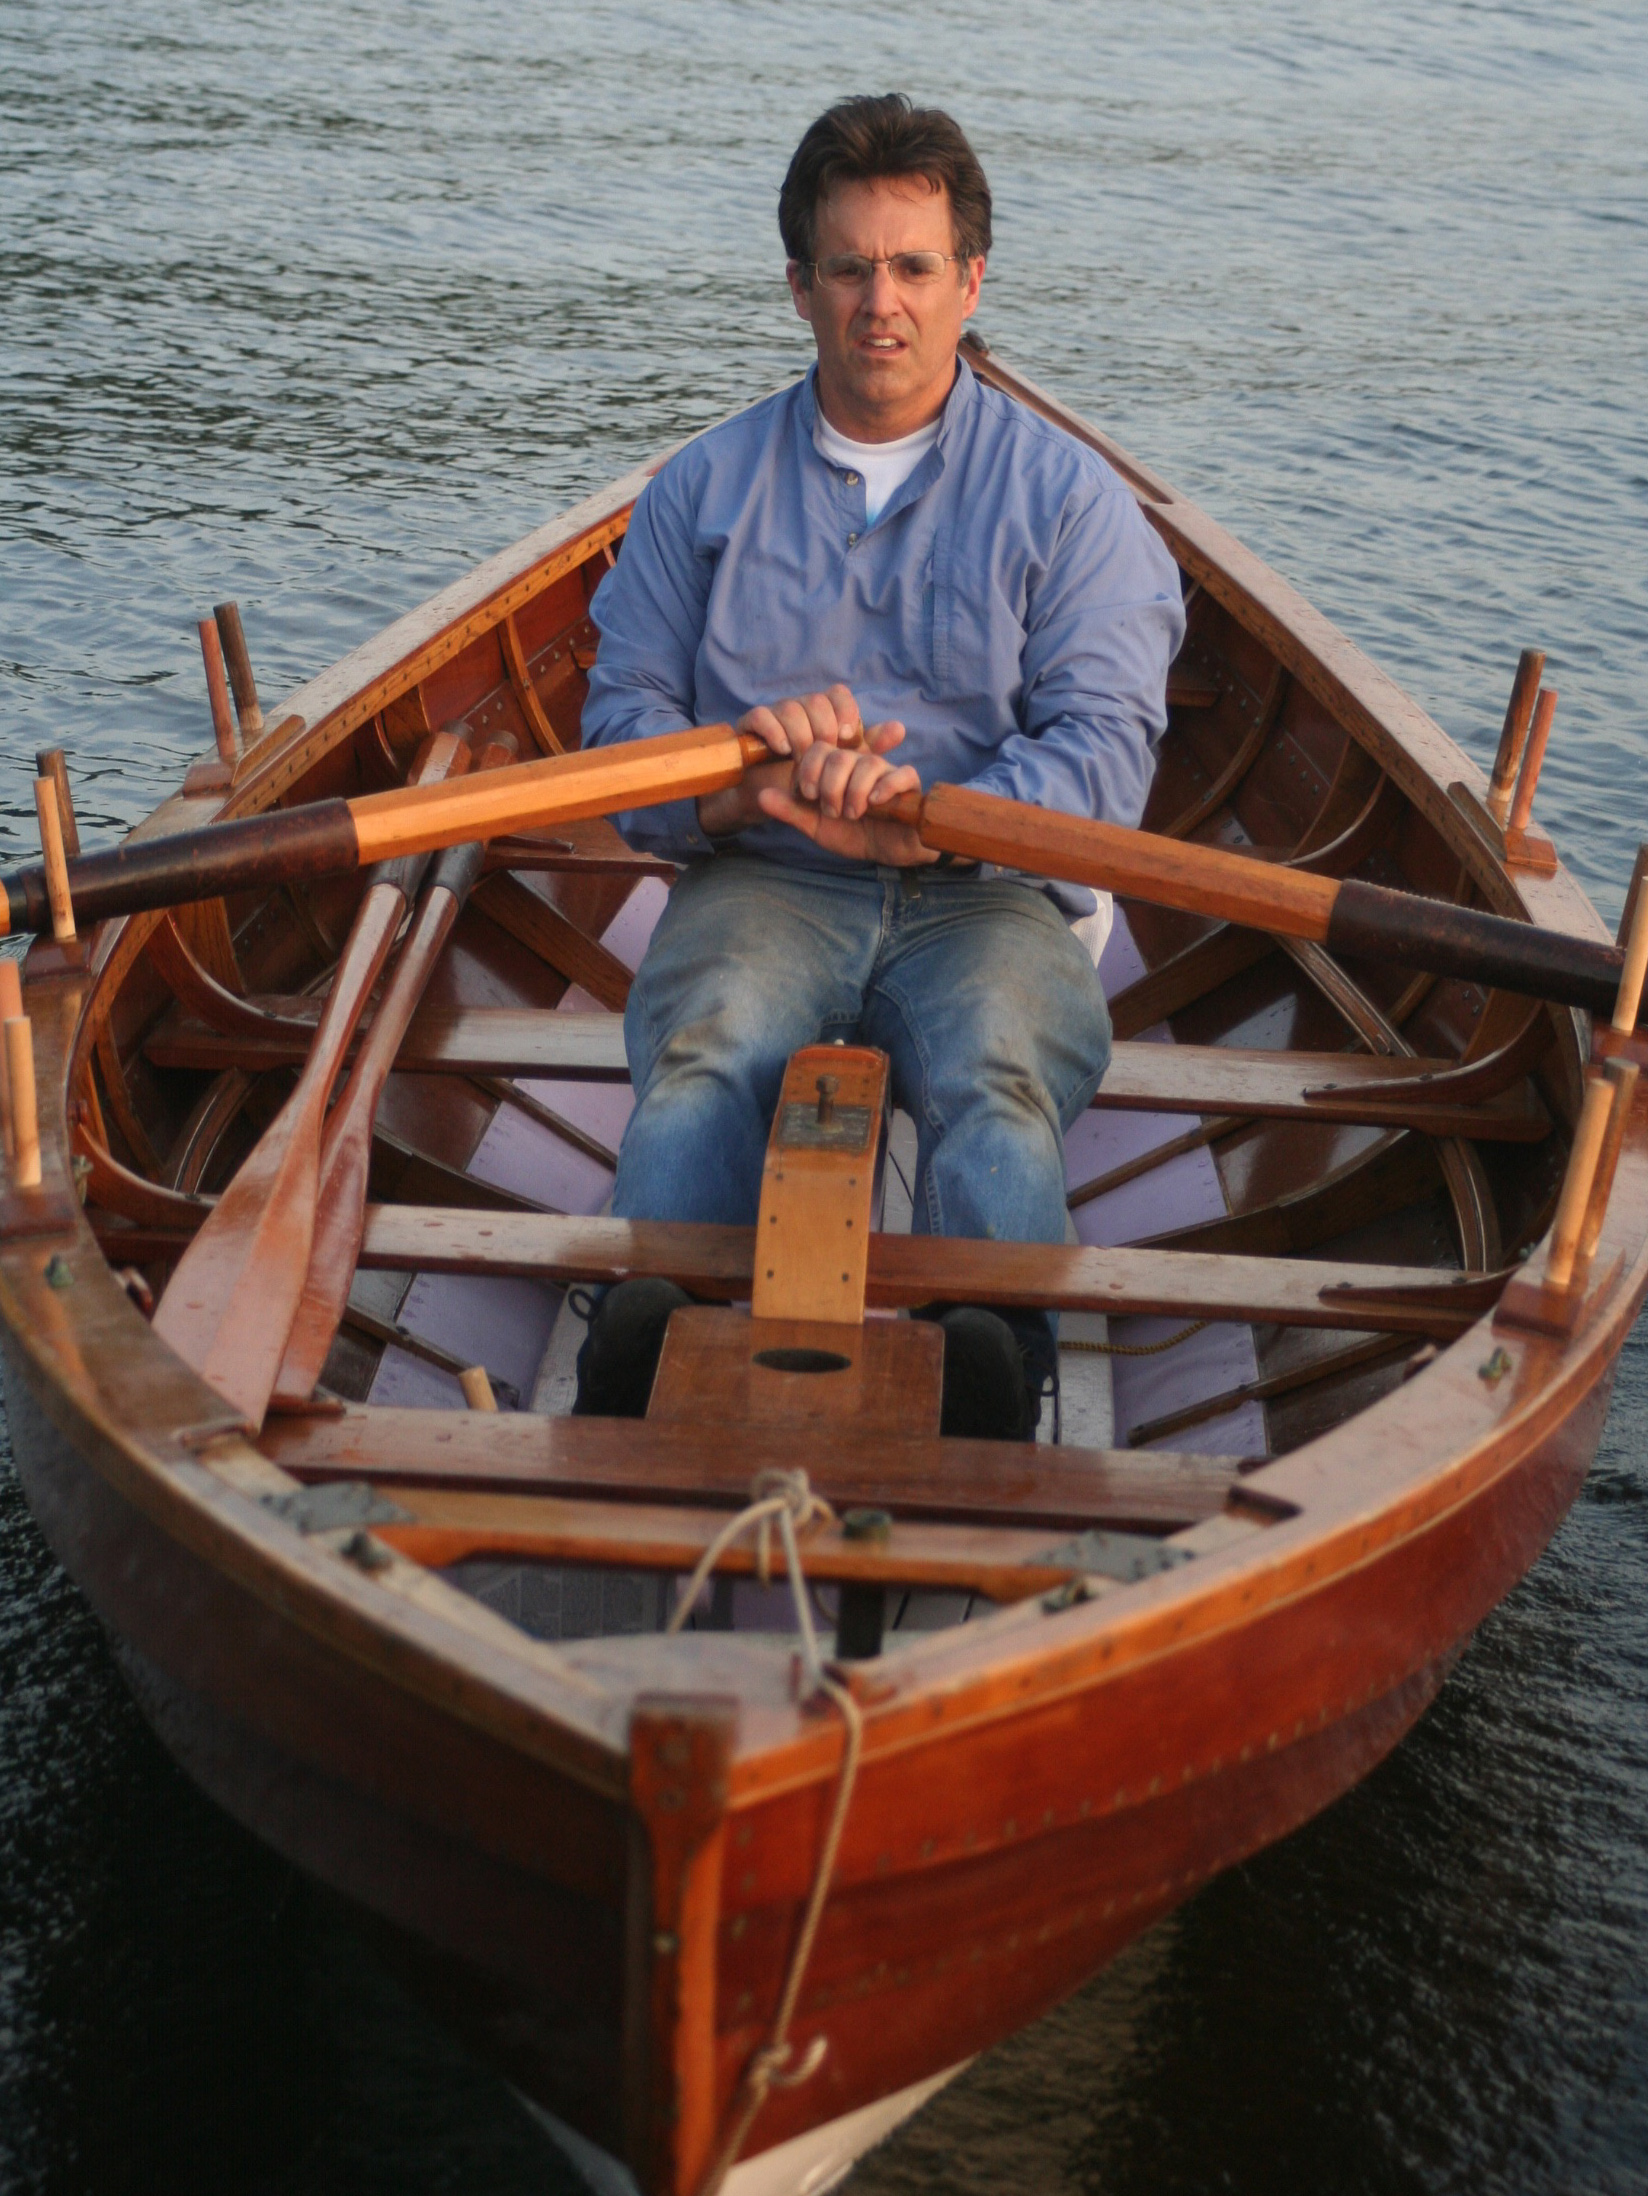
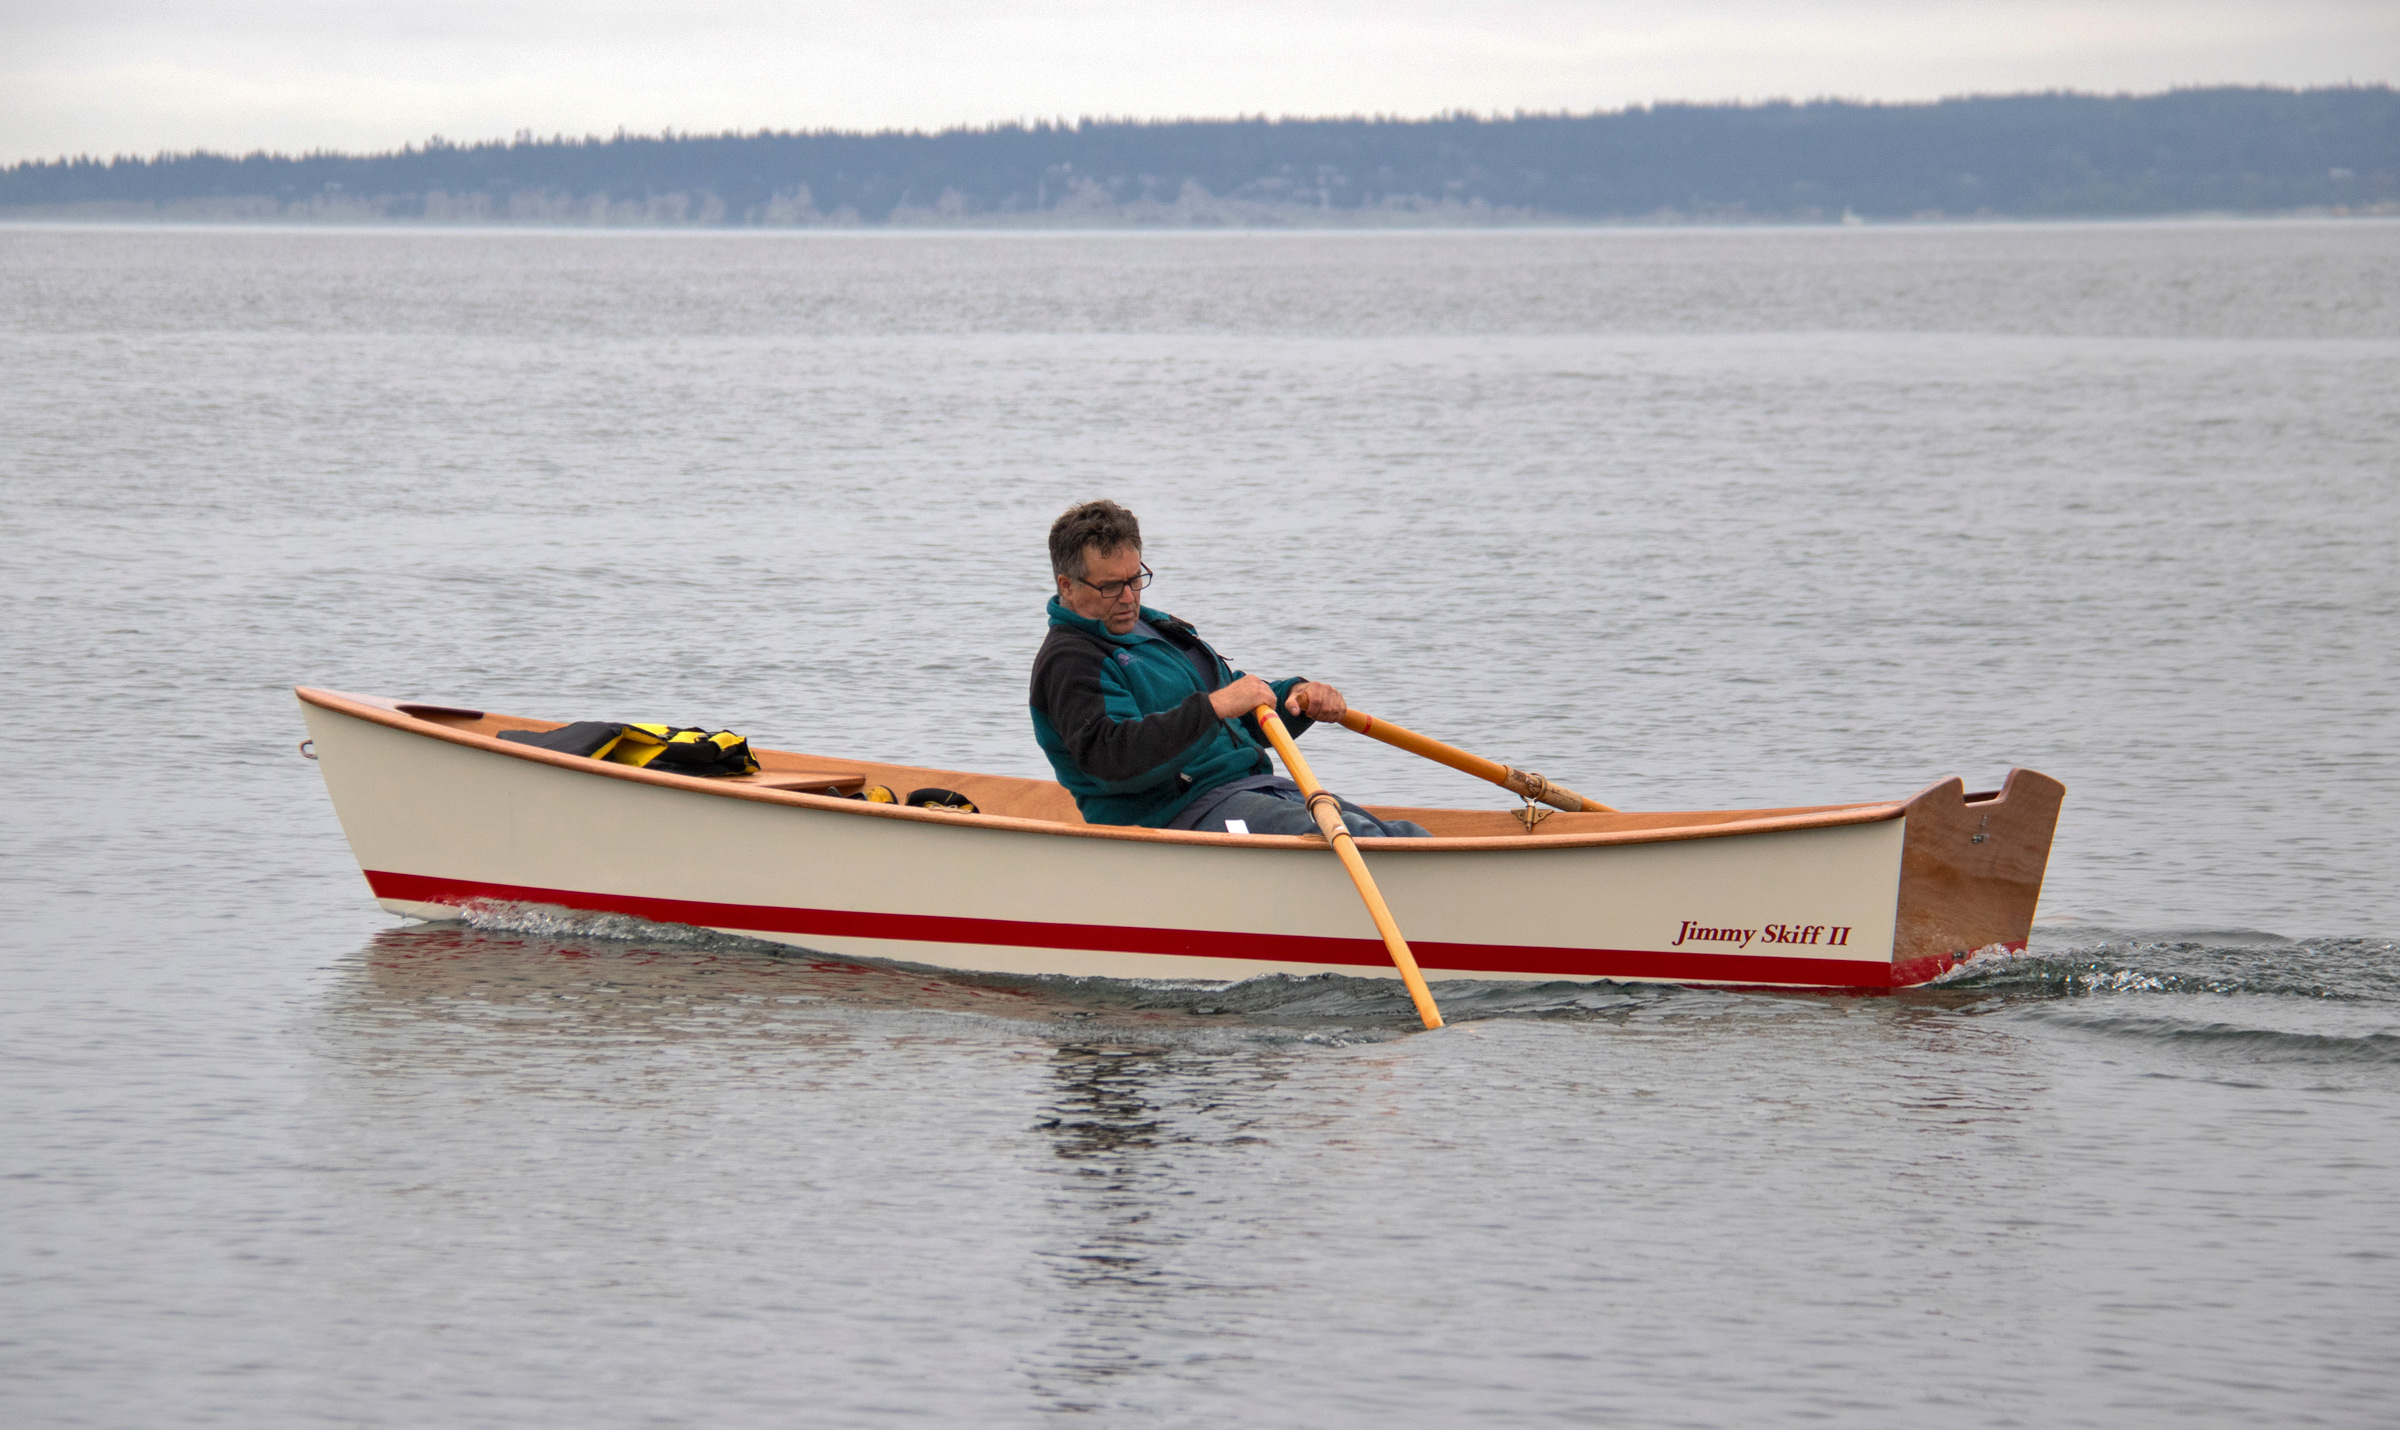
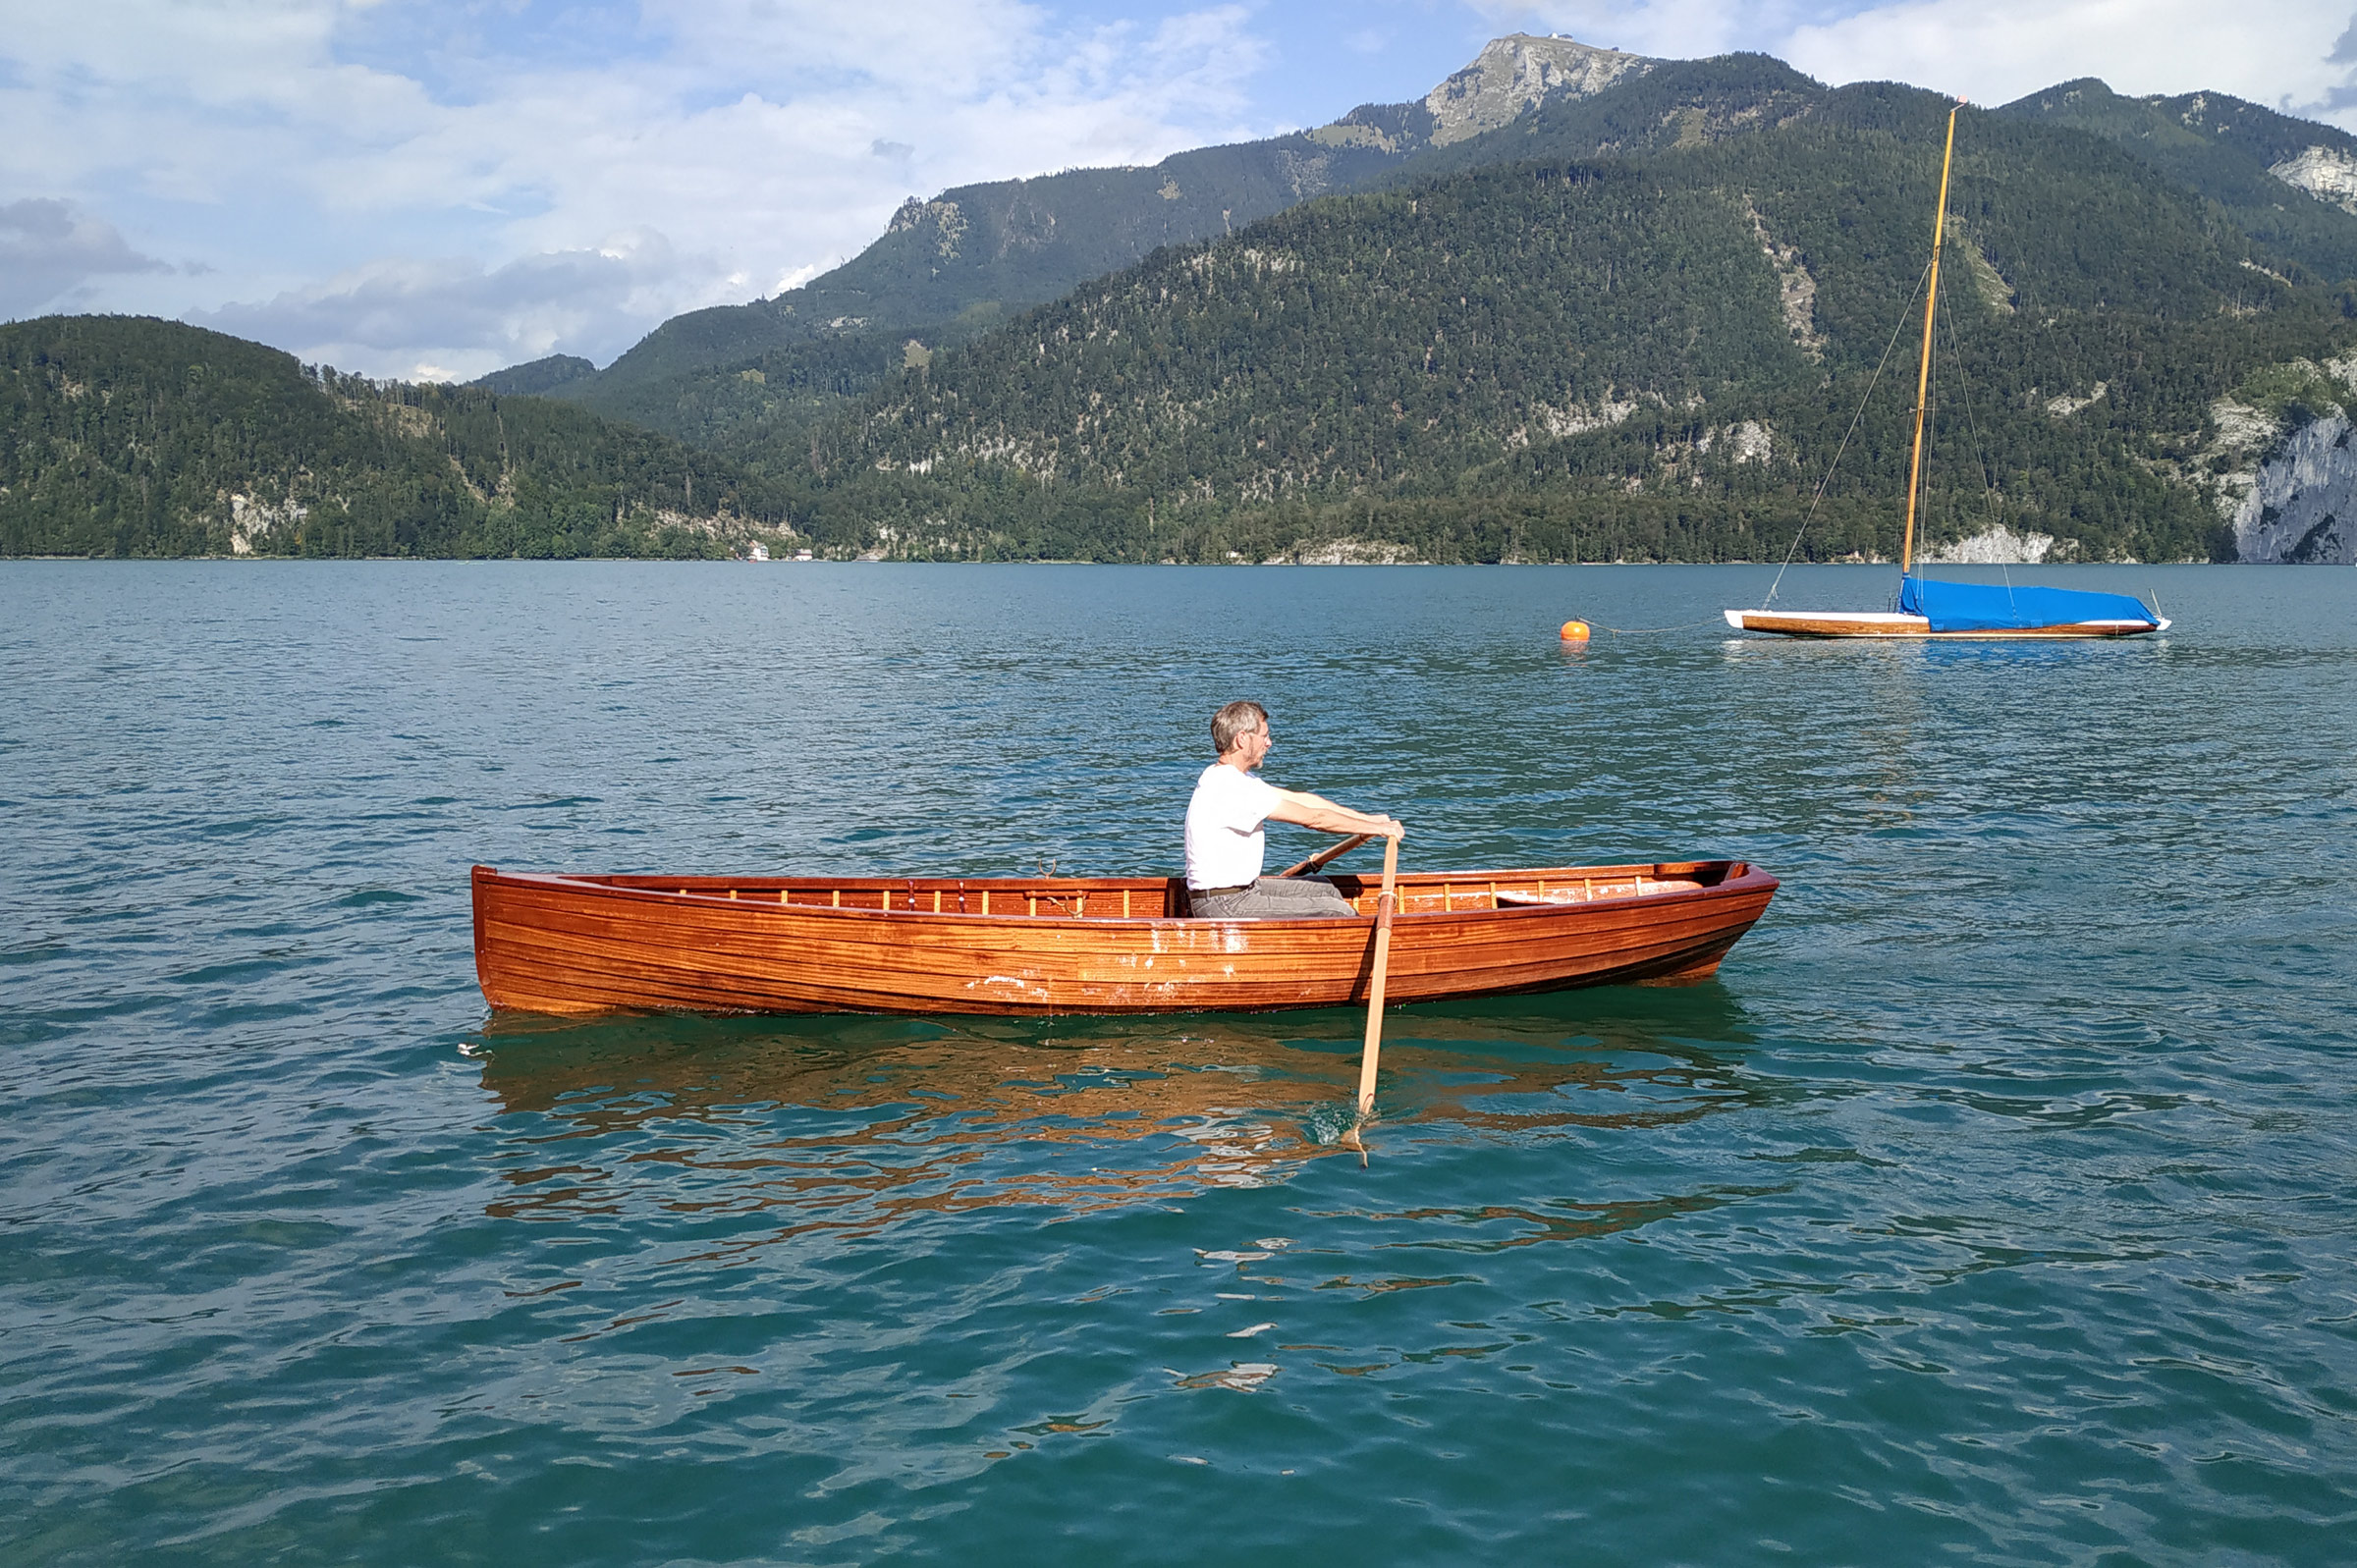
The Peapod is a nimble boat under oar power and a pleasure to take out for a quick, uncomplicated outing.
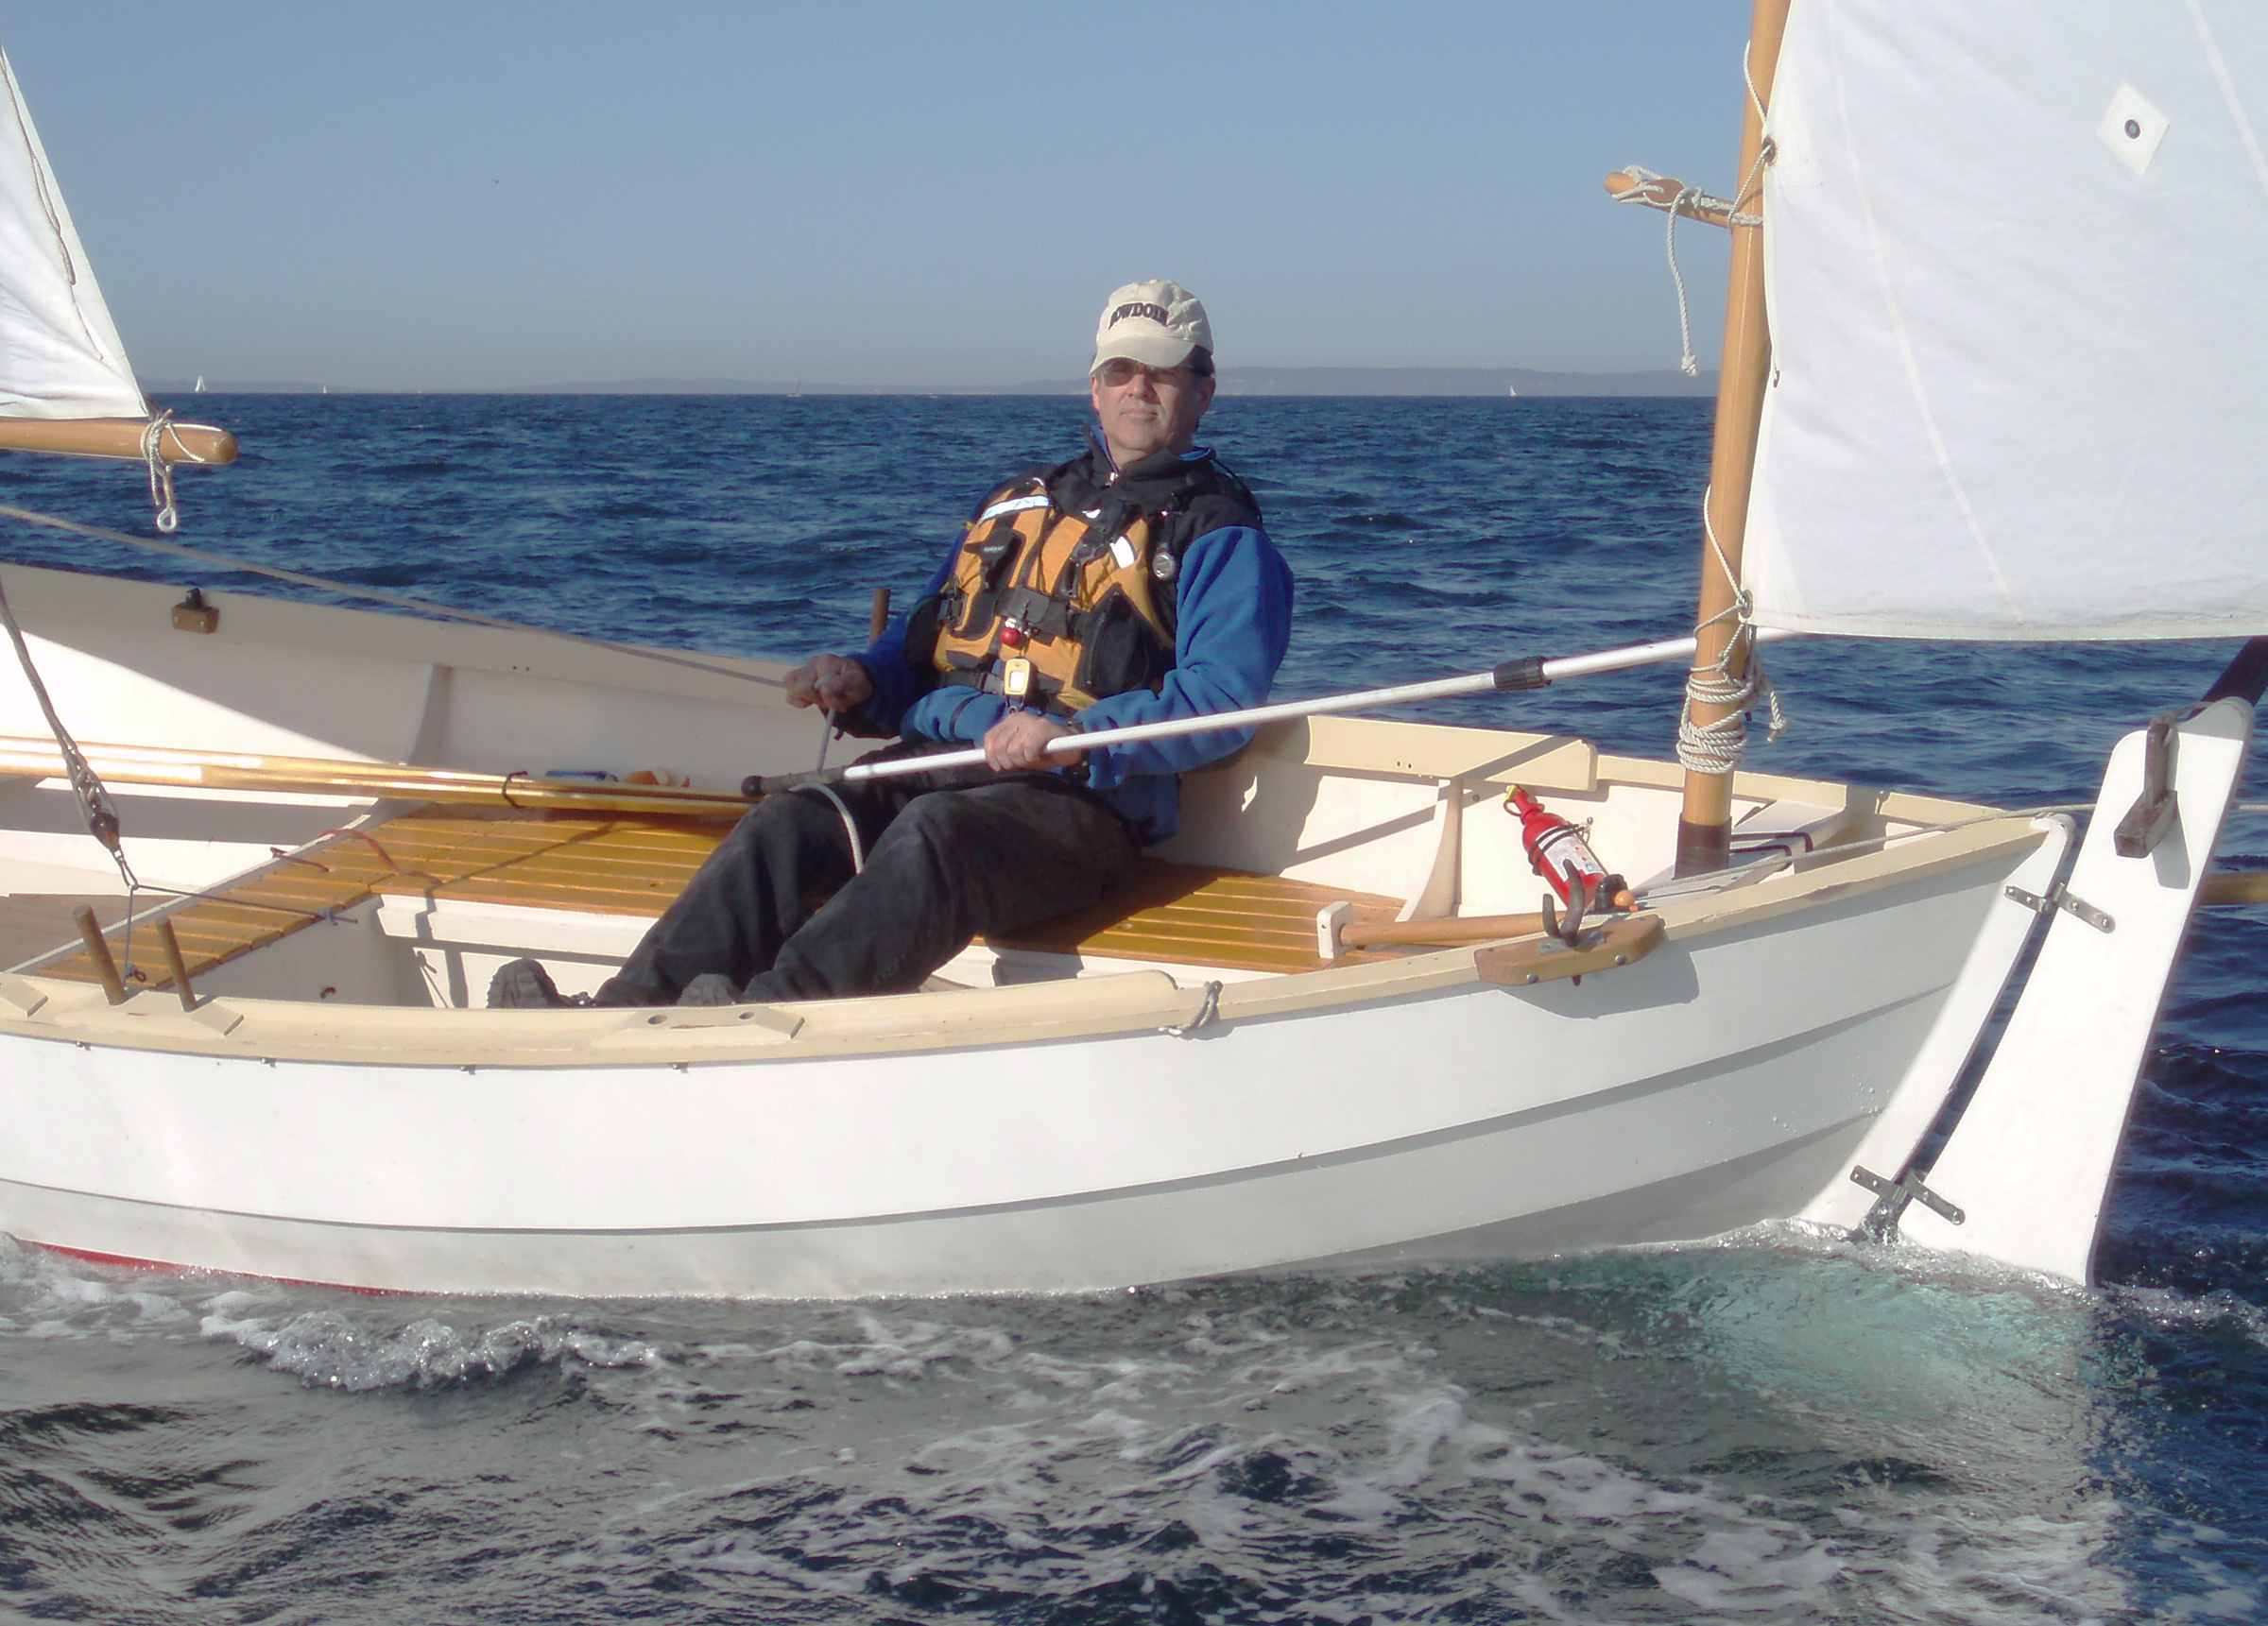
When I stepped aboard the Peapod while it was afloat just off a cobble beach, its stability was readily apparent. I could lunge over the side and move about with ease. Sitting on the end of the center thwart, I rested my shoulders on the gunwale to look over the rail and still had plenty of support and freeboard. It was easy to imagine pulling a crab trap up over the side. My first task to get ready for sail was to lower the rudder blade. Leaning over stern, wrapped around the mizzen to reach the blade, was a further test of the double-ender’s stability. In a boat with a transom there would be some beam at the stern to support my weight off center, so I was surprised the Peapod didn’t mind having its tail end twisted.
Chesapeake Light Craft
For rowing through the lulls, the sails are easily dropped out of the way and the rudder blade retracted to clear the water.
With a fluky wind blowing at 12 knots and gusting to 15, I set out with the full main and mizzen set, just right for the conditions. For stiffer breezes, the first reef is to remove the mizzen and move the main from its forward position aft about 15″to its other step. The second reef is made by pulling the main about 24″ down to the boom in a traditional slab reef, which is made easy by the reefing lines on the luff and leech and three reefpoints. On a reach, the Peapod made 4 3/4 knots in 1-1/2′ wind-driven waves and rolling freighter wakes. The Peapod was quite lively and bobbed like a cork. The bow rose quickly and I never saw any spray, let alone have any come aboard. And I didn’t see any water sloshing up out of the open top of the centerboard trunk.
Chesapeake Light Craft
The yawl sail plan offers a total sail area of 95 sq ft.
The bow rounded up smartly with the helm a-lee for tacking, and then slowly crept across the eye of the wind; it didn’t get caught in irons, but I took to backing the main to snap it across. The Peapod did well to windward and in gusts resisted heeling quickly, giving me plenty of time to react by easing the sheet or rounding up.
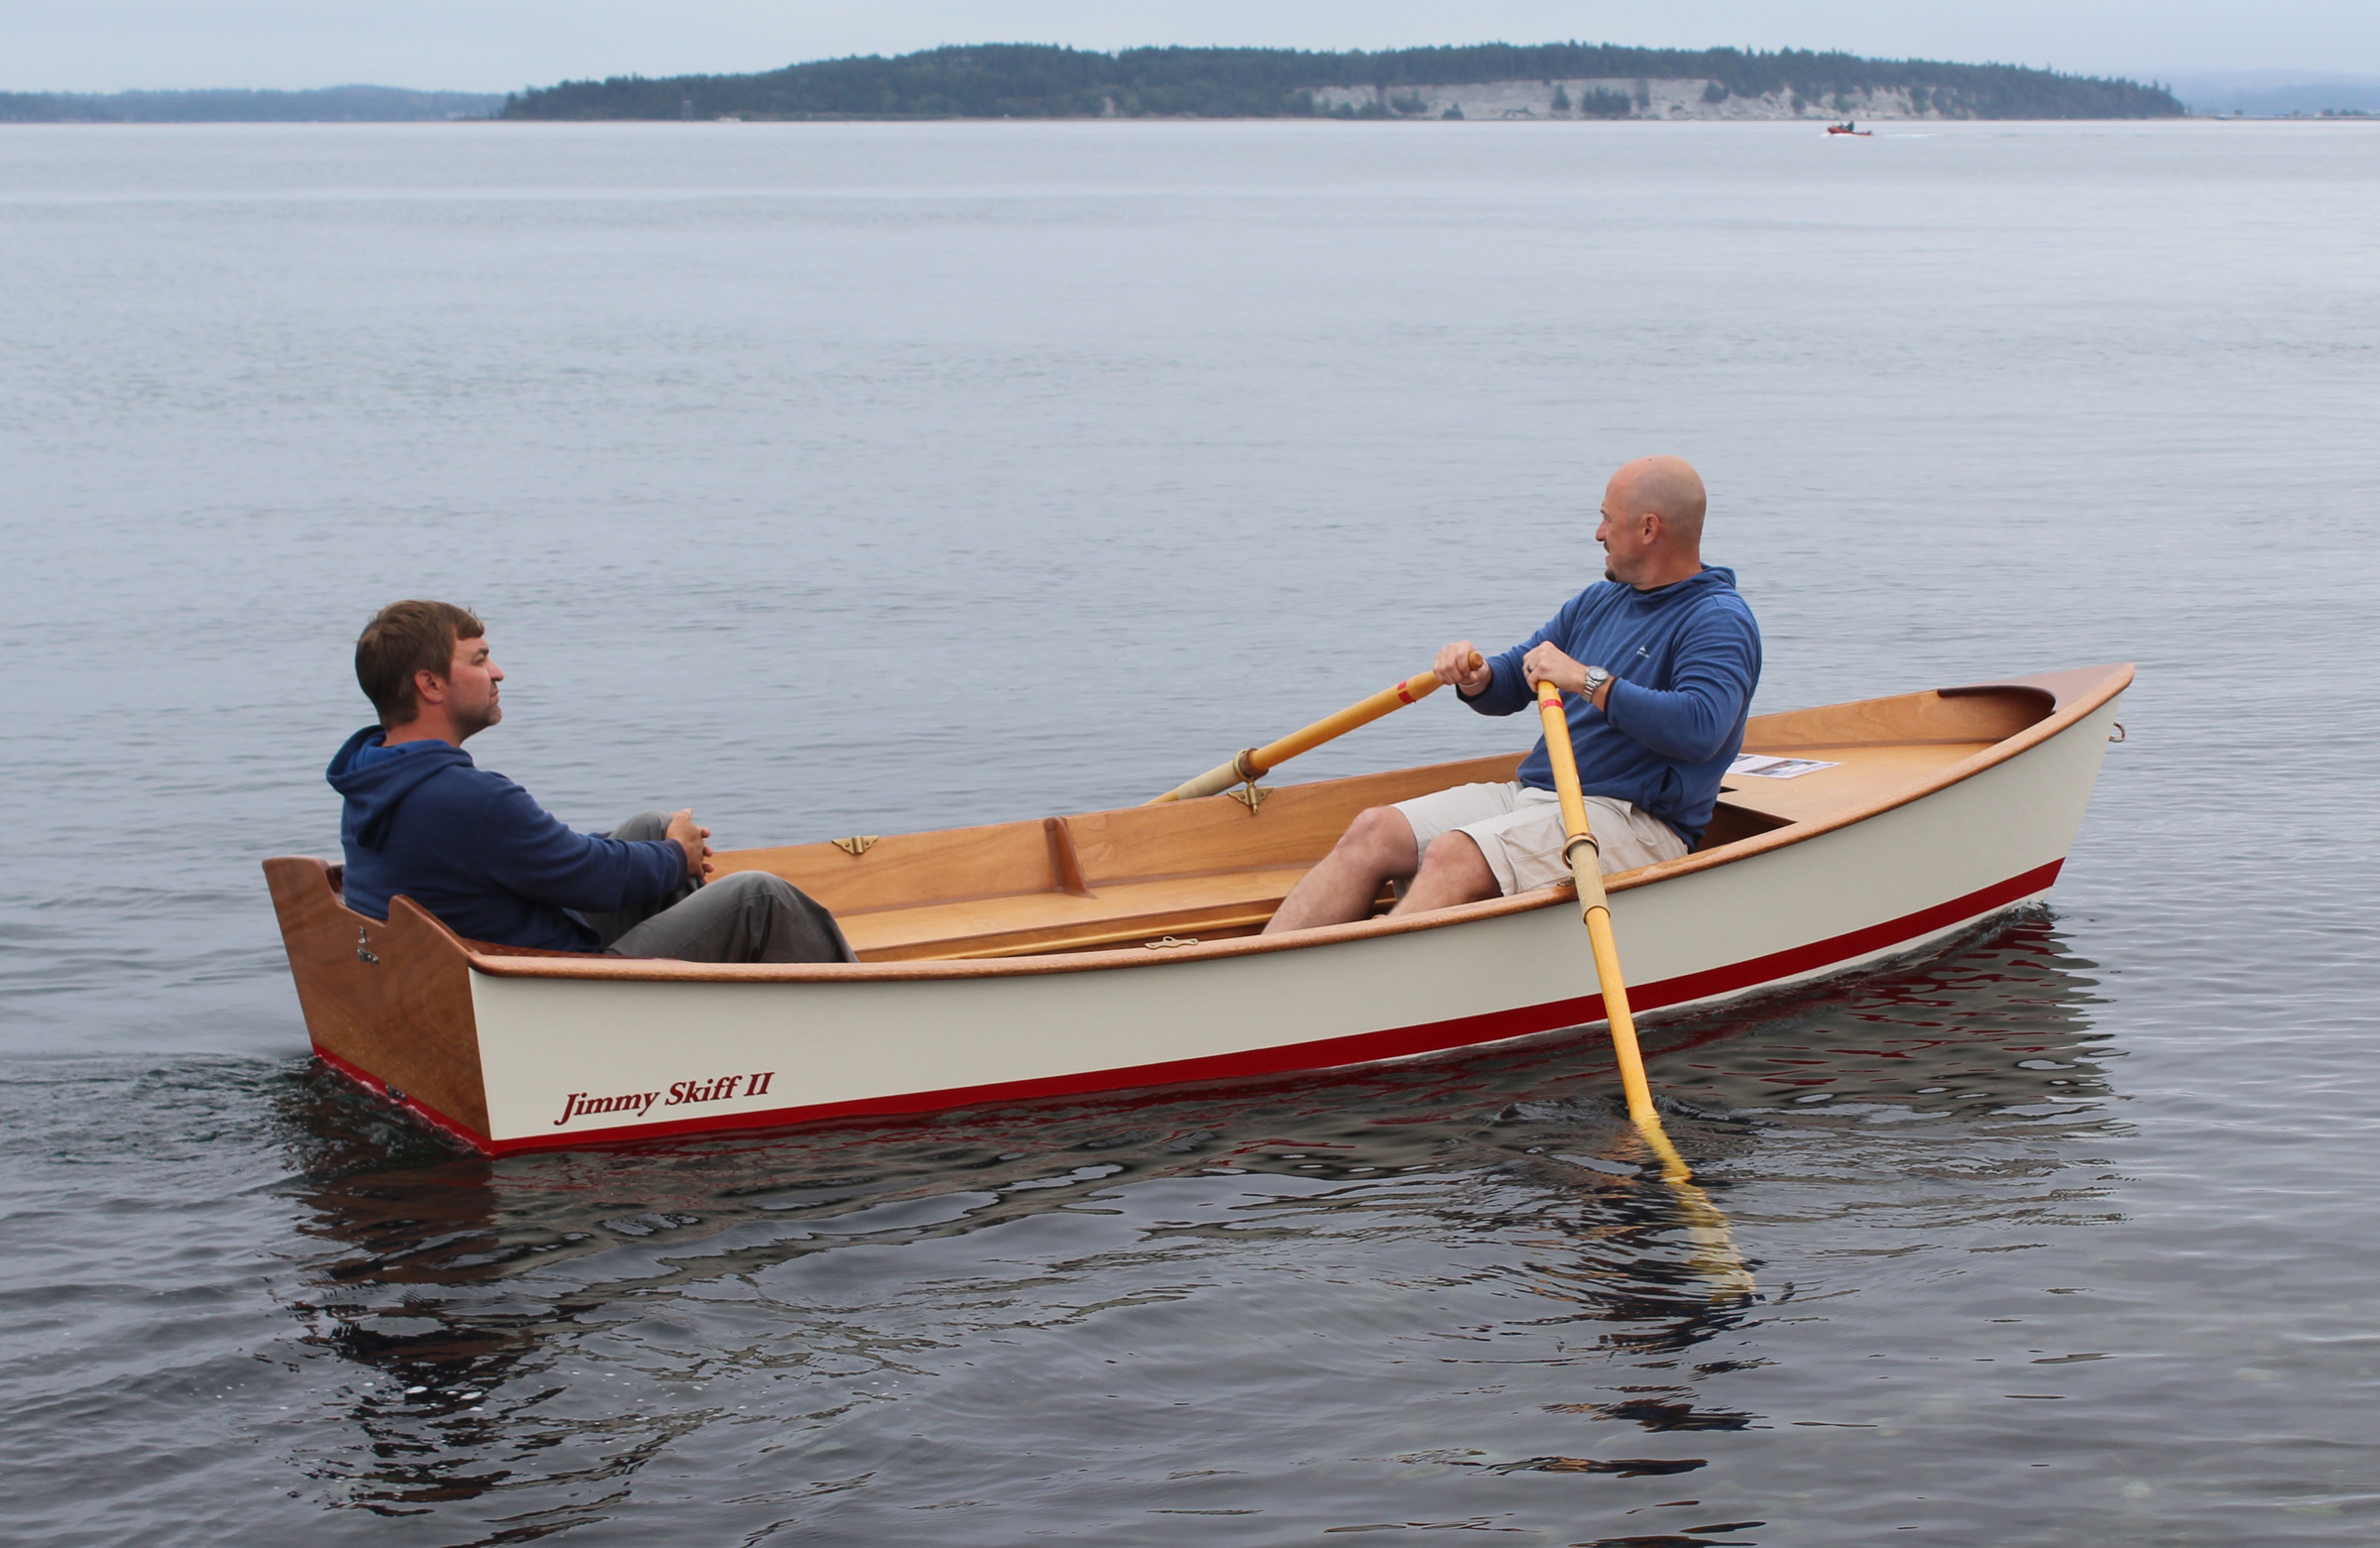
I only sailed the Peapod solo, and for the gusty conditions I was most comfortable kneeling in the bottom rather than sliding across the center thwart. There was plenty of room for two more people. The full ends would give the additional crew room to move athwartships and shift weight to windward.
Chesapeake Light Craft
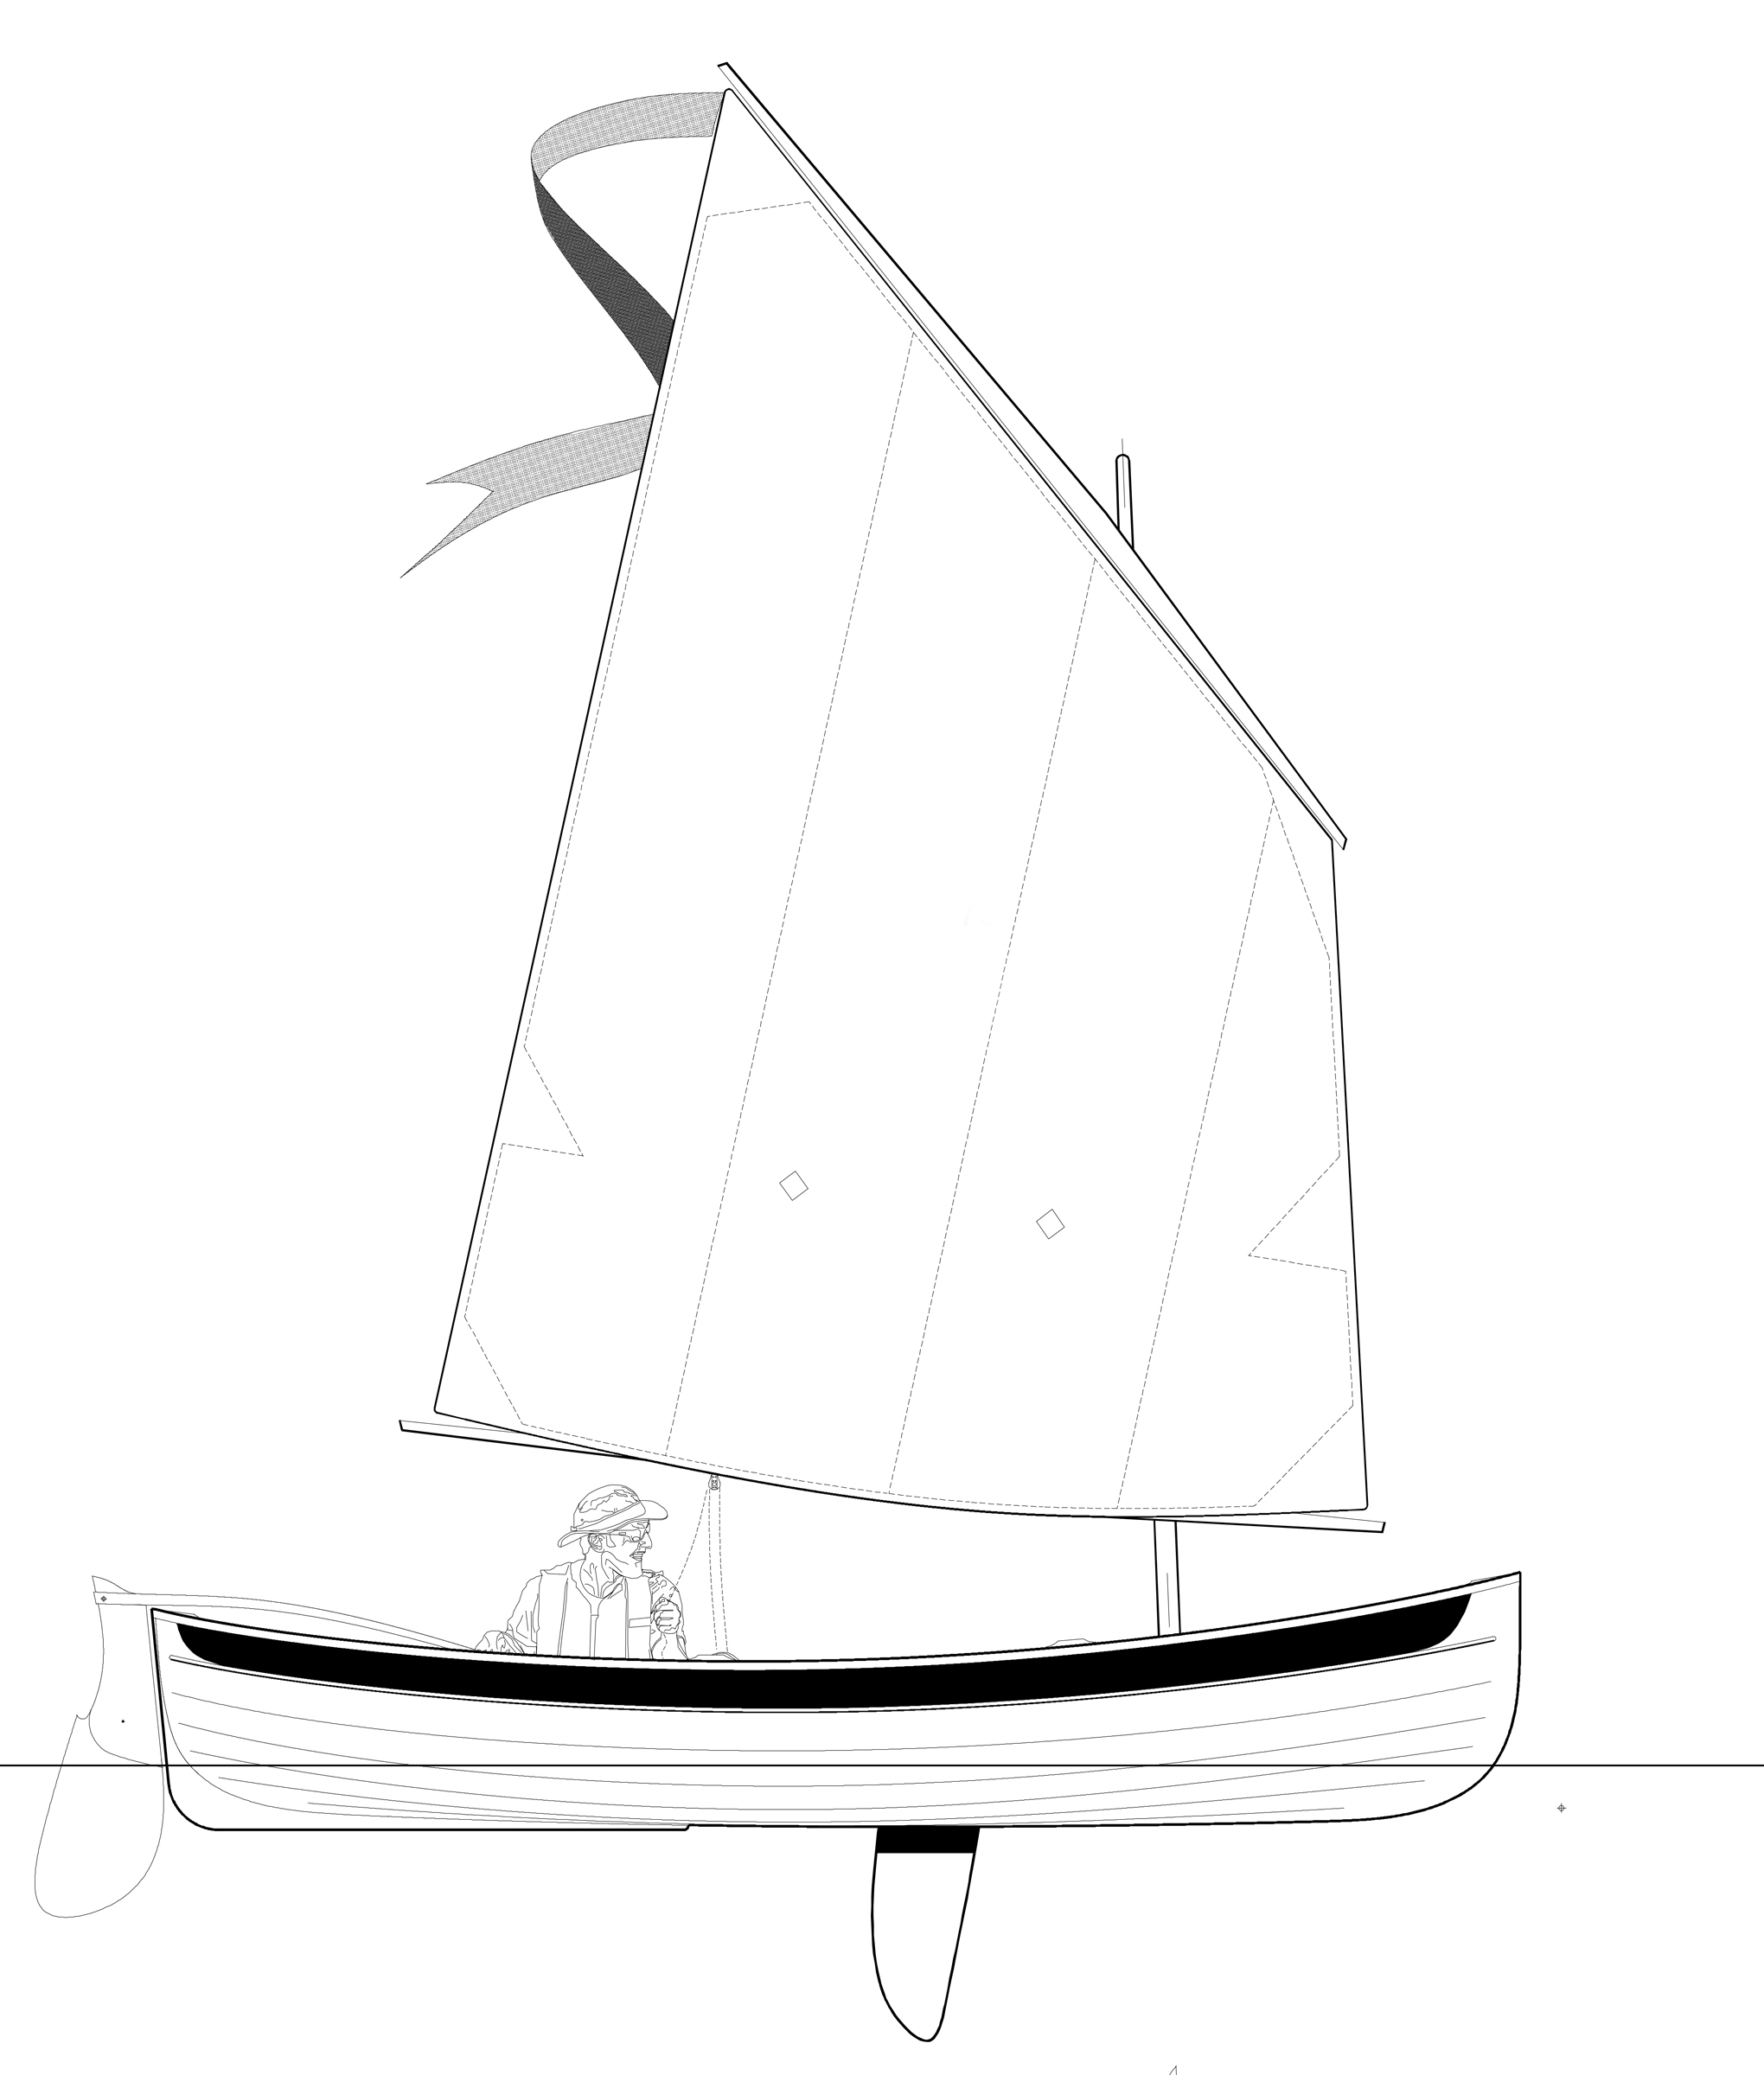
There is an optional sail plan for a lone 79 sq ft mainsail. With no mizzen in the way, a common tiller can be used.
For rowing, with both sails and spars resting in the hull and the rudder blade cocked up, the Peapod performed well. The retracted rudder barely touched the water so it didn’t drag or interfere with tracking or turning. The skeg gave the boat good directional stability without hindering maneuvering. The boat scooted along at 3 knots with a lazy effort, held 4 knots at an aerobic exercise pace, and did 4-1/2 knots in a short sprint. The Peapod has two rowing stations, one for rowing solo or with two passengers, and the other, about 32″ farther forward, for rowing with a single passenger in the stern. With three men aboard, the hull still shows two-and-a-half strakes above the water. There is plenty of freeboard. Chesapeake light Craft set the capacity at 650 lbs.
Chesapeake Light Craft
With three men aboard, the Peapod sits nicely on its lines and has plenty of freeboard.
With the Lighthouse Tender Peapod, Chesapeake Light Craft has brought a modern construction that is easy, inexpensive, and light to a traditional form that isn’t within reach of a beginning boatbuilder or well suited for recreational pursuits. It has the pleasing shape of its predecessor and the simplicity and ease provided by modern construction.
Christopher Cunningham is the editor of Small Boats Magazine.
Lighthouse Tender Peapod Particulars
[table]
Length/13′ 5″
Beam/52″
Hull weight/160 lbs
Draft, rowing/6″
Draft, sailing/30″
Sail area/95 sq ft
Maximum payload/650 lbs
[/table]
Kits for the Lighthouse Tender Peapod will be available from Chesapeake Light Craft sometime in February, 2020.
Is there a boat you’d like to know more about? Have you built one that you think other Small Boats Magazine readers would enjoy? Please email us!
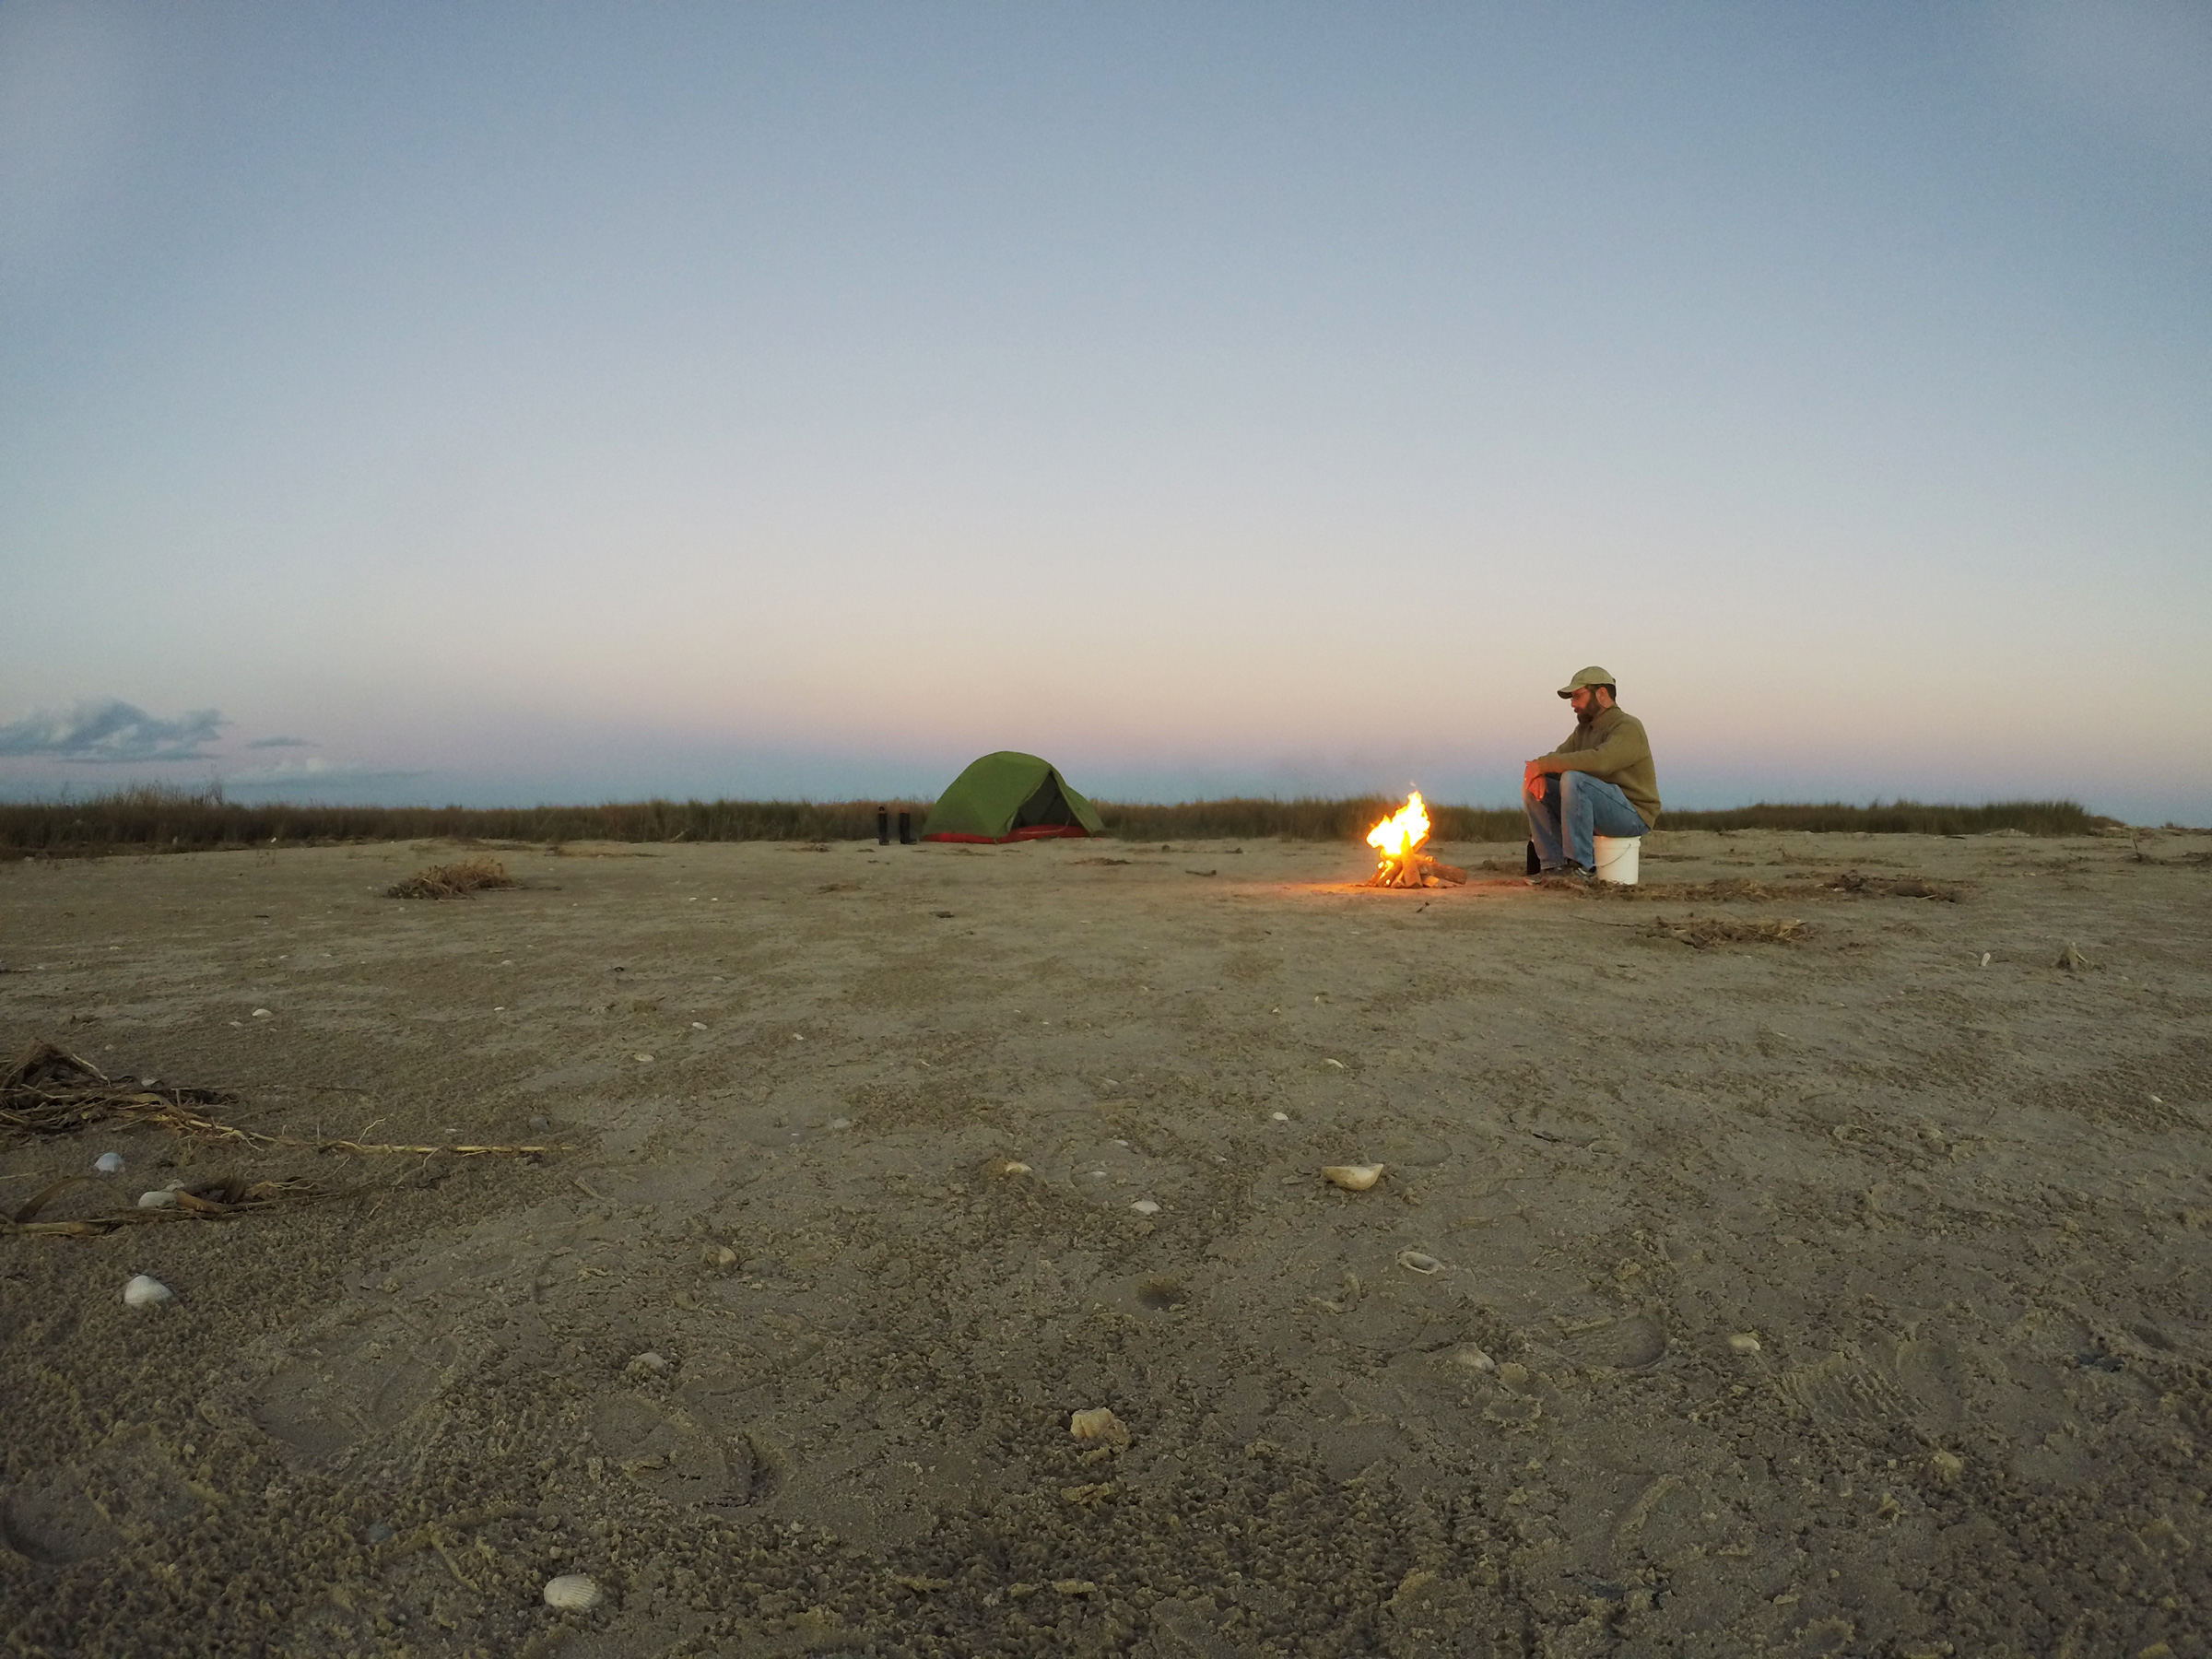
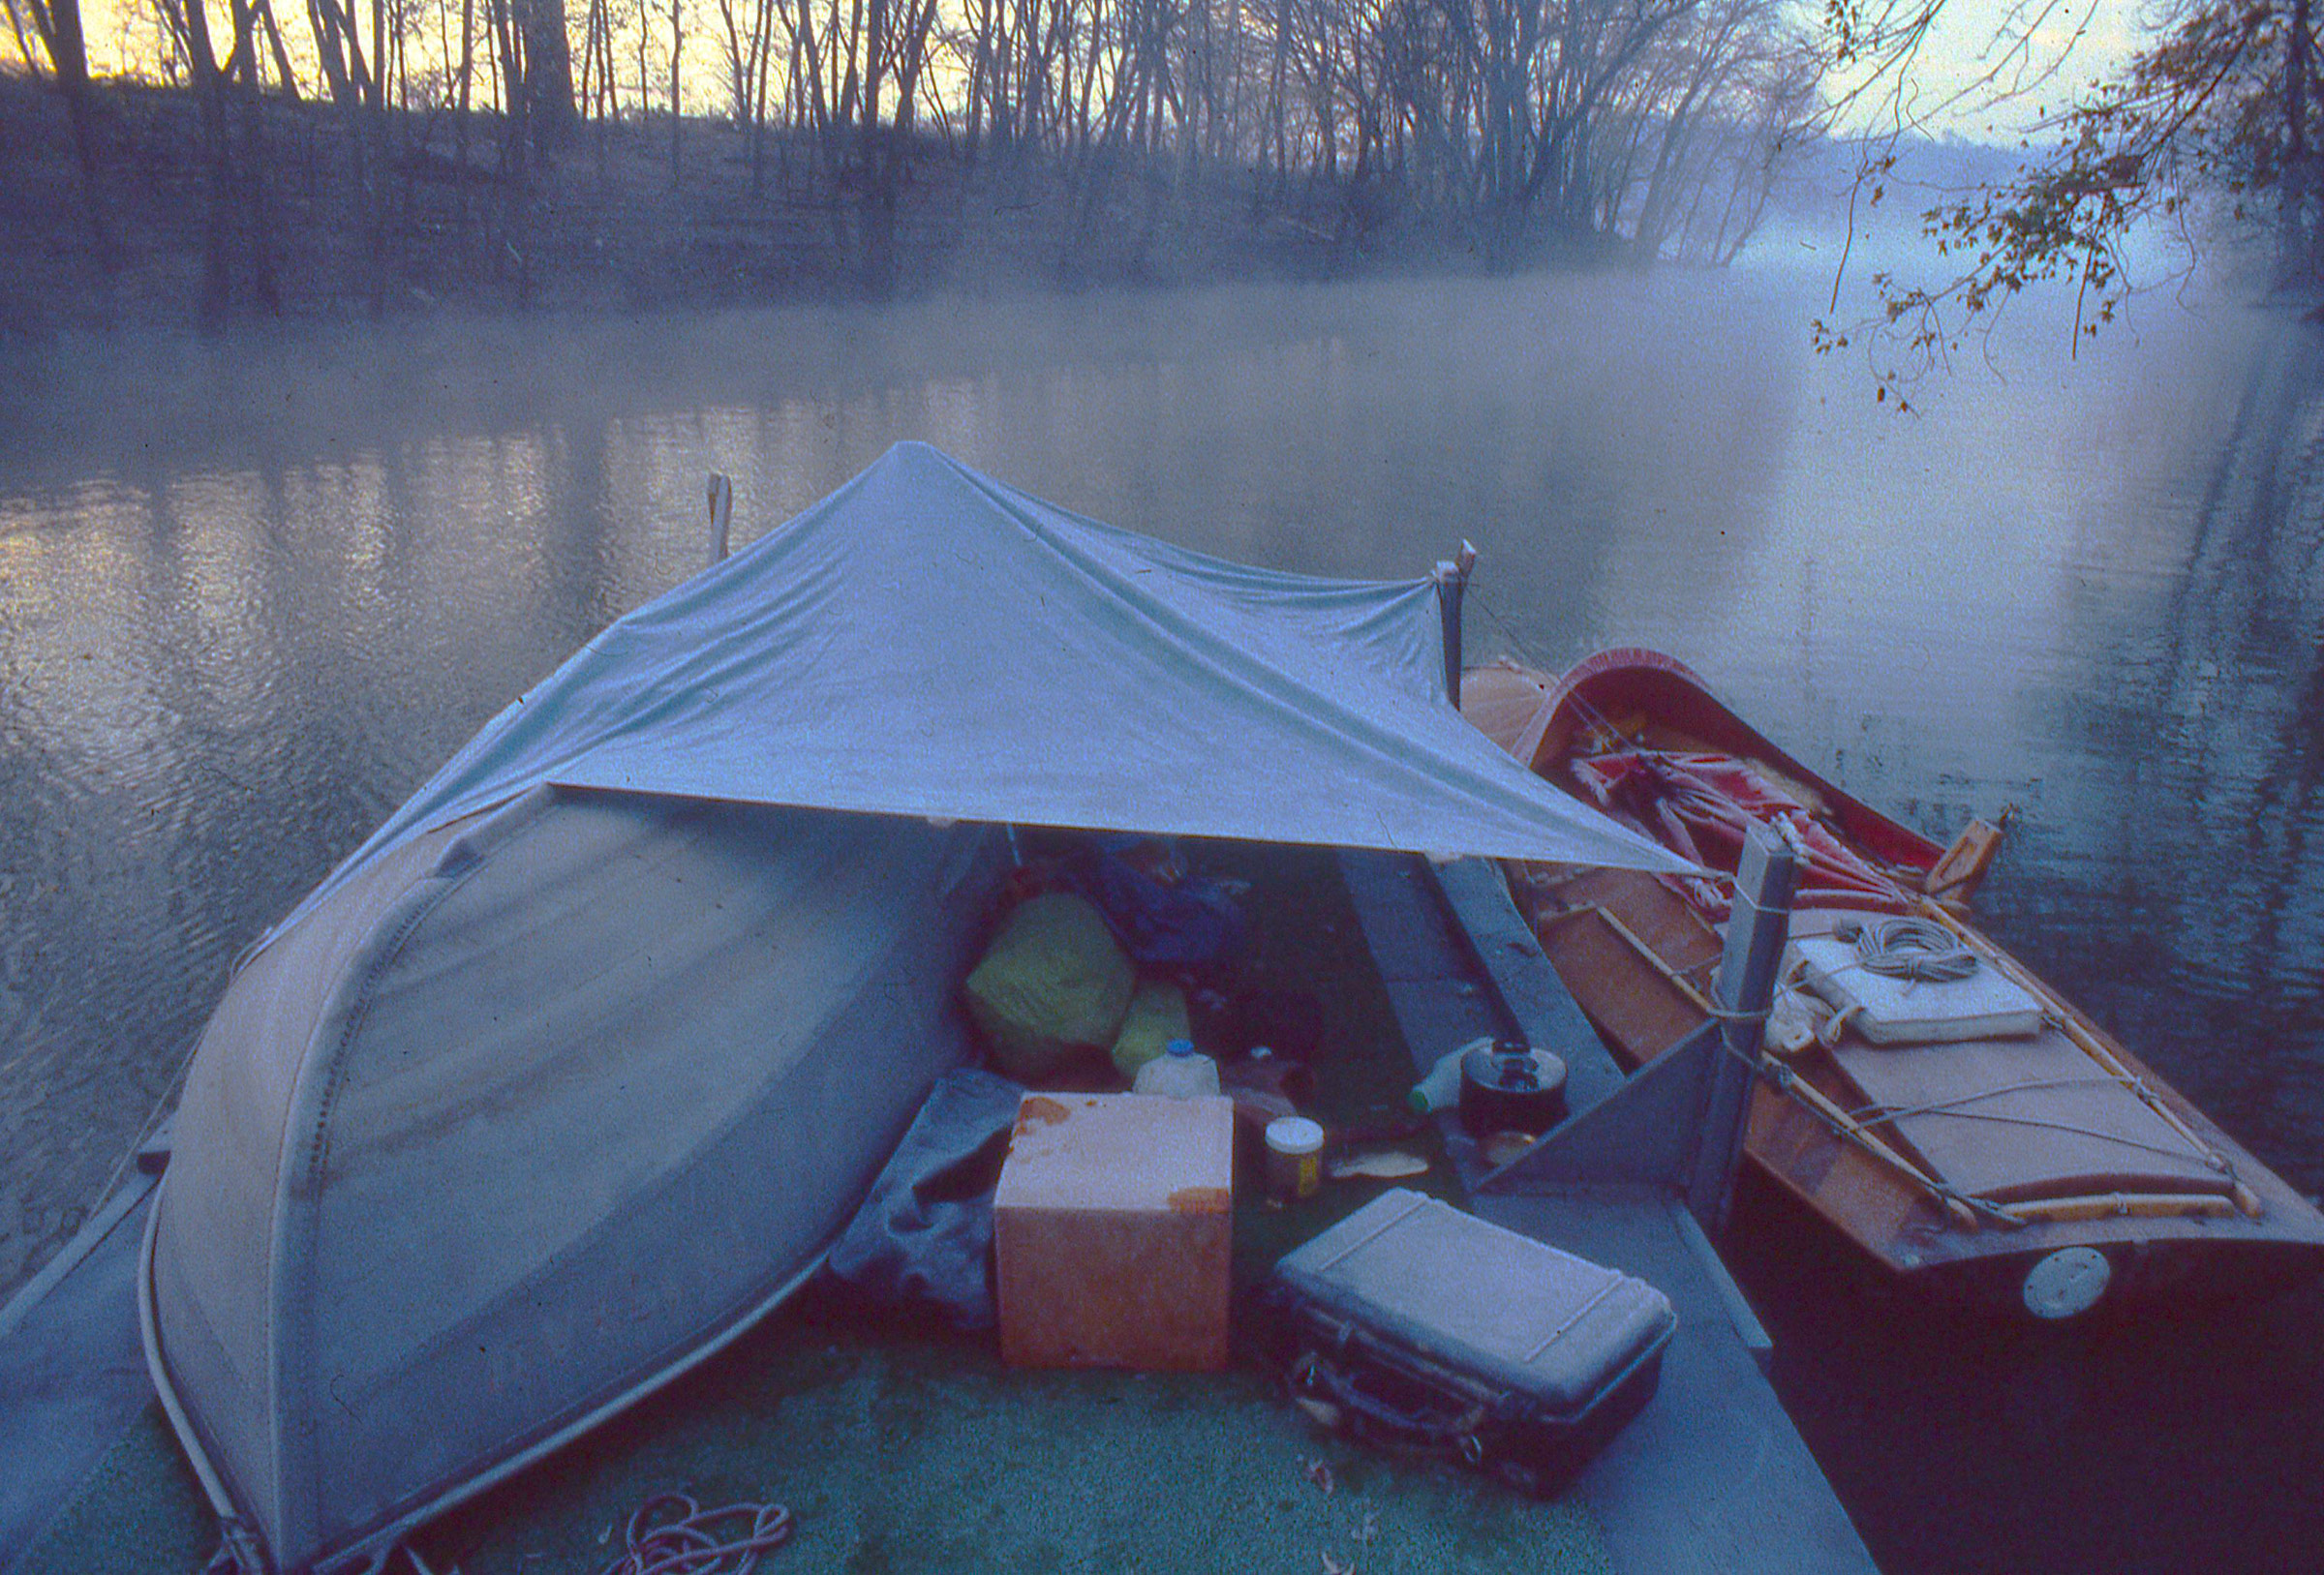
It was already past noon when I loaded three days’ worth of camping gear aboard my Flint, ARR & ARR, still on its trailer in the unpaved lot near the launch ramp at Port O’Connor, Texas. The sky over the Gulf of Mexico was thickly overcast and gray; a chilly breeze cut through my shirt, but I expected to warm up once I started rowing.
I had postponed this winter trip twice because of poor weather, so the forecast for a fair weekend was a welcome change. There would be some rain in the evening and the nights would be chilly, but the three days were supposed to be mild.
I wanted to have camp set up by twilight, before the rain arrived. I just needed to get going and keep an eye on the time. Rowing ARR & ARR, I can sustain 3 knots, and with Matagorda Island only about 6 miles from the mainland, getting to my campsite at Sunday Beach before the rain wouldn’t be a problem. I’d have ample time to explore the oyster reef and mangrove marsh along the route.
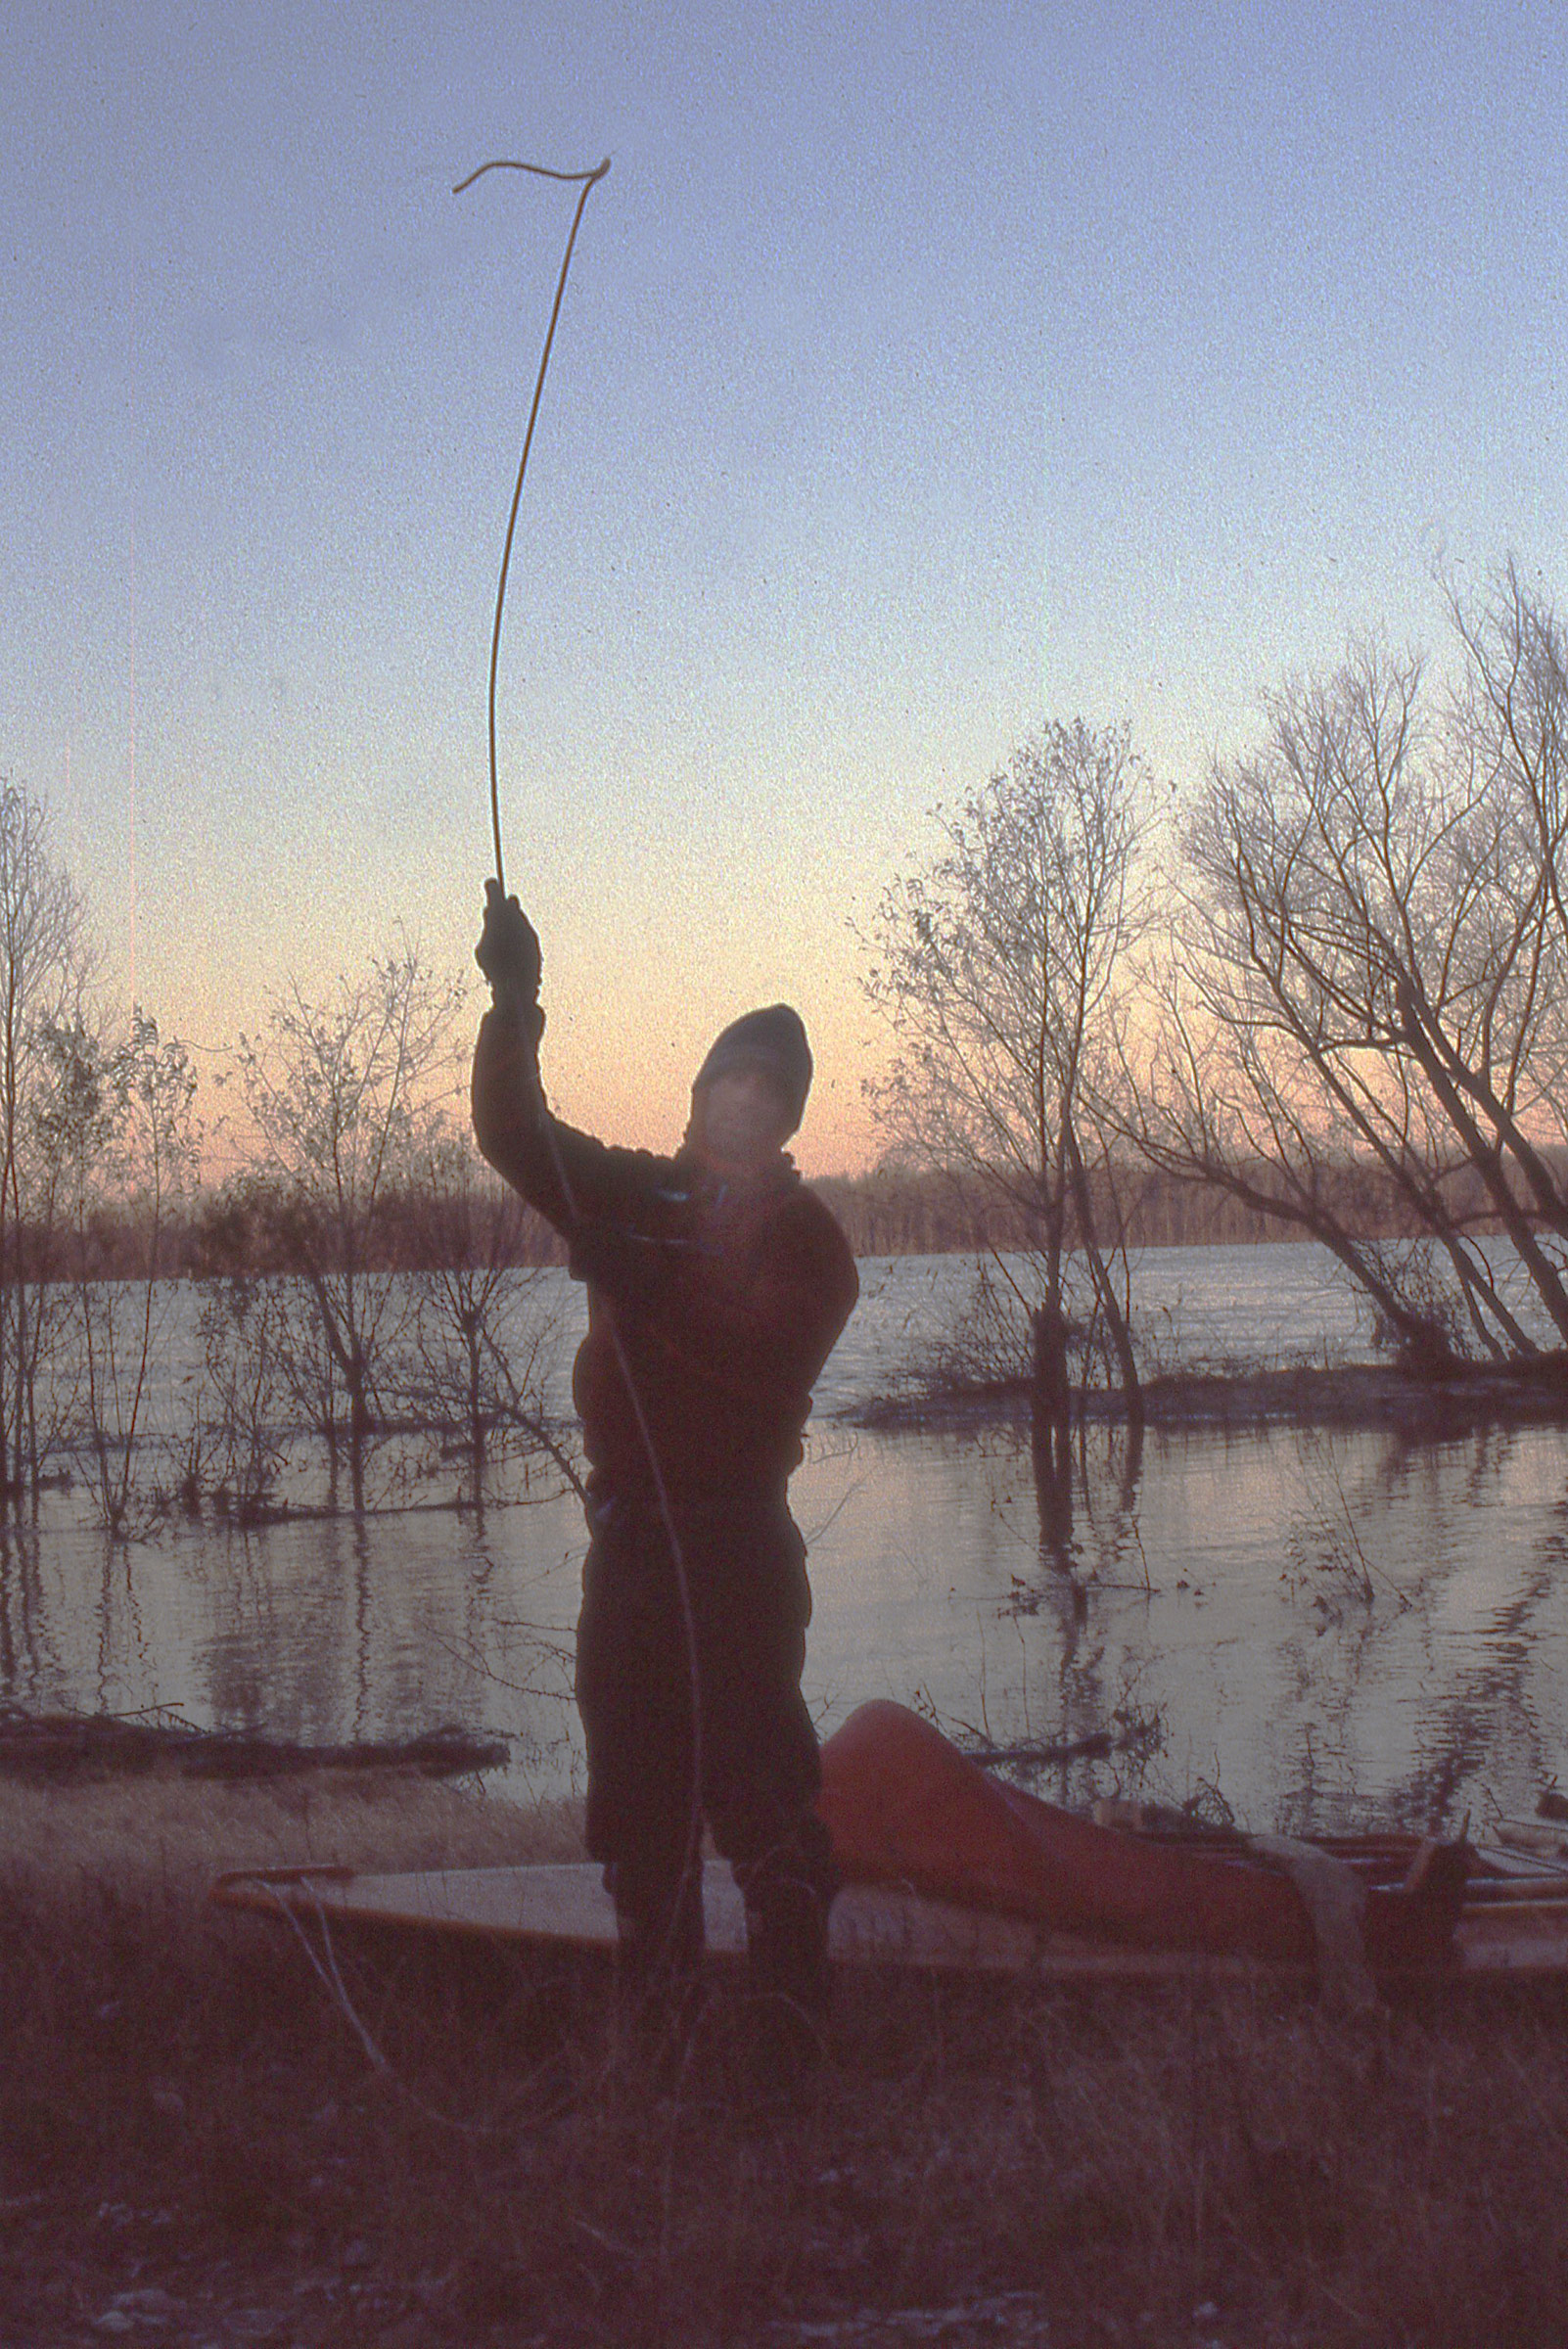
I pulled on my muck boots, tied a slack line from gunwale to gunwale just forward of the stern sheets to serve as a rowing foot brace, and launched the boat. I rowed straight across the Intracoastal Waterway’s 150-yard-wide channel between Port O’Connor and slender Blackberry Island and entered Fisherman’s Cut, a passage just 200 yards long. The water in the sheltered channels was barely rumpled and just clear enough to see the oar blades on each stroke above its dark olive-green depths.
Photographs by the author
On Sunday, I set my boots, socks, and insoles out to dry at camp. The powerboat in the background belongs to a nice couple who came ashore for a while, stopped by for a chat, and then went fishing for sea trout.
I followed Fish Pond Trail, a route traced in red on the Port O’Connor Paddling Trail map that would lead me through the mangroves and into the shelter of Pelican Island. Hurricane Harvey had rearranged parts of this coast in the fall of 2017, which included cutting a pass through Sunday Beach that sheared Pelican Island off from the main 40 or so miles of Matagorda Island. There is now a 1,000′ gap where an isthmus had connected the two islands.
For a weekend, the waterways were surprisingly quiet, without a single fisherman in sight, and Port O’Connor resembled a ghost town, inhabited by only birds. Gulls hovered in the breeze; pelicans glided by in undulating single-file lines; and wading curlews dipped their long, slender beaks in the shallow water off a small beach at the edge of Barroom Bay. I crossed the bay along its eastern edge and entered Little Mary’s Cut. Four dolphins surfaced astern where I had been only a dozen strokes earlier, and a lone roseate spoonbill flew overhead, its deep pink feathers with splashes of crimson at its shoulders and tail striking against the gray sky.
Port O’Connor’s stilt-elevated houses shrank in the distance, soon leaving me surrounded by lowlands covered with thigh-high cordgrass and black mangroves thick with deep-green, thumb-sized leaves. I rowed by short beaches of pale-brown sand and low dunes fringed with sea oats.
Little Mary’s Cut was about twice as long as Fisherman’s but only about half as wide, with water deep enough for rowing right up next to the mangroves, where their upright pencil roots jutted out of the water like slender gray stalagmites.
Little Mary’s Cut emptied into Big Bayou, which was open on its east end to Matagorda Bay. Whitecaps dotted the bay and sent a light chop rolling into the bayou. I turned my stern to the chop and continued following the paddling trail, rowing a short dogleg west and turning south into calmer water at Chris’s Cut.
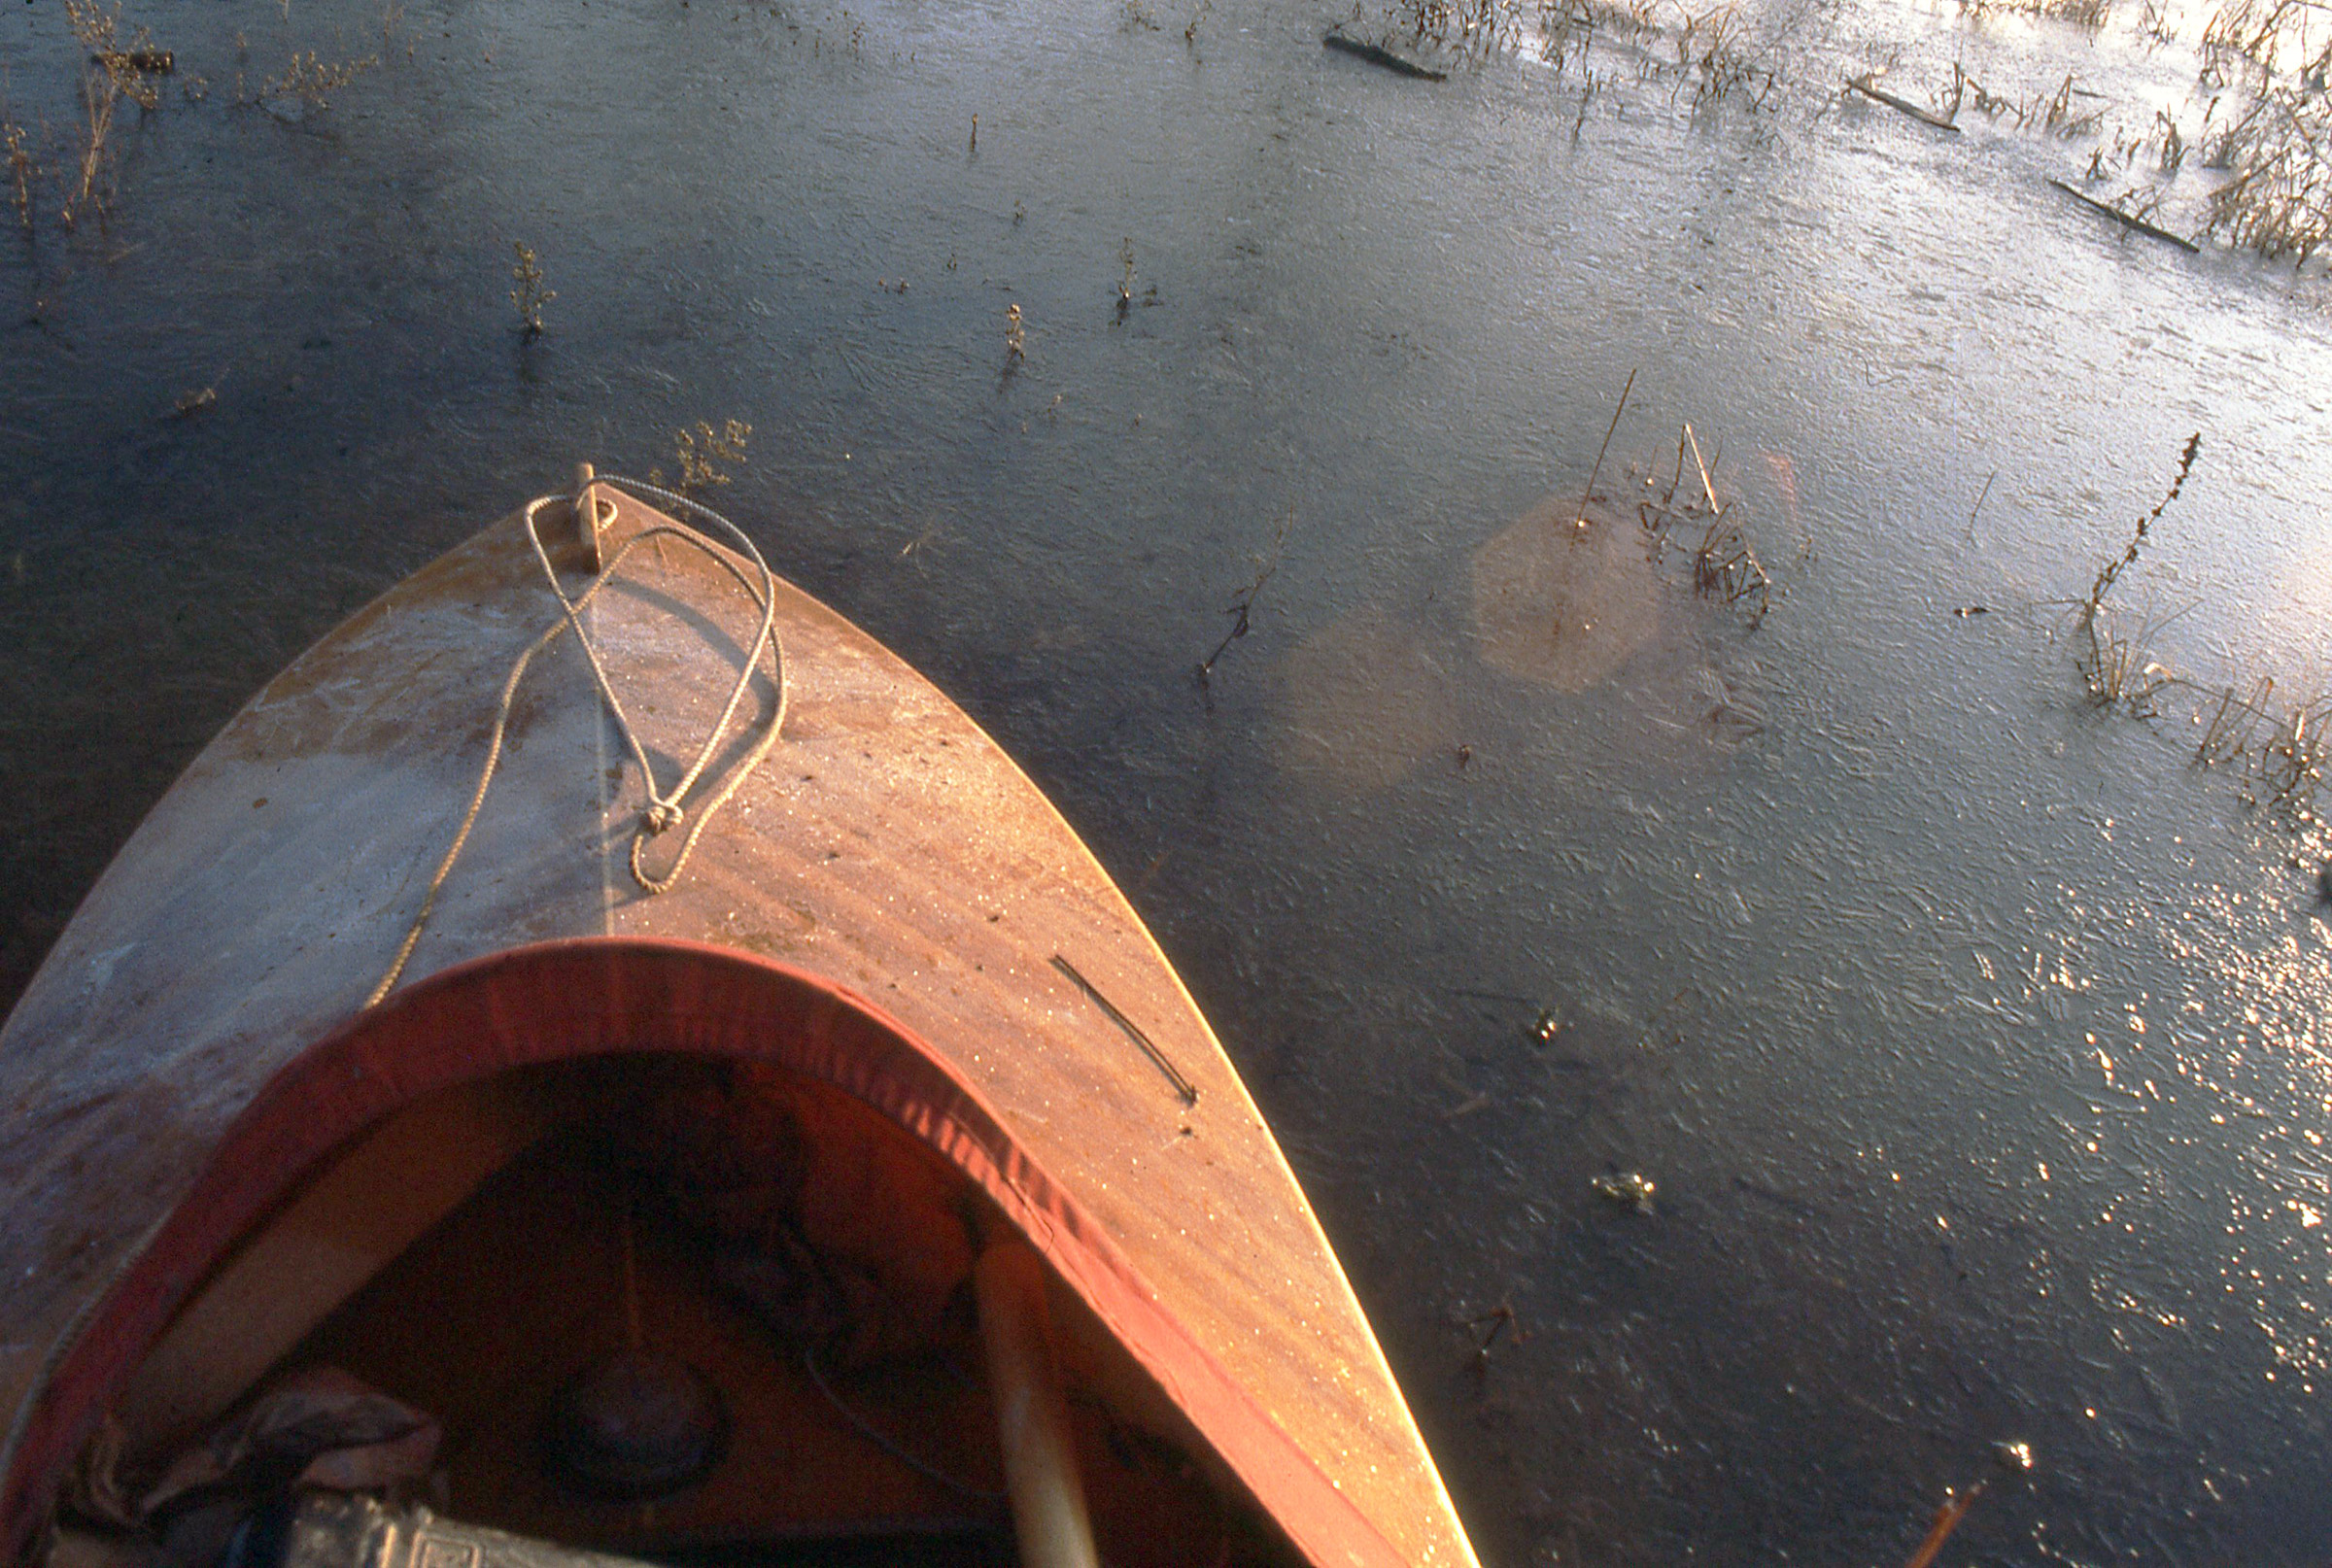
The cut was narrow and less than ¼-mile long, and I soon rowed over its south end where the water was so shallow that I could see the sandy bottom and seagrass laid flat by a slight current, the blades’ tips waving toward wide-open Espiritu Santo Bay. The current carried me onto a shoal with a gentle bump and dragged the hull hissing across the sand. With ARR & ARR aground, I stood and used an oar to push back into deeper water.
I rowed around the shallow spot, and the channel markers swung away from Bayucos Island out into the bay in a wide arc that didn’t turn back toward the island for another half mile. The small waves tumbling near the edge of the bay traced the edge of the massive half-moon shoal that reached out from the island. Sand and seagrass clearly visible beneath the ripples meant that it was too shallow for ARR & ARR, so I followed the markers instead of cutting across.
I followed Mitchell’s Cut through Bayucos. The cut, spanning 500′, was the widest yet, and yet so short, barely twice its width, that it seemed more like a natural gap between two islands than a manmade passage. As soon as I rowed out the other side and into Saluria Bayou, I met chop from Matagorda Bay again. This time I rowed east, into the waves.
ARR & ARR was safe in the cordgrass with just enough water beneath her astern so she could slip back out into the bay. During the night, when I pointed my flashlight in the boat’s direction, all I could see was cordgrass and a tiny bright spot of reflected light. In the morning I discovered it was my rowing mirror that I’d been seeing.
Saluria Bayou is the namesake of the town Saluria, a once-thriving port and ranching center that was nearly wiped out by a hurricane in 1875 and was abandoned in the early 1900s. Only the Coast Guard station remained, and it was closed in 1942. A bare concrete platform on pillars at the east end of the bayou is all that’s left. It was hard to believe that an entire town once stood where there was only a mangrove marshland.
About 500 yards west of Matagorda Bay, I turned south into First Cut, a fairly narrow channel, just 50 yards across, once used to access now long-closed oil wells, and rowed past marker No. 25 of the paddling trail.
The water in First Cut was calm, the rowing was easy, and I made good headway. About 600 yards in, I passed a side cut that ran out perpendicular to the east from First Cut toward Matagorda Bay. Another a short distance beyond that I passed a raised 10’ by 15’ metal platform sun-bleached to a dusty pink. The bottom 2’ of the four legs were rusted and thick with barnacles. Rising above the mangroves to the east stood a row of bare utility poles that had once run lines between the Coast Guard station and a now-abandoned WW II airfield on Matagorda Island.
Another abandoned platform, this one brown and topped with a rusting vertical cylindrical tank, stood at the trail’s No. 24 marker. The route followed a dogleg west for about 1,000’, turned back south, and emptied into an expanse of water about half the size of a football field. In every direction beyond was a watery labyrinth that wends through scattered clumps of mangroves.
White pelicans flew past the little spit where ARR & ARR was beached. Barely visible on the land on the other side of the pass are some of the utility poles in a line between the abandoned airfield on Matagorda Island and the old Coast Guard station at Saluria Bayou.
Just south of marker No. 23, a flats boat sat motionless with a boy poised on top of its tower with his rod and reel; a man wading in thigh-deep water fished next to the boat. I nodded to them and rowed into the widening water.
Although the map showed the trail continuing south and east for another 1-1/2 miles toward the sheltered water behind Pelican Island, my chart and navigation app put me at the end of water deep enough to row, with only marsh and mud flats between me and Pelican Island. Boating friends who knew the area had hinted that there were ways through the flats, which was what I wanted to explore to see if I could find my way through. I couldn’t see the No. 22 marker, and there was no obvious gap in the mangroves ahead that looked like a continuation of the trail, so I rowed due south, hoping to stay close enough to the trail to keep water beneath my keel and eventually spot the marker.
I hadn’t rowed more than 30 yards before my boat squealed to a stop on oyster shells. I stepped out into water only 6″ deep and the soles of my boots crunched the shells. The oysters on the bottom were a dark, mossy brown that made it difficult to gauge the depth. It was the short path of white slivers ARR & ARR had left astern that made it clear how little water there was over the shoal.
Holding the gunwale, I walked the boat along a meandering route between the shallower spots. When I reached water deep enough to threaten pouring in over the tops of my boots, I carefully kicked them in the water to remove clumps of thick black mud, stepped back aboard, and pushed off.
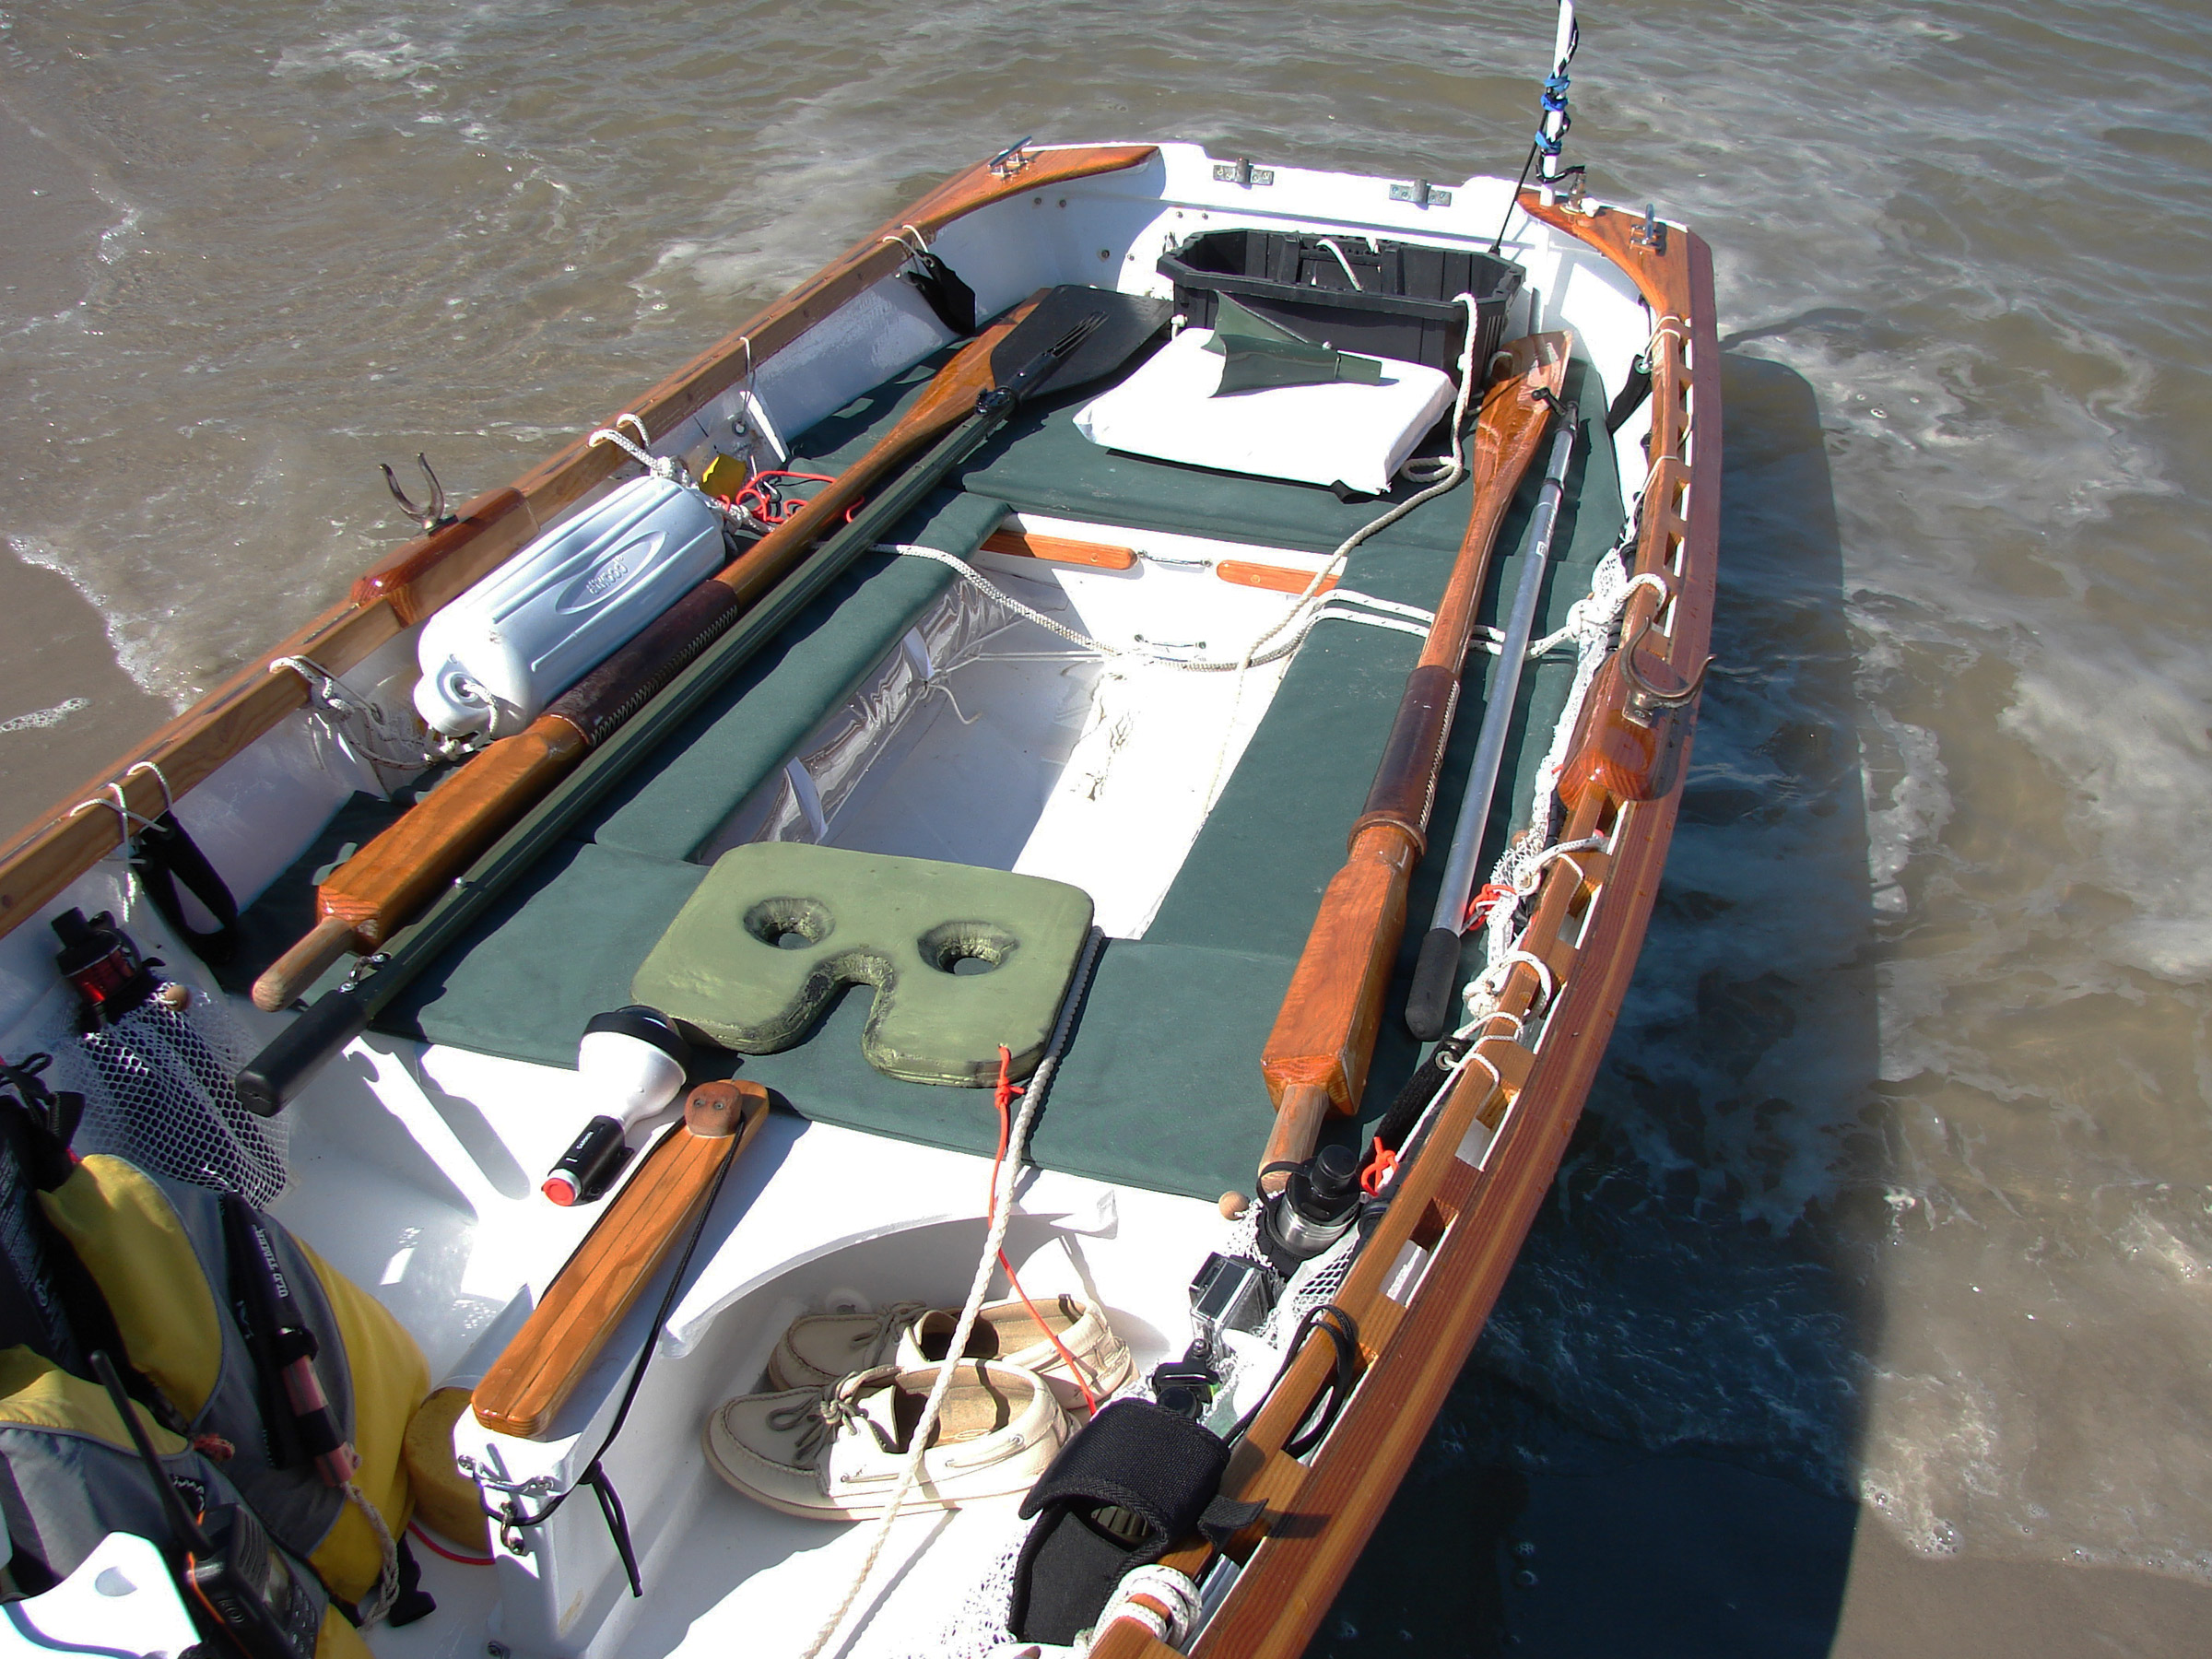
On the thwart is a rowing-seat pad made from two layers of a camping sleeping mat laminated together; strapped beneath the side benches are transparent homemade buoyancy bags. Shock cord pulled over a thumb cleat holds a plug down inside the daggerboard trunk to keep water from splashing out while I’m rowing. The line running from gunwale to gunwale and hanging slack between the side benches serves as my rowing foot brace.
Among the mangroves just in front of me was a flats boat with a boy fishing from the tower and a man fishing in the shallows next to it. Was it the same boat I just rowed past? Did they get ahead of me somehow? I checked my compass and it showed I was heading due north; I had turned myself 180 degrees without noticing it. The mangroves looked the same in every direction, and the sky, completely overcast with thick gray clouds, had blotted out the sun and offered no sense of direction.
I turned south again and ran aground after only a few strokes. I continued for a good 15 minutes, alternating between walking the boat and rowing before finally giving up the effort. I hadn’t made any appreciable headway toward where I thought the trail was, and I still had a mile or two of marsh and mud flats to negotiate if I were going to continue southward. Afternoon was turning into evening, and I didn’t have the time to walk the boat through miles of an oyster-ridden mangrove maze before the rain was supposed to start and the light would fade.
I cringed each time I heard the boat being grated by oysters and feared they would gouge through the thin layer of fiberglass and into ARR & ARR’s plywood hull. I dragged the boat back toward the trail that had brought me into the labyrinth. It baffled me that this could be part of a mapped paddling trail and have so little water. It was true that I was trying to wend my way along the trails just after low tide, but it was a low that was only 2″ shallower than the day’s high. What I didn’t know was that tides along the Texas coast have not only daily and monthly patterns, but also a seasonal one. If I had tried to navigate through the marsh and mud flats three months earlier or later, I could have had up to another 1-1/2′ of water, all the difference for a boat that draws only 8″ fully laden.
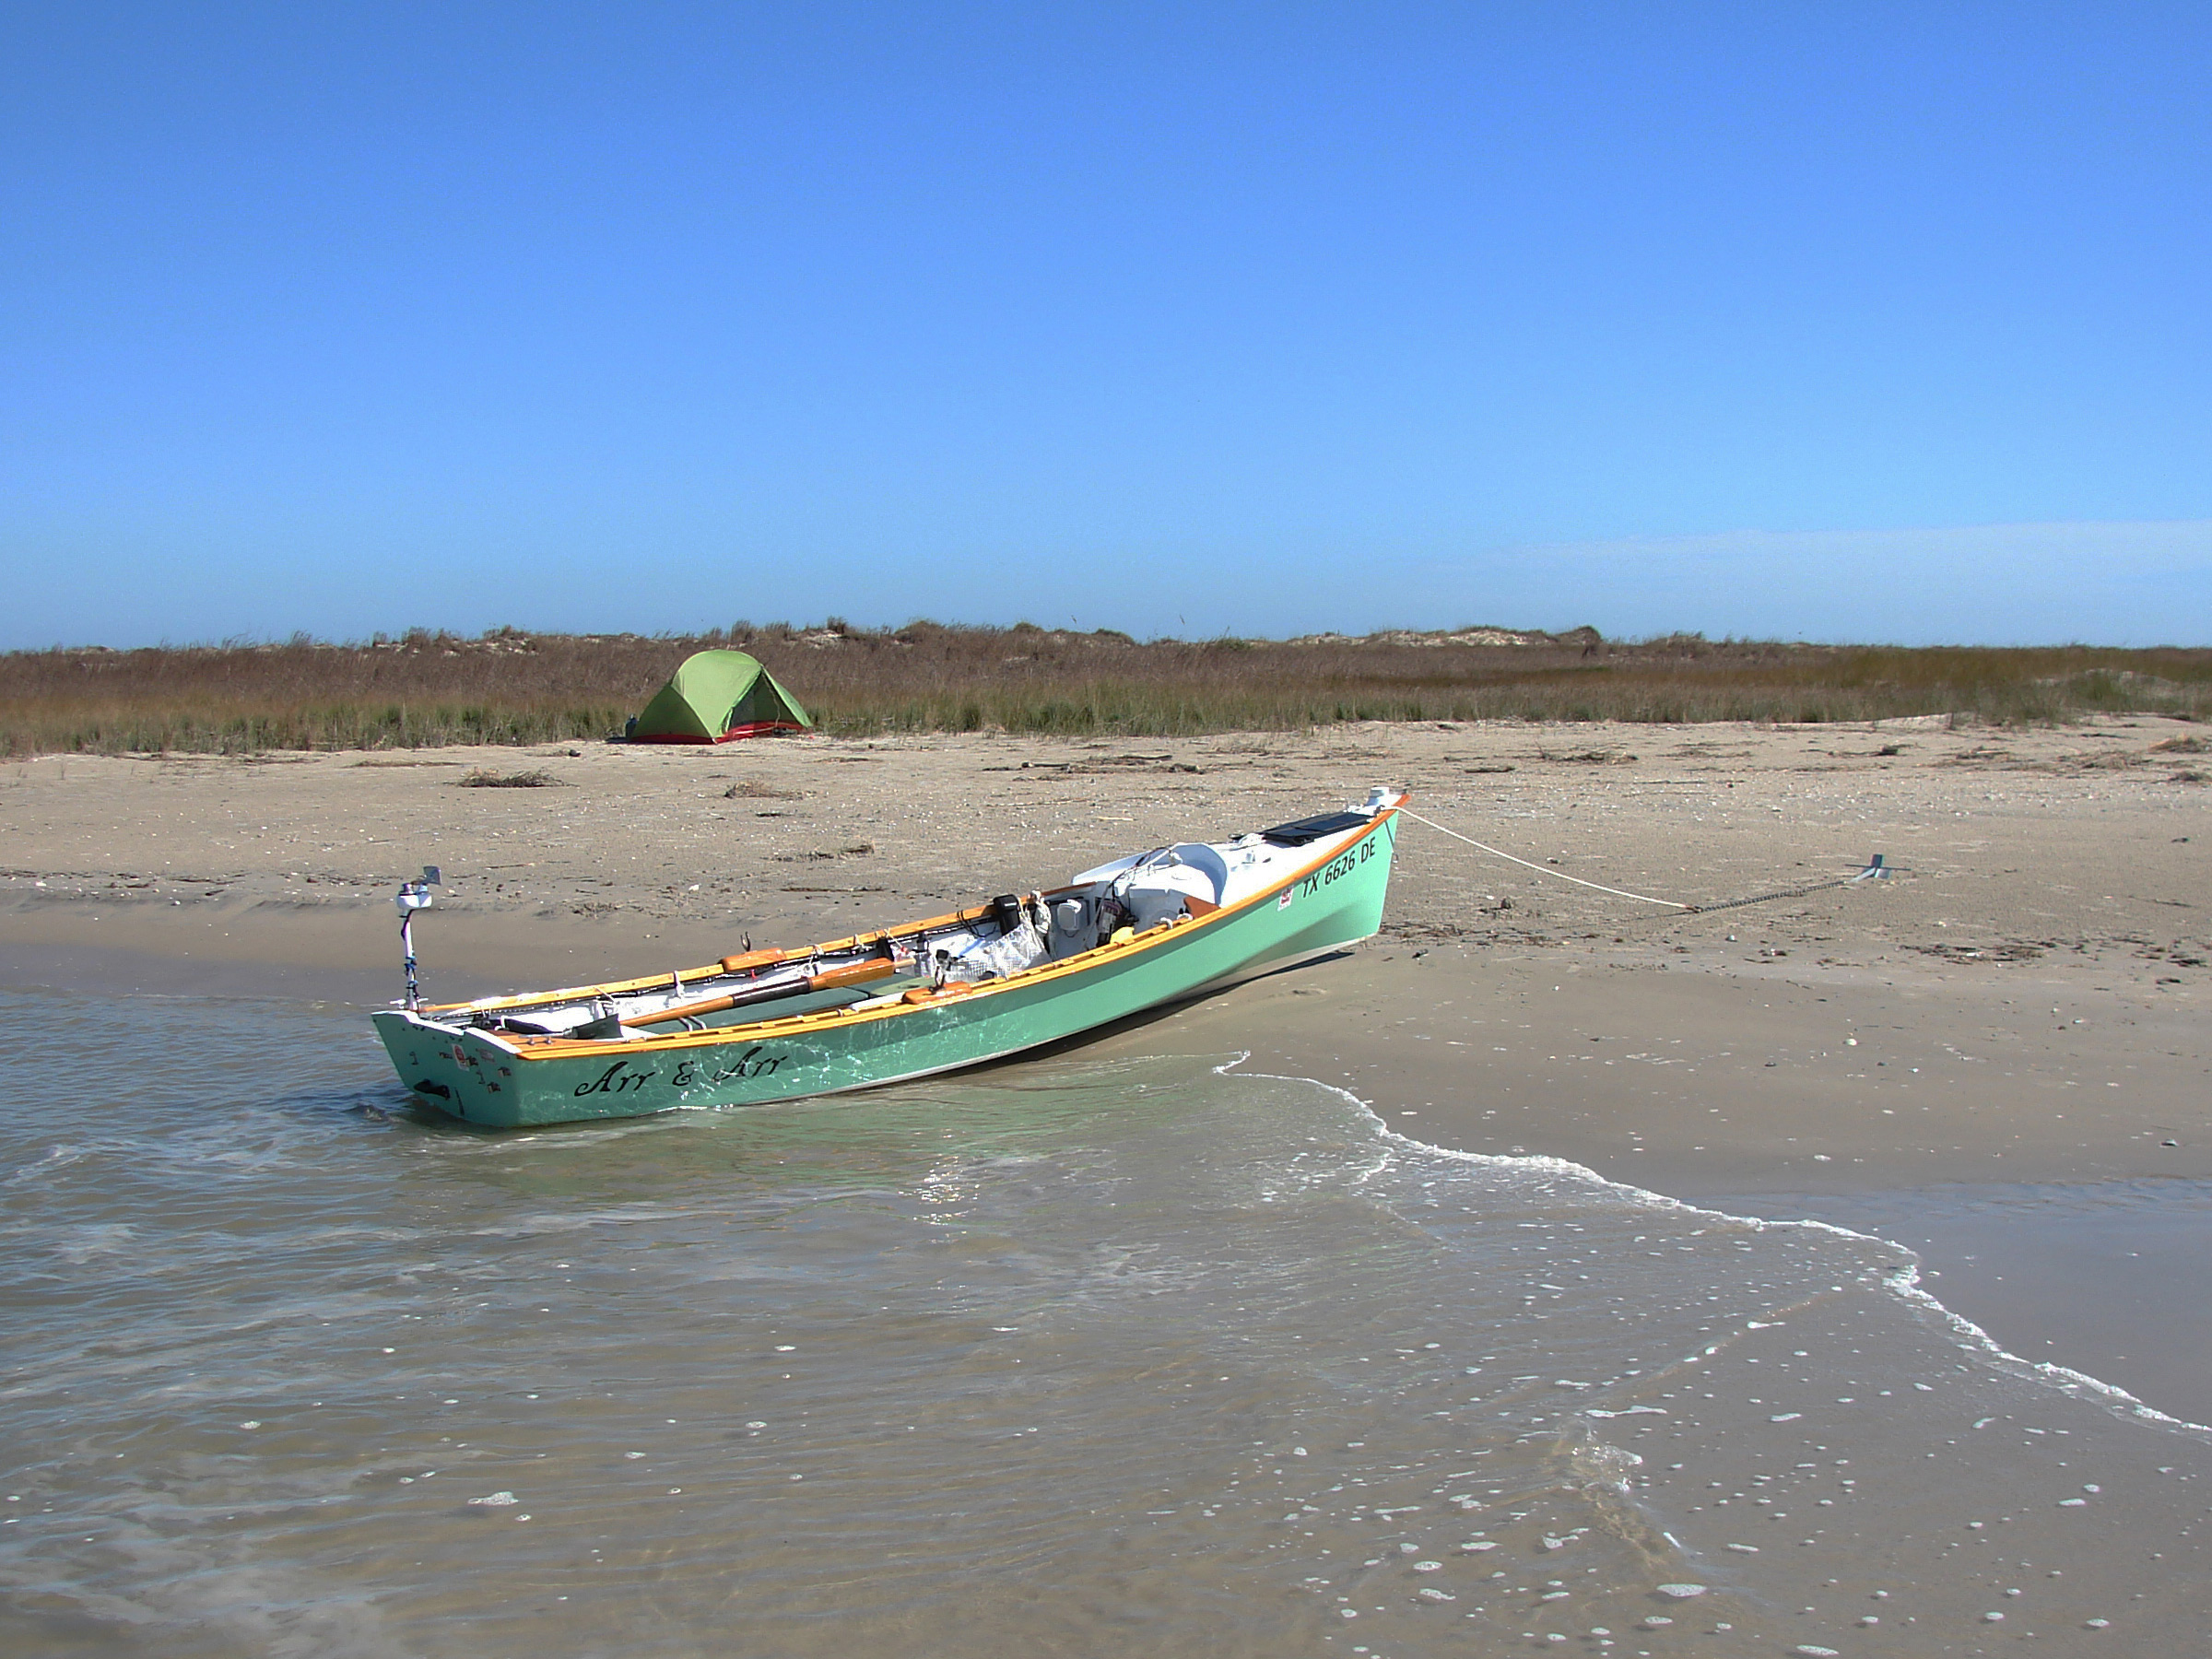
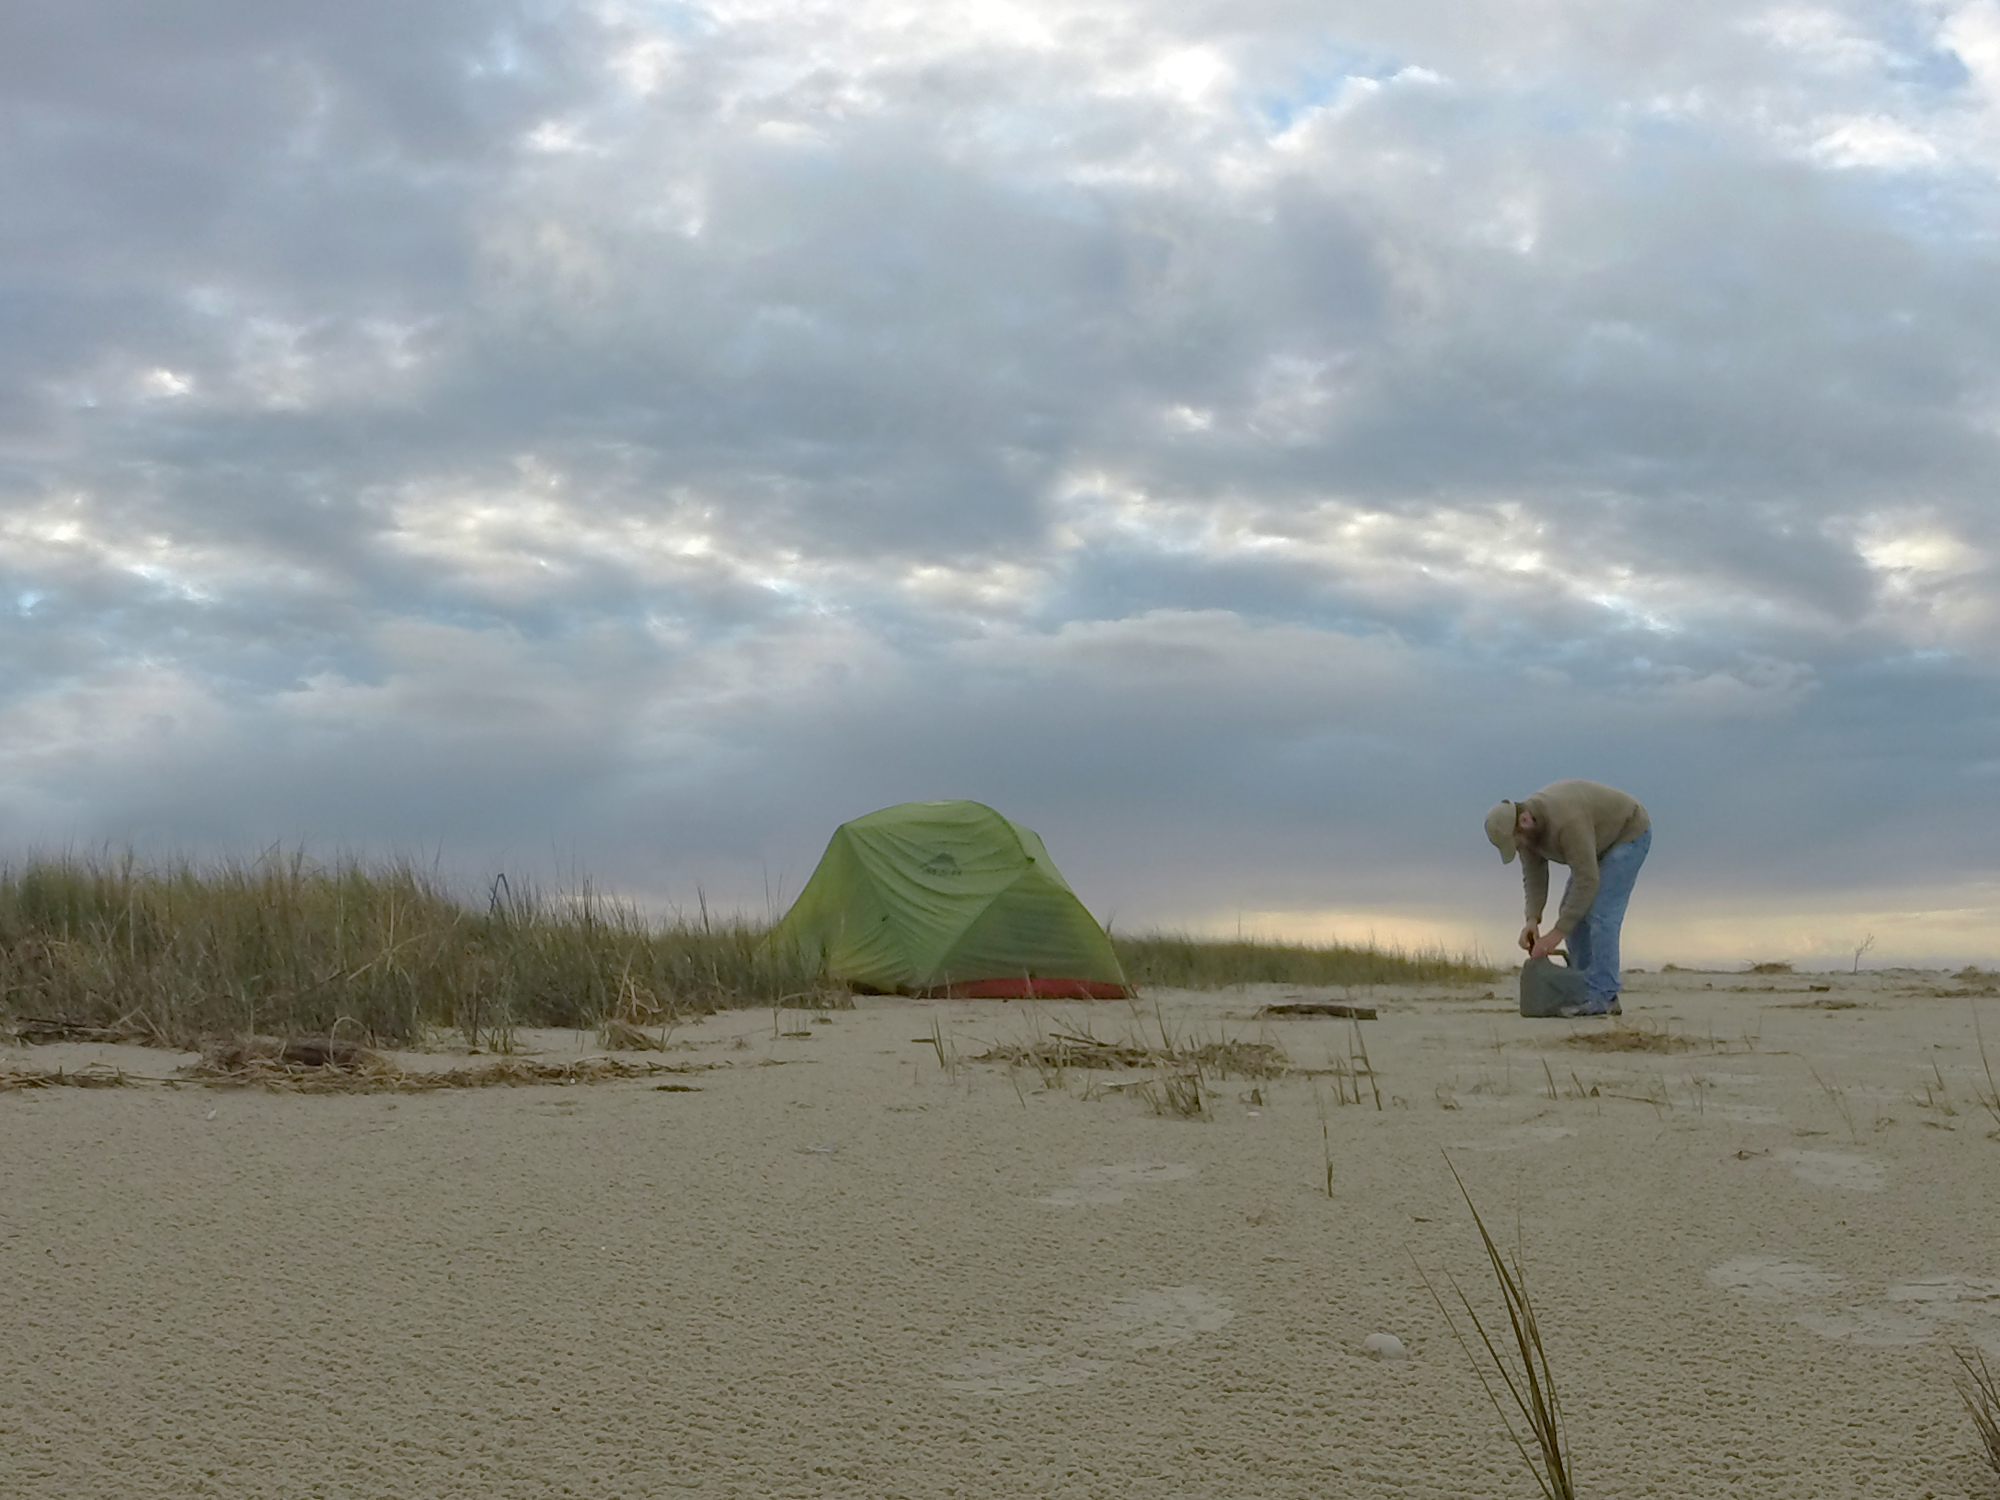
In an attempt to record the size of the beach I had camped on, I took this picture from the end of the little spit. Judging from pictures taken almost a year later, the little beach has grown at least sixfold.
Once I was past the flats boat, I rowed back down the dogleg and First Cut. A flats boat with three men in it came speeding around the bend behind me and slowed to an idle while still 100 yards away. I expected the boat to stop to fish or come ahead and squeeze between me and the mangroves, but it maintained its course at idle speed and at the same distance off my stern. They trailed me that way for a minute or so, and the distance between us didn’t seem to be shrinking. It occurred to me that the skipper might be trying to pass without making a wake, so I stopped rowing and rested the oar handles in my lap, the blades hanging in the air. ARR & ARR drifted to a stop and the flats boat drew even.
Its skipper and I nodded to each other, and he called out above the sound of his engine, “You were moving faster than I thought.”
I smiled and replied, “Thank you for slowing down.”
After he was a dozen yards past, he throttled up and sped on down the cut.
I had rowed north about half of the way along First Cut, approaching what my charts showed as a side cut, branching out to the east and stopping just shy of Matagorda Bay, but if it actually connected with the bay, or at least ended in mangroves sparse enough to allow me to drag my boat through, it would cut the distance I’d have to row in the bay in half, so it seemed worth a try.
The side cut was quite still, barely rippled, even after I’d rowed half its length. I should have encountered waves from the bay by then if the side cut connected to it. I rowed to the end and found what I’d feared: a thick mass of mangroves growing out of a ragged oyster bank. I had to turn around and row back to First Cut.
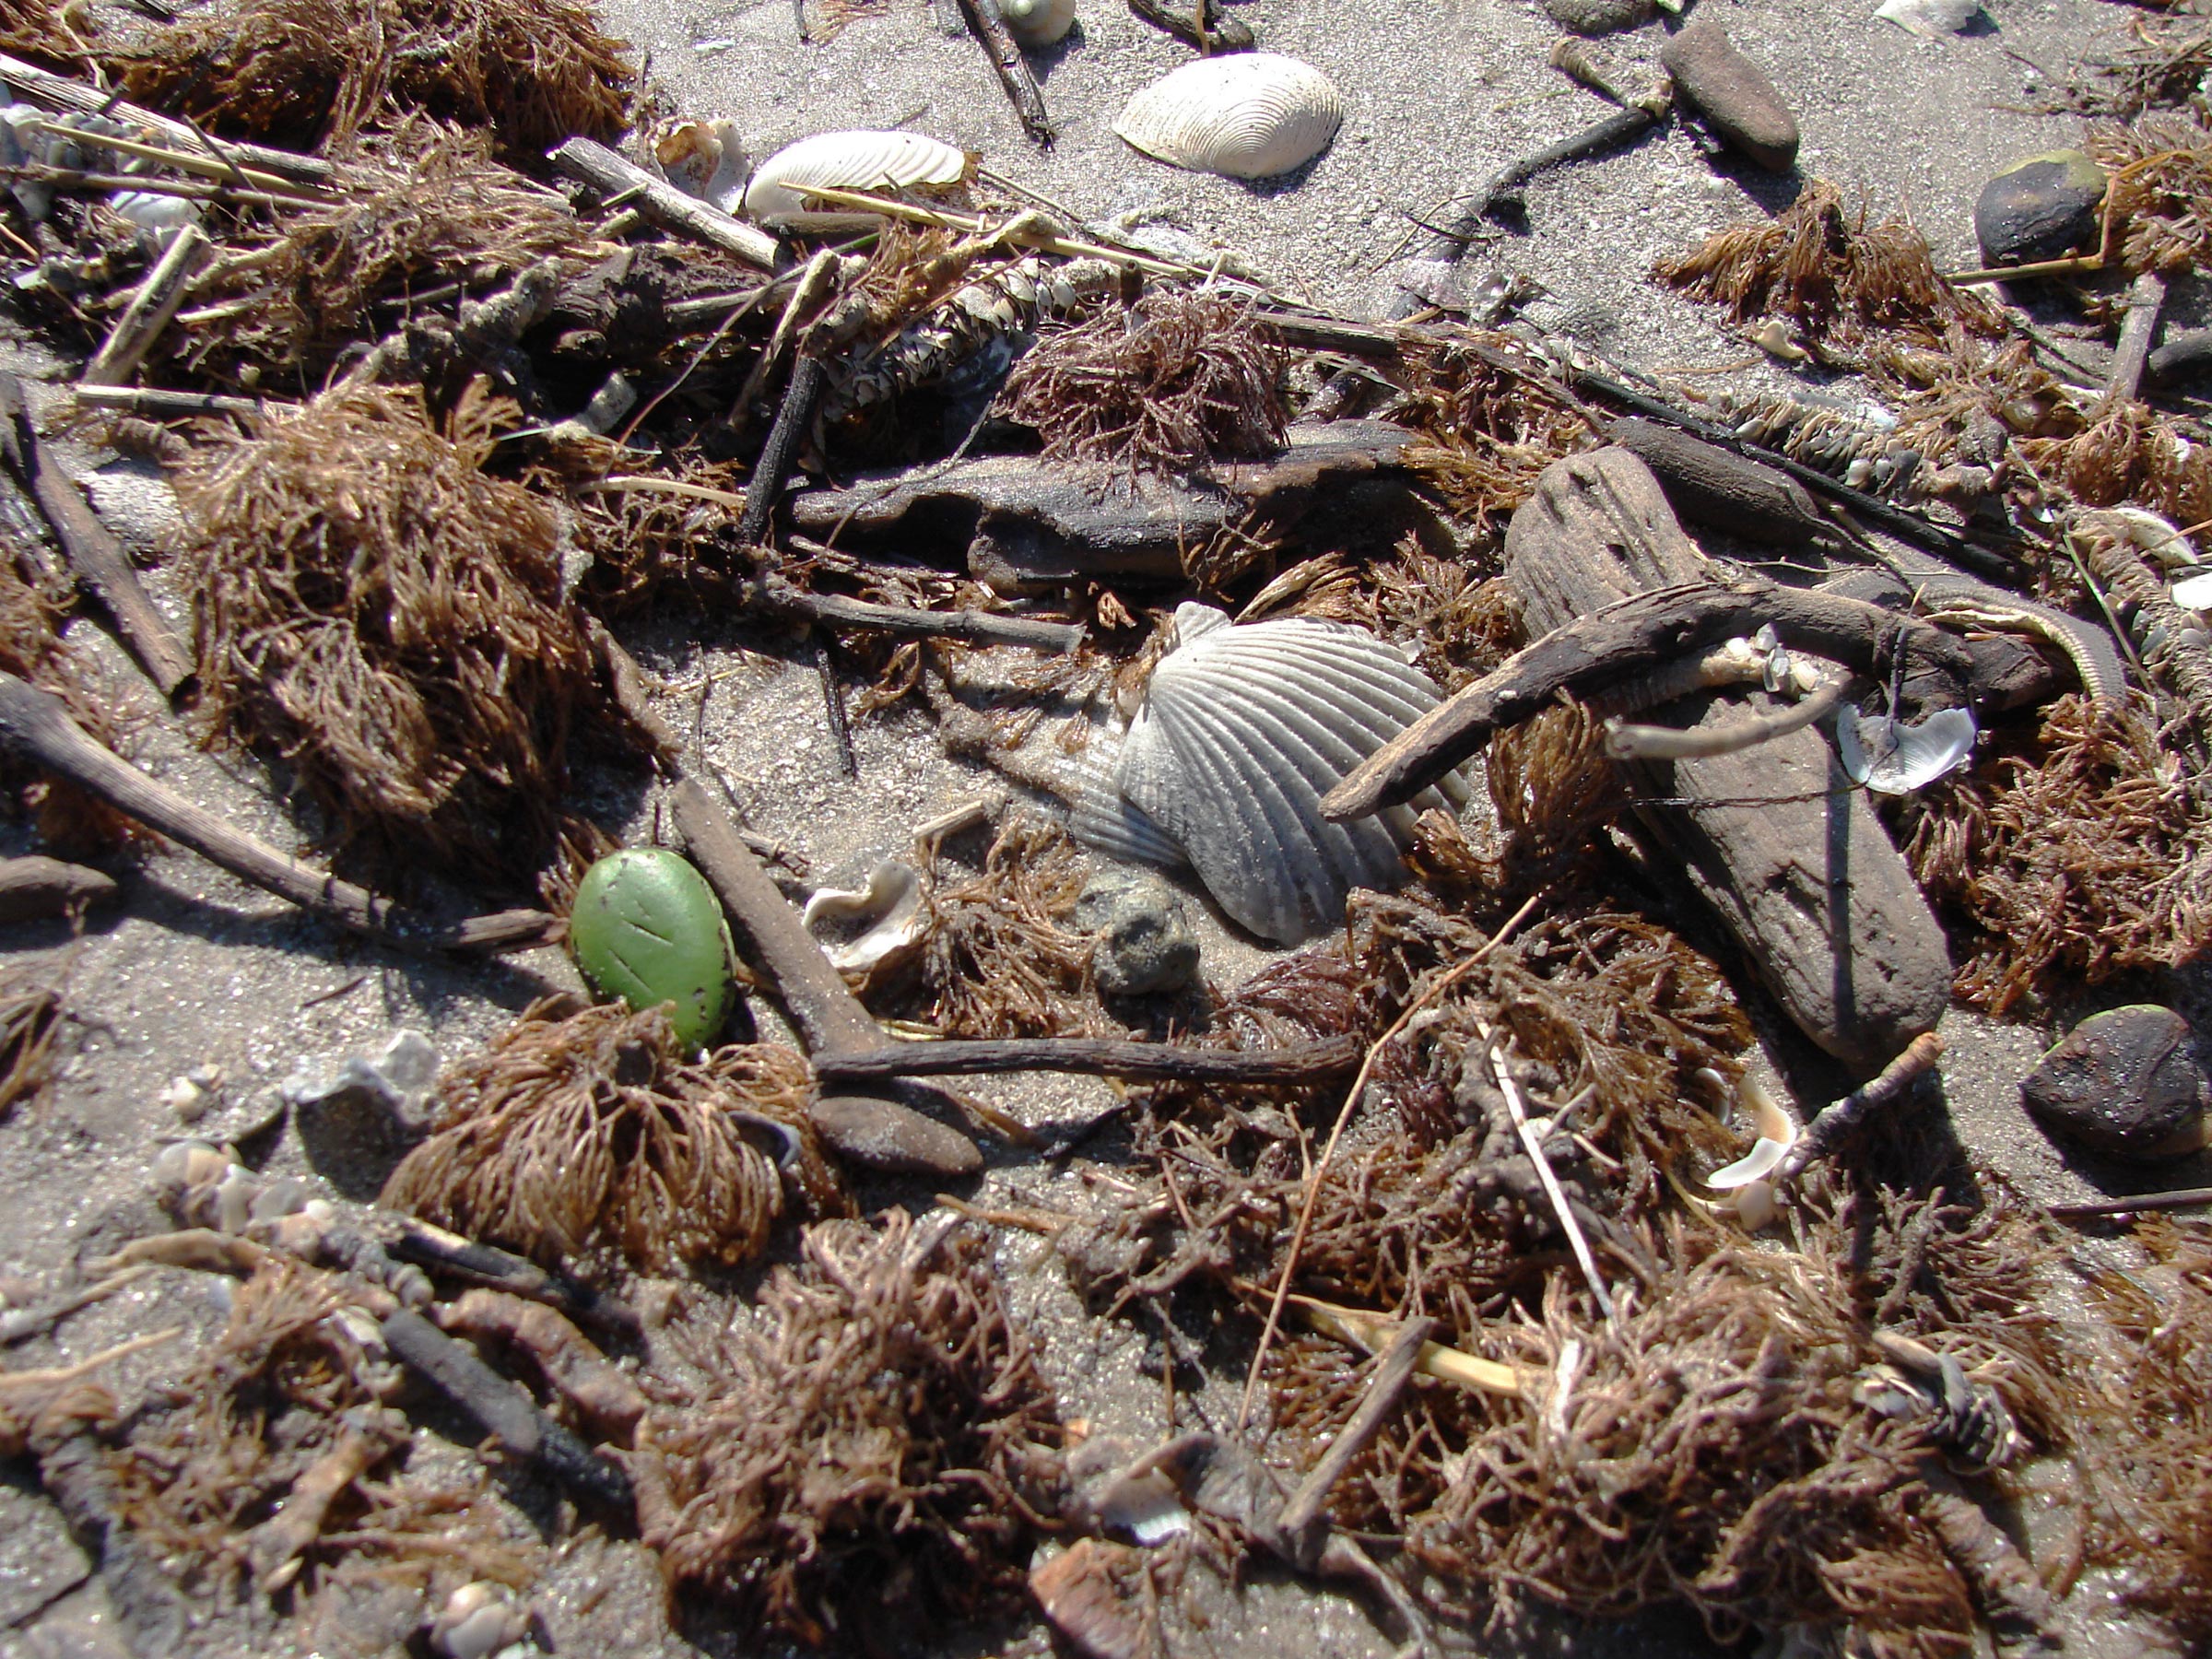
The green object, which that looks like a large lima bean sitting in the wrack line, is a black mangrove seed. The 1”-wide seeds drop from the plant’s branches and are carried by tides and currents and can travel far from the parent plant before washing ashore and putting down roots.
I was nervous about rowing in Matagorda Bay. The bay had shifting shallows all the way from Saluria Bayou to Pelican Island. To get to the still water in the lee of the J-Hook, the island’s northern peninsula, I would have to row about a mile across the shallows, taking waves on the beam. If I found the bay was too rough, I could just turn around and row with the wind and waves back into the bayou, though without a place to spend the night I’d have to return to my car. It’d be better than capsizing in winter.
Under a gray sky, I rowed into the bay and past the massive somber concrete platform of the old Coast Guard station. The waves in the bay weren’t as daunting as I had expected, especially rowing dead upwind to gain sea room before turning toward Sunday Beach. The boat pitched in the waves, occasionally shuddering violently, but nothing more than spray came aboard, and the boat’s fine forefoot cut into the waves well enough to allow me to maintain decent headway.
After I turned southwest to parallel the shoreline, ARR & ARR took the waves on the beam. They weren’t breaking but the boat rolled in the steep chop. No water came aboard, and I found myself enjoying the rolling ride. As sets of taller waves rose ahead, I didn’t fight them. I’d stop rowing and let them pass. It made for slow progress, but I enjoyed the challenge.
Though the water droplets spattered across the wide-angle mirror mounted on my stern-light post, I spotted the reflection of something low and dark blocking the path ahead. It was the skeleton of a tree trunk lying on its side with limbs jutting out in all directions, so long and thick that they held the trunk high out of the water. I headed farther out into the bay and around the trunk and the shoal it rested on.
The two plastic buckets I carried aboard the boat served as camp seats, bailers, and garbage cans. If I need extra ballast for my return trip after going through firewood, food, and drinking water, I can fill one or both buckets, snap on the lids, and lash the weight wherever it’s needed in the boat.
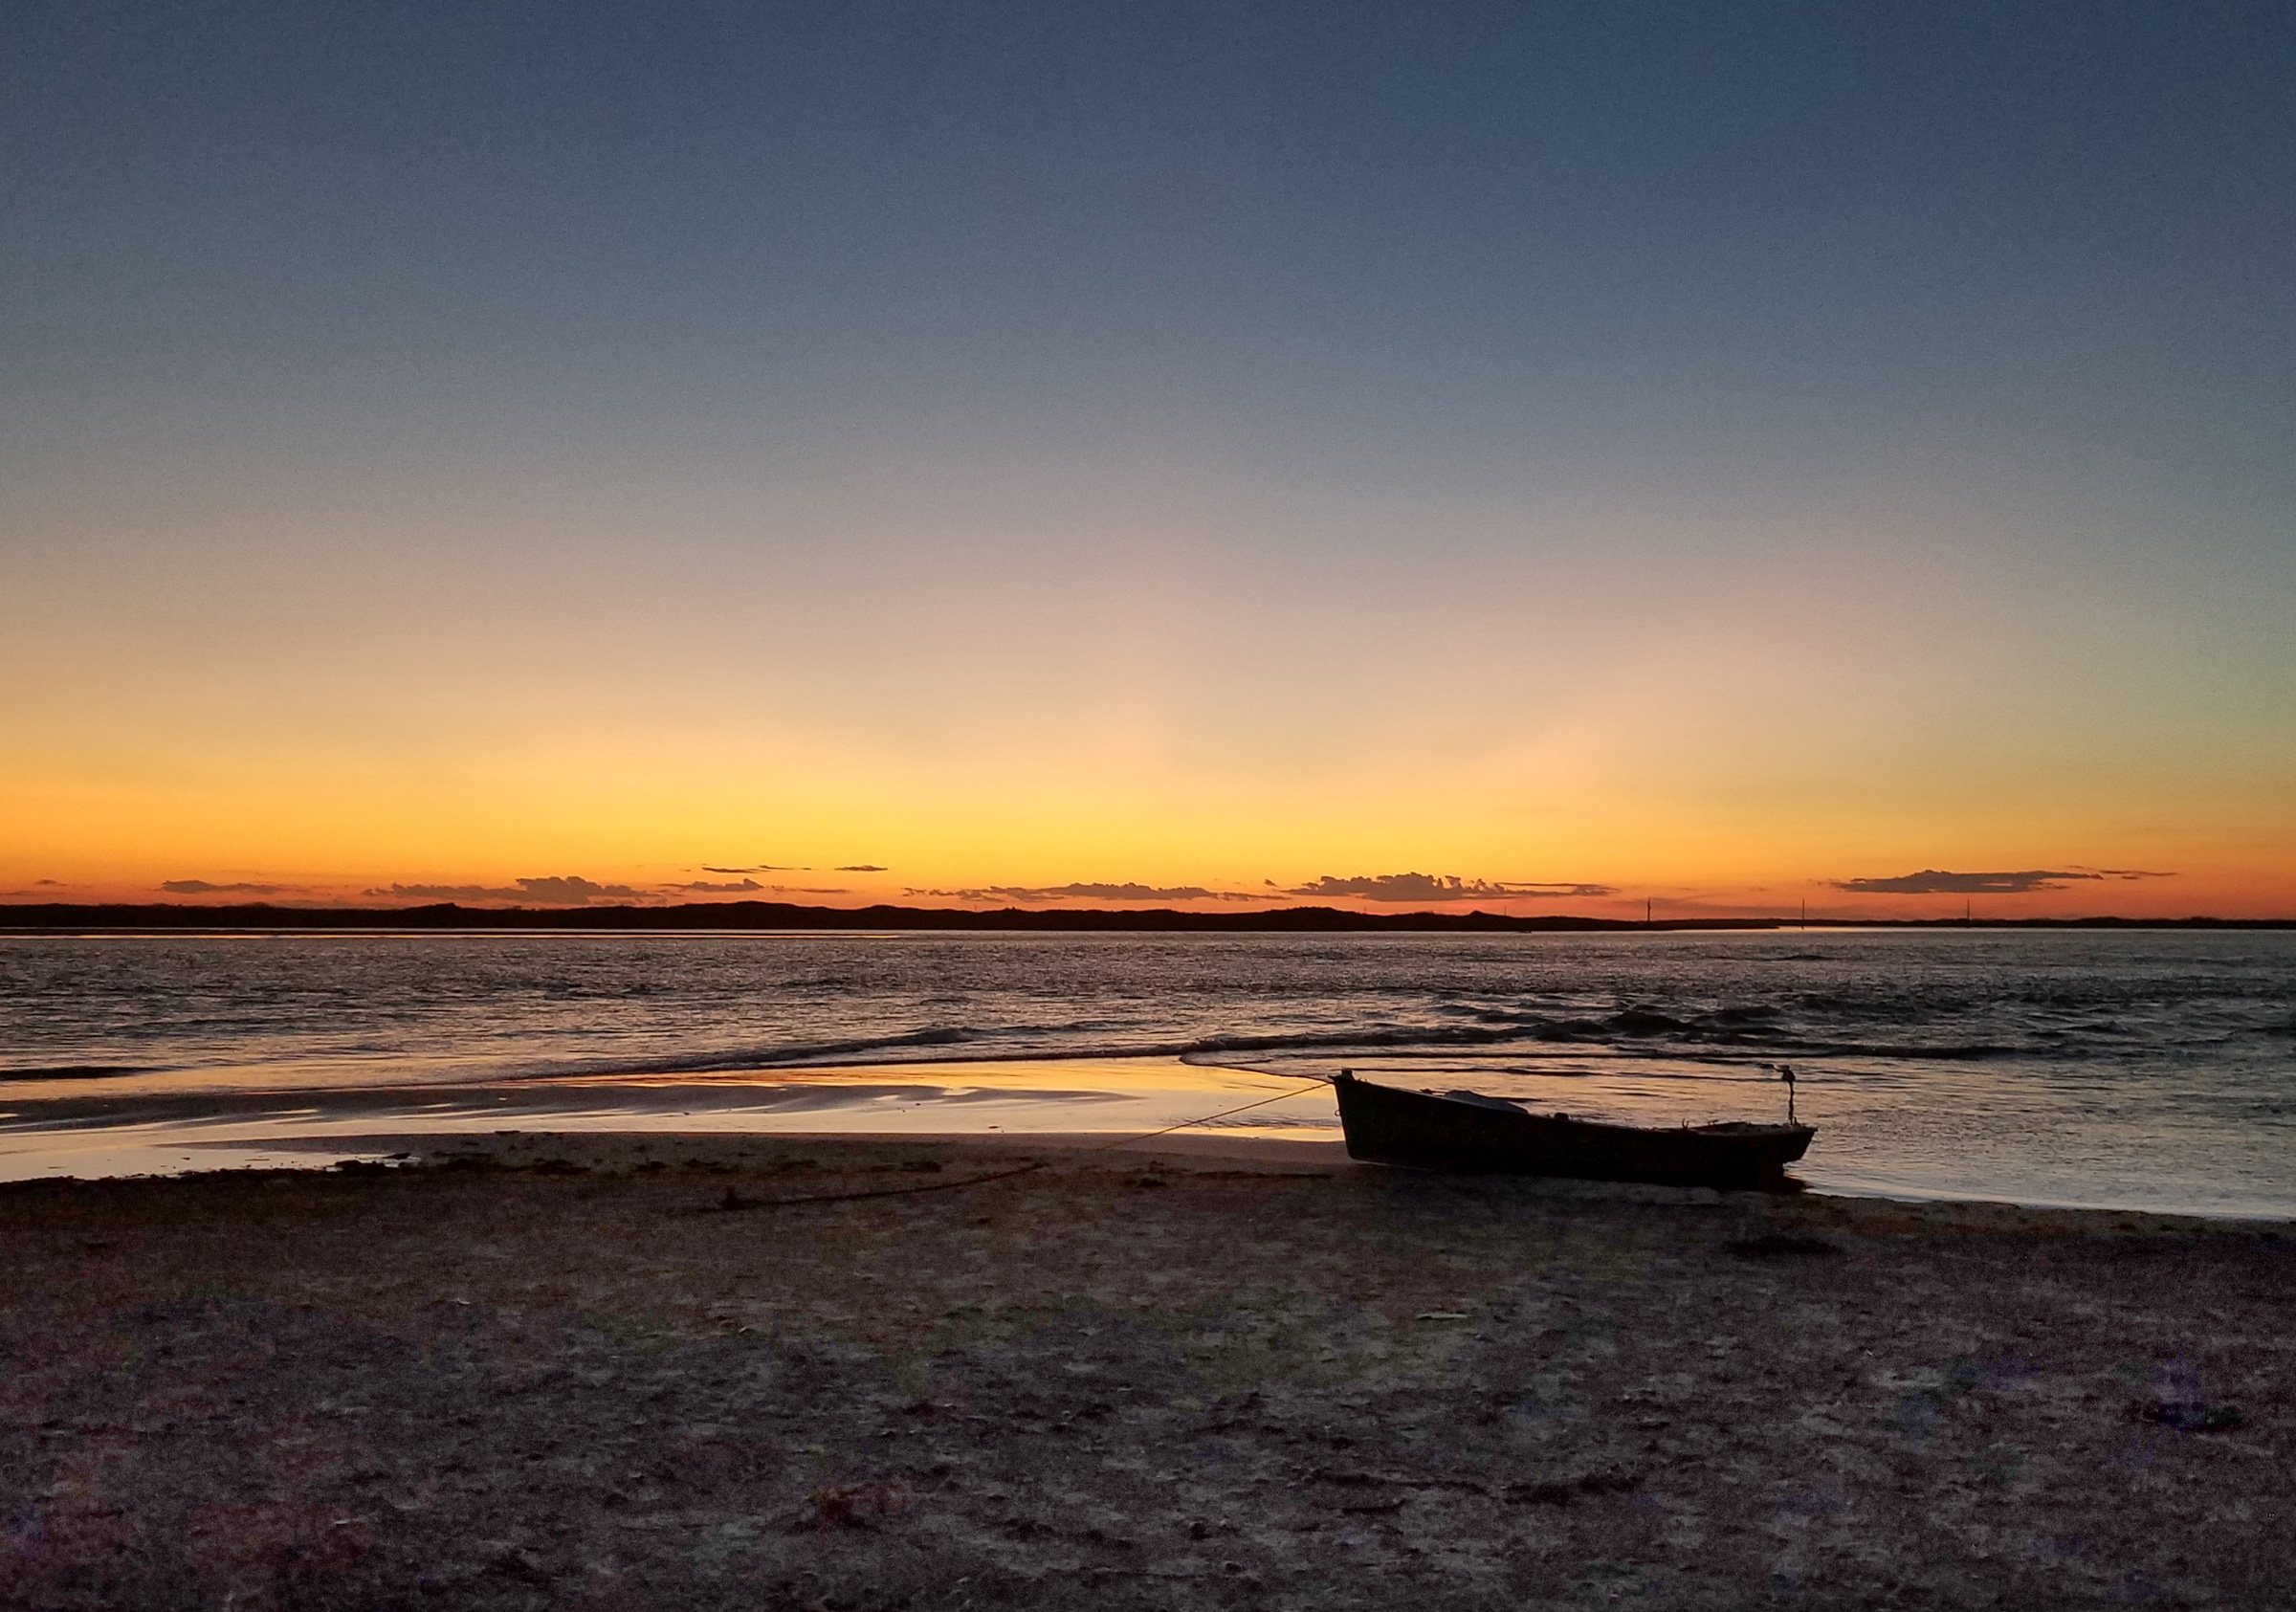
I passed the J-Hook and rowed into flatter water in the channel that would take me to the pass at Sunday Beach. To the southeast, beyond the island, a thick, dark band of clouds out over the gulf was hanging lower than the rest. Slate-gray sheets of rain falling beneath the dark band blurred the horizon. I picked up the pace, hoping to avoid a drenching.
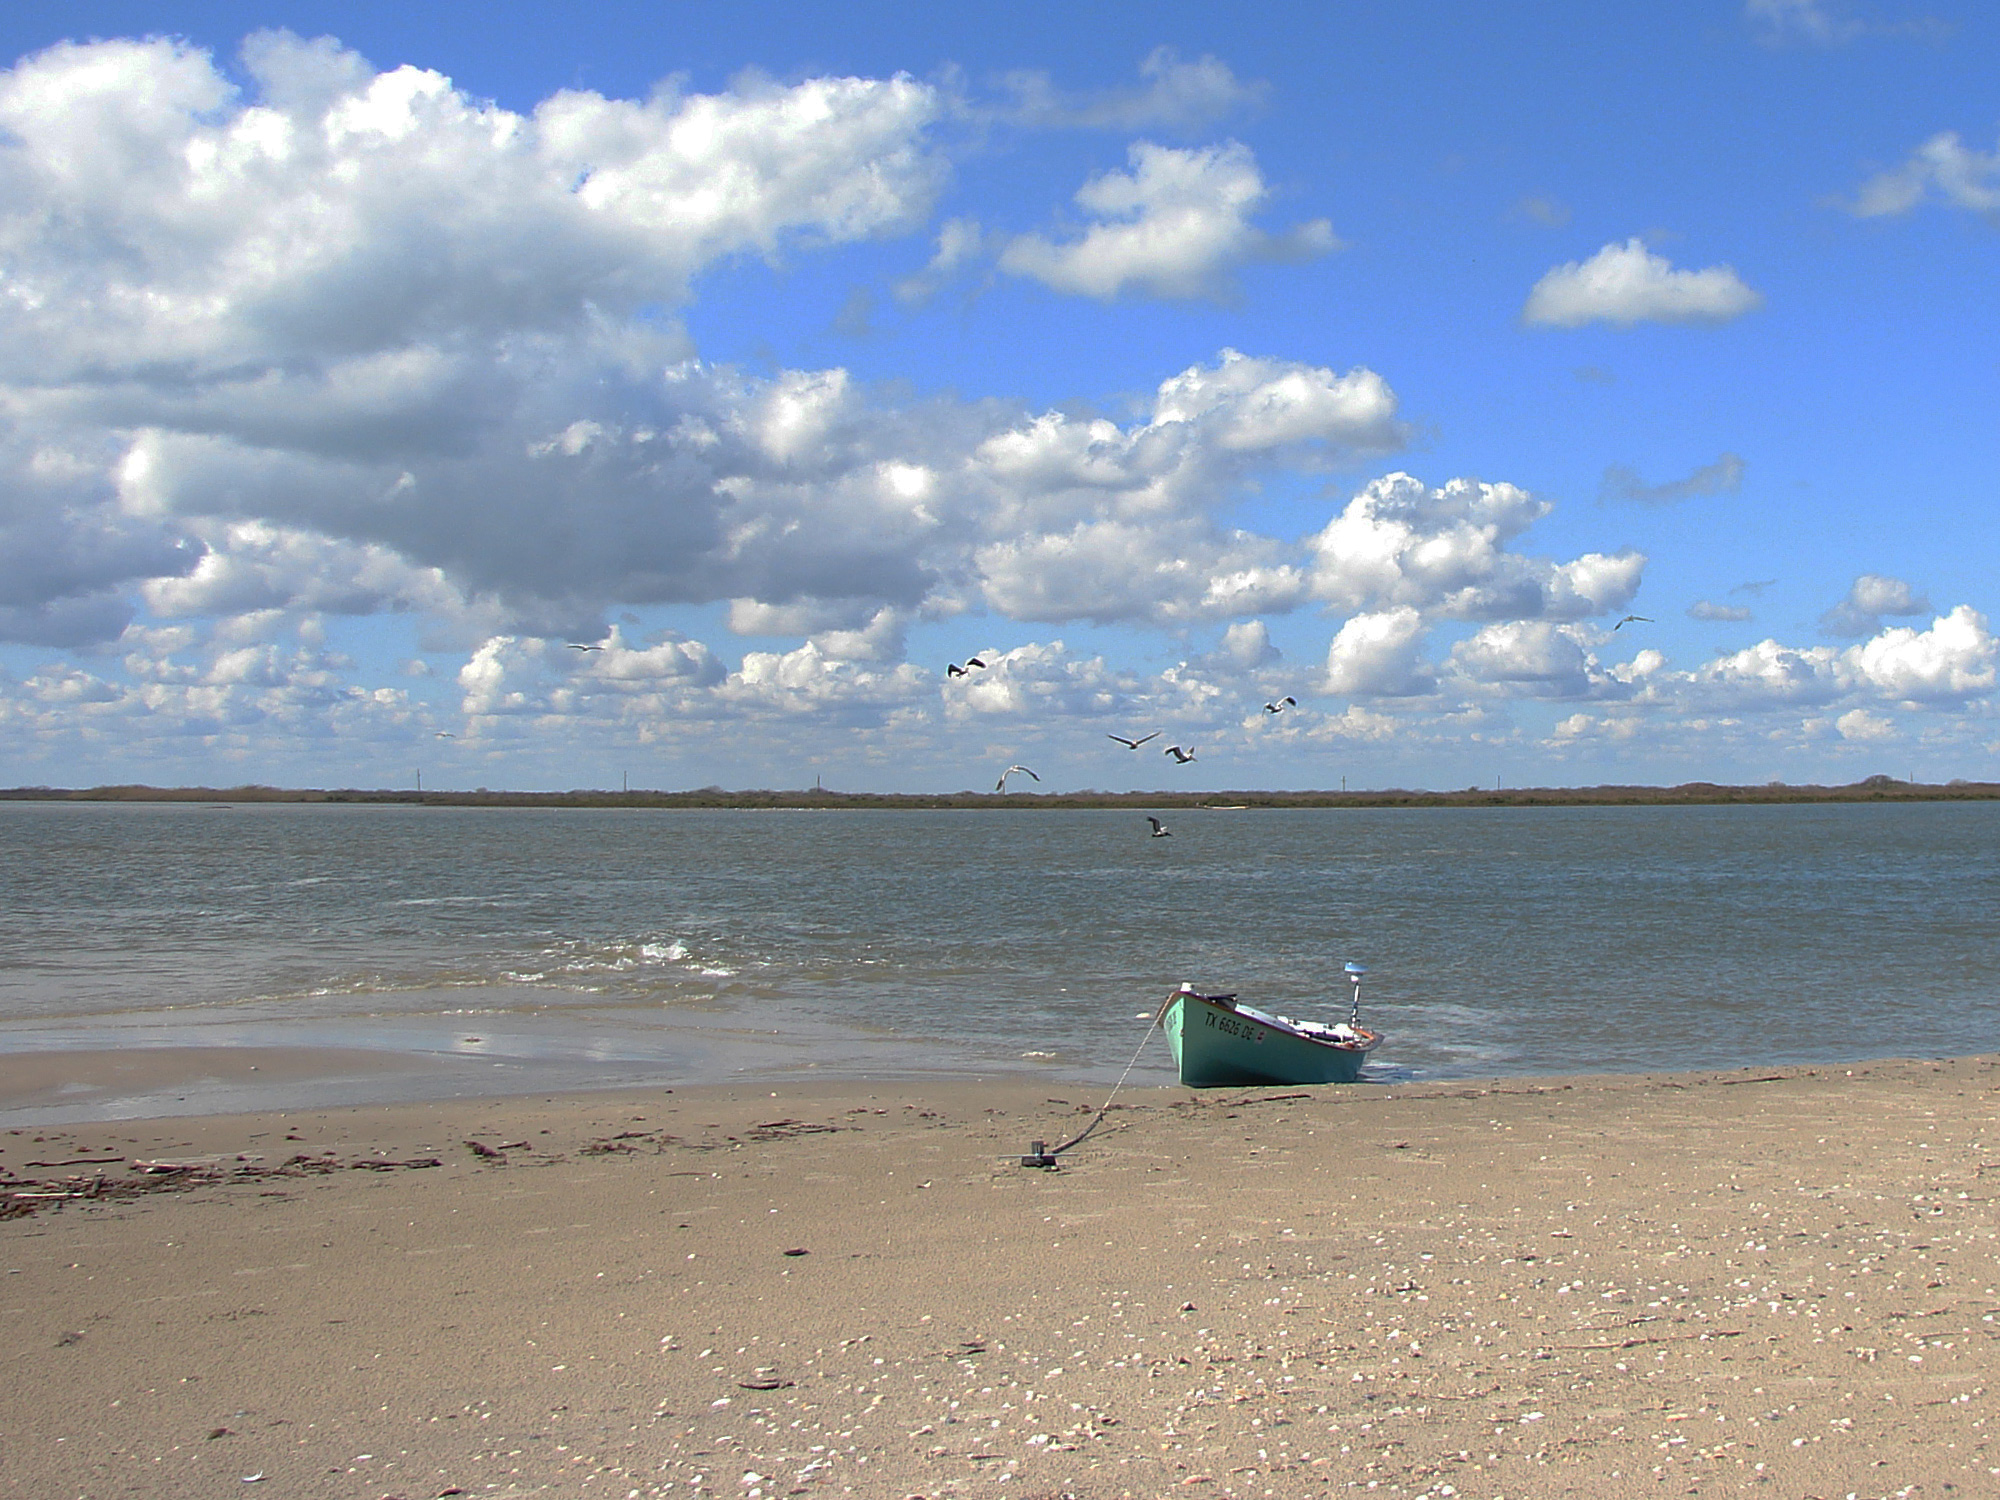
Ten minutes later, though, the clouds seemed to be no closer and the horizon appeared sharper through thinning veils of rain. Beaches the color of weathered manila rope lay on both sides of Sunday Pass. Two powerboats were beached on the south end of Pelican Island, with anchors dug in above the wrack line. Boats were beached on the Matagorda Island side of the pass as well, on a much larger expanse of sand. The deep water in the middle of the pass was full of breakers. I closed in on the little beach on Pelican, aiming for the 15-yard space of beach between the two boats already there.
After another five minutes of rowing, ARR & ARR nudged into the sand and came to a stop. I stepped over the side, lost my footing, and tumbled into the water—I was more tired than I had thought. With water squishing out of the tops of my boots on each step, I pulled the bow farther up on the beach. I was soaked and began to shiver, but I needed to tend to the boat and tent before I changed into dry clothes.
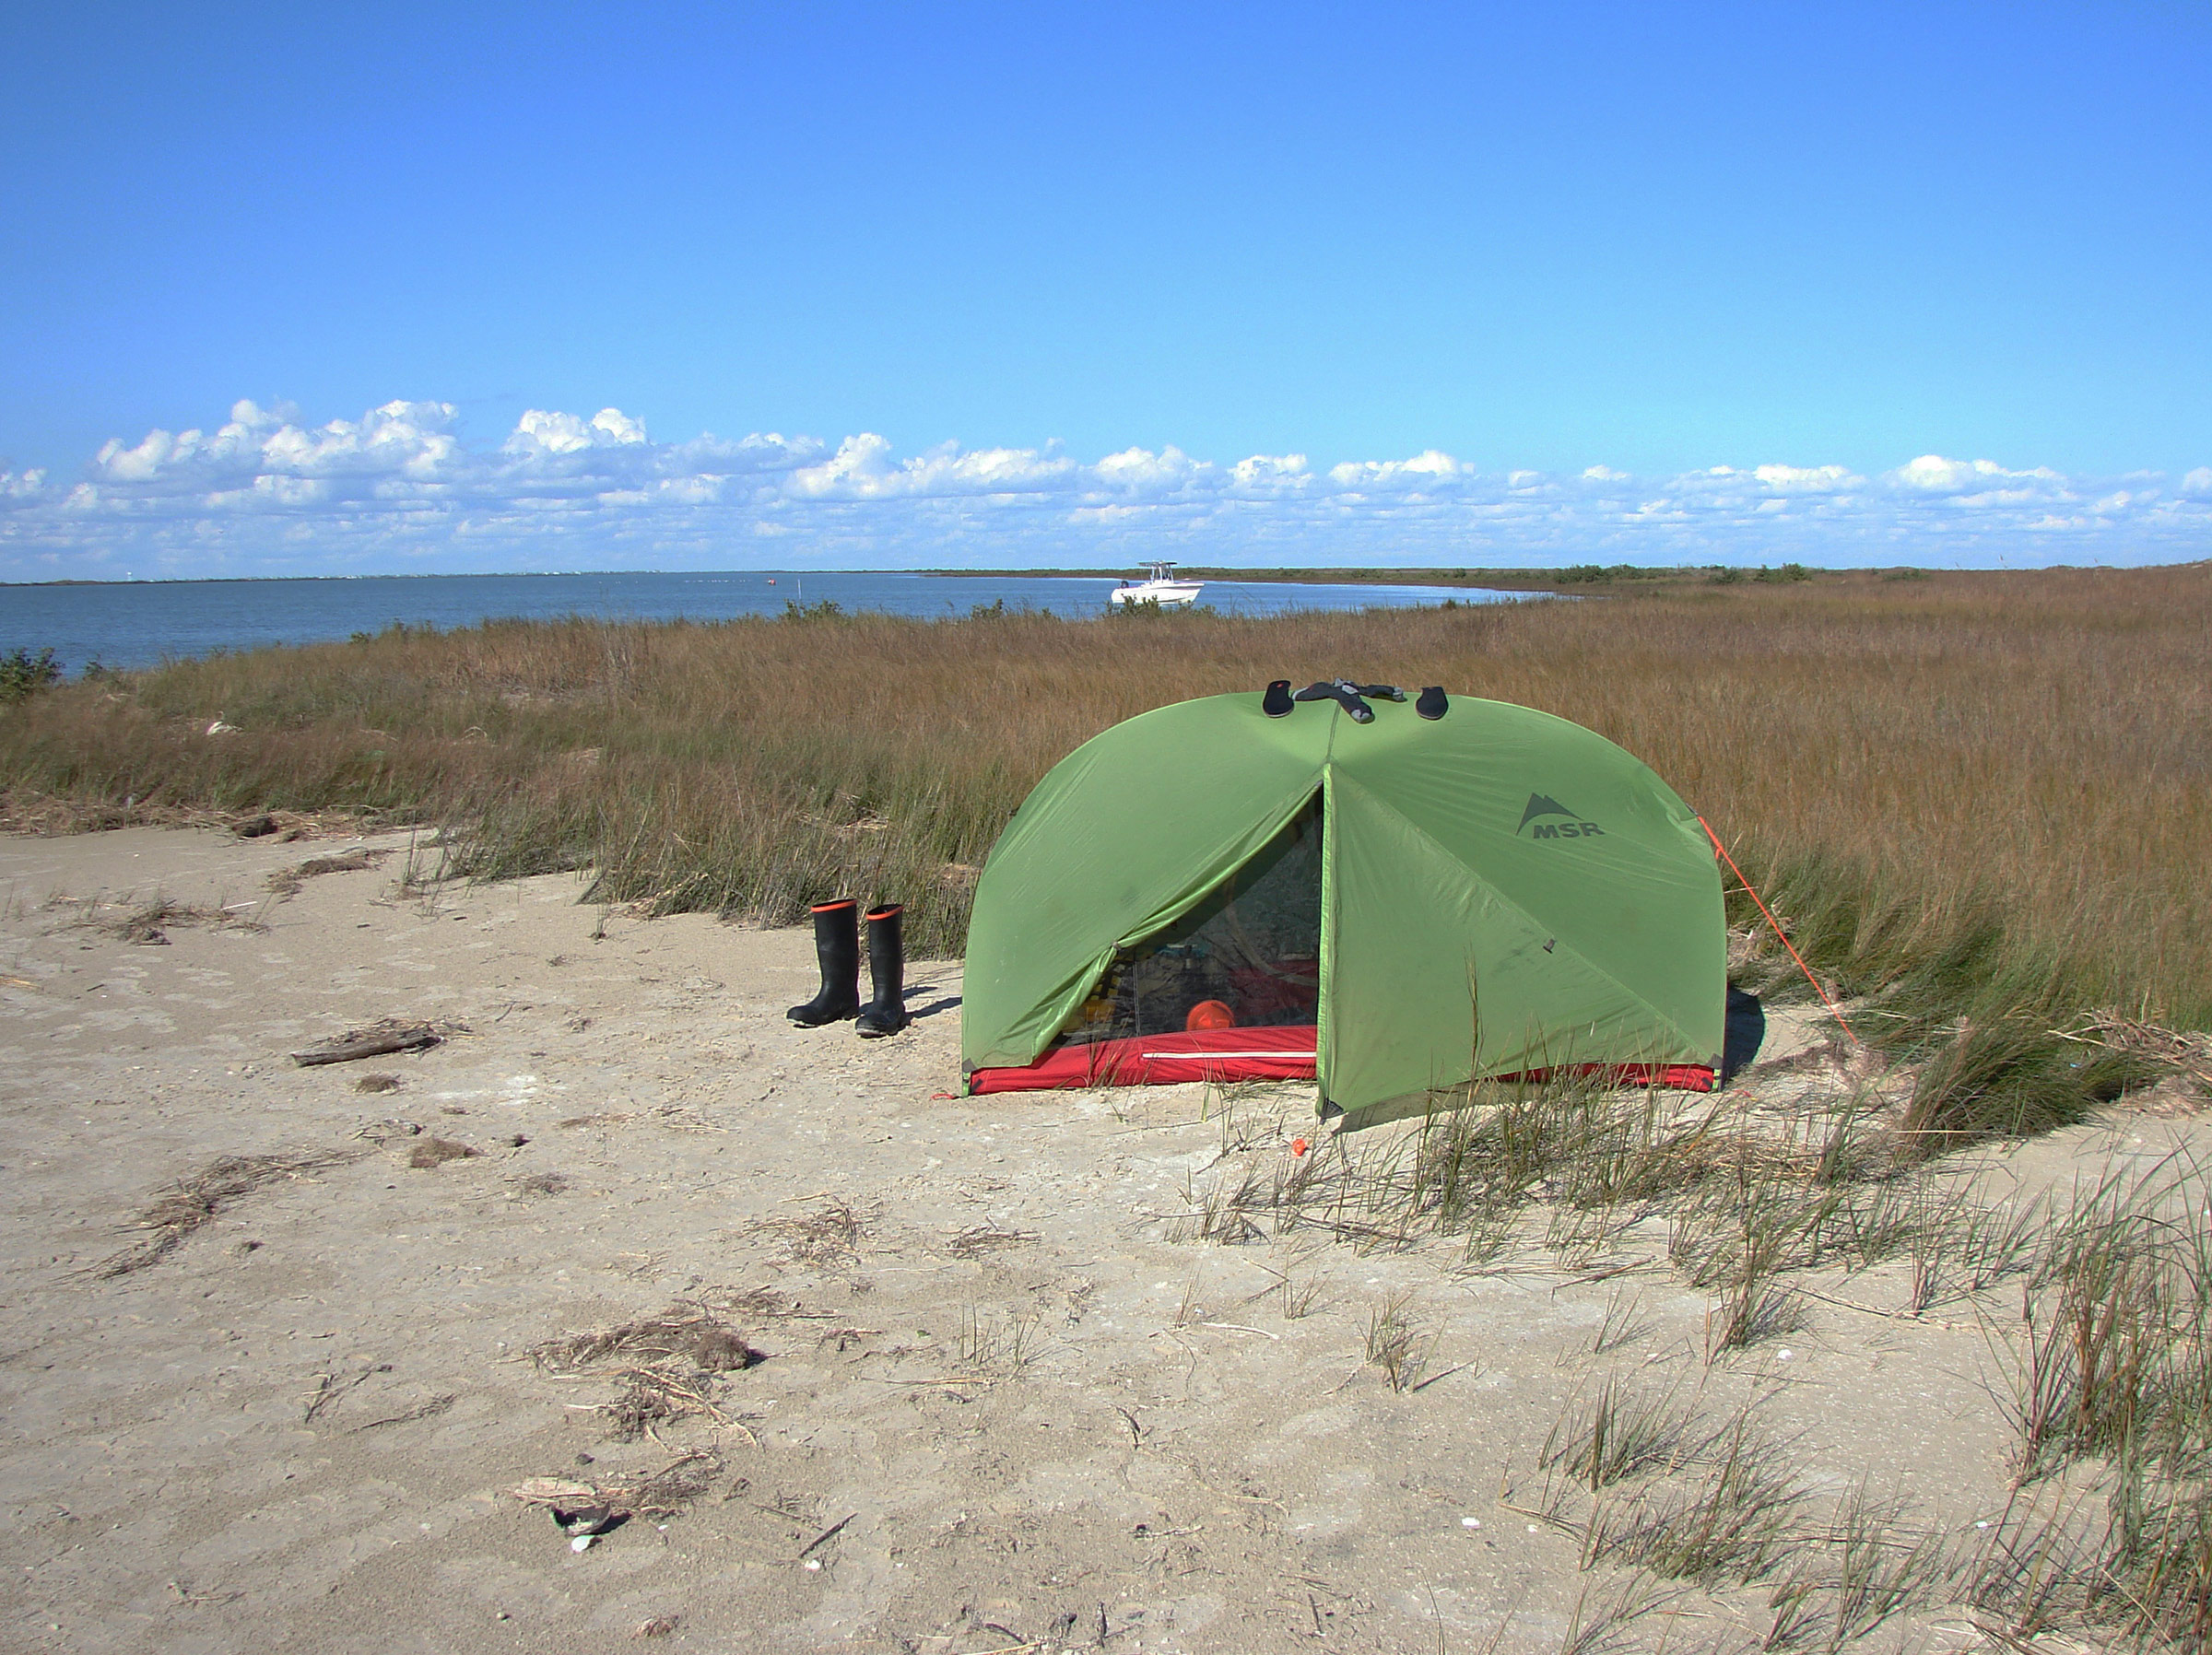
Dunes 10′ tall separated the beach from the gulf side, and while I would have liked to make camp on that high ground, a 30-yard-wide swath thick with grasses and mangroves surrounded it. The beach on my side of the barrier had only a slight slope, and I picked out what seemed the highest spot for my tent. With a tide expected to rise only inches during the night, I figured the site would do.
With the sun shining brightly, I pulled ARR & ARR ashore in the niche behind the little spit. A foldable solar panel draped across the foredeck charges the 15-amp-hour battery strapped down inside the forward buoyancy compartment. In the distance on the other side of Sunday Pass is Matagorda Island.
The waves edging ashore pushed my boat around until it was beam-to the little waves, getting rolled and bucked against the shore. I tried pulling the boat higher onto the beach, but the waves still hit the stern and pushed it around again. The waves had also turned one of the powerboats, but it was large and heavy enough that the little waves couldn’t bat it about—it would be fine until its crew returned. The other powerboat, closer to the pass, was nestled into a niche behind a tiny spit, clearly the sweet spot for a boat on this beach.
Inside the pass, the beach ended and gave way to a marshy shore thick with cordgrass and dotted with black mangroves. Curled into the grass was an inlet just large enough for my boat. I relaunched, paddled ARR &ARR around to the inlet, and dragged it in across a shallow at its mouth. In the still water there, the boat floated motionless. I set its anchor in the sand just beyond the cordgrass and tied a second line from the foredeck cleat to a short length of chain I wrapped around the exposed roots of a mangrove farther inland.
I pitched my tent, changed into dry jeans and sweatshirt, and pulled on dry socks and sneakers. I stored my boots in the tent’s vestibule, pulled out their spongy insoles, wrung them out, and draped them across the tops of the boots. I hung my damp rowing clothes on a cord tied inside the top of my tent.
The dark band of clouds broke apart, and it didn’t rain that evening. As the light waned, the crews of the two boats returned from the gulf side of the island, shoved off, and headed back to the mainland. I spent a comfortable evening sitting on one of my 2-gallon buckets next to a campfire, enjoying my dinner snug in warm, dry clothes. I stayed up for over an hour enjoying the breeze and the shushing of the waves rolling ashore before finally putting out the fire and crawling into my bedroll in the tent.
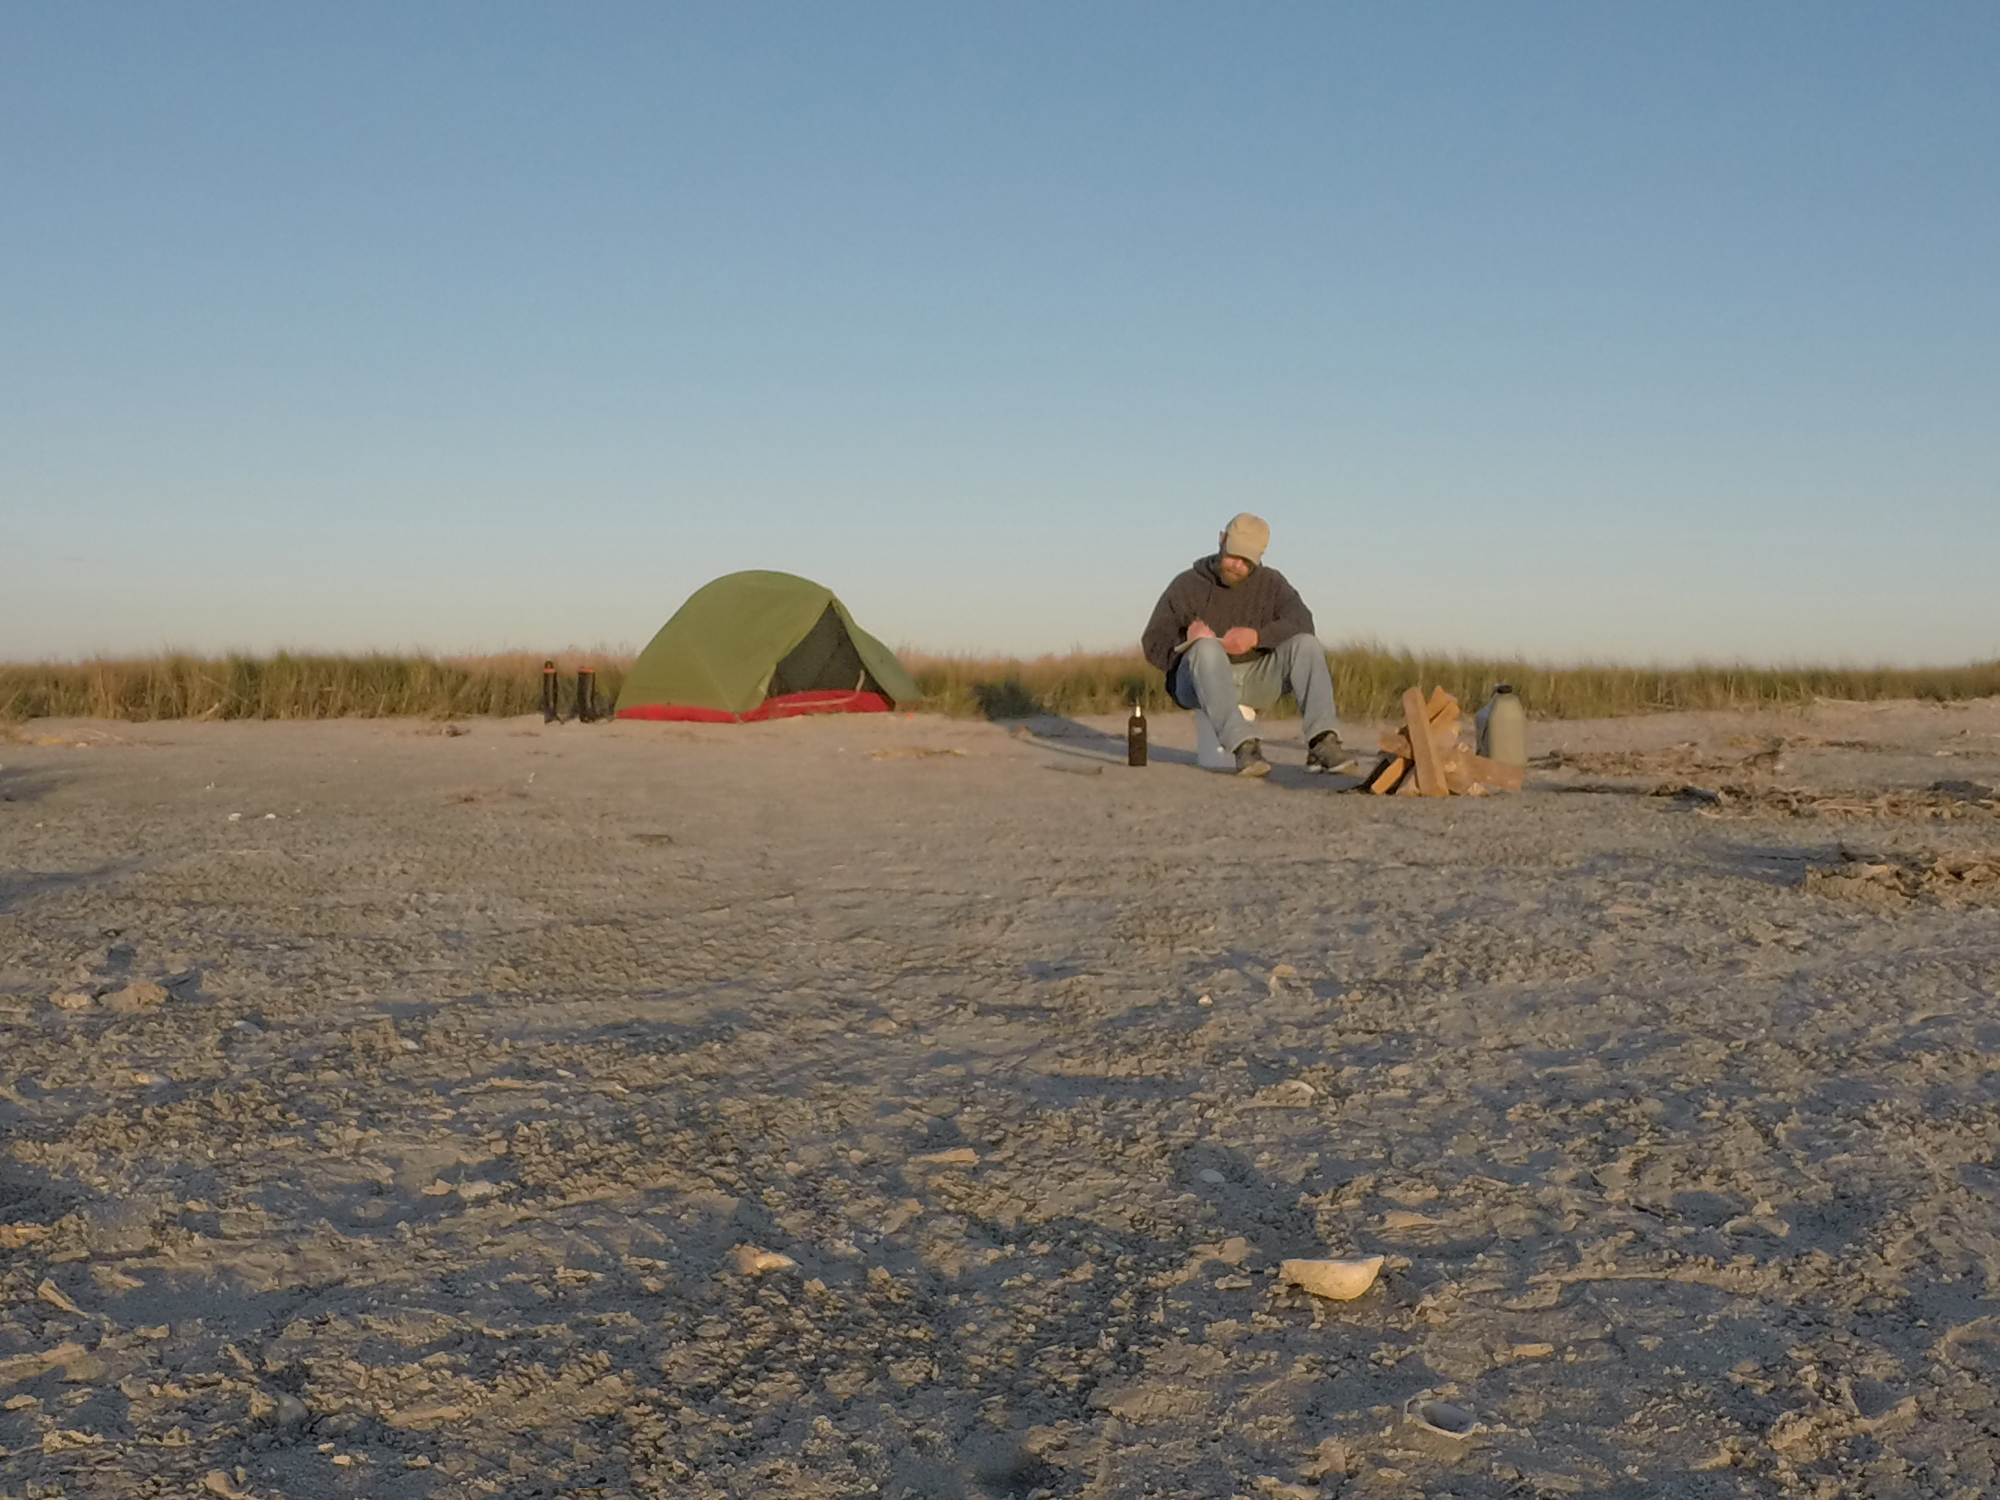
After the rain stopped on Sunday morning, the beach was left textured by tiny pits, a fresh surface for footprints. As the clouds began to break up I refilled my drinking bottles from the water can.
I woke to a dull-gray morning with rain pattering on the tent’s fly and leaving pockmarks in the sand beyond the fly’s perimeter. I crawled out of the bedroll and pulled on my sweater. For breakfast, I put a cup of coffee on the stove and ate a baggie of granola mixed with milk. Gunshots echoed in the distance—hunters out early on this drizzly Sunday morning. A boat roared somewhere out in the mangrove marsh.
After the rain stopped, I crawled out of the tent. The air was cool and still. Patches of clear sky showed between the remnants of the clouds. Pelicans, cormorants, avocets, willets, and gulls squawked and peeped while feeding in the shallow waters around the pass. I sat watching and listening on a blackened driftwood beam close to the water.
A dolphin darted and rolled in the water just 15 yards off the little spit. Farther out, jumping fish flashed silver in the morning light. White pelicans and brown pelicans circled over the pass. The brown pelicans dove and plunged into the water, resurfacing with skyward thrusts of their beaks, swallowing whatever they had caught. The white pelicans settled on the water surface, usually in teams, flapping their wings as they swam toward each other to box in fish before scooping them up.
Despite the noise of the birds, the dolphin, and fish—or maybe because of it—my morning of sitting on a driftwood beam beneath the waning cloud cover was the most peaceful I’d had in months. Port O’Connor was a faint blur of white buildings beneath a single water tower tiny on the northern horizon.
I thought about moving my camp for my second night, but I was tired and wanted to let my wet clothes dry, so I left my camp set up and struck out for a short outing. I rowed north into the little bay on Pelican Island’s west side as a cool but very light breeze came up, which was refreshing for the row beneath the mostly sunny sky.
By midmorning, powerboats were showing up at the pass. I didn’t want to stray too far from camp, so I rowed back to my beach and landed in that sweet spot behind the little spit of sand that that powerboat had occupied the day before. I set the anchor high on the beach, pulled out my solar charger, unfolded the panels across the foredeck, and hooked up the regulator to a through-deck connector wired to the boat’s battery, which is strapped down inside the forward compartment.
I noticed a snail with a gray shell about the size of a pistachio on ARR & ARR’s topsides, most likely a marsh periwinkle from the boat’s night in the cordgrass. Then I started to see dozens. I walked around the boat plucking the snails off and tossing them into the water for the crabs.
I went back to my driftwood bench and watched slender-beaked willets working the swash, plucking coquina clams from the glistening wet sand. I sat very still and the willets passed right in front of me, just 4′ away.
While I made a sandwich in my tent for lunch, the roar of an engine drew so close that it seemed right on top of me. The engine’s pitch dropped to an idle, and I heard a mix of voices. I peeked out of the tent; eight teens were packed inside a 16′ open boat nudging its bow onto the beach 10 yards from ARR & ARR. I waved and ducked back inside the tent to finish making my sandwich. The engine revved for a few seconds, and after dropping back to an idle for half a minute, its pitch rose to a constant roar again while its volume steadily dropped. By the time I reemerged from the tent with my sandwich and an apple, the little boat was already halfway across the pass, heading toward the beach on the opposite side. I must have looked a little less civilized than I’d thought.
Sunday Beach is a popular spot on weekends in the summer, and by early afternoon, even this midwinter Sunday was mild enough to lure a dozen boats to the pass. I took a short stroll around the southern end of the island to the gulf side, but I didn’t feel comfortable out of sight of camp, given the number of boats coming and going and not being able to lock up ARR & ARR’s gear. I cut my walk short and returned to camp.
A great egret, brilliant white with a school-bus-yellow stiletto beak, stood poised at the edge of an inland brackish pool, and a great blue heron waded with deliberate, punctuated steps just off the marshy shore on the island’s bay side. The washed-up wrack was a tangle of brown grass, weed, and palm fibers; broken clam, cockle, and moon snail shells; a sprinkling of drift twigs worn as smooth as creek-bottom pebbles; dark green mangrove sprouts; and bristle-worm tubes encrusted with the tiniest bits of shell. I turned over a mass of brown weed, and little gray sand fleas skittered away.
The sky had completely cleared by 5:30, and with the sun low in the sky and the air turning chilly, the dozen or so boats that had landed nearby for the day were gone. The wind swept across the beach toward the bay and the distant marsh. Sand drifted around the firewood I’d stacked for the evening. I squatted upwind of the pile to prevent the lighter from blowing out and got the fire going. After the fatwood was burning well, its amber resin liquid and bubbling, and had started the larger pieces, I sat on my bucket off to one side.
With the clear sky, the temperature plummeted after sunset, so I swapped out the hoodie for a thick sweater and got the fire going. Later I wore both the sweater and the hoodie. Matagorda Island State Park regulations allow Sunday Pass visitors to bring firewood from home, a luxury that makes starting a campfire easy.
The fire roared in the wind; flames whipped outward, sending sparks across the sand toward the bay. I moved my 3-gallon drinking water can and my other bucket to the fire’s windward side to block some of the wind and used a driftwood poker to rearrange the pieces of burning wood so that the fire was more compact. The only clouds in the sky, lying low and wide just above the horizon, pleated the fan of the sun’s copper and gold light where it spread across a purple sky. After the sun slipped beneath the horizon, the thin band of Matagorda Island’s dunes and mangroves across the pass dimmed to an empty black. The water in the pass glistened with the colors of the sky. Both sky and water dimmed around the silhouette of Matagorda Island and then disappeared entirely. Stars winked on by ones and twos and then by the dozens, and Mars glowed steady, orange, and bright. I stepped away from the fire to escape its scrim of amber light, and the Milky Way spread across a moonless sky.
Eventually I got cold and returned to the fire, and an hour or two after that, the last of my firewood burned down to only a red-orange pulsing glow deep within black-edged coals. It was 9:00 and high tide. The boat sat unmoving, its rode slack. I poured half a bucket of seawater over the coals, stirred the sludge with my driftwood poker until the last trace of the fire’s light was gone, and poured the rest of bucket of water on top.
As the sun set beyond Sunday Pass, it was hard to believe that the expanse of water between this little sand spit and Matagorda Island in the background was once Sunday Beach; the land was entirely swept away by the 130-mph winds of Hurricane Harvey in 2017.
The morning was quiet. It was Monday, and for most, the weekend was over. The birds and I had the world to ourselves.
I sat on my driftwood beam with my coffee and cereal and enjoyed the morning. With the sky so clear and the air so still, the just-risen sun could take the chill out of the air. I was looking forward to a casual row back to the mainland on such a day, but I couldn’t dillydally. A front, forecast to come through in the evening, would stir the air soon enough and pick up steam over the course of the day. Although most of my row back to Port O’Connor would be downwind, I would be exposed to waves crossing Espiritu Santo and Barroom bays, so after breakfast and a short stroll down the beach, I broke camp and loaded the boat.
It was a pleasant row back to Port O’Connor. I had suspected I might be saddened by leaving such a special place, knowing it would be a while before I could make such a trip again, but I felt surprisingly content. The place I had found was now as much within me as it was on my chart.
Roger Siebert is an editor in Austin, Texas. He rows and sails his Flint on local lakes, and has trailered it to a few of his favorite places on the Florida coast.
Is there a boat you’d like to know more about? Have you built one that you think other Small Boats Magazine readers would enjoy? Please email us!
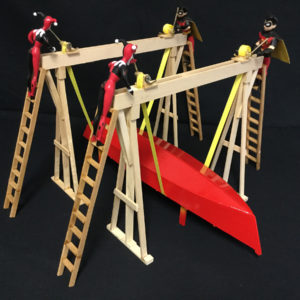
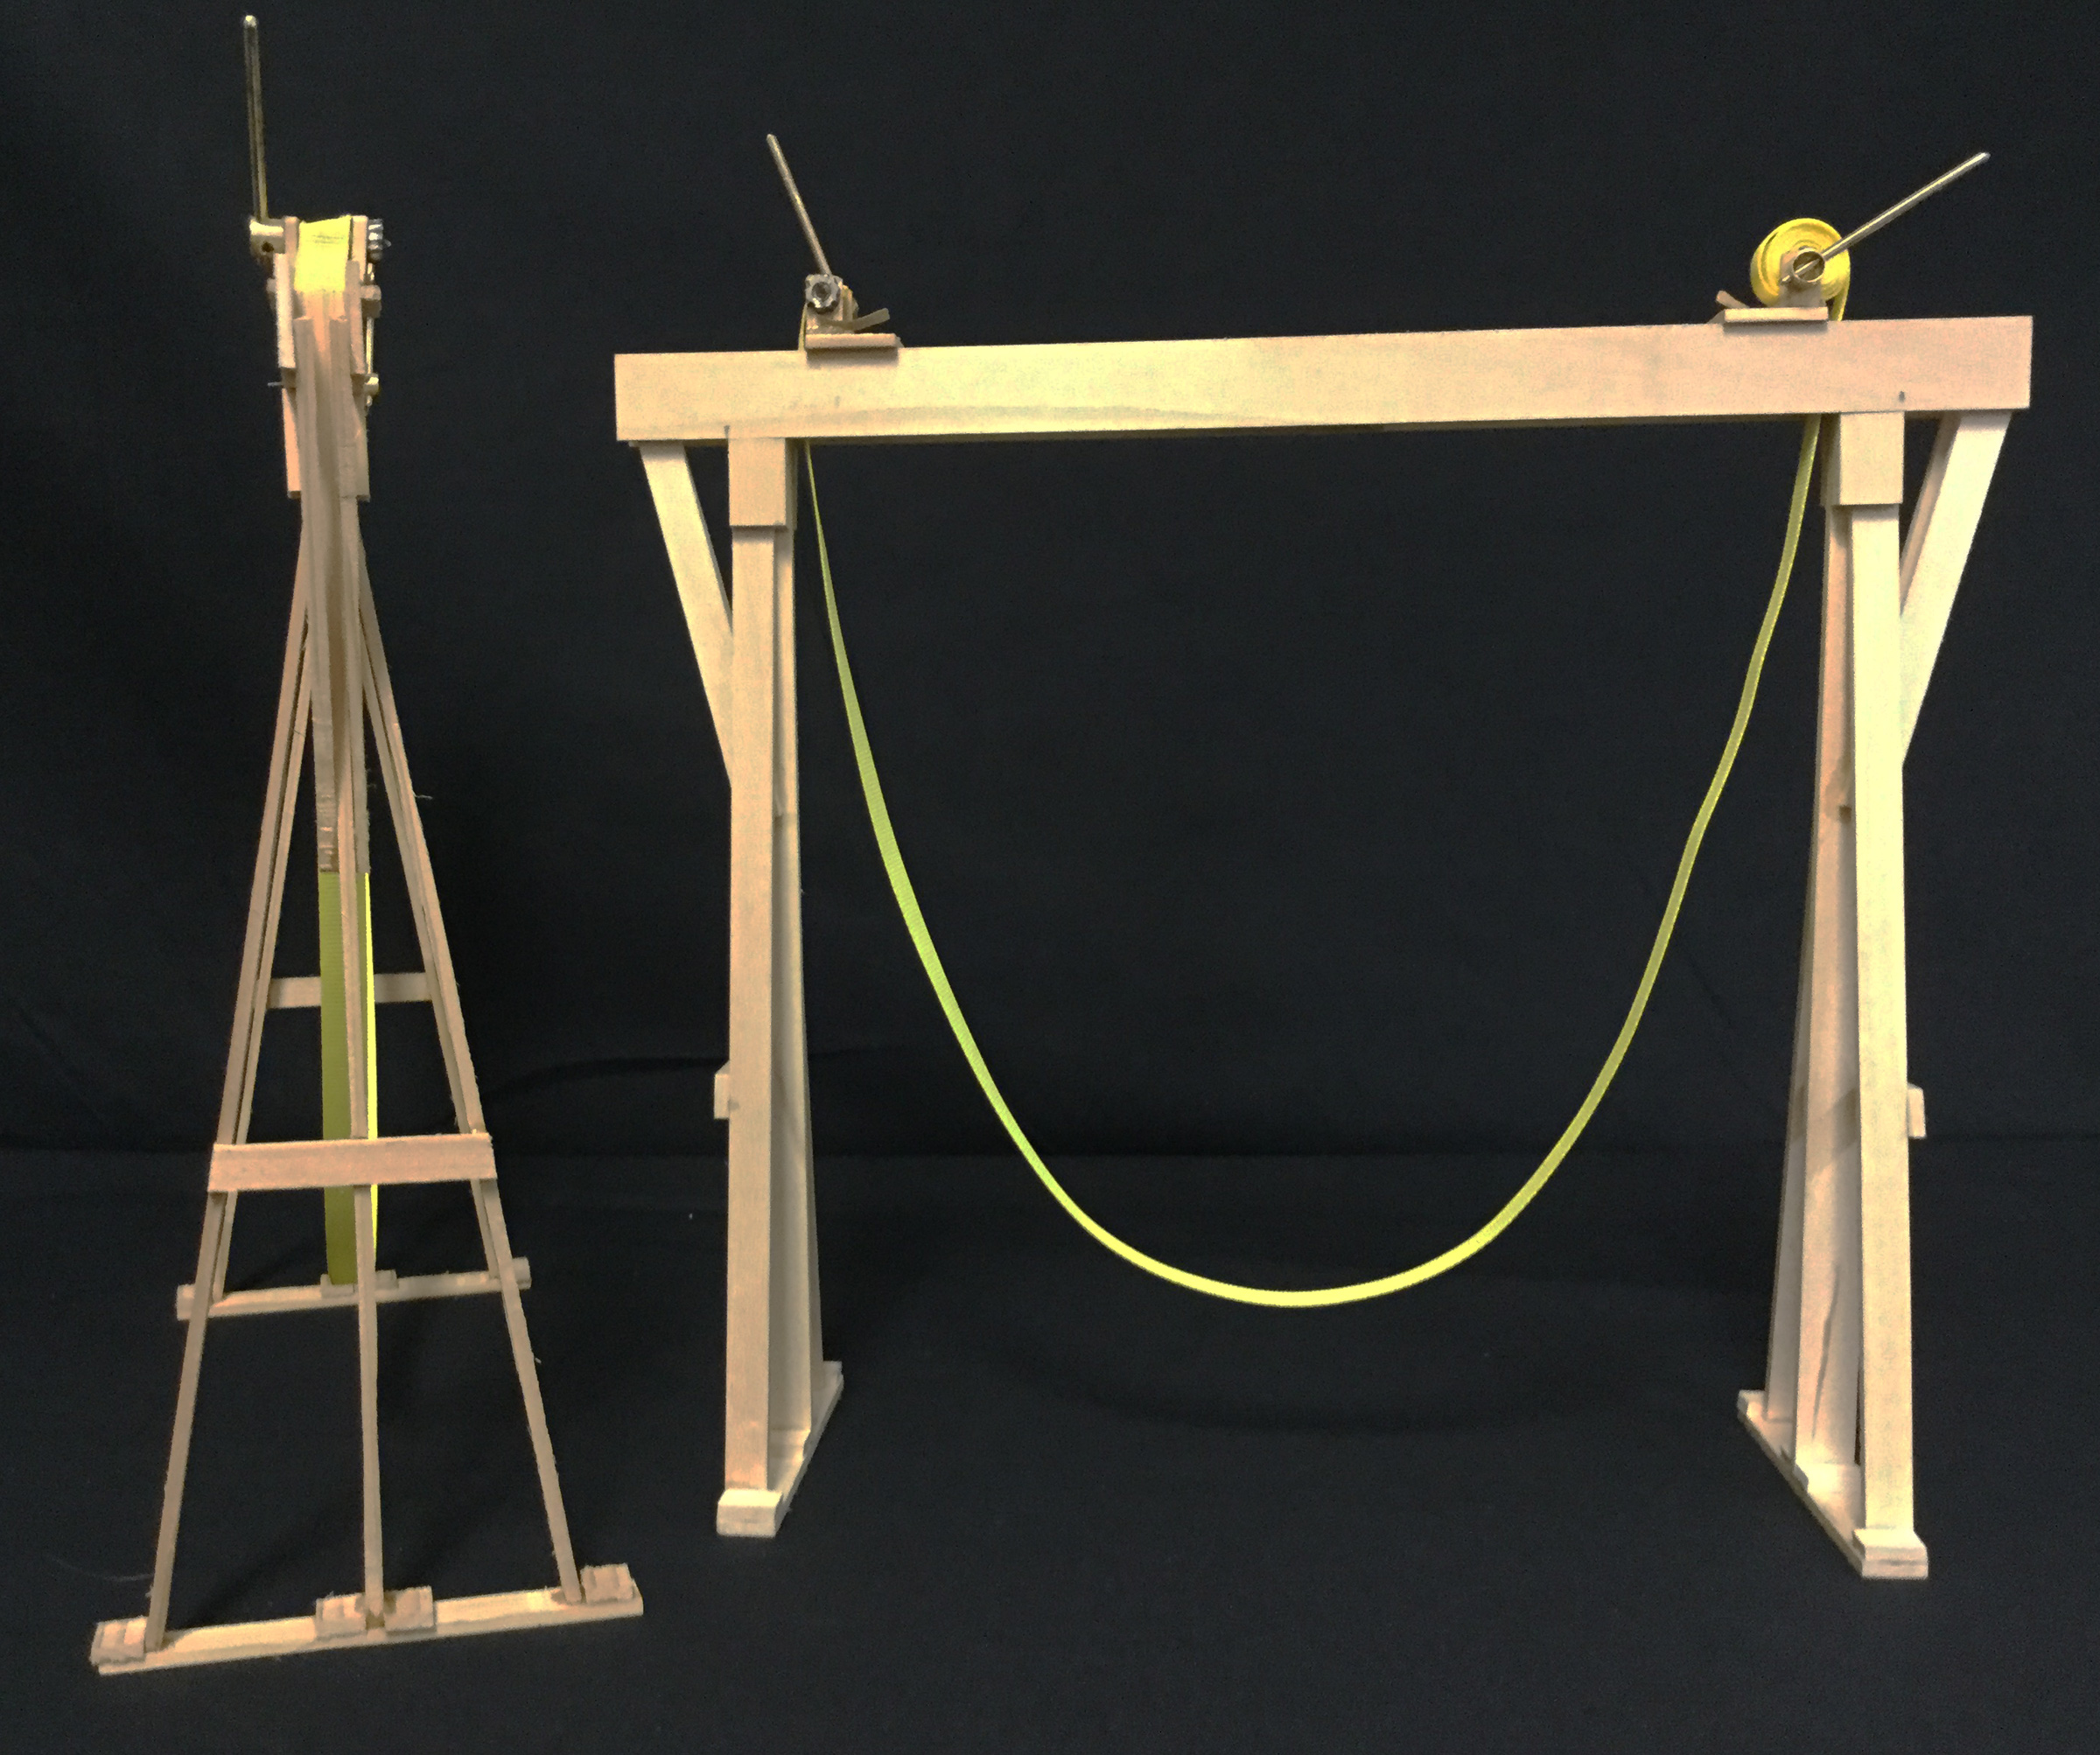
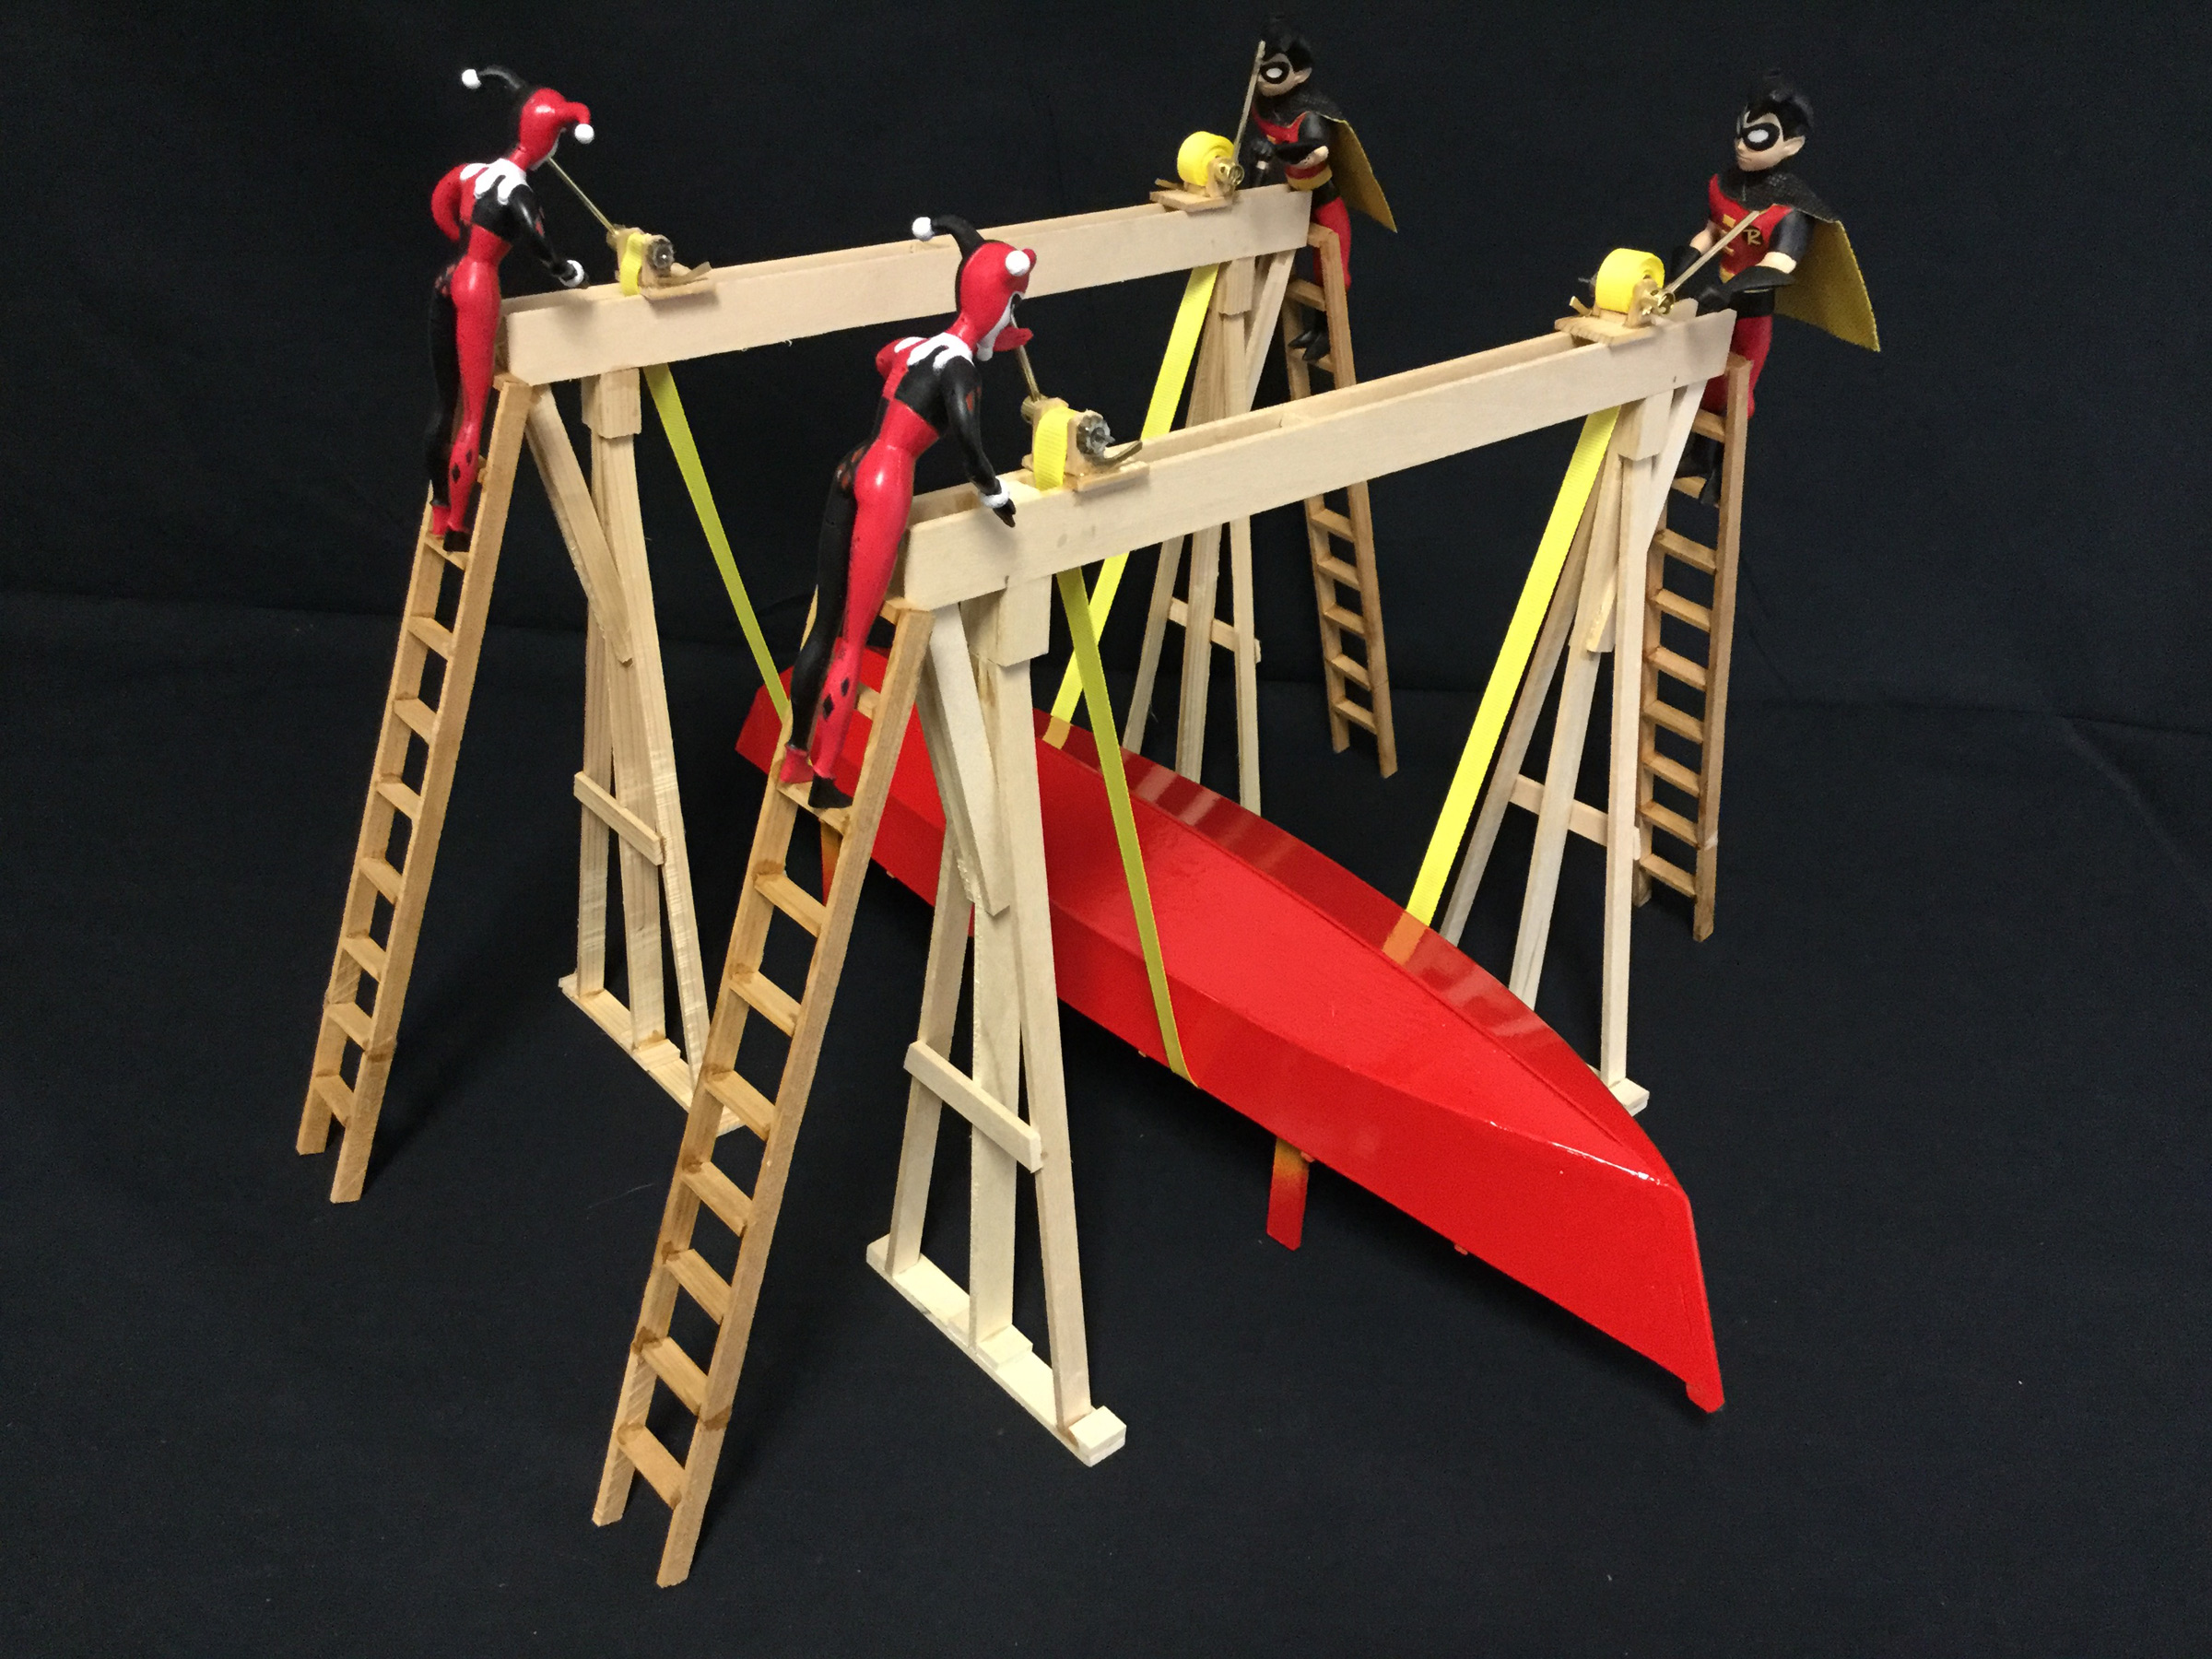
In order to ease the construction of my 18′ pocket cruiser, I built a pair gantry cranes. I dismantled them at the job’s conclusion, so I built models to illustrate them here. While the size and materials may be adjusted to the builder’s needs, my full-sized gantries had 12′ 2×8 horizontal beams, 10′ 2×6 vertical supports, 8-1/2′ 2×4 angled upright braces, 18″ 2×6 top spacer blocks, 8″ 2×6 top beam supports, and 4′ 2×6 bases. The handles for winding the winches are inserted here.
When I built my Glen-L Bo Jest, an 18′ x 8′ pocket cruiser, there came a time when I had to get the hull from upside down—the way it was built—to right-side up to finish construction. To do the job I made a pair of gantry cranes; I’ve long since dismantled them, as they were of no use after I trailered the boat away from the shop.
This exploded detail shows the arrangement of the corners of the frame. Omitted for clarity is the diagonal brace running from the ends of the beam down 4’ or 5’ to the vertical support to prevent side sway.
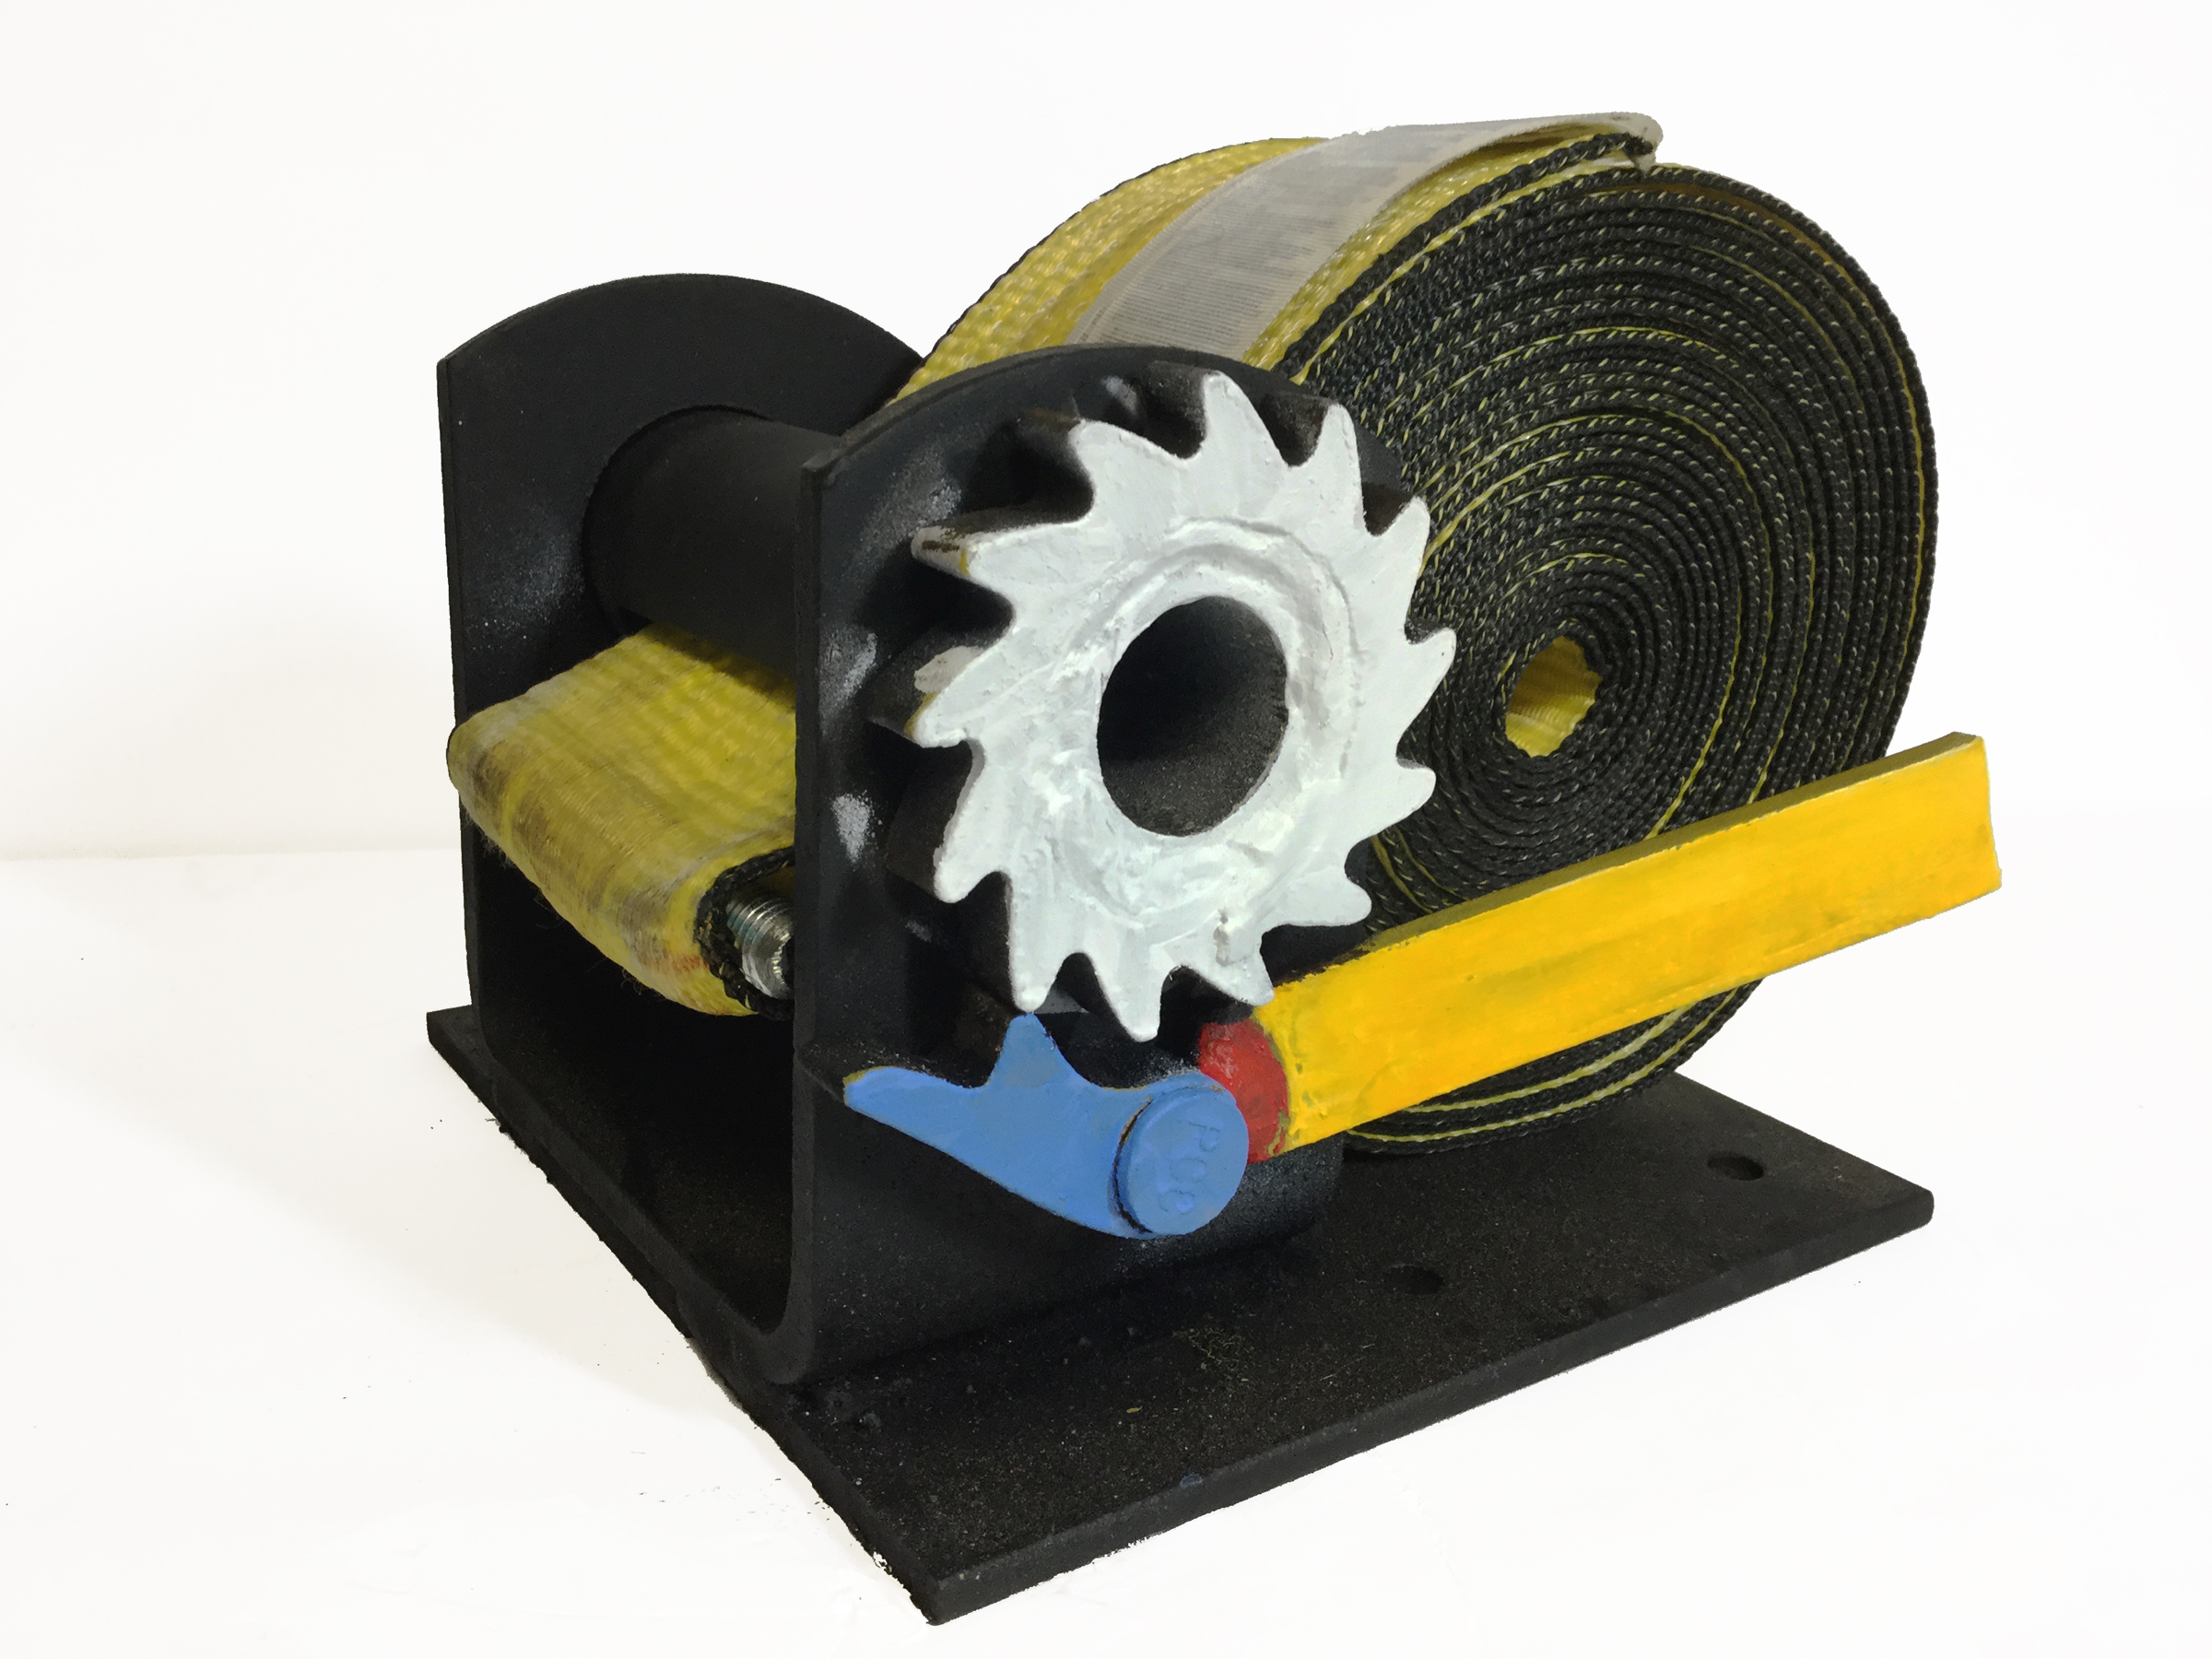
I made the frames of the full-sized gantries with dimensional lumberyard stock assembled with Torx self-tapping screws, along with 1/2″ bolts and fender washers where extra strength is needed. The lifting was done with the four truck winches and two 4”-wide, 5,500-lb-rated tie-down belts. Each winch was drilled with 3/8″ holes and mounted to the frames’ horizontal beams with long bolts. Steel plates, 8″ x 8″ x 1/4″, distributed the weight on the softwood gantry frame and kept the winches stable.
Rolling a hull of this size is usually an operation that requires a small army of helpers. Working with the gantry cranes doesn’t require so many people; it goes fastest with four winch operators, each on a safely secured ladder, and a couple of additional helpers on the ground to assist when needed. The cranes rotate the hull in place, keeping it from rolling and traveling across the floor—a benefit for working in a small space.
A modified tie-down winch is shown here with the webbing rolled up and its end loop threaded through the winch drum and a metal retaining pin inserted. The ratchet gear is painted white; the ratchet pawl is blue and the added handle is yellow. The weld joining the ratchet pawl and the handle is painted red. The weight of the handle pushes the pawl against the gear. When this type of winch is used on a truck, the pawl is on top of the ratchet gear pivots under its own weight to engage the ratchet. When the winch is mounted in this orientation, the added handle provides the gravity operation and allows the operator easy and safe release of the ratchet gear, as needed.
To use the cranes, lead the belts under the hull and load the ends on the winches. Tension the belts and lift the hull slightly to allow the building jig to be released and removed. Block the hull up and take the tension off the belts to reposition them on the winches, rolling most of the belts onto the winches on the same side of both gantries and leaving just enough on the winches opposite to begin rotating the hull. This method provides the most length for lifting. The loops sewn into the ends of the webbing must be threaded through the slotted drum of each winch and have a steel rod inserted to prevent the web from slipping out of the winch. A heavy load may unwind webbing that relies on additional wraps to keep them in place.
Winch the hull up a few inches and begin rolling the hull, keeping it parallel to the floor. Wind each belt from the full winch to the nearly empty one. The helpers operating the empty winches pull and reset the winch handles as needed, and the ratchets will lock themselves automatically with their own weight. The helpers on the other side paying out the belts will have to pull back on their bars slightly, lift the ratchet dog handle, let a few inches of webbing out, and let the ratchet relock.
Twins of Harley Quinn and Robin have winch duty. As they wind the webbing from Robin’s side (right) to Harley’s (left), the hull rolls over.
The hull rolls as the process is repeated. The operation will progress smoothly if the teams coordinate their efforts between the winches paying out and the winches pulling in. Continue until the hull has rolled 90 degrees or slightly more. If the hull hasn’t reached the tipping point and the winches taking up the belts are now full, use some rope or a pole to get the hull to shift its weight across in a controlled manner. Once the tipping point has been passed, the hull should slide upright on its own, or with just a little coaxing, within the confines of the now static belts.
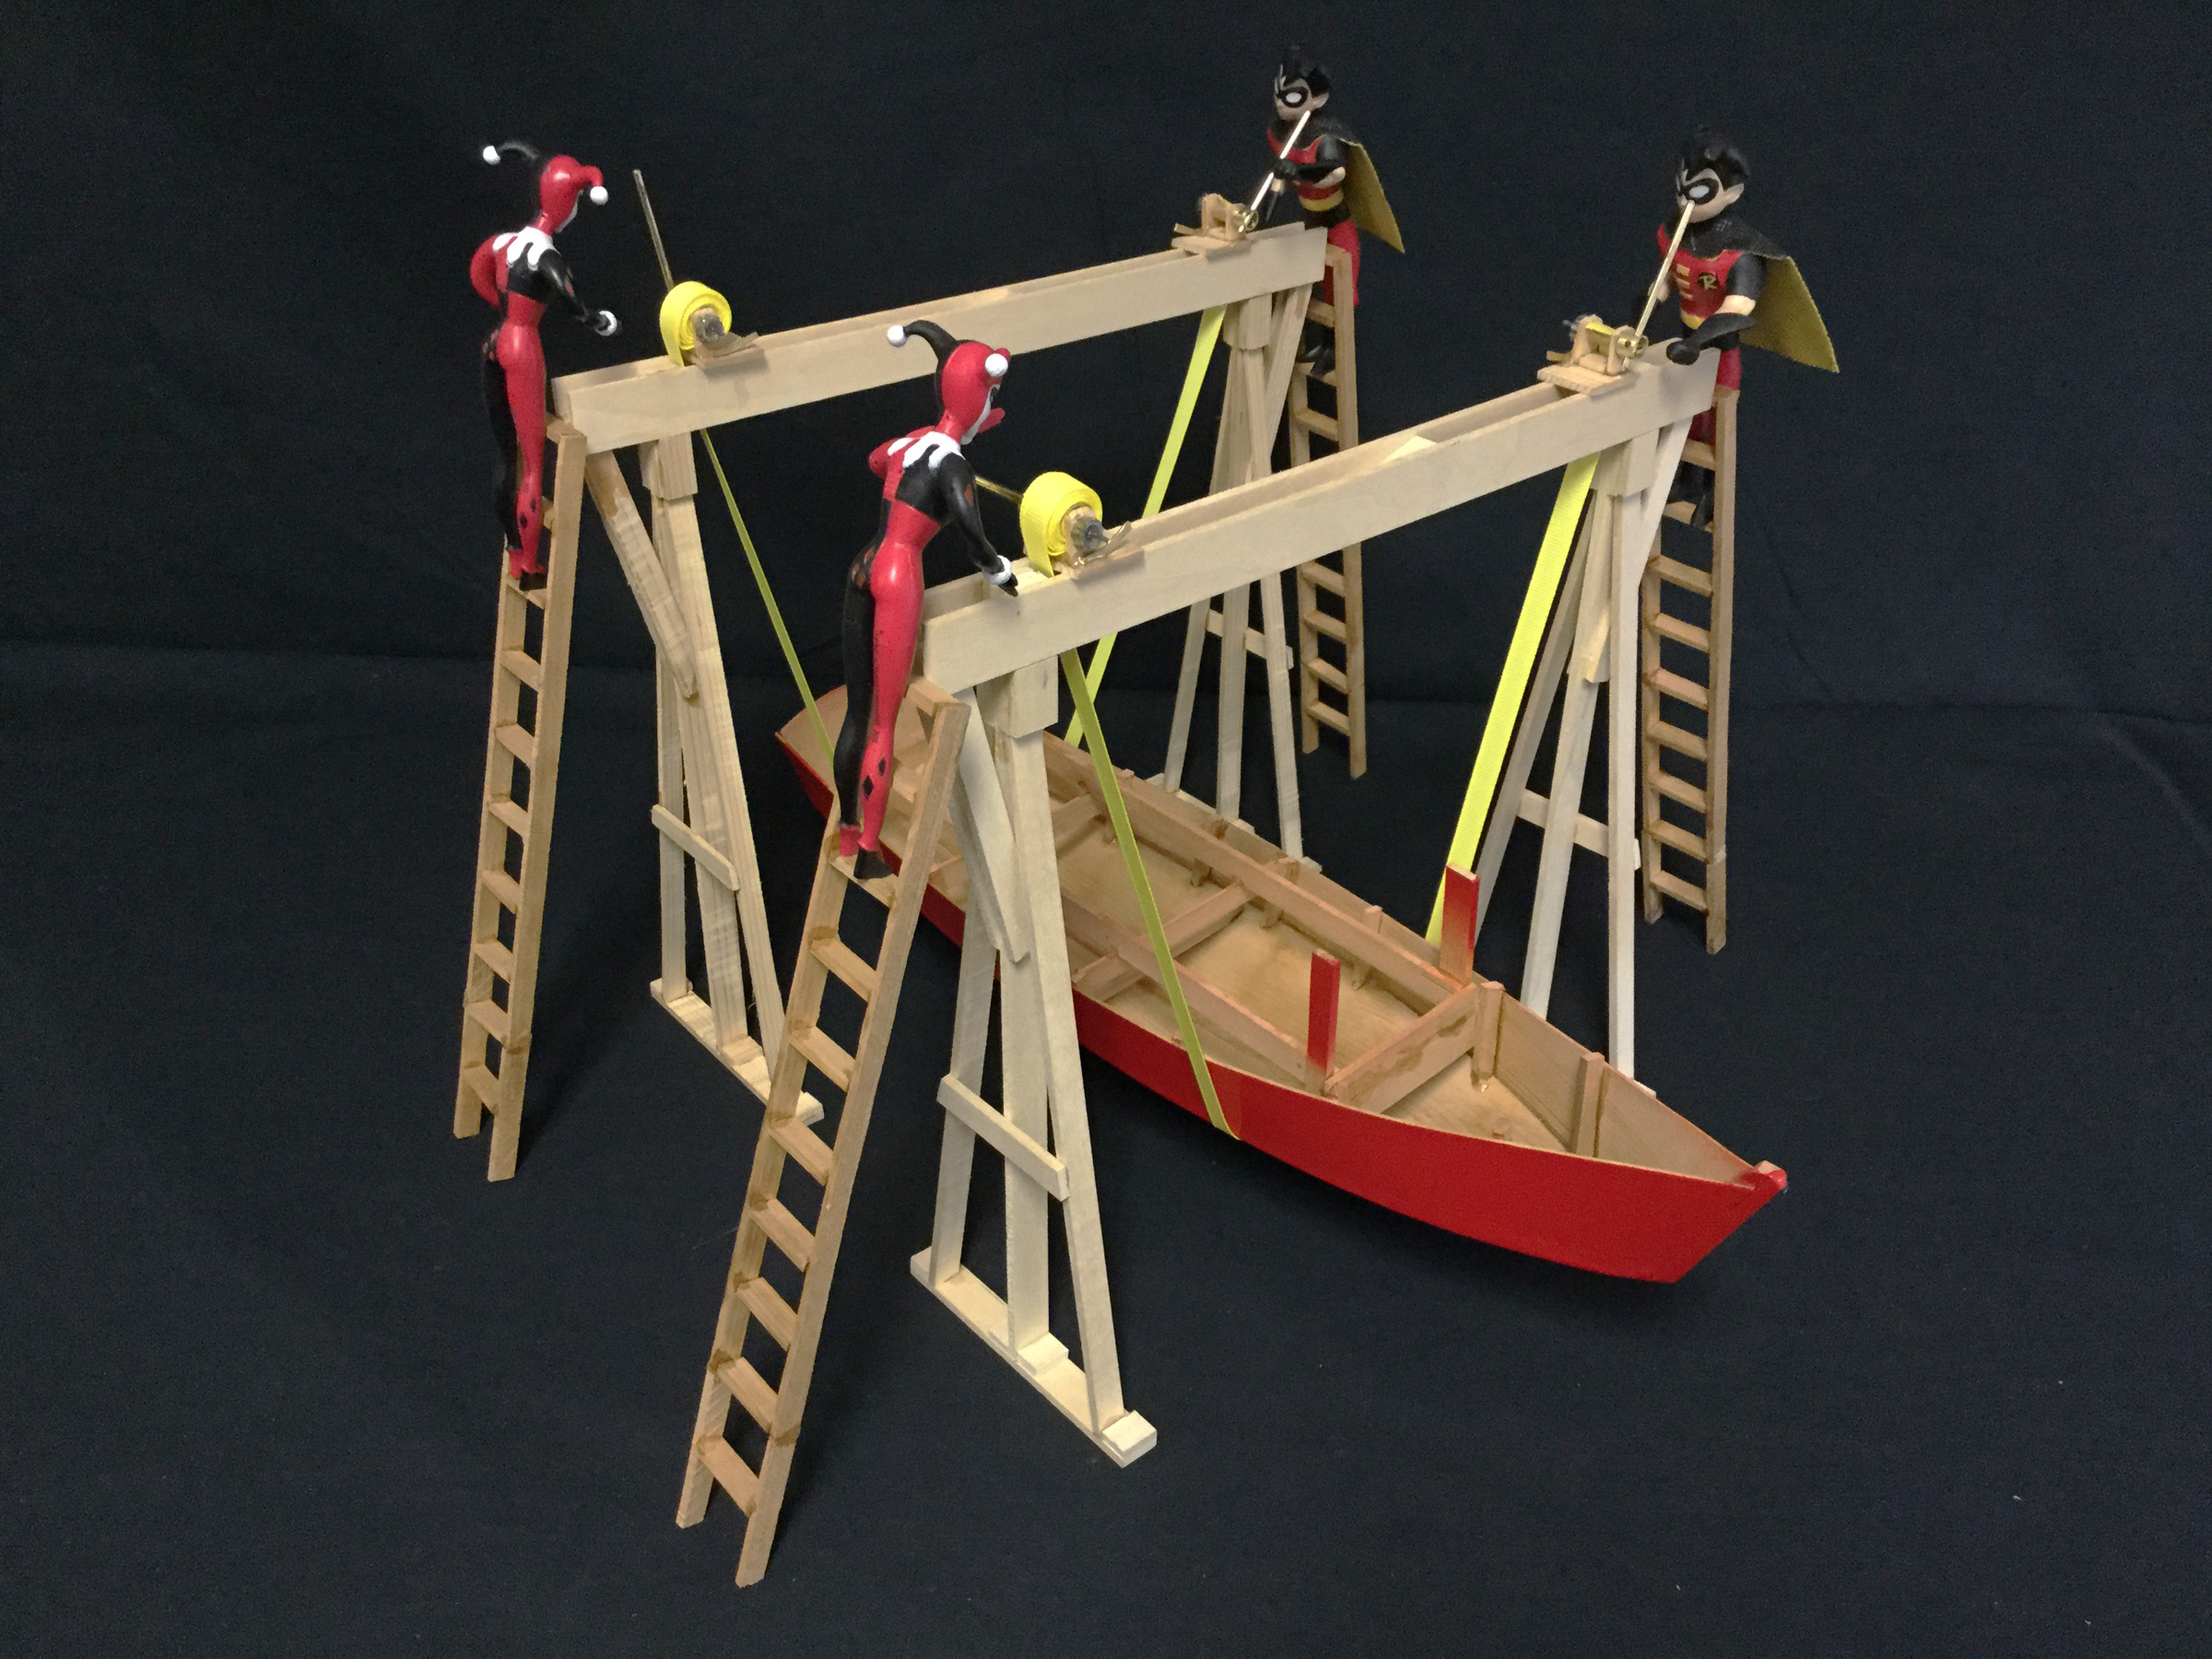
After the hull is upright it can be raised and then lowered onto a cradle or positioned on blocks. The 4′ bases on my gantries made them free-standing and allowed me to push them out of the way while the remainder of the construction continues. At the end of the build, the gantries lifted the finished 2,350-lb boat onto its trailer.
With the webbing shifted to the left sides, the hull is upright, ready to be lowered onto a cradle for the construction of the interior. The gantry cranes will be put aside and returned when the finished boat is ready to be lifted onto its trailer.
If your work space has strong, accessible ceiling joists or other overhead structures that can support the hull, you may be able to use truck winches without having to build gantries. The ratchet dog handles will work by gravity in the orientation shown; if they are used upside down, then a spring mechanism or a counterbalance opposite to the ratchet handle will be needed.
Earl Boissonou, 81, lives in Corvallis, Oregon, and is a retired elementary-school teacher. He is a passionate artist who draws, paints, and sculpts. He began sailing in 1968 and built his first boat, an Adirondack guideboat, in 2009 to keep busy while recovering from a major operation. The Glen-L Bo-Jest that required the gantry cranes was his most recent build. He wishes to credit to his friend John Fruetel for coming up with the idea of the gravity-operated ratchet dog—a necessary component. At age 91, John still as an active and inventive mind.
You can share your tips and tricks of the trade with other Small Boats Magazine readers by sending us an email.
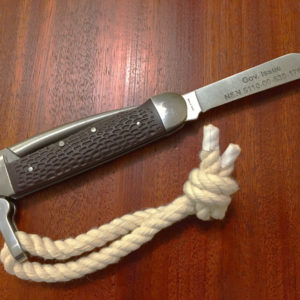
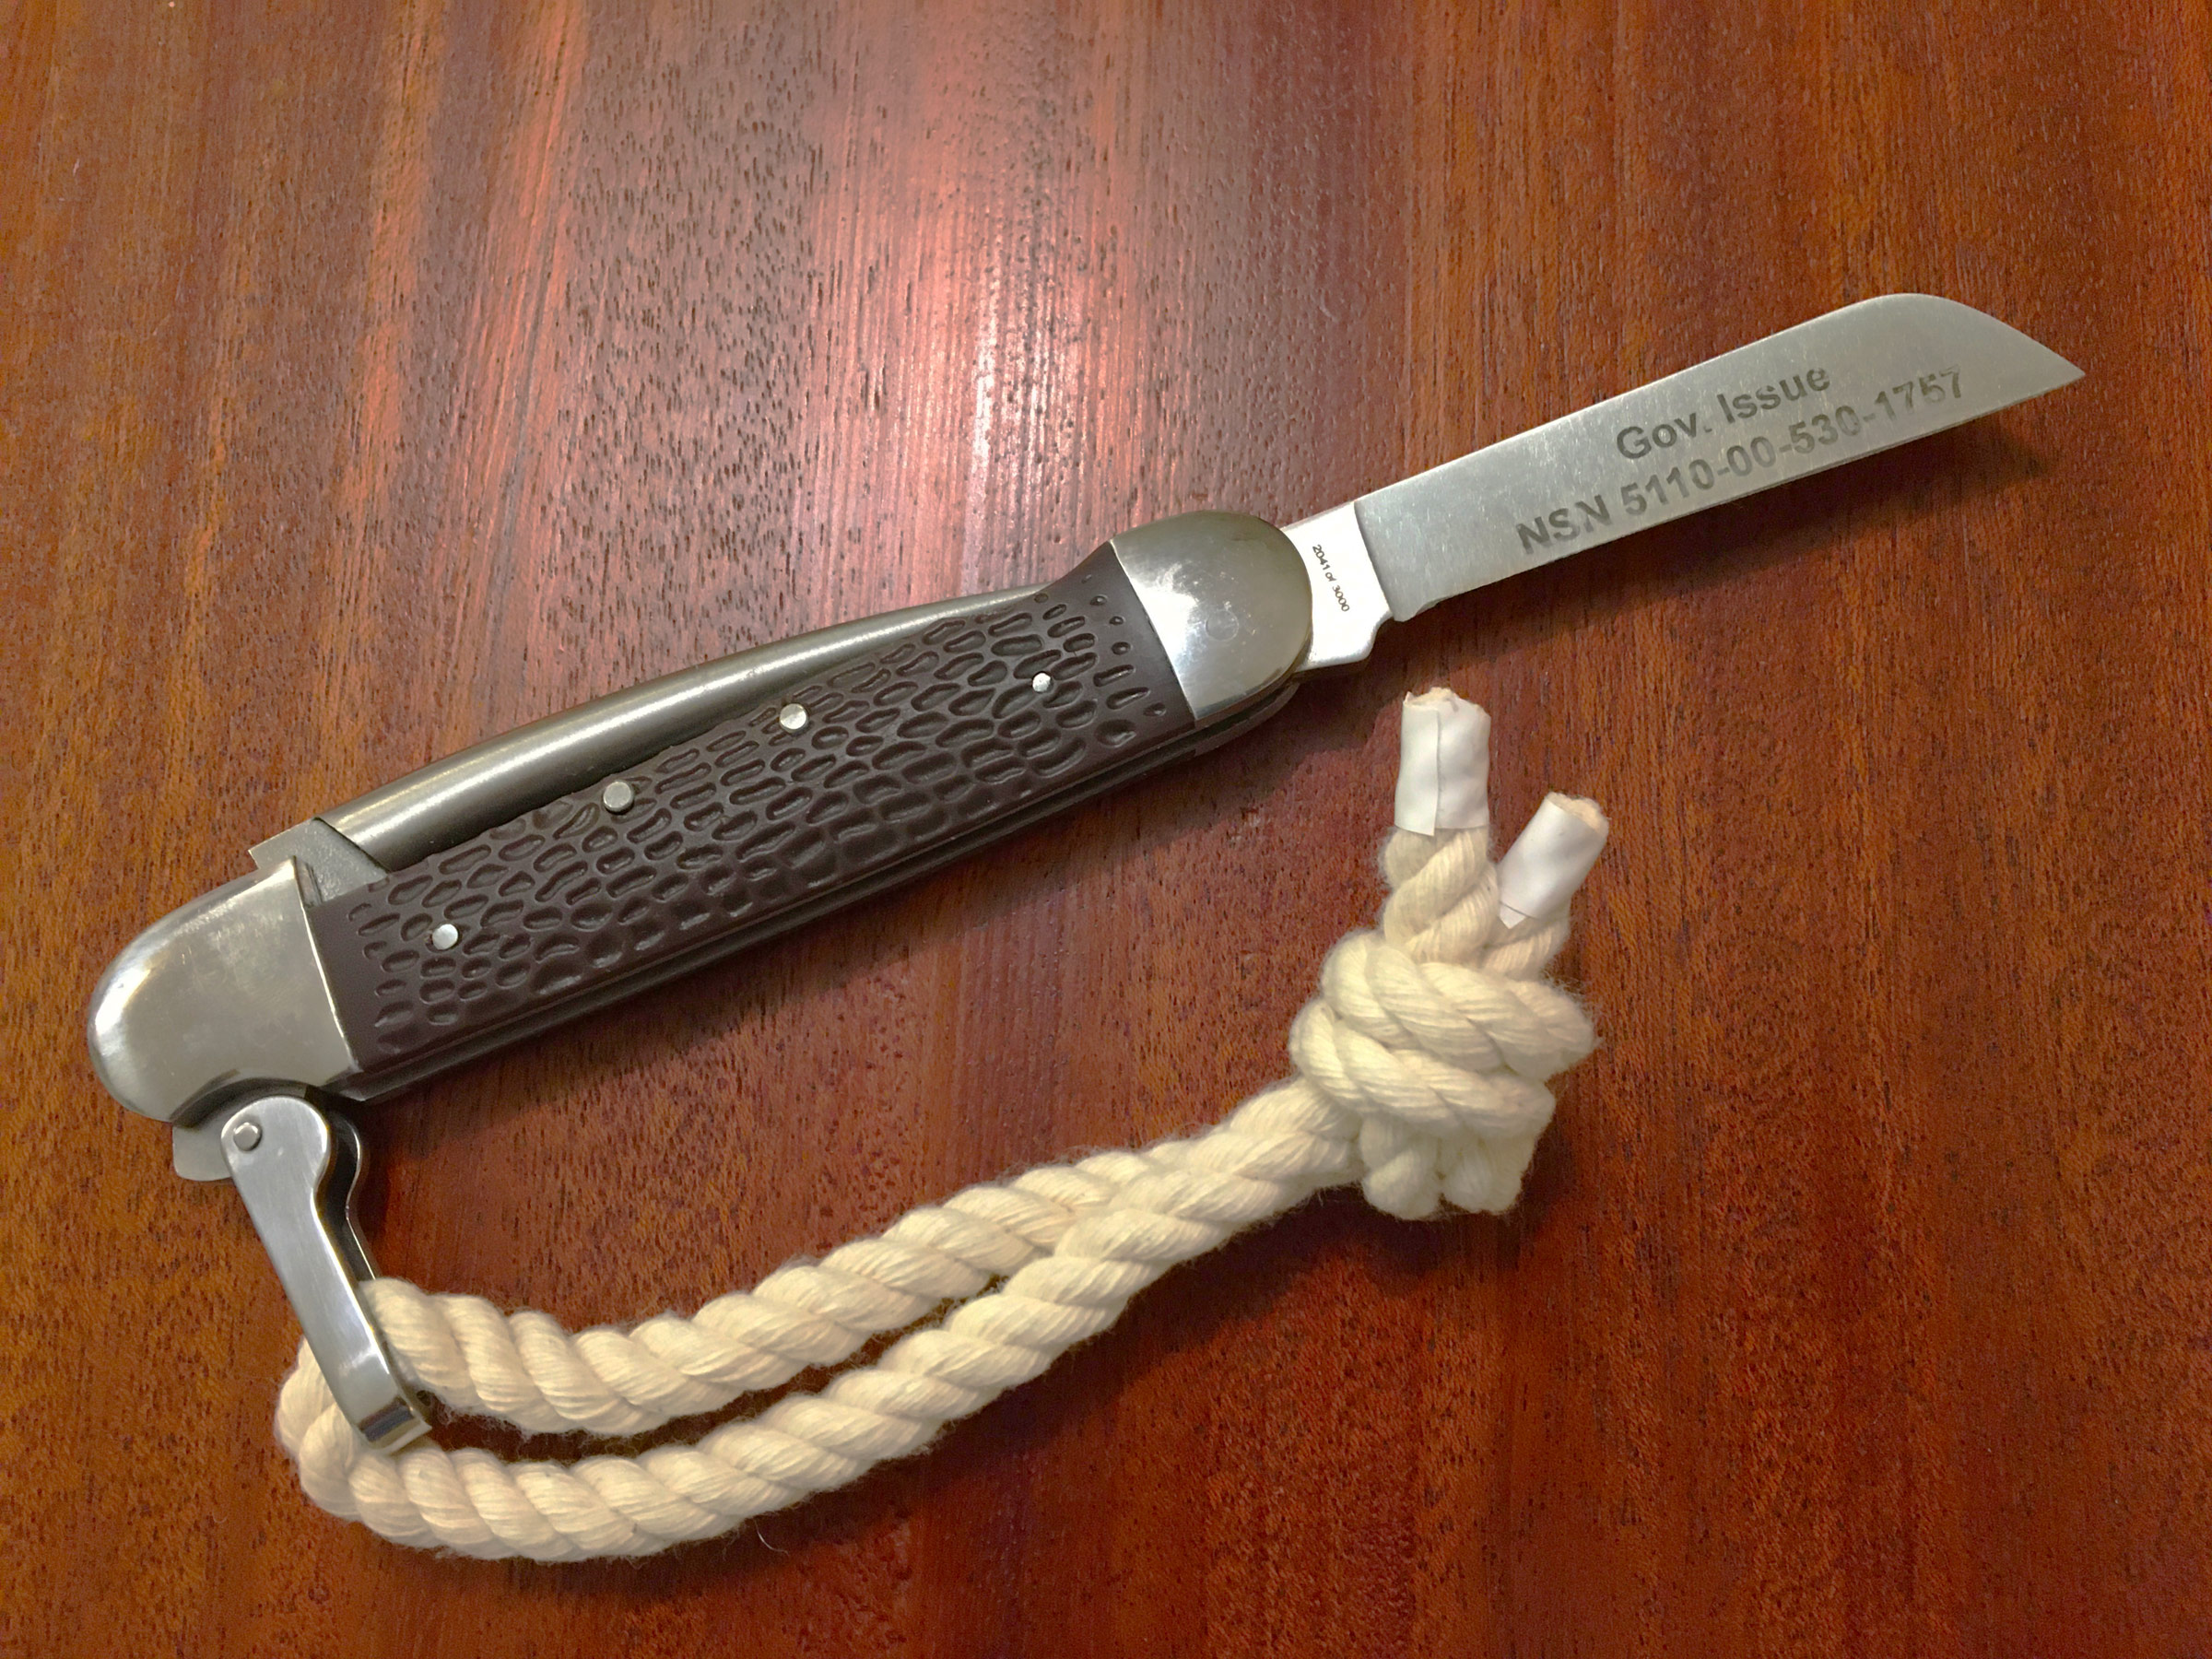
The Marlinspike Knife from Colonial Knife Company is built to a U.S. Navy design and comes with the lanyard shown here, and the Department of Defense National Stock Number (NSN) etched onto the blade.
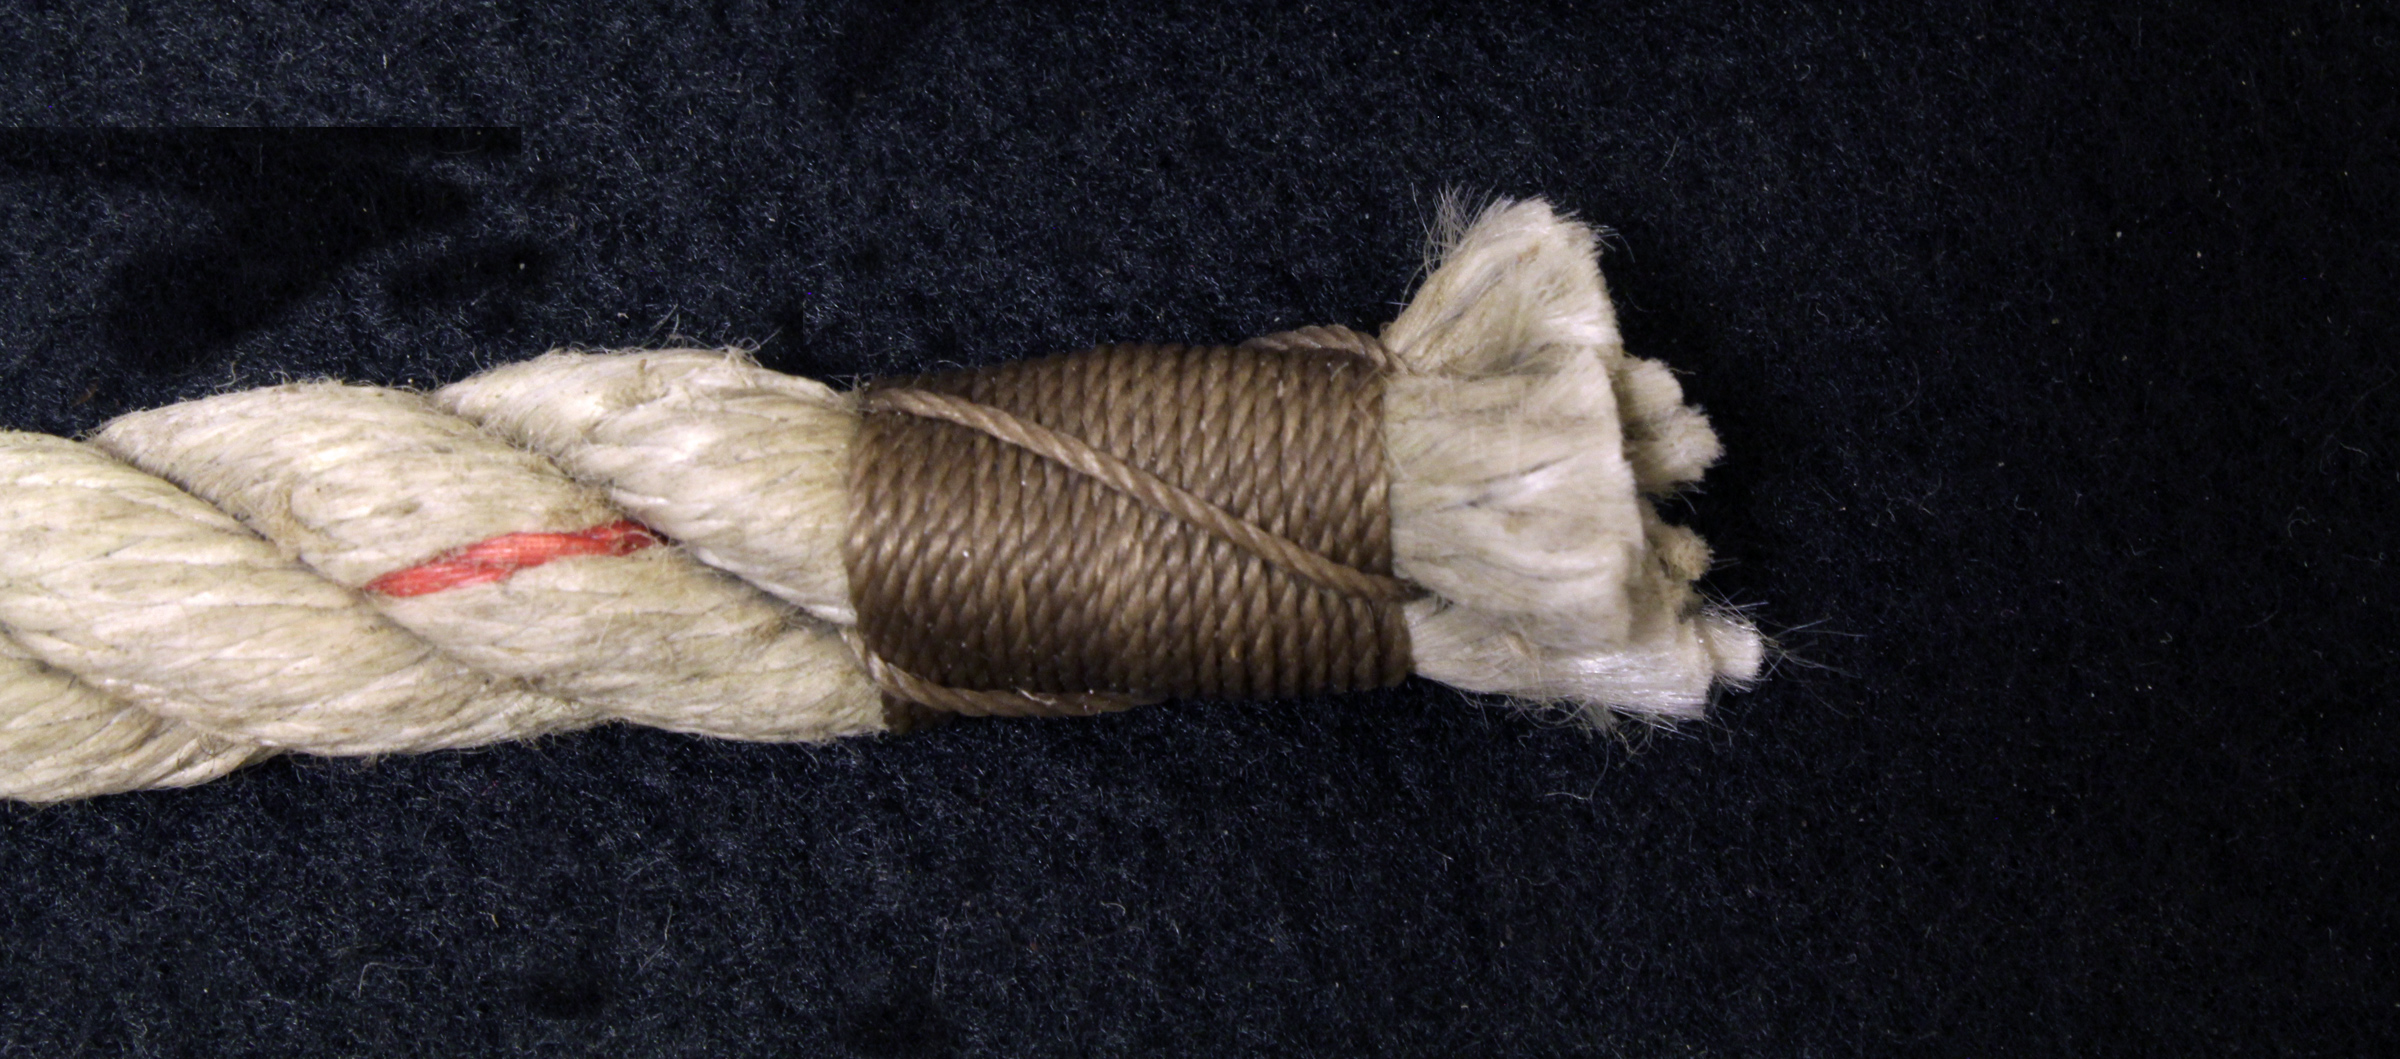
Before I had a rigger’s knife I used various pocket knives, X-actos, and scissors for cutting line. I kept a lookout for a good rigger’s knife, but most seemed too big for the smaller jobs that I took care of on our fleet of boats. That all changed when I found the Marlinspike Knife from the Colonial Knife Company. A 4 1⁄2″-long folder, it’s a nice size to fit in a pocket.
The Marlinspike Knife has a hardened 440A stainless-steel 3″ blade with a deep fingernail groove for easy opening. The blade does not lock when open. The frame and pins in the knife are also stainless steel. The blade’s 2 5⁄8″ cutting edge is straight for its entire length, a very useful feature for cutting line. You can make a long draw cut without having to pivot the knife to keep the whole length of the edge on the rope. The sheepsfoot blade’s flat spine curves down to meet the cutting edge to make a point that reduces the chance of piercing injuries and the blade’s satin finish helps hide fingerprints. The blade needed minimal attention straight out of the box, just a few strokes on the stone to finish the edge. The blade stays sharp through an afternoon of small-line cutting and will cut through 3⁄8″ polyester line, both braided and three-strand, with one stroke.
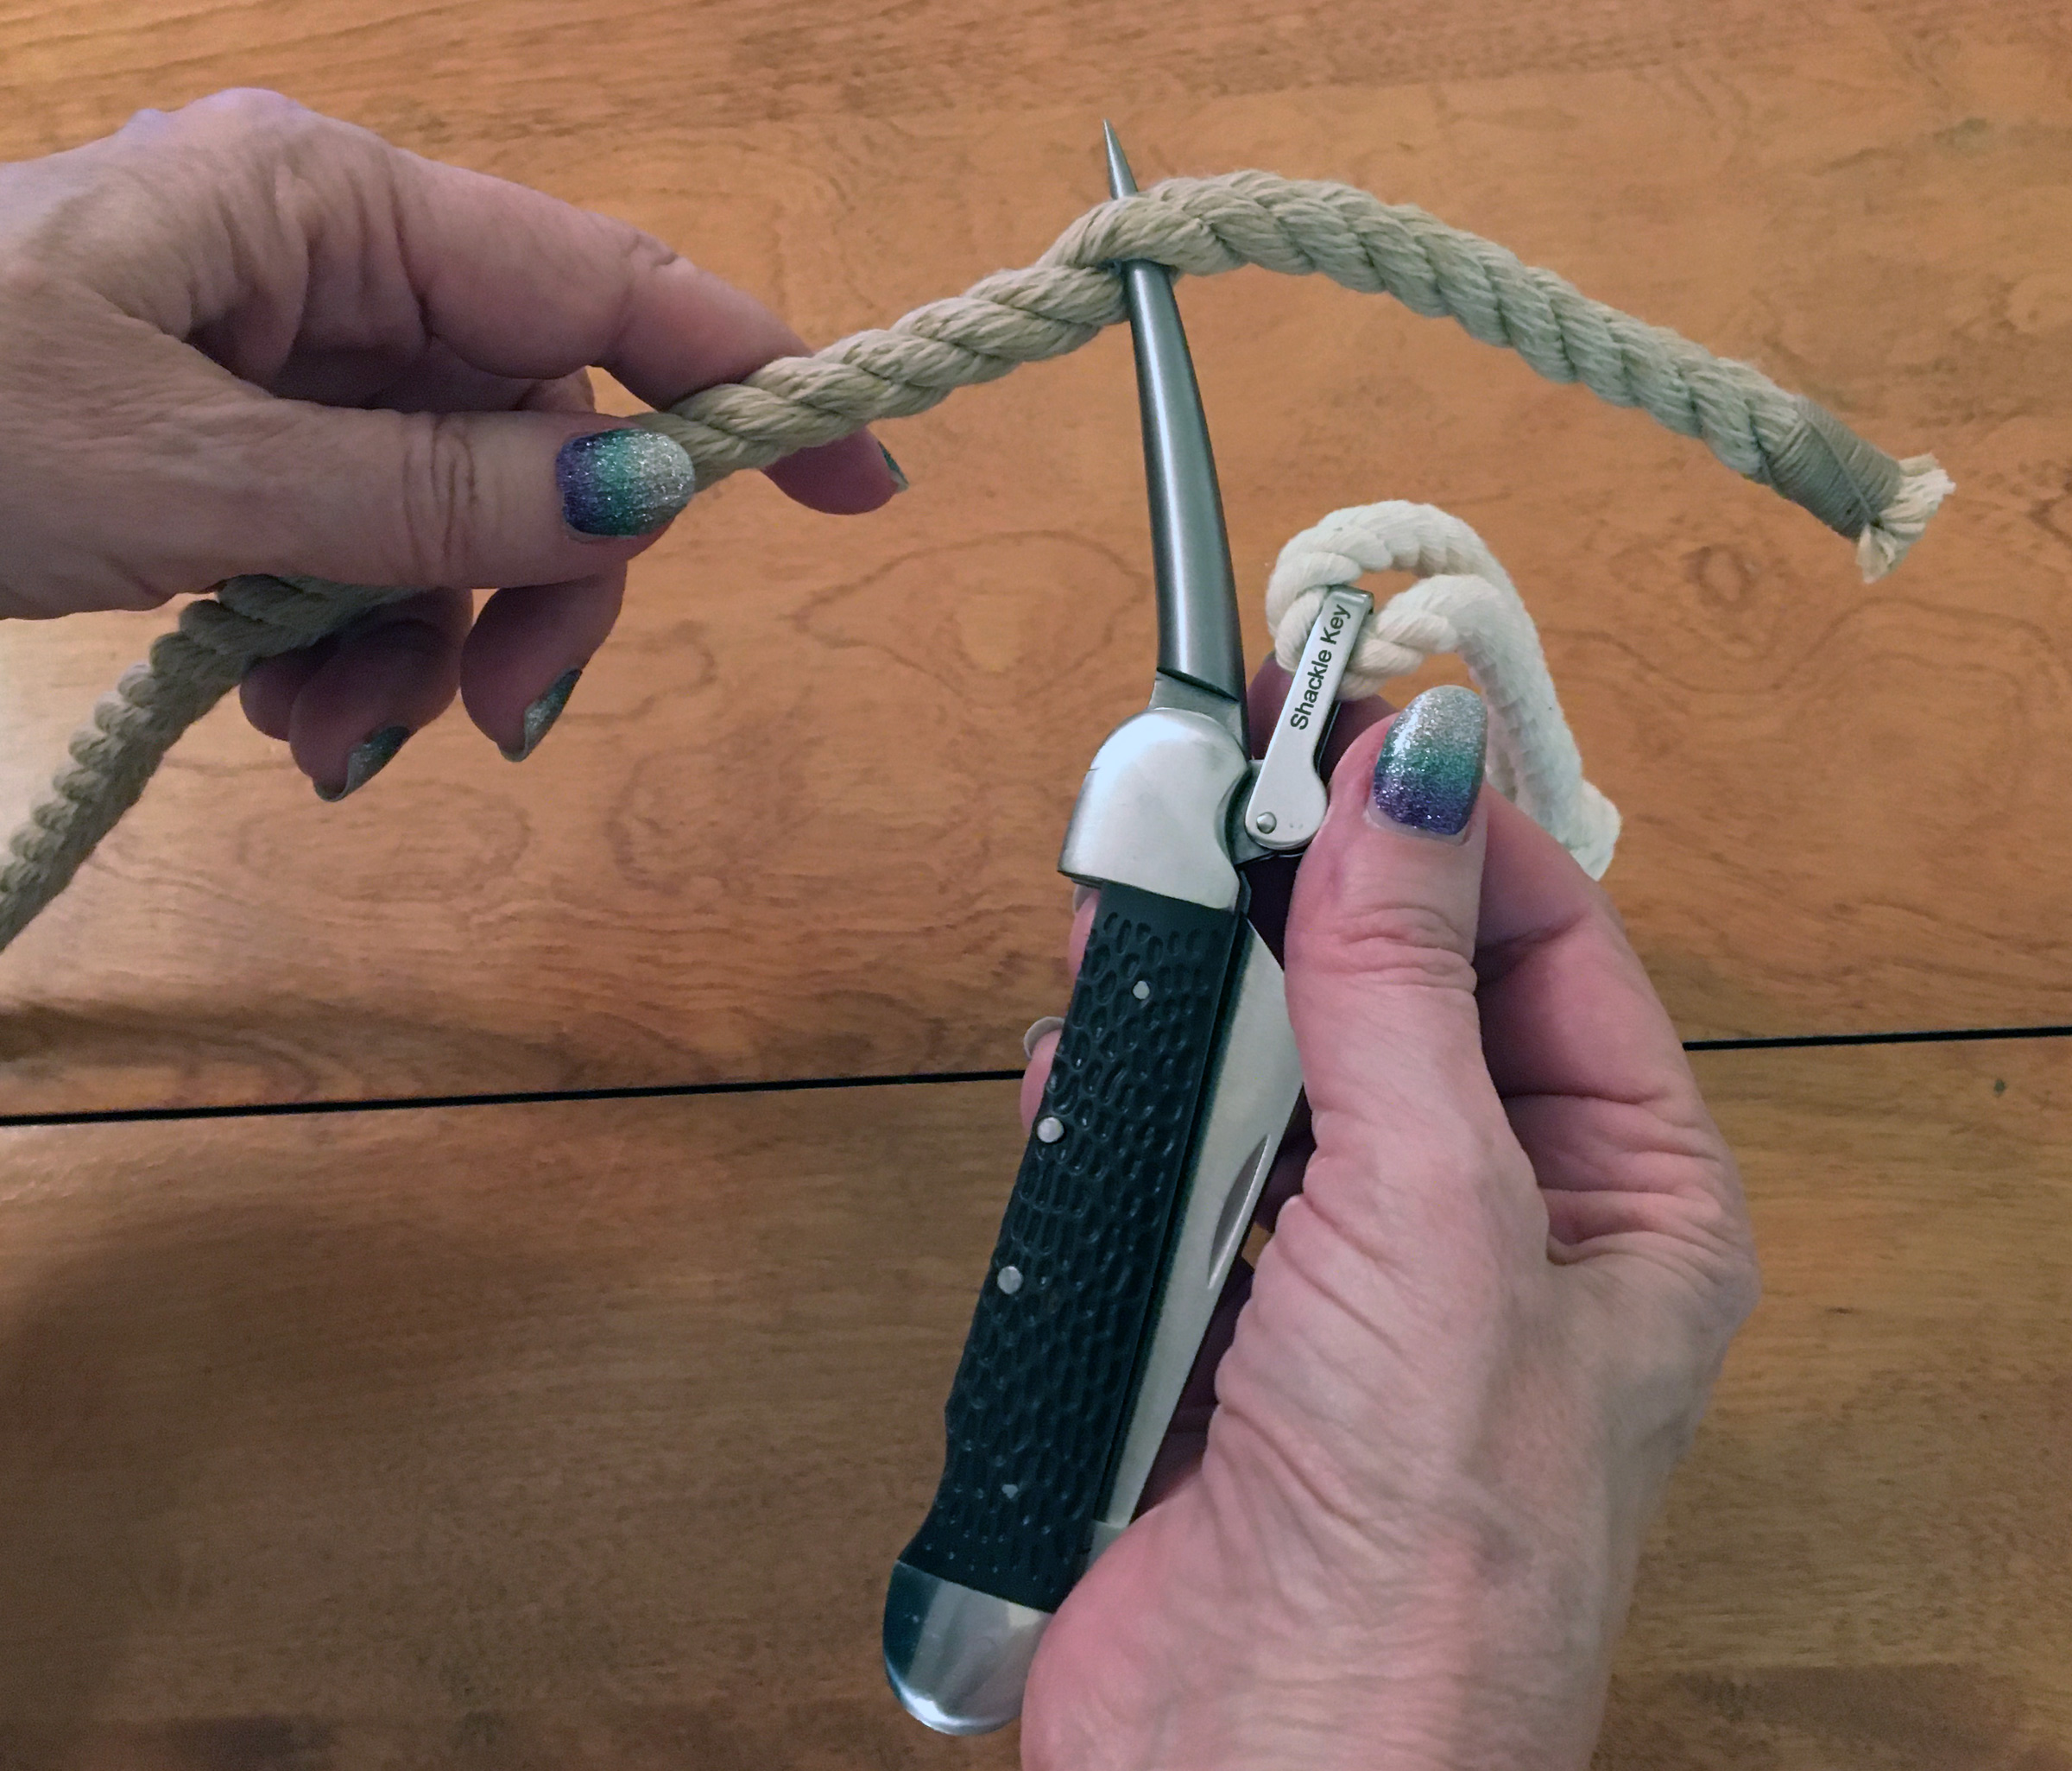
The spike locks when in use. Its release latch also serves as a shackle key.
The folding marlinespike is 316 stainless steel and locks in the open position, which keeps the spike from folding on your fingers when prying jammed knots open. The push-down lock release also serves as a shackle key and as a lanyard attachment point—a rope lanyard is included. The marlinespike is an excellent size for working the cordage that we use with small boats, whether loosening tight knots, splicing line, or laying open strands for whipping.
The durable Zytel handle has scalloped areas that ensure a firm grip. It is impact and abrasion resistant. Zytel can be sterilized in boiling water, which is one of the reasons that the U.S. Navy chose the material; it conforms to requirements for use by medical personnel.
The heavy-duty design has been around the U.S. Navy since the First World War, so the design is battle tested and the construction of this knife is well executed by Colonial. I have enjoyed the knife so much that I bought a second one; one knife is dedicated to our rigger’s kit, and the other floats around the shop and the fleet.
Kent and Audrey Lewis mess about in an armada of small boats on the inland waters of Northwest Florida. They log their nautical adventures at www.smallboatrestoration.blogspot.com.
A new model of the Marlinspike Knife will be available in 2025 sold directly by the Colonial Knife Company for $79.99. The knives are designated with the Department of Defense National Stock Number (NSN) 5110-00-530-1757.
Is there a product that might be useful for boatbuilding, cruising, or shore-side camping that you’d like us to review? Please email your suggestions.
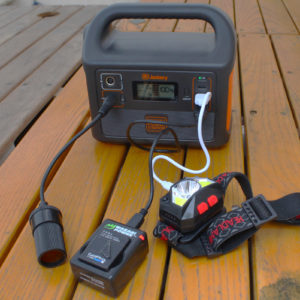
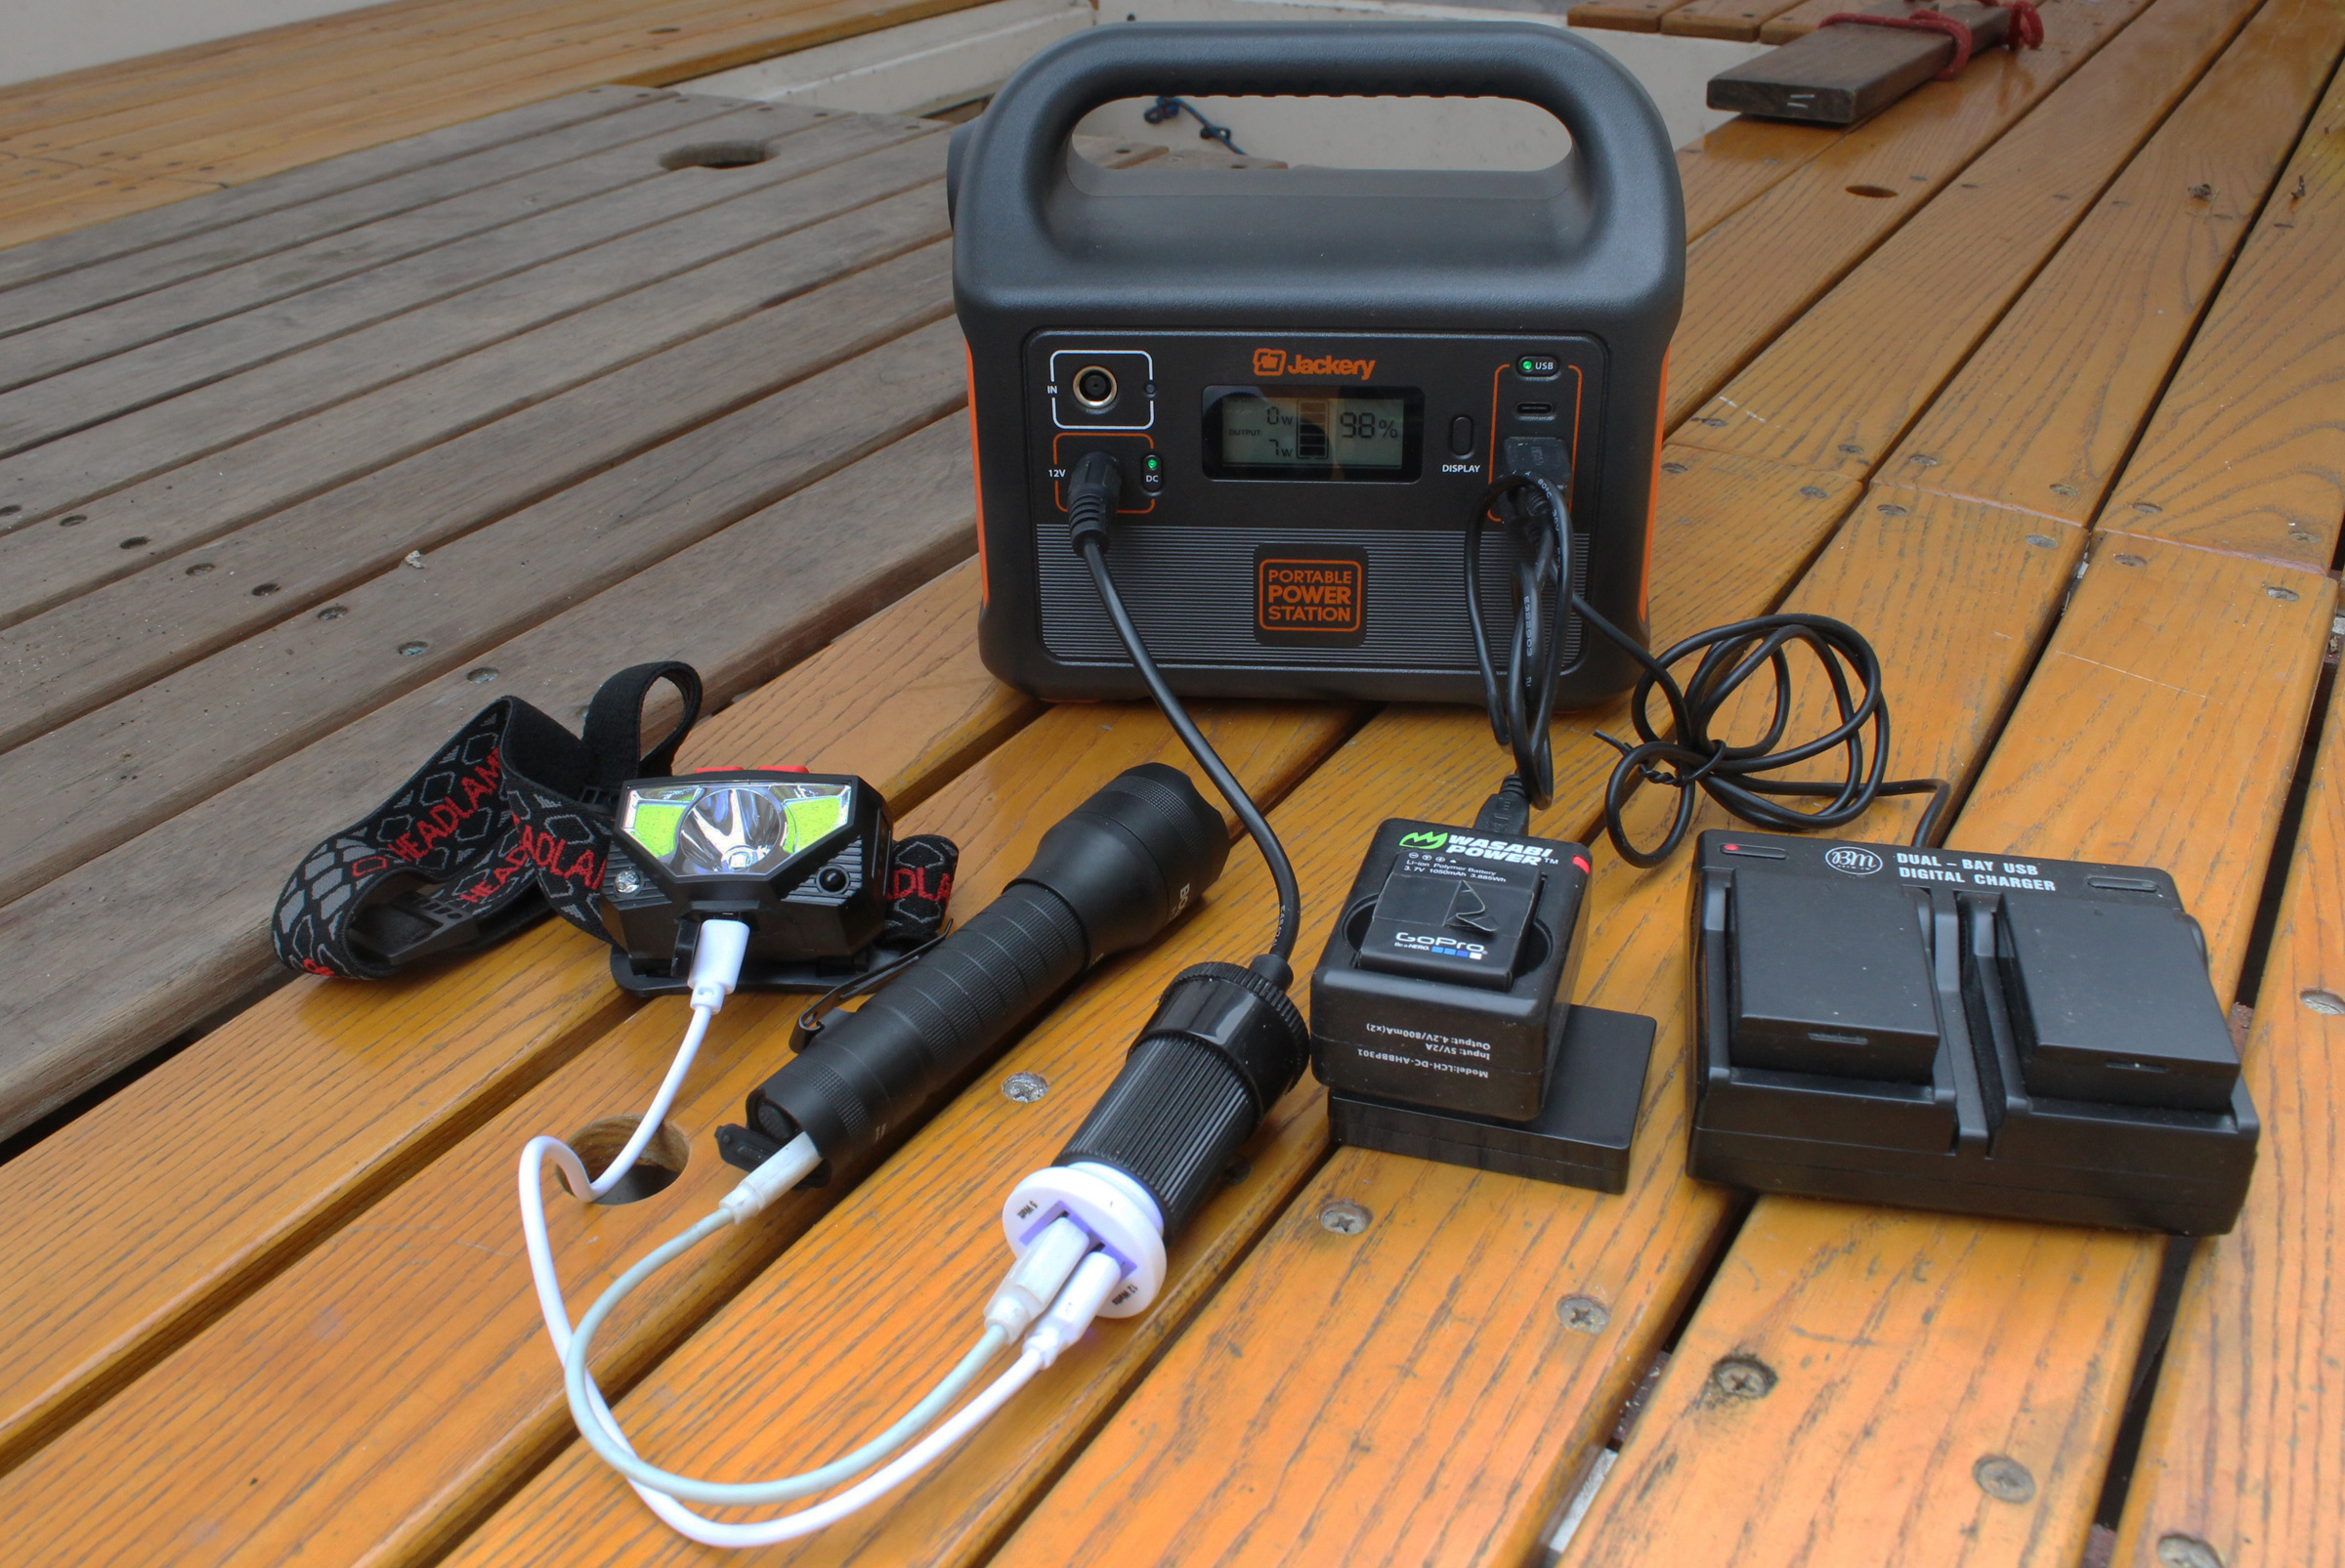
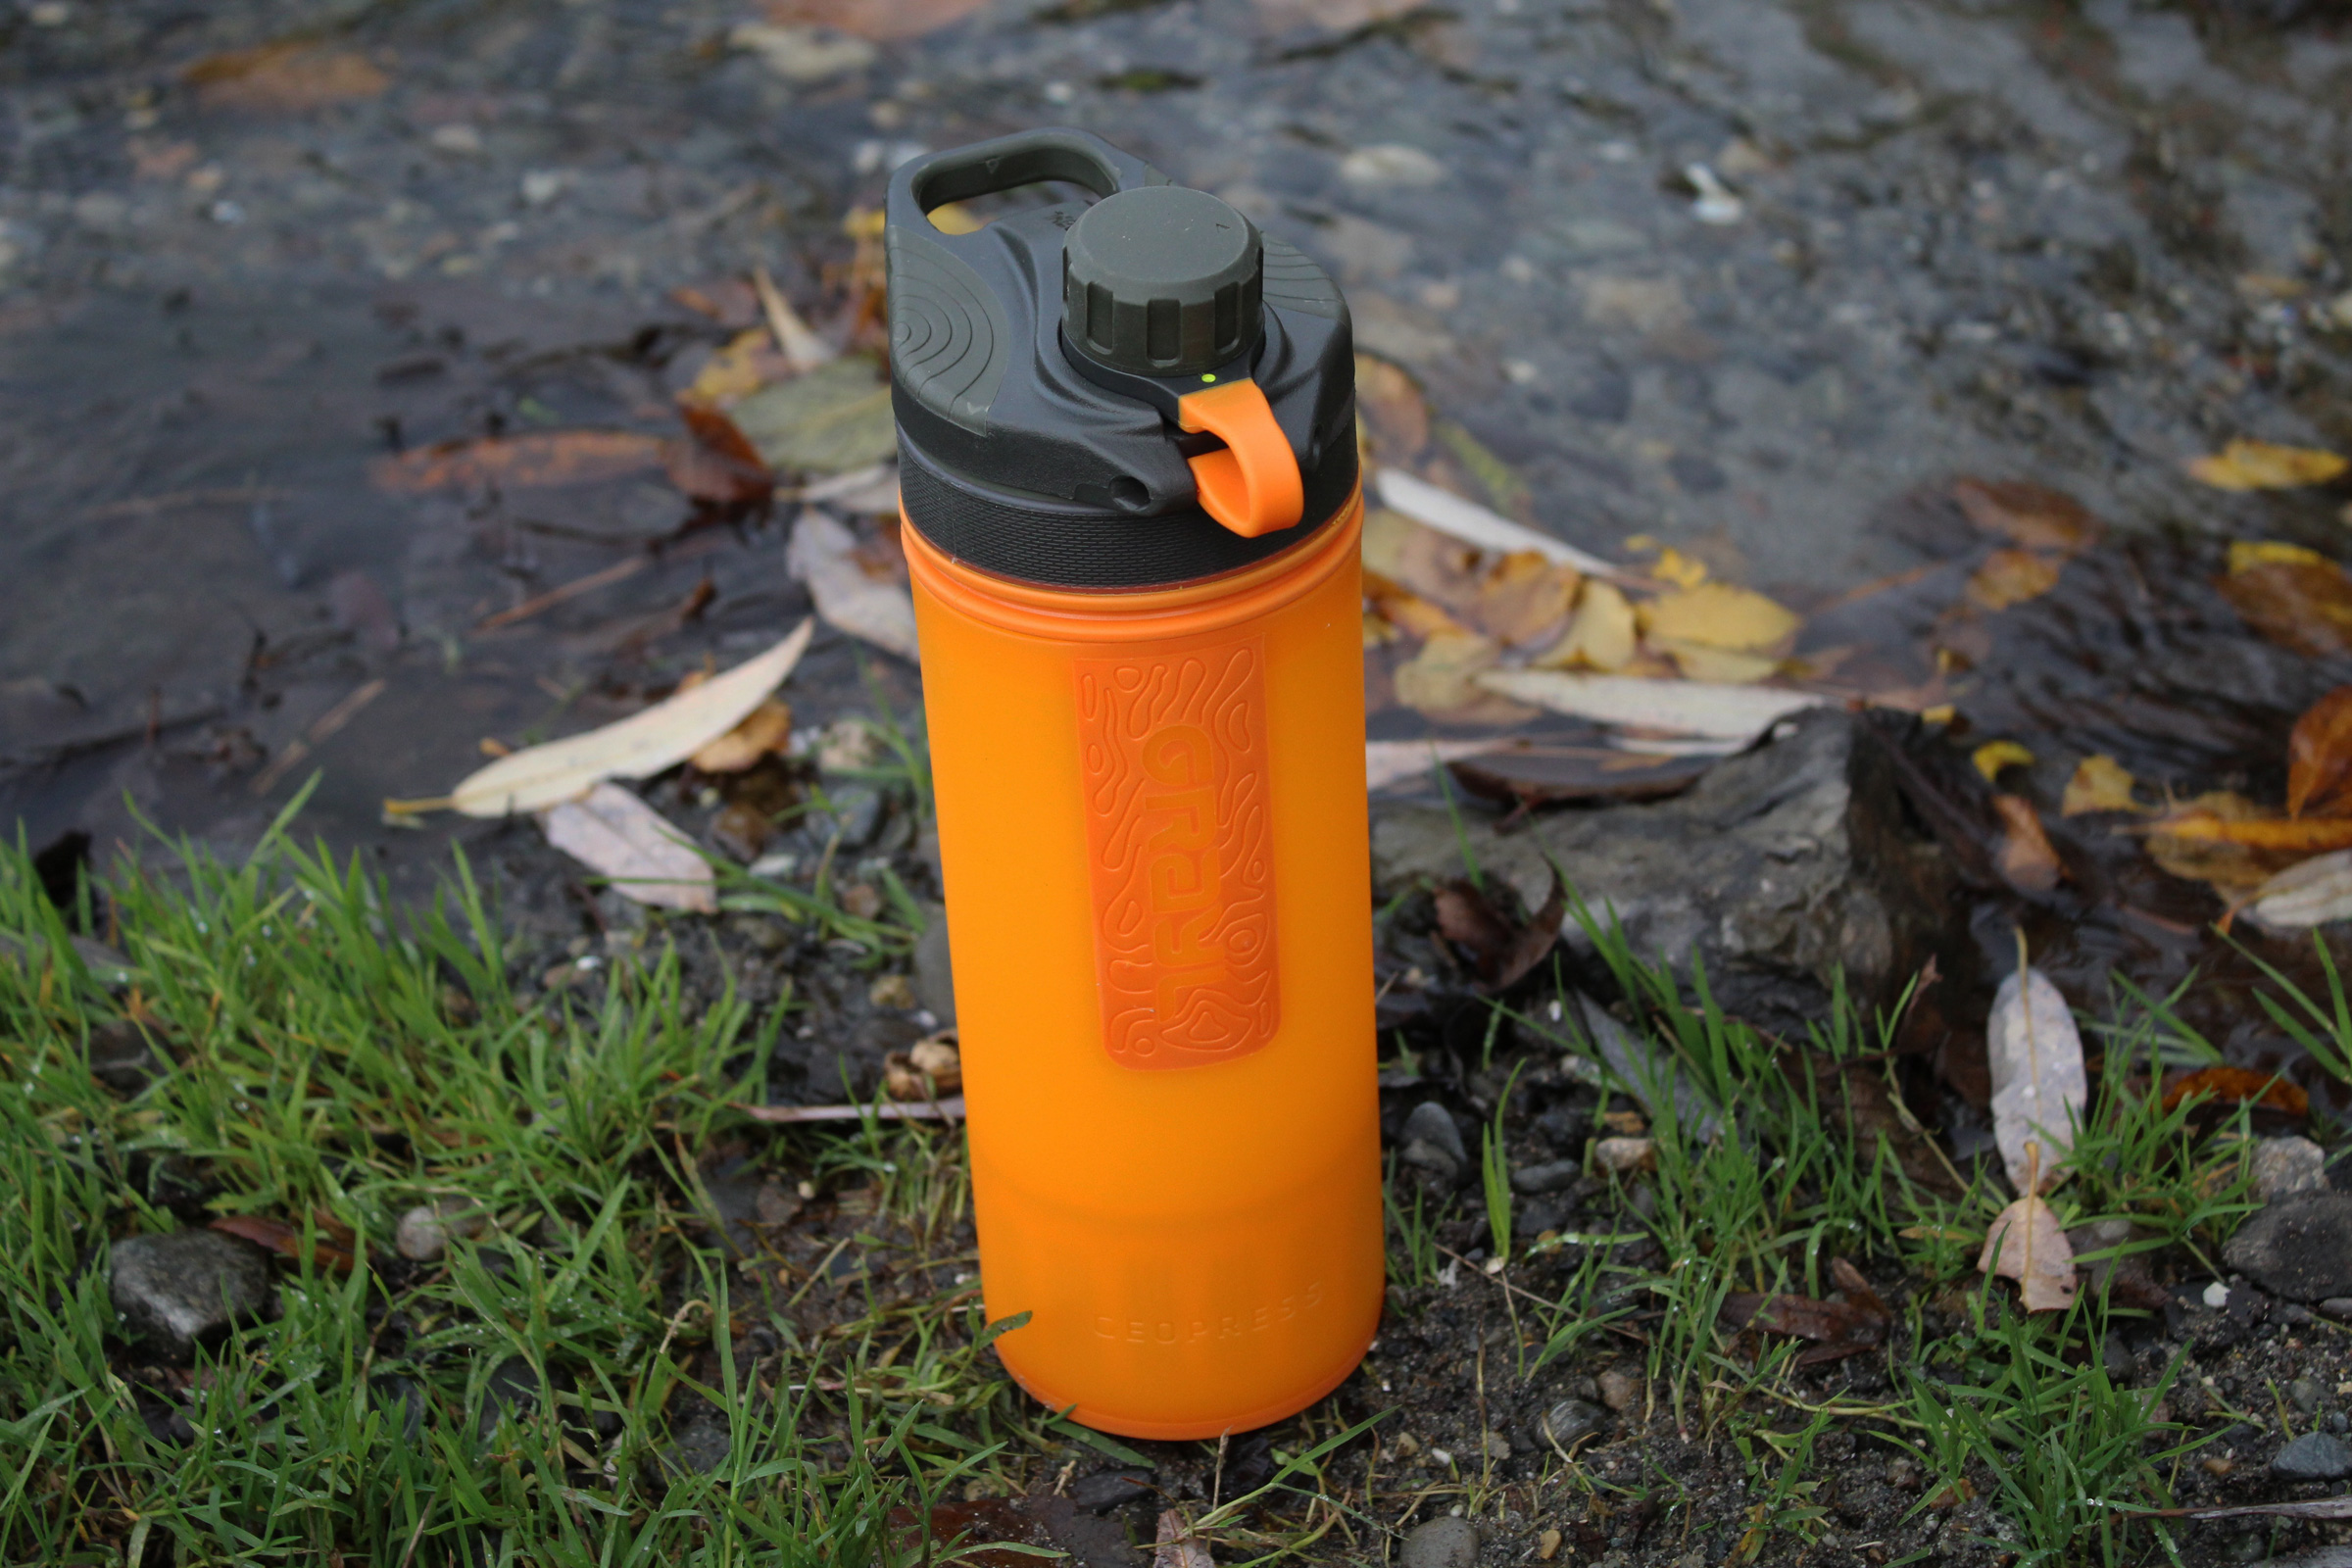
The left side of the Explorer 160 has a 12-volt outlet used with the included adapter and socket. I bought a 12-volt-to-USB plug, which is shown here charging a headlamp and a flashlight. The right side has three USB outlets. The two USB-A ports are in use here charging camera batteries; the USB-C port is idle. As the unit charges these lights and batteries, the LCD screen is showing an output of 7 watts.
It has been a while since I could venture into the wilderness with all the electricity I needed supplied by a single battery for my headlamp. Now on my overnight boating trips I need to power cameras, a cell phone, a GPS, a VHF, running lights, weather radio, and often a small laptop. Some devices, such as my handheld depth sounder, get by with a single battery for the duration of a cruise, but devices used more frequently—running lights, smart phone, or cameras—require either backup batteries or recharging.
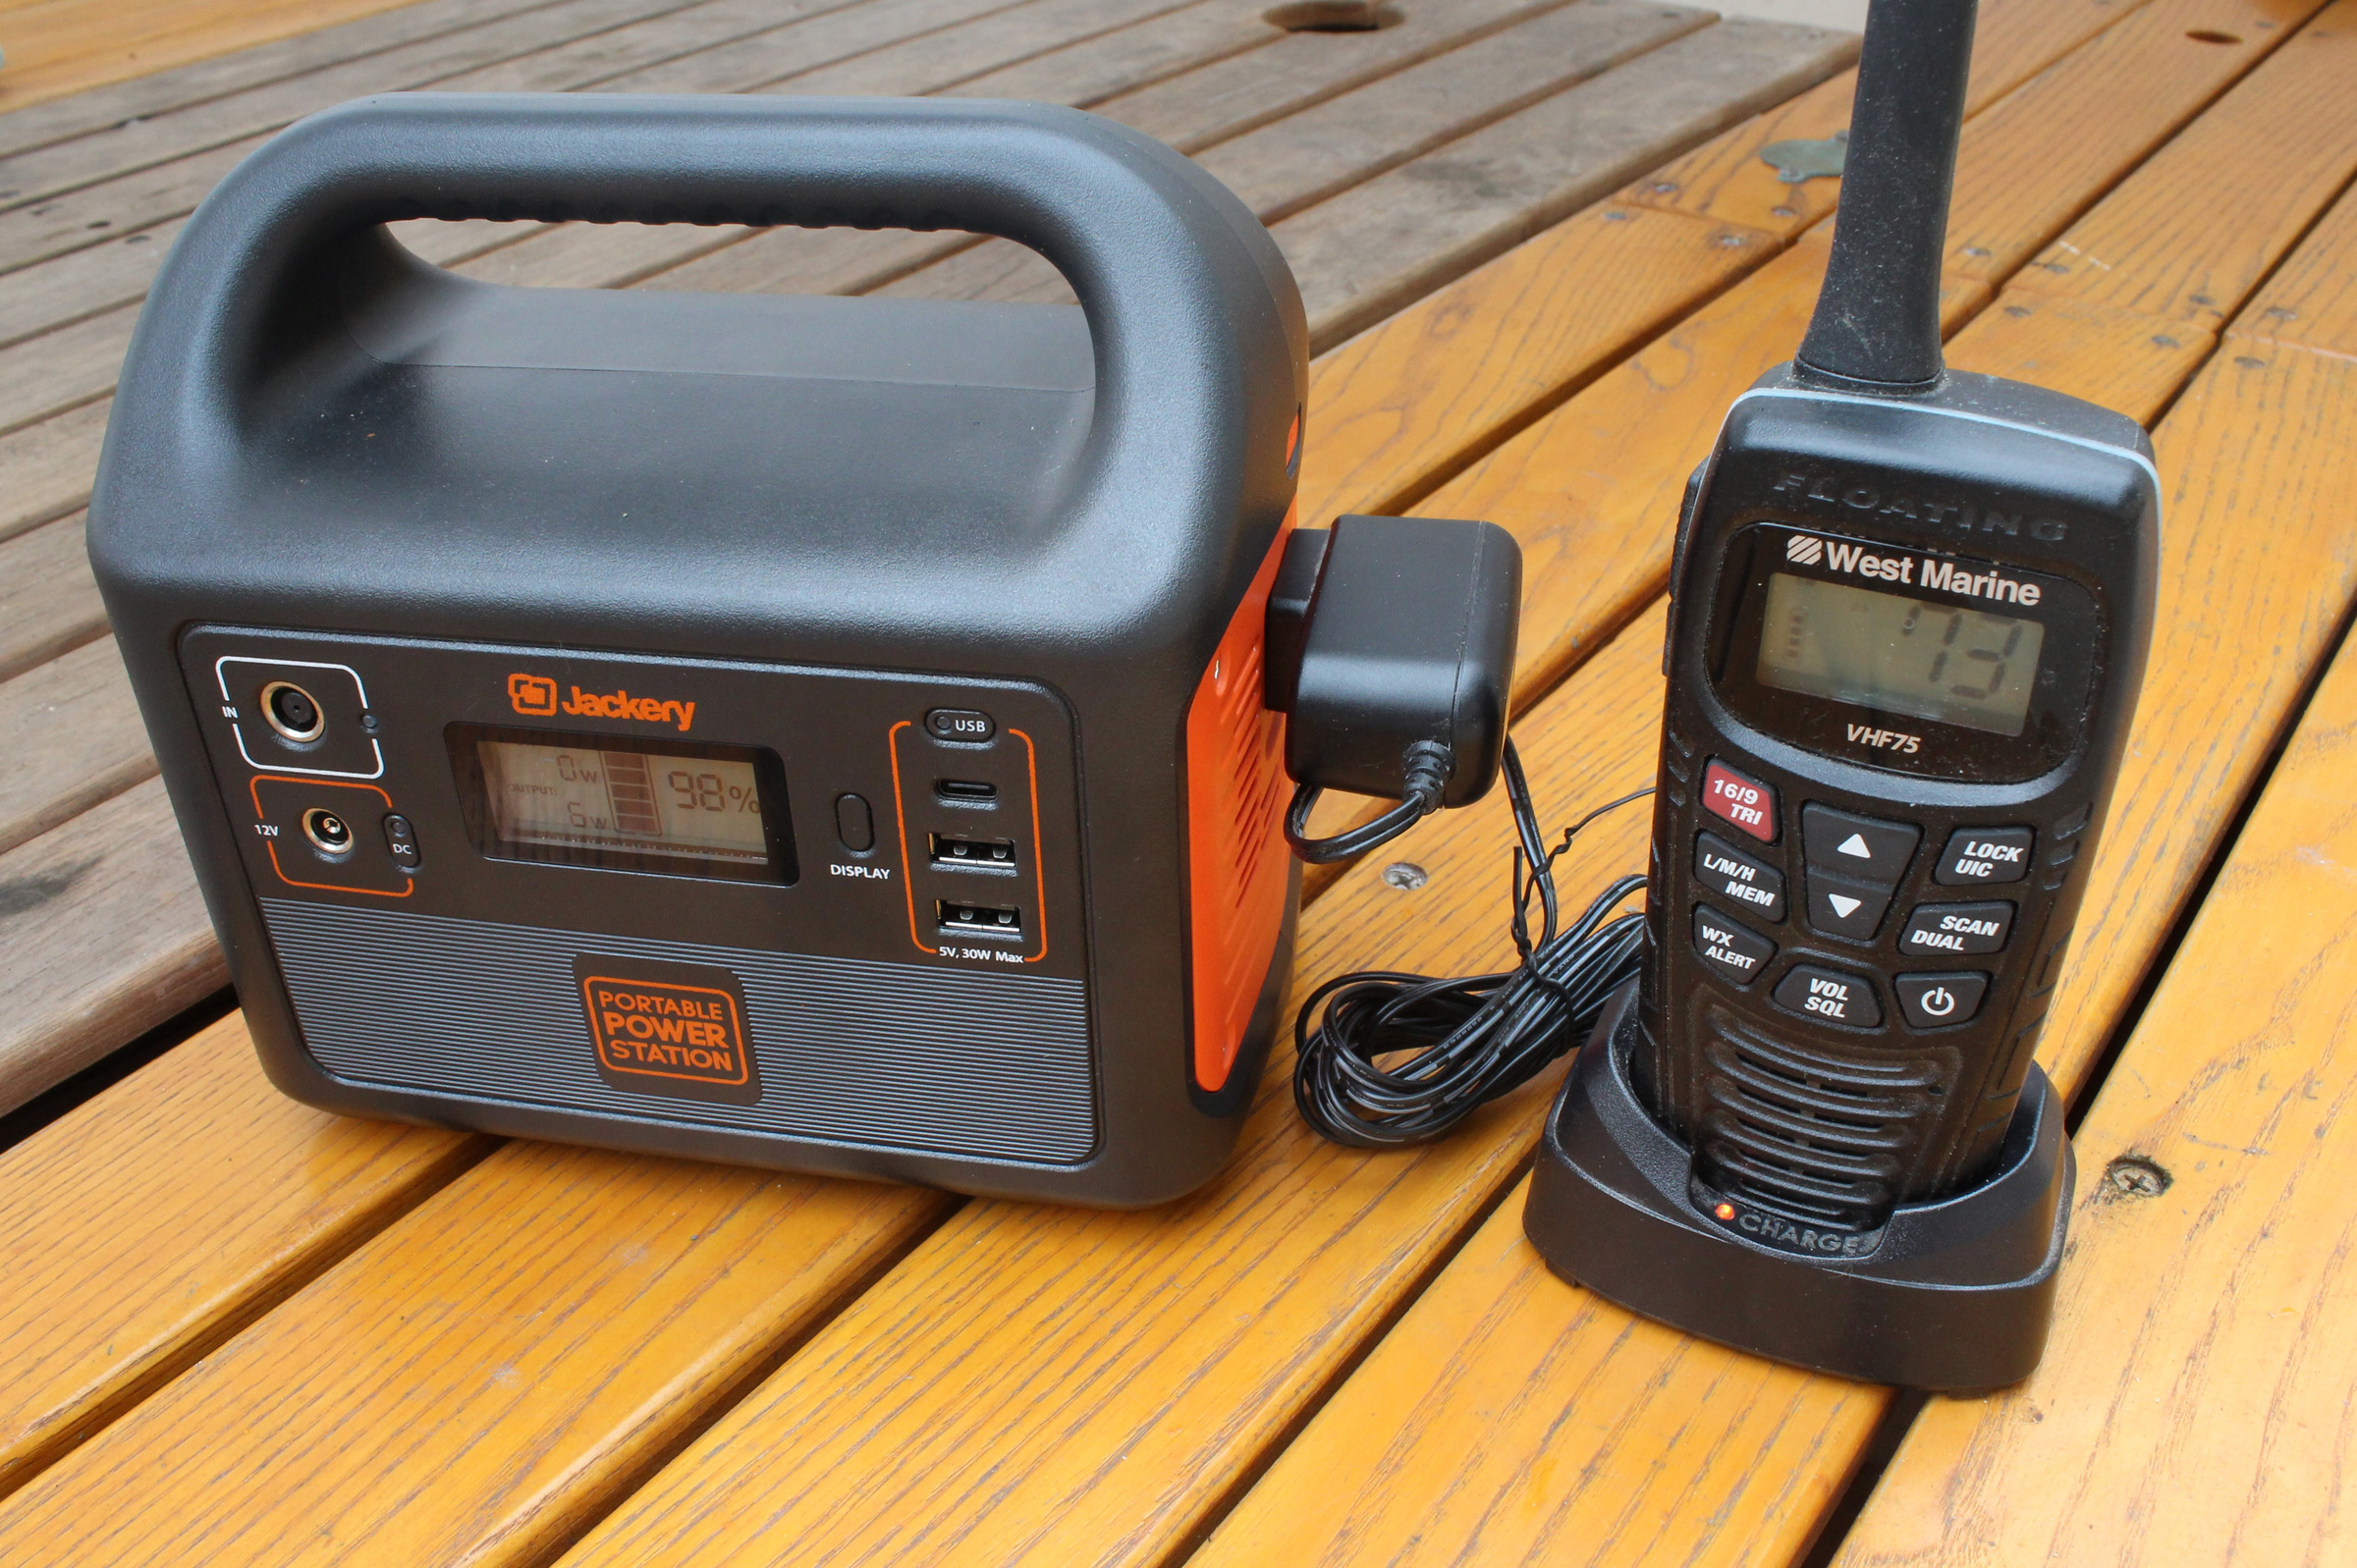
The right side has a 110-volt AC outlet, used here to charge a VHF radio. The onboard inverter, its cooling fan, and the transformer for the radio all consume a a lot of of electricity. I plan to find a plug and cord to connect the radio’s charging base to the 12-volt outlet on the front of the unit, thus bypassing the electrically demanding inverter.
In recent years I’ve carried a 12-volt deep-cycle battery wired to a cigarette-lighter socket. It worked well for recharging devices that had car chargers, but it weighed a cumbersome 50 lbs and was so often in the way that I made a foam-and-canvas cover for it to blunt the impact of my toes. When I stumbled across Jackery’s portable power stations, I quickly turned my back on my deep-cycle and bought the Jackery Explorer 160, the company’s smallest unit. Its bank of lithium-ion cells is rated to supply 167 watt hours, which is, if my calculations are correct, a 30 percent improvement over my deep-cycle battery. The Explorer 160 delivers that capacity in a 7.5″ x 4.75″ x 6.9″ package that weighs just under 4 lbs. The face of the unit has two ports for 12-volt power, one for charging the Explorer 160 with the included AC adapter or an optional solar panel, the other to supply power to electronic devices using the included cigarette-lighter socket and cord.
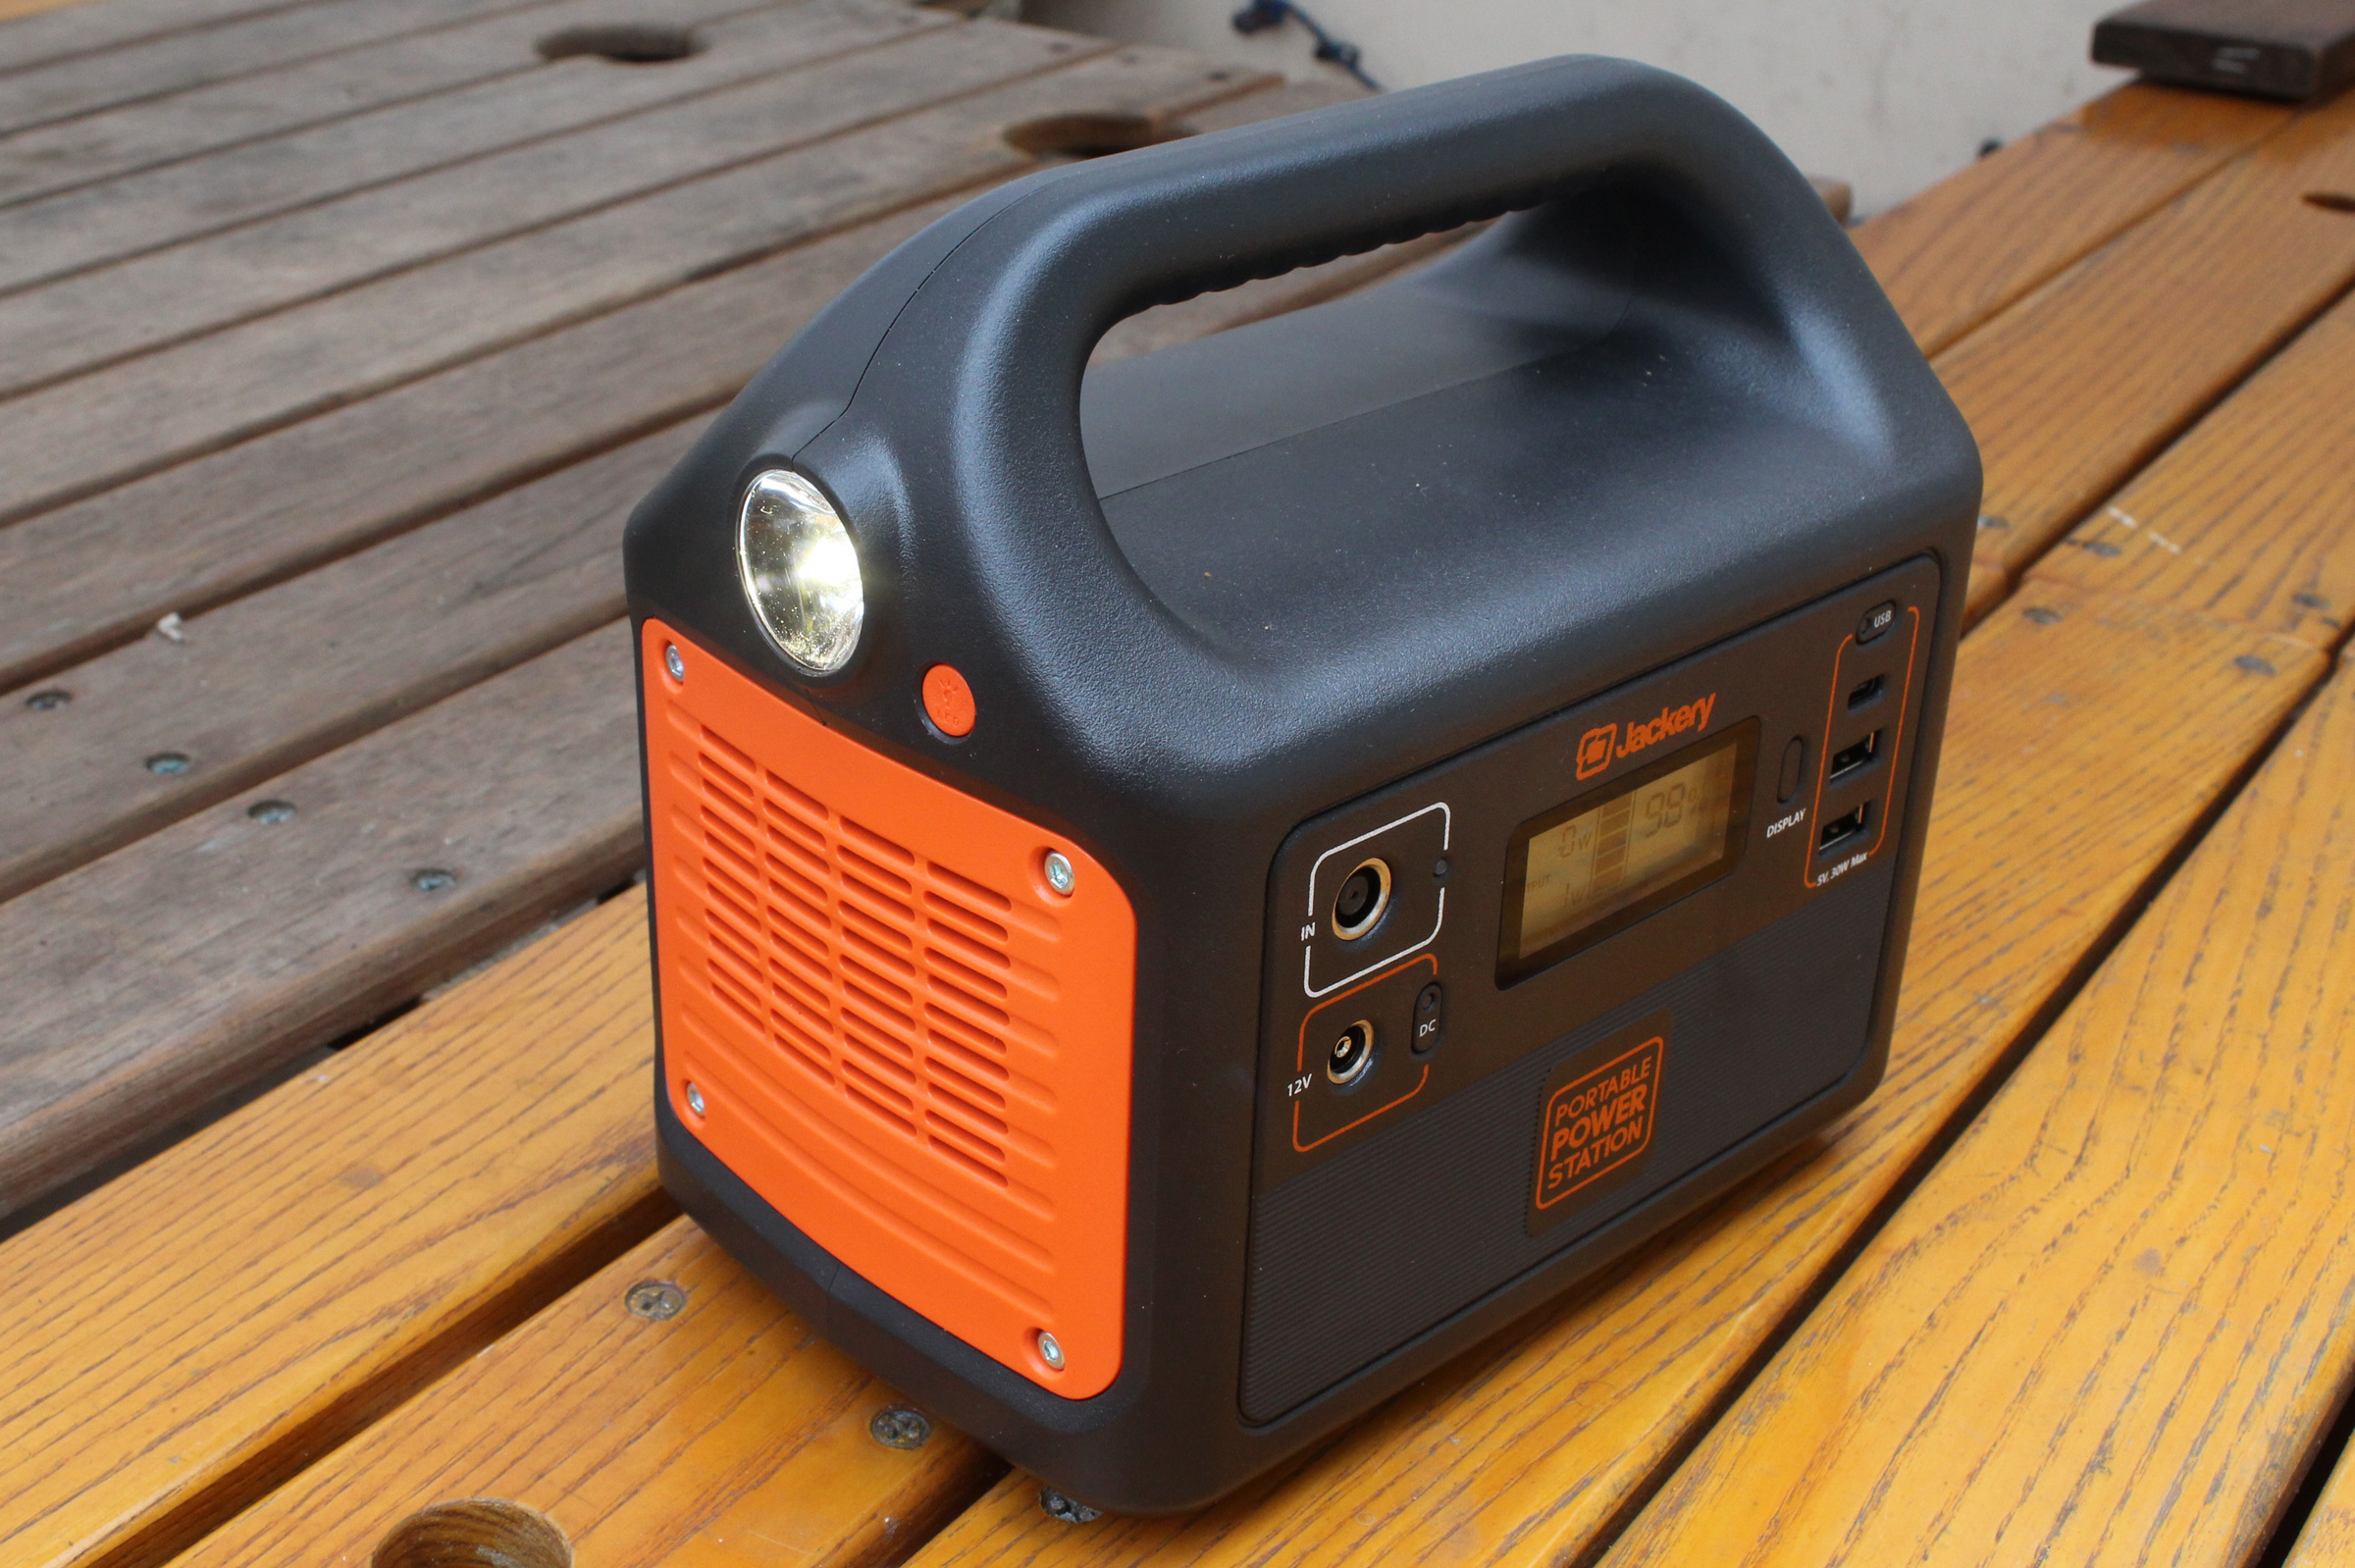
The built-in flashlight is useful on a boat or around camp. It can flash a programmed-in SOS signal in an emergency.
There are three USB ports, one USB-C and two USB-A. A backlit LCD screen in the middle shows input and output in watts, a graphic of a battery showing the level of charge, and the percent charge remaining. With each device being charged, the display screen shows how many watts are being drawn. When multiple devices are being charged, the display shows the total output. There’s an AC outlet at one end of the Explorer 160 and a built-in flashlight at the other. The outlets, display screen, and flashlight all have switches. The flashlight’s switch, if pressed and held, will make the light a flashing Morse SOS signal.
The Jackery power station isn’t waterproof, so it would need to be protected by a dry bag if carried in an open boat. It’s not meant to survive being dropped, so treat it as you would the electronics you charge with it.
Jackery includes a 12-volt socket for the charging of devices (top), a 12-volt plug for charging the Explorer 160 in a vehicle, and a transformer for charging the unit at home. The included pouch provides a place to store all the cables and adapters.
For my first trial with the Explorer 160 I charged my electronics for a weekend outing. Starting with 100 percent capacity, it charged a fully dead laptop battery, a dead VHF radio, four GoPro batteries (three 1,050 mAh, one 3,400 mAh), two DSLR batteries, a Bluetooth keyboard, a flashlight/power bank, a trailer back-up camera, and my phone, and still had 22 percent of its capacity remaining. The instructions advise recharging the Explorer 160 when it reaches 20 percent. If I head out with everything topped off, the Explorer 160 can keep me going for a three-day cruise, taking a lot of photos and video and spending evenings writing on the laptop.
Christopher Cunningham is the editor of Small Boats Monthly.
The Explorer 160 is available from Jackery for $159.99. I bought mine on Amazon using a $40-off coupon that appeared on the listing there. Jackery offers two larger power stations, Explorers 240 and 500, as well as two sizes of solar panels for recharging.
Is there a product that might be useful for boatbuilding, cruising, or shore-side camping that you’d like us to review? Please email your suggestions.
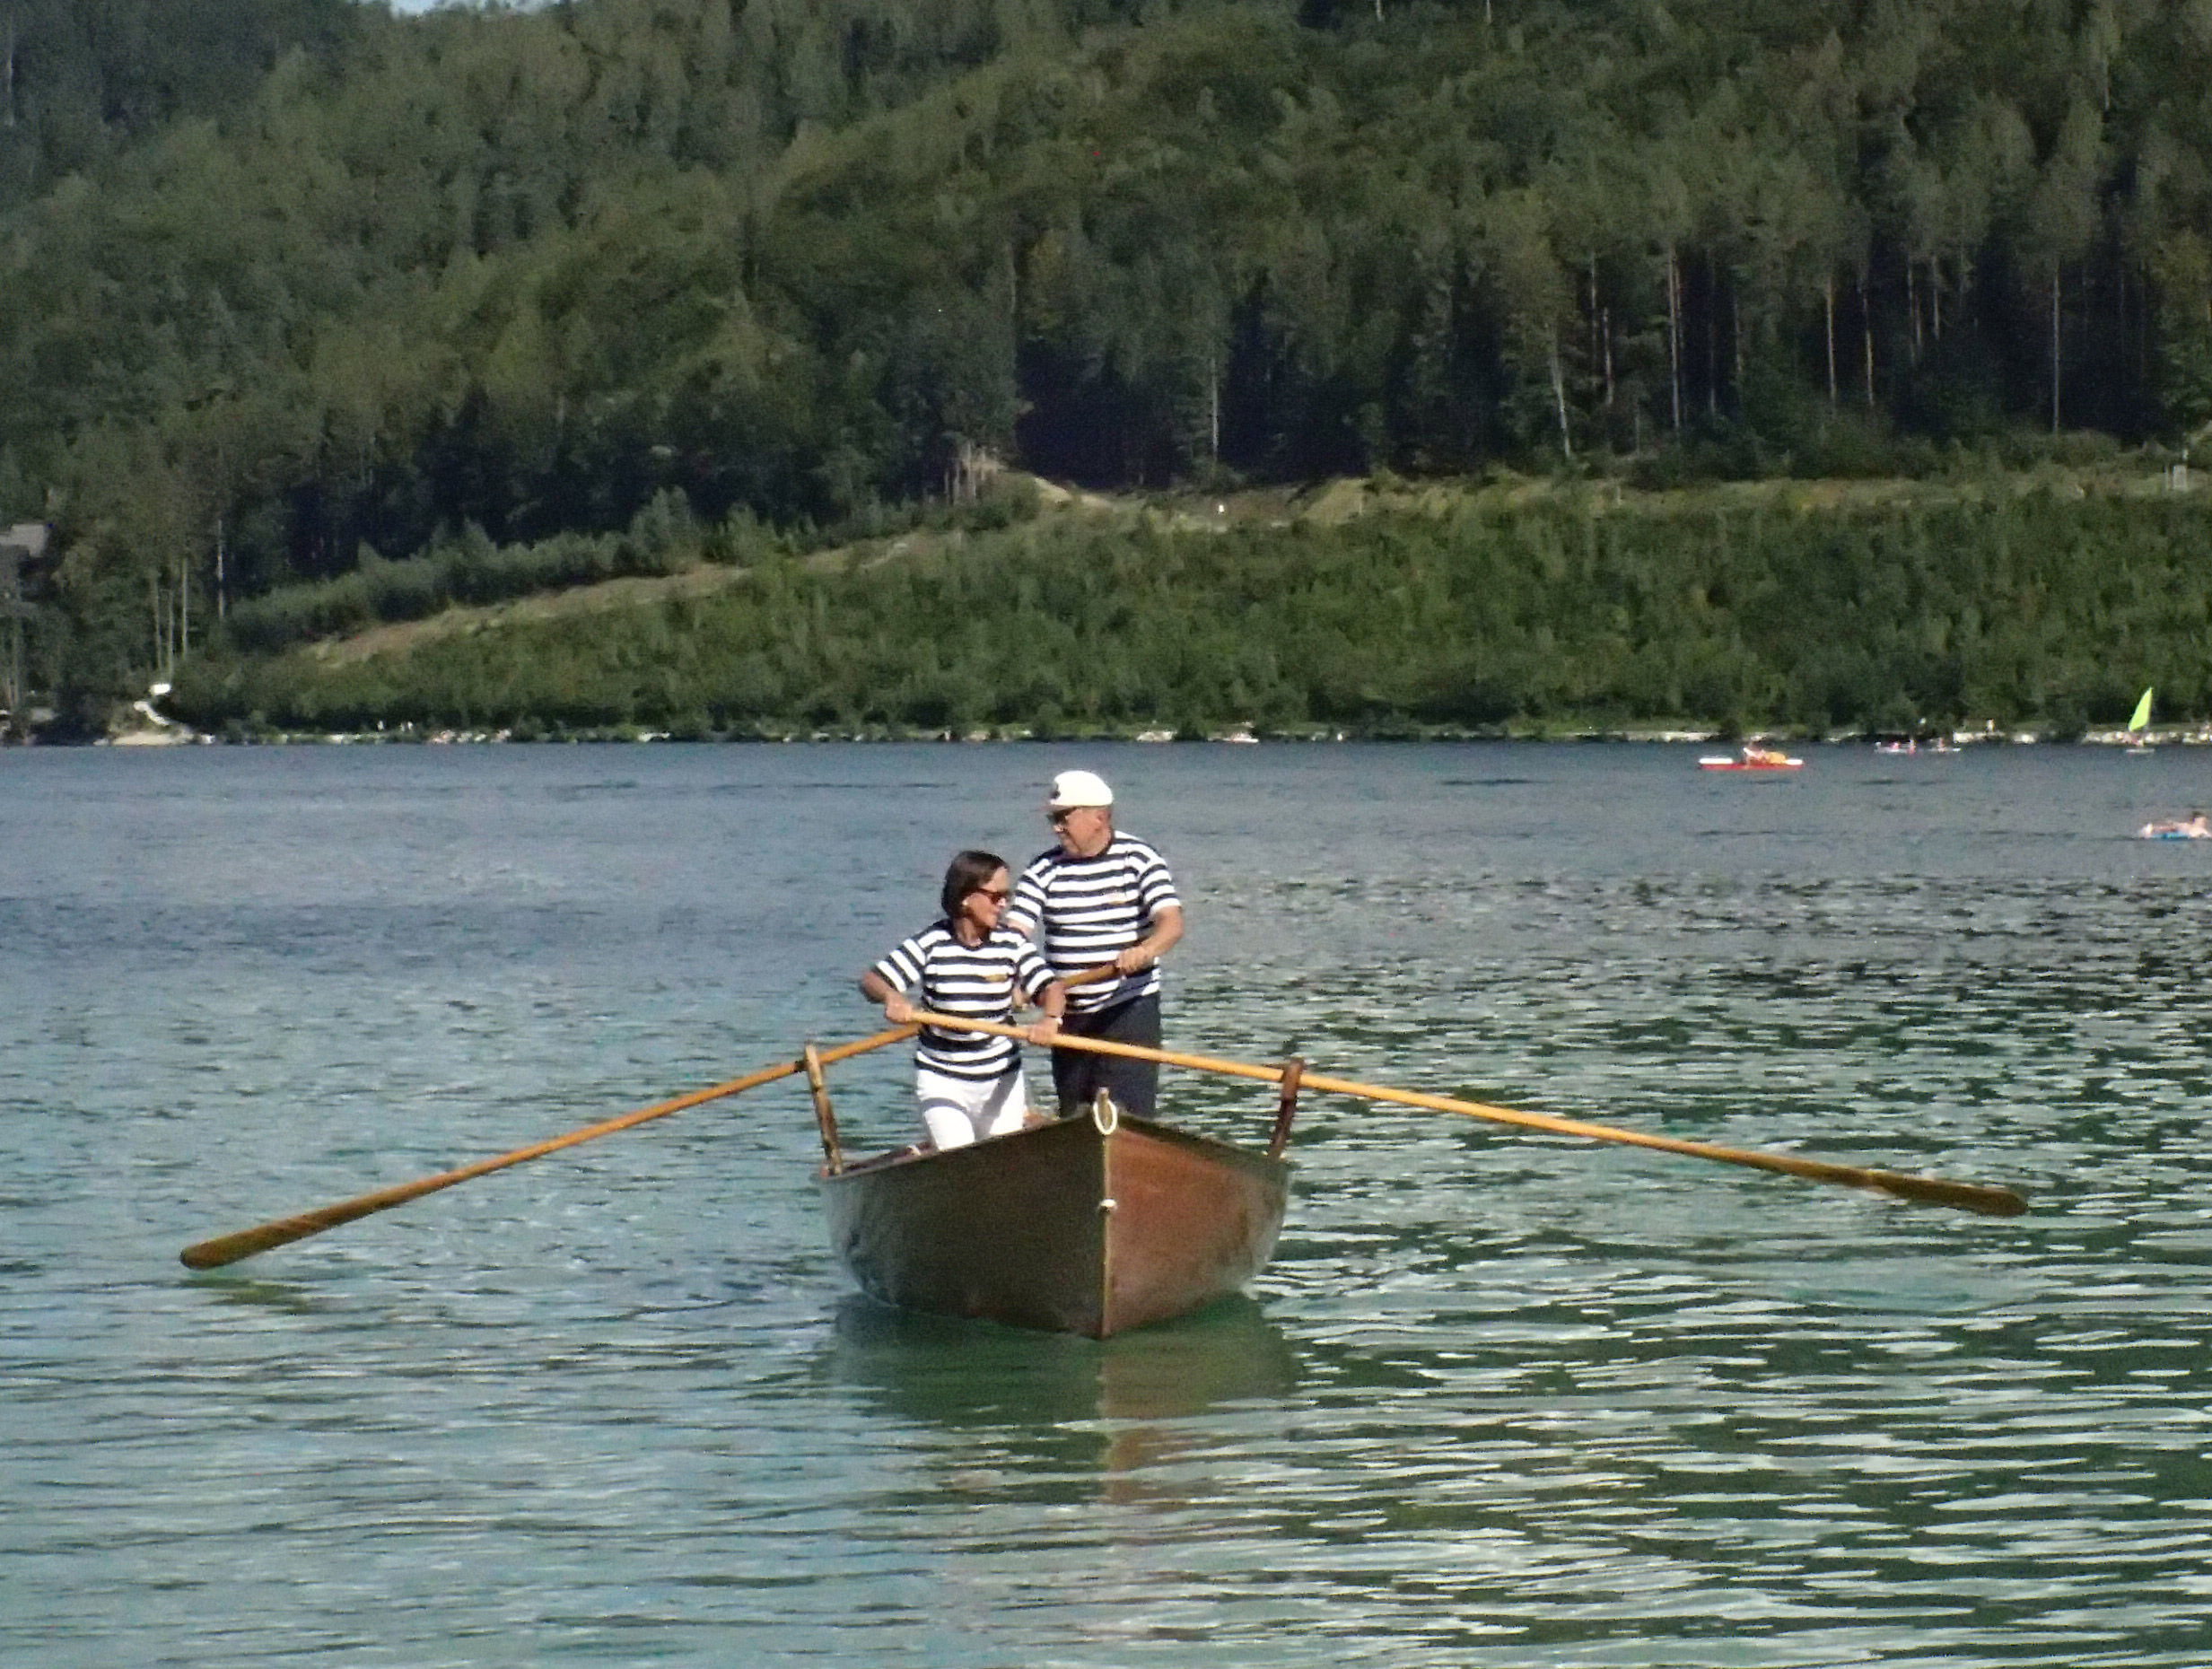
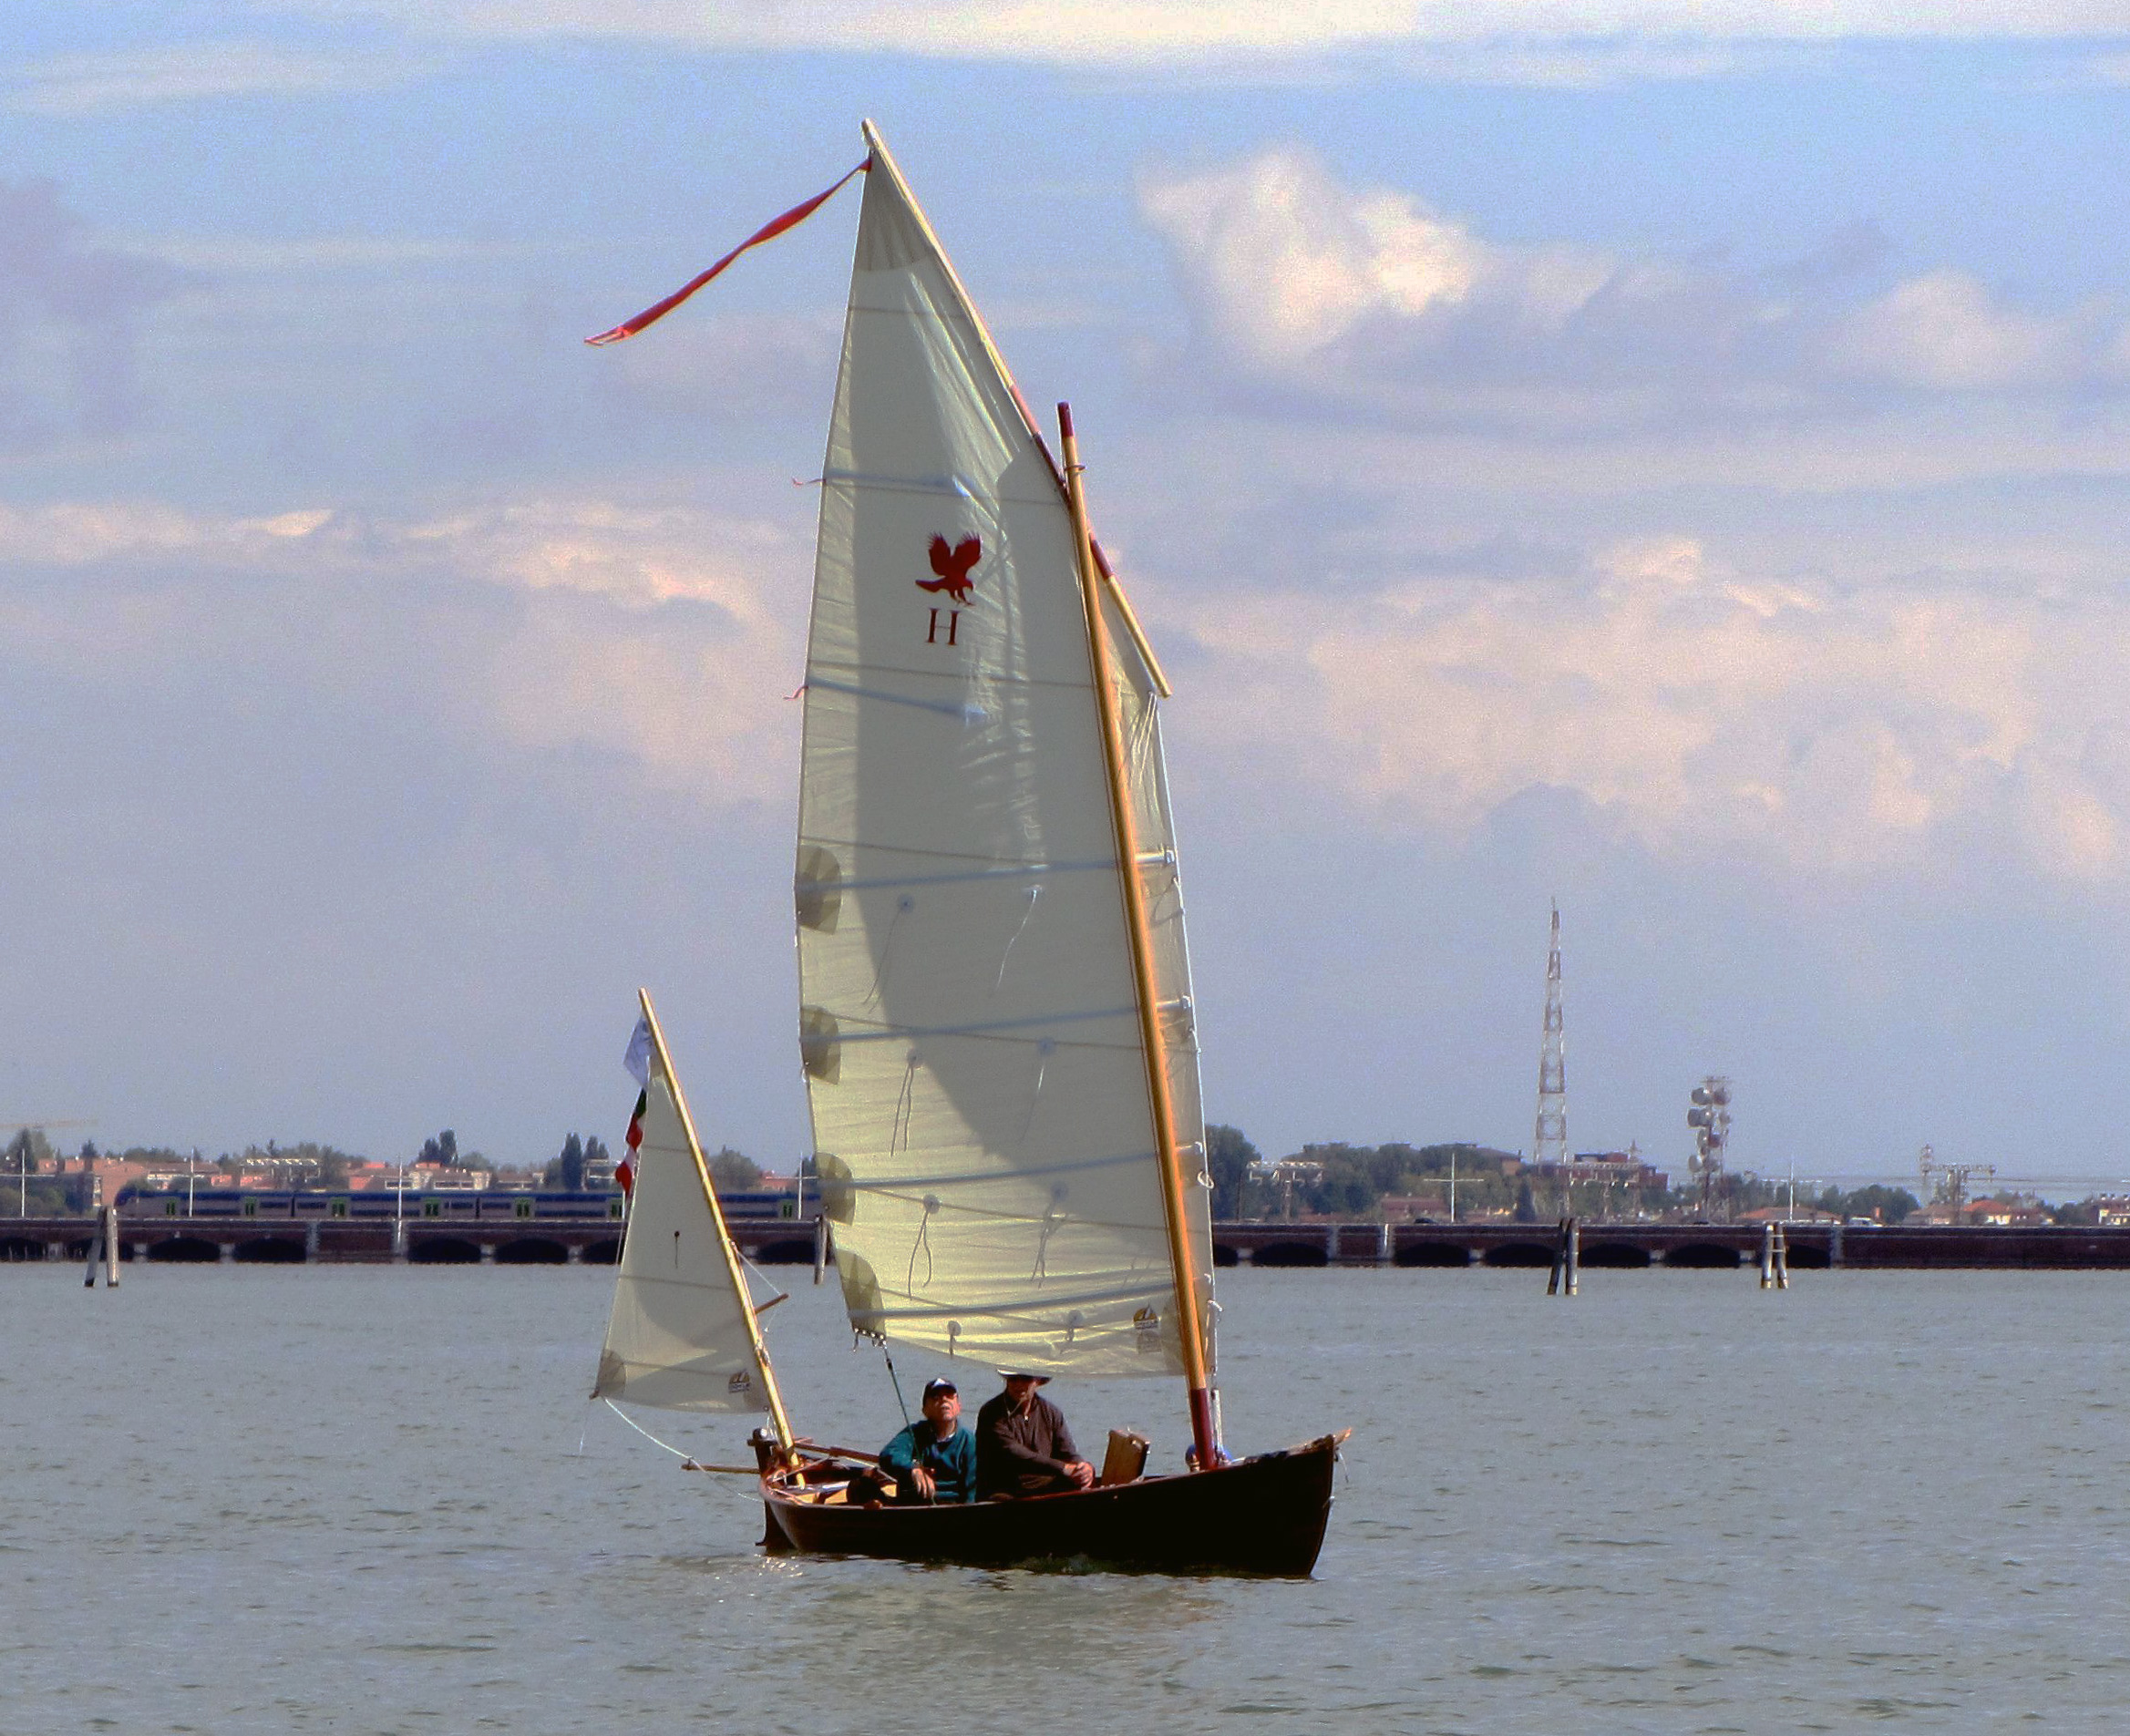
Detlef Arthur Duecker, and his wife, Elisabeth, make a unique sight rowing his Dias-designed Harrier, FALCONE de PALÙ, on Lake Klopein, in the Austrian province of Carinthia. Detlef equipped the boat with Venetian oars and oarlocks made by an Italian master builder.
When Antonio Dias drew the Harrier for Ben Fuller of Cushing, Maine—a frequent contributor to Small Boats—his mission was to design a double-ender that Ben could use for camp-cruising and day use under sail and oars. Ben’s boat, christened RAN TAN, has a small outrigger set just forward and to port of the stern; it supports an oarlock that Ben uses for sculling, in lieu of a notch that a transomed boat makes possible. There’s something to be said for propelling a boat while standing up and facing forward. The view’s better, being higher above the water than while sitting, and there’s no twisting around to see where the boat’s headed. Detlef Arthur Duecker of Austria took that approach a step further when he built his Harrier.
Elisabeth Duecker
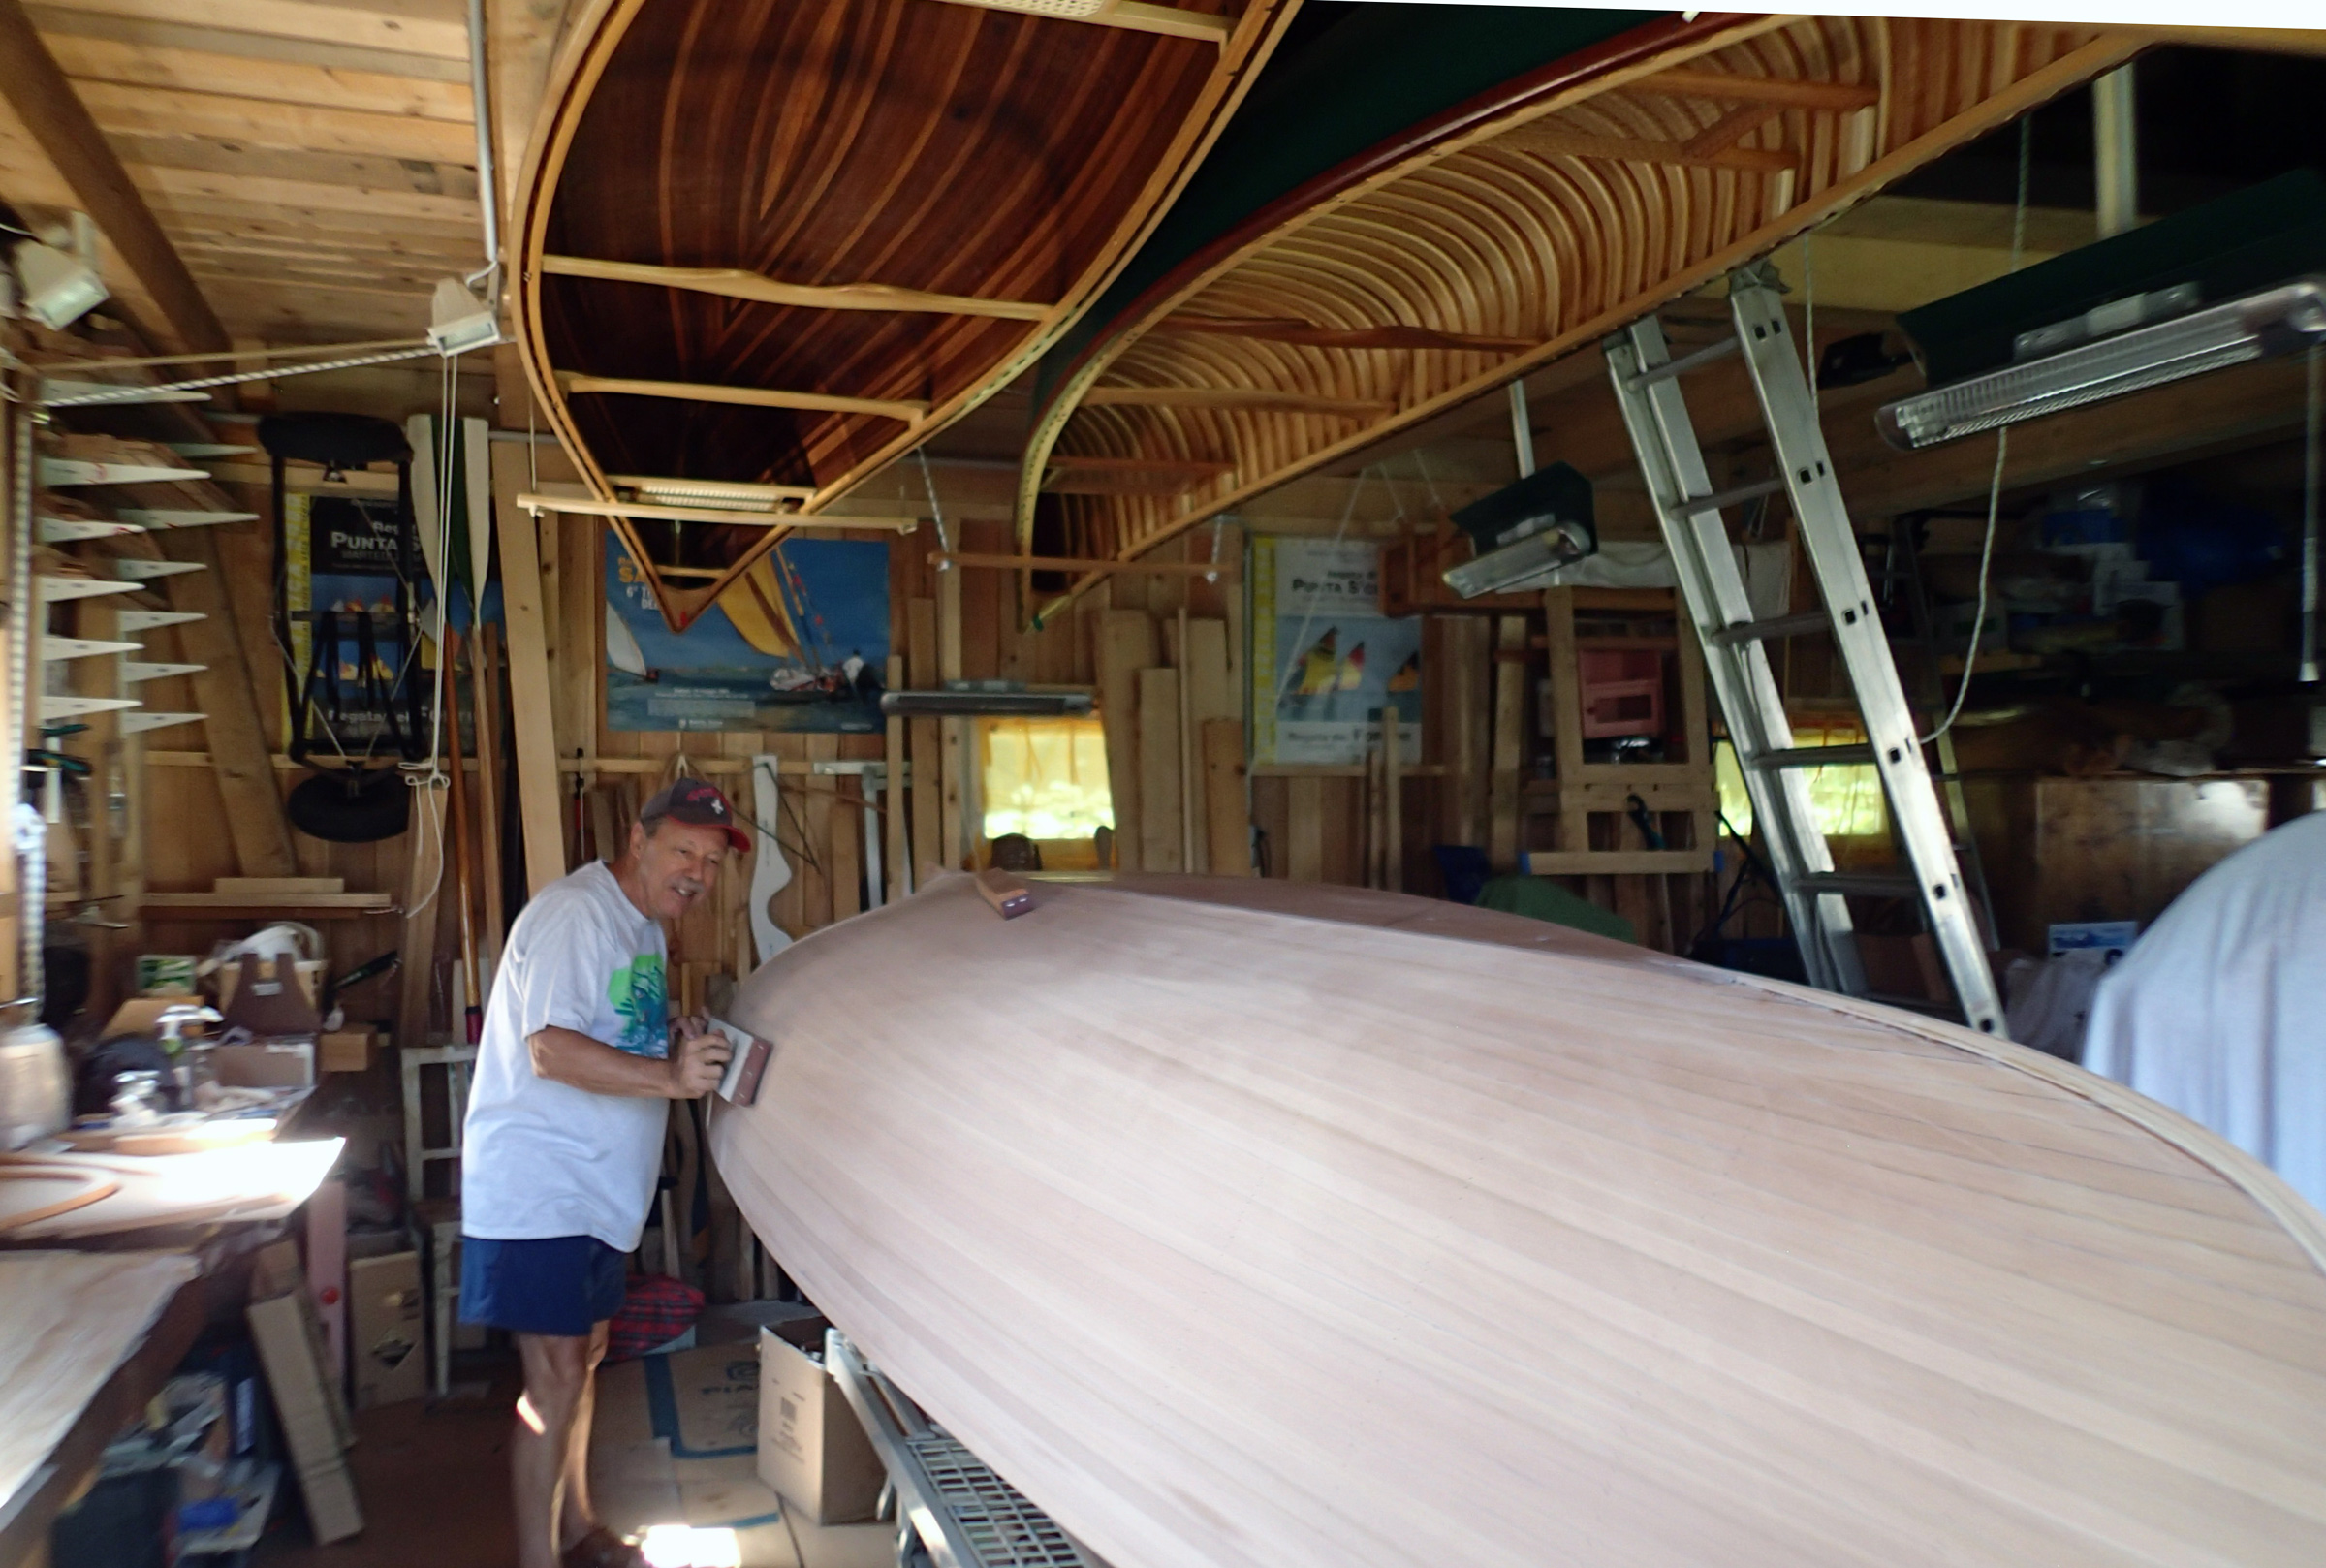
The Harrier was designed for lapstrake construction, but Detlef chose to strip-build his. He’d become familiar with the latter method while building the canoe seen here, suspended directly above him.
Detlef Arthur grew up in southern Austria and while he did a lot of boating on lakes and rivers, Italy’s coast was not far away and he occasionally traveled with his canoe to Venice, paddling the lagoons and canals the city is known for. The Venetian style of rowing made a lasting impression on him. The gondolas that frequent the canals of the island city are well known and perhaps the most elaborate of the rowed boats, but there is a wide range of simpler boats. To negotiate the narrow canals, the gondolas are rowed with a single oar to take up less room, but in the wide-open lagoons, workboats and racing boats are rowed with oars sticking out on either side, with one person per oar, or with a rower with two oars. The oars cross in front of the rower with the handle of the port oar going to the forward-facing rower’s right hand, and the starboard oar going to the left. The crossing of the oar handles forms a shallow V, like a valley or vale, and gives that manner of rowing its name, a la valesàna.
Detlef Arthur Duecker
With both fórcole set aft, a solo rower can row with the oar handles crossed, a la valesàna.
Detlef Arthur saw a review of the Harrier, Ben’s RAN TAN in particular, in our print annual, Small Boats 2009 , and was impressed by the design. He liked the double-ender’s promise of ease in a following sea, the power of the tall, fully battened lug mainsail, and the control offered by the mizzen. Detlef Arthur had previously built a Cosine wherry, a boat designed for strip construction, and had some clear tight-grained cedar planks left over from that build. After consulting with Antonio, he set up molds and prepared to strip-plank the hull.
Detlef Arthur Duecker
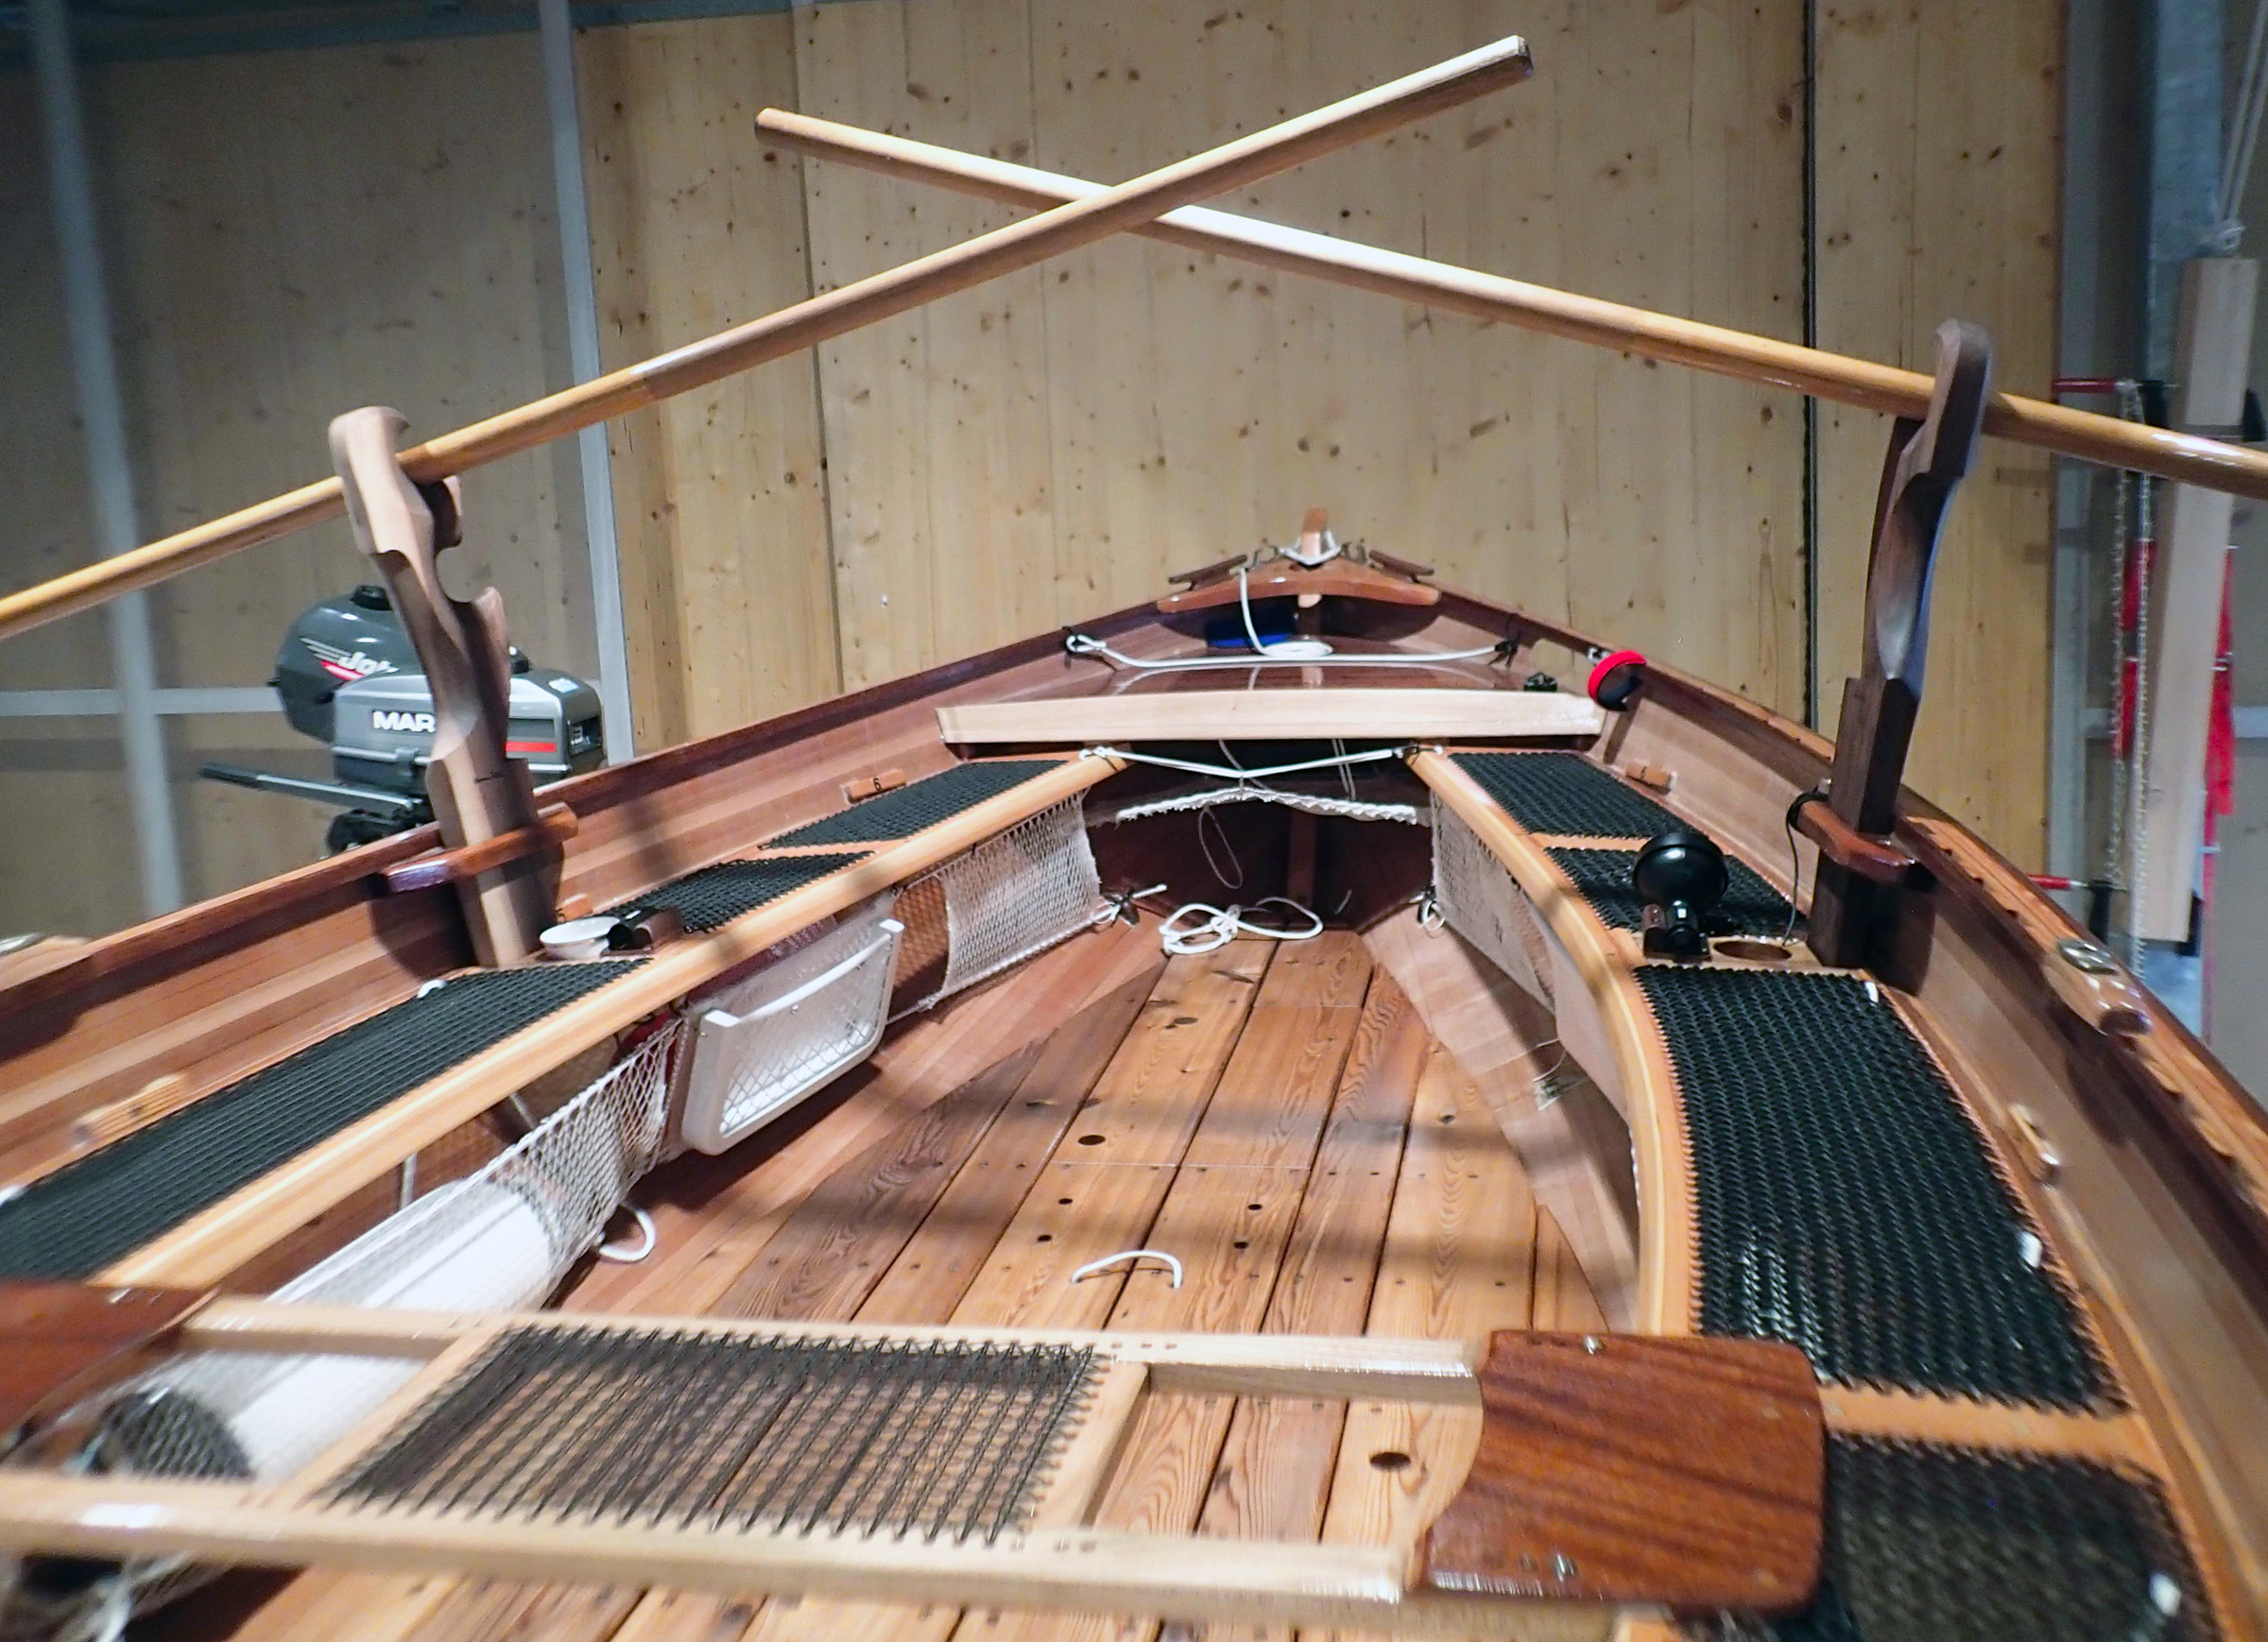
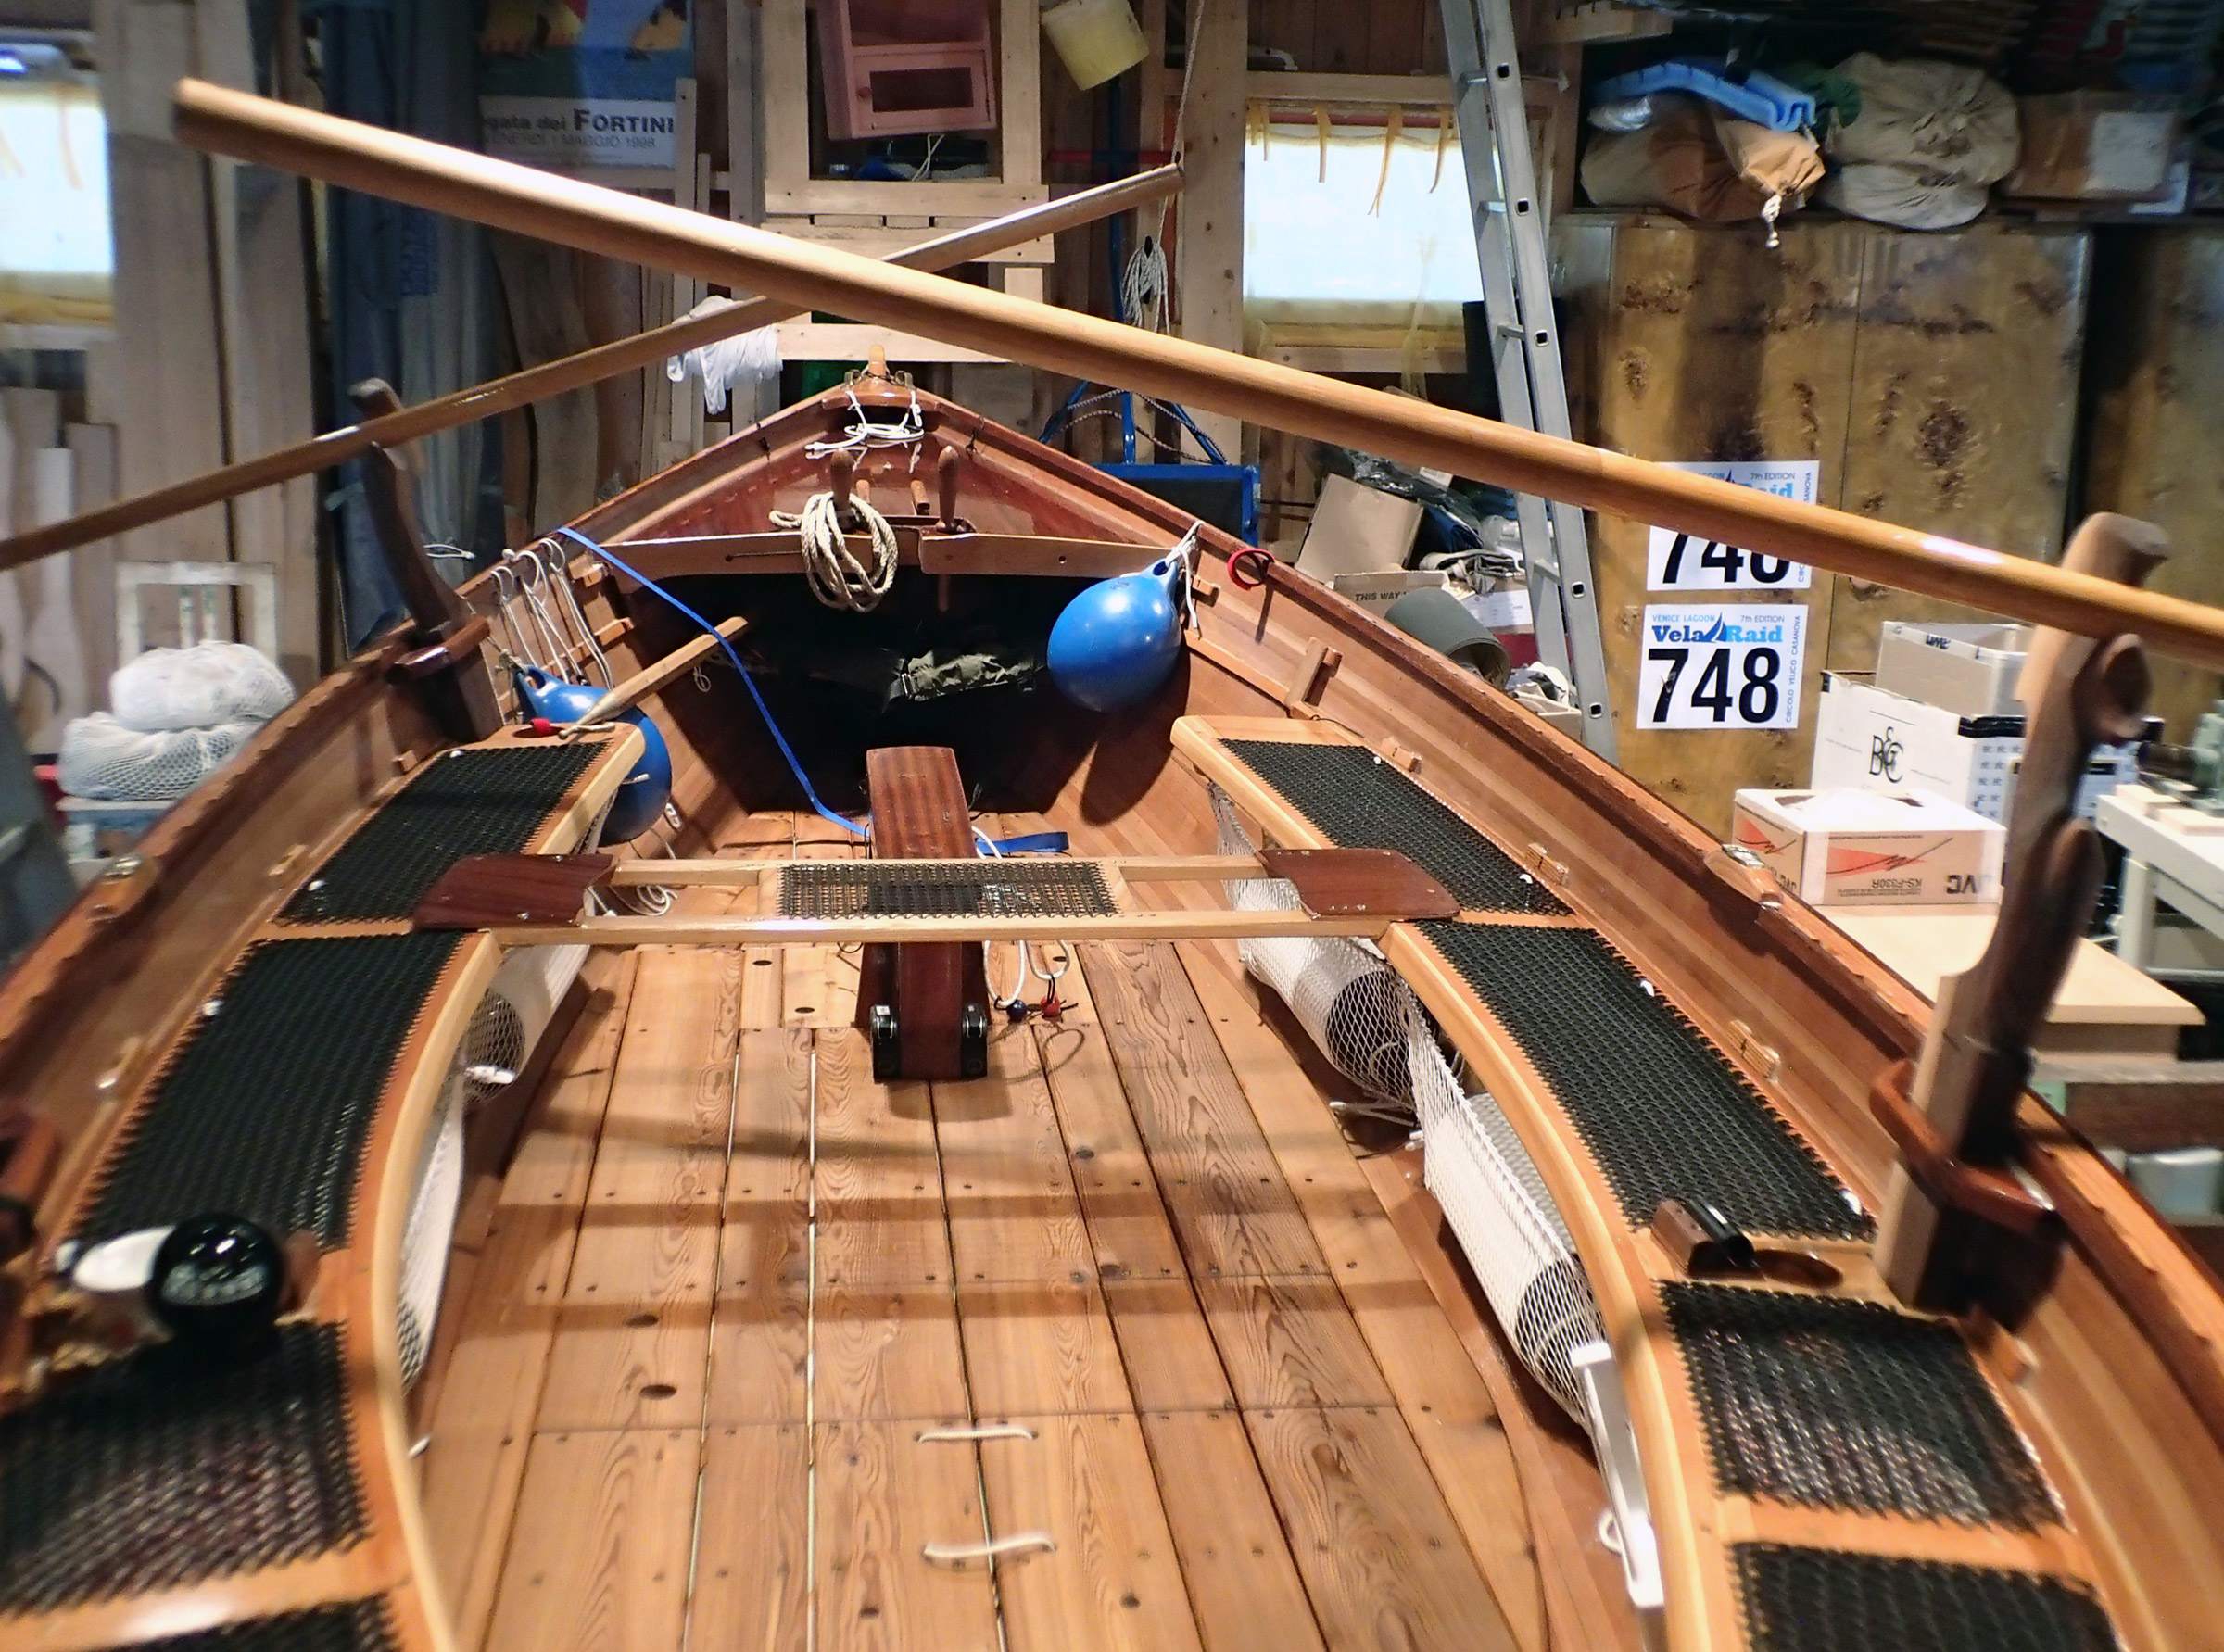
The boat is shown rigged for rowing by two, with the two fórcole offset in the Venetian style. The removable thwart, which is used for conventional rowing, is in place here.
When the hull was finished and ready for the interior appointments, he studied the layout of RAN TAN. She has the thwarts, stern sheets, and side benches typical of a sail-and-oar beach cruiser. Detlef Arthur had a different vision for his Harrier, a vision of Venice. The thwarts would have to go; they weren’t going to be needed for rowing in the Venetian style, and without them he’d have a clear path to move about between the helm to the mast. To keep intrusions to a minimum he switched from the long centerboard trunk that spanned the thwarts in RAN TAN to a short, self-supported daggerboard trunk. The daggerboard isn’t likely to jam after beaching or running aground, a virtue in the shallow Venetian lagoons.
Detlef Arthur Duecker
Saverio Pastor’s shop was full of fórcole of many various types in the works.
Detlef Arthur Duecker
The oar, shown here in the aft fórcola, the fórcola da poppa, has no leather to protect it from wear. Both of Detlef’s fórcole are branded with the name of their maker, Saverio Pastor.
He kept the side benches, but instead of giving them solid wooden tops, he made them like canoe seats, with frames filled with a weave of black polyester cord—miles of the stuff—making them dry, comfortable perches for sailing.
Detlef Arthur Duecker
Laced side benches offer comfortable seating, and the removable rowing thwart stows alongside the port bench.
For rowing standing up, a boat needs to offer a place to stand. For rowing a la valesàna, the rower stands in the center. With a pair of rowers, each holds a single oar, standing off-center for better span and more power: the forward rower, the provièr, to the right of center with the oar to port, and the stern rower, the popièr, to left with oar to starboard. The floorboards need to span a greater width than in a conventionally rowed boat. To get the width, Detlef Arthur had to raise the floorboards 4″ from the bottom. To provide good footing, the red-cedar floor boards are oiled rather than varnished or painted to preserve the grippy texture of the wood.
Detlef Duecker
By doing away with the thwarts, Detef created a clear path from the tiller to the main mast. The daggerboard trunk occupies much less space than a centerboard trunk would.
Rowing in the Venetian style requires special oars, remi, with long looms and slender, slightly offset blades, and sculpted wooden oarlocks, fórcole. They can be quite simple, even crude. A remo can be made of a sapling’s trunk with a flat board nailed on as a blade, and a fórcola can be made with from a board with a couple of half-moon notches cut out. But these pieces have achieved a degree of sophistication and beauty that can humble not only simple wooden tholepins but even polished bronze oarlocks.
Detlef Arthur Duecker
For camp cruising, FALCONE de PALÙ has flexible battens and a cover to provide a cozy space at anchor. The broad span of the sole, required for the Venetian rowing arrangement, makes plenty of room for sleeping.
When he traveled to Venice, Detlef Arthur often visited Saverio Pastor, Venice’s master remèr, and commissioned him make two remi and two fórcole. Pastor’s work is featured in Gilberto Penzo’s book, Forcole, Remi e Voga alla Veneta where his fórcole were photographed against a black background, removed from the context of a boatshop. It would be easy to open the book to those pages and assume you were seeing abstract sculptures in beautifully finished wood. And like works of art, the walnut fórcola made for Detlef Arthur bears the maker’s signature. The fórcola for the popièr, because it is used for most of the steering, is more complex than the fórcola in the bow. It has two notches—mòrsi, literally “bites”—in the aft edge for variations on the forward stroke, and a wide notch on the forward edge for stopping and backing. The fórcola for the provièr is a simpler device with a single mòrso, though still elegant in its form and functional. For solo rowing a la valesàna, this fórcola can be inserted in a set of sockets in the stern.
Tony Peressin
The sailing rig has a high-aspect-ratio, fully battened standing lug mainsail and a small sprit-boomed leg-o’-mutton mizzen.
The remi are 11-1/2′ long and have blades that at first glance are like elongated versions of those of beavertail canoe paddles, but in fact much more complex. Here’s how they’re described in Penzo’s book: “Venetian oars are not really so simple: the oar is not straight, nor symmetrical on any axis, and its construction requires careful observation. It can be a question of the difference of a few millimeters on an object that is four meters long.” The oars used to be made out of a single piece of beech, split out of a tree trunk to assure the shape of the oar followed the run of the grain. White ash was also used. Deltef Athur’s Pastor-built oars are made of ramin, an Indonesian hardwood, with laminates of beech in the blades.
Detlef Arthur Duecker
For outboard auxiliary power, Detlef made a bracket that spans the stern.
Detlef Arthur did make accommodations for conventional rowing, which is better suited to take on rough conditions along the coast. He mounted oarlocks amidships, made a removable footrest and a thwart with a laced-cord seat, and built a pair of 10′ spruce oars following Pete Culler’s pattern.
Dr.Marie Duecker
Elisabeth and Detlef dress the part for rowing alla Veneta, wearing the striped shirts that are commonly worn by Venetian gondoliers.
With his Harrier, christened FALCONE de PALÙ, Italian for the marsh-harrier, a bird of prey. Detlef Arthur and his wife, Elisabeth, have traveled to Venice to sail the lagoon there. Detlef Arthur has also entered the boat in numerous raids, in Venice, Piran, Izola (Slovenia), and the Barcolana Classica in Trieste, Italy. FALCONE de PALÙ may seem an unlikely mix of elements from its modernized version of a lugsail looming over seats for a canoe to the classic fórcole fixed to its strip-built hull, but in the waters around Venice, the boat never fails to draw compliments from the locals who, for centuries, have had a culture that fosters a highly refined sense of aesthetics.
Do you have a boat with an interesting story? Please email us. We’d like to hear about it and share it with other Small Boats Magazine readers.
When I first saw the Jimmy Skiff II (above) that I reviewed for this issue, I was pleased to see its interior equipped with an offset daggerboard trunk. In “Getting Out of Line,” I had mentioned my fondness for off-center trunks, and Bud McIntosh expressed a similar sentiment in How to Build a Wooden Boat: “The centerboard and its trunk take up room in the best part of the boat, and create an antisocial barrier in an otherwise friendly cabin.” I think he’d also agree that thwarts, as their very name suggests, create a barrier to an otherwise friendly cockpit. The Jimmy II’s removable slip thwarts, and the side benches that support them, are features I’ve found very well suited to rowing, sailing, and sleeping aboard.
Laurie Cunningham
The gunning dory is a lovely boat to row and sail as long as I sit down and stay put. Making any sudden moves is perilous. Six-yard hurdles anyone?
My path to considering slip thwarts and side benches began with the Chamberlain gunning dory I built in 1980. In its 19′ length it has five thwarts, and three of them intersect the centerboard trunk and the mizzen partners, so getting from one end to the other at any speed rocks the boat and begs for barked shins.
I’ve spent just one night at anchor aboard that boat—long, uncomfortable, and sleepless hours waiting for daylight—plenty of time to let it sink in that the boat wasn’t at all suitable for cruising. While that boat pointed out the problems of a cluttered and unalterable interior, the 13′6″ sneakbox I built in 1985 provided some solutions. The seat for rowing was not a fixed thwart but a box that could be tucked under the deck at night to open up the cockpit for sleeping. Its daggerboard trunk was set 12″ to starboard and part of the coaming, leaving the center of the boat free.
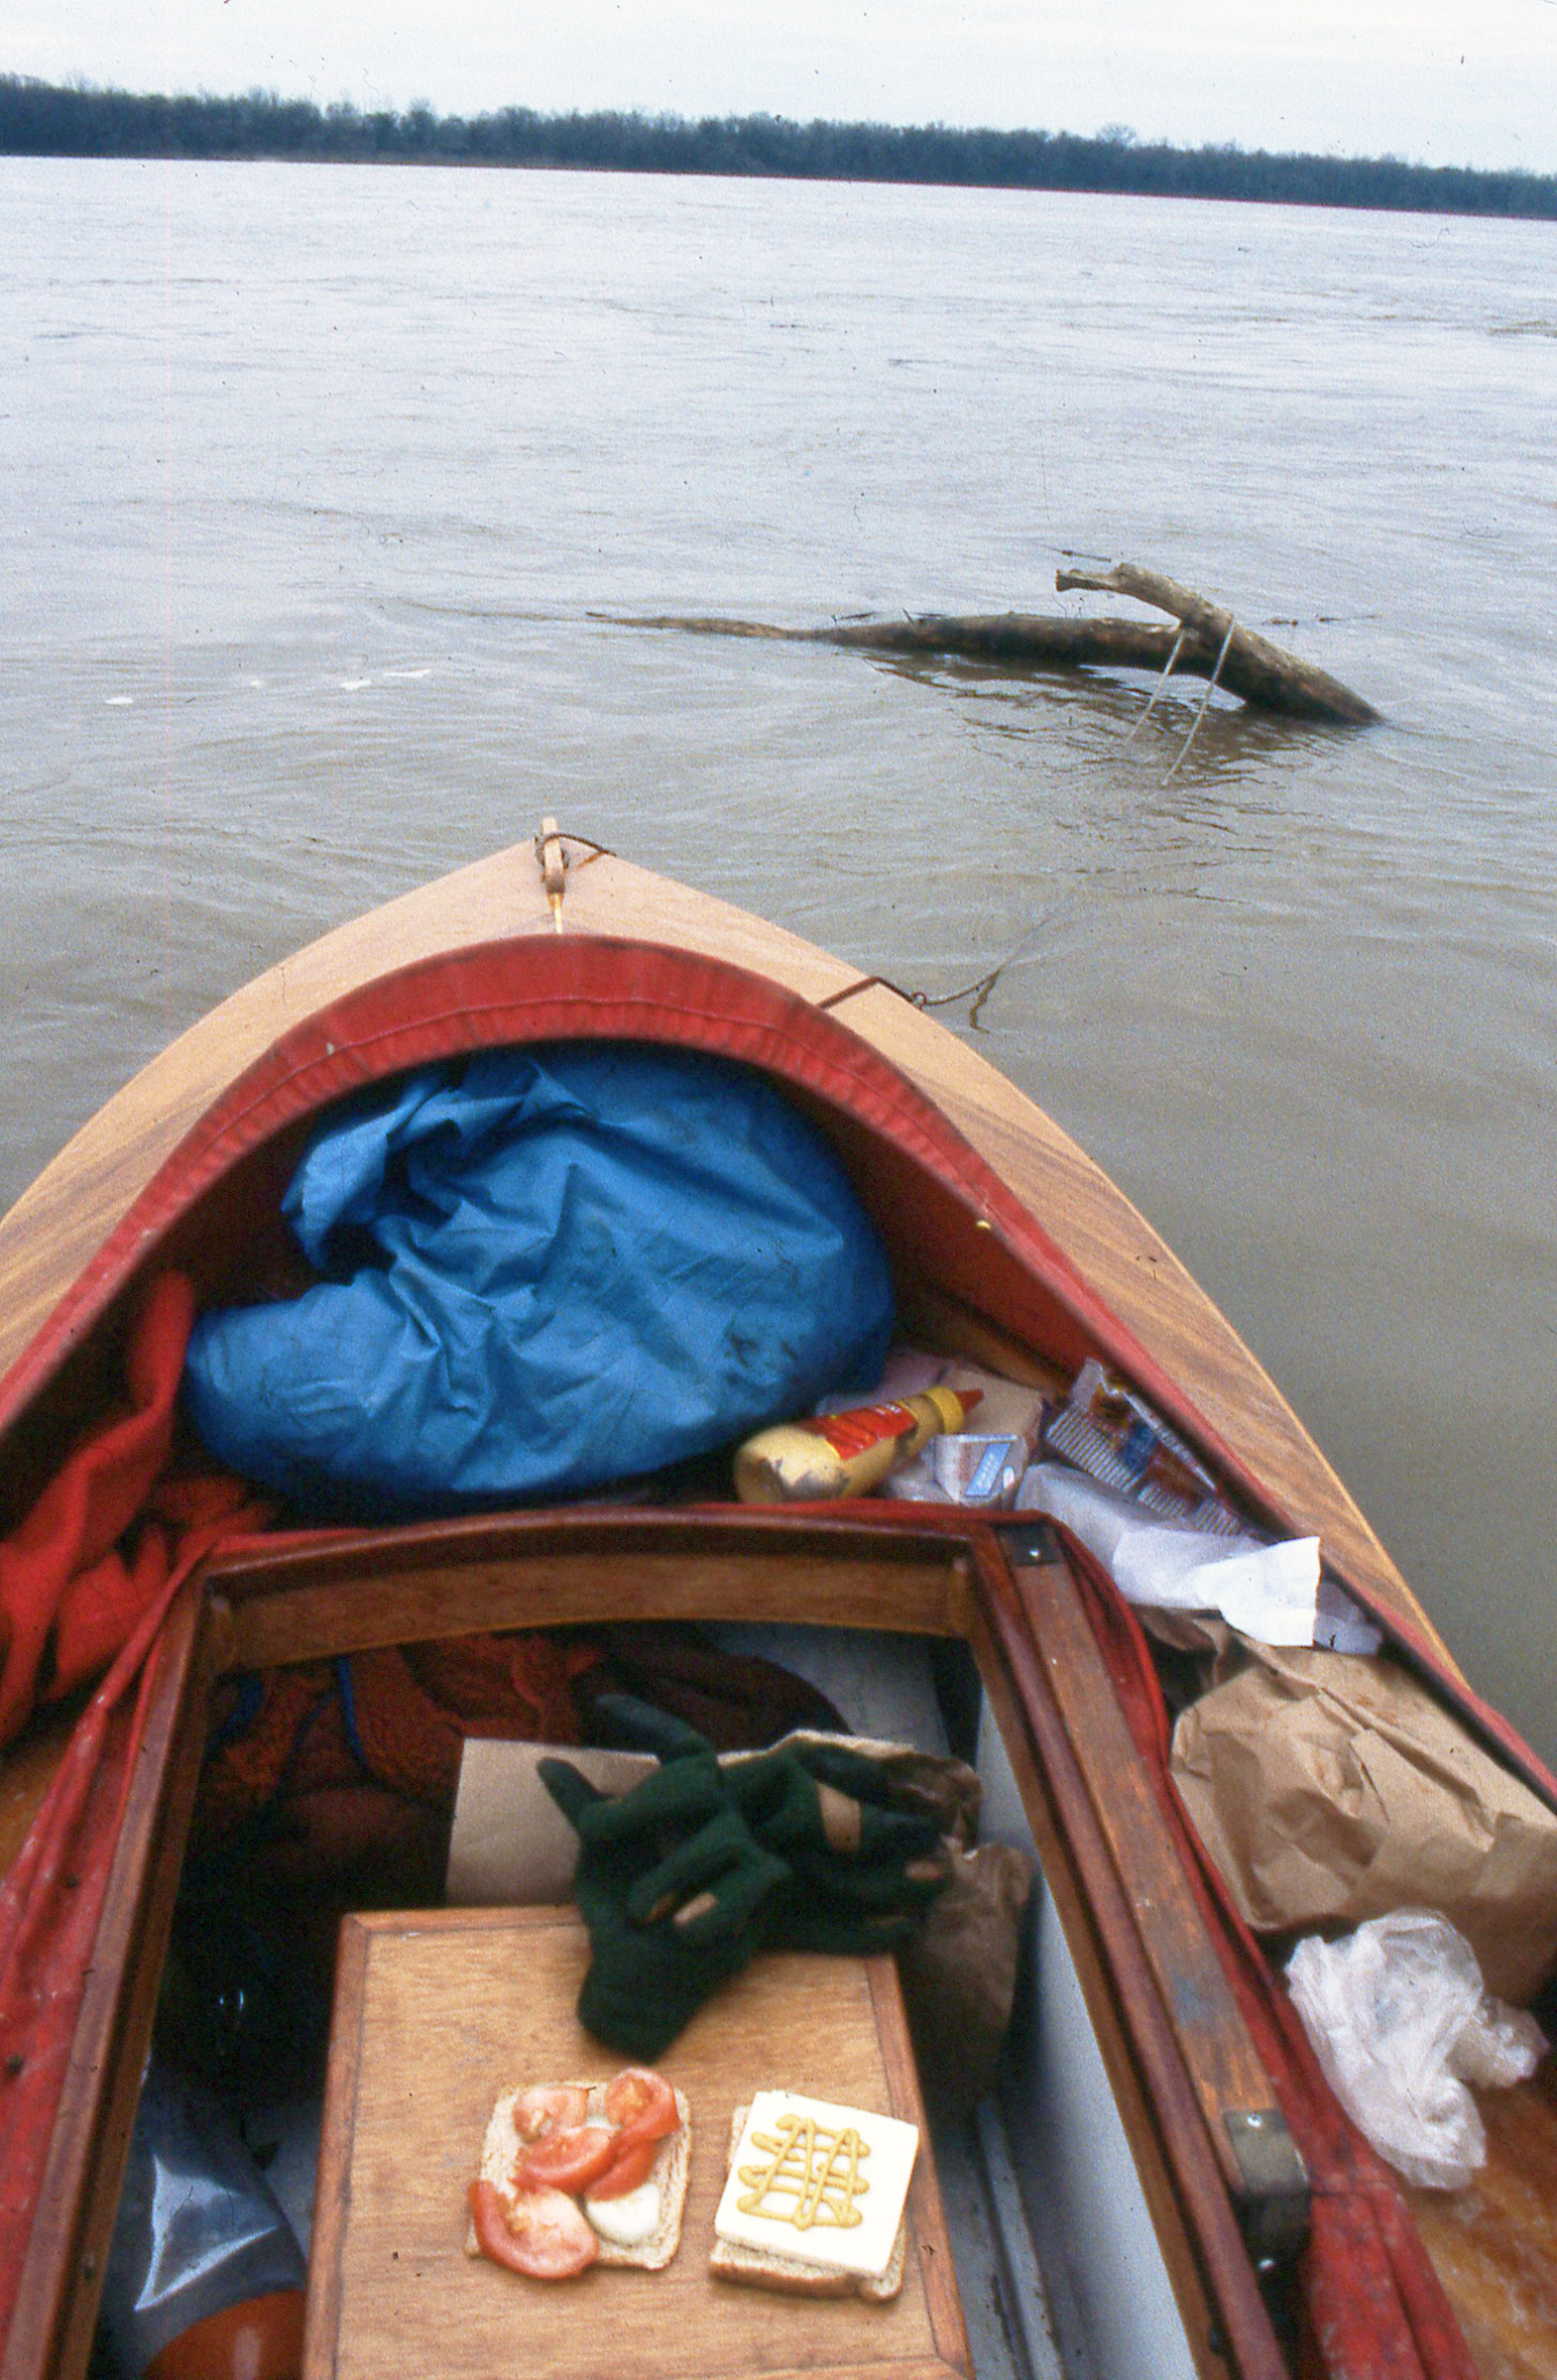
With the pad removed, the box that was my rowing seat served as a lunch kitchen. The daggerboard trunk, out of the way to the right of the sandwich makings, has a cap over its opening to block the splash. During this break on the Ohio River, the wind was blowing upstream, so I took a tow from tree trunk that was drifting down river.
In 2005, when I built a Caledonia yawl for camp-cruising with my two kids, I kept the hull and sailing rig as designed but started from scratch for the interior arrangements. Applying the sneakbox’s lessons of asymmetry and adaptability, I moved the centerboard trunk 14″ to starboard. (Keeping its top at seat level and raising it bottom up the slope of the garboard diminished the depth of the trunk, so I made it longer to give the board the same area.)
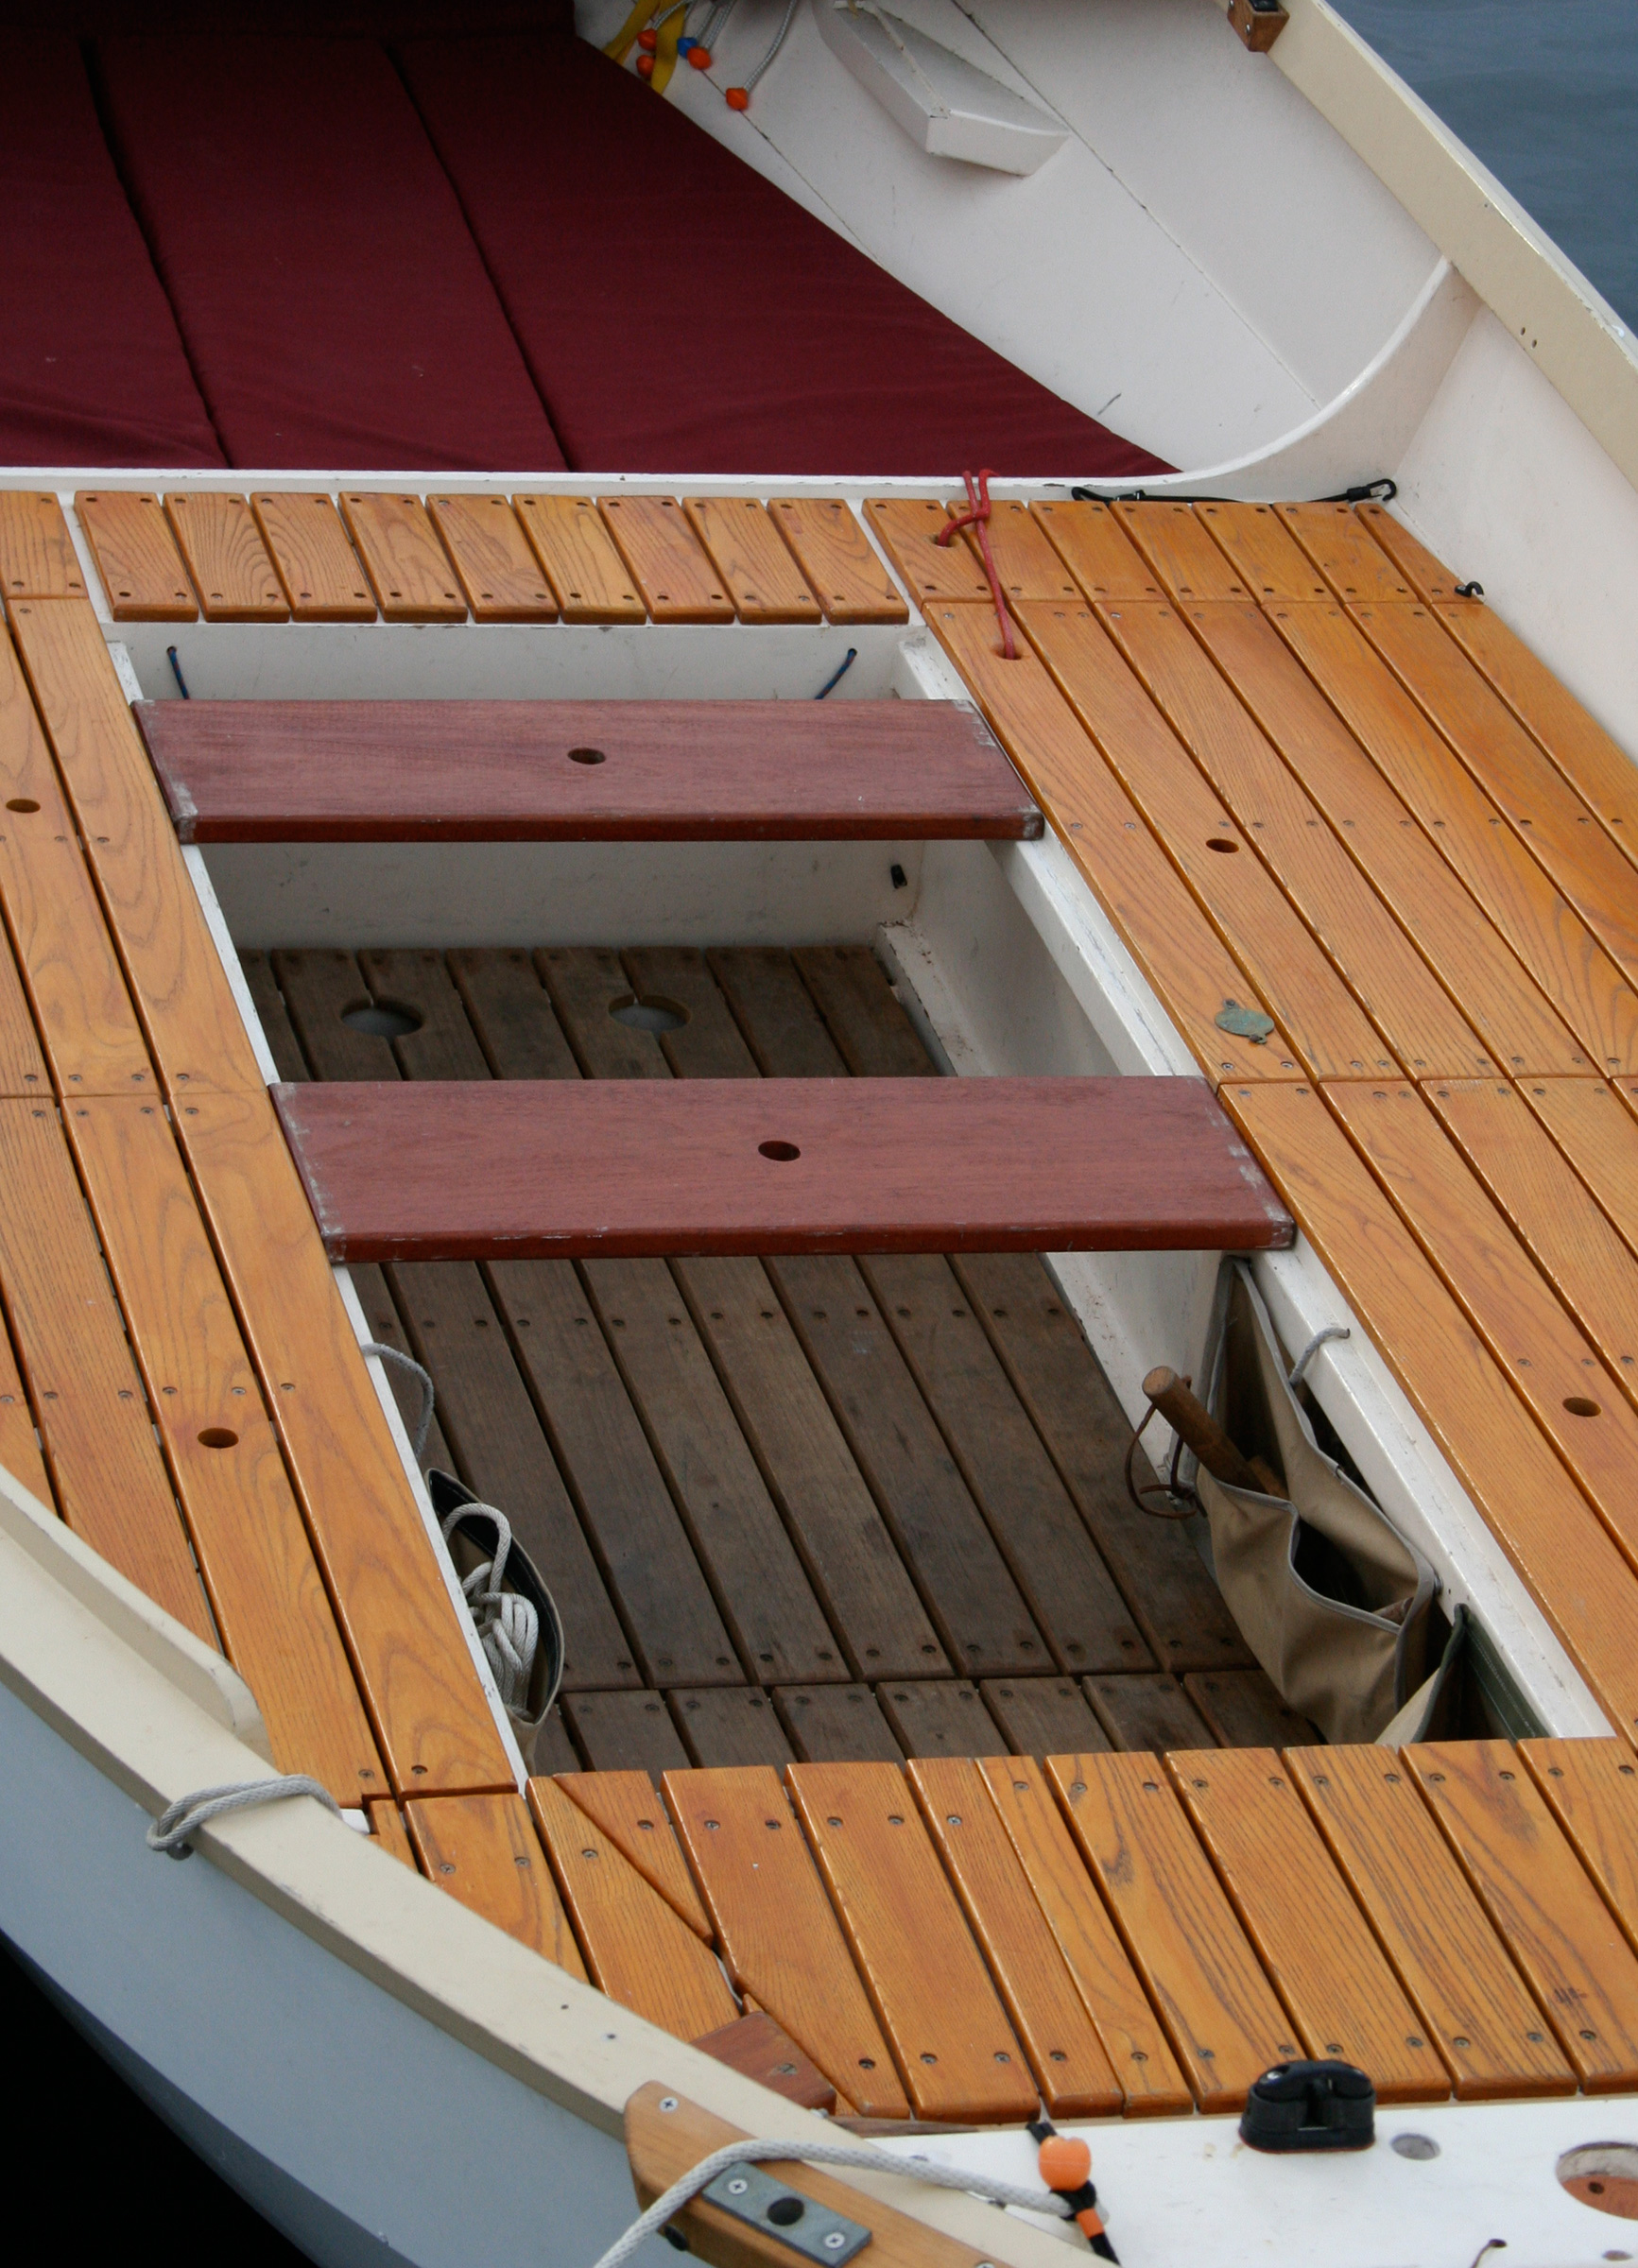
The slip thwarts can be positioned anywhere on the ledges. A dowel inserted into the holes in the thwarts connects to two and holds them upright to support a table.
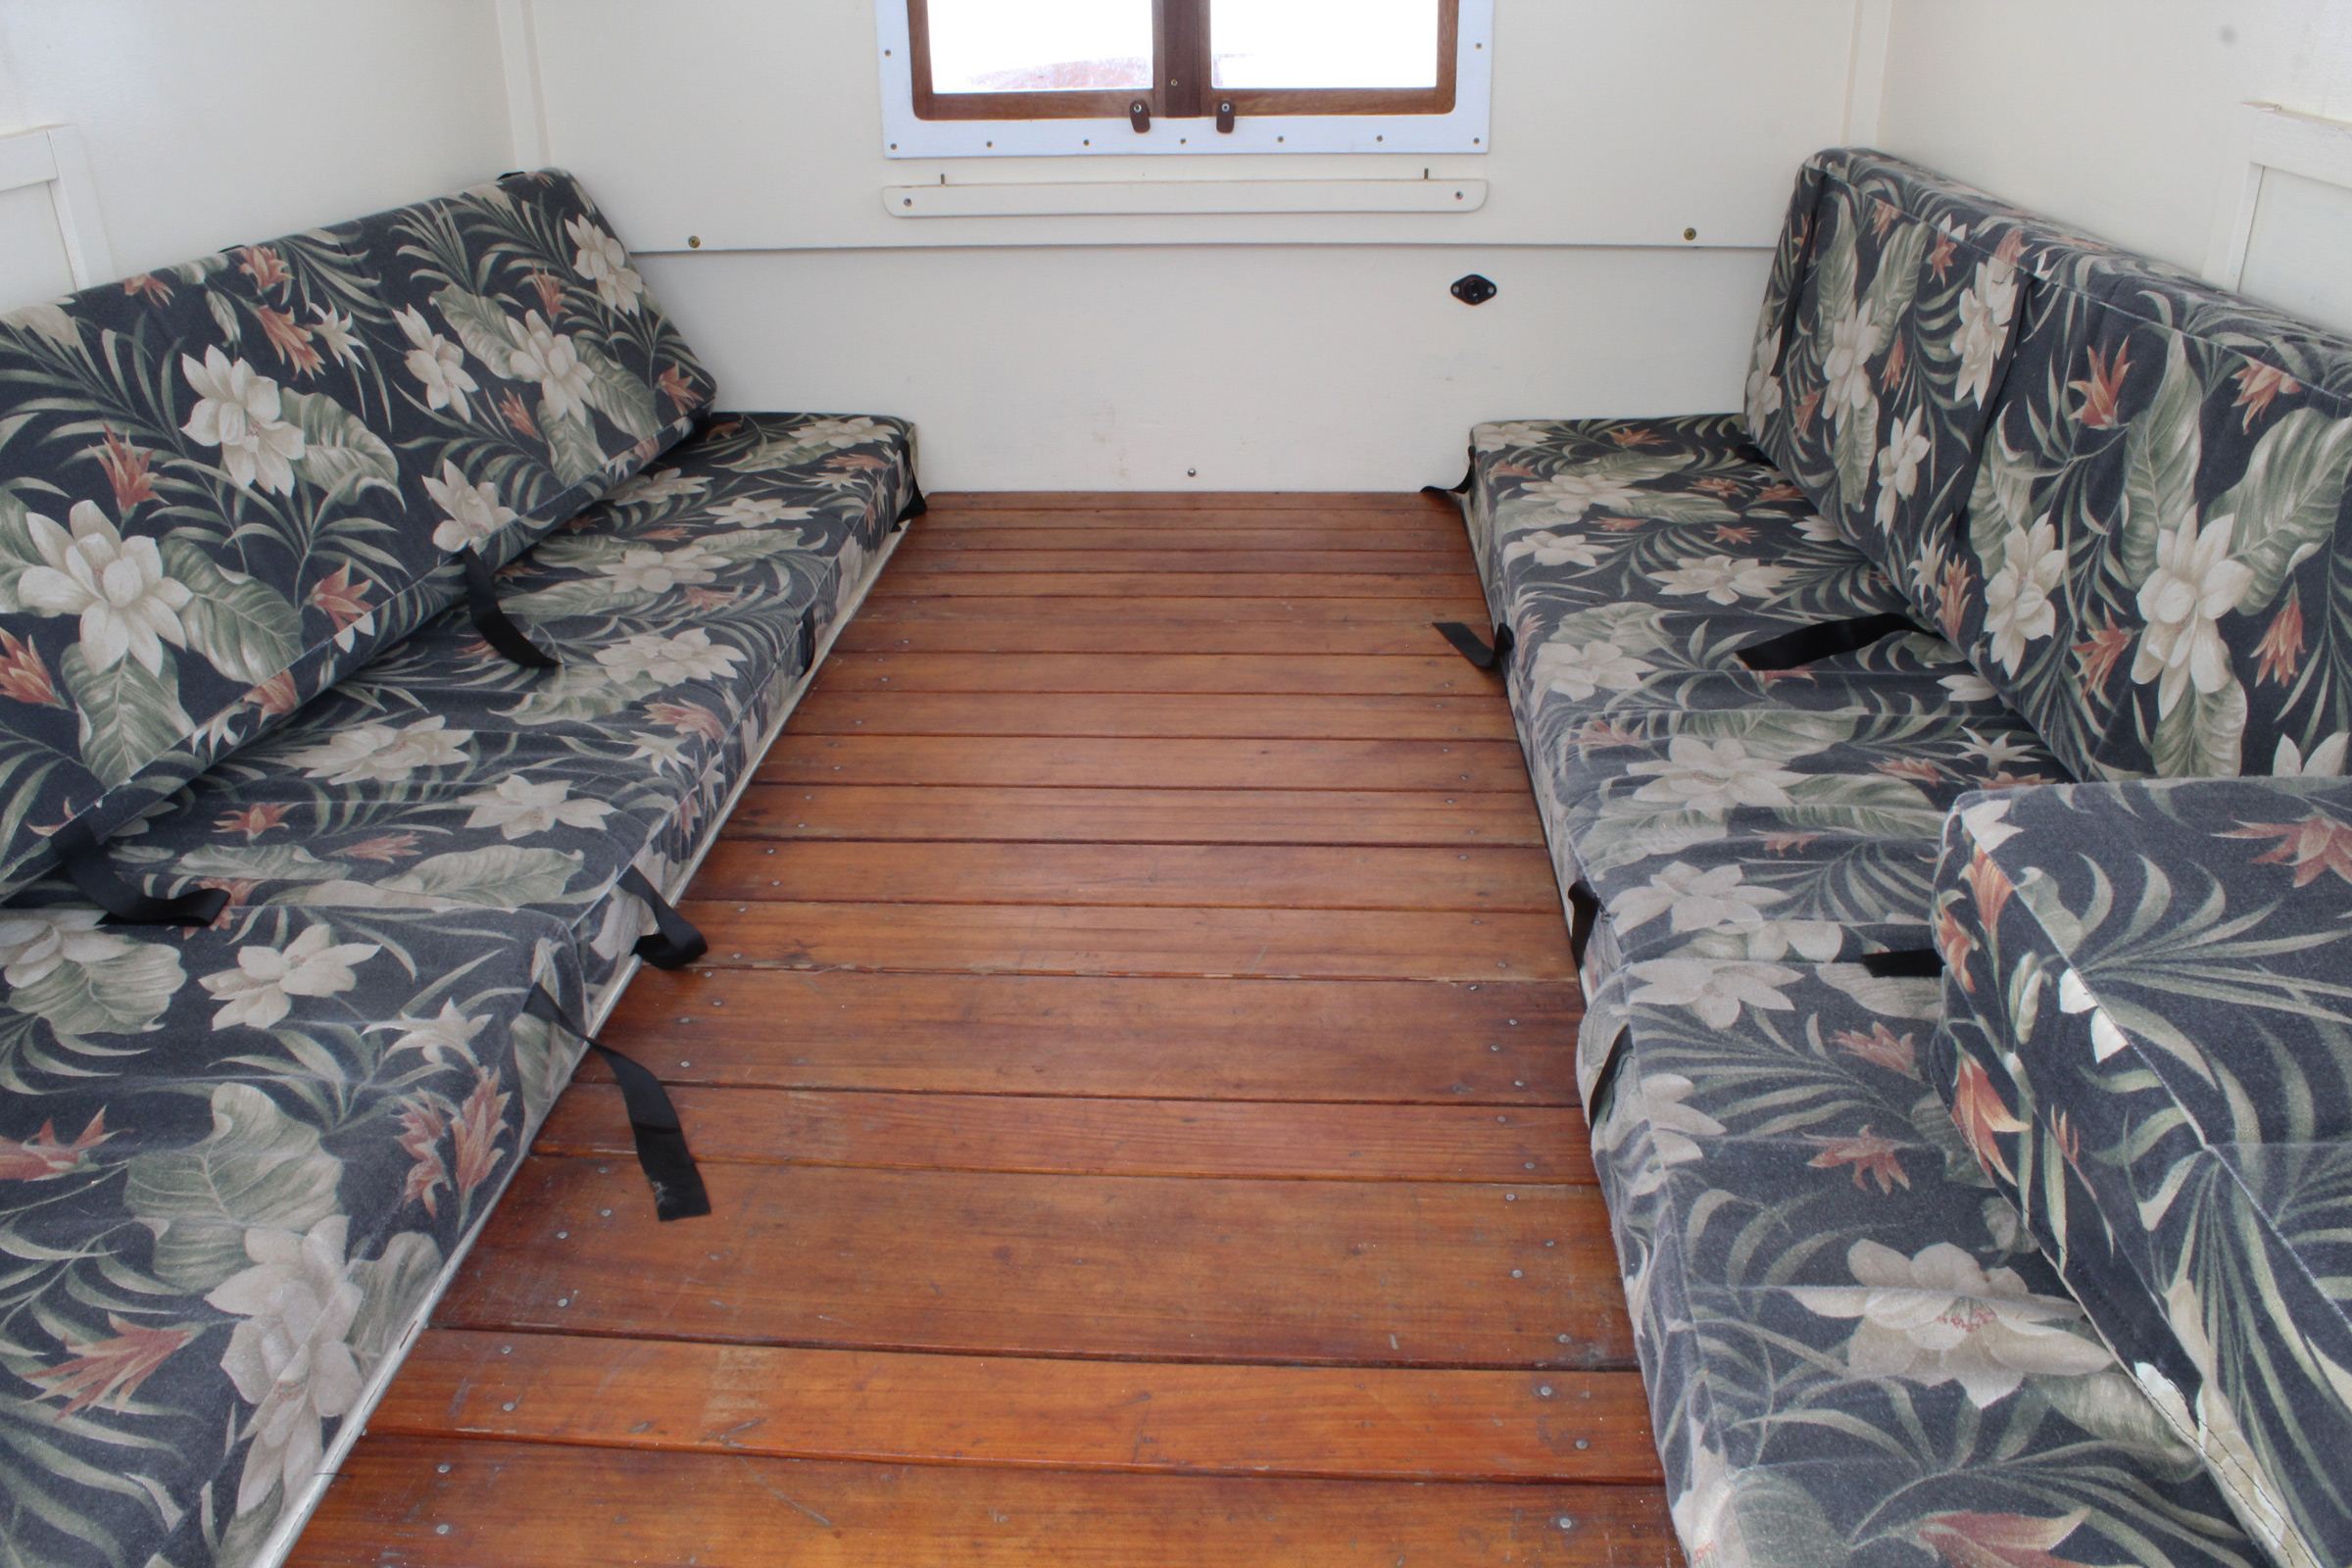
The trunk led to wide side benches with parallel inboard edges, and those invited a modular system where slip thwarts and floorboards could rest anywhere on ledges to fill the gap between the benches.
Todd Waffner
When my Caledonia yawl is heeling, the inboard edge of its leeward bench is in the Goldilocks zone for bracing my feet: a centerboard trunk would be too close and a traditional side bench too far.
The resulting width of the side benches brought some benefits I hadn’t anticipated. Standard benches are usually fairly narrow, and their curves parallel the contour of the hull. A 9”-wide side bench, like that in my 14’ Whitehall, is not much of a seat while at anchor, let alone when a boat is under sail. When the boat heels, the weather inwale angles into the small of your back and pries you off the bench. With a wide side bench you can lean against the inwale and still be well planted on the seat. In light air, the wide bench also allows you to shift your weight inboard in response to lulls in the wind. The inboard edge of a leeward wide bench, which is closer to the centerline than that of a narrow bench, can make a foot brace that’s better positioned to keep your weight on the high side.
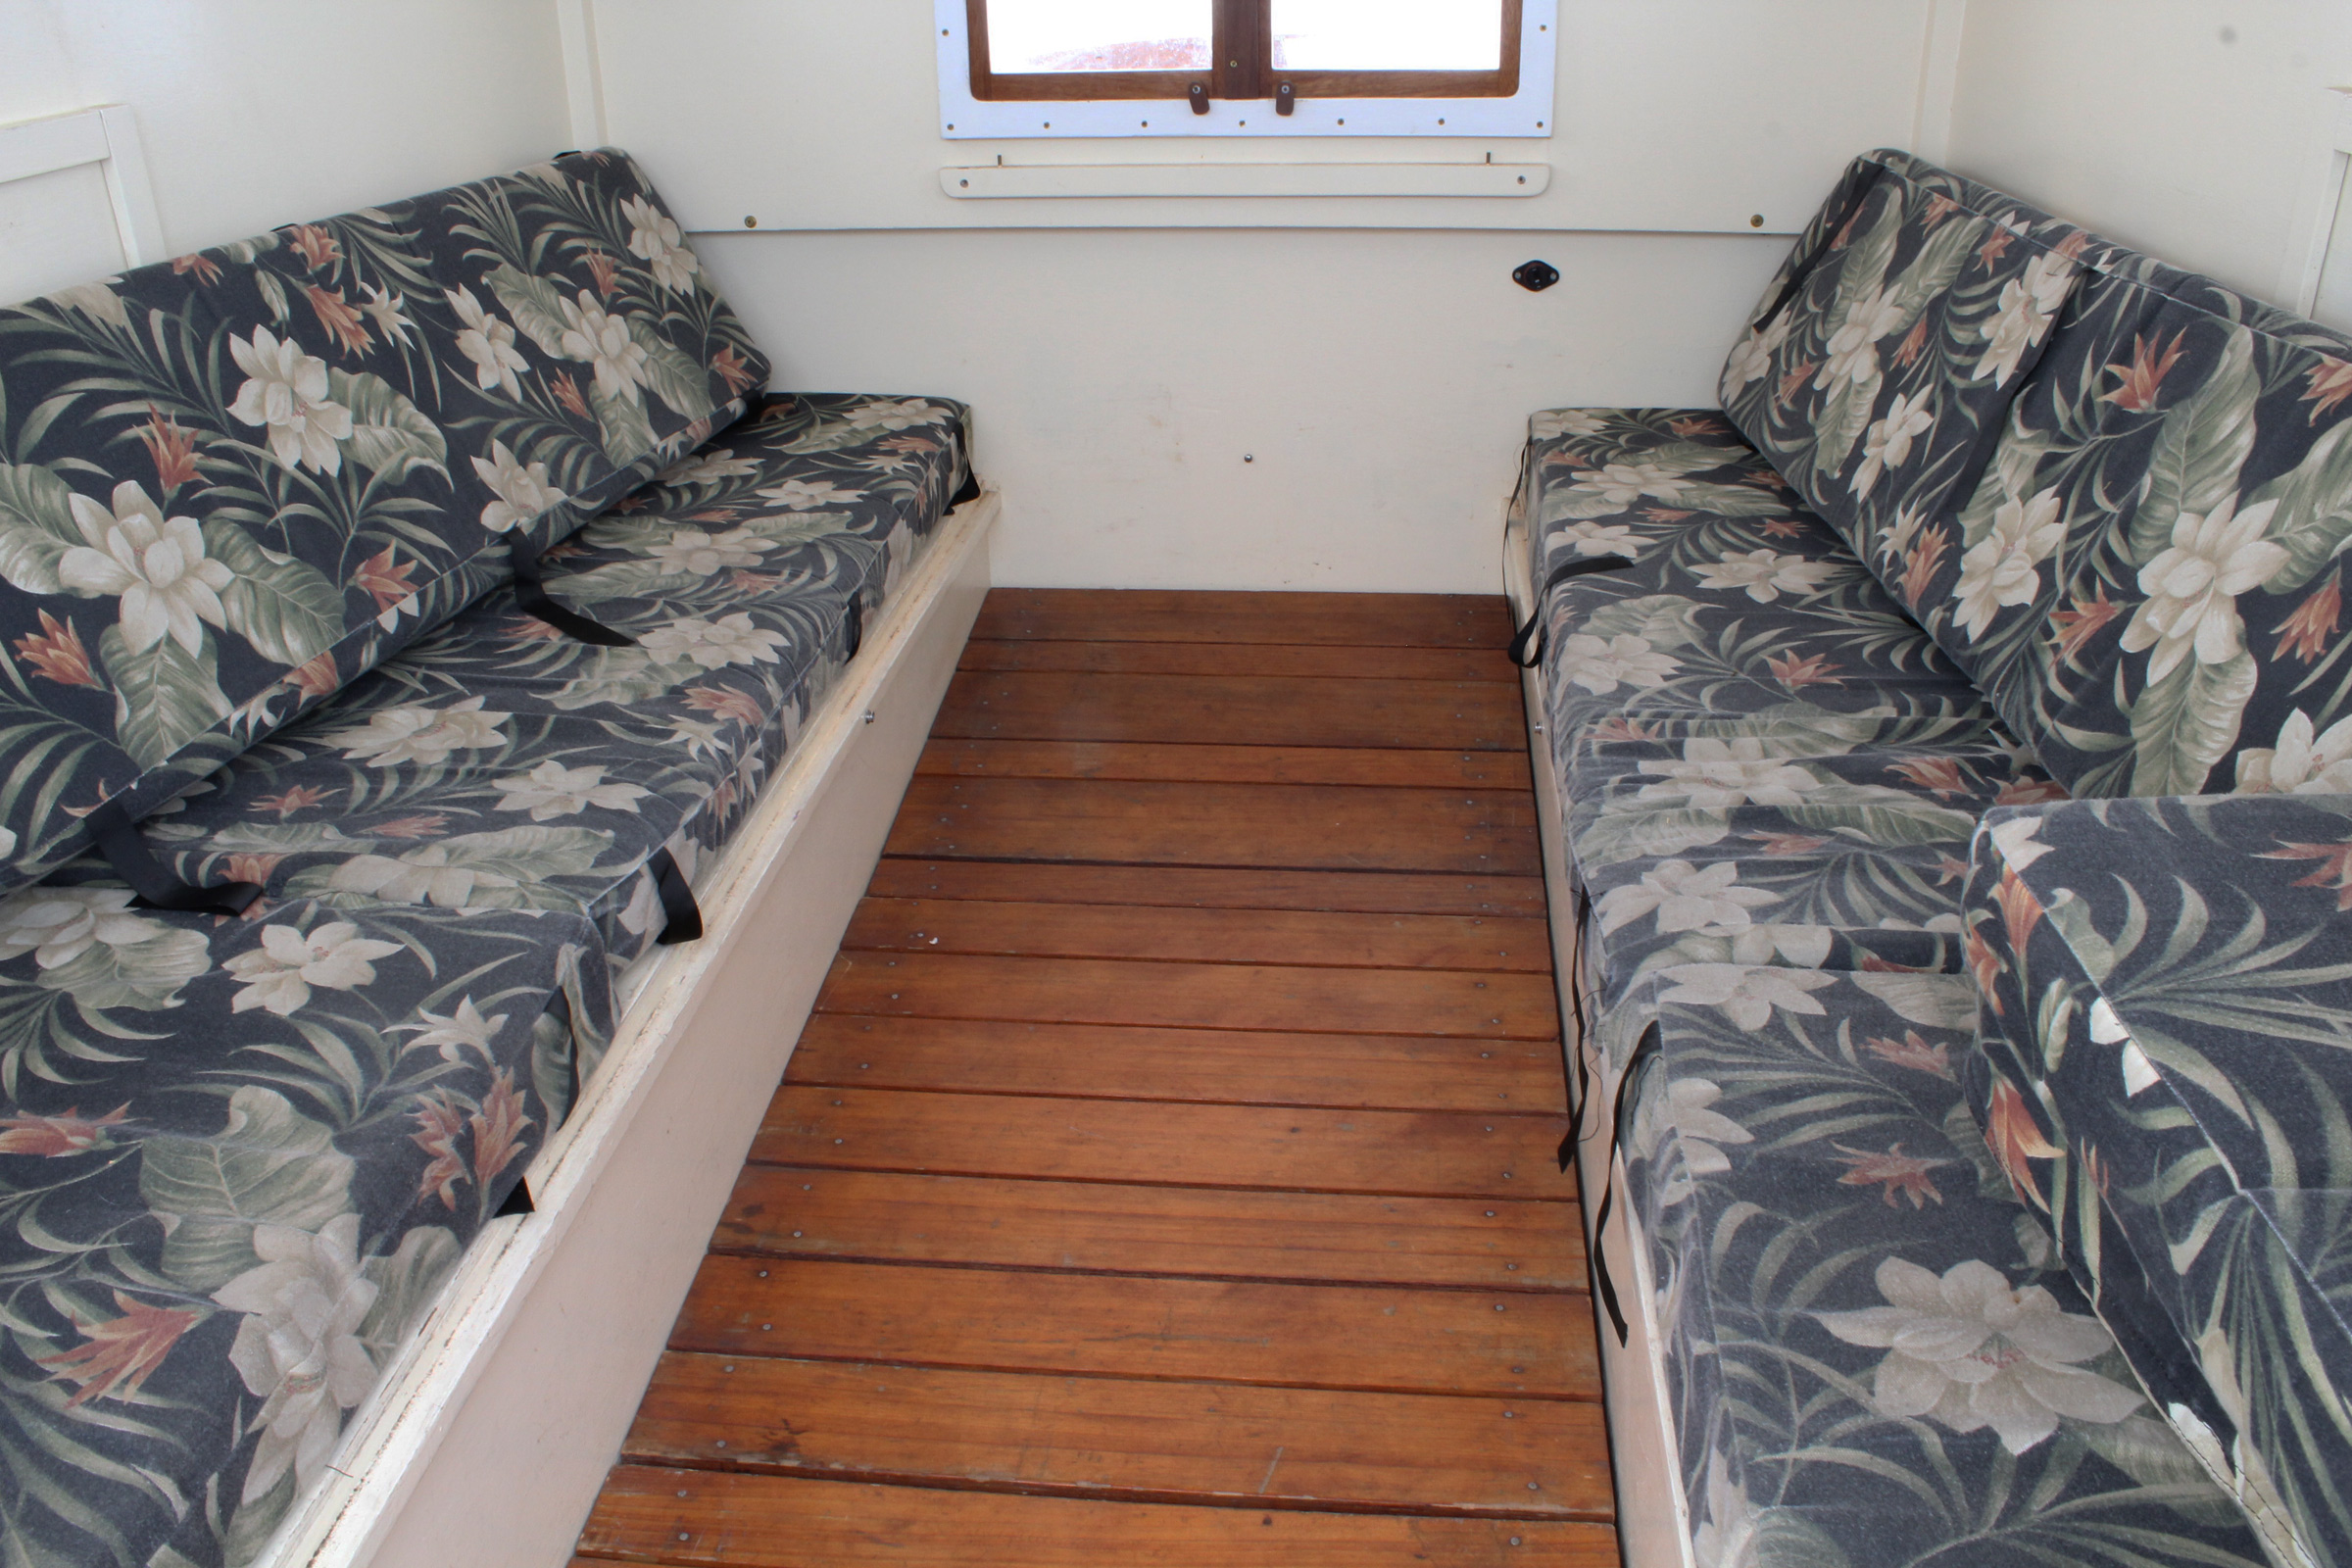
Side benches also provide voluminous, out-of-the-way storage areas. The Jimmy II has watertight flotation or storage compartments; those in my Caledonia just have slatted tops and canvas-panel fronts, but they protect the dry bags and keep the hull’s sloped sides from funneling them into the middle of the boat, right where I need to put my feet.
The side benches provide a cockpit and a footwell that’s the equal of a much larger sailboat. The central transverse bench is the only obstacle between the bow and stern areas. The off-centerboard trunk supports the forward end of the starboard bench.
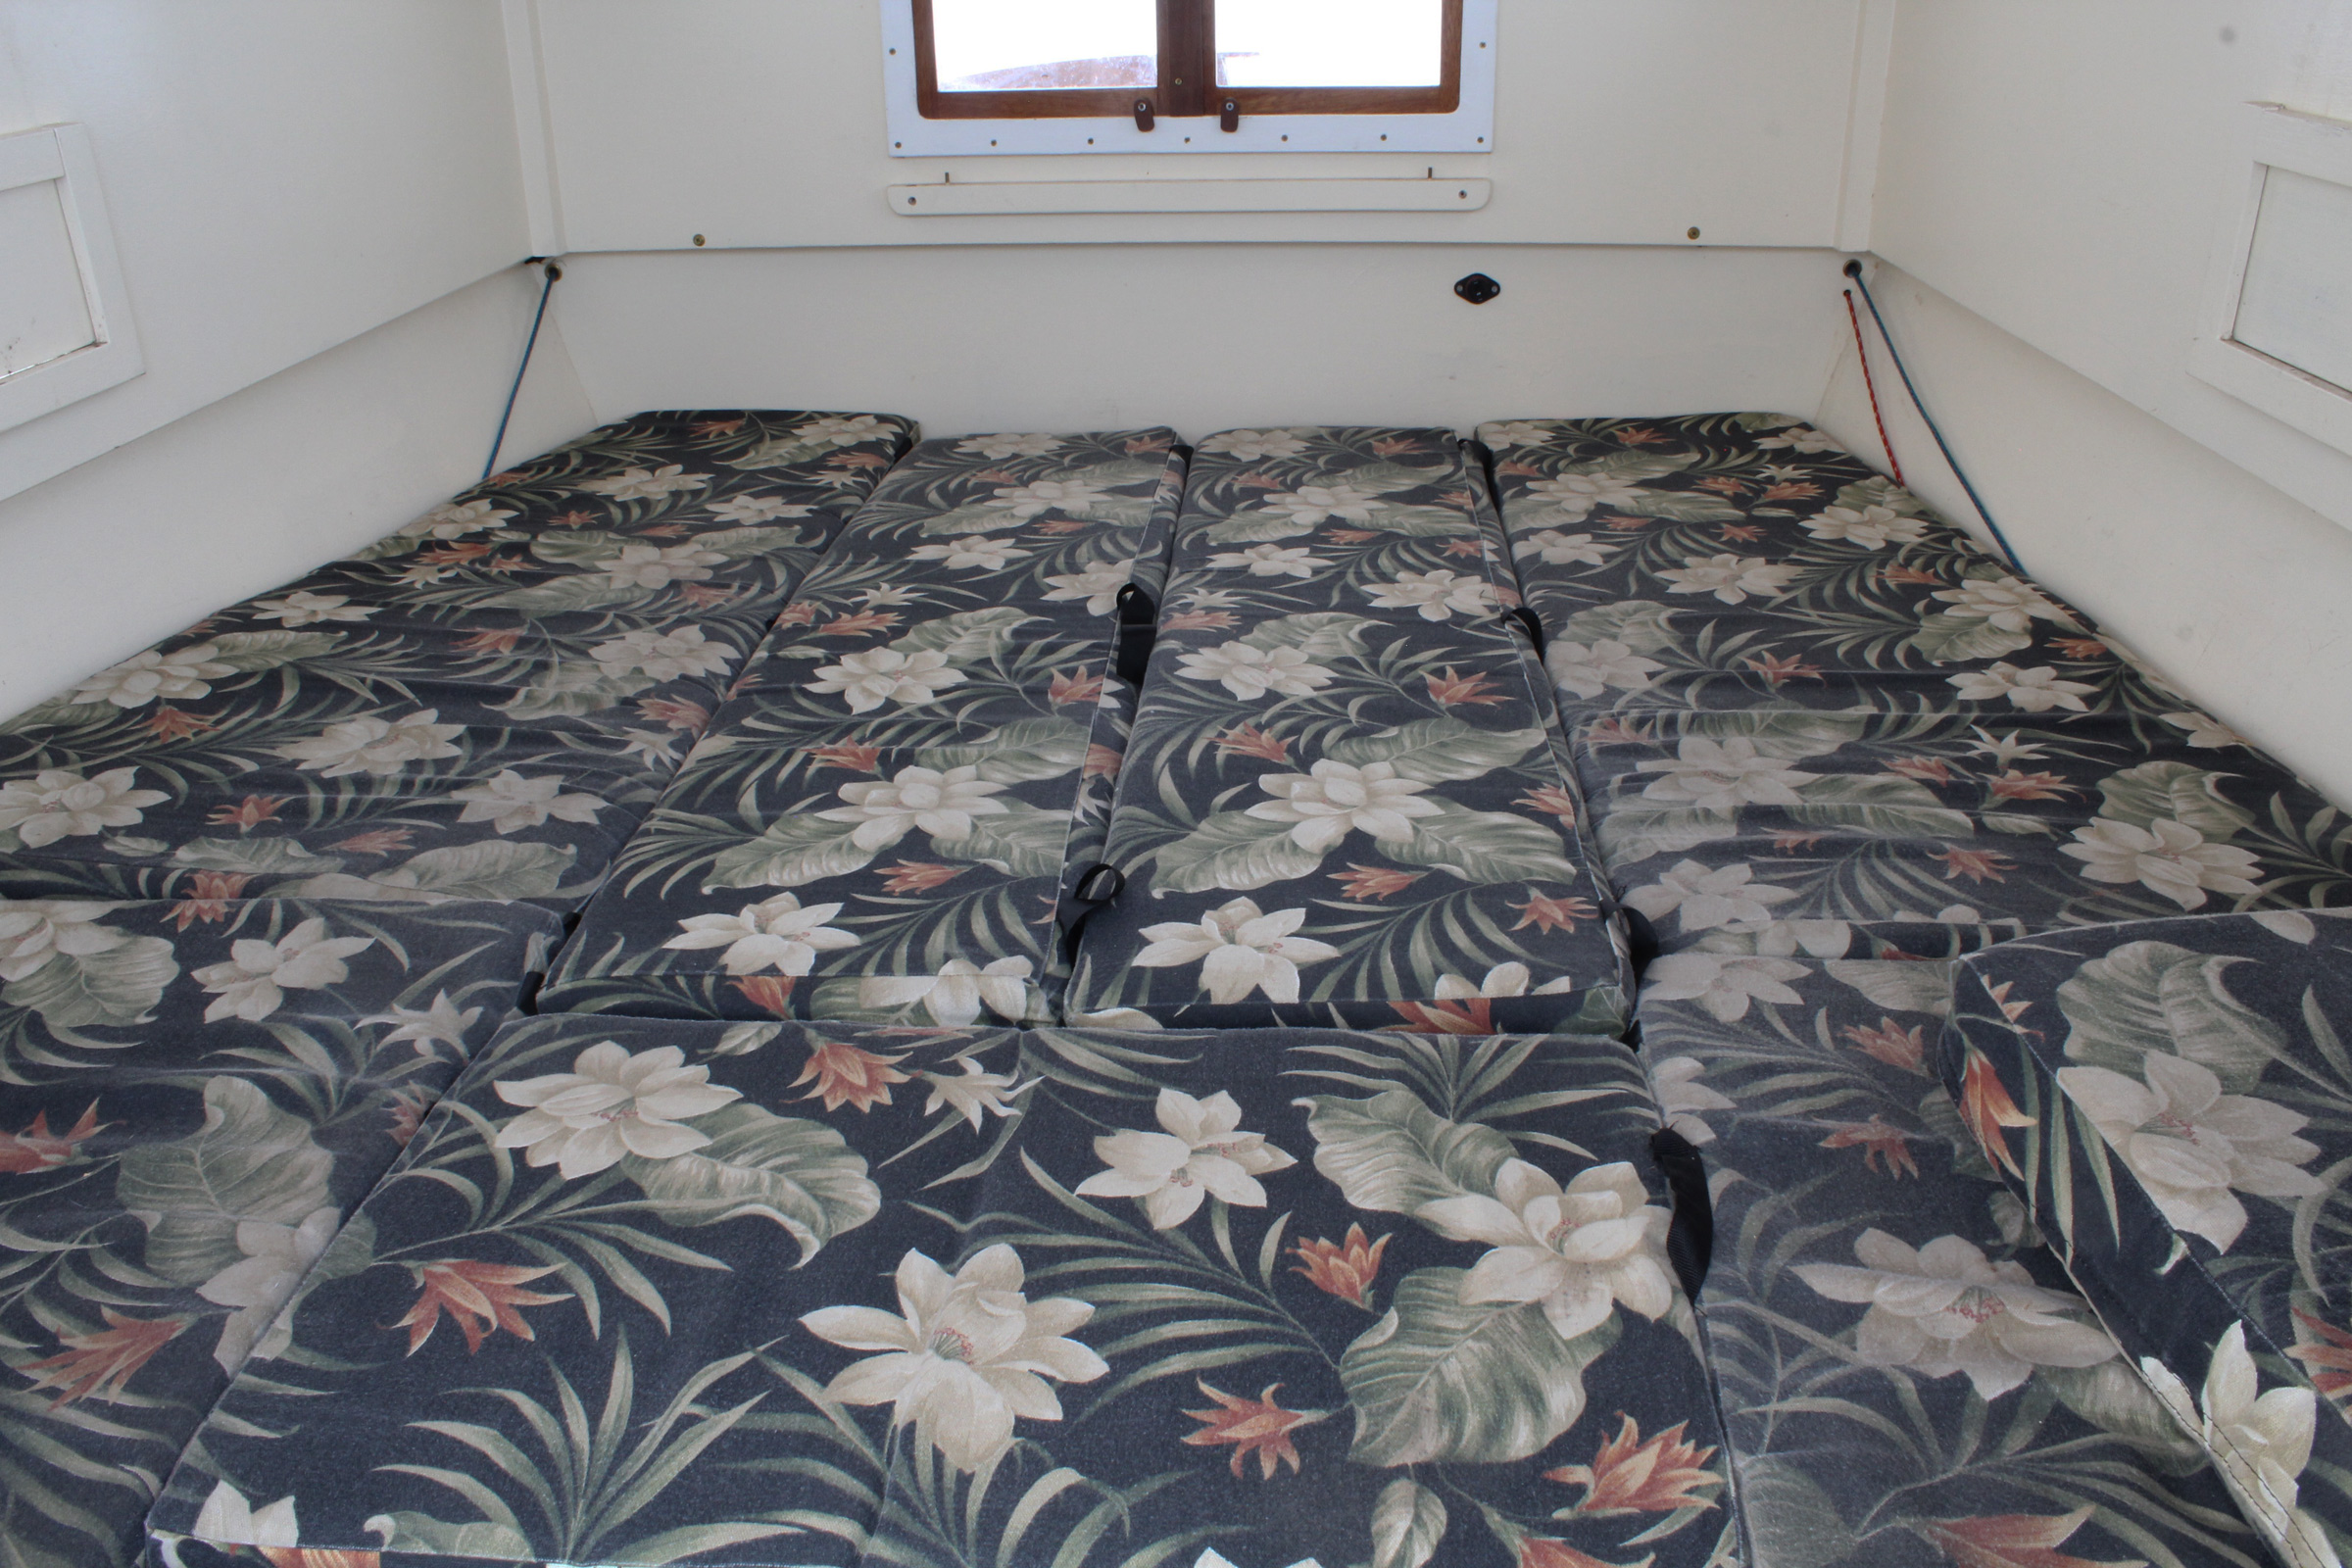
With the floorboards set on the ledges, the cockpit becomes a queen-sized sleeping area.
My yawl has a bit of deadrise, so it needs floorboards to provide a flat surface to stand on. I made the floorboards as wide as the slip thwarts are long so they can also be set on the bench ledges to create a large sleeping platform. Some argue for sleeping in the bottom of the boat to get the best stability, but I’ve never had any issues with sleeping at bench or thwart level in any of my boats.
The galley box, flipped upside down, rests its oak-plank base on the ledges. It takes the place of a slip thwart for rowing. Here the aft floorboards are also resting on the ledges to add to the seating area.
Flipped, the galley box holds two stoves, ready to cook. When everything is stacked for storage, the contents of the box don’t shift much and stay in place when the box is upside down. The box cover has been put aside; the black straps hold in place. The slip thwart gives the cook a place to sit, surrounded with lots of side-bench kitchen-counter space.
Other extensions of this “modular” approach made possible by galley-box benches supported by the ledges—right side up to cook, upside down and closed to be used as a thwart while under way—and a dining table created by setting a floorboard on a pair of slip thwarts set on edge.
With the slip thwarts set on edge on ledges and held upright by a length of dowel, they’re ready to support the floorboards as a table top.
For those who are put off by eating off floorboards, I carry a table cloth. There’s no pulling chairs back to get seated, but once at the table, the diners are all comfortable.
When I decided to build a boat with accommodations for cruising in the off season (see “A San Juan Islands Solo“), I incorporated the the side-bench/slip-thwart concept in the cockpit and the cabin.
I made a narrow floorboard that serves as the rowing seat, making a dedicated slip thwart unnecessary.
I extended the benches and ledges of the cockpit into the cabin of my little cruiser, HESPERIA. The floorboards spend much of their time on the cabin floor, though I have small rugs underneath them for comfort when the floorboards are used as a catwalk on the cabin roof.
Come bedtime, the floorboards rest on the bench ledges to make a broad sleeping platform.
The backrest cushions cover the floorboards, making a queen-sized bed.
In 1927, the architect Le Corbusier wrote: “Une maison est une machine-à-habiter”—A house is a machine for living in. We inhabit our cruising boats, and they too should be machines designed for our living aboard them. A good measure of their performance is the ease with which we can use them. Your boat should adapt to you, not the other way around.
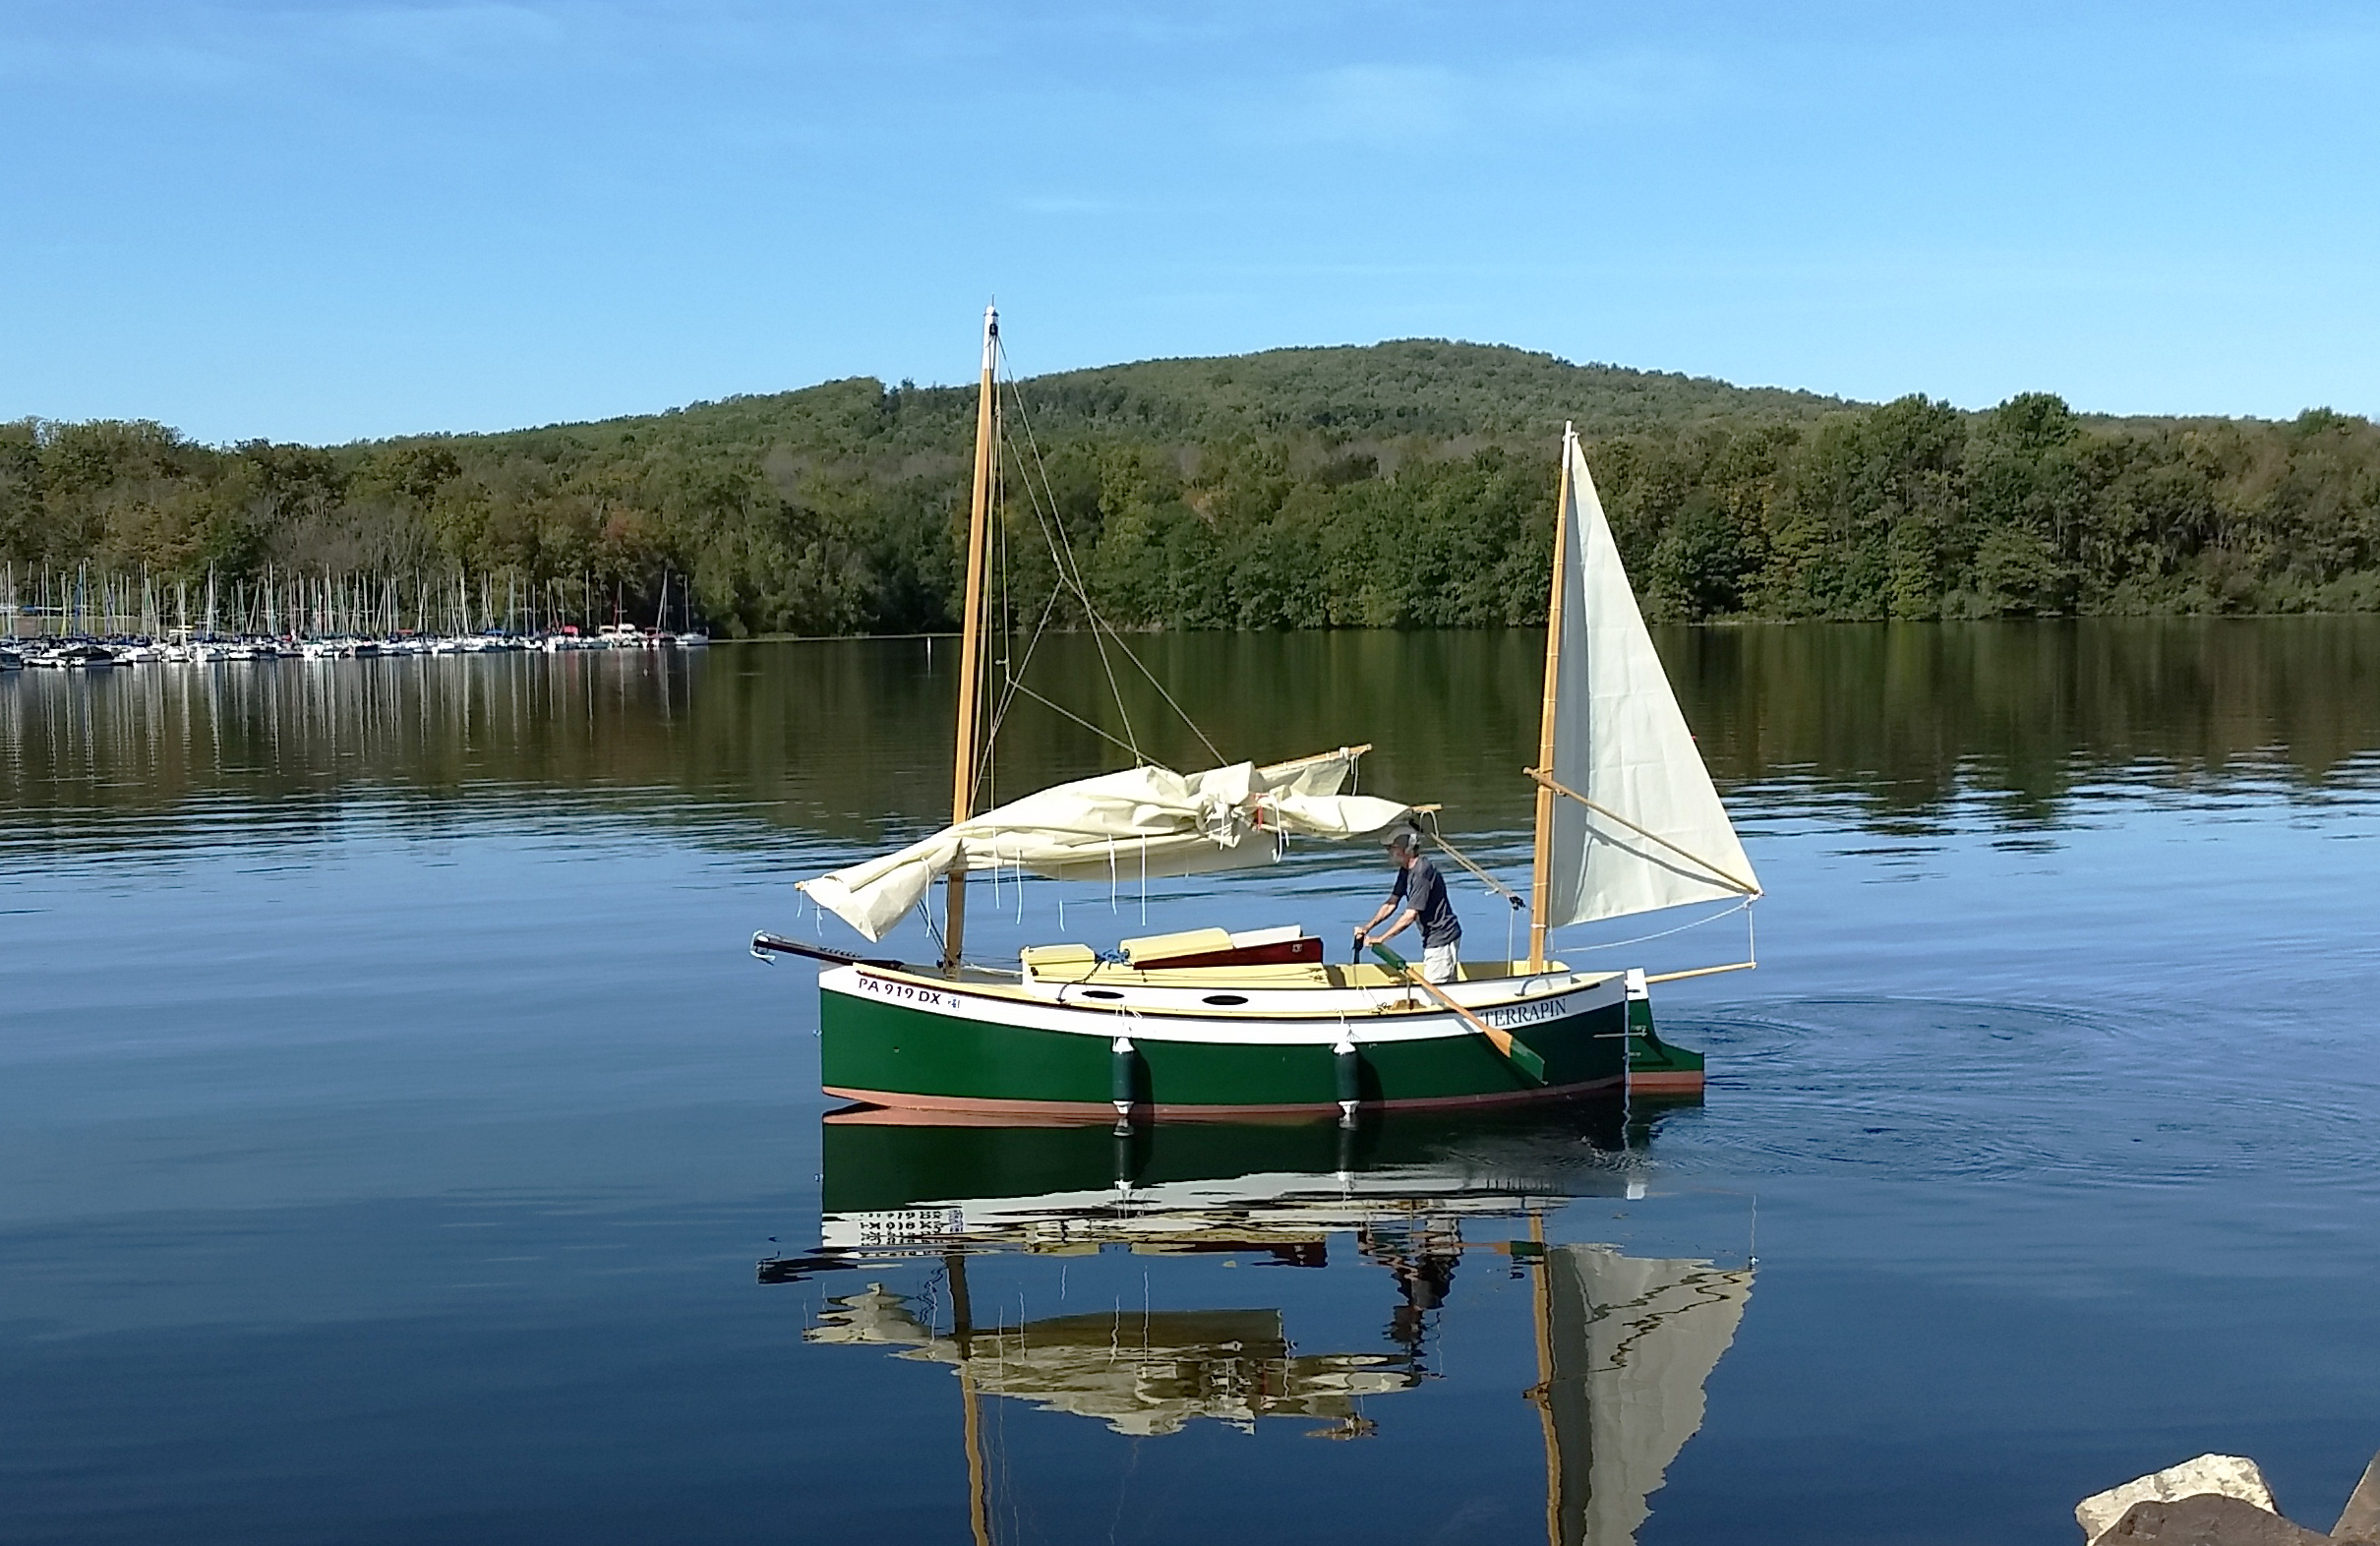
Chesapeake Light Craft’s Jimmy Skiff was inspired by flat-bottomed utility boats used under sail and oar for work and transportation on the bay. The design was named not after a guy named James, but after the blue crabs of Chesapeake Bay—the females are called sooks and the males are called jimmies. The original CLC version was developed two decades ago and for almost half of that time designer John Harris has been working on an update to the popular design. The 13′2″ Jimmy Skiff II has the same length as its predecessor, but its beam is up from 50″ to 52″ and the transom has been reconfigured—broader and with less rake—to accommodate a small outboard motor.
Christopher Cunningham
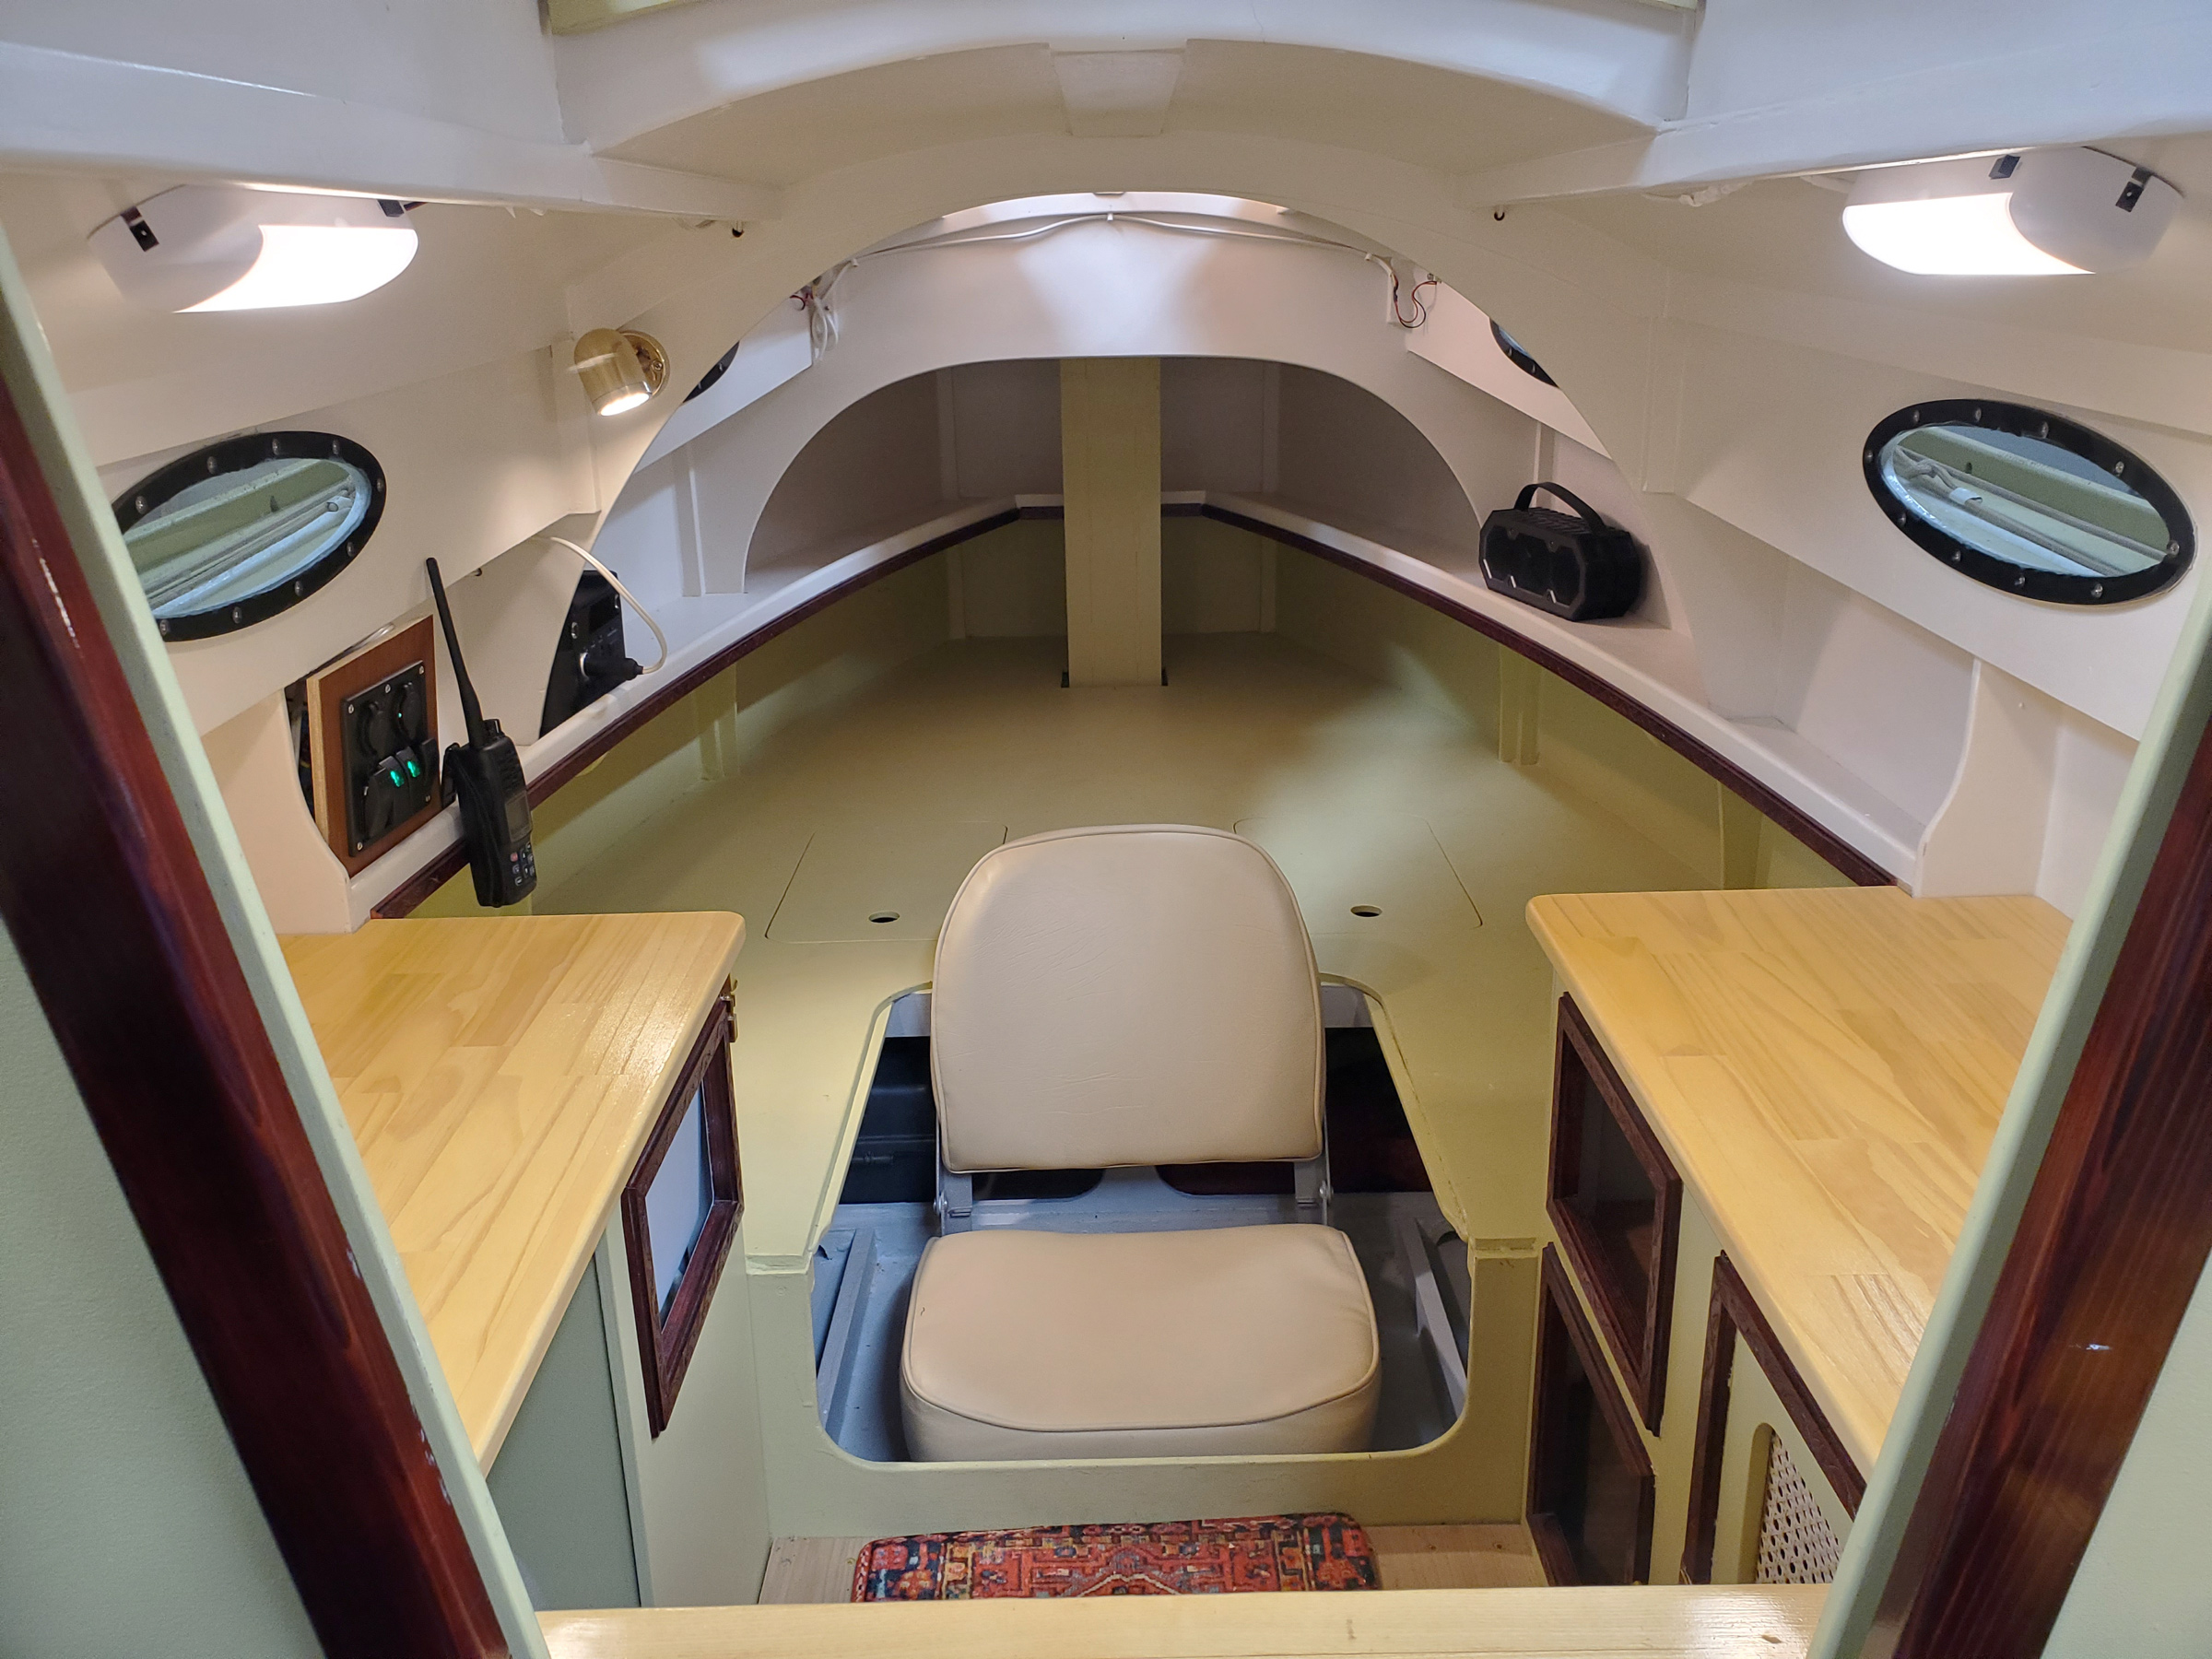
The space from the transom to the forward bulkhead is 9′ 6″ long. With hatches to provide access to the enclosed space under the benches and slats to bridge the space between them to make a sleeping platform, the Jimmy II could do some overnight cruises.
The Jimmy II can be built from a kit or from plans. The instruction manual provided for both options is 179 pages long and richly illustrated with drawings and color photographs; there’s no shortage of hand-holding to lead first-time boatbuilders through the process. The last 13 pages of the manual provide instructions for the builders who opt to build from the plans, including details on scarfing plywood and timber to get the full-length pieces required.
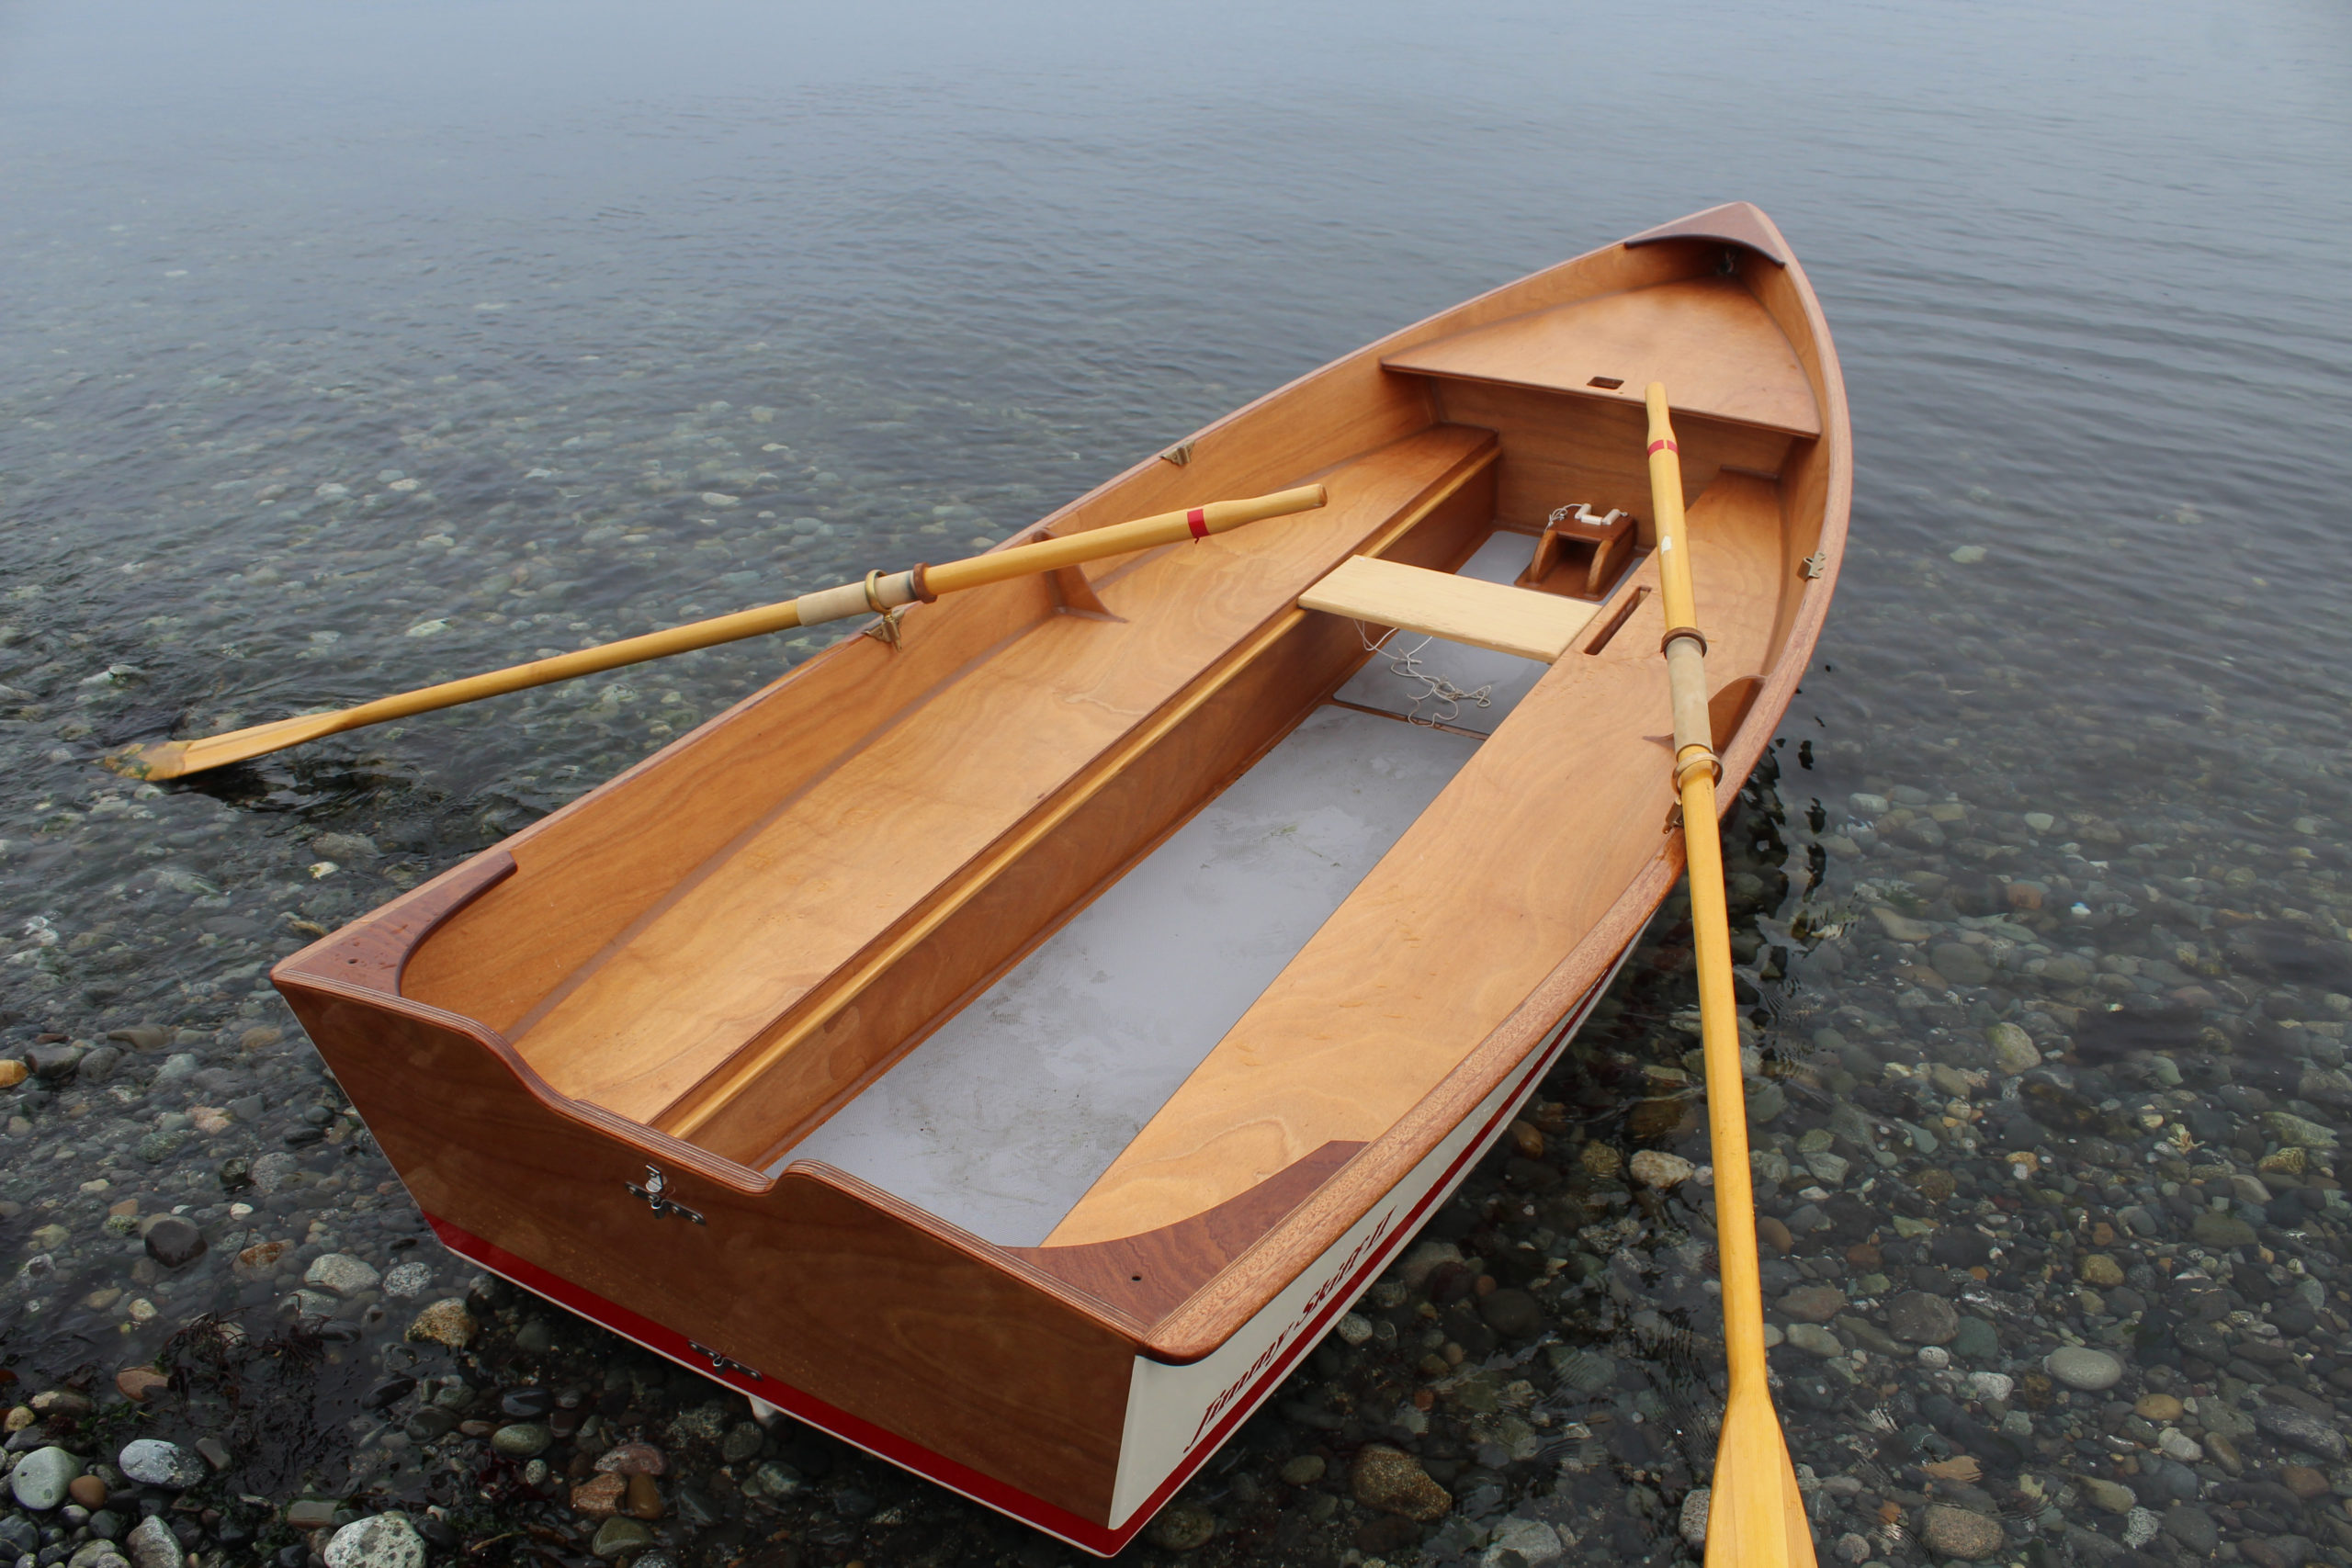
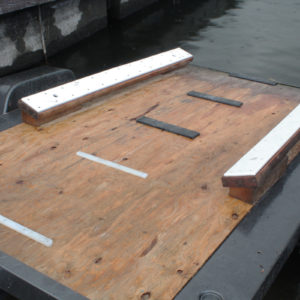
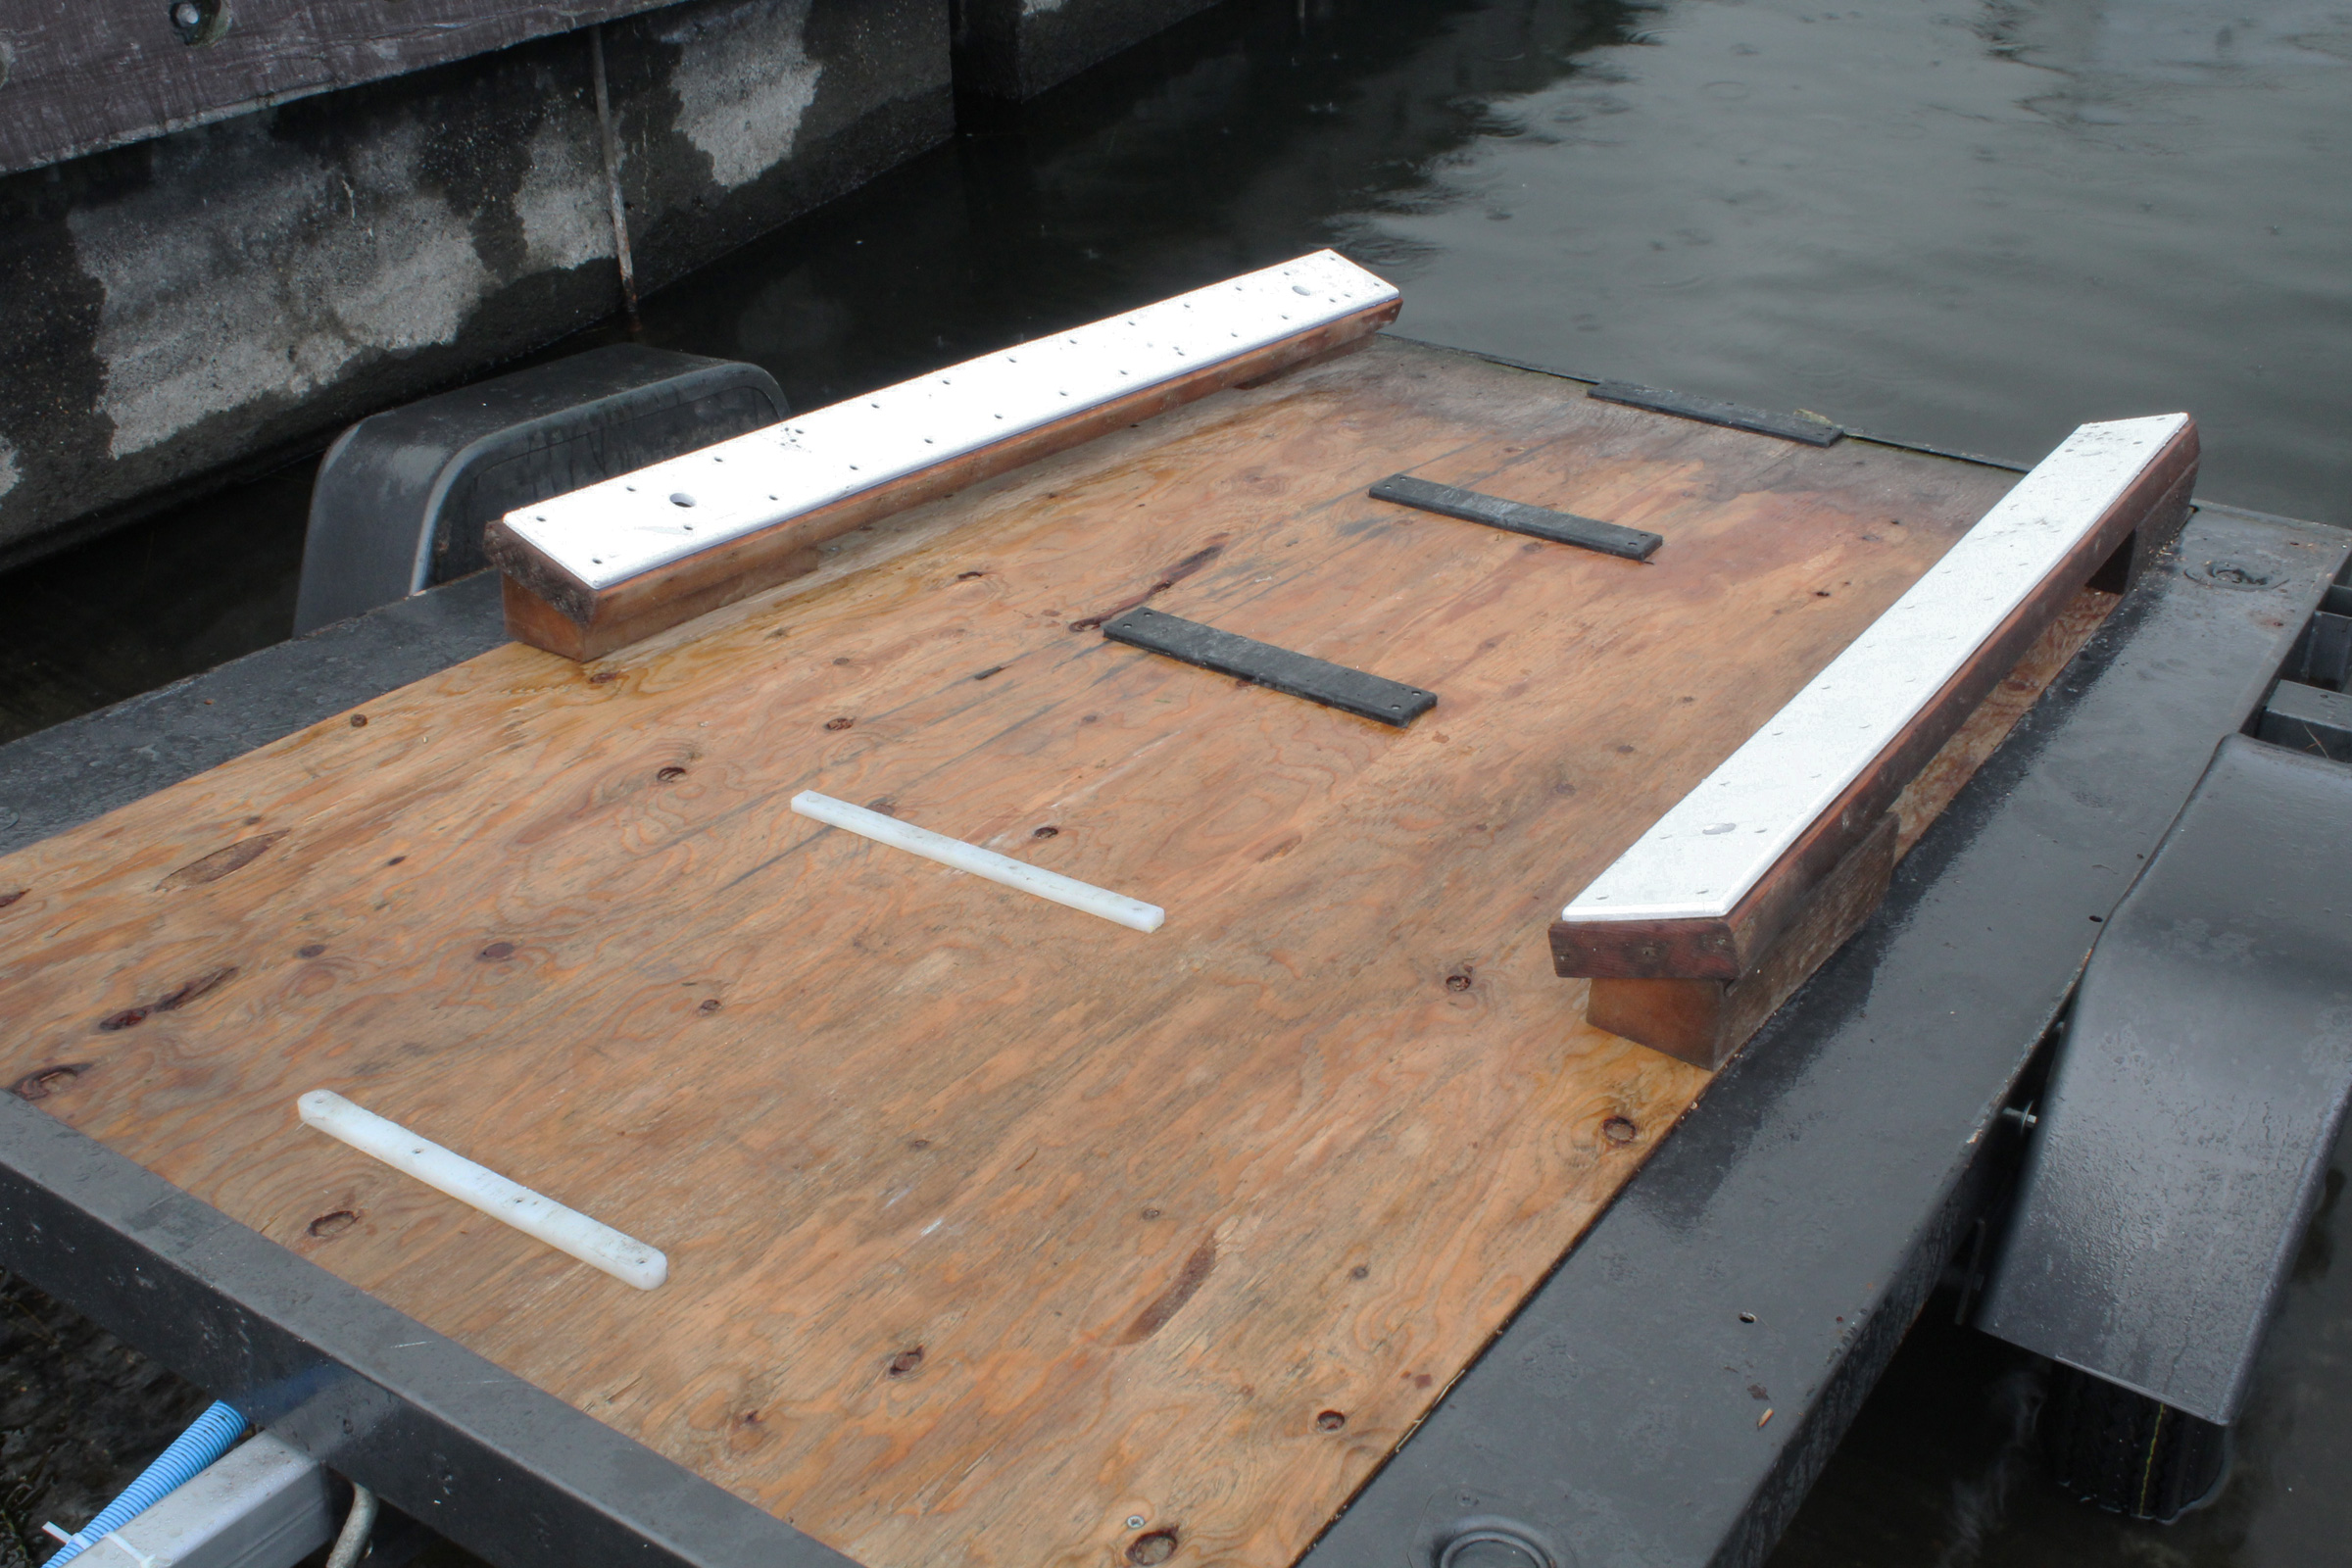
Eight plywood panels make up the kit’s hull; its bottom and sides are all composed of two pieces joined together with puzzle joints and the transom is built up of two layers. The CNC-cut parts assure the accuracy of the construction. With the shell of the hull put together, the construction of the Jimmy Skiff II departs from the original design. It has three bulkheads: the forward bulkhead will be part of a flotation compartment in the bow and the other bulkheads will provide support for the side benches/flotation compartments, the new design’s most notable features. The ‘midship and aft bulkheads each have center sections that hold the boat’s shape during construction but are later removed to open up the space down the middle of the boat.
Christopher Cunningham
The mast partner is incorporated in the aft extension of the foredeck. The white plastic shims in the mast step are not standard equipment but here was an adaptation in one of the first Jimmy Skiffs built. The step in the production model is cut to fit the mast.
While the original Jimmy had a foredeck enclosing the bow’s flotation compartment, the Jimmy II has that triangular panel set below the sheer. Access to the compartment in the original was through a round port in the bulkhead, which was blocked when the mast was in place. The recessed panel accommodates the hatch nicely and provides a place for where gear can be set when conditions are calm. It also makes a perch that’s more comfortable than the arched foredeck with a small coaming along its aft edge.
The side benches extend from the transom to the forward bulkhead and enclose a generous volume of flotation. The instructions note: “If you plan on using an outboard on your Jimmy Skiff II, you must add foam flotation inside the seat tanks. The U.S. Coast Guard requires it.” The rigid sheet foam insulation shown in the manual assures the flotation compartments keep the boat afloat even in they take on water. If you choose to cruise without a motor, the bench seats, equipped with hatches, offer a lot of protected storage.
Christopher Cunningham
The daggerboard is built inside the starboard bench. Builders who initially build the Jimmy II for rowing only can build the trunk into the bench compartment and open the slots later, when the sailing rig option is added. The instruction manual includes measurements for locating the two places to drill pilot holes.
For sailing, the benches provide broad seating surfaces that make shifting weight fore-and-aft easy. Between the benches the boat has a 20″-wide passage that’s 9-1/2′ long. Ledges along the benches’ inside faces support slip thwarts that drop into place for rowing. The daggerboard trunk is set inconspicuously in the edge of the starboard bench, eliminating the obstacle created by a trunk set on the centerline. (Read a few of the editor’s thoughts on off-center daggerboard and centerboard trunks in “Getting Out of Line.”)
Chesapeake Light Craft
Rowed at speed, the Jimmy Skiff II keeps its proper trim.
The Jimmy II has very good stability, and I was at ease whether I was rowing, motoring, or sailing. I found the open interior plan quite inviting. And familiar. I had designed the interior of two of my boats with side benches, an offset board, and an unobstructed middle; no rocking the boat stepping around a centered trunk, no barking shins on fixed thwarts. For rowing, the slip thwart is easily adjusted to get a comfortable distance from the oarlocks. The skiff wasn’t equipped with foot braces and I always miss having to row without them. In one of my slip-thwart boats I have a footboard supported by a dowel stretcher that sits in fittings secured beneath the thwart-support ledge. A similar arrangement could easily be added to the Jimmy II. Even without foot bracing, the boat, being so light, is easily driven under oars. The optional textured sheet foam in the bottom is a good addition, and provides a bit of friction to push against.
Christopher Cunningham
With two aboard, the skiff trims well with a rower at the forward station and a passenger in the stern.
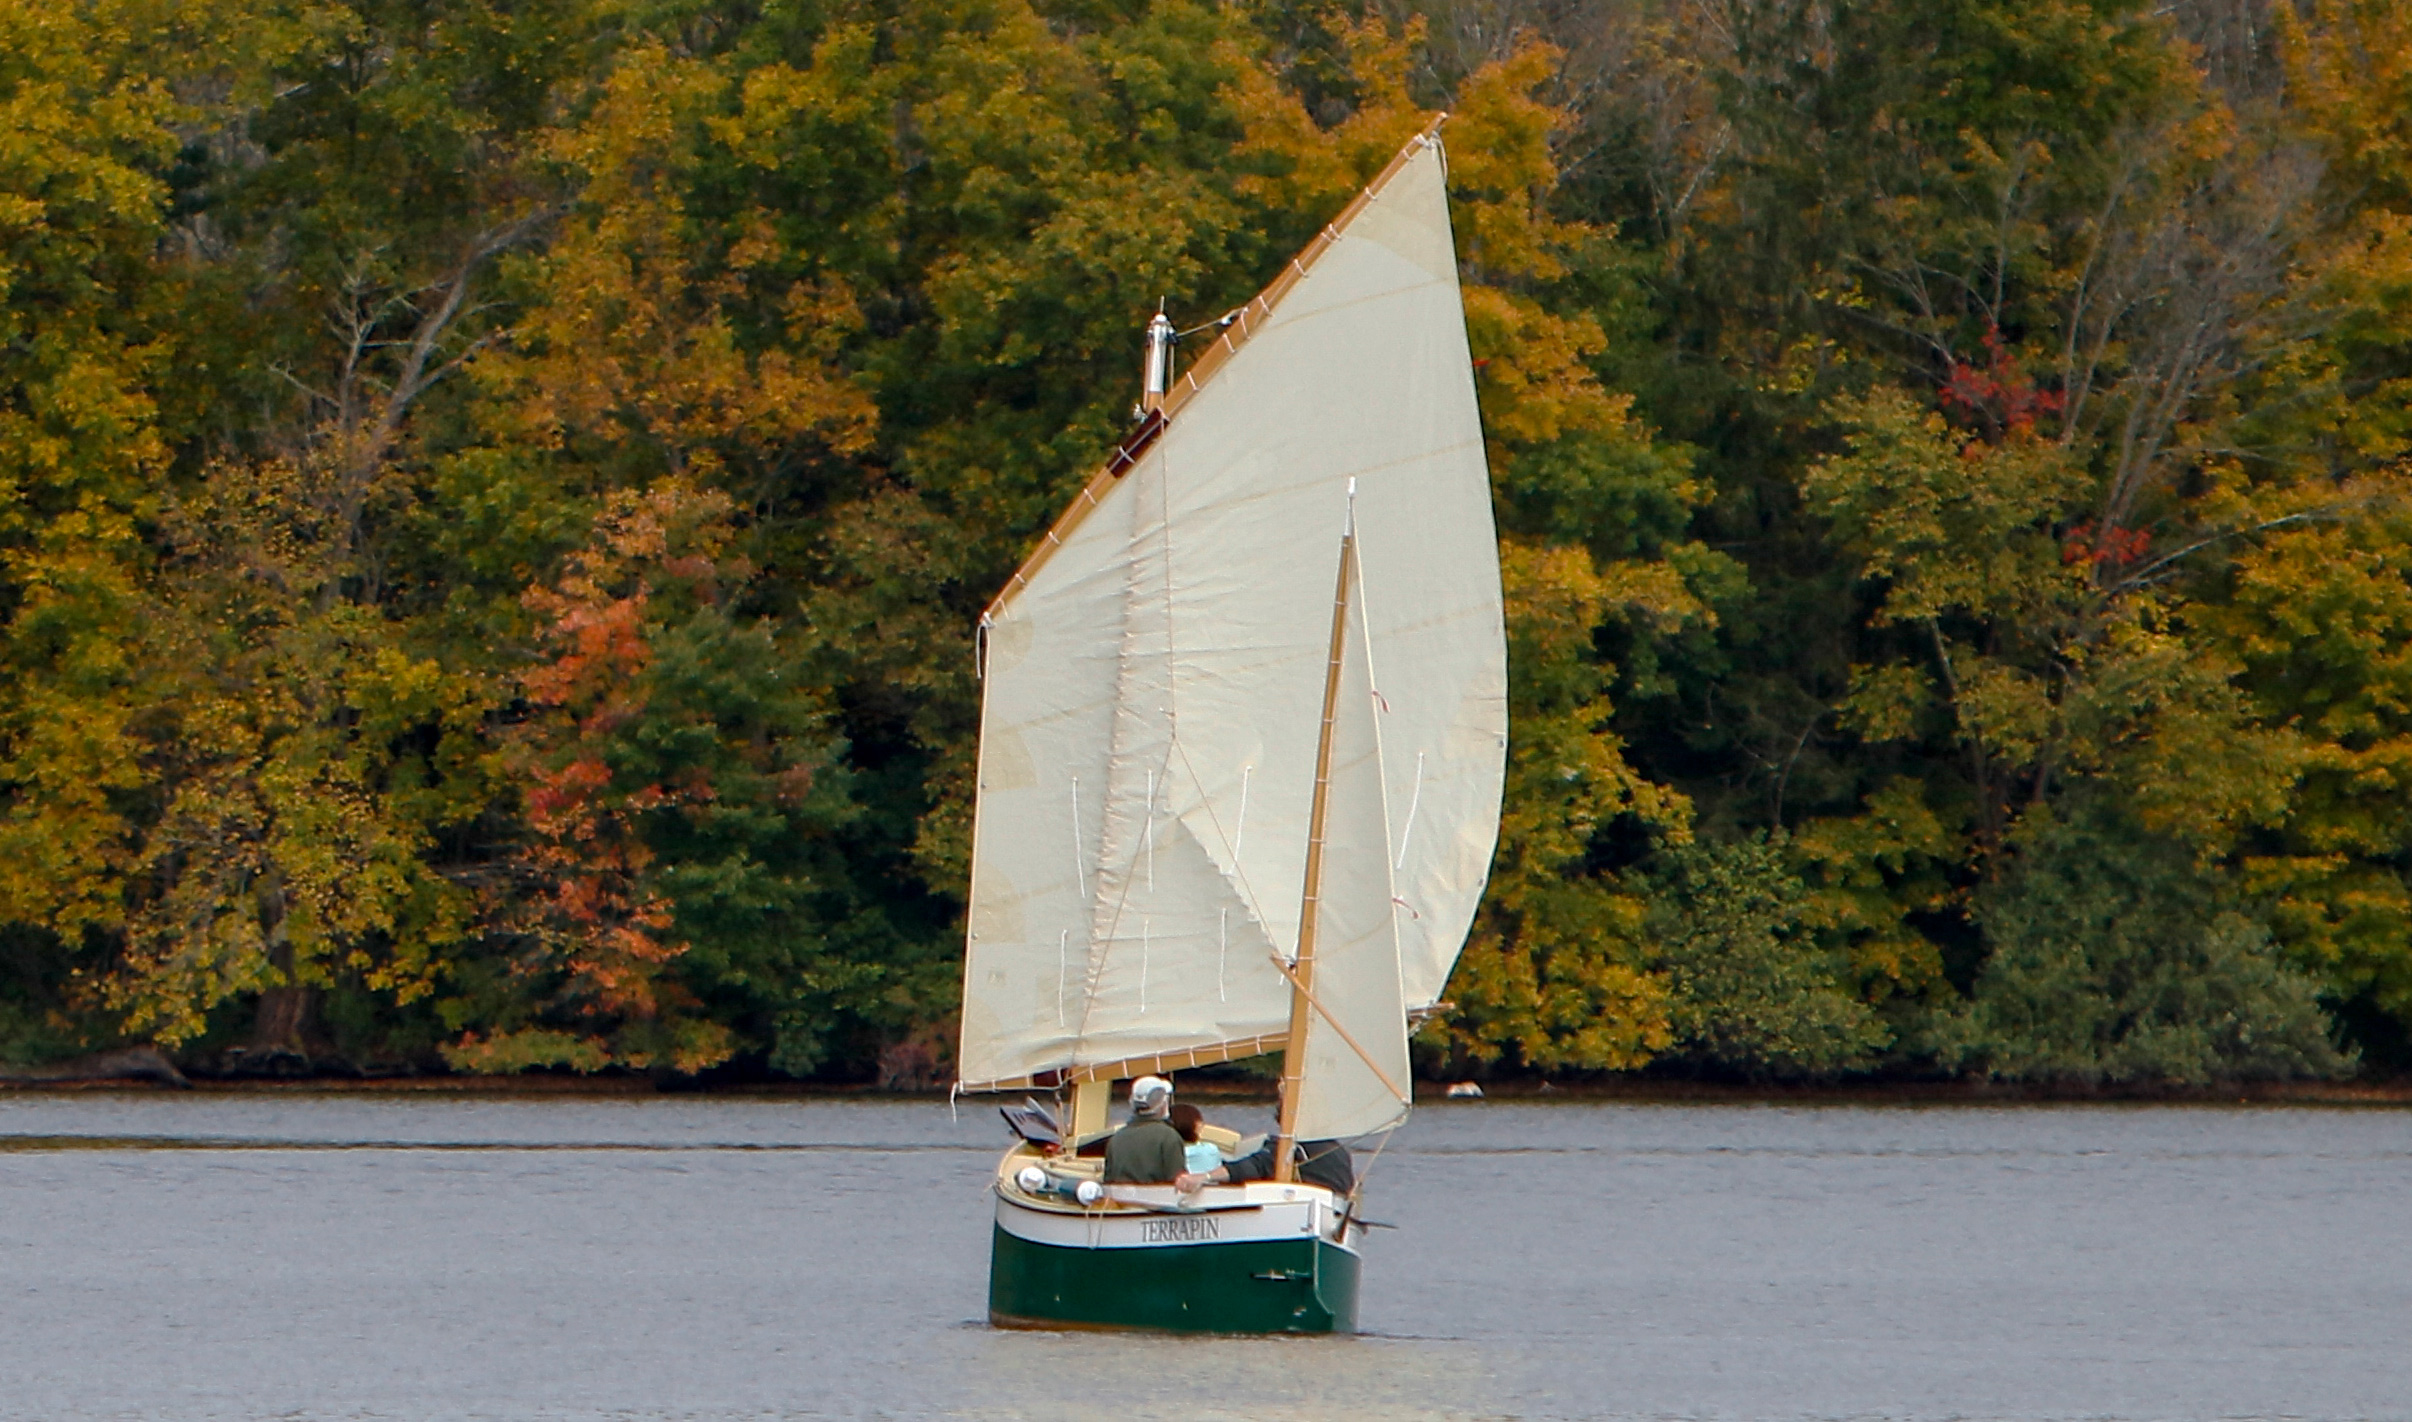
The boat was quick to accelerate and tracked well. I could maintain 3.3 knots at a relaxed pace, sustain 4.25 knots at an exercise pace, and topped out at 4.5 knots. With a passenger along, I took a seat in the bow and, rowing at the forward station at a relaxed pace, hit about the same speed; exercise pace was 3.9 knots and top speed was 4.3 knots. Solo again, sitting in the center of the boat facing the bow and pushing the oars in the forward locks, I could hit 3.5 knots.
Chesapeake Light Craft
The weight of the outboard and the helmsman in the stern forces the bow to ride high. A tiller extension would improve trim and likely add speed when motoring solo.
I brought my 2.5-hp, four-stroke outboard along for my Jimmy II sea trials. It’s mount, fortunately, straddled the upper rudder gudgeon and could be securely clamped to the transom. The outboard weighs 37 lbs, just shy of the listed maximum of 40 lbs. I should have had a tiller extension so I could get my weight farther forward to relieve some of the burden on the stern. The slip thwart allowed me to get as far forward as I could and still have a grip on the tiller; the trim wasn’t ideal but the skiff behaved itself, and I hit 5 knots at full throttle. With the motor kicked up, the boat was in good trim when I rowed from the forward station. I brought a passenger aboard to sit in the bow and get it back into the water for motoring and that brought the speed up to 5.3 knots.
Chesapeake Light Craft
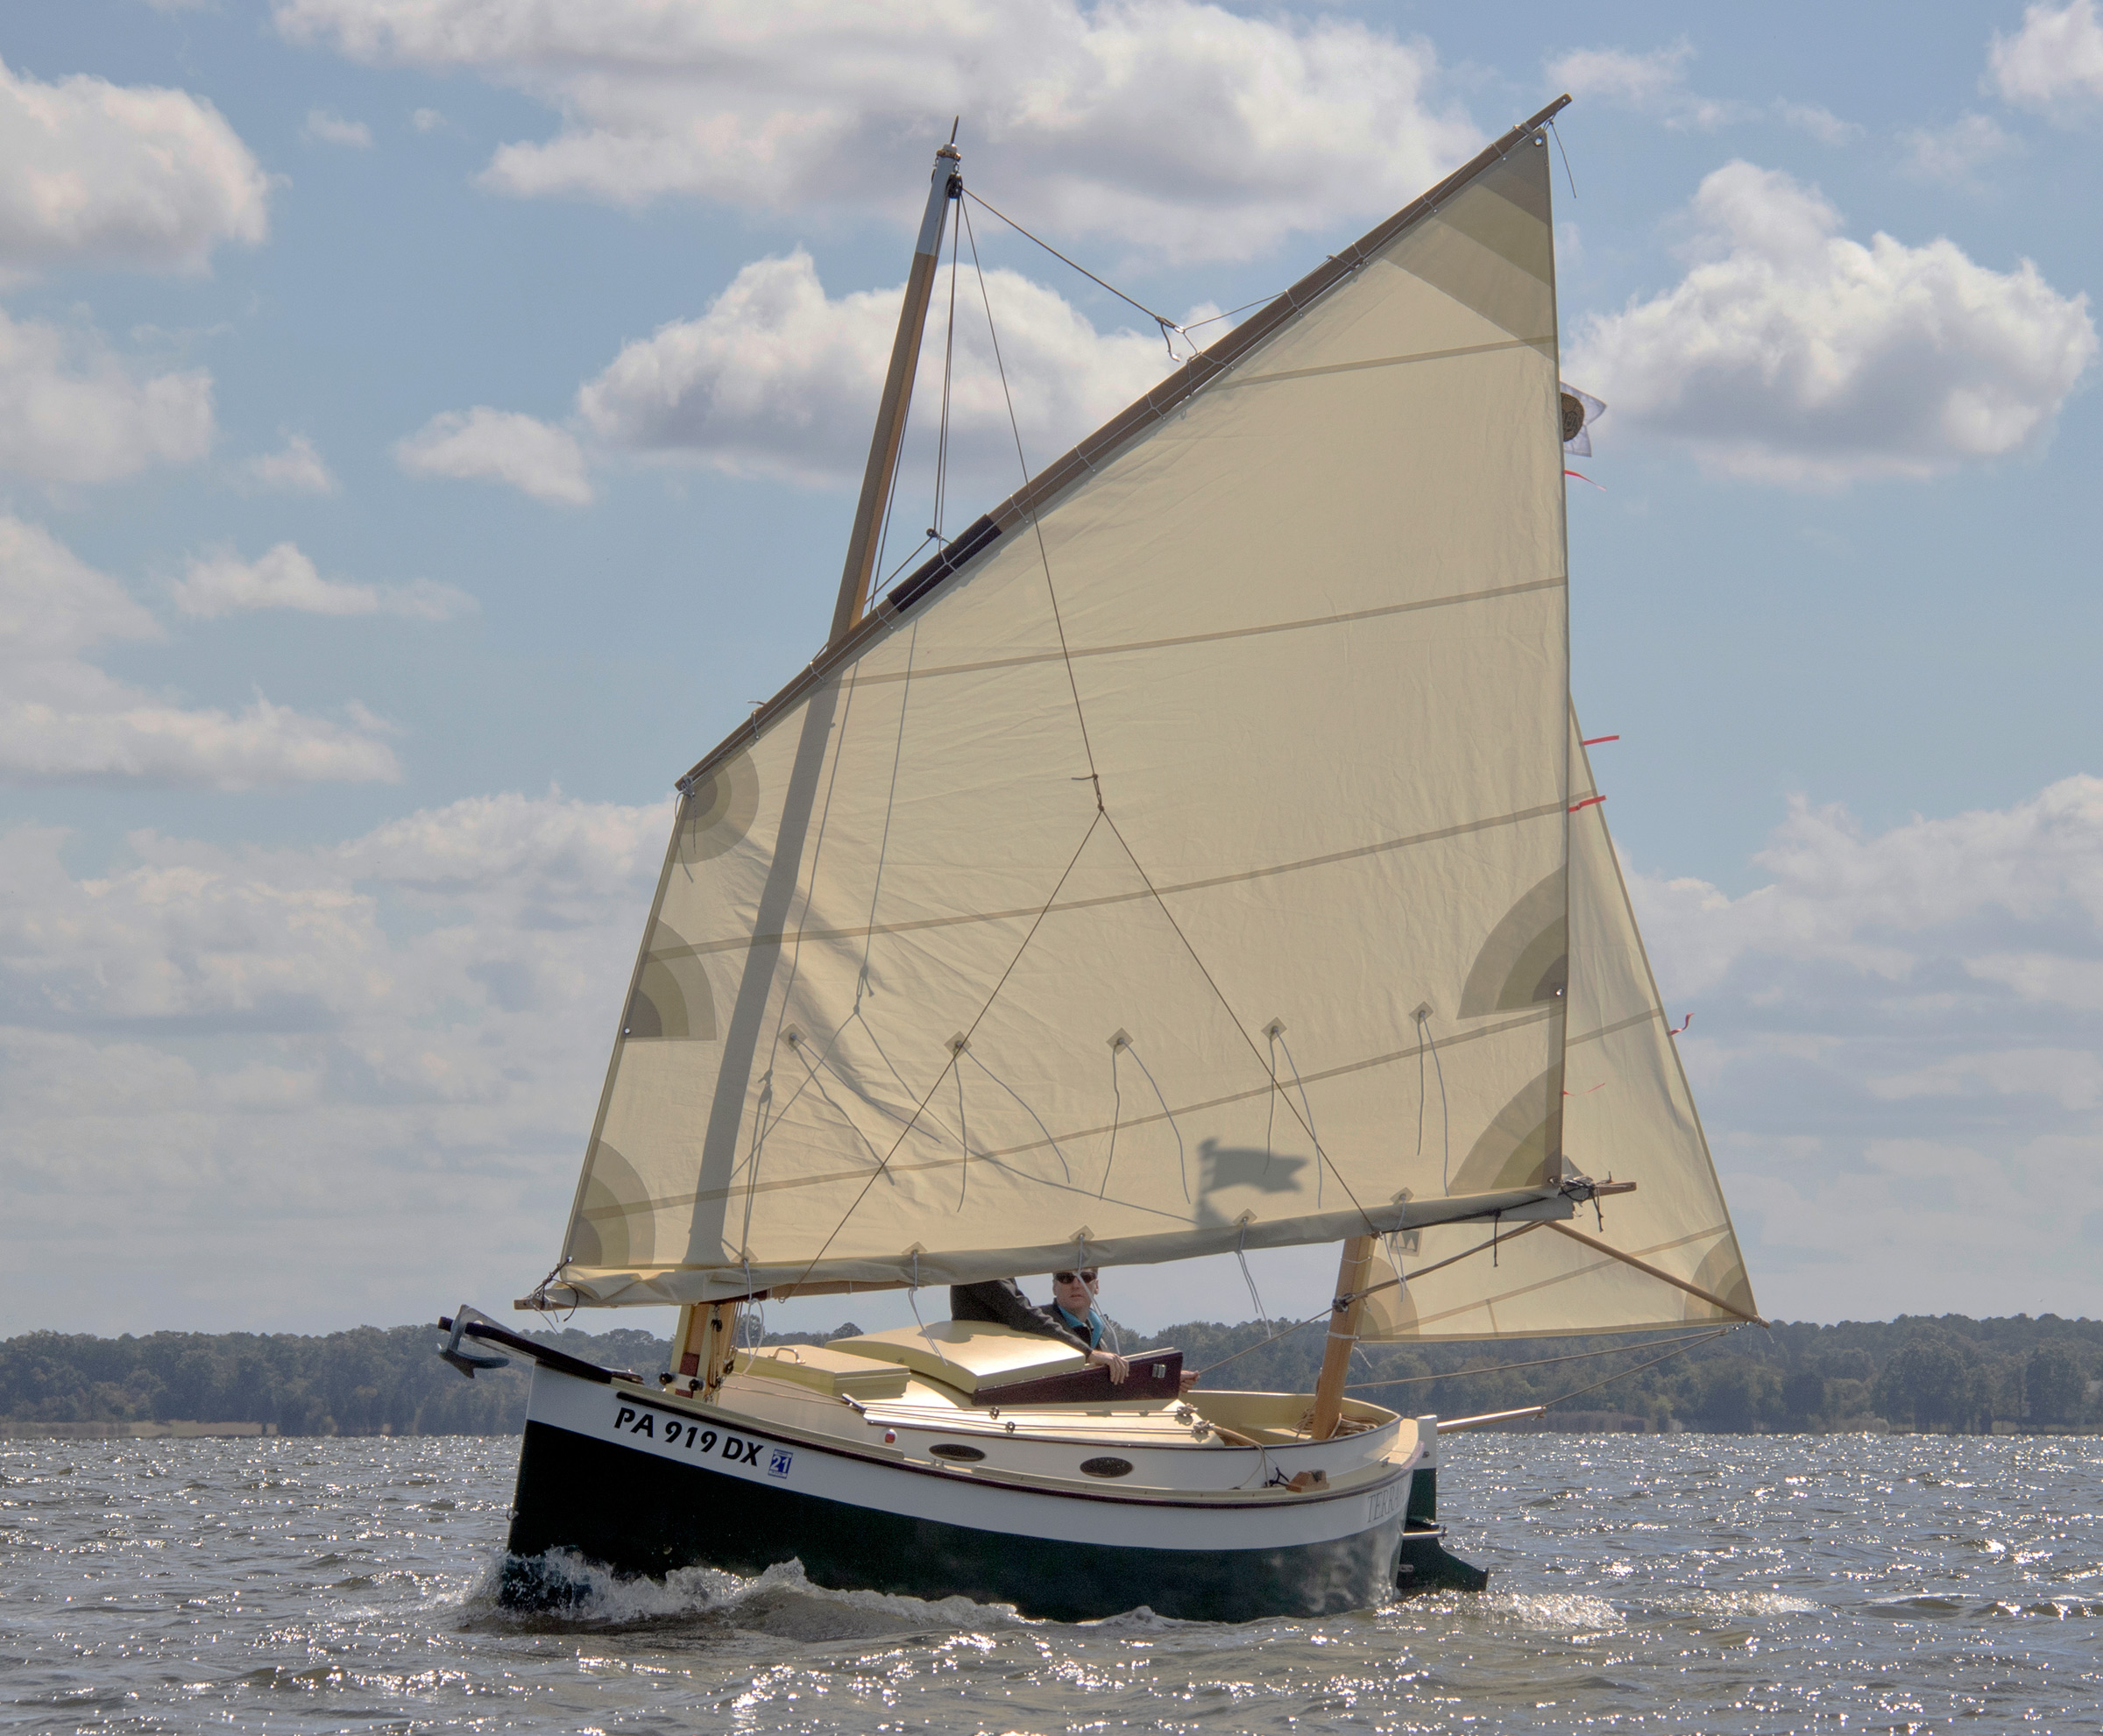
The 19′ 2″ unstayed mast supports a 68-sq-ft leg-o’-mutton sail. The high sprit boom is vanged by the sail and isn’t likely to clobber anyone when coming about.
The Jimmy II carries a 68-sq-ft leg-o’-mutton sail that’s set with a sprit boom. The forward end of the boom is set well above the tack, so the sail is self-vanging. The snotter is led down to the base of the mast, rather than tied off on the sprit, so it’s easy to adjust the boom while safely seated. For my trials, the wind was blowing offshore and very fluky, switching suddenly from holes that let the sail droop to gusts I’d guess were pushing 15 knots. Fortunately, the side benches made it easy to shift my weight in any direction and I could respond quickly. I placed the slip thwart close to amidships so I could sit there to keep the boat on an even keel in the lulls and use it to slide across from one bench to the other when tacking. With that arrangement I had none of the awkward crawling around in the bottom of the boat that can dampen some of the enthusiasm I have for sailing a small boat. In the gusts, the hull had enough stability to absorb the blows, and I had time to react by easing the sheet and rounding up. When a gust sustained itself, the skiff accelerated quickly and took off. It was a thrilling ride. The boat, as light and as quick as it was, kept me on my toes, but stayed under control.
Christopher Cunningham
The slip thwart rests on ledges on the side benches and is tethered to prevent loss. The thwart not only provides a seat for rowing, but also serves as a bridge between the benches for sliding across the cockpit during a tack while sailing. Filling the gap between the benches with more thwarts or bed slats could create a roomy sleeping platform for a solo cruiser.
In the manual, there is the suggestion that Jimmy II can be used for cruising, with the slip thwarts removed to clear the center for sleeping. Designer John Harris wrote, “That would fit my narrow shoulders, but if you were wider you could have a bundle of ‘bunkboards’ to fill in the space between the side seats to create a big berth flat.” That 20″ space would be too tight a squeeze for me, even if I could sleep on my back, taking up the space with my shoulders. I sleep on my side and need to have enough room to draw my knees up, so I’d opt for bunkboards. If you were to make eight more slip thwarts, in addition to two included in the kit, you could cover 7′ of the space between the benches. That makes for a sizable block of lumber when it needs to be stowed, but if you have a thick sleeping pad you can get by with spaced slats, connected by webbing to keep them evenly spaced. (See the IKEA bed-slat tip.) Though a 13′ skiff might seem like a small boat to cruise, in protected waters it can be up to the task if you pack light and pick your weather.
The Jimmy Skiff II is small and simple, yet since its side benches and clear path down the middle of the boat make it easy to move around, it feels much bigger. Its versatility is among its many virtues, and in sheltered waters like some of those in Chesapeake Bay it would prove quite useful.
Christopher Cunningham is the editor of Small Boats Magazine.
Jimmy Skiff II Particulars
[table]
Length/13′ 2″
Beam/52″
All-up weight/120 lbs
Rowing draft/4″
Sailing draft, board down/24″
Sail area/68 sq ft
[/table]
Full-size plans ($125) and kits (base kit, $1520) for the Jimmy Skiff II are available from Chesapeake Light Craft. A sailing kit ($1420) is available separately.
Is there a boat you’d like to know more about? Have you built one that you think other Small Boats Magazine readers would enjoy? Please email us!
The plans for Yankee Tender first appeared in 1979 in WoodenBoat Nos. 30–32 as part of a how-to-build series. When you get the six generously detailed sheets of plans from The WoodenBoat Store for this 12′4″ flat-bottomed rowing skiff, you also get reprints of those magazine articles with their numbered photos and written instructions. What a deal! If you have some heavy paper and a clean-swept floor you can get right to work on laying out the molds, as no lofting is necessary. Study the plans carefully, and you’ll learn a great deal about building a flat-bottomed lapstrake boat with wood in the traditional manner. I sure did.
Johanna DeVries
The Yankee Tender’s profile shows the strong curves of the sheer and rocker.
The tender is an elaboration on a boat designed and built by Asa Thompson in New Bedford, Massachusetts, more than 90 years ago. He started a one-man boatshop specializing in canoes during the late 1800s, and over the ensuing years adapted his methods to changes in boaters’ tastes. In 1927, he built a flat-bottomed yacht tender with canoe-like scantlings. This tender-skiff is in the Mystic Seaport Museum collection and is occasionally on public display—I got to see it two years ago at The WoodenBoat Show. For some time, I’d been contemplating building a lightweight, trailerable, traditional, flat-bottomed rowing boat with a saltwater pedigree. Three things that make this boat a standout: its lightness, both in weight and looks; its double-planked bottom; and its fish-well center seat. Seeing Asa Thompson’s skiff led me to The WoodenBoat Store’s plans.
The plans call for either white pine or northern white cedar for the transom, planking, and bottom—I built with cedar—and the remainder of the structure is white oak. The 3/8″-thick side planks are beveled at both sides of the lap to reveal a delicate edge. The sawn-oak frames are sided 5/8” and given a graceful curve; the inwale and guardrail are as fine as a canoe’s, helping bring the boat’s weight down. My boat weighs 130 lbs.
The bottom is cross-planked with two overlapping layers of 3/8″ cedar with a sheet of canvas slathered in bedding compound sandwiched in between. This construction prevents the gaps and subsequent leaks that occur when boats with single-plank bottoms dry out.
Johanna DeVries
The cross-planked bottom doesn’t require framing, so it provides a clean, unobstructed surface.
The cross-planking requires no framing on the bottom and provides an uncluttered interior. The fish-well structure of the center seat makes it sturdy and stiffens up the light hull, and gives great dry storage (or live bait) options.
The Yankee Tender is much more than an excellent introduction to traditional boatbuilding. The materials and fastenings lists are detailed and complete. There are even drawings for help in setting up the simply designed strongback. You’ll learn how to bevel the laps, cut gains, scribe frames, and get a sweet, fair sweep of the sheer. And when you’re done, you’ll have an elegant skiff.
I didn’t make the A-framed building platform as shown in the plans, but set the molds up on a ladder frame I’d made for a previous boat. The transom is of 7/8″ cedar, edge-glued with splines. The inner stem is sawn from 8/4 white oak. The transom and stem bevels are shown on the plans and can be gotten out on a tablesaw. With the molds squared and plumbed and the stem and transom in place, a temporary 1×4 backbone batten is secured to stem and transom and to notches in the centers of the molds to complete the setup.
I ripped the chines’ bevels on the tablesaw. It’s recommended that the chine logs be steamed to ease twisting and bending into place. My steambox is only 6′ long, so I steamed the aft ends and clamped them into place until cool. Later in the day I steamed the forward ends and clamped them overnight before fastening.
The cedar I had for the planking was 1″ thick and live-edged. I picked through the boards looking for knotty and narrow planks that would work better for the bottom planking, saving cleaner material for the sides. After sawing straight, parallel edges and resawing to a thickness of 3/8″, I laid out the random-width boards to dry-fit the planks for the inner bottom, hand-planing edges for a good fit. As per the plans, I laid a strand of cotton wicking along the chine as each bottom board was nailed home tight.
The garboards have a width of 10-1/2″ at the stem. My bandsaw can only resaw planks up to 8-1/2″ wide, so I needed to narrow the stock before resawing it, and then edge-glue two pieces with epoxy to achieve the required width. Next, I trimmed the ends of the inner bottom boards to match the chine bevel. The plans call for a strand of cotton as caulking between garboard and stem, chines, and transom cleats, but here I applied a healthy bead of polysulfide before fastening the plank.
After trimming the garboard flush with the bottom and sanding the inner bottom planking, I dry-fit the outer bottom planks, overlapping the garboard edges and covering the seams of the inner bottom planks, noting where nails lay, then pre-drilled and temporarily screwed-in the planks. With an oscillating tool and a flush-cutting blade, I trimmed the bottom planks flush with the outer surface of the garboards. I numbered the planks, removed the screws, and stacked the planks in order.
Then came the fun part! I had purchased No. 10 cotton duck and laid it out on the smooth inner bottom, cutting it to overhang a few inches. Before starting the bedding process, I lavishly brushed the bottom planks with boiled linseed oil, allowing them to soak it in overnight. Then I thinned Interlux Boatyard Bedding Compound to a peanut-butter consistency with boiled linseed oil, spread it evenly across the inner bottom, then laid out and rolled the canvas, squeezing the bedding compound into the fabric. Next, I trowled more of the goo onto the canvas. I then replaced the pre-drilled outer bottom planks, the setting and driving the screws home. I drew the double bottom tight along the plank seams with 7/8” copper clout nails, hammered in and clenched every 5″ to 6″. All told, I used 2-1/2 quarts of bedding compound and 1 quart of linseed oil.
After the remaining three planks were hung, I flipped the hull and fitted and attached the outer stem, breasthook, quarter knees, frames, and rails. I then flipped hull back upside-down to fit and fasten the skeg and keel. Finally, right-side up again, the fish well and thwarts were installed and oarlock pads were riveted to the rails.
Tom DeVries
The generously rockered bottom keeps the transom well clear of the water when the boat has a solo rower aboard.
Two hours from where we live are places like Mystic, Connecticut; Bristol, Rhode Island; and Cape Ann, Massachusetts. Cape Cod isn’t too much farther. The Yankee Tender is easy to transport on a lightweight trailer. Its skeg, keel, and stem settle readily onto my trailer’s rollers and, by modifying the bunk boards just a bit, the hull rests its flat bottom for secure strapping. Two spry people can lift the light hull. For cartopping, roof racks that span 5′ are necessary to accommodate the boat’s 52” beam.
My first go at rowing Yankee Tender was on a quiet lake. It took some getting used to the angle of the 8-½′ oars I had made. The center seat height of 9-3/4″ is very comfortable, but my hand position seemed to be higher toward my chest than I’m accustomed to. The boats I’m more familiar with have a lower freeboard. It felt a bit like driving a Ford after years in a Toyota—the controls weren’t all in the same place. The Yankee Tender’s plans offer no recommendation for oar length, but the plan for Asa Thompson’s original 11′3″ skiff suggests 6′6″ oars. I felt these were too stubby. With practice, I found a quicker cadence, 8′ oars, and a shorter stroke worked well, especially with any headwind.
The boat is as zippy as a sports car in its maneuverability. With one occupant, it rides high on the water, with no drag at the transom. The skeg keeps you on course, yet the wicked rocker allows quick spins. The tender’s width and flared topsides allow you to scooch over on the center seat to a rail so you can open one of the hinged fish-well covers without making the hull unsteady. The boat moves along with ease; it’s not a flier but it offers a safe, dry, seaworthy ride.
Tom DeVries
The tender has two rowing stations, but it is not intended for tandem rowing. The forward station is used for rowing with a passenger.
With two adults on board, the rower occupies the forward thwart and the passenger sits in the stern with the angled transom as a comfortable backrest. Proper weight distribution is important to keep an even keel. The tender carries its load well with its fullness forward and ample beam. Settled into the water with the weight of two aboard, the boat has added stability, and is still lively and quick on a turn. The tucked-up transom makes it easy to back into shore and disembark dry-footed.
I had two goals in mind when building the Yankee Tender. First, I wanted to gain some more knowledge of traditional wooden boat building. If you’re like me and relish the smells of sawn oak and cedar accompanied by a heady waft of linseed oil or the fishy smell of bedding compound in your shop, building this 40-year-old design might be for you. Second, I wanted to have a light boat for safe seaside exploration. This is not a bull of a skiff, but a jaunty craft that will serve well in our saltwater adventures. Asa Thompson’s original tender has been around for more than 90 years, and there should be many more generations enjoying this salty skiff.
Tom DeVries studied fine woodworking with James Krenov in the early 1990s. He and wife Tina live in central Massachusetts surrounded by white-pine and red-oak trees. Tom drives north for his white cedar planking stock and wishes his lumberyard still carried spruce 2x6s.
Yankee Tender Particulars
[table]
Length/12′4″
Beam/4′4″
Depth amidships/15.25″
[/table]
Plans for the Yankee Tender are available from The Wooden Boat Store, printed or downloaded PDF (digital), for $50.
Is there a boat you’d like to know more about? Have you built one that you think other Small Boats Magazine readers would enjoy? Please email us!
In this final video of their series, Finn and Teresa are at their journey’s end: Constanta, a Romanian port on the west coast of the Black Sea. With their boat covered and strapped on a trailer and ready for the return trip to England, the young adventurers reflect on the three months they spent crossing Europe by river and canal.
The weather forecast for December 9, 2018, promised clear blue skies, light winds, and a calm sea, perfect for my start of rowing from El Hierro, a rocky island 240 miles off the African coast and the smallest of the Canary Islands. Family and friends had come to see me off on my first solo adventure, rowing singlehanded, without stopovers and without assistance from the Canaries to the Caribbean island of Martinique, a distance of some 5,400 kilometers. December was the recommended month for rowing the Atlantic, the end of the hurricane period, and the start of the tradewinds, a time, I was told, for “more secure and safer rowing.”
I am a retired military parachutist, now 51 years old, and in January 2013 I had lost three very close friends, soldiers killed in the same military combat. Losing them had left a lasting mark deep inside me; the sadness of their families was heartbreaking to witness. I wanted to honor them and all soldiers who had died in combat. I felt compelled to raise money for military widows and orphans, and so to do that, I decided to find sponsors and donors who would put their support behind a great personal challenge.
I gave myself 18 months for training, planning, and preparations, while exploring all the available avenues. Fundraising was my first priority, for both the crossing and the cause. I had to prepare myself physically and mentally for the challenge I’d set, and equally important, it was essential to have the support of a robust and reliable team behind me. Sailing was something I enjoyed, but rowing was new territory—I had only been on a few small kayak outings during my military career.
I acquired a boat, and it was a bonus that it had already proved itself seaworthy. Made of plywood and covered with epoxy and fiberglass, the boat had made four crossings from Dakar in Africa to Martinique, the first in 2006 and the last in 2014. The basic features were perfect. It was light, 1,000 lbs empty, 26′ long, and 5′ 3″ wide. I was delighted when the owner handed it over—a loan, he said, but “it does need a lot of work.”
Photographs courtesy of Christophe Papillon
Veronique, here applying the first coat of white paint on the handrails, painted all of the wooden elements on RKKD. We were lucky that the local town council allowed us to refurbish the boat in a spacious shed not far from home.
He was right, the basics were there, but the boat needed a complete overhaul. It had to be entirely stripped before any replacements could be made or rebuilding could take place. Renovation took place at my home in Toulouse, in southwestern France, with four of us working a total of 2,000 hours in our spare time. Doing the repairs ourselves meant more funds for the cause, and besides, it allowed me to better know my future oceanic home.
The first thing we did was to remove the entire interior, then thoroughly repaired all the cracks and holes of the hull. We continued with extensive work on the rudder and deck before tacking the electrical system installation.
We installed two batteries for storing the electricity from the solar panel; the desalinator, one of my most precious resources on the boat, would run off the batteries. I decided against an autopilot; it would have consumed too much electricity.
I named the boat RKKD after Denis, one of my deceased friends. A small chap with a great sense of humor, his nickname was Ree Kee, and “RKKDenis” was how he signed his name.
As we were loading the five plastic containers filled with water, it was essential to stow them correctly to get the right boat trim.
On embarkation day, my support team carried out their tasks rigorously, making last-minute preparations, checking equipment, and loading food supplies. Aware that the smallest technical problem could have enormous consequences, we made sure that all the electrical and safety systems and their backups were ready. RKKD was ready.
My singlehanded shakedown run in the unpredictable stretch of Mediterranean Sea between Monaco and Corsica had allowed me to make the final adjustments and improvements. My router, Eric Dupuy, understandably, wanted to check our satellite telephone system and back it up yet again. He would be my eyes, my ears, my only link at sea monitoring my progress and providing weather reports and routing advice at least once a day. Food supplies were the last to be loaded aboard: 40 days’ supply of military commando rations (balanced freeze-dried meals; just add water), 60 days of canned foods, some oranges, and onions. Although I had a desalinator, I also included 10 gallons of drinking water and three pairs of oars for security. Fully loaded, RKKD weighed 2,650 lbs.
In the last few minutes before departure, I had verified my checklist and did some last-minute tweaking to have my load balanced and evenly distributed. Everyone appeared super calm, but I could hear my heart beating.
It was a very emotional goodbye to my partner Veronique; strong and loyal, she never once distracted me from what I’d set out to do. I heard my father, full of life and stoic as ever, say to a reporter, “I wish him good luck and pray to all the gods that he arrives safely.” The tow line was released, the tug headed back to the harbor, and I began my first day alone at sea.
With my adrenalin running alongside inevitable apprehension, I picked up my oars and faced the deep, mysterious Atlantic. I told myself, “All I have to do now is to get RKKD to the other side.” I was determined to make it, and in the process do as much as I could for the military families who had been left behind.
Roger Siebert
.
I couldn’t have asked for better weather for the first 10 days; it gave me time to adjust to the constant sounds of the waves, and to get used to the effect they had on the boat. I rowed on average around seven hours a day with wind speeds around 10 to 12 knots, with waves 6′ to 10′. My body adjusted to the physical demands on the third day, thanks to my daily rowing practice before setting off. I could now row four hours nonstop, have a break for 10 minutes, then do another four hours.
All in all, I was pleased; I was right where I wanted to be with the tradewinds and their currents in my favor.
I would sometimes have about 40 mahi-mahi following me. During the day, they were multicolored and silvery, but at night they became almost white, and looked like ghosts.
However, I got caught up in plastic pollution that first week, which was disappointing. A piece of plastic had got caught up in the rudder. As if to make up for this human negligence, I had a surprise visit, one that I had been anticipating, yet it came as a surprise. Dolphins! They appeared first astern, and then in a flash they were both port and starboard, popping up from nowhere, leaping close enough to see their unwavering, impish smiles. They cheered me up so much that I had to stop rowing to watch. In seventh heaven for a good 10 minutes, I watched fascinated as at least 20 of these fabulous creatures leaped and danced.
My sleeping quarters were a bit like a large tube with little headroom. The yellow foam pads kept me from hurting my head too much. I am glad that I’m not claustrophobic.
I’m fortunate in that I’ve never needed a lot of sleep, and aboard RKKD I could get by with just three to four hours. I was now sleeping mostly in a fetal position, with my back and knees leaning against the hull. Five minutes after waking up, I’d pick up the oars and row almost nonstop, allowing 10 minutes for meals. It was simple: if I didn’t row the boat, it would drift—and usually not in the direction I wanted to go. Living quarters were small and tight, so I had to be highly organized, putting things back where they belonged so they would be easy to find in an emergency.
Listening to music on my iPod became a regular pastime at any time of the day, from rock to pop, jazz, and even a bit of classical music. Hearing words of encouragement, prerecorded messages from friends, mixed in with the songs gave me that boost I needed. As a special treat, Veronique had included a few packets of my favorite biscuits and sweets, little things I didn’t consider bringing. These little luxuries had a massive effect on my morale, not only as I was eating them but long after. Being reminded of her pulled me out of the dull grind of my daily routine.
Eight days out, on December 17, I reported to Eric by satellite phone that I was 340 nautical miles from El Hierro. “Good going,” he said. I agreed. As I would soon learn, however, I couldn’t always rely on the trades.
Thankful and relieved after my first brush with bad weather, I wished everyone a Happy Christmas. Little did I know there was more foul weather to come.
My first episode of lousy weather started on Christmas Eve, and it slowed me down for two days. I was caught in a storm and pushed backward by an adverse current. It took me two days of rowing to make up the lost ground.
I recuperated for two days, then got hit again by another bout of bad weather, which lasted four miserable days. Eric had warned me that I was in for a rough time with winds of 20 to 25 knots, so I was prepared for it. I rowed harder than usual, fighting not to get pushed backward too much. I wasn’t particularly perturbed at first, just a little peeved. I told myself if this were the only way I’d be tested, then it would be okay. By the end of the day, however, weather conditions had noticeably deteriorated with more swells and a menacing horizon.
The following morning, things got a bit more stressful. Eric called on the satellite phone, announcing more bad weather: “A depression for the next couple of days will slow you down considerably.” It wasn’t what I wanted to hear. Waves hit the boat, rocking me from port to starboard and back to port [as I rowed], and drenching me. I summoned all my courage and gripped the oars as if my life depended on it. Without a second oarsman or an autopilot to control the rudder, it was up to me to keep the bow straight and maintain the right course.
Eric had forwarded a message saying I looked like Robinson Crusoe. This selfie proved him right, but shaving was the last thing on my mind.
Navigating 12 to 14 hours a day took a toll on my body. I was suffering from tendinitis, and the anti-inflammatory pills I took for muscle soreness and fatigue didn’t seem to be working. The scene was surreal; waves were roaring with anger and hitting my face while I did my best to keep myself and my boat upright. God, I was having a bad time.
I decided to use the sea anchor to help stabilize the movement of RKKD and to prevent us from going backward. The time I’d spent learning about and testing this invaluable piece of equipment before the trip was definitely a good investment; set beneath the heaving sea, it worked well to keep the lost miles to a minimum.
Dejected, heavy-hearted, and alone under the gray skies and menacing seas, I had to admit I was lonely. I was begging for a change in the weather conditions. I thought of my father, who has always taught me the true meaning of commitment, excellence, and self-sacrifice. I thought of my deceased military friends, their wives and children now without them and who needed comforting. Wiping the sweat off my face, I raised both arms, imploring the skies, and hollered, “I’ve had enough! Stop blowing so hard! I have a mission!”
A rain storm that occurred while I was rowing allowed me to have a fresh rain-water shower. With tropical storms, I got a good salt-free soaking for an hour or so, then dried off in bright sunshine.
On the third day, realizing I had little choice but to stay calm, I stopped yelling. My only option was to continue fighting. I was alone, prey to strong winds, losing mileage every day, and doomed to drift.
I thought of Tom Hanks in Castaway, one of my favorite movies, where he was stranded on an inhabited island, and somehow, I found my courage again. But four days of constant bad weather had left me weary. Checking my position on the GPS didn’t help. On December 31, I was 100 nautical miles off the coast of Mauritania in West Africa. I had gone backward, and I had added 100 nm to the distance I had to row. My sore shoulders, glutes, and quads were stiff from exertion; I was physically exhausted and mentally drained.
On the last day of the year, waves of nostalgia washed over me and added to my bleak mood. I should have been holding hands and drinking champagne with Veronique on New Year’s Eve, but here I was, under gray skies, more alone than I had ever been. I had clocked 1,825 miles, but I still had 1,720 more to go. I tried to be rational, and told myself things could have been worse—the boat could have capsized. I had learned how to recover RKKD just in case, but RKKD had remained upright so far. I had painted her bright fluorescent orange—and the sponsor decals added to the hull were deliberately small so the boat would be visible to any rescue air mission.
There wasn’t much to see inside the boat when I looked out from my cramped sleeping quarters. There was no lighting inside RKKD.
Missing Veronique and the comforts of home hurt like hell that night. I looked at the white-paint print of her hand on the orange cabin wall: I had pressed her hand there as we were painting, knowing it would help in moments like this. Remembering how she laughed and put her hand on my heart that day gave me the courage to wish a Happy New Year to all my friends, family, sponsors, and donors on my satellite phone call to Eric.
Just as quickly as the bad weather had started, the wind change I longed for and prayed for finally arrived. The sea, now released from the cycle of turbulence, seemed to breathe a sigh of relief. And so did I.
The wind, coming over the stern, was now in my face and pushing RKKD forward instead of holding her back. It had an immense effect on my morale and energy level. I rowed with renewed strength, and my stroke rate rose as the worry of nature’s adversities lifted. I started to see the benefits of increased miles and my morale continued to climb. The lesson I learned those last few days is that in a wild ocean, unlike in the army, we do not fight, but instead must adapt to the elements with patience.
My good luck continued a few days with a most unexpectedly unusual encounter. On my AIS (Automatic Identification System) screen, I picked up a vessel some distance away. I wasn’t sure its crew seen me. I was, after all, only a low-lying rowing boat that might not have registered on the ship’s radar. I certainly wanted to avoid a collision, so I radioed the captain. It was apparent he wanted to chat, probably intrigued at the sight of a lone, disheveled figure rowing in the middle of the Atlantic. As the ship approached, the captain talked to me from his observation platform inquiring after my health, my morale, and finally asking why I was doing what I was doing.
Then, to my great surprise, he asked if I’d like to have some fruit. I happily accepted his offer. As the Panamanian-flagged vessel NORDKAPP drew within hearing range, I shouted, “I am very happy to see somebody; it’s been 48 days since I’ve seen anyone.” My voice sounded raspy and rusty.
The vessel NORDKAP approached RKKD as the captain and I talked over the radio. His kindness and generosity during this contact after my hazardous spell of lousy weather brought me immense relief and comfort. The handprint on the cabin wall is Veronique’s.
I wondered how I would manage to receive the delivery of a package. Thank goodness they didn’t leave it to me; I stayed where I was and watched their brilliant ship-handling. NORDKAPP first came toward my starboard side, sailed beyond RKKD, then lined up on her port side. Maneuvering to get close enough was tricky and took a good 15 minutes. At a distance of about 50 yards, crew members then lowered a blue canister wrapped in plastic on the end of a long line and set it in the water. It slowly came closer and I picked it out of the water. The crew retrieved the line, and job done, the NORDKAPP didn’t hang around—a quick honk on the horn and off she went.
I opened the canister and I found several containers. When I opened the first, I was overwhelmed by a savory aroma, which turned out to be a freshly cooked omelet. In a jam jar was some saucisse rougail of creole sausages, tomatoes, and fresh herbs to have with my omelet.
I hadn’t heard the captain clearly and had mistakenly heard “fruit” when he had actually said “food.” I radioed my thanks, my mouth already watering over this unexpected banquet. Hot and tasty food! I wolfed it down in no time. There were chocolates too—a box containing 15 Ferrero Rocher chocolates, those special ones that only appear at Christmas. I decided I would ration these and reward myself with one chocolate for every 25 miles made good toward Martinique.
Weather conditions had now stabilized, thank goodness, and I wasn’t preoccupied with safety and navigation and had time to reflect. In a world where we are continually being bombarded with outside interference, we don’t often get the chance to be completely alone in the natural world. I was lucky to enjoy beautiful marine life: to have dolphins jumping around me on several occasions, to have seen five or six whales…one had even come close up to the boat, staying for a good five to ten minutes.
Keen for RKKD to have a clean bottom for efficient gliding through the water, I scraped the hull every 10 days, and it was during such maintenance that I discovered why the dolphin fish (also called mahi mahi) almost always accompanied me. These colorful fish fed off the microscopic organisms and barnacles attached to the bottom of the boat. I was going slowly, so gave them shade and provided food. There were smaller things as well. Night rowing gave me the chance to marvel at noctiluca, those tiny microorganisms that light up at night. They accompanied me, shedding a lovely pale blue light as I swept my oar blades through the warm waters. Equally magic were those starry nights in an utterly clear, dark sky, the luminous streak of the Milky Way stretched out across it, and the warm, vibrant colors of sunsets and sunrise. These were my landmarks on the expanse of the ocean.
This is the first photo taken from the first boat that came out to greet me. Muscles sore, I still had another four hours of rowing to officially finish the crossing.
My arrival in Le Robert, a harbor town on the east coast of the Caribbean island of Martinique, on February 10, was phenomenal. Throngs of people crowded at the jetty waved and cheered; it seemed the whole town was there to greet me. It had taken me 64 days to row across the magnificent Atlantic; I had rowed a total of 2,900 nautical miles.
I had a moment of panic when I first saw land as I realized that my legs felt weak. Would I be able to walk straight? Sweating, aching all over, my pulse racing, but bursting with joy, I finally spotted Veronique and next to her my father. Holding Veronique in a warm embrace and sitting down for a real meal with friends and family who cared was all that mattered now.
As I finally arrived at my landfall I felt liberated. The sea was tranquil and a beautiful blue; a fair bit of wind made my landing somewhat tricky but its rush in my ears was sweet music to me. I was safe.
I’m sometimes asked what lesson I learned from this achievement. I can genuinely say that I learned a lot about myself. But the most obvious is that this crossing alone shows that we can unite people around us if the cause is beautiful. A solo trip is, in fact, a tremendous collective adventure. I had accomplished my mission to raise funds for the wives and widows who had lost their husbands and fathers. But I couldn’t have done it alone. Through donations and sponsors, we were able to give over $91,000 to a very worthy cause, much more than I’d hoped for.
Christophe Papillon spent his childhood on the island of Corsica and in Saint Mandrier on the south coast of France. He discovered his love of the sea through his father and his dream of adventure developed while watching the explorer Jacques Cousteau and his ship CALYPSO. He spent 21 years in the army as a parachutist and a parachutist commando. Losing military friends killed in action moved him to honor their memories and help their families. He has traveled extensively, to more than 90 countries. To continue raising money to support military families, he is preparing an unassisted solo crossing of Antarctica on foot.
Freelance writer Alice Alech writes from her home in the south of France.
If you have an interesting story to tell about your adventures with a small boat, please email us a brief outline and a few photos.
The HDPE strips and StarBoard-covered bunks made moving the boat off and back on the trailer much easier than the bare plywood deck and carpet-padded bunks did.
I have four boat trailers, and on all of them the boats drag over bare wood and come to rest on the bunks padded with carpet. Rollers seemed to be the only alternative, and may work for all the motorboats that I see throttling up to power onto their trailers, but they weren’t well suited to any of my boats. I have bearing buddies installed, but I prefer to keep them—and the taillights—out of the water whenever I can, so I like a trailer with a plywood platform that I can safely walk on for pushing a boat out to launch and pulling a bow up out of the water to retrieve a boat. The plywood trailer decks and the carpet-covered bunks create a lot of drag; even when I’m launching the boat and have the slope in my favor, it takes a hard shove.
Carpet gets less boat-friendly with use and age. My boats come out of the water pretty clean, but when I vacuumed the carpet I was going to replace with HDPE, I extracted a lot of grit, which appeared, under magnification, quite fine compared with beach sand,. I suspect it was picked up from roads while driving. And the pile of the carpet padding I’d put on one trailer 10 years ago has become quite stiff and is now more of an abrasive than a cushion. I don’t mind the painted hulls getting a bit scuffed—they’re meant for the rigors of cruising—but I don’t want my Whitehall’s varnished Port Orford planks to prematurely lose their shine.
High-density polyethylene is as easy to work as softwood. This 1″ Forstner bit cut right through the 1/2″-thick panel.
A few years ago, I had added some small pieces of high-density polyethylene (HDPE) across the centerline of one of the trailers plywood decks to reduce the friction of bare wood. I was pleased with how much easier it made launching and retrieving my 14′ Whitehall, so when I modified that trailer with a longer tongue for my 19’ Caledonia yawl, I decided to replace the carpet-padding on the bunks with StarBoard by King Plastics, a slippery marine-grade HDPE. I bought 3/8″ StarBoard for the two bunks, stiff enough to keep its shape and thick enough to accommodate countersinks for screws. The material is easily worked with common shop tools. I quickly rounded the corners with a router and drilled holes with Fuller bits and Forstner bits. I used galvanized screws to secure the StarBoard to the 2×6 bunks. The HDPE was more than solid enough to keep the screw heads from pushing past the countersinks.
The difference the HDPE makes at the ramp is dramatic. When the yawl was resting on carpet and plywood, I had to put my shoulder into the bow to push the boat into the water, and that was with the slope of the ramp in my favor. Now even standing upright with just my hands on the boat I can push it back, even when the trailer is on level ground. The reduced friction means I have to be prepared for the boat to pick up its own momentum when it’s being launched at the ramp. When it’s steep, I can loop the painter around the winch post to check the boat’s speed. Bringing the boat back aboard the trailer takes much less work than before. The winch no longer takes two hands on the crank to bring the boat up the last several feet.
With the reduced friction, having the boat well secured on the trailer is all the more important. An extra tie-down strap or two can keep the boat in place, and a preventer chain made to the bow eye is a worthwhile backup to the winch connection.
Where I’ve installed HDPE, and the especially slippery StarBoard in particular, I’ve greatly decreased the strain on the boat, the winch, and my back when I’m at the launch ramp. I have two boats that are too big and heavy to take off their trailers while they’re at home, but installing HDPE is simple enough that I can cut, router, and drill the pieces at home and then install them at the ramp while my son motors to one of the waterside restaurants to pick up lunch for the two of us.
Christopher Cunningham is the editor of Small Boats Magazine.
The author is grateful for the recommendation to try StarBoard, which came through Kent and Audrey Lewis from Steve Baum, who had made the same switch on his trailer.
Starboard is available from a number of retailers. Search online for “Starboard HDPE.” For the bunks shown here. I bought two 3/8″ x 5″ x 60″ pieces for $50 at the Seattle TAPS Plastics store.
You can share your tips and tricks of the trade with other Small Boats Magazine readers by sending us an email.
Years ago the wooden mast in our Drascombe Lugger was getting wear marks where it contacted the wooden partner/thwart. The manufacturer didn’t put leathers on the masts to protect them and the partners didn’t have room for adding leathers, so I needed another solution. At about the same time, Audrey brought a roll of tape home from a theater event; it was gaffer tape, used to secure cables to equipment and stages. On that day we welcomed Pro Gaff Gaffer Tape to our small-boat rigging kit.
Duct tape is a staple in the kit for shops, camps, and boats, but for many jobs, there’s a better product: gaffer tape. It’s made of heavy cotton fabric and, unlike duct tape, does not have a slick polyethylene coating. It adheres with a synthetic rubber adhesive (SRA) that does not leave residue behind, as duct tape’s adhesive does, when it is removed. The tape has a nice look and feel, and does not become oily and sticky like some other types of multi-purpose tape. Gaffer tape has excellent adhesion and sticks well to the wooden, metal, and fiberglass surfaces on our fleet of boats, and it conforms to many different shapes.
SBM
Pro-Gaff’s gaffer tape comes in white, black, and 18 other colors.
The tape’s tensile strength is rated up to 50 pounds per inch of width, the equal of the best duct tapes. Gaffer tape protects a variety of components, it is easy to remove without damaging the surfaces, and it resists abrasion itself. The tape is easy to tear by hand, no scissors required, both off the roll or along its length to get a piece at just the right width. Gaffer tape has a matte finish, so it does not reflect light, and it is also tolerant of UV light.
Kent and Audrey Lewis
The tape was used instead of leather to protect a mast where it bears against the partner.
After we taped the lugger’s mast to protect it from abrasion by the partner/thwart, we were pleased by how well it stayed in place and survived the wear. We then used the tape to wrap a sprit where it rubs on our Penobscot 14’s mast.
Kent and Audrey Lewis
A spiral wrap of black gaffer tape reduces the chafing between a sprit and a mast.
Another bit of tape reduces wear and abrasion where the tiller bolt on our wooden Sunfish rubs the deck; we also taped the tiller extension, which gave it a good grip and a nice soft feel. We have used the tape as a spacer between dissimilar metals of the bronze gooseneck and aluminum boom on our Sunfish. Gaffer tape works great to wrap clevis pins and keeper rings to keep them from abrading the sails; we wrapped the bottom of the turnbuckles on our Day Sailer with gaffer tape to keep them upright while the mast is stepped and to prevent snagging the jib sheets under sail.
One of our most frequent uses has been to tape the last 1/2″ of a line, an “Electrician’s Whip,” before we applied a thread whipping.
There are many brands of gaffer tape, and we have been very happy with Pro Gaff’s offerings. Their regular gaffer tape is water resistant, and there is also a waterproof version. It comes in 20 colors—among them a glow-in-the-dark tape that could have interesting applications, and a camouflage tape. Pro Gaff Gaffer Tape is not as ubiquitous or as inexpensive as duct tape, but it is well worth adding to your kit.
Audrey and Kent seek prizes on the shoal waters of Northwest Florida when not taping things with gaffer tape. Their mess-about log can be found at their blog.
Gaffer tape works very well as a stand-in for first-aid tape, and wraps on tender fingers can ward off blisters at the beginning of a cruise that requires a lot of rowing.
SBM
The matte, textured surface of the tape takes pen and pencil marks well. The white tape is especially good for making clear, sharp marks. The tape on the table saw has a mark for stopping the cut at the right place on the bottom side of the wood; the gaffer tape on the side of the measuring tape provides a handy, transferrable place for recording dimensions.
Is there a product that might be useful for boatbuilding, cruising, or shore-side camping that you’d like us to review? Please email your suggestions.
The Vintage 3-Strand has a soft feel and doesn’t tend to kink while coiling.
The Penobscot 14, with its glued-lapstrake hull and small sprit rig, resembles a traditional workboat, so when we rigged ST. JACQUES we wanted rope that matched the vintage look and had a soft feel with the strength and performance of the newest technology. We tested several samples of P.O.S.H., Hempex, Vintage Sta-Set, and Vintage 3-Strand in different diameters acquired from R&W Ropes.
The product we chose for ST. JACQUES was New England Ropes’ Vintage 3-Strand. It is a 100% polyester blend of spun and filament yarn that is UV stable. The spun yarn is made of softer, shorter lengths that are blended with the longer and stronger filament yarns. Vintage 3-Strand is available in nine different diameters ranging from 5/32″ up to 1″. Tensile strength of the line runs from 730 lbs for 5/32″ line up to 20,200 lbs for 1″, well in excess of the performance required by our small sprit rig. The line has low stretch properties, which make it acceptable for use in both running and standing rigging. The two colors available are Natural, a convincing hemp lookalike, and Noir, which looks like tarred line.
The Vintage 3-Strand here is being used for the snotter, the mast lacing, and the slender brail line.
The look of the 3-Strand is exactly what we want on our small sailing dinghy. It has a nice feel and is easy on the hands, being neither stiff nor scratchy. All of the other samples were stiffer; the 3-Strand is very flexible, running easily through the snotter and sheet blocks, and it coils nicely without any tendency to kink. It has a secure grip when wet and it dries quickly.
The ends of the line are easy to cut and whip—the line can be unlaid and twisted back together without excessive fraying. New England Ropes has excellent splicing instructions for 3-Strand on their website.
We have been using the line for two years now in a saltwater environment, and it has retained its clean new look, with no mildew or mold in outdoor storage. There have been no indications of wear, and the line has not abraded any of the paint or varnish on our boat.
We liked the 3-Strand so much that we also used it on our gaff-rigged Drascombe Dabber for the painter, halyards, downhaul, and sheets. We have been very happy with Vintage 3-Strand for its look and feel and its performance.
Audrey and Kent Lewis mess about in the shoal waters of Northwest Florida in their armada of vintage small boats.
I once saw LA BELLE OIE sailing away from the Puget Sound launch ramp as I was on my way back, and as always, I altered course to intercept her.
The first time I saw this lovely melonseed skiff was while I was kayaking on Seattle’s Lake Union. It was a couple of hundred yards away, and at that distance, there’s not often much to distinguish one small boat from another, but I was struck by its plucky low profile, understated sheer, and classic gaff rig. I paddled well out of my way to get a closer look and met her builder, Noah Seixas.
Since that first meeting, I’ve seen Noah sailing his melonseed many times—convinced now that there is no boat on the lake that’s prettier—and I always chase him down.
Noah grew up on Long Island and learned to sail in the ’60s aboard his father’s boats on Gardiners Bay, at the island’s eastern extremity. His schooling, which lingered a dozen years beyond a BA to a PhD, and work (he’s a professor of occupational health and safety at the University of Washington and now on the verge of retirement) kept him from devoting his time to boating, but it didn’t erase his fond memories of being on the water.
In the early 1990s, his budding career brought him to Seattle, where Puget Sound rekindled his memories of sailing Gardiners Bay, memories he shared with his ’tween daughter, Isabel, too often, evidently. “Dad,” she said, “stop talking about boats and build one.”
Noah Seixas
Young Isabel and Gus pose with the hull with the garage door open. The foredeck’s longest deck beams are supported by the centerboard trunk.
Noah started looking at boats with an eye toward building one, and the Wooden Boat Festival at Port Townsend offered many possibilities to consider. The boat that caught his eye was a melonseed skiff. The type was developed in the 1880s for waterfowl hunting in the bays of New Jersey. It was an improvement over its predecessor, the sneakbox, and could extend the hunting grounds from the marshes and mud flats to open water where the vertical bow could slip through the chop without taking water over the foredeck as the spoon-bowed sneakbox did. The drier ride makes the melonseed well suited to sailing for pleasure.
courtesy of Noah Seixas
With the skiff in its finishing stages, Gus (left) and Noah set it in the alley, across from the garage shop.
Noah purchased plans from The WoodenBoat Store for Marc Barto’s 16′ adaptation of the 1888 New Jersey melonseed gunning skiff documented in Howard Chapelle’s American Small Sailing Craft. Chapelle notes that the melonseeds built for hunting were carvel-planked, believing that lapstrake hulls were too noisy for approaching skittish waterfowl. Barto’s glued-lap plywood construction suited Noah just fine. He remembered all too well the annual summer chore of having to caulk, soak, and bail the family’s old carvel boats before they were ready for the sailing season. His father ultimately switched to a 20′ leak-free, cold-molded mahogany daysailer. It was in that leak-free boat, THE GOOD TERN, that Noah was infused with an affection for the beauty of varnish and the lapping of waves against a wooden hull, a soothing sound when the water isn’t seeping into it.
The plans for the Barto melonseed include full-sized patterns, often an indication of a project suitable for a beginner, but the build is an intermediate to advanced challenge. Noah’s most ambitious project before the melonseed was a Bevin’s Skiff, built from a kit, and while his home shop was equipped with the tools he needed for simple woodworking, he had to borrow a bandsaw and a thickness planer to do all the tasks the melonseed required. Fitting the boatbuilding in between work and home life, he could work only a couple of hours at a time on evenings and weekends. While his progress was slow, it was steady and he found the work engaging. “I was always looking forward to the next step,” he recalls. “In fact, I often would lie awake at night thinking about the next step, what I needed to do to make it all go together.” The project stretched out over four years, and the care he put into the work is evident. The boat looks as good up close as it does from a distance.
Christopher Cunningham
Making good speed in light air with a grown-up Isabel and Noah aboard, the melonseed shows the profile that draws me in no matter how far away I am when I spot it.
He christened his melonseed LA BELLE OIE, French for “the pretty goose.” It doesn’t have any special significance in French, or even in English. It’s a family homophonic joke. His daughter, Isabel, “is-a-Belle,” and his son, Gus, is the sound-alike goose.
Almost every time I get in touch with Noah, I ask him if he has put oarlocks on LA BELLE OIE. The Barto plans didn’t include details for oarlocks, but Chapelle’s drawing showed tholepins. I think the melonseed would make a fine rowing boat. I built a sneakbox to follow the route Nathaniel Bishop followed from 1875 to 1876 and wrote about in his book, Four Months in a Sneak-Box. My sneakbox rowed well on the Ohio and Lower Mississippi rivers, but on the open waters of the Gulf of Mexico it made for some miserable pulls to windward with the bow slapping against the chop. I had many occasions to wish Bishop’s book was Four Months in a Melonseed. Later, I had even started building a Barto 16′ melonseed to make up for Bishop’s lapse in judgment. I got the molds set up but then stalled and abandoned the project. I’ve been hoping Noah would make LA BELLE OIE rowable so I could recover a bit of my discarded dream.
courtesy of Noah Seixas
Dwarfed by the brig LADY WASHINGTON, a replica of a Revolutionary War ship, LA BELLE OIE heads out on Puget Sound.
Noah too is an avid rower but said, “The addition of oarlocks, while it would seem useful, is pretty elusive given the lack of a thwart, and the presence of the boom and gaff. A loose-footed sail, or lug rig might better accommodate a rowing station.” Thwarts were not installed in the original hunting sneakboxes either, and seating was provided by a box that could be moved out of the way when the hunter needed to hide by lying down in the cockpit. I suspect the early melonseeds had a similar arrangement, with easily removed seating. As for the boom, a topping lift would get it out of the way for rowing while the rig is up.
courtesy of Noah Seixas
This is how I often find Noah and LA BELLE OIE, sailing solo on Lake Union. Seattle’s Center for Wooden Boats is just above the melonseed’s bow.
Whatever the practical issues there are with rigging LA BELLE OIE for rowing, I suspect I know why Noah hasn’t gone to the trouble of installing oarlocks and making a set of oars. When I see him sailing his melonseed, he is the picture of contentment, even when there’s only a whisper of wind. There’s not a good word for what I see in him when he’s aboard LA BELLE OIE, but there’s an apt expression in German: wunschlos glücklich—wishlessly happy.
Christopher Cunningham is the editor of Small Boats Magazine.
Do you have a boat with an interesting story? Please email us. We’d like to hear about it and share it with other Small Boats Magazine readers.
The final week on the Danube brought Finn and Teresa to a short-cut to the Black Sea. Small boats aren’t allowed on the 40-mile-long canal, so they hitched a ride aboard a cargo-carrying motor barge. Join them for their last miles as they relaunch JILL at the end of the canal and row on the Black Sea under sunny skies.
The Caledonia yawl in my back yard was covered with a heavy frost this morning and all of the varnished ash had been turned from amber to silvery white. In the afternoon, when the I draped a tarp over the boat to protect it, I was daydreaming about waking up to a heavy frost after spending the night at anchor.
It has taken me a while to appreciate the cold. Before I took to adventures in small boats, my focus was on backpacking. It started as a summer activity with my father and older sister when I was about 10 and became a solo pursuit when I was 18. I kept increasing the challenge of wilderness travel, first by stretching the distances and later by shifting, by degrees, from summer to winter. In 1997, my friend Mark and I snowshoed across the Cascade mountain range. I have a vivid, lasting memory of getting up in the middle of the night for a pee break and seeing the light from my headlamp being reflected as thousands of flickers of light, brighter than anything I’d seen reflected by snow. During the night ice crystals had grown up from the surface of the snow, each like a hexagonal golf tee of crystal, some over 2” tall, and their cupped tops reflected the light back to me. The crystalline pillars would fall over with the slightest touch—even a breath could send them knocking others over like dominoes.
Deep in the woods, Mark and I found a trail maintenance shed that made a comfortable camp. The shin-length cagoule and foam-insulated booties I’d made kept me toasty warm.
I ultimately graduated to winter solo hikes and carried a heavy pack to a frozen alpine lake where I spent the first night in my tent, and the rest of the time in an igloo I made the following day. My boating took a similar trajectory, starting with summer cruises and drifting toward winter.
It was slow going in the Okefenokee Swamp, where temperatures were in the teens the water trails were barricaded with ice.
Paddling the East Coast from north to south, starting in September 1983, was intended to stay in autumn and keep pace with the migration of the cold weather that would clear alligators, snakes, and biting insects from our path. That strategy worked well until we reached Florida, when a cold front caught up with us. The St. Marys River was fringed with ice and parts of the Okefenokee swamp were frozen over. My paddling partner’s kayak had a long, overhanging bow, so she got the icebreaking duties. She’d sprint at the ice and ride up over it until the ice collapsed under the weight. We were free of the ice by the time we reached the Suwannee River, but it was still bitterly cold. We’d learned about “fat lighter” wood from the locals, so we’d camp where there were pine logs and stumps that had rotted away, leaving the resin-saturated heartwood. Even sticks that I pulled out of the river water would light and burn. The wood bubbled black resin as it burned and made hot, long-lasting fires that would hold the cold back until we were in our sleeping bags.
This raft seemed like a good place to spend the night, but it was bitterly cold. I didn’t sleep at all and just waited for dawn when I could row to warm up.
Two years later, when I started a solo rowing trip on the Ohio river in November, the idea was to travel with the leading edge of winter. I had a few cold nights. I stopped at a small marina on the Ohio shore, asking permission to sleep on the dock, and the owner’s son brought me an electric blanket and an extension cord. On my last night on the Ohio River, I dragged my sneakbox into a flooded field and woke the next morning with the boat locked in ice.
The Ohio River lies just beyond the row of trees, and I had a quiet night in this flooded field. I had slept aboard the boat, protected from the wind and insulated from the cold by the cedar hull and deck. The green and blue cagoule is the one I’d made for snowshoe hiking.
The field (in the photo above) that I’d waded the boat across the evening before, made for a noisy passage in the morning as the layer of ice buckled under the sneak box.
At another camp I had left my cook pot full of water to soak before I washed it. A hard freeze overnight had entombed my spoon in a solid block of ice.
In baseball, blistering line drives and long hard throws from the outfield are called “frozen ropes.” A wet painter, left taut overnight, is the literal version.
The cold caught up with me in earnest on the Mississippi River south of Memphis, Tennessee. A moonless night fell across the river before I was able to find a place to pull ashore. In the dark, carried fast by the current, it was even harder to spot a place to stop. A wind blowing upriver created a chop that splashed over the bow, coating the deck, the dodger, and my jacket with ice. I was aware of the numbness creeping from my hands and feet up my arms and legs. I’d had a run-in with hypothermia once before, and knew I’d be in trouble when the cold hit my core.
The beam of my flashlight picked up a bright patch of sand flanked by stands of dead reeds. I rowed for the sand but the reeds, frozen and coated with ice brought me up short. I had to back up and ram the reeds again to break through. I was racing against time to get a fire started. As I gathered dead wood the cold seeped into my core and I was doubled over and wracked by spasms. It took intense concentration to get the fire lit.
I got through the night, warmed by the fire, hot food, tent and sleeping bag. In the morning I woke up just as the sunlight set my tent aglow. Outside there was a single leafless tree surrounded by fist-sized cobbles. Its shadow, as intricate as a cathedral’s rose window, was white with frost, luminous against the wet black rock.
In the morning after that cold night south of Memphis, my boat was coated with ice and frost.
That night on the Mississippi taught me to better respect and prepare for cold, and the morning showed me another beautiful creation of winter, one that can easily go unnoticed.
I am much better equipped now to go boating in winter and can be quite comfortable when the weather turns cold. The frost on the boat in my backyard this morning doesn’t make me happy to be home. It makes me wonder what I’m missing by not being out on the water.
Joined by a schoolmate for the lower Danube River through Bulgaria and Romania, Finn and Tereza, draw near the Black Sea. One last barrier stands in their way—a canal that doesn’t welcome small boats. Watch as a Ukrainian merchantman comes to the rescue.
Still descending the Danube, Finn and Tereza found the going slow on a stretch of the river between Serbia and Romania. Rather than struggle for meager miles against a headwind, they did what any resourceful wayfarer would do: stick out a thumb and hitch a ride. Every wonder what it’s like to be towed alongside a barge doing 7 knots? Check out their latest video.
Lukas Schwimann’s home is in the village of St. Gilgen, Austria, at the top end of Lake Wolfgang—Wolfgangsee in German. A friend who lives near him owns a 16′5″ rowing skiff that has been in his family for about 100 years. The boat is not in great condition, but it is still serviceable. Over the years it has been patched up with chopped-strand mat and polyester resin. Lukas has had several opportunities to use it and has found it to be an enjoyable boat to row. He already has three sailboats, and his wife, Irmfried, insisted that if he were going to attend the Boat Building Academy at Lyme Regis and build a boat there, it would have to be a rowing boat. Lukas decided he would build a replica of the skiff.
Lukas Schwimann
New and old: the reproduction, here rowed tandem, has the same flat sheer as the original skiff behind it.
Lukas’s starting point was to take the lines off the old boat, although this proved particularly difficult as its shape had distorted somewhat over the years. “It was kind of hogged and sagged all at the same time,” said course tutor Mike Broome. When Lukas arrived at the Academy, he gave Mike the information he had. “It was a bit like a fairground ride,” said Mike, “but I breathed on it a bit with CAD and produced a table of offsets.” From this, Lukas and his fellow students lofted the boat full size and then “tweaked it here and there.”
Despite the distortion in the original boat, Lukas recognized that it had a fairly straight sheer and that was one characteristic that he was keen to retain. Although it is thought that it was originally used as a leisure boat, Lukas thinks it is a “workboat type and doesn’t have any fancy features” and he was also keen to replicate that. When he measured the skiff’s scantlings he kept coming across the figure of 44mm (1-3/4″) or neat divisions of it and used that as a guide through the lofting details.
Nigel Sharp
The cleats below the oarlocks have a hole to brace the bottom ends of the oarlocks and to slow the wear on the sockets. The feature was built into the original boat. Removable, adjustable heel braces anchor the rowers.
The boat was built upright, and before construction could begin, a strongback was set up with its top about 2′ off the workshop floor, and directly below an overhead beam. These were put in place with great care and accuracy—partly with the aid of a laser—to ensure the centerline components would be exactly in line. Assembly of the boat’s sapele backbone components could then proceed, beginning with the perfectly straight keel (1-3/4″ thick at its maximum) and hog (3 1/2″ x 7/8″). The stem was composed of a grown outer part in two sections scarfed together and with the lower section scarfed to the keel and hog; and an inner part, or apron, which was laminated from 11 layers to give a thickness of 1-3/4″ and which overlapped the top of the hog over a length of 16″. The 7/8″-thick sapele transom was supported by a 1-3/4″-thick sapele stern knee. All of the centerline components were glued together with epoxy and fastened with bronze screws.
The seven plywood molds produced from the lofting were temporarily fastened to the hog and braced with cross spalls and struts going up to the overhead beam. Battens secured to the stem head and cross-spalls held the molds in their vertical positions.
Lining off the eight strakes was done with a 13/16″ x 1/4″ batten, the same width as the planking laps. The rabbets for the planking had been cut into the keel, hog, and stem as part of the lofting process and had now been faired, so with the laps marked on the stem, molds, and transom, now everything was ready to fit the 3/8″-thick khaya planking. The garboards were dry-fitted, checked for accuracy, and then permanently installed with silicon bronze screws and butyl rubber mastic as a sealant.
The rest of the planks followed, riveted together at the lapse with copper rivets spaced at 2-5/8″ intervals, skipping where the steam-bent frames would be installed later and fastened with longer rivets. All of the planks needed some steaming to cope with the twist at both ends of the boat. Lukas found the mastic “messy to work with and I am not sure if it was necessary apart from with the garboards and the hood ends. The garboards are obviously a critical element and as they were the first planks we fitted, we were learning fast then, so I am glad to have mastic there.”
Lukas Schwimann
The solo rower can choose between the two rowing stations, aft for downwind work, forward for rowing to windward.
The molds and their supporting struts were removed, leaving struts from the transom and stem to the roof beam, and adding two new temporary braces across the boat and notched over the sheerstrake.
Oak frames, milled to 7/8″ x 7/16″ and tapered to 5/16″ at the ends, were steamed into place at 8″ spacings and riveted to the planking. They were continuous from one side of the boat to the other, except for the forwardmost three, which were taken down to the outer faces of the apron, and the aftermost two, which were taken down to the top of the hog where the garboards are nearly vertical. The framing started amidships and worked toward the ends. A few of the amidships frames broke as they were being fitted, and a piece of that was used to make a shorter rib at one end of the boat.
After the frames were installed, their ends were cut a little below the sheer. The sapele inwale was notched to fit over the frame heads, then steam-bent into place. Mastic sealed the frames’ end-grain. The sapele outwale was not steamed but left overlength initially to help with the bending. The finished gunwale, perhaps not surprisingly, has an overall gunwale thickness of the “magic” 1 3/4″.
Ten 7/8″-thick sapele floor timbers were fastened with bronze screws through the planking. The 1/2″ khaya floorboards bear on the structural floors; both rowing positions have adjustable stretchers. The khaya thwarts had individual end supports rather than full-length risers. The sapele breasthook, transom quarter knees, and thwart knees were each made from two pieces with a half-lap joint between them.
Part of the course at the Academy involves making spars and oars, and Lukas managed to persuade three other students to make oars in the same size and style as the one he’d made in spruce with a sapele inlay, giving him a matching set of four oars.
Lukas Schwimann
With two rowing, the bow trims well when the rowers lean aft at the catch. When their weight moves forward at the release, the bow dips a bit.
A long time ago, I spent several years sculling and rowing competitively in everything from single sculls to eights on various English rivers, and I have always enjoyed rowing my own yacht tender. With Lukas happily leaning against the transom keeping watch forward, I took the bow rowing seat in his newly launched Wolfgangsee skiff. A fellow student, Will Mackie, set the pace from the stern station. The boat felt like the best of all compromises. It was more stable than a river-racing boat, of course, but at the same time considerably faster and easier to row than the average yacht tender; it really was a joy.
There was practically no wind, so we were lucky enough to enjoy flat water, but even the wash of a passing speedboat did little to concern us. The new boat has a beam of 4’ and the oars are 8’ long, proportions that felt just right, as did the relative heights and fore-and-aft positions of the seats and rowlocks.
Nigel Sharp
With the builder rowing in the stroke position, the skiff carries a passenger without sousing the stern.
On its home waters in Austria, Lukas was able to report further on its performance. “Interestingly enough there is not much difference in the speed with one or two rowers,” he said. “The maximum speed is somewhere between 6.3 and 6.8 knots, and it depends more on the wind and waves. When crossing the lake with some side wind you feel the boat going off to one side, as is to be expected, but it can easily be compensated when pulling a few strokes stronger on one side. To turn the boat, by pulling with one oar and pushing with the other, it takes about four strokes to turn around. It is also interesting how the boat sits in the water: it is best with either one rower or with two rowers and a passenger. With two at the oars and no passenger, the bow dips a little bit with the rowers’ layback at the finish of the stroke.”
Irmfried is particularly keen to use the boat to row across Wolfgangsee to their favorite restaurant. Lukas plans to set up as a boatbuilder and he is very much hoping that the original boat’s owners, when they see his reproduction of it, will be eager to have him build a new one for them.
Nigel Sharp is a lifelong sailor and a freelance marine writer and photographer. He spent 35 years in managerial roles in the boat building and repair industry, and has logged thousands of miles in boats big and small, from dinghies to schooners.
Wolfgangsee Skiff Particulars
[table]
Length/16′5″
Beam 48.8″
Depth amidships/20.75″
[/table]
For more information about the Wolfgangsee skiff, email Mike Broome at the Boat Building Academy, or the builder, Lukas Schwimann.
Is there a boat you’d like to know more about? Have you built one that you think other Small Boats Magazine readers would enjoy? Please email us!
Two years ago, when I was considering building my next sailboat, I daydreamed about a compact, shoal-draft solo cruiser with a comfortable cabin that has no need of an engine. My sailing in recent years involved cruising and racing my trimaran, sometimes in very lively conditions. That boat was all about speed and distance. Perhaps I’m getting old and lazy and even a bit cranky, but no more jibs, no more winches, no more twangy-tight shrouds for me. I’d had enough of fooling with the noise and maintenance of engines and the careful timing and physical effort that sail rigs demand simply to change direction. I wanted to revisit the low-key end of the boating spectrum, gunkholing the shallow and protected places that few cruisers visit.
I had expected there would be a good list of production boats to fit the bill, and an even greater selection of plans and kits for the home builder. But no, my search was a frustrating one until I recalled seeing Chesapeake Light Craft’s Autumn Leaves in WoodenBoat No. 249. It was not just a boat that I could make work for what I had planned, but one that John Harris had drawn from scratch for exactly this purpose. Add to that the availability of a CNC-cut plywood kit and a timber package milled of quality stock, and my decision was all but made.
David Dawson
The Autumn Leaves has a towing weight of about 1500 lbs. and doesn’t require a large truck to pull it. The Volvo here has a towing capacity of 3,300 lbs.
At the time I had read Mike O’Brien’s comments about the design in WoodenBoat, no one had built an Autumn Leaves, but I was quite intrigued by Mike’s assessment of the drawings. While he noted the rig—a classic yawl with a jib— “will prove a joy to handle,” it seemed the three sails might be a bit fussy for me in an 18′6″ boat. A few years ago, I turned a 16’ skiff into a balanced lug yawl and found it most agreeable, and knew this rig was the right direction to take. I was downsizing from that larger and fairly complicated trimaran and wanted to simplify everything as much as possible. I wrote to John and asked if an Autumn Leaves could be built with a balanced lug main in a tabernacle. John agreed and drew the new sail plan and at the same time extended the cabin trunk to create a more agreeable interior. With that, I placed my order.
Putting the hull together was straightforward. Chesapeake Light Craft cut the kit for me without having put a prototype together—the first time they’d done this—but I was game to be the guinea pig. The plans were detailed, but a step-by-step construction manual had not yet been created. I received countless tips from John as I worked my way through the build. The precision of the CNC okoume parts was a marvel. I found just one very minor measurement error in the entire kit. I also purchased the Autumn Leaves timber- and spar-stock packages. The quality of the lumber was far beyond anything I could have sourced locally, and because the stock was milled to the finish width and thickness, I saved many hours of work sawing, resawing, and planing.
Caroline Dawson
The auxiliary power is provided by a pair of oars rowed while standing and facing forward.
The specs for Autumn Leaves create a very stout hull. The bottom is composed of two layers of 9mm plywood with a third strip of 18mm ply down the center, forming a wide, flat keel. Generous placement of cleats and stringers tie bulkheads and horizontal plywood members together to create a very rigid structure. In the ends of the boat, below the cockpit sole aft and berth flat forward, foam provides about 860 lbs of flotation. This plywood boat does not resonate like a drum, often a problem with the type. The exterior surfaces are sheathed in epoxy and fiberglass. I had the aluminum tabernacle for the free-standing main mast fabricated by a local shop.
The plans call for 14 ballast castings of approximately 38 lbs each, or 532 lbs total. The mainmast and tabernacle structure on the lug version is heavier than the deck-stepped, stayed mast on the original version. To compensate for this, John suggested that I add extra lead, bringing the total up to 620 lbs. Making the castings was the only process I’d never done before, and so was the biggest challenge of the build for me. Others may be intimidated by having to melt and pour lead, but those familiar with the process said it’s not really difficult. My view is that going with lead is preferable to the alternative. Building a water-ballasted boat adds another step to the launching and retrieval at the boat ramp.
courtesy of Chesapeake Light Craft
The box-section hull has a beam of just 5′, but lead ballast in excess of 600 lbs keeps the hull on its bottom while under sail.
Fifteen months after picking up the kit from CLC in Annapolis, Maryland, I had my Autumn Leaves in the water. The boat immediately surprised me with a surefootedness and ease of motion that I did not expect. The slab-sided hull has just 5′ of beam, but motion is tempered by of the lead ballast under the floorboards. It feels in every respect like a bigger boat than it is.
I’m more than pleased with the ease of raising the mainmast in its tabernacle without assistance, setup rigs, or tools of any kind. Both the main and mizzen sails remain laced to their spars. The mizzen bundle is light enough to lift and simply drop straight through its partner. The bilge boards are housed in cases that open to the side decks. They are not ballasted and pivot up and down with very little effort.
The Sitka-spruce mainmast, boom, and yard are of lightweight, hollow box-section construction, and the masts are unstayed so it takes little effort to rig the boat and raise sail. The mizzenmast and its sprit are solid, but are small enough to be easy to handle. The 180 sq ft of canvas the boat carries in the main and mizzen is plenty; even in the lightest airs, it ghosts willingly and easily. As the wind picks up, weather helm predictably builds, and feathering or even dousing the mizzen and trimming up the boards will reset the balance.
My first real outing in a strong wind had me concerned on this point. A tailwind of 25 knots and a steep, breaking Chesapeake Bay chop that reached 4′ high forced yawing beyond what the shoal-draft rudder could control, despite its generous endplate. But adjustments since then—setting the sail more forward on the mast and lifting the boards partway—have shown that in most conditions the boat is fine as drawn. For sailors who regularly have to navigate rougher conditions, John has sketched a rudder that encloses an aluminum drop plate to increase its depth and area when needed. I may make one, but rougher conditions are not what I have in mind.
Cie Stroud
The lug rig carries 150 s ft in the main and 30 sq ft in the mizzen for a total of 180 sq ft, just 7 sq ft less than the alternate rig with the same mizzen, a 114 sq ft Bermuda main and a 43 sq ft jib.
The suitability of the Autumn Leaves design to the dedicated gunkholer is obvious at a glance. It draws just 8” with the boards up and has no appendages to catch weed or pot warp. This was brought home to me on a very blustery day at a local lake. It was time for lunch and I wanted to get out of the wind and relax. I sailed deep into a tree-lined cove, close to the shoreline. The water was choked with weeds. No problem, I doused the sails and let the anchor go into the green mass. So close to shore, the wind was down to nothing and the October sun was quite warm. After I ate and rested, it was an easy drill to raise the anchor, set the sails, give one sweep of an oar to bring the bowsprit away from the overhanging branch it was nuzzling, and off we went. As soon as I cleared the weeds, I put the boards down. Catching the breeze beyond the shoreline’s wind shadow, the boat bounded down the lake.
When I first sailed the boat, I found it easy to greatly underestimate my speed until I consulted the GPS. The skinny hull does not toss the water around much, removing the noise and visual clues that usually suggest speed in a boat this size. And if the reefs are tucked in when due, the Autumn Leaves stays on its feet, giving the crew nestled in the deep cockpit a sense of solid security.
David Dawson
The cabin isn’t large, but it has a comfortable chair that folds down to create a broad sleeping platform for one.
Simplicity extends to life aboard the Autumn Leaves. When it’s time to settle down for the evening, John made sure the solo cruiser would have ample comfort. In the center of the cabin is a cushy easy chair, just right for reading. It’s folded and hidden under the end of the berth when not in use. Countertops are right at hand near the companionway, with camp stove to one side and navigation gear to the other. Everything is within arm’s reach. The cabin overhead is low, but the average person can sit on the forward end of the berth flat without butting up against the roof, and there is space enough to stow and use a portable toilet or bucket, as one prefers. One compromise I made in opting for the unstayed mast is an obstruction about a foot back from the forward end of the cabin—the tabernacle comes through the deck and the berth on its way to an anchoring cross-member on the hull. There is good headroom forward, thanks to the extended trunk, and to my surprise I found it wasn’t difficult to crawl out through the hatch at the forward end of the cabin roof. Storage in the cabin is generous, with lockers under both the berth flat and the cockpit sole.
courtesy of Chesapeake Light Craft
The designer recommends putting the first reef in when whitecaps appear.
Three can be comfortable in the cockpit for a day sail, but for overnighting, Autumn Leaves is a one-person cruiser. And the solo sailor does need a bit of determination to go without a motor. The boat has a good deal of windage and, loaded for a week’s cruise, it displaces over a ton. It rows easily in a calm—I can maintain 1.5 knots with minimal effort, 2 knots if I push hard—but once the wind is much over 5 knots, the boat needs to be sailed to make good way.
John told me he was aiming for an L. Francis Herreshoff Rozinante-type of boat that would be easy and affordable to build, a canoe yawl in the tradition of Albert Strange and friends, an engineless sailboat for cruising as it was once always done. I think he hit the mark. I christened my Autumn Leaves TERRAPIN, after a turtle once common up and down the East Coast of the U.S., and with her I’ll be gunkholing the shallow and protected places that few cruisers visit: the backwaters, creeks, rivers, and estuaries along the Mid-Atlantic coast.
David Dawson is a retired newspaperman who has been hooked on boats since he was a boy, when his dad built a plywood pram. He does most of his cruising on the Chesapeake Bay, but has taken a variety of trailerable boats elsewhere to explore waters from New England to Florida. Nearer to home in Pennsylvania, he enjoys kayaking the local rivers, lakes, and bays.
Low gray clouds and fog hung in the hills above Port McNeil, an isolated town on the northeast side of Vancouver Island, British Columbia, and the jade-green water of Broughton Strait didn’t show a ripple. A curtain of dark conifers lined the shore and a bare, logged hillside hulked in the distance. Every inch of space of ROW BIRD, my 18’ Arctic Tern, was stuffed with gear, food, water, art supplies, and books. It was early August, and over the next six weeks, I would row and sail some 350 nautical miles through British Columbia’s Inside Passage back to the United States.
Photographs by the author except as noted
I wasn’t used to rowing with a heavy load—seven gallons of water and three weeks’ worth of food—and the going was slow, but the scenery near Near Port McNeil was so striking that I didn’t mind.
After I launched at a campground between town and the Nimpkish River, the clouds broke up and thin strips of blue sky appeared. ROW BIRD glided through the shallows, gliding over a meadow of eelgrass. The tips of my long green blades were just inches beneath the surface; rusty rock crabs and finger-sized fish darted at the approach of the boat’s shadow. Reaching deeper water, I rowed toward the jumble of buildings and boats that crowded Alert Bay, the village lining the edge of Cormorant Island, 1-1/2 miles away.
At the north end of the bay, a First Nation’s longhouse, as big as a barn, was covered with the black-and-white stylized painting of an eagle perched atop a skeletal fish. Several cedar totem poles with orca, wolves, and human figures painted in bold red, green, and black stood nearby. I spent the afternoon walking around the island, and that evening I anchored just offshore of the longhouse. I unrolled ROW BIRD’s cockpit cover and stretched it between the masts; I arranged my foam pad, sleeping bag, and mini pillow on the floorboards. Black turnstones—stocky, white-bellied shorebirds perched on splintery pilings—kept me company with their shrill chirps until dusk. Exhausted by a busy first day, I quickly fell asleep.
Edye Colello-Morton
The wind shifted from hour to hour, so I frequently changed from sailing to rowing. Fortunately, the balanced lug sail was easy to set or strike.
I awoke in the morning to a fog so thick I could barely see the shore 300’ away. I stowed my bedding, transformed the cockpit into a galley, and cooked a breakfast of oatmeal with dried apples. When I peered out under my cockpit tent, I saw nothing but a dingy white haze and heard only the deep bellow of ships’ horns farther offshore. I got under way and crept along close to the shore, but when one particularly loud horn inexplicably seemed to be getting closer and closer to the shallows, I tied up to a dock. A break in the fog revealed the source: a seven-story-tall cruise ship that was anchoring in deep water just a few hundred feet away.
When the fog lifted, I rowed east along the upper reaches of Johnstone Strait into the Broughton archipelago through the churning currents in Blackney and Whitebeach passages. In the fluky wind filtering between islands and along channels, I changed from sail to oar frequently as I navigated through a few dozen of the archipelago’s hundreds of forested islands, tree-capped islets, and bare rocks. I measured time now only by the tides and the amount of daylight available, and because I wouldn’t be returning to my starting point near Port McNeil, there was no need to think about when to head back, only where to go next.
At the north end of Vancouver Island, dense fog dominated the mornings. Here, just south of Mound Island, I waited for it to lift.
I explored the intricate shorelines of the Broughton Islands, poked around rock gardens, and slid into small coves. A few dozen yards off Mound Island, a 3/4-mile-long wooded island nestled in the south end of the archipelago, I used my Anchor Buddy to keep ROW BIRD off a stone outcropping almost as big as a baseball diamond. At its top was a shallow basin filled with salt-marsh plants and succulents like lime-green pickleweed with tiny salt crystals under its plump stems. Intricate horseshoe-shaped patterns of blue-gray lichen clung so closely to the rock that they appeared to be painted on.
I could have spent my whole trip wandering through the archipelago, but I had a loose itinerary that included 35 stops. I had allowed for a few relaxing zero days, as well as weather or tide delays, but felt I had to move whenever weather and currents were in my favor, meaning I was neither rushing nor lingering.
Roger Siebert
.
To travel eastward from the Broughtons, one option was to take on 50 miles of the notoriously windy and rough Johnstone Strait, a narrow passage so long and straight that its eastern extremity would be hidden not by islands but beneath the horizon. The passage provides limited shelter for a small boat, so I opted for a longer, more protected route through the meandering back channels along the mainland. On this calmer journey I would only need to navigate a brief 15-mile stretch of Johnstone Strait—but I’d have to contend with the fast-moving tidal currents in Chatham Channel, Whirlpool Rapids, Greene Point Rapids, Dent Rapids, Gillard Passage, and Yuculta Rapids.
I had rowed for several hours against a current in Johnstone Strait and was relieved and exhausted by the time I reached Sunderland Channel. When I found the tiniest breeze, I set sail, even if it meant moving at just one 1 knot.
A few mornings later, I was rowing in the 3/4-mile-wide channel between the Lady Islands and Turnour Island. Since dawn, the only sounds I’d heard were the gentle splashing of my oars and the occasional guttural cackling of a raven, but that calm was pierced by the loud “PFFFFT” exhalation of a humpback whale that had broken the glassy surface of the water just a few boat lengths to starboard. The whale was as long as a school bus and could have been quite frightening, but it just rolled on its side, extended a 12′ long pectoral fin upward, and promptly disappeared.
Many of beaches along the Inside Passage are composed of stone and pebbles. A white shell beach, like this one in the Mist Islets of Cracroft Island’s Port Harvey, is a good indication that the site was once a First Nations village.
The next day, leaving from the placid waters of Lagoon Cove on the north end of East Cracroft Island, I rowed through The Blow Hole, a 130-yard-wide channel between Cracroft and Minstral Island that’s known for strong winds that funnel through the gap. I encountered only a modest headwind that followed me as I turned south between the steep, forested hillsides that surround Chatham Channel, the first of six tidal rapids I’d need to traverse.
Near Port Harvey, on a rare clear morning, the reflections on the water changed from pink to a deep blue. It was 7:15 as I was getting ready to depart from a beach near Port Harvey after spending the night at anchor.
I tried sailing against the headwind, but found myself making ground on one tack and losing it on the other, making it to Chatham rapids later than I expected. I turned on my marine radio and looked around for other boats. Seeing none, I headed east in the narrows with almost 2 knots of current in my favor. About halfway through, I saw a flash of red through the trees. I saw it a second time, but I wasn’t sure what I’d spotted on the far side of the bend until the radio came alive.
“Tug heading west up Chatham Channel,” a voice said. “This is motor vessel ENCHANTED SEA. We’re heading east. What can we do to keep out of your way?”
“We’re triple wide,” the tug’s captain replied, indicating the he was in one of two tugs pushing four barges, “It would be appreciated if you could spin a few circles above the rapids until we pass.”
“Roger that.”
Under oars alone, it was a challenge for me to turn ROW BIRD around and buck just a couple of knots of current. As the tugs and barges came into view, I doubted there would be enough room for me to stay safe between their likely course and the jagged, barnacle-covered rocks in the shallows. I spied a tiny cove, barely twice the width of my boat, on the Cracroft shore, a few hundred feet downstream. I floated into that small refuge, just as the tugs and massive barges labored by leaving, to my relief, virtually no wake behind them.
When I spent the night at the Port Neville dock, my boat was, as usual, the smallest. The other mariners were curious about me and my travels, which often resulted in much-appreciated invitations to dinner.
Over the next few days, I covered about 30 sea miles almost entirely under oar power, and transited Johnstone Strait, Sunderland Channel, and Whirlpool Rapids in the middle of Wellbore Channel. The northwest winds that I’d read were typical in this area never materialized, despite daily weather forecasts issuing warnings for a strong northwest wind.
Edye Colello-Morton
Under calm conditions, ROW BIRD is easy to steer standing up. During long days in the boat, I took every opportunity to change positions.
As I rowed west along Cordero Channel and approached Greene Point Rapids on the northeast side of West Thurlow Island, I expected funneling winds to push me through the gorge-like passage. The rippling rivers of water pushed with the flood tide, waving kelp, and swirling back-eddies were the only signs of movement for the first few miles. Eventually, a westerly wind rose just enough for a sedate downwind sail through the end of the rapids; it petered out at the east end of East Thurlow Island, just before I reached the 600’ government pier at Shoal Bay. I cleaned the hull in the afternoon and then spent a sociable night at the dock there with cruisers who had arrived aboard several big motor yachts.
When I built ROW BIRD, I used topside paint on the interior and exterior. Worried that keeping topside paint submerged for weeks on end would damage it, I dried the boat periodically, as I did here at Shoal Bay, and scrubbed the bottom to rid the hull of growth that would damage it.
Underway again at dawn, the coal-black water reflected the low clouds overhead as I rowed toward the final trio of rapids—Dent, Gillard Passage, and Yuculta—strung one after another along a 3-½-mile stretch of Sonora Island’s east coast. I had planned to complete one rapid per day, slipping through each one as wind and current allowed, stopping for a night in between. I went through much faster. I arrived early enough that I rowed against the last of the opposing tide and passed through Dent Rapids as soon as slack started. Surprised to see that I’d made it to the Gillard Passage rapids just as the tide was turning in my favor, I forged on, taking Innes Passage, the 250′-wide channel tucked behind ½-mile-long Gillard Island.
Just 1/4 mile south of Gillard I entered Yuculta Rapids, where two hulking sea-lion bulls cavorted in the water. I rowed into an eddy and slowly pulled out my camera, thrilled as they came closer. Then, like a growing crowd of rowdy school boys, three more bulls joined them and I felt I was becoming the subject of their chasing game. Worried one might get the idea to leap aboard, I charged away into the heart of the rapids. It was just past slack, and a tongue of bubbly water down the center of the broad channel showed the safest and least obstructed route. ROW BIRD was jostled and turned here and there, but I drew on my experience with whitewater rafting to hold a steady course downstream.
Once clear of the main current, I pulled into a small cove on the rocky east shore of Sonora Island. I landed on a patch of white shell beach where I found a cascading freshwater stream surrounded by logs and lush green sedges. I checked for bear scat and prints, and seeing none, stripped off my sweat-soaked clothes and stepped in for a chilly bath and laundry session. It was pure relief to be clean again, despite the long strands of algae that clung to my hair and clothes. From the safety of the cove-nestled stream, I watched logs and woody debris in the tail end of Yuculta churn beneath the flanks of the surrounding mountains.
During the two weeks I’d been out, I hadn’t encountered another self-propelled cruiser, but I was hoping I’d cross paths with my friend Dale, who was participating in the Barefoot Raid, an informal race for sail-and-oar craft. I studied the race itinerary I’d jotted down on a scrap of paper before I’d left home, and realized that with a small change from the route I had planned, I could intercept the fleet on the northwest side of Cortez Island.
With this hopeful and loosely planned rendezvous on the horizon, I rowed into the lazy backwaters of Háthayim Park and spent a zero day cleaning salt off the gunwales, mopping out the bilge, organizing my supplies, and relaxing.
A wide variety of production and custom-built boats made up the Barefoot Raid fleet. At night the racers gathered around the mother ship POOR MAN’S ROCK.
The next day, I ghosted south 2 miles to rock-fringed Carrington Bay, also on the northwest coast of Cortez Island. The fastest of the racers had already arrived and were at anchor. A few stragglers, Dale among them, tacked all the way in a dying breeze to join the rest of the fleet. I tagged along and soon all of the boats had surrounded POOR MAN’S ROCK, a two-story workboat that followed the racers and served as the Raid’s sweep, cookhouse, and party spot. It was large enough to hold several boats in its cargo bay and 20 Raid sailors on its deck.
In the morning I joined the raiders as they continued on their clockwise circumnavigation of Cortez Island. We made the 1/2-mile crossing to West Redonda Island, tensely waited out a gale warning in a cove, and then plowed south flanked by the steep, forested hills along Lewis Channel. On the third day, the group headed west around Cortez and I continued south, crossing to the mainland’s Malaspina Peninsula, and the town of Lund. It was the first time in weeks I’d seen cars on a road.
I spent a restful night in a tidal estuary near Powell River while a storm blew through Malaspina Strait. I anchored in shallow water so ROW BIRD would settle on mud during the night, allowing hours of peaceful sleep.
I followed the mainland coast for another 15 miles, resupplied in Powell River, and continued toward the Strait of Georgia, a vast body of water covering nearly 2,400 square miles. Each morning I listened to the marine forecast, trying to make a cautious plan to cross safely from the British Columbia mainland to Vancouver Island. The forecast covered such a wide area that it was hard to know what I’d encounter within the narrow band of the strait where I’d make the crossing.
Malaspina Strait was protected by Texada Island from some of the influence of the adjacent Strait of Georgia, but being over 2-½ miles wide, it was choked with chop and confused swells that splashed aboard ROW BIRD. The one saving grace was a northwesterly 15-knot wind that pushed me through the lumpy conditions to Pender Harbor, where I would start the first half of the 20-mile crossing to Vancouver Island.
Humpback whales were a common sighting. The white cloud in the center is the exhaled mist from the whale that had come up to breathe.
Leaving the crowded harbor the following morning, I was excited to get back to open water and the freedom to move without constantly looking out for faster-moving motorboats. From Pender to Lasqueti Island was about 11 miles. I put on my sun hat and slathered myself with sunscreen. To row at the quickest pace I could before the wind picked up, I dropped the masts into the boat. I had rowed barely an hour when the tide must have shifted, because the water became so thick with short chop that it felt as though I was rowing through syrup. My normal 3-knot rowing speed dropped by half.
Later in the day a tailwind filled in and I set sail; wind waves combined with the chop, creating a lumpy 2′ following sea. ROW BIRD seemed to push the water like a bulldozer instead of cutting through it. As the wind strengthened from a gentle breeze, little whitecaps began to appear in the distance. Normally, I’d reef my mainsail when the wind approached 12 knots, but I pressed ahead under full sail. ROW BIRD bounced along, taking spray over the bow, but with the ballast of 7 gallons of drinking water and all my gear on the floorboards, combined with the steadiness of the wind, the boat felt docile and the tiller was light in my hand.
Hours later, the 8-mile crossing of Malaspina Strait was behind me and I passed Texada Island. After another 3 miles, I reached the craggy south end of Lasqueti Island. Its black volcanic rock jutted out into the strait like the broken furrows of a giant plow. I had a 1:20,000-scale chart for the islands, so I knew where Squitty Bay was, my destination for the night, but I couldn’t see its narrow entrance. I dropped the sail and poked cautiously into crevices in the southern shore by oar, aware that an errant wake could bash me against the rocks. Finally, I saw masts sticking up above a steep stone outcropping, and found the crooked 30-yard-wide entrance. ROW BIRD glided through the sheltered water toward the government dock, where I found a spot just big enough among the 10 local boats occupying the rest of the space.
Sheltered by two long ridges of rock, the water around the dock was smooth enough to see a reflection. I fell into conversation with James, a local shipwright working on a wooden sailboat moored there. He’d been living in the islands and exploring them in craft large and small for most of his life. I told him about my journey, and he suggested a route across the western 8-mile crossing of the strait that would avoid a National-Defense torpedo test range southwest of Lasqueti and provide some protection from waves by threading through a series of house-sized rocks and small islands close to the mainland.
Squitty Bay was surrounded by a provincial nature park, and feral sheep grazing among the smooth-skinned madronas and rough-barked junipers kept the grass and shrubs under the trees so low that it looked like it had been mowed. I spent two days relaxing, sketching, and waiting for the right weather window. Early on the third morning, I climbed a 200’ hill that looked over the strait. Smooth water spread to the south of the island; to the west, where I was bound, dark ripples marked the open water separating Lasqueti from Vancouver Island.
At Squitty Bay, I slept comfortably aboard the boat, my accommodations for more than 30 nights during the cruise. The canopy, here opened on the starboard side, is a two-layer cockpit tent. Its outer layer is waterproof ripstop nylon, and the inner layer is breathable Sunbrella.
The forecast called for a 5- to 10-knot northwest wind, so I anticipated a fast and mellow crossing. I rowed out of Squitty Bay, negotiated around a tug towing a log raft the size of three football fields, then passed from the smooth water into the first of the ripples I’d noticed from the hilltop. In the distance, Vancouver Island was so far away it looked like a thin ribbon of green on the horizon, in spite of the 4,000′-high ridge running along its length. Once I was under sail, the water became lumpy, and a confused swell from the north slapped ROW BIRD on her starboard side. Every third or fourth wave sent spray over the bow that left a salty film on all my dry bags and lines.
Half an hour later, the hull hissed as ROW BIRD bounced through the chop, leaving a frothy wake astern. Seven miles into the crossing, I cleared the Ballenas Islands, two 1/2-mile-wide islets that sit 3 miles from Vancouver Island’s shore. The swell and wind had increased enough that I hove-to and put a reef in the lug mainsail. The wind turned gusty, and I had to luff the mainsail more often than I could haul it in; I hove-to again and put in a second reef. I was following the plan for the crossing that James had outlined, but the rising wind and worsening sea state was troubling. Nanoose Harbor, the nearest place on Vancouver Island to get off the water, was still about 3 miles to south, but with access limited by a military base along its shore, I was reluctant to pull in there unless I got desperate.
I scanned the chart for a sheltered landing site, but couldn’t figure out how to progress safely perpendicular to a following sea that had now built to nearly 4′. Putting the third and final reef into the sail, I tried to make my way toward a private marina I saw in a tiny cove but ultimately decided I couldn’t make it. To avoid taking on water, I had to steer away from crests breaking astern. Seawater sloshed in and out of the bilge and over my feet, but I didn’t dare stop and bail.
A strong gust made ROW BIRD round up and slam over the back of a steep wave into a deep trough. The sails hung limp for a moment, then rattled noisily. I decided to let ROW BIRD drift, hoping that conditions would moderate. I set the mizzen tight, and the bow pointed into the wind, but, unfortunately, the waves were coming from a different angle and hitting the starboard quarter. I drifted toward slowly southward toward the Ada Islands, little more than a cluster of bare rocks with reefs awash in whitewater. I clenched the tiller in my right hand, adjusting to each set of waves, wondering if the next might swamp me. I pulled my VHF radio out of my PFD pocket and switched it to channel 16. Would this be the day I called for a Coast Guard rescue?
The waves crested in crumbling white foam, lifted the boat, then slowly passed me by without breaking entirely from top to bottom. Twenty minutes later, I decided that I wouldn’t call for help as long as I could still sail, so between swells, I hauled the mainsail back up, loosened the mizzen sheet, and turned ROW BIRD downwind. She surfed, swerved, and ducked between waves, and as I approached Stephenson Point at the entrance to Departure Bay. In the lee, the wind and waves abated but I had to steer away from an approaching ferry, and in the bargain slid over a reef near Horswell Rock, scraping the centerboard. When I slipped behind Jesse Island, the sails suddenly went limp, and with the ordeal of the crossing over, I felt lightheaded and hot. I peeled off my damp drysuit and collapsed onto the thwart. When I regained my strength, I rowed into a marina in downtown Nanaimo, where the high-rises loomed over the shoreline. I went to check in at the front desk, and exhausted and ravenous, I asked where I could find some pizza. The harbormaster immediately produced a partially eaten pie from behind the desk. “Take as much as you want,” he said.
Two days later, I left Nanaimo and continued southward. Using a pair of range markers, I slipped between Vancouver and Gabriola islands via False Narrows. This signaled the entry to the Gulf Islands and cruising in civilization where there were ample calm anchorages, marinas, and sand beaches. The days that followed were like a vacation rather than a wilderness expedition. I rowed and sailed in protected waters where a multitude of islands prevented much fetch from building, and stopped frequently in small towns for luxuries such as ice cream and fresh baked pastries. No longer did I think about my stores or the presence of bears; I simply enjoyed long ambles in provincial and national parks.
The afternoons were set ablaze when the sun set, turning the sky and water fiery reds and oranges, and, as September rolled in, there were fewer boats on the water. Rainstorms indicated that the season was coming to a close. Forty miles to the southeast of Nanaimo I stopped at Saturna, a 7-mile-long island pushing into a notch in the border between Canada and the U.S. Black clouds skated across the mountains to the west and blocked the sun. As I stood on a dock at Winter Cove, rain fell in dreary streaks from gray clouds.
On the days that followed, I made my way at an easy pace through the Gulf Islands, and then crossed Haro Strait into the San Juan Islands of Washington.
Under clear skies, a chilly westerly wind drove me across the San Juan archipelago to Orcas Island, where I left ROW BIRD at a marina for a few days off the water. I spent two nights at a friend’s house, grateful for the shelter as thunderstorms or low clouds rolled in each evening. Being indoors was starting to feel appealing.
My friend Andy had brought my car and trailer from home, parked them on the mainland, and came by ferry to Orcas to join me for the last leg of my cruise. After being alone on my boat for over a month, it felt good to have some company as we wound through the remaining islands.
We spent a damp night camping on Lopez Island’s Spencer Spit, a popular marine park, and got underway in the morning, headed east for Thatcher Pass, a ½-mile-wide gap between islands on the thoroughfare to and from the mainland. A hide-and-seek fog covered navigation marks, waterways, and entire islands. Foghorn in hand, we crept around Decatur Island to the safety of the cove on the west side of James Island.
I lingered on the edge of James Island in the San Juan archipelago. Even in the still air, the fog banks formed and dissipated quickly.
We tied ROW BIRD to the public dock there and climbed the wooded trail to a ridge where we hoped to see east across Rosario Strait to Anacortes, 3 miles distant, but it was lost in the fog’s dull-white void. The strait is a dangerous crossing, with strong currents, long fetches, and a north–south shipping lane crossed by a busy east–west ferry route. I’d never attempt it in fog, and even if it were to lift, we’d have to wait for the turn of the tide to slow the currents in the strait. We were stuck, at least for the night, on James. Andy got busy with his phone, making arrangements for the unanticipated absence from home and work. But for me, the fog provided the chance for another zero day and a welcome excuse to savor a final day of cruising, my 37th away from home.
Late the next morning, the fog had cleared, and with Andy navigating in the stern, I rowed, somewhat reluctantly, the last few uneventful miles across water that shimmered like rippled satin.
Bruce Bateau, a regular contributor to Small Boats Monthly, sails and rows traditional boats with a modern twist in Portland, Oregon. His stories and adventures can be found at his web site, Terrapin Tales.
If you have an interesting story to tell about your adventures with a small boat, please email us a brief outline and a few photos.
One of the first things that my father-in-law taught me was how to make the end of a line shipshape by applying a whipping. The method that he taught me is known as the “common whipping,” multiple turns of whipping twine with its ends pulled underneath the turns. The common whipping is quick and easy but prone to slipping off the end of the line and will come completely apart if any part of it is cut or chafed. Two other options—the Admiralty whipping and the West Country whipping—are more secure, nearly as easy to execute, and don’t require a needle.
SBM
The Admiralty whipping looks like a sailmaker’s whipping, but it is applied without a needle.
The Admiralty whipping is described inThe Ashley Book of Knots and the British Admiralty Manual of Seamanship as a good way to finish three-strand line and looks very much like the sailmaker’s whipping, also known as the palm-and-needle whipping, but it doesn’t require the palm or needle. Start the Admiralty whipping by tying the end of the line with a short length of whipping twine to keep the strand ends from untwisting and fraying while you work. Waxed polyester twine holds knots and stays in place best.
Normally a whipping covers a length of line that’s one-and-a-half times the line’s diameter. A 3′ length of twine is enough to whip a line up to a 1/2″ diameter. Spread the strands apart about 1-1/2” back from the line end by inserting a marlinespike or twisting the line against the lay; pull 6″ of whipping twine under a strand to become the standing end. The working end of the twine is taken over and back under the next strand up from the first strand, forming a small loop on either side of the first strand. This twine loop must be about 2” in length, which is long enough to slide over the end of the strand it crosses. At this point the working end is wrapped tightly around all three rope strands, starting at the base of the loop and working toward the end of the line. Once the turns are complete, the short length of twine holding the ends of the strands can be untied and discarded. The loop of twine, made at the start of the whipping, is pulled across the turns and put over the end of the strand that it straddles, then the standing end of the twine is pulled to tighten the loop around its strand. The standing end of the twine is then run alongside its strand, across the turns, and it is tied off to the working end of the twine with a square knot. The square knot is buried between the strands at the end of the line, and the end can be trimmed neatly with a knife.
SBM
The West Country whipping can be applied on laid or braided line. The gaff tape wrap underneath it is optional.
The West Country whipping is easy to tie and is both functional and decorative. It can be tied without a needle and palm, and its multiple knots prevent a quick unraveling. The knots can be retied if they come loose. The West Country can also be tied with cord to wrap tillers and handholds to provide a secure grip.
When we tie the West Country whipping, we tape the last inch of the line with two wraps of cloth gaff tape. The Ashley Book of Knots, incidentally, identifies this taping on the end of a line as a “linesman’s whipping” and notes that it starts with the end of the tape getting tucked in between strands of a laid rope. For whipping a 3/8″ line, I measure out about 3′ of waxed twine. The whipping can be started at the end of the line or worked out to the end from about an inch back. For laid line we work from the end. We draw the middle of the twine around the line and start tying half knots, the beginning of a square knot, first on one side, then on the opposite side, going back and forth for about 3/4″ of the line. The whipping is finished with a square knot; excess line is trimmed and the knot can be buried in the strands.
When we put whippings on synthetic line, we’ll often pass the freshly cut end by a flame to fuse the strands’ fibers. We do this with a light touch to avoid melting the material. A liquefied blob of synthetic material hardens with a sharp edge at its perimeter, which can cut skin if it slips through your hands.
Nicely whipped lines make our boats shipshape, and we find doing the whippings is very relaxing. Pull up a chair and try your hand at it.
Grayl has created a water-treatment system that is two reservoirs and pump all in one compact unit.
Unless you’re willing to risk a most unpleasant bout of giardiasis or worse on your backcountry ventures, some kind of water-treatment system is a necessity. I much prefer filters to chemical treatments or boiling, so I was immediately intrigued by Grayl’s Geopress, which offers an interesting alternative to the hand-pump type filter I’ve been using.
Unlike pump-operated filters, the Grayl Geopress combines a filter and water bottle in one unit. An inner bottle, with a replaceable filter attached, fits snugly inside an outer shell with a gasket providing a watertight seal between them. There are no moving parts likely to fail in the field, and very little opportunity for the kinds of accidental contamination that’s possible in pump-type filters, such as dropping an output hose into untreated water. Simply pull out the Geopress inner bottle and set it aside, then dip the outer shell in untreated water to fill it. Set it upright on a flat surface, reinsert the inner bottle, and open the pour spout’s threaded cap a half turn for venting air. Press the bottle down slowly and firmly into the outer shell. This forces the untreated water through the filter at the bottom of the inner bottle. It took me about 40 seconds to filter 24 ounces of water, much faster than pump-type filters I’ve used.
The filter at the bottom of the inner cylinder incorporates the gasket that forces the water through the filter. The replacement filters come with a new gasket to assure the watertight seal between the two cylinders.
The filter uses a combination of ceramic fibers for particulate removal, positively charged ions to bind pathogens, and activated carbon to adsorb chemicals and impurities. The manufacturer claims that the Grayl filter removes 99.9999% of bacteria, 99.99% of viruses, and 99.9% of protozoa, claims that have I found verified by independent laboratory tests for the similar Grayl Ultralight model. Replacement filters are available, and recommended after filtering 65 gallons of water (350 cycles), or when the time needed to press the inner bottle into the outer shell nears 25 seconds. The filters include the gasket, so that critical part is regularly replaced.
The Geopress is made of durable, BPA-free plastic throughout. The design is just right for easy drinking or spill-proof pouring. An arrow on the drinking cap clearly indicates open and closed positions, and the raised “Max Fill” line on the bottle is a useful feature as well, though a contrasting color would make it easier to see. A rigid plastic loop on the cap accommodates a carabiner for secure carrying.
The Geopress turned the murky stream water at left to the clear water at right. It’s best to filter the clearest water you have access to. The silt-laden water here was used to highlight a before and after difference. Many of the contaminants removed by the filter are invisible.
There are just a few things to consider. Those with small hands might find it difficult to pull the inner bottle from the outer shell—that’s an operation requiring a firm grip and a steady pull-and-twist. My wife, whose hand can comfortably span an octave on a piano keyboard, had some difficulty here. When drawing water from water too shallow to dip the outer shell, you’ll need a cup to fill it. The Geopress filters only 24 oz of water at a time, so while purifying a single bottle of water goes quickly, filtering larger amounts requires emptying the inner sleeve into a separate container and repeating the operation several times.
For best results, follow the instructions and position the Grayl on a low, stable surface so that you can slowly lean the full weight of your upper body on the top of the bottle, with your arms straight and locked, to force water through the filter. Kneeling on the ground with the Grayl between my knees worked best; in that position, it took me about 8 seconds to filter a full bottle of water. It’s also possible to operate the Grayl while standing by putting it not far above knee height and keeping arms straight to let body weight do the work. The Grayl is easy to operate ashore where there’s no shortage of solid ground, but because space is limited aboard my sail-and-oar beach cruiser, I found it a bit awkward to use onboard. Standing up and pressing down on the Grayl while it’s on the thwart can be a bit dicey in a round-bottomed boat with a beam of just 4′6″. If you have room aboard to kneel, though, it’ll be easy to filter water while afloat.
If what you need is a method of very quickly treating drinking water one bottle at a time, the Geopress shines; it does everything it’s designed to do, and does it very well. Pricing for the Geopress is comparable to popular pump-type filters, and I was impressed with its quality, simplicity, and ease of use.
Tom Pamperin is a freelance writer who lives in northwestern Wisconsin. He spends his summers cruising small boats throughout Wisconsin, the Great Lakes, and along farther afield. He is a frequent contributor to Small Boats Monthly and WoodenBoat.
The dolly has made it much easier for me to move over a half ton of boat and trailer.
If I had my druthers, I wouldn’t have to man-haul my boat trailers to get them to the car to hitch them up. The caster on a trailer jack works okay on pavement, and only marginally in my backyard in the summer when the lawn is dry and hard, but on gravel and damp sod it’s a struggle to get it to roll or pivot.
I recently sprang for the MaxxHaul trailer dolly and wish I’d bought one sooner. It took about 20 minutes to assemble; metric sockets would have been much quicker than the crescent wrenches I had to resort to. The dolly weighs 31.7 lbs and feels quite solid. It comes with a 1-7/8″ ball, which fits the couplers on my two small trailers. The 12″ x 4″ pneumatic tires are like those used on wheelbarrows and roll easily on pavement, grass, and gravel. The dolly has a stable 24″ wheelbase and the wheels spin on bearings slipped over a 0.9″ steel tubing axle. A sturdy 1/4″-thick steel bracket supports the hitch ball and is connected by a brace to the 4′ long handle.
To roll a trailer-jack wheel across this soft lumpy ground, I had to lay down a path of boards. The dolly isn’t bogged down by it.
The first time I used the dolly—on the trailer I don’t have outfitted with a jack—I was impressed with how easily it can lift the trailer’s tongue from the ground. Raising the handle lowers the hitch ball, and after the ball is steered under the socket of the trailer’s coupler, lowering the handle lifts the tongue. The long handle not only provides a lot of mechanical advantage—4.4 to 1—but also entirely eliminates the back strain of lifting the tongue up by hand. I just have to put my weight on the handle to push it down. The tongue weight on the trailer I’ve been using the dolly on is 137 lbs and the weight of the trailer and the Caledonia yawl it carries is between about 1200 lbs. MaxxHaul sets the dolly’s capacity at 600 lbs, so even though I’m doubling the working weight, the dolly hasn’t shown any sign that it’s suffering under the load.
The handle comes to a convenient height for pulling; it just lines up with my arms and there’s no fighting its angle. Pushing is almost as easy, I can set the handle in the crease of my hips if I need extra power. Steering with the dolly is a breeze—it easily spins around the hitch. Lowering the handle moves the hitch ball a bit past directly over the axle and presses the handle down on the stand that’s bolted to its backside.
My backyard has a bit of a slope down to the sidewalk next to it, and while it’s neither long nor steep, it’s too much for me to push a half ton of trailer and boat up it. Although I can’t simply pull or push the dolly to get the boat up the slope, I can use the dolly to take advantage of the leverage provided by the long boat-trailer tongue. The 13′6″ trailer tongue gives me a nearly 3:1 mechanical advantage over the 4′8″ wheelbase. Chocking one wheel and pushing the tongue to that side will roll the other wheel forward.
The wheel chock I use for hauling the trailer uphill is tied to the trailer and follows close behind both wheels, allowing one to roll forward, while the other is prevented from moving back.
To make leverage work in a single-handed operation, I made chocks to follow the wheels. I added 1″-thick slabs of scrap wood to both ends and both sides of a 2×4 that spans from one wheel to the other. Cords, tied between the 2×4 and brackets forward of the wheels, pull this device forward, so all I have to do is push the tongue back and forth sideways and the chock lets the wheels roll forward but not backward. The dolly makes it very easy to move the tongue from side to side and ratchet the trailer uphill.
The fewer impediments that I have to getting a boat to the water, the more likely I’ll be able to get on the water more often. The MaxxHaul trailer dolly will get most of the heavy lifting out of the way.
Christopher Cunningham is the editor of Small Boats Magazine.
If you’d prefer to upgrade your trailer jack with dual 10″ pneumatic tires, see Ben Fuller’s review of the Croft wheel kit.
The MaxxHaul 70225 trailer dolly is available from online retailers. I purchased mine through Amazon for $50.80.
Is there a product that might be useful for boatbuilding, cruising, or shore-side camping that you’d like us to review? Please email your suggestions.
Subscribe For Full Access
Flipbooks are available to paid subscribers only. Subscribe now or log in for access.
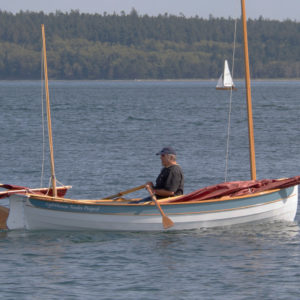
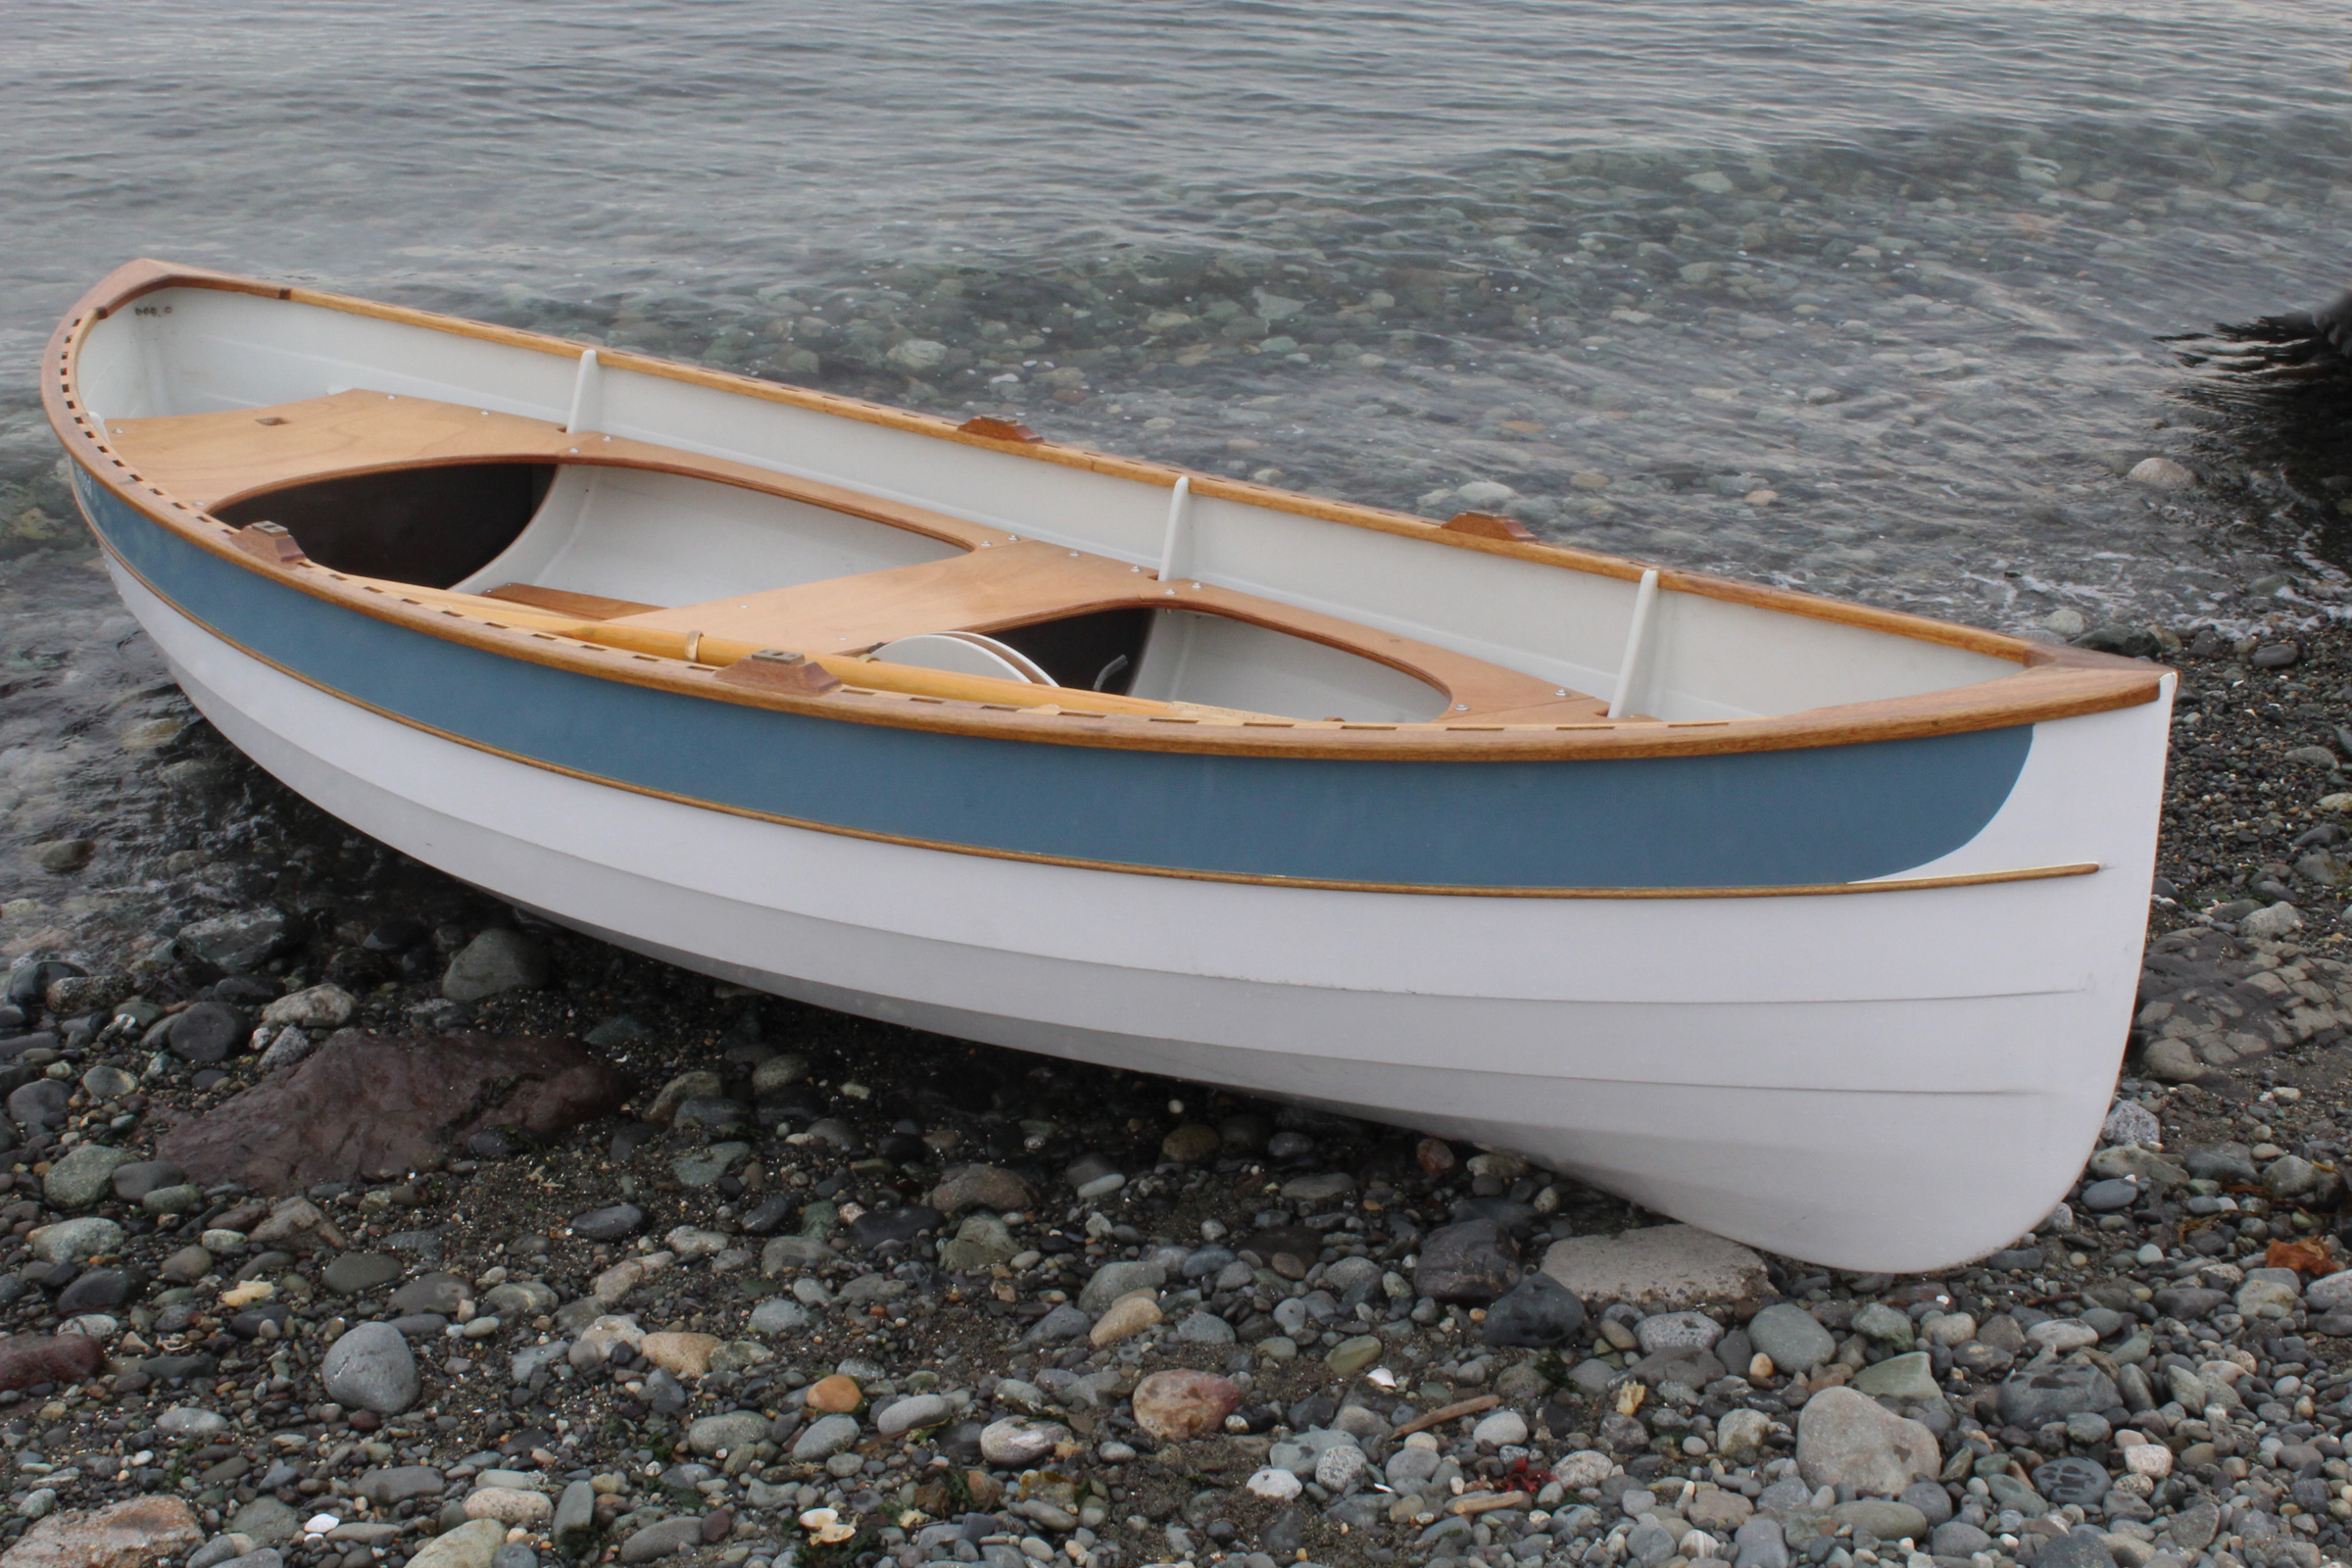 Christopher Cunningham
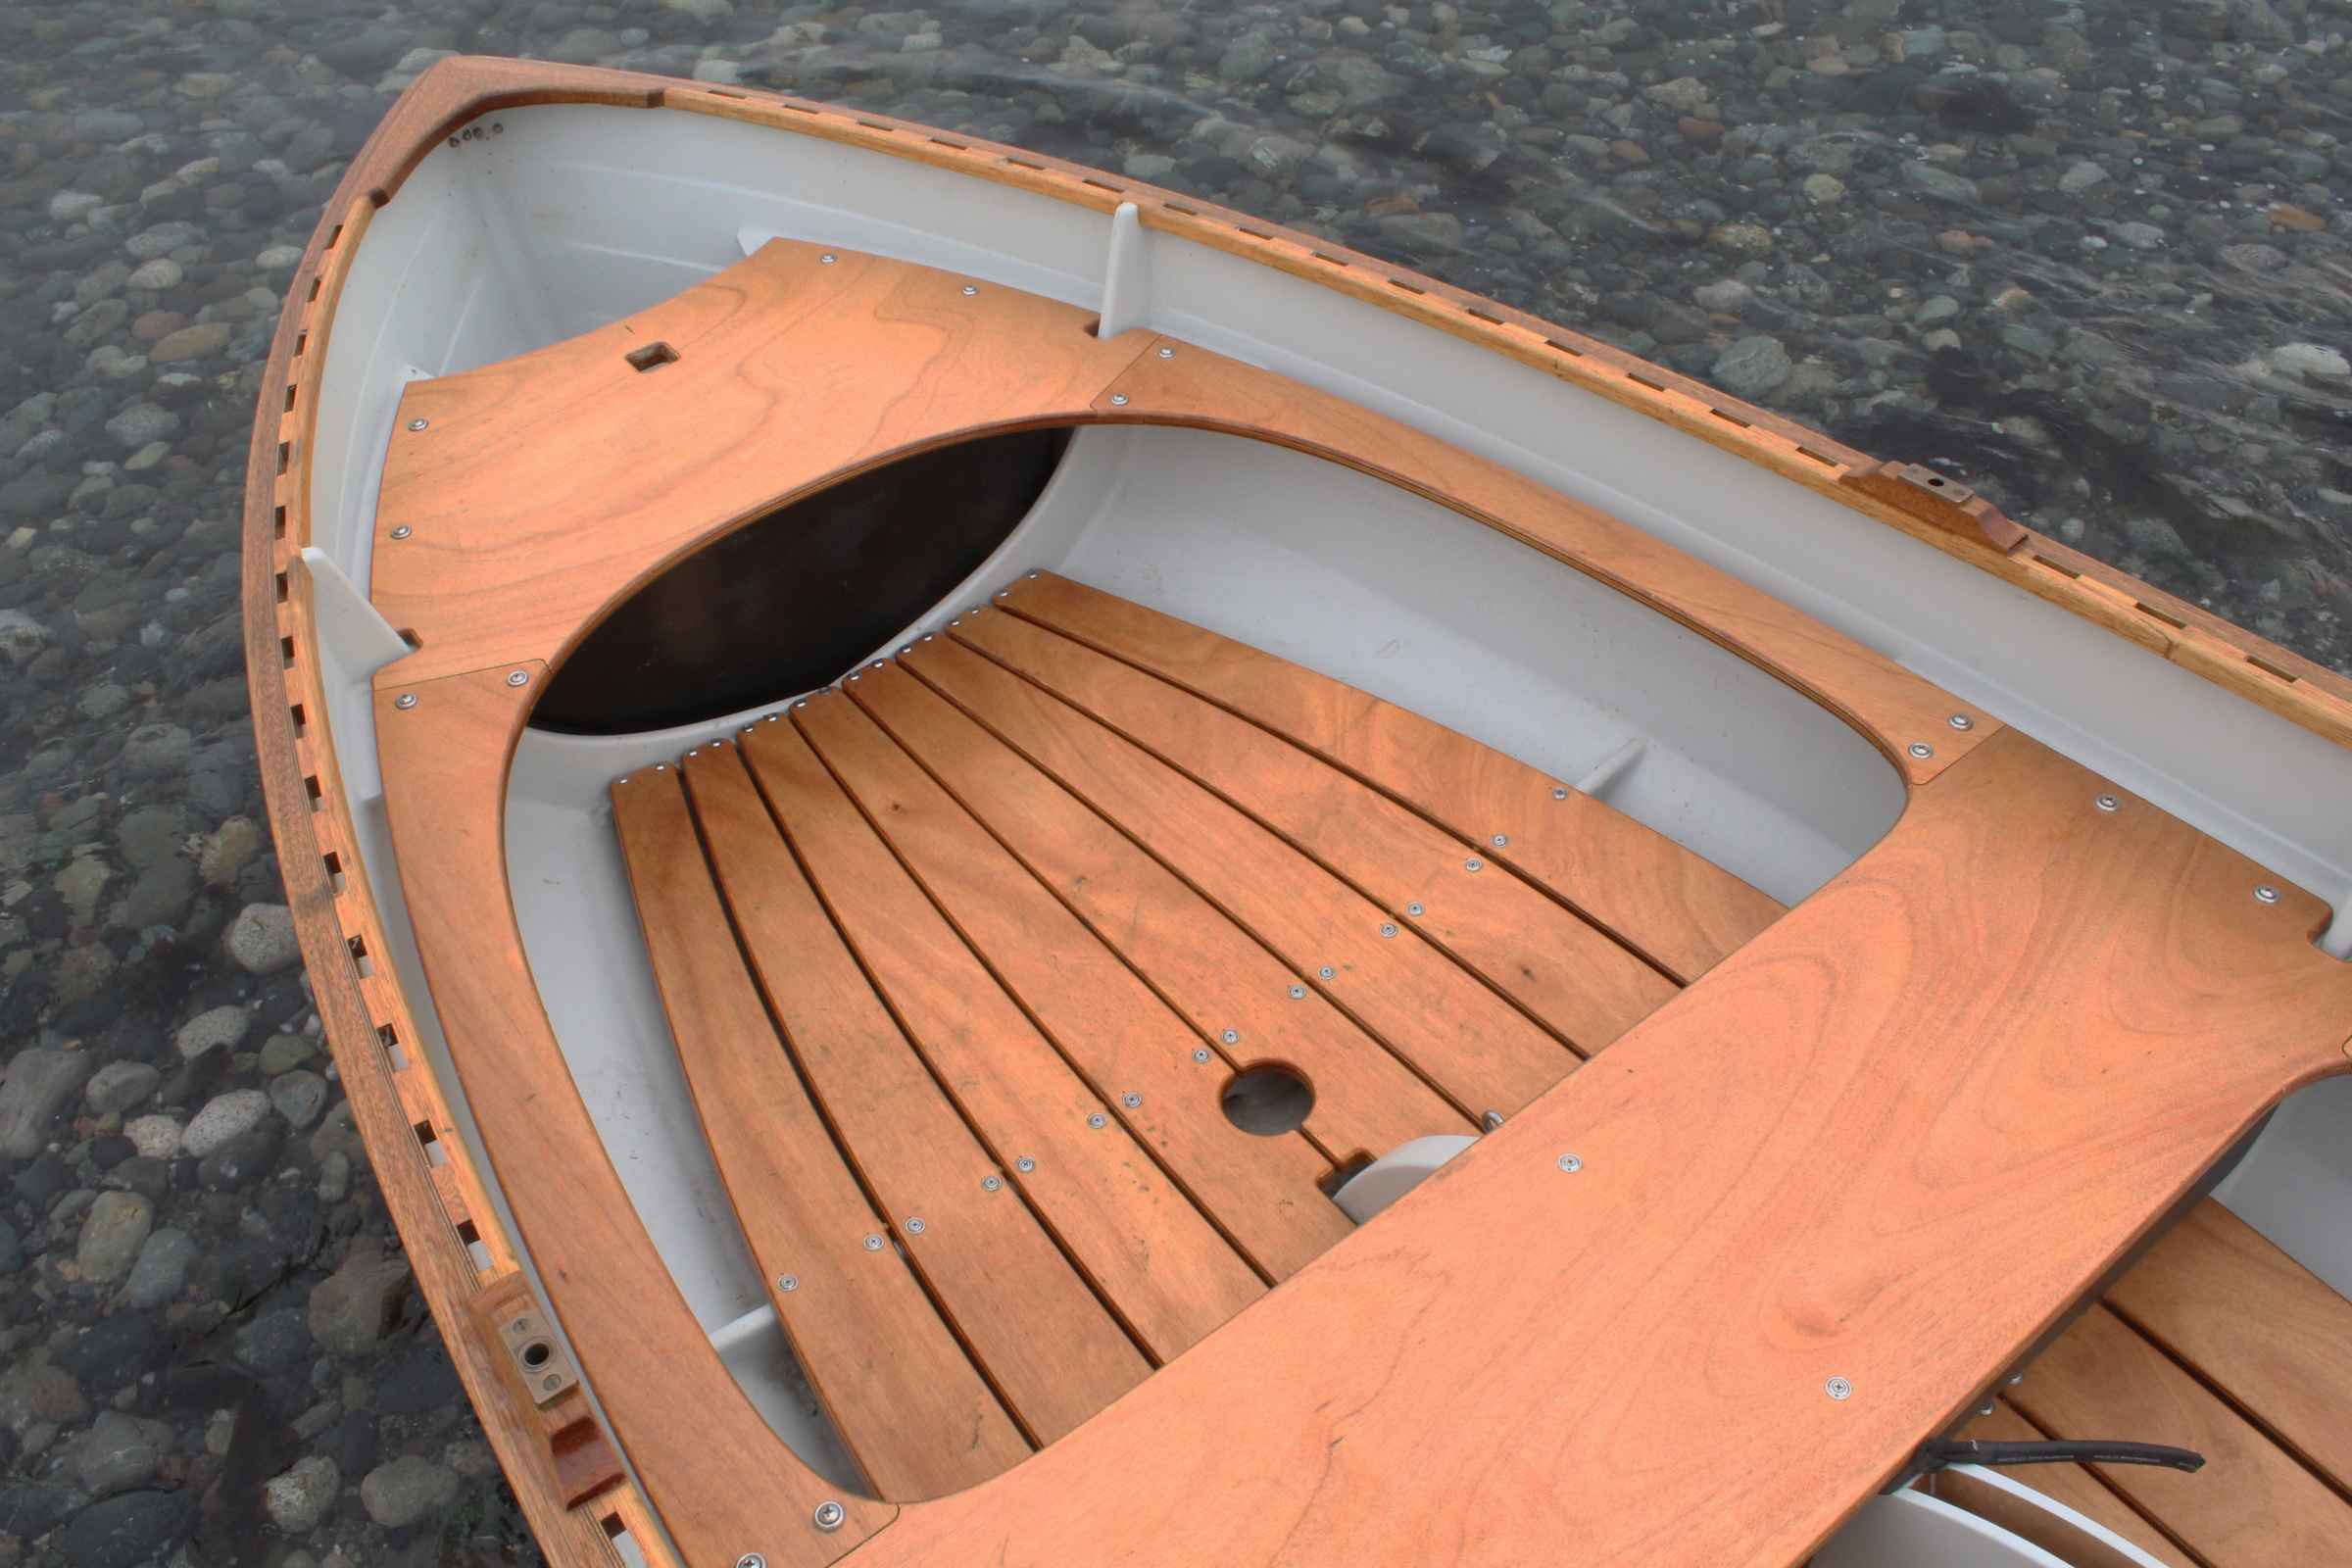 Christopher Cunningham
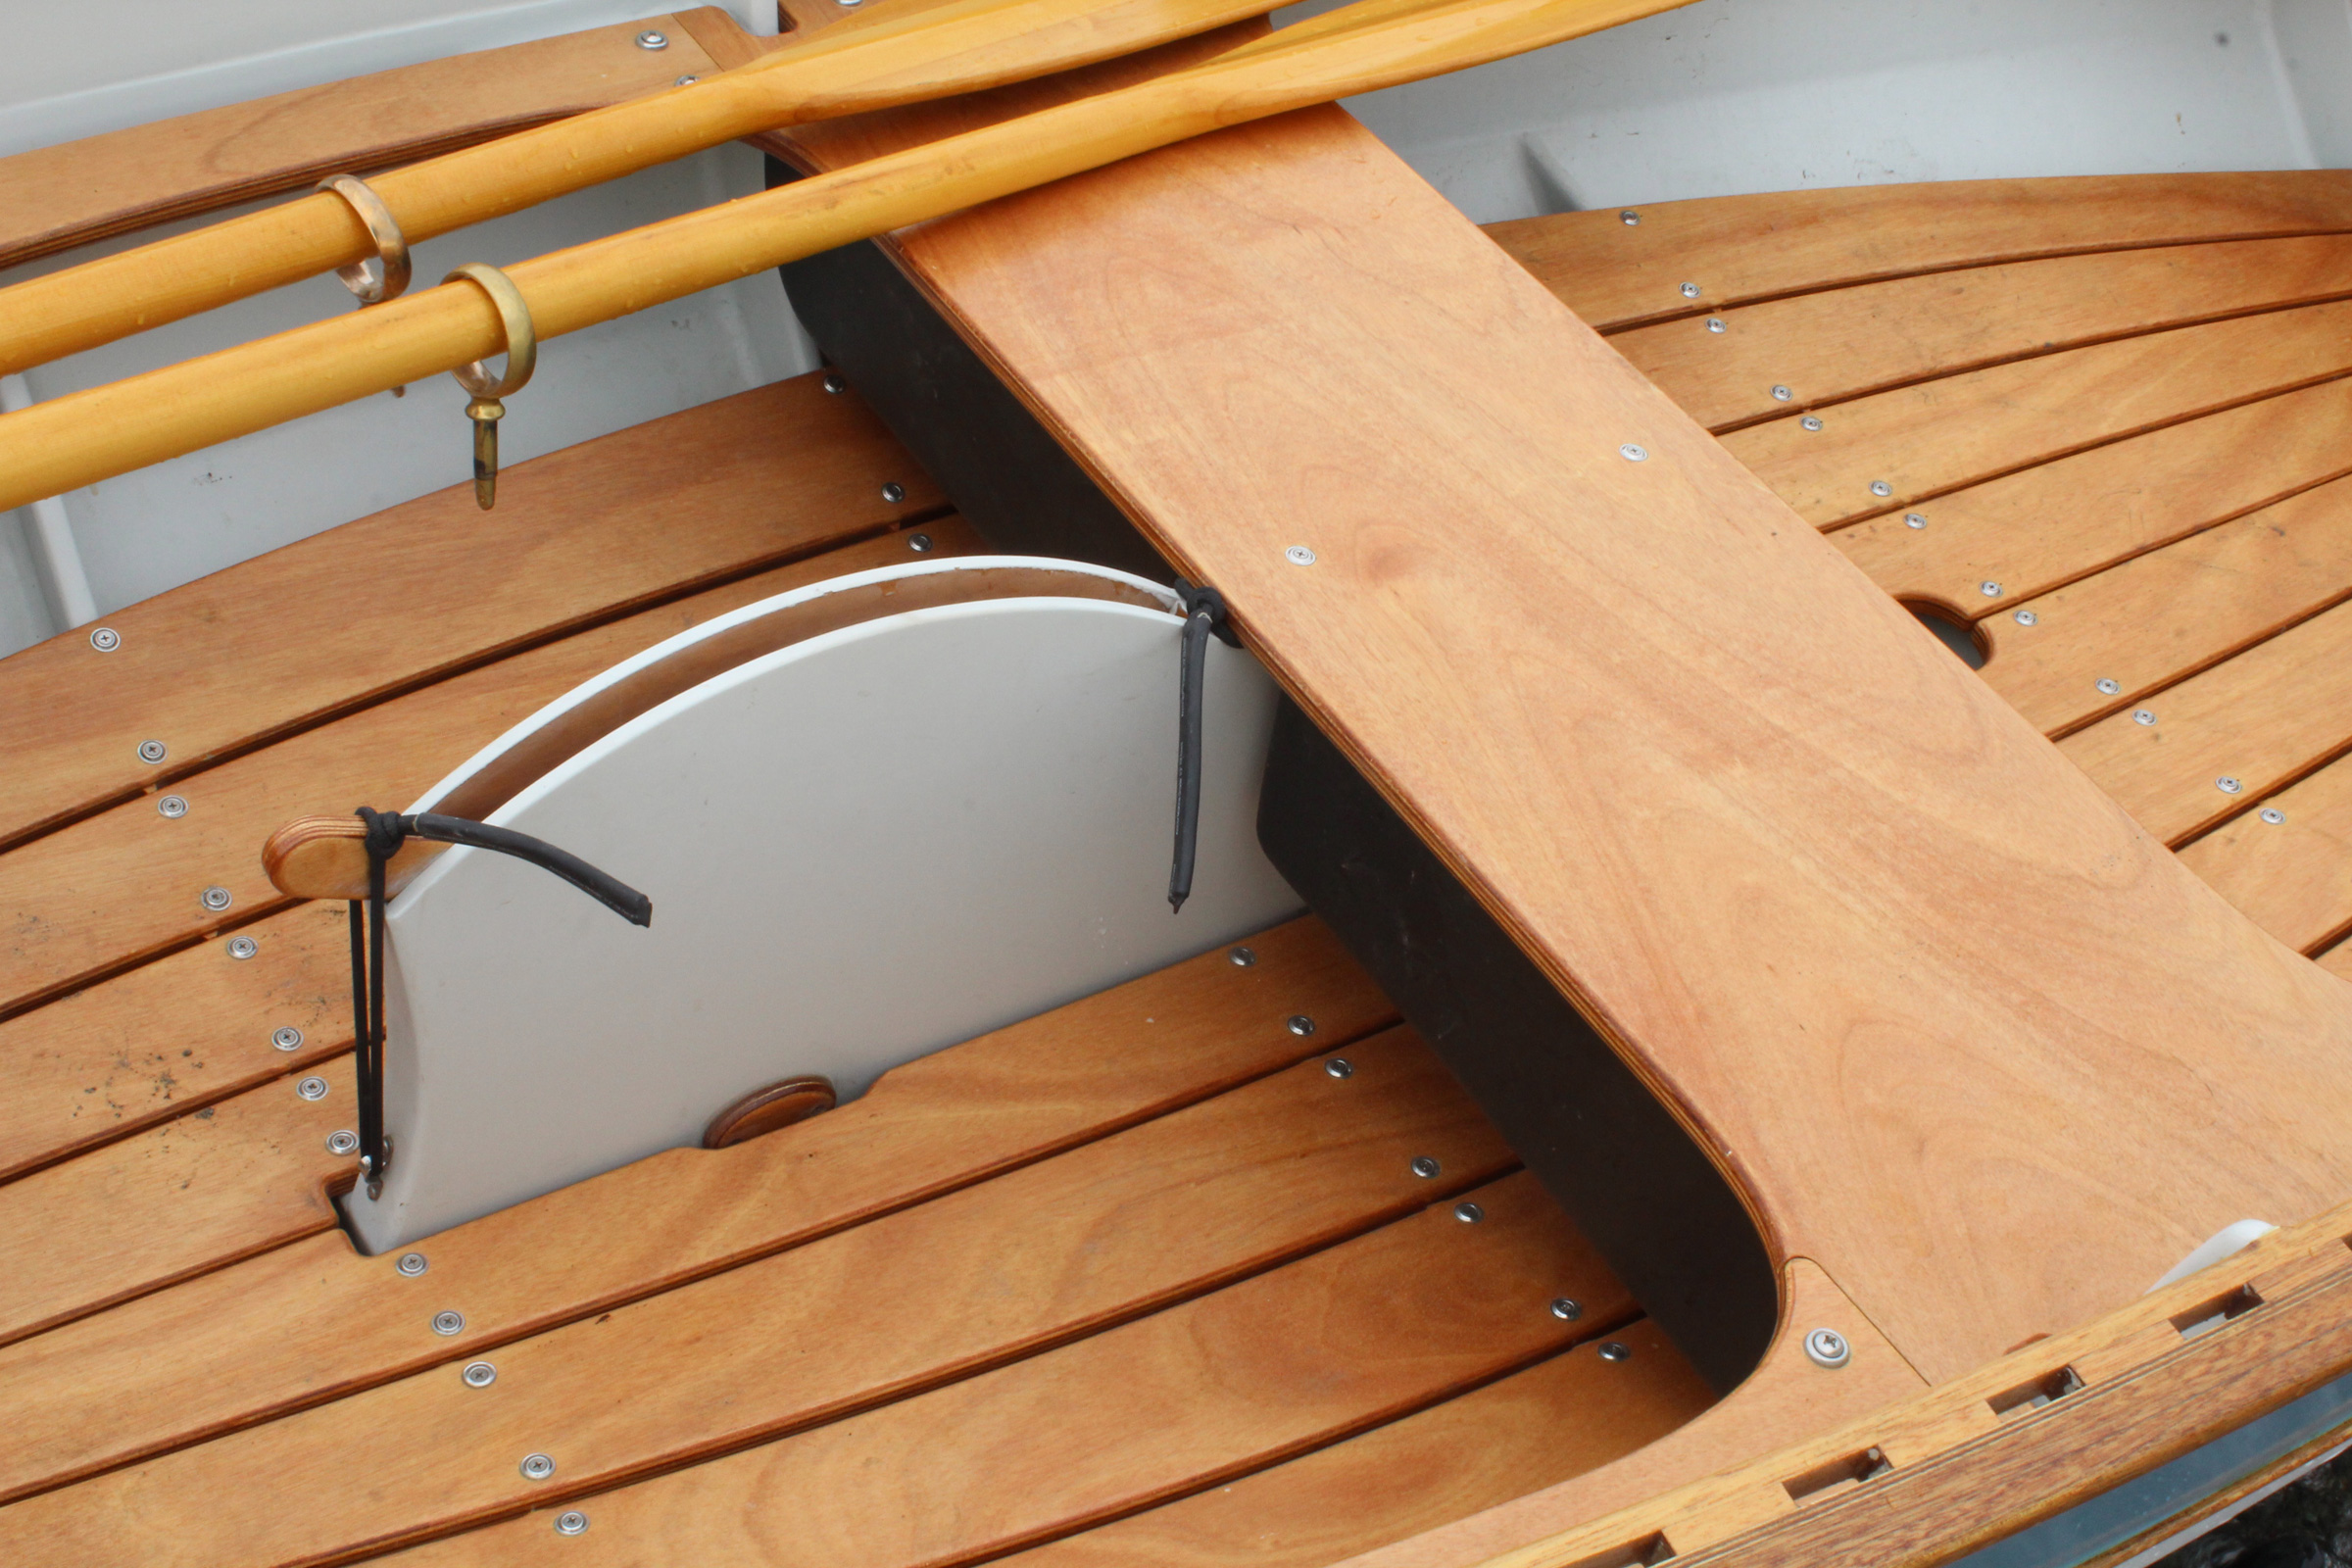 Christopher Cunningham
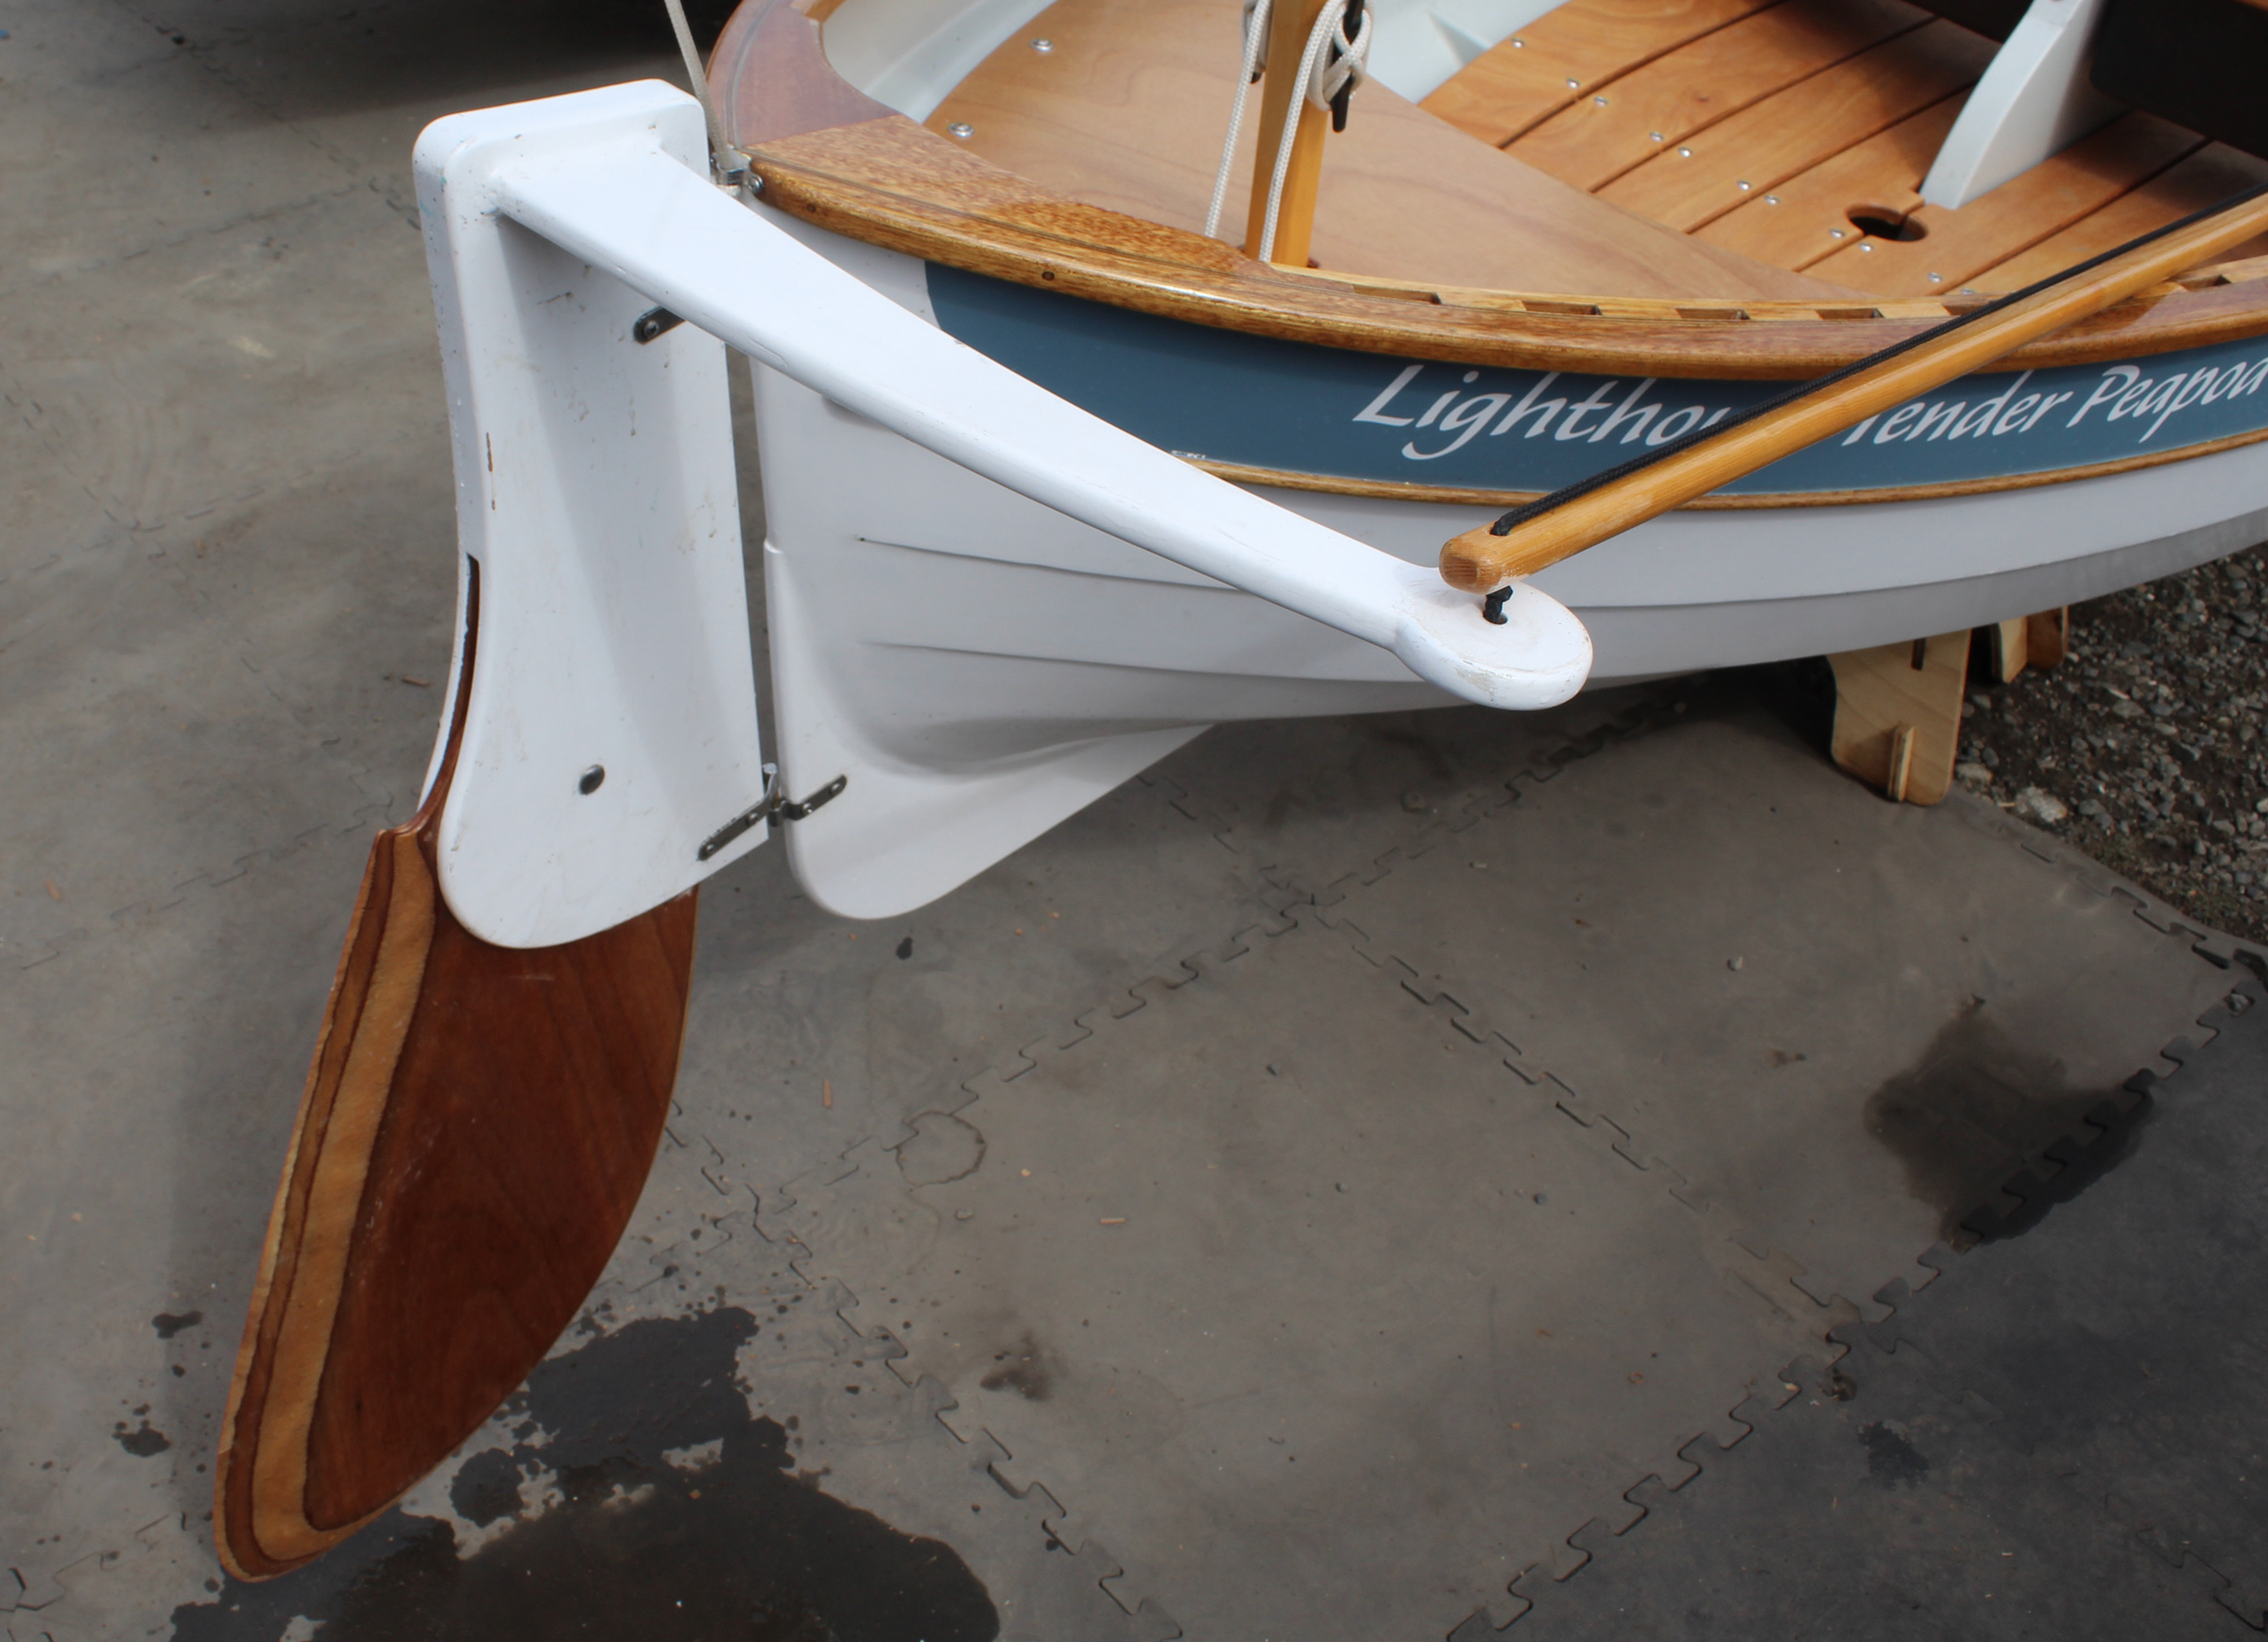 Christopher Cunningham
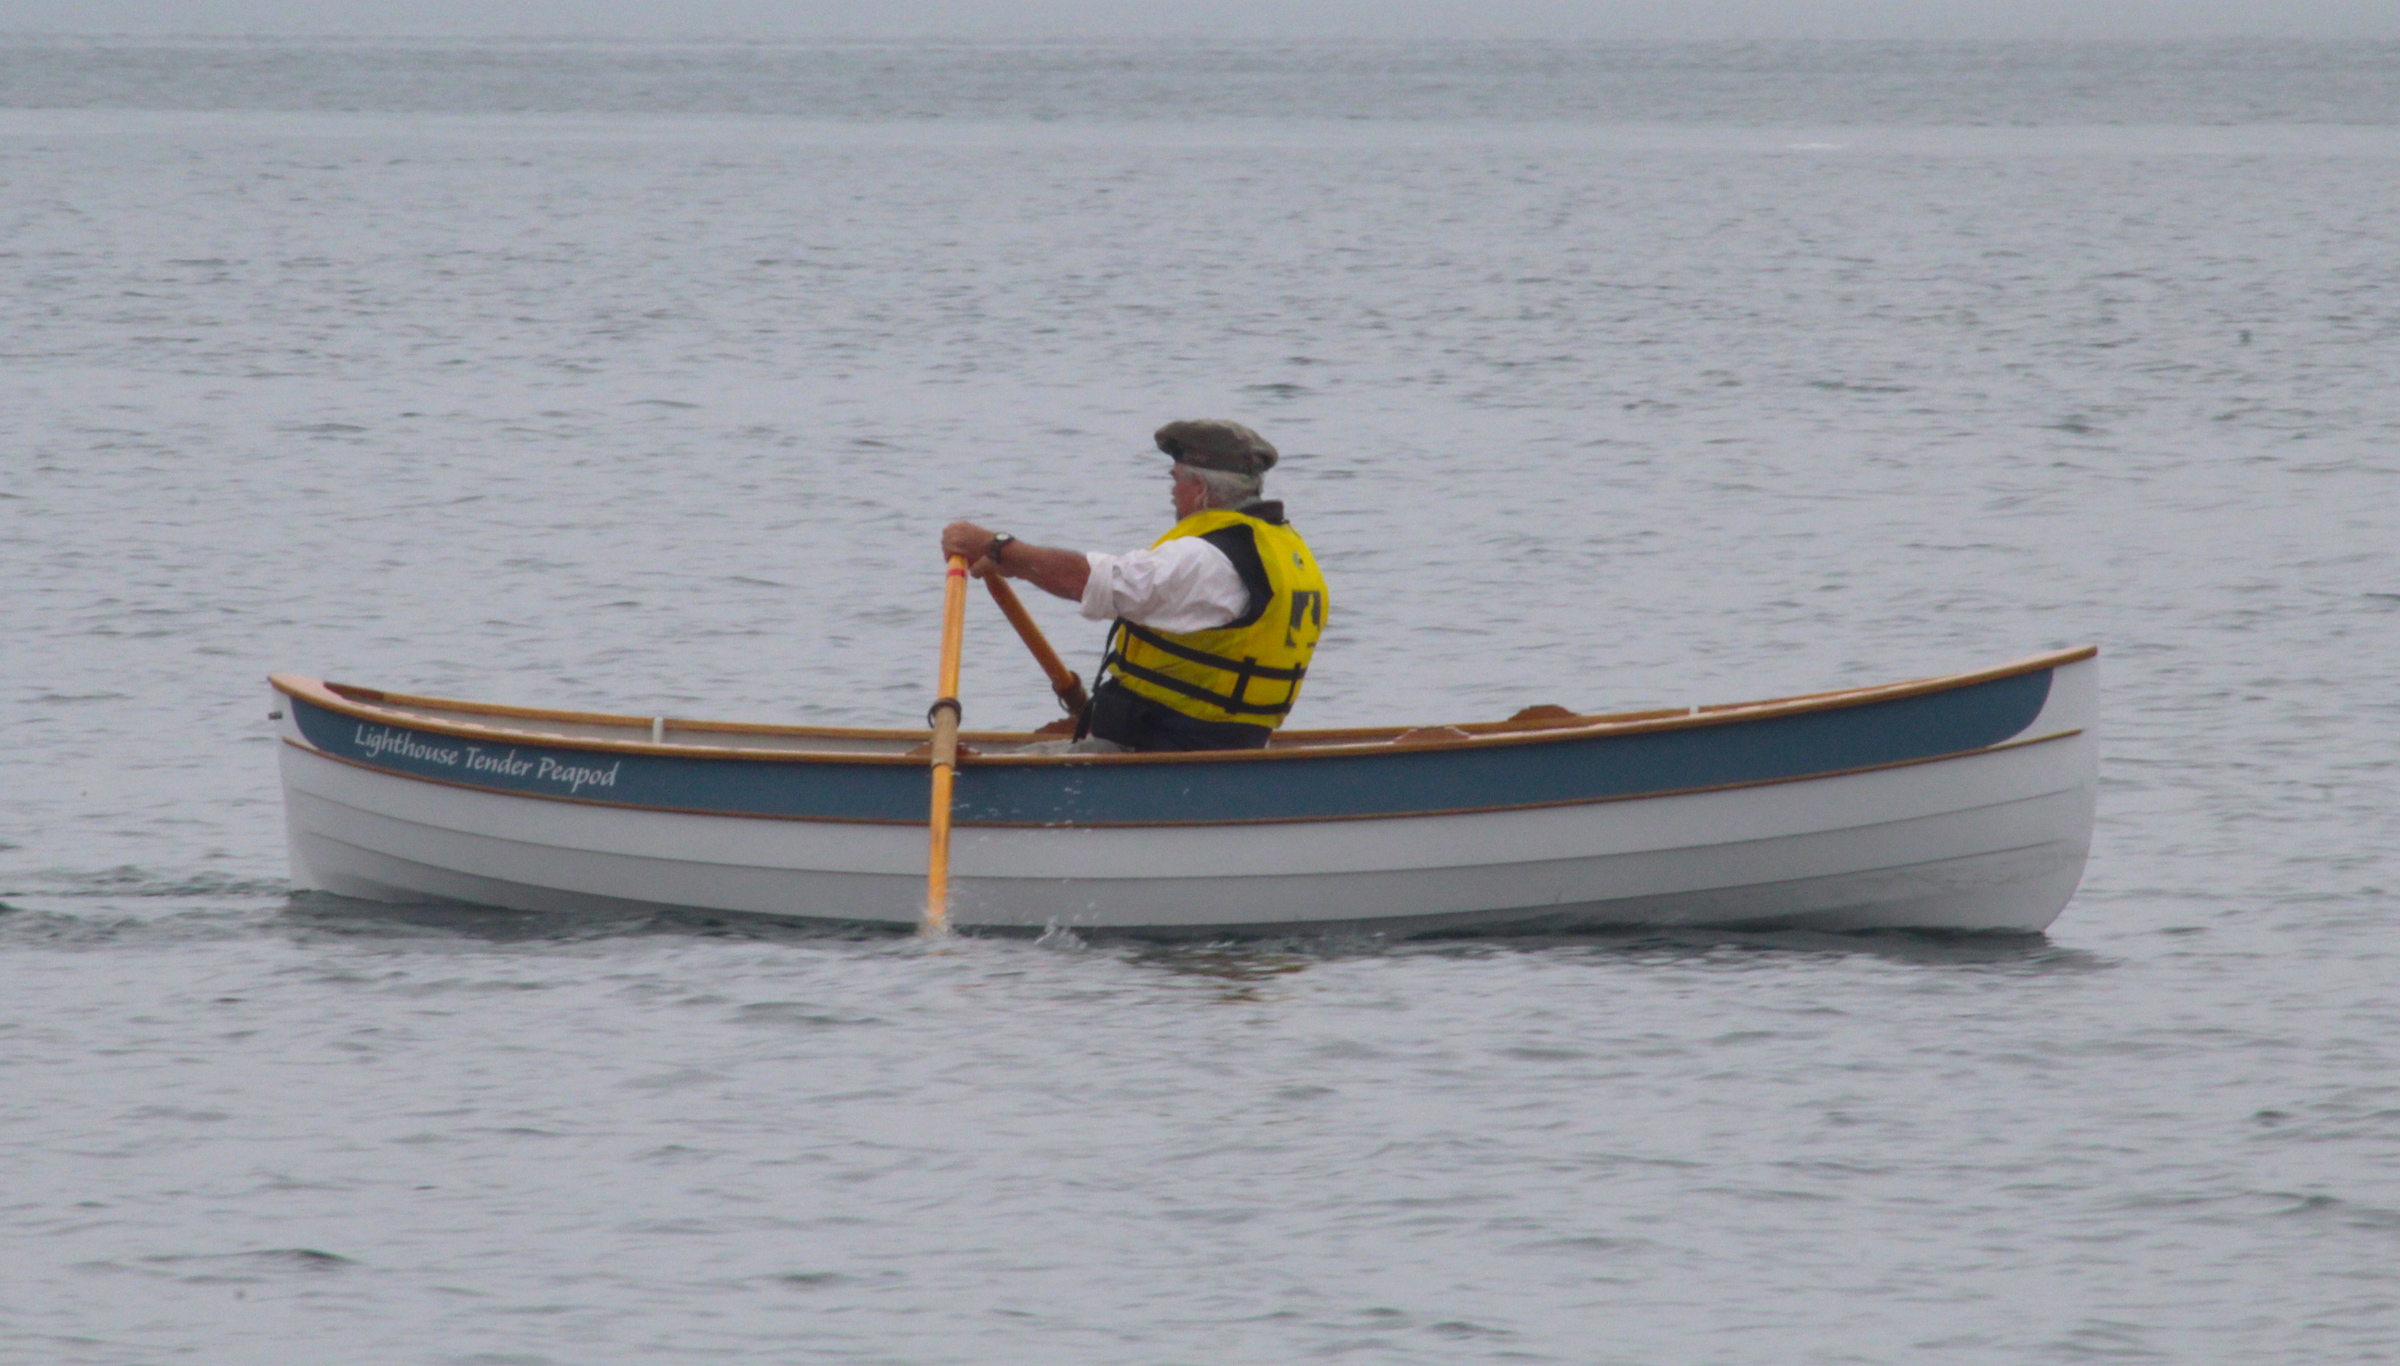 Christopher Cunningham
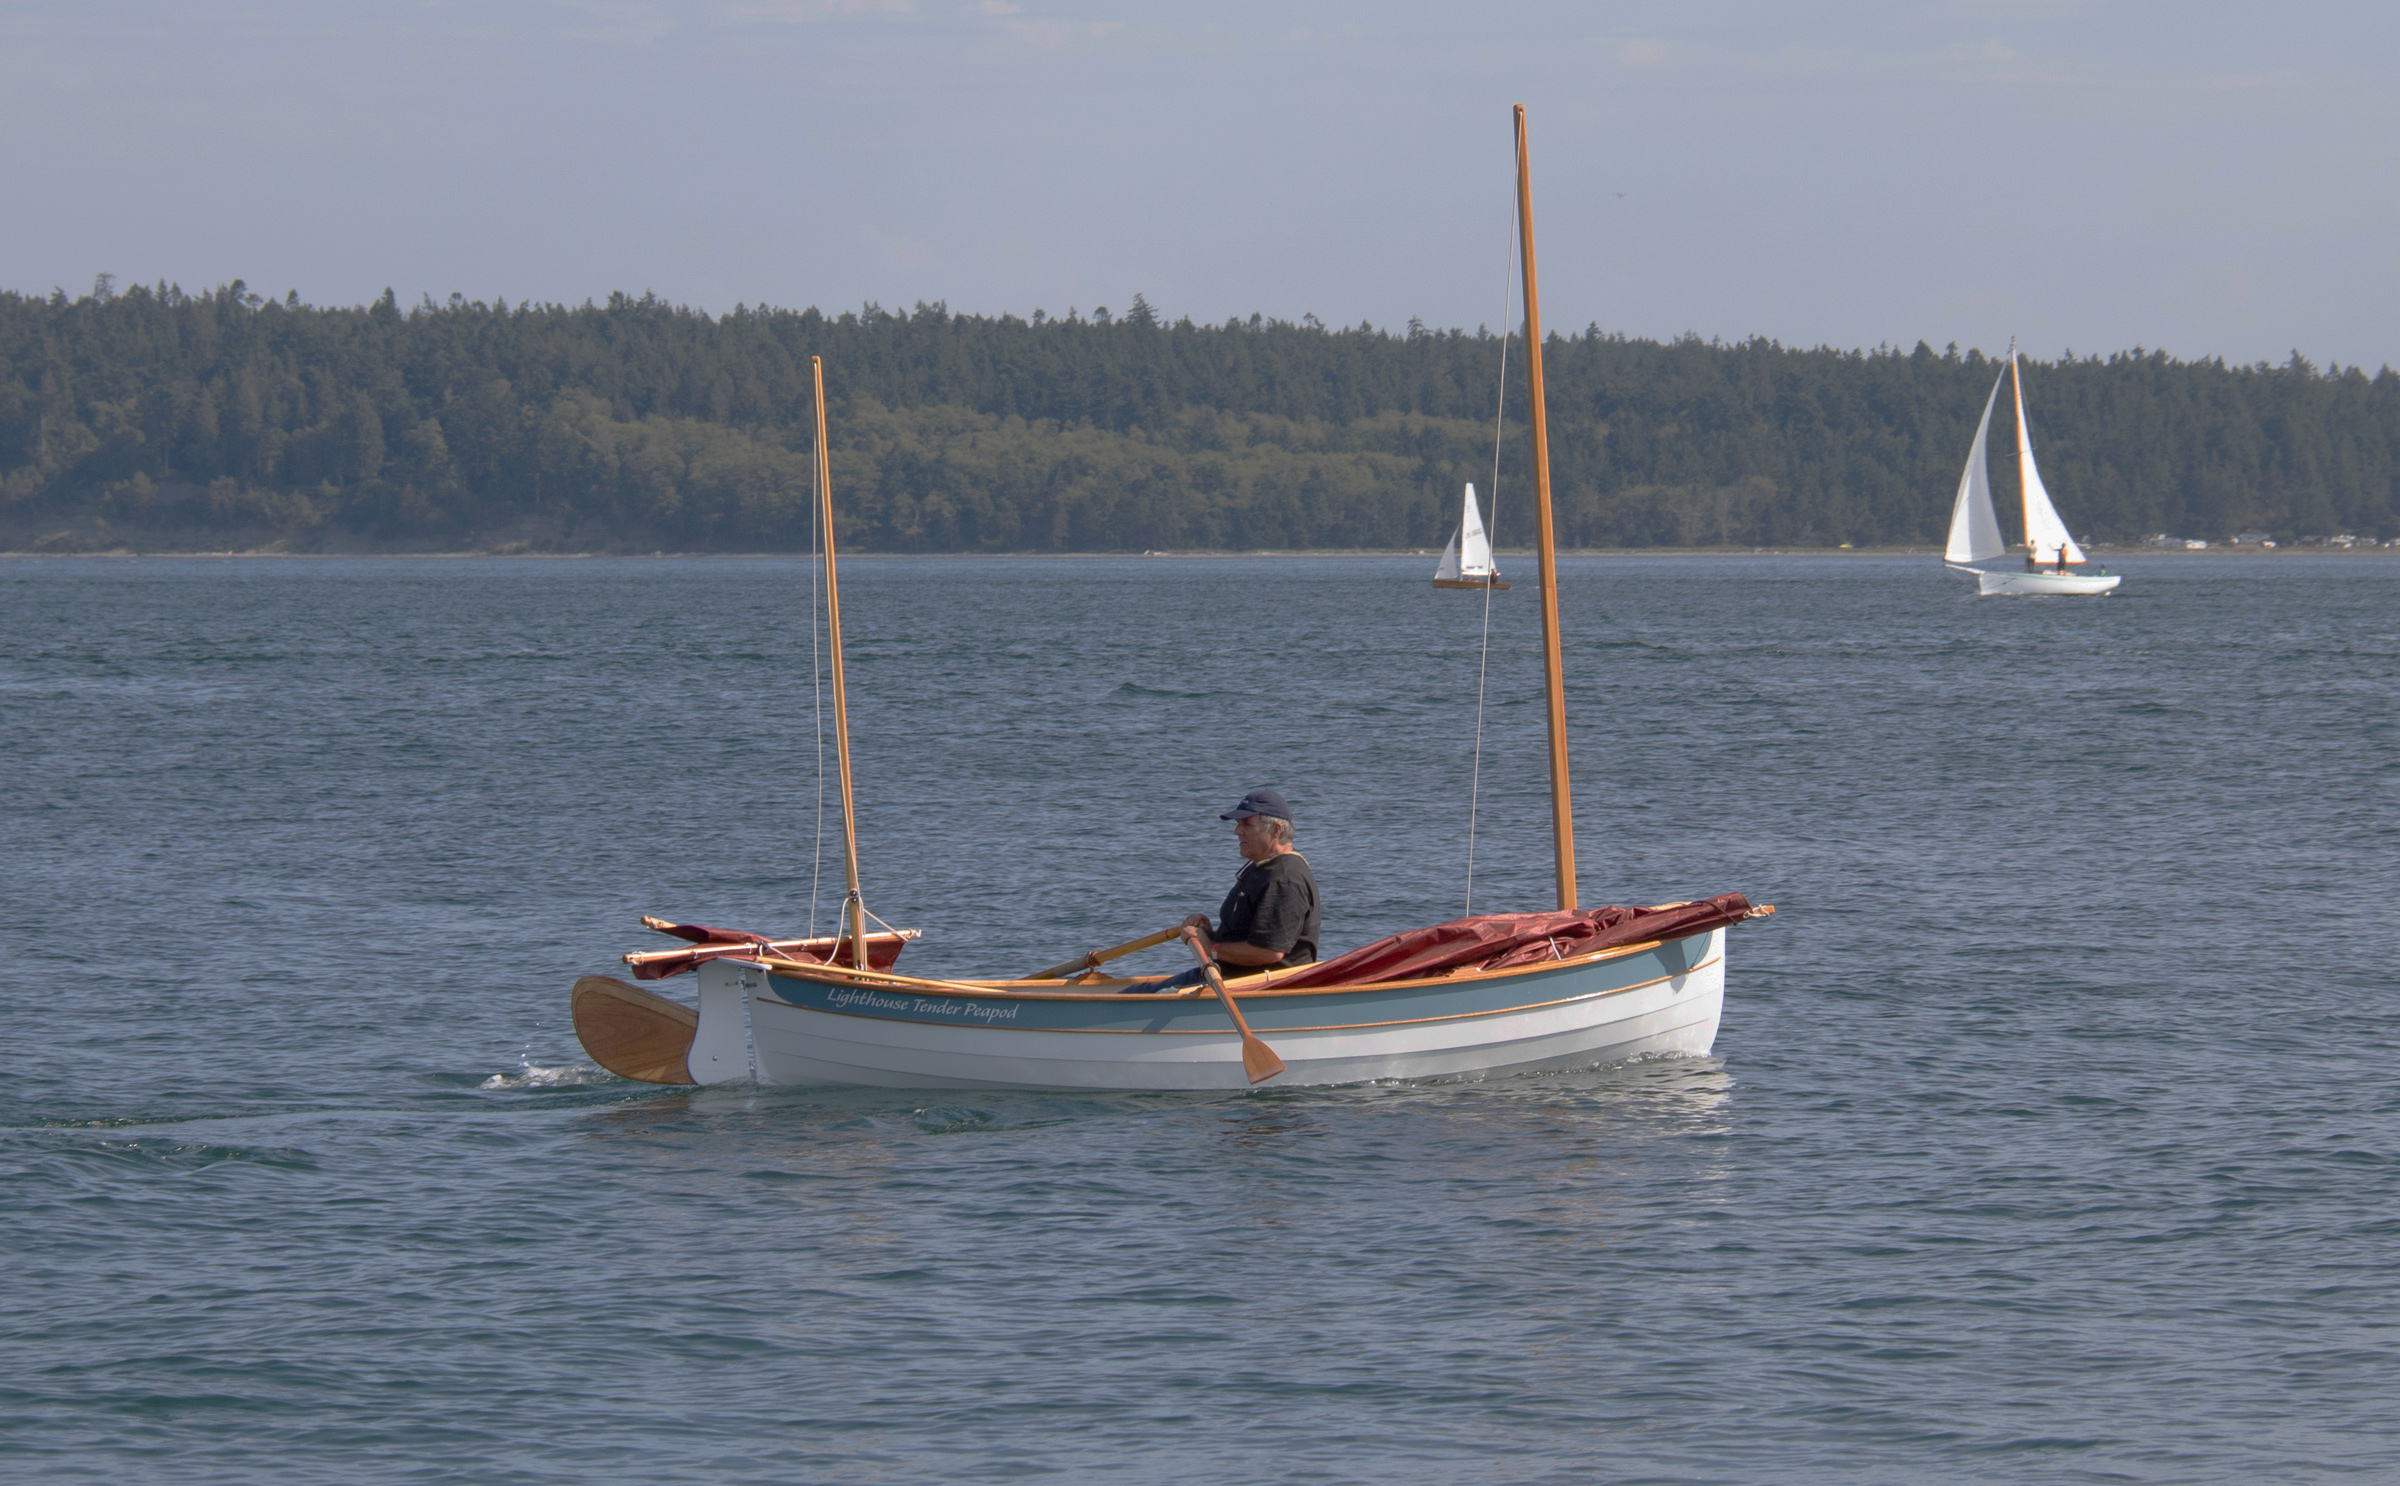 Chesapeake Light Craft
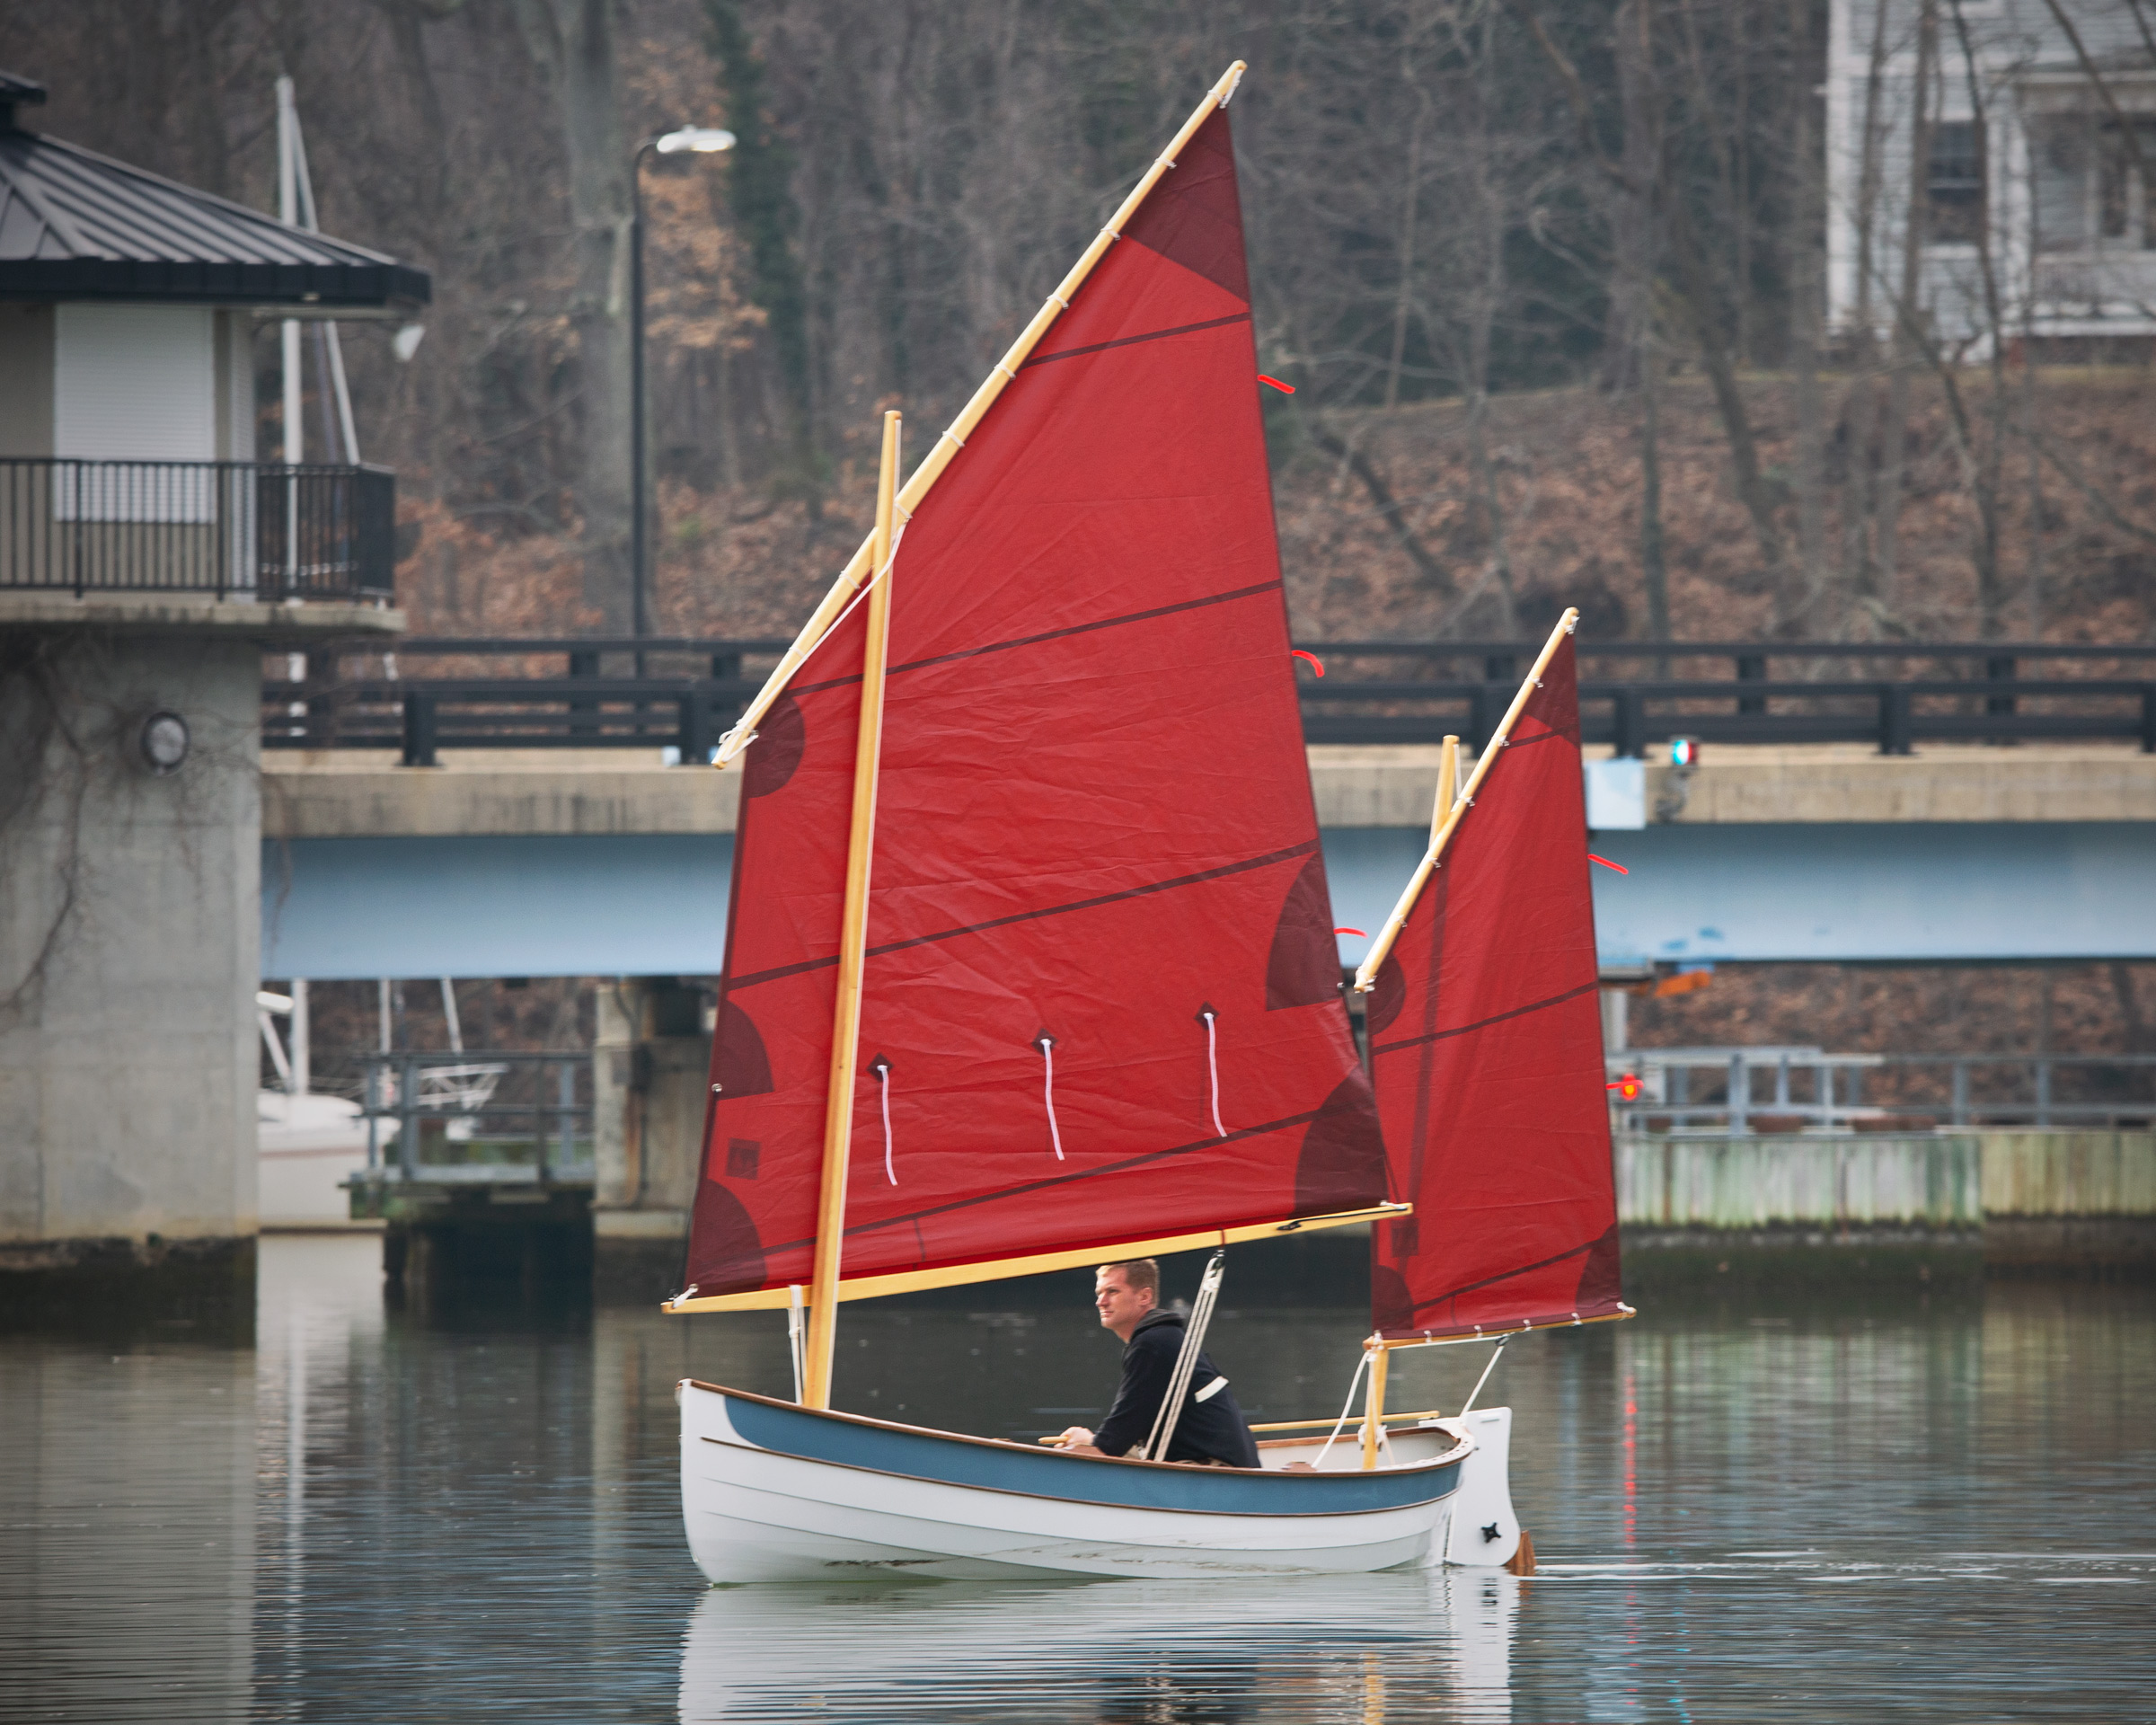 Chesapeake Light Craft
 Chesapeake Light Craft
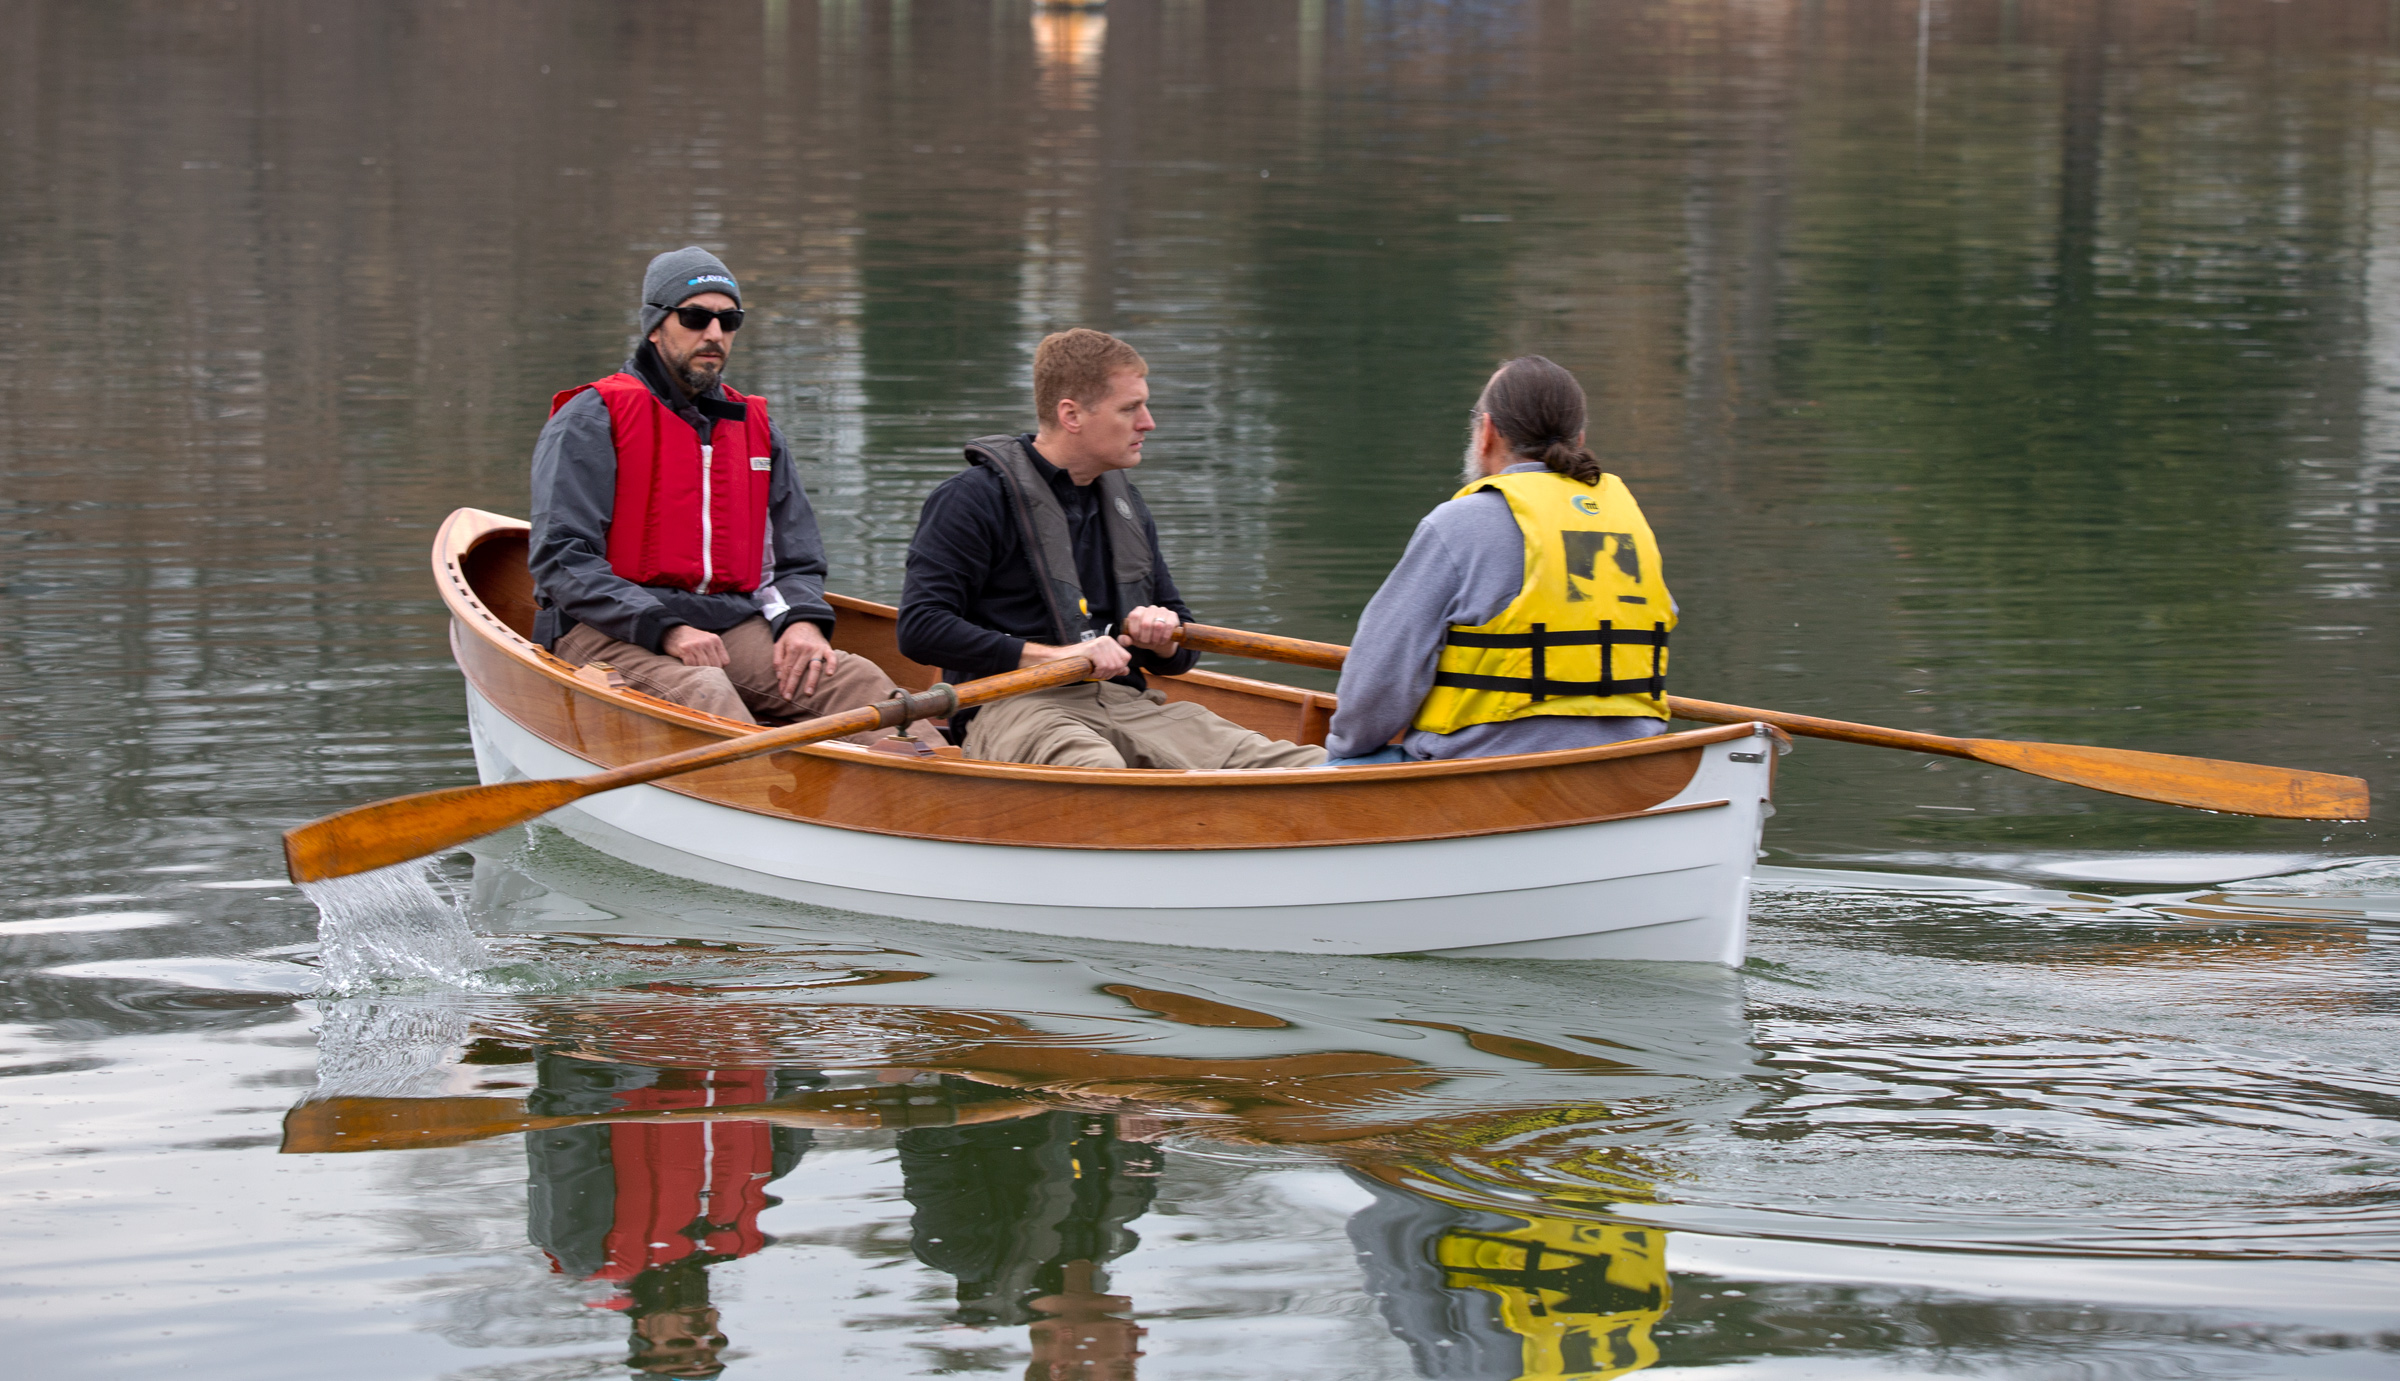 Chesapeake Light Craft