Audrey’s family always had a canoe either around the house, on top of the car, or splashing down into many lakes and ponds from Texas all the way up to Illinois. That canoe was acquired in the mid-1960s and it is still around 55 years later, often resting on the shoreline of her brother’s pond in Southeast Texas. That canoe is aluminum and a Grumman.
We set out a few years back to find another Grumman 17′ Double-Ender; we knew they were a good size for two to four people and some picnic snacks, and Grumman canoes have a well-deserved reputation for versatility and durability.
Photographs by the Lewis family
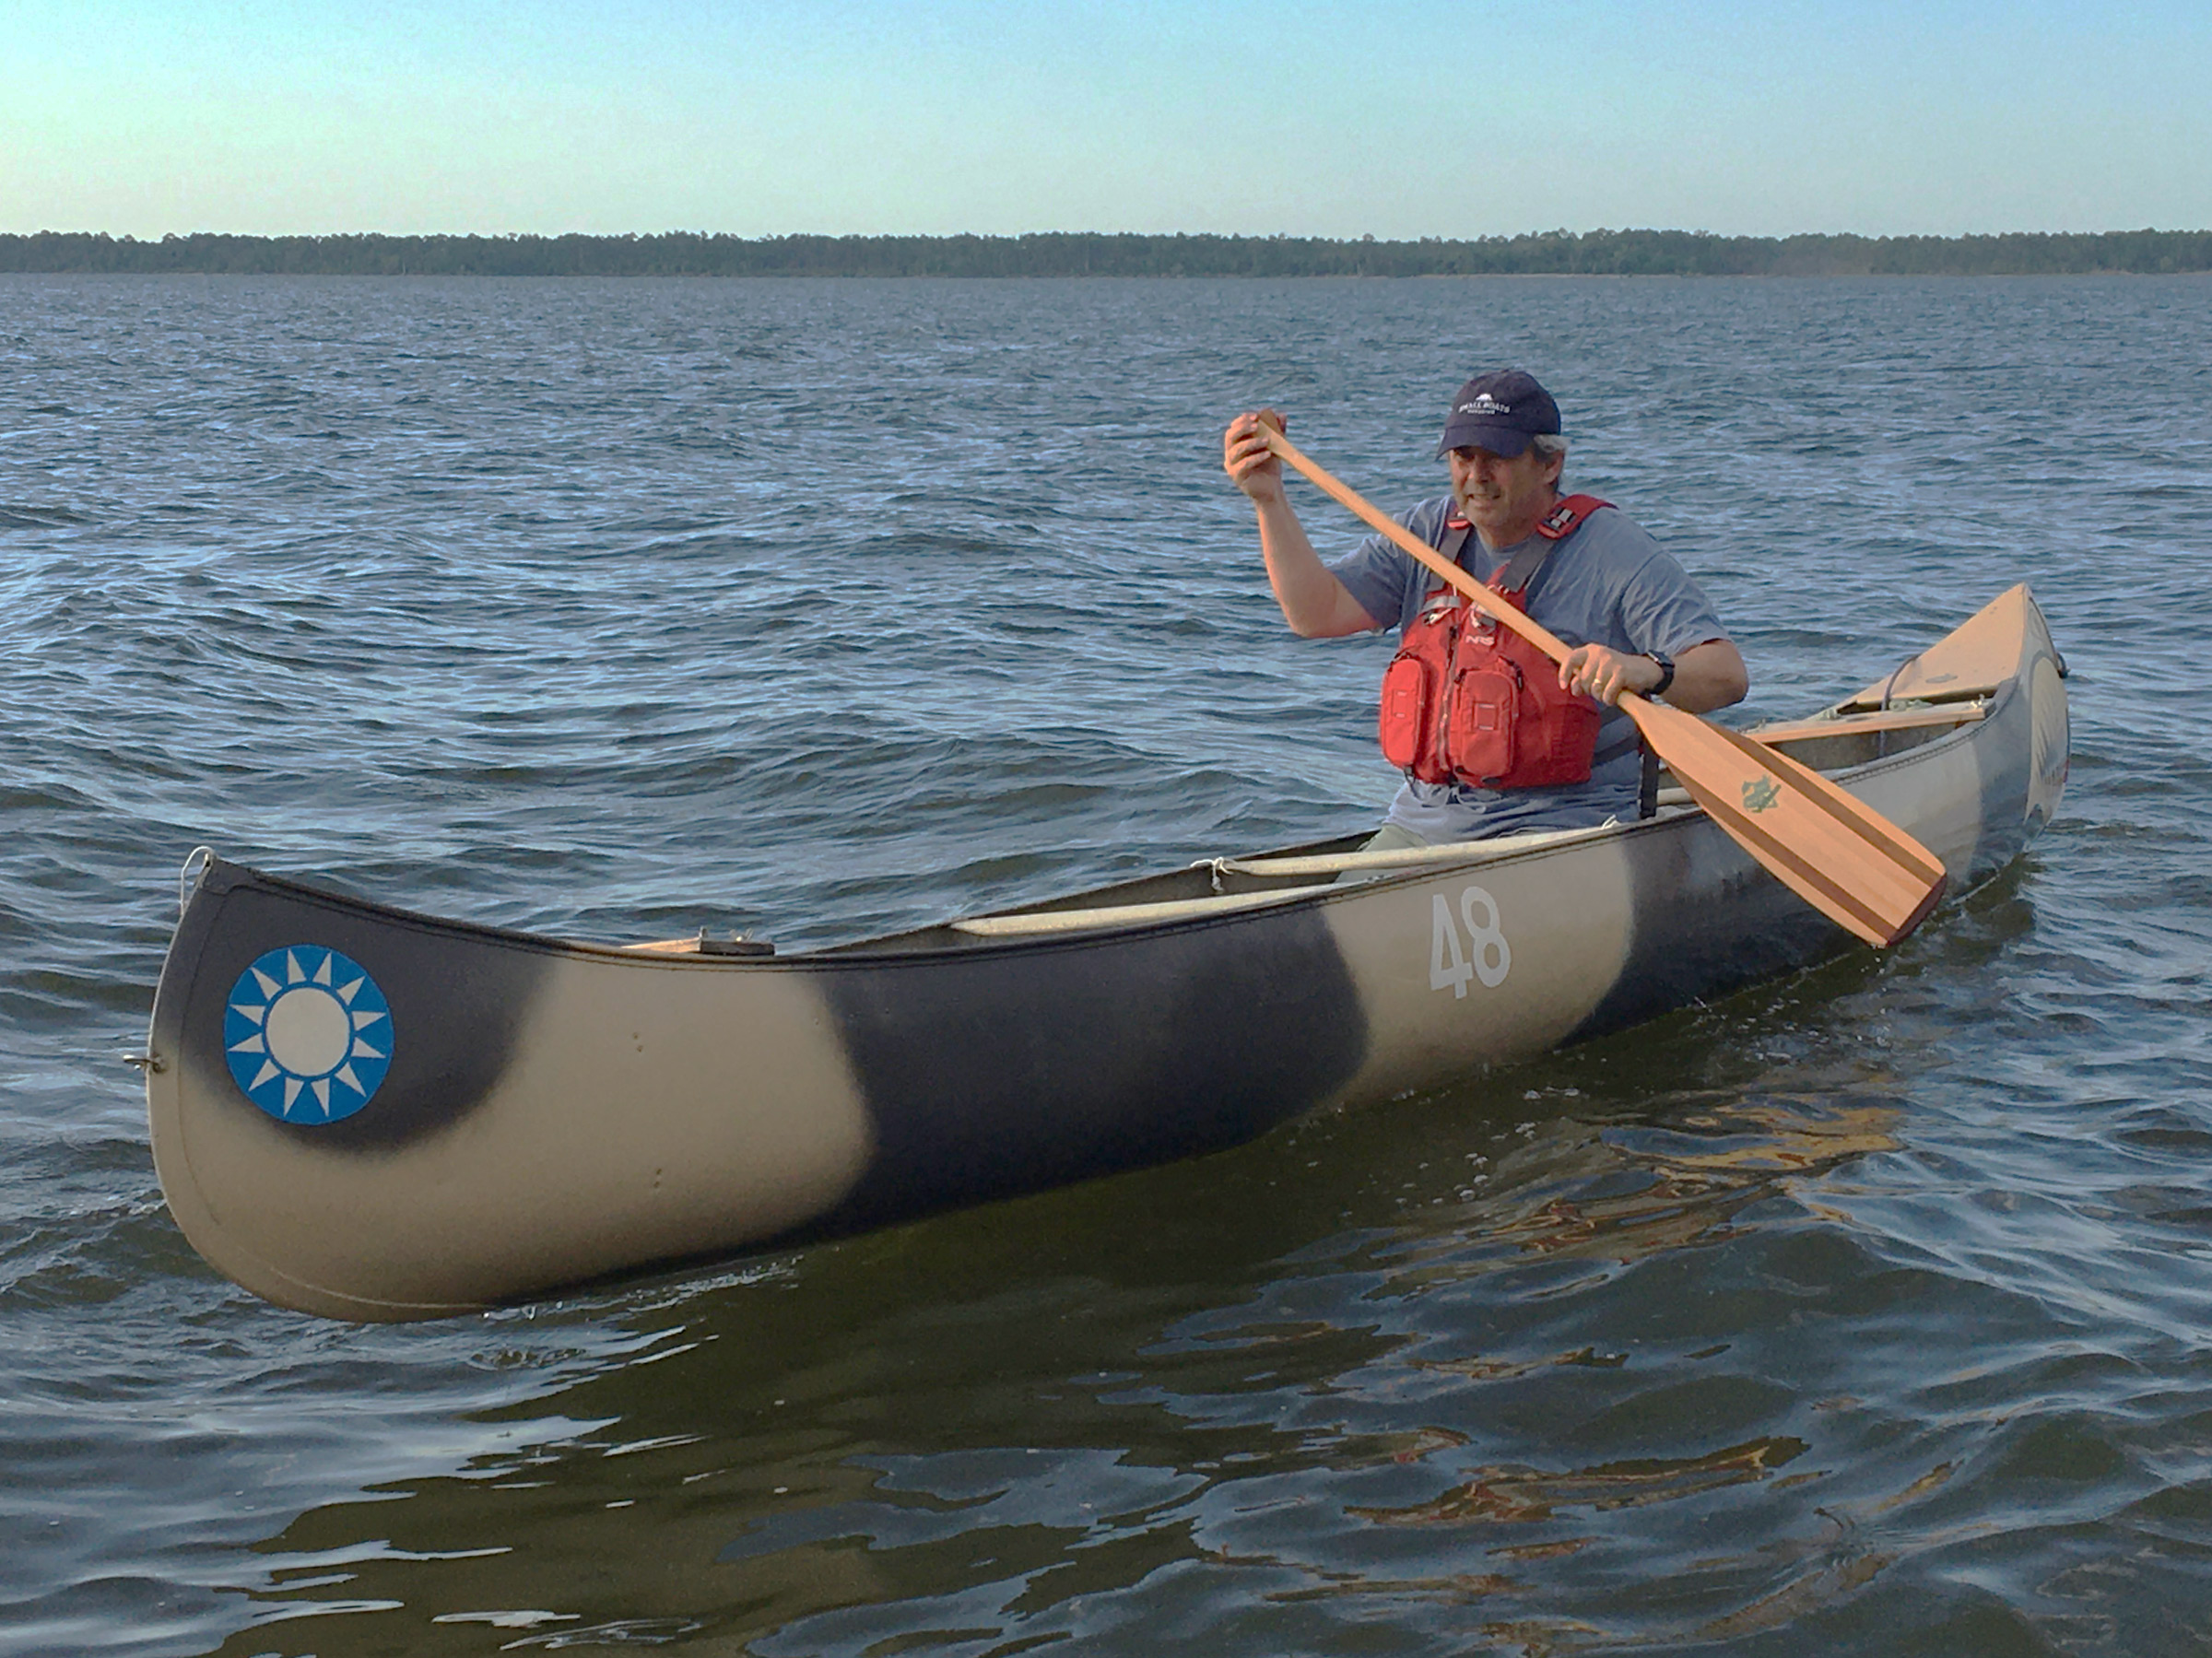
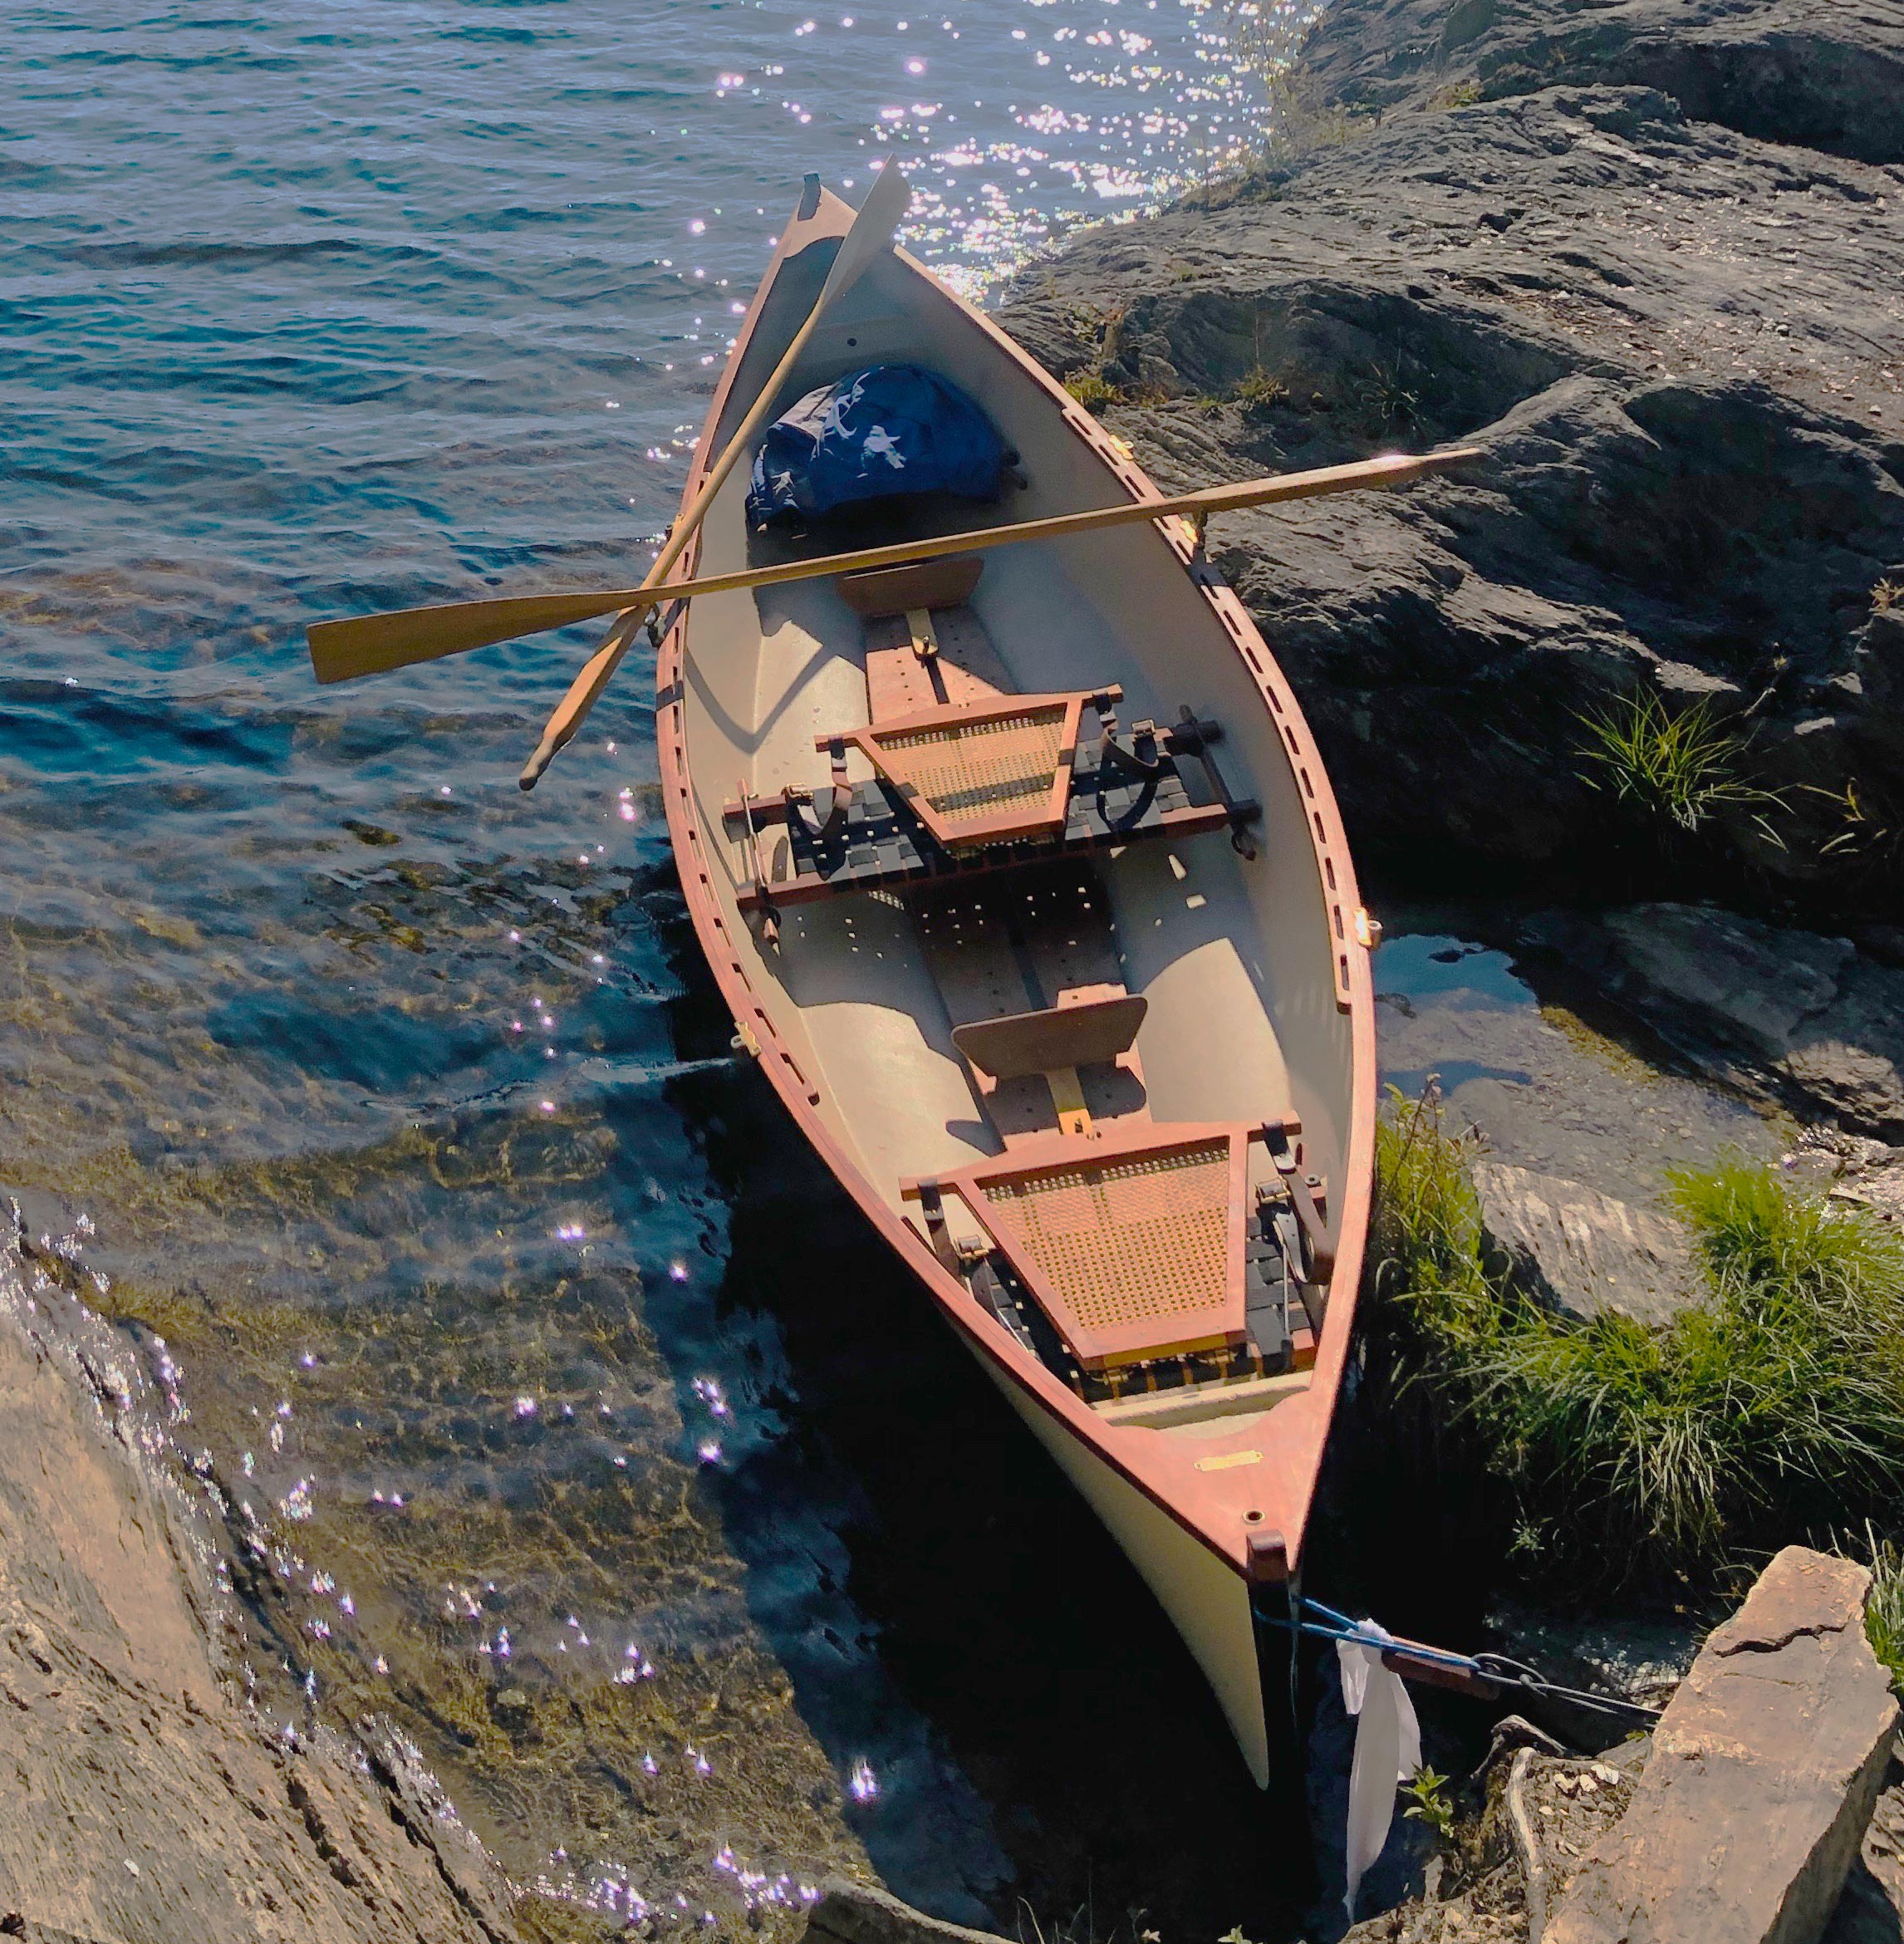
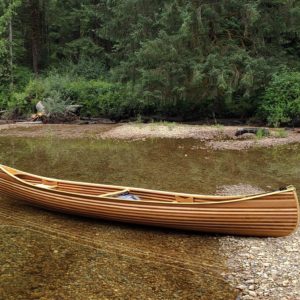
The authors’ 17′ Double Ender sports a new paint job, on the outside and aside from the facelift, is as good as new more than 60 years after leaving the factory.
Grumman Aircraft Engineering Corporation was founded in 1929 and manufactured Navy fighter planes during World War II. One of the company vice presidents, William Hoffman, after portaging a heavy wood-and-canvas canoe on a fishing trip, had the idea to make an aluminum canoe that would be 25 to 50 percent lighter. After the war, Grumman branched out into canoes and johnboats, with their first canoes coming out of the aircraft plant in Bethpage, New York. The first canoe produced in 1945 was a 13-footer, and five more models followed by the end of the war. The canoes are made of the same high-strength and quality materials that their famous Navy fighter aircraft and seaplanes were made from, with the same exceptional levels of workmanship. Grumman opened a second plant in Marathon, New York, in the 1950s, dedicated solely to construction of recreational watercraft, and it is still producing boats today.
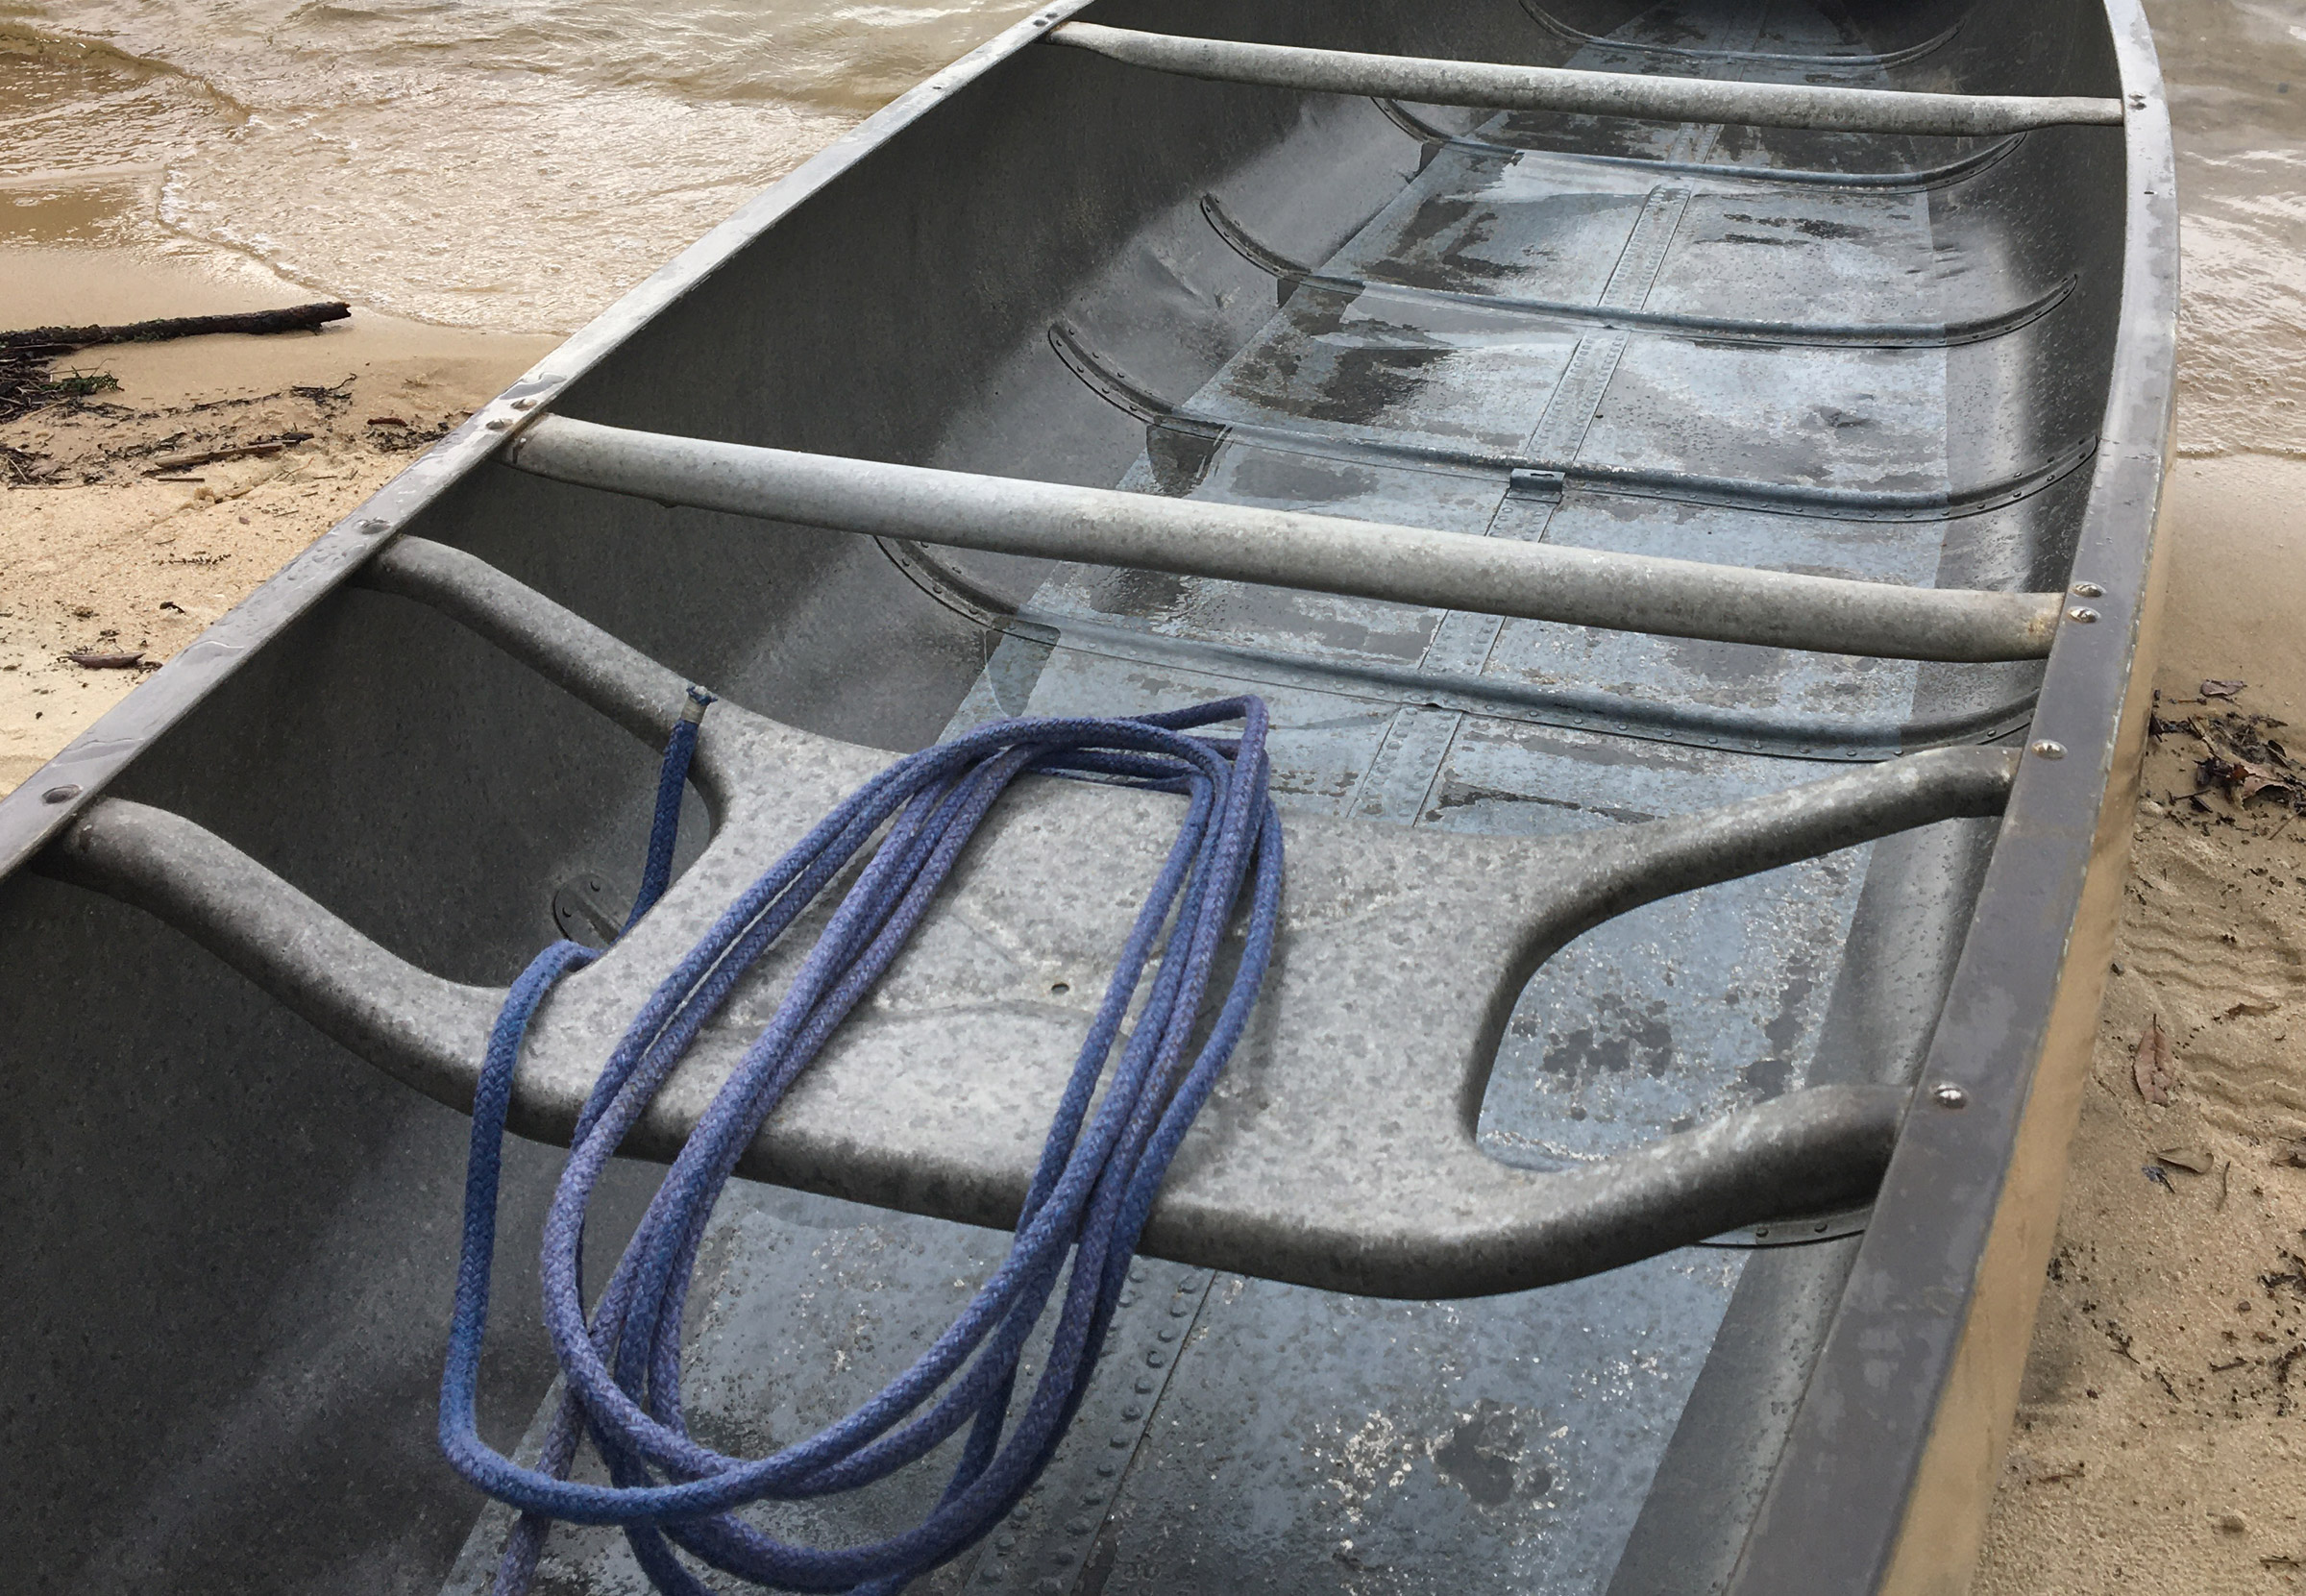
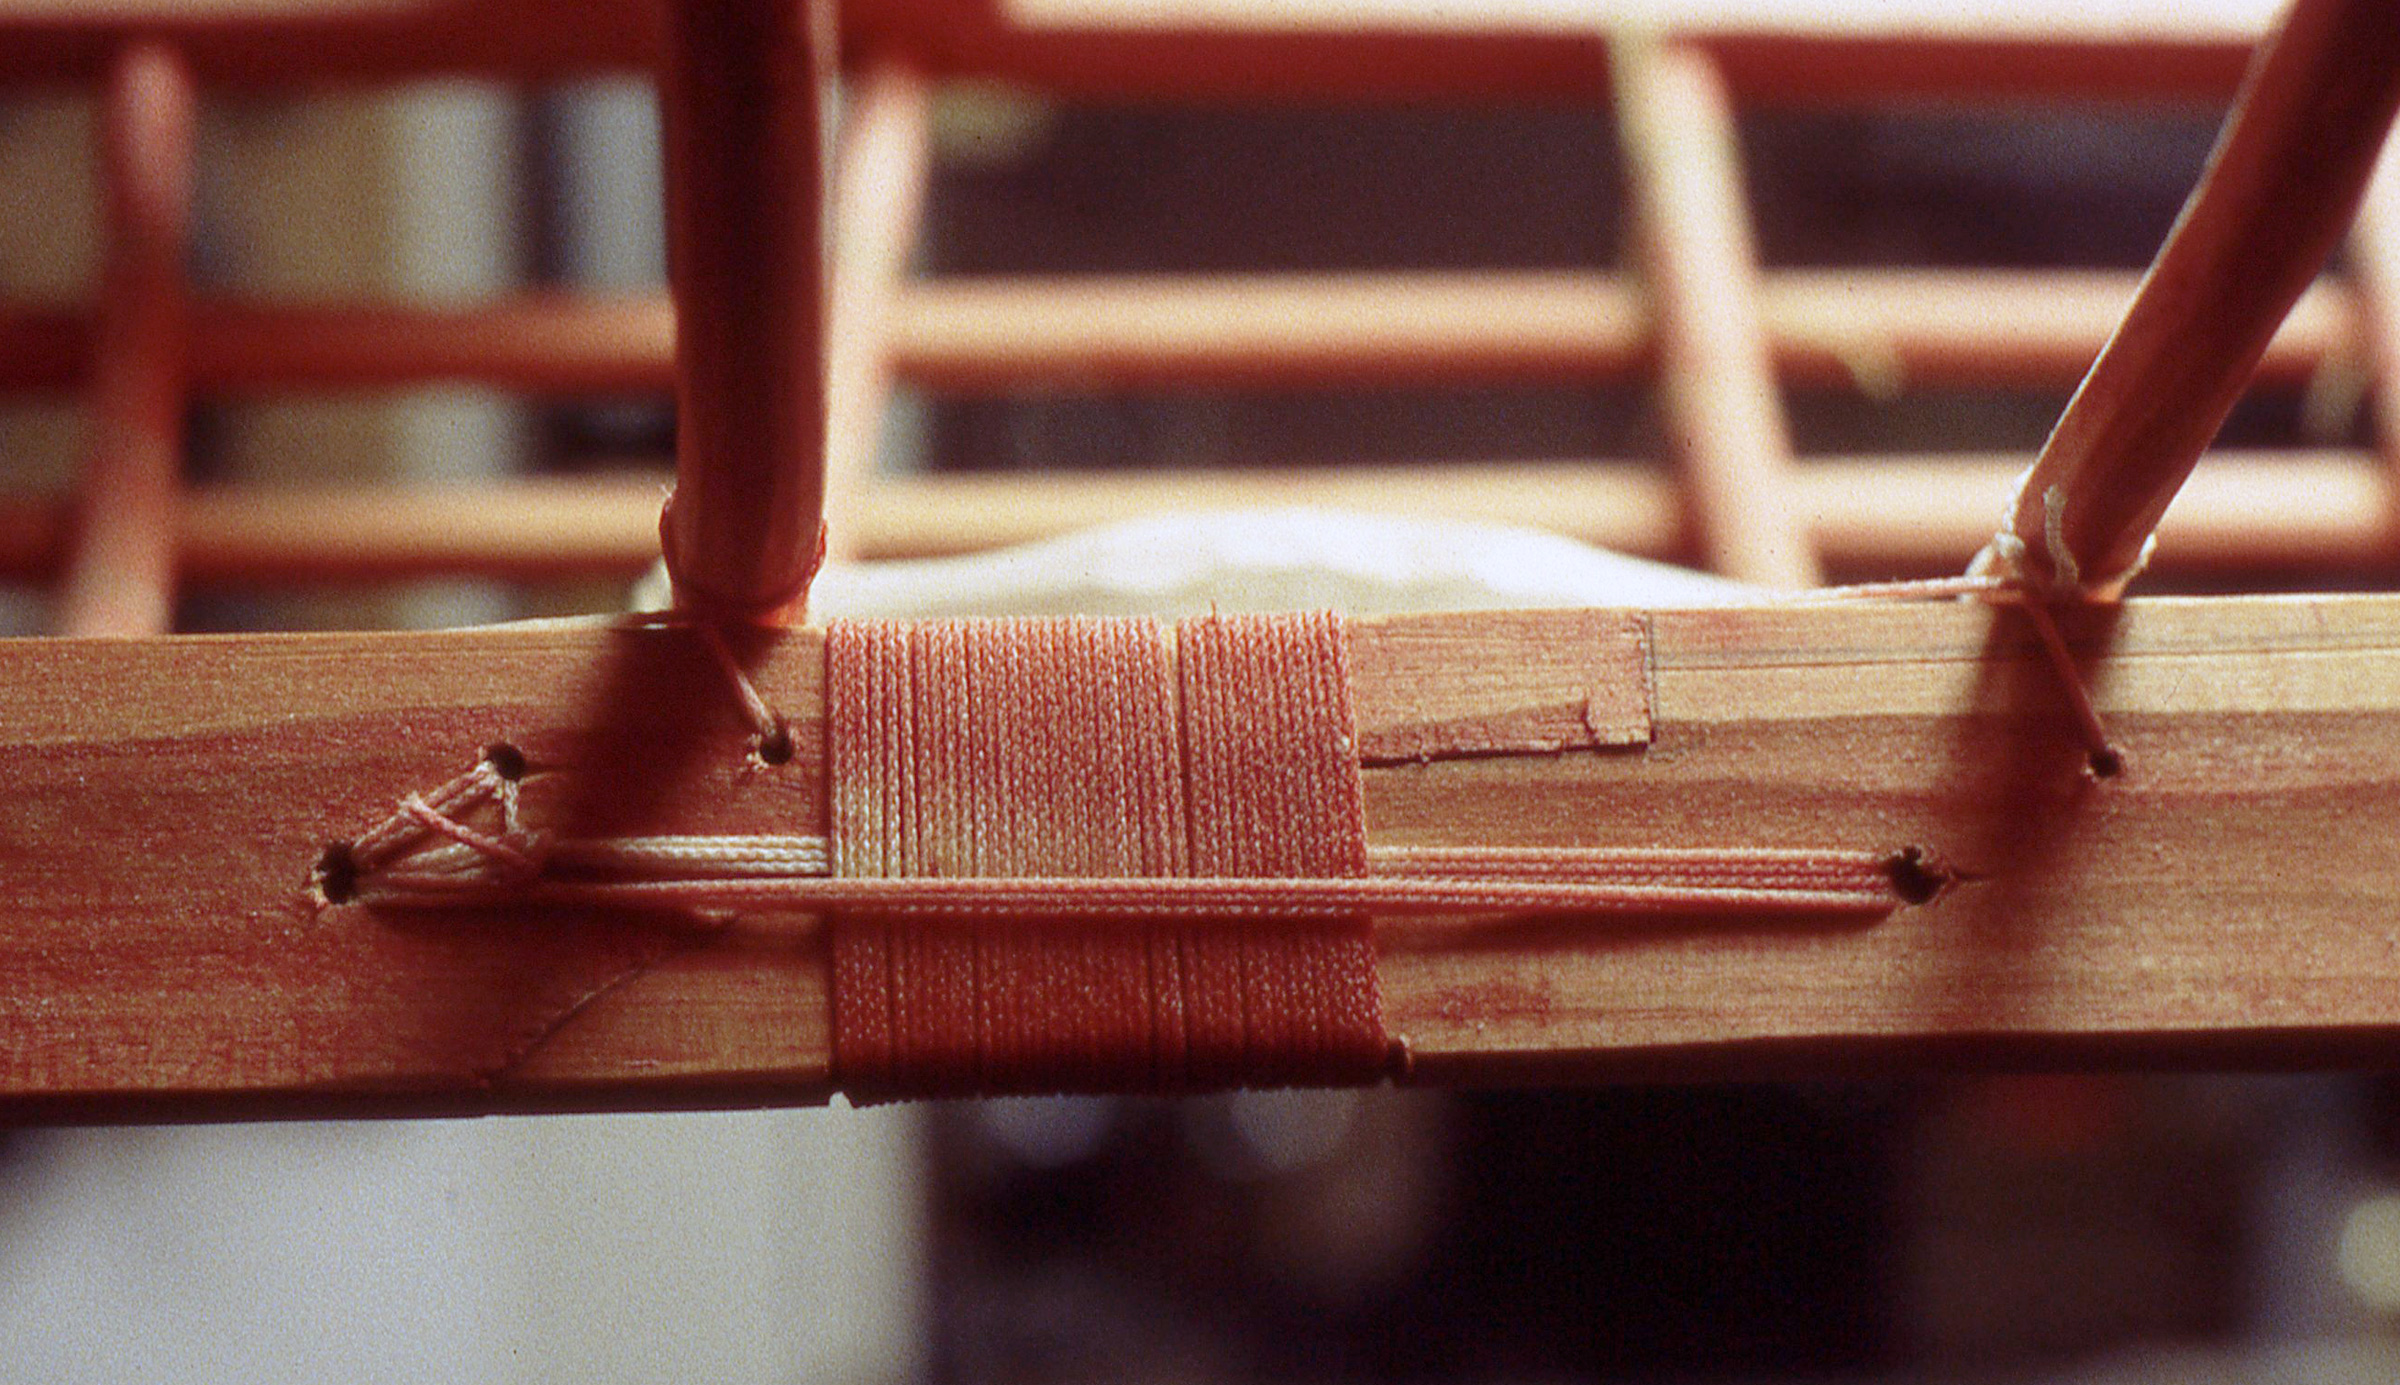
The same tooling and jigs that were developed for postwar production of the canoes are still in use in Marathon. The canoes are handcrafted and begin with hull halves formed on a cold die press from an aluminum alloy sheet, then heat-hardened to a T-6 temper to increase mechanical strength and reduce the metal’s susceptibility to intergranular corrosion. The halves are joined to an extruded aluminum inner and outer keel, die-formed ribs, gunwales, stem and stern caps with T-6 Alumilite rivets that were specifically designed for the Grumman process. Close rivet spacing ensures maximum strength along the keel and ribs. Templates are used to establish uniform spacing for the rivets. The canoes are still riveted by hand. The inner and outer extruded keels sandwich a neoprene gasket with the hull halves for a watertight seal; flush rivet heads reduce drag. The standard 17′ Double-Ender has a T-shaped keel that helps the canoe track straight and reduces leeway, which we can attest is very helpful on open water. For whitewater use, a flatter keel with a lower 3/8″ profile, is available.
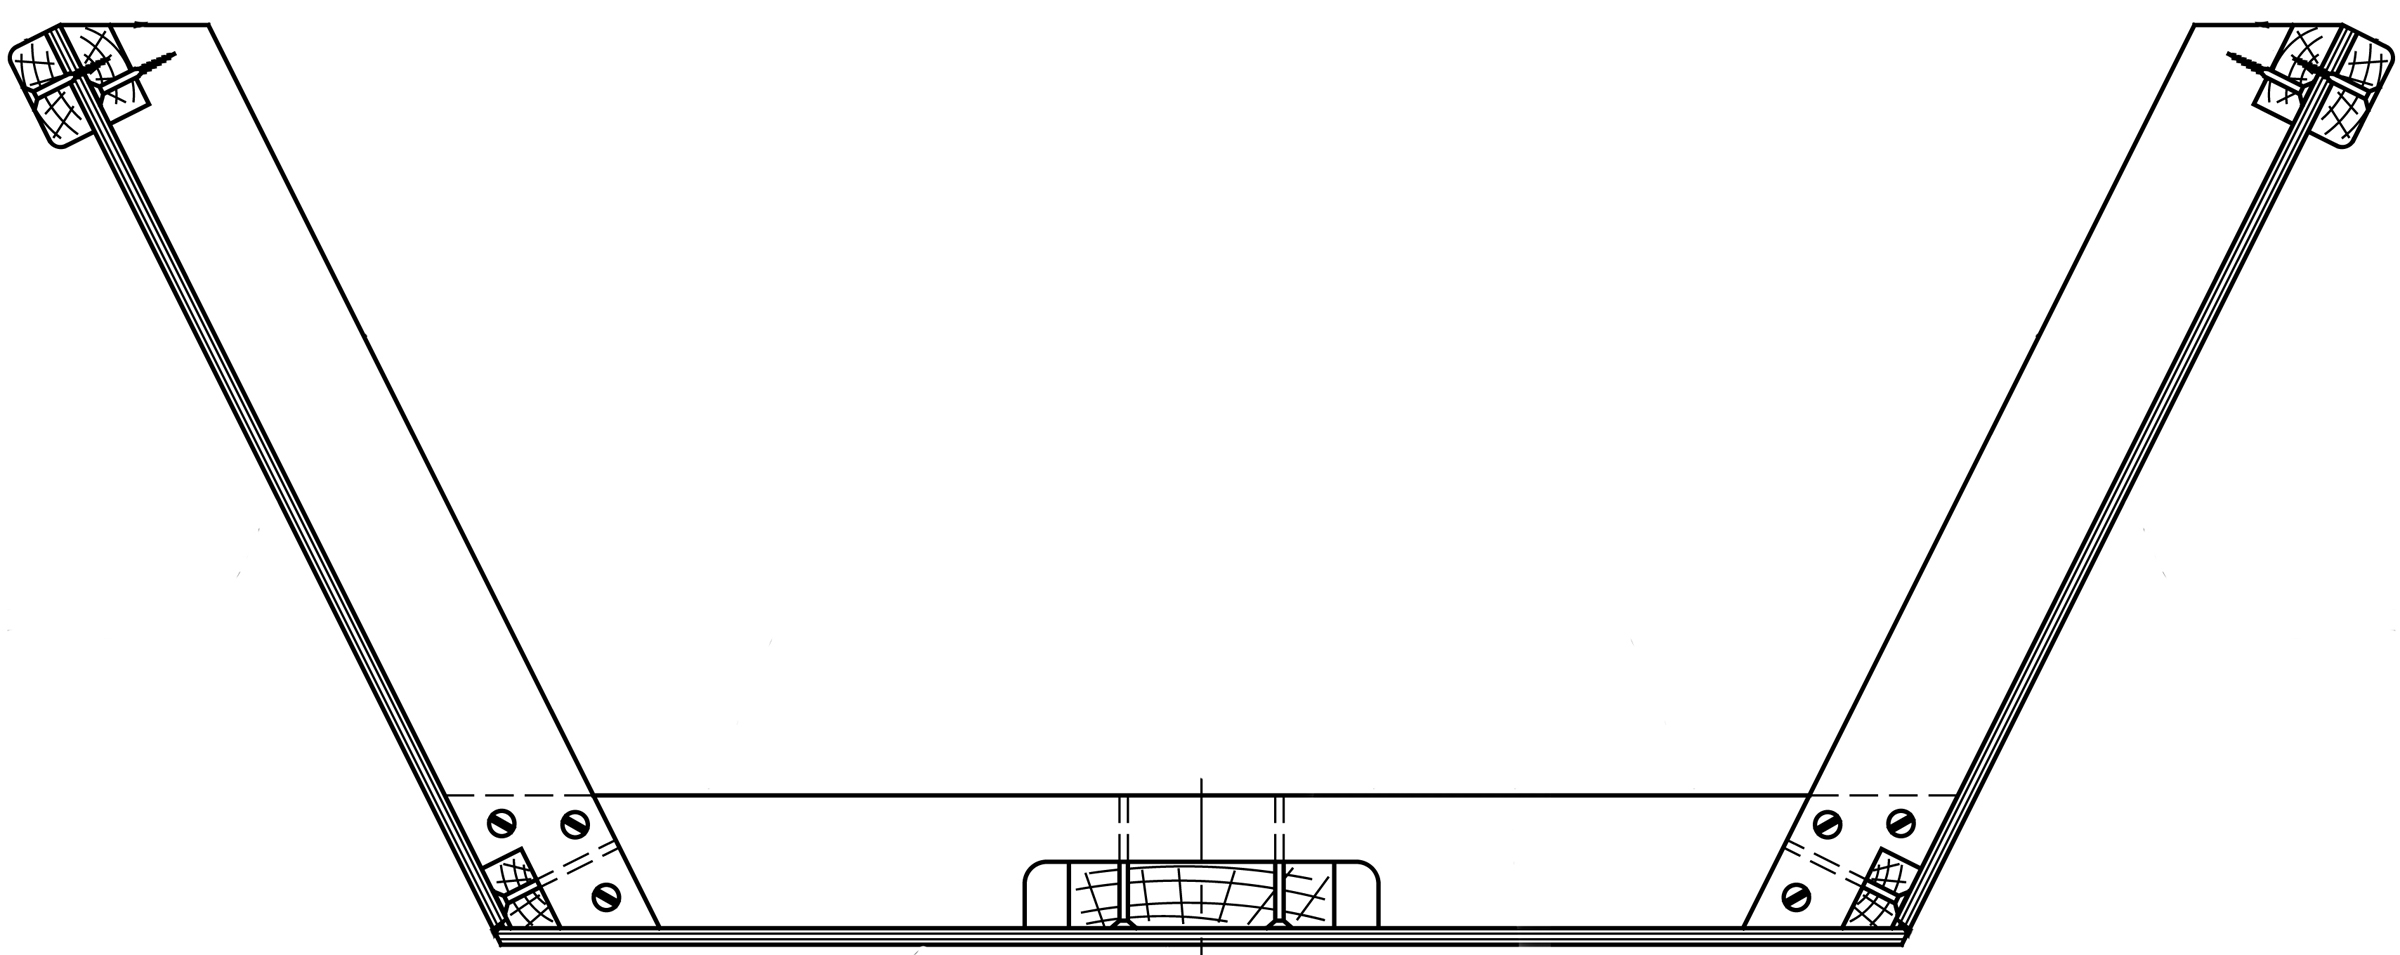
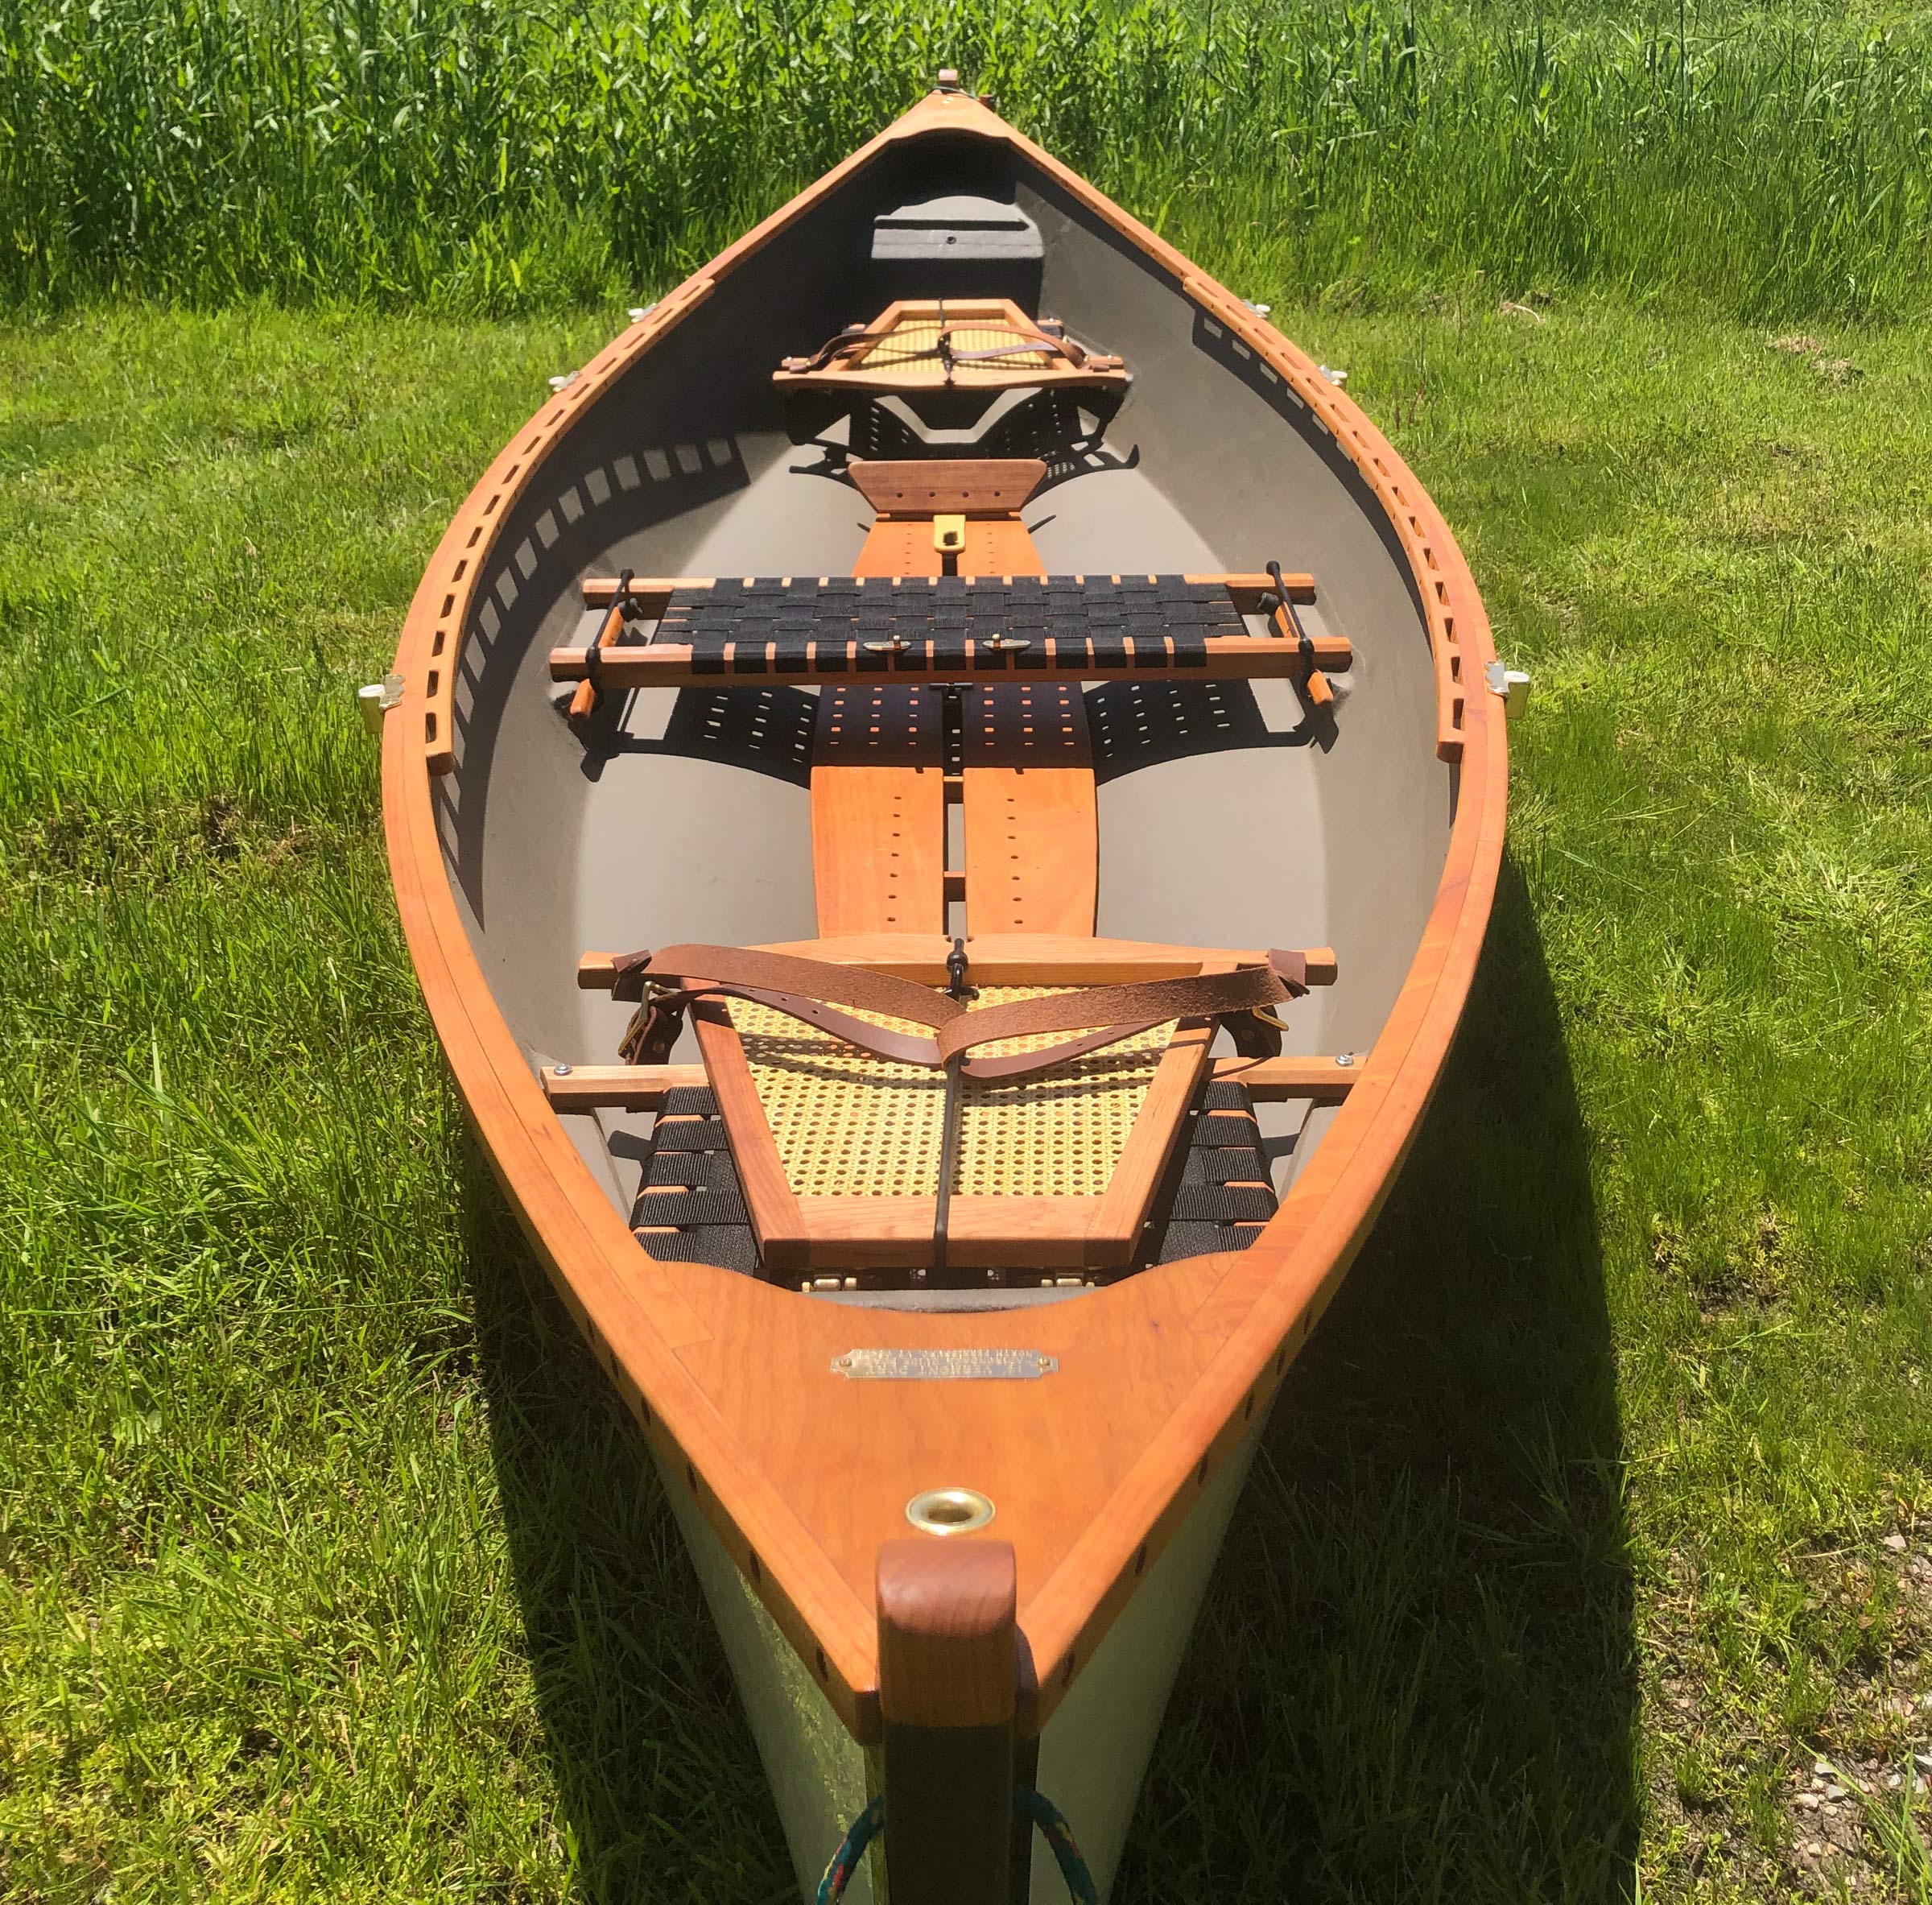
The bow paddler’s seat is shown here. Note the tight spacing of the rivets along the keel.
Our 17’ Double-Ender, built in the mid-1950s, is made from 0.051”-thick aluminum alloy. Grumman also offered a Light Weight model with hull thickness of 0.032″ for canoeists who did a lot of portaging. The Light Weight models had extra ribs to offset the thinner hull material. The standard 17′ Double-Ender weighs 75 lbs and the Light Weight, 60 lbs. The newer Marathon boats have hulls that are 0.060″ thick and, as a result, weigh in at 81 lbs.
We found our latest Double-Ender on Craigslist in 2013. The canoe trailers easily and can be singlehandedly cartopped by raising one end and then the other onto a roof rack. Secure the upside-down canoe over the passenger’s side. This provides better visibility for the driver. The canoe thwarts to be secured to the side of the rack, in addition to two top straps. Straps from the tow shackles down to the bumper are also advisable.
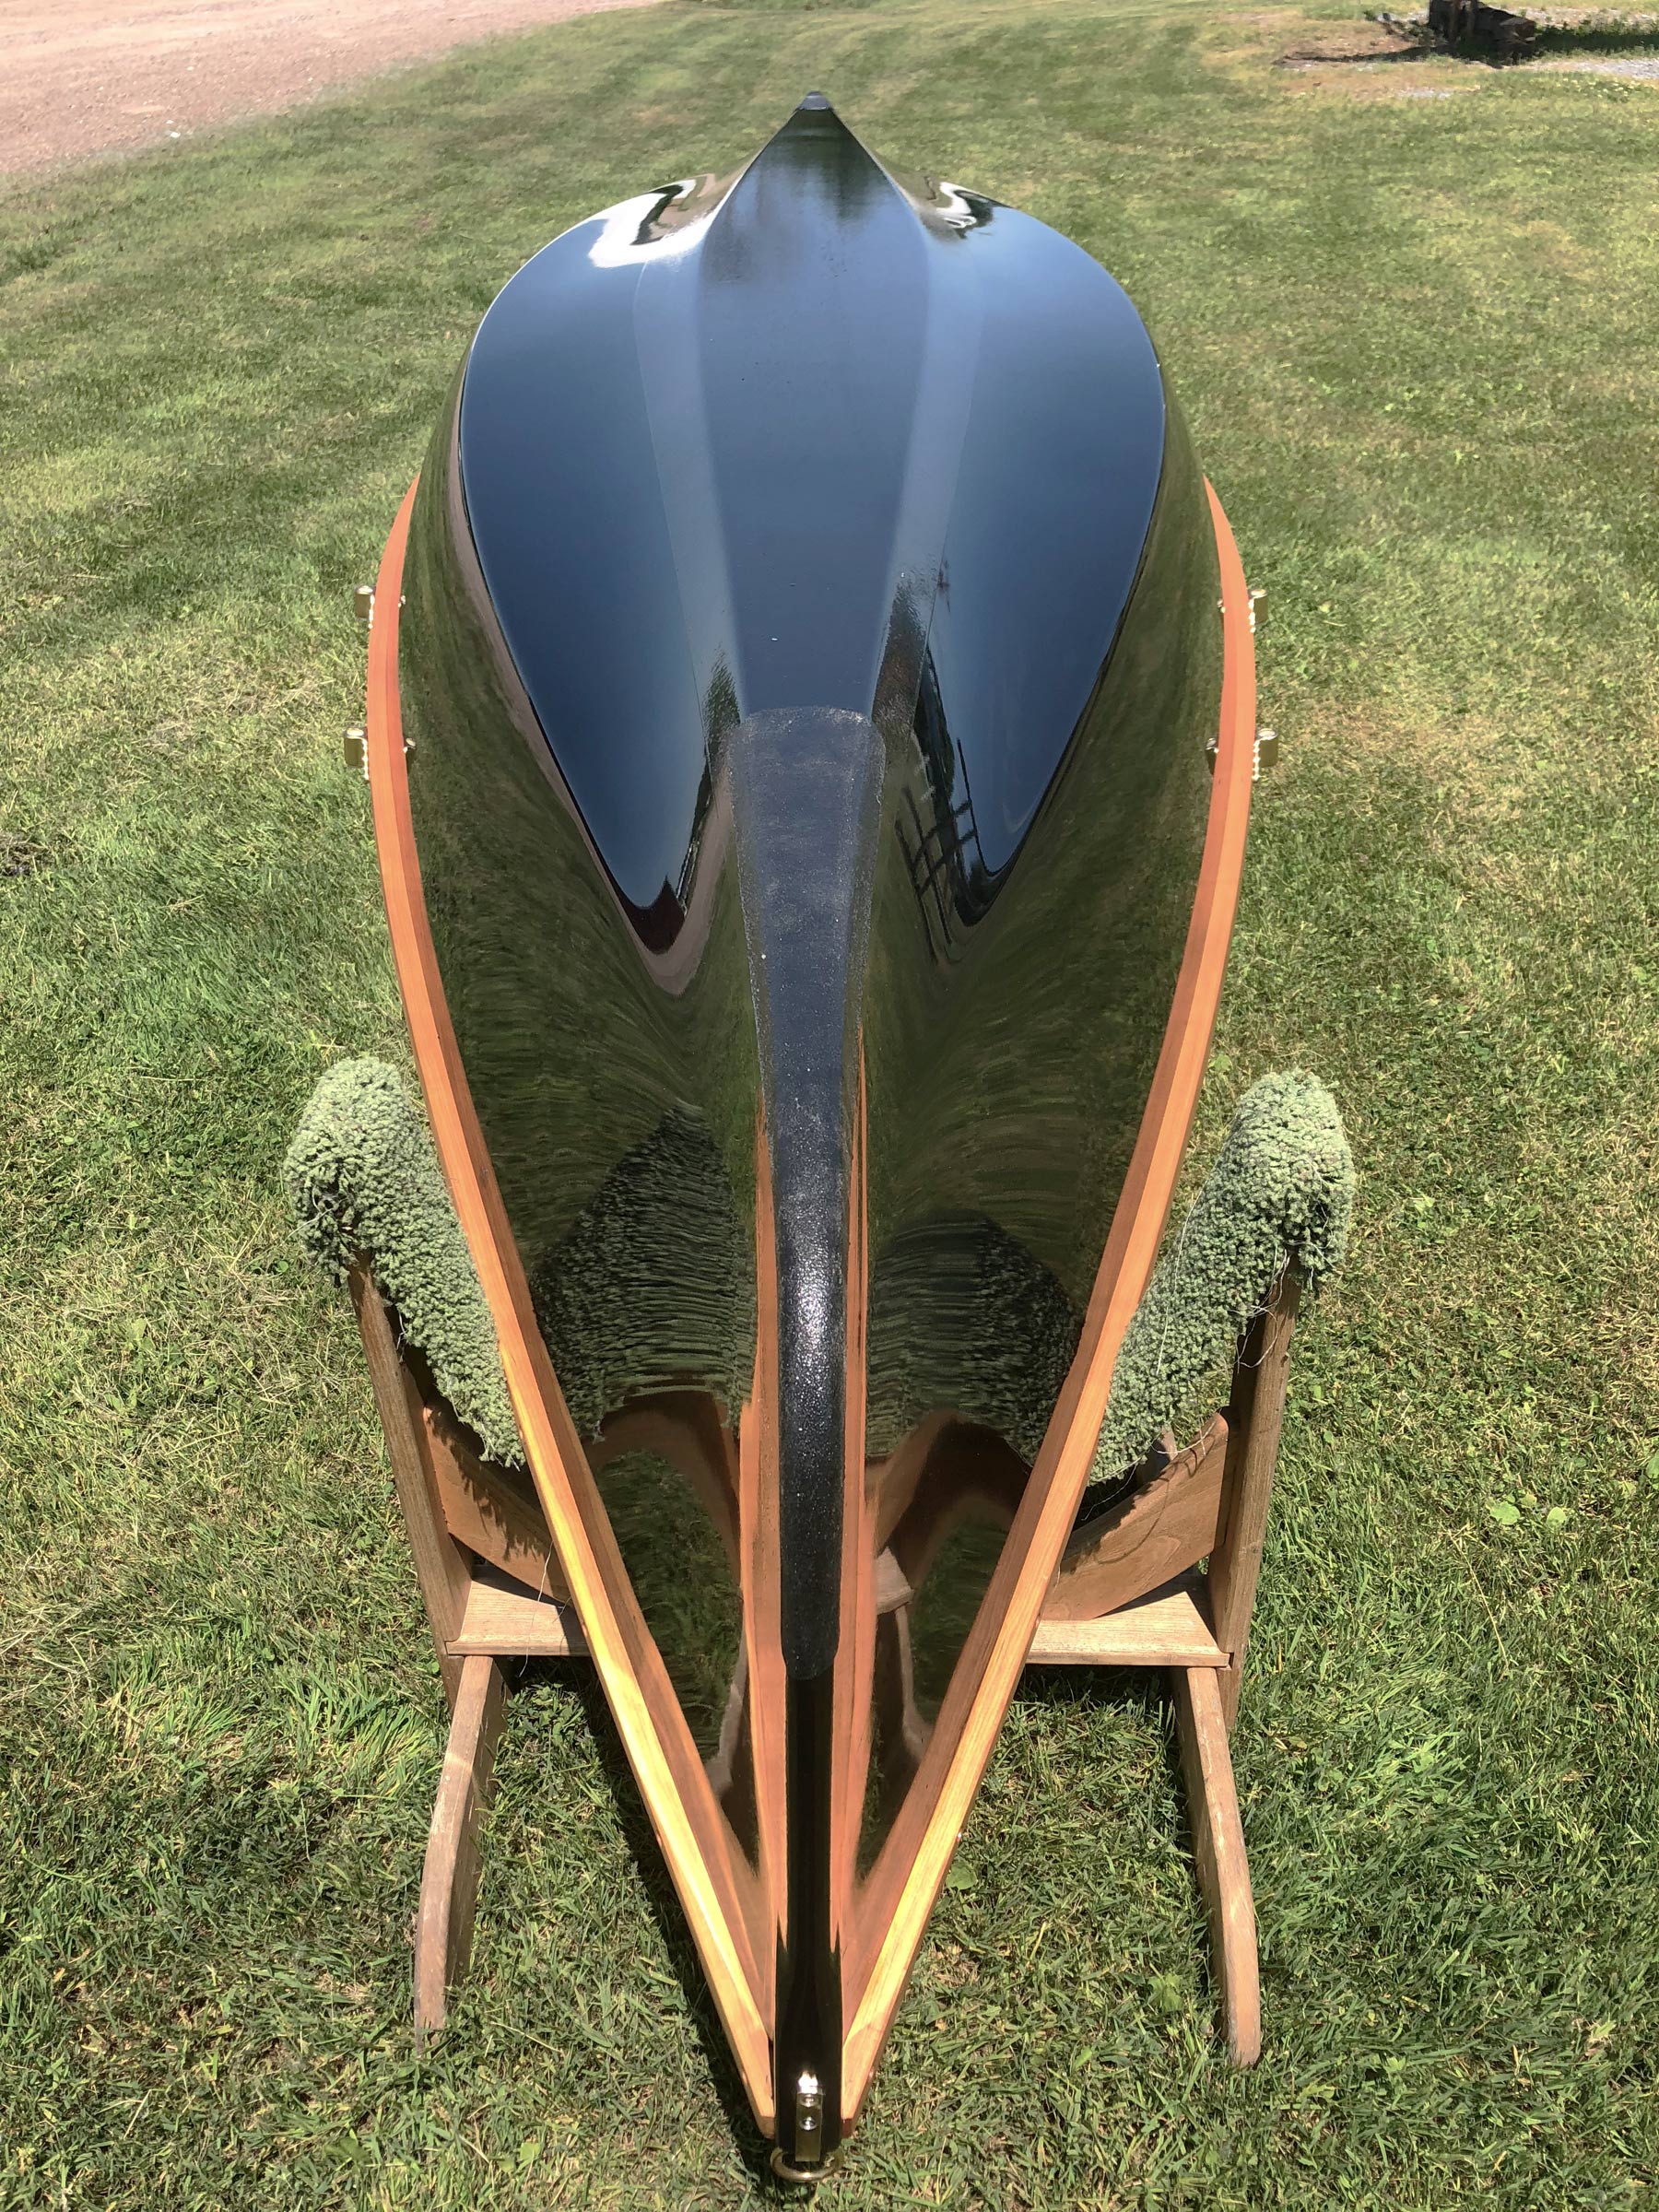
The bow and stern caps have rolled edges that make comfortable handholds when dragging or carrying the canoe. These rolled plates also serve as covers for the flotation compartments, which are filled with closed-cell foam to keep the canoe afloat. There is a small gap around the compartment edge that allows for ventilation and drainage, a great attribute because closed compartments often take in water and retain it. Our 17′ Double-Ender has a rated carrying capacity of five people (weighing a total of up to 750 lbs) and 805 lbs total capacity. The current Marathon canoe capacity, subject to the more stringent requirements established in 1972, is a little lower at 755 lbs total (660 lbs people weight).
The solid extruded T-6 gunwales provide rigidity and are bolt-fastened to the thwarts. The stem caps are also heat-treated for strength, close-riveted with flush rivets to reduce drag below the waterline, as is the outer keelson. The ends also have sealed holes for shackles to take painters.
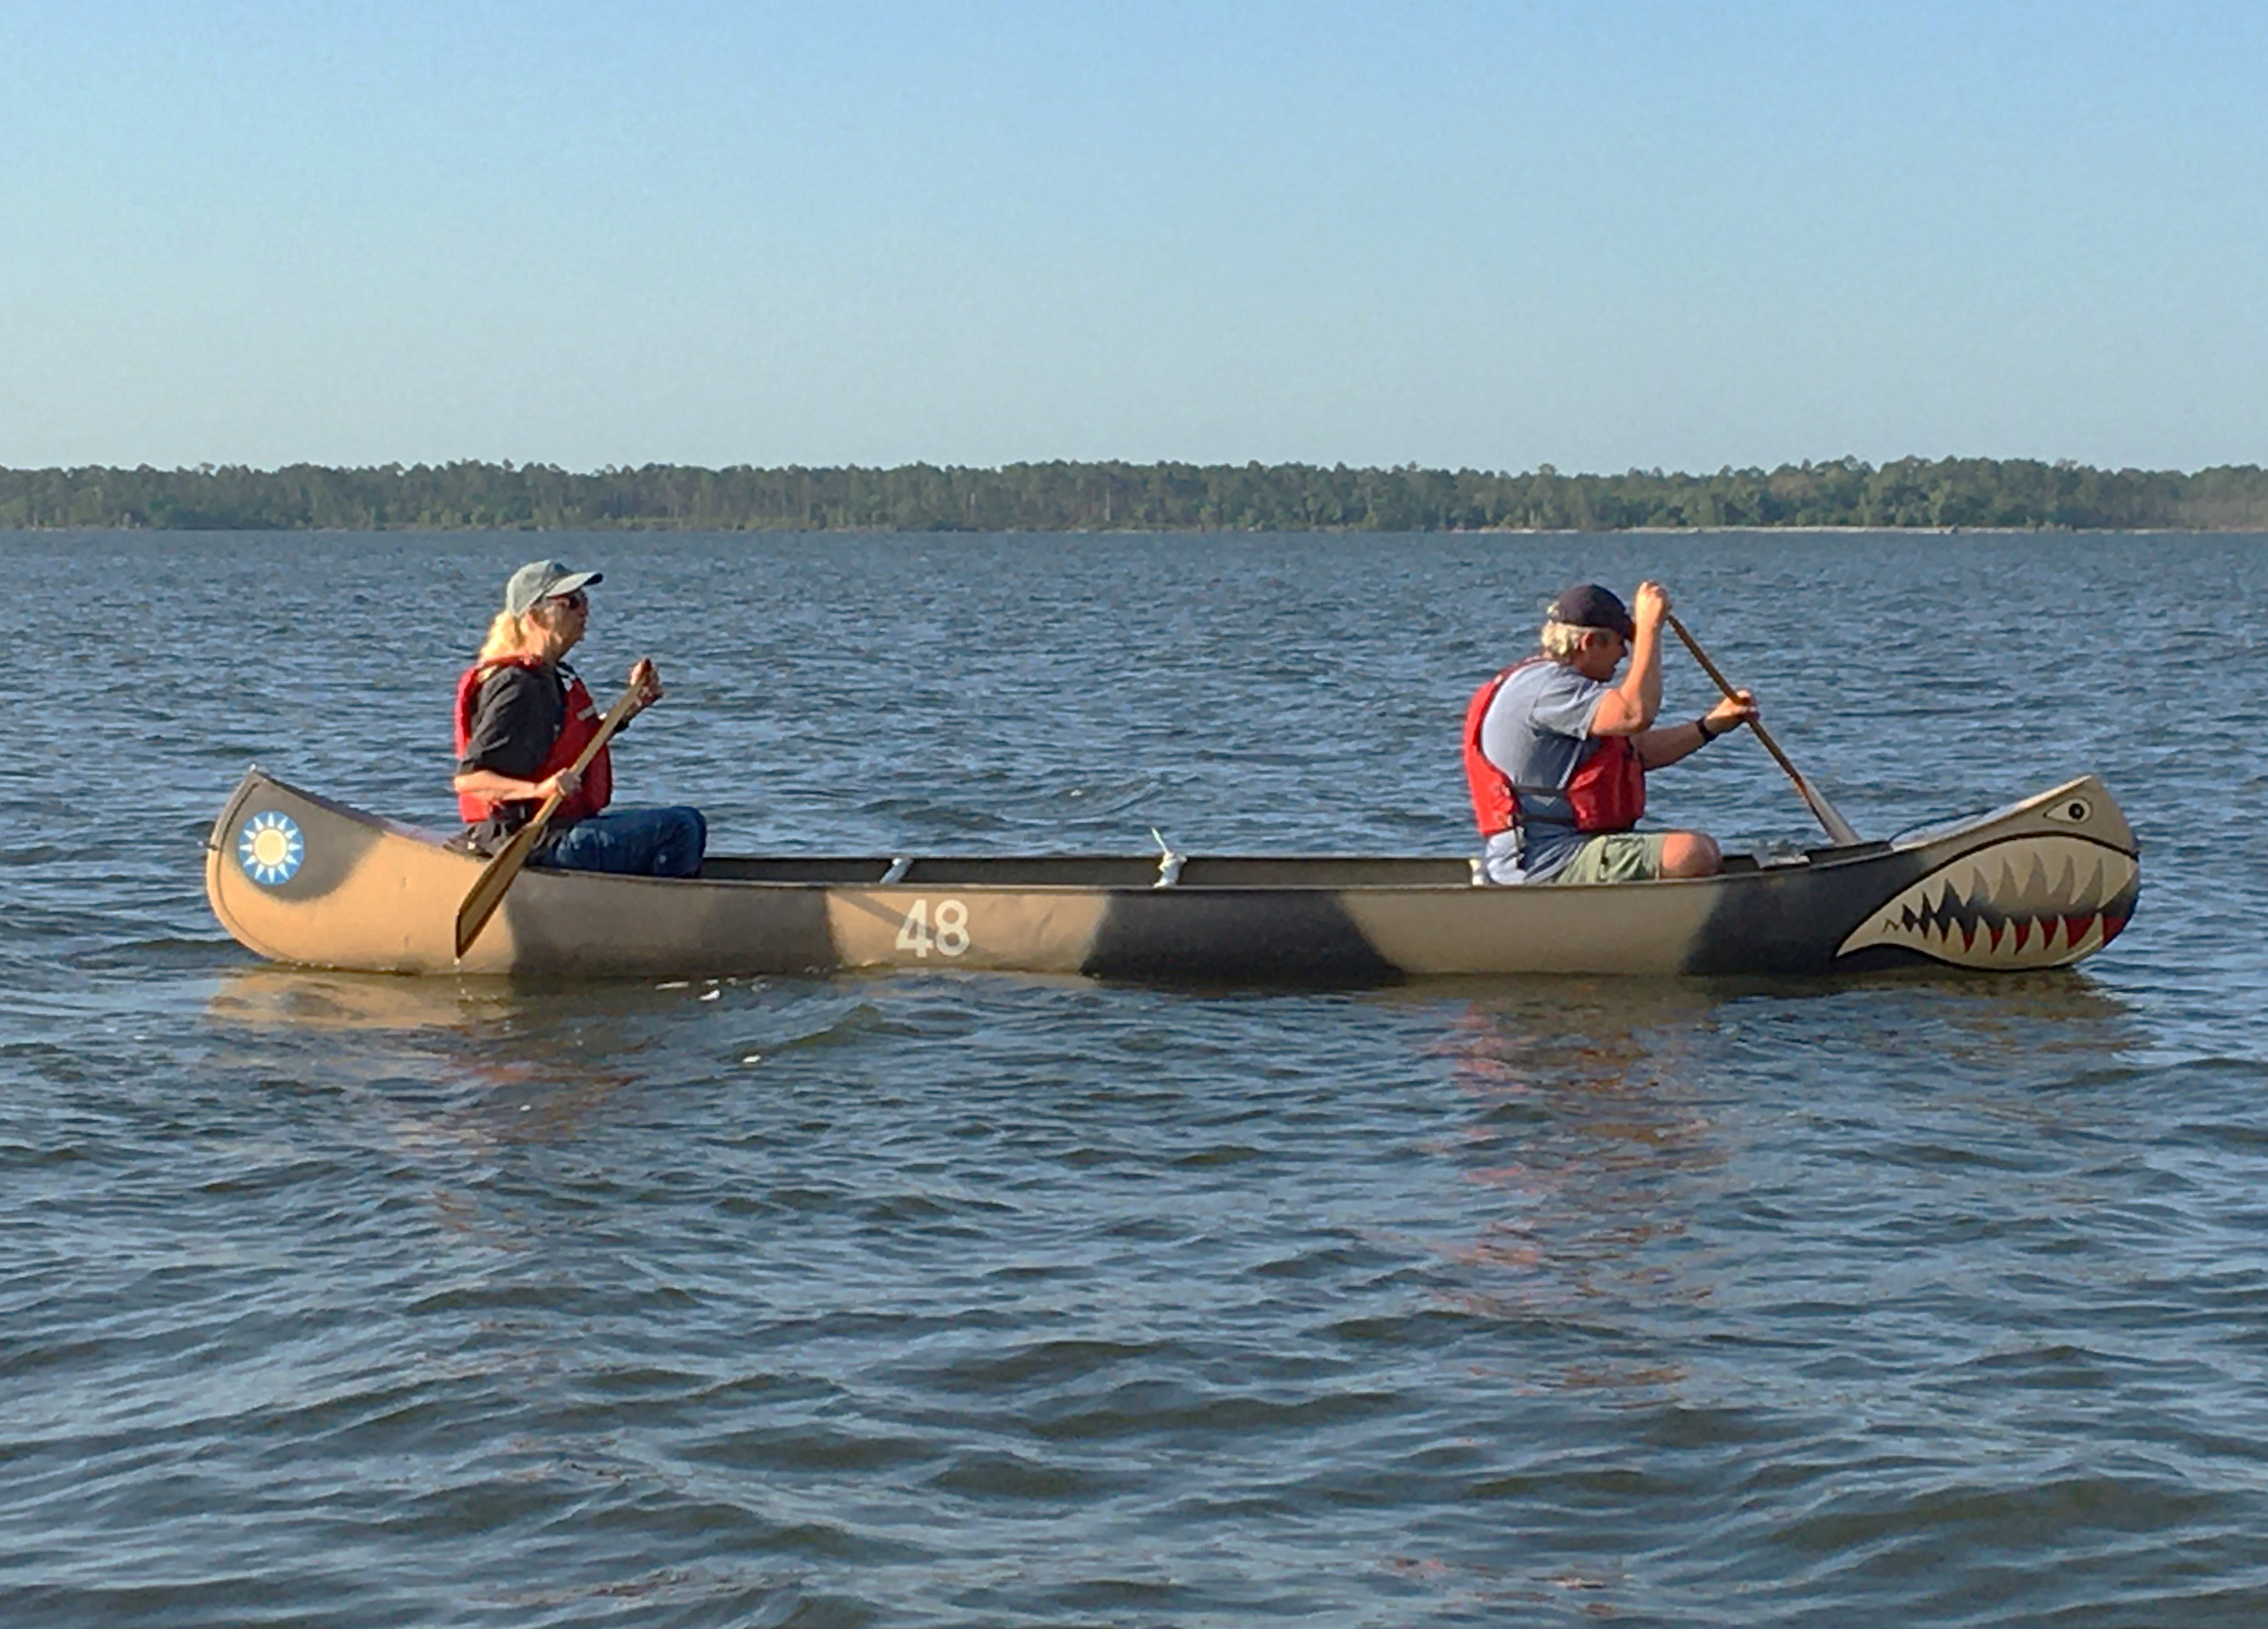
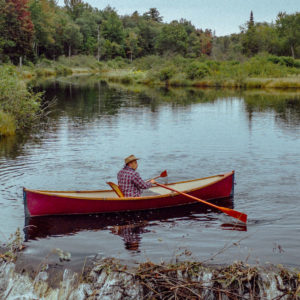
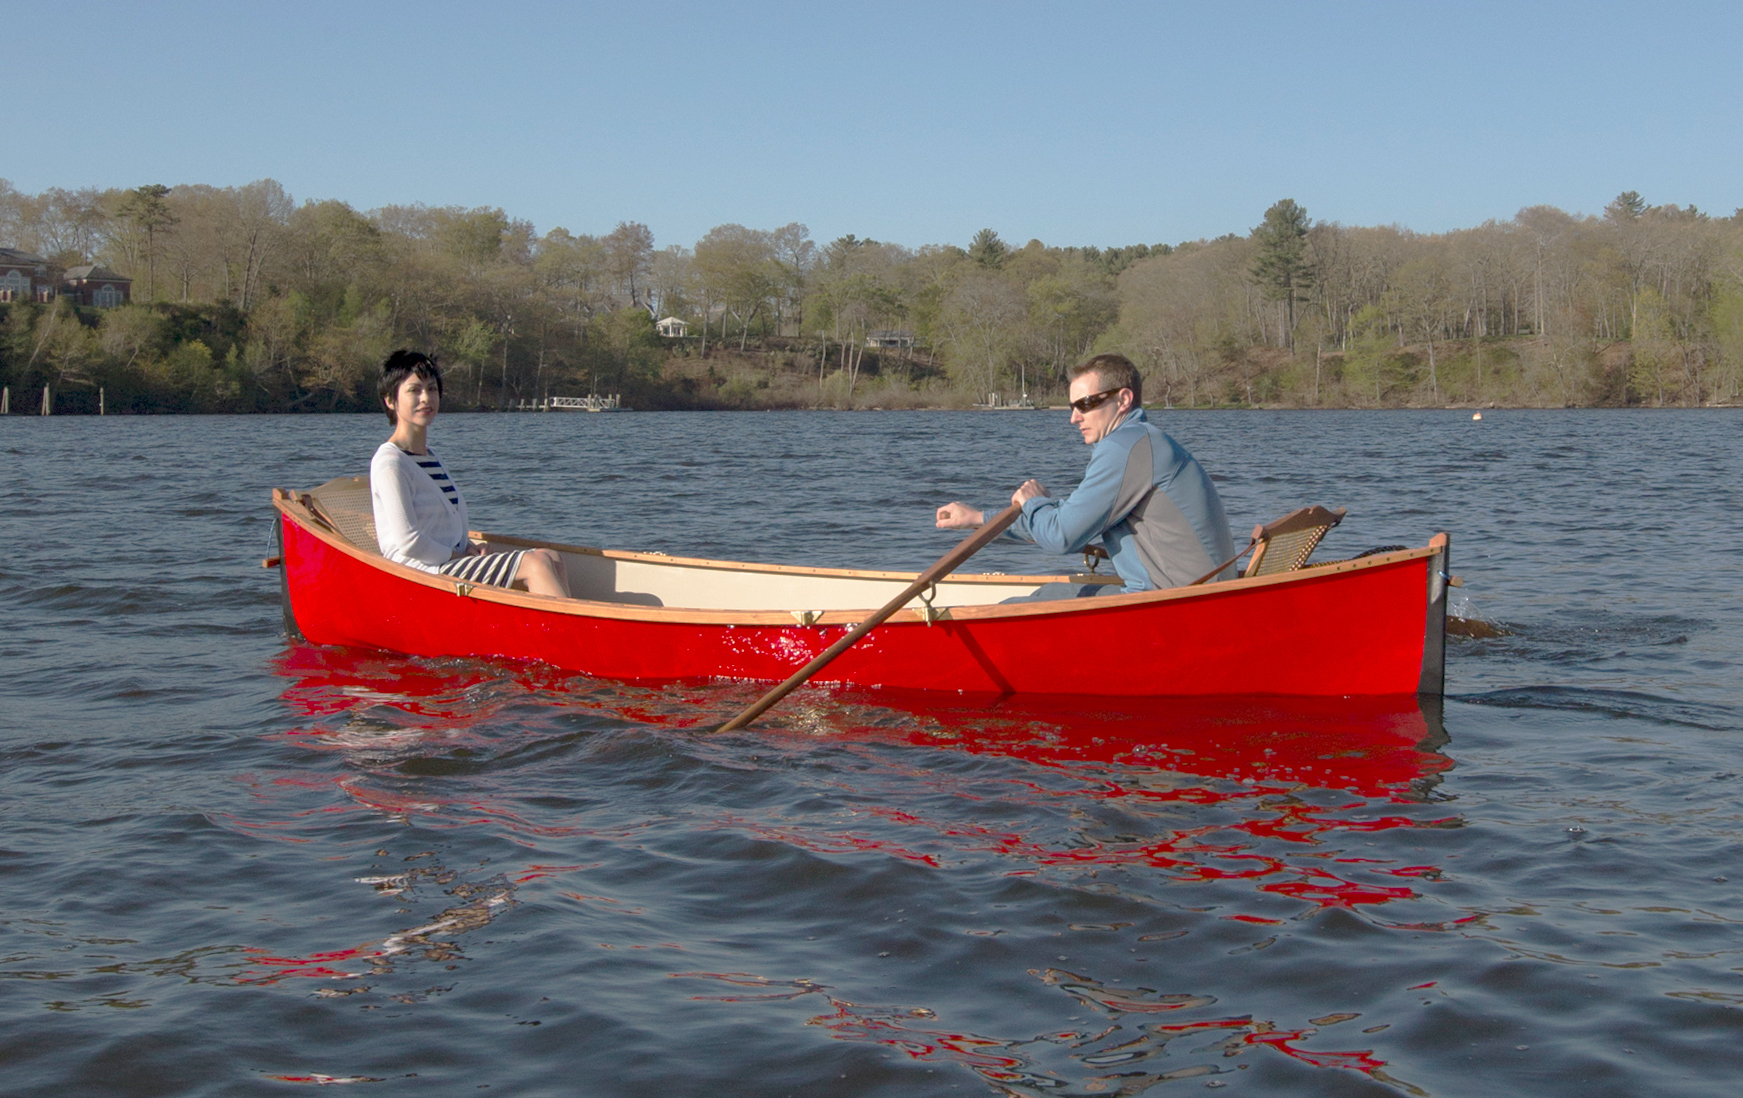
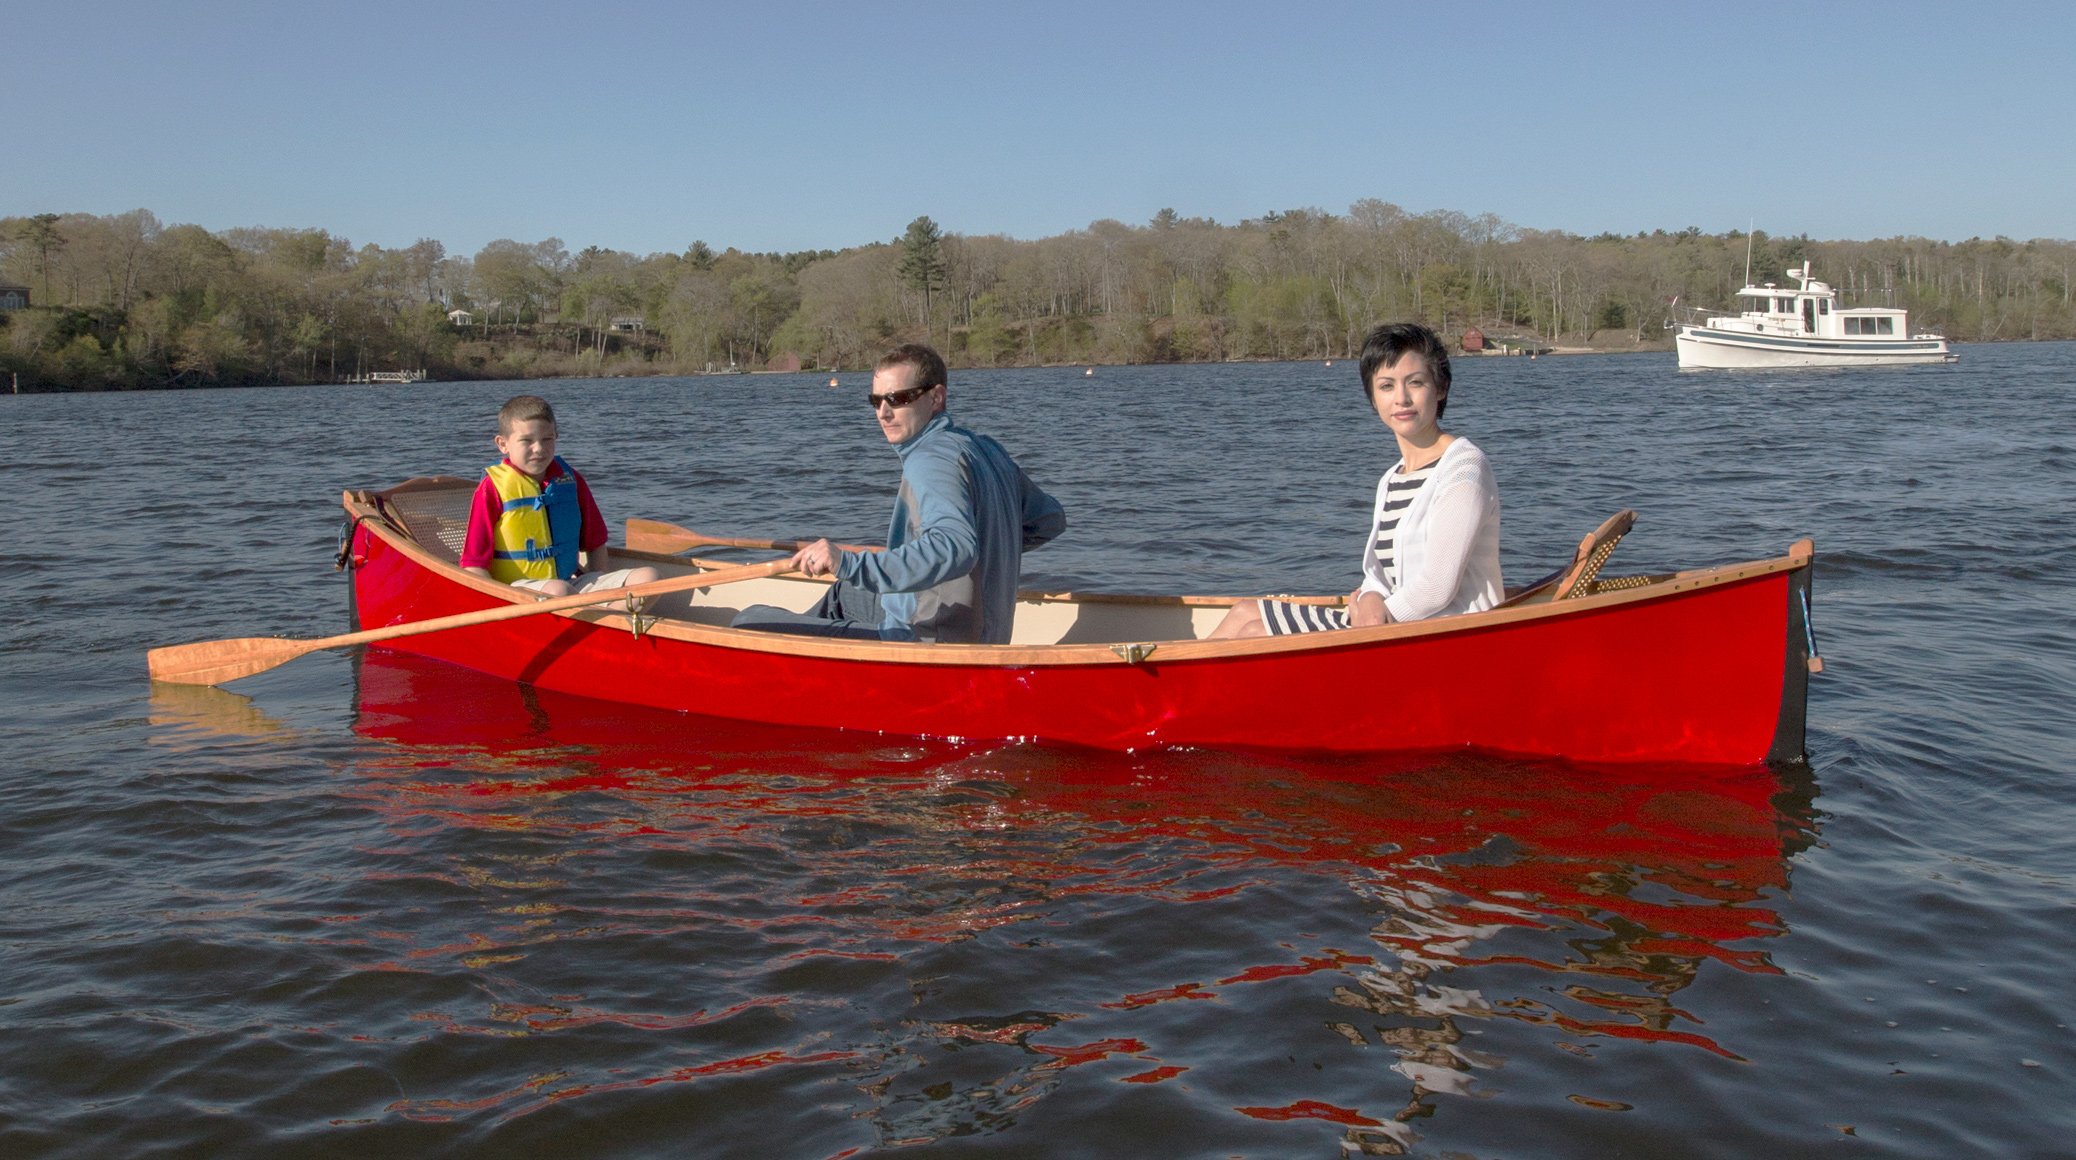
The 17′ Double-Ender is designed for tandem paddling and trims nicely with two aboard and with a rated capacity of 805 lbs, can carry plenty of camping cargo.
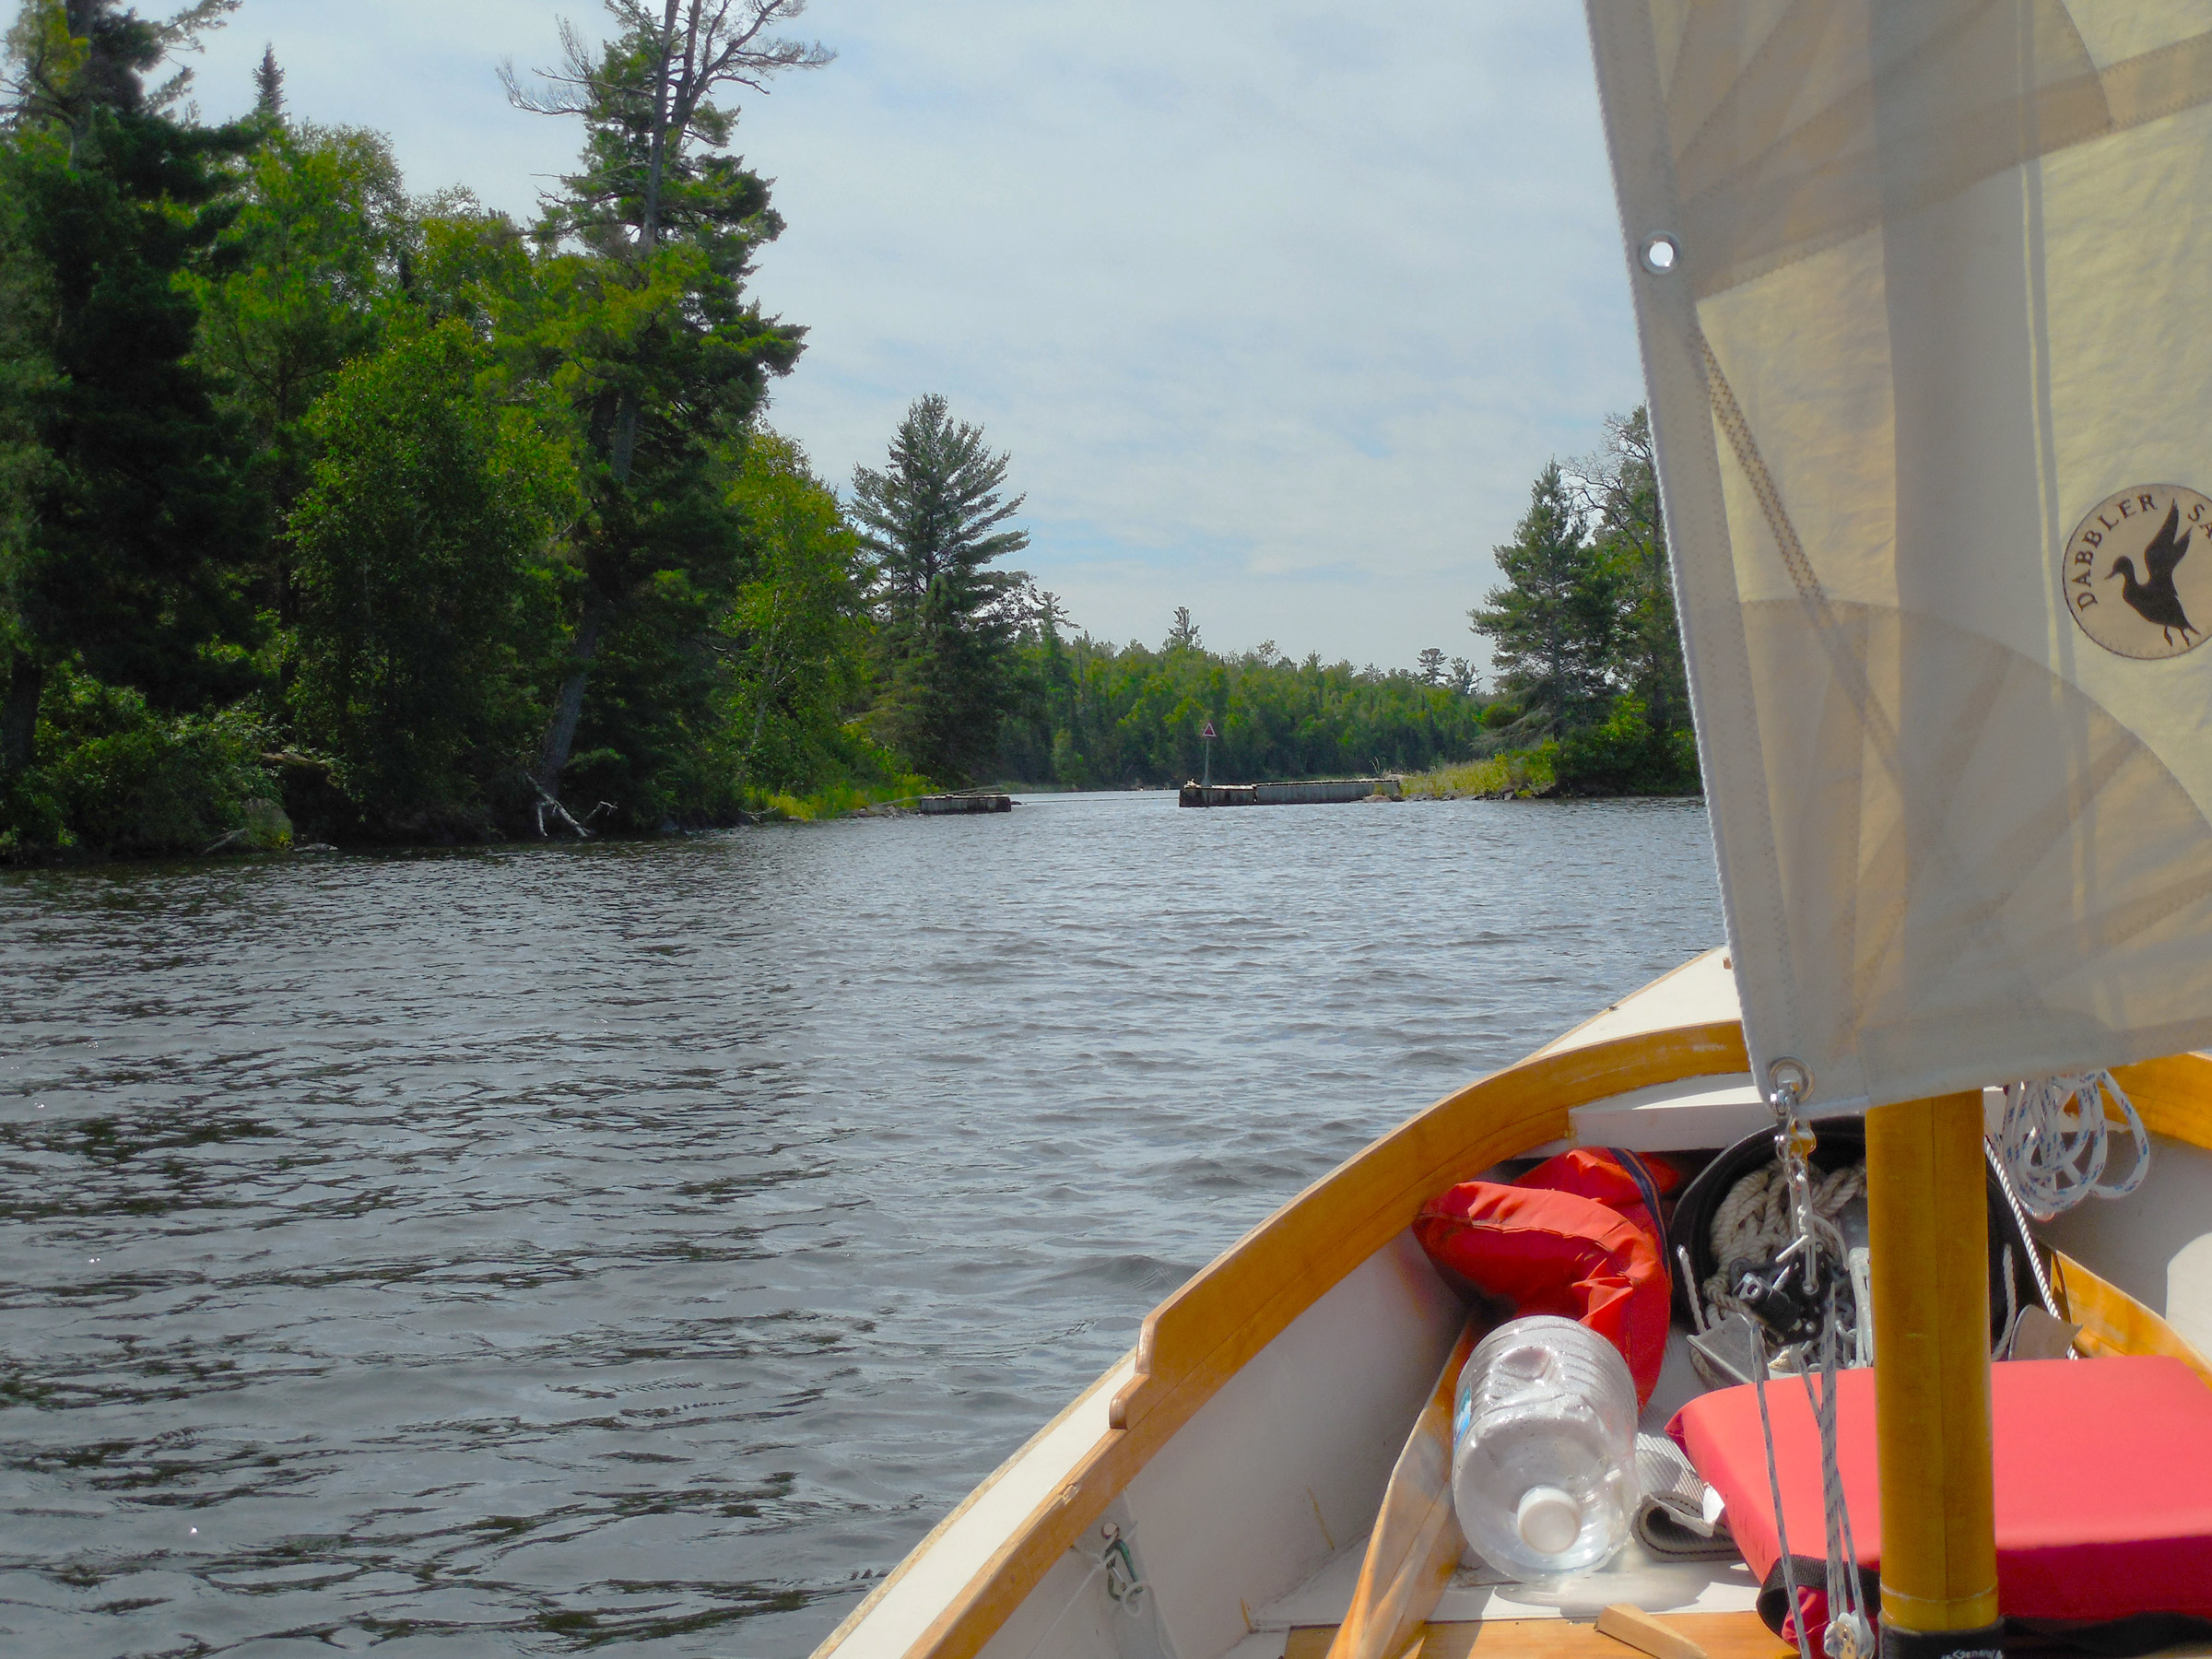
Once we slide the canoe down to the water it behaves well, and the wide bottom and full ends offer excellent stability. I can easily get aboard over the side. With the long waterline and keel the Double-Ender tracks straight and makes paddling easy; we have seen up to 3 knots without really trying. The canoe tracks straight until the wind picks up; it will start drifting to leeward when the wind abeam is more than 8 knots or so. With higher winds, trim becomes an issue.
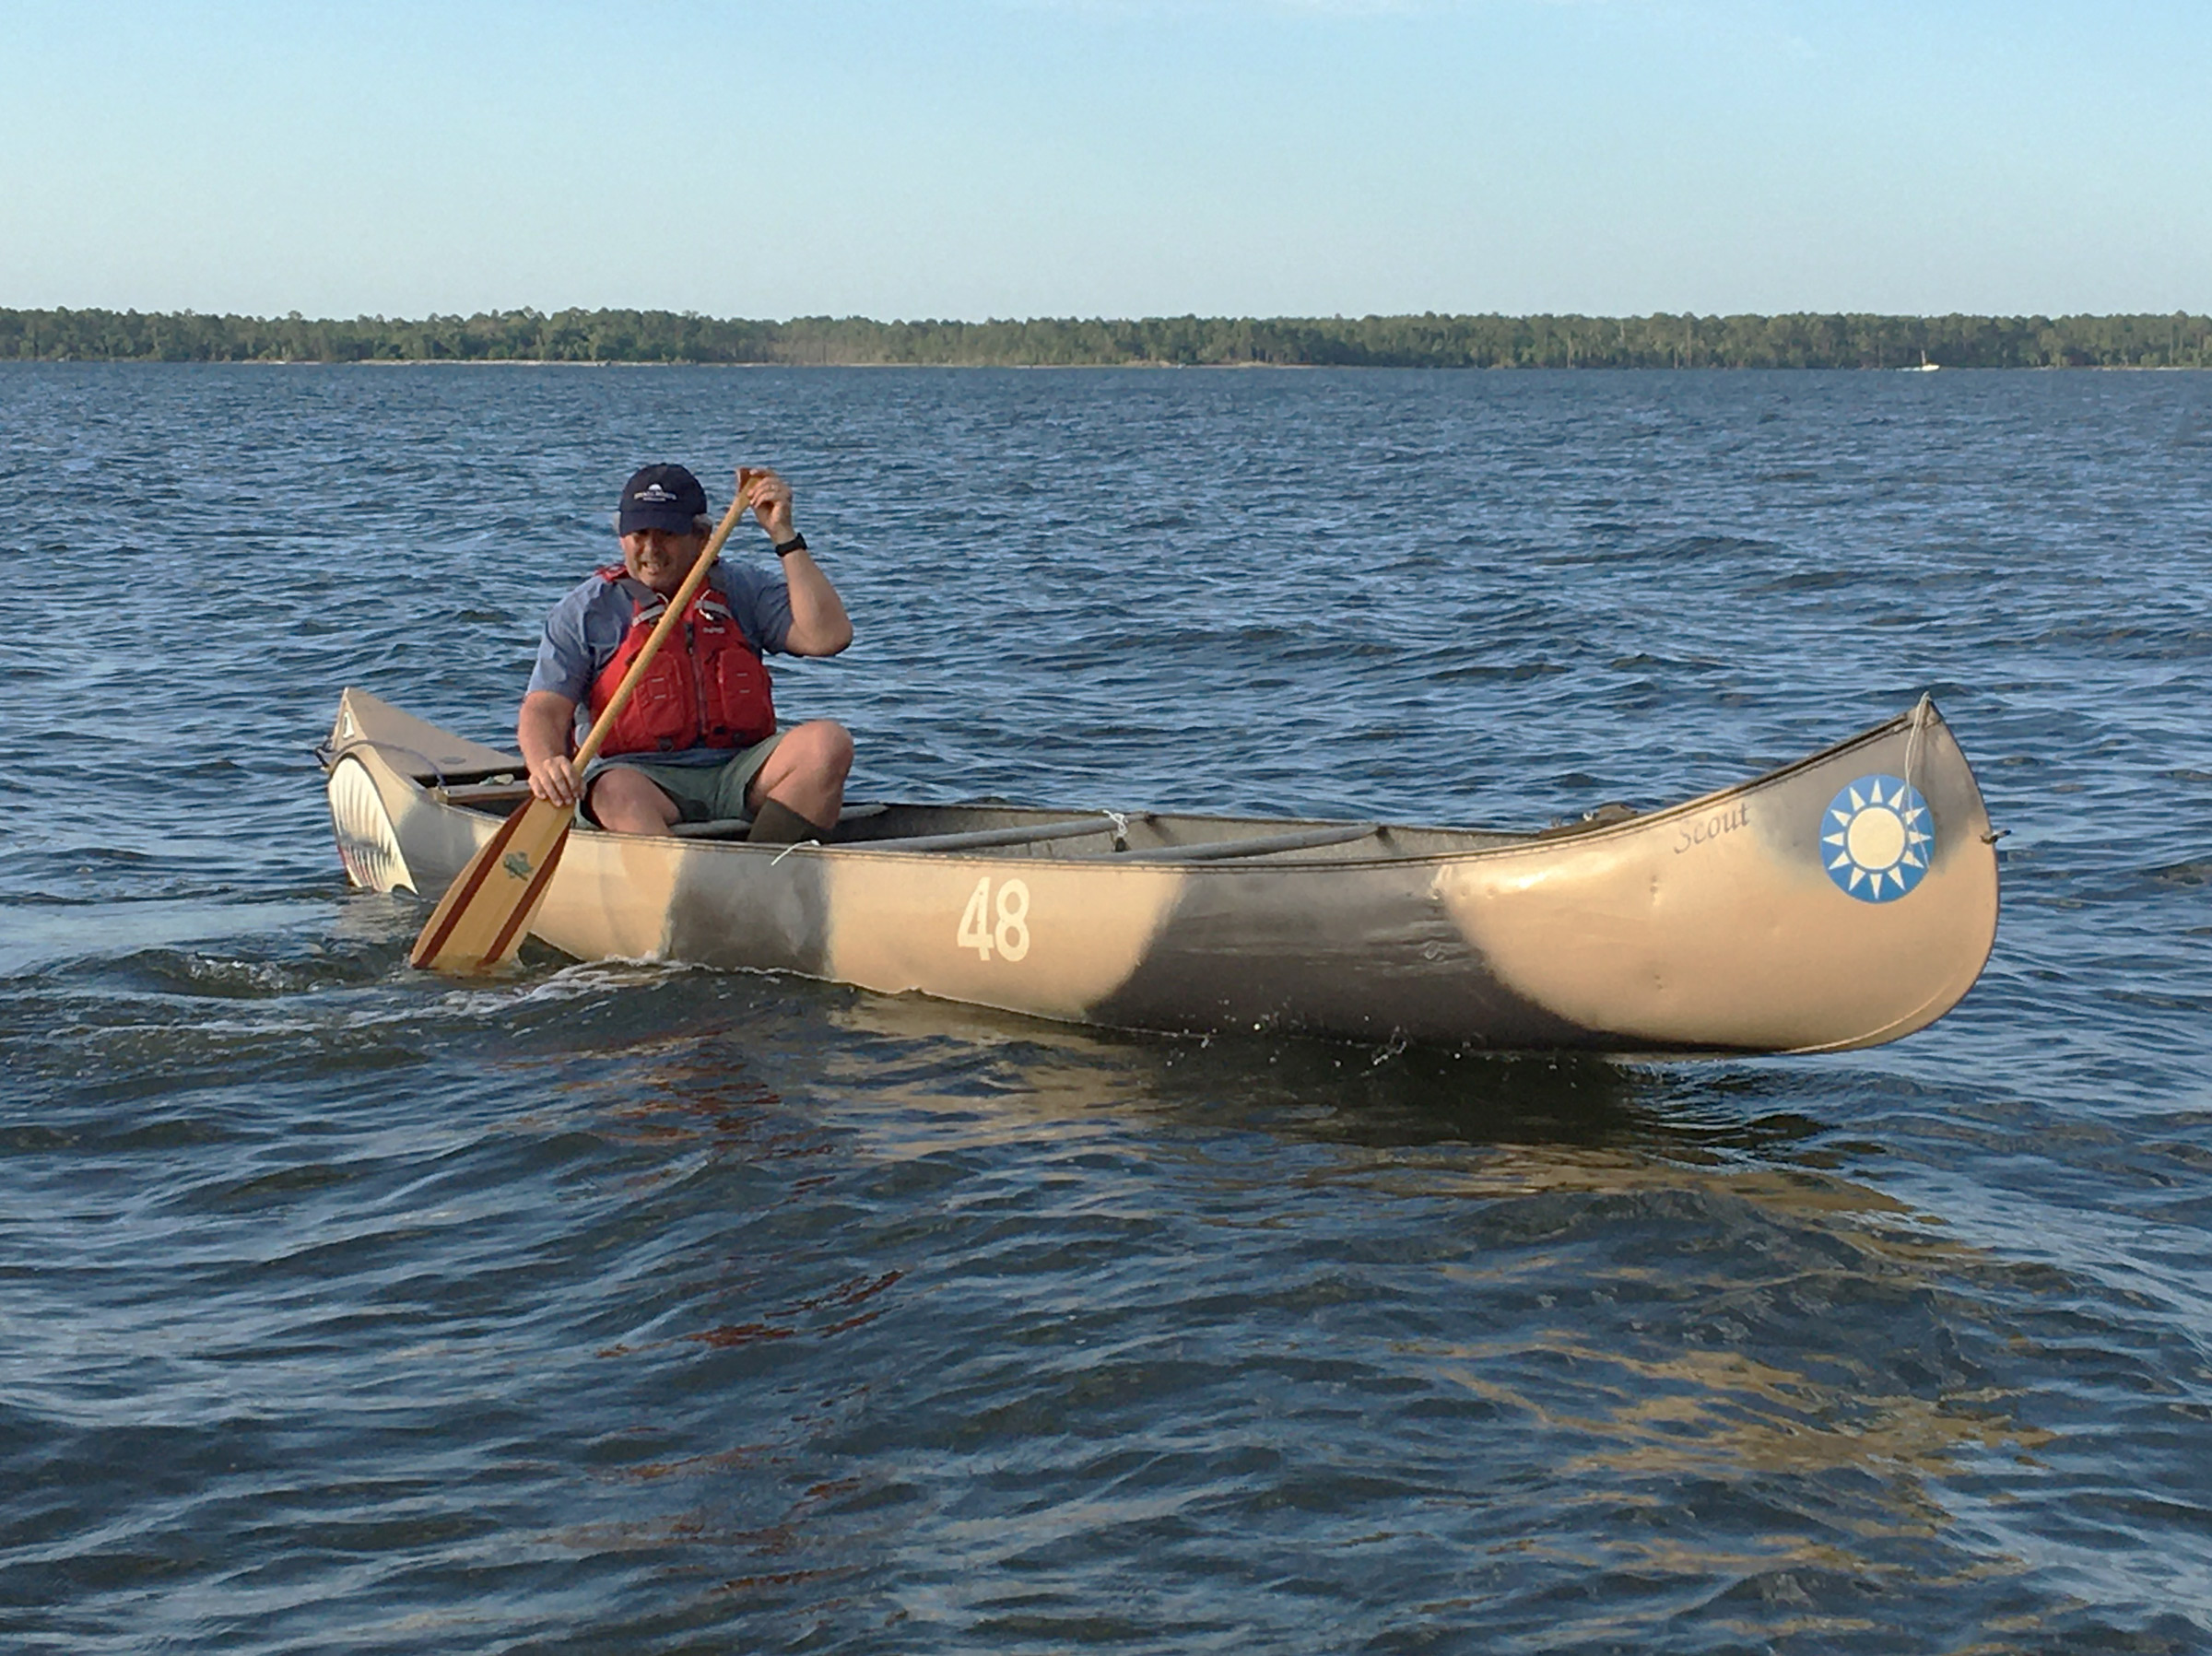
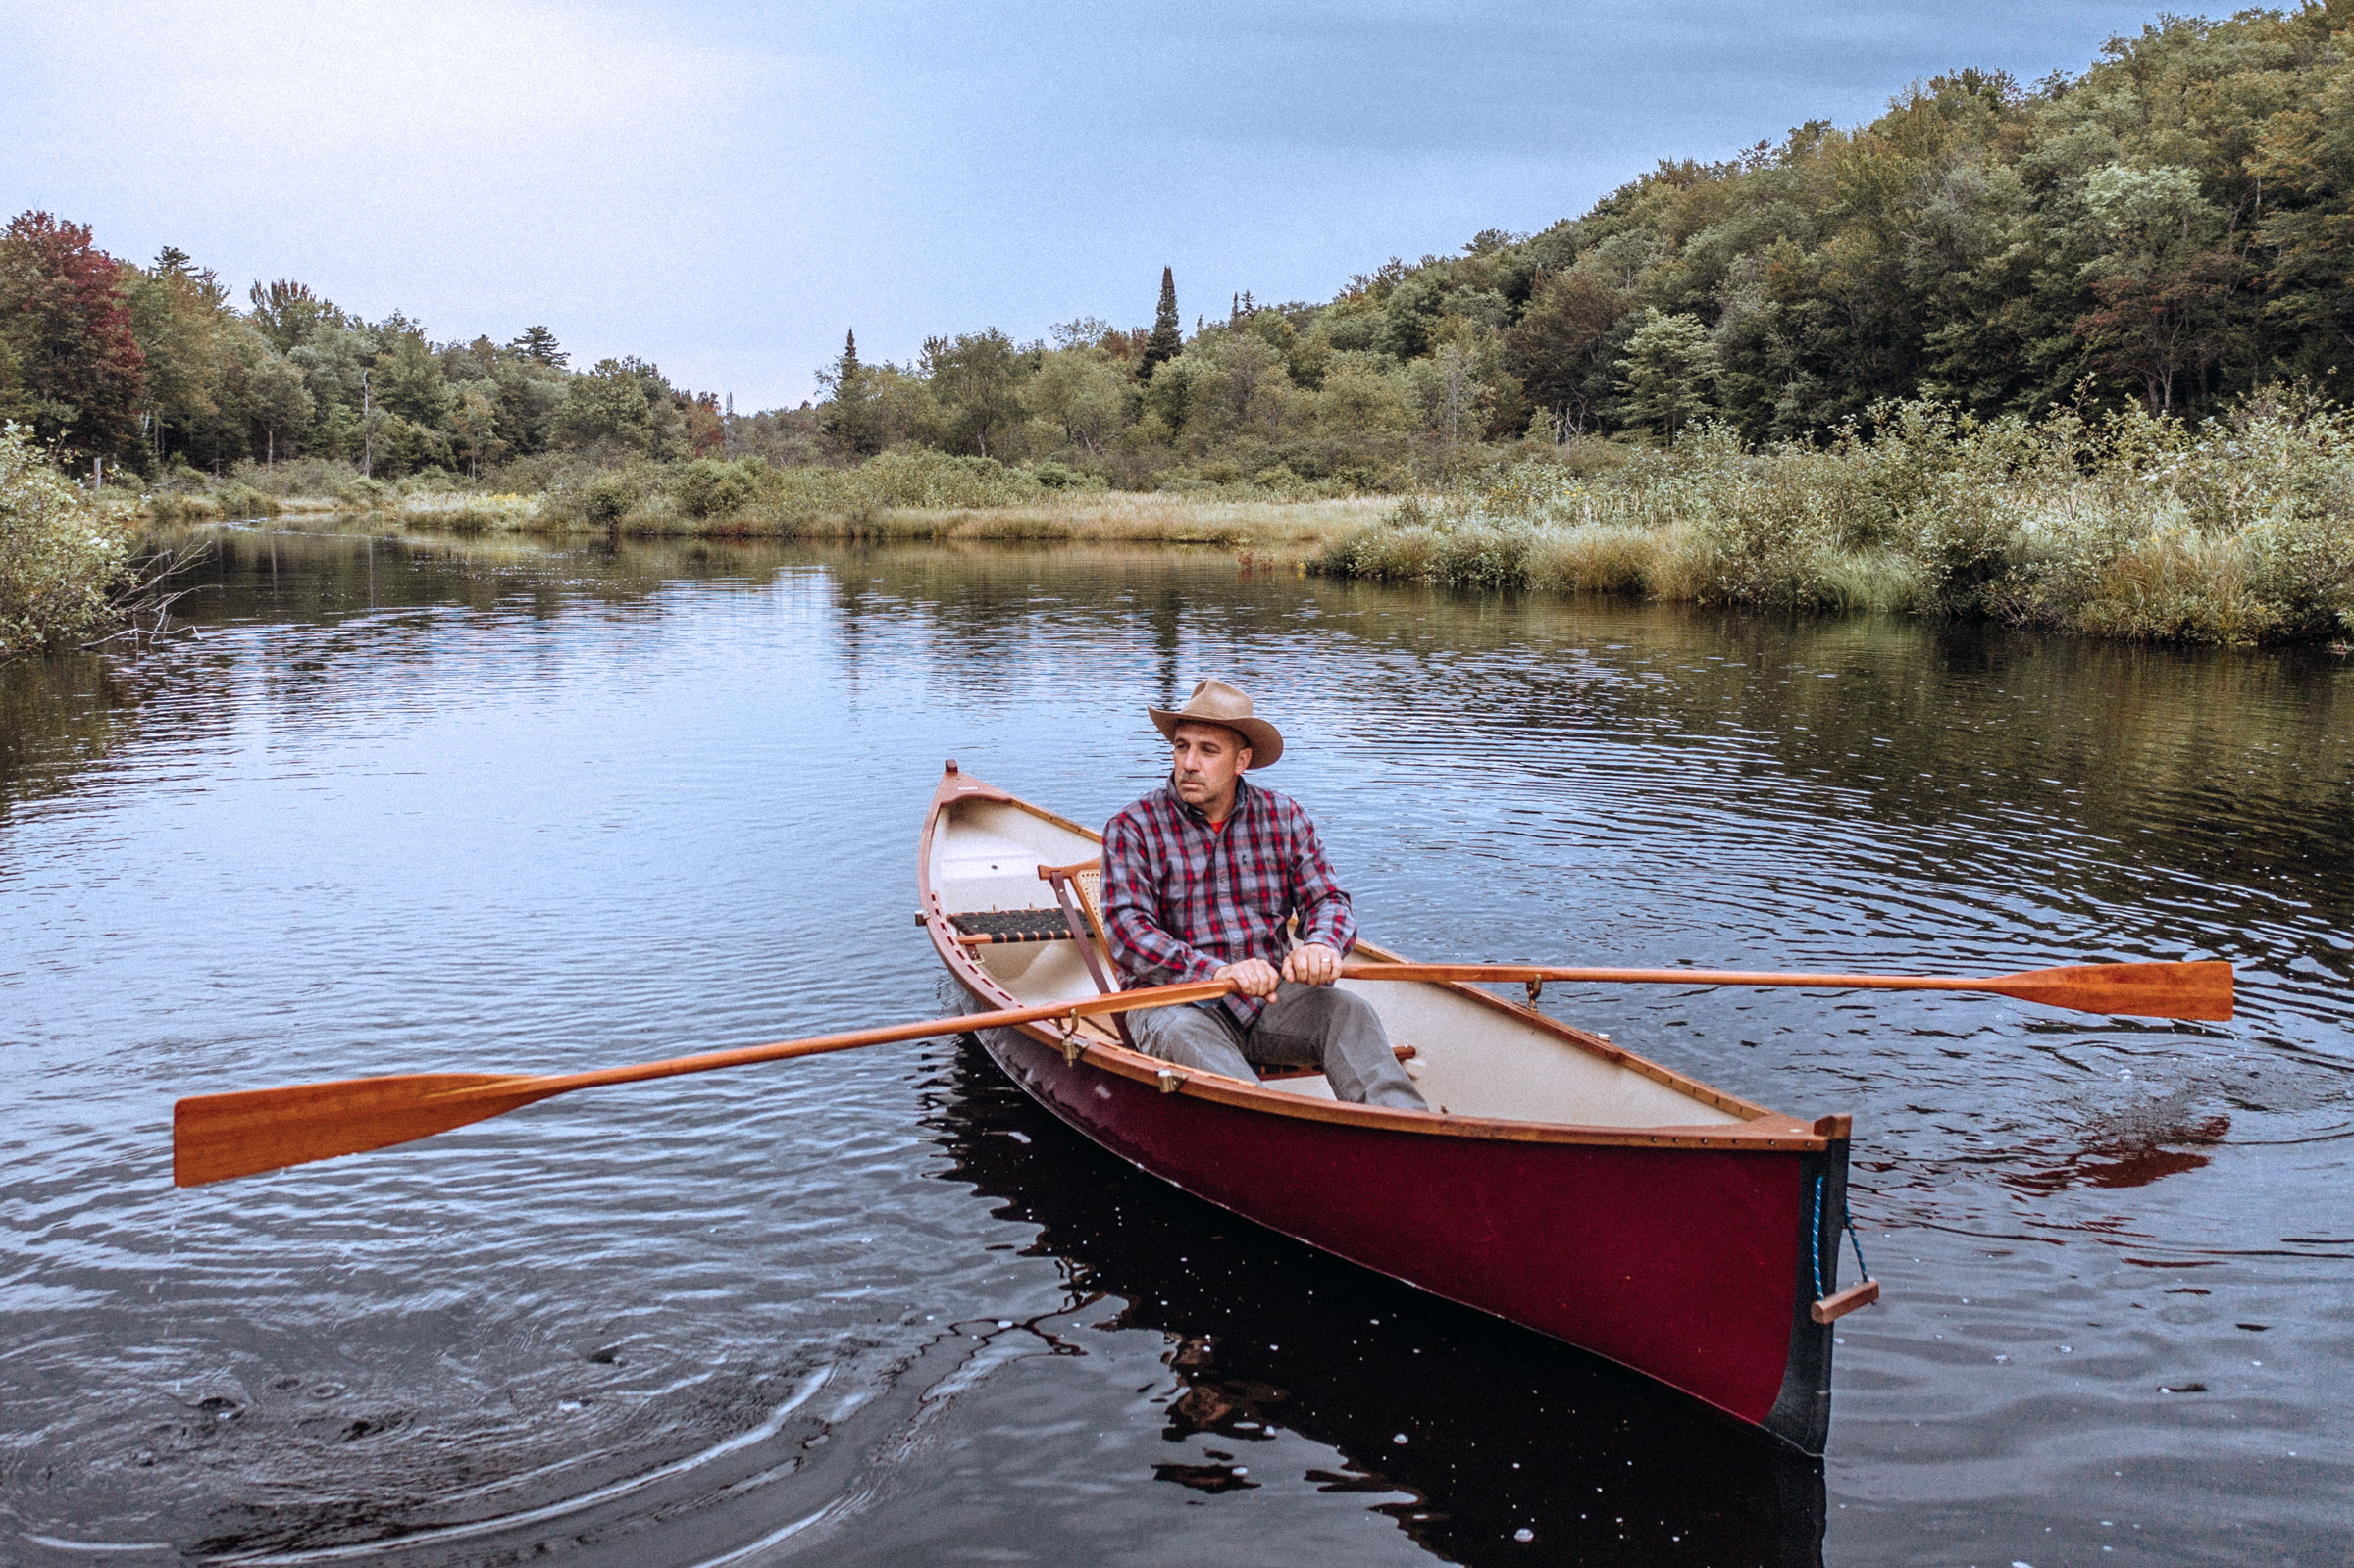
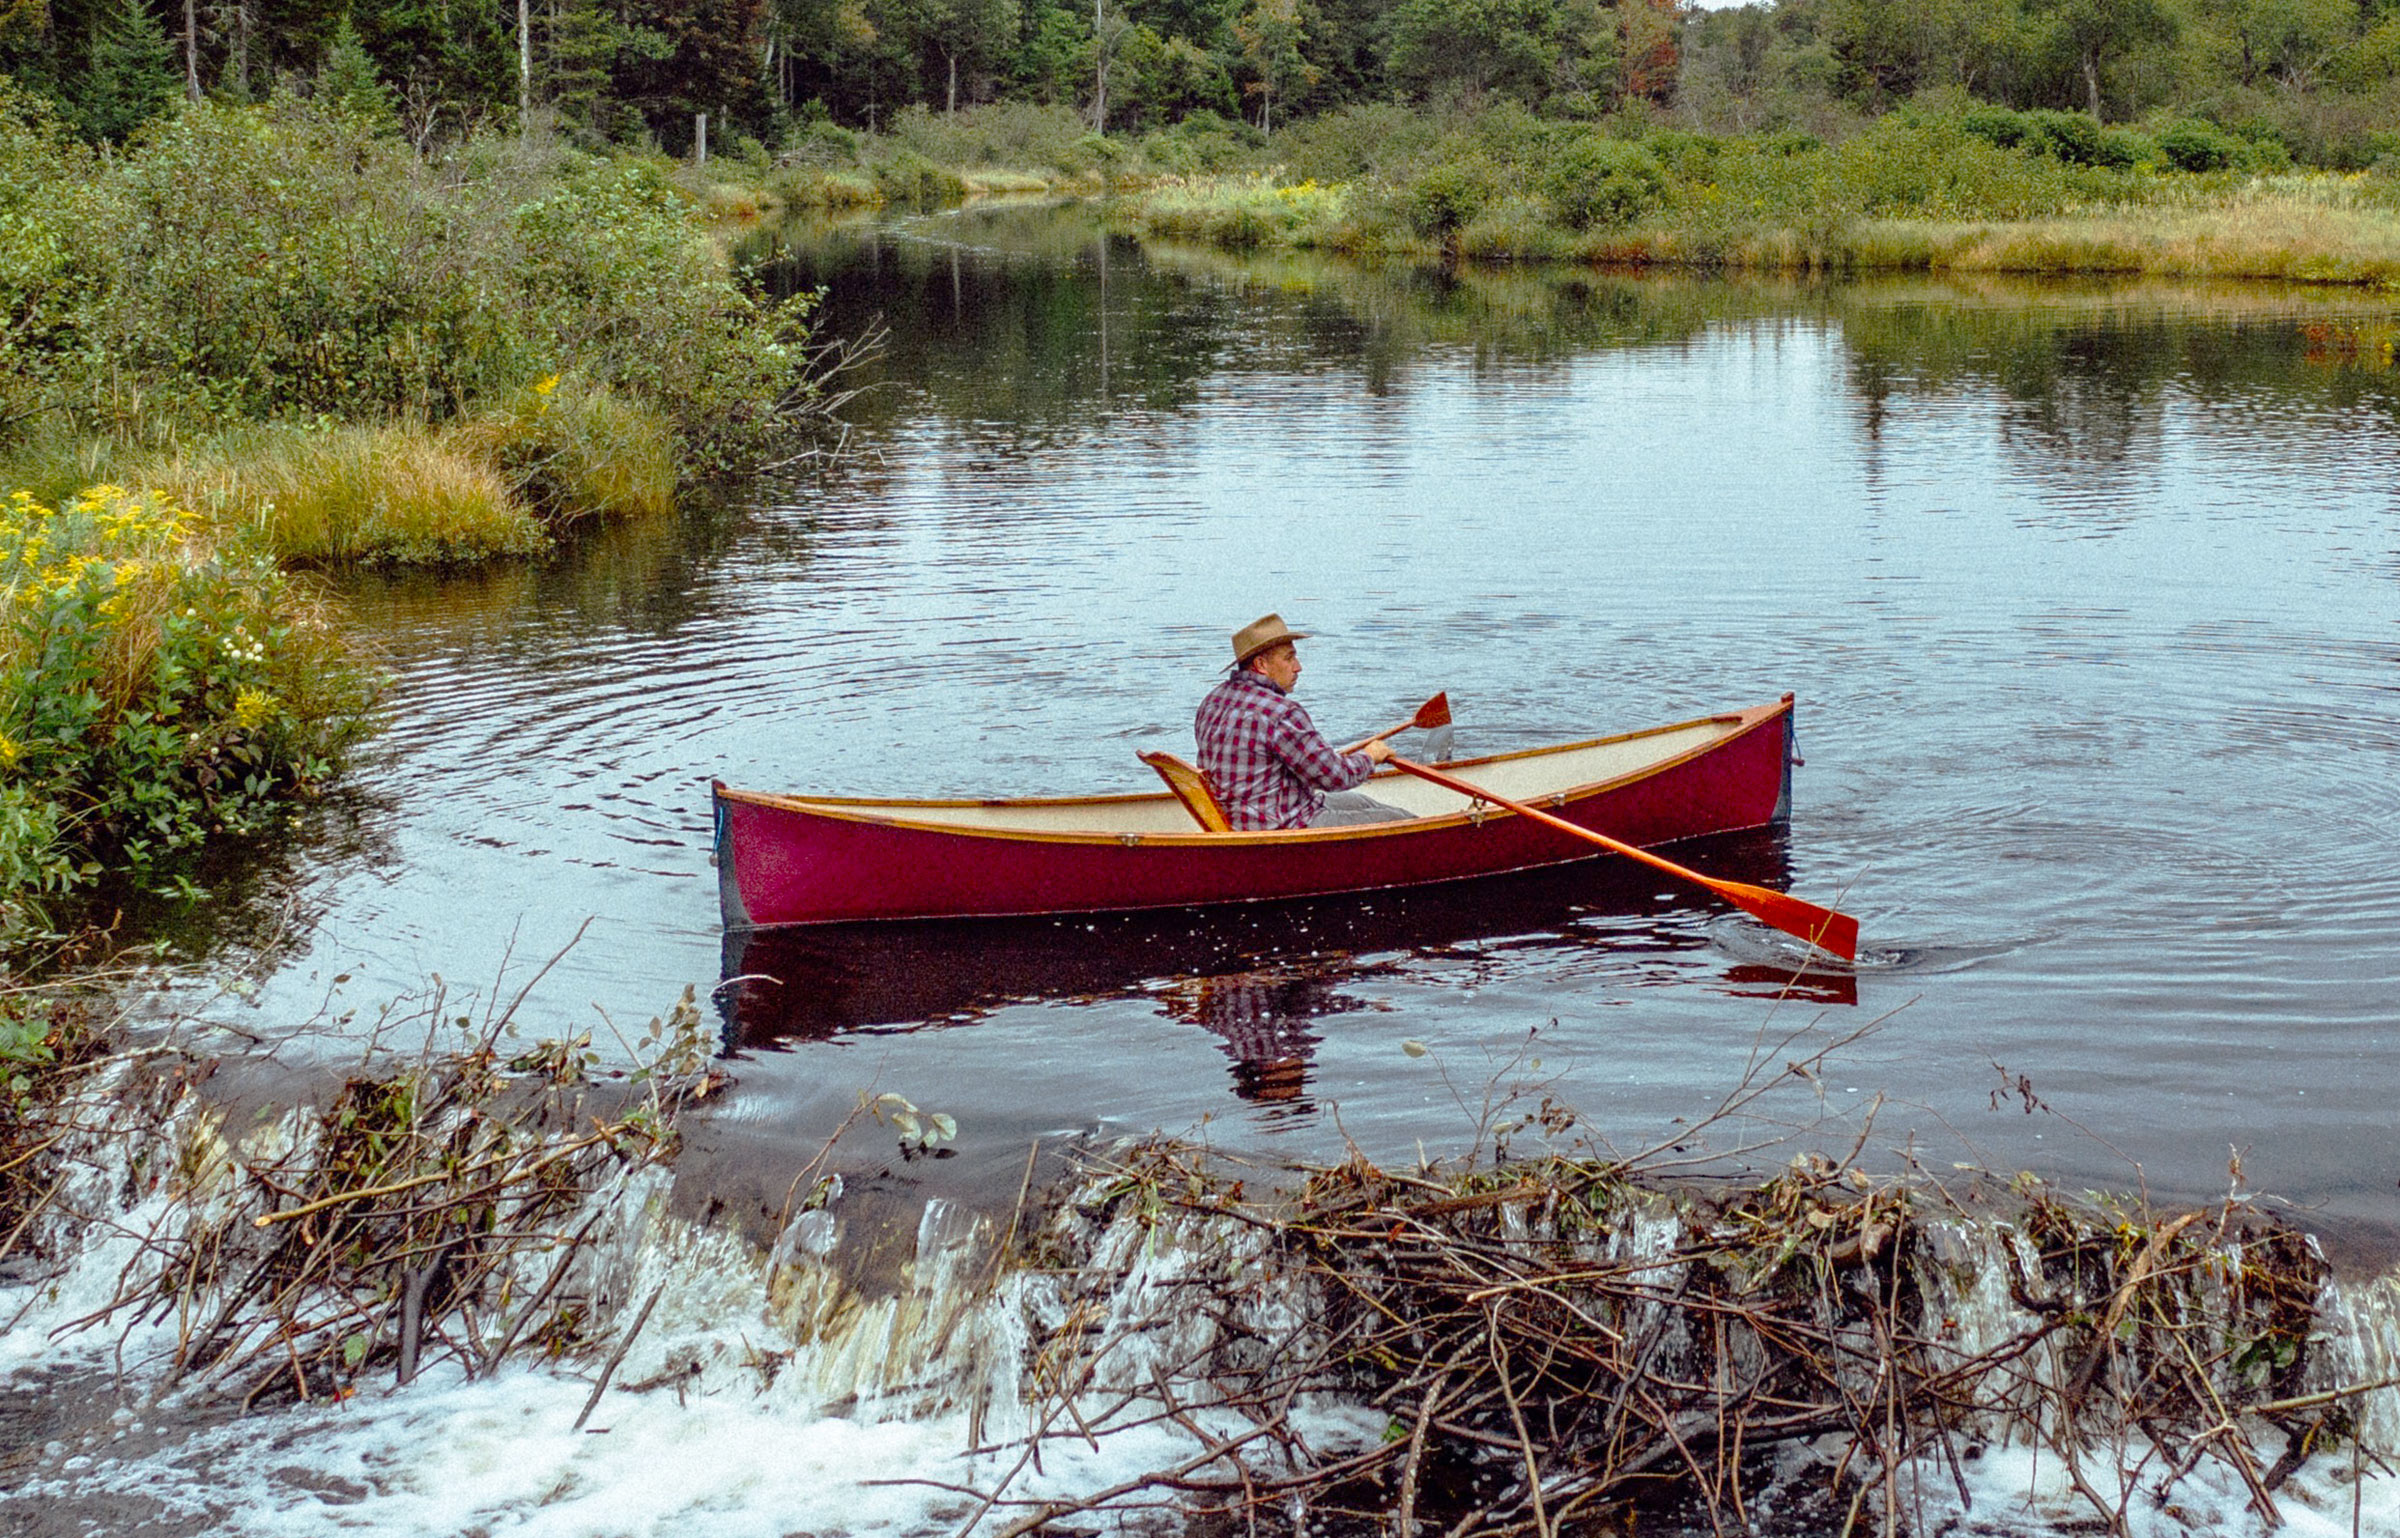
For a solo paddler to get reasonable trim, a good option is to sit backward on the forward thwart and paddle stern first. The new bow is slightly elevated.
A single paddler can then kneel forward of the stern seat or place some form of ballast up front to lower the bow. Another trick for a solo paddler is to row the canoe stern-first from the bow seat to help get the balance closer to amidships. However, a bit of bow-up trim can be helpful to take advantage of a stern breeze. In choppy water the canoe rides dry, and in small following waves never once have we felt that the canoe was in danger of broaching. Our canoe has capsized only once, when Audrey’s father mistimed jumping aboard during a beach launch.
For better trim while paddling solo, kneeling close to the center thwart works well. The bow here is over a trough; in flat water, it would be in contact with the water.
The canoe is well laid out with thoughtfully placed bow and stern seats. The seats are at a good height for the average adult, but the leg room gets a little tight up in the bow. It paddles well with tandem crew. There is a thwart amidships and one farther back which make do as seats for solo paddling.
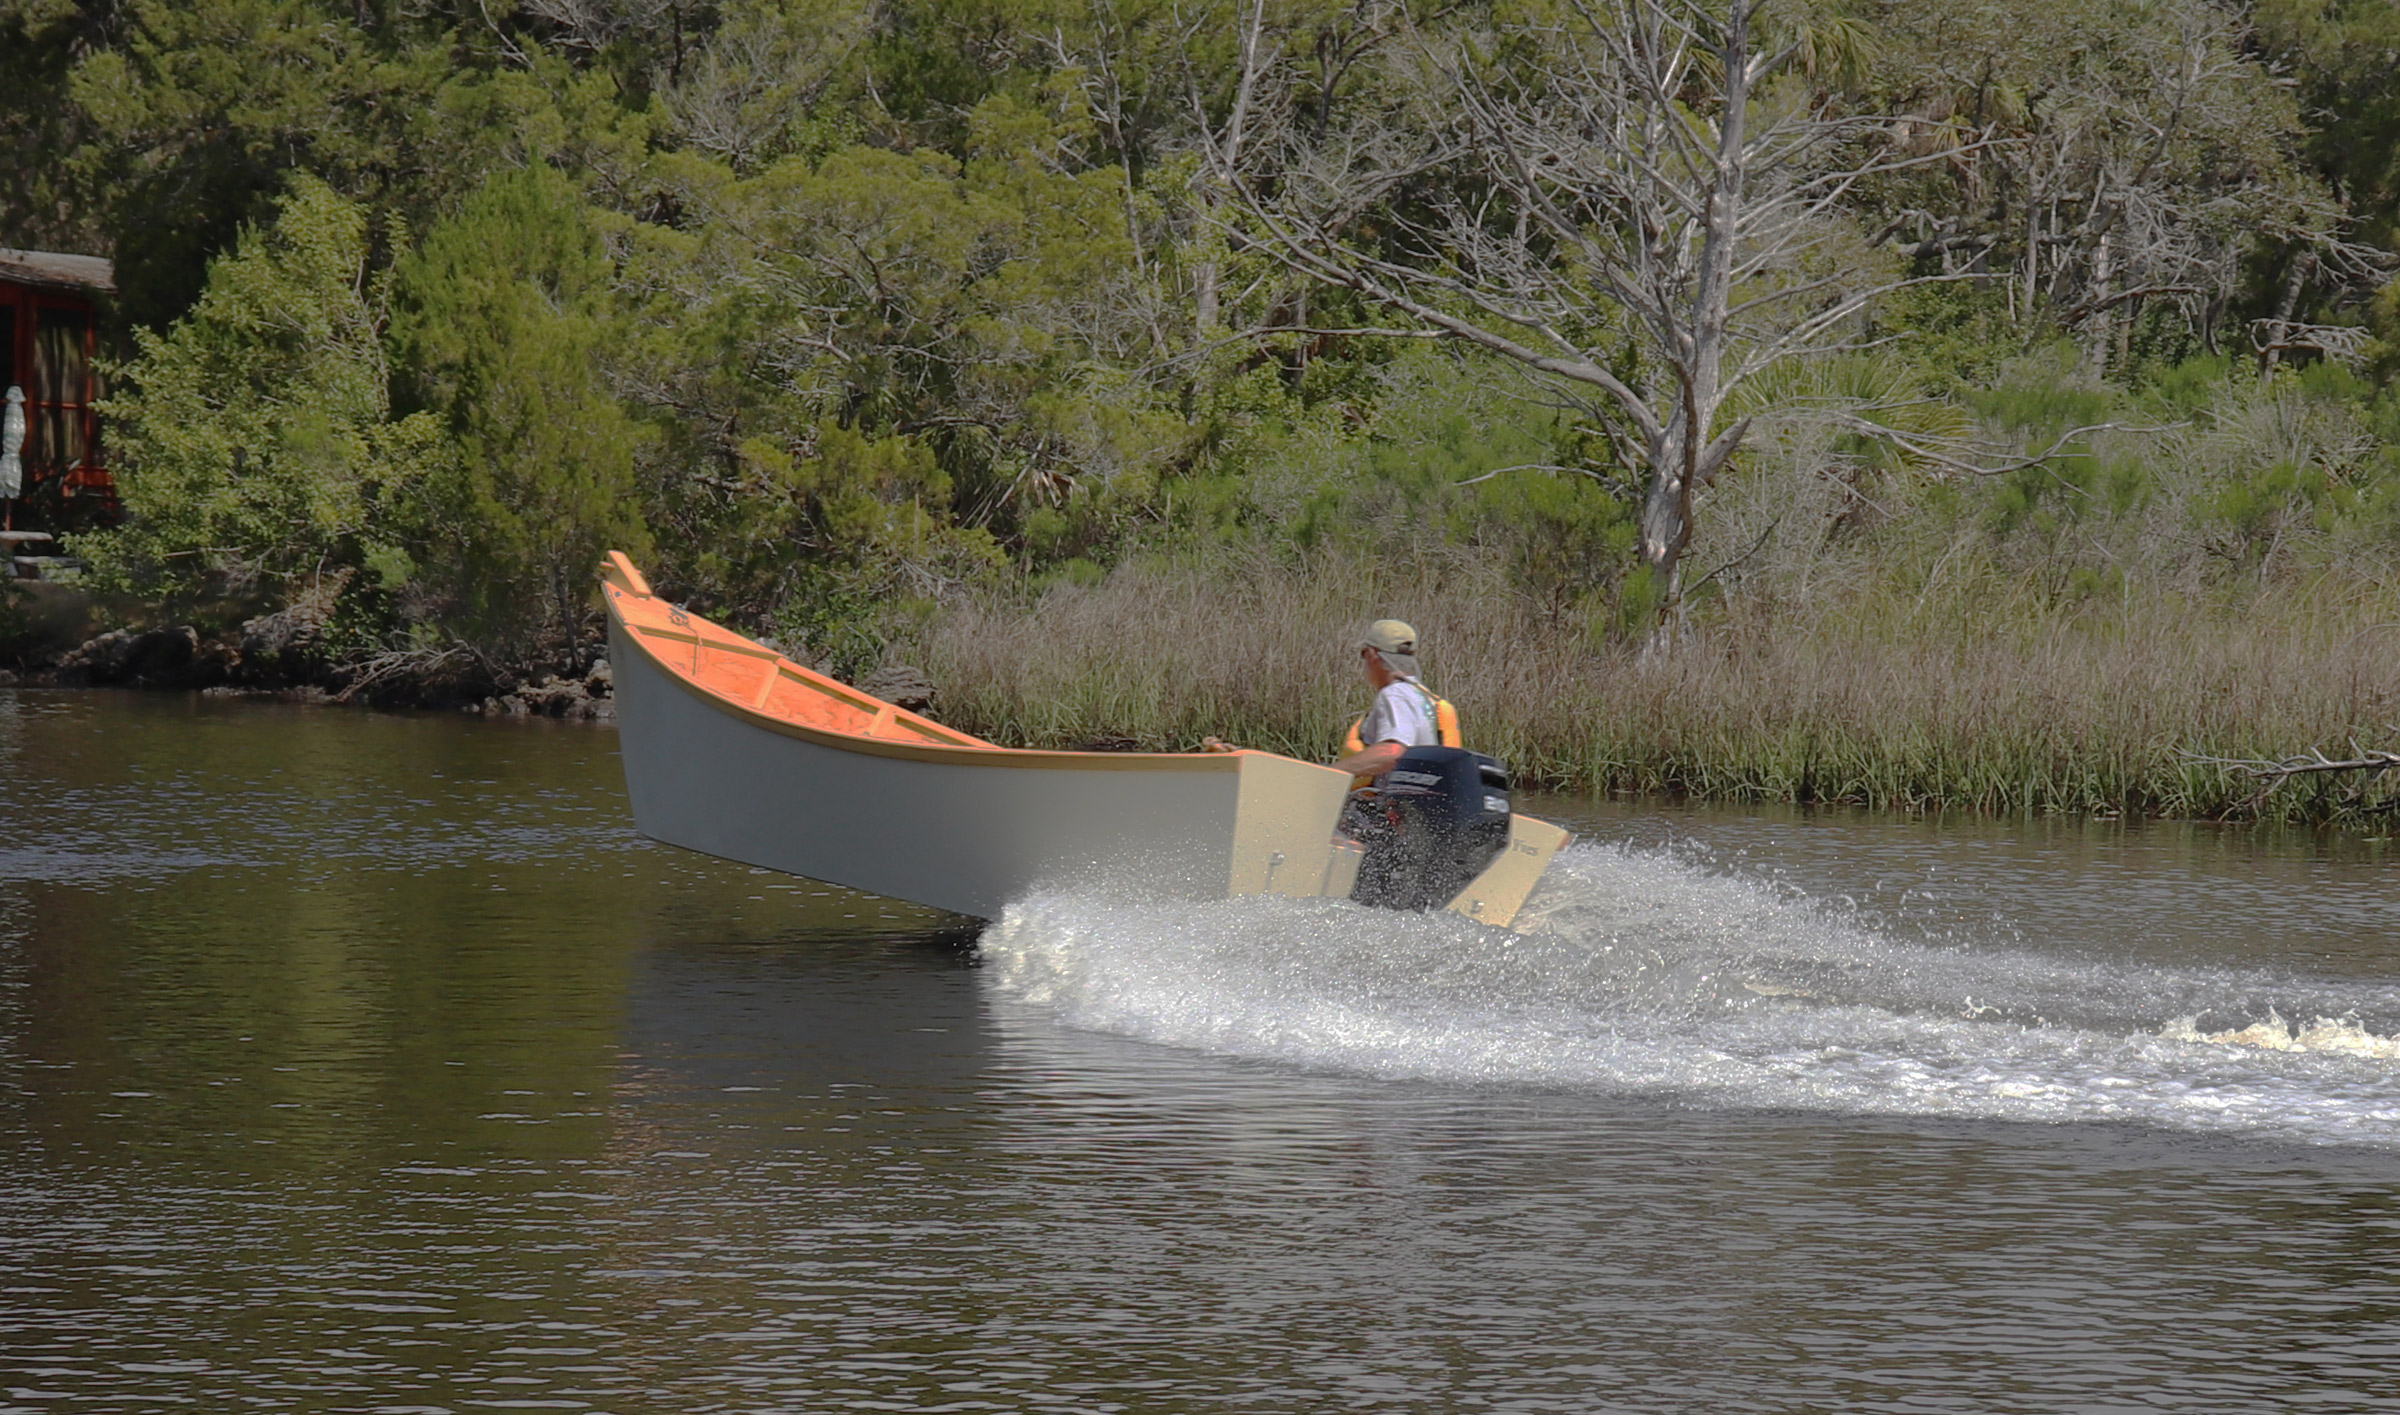
We have had three adults on board without issue, and the canoe is most at home with an adult in the stern and a junior paddler on the bow seat. With an enormous amount of room for gear, the canoe is a true utility watercraft that can be paddled, sailed, motored, or rowed. Motor brackets and rowing rigs are available from Marathon. With our 24-lb-thrust trolling motor we cruised for an hour, and had a top speed of just under 3 knots. Used sail rigs can be found online—either a 65-sq-ft gunter or a 45-sq-ft lateen—but not currently offered by Marathon.
The canoe’s overall design, construction, and material are outstanding; as a former aviation mechanic, I am impressed with the craftsmanship. Grumman is confident with their craftsmanship also—to the original owner they offer a lifetime guarantee for hull punctures and a five-year warranty against defects in workmanship.
Grumman canoes are virtually maintenance free, save for a periodic freshwater rinse. The manufacturer advises that a good-quality paste wax can be used to maintain the aluminum’s shine. We leave our canoe by the shoreline of our saltwater bay in Florida through most of the year and have seen some expected surface corrosion.
The 17′ Double-Ender is a versatile, stable canoe with enormous capacity for people and cargo, but still easy to paddle and control. The safety features are top-notch, and the canoe is self-righting and unsinkable, features built in even before the imposition of federal requirements. It can fill up with water and still float you to shore. Our canoe, now well over 60 years old, is a testament to the 17′ Double-Ender’s longevity and durability: easy to paddle, comfortable, confidence-inspiring, and we know it won’t let us down.
Kent and Audrey (aka Skipper) Lewis paddle their Grumman canoe around the shorelines of northwest Florida and ponder why canoeing is not as popular today as it was in its heyday in the ’70s and ’80s. They painted shark’s teeth on their canoe, SCOUT, to replicate a paint job that Audrey’s father had done on the family Grumman in the 1960s. They went a step further by incorporating the teeth into a Flying Tigers scheme, as a tribute to the First American Volunteer Group that flew in defense of China, 1941–42. Number 48 was the aircraft assigned to Flying Tigers Triple Ace “Tex” Hill.
Grumman 17′ Double-Ender Particulars
Length: 17′
Beam: 36 1⁄8″
Depth amidships: 13 1⁄8″
Outboard: 5 hp max
Capacity: 755 lbs max, 655 lbs persons
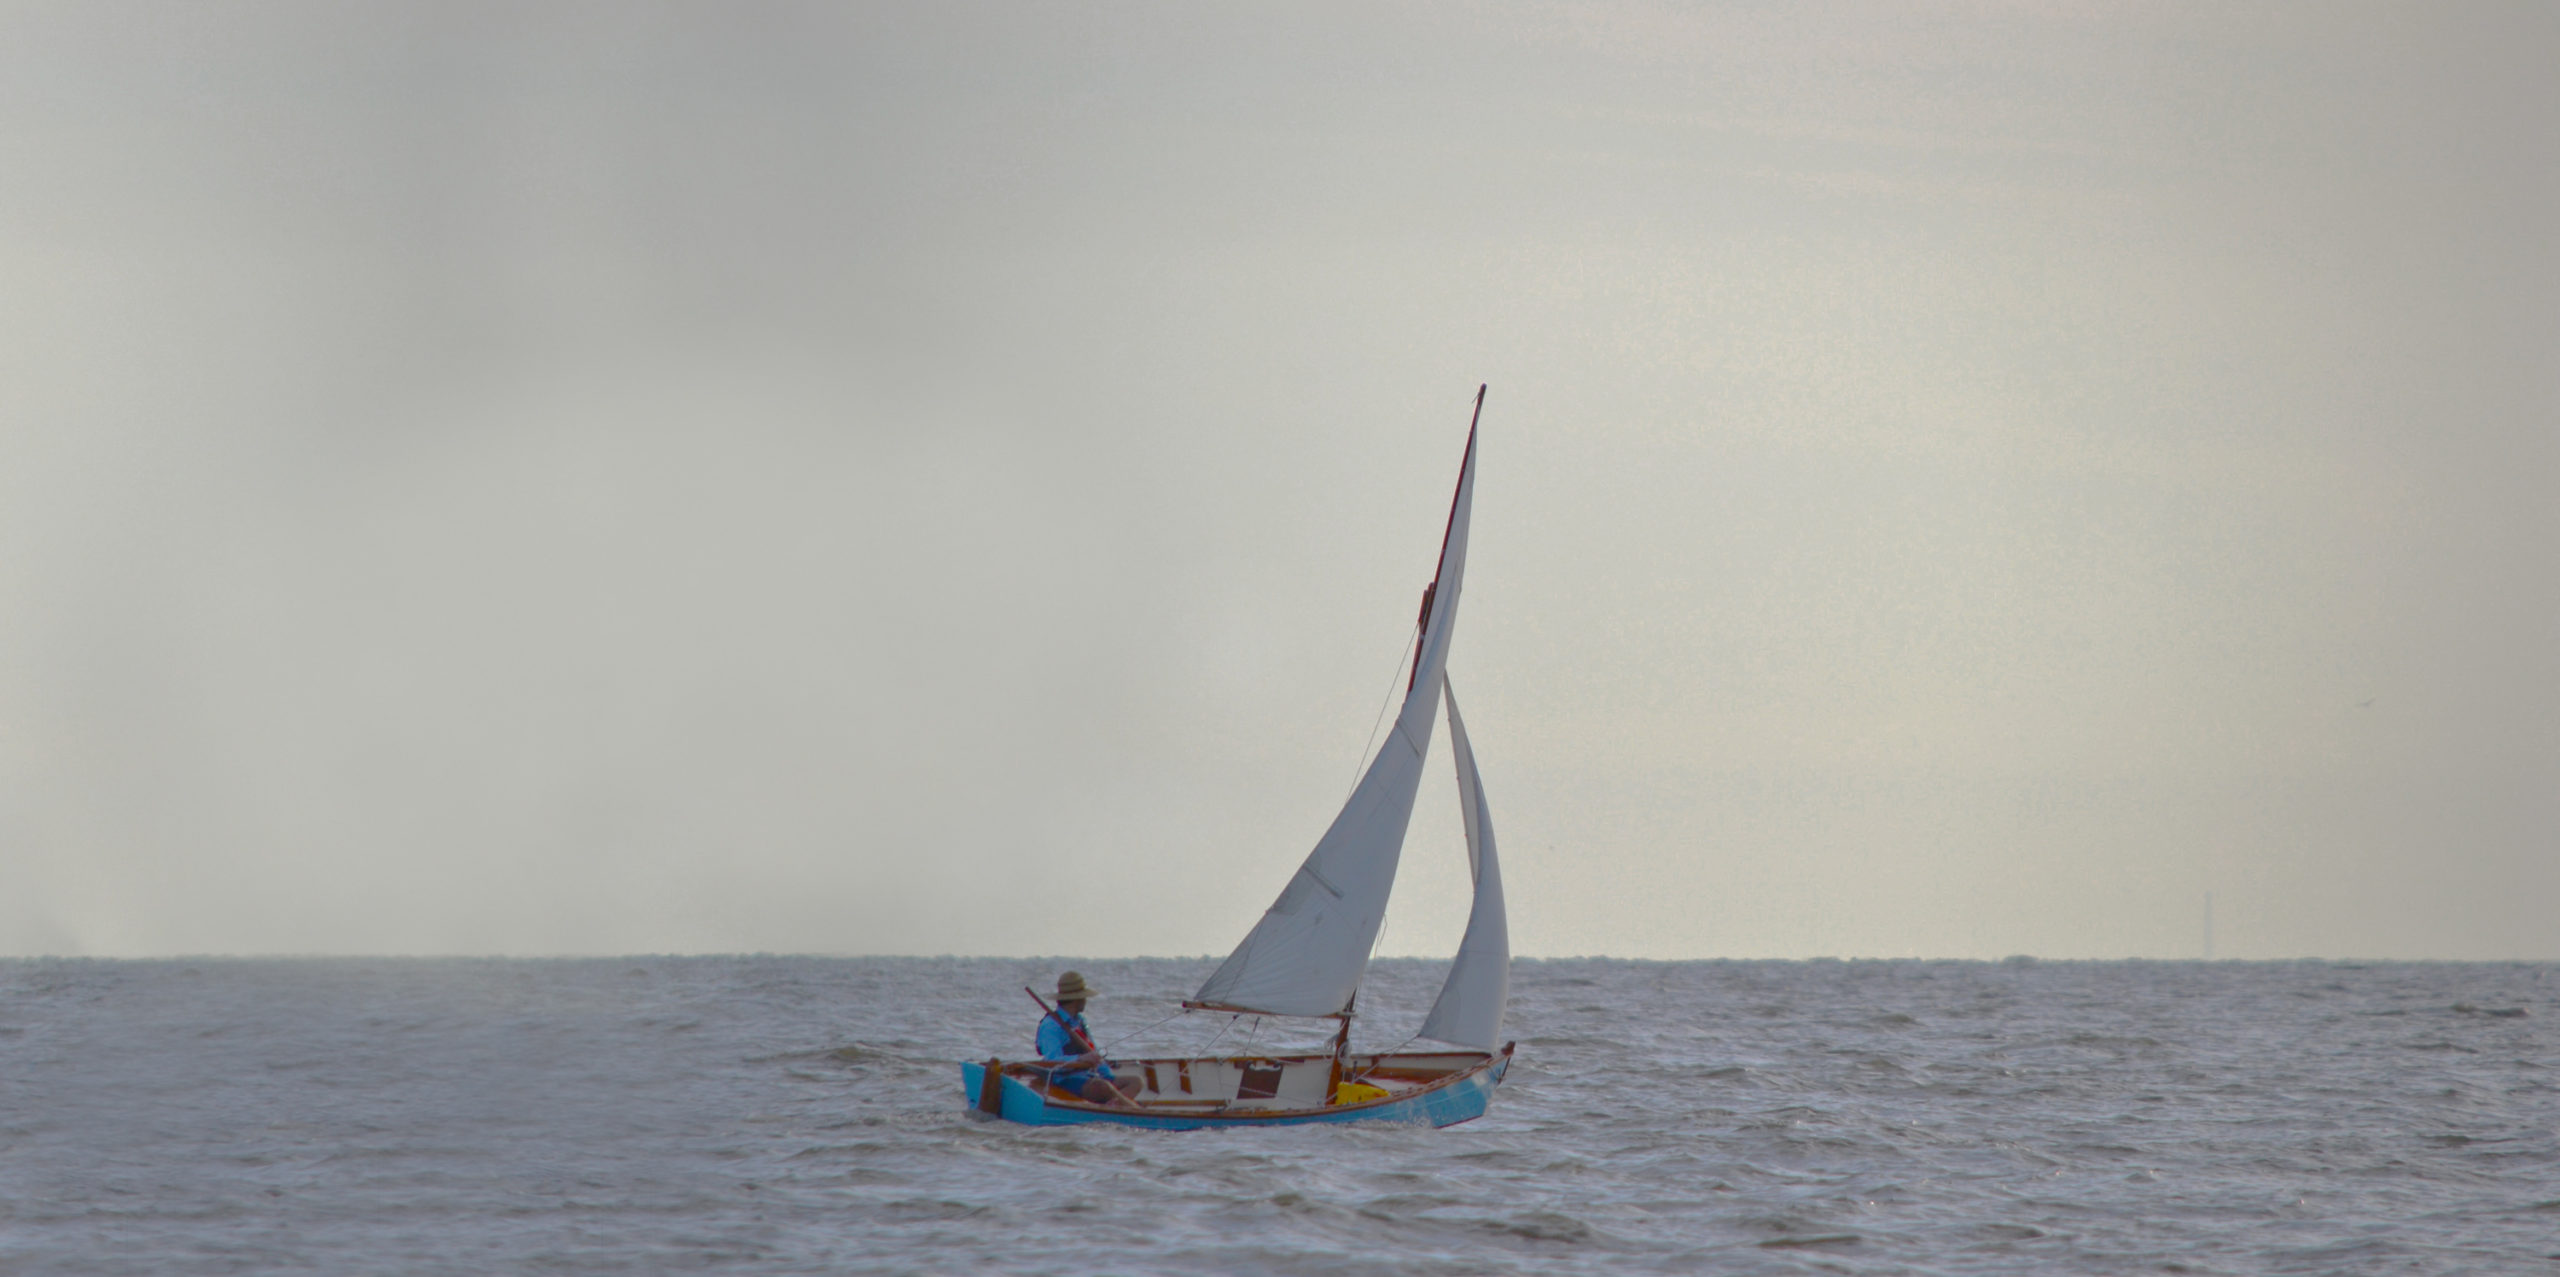
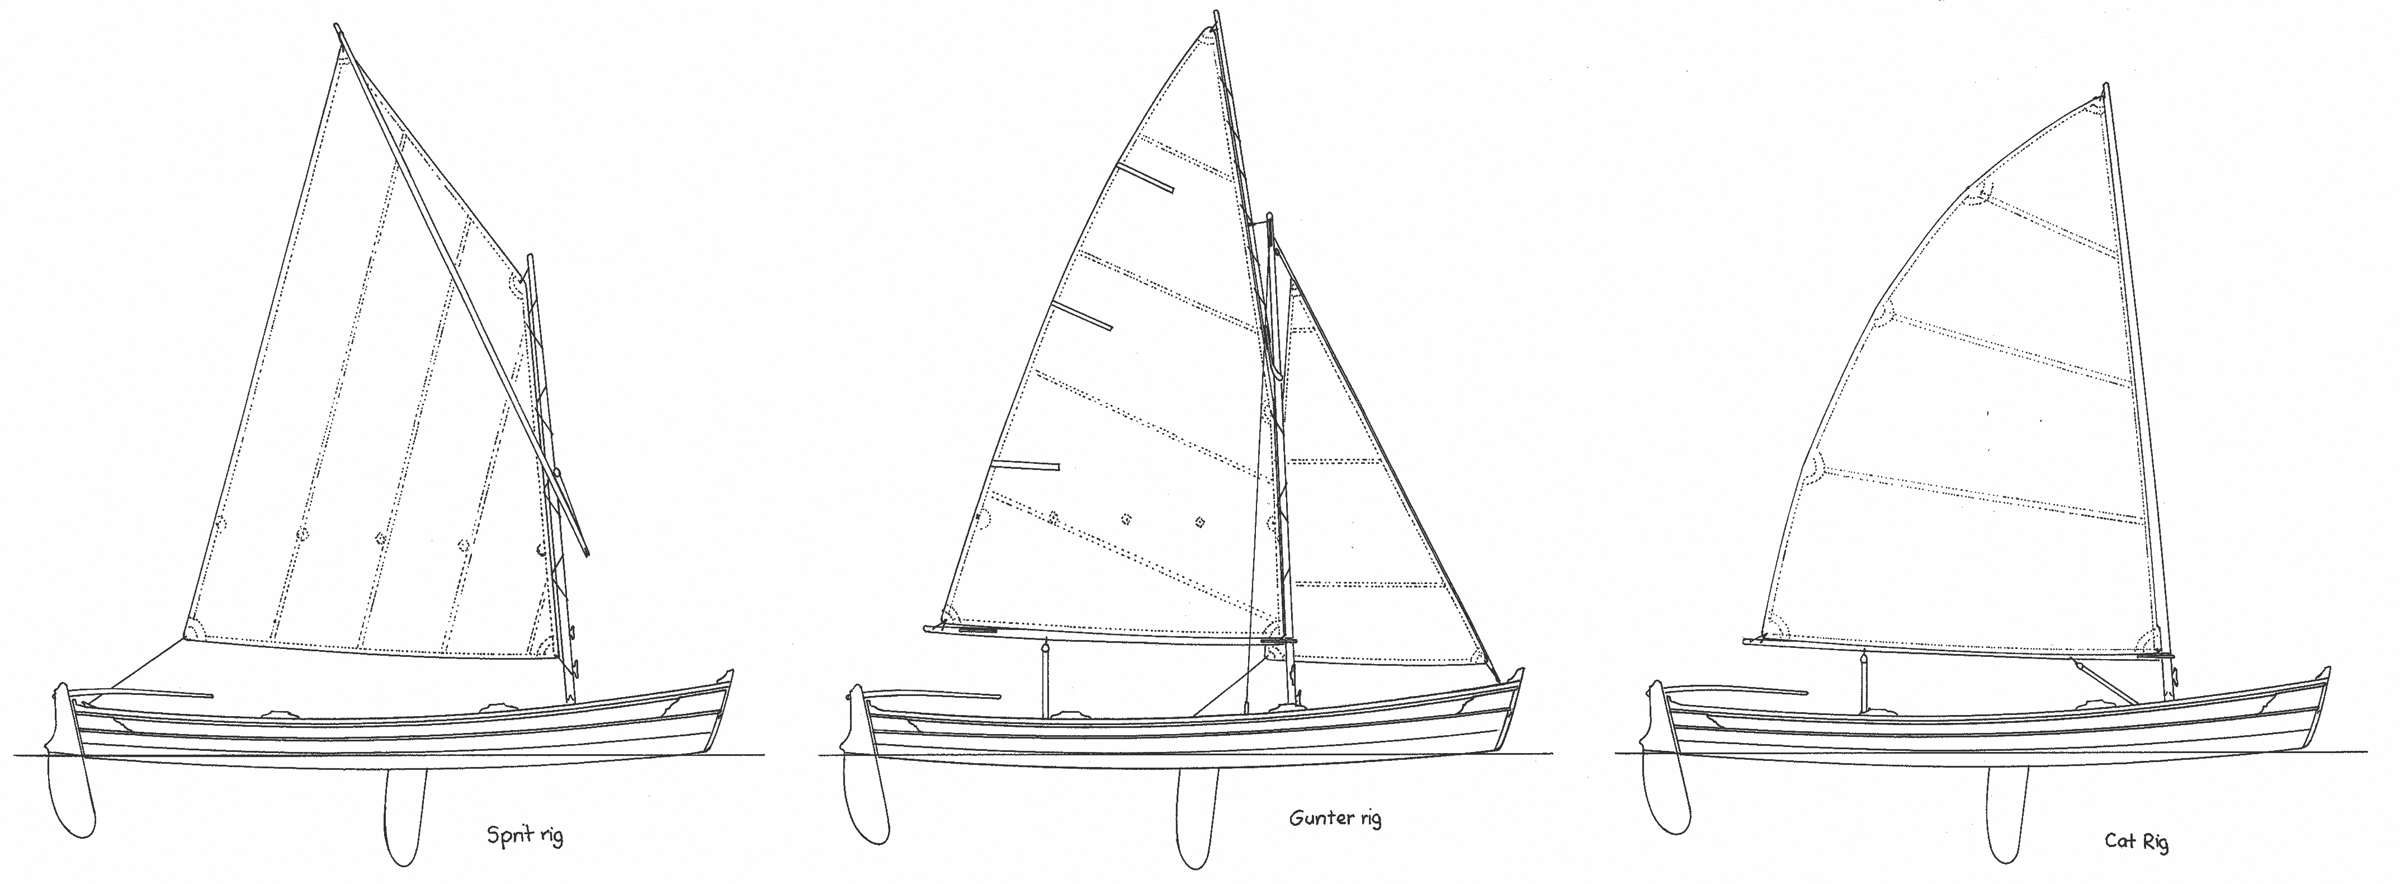
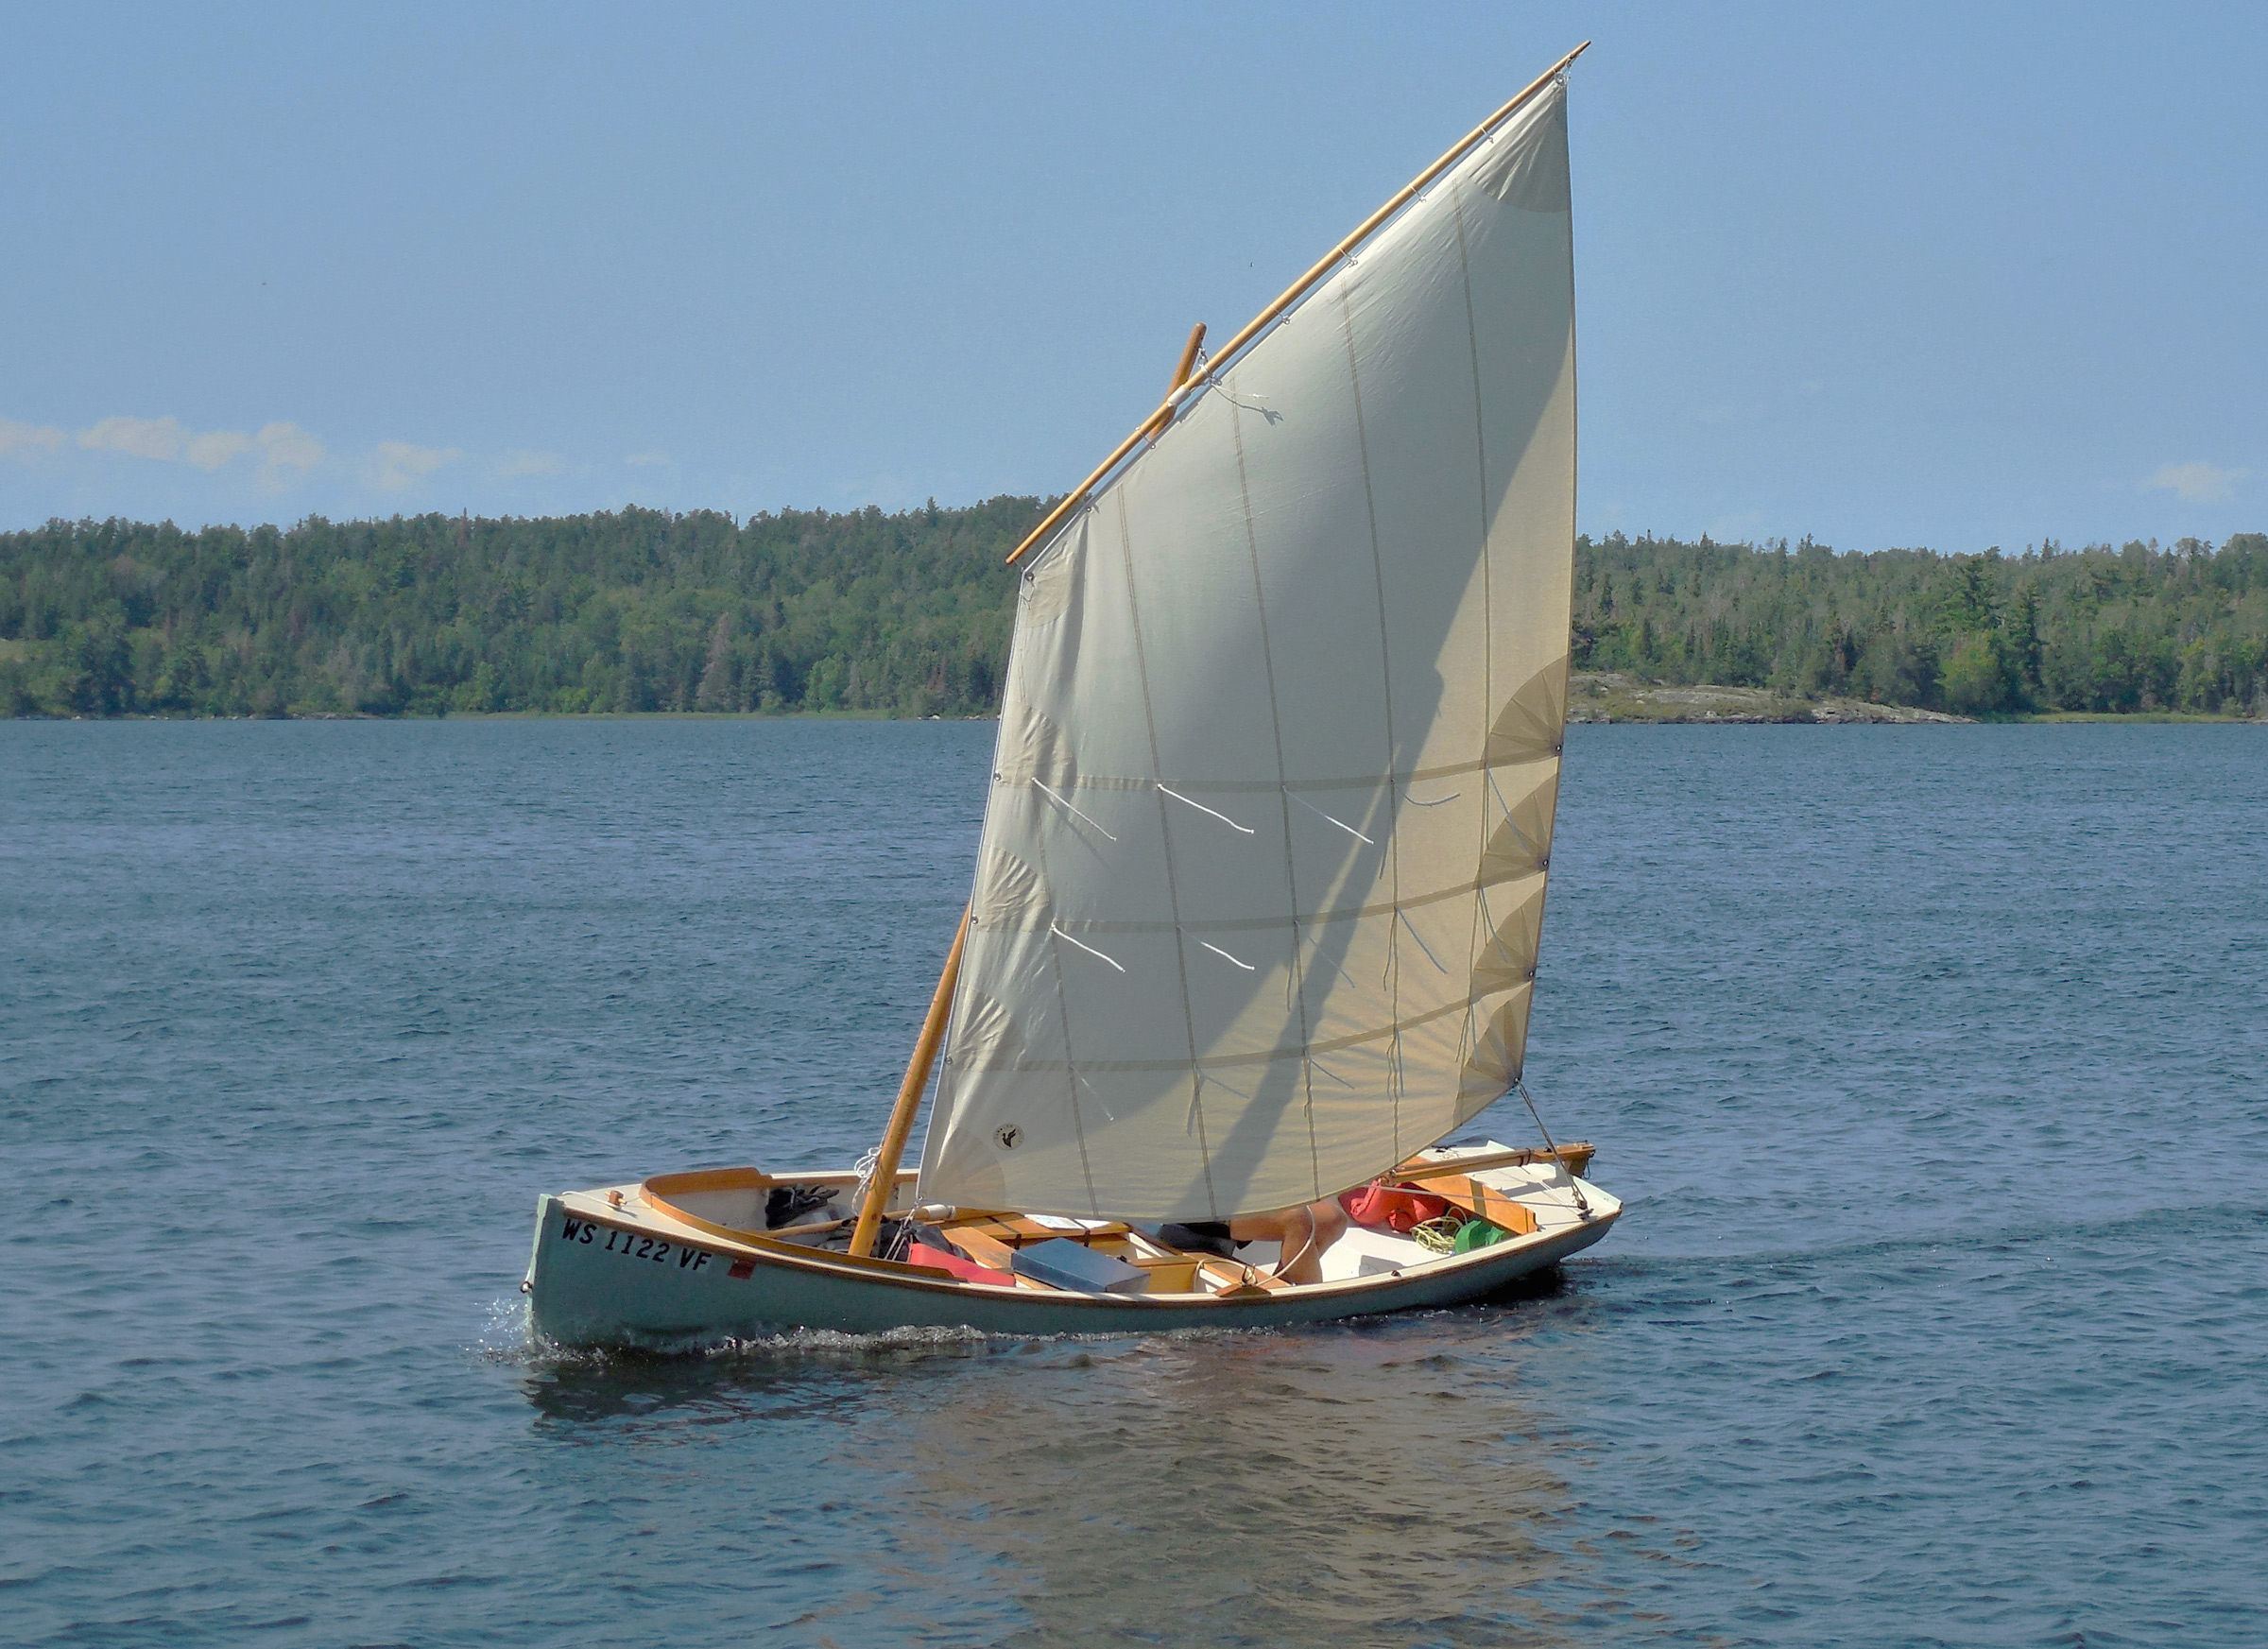
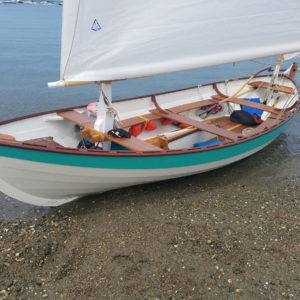
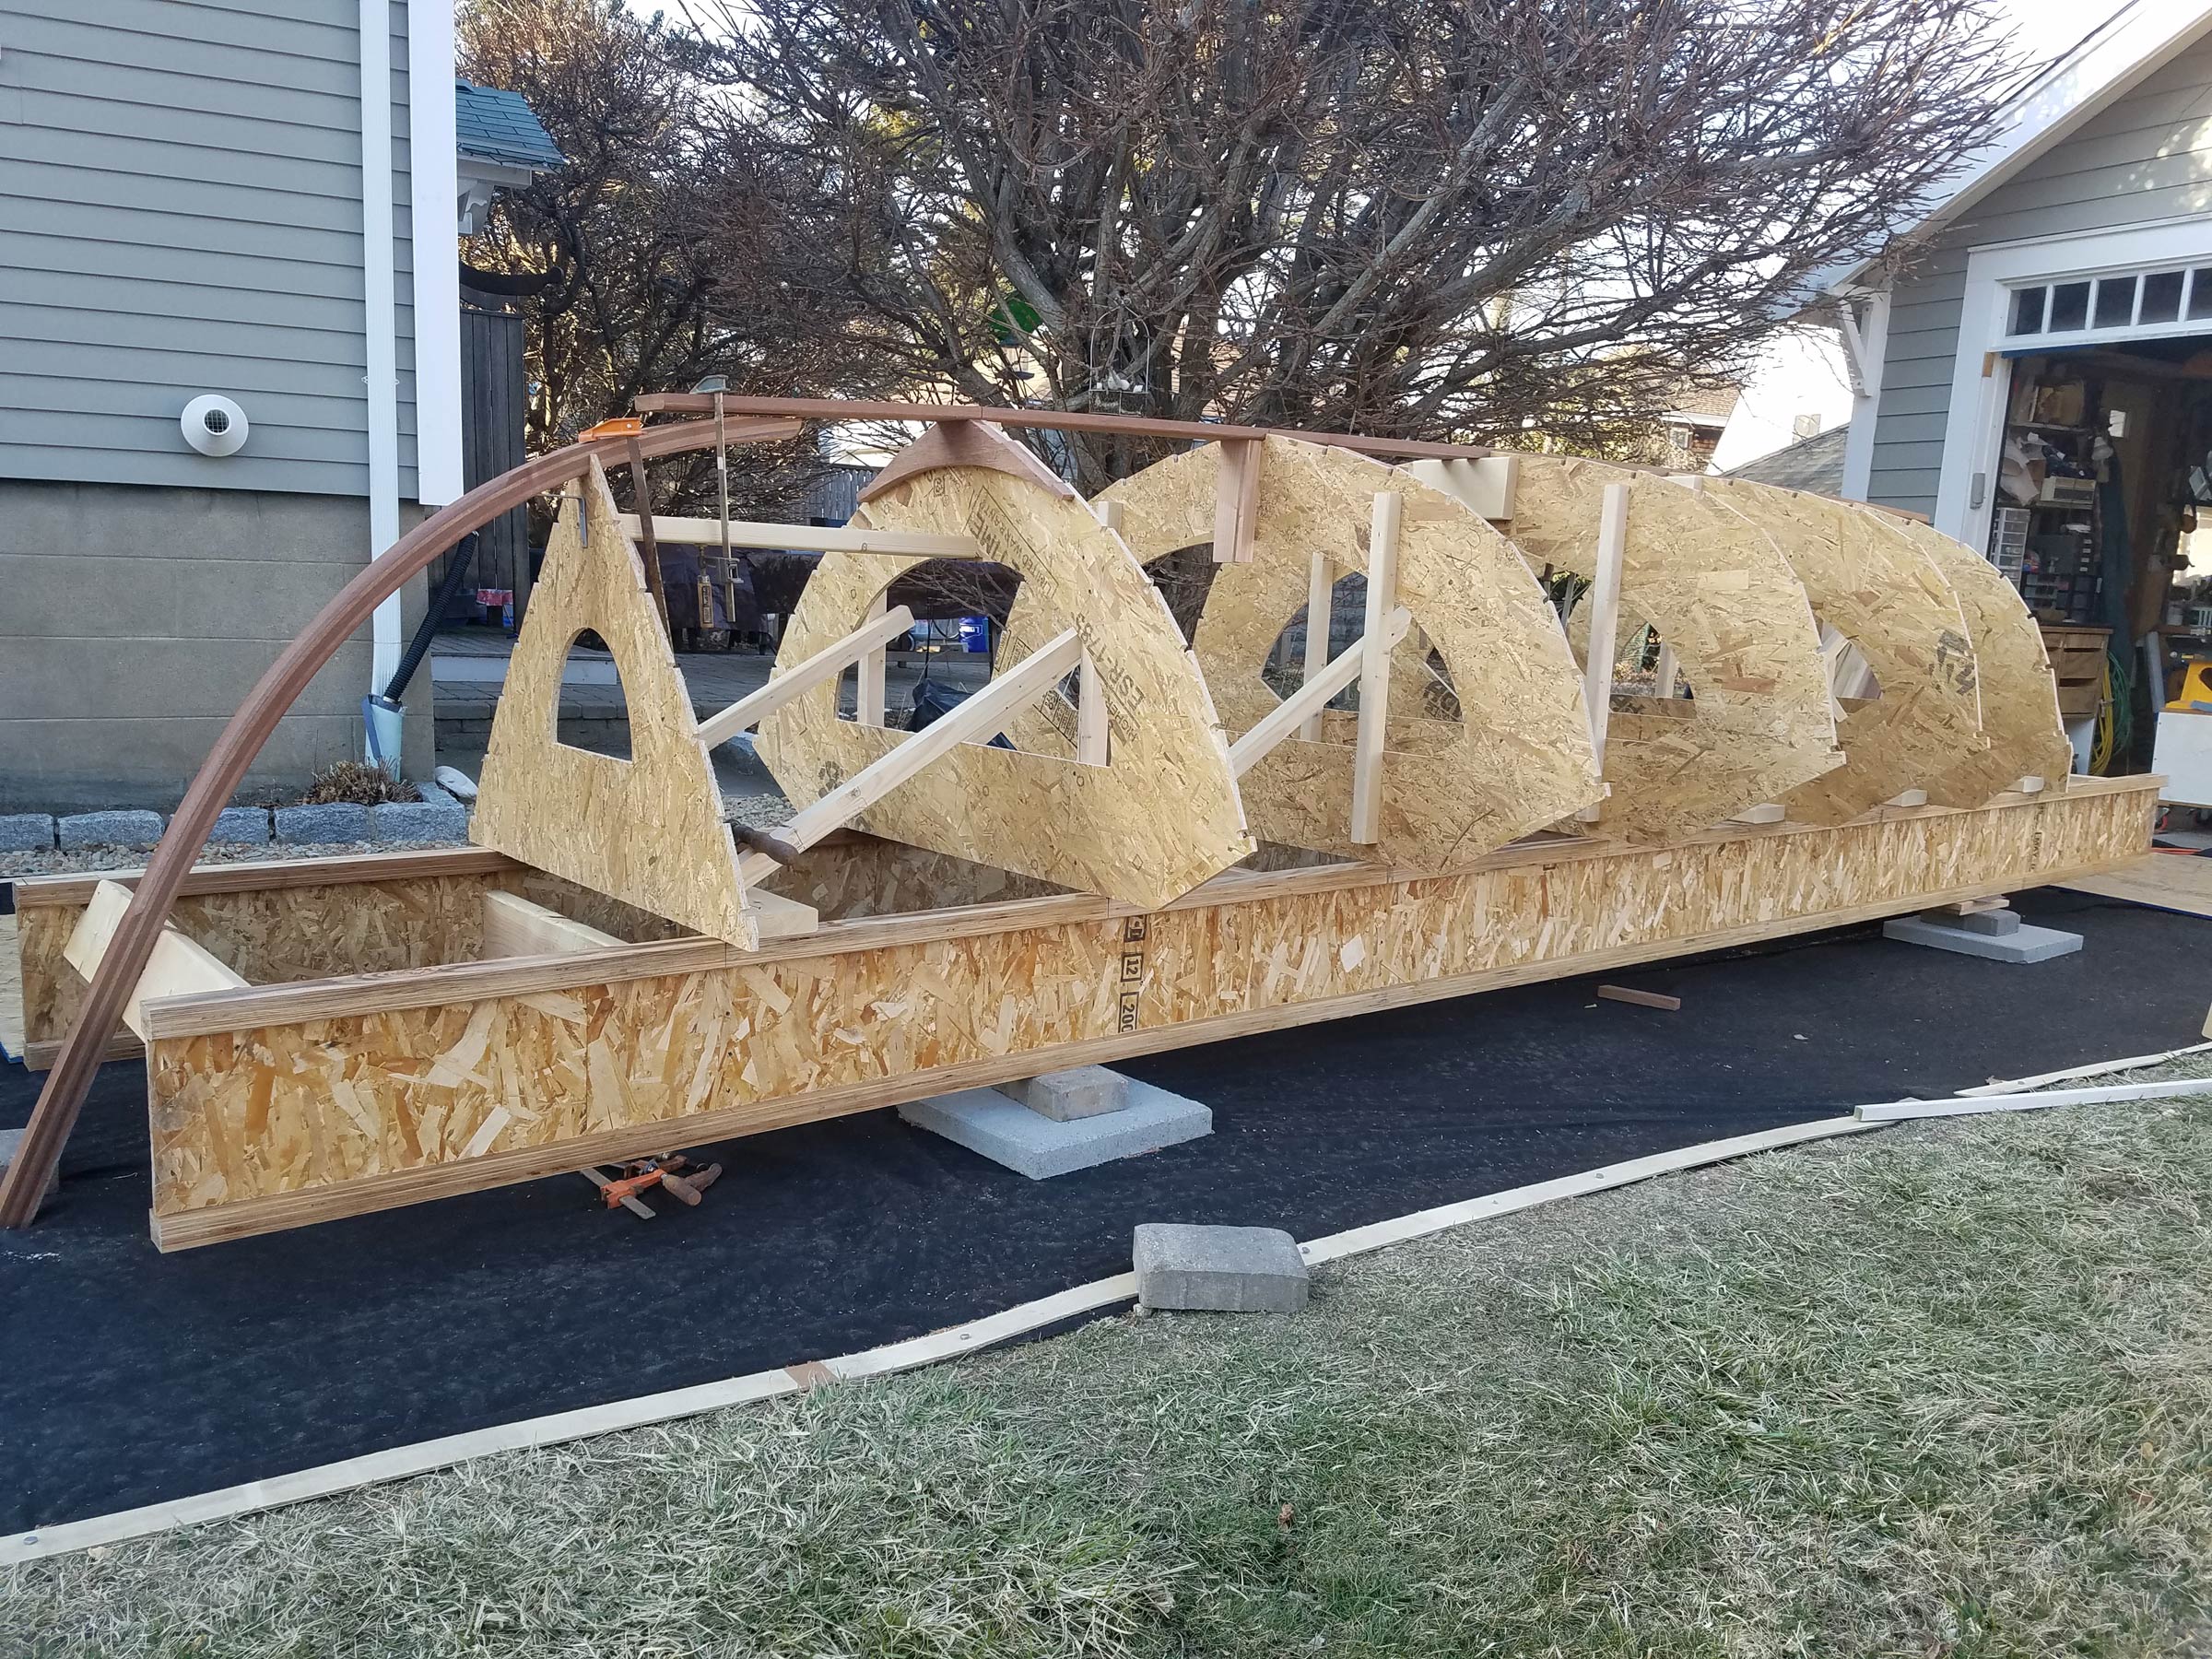
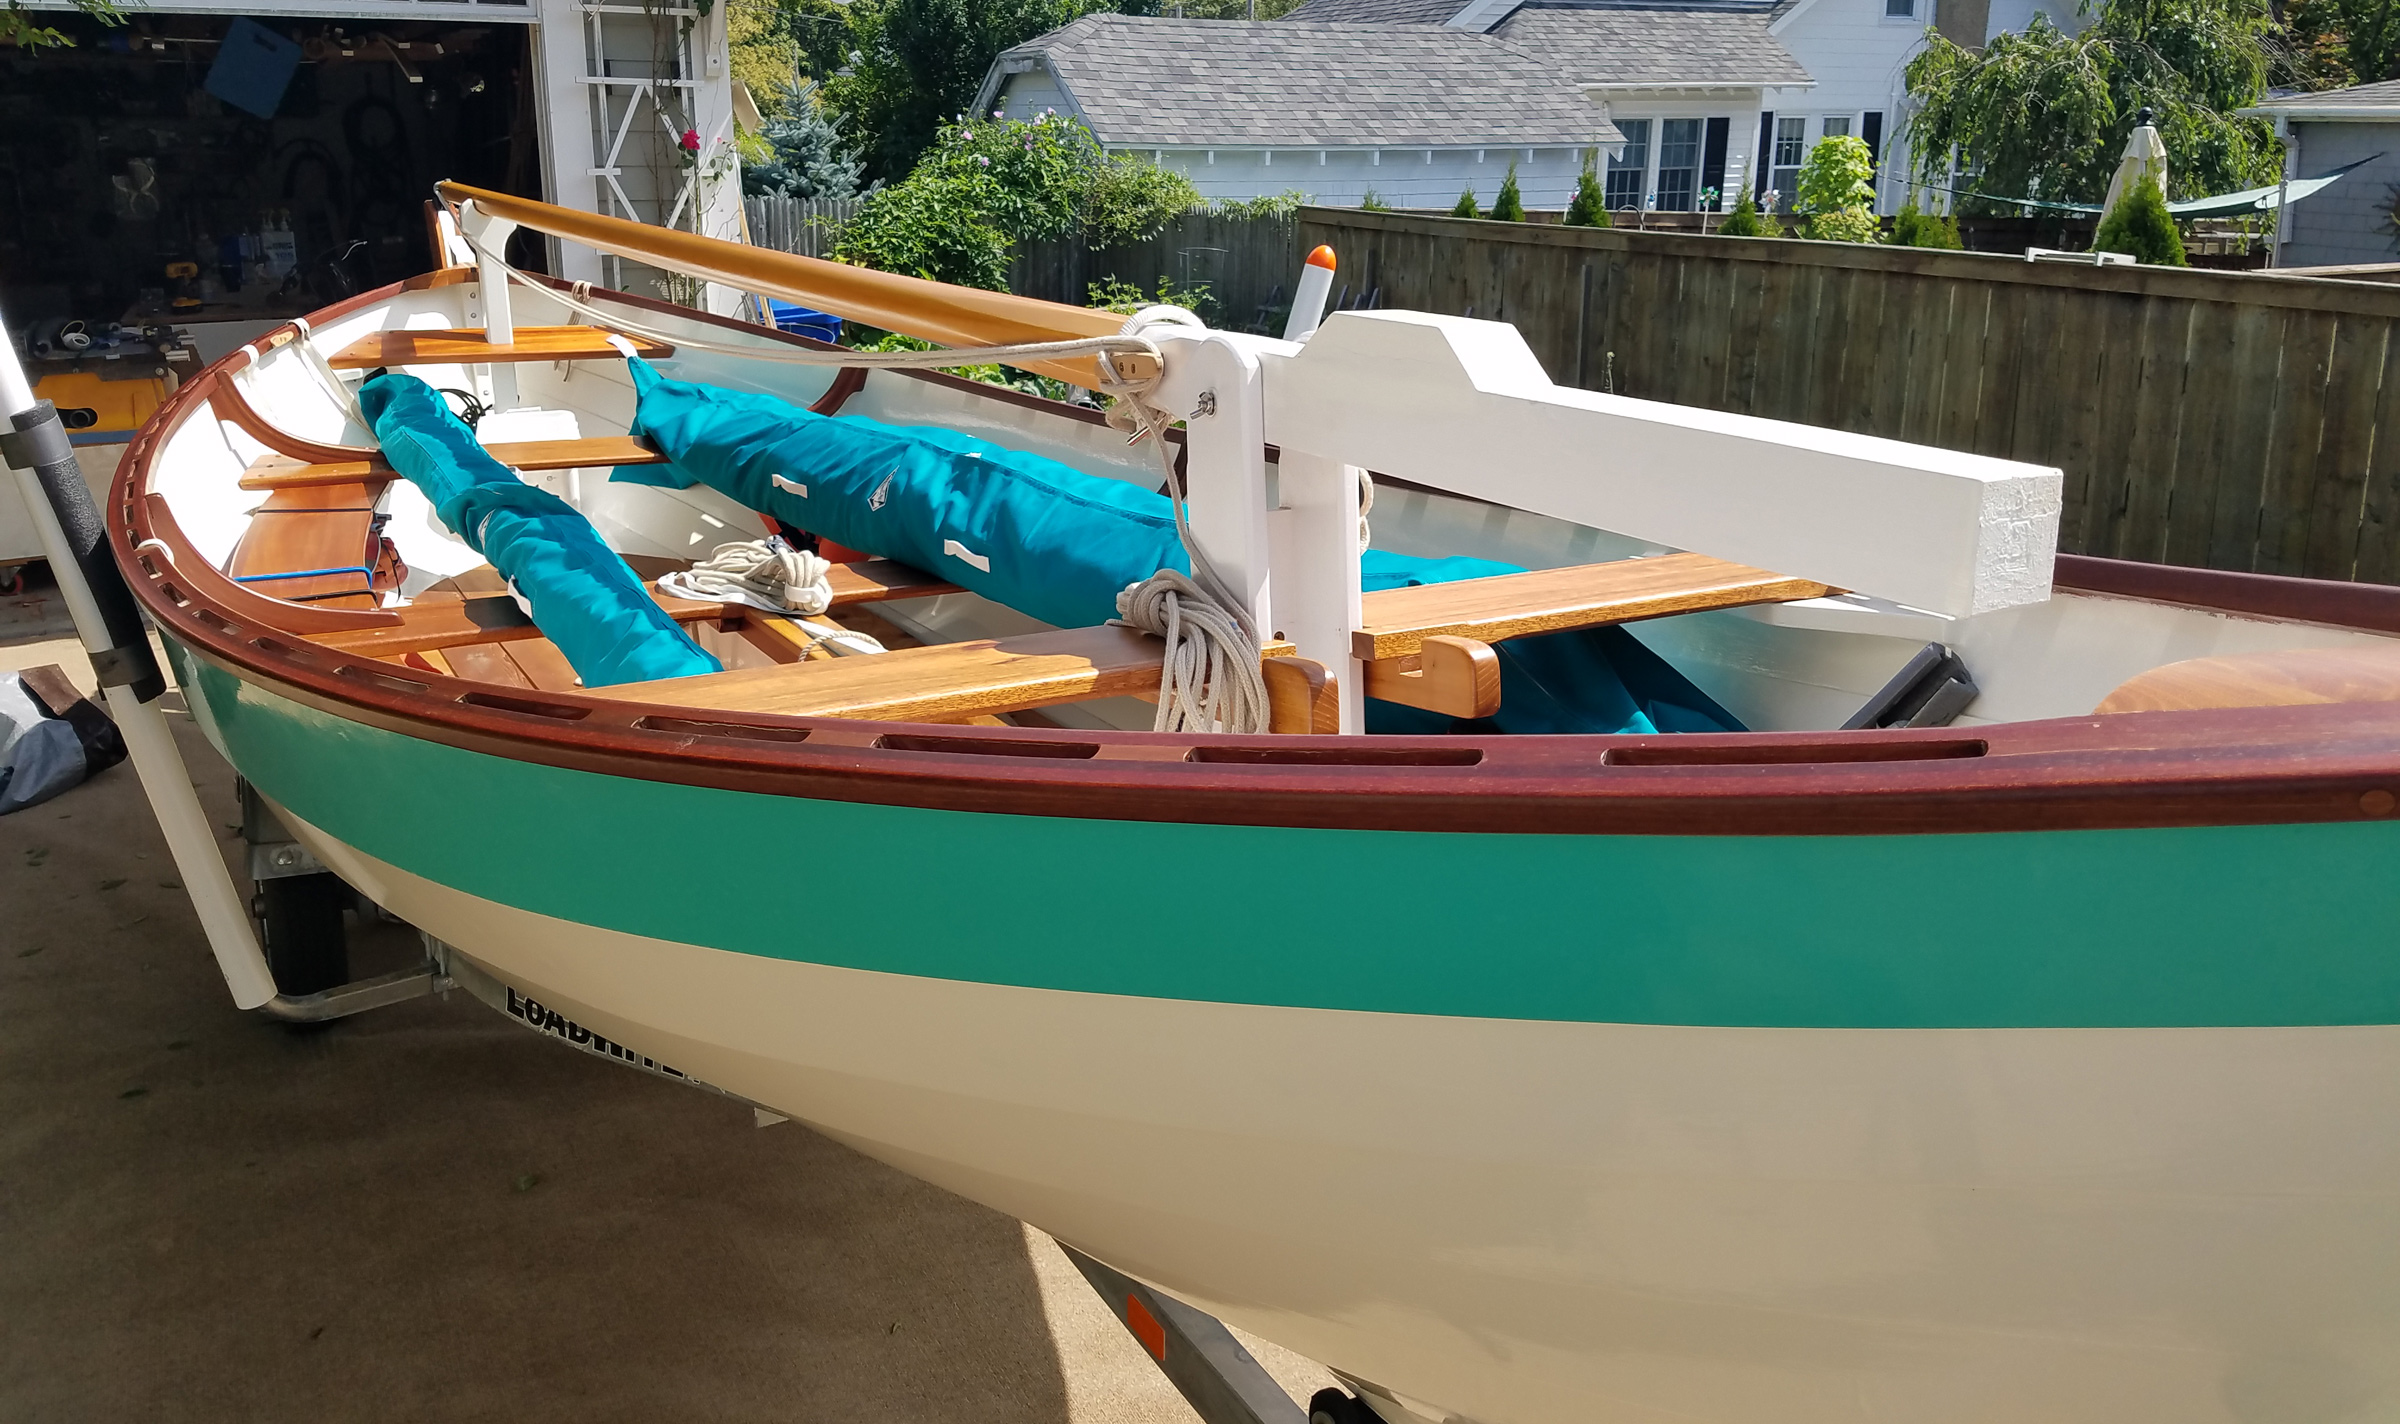
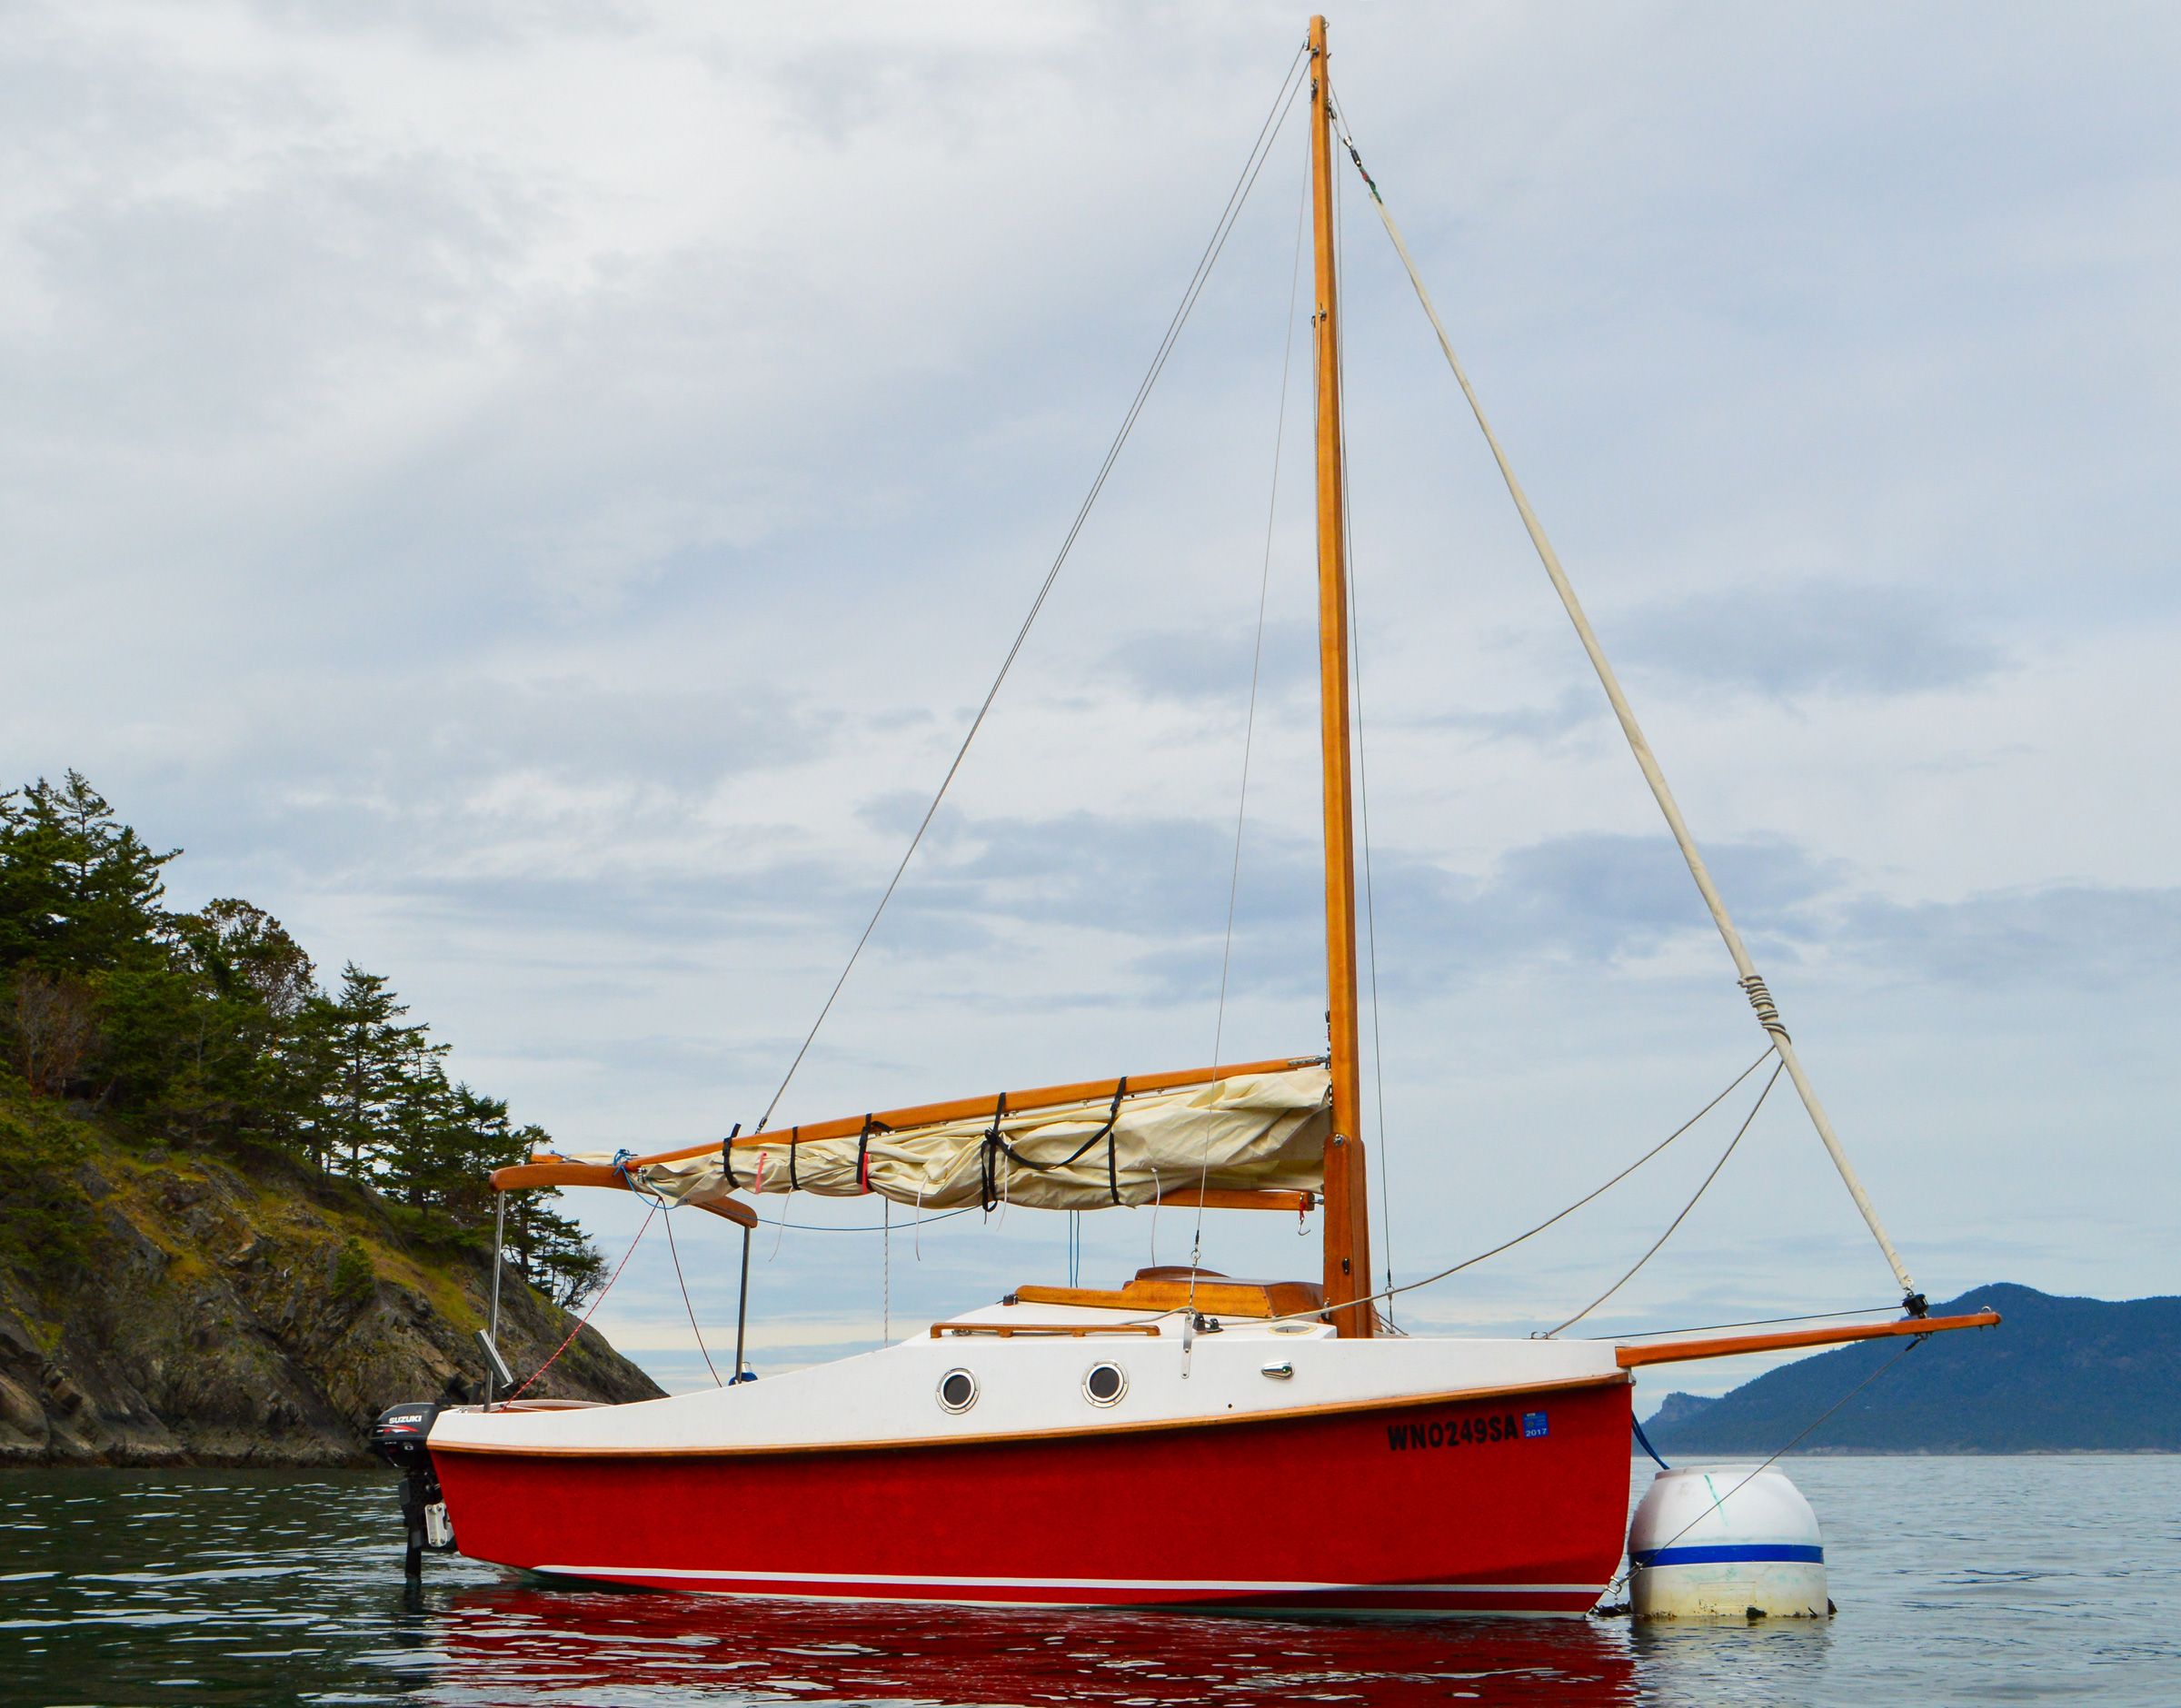
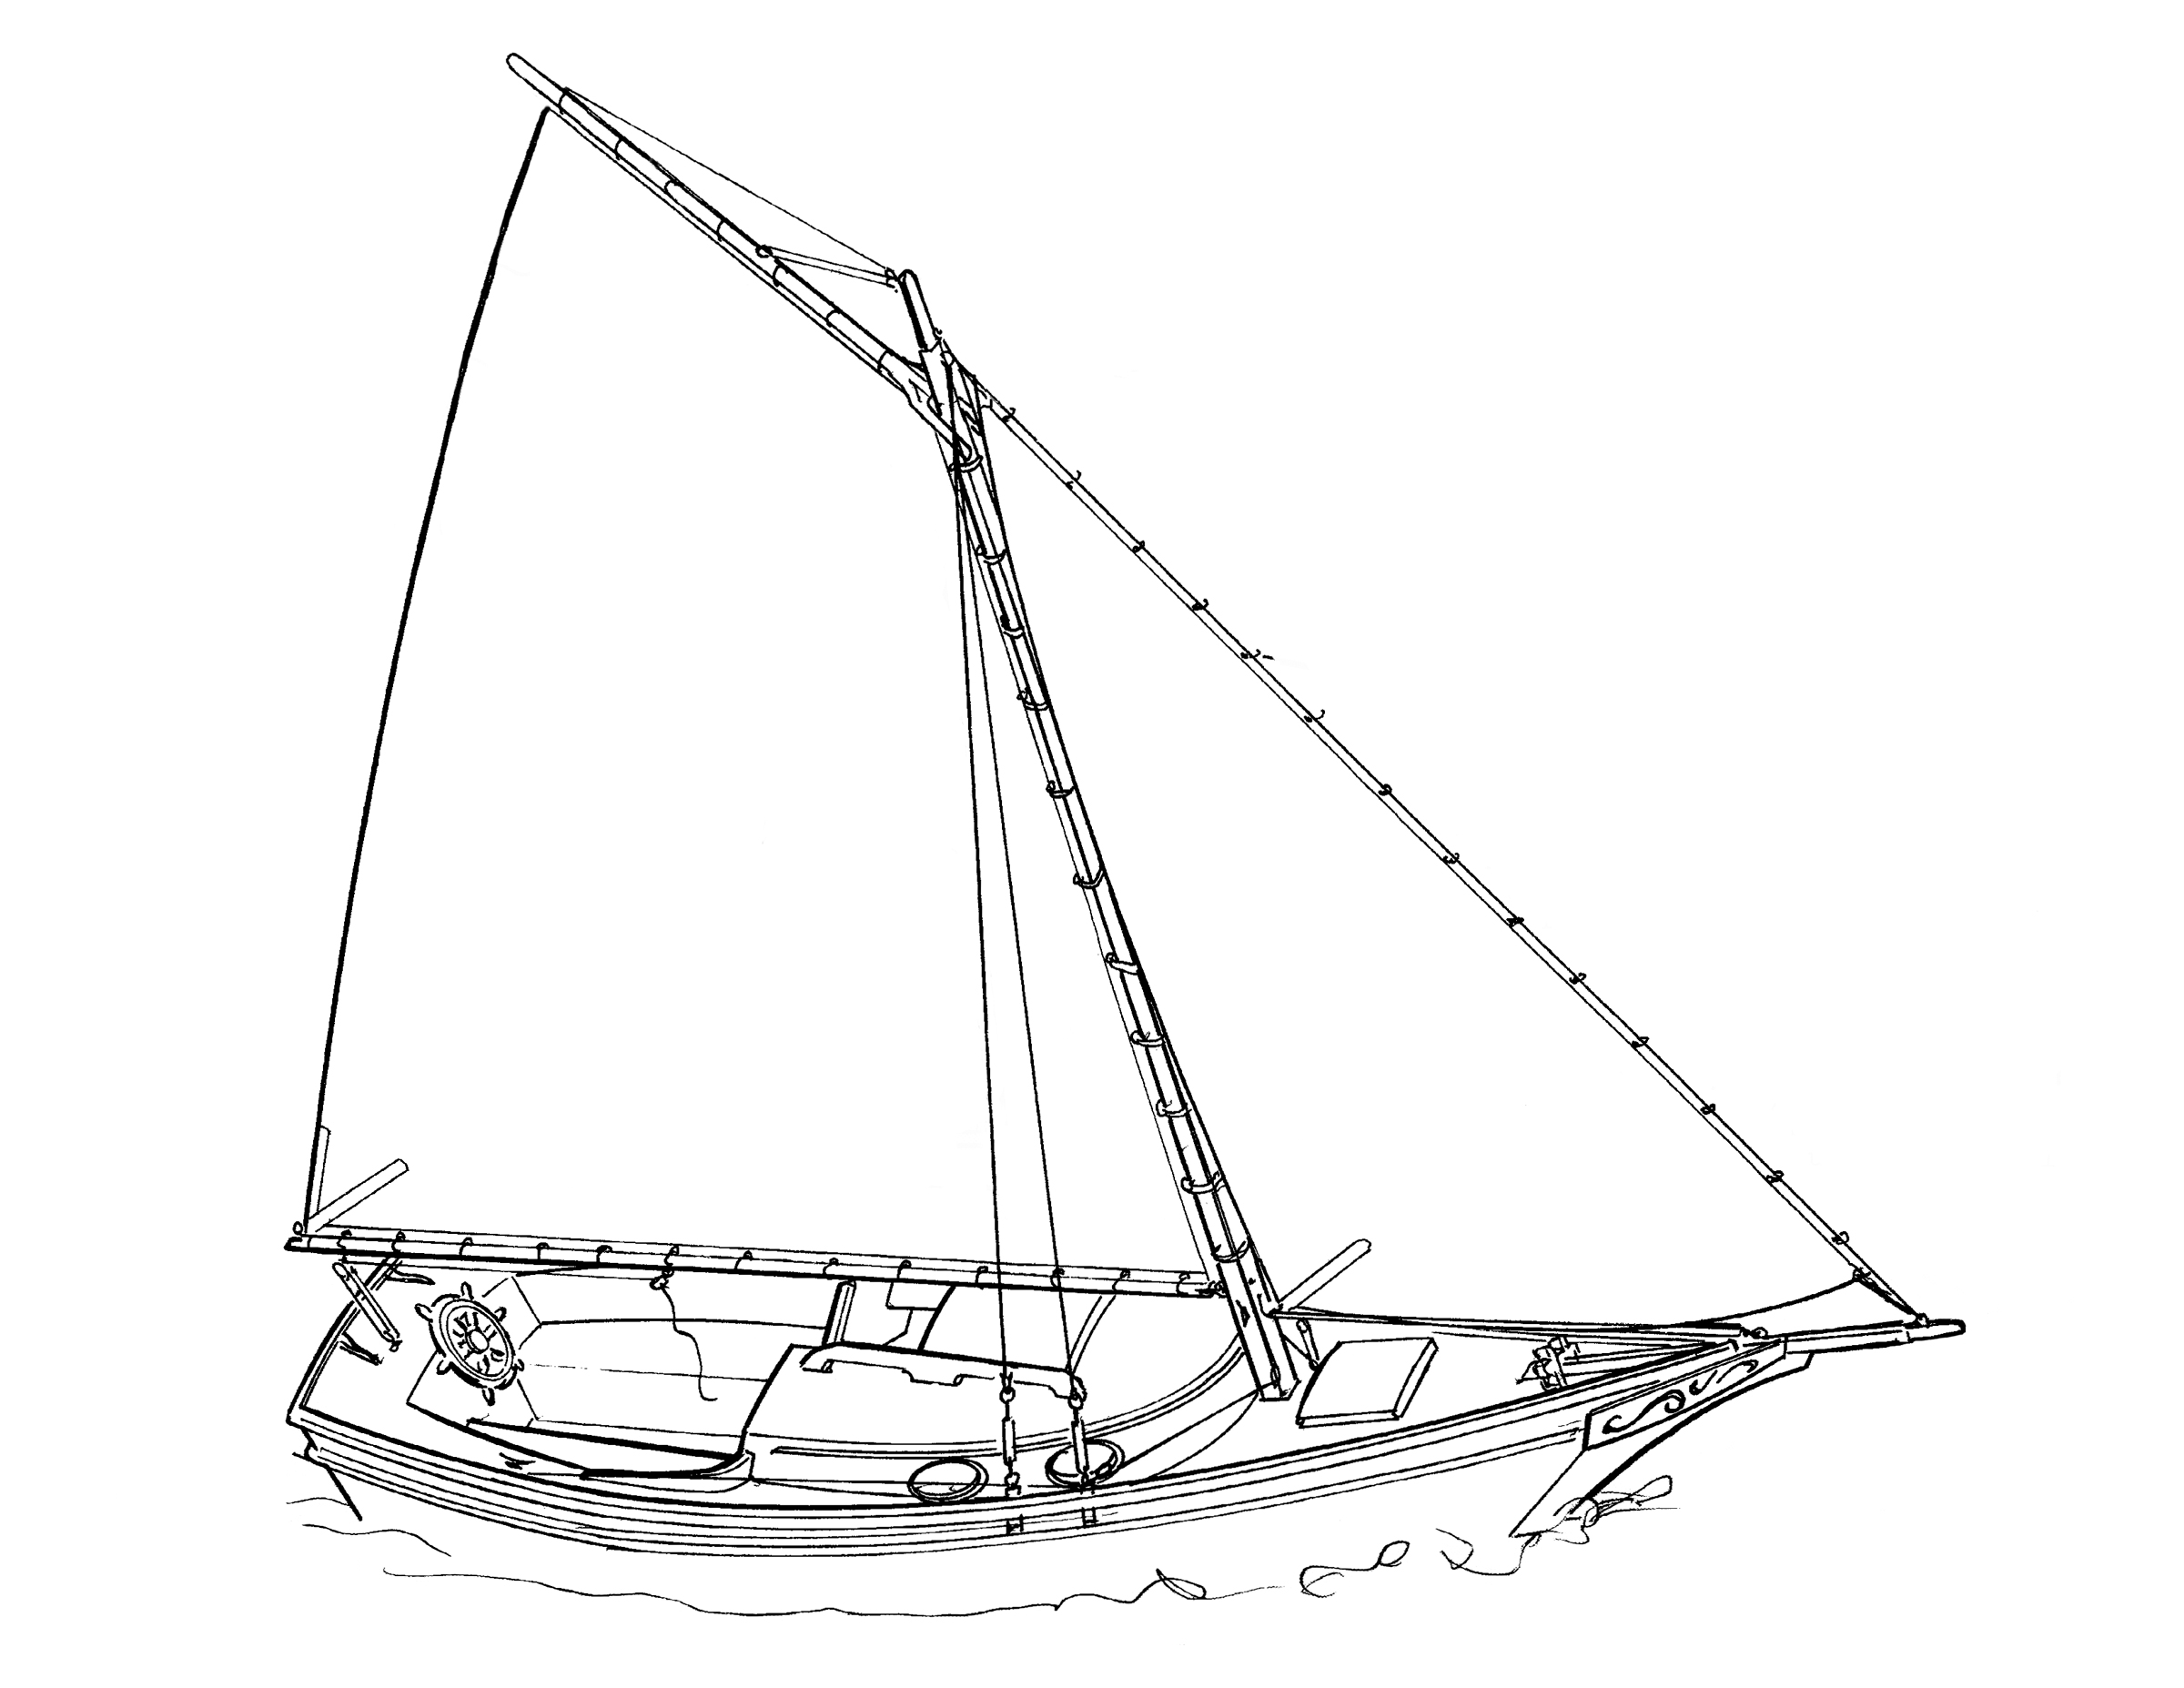
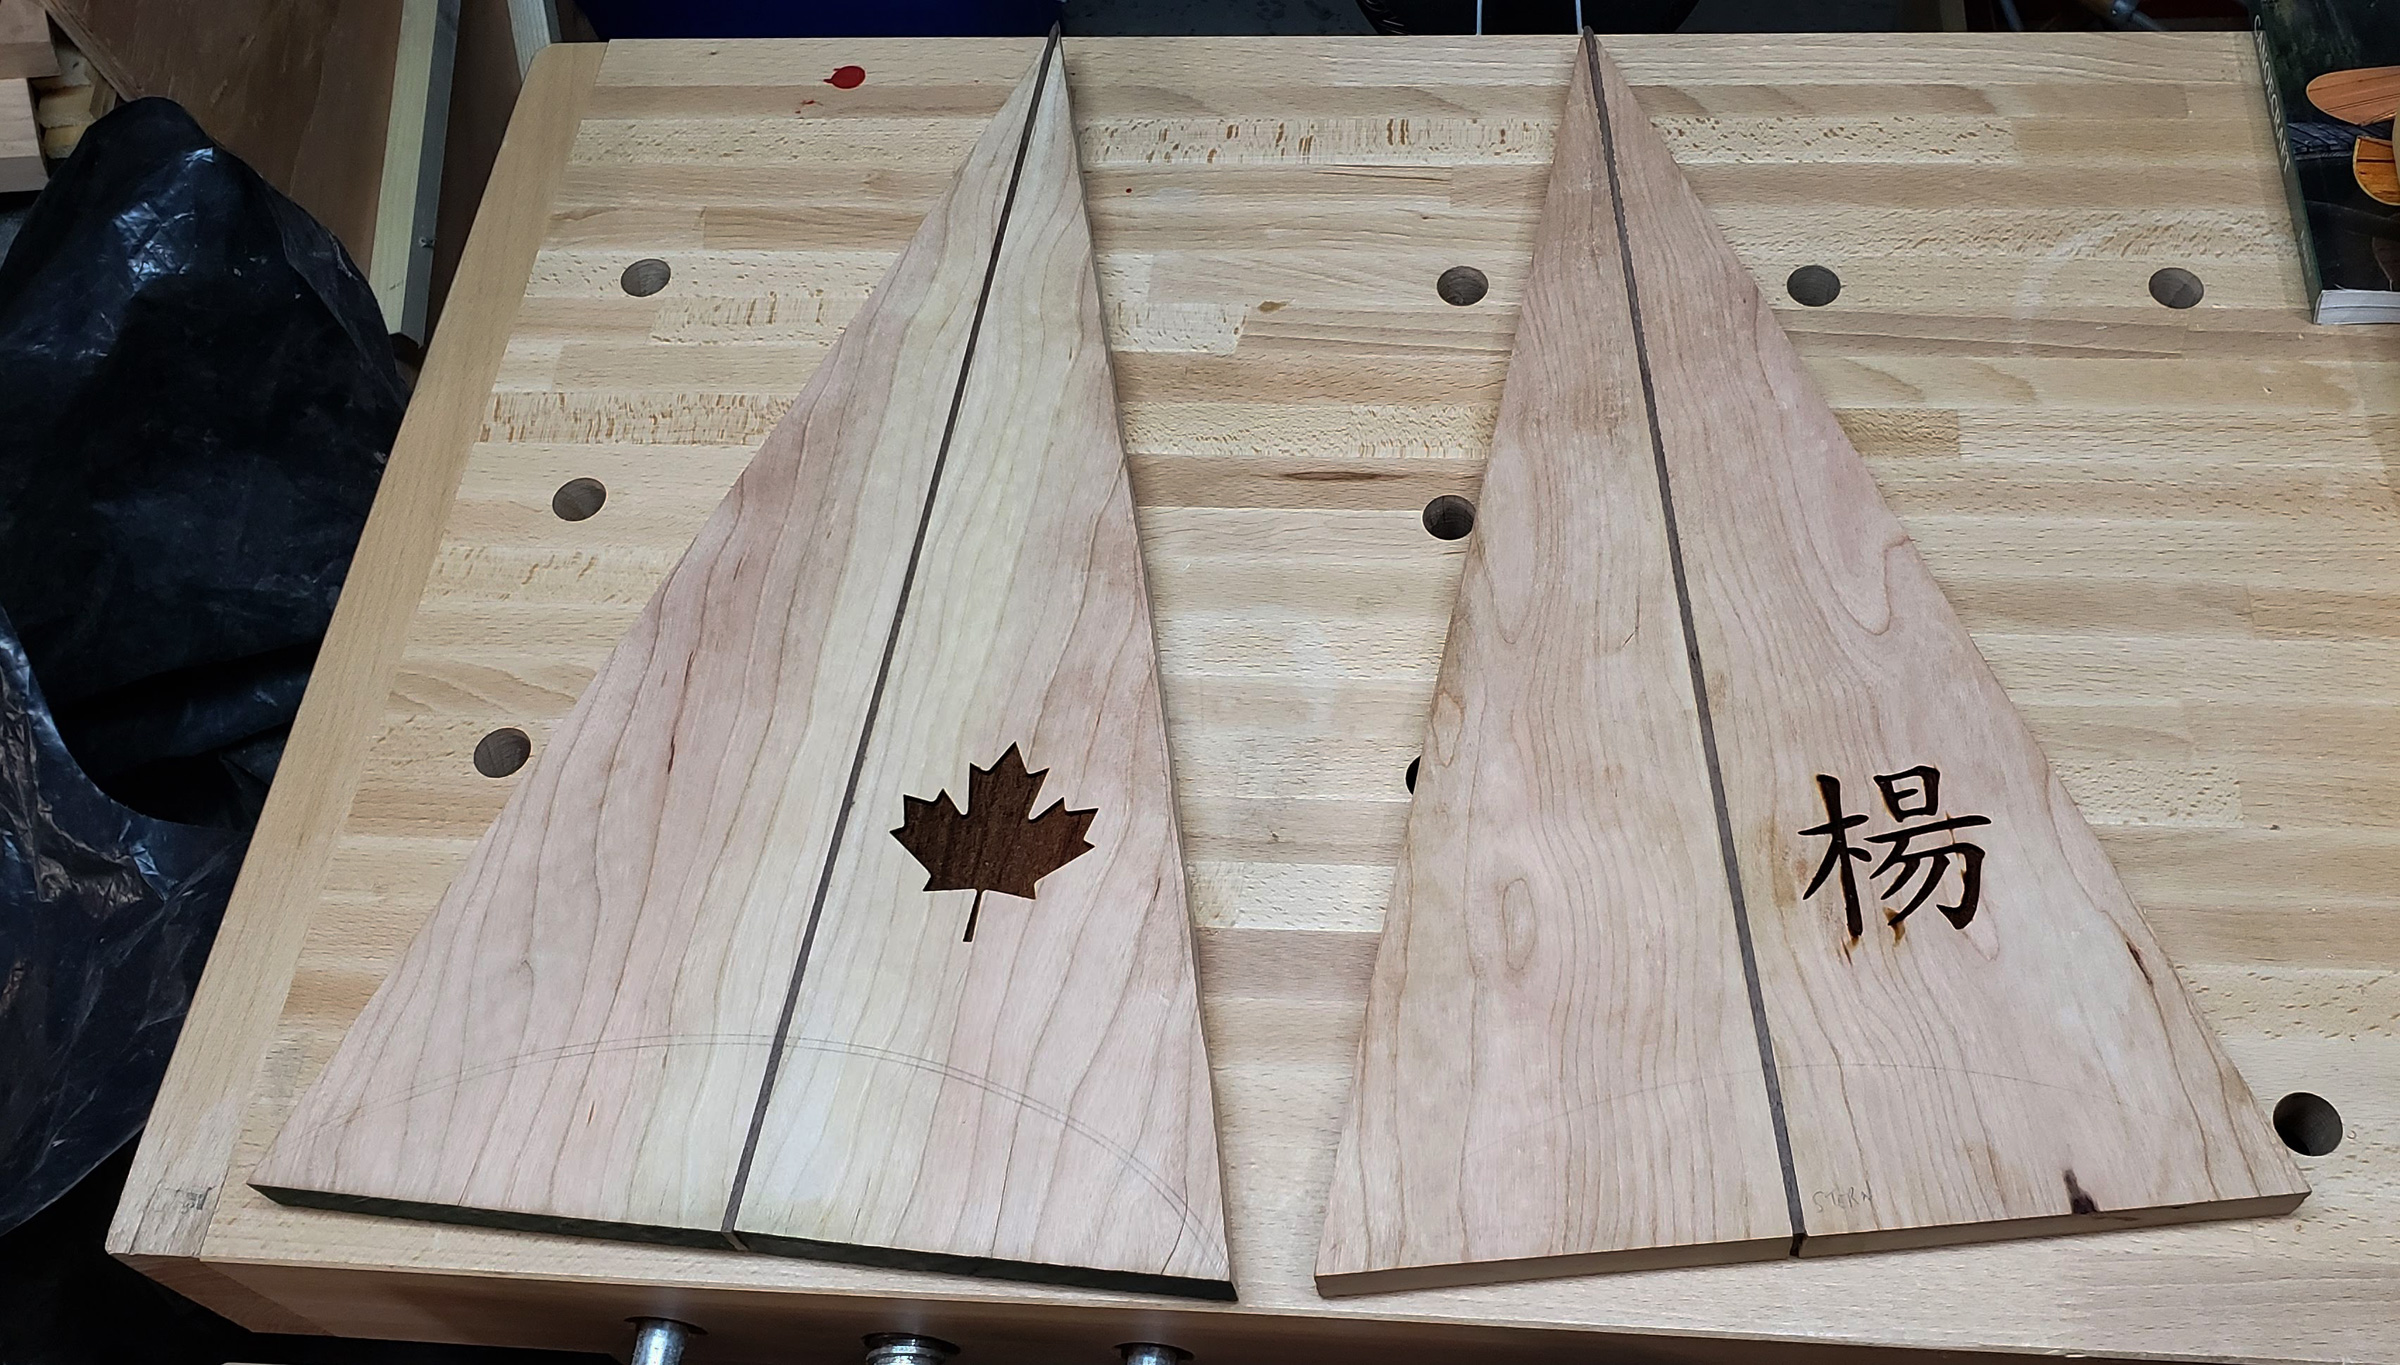
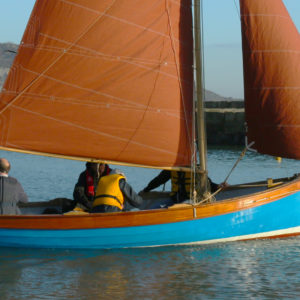
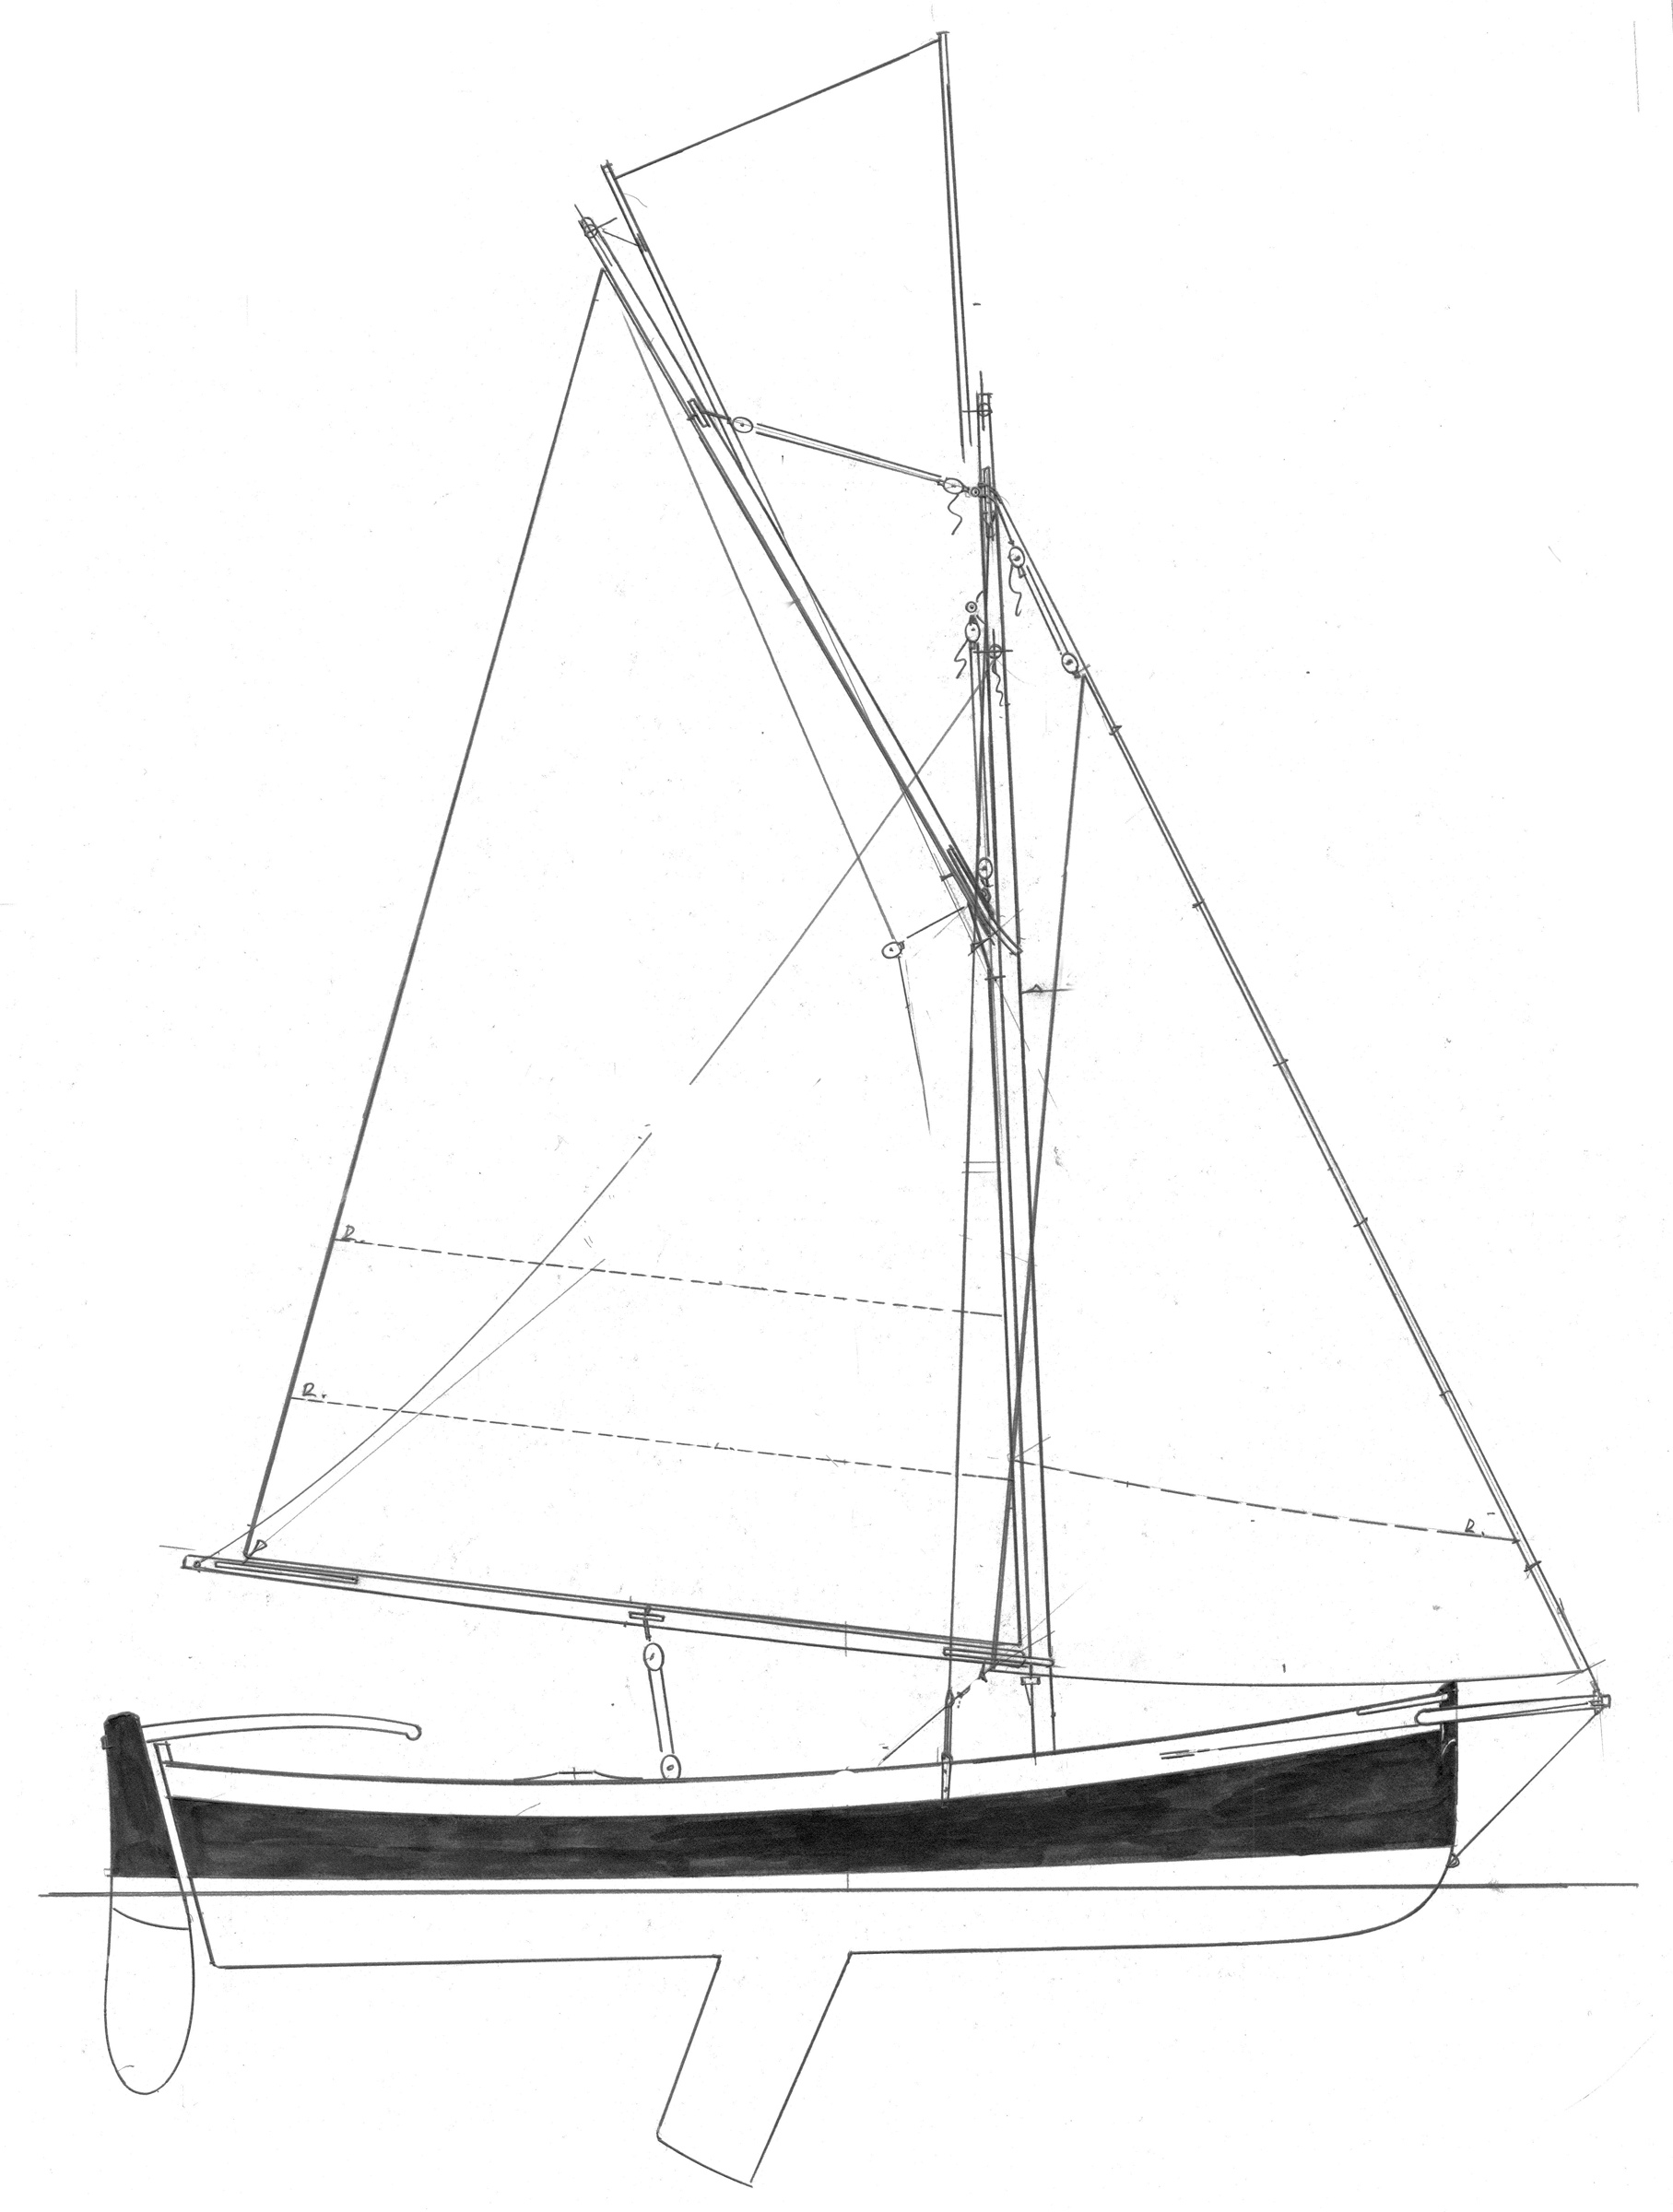
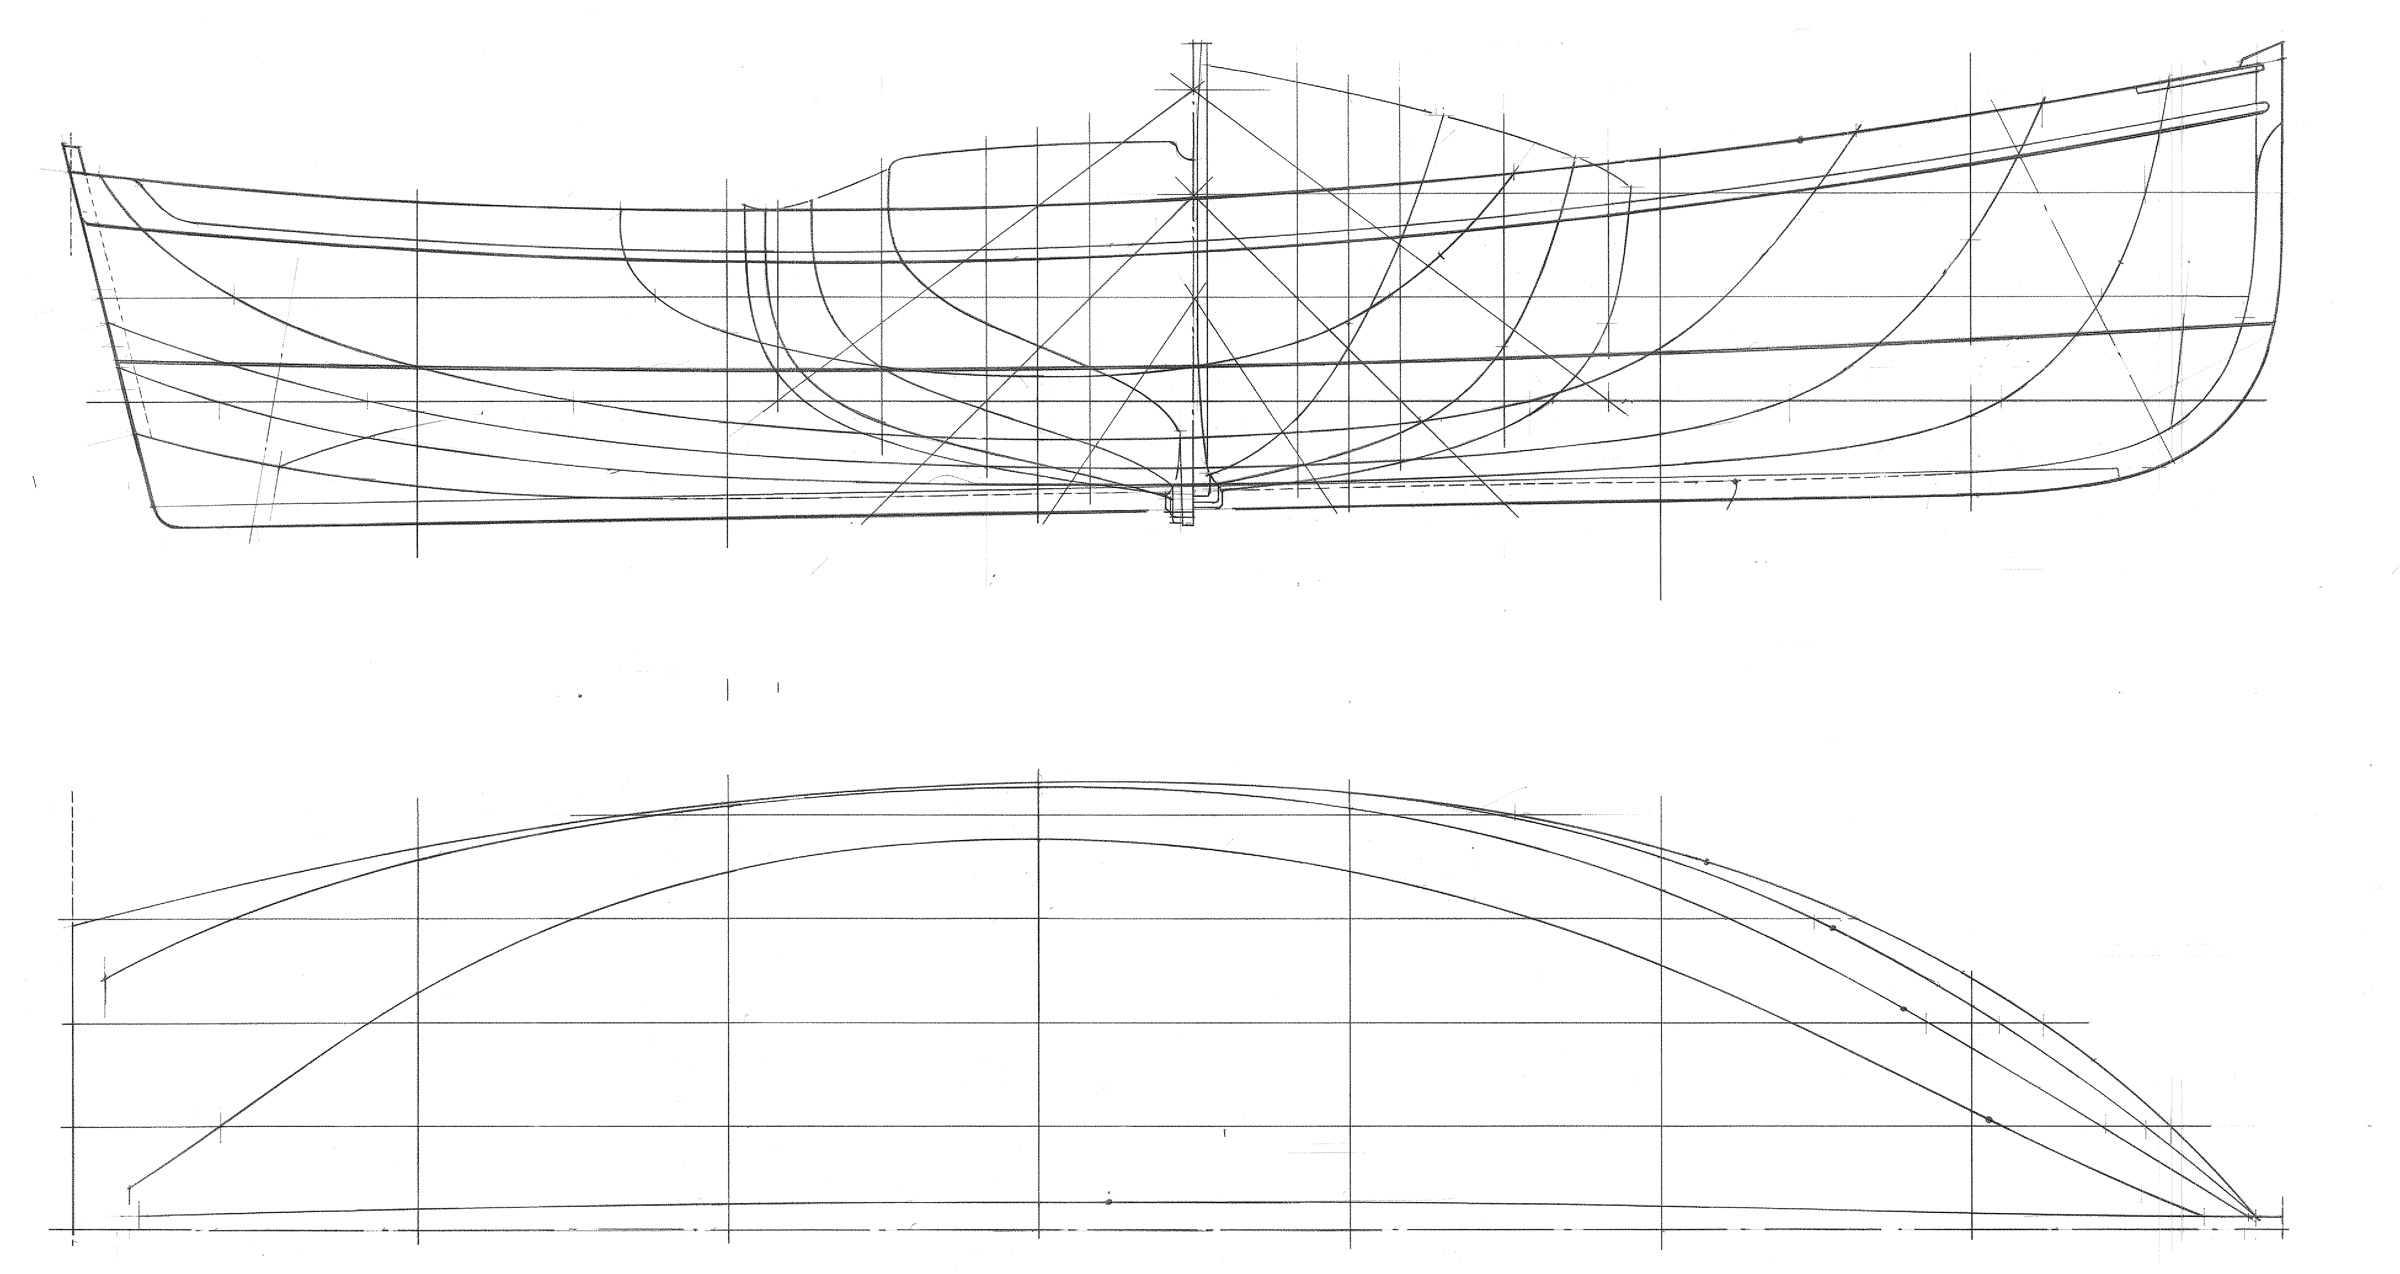
The Laughing Gull is a 15′ 9″ gunter-rigged sharpie sloop designed by Arch Davis. Early sharpies were used by oystermen in Long Island Sound in the latter part of the 1800s for sailing shallow waters, including skimming over sandbar shoals to get their hauls quickly to market. They had flat bottoms, single hard chines, and very shallow draft. Ralph Munroe, yacht designer and jack-of-all-trades in Coconut Grove, Florida, further refined the design in the late 19th and early 20th century. His most notable design was a 28-footer, EGRET.
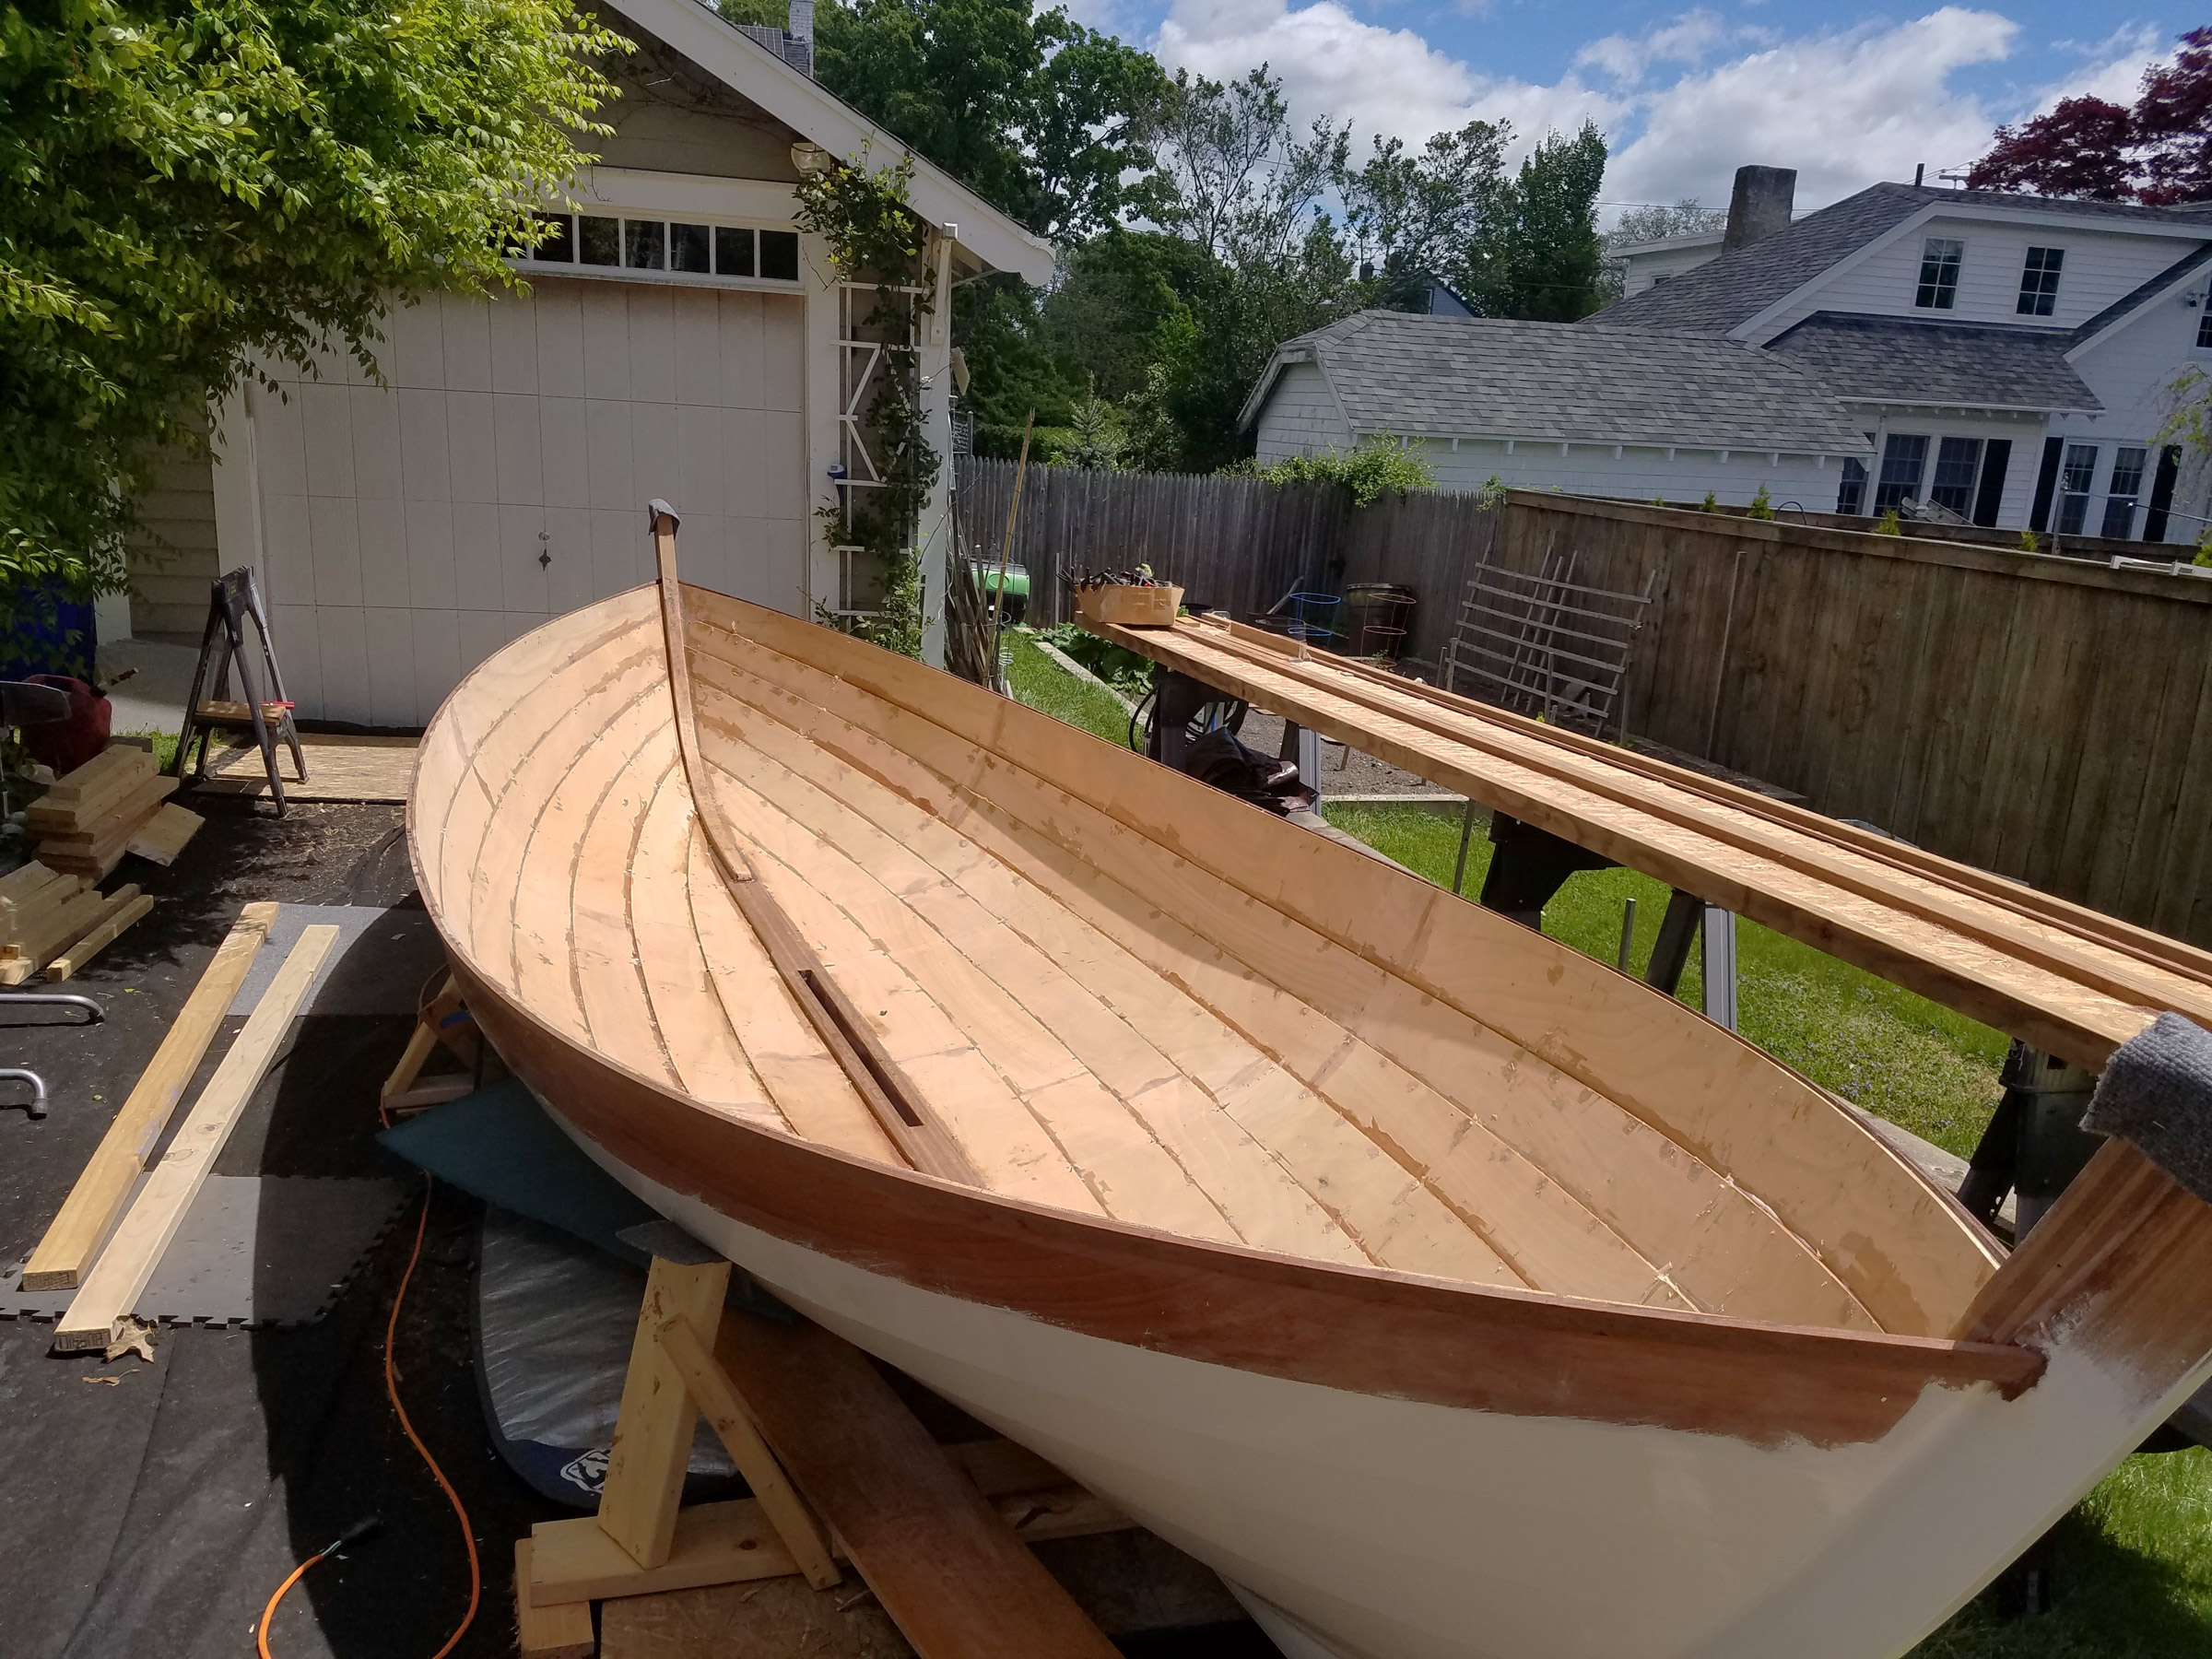
I began building my Laughing Gull in the summer after my junior year in college. I had admired Arch Davis’s designs since middle school, and called him about building a boat. He sized up my interests and skill level—only birdhouses and bookshelves at that point—and recommended the Laughing Gull. He had designed the boat with young people like me in mind. It would be simple to build, thrilling for a youthful crew hiked out on the rail as the skiff leapt up on a plane downwind, and forgiving when capsized.
I soon had the 110-page building manual and plans in hand. Shortly thereafter, my shipment of marine plywood arrived. Mr. Davis generously made himself available for free phone consultation, but his written instructions were so thorough, I hardly needed to call. Only basic carpentry tools were required. I did not own a tablesaw, so I borrowed one from friends. The only things I did not make myself on the boat were the sails and hardware.
Photographs by Ashley and Casey McMann
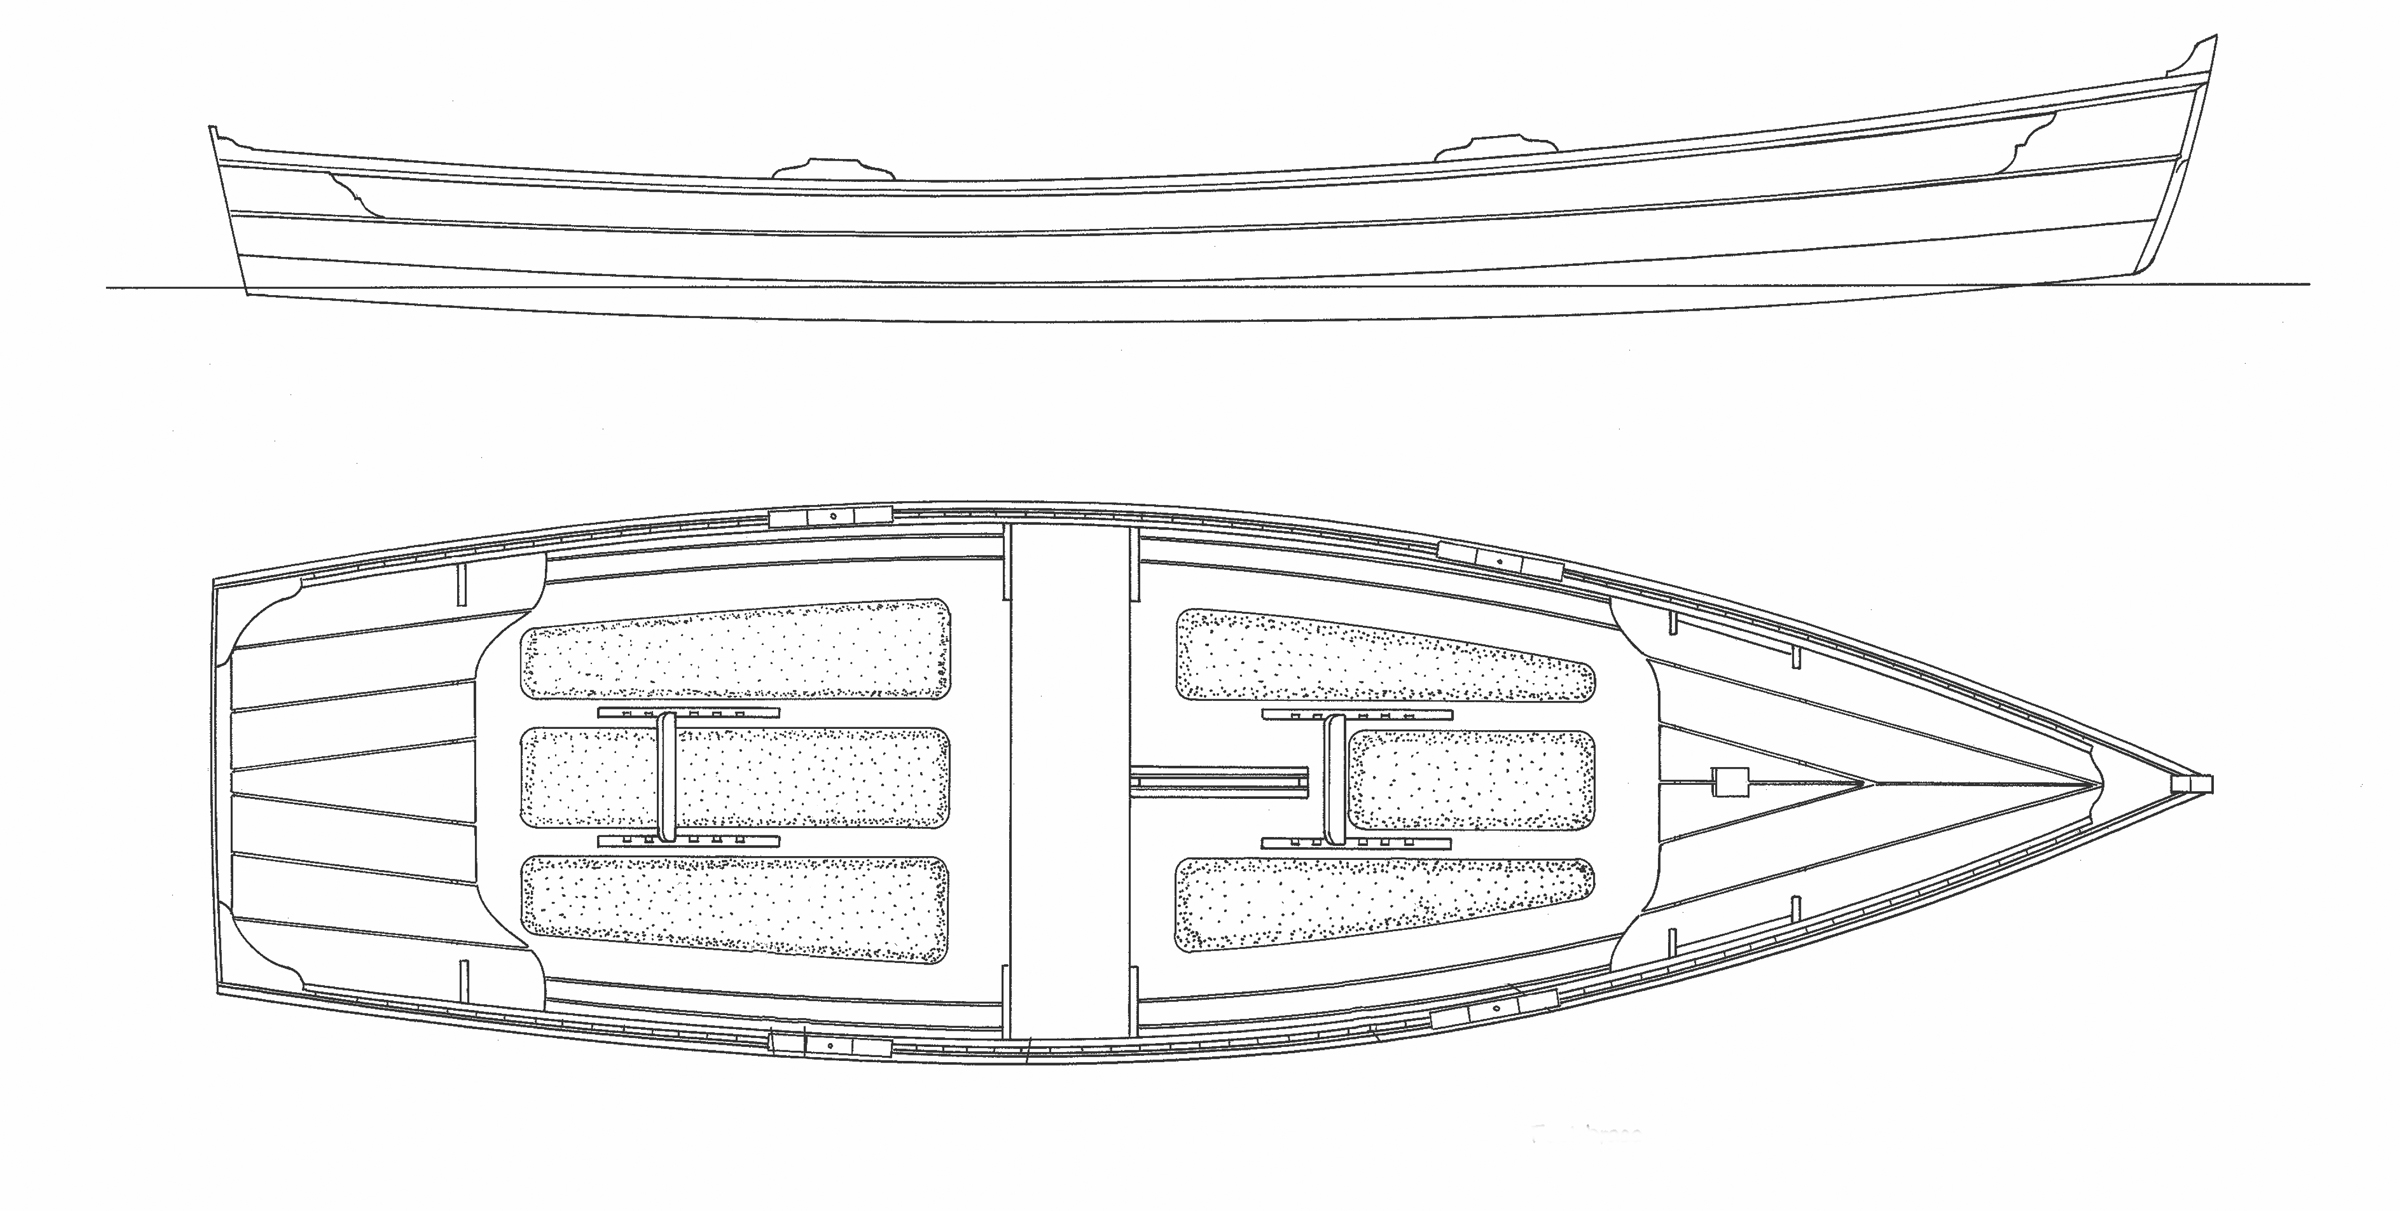
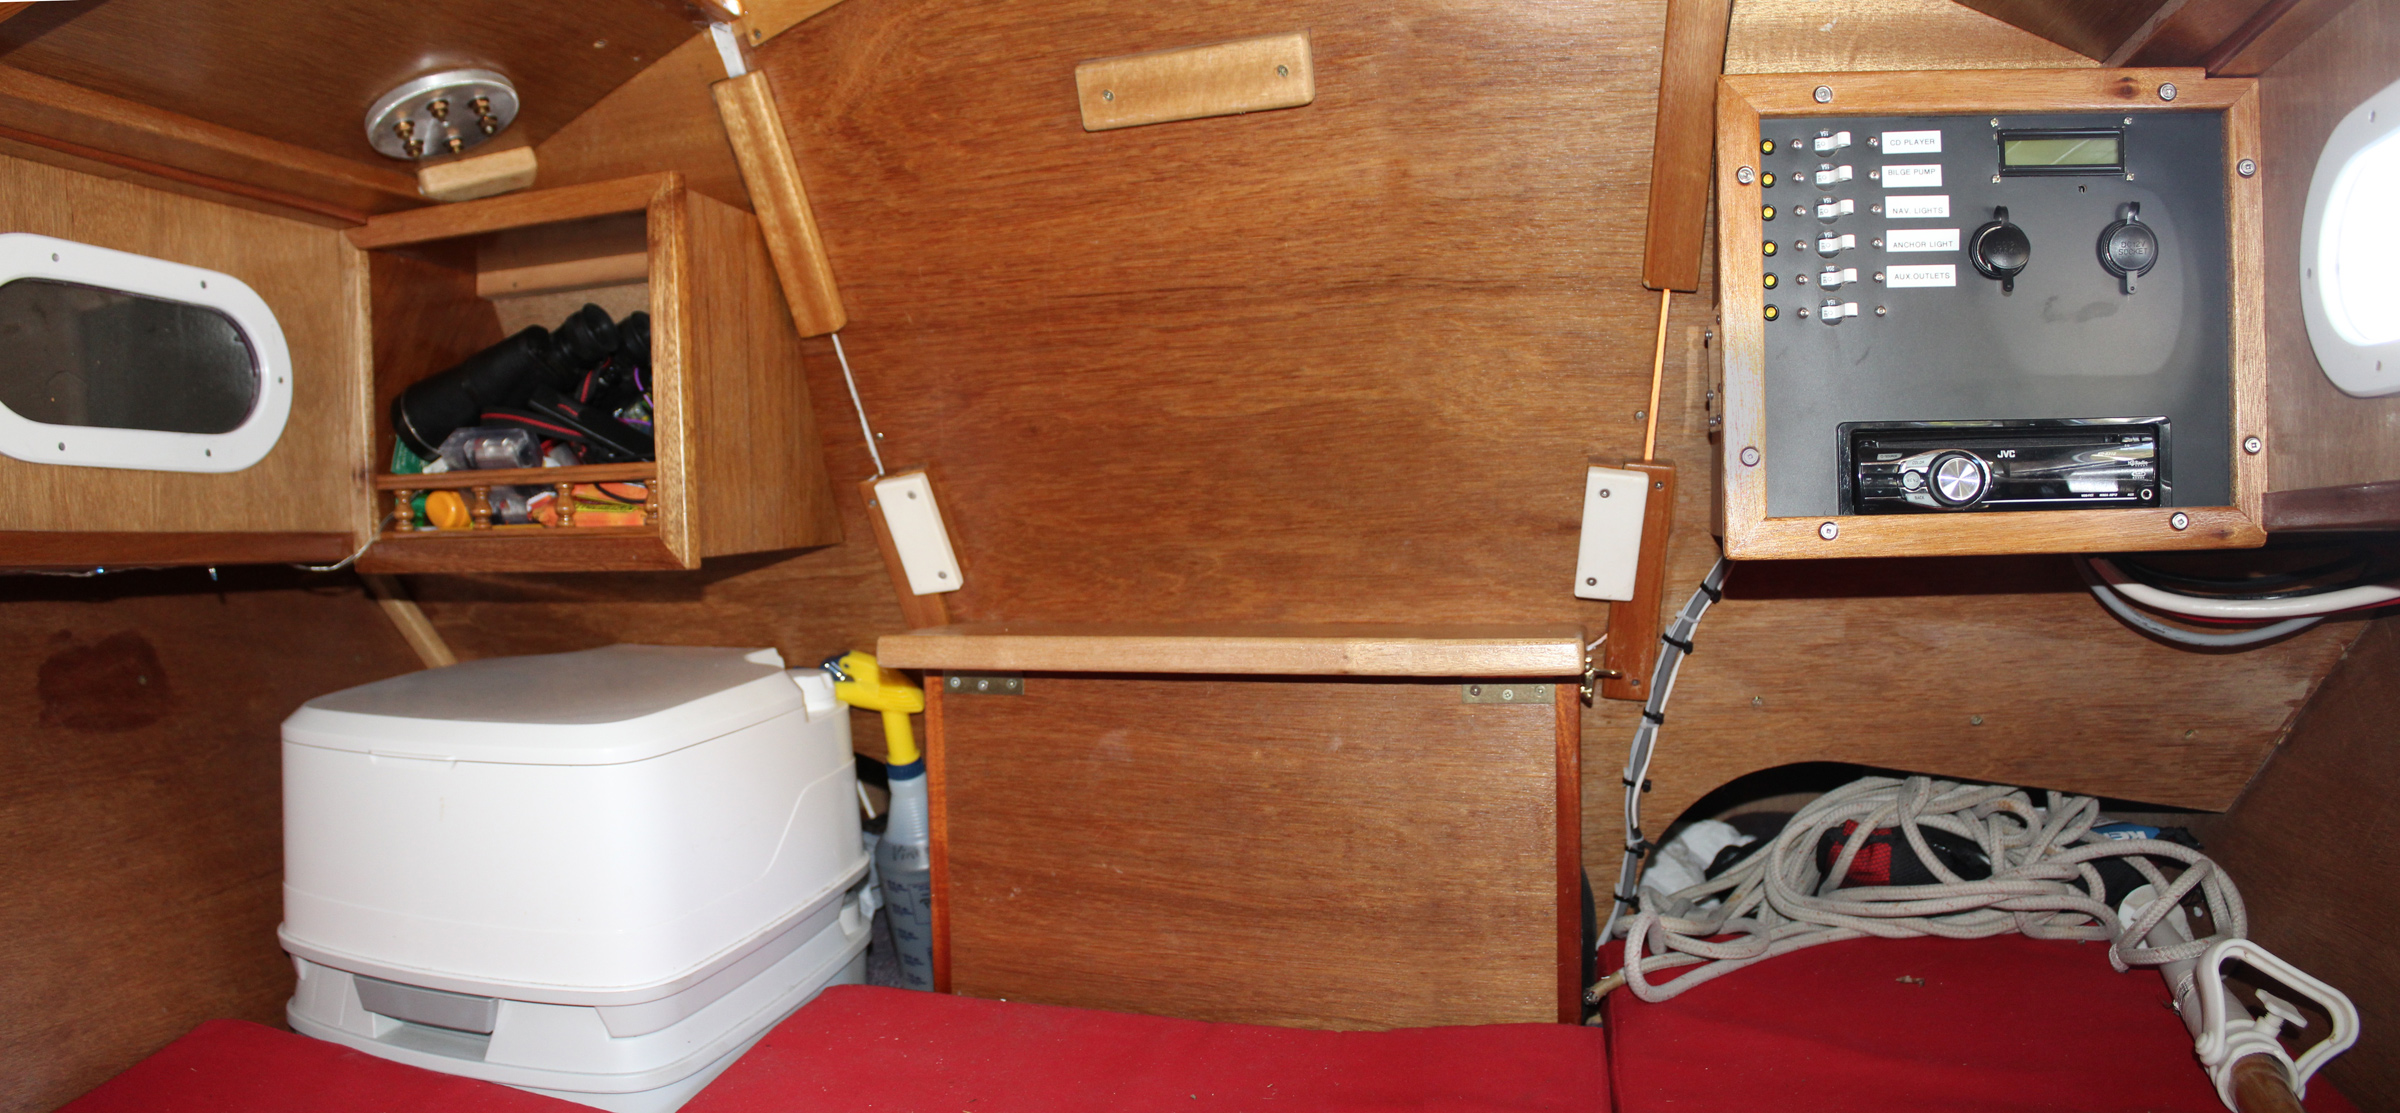
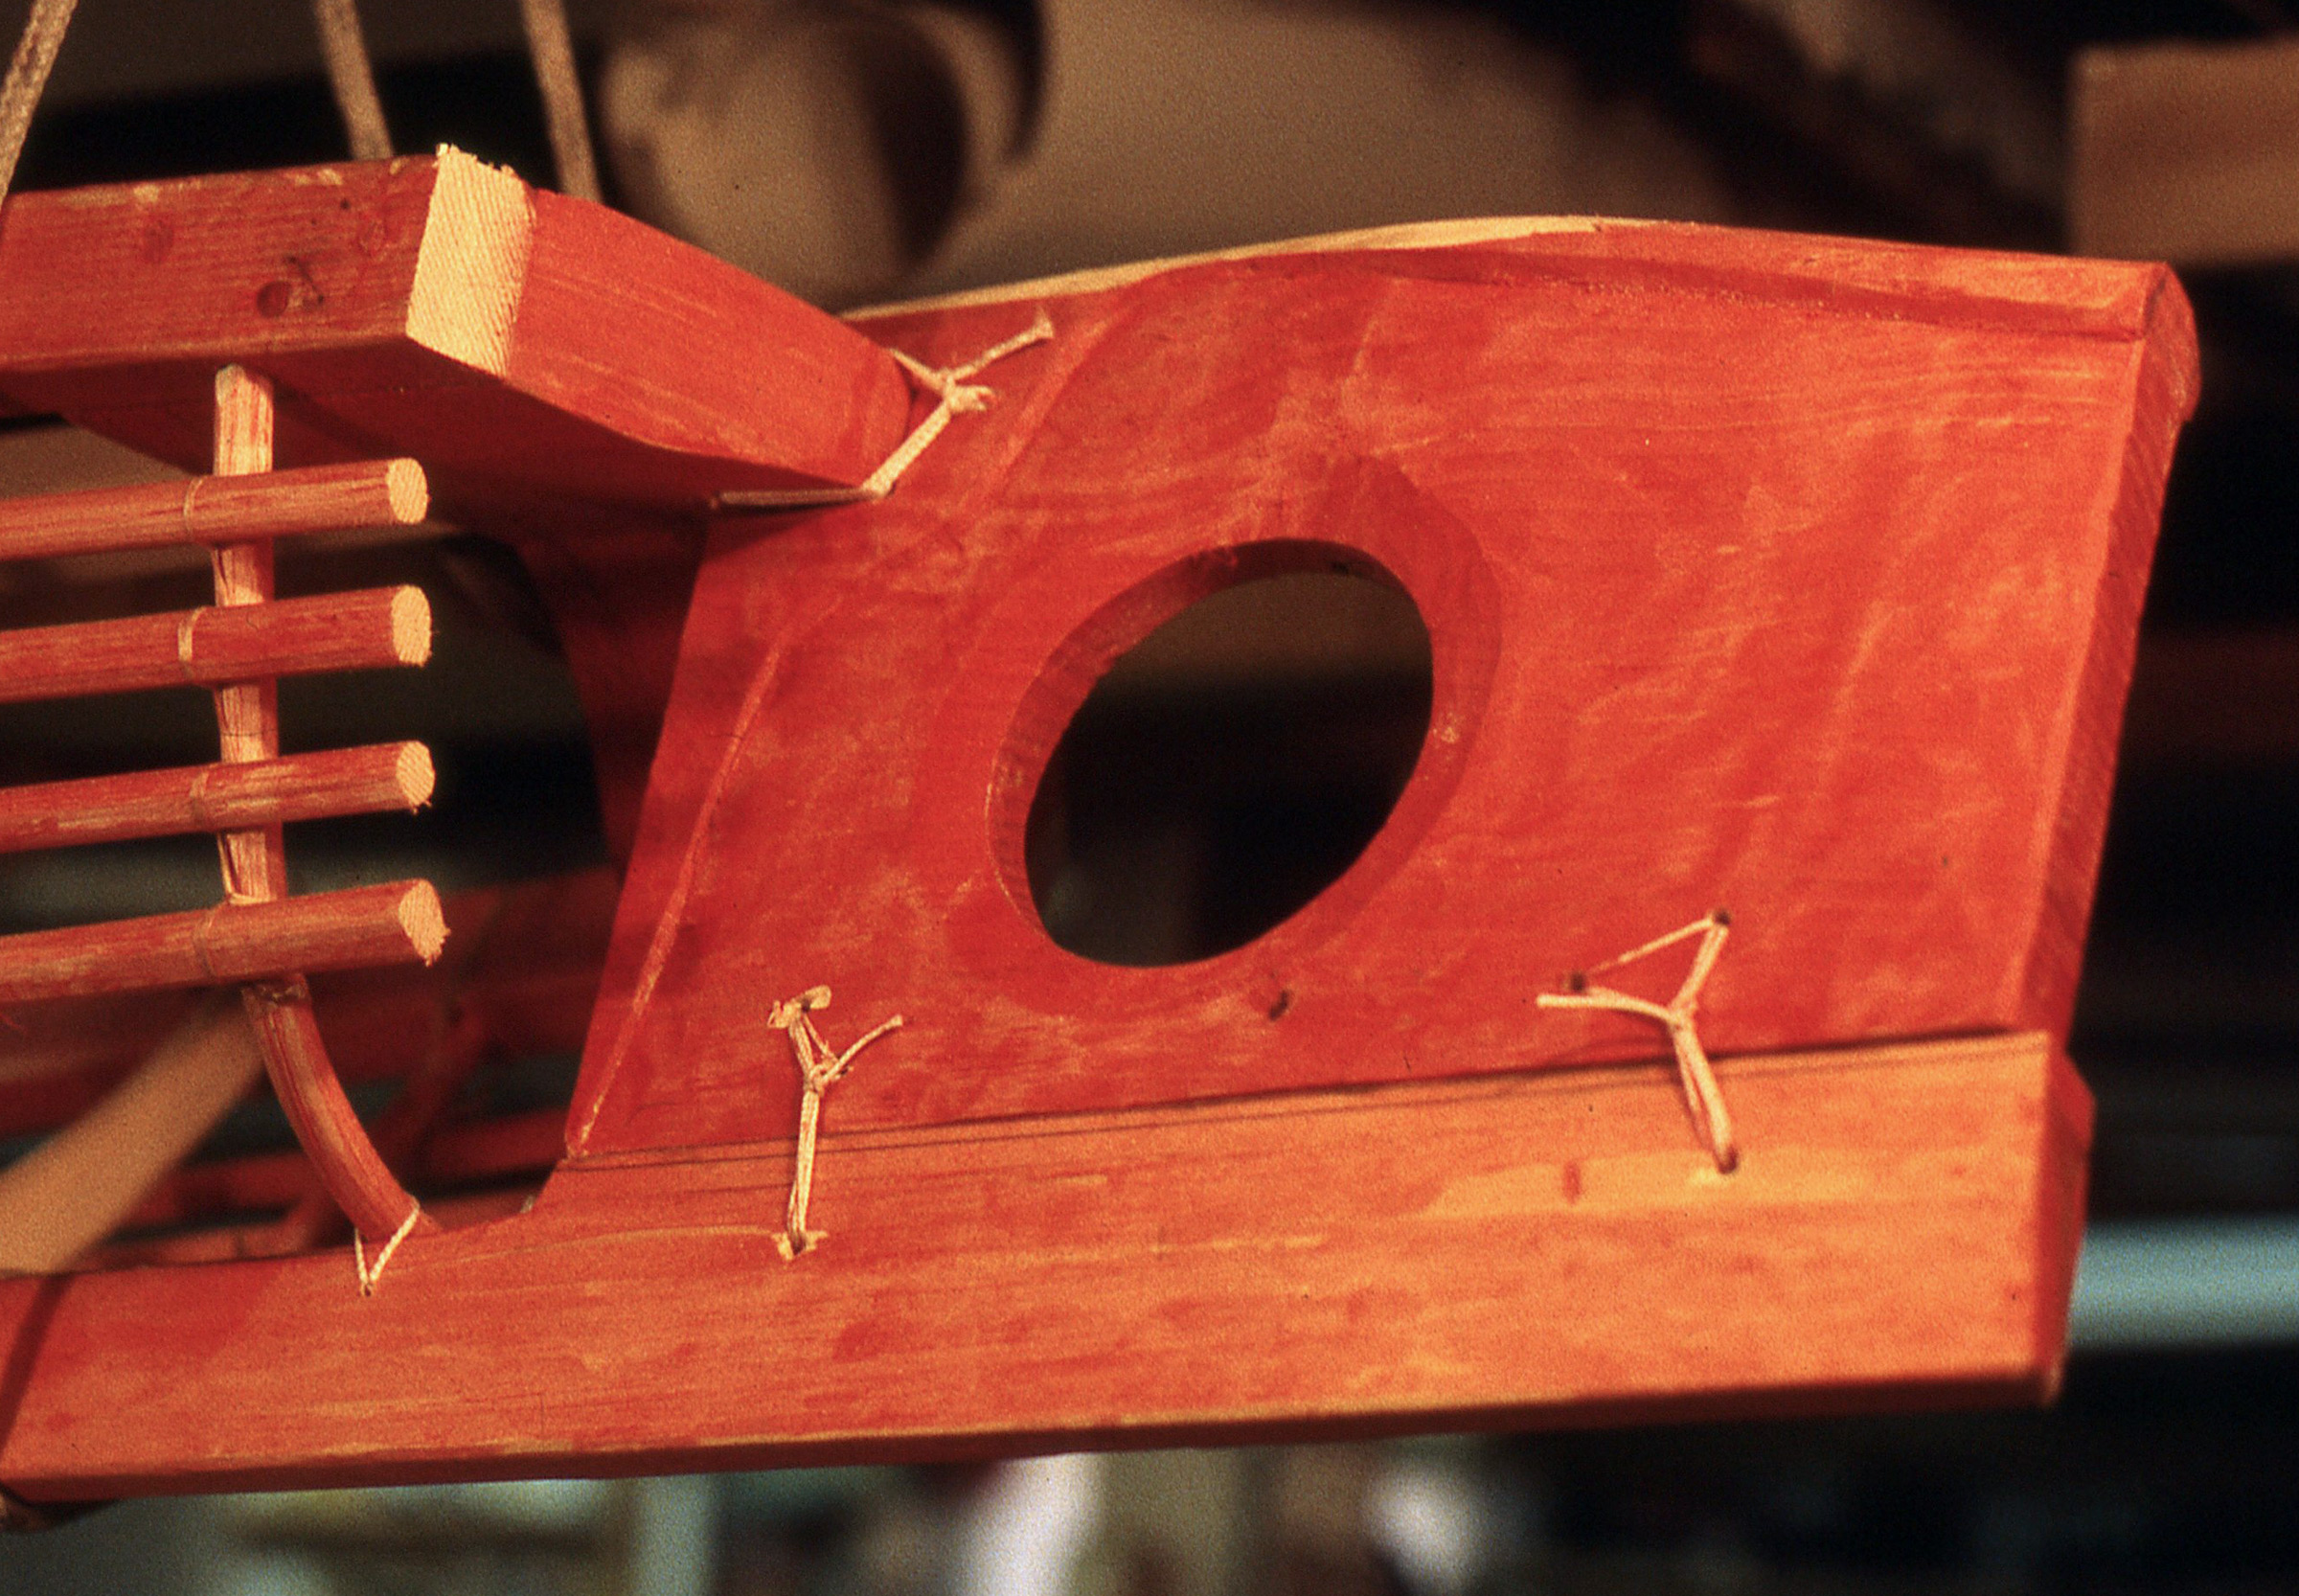
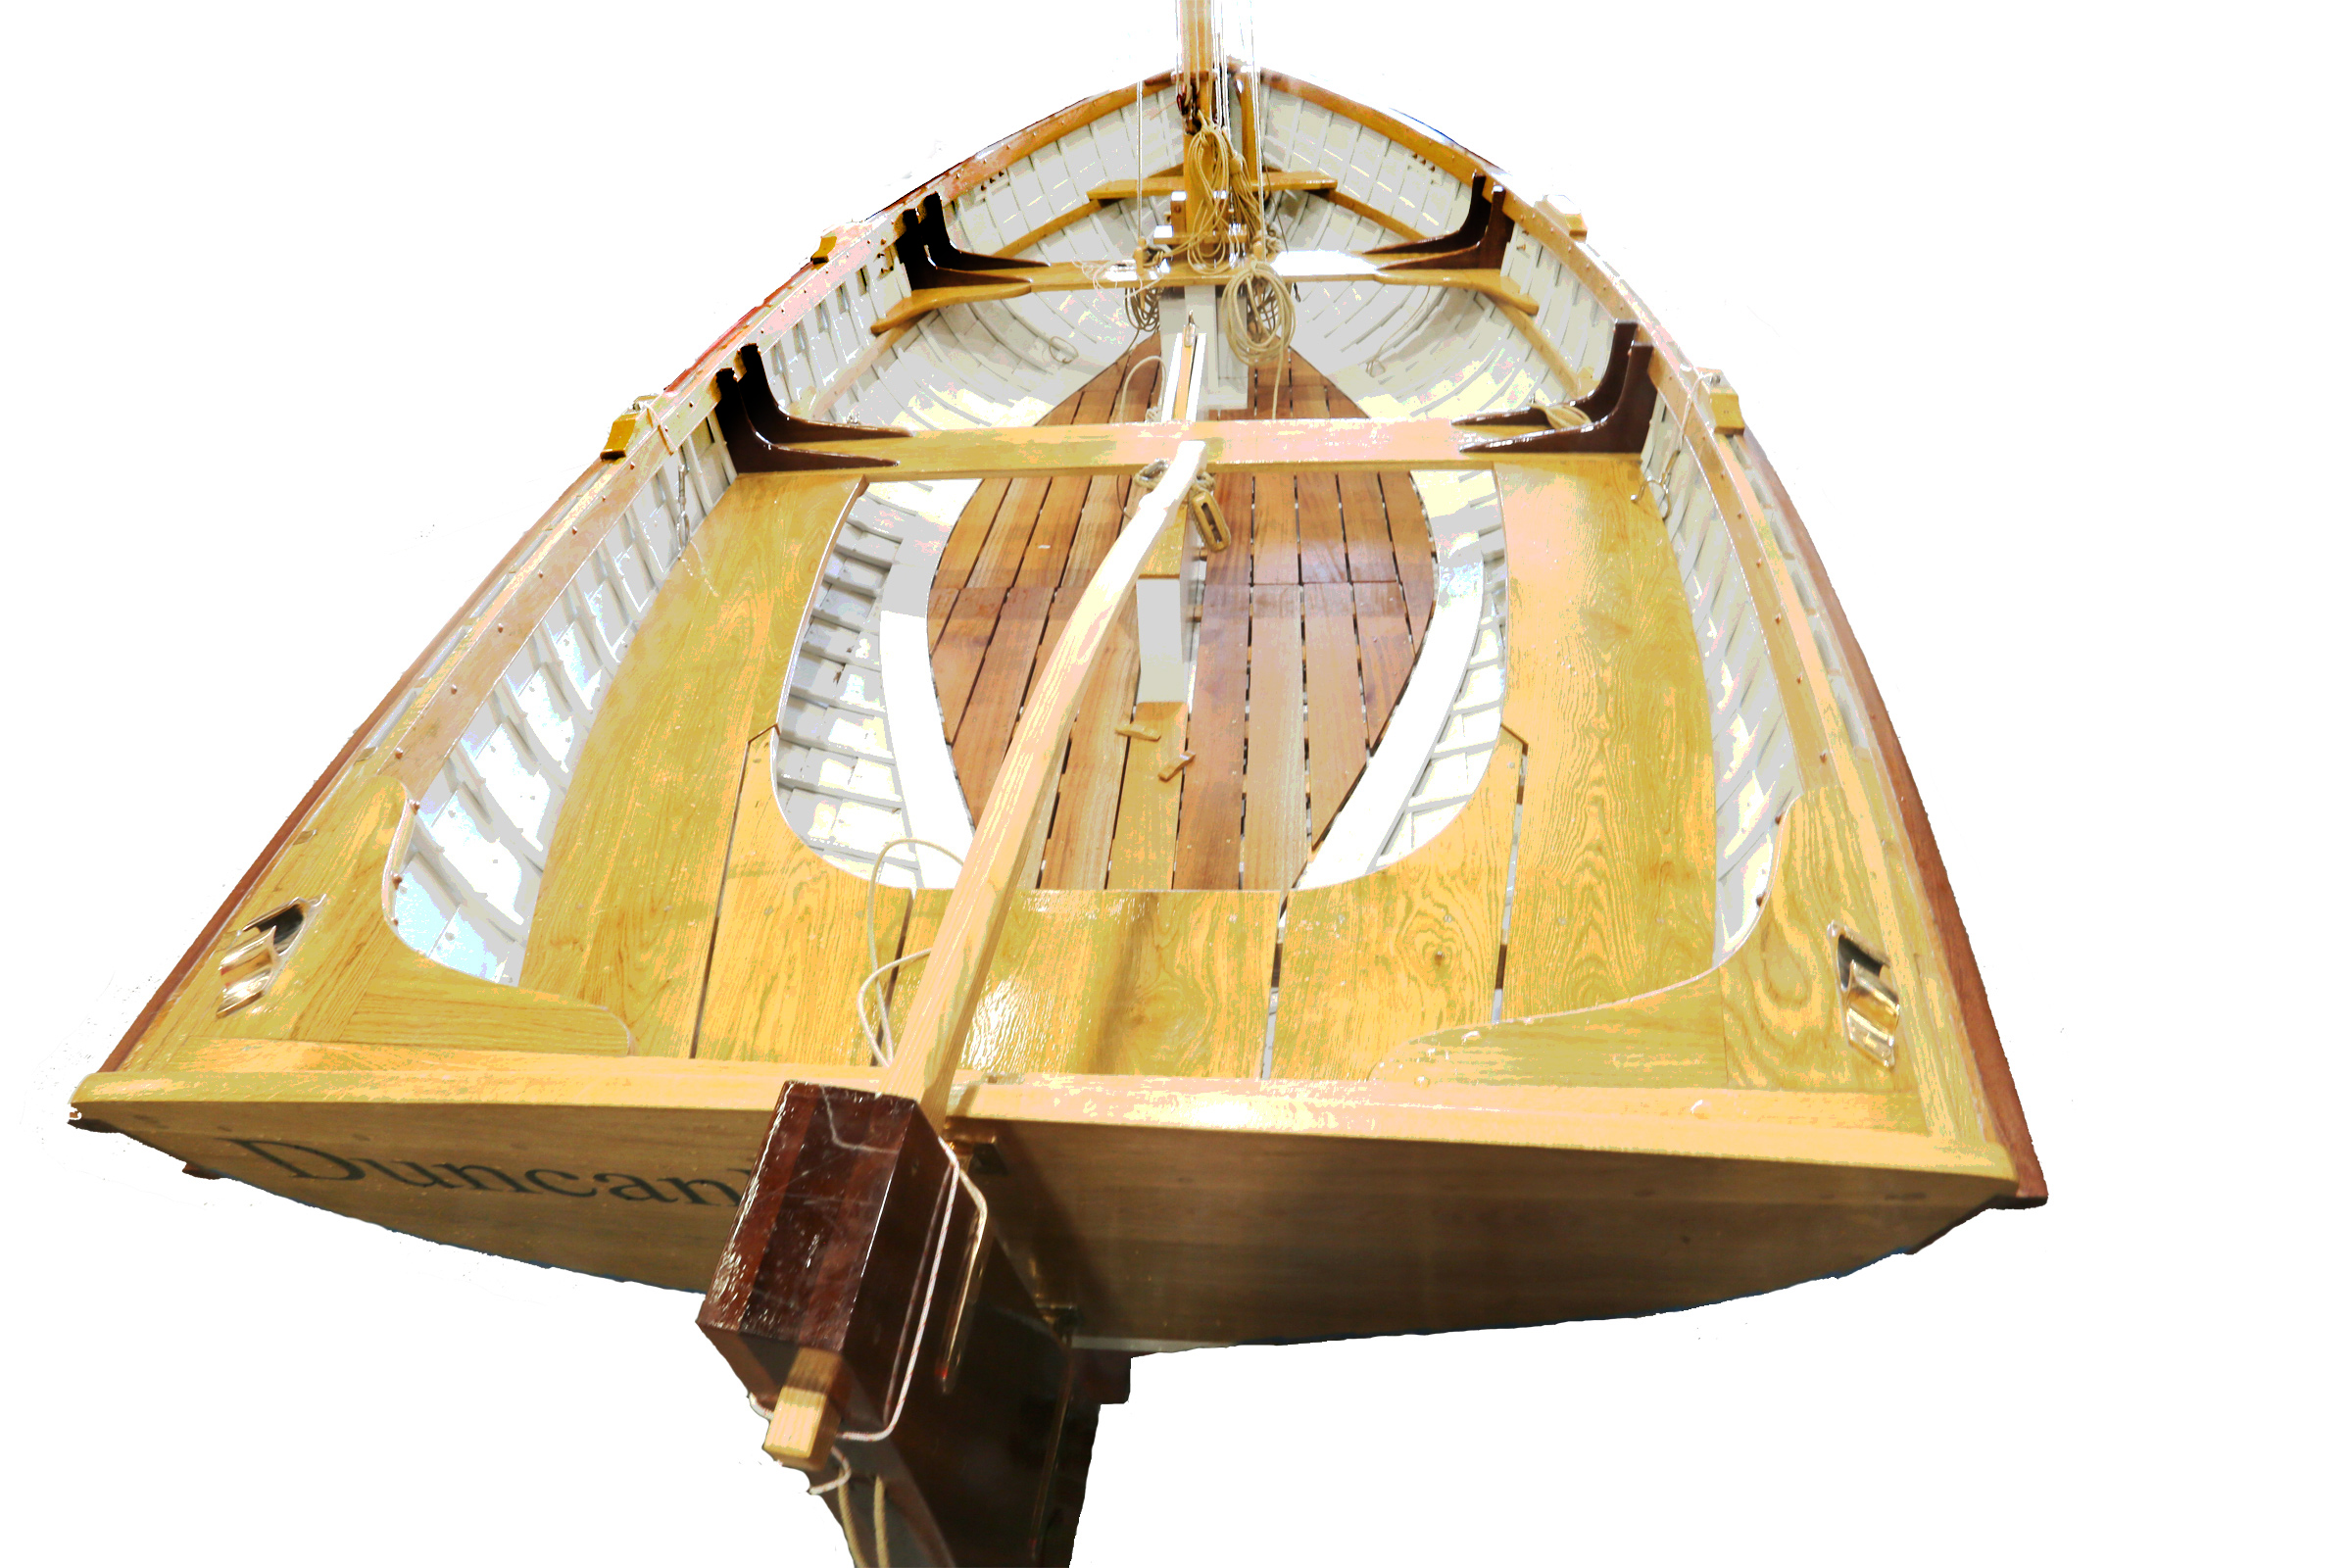
The cockpit sole is elevated to create a self-bailing cockpit and a voluminous flotation chamber spanning the entire bottom of the hull. Its perimeter lands just below the middle of the sides.
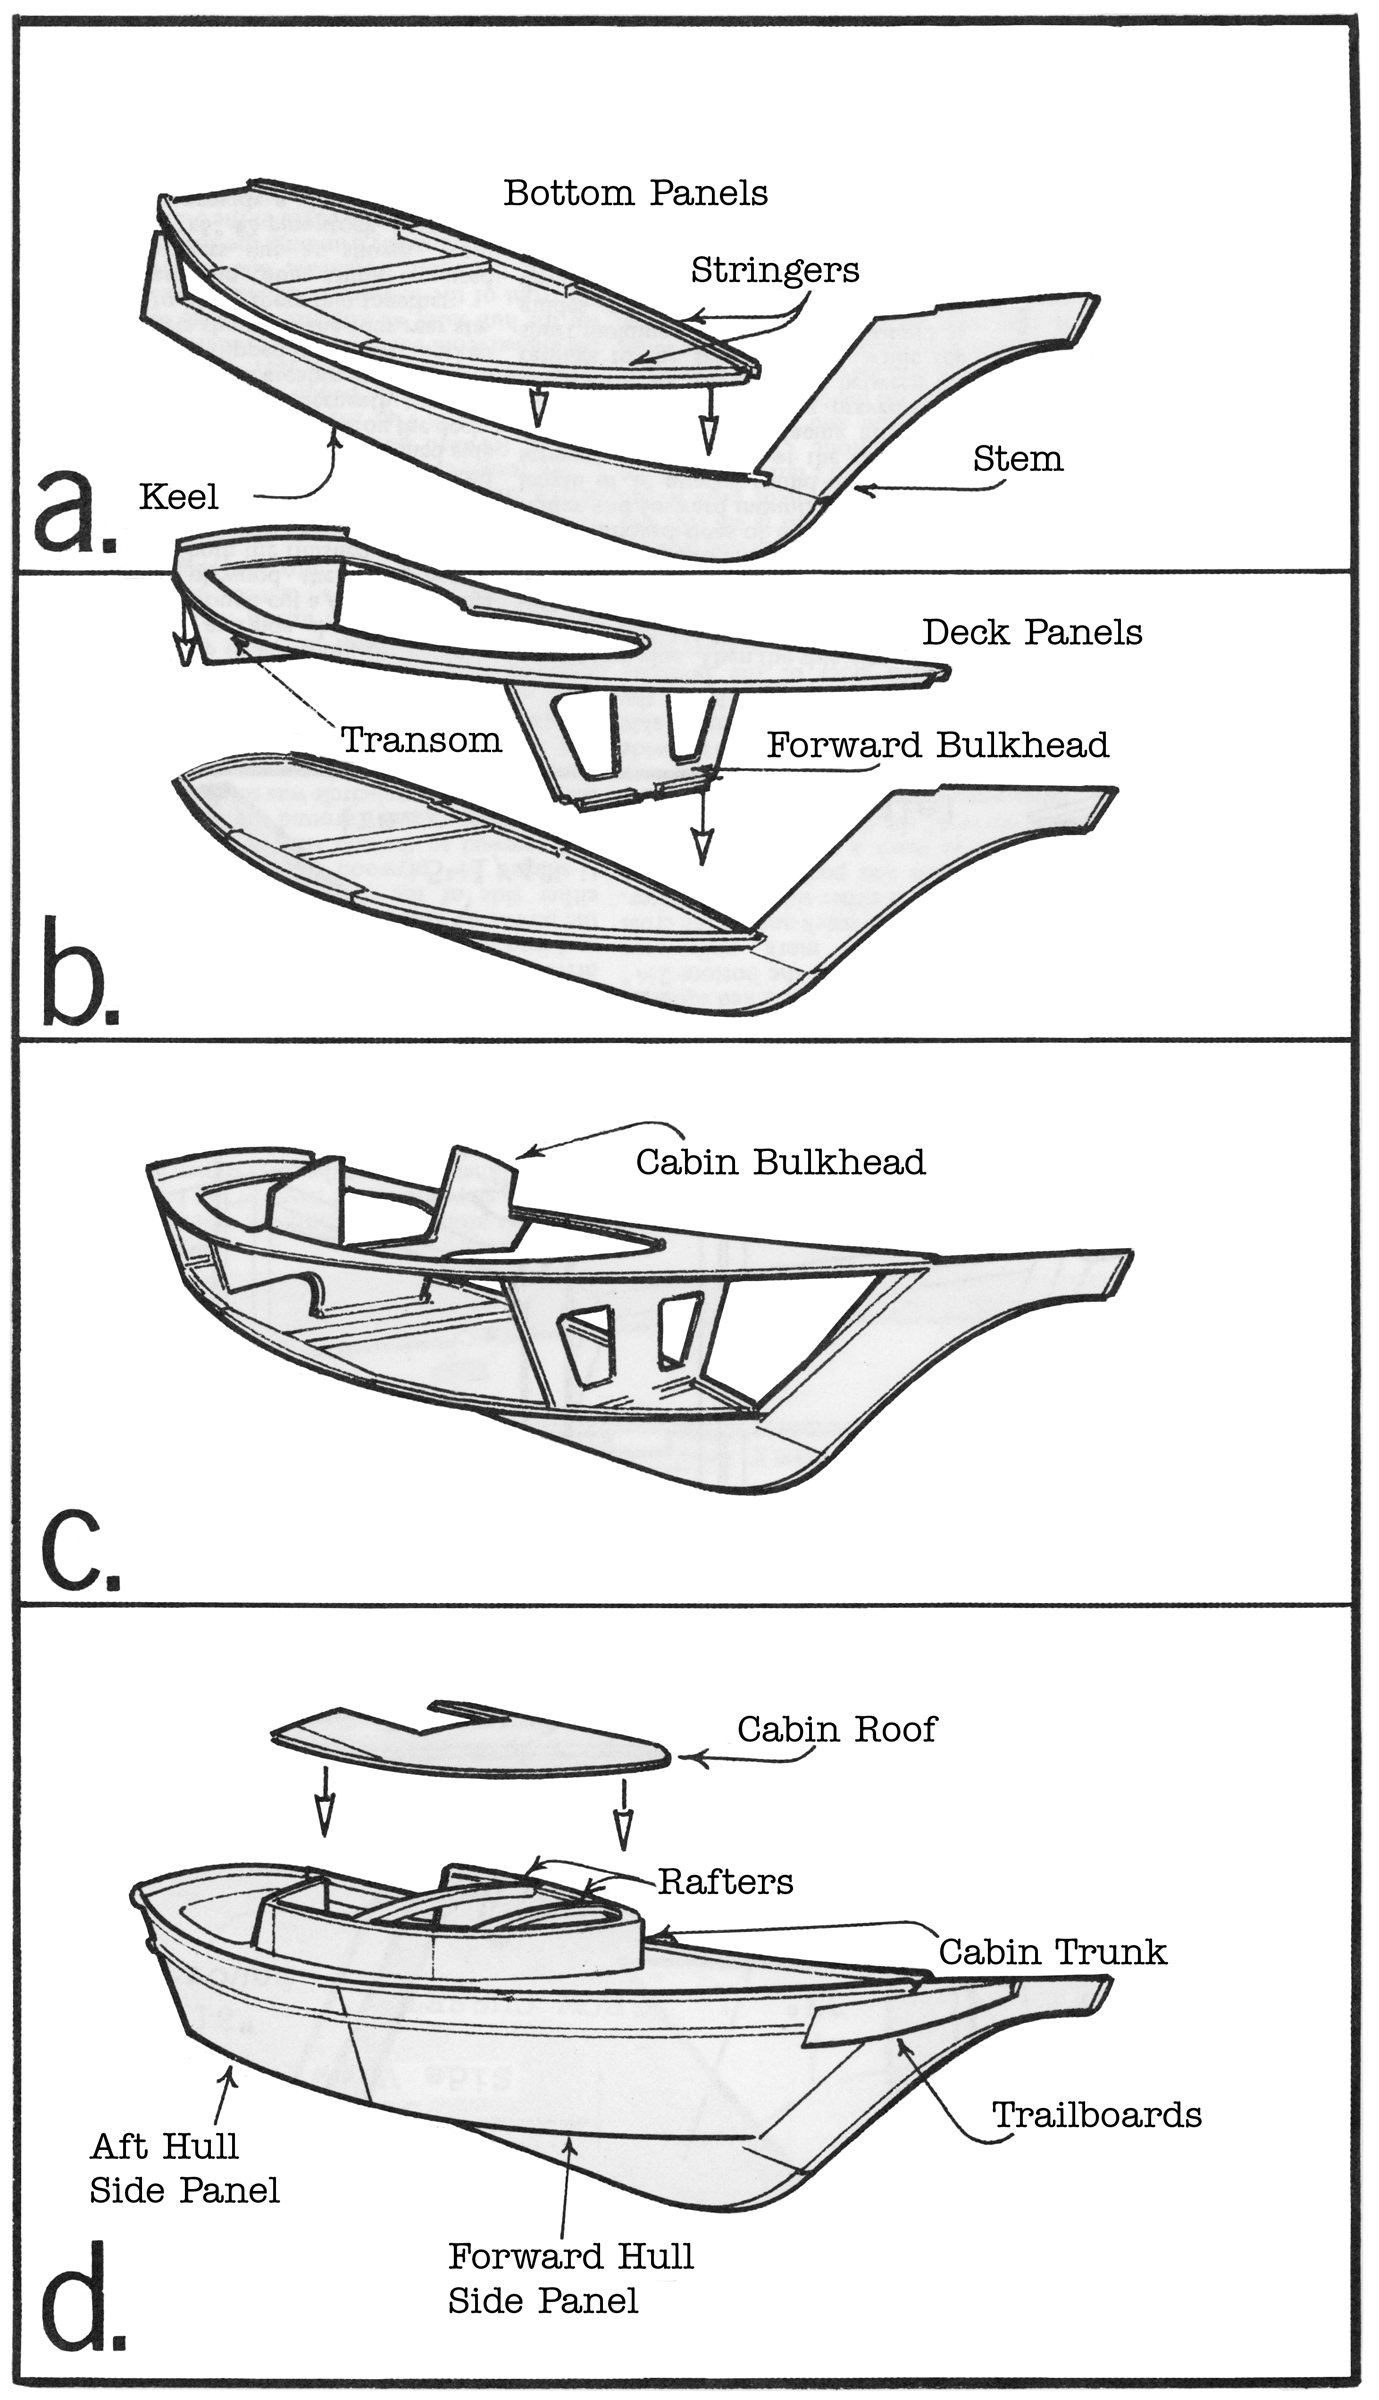
Construction begins, interestingly, with the cockpit sole. It forms a watertight compartment with the hull bottom and drains unwelcome water through above-the-waterline scuppers. The sole is cut from 1/4″ plywood, and frames are fitted along the sides. Longitudinal stringers with horizontal supports and the stem are then glued and screwed in place to the sole; the bottom is then similarly attached to the stringers. I used red cedar for the stringers, frames, and stem to save weight, but in retrospect Douglas-fir, which was also a recommended option, would have provided better strength.
The 1/2″ plywood transom is attached to the angled ends of the stringers, sole, and hull bottom. The lapstrake sides, cut from 1/4″ plywood, are glued and clamped along their length, and screwed to the frames, transom, and stem. The gunwale is stiffened with a rubrail and sheer clamps, for which I used heart pine. I used Douglas-fir for the spars and pine for the rudder. The daggerboard was initially a composite of pine and cedar, but it fractured after hitting an underwater obstruction. It is now made of an African hardwood. The interior is fitted out with seats and rigging. All surfaces have two coats of epoxy.
In the cockpit, the mainsheet runs to a block in the center, mounted on a small pad of oak. The jibsheets run to cam cleats on the inboard side of the gunnels. There are seats fore and aft with storage beneath.
The center thwart has been left out of this Laughing Gull. Its place would be just aft of the daggerboard trunk supported by the two closely spaced frames.
I did deviate slightly from the plans during construction. Intending to use the boat almost exclusively for sailing, I did not make the oarlock risers because I thought these might make sitting on the rail uncomfortable. I omitted the center bench and rowing footrests to keep the cockpit clear. I added hiking straps for the skipper and one crew. I added hinges to the seats for better access to storage space beneath.
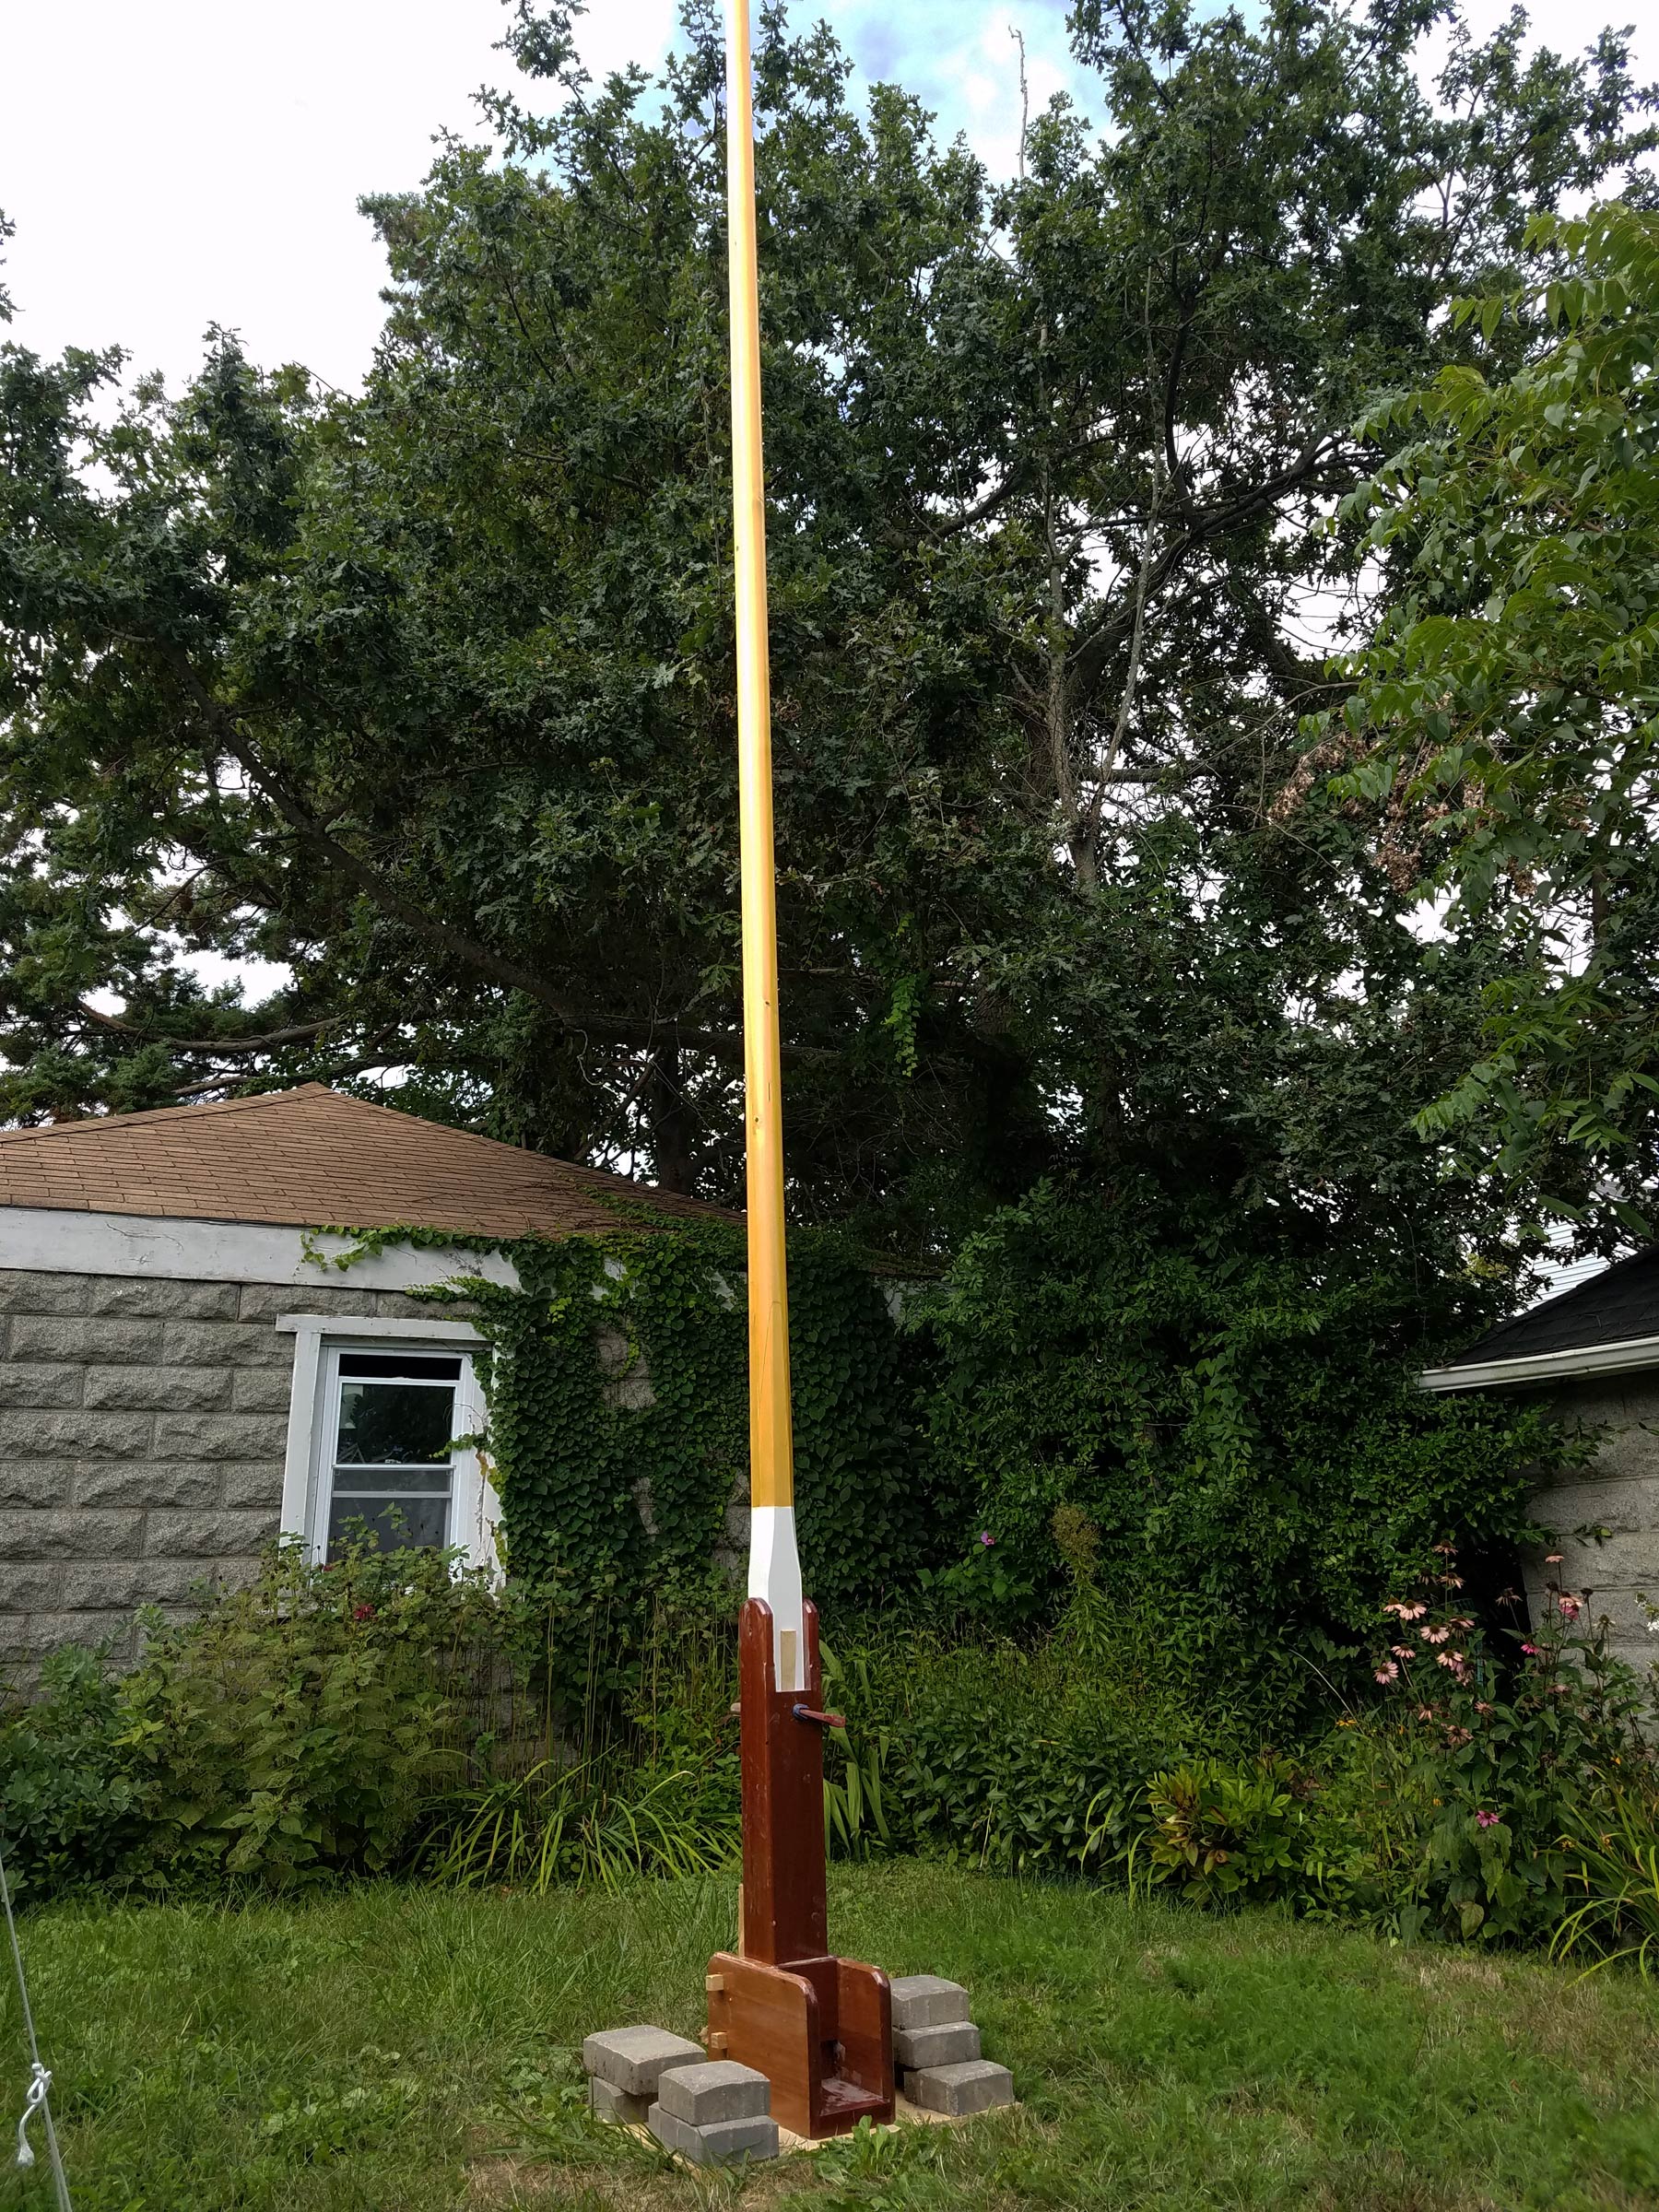
The plans specify a hollow mast but, regrettably, I was too eager to launch to take the time to carve out the insides. My mast is solid and therefore heavier than it would be otherwise.
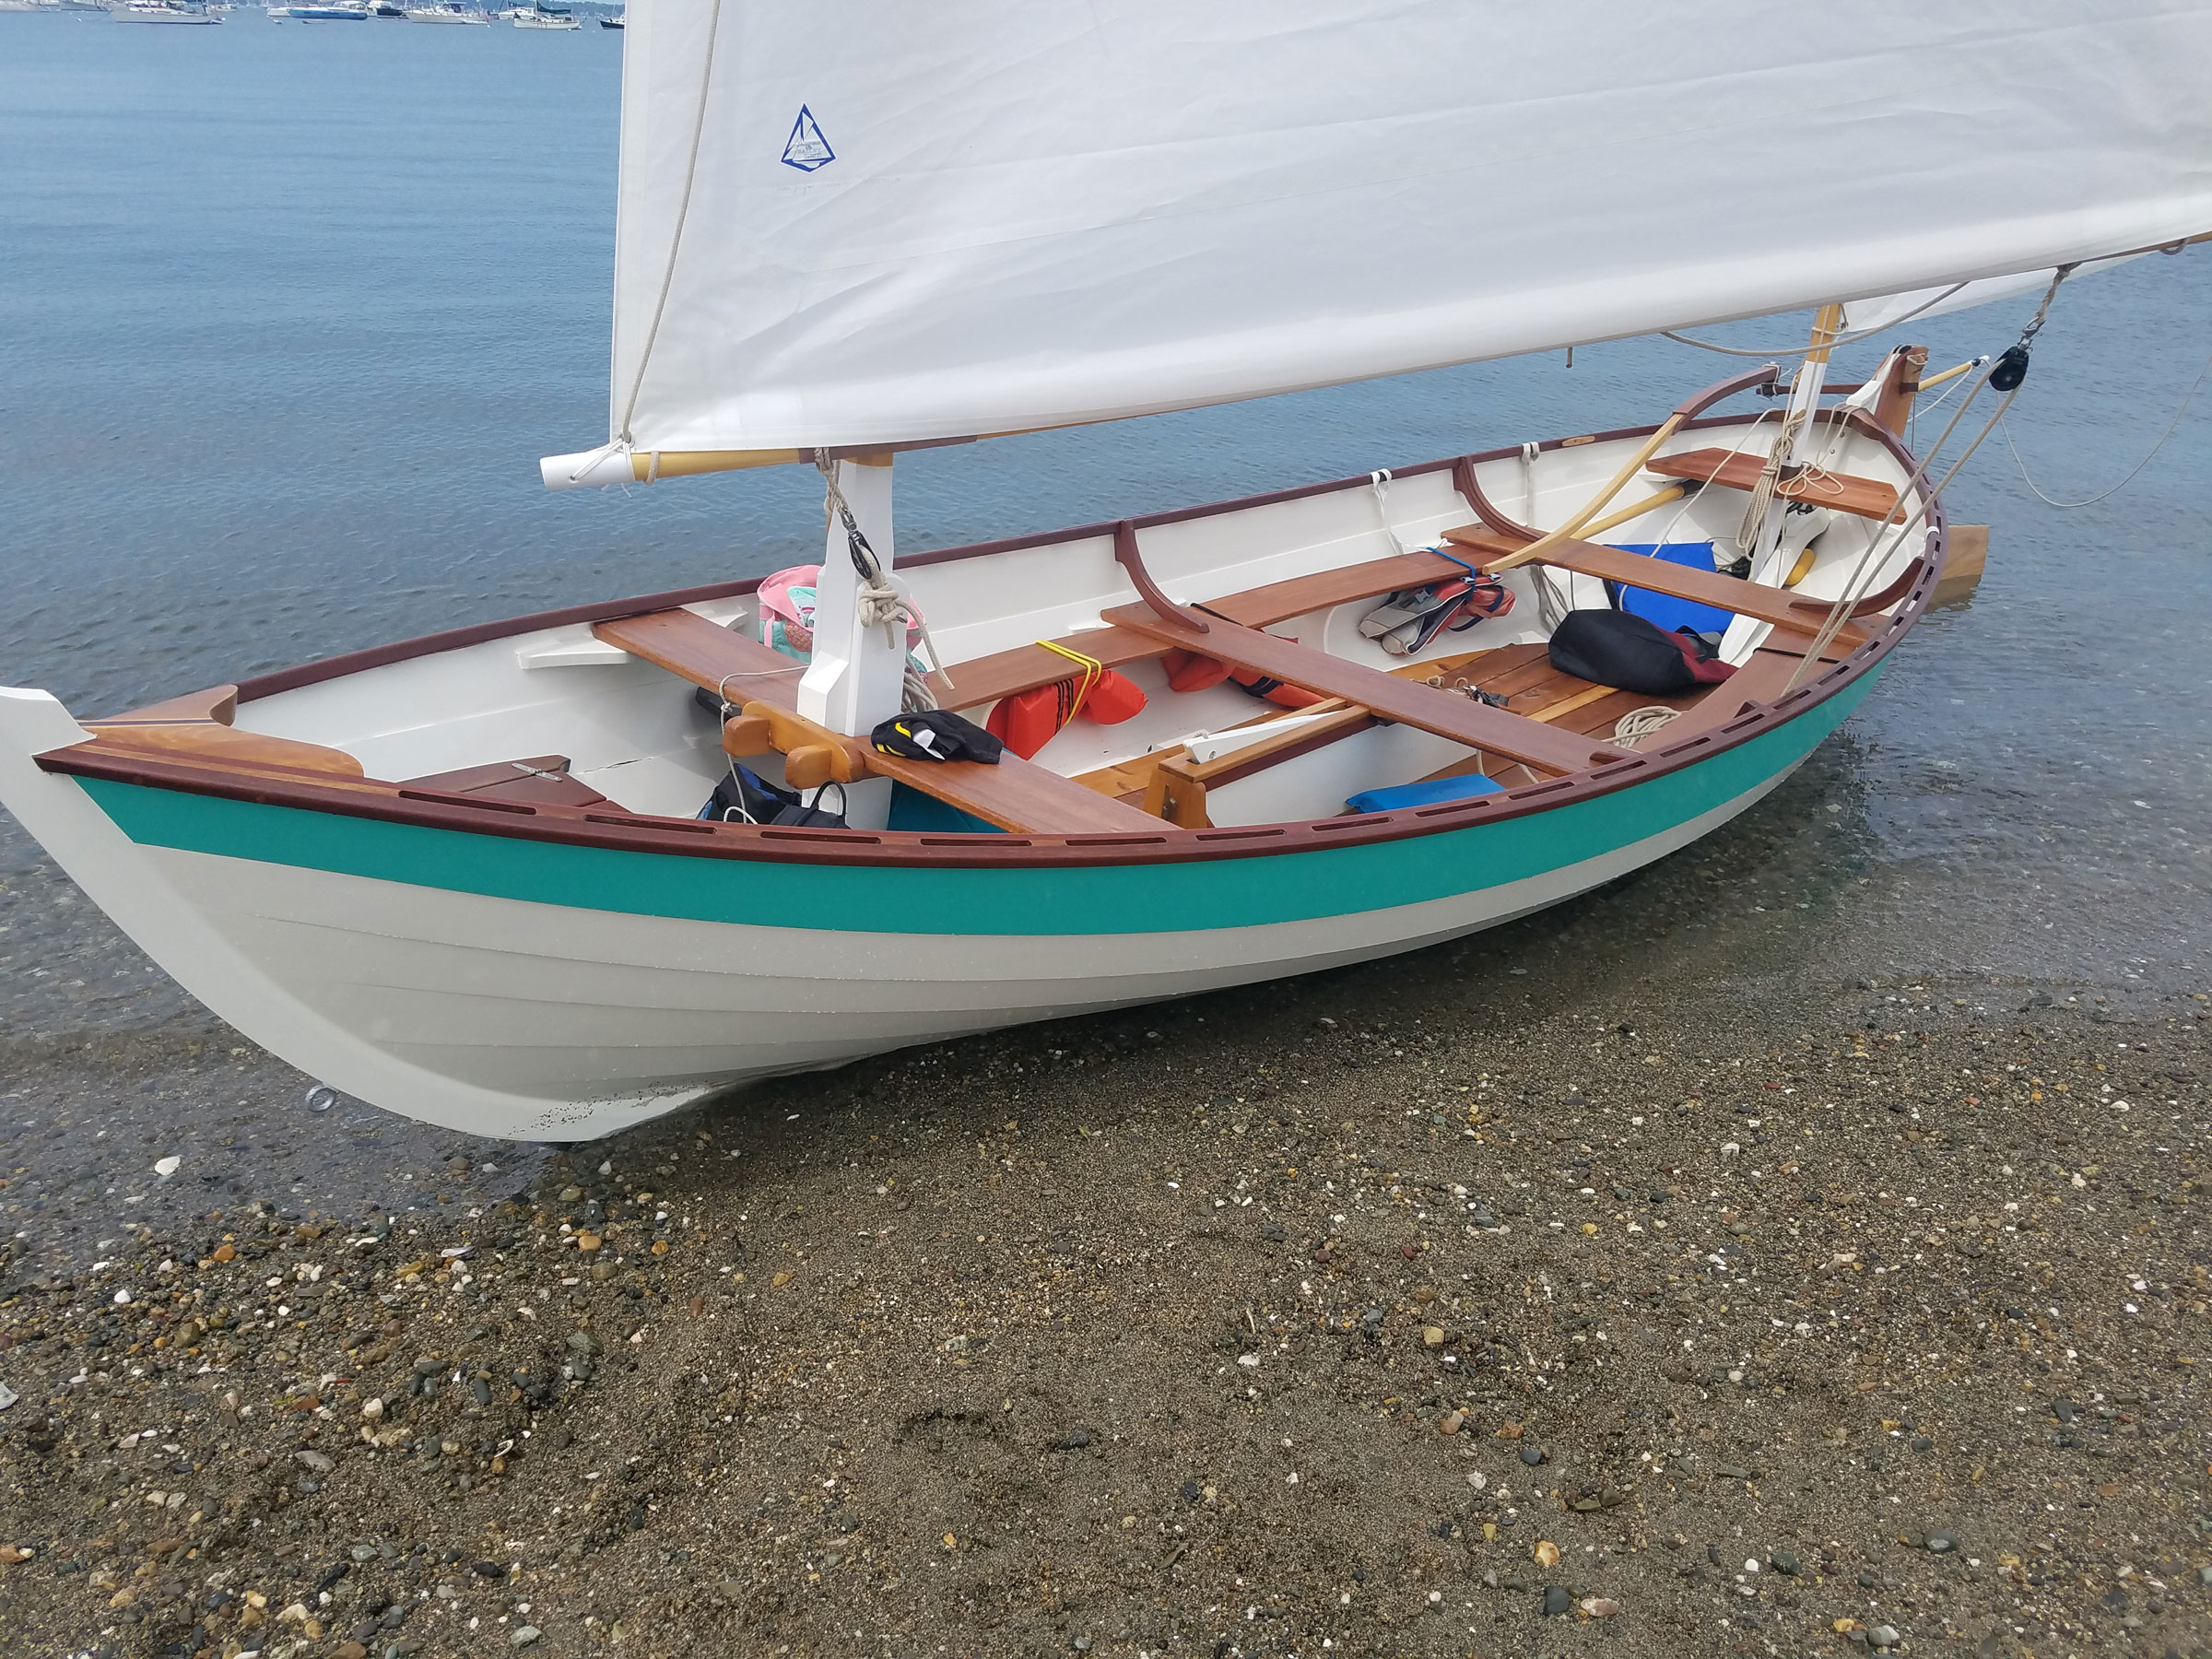
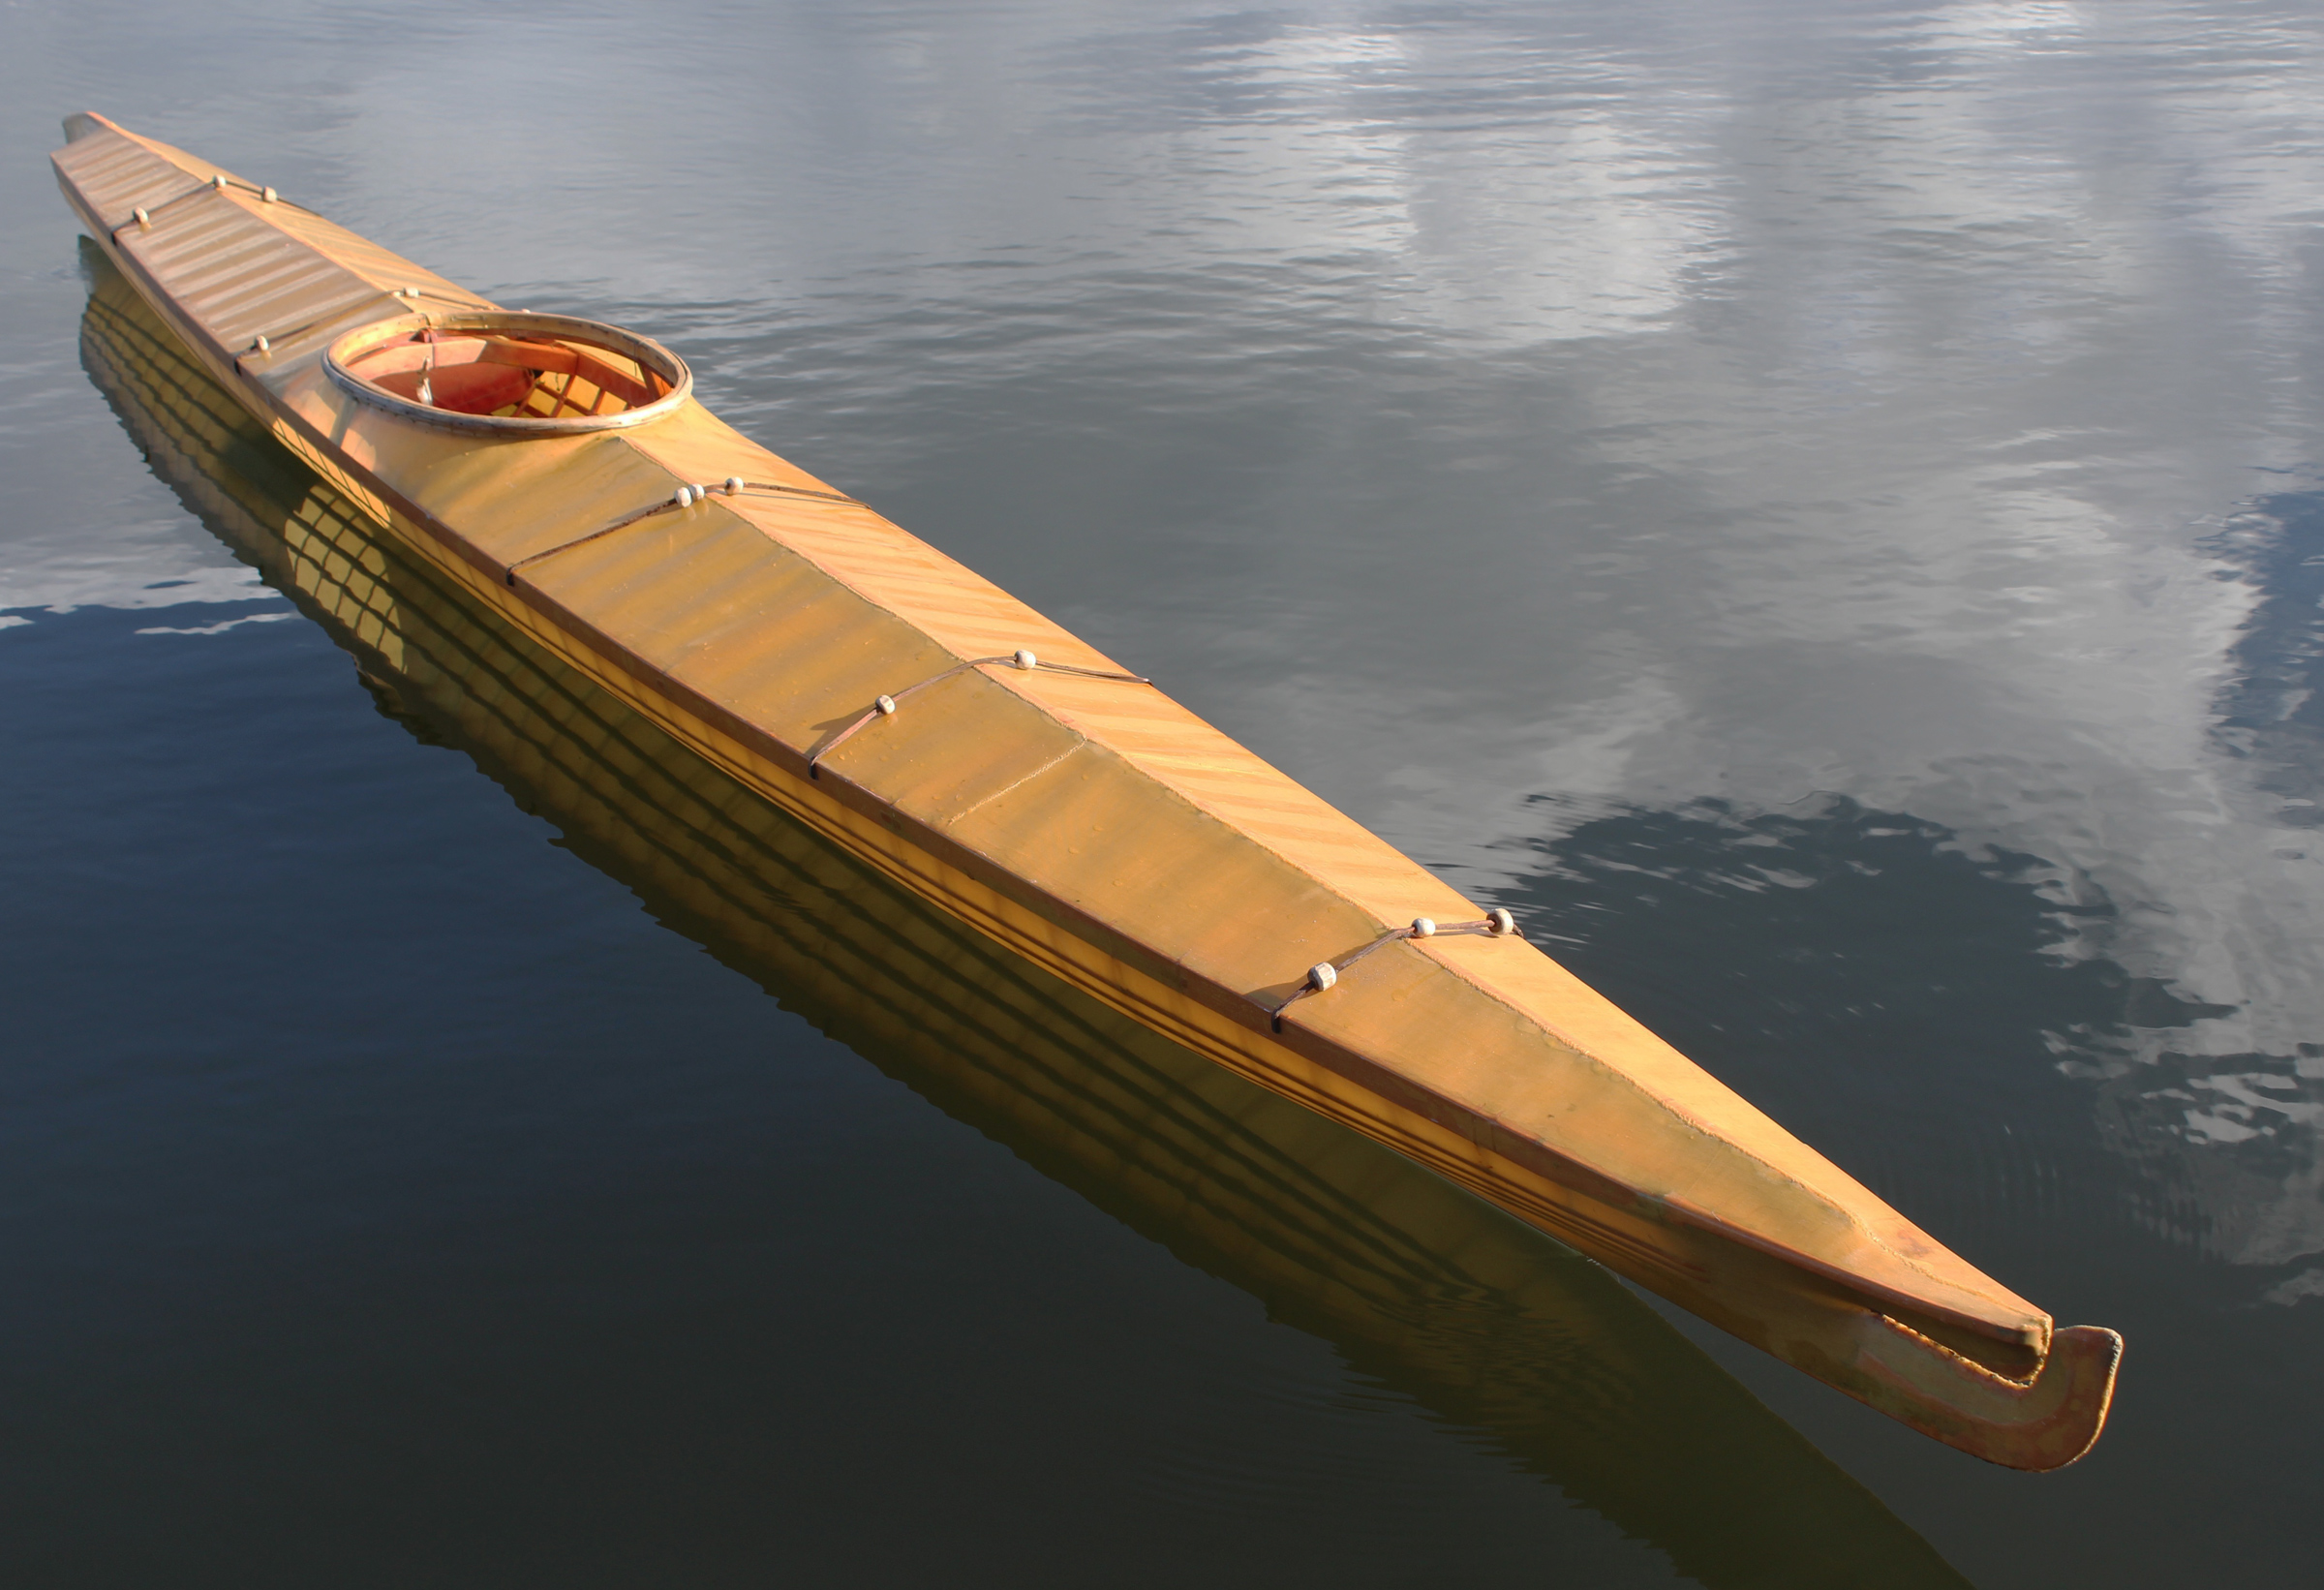
I christened the boat CAROLINA ROSEO after my great-grandmother who emigrated from Italy to New York by herself when she was just 15. The boat has beautiful lines and gets compliments everywhere I go. This is most amusing in Miami, where this little sailing skiff often steals the show from the superyachts.
Quite soon after launching, a friend and I took it on an eight-day camping trip along the north Florida Gulf Coast. When I moved to Coconut Grove, I sailed almost weekly for four years and went on several overnight sailing-camping trips throughout Biscayne Bay, Florida Bay, and the Keys. I now sail out of New Orleans, and my Laughing Gull is more than 10 years old.
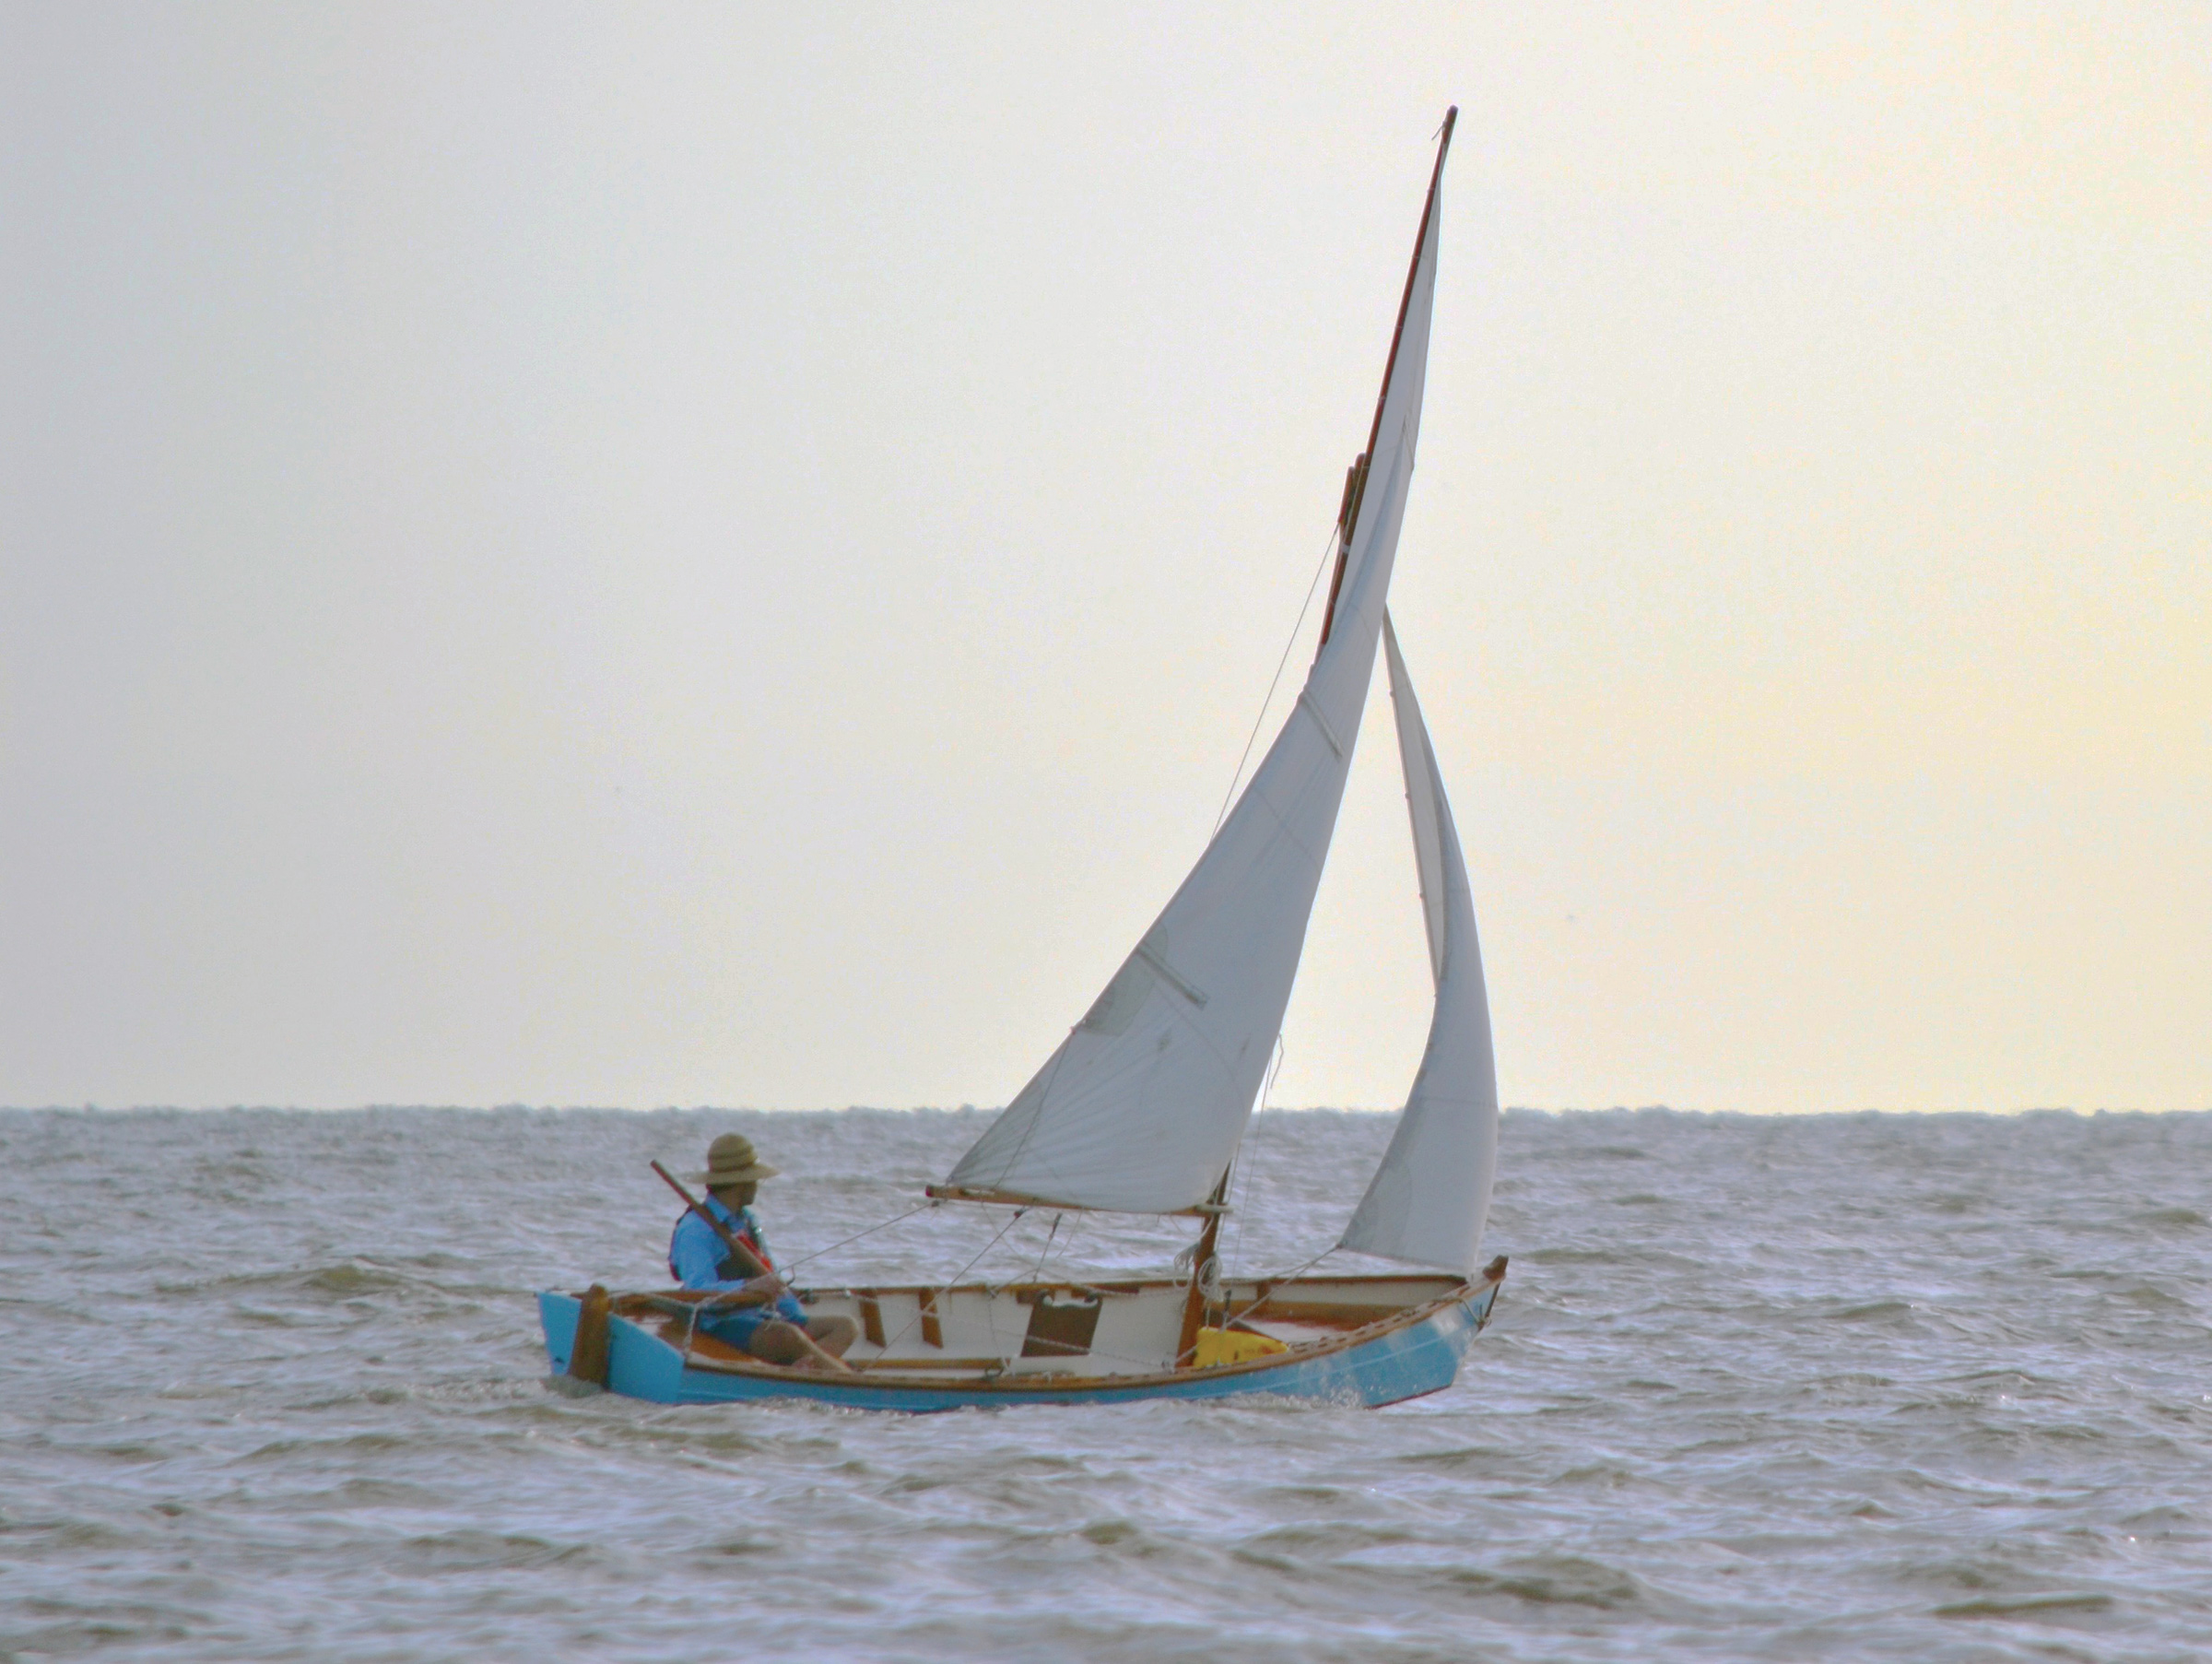
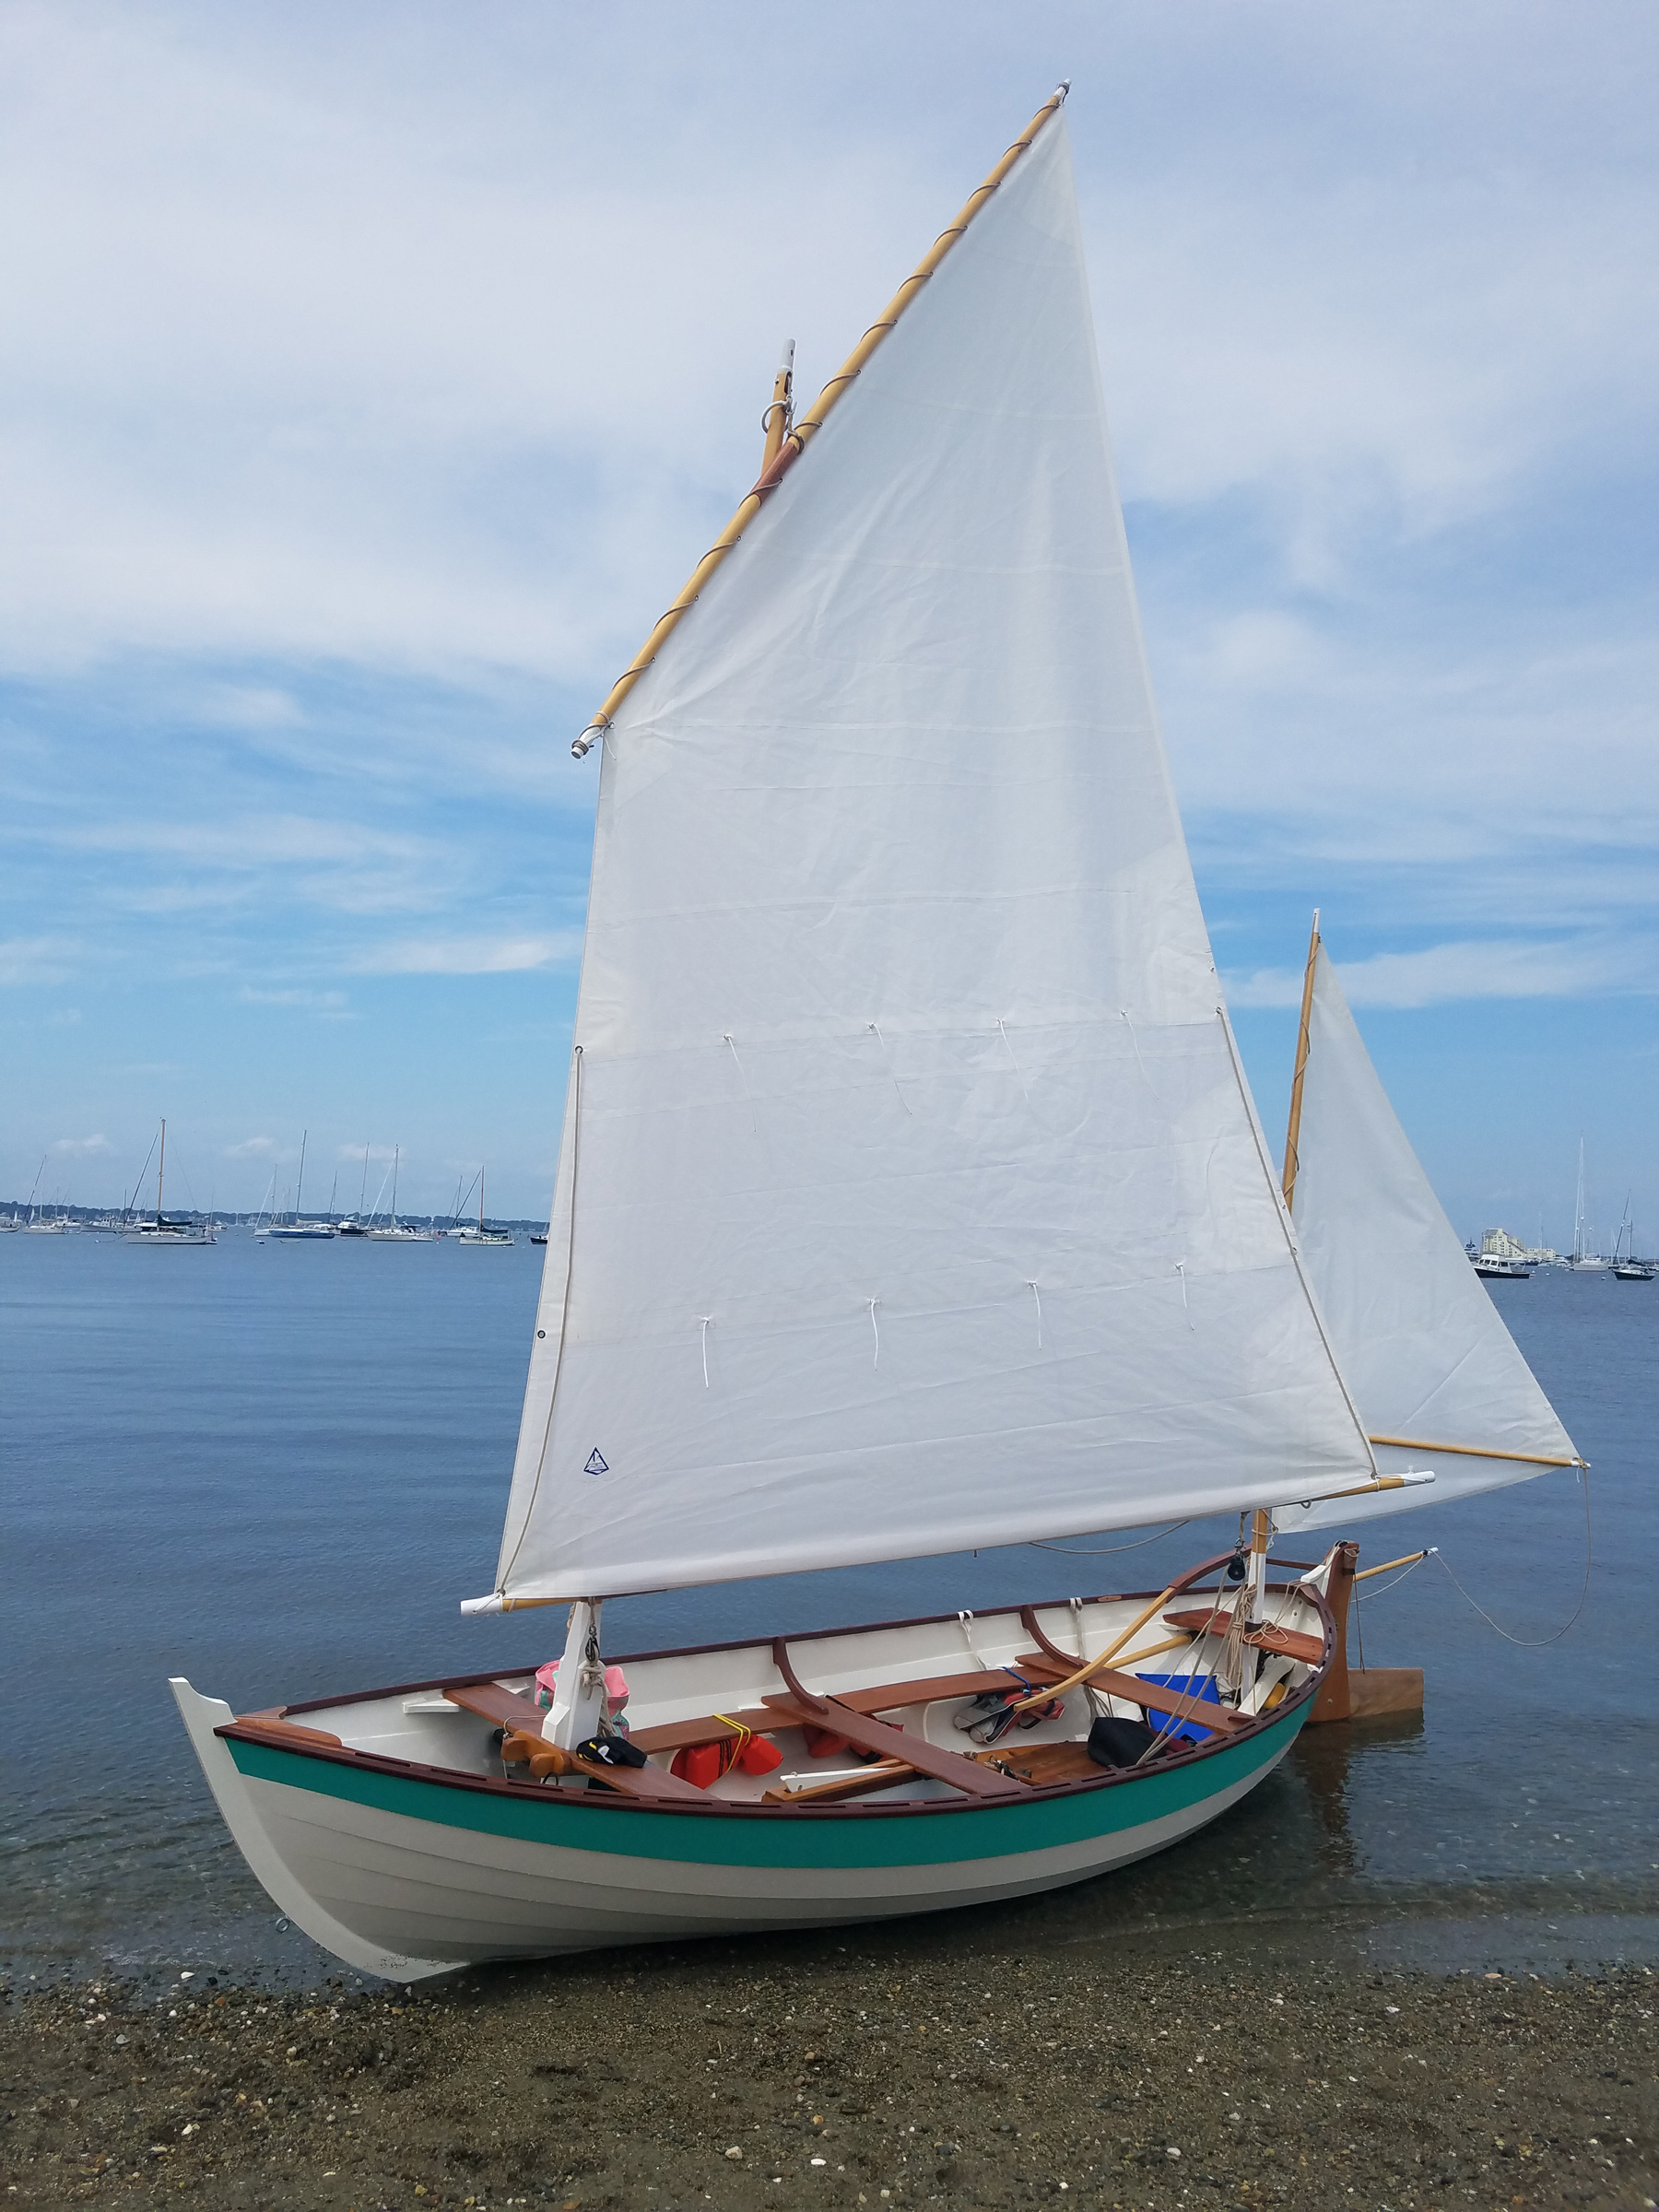
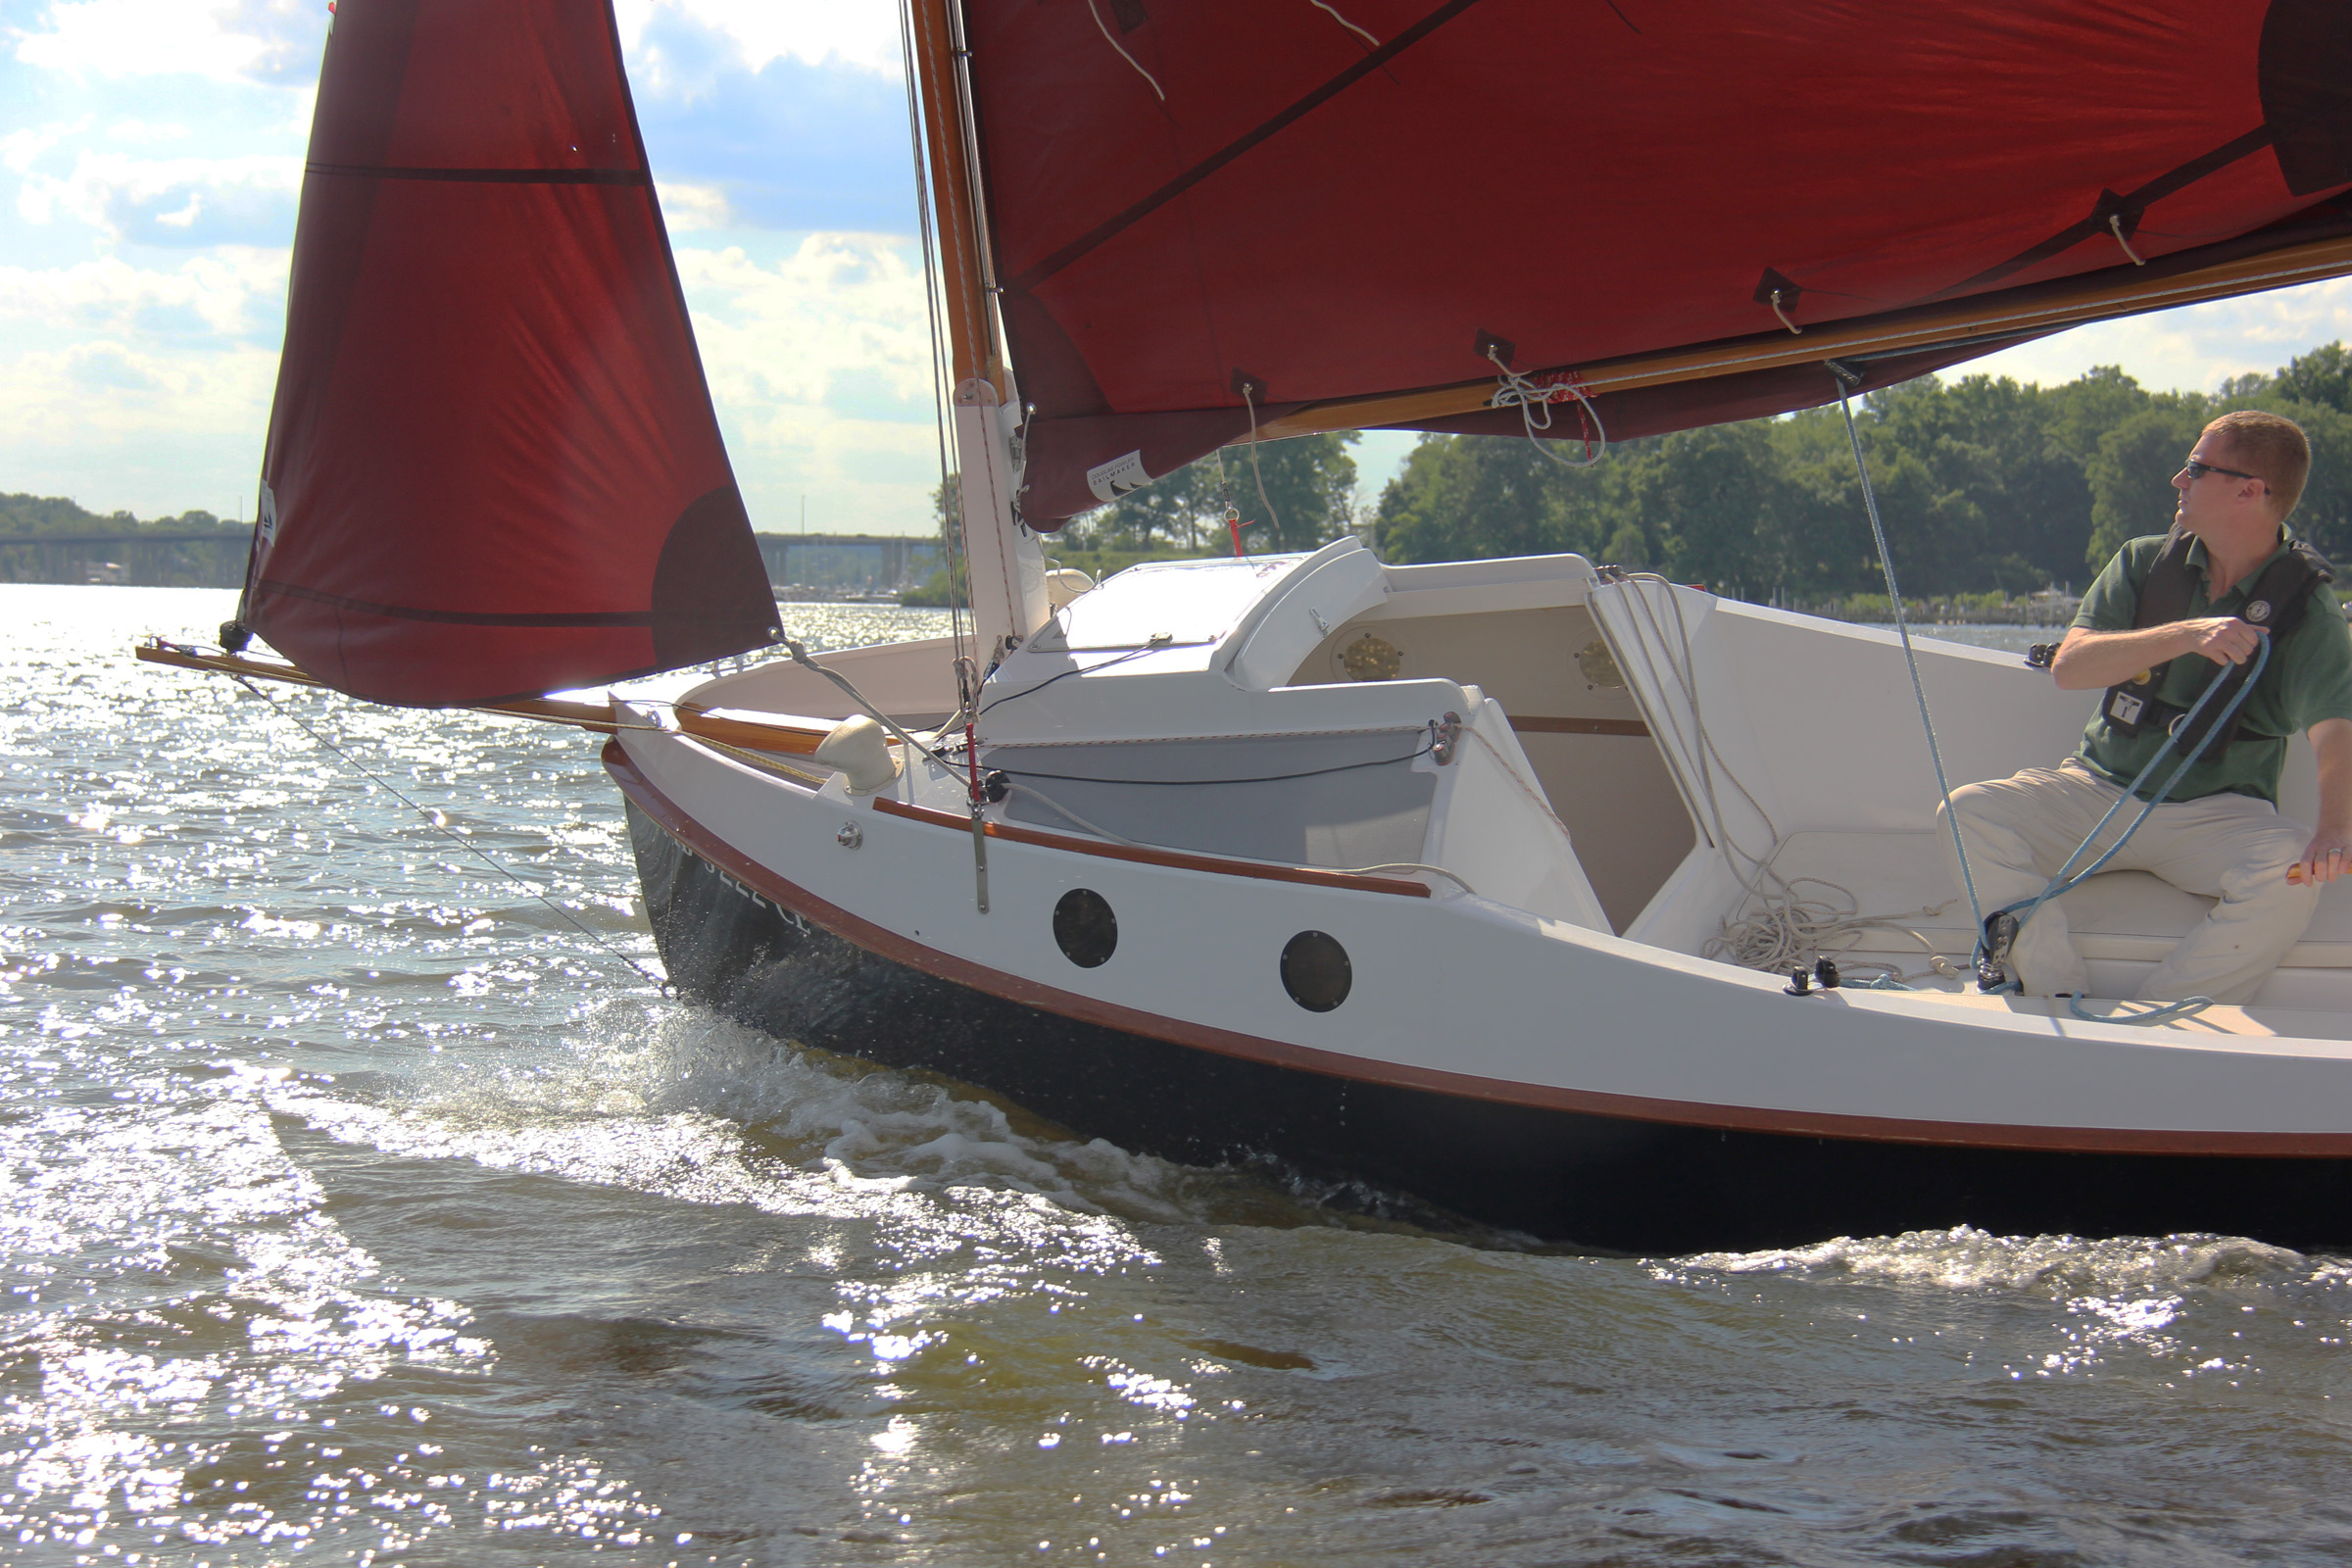
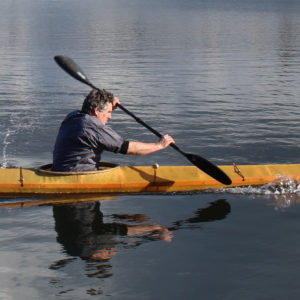
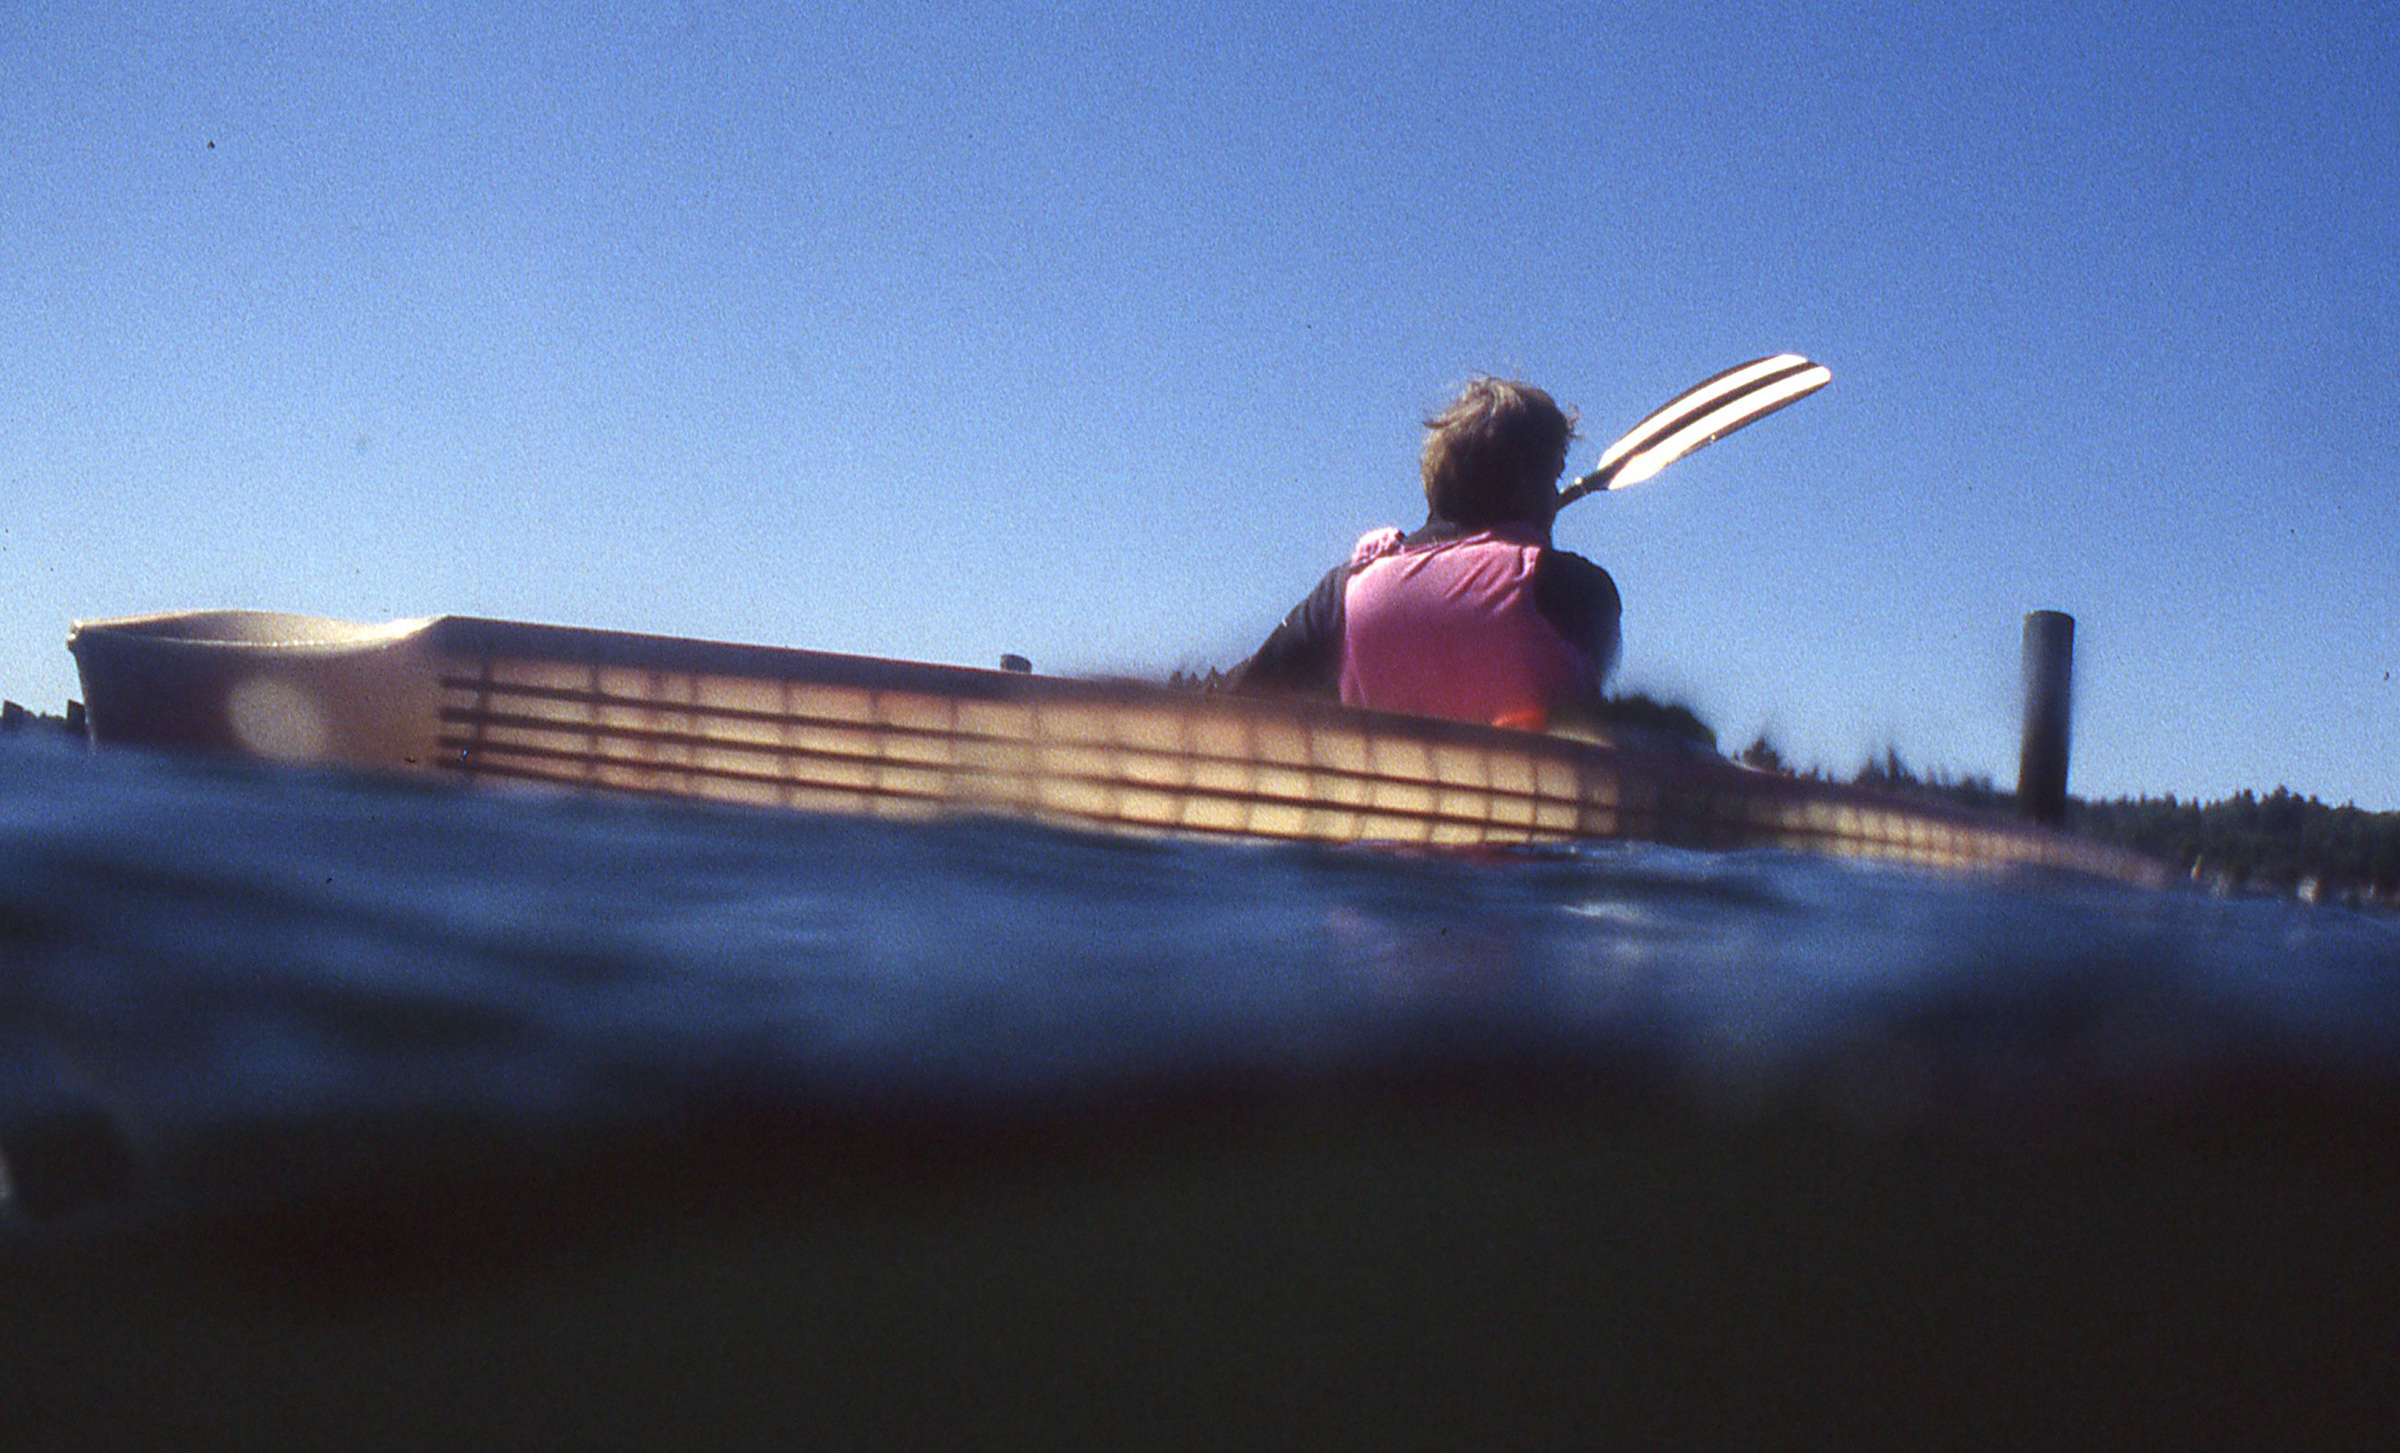
The author reports he has “comfortably sailed the Laughing Gull in up to 25 knots off the wind.”
I have sailed the hell out of this boat and send updates to Mr. Davis, often to his chagrin. He frequently reminds me that I sail in conditions the boat is not designed for. That said, I can tell you that my Laughing Gull positively screams downwind in 35 knots of breeze (caught in a squall, somewhat on purpose). It easily makes 12 knots surfing down the Atlantic swell off Miami on a broad reach with 20 knots of wind. I once sailed the 15 miles from Ragged Keys back to Coconut Grove on a broad reach, and averaged 9 knots. The boat is also content ghosting along in inches of water in Florida Bay with her board and rudder up, steering by sails alone.
The Laughing Gull’s light weight (225 lbs) and ample sail area make it sensitive to every variation in the wind. The most remarkable thing about the skiff is how readily it planes on anything between a close reach and a broad reach. At the first sight of whitecaps, it will leap on top of the water and soar.
As speed increases when sailing a beam or broad reach in high winds, a phenomenon curious for a monohull occurs: the windward telltales on the jib gyrate and the main luff flutters. You trim the sails and it happens again. Soon, you find yourself in the paradox of sailing a broad reach with sails trimmed as if on a close reach! Recognizing variations in apparent wind is an important factor in sailing this boat well.
In Miami, I sailed out of the U.S. Sailing Center and so was surrounded by world-class sailors (which I absolutely do not count myself among!) in racing dinghies. On many occasions while returning to the harbor, the Laughing Gull would keep pace with Stars and 420s.
Another testament to its speed: The Barnacle Society of Coconut Grove, Florida, holds an annual classic boat regatta at The Barnacle Historic State Park that was once the home of Ralph Munroe. I entered CAROLINA ROSEO in the race for four years, and won my division in three of them—much more a credit to the design than to my racing skills. The boat is fast!
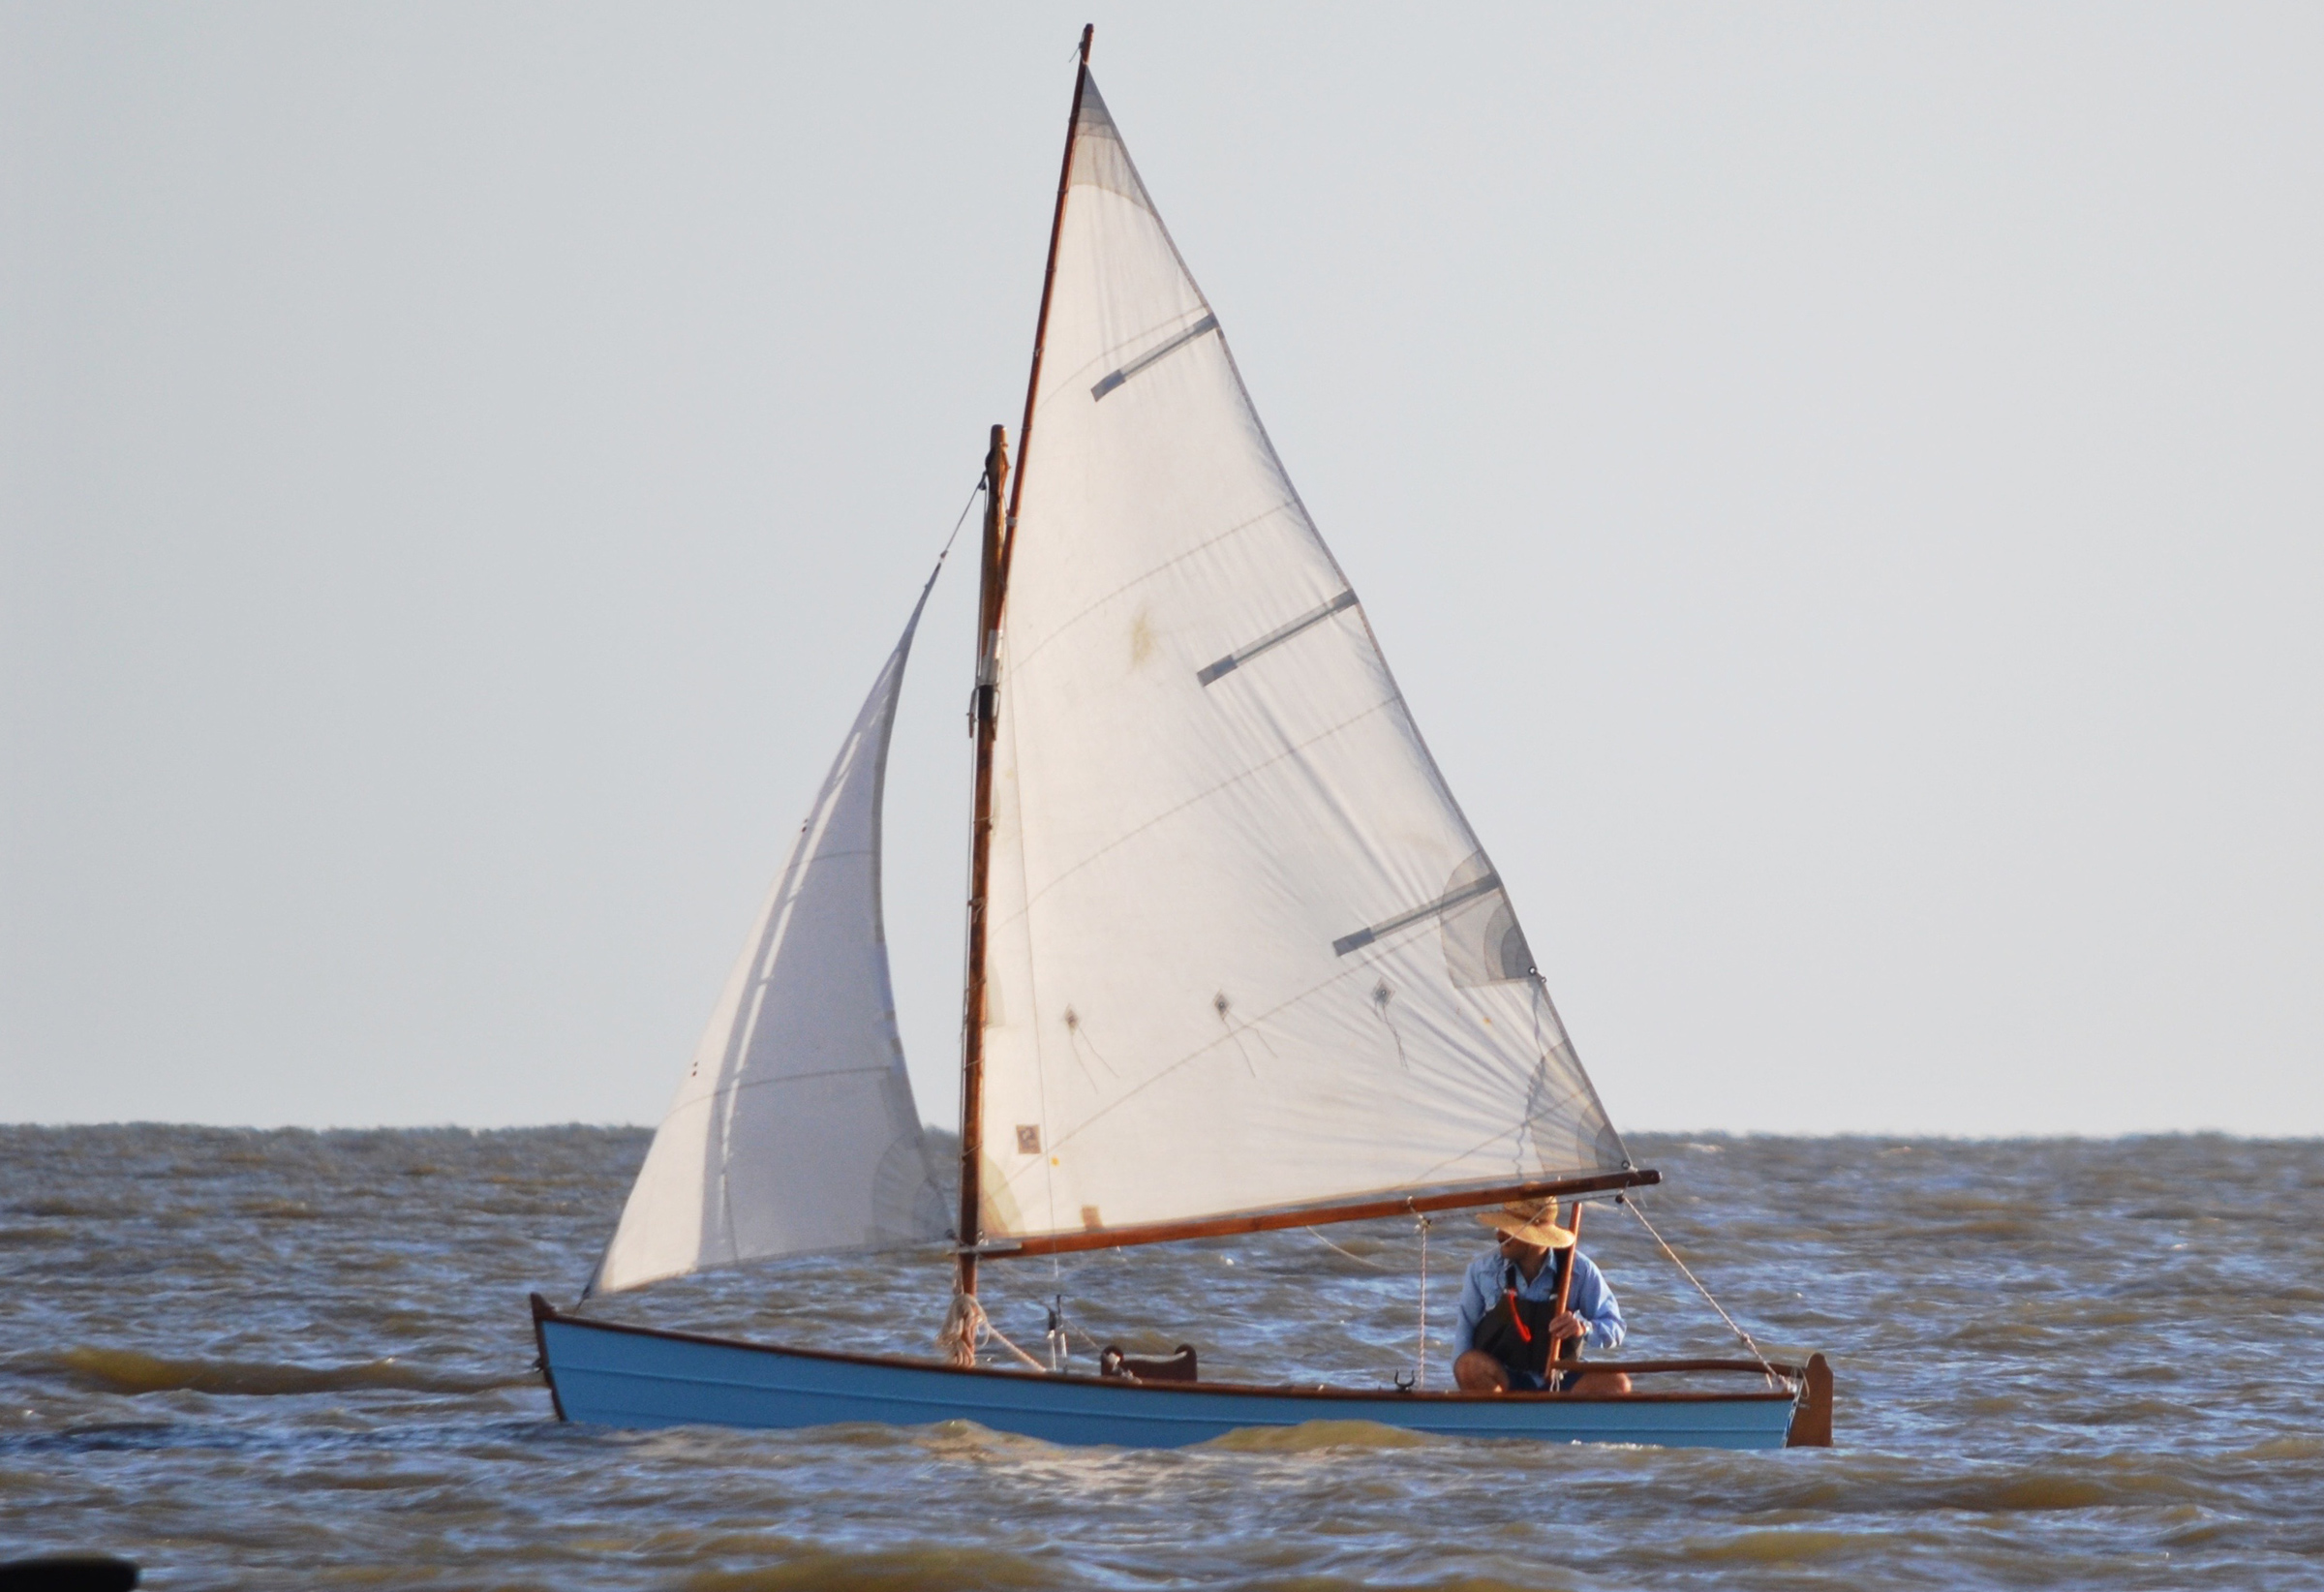
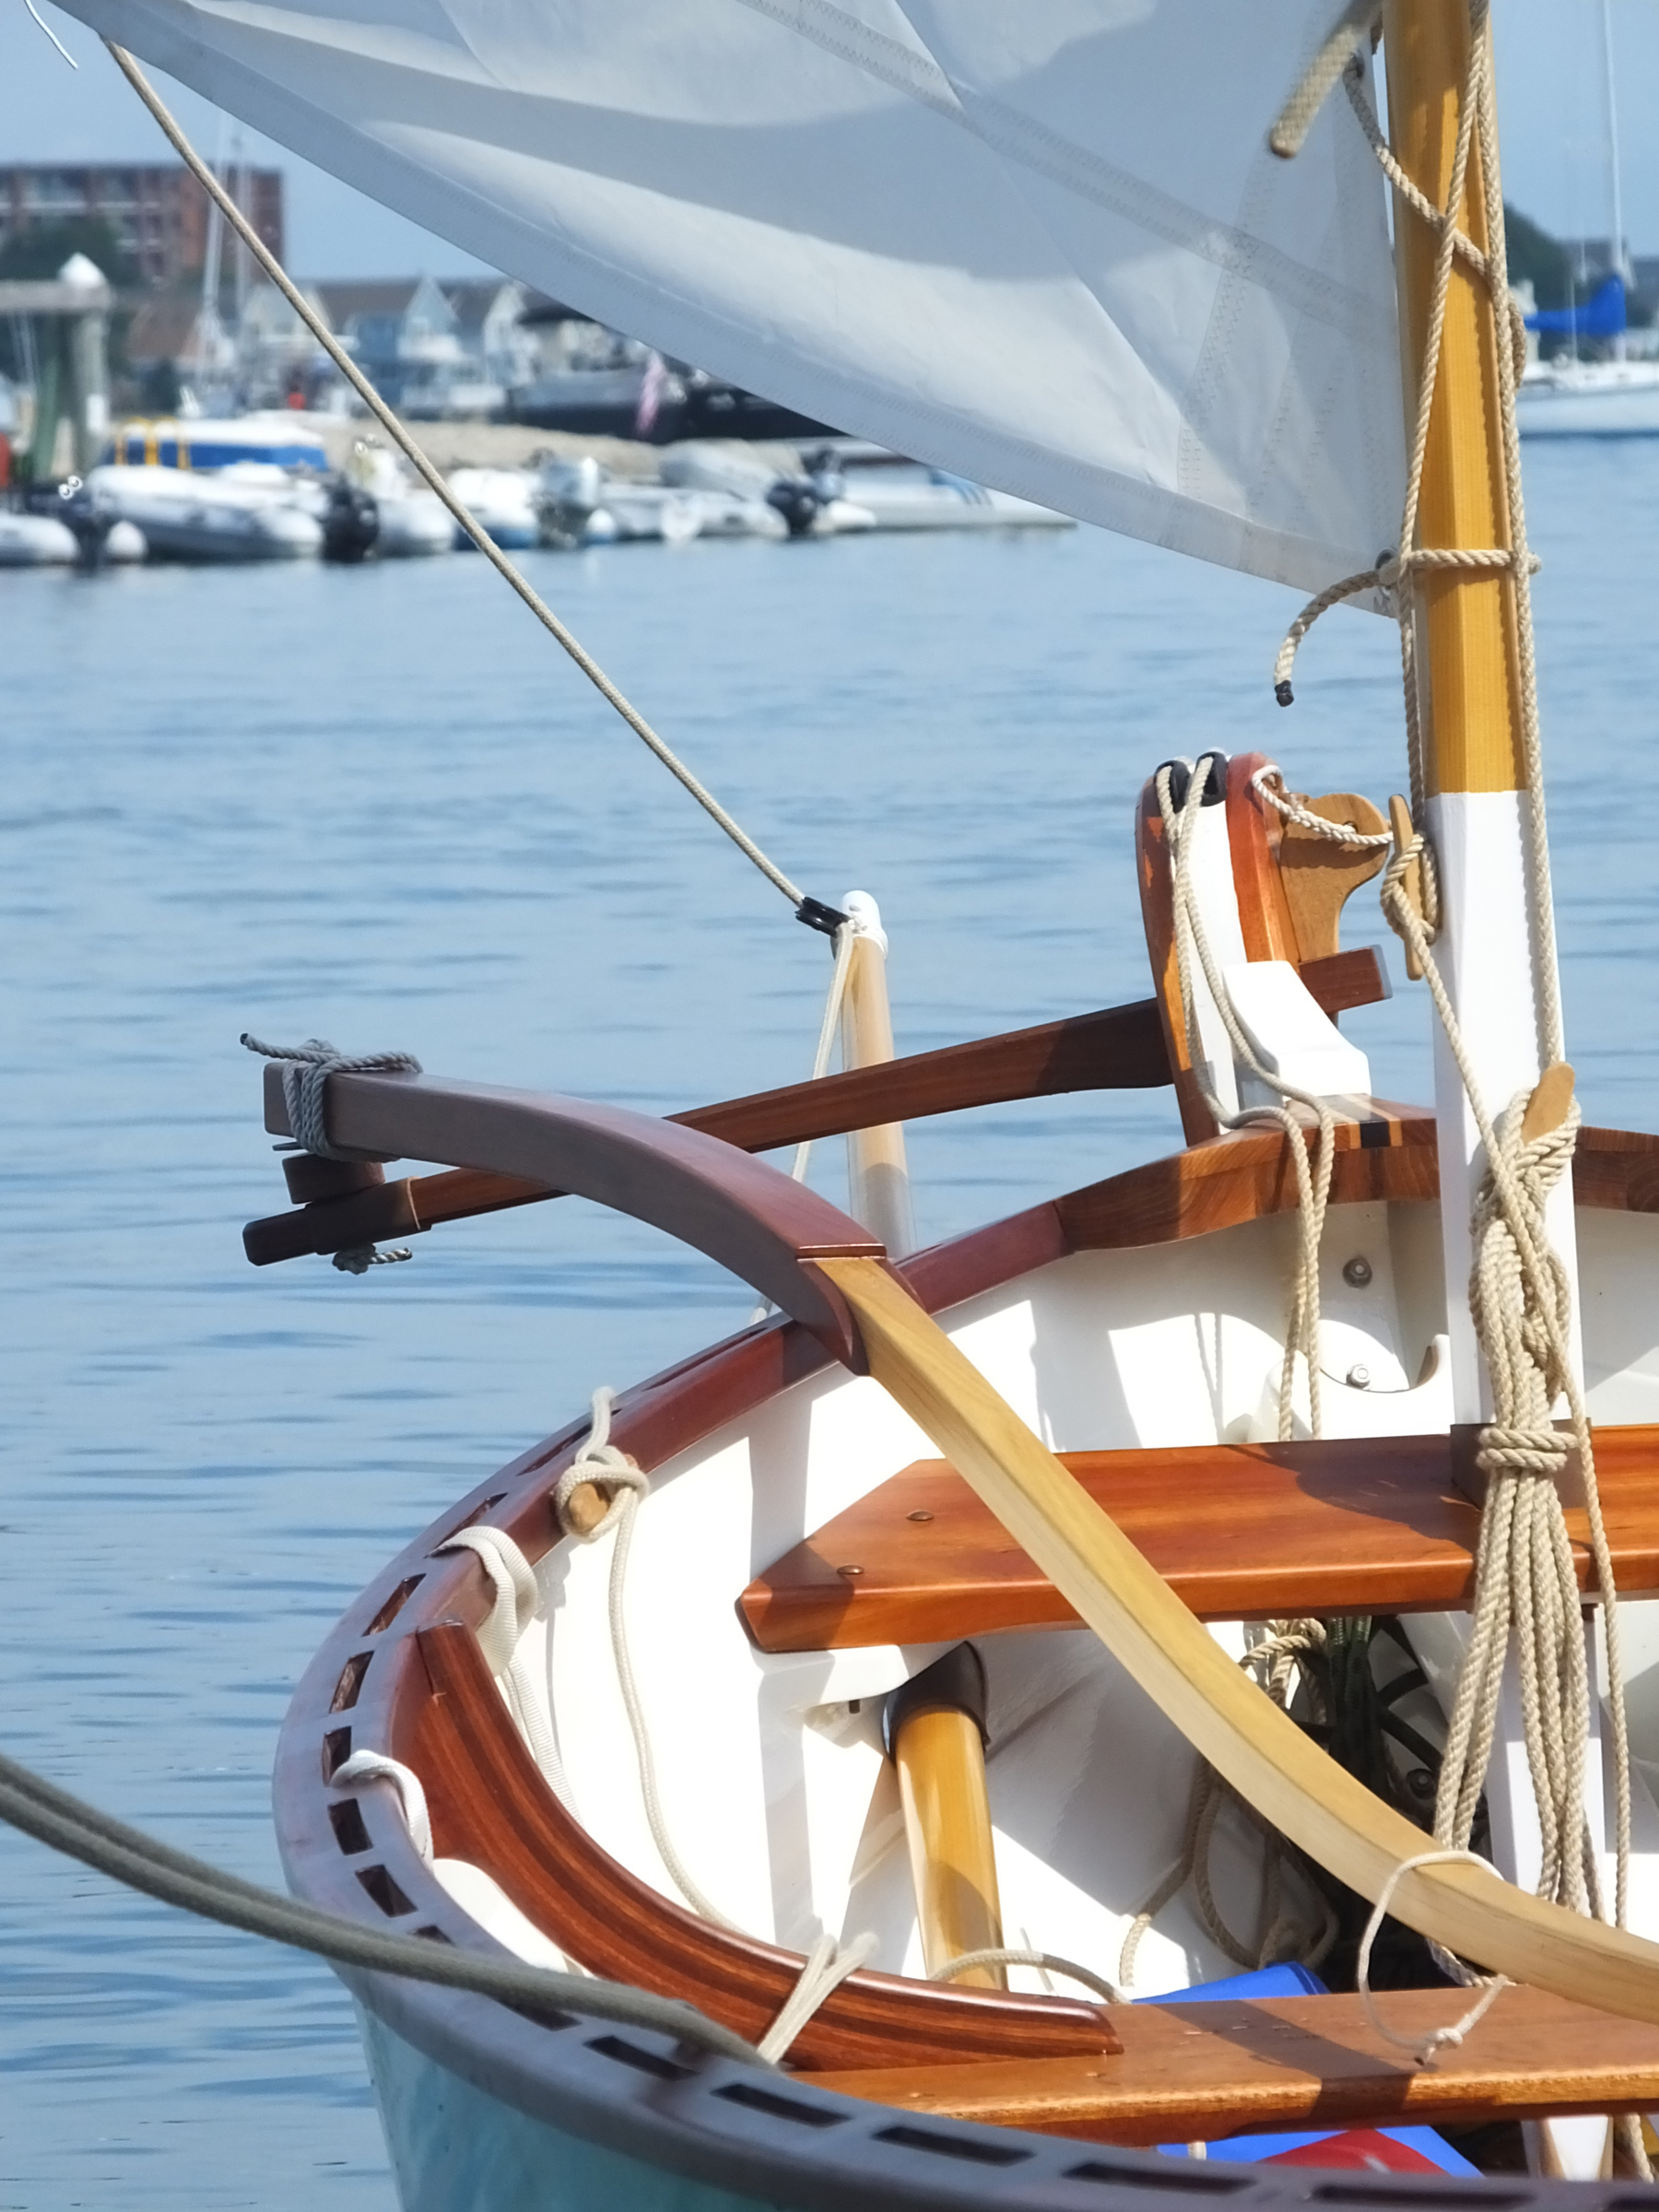
The Laughing Gull’s gunter rig points quite well but, given its large sail area, adequate weight on board to keep the boat balanced is critical. It is stable on a run with a slight windward heel, cutting a handsome figure wing-on-wing.
A reef is prudent when sailing alone in 15 knots or in 20 knots with crew. I’ve comfortably sailed in up to 25 knots off the wind, but after that things get unwieldy, and I risk ending up in the drink.
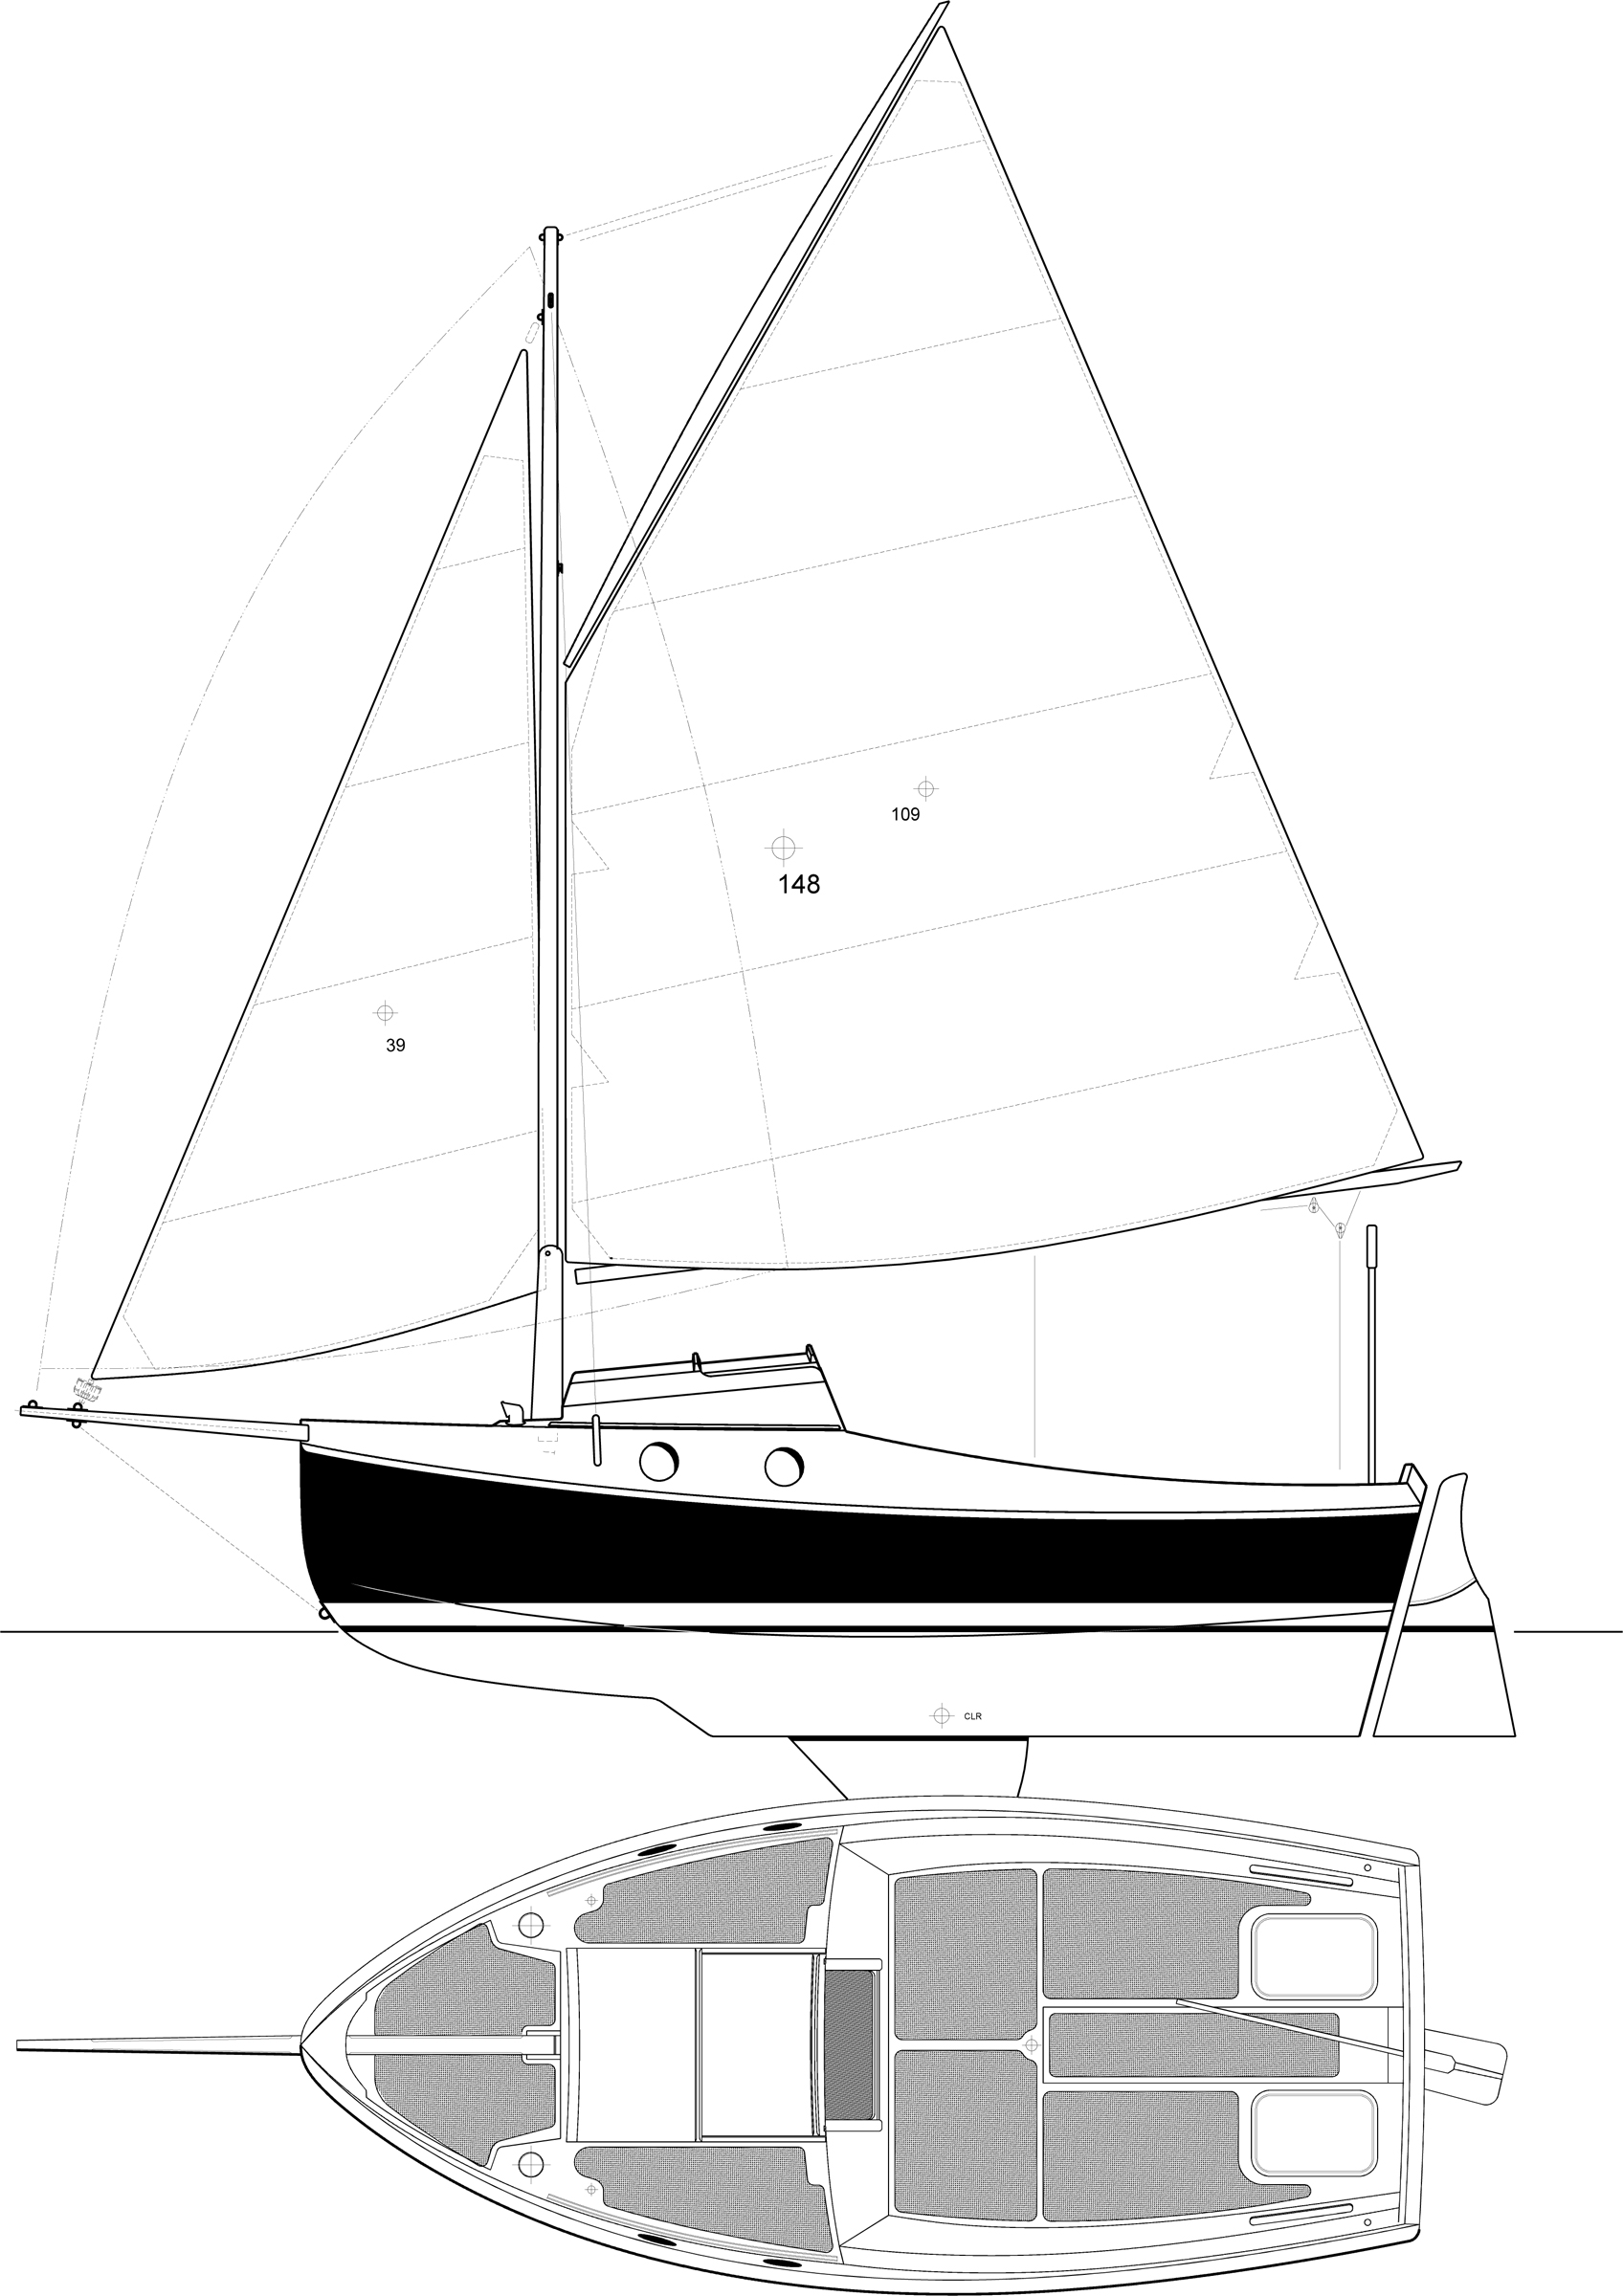
There are 70 sq ft of sail in the gunter main and 25 sq ft in the jib. The plans offer a sprit rig with and 82 sq ft main and a cat rig with 83 sq ft.
Recovering following capsize is easy. Best is to hop over the gunwale and recover the boat dry, which I have done successfully on several occasions. When that opportunity has passed, the skiff still comes back up without too much effort. The raised deck makes the boat somewhat tender when swamped, so waiting for the scuppers, which are above the waterline, to do a bit of their work before getting back on board, is wise.
The boat does tend to be a wet ride; quite a bit of spray is kicked up primarily when hitting waves while on a plane. The scuppers also let in some water when heeling.
The Gull is nimble, and easily makes a 180-degree turn in a boat length. With the flat bottom, the boat is a bit tender initially at the dock, but is stable once under sail.
Though tight, the cockpit allows for storage of bare essentials for warm-weather onshore camping for two. On a four-day solo trip from Miami to Big Pine Key (just shy of Key West), I slept on board, tucked away in shallow mangrove coves. I could stand outside the boat to work on things and get situated. It was like sleeping on a canoe. However, as Mr. Davis would point out, the boat is not designed for this kind of use.
I have made several modifications to strengthen the boat for sailing in high winds. The rudder has been a bit of a problem for me over the years. I first broke the gudgeon launching from the beach for the north Gulf Coast trip mentioned above. The rudder caught in the sand and the gudgeon pulled out. The gudgeon was attached with screws, per the plans. I made the repair with through-bolts, and would recommend this approach for maximum strength. I also recommend securing the pintles to the rudderstock with bolts rather than screws.
Sometimes the gaff jaw doesn’t rotate well in a tack, leaving the gaff at an awkward orientation. Wrapping that section of the mast with copper sheathing and using a metal bail to secure the gaff around the mast has been an improvement. A related issue is an occasional crease in the sail, which appears when the peak halyard is not right against the mast, or the gaff is twisted. I think that a slightly greater angle between the gaff and mast would address both the crease and the restricted gaff jaw rotation. Designer Arch Davis notes: “I am aware of the issue of the gaff jaws not rotating easily. I also have copper sheathing where the gaff jaws bear on the mast. Rubbing paraffin wax on the sheathing and jaws helps the jaws rotate more easily. Some time ago I changed the shape of the sail a little, so that the gaff is not so nearly vertical. This has been helpful and the sail should be stretched tightly along the gaff. In any case, it’s certainly good practice to experiment with the attachment point of the peak halyard, and the tension of both halyards. Obviously, they need to be eased or tightened, depending on wind strength.”
To strengthen the gaff and boom jaws for high-wind sailing, I found a metalworker who made two custom aluminum jaws, which have stood up to every condition I’ve thrown at them.
The above issues are the result of heavy use in tough conditions. I mention them here for folks interested in experiencing the thrill of sailing this boat in high winds.
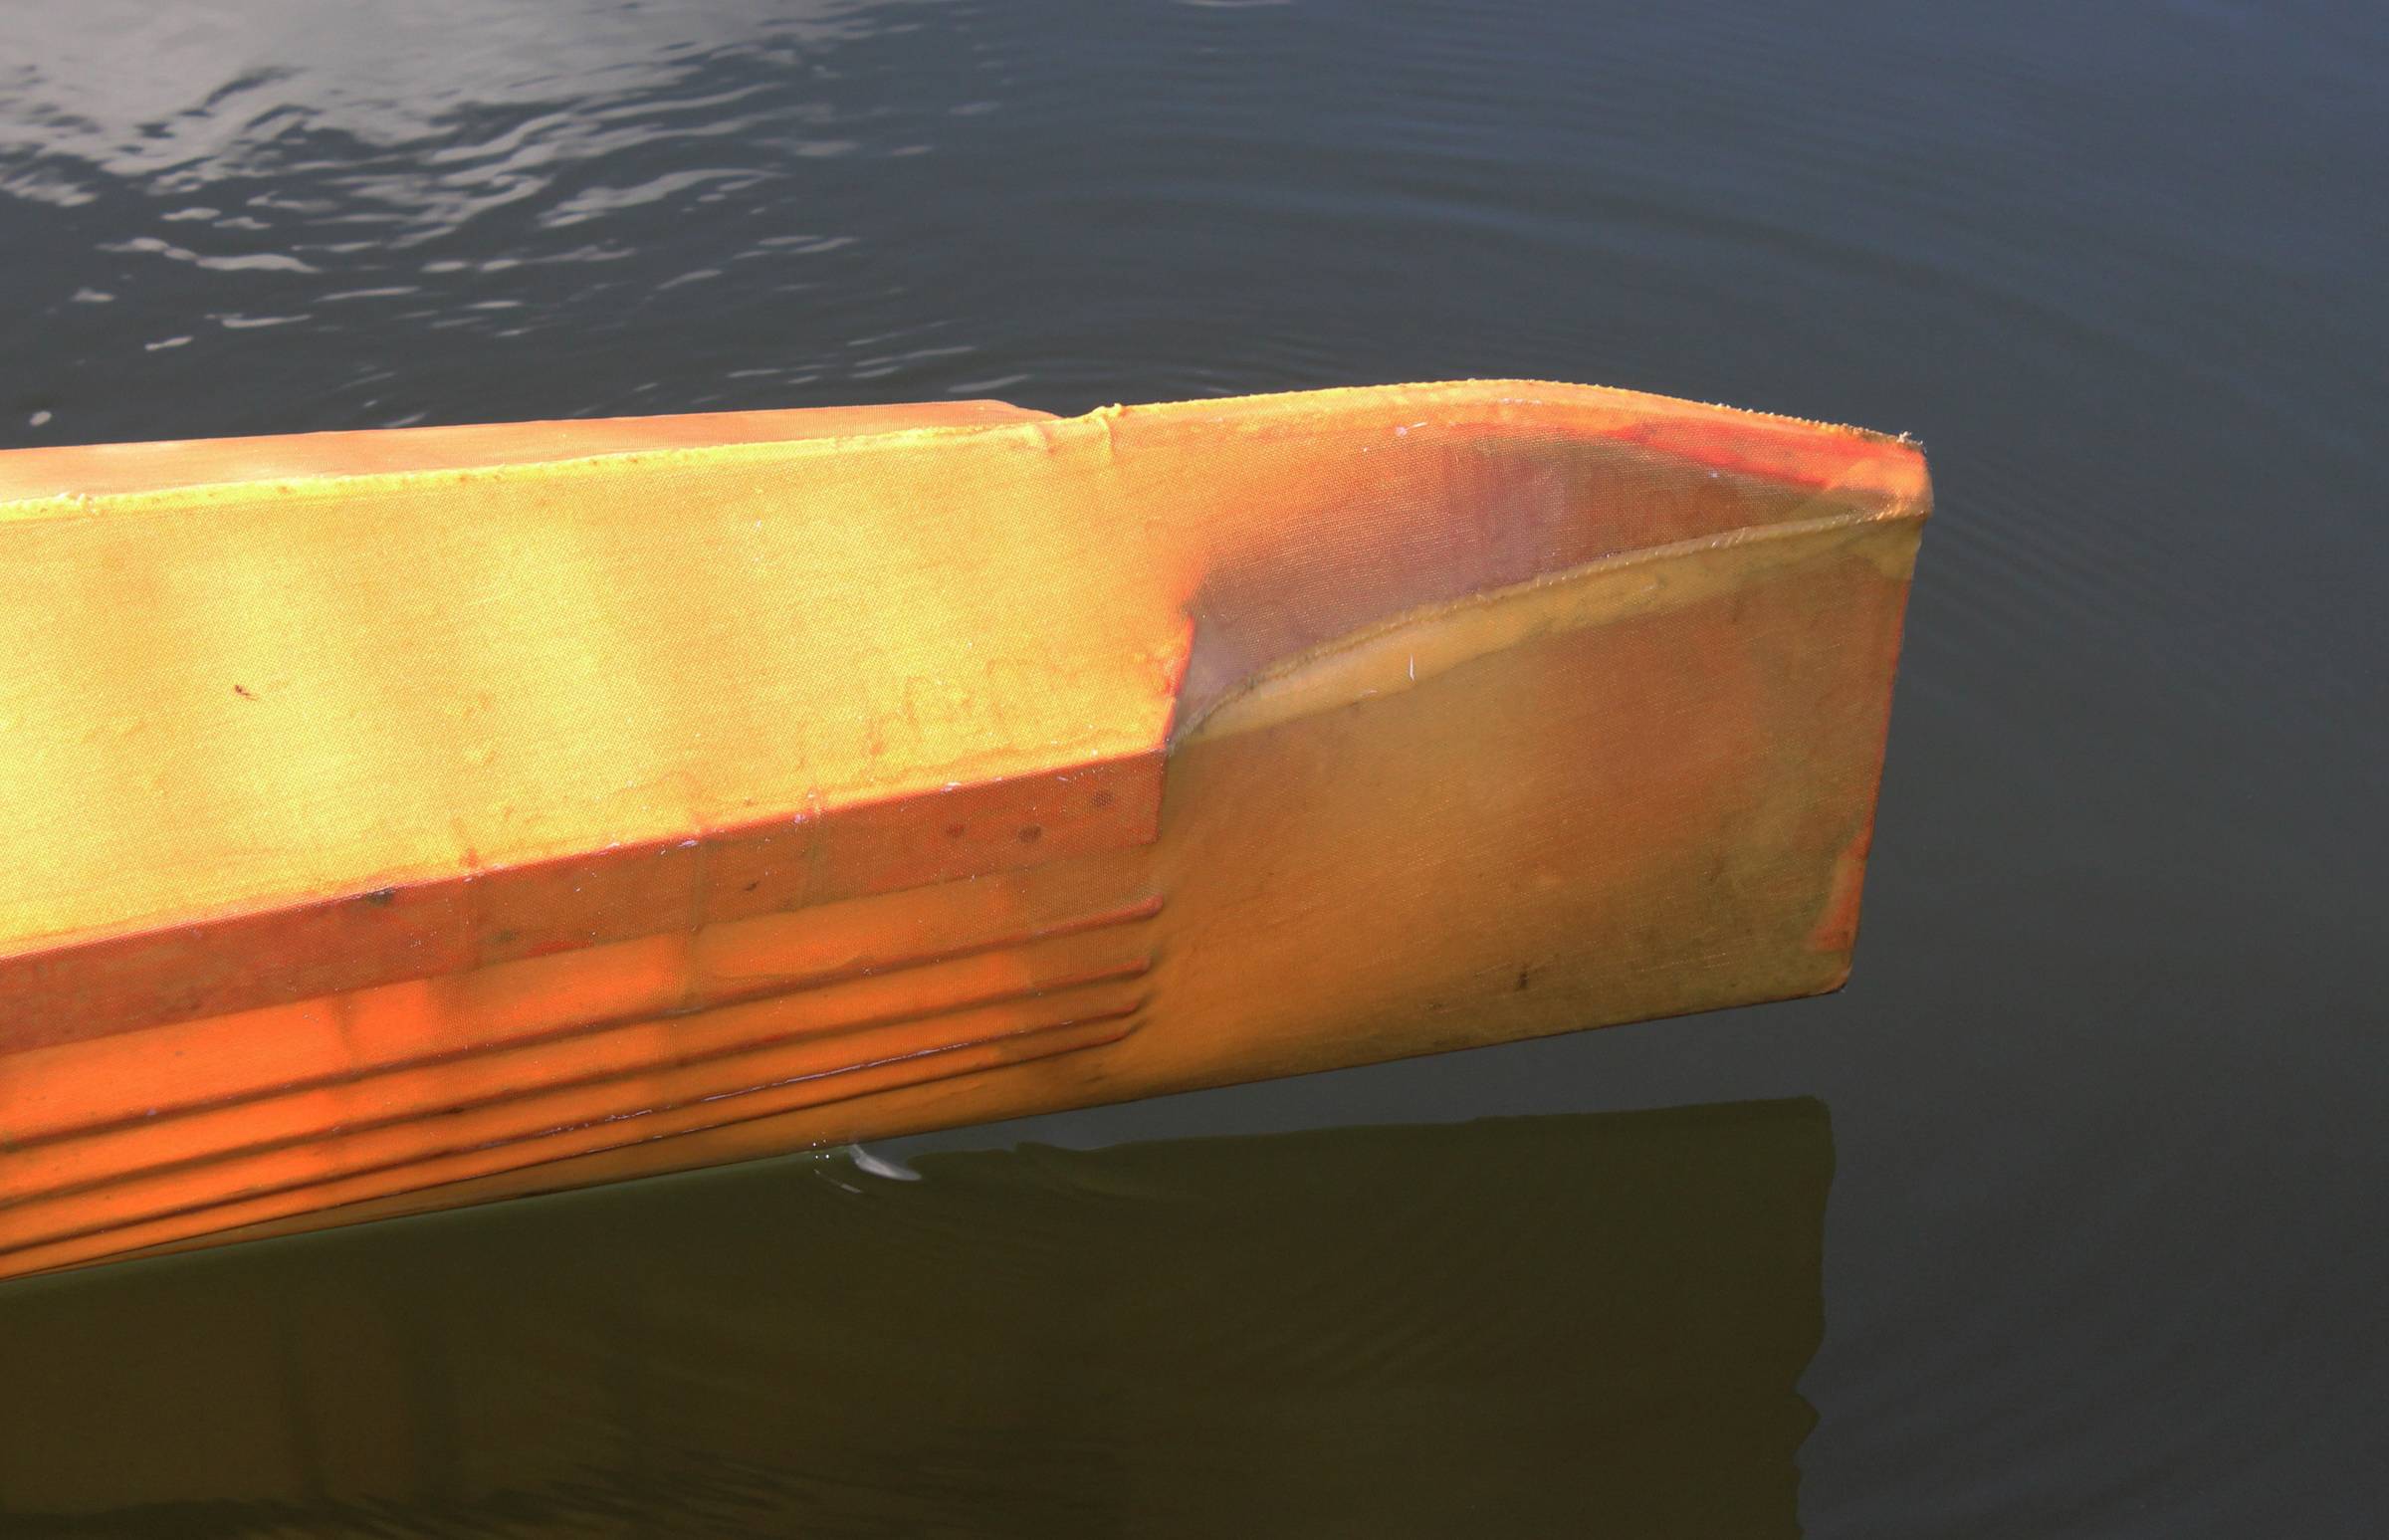
The boat is designed with two rowing stations. The author preferred to keep the cockpit unobstructed by a rowing thwart and rows while seated on the cockpit sole. It works, but is not as effective as having the thwart and foot brace. Note that the transom has two scuppers, which make it self-bailing.
I do have one pair of oarlock sockets which are set directly into the gunwale rather than as blocks added on top. However, since I usually launch where the distance from ramp to open water is not far, a short canoe paddle is more than adequate for auxiliary power to get to the wind. On overnight trips, I do bring a set of oars to get into unfamiliar marinas or tidal creeks. Without the oarlock risers, center bench, and footrests that are specified in the plan, but not installed on my boat, rowing in open water is unsurprisingly unwieldy. For best performance under oars, stick with the design. In spite of my omissions to the rowing arrangements, the skiff is quite speedy when propelled by oars and can easily outpace a kayak.
The Laughing Gull is easily hauled on a johnboat trailer with flat bunks, and its light weight makes it easy to handle at the ramp. It takes me about 45 minutes to rig and launch.
I adore this boat. It is elegant and super fast. The Laughing Gull is perfect for someone young with a taste for adventure or anyone with an appreciation for a beautiful craft. It was a joy to build. Mr. Davis has been a great support, and continues to provide helpful advice. Building the Laughing Gull and sailing it hard remains my proudest accomplishment.
Peter Sawyer is a general surgery resident in New Orleans, Louisiana. He learned to sail when he was 11 years old at Camp Sea Gull, a seafaring summer camp on the North Carolina coast. He has been at it ever since. He thanks Art Ballard, the Miami-based metalworker who made the aluminum jaws.
Laughing Gull Particulars
[table]
Length/15′ 9″
Beam/4′ 5″
Draft, board up/5″
Draft, board down/2′ 9″
Weight/225 lbs
[/table]
Plans for the Laughing Gull include ten 24″ x 36″ sheets of drawings, full size patterns, and an illustrated building manual. are available for $200 from Arch Davis Designs. Pre-cut kits cost $1,450 and include: stem, transom, frames, bottom and deck panels, topsides planking, plan, and DVD.
Is there a boat you’d like to know more about? Have you built one that you think other Small Boats Magazine readers would enjoy? Please email us!
Comments:
We welcome your comments about this article. If you’d like to include a photo or a video with your comment, please email the file or link.
Credit Notes:
A colleague, Ashley McMann, kindly took some photos for me, which I have uploaded to the Dropbox folder. They are under the Sawyer Sailing folder. Her husband, Casey McMann took the photos in the Casey McMann photos folder. I tried to make named photos for Ashley’s work but it won’t let me do it.
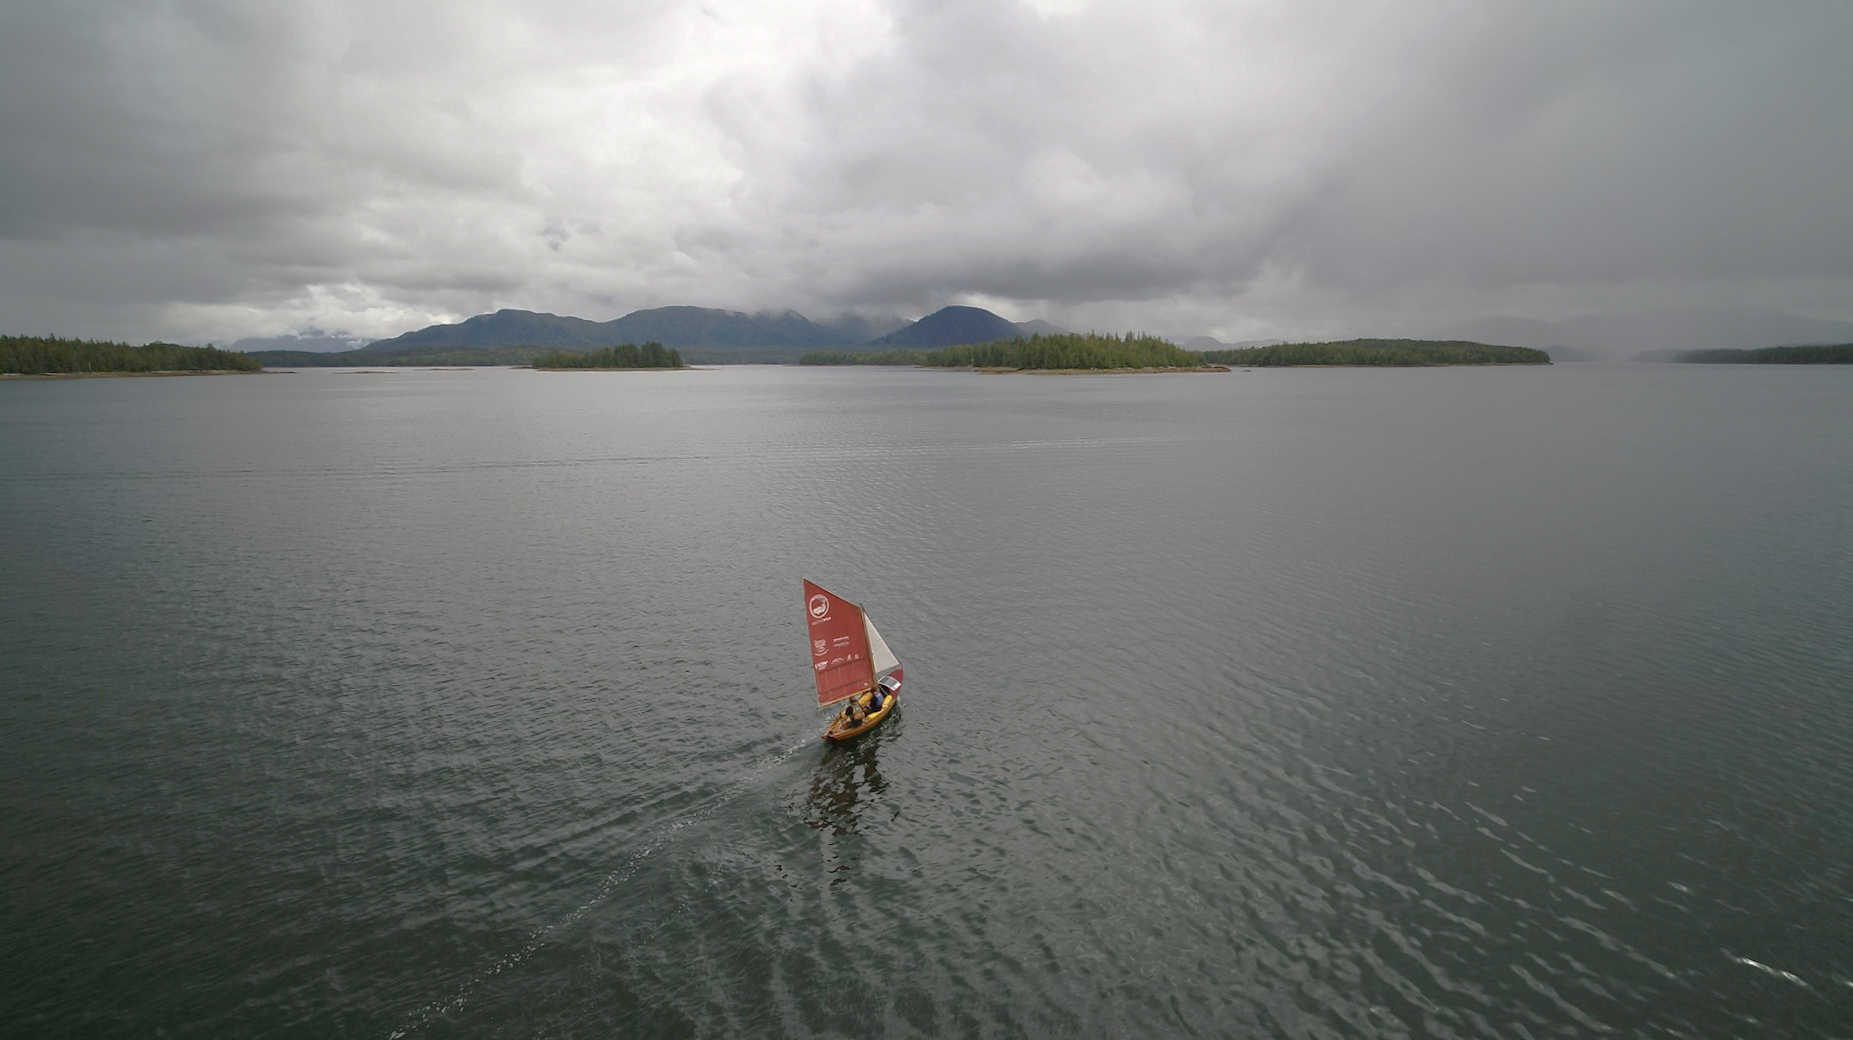
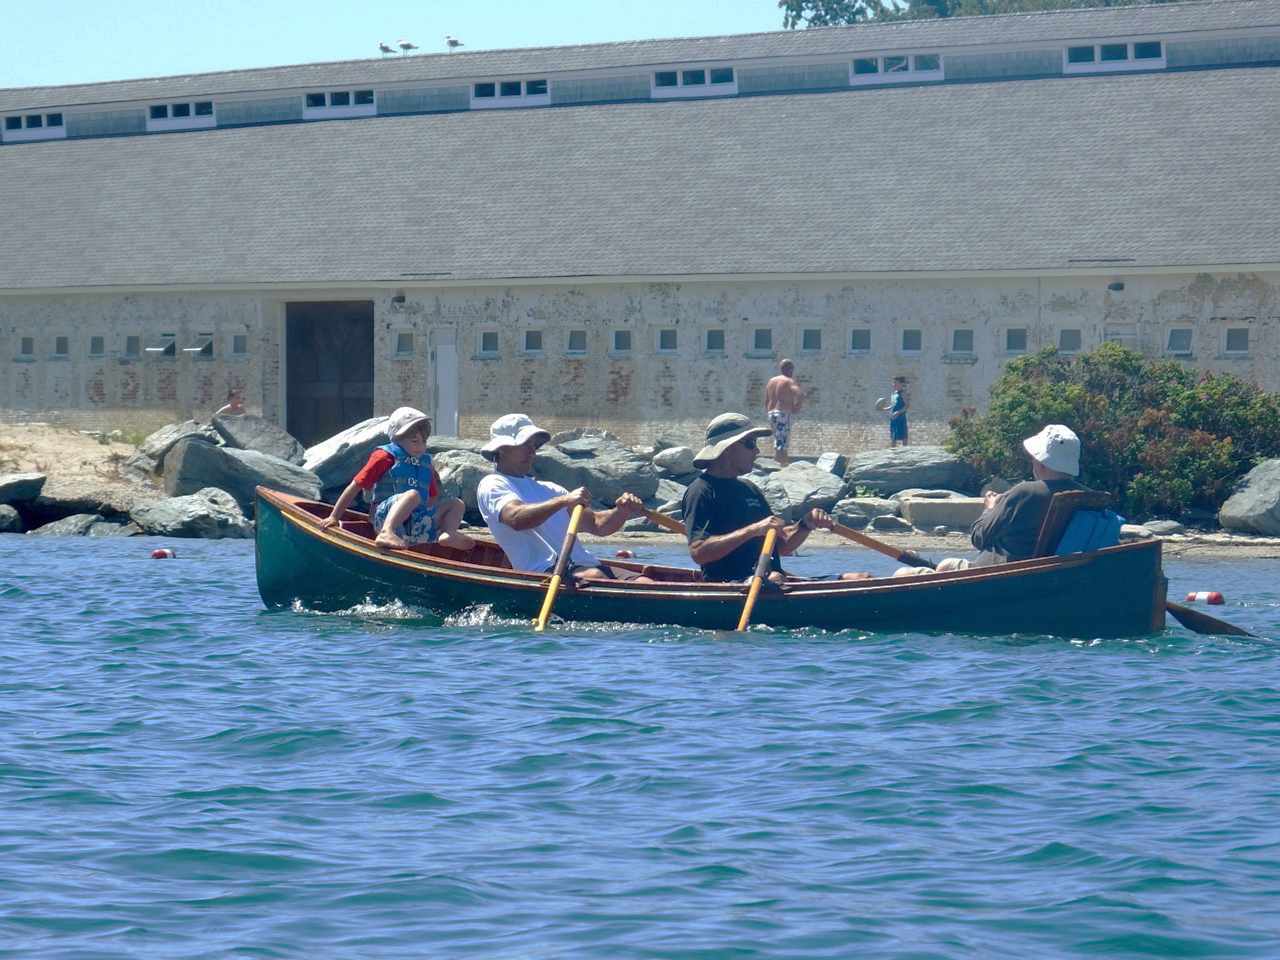
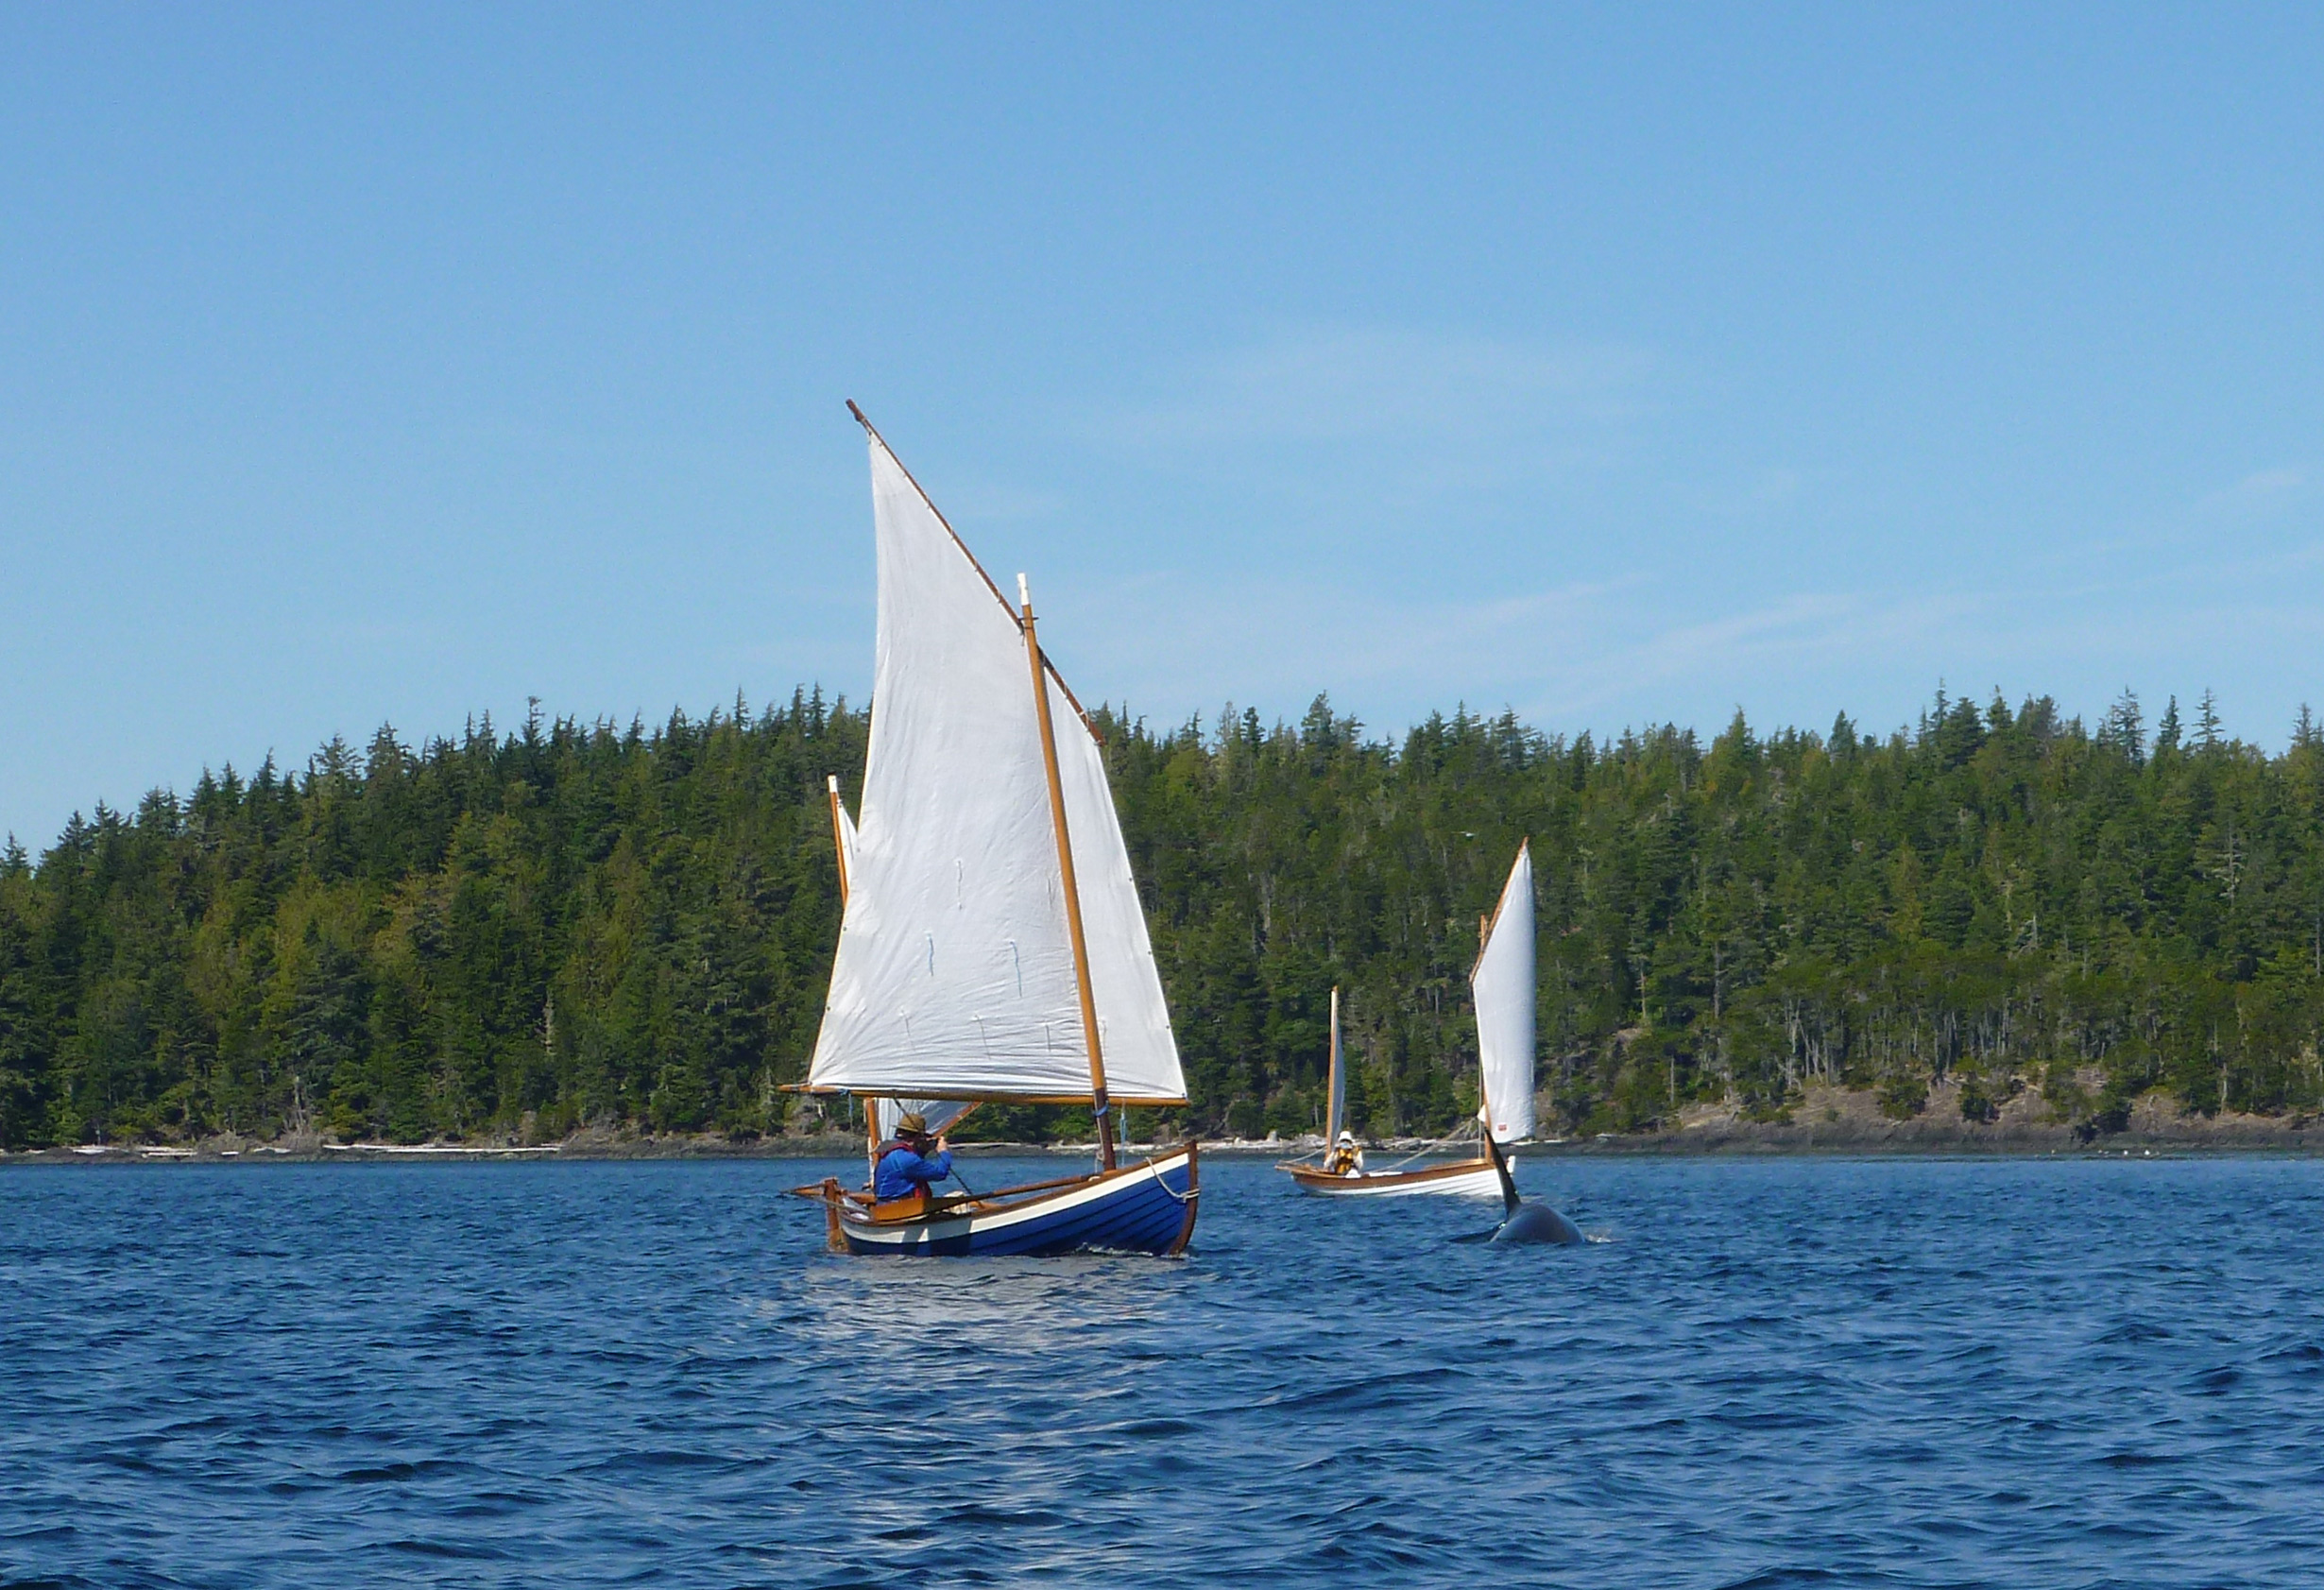
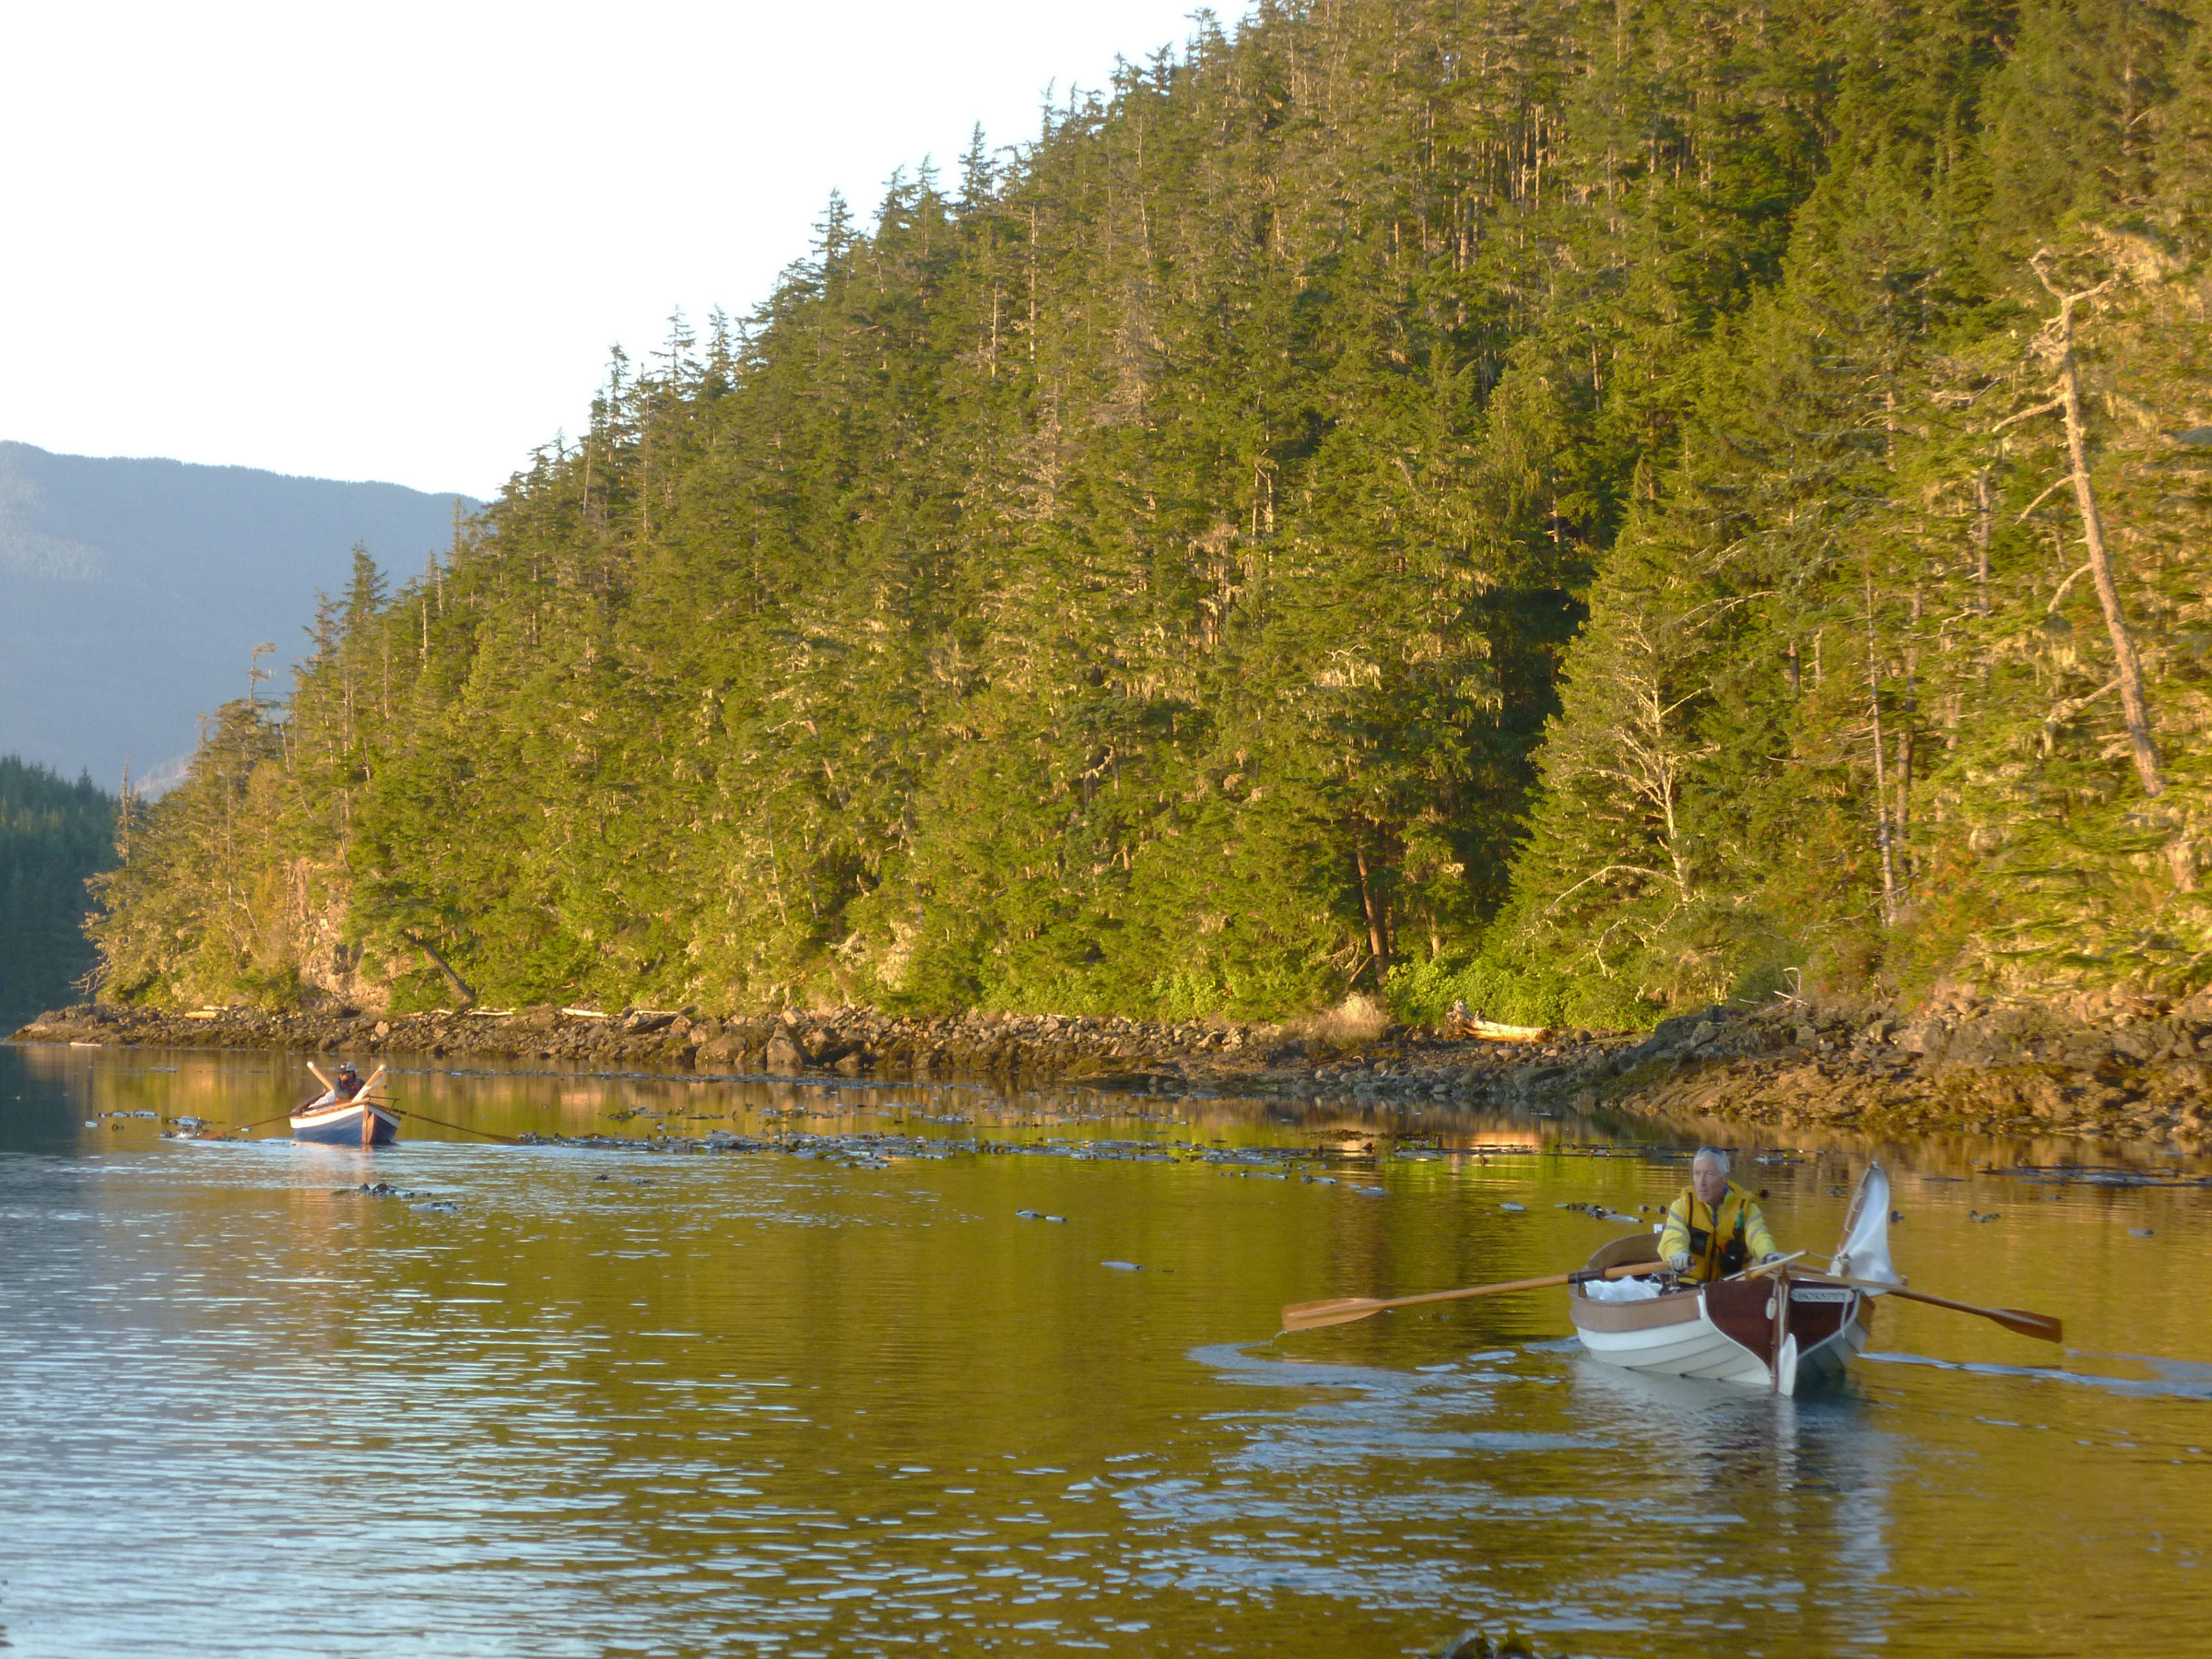
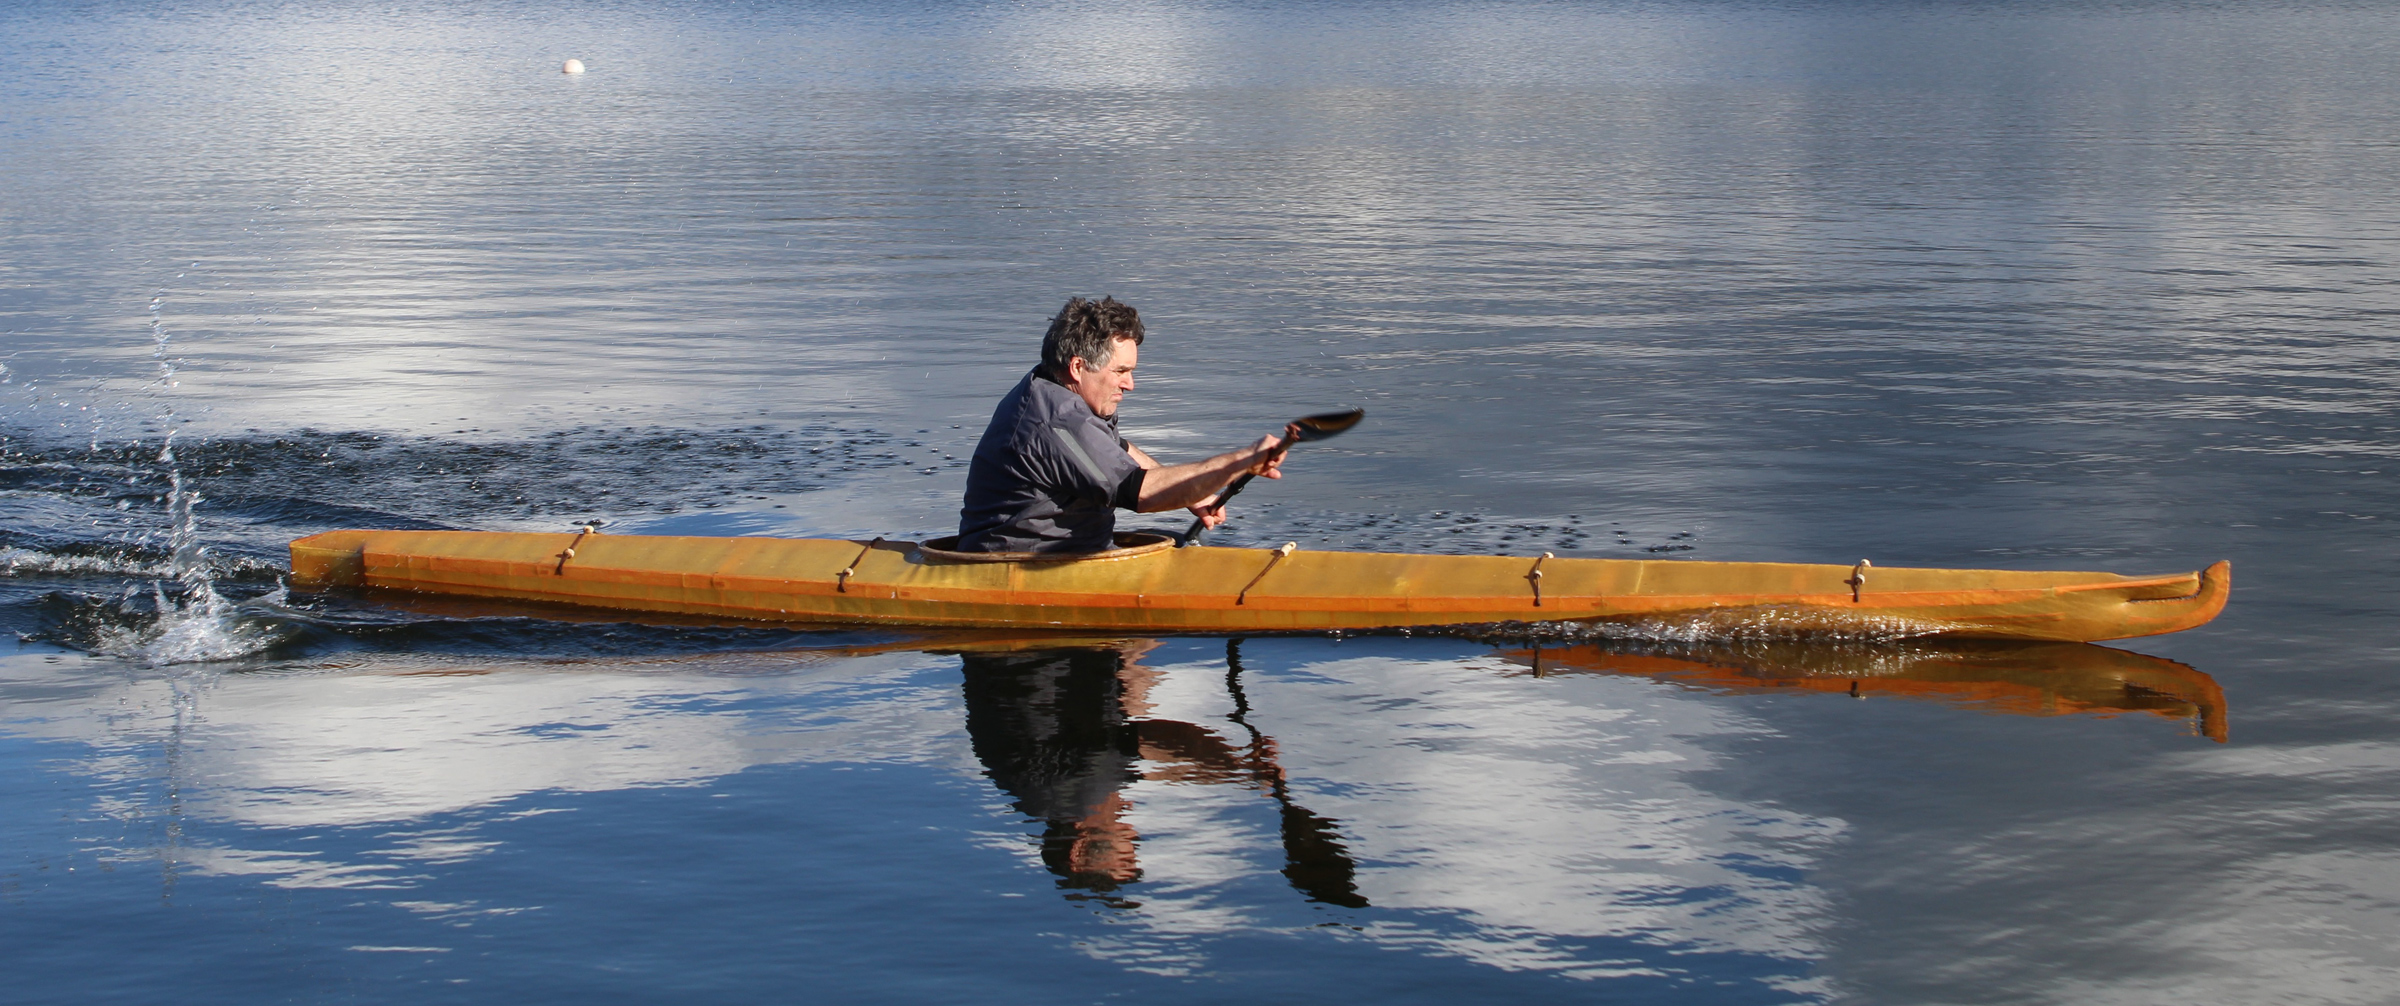
It was 5 a.m. and Thor Belle and I were late. The first beams of light were already slicing through the clouds of a gray Washington morning as the crunch of gravel under our truck tires marked our arrival to the Port Townsend boat launch. When we stepped out of the truck, we heard halyards smacking masts in the adjacent harbor. Just offshore, sailboats tacked back and forth behind the starting line like greyhounds nervous to leap onto the racetrack.
For days, there had been speculation about what the early-June weather would do, and big conditions seemed likely. Most of the teams gathered here for the 2019 Race to Alaska (R2AK) were already on the water, and only a handful of smaller craft like ours were still in the final preparations to launch. The pier next to the Northwest Maritime Center was crowded with spectators and race-tracker junkies who had turned out to support the 50-odd teams of crazies. The race, on paper, is straightforward enough: Navigate a boat without a motor and with no outside support from Port Townsend, Washington, to Ketchikan, Alaska. Simple, right?
Photographs by and courtesy of Thor Belle
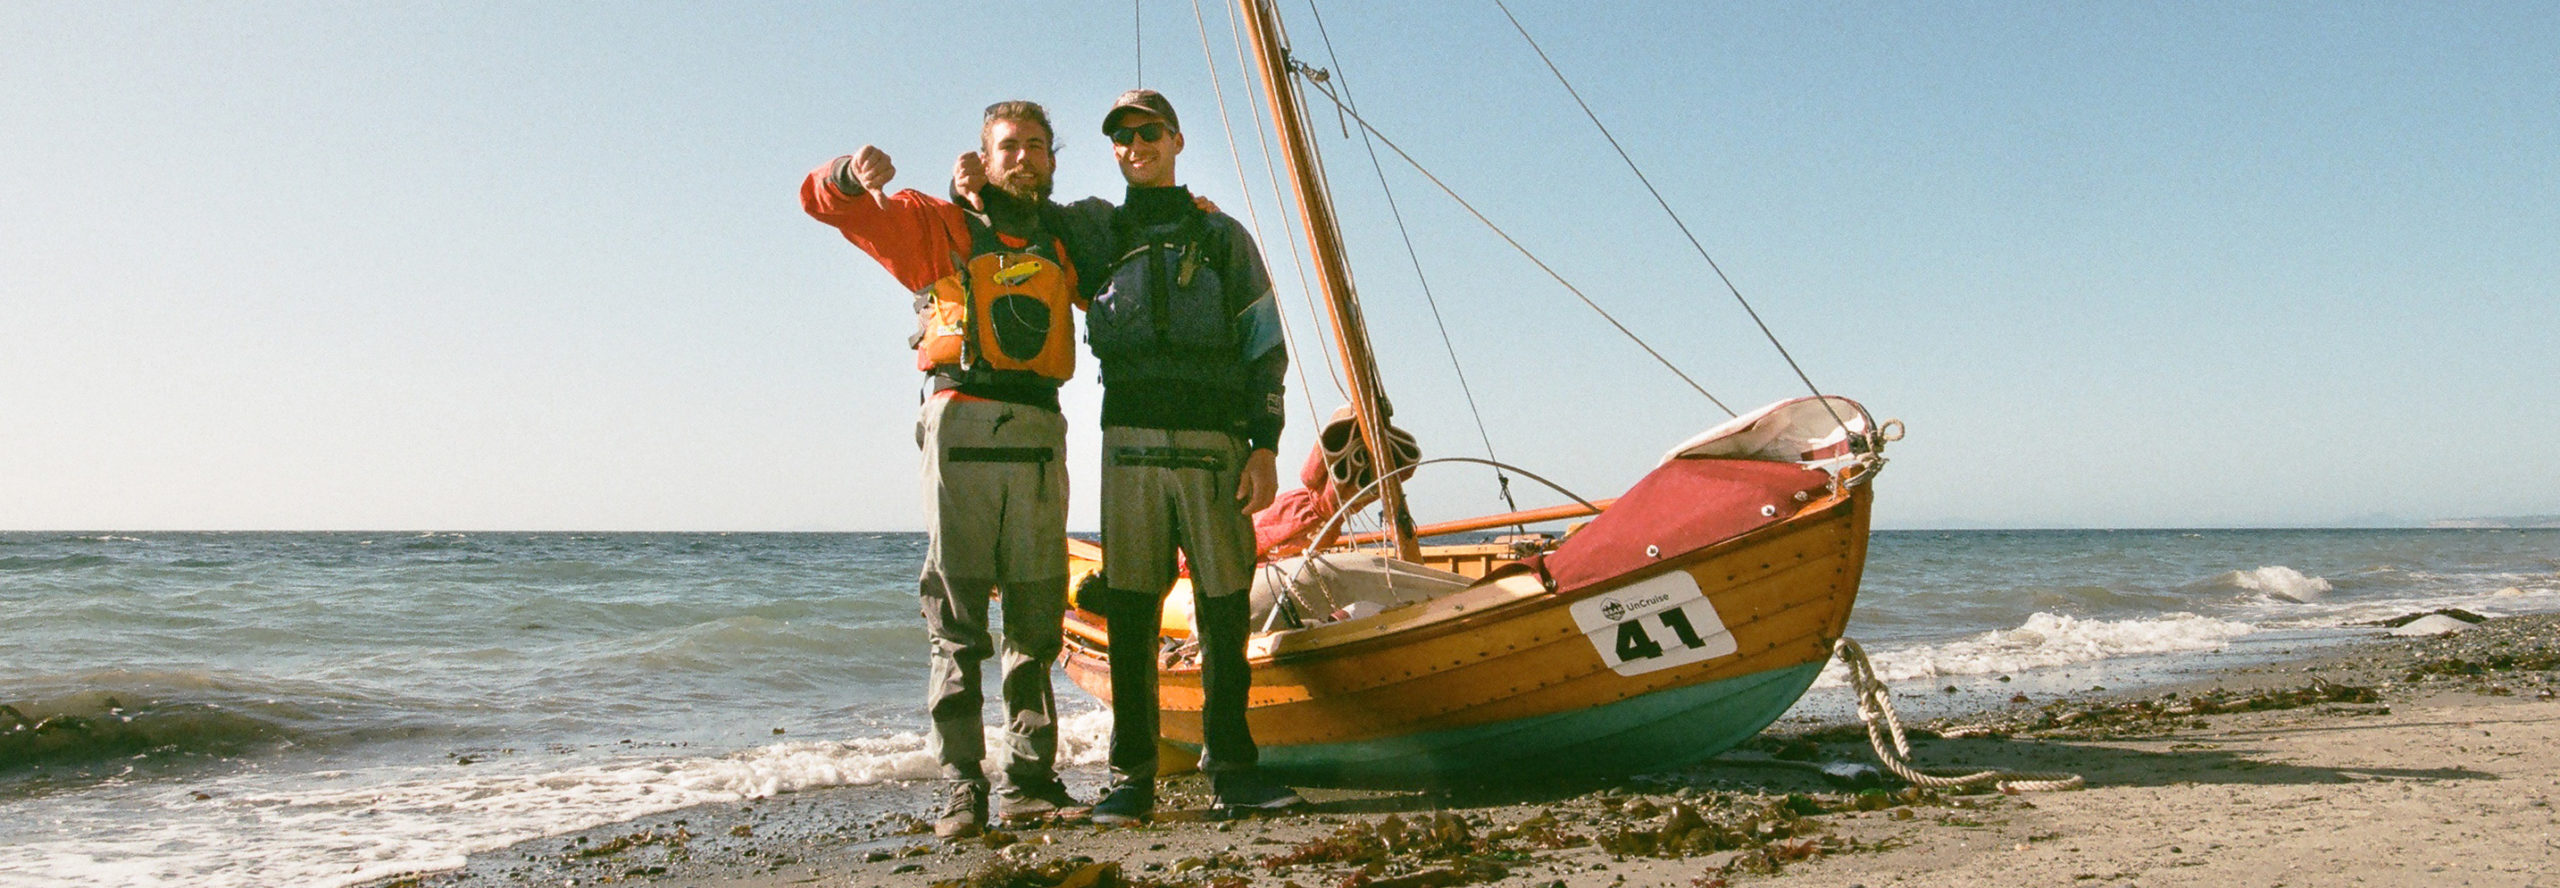
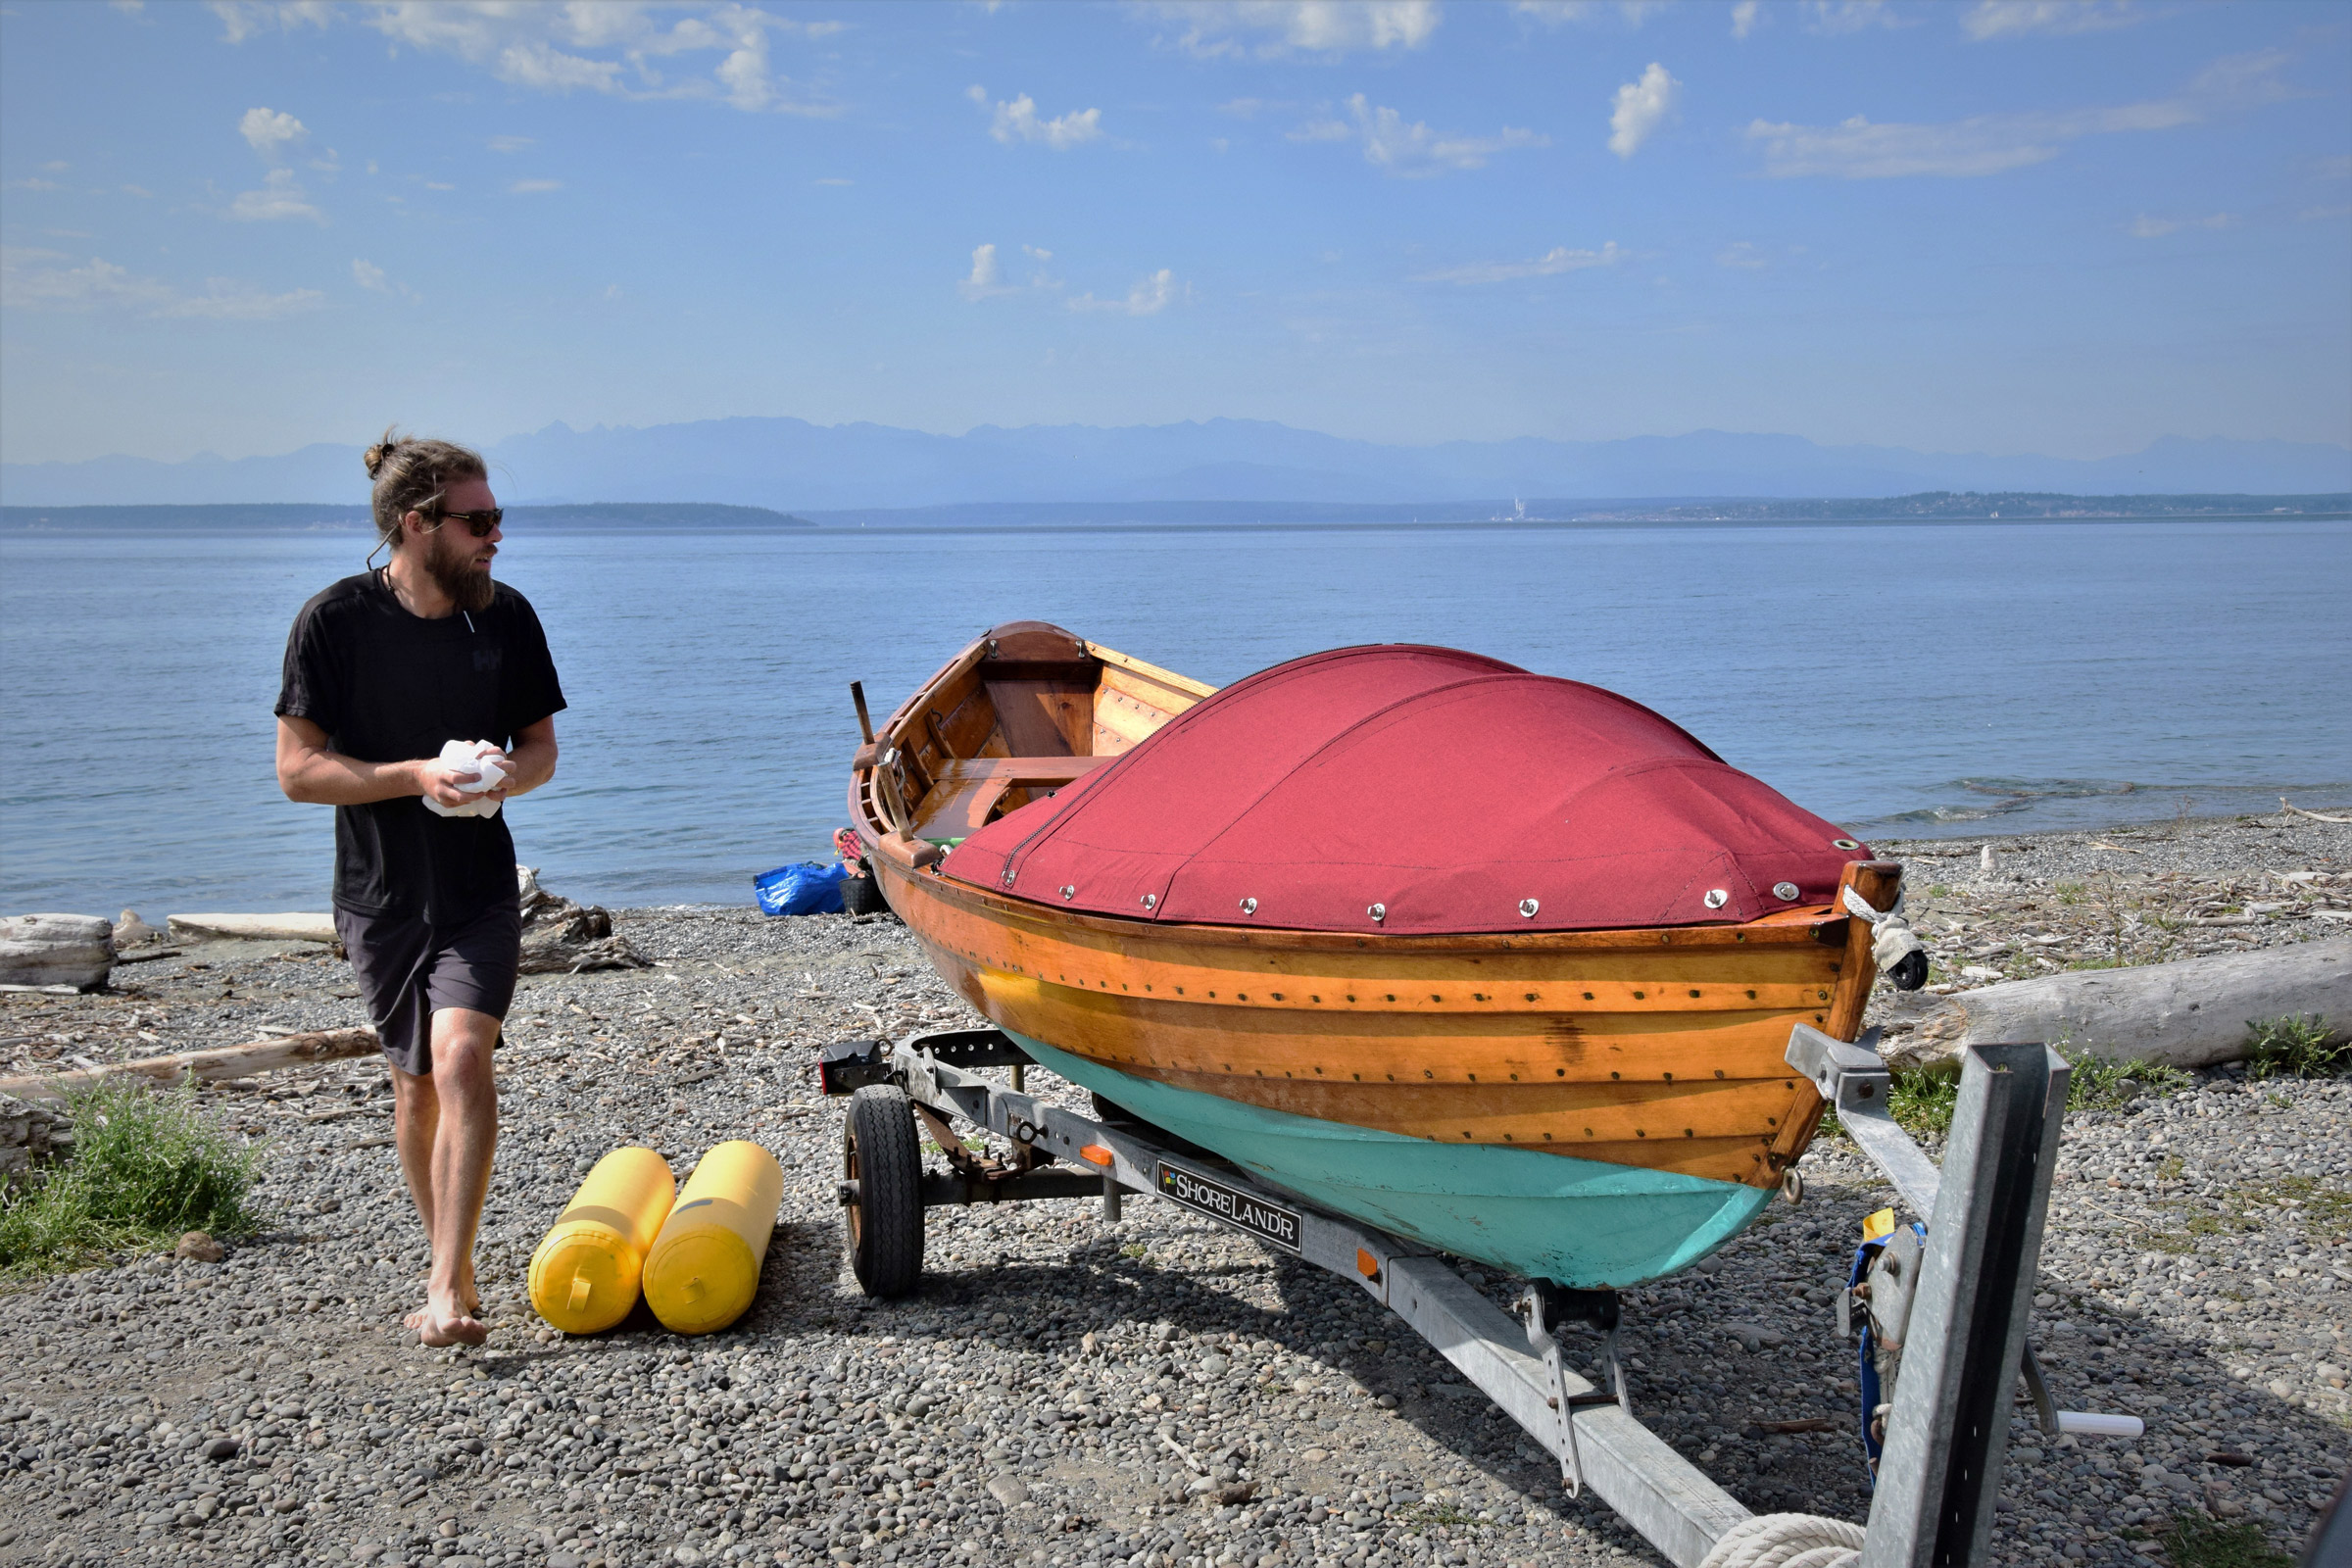
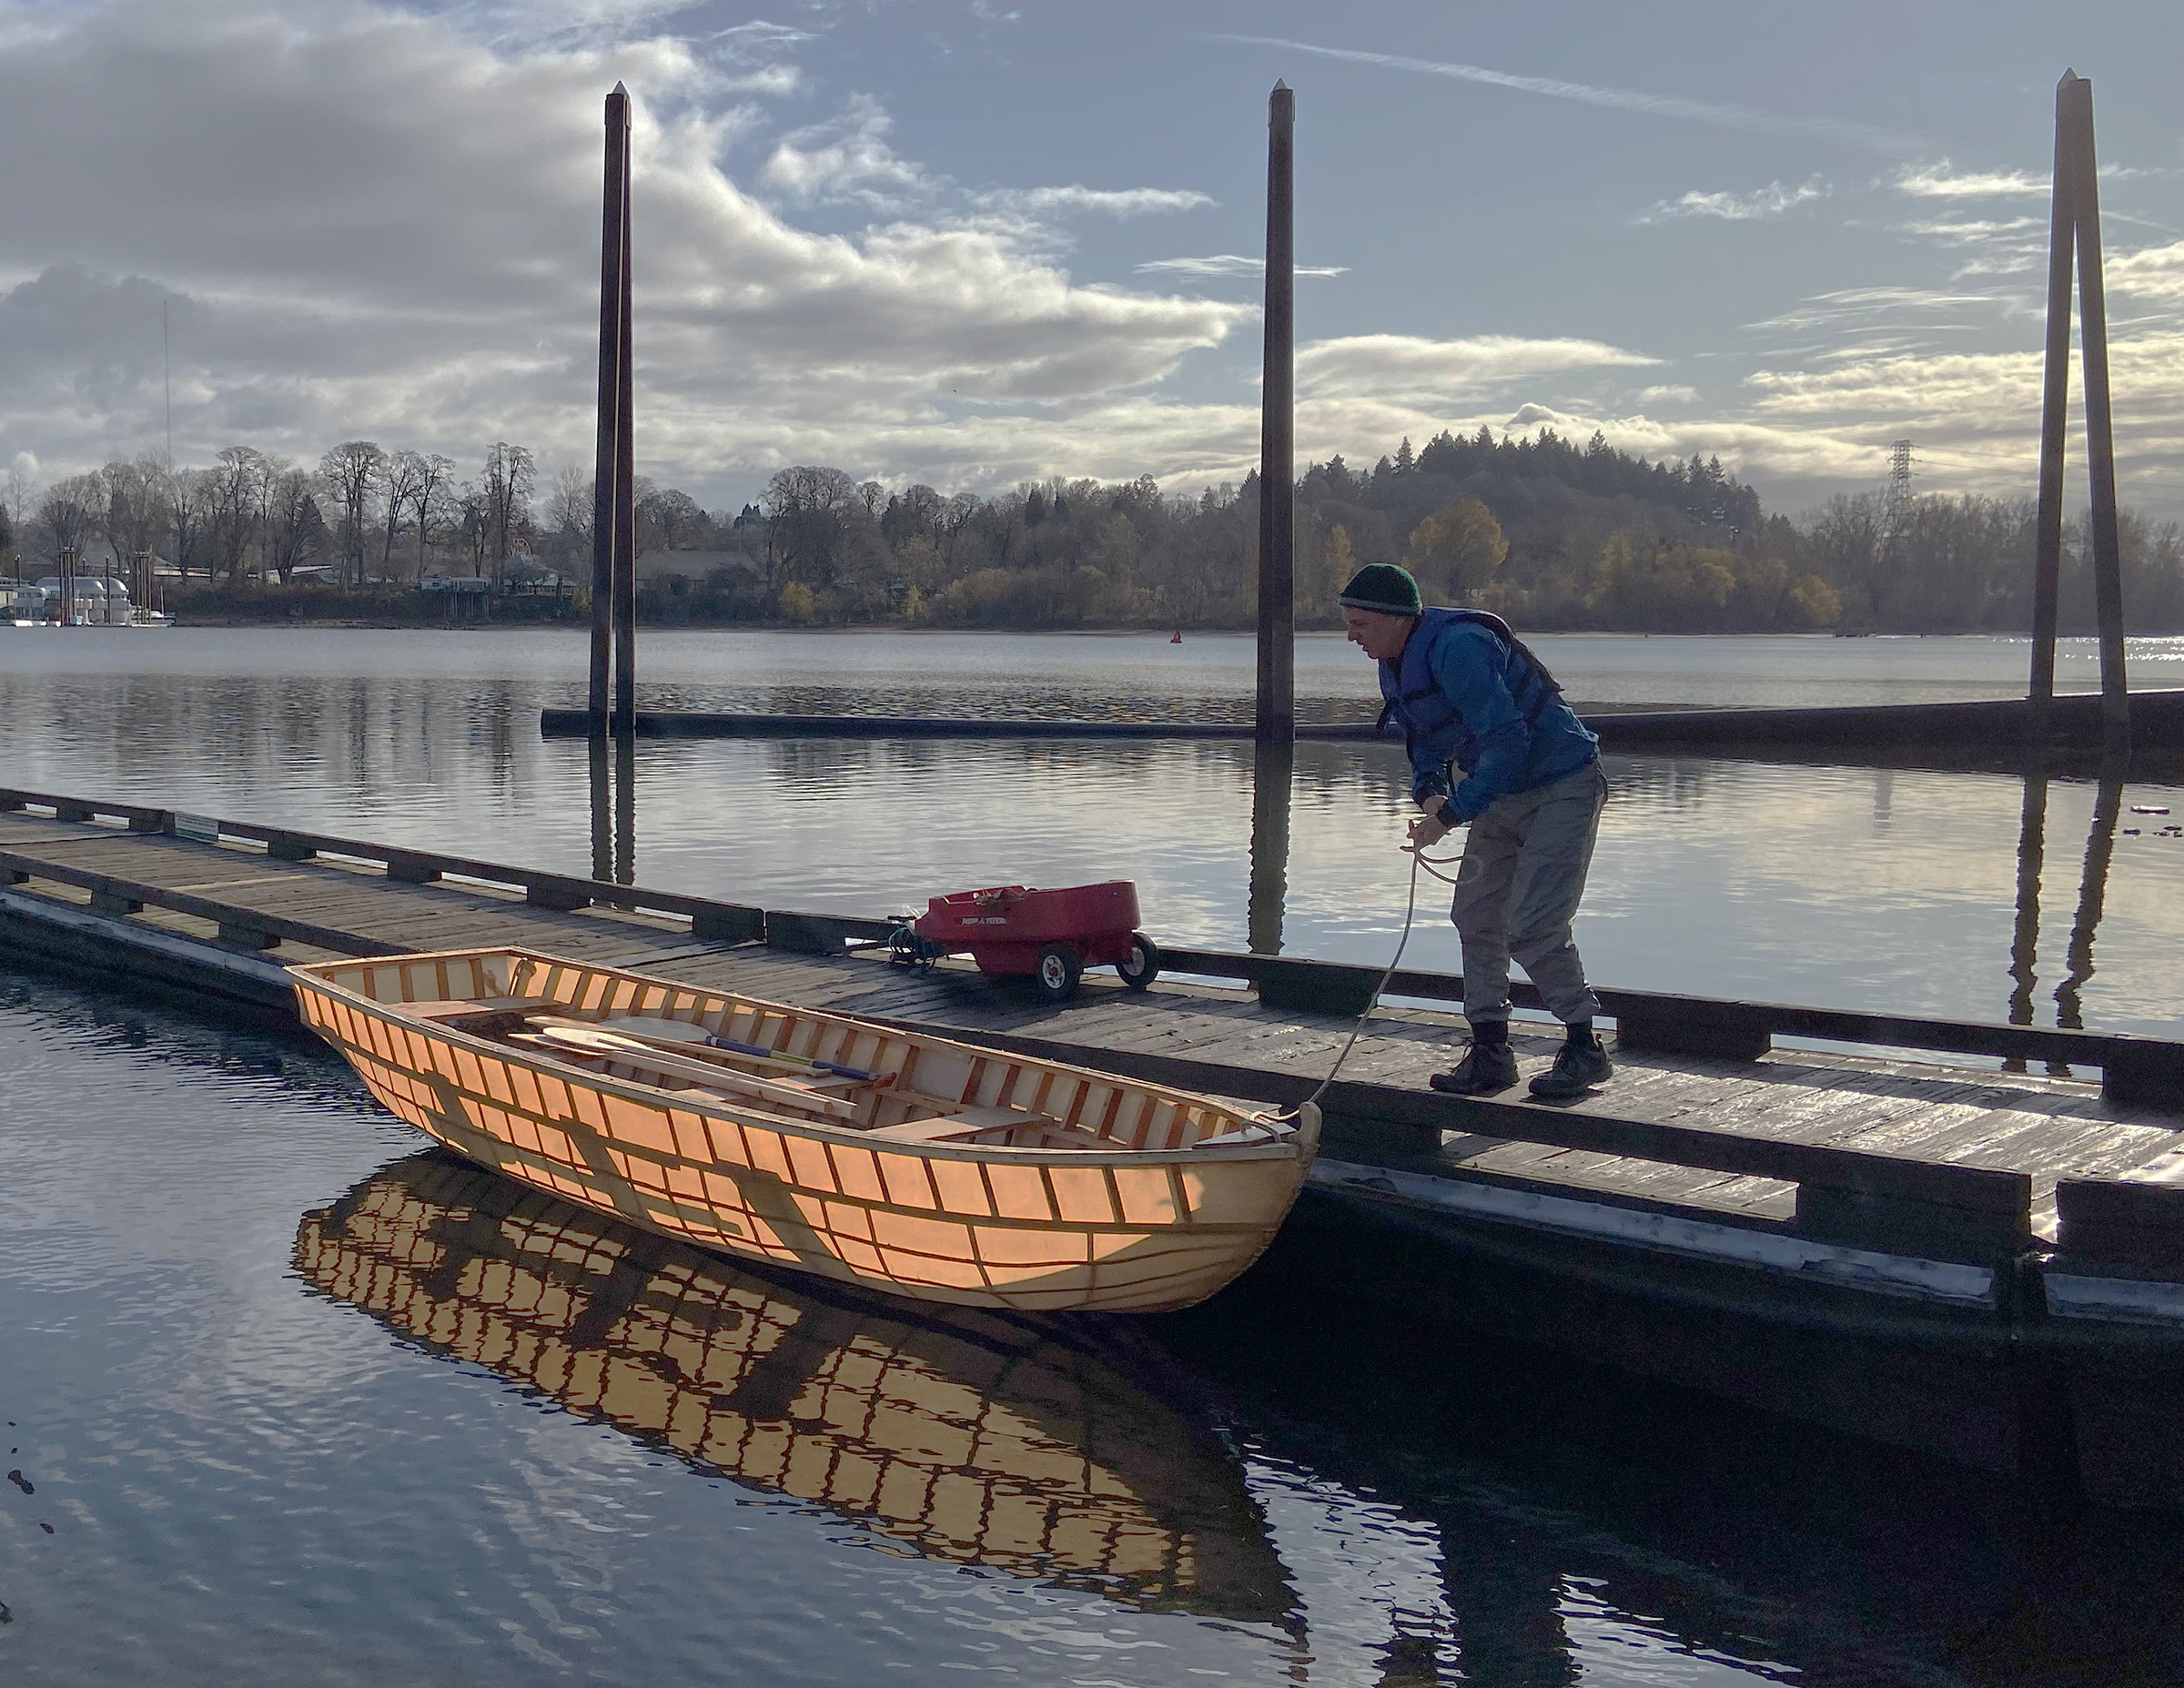
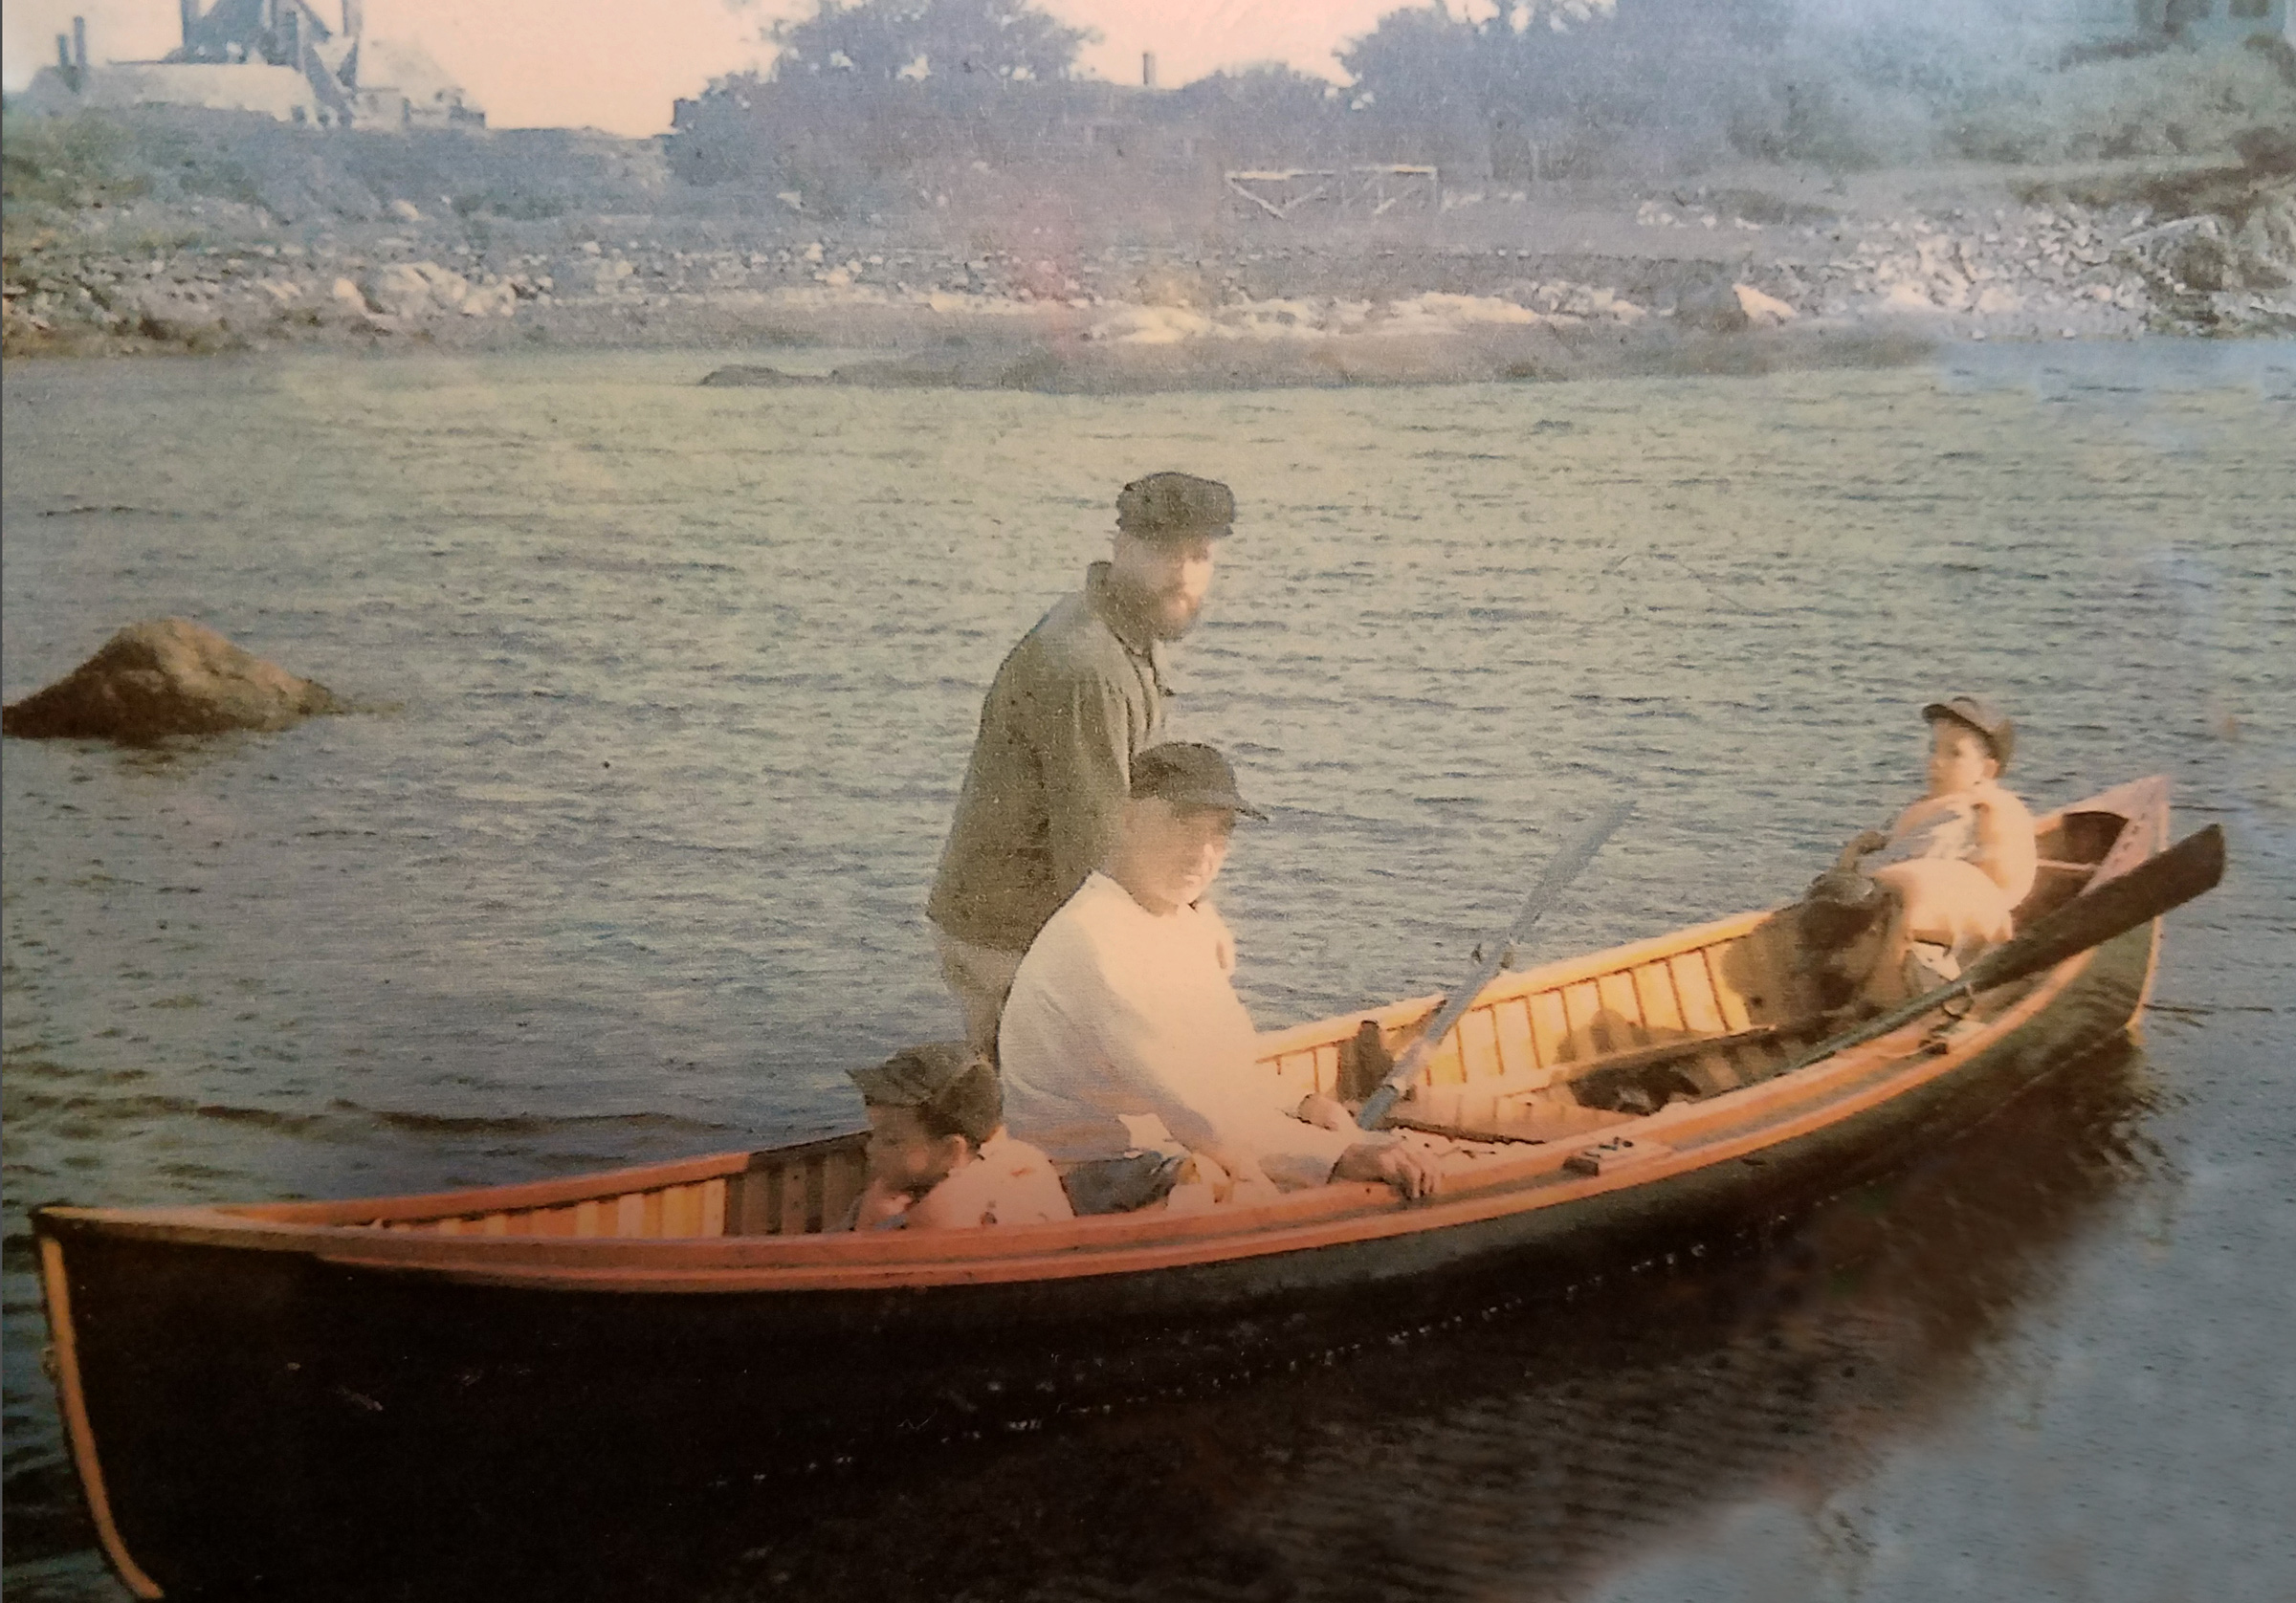
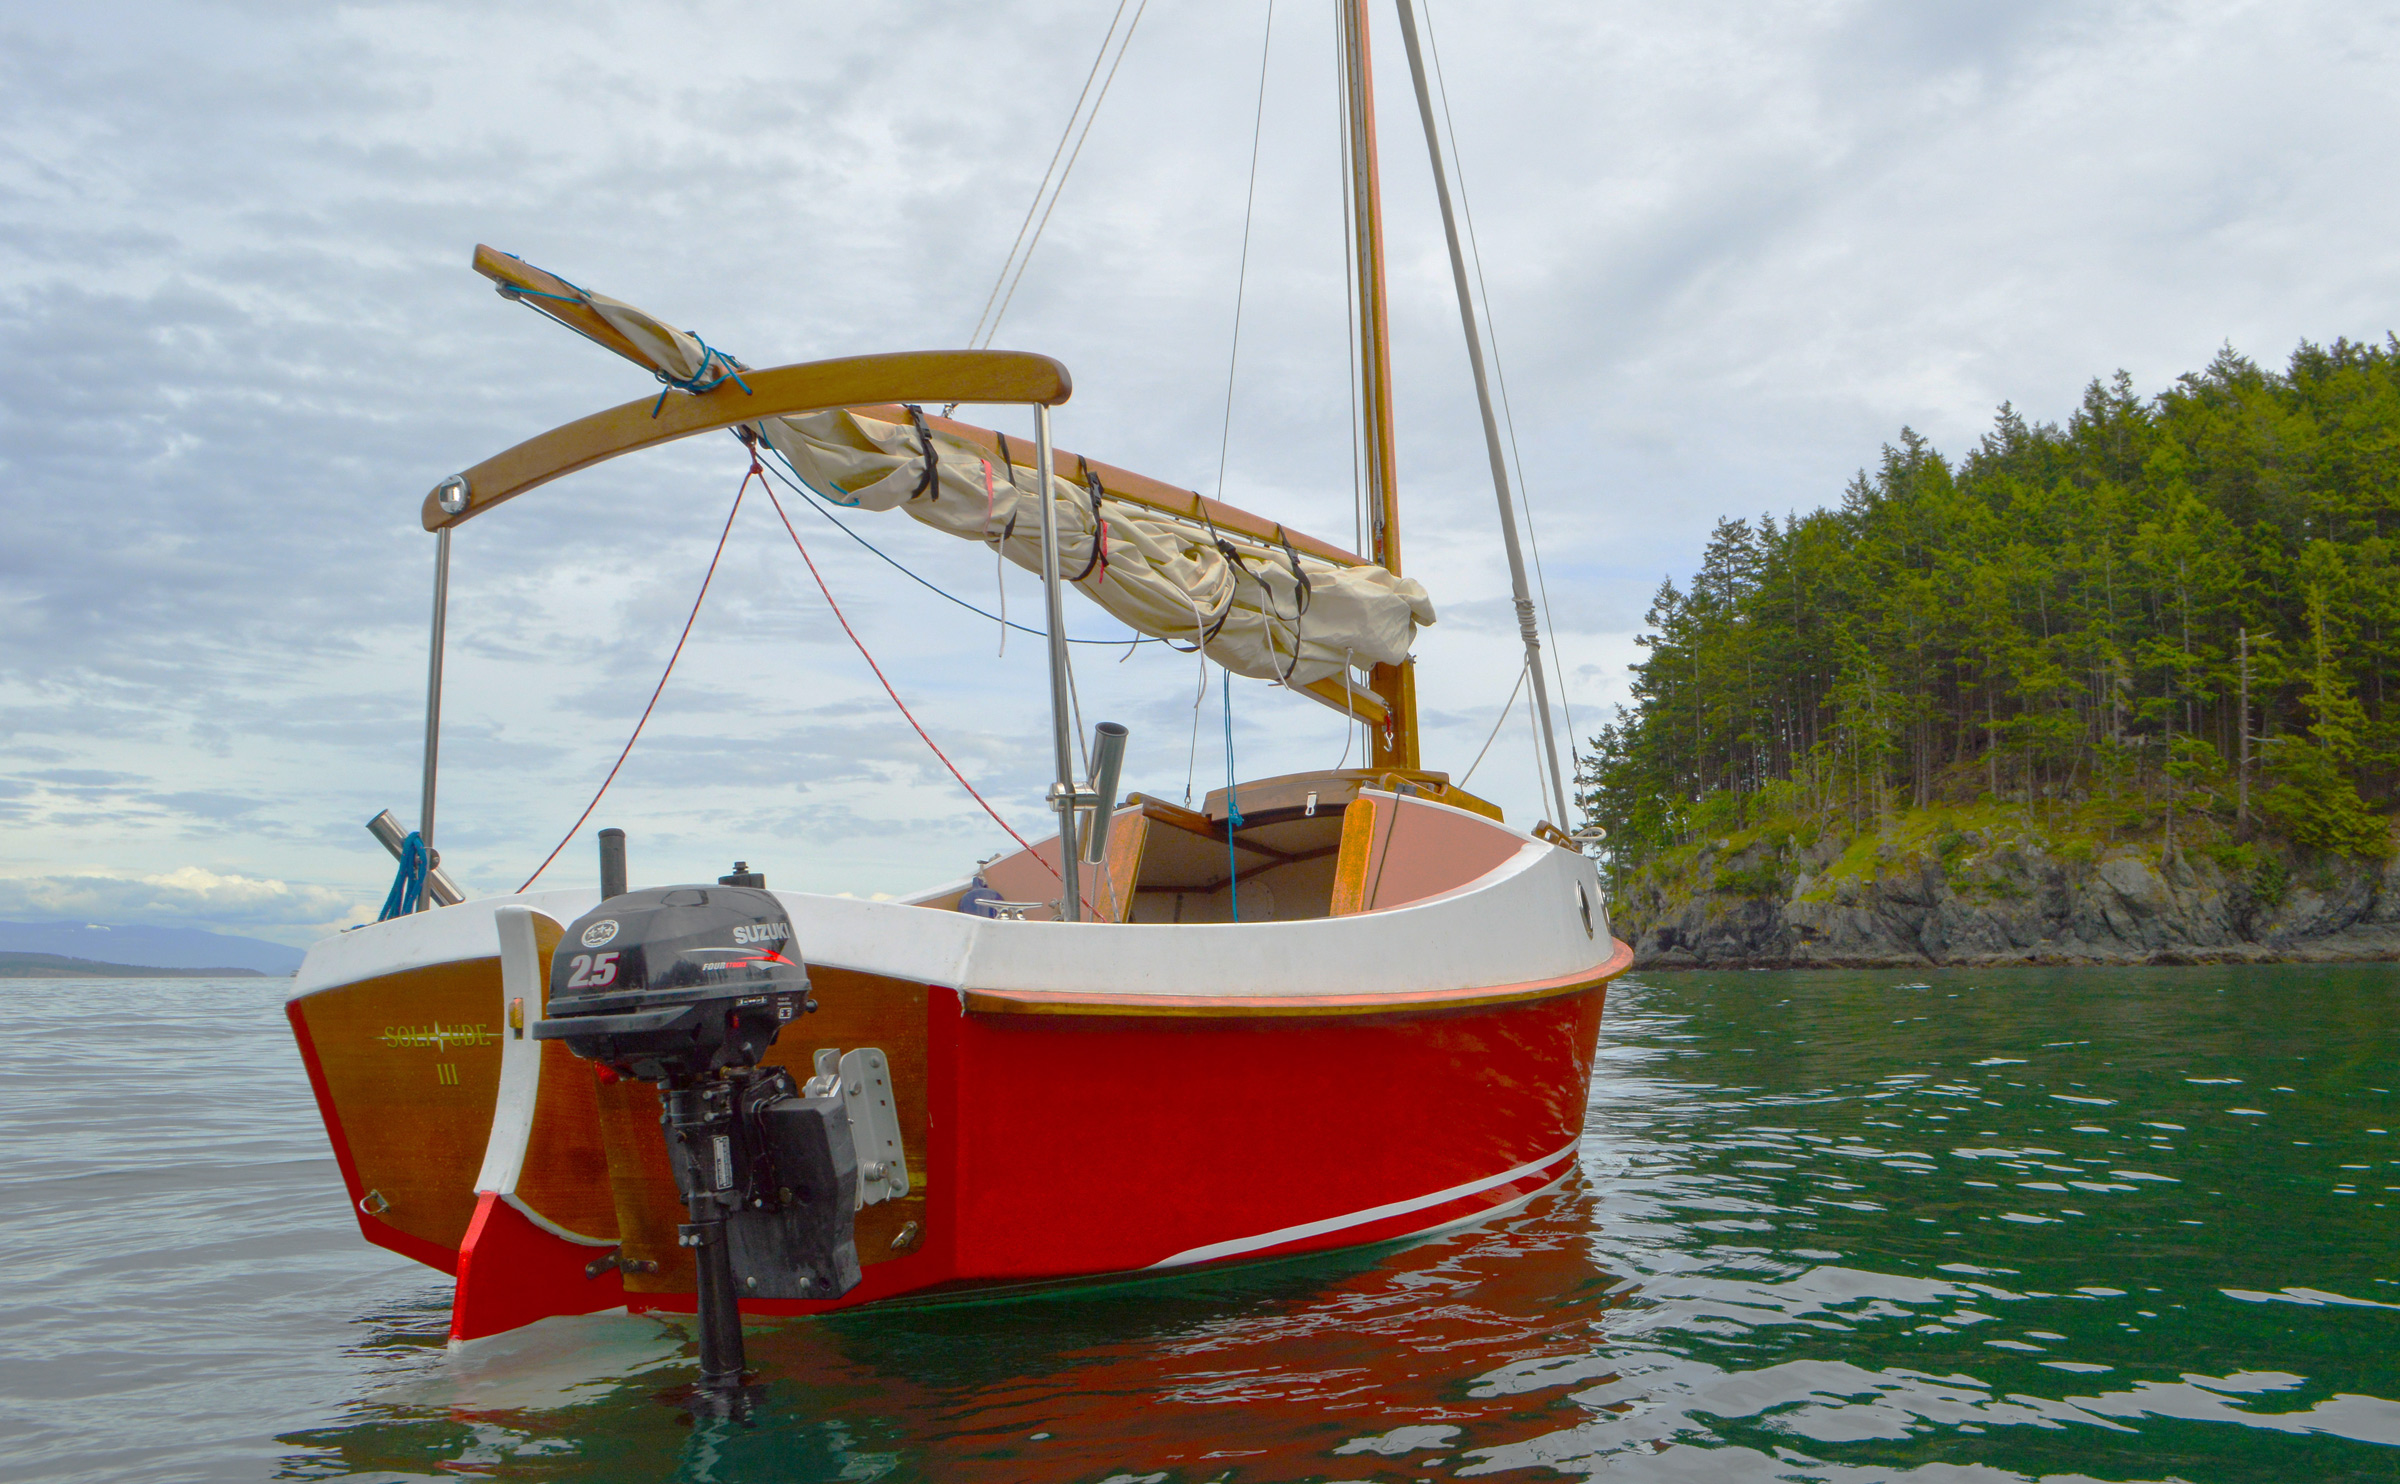
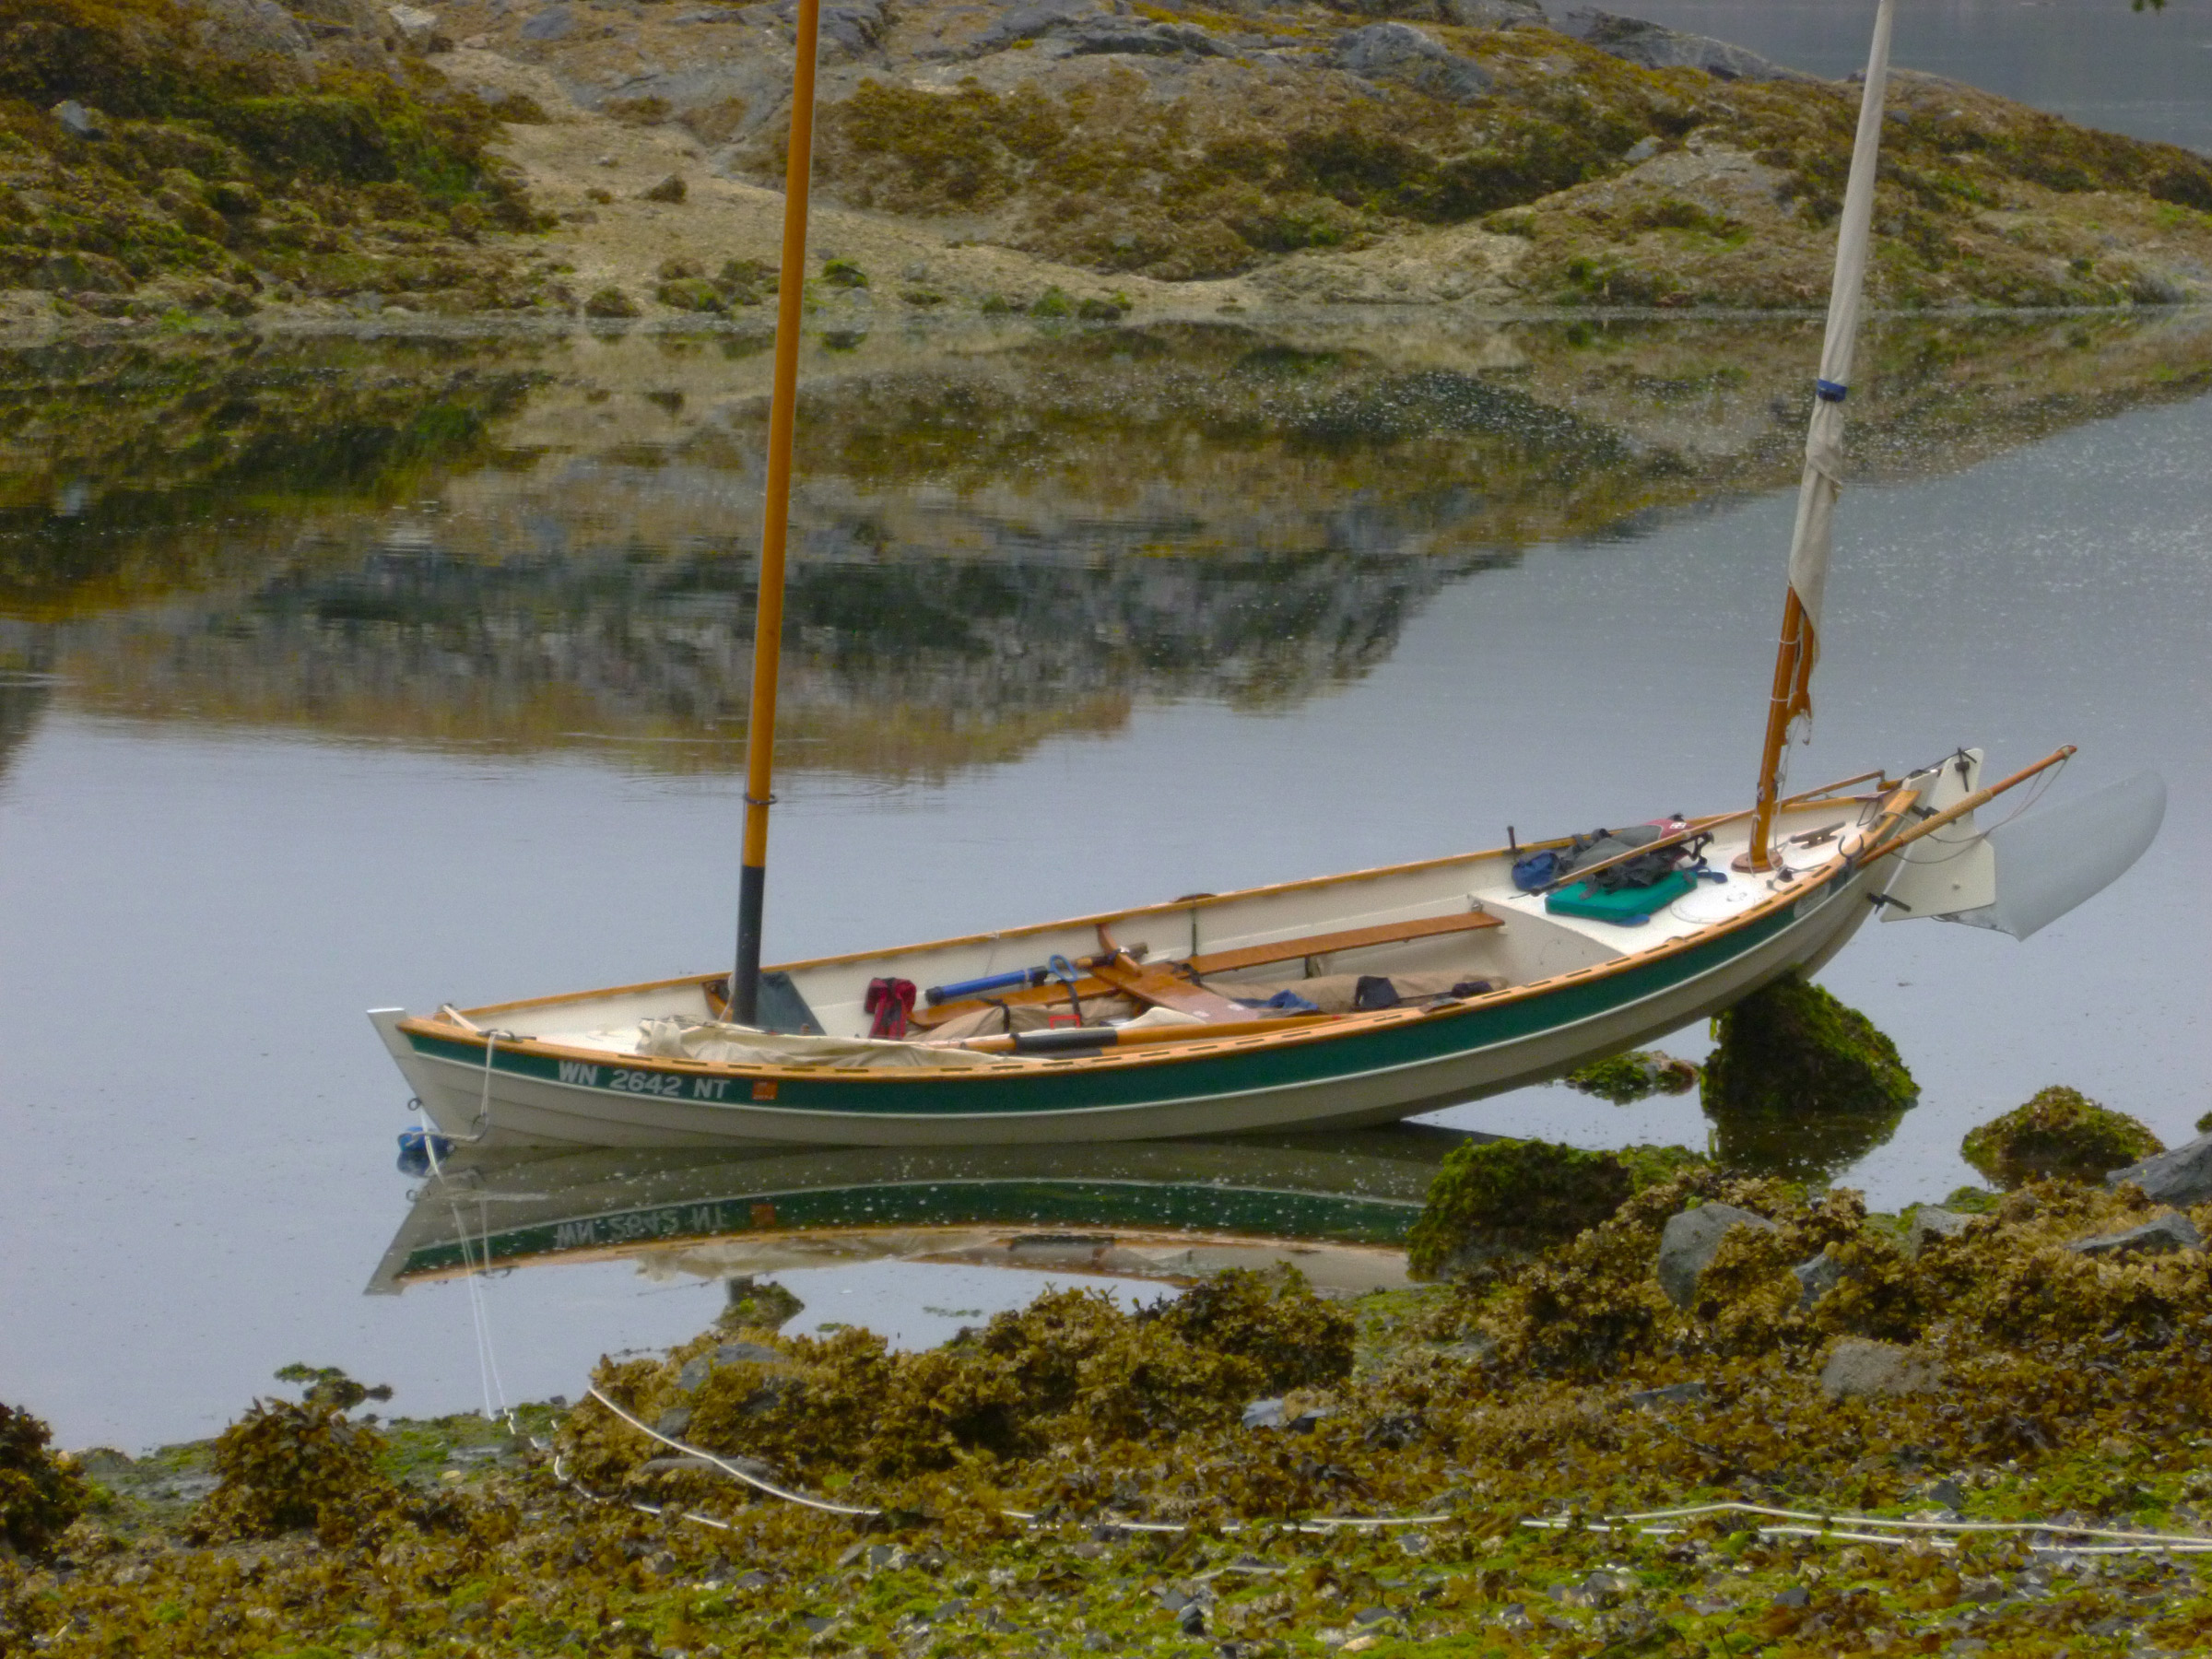
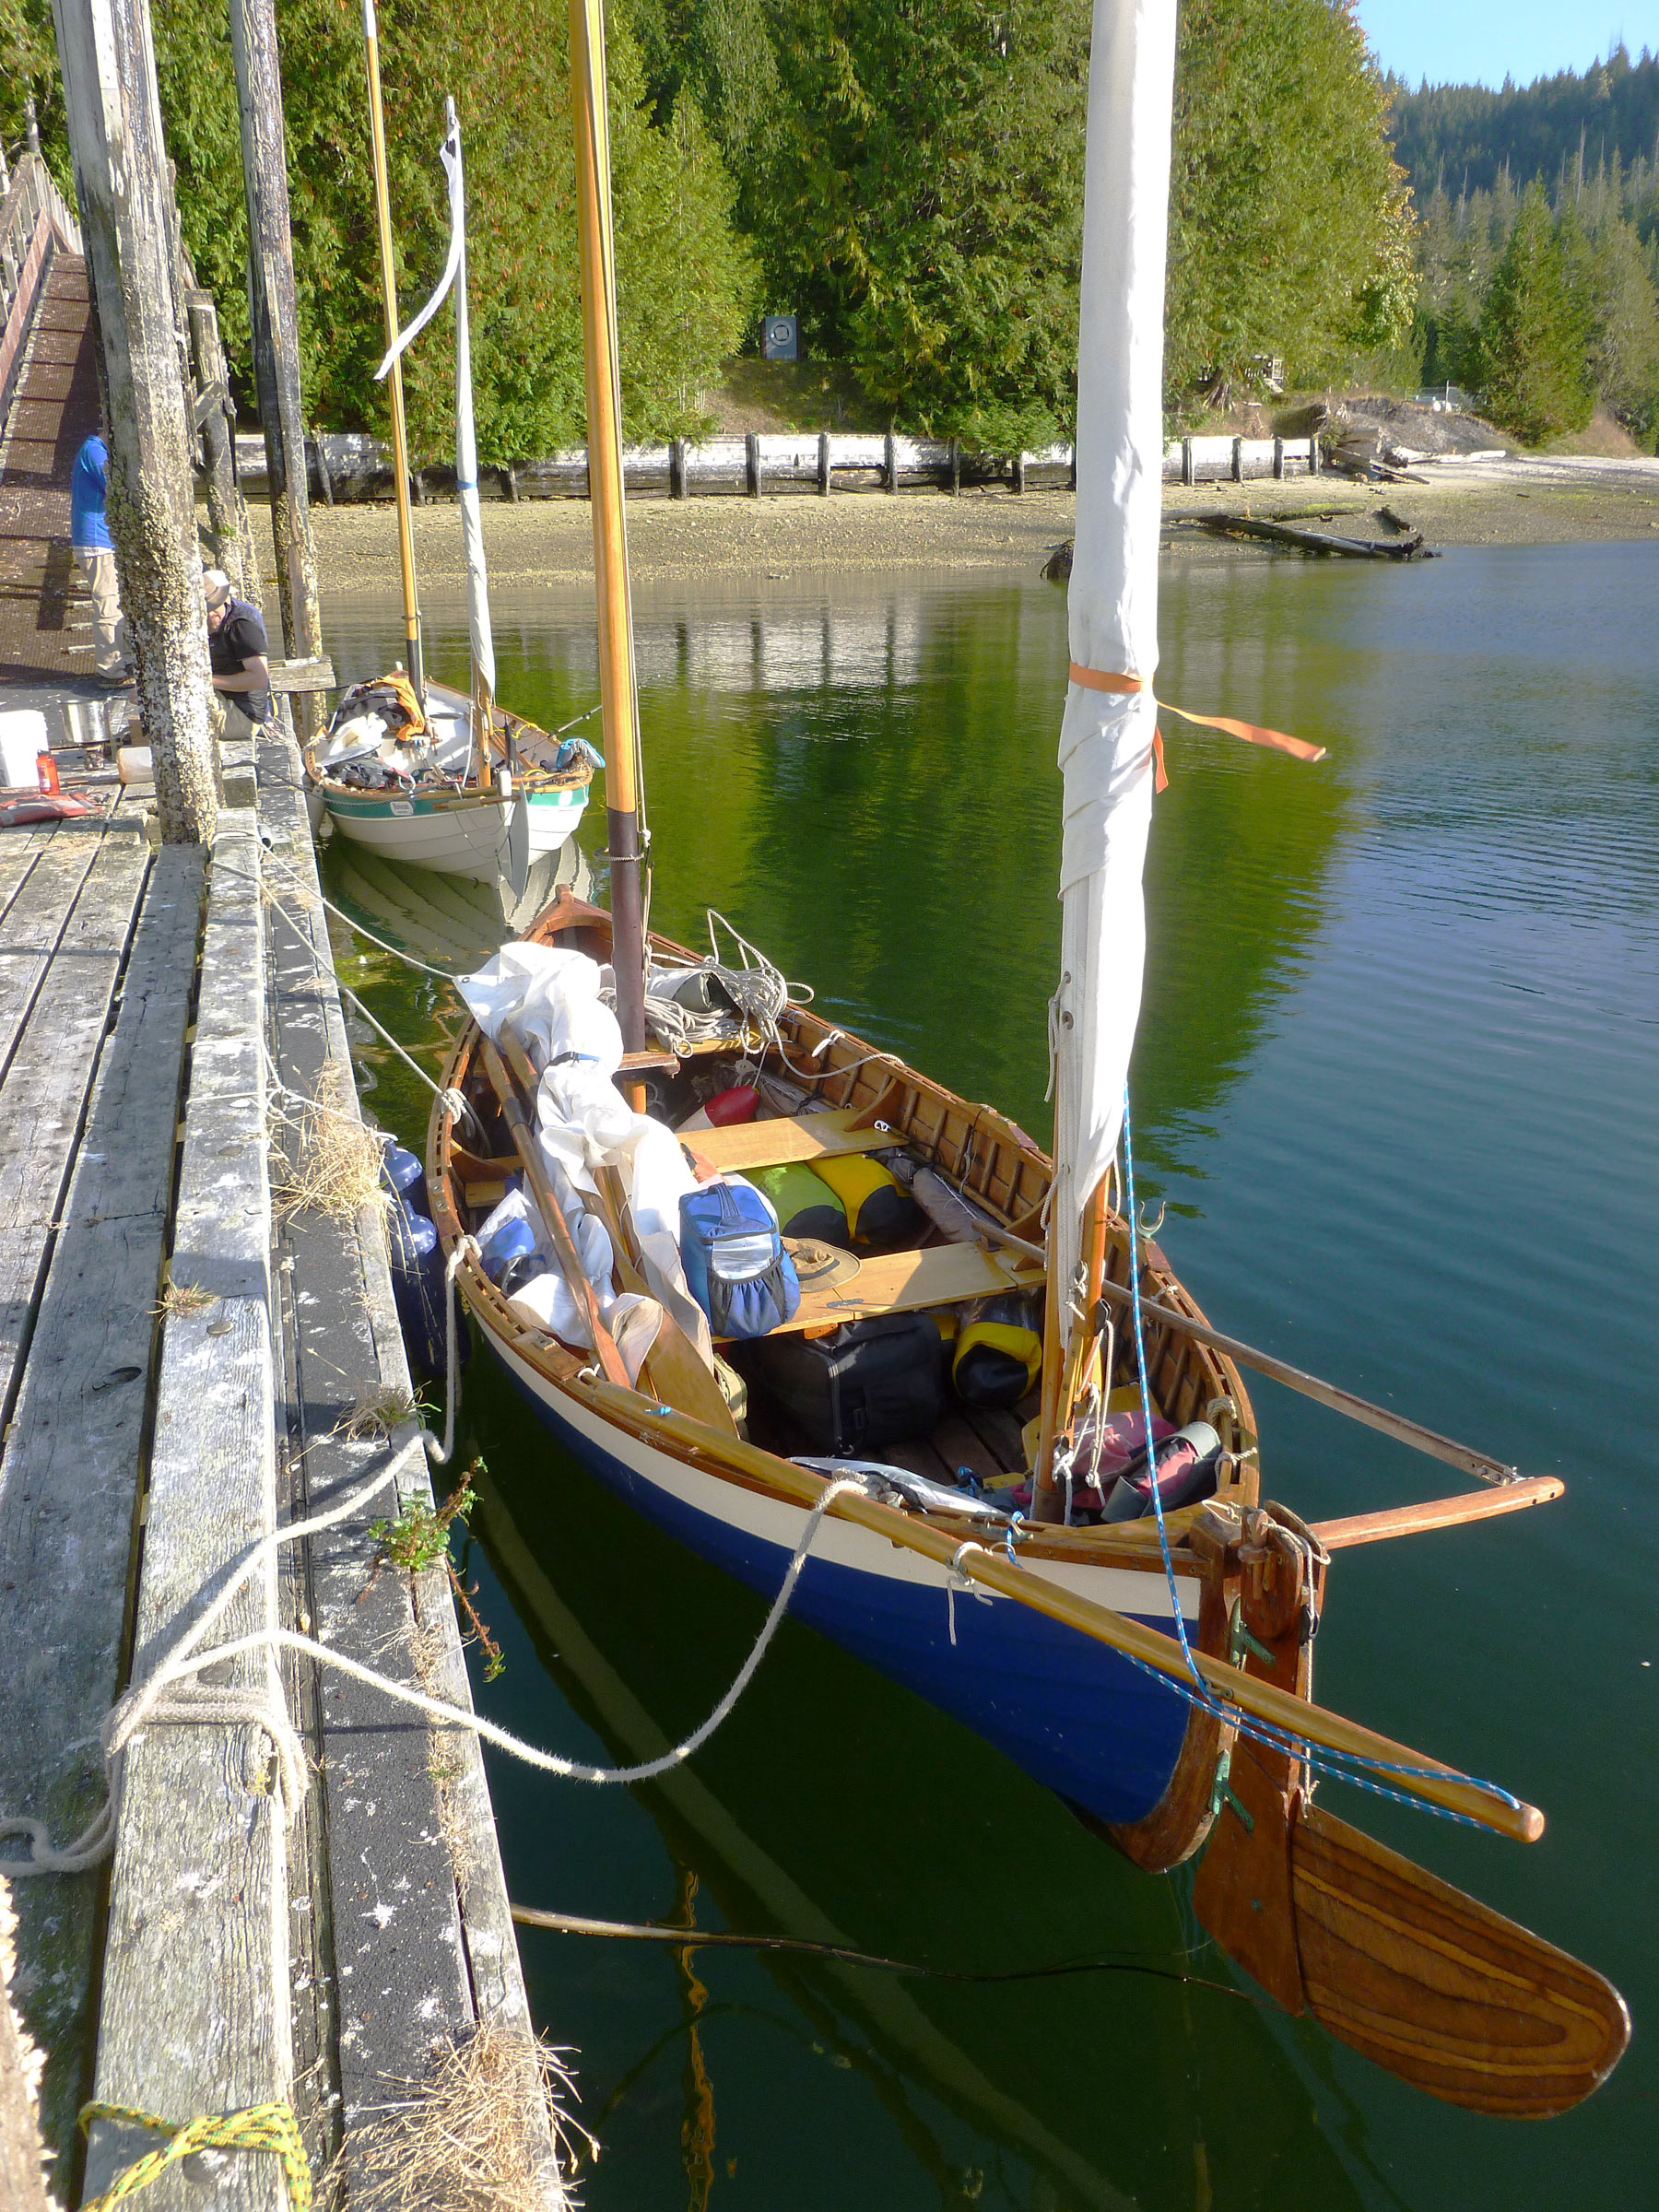
The dory, LOOK FAR, was built in 1978 in Anacortes, Washington, by David Jackson of Freya Boatworks. David, now a marine surveyor, says he built the Hammond 16′ Swampscott dory to plans in the Dory Book, but with a few tweaks. Thor, pictured here, found the boat in the bushes down by the Columbia River, where it had been sitting for the last ten years or so, half-heartedly covered and just waiting for some fools to come along and give it a second life. The owner agreed to sell it to Thor for a dollar after hearing a long story about wanting to raise money to help the ocean by restoring an old wooden boat and going on a crazy adventure with it. The hull had two major cracks, one of which had been repaired with chopsticks, dental floss, and spray foam.
Two of our most loyal supporters, Emiliano and Sue, came to see me and Thor off. After a rushed greeting, they ceremoniously circled our Swampscott dory, LOOK FAR, singing blessings and adorning her with feathers and sprigs of cedar. Emiliano had sewn the original sails for LOOK FAR when she was built in 1978 and, as an avid dory lover himself, was fully invested in our success. The Soviet National Anthem, the official starting “gun,” suddenly rang out over the race organizers’ PA system, and the race was on.
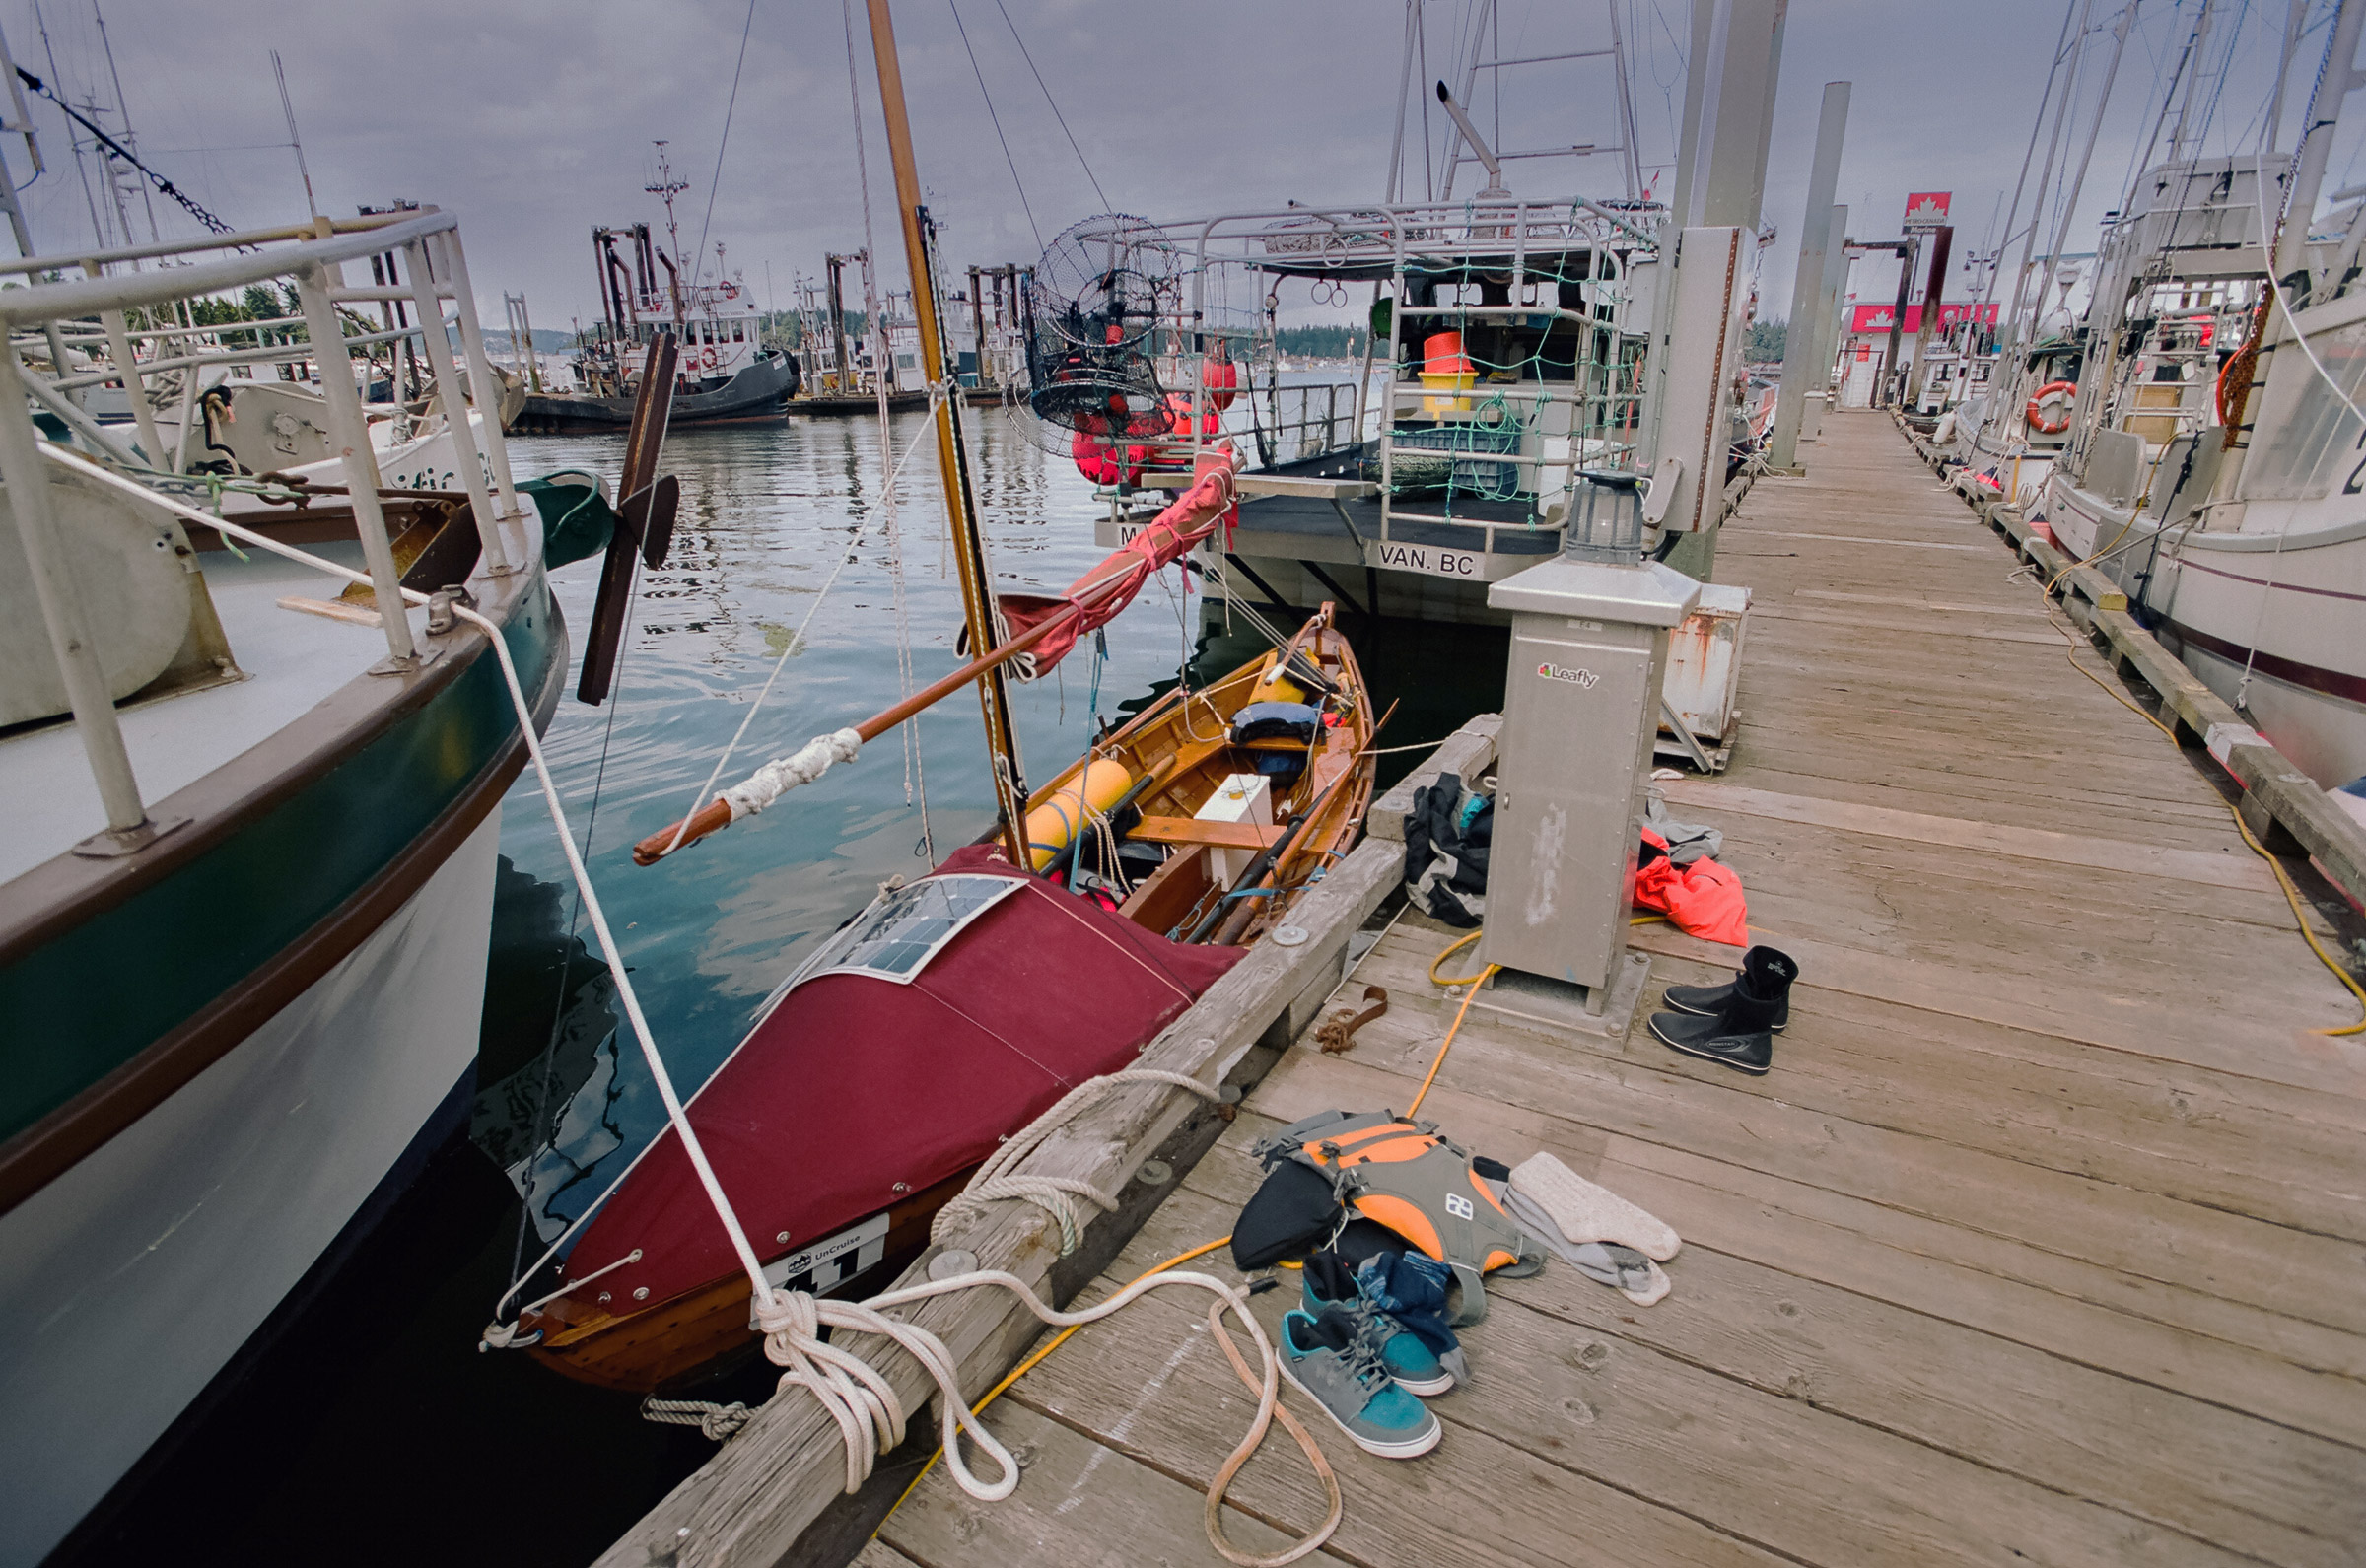
As the fleet charged across the starting line, we were still stuffing the space under the dodger tight with dry bags full of food, gear, and tools. When the gear was all stowed, the only living space that remained for us, both 6′ tall, was a ludicrously small 4′ x 4′ section of seats. Before backing the boat off the trailer, we thanked and hugged our small group of loyalists. The long road that had brought us to the boat launch had been full of unforeseen circumstances, among them a recent automobile accident that had cracked our centerboard and dislocated Thor’s shoulder. We were just happy to be at the start.
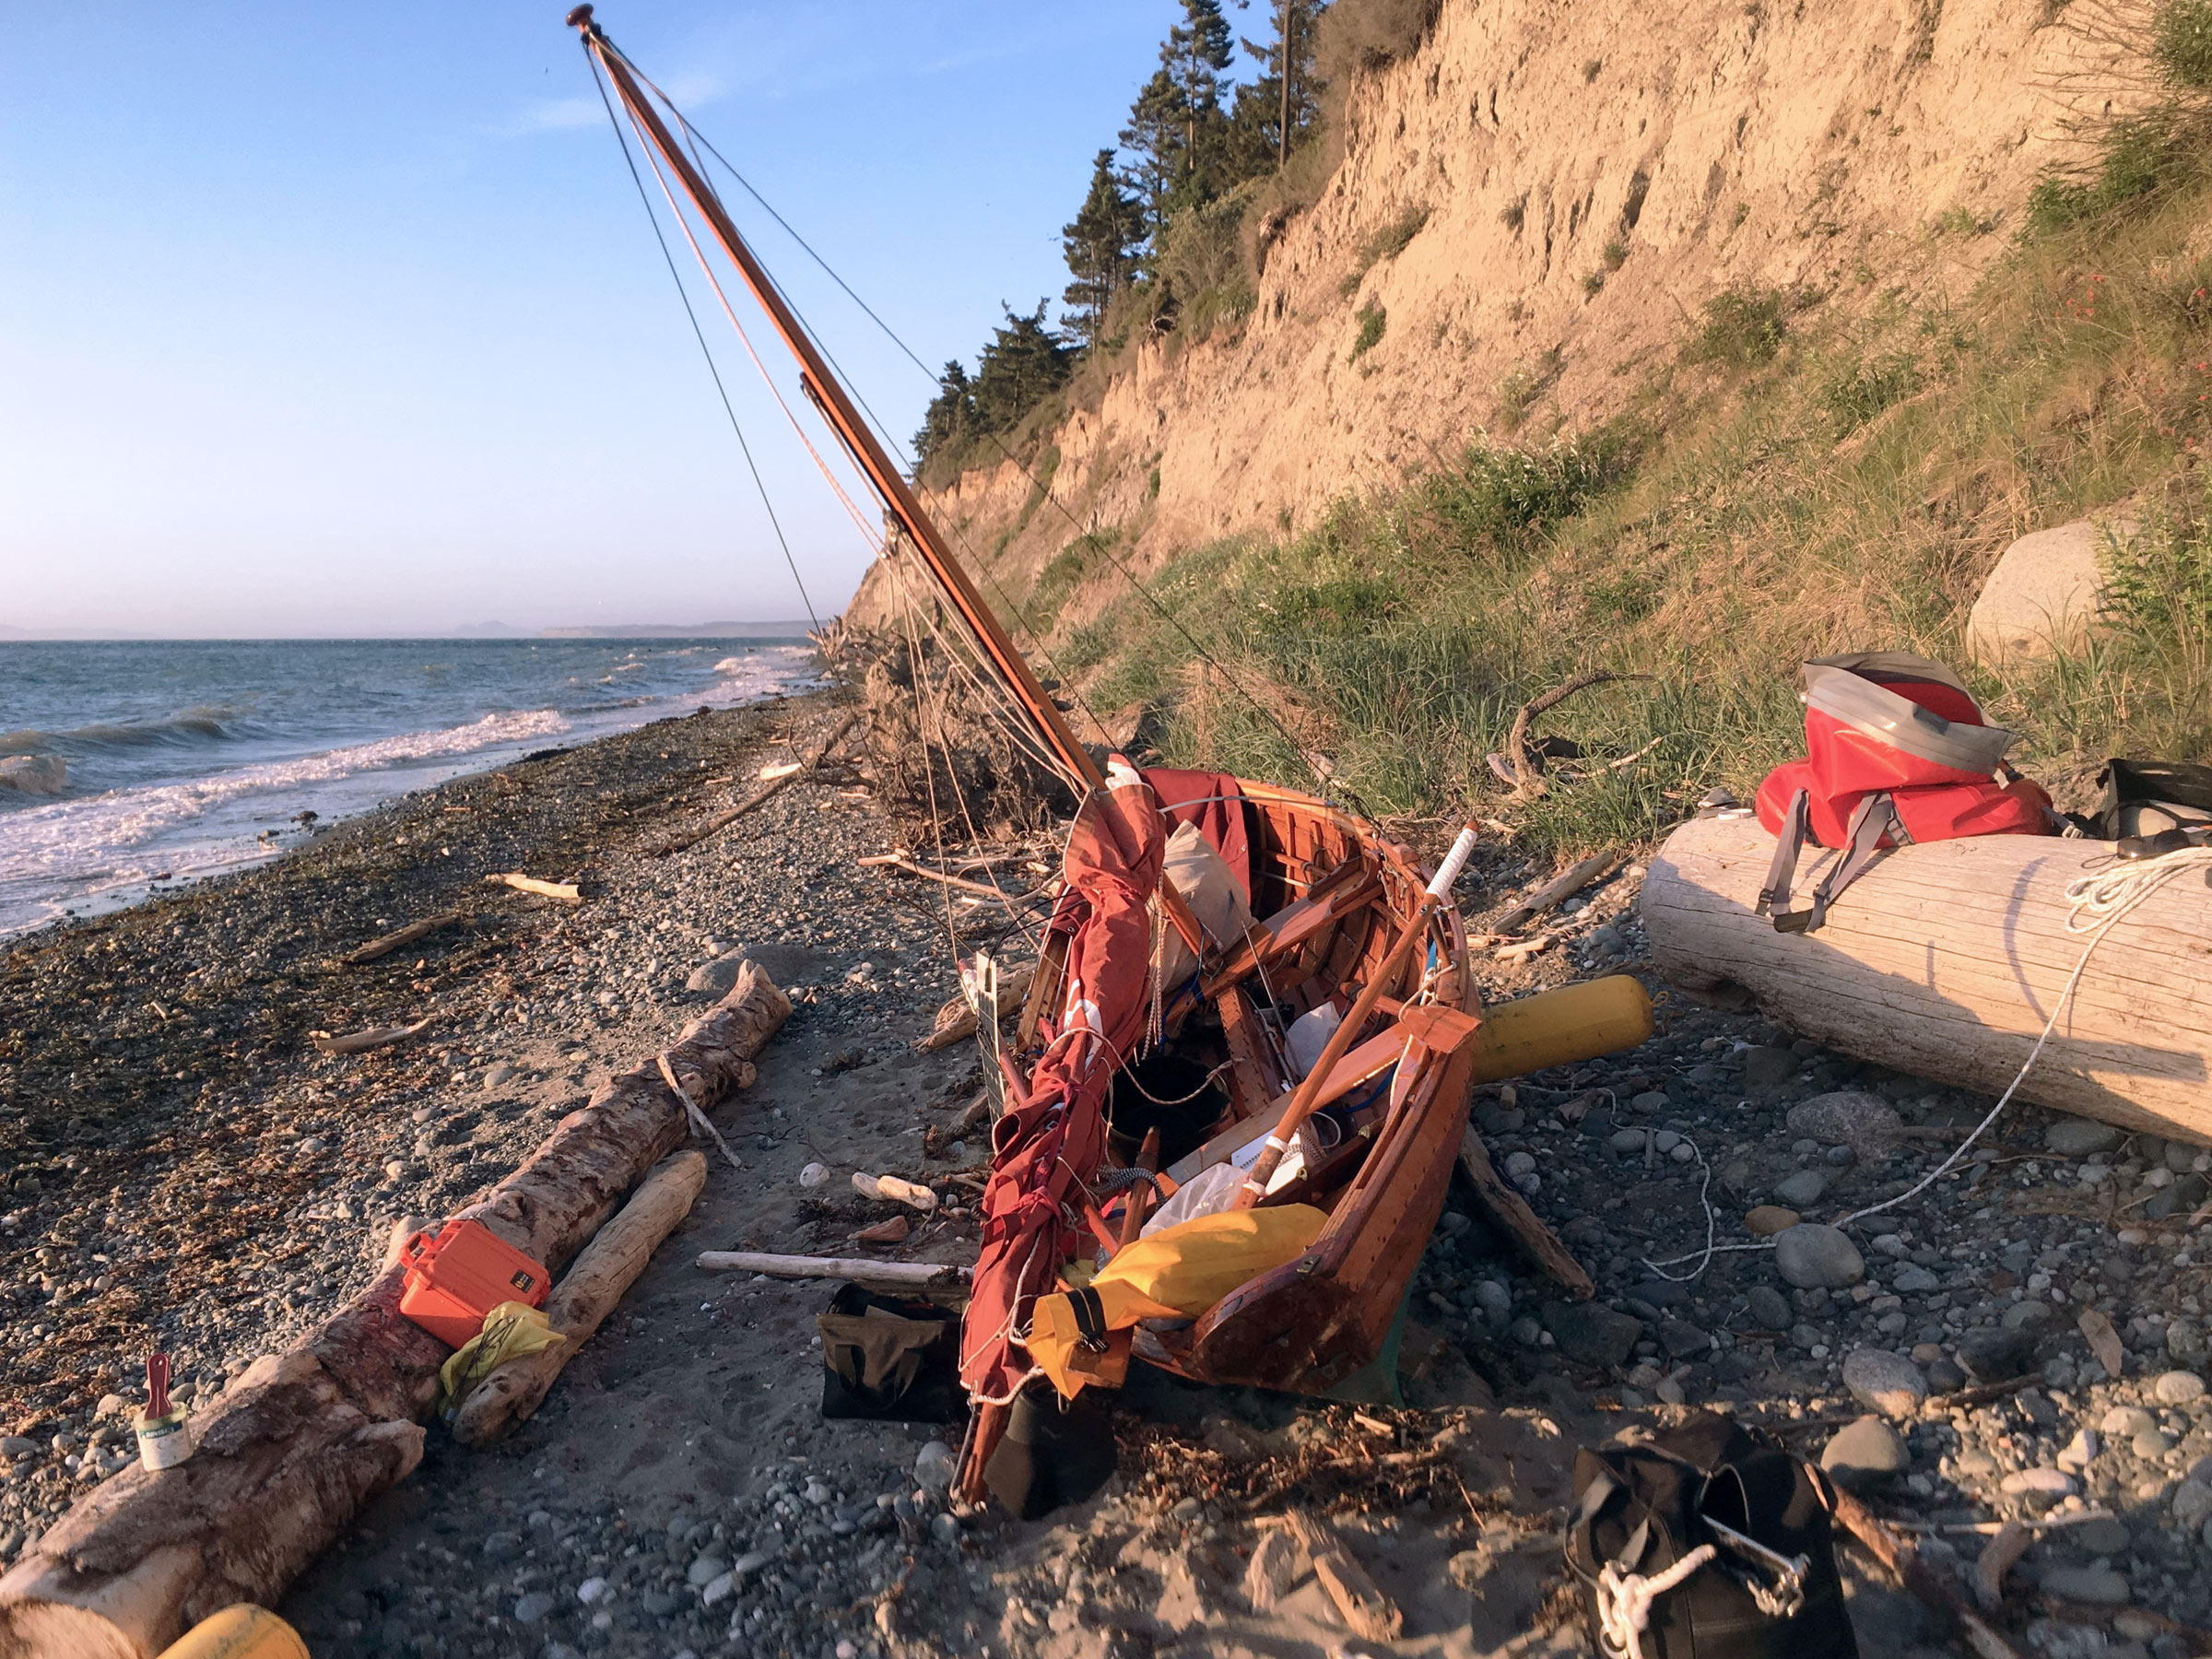
I stepped into the ocean and felt the chilly water squeeze the dry suit tight around my calves. Pebbles shifted grittily under my feet as I eased the boat into the water and pivoted the bow around for launching. The gleaming amber varnish contrasted with the gray and muted blues of early morning, and the 41-year-old boat’s beauty made me think that it belonged in a museum rather than the R2AK.
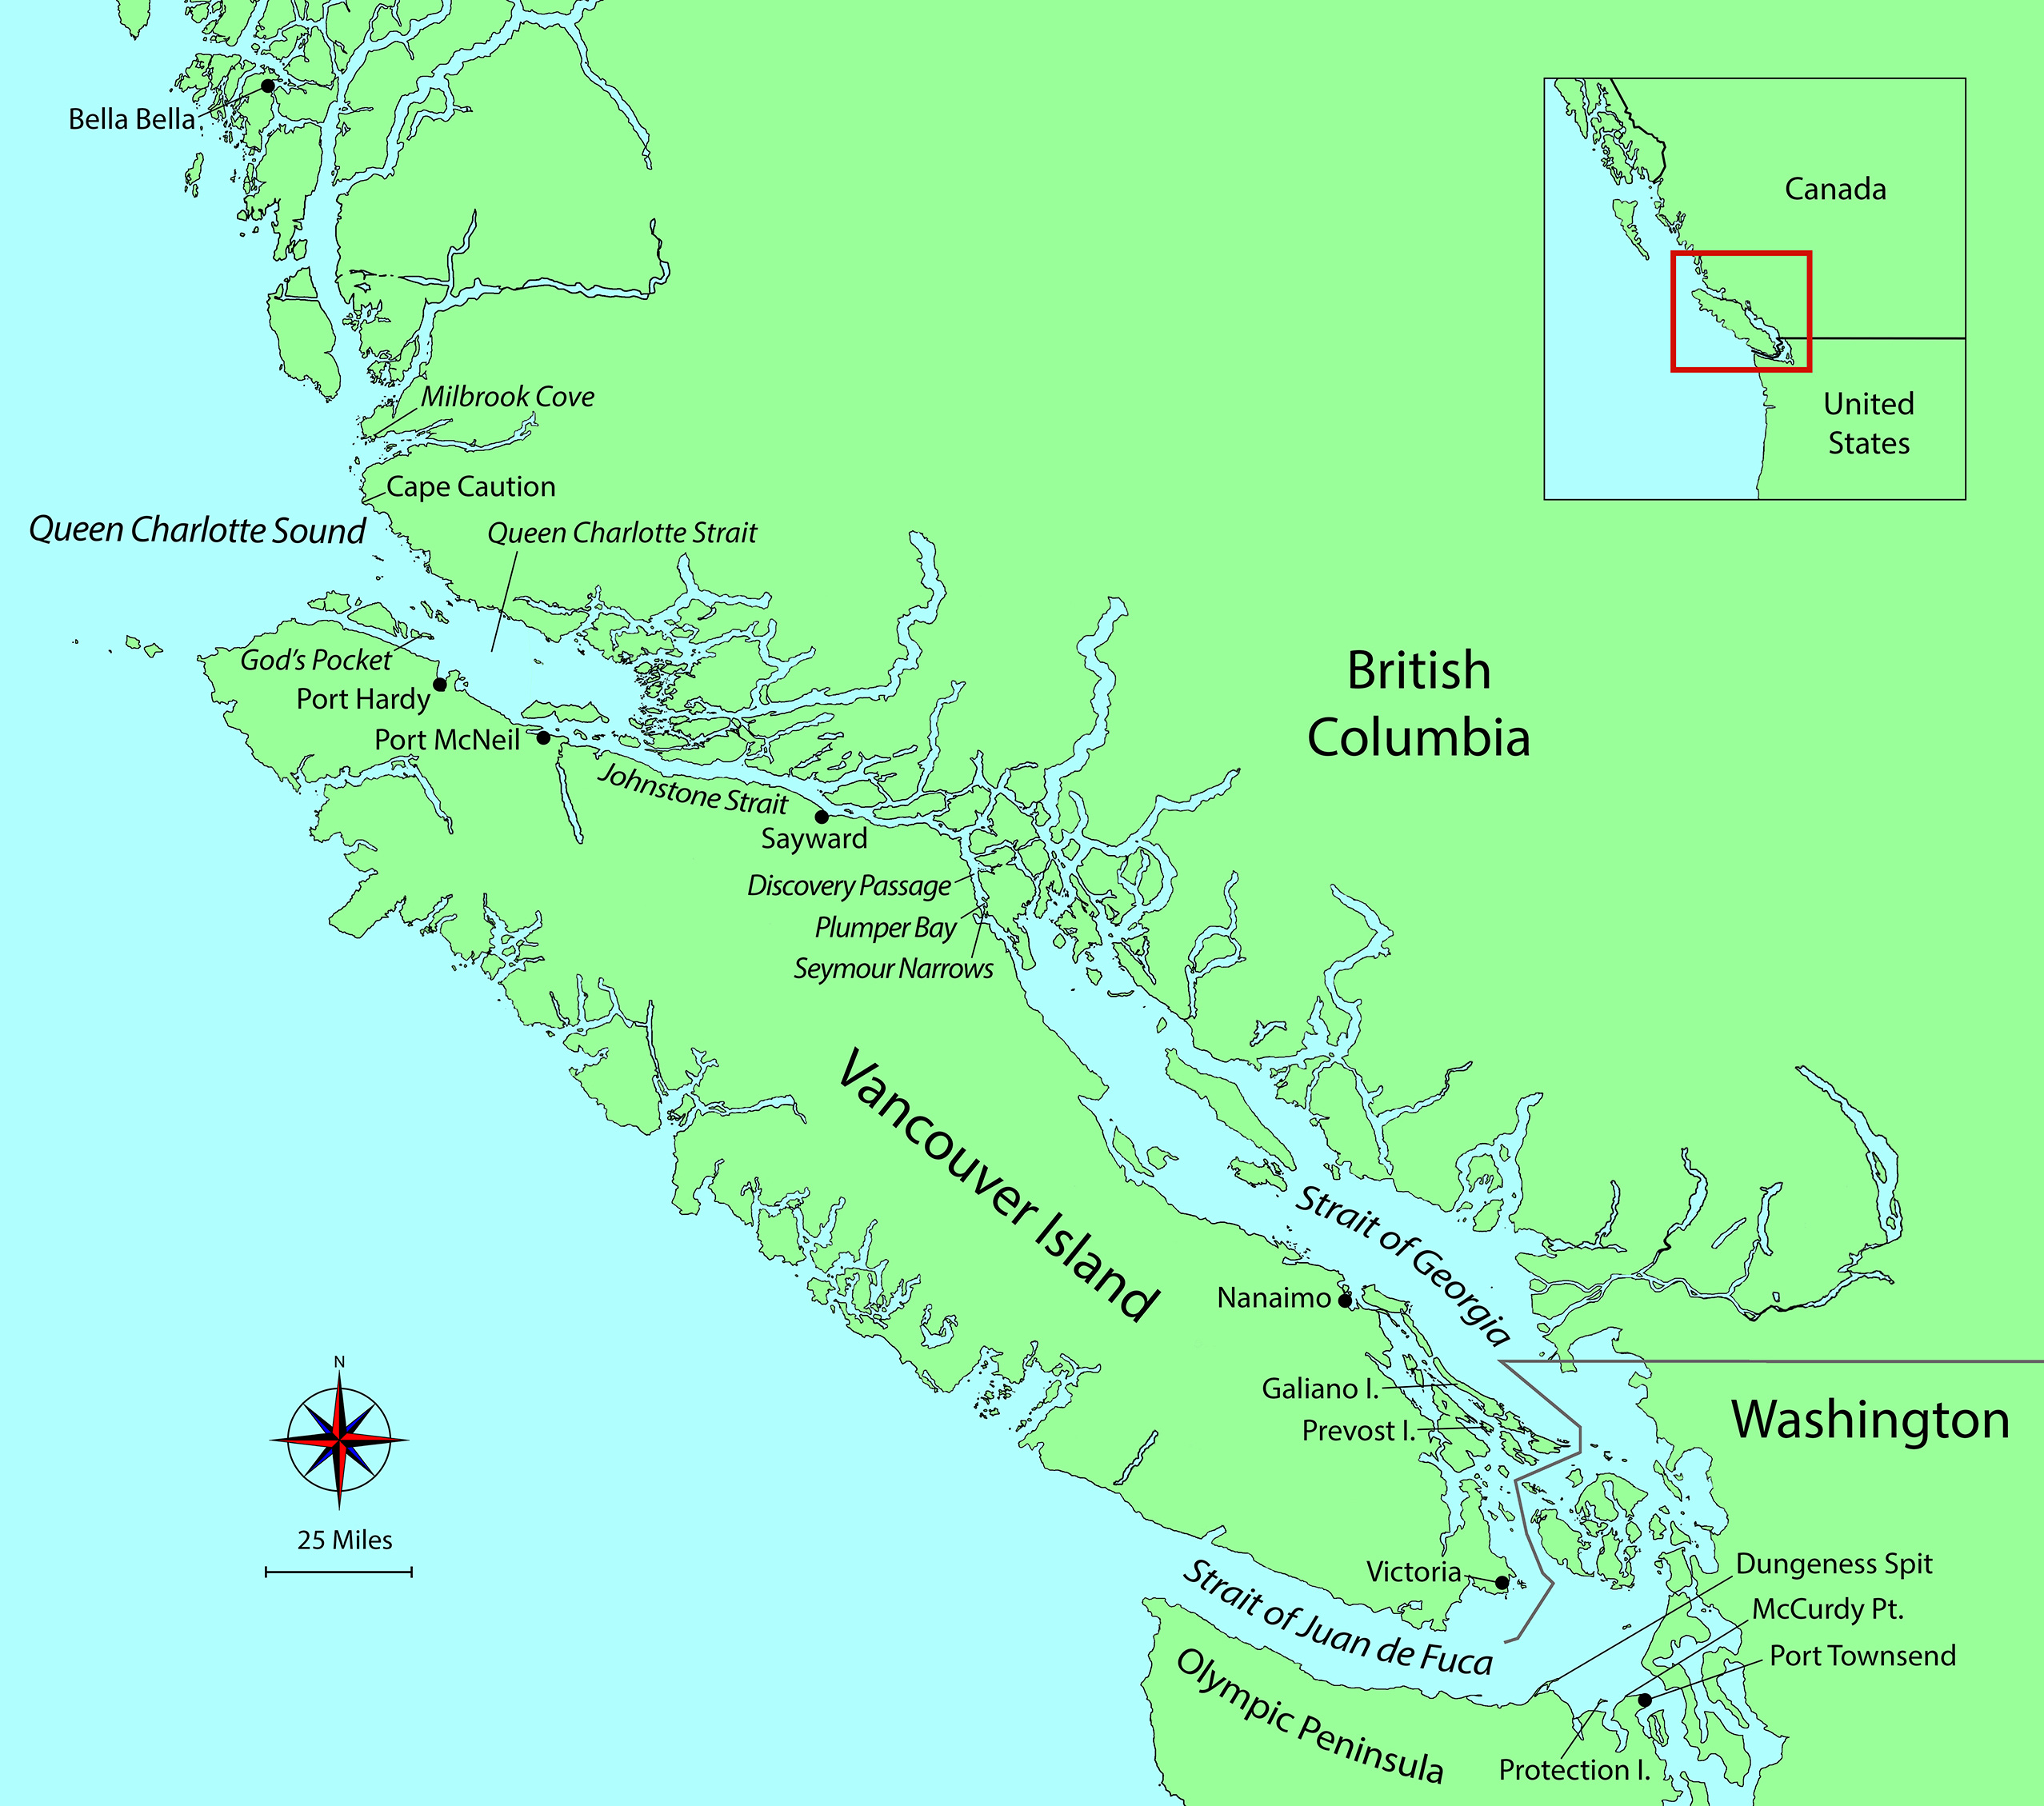
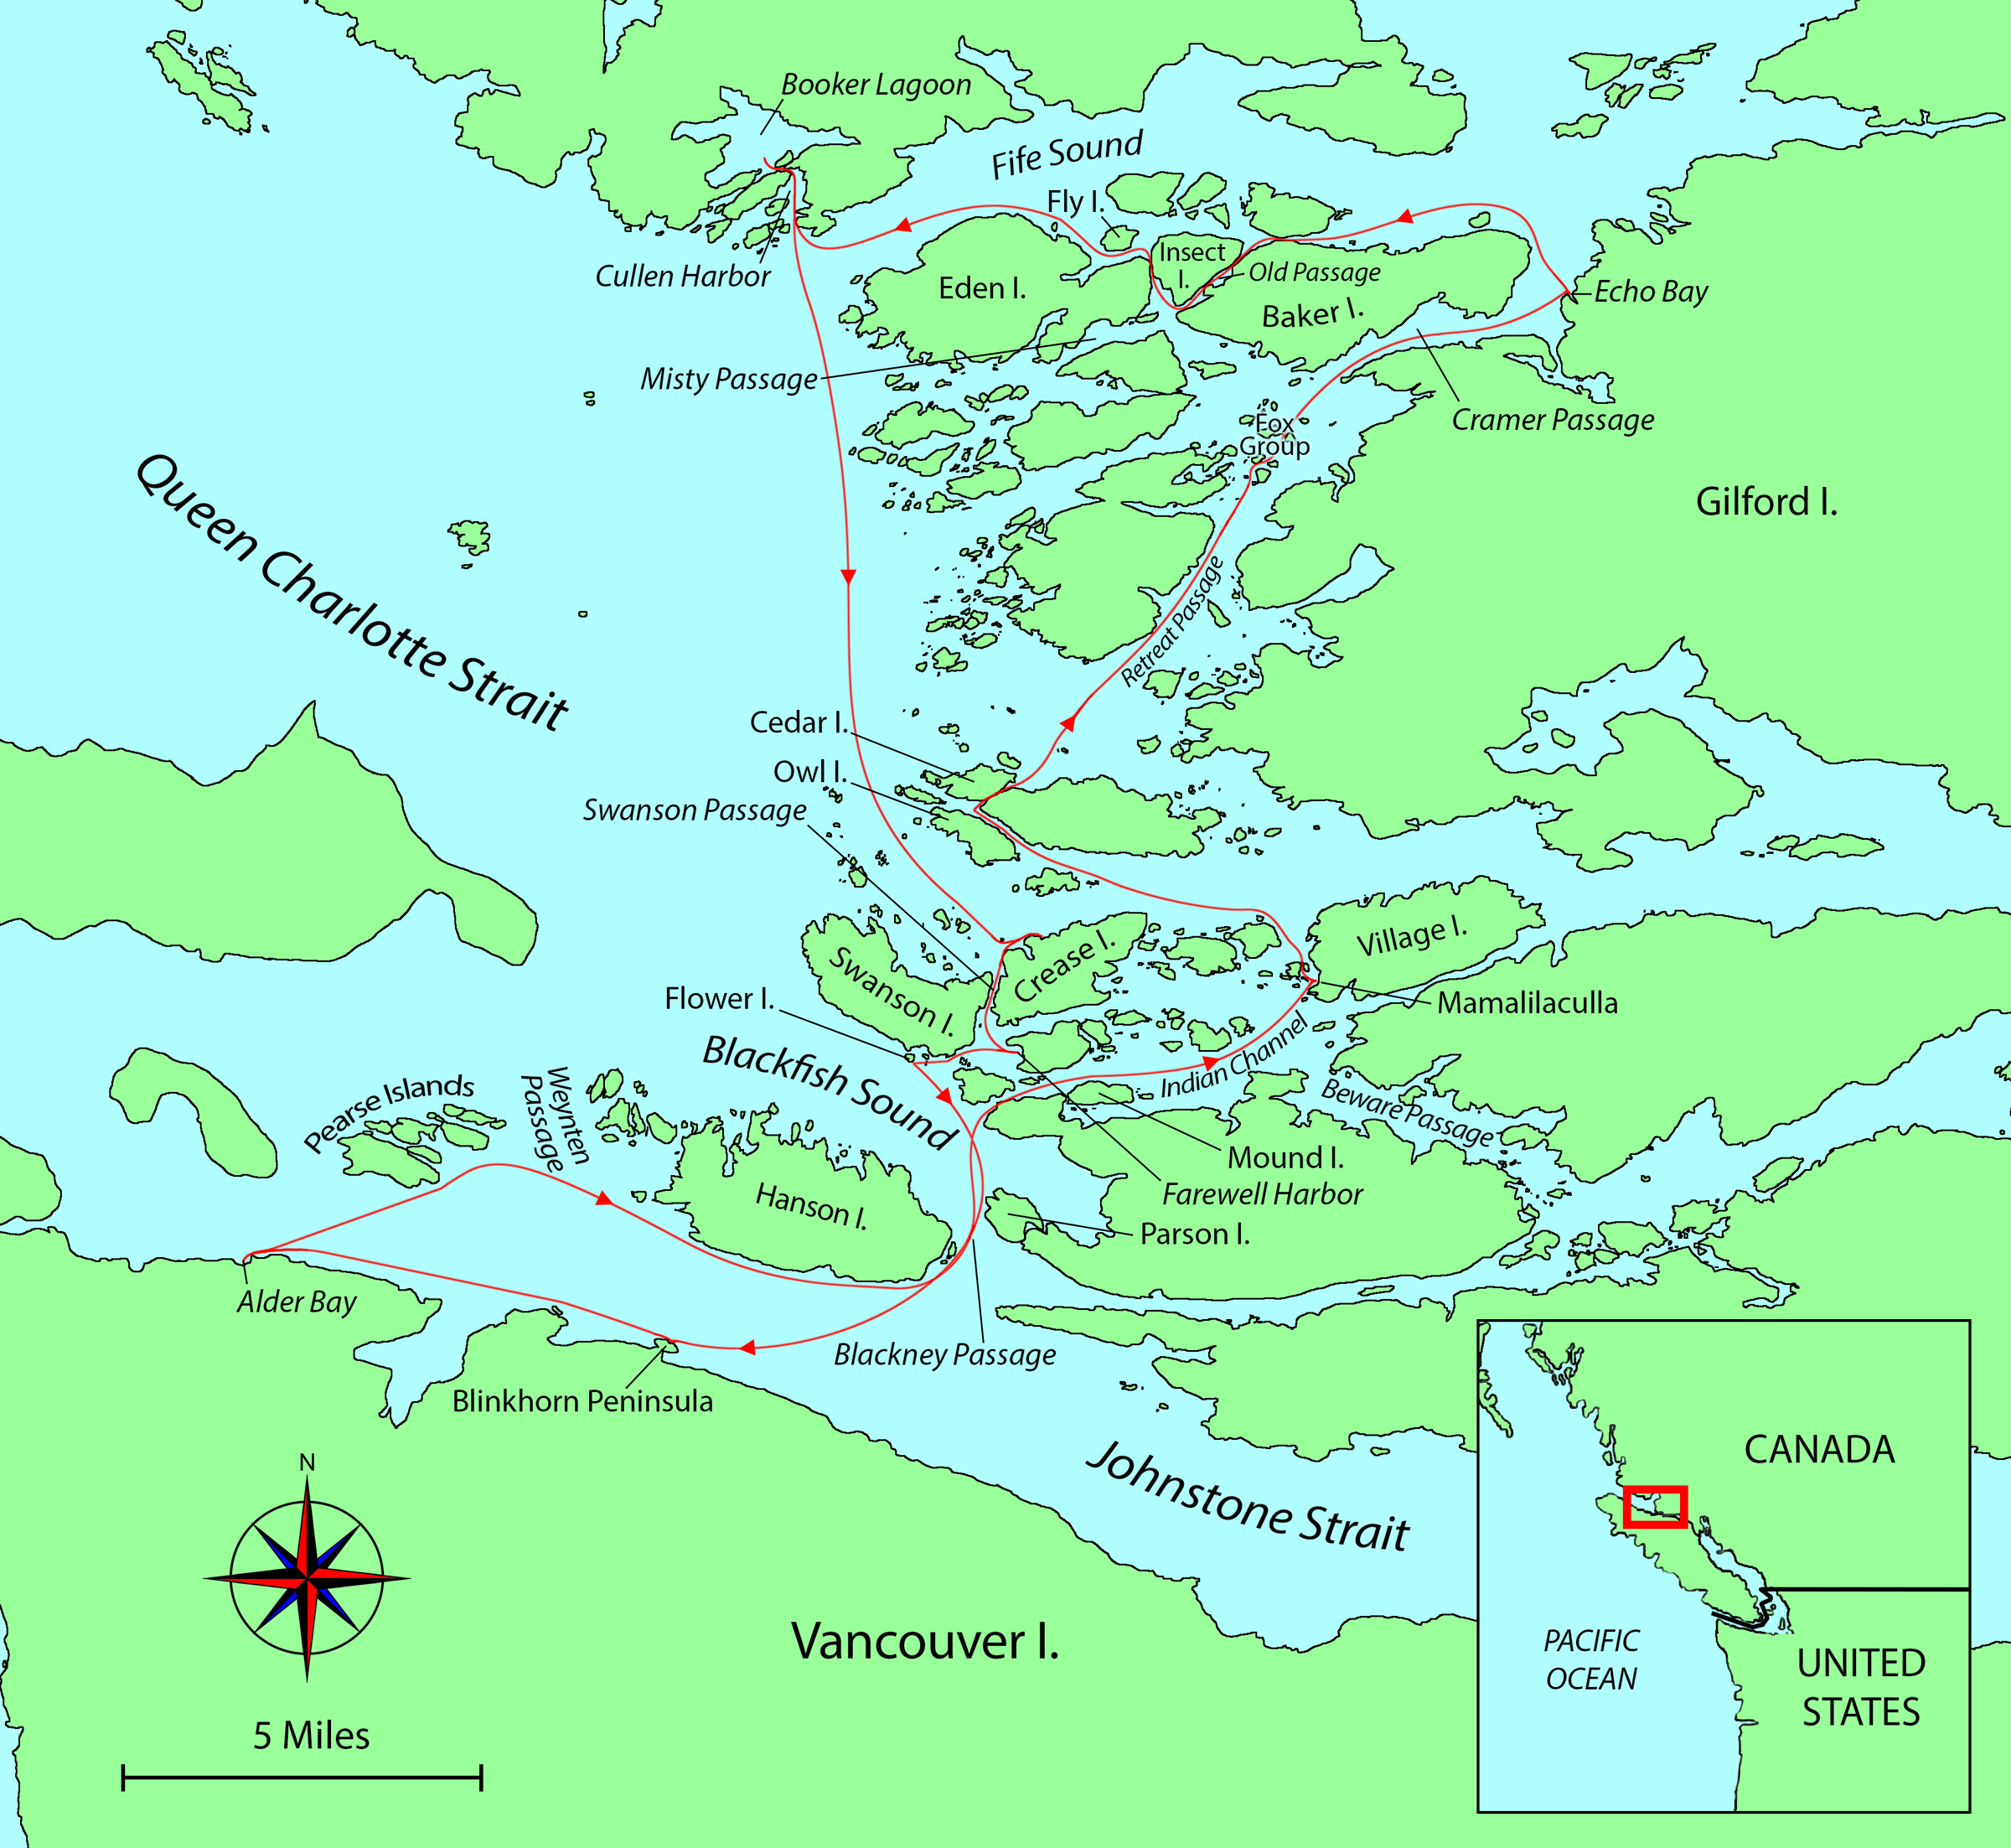
Roger Siebert
.
I steadied the gunwale, which rested only 6″ above the water, while Thor hopped aboard on the opposite side. The boat careened as I made my own entry, betraying the tenderness of its 4-1/2′ beam. Thor tucked himself into the aft rowing station and rowed us away from shore while I set to work raising the mainsail, securing the halyard to the oak cleat at the bottom of the mast. Thor took the helm and pointed the bow into the wind as I raised the jib. The wind caught our sails and as the boat gained way, I crouched beneath the boom and struggled to organize the mess of lines. A cry of “Go Team Funky Dory!” rang out from the pier, and I was shocked to see just how many people were watching us. The slosh of water at my feet snapped my attention immediately back to the boat.
LOOK FAR had been out of the water for weeks while we sanded, varnished, drilled, glued, and puzzled over how to turn a 16’ Swampscott dory built in 1978 into an expedition race boat. Nine months earlier, Thor had found her under a tangle of blackberry bushes by the Columbia River, rotting away from neglect and exposure. Her path to recovery and improvement had continued until the very night before the race as we spliced shrouds by headlamp. Now, as water trickled in through imperceptible and unrepaired cracks in the planks, 1,000 hours of work were being eclipsed by our failure to get the boat in the water early enough to swell up.
Within minutes, the water inside was above the floorboards. On top of the steady trickles coming from below the waterline, every time the boat heeled, water seeped in at the sides through cracks that had formed around the lap rivets. For bailing, we had a gallon milk jug and a small electric bilge pump. Unfortunately, we hadn’t had time to wire the pump and it was in a dry bag stuffed in the bow; the milk jug was our only option. Balancing our weight in tandem, Thor and I alternately leaned in and out of the boat to allow me to reach the bilgewater without swamping us. I hurled jugful after jugful over the side.
We immediately fell even farther behind the fleet. The larger boats quickly disappeared around Point Wilson, soon followed by the smaller craft. A short time after we passed the Point Wilson lighthouse, the lone stand-up paddleboarder passed us by taking advantage of an eddy along the shore. As he went by he shouted out an overly optimistic “See you in Alaska!” Steaming in frustration over our poor speed under sail, we changed course and landed on a boulder-strewn beach near McCurdy Point, just 5 miles from the start. As Thor lifted the rudder off the transom, I hopped out into waist-deep water, grabbed the painter, and threaded the boat between the submerged boulders to a patch of sand. Thor dropped the sails and I set up the rowing stations for tandem rowing. With the boom detached, we lifted the mast out of the center thwart, wrapped it and the boom in the sail, then tucked one end of the bundle under the aft thwart. The rolled-up spars stuck out haphazardly beyond the stern. A quick handful of beef jerky and we launched back into the gentle surf.
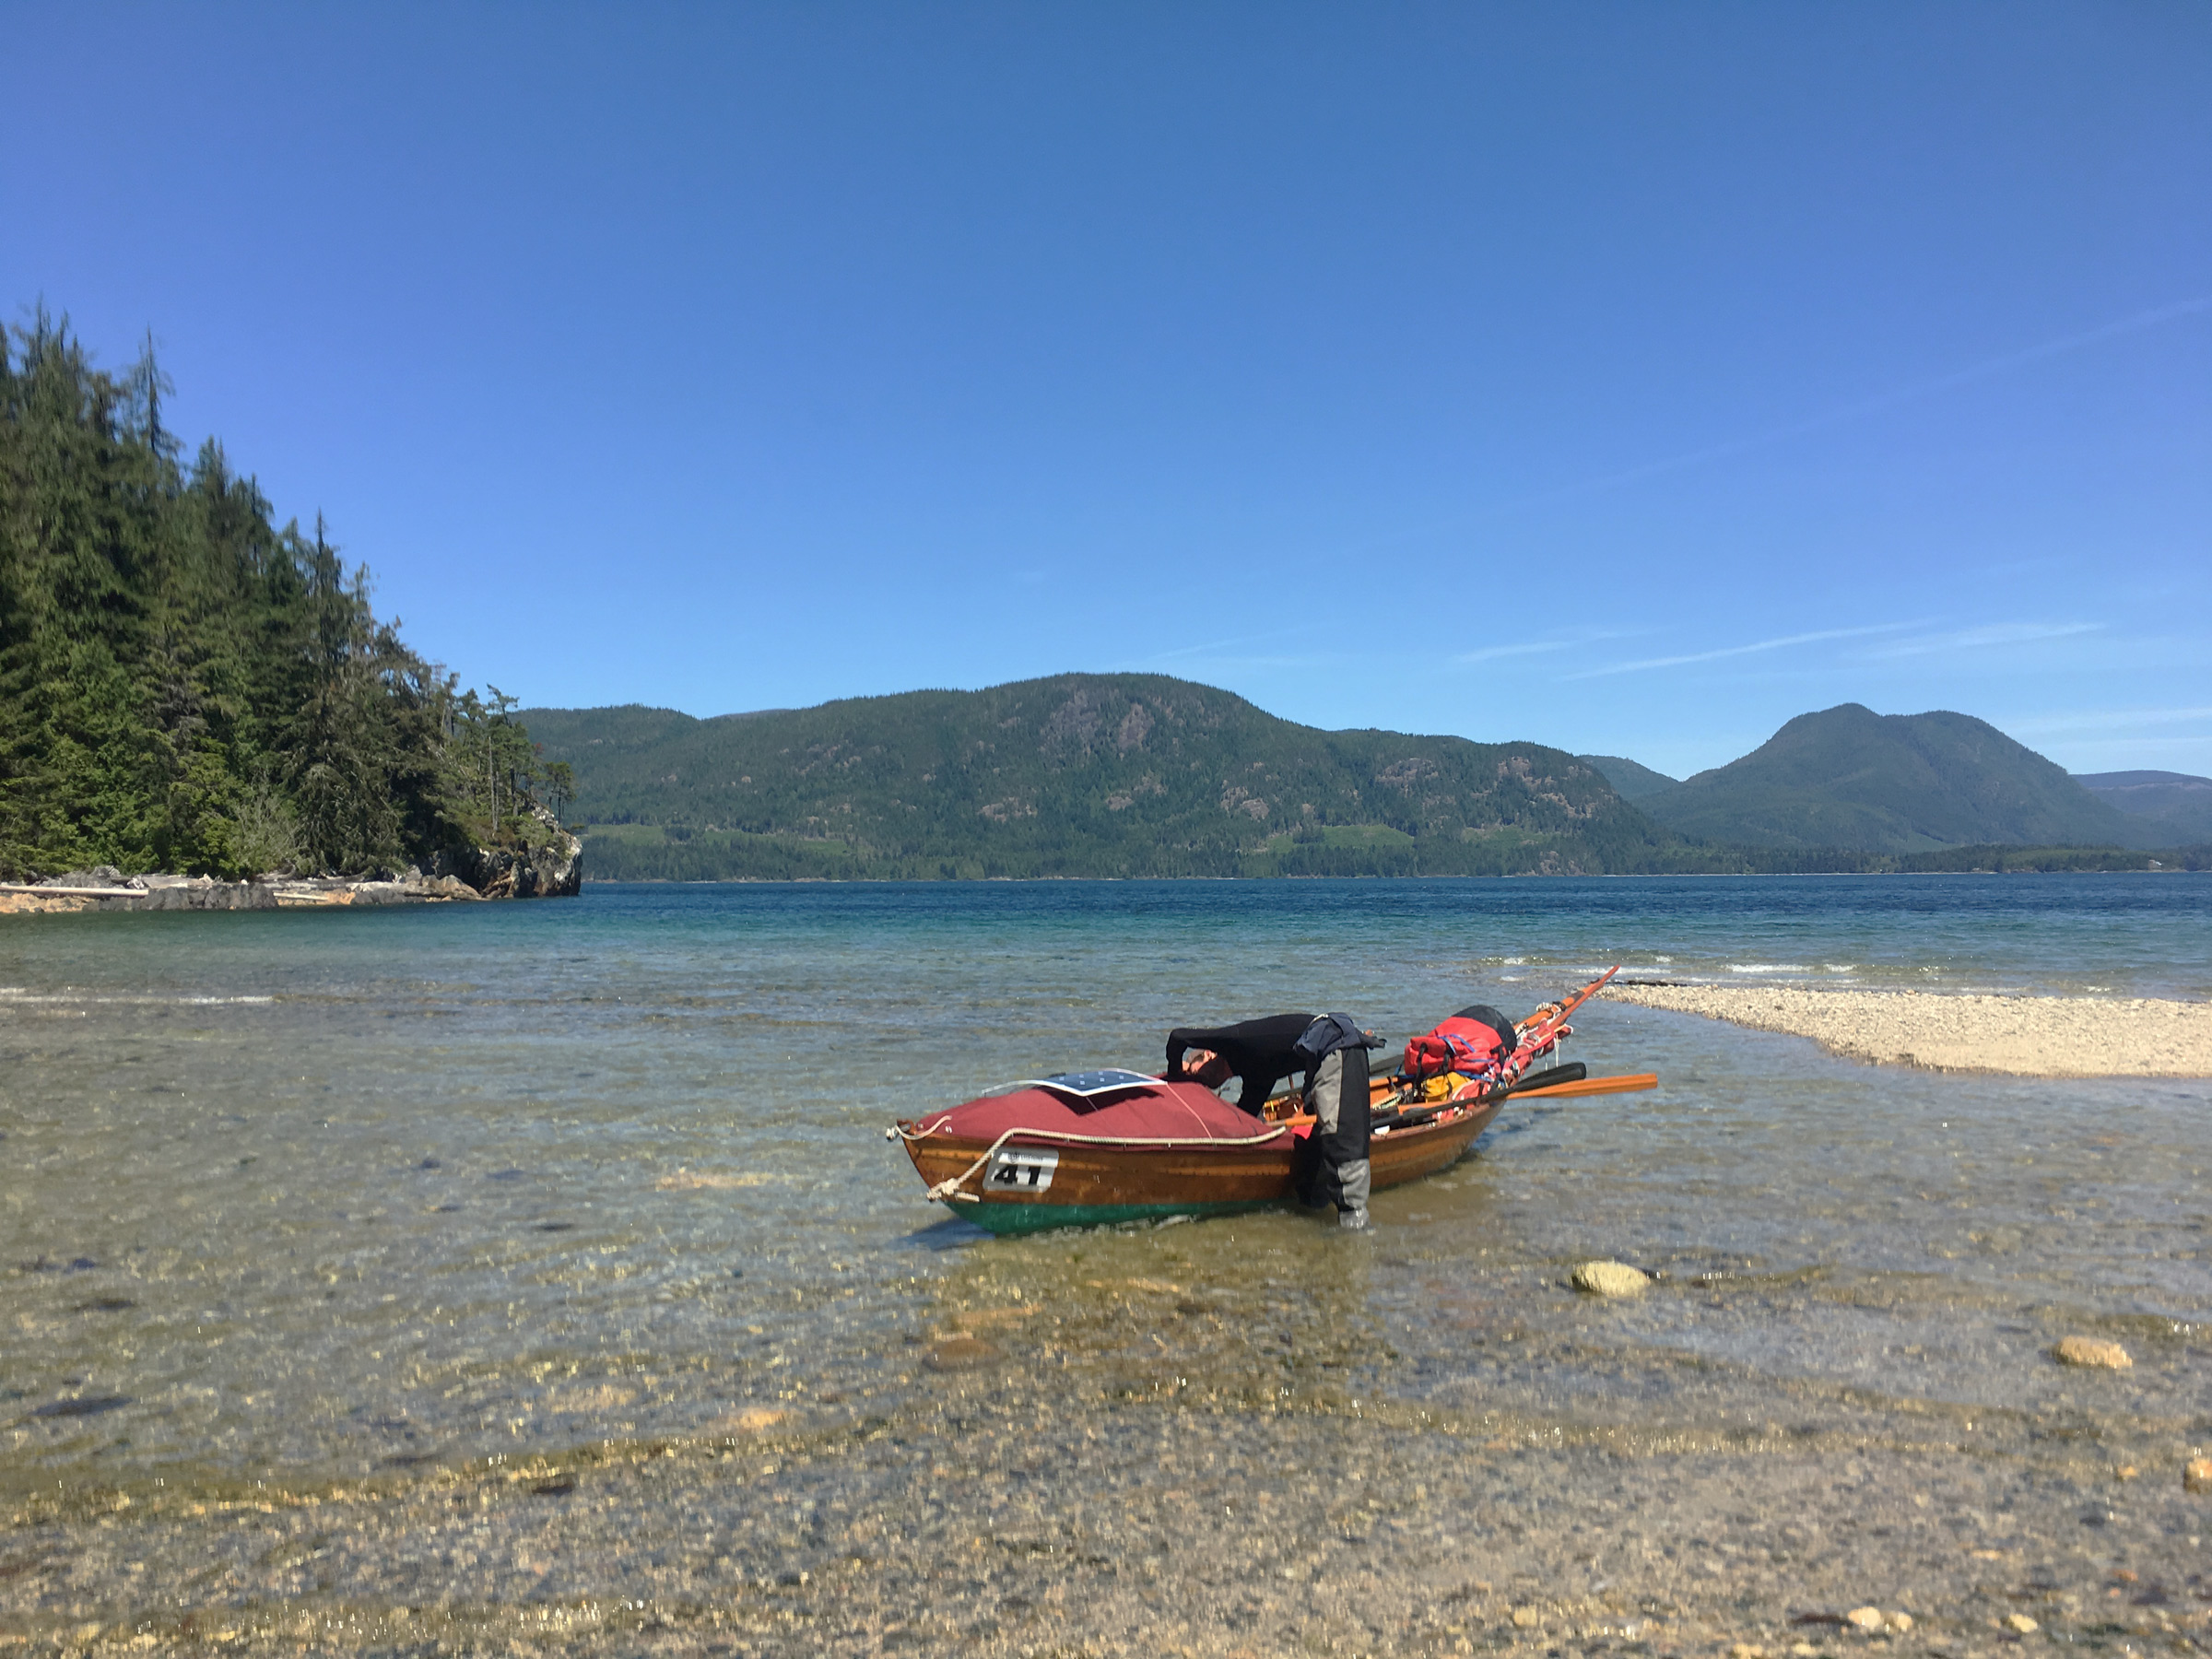
One of the greatest advantages of our 16′ boat was the possibility to pull her up on land. Whether that was for boat work, avoiding a questionable anchorage, or just to stretch and feel solid ground, I grew to greatly appreciate the dory’s versatility. It almost made up for its slow hull speed and inability to keep above some wave crests. Almost.
We were not able to row for long. I had dislocated my elbow ten weeks before the race, and Thor had dislocated his shoulder just six weeks before. The wind picked up swiftly and my elbow burned with the effort of pulling the oars to plow LOOK FAR through the chop. Exhausted and in pain, we once again retreated to land, this time through crashing surf to a pebble beach not a quarter mile beyond the previous stop. We hopped into neck-high water and manhandled the dory up onto the beach. We raised the sail rig again and launched back into the waves. After hauling the boat out past the break line, we counterbalanced each other and crawled aboard simultaneously.
I raised the main as Thor went to drop the centerboard; it refused to move. We pushed our fingers and various objects into the hole atop the case to push the board down, but it would not budge. In our haste to pull the boat above the surf, it seemed pebbles had lodged inside the case, firmly jamming the board in place. Defeated, we returned to the pebble beach. It seemed that our months of working on LOOK FAR had produced a boat scarcely capable of a 7-mile journey. We pulled her up as high as we could on the narrow beach, our optimism in the boat seeping out of it as quickly as the water had leaked in.
We took stock of our situation and decided we could not continue in our present state. It was already late afternoon and we had serious problems. We had intended to make it to Dungeness Spit, 10 miles to the west, but this was clearly out of the question. Just 2 miles away, the siren of Protection Island glimmered in the white gold of a bright afternoon sun. While the rest of the race fleet was likely within striking distance of Victoria, we were stuck looking at Protection Island. If we were going to attempt a crossing of the Strait of Juan de Fuca, we would have to wait until tomorrow.
Unable to sail, we set to work repairing things. Thor and I pulled everything out of the boat, removed the top of the centerboard case, and rolled the boat on its side. We used long pieces of driftwood and bits of line to pry the pebbles out of the case one by one. We reassembled the centerboard case, pushed seam compound into the larger cracks to slow the leaking, and set the boat high on the beach for the night. Tasks finished, we rewarded ourselves with a hearty mac-n-cheese dinner and lingered in the beauty of a tangerine sunset. The stars were soon above us and we huddled between driftwood logs in our bivy bags. Gale-force winds howled around us on the exposed beach and surf crashed just a few yards away.
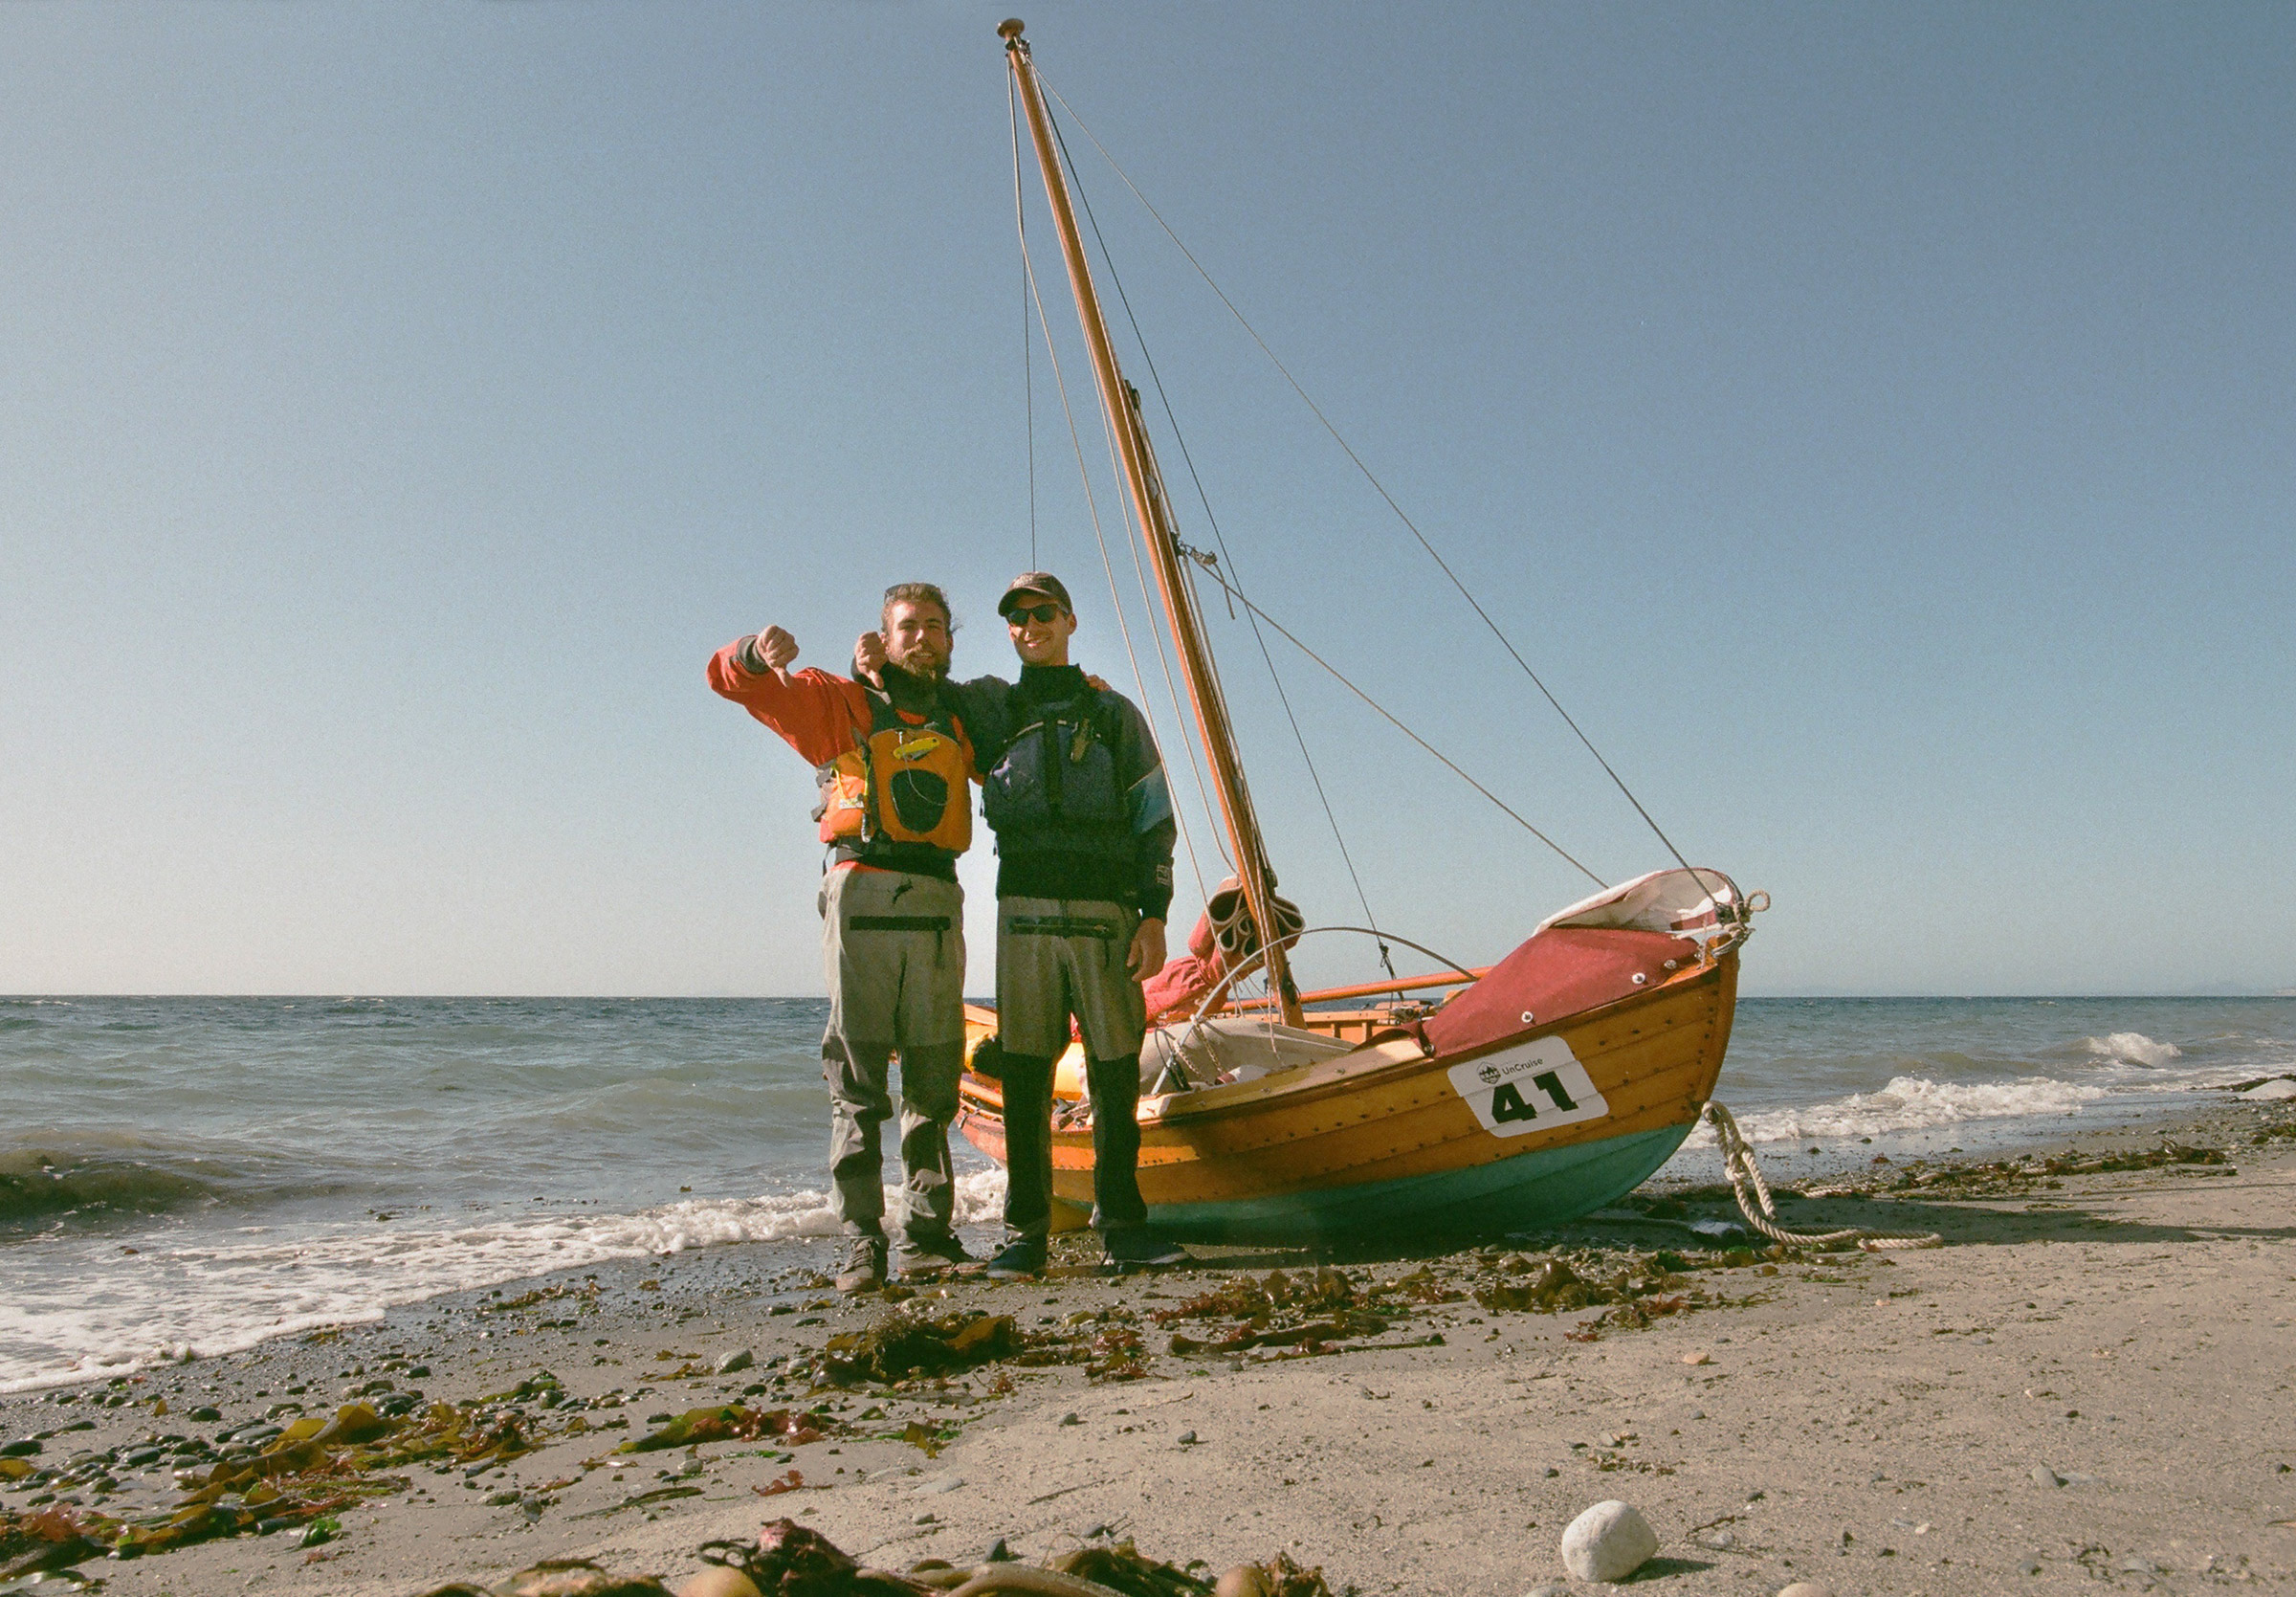
Our first day in, things didn’t exactly go to plan. Someone once told me: “When everything goes wrong, all you really can control is your attitude and how you handle it.” So here we are taking a selfie and making the most out of our leaking failure of a first day. A selfie for the moms, thumbs down for the boat.
We were up at 4 a.m. the following morning. Thor set to work with pliers, a beach pebble, and a butane lighter to wire the bilge pump into the battery box. I prepared coffee and oatmeal for a quick breakfast, and we launched at first light.
Conditions were ideal to start, and our little boat surged quickly out into the Strait of Juan de Fuca for the 25-nautical-mile crossing to Victoria. Our work on the leaking cracks had greatly diminished the flow of water into the boat, and we watched as Protection Island shrank rapidly behind us. We sailed northwest for Vancouver Island as a westerly wind ripped across a powerful spring tide approaching maximum ebb. An hour offshore, lines of whitecapped tidal races pulsed with the pull of the ebb. Spray blew over the dory’s dodger and into our faces. I clipped the race-tracker beacon to my life jacket and Thor clipped an EPIRB to his, our sober acknowledgement of the gravity of the conditions.
Cresting waves were coming at us from several directions, each one capable of swamping us if hit at the wrong angle. The electric bilge pump was working, but it couldn’t keep pace with the water sloshing over the gunwales. I began to bail and kept at it non-stop, easily filling the milk jug with each plunge into the bilge. We treated each wave as a unique obstacle, shifting our weight and easing and tightening sheets. We ran this gauntlet for hours, so singularly concentrated on survival that we were in disbelief when the buildings of Victoria came into view. Slack tide provided us the brief opportunity to drink some water, eat a protein bar, and pee, activities which were not possible during the six-hour crossing.
A mere 1/4 mile from Victoria Harbor, conditions deteriorated in the span of just a few minutes. Winds gusted to 30 knots, and Thor and I hiked out as far as we were able to, cursing our failure to reef. We passed the first channel marker and found ourselves in the path of an outbound ferry, COHO. We tried to tack out of the way, but the jibsheet snagged on a cleat on the mast mid-tack, pitching us sideways. One wave was all it took –water rushed over the side and in seconds we were under. Still sitting in the boat but in chest-high water, my hands shaking, I grabbed the few loose items that were about to float away. Thor shouted at me to hold on to the sheets.
Astonishingly, as the sinking dory stabilized with the gunwales several inches below the waterline, our mast, boom, and sails remained proud above the water and continued to propel us forward. I looked to Thor in bewilderment as we held on for dear life, the heavy air pulling us out of the path of the COHO and across the harbor entrance into the cruise-ship terminal.
Once inside the sheltered waters of the terminal, we dropped the sails and I hopped into the water, swimming and hauling the boat by the painter over to the 6’-diameter rubber bumpers along the wall. Climbing out onto an algae-coated bumper, I used an oar and my foot to stave off the dory from smacking into the bumper as Thor used our 5-gallon two-handled emergency bathroom bucket to bail. With my weight out of the boat, Thor made good progress. Unfortunately, the bumper was not a friendly place for the dory in the yet choppy waters, and we elected to try anchoring in the terminal instead. Beneath an ironic “Welcome to Victoria” sign, our anchor held and we were able to finish self-rescuing. It took us a good 30 minutes to restore our boat to our standard several gallons of water in the bilge.
With adrenaline wearing off, we stowed the sails, set up the aft rowing station, and proceeded the final nautical mile through the harbor. Our survival was now guaranteed, and the realization sank in that we might actually make the 5 p.m. cutoff; the dock bearing the bell marking the end of Stage 1 of the R2AK came into view with 15 minutes of the allowed time left. Pulling into the dock, we were welcomed with two cans of warm beer and hearty congratulations. Hungry, exhausted, and relieved, Thor and I walked over to the bell, and cracked the beers. Although the skipper conventionally takes the honors, Thor did not stick to tradition. We cheered and rang the bell together to mark our arrival.
The city of Victoria was kind to us. Our fear that our battery and electrical system had been ruined during the swamping proved unfounded and the Canadian Coast Guard returned our dry bag of safety gear which had been found floating in the harbor. During our rest day, friends from Team Sail Like a Girl helped us get supplies to modify our snotter and reefing system and install a boom vang. With our gear and projects strewn across the dock, racers, race fans, journalists, and the general public stopped by to pepper us with questions and show support. Most seemed as surprised as we were that we had made it across in time.
Our work took us late into the evening and ultimately just the two of us remained on the docks. Katherine, a journalist covering the race, generously offered us the use of the pullout couch in her hotel room. Happy to have one final night of comfortable sleep, we walked the deserted streets of Victoria to her hotel at 1 a.m., our way illuminated by thousands of city lights. Once in bed at the hotel, I savored the crisp sheets and soft pillow, trying to burn the sensation into my memory to recall in the days to come.
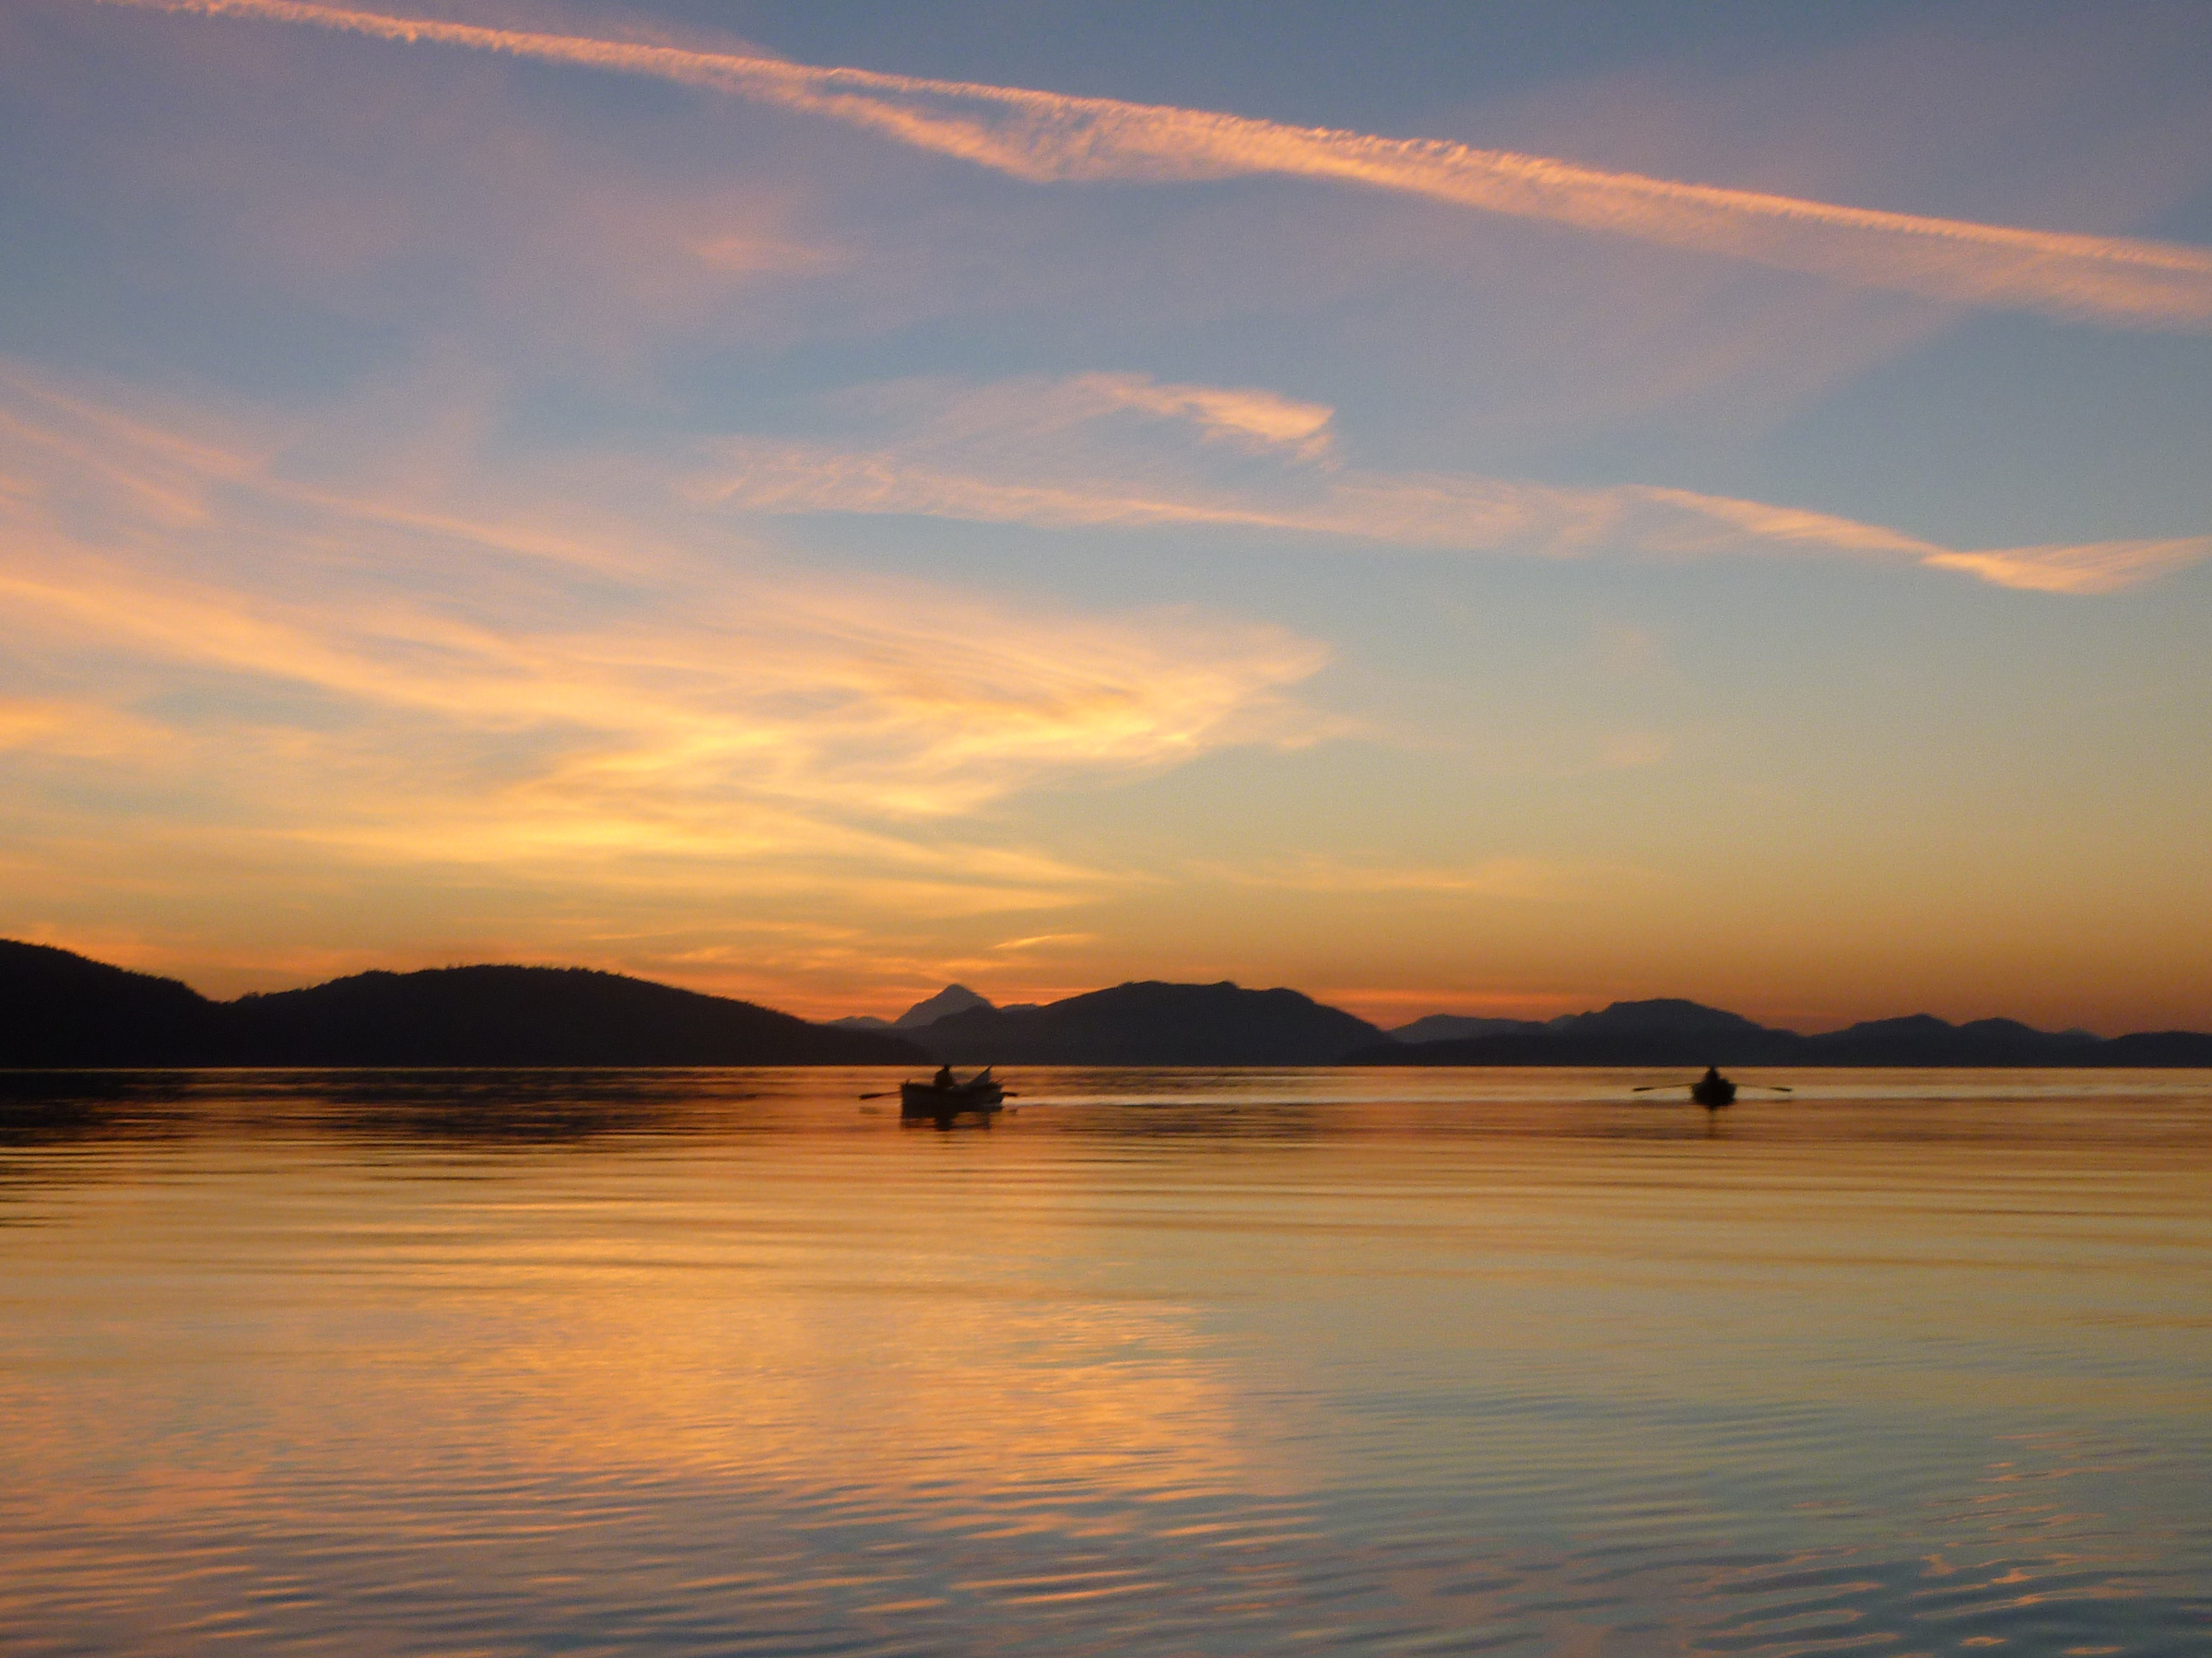
At noon the next day, Thor and I stood sweating in our dry suits as the bell went off signaling the Le Mans start of the roughly 700-mile-long second leg of the race to Alaska. We were going to be slower on the water than almost all of the other teams, and there was no sense in fighting it, so we walked rather than ran to our boat. As underdogs, racing for a participation award seemed as much as LOOK FAR and our injured bodies could expect. Once outside of the harbor, the rough waters to the south that we had battled over the two previous days were now flat as a pancake all the way back to the Olympic Peninsula, where the sun was reflecting off the snowy peaks.
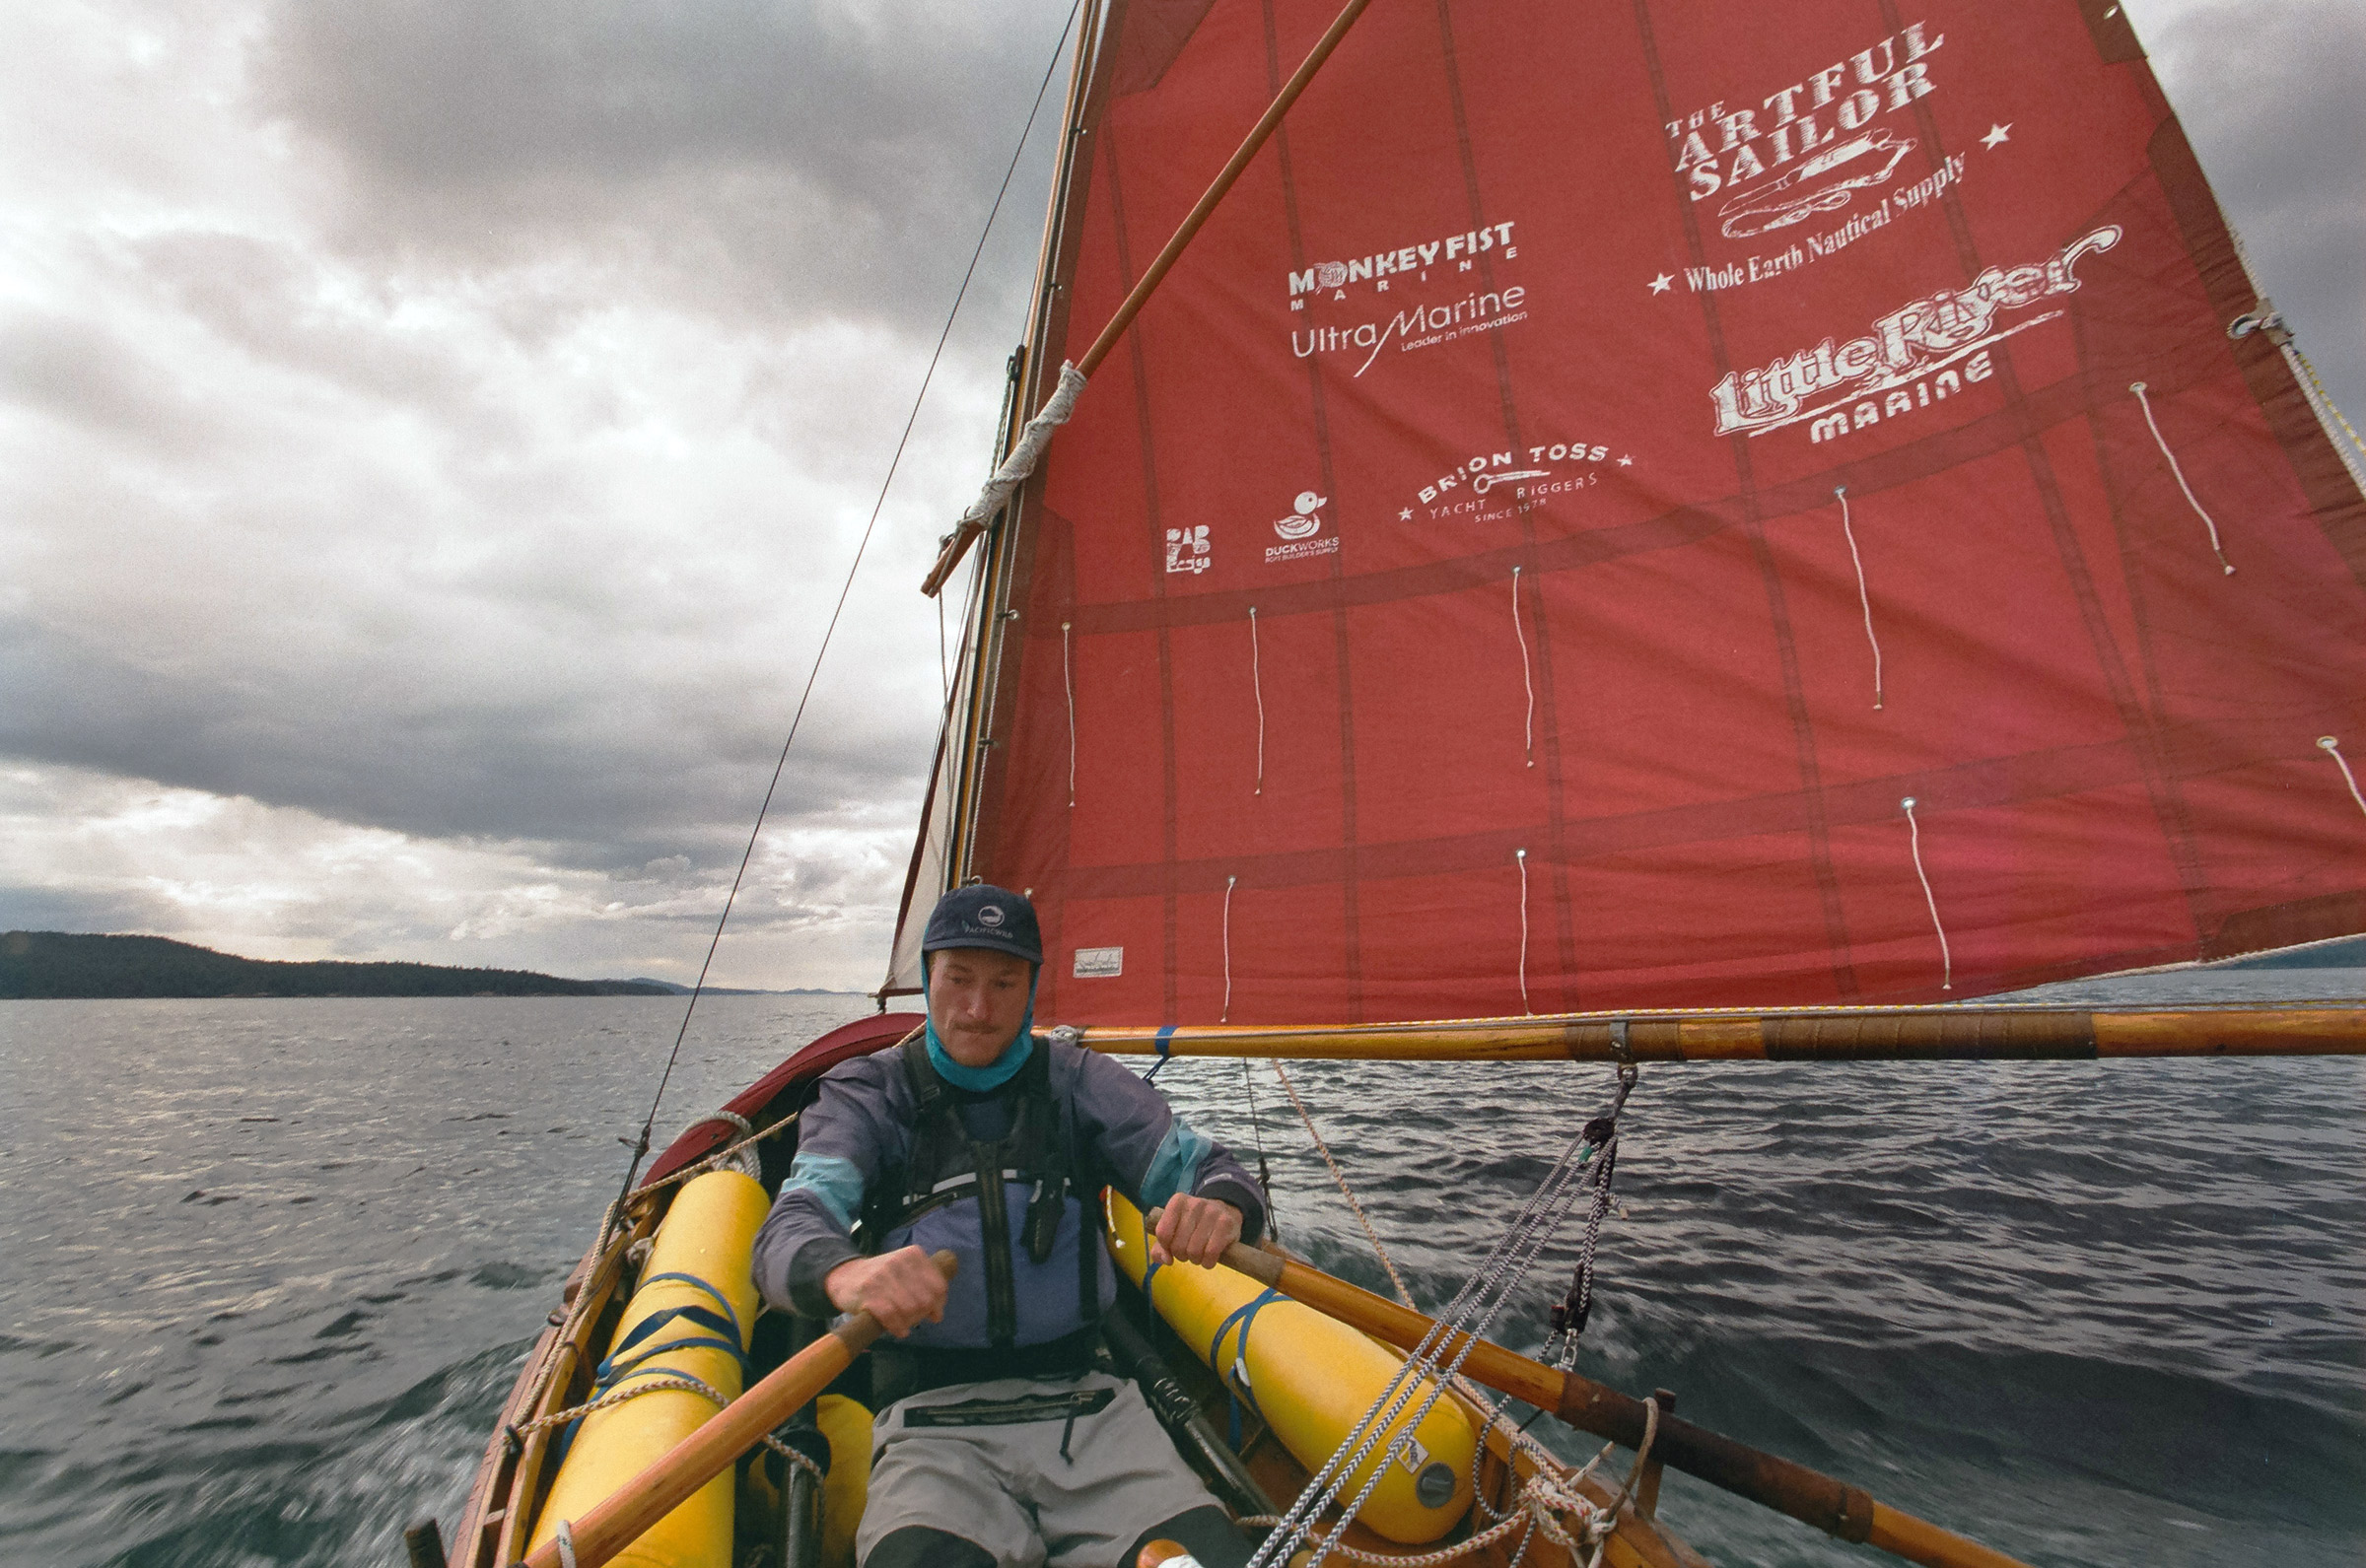
Pictured here is LOOK FAR’s version of motorsailing and our sail displaying the many lovely people and businesses who supported us and made the journey possible. We received incredible community support and would not have been able to even get on the water without the help of others. The R2AK pulls together an extraordinary community of individuals who are passionate about the environment and the spirit of adventure.
We commenced “motorsailing.” Thor held the boom away from my head while I rowed. I did a one-hour stint and then we switched. We only made 2 or 3 knots with this technique, but dropping the sailing rig seemed risky given the cumulus clouds to the south. Two hours later, we were sailing downwind at 5 knots along the Strait of Georgia under clouded skies. I happily watched the last islands of familiar land fall away behind us.
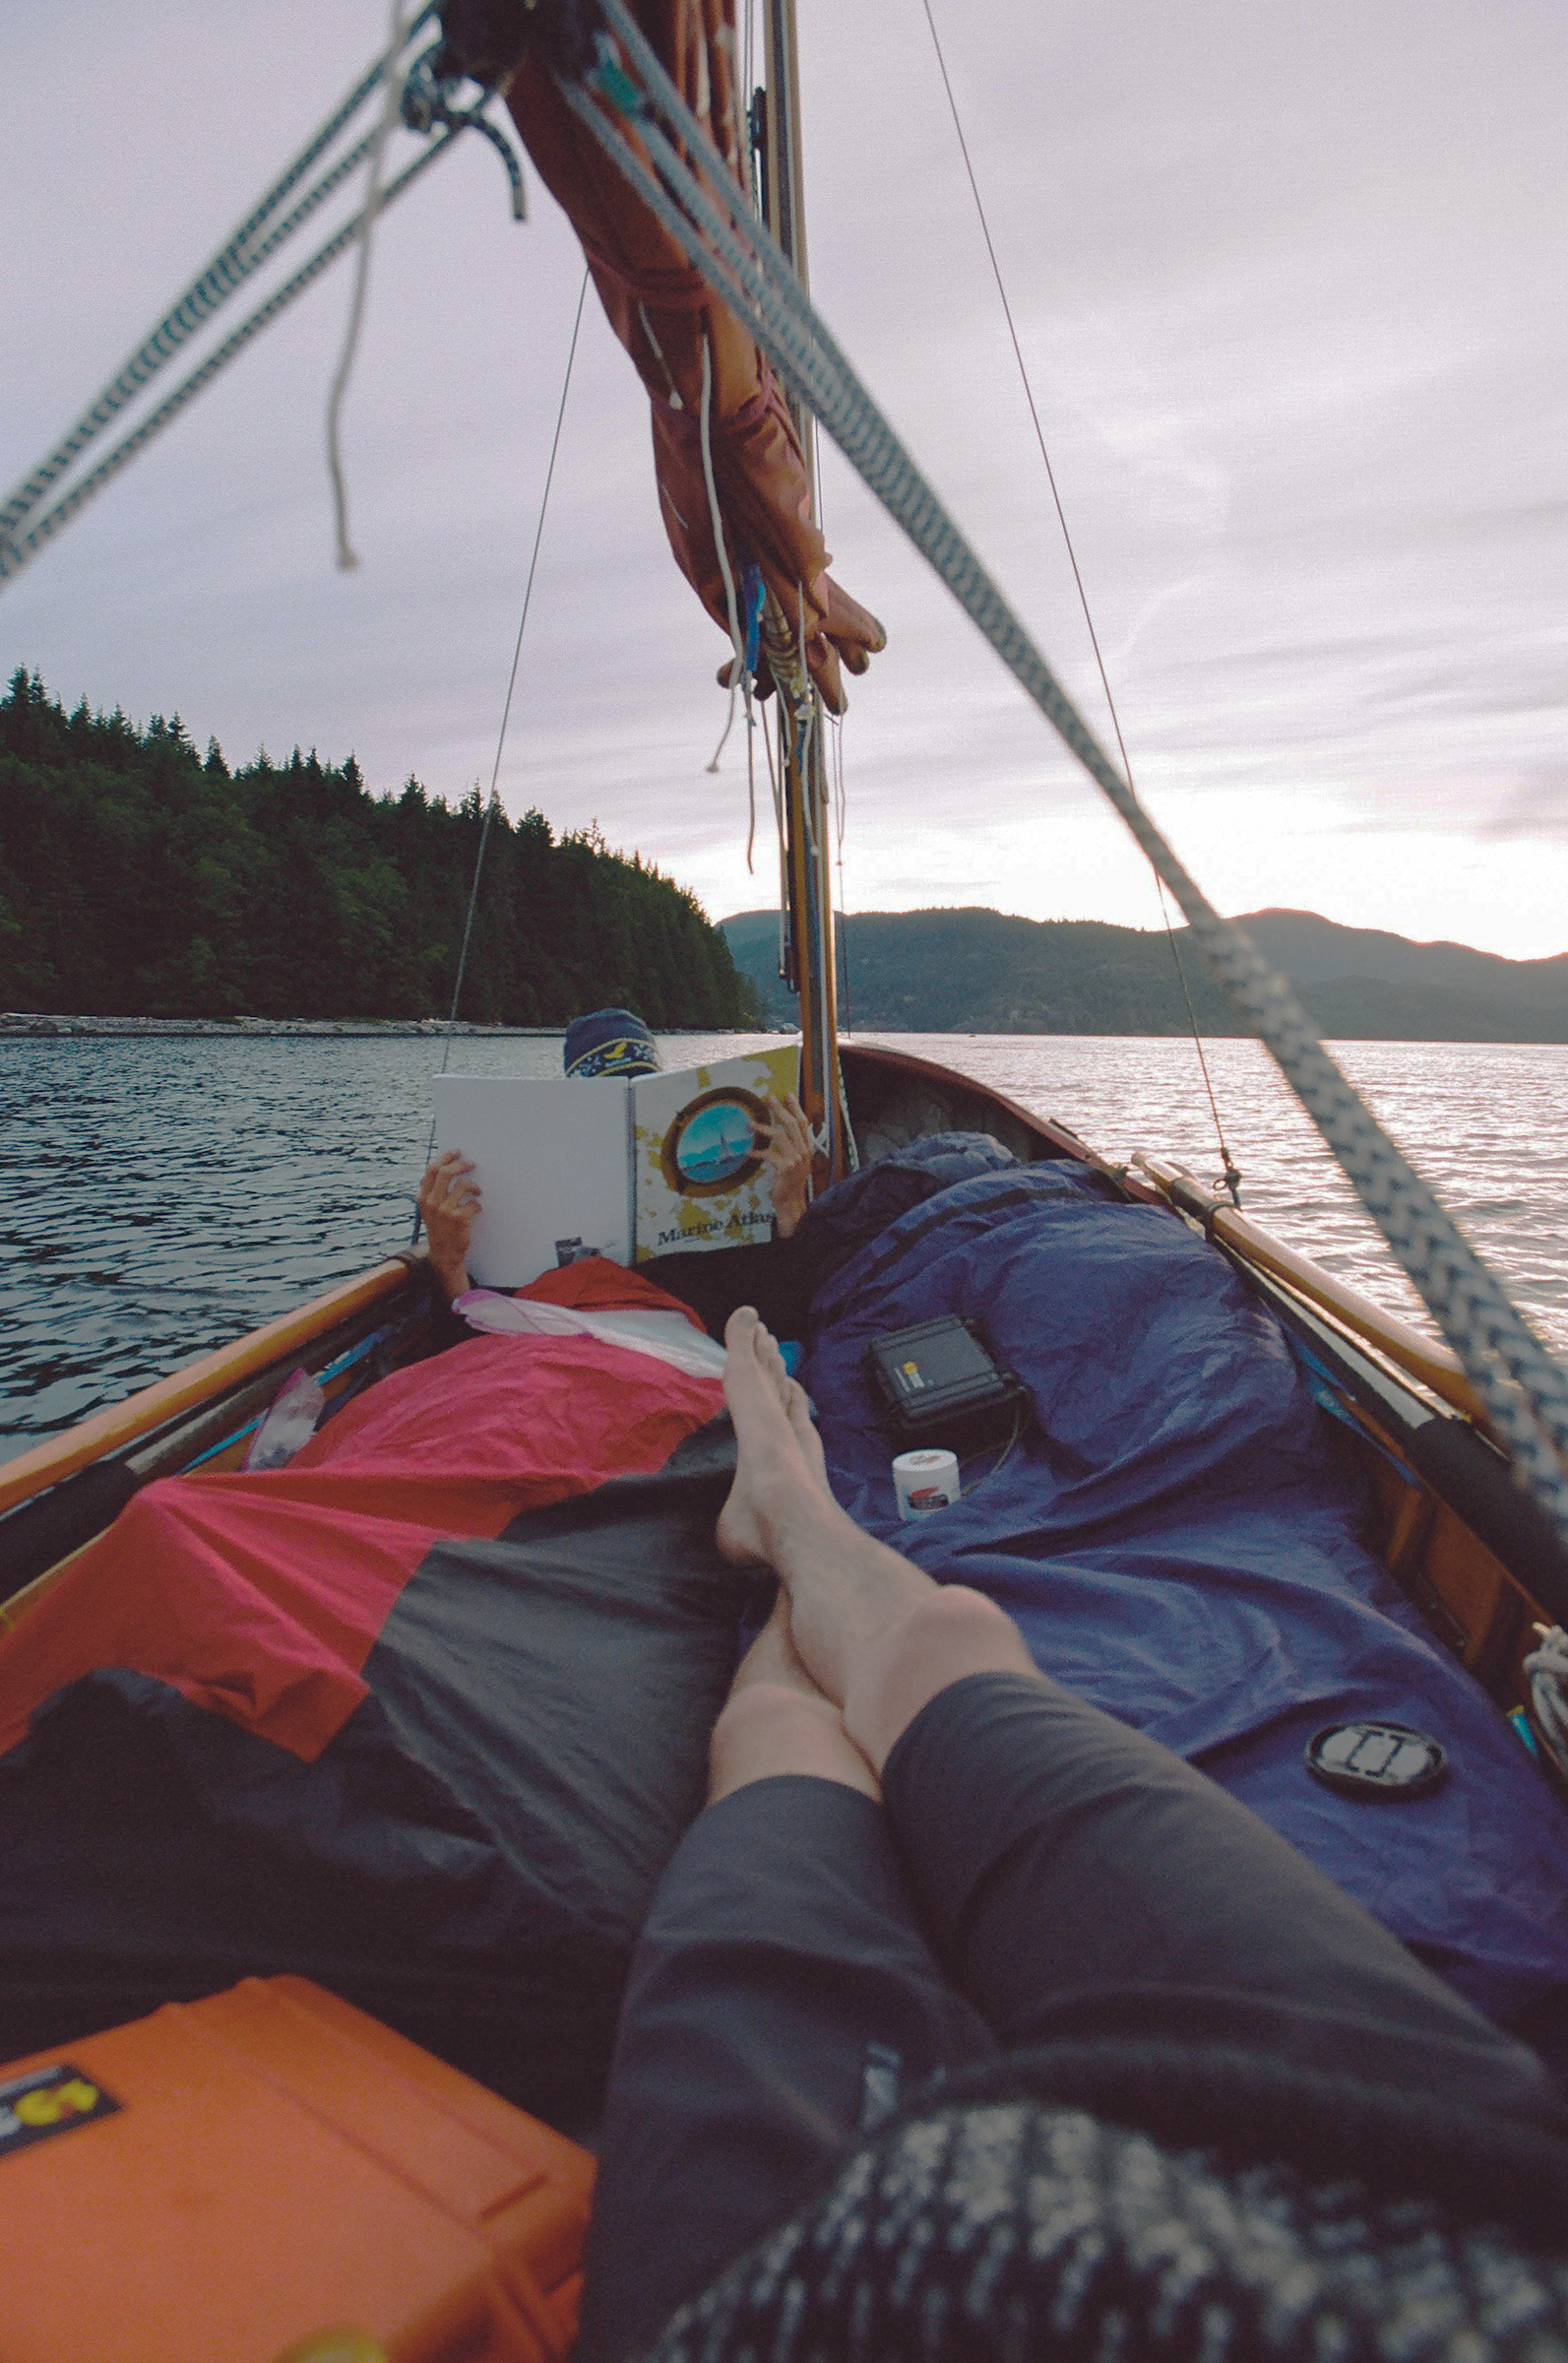
That night, we tucked into a small bay off Prevost Island, a more than hospitable place to spend our first night sleeping aboard. We stacked dry bags on the floorboards, followed by sleeping pads and bivy bags stuffed with mummy bags—there was just enough room for two. Exhaustion and the calm waters lapping lightly against the hull pushed out any misgivings I’d had about sleeping in a boat with only 6” of freeboard.
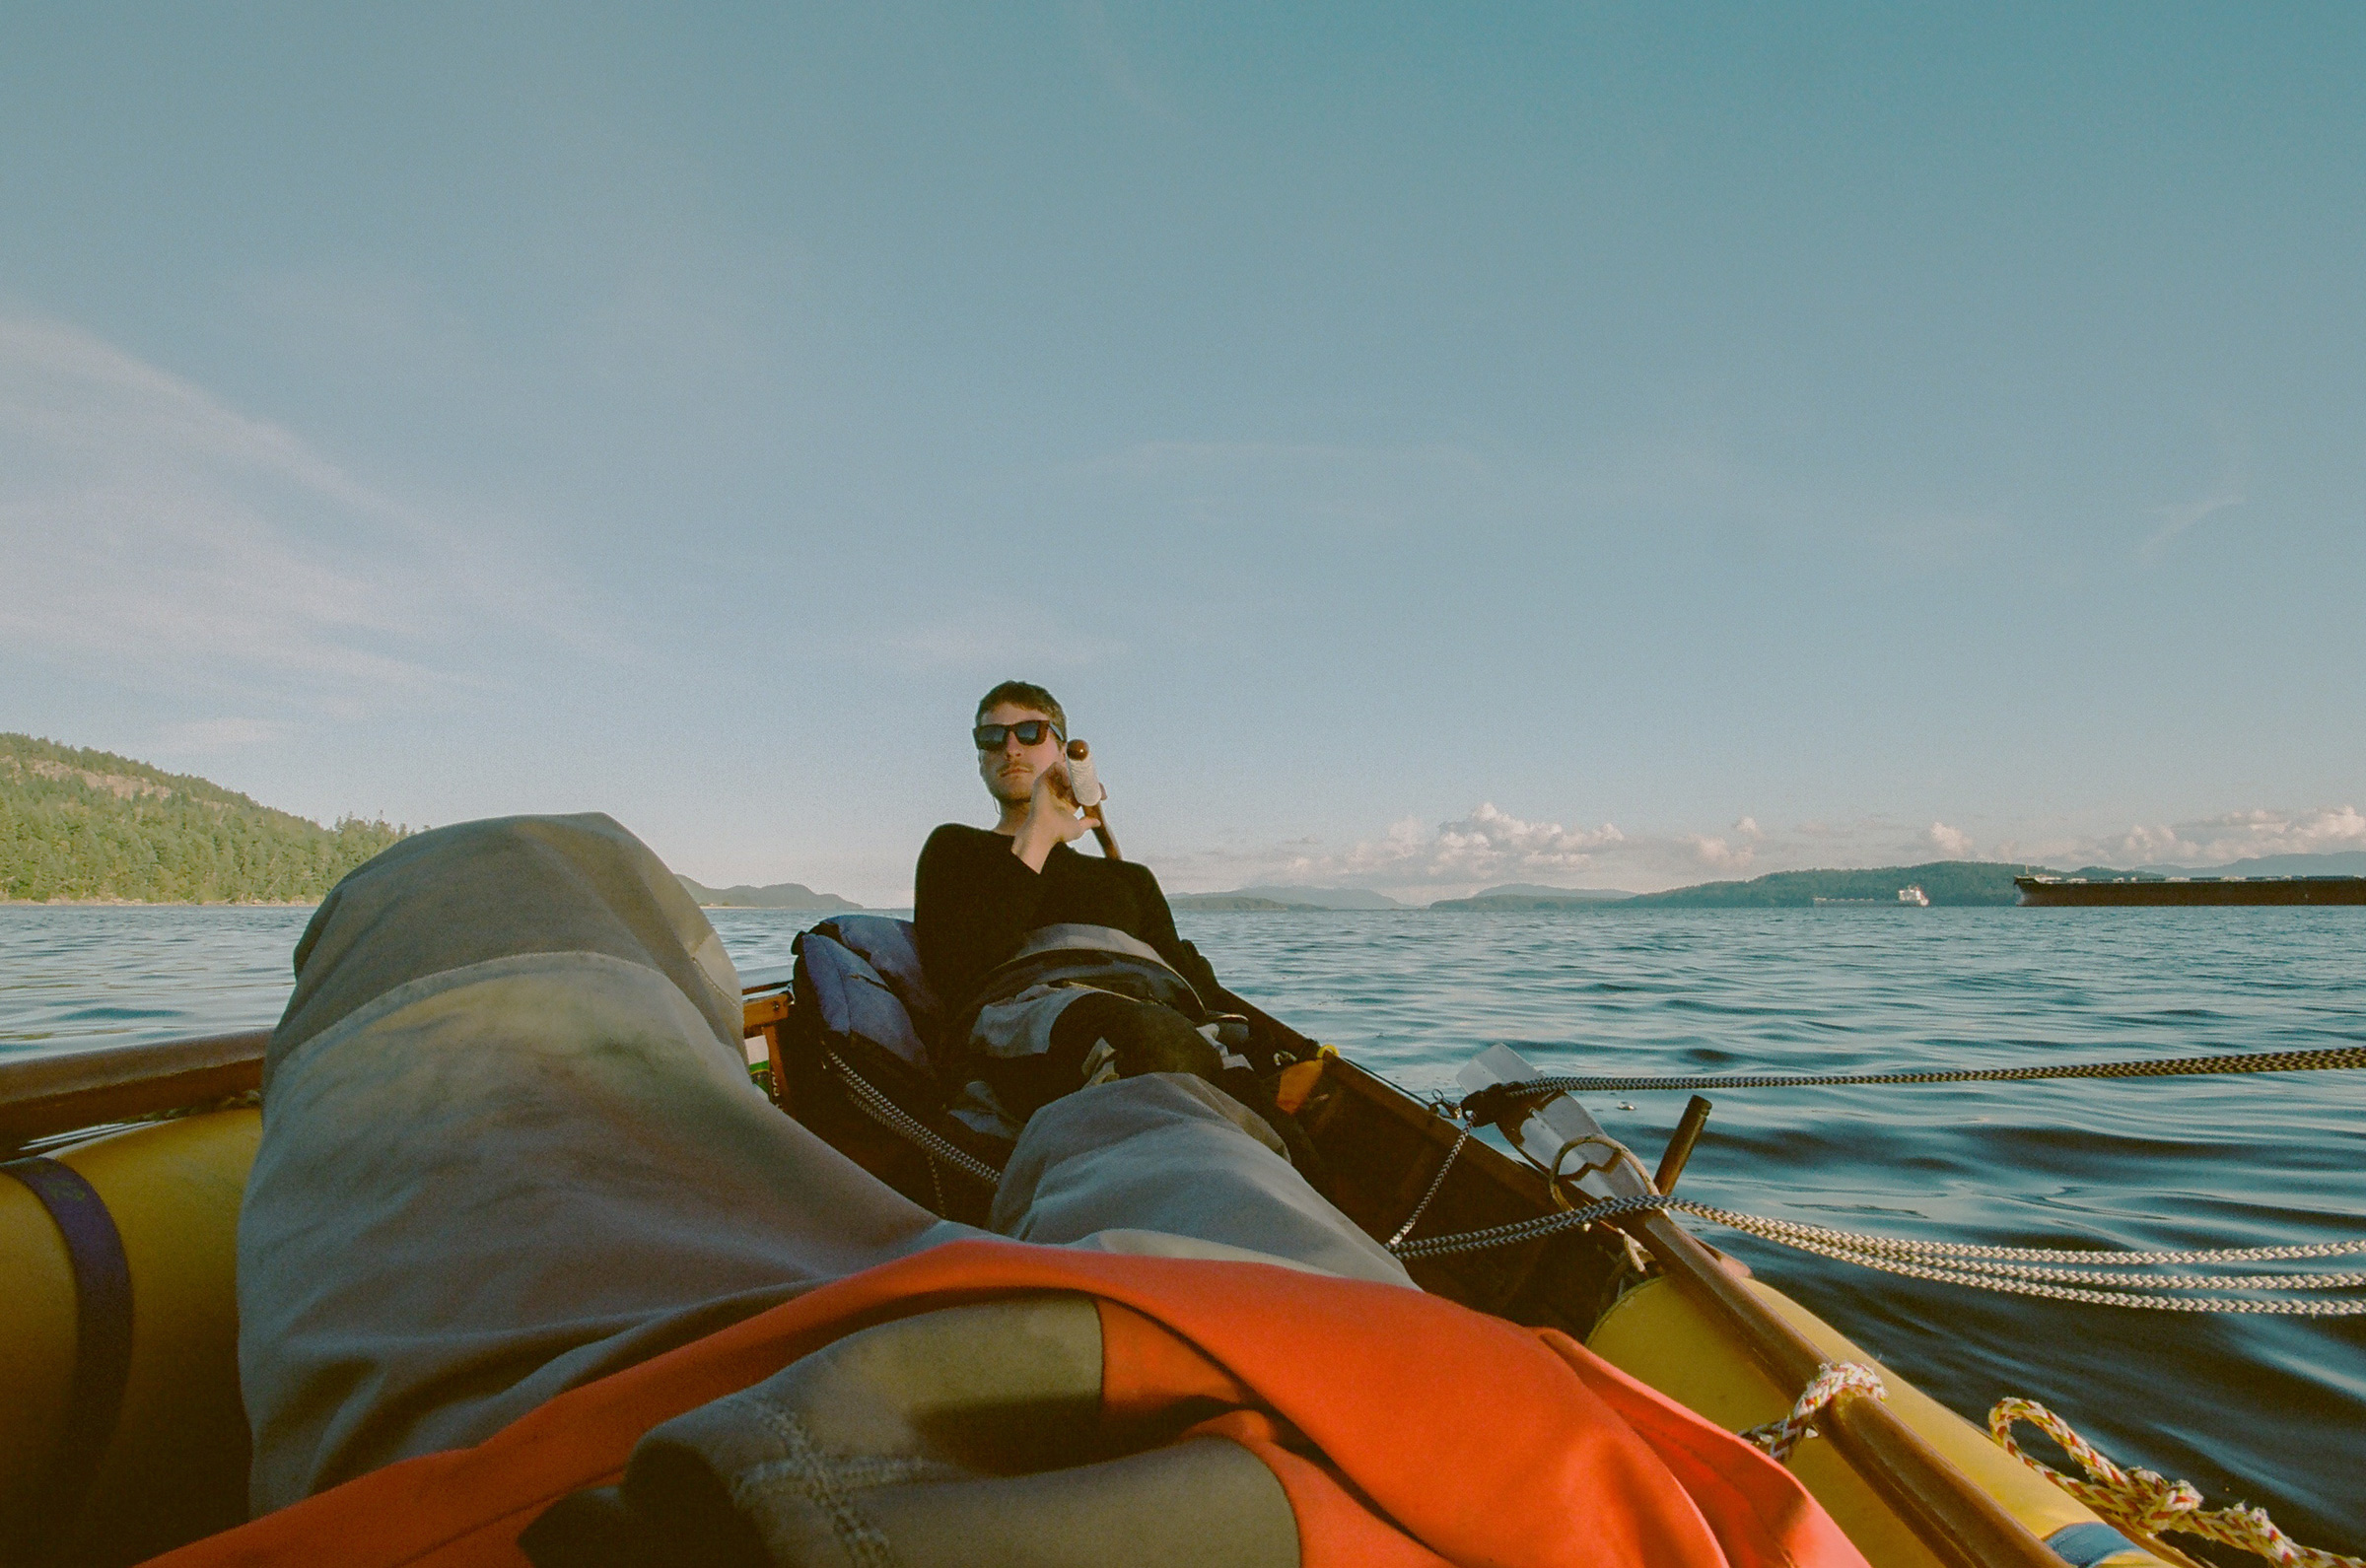
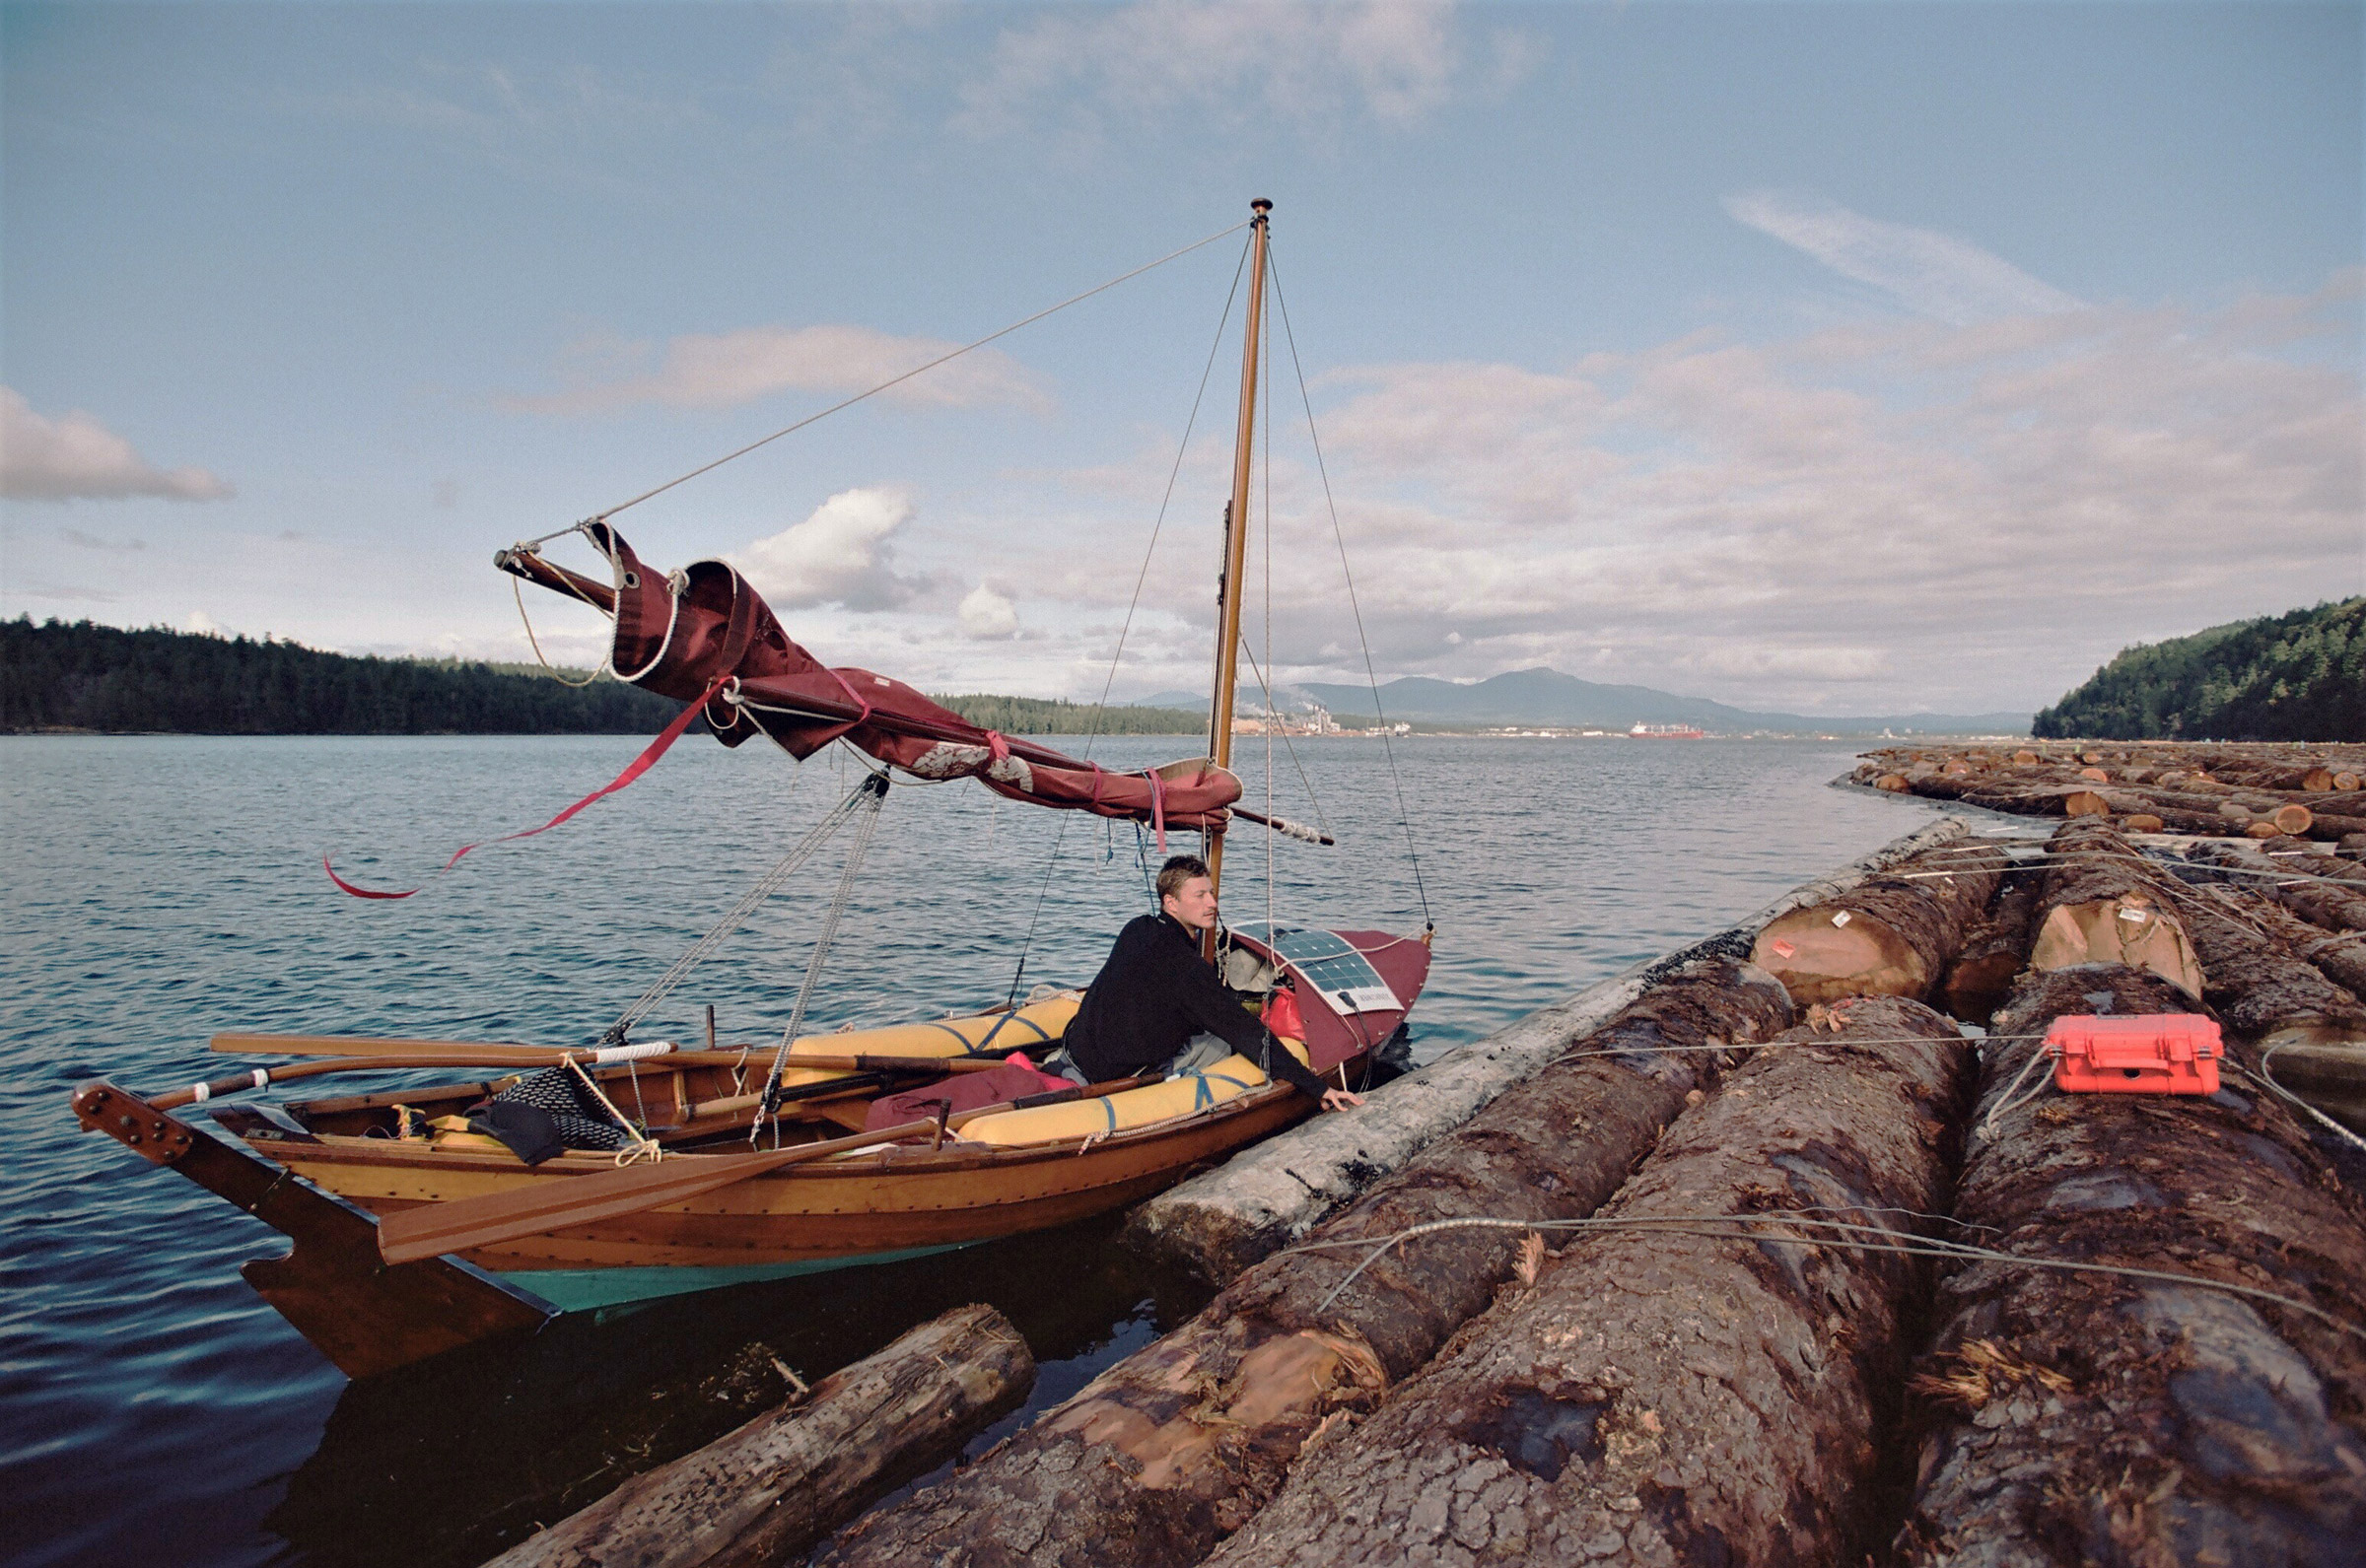
Pushed gently along by a southerly up the south side of Galiano Island, we passed beneath the bows of tankers on anchor in Nanaimo (at right on the horizon). While in their presence we debated the trade-offs of globalization and the conflict of industry and nature. Confronted by the beauty of the Inside Passage, it’s difficult to feel moved to take the side of industry, and we were eager to put distance between us and the larger vessels.
As we rowed north toward Nanaimo, industry pressed in along the shore where I had expected we’d find wilderness. Towering above our dory, oil tankers at anchor were steel giants intruding on the soft-edged beauty of the Gulf Islands. Log booms lined the shoreline for miles and houses occupied the remaining waterfront.
Squeezing in among the fishing boats of Port Nanaimo, we left LOOK FAR to restock on provisions. Stripping off our dry suits was liberating, and in the hot sun we indulged in a pint of Häagen Dazs each before resuming our slog north. It’s the small rewards that keep you focused in an endurance race, and few things are more motivating to Thor and me than a pint of ice cream.
Our search for wilderness continued. When we pushed through the seething boils of a dying flood tide in Seymour Narrows and settled into the glacial views from Plumper Bay, it seemed we had finally found it. Eagles swooped down to catch fish in the dying twilight, and we began arranging the boat for an evening on anchor. Out in Discovery Passage, seven cruise ships invaded our quiet wilderness with blasts of their horns and large clouds of smoke, parading through the narrow tidal gate at Seymour, one right after the other. Left in a cloud of diesel exhaust, the dying light refracted gold through the remaining haze and I couldn’t help but feel ashamed by what civilization has done to these waters.
Sleeping in the dory at anchor was surprisingly comfortable, but most certainly an exercise in trust. I could drop a hand over the edge and touch the water without putting my wrist below the gunwales. Combine that with wave action and being zipped into a mummy bag that’s stuffed inside a bivy sack, and stress dreams inevitably disturbed my slumber. Thor, on the other hand, appeared unfazed and snored his way through most nights on anchor.
In Discovery Passage, the morning flood tide ripped through the mile-wide channel, forcing us to row into the back eddies with our oar blades a mere 1’ away from the barnacle-encrusted granite cliffs. We craned our heads over our shoulders, keeping watch for lurking boulders in the dark water. Sea lions and a solitary minke whale passed us on our way, and the sun kept us warm and smiling despite slow progress north up the passage to Johnstone Strait.
As we rounded the corner into the strait and began to head west, the afternoon turn of the tide arrived with a series of strong gusts of wind. Thor was taking a light snooze and I shook him awake to the rapid change in conditions.
“Dry suits on,” I said. “Something is about to go down out here.”
Within five minutes, what had been a glassy-smooth sea was seething in whitecaps. With no time to reef and the wind too strong to pause, we were vulnerable. We rode a single tack north across Johnstone to the only sheltered beach in sight. By the time we reached the lee of the headland protecting the beach, the water inside the boat was just two planks below the gunwale.
We landed and while I emptied out water and lashed our supplies in, Thor put a double reef in the main. We were determined to make miles and headed back out. Rounding back into Johnstone, the full force of the wind heeled us over immediately and we resumed bailing steadily. The current had strengthened, forming messy patches of standing waves and large whirlpools. Driftwood logs spun in place as the wakes of freighters headed south ricocheted off each other.
Johnstone Strait is full of tiny, secluded, charming coves. In many spots, the sandy bottoms and good sunlight can almost fool you into thinking you’re in the Caribbean. Until you stick your hand in the water. Ocean temperature aside, these bays made excellent spots for a quick snack and a moment to appreciate our progress through the ever-changing landscape. We were moving just slow enough to observe the subtle changes in geology, wildlife, and climate as we headed north.
Occupied more by bailing than by sailing, we decided to make for the only sign of safety, an unnervingly short little fingernail of a beach. With no other option, we were forced to gamble that the high tide wouldn’t flood the beach we’d have to land on. We unloaded all of our gear and pulled the boat up as high as possible, the bow nosed into the forest and tied off. We pitched our bivies on the forest floor. There were piles of bear scat not 20′ away. Spooned around our only can of bear mace, I slept fitfully.
After an adrenaline- pumping day in Queen Charlotte Strait and a wavy approach to the beach, we emptied LOOK FAR and pulled her high up onto the logs to spend the night. We were lucky to find a plentiful supply of dry wood and used my hammocking tarp to keep us dry and warm through most of the rainy night. In the dark, with rain pelting down on the tarp above, I wondered how many souls had spent a night on this unnamed beach in a cove with an entrance just wide enough for a boat our size.
When I awoke to the shadowy light of dawn, the trees were heaving in the wind, and Johnstone Strait remained too dangerous to sail or row. I was secretly happy for a guilt-free excuse to make some much-needed repairs during the day and enjoy a full night’s rest.
We left the beach at sunrise on the second day and made our way up the Strait with the sea state still on the edge of precarious. Around 10 in the morning, the winds again peaked and forced us to pull off at Sayward, a once vibrant logging town that’s now a sleepy settlement with only a few hundred residents.
At first glance, it appeared to be a ghost town. There were trucks and RVs parked next to the community pier, but not a soul was to be seen. The wind howling, it seemed eerily deserted. It felt good to stretch my legs and we headed toward the pier where we found a small gift shop which wouldn’t open until 11 a.m. Next door was a place marked “Al’s Room.” It was evidently designed for people like us, wayward souls with no shelter in need of a warm, quiet space. Its doors never locked and anyone was welcome to enjoy its microwave oven and selection of steamy romance novels. What luxury!
At 11, a bubbly woman stuck her head in the door. Sue, the gift-shop manager and mayor’s wife, informed us we were welcome to stay in Al’s Room for as long as we needed. After spending the day watching the water and hoping for a break in wind—which never came—she convinced us to join her family for dinner at her house. Sitting around the table, the luxury of a cold beer and a home-cooked meal made it easy to forget how slow a race we were running.
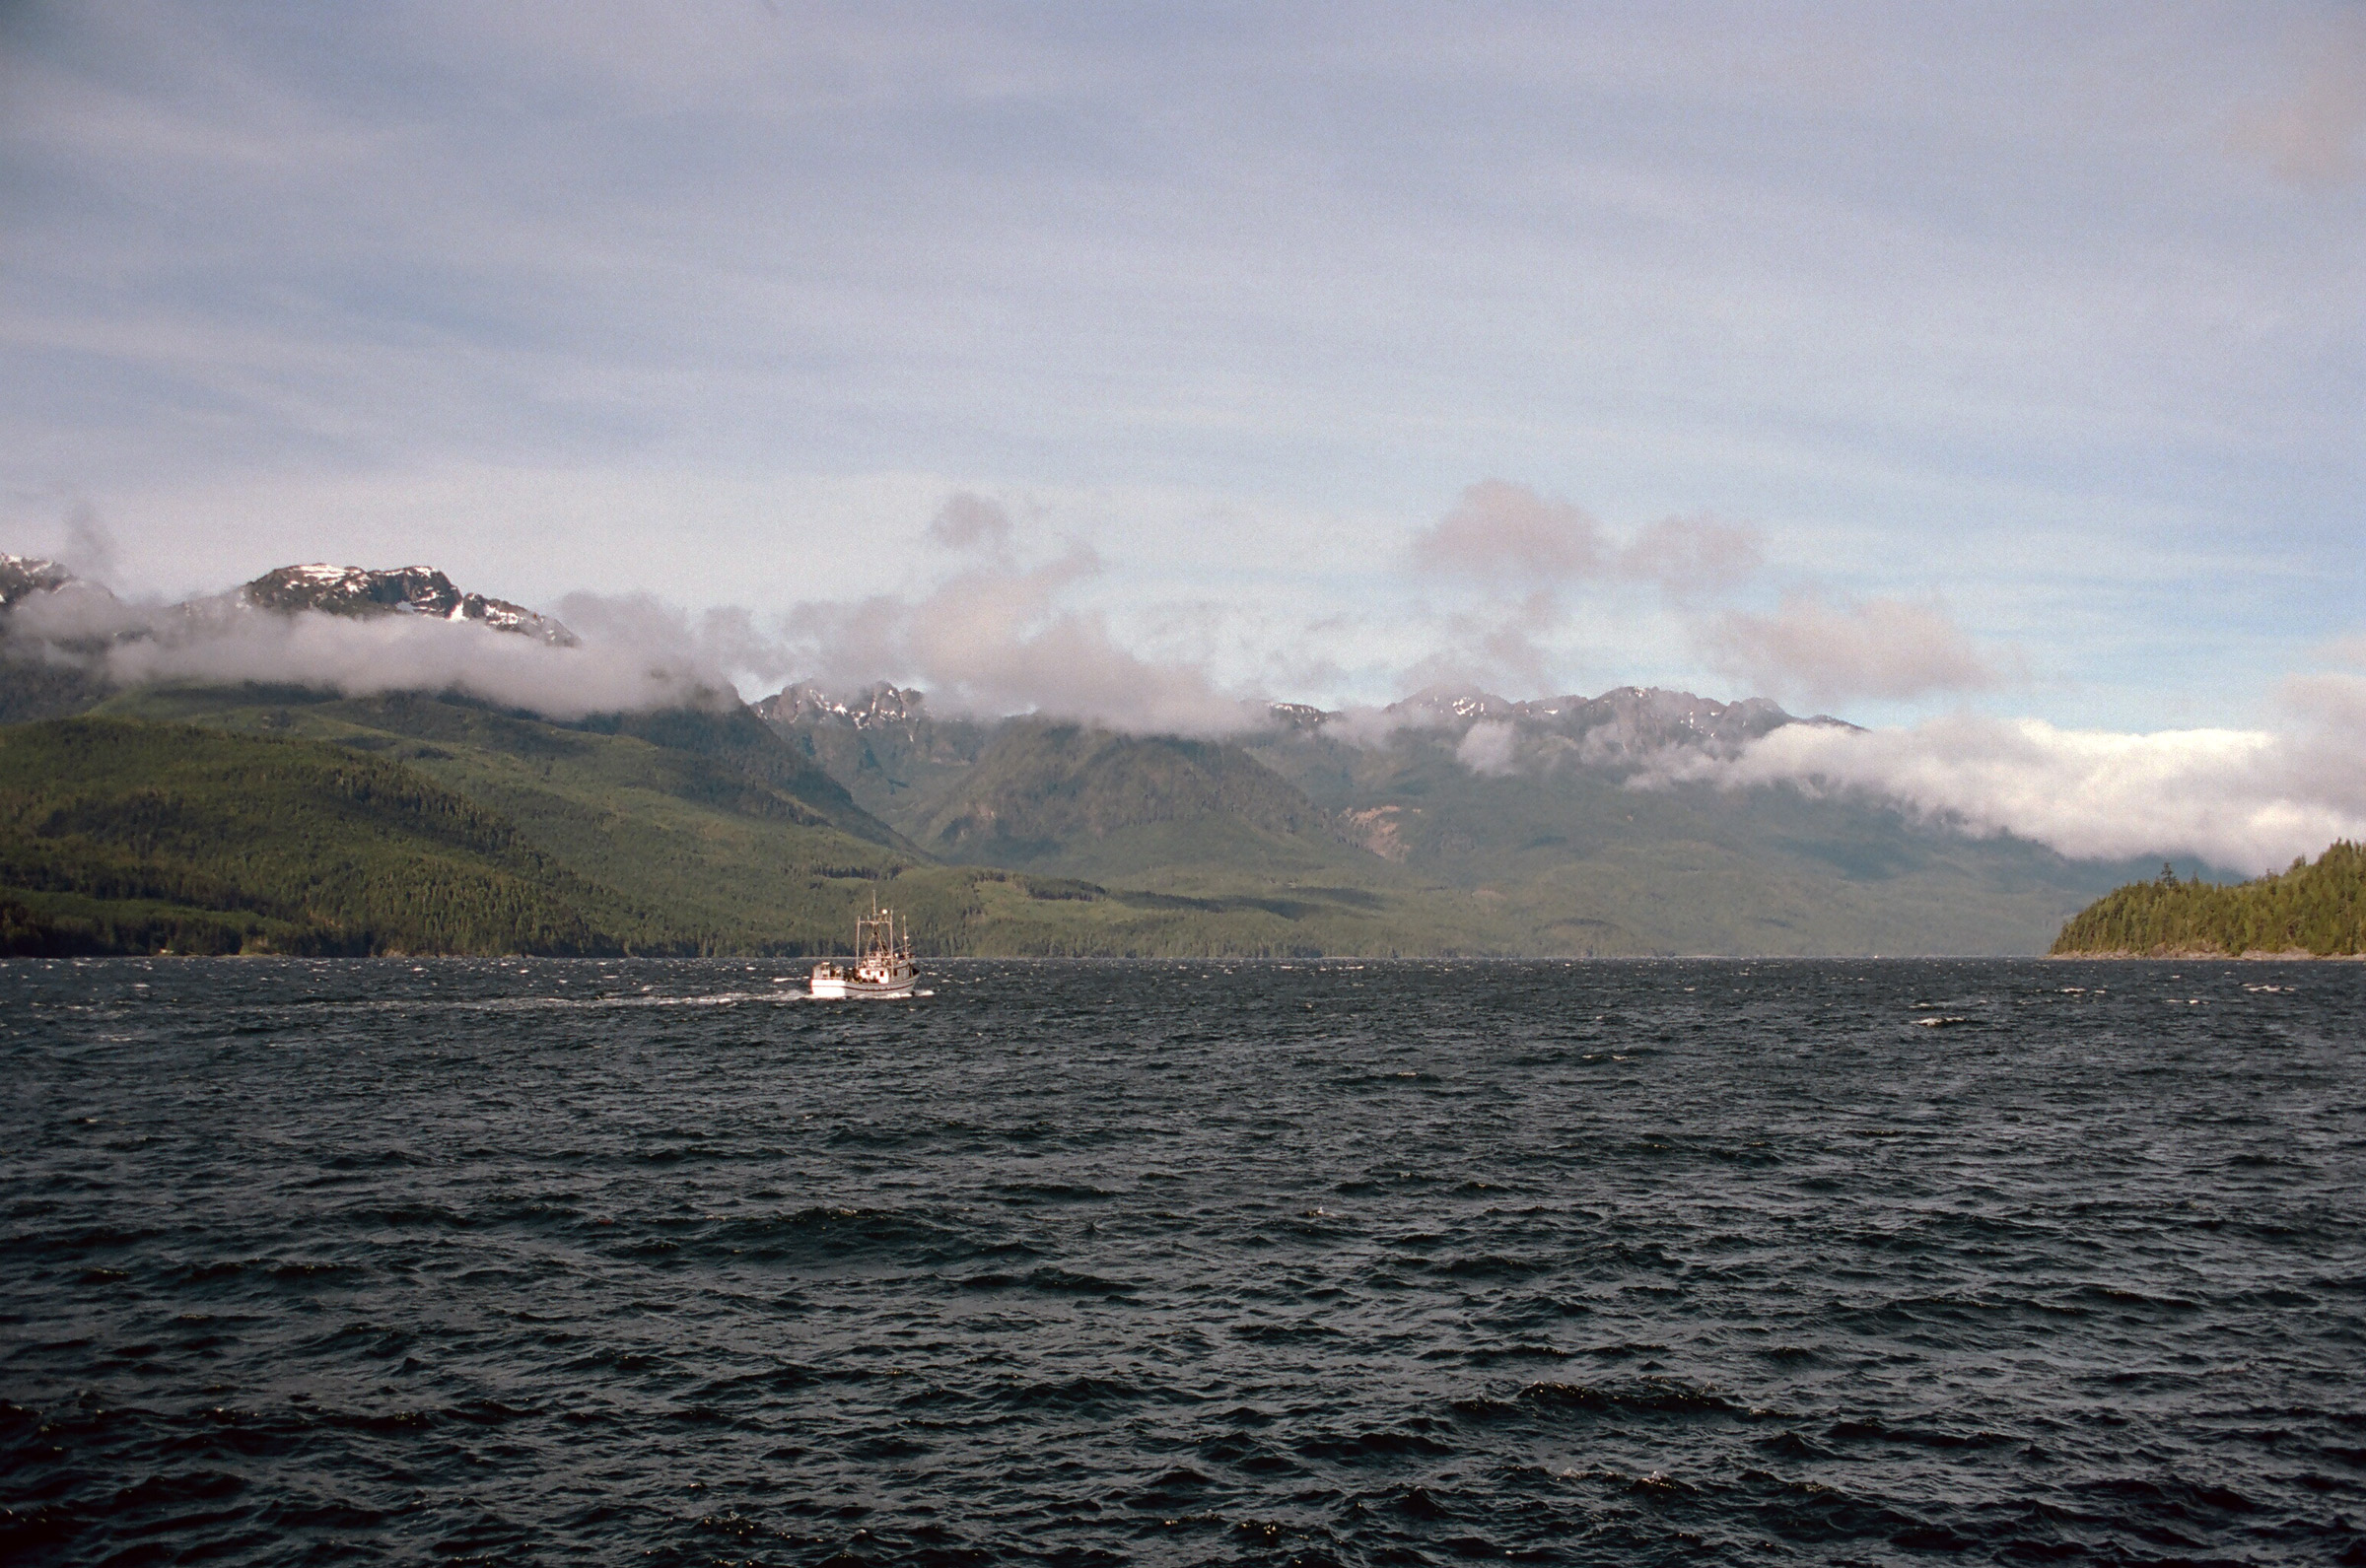
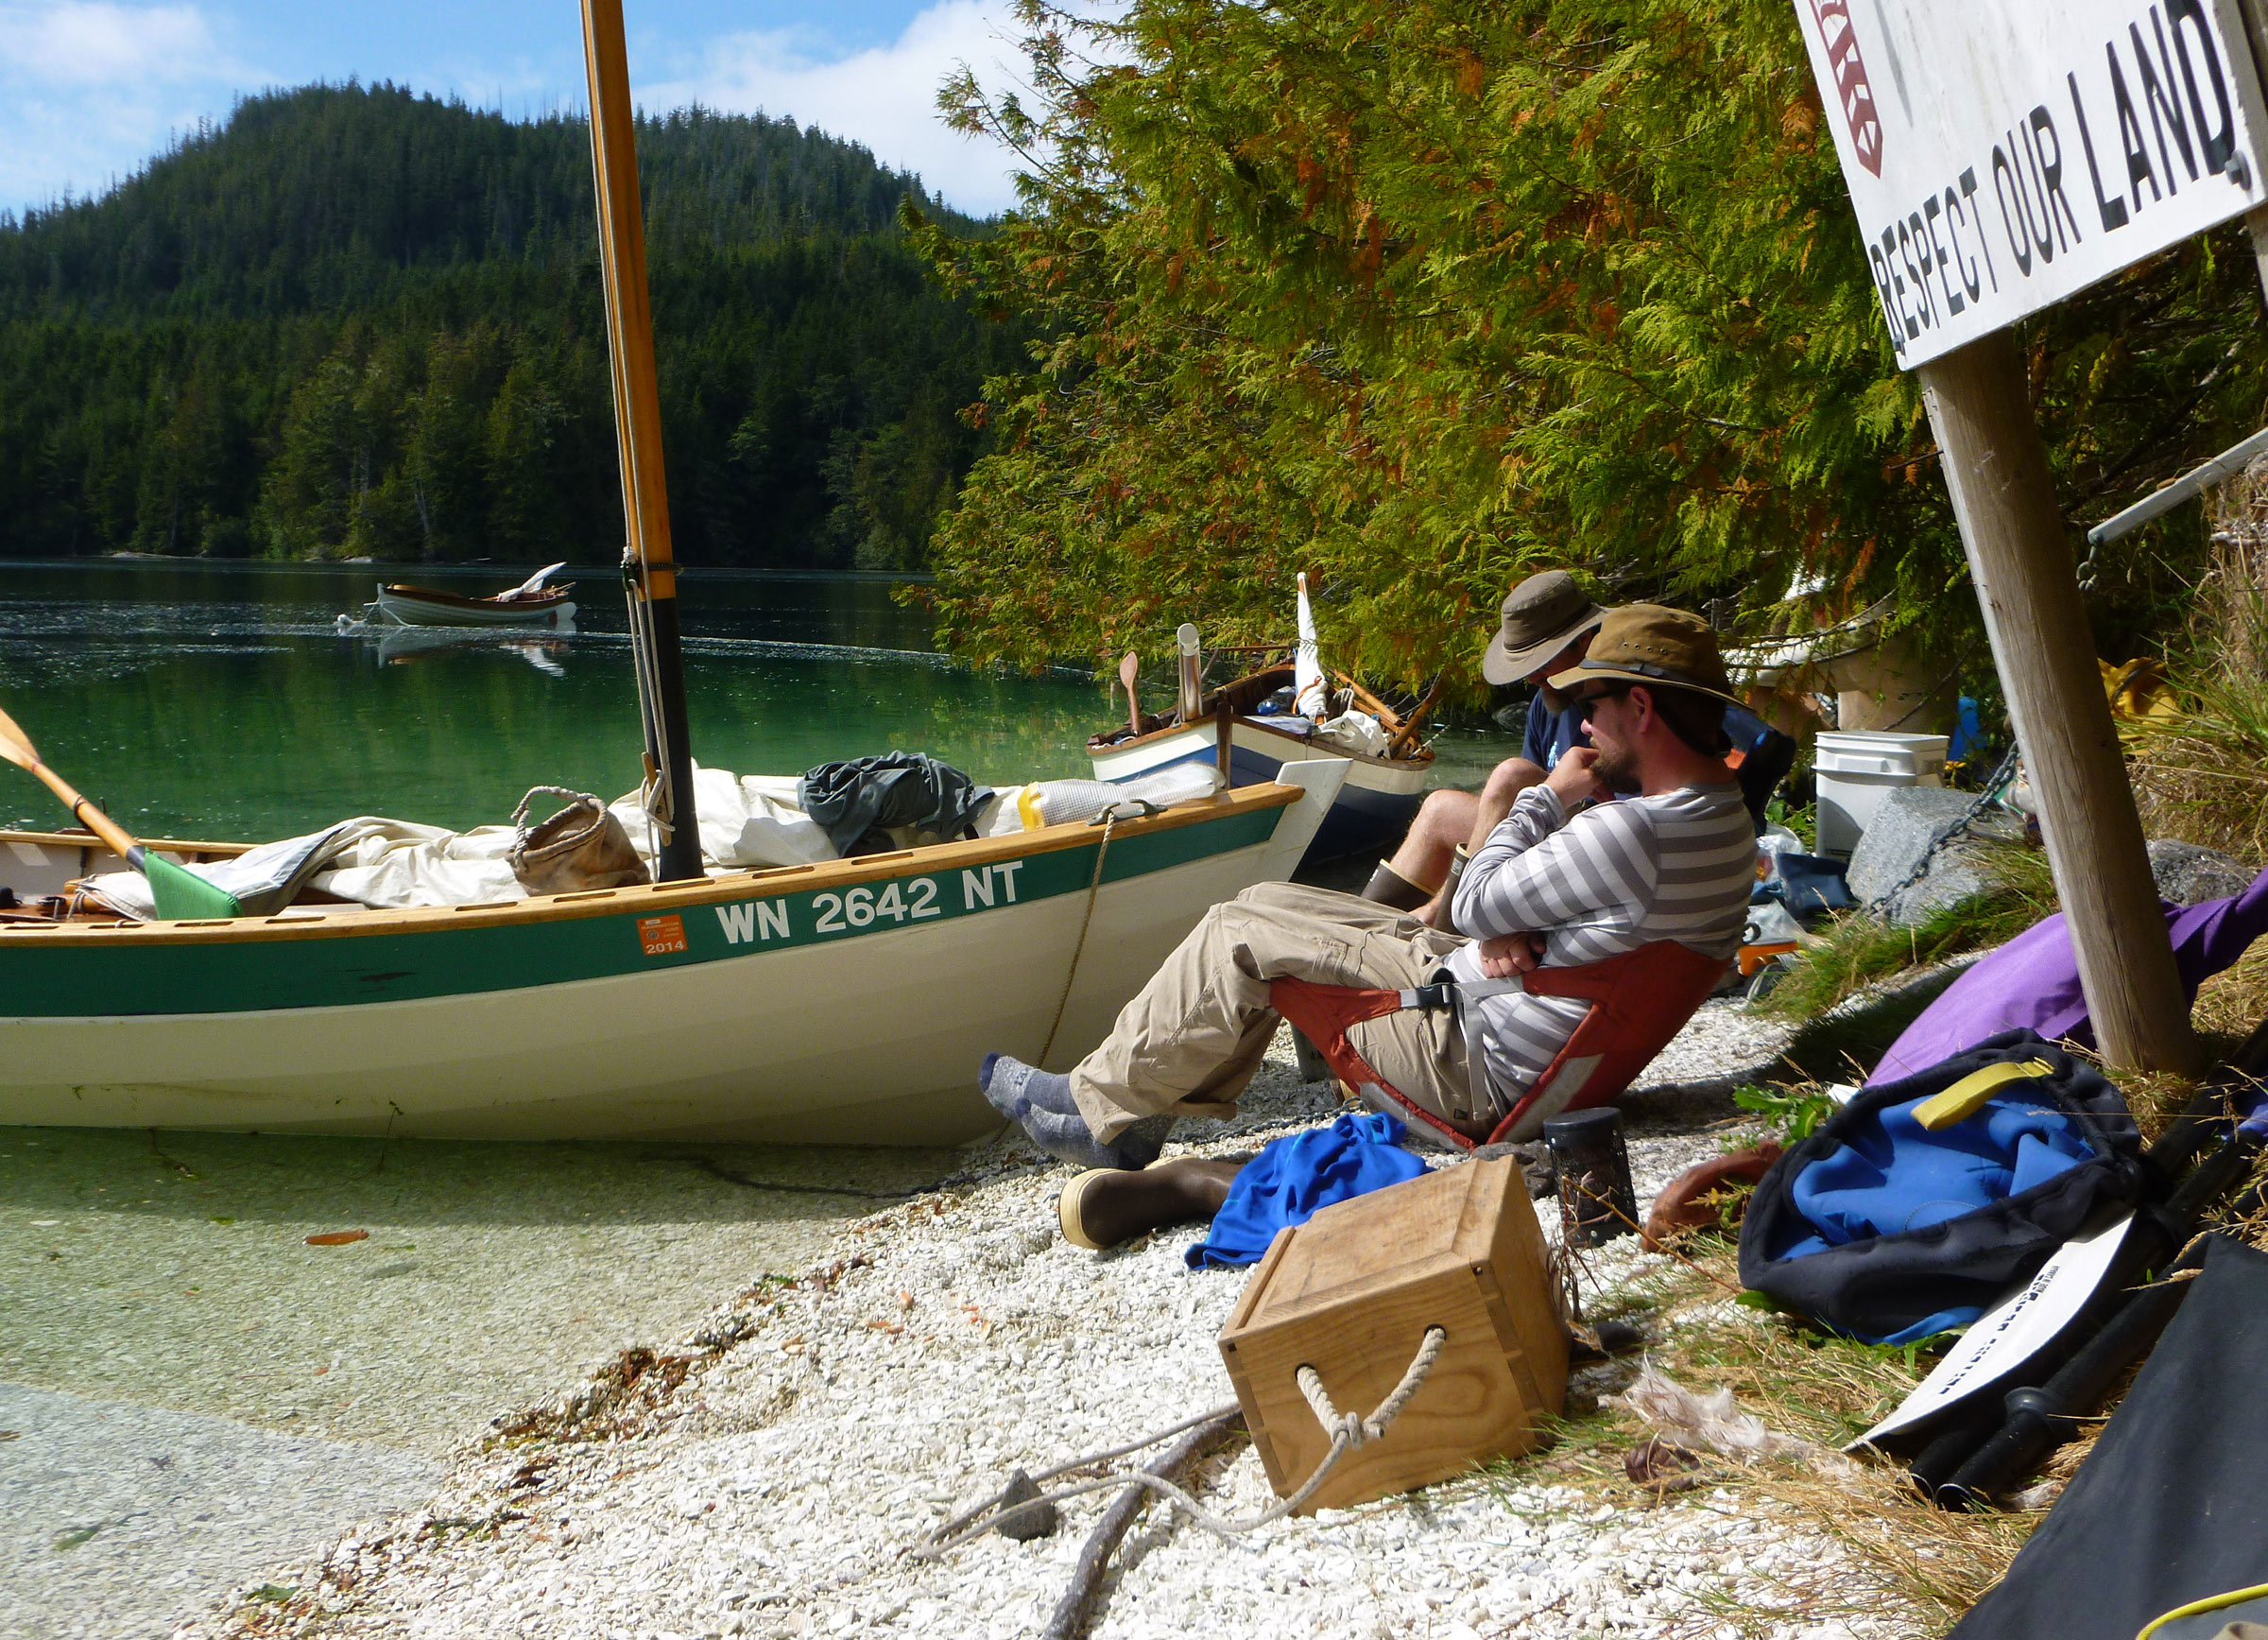
Johnstone Strait was a particularly trying part of our journey. For days on end, as the tidal currents of up to 5 knots switched directions in the late morning, opposing northwest winds gusting up to 35 would kick up and make forward progress in the dory impossible. We spent many hours on land watching the whitecaps froth and listening to the winds howl through the trees around us, as clouds blew over the snowcapped peaks in the distance. Forced to remain ashore while other larger craft such as this seiner headed north weathered the storm, we were grateful for the enthralling views.
At first light we left Sayward and resumed our slog up the Strait. It took several more days of dancing on and off the water to make it out of the erratic conditions of Johnstone. By this point, we began to see R2AK boats that had already finished the race and were heading back home from Ketchikan. It became apparent that we would be knocked out of the race by the Grim Sweeper, a delightfully named sweep boat and “rolling disqualifier” for those who don’t reach Ketchikan before it.
After a 16-hour day of rowing, we stretched out our aching bodies on the docks of Port McNeil and evaluated our position. We were not yet halfway to Ketchikan and about to enter unbroken wilderness, but our bodies were failing. The ache in my elbow had transformed into ominous pangs of acute pain that would radiate up my arm while I was rowing. Thor was struggling with his shoulder and needed to take longer breaks from rowing more frequently.
There wasn’t much choice in the matter—we had to withdraw from the race. We sent word out for Thor’s girlfriend to meet us with a trailer in Bella Bella. Bella Bella wasn’t quite Alaska but it was the section of British Columbia coastline that we were most excited to see. We had come too far and worked too hard to call it quits on Vancouver Island at Port Hardy. This left us with two challenges remaining: navigating Queen Charlotte Strait and rounding Cape Caution.
Queen Charlotte Strait is a dangerous area. The swell of the Pacific Ocean rolls in to meet the powerful tidal surges of Johnstone Strait and the outflow of several glacier-fed rivers. The confluence of the waters and the wind can be tame at times or lethal. The advice from the locals was to hug Vancouver Island until we can safely cross to God’s Pocket, an aptly named island chain of exceptional beauty. We’d spend the night there and wake up before first light; if there is any wind, we don’t go. If it’s clear, we row like hell. Conditions are known to deteriorate rapidly over the course of a day, making rounding Cape Caution risky. Even large boats take the Cape seriously.
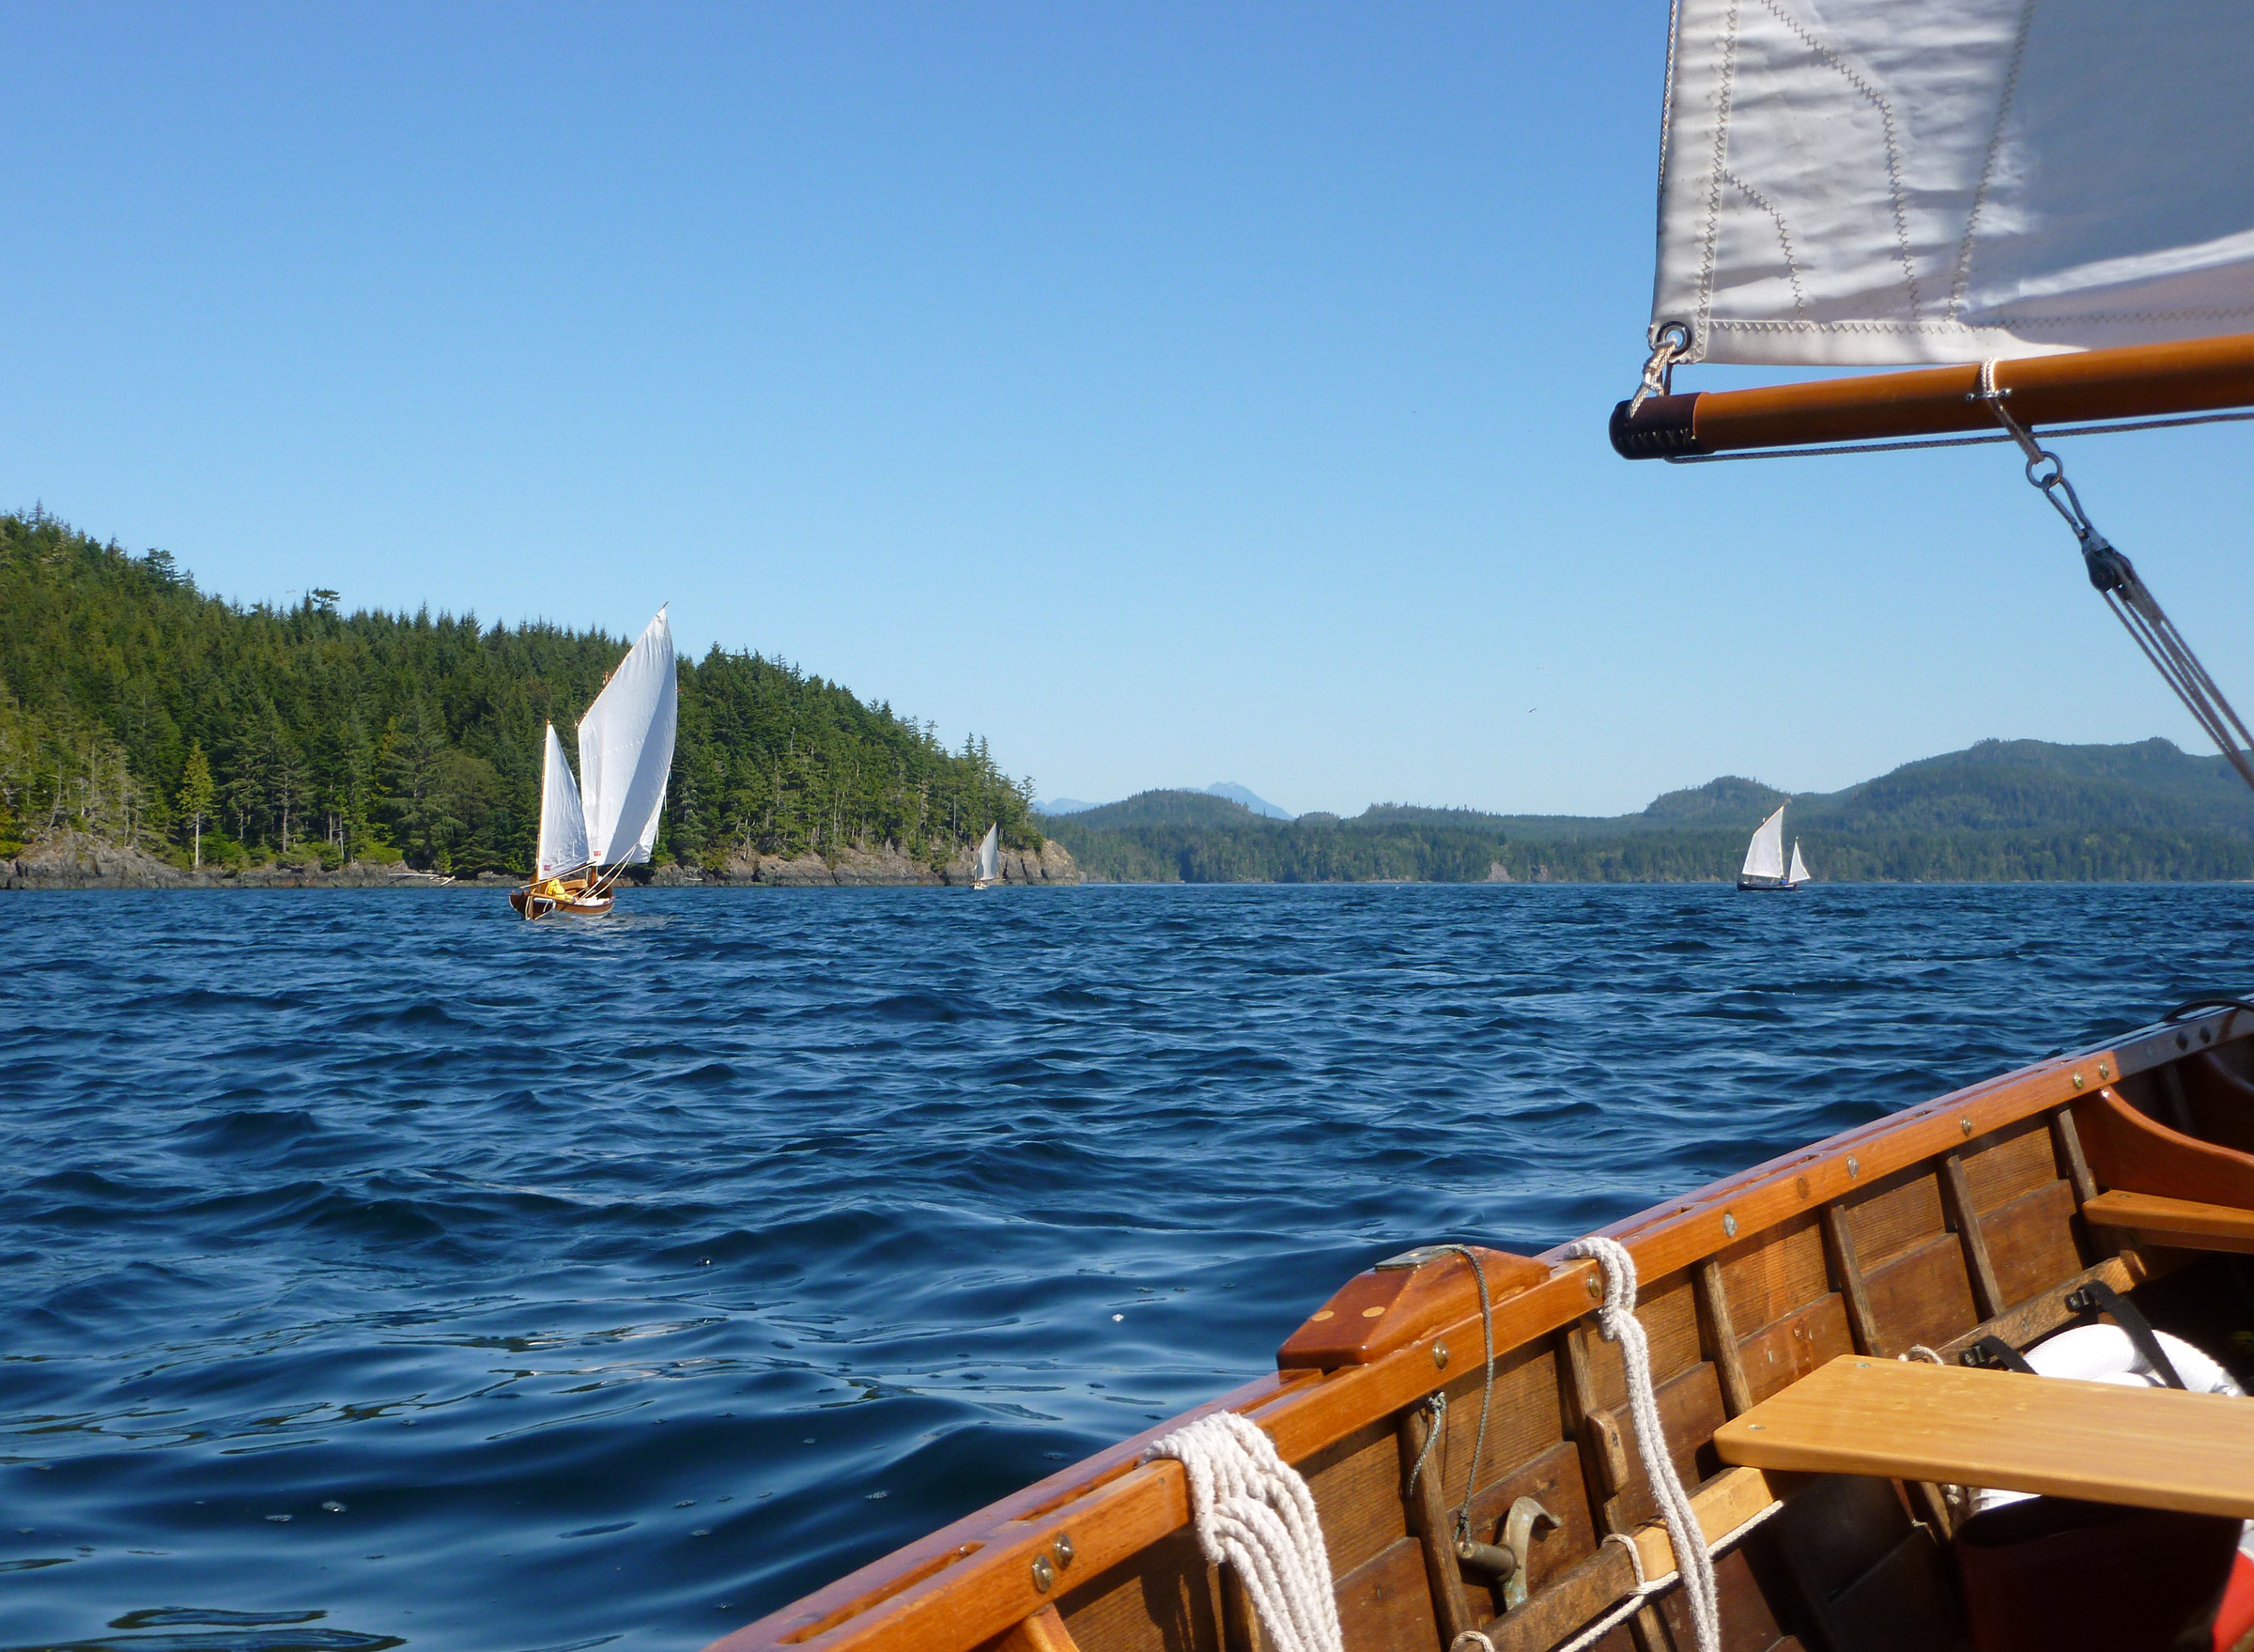
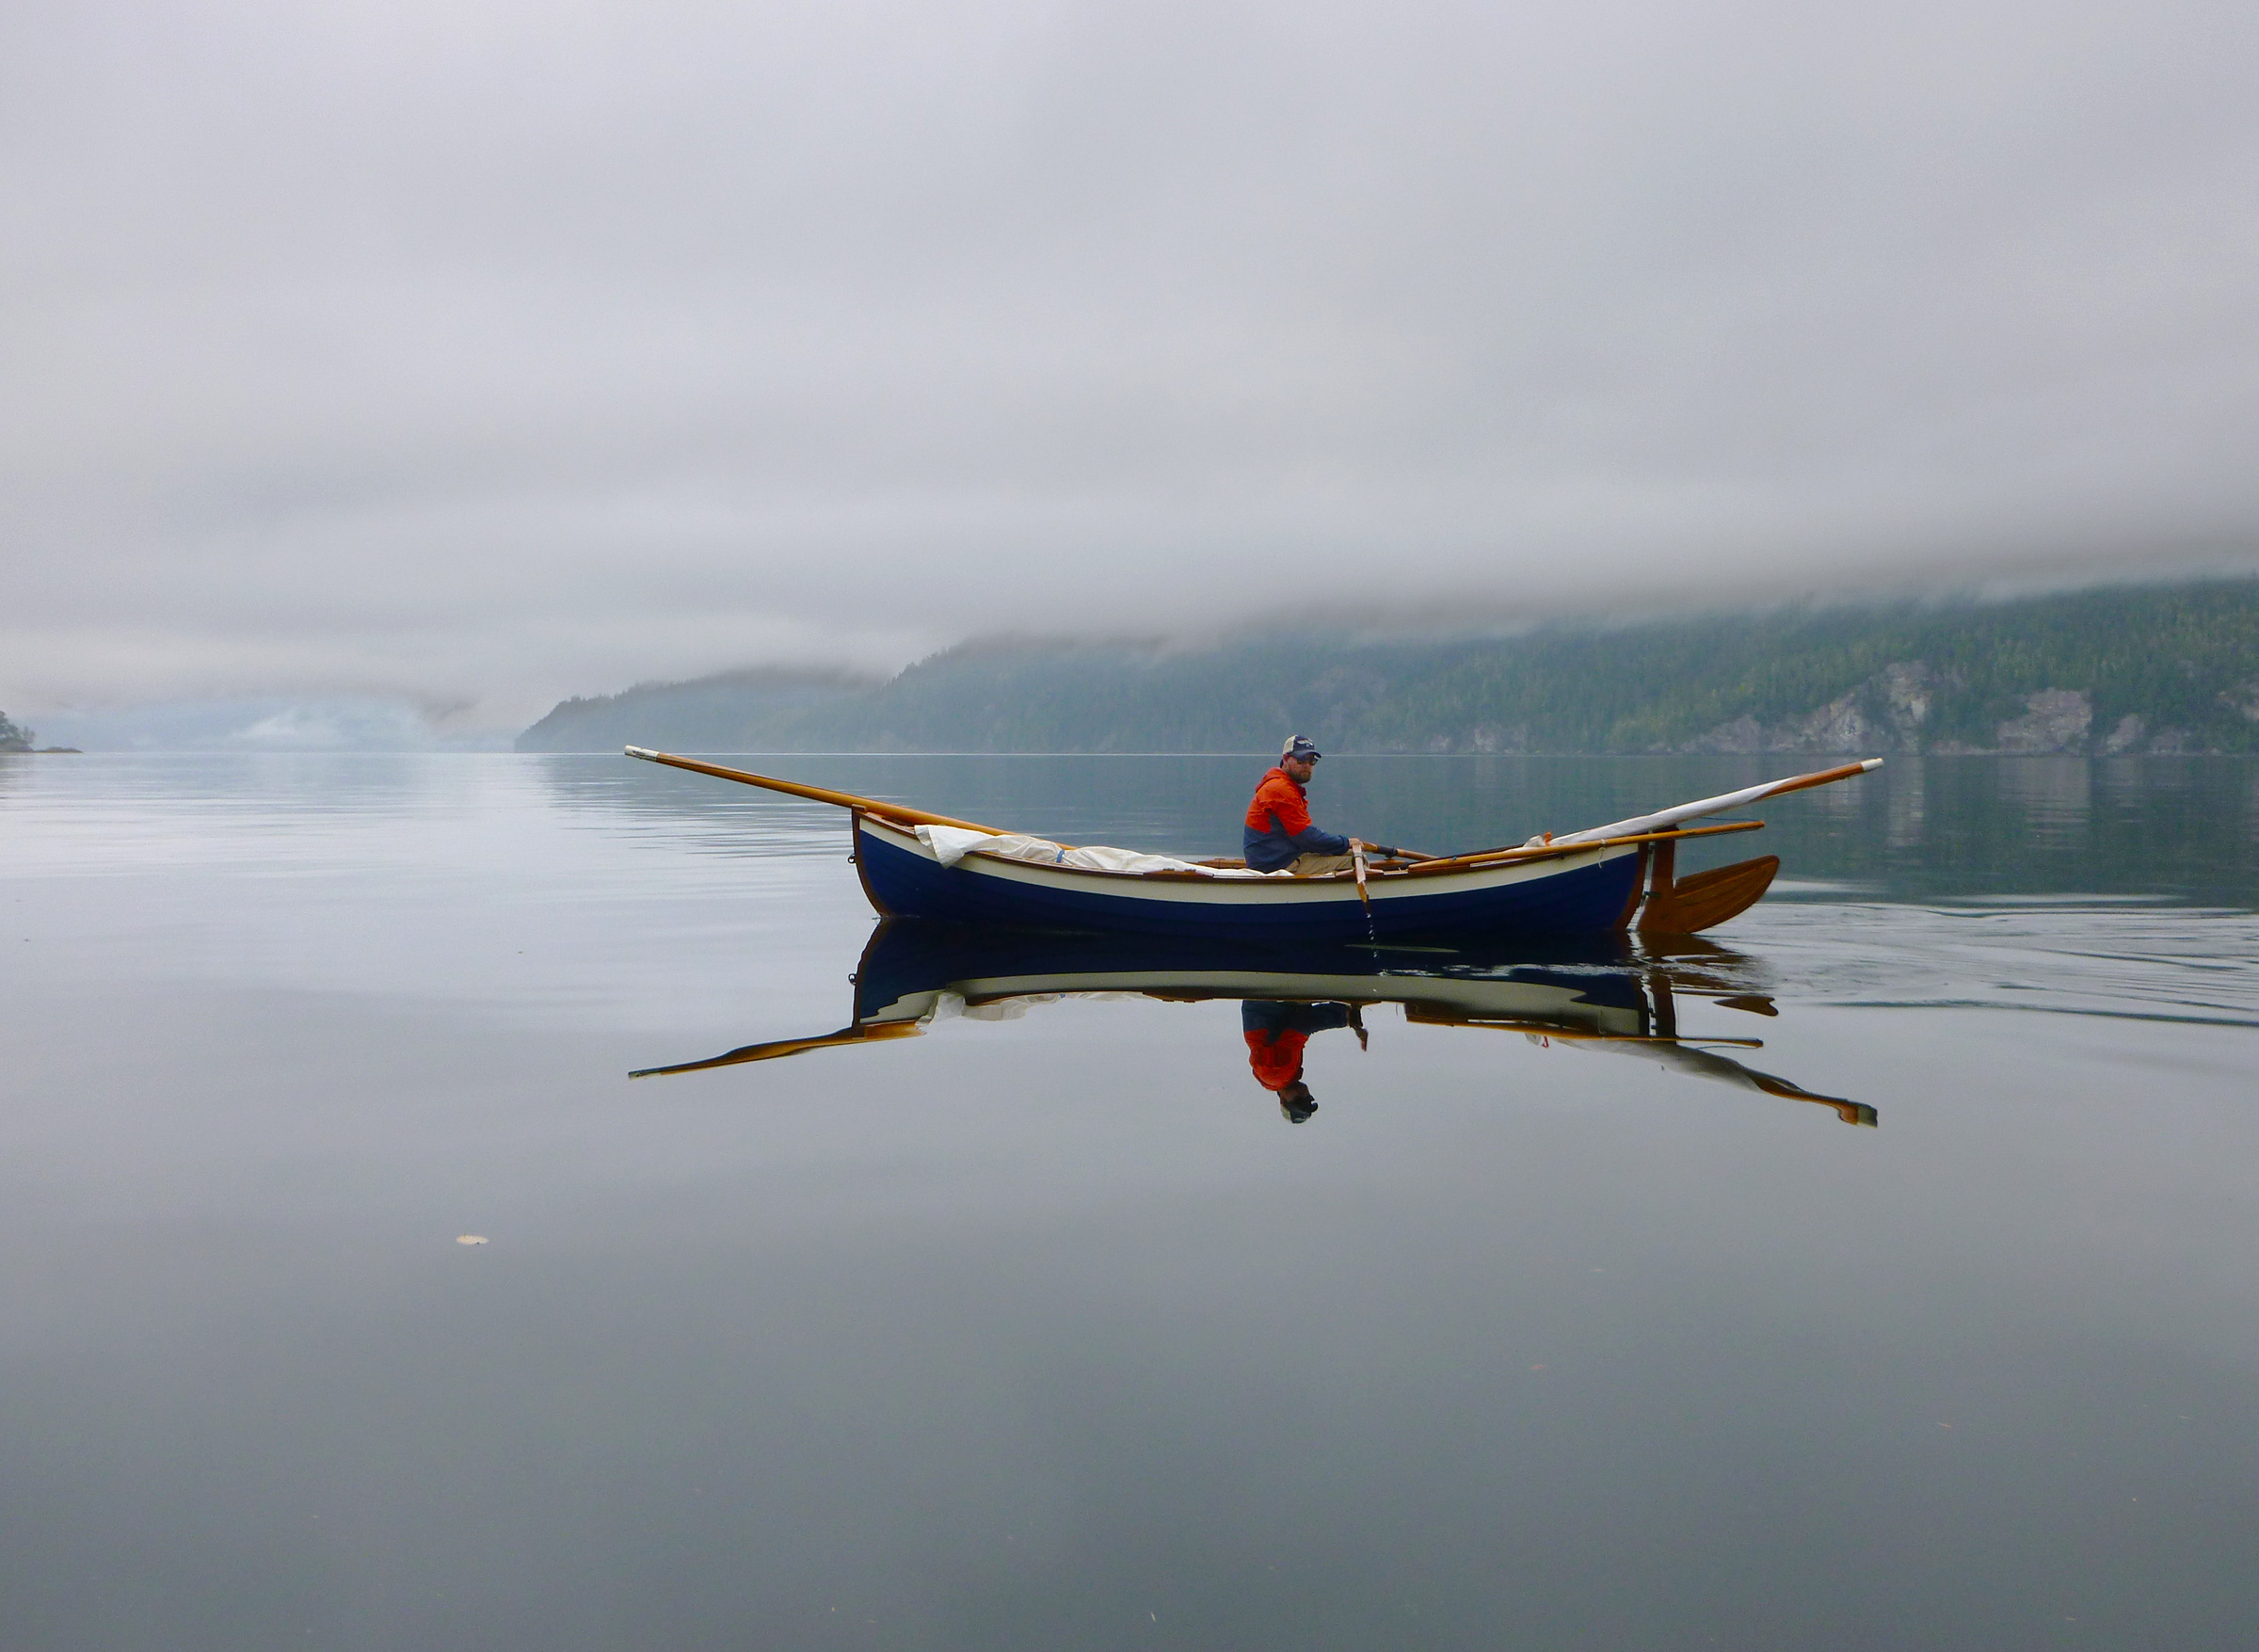
Sailing in flat water is a rare treat along the Inside Passage and was truly a wonderful experience in LOOK FAR. No water came in over the sides, and Thor and I weren’t forced to bump into each other as we tried to balance the boat. Our momentum wasn’t swallowed by every wave trough, and the laps of the planks happily displaced the small wavelets in its path. These conditions made Thor and me smile from ear to ear whenever we came across them.
We entered the sheltered area of the Sound by midafternoon, happily sailing past Port Hardy, and aiming for God’s Pocket. God, it turned out, had other plans for us than the safety of his pocket. Dark clouds appeared to the west, menacing us with a sound that most resembled a freight train approaching.
“Is that the wind?” Thor asked in disbelief.
“I think we need to turn around,” I responded.
We did, and less than a minute later the choice was validated as the right one while we hurtled back toward Port Hardy, taking on water at an unsustainable rate. We wouldn’t make the town so we instead tucked into the bay at its edge, a small cove host to an off-grid fishing lodge.
Prior to the R2AK, I had never really seen a log boom up close and personal. Rowing up next to one, Thor was eager to climb out and take a picture. A tanker wake passed by not a moment after this photo, forcing Thor to make a leap back into the boat as I quickly rowed us out from the impact zone with the logs. There were many moments of near calamity on our journey, and this was an early reminder to always keep our wits about us.
As we tacked back and forth along the entrance to the cove, a man in the interior dragged logs erratically by motorboat to create a barrier. No communication was made despite our obvious distress.
After ten minutes, the man finally shouted out “Y’all screwed up or what?”
The humor was not lost on us. We yelled back, “We’ve been better!”
“Well, you better come land. I’m Dave and this is my lodge.”
He escorted us in between the logs and instructed us to land on his dock. It hadn’t taken him long to evaluate our situation. To the motoring fisherman, our journey was reckless and bordered on absurd. He gave us each an apple, a cup of coffee, and a floor to sleep on inside a small unfinished cabin that had a roof but no windows. Dave entertained us with tales of humpbacks burping up seagulls and orcas cornering pods of dolphin in his bay. He was unpolished and proud, generous, and strangely charming. His stories were hilarious and the following morning, as we departed for Cape Caution, he sent us off with some frozen salmon for the rough day ahead.
We sailed north through two glimmering island chains and at the opening of Queen Charlotte Strait we encountered the Pacific swell. It gently lifted and dropped us several yards, bringing Cape Caution in and out of view. By the time we reached the exposed headland, intensifying afternoon squalls were chunking up the water. There are very few hospitable beaches near the Cape, and the swell makes a surf landing and launching dangerous. We were forced to sail 2 nautical miles back away from the cape before finding a bay with enough protection from the swell to attempt a beach landing. When we came ashore we spotted fresh wolf and bear paw prints below the high-tide line; the patter of rain spurred us to action. Under a tarp supported by driftwood, we set our bivies on the wet sand and built a large fire. We kept it alive until morning to deter the predators from coming too close.
The rough conditions persisted the next morning, but we elected to go anyway. Explosive waves around the Cape made it safer for us to sail miles out to sea, coming about only when we were positive the port tack would clear the point. Our two-man balancing and bailing act kept us afloat as we endured the open ocean slapping us around. North of the cape, spray blew up around us from a series of hidden rocks and ledges. Not daring to stop even to eat, we pushed on until sunset. The golden rays of another day gone by ushered us into the protective cedar-draped shores of Milbrook Cove, 10 miles north of the Cape. We were happy to have the company of throngs of bald eagles and a sea otter happily hunting in the kelp beds.
It took us three more days of continuous rowing to reach the village of Bella Bella. The tidal exchanges were large and each low tide exposed a rich world of color. Magenta and ochre sea stars and crimson sea urchins dotted the yellow rocks, vying for space in the intertidal zone. Despite the bone spur I could feel growing on my elbow, my brain began playing tricks on me, challenging my decision to stop and encouraging me to ignore the pain. Who needs a left arm after all?
When we were within sight of Bella Bella, everything inside of me was fighting our logical, safe choice to withdraw from the race. But for better or worse, it had already been decided, as the wheels were literally in motion to bring us home. Our loved ones with a truck and trailer were headed up Vancouver Island at that very moment. We approached the public dock and tied up among the fishing vessels.
Without needing to do any work on the boat and our contact in Bella Bella busy until the evening, we took our free moment and sought out a consolation prize of cold beer. Thirty minutes and two tallboys later, Thor and I were seated on a concrete slab adorned in graffiti, gazing out on the harbor.
Thor and I had sought out the Race to Alaska as a venue to share our passion for the ocean and boats with kindred spirits and raise money for Pacific Wild, a nonprofit dedicated to pushing for wildlife protection and environmental rights in British Columbia. For me, visiting their headquarters in Bella Bella was a personal victory despite the failure to finish the race. The race structure had brought my ego into the forefront: pushing myself both physically and mentally. Failure freed me from that and returned my focus to the ocean, to its many lessons and gifts, to peace and gratitude for my experience. Our journey to Alaska, for now, was finished.
Pax Templeton was born in 1992 and grew up exploring the woods and beaches of Maine and the desert of New Mexico. For the last several years, he has lived seasonally between Utah winters and Washington summers, kayak guiding, skiing, and commercial fishing. Always up for an adventure, Pax has a deep love and appreciation for the ocean and the ability to go by boat where no roads lead. He became exposed to the world of sailboats through his friendship with Thor and learned most of what he knows regarding their operation, upkeep, and repair from him. The R2AK was a steep learning curve and bestowed tremendous respect for the Port Townsend and R2AK community, wooden boat builders, the sheer power and beauty of the ocean, and the capabilities of a 16′ Swampscott dory.
Thor Belle had a boat well before a car and grew up poking around tidepools in Maine and spending as much time as possible in, on, and around the Atlantic Ocean. Thor is happiest when it’s cold out. He has adventured all over the world and has many years of experience on the open ocean delivering sailboats in the North Atlantic, teaching environmental education and big-boat sailing, and working for commercial sail charter businesses. He firmly believes in boats as a way to connect people to their environment and hopes to devote his life to doing just that.
If you have an interesting story to tell about your adventures with a small boat, please email us a brief outline and a few photos.
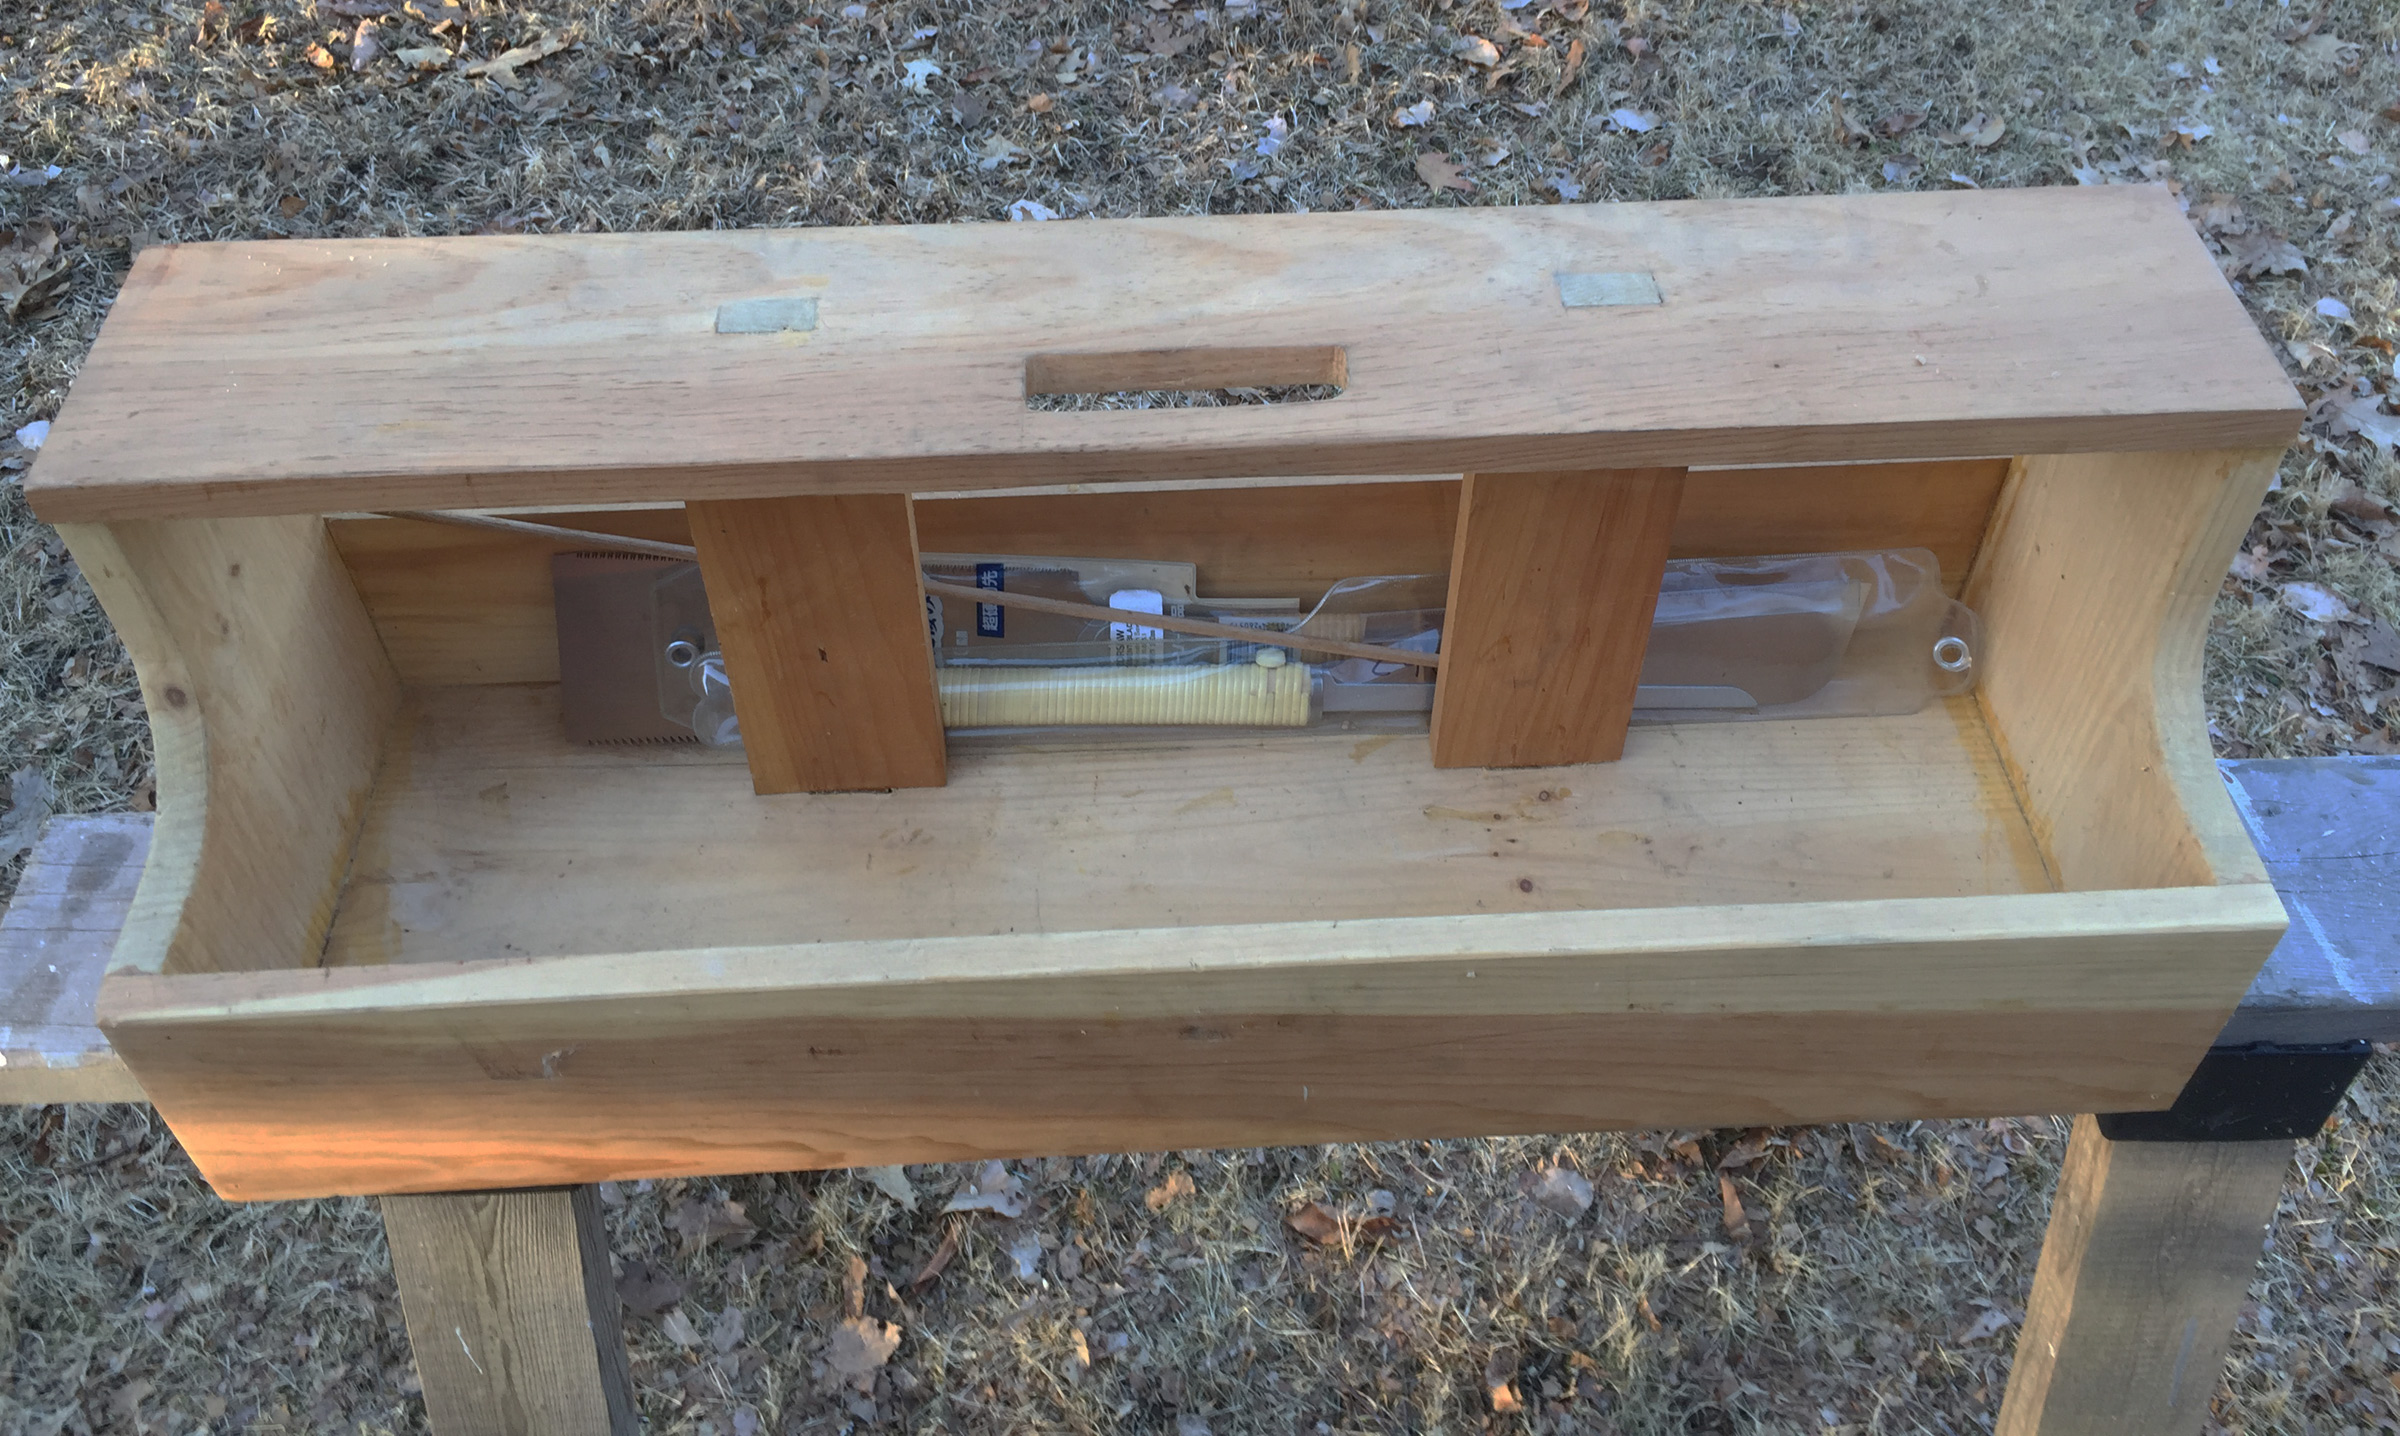
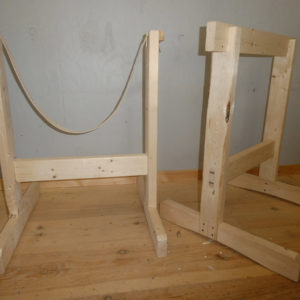
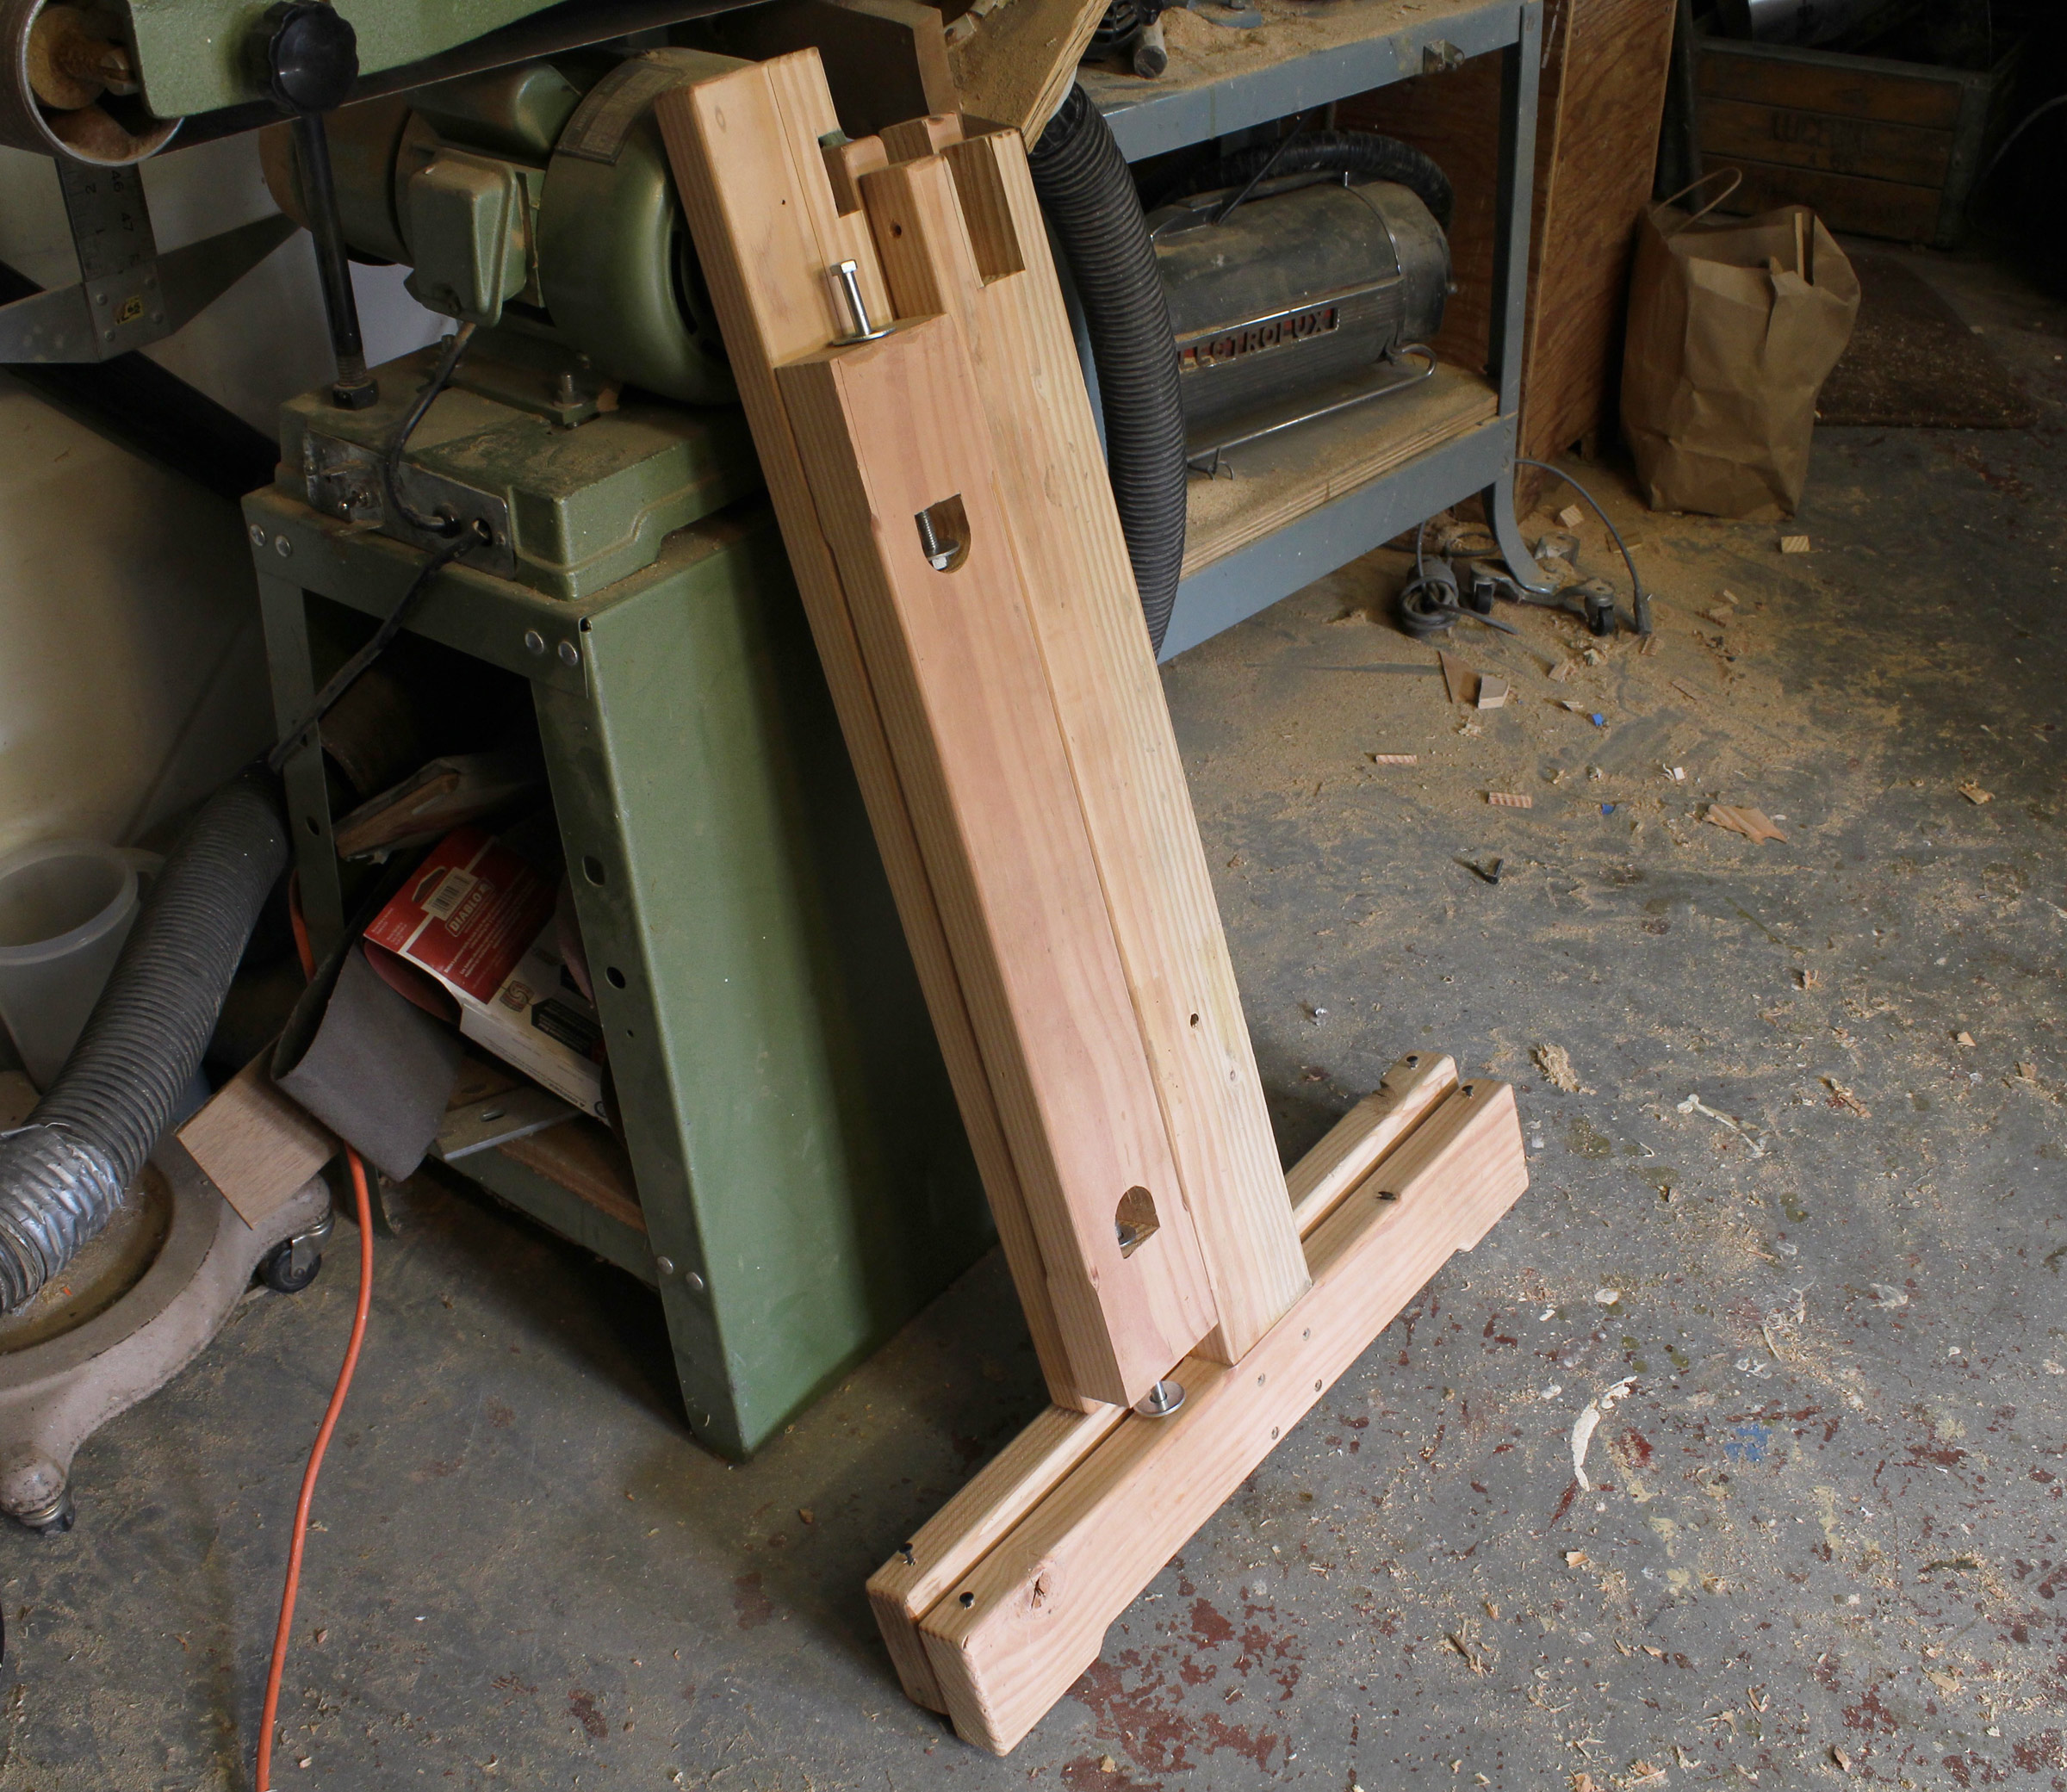
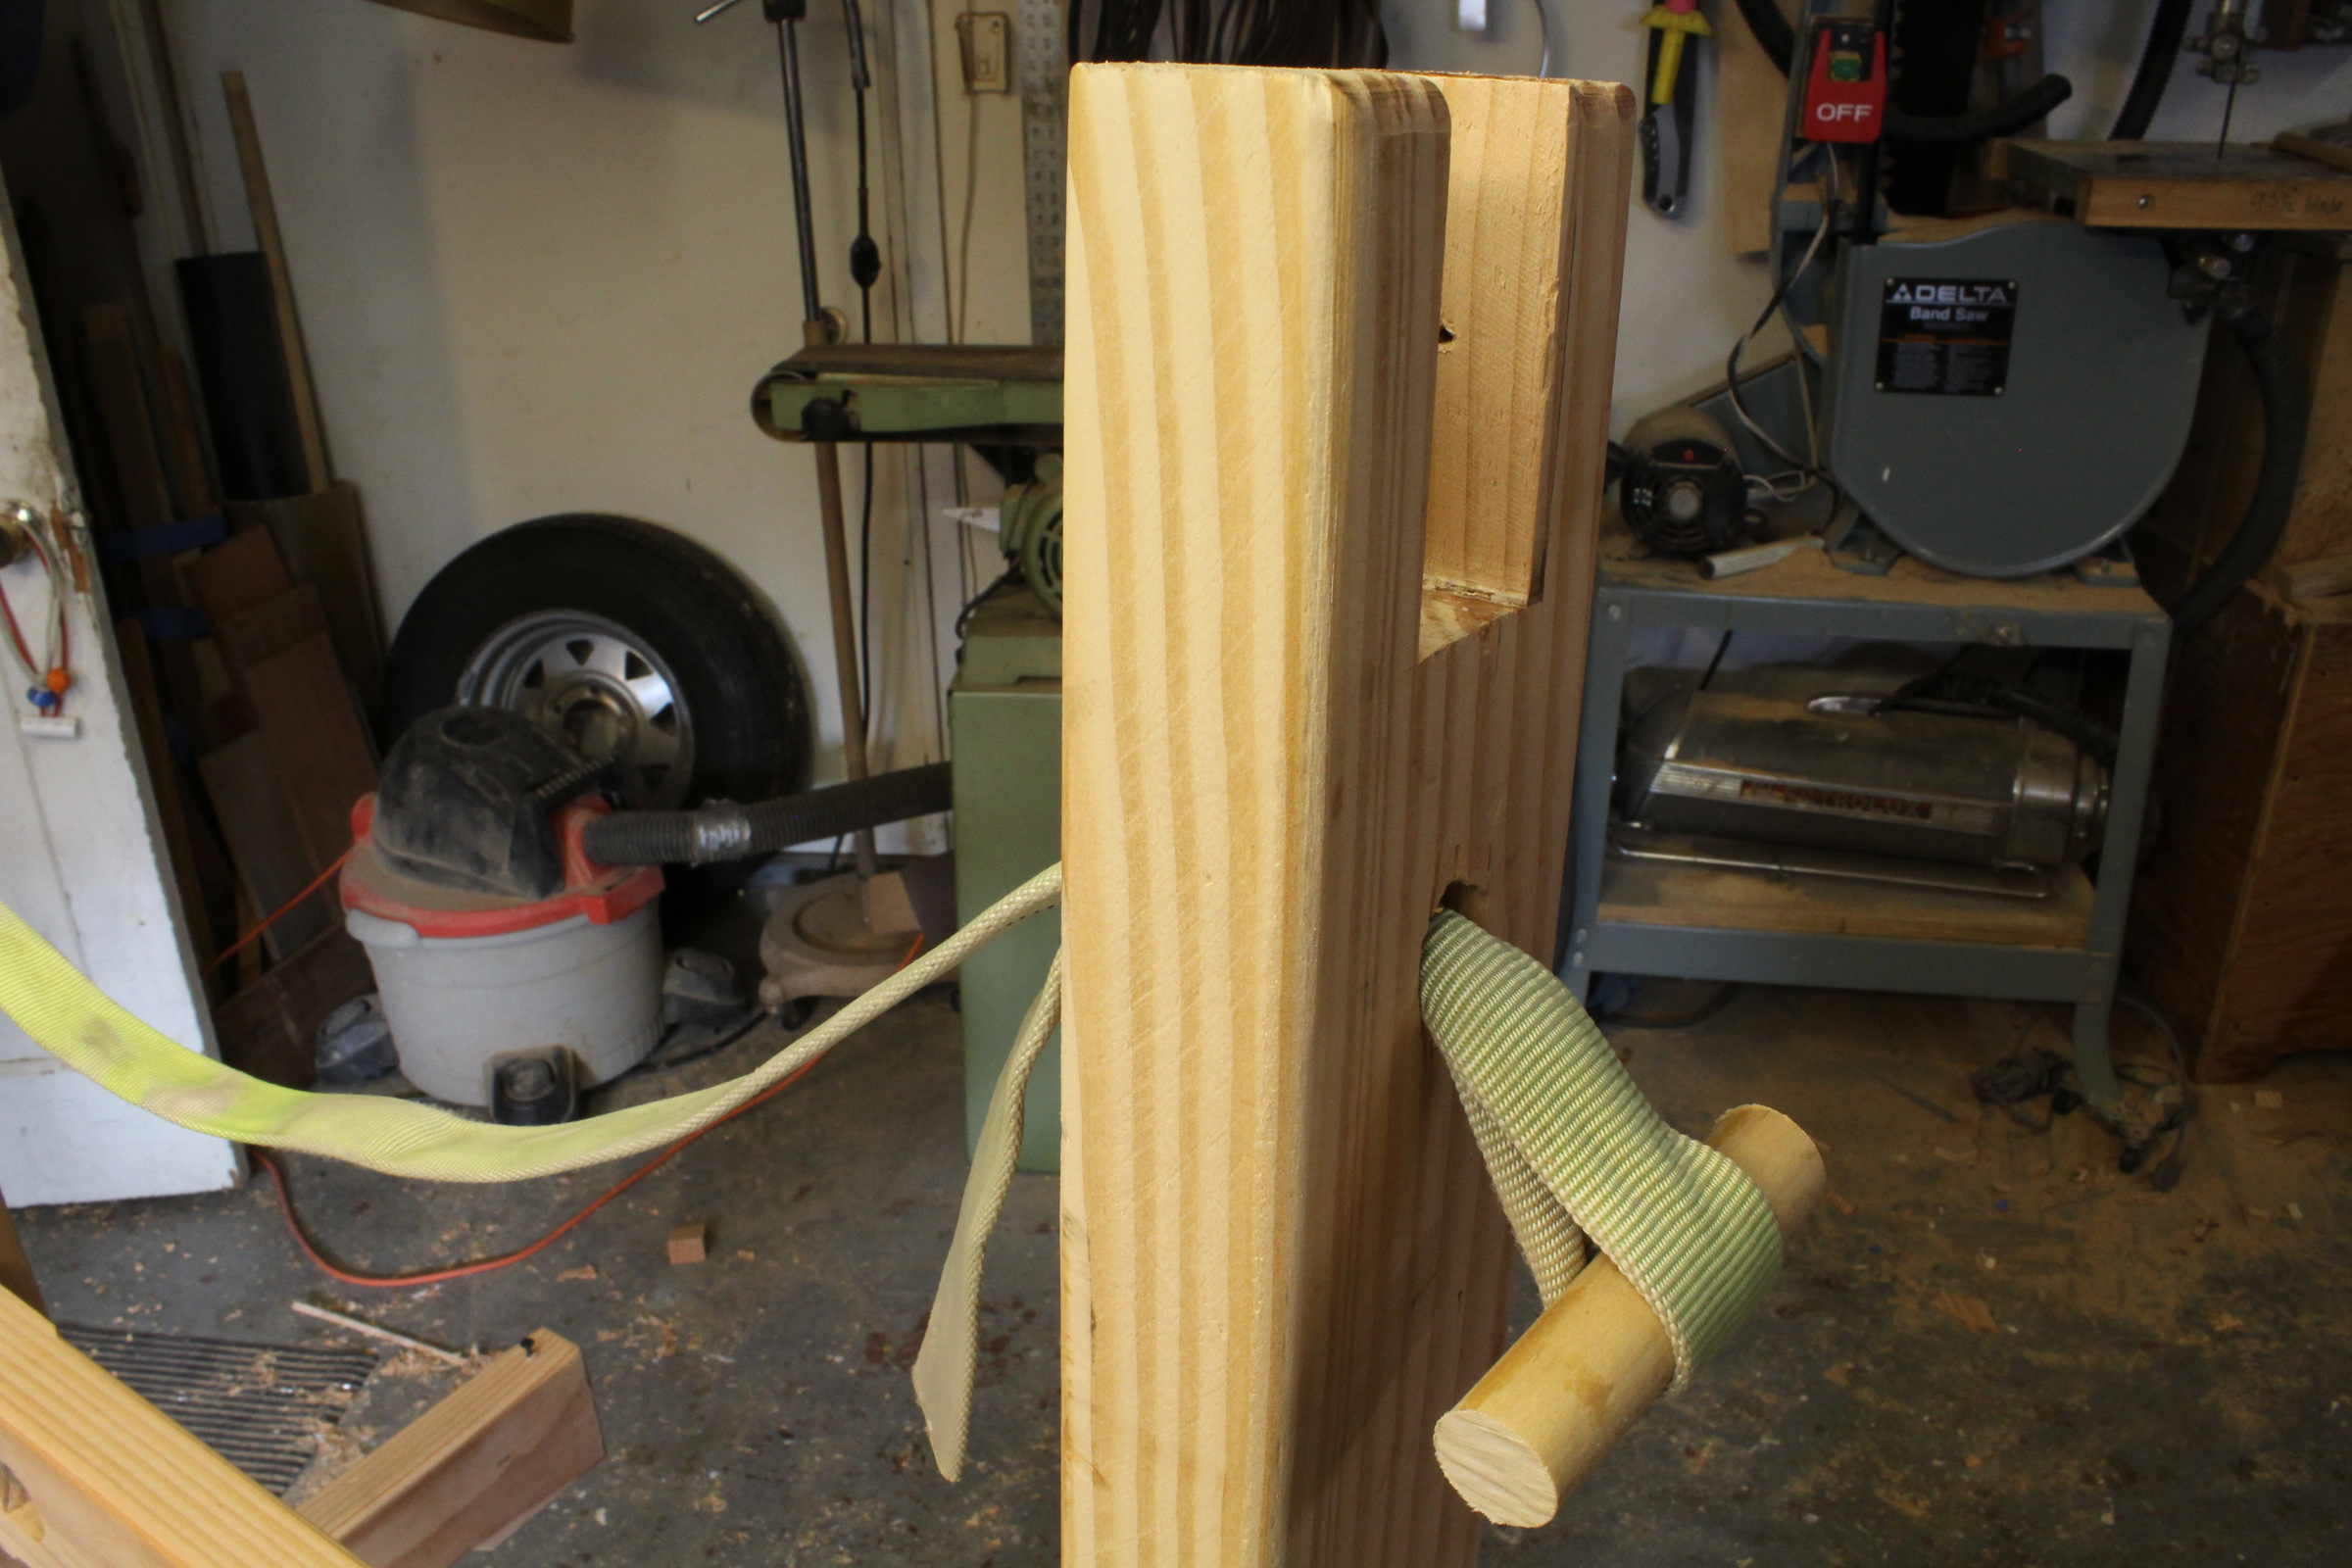
189A few years ago, I needed to take some hand woodworking tools along to a boatbuilding project. My tools live on shelves in the cellar or in tool bags. My tool bags weren’t big enough to carry everything; I needed a tool tote that could carry handsaws, long chisels, and bar clamps. Most of the totes that I had seen were too small, and their joiner work was well beyond my skill level.
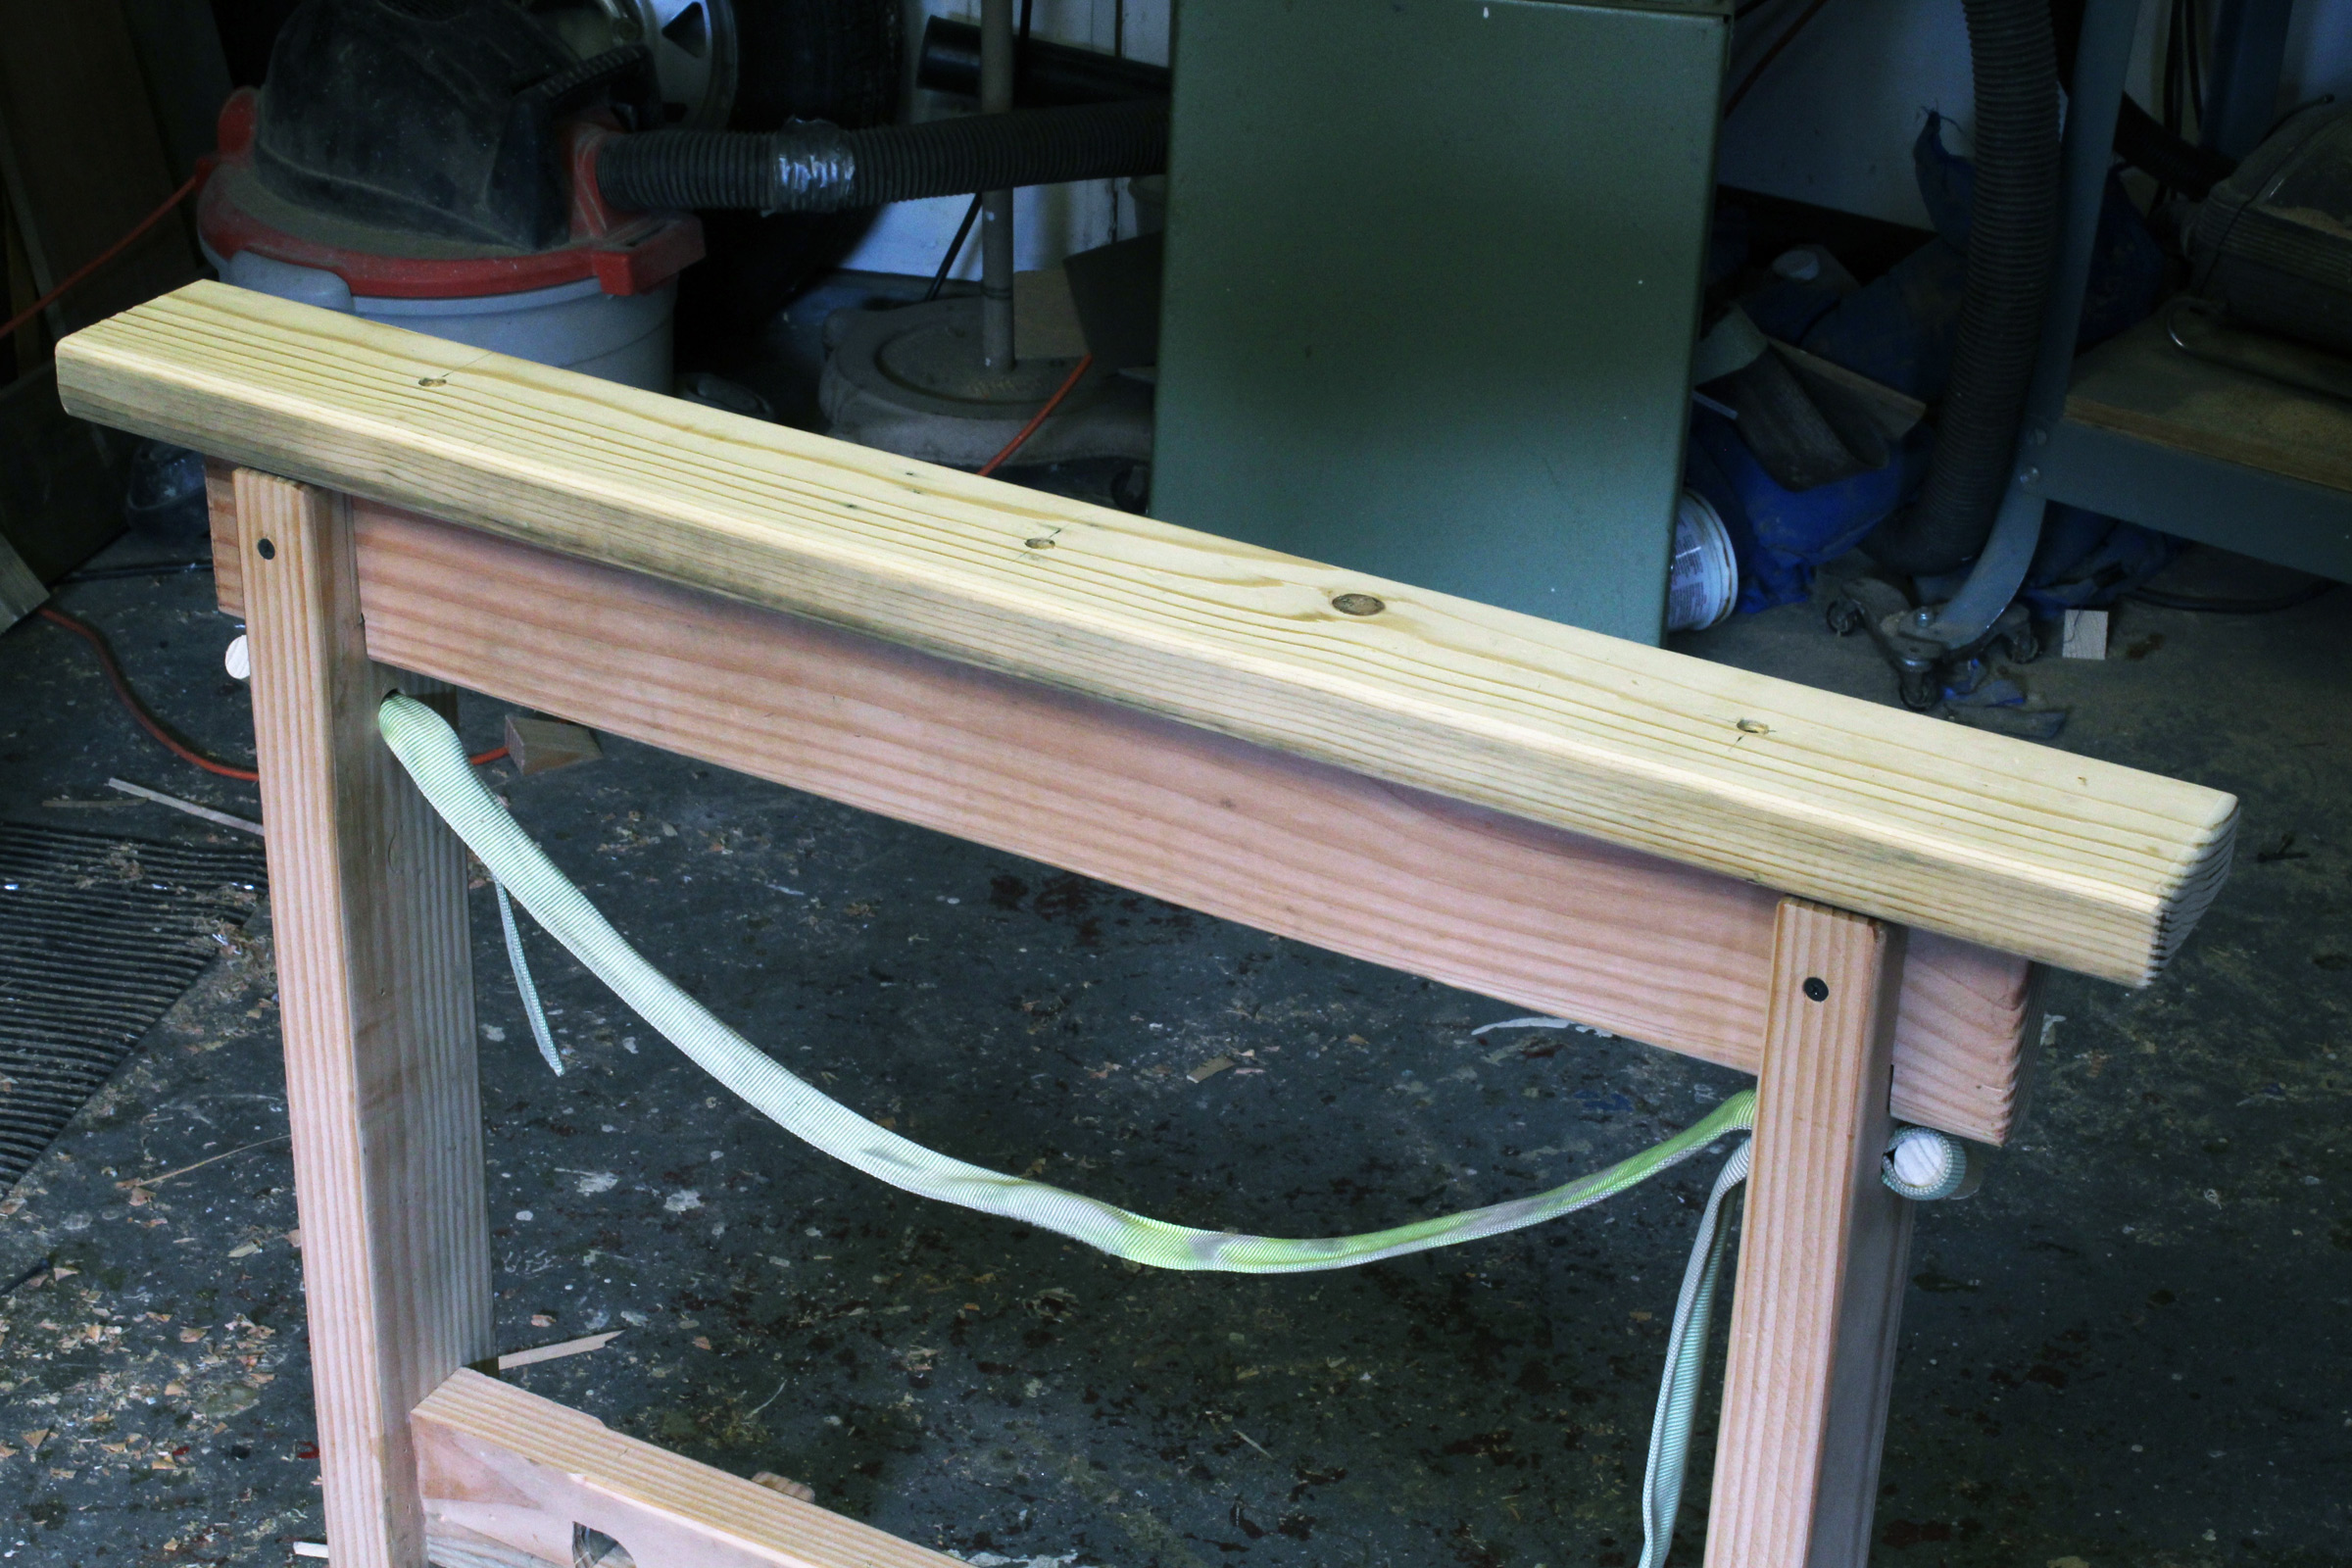
Then I remembered one of Joe Liener’s totes. A master builder, Joe ran the Philadelphia Naval Yard’s small-boat shop before its conversion to fiberglass work. He had a complete shop in his basement, which included his massive tool chest, big enough that it took two to carry or steal it. From it, he’d pull the tools needed to do a day’s job and load them into one of his totes. One of them had two features that I remembered well and have not seen on totes now common: You could use it as a low sawhorse, a step stool to reach things overhead, and a seat when working underneath a boat or stopping for lunch. It also had a wide board for the top, offset, with a handle hole cut in the center. The box is long enough to take handsaws; they get stowed under the top. Smaller tools go on the other side, where the access is unhampered.
Ben Fuller
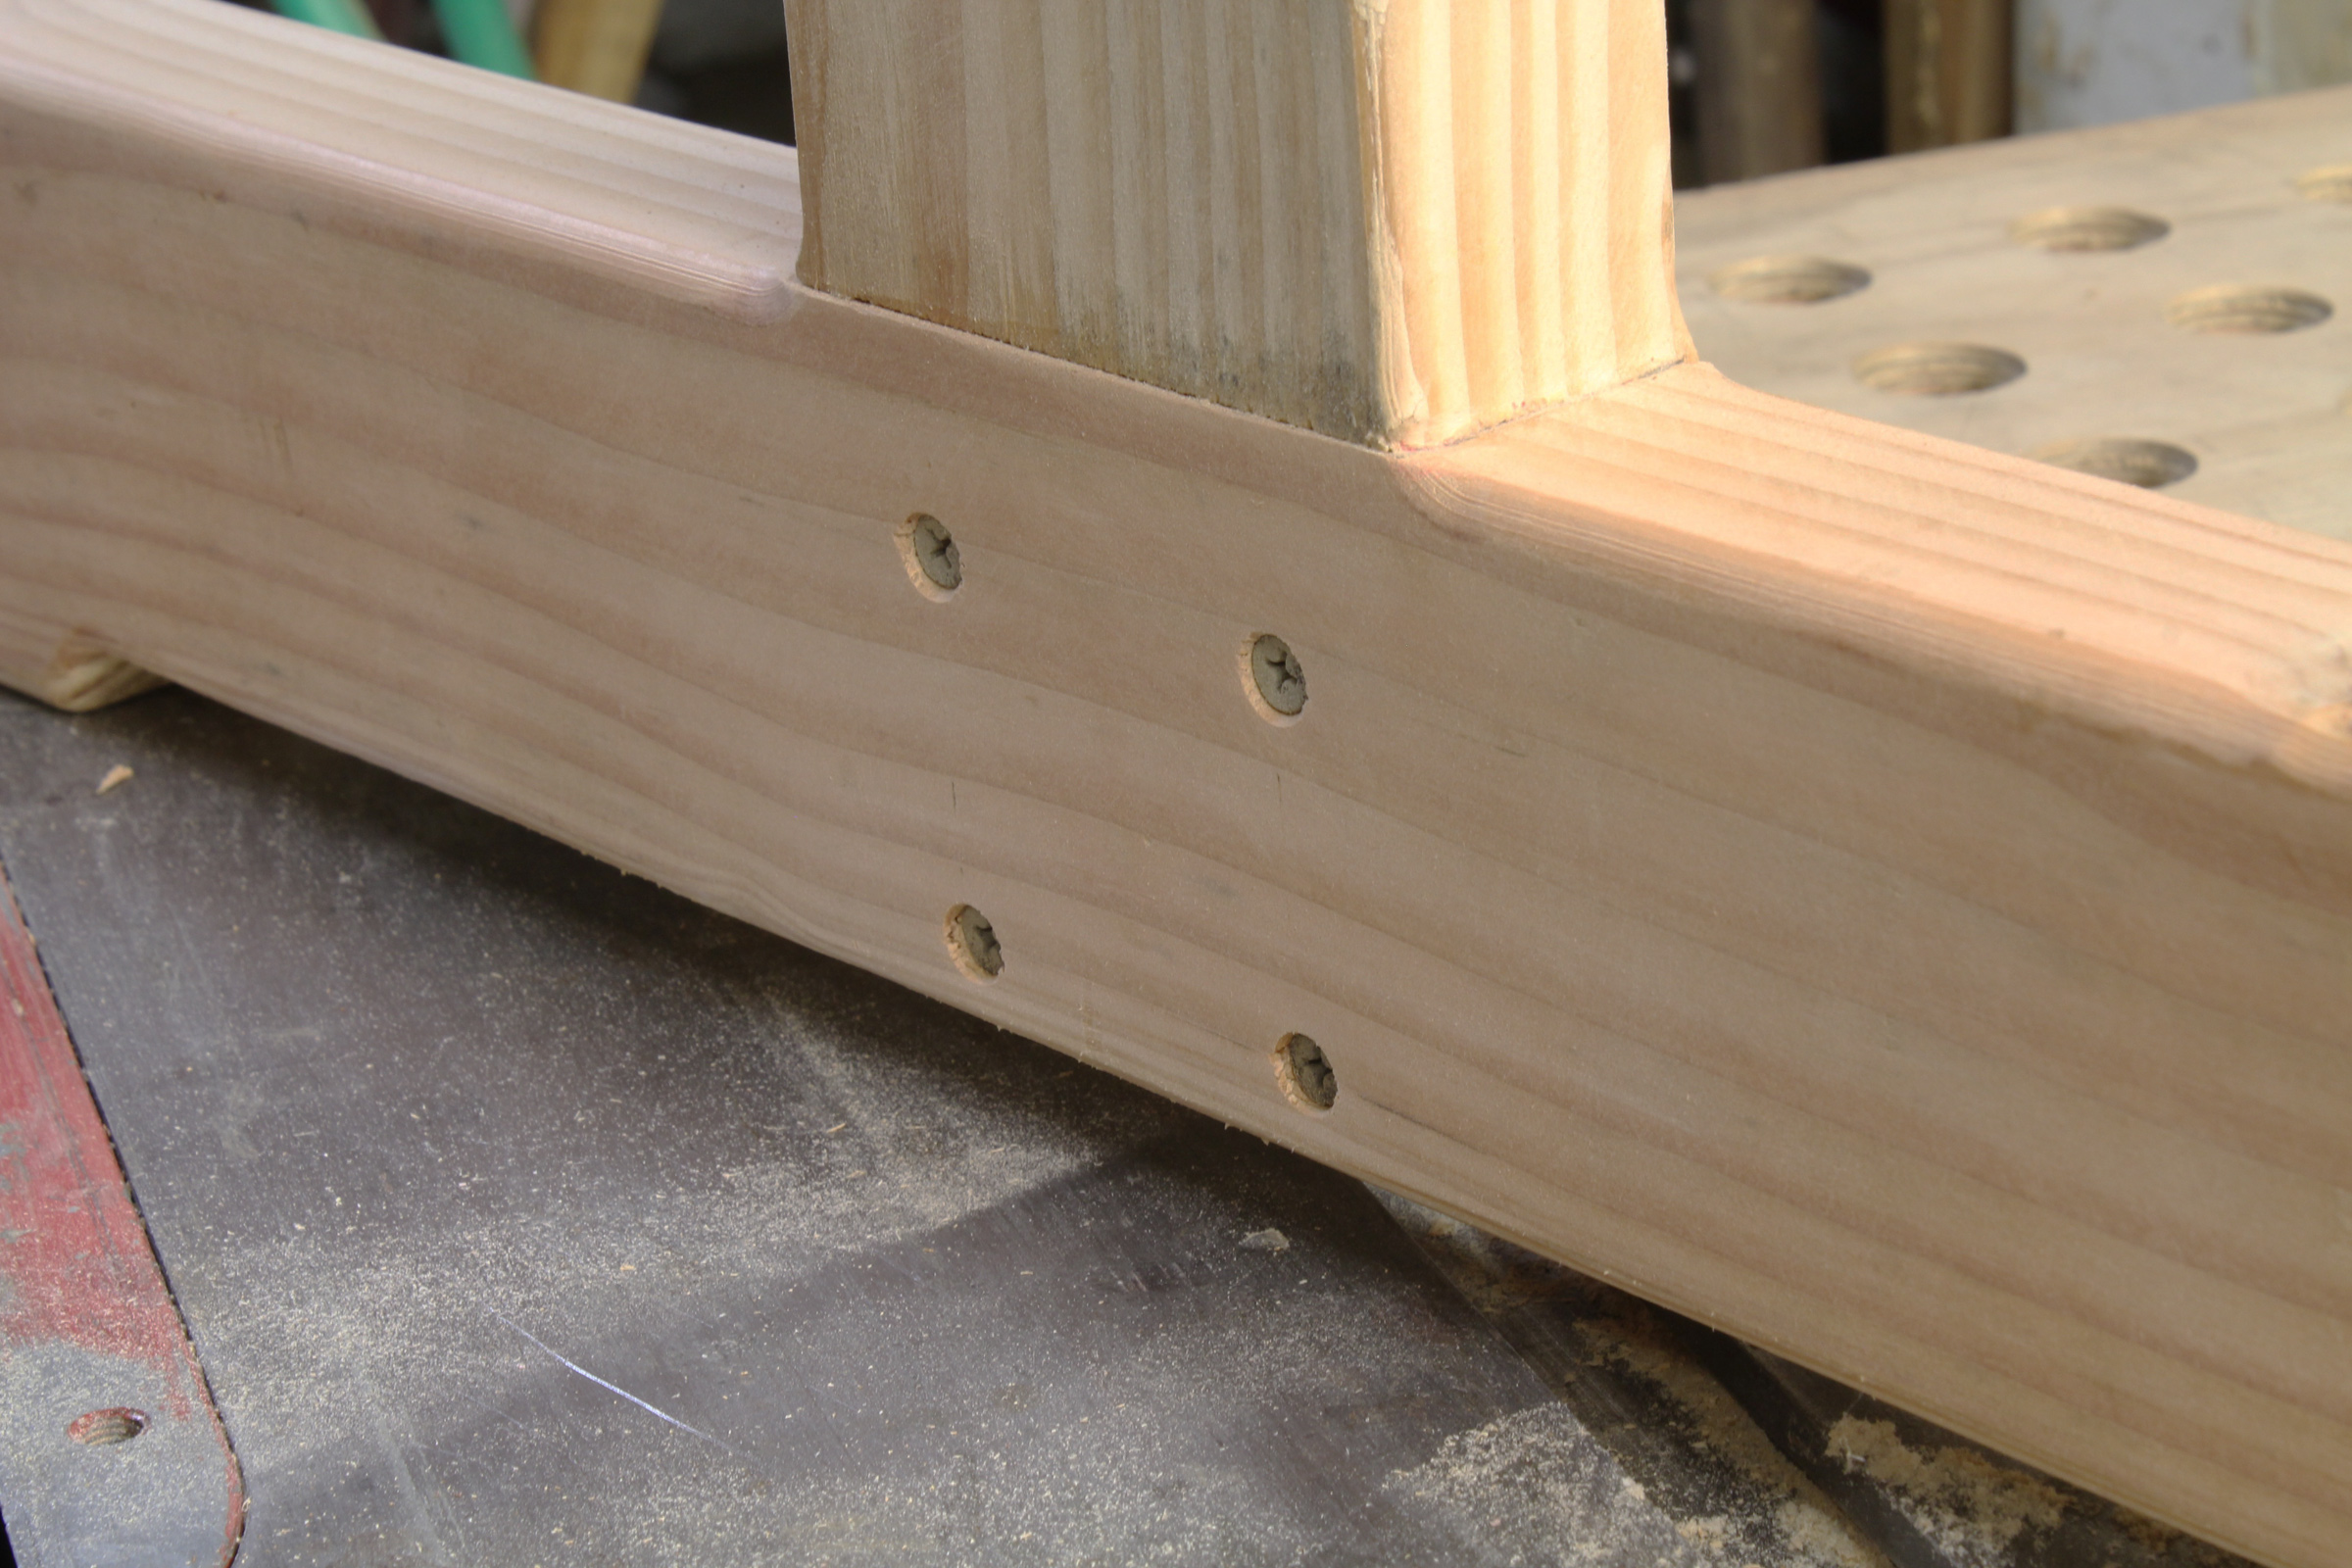
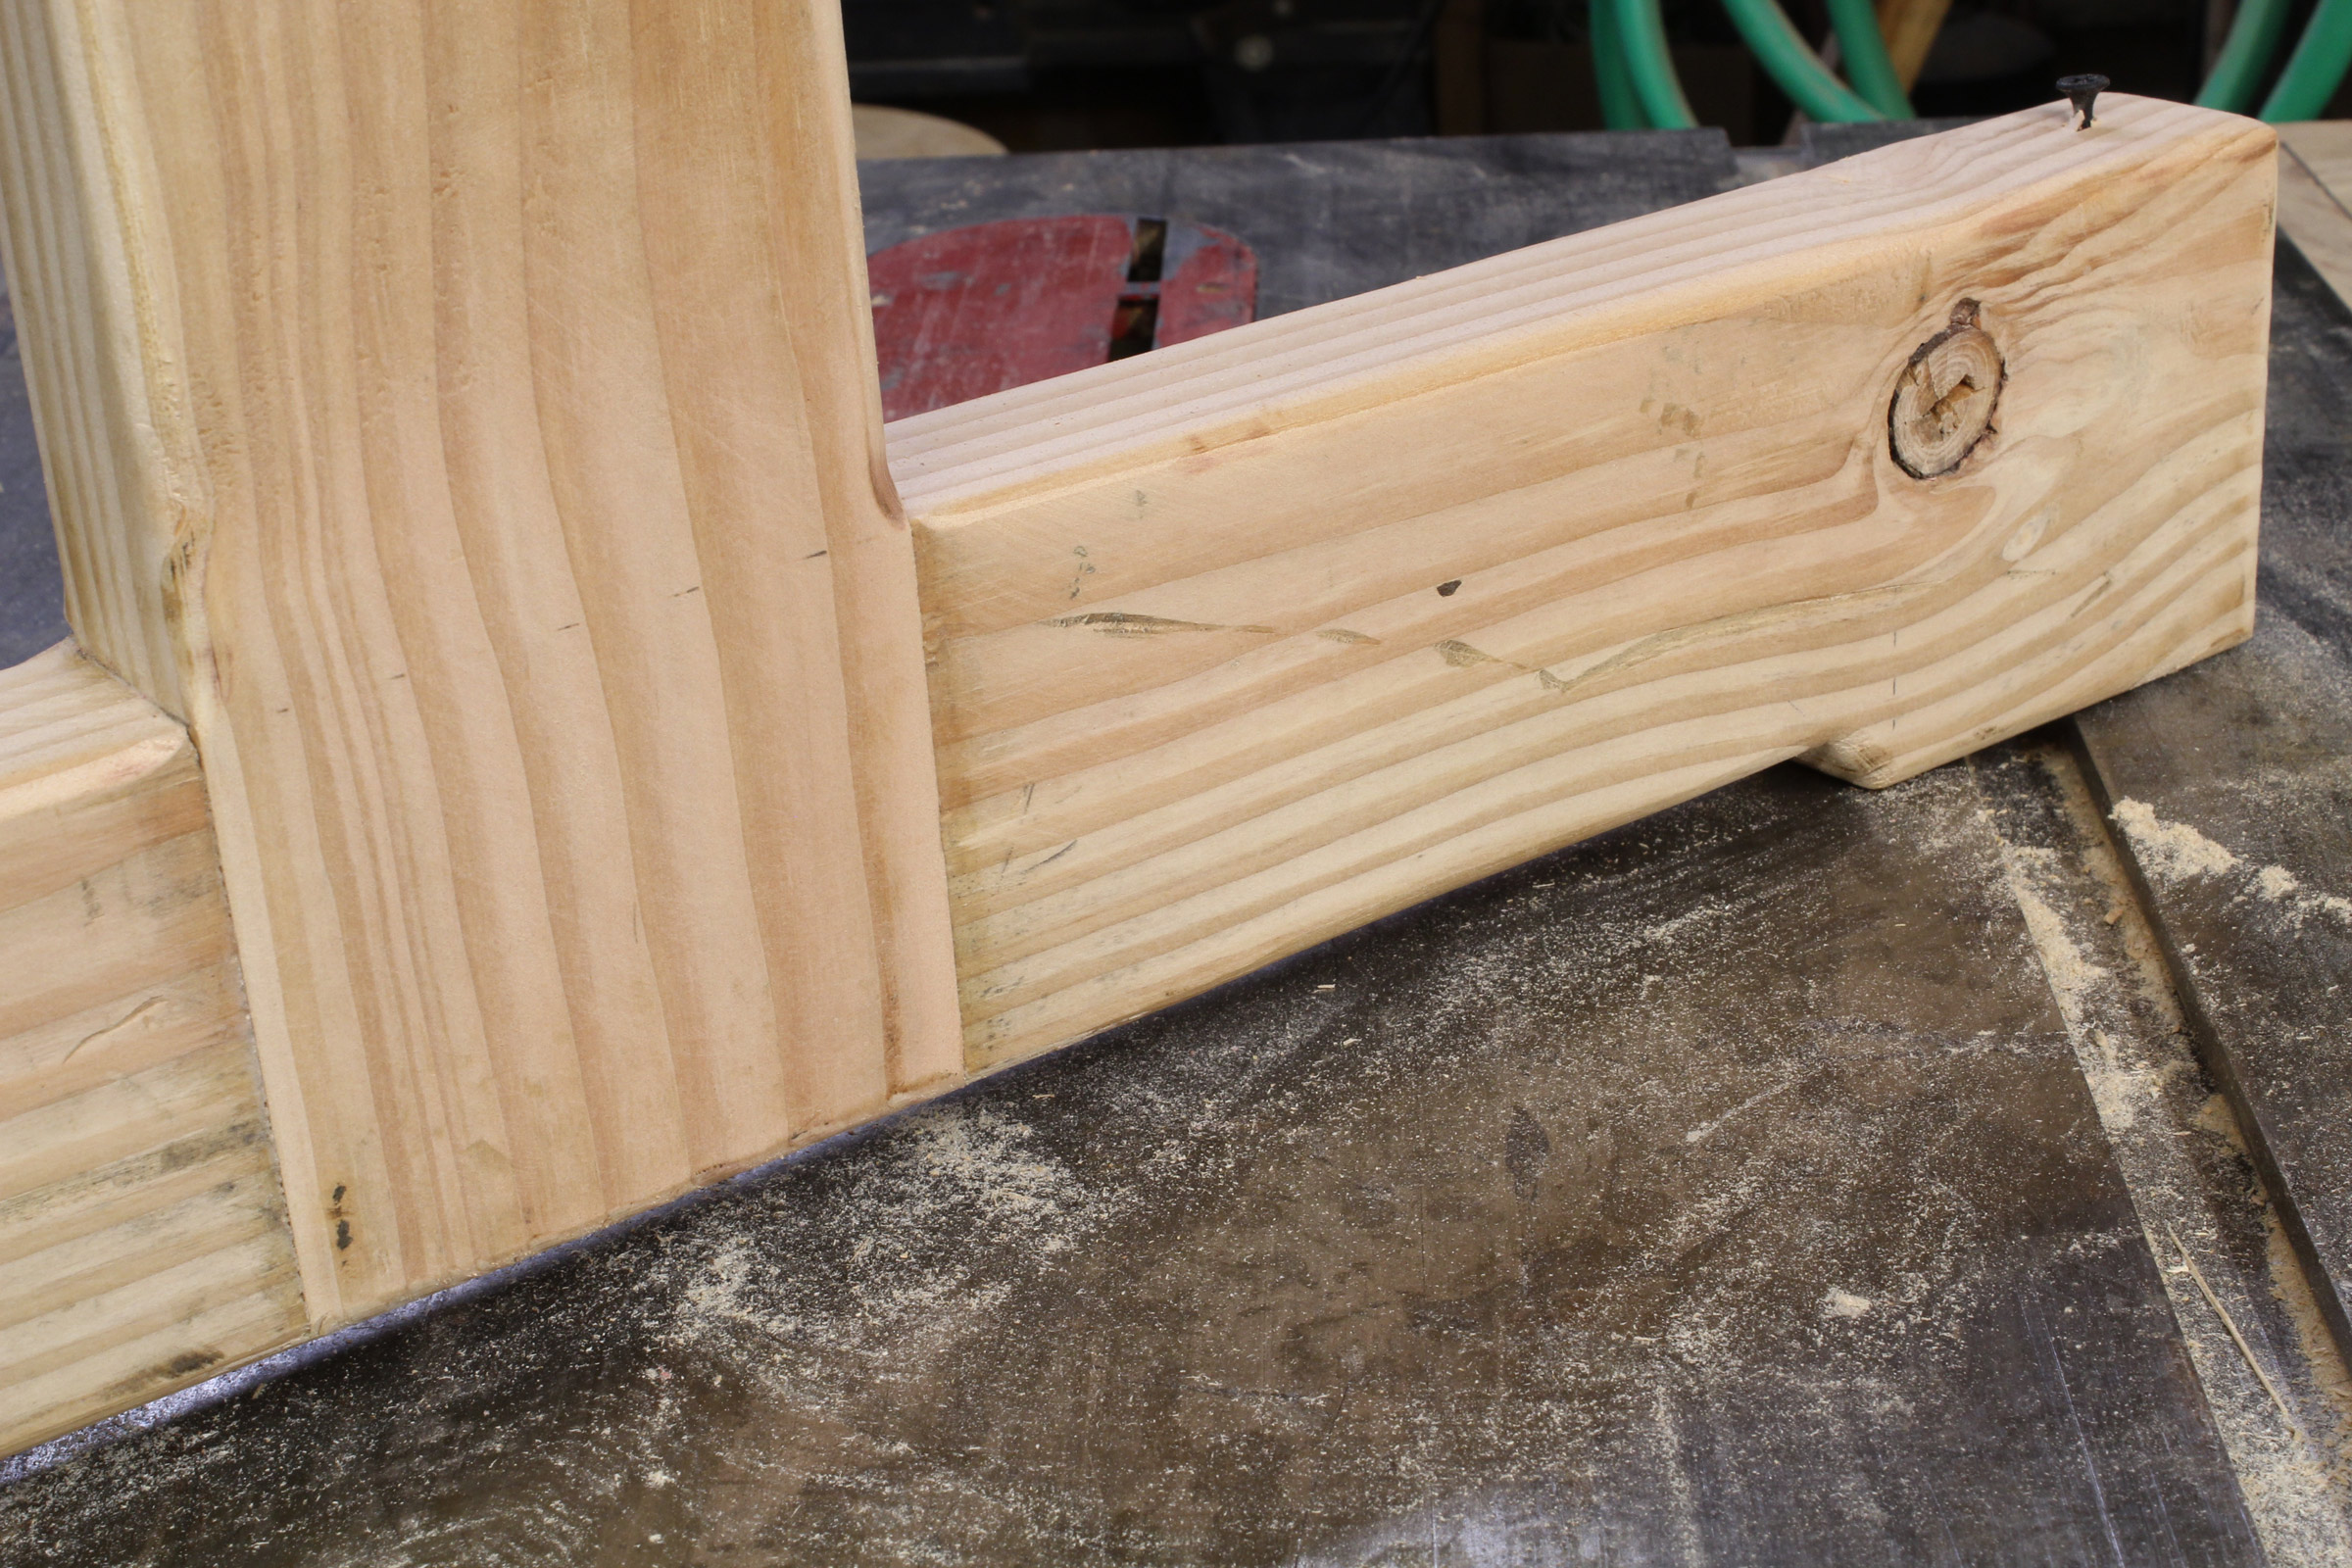
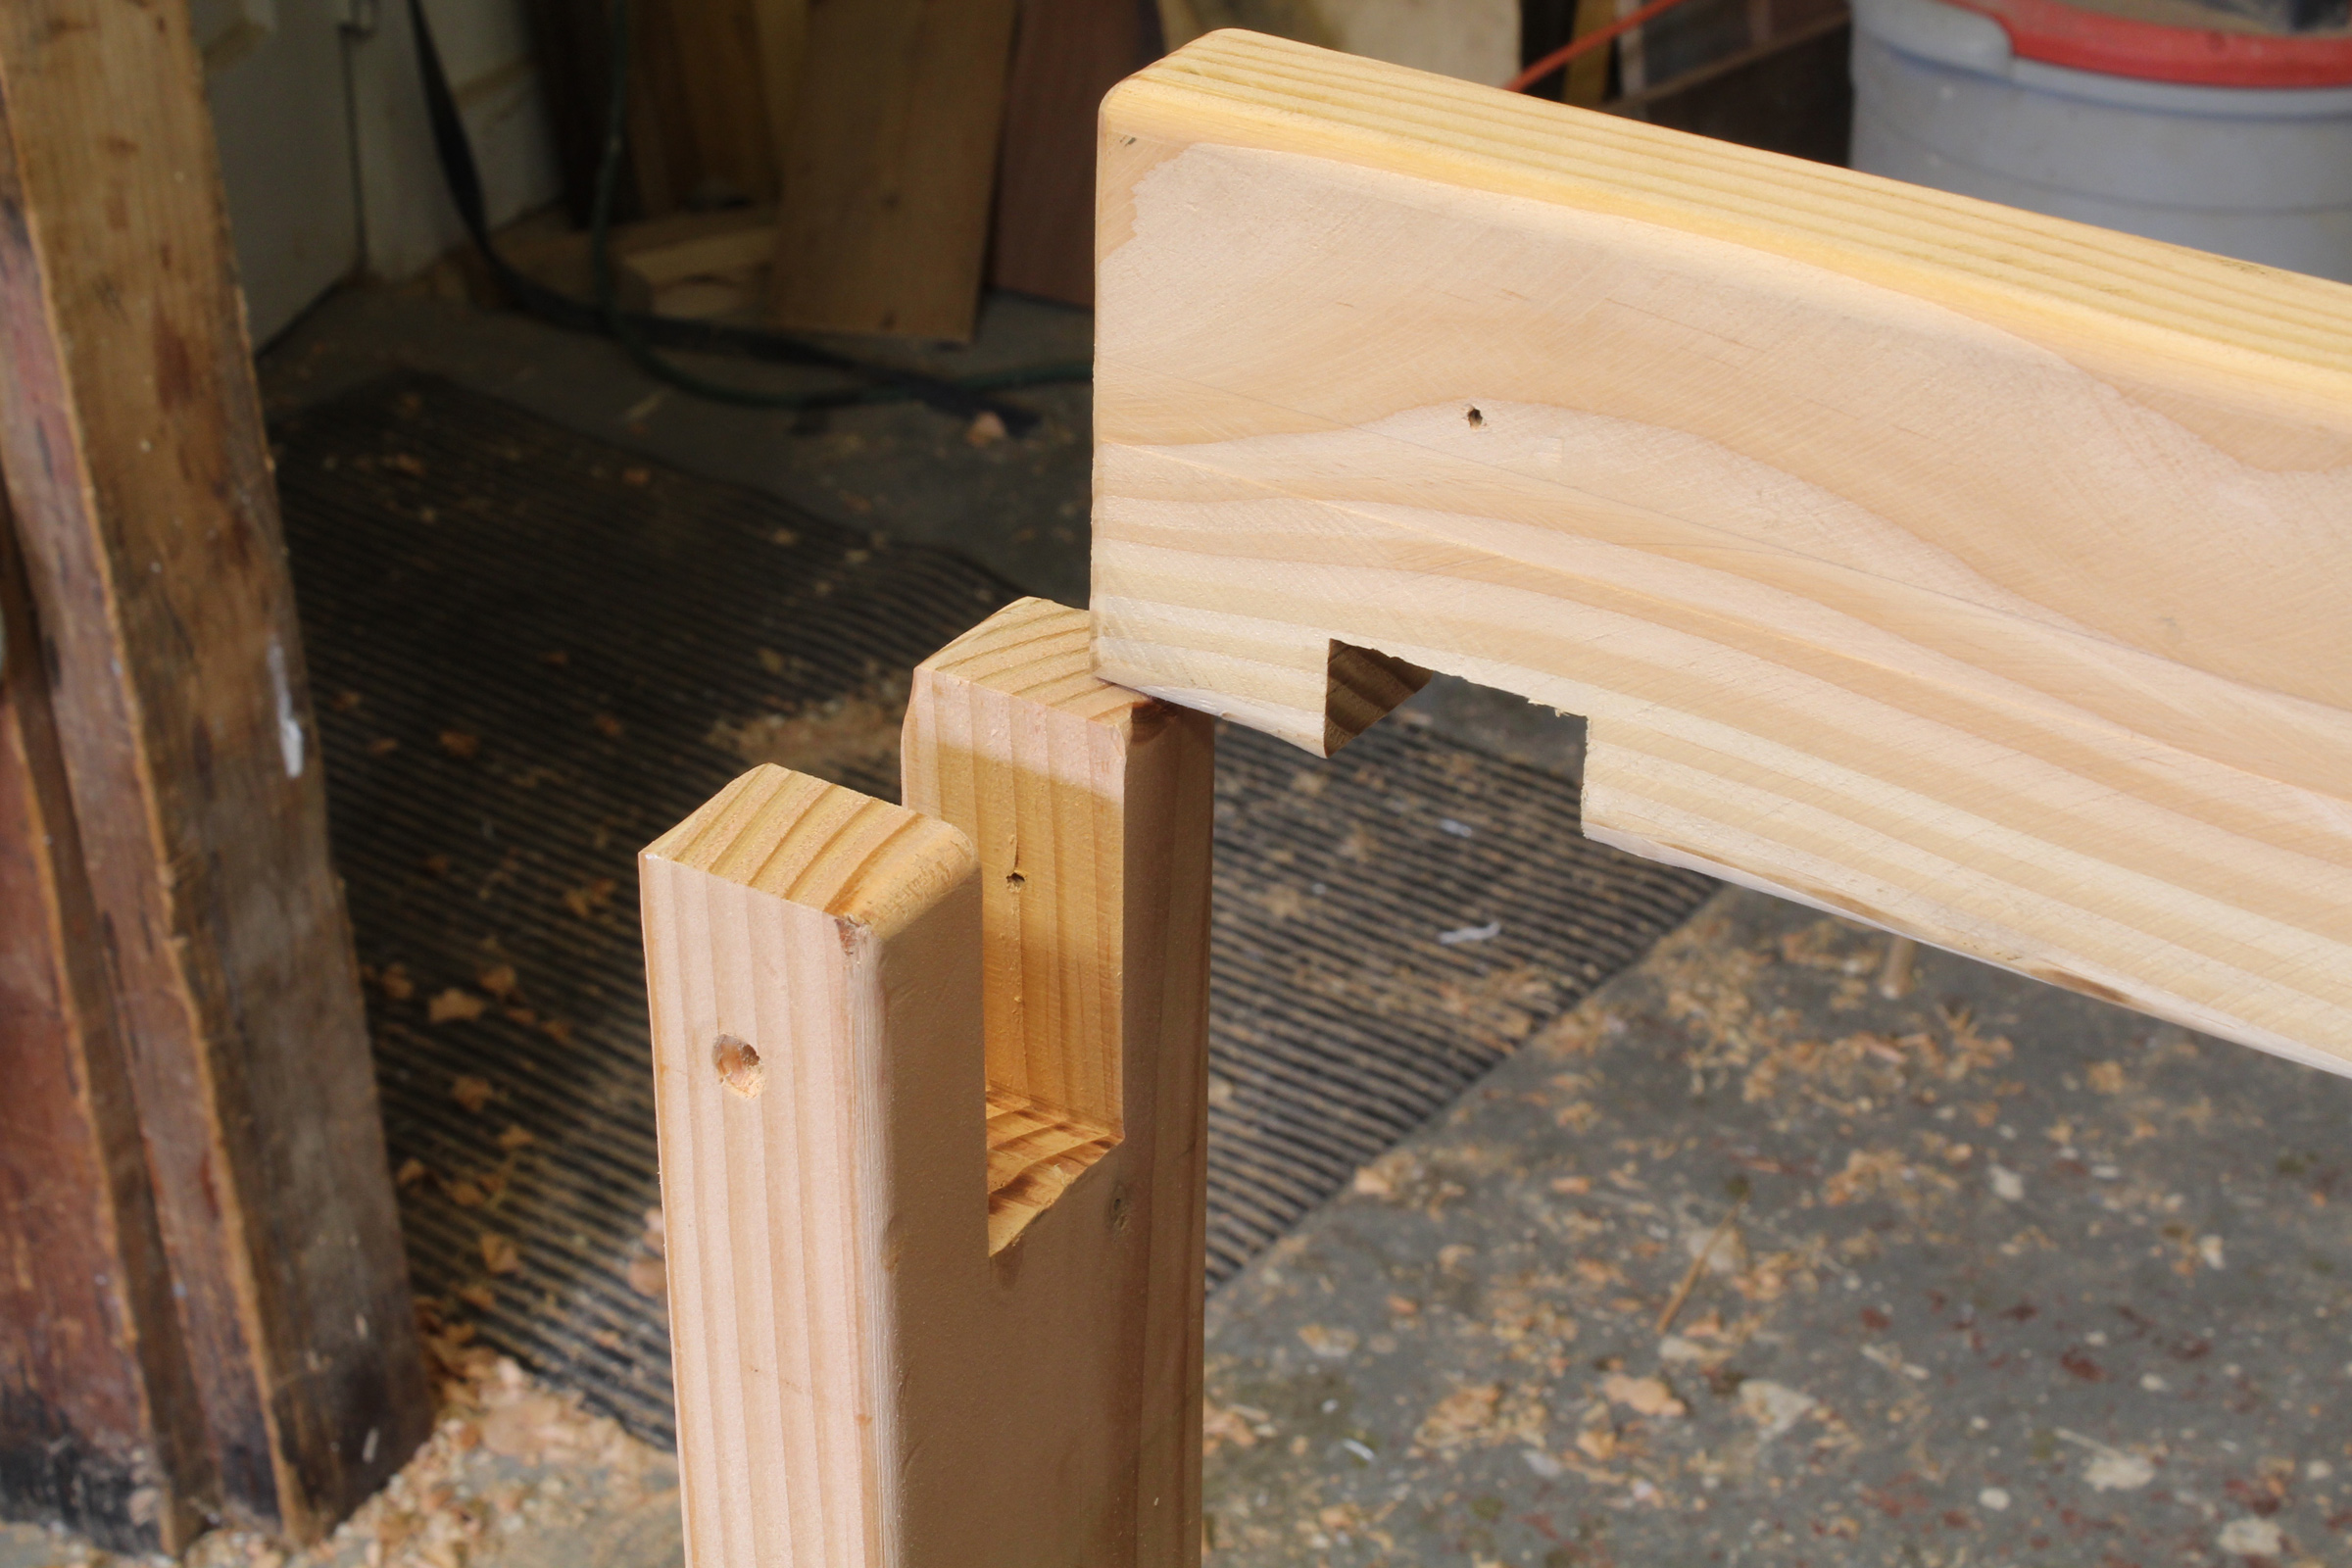
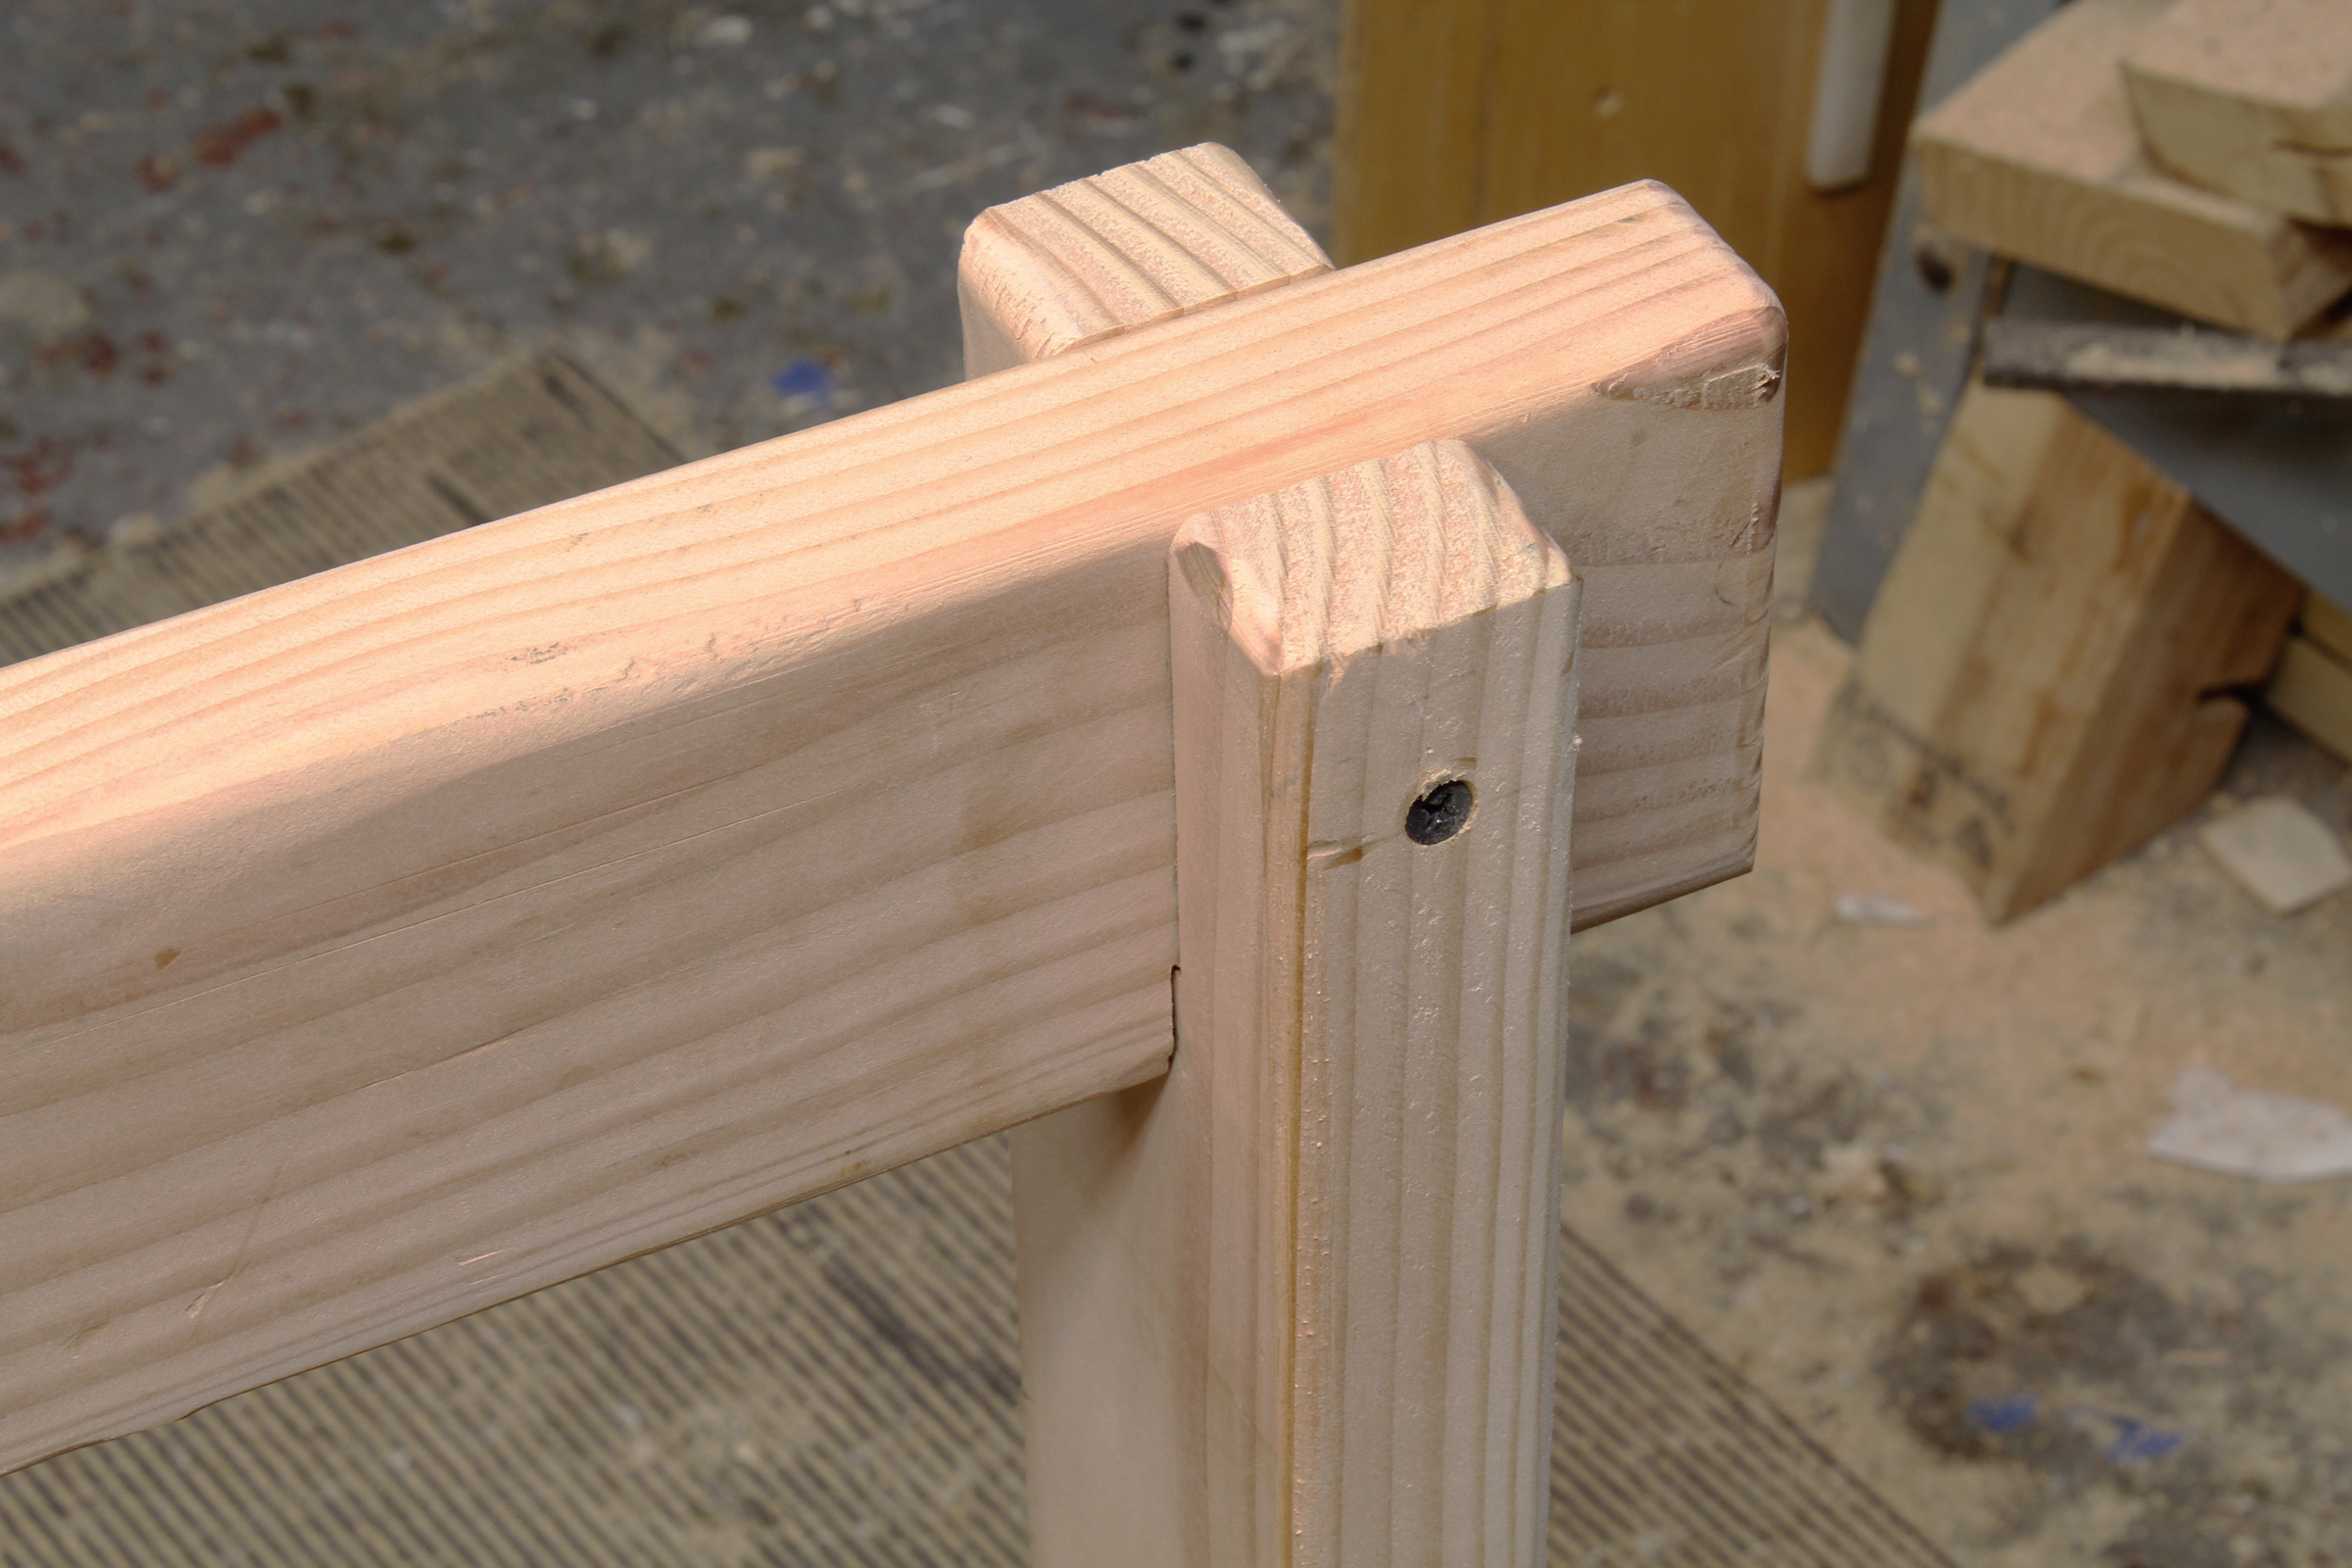
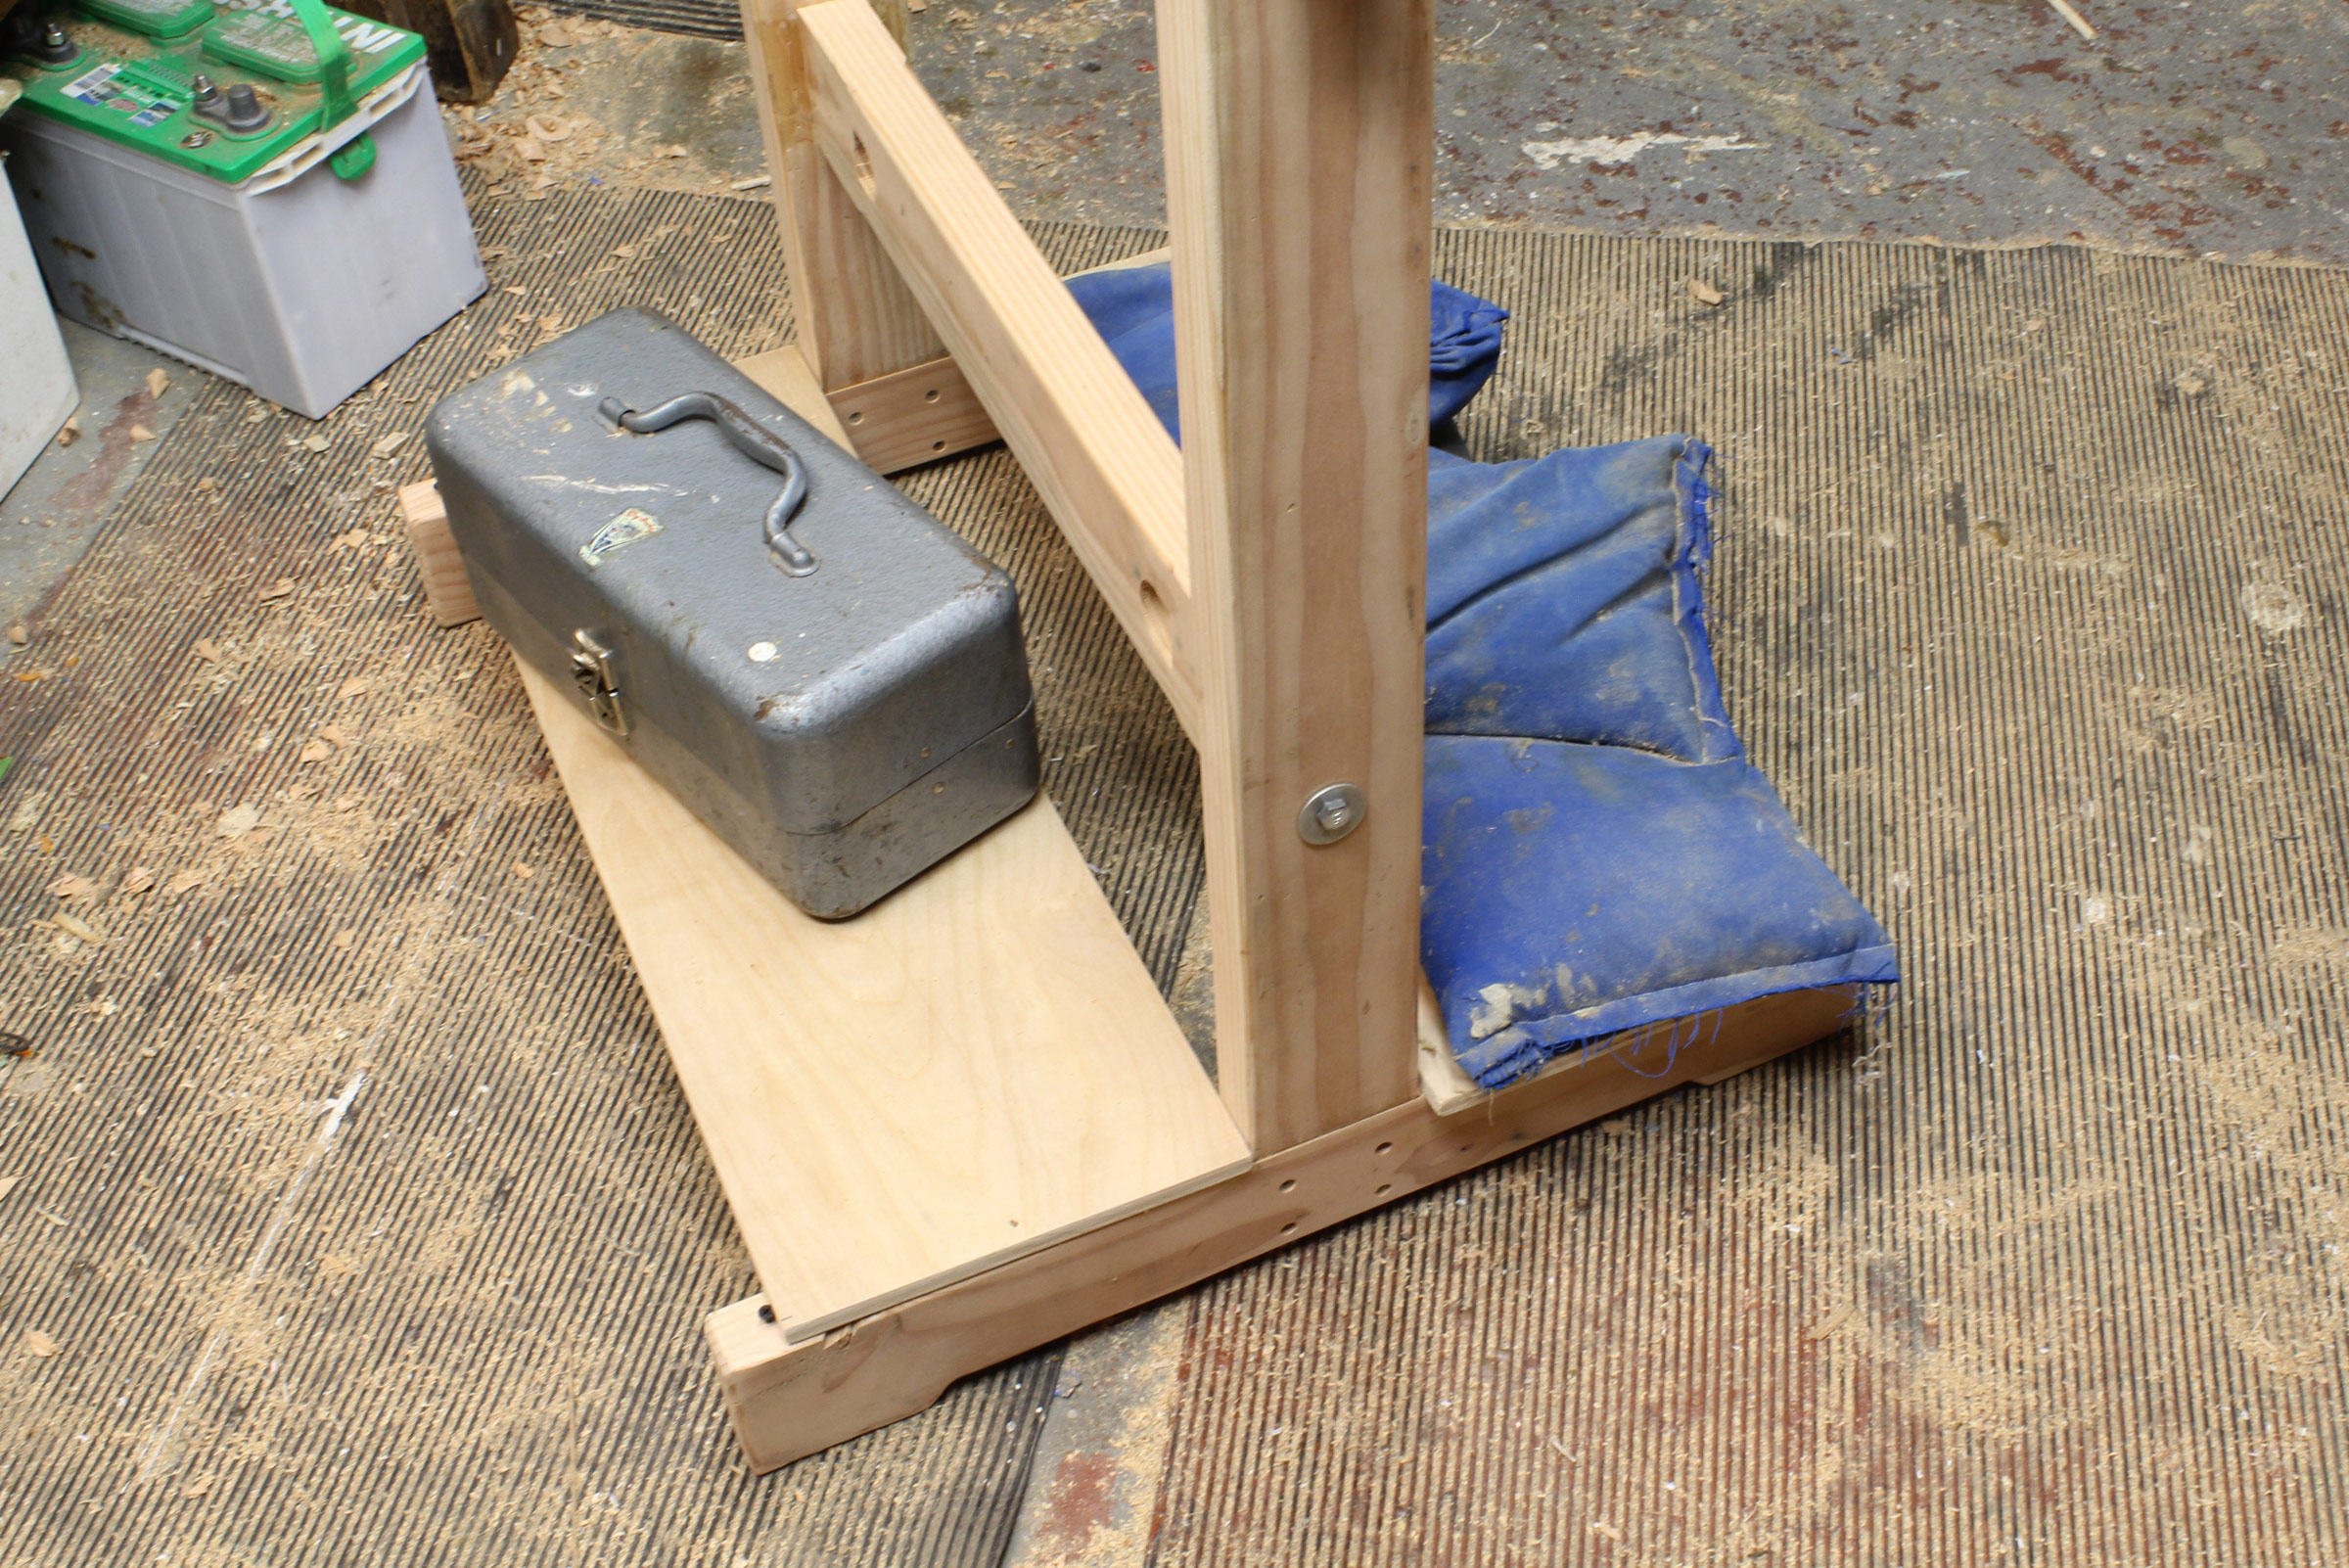
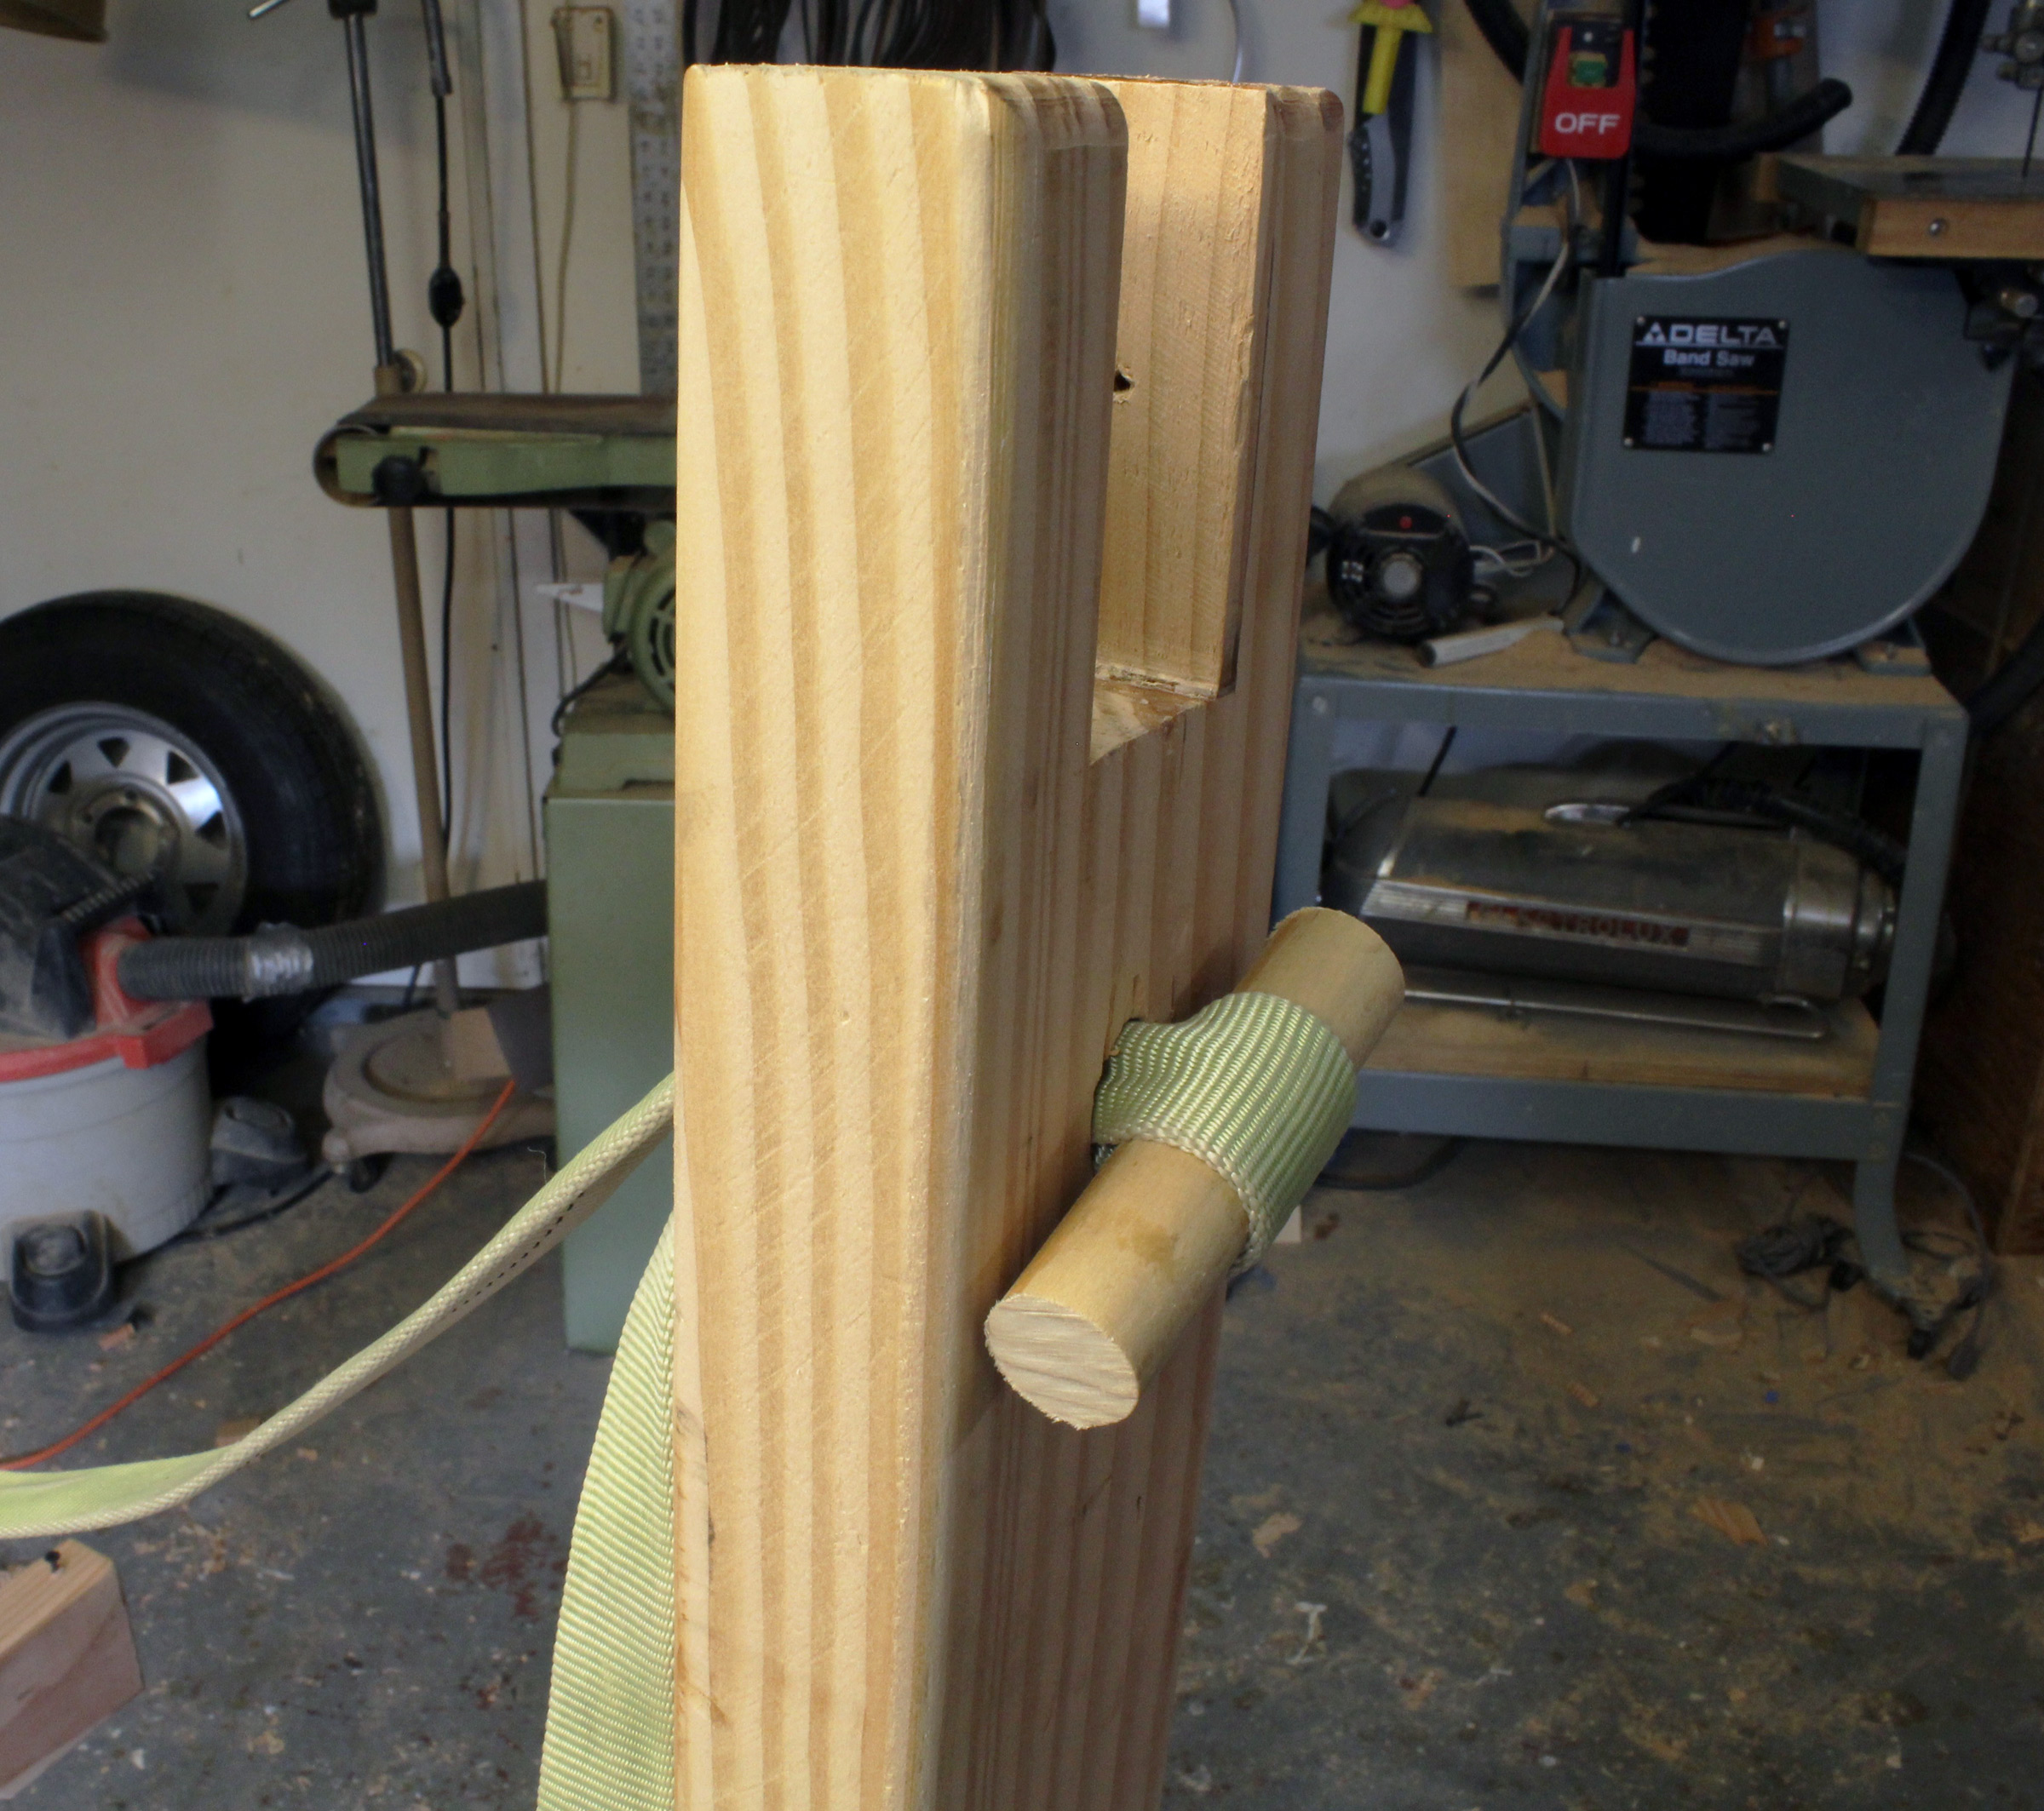
The pillars separate the saws from other tools and support the top when it is used as a step or a stool.
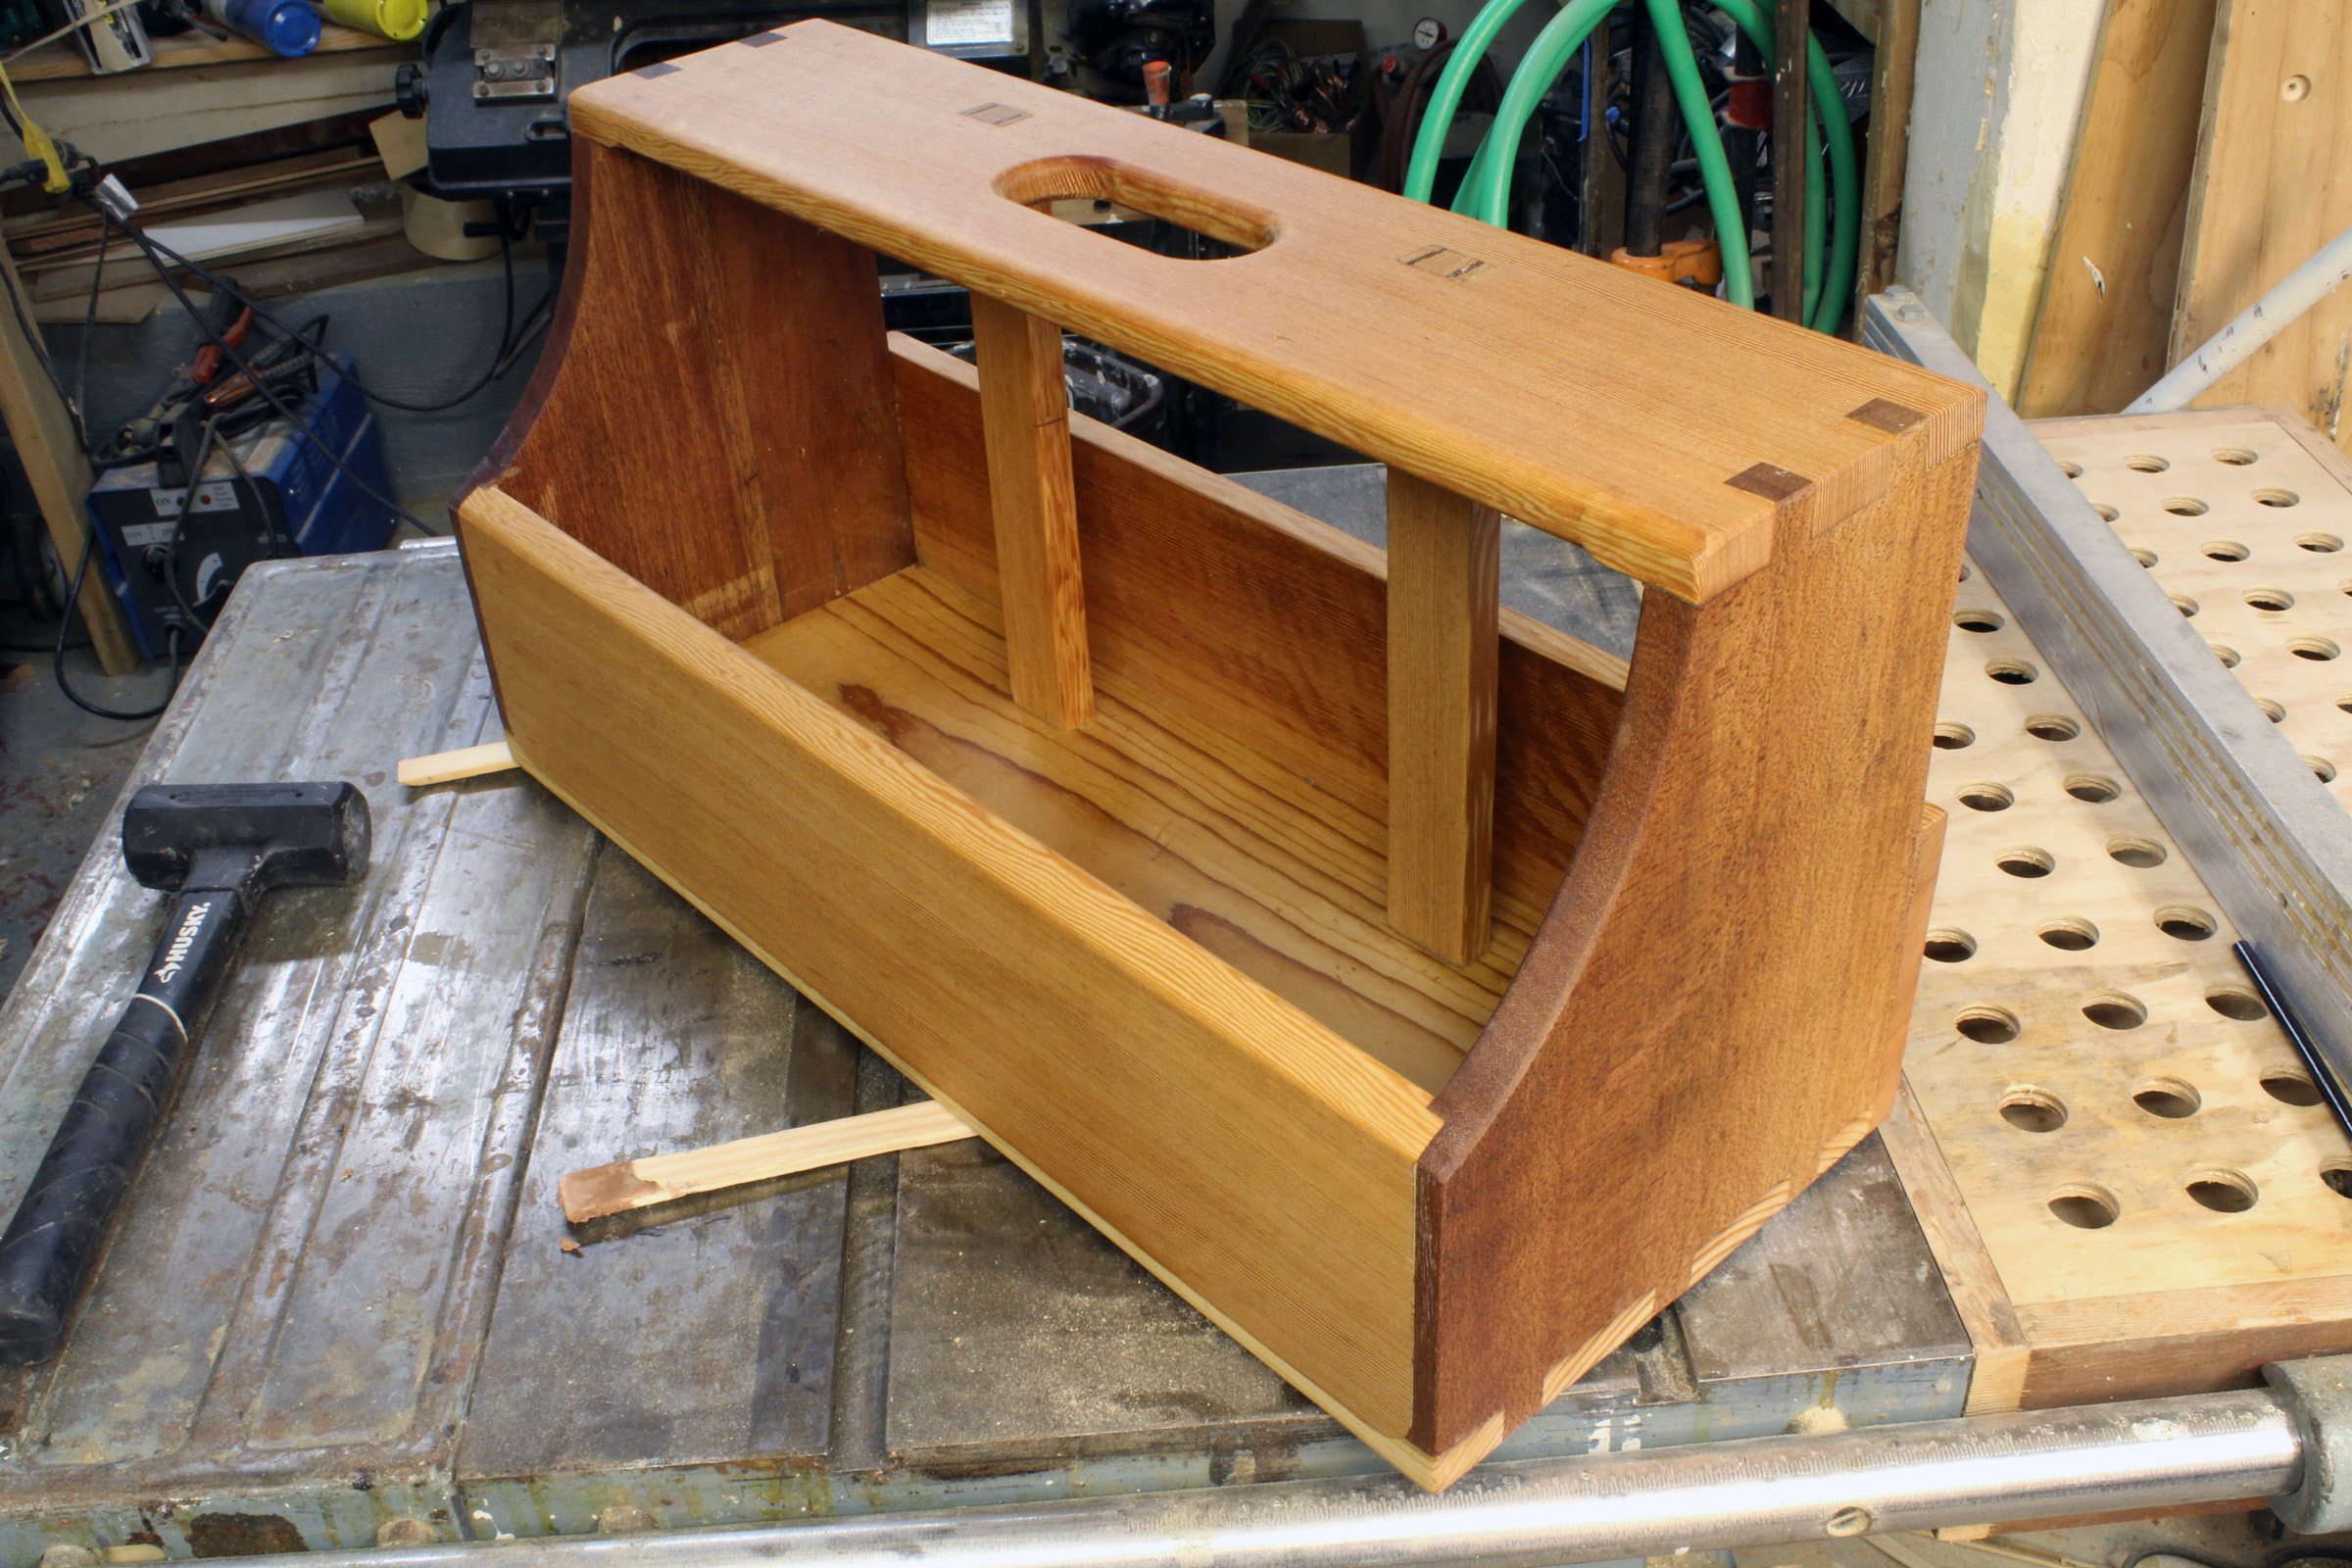
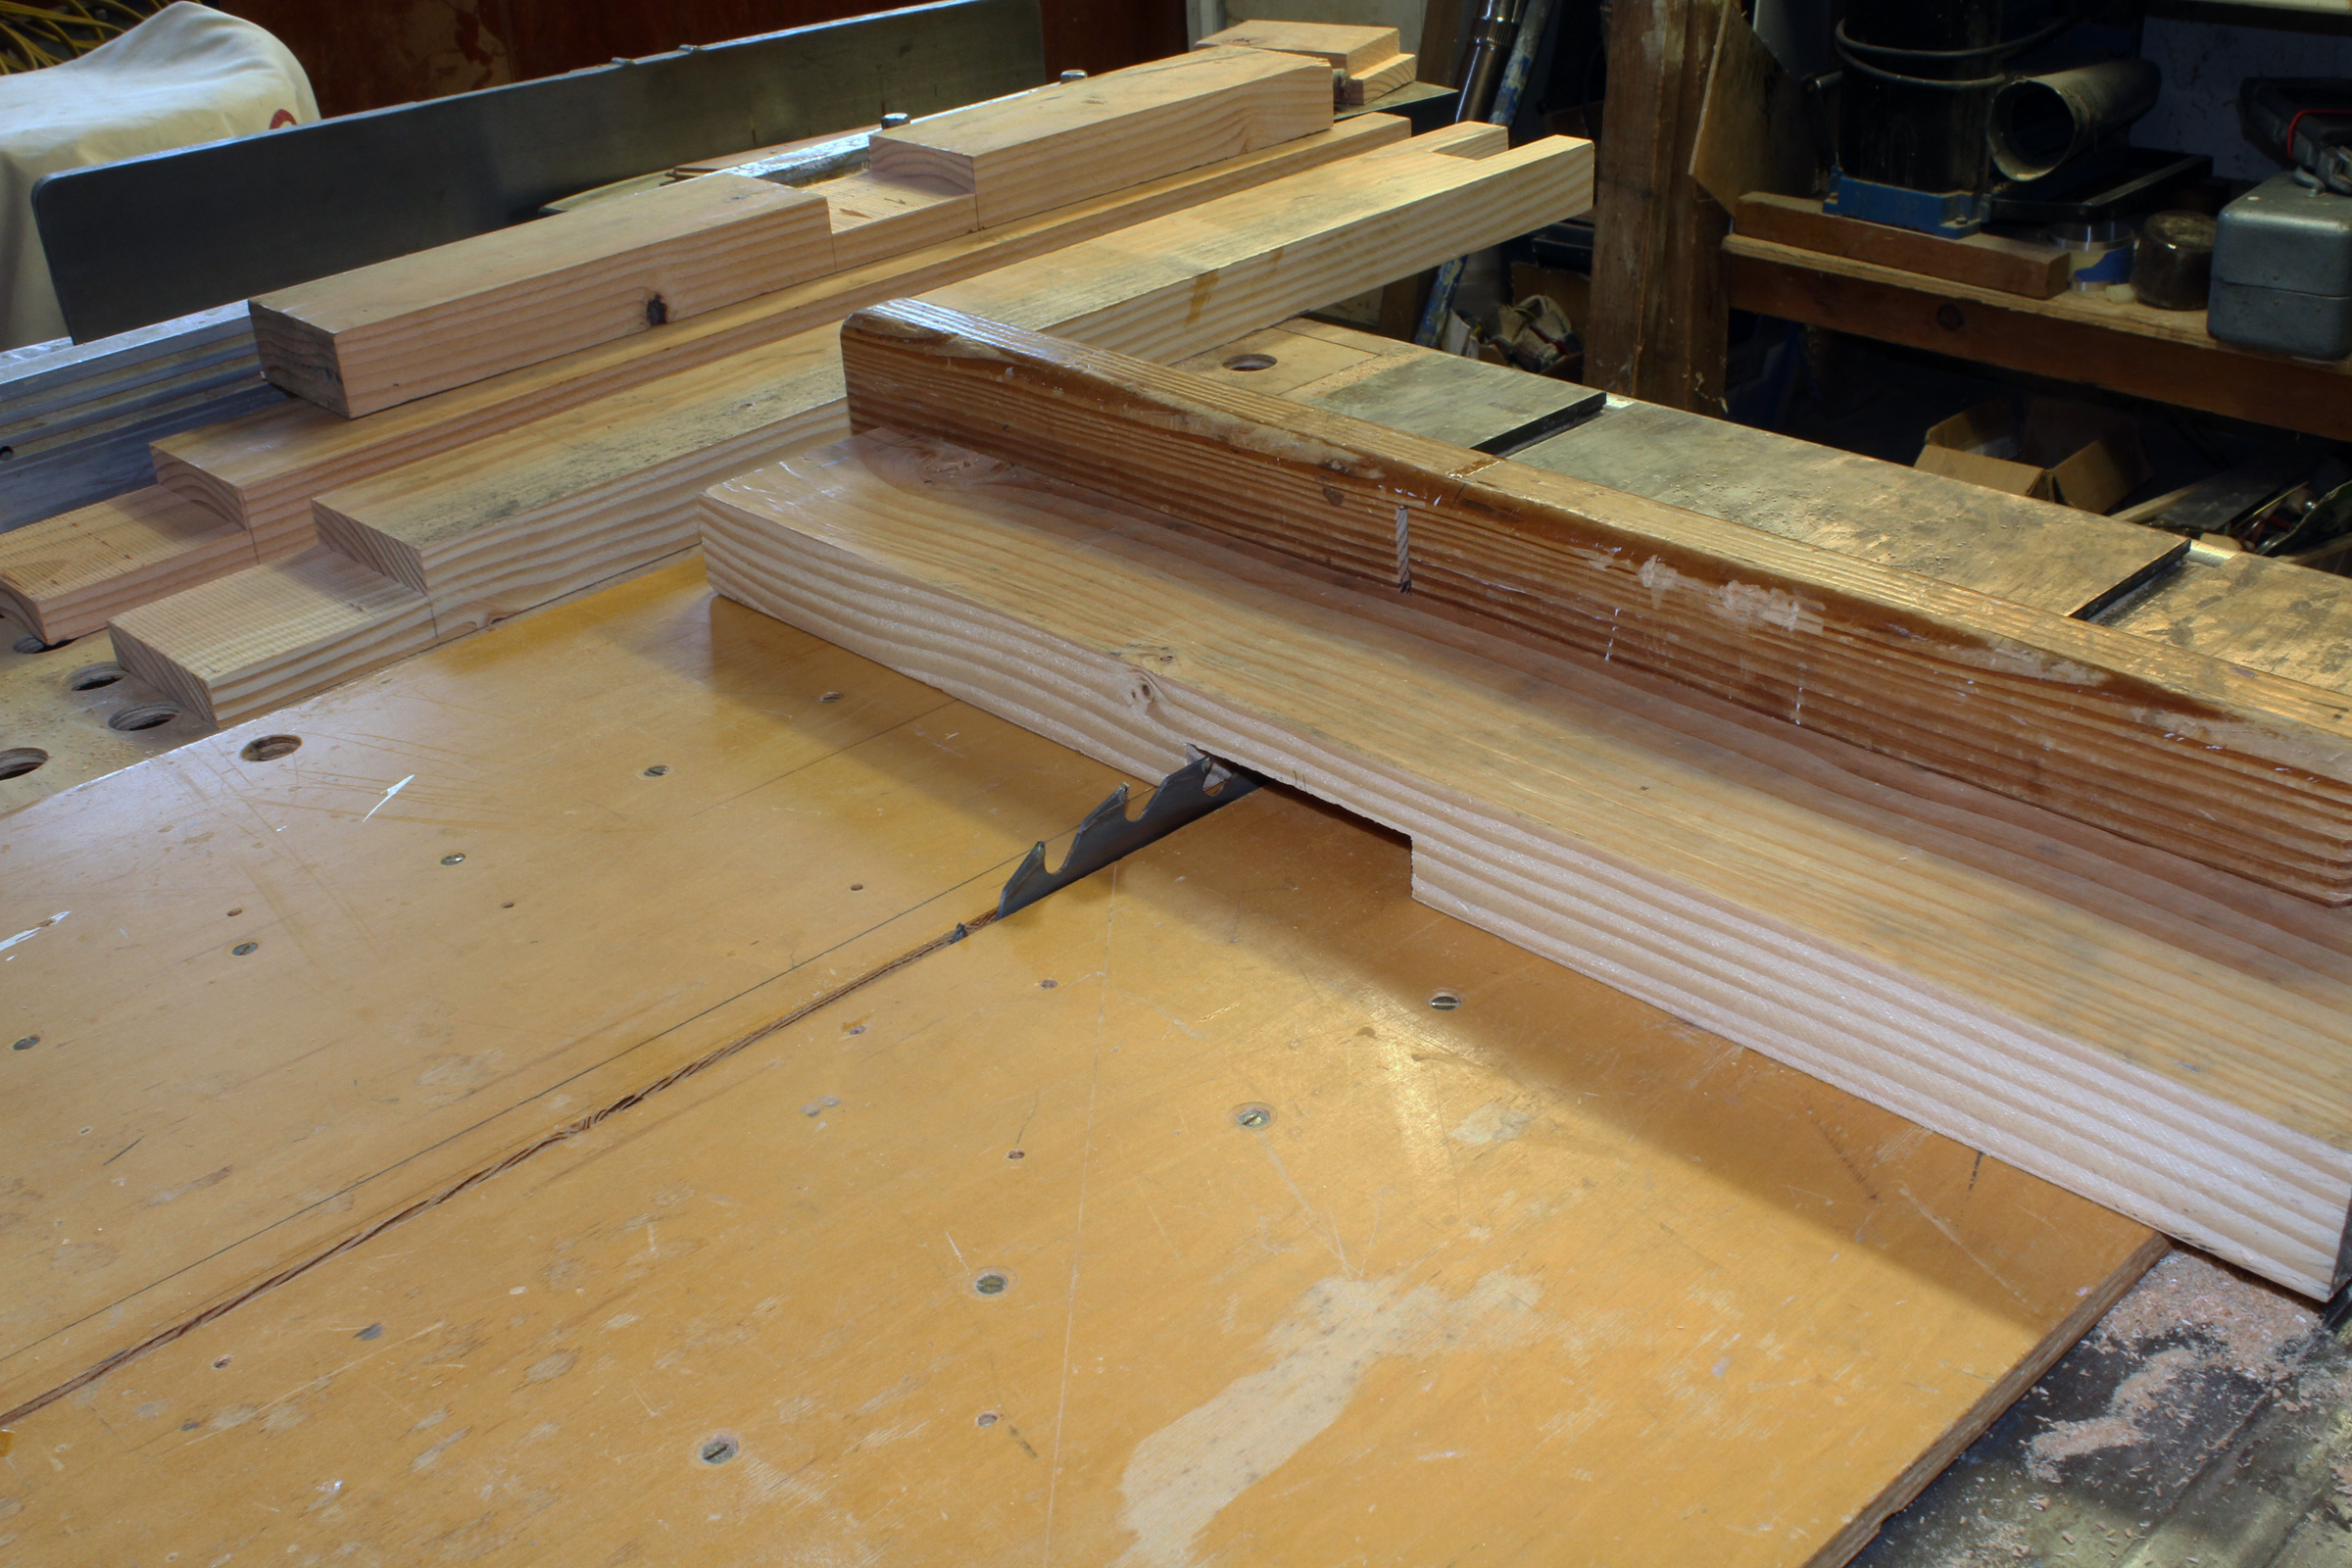
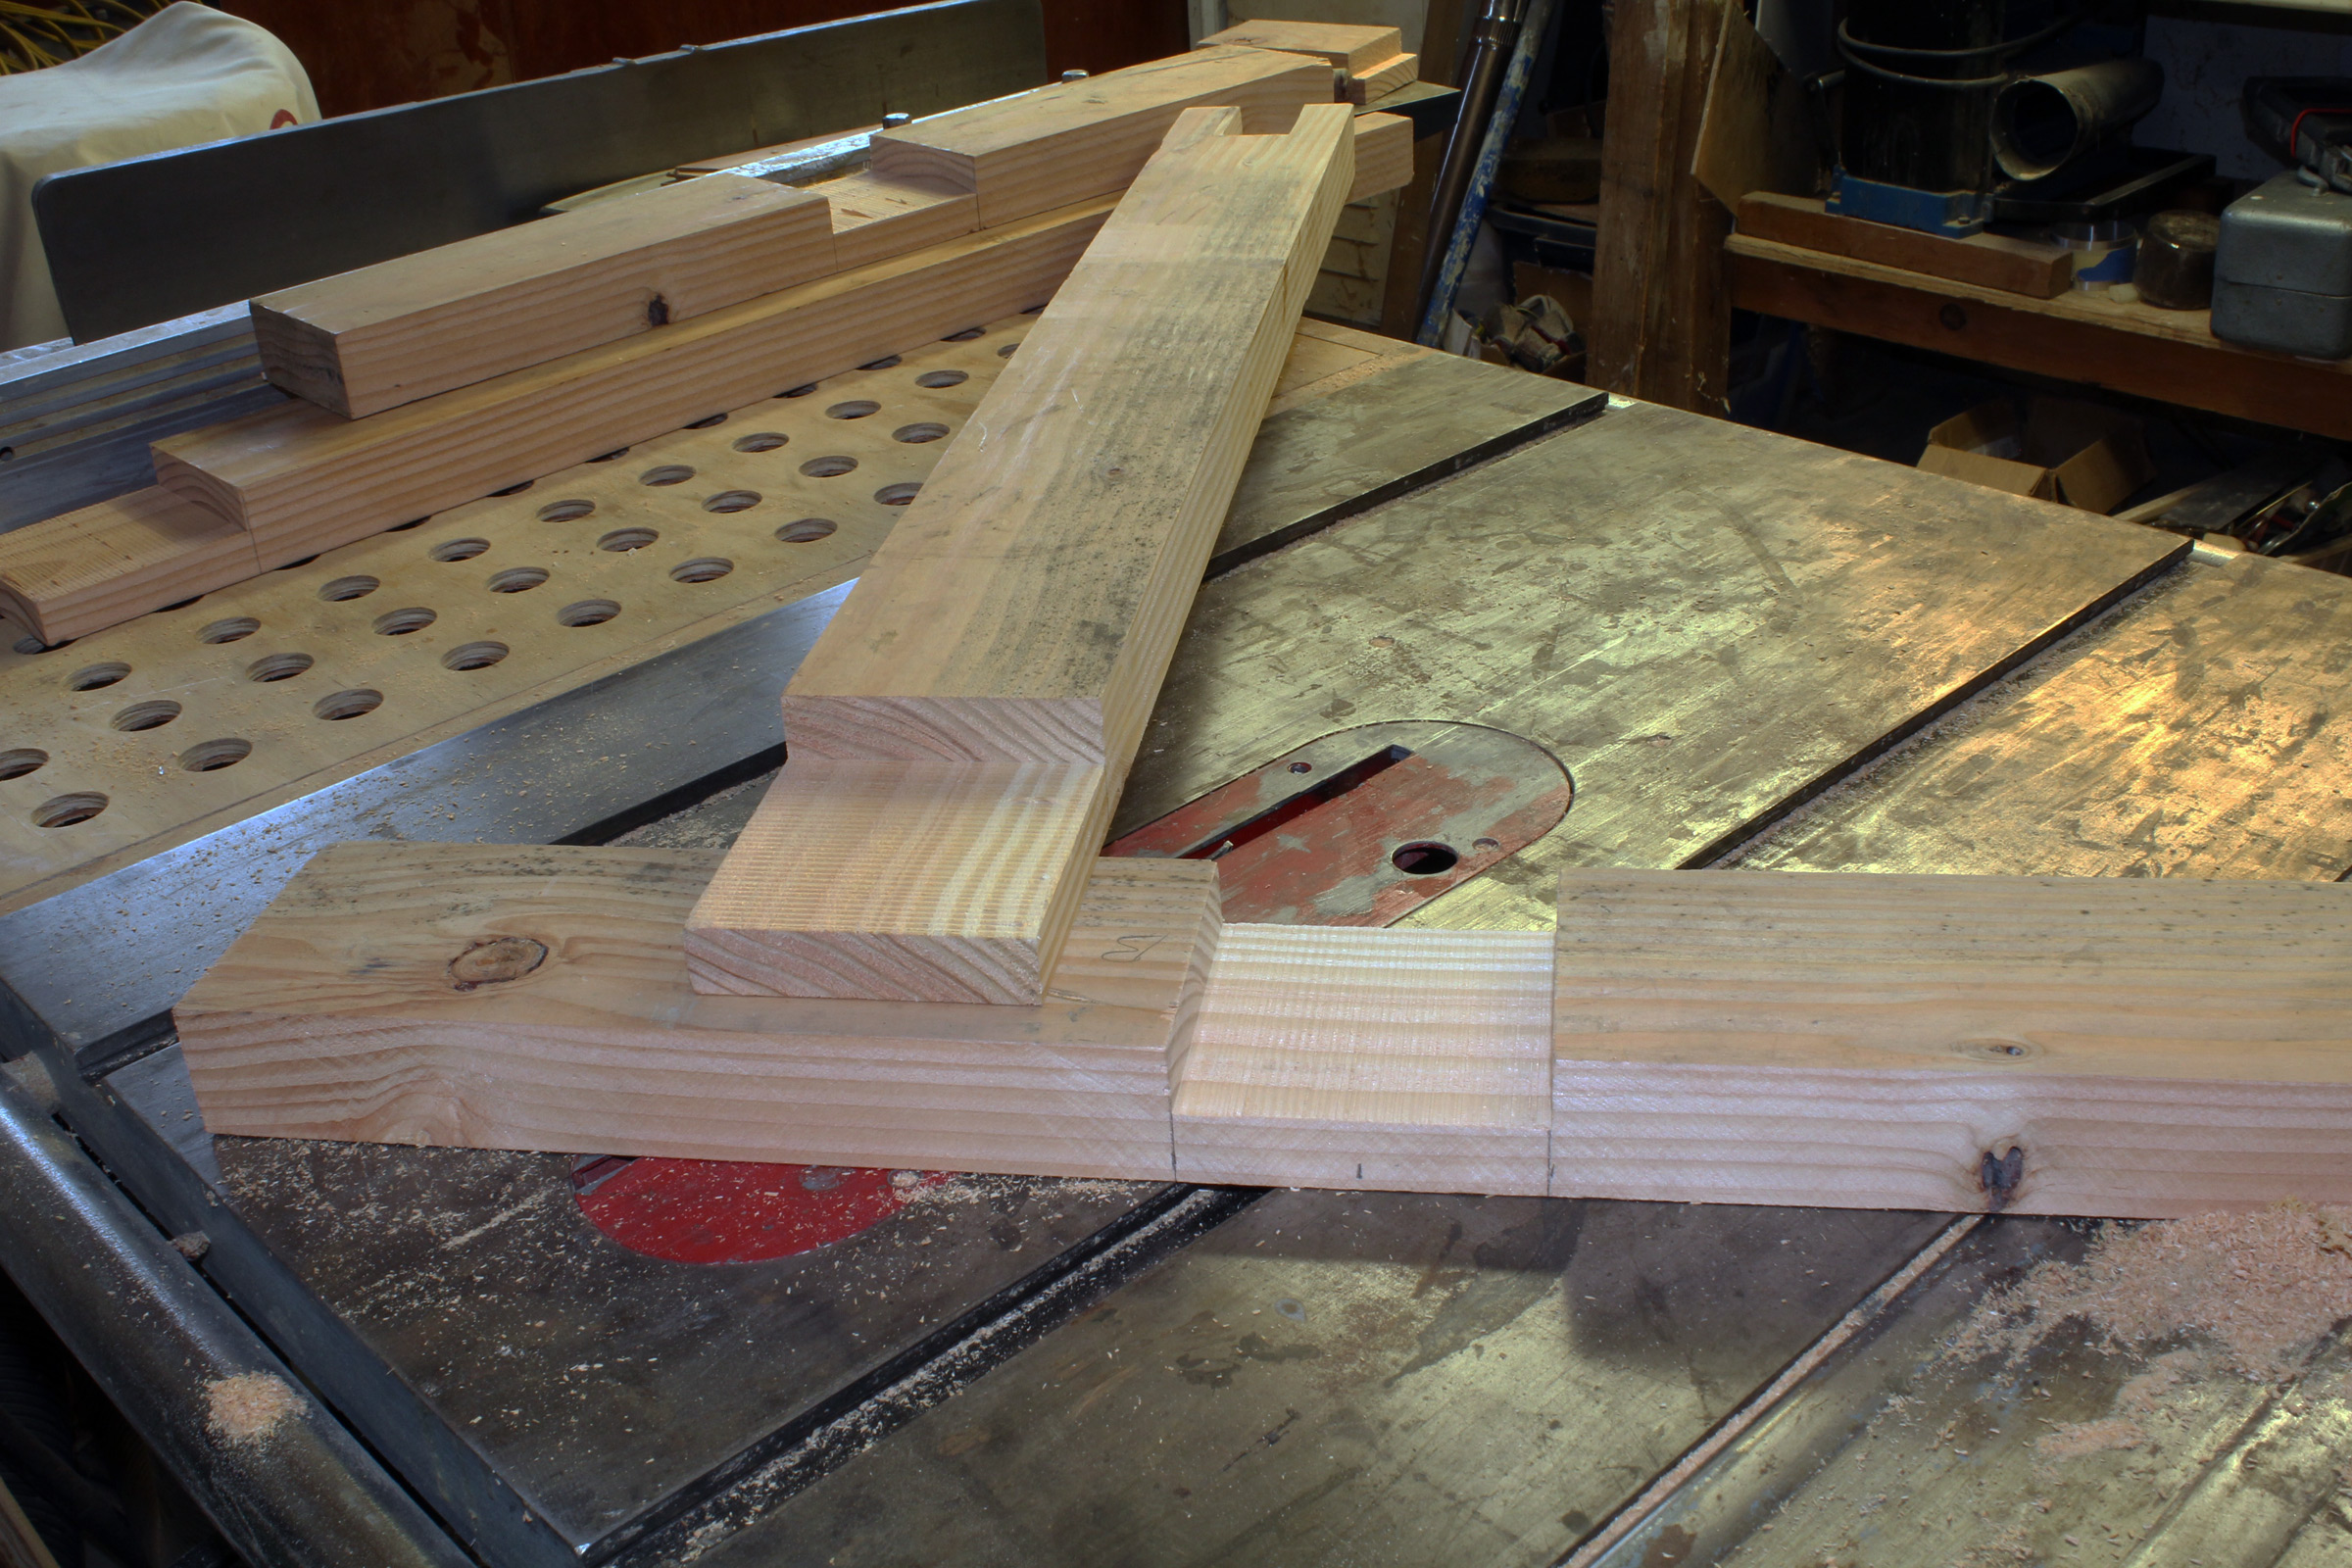
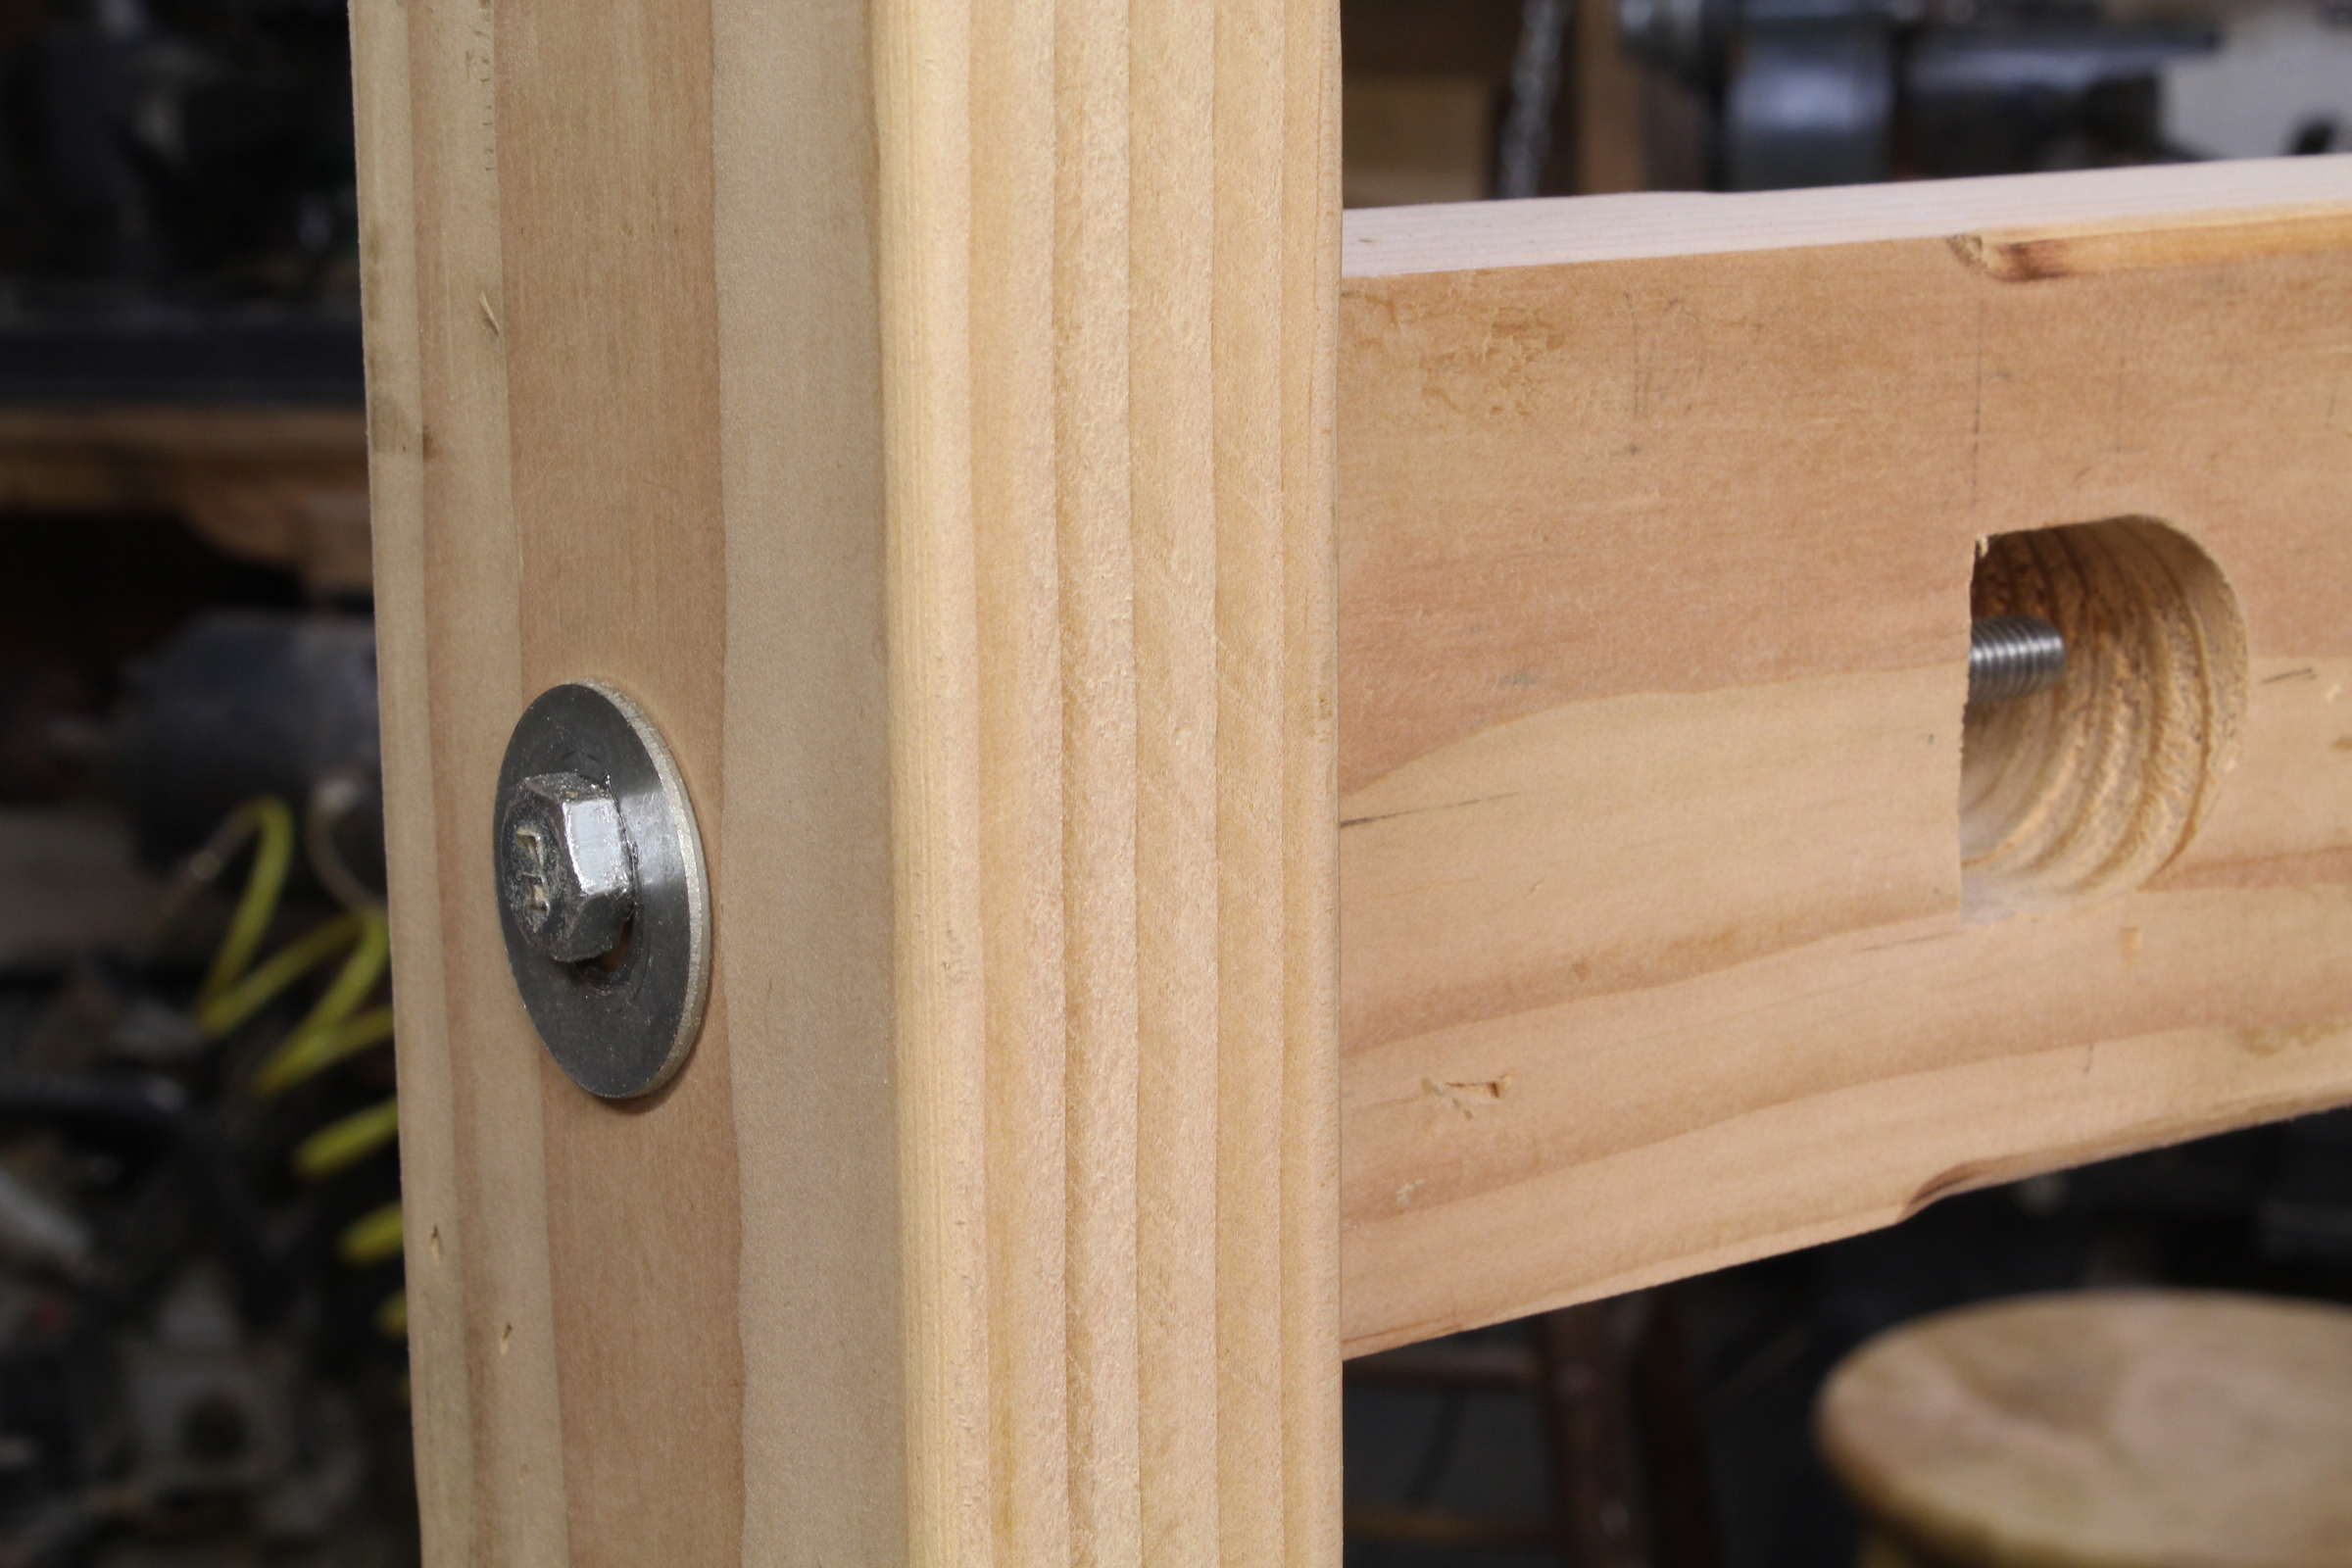
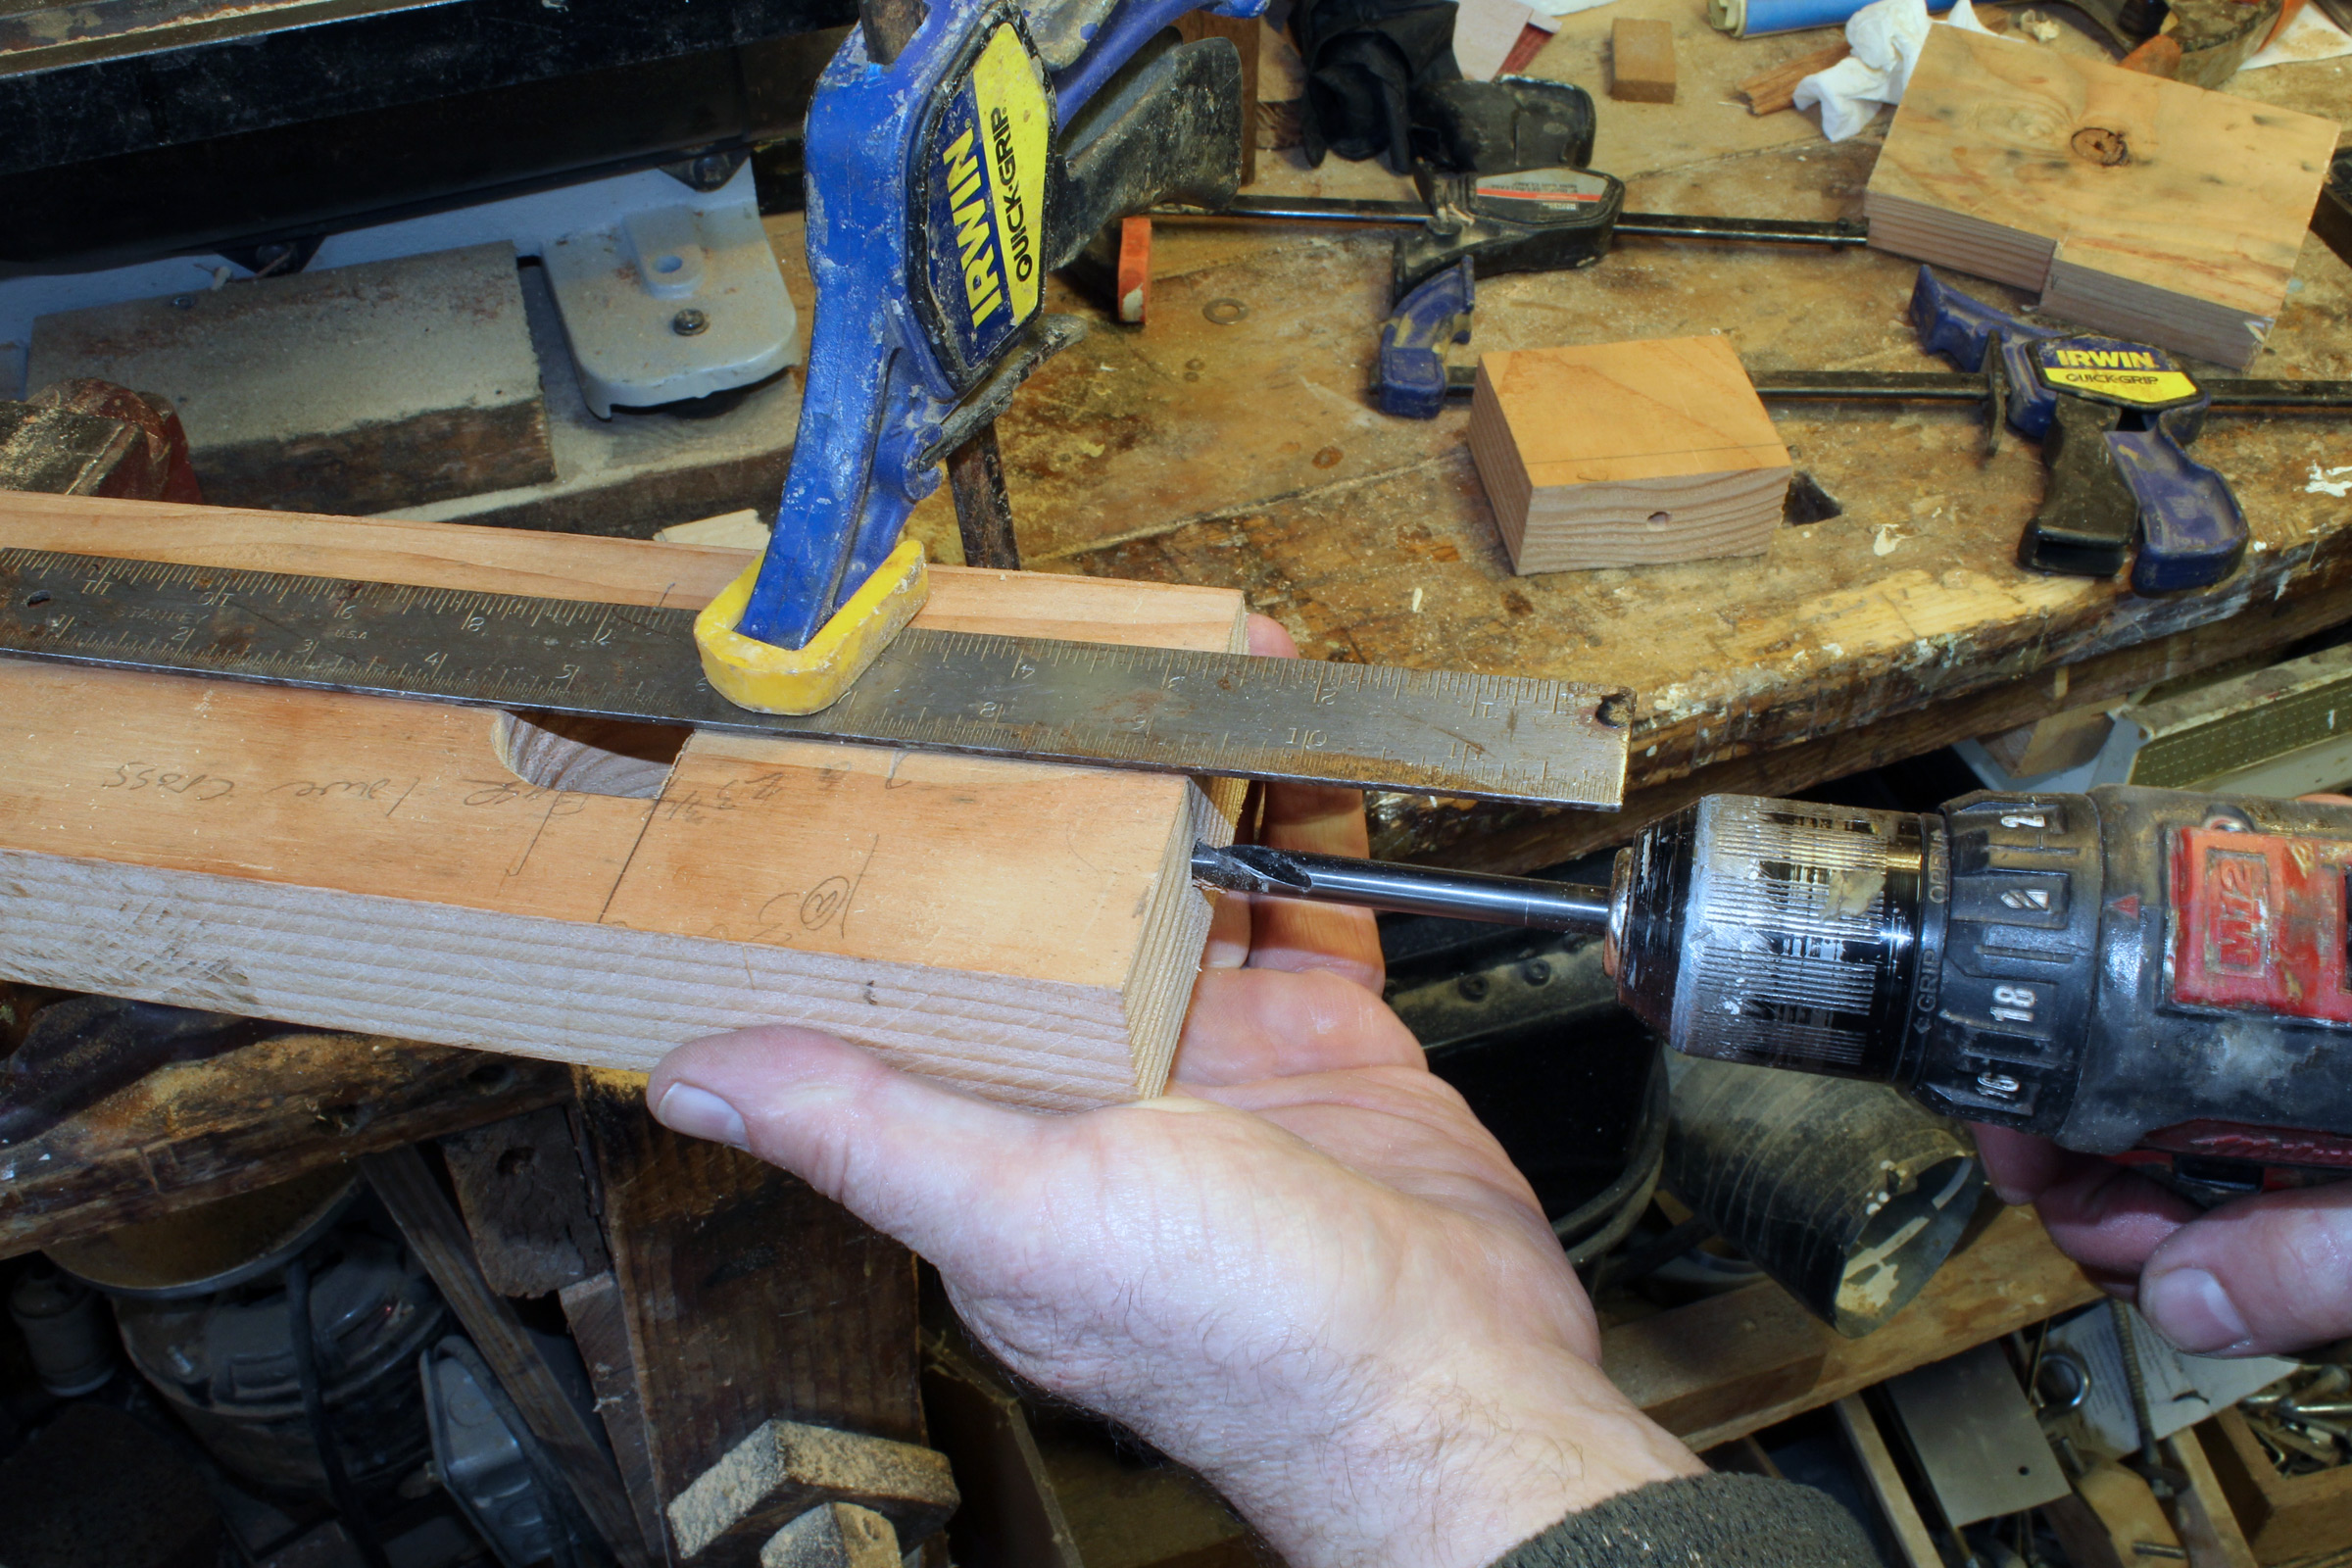
Joe’s totes would have had much nicer joinery than anything I could come up with, built of carefully selected materials. I built out of what I had handy, so it would be butt joints, glue and screws, with no planing or finishing. Four mortise-and-tenon joints are needed for weight-bearing pillars.
Ben Fuller
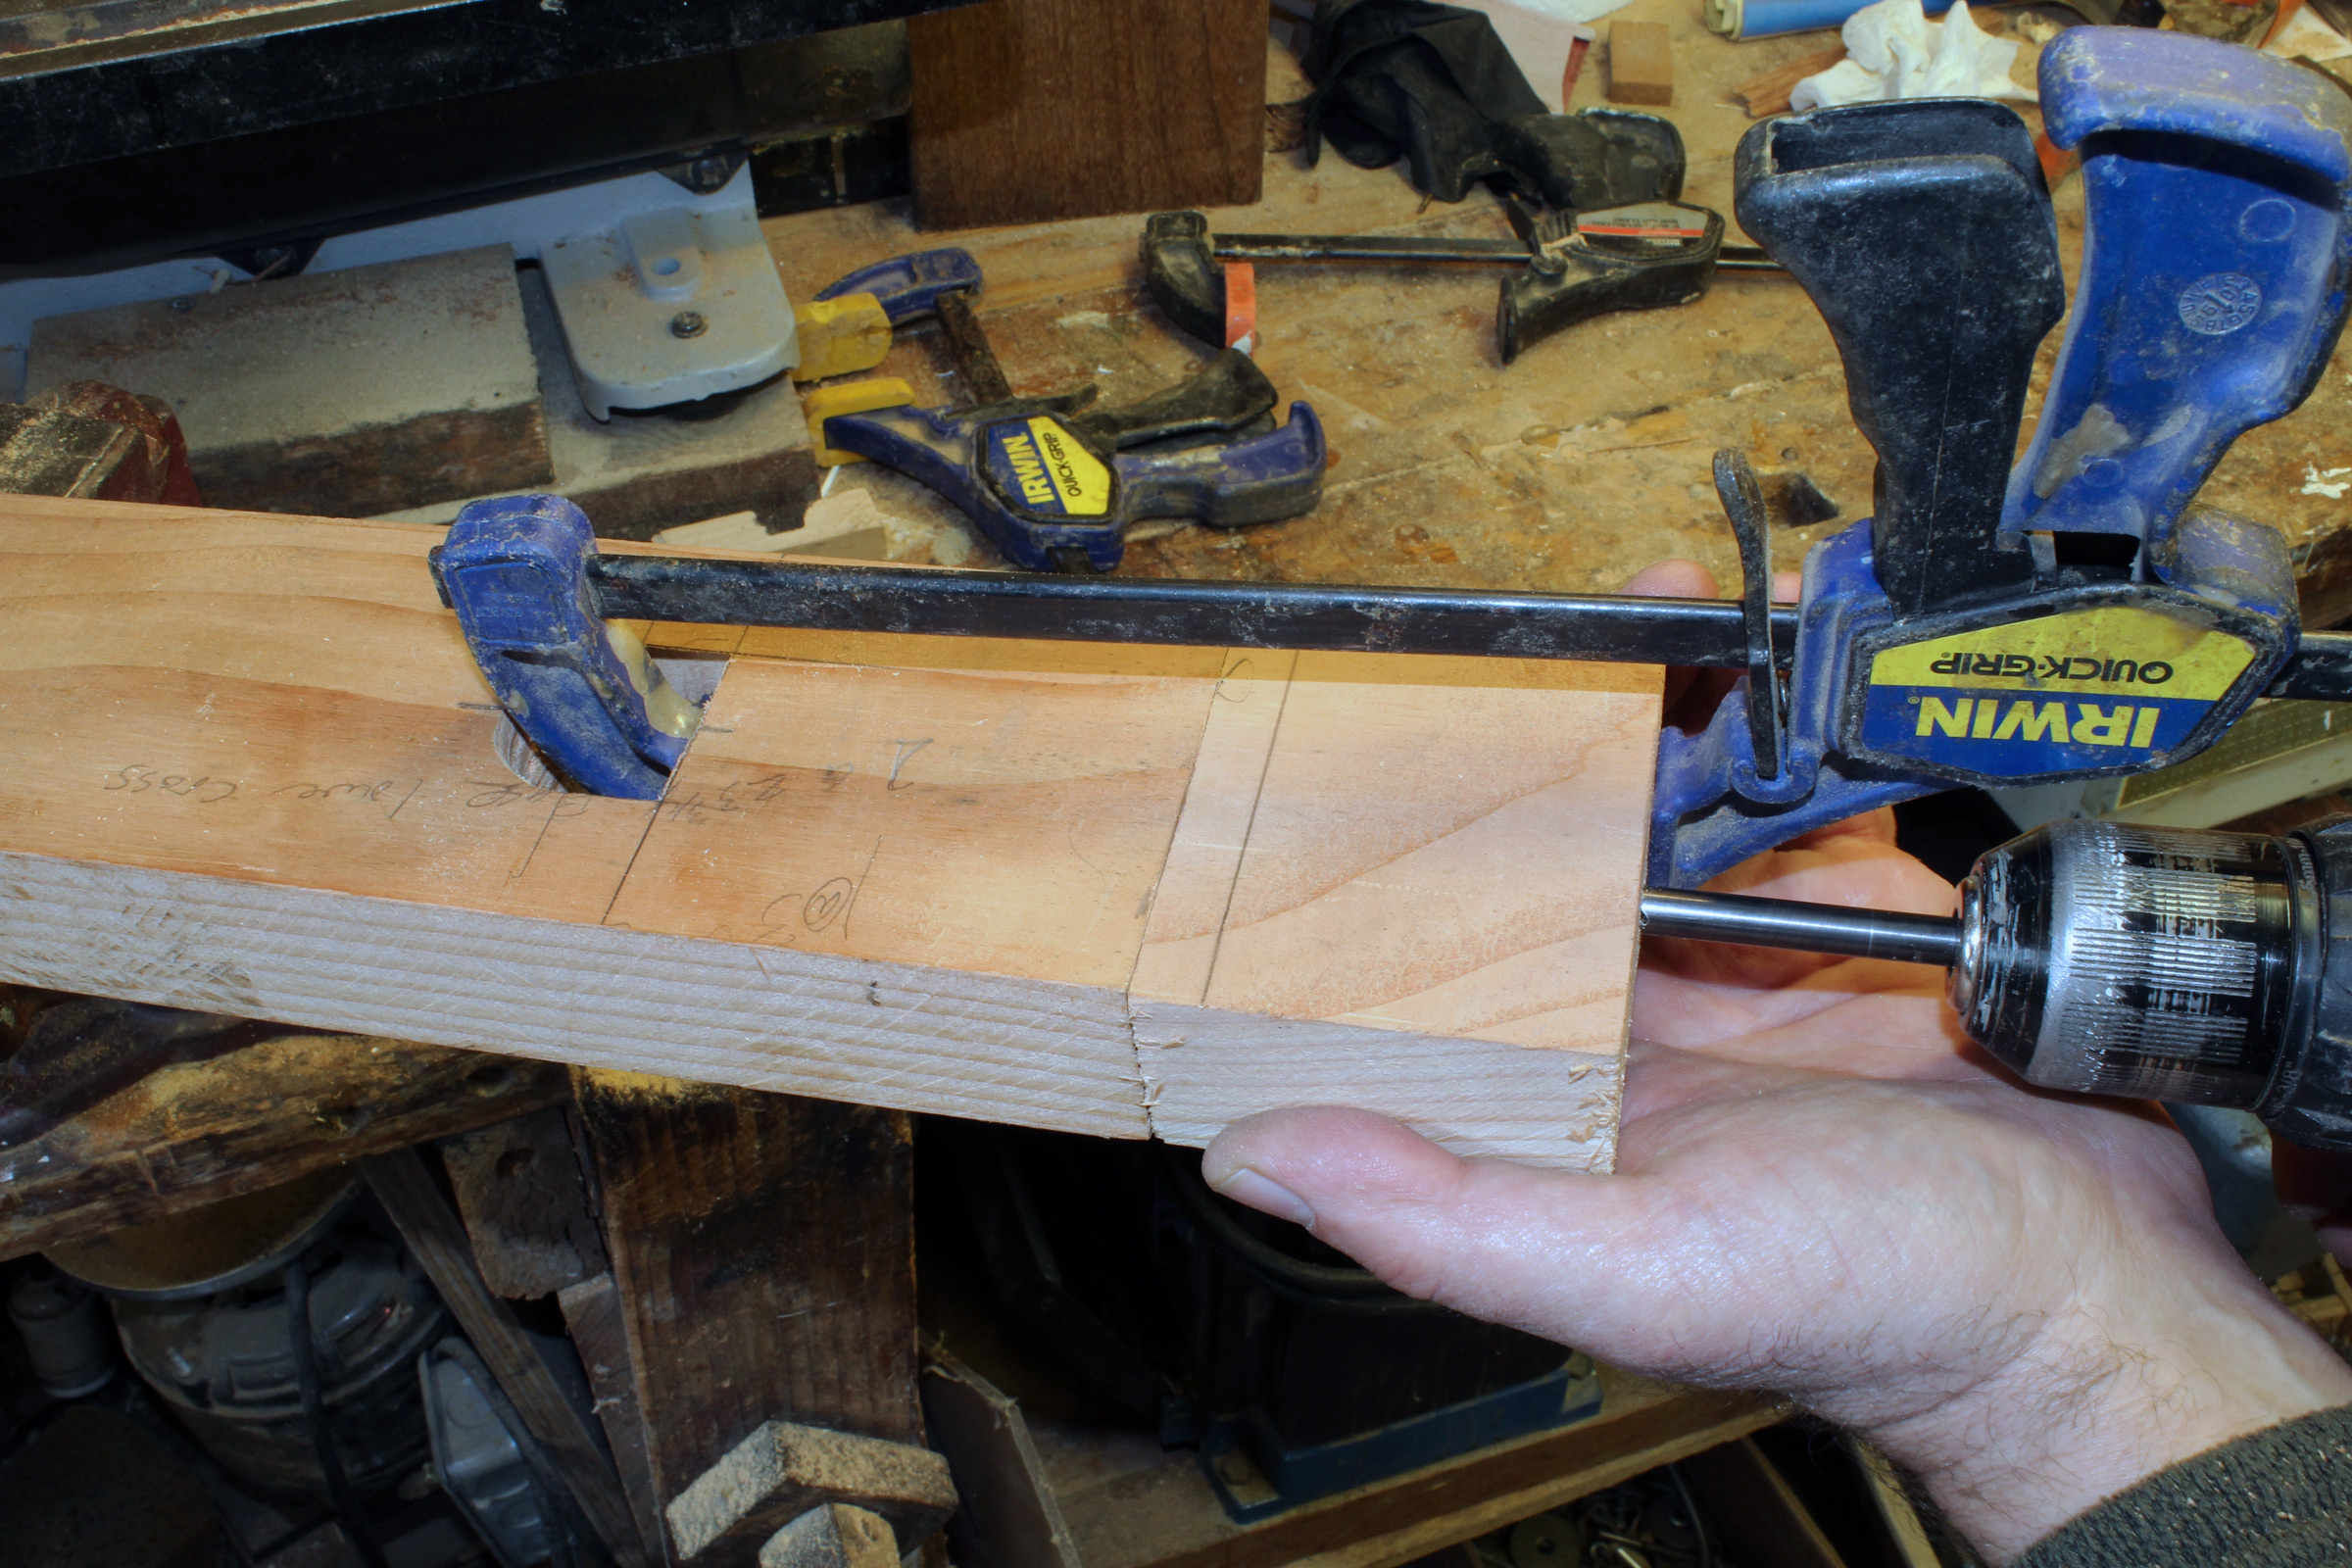
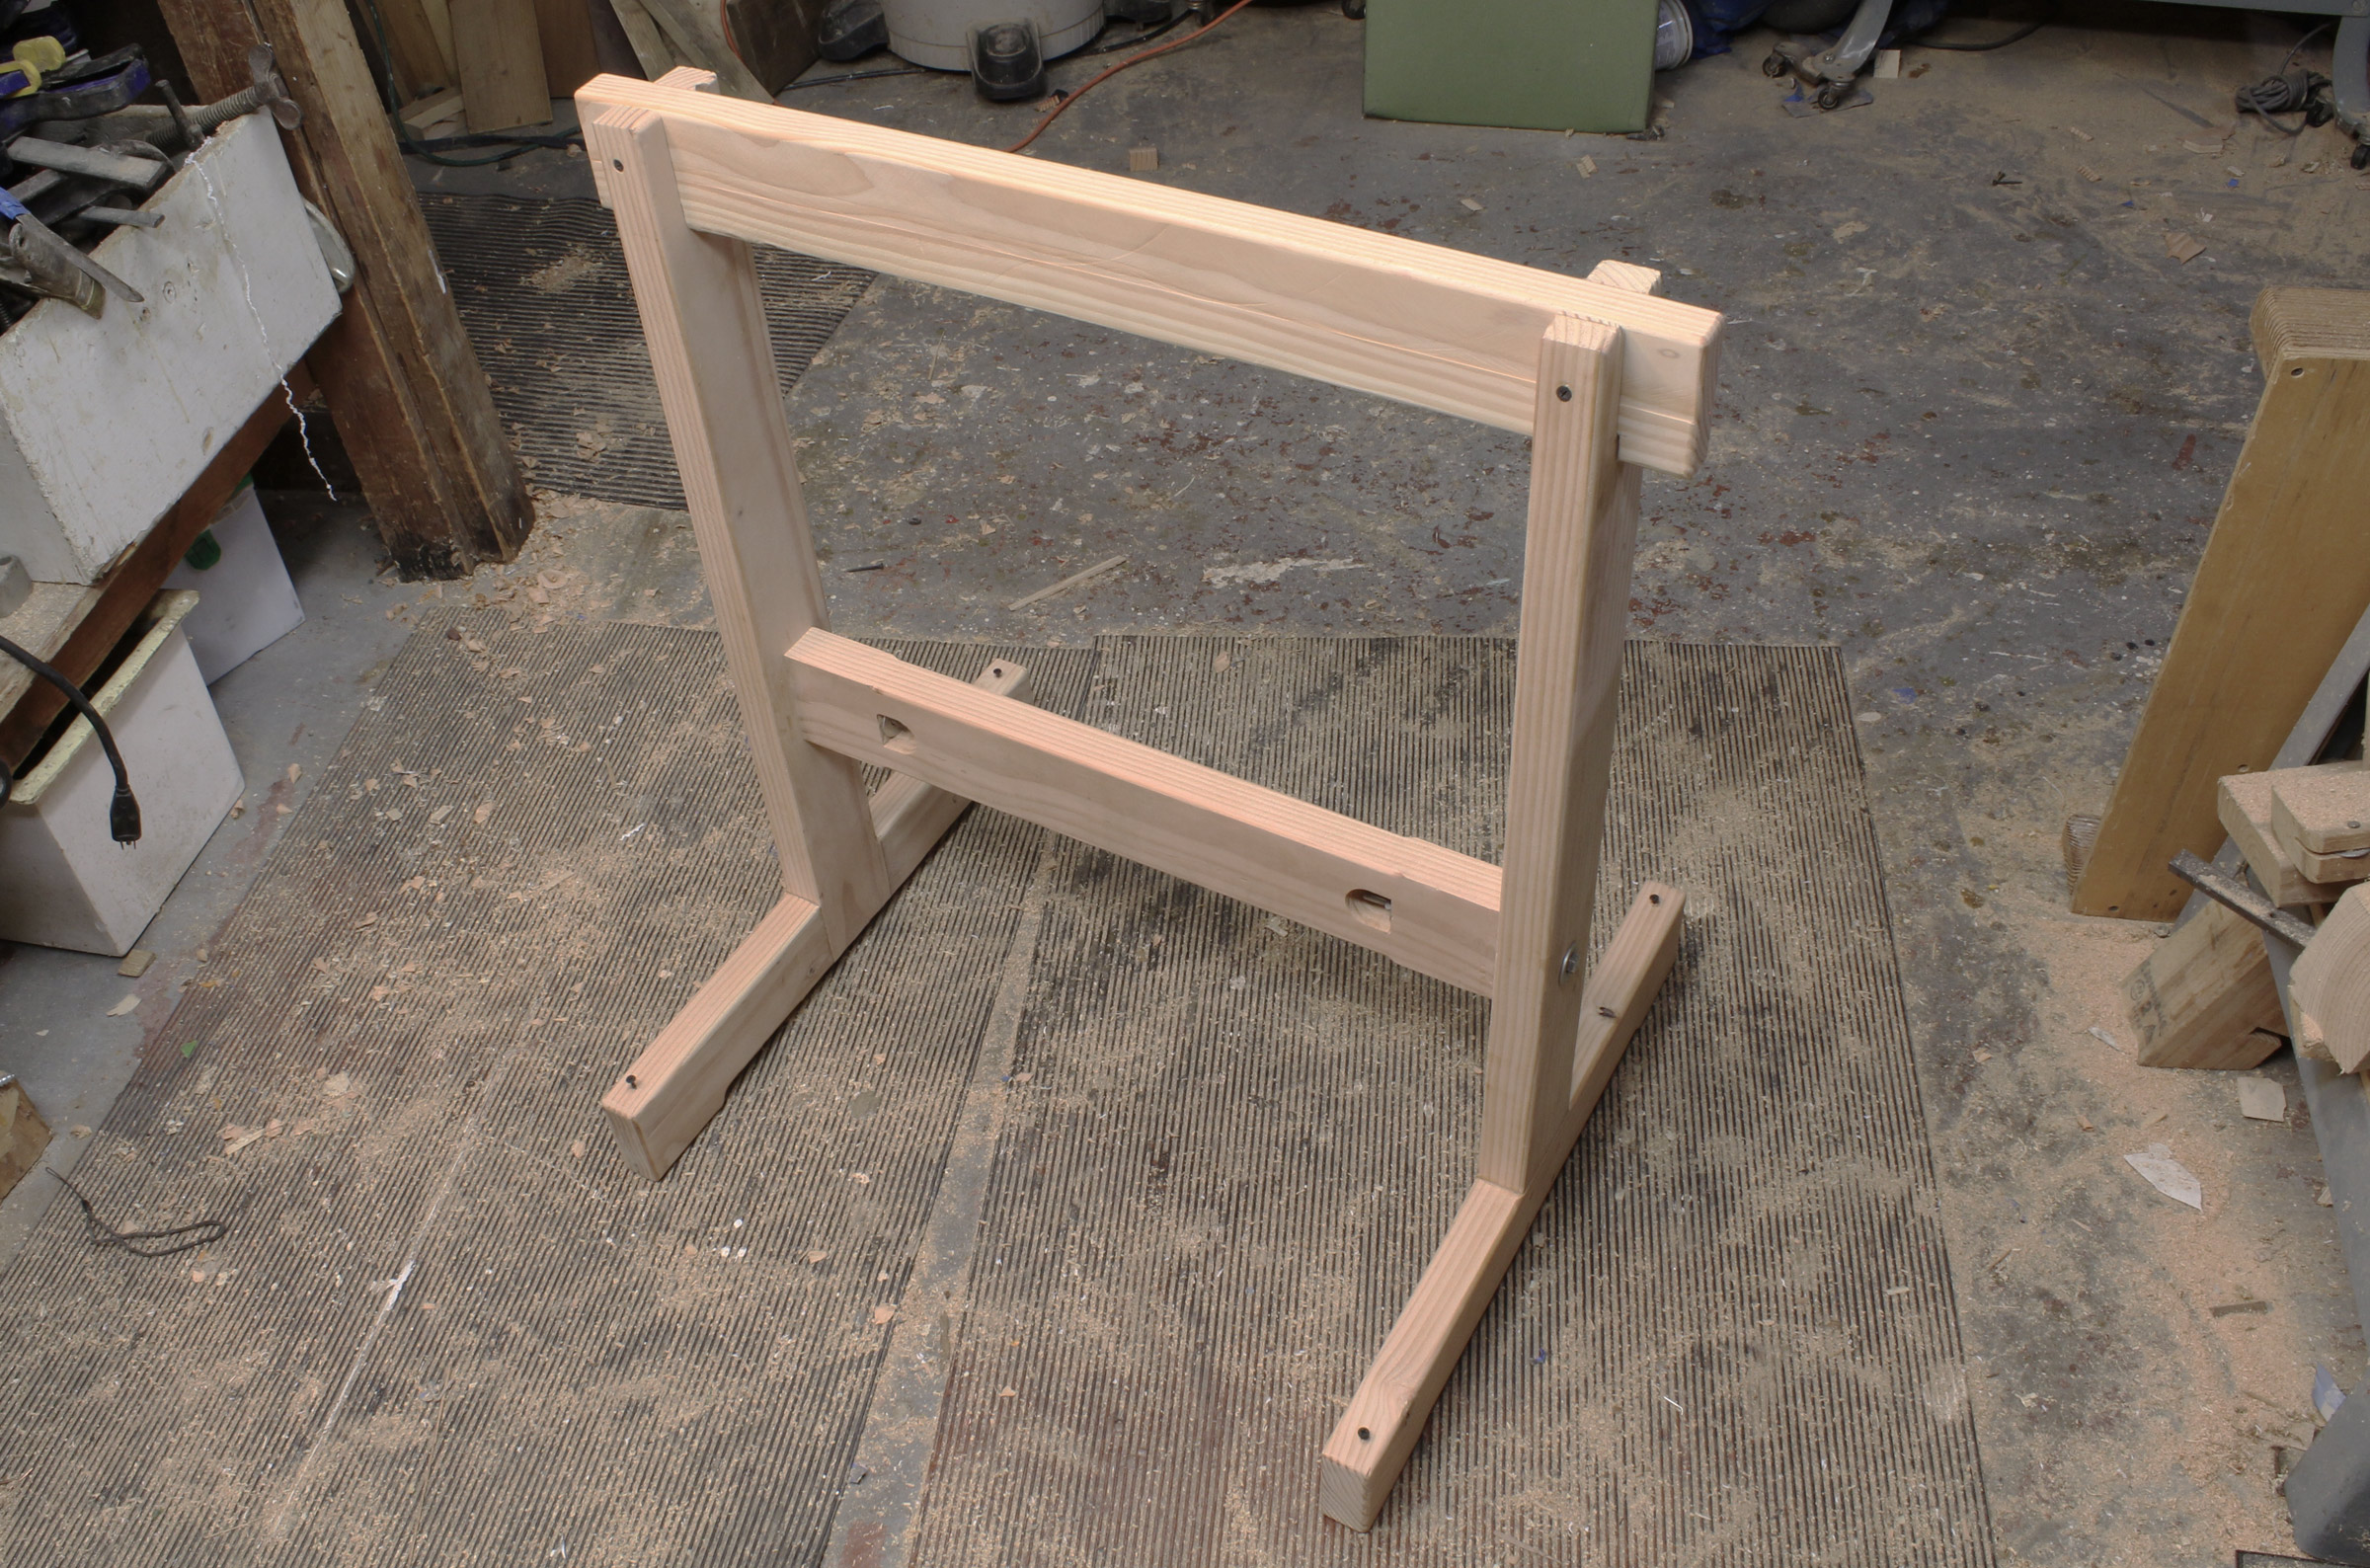
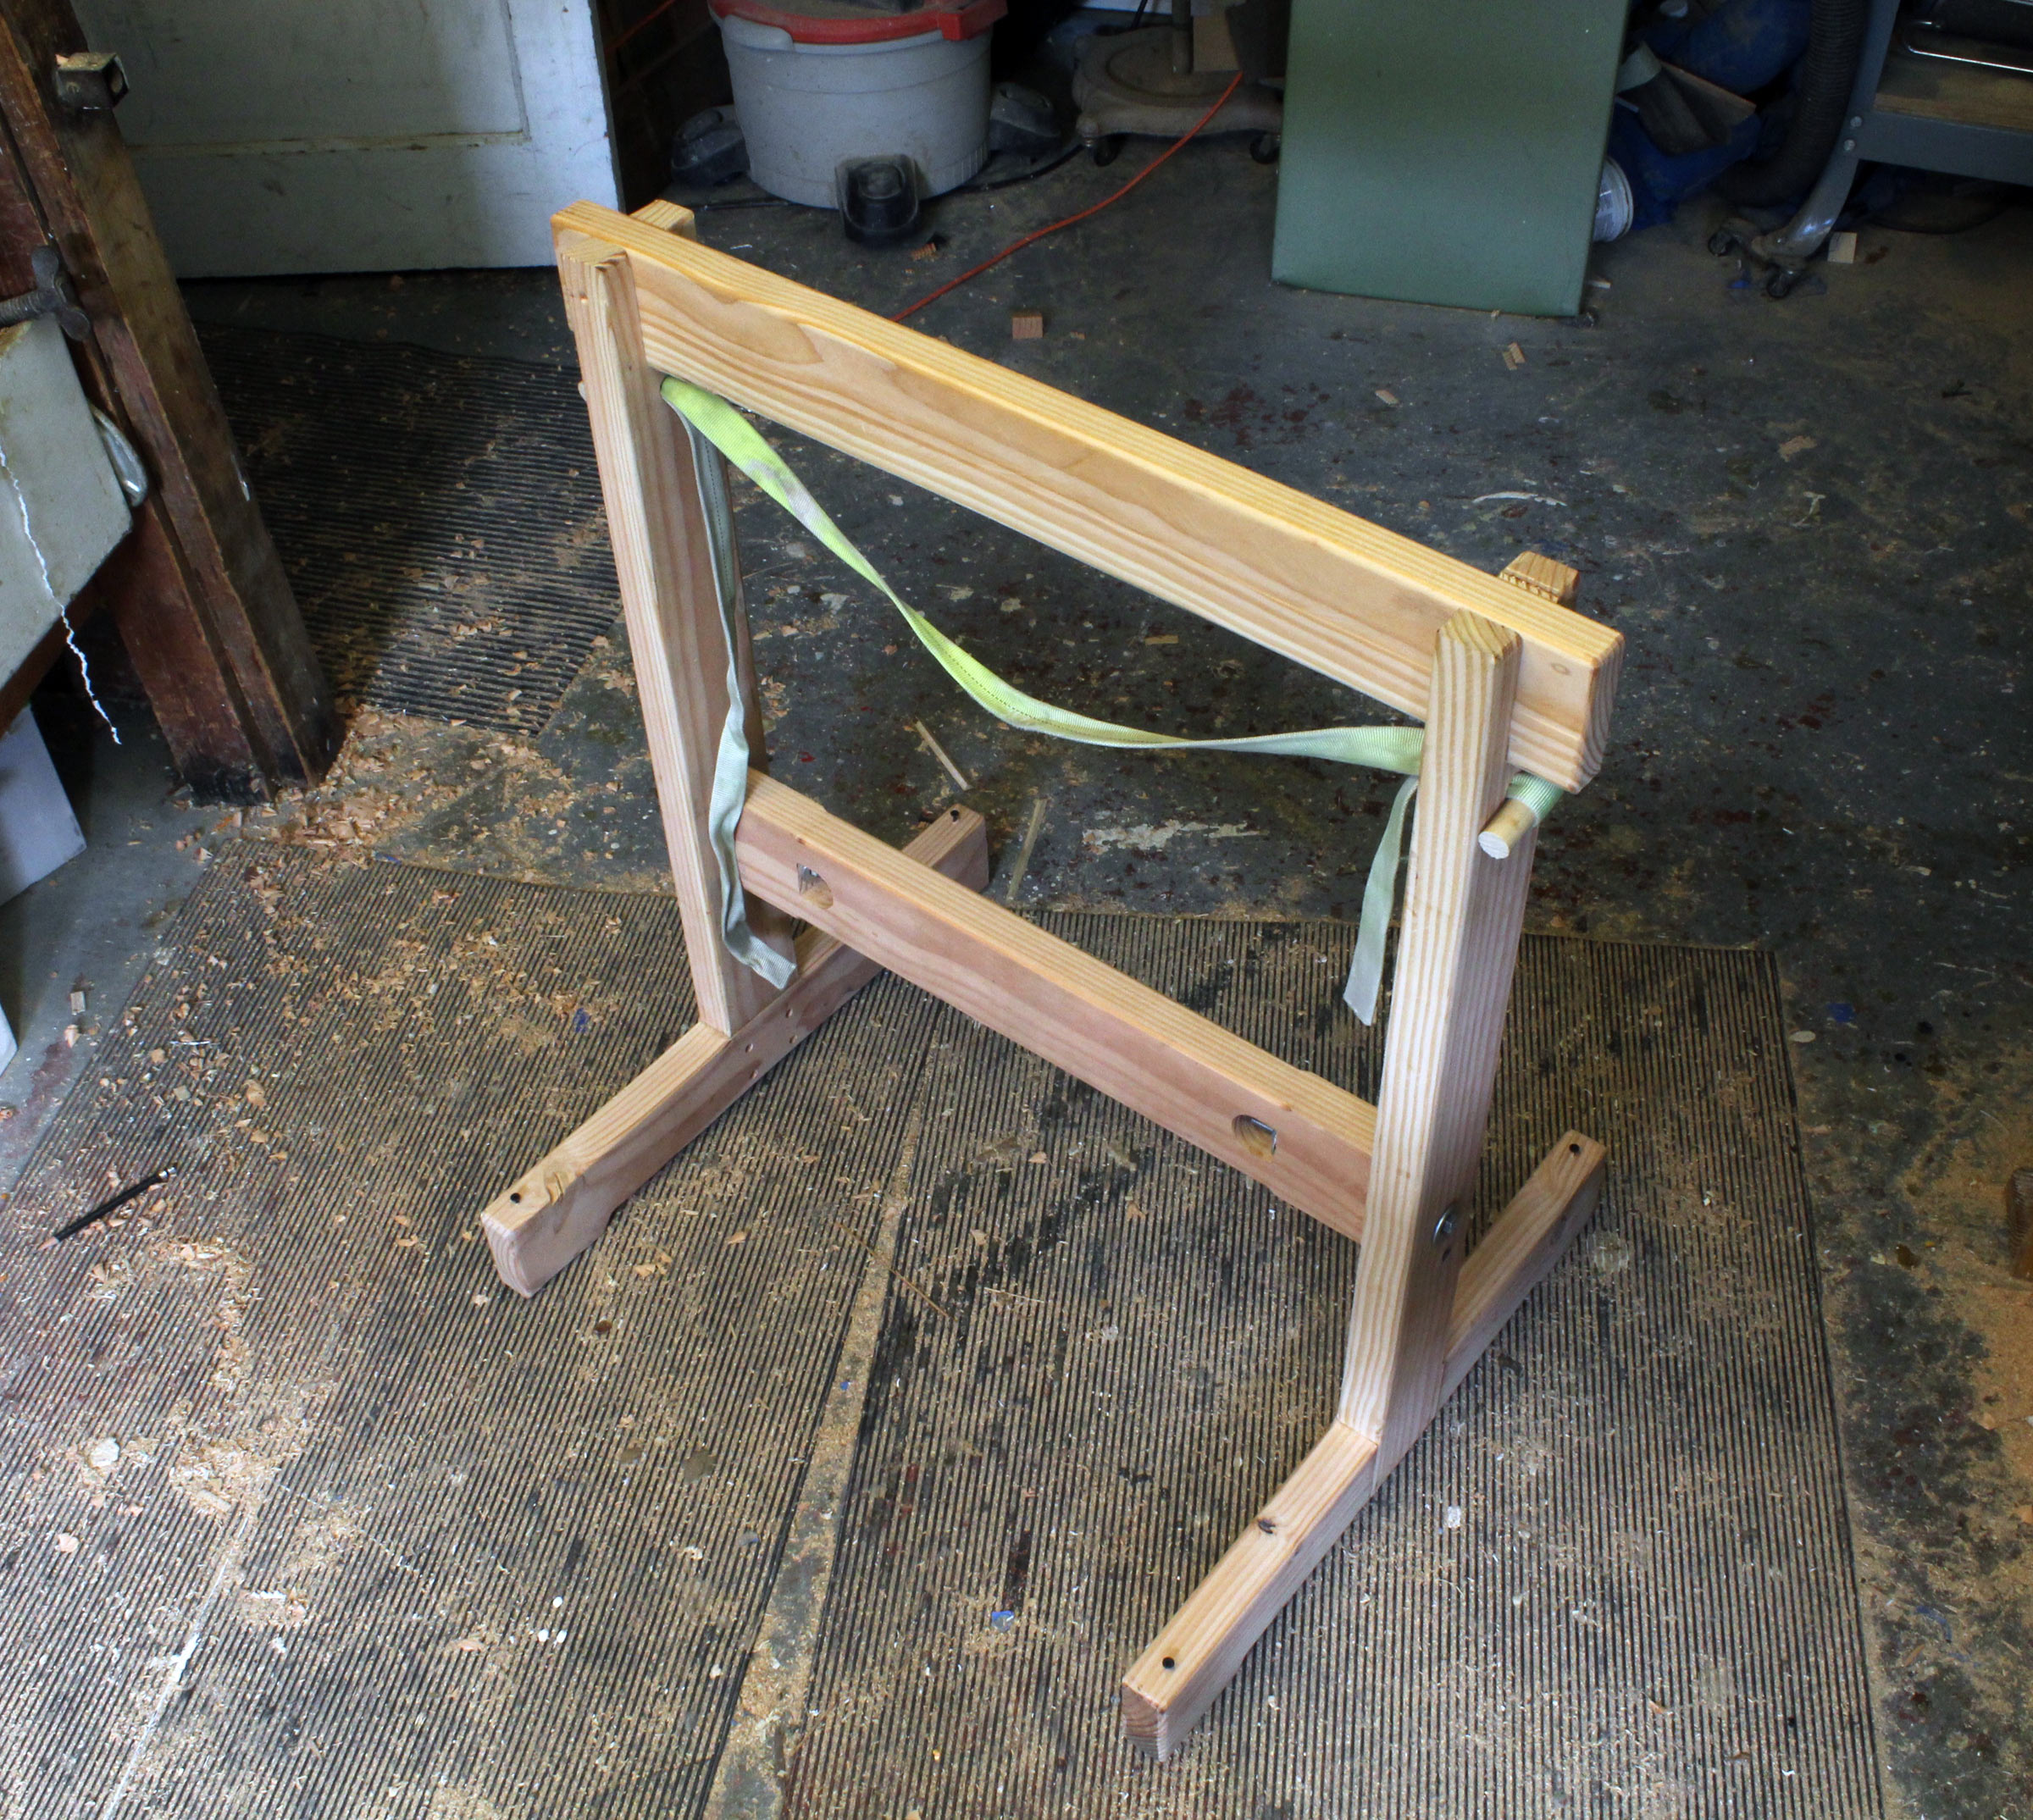
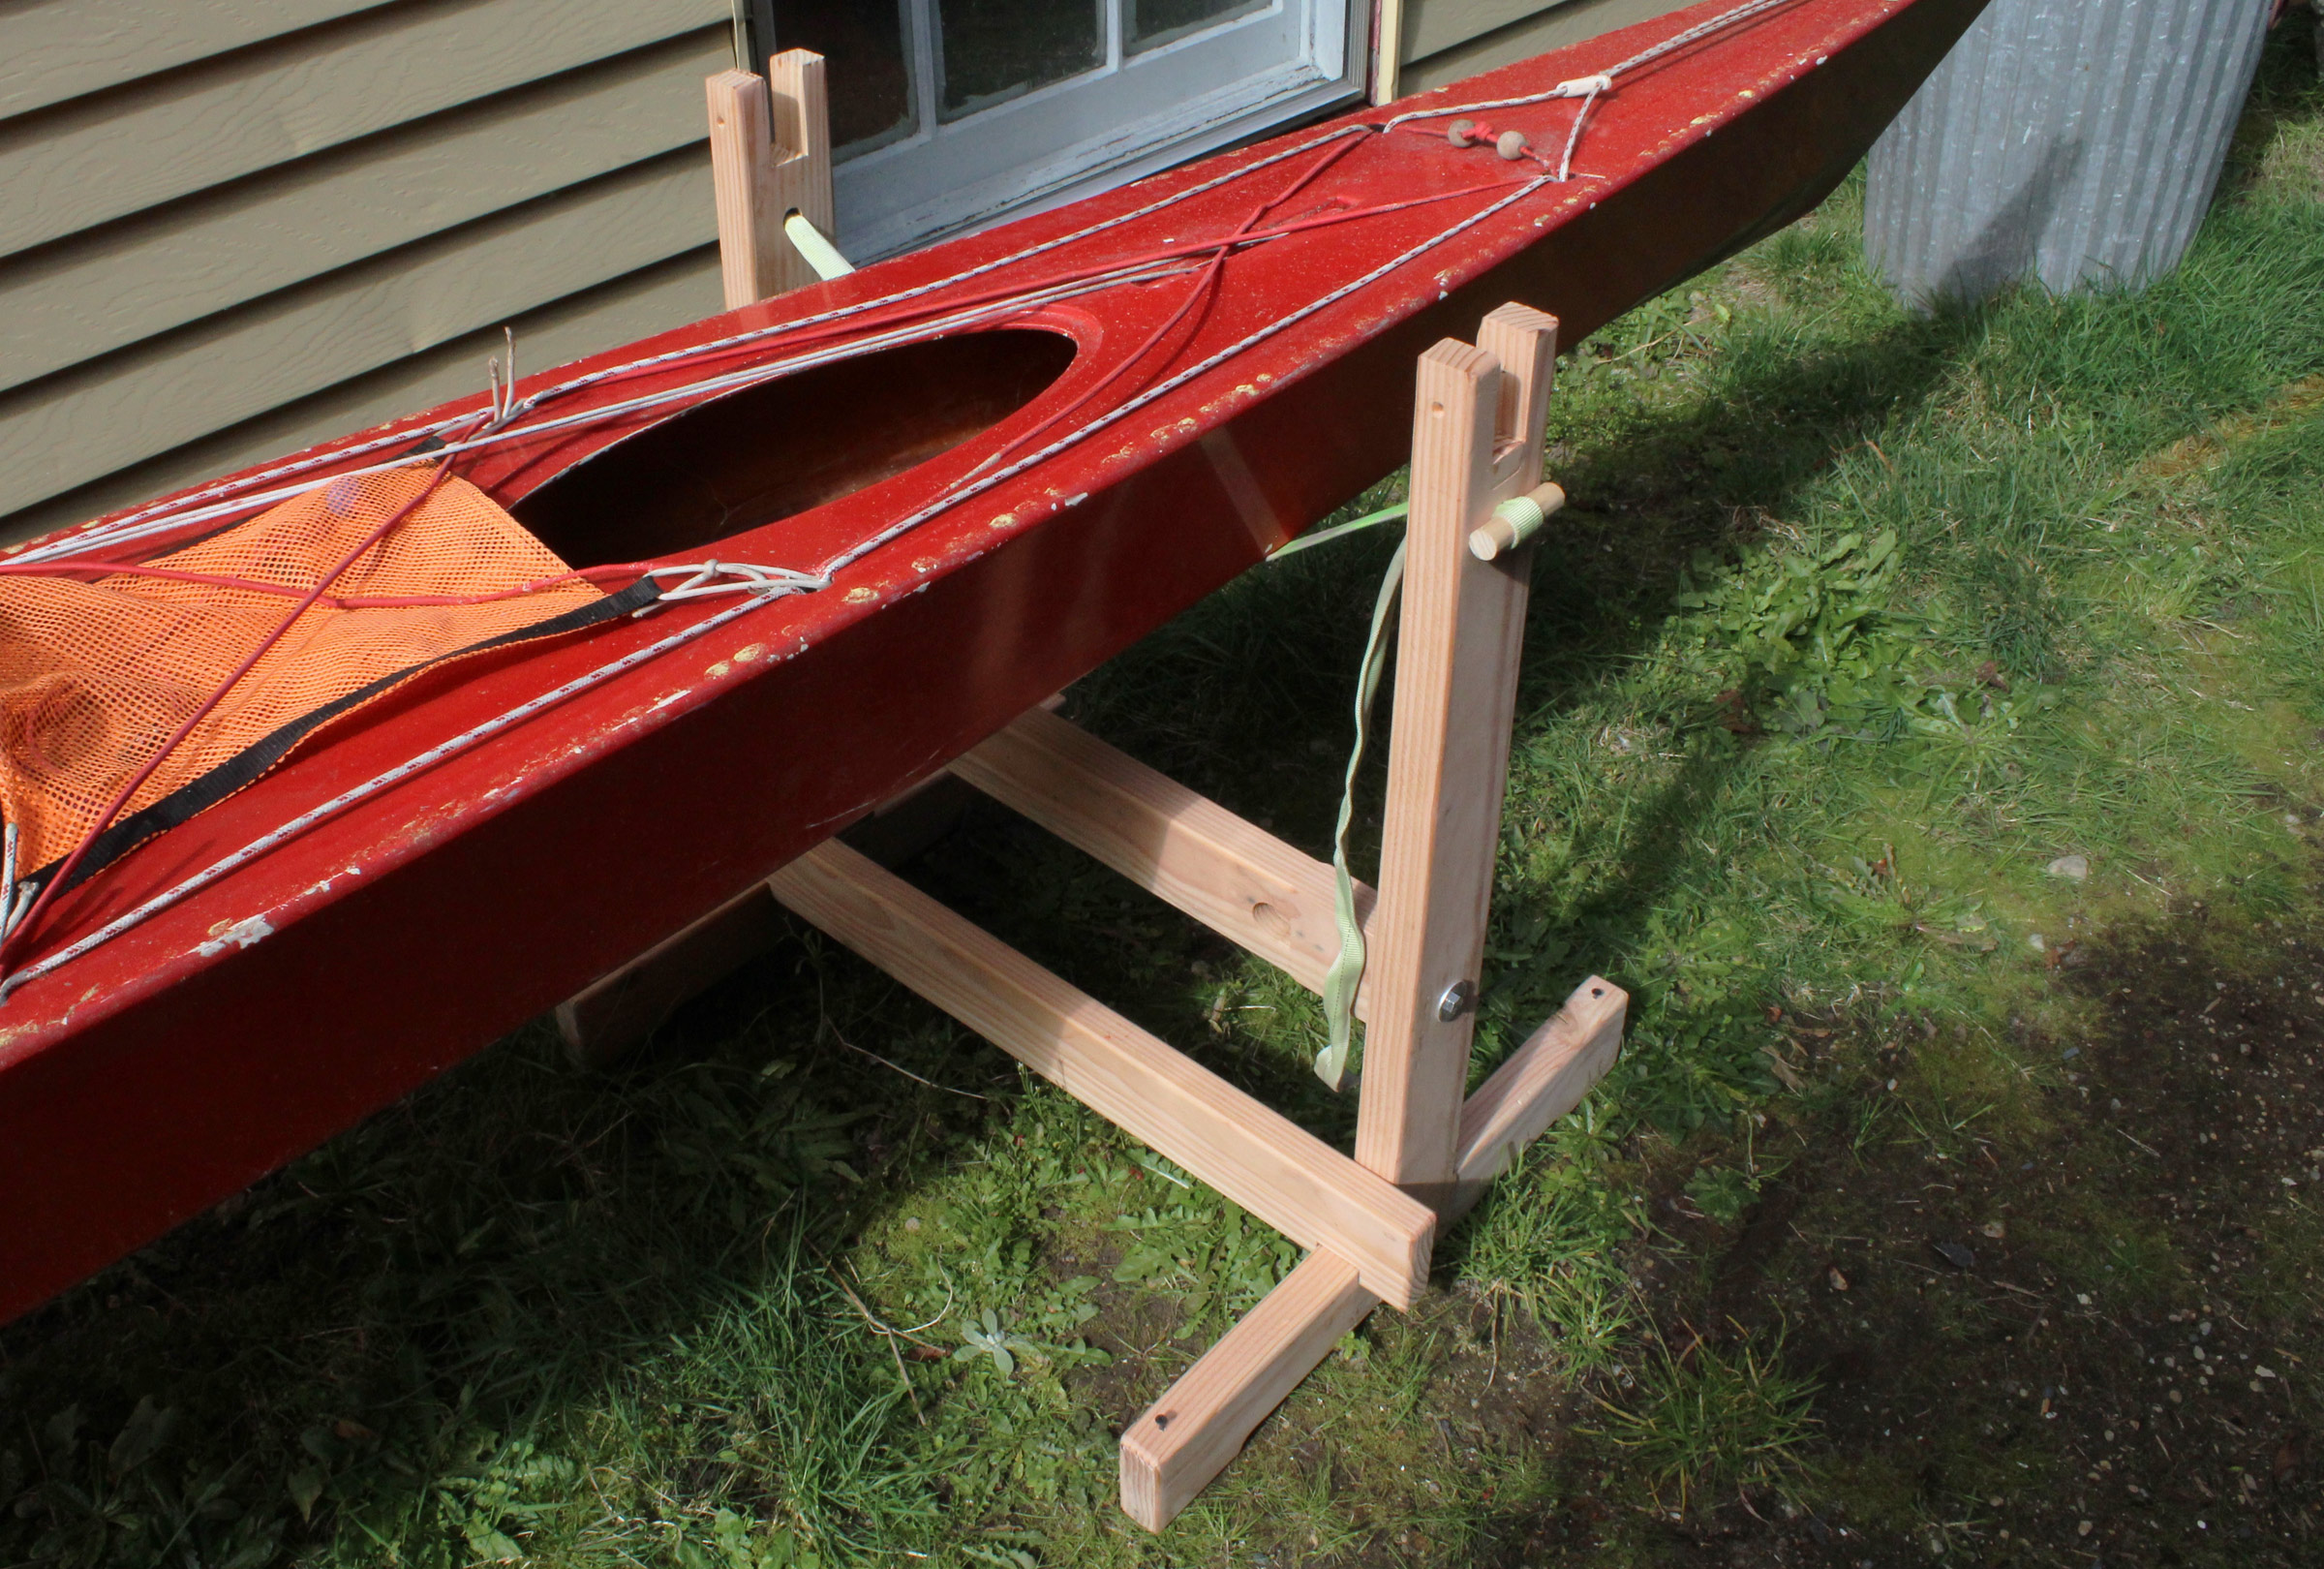
The tool tote can be built quickly with hand tools and assembled simply with screws and glue.
I had a nice 1×10 (nominal) pine board which made the ends and the bottom, and a 1×6 board for the sides and the top. I made the ends 11-1/4″ tall for an overall height of 12″. The bottom is 32″ long and the top is 33 1/2″. The pillars that support the top and separate the saws from the other tools are made from 1×4. I kept the construction of the tote simple, something that could be done with just handsaws and a chisel. If you have a better-equipped shop than I do, you might do a simple box joint or a dovetail joint between the ends and the bottom. (I’m pretty sure that Joe would have hidden the end-grain—that would have been neater. With a wider bottom and ends you could cut rabbets to set the sides in and have their end-grain covered.)
Christopher Cunningham, Editor
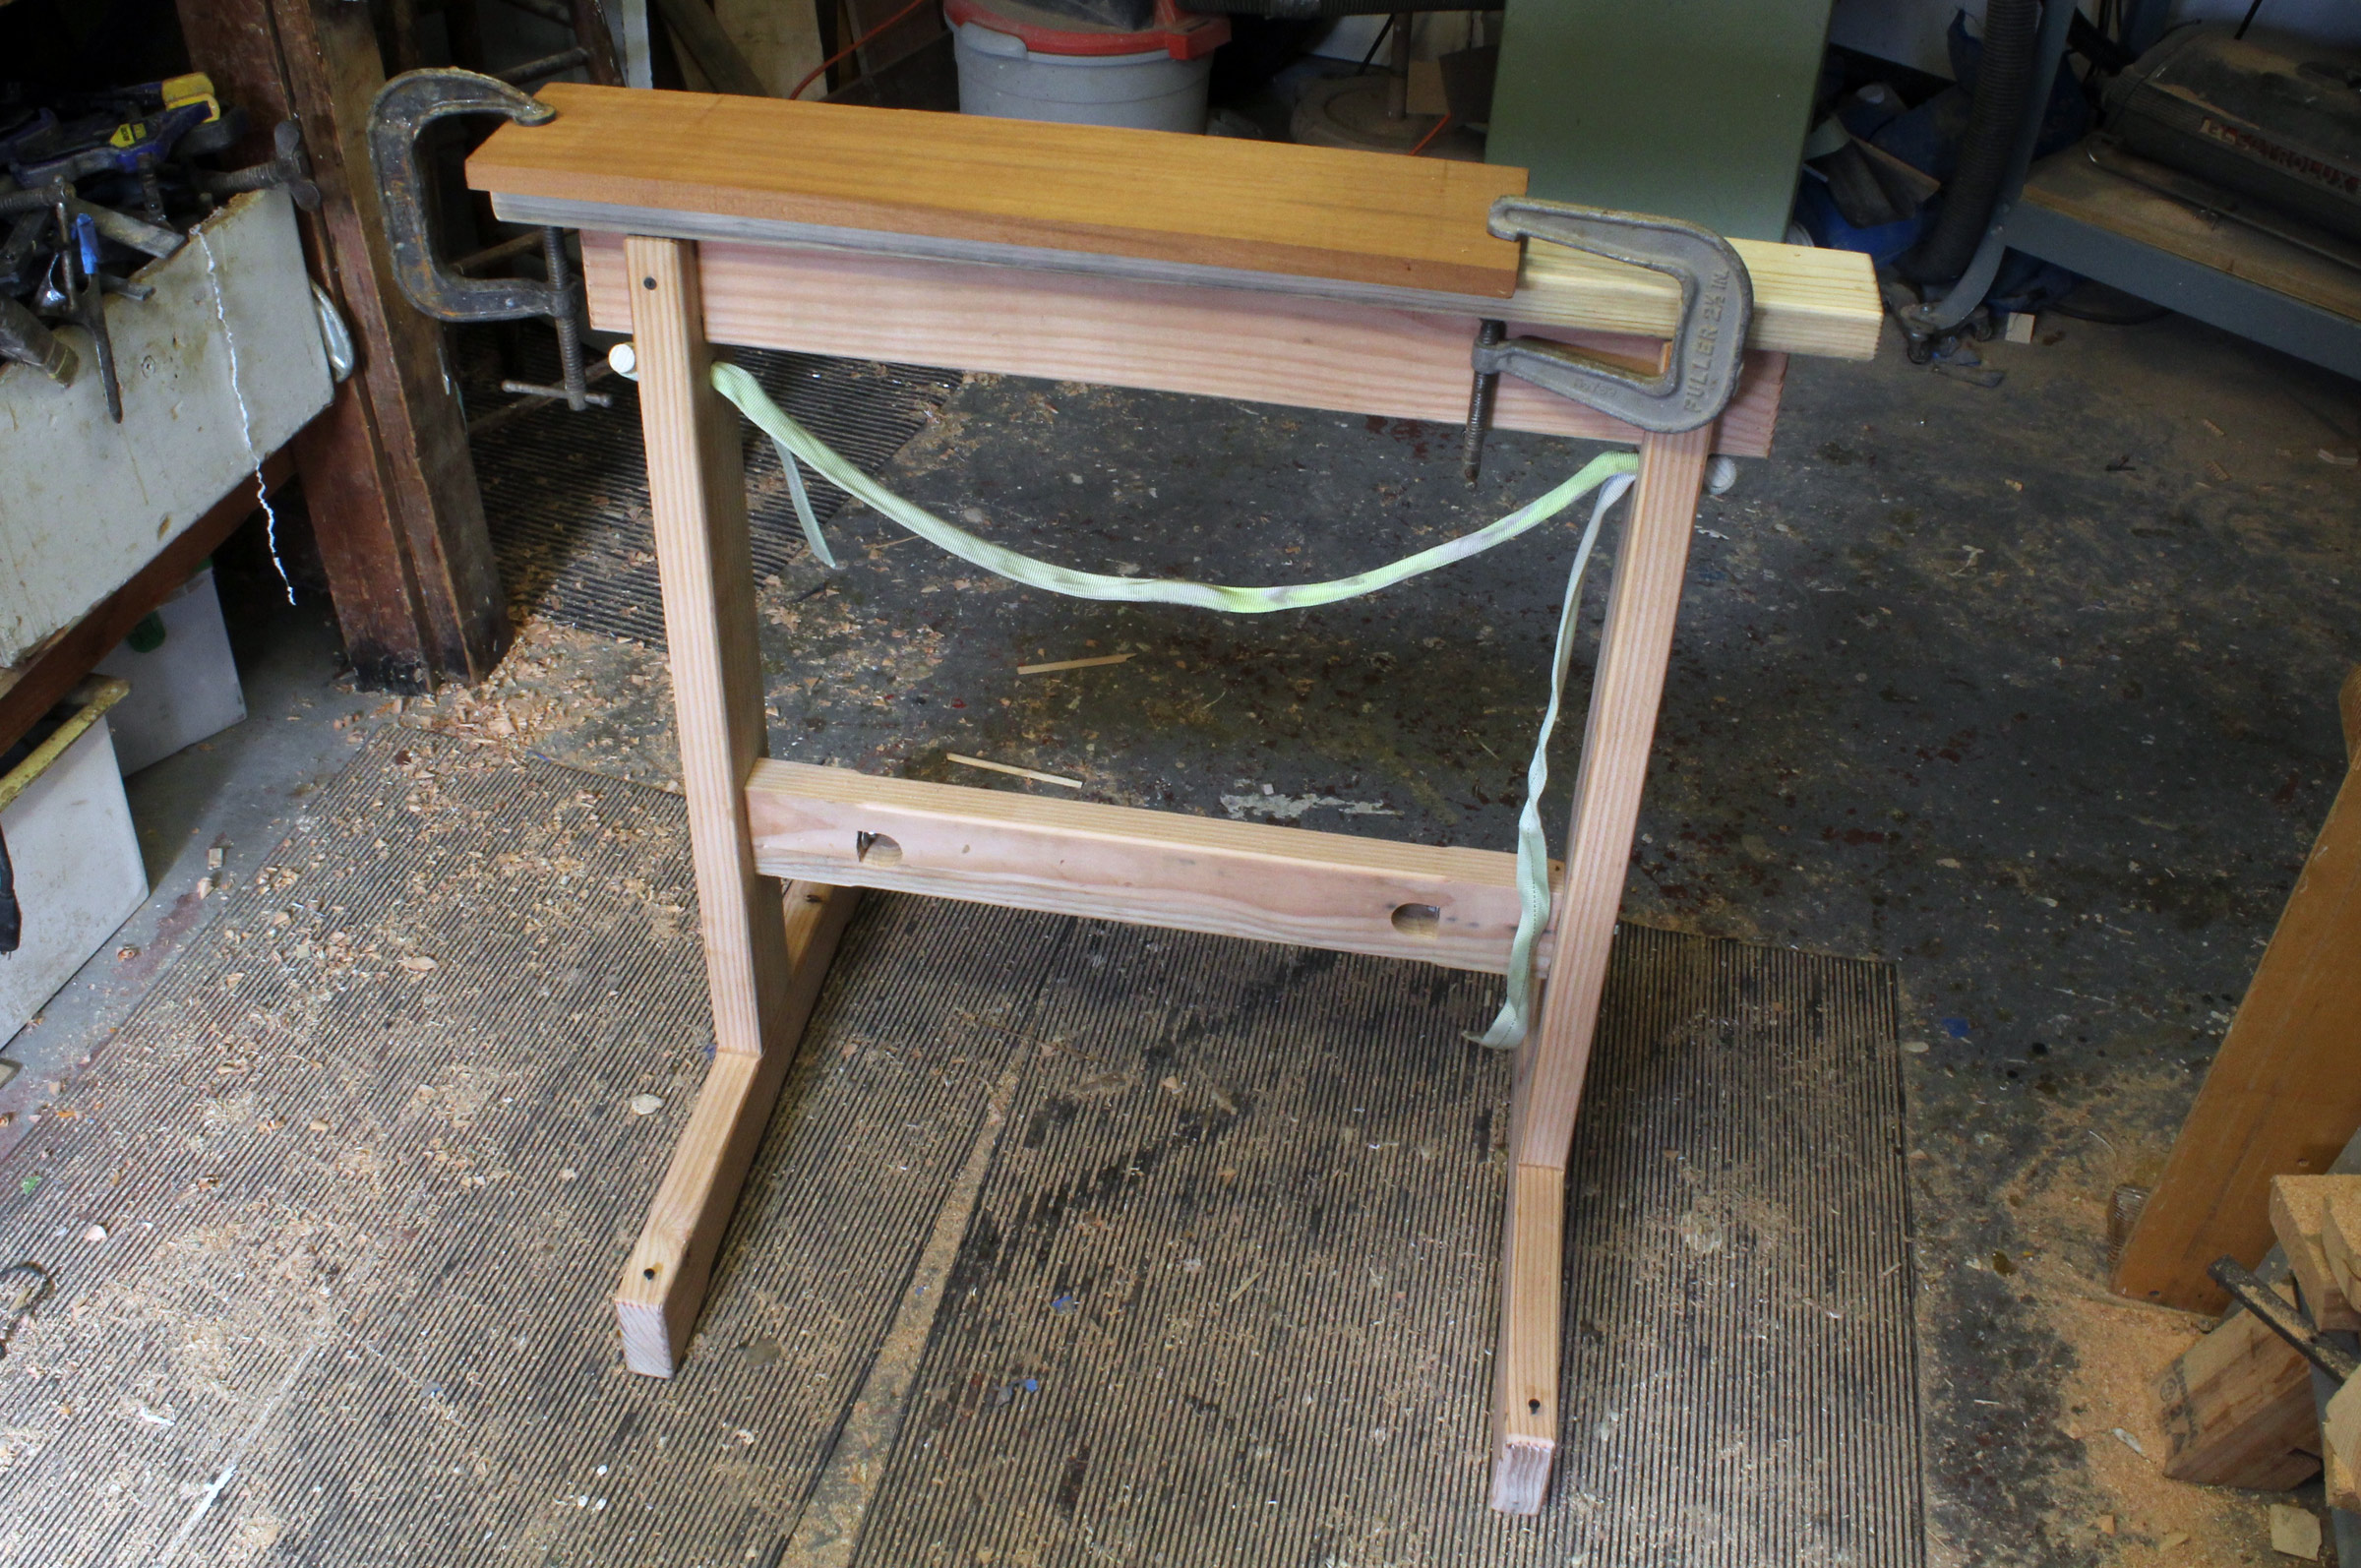
The tote can also be as fancy as you like. Joe most likely would have kept dovetail or finger joints simple and covered end grain with rabbeted joints. This box is just 24″ long.
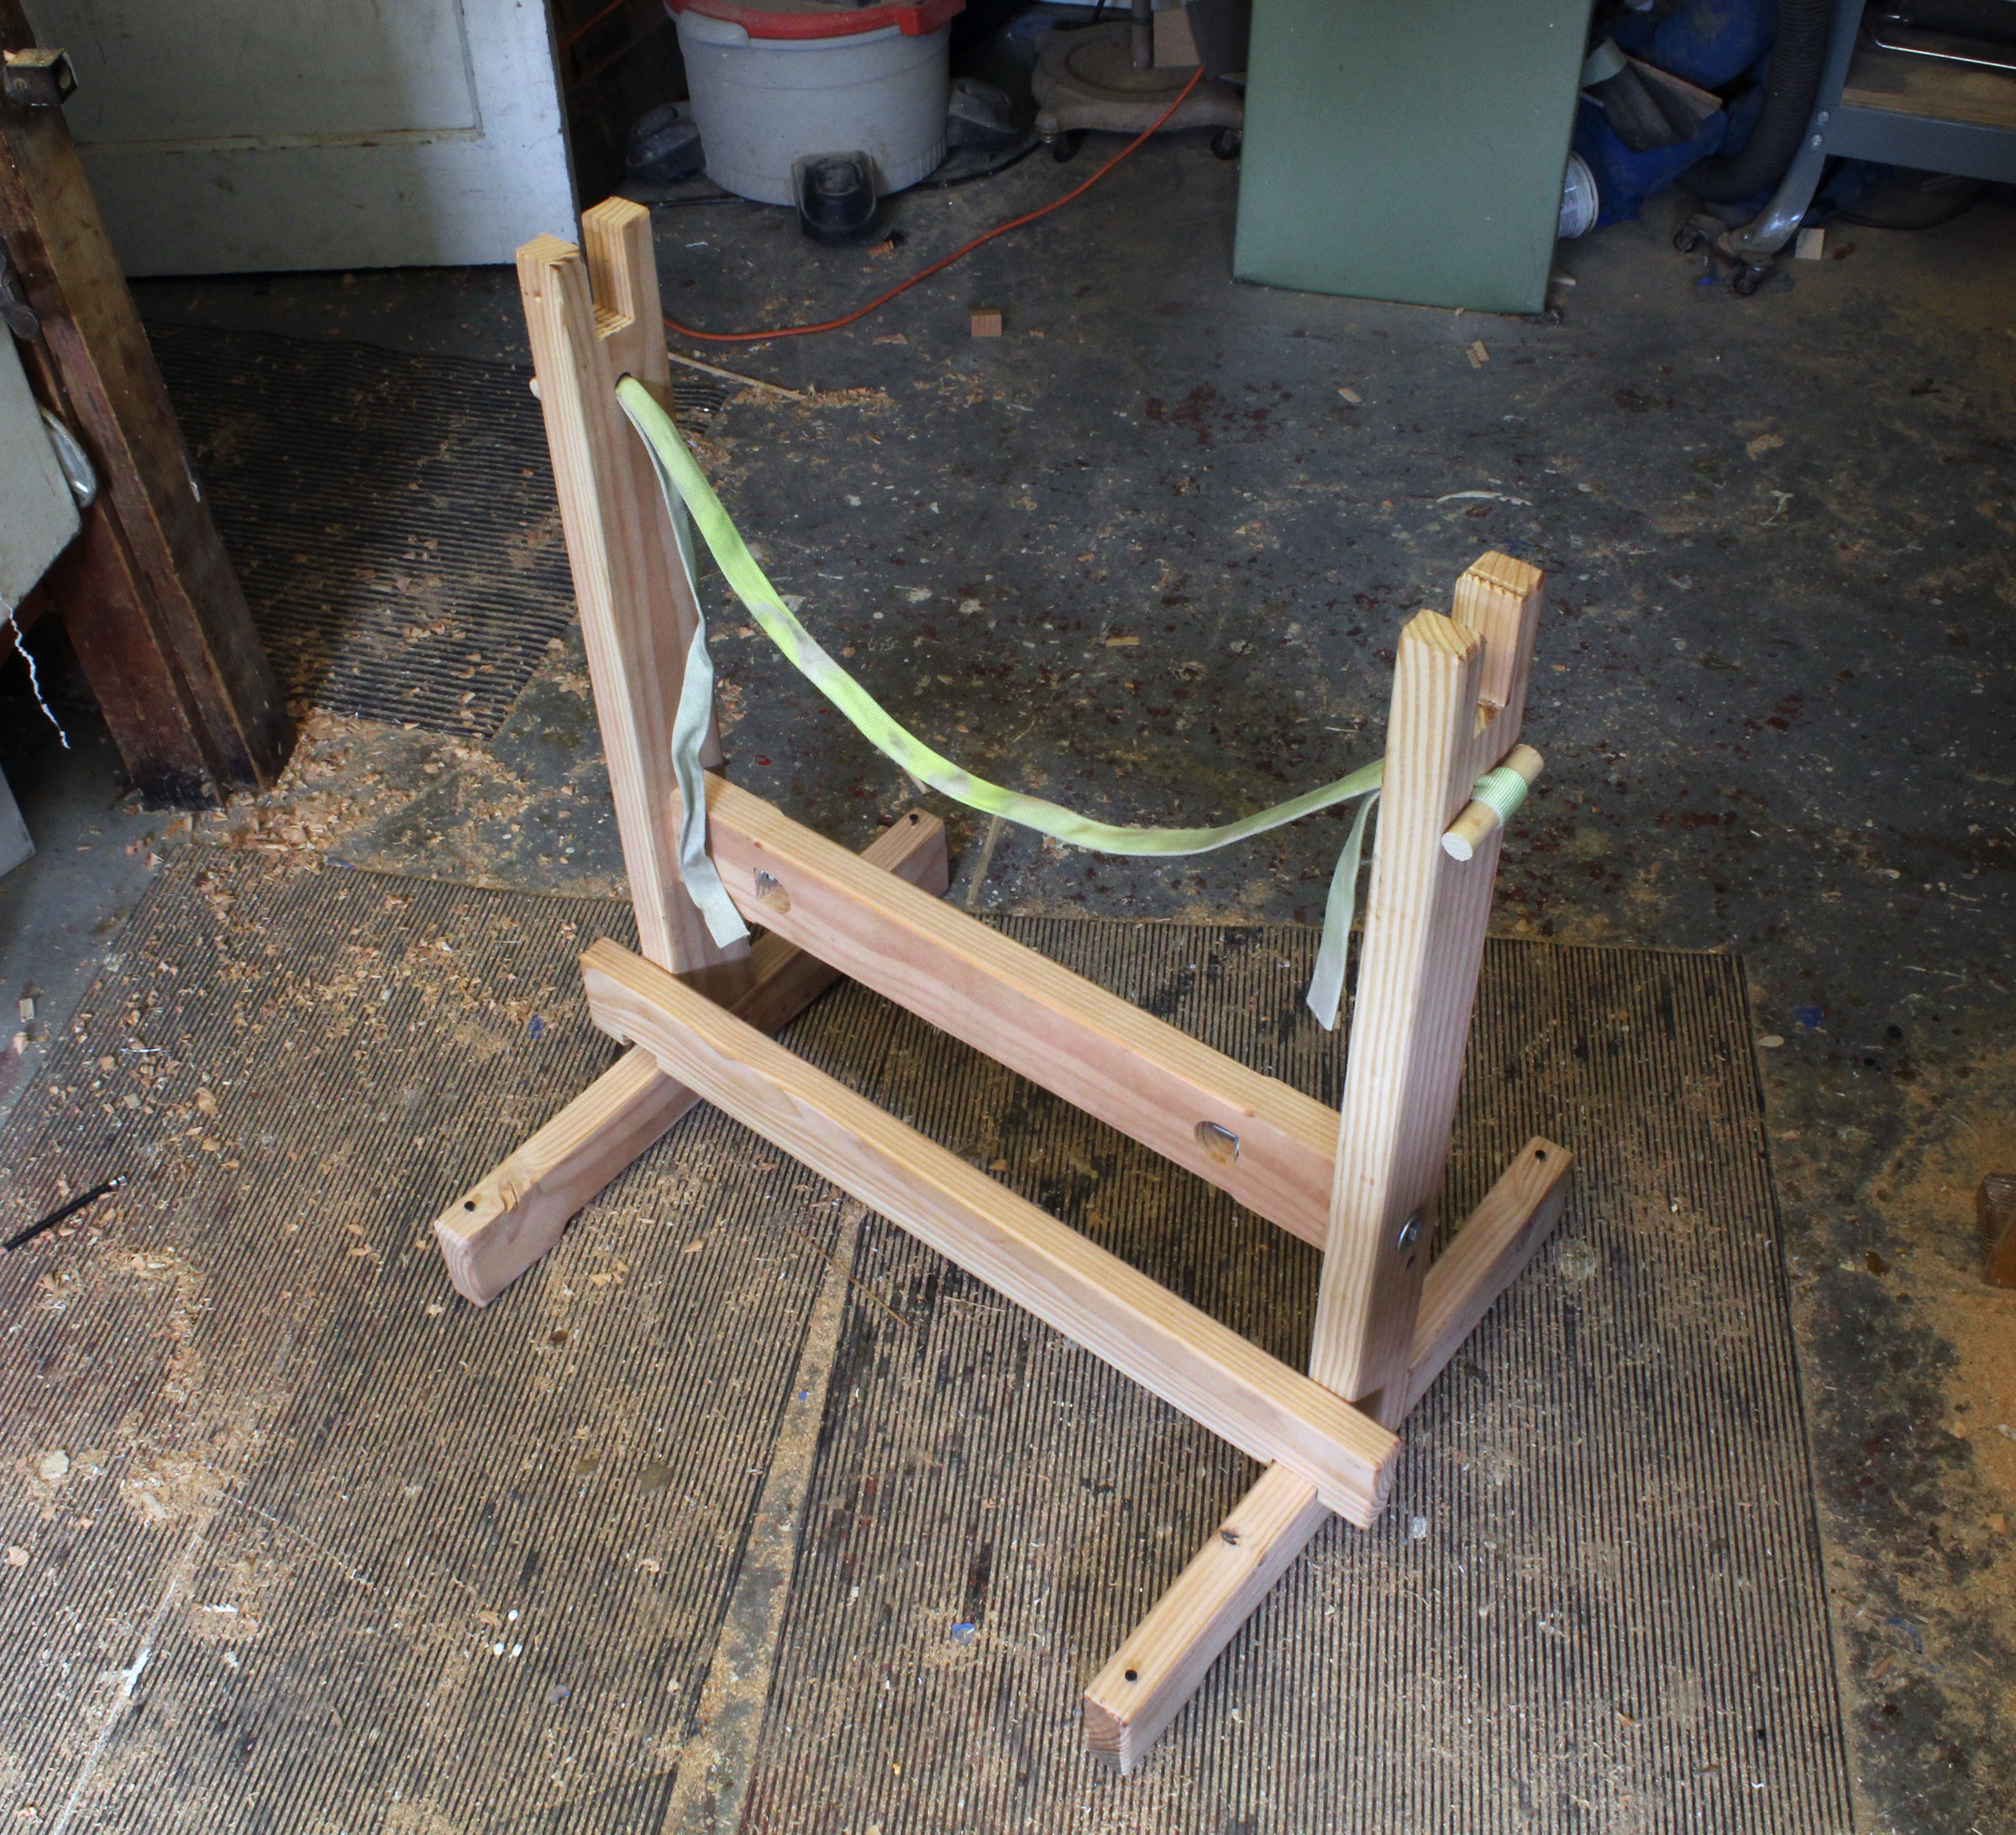
Everything was fit dry. Then the bottom, ends, pillars, and top were glued together using bar clamps. The sides go on in a second gluing operation.
My 1×10 provides an interior width of 9-1/4″, and a length of 32″, which is ample room for a 2′ level, a handsaw, and some quick-release bar clamps. I’ve kept my tote open so I can use it for different tools for different projects. For painting jobs, the plain interior accommodates several quarts of paint, thinner, brushes, and brush-cleaning cans.
Making your own version of Joe Liener’s tool tote could be a good project for passing the time during social distancing. You can make it simple, as I did, or make a nicer one with dividers to separate tools and racks for small stuff like pencils and small chisels.
Ben Fuller, curator of the Penobscot Marine Museum in Searsport, Maine, has been messing about in small boats for a very long time. He is owned by a dozen or more boats ranging from an International Canoe to a faering.
You can share your tips and tricks of the trade with other Small Boats Magazine readers by sending us an email.
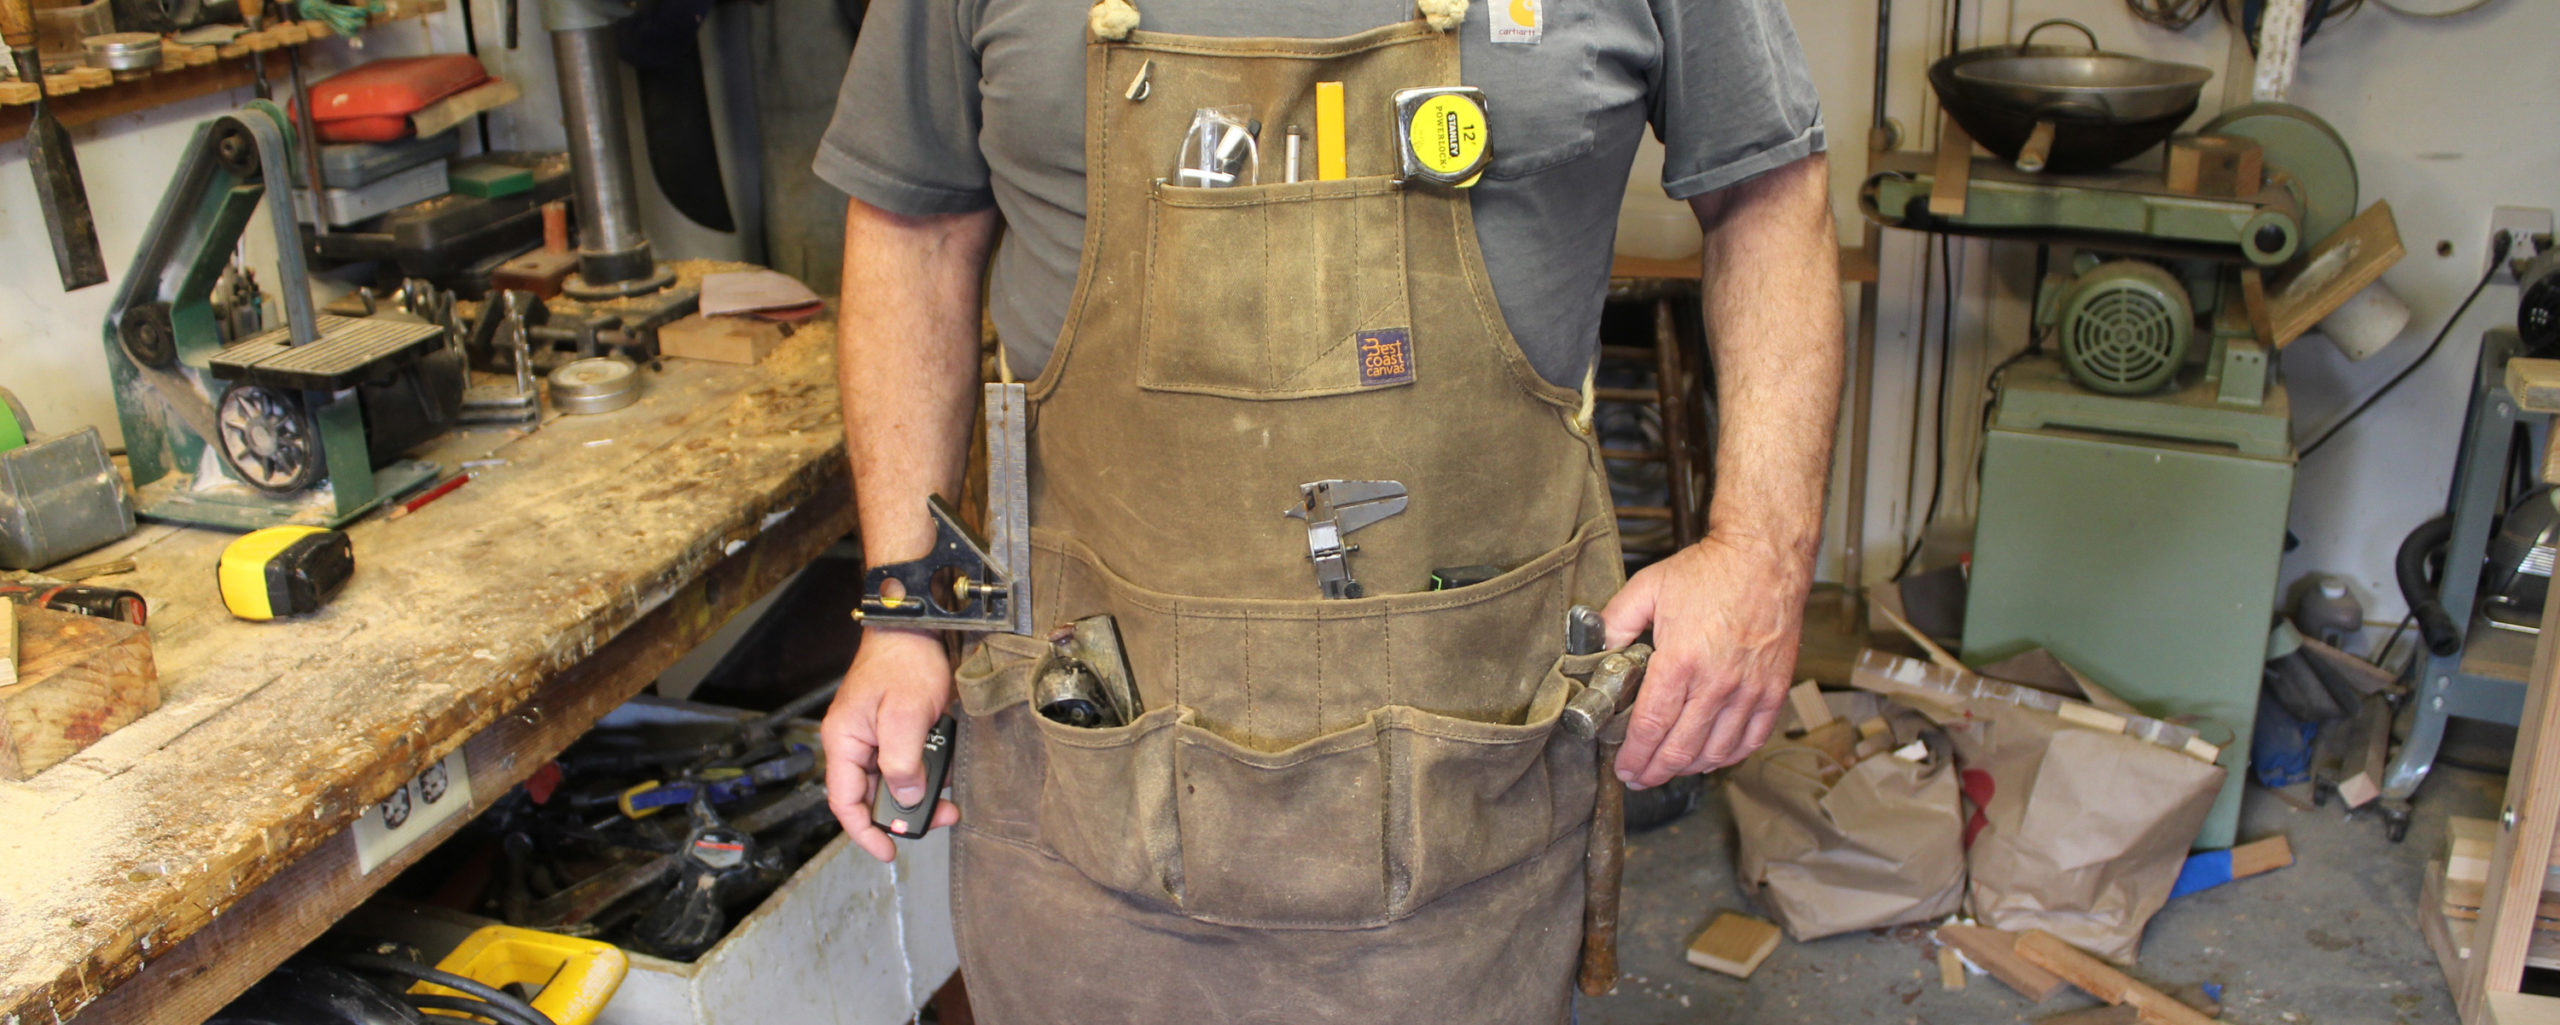
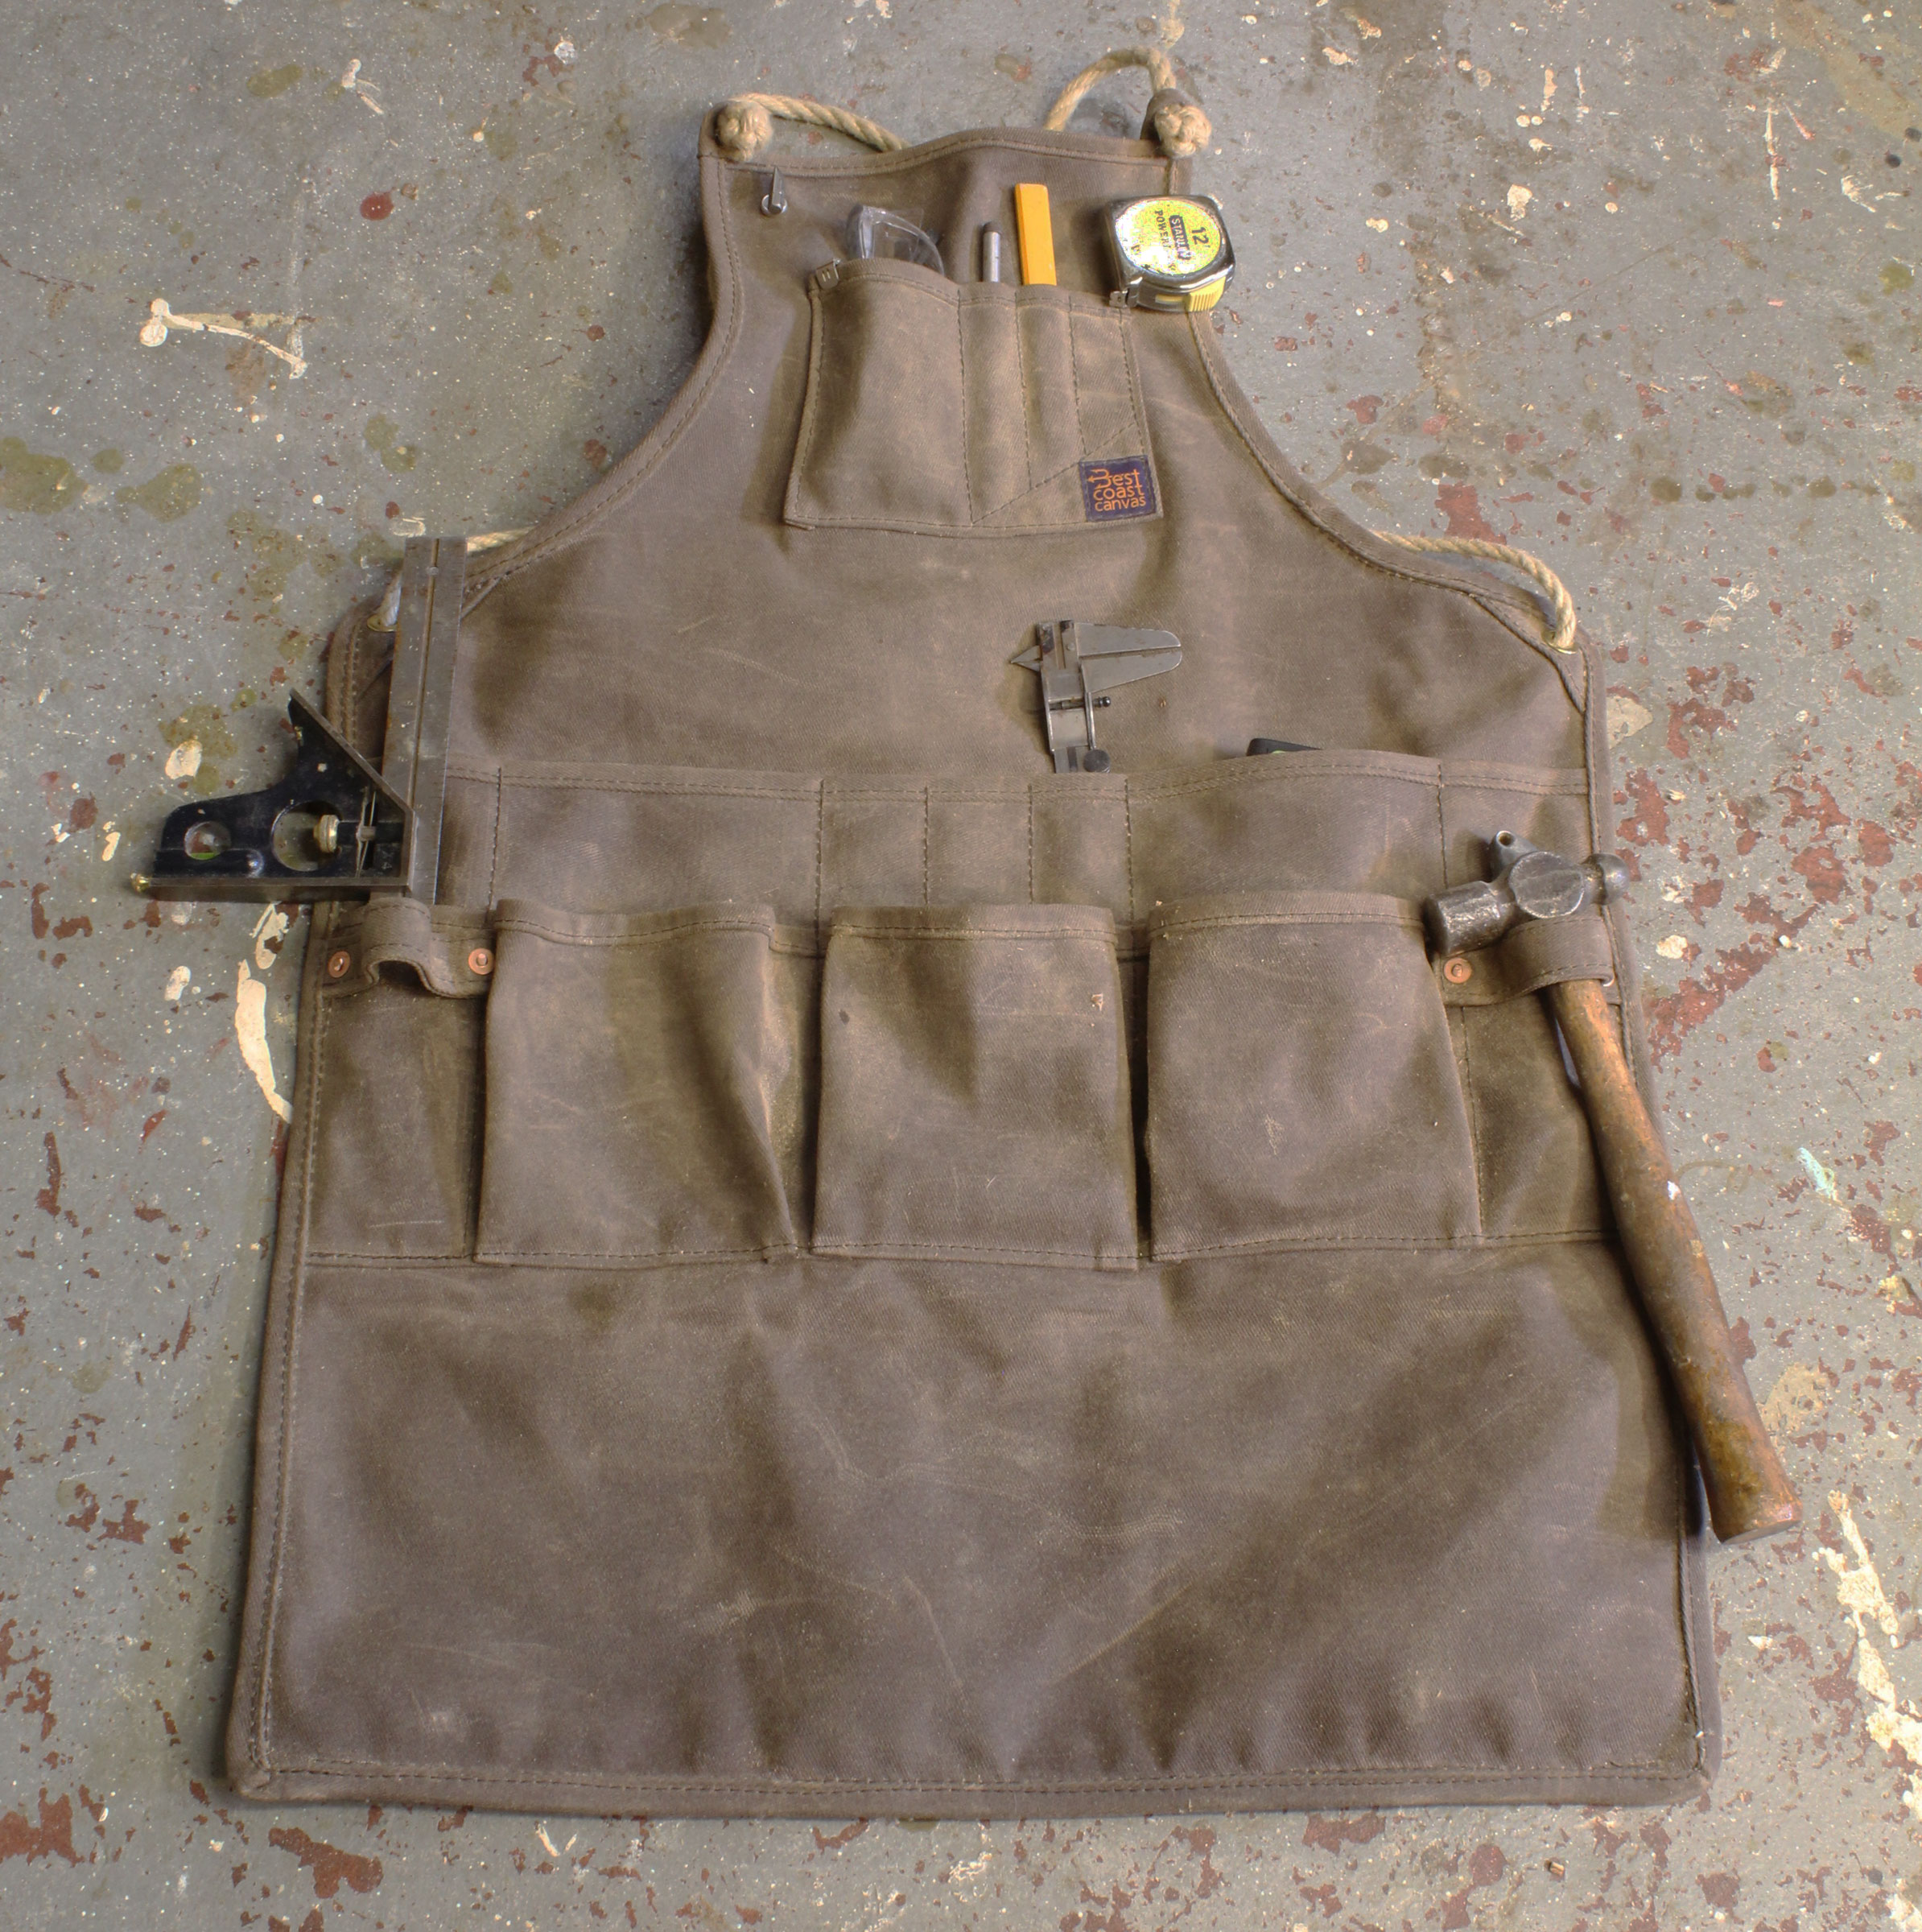
The apron I’ve had in my shop for as long as I can remember isn’t good for much. It’s made of denim and has a single flat chest pocket, a neck strap, a waist strap, and “Zabar’s” written across the front. I usually put it on only before I do some painting or gluing and I’m too lazy to change into my work clothes. My low opinion of aprons for woodworking changed when the Verksted apron I’d ordered from Leah Kefgen at Best Coast Canvas (BCC) arrived in the mail. Even before I put it to use, I liked the look and feel of the waxed 24-oz canvas, which is dyed oak brown and neatly sewn with a very heavy-duty thread.
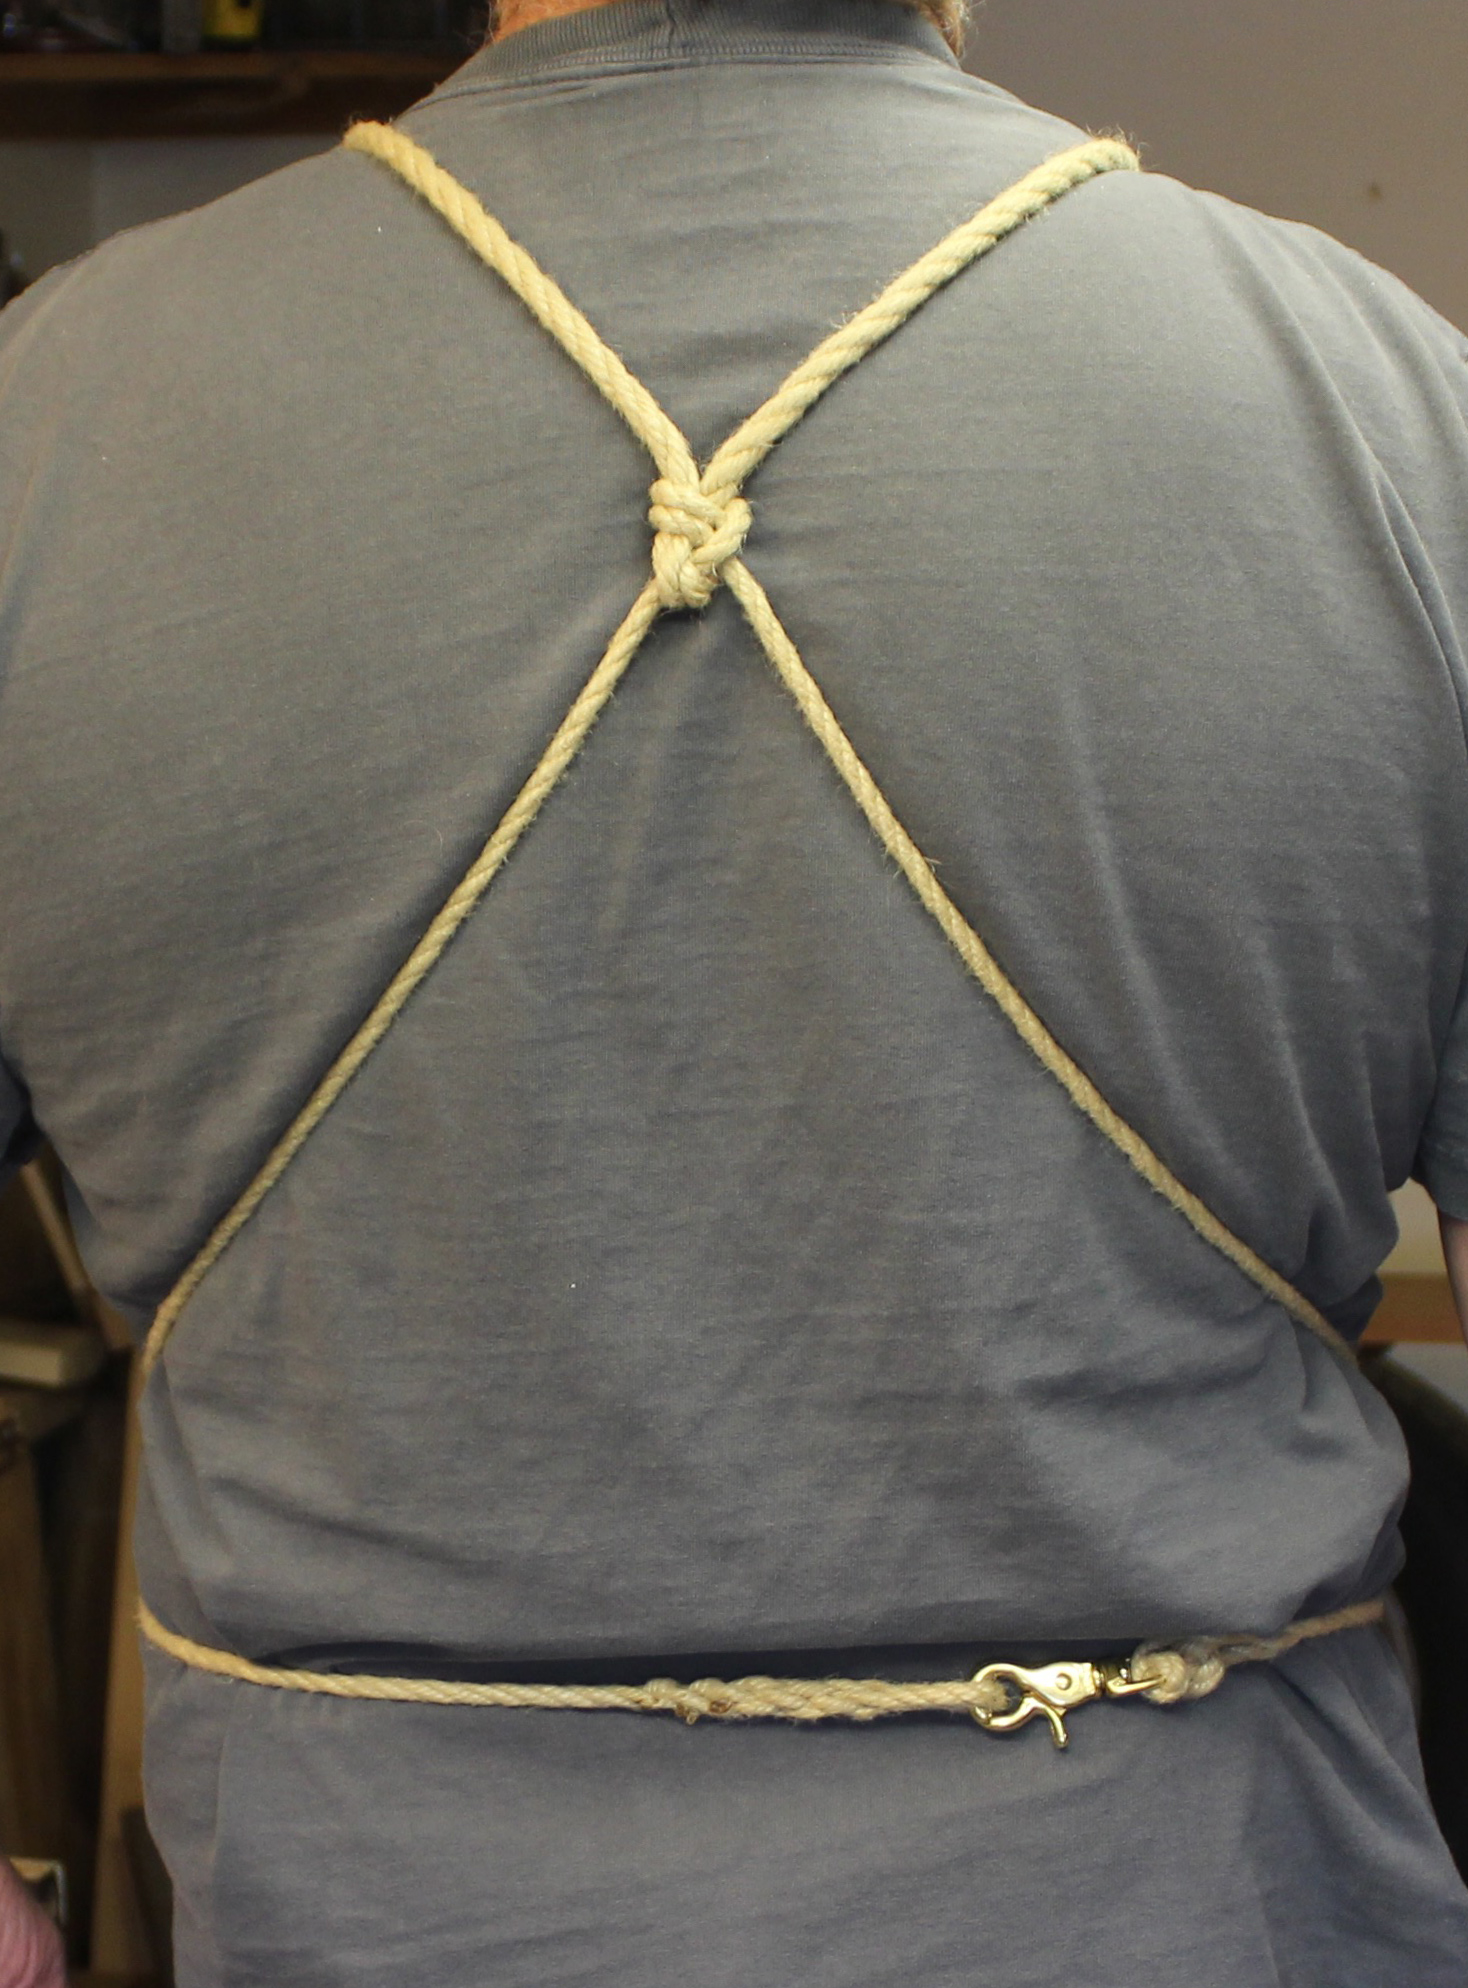
If tying knots behind your back isn’t in your skill set, the brass trigger snap is a useful feature. The weight of the apron and tools is taken by the shoulders, much better than by the back of the neck.
The soft rope shoulder ties are finished with wall-and-crown knots in the front and connected with a double sheet bend to the waist ties, which are fastened at the back with an eye splice and a brass trigger snap. These are all familiar nautical elements, by design, evidently, as the BCC web site notes that the apron was “originally designed for shipwrights and woodworkers.”
All photographs by the author
The apron made a noticeable difference in the projects I’ve done while wearing it. Having my combination square, safety glasses, center punch, pencil, and measuring tape on me saved time and allowed me to work without the annoying interruptions caused by stray tools.
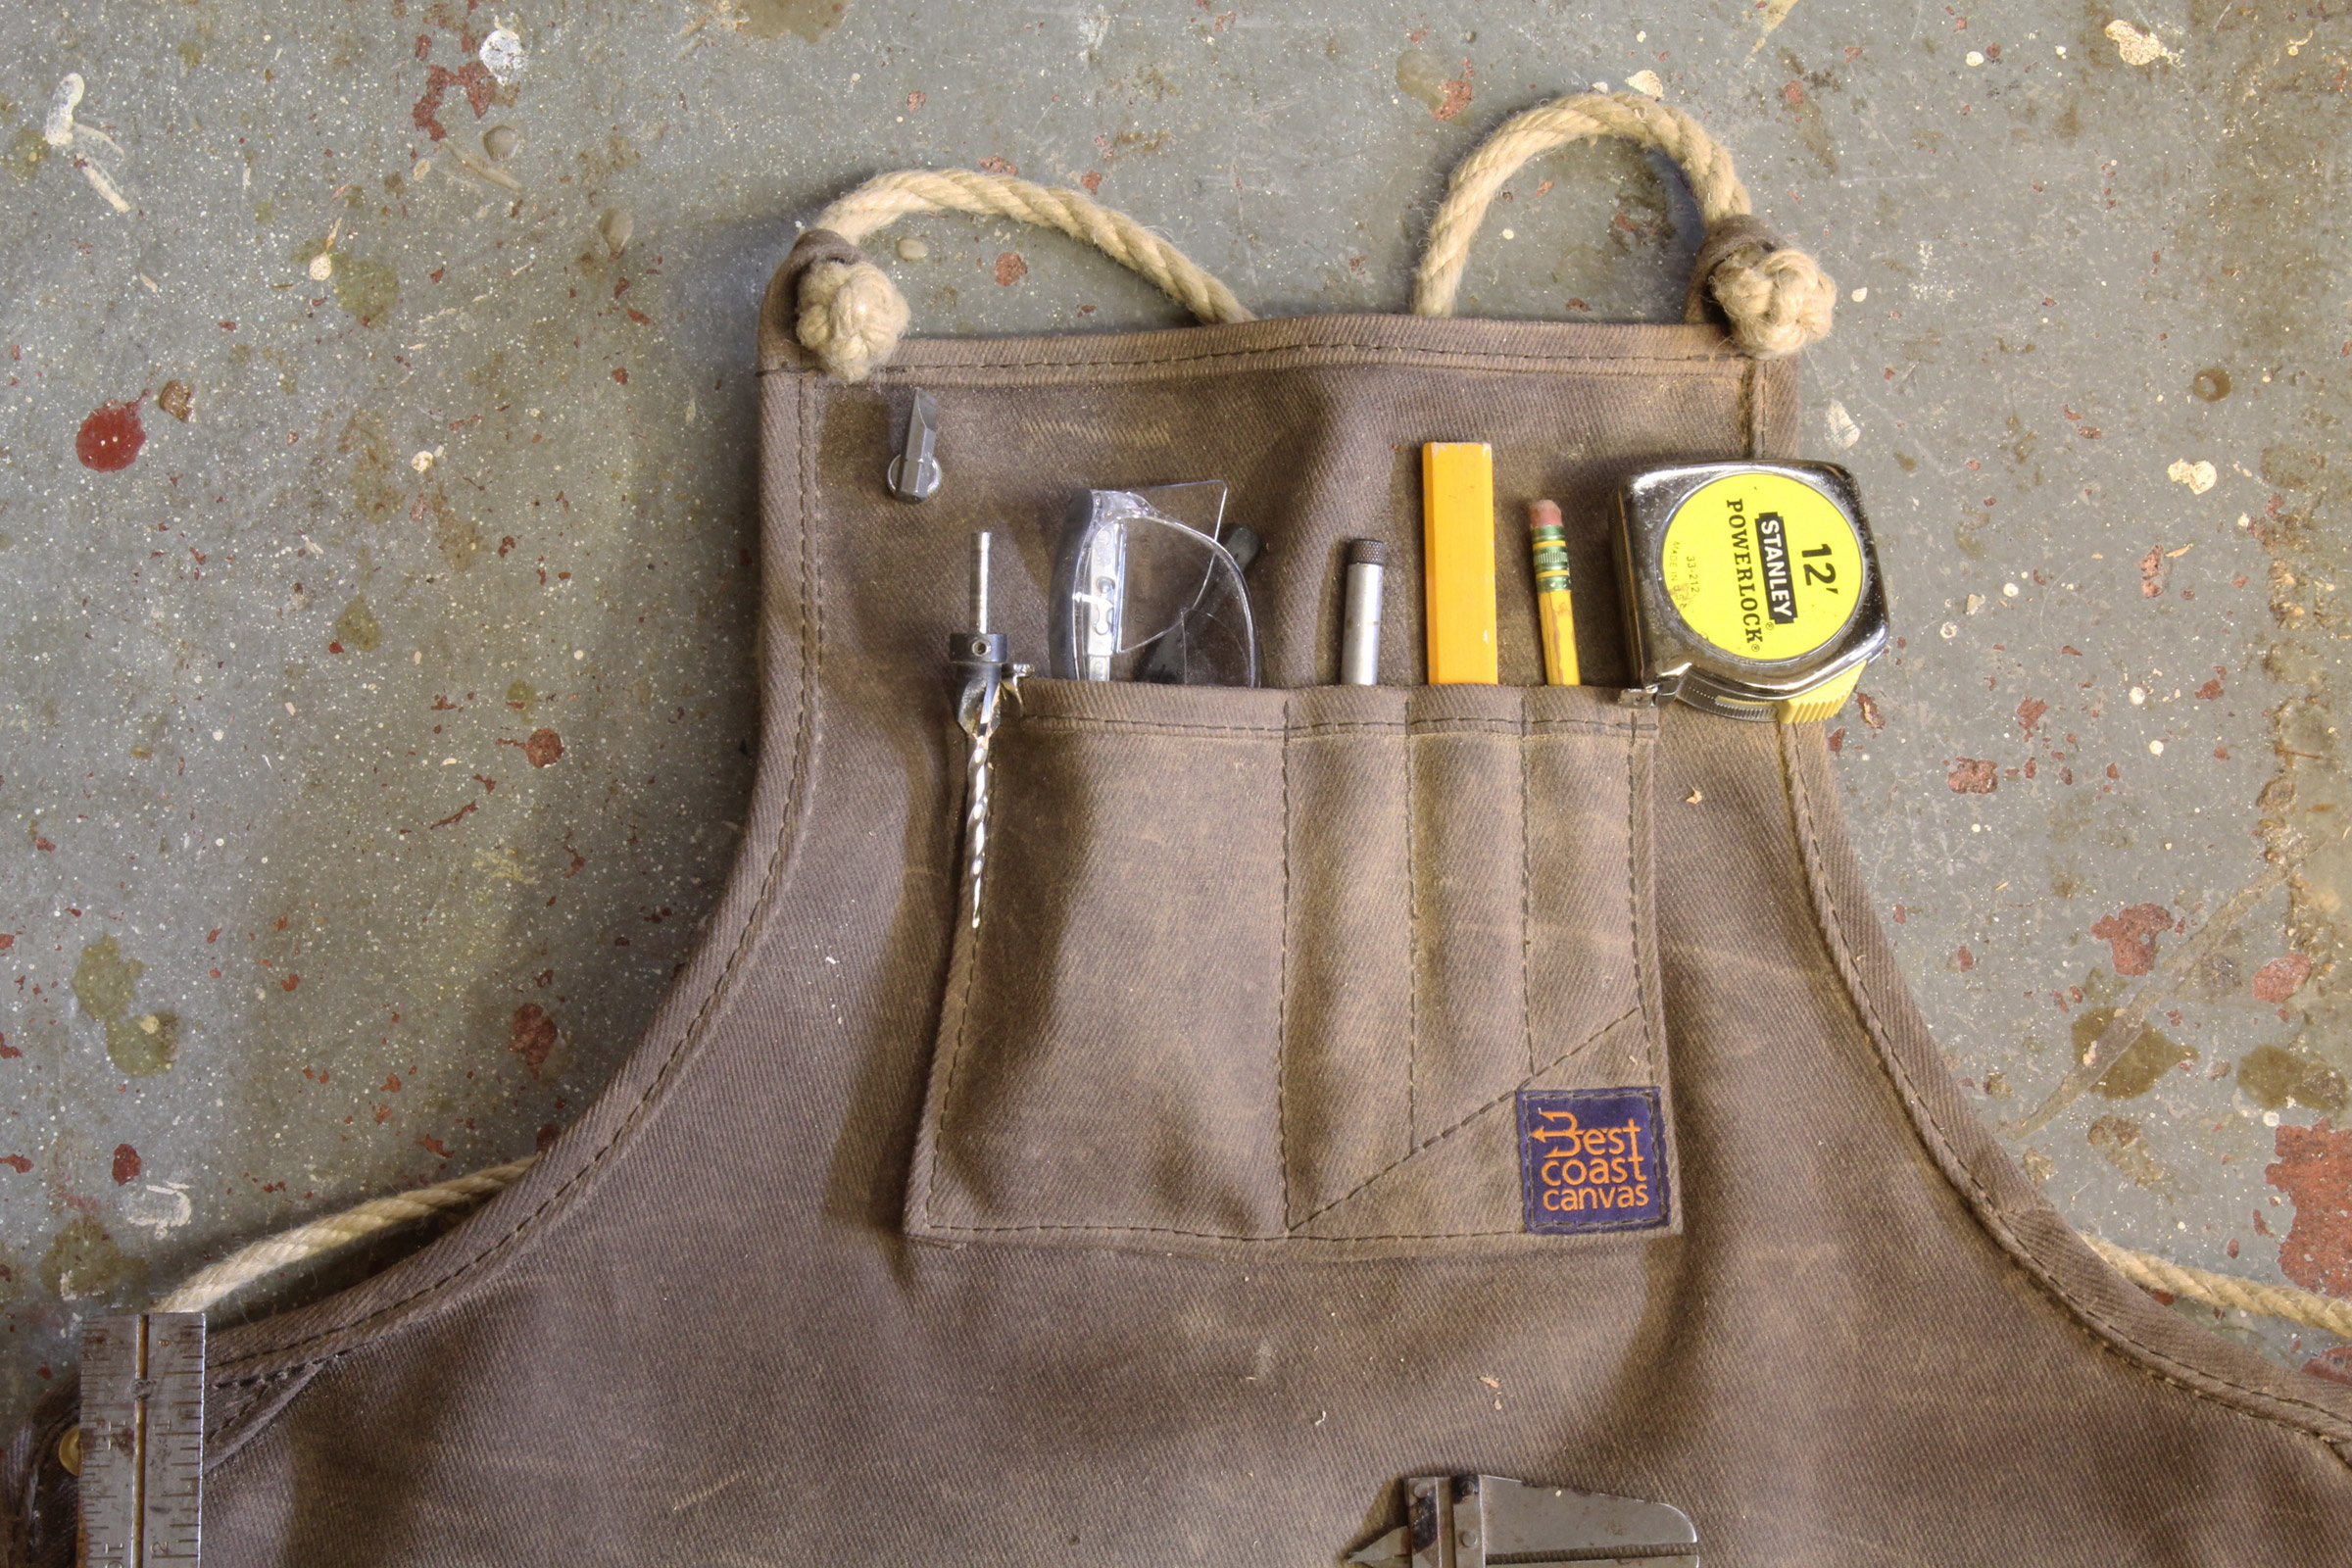
There are ten pockets on the apron. The flat pocket at the top is divided into four compartments: one that fits a pair of glasses, and three I use for pencils and a spring-loaded center punch. The shortest of those three is 3″ deep, so oft-sharpened pencils nearing the end of their useful life won’t get buried in the pocket. The pencil spaces accommodate carpenter’s pencils as well as common round or hexagonal pencils. The fabric is stiff enough to keep them from slipping out accidentally.
Safety glasses, a center punch, and pencils occupy the top pocket. The tape measure spends almost all it’s time clipped to the apron, even when the tape is pulled out. The pilot drill and the driver bit are held by magnets I attached to the apron.
I have a 12′ measuring tape clipped to the bias binding to the left of the top pocket. The tape feeds out from the bottom so I pull it out for most jobs without unclipping the housing from the apron. On the other side of the pocket I added some magnets to hold driver and drill bits.
The middle row of pockets is sewn flat on the apron and 4-3/4″ deep. The two pockets on the sides are 2-1/2″ wide; the adjacent pockets are 5-1/2″ wide. The three pockets in the middle are 1-1/2″ wide. The regular occupants of this row are my calipers and notepad.
The Verksted apron has 16 separate places for tools and two loops for hammers. Even with only a half dozen spots occupied, the apron earns its keep.
The bottom row of packets is 6″ deep and has three 5-1/4″ wide pleated pockets flanked by two 2-3/4″ flat pockets. There are loops for hammers copper riveted over the side pockets. The pleated pockets can be filled to suit the job and hold fastenings or tools like palm planes and large tape measures. I keep a combination square in the flat pocket on the right, and a utility knife in the pocket on the left. To keep the knife from sinking too deep to get a hold of it, I shaped a wooden plug to fit in the bottom of the pocket.
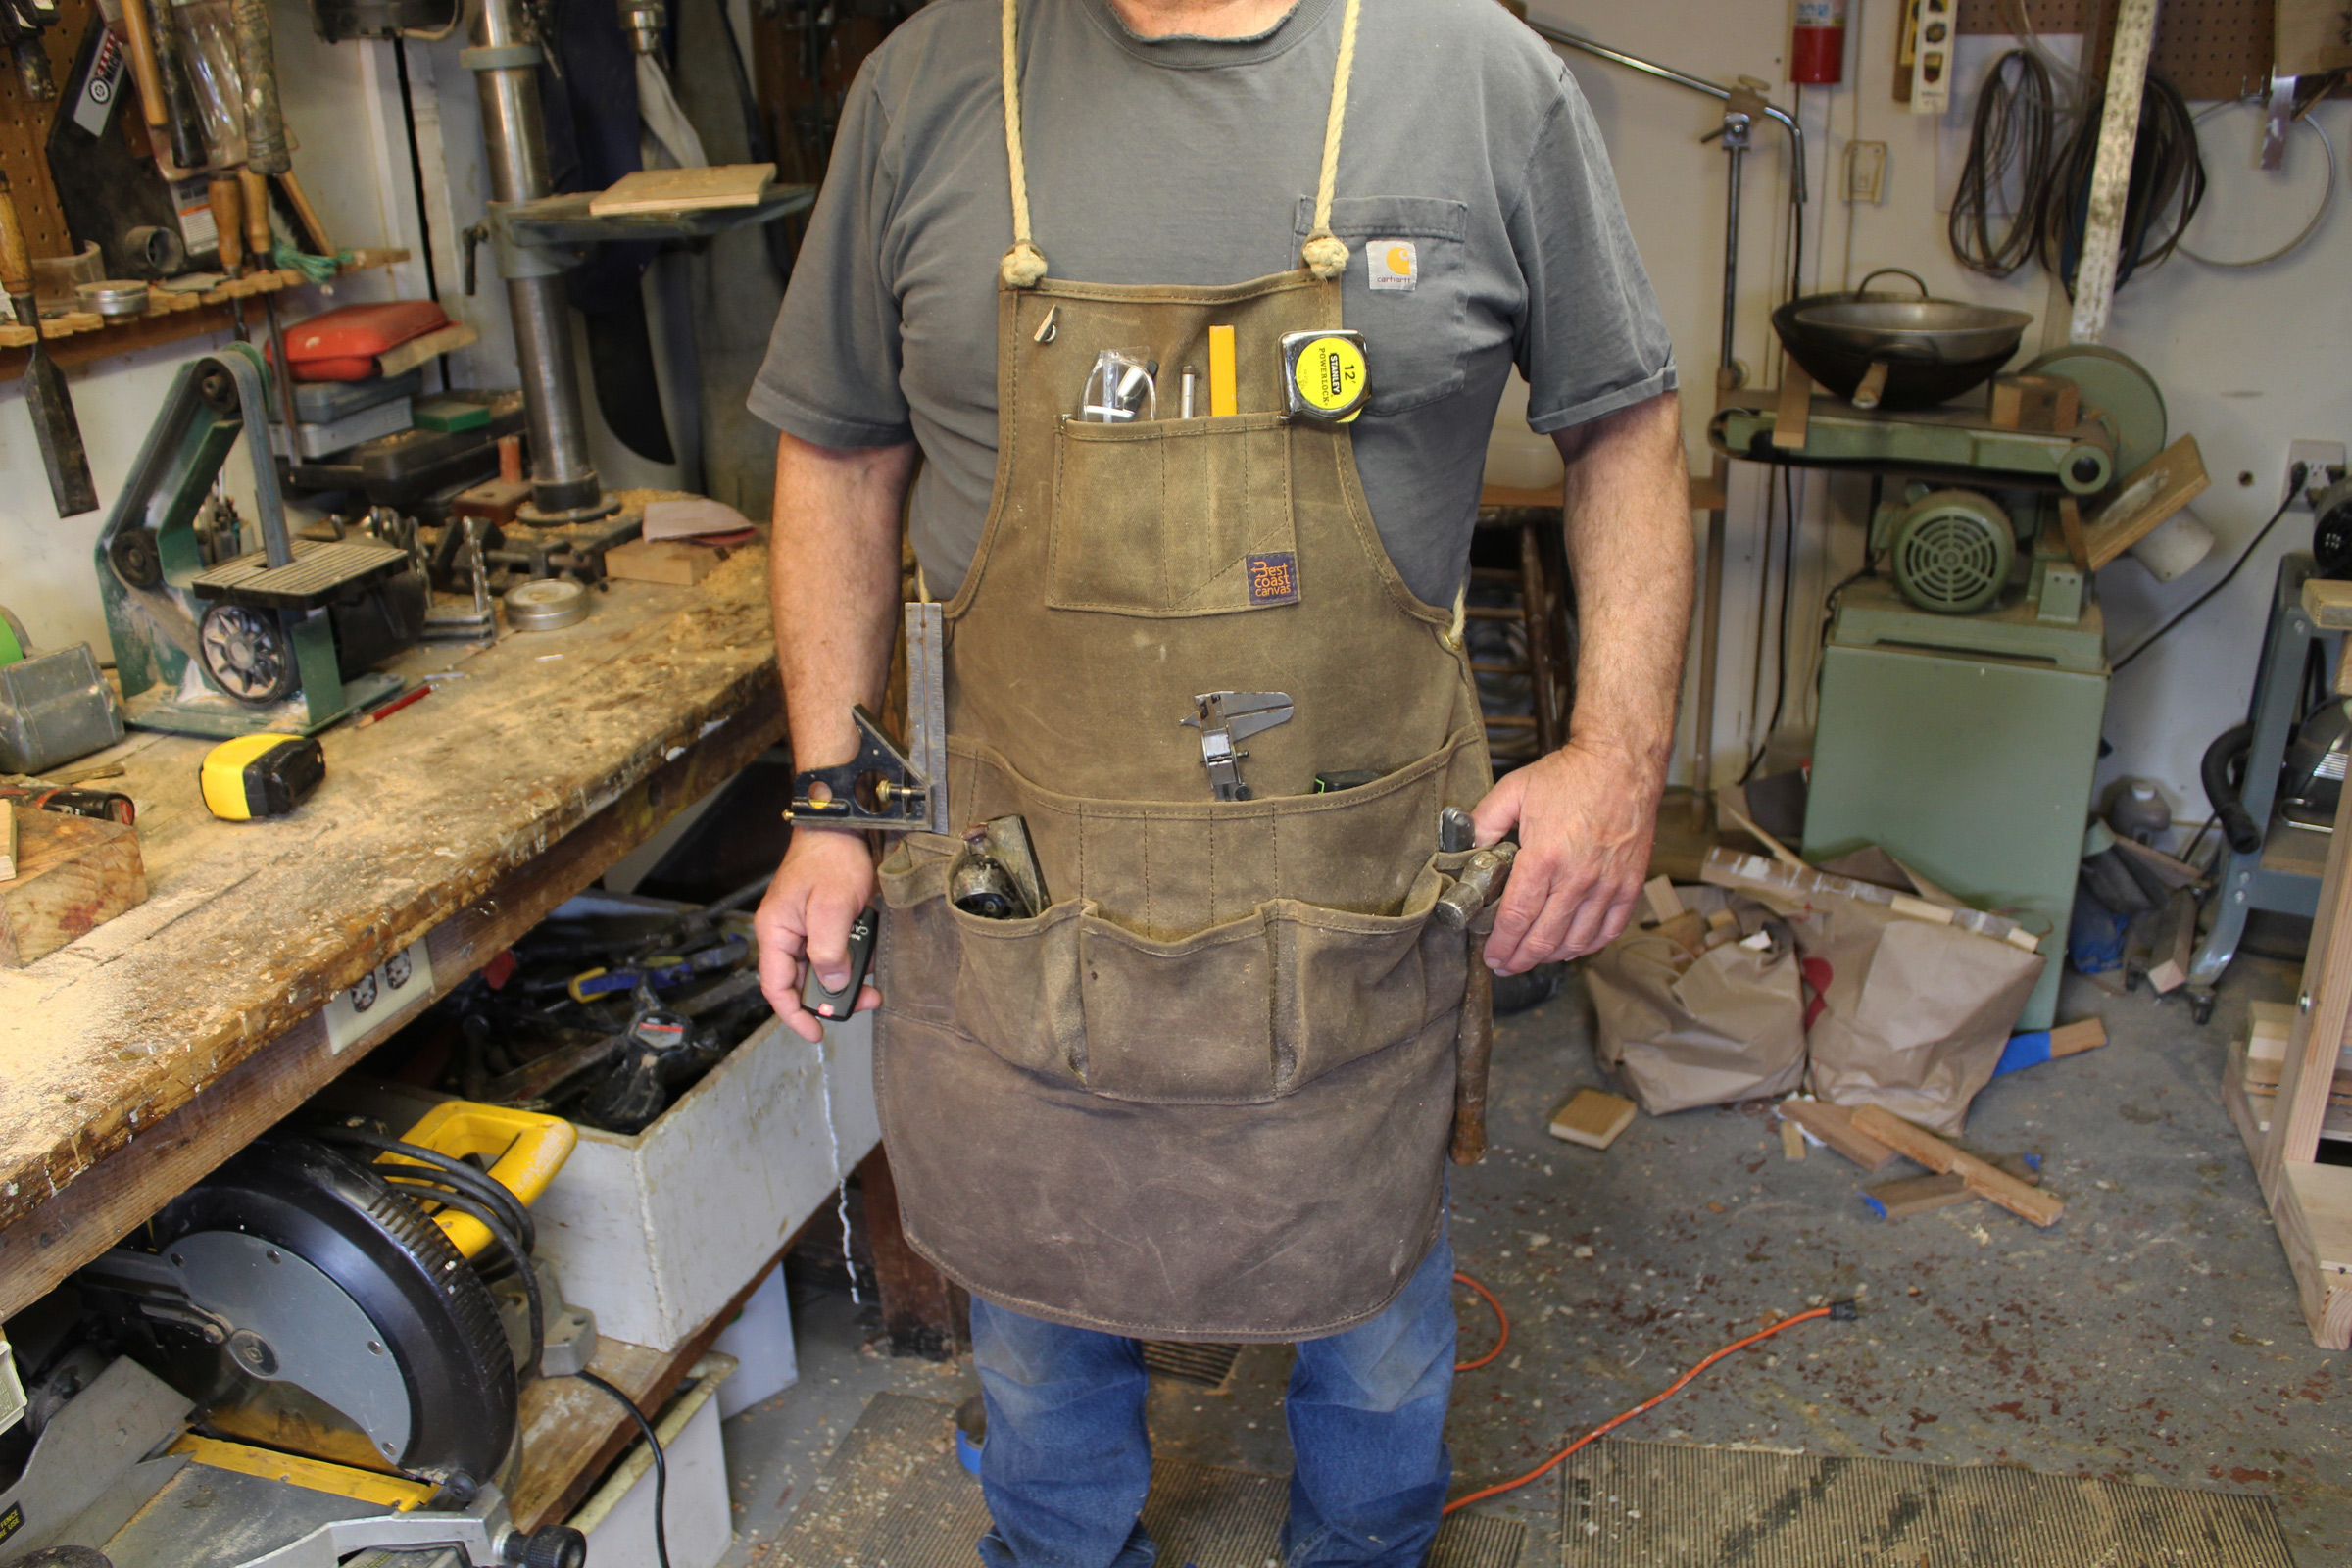
I bought the long version of the apron; it extends 8″ below the pockets and covers me just about to my kneecaps. The short version ends with the bottom of the pockets.
I’ve worn the Verksted apron to do a bit of gluing with Titebond III and got a few drips on it, but the dried glue could be picked off the waxed canvas. I’ve seen what epoxy does to a good pair of pants, so I’ll let Zabar’s handle that mess and spare the Verksted that indignity.
When I first started wearing the Verksted apron, it took a while to break some old habits. I’d catch myself scanning the workbench for my pencil or combination square, unused to the idea that I didn’t need to look. Soon enough I could get to the tools on the vest by touch alone and, with less time wasted searching, my work went noticeably faster.
I think of the Verksted apron as my workshop PFD. I have a lot of tools and machinery crowded into a one-car garage—it can be a hostile environment that tries my patience every time it swallows up tools and pencils as surely as if they’ve been dropped overboard. The apron keeps my enthusiasm afloat and keeps the tools I need on me.
Christopher Cunningham is the editor of Small Boats Magazine.
The Verksted apron is handmade and sold by Best Coast Canvas. The long version, featured here, is priced at $179, the short at $165. There is a version sized for children. The aprons are individually made to order; allow 4 to 6 weeks between placing an order and shipping.
Is there a product that might be useful for boatbuilding, cruising, or shore-side camping that you’d like us to review? Please email your suggestions.
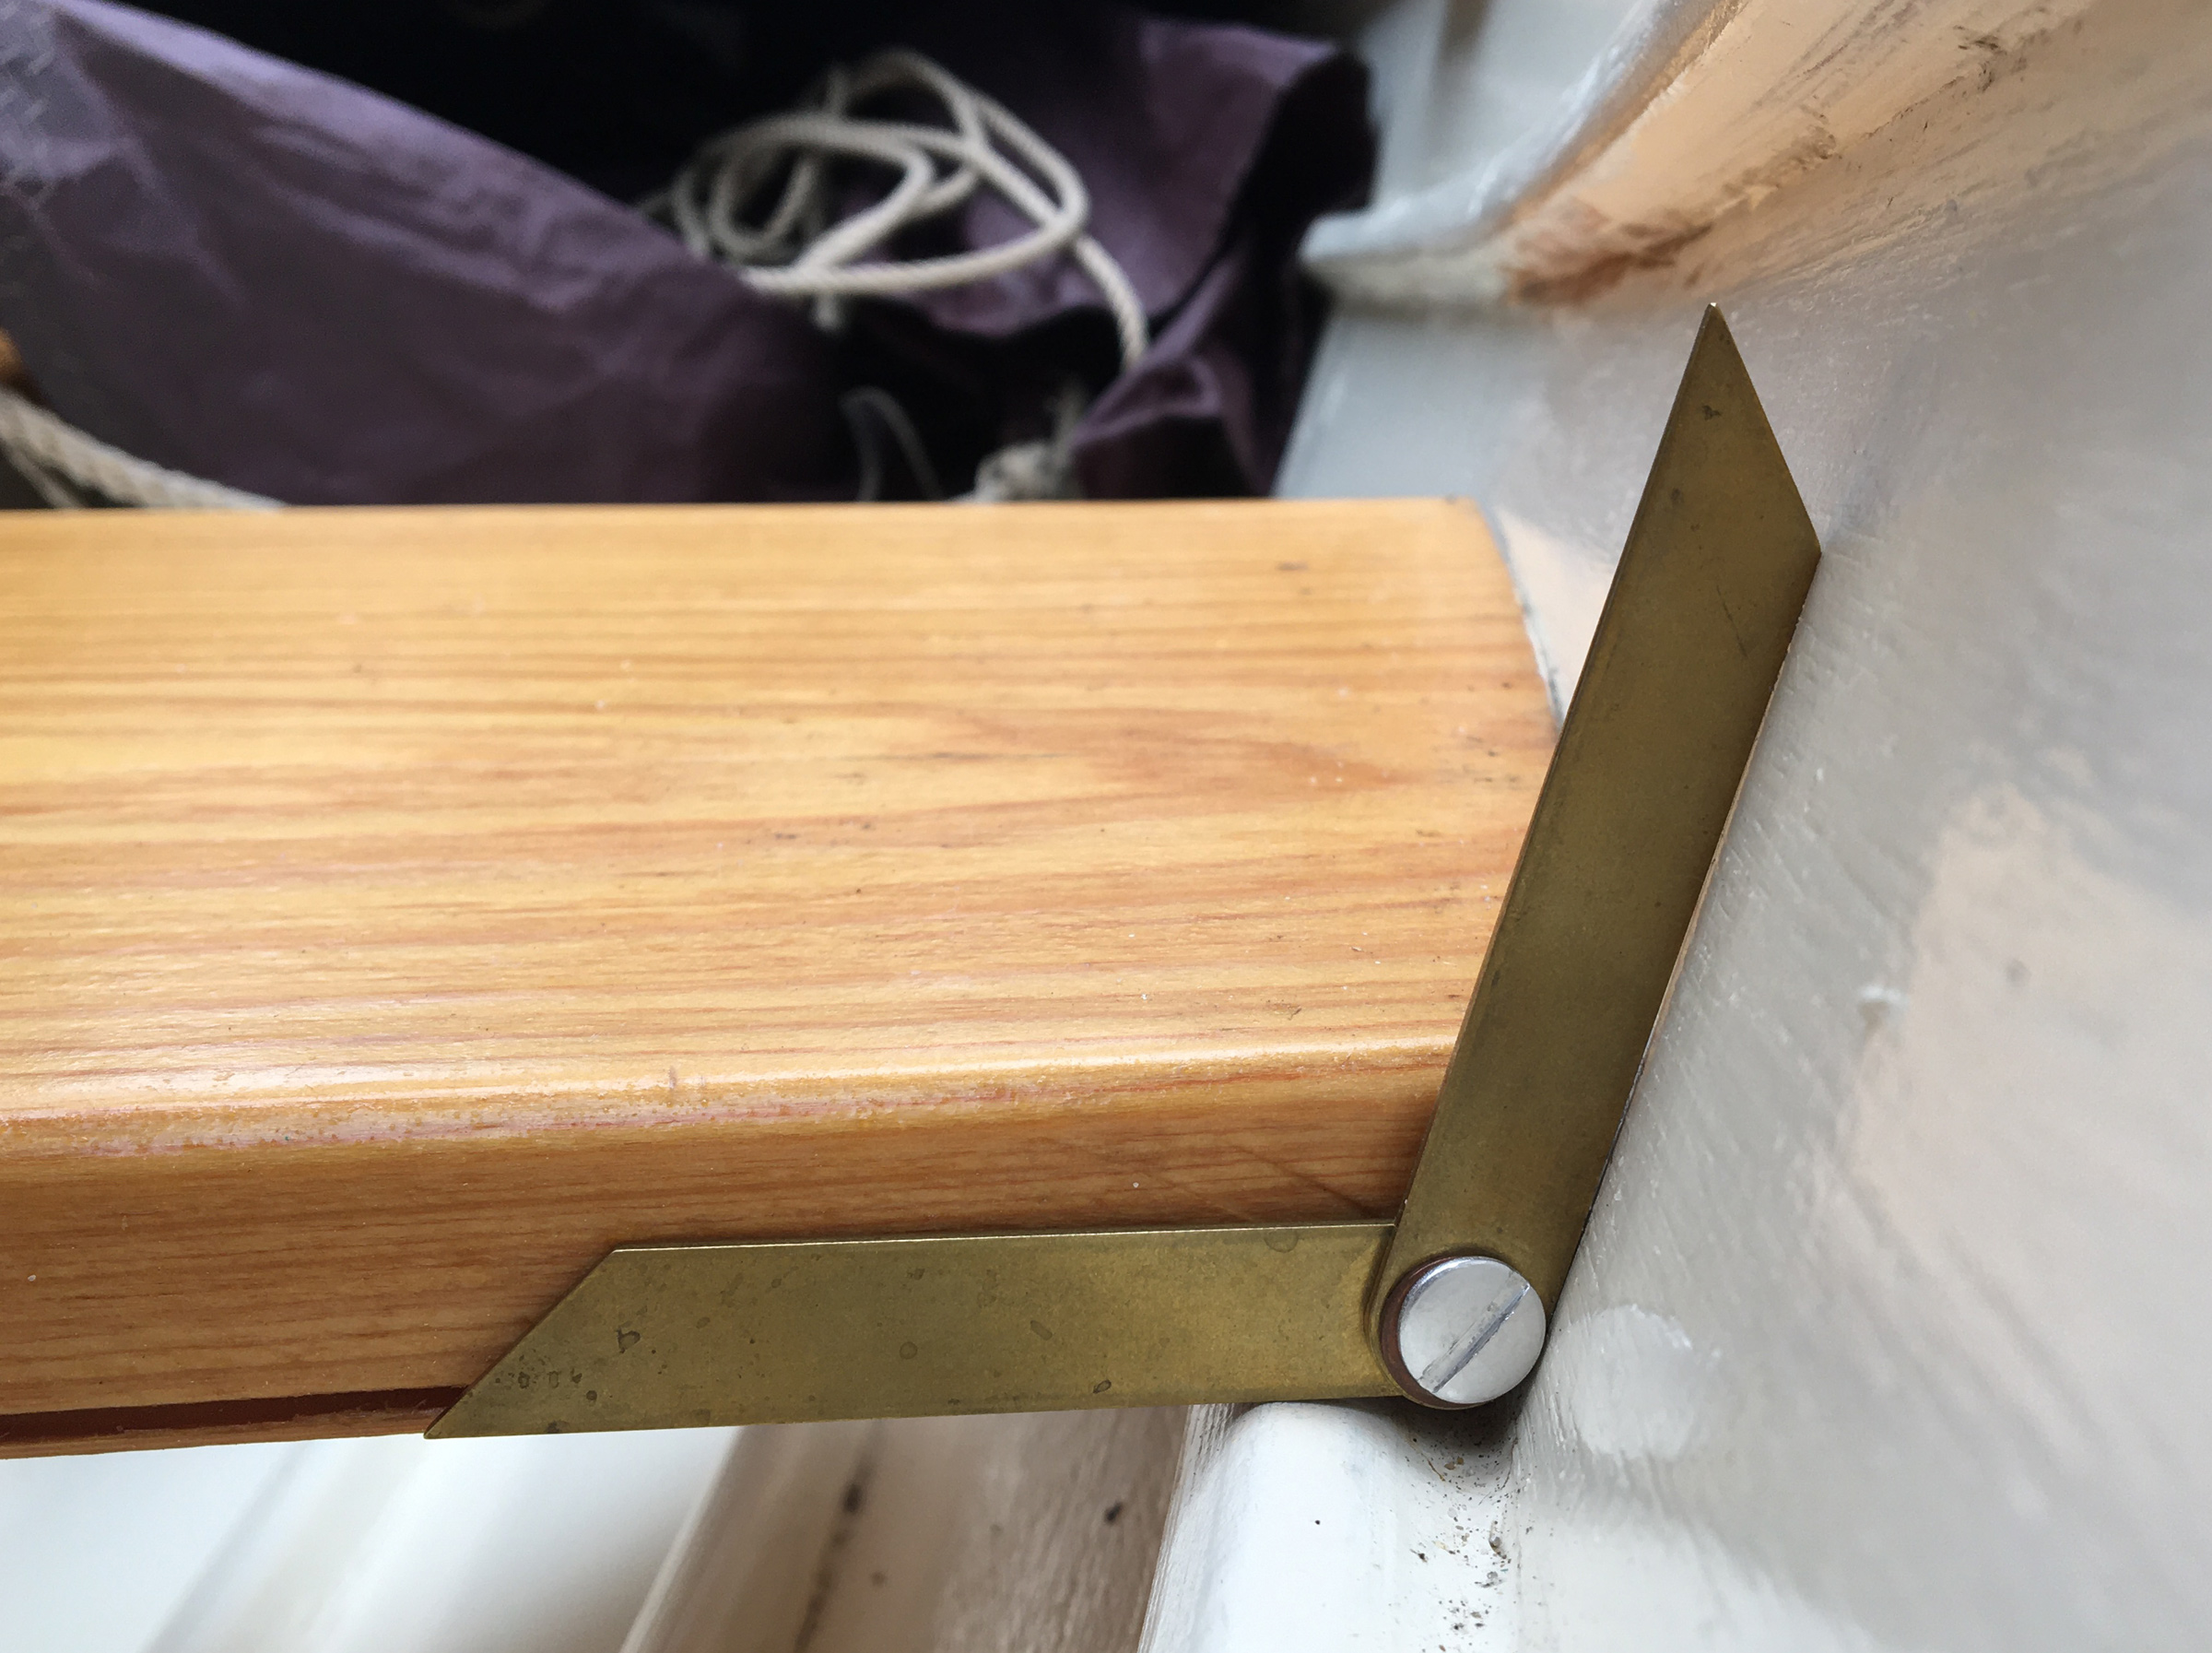
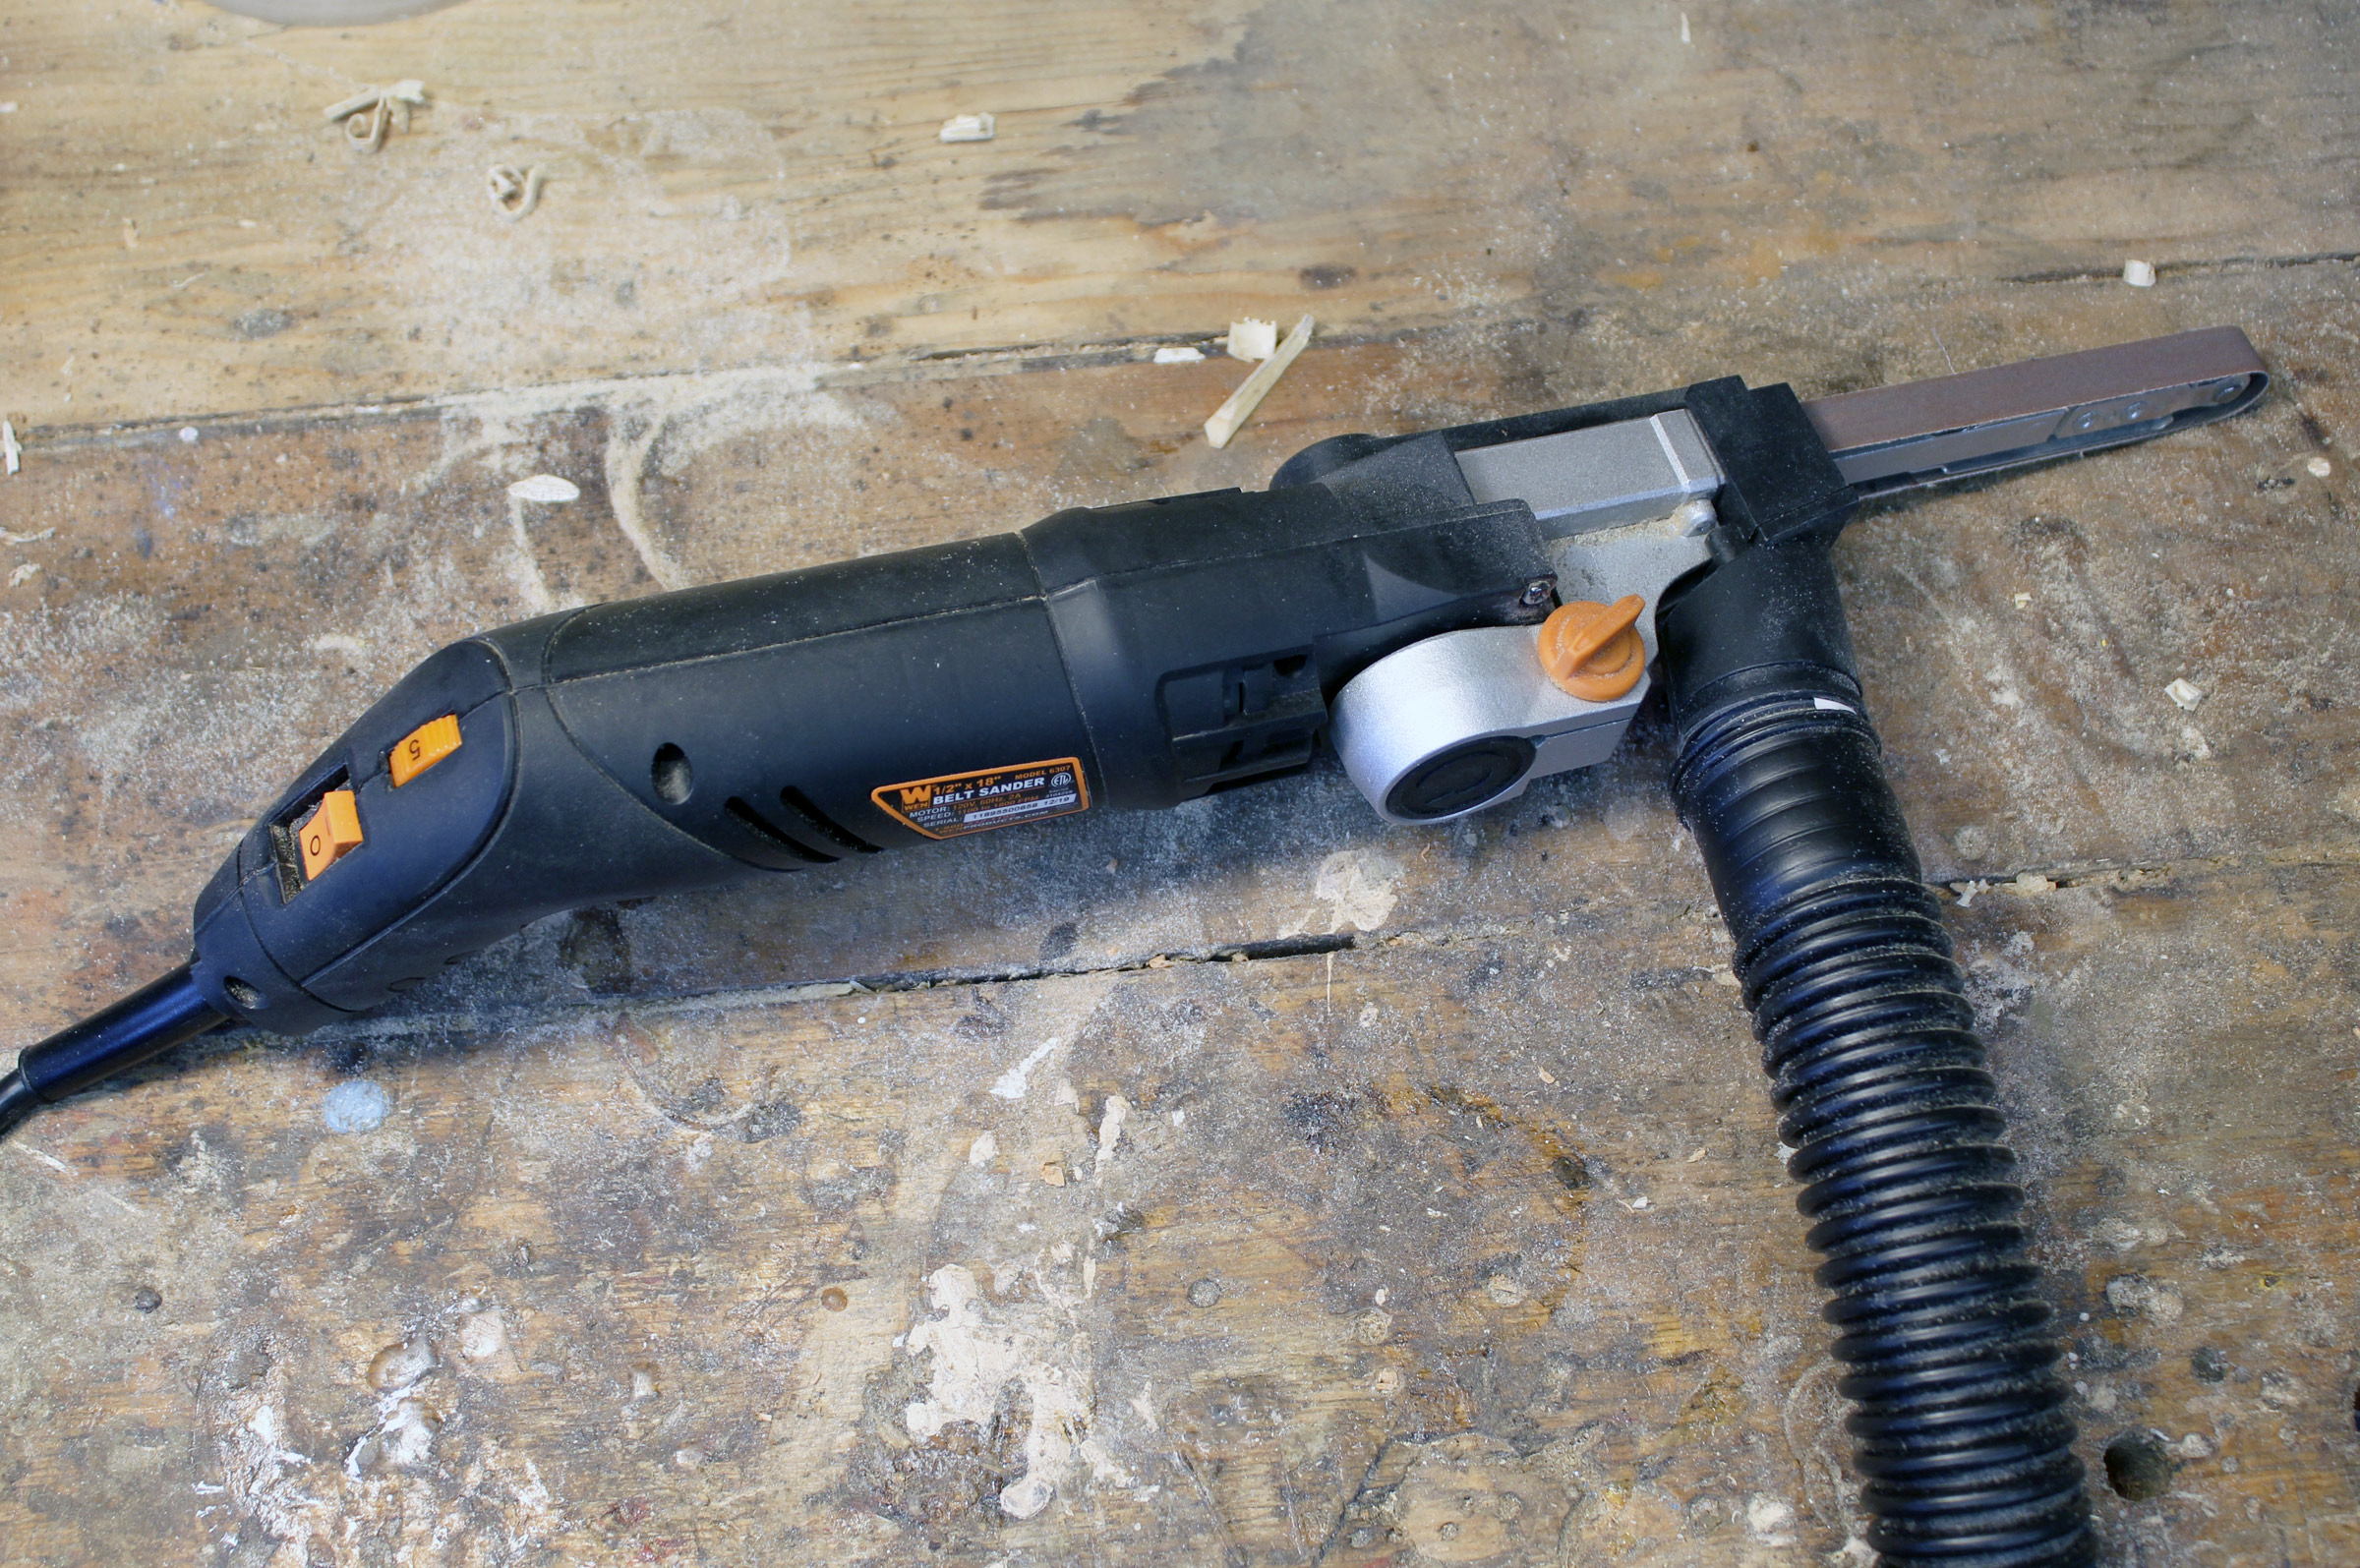
Bevel gauges are handy tools when building boats; they can be used to measure, mark, and transfer angles from one work surface to another. They can also be used to directly set accurate blade angles on cutting tools, versus transferring measurements from a larger bevel to a protractor and then to a saw’s bevel gauge. We used a 9″ sliding bevel gauge when building our Penobscot 14 and while restoring an 1880s Mississippi River skiff, but it was too big to take angles in small spaces, made an awkward fit in a pocket, and kept getting left in a variety of hiding places. A few years ago, I began looking for a smaller, handier bevel gauge, and found the aptly named 3-inch Bevel Gauge.
Photographs by the author
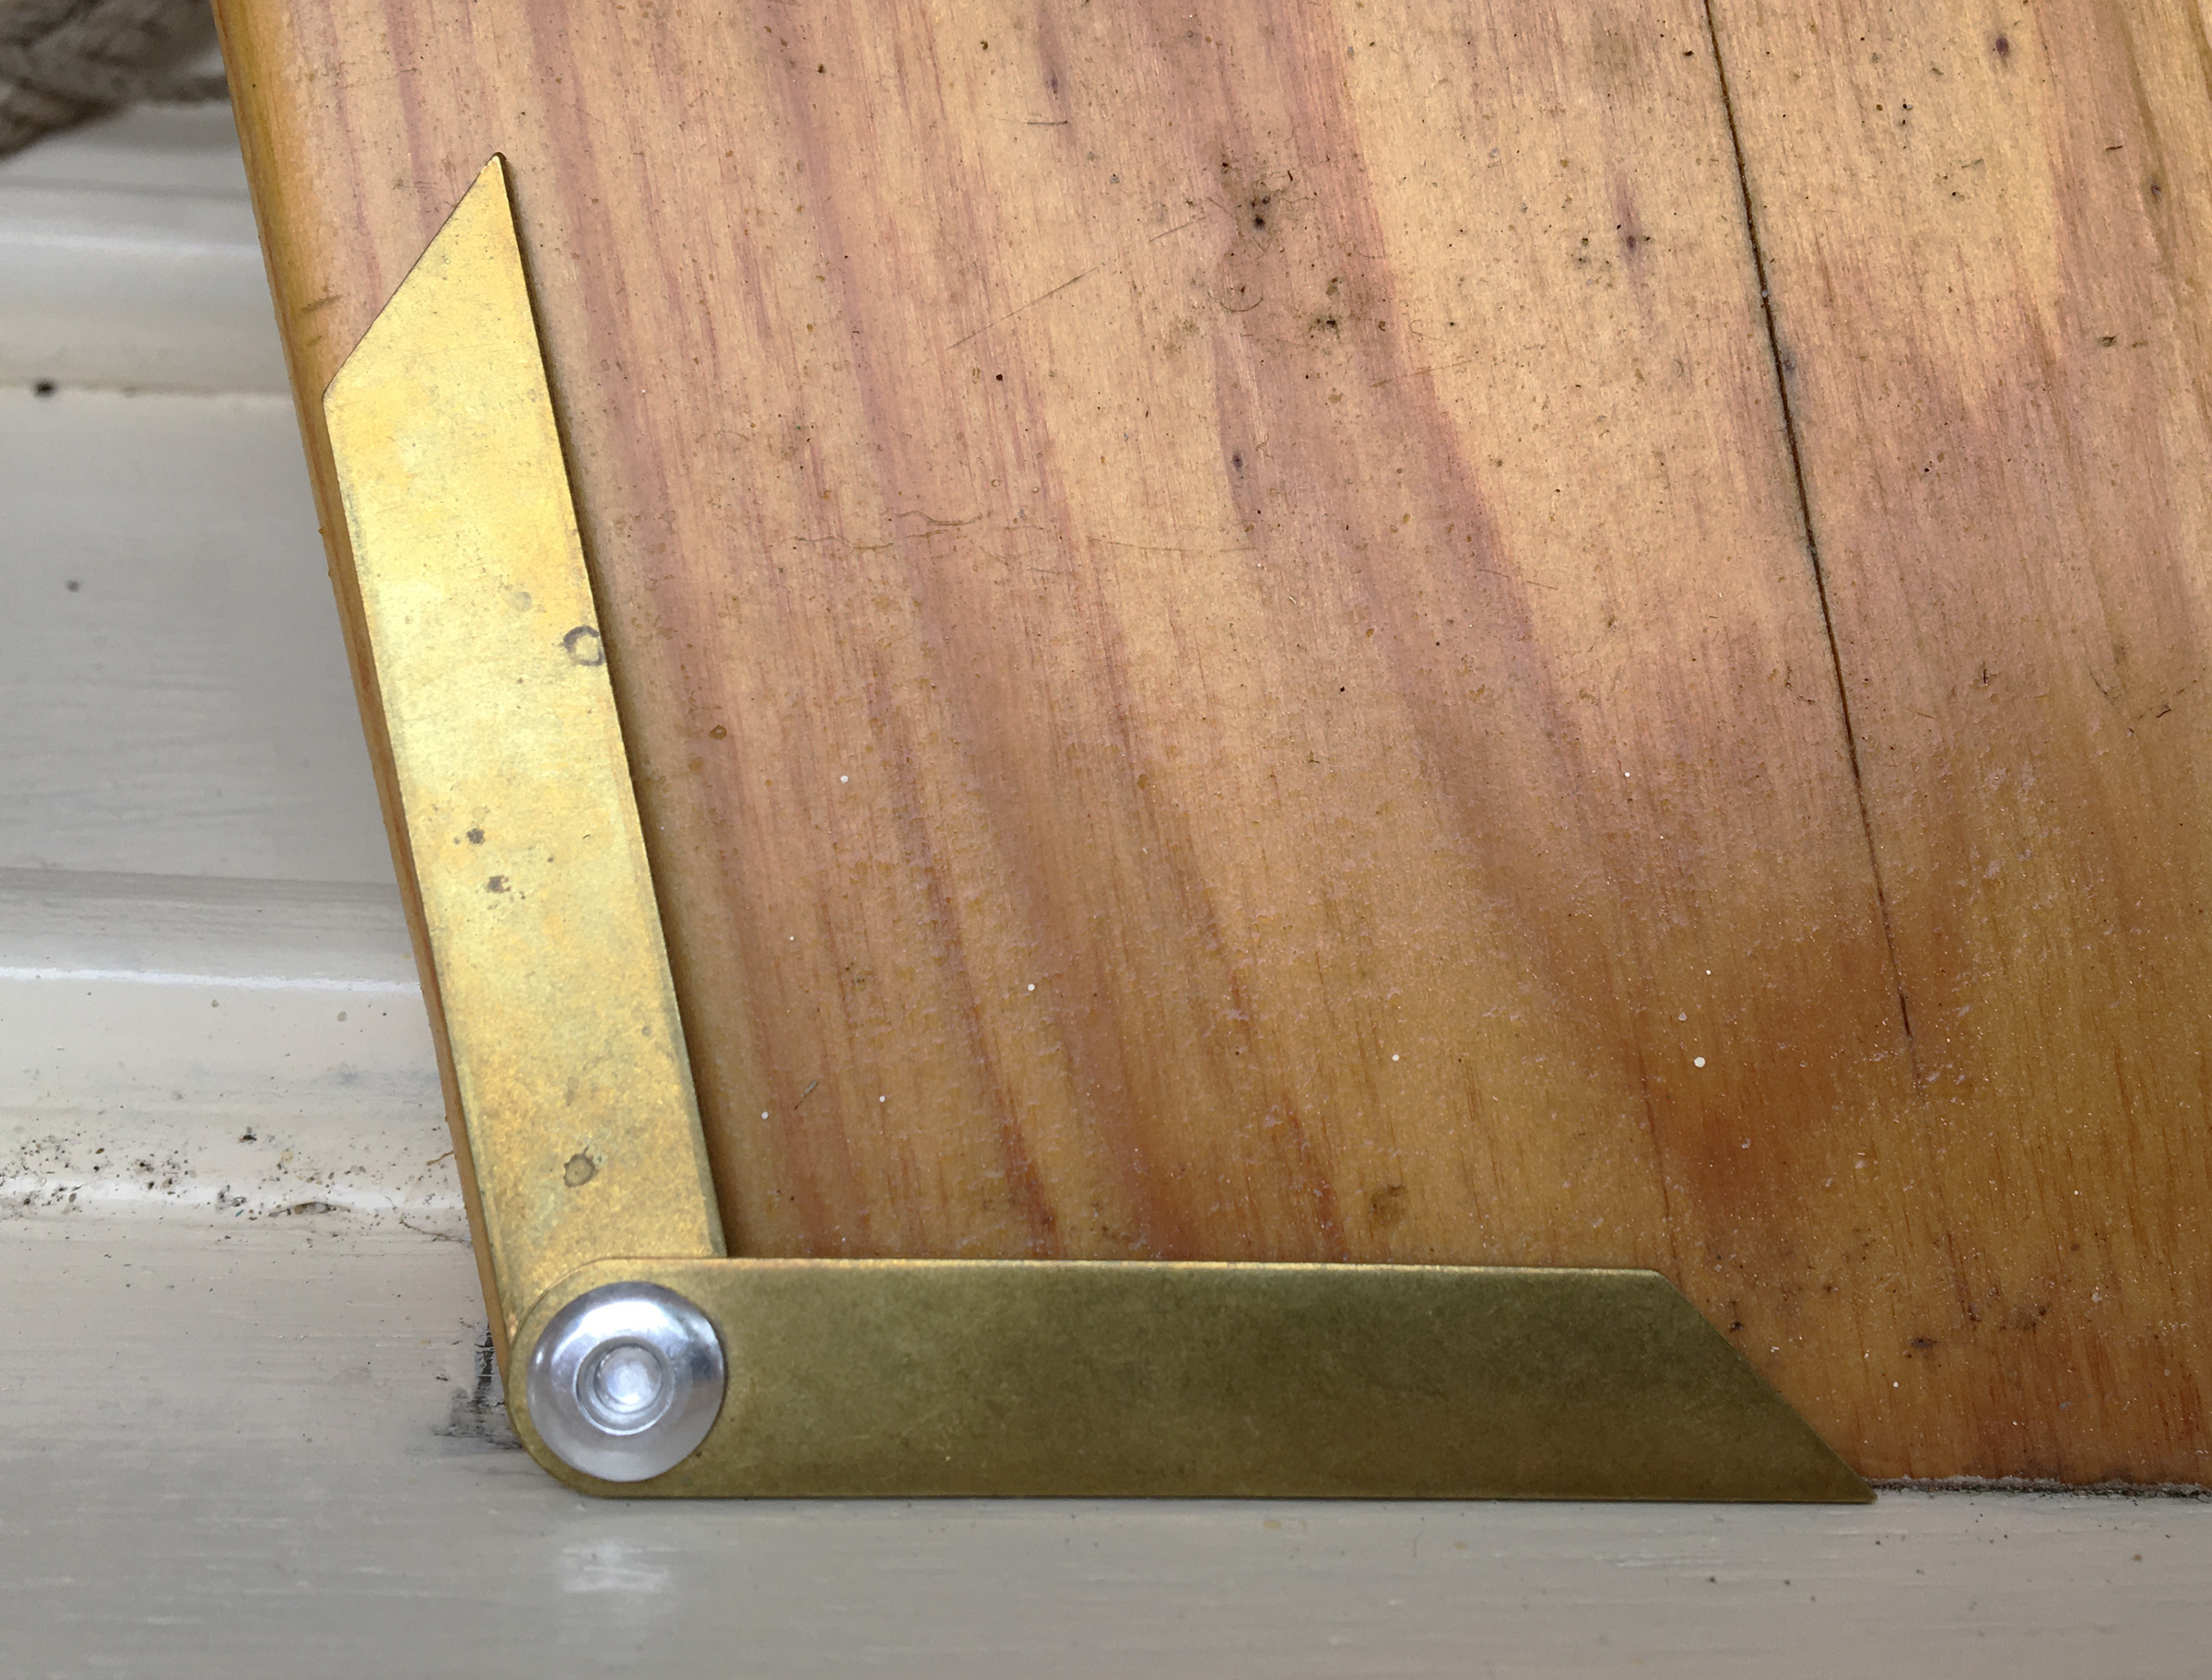
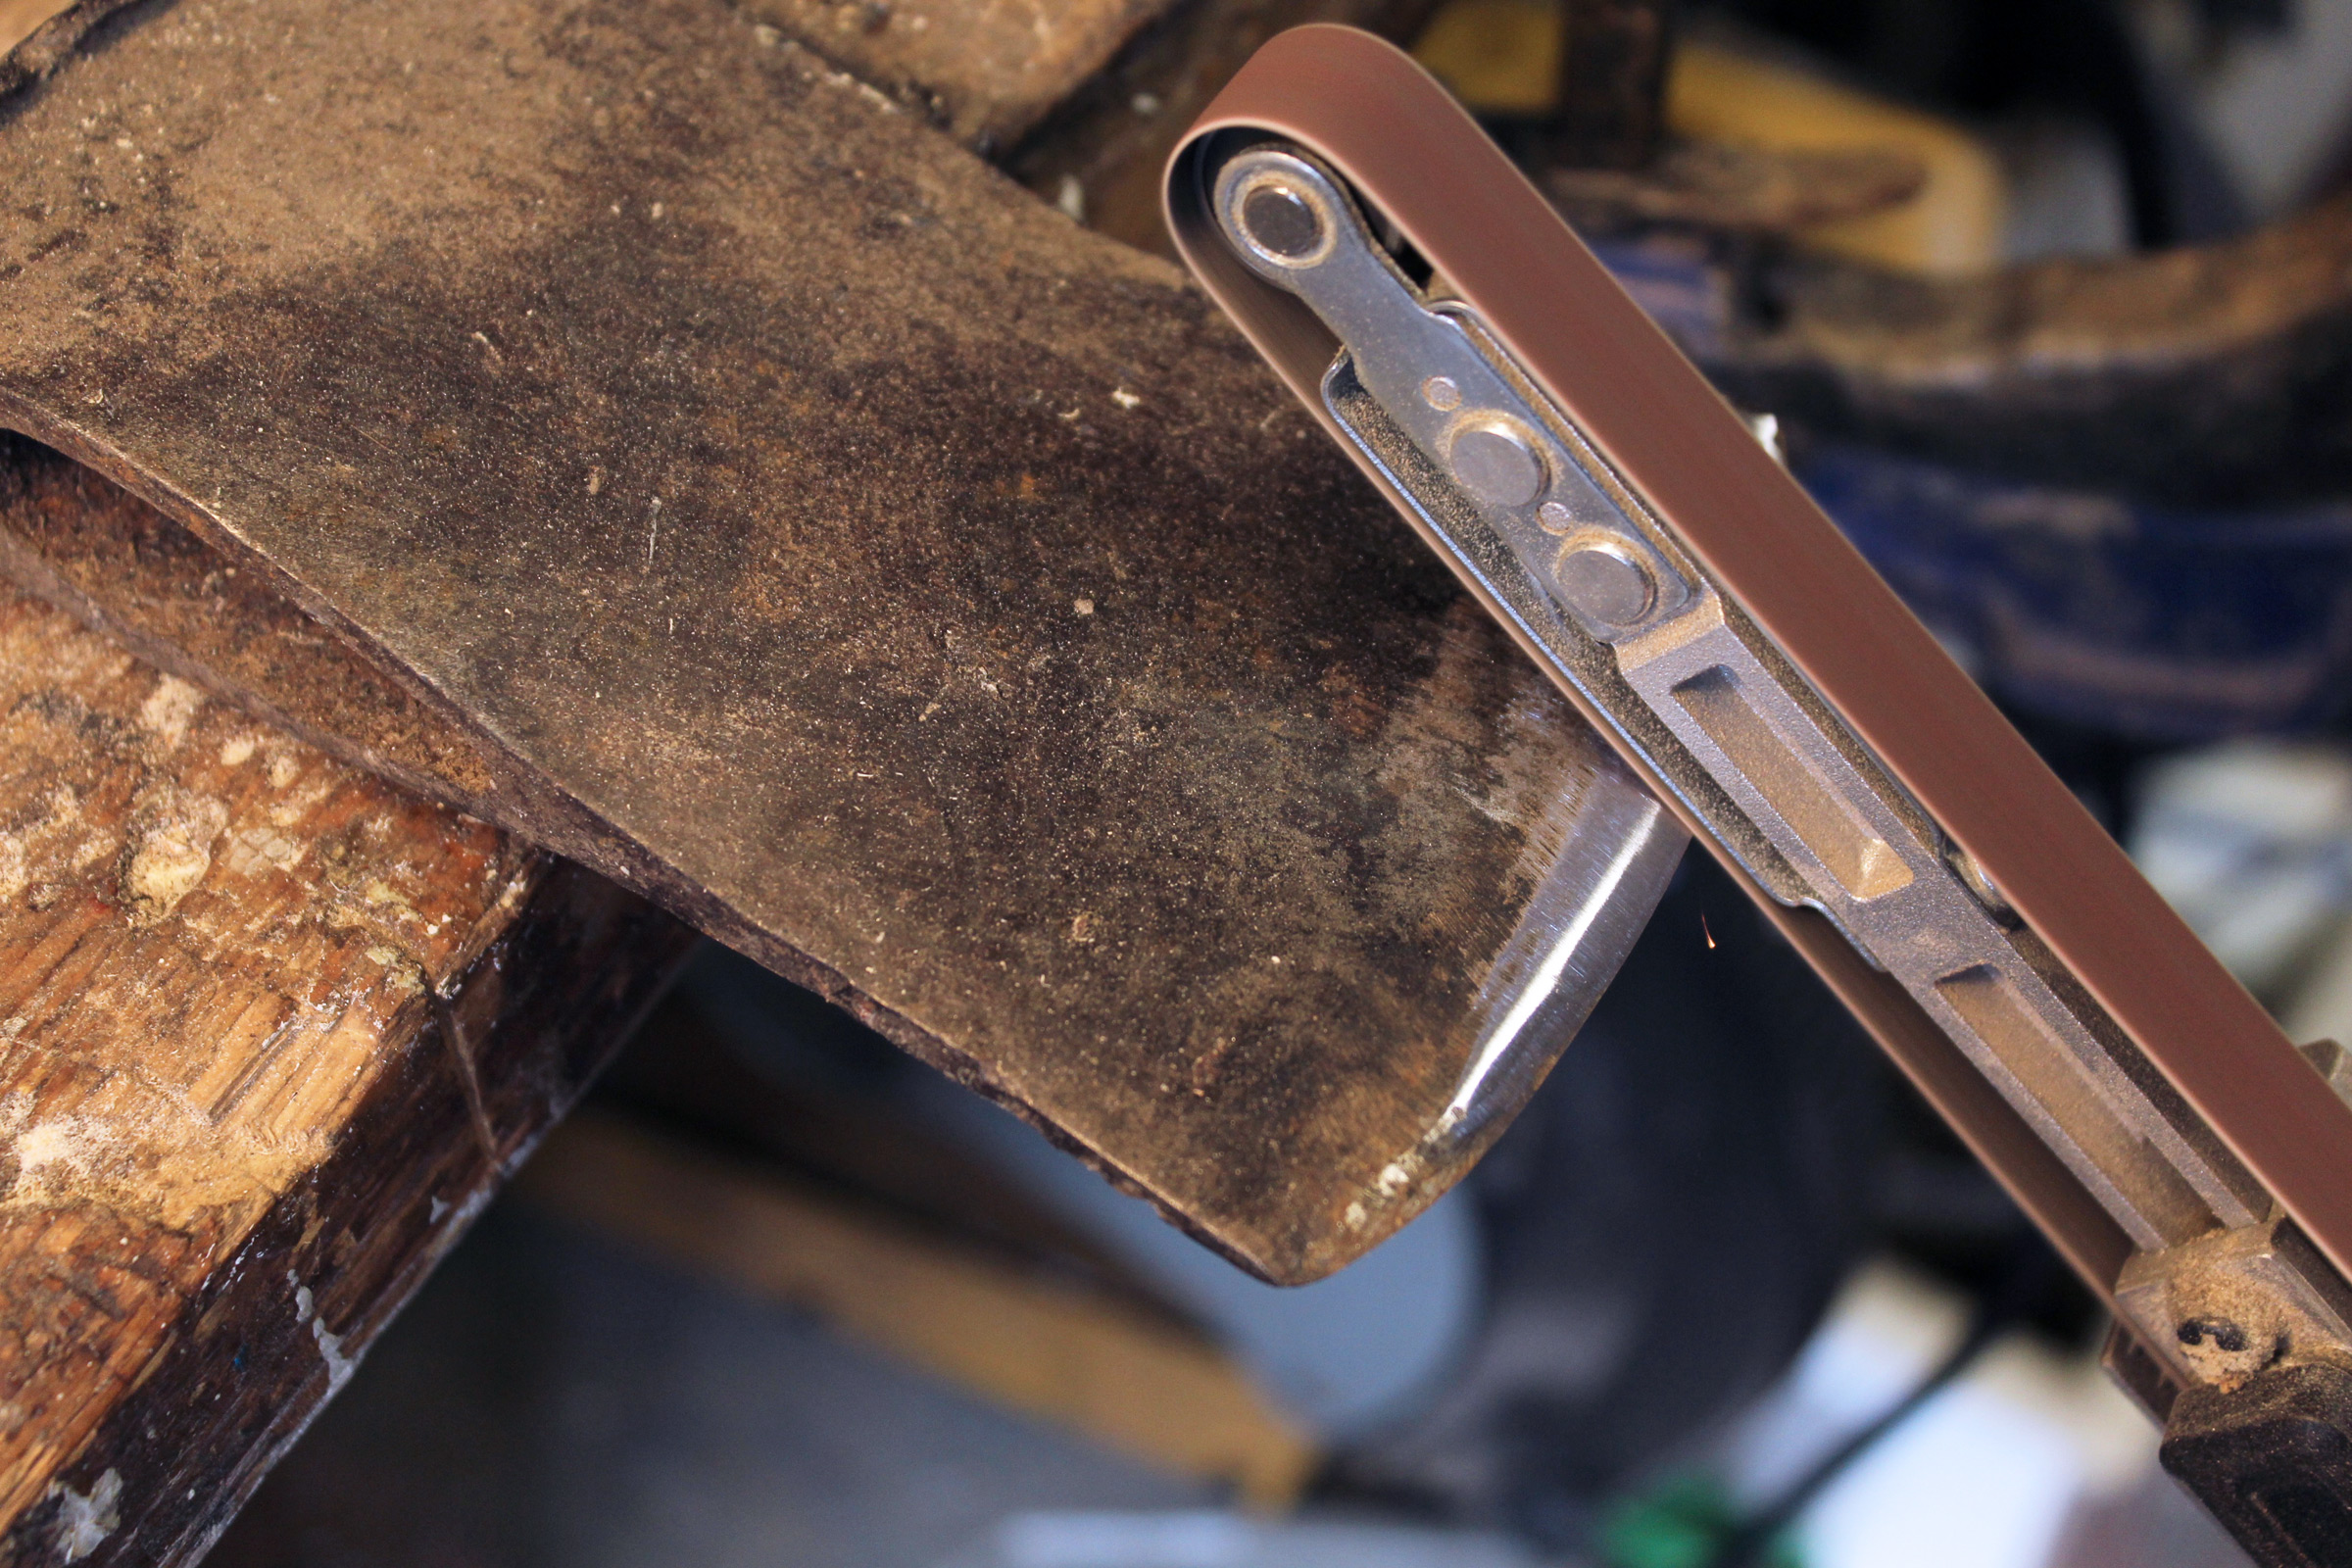
The gauge lies nearly flat, so taking and marking angles can be done more accurately than they can with a common sliding bevel gauge.
The gauge is made of brass strips that are 1/16″ thick and 1/2″ wide, and has angled points at the ends. For safety’s sake, the points are not sharp, and the edges are softened to be kind to hands and workpieces. The large aluminum screw is easy to adjust and set the right amount of friction between the blades. The screw’s low profile ensures that it does not snag inside a pocket. The ends of the blades at the screw are evenly rounded and their pointed ends line up accurately. The bevel gauge has a nice weight to it, indicative of a well-made tool and, most importantly for me, it slips easily in and out of a pocket.
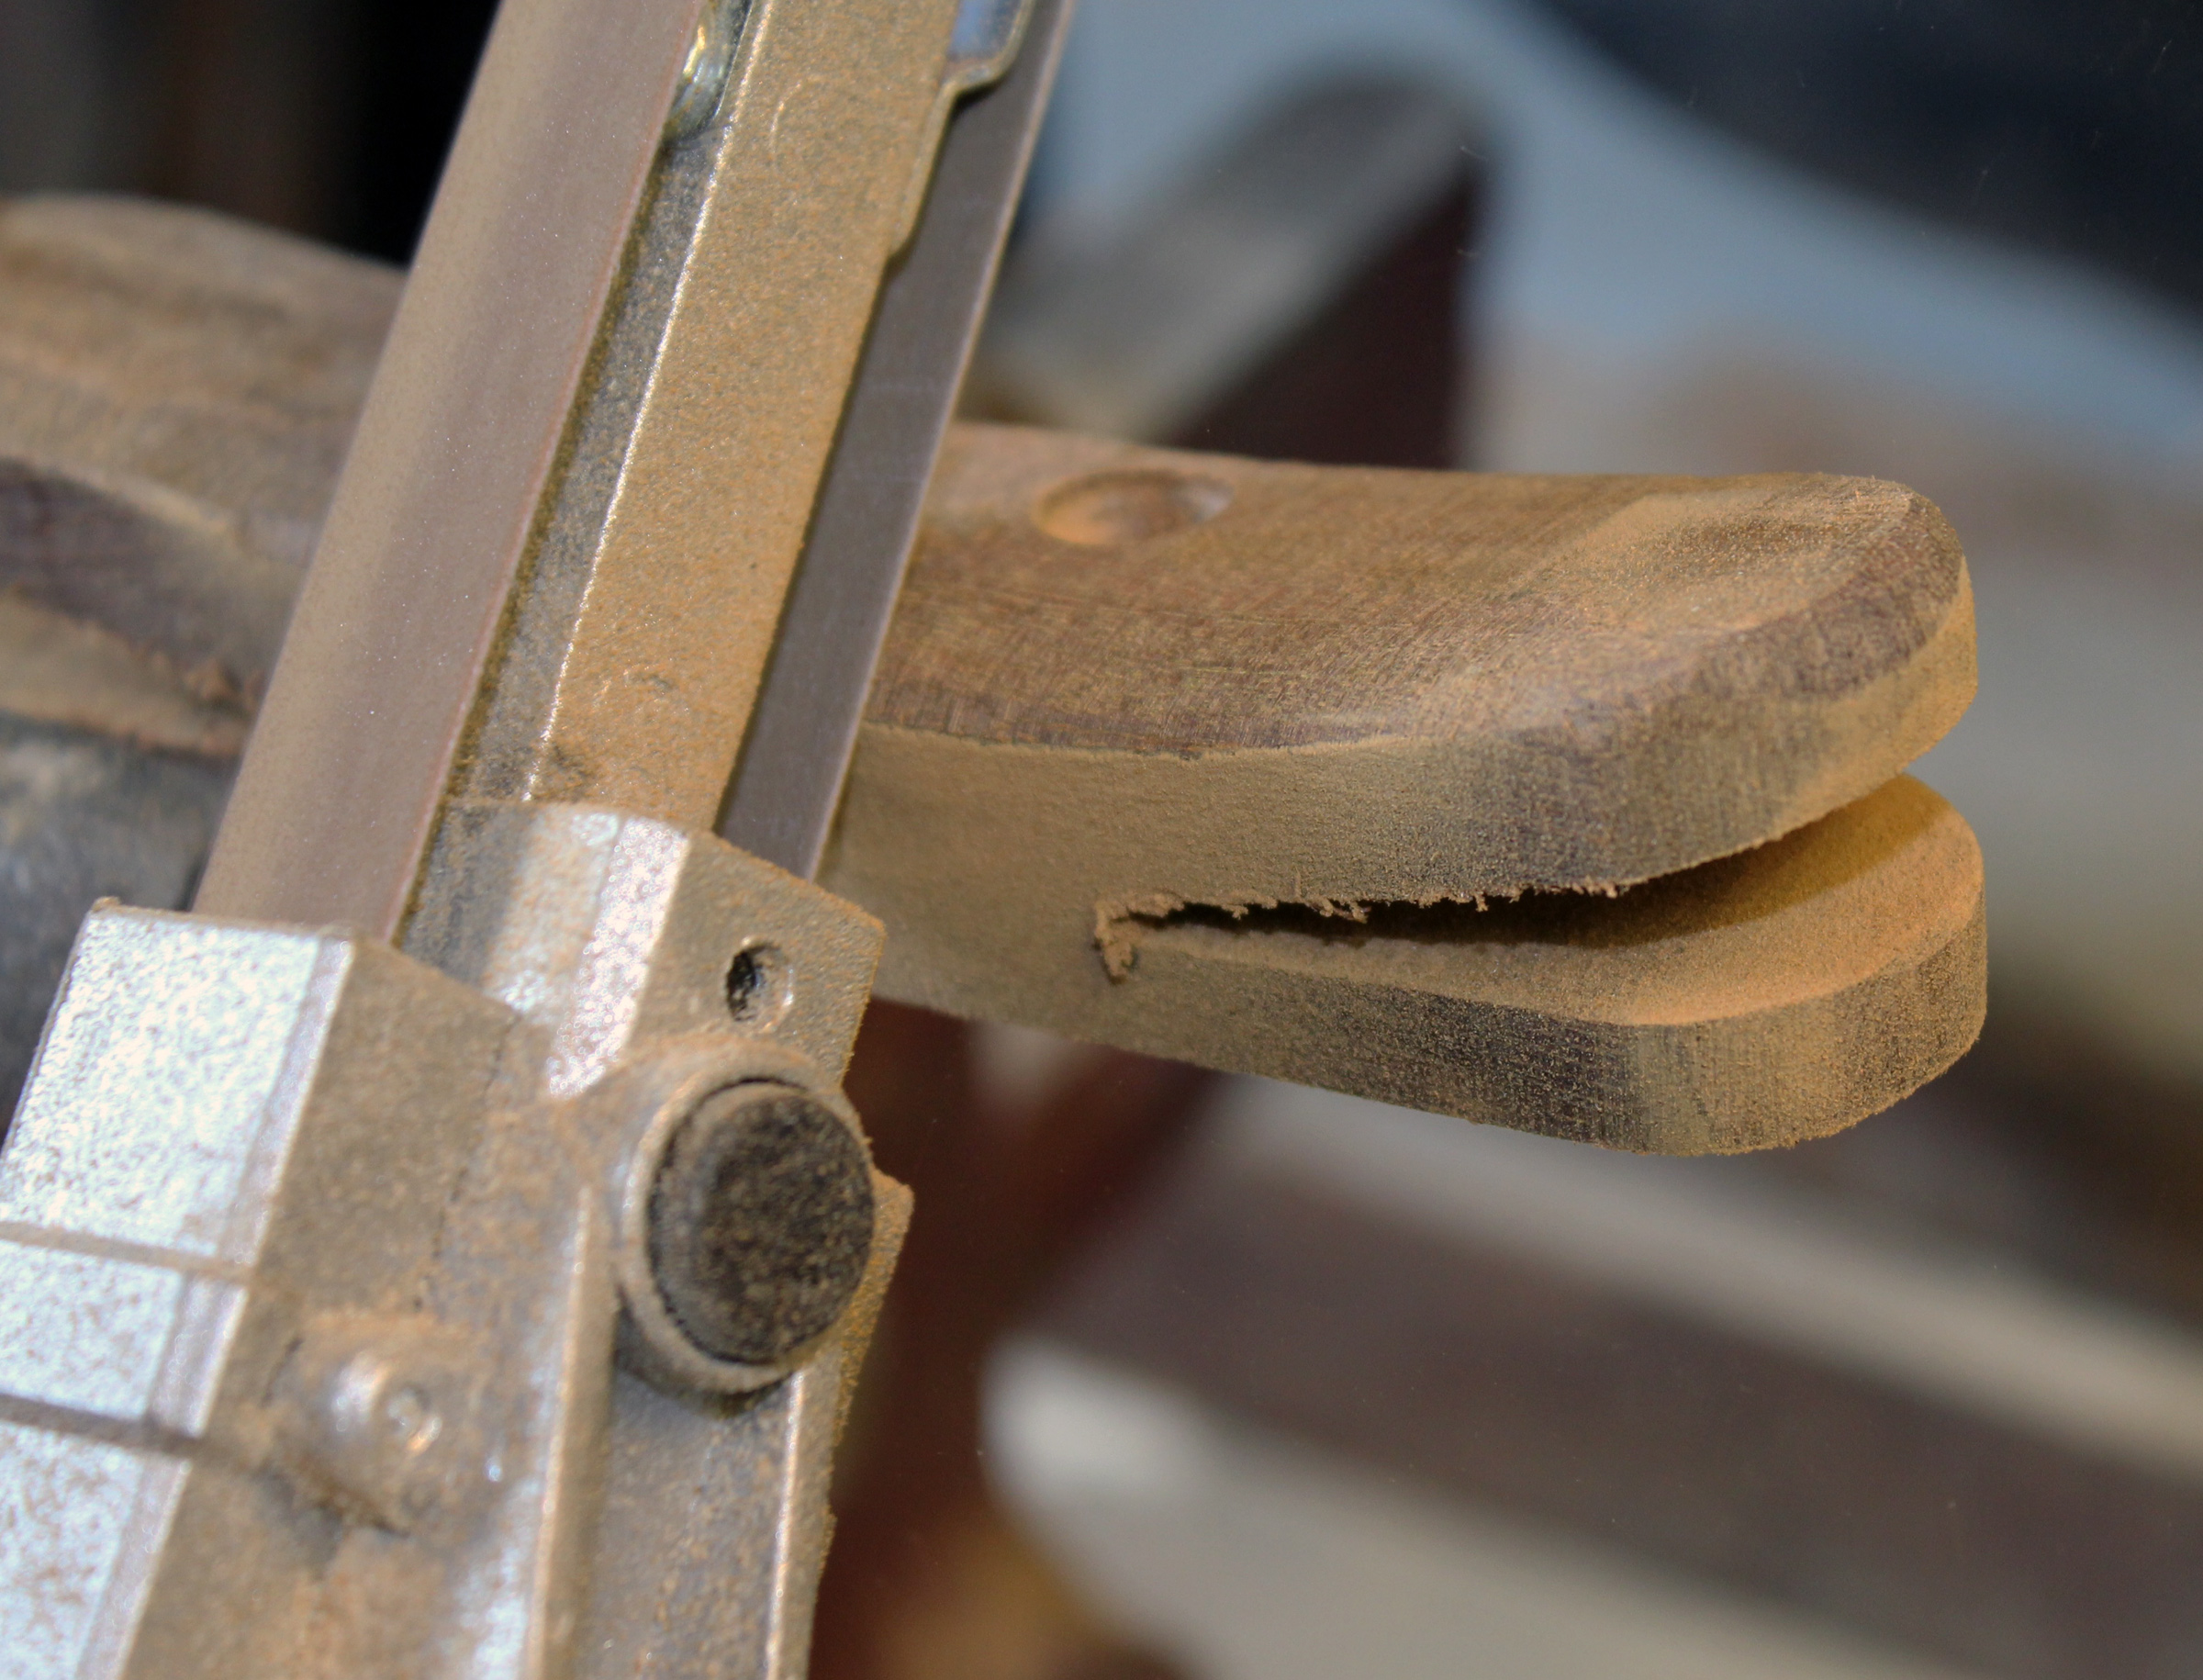
Getting the angle for the bevel at the end of this boat’s thwart requires a gauge that can fit between the chine stringers.
The small gauge is simple to use; the tightness of the blades can be adjusted to slip smoothly to a setting and then hold it. The blades can also rotate 360 degrees, an advantage over sliding bevel gauges that can’t take small angles without having the blade extend beyond the pivot. The short 3″ blades allow the tool to be placed in small places where larger bevels can’t fit, and take more accurate angles where a curved surface is involved. Settings can be taken from the boat and quickly transferred to the workpiece. The gauge is thin, just 1/8″, so it is better suited for picking up angles from a lofting than is a traditional sliding bevel with a thick wooden body, which elevates the blade above the lines. And the bright brass makes the gauge easy to see when the bevel is placed in a dark area of the boat.
The 3-Inch Bevel Gauge is useful, simple, small, portable, and reasonably priced. I’ll hang on to mine and give them as gifts to my boatbuilding friends.
Kent Lewis repurposes wood into boats under the watchful eye of his wife, Audrey, commodore of their Small Boat Armada. They are designing a 16′ diamond-bottomed catboat, based on personal histories of Pascagoula, Mississippi, sailors who raced them in the 1950s.
The 3-Inch Bevel Gauge is available from The WoodenBoat Store for $14.95.
Is there a product that might be useful for boatbuilding, cruising, or shore-side camping that you’d like us to review? Please email your suggestions.
Catlin Gabel is an independent day school with a 67-acre campus on the wooded outskirts of Portland, Oregon. The school promises its students “Experiential Learning” and Ric Fry, the Lower School Woodshop teacher, delivers on that promise with hands-on boatbuilding for kids as young as 7 years old.
Ric himself got an early start on woodworking. When he was 10, his family moved to a small farm near Toronto and he had to build sheds for the cows he was charged with raising. In his teens he made strip-built canoes for paddling the lakes in the region. When he began his teaching career in New York City it was only natural that he would take grade-schoolers boating on the Hudson River to teach them about marine biology.
While teaching at Catlin Gabel, he has introduced boatbuilding to students from second to fifth grade in woodshop classes, after-school programs, and off-campus workshops, held in conjunction with RiversWest Small Craft Center. In past projects, he has guided young students through building Salt Bay Skiffs, Amphora Skiffs, and a skin-on-frame canoe.
With his most recent projects at the school, Ric added a new dimension to experiential learning: building boats with materials harvested from the land. To get off to a running start, he called on Steve Carrigg, who builds skin-on-frame boats in Tigard, a Portland suburb. Steve’s specialty is working with the slender new branches of hazelnut trees to make coracles and curraghs. The Willamette River valley south Portland has an abundance of the trees in nut-producing orchards as well as bushes growing in open spaces.
Photography by and courtesy of Ric Fry
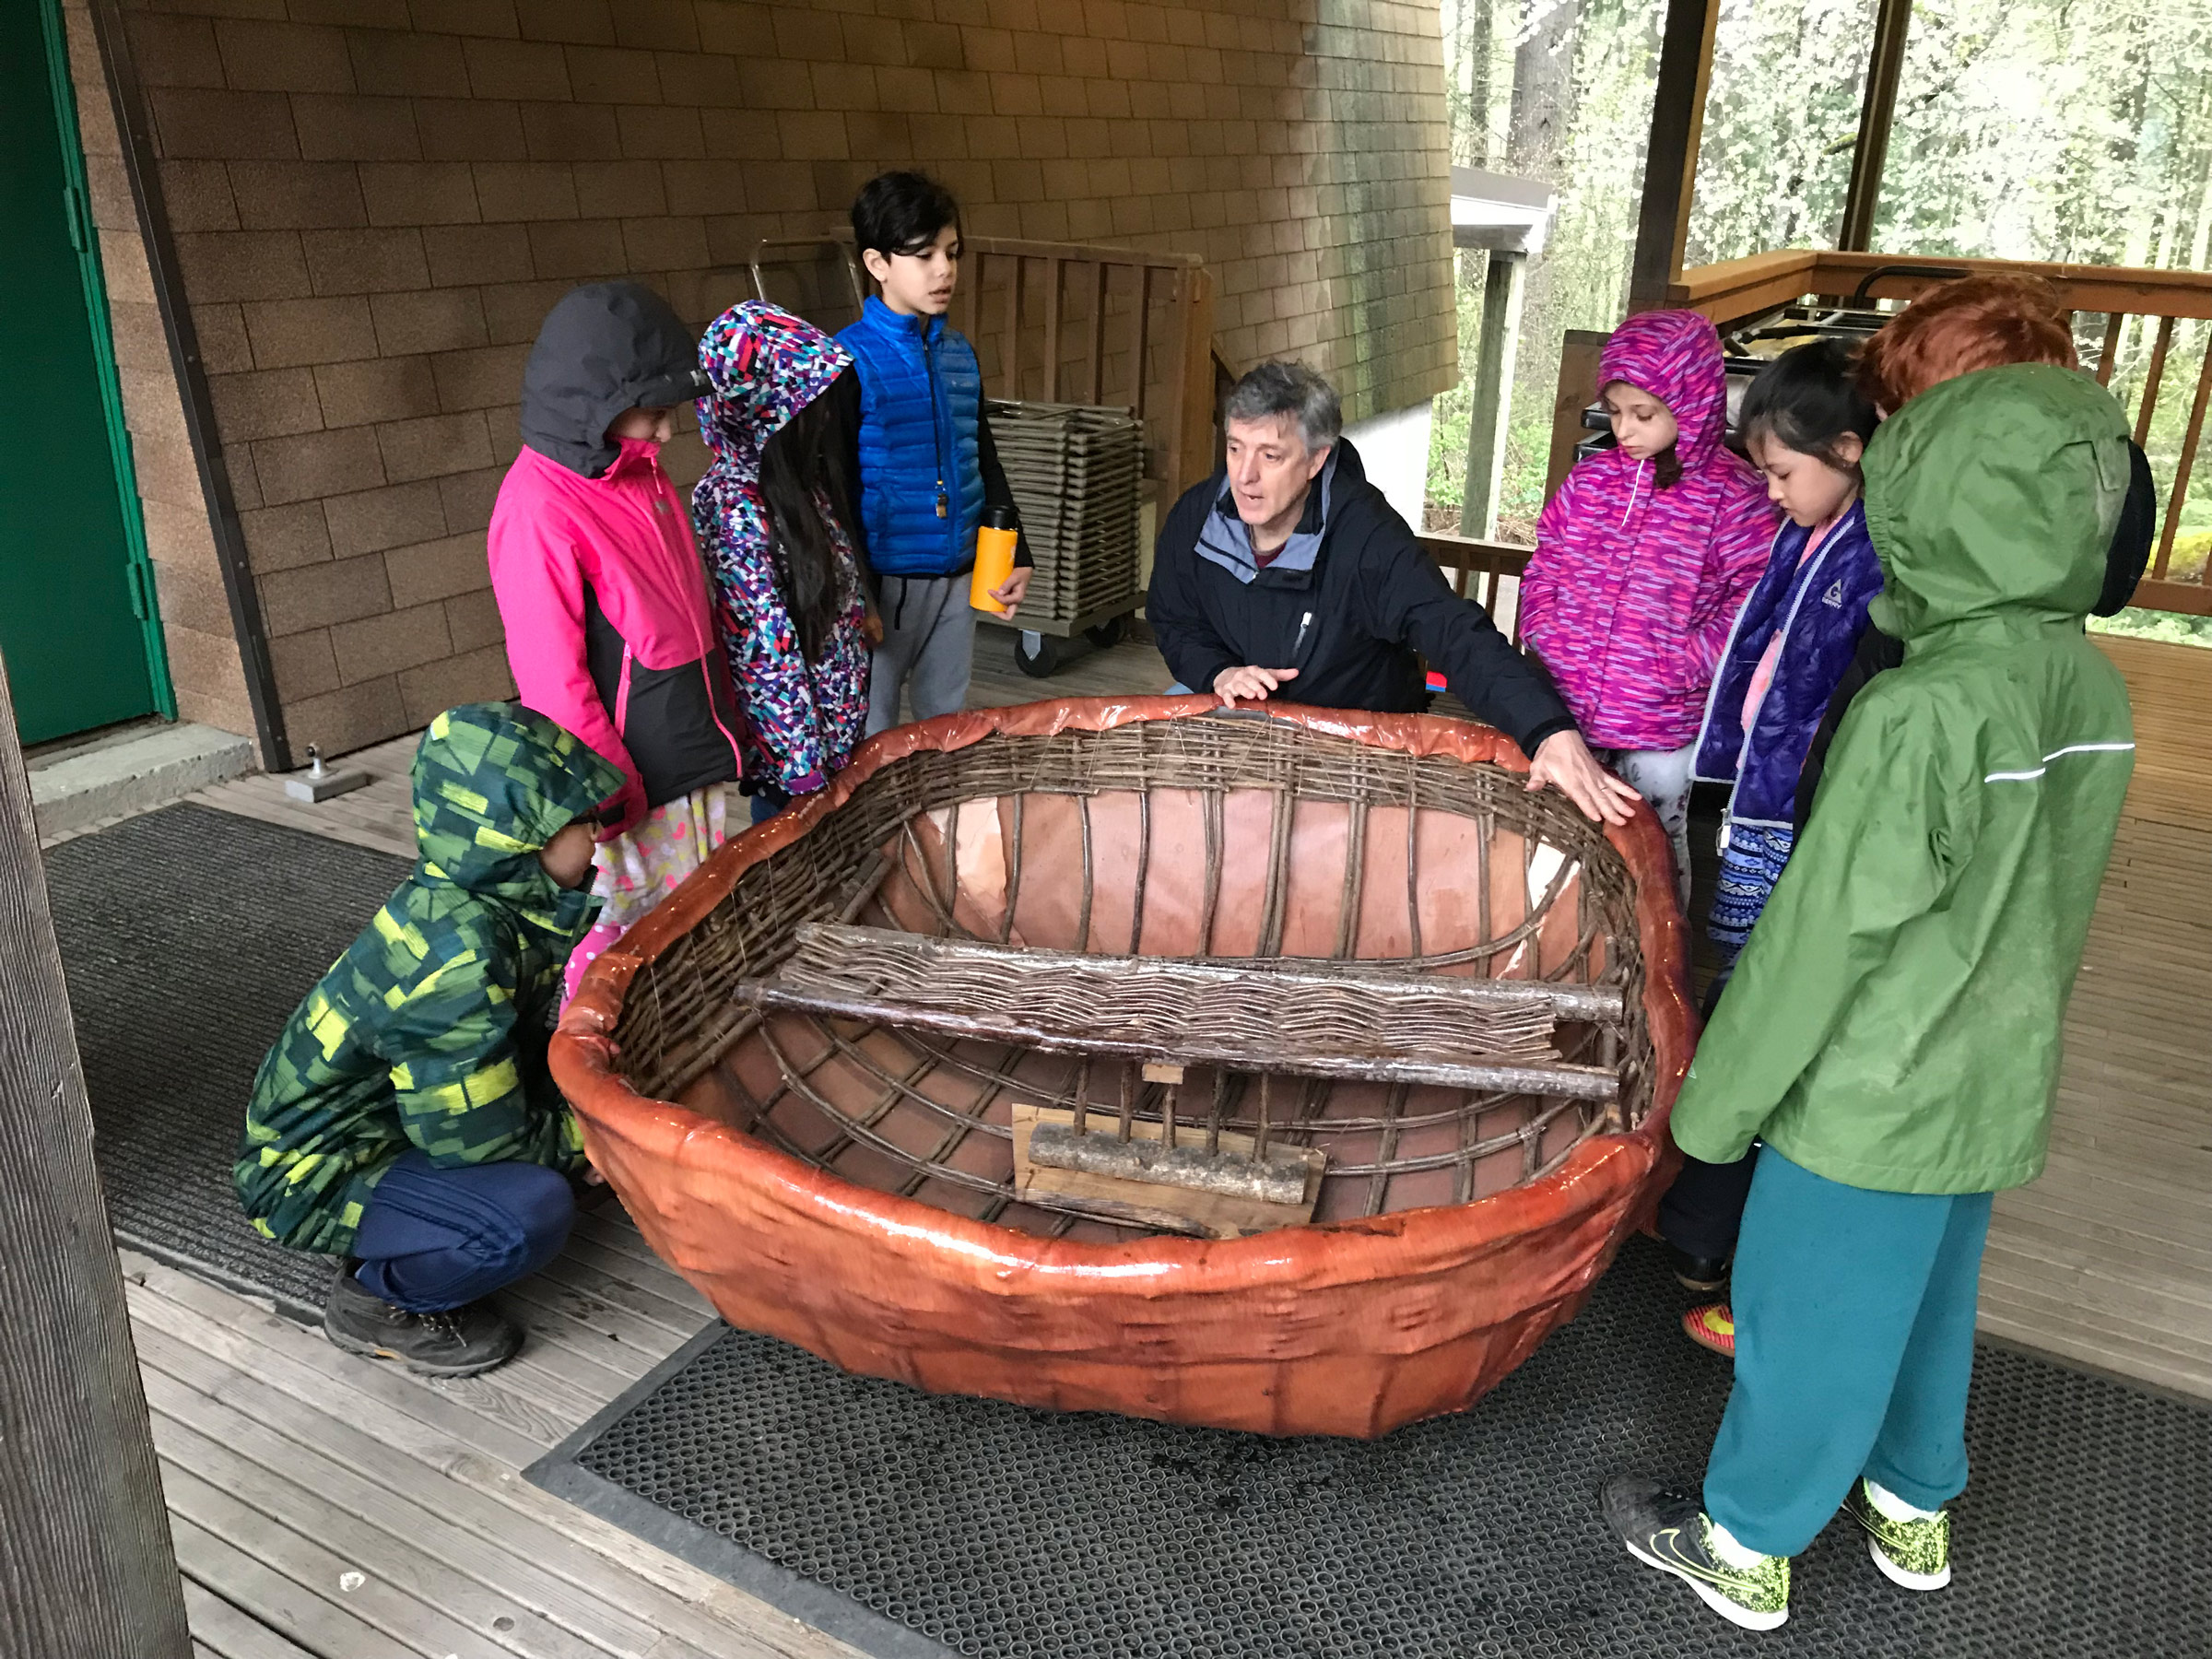
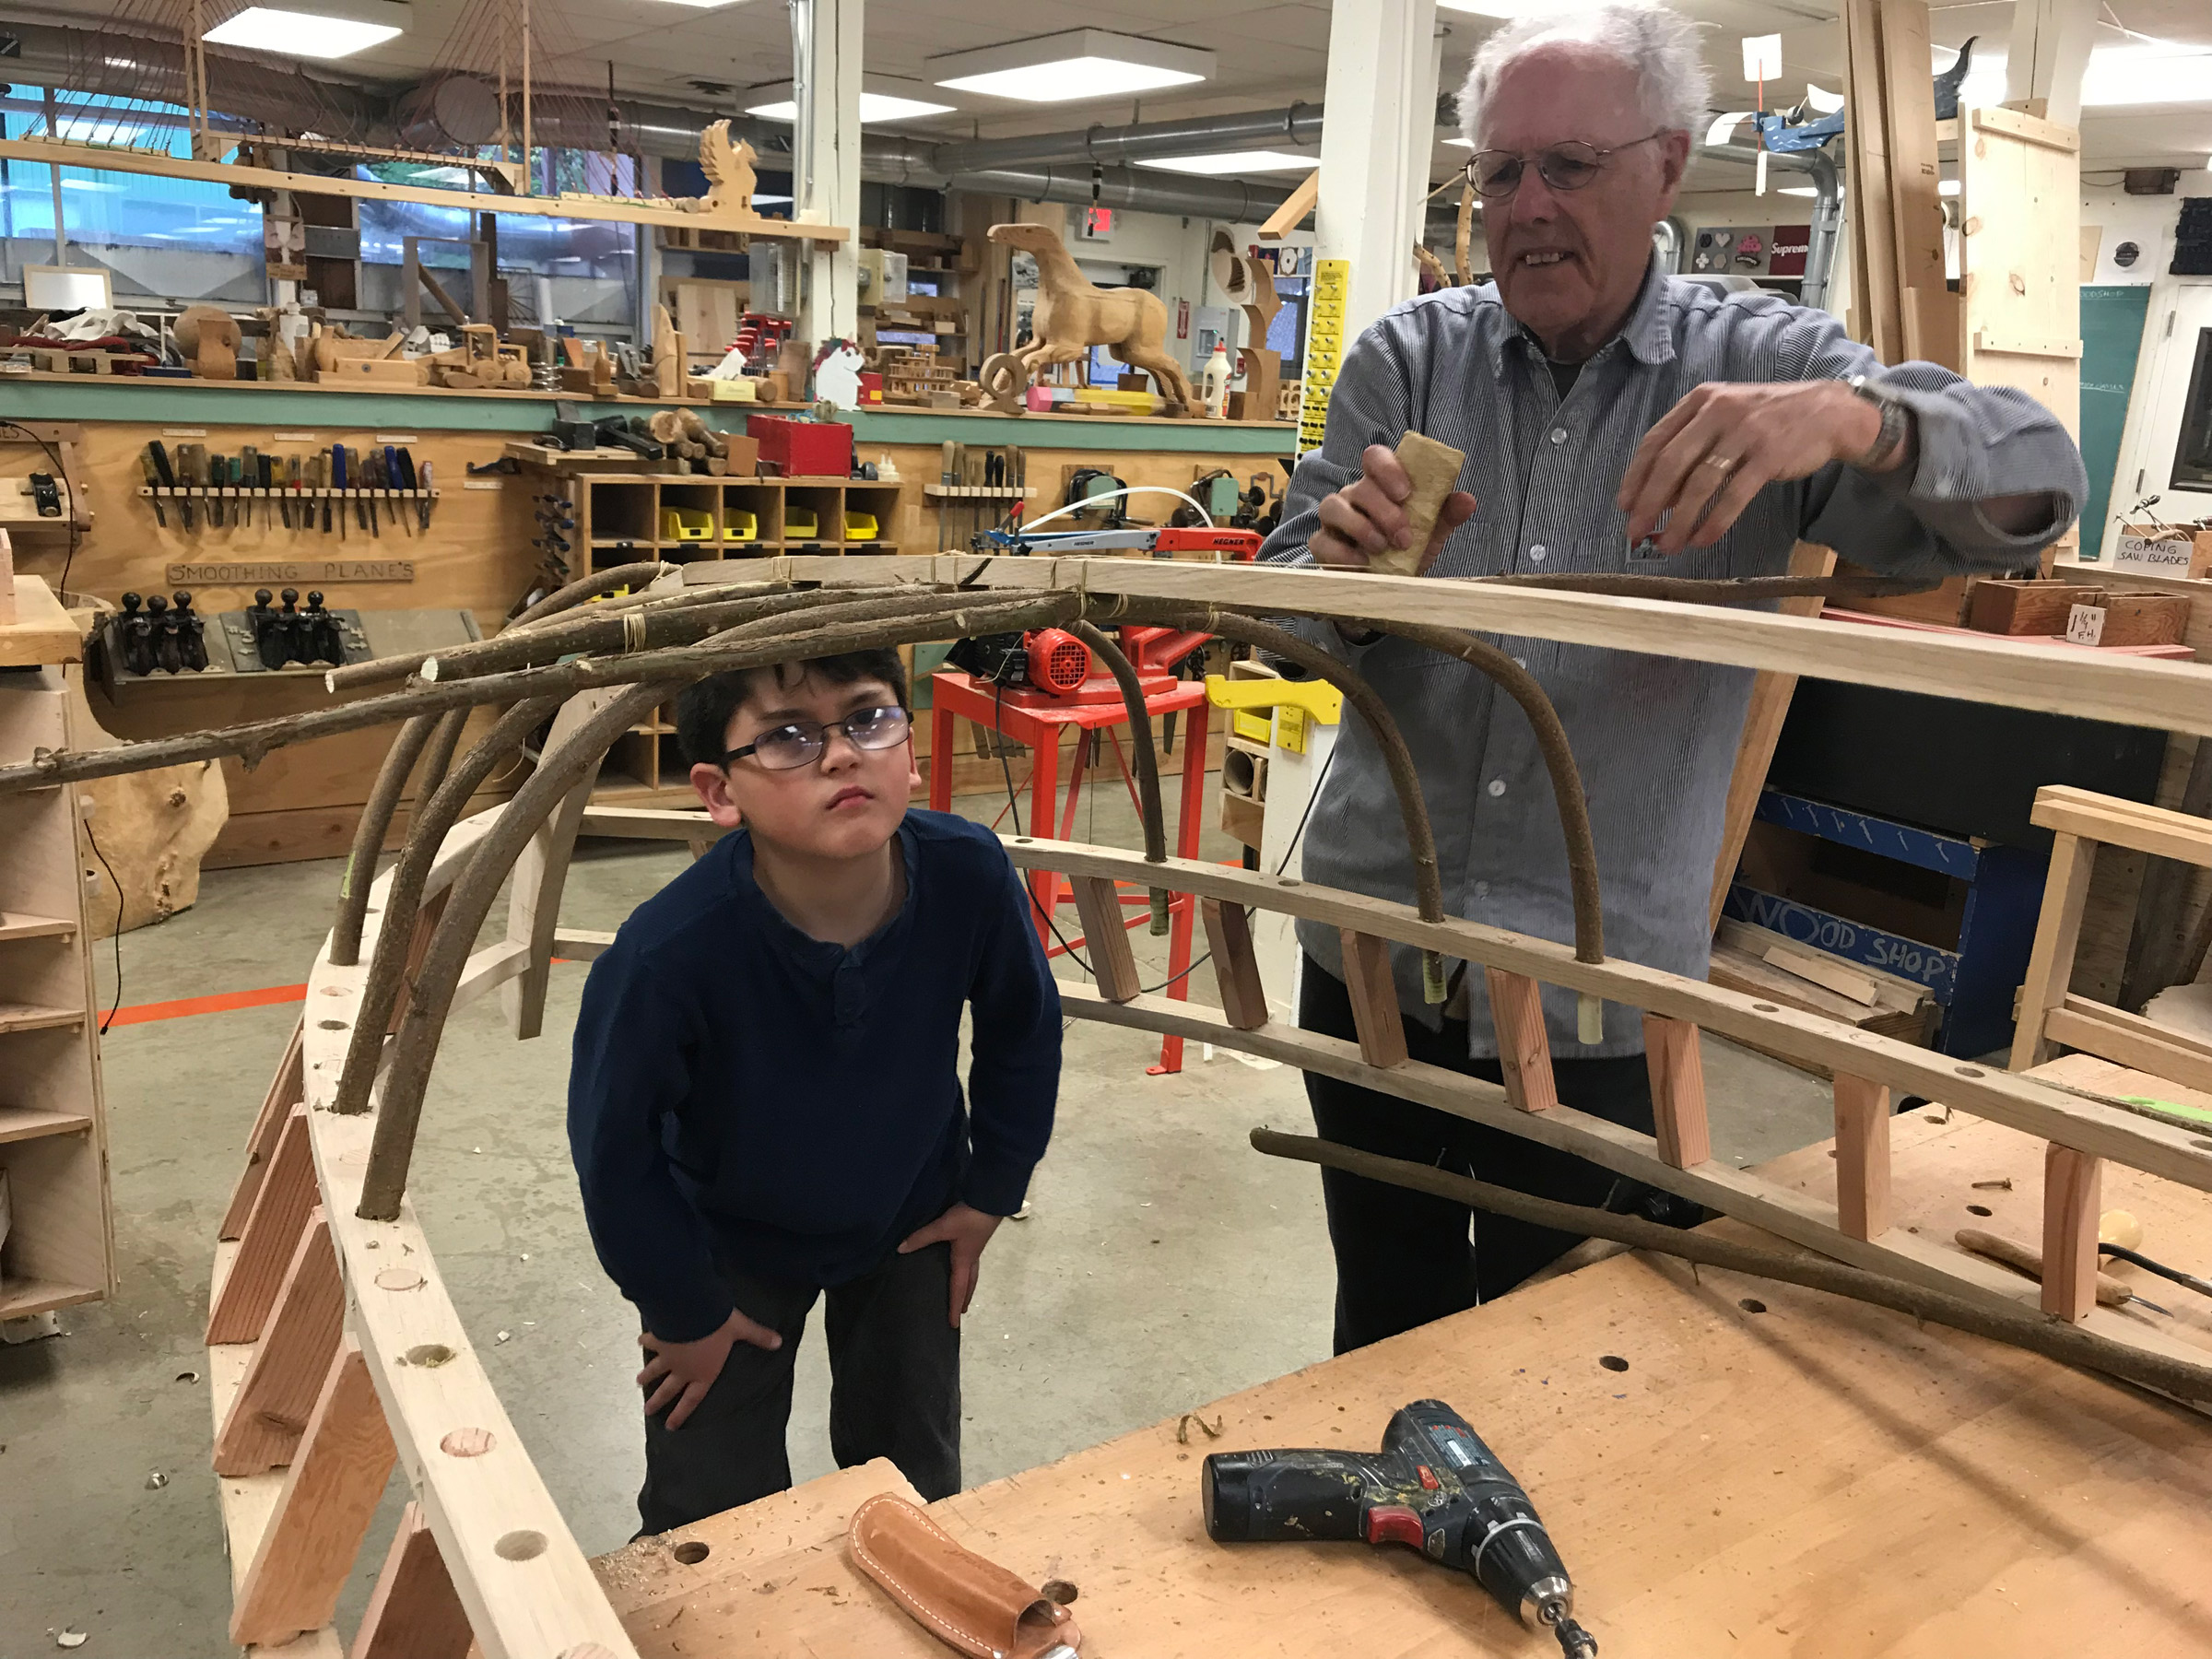
Steve Carrigg, a Portland area boatbuilder who specializes in the use of hazelnut withies, brought one of his coracles to show the second graders what they’ll be building.
The trees need frequent pruning, a job that’s best done in winter when the trees are dormant, so in February of 2018, Ric arranged with one of the orchardists for a class field trip to cut and collect the straight green withies that sprout from the trees.
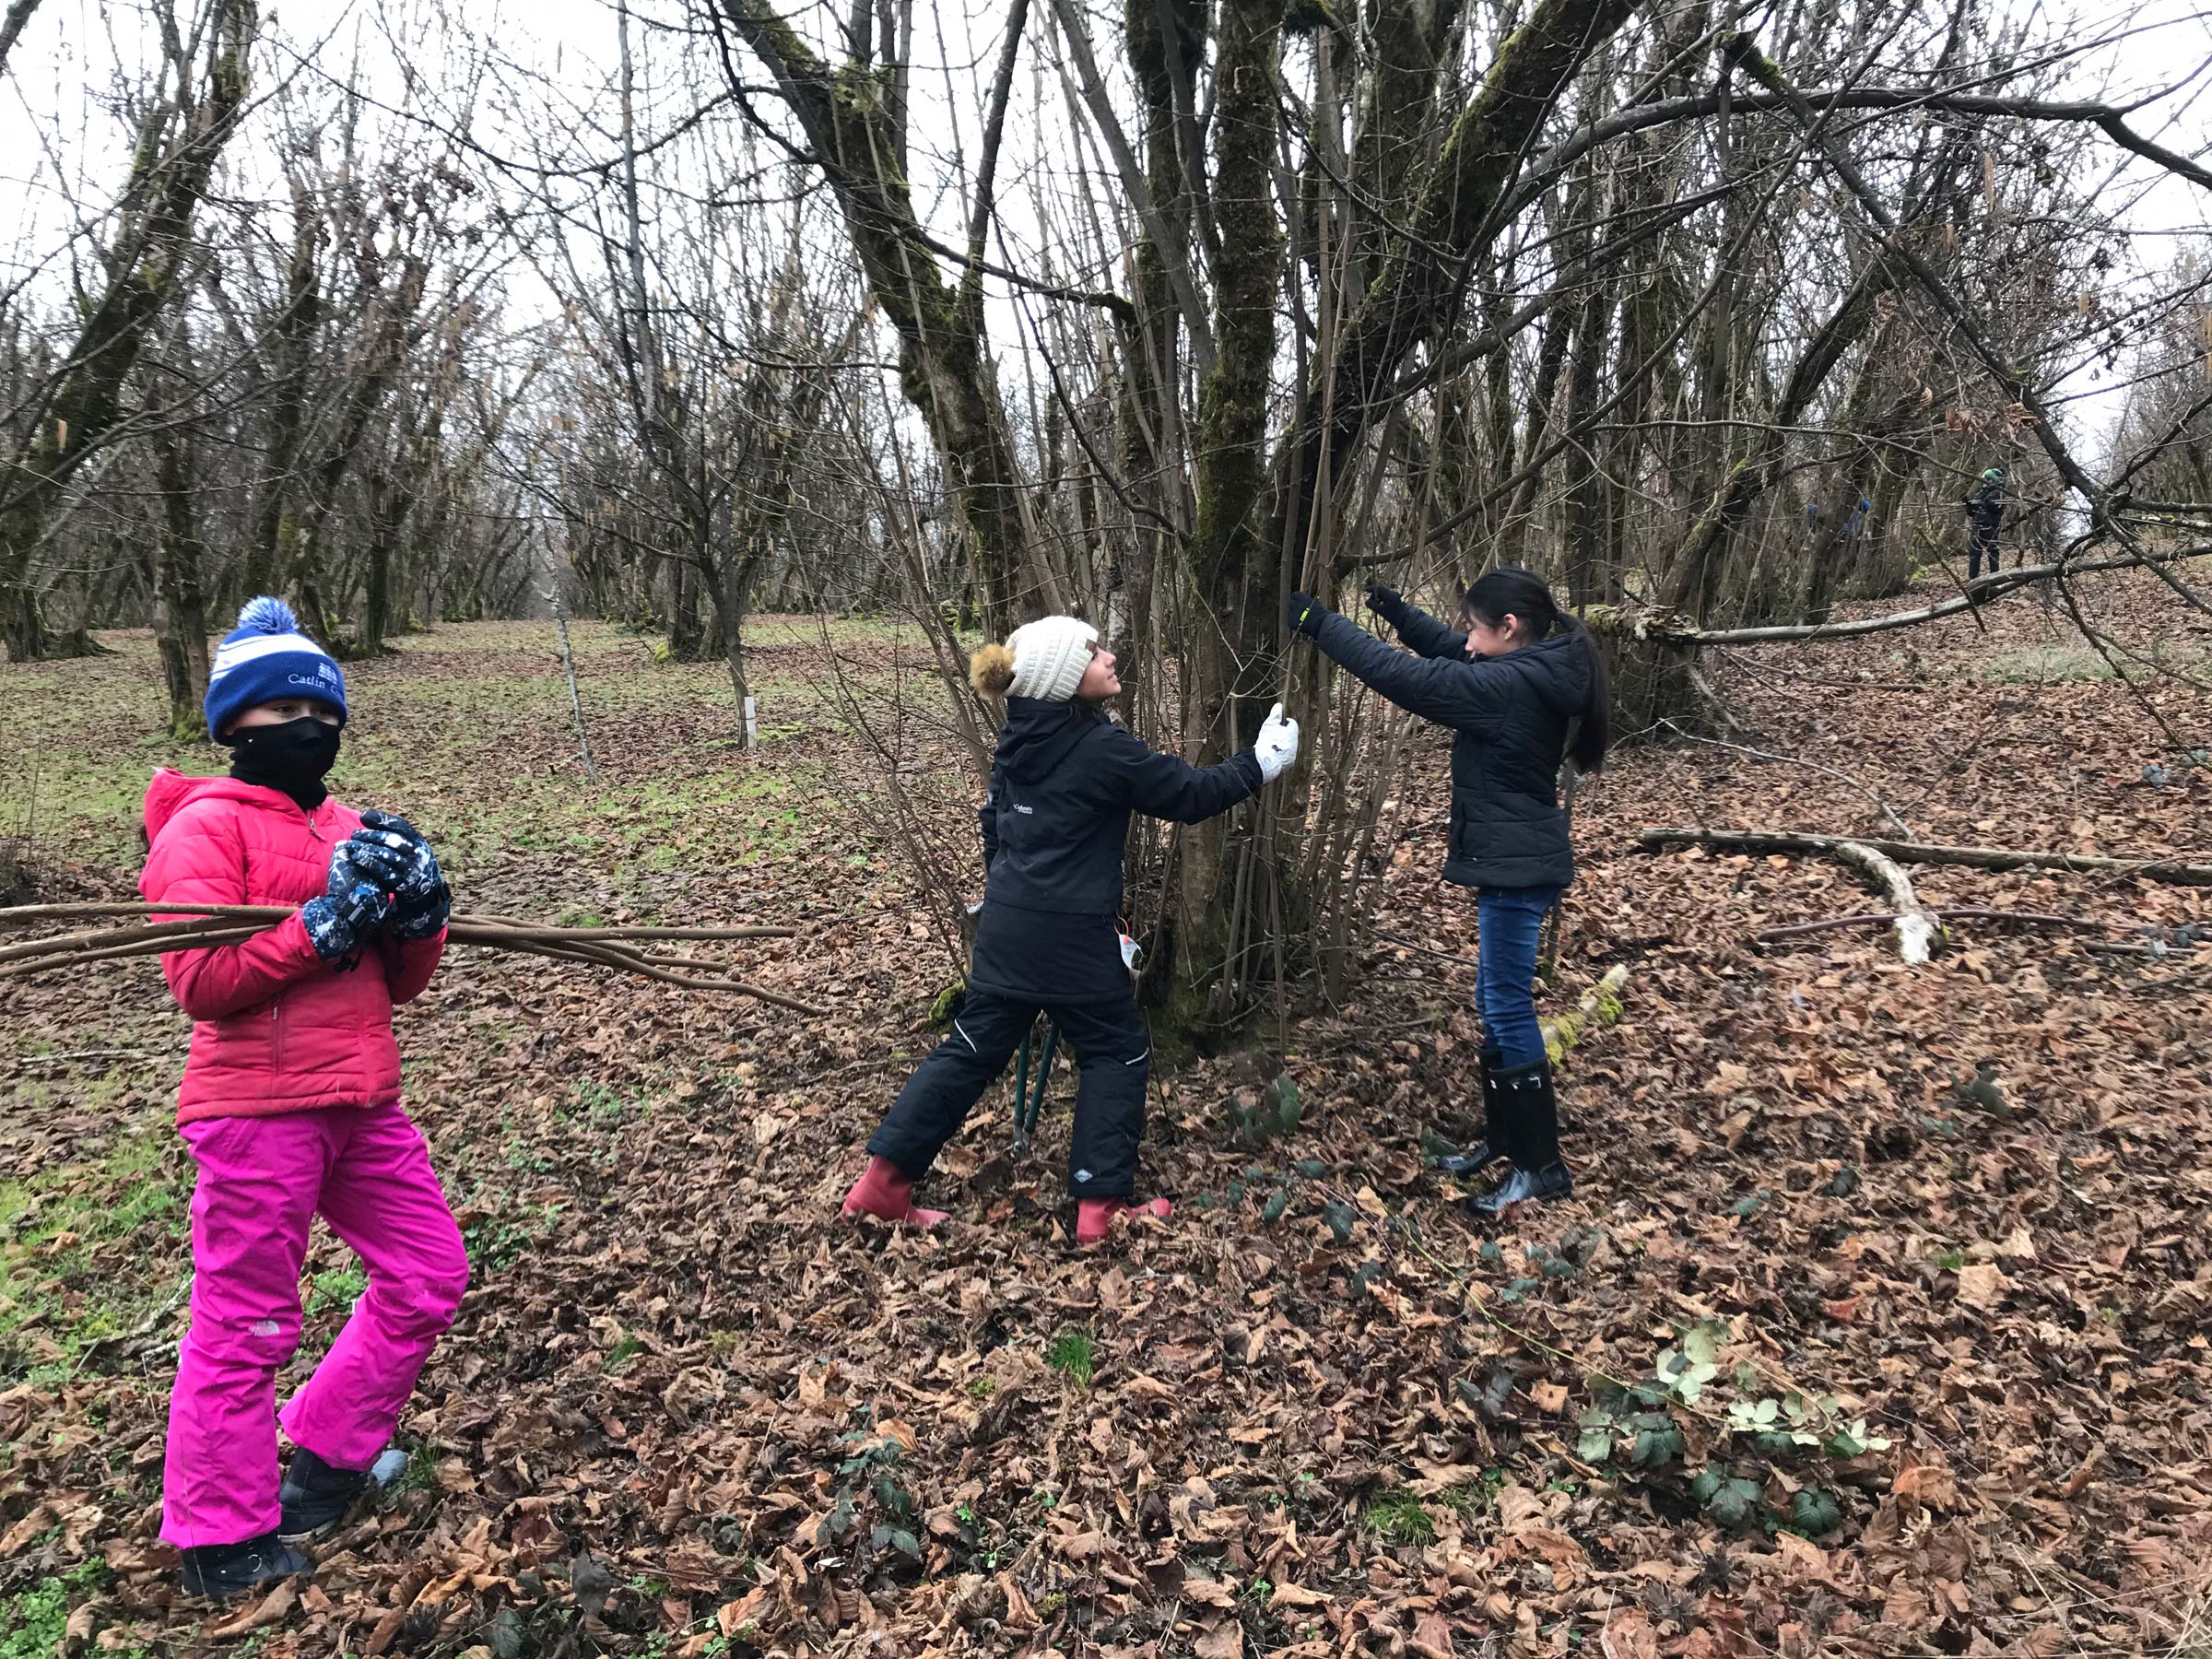
The building of the coracle and curragh began with harvesting shoots from a hazelnut grove that’s a short drive from school.
Ric and his volunteer students spent a couple of hours collecting about 120 withies, all about 10′ long. They would need to season for a few weeks, because the wood will shrink as it dries and create a loose boat if used too soon. After the withies dry, they will remain limber for months.
The boatbuilding with the hazel pieces began with a coracle project for second-graders. The class took over a bit of the campus lawn for their building site and “planted” about three dozen withies in the ground. More withies, woven in and out of the uprights, formed the coracle’s gunwale. Then the uprights are bent over in pairs, forming a latticework that gets lashed together. The canvas covering was waterproofed with Rust-Oleum paint.
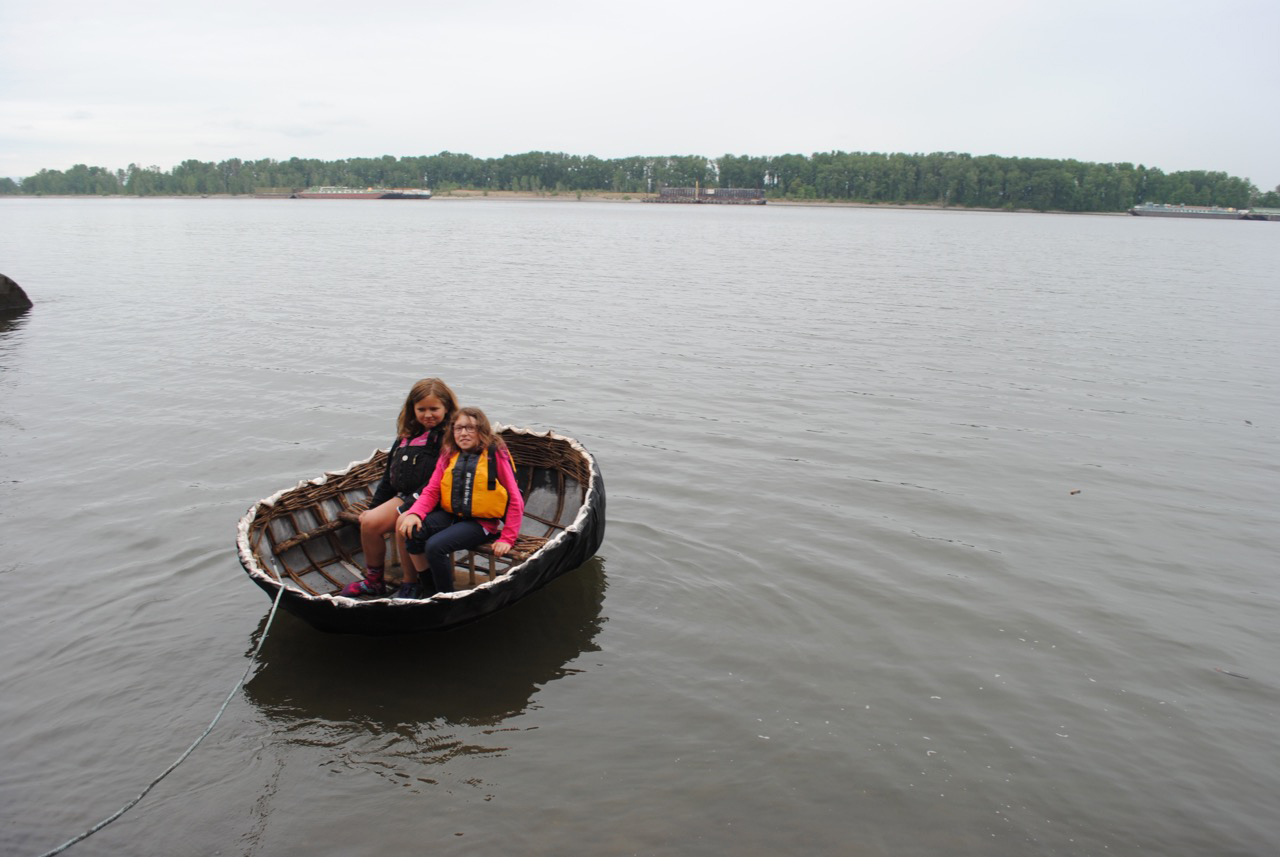
Tethered to shore, two student builders get a feel for the coracle. Paddling a coracle requires a sculling stroke that takes some training and practice.
Curragh
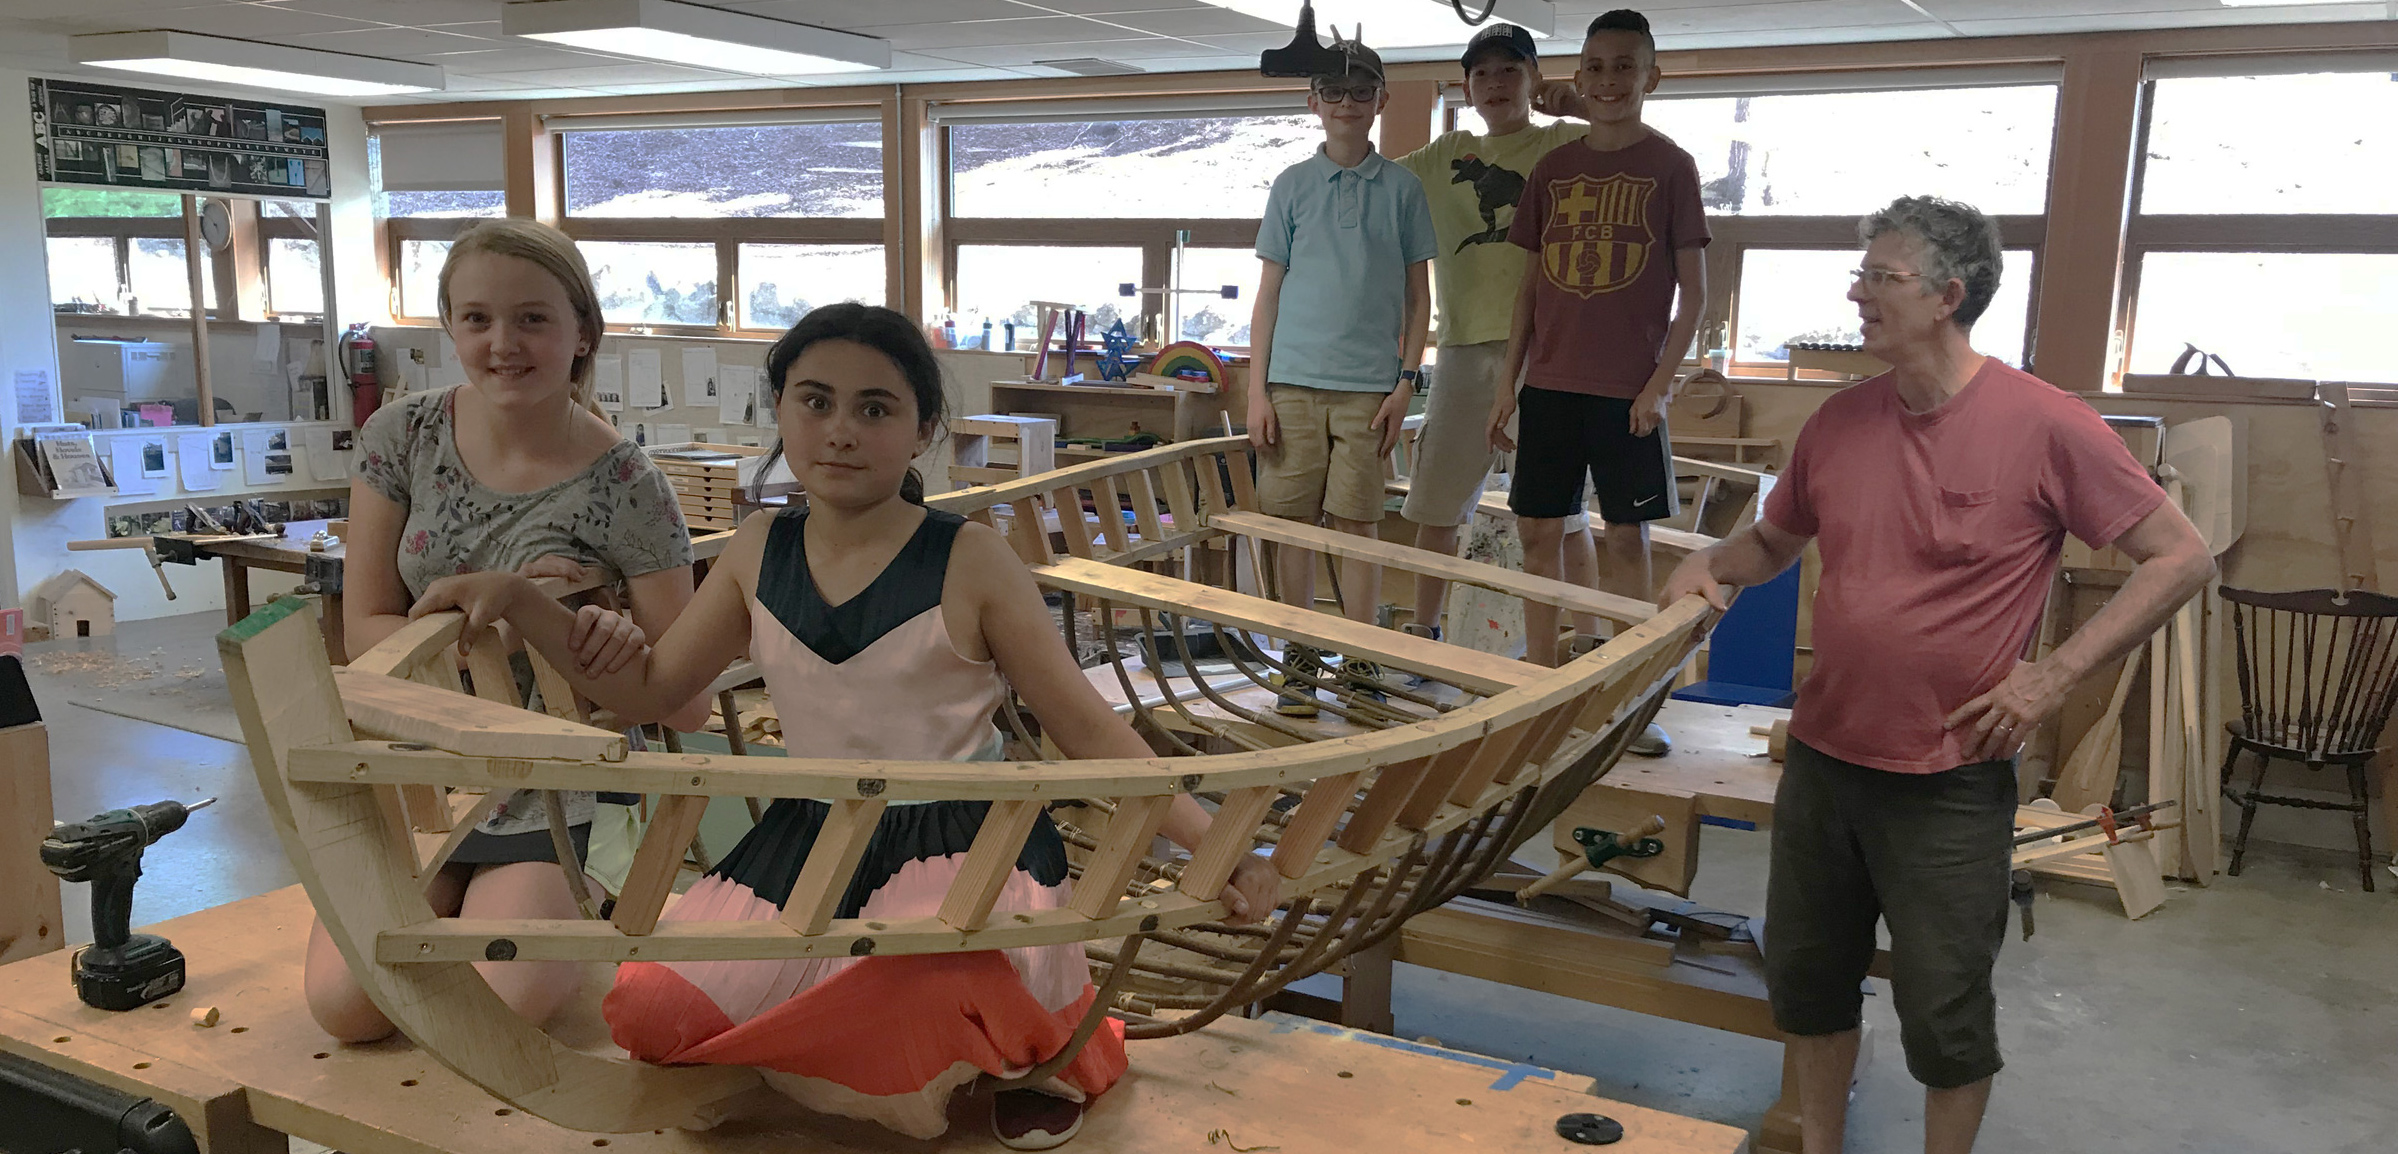
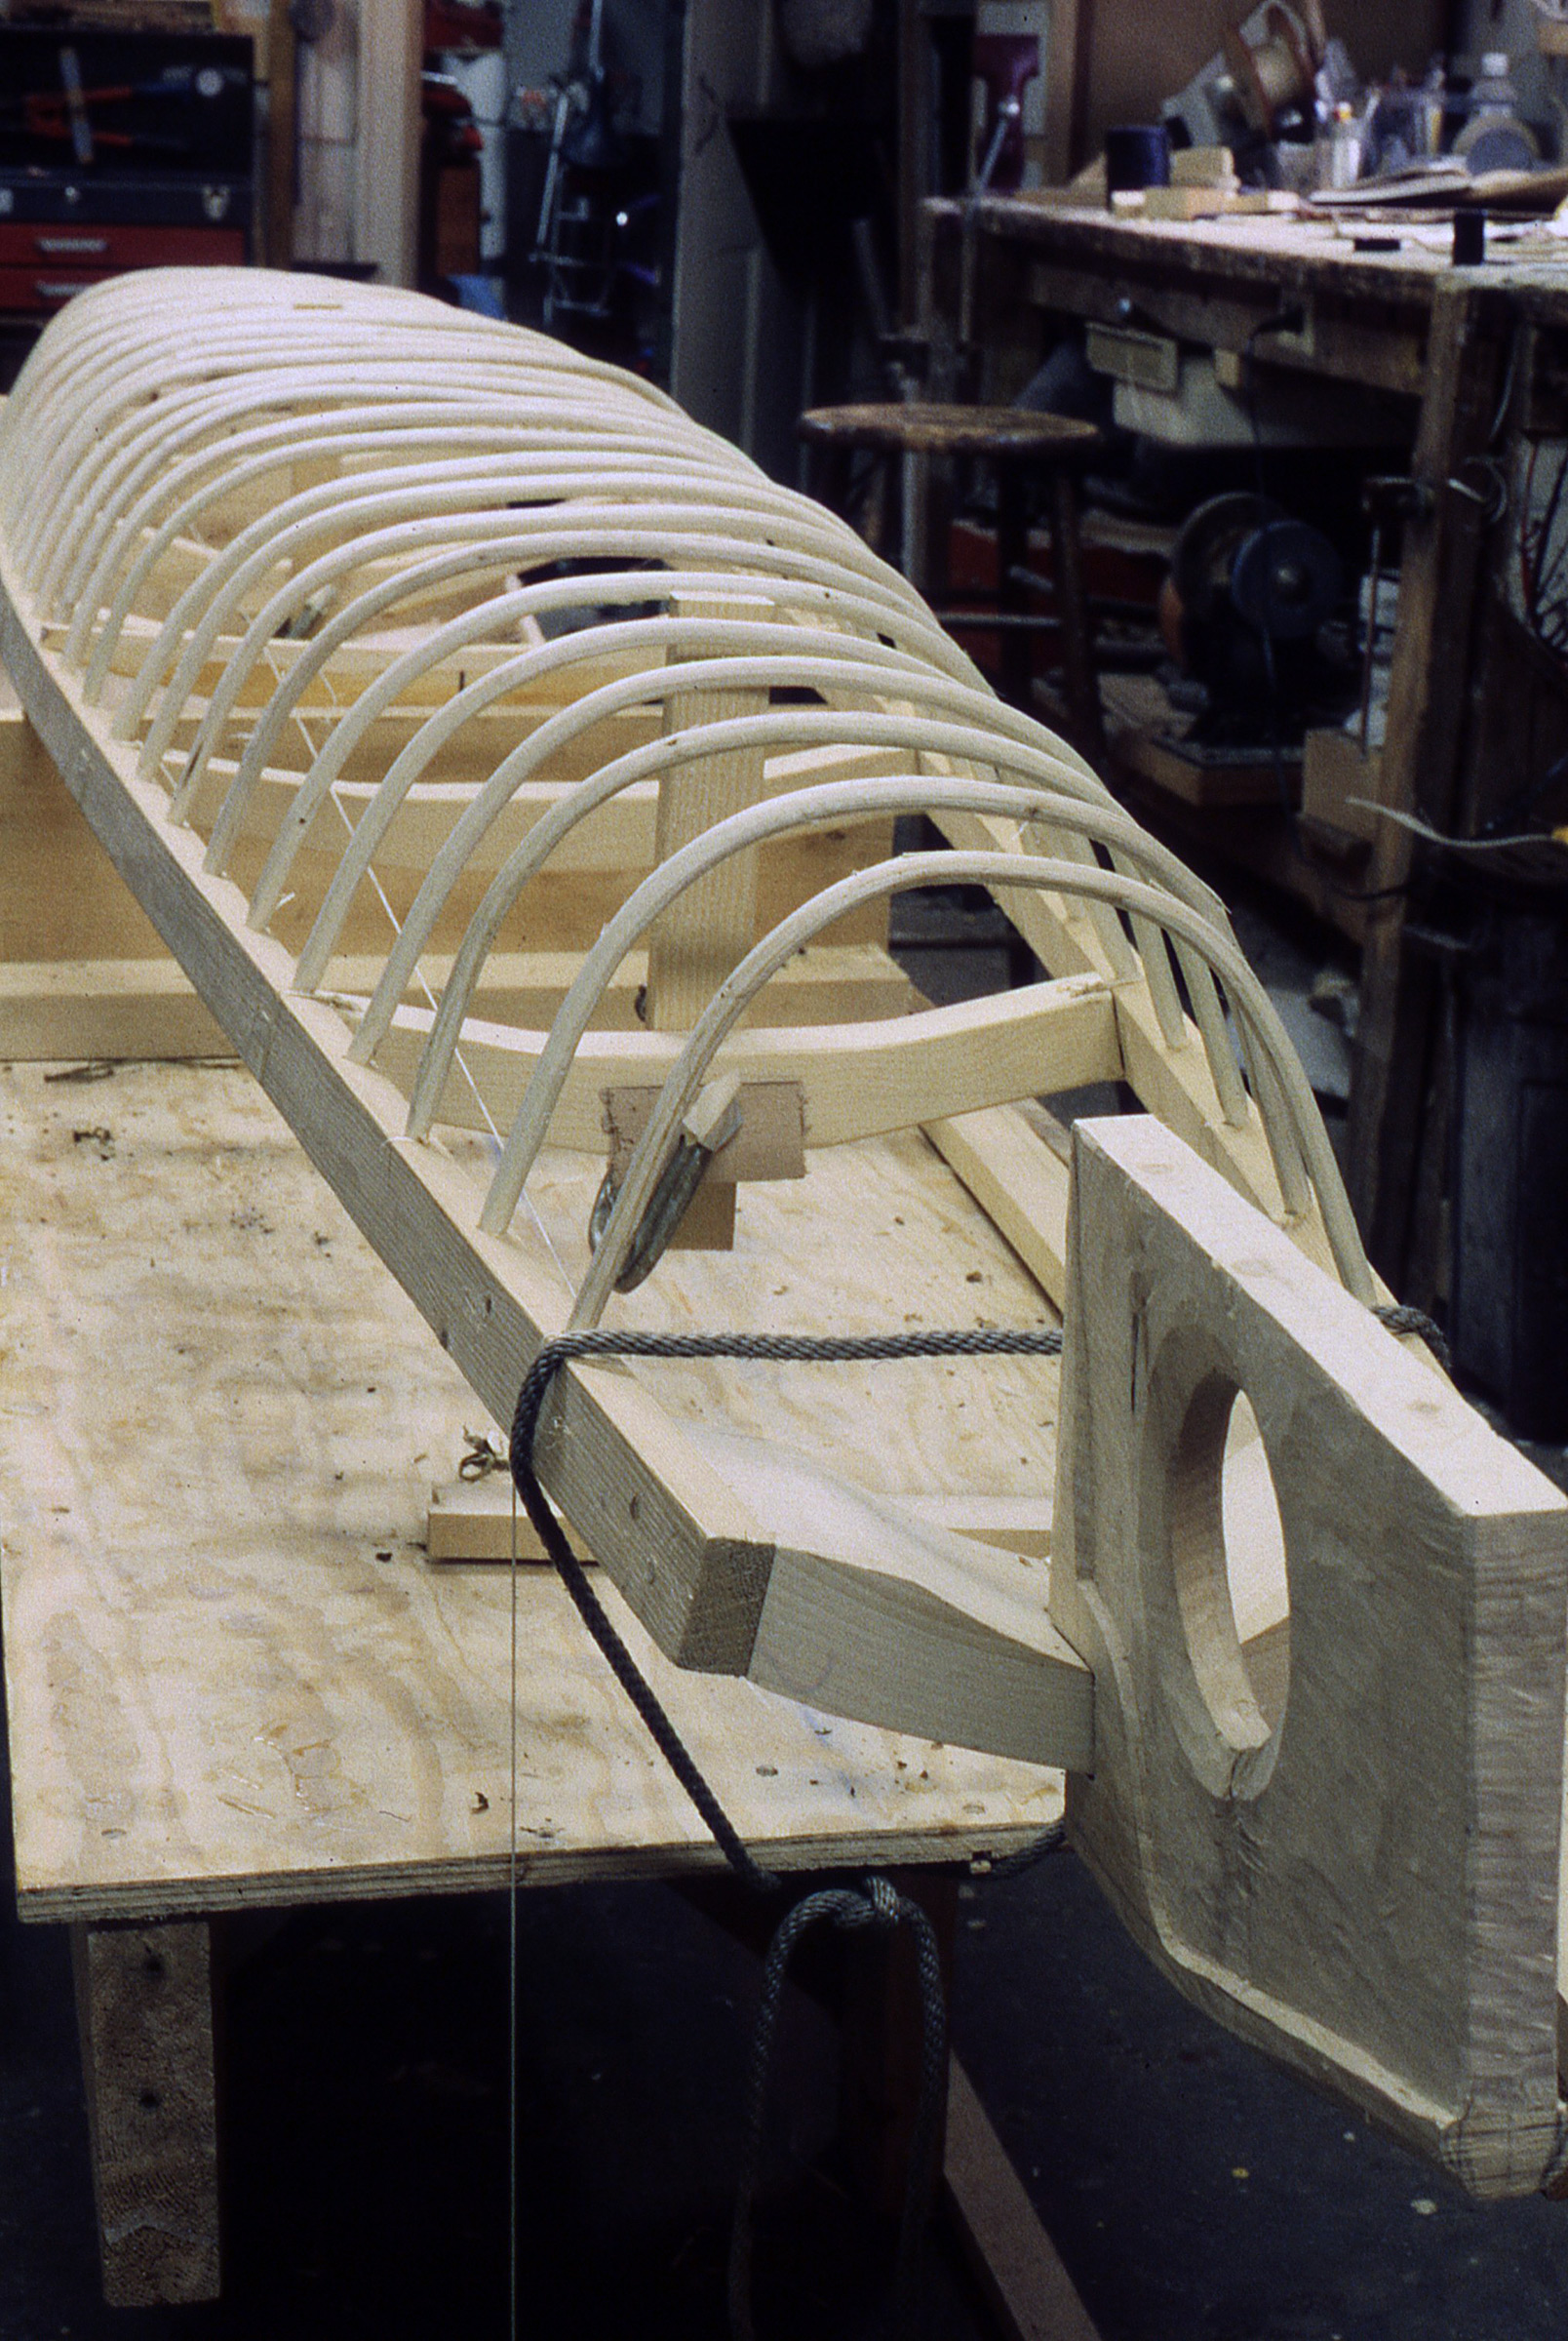
In 2019, Ric took on a more ambitious project, a curragh, with his fourth and fifth graders. The frame of their version of the traditional Irish rowing boat, built without plans, would use the withies for the frames and stringers with Oregon white oak for the double gunwales, stem, and keel.
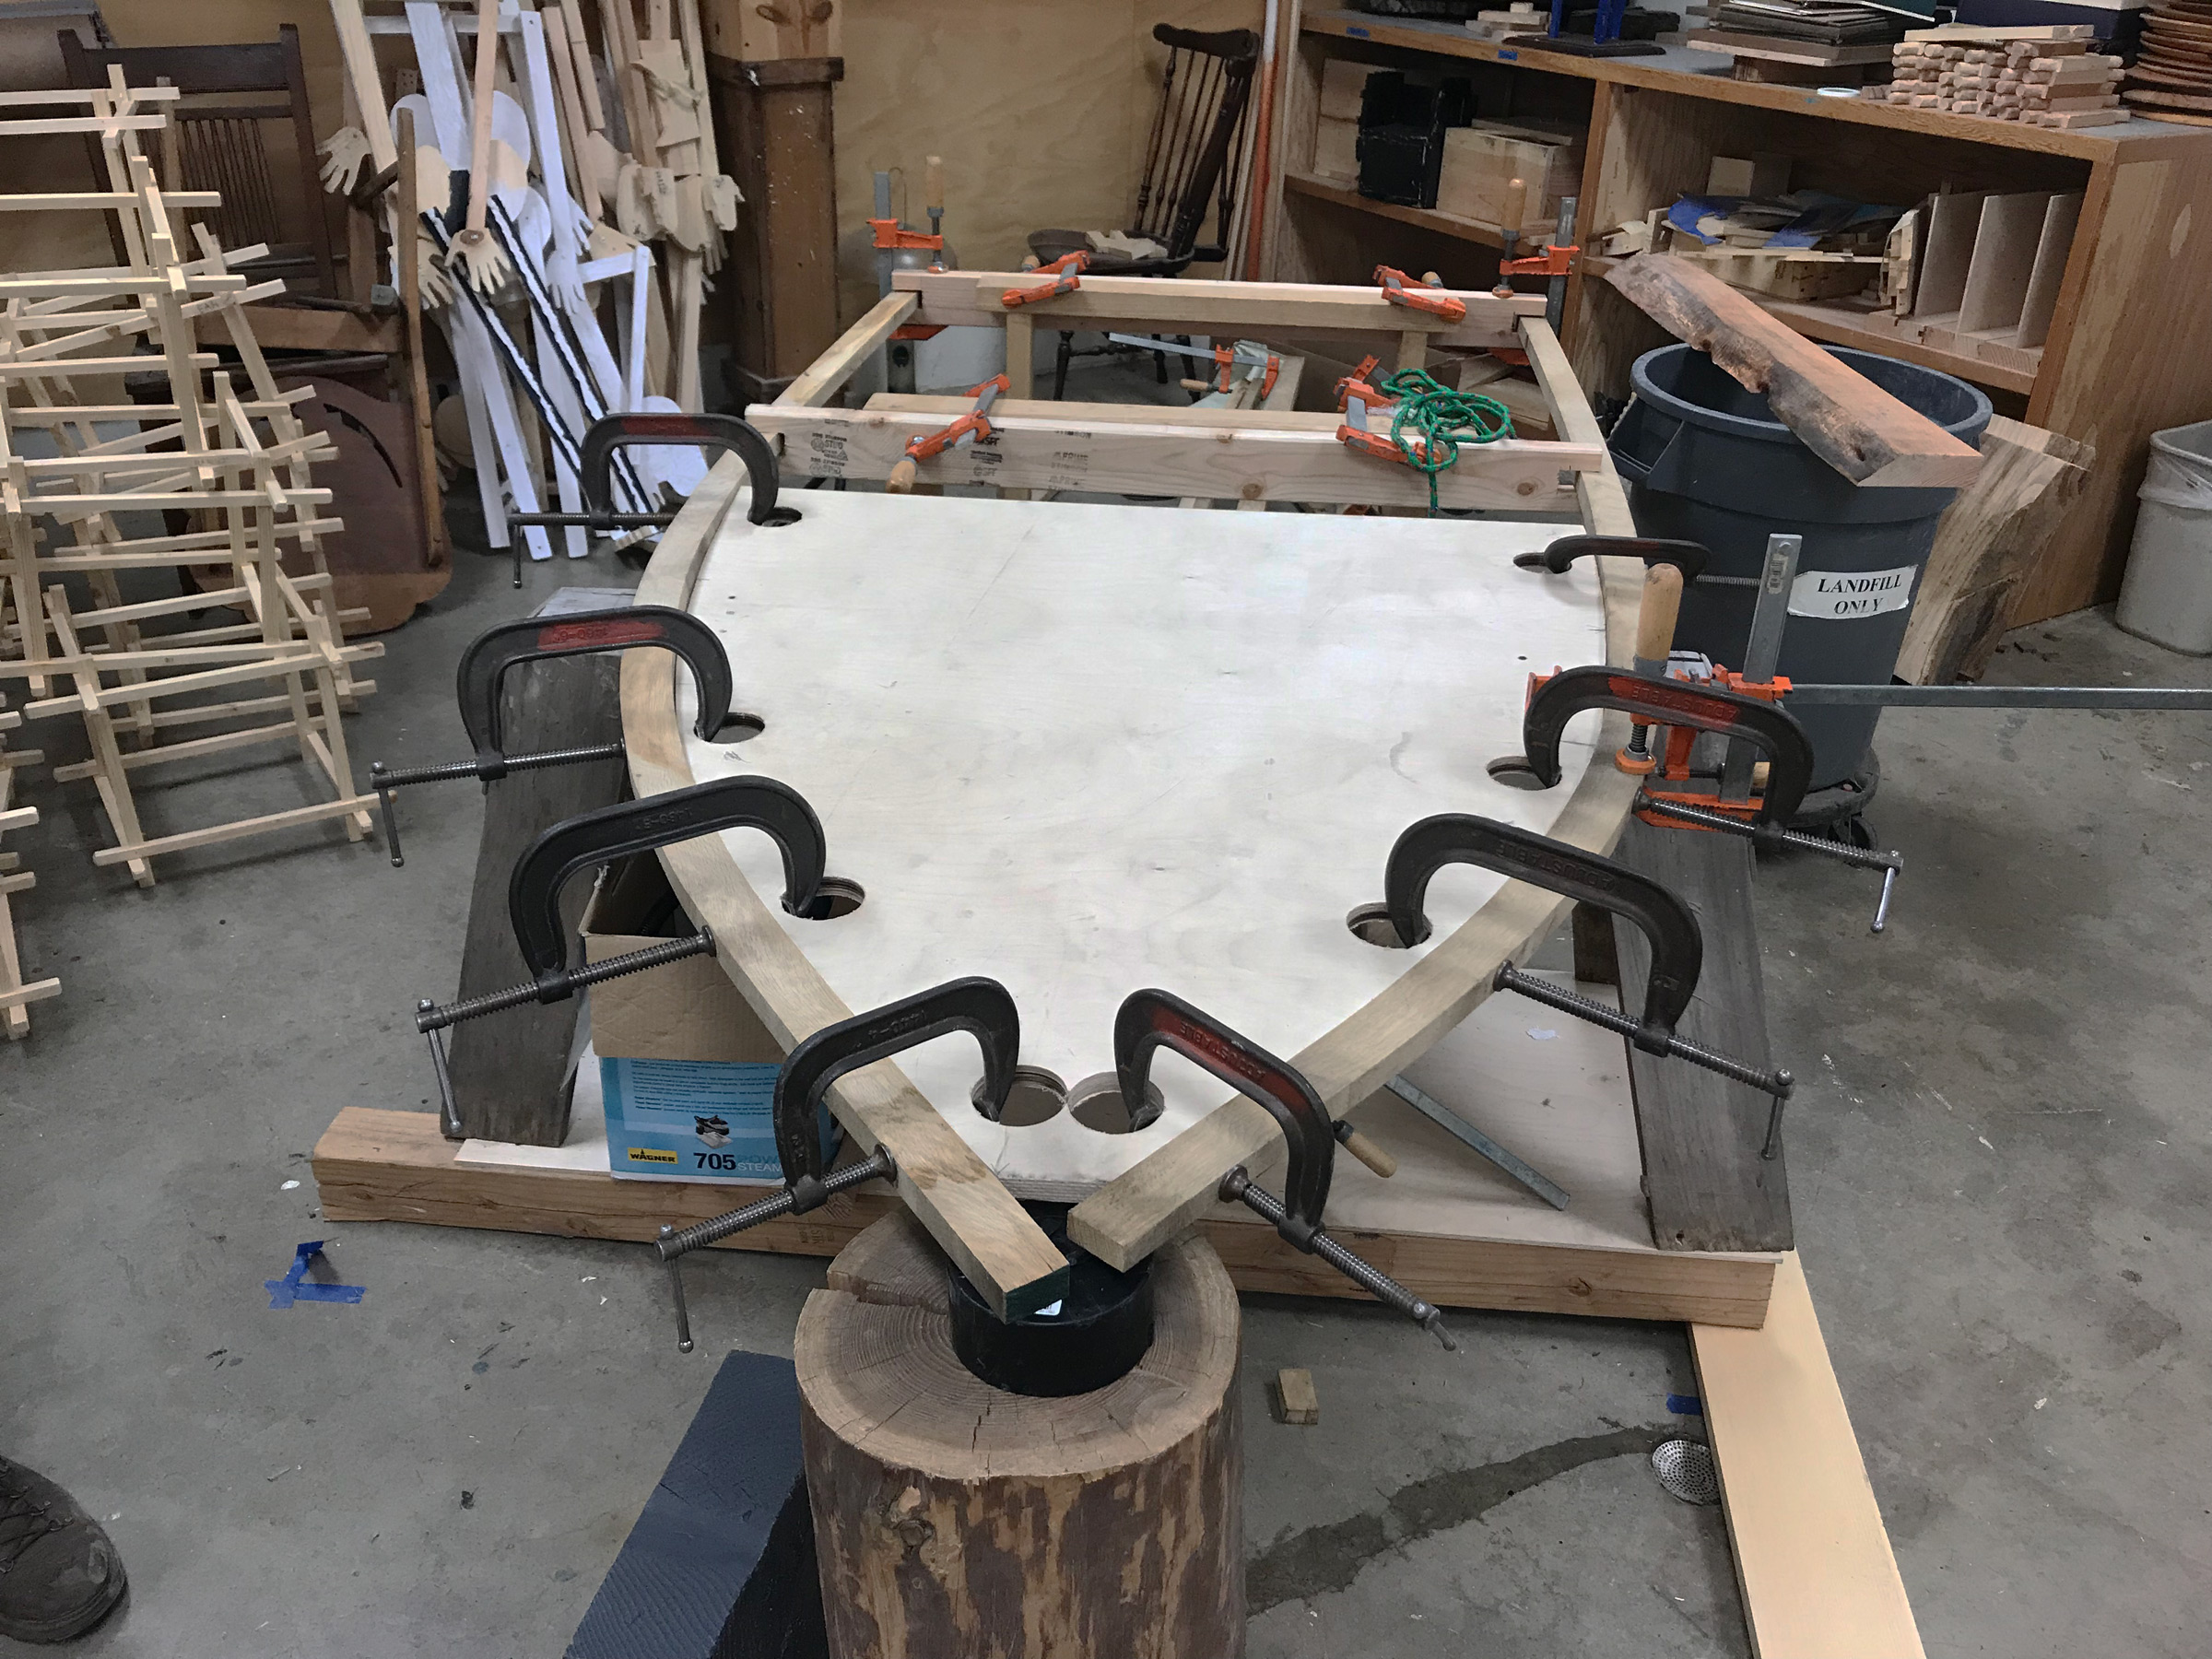
The Oregon white-oak gunwales for the curragh were steamed, then bent around a plywood form.
The forward ends of the gunwale longitudinals needed to be coaxed into curves; the green oak, steamed in a PVC pipe, took their shapes around a plywood form. The stanchions between the parallel gunwale pieces had rounded tenons, shaped with scroll saws and rasps, to fit the holes the kids drilled in the gunwales with a brace and auger bit.
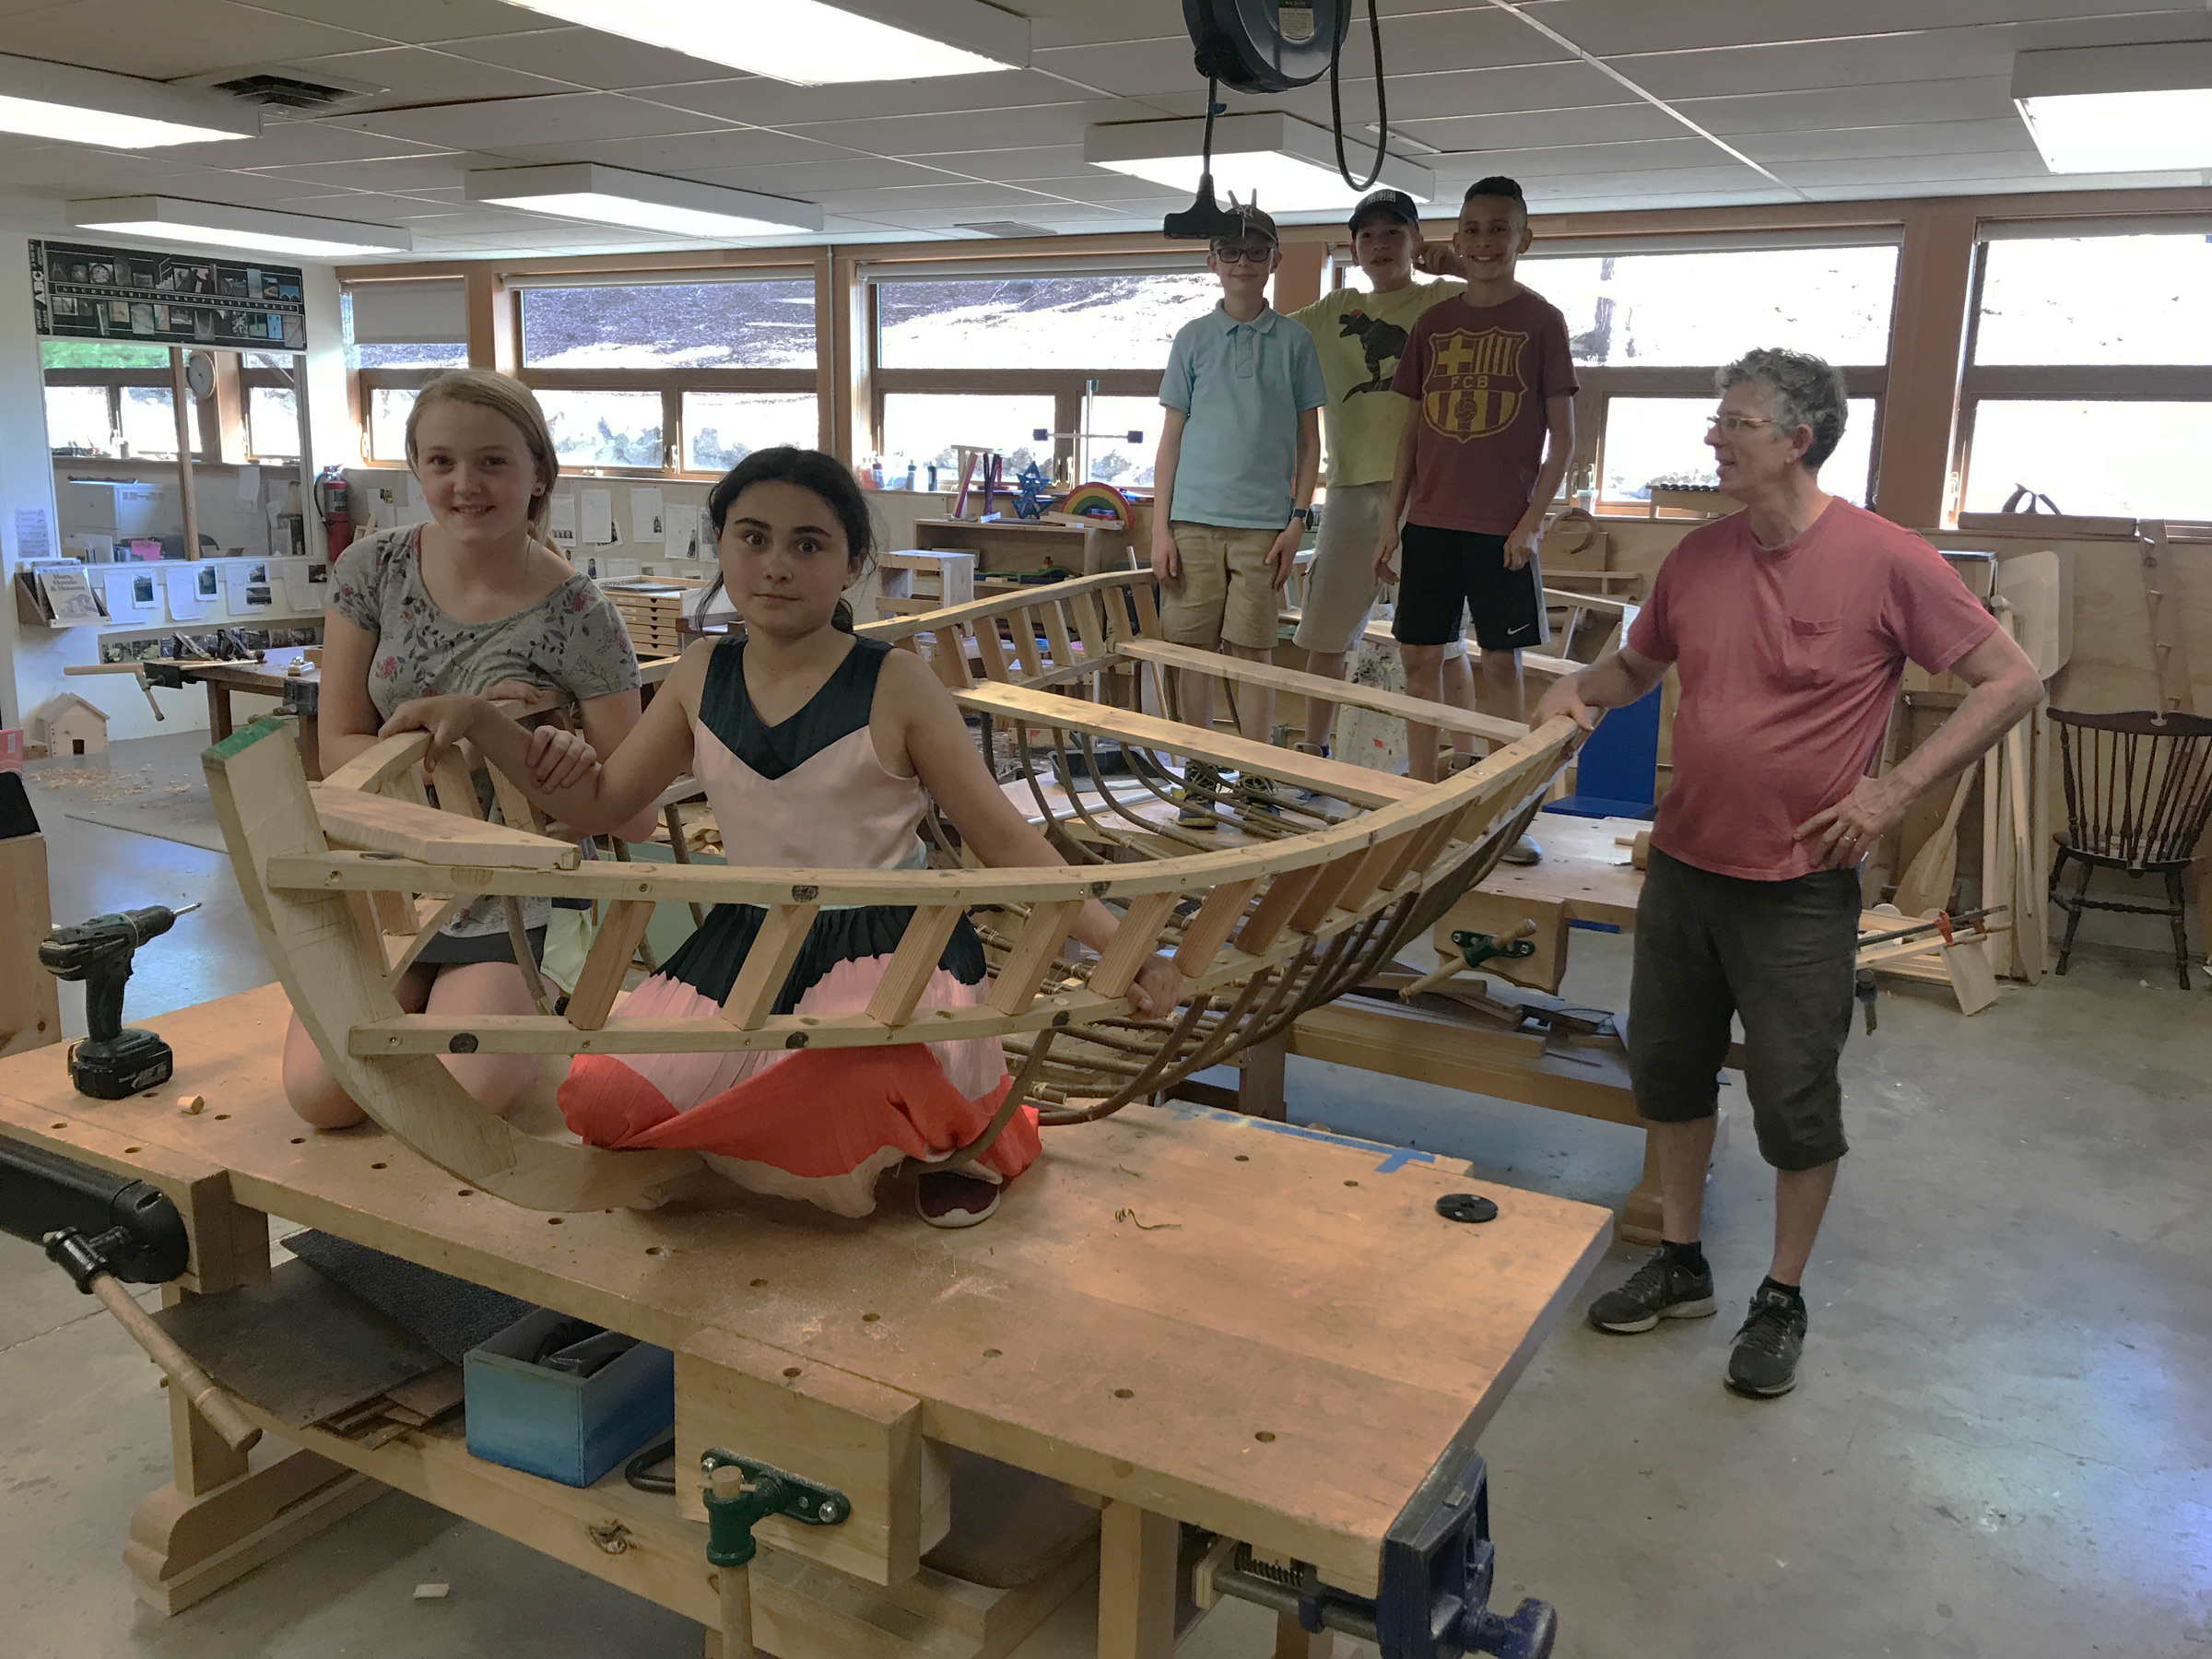
Teacher Ric Fry and student builders celebrate the completion of the gunwale assembly.
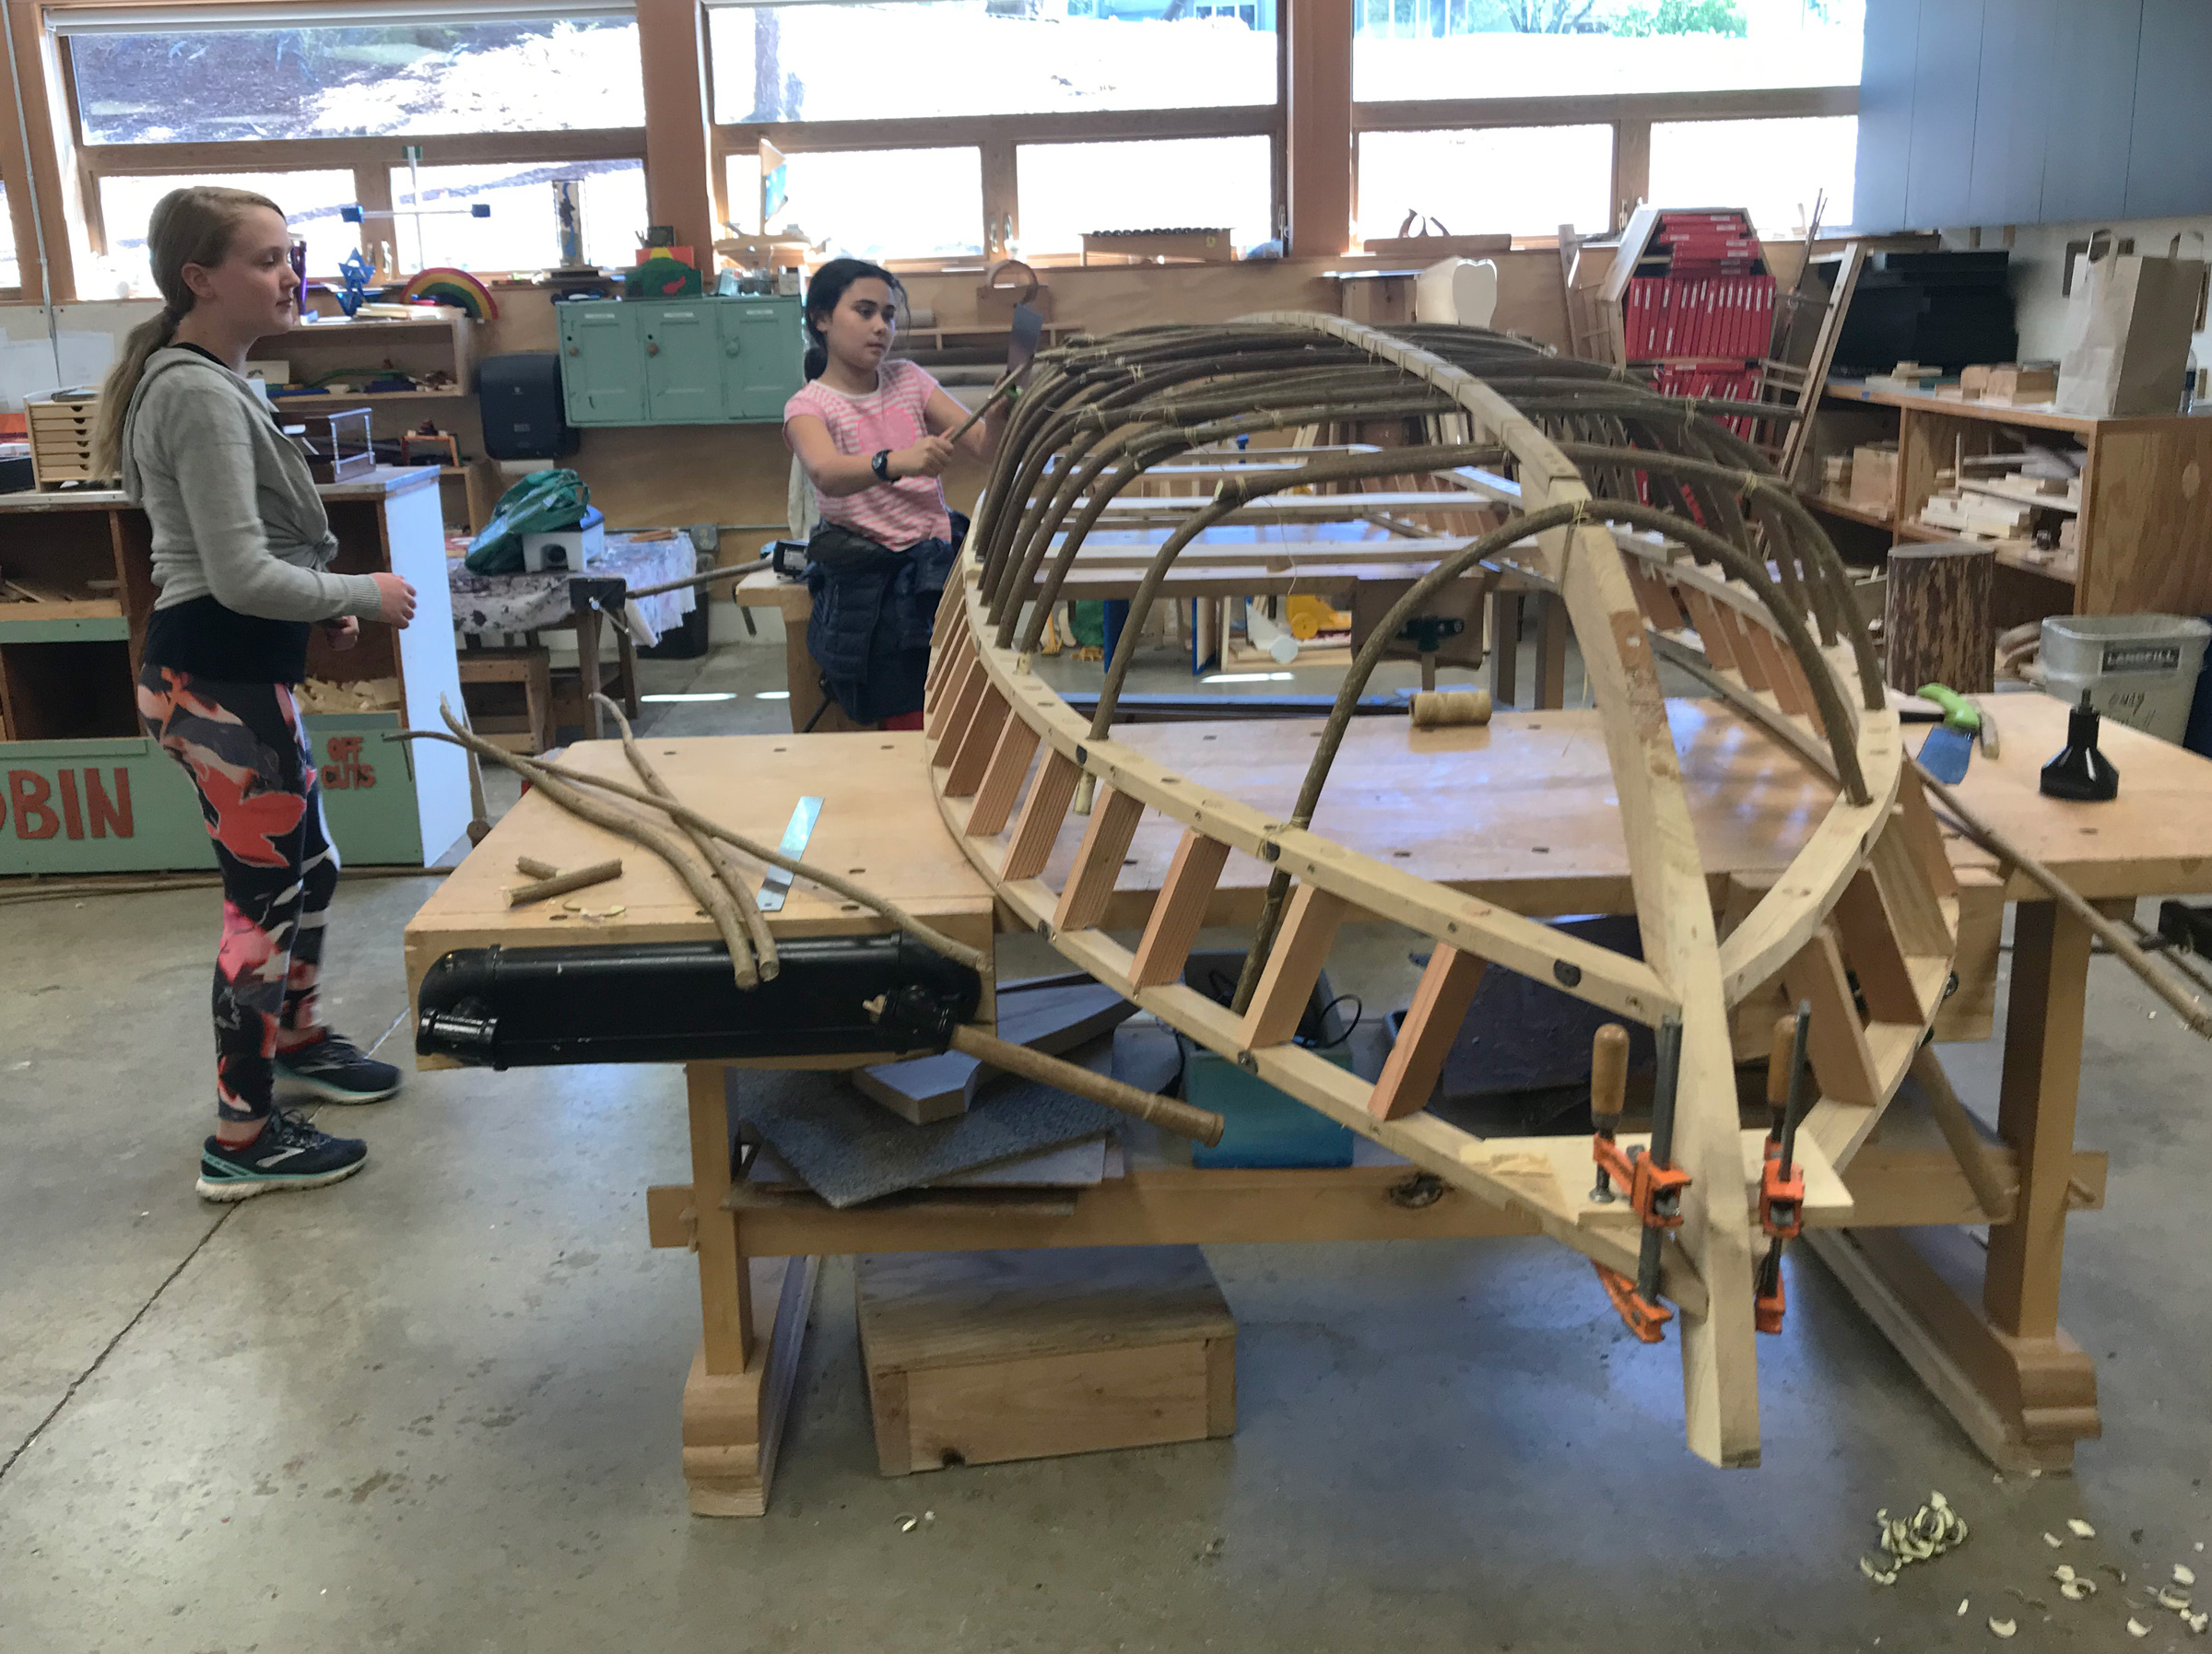
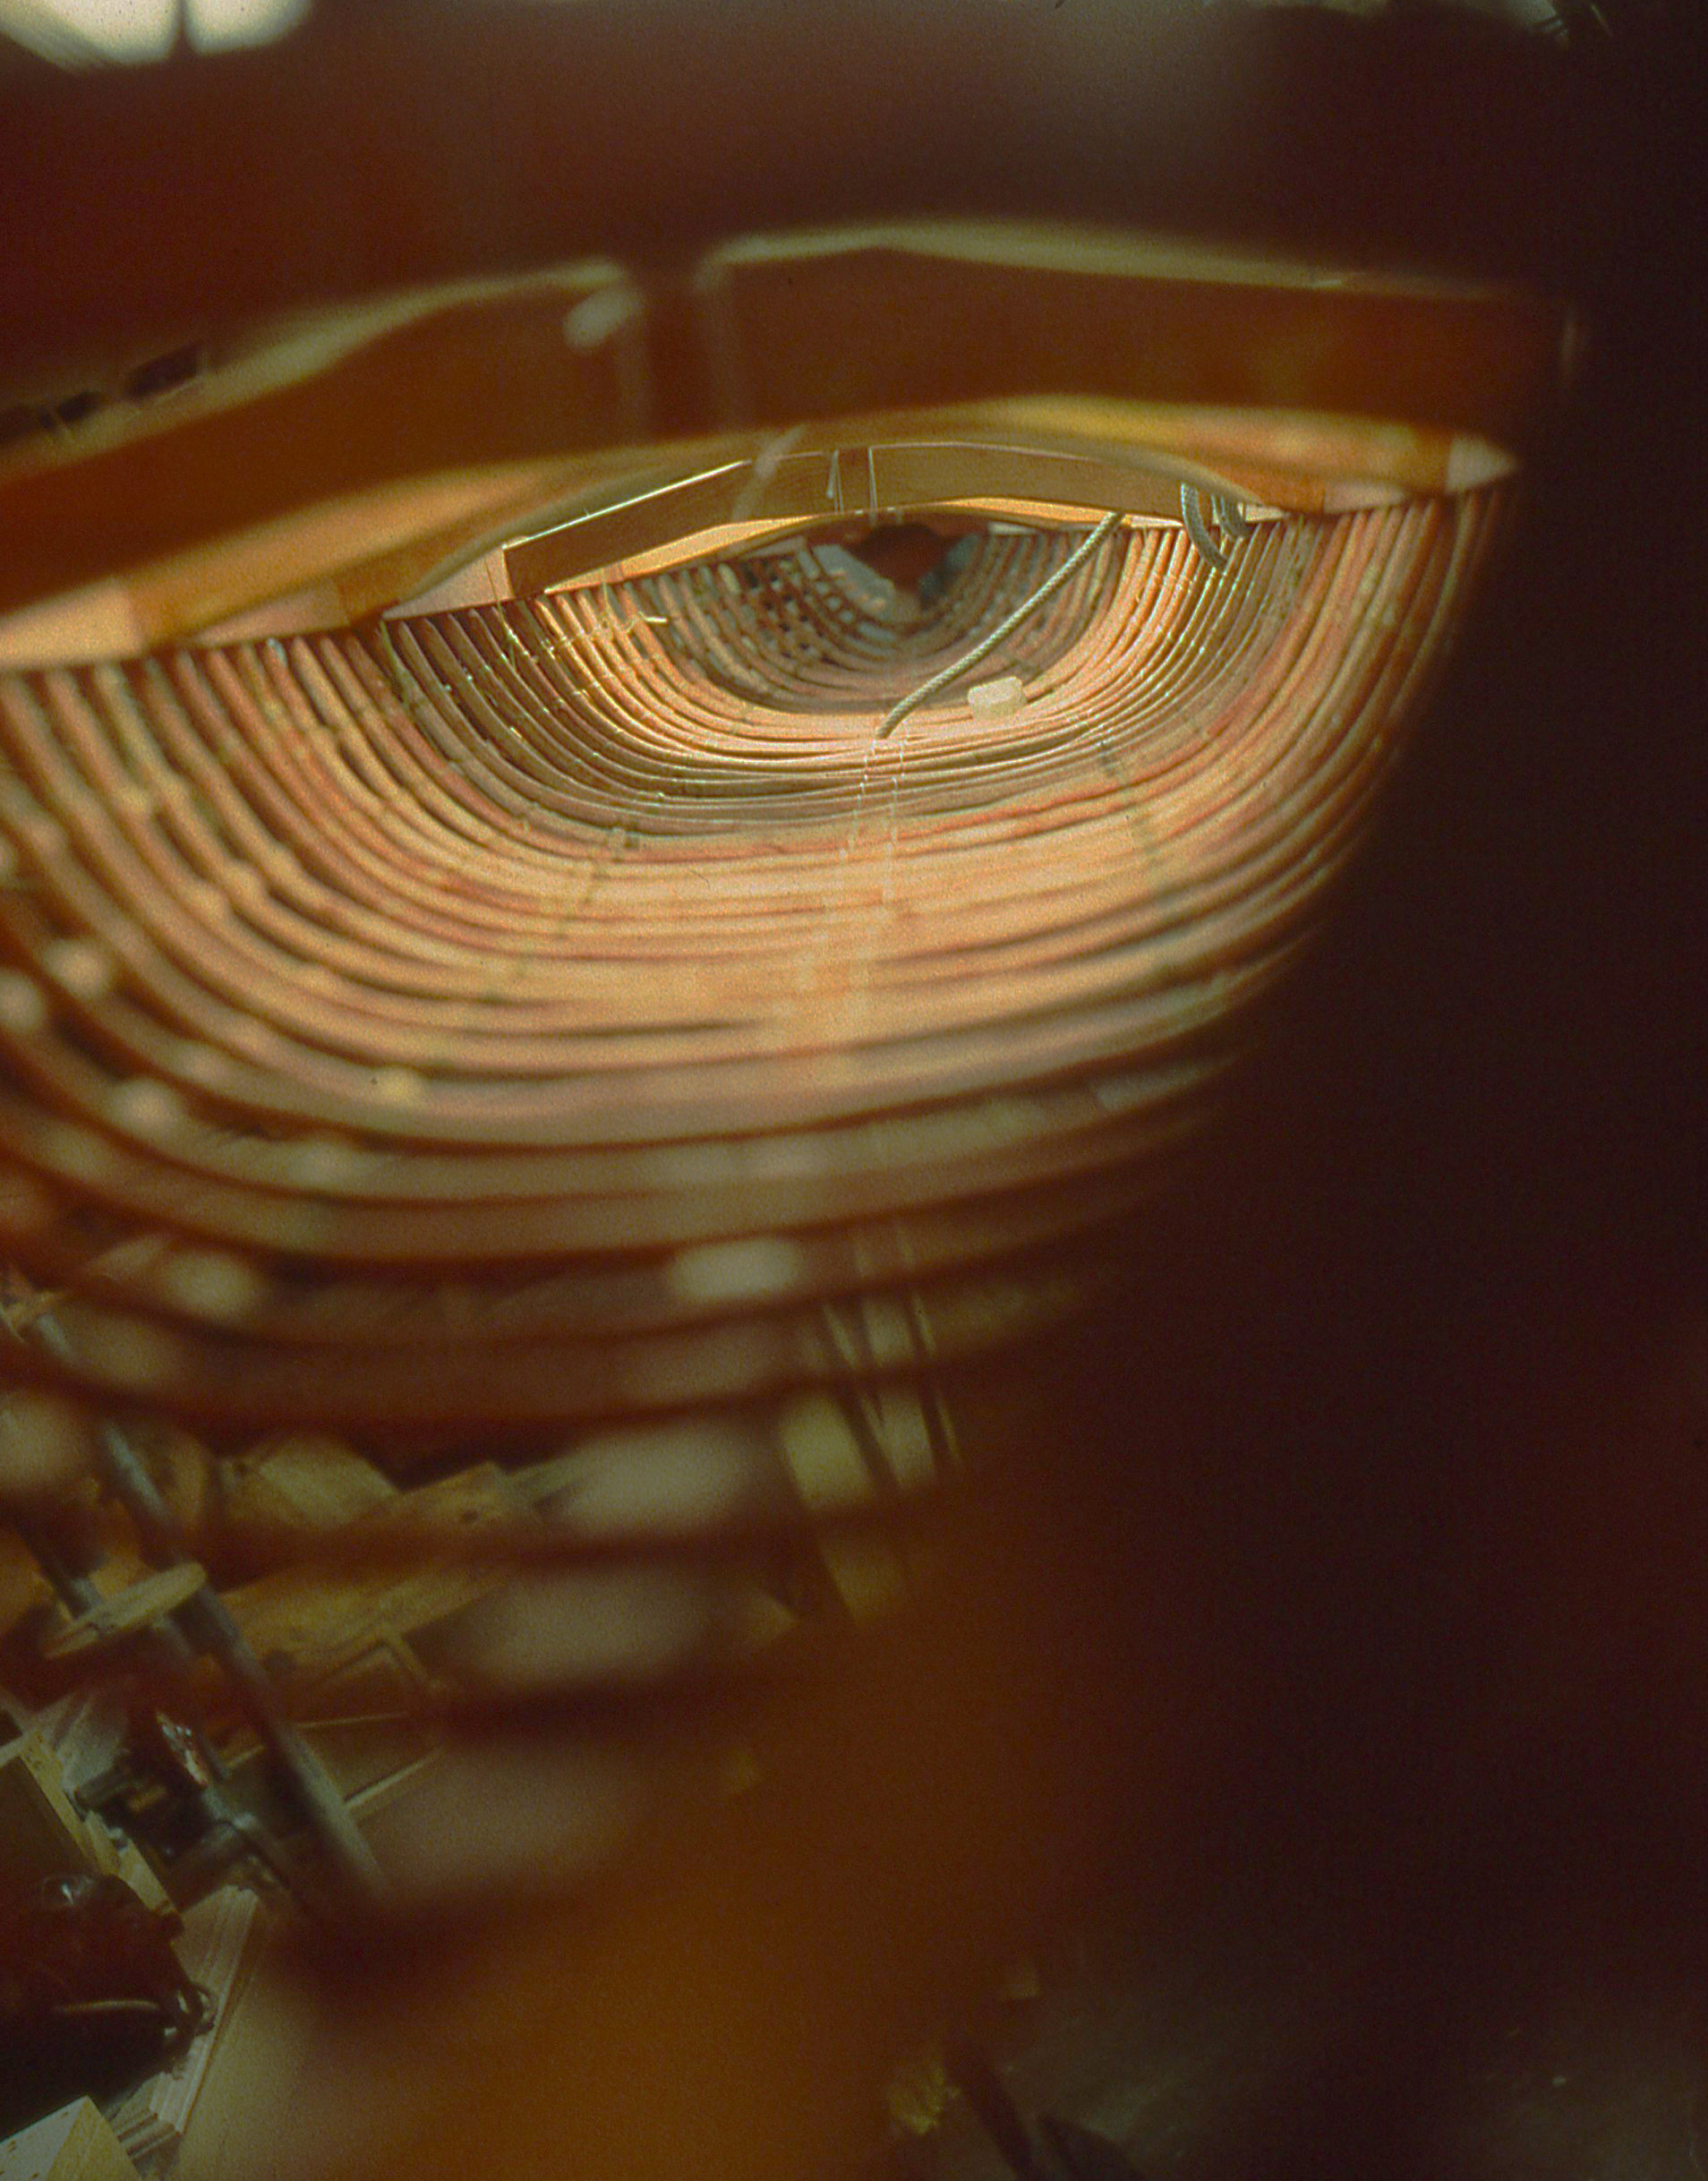
The withy frames, with their bark on and still quite flexible, were bent under the keel and fit in holes in the lower gunwale pieces. The pairs were shaped by eye, lashed together, and trimmed.
The flexible ribs get shaped by eye; the more points of view, the better.
Most of the ribs are made in pairs, doubling up across the bottom where the resulting flattened curves give the hull its proper shape.
Finishing the framing was another milestone in the curragh build. Stringers, skin, and coating remain to be done.
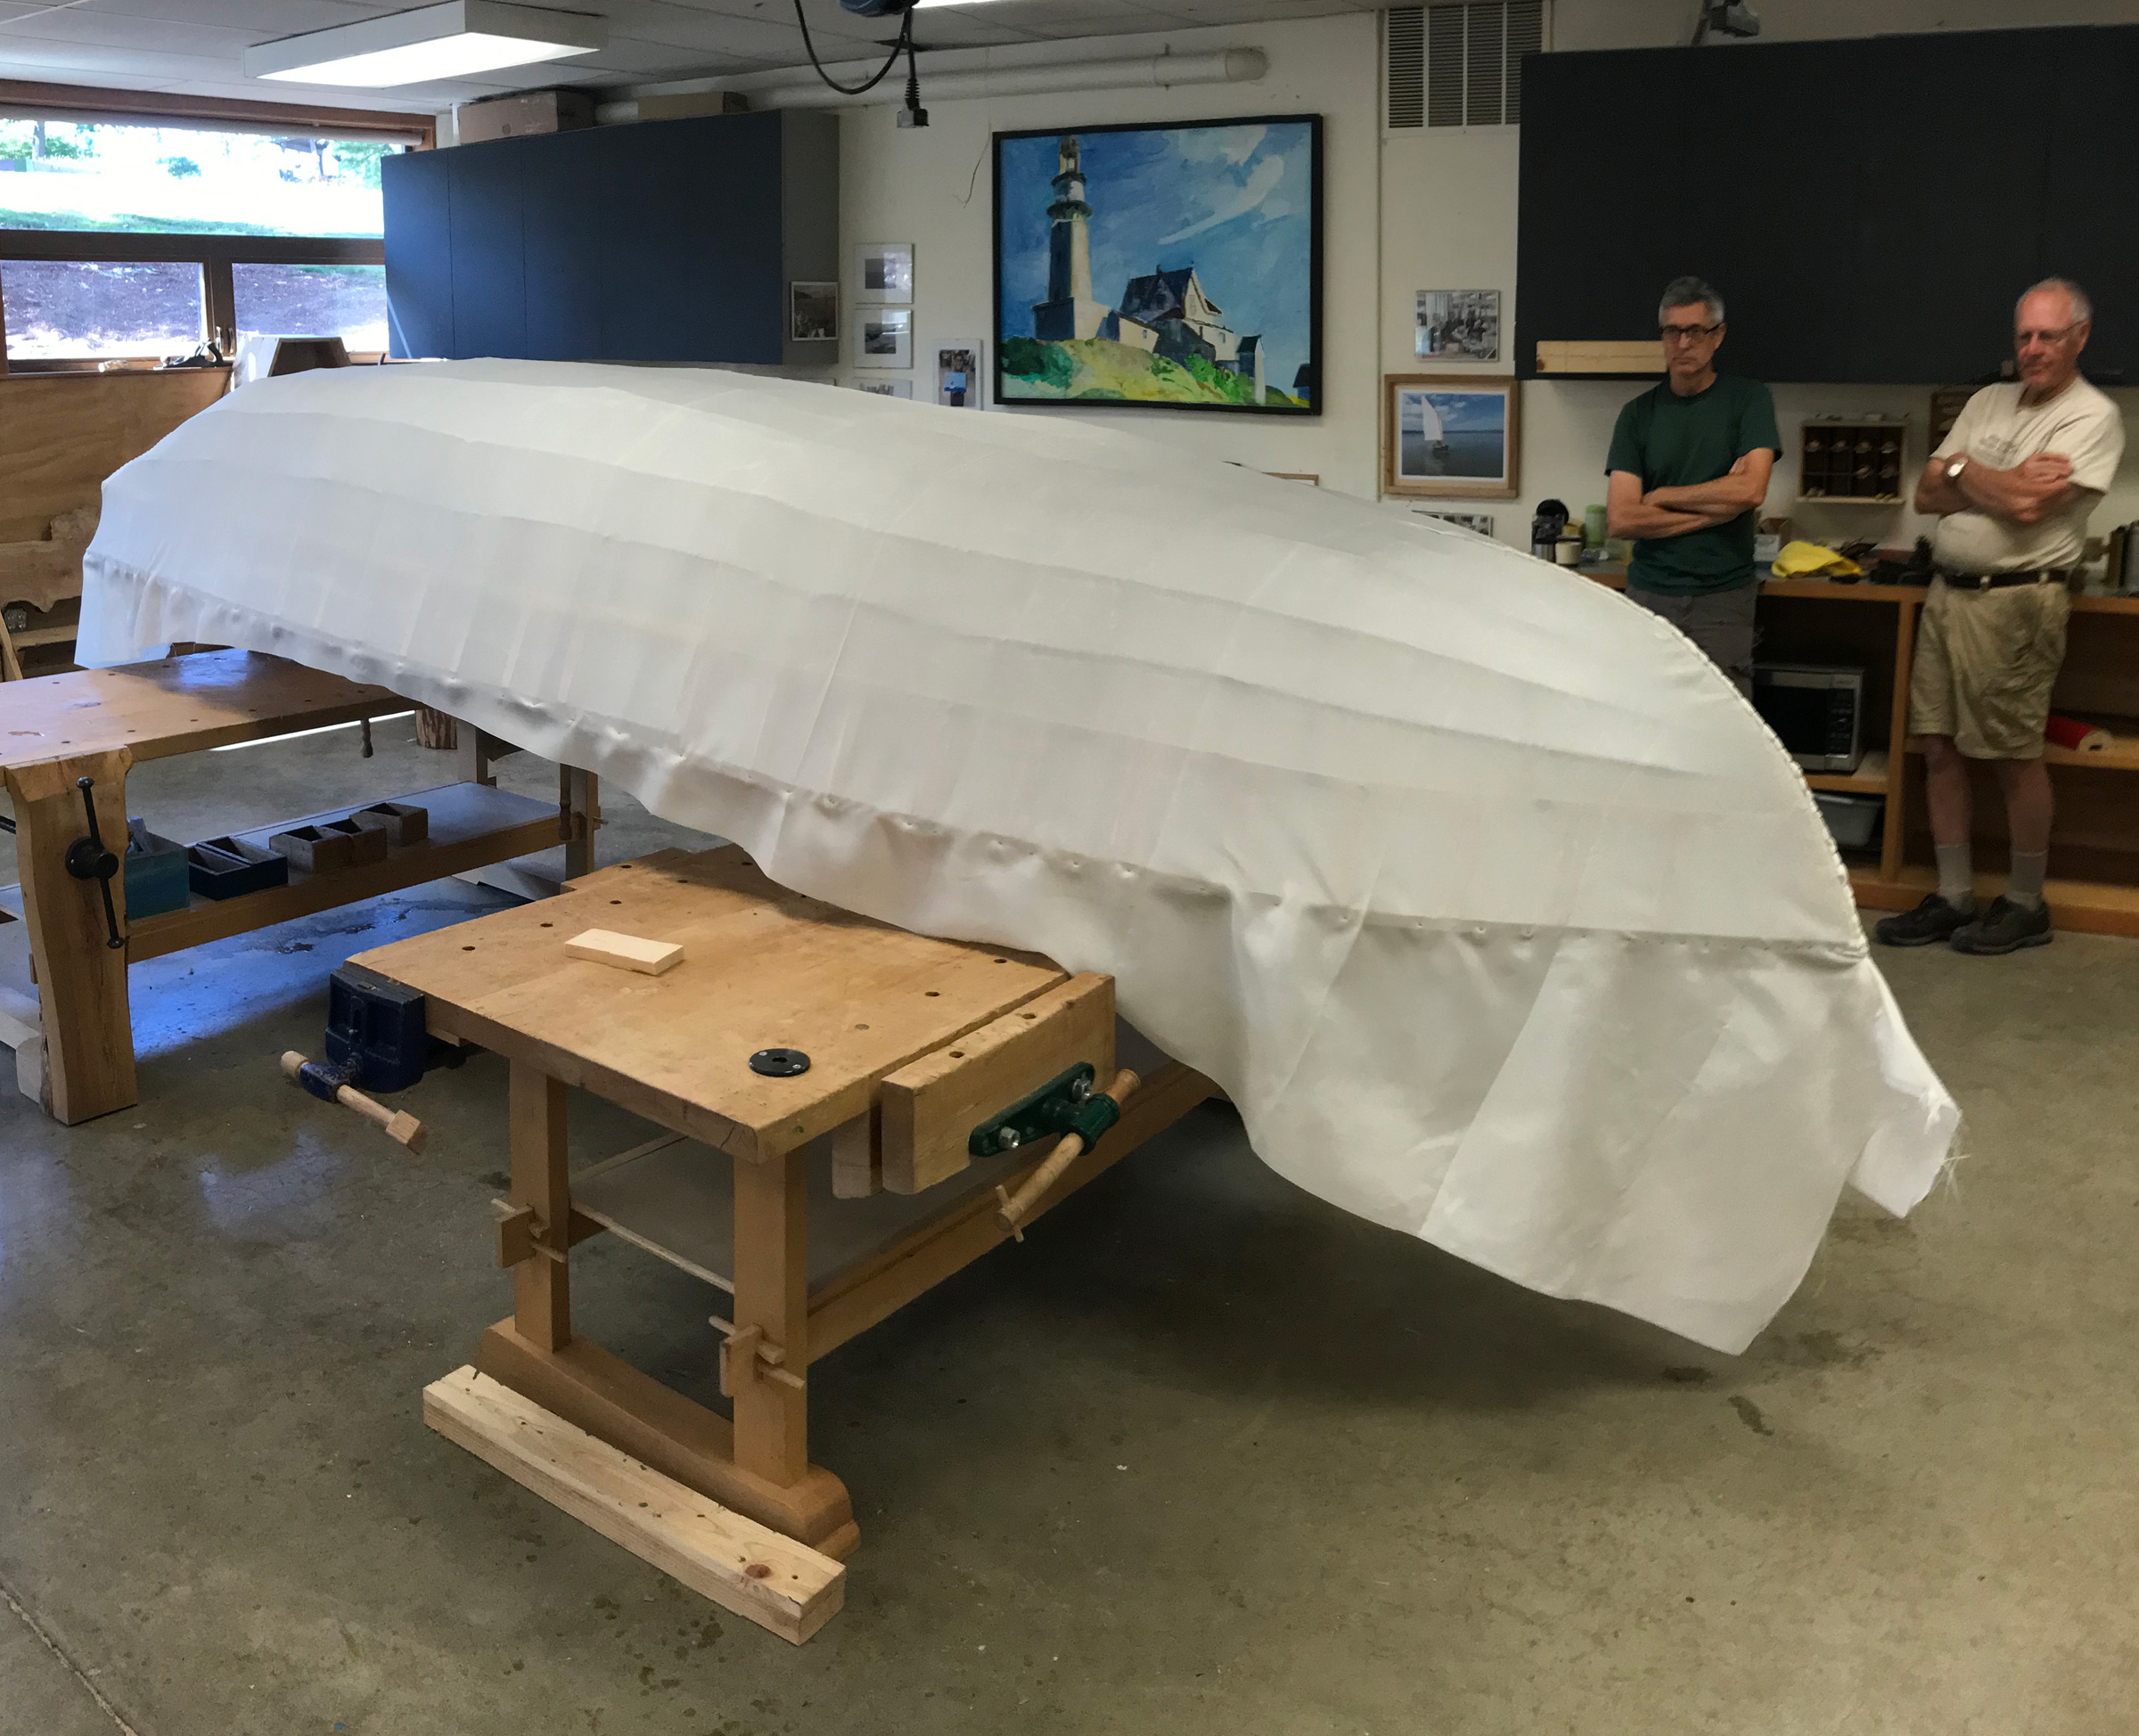
The students did good work skinning the curragh, drawing it tight to eliminate almost all of the puckers. The application of a bit of heat would finish the job.
The students stretched 12-oz ballistic nylon over the completed framework and stapled it to the upper gunwales. Summer vacation left completing the curragh up to Ric and RiversWest member John Ost. They stitched the fabric seams at the stem and stern and waterproofed the skin with a two-part polyurethane with a bit of pigment.
The curragh was finished when school was out of session, so its sea trials were conducted without the students who had built it.
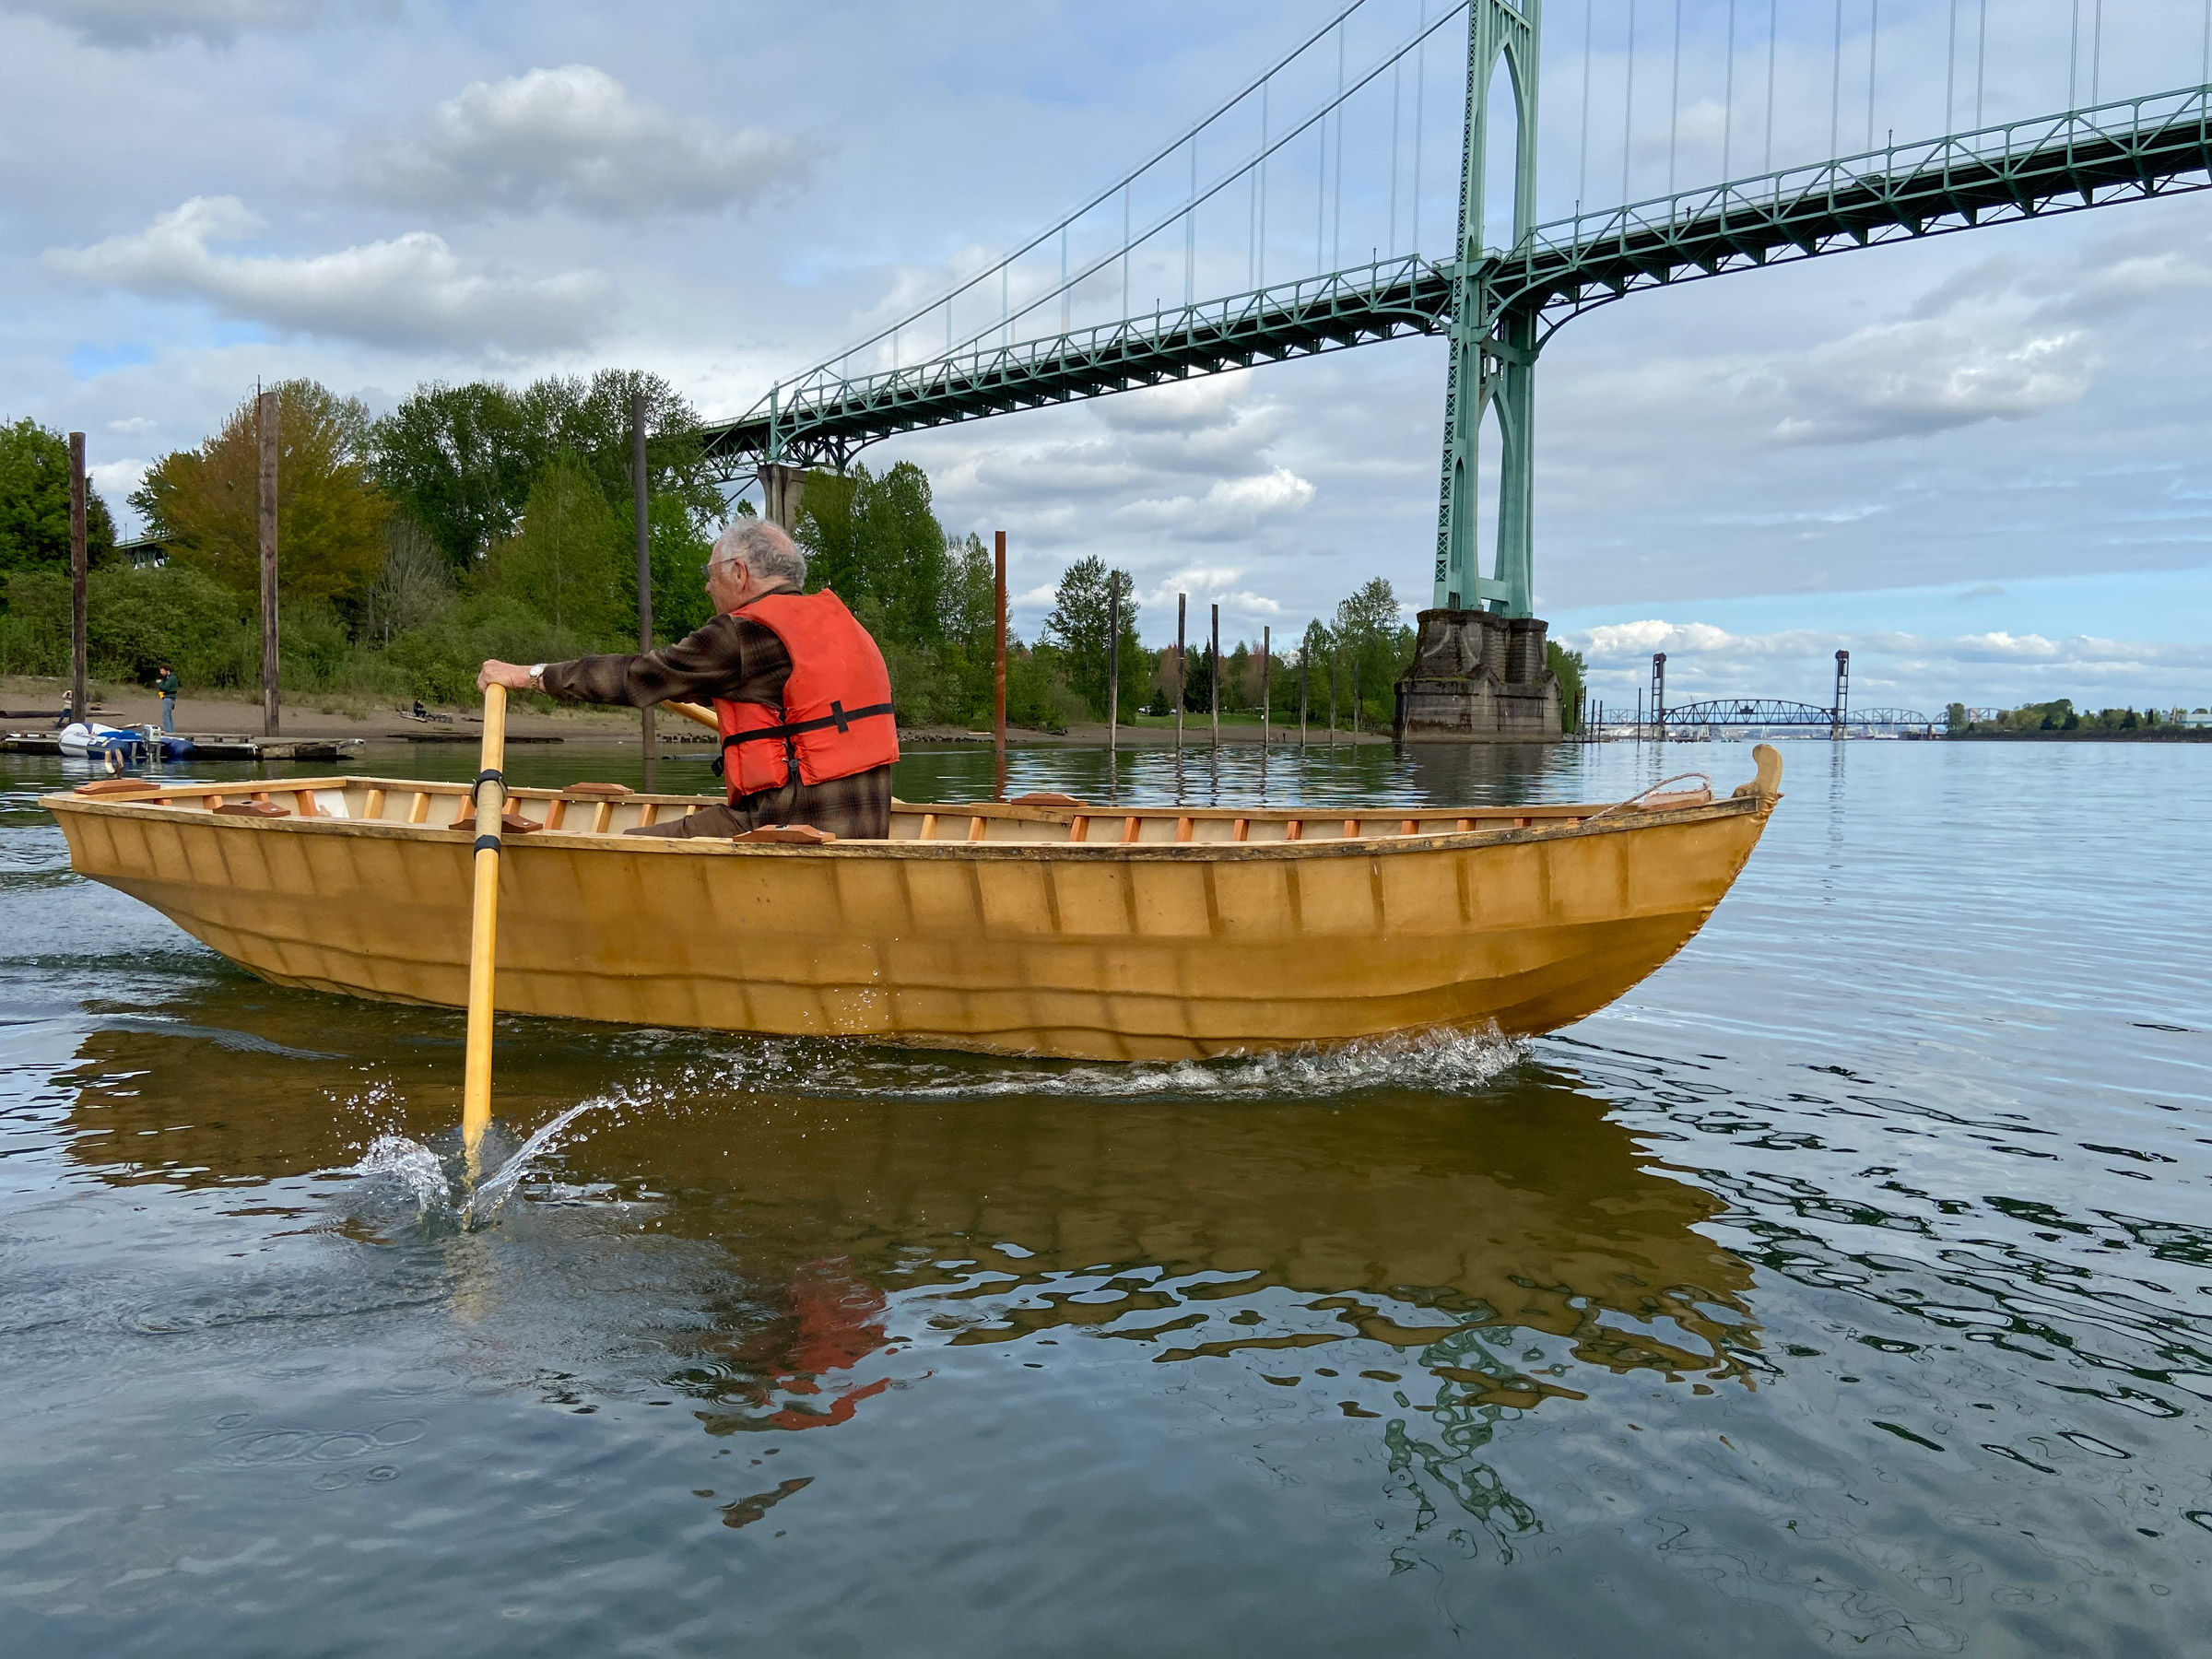
With John Ost at the oars, the curragh put on a good turn of speed during an outing on the Willamette River a few miles downstream from downtown Portland.
The curragh and coracle will join Catlin Gabel’s growing fleet of small boats, as much a part of the Experiential Learning program on the water as the boats yet to be built in the school’s woodshop.
Do you have a boat with an interesting story? Please email us. We’d like to hear about it and share it with other Small Boats Magazine readers.
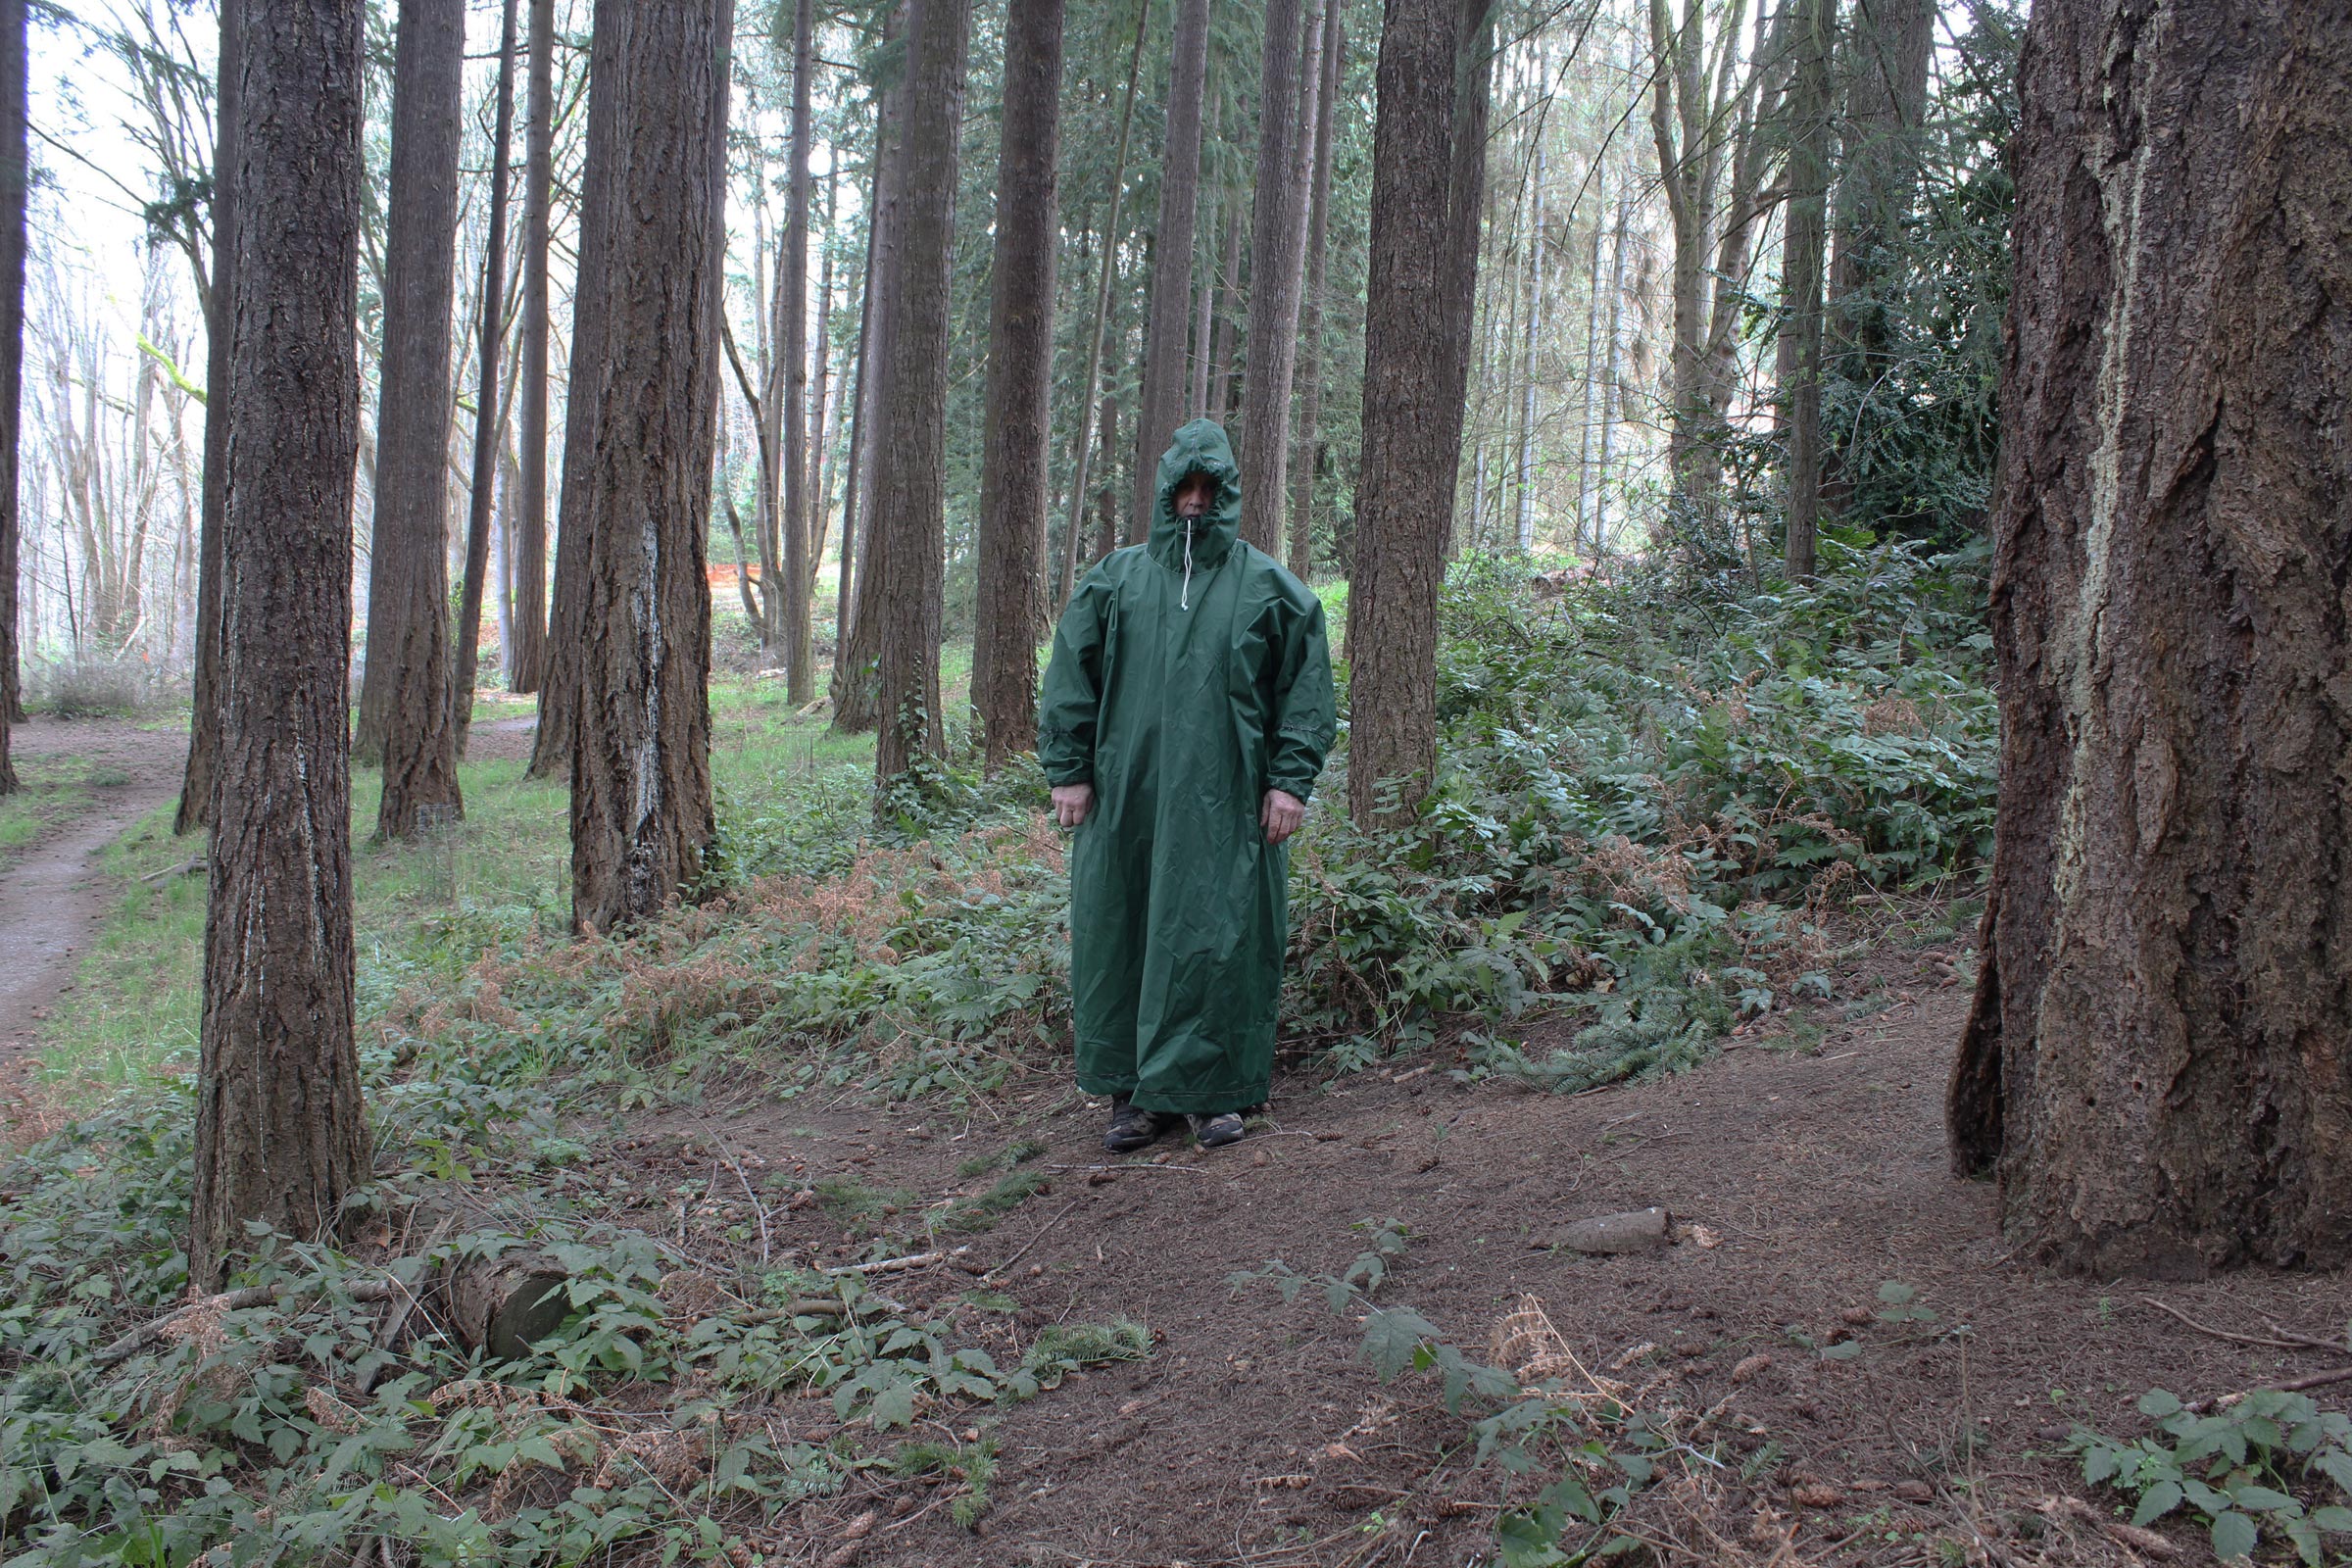
Here in the state of Washington, our governor declared a state of emergency in response to the spread of the COVID-19 disease and imposed a Stay Home—Stay Healthy order. There are four “essential activities” for which we may leave the safety and isolation of home, and the last of them is: “Engaging in outdoor exercise activities, such as walking, hiking, running or biking, but only if appropriate social distancing practices are used.” Rowing has long been one of my normal forms of exercise and it’s certainly a very effective method of achieving the social distancing we’re all now called upon to practice. When I decided to take a break from sitting at my desk working on this issue’s deadline, I rowed my 14′ New York Whitehall along the shore of Puget Sound.
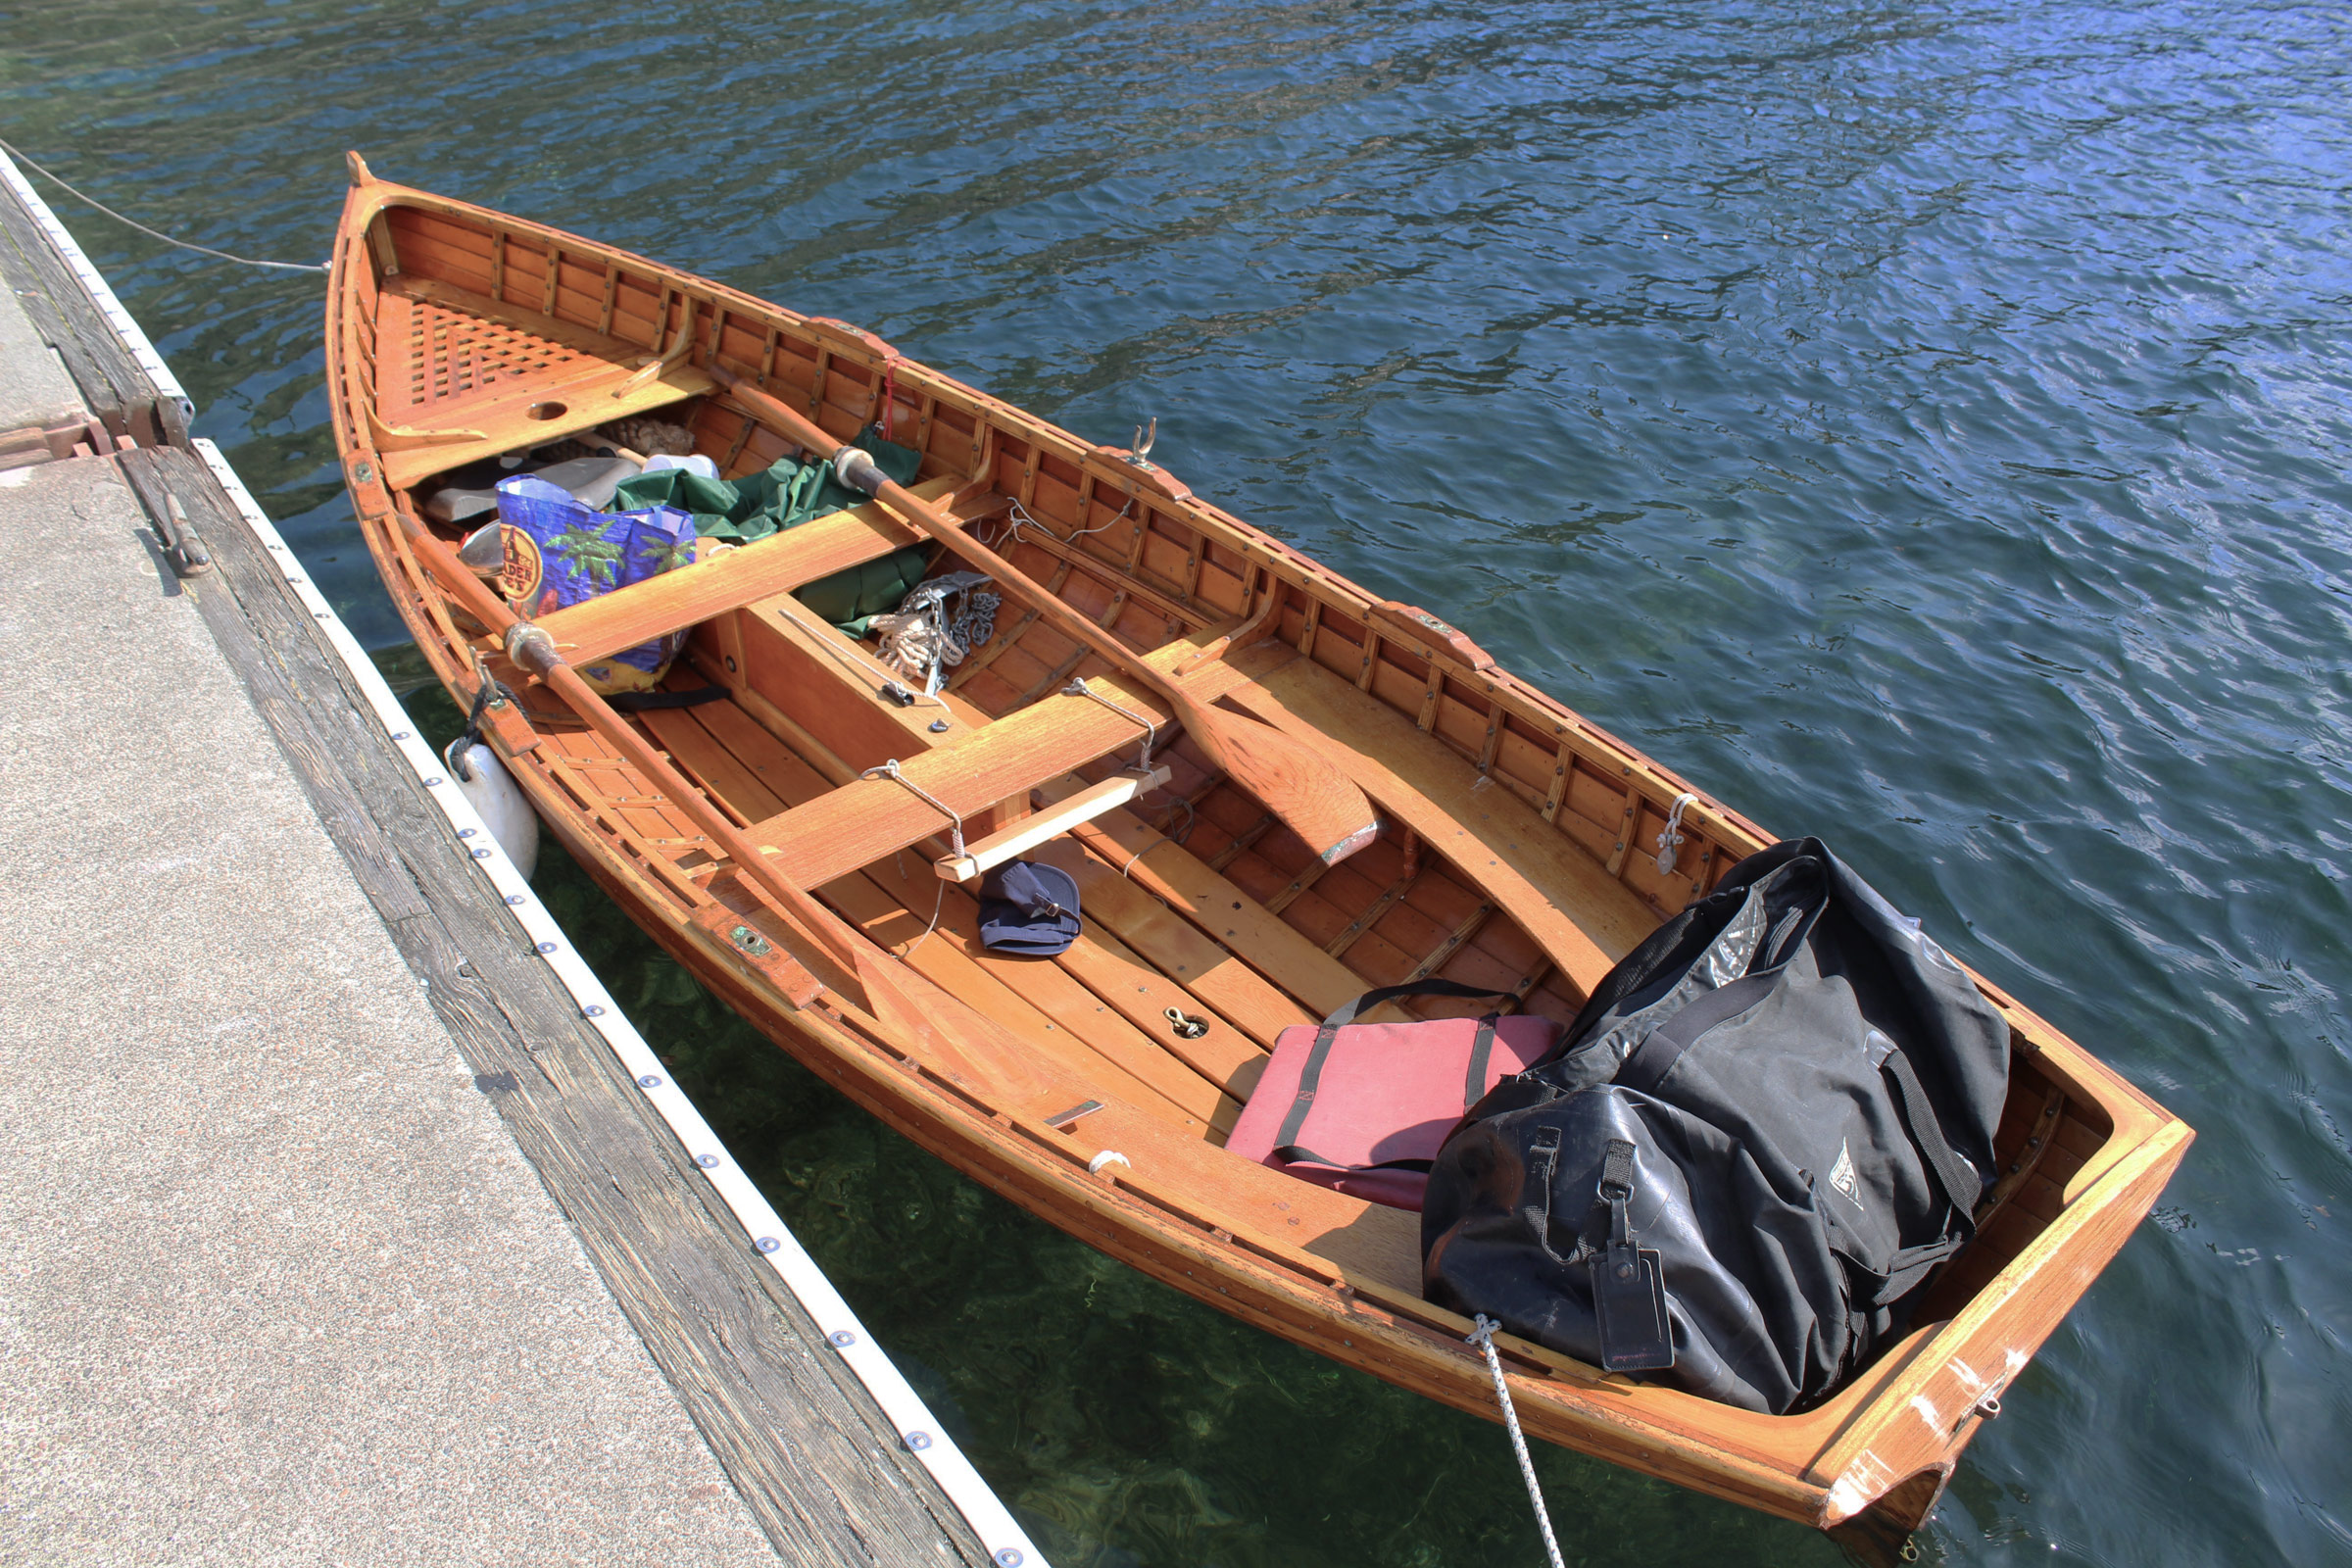
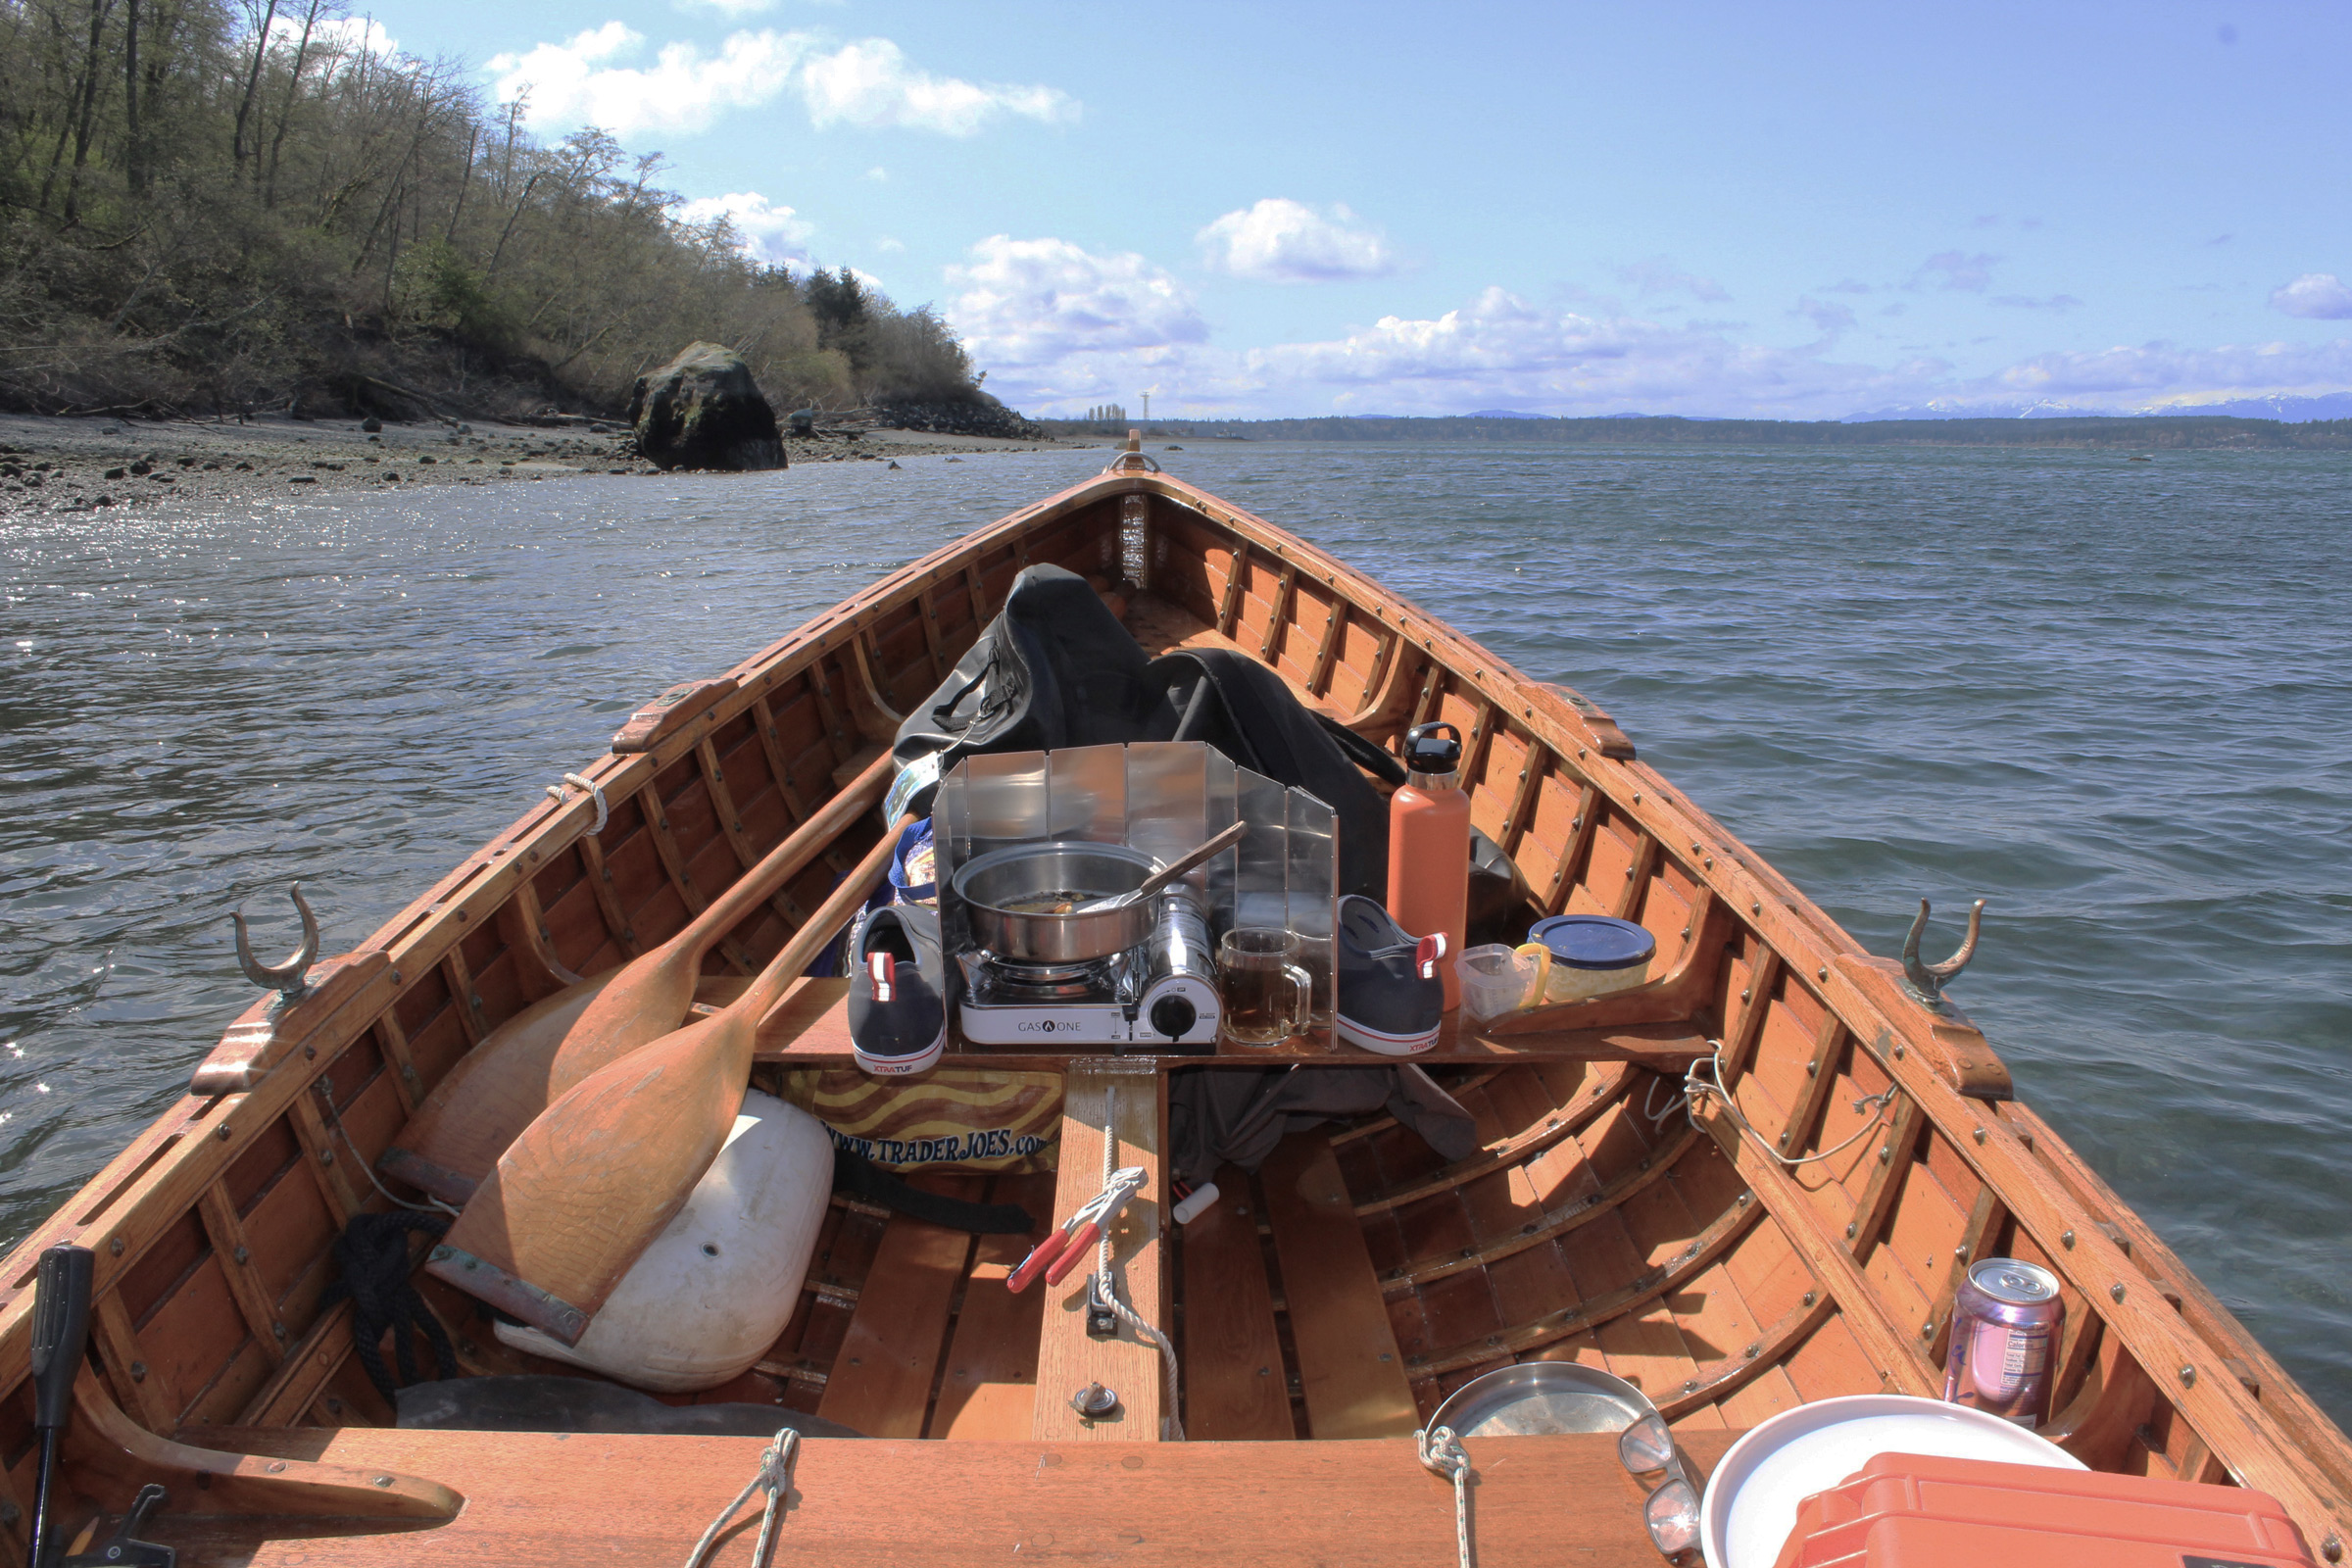
With a bit of kit aboard , the Whitehall is ready for rowing as well as taking a break at anchor.
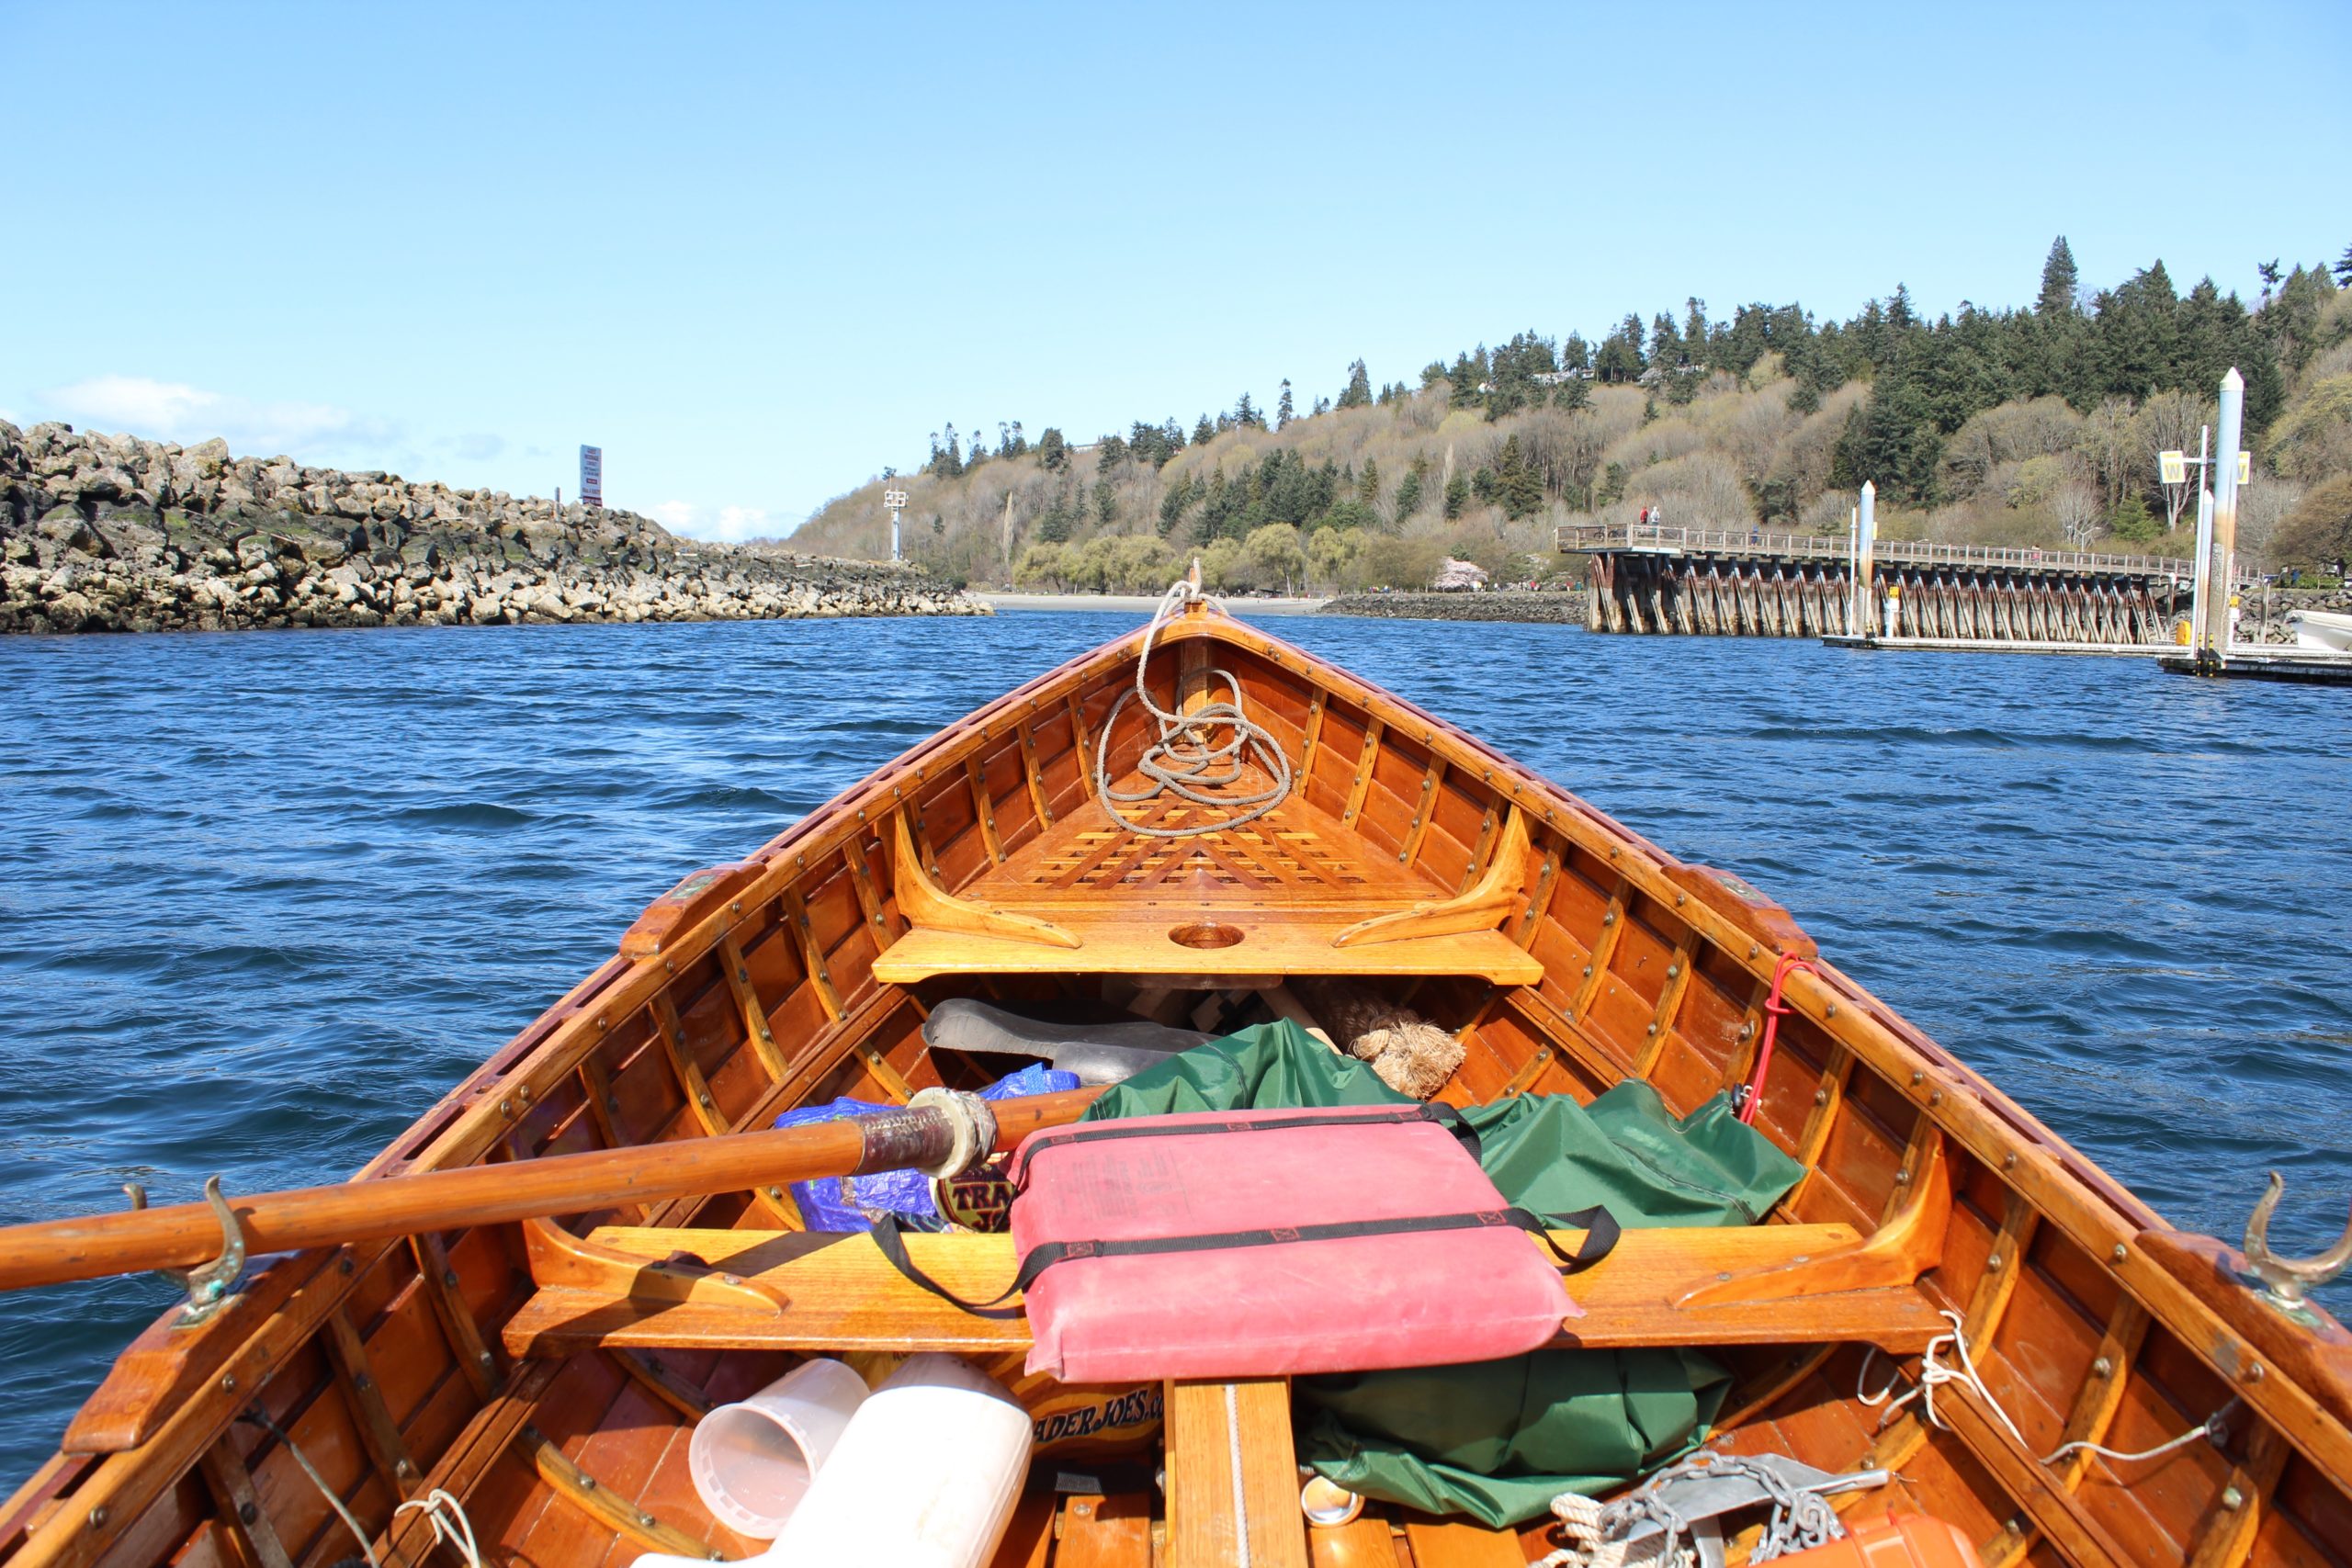
The ramp I use on the north end of Seattle is adjacent to a popular city beach; the park has been open, but its parking lot has been closed because of the governor’s order. Beachgoers have been parking in the lot by the ramp, a lot reserved for cars with boat trailers. When I arrived with my boat in tow, the place was crowded with trailerless cars; there was just one parking space left. I quickly got the Whitehall into the water, secured it to the dock, and backed the trailer into the open spot. As required, I paid my $12 launch fee at the automated kiosk and placed the permit on my dash. I’m sure it was the only permit in the whole parking lot.
There was a southerly blowing at 21 knots, as measured by the weather station at West Point, a peninsula with its western extremity 2 miles to the southwest of the ramp. I could see a line of whitecaps parading north along the shipping lanes and a lot of chop closer to shore, so I rowed south inside the breakwater of the Shilshole Marina. A glaucous-winged seagull flew over the ridge of pale-gray broken rock, came to a full stop in midair, and with wings outstretched and immobile, rode the wind straight down to a landing, as if lowered by a crane. On a rock farther along on the breakwater, a pair of gulls were already settled and nestled right next to one another, their beaks pressed into their sugar-white breasts. Then a memento mori, a rusted steel sculpture of a human skeleton with its back to the wind, hands resting on a sword planted in the crest of the breakwater. This familiar piece of public art struck me now as more sobering than camp.
I had protection from the waves for the 2/3-mile length of the marina but the breakwater funneled the wind parallel to it and made the rowing hard work. When the Whitehall nosed out beyond the end of the breakwater into open water, I had the waves to contend with too, as well as an ebb-strengthened current flowing out of the ship canal. It was slow going and I watched marks on shore to make sure I was still making headway.
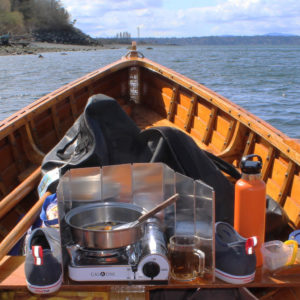
I set up my galley on the center thwart. The boulder on the beach off the port bow, one of two glacial erratics here, was surrounded by water when I arrived. I was at anchor in the middle of a 9-1/2′ ebb and the water level dropped quickly.
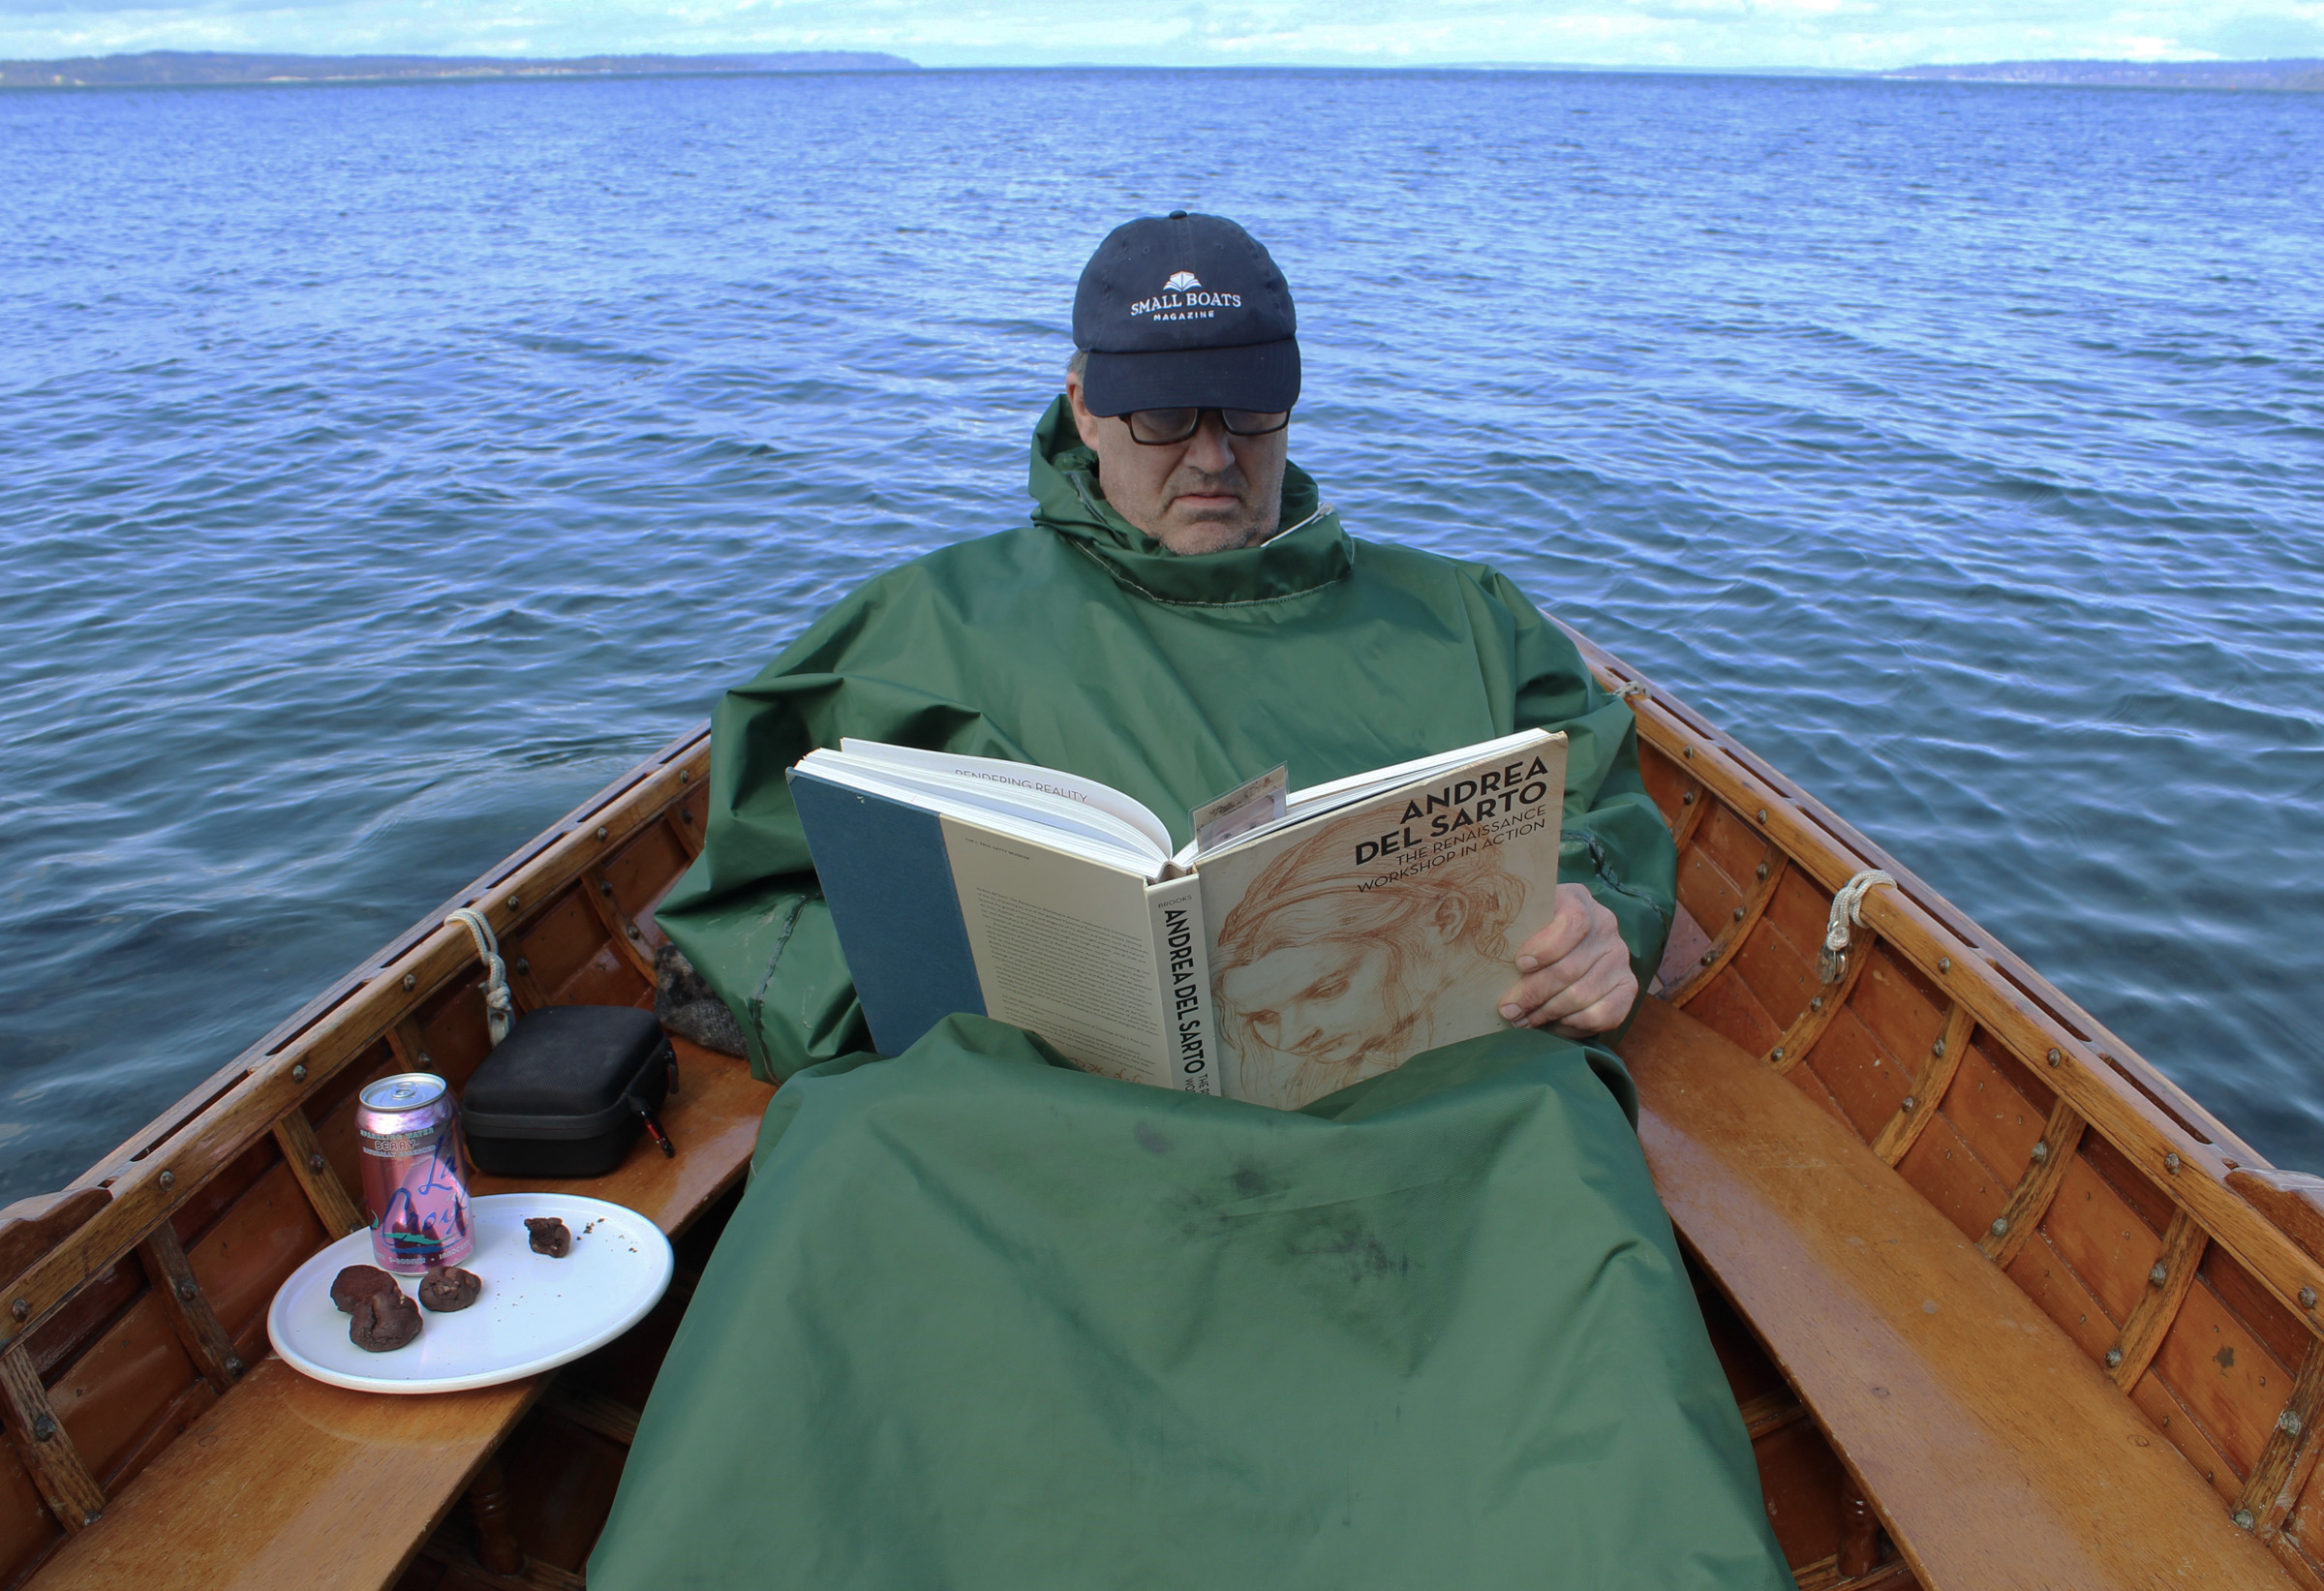
I had worked up a sweat by the time I slipped into the lee of West Point’s tall, steep north side. The air and water there were not completely still as I’d hoped; there was enough wind hooking around the point to dishevel the water and push the Whitehall upstream against the current that was bending the fronds of seaweed to the west. I rowed along the shore and dropped the anchor in a fathom of water between two 10′-tall glacial erratic boulders that were then showing little more than their turtle-back tops. As I settled into the boat, I got chilled by the wind cutting through my damp pile jacket. I pulled on my cagoule and quickly warmed up.
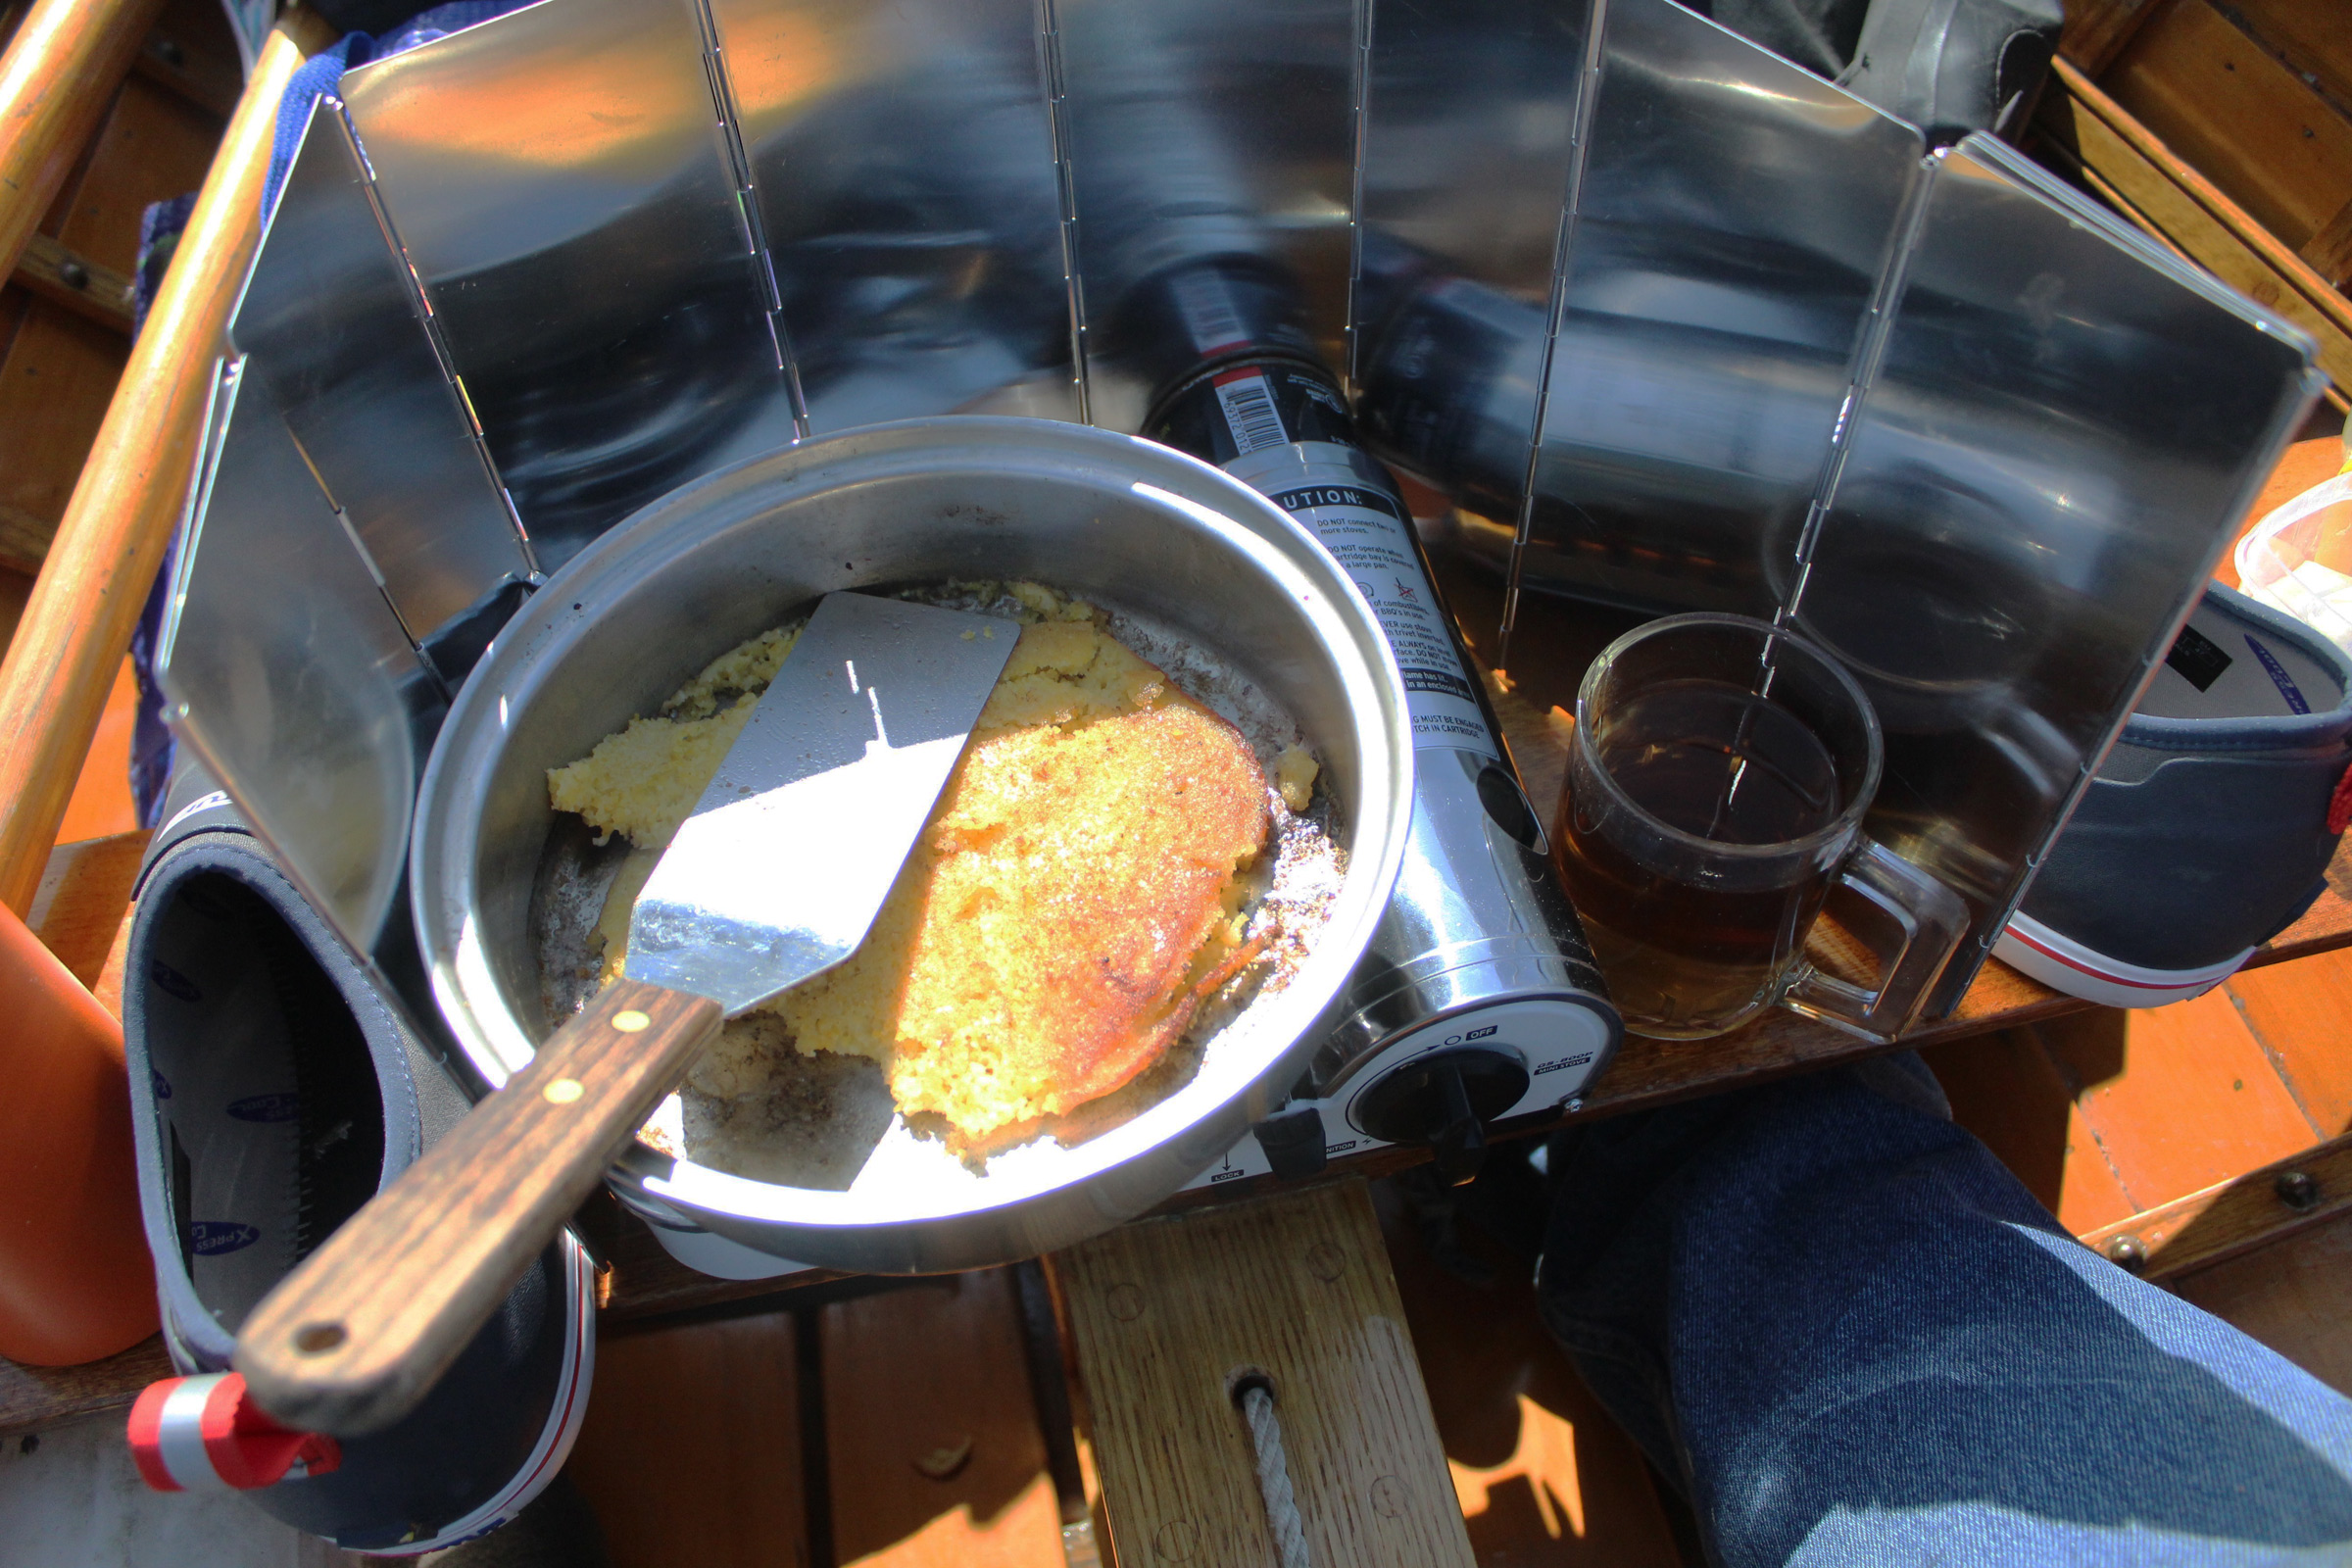
My first attempts at making johnnycakes weren’t pretty, but the ragged results sure were warming and tasty. I didn’t bring maple syrup, but a bit of butter was good enough. The tea is echinacea, my go-to drink for immune support during a flu season.
For a late-morning snack I’d brought some johnnycake batter I’d mixed up at home. Small Boats contributor Evelyn Ansel, who works for the Herreshoff Marine Museum, had mentioned johnnycakes in a recent email to me about the museum’s Code Flag Lima Project. It’s a blog that offers people some interesting resources while the museum is locked down, and includes recipes for johnnycake, a lifelong favorite of the Herreshoff brothers. During our Stay Home—Stay Healthy isolation, Rachel has been spending more time at home and using the opportunity to try new recipes and inspired me to do the same. Johnnycakes, as simple as they are, seemed like a good experiment in onboard cuisine.
There was enough wind at my anchorage to blow the hat off my head. Fortunately the current was running against the wind and brought it back to me. The cagoule, with a little help from double-chocolate cookies I’d baked the day before, kept me warm.
During the lockdown, Rachel has also been reading a lot of books, a good way to pass the time, so for my stint in the boat I brought my book about Andrea del Sarto, my favorite artist. Rachel has also been connecting to her old friends. This inspired me, as I sat anchored, to call Dale, one of my oldest and closest friends, who now lives in New York City. The city, he said, is eerily quiet and he and his circle of friends, all staying in their apartments as much as possible and following the current medical advice, are still in good health in a city hit hard by the coronavirus.
To keep the bow into the wind, I tied the painter into the middle of the anchor rode and then tied the slack tail end of the rode to the gunwale. I didn’t have to crawl forward to get to the painter when it was time to leave, a good thing because I had to leave in a hurry when the boat hit bottom.
I stayed a bit too long at anchor. I’d been reading when I heard and felt the Whitehall knock against a rock. When I looked over the side, the boat was floating in less than a foot of water and the two erratics were fully exposed and part of the beach. I double-poled with the oars to deeper water, retrieved the anchor, and set to rowing.
Out of the lee, I had the wind and current both in my favor and quickly reached the entrance to the marina. Behind the breakwater there was plenty of wind, so I sat in the stern with an oar for steering and let the wind catch the bow and pull me back to the ramp at about 2 knots.
To take advantage of the wind, I sat in the stern right up against the transom. That lifted the bow high to better catch the breeze.
For now, the launch ramp is still open and I can use it to go rowing for my exercise as long as I get a place to park the trailer. During the Stay Home order, I can’t in good conscience take my larger boats out under power or sail; they can be rowed but I can’t argue that I’d do that for exercise. The fishing season has been suspended and the fisherfolk, almost all of them powerboaters, are abiding by the closure. That has eliminated crowds of cars with boats and trailers at the parking lot, but the space has been completely filled up by beachgoers, so I suspect that the ramp and the lot may soon be closed in the best interests of us all. If that happens, I’ll anchor myself in the lee of my home’s four walls and ride out the storm calling friends, reading books, and cooking johnnycakes.
Small boats have been a part of my life from a very early age; over the years I’ve owned kayaks, canoes, and several powerboats. I had often thought of building my own small boat but never had the time or confidence to do so. I did not have much experience as a woodworker and no experience at all working with epoxy or fiberglass. In spite of these limitations, I felt a strong urge to build a small powerboat, something between 16′ and 18′, with room for four, and easy to trailer and launch on my own. A lot of our fishing is in shallow water, so I was leaning toward a flat-bottomed hull, one that would lend itself to rowing at times.
I came across Spira International’s website on a random internet search. Intrigued by some of the designs, I was happily surprised that the boats could be built using construction-grade lumber. The Carolinian Carolina Dory seemed to have the qualities I was looking for. Designer Jeff Spira notes: “The design was taken from the Grand Banks Dories after the advent of power. The built-in rocker hull common to a Grand Banks dory was replaced with a flat bottom which would allow the boat to plane under power. These boats, primarily used for fishing in the inland and near shore waters of the Carolinas, did not require a lot of horsepower to move along at a good clip.”
Bill Smeaton
The Carolinian Carolina Dory from the design firm Spira International is based on the shape of the traditional Grand Banks dory—but updated for outboard power and construction with lumberyard materials. With most of the Spira designs, the interior arrangements are left up to the builder. In the author’s boat, he sits on a starboard seat to take the helm while underway. The battery for the motor, kept under the port bench, provides some balancing weight.
I ordered the plans in electronic format. They included six easy-to-follow pages detailing framing measurements, chine-log and sheer-plank assembly, transom assembly, and bow specifications. The plans package included a bill of materials, schedule of fastenings, and an illustrated e-book about the construction of the Carolinian. A second e-book, the Illustrated Guide to Building a Spira International Ply-On-Frame Boat, has instructions covering wood selection, fastenings, scarf joints, epoxy, and fiberglass.
The only power tools I used in the construction were a circular saw and orbital sander. All of the lumber was of construction grade—marked “SPF” for spruce, pine, fir. It’s most often spruce, which keeps the boat light. For the plywood, the plans called for 1/2″ exterior construction plywood. I was considering finishing the interior bright with spar varnish, so I paid a bit extra for plywood with an A-grade face, without the football patches found with B-grade. All joints were glued and screwed as instructed in the plans, using stainless-steel screws to secure all frame joints and the attachment of plywood to the frames. All screws were countersunk and sealed with epoxy. I deviated from the plans and used Gorilla construction adhesive instead of epoxy on all frame joints and the transom frame. It made the construction much simpler because it required no mixing. I also used the adhesive on the chine-log and sheer-plank scarf joints. The Gorilla adhesive held well and none of those joints failed when bending those longitudinals. [Editor’s note: Gorilla Glue is rated as “Waterproof, Passes ANSI/HPVA Type I.” This polyurethane adhesive first came on the market in 1999, and it’s not clear yet how it holds up over time or during prolonged immersion. Marine epoxies have proven reliability for use in boats.]
Laurie Smeaton
The flat bottom gives the boat a very shallow draft, just under 5″, with two aboard.
The frames are constructed with 2x4s using a jig set up on a sheet of plywood. The transom is framed with 2x4s with a piece of 2×8 at the motor mount, and its 1/2″ plywood face is glued and screwed in place. A straight strongback supports the seven frames, the transom, and the stem—which is cut from a 2×8. Joined to these pieces are a 2×6 keelson and the 1×2 chines and the sheer clamps. When the framework is finished, 1/2″ plywood is bent around the sides and the shape traced along the sheer clamp and chines. It takes three pieces to cover a side from stem to stern; they’re joined with butt plates that are attached with glue and screws while the side panels are in place on the framework. The 1/2″ plywood bottom goes on last, its shape traced along the side panels. Rubrails of 1×3 strengthen the sheer.
Among the elements I added that were not included in the plans were an oak breasthook installed beneath the plywood foredeck and a 1×3 oak keel running the full length of the bottom. The breasthook provides additional strength to the bow for lying at anchor and loading the boat onto the trailer; the keel improves tracking for motoring at slow speeds and rowing.
The plans called for the entire boat to be sheathed in 6-oz fiberglass cloth set in epoxy with a second layer added to the bottom for boats that may be beached. I chose to use 7.5-oz cloth with layers doubled up at all of the seams.
Laurie Smeaton
Outfitting the dory for rowing is, like the interior layout, a personal choice.
As with all Spira designs, finishing the interior is a personal choice. I chose a split seat in the stern to allow for operating the boat from a standing position, which is sometimes required when running slowly through the inshore waters of Florida’s Gulf Coast where we spend time in the winter. I installed a rowing bench amidships and left the bow open for a folding deck chair which can be stowed when fishing. I used white cedar for the seats and floorboards and finished it with an oil-based semigloss spar varnish.
My boat will not be in the water for long durations, and with the exception of our time in Florida, will spend all of its time in fresh water. I painted the exterior with commercial-grade oil-based rust-inhibiting paint. Applied with a foam roller, it went on very nicely with five coats on the bottom and three coats on the sides and transom.
I completed the Carolinian project, including making 9 1/2′ oars, in 350 hours. The boat trailers very well; for its maiden voyage we towed it 1,200 miles from Ontario to Florida.
Laurie Smeaton
With a 20-hp outboard, this Carolinian dory can hit 28 mph.
The boat has performed extremely well, meeting and even exceeding many of my expectations. Powered by a 20-hp Mercury ELPT (Electric Start, Power Trim) with 20″ shaft, it comes up on plane quickly, has a top speed of 28 mph, and cruises comfortably in choppy water at 15 mph. With two occupants aboard, the boat draws less than 5″, and the power trim diminishes the draft to allow for navigation in very skinny water; the power trim also keeps the bow down when going fast. I have installed the full-sized 40-lb marine battery beneath the port stern seat, and this is balanced quite nicely with the operator on the starboard side. Under full power the hard chine causes the boat to respond very quickly to the tiller; my first time experiencing this caught me a little off guard, but it was easy to adjust to. Trimming up the bow helps to lessen this quick response, which is another benefit of a power-trim motor.
Laurie Smeaton
An outboard motor equipped with power tilt can adjust the boat’s trim. Raising the bow smooths the dory’s response to turns.
I added oarlocks because I thought they were a must for a dory. The Carolinian tracks well while being rowed, and while I row mostly for the pleasure of it, the boat has a satisfying speed under oars.
The hull is stable. I can stand on the gunwale and not have any sensation that the boat is about to tip. My wife and I have moved to the same side of the boat to land fish without feeling the stability has been compromised.
I especially enjoy the Carolinian at 15 mph, listening to the sounds of waves running along the wooden hull of this beautiful boat. I have named the boat the JACQUES-YVES after my childhood hero, the marine conservationist Jacques Yves Cousteau. It was fitting that on her maiden voyage, two dolphins swam with us for at least a quarter mile. JACQUES-YVES promises to provide many hours of enjoyment to come.
Bill Smeaton is retired and living in the village of Beachville in southwestern Ontario. He started his career as a commercial diver, followed by a 32-year career with a large electrical transmission and distribution utility. He and his wife Laurie have two sons and four grandsons. They are avid fly fishers and enjoy spending many hours on lakes and streams throughout Canada and the United States.
Carolinian Carolina Dory Particulars
LOA/17′ 7.5″
Beam/6′ 6.8″
Draft/5″
Hull weight/650 lbs
Maximum displacement/2,500 lbs
Maximum outboard, 20″, remote/75 hp
Maximum outboard, 15″, tiller/30 hp
Update: Jeff Spira passed away unexpectedly in the spring of 2022. His website is no longer operating and it is presumed that his boat plans are no longer available.
Is there a boat you’d like to know more about? Have you built one that you think other Small Boats Magazine readers would enjoy? Please email us!
My first encounter with the Adirondack Guideboat Company (AGB) was at an art fair during a summer visit to Vermont. Coming from the Midwest, I’d never seen or heard of a guideboat; their cedar 15-footer was the most beautiful boat I’d ever seen. My wife and I bought one of AGB’s navy-blue Kelvar guideboats as a “retirement present” and for 12 years I rowed it on lakes and streams and rivers throughout the Indiana countryside.
We moved to Vermont, and as time passed and the AGB catalogs kept appearing, I was drawn to the company’s newest boat in their line of rowing craft, the Vermont Dory, a 14′ flat-bottomed double-ender. One day, giving in to longing rather than need, I drove to AGB’s North Ferrisburgh shop to check it out. In their lobby sat a magnificent Vermont Dory, with spruce-green sides, cherry gunwales and decks, woven rush seats, and furniture-quality 7′ cherry oars with wonderful grain-swirls in the blade ends. I bought it on the spot and rowed it that day. When I pole-pushed off from the shore, the Vermont Dory softly drifted into a lengthy glide while I slid the brass oar pins into the oarlocks. Then, with the first reach-and-pull on the oars, the Vermont Dory went out into the river quickly, quietly, effortlessly, and straight. I blissfully made a nearly two-hour maiden voyage.
Photographs courtesy of Adirondacks Guideboats
The Vermont Dory is a 14′ double-ender based on Adirondack guideboats dating to the 1800s. The bottom of the hull has a flat to keep it upright when beached. The wide, low chines contribute to the boat’s reassuring stability.
The Vermont Dory was first developed by AGB in 2004 to build upon the abilities of the original guideboats that had been in use in the Northeast since the 1800s. As the “pickup trucks of the Adirondacks,” they were used for hunting, fishing, and hauling in areas where there were no roads. They were light enough to drag or portage overland, stable on lakes subject to heavy winds and waves, agile in rivers and streams, and capable of carrying two people and a week’s worth of gear. The Vermont Dory was recently modified with a wider beam (44″) and a broader flat bottom (30″) to be more stable, and to have more carrying capacity—up to 700 lbs.
The seat backs are hinged and can fold forward or back. Leather straps keep them in a comfortable position when in use.
Each boat built at AGB is a one-off undertaking, hand-crafted by brothers Ian and Justin Martin, who together have over 35 years in the boatbuilding trade. The Kevlar hulls are reinforced with select cherry gunwales, with ends capped by a cherry deck. At each end is a flotation compartment, so the boats won’t sink if swamped. The frames for the seats are shaped from cherry, and the backs are made of a pre-woven material simulating old cane seats. The hull bottom and ends are reinforced with functional heavy-duty abrasion-resistant Kevlar skid plates; I know from experience that sand, gravel, or oyster bars won’t cut it.
Although there is just one pair of oars shown here, two foot braces are secured to the floorboards for tandem rowing.
The oarlocks are the type originally used on Adirondack guideboats, with pins through the loom of the oar. The pins hold the blades vertically, preventing feathering, and keep the oars secure if the rower needs to let goof the handles quickly. There are three rowing stations: one in the center for a single rower and one at either end for rowing tandem or with a single passenger. (The rower can sit at either end of the Vermont Dory, with the passenger at the opposite end, and the rower’s end becomes the bow.) With the Vermont Dory’s high carrying capacity, a person can row from the center station with passengers in each end. Passengers are accommodated in cherry seats that can be moved forward or aft, for comfort, trim, or both. The seats are comfortable for long-distance rowing, or just sitting and having lunch on the water. All of the seats have backrests supported by leather straps with brass buckles so seats can be adjusted to a comfortable angle or lowered out of the way for a full range of motion while rowing or fishing. Adjustable foot braces lock into holes in the two floorboards and the slot between them. A sliding seat is also available. The seats are set low in the boat and provide a feeling of being close to the water while adding to the hull’s stability in heavy weather.
Nicola Visuals
The pinned oarlocks hold the oars with the blades fixed in a vertical orientation, the typical arrangement for guideboats.
Initially I was worried that the wider beam of the Vermont Dory, compared to the classic guideboat, would prevent me from easily loading it into my SUV, transporting it, and smartly launching it; it was important to me to be able to do this by myself, so I could go rowing without help. The put-in and take-out times turned out to be just as good as with the classic guideboat: around 3 minutes. I carry the Vermont Dory in the back of my SUV, which has a truck-bed extension that slides into the trailer-hitch receiver. AGB sells a small trailer, as well. The Vermont Dory could be cartopped with the appropriate roof-rack by someone strong to lift the boat alone—or by someone with a helper. Wooden handles on either end facilitate the loading of the boat into the car. I usually drag the Vermont Dory to the water from the car. For portages, I bought a collapsible aluminum dolly.
For carrying a single passenger, the rower takes a seat in one end and the passenger sits in the other. It doesn’t matter which end, the dory can accommodate this arrangement going either direction.
I noticed immediately that the flatter bottom and wider beam of the Vermont Dory boat provided better stability for my entry and exits, a benefit for 78-year-old knees. The Vermont Dory is meant for fly-fishing, among other things, and I’ve heard that it is stable enough on the water so a person can stand and cast; but I’m not steady enough to give that a try…yet. I’m content pulling in a 9-lb bass every so often while I’m seated!
With seating for three, the Vermont Dory is well-suited to a young family.
As a camp-cruiser, fishing boat, or open-water recreational rowboat, the Vermont Dory is about performance: the rhythmic dip of the oars in the lake, the shush of the water passing the sides, and the satisfying feeling as the blades catch the water at just the right depth as the pull and glide begins.
The Vermont Dory cuts cleanly through curling white-topped waves without a hitch and rides up and over the big ones. The harder I rowed, the faster it goes, limited only by the power I can muster. But it’s so light that even at speed it will still stop, pronto, when you back-push the oars. The flat bottom makes it easy to spin the boat around by pulling on one oar and pushing with the other. Rowing in a crosswind took some getting used to, but I could soon adjust the balance of the pull on the oars to keep on course. It was much, much easier than managing a canoe. Rowing, surfing, and gliding downwind with the waves was the greatest fun, and the boat stayed well under control. When the wind blows and many canoes and kayaks stay beached, out I go, for the pure fun of it.
Nicola Visuals
With its 700-lb capacity, the Vermont Dory can carry plenty of gear for wilderness adventures.
I’ve taken my Vermont Dory, BARBARA II, into the backwaters of the Indian River Lagoon in Florida, up through the tall weeds of Spruce Creek, along small boat trails in Canaveral National Seashore’s mangrove cuts, and on narrow runs on Snake Creek off the Saint John’s River. It draws only about 2″, making shallows and tides a non-issue. I use a long double-bladed kayak paddle as a backup for moving forward through tight places and brush, or when birdwatching. I also carry a 6′ push-pole I made, which is nice for launching and for navigating unexpected sandbars in the creeks.
My Vermont Dory boat, like my old guideboat from AGB, is well thought-out, well equipped, and well built. It is a very family-friendly boat, and I like to take people—especially my grandchildren—along with me, to experience the joys the Vermont Dory can provide whether rowing or coming along for the ride.
If you get one, plan extra time when you come back to your launch site after a row. Someone is always waiting with: “What is that beautiful boat? I’ve never seen a boat so smooth and so fast. Is all that hardware really brass? My gosh, look at the wood on the oars. Where did you get it?” And “Gee, could I give it a try?”
Mike Schmidt lives a cloistered life in the small town of New Smyrna Beach, Florida, near the mouth of the Indian River where it opens into the Atlantic. He rows lagoons, mangrove backwaters, and streams with birds and dolphins for company. In the spring, he and his wife move to the hills of Vermont to live in an old log cabin, surrounded by forest and overlooking a small trout pond. He rows Lake Champlain, and its surrounding rivers and reservoirs and when not rowing, does sport shooting with a recurve bow and a shotgun, rides his bike, plays the guitar, works at playing golf, and, spends time with his grandkids.
Despite my best intentions, I was off to a late start, as usual. It was midafternoon—late afternoon, maybe—by the time I launched the boat and started rowing up Hanson Bay. I wasn’t sure because I hadn’t brought a watch. Given the jumble of gear I had hurriedly transferred from car to boat after launching, there were probably other things I hadn’t brought. And there were also things I had packed in such a rush that they wouldn’t be seen again until I unloaded the boat to trailer it home a in a week. But now that the boat was in the water, none of that mattered. I had finally managed to find my way to Ontario’s Lake of the Woods, twenty years after I’d first seen a chart of it.
After parking the car, I took what little cash I had on hand into the marina store in a gesture to bolster the local economy, but I didn’t see much that looked useful. I finally bought a candle-powered flying lantern made of tissue paper—a red one, of course: a red lantern is the traditional award for a race’s last finisher, which suited my intentions for a languid cruise quite nicely. I handed over my last few Loonie coins, collected my change, and headed back to the boat.
“SOAR TO NEW HEIGHTS!” the lantern packaging read—and, this being Canada, “S’ENVOLENT VERS DE NOUVEAUX SOMMETS!” The picture on the label showed a trio of glowing red tissue-paper spheres floating through a starry night above a skyline of spruces and pines. Airborne candles in the north woods? Last summer, a three-day stopover in Georgian Bay’s Churchill Islands had given me a front-row seat to a major forest fire. This year I’d be able to start my own.
“YOU WON’T BELIEVE YOUR EYES!” the label continued, “VOUS N’EN CROIREZ PAS VOS YEUX!” Maybe so, maybe not. I pulled the flimsy lantern out of its packaging and chucked it in the back seat of the car, then slid my Lake of the Woods chart into the now-empty plastic bag and pressed the seal closed again. Look at that, I thought. VOILÀ! A waterproof chart case.
Photographs by the author except as noted
My 18’ Kurylko-designed Alaska was nearly ready for my week-long exploration of Ontario’s Lake of the Woods, but I’ve learned to not cast off until everything is neatly stowed. Proper trim for solo sailing demands that heavy gear, along with 100 lbs of ballast in four 25-lb bags of steel shot, is loaded forward, at the foot of the mast. The small backpack and dry bag on the dock will be kept at hand under the Alaska’s small aft deck, protected from spray and rain, and within easy reach of the helm.
The boat was waiting at the dock, everything loaded and lashed down. Dry bags stuffed with books, clothes, food, and camping gear. Water jugs. Anchor and bucket, chain and line. Rudder secured on the pintles, tiller bolted in place. Mast stepped. Yard and sail bundled along the port gunwale, ready to be hoisted. Downhaul rigged. Foam cushions for cockpit lounging. There didn’t seem to be any excuses left. I uncleated the docklines, stepped aboard, and shoved off.
I rowed easily up the bay, a mile-long finger of water so narrow that raising the sail would have been a waste of time. Even as heavily laden as the boat was, I didn’t feel the weight once we were moving; a Whitehall-type hull carries a load gracefully. Before long I had reached the open waters of Sabaskong Bay to find a light wind from the southeast and a broad scattering of thickly wooded islands in every direction. I brought the bow into the wind and raised the sail.
There wasn’t much of a breeze, but it was enough to keep me moving. Barely. At my current light-air, red-lantern pace, the lake seemed enormous—no, it was enormous. On the 1:150,000 Lake of the Woods chart tucked under a strap on the rowing thwart, Sabaskong Bay alone fit comfortably under the palm of my hand, ten miles crammed into four inches: four hours of sailing, maybe five. But the world here was to be understood not with a glance at a chart, but only moment by moment, island by island, mile after slow mile. That’s what I had come for.
My plan was to head northeast across Sabaskong Bay and into Turtle Lake, a connecting bay with an entrance channel so narrow that its opposing shores merged into a single line on the chart. Once through, another mile of sailing would bring me to the northern end of Turtle Lake, where I hoped to camp. Here the chart showed a strip of land perhaps 25 yards wide separating Turtle Lake from Whitefish Bay to the north—a dead end. Or was it?
A thick black line labeled “Canal” connected Turtle Lake to Whitefish Bay, at least on paper. But I knew the canal had been filled in years ago, and I’d heard that it had later been replaced with a hand-operated marine railway capable of hauling small boats over the gap with a cart and winch. But reports about the current state of affairs were inconclusive, even contradictory. The railway would soon be removed by the Ministry of Natural Resources… it had already been removed… it was still in place but no longer functional, as the cart apparently had run off the end of the rails and sunk into the lake, leaving only an empty set of rails to bridge the gap. Who knew what to believe?
If I could get my boat across the portage at Turtle Lake, I would be able to circumnavigate the entire Aulneau Peninsula, a 600-square-mile land mass that filled the center of Lake of the Woods like a small continent, its convoluted shoreline offering a muddle of channels and islands and back bays that were themselves filled with even smaller islands, a confusion of mazes within mazes. Circling the Aulneau would give me 100 miles of sail-and-oar cruising. But I wasn’t keen to manhandle 600 lbs of boat and gear over who knows what kind of terrain to begin.
When I had asked about the current state of the railway back in Hanson Bay, no one had been able to tell me anything. Local boaters seemed surprised I had even heard of it. After I failed to find anyone who had actually used it themselves, I gave up. The railway would either be there or it wouldn’t. Uncertainty is the essence of travel; everything else is tourism.
The gearing on the mechanism of the Turtle Portage Marine Railway provides enough mechanical advantage to make its big wheel, at upper left, easy to spin, and thus to pull the boat and cart up the tracks. An automatic brake holds the cart in place whenever the foot lever, just visible at the base of the wheel, is released. It’s a simple and effective system for transporting small boats.
The sun had sunk below the horizon well before I reached Turtle Lake, but I kept rowing through the long twilight after the faint breeze had dropped away to nothing. I continued into the entrance channel, passed a couple of small islands, and crossed Turtle Lake in the full darkness of a night lit only by stars. Twenty yards from the far shore I pulled out a flashlight and managed to find the buoys marking the entrance to the canal, or railway, or dead end—it was still impossible to say which.
And then, with the flashlight’s beam, mosquitoes. They swooped down on the boat in ravenous thick-thrumming clouds—biting, biting, biting, biting—swarming my face, my eyes, my nose, my ears, my feet. I pulled on my raincoat and rain pants, rowed at full speed to the channel’s end, splashed awkwardly to shore, and began to set up the tent in the dark with a rush of slapping and swearing, not even bothering to look around for the railway. Biting, biting, biting. My arms, legs, and face were smeared with blood. Mosquitoes crawled wriggling up my sleeves, under the brim of my hat, up the legs of my rain pants. Biting, biting. The air was thick with them, their buzzing the live-wire hum of a high-voltage transformer. Biting, biting, biting. I held my hand over my mouth and nose to avoid breathing them in, and still a dozen mosquitoes fluttered in my throat at each inhalation. I unzipped the tent, threw in whatever gear I could reach, and crawled in after it. I spent the next hour killing every mosquito that had found its way in. By the time I was done, the walls were covered in streaks of blood, and the floor was strewn with heaps of crumpled bodies.
Roger Siebert
.
In the morning the mosquitoes were gone. I crawled out of the tent and looked around. A rusty set of railroad tracks rose from the dark water, up and over the narrow isthmus, and down the other side. A sign—“Welcome to the Turtle Portage Marine Facility”—stood alongside the center of the railway, with a notice nailed on top of it:
Public Notification for a Category B Project Evaluation
The Ontario Ministry of Natural Resources and Forestry intends to decommission the Turtle Portage Marine Railway System in 2019.Maintenance and operation of the current system is cost prohibitive.
The cart was submerged deep in the water at the end of the track. The dock above it hung limp and half-submerged from its rotting pilings. The railway was knee-deep in weeds. It all looked distinctly unpromising. But when I spun the wheel that wound the cable onto the drum, the cart creaked slowly up the rails. I winched it all the way up and halfway down the other side for a test run. Decommissioned or not, it appeared to be functional.
Good enough. I manhandled the boat onto the cart, tied it to the rails, and winched it over the low rise separating Turtle Lake from Whitefish Bay, where I left it tied to the dock on the far side of the portage. Then I took down the tent, carried my gear to the boat, lashed it in place again, and finally winched the cart back up to the center of the railway for whoever might need it next. The sun was still low in the sky by the time I finished, and the surface of the lake was rippling and wavering under the first faint stirrings of a west wind. I cast off, rowed a few yards out, and raised the sail. My circumnavigation of the Aulneau Peninsula was underway.
Lake of the Woods lies in the far southwestern reaches of the Canadian Shield, a fascinating geological region where glacier-scoured granite bedrock lies close to the surface. On my journey north through Whitefish Bay, I stopped at several unnamed islands to scramble up tall cliffs and domes of bare granite for a bird’s-eye view of my route.
The rest of the day was sublime, sailing a broad reach northward up Whitefish Bay past Alfred Inlet, Devil’s Bay, Atikaminike Bay, Camp Bay. I jibed and slalomed my way through chains of rocky islands that rose from the water like long-forgotten ruins, and stopped ashore for a view from one granite-slabbed summit before continuing on. A group of white pelicans bobbing on the surface eyed me suspiciously but declined to take wing as I passed. A lone cottage stood tucked away on its own tiny island above an empty dock. I saw no other boats, heard no motors.
I had my sailmaker, Stuart Hopkins of Dabbler Sails, put in an extra-deep third reef that’s not specified in the plans for the Alaska. Since the foot of a boomless sail comes under considerable strain from the sheet, Stuart installed continuous reef bands rather than individual reef points. With the third reef in, the boat performs very well off the wind—a good thing for this trip, because the wind was gusty and strong from the west all week.
Late in the morning I rounded the easternmost point of the Aulneau Peninsula, rowing through a narrow passage overrun with lily pads to emerge into a gusty southwest wind that swept across the open water in a flurry of whitecaps. I fought my way to windward into the lee of an island thick with tall pines, where I dropped the sail and considered my options. A southwest wind was perfect for this northward leg of my journey—but a southwest wind gusting to 25 or 30 miles per hour was hardly ideal. There was plenty of daylight left, though, and an almost infinite array of options for ducking into shelter if I needed to. After thinking it over, I raised the sail and continued north triple-reefed, the 85-sq-ft mainsail reduced to well under half its full size.
Reef early, reef often, I reminded myself, leaning back on the sternsheets with the tiller tucked casually under my arm. The boat was making an easy 4 or 5 knots, I guessed, and remained perfectly docile and well-mannered, surging ahead and surfing the wave crests, showing no tendency to broach. Of course, speed is a relative thing; even with the wind on the port quarter, our pace was barely faster than a brisk walk. Not that I was in any hurry to put miles behind me.
After an hour or two I set my bungee-and-line autopilot and started slicing thin discs from a sweet potato to eat raw—call that lunch. As I rounded the northern tip of Bell Island, the last slice of sweet potato in hand, a bald eagle swung down from a treetop to snatch a fish from the water not ten yards off the port bow, then lurched clumsily into the air with a startled glance as I sailed past. “VOUS N’EN CROIREZ PAS VOS YEUX!” I thought.
Island after island passed by as I kept a close eye on the chart—lacking any navigation gear more sophisticated than a chart and hand compass, I’m careful to keep track of where I am as I go. Better that than to try to puzzle out a location after you’re already lost. And there was plenty of room for getting lost, or at least temporarily displaced, on Whitefish Bay.
Heading west along the top of the Aulneau Peninsula on the third day, I had to fight strong gusty headwinds. I eventually gave up, and anchored briefly off this sandy beach for lunch before rowing to a more sheltered anchorage nearby to wait for the wind to die down. Later that evening, I sailed another 10 miles in much more pleasant conditions. I consider an open calendar and an absolute refusal to stick to a pre-set schedule to be my most effective safety measures.
By evening I had reached the western end of Long Bay, where I tied up in a sandy backwater and took my tent ashore. The Aulneau lay somewhere out of sight now, six or eight miles off my route, hidden behind a tangle of intervening islands. As I ate my supper, a beaver swam by dragging an entire birch sapling through the water. Catching sight of me on shore, he ducked beneath the surface without so much as a slap of his tail, taking the entire mess of branches with him.
Two otters approached within arm’s reach, then scampered off into the woods, as I pulled into this quiet backwater along the north side of the Aulneau. I suspected the mosquitoes would not have been quite so welcoming in such a protected bay, so I carried my gear ashore and set up my tent for the night. In Canadian-Shield terrain, a freestanding tent makes life much easier, because it’s rare to find a campsite where the ground will take tent stakes.
From Long Bay my route would take me west along the northern edge of the Aulneau for forty miles before rounding the corner and turning south again. Forty miles of headwinds—two days, I told myself, maybe more. Probably more.
The wind grew stronger as the day went on. The first reef went in before noon, the second a few minutes later. Before long I could have used the third reef again, but I knew the shorter luff of the triple-reefed sail wouldn’t have done well to windward. I bashed along for an hour or two through a haze of cold spray, easing the sheet in gusts, hoping for the wind to drop. Finally I missed a tack, then missed again, and found myself too close to shore for a third try. I hurriedly doused the sail, dropping the yard on the gunwale with a clatter, and took to the oars. With the mast still up, I was practically rowing in place against the wind. It took me ten minutes of hard rowing to move twenty yards. As soon as I could, I pulled into a sheltered bight in the lee of a tall island, dropped the anchor, and settled in to wait out the wind.
Although I guessed that French Portage Narrows wouldn’t involve an actual portage, it wasn’t until the narrow passage came into view that I knew this for certain. With the Internet always at my fingertips at home, I could have found out before my trip, but I try to avoid gathering too much information for my solo trips ahead of time. I prefer to discover things for myself as I go.
I had come eight miles, more or less, and might make a few more miles in the evening if the wind died down. I adjusted my mental schedule to account for the strength of the prevailing westerlies: five days to cross the top of the Aulneau Peninsula, then another three days back to Hanson Bay. My red-lantern award was secure.
It’s hard for a solo sailor to see what his boat looks like from the outside. When I saw this sandy beach south of French Portage Narrows, I decided to stop and have a look for myself. Not bad, I decided, not bad at all.
Pleasant days can make boring stories, but even so, I wouldn’t trade them away for more interesting times. For two more days I sailed on across the top of the Aulneau, tacking westward in mild breezes, following each sunset to its gentle conclusion in long-lingering twilight. I rowed past snapping turtles the size of manhole covers sunning themselves on slabs of rock, sailed past herons and deer and white-whiskered otters. I stopped at sandy beaches to swim under the hot sun. After lunch each day I let the boat drift in a quiet cove while I read a few pages from whichever book I had on hand. Aldo Leopold’s essay “A Man’s Leisure Time” seemed particularly serendipitous:
At first blush I am tempted to conclude that a satisfactory hobby must be in large degree useless, inefficient, laborious, or irrelevant…a defiance of the contemporary… an assertion of those permanent values which the momentary eddies of social evolution have contravened or overlooked.
Leopold would have understood what I was doing here, aboard a boat it had taken me seven years to build, perhaps stretching even his idea of “laborious” and “inefficient.” He would have known, too, why I carry oars instead of an engine, a chart and compass instead of an iPhone or chart plotter. A defiance of the contemporary—exactly so, I thought. And mile by slow mile the journey continued, past the crooked corners of the world that reveal themselves to those who have learned how not to hurry past. Light the red lantern and hoist the sail, brother. Hoist the sail.
To camp for my last night alone on Lake of the Woods, I found a perfectly protected sandy beach on at the southern end of The Tug Channel. In these conditions, the 3-lb Northill seaplane anchor I rigged to hold the boat off the beach was overkill.
On my fourth day out of Hanson Bay, I rounded the northwest corner of the Aulneau at last and turned south down its western shore. I spent the morning ghosting along in light winds, sometimes becalmed entirely but not ambitious enough to row. I passed lazily through the long passage of French Portage Narrows and on to The Tug Channel, where the wind returned at last.
During my stay with friends at their cabin near Splitrock Island at the end of my journey, we found time for a long light-air circumnavigation of their island one evening. We returned to their beach near sunset, and I anchored for the night above a sandy bottom in knee-deep water.
That night I camped ashore on a sandy beach fronted by a wall of reeds eight feet high, a perfect screen to hide my bright orange tent. After supper I took the boat out again, empty of gear, sailing just to be sailing, unburdened of all aspirations but this: to inhabit for a while the conjunction of here and now: the surging rush of the waves, the hiss of water rushing past the hull, the pull of the sheet in my hand. By the time I returned to shore, the moon had climbed well over the horizon.
Don Engen
The morning I set out on the final leg of my journey back to Hanson Bay, my friends at Splitrock Island captured this photo from the end of their dock. Despite the obvious low freeboard, the Alaska’s reserve stability will let the hull heel only so far before hardening up.
I opened a can of peaches for supper and leaned back against the trunk of a red birch at the edge of the beach to watch the night unfold. A whisper of breeze slipped through the leaves above me. A pair of barred owls called from the forest at my back, and called again. A mink scampered along the rocky shore at my feet, chasing its own shadow through the moonlight. And just off the beach the boat floated on water so dark and calm that it mirrored the stars, a pale green hull adrift in the night sky. “S’ENVOLENT VERS DE NOUVEAUX SOMMETS!” I thought.
Tom Pamperin is a freelance writer who lives in northwestern Wisconsin. He spends his summers cruising small boats throughout Wisconsin, the North Channel, and along the Texas coast. He is a frequent contributor to Small Boats Monthly and WoodenBoat.
If you have an interesting story to tell about your adventures with a small boat, please email us a brief outline and a few photos.
Some sawhorses I’ve used were built bull-strong for house construction; others were so feebly put together that they quickly became kindling. The style I like most is based on a James Krenov type used for a mortise-and-tenon exercise 30 years ago at furniture-making school. Those horses were made of 4/4 hard maple with legs like an inverted-T and upper and lower crossbars that are through-tenoned, wedged, and glued. Variations on that style have become the mainstay in my shop.
Tom DeVries
This pair of sawhorses converts from crossbeam (right) to sling (left). The lower beams’ tenons are wedged to lock them permanently in the uprights’ mortises.
I wanted knock-down sawhorses for travel and storage, so I designed a set with cross bars attached with dowels and carriage bolts. I made these of spruce 2x4s and with upper cross pieces I can remove and replace with carpet-strip slings screwed to the uprights. For displaying a pair of lapstrake canoes, I made two pairs of “show horses.” I worked out a simple, break-down design with loose-wedged tusk-tenons for the lower cross piece and a sling made of soft, polyester three-strand rope attached through holes in the uprights with fancy stopper knots. These stands readily break down to two parts and lie flat for transportation or storage.
Tom DeVries
These take-apart sawhorse slings have tenoned crosspieces that are held in their mortises by removable wedges.
On occasion, I have more than one boat needing attention, so I recently put together a new set of work horses that have both upper cross bars and canvas slings. These were made from four 8′ 2x4s of the SPF variety (my chosen boards were likely fir). With a chop saw I got out four bases 23 3⁄4″ long, two 23 3⁄4″ lower cross pieces, four 31 1⁄2″ uprights, and two 30″ upper cross bars. I picked the heaviest 2×4 for the bases and the lightest for the top cross bars, then thickness-planed the top cross bars to 1 1⁄4″ and left the other parts as is. After cutting mortises in the uprights for the lower cross piece through-tenon and cutting the notches for the top cross bar bridle joints, I mated the bases and uprights with a half lap, glued, and screwed together, with the joint off center. (A great resource for all woodworking joinery is a book titled Woodwork Joints by Charles H. Hayward. In it you will find the half-lap, dowel, tusk-tenon, through-tenon, and bridle joints used in these sawhorses.)
Having longer feet pointing toward each other makes the horses less likely to rock when a boat is slung on them. Offset bases also require a little less floor space when these horses are stored shoved together. A slight arch cut on the bottoms of the bases keeps them from getting high-centered and rocking. The lower cross piece is attached to the uprights with wedged through-tenons. Before the glue-up I dry-fit everything, including the notched top cross bar. I checked for square and avoided racking while clamping for this glue up. The slings are made of a triple layer of No. 10 canvas that I sewed to a width of 1¼″. They are 44″ long and are glued and screwed to wooden blocks that fit the upright notches.
Whether glue-fastened tight or designed for easy disassembly, these show horses and work horses cost only a few dollars and a few hours’ work, and all earn their keep.
Tom DeVries studied fine woodworking with James Krenov in the early 1990s. He and wife Tina live in central Massachusetts surrounded by white-pine and red-oak trees. Tom drives north for his white cedar planking stock and wishes his lumberyard still carried spruce 2x6s.
Editor’s notes
When I first saw Tom’s Krenov-style sawhorses, I was a bit skeptical. All of the sawhorses I’d ever used a flat plank top and four splayed legs; I didn’t think an inverted T shape could be as solid. I built a sawhorse to Tom’s specifications, modeled on a bolt-fastened take-apart he’d made, and as soon as I had it assembled, I was sold on the design. I can take the one here apart in less than a minute and put it back together in about 75 seconds.
Years ago I’d bought some molded brackets that held 2×4 legs to a 2×6 top. They were annoying to assemble and constantly got loose and wobbly. I can get rid of them now and replace them with the Krenov-style.
The half lap is easily cut on the table saw. A shop-built sled is safer and more accurate than a miter gauge. If you don’t have a sled, this is a good excuse to make one. To make the sawhorse joints as strong as possible, cut the slots in the bases for a tight fit on the sides of the uprights.
After the upright and base have been cut and dry fit, the joints is assembled with carpenter’s glue and screws.
Screws are driven into the joint from the base side because the upright’s side of the joint has an open end that poses a risk of splitting.
Cutting 1⁄2″ from all but the ends of the base creates feet at the ends that will keep the sawhorse from rocking. An alternative is to glue 1⁄2″-thick blocks on the ends of the bases.
The cutout for the bolt end starts with a 1 1⁄2″ hole; a jigsaw is then used to cut a flat for the washer.
A long hex-head bolt holds the lower crosspiece in place. A bolt with a washer allows putting a lot of pressure on the connection, making it so solid that the tenon used in the classic construction isn’t necessary. The hex head makes for quick assembly and disassembly. A carriage bolt would mean turning the nut in the cutout, a slow and awkward process. And the head of the carriage bolt would eventually crush the wood and make the connection less solid.
To assure that the hole for the bolt hits its mark in the center of the cutout, use a guide block bored on the drill press.
Another aid to a straight hole is a straight edge clamped on the centerline. Eye the drill bit parallel from above and the side.
The crossbar is notched to keep the crosspiece from sliding out of the upright’s slot. Cut the slot 2 3⁄4″ deep and the notch 3⁄4″ deep, so the top surfaces of the uprights and crosspiece will be flush. You can plane or rip the crosspiece to a thickness of 1″ to make the sawhorse lighter; if you do, cut the upright slot to match.
A screw driven through each upright keeps the crosspiece in place when you use it to lift the sawhorse.
With the bolts turned up tight, the take-apart sawhorse is quite solid.
Taken apart, the sawhorse makes a compact bundle.
A pair of plywood shelves set on the bases provide a place to hold tools or weight (sandbags here) to steady the sawhorses. To keep the shelves in place, screws driven into the bases are set close to the shelf’s edges and left about 1⁄4″ proud so the screw heads dig into the edge of the plywood when it is pivoted in place, wedged against the uprights.
A sling of 1″ tubular or flat webbing can be a permanent part of the sawhorse. I drilled 3⁄4″ holes for some 1″ tubular webbing 1 1⁄2″ below the uprights’ slots.
Simply remove the crosspiece to use the sling. The idle crosspiece can rest on the bases, with its notches engaged to keep it from sliding around.
The 1″ webbing for the sling is inserted through the top of a 3⁄4″ hole, looped around a dowel, and passed again through the hole, on the bottom.
When the webbing is drawn tight, friction and downward pressure on its tail end keeps it from slipping.
The sling will keep round- and V-bottomed boats upright.
A 2×4 or 2×6 fastened on top provides a lip for clamping.
The 2×4 is held in place with a few screws driven into the crosspiece.
You can share your tips and tricks of the trade with other Small Boats Magazine readers by sending us an email.
The front of the Odyssey PFD has pockets on pockets, D-rings, and lash tabs to carry essential gear.
The PFDs that Audrey and I have been using for the past several years were starting to look a little weather-beaten. Their faded colors, bleached by the Florida sunshine, were our sign that the fabric was probably weakening and the aging flotation foam was losing buoyancy.
In search of replacements, we found our way to Northwest River Supplies (NRS), where we both bought the Odyssey. This Type-III PFD is available in XS/M, L/XL, and XL/XXL to fit chest sizes from 30″ to 56″. Because we prefer bright, easily seen colors, we chose the all-red version; the PFD is also available in black accented with lime green.
The Odyssey PFD has 16.5 lbs of foam flotation, a pound over the USCG requirement. The PFD weighs 1.9 lbs, and the fabric is 400-denier ripstop nylon. The two shoulder straps and the four waist straps can be adjusted for a snug and secure fit; a quick-release buckle below the zipper has an adjustable strap that’s cinched to keep the PFD from riding up when the wearer is in the water.
The flotation foam is divided into seven panels, four on the front and three on the back, so the Odyssey PFD can mold comfortably around differently body shapes. The Odyssey was designed for sea-kayak touring, so the arm openings are wide and low to provide an unrestricted range of motion, which works well for sailing and rowing. The full-length foam back has the NRS “Cool Flow System,” four mesh-covered “pillows” along the spine that hold the vest away from the body to increase ventilation.
Kent Lewis
The back of the Odyssey PFD has a lash tab, usually used to secure a rescue strobe.
The large front-entry plastic zipper will not corrode, and its tab is easy to grip with wet fingers. Two large zippered storage pockets can hold small essentials and rescue items or a cell phone in a waterproof bag. The left pocket has a plastic snaphook on a tether to attach car keys or safety gear. Attached to the large pockets are two vertical clamshell pockets, which are a good size for VHF radios; dual zippers allow many options for the antenna to pass through.
All of the pockets have grommets at their bottoms to drain water. There are two plastic D rings above the pockets and two below the smaller pockets. Two small flat pockets on the chest just below each shoulder strap provide a good spot for a whistle and an LED light. There are two lash tabs on the front of the Odyssey where a knife can be clipped, and one tab on the back that’s usually used for a rescue strobe. Six retroreflective straps are placed high on the chest, shoulder, and back, and could be used as attachment loops to secure gear, though we recommend not covering them with accessory items.
The cut of the vest allows a good range of motion, and we find that the back is very comfortable for use with the seat backs on our sit-on-top kayaks. The foam back is also appreciated in our small sailboats and runabout, and the low profile of the neck helps keep it from snagging the sheet during tacks on our Sunfish. In the water, it was easy to float on my back or float vertically with my legs tucked up in the Heat Escape Lessening Position (HELP). The waist strap prevented the Odyssey from riding up around my neck, and the arm openings kept it from interfering with swimming, using either a backstroke or crawl. I was also able to board our sit-on-top kayak from the water without interference from the front pockets and foam panels. In fact, I liked the cushioning provided by the foam.
Both Audrey and I have found that the Odyssey PFD provides a snug, secure fit. It is comfortable enough to wear for extended periods so we don’t have to suffer in the name of safety.
Audrey “Skipper” Lewis is a costume designer who has extensive experience designing garments and working with fabric. Kent Lewis is a retired Marine Corps Aviator with thousands of hours wearing integrated life-preserver units and survival vests, flying combat missions, and conducting search-and-rescue operations. The fleet at their Florida Panhandle home includes lateen, lug, sprit, sloop, and gaff-rigged sailboats, a canoe, two kayaks, and a 15’ lapstrake runabout; these boats range in length from 10’ to 19’. A diamond-bottom, cross-planked catboat is in the design phase.
The GasOne Mini has a body made of plated steel and enameled steel.
I’ve used a variety of backpacking stoves for camp-cruising, and for the past 15 years I’ve happily settled on portable gas stoves that use butane cartridges. When I discovered the much more compact GS-800P Mini Camp Stove from Gas One, which uses both butane and propane, I had to have one. I liked the idea of being able to use my favorite kind of stove with the propane cylinders I seem to accumulate for soldering torches. My son, who has taken to camp-cruising, also uses propane cylinders on his galley stove and grill for cooking meals onboard.
I’ve been using two standard butane stoves for years and they’ve been very reliable. The GasOne can do the same job without taking up as much space on the boat.
The Mini Camp Stove’s steel frame is coated with white enamel, which didn’t burn or blister when I held a lighter’s flame to it. The rest of the body is plated steel. Some retailers list the stove as having stainless-steel construction, but all of the body parts were strongly magnetic. Only the four pot supports and the burner parts proved non-ferrous.
The Mini can use propane fuel when fitted with its hose and adaptor.
The butane fuel canister fits into the compartment to the right of the Mini’s stovetop and is shielded from the heat by a hinged cover. A lever on the front engages the canister to allow the flow of fuel. A dial regulates the fuel and, turned fully counterclockwise, it clicks a piezo ignitor, creating a bright blue spark at the burner to ignite the gas. To use propane, first connect the Mini’s hose to the stove and then to the canister—the hose fittings don’t have a valve, so don’t connect the canister first.
The fuel receiver is threaded to accept the hose that connects to a propane canister.
The stove has a guard surrounding the burner head to prevent a gust wind from extinguishing the flame, but to get the best out of the stove, I bought a folding windscreen to surround the stove and the cookpot. The stove is supported by rubber and plastic feet that elevate the steel body ½”, and whatever I set the stove on got only warm to the touch.
I compared the Mini with the two types of camp stoves that I’ve been using: a standard butane stove (left), and a basic propane stove.
I did trials to see how the Mini compared to my familiar stoves. With the air temperature at 46 degrees Fahrenheit and the water from the tap at 52 degrees, I used my 7″ camping saucepan, uncovered, to bring 2 cups water (500 ml) to a rolling boil. The Mini brought the water to a boil in 3:35 (minutes:seconds) when fueled by butane and 5:20 by propane. The packaging gives the stove’s output as 7,172 BTU/hour for both fuels, but it seems the butane provides more heat. My old portable butane stove, rated 9,500 BTUs, boiled water in 3:40, so the Mini is almost as effective. My son’s propane bottle-top stove, rated at 10,000 BTUs, brought the water to a boil in 3:10; even judging by the sound, it delivers fuel at a higher rate than the Mini. The 6″ burner on my 220-volt range in my home kitchen boiled the 2 cups in 3:45 from a cold start, and in 2:30 when started on a hot burner.
My water-boiling trials demonstrated that the GasOne mini was just as effective as its full-sized butane-burning equivalent.
Butane canisters cool as they’re used, a function of expanding gas, and the pressure drops, so the Mini didn’t burn as hot with continuous use. Switching to a warmer canister brings the pressure back up. (Some of GasOne’s higher-end stoves have a thermal conductive plate to transfer heat from the burner to the canister to keep it warm and maintain pressure.)
A folding windscreen is a useful addition to the stove. The ring surrounding the burner head protects the flame, but a screen surrounding the stove keeps the heat around the cook pot.
Folded, the screen makes a compact bundle. It is an option from GasOne and sold by many other camping-equipment suppliers.
The Mini will simmer and cook at low heats beautifully. The burner has an inner and an outer ring of ports to create the flame, so the heat, even on a thin pan, is evenly distributed to the food being cooked. Just keep an eye on the flame when you dial it down. The flame will begin to flutter with the dial at its midpoint and extinguish itself at the one-third point, and yet fuel will continue to flow.
With the flame turned down, it’s easy to cook without scorching, as this eggy batch of French toast shows.
The Mini is bound to get more use than my other camp stoves. It’ll fit in with my galley box with room to spare and easily fit in a small daypack for picnicking.
Christopher Cunningham is the editor of Small Boats Magazine.
The GS-800P Mini Camp Stove from Gas One is manufactured by Gas One and sells for $38.99. The GS-800, without the propane adapter, sells for $26.99. The stoves are also available from outdoor and hardware stores and online retailers.
Is there a product that might be useful for boatbuilding, cruising, or shore-side camping that you’d like us to review? Please email your suggestions.
Martin Casey’s Caledonia yawl, AUDREY/JAMES, carries the names of his parents, assuring they will be remembered by future generations of the Casey family.
James Casey was a remarkable man. He was born in Newport, Rhode Island, in 1924, grew up in the Great Depression, attended Rhode Island School of Design, and, with the arrival of World War II, enlisted in the U.S. Army and served in Italy. In January 1942, then Private Casey saw action in the Battle of Rapido River in an ill-fated effort to secure Rome. American losses were 2,100 troops either wounded, killed, or captured. In January 1944, in another attempt by American forces to reach Rome, Casey took part in the Battle of Monte Cassino, a victory for Allied forces that came at the cost of 55,000 casualties; Casey was among them, having been hit in his right foot by German rifle and machine-gun fire. Four months later, in the Battle of Anzio, he took a German machine-gun round in his left leg. By the end of the war in Europe, Casey had been raised to the rank of Sergeant, and for his service in Company F, 143rd Infantry Regiment, 36th Infantry Division, he was awarded six Purple Hearts and a Bronze Star for bravery. Following the war, he spent two peaceful years as a Trappist monk.
James Casey married Audrey Barton in the 1950s, and the couple raised a family of 10 children. He worked as a calligrapher and stone carver at the John Stevens Shop, a company in Newport that has been doing inscriptions in stone since 1705. Some of Casey’s carving is on the John F. Kennedy Memorial at Arlington Cemetery, at Rockefeller Center in New York and the Prudential Center in Boston.
In addition to being a master craftsman and artisan, he had a lifelong interest in boats. One of Casey’s four sons, Martin, took to boats too. He had been, by his own account, “a rebellious, tormenting teenager who challenged his father frequently,” an uncomfortable match for a father who was a strict disciplinarian. Even as he grew into adulthood, Martin found it difficult to connect with his father, but when he became a father himself he was able to leave the discomforts of the past behind and develop a greater appreciation for his father and compassion for the unseen scars he bore from his experience during the war.
Martin had taken to building wooden surfboards while his father was in his 80s and thought building another board would be a way to connect with him through their common interest in boats and woodworking. James replied to the offer with “No, I don’t know anything about it,” an answer Martin was prepared for. He made other overtures for experiences they could share, without success, until he suggested visiting Newport’s International Yacht Restoration School, where the 131’ schooner-yacht CORONET, built in 1885, was being restored. The day went well, and provided an opening between father and son. A few weeks later, the elder Casey accepted Martin’s offer to join in building a new surfboard. While his spirit was willing, his health was failing and he was hospitalized. He passed away in June 2017 at the age of 92.
This 16′ Old Town double-ended row boat was James Casey’s second love. He bought it in 1958 when his wife, Audrey, was delivering baby No. 5. The family affectionately called it “the green boat,” but its true name was KOWLOON GIRL in honor of Audrey, who was born in Kowloon. Note the oarlocks set on a small side deck, which is actually the top of a long sponson, an addition Old Town provided to add stability and safety. Standing by is Martin’s father, and aboard are his grandfather and two of his brothers. Martin is the boy in the stern looking down into the boat.
The Old Town double-ender KOWLOON GIRL carries four generations of Caseys. James steers with a paddle from the stern, Martin rows stroke, his son rows bow, and his grandson is perched in the bow.
Martin had been considering building a wooden boat for camp-cruising in his retirement and settled on Iain Oughtred’s Caledonia Yawl, a boat that appealed to him as both beautiful and practical, and a design of which his father, who loved small double-ended oar-and-sail boats, would have appreciated. James had purchased an Old Town double-ended rowing boat in 1958 and in the ’80s had built a cold-molded Wee Lassie canoe with Martin’s younger brother.
The weather was looking reasonable in mid-March 2019 when Martin set up the building jig for the Caledonia Yawl. Snow was still a possibility, but the winter had been mild, a trend he hoped would continue. Two 20’ composite construction joists from a local lumber yard formed a building frame that would remain true for the duration of the build.
In March 2018, eight months after Martin’s father died, Audrey became ill and was hospitalized for what was expected to be a short stay. During that time, Martin ordered the Caledonia plans and got his workshop ready for the build. He started with the small parts: thwarts, laminated stems, spars, centerboard and trunk. Audrey was pleased to know her son was happily occupied with a complex and engaging project, but sadly, she didn’t live to see the boat finished. Before the month’s end, she passed away, as had her husband, at the age of 92.
Martin chose to build Iain Oughtred’s second version of the Caledonia yawl, which had seven strakes instead of the original design’s four. While there are more planks to shape, they more easily take the curves and twists demanded of them.
Martin continued with the Caledonia Yawl, and as the work progressed, he gathered resources on boatbuilding to help him through his first experience with lapstrake construction. He discovered that Oughtred had written Clinker Plywood Boatbuilding Manual and was poised to buy a copy.
It’s not a flagpole, but the Caledonia’s main mast, equipped with a tabernacle. Stepping the 18’ mast in an unsteady boat seemed a little daunting to Martin, and in May 2018, while he was recovering from back surgery, he decided to mount the mast on a tabernacle.
The finished tabernacle, installed in the boat, has worked well and saves Martin from straining his back.
While settling their parents’ estate, Martin and his brothers cleared out their father’s shop, sorting through tools and materials accumulated over six decades for working on his boat, carving wood and stone, doing calligraphy, making paper, and casting concrete. Among the books James had collected, Martin found a copy of Clinker Plywood Boatbuilding Manual. It was confirmation that his father would have approved of the Caledonia Yawl.
The black walnut gracing the tiller came from Martin’s father’s workshop.
Martin added his father’s tools—planes, chisels, clamps, files, rasps, and handsaws—to his own in his small shop. He also inherited several sharpening stones and leather strops; his father always kept a keen edge on all of his edge tools. Whenever Martin used those tools he thought of his father and often felt he was fulfilling his father’s dream. Bits of wood from James’s shop were incorporated into the yawl: cherry for the mizzen thwart, black walnut for the tiller, and a salvaged maststep from the Old Town for the Caledonia’s mizzen maststep.
If AUDREY/JAMES follows the example set by KOWLOON GIRL, she’ll be around for a long time and be enjoyed by Martin’s large extended family for at least half a century.
On August 1, 2019, with most of his siblings and his two grandsons present, Martin launched his Caledonia Yawl and christened it AUDREY/JAMES in honor of his parents. She sails the waters of Newport as a link between generations.
Do you have a boat with an interesting story? Please email us. We’d like to hear about it and share it with other Small Boats Magazine readers.
On January 23, I bought a box of 30 N-95 disposable dust masks at Home Depot for $21.47. They’ve been standard fare in my shop for decades, but a little more than a month later, with the spread of the coronavirus, a box of 20 was selling for $132.99 on Amazon, and wouldn’t be available for two weeks. I’ve been watching the coronavirus spread like an incoming tide, and it is already lapping at my doorstep. On February 29, a man in a care facility 8 miles from my home in Seattle died, the first person in the U.S. to succumb to COVID-19, the illness linked to the virus. The governor of Washington has declared a state of emergency.
I was once on a morning Seattle TV program along with an Iditarod-winning dogsled musher, the late Susan Butcher, and an aerial-acrobatics pilot, Patty Wagstaff, if I recall correctly. I was there because I’d covered a lot of miles in a small boat. We were all introduced as risk-takers, but all three of us had to explain that we were doing what we loved, had logged a lot of hours, and took great pains to avoid risk.
Risk takes on a different look when it’s not something you take on willingly but something imposed upon you. Dealing with what appears to be a pandemic seems scary to me, but health professionals all around the world are approaching it head on. They’ve learned to accept working with people carrying viruses and infections and can rely on their training to minimize risks to their own health to levels they can accept. For me, the threat of COVID-19, something unfamiliar and imposed, makes me anxious.
I read a lot of books before I built my first boat, took my first cruise, did my first solo hike, and climbed my first mountain. The more knowledge I accumulated, the more I knew the risks and how to avoid them. Heeding the advice of health professionals now, I trust, will do the same.
My first instinct was to stock up on supplies and stay home, but I realized I’d be just as safe out on the water and working in my shop where I have made peace with the inherent hazards to life and limb. So I’ll continue with my shop projects and my outings on the water. I know how to keep my fingers away from a spinning tablesaw blade and how to scan the horizon for any subtle signs of a change in the wind and the water. I can adapt those kinds of skills now and put them to good use now as I navigate a changing world.
Afterword, Tuesday, March 24
On Sunday, I called up my local hospital and offered to donate N-95 masks and safety glasses from my basement shop. They’ve set up a system for collecting much needed Personal Protective Equipment (PPE) and I’m waiting for instructions on delivering what I can to the hospital. Your local healthcare providers may also welcome donations of PPE that we boatbuilders and woodworkers can spare. Please call them if you can help.
"Is that a PocketShip?” Even though it was the first time I had ever launched my PocketShip, it was not the first time a stranger had approached me to ask about it. This stranger turned out to be very familiar with the design, having followed it since Chesapeake Light Craft introduced it. What would prove to be the usual suite of questions followed: Did I build it myself? Plans or kit? How long did it take? How does it sail? He expressed his enthusiasm for the PocketShip and his dream to build one.
Jon Lee
The PocketShip was designed to be towed by a modest car with a four-cylinder engine. The full-sized sedan here is more than up to the task.
John Harris, the proprietor of and chief designer for Chesapeake Light Craft, designed the PocketShip as his personal boat. “I’d owned a production fiberglass pocket cruiser, which sailed well but was hellish uncomfortable,” he explained. “I had a hunch that I could design a sailboat with a 15′ length-on-deck that not only sailed extremely well, but was ergonomic for someone of my 6′ 1″ height.” The boat had to be light enough to tow to Florida behind his four-cylinder car, fast and seaworthy enough to sail overnight to the Bahamas, and commodious enough for a week’s cruising once there. He drew a centerboard gaff sloop with a doughty profile. The waterline length is 13′ 8″, and the boat weighs around 1,200 lbs when rigged, ballasted, and loaded with provisions. John packed a lot of boat into a small, well-balanced package.
Jon Lee
The boom gallows catches the boom and gaff when the main is lowered.
The PocketShip struck a chord with amateur boatbuilders, and a flurry of interest from potential customers led John to add the design to the CLC offerings. The promise of big-boat cruising adventure in a petite, built-it-yourself, trailerable package proved irresistible to many, and at last update more than 300 kits and plans have shipped to locations around the world.
The PocketShip is a do-it-yourself project with a scope and complexity that a handy amateur can readily contemplate. It is available as a kit with CNC-cut plywood parts, epoxy, epoxy thickeners, fiberglass, drawings, and manual. Hardware, timber, and sails are available as optional packages. I built from CLC’s plans, huge rolls of paper with full-sized patterns for nearly all parts. The 280-page manual is a masterpiece, with minutely detailed instructions, readable prose, and clear photographs and illustrations. While PocketShip is best for the intermediate-level amateur, the quality of the manual has enabled complete novices to build fine PocketShips.
I built my PocketShip in a one-car garage over the course of two years. When I decided to order plans instead of a kit, I felt that I had to cut out all the wood myself in order to claim I had built my own boat. If I were to do it over again, I would build from a kit; it would get the build started faster, produce more precise work, and still require enough labor to provide a legitimate claim to a self-built boat.
Jon Lee
The 2.5 hp four-stroke outboard is the maximum recommended auxiliary power. A larger outboard would add an unnecessary burden to the transom.
The PocketShip is constructed using the stitch-and-glue plywood method. Having built two kayaks before the PocketShip, the basic techniques were familiar to me, and the hull went together much like a giant, complex kayak. I picked up some new skills such as scarfing plywood (the kit uses CNC-cut puzzle joints), melting lead for the keel, and rigging the sheets, halyards, and stays. The manual always kept things from getting intimidating; it breaks down the building into a series of small, achievable tasks, most of which can be completed in weeknight sessions. Some things, such as the big fiberglass jobs, are best reserved for weekends.
courtesy of Chesapeake Light Craft
For the performance-minded sailor, the optional spinnaker adds power for sailing off the wind.
Construction begins with the keel assembly, which includes the centerboard trunk and has two compartments, one at each end of the trunk, that are filled with 108 lbs of lead, melted and poured in. (Another 150 to 200 lbs of ballast—bags of lead-shot—will later get set in the bilges of the completed boat.) The finished keel assembly is dropped into a building cradle made of two female molds. The hull bottom and sides are then dropped in and wired together with temporary 18-gauge-steel wire stitches. Next, an array of plywood bulkheads and floors are stitched in place. The joints are then permanently bonded with big epoxy fillets and the entire interior is sheathed in fiberglass. The decks and topsides are also stitched, glued, and ’glassed. There are a few fiddly bits of carpentry along the way, where timber needs to be cut at a complex angle, but these tasks tend to be welcome breaks from the epoxy work.
The mast is a tapered hollow box, built up from four 16′ spruce staves. The bowsprit, boom, and gaff are all solid timber with rectangular sections, milled down to attractive tapers. While traditional in appearance, the rig is fairly modern in the details, including a roller-furling jib and sail track for the main. Rigging requires a wide variety of blocks, cleats, and eyestraps, and careful routing of the running rigging.
Getting the PocketShip to the launch site and out sailing is a breeze. For easy trailering, the mast is stepped in a tabernacle and folds down onto the boom gallows. On reaching the launching ramp, you start by casting off the tie down that secures the mast to the boom gallows. The bobstay also must be shackled to the bow eye, unless the geometry of your trailer permits it to remain attached. Standing in the cockpit, you thrust the mast upward toward vertical and haul in on the jib halyard, which does double duty as a forestay, pivoting the mast into place. Once the boat is in the water, drop the centerboard and slide the mainsail onto its track. When this process is well-rehearsed, it is possible to be underway within 10 minutes of arriving at the ramp.
The boat is designed with singlehanding in mind, with all lines, including the jib’s roller-furler line, led to the cockpit. For a relatively heavy displacement boat with a 13′ 8″ waterline and 6′ 3″ beam, the PocketShip has surprisingly inspired sailing qualities. John Harris likes his PocketShip to sail fast, and worked hard to get as much speed as he could out of this little vessel. The hull lines are fairly refined and carry a good dose of racing dinghy in them. The boat has a single hard chine, a V bottom, and a surprisingly fine entrance. If it were not for the 268-lbs of ballast required to keep her on her feet, it could probably be induced to plane quite readily. The ample sail area adds to performance; with a 109-sq-ft main and a 39-sq-ft jib, the boat has no shortage of power.
courtesy of Chesapeake Light Craft
The prudent reefing and PocketShip’s ballast, over 250 lbs divided between the keel and bilge, lets the skipper sail while safely seated in the cockpit.
For a gaff-rigged boat, the PocketShip is close-winded, able to sail to within right around 50 degrees of the wind. A beam reach is where it really shines. The boat almost effortlessly plunges forth at a sprightly 5-ish knots and settles into a groove that yields delightful sailing. At speed, the PocketShip will plow jauntily through chop, and is stable and confident in rough conditions. Full sail can be carried up until the wind hits 10 to 12 knots; above that, a single reef will calm the boat down substantially without sacrificing any speed.
With its large sail area, a PocketShip will propel itself in even the lightest of airs. If currents are a fact of life in your home waters, however, a 2- to 2.5-hp outboard motor, hung on a mount fixed to the transom, is essential. The boat is easily driven and zips along under power. The manual notes that a pair of oars and a yuloh are auxiliary power options, good for a couple of knots, and though accommodations for them are not included, they would be easy enough for the builder to add.
Jon Lee
The cockpit foot well is kept to a minimal but functional size to make more room in the cabin for storage and sleeping.
The cockpit is roomy enough to accommodate three or four adults. It is an expansive and comfortable space, almost as well suited to lounging about as a living-room couch. The narrow, shallow footwell is a compromise with the sleeping accommodations below it, but the PocketShip’s cockpit is perfectly functional.
Jon Lee
The cabin provides sleeping quarters with the extensions, to left, under the cockpit seats.
The cabin has an open layout; you sit or sleep directly on the floorboards, with legs extended aft under the cockpit. At the forward end of the cabin there is a large storage area, and additional space aft, below the cockpit decks. There are comfortable sleeping accommodations for two full-grown adults. Though the cabin is small, it is possible to spend time below without discomfort, as I discovered during one very rainy weekend.
Jon Lee
The PocketShip performs well in light air, and when the winds fail, it is light enough to be propelled by sculling or rowing if the builder choses to rig the boat for oars.
There is a degree of celebrity that comes with sailing a PocketShip. A PocketShip owner gets used to being photographed out on the water, complimented at the dock, and peppered with questions at boat ramps. On a recent trip to Friday Harbor in Washington’s San Juan Islands, my PocketShip looked Lilliputian moored next to the long rows of enormous, glittering, white production cruisers. Yet, the tourists walking the docks were inevitably drawn to my little red boat. I had to abandon my plan to lie about and read, and instead respond to the stream of questions and compliments that the boat drew. While the monster yachts that surrounded me had galleys, settees, even televisions, one little boy stood wide-eyed, marveling that such a little boat could have windows!
The PocketShip has indeed gained a following. With stout and shippy good looks, delightful sailing performance, and micro-cruising comforts all rolled into one built-it-yourself package, it is a following that is well-earned.
Jon Lee of Everett, Washington, is a full-time engineer, sometime amateur boat builder, not-enough-time sailor. He built his first boat, a self-designed rowboat, during grad school. In the years since, more boats followed, while Jon swore he could quit anytime he wants. His greatest claim to fame is successfully leading his boatbuilding team to two successive last-place finishes in the Edensaw Boatbuilding Challenge at the Wooden Boat Festival, and loving it.
The Weekender is a plywood gaff-sloop pocket yacht designed by Peter Stevenson and first presented to the public in a two-page article in the March 1981 issue of Popular Science magazine. In the decades that have followed, it has been a very popular design. I was drawn to its classic look and simple construction. Eager to learn how to sail—and to find out if my wife would enjoy sailing too—I was excited about the journey of the build and encouraged by the many helpful examples of other builders who are linked to the Stevenson website.
SBM photographs
The Weekender draws 3′ with the rudder deployed; with its blade retracted, the hull draws 1′.
I bought the set of plans and the two companion DVDs. The combination of the 44 printed pages and three-and-a-half hours of video were helpful, entertaining, and, above all, encouraging. The plans are well illustrated with some photos and many nice drawings. There are no full-sized patterns, so each part is drawn right onto the materials. Step-by-step instructions keep the process going in the correct order. As a shipbuilder, I found the instructions clear and straightforward. My granddaughter, who was three years old when we started and nearly seven when we finished, was as eager to build the boat as I was, and we watched the video instructions several times together. Even at her young age, she could recognize the steps we had completed and the ones we had yet to accomplish, a good indication of how easy the plans were to follow. For me, the video clarified the few places in the plans that I was having difficulty understanding. Mike Stevenson, Peter’s son, who took over the business, has assured me that the most recent revision has eliminated some of those sticking points.
The Weekender has a very unusual construction: it is built right-side up with the stem and keel serving as the strongback. The deep keel and its integral stem are made of three laminates of 4/4 pine, fir, or mahogany. The keel, 10″ at its deepest, is rigid enough to support the build. I built a cradle to hold it upright throughout the build. Plywood is joined with butt plates to get the necessary length and width for the bottom panel; the bottom is attached to keel with screws and epoxy. The deck is added and secured at the stem and then temporarily propped up until the transom and three bulkheads are installed. The side panels go on next and they’ll extend above the deck to become part of a toerail. The construction then follows a more common sequence, with the assembly of the cockpit and the cabin. The hull, deck, cockpit, and cabin are sheathed with 6-oz fiberglass and epoxy.
The plans indicate a solid mast, and I built mine as per the instructions; however, a lighter hollow version would be much easier to raise. Details to build the wheel, trailboards, towing bitt, and bowsprit are included. There is also an option included to add a taffrail.
The forward hatch provides access to the storage space in the bow. The block to the right, held upright by a spring, is for the single sheet that controls the jib boom.
My PT Cruiser has enough power to pull our Weekender. The boat has a somewhat deep keel for a flat-bottomed boat, so bunks are required under chines to support the hull. At the ramp, it’s easiest to float the boat off the trailer; at shallow ramps it can be a bit of a struggle sliding it off, in part because the two batteries I use for the trolling-motor auxiliary power add significantly to the Weekender’s weight. However, the boat can be winched up onto a trailer that’s not fully submerged. It takes as little as 30 minutes after arrival at the ramp to get the rigging in place and have it in the water; the most time-consuming part of launching and loading the boat is almost always the attention it attracts from people watching. When people gather around, the time at the ramp stretches out to a bit more than an hour.
The mast tabernacle is created with two strap hinges—one aft to act as the pivot, and one forward with a loose pin to lock the mast upright—and it works well. The two pairs of shrouds have turnbuckles that are adjusted each time the mast is raised; they remain connected, and only the forestay is removed for lowering the mast.
The 5’ bowsprit is fixed and anchors the forestay at its tip and the jib’s 60″ clubfoot at its middle. The club foot pivots about halfway out on the sprit, and the jib clears the mast when tacking and requires only a single sheet. I have added a downhaul to the jib so that I can both raise and lower the jib going no farther forward than the companionway. I also led the main’s throat and peak halyards to cockpit so I didn’t have to go forward to the mast to drop the sails.
To help keep the mainsail from overwhelming the cockpit when it’s lowered, I added lazyjacks. The plans specify eyebolts and a bit of pipe and metal strapping to make the gooseneck; I instead made an aluminum gooseneck with an extension that allows me to pivot the boom fully vertical and scandalize the mainsail. When coming into harbor, it’s a quick way to douse the mainsail and clear the cockpit for docking. This has proven most helpful especially when sailing alone. I also fabricated an aluminum masthead fitting to help with the rigging and give me a base for an anchor light and a wind-sock vane.
The rudder is in a rudder box that is an integral part of the tiller arm that is connected by lines and pulleys to facilitate a wheel. The rudder must be pivoted and locked up for transport. The wheel keeps the cockpit free of a long tiller that would most certainly use up the limited space. I find it quite handy.
The Weekender carries a total of 120 sq ft of sail. The jib, with its boom and single sheet, is self tending, so tacking is uncomplicated.
Under sail, the Weekender is like a sports car and very snappy in response on most points of sail. It can sail remarkably close to the wind for a gaff rig, and the self-tending jib makes tacking a snap. Its club foot is an excellent touch to the rigging, making singlehanding very simple. The Weekender can ghost along with hardly any discernible wind, although in light air it can be a bit hard to tack if the boat doesn’t have quite enough way on; the long keel requires some momentum to overcome its resistance to sweeping sideways when tacking. I have found that moving my weight to the downwind side forces the boat to heel, and it will gain speed and increase its ability to turn.
The Weekender is a pretty stable little boat, and ours is made a bit more so by the weight of the batteries for the trolling motor. It is stable when one is standing on the foredeck; however, it is a small boat, so if you step off-center it will move accordingly. But I have never felt that it was going to come out from under me.
The Weekender was initially designed with a centerboard, but the full keel provided good performance to windward and the board and trunk were eliminated from the design, freeing up cabin space.
The hull can take waves better than one might guess for being so close to the water. The flat bottom can slap a bit depending on the angle of approach to the waves, but that same flat bottom can also surf down waves quite well, getting some help from the broach-countering directional stability of the full-length keel. I have found the cockpit to be generally dry with only occasional spray from hitting a larger wave. I prefer fair-weather sailing with our boat. When running dead downwind, wing-on-wing, the boat performs well; it’s a comfortable point of sail for the crew, with the hull sitting pretty much bolt upright.
For auxiliary power, we have a 55-lb-thrust electric trolling motor. While the plans call for a mount made of a 2″ x 10″ chunk of wood through-bolted to the transom, I designed and welded an aluminum bracket. The motor pushes the boat at just the right speed for harbor maneuvers, and provides an occasional boost to make a tack in light air. I have the two batteries on separate switches, but they can be combined for back-up power. I have run out of power only when I forgot to charge one of the batteries.
The cockpit benches include dry storage compartment aft and extensions of the cabin space forward.
The cockpit is not large, but it has enough room for the me and my wife to be comfortable, even when we’re sailing with our granddaughter and our small dog. The cockpit footwell is not self-draining and we have been caught several times in squalls that filled half of the cockpit, so I added a bilge pump under the hinged step at the forward end of the cockpit. The cockpit seats have hatches, and aft sections serve as storage. The curved coaming, shaped from a stack of 4/4 stock, makes a comfortable backrest and keeps water out when the toerail is in the water under sail. I cold-molded my coaming out of 1/8″ x 2″ sapele.
The wheel is more than an affectation. It doesn’t crowd the cockpit as a tiller would.
I added running lights to our Weekender as well as a small LED to illuminate the cockpit for the times when we are out later than expected or after dark at anchor. My wife and I have slept aboard comfortably on several occasions. We rig a boom tent for privacy and rain protection so we can keep the companionway open through a warm night; to clear the berths, we move most of the gear that usually resides in the cabin into the cockpit. The bottom serves as the berth and is flat, save for one transverse butt block, but with foam mattresses it’s not noticeable. The space works best sleeping with heads forward and our feet aft to take advantage of the space under the cockpit benches. Shelves with rails on their sides are a nice feature and are in fact part of the rigid framing.
The bulkhead at the forward end of the cabin allows access to the storage compartment in the bow. Rails on the shelves port and starboard keep gear in place while under sail.
The designed cabin has sitting headroom if you are of average height—I made our cabin a couple of inches higher than the design, for even more sitting headroom. There is no cabin footwell, so sitting is with legs outstretched on the bottom. There is access through the forward bulkhead to storage space under the foredeck, but it is easiest to use the foredeck hatch for larger items. The storage bin/seat at the companionway has proven to be a great addition for holding safety equipment, and it has also been a good speaker box for our CD player.
The aft end of the cabin provides a place to stow a portable toilet when it’s not in use. At right, one of the spaces under the cockpit benches is visible.
We have enjoyed our Weekender immensely. It was a most satisfying build, and the whole family agrees that it has been a wonderful boat to sail. My wife and I have trailered it to many lakes, both large and small, as well as portions of Puget Sound, and always have come home with a new story to add. The Weekender can provide an affordable and convenient way for getting armchair sailors out of their armchairs and into real sailing.
Ken Hauenstein lives in Burlington, Washington, just a few miles from Puget Sound, and is a general contractor who does all manner of work including interior boat remodels. He dreamed of working with boats from an early age and had his first real exposure working in a boat factory building interiors for cabin cruisers. He later worked in various shipyards and ran his own cabinet shop. His last shipyard job ended in 2017 as he made plans to retire. He started HUMMINGBIRD while working there. Since then he has built two dinghies, one wood and one aluminum. He is currently building a large aluminum ketch. He hasn’t set a launch date, and won’t because he finds the work therapeutic and likes to give the details all the attention they deserve.
Weekender Particulars
[table]
LOA/19′ 6″
LOD/16′
Beam/6′
Draft/3′ (1′’ with the rudder up)
Hull weight/550 lbs
Sail area/120 sq ft
Crew capacity/Daysailing, up to four; Overnight, two cozily, one easily
Auxiliary Power/up to 5 hp outboard or 45-lb thrust electric
In September 2014, Tim, Alex, James, and I launched from Alder Bay, near Port McNeil, at the north end of Vancouver Island. Each of the four of us brought our own open wooden boat, built with our own hands: Tim with BIG FOOD, a John Gardner-designed peapod; James with ROWAN, mostly an Iain Oughtred-designed Sooty Tern; Alex with HORNPIPE, a modified Don Kurylko-designed Alaska; and me with BANDWAGON, a Hvalsoe 16 of my own design. All of the boats were designed for oars and sail and rigged as lug yawls. We were headed for the Broughten Archipelago, on the southern rim of Queen Charlotte Strait, positioned between Vancouver Island and the remote, mountainous British Columbia mainland.
We were having an easy sail along Hanson Island on the north side of Johnstone Straight when an orca crossed through our fleet and swam between Tim in BIG FOOD, left, and Alex in HORNPIPE, right.
We began with a 2-nautical-mile crossing to the wooded, low-lying Pearse Islands, and headed east by southeast. Immense whirlpools and gyres boiled up near Weynten Passage at the north end of Johnstone Strait. Our course described long, lazy arcs through and around the edges of broad upwellings, spinning around one way, then another. A pleasant breeze filled in as we skirted the south shore of Hanson Island. Several orcas passed close by, heading northwest.
From left, HORNPIPE, BIG FOOD, and ROWAN approached the south end of Hansen Island. ROWAN has the longest waterline of the bunch and tended to sail at the head of the pack depending on James’s whim. My BANDWAGON’s boom is run well out to port.
We slipped through Blackney Passage and crossed the bottom of Blackfish Sound. Alex led the way to our first overnight stop at Mound Island. In woods behind the well-hidden beach I found a cozy tent site where moss padded the earth and lichen hung from cedars and hemlocks.
Shoehorning four sail-and-oar boats with clotheslines moorings off the beach at Mound Island was pushing our luck. ROWAN came up with the short end of the stick. The anchorage appeared snug but adequate with the high tide at day’s end—not so much. In the early morning after the 15′ tidal swing that left ROWAN high and dry on a foul bottom.
In the morning the falling tide had shrunk our anchorage to the size of a swimming pool. James, who had been sleeping aboard, was roused when ROWAN’s stern hung up on a drying rock. He was rattled by his precarious predicament, but ROWAN suffered no significant damage and he quickly recovered his senses and good humor.
A gentle sail of 4 nautical miles along Indian Channel brought us to the old Mamalillicula town site on Village Island. We glided into the inner harbor, where a narrow beach of brilliant white shells fronted the brush-covered embankment. A well-beaten path just above the bank carved its way through brambles and grasses. Two huge silvery, adze-textured cedar posts, rising up above the thick undergrowth, held overhead a great beam, the remains of a native longhouse. Nearby, a two-story building of weathered clapboards was framed by vines and creepers. Farther along the path an aged totem pole lay on the ground, the carved features barely discernible; moss and delicate fern flourished over its gentle folds. Silent, dense green forest edged the clearing.
Roger Siebert
.
We rowed west to Owl Island and pulled into a small kelp-armored nook. The beach was soon cluttered with our lines and pulleys as we jostled clothesline moorings to keep the boats afloat and clear of each other on the overnight low tide. With the chaos sorted out and our boats secure, we explored the island. A path led overland under towering spruce and cedar trees, through salal and understory growth, bathed in infinite shades of cool green light. On the seaward side, stunted pines and fir clung to the foreshore above jumbled driftwood and tidepools.
The next morning, we weighed anchor and moved out along Cedar Island. My attempt to sail against wind and tide in the narrow channel left me lagging far behind the others. I took to the oars and pulled hard to catch up. Just as I spotted Tim, James, and Alex again, they seemed to vanish into a solid wall of rock. I followed, through a narrow passageway just wide enough for our boats to pass through one at a time. This yards-long slot near the north end of Cedar Island led to the open water of Queen Charlotte Strait with a strong westerly blowing along its 40-mile fetch.
Waves deflecting off the shoreline piled upon each other and rocked the boats like bucking horses. We tucked in multiple reefs, raised sail, and surged northeast across the swells toward Retreat Passage, the wind on the port quarter. Regrouping among the Fox Group, a cluster of islets sprinkling the far end of the Passage, we sheeted the mizzens in to point with our bows into the wind and dropped the mainsails. The high eminences of Gilford and Baker islands loomed to the west and north.
After a lunch break, we raised sail again and continued eastward through Cramer Passage. The wind strengthened as it funneled between the two islands. BANDWAGON felt on the verge of a knockdown. Once again I sheeted the mizzen, threw the helm back, and dropped the main as the bow swung into the wind. Even after tying in another reef, my hands were full as the rig started drawing again. I managed to careen along the last bit of the passage and into the opening of Echo Bay.
With BIG FOOD and ROWAN tied up to the wharf at Echo Bay, the steep ramp and barnacled pilings indicate a low tide. The ramp leads to a spacious meadow and a path continues to the right to other parts of the settlement. BIG FOOD’s stern shows her kick-up rudder, boomkin, and push-stick steering arrangement.
We eased up to the sturdy, though somewhat neglected, government wharf at the head of the bay. Its pontoons floated lazily at odd angles and grass grew in the gaps of the decking. On the north side of the bay, docks and a few modest floating cabins with bright red, green, and blue metal roofs backed up against a 100′-high cliff of fissured grey rock. The half-dozen finger piers of the marina opposite were nearly empty. Operations were largely shut down for the season: only a handful of other vessels lay scattered about, and the cabins were quiet.
A ramp led from the dock to shore and a spacious meadow with scattered cedars and firs. The place was just right for camping. A short walk from the meadow sat a modest single-story building, used as a schoolhouse in earlier times, when small thriving communities supported by logging and fishing dotted the British Columbia coast.
After tidying up the boats and claiming tent sites, we followed a trail across a 100-yard-wide peninsula to Billy Proctor’s sprawling homestead at the foot of the adjacent bay. Set apart from his home, museum, and gift shop, an arched, shingled boathouse and shipway looked like nothing so much as an inverted boat hull. After perusing the gift shop, we made our way back along a steep trail to Echo Bay and Pierre’s marina where we found the restaurant closed and the store’s shelves nearly bare. We were able at least to bolster our supply of drinking water. Back at the government float, James and Tim hauled in their traps, which held a catch of Dungeness crab and not the more-common rock crab they’d expected. Boiled on James’s powerful white-gas stove, this signature northwest delicacy was served for dinner alongside our boats that evening.
Tim rowed in the glass calm typical of of our early morning departures. The westerly breeze would regularly come up in the afternoon. After our Broughton trips, Tim switched from BIG FOOF to HAVERCHUCK, an 18-footer he built to my design.
Departing Echo Bay in a light fog the next morning, we rowed north then west along Baker Island, its vertical walls of multi-hued conglomerate rock washed by the 15′ tidal range. Tim and I bore away to the southwest and pulled hard against a foul current through narrow, mile-long Old Passage. Around midday we met up again with James and Alex between Eden and Insect islands. We pulled up to a narrow strip of beach on Insect Island. A signboard on posts at the edge of the beach implored visitors to respect First Nations land and territory.
At high tide on Insect Island, we took a break next to a First Nation’s sign requesting “Respect Our Land,” which we endeavored to do. Access to Insect Island is now limited, but there is plenty of gunkholing, and other anchorages in Broughton Provincial Park. Among our group, beach chairs are mandatory and provide a welcome measure of comfort on the shell-midden beach. The wooden box is James’ cooking kit.
Treading lightly, I walked across the soft luxuriant forest floor, thick with needles and duff. Logging had left most of the island covered with second-growth forests but huge trees remained, crowding out sunlight from the interior. Fallen giants spanned broad ravines and hollows. The land above the beach was steep, providing wide-ranging views northward over the surrounding wooded islands and channels to Queen Charlotte Strait. In the afternoon I went for a sail in the fresh breeze, exploring Misty Passage. That night I put BANDWAGON on her mooring and slept ashore; I used every bit of my 400’ clothesline to keep her afloat beyond the shallow shelving beach.
I anchor BANDWAGON with the mizzen set as a riding sail. My clothesline mooring has a blue buoy attached to the anchor and a yellow floating retrieval line, which passes through a ring on the buoy and runs in a loop from the boat to shore.
The next morning, after a light breakfast and stowing anchors and clothesline gear, we rowed quietly north and west through narrow passages separating Fly and Eden islands. Already the air was warming and ruffles of wind tickled the water’s surface. Tim and James paused for a spell with their rods and lures.
As the four of us spread out over the wider waters of Fife Sound, two humpback whales cruised along the perimeter of the waterway. Rowing well out in the middle, I entered a broad area of tidal upwelling; the two whales began crossing from the west shore to the east, seeming to make a beeline for me. Their arched backs slid across the water’s surface, the immense tail flukes slowly following in a graceful and powerful arc.
The pair dove and resurfaced very close to BANDWAGON, at times within yards. They came from one direction, then another, sometimes each from opposite sides. Spinning around, I tried to identify a pattern of movement so as to steer clear, and eventually backed out of the upwelling. Only later, after the adrenaline subsided and my head cleared, did it occur to me that I had been sitting right atop the humpbacks’ dinner table. The upwellings were stirring up a rich stew for these giant filter feeders.
A large humpback trailed BANDWAGON in Fife Sound just off the logged slopes of Broughton Island. We heard or saw humpbacks nearly every day, but they never came so close to us as in Fife Sound.
In the late afternoon, after 5 or 6 miles of parched rowing and sucker wind holes, we reached Cullen Harbour. It was high tide and Alex had arrived first but found no feasible campsite or haulout around the perimeter of the bay. We would have to try the lagoon just out of sight to the northwest. With high slack water, Booker Passage, the 1/4-mile-long easternmost entry into the lagoon, was calm. I followed James as he entered the passage then took a sharp right turn into a narrow opening where the forest canopy closed over our heads. A strong current set against us, and in the dappled light oar blades kissed the tree-choked banks.
After a couple of minutes, the tunnel opened up and we coasted into Booker Lagoon. Two miles long east to west and more than a mile wide, the lagoon was expansive, and as still as a millpond. Dense foliage and sagging evergreen boughs hugged the water’s surface, giving the impression of an overfilled tub. To port was a flat-topped rock islet. Tim and Alex, having taken a slightly different route into the lagoon, came around the corner. We brought the boats gently to rest on stony ledges. The islet was not much to camp on, but a fine place to have dinner after a long day.
We arrived in Booker Lagoon with the high tide at the end of the day. As the lagoon drained with the ebb, we had to shuffle the boats around as the rock dried. The white shape in the distance is a motor yacht at anchor. It surely would have taken local knowledge to get a vessel that large safely in and out of the lagoon.
The late-afternoon ebb began to draw down the water in the lagoon. Between bites of food, we shuffled the boats around to keep them from going high and dry. Our rock platform grew and its sides began to fall away steeply. With dusk approaching, we clambered back down to the boats. Each of us stole away to drop the hook for the night. I carried more than 100’ of anchor and rode; all of it went overboard. Not a lick of wind ruffled the surface. As an orange glow faded from the western sky, I slung my tarp between main and mizzen masts and set the alarm for predawn to catch the next morning’s slack.
After being rousted by the morning alarm, I rose from my sleeping pad on the gently curving floorboards, slipped half out of my bag, and fired up the stove for a cup of oatmeal. As I stowed the tarp, the stars began to fade away and the eastern sky brightened. I coiled ground tackle into the forepeak and lowered the spars for the row out.
The four of us slipped toward the mouth of the lagoon. An unfamiliar noise began as a faint whisper. I rounded a corner and took a look at the outlet stream, so calm when we had entered the previous afternoon, and the whisper became a roar. We had extrapolated the tides for Cullen Harbour from the tables but we could only guess at when and how the water might flow out of Booker Lagoon and its two narrow outlets.
The channel was a whitewater tumult. Thinking it may only get worse, I took a deep breath and thrust into the maelstrom. With my legs braced and a firm grip on the oars, I ferried across the current in whitewater fashion, stern first, bow pointed against the flow. After a quick few hundred yards the rapid deposited BANDWAGON into the north end of Cullen Harbour, and I pulled into an eddy beside a large rock to watch the other boats sweep through.
The morning had barely begun. We rowed out to the mouth of the bay and gazed upon the open water of Queen Charlotte Strait. The sun warmed the chill air as we rafted together for morning coffee.
To seaward, the dark silhouettes of two humpbacks appeared, possibly the pair we had seen the previous day, one enormous with immense flukes as broad as my boat is long. Arcing in slow motion, the pair moved as if in a choreographed ballet. In the stillness of the crystalline morning, within a few hundred feet of our floating congregation, the large humpback leapt for the sky. After extending nearly its full length above the water, it fell back into the sea with a thunderous boom and eruption of spume and spray. We sat in dazed silence, coffee cups motionless in hand.
From Cullen Harbor, the four of us fanned out across Queen Charlotte Strait to rendezvous again 9 miles to the south at Crease Island. James skirted closely along the Broughton Archipelago. Tim, Alex, and I chose a more direct course toward Swanson Island, a little over 8 nautical miles distant, leading us out into open, glass-still water. In the midst of a sun-soaked rowing stupor, I became aware of a distant splashing sound. Nearby, Alex was already standing up and gazing across the water. I looked east and all around the water was dappled with splashes. We were in the midst of a massive school of Pacific white-sided dolphin, as far as the eye could see and traveling northwest. I sat for several minutes taking it all in, surrounded by the sounds of dolphin.
Tim and Alex pulled through Swanson Passage as we headed south, back to Vancouver Island, which towers in the distance. After this trip with HORNPIPE, Alex built a new sail and oar boat, FIREDRAKE, to his own design and has since cruised extensively with it.
Off the north end of Swanson Island several clusters of islets, rocks, and shoals turned the calm water into a confusing mix of rips, eddies, and upwellings. We made our way through the turbulence and continued south; a pleasant following breeze sprang up. Tim, Alex, and I had yet to spot James. We passed a cove on the north shore of Crease occupied by a motoryacht, and continued eastward along the edge of the island as the day waned. The three of us landed at a small beach with a rock-strewn approach, pulled the boats above the high tide line, and settled in for the night. I bivied among the driftwood on the beach and under the stars fell into a deep sleep.
It was an early-morning call the next day to get the boats off before being trapped by the falling tide and obstacle course of rocks. With mighty heaves we pushed the three boats down the rough beach and into the water, getting away just in time.
As we made our way back toward the anchorage passed by the previous afternoon, we found James and ROWAN standing off the point. It seems he had been in the anchorage all along, obscured from our view by the motoryacht. He had avoided our mad morning dash; we avoided the noise of his neighbor’s generator in the anchorage.
Continuing south around Crease Island, we pulled against the current through Swanson Passage. Mist clung to the verdant shores of Crease and Swanson islands. To starboard, larger vessels lay in fog-shrouded Farewell Harbour. The ebbing current exposed a rich intertidal zone that popped and hissed. Slowly the fog burned off, and as we rounded the bottom of Swanson, we pulled inside the bight of Flower Island. Thick kelp beds provided a handy mooring. It was now a waiting game to pick a time to negotiate Blackney Passage, one of a handful of constricted exits for the ebb-powered flow of Johnstone Strait.
Eventually we cast off and made our way a couple of miles to the north end of Parson Island. While the current still ran strongly northward through Blackney, we inched south, rowing along the steep shores of Parson, playing the back-eddies and fighting through the kelp beds. A raft of sea lions was as surprised to see the four of us as we were to see them. Wanting to leave them in peace and avoid any aggressive behavior, we gave them as wide a berth as possible, but quarters were tight. As the current showed signs of weakening, Tim judged the time right to make a dash west across to Hansen Island. We crossed without difficulty and continued into Johnstone Strait.
The gang spread out across the beach on the Blinkhorn Peninsula. The campfire was ready for cooking and James bent over a big ling cod to fillet it.
A steady northwesterly that afternoon gave us a glorious sail to windward and the Blinkhorn Peninsula, 5 nautical miles distant. For dinner, the 10-lb lingcod James pulled in that afternoon was filleted on a driftwood platform and cooked over the campfire, to be topped off by James’s Dutch-oven biscuits. That night Alex retired to his tent while Tim, James, and I slept soundly at anchor.
At dawn of the eighth day, we pulled home to Alder Bay.
In the morning we rowed west 5 miles in a dead calm along the forest-draped coast of Vancouver Island, back to our launch point at Alder Bay and one of the very few things we had missed: warm showers.
Eric Hvalsoe grew up in a boating family near Seattle, Washington, and got glimpses of the San Juan and Gulf Islands, and northern BC waters, at an early age. He later revisited some of these same destinations, including the Broughtens, in sea kayaks and most recently, traditional sail-and-oar craft. As Hvalsoe Boats, Eric has been designing, building, repairing, restoring, and maintaining wooden boats since 1980. His home and shop are located in Shoreline, Washington. Eric teaches traditional boatbuilding and lofting skills at Seattle’s Center for Wooden Boats. The Center’s collection includes some of Eric’s designs, the Hvalsoe 13, 15, and 16. This family of sail-and-oar designs has expanded to include the Hvalsoe 18. For a while longer yet, Eric hopes to continue exploring the Salish Sea in non-motorized craft.
Travel Notes
A portion of the Broughton group has been designated as the Broughton Archipelago Provincial Park. Find out more about the park and environs, including up-to-date bulletins, from BC Parks. Bring water, be bear-aware, and leave no trace. Campsites, with beach haulouts or anchorages for small boats, are relatively scarce. Weather is variable and can be fierce, so monitor marine-weather-radio forecasts. Be mindful of First Nations ancestral sites. For permission to go ashore at Mamalillicula, contact the Mamalillicula Band office at 250-287-2955. A fee of $20 is required for each person visiting the site. Insect Island, according to a kayak guide service operating in the area, was closed to visitors in 2016. Tidal Waters Sport Fishing License must be obtained from Fisheries and Oceans Canada. Licenses can be obtained online or in person at recreation and sportfishing shops. E.H.
If you have an interesting story to tell about your adventures with a small boat, please email us a brief outline and a few photos.
I made my first full-length cagoule, left, in 1977 for a snowshoe hike and later used it for winter boat cruising. This year, I decided it was time for a new one, right.
In a journal entry dated January 4, 1977, I wrote: “I made a cagoule last week,” but I don’t now recall where I got the idea to make an oversized, full-length cagoule. A cagoule is a lightweight pullover rain jacket that’s usually only thigh length. There may have been something similar to my long version on the market 40 years ago, but I can’t find anything like it on the Internet now, which is unfortunate because it’s quite useful in cold and wet weather.
My cagoule proved its worth on the outing that began on that cold day in 1977. My friend Mark and I embarked then on a snowshoe hike across the Cascade Range from Western to Eastern Washington. Temperatures dipped to 20 degrees, and the cagoule was especially valuable in camp when we weren’t warmed by hiking. In the evenings I’d sit with the bottom of the cagoule drawn up under my feet, the hood tight around my face, and my arms drawn in from the sleeves into the warm bubble of still air inside.
I was so pleased with my new cagoule during that 1977 snowshoe hike that I made a sketch of it in my journal. It shows the sleeves hanging limp because my arms are tucked inside. One snowshoe is stuck in the snow and the cagoule is tucked around my feet.
For taking refuge from the weather, my cagoule worked very much like a bothy bag, which is an emergency shelter, usually for two or more people, that slips over the occupants with the bottom opening tucked underneath them. When you’re in a bothy bag, you can read, take notes, check the weather, anything you can do in a small tent, but for anything else you have to leave its protection. With a cagoule, you can pop your head into the hood, and put your hands and feet outside; you’re then able to move about and tend to chores and still be warm.
Photographs and drawings by the author
My cagoule’s width makes it easy to spread out while seated and its length covers the feet.
A full-length model eliminates breezes and helps keep feet warm, but for climbing stairs or steep terrain and stepping over thwarts, the hemline needs to be hiked up. The belt of a backpack or a PFD can hold extra fabric up, or you can tuck the excess fabric into the front of your pants. The cagoule has a generous width to make it easy to slip arms in and out of the sleeves and to keep it loose while sitting down—if it’s too narrow, it stretches tight across the knees, creating cold spots.
The first of my two recent cagoules, left, was cut full enough for walking, but was a bit tight for sitting. The second has plenty of width and is much more versatile.
I lost track of my original cagoule, so I recently re-created a pattern and sewed up two new cagoules. The first was a bit tight over my knees when I sat down with it on, so I added to the girth of a second cagoule; it measured up to the pleasant memories of the original. Sitting out in the weather, I can be quite comfortable. Wearing just a light pile pullover over a T-shirt —what I wear in the house—and a knit cap prevents cold spots where the shoulders and the hood make close contact with the cagoule. With the hood opening drawn tight around my face and my hands pulled in, it can be 20 to 30 degrees warmer inside the cagoule than outside. On one 37-degree night I measured 67 degrees inside the cagoule.
A little reading or journalling? Tuck inside.
Making a cagoule doesn’t cost much or take a lot of time. Four yards of 200-denier coated cloth cost $20, and I spent another $10 on thread, cord, toggles, and seam sealer. Working from a pattern I made of plastic sheeting, I progressed from raw fabric to a seam-sealer-ready cagoule in a single Saturday.
On a sunny day with a chilly northerly blowing, my new cagoule kept me quite warm. The generous circumference kept it slack around my knees and the length accommodated my feet.
When my son saw the finished cagoule, he said there would be a market for it at football and soccer games in open stadiums. The fans are unexpected kindred spirits to boaters and camp-cruisers, just other people who sit out in the weather and want to keep dry and warm.
Making a Cagoule
The tools I use for the job include a sewing machine, of course, and a seam ripper—I rarely get through a project without sewing something I have to undo. The plier stapler is much faster than pinning and the pinching type of staple remover is best for fabric. The Fiskars scissors with offset handles are well suited for making the cut of the folded body’s four layers at once without having them slip out of line.
This is a one-size-fits-all hood. I have a 7-3/4 to 7-5/8 hat size, on the border between XL and XXL, so the hood should have plenty of room for most. The opening at the bottom measures 16 -1/2″, with seam allowance, which will fit the 10″ circle you’ll cut into the cagoule body. The face opening is the same size, so you can push the hood back off your head. The right angles at the ends of the face opening will create a straight line between the hood halves when the hood is opened up for sewing the draw-cord sleeve on.
The fabric for the hood gets folded back 16-1/2″ and the chin of the pattern is set on the fold. After cutting the fabric, sew the hood from the back to the top of the face opening.
Here the back of the hood has been sewn and the staples can be removed. All of the seams are topstitched, leaving the edges exposed. The fabric’s coating will keep them from fraying. Open the hood, fold the seam allowances to one side, and topstitch them.
You can use this pattern using a few dimensions to size the cagoule to yourself. For the height, drape a light cord over your shoulder and note where it touches the floor in front and behind you. Half of that length of cord is the Height indicated on the drawing. The Width of the pattern is the Height x 0.35; making the full width 70 percent of the Height, which will make the finished cagoule quite roomy. The Span sets the lengths of the sleeves. Put your hands together in front of your chest, arms outstretched, palms together, and fingers pointing away from you. Measure from fingertip around your back to fingertip. The folds at the cuffs and the hem are 2″ wide, stitched with a 1/2″ seam allowances, and creating 1-1/2″ draw-cord sleeves.
For a custom fit, you can make adjustments to a plastic-sheet version, assembled with tape and staples, before cutting fabric. The 6mil sheeting I used was easy to work with.
You can use the pattern provided above or use your plastic-sheeting prototype, folded in quarters, as a pattern. Fold the fabric in quarters.
Weight the fabric so it won’t shift as you cut it. The excess length has been trimmed here.
Here’s where the scissors with the offset handles prove themselves. They won’t lift and shuffle the fabric as regular scissors will, so you can cut all four layers at once with accuracy. Note the curve in the armpit from sleeve to waist (I forgot that when I cut the green cagoule) and the marks at the upper right corner marking the midpoint of the cagoule.
Open the body to add the sleeve extensions and to draw and cut the hood opening.
The crossing straight lines are centered on the midpoint marked with the fabric was folded. The hole for the hood has a diameter of 10″. It is set toward the front with 1/3 of the opening on the back side of the shoulder fold and 2/3 on the front side. The center of the hole is 1-3/4″ away from the cross’s midpoint.
Cut 1/2″ inside the drawn line.
Stapling or pinning the hood opening to the hole with the fabric slack is nearly impossible. I made two sailmaker’s hooks with a couple of 16-penny steel sinker nails, tied some cord to them, and pulled the hood and body tight against each other. Then I could mate the edges and staple them together, uncoated faces pressed against each other.
The sleeve extensions are sewn on and trimmed to the pattern. You can see the inside surface of the topstitched seam here, with the seam allowance flaps folded flat and sewn.
The sleeves for the drawcords on the cuffs at the bottom of the cagoule and its arms get their edges folded back at an angle.
The draw-cord sleeves are then folded and sewn. The the drawcord opening at the bottom can be put at one of the side seams.
From here, the cagoule can be folded so the sides can be stapled together with coated sides out, sewn, and topstitched. Seal all of the seams. I used SeamGrip +WP. Let the sealer dry overnight.
Christopher Cunningham is the editor of Small Boats Magazine.
Afterword:
A cagoule that’s cut very wide, like the green one here, works great for privacy when changing clothes or using a porta-potti. While the crescent-moon on the blue cagoule pictured above suggests the latter, it’s a design from my third great-grandfather’s private signal.
A couple or readers asked about condensation in the comments below. I mostly use the cagoule for relaxing in camp or as an extra wind-proof layer in very cold weather. I went out rowing on March 29 and was getting chilled by a brisk headwind. The air temperature was about 50 degrees F, not especially cold, but the wind was cutting through my fleece jacket. My cagoule was handy so I slipped it on. I was working hard for about a half mile against the headwind and worked up a sweat. I could feel the moisture in the sleeves of the jacket while I was rowing so when I reached a lee and dropped my anchor I took the cagoule off. The inside of its sleeves was somewhat wet. The jacket and the cagoule dried in a few minutes and I put the cagoule back on for relaxing in the boat. The waterproof/breathable jacket tucked away in the boat would have been a better choice for the rowing, saving the cagoule for the anchorage.
You can share your tips and tricks of the trade with other Small Boats Magazine readers by sending us an email.
The HX890 packs VHF, GPS, FM radio, distress beacon, and many other features in a waterproof unit that will fit in a PFD pocket.
Audrey and I wanted to buy a full-featured handheld VHF transceiver for communication, navigation, and emergency response; our research led us to the Standard Horizon HX890 with DSC and GPS.
The HX890 floats and is submersible down to 1-1/2 meters for 30 minutes, important features for boating kit. It functions as a standard VHF marine-band two-way radio and can transmit digital distress calls that include latitude and longitude provided by its 66-channel GPS receiver as well as a Maritime Mobile Service Identity (MMSI) number, a unique nine-digit number that is assigned to Digital Selective Calling (DSC) transceivers. We obtained our number through BoatUS; it provides our names, address, emergency contacts, and information about our boat. The MMSI number is entered into the HX890 during its initial setup.
This DSC transceiver enables boaters to make digital calls to other boaters. It can send out a preprogrammed message to any listener on a selected frequency or transmit a private alert to initiate a voice call. DSC improves upon analog voice calls by reducing frequency congestion, transmitting preprogrammed digital messages out to a slightly longer range, and helping ensure that critical calls are received by rescue agencies. Up to 100 DSC contacts can be stored, and combined in up to 20 groups. The HX890 can receive a DSC distress alert and be directed by a directional compass to the aid of a boater in distress.
As a GPS unit, the HX890 can be used for navigation. It can store up to 250 waypoints and multiple routes. It can be used to navigate to a GPS position received from another DSC radio. A man-overboard (MOB) function records the position of a person who has fallen overboard and points the way back that spot. The HX890 can be set up to automatically turn on and activate an LED light when it senses water immersion if the user goes overboard.
Dropped into the water, the HX890 floats face up and activates its built-in light, the bright spot here in the middle of its right side.
Another feature of the HX890 is Group Monitoring (GM), where group members’ locations can be displayed. Ten groups of one to nine members can be stored. Individual locations will be displayed, calls to members can be transmitted and the transceiver can be used to navigate to them. Communications between other DSC users can be scrambled to be private. The HX890 can receive FM radio and get updated weather through the NOAA radio frequencies.
The HX890 transceiver comes with a manual, rechargeable lithium-ion battery that provides 11 hours of operating time, charging cradle, AC adapter, DC cable with 12-volt-lighter plug, a case for using five AAA alkaline batteries, belt clip, hand strap, and USB cable. The device is compact, measuring 2.60″ x 5.43″ x 1.50″ not including antenna, and lightweight, weighing just 10.94 oz. The backlit display screen measures 2.3″ diagonally and has adjustable brightness for day/night operations. The LED strobe light can be programmed to burn steady, flash at three different rates, or flash distress SOS. The strobe is at the upper right of the control buttons, so facing the operator, but it is not a powerful light. A lot of SAR agencies have night-vision devices so a little goes a long way. You can set the light to go on when the VHF is submerged; the radio turns face up when dropped in the water, so having the light go on will help you to locate it in the dark.
The controls are intuitive, with a dedicated Channel 16/Sub Frequency button and a soft-key-driven menu system—the soft keys are programmable to allow personal choices of 16 different functions, such as weather radio, transmit power, scan, compass, and position logging. The transceiver can be set up to scan multiple desired frequencies or to stand watch over two to three priority frequencies. The HX890 has a very powerful 6-watt transmitter, adjustable down to 2W or 1W, with a line-of-sight range of over 5 miles.
Should one purchase the HX890E for international use, it will also support the Automatic Transmitter Identification System (ATIS) used in inland waterways of Europe. Whether it be for the basic or advanced features, we consider the HX890 to be a great value.
Kent and Audrey Lewis mess about in a small armada of boats in the waterways of northwest Florida. You can follow them on their adventure blog.
The HX890 is manufactured by Standard Horizon and available for around $199.99 from many marine supply stores and online retailers.
Is there a product that might be useful for boatbuilding, cruising, or shore-side camping that you’d like us to review? Please email your suggestions.
The Wen 6307 weights a bit over 2 lbs and its grip is just 2″ in diameter. It’s easy to work with.
I was introduced band files when I was working at the Smithsonian, making the brass mounts that support museum artifacts on display. The mounts were often complex shapes that needed to be sculpted to blend in with the objects they supported. The band file could do the work quickly and with a light touch that wouldn’t damage delicate bits of brass.
The band file I’d grown to like was very expensive, so I never bought one. I did buy an inexpensive band-file attachment for an angle grinder, but it was a bad pairing. Angle grinders are too heavy, powerful, and loud—and spin too fast—for the work I do with a band file.
The Wen 1/2″ x 18″ belt sander, model 6307, was what I was hoping to find, and it came at a very affordable price. It has a motor about the size of a Dremel tool and weighs, with cord, just 2 lbs 6 oz. To install a belt on it, you press on the front roller to push the arm against its tensioning spring until it clicks; that shortens the arm about 3/8″ so a belt can be installed. A fresh belt can be a bit difficult to put on, even with the arm retracted, but it will eventually slip into place. Used belts that have stretched just a bit tend to go on more easily. The push of a button releases the arm, putting the belt in tension.
The arm pivots through 55 degrees.
The arm can be pivoted 25 degrees up or down from its straight position to accommodate jobs at odd angles. A fitting for dust collection clips onto the tool’s right side. It covers the belt tensioning button, so the fitting has to be removed when changing belts. With a vacuum attached, the dust collection is very effective; I don’t see any dust escaping.
The right side of the tool accepts a clip-on bracket that fits a 1-1/4″ dust-collection hose.
Just behind the front roller there are two base plates, one on top, one on the bottom, that make contact with the sanding belt and back it up for working a flat surface. The plates are slightly narrower than the sanding belts, so the belts can work into corners. Closer to the 6307’s body the belt is unsupported, so it will take a gentle curve for working convex contours and softening corners. The front roller has a diameter of 5/8” and can reach into concave surfaces, though it works like a gouge and can’t fair a curve.
This newly brazed brass fitting was easy to clean and shape with the Wen 6307. Note that the sanding belt extends slightly beyond the base plates below the front roller, making it possible to reach the inside corner and smooth the fillet of silver braze.
A dial at the back of the 6307 controls the speed, which ranges from 1,100 to 1,800 feet per minute. When turned on, the tool isn’t disagreeably loud at its lowest speed, but at half speed it starts to get loud and whine, and it’s certainly time for hearing protection. The vents for the motor’s cooling are at the forward end of the body, where I like to grip the tool for fine control, but when the air flowing from the vents gets hot, it’s time to back up. Farther back on the body, a rubber insert assures a non-slip grip.
As a test of sanding speed, I “sawed” through a 1″-square piece of spruce with a 60-grit belt running at top speed. It took less than 40 seconds. The dust collection attachment worked effectively; the sanding dust on the workbench is from earlier work.
As a test of sanding power, I put an 80-grit belt on the 6307, dialed the speed up to the maximum, and cut a 1/2″-wide “kerfs” all the way through a 1″ x 1″ piece of softwood. The 6307 could lop off the end of that stick in an average of 37 seconds. I had to let the belt do the work—if I applied a firm pressure, the drive wheel would slip and the belt would bog down or stop.
The portions of the sanding belt that are not backed by the base plates are well suited for working curved surfaces like the top of this wooden cleat.
The 6307 comes in handy for working the saddle-back shape between the horns of wooden cleats and the complex transition from blades to looms on oars and paddles. On metal, the 6307 knocks down sharp edges quickly and excels at working inside corners and cleaning up flux and oxidation left by brazing.
The belts with the finer grits can be used for quick sharpening of tools that don’t require precise edges. For this axe, I started with a 220-grit belt and finished with a 320 and the edge was ready for chopping.
The 1/2″ x 18″ sanding belts cost around $1 each and come in grits from 40- to 400-grit, so the 6307 can take on jobs from the rough shaping of wood to quick sharpening jobs on outdoor equipment such as hatchets and machetes.
Christopher Cunningham is the editor of Small Boats Magazine.
The 6307 1/2″ x 18″ file sander is manufactured by Wen. Wen currently lists the tool as out of stock. It is available from other sources online. The one shown here was purchased from Amazon for $36.40. The current price is $44.37. The Grizzly T10745 appears to be identical, and is listed in the Grizzly catalog at $59.95
Is there a product that might be useful for boatbuilding, cruising, or shore-side camping that you’d like us to review? Please email your suggestions.
Rebecca and Kimberly Yeung built this 15′ Prospector Ranger canoe from a Bear Mountain Boats kit. Widgeon Creek, here, is where the canoe made its first camping trip. The creek is 35 river miles inland, yet not above the reach of the tides.
"We’re just two sisters who love science.” That’s how Seattleites Rebecca and Kimberly Yeung describe themselves. In 2015 they decided to get a glimpse of the Earth from the edge of space and sent a weather balloon up from the flatlands of Eastern Washington to an altitude of 78,000′ (14.8 miles). Two GoPro cameras recorded the ascent to the point where the expanding balloon burst and the parachute controlled the descent back to Earth. The sisters gathered data along the way with temperature sensors to detect the point between the troposphere and the stratosphere where the temperature rises rather than drops with an increase in altitude. A flight computer with GPS tracked the flight and included a beacon so they could recover their craft and its instruments from its landing in a cow pasture 52 miles from the launch. The video of their flight has been viewed over 370,000 times on YouTube, and Rebecca and Kimberly were written up in Geekwire’s technology news website and the Washington Post. They have spoken at the Gates Foundation and were invited to the White House to present their work to President Barack Obama. At the time, Rebecca was 11 years old and Kimberly was 9.
Kimberly did not perform a Māori warrior’s haka before applying a coat of varnish, but she brought a fierce enthusiasm to every step of the canoe project.
In 2016 the Yeungs launched a second balloon carrying their usual instrumentation as well as a solar panel to test a hypothesis that the solar energy that could be captured increased as the density of molecules diminished with altitude. While that might be a commonsense conclusion, Kimberly warns, “You don’t want to speculate. You always want to rely on data.” Their instruments on this flight recorded a maximum altitude of 101,000′ (19.1 miles).
Their third launch required making precise calculations and predictions. They launched the balloon from eastern Wyoming as part of a NASA program to document the total solar eclipse of August 21, 2017 in the NASA-supported Eclipse Ballooning Project. They had a launch window of just two-and-a-half minutes to assure that their cameras would capture the shadow of the moon drifting across the face of the Earth before the balloon burst. They succeeded and got video from 80,000′ (15.2miles) before the cameras ceased operating in extreme cold of -81°F. The ascent reached 96,000′ (18.2 miles). On that last flight, the Yeungs collaborated with NASA Ames Research Center on a microbiology experiment. Their payload included microbes that would be exposed to the conditions of the stratosphere, which are similar to the atmosphere on Mars. The experiment was part of the ongoing research into the possibility of life on Mars. The Yeung’s mission was featured in a program by the BBC and PBS.
Rebecca and Kimberly have other interests. Kimberly enjoys archery and playing piano; Rebecca is into basketball and martial arts. On her way to her martial arts classes in Seattle’s International District, Kimberly often saw homeless people camped in the streets. She felt compelled to do something, and she and her sister set out, as they usually did, doing research. After a visit to Seattle’s Low Income Housing Institute (LIHI), they decided to do something tangible and ordered a kit for a tiny house that could be incorporated in a LIHI village. During the summer of 2018, with a bit of help from neighbors, family and friends, they built the house in their driveway and finished it in just over a month. It was trucked to the village, and one homeless person had a safe, comfortable place to live.
The build started with CNC-cut molds purchased in addition to the kit.
That fall, Rebecca and Kimberly, now 14 and 12, began work on a Prospector Ranger 15 canoe kit from Bear Mountain Boats. Their father, Winston, helped with the project and their mother, Jennifer, gave the three free time by doing everyone’s household chores and feeding the troops. Canoecraft, the how-to book by Bear Mountain designer Ted Moores, was their guide through the build. “Every year,” says Winston, “we do big Lego sets and they just love going through the instruction books and following the guidelines, so they both liked that there was a book we could follow with really detailed instructions.”
Most boatbuilders eventually tire of sanding, but Kimberly enjoyed long stints working with the random-orbit sander.
While Winston describes himself as “handy,” neither he nor his daughters had much woodworking experience beyond the tiny house build. “Many stages were new to us. We’d never worked with cedar strips, never used a spokeshave, never bent wood, never used fiberglass, never did epoxy. This was all new.” Since a lot of time building a wooden boat is spent sanding, it was good that Kimberly was good at it and enjoyed working with the random-orbit sander.
Kimberly and Rebecca took the cherry decks to school where they used the laser cutter in the Maker Space to etch designs in the wood. They filled the maple-leaf etching with red epoxy to finish the tribute to the family’s Canadian roots. The aft deck’s engraving, to be filled with black epoxy, is the Chinese character for the Yeung family name.
The hull, with its exterior ‘glassed, came off the molds late in November, and construction continued through the winter with the canoe largely finished in January 2019. Brushing on the final finish coats waited until the warm, dry weather of May. On the first of June, Kimberly and Rebecca, with their parents, brought the canoe to Green Lake, in the heart of a popular Seattle park, for its launch and maiden voyage.
The family gathered around the canoe at the south end of Seattle’s Green Lake before putting it in the water for the first time.
Rebecca, bow, and Kimberly, stern, took the canoe out on its maiden outing.
In the summer the Yeung family took the canoe to Widgeon Creek, a meandering tidal stream cradled in the foothills northeast of Vancouver, British Columbia, for a weekend camping trip. It was a first for Kimberly and Rebecca; Jennifer and Winston had done two outings there while dating 25 years earlier. The round trip at the creek is less than 4 miles, a cautious beginning for the family’s canoe cruising, but this summer they may work up to a 35-mile trip along the Powell Forest Canoe Route, a chain of eight lakes outside of the city of Powell River, British Columbia. Beyond that, the sisters might take to even more ambitious canoe trips, but rather than speculate on where their wide-ranging interests may take them, it’s safe to say that whatever Kimberly and Rebecca choose to do, their data proved that even the sky’s not the limit.
During the canoe trip, Kimberly and Rebecca—sisters, budding scientists, fellow boatbuilders, and paddling partners—shared a waterfall at Widgeon Falls in Pitt Meadows, British Columbia.
Do you have a boat with an interesting story? Please email us. We’d like to hear about it and share it with other Small Boats Magazine readers.
I built my first kayak in 1978. It was my own design, a mongrel of elements I’d seen in the classic documentary book, Bark Canoes and Skin Boats of North America, by Edwin Tappan Adney and Howard Chapelle. It had a stern profile from Alaska’s King Island, a midsection from Canada’s Southampton Island, and a bow from Greenland’s Disko Bay. I built it in fuselage-frame fashion as I’d seen my father do for his Hypalon-skinned interpretation of an umiak. I thought my kayak looked pretty good, and it served to get me on the water, but I clearly had learned nothing about traditional Arctic kayaks. When I paddled an old and rough reproduction of a Greenland kayak I got my first inkling of what I had missed.
The baidarka has 43 ribs, bent cold from saplings. They seem delicate, but they are all intact almost 30 years later. They were very easy to shape and the irregularities get smoothed out when the stringers are lashed to them. The “wings” connecting the stern block to the gunwales are curved toward the keel, not straight across as in Zimmerly’s reproduction, a detail that my friend John Heath pointed out.
In the years that followed I built reproductions of traditional Arctic kayaks to see what I could learn from them. In the early ‘80s I took an interest in Aleut baidarkas. John Heath, for years a leading authority on traditional kayak who later became a good friend of mine and a mentor to me, had taken the lines from an Aleut double and published them in Skin Boats. I built that kayak and was impressed by its speed and ability to rise over oncoming waves.
I stained the frame red with some artist’s oil paint mixed with linseed oil. The Lowie specimen was, according to Lantis, “painted with blood and a powdered red mineral mixture.”
The ribs dried quickly and held the shape of the hull quite well.
Ten years later I had my eye on a single-cockpit baidarka documented by David Zimmerly in the February/March and April/May, 1982 issues of the now extinct Small Boat Journal. I happened to be in Berkeley, California, and visited the Lowie (now Hearst) Museum of Anthropology and was permitted to see that very kayak, an exquisitely crafted frame collected by Margaret Lantis in 1934 from Atka Island in the middle of the Aleutian chain. The woodworking bore the marks of the builder’s simple tools that the builder used; the bow and stern pieces, which wouldn’t be seen once the skin covering on, were as carefully sculpted as works of art.
I carved the lower piece of the bow from a yellow cedar crook, so as in the original, it can be slender yet strong. The upper bow is in the shape of a T in cross section, and could easily be made from two boards joined together, but it is meant to be carved from a solid block.
Sewing the skin into the gap between the upper and lower bow pieces was difficult, but it was not merely for a decorative effect. The gap makes it possible to put increase the fore-and-aft tension on the skin so that it takes a convex curve from the sheer line to the keel. That flare, as in modern fiberglass powerboats, throws spray outward, and helps keep it from getting to one’s face.
Several years later, still captivated by the Lowie specimen, I began work on my reproduction of that baidarka. I had plenty of Alaska yellow cedar for the deck beams and end pieces, including a good crook for the curved lower bow, and clear straight-grained spruce and red cedar for the longitudinal elements. The ribs in the original were round in cross section and while Zimmerly milled his ribs from lumber, resawn, and rounded, but I decided to use saplings. I don’t now recall if saplings were used in the original; trees are scarce on the Aleutian islands. I harvested the saplings from a hillside overlooking Puget Sound. They grew in clumps, very straight and slender, and I found them very easy to bend and shape.
The hole in the stern piece was likely meant to save weight and perhaps to increase air flow to speed drying in the stern. The lashings holding that piece to the keel are extremely tight. They start with the lashing twine laced tight in a V shape between the 3 holes. Frapping turns pinch the V into a Y, greatly increasing the tension.
The unusual stern has the provides a lot of lift and forward drive in a following sea.
My baidarka was the first kayak I covered with nylon and two-part polyurethane instead of canvas and airplane dope. The dope was quite forgiving of application errors and was easy to work as long as I wore a respirator whenever I got near the vaporous stuff. The urethane was going to be a challenge for me, working alone, because it had to be put on continuously, coat after coat, and was very runny. I set up my drill press with a stirrer I made out of brass and while I was applying one batch it was mixing the next. That worked fine until the can at the drill press broke free and got spun by the mixer. In an instant the contents were flung from the can and splattered in a horizontal line across every wall in my shop and on any tool that happened to be stored at that height. I had my back to the drill press so I got a coating on the one part of me that wasn’t protected by my apron.
In spite of the trouble I had with the skin, I like that it is semi-transparent and lets the intricate framework show.
I eventually finished a serviceable if rather drippy coating on the baidarka skin. I’d been quite proud of the way the frame had turned out, but now it had a skin that bore a strong resemblance to a syrup-drenched stack of pancakes. To make matters worse, when I stored the finished baidarka in an unheated warehouse in the middle of winter, the nylon went slack with the cold and was as wrinkled as a raisin. During the summer the skin smoothed itself, but as soon as I put it in the water it cooled off and got all wavy again.
My baidarka,weighing just 42 lbs, sits lightly on the water. On this cold winter day the deck shows a bit of the waviness that plagued the skin for years.
I haven’t been kayaking since last summer, but I was able to get the baidarka up to 7 knots. I did speed trials with scores of sea kayaks while I was the editor of Sea Kayaker magazine and there were only a handful that were as fast. Here I’m using a carbon-fiber wing paddle. The Aleut paddle I made is in storage and I’m not as adept with it as I am with the wing.
I didn’t paddle the boat much at all until about three years after completing it. Fortunately, the skin got tighter with time and the color became darker and richer and concealed the drips. I began to take the baidarka out and bit by bit learned how the Aleut design performed. It was clearly fast, especially given its 16′ 8-1/2″ length. I didn’t have a good way to measure its speed, but when I got a GPS years later, I found I could hit 7.2 knots in a sprint. Zimmerly’s plans note the theoretical top speed is 4.9 knots. When I took the baidarka out for the photos here, I hadn’t been kayaking for months, but I still managed to record 7 knots on the GPS.
In wind, the fairly low profile keeps the baidarka from getting blown around and the long bow counters weathercocking. The slender lower bow cuts cleanly through smooth and rippled water, and the broad upper bow provides lift in oncoming waves. In a following sea, the buoyancy above the waterline created by the spread of the gunwales keeps the stern from being swallowed up by waves. It rises instead and you can feel the waves pushing the baidarka forward. It’s a great boost for starting a sprint to get surfing.
After I finished my baidarka I stumbled upon a hidden key to an Aleut baidarka’s speed. In 1805, Urey Lisiansky, a Russian sea captain traveled 300 miles in a baidarka and wrote: “At first I disliked these leathern canoes on account of their bending elasticity in the water, but when accustomed to them, I thought it rather pleasant than otherwise.” I doubt my baidarka is as flexible as the original Lowie specimen. The urethane soaked through the nylon and bonded it to the frame, so the whole structure is quite rigid. The skin of the original baidarka wouldn’t have restricted the frame’s movement and the flexing would have allowed the frame to conform slightly to the shape of the waves as well as soften the impacts of rough water. Kayakers who have both folding kayaks and rigid molded kayaks know that the folders have a speed advantage when the going gets rough.
There are two joints like this in the keel. They seem designed to let the ends of the baidarka curve down around a wave lifting the middle of the hull, yet support the paddler over a trough.
The keel of the Lowie baidarka is made up of three pieces and the joints between them are shaped like the moldings on drop-leave tables—a mating quarter-round with a small vertical butt joint at the top. The way the keel is constructed, the ends of the baidarka can move slightly to wrap around the crest of a wave, but resist sagging into a trough.
In this damaged museum specimen, the bone bearings hidden inside a keel joint are visible.
The joints in the Lowie baidarka may be concealing some interesting bone bearings called kostochki. Joe Lubischer, a Canadian graduate student in anthropology and a fellow kayaker, once mentioned to me that the literature on baidarkas suggested the existence of these bearings but none had been discovered in the museum specimens he knew of. A few months earlier I had just happened to see a bunch of kostochki at the Burke Museum on the University of Washington campus. I had gone there to see what I might find in their collection related to baidarkas and was allowed to see a baidarka that had been collected in and shipped from Alaska quite a while ago. To get the unskinned frame to fit into a reasonably sized shipping crate, someone had sawn it into pieces. Unfortunate for the kayak, but lucky for me, and for Joe, that all of the bone bearings were accessible.
The kostochki in the keel joints were elliptical bone bearings cradled in matching recesses carved into bone rectangles which were set into mortices on either side of the curved part of the joint. The allowed a bit of longitudinal movement, but no lateral movement. There were also rectangular strips of bone let into the contact surfaces between the deck ridges and the deck beams. John Heath believed the principle function of all of the various kostochki was to prevent wood surfaces in contact with each other from wearing away over time. The bone could endure the abrasion and keep the joints from getting progressively looser inside of their lashings.
A few years later Joe and I, along with George Dyson, author of the book Baidarka, studied a baidarka on loan from a Russian museum. It was collected in Unalaska in 1826. With a veterinarian’s X-ray machine, we made images of the joints and the films revealed the kostochki inside of them. If I had known about the bone parts when I built my baidarka I would have made them, even if all that work would be hidden away, just to experience a little connection with long-forgotten baidarka builders.
I suspect that the kayak I designed for myself four decades ago will be the only kayak I will ever design. I suppose I’d take some pride and pleasure in coming up with something that performed well, but nothing I could do would fill me with a sense of wonder as the genius that lies waiting to be discovered in kayaks from the past.
Paul Gartside’s 16′ Gaff Sloop, his Design No. 218, has its roots in SJOGIN, a 22′ traditional double-ended Scandinavian workboat built in the late ’50s. Paul designed a modified version of it, his Koster Boat, Design No. 176, and later developed three smaller versions. The last of them, Design No. 218, is the Gaff Sloop, a 16-footer with a transom stern. When Jonathan Sheldon of Hereford, England, enrolled at the Boat Building Academy (BBA) in Lyme Regis, he decided that this design fulfilled all his criteria for a new boat. He wanted a trailerable, stable, traditional-looking boat that he could sail, row, or motor either singlehanded or with a sizable crew.
Photographs by the author
The removable floorboards are finished bright and bordered by fixed perimeter boards, here painted white.
Jonathan was keen for the boat to have a cutter rig with a bowsprit, a feature that was present in the Koster. Paul was more than happy to draw a new rig with a bowsprit but thought the boat was too small for two headsails, so the gaff-sloop rig was retained. The mainsail and topsail were adjusted slightly to keep the center of effort in the same place.
The lines were lofted, according to BBA tutor Matthew Law, “using Gartside’s own lofting process, which is to loft the body plan first using all the offsets, including the offsets for the diagonals. Some people only use the diagonals at the end of the lofting process.” The long, fore-and-aft lines were then drawn as a result of which only minimal adjustments were necessary on the body plan. “Gartside’s drawings tend to be very good,” said Matthew.
For two of his iterations of the design, Paul specifies a variety of construction methods such as glued lapstrake, strip-planking, cold-molding, and traditional lapstrake, but he has drawn No. 218 for traditional lapstrake only, built right-side-up so the sweep of the planks can be tuned by eye as work on the hull progresses.
The boat is easily rowed, though the builder plans to lower the oarlocks and their pads to bring the oar handles down to a more comfortable height.
The centerline structure consists of a 2″ x 5″ keel of three laminated pieces, and a 9/16″-thick hog (both in sapele and with a slot for the centerboard), and an oak stem laminated of 13 layers of about 3/8″ thickness each]. The stem was made in two parts: an outer stem and an apron to provide a rabbet for the planking, with enough width in the apron to provide a substantial landing for the plank ends. The laminations were steamed to get them into their basic shape and then left to dry for about three days before clamping on a form and gluing up with epoxy. These centerline components were set up on a base framework along with the 1-1/8″-thick oak transom and 2-1/2″-thick oak stern knee, all of which, along with six temporary molds, were stabilized with struts up to an overhead workshop beam.
The 12 strakes of 3/8″ thick khaya planks were then fitted starting from the centerline, with the forward ends of the lower five planks steamed to cope with the twist as they approach the stem. The wood for the top strakes, which would be finished bright, was carefully selected from two particularly straight-grained boards and set aside before planking began.
For ease of access, the centerboard case was fitted when the planking was partially complete and required making cutouts in two of the temporary molds. Each side of the case was made up of three pieces of 7/8″ sapele, biscuit-joined, and had a 3″-deep sapele log fixed to the bottom, to be bolted through the keel. This, Jonathan thought, was “more efficient and cheaper” than rabbeting the sides into the tops of the logs in the way that Paul had drawn.
With the planking complete, the molds were removed and replaced with three sheer-to-sheer cross spalls to maintain the shape of the hull during the framing. The 1″ x 5/8″ steam-bent oak frames were fitted on 6″ centers. The frames are installed in halves in the bow and stern where the garboards are nearly vertical and amidships where the centerboard is located; the rest are bent in place in one piece.
The transom doesn’t have a notch for an outboard, but if the motor’s shaft is long enough, one isn’t required. The transom is designed to be strong enough to support outboard power.
Next came the ten 1″ oak floors, each made with a limber adjacent to every plank lap, and the 7/8″ x 2-1/2″ oak inwales. The plans called for a cap over the top of the inwale and sheerstrake, but Jonathan left this out because he wanted an open gunwale with the frame tops visible and open spaces between them. To compensate for the loss of structure, he added sapele outwales shaped from 1-1/8″-square stock. The sheer is also strengthened by the rubrail that Paul drew to protect the lower edge of the sheer strake.
The 1″ thwarts (pine in the plans, oak in Jonathan’s boat) rest on risers (the 2-1/4″ x 5/8″ pine in the plans proved difficult to edge-set at the stern so Jonathan used 1-1/2″ x 3/4″ oak) and have lodging knees connecting them to stiffen the hull. Each end of the thwarts also has a pair of vertical knees that extend 15″ inboard and taper down to a very low profile. Paul calls for 7/8″ grown knees, which can be hard to come by, so Jonathan made his with 1″ iroko, in two pieces, half-lapped to avoid weak cross-grain at the ends. Jonathan had been collecting timber from various flea markets, auctions, and odd sales, and he often used that stock in lieu of the lumber specified in the plans.
The floorboards rest on the floor timbers as loose panels for easy removal. They run fore and aft and are bounded by a fixed, curved perimeter floorboard port and starboard.
I had the opportunity to take a short sail on Jonathan’s Gaff Sloop on the Academy’s Launch Day in gentle Force 1 to 2 winds, which would have been good, forgiving conditions for a first sail, were it not for a disproportionally lollopy chop. There were four of us on board, but at no time did the boat feel crowded, even when we were tacking and each of us had to shift to a new place to sit. Jonathan has sailed with five aboard, including himself, and observed there was still plenty of space. The boat felt comfortingly stable at all times, not surprising given the generous 6′ 9″ beam, the stability provided by the hull form, and the 35-lb lead insert in the centerboard.
Adding the bowsprit to the original sail plan increased the length of the jib’s foot by 12″ and its area by a bit over 6-1/2 sq ft.
In the stronger winds of the day, the sloop was beautifully balanced and I was able to let go of the tiller for a couple of minutes at a time while the boat steered a straight course. When the breeze went lighter, however, I found that there was a lee helm and the boat wouldn’t tack. I put that down to the chop, which I felt was giving us a less-than-fair test, but afterward I contacted Paul about it. He was a little concerned because, he said, “I have the sail’s center of effort right over the spur (the intersection of board’s leading edge and the hull) and normally that guarantees a neutral helm until the boat heels, even on a beamy boat.” He suggested that perhaps crew distribution had put the boat out of trim or the centerboard wasn’t fully lowered. He was right; Jonathan acknowledged the centerboard control lines were not yet set up quite right, and the board was about 90-percent deployed.
At the time of launching it was only possible to row from the central thwart—Jonathan was experimenting with the location of the forward thwart and hadn’t yet installed locks for the forward rowing station. When rowing from the ’midship station, with two others aboard and pulling on the new 10′ oars, it took a bit of effort to get the boat going—it is, after all, big and beamy for a 16-footer–but it then carried its way well. Jonathan and I both agreed that we had to raise the oar handles a little too high when taking a stroke, but this should be easily resolved by lowering the height of the rowlock pads and by replacing the rather long-stemmed rowlocks Jonathan had available with lower ones. Longer oars would help too; a common oar-length formula indicates 12-1/2′ oars would be suitable for rowing, but anything over 10″ would be awkward to stow aboard.
The 28.5 sq ft topsail catches the faster-moving air aloft when the breeze is light. Here it’s set a bit high; it should overlap much of the main’s gaff to close the gap between the two sails.
It is to be expected that any new boat’s launching and first sea trial would have some teething problems, but in the case of Jonathan’s Gaff Sloop, christened DUNCAN R, the problems were all human error: the partially deployed centerboard, the choice of oars and oarlocks, and having the topsail set a bit high when the sails were set. But the boat itself, as designed, lived up to Jonathan’s expectations: it was comfortably stable and manageable under sail, singlehanded or with a crew of four or five aboard, and it had the classic look of a lapstrake sailboat. And, he and I agreed, she looked great with the bowsprit which Paul had added.
Nigel Sharp is a lifelong sailor and a freelance marine writer and photographer. He spent 35 years in managerial roles in the boat building and repair industry, and has logged thousands of miles in boats big and small, from dinghies to schooners.
 Photographs by the Lewis family