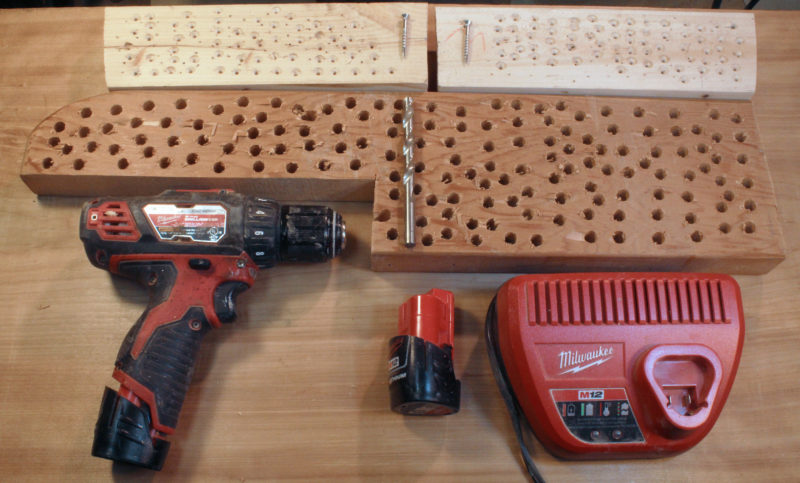
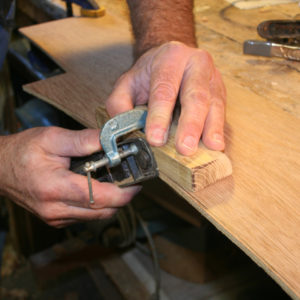
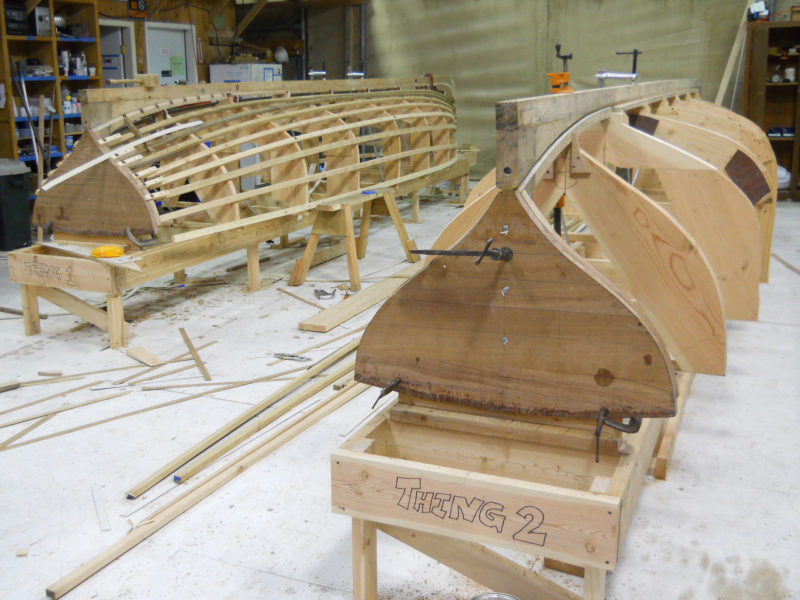
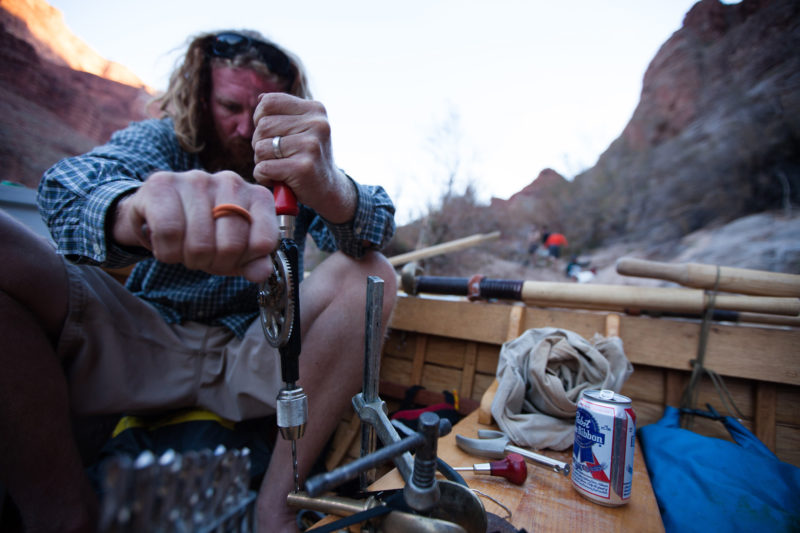
My drill is beginning to take on a patina of glue and paint but is none the worse for wear after a year of hard use.
I hated giving up on my Makita cordless drill after it had served me so well for over 25 years. I bought it in 1989 when I was doing exhibit installations in museums, and it quickly became the most frequently used tool in my home shop. I’ve used other cordless drills but always preferred the Makita because its batteries were housed in the grip, rather than in a clunky box clipped on the end. My trusty Makita was bright blue when I bought it; it’s now brown, covered with epoxy after countless boatbuilding projects. It never stopped working, but the batteries for it eventually became obsolete and too expensive to replace.
I was reluctant to put my trust in a new and different cordless drill, but I switched brands and bought a Milwaukee cordless 3/8″ M12 drill/driver (as a kit, Model 2407-22). The grip is ergonomically designed and as pleasant to hold as the beautifully sculpted handles on my ancient Disston handsaws. It wraps around the web between my thumb and index finger and fills the hollow of my palm. The forward-and-reverse switch is located right between thumb and forefinger and operable without shifting my hand. On the top of the M12 there’s a switch with two settings: 1 for high-torque and 2 for high-speed. The variable-speed trigger is quite sensitive, especially in the high-torque mode, so I can easily line up driver bits with the slots in screw heads; there’s a 20-step clutch that prevents tearing up screw heads and spinning screws in soft wood. The chuck is keyless and provides a tight non-slip grip even on round drill bits.
The only quibble I had with the Milwaukee was the belt clip is too stiff and too tight against the drill body to slip over the edge of a belt.
The Milwaukee’s 12-volt lithium-ion battery is so small that it extends just 1/2″ below my hand when it’s plugged into the grip. You’d hardly know it was there. In spite of its compact size, the battery has enough oomph to deliver 275 inch-pounds of torque, almost three times the 104 inch-pounds of my Makita. The M12 will push a 1 3/8″ Forstner bit through pine or a slightly dull 7/8″ Forstner through locust. It can also drive a 4″ exterior screw all the way into a 4×4 and bury its head without hesitation.
To see what the drill could do to 1/2″ stock on a single charge, I drilled 151 3/8″ holes with the first fully charged battery and with the second drove deck screws in and backed them out 143 times.
The battery is rated at 1.5 amp-hours, whatever that means. To put amp-hours into terms I could understand, I drilled some 3/8″ holes through 1 1/2″ Douglas-fir using the high-speed setting. I did 151 holes, one right after the other, before the fully charged battery pooped out. With the drill switched to high-torque and the drill’s second battery ready to go, I then drove a 1 5/8″ square-drive stainless-steel deck screw through a 2×4 and backed it out 143 times before that battery ran out. The charger included with the kit brought the batteries back up to full charge in less than 35 minutes, much less time than it takes me to deplete one in ordinary use.
The drill has some nice bells and whistles. There’s a built-in LED headlight to illuminate the work. The chuck casts a shadow, but any drill or driver bit longer than 2″ will have illumination at its tip. The light goes on when you pull the trigger partway, stays on while the drill is running, and turns itself off 10 seconds after the trigger is released. There’s an audible tone that sounds after the light goes on and just before the motor begins to turn, not a bad idea if you need to get a bit properly set in a straight-slotted, easily damaged brass screw before driving it. There are four red lights on the left side of the drill that indicate the level of charge remaining in the battery. And the drill is balanced so it will stand up on the flat end of the battery. While it’s not as steady as a cordless drill with its feet cemented into a bulky battery box, I thought it was a good indication that the Milwaukee designers thought of everything. The Milwaukee drill/driver’s light weight and compact size belie its power and endurance, and make it well suited to working in the narrow angles and tight spaces of small boats and to taking on bigger jobs around the house.
Milwaukee tools are widely available at hardware and home-improvement stores. The company web site provides a finder for stores and online vendors.
Christopher Cunningham is the editor of Small Boats Monthly.
Is there a product that might be useful for boatbuilding, cruising or shore-side camping that you’d like us to review? Please email your suggestions.
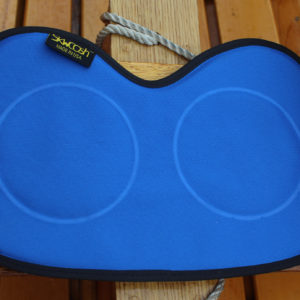
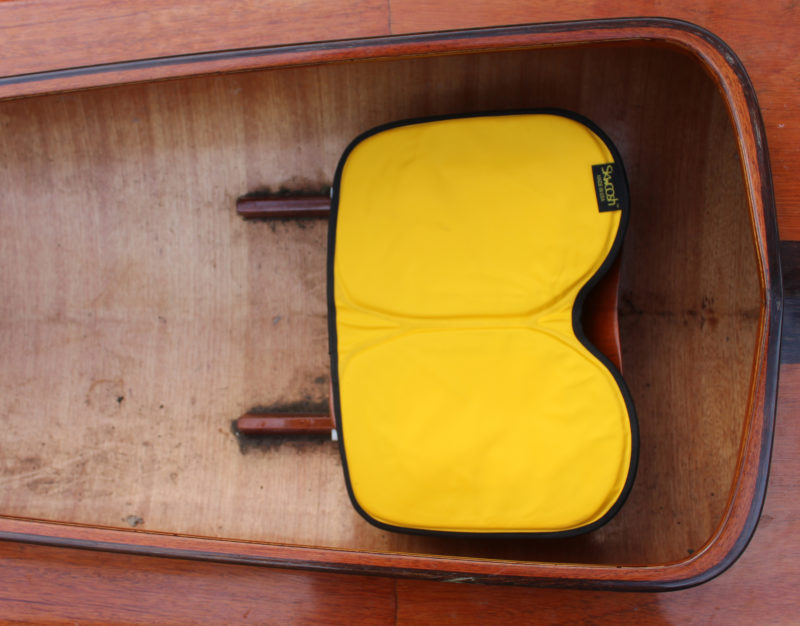
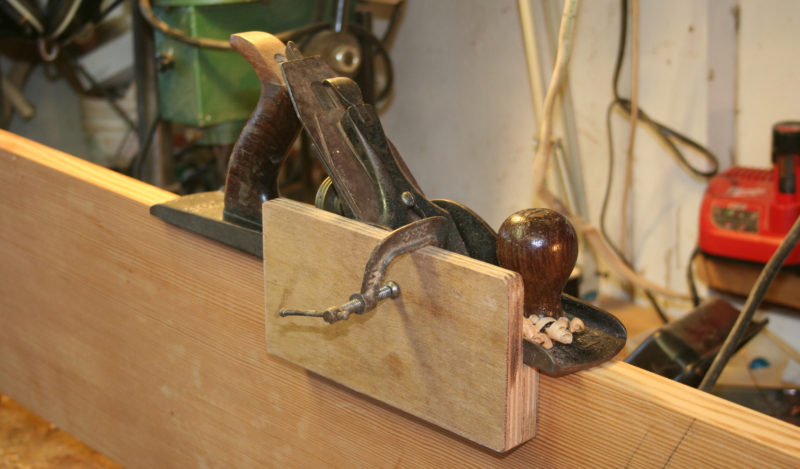
The Row Pad is sized to fit racing-shell seats and has a non-slip bottom to keep it in place.
One of the things I learned from my long paddling and rowing trips was that the body adapts to the demands put upon it. Muscles get stronger, hands develop callouses, and heart and lungs get more efficient. The one thing that didn’t adapt was my butt. The farther I got into a 4 1/2-month paddle down the East Coast, the more padding I needed. I kept an eye out for new home construction along the Intracoastal Waterway and when I found job sites I went dumpster diving for scraps of foam carpet pad.
Skwoosh is a company dedicated to eliminating pains in the butt, and to that end developed TekPad gel. The gel contains tiny air-filled balloons and is sealed into flexible packs in a wide variety of seat pads including the AGP Row Pad and the Kayak Pad.
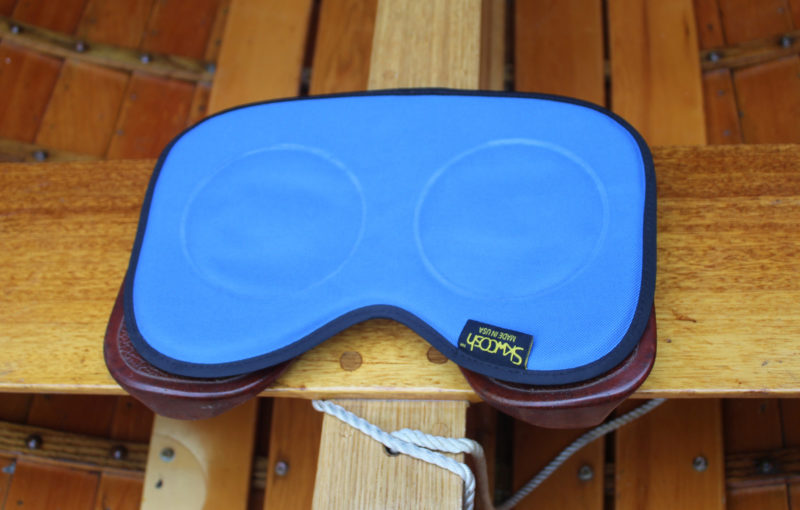
Rowing puts intermittent pressure on the tailbone and constant pressure on the ischial tuberosities or sitz bones. The tailbone is easily taken care of: Just cut away the portion of a seat pad that the tailbone touches. Skwoosh uses the packs of TekPad gel to ease the pressure on the sitz bones. The Master AGP Row Pad is 5/8″ thick and has two 4 1/4″ circular gel pads. If you squeeze the foam padding that surrounds the gel pads, it will push pack; squeeze the gel pads and it will yield. It feels a bit like squeezing a tube of toothpaste. While the gel provides some cushioning, it’s the way that it moves that makes the Row Pad effective.
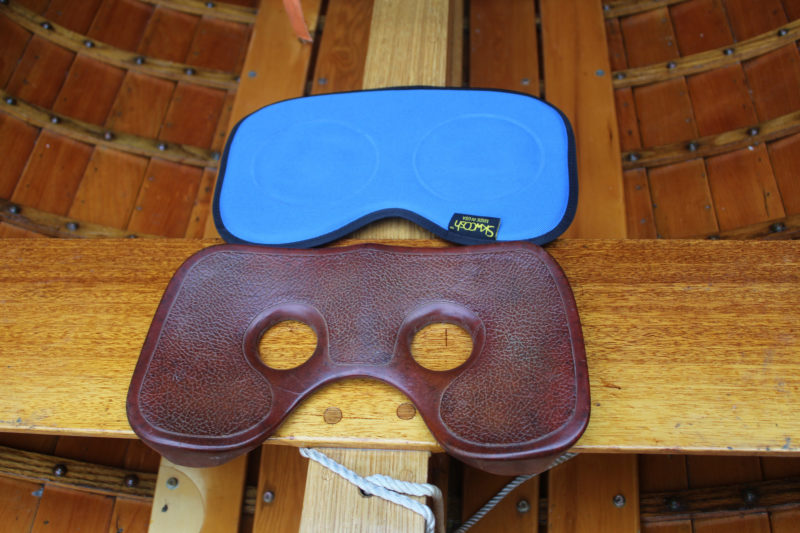
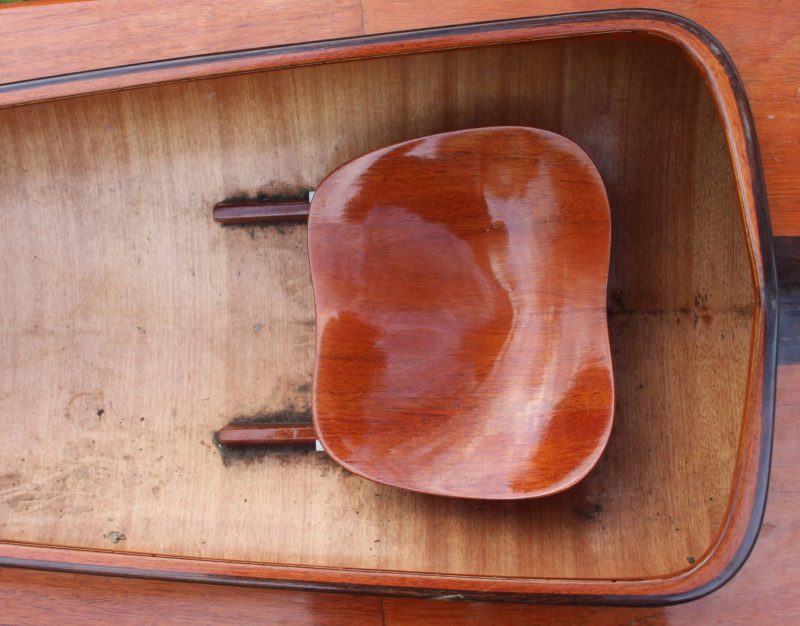
The molded rowing seat is a vast improvement over a bare thwart and the Row Pad adds an equal measure of comfort on top of that.
Using my 14′ Whitehall as a test platform I’ve used the Row Pad on its own and along with a racing shell seat. Anything is better than sitting directly on the thwart. Without any paddling I feel the pressure of my sitz bones bearing against my gluteus maximus muscles and the skin over them. Just sitting on the thwart with my legs relaxed isn’t so bad, but rowing makes the pressure much more acute. At the catch I lean at my hips and, as I tilt my pelvis aft, my knees rise. The angle between my back and legs gets more acute, my glutes stretch and thin over my sitz bones and the pressure increases. Almost any padding helps, but foam tends to push back, so where the pressure is the highest, the foam exerts the most resistance. The gel moves away from the pressure points and, a bit like a waterbed, exerts the same amount of pressure wherever there’s contact. By itself, the Row Pad makes a big difference even though it is on 5/8″ thick. I can feel the gel moving back and forth as my sitzbones rock on it. It even pops, much like synovial fluid does when you crack your knuckles. The RowPad is meant to be used in conjunction with a racing shell seat and that’s a winning combination. I often use a racing shell seat when I’m rowing from a fixed thwart; its notch keeps the tailbone free of contact and its holes take some of the pressure off the sitz bones like a ring of moleskin does for a blister. But the rocking of the pelvis that occurs during the stroke kneads the glutes against the edges of the holes in the racing shell seat, particularly at the catch where the glutes are at their thinnest.
A Row Pad set on top of the racing shell seat gets the benefit of the seat’s sculpted shape. Cushioned by gel and cradled by contours, my butt feels like it’s all one unit, not made up of moving pieces wearing against one another. The combination would be quite well suited to the long haul in either a fixed-thwart or a sliding seat rowing boat.
The Kayak Pad adds warmth and comfort and minimizes friction. It has a loop for a tether to prevent loss in a capsize.
The Kayak Pad is 5/8″ thick and has a non-skid bottom and a slick yellow top. Like the Row Pad, it is meant to be used in conjunction with a contoured seat. I’ve used the Kayak Pad aboard a Struer Freedom, a molded wooden kayak with a racing-style cockpit and seat. The seat has plenty of contour and I’ve never found it uncomfortable. It helps that paddling a kayak doesn’t set the pelvis rocking back and forth. The kayak stroke calls for torso rotation, and in a racing kayak the hips also rotate as the leg muscles are engaged to add their power.
My Struer’s molded wood seat has deep contours and is fairly comfortable by itself but it isn’t slippery enough for effortless hip rotation.
I’ve been doing my paddling with the Kayak Pad in cold weather, and the first thing I’ve noticed is the warmth of the pad. The wetsuit pants that I wear don’t slip on either the varnished wooden seat or on me, so I feel some of the hip rotation happening between my sitz bones, glutes and skin. The pad’s slick fabric lets the neoprene pants slip easily, so there’s no friction to put my knickers in a twist either literally or metaphorically.
Christopher Cunningham is the editor of Small Boats Monthly
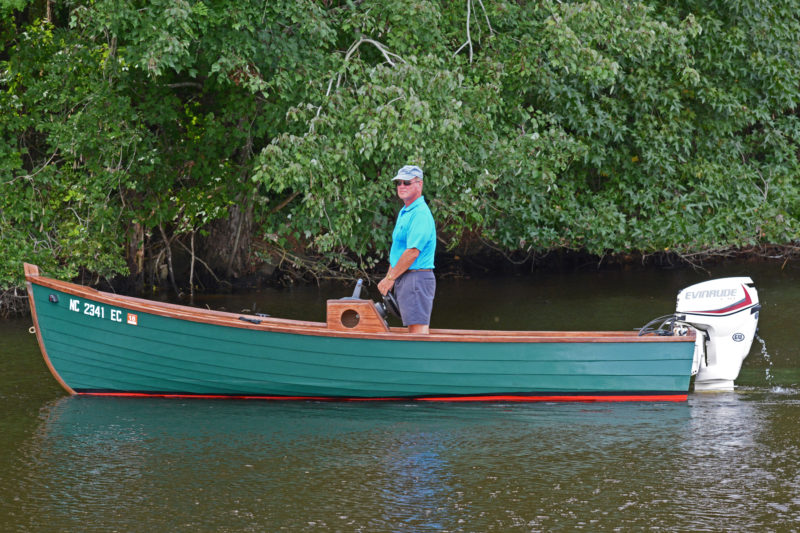
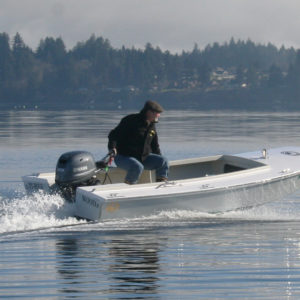
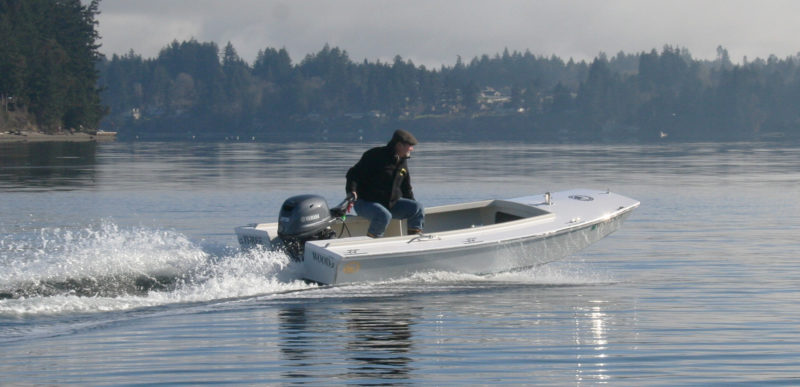
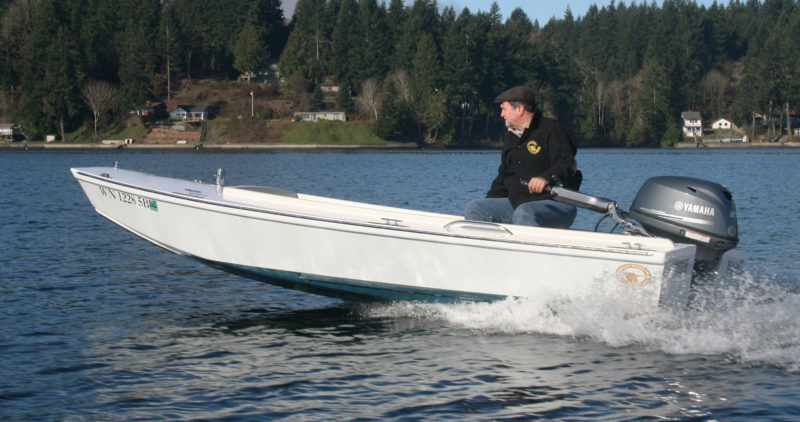
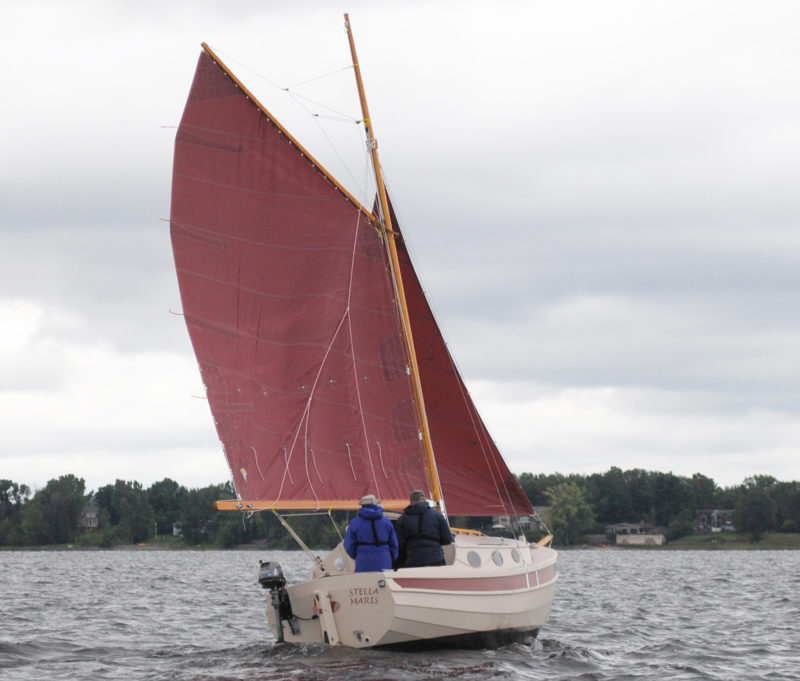
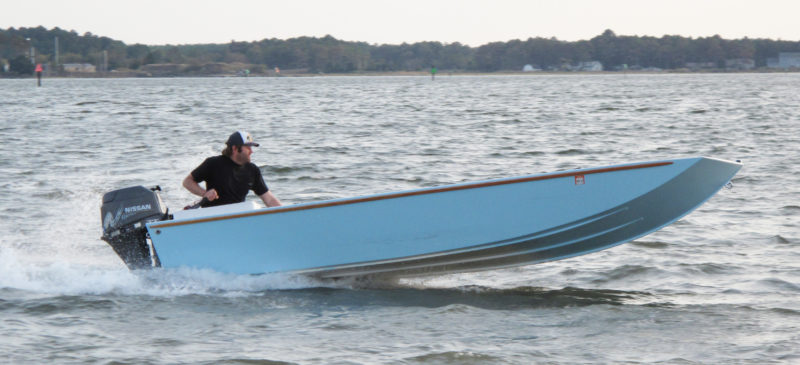
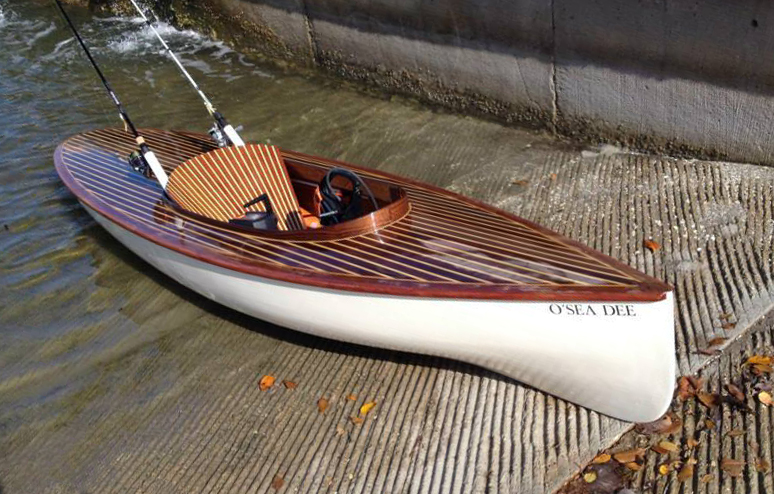
The skiff’s concave run is as effective as trim tabs in keeping the bow down at speed.
James Boyce has been a professor of biology at Coastal Carolina Community College in Jacksonville, North Carolina, for the past 42 years, but he grew up fishing and has kept at it his whole life. From the very start, boatbuilding has been intertwined with fishing. He was raised in Gastonia, North Carolina, and when he was in the seventh grade his family moved to a 130-acre farm that had a 6-acre farm pond. He and his father built two plywood 10′ rowboats for fishing. “For the next five years, while going to high school, I would come home in the afternoon and either go hunting, plinking with my .22 rifle, or get out the bamboo fly rods and go fishing for a few hours on the pond. One of the great pleasures was to catch a 3/4-lb bluegill on a light bamboo fly rod. What a fight!” James later built a vinyl-skinned kayak from a Folbot kit.
Married and with a young family of his own, he built a flat-bottomed Carolina skiff, a boat he used for years but never cared much for: “I finally sold it to a fisherman who used it for about another 10 years, and then I lost track of it.” In the past decade James built an Arch Davis Penobscot 14, a Simmons Sea Skiff, a strip kayak, and, along with a friend, a 21′ stitch-and-glue rowing shell.
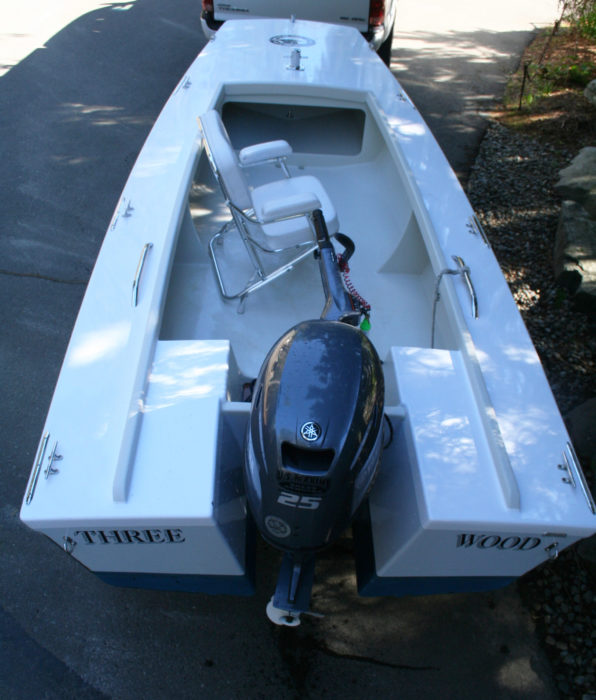
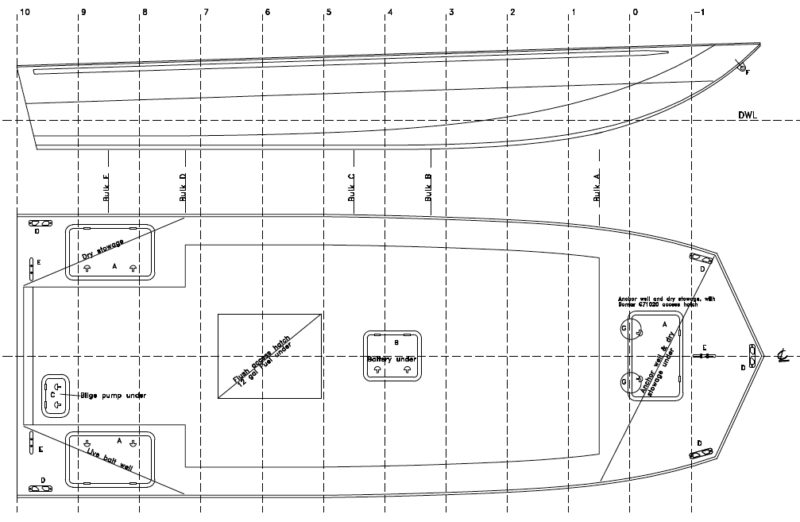
Bulkheads under the seats enclose storage compartments and serve as framing to reinforce the glued-lap plywood construction.
The Jericho Bay Lobster Skiff is his most recent build. The 15′6″ skiff was originally designed by Joel White and named for a bay within sight of the WoodenBoat offices in Brooklin, Maine. Renowned peapod builder Jimmy Steele built two of the first boats, carvel-planked, cedar on oak. Tom Hill adapted the design for strip-building and detailed the construction in WoodenBoat (September/October and November/ December 2009).
James’s lapstrake version of the skiff made it lighter and easier to maintain than the carvel originals.
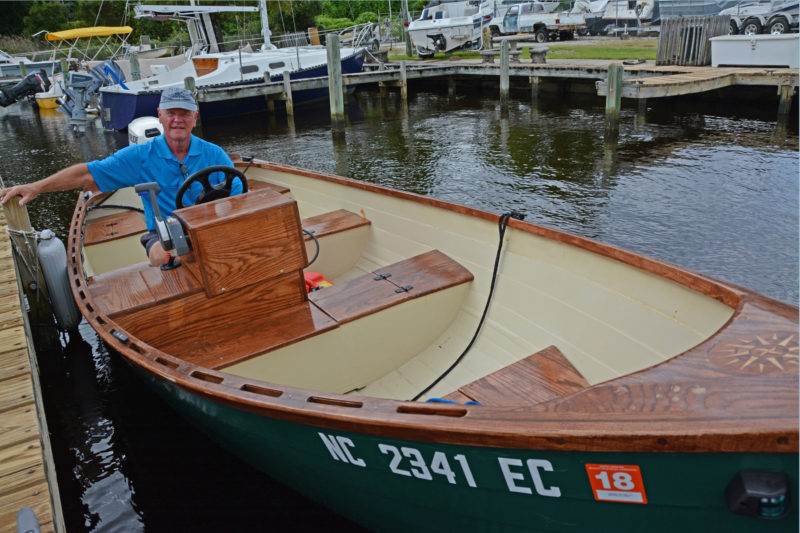
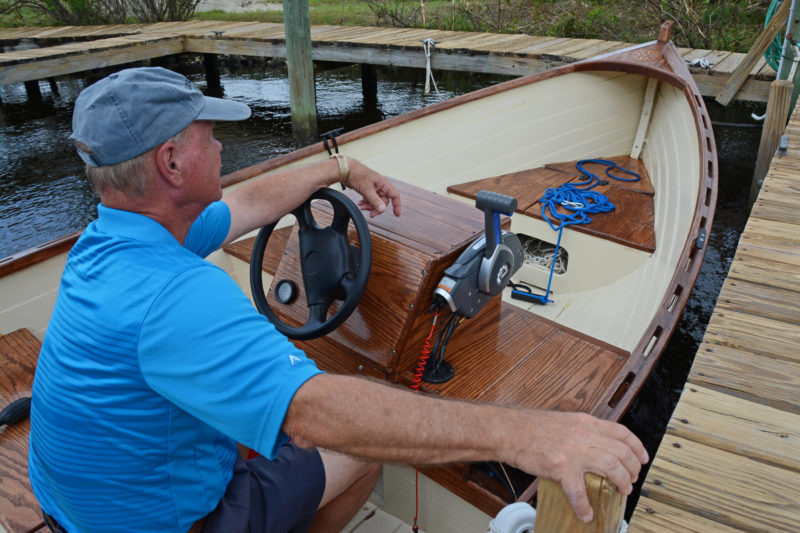
James got Tom’s plans and set out to build his own version of the Jericho skiff in lapstrake plywood. The modifications he had to make to the hull shape were minor, and his skiff OSPREY is as true as possible to the original form as he could make it. That includes the slightly concave profile of the bottom aft of amidships. The unusual reverse curve there was drawn by White to serve the same purpose as trim-tabs do: bringing the bow down as the boat gets on a plane and holding it there while at speed. James used yellow pine for the keelson and red oak for the keel, knees, breasthook, seats, and console. He laminated ash for the stem and two layers of 3/4″ marine plywood with a 6mm layer of meranti plywood for the transom.
James made some slight modifications the the console, but kept the location as it was in the original, with the helmsman’s weight close to amidships for optimum trim.
James confesses that he’s not much of a painter, but he did well with the finishwork on OSPREY. He took extra time and care sanding between coats of paint and on the advice from the folks at Interlux, used their 333 Brushing Liquid to keep the surface damp as he applied fresh coats of paint. “It came out looking almost as good as a spray job. I was very pleased.”
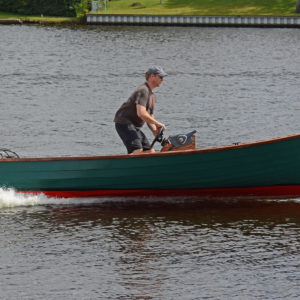
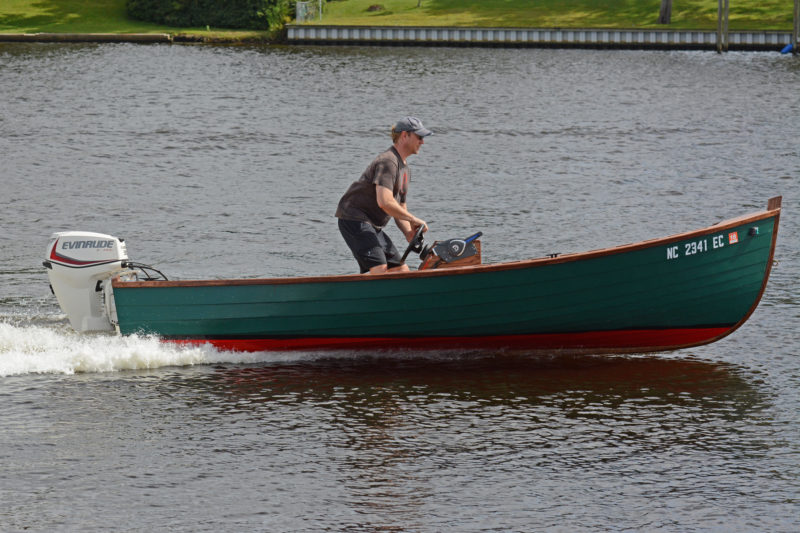
OSPREY is powered with an Evinrude E-TEC 30-hp outboard equipped with remote steering and electric trim and tilt. With the throttle wide open, the Evinrude gets OSPREY up to around 30 mph by James’s estimation—keeping the boat simple, he chose not to install a knotmeter. He reports “the ‘hogged’ bottom does a good job in getting the boat up on plane rapidly from the start. At top speed, however, with just me aboard, the boat has tendency to porpoise, so I use about 90 percent power to cruise. With another person in the boat, seated in front of the steering station, there is no porpoising. With a lighter 20-hp motor, that would also cease to be an issue.”
In a hard turn at 25 mph, OSPREY, he reports, “holds the water well and doesn’t side-slip.” The skiff takes on chop with aplomb. Being caught out on open water by a 20-mph northerly would have made for a wet ride in his other boats, but not in a Jericho skiff. “North Carolina rivers,” James notes, “are famous for getting into a hard chop quickly with this much wind.” OSPREY took on several miles of chop very well and stayed virtually dry even when taking a course at an angle to the wind.
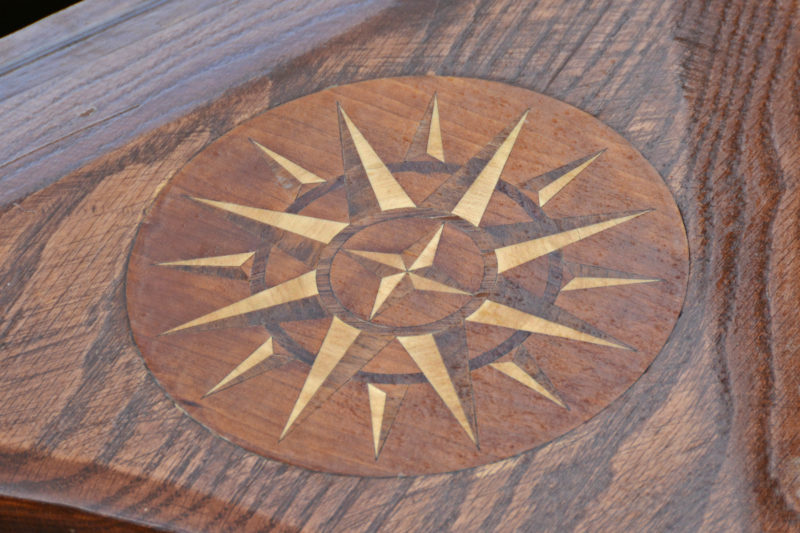
A bit of inlay in the breasthook dresses up an otherwise utilitarian skiff.
Whenever James takes OSPREY out, it draws a once-over from almost every other boater who sees it and many ask where he got the boat. James gets the pleasure of replying: “I built it myself.”
Have you recently launched a boat? Please email us. We’d like to hear about it and share your story with other Small Boats Monthly readers.
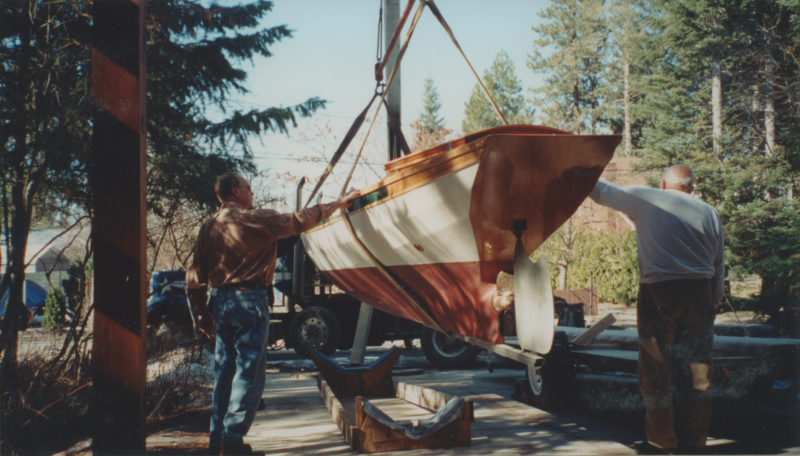
I met Dick Wagner in 1976. I was fresh out of college, living in Seattle, and boatless; Dick and his wife Colleen ran a boat livery out of their home on Lake Union. Their home is indeed on Lake Union: It’s a white clapboard-sided houseboat afloat on a raft of western red cedar logs. In their watery “back yard” they kept a half dozen or so rowing skiffs, mostly lapstrake White Bear skiffs. I rented one of the skiffs for an hour and took Mary Ann, my girlfriend then, out for a tour of the lake. When we returned, Dick was ready to help us in. I wanted to impress Mary Ann with my rowing skills and started sculling the boat sideways toward the dock where Dick was waiting. I knew how sculling was supposed to work, and had tried it on occasion, but I wasn’t very good at it. I wagged the starboard oar back and forth but that didn’t slide the skiff to port. I’d had my chance, blown it, but kept wagging. Dick rolled his eyes and said: “Hand me an oar.” I extended the port oar to him and he pulled us in. I came away from my first meeting with Dick with some important lessons: pride goeth before a fall; a waterman is businesslike, not frivolous; and if you’re going to show off, you have to be really good.
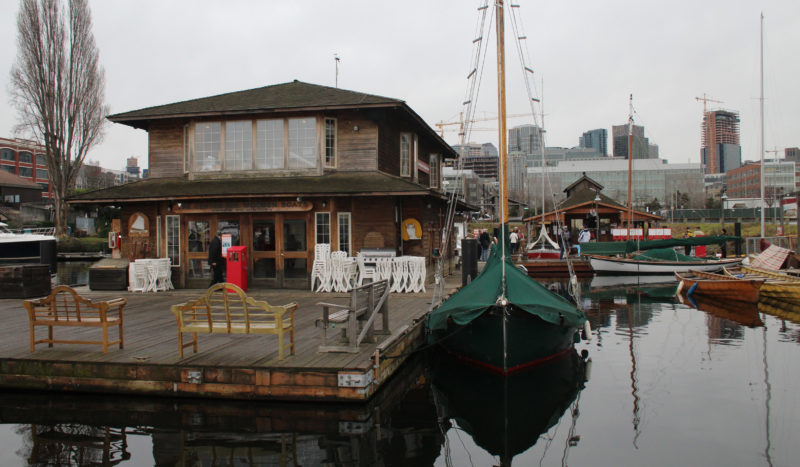
The center’s main building is anchored on Lake Union surrounded by a fleet of wooden boats. The site for the new education center is marked by a green fence to the right of the boatshop roof in the background.
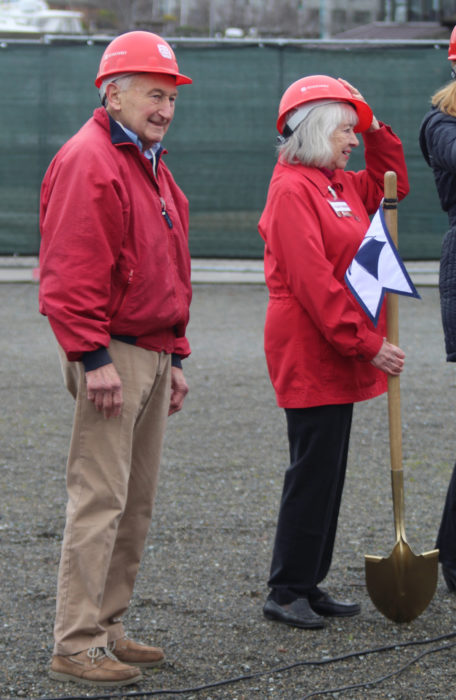
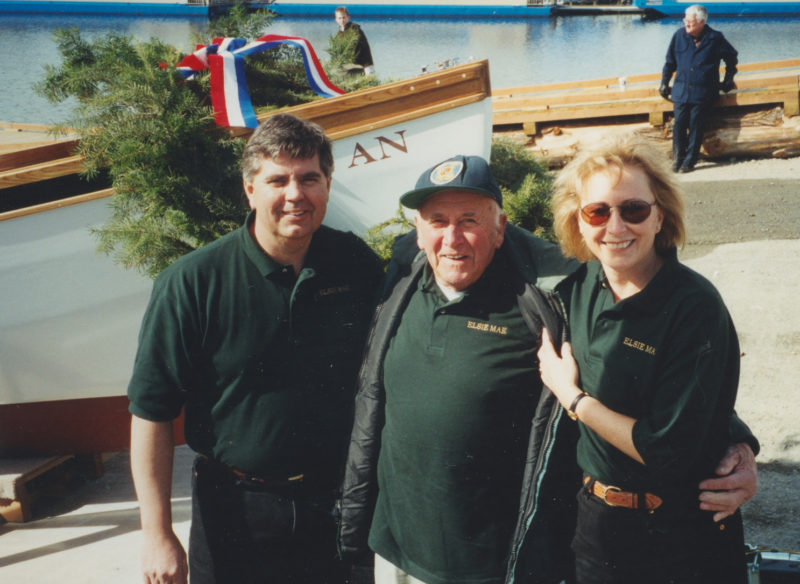
In the years that followed I practiced my sculling; the Wagners went on to much greater things and created the Center for Wooden Boats at the south end of Lake Union. Since its founding in 1977, the CWB has grown to become a priceless Seattle institution, keeping the history of wooden boats alive and introducing countless people to boating. Last Tuesday, Dick and Colleen broke ground to begin the construction of the Wagner Education Center. It will house a shop much larger than the Center’s current floating boatshop and provide space that can that can be adapted for use as a sail loft, classrooms, and exhibition galleries. If construction goes according to plan, the building will be finished and open this October. It will assure the continuing and growing interest in wooden boats for generations to come.
Dick and Colleen prepare to break ground for the new building that will carry their names.
The education center will be a well-deserved tribute to the Wagners. Over the nearly four decades that have passed since I first met Dick, the Center for Wooden Boats has become an important part of my life. It lies literally in the shadow of the Space Needle, a Seattle landmark that I’ve visited only three times since it opened in 1962 along with the World’s Fair. In contrast, I visit the CWB dozens of times a year and I’ve never grown tired of it.
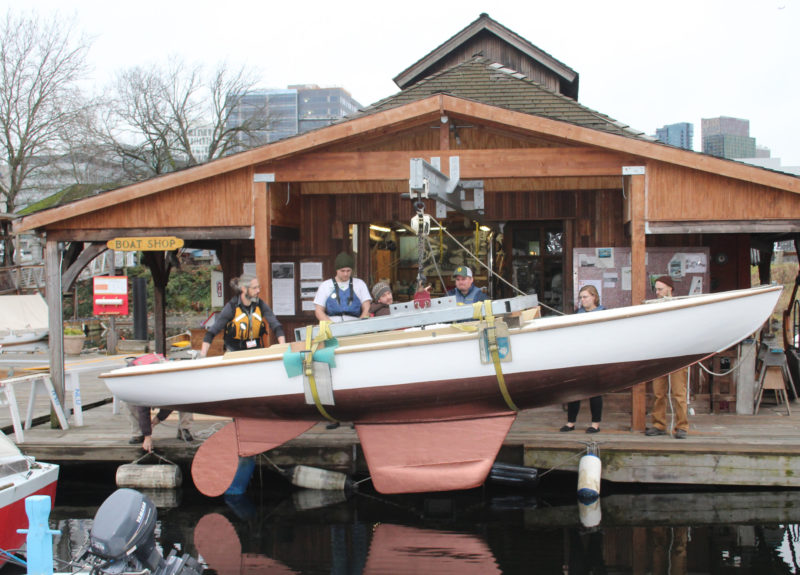
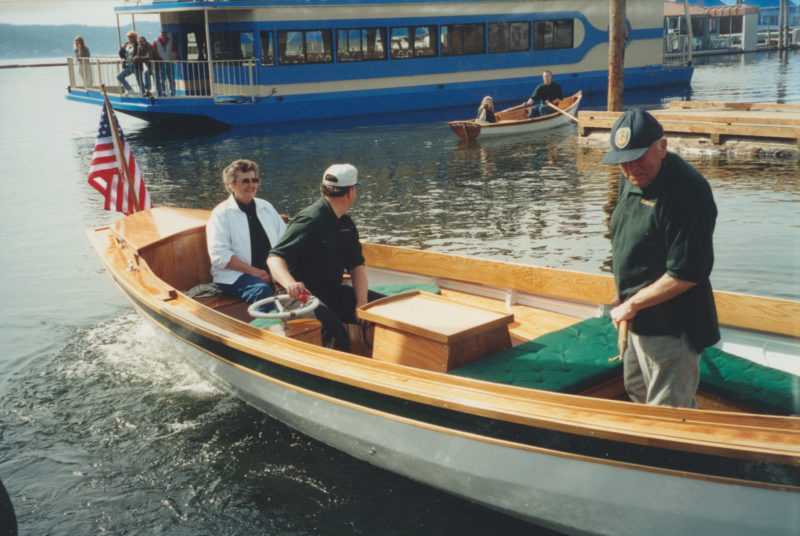
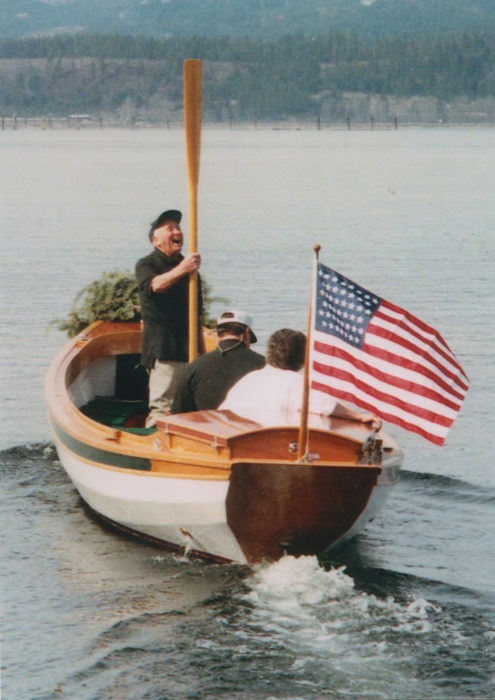
To celebrate the ground-breaking ceremony, the CWB shop relaunched one of the Center’s eight Blanchard Junior Knockabouts. Lead Boatright Bradley Suedekum (at left in the yellow PFD) directs the action. The new building will have room for a shop twice the size of this one.
The Wagners still live in their houseboat on the north end of the lake and I pass by it every time I’m paddling or rowing to the Center, ever grateful for my friendship with Dick and for what he and Colleen have done for the wooden boat community.
Dick Wagner, now in his mid 80s, remains active at the center he founded 39 years ago.
We’re pleased to have you aboard Small Boats Monthly as we greet the New Year. This issue is number 17 and we’ve been pleased with the response to this recent addition to the line of WoodenBoat publications. Many of you have been surprised to learn that SBM is bicoastal. The crew at the WoodenBoat offices in Brooklin, Maine, is, of course, the driving force behind SBM; I live and work in Seattle, Washington.
While I was born on the West Coast, my connection with wooden boats has East Coast origins. My grandparents on my father’s side lived in Lowell, Massachusetts, and I spent many summers there and at Marblehead. Some of my earliest memories are of sailing outside of Marblehead Harbor aboard MOLLY MAY, my grandfather’s wooden cutter. Hanging above the mantle at the Lowell house was a painting of NEWSBOY, a brigantine built in 1854 at Owls Head, Maine, for my second great grandfather, Frederic Cunningham and my second great granduncle, Charles Dabney, Jr. Several wooden half-hulls of boats in the family also graced the living-room walls.
The home I was raised in is in Edmonds, Washington, and walking distance to the shores of Puget Sound. My father always had wooden boats and would often say about them: “Every aspect pleases.” He kept a 27′ Tumlaren sloop at the Edmonds marina, and the rest of his fleet—a Herreshoff Amphi-Craft, a skin-on-frame rowing wherry, a wood-framed Folbot, and several Pocock racing shells—was scattered around the yard, hung from rafters in the garage, and stuffed in the crawlspace under the house. I grew up earnestly believing that wooden boats were not only necessities in life but also good for the soul.
In this new column, “From the Editor,” I’ll be making notes about changes to SBM, new developments in the topics we’ve covered, events we’ll be attending, and other items that we hope to be of interest to you. If you’re reading Small Boats Monthly, you likely share an affection for wooden boats and we hope you’ll find food for the soul here.
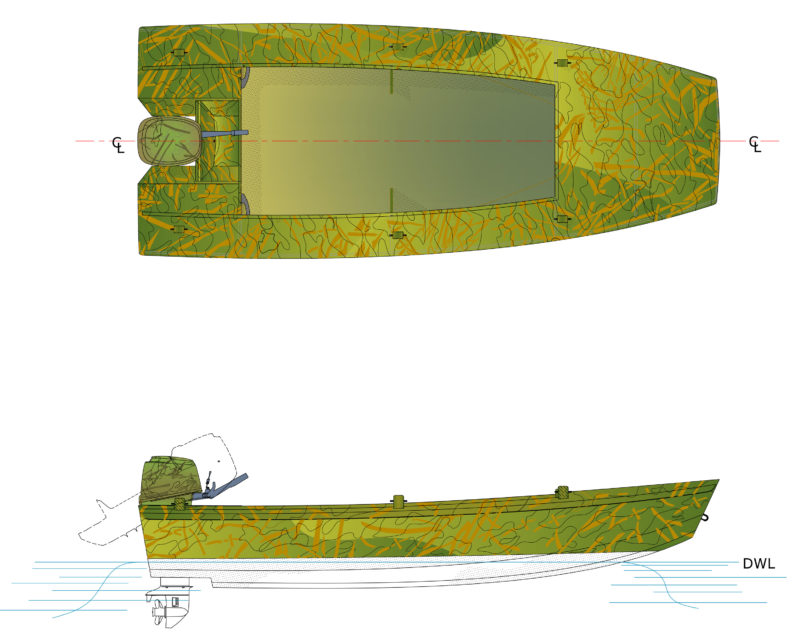
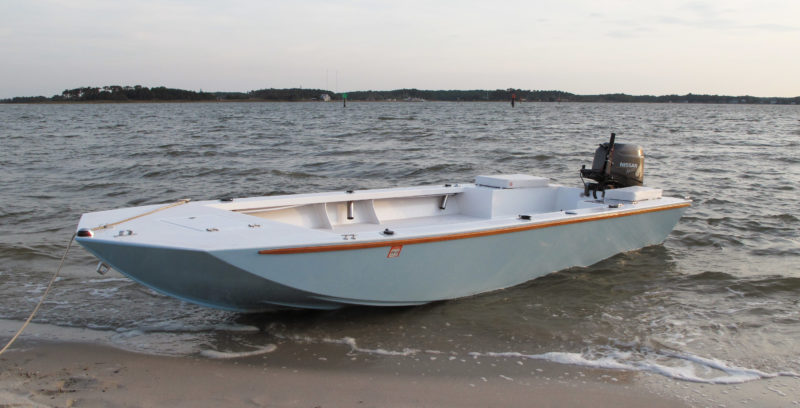
Sam Devlin’s Cackler wears camo well, but if hunting’s not your thing, it can easily take on a different look and different duties: Its 14′4″ garvey hull and unobstructed cockpit are eminently adaptable. Sam recalls: “I did the original work on the Cackler design years ago—about 1984—and did the design as a combination shop skiff and hunting skiff. The evolution was directly from my other duck-boat designs, with higher freeboard but retaining the decking that gives the reserve buoyancy and seaworthiness. A garvey-type hull allowed easy walking off the front of the boat when beaching, and effectively gives a larger volume to the interior without additional and unusable length. With the first one built I knew, in my humble opinion, that I had a winner.”
The Cackler I spent some time with was built at Devlin Designing Boat Builders for one of Sam’s regular customers, John Heater, a 95-year-old Bainbridge Island, Washington, man who has owned four other Devlin boats ranging from a 9′ 6″ skiff to a 31′ cabin cruiser. “In his more than 25 years of owning Devlin boats, John’s boating needs have changed over the years,” writes Sam, “and with this latest build he really wanted a small and fast boat that would be seaworthy enough to keep him aboard in all kinds of weather and conditions and would allow him to explore the Puget Sound waters around his island home safely.” Meant to be seen and enjoyed rather than concealed in the marsh, John’s boat looks good in gleaming dress whites.
photographs and video by the author
At rest, the Cackler offers a stable platform for fishing or hauling pots.
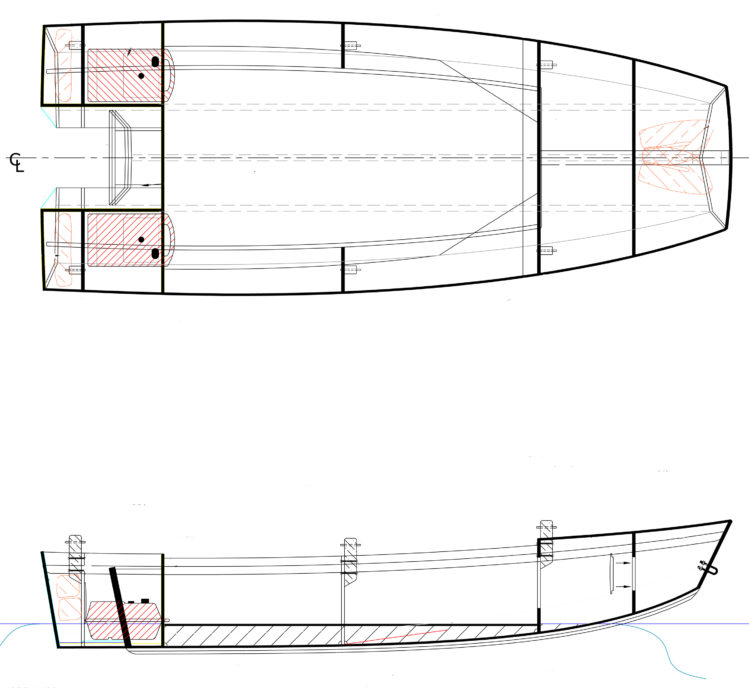
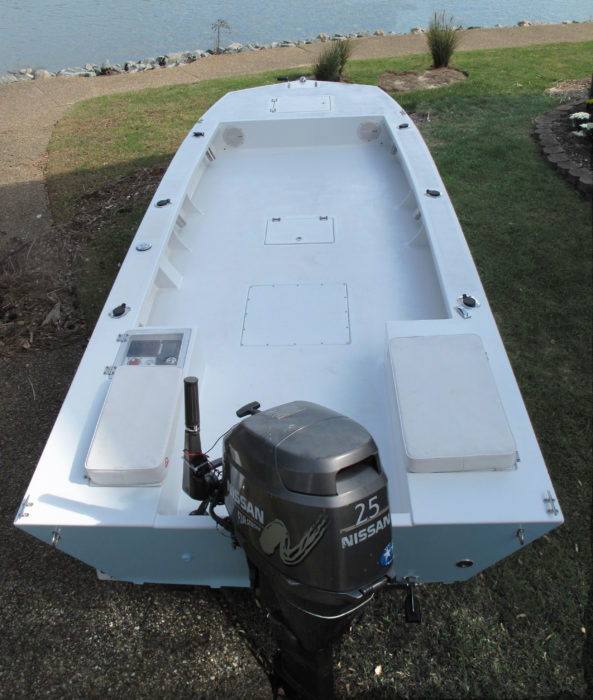
The Cackler, named after a species of goose with a distinctive call, has a simple garvey hull—two bottom panels, two side panels, and two transoms. Parts are CNC-cut from 1⁄2″ and 3⁄4″ BS1088 marine plywood, joined into full-length panels with interlocking puzzle joints, and assembled in the stitch-and-glue manner that Sam developed for all of the boats he has designed. The hull has a shallow-V bottom from bow transom all the way aft, and a pair of 1 1⁄2″ × 1 1⁄2″ bilge keels stiffen and protect it. A pair of wedges added at its trailing edge help keep the bow down when running at full speed.
There are three options for mounting the outboard motor: directly on the transom (the option offering the best speed), on the bulkhead at the forward end of the aft deck, or on a mount installed halfway in between. If there’s any fussing to do with the outboard, having it mounted in one of the forward positions provides a place to work on it without hanging out over the stern; according to Sam, this position also offers a profile less apt to make waterfowl nervous—especially late in the hunting season. The boat shown here was built to have the motor mounted in the middle. The arrangement provides a compartment between the mount and the bulkhead for a battery to power the electric starter.
Two 6-gallon tanks each have their place under the aft decks. The scuppers at the aft end of the cockpit sole drain water into a splashwell.
Under the decks in the aft corners are two compartments designed to take a pair of 6-gallon fuel tanks. Aft of those compartments are enclosed buoyancy chambers accessible through watertight deck plates mounted on the vertical bulkhead at their forward ends; inside each flotation chamber are two or more Type II personal flotation devices (PFDs). They’re strapped up against the deck, keeping them from sitting in any water that might find its way into the compartment. The PFDs provide readily available and inexpensive closed-cell foam to meet a Coast Guard requirement for positive flotation. Sam had tried other types of foam in the compartments—two-part pour-in foam and blocks of solid foam—but neither would survive an accidental exposure to gasoline. There’s a third buoyancy chamber under the foredeck that contains another four PFDs. A storage area aft of that chamber occupies the remaining space under the deck.
The plans call for six 2″ × 3″ hardwood bollards set around the cockpit coaming, a versatile arrangement for a workboat, but John’s Cackler has a full complement of stainless-steel deck hardware, including a single stout bitt bolted through the foredeck and into a broad carlin and a wooden backing plate.
The folding chair is the owner’s concession to comfortable seating. When not in use, it tucks under the foredeck, out of the way.
The 8′-long cockpit sole is unobstructed. Limber holes forward and aft keep the water from accumulating and let it flow aft to a splashwell just forward of the motor mount. The water can be pumped out while the boat is afloat or drained when it is hauled out and the transom stopper pulled. The coaming is a couple of inches wide and can serve as a perch for the helmsman, though John, understandably, likes the comfort of a padded folding chair. In 2015 he asked Sam to rig his Cackler for wheel steering. “He loves the change;” Sam writes, “he doesn’t have to sit sideways to run a tiller and he can more easily keep his eyes on the waters ahead.”
John’s Cackler has a bright white Awlgrip finish that’s so smooth and glossy it would be easy to think the boat was built of fiberglass and gelcoat, popped out of a production mold, and buffed to a high shine. Along with the sparkling hardware, it’s a far cry from the olive-drab and camouflage paint jobs the hunting versions get.
The Cackler banks into turns, keeping its place underneath the crew.
A 25-hp, four-stroke Yamaha provides the power for John’s boat; the Cackler will take up to 35 hp. The recess in the stern limits the turning range for the motor, but probably only a hair more than the 35-degree swing to either side that’s built into the motor. I wouldn’t expect better maneuverability: At low speeds with the tiller hard over, the Cackler did 360s within a boat-length radius. With a quick twist of the throttle to full power, the boat gets up on plane in 3.5 seconds. Push-button trim on the outboard adjusts the attitude of the boat for optimum speed. With just me aboard, I peaked at 22.2 knots. In turns, the boat banks without surprises, and I never felt that the hull was moving out from under me. The wide bottom offers a feeling of stability at speed and at rest.
When I cut the throttle suddenly and coasted to a stop, the wake would catch up and nudge the stern, but none of the slop washed aboard. I found backing a bit tricky. The shallow-V underbody doesn’t offer much resistance to lateral movement and once the bow gains some sideways momentum, it keeps drifting. Putting the tiller hard over to counter that only makes the boat sideslip. With more weight forward, the bow would have more water to reduce the lateral drift, and with more practice I’d learn to steer with a bit more finesse, avoiding the oversteering that’s likely the source of the problem.
Designer Sam Devlin puts the Cackler up on plane on Eld Inlet, his home waters at the south end of Washington’s Puget Sound.
You can order a Cackler with a host of options for hunting: a camo cockpit and engine cover, layout boards to give a hunter a comfortable seating position with a low profile, brackets for a cockpit blind, and a grassing skirt system to conceal the hull behind a fringe made of baling twine. If you opt to build a Cackler from a kit, you’ll get plans, instructions, and a 4′ x 8′ pallet with all of the plywood parts for the boat and for a building frame. Everything is accurately cut with a CNC machine, assuring that the boat goes together in proper alignment. Fiberglass, epoxy, and dimensional lumber can be purchased separately from Devlin Designing Boat Builders or from local sources.
If you’d like a larger version of the design, Cackler has big-sister designs: the 16′ Snow Goose and the 18′ Honker. You can ease into building a Cackler by reading Sam’s book, Devlin’s Boat Building: How to Build Any Boat the Stitch-and-Glue Way, and by ordering a 1/4-scale model kit. It has all of the same plywood parts as the real thing.
If you won’t be going hunting with a cockpit crowded with hunters, dogs, and decoys, you can use a Cackler for lake fishing, salvaging driftwood logs, or even taking the kids water-skiing. You’ll have little trouble adding to the list.
Christopher Cunningham is the editor of Small Boats.
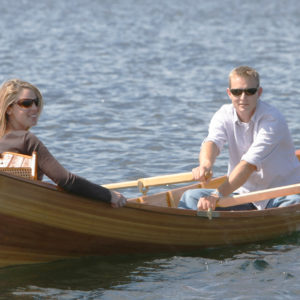
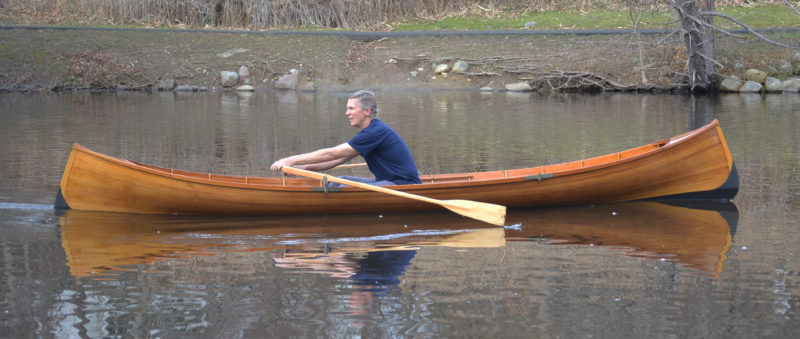
The Adirondack guideboat traces its lineage back to the 1840s and the water-rich, road-poor Adirondack region of upstate New York. The myriad lakes, streams, and rivers there required slim, shallow-draft boats that were fast, performed well in a wide range of wind and wave conditions, and were capable of carrying up to three people and their gear. They also had to be light enough for one man to portage. It was a tall order.
A number of builders created boats to meet the region’s needs, and a recognizable type developed. Double-ended with a strong sheer, it resembled a Native American canoe in profile. The guideboats were, on average, 16′ in length with a beam of 38″ and weighed 60 lbs. They were constructed with a plank keel—referred to as a bottom board—and closely spaced ribs sawn from spruce knees. Thin spruce or cedar planking was attached to the ribs with screws. The oars used with the boats were light with some flex, overlapping grips, and distinctive fixed-pin oarlocks.
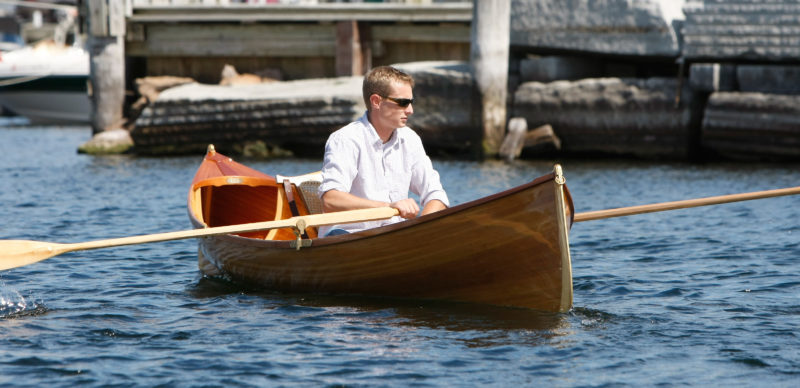
When Steve Kaulback, a self-styled “refugee” from New York City, built his first Adirondack guideboat in 1979, he wasn’t presuming to create a design that would eventually become one of the flagships of a guideboat revival; he just wanted to build a truly beautiful boat for himself. He had moved to Vermont in 1973, armed with little more than a Bachelor of Fine Arts degree from the Pratt Institute, and had no background in boating, much less boatbuilding. His older brother, Peter, had seen guideboats in Vermont and told Steve it was imperative to check them out if he ever got the chance. His chance came in the form of a vintage guideboat built by Warren Cole at Long Lake, New York, in the early 1900s. Not only did he get to see it, he got to row it. It was a life-changing experience. “It was the most incredibly beautiful thing I’d seen,” Steve said, “a perfect example of form following function. I knew I simply had to build a guideboat of my own.”
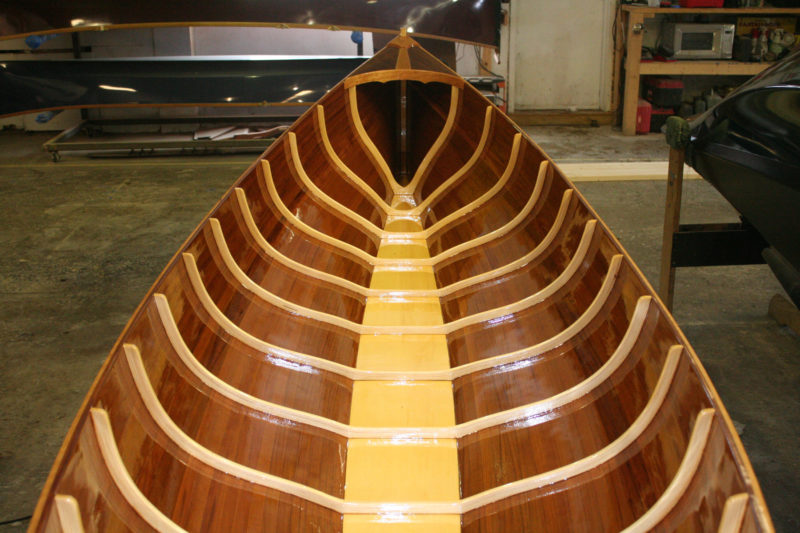
Adirondack Guideboat
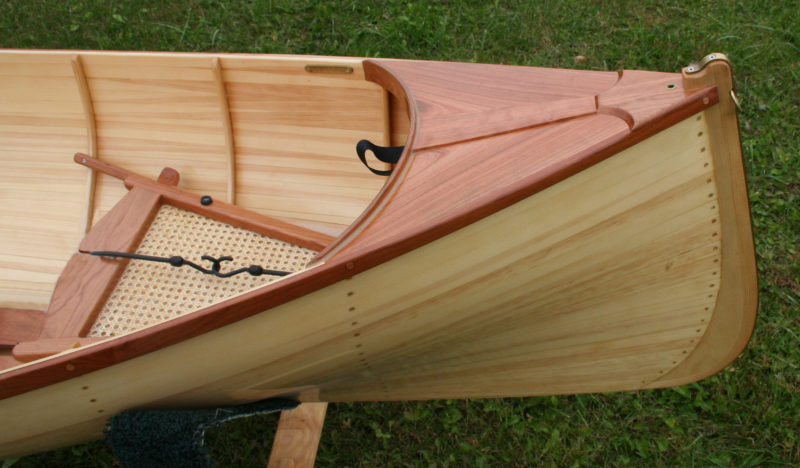
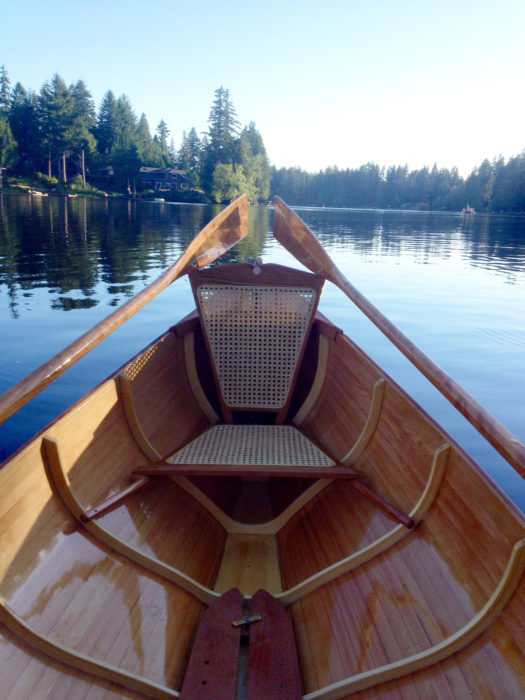
The backrest for the center seat is supported by leather straps with brass buckles. The holes in the floorboards anchor adjustable foot braces.
Plans were not available then as they are now. Atwood Manley’s Rushton and His Times in American Canoeing included the lines and offsets for Rushton’s Saranac Lake guideboat. Steve built a nicely crafted wood-strip version, and it was closely followed by a second. While generally pleased, he found the Saranac Laker had two drawbacks: Its narrow bottom-board rendered it too tender, and the straight keel made turning arduous. Examining John Gardner’s lines of Dwight Grant’s VIRGINIA, published in 1980 in Helen and Kenneth Durant’s The Adirondack Guide-Boat (and later in Building an Adirondack Guideboat by M. Olivette and J. Michne), he deduced that VIRGINIA’s wider bottom-board (slightly over 8” amidships) and hollowed deadrise in the garboards and broad strakes would offer better stability. Its rockered keel would have better maneuverability. Steve’s third guideboat incorporated these features and while its stability was indeed much better, turning was only marginally easier. In his fourth boat, Steve increased the rocker to about 1 1/2″, and that became the standard for his later guideboats.
Peggy Neil
Paul Neil, in an AGC guideboat built by Steve Kaulback, shows the rowing form that has taken him to scores of wins in rowing races.
Steve proceeded to build guideboats to order, and, with only a few minor alterations, this is the wooden boat still built today by the business he founded, the Adirondack Guideboat Company (AGC). Brothers Justin and Ian Martin now own the company and build guideboats in the traditional style as well as in a Kevlar composite. If you’d like to build your own, AGC offers kits for boats with lengths from 13′ to 19′.
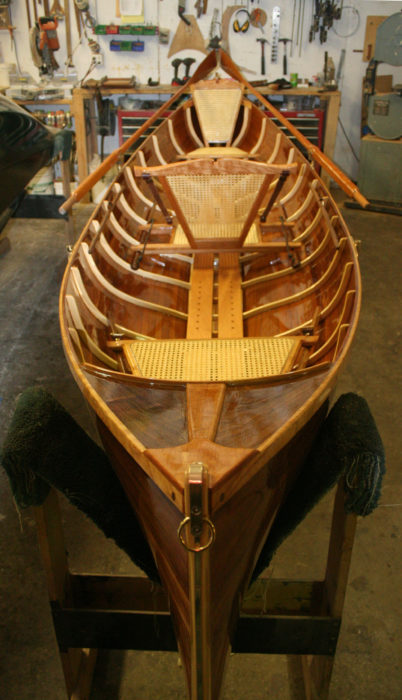
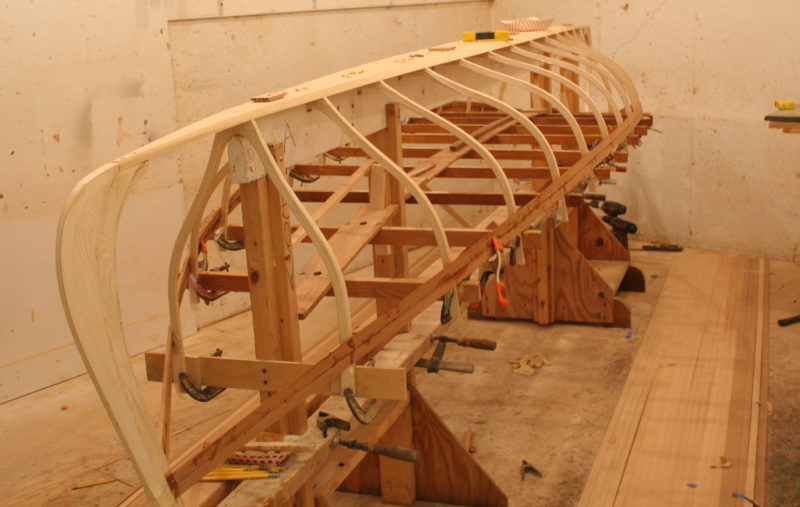
The construction of AGC’s boats closely mirrors how guideboats were built in the latter 19th and early 20th centuries; early builders Warren Cole and Dwight Grant would need little explanation for what they would see. The woods used are the same as for the originals—spruce for the stems and frames, pine for the bottom board, and cedar for the planking. The stems and frames are now laminated spruce, not natural crooks. The planking is still 5/16″ cedar, but cut into uniform 1″ strips, not shaped strakes ranging from 2 1/2″ to 4″ in width. The bottom board remains 3/4″ pine.
Adirondack Guideboat
After the ribs are fastened to the bottom board they’re braced with cross spalls that establish the sheer line.
The shape of the guideboat, then and now, is established not by molds, but by attaching the stems and frames to the bottom board with brass screws. Most of the frames in the AGC boats are continuous from gunwale to gunwale; only the last frame at each end is in halves lapped across the bottom. The traditional frame spacing was 4″ to 6″—the maximum distance the strength of the natural crooks would allow. The laminated frames are much stiffer and stronger and are set 11 1/4″ apart. A 15-footer can be built with 13 laminated frames as opposed to 26 pairs of lapped sawn frames. This saves time, material, and weight.
Adirondack Guideboat
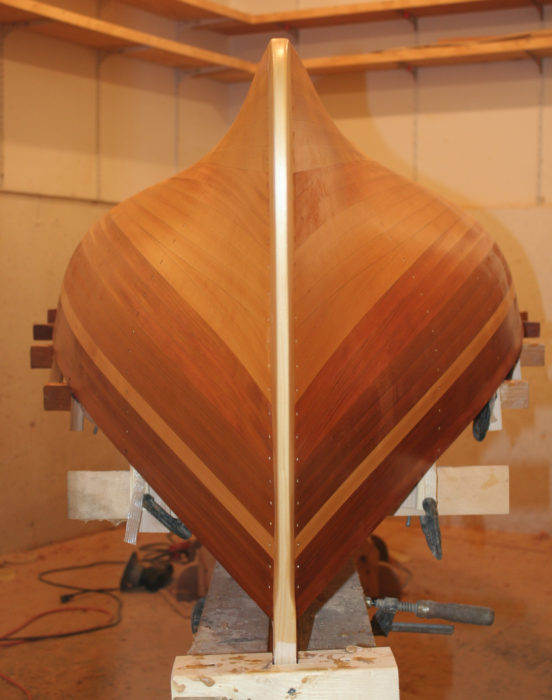
About a dozen strips run parallel to the sheer, and a half dozen parallel with the bottom board. Another half dozen split the difference in between. Wedge-shaped stealers fill the resulting wedge-shaped gaps at the stems.
The original boats were a variation on lapstrake planking. The overlapping strake edges were beveled to bring the planks flush with each other. The absence of external laps reduced the weight of the completed boat, and the smooth exterior slid through the water much more quietly. This stealthy quality was highly valued by sportsmen after the more elusive species of fish and game.
Adirondack Guideboat
The caned seat backs have snap-apart brass hinges and can be folded down or easily removed.
Strip-built boats produce smooth hulls whether the strips are sawn with square edges or milled with mating beads and coves. At AGC the strips are cut with parallel beveled edges. As each strip is applied to the frames, its gunwale-side edge tucks under and locks against the edge of the previously installed strip, providing a tight fit and a fair hull. The edges of the strips are given a coat of thickened epoxy just before installation; small, specially designed brass screws hold each strip to the frames and stems. True to traditional construction, AGC’s strips terminate in rabbets cut into the stems rather than running past an inner stem, to be trimmed and then capped with an outer stem.
Adirondack Guideboat
The ribs start as thin but wide strips of spruce. They’re steamed and clamped around a form; after they’ve dried, they’re removed for an application of epoxy, then clamped back on the form until the epoxy cures. Each completed lamination yields five ribs in the thickness shown here.
The hull is thoroughly sanded smooth inside and out. The interior is treated with four coats of epoxy followed by four coats of varnish. The exterior gets a layer of 4-oz fiberglass and epoxy. After the weave is filled with three more coats of epoxy, the hull is sanded smooth and finished with three coats of varnish or an application of high-quality marine paint.
Spencer Leonard, www.spencerleonard.com
The oarlocks for the guideboat don’t allow feathering but will let the oars trail at the ready whenever the rower needs to tend to a fishing rod.
The AGC boats met and exceeded my expectations of a guideboat. They handle a variety of loads well and safely under a range of conditions—dead calm up to truly challenging. I’ve rowed several of AGC’s guideboats, both cedar and Kevlar, and am most familiar with the 15′ version.
Throughout the history of guideboats, people have described them as “cranky.” The boats feel tender and present some challenges in adapting to a style of rowing unfamiliar to most. I won’t contest this—that was my initial impression, too. Trusting that patience is a virtue often rewarded, I elected to stay the course and let the boat teach me rather than trying to master it based on my experiences with other, very different small rowing craft. I’m glad I did.
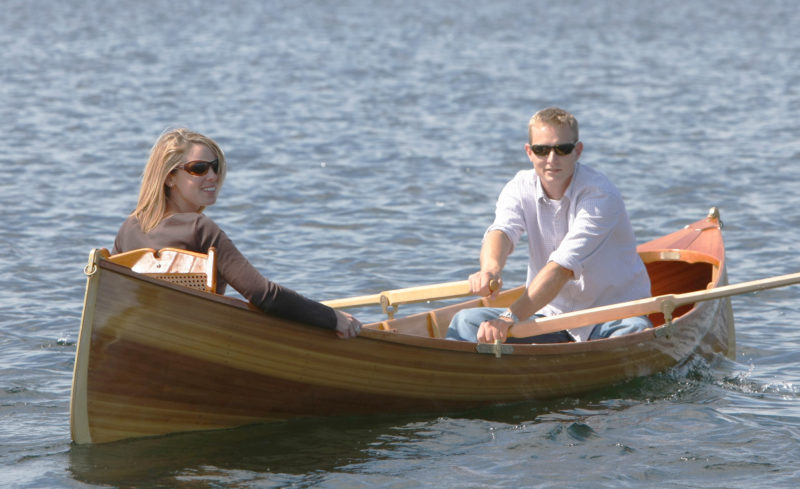
Guideboats have two rowing stations but are intended to be rowed by only one person. The amidships station is used for rowing solo or with two passengers and a goodly load of cargo. The passengers sit in the bow and stern seats, and duffel, evenly divided, is stowed in the bottom at their feet. The forward rowing station is for carrying a single passenger seated in the stern. If duffel is carried, it’s stowed between oarsman and passenger.
Traditional guideboat oars are used in locks with fixed pins through the loom. The oars are non-feathering, and the length of the loom inboard dictates that the grips overlap each other. This requires the oarsman to row with one hand held forward of the other and the after hand held a bit higher. This takes some getting used to but provides exceptional control of the boat once mastered. The oars I used were 8′long, flat-bladed, with about 8″ overlap.
Adirondack Guideboat
The seat backs have projections at the top corners to catch the oar blades when they’re rested out of the water.
All of my experiences of getting aboard guideboats have been from docks. I rapidly learned to place my weight squarely in the center when getting in and gain my seat as smoothly and quickly as possible. Once centered in the boat and with oars in hand, I immediately sensed the boat settling in the water, and the tenderness I felt getting aboard diminished. Getting underway is best accomplished with short, smooth, even strokes. Once the boat was moving I never felt any lack of control.
Spencer Leonard, www.spencerleonard.com
Guideboat builder Justin Martin takes Erin out or summer row on the occasion of their engagement. She has her backrest up for comfort; Justin has his down for rowing.
My rowing with a load aboard has been limited to a single passenger weighing about 150 lbs and just a few pounds of duffel. The main challenge was encouraging the passenger to get used to the motion of the boat and sit still; that would relieve me of having to adjust my own balance and stroke style every time a nervous passenger squirmed to a different position.
My excursions have been in conditions ranging from calm to swells and up to a sharp chop with wind and some confusion between tidal currents and powerboat wakes. The guideboat’s stability in uneven water was excellent, and its response to my strokes crisp. I easily maintained headway and heading.
My shortest excursions, both solo and with a passenger, were about an hour. One 2 1/2-hour outing included a passenger. My longest “voyage” was more than 4 hours long with one coffee break; I averaged just over 4 knots.
I can hardly claim to have “wrung the boat out to its max.” Far from it. But the AGC boats have given me a sound basis from which to appreciate this design’s potential and to find credible the many reports of stellar performance under extreme circumstances and a rather incredible number of wins AGC boats have racked up in many competitive venues. This design is a real winner, as enchanting to look at as it is to row.
Rodger Swanson was introduced to traditional rowing 45 years ago and has never looked back. He owns the Swanson Boat Company in Windsor, Connecticut, a small business devoted to boatbuilding and rowing accessories. His company is the sole remaining marine tallow producer in North America.
Particulars Length: 15′
Beam: 40 1⁄2″
Stem height: 24″
Depth at center: 12″
Capacity: up to 550 lbs
Weight: 70 lbs
Lines for the 15′ guideboat as drawn by Steve Kaulback
The Adirondack Guideboat Company offers finished boats from 13′ (53 lbs) to 19′ (88 lbs) in 1′ increments for $14,960–$18,040. (Dimensions above vary depending upon boat length.)
The AGC cedar guideboat kit provides all of the wood and metal parts needed to build the boat: pine bottom board, cut and beveled cedar planking, spruce stems, laminated spruce ribs, cherry seats, gunwales, floorboards and decks, brass rowlocks, oarlocks, brass stem bands, and soft maple oar blanks. In lengths from 13′ to 19′, priced at $3,800–$5,100.
Is there a boat you’d like to know more about? Have you built one that you think other Small Boats Monthly readers would enjoy? Please email us!
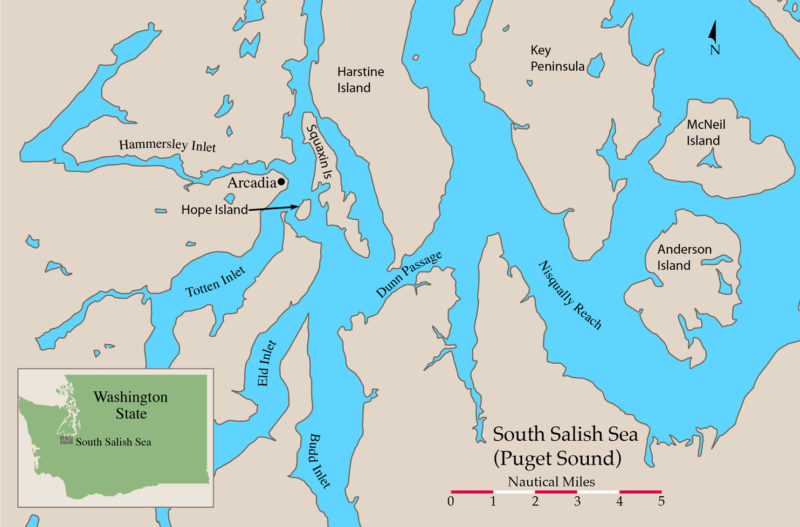
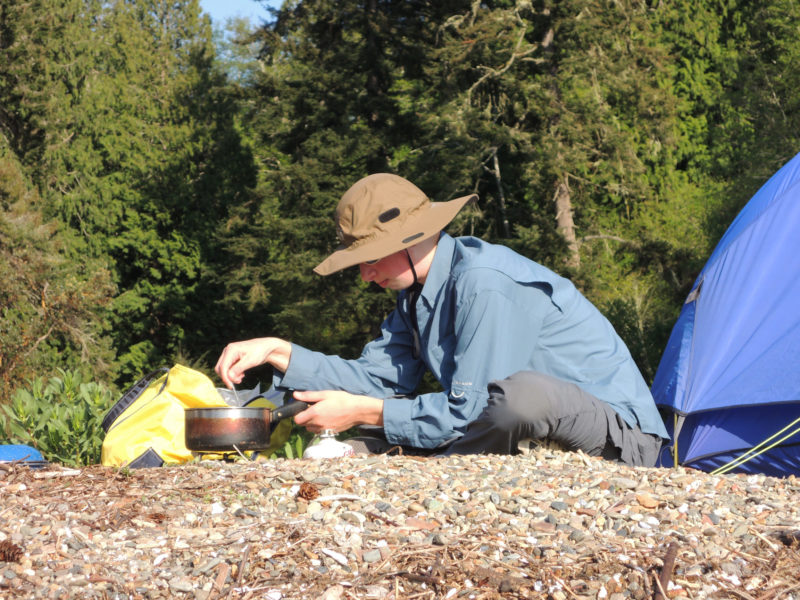
The boat ramp in Arcadia, Washington, lies at the end of a quiet road where a handful of modest houses nestle among cedar, fir, and alder trees. I stood on the ramp’s sloping cement with my 15-year-old son, Merry, looking out at this southern edge of the Salish Sea. To the east lay Hope and Squaxin, two tree-clad islands scarcely more than a half mile from the Arcadia shore, with the snow-topped peak of Mount Rainier hovering above them in the distance.
all photographs by the author
As Andy approached Anderson Island, Mt Rainier seemed to float above the clouds. This section of the Salish Sea is lightly settled and less traveled than areas closer to Seattle.
We had left our Portland, Oregon, home the day before, driving 100 miles north to this hamlet, the launch point for a three-day camp-cruising expedition with our friends Andy and Tim. Our plan was to explore Hope, Squaxin, and Anderson islands, camping at sites along the Cascadia Marine Trail, a network of access points for non-motorized small craft. I’ve sailed and paddled this region many times, yet I’ve seen only a fraction of its many nooks and crannies, so each trip is a chance to see something new.
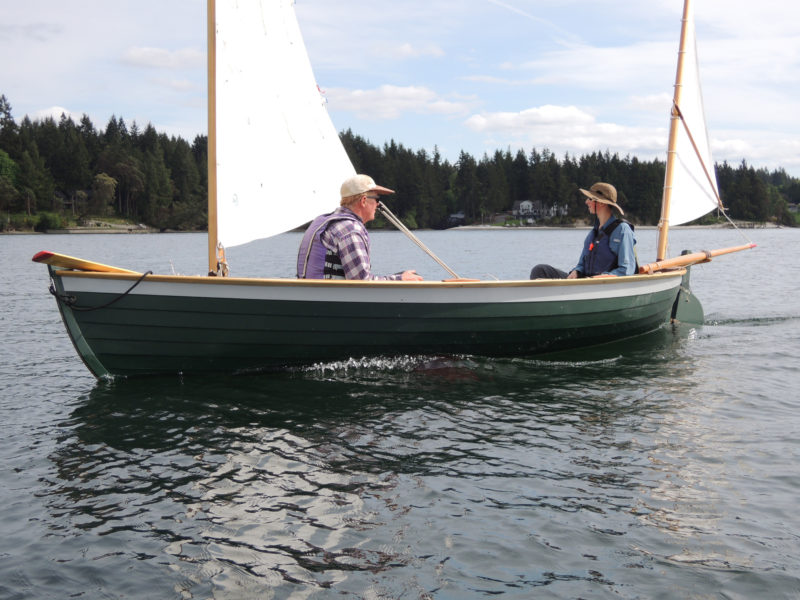
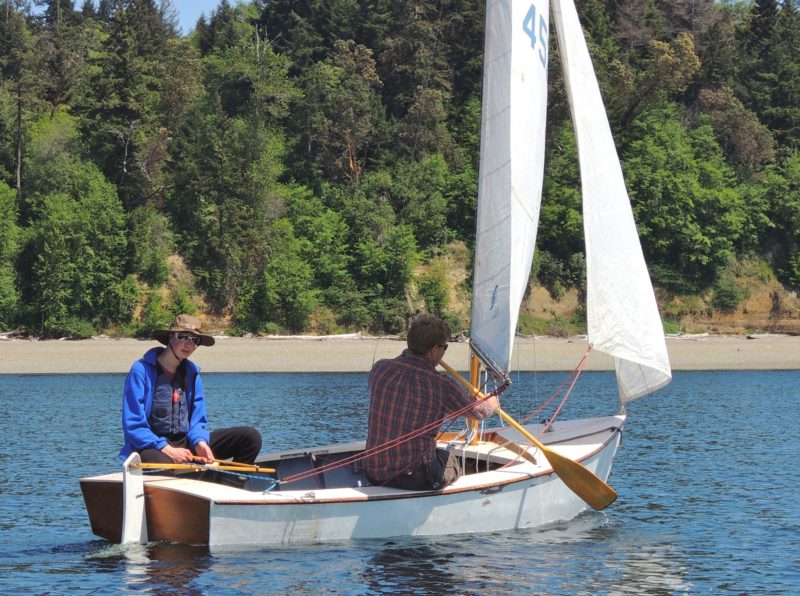
Merry and I were first at the ramp with ROW BIRD, our 18′ Iain Oughtred Arctic Tern. Soon after, Andy arrived with his 17′ Antonio Dias–designed Harrier, WILBUR LARCH, but by one o’clock, Tim had still not appeared. Figuring that he’d catch up with us at our campsite, Andy, Merry, and I loaded the boats and launched. We were bound for nearby Hope Island State Park, but we began with a side trip into Totten Inlet, which transitions along its winding 9-mile length from a shore crowded with homes to a quiet, muddy backwater. I was pleased when Andy invited Merry aboard WILBUR LARCH. My son would get the opportunity to take the helm of a new boat and to learn the finer points of sailing from someone other than his dad.
Andy, a parent himself, was a good mentor to Merry, listening more than he talked and offering tips rather than lectures. Merry found the Harrier to be faster, more responsive, and tippier than the Arctic Tern he was used to.
When we started out from Arcadia, the wind was a relaxing wisp, barely requiring a hand on the tiller, but over the next hour it rose, and ROW BIRD’s speed increased from quick to heart-pumping. Bouncing through chop, pushed on by a few big puffs, I tightened my grip on the mainsheet. It was satisfying to watch the concentration on Merry’s face as he adjusted WILBUR LARCH’s course and sail trim to accommodate the changing conditions.
As the sun started getting low in the sky, we headed for our campsite. The many headlands and inlets here disperse breezes, contributing to the area’s reputation for fluky conditions and extended periods of calm. Aware that the breeze might die at any moment, I savored a few long tacks before heading in. Andy and Merry rowed directly for shore though, and when I finally arrived at the island, they were already setting an anchor for the night.
We lugged our gear into the dense evergreen woods, where we found the campground deserted. There were picnic tables at the campsites, but when we returned to the beach, the view of the clouds, now glowing pink with the setting sun, was so striking that we decided to cook dinner right there. Just as we were savoring our last bites, a sailing dinghy came zipping near the shore. Merry was the first to recognize its sole occupant: “It’s Tim!”
Tim dropped sail as he drove his 13′ Sparkman & Stephens Blue Jay up to the beach and stepped confidently ashore in street shoes. The rest of us, in our knee-high rubber boots, were impressed by his insouciance. I wondered how Tim’s lightly built racing vessel would fare as we got into more exposed waters, tidal currents, and areas of heavier air.
Hope Island State Park’s primitive campground and lack of dock make it a quiet stopover for small, beachable boats.
The next morning Andy and I stood on the shore, mesmerized by the reflection of the dawn sky in the dark blue waters between Squaxin and Hope islands. For a dream-like moment it seemed as though the sea and sky were one; that speaking a single word might make the whole scene disintegrate. And where was my teenager during this ethereal moment? Asleep in his tent, lost to the magical world around him.
The offer of a hot breakfast got Merry out of his sleeping bag, and yet sleep still clung to his eyes 45 minutes later, when we were all finally loaded and ready to go. The water was smooth and glassy as we pulled away from the shore; it looked like it was going to be a slow, 10-mile row to Anderson Island, our destination for the night. I watched Merry relax in the stern, then sit up, his attention attracted by a seal that was following us. It was clear to me that, despite his reluctance to rise this morning, my son was happy to be here on the water with me.
You can’t make someone else love boating, even if you really want to, and I’ve been careful not to force it upon my boys. Years ago, many an afternoon on the water was cut short when our sailboat heeled over, alarming a then much younger Merry, who would scream, “We’re going to die!” What I considered fun knot-tying exercises at home were greeted with groans of boredom from him and his brother. But while my younger son has never cared much for the water, Merry gradually lost his fear of boats and developed a spark of interest, one I’ve tended carefully.
We do most of our boating close to home, on the Willamette and Columbia rivers; but over the years, I talked up the allure of saltwater sailing, imbuing it with a sense of mystery and magic, describing to Merry the fascinating creatures, challenging conditions, and delicious food I encountered on my trips. Eventually, it worked, and three years ago, he decided to join me and some friends on an annual pilgrimage to the Salish Sea, which spans the inland waterways of Washington State and British Columbia. Each spring since then, Merry and I have found ourselves a quiet place to sail, row, and camp. We enjoy each other’s company on these expeditions, and I always hope he’ll learn something too. Still, I try not to be didactic. The experience of cruising—traveling with other boats, sorting out tides and weather, and outfitting the boat—is enough to impart the lessons of sea lore and to foster what I hope will be a lifelong love of boats.
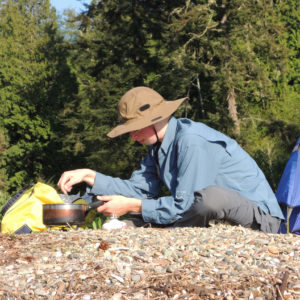
At home, Merry’s no fan of cooking, but in camp and near the water, he’s happy to oblige. Isobutane canister stoves nicely balance convenience and safety on shorter trips.
As I rowed, I scanned the water ahead for signs of currents. One crossed our course, and pulled us toward a mooring buoy. Merry watched the current swirl around it, a sure sign that, despite the seemingly still conditions, a lot of water was on the move.
The wind was so variable that we found ourselves frequently switching between sailing and rowing. Although we weren’t racing, Merry and I watched our companions’ choice of sail or oars closely.
During a lull in the wind, Merry and I skimmed along under oars in the clear, still waters near shore, looking for marine life. We spotted moon snails as big as grapefruit, golden sea stars, and plumose anemones with their feathery tentacles. Our best sighting was a hefty maroon rock crab scuttling through clumps of seaweed. Its stout claws looked large enough to make a tasty meal. Merry has always loved looking for wildlife, and even at the age of 15 he maintains the endearing belief that he’ll be able to snag dinner with a long stick. As in past years, he tried and failed to even touch the crab, let alone capture it, but that didn’t diminish the fun of the hunt for either of us.
Untethered from his smart phone, Merry became increasingly absorbed by the natural world all around, especially by a large crab he hoped to snare for dinner.
The weather radio had forecast 5 to 10 knots of wind from the north, but the warm air was mostly still. In his light, simple boat and with his experience racing his sailing skiff, Tim was our pacesetter. Andy’s boat was lighter and sleeker than ours, and he frequently took the middle position. Despite the weak winds, conversation on our boat was cheerful. With 4 miles to go until we reached Anderson Island and a good six hours of daylight remaining, there was no reason to rush. Merry and I set out nuts, fruit, and sandwich fixings on the side benches and prepared to nosh. “This,” I said, basking in the sun, “is what a cruise is all about.”
As we ghosted along I persuaded Tim to come aboard ROW BIRD to fix a persistent crease in my balanced lug mainsail. Merry boarded the Blue Jay. While I leaned lazily against the mizzenmast, Tim lay on the foredeck, adjusting the downhaul, outhaul, and lashings on the tack. Tinkering is what he likes best about sailing.
Merry, at the Blue Jay’s helm, beamed like a teen given the keys to a new car. Oblivious to the peeling paint and the water sloshing beneath the floorboards, he kept a grip on the tiller and tugged on the mainsheet, excited to chart his own course. Tim and I kept an eye on him, occasionally offering sailing advice, and contentedly cruised along, if slowly, toward our destination. Halfway to Anderson Island, the wind ceased, and brought an end to our sail tuning. We’d need a more serious breeze to determine whether Tim’s doctoring had made a difference.
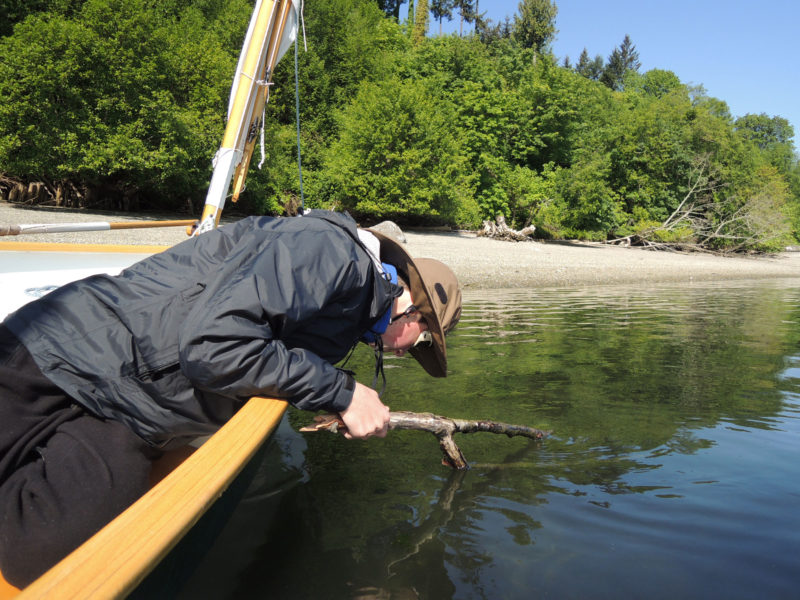
I’d installed an extra oarlock on the aft, port side of ROW BIRD to use with an oar for a makeshift rudder or to use for sculling. I’d never been able to scull effectively, so I asked Tim to demonstrate.
Even with an extra boat in tow, Tim’s sculling produced enough power to move us steadily along. He taught me that the oar must dig deep into the water to be effective.
He set an oar in the oarlock, and began making a graceful swaying, figure-eight motion. ROW BIRD slipped forward at about a knot and a half, and we left Merry behind. He was in no danger, but I felt a slight pang at watching my son recede into the distance. So we looped back; I grabbed the Blue Jay’s painter and took Merry in tow as Tim sculled. All was well until the blade of the oar broke off at the throat.
We were a mile from shore, with no wind. We could scull with the other oar to Anderson Island, but I worried about making tomorrow’s 10-mile trip back to the launch ramp with a single oar. Smiling, Tim hopped into his boat and pulled out a pair of clunky 9′ oars. He handed them to me and took back his painter. They were heavy ash workboat oars, but I was glad to have them.
“But how will you get to shore?” I asked.
Tim laughed and pulled out a paddle. Sitting atop the rail, he began to propel the boat forward while Merry handled the sail and rudder. My son grinned, clearly soaking up Tim’s make-do attitude and paddling skills. The Blue Jay was now moving through the water almost as swiftly as I was able to row ROW BIRD.
A canoe paddle can make an effective and easily stowed auxiliary means of locomotion, especially for a boat as light as a Blue Jay.
An hour later, we reached the shallow cove at the nature preserve where we intended to camp. Andy had arrived before us and was relaxing at anchor aboard WILBUR LARCH, a book in hand. Surprised that he hadn’t pulled ashore yet, we soon realized that he was waiting for the flood tide to rise enough to allow us to set our boats above a line of barnacle-covered cobbles.
Ashore at Anderson Island, the crew enjoyed basking on the smooth round stones that had soaked up the sun’s warmth.
Merry and I looked for a clear patch of sand in which to drop our anchor, and we noticed that the bottom had a lumpy, purplish covering. Rowing into shallower water, we were amazed to discover that the odd-looking mass was composed of thousands of sand dollars. We had seen their bleached skeletons before, but were never lucky enough to see them alive with their velvety covering of tiny lavender spines.
We set our anchors and ran stern lines to the land so the boats would stay perpendicular to the shore, facing into any waves that might arrive. We checked the tide tables and positioned the boats so that they could be on the hard during the evening’s low tide, but would float again with the morning high tide.
After setting up camp, I drew in my sketchbook, Merry scavenged for kindling and prepared a bonfire, and Tim and Andy went for hike.
When we reconvened at our campsite late in the day, a rich, musty smell blew off the salt marsh behind us; stands of rusty red madrone and ancient Douglas-fir loomed over the hillside beyond. We sat by the fire, talking well into the night.
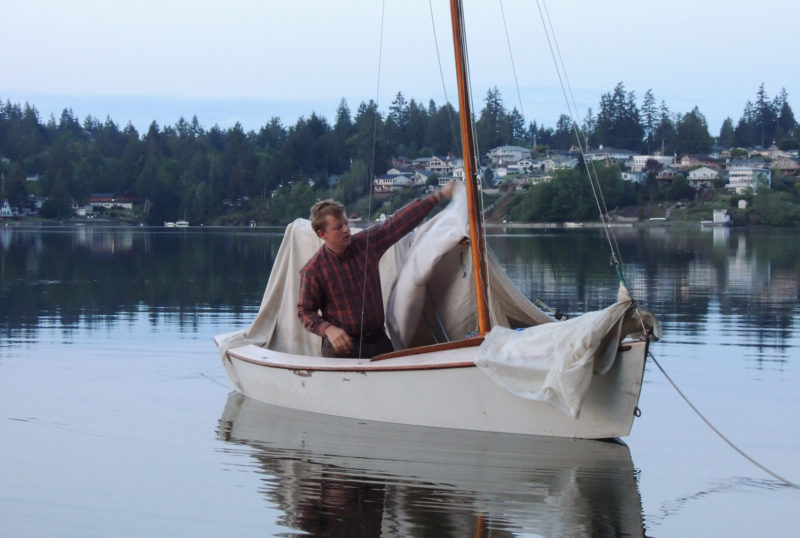
Mild temperatures and a scarcity of insects make this part of the Salish Sea ideal for camping. A canvas painter’s dropcloth made a simple, but effective cockpit tent for Tim’s boat.
We woke the next morning to clear skies and still air. After breakfast, we broke camp and packed the boats. Our best bet for a speedy return to Arcadia was to use eddies and tidal currents, search for pockets of breeze, and row—a lot. All morning, Merry and I traded off the oars and watched harbor porpoises and seals come and go. We talked about tide charts and how to read them, life at home, and the Maine peapod Merry was planning to buy. There was none of the teenage arguing and eye-rolling I’d become accustomed to at home. On the water, we simply enjoyed hanging out.
With about a mile to go, Merry noticed a patch of water darken some distance astern of us. He let the oars sit still in the oarlocks and watched the textured pattern, aware that it would bring an end to rowing. As it drew near, he enthusiastically grabbed the tiller while I hoisted the mainsail. A minute or two passed and then our sail bellied out and we were soon coasting along Hope Island, relishing the lightness and speed of the boat’s motion without our labor at the oars. Sunlight glinted off the water. The Salish Sea was empty of any craft but ours. We were homeward bound, but in a few weeks Merry would be launching his peapod. Next year, I was confident there would be one more sail in our fleet.
Bruce Bateau sails and rows traditional boats with a modern twist in Portland, Oregon. His stories and adventures can be found at his web site, Terrapin Tales.
If you have an interesting story to tell about your adventures with a small wooden boat, please email us a brief outline and a few photos.
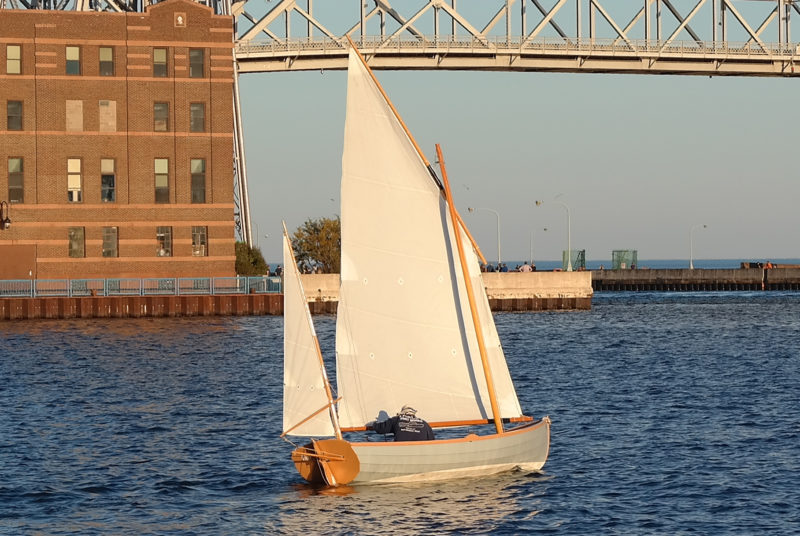
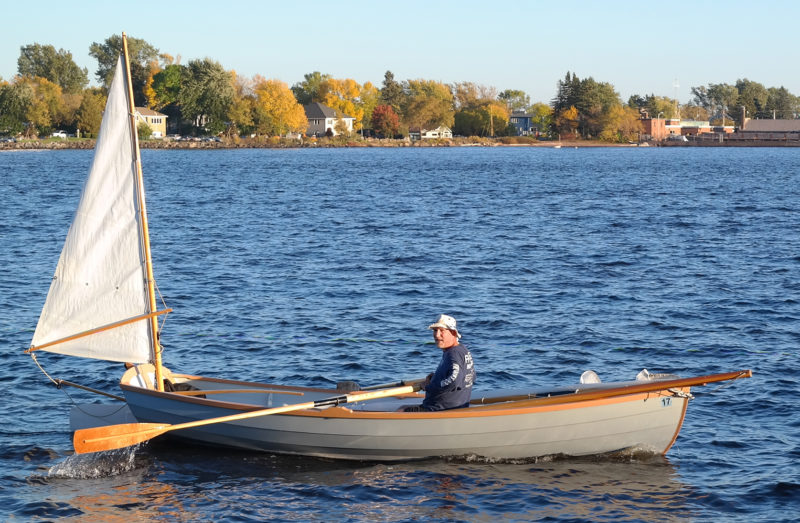
Author Dale McKinnon, in her sliding-seat equipped light dory, makes her way upwind.
Sailors want wind; rowers don’t. Rough water can be a challenge to a rower’s skills, but I’ve found a few techniques that can help you reach a safe haven when conditions on the water take a turn for the worse.
I had the first difficult row of my wilderness-rowing career 10 years ago in Wright Sound, British Columbia. I was into the third week of rowing my 20′ dory from Ketchikan, Alaska, to Bellingham, Washington, a distance just shy of 800 miles. Halfway across the entrance to McKay Reach I encountered swirling gale-force winds and waves coming at me from all directions. As my fear increased, my grip on the oars grew tighter. I was tiring quickly and my hands, forearms, and back ached. I knew that if I didn’t regain my composure and relax, fatigue would add exponentially to the danger I was in. To reach the safety of even the nearest lee I would have to conserve energy. I kept pulling and calmed myself. I loosened my grip and soon felt my body begin to relax. As my spine became less stiff, my hips could adjust to the wild gyrations of the hull. My head no longer swayed with every wave, and my growing dizziness subsided. My blades stopped getting slapped skyward off the tops of waves, and my tendency to “catch a crab” disappeared. I could feel the water on each blade and adjust more quickly to the waves’ erratic shapes.
Shorten Your Stroke In difficult seas you have control of the boat only when the blades of your oars are in the water. Many rowers believe, erroneously, that long, powerful strokes will get them through a clutch situation, but in a long pull, the blades are most effective in moving the boat forward through the middle 45 degrees of the blade’s arc. At the beginning and end of that arc they exert about as much outward or inward pressure as propulsive power. Long strokes also lengthen the time your blades are out of the water during the recovery and, if your boat is rocking, will have the oar handles flailing up and down during the pull. Shorten your stroke by a quarter to a half.
Relax As the wind gets stronger and waves bigger, it’s natural to grip the oars more firmly, but tightness in your hands will have a domino effect of tension through your entire body; you’ll lose the ability to accommodate your pull to the changing contours of the waves. Relax. If your hands are resting lightly on the oar handles, most oars are balanced well enough for the blades, when squared, to find their perfect level just below the water’s surface. Gripping the oars for dear life stiffens your arms and will result in missed catches and washed-out finishes.
During the recovery phase of the stroke, a tight grip will likely force the blades to plow into waves. The handles, driven both downward and forward can knock you off balance or even shove you off your seat. Feather your blades: If you clip the top of a wave, the blade will skip over it.
During the drive phase, a perceived need to exert extra effort and control may compel you to dig the blades too deep. The lower the blades dive, the higher your arms and hands go, reducing the power you can apply, the effectiveness of the oar’s arc, and the ease with which you can release the blades at the end of the stroke.
If you concentrate on softening your grip, you will find that you will calm the rest of your body. Stay balanced and relaxed, and let the boat do its wild hokey-pokey beneath you; you’ll find that the water isn’t quite as rough as you thought.
Cross the Trough Rowing with the wind and waves on the beam will tire you quickly, and having one oar blade sky and the other submerge is a sure way to lose your temper. Waves cresting against your flanks also increase the possibility of swamping. If the course to your nearest safe haven is across the wind, quarter your boat into the wind and waves. Not only will this counter the usual downwind set, it will also diminish your boat’s rolling and allow your oars to remain more balanced in relation to each other. If you work your way well upwind of your mark, turn to take the waves on the stern quarter. A zigzag course will avoid settling into the trough.
Avoidance The best approach to rowing in uncomfortably rough water is, of course, not to, so listen to the marine forecasts. Meteorology is not an exact science: Allow for errors in the forecast and give yourself escape routes. Along inland waterways even accurate forecasts tell you only what’s going on in the big picture. You need to know how topography affects local winds and waves. Look in all directions for the telltales of wind in the sky and on the water’s surface. Under oars you’re aboard one of the least powerful vessels on the water, so noticing and understanding a catspaw or a sawtoothed horizon is critical. Pay attention, be flexible in your plans, and keep a relaxed hand on your oars.
Dale McKinnon began rowing in 2002 at the age of 57 and in 2004 rowed solo from Ketchikan, Alaska, to Bellingham, Washington. In 2005 she rowed from Ketchikan to Juneau. The Salish Sea of Washington and British Columbia is her playground. She lives in Bellingham near her grandkids, with her partner Berns, and a chocolate Lab Thea, and builds Sam Devlin-designed Oarlings for other rowers.
You can share your tricks of the trade with other Small Boats Monthly readers by sending us an email.
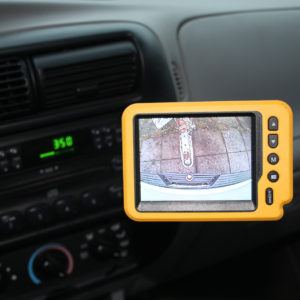
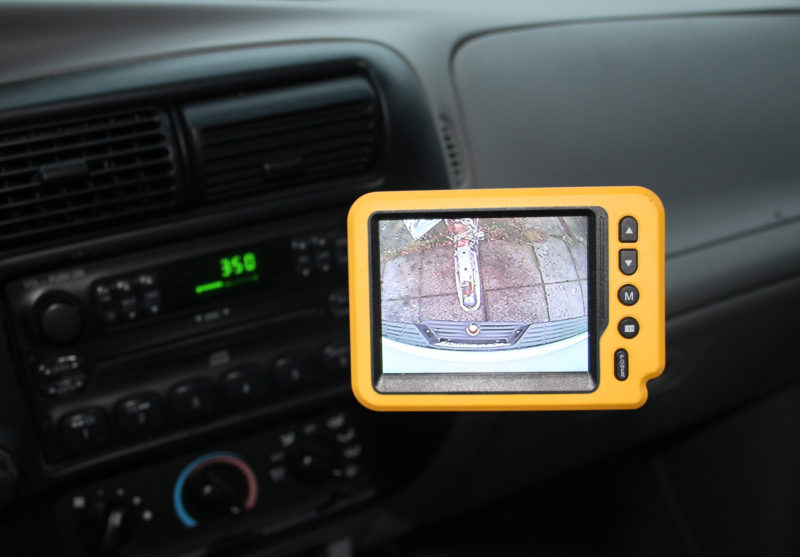
The iBall monitor has a gooseneck mount that plugs into a cigarette-lighter socket.
To get the two heaviest boats in my family’s fleet to the water, I have to back the car up to bring the trailer ball perfectly under the hitch. There’s too much tongue weight for me to lift, and the trailers are parked on a bit of a slope with the wheels chocked. Having someone guide me is often frustrating for both of us. Instructions get lost in translation and nerves get a little frayed before we even get to the launch ramp. Doing the job solo is next to impossible without some way of bringing the ball and hitch into alignment. I tried a device made of magnets, telescoping rods, and yellow balls, but it never lived up to its promise. A mirror I mounted to a suction cup did pretty well, but I had to be pretty much right on target to get the reflection of the hitch to appear.
The angle between the camera and its magnetic mount is easily adjustable. A light to the left of the lens indicates when the camera is on.
The iBall is the best system I’ve used yet. It’s a video camera with a magnetic mount and a 3.5″ color LCD screen that plugs into a cigarette-lighter socket. The wireless connection between the two opens up a lot of useful possibilities. The usual routine is to attach the camera to a metal surface at the back of my car or pickup. The camera gets angled to put the ball at the bottom of the image. I can see the monitor through the back window, so it’s easy to get the correct angle. That’s all there is to it. I back up looking over my shoulder to get centered on the trailer, and then for the last couple of feet I watch the color monitor. The trailer tongue comes into view on the screen when I’m about 3′ out, and I can make all the necessary corrections as I close the distance and stop with the hitch perfectly centered over the ball.
That takes care of getting hitched up. Coming back home I have to back the trailer into a spot not much wider than a parking lot space and stop a slim 3″ shy of a downspout on the corner of the house. (I actually have a bit more leeway now that I’ve crushed the downspout nearly flat, in spite of the chocks I’ve placed to stop the trailer on its marks.) Setting the camera aimed at the gap from the side gives me the extra eye I need to do the job solo. A switch on the monitor flips the image vertically and horizontally to suit the camera orientation and a preference for true or mirror image.
The monitor will pick up the signal from the camera in the neighborhood of 300′ (far better than the 100′ specified by the manufacturer) and the image is visible even at night with just the illumination of streetlights; in dim lighting the image is mostly black-and-white. The image can sometimes be a bit grainy and flicker—interference from other radio waves or electromagnetic fields, I suspect—but it’s clear enough for me to get the job done.
I’ve found the system useful for other tasks. When I want to check the trailer lights, all I have to do is set the camera on the pavement about 8′ behind the trailer. For chores around the house, I’ve wired a 12-volt battery to a cigarette-lighter socket (a 12-volt DC transformer would work as well) to provide the monitor with power. I recently used the iBall to figure out which breaker I needed to turn off to replace a switch to a ceiling light. Transmission through walls and floors provided a grainy but usable image. I also used the iBall to keep an eye on the front door from my basement office, waiting the better part of the day for a package to arrive. The camera’s battery lasted a bit over 10 hours before it needed to be charged overnight with the included USB cord.
The iBall is a nifty and useful gadget. It gets my boating outings with companions off on the right foot, and it will allow me to do something I’ve never been able to do before: take one of the big boats out by myself at dusk for an evening on the lake.
Christopher Cunningham is the editor of Small Boats Monthly and the owner of three boat trailers and one homebuilt teardrop trailer.
The iBall system is available direct from the maker, Outdoors Insight, with a one-year warranty, for $169.
Is there a product that might be useful for boatbuilding, cruising or shore-side camping that you’d like us to review? Please email your suggestions.
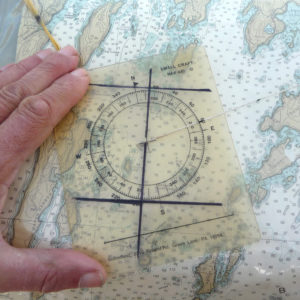
To facilitate reading in magnetic bearings, this Nav-Aid has been marked with a line through the angle of the magnetic deviation for the area covered by the chart.
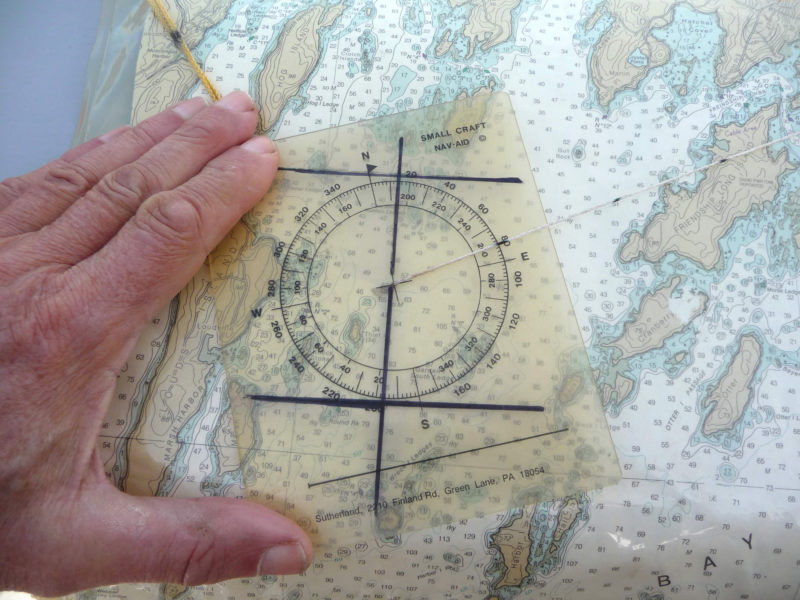
I like “big-screen” navigation, and in a small boat the only way I can do it is to use an old-fashioned paper chart. My handheld GPS often sits idle. While it’s great for detail, it’s hard to read in sun and needs seconds, even minutes to give me big-picture information. The challenge for chart users on little boats is determining one’s position or calculating course and distance to a spot, a “waypoint” in today’s language. The usual navigational aids—parallel rulers and large rigid-armed protractors—need a big flat place, out of the wind and spray. They don’t work on kayak decks, rowboat thwarts, or cockpit seats.
Chuck Sutherland, a serious paddler and scientist, solved the problem decades ago with his Small Craft Nav-Aid. It’s a compass rose printed on transparent plastic, with a monofilament line coming out of the center. Designed to be used on a kayak deck or an open-boat thwart, it provides results in a fraction of the time needed for conventional tools.
Using the Nav-Aid is simple. You place the center of the rose over a point of interest and align the edges of the plastic with the latitude or longitude lines on the chart. Stretch the line out to a second point and read the bearing off the rose. To get distance, mark the monofilament with miles according to the scale of your chart using a waterproof marker, and the line becomes a movable scale. When the Nav-Aid is aligned with the chart, its compass rose will read true north and you can calculate magnetic north by doing the math for the local variation or customize the Nav-Aid to read magnetic. With a waterproof marker, draw a line on the rose through the variation, and add two lines at 90 degrees, kind of like a sideways H. Orient these lines to the chart’s longitude and latitude, and the compass rose reads magnetic. (If you travel to another region with a different variation, draw new lines in a different color.)
Now you can read the magnetic bearing and distance from your position to any point on the chart in less time than it takes me to write this, much faster than using a GPS. I’ve customized my Nav-Aid a bit further by marking its lanyard with the scale of nautical miles; it’s really handy when trying to figure out non straight-line distances. You can also mark a scale on the side of the plastic.
The Nav-Aid comes with a booklet of instructions and a mini-course in chart use. There are some issues to be aware of. With the prevalence of non-NOAA charts, the scale on the chart may be different from the 1:40,000 system common to NOAA. You may need to put an additional set of markings on your monofilament in a different color or estimate the differences. I also make paper copies of the scales and put them in my chart case at a convenient place on the chart.
Ben Fuller
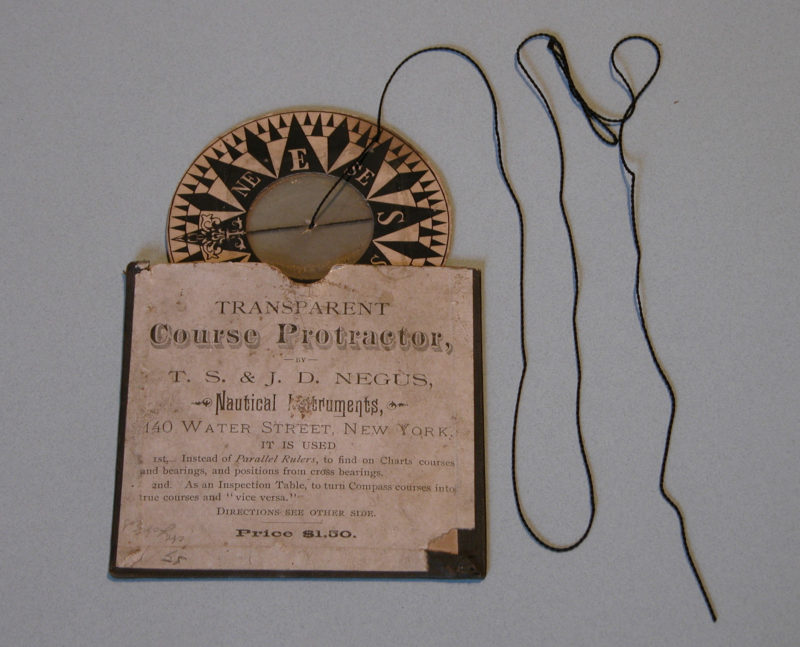
This 19th-century device is quite similar to the Nav-Aid in appearance and function.
More than a century ago, the T.S. & J.D. Negus nautical instrument company of New York City patented a similar protractor-type instrument made of isinglass, using a silk thread for a string. The one shown here, printed on a round card, is in the collection of the Penobscot Maritime Museum. A Negus Course Protractor in the collection of the Mystic Seaport Maritime museum is printed on a square card. The protractor is included in the Negus catalog of 1899 but it didn’t sell well, because ship captains didn’t need it. They had chart tables, parallel rulers, and armed protractors. When Chuck developed the Nav-Aid for kayaks and small boats, he didn’t know about the Negus protractor, and mini-GPS devices didn’t exist. Things have changed electronically, but I still use and like my Nav-Aid. You will too.
Ben Fuller, curator of the Penobscot Marine Museum in Searsport, Maine, has been messing about in small boats for a very long time. He is owned by a dozen or more boats ranging from an International Canoe to a faering.
The Nav-Aid is available by mailing $8 to Chuck Sutherland at 2210 Finland Road, Green Lane, PA 18054. You can reach Chuck by email at [email protected].
Is there a product that might be useful for boatbuilding, cruising or shore-side camping that you’d like us to review? Please email your suggestions.
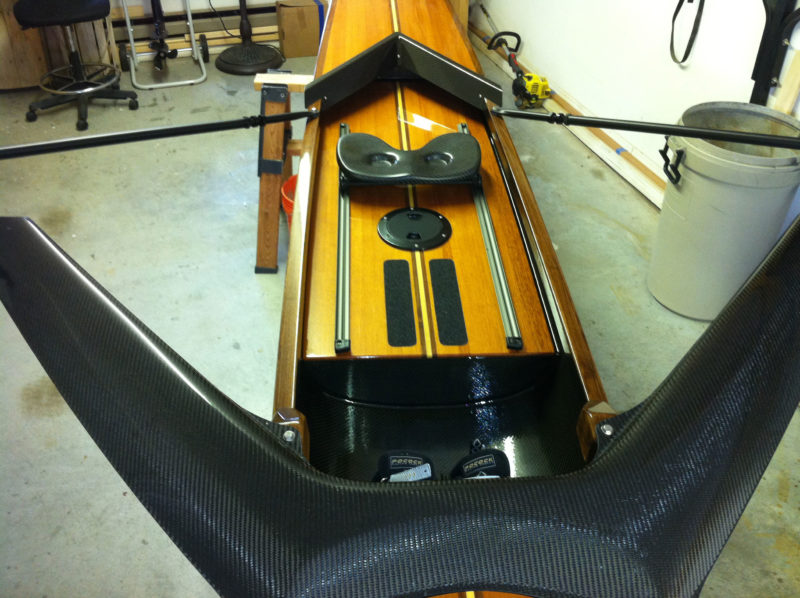
The Dragonfly has a length of 22′ 4″, a few feet shy of that of racing singles, but it is still capable of a good turn of speed.
When Bill Carlson decided to build a rowing shell, he had never sat in one, let alone tried to row one. But he had good shop skills: He’d already built an aluminum sailplane with a 56′ wingspan, a replica of a 1965 Cobra roadster, a MacKenzie River drift boat, and a strip-built kayak. And, now retired from a career as a manufacturing engineer in the medical industry, he had time to devote to building a shell and learning how to row it.
His search for plans led to Steve Killing’s Dragonfly, a rowing shell that the designer describes as falling “between a hard-to-master racing shell and a much-too-sedate recreational shell.” Bill “liked the idea of the recreational shell, which would offer the rowing-shell experience but with a little more stability,” but the Dragonfly, with a waterline beam of 17″ and an elevated seat, would still be quite tiddly. Its stability, like that of a racing shell, would come from the sculls, quick reflexes, and, eventually, a well-refined sense of balance.
courtesy of Ron Frenette, Canadian Canoes
The original design included a laminated outrigger and a foredeck that slopes down to create the rower’s bench.
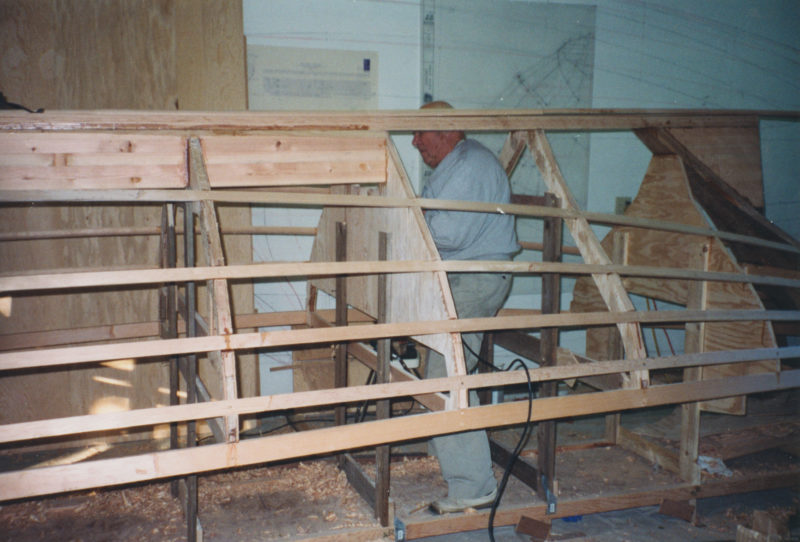
Bill’s experience with strip-built kayak construction would provide a good base for the demands of building the Dragonfly. He wanted to do exceptionally fine work on his rowing shell, so instead of using the 3/16″-thick western red cedar strips he’d been accustomed to, he milled Spanish cedar into 1/4″ strips. Spanish cedar, Cedrela odorata, isn’t a true cedar (neither is western red cedar, for that matter), it’s a variety of mahogany from Central America and was used in the building of racing shells through the early 1900s. Bill went online looking for the longest stock available, hoping to minimize the number of scarf joints required to make the strakes for the 22′4″ hull. He found a source for 3/4″ x 6″ x 13′ boards and had 11 shipped to his home.
Before he started sawing the cedar, he marked the boards so he’d be able to keep the strips in order for the best match of grain and color when it came time to fit them over the molds. Outfitting his tablesaw with a 3/32″ thin-kerf blade instead of a standard 1/8″ blade gave him gave him an extra strip for every eight he cut. To keep the milling as accurate as possible, he used feather boards to keep the stock tight against the rip fence and regularly checked the strips’ thickness with a caliper. At the end of the milling operation he had 165 strips and two 30-gallon cans filled with fragrant sawdust.
Bill Carlson
Closely spaced forms, carefully shaped and aligned, assured the hull would be symmetrical and fair.
Bill had a 16′ strongback he’d made for another boatbuilding project and added a 6′ extension to it for the Dragonfly. The plans called for 21 molds, one every 12″, and forms for the bow and stern. Precision was the key to a fair hull, so Bill had the plans copied onto Mylar, carefully cut each pattern, and traced them to high-quality plywood. With a disc sander mounted in his tablesaw he trimmed the roughed-out forms, splitting the pencil lines.
Aligning the forms on the strongback, Bill noted, “was probably the most critical part of the whole boat as it determined the final look and performance of the boat.” He spent two days at the task.
Applying the strips to the molds was also slow, painstaking work. Bill’s home-made strips didn’t have the bead-and-cove edges commonly used to eliminate gaps between them. Instead, he carefully cut 23′ -long rolling bevels with a sharp and finely tuned block plane. It could take him two hours to get a perfect gap-free fit for a single strip. With that level of attention to detail, using staples to hold the strips to the molds was out of the question. There would be no rows of holes in Bill’s Spanish cedar. He used dabs of hot-melt glue, wedges, and clamps to hold strips in place.
Bill Carlson
Bill modified the foredeck and added splashboards for a more traditional look for his Dragonfly.
The Dragonfly, as designed, has a foredeck that sweeps gracefully down into the cockpit and levels out to form the rower’s bench. It’s an innovative and sculptural feature, but Bill preferred a more traditional look and added washboards to define the cockpit. They’d also deflect any water that comes over the foredeck.
Bill Carlson
Bill’s modified cockpit brought a more traditional look and function to his Dragonfly.
Killing designed a one-piece outrigger for the Dragonfly, a laminated wooden arc bolted to threaded inserts in the gunwales and aft deck. Bill opted for a carbon-fiber wing outrigger, which is lighter and, with backstays to the tops of the lock pins, perhaps stiffer. The other rowing components—seat, tracks, and stretcher—came from Pocock. Bill’s 10′ carbon-fiber sculls are by Dreher.
Carol Carlson
The carbon-fiber outriggers by Pocock include backstays. Fastened to the top of the lock’s pin, they keep the lock from twisting and keep the pitch of the blades constant.
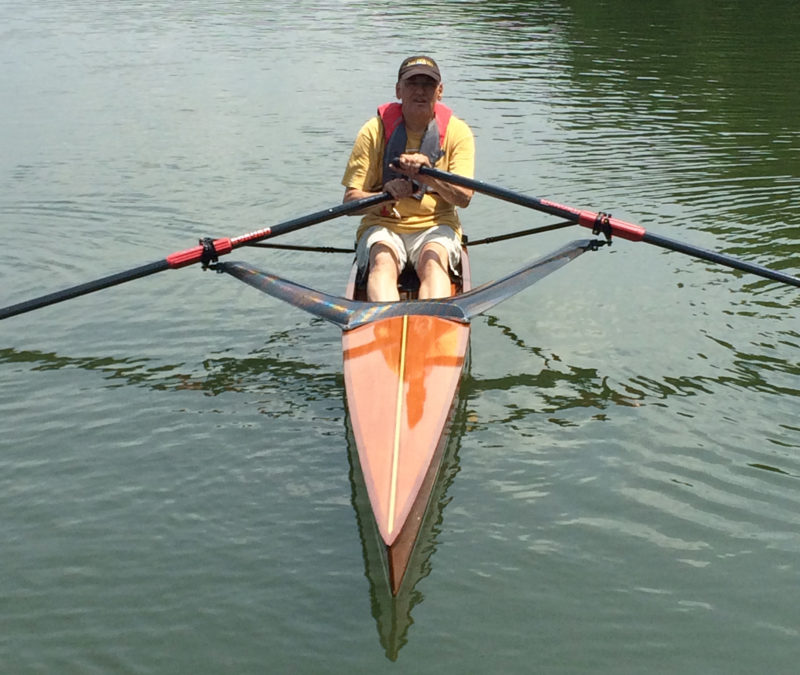
In the video here we see Bill take the first strokes of his newly launched shell. He’s a bit tentative and wobbles a bit, but he stays upright and his rowing form shows good promise. Last year Bill joined a rowing club to get some coaching and reports he’s enjoying the boat and his new sport.
Canadian Canoes engaged Steve Killing in 2001 to draw a single shell for a customer who had rowed while attending a university. Steve drew the lines for the Dragonfly and a few were built at the Canadian Canoe workshop, but an instruction manual was never written. For boatbuilders with enough experience to work from Killing’s drawings, copies are available upon request from Bear Mountain Boats.
Have you recently launched a boat? Please email us. We’d like to hear about it and share your story with other Small Boats Monthly readers.
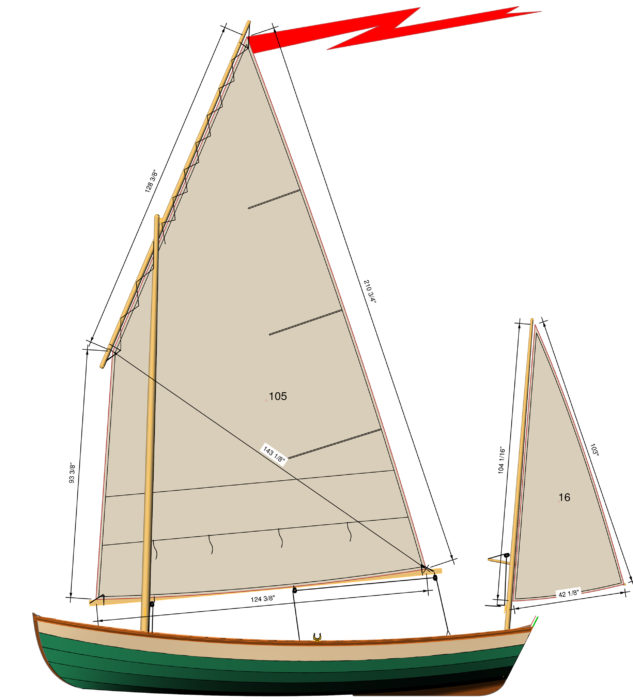
Jim Levang’s Calendar Islands Yawl is a real beauty. Maine designer Clint Chase acknowledges the influence of designers he admires, especially in his early work—Paul Gartside, Iain Oughtred, François Vivier, and Joel White in particular—but intuition also plays a big role in his boats. “I just draw until it looks right,” he says. Based on this new yawl of his, it’s an approach that works extremely well, if you have as good an eye as Clint Chase, and have spent as much time looking at boats as he clearly has.
One design that Chase spent some time looking at was Australian designer Michael Storer’s Goat Island Skiff, a seemingly simple flat-bottomed skiff with a big balance-lug rig that has earned a reputation as a very fast sailer. But the Goat Island Skiff is not at its best in a chop, or under oars. One of Chase’s friends suggested there ought to be a Maine version of the Goat Island Skiff, something that could handle the rough waters and open stretches of the Maine coast. Chase happened to have on hand the preliminary 3D models for an 18′8″ yawl he’d been working on. It was too beamy for easy rowing, and much bigger than the Goat Island Skiff, but with his friend’s comments in mind, he played around with the design and, after scaling it down to 15′6″ and a beam of 5′2″, everything seemed to fit. The Calendar Islands Yawl was born. Chase describes the new design as “a fast, mostly-sailboat for singlehanders who would need to row for good lengths of time.”
Just two weeks after receiving the very first kit for a Calendar Islands Yawl, builder Levang started planking, and just three weeks of evenings and weekends later, working alone in his garage, he had a fully planked hull. Considering all the preparation work necessary for a conventional build—lofting, molds, strongback, keel, stems, and transom—I can see why Levang reported that the boat almost built itself.
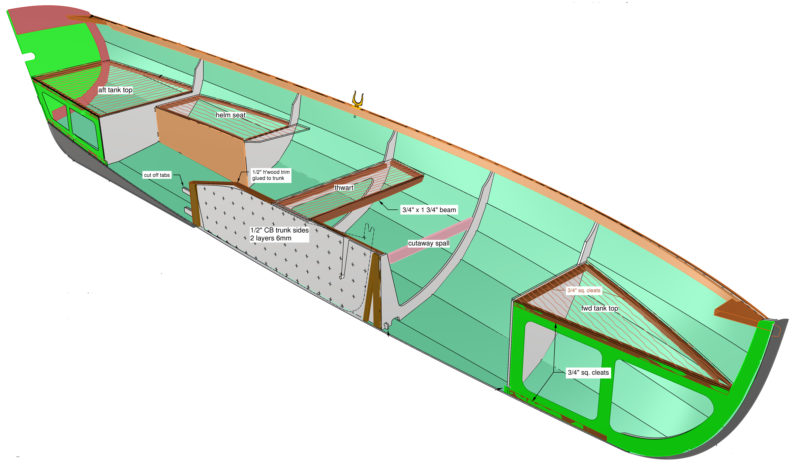
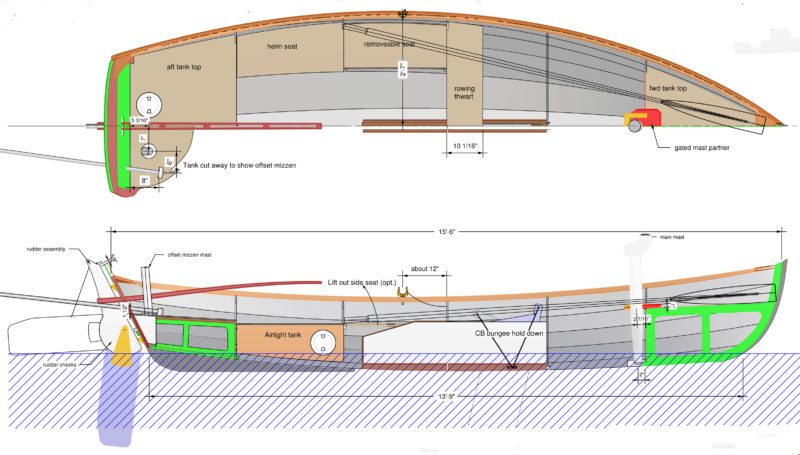
The kit’s well-designed building jig, computer-cut in oriented-strand board, speeds construction considerably. Its molds are cut to fit the boat’s permanent frames, and tabs and slots routed into adjoining parts make them self-locating. “It’s a very slick system,” says Levang. Frames, bulkheads, and the centerboard trunk are positioned, epoxied, and filleted before the planking goes on, so much of the interior is already in place once the boat is turned right-side up, eliminating a lot of fussy fitting and fairing.
Jim Levang
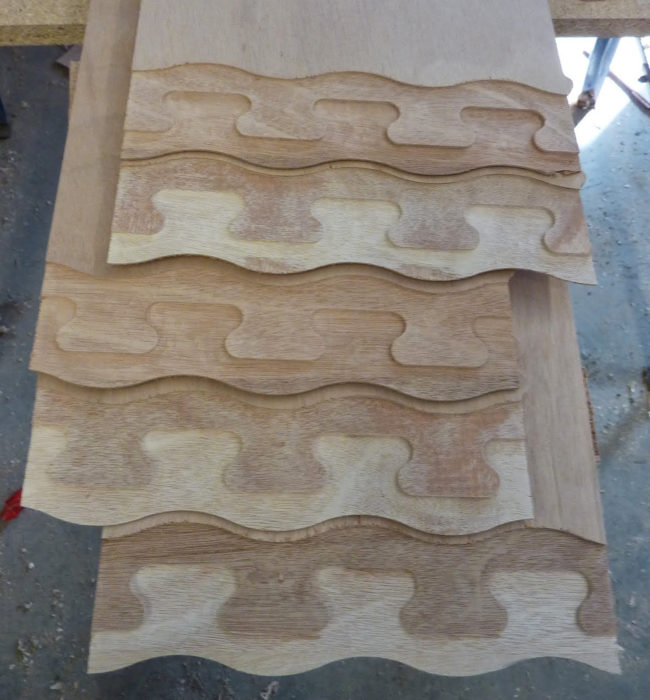
The CNC-cut joints in the long plywood panels are cut with three levels. The middle level is designed to lock the pieces together. The outer levels have an undulating curve that avoids the weakness of a straight butted edge and offers a more pleasing appearance than a jigsaw joint.
The 15′6″ Calendar Islands Yawl is designed for glued-lapstrake construction, with a narrow flat bottom and five strakes. The planks come precut in sections, ready for assembly into full-length strakes. The jigsaw-puzzle joints that join the sections together, commonly left exposed in kit boats, is invisible, cut only in the middle laminates of the plywood and overlapped by the outer laminates. With this stair-stepped approach the resulting seams visible on the inside and outside faces of the planks are gently undulating lines, a more refined look for a bright finish than the bulbous curves required to lock sections together . The bottom is glued to the interior framework and then the garboards are hung; seams between the bottom and garboards are reinforced with fiberglass tape. Before the remaining strakes are added, the garboards and bottom are sheathed entirely with fiberglass cloth and epoxy.
The kit includes precut parts for every plywood component in the boat, a detailed bill of materials, and a few full-sized Mylar patterns for parts that aren’t precut. Builders have the option to purchase an epoxy-fiberglass kit, a hardware kit, a sail, a painting kit, and even a carbon-fiber mast.
“All of my boats will eventually be buildable from plans or kits,” Chase explains, “but I need to convince people that the kits make more sense. It’s a huge added value to have all of the parts precut.” CNC-machine-cutting the parts can save on the cost of materials, notes Chase, because it can cut a tighter-nested sheet layout than it’s possible to do by hand, and removes the possibility of cutting errors. In addition, a typical kit customer will see a 25-percent savings in the time required to finish the project. “That said, when I was getting into boatbuilding,” Chase says, “I was frustrated when a boat was only available as a kit. I wanted to learn more about lofting and making plank patterns and so on. I respect that, which is why I want to offer plans as well.” There are a lot of traditional skills to learn and put into practice when you start with a lines drawing and a table of offsets: With a precut kit you skip lofting, fairing lines, and picking up patterns.
Jim Levang wasn’t bothered by that. To him, a computer-cut kit is not a shortcut; it’s merely the direct route, the logical outcome of the high-tech design approach Chase employs. Using paper plans to build a boat designed in a digital 3-D modeling space for plywood construction, Levang says, “would be like hooking horses up to a car and using it as if it were a stagecoach.”
Jim Levang
The 105 sq ft main and the 16 sq ft mizzen offer good speed in light air. The 14’11” mast and the 11′ boom are both hollow with birdsmouth and box construction respectively.
I had Jim Levang’s Calendar Islands Yawl —hull No. 1—to myself for a 10-mile sail across the western tip of Lake Superior near Duluth. Rigging and launching the yawl was a cinch: We stepped the masts, pinned the removable boomkin in place, attached the rudder and tiller, and backed the trailer into the water until the boat floated free. I hoisted the balance-lug mainsail with the first reef tied in and shoved off from the dock.
I hadn’t gone more than a half mile before I decided to shake the reef out and try the yawl under full sail. With the mizzen sheeted in, the boat lay sedately head-to-wind, drifting slowly backward as I dropped the mainsail. Undoing the reef and rehoisting the sail took only a minute or two, but by that time there was a 700′ ore boat inbound through the ship channel. I tacked and jibed in tight circles to stay well out of the way, dodging back and forth in the narrow space between the nearby loading docks. The Calendar Islands Yawl came about reliably and smoothly, even in the shifting breezes behind the tall ore docks. Everything felt good and as soon as the channel was clear, I headed out onto Lake Superior.
By the time I’d reached Duluth’s inner harbor early that evening, I’d had a fair chance to try out the new design. The big, high-peaked mainsail is a delight in light airs, moving the boat along at a steady 3 knots when I can barely feel the breeze. The leg-o’-mutton mizzen is self-tending and almost makes the boat maneuverable enough for parallel parking.
Sailing performance is clearly the main focus of the design, but even so, the boat feels light and responsive under oars, tracking and steering well. Unstepped, the mast fit easily in the boat (heel aft, masthead protruding over the bow) without obstructing the oarsman’s stroke. The trim seemed just right for a singlehander, with the transom carried well out of the water. I maintained 2 knots without much exertion at all. With my long arms I felt the spacing between the oarlocks and the thwart was a bit too short, though; a wider thwart that extends farther forward would allow some room to accommodate rowers of different heights or to change position slightly during long stretches at the oars. There’s more freeboard than I’m accustomed to in a rowing-oriented boat, but that’s not a complaint; with 121 sq ft of sail, that extra freeboard will be greatly appreciated when sailing in rough conditions.
The late afternoon brought stronger winds, and I was soon sitting on the rail and paying close attention to the gusts. Even under full sail the boat felt stable and well under control, but like the Goat Island Skiff, it carries a big rig for such a light boat, allowing stellar performance in light air and keeping things manageable when it breezes up. Still, “reef early and often” will be the general rule. The yawl rig lets the skipper heave-to easily for reefing, or bringing instant calm and comfort whenever a break is needed. Sailed sensibly, this is a boat that can take you places—and more important, bring you back.
Tom Pamperin
The bottom panel and the garboards are butted rather than lapped to provide a more abrasion-resistant bottom for beaching.
Large sealed chambers in the bow and stern, and under the side benches, provide ample flotation for capsize recovery. The tops of the bow compartment and center thwart are on the same plane, well below the sheer, providing a handy, unobstructed space to drop the mainsail and stow the bundled sail, boom, and yard. The tiller passes through an oval hole in the center of the transom; the mizzen is offset to starboard so it’s not in the way. The combination of a long tiller and a long centerboard trunk made onboard maneuvers a little awkward, though—a shorter tiller with an extension would be much more convenient.
The Calendar Islands Yawl has both a centerboard and a daggerboard option. The centerboard has some nice features: The interior sides of the trunk have shallow grooves to receive the board’s pivot pin, and these grooves make it possible to insert and remove the centerboard through the top of the trunk. The board is held down with a simple bungee, allowing it to retract if it hits an obstruction. Although I generally prefer centerboards, I’d make an exception in this case. With the boom kept fairly low to maintain a low center of effort for the rig, getting around and over the centerboard case when coming about felt more than a bit clumsy, even after a few hours aboard. A daggerboard would open up the cockpit aft of the center thwart completely, making it much easier for the helmsman to move across the boat.
Then, too, during my sailing trials I sometimes found myself sitting farther back in the boat than good trim demanded, at the forward edge of the side seats rather than nestled in behind the rowing thwart. The space between the side benches and the center thwart, an interesting design feature, creates a cozy spot well forward for the helmsman to lean against the side of the hull when a bit of weight is required to windward. A removable seat insert can be used to extend the side benches to the thwart when desired, but either way, a daggerboard would be a better choice here, since the centerboard case restricts the space available.
Jim Levang
The 10′ oars called for in the plans get tucked between the inside face of the stem and the top of the fourth frame aft to keep them out of the way when under sail.
By the time I reached the Duluth ship channel and dropped the main to row into the inner harbor, I was wishing I could have more time with the boat. A whole summer, maybe with time to adjust the details of rigging and fitting out for camp-cruising, time to find out just how much speed that big rig can really provide, and time to get used to the admiring comments from other sailors as we breeze past them—although I must admit that, after my day with the boat, I’d already grown accustomed to that part.
Tom Pamperin
Four separate watertight compartments provide flotation and , through watertight deck plates, dry storage for gear.
The Calendar Islands Yawl is so beautiful, and meets its design brief so well, that I had to remind myself that the boat I’ve sailed is the first of its kind, rather than an established design that has gone through a number of small refinements over the course of several years. Chase is considering minor changes, including a slightly firmer turn of the bilge, and a lower transom to increase bearing aft and provide a little more speed off the wind. He also intends to remove the aft compartment and extend the side seats back to the transom, which would simplify construction of the mizzen step while still providing plenty of buoyancy. And although Chase hadn’t initially intended the crew to sleep aboard when cruising, he may include details for an optional sleeping platform. But whatever tweaks Chase incorporates, his Calendar Islands Yawl has already hit the mark.
I’d had a great day of sailing, but it couldn’t last forever. As the sun dropped below the horizon, Jim Levang met me at a small beach along Duluth’s inner harbor, where the boat’s rocker and narrow flat bottom made it easy to roll the hull up onto a couple of plastic fenders. From there, four of us lifted the boat out and carried it to his trailer. A few minutes later we were on the road.
As Levang dropped me at my car back on the Wisconsin side, I was already running through my list of fellow boatbuilders. I have two boats already, and a new build underway, so I’m not in the market for another boat yet, unfortunately, but there’s got to be someone in my area who can be persuaded to build a Calendar Islands Yawl—the daggerboard version. It’ll have to be someone who’s too busy to go sailing much himself and willing to loan the boat to me.
Tom Pamperin (www.tompamperin.com) writes regularly for Small Boats Monthly. His first book, JAGULAR Goes Everywhere: (mis)Adventures in a $300 Sailboat, was released in 2014.
"So, should we be expecting a prolonged period of rain?” asked a neighbor as I clamped the final plank onto the Welsford Penguin taking shape in my garage. The reference to Noah’s Ark had been made rather frequently as I carefully built my 21′ sloop, STELLA MARIS. The deluge was not imminent, as I took my time over 10 years to complete the boat. However, the comparison to the ark is not entirely misplaced.
John Welsford designed this trailer-yacht to be a roomy and comfortable cruiser with aesthetic appeal and excellent seakeeping ability. A curvaceous design, there’s hardly a straight line to be found from the rockered bottom to the striking sheer and the curved cabin roof. The gaff rig elicits images from a bygone era, but there is nothing old-fashioned about the Penguin. Plywood-on-frame construction with fiberglass sheathing results in an extremely strong yet relatively light structure. The interior layout is exceptional for a boat of this size, with a queen-sized berth in the forward compartment, ample storage, a head with privacy, a galley, comfortable seating in the main cabin that can sleep another two sailors, and even more storage space. So while it is not quite an Ark of Noah’s dimensions, it is pretty impressive for a 21-footer.
Jonas Abromaitis
The centerboard trunk can be used to support a drop-leaf table. Builders opting for the leeboard or bilge-keel versions of the Penguin can omit the trunk to open up the cabin space.
Jonas Abromaitis
The forward compartment has queen-sized sleeping accommodations. Beneath the mattress there is ample room for storage.
The hull is lapstrake with rounded sides and generous freeboard, culminating with a slightly raked transom. A substantial weighted centerboard and large rudder keep the vessel on track and, even with the gaff rig, allows for respectable windward performance. A lead shoe keeps her on her feet, and the designer indicates that the Penguin “will self-right from well past 90°.” A ground-tackle locker in the bow holds a good-sized anchor and all the rode you might require, while providing a handy and secure place to rest your feet if you want to sit forward while under sail. The deck and cabintop provide sufficient room for handling sails and rigging safely.
Camil Laprise
Designer John Welsford notes: “The gaff rig has proven to be noticeably faster on all points of sail except ‘hard on the wind,’ and the rig is very strong so the boat will stand heavy weather when making coastal passages.”
Penguin plans offer several sail configurations: gaff, Bermudan, and yawl. I built the gaff rig. The mast tabernacle and other fittings are extremely strong, with wire forestay and shrouds anchoring the rig to stout chainplates. Welsford’s drawings are precise and well detailed, and although a gaff rig can be somewhat complicated to get just right, his guidance is spot-on.
Twenty pages of highly detailed drawings, along with a materials list, several pages of instructions, building suggestions, and an index, should be sufficient guidance for any reasonably patient and skillful builder to complete a Penguin. While I took 10 years to build mine, that’s no indication of how long it should take a motivated builder to get the boat to the water. I worked alone, mostly evenings and weekends, with frequent interruptions by family, work, and other events. And on top of that, building in Canada can be a challenge with our very long and cold winters, when an unheated garage just isn’t the place to be for about five months of the year. That being said, much of the building, especially the early stages, took place in my basement workshop: measuring and cutting out the bulkheads, centerboard case, and numerous other smaller parts. Measurements are in metric, which pose no problem to those who are accustomed to working in inches and feet when you have rulers and a tape measure with both metric and imperial readings.
The Penguin is built upright, beginning with construction of a sturdy building frame; I built my building frame on a foundation of wooden prefabricated I-beams of the type used as joists in home construction. This solid and level foundation is critical for accurate placement of the bulkheads, which define the shape of the boat. Often in the building process I found myself using a level to check the placement of components, and this works only if your building frame is level too.
Once the bulkheads are up, longitudinal strips that will define the shapes and positions of the planks go on. I used ash for the interior stringers, and found them to be sufficiently flexible to take the bends and twists. When thicker stringers were called for, as in the sheer clamp, I laminated them in place, in ash, in order to avoid breakage and steaming. Given the price of high-quality marine plywood, I used inexpensive doorskins as templates for the planks and many other curvy pieces. My wife didn’t like the wood paneling in our basement, so those sheets of old paneling were also put to good use in making patterns. As a result, I had very little waste of the good meranti plywood.
Once the boat was nearly complete, it had to be turned over to complete the bottom. I jacked up the construction platform, installed heavy-duty casters under it, and used 2x6s to build two octagonal forms around the boat. With the help of friends and neighbors, we pulled the platform out onto the driveway, and using a variety of winches and block-and-tackle, gently rolled the boat over on the octagonal forms. Then I moved the casters from the top of the construction assembly to the new bottom, and brought the platform back into the garage. This event proved to be quite a pleasant community gathering.
With STELLA MARIS upside down, I faired and sealed all of the exposed plank edges with epoxy, and fit the Douglas-fir keel and skeg. I covered the bottom first with a layer of Kevlar up to the waterline and over that with layer of fiberglass and epoxy.
Did I mention sanding? Or rather fairing and sanding, sanding and fairing? Actually, it wasn’t so bad, since with careful construction in the early phases and precise placement of the planks, the hull was quite fair to begin with. I built a dummy ballast from pine boards, and faired it to the exact shape that the lead would take, with a slot for the centerboard and holes for the keelbolts. I had acquired lead ingots and my plan was to melt them in our backyard, but my wife nixed that idea. I took my dummy keel to a lead-casting company that did a superb job of pouring the ballast. Even the bolt holes lined up perfectly once the boat was rolled over again. The lead shoe weighs close to 1,000 lbs and, needless to say, one becomes quite good at using a variety of jacks when working with something so heavy.
The final phase of construction involved the wiring of the navigation lights, interior lighting, and VHF radio. I called in my friend Daniel, a Navy veteran, to assist with rigging. His knowledge and assistance were invaluable as we laid out the spars, sails, blocks, and lines on the lawn and put it all together.
Jerome Menton
A tabernacle eases the task of raising the mast.
My rigging crew and I brought STELLA MARIS to the wide Ottawa River for her launch on June 24, 2015. After we raised her mast, bent on the mainsail, adjusted shrouds, and installed lazyjacks, we backed her into the water. She glided off her custom trailer easily, and sat at the dock looking quite pretty. Satisfied with our morning’s work and assured that the rigging worked as designed, we motored to my slip at the Nepean Sailing Club. We decided to take her for her inaugural sail once we were rested and the winds were favorable.
Giedre Abromaitis
The gaff rig is one of three options for the Penguin. The Bermudan rig, like the gaff rig, has the mast stepped on the cabin roof. The yawl rig has a leg o’ mutton mizzen, its mast offset to clear the tiller, and a mainmast stepped on the foredeck. Here, STELLA MARIS has a bracket for its auxiliary outboard. The plans include a motor well with a notch in the transom for kicking the motor up while under sail.
The next day we were out in 8 knots of wind, discovering that hauling up a gaff involves a substantial amount of line. Once the main was up and the jib was flying, STELLA MARIS kicked up her heels and she was off. The occasional gust did not perturb her at all, as she moved gently on all points of sail. It was a great success. A few days later, we took her out in stronger winds, gusting to 20 knots. With a single reef in the main, she performed splendidly, and was fast: We easily kept up with other boats, some quite a bit larger. She did not sail as close to the wind as marconi-rigged boats, but sailing just a few points off the wind she picked up speed and was a delight. She has a gentle motion when responding to changes wind speed, unlike the tiddliness of many other boats I’ve sailed. Her only shortcoming, in my estimation, is that she’s a bit rolly in a beam sea, but this is nullified when the sails steady her in a good breeze.
My youngest daughter became frightened of sailing at a very young age when we were surprised by a squall while sailing a dinghy. Now her fear has disappeared as STELLA MARIS solid and gentle motion reassures her. I look forward to building Welsford’s Pathfinder, but my wife won’t hear of it unless I find a new home for the Penguin. Is there prolonged rain in your forecast?
Having recently retired from a career in education, Jonas Abromaitis fills his days building things, the most enjoyable of which are boats. His challenge is finding the right balance between time spent in the workshop, and time spent on the water. He sails STELLA MARIS out of Nepean Sailing Club in Ottawa, Canada.
Art Arpin was a Flying Tiger. He wasn’t one of the original group of American aviators—he joined just after the departure of their commander, Claire Lee Chennault, in 1942—but took part in their ongoing mission to defend China against the Japanese. How do I know this? Because Art told me while he was holding one end of a board I was cutting for a boat I began building in 1998 and launched three years later. I cut a lot of boards, and Art told me a lot of stories.
First I have to tell how I came to build a boat in Coeur d’Alene, Idaho. My wife, Samm, and I met as children growing up in the California Delta. I tell people our town was so small that we were the only people left who could legally marry. Samm is a remarkably understanding person, and when I asked her if she’d allow me to have my midlife crisis by building an Amesbury Skiff in the garage, she wholeheartedly agreed, as my other option involved gold neck chains and a Corvette.
The skiff, named ARCUS, cost $300 in materials and $400 in books to build. Now, 21 years later, I still use ARCUS on a weekly basis, and she looks brand-new.
Drawing by the author
There is no record of the original Hammond power dory’s interior so Rann was free to draw it as he wished.
Samm and I moved our family to Coeur d’Alene in 1995; being an architect, I designed and built a house for us on an island on the Spokane River. It quickly became apparent that we’d need a powerboat to enjoy the body of water that surrounded us. I dug out the books I’d purchased for the building of ARCUS and reread everything.
In John Gardner’s Building Classic Small Craft, Volume 2, I found a snippet of information about a mysterious half-hull model he found nailed above a workbench at the Hammond boatshop in Danversport, Massachusetts. John noted that the boat built from the model was known for its speed but nothing regarding the layout of the interior was ever found. He measured the half model and drafted the lines, and that drawing was the only illustration he included in his chapter about the Hammond dory. I thought it was the perfect boat. It was sleek and had the potential to be a great family boat. Best of all, no expert could tell me I was building it wrong. I named the boat-to-be ELSIE MAE after my mother.
Art was 83 years old; he and his wife, Audrey, lived next door. He had retired from the Seattle Police force, and the couple had moved in just a year before we arrived in Coeur d’Alene. In the summer, Art, wearing only a Speedo swimsuit, rode a bike all over the island. Once in a while I would see him in a rappelling harness on his roof, apparently just something he’d do when he got bored. Audrey, an elegant lady, seemed to expect Art to do something eccentric every day.
Rann Haight
Art Arpin, cleaning up excess epoxy with a power grinder, is the first person to get in the ELSIE MAE.
Although he was an odd character, his love of boats brought us together. He was impressed with ARCUS; I told him I intended to build a power dory after I finished the house. Having grown up in Connecticut, Art knew about power dories and offered to help me build mine.
I built our house with an unusually deep four-car garage. Its long wall— Sheetrocked, sanded smooth, and painted white—was like a giant sheet of paper. Samm hadn’t questioned why I had built such a long garage, but my reason became clear when I began lofting a 26′ power dory on the wall.
Rann Haight
Elsie Mae meets ELSIE MAE: The builder’s mother pays a visit to the shop. The lofted lines adorn the long garage wall.
For those not familiar with power dories, they are a nearly extinct type of workboat that had their heyday at the dawn of the 20th century. They had narrow, flat bottoms and sides either flat or round. They were easy to build, could carry enormous payloads, and were popular with fishermen because of their seakeeping abilities. They never fought the water; they simply allowed waves to roll under them.
I began building the power dory when I was in my mid-40s. The project was relegated to weekends and nights: I turned on the garage lights after the kids’ homework was done and the dinner table was cleared. Art could see our garage window from his house and when the garage light came on, Art was soon knocking on the garage door.
I had generated a full set of drawings from lines published in Gardner’s book and lofted them on the garage wall. A single 24″-deep truss joist from the local lumberyard served as a strongback: I laid the joist on its side, leveled it, and marked the station locations. After that it was just a matter of cutting and fitting the plywood and lumber to do their respective jobs of keeping the water out.
Art had been an avid sailor in the Seattle area and had some experience with boat construction. He told me about restoring the ARTHUR FOSS, a wooden tug built in 1889 and now a floating museum on Seattle’s Lake Union. It was a huge project and he was proud that he’d helped save the old tug. He was quite helpful and always ready to place a clamp, support a board coming out from the tablesaw, or hold the dumb end of the measuring tape, all the while telling stories. He never interrupted the progress of the work—it was like having a book on CD playing in the background.
Art said he was a pilot during World War II. He loved flying and during the war had flown just about every type of aircraft, but mostly twin-boom P-38 Lightnings. I’m a big fan of World War II fighter aircraft and listened intently. Art flew in China and North Africa, and after the war he ferried brand-new P-51 Mustangs right from the factory to the bone pile in Arizona. He told me about an argument he’d had with the officer in charge of destroying the new planes. They were finished without radios, so Art would bring his own and install it before each flight. The destruction chief insisted that anything that arrived in the plane had to stay with it and be destroyed. Art said he had won the argument but didn’t offer any more details. He just smiled. His garage, I had noticed, was crammed with aviation gauges and electronics.
For weeks I measured and fitted pieces; Art always knew when to plug in a power tool I’d soon need and how to support the free end of a board I was working on. Our island community is tight, almost claustrophobic, and other neighbors often came by on weekends to chat and see the progress. No boat had been built in a long while on the island, so interest in the project was high and interruptions frequent. Art preferred to come around when there work was to be done.
He told me about working after the war at General Dynamics Electric Boat in Groton, Connecticut. He was the chief procurement officer for the USS NAUTILUS, the world’s first nuclear-powered submarine. Only Art and Admiral Rickover had complete access to the boat during its construction. Art didn’t know much about atomic energy, but he knew where to get a left-handed wing nut when one was needed. He would get the wish lists from the various foremen in the morning and go scour the docks until he had the material they needed.
Like me, Art was a displacement-hull enthusiast. While he had flown airplanes at 400 mph right at ground level and seen the world at high speed, water, he agreed, should be enjoyed slowly. But boats like the Hammond dory had slipped into obscurity early in the 20th century when aircraft development spawned engines with higher power-to-weight ratios. Boatbuilders, eager to take advantage of the new power plants, discovered the extra horsepower just pushed displacement hulls deeper into the water and wasted energy. The solution was to break the displacement barrier by climbing over the bow wave and riding on the surface of the water. New boats capable of doing this became known as hydroplanes, and with their seemingly limitless speed, the future of power dories was doomed.
Gardner’s book brought power dories back to life for me. His wonderful works preserved the old designs of the pre-hydroplane era. I devoured everything I could find from his pen and from Mystic Seaport.
After six weeks of work, the frames and bulkheads were assembled and standing at their stations on the strongback. I developed a system of half-round stringers following the chines as backing for the lapstrake joints. It somehow seemed to me the natural thing to do. Later I remembered it was exactly the same system used to make balsa airplane model fuselages, though this time I would be skinning over the stringers with plywood and epoxy instead of tissue paper and dope. To bevel the stringers to fit the angle between strakes, I mentioned to Art that I needed a long-tailed plane. Art left to look through his garage. He returned a half hour later with a plane over 2′ long. It worked perfectly.
The dory was coming together without a hitch, but I still needed to find a power plant. The maximum hull speed would be about 5 knots and the dory would need only 6 hp to get there. I wanted the motor to be as close as I could get to what the Hammond brothers would have used, something heavy and low powered.
I had spent that first year of building the boat fretting over the problem of the gas engine. An authentic engine could be easily obtained from a supplier of make-and-break engines in Lunenburg, Nova Scotia, but the volatility of gasoline haunted me. I asked the Canadian supplier how easy the old engines were to operate. I was assured that they were tough and reliable. I would need only to shut off the ignition, wait for the flywheel to slow, and then kick the flywheel with my foot in the opposite direction while reversing the ignition. This explains why old sea captains are always depicted with peg legs. I decided to look elsewhere.
Some Japanese companies were building small inboard diesel engines for sailboats. I considered one for a while, but the high rpms and knocking sounds of the engine seemed like a desecration of everything I was trying to do, and the engine would cost me around a thousand dollars per horsepower by the time I had installed the little shaker.
Out of frustration I called an old-time boat equipment supplier in Seattle and was given a lead to a waterfront repair shop in the Port of Everett. I called and, as instructed, asked for Jim. I explained my boat and said what I really wanted for it was an old Sabb diesel engine from Norway. Jim said he had pulled a 10-hp Sabb out of a sailboat just the previous month. It had been to the South Pacific twice but was in great condition.
Rann Haight
Rann contemplated using a 10-horsepower four-stroke outboard in a well. “It would work beautifully and be very quiet, although extra ballast would be needed to get the hull down to waterline. I rejected the idea because I wanted the chugging and prop wash of a real old fashion one-lunger.”
I bought the engine over the phone, asking him to hold it until I could get over to Everett the following week. I called Art and he agreed to join me on the six-hour drive in my little pickup truck to see it. During the long drive, Art told me about his first night in China as a Flying Tiger. He was an honored overnight guest at the home of the village mayor and given a bed with an insect net draped over the bedposts—malaria was a problem in that part of China. Art awoke at midnight and saw an enormous tarantula on the inside of the netting. He drew his .45 and shot the spider dead center. Startled out of sleep by the gunshot, everyone in the house was in an uproar. The mayor rushed into the room and Art, through lots of hand gestures, indicated that he’d killed a dangerous spider. The mayor then explained through broken English that the spider was kept inside the net to eat any mosquito that should get by the first line of defense. I asked Art if he had to repair the ceiling. He chuckled and said it was a thatched roof.
When we arrived in Everett, I was pleased by what I saw: The heavy Sabb engine with its large flywheel would be a perfect fit for the dory. Jim accepted a down payment and agreed to hold the engine while I finished the boat.
I worked steadily throughout the winter of 1999. When it snowed, Art would arrive at the garage door in rubber boots. I set small goals for our evening sessions and let Art know what I wanted to accomplish before bedtime. Once the goal was reached, Art would say good night and head back home through the snow.
One Saturday, Art was helping while I mixed epoxy. I pumped a small amount of the two-part cocktail into the mixing cup and as I began the two-minutes of stirring, I asked Art if he had seen any action during the war. He said he had volunteered to fly as co-pilot in a C-47, a twin-engine transport airplane adapted from the Douglas DC-3. The mission was to fly supplies from US air bases in China, over the Himalayan Mountain range to the British in Burma along a route known as “The Hump.” They were over a Burmese jungle when a Japanese Zero pulled in behind the C-47. The pilot ordered the cargo to be shoved out the large side door to lighten the C-47. Art had the only weapon on board, a .45 automatic pistol. He opened the side window of the cockpit and fired at the Zero as it roared by. The C-47 pilot ordered the crew to strap in and put the plane into a steep dive aimed at the river in the bottom of a canyon beneath them. A fighter pilot, Art explained, can become fixated on the target and lose track of where he is. The pilot of the Zero followed the C-47 downward. Art’s pilot waited for the last possible moment to pull up hard out of the dive. The Zero, reacting a fraction of a second too late, couldn’t pull up in time and crashed into the river. The C-47 pilot was credited with a kill. Art finished the story by saying they landed safely but the plane never flew again. Its wings had bent up 5 degrees coming out of the dive.
Rann Haight
Daughters Erin and Sara, looking for work as game-show hostesses, present the recently righted hull. Planking is 3/8″ Douglas fir marine plywood sheathed in fiberglass and epoxy.
We flipped the hull upright on Mother’s Day. My parents were present and Mom sat in her namesake for pictures. In the weeks to come, all of our family members, whenever they were in town, helped with sanding the interior of the hull in preparation for epoxy and paint.
Haight family collection
The dory’s transom extends to the bottom; deadwood fixed to it supports the prop shaft. A stainless-steel skeg protects the rudder.
It had been almost a year since I’d put a down payment on the engine. I had been sending letters to Jim in Everett every month assuring him we would indeed collect the engine. Art and I drove over expecting the engine to be overhauled and a bill for repairs to be paid, but Jim said he had done nothing to the engine in the time he’d held it for me—there wasn’t anything that needed doing. The engine with its variable-pitch reversible prop ran still like new.
Drilling the hole for the drive shaft took a lot of courage, and Art and I discussed the process at length. He had, of course, an electric drill big enough for the job. I found a bit for the job, a 1½″ single-cutter auger with a pilot, and an extension and we started boring the 18″-long hole. The bit emerged right on the mark, and we celebrated with some ginger beer that Art found at an obscure market in town.
The interior was complete, and Amy, another one of our neighbors, was sewing the cushions and the boat cover. After almost two years working on the boat, I felt Art and I had gone through enough together to ask him if he had downed any enemy planes. I knew he had lost an engine in his P-38 and landed safely, and he had talked about losing friends flying in formation during difficult ocean crossings, but those had been due to navigational errors, not combat. He had never shared any stories about dogfights.
Haight family collection
Rann, Art, and Samm prepare to launch ELSIE MAE for the first time.
Art, who had always smiled while telling his tales, took on a grave expression. Toward the end of the war there was very little dogfighting. The Japanese aircraft and equipment were rapidly becoming obsolete, and their experienced pilots were all gone. His P-38 was not considered a fighter aircraft, so the tactic was to fly at a high altitude and make a single pass diving on unsuspecting Japanese planes. If you hit one, good; if not, you kept diving to get enough speed on so it couldn’t catch you. He told me he had downed two Japanese Zeros. Having lived into his 80s, Art realized how much life he had been able to live after the war. When he was flying in China he had not thought of the men in the planes, only that he had shot down machines. Now he realized how much joy he had deprived those young men of. We did not talk about the war much after that.
Haight family collection
Rann backs the ELSIE MAE from the ramp with his mother Elsie Mae and Art Arpin aboard. Rann’s daughter Heidi, aboard the skiff ARCUS with her fiancé Sean, records the moment.
We launched ELSIE MAE at the Coeur d’Alene Resort. I had just finished designing a house for Jerry Jaeger, one of the owners, and he lavished the event with a complimentary cruise-boat party. On board our friends celebrated with champagne; our daughter Sara played “Anchors Aweigh” on the violin (her music teacher’s idea); another daughter, Erin, made a wreath to drape over the bow; and oldest daughter, Heidi, and her fiancé Sean were aboard ARCUS video-recording the event While Art stood by, almost at attention, ever at the ready, I thanked everyone who helped on the project. He was, of course, aboard for of the maiden voyage standing amidships, his oar tossed upright in salute.
Haight family collection
On launch day, with Rann at the helm and his mother Elsie Mae in the sternsheets, Art proudly took his place amidships. The ensign is one Samm had made to reflect the boat’s origins, circa 1900. It has 45 stars.
I logged 790 hours of actual labor building ELSIE MAE. I spent at least twice that time thinking about what and how to perform each small step in the process. Art was there to be part of the resurrection of a boat from its long hibernation, and never suggested a better way to do something or argued over whether a decision of mine was wise or not. He spent at least 200 hours with me in the garage, and in all that time he only repeated one story. It has been 15 years since I built ELSIE MAE; Art Arpin is gone now, but he is as much a part of the boat as every piece of wood he touched.
Born on a Northern California dairy farm in 1953, Rann began drawing in 1954. In his younger years, he worked as a cowboy, a pool cleaner and rock ‘n’ roll singer, but it was art and architecture that seemed to have the most promise for him. He was educated at Walt Disney’s California Institute of the Arts earning a Bachelor of Fine Arts degree in Design. Rann is a licensed architect with projects in the western United States, Hawaii, Alaska, Canada and Mexico. Rann is married to his high-school sweetheart, Samm. They have three daughters, three sons-in-law, 6 grandchildren and 3 grand-dogs. They are all an inspiration to Rann’s art and spend a part of their lives posing for his 25 years of personal Christmas cards. To see some of his work, visit rannhaight.com.
Rann Haight
Sara, Heidi, Samm, and Erin pose aboard the not-yet-finished ELSIE MAE for the year’s Christmas card.
Artwork by Rann Haight
The Haight’s Christmas card for the year 2000
If you have an interesting story to tell about your adventures with a small wooden boat, please email us a brief outline and a few photos.
Two pieces of 9mm plywood glued together create a side fence for a jack plane.
When you give a plane a sharp edge and set it to make a fine cut, it’s easy to come neatly up to the pencil line you’re cutting to. It’s not so easy to keep the plane square to the work, especially if its sole is teetering on a narrow edge. For some jobs, such as fairing the edge of a lapstrake plank, being off a few degrees isn’t cause for concern, but for other jobs, such as planing stitch-and-glue panels in pairs or joining boards for a transom, an unwavering square edge matters. I’ve resorted to a few simple shop-made fences clamped to a plane to make it easy to keep the tool square to the work.
For larger planes balance on the work can be an issue. The small section of this fence could be made thicker to better balance the jointer plane over the work.
For working long, straight edges on lumber with a jointer plane or a jack plane, I’ll use a fence clamped to the side of the plane. It’s a bit like a shooting board that moves with the plane instead of staying with the workpiece. The fence is made of two pieces: The one that makes contact with the work is 2″ to 3″ wide; the other about twice that. Glued together, the two pieces of wood create a stagger that sets the work within the span of the plane’s blade. A small clamp holds the fence in place on the plane. The workpiece should be rigid enough to be held vertically, to support the weight of the plane, and to resist the lateral pressure the fence requires.
When I’m shaping long, curved plywood planks that are too flimsy to be worked if clamped vertically on the face of a workbench, I use a block plane with a fence clamped to its sole.
Two old friends: I made this sole fence in 1979 while I was building a Chamberlain dory skiff. The plane got its tail docked when I dropped it on a concrete floor. A little time with a grinder smoothed its rough edges. The square hole isn’t necessary. While it makes it possible to adjust the plane and clamp to fit the grooves for the blade on top, it’s easier to drill a round hole and rasp a new groove as needed.
There’s usually enough room forward of the plane’s throat for a small clamp to apply pressure.
Flexible planks are better behaved when they’re resting flat on a long worktable and the smaller, lighter plane is more easily managed, it’s weight chiefly supported by the fence. While this is the only option for a plane that doesn’t have sides machined flat and square to the bottom, it has the added benefit of allowing the plane to be set at an angle to the work, shortening the contact area of the plane for concave work.
This small fence of locust wood took about five minutes to make.
Skewing the plane also makes the “apparent” bevel of the blade more acute for easier cutting whether the workpiece’s edge is concave, straight, or convex. The sole fence is just a block of wood with squared faces and a 1″ hole drilled in the middle close to one face. Grooves cut with a rat-tail file or a bandsawn recess keep the fence from pushing against the plane blade.
Sole fences require recesses to provide clearance for the plane blade.
I’ll occasionally have a hard time with a side fence on vertical work: a heavy plane working a narrow edge will want to tip and tends to cut at an angle. Then a pair of sole fences pressed to the sides of the workpiece with a light pressure will do the trick with the added benefit of making it easy to switch directions if the grain demands it.
When a single side fence isn’t stable enough for planing a straight edge, a pair of sole fences will keep the plane square.
When there’s a lot of wood between the rough-cut edge and the pencil line I need to get to, I use a small router equipped with a fence. The router removes wood quickly and won’t push the wood around like a hand plane will. The router also rests its weight on the work unlike a power planer. The work is clamped with the edge just beyond the workbench.
The fence is held to the router base by two machine screws. A 3/4″ carbide straight bit does the cutting.
The router fence is a piece of hardwood, cut straight or curved to match the work, with an oversized hole for a straight-sided router bit intersecting the working edge. There are two holes for mounting the fence with machine screws; one is elongated to allow the depth of cut to be adjusted from gobbling wood to sneaking up on a pencil line.
A workpiece thicker than the bit is long can be done in two steps: Work up to the line and then remove the fence, flip the piece over, and use a bottom-bearing flush-trim bit to finish.
It’s worth mentioning that there are ways to use a batten both to draw plank shapes and then, while it is still in place, use it as a guide for a top-bearing flush-trim router. But these methods require nailing the batten to the stock. Using a router with a fence doesn’t take you automatically to a finished edge as these methods do, but you can draw your lines with a more limber batten, use spline weights instead of nails, and work a complex curve that requires more than one batten to draw.
Christopher Cunningham is the editor of Small Boats Monthly.
You can share your tricks of the trade with other Small Boats Monthly readers by sending us an email.
It’s widely accepted that organic food is better for us and the environment, so it’s not a great leap to reason that organic paint would be just as good for our health, the environment, and the longevity of our boats. When it’s time to think about painting your boat, it’s well worth considering a natural, solvent-free paint.
Allback Linseed Oil paint is produced with natural earth pigments and linseed oil pressed from organically grown flax seeds. Plant-based paints are nothing new; linseed oil paint predates today’s petroleum-based products. Modern alkyd resin and acrylic resin paints create a barrier between the wood and the marine environment, but water eventually finds its way into the wood, and the moisture sealed inside by the paint results in wood decay, causing the paint to bubble, crack, and fail. Linseed oil paint preserves the wood by allowing it to “breathe.”
Capt. David Bill at Wooden Tangent, Mattapoisett, MA
Linseed oil soap, a 7-oz sample of linseed oil paint, and purified raw linseed oil
I ordered small samples of Allback’s raw organic linseed oil, their organic linseed-oil soap, and their linseed-oil paint to try out on strips of pine, teak, mahogany, cedar, and walnut. The oil and paint went on smoothly and dried flat without prominent brush marks. The paint dries to a flat or semigloss finish and can be turned into a high-gloss paint, according to the manufacturer, with the addition of some of their linseed-oil varnish. I used the nontoxic linseed-oil soap, rather than paint thinner, to clean the brush and my hands.
Linseed-oil paint adheres to all surfaces—wood, iron, glass, cured epoxy, and previously applied alkyd and acrylic paints—as long as they are clean, dry, and in good condition. Untreated wood doesn’t require a paint primer before finish coats are applied. If the wood is especially dry, a wiping-down with linseed oil, allowed to be well absorbed into the wood, will keep the paint where it belongs: at the surface. Apply at least two thin coats of linseed-oil paint, using a stiff natural brush to spread them out.
Capt. David Bill at Wooden Tangent, Mattapoisett, MA
Test samples painted in “Linseed Blue” linseed-oil paint
Boiled linseed oil and linseed-oil paint were used throughout the recent restoration of the Charles W. Morgan, the 174-year-old whaleship that is the centerpiece of Mystic Seaport, for both historical and practical reasons. During the restoration, new planking was saturated with multiple coats of boiled linseed oil. Old planking was stripped, water blasted, and then prepped with linseed oil. The entire hull was finish-painted with two coats of Allback’s black linseed oil paint. I spoke with Rob Whalen, the lead shipwright and project foreman for the MORGAN restoration, and it was clear that the Seaport’s research and testing had determined that Allback linseed-oil paint was the best choice for the preservation of the world’s sole remaining sailing whaleship.
I won’t know the outcome of my own paint trials for years to come, but linseed-oil enthusiasts support the manufacturer’s claim that the paint has excellent longevity while preserving the wood. Thad Danielson builds and restores wooden boats in Cummington, Massachusetts. “Prior to learning about Allback paint,” he wrote, “my boat paints always cracked and peeled in places, requiring sanding, filling, and repainting the entire boat every year. Last fall when we hauled SEA HARMONY, a 1937 Albert Strange yawl I’d painted with Allback paint, the yard manager looked at a few small breaks in the paint at plank seams and said: ‘Looks like your paint is peeling.’ I said it had been that way for seven years. He replied, ‘You have done very well.’ I also painted my Mower dory with Allback’s Old White. It goes on beautifully, and any encouragement to lay raw linseed oil on one’s boats seems all good to me.” Such longevity in a paint finish saves significant effort and expense in the long run.
Allback notes that its paints can take on a matte look over time due to the oxidation that occurs as linseed oil dries. Simply rubbing linseed oil or linseed wax on with a cloth will rejuvenate the paint’s luster.
On a cost comparison alone, Allback linseed-oil paint is pricier, at $0.30 per sq ft than Benjamin Moore SuperSpec at $0.09 per sq ft or Rustoleum Topside at $0.15 per sq ft. But to compare more accurately, dry weight needs to be factored. Linseed-oil paint is 100 percent dry weight: no added solvents evaporate from the paint; the linseed oil transitions from a liquid state to solid. The dry weight of petroleum-based paint is measured only after the water, volatile organic compounds (VOCs), and solvents evaporate from the paint. For some petroleum-based paints, only 40 percent of what’s in the can is dry weight. If you take into account the thickness of the film of paint after it has dried, quart for quart you’ll have nearly twice as much paint on your boat per coat of linseed oil paint.
Consider going organic with your next painting project. Using Allback Linseed Oil products will make a healthier, more effective, and—for traditional boats—historically appropriate way to protect your investment.
Capt. David Bill is a Sea Survival Instructor at Tabor Academy in Marion, Massachusetts, and writes about his adventures on his blog, Boats and Life.
Allback’s full line of linseed-oil products is available at Viking Sales.
For more information about linseed oil see “Linseed Oil: Both a primer and a finish” by Harry Bryan, WoodenBoat, September/October 2009.
Is there a product that might be useful for boatbuilding, cruising or shore-side camping that you’d like us to review? Please email your suggestions.
Sometimes, when you want to slide quietly from one fishing spot to the next, work up a narrow guzzle, or maneuver through a tight mooring field, it’s nice to be able to put a single oar over the stern to move the boat by sculling. The technique also comes in handy when you want to move your dinghy without getting your seat wet from the morning dew or simply do some salty stylin’ in front of a crowd of dock dwellers.
Learning how to scull takes some practice, but with the Scullmatix, a device that automatically produces the right angling of the blade, you can get your boat moving straightaway and without instruction. The Scullmatix provides benefits even for skilled scullers: It doesn’t strain your wrist, it allows you to stand in the best spot to trim the boat, and it converts one of your boat’s oars into a long, take-apart sculling oar.
Ben Fuller
The Scullmatix is made of 1/8″ stainless steel plate and secured withe a pair of stainless 5/16″ bolts and wingnuts. Resting in the boat here, it’s shown upside down.
To use the Scullmatix, clamp an oar in one side with its blade perpendicular to the device and a handle in the other. It’s sized to fit an oar with a diameter of 1¾″ and a handle with a diameter of 1½″ and a length of around 40″. The handle, situated below the oar, automatically twists the blade; you simply pull and push the handle back and forth.
I’ve been sculling for years, so I was curious to see how well the device would work and tried it on several boats. My narrow-bottomed Swampscott dory, TIPSY, was not ideal. A 7½′ oar I had kicking around was too short, even with a 48″ handle; an 8-footer, one of the dory’s regular oars, worked a little better, but I still had to stand too close to the stern. When I clamped the Scullmatix onto my 10′ sculling oar, I could sit on the after thwart; I had a good time sculling for a good half mile at 1.5 to 2 knots. The 10-footer has a 4′ blade that induces a slow and sustainable rhythm; the smaller blades meant for rowing wanted a higher “wag” rate.
Ben Fuller
The author’s double ender has a short outrigger for an oarlock for sculling. It needed to be slightly elevated for the Scullmatix to keep the handle from making contact with the outrigger.
With RAN TAN, my double-ended 17′ Tony Dias–designed Harrier, I have an outrigger for sculling. With the 7½′ oar in the Scullmatix, it didn’t feel like I had enough blade in the water. The 8-footer made a difference by immersing more blade area. But what was really nice was using my 10′ sculling oar. I could put my body weight into the stroke in a nice rhythm. The boat is a little light and narrow, and it rolled when sculled hard, so the big oar would have been better with a heavier or beamier boat.
I also tried sculling an 18′ Lund outboard skiff on a windy day, using an improvised oarlock socket on a bit of wood clamped to the transom. With my 10-footer in the Scullmatix I was able, much to my surprise, to make good progress into the wind. With a wide, steady platform offered by the wide stern, there was no problem with boat trim or rocking.
The Scullmatix is designed for use with an oarlock rather than a transom notch. The flange in the middle of the device is meant to bear upon the metal lock; it will chew up wood around a notch. The oarlock socket should be oriented athwartships, and whatever the oarlock is mounted on should be relatively narrow so that neither the oar nor the Scullmatix makes contact with it.
The Scullmatix is nicely made of heavy-gauge stainless steel, and the clamping surface is long and smooth enough so that even a soft spruce oar isn’t damaged by it. The unit has wing nuts to tighten it, and securing it requires pliers or a wrench as recommended in the instructions.
The action is indeed automatic. You won’t need to grip the handle firmly to maintain pitch, or to reverse your angle on every stroke. You can push it back and forth and grip the handle only during the pull stroke; your hand can be loose, and even open, as you push. This definitely helps prevent cramping and other wrist and forearm problems. I had no trouble sculling RAN TAN a couple of miles at close to 2 knots in smooth water with little wind.
The biggest challenge is making sharp turns. With a regular sculling oar you flatten your pitch on one stroke and use plenty on the other to turn sharply. With the Scullmatix it seems almost impossible to move the oar with no pitch. Instead, I would alternate a power stroke and almost a coasting stroke to turn. With more practice I’d expect to improve.
What is really handy about the Scullmatix is the addition of a handle to make an oar long enough to scull effectively. Generally a rowing oar is too short to get its entire blade into the water and forces the user to stand too far aft in the boat or hold the oar awkwardly close to vertical. The Scullmatix would be really handy for people wanting to scull small sail-and-oar boats not equipped with with an adequate-length oar for the job. The Scullmatix, by putting virtually the entire length of an oar aft of the transom, solves the problem; a custom-length handle makes it possible to scull from a comfortable spot in the boat. If you have such a boat, I’d certainly recommend adding the Scullmatix to your equipment.
Ben Fuller, curator of the Penobscot Marine Museum in Searsport, Maine, has been messing about in small boats for a very long time. He is owned by a dozen or more boats ranging from an International Canoe to a faering.
Jack’s Columbia Star kit on the building jig: The numerous crosspieces make it possible to assemble the board without the use of staples or other fasters that would damage the wood.
John “Captain Jack” Hess got an early start with strip-building, but it wasn’t with boats. Around 30 years ago, his sons Chris, Ben, and Jonathan, and his daughter Sara, all took an interest in Soap Box Derby racing and Jack guided them through the process of making gravity-powered Derby cars, each custom-fit to its young driver. With their sleek aerodynamic shapes and strip-built construction, the race cars were a lot like boats. The Hess kids built their cars with Sitka-spruce cove-and-bead strips either bent over ordinary molds or pressed into concave female molds. The interior surfaces were sanded smooth and sheathed with fiberglass and epoxy; after the top and bottom assemblies were finished, they were joined together and the whole body was faired, glassed, and painted.
The four kids participated in races coasting down tracks around 1,000′ long, reaching speeds around 30 mph. All four qualified for the Soap Box Derby World Championships. In 1992 Ben finished in 4th place; in 1984 Chris, at the age of 11, was the World Champion.
Hess family collection
Hess Soap Box Derby cars in the 1980s: spruce strips, fiberglass, and gravity.
Jack had always dreamed of building a boat and when he retired recently he had his opportunity. He thought he’d start with a plywood kit wherry and a strip-built kayak, but when he first saw a stand-up paddle (SUP) board go by his lakefront home on Lake Keowee in South Carolina, he thought: “Wow, that could really be something if made out of wood!” He put his strip-building knowledge to good use and began building SUP boards.
Hess family collection
The deck of AMERICAN STAR has a pattern that is a graphic interpretation of a totem-pole owl.
AMERICAN STAR is Jack’s first board, built around a Columbia Star frame from Cedar Boat Works. It measures 12′ by 30″ and is designed for flatwater paddling. The bottom starts out as a flat strip-built panel, later cut and curved to fit the snap-fit, interlocking 5mm plywood framework. Jack avoided the rows of staple holes often associated with strip-built boats by assembling the panel on an intricate strongback and clamping the strips together.
He also used clamps to glue deck strips to the curved sides and top of the framework. The work doesn’t go quickly applying one strip at a time and waiting for the glue to cure, but the unblemished finish was worth the extra time and effort.
Hess family collection
Clamping strips in place avoids the holes left by nails, but slows the work. Capt. Jack uses the time needed for the glue to cure to smooth other sections of the hull.
Jack built his second board for his dentist, an enthusiastic stand-up paddler. When Jack showed her pictures of AMERICAN STAR, she asked him to build a wooden board for her. Jack did a little research and chose the Chesapeake Light Craft kit, Kaholo, for her. Jack suspects that his dentist keeps the board displayed on a wall inside her waterside house near Charleston—she said her furniture isn’t as nicely finished as her Kaholo.
Jack Hess
The paddle for LOKA KAHOLO has a carbon-fiber tube at its core and the middle of its shaft has finger notches for a relaxed but secure grip.
LOKA KAHOLO is his third board. It’s another Chesapeake Light Craft Kaholo, built from a kit. The hull is stitch-and-glue sapele marine plywood but instead of using the same plywood for the deck, Jack created patterns in strips of Peruvian walnut, red mahogany, and the various colors of cedar. The deck fittings are walnut and include a lathe-turned cup holder. After the deck got its sheathing of glass and epoxy, Jack sanded the board smooth, finishing with 2000-grit wet sandpaper. A clear UV-resistant coating, polished to a high shine completed the job.
John Barnum
LOKA KAHALO now plies the coastal waters of Maine.
LOKA KAHOLO was built for his neighbors’ daughter and her family. LOKA KAHOLO’s matching paddle was built by Jack’s good friend Tim Deppen of Deppen Paddles. It has a hollow shaft with a carbon fiber tube built in and weighs only 26 ounces.
Jack Hess
For Capt. Jack, paddle boards are as much a means of artistic expression in wood as they are functional watercraft.
Jack keeps AMERICAN STAR at home, but he hasn’t yet mastered stand-up paddling. He finds it rewarding enough to build boards as works of art and to watch his kids and grandkids paddling.
John Barnum
.
Have you recently launched a boat? Please email us. We’d like to hear about it and share your story with other Small Boats Monthly readers.
It’s unfortunate that “Jack of all trades” is so often followed by “master of none.” It is possible to do a number of things quite well, and versatility is often of more value than virtuosity. The new Southwester Dory from Chesapeake Light Craft (CLC) was designed to serve not only as a sailboat and a rowboat, but also as a motor launch, and it does well in all three capacities. Its predecessor is CLC’s Northeaster Dory, a boat that proved popular among the sail-and-oar crowd, but many prospective buyers asked about adding outboard power. Designer John Harris wisely left his Northeaster as it was and drew up a slightly larger boat that could accommodate a small motor.
The narrow, raked transom isn’t meant to support an outboard, and the slender sections aft won’t support the weight of someone at the motor’s tiller, so John situated the Southwester’s motorwell just aft of amidships. The centralized well, an optional module that can be installed at any time during or after construction of the boat, allows comfortable seating and makes it easy to get to the motor’s fuel cock, steering friction screw, tilt lock, and fuel-tank cap without having to hang overboard. It brings the motor’s noise into the middle of the boat, but in a small boat, there’s no escaping it anyway.
The well is long enough to allow the motor to kick up when it hits something or isn’t in use—a real advantage over a short well that requires removing the motor and stowing it elsewhere to transition to rowing or sailing, coming ashore, or coasting over shoals. While leaving the motor lowered creates a lot of drag, so does the motor well opening. So the Southwester has two inserts to fill the open slot, one notched to fit around the motor when it is in use, and the other to fill the entire slot. Toggles hold the plywood inserts in place.
Christopher Cunningham
There’s no need to go to the trouble of installing control lines for the kick-up rudder when you can just reach over the side, ease the pressure applied by the threaded knob, and put the blade where you want it.
The rudder has a kick-up blade. A knob on the pivot bolt is backed off to drop the blade and tightened to keep it in place, up or down. Applying a moderate amount of pressure to the knob will keep the blade down and still let it swing up over an obstruction. The rudder stock is 1” higher than the skeg, and the jog will help keep lines or kelp from slipping in between the transom and the rudder. If you’re rigging the boat for sailing, keep in mind that it’s easier to tend to the rudder blade when the mizzen isn’t stepped, but even if you have to snake around the mast to get to the rudder, there’s still enough stability to keep the boat upright.
The Southwester’s Norwegian-style push-pull tiller has a half yoke extending to starboard and a pivoting extension to reach around the mizzen mast to the center of the cockpit. The transverse arm is permanently fixed to the rudder head, making the assembly an awkward thing to stow. Instead of gluing the two pieces together, I’d add a few extra layers of plywood to beef up the slot in the tiller for a secure slip-fit over the rudderhead. Having the rudder in place while rowing can work well when there’s a second person aboard to take the helm, but for rowing solo, even with a pivoting rudder blade retracted, there’s enough of the rudder in the water to cause drag, slow steering, and flop over while backing. I prefer to have it unshipped. Removing the rudder will also allow you to use the notch in the transom for sculling. The notch is deep and partially enclosed, making it also well suited for using an oar as a backup rudder.
John C. Harris
The 9’10” oars would be suitable for the beam of the dory, but a pair about 6″ shorter would fit neatly in the cockpit footwell without interfering with the seating. For those devoted to rowing, the longer oars could be accommodated by a recess built into one of the bulkheads.
Unlike CLC’s Northeaster, which has three rowing stations to accommodate one or two rowers, the Southwester has only a single rowing station. It would be difficult to fit two more stations into the Southwester for tandem rowing—the centerboard trunk and motorwell are in the way—and I’d be willing to bet that folks drawn to the boat will choose passagemaking under sail or power. A single rowing station is all that’s needed for shorter distances.
At 18′10″ x 5′2″, the Southwester dory is a lot of boat to row solo, but the stitch-and-glue construction keeps the weight down; the boat has a light and lively feel under oars and carries its way well. The 8′6″ oars I used worked well enough but were a bit on the short side; the common formula for oar length suggests 9′10″ oars would be the best fit. A foot brace could easily be attached to the motor well for rowing solo very powerfully. While the insert in the motor well eliminates drag, it’s not gasketed, so there are always a few inches of water in the well. I wasn’t even aware of it while motoring or sailing, but as I was rowing, the rhythmic surge set the water to sloshing about, and if I rowed with gusto a bit would splash into the cockpit. The water does no harm, but the meditative aspect of rowing is incompatible with all the commotion in the well. A watertight insert with a self bailer or pumping out might solve the problem. Another fix is to have something to fill the space—say, foam blocks or a custom-built insert (the one I have for the well in one of my boats has a Plexiglas window for a view below).
Christopher Cunningham
The mizzen’s partners and step are built into the aft end of the motor well. Note the jigsaw-puzzle joints connecting the plywood pieces.
Balance-lug rig is used on both the main and the mizzen masts. The spars are all rectangular in section, but their tapers keep them from looking clunky. The main’s downhaul takes a turn around the mast to serve as a parrel line. It holds the boom in its proper position while sailing; when striking the main, casting off the downhaul allows the boom to slide forward, as it must as the yard rotates to horizontal and pushes the sail forward. It’s a simple and effective arrangement for a lug sail.
Christopher Cunningham
The storage compartments in the bow and stern provide a total of 12 cu ft of storage space.
The mizzen has a loop of line made off at the forward end of the boom and looping around the mast. It slides up and down as the sail is raised and lowered. The tail end of the mizzen sheet is tied to a bridle across the stern and its working end leads forward along the boom through a cam cleat on the mast.
Christopher Cunningham
Lines for raising and lowering the centerboard lead aft within easy reach of the helmsman, though the downhaul here has slipped from its fairlead/cleat.
The centerboard is lowered and held in place by a downhaul, which I prefer to a weighted board, which can’t be forced down if jammed and adds to the burden of moving the boat across a beach. The downhaul is held by a jam cleat and won’t release if the board runs into something, so a releasing cleat (by ClamCleat in the U.K.; click “Purchase Options” to find distributors worldwide) is worth having if you’re in an area of rocks or shoals—or if you’re like me and occasionally forget to raise the board before haulout.
John C. Harris
When switching from motoring to sailing, it only takes a minute to tilt the outboard up and close the the bottom of the well. Taking another minute to stow the motor—alongside the centerboard trunk—will clear the path for the tiller across the boat when you’re coming about.
In wind around 8 knots and waves under 1′, the Southwester’s 107 sq ft of sail had me scooting along at a satisfying pace—I’d be content to sail like that for hours. When the wind picked up to around 12 knots the sailing was more exhilarating, but not approaching the need to reef. The dory tacked quickly, carrying enough momentum to not get caught in irons. With the long Norwegian push-pull tiller I could sit where my weight belonged—amidships—and the wide side benches were comfortable, with room enough to move laterally to respond to gusts and lulls. With the sails largely self tending and only two sheets to fuss with, singlehanding is easy.
The 2.3-hp outboard motor available for my test outing wasn’t the one meant for the plug in the motor well, so I had to go with the well open. The motor supplied more than enough power to get the boat moving as fast as it will comfortably go, and while there was turbulence in the well, it wasn’t enough to slosh into the cockpit. At full throttle, the raked transom pulled up quite a pile of water astern. I enjoyed not having to reach behind me to get to the throttle and shifter.
In the bow there’s a recess for stowing a long line threaded through a hole in the stem. The hole squeegees water and seaweed off and any remaining water drains through two discreet holes though the planking. The line pays out again tangle-free and can be adjusted to any length with a figure-eight on a bight. It’s a dandy system. Stowage compartments at the bow and stern are fitted with hatches for access. The side benches enclose large flotation compartments filled with slabs of expanded polystyrene foam—the pink or blue insulation panels you’ll find at home improvement stores. Ledges along the side benches support the thwart and it would be quite easy to add ledges along the well and trunk for inserts to create a continuous platform for a crew of two to sleep aboard. There’s an optional bimini top available for shade under sunny skies…which would be a good starting point for enclosing the cockpit for shelter in cold and wet conditions.
CLC has packed a lot of features into the Southwester without making it cluttered or complicated. It offers a lot of options for propulsion, and none of them feels like a compromise.
Christopher Cunningham is the editor of Small Boats Monthly.
CLC Southwester Particulars
[table]
LOA/18′10″
Beam/5′2″
Hull, stripped/200 lbs
Hull, motoring, with engine/280 lbs
Hull, sailing, rigged/350 lbs
Draft, rowing/7″
Draft, sailing/3′
[/table]
Kits and plans for the Southwester Dory are available from Chesapeake Light Craft.
Is there a boat you’d like to know more about? Have you built one that you think other Small Boats Monthly readers would enjoy? Please email us!
Any serious angler knows the need for fresh bait for a day of fishing; being able to catch your own and not having to depend on a bait-and-tackle shop is a big advantage. After many very early mornings being let down and left scrambling for bait because the bait shop was either sold out or the quality was poor, I decided it was time to make a change: I started catching my own baitfish during the week, after work, and keeping it alive in cages I sank alongside the dock. The boat I was using at the time was well suited to chasing flounder and cobia in the lower Chesapeake Bay and coastal waters off Virginia Beach, but too large for the baitfish-rich inlets and shallow coves, and I found myself looking for a small, easy-to-maintain outboard skiff.
The search for an inexpensive, used, production fiberglass skiff went on for a while without success. The fit and finish of most affordable small and simple powerboats left much to be desired. Exploring other affordable options, I discovered I could build a wooden boat for less money and put into the project the standard of finish that I wanted.
I found my way to Dudley Dix, a yacht designer living in Virginia Beach. When I sat down with him to talk about what I was looking for, he said he’d wanted to design a line of garvey-style outboard-powered boats and was looking for the right time to start the drawings. The boat I outlined for him provided the catalyst for his design project. My list of requirements for the boat were fairly basic. I had very little woodworking experience and no boatbuilding experience so I needed something easy to build, something a true novice could tackle. The project needed to go quickly enough to complete in six months, working in my spare time, so the boat could be ready for the upcoming summer. My plan was to leave the boat in a slip during the summer so I wanted it to be self-bailing, to ease the worry of swamping while the boat was tied up and unattended during the many evening thunderstorms we have here. After a few months of designing, Dudley presented me with drawings for a 16′ garvey, and I began construction.
photographs by Jesse Goodwin
The outwale is the only brightwork on the boat. Its wood is of unknown species, having been cut from a 2×6 that Dudley Dix found in his front yard, evidently having fallen off a garbage truck. It was once part of a door because a handle was still attached. Dudley ripped it down to size on a table saw and Kevin coated it with epoxy and finished it off with varnish.
The hull was to be built with okoume plywood and epoxy using the stitch-and-glue method. Since my boat was the prototype, there wouldn’t be a time-saving CNC-cut kit available. Instead I received a roll of full-sized patterns to transfer over to the plywood panels. The hull bottom and sides are built from four sheets of 9mm plywood using taped joints to create the lengths needed. Tabs on the five bulkheads and slots to fit them in the hull panels made stitching the basic shape of the boat together quick and easy; the bulkheads stayed securely in place while I assembled the hull.
As I stitched the keel seam together, the bow took a smooth and sweeping curve upward in the simple but functional garvey fashion. Once the hull was stitched together, fiberglass tape and epoxy resin reinforced the chine and keel seams inside and out. Several layers of 9mm plywood added to the transom created a total thickness of 45mm, which is strong enough to handle an outboard of up to 50hp. Fuel-tank beds support a permanent 12-gallon below-deck fuel tank. A stout tray under the deck amidships stores the battery out of the way, keeping its weight out of the stern. A pair of 1×2 carlins running from the transom to the bow and secured in cutouts on the top portion of the bulkheads supports the inside edge of the deck.
The framework for the bilge-access hatches was laid out according to the full-sized patterns, and the cockpit sole was cut to fit. Before the sole was installed, its underside and the entire bilge area were coated with three coats of low-viscosity epoxy. To save money and enhance the clean appearance of the deck, I built my own flush-mount hatches and access covers.
Dudley and I decided against covering the hull with a layer of fiberglass and instead three coats of epoxy seal the entire hull. The extra time and work needed to obtain a nice finish over the weave of fiberglass cloth did not justify the extra abrasive resistance a layer of ’glass would have provided, given the way I’d be using this boat: I had no need to pull it ashore.
To stiffen the hull and add longitudinal strength, 1×2 stringers were added to the bottom. Installed on the exterior side, the stringers would help give the boat lift by trapping water and air while on plane and add some protection if I should happen to run aground in the shallows. All of the 1x2s I used for the hull and carlins were sourced from our local home improvement center, helping keep the costs down. It was cheaper than shopping at a specialty lumber yard but I had to spend lot of time picking through the select poplar boards looking for pieces that would suit my needs.
The interior is quite open to keep the boat versatile. Sealed storage under hatches in the foredeck, sole, and the seat to port keeps gear out from underfoot. The starboard seat conceals a live-bait well.
Once the hull was built, sealed, and faired, I could fit the deck. To make the boat simple to maintain and keep the cockpit open, the only interior furnishings are a pair of rectangular boxes built into both sides of the stern. The starboard one is a 19-gallon bait well with plumbing to support a 500-gallon-per-hour pump to keep baitfish alive and happy. The port-side compartment has a dry storage box that also serves as a seat for the helmsman. The forward section of the port compartment has an electronics panel that is easy to access and see while steering from the seat flush with it.
The instrument panel includes switches for lights and bilge and bait-well pumps, flush-mount GPS/fishfinder, CD player with AM/FM radio, master electrical switch, and fuel gauge.
Side decks, 7″ wide, extend from the stern boxes forward to the foredeck, and along these decks are flush-mounted stainless-steel rod holders, three per side. A hatch on the foredeck provides access to a storage compartment. The enclosed compartments leave plenty of space in the cockpit for stowing all of the safety equipment, fishing gear, and anchor.
I named my boat INLET RUNNER, and Dudley adopted the name for the design. On the water, the boat jumps up on plane with little rising of the bow, and then quickly levels out at speed. With a dry hull weight of only around 400 lbs, she feels very light and responsive. Banking into turns, she carves around nicely and feels predictable. With two adults on board, the 25-hp, four-stroke outboard pushes her in the mid 20-knot range at full throttle. At three-quarters throttle, she cruises along nicely around 19 knots. She’s at her best running trim with a passenger just forward of the centerline with the helmsman sitting close to the stern. The hull has an 18-degree deadrise at the entry, which helps soften the ride in a chop; this angle flattens to 5 degrees at the transom. At rest she draws just 4″ and, for having only a 6′ beam, she provides a very stable fishing platform and has enough buoyancy for standing on the side while pulling pots.
The self-bailing cockpit has plenty of height to drain well and to keep the scuppers from taking on water while moving in reverse and at anchor in choppy conditions. Seat cushions made to snap on top of ice chests add comfort to the tops of both stern compartments while under power. The open cockpit layout leaves plenty of room for crab pots if needed or a small cooler added for extra seating.
Running in a slight chop on Virginia’s Back River, the builder’s home waters, INLET RUNNER moves along nicely with very minimal pounding.
The Inlet Runner’s lightweight design needs minimal horsepower to perform well. We can cruise around all day on only a few gallons of gasoline, making the garvey very inexpensive to operate. With every nook and cranny sealed with epoxy, maintenance is easy. After returning to the dock, a quick rinse with fresh water is all that is needed. I leave the boat at the dock uncovered and it is unaffected by downpours.
The Inlet Runner is a great all-around, well-thought-out and -designed little powerboat. It’s easy to build and once completed is a lot of boat for the money: around $3,000 for the completed boat, less the engine. From start to finish the boat took a little over six months to build. I expect to spend many pleasant hours on her catching baitfish, fishing for flounder on calm days, and just messing about in the local estuaries and protected waters.
Kevin Agee is a professional BMW Mechanic living on the east coast of Virginia. He spends most of his spare time fishing or sightseeing on his local waters. He has long been passionate about small, simple, and easy-to-maintain wooden boats that are versatile and have character; new to boatbuilding, he’s looking forward to more projects in the future.
Plans are available from Dudley Dix Yacht Design and can be purchased along with measurements for the components or full-sized patterns on paper or on Mylar. A pre-cut plywood kit is in the works.
Is there a boat you’d like to know more about? Have you built one that you think other Small Boats Monthly readers would enjoy? Please email us!
After the close of the American Civil War in 1865, John Wesley Powell, a Union Army veteran who had lost his right forearm to a Confederate musket ball, returned to civilian life as a geology professor. In 1869, he set out to explore and survey the Green and Colorado Rivers and lead the first scientific expedition through the entire Grand Canyon. The feat required boats built specifically for the task by the Thomas Bagley boatyard in Chicago. In the 1860s, there were no boats appropriate for this kind of journey and also no practical way to get them there until the completion of the first Transcontinental Railroad on May 10, 1869. Bagley could then send the boats west by rail to the Green River station in Wyoming. After christening the three large boats KITTY CLYDE’S SISTER, MAID OF THE CAÑON, NO NAME, and the small one EMMA DEAN, the expedition got underway on May 24, 1869. Three months later, on August 30, Powell arrived at his goal, the mouth of the Virgin River, with just three of his four boats and six of the ten men he’d set out with.
In 2013, the British Broadcasting Corporation (BBC) commissioned the Northwest School of Wooden Boatbuilding to recreate two of Bagley’s 21′ Whitehall “freight boats” and the smaller 16′ scout boat for Operation Grand Canyon, a TV program about the retracing the famous expedition by Powell, who was later the director of the U.S. Geological Survey. I worked with eight students to build the Whitehalls, and senior instructor Jeff Hammond built the scout boat with other students.
There are no plans or pictures of the boats of this expedition. Powell’s journals offer only an outline for their construction:
Three* are built of oak; stanch [sic] and firm; doubled-ribbed with double stem and stern posts, and further strengthened by bulkheads, dividing each into three compartments.
Two of these, fore and aft, are decked, forming water-tight cabins. It is expected these will buoy the boats should the waves roll over them in rough water. The little vessels are twenty-one feet long and, taking out the cargoes, can be carried by four men.
The fourth boat is made of pine, very light, but sixteen feet in length, with a sharp cutwater, and every way built for fast rowing and divided into compartments as the others.
*One of Powell’s boats was lost at the rapids he named Disaster Falls. For Operation Grand Canyon only the boats that had survived were replicated.
The usual carvel construction of Whitehalls in the last half of the 19th century was ill-suited for this type of expedition, and, following Powell’s notes and channeling Thomas Bagley, I beefed everything up considerably and added some atypical features. I decided that Bagley would have added a keel batten to back up the garboards if he was concerned about the boat coming down hard on a rock. I also studied photographs and engravings in books about Powell’s second expedition—in 1871—and built the boats the way I felt Bagley would have in 1869.
Northwest School of Wooden Boatbuilding
The oak logs harvested for the Whitehalls were sawn with a bandsaw mill in Bristol, Rhode Island. The planks cut from trees with curved trunks made it possible to get planks with a lot of shape out in one piece.
The first two tasks were to find suitable white oak and to draw the lines that would later be lofted full size. While Jeff and I were drawing lines, our executive director at the time, Pete Leenhouts, was on the phone searching for oak. He eventually found white oak big enough for full-length planks and backbone timbers in Rhode Island, some 3,000 miles away. While we were building the strongback and making patterns and molds, the oak was being harvested and sawn and I was quite nervous about building boats with green wood.
The oak arrived, some as rough-sawn 10/4 flitches. We planed them down to 2 ¼″ and arranged our Mylar backbone patterns to make the best use of the oak’s beautiful grain. The wood had had very little time to dry after being cut, and our moisture meter just blinked—the readings were off the charts.
Northwest School of Wooden Boatbuilding
The frames on the two large Whitehalls would soon be bent around the forms’ ribbands. Pockets chopped in the backbone aft (left) allowed the frames to get a nice tuck in the stern. Whitehall designs vary slightly depending on the builder; I drew these boats with the aid of lines from John Gardner’s Building Classic Small Craft and lines taken from a San Francisco Whitehall by fellow instructor Jack Becker.
My students seemed to be enjoying themselves despite the cold, wet, dark shelter we worked in and our morale was high. Soon enough the enormous backbone was in place, and the transom was bolted on.
Powell’s description of the boats as “doubled-ribbed” could be taken to mean either that there were twice as many frames as a normal Whitehall might have or that each was twice as thick. I decided to compromise by increasing the thickness by half and decreasing the normal frame spacing from 9″ to 6″.
Northwest School of Wooden Boatbuilding
As we decked the large oak boats the plank seams began opening up. If you look closely at the seam just below the forward thwart you’ll see light coming through. The hatches were made traditionally without any modern gasket materials. Water found its way into the “sealed” compartments in a few big rapids making it difficult to keep gear dry. Powell must have dealt with the same problem.
The green oak was glorious to bend when steamed—it could take a 90-degree twist in a matter of a few feet—so the garboards went on quickly and we had plenty of time to put on the first broadstrake before we left for the weekend. On Monday morning, as I’d feared, the plank seams that were perfect on Friday now had ¼″ gaps. It was going to be a battle to get these boats to float. I tried everything I knew to keep this from happening again—oiling the planks to slow the drying, building a kiln to dry the oak before it went on the boat, even using a wood stabilizer that replaces water in the cells—but in the end it was a losing battle. Time was not our ally, so we planked the boats and let the oak do what it wanted to do. We flipped the hulls and turned to fitting out the interior and decks.
Northwest School of Wooden Boatbuilding
Pete Leenhouts, then the school’s director, and author Ben Kahn contemplate the widening gaps in the planking seams and the looming deadline for the completion of the boats.
By May, it was time to get the boats afloat, but some of the seams had gaps of as much as 3/8″. We ripped 8′ lengths of red-cedar splines, matched to the thickness of our planks. Because the seam gaps were anything but uniform, we made splines in several different widths, coated them with linseed oil, and tapped them in. The cotton caulking that followed kept everything in place without glue. I had to leave the shop in disgust several times after I’d caulked the same spot multiple times before it seated properly and didn’t blow out the inside of the planks. My students were calmer than I was about the whole process and so absorbed in it that they wouldn’t even look up when I blurted out my frustrations.
Northwest School of Wooden Boatbuilding
The scout boat’s tongue-and-groove decking will have tarred felt stretched over it, followed by canvas and paint. A few of the screws here await bungs. The scout boat had bronze screws and the large boats had galvanized screws; Powell’s journals didn’t mention the type of fasteners used in his boats.
After six months of work we put the Whitehalls—one painted green, the other blue—and the red-hulled scout boat on the beach by the school and waited for the rising tide to lift them off their slings. In the days that followed I trained with the boats in the bay. They were like huge battleships compared to the light boats I was used to rowing, but they could take a pounding like no other Whitehall. They were ready for their journey.
Bryan Smith
The two Whitehalls, left and center, and the scout boat, right, lined up at Redwall ready for action. Powell came ashore here on August 8, 1869 and named the place for a 400′ band of cliffs stained red by iron leaching from the strata above them.
The boats arrived in Flagstaff, Arizona, amidst such a frenzy of activity and preparations for the trip down the Colorado that they were never given names. Fred Thevanin, the fearless leader of Arizona Raft Adventures (AZRA) and in charge of the trip, also served as the guide in the scout boat I’d be in as crew. I had never seen such insanity as people threw bags of potatoes, welded solar-panel brackets onto raft frames, filled whiskey barrels, and moved boats around. We were all as excited and as anxious as we’d have been if we were going to the moon and might never come back. Even the guides, who had been down this stretch of river countless times, knew this would be no ordinary trip.
A few days before launching, the British boatmen arrived along with the remaining film crew—which included Dan Snow, a popular British television host and dedicated historian. The boat crew included Mike Dilger, an ecologist and BBC reporter; Dougal Jerram, a geologist; Sam Willis a maritime historian; Bryan Smith, a filmmaker and whitewater kayaker; Fred Thevanin; and Adam Bringhurst and Tom O’Hara, both river guides. This crew of nine was the same number Powell had for this stretch.
We piled everything into trucks and headed to the boat ramp at Lees Ferry, arriving to ominous claps of thunder and bright, ragged lightning bolts. The rain came soon after so we checked into a local hotel for one last comfortable sleep. Those who hadn’t been down the river looked to the guides for assurance, but because they had never used boats like those we’d built even they were unsure.
Bryan Smith
The scout boat, with only 6′ of cockpit between its bulkheads, was cramped for our crew of three but on the bright side, with just the one rowing station, Sam and I each had to row only half much as the crew in the other boats and had only half as much water to bail when we got swamped.
The next day, we launched the boats for rowing trials. The hulls had dried out in the desert air, and the seams were leaking badly. I assured everyone that this was normal and the planks would swell up, but feeling cold water around my shins as I rowed a sinking boat made me more terrified by the hour. I had committed to something that now seemed downright foolish; once we left Lees Ferry, there would be no getting out of the canyon except by helicopter. I took solace from Tom’s calm demeanor and focused energy. As we shoved off and headed downstream, I took a deep breath, rejected negative thoughts, and pondered the eight months of hard work that had gotten me this far. What a relief it was to be on the river, living in the moment, and no longer fearing the future. As we rowed through the first riffle, I was surprised by our speed; Fred was quickly figuring out how to manage the 14′ ash sweep he was using to steer. After that riffle, my anxiety turned to excitement.
Bryan Smith
Fred set the scout boat up for the line he’d chosen to run Badger Creek Rapid.
Our first real challenge was 17 miles downriver from Lees Ferry at House Rock Rapid, where the current threatens to take you into a large hydraulic hole to the left; to avoid it, the boat must cross the river mid-rapid and dodge huge rocks on the river’s right. It would test our maneuverability. As we dropped into the smooth V of water at the top of the rapid, Fred said, “Take me on a walk,” meaning row with a slow but powerful cadence. When smooth water turned to cresting waves Fred said: “Take me on a jog.” A cold breaking wave smacked me in the back and took my breath away. Another wave wrapped around us from the other side. “Don’t forget to breathe,” Fred yelled. He squared up the bow of the boat with the huge lateral wave. As the boat climbed, the water pushed our bow parallel to the lip on top of the wave and we got a glimpse over the edge into the deep and deadly hole, which was roaring like a jet engine. Then, like a big-wave surfer, our boat dropped into the downstream trough, sped into flat water, and pushed through the eddy line with authority. As the eddy spun the boat up river, we were nearly submerged and bailed water while our hearts pounded. The other two boats punch though the waves and into the safety of the eddy.
That night, we camped on a soft, sandy beach sloping from a sheer wall of ancient rocks. Everyone had aches and pains, even the film crew. Despite being on modern rafts, they too had taken some punishment. We unloaded the boats of gear and food, and set up the kitchen. Fred and Bryan figured out what to make for dinner. Our meals consisted of foods that Powell may have taken on his journey. By this point on Powell’s trip, his crew had been on the river for months and were running out of food. Our meal was simple but delicious after a long day of physical exertion under the desert sun.
Bryan Smith
We set up camp on a beautiful beach above Unkar Rapid. Unkar is the Paiute word for red stone; the area has several archaeological sites, indications of a settlement dating back 1,000 years.
On many of the nights that followed, like our first night camping just upstream from the head of Crystal Rapid, we would drink bottom-shelf whiskey and sing around the campfire to the beautiful music of Sam and Tom on guitar and banjo. On those nights when we expected torrential rains, I’d work with the English crewmembers to create shelters out of a huge canvas tarp using oars as poles. At the camp downstream from Separation Canyon, we set up a particularly nice canopy over the kitchen using four oars on the perimeter and a longer sweep oar for the peak. We were grown men arguing the finer details of design and knots while wrestling a huge leaky tarp, but it felt like we were kids building a fort.
Bryan Smith
On a sweltering off-river day, I got a chance to put a riser block under the scout boat’s stern-sweep oarlock. Fred needed a few extra inches above the deck to get his sweep oar to clear cresting waves.
The boats were constantly deteriorating, and I spent most evenings fixing broken oarlocks, patching holes, and mending oars. To achieve better trim for steering and climbing over waves, I arranged a few boulders as ballast in the stern compartments. Obsessed with the maintenance of the boats we’d created, I was prepared and ready for almost any repair. I’d brought wood, screws, bolts, and three canvas bags full of tools. Almost daily something needed to be fixed. Halfway through the canyon, CRAZY HORSE, as Dan had been calling the blue boat, pulled through an eddy line and struck a rock concealed just below the surface of the water; an hour later, as the fleet pulled into camp, Dan mentioned the boat was sinking. The mangled stem and keel took three hours to fix, with three other team members helping. I had brought large pieces of wood to replace broken pieces, but even if we could replace the stem and keel, the task would have set us back a week. So we put tar in and around the hole, molded a lead sheet by hammering it over the tar, and then tacked it down with copper nails. The four of us showed up for dinner covered with splattered tar.
Bryan Smith
Adam drilled holes in the oarlocks to attach tethers. Our sweep oars had been getting wrenched out by powerful whitewater and these simple modifications successfully kept the oars and their oarlocks from getting lost overboard.
It was satisfying to see what these boats could endure. People asked me if it was painful to watch the boats get damaged over and over again, but I enjoyed seeing them pushed to their limits and beyond and relished the challenge of keeping them afloat. CRAZY HORSE collided with a sheer wall at Bed Rock Rapid and I was amazed the boat didn’t break in two. The patch we’d put on a few days earlier was ripped completely off, exposing the hole again. The impact punched through the planks, but the damage could have been much worse: The double framing prevented more of the plank from being shattered, and the hole in the stem could be repaired because the timber was oversized.
Bryan Smith
Dan and Dougal kept CRAZY HORSE moving slightly faster than the current so Tom could maneuver the boat and navigate around flat-water obstacles.
Crystal Rapid was an exceptional threat to both boats and crew. The filmmakers wanted us to line one boat, portage the second boat, and run the rapid with the third boat to demonstrate methods used by Powell’s expedition. We eased CRAZY HORSE down the bank next to the rapid, with Tom and Bryan in the boat and the rest of us three-deep paying out and then grasping bow and stern lines, we controlled the boat’s descent. We let the boat drift just far enough from shore for the current to pull it downstream without letting it into faster-moving water that would have ripped the lines out of our hands. At one point, CRAZY HORSE perched on some rocks and rolled on its side, allowing a huge wave to come over the rail. The additional weight solidly pinned the boat there, and despite trying for hours we could not free it. We gave up, hoping that the expected decrease in water level at night (the Glen Canyon dam upstream releases less water as the demand for electricity diminishes in the evening) would help get it off the rocks. It was depressing to think that the boat might be in its final resting place. If three crew were rendered boatless, they would have to cram aboard the other two boats. At 4 a.m., however, the water was low enough that we could bail the boat and work it free, after which we lined it the rest of the way to a beach at the bottom of the rapid.
We portaged the scout boat around Crystal Rapid. All nine of us carried provisions and gear 400 yards downriver along the bank. We then lashed oars across the 800-lb boat to provide handholds for carrying it over boulders at the edge of the river. Stumbling and falling in the sweltering sun, it took us hours to portage the boat.
The green boat ran Crystal Rapid and got swept into a boulder garden, slamming into several rocks without much damage. While Powell portaged his boats overland to avoid rapids he deemed unwise to run, most of us agreed that running the rapid was the best way to get people and boats down the river. It was less risky for the boats than lining and safer for the crew than portaging.
Bryan Smith
Adam, Bryan, and Mike braced for a big hit at Lava Falls. Moments later, their boat disappeared into a hole and resurfaced with only Bryan and Mike still aboard.
Lava Falls was our last big rapid. Of all of the rapids in the Grand Canyon, it is widely regarded as the most powerful and the most dangerous. The film crew took several hours to set up, since they would have only one chance to capture the run on film. After hours of watching private groups scout the rapid only to have Lava Falls flip their rafts, it was finally our turn.
I shoved off while Fred gave directions to Sam on the oars. Fred maneuvered the boat a few feet to the right of a giant hole that has claimed many boats over the years. The muddy water was boiling as we plowed through and over a train of giant waves. At the bottom of the rapid we rode over a pressure wave the size of a bus and came to rest in an eddy on the right side.
Bryan Smith
Although it looks like we’re about to be swallowed up by the whitewater, Fred had chosen a perfect line to get the scout boat safely through the heart of Lava Falls.
Next came CRAZY HORSE carrying Tom, Dan, and Dougal, who also survived Lava even though the boat was swamped. We all stood by as Adam, Bryan, and Mike entered the rapid in their Whitehall. Adam maneuvered next to the explosive keeper hole at the top, then his boat hit a huge hole at the bottom and vanished. When it emerged from the depths like a breaching whale, only two people were aboard. Adam was gone. We quickly rowed out in search of him. Adam eventually resurfaced 10′ behind his boat and swam to catch up. With Bryan’s help, he clambered aboard just before they were swept into the next rapid, Son of Lava. Completely swamped and lacking Adam’s steering sweep, they were at the mercy of the river; they could only hope for the best. All three boats made it through. Our nerves shattered, we regrouped, had a quick bite to eat, and rowed in silence for an hour until we reached our next camp.
Bryan Smith
Our last day in the canyon we ate breakfast in the dark and pushed off the beach at daybreak. We rowed through a thick low-lying fog and covered our last miles on flat water. All the drama was behind us.
Our 18 days in the Grand Canyon gave us a deeper understanding of ourselves, the power of the great Colorado River, and the toughness of Powell and his crew. Only six of the 10 who started his 101-day, 930-mile expedition made it through the canyon, the final leg of the journey. One had given up before reaching the Grand Canyon and after Lava Falls three of the men abandoned Powell at Separation Canyon and were never seen again. Of his four boats, three made it to the end of the expedition. After running just the 280 miles of the canyon and more than 100 rapids, I understood all too clearly my obligation as a boatbuilder to build boats as best I can and to take good care of them. In the Grand Canyon the bond created with boats is especially strong; as the Colorado River guides say: “If you want to live, stay with your boat.”
Ben Kahn earned a bachelor’s degree in industrial arts from Berea College in Kentucky in 1999 and graduated from the Northwest School of Wooden Boatbuilding (NWSWB) in 2001. Working in the Port Townsend, Washington, and Sausalito, California, shipyards prepared him for his current job teaching at NWSWB. He spends his free time enjoying boats and friends in the beautiful Pacific Northwest.
John Wesley Powell went on to serve as the director of the U.S. Geological Survey, and as an anthropologist and ethnographer he was the first director of ethnology at the Smithsonian Institution. He died, strangely enough, in 1902 in none other than Brooklin, Maine—the headquarters of Small Boats Monthly and its sister publication, WoodenBoat. For more about his explorations, see Wallace Stenger’s book Beyond the Hundredth Meridian: John Wesley Powell and the Second Opening of the West.
If you have an interesting story to tell about your adventures with a small wooden boat, please email us a brief outline and a few photos.
With a sleeping bag in place, the bunk is ready for the night.
Cruising under sail and oars can be an odd combination of casual relaxation and nonstop intensity. It means uninterrupted time on the water, to be sure—and intimacy with nature and the elements. But the imperative of covering miles to make it to the next safe anchorage, or home, can sometimes involve a relentless focus that can be mentally exhausting. Getting a good night’s sleep is imperative.
Sleeping well on board starts with choosing an anchorage wisely, setting a heavy anchor on an appropriate rode, and getting settled early enough to eat well, get organized, and enjoy the evening light. In addition, having a comfortable place to bed down makes all the difference in facing the next day, especially in less-than-sterling weather. I had been sleeping on the floorboards of my 18′ No Mans Land boat, which worked well enough. But my feet were captive under the after thwart, and the space between the centerboard trunk and the side seats was, admittedly, a bit tight. Plus, the floorboards could be damp, or downright wet, from the day’s rain or spray.
It all seemed acceptable enough, though, and I didn’t give my sleeping arrangements much more thought—at least not until I happened to be in Portsmouth, England, during a voyage and went to see HMS VICTORY. There, in the admiral’s cabin, was a sort of plank-bottomed, canvas-sided box slung from the beams overhead. Though not original, this reproduction of Horatio Nelson’s hammock, down to the froufrou embroidery done by his mistress, seemed more than a bit “precious” to me. Nevertheless, the idea was interesting enough to remember.
It came back to me on a solo cruise, during a driving night rain. I had jury-rigged a tent out of my mainsail—a bad idea, since the Tom Sawyer approach is often lacking, and cheating nature is a losing proposition. As soon as the reefpoints started dripping rather liberally, I threw my gear on top of the oars on the other side, which was drier because the sail was doubled there. I perched my sleeping bag on top of it all—and I distinctly recall muttering, among other expressions, that this just wasn’t any fun. Right then, I vowed to come up with a better tent, which I’ve done. In that moment, I had time to think more about Nelson’s hammock. I also fondly remembered the security and comfort provided aboard racing yachts by lee cloths, those simple canvas panels held vertical by lines to overhead deckbeams to prevent off-watch sailors from being thrown from their berths during a change of tack. When I got back home, I made the simple canvas bunk that I designed in my head that night.
photographs by the author
Floorboards provide a reasonably good sleeping surface, but a purpose-made boat bunk is more comfortable. Here, the mainsail is rolled around its yard and slung between the main and mizzen masts. With thole pins removed, a tent pole set in the vacant holes arches from one side to the other to provide a generous interior space. The tent cover is omitted here for clarity.
This bunk, designed around a standard camping pad, is made of readily available synthetic canvas. The bottom has five 1-1/8″ x 5/8″ wooden slats slipped into sleeves. I made the sides about 6″ high. The ends are generously peaked, each supported by an additional 3/4″ x 3/8″ slat. The whole thing rolls out on top of two oars, laid on top of the thwarts. (Aware that this “traps” the oars, I always keep a good-sized paddle forward in case I need to maneuver at night.) Lines from grommets in the end panels and sides extend up to the spar-and-sail bundle that I sling between the masts to serve as a ridgepole for my tent.
The first attempt didn’t work well. I made the slats a bit too thick, thinking they would need to withstand point loading. But with the standard foam pad slipped into the bunk, I couldn’t get my hip and shoulder to find comfortable spots between the slats. I considered adding more slats to spread the load, maybe making them thinner to avoid too much bulk to stow. But at an outdoor store I found an insulated air sleeping pad that has a built-in pump operated by hand pressure to blow it up to about 3″ thick—much thicker than my earlier-generation one. This was perfectly comfortable, plus the air pad packs in less than half of the volume of my old foam pad, and less volume in stowage is always a real benefit aboard a small boat.
Modified foam pads—the type used for cartopping canoes and kayaks—protect the thwarts from the oar looms forward.
The oars are lashed at both looms and blades to keep them and the foam pads in place.
The canvas bunk rolls out over the oars. All lines remain with the bundle to hasten setup.
The bottom of the bunk is turned up here to show the line about to be unknotted and then tied around the oar below.
The short line extending from the bottom of the bunk, now tied around the loom, keeps the bunk in place over the oars.
The 1-1/8” x 5/8” bottom slats, made of common pine, are fitted into canvas sleeves. At each end of a slat, the canvas layers are sewn together with sailmaker’s twine through a hole bored in the wood, keeping the slat from sliding out.
Lines pass over the main yard and are made off to keep the bunk’s sides and ends vertical. Note the short lines passed through grommets inside the bunk—they tie the slats to the oars.
The canvas “box” was designed around a standard-sized camping pad, which is inserted next. Note the 3/4” x 3/8” slats sewn into each end panel to keep them from collapsing.
The bunk, with all of its associated gear, fits into a large dry bag along with my tent and mosquito netting, and takes just a few minutes to set up. There’s ample room underneath to stow things I won’t need for the night, keeping them from getting underfoot. I am the admiral of nothing and have no embroidering mistress, but with the boat well anchored down and a good book at hand, I can look forward to a fine night’s rest and to arising refreshed at the next day’s dawn, ready for more sailing and whatever the day might bring.
Tom Jackson is the senior editor of WoodenBoat.
You can find a picture of Nelson’s bed on the HMS VICTORY web site at the bottom of the page.
If you’d like to share your tricks of the trade with other Small Boats Monthly readers, send us an email.
Over the years I’ve gathered up a lot of rasps, usually with high hopes that their shark-like rows of teeth would cut through wood with ease, but none did much more than gnaw. I’d never grown fond of any rasp until I bought a Shinto Planer Saw Rasp. It’s just as effective rounding the tip of a dory’s oak stem as it is fine-tuning spruce tenons for a Greenland kayak. While I’ve always just accepted that the Shinto works well, I’d never taken a really close look to see why. At first glance it looks nothing like an ordinary rasp. Instead of being a bar of gray steel with rows of teeth, the Shinto is a lattice of what appear to be wavy hacksaw blades.
The lattice design helps to prevent clogging, not so much because the open structure provides space for the wood debris—most of that gets pushed away with every stroke—but because the teeth aren’t in rows. It’s easy to push one person off a chair; difficult to shove a row of congregants off a pew. The vast majority of the teeth on the Shinto are loners, like the single person on a chair. There are some shoulder-to-shoulder pairs where the blades touch and that’s where little bits of material get stuck. Compare that to an ordinary rasp where the clogs accumulate in the rows.
The machine-cut teeth of this rasp curve up on the back side to the cutting edge, creating a point of contact that is nearly parallel to the work and making it difficult for the rasp to engage the wood.
The teeth of an ordinary rasp are gouged up from the metal’s surface, each having a little triangular hollow in front of its cutting face. You can see that the tool that made the groove had a sharp point, but the teeth it creates are not themselves pointed, even on expensive hand-made rasps. Instead they’re shaped a bit like Half Dome in Yosemite—a rounded mound with a flat vertical face. The teeth of some machine-made rasps have another thing in common with Half Dome: The edge of its sheer face isn’t quite at the summit, and engaging similarly shaped rasp teeth in wood requires a lot of pressure.
The rounded high point of this machine-cut rasp tooth, not its cutting edge, is what makes contact with the work.
The teeth on my round rasp are poorly tempered and have bent away from the work.
The Shinto’s teeth are cut, evidently, as they are in hacksaw blades, with a mill grinder—a rotary cutter that moves across blade blanks and cuts all of the teeth in one pass. The front face of each tooth is vertical and the cutting edge across the top is straight, just like the teeth of a ripsaw. The backside of each tooth slopes directly away so there’s nothing to keep the cutting edge from biting in. The teeth are well tempered and make quick work of brass, aluminum and even steel—as you’d expect of hacksaw blades—but I prefer to extend the life of my Shinto tools by using them only on wood.
The teeth of the Shinto Saw Rasp have straight cutting edges, all parallel with each other for a smooth cut. These are the teeth on the coarse side.
These are the teeth on the fine side of the Shinto Saw Rasp. The teeth in the center of the image are at the contact point between two blades. Staggered, they don’t get clogged.
The sides of the Shinto rasps aren’t straight; they curve in a bit at the rivets that hold the blades together. (The blades aren’t welded where they contact each other.) The concavity at the rivets “buries” their heads so the rasp can be worked into the corner of a right angle.
I have several common rasps with smooth sides that can also be worked in a corner, but the teeth on the working faces of those rasps don’t extend fully to the edge and leave a ridge of material that has to be removed with some other tool. The Shinto has a full complement of teeth right up the edge. Those outside teeth are ground back at a bevel, a special operation done only on the two outside blades, so there must have been a reason to add the extra step in the manufacturing. In a right-angle tenon the bevel would leave a fillet of wood just 3/100” wide, which is hardly worth fussing over, but in an obtuse angle, like the beveled shoulders of the tenons I cut for Greenland kayaks, the Shinto won’t cut an unwanted groove in the apex.
Shinto rasps come in two styles. The Saw Rasp has a handle in line with the cutting surfaces and the Planer Saw Rasp has an offset handle. The offset handle allows work in the middle of large flat surfaces and is removable, so you can switch between the coarse side and the fine. My Planer Saw Rasp came with a knob extending forward for my other hand, but I removed it, preferring to have my left hand on the back of the rasp itself for a better feel for the work.
The Shinto does faster and smoother cutting with less effort than with a common rasp. Because its teeth aren’t aligned in rows you don’t have to angle the tool to keep it from getting hung up. Pushing a common rasp’s rows of teeth straight across the edge of a board is like negotiating a flight of stairs with a hand truck. The Shinto rasps leave a noticeably smoother surface when worked with the grain and excel at working across end grain. Are you fine-tuning the end of an inwale for a perfect fit with a breasthook? The Shinto is the tool for the job. I’ve had my Shinto Planer Saw Rasp for at least a decade, maybe 15 years, and it still has plenty of bite and remains a pleasure to use. My other rasps? They’re under a blanket of dust waiting for me to brush their teeth.
Christopher Cunningham is the editor of Small Boats Monthly.
Shinto rasps are available from the WoodenBoat Store, woodworking stores and web sites.
Is there a product that might be useful for boatbuilding, cruising or shore-side camping that you’d like us to review? Please email your suggestions.
The deck is strip-built, alternating western red cedar with white pine; the trim is walnut.
Sandy MacKenzie lives in Gananoque, Ontario, just a few blocks from the banks of the St. Lawrence River. He enjoys fishing from kayaks, but putting his fishing rod down to pick up the paddle began to wear on him. He scouted about, without success, for plans for a canoe or a kayak with pedal or electric power that would leave his hands free for fishing. He had built a few kayaks and felt confident in his boatbuilding abilities, so he decided to take a chance on coming up with a design himself, something quite different from anything he’d seen.
Using balsa-wood strips and working by trial and error, Sandy arrived at the shape of his mini-launch.
He had always admired the lines of fantail launches and embarked on an experiment to create one as the size of a paddling craft, but with the eye appeal of a launch. The overall dimensions were determined by other existing small boats, which assured him that a 10′ 7″ by 2′ 4″ mini-launch would support his weight and the boat’s outfitting. He “sketched” the boat in three dimensions by constructing a 1:8 scale model, planking it with strips of balsa wood and adjusting the shape as he went. Designing with a model is traditionally done by carving a half hull from a block of wood, but that involves a lot of wood chips, which is okay in the shop, but not in the living room where Sandy could work in more comfort. When he had the model shaped to his satisfaction he derived six stations from it, and scaled them up to make the molds on which he’d build the boat.
Unsure if the finished results of his experiment would be worth keeping, Sandy didn’t buy a new batch of cedar strips, but instead used white-cedar strips he’d culled from the stock used for other kayaks he’d built. Like most fantail launches, the hull of this new boat would be painted anyway, and the worst of the knotty subpar strips would be used where they would be hidden from view in the bright-finished interior.
The mini-launch’s seat was inspired by Adirondack chairs.
It took Sandy only two days to strip the hull. Then came a layer of 6-oz fiberglass cloth and a skeg scribed to fit the stern. The seat and backrest, to be finished bright, weren’t so easy to make and consumed countless hours.
The electric motor fits a well initially intended for a pedal-drive unit. Latches fixed to the well keep the motor locked in place.
Sandy outfitted the hull with a custom “motorwell” to take a Hobie Mirage drive—a pedal-powered device designed for sit-on-top kayaks. Its oscillating pedals power two flexible fins beneath the hull, propelling the boat like penguin wings. Unfortunately, sea trials revealed that the spoon-shaped stern was pulled down when the boat was pedaled up to speed. Moving the seat and the drive-unit receptacle forward might have solved the problem, but there wasn’t enough length in the boat to make that adjustment. Fortunately, Torqeedo makes an electric power unit, the Hobie evolve, designed to fit in receivers for Mirage drives. Sandy could move the seat forward to solve the trim problem and leave the drive mount in the same place.
Sandy christened the boat O’SEA DEE, a nod to the inordinate amount of time and obsessive fussing he had invested in such a small boat. His little launch cruises comfortably at 4 knots and can do 6 at full throttle. The stern still squats at top speed, but not nearly as badly as it did. As for the fishing that O’SEA DEE was designed to accommodate, “trolling with the motor,” he says, “is a dream.” It has a distinct advantage over the pedal drive in that it has reverse, so Sandy has all the maneuverability he needs to pursue fish.
As fall comes to a close, Sandy still takes O’SEA DEE out on the St. Lawrence River exploring the clusters of islands surrounding Gananoque and “jigging for pickerel and small-mouth bass in deep water where there isn’t much boat traffic,” he says. “If I’m not catching anything, I’m thinking about the next design.”
Have you recently launched a boat? Please email us. We’d like to hear about it and share your story with other Small Boats Monthly readers.
Continue Reading - Enter your email to log in or subscribe
New to Small Boats? Create a free account to get our weekly emails and two free articles each month.
Time to upgrade!
You've read all of your free content for the month. Upgrade to a paid subscription for unlimited access.