The Matsu I tested was sized to fit my disproportionally large chest and feet; the loose fit elsewhere was scarcely noticeable once the excess air was “burped” out through a gasket.
One of the great things about Puget Sound, my home waters, is that you can go boating in the middle of winter—the temperature of its waters is never far from 50°F. One of the not-so-great things about the Sound is that when you go boating on in the middle of summer the temperature of its waters is never far from 50°.
Many years ago my father was sailing a small boat far from shore when he capsized. The skipper of a cabin cruiser motoring nearby had seen the boat turn turtle, pulled up alongside, called out “You know you can only live 15 minutes in that water,” and then hauled Dad aboard. If you wind up in 50° water, dressed in street clothes as my father was, you may last longer than 15 minutes, but if you aren’t able to recover from a dunking on your own or get rescued, your time is as good as up. In short order your thinking will get muddled and your hands will become almost useless.
A drysuit, combined with insulating layers worn underneath it, can protect you from the detrimental effects of cold water. You’ll be much more comfortable in one made with waterproof/breathable material that can transfer moisture from your skin to the outside and keep you much drier than one made of non-breathable material, but the cost of such drysuits—from $700 to $1,000—may be prohibitive to many. Mythic Gear set out to lower that price barrier and now offers drysuits in a range of $250 to $395.
Mythic’s drysuits are made only in stock sizes, one of the ways of keeping the price low. The Matsu model I reviewed was an XXL, the size I needed to fit my 49” chest and my size 13 feet. An XL would have been a better size for the rest of me, but the extra fabric wasn’t much of a problem; the loose fit provided plenty of room for insulating layers underneath and enough slack for a free range of motion. The Matsu has an adjustable elastic waist cord to keep it from drooping, but by squatting or wading out into the water, I could bleed extra air out of the suit by lifting the edge of a gasket, and with the suit a bit “vacuum packed” around me, it didn’t feel at all bulky.
Even with most of the air intentionally vented while in the water, the Matsu still offered plenty of warmth, buoyancy and a full range of motion.
The Matsu, like other Mythic suits, doesn’t have all the details often found in other, more expensive drysuits— multicolor styling, pockets, reinforced seat and knees, and Velcro-cinched overcuffs at the ankles, wrists and neck—but the basics are all there. The sewing is first-rate, and the seams are all backed up by heat-sealed tape. The latex gaskets are supple and stretchy and, as expected, just needed a bit of trimming to customize the fit. The neck gasket has a pronounced bulge molded in; with the extra material I could turn my head to look over my shoulder without having the gasket tug at my neck. The integral socks have an extra layer of Oxford cloth and are seam-sealed inside and out, nice touches for an area susceptible to wear. The waterproof entry zipper does its job of keeping the water out. While a short relief zipper is a feature on other Mythic suits, there isn’t one on the Matsu. I didn’t miss it—I have a relief zipper on one of my other suits and I rarely use it.
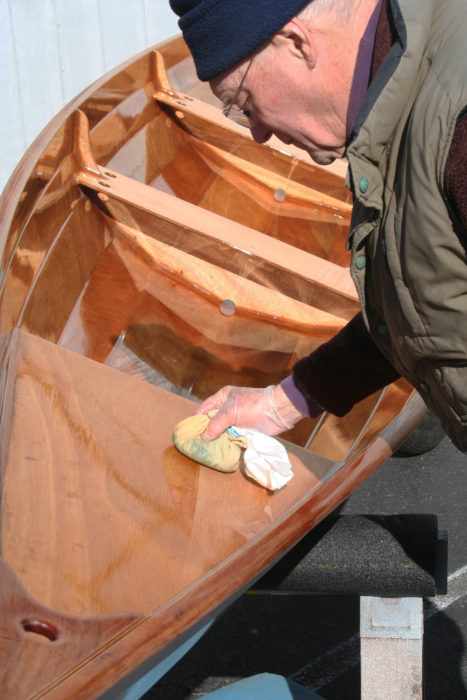
Floating in a drysuit, even in cold water, can be as relaxing as resting on a waterbed, but my bare hands chilled quickly and became painfully cold, in sharp contrast to the comfort provided by the Matsu suit.
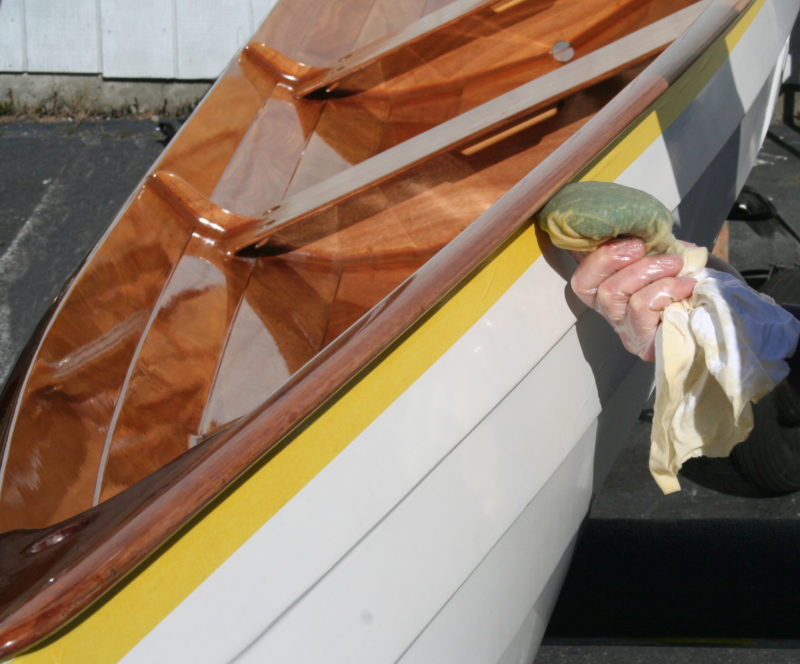
When I took the Matsu for a dip in Puget Sound, the water was painfully cold on my bare hands but, the drysuit did its job well, keeping water out and warmth in. I had a full range of motion for my arms to swim. The water-repellent treatment on the outer laminate of fabric does a great job shedding water, allowing the fabric to breathe better and reducing evaporative cooling when exposed to the wind.
At $325, the Matsu has a price that should encourage more boaters to invest in a piece of equipment that provides comfort and safety in foul weather and cold water.
Christopher Cunningham is the editor of Small Boats Monthly.
UPDATE: 12/12/19 Mythic Gear’s web site URL is no longer valid and it appears that the company is no longer in business.
Is there a product that might be useful for boatbuilding, cruising or shore-side camping that you’d like us to review? Please email your suggestions.
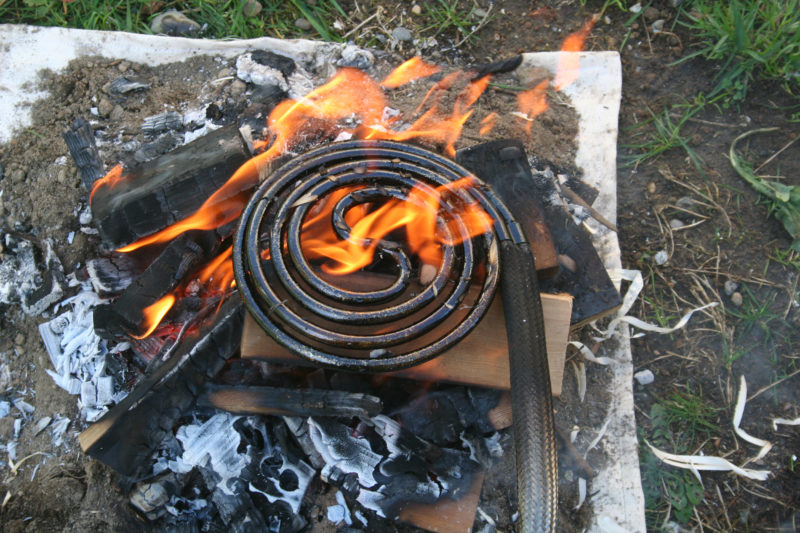
A campfire for cooking doesn’t need to be any larger than the pot it’s heating. The Emberlit keeps the fire small and contained, minimizing the impact on the wilderness.
Self-sufficiency is among the many satisfactions of camp-cruising in a small boat, and there’s a very satisfying level of independence that comes with using a wood-burning stove. Emberlit makes a line of lightweight, compact wood-burning stoves that disassemble to fit into a carrying case about the size of a large slice of bread. The stoves fire up with any burnable material at hand; for most of us, that’s small branches, sticks, and even dry leaves. At about 11oz, the weight of the stainless-steel Original model (reviewed here) won’t be noticed by the average boater, but when every ounce matters, a 5-oz titanium model is available for about twice the price.
The stove is constructed of four side panels that link together with slotted tabs around a bottom plate. The sides slant inward—creating a chimney that concentrates the flames—and are topped by two crossbars that provide a stable surface for pots of all sizes. Assembling the stove is easy and takes just one minute.
The stove pieces slip together with slotted tabs. Taken apart for packing, they occupy very little space.
Over the years I’ve used a number of white-gas and alcohol stoves and some tend to flare up frighteningly, while others run out of fuel at inopportune moments. I found the Emberlit to be comforting and straightforward. Because it’s essentially a tiny, enclosed campfire, organizing material inside the stove is critical. As with any campfire, small, easily ignited tinder goes in first, followed by twigs, then finger-sized sticks. After getting my fuel arranged properly, I can light a cooking fire with a single match. Once the tinder is burning, larger, longer sticks are inserted through the opening in the front panel and gradually fed into the stove as they’re consumed by the flames.
The Emberlit needs to be tended while cooking, but its wide base makes a stable platform and I never worried that the pot would tip off the cooking surface while I was feeding wood into the fire. Boiling a pot of water was simple and reasonably fast. A high-tech canister stove will boil water faster, but if you’re out camping, what’s the rush? To cook a meal in a pan without scorching it, I had to control the flames carefully by adding just the right amount and size of wood. When the cooking was done, the interior of the stove and my pots were, predictably, coated with soot and needed to be cleaned or wrapped in a rag to avoid soiling other equipment.
Because it can only contain a small mass of wood, if the Emberlit is left alone too long, the coals cool down and take some coaxing to reignite with new wood. While I enjoyed tending the stove, the necessity for constant maintenance might irk some. Just think of the Emberlit as pleasantly “interactive” and a fair trade-off for a cooking system that doesn’t rely on fossil fuels, won’t scar the landscape, and doesn’t consume as much wood as a campfire. I’d pack the compact, durable, and fun Emberlit anytime.
Bruce Bateau sails and rows traditional boats with a modern twist in Portland, Oregon. His stories and adventures can be found at his web site, Terrapin Tales.
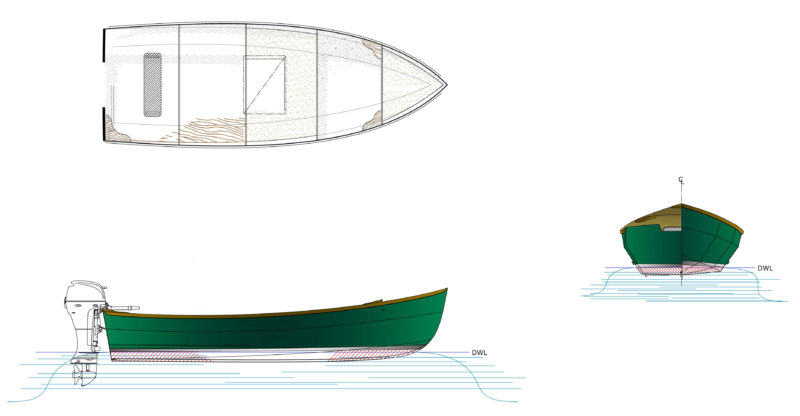
Designer Karl Stambaugh found the inspiration for his Redwing 18 design in the Camp Skiff designed by Howard Chapelle.
Dr. Don Lewis liked the looks of Karl Stambaugh’s Redwing 18 from the first time he saw the boat’s lines 14 years ago, leafing though an issue of WoodenBoat magazine. It looked like just the right boat for cruising his home waters on the Rock River in Illinois and poking into the sloughs, creeks, and streams on the fringes of the river. For months the boat slipped into his dreams, and he eventually ordered the plans and set the project in motion. The Redwing was his first boatbuilding project. He had a workshop and woodworking tools, but he needed knowledge and lumber. For the former, he haunted libraries for boatbuilding books; for the latter, his local lumberyard for their best oak boards and sheets of marine plywood.
A month after the plans arrived, he was ready to begin work. The hull went together with bronze screws, thickened epoxy, and fiberglass tape. A year and a half later, the 18′6″ by 6′6″ hull was finished and ready to be rolled upright. The task was accomplished with a pair of plywood semicircles, a block-and-tackle, a truck, eight friends, and a case of beer.
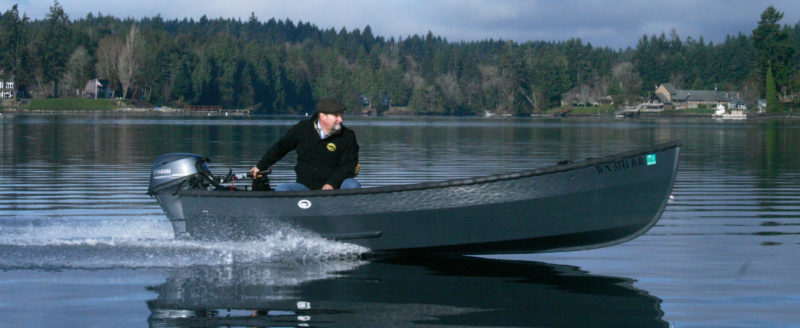
PILGRIM’s 15-hp 4-stroke outboard is housed in an insulated compartment that keeps its noise from interfering with conversations in the cockpit.
With the hull back in the shop, Don installed the cabin, bulkheads, decks, and the engine compartment for the 15hp four-stroke Honda. Fiberglass and epoxy sheathing covered the completed topsides. In the final stages of construction, Don installed kerosene lanterns as running lights. The throttle and shift controls for the outboard were mounted on the starboard side of the cockpit, and the pulley-and-cable steering system was linked to an 18” wheel mounted on the forward side of the soundproofed motor compartment.
The wheel, mounted on the engine compartment, allows the skipper to steer without having his back turned to his passengers.
After PILGRIM was launched, Don reported that she “is a dream to conn.” The boat’s flat bottom provides plenty of stability, a blessing as long as the water is flat, but that high stability likes to keep the hull parallel to the surface of the water, so a bit of maneuvering is required for negotiating big boat wakes. “As long as I turn into the wake, all is fine. I try to meet the waves at 35–45 degrees, and there will be one slap and two-and-a-half rocks, and then we are all calm again. It is sort of a game.” Don and his wife Ann often explore the backwaters that the wake-throwing powerboats avoid. Even with just a 12” draft PILGRIM will run aground now and again, but the hull has enough rocker that shifting weight aft will get the bow unstuck and she can be easily backed off.
Over the years Don has done some additional work on the boat. Her replaced the kerosene lights with a 12-volt system, replaced the seats twice, and made repairs to the wear and tear of regular use. The work isn’t a burden for him: “Repainting and repairing a wooden boat is its own sort of Zen experience.” PILGRIM gets launched every year in April or May and gets hauled out for the winter in October.
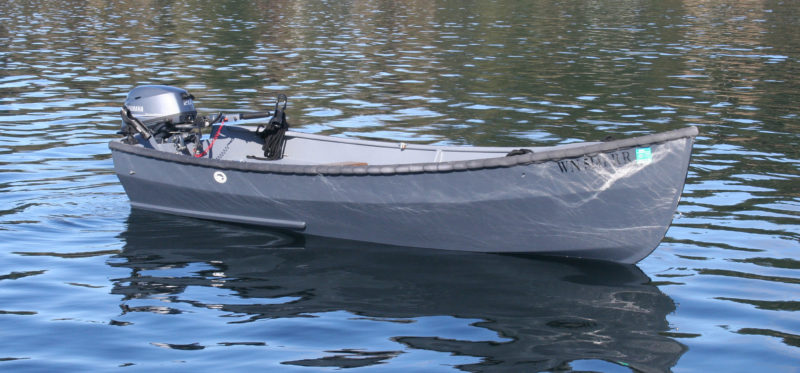
PILGRIM sleeps two and is equipped with a galley and a small marine head.
For the summer season that she is afloat, Don and Ann will take her out as often as five times a week. “Every trip is an adventure, whether just a few miles on the Rock River, or putting in at a lake or a different river. If we get tired, we can always toss out the anchor, put on some coffee, have a snack from the little stove, or even take a nap in her comfy berth.” Every time they go out, PILGRIM draws compliments, and equally often Ann says to Don, “This is the best thing you have ever built.”
When the Rock River gets crowded with other boaters, PILGRIM’s 12″ draft allows her to explore quieter backwaters.
Don is a surgeon and a scientist and not prone to stray from demonstrable facts, but says, “I am blessed to be able to buy almost any small boat I want, yet I wouldn’t even get or build another, because that might hurt PILGRIM’s feelings. PILGRIM has a soul.”
Have you recently launched a boat? Please email us. We’d like to hear about it and share your story with other Small Boats Monthly readers.
A century ago, Nathanael Herreshoff designed a 16′ keelboat known widely as the H 12½ after its 12′6″ waterline length. She was intended to handle the steep chop and strong winds of the Eastern Seaboard, and to serve as a sailing trainer for the young men of the Buzzards Bay Yacht Club.
The late Joel White drew a shoal-keel version of the H 12½ that proved even more widely popular than the original, despite the fact that, with carvel planking on steam-bent frames, it is not generally regarded as an easy boat to build. John Brooks, after many requests from his students at WoodenBoat School, drew up plans for a glued-lapstrake version, and in 2002 launched RED SKY, the first Somes Sound; eight years later he offered his plans for sale.
When I came across photos of the Somes Sound, I knew I had to build one. John’s plans for lapstrake construction eliminated many of the obstacles that would discourage the average boatbuilder from attempting to build this most beautiful sailboat. He employs a number of methods for decreasing the time and skill required to build the Somes Sound: planks are cut in one full-length piece from pairs of marine plywood sheets scarfed together end to end; using an inner and outer stem eliminates the need to cut a rabbet in the stem; and the garboards are planed flush with the keelson, then capped with the deadwood and the lead keel.
David Johnson
Canted benches and a broad, carefully angled coaming offer secure and comfortable seating while under sail.
John’s plans are very detailed and are accompanied by an extensive building manual. The boat is built upside-down on a building jig that keeps everything in alignment. To accommodate the rocker of the hull, the keelson has to be built up from two pieces. I made a vertical guide fence, an infeed table and an outfeed table for my bandsaw, and resawed 4/4 stock in half. Planed smooth into two 3/8″ boards, the two keelson halves were epoxied back together upon installation on the molds.
Building a boat with a full bilge and overlapping planks provides the builder with challenges as well as opportunities to learn new skills. Spiling strakes, cutting gains, planing rolling bevels, laminating inner and outer stems, building spars, and pouring a lead keel, all may be unfamiliar tasks to many but provide newfound pride when completed. In numerous blogs and comments by fellow amateur boatbuilders, I find one common theme runs through their experiences with the Somes Sound: All take great satisfaction and pride in learning new skills that they never dreamed they could master.
David Johnson
The centerboard was designed to set the trunk lower in the cockpit and make it less obtrusive.
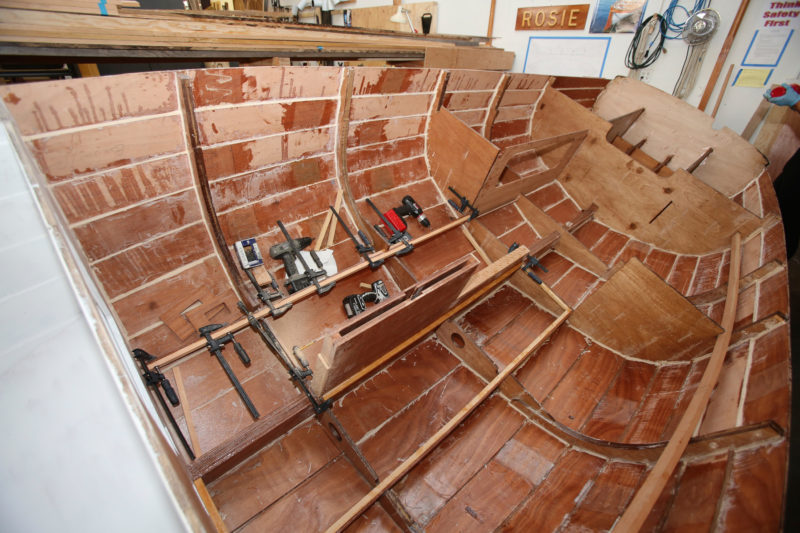
The most challenging prospect for my building of the Somes Sound was the lack of a helper. I learned quickly that clamps and homemade jigs are the solo boatbuilder’s best friend. Wrestling a wobbly 15′ plank into place requires planning, an ample supply of clamps, and some homemade support brackets to keep things in place during alignment. Screws inserted into predrilled holes in the joint laps and anchored into backing battens align the strakes and produce epoxy squeeze-out to ensure a good bond. Epoxy is very slippery stuff even when thickened, so having an alignment system is critical.
By far the most daunting prospect for me was building a mold for the keel and then melting and pouring hundreds of pounds of lead into it. By scribing 1/8″ plywood to the keel and deadwood the keel, I transferred the contour to stacked 2×8s and cut them to shape on the bandsaw to form the bottom of the mold. The sides of the mold were ¾” plywood, and all of the surfaces that would come in contact with the molten lead were lined with a ceramic-fiber fire-resistant paper. Copper pipes created shafts for each through-bolt. When I had finished the pour, the mold had taken nearly 640 lbs of lead.
Another challenge was to figure out how to install that heavy lead keel by myself. The solution was to raise the keel and install it prior to turning the hull over. My biggest concern was the structural integrity of the steel canopy of my boat shed that would take the load. I attached a 2×12 to the steel rafters to spread the weight. After I’d removed the lead from the mold and cleaned it up, I lifted it using two ½-ton chain hoists. The copper bolt shafts provided alignment for drilling through the keelson. I did a dry-fit with the bolts inserted and tightened and, satisfied with the seam, I raised the lead, applied epoxy to the joint, and permanently bolted the keel to the hull.
David Johnson
Rolling the hull upright required three chain hoists: two for the slings that rotated with the hull and a third to ease the lead keel past the tipping point on its way to the shop floor.
Then the question arose: How do I turn the hull over while it’s still attached to the building jig and has over 600 lbs of lead attached? I wrapped wide nylon straps around the hull and raised it using the two chain hoists. I used a third hoist to control the lead keel during the rollover. When the hull was high enough, I removed the molds from the hull, and took the legs off the building platform to allow it to rest directly on the floor. The nylon straps supporting the hull were slippery enough to slide through the chain-hoist hooks, so I could lift upward on the starboard sheer and rotate the hull. Once the weight of the lead passed the tipping point, a third hoist controlled the rotation until the hull was upright and the keel was centered over the building platform. I lowered the hull onto the jig and installed braces to stabilize it. I had made the platform frame from 2×12s so the height was ideal for finishing out the interior. Later I used the slings and chain hoists to lift the boat and set it on its trailer.
For those who are not inclined to tackle the task of melting lead, the Somes Sound 12 ½ uses the same lead keel as the Haven 12 ½, and ready-to-go lead keels are offered by several foundries nationwide. For builders who aren’t close to a foundry that casts Haven lead keels, building the keel mold from the optional Somes Sound keel plan, then having a local foundry cast the keel is another option.
If you are contemplating building a Somes Sound, I encourage you to read John Brooks’s book How to Build Glued-Lapstrake Wooden Boats. If you want to peruse the construction process on the web, John has a photo series (mixed with other photos over two pages) on his website, or you can check out my blog.
Huguette Johnson
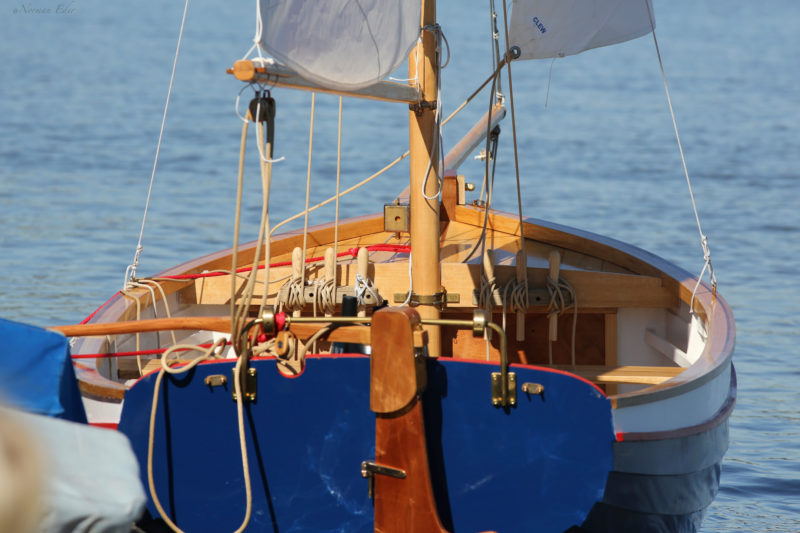
The Somes Sound’s mast is set farther aft than that of Herreshoff’s 12 1/2, shifting some sail area from main to jib for better windward performance.
Building the Somes Sound was truly a rewarding experience, and sailing the boat has been the frosting on the cake. I have sailed a wide variety of different boats over the past 50-plus years, but my Somes Sound, christened L’ETOILE DU MATIN (MORNING STAR) by my French-born wife Huguette, is truly my favorite.
I opted for the gaff rig John drew for the Somes Sound rather than the marconi. The mast for the gaff rig is 18′ long, making it easy to fit the trailered boat, with the mast laid on top, in my garage. The shorter mast and lower rig also gives the boat excellent stability. The hollow bird’s-mouth construction of the mast makes it light enough for me to step singlehanded. At the launch ramp it takes me about 45 minutes to step the mast and rig the sails. I installed side guides on the trailer so launching and retrieving is also a one-person job.
I sail solo on most occasions, and having a boat that does not involve a complicated rig was a high priority. Once the self-tending jib is adjusted, the only activity for me is to steer and keep the mainsail adjusted. L’ETOILE DU MATIN is so responsive she can turn 180 degrees in a radius of one boat-length. The lead ballast makes her stiff in a strong breeze, and the large weighted centerboard gives her excellent upwind tacking ability.
Huguette Johnson
With over 600 lbs of lead attached to its keel, the Somes Sound 12 1/2 carries its way well and does much of the work keeping upright so a solo sailor can stay comfortably seated inboard.
After a frustrating season of sailing in the Nevada County foothill reservoirs—where wind is the exception, not the rule—I took L’ETOILE DU MATIN to Southern California and sailed her out of Ventura Harbor. From late spring to fall there is a dependable onshore breeze every afternoon. It usually reaches 15 to 20 miles per hour, perfect sailing weather for a Somes Sound. The harbor offers both sheltered water in the inner channel and a full onshore breeze as you sail out the entrance channel. Because large swells are common to the Pacific coast, I have thus far opted to stay behind the shelter of the outer breakwater, but even there I have nothing to complain about; it’s a joy tacking into a strong breeze. Both with a crew and solo, L’ETOILE DU MATIN has shown herself to be an able sailer.
David Johnson retired in 2005 after 30+ years as a general contractor. After two years of remodeling his home in Grass Valley, California, he decided to try building a boat. His first sailboat was a 16’ single-chine cutter; that got him hooked. His next build was the Somes Sound 12 ½, his crowning achievement. He is presently building a Rundgatting Snipa that has morphed into a small Viking vessel.
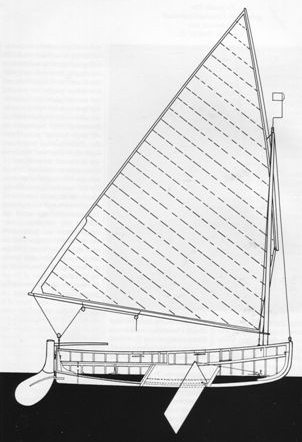
I had spent a long time looking for a boat that I could build to sail the waters of Chesapeake Bay and beyond. The boat would need to be able to carry four for daysailing, accommodate two for camp-cruising for up to two weeks, offer good sailing performance, have a shallow draft for exploring backwaters, and carry a small outboard for auxiliary power. It had to be small enough to be built and stored in a two-car garage, easily trailered, simple enough to be built in a reasonable amount of time, quick and easy to rig at the launch ramp, and have the good looks of a classic wooden boat. Although my list of requirements seemed to grow as I browsed through books of boat plans, my focus narrowed down to catboats. Their generous beam, sometimes almost half their length, offers lots of room, and their single sail is as simple as rigs get. In the book Forty Wooden Boats, I finally found the boat I wanted to build, the Marsh Cat by Joel White.
Kevin MacDonald
The Marsh Cat’s broad beam makes the cockpit sole wide enough to sleep two flanking the centerboard trunk. A boom tent provides cover.
At 15′ long and with a beam of 6′ 11″, the Marsh Cat has a spacious cockpit. With that much breadth, there would be ample room for sleeping comfortably on the floorboards on either side of the centerboard case. The 152-sq-ft sail set on a high-peaked gaff rig supplies the power. The 1,309-lb displacement assures easy trailering and launching, and the 9″ draft, with the centerboard up, makes exploration of the Chesapeake Bay’s shallow estuaries possible. The Marsh Cat plans from The WoodenBoat Store offered all the detail needed for a first-time builder. The full-sized patterns for molds, stem, and transom eliminate the need for lofting.
Phil Maynard
Sailed level, the Marsh Cat has very little weather helm and can clip along at 5 to 6 knots.
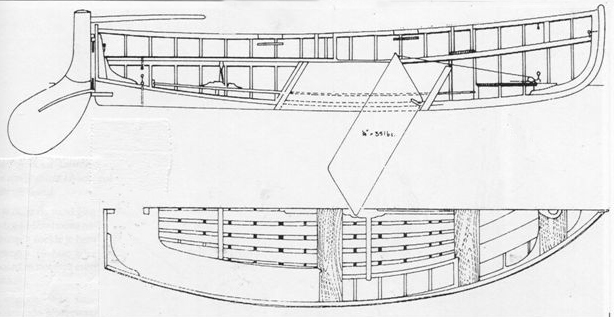
The round-bilged hull can be cold-molded, or carvel-, lapstrake-, or strip-planked. I chose to strip-plank the hull with 5⁄8″ × 1″ western red-cedar strips. The hull is constructed upside down on a strongback supporting molds cut from 5⁄8″ OSB (oriented-strand board). The keel gets laminated in place over the molds, and the 1 1⁄4″ mahogany transom and laminated stem are secured to it. Starting at the sheer, I sprang the cedar strips around the molds and attached their ends to the stem and transom with bronze wood screws. I started with bead-and-cove strips, which nest together edgewise on the curving sections of a hull. but eventually I switched to making them with a rectangular cross-section, which saved time and wasted less material in the milling process; the rectangular-sectioned strips also seemed easier to bend. There are no tight curves in the hull, so the gaps between strips were minimal and easily filled themselves with the epoxy that squeezed out as I glued them in place.
With all of the strips in place, I removed the drips and runs of cured epoxy from the hull with a heat gun and scraper. I cut the centerboard slot, faired the hull, and ’glassed the exterior with 10-oz fiberglass cloth for a low-maintenance, watertight structure. The outer keel was then attached with epoxy and bronze screws. Priming and painting the hull revealed the sweet lines Joel had drawn. After turning the hull over I gave the interior the same cleaning, fairing, and ’glassing. I spiled, laminated, and installed the sheer clamps, then built the centerboard trunk with 3⁄4″ okoume plywood sides and Douglas-fir head ledges. The molds used to form the hull served as patterns for the floors that I set in the hull with epoxy and fiberglass. The laminated Douglas-fir deckbeams, set in notches cut in the sheer clamps, were canted slightly from vertical and set square to the deck so the top faces wouldn’t have to be beveled. The 1⁄2″ okoume plywood deck easily took to the slight compound curve created by the deckbeams, a great relief. I laminated the coaming with three 1⁄8″ × 8″ mahogany pieces sprung into place; after the epoxy cured I removed the lamination and cut it to shape before installing it permanently. For the floorboards I chose ipe, a dense hardwood that is very durable but equally hard to work; I took great pains to install them with the holes for the screws drilled, countersunk, and plugged.
After I’d finished the boat, I turned my attention to the spars and rigging. I used Sitka spruce for the spars, but there’s no reason Douglas-fir couldn’t be used; there are valid arguments for both and, in my opinion, either is fine. When money is more important than shaving ounces, Douglas-fir is the less expensive option, with the added benefit of being more durable. I ordered my sail from Stuart Hopkins of Dabbler Sails, a company specializing in classic small-boat sails. The running rigging is all Sta-Set, a braided polyester line with low stretch, and the standing rigging is 3⁄16″ stainless-steel 1 × 19 wire with Sta-Lok terminals. If I had it to do over again I would use 5⁄32″ wire and terminals to save a little weight.
After 800 hours of work, my Marsh Cat was ready for launching. My wife Teresa and I trailered the boat to St. Michaels, Maryland, for its shakedown voyage. After arriving at the ramp we spent a long time rigging the boat, only because we were constantly interrupted by lookers-on with lots of questions and compliments. I backed the trailer down the ramp and LITTLE T slid effortlessly off the trailer into the water. After my usual scramble to secure the forgotten drain plugs, two of them, it was a relief seeing that she floated on her lines.
Kevin MacDonald
With a reef in her 152-sq-ft sail for a fresh breeze, LITTLE T’s 9″ draft allowed her to take a break in some thin but well protected water.
It was a hot, humid summer day without a whisper of wind, and we motored the newly christened LITTLE T around the St. Michaels harbor and past the Chesapeake Bay Maritime Museum. Several people shouted their approval from the shoreline, adding to our already swelling sense of accomplishment. As the day progressed, the clouds began to build and a breeze finally showed up. We raised the sail and were sailing at last, but the skies soon turned black and the wind increased markedly. We should have taken cover in a cove and waited out the storm, but we opted to travel out into the open Miles River with 6 miles to go to get back to the ramp. LITTLE T was really going to get a test. The wind howled and a torrent of rain came down. We bailed constantly to keep up with the rainwater pouring off the sail and into the boat. We made it back to the ramp in about an hour, glad that the maiden voyage and sea trial was over. The conditions for our first outing were quite challenging, but the Marsh Cat came through with flying colors.
It has now been six years since that initial launching, I have sailed my Marsh Cat about 4,000 miles, and in that time have gained a great deal of respect for the boat’s abilities. Catboats are known for their weather helm in stiff winds, and the Marsh Cat is not immune to this, but with a little experience and a proper reefing schedule it can be minimized. The Cat likes to sail level and the weather helm is all but eliminated when it is. With a single reef and a slackening of the mainsheet in gusts, it remains docile and in control in winds of about 14 knots. As the wind builds to about 18 knots, it’s time for the second reef. Above 25 knots, it’s time to head for the barn unless you have crew. I’ve sailed my Marsh Cat in the Florida Keys with a competent crew member aboard in 30+ knots of wind with a double reef and both of us—over 500 lbs—hiked out over the rail. In gusts we buried the leeward rail but were still in control and felt no need to return to shore. Beating into the wind, it is common to make 5 1⁄4 knots; 6 1⁄2 knots running before the wind. I have seen peaks of 9 knots surfing down waves. When the wind is down, a 2-hp outboard pushes the Marsh Cat easily to a slow cruise of 4 knots or well over 5 knots if need be.
Barry Long
The Marsh Cat was designed without arrangements for seating other than an expansive sole to stretch out on and a wide coaming to lean against. Some builders have added low benches.
It is often said that all boats are a compromise, but the Marsh Cat has met all my requirements and then some without any significant shortcomings. Simplicity is certainly one of its most appealing traits. The single sheet and sail make solo sailing a breeze. There is no interior furniture to get in the way: The sole is my seat and the coaming is my backrest. It can handle heavy loads and stay out when the rest of the fleet is heading for shelter. Its spacious accommodations are a delight when camp-cruising. A setup time at the ramp of less than half an hour isn’t an impediment to frequent use or going sailing on a whim. I sail backwaters of Chesapeake Bay often, and I’ve trailered LITTLE T from my home in Maryland to Maine to sail to Matinicus Island, over 11 miles from the mainland shore. I’ve sailed her along the Florida Keys and made the 45-mile passage to the Dry Tortugas. A crossing from Florida to the Bahamas is in the planning stages. From gunkholing to open-water sailing, the Marsh Cat can do it all.
Since early childhood, Kevin MacDonald has been involved in boating activities ranging from water skiing to offshore fishing. Small-boat sailing and camp-cruising became his water sport of choice 8 years ago. The lack of suitable production boats for camp-cruising necessitated his building of LITTLE T.
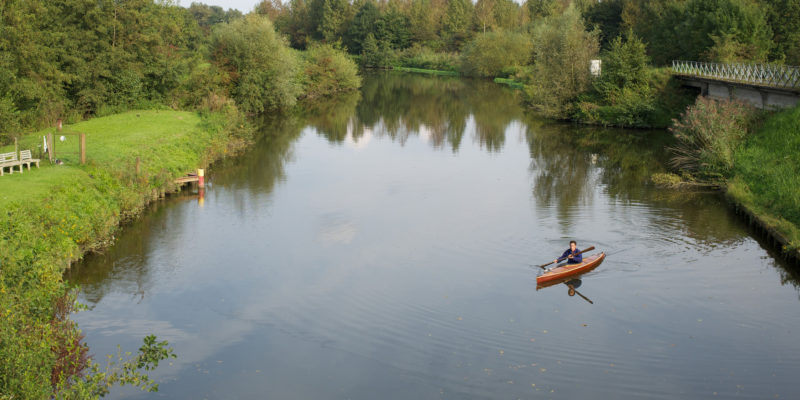
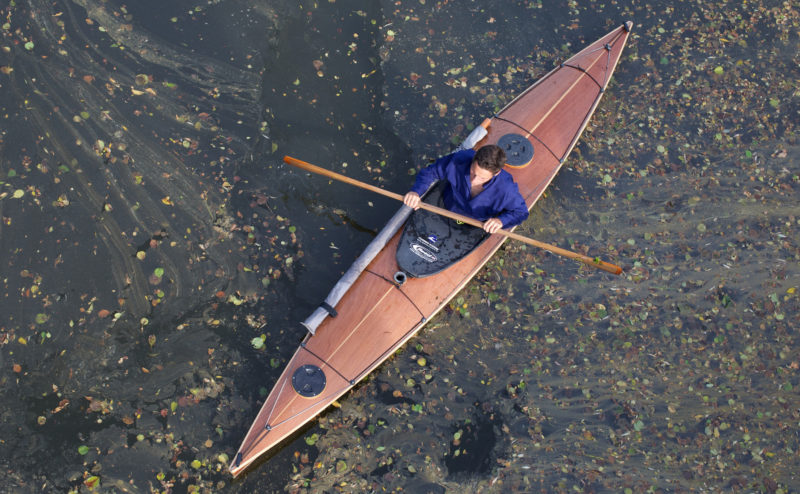
I had timed my launch for the afternoon slack tide; it was a late start, but at midday the ebb pouring through Rosario Strait would have been running against me at close to 3 knots. There were 18 miles to go to reach Matia, Sucia, and Patos, three small islands that crown Washington state’s San Juan archipelago, but I’d make good speed with the flood in my favor and my 2.5-hp, four-stroke outboard pushing HESPERIA, a 17′ camp cruiser I’d designed and built. My course paralleled the undulations of Cypress Island’s west shore up to the cusp at Tide Point and there I began a diagonal crossing of the strait to Orcas Island. In the open water the tide was with me but the wind was not and as light as it was, it still made a mess of the water. All around the buoy at Buckeye Shoal the waves were as ragged as rasp teeth. It wasn’t the kind of water that agrees with HESPERIA’s pram bow and shallow-V forward sections. At first I took just a bit of spray over the bow so I just partially unfolded FAERIE—my 4′8″ collapsible, coracle-like tender—like a dodger to keep myself dry. I soon retreated through the cabin to get my weight out of the bow and steered standing in the open hatch. It was still an uncomfortable ride so I veered west toward a bit of flat water on the downstream side of North Peapod, the largest of a cluster of rocks a half mile out from Orcas. I considered abandoning my plan and seeking the more sheltered waters between Orcas, Blakely, Lopez and Shaw Islands but just north of Lawrence Point there was an end to the chop.
Passing within 75 yards of Little Sister, a ragged islet bare but for a few patches of wind-shorn scrub, I steered between mushrooming boils and dimpled eddies toward Barnes Island. Beyond Barnes, the four-mile crossing to Matia offered smoother waters that slipped docilely under the bow. I didn’t turn on my GPS to check my speed; the overlapping hills of Orcas Island showed HESPERIA was making progress and that was enough: There was plenty of daylight left, I was where I wanted to be, and it didn’t matter how fast I was going. Matia and Sucia were drawing near while behind me the Cascade mountain range, a dusty blue deckle edge spanning the eastern horizon, was flattened and faded by distance.
I had been to Matia a few times before and had hiked by a small pocket cove on the south side of the island. A few dozen yards from the mouth of that cove I cut the motor and cocked it up, crouched through the cabin, and rowed to a band of gravel nestled in a 30′ gap between rock outcroppings. With HESPERIA pulled up just high enough to keep her from floating away, I picked my way across a tangle of sun-bleached driftwood. Among the long bark-bare poles and fluted trunks, two baguette-sized sticks caught my eye. I pried off long slivers to get beneath the silver-gray punk on the outside. The sticks were, as I’d suspected, both cedar, one western red and the other Alaska yellow. I took them back to HESPERIA as much for their fragrance as their usefulness as kindling.
The little cove, I’d decided, was too close to open water to afford much protection for anchoring overnight so I rowed around the southeast corner of the island and into Hermit Harbor.
All photographs and videos by the author
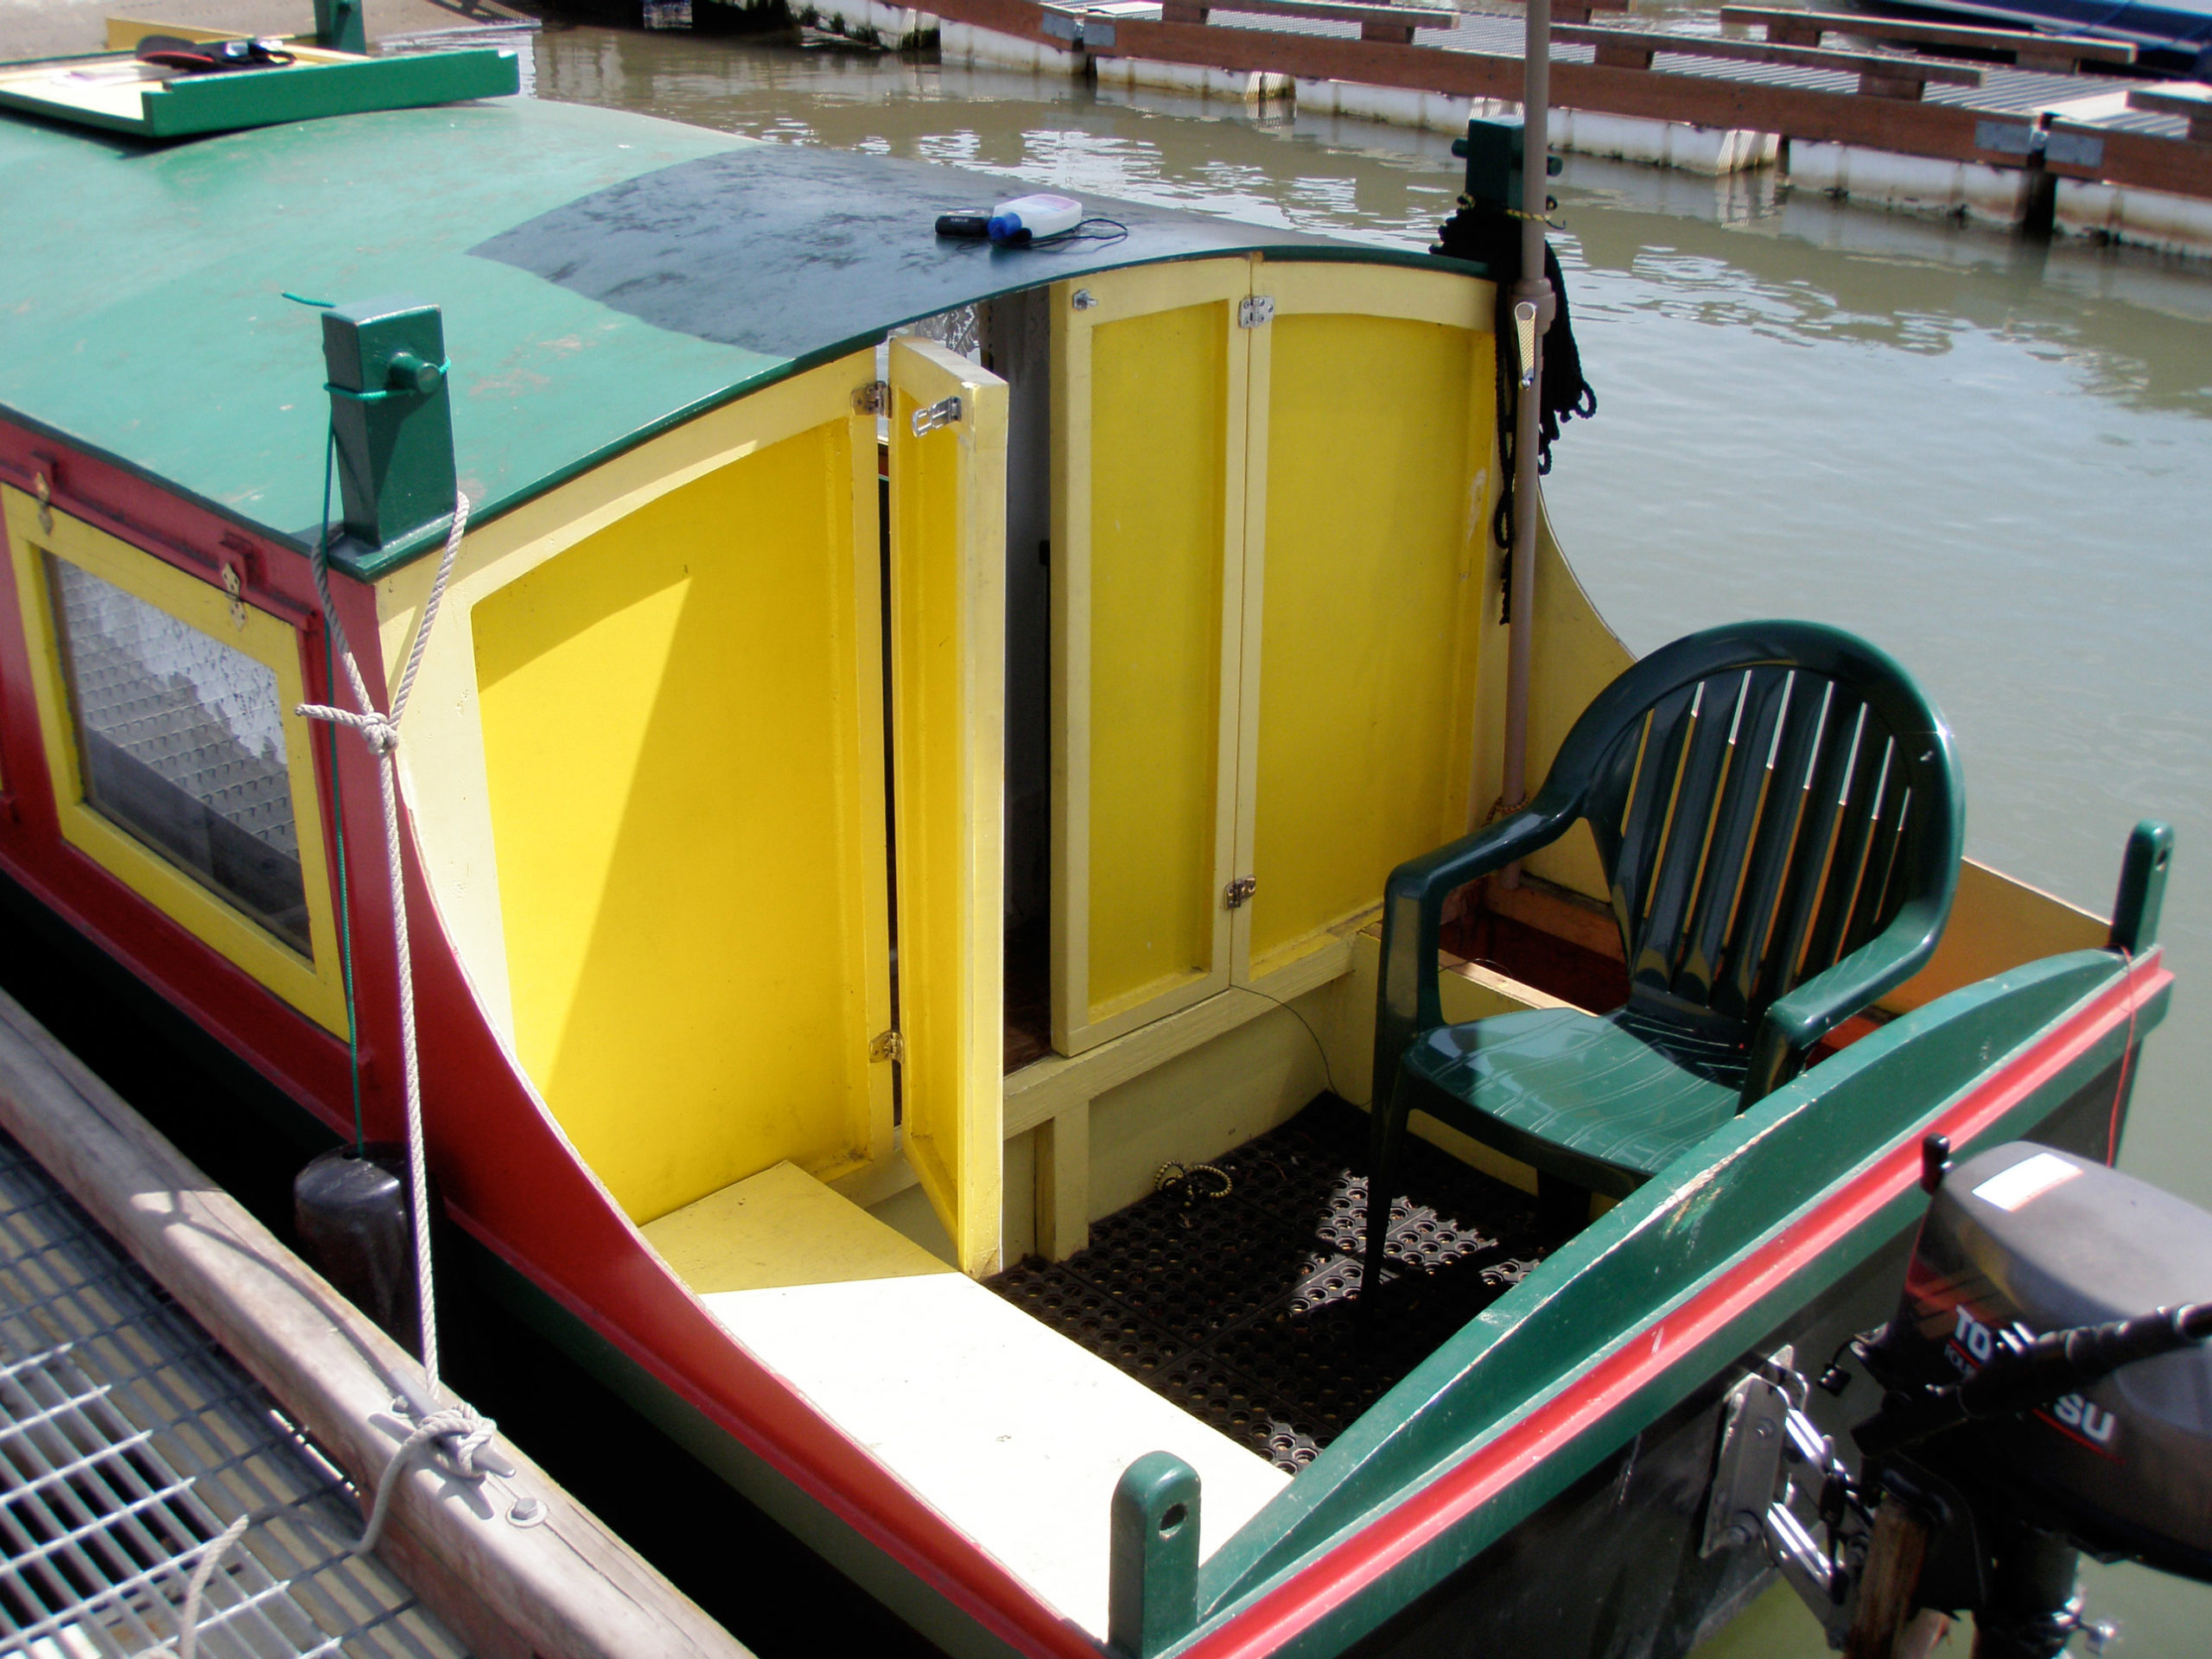
Once the cabin top is raised, the saloon has 17 windows though which to take in the view. The lower pair here open onto the aft cockpit.
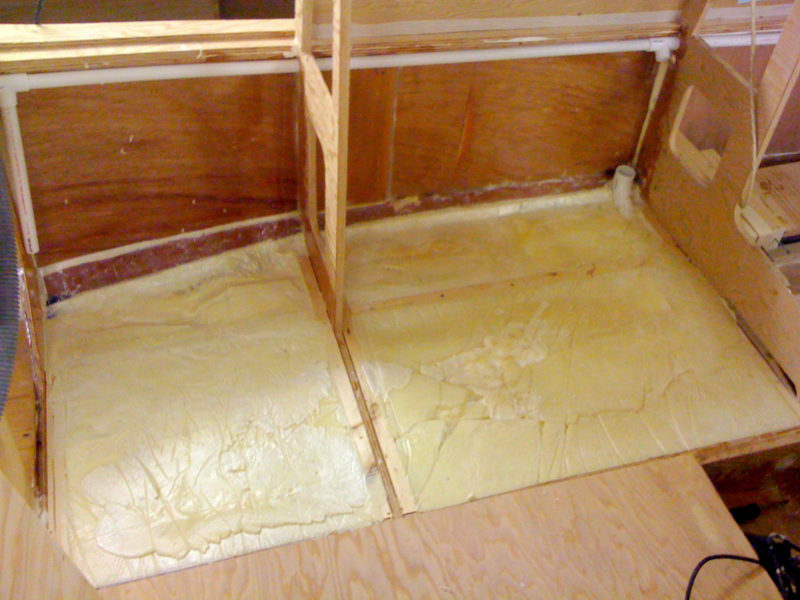
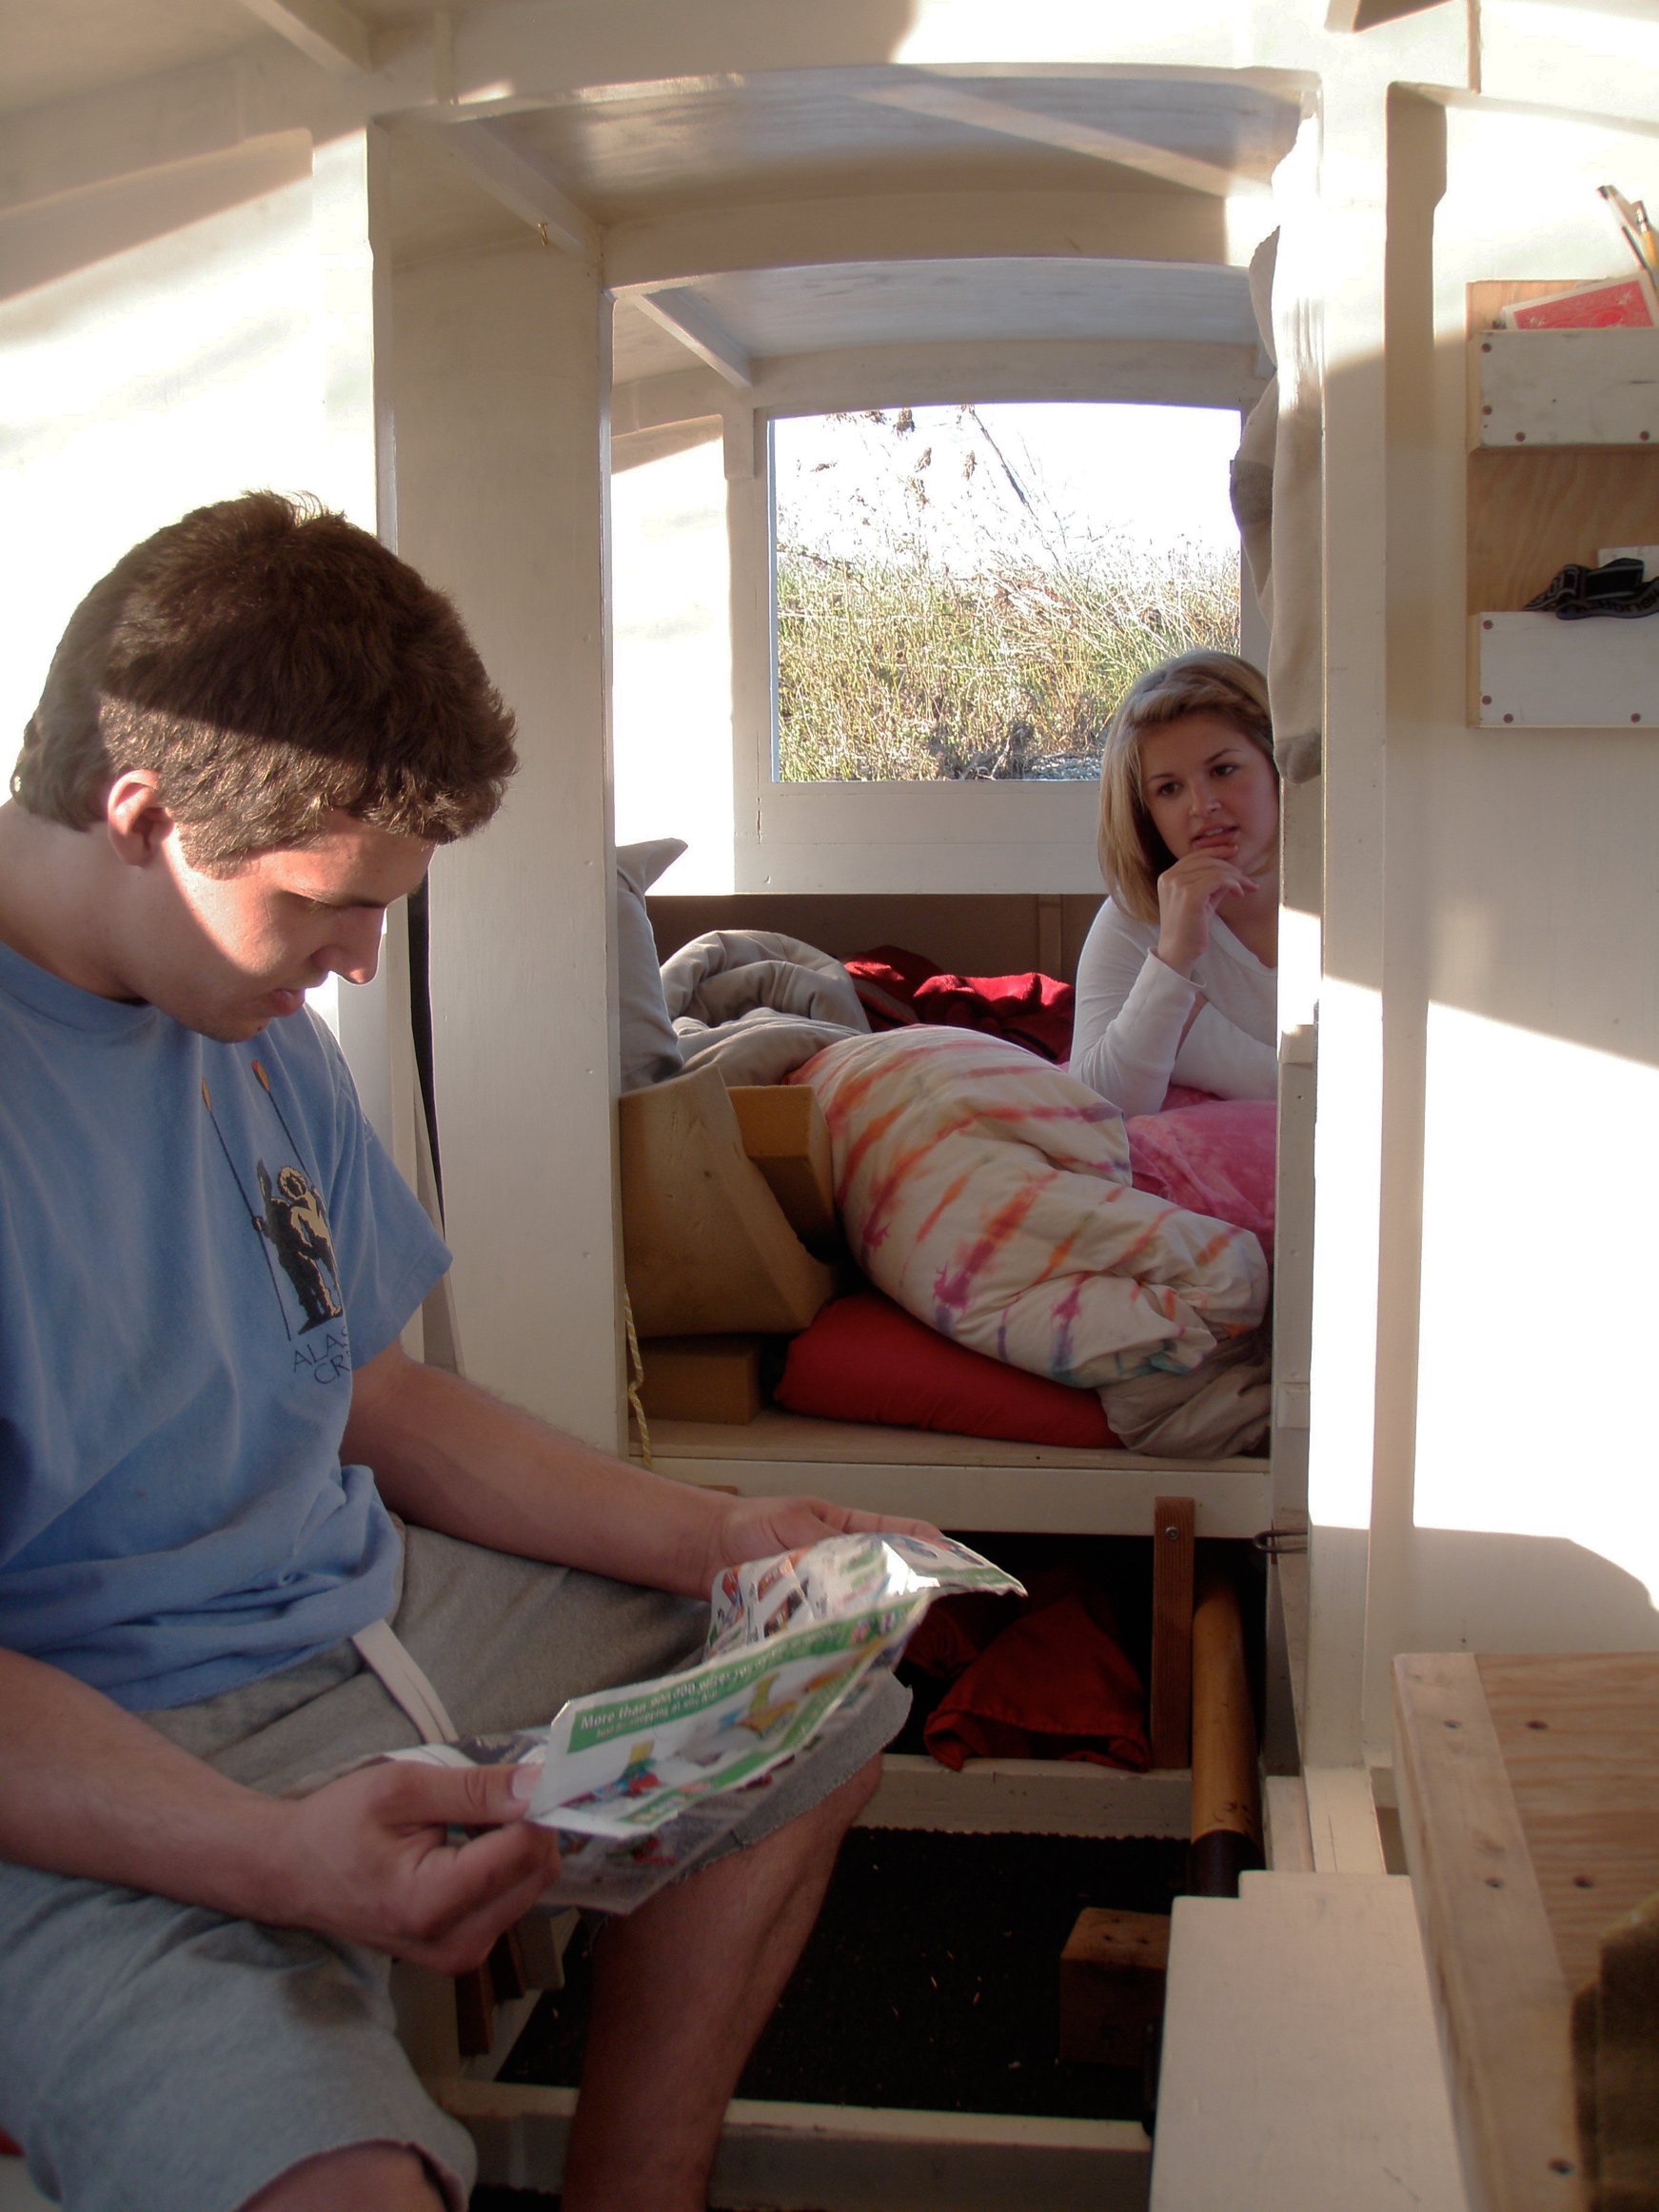
There was plenty to do before I turned in for the night. To raise the cabin roof, the spars came off and were set across the cockpit. I lay down in the cabin, put my feet against the ceiling and pushed the cabin top up until the hinged struts in the corners swung down and supported it. With the stovepipe in place I could start a fire in the wood stove. The cedar kindling lit quickly and orange flames were soon glowing through the stove’s mica window. With the middle sections of the cabin doors in place, the cabin warmed up. Not wanting to take time to make a proper dinner, I set a pot on the stove to boil water for a camping meal that cooks in its zip-lock bag. I set the floorboards on the ledges that hold them flush with the benches, rearranged the cushions and made the bed: clean sheets, a down comforter, and the pillow I use at home.
Inside each bench cushion there is 3” of camper-pad foam on top of ¼” of closed-cell foam—good enough for sitting—but for sleeping, 1½” Therma-rest pads slipped underneath the cushions add a welcome measure of comfort.
By the time I was ready to push off the beach and anchor, it had grown dark and the woods that wrapped around the cove were a sooty fringe for a starlit sky. The first dip of the oars in the water set the blades aglow with pale blue light. About 50 yards out, I slipped the anchor over the bow and watched the bioluminescence wrap around it like an alcohol flame.
In the morning I unfolded FAERIE, put her over the side, and paddled ashore. The half-mile trail across Matia meanders around tall cedars and pines that knit a lofty canopy so tight that only speckles of sunlight reach the forest floor. Olive-drab and licorice-black slugs traced cellophane-clear tracks across the trail and moss flocked the tree trunks and boulders. The dock at Rolfe Cove at the west end of the island was empty; I had Matia all to myself.
With HESPERIA at anchor, I paddled my folding tender FAERIE ashore on Matia Island.
Back aboard HESPERIA, I spent a leisurely morning getting ready to row to Sucia Island. After breakfast I stowed the bedding, did the dishes, polished some of the silver, and shook the rugs out. The water in the cove and as far as I could see beyond it was slick and bright; without any wind in the offing I could leave the cabin up, snap the canopy in place over the cockpit and row to Sucia in the shade.
The south side of Matia is a band of ragged cliffs about 20′ high, not quite as tall as the trees perched on top of them. Eroded sandstone walls are pocked with irregular cavities arrayed like hollows in airy leavened bread. In the currents swirling off Eagle Point, the western extremity of the island, an outboard skiff drifted slowly with four fishermen aboard, each occupying a corner of the cockpit with his back to the others, a rod in hand, and head bowed as if in prayer.
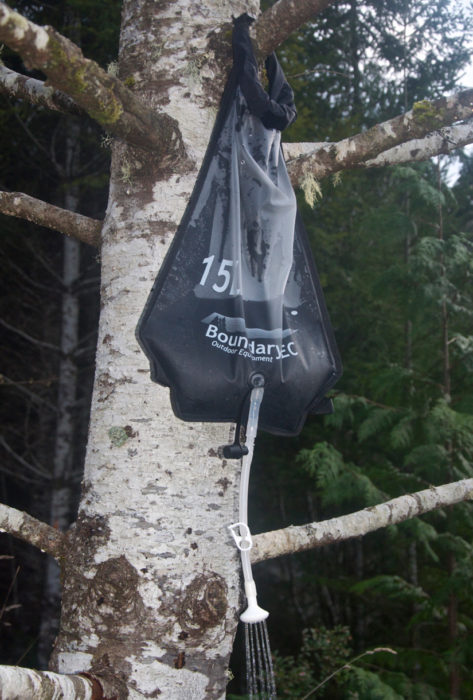
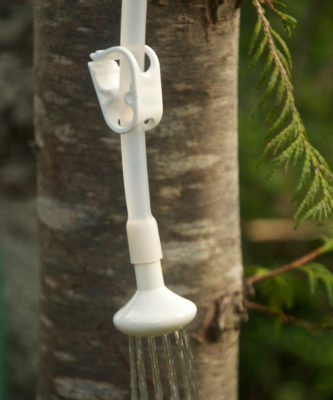
Decked out for a day in the sun, HESPERIA has her canopy in place over the cockpit, a shower bag hanging from the gallows, and two solar panels charging overhead.
There was a slight current setting me to the south as the ebb sifted itself through the islands so I angled the bow northward to keep on course. Harbor porpoises worked the tide rips, showing only their backs, curved like ulu blades cutting upward through the water. I reached Sucia at its southeast corner where its slender peninsulas and islets are arrayed like the tines of a fork. As I entered Echo Bay the current grew stronger so I hugged the shore, keeping my starboard oar just a few feet from the rocks. I crossed to the Cluster Islands that separated the bay from Ewing Cove; the low water had joined several of the islets into a peninsula but there was a gap just wide to get through, though I’d have to hop my port oar blade over an ottoman-sized rock that sat in the narrowest part of the passage. The current was strong but I’d built up enough momentum to carry past the rock, get the port oar back in the water and keep working my way upstream.
Ewing Cove is well separated from Sucia’s more heavily used anchorages and campgrounds. It gets lots of visitors during the day but few, if any, stay the night.
Ewing Cove’s shallows were covered with chocolate-brown fronds of seaweed that reflected the sunlight in glimmers of iridescent blue. I found a patch of sand for the anchor and back-paddled at the end of a short rode until the flukes had buried themselves. After paddling FAERIE ashore I walked 1½ miles along the dirt path that weaves in and out of the woods along the margin of Echo Bay.
Back aboard HESPERIA I set to work making dinner. It would be a bit more elegant than the last night’s meal out of a bag and I eventually sat down to a tuna steak, pan-seared with sun-dried tomatoes; steamed asparagus spears under a thick pat of butter; a green salad with kale, dried cranberries, toasted pumpkin seeds, and poppyseed dressing; coconut water with bits of coconut meat; and a small chocolate truffle cheesecake.
It’s well known that even the plainest meals taste better in the wilderness and it should, of course, go without saying that sterling silver is an unnecessary extravagance aboard a small boat. Silver plate is more than adequate.
The solar heated shower bag that had been out all day had warmed up a couple of gallons of fresh water, and now that all of the kayakers and walkers who’d visited the cove during the afternoon were gone, I could shower in the cockpit and then retreat to the cabin to dry off in the heat of the stove.
On the north side of Ewing Cove there’s a 75-yard wide gap between Sucia and tiny Ewing Island and the tide flushing through creates an eddy running parallel to the beach that would set HESPERIA beam-to waves entering the cove from the east. To keep her from rocking all night as she would surely do even with sets of small waves, I tied the main sheet, the mizzen sheet and a few other lengths of line together as a stern line and paddled FAERIE ashore with it. Pulled tight and tied to driftwood, the line set HESPERIA across the current with her bow facing the entrance to the cove. The difference was quite noticeable—HESPERIA was serenely steady—and I would have slept soundly the whole night through if not for the midnight squabbles of Canada geese.
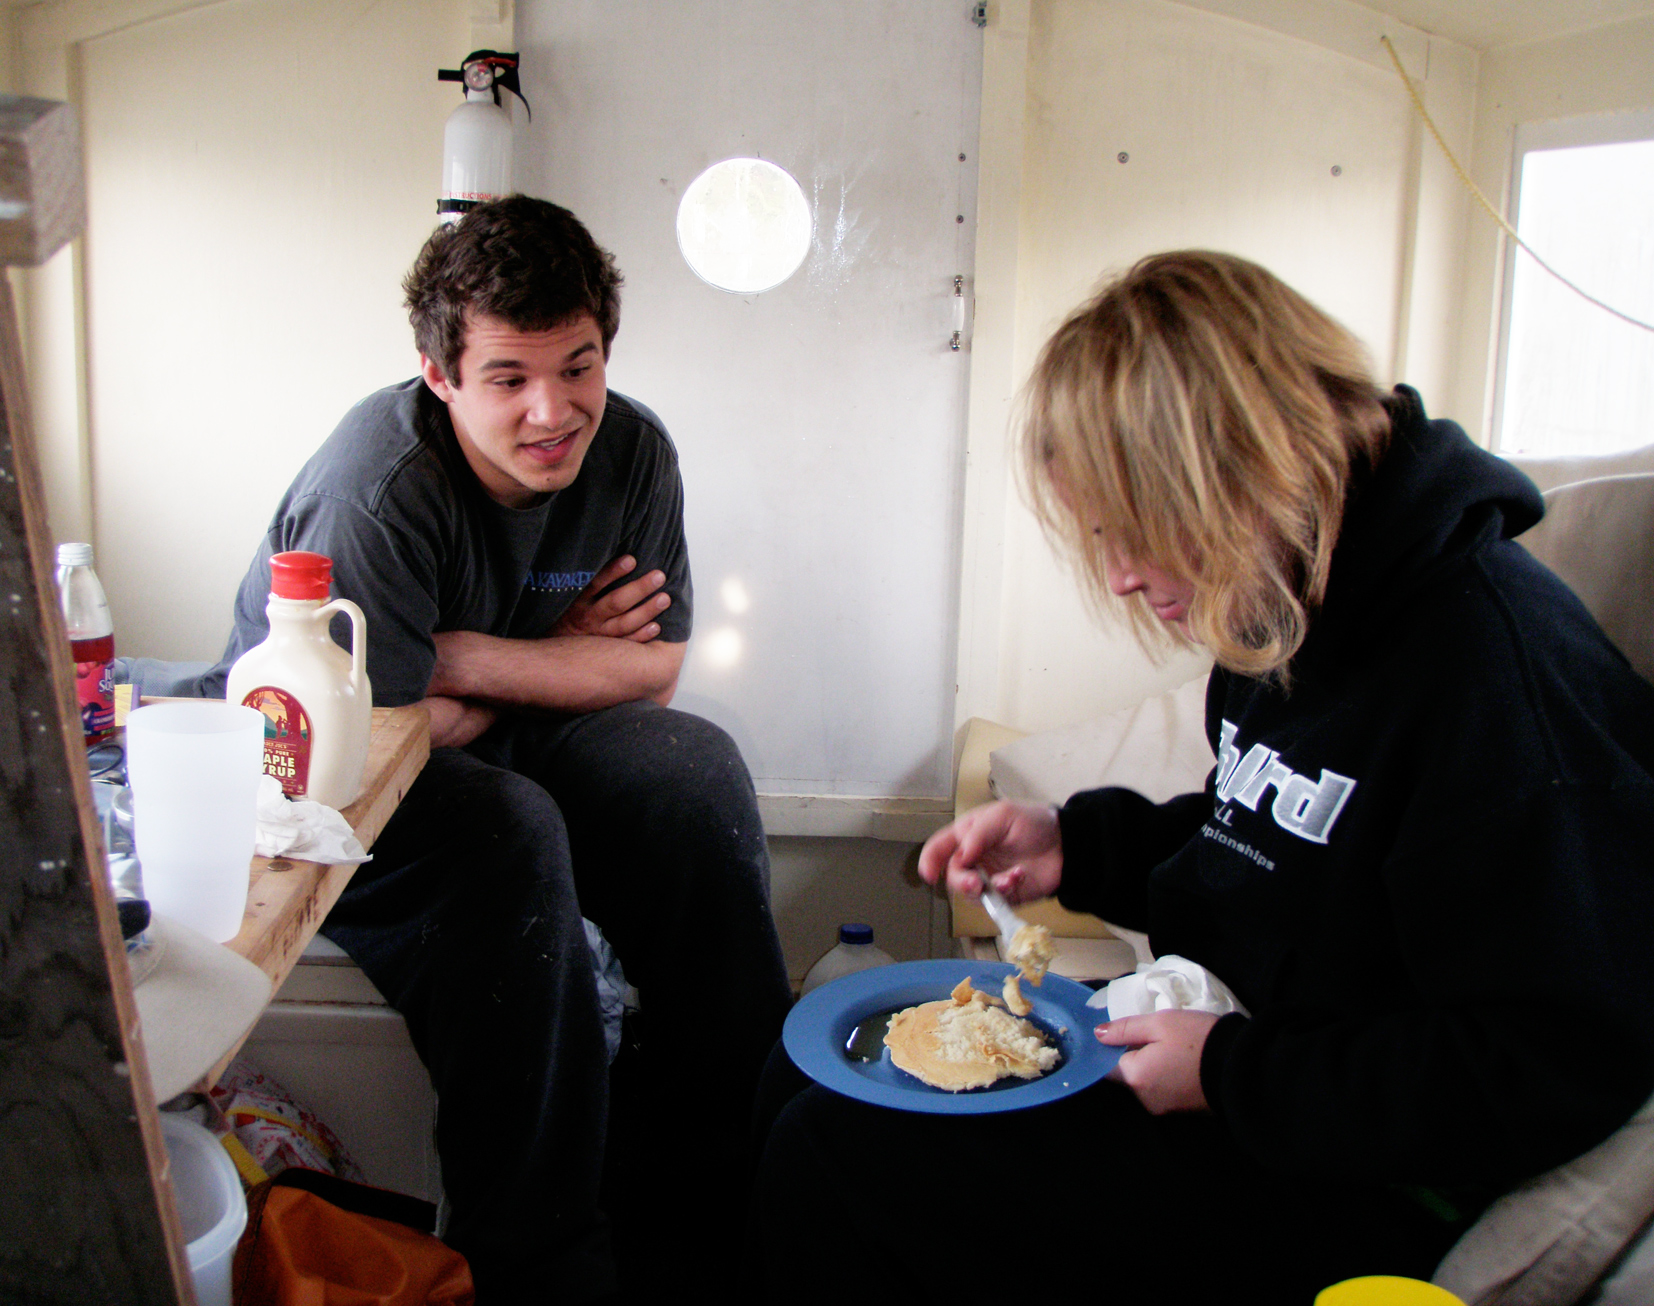
A mahogany cover converts the sink into a breakfast nook. The gypsy flowers, hastily carved of red cedar and yellow cedar driftwood, were as fragrant as any blossoms. The spork is, I confess, a silly affectation. I have plenty of room aboard HESPERIA to carry a separate spoon and fork and needn’t put on airs as if I were through-hiking the Pacific Crest Trail. The spork was, I should add, utterly useless for eating a fried egg, over easy, on a toasted bagel half.
In the morning, after breakfast, I got a fire going, set a collapsible water jug on the cabin roof to supply HESPERIA’s plumbing, and filled the sink with hot water for a shave. I’ve tried going without shaving on previous cruises but my encounters with strangers led me to understand that a few day’s growth make me look more feral than outdoorsy and clean-shaven I elicit kindness more than fear.
Only the sink is plumbed for hot (via a heat exchanger on the wood stove) and cold running water. The head, stowed out of sight in a compartment in the cockpit, is a portable rig with its own water supply and the bathtub, a soft-sided PVC liner for the cabin footwell, is used in conjunction with pots of stove-warmed water.
My plan was to continue west to Patos Island and spend my last night there. The crossing from Sucia is a short one, only 1 ½ miles, but when I motored along Ewing Island on my way out of the cove I saw a small outboard cruiser right where I was going to make the turn to head east to Patos. It was pushing a foaming white bow wave but making barely 2 knots over the bottom. My little 2.5-hp outboard would be no match for the current so I turned south across Echo Bay to consider my options. The wind coming across the bay was from the northwest and perfect for beginning my homeward leg. I killed the motor and went forward to raise the main mast; for the downwind run I’d leave the sprit main wrapped around it and use the jib halyard to raise the square sail. It billowed forward and HESPERIA steered herself, setting a course for the far corner of Orcas Island, exactly where I wanted to go. I stretched my legs out on the starboard bench and leaned up against the cabin, keeping only a light touch on the tiller line. Matia slipped by to port and Mount Baker’s sugar-white flanks gleamed under the lower yard.
The wind was light at first but halfway through the nearly 9-mile run to Lawrence Point, it strengthened, and HESPERIA was making 5 1/3 knots. After picking up a bit of ebb beyond the point we passed Buckeye Shoal making 7 knots over the bottom. The wind carried HESPERIA as far as the north end of Cypress. The square sail had made quick work of the 13-mile run and left me with only 2 miles of motoring to reach Eagle Harbor.
Cypress Island’s Eagle Harbor has broad mud flats at the head of the cove. While there were a dozen or more boats anchored nearby, no one else, oddly enough, had come ashore.
There were several boats anchored at the mouth of the bay but no one had ventured into the shallows. Perched on the foredeck I paddled ashore, stepped off, and post-holed across the mud flats with a long painter and a stake in hand. With HESPERIA tethered, I crossed the beach and walked a path so hemmed in by trees and brush that there wasn’t much to see; after just a few hundred yards I turned around. I gathered some nettles on my way back to the boat. They’re the limit of my foraging skills: I’m never sure about plants I think I know on sight, but nettles picked with bare hands provide an unmistakable sting.
I thought I could do better than labor through the mud back to HESPERIA and did a little beach combing for materials to cobble together some snowshoe-like footwear to keep me from sinking. I found a short length of line and two slats of driftwood. I unlaid the line and used two of the strands to tie the slats to my feet. They worked like a charm and kept me right up on the surface for most of the length of the mud flats but then got progressively stickier. With each step the trailing foot was harder to pry free, and the more I pulled, the more deeply I mired my lead foot. Soon I had both feet firmly glued in place, just two yards from the edge of the rapidly advancing tide. I had tied the line as tight as I could to keep the slats from falling off and didn’t have enough length to slip any of the knots. The knots were over my heels so I couldn’t see what I was doing and my fingertips, still stinging from my nettle harvest, were, in essence, quite numb. I stood up, a bit perplexed, thinking about a pen-and-ink illustration I’d seen in a WoodenBoat magazine article on shoal-draft cruising. It showed a boy running across the mud wearing splatchers, a fancier shop-made version of what was, at the moment, using me as bait for the incoming tide. All too often I’ve gone ashore without a knife, an oversight that I’d often regretted, but never more than now. I patted myself down and discovered a small folding knife in my pants pocket; I cut myself out of the bindings, stepped off the slats into shin-deep mud and slogged back to the boat.
After paddling out to anchor, I picked a spot in the shallows, well away from the other boats. The sun had not yet pushed the shadow of Cypress’s ridge across the cove so I set up the kitchen in the cockpit, steamed the nettles, cooked up a stir fry, and took my dinner al fresco. The nettles were a disappointment; they had neither the peppery attack nor the buttery artichoke finish they would have had a month earlier.
Setling in for the night, I fired the stove with the yellow cedar gathered on Matia; it put out so much heat I had to open the cabin doors and the hatch and step outside to cool off. Eagle Harbor was so still that I could get a good look at Jupiter through my binoculars and make out two of its moons. When the cabin was comfortably warm I was in no rush to crawl into bed and sat on the comforter with my pillow at my back, stared at the orange glow of embers behind the stove’s widow, and idly worked my way through a bag of pistachios. When I began to feel drowsy I tossed the mound of shells into the stove, turned out the lights and slipped under the covers.
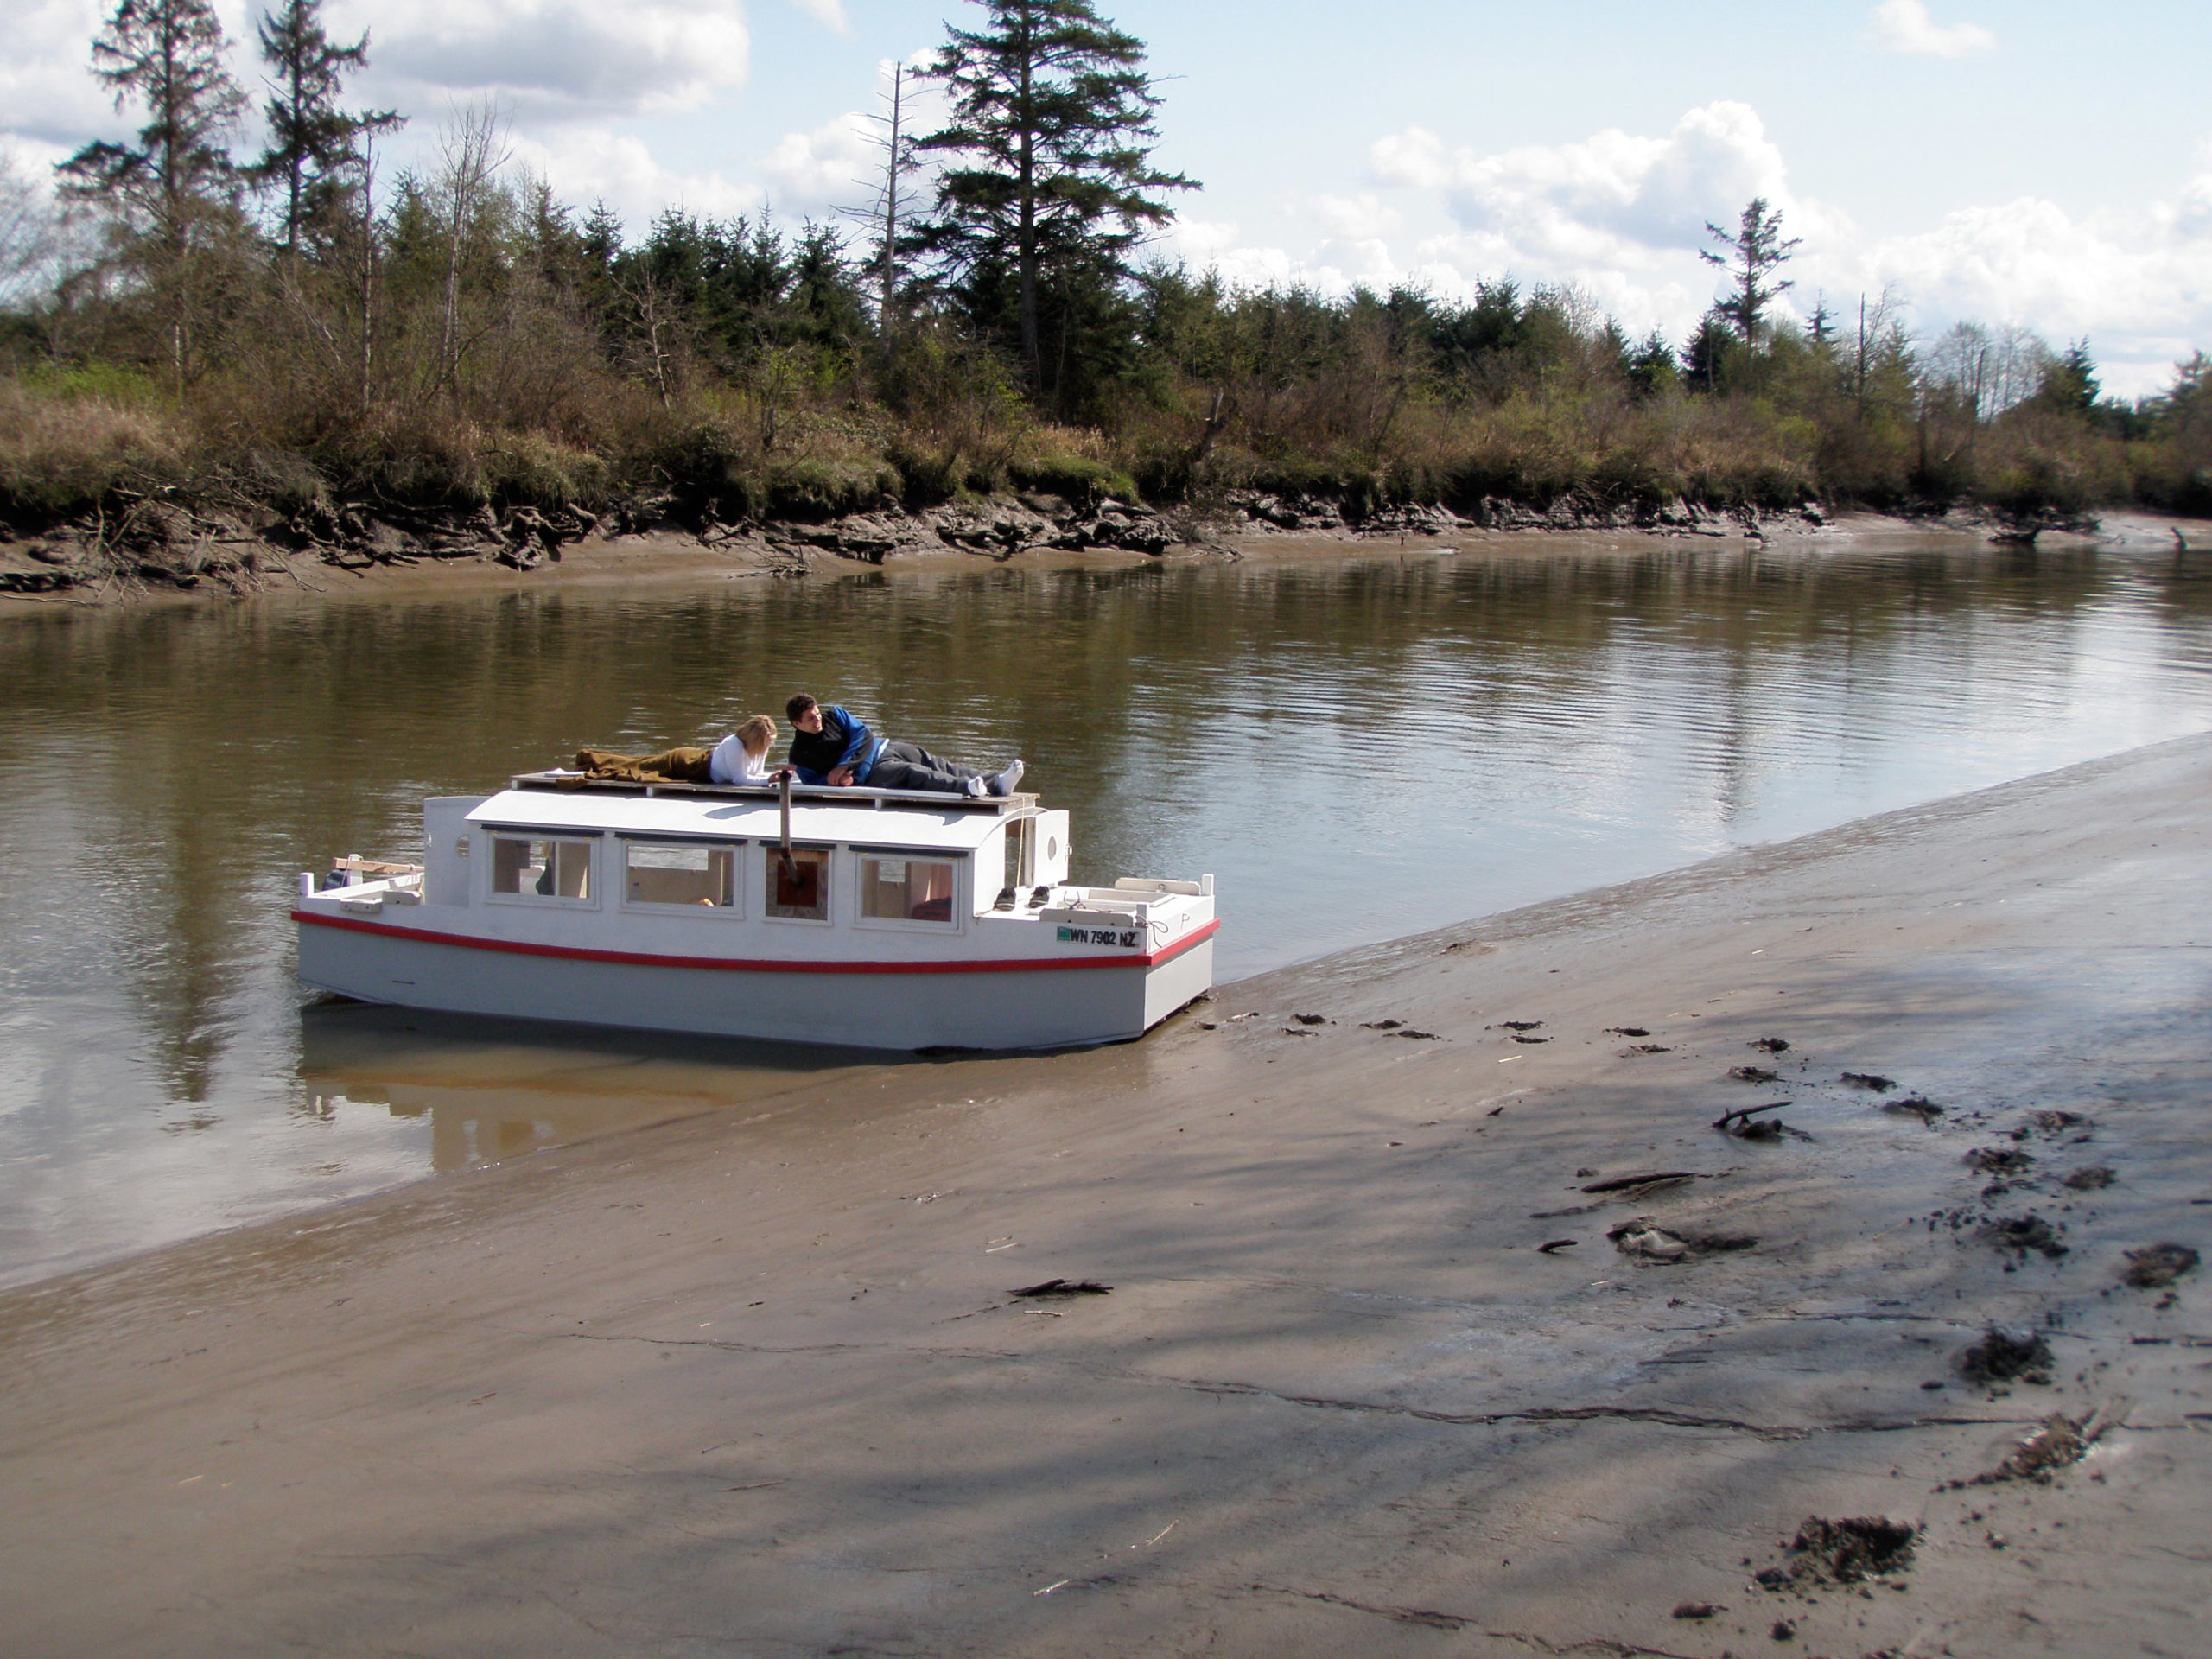
There wasn’t a breath of wind when I left Eagle Harbor, but I set sail and motored out to find a breeze.
I was up early. The rapid knocking of a woodpecker somewhere in the woods was the only sound and it filled the cove. After a long silence an owl hooted its two-note ooo-hoo, clear and loud although more than 100 yards of water separated me from the woods. There was not a breath of wind but I rigged for sailing in the hopes of finding a breeze somewhere around Guemes Island. With main, jib, and mizzen up, I motored out into Bellingham Channel. Halfway across there was a patch of water scuffed by a breeze; I motored into it and sailed on a reach the remaining distance to Guemes. After rounding the north end of the island I had the wind behind me; it was light, and HESPERIA ghosted along under a high haze that put a faint rainbow ring around the sun. The jib didn’t have enough wind to draw its sheet tight so I dropped it and used the halyard to raise the square sail. It filled and drew nicely even though half of it was blanketed by the main. I thought I could get more of the sail out where it could do some good by slipping the lower yard to port through the loosely tied truss holding it against the mast. It worked and when the wind freshened I was making 4 ½ knots.
Saddlebag Island lay a mile to the east of Guemes, and although the wind had dropped enough to leave the water glassy, I made good headway on a reach under main and mizzen. When I arrived at the cove notched in the island’s north side I let the sheets loose and aimed for the beach. It appeared to be sandy, but I sat on the foredeck as I came in to keep an eye out for rocks. There were many and I slipped off the bow before running aground and held HESPERIA off. Behind me someone spoke my name. It was my friend Ted, an experienced paddler and a fixture in the local outdoor recreation industry. He and a friend waded in and held on to HESPERIA. I was going to have to anchor to visit the island and invited them both to climb aboard. We paddled out about 20 yards and dropped the hook. To get us all back to shore I unfolded FAERIE and had them paddle in one at a time, trailing a long tether so I could pull FAERIE back. I came ashore last, visited a while, and took a brief walk across the island’s wasp waist to the cove on the south side.
When I left Saddlebag there wasn’t any wind; as I motored west I dropped the rig and stowed it on the cabin roof. With the current in my favor I made 6 knots over the 7 miles back to the launch ramp Washington Park and when I arrived there, HESPERIA had carried me in comfort for 55 miles. By dusk, I’d be back home, in a house that hasn’t moved an inch in 88 years, and HESPERIA would be in the driveway, covered by a tarp.
Christopher Cunningham is the editor of Small Boats Monthly. He built a Chamberlain dory skiff in 1979 and rowed and sailed it 700 miles up British Columbia’s Inside Passage. In the fall and winter of 1983 he paddled 2,500 miles from Quebec to the Gulf of Mexico in a canoe he’d made of laminated paper. Two winters later he rowed a sneakbox 2,000 miles from Pittsburgh to New Orleans and continued another 400 miles under oars and sail to Florida. For a 1,000-mile rowing/sailing trip up the Inside Passage in 1987, he built a replica of the ninth-century Gokstad Faering.
HESPERIA
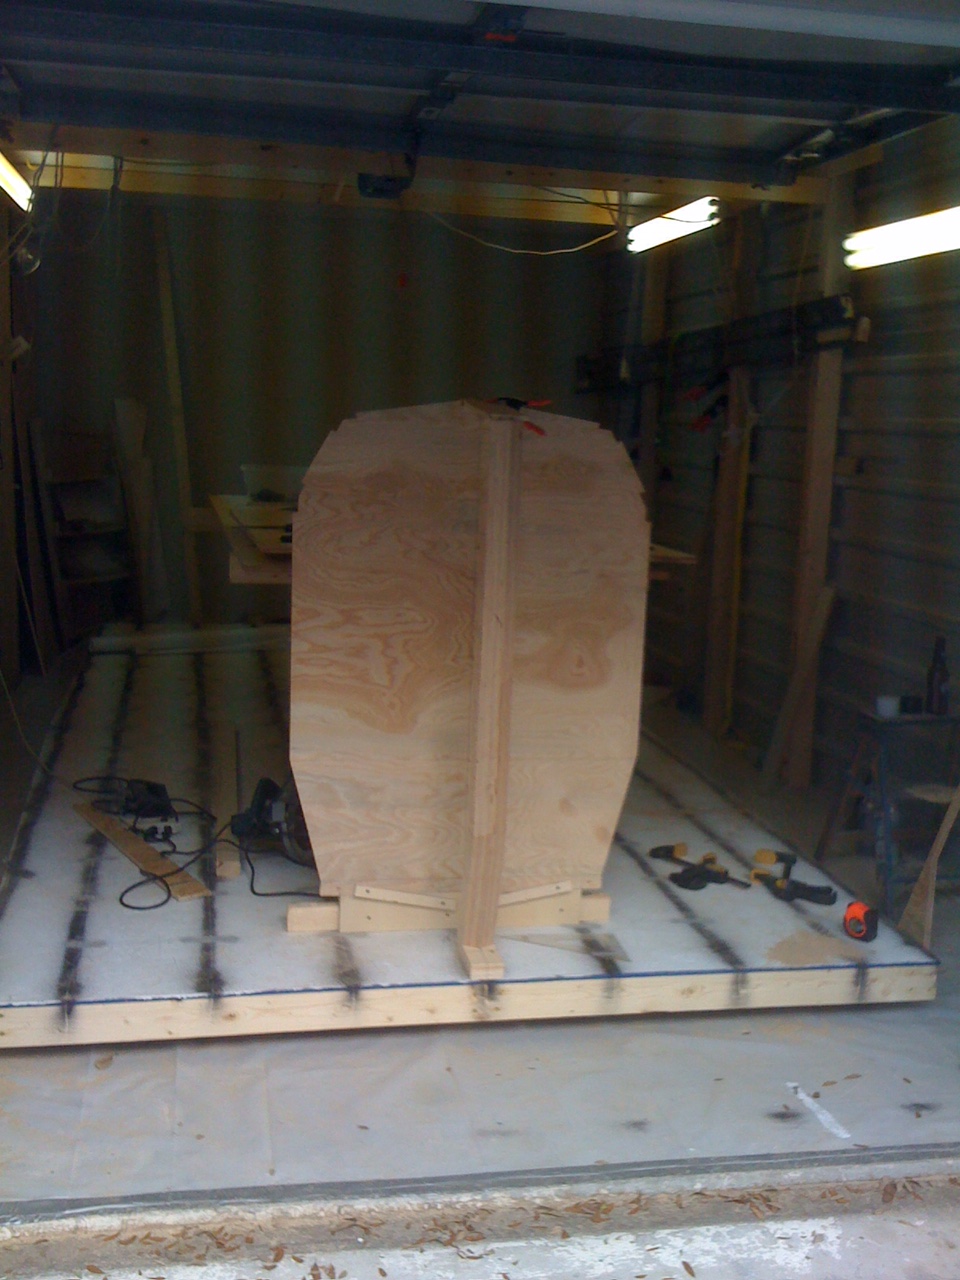
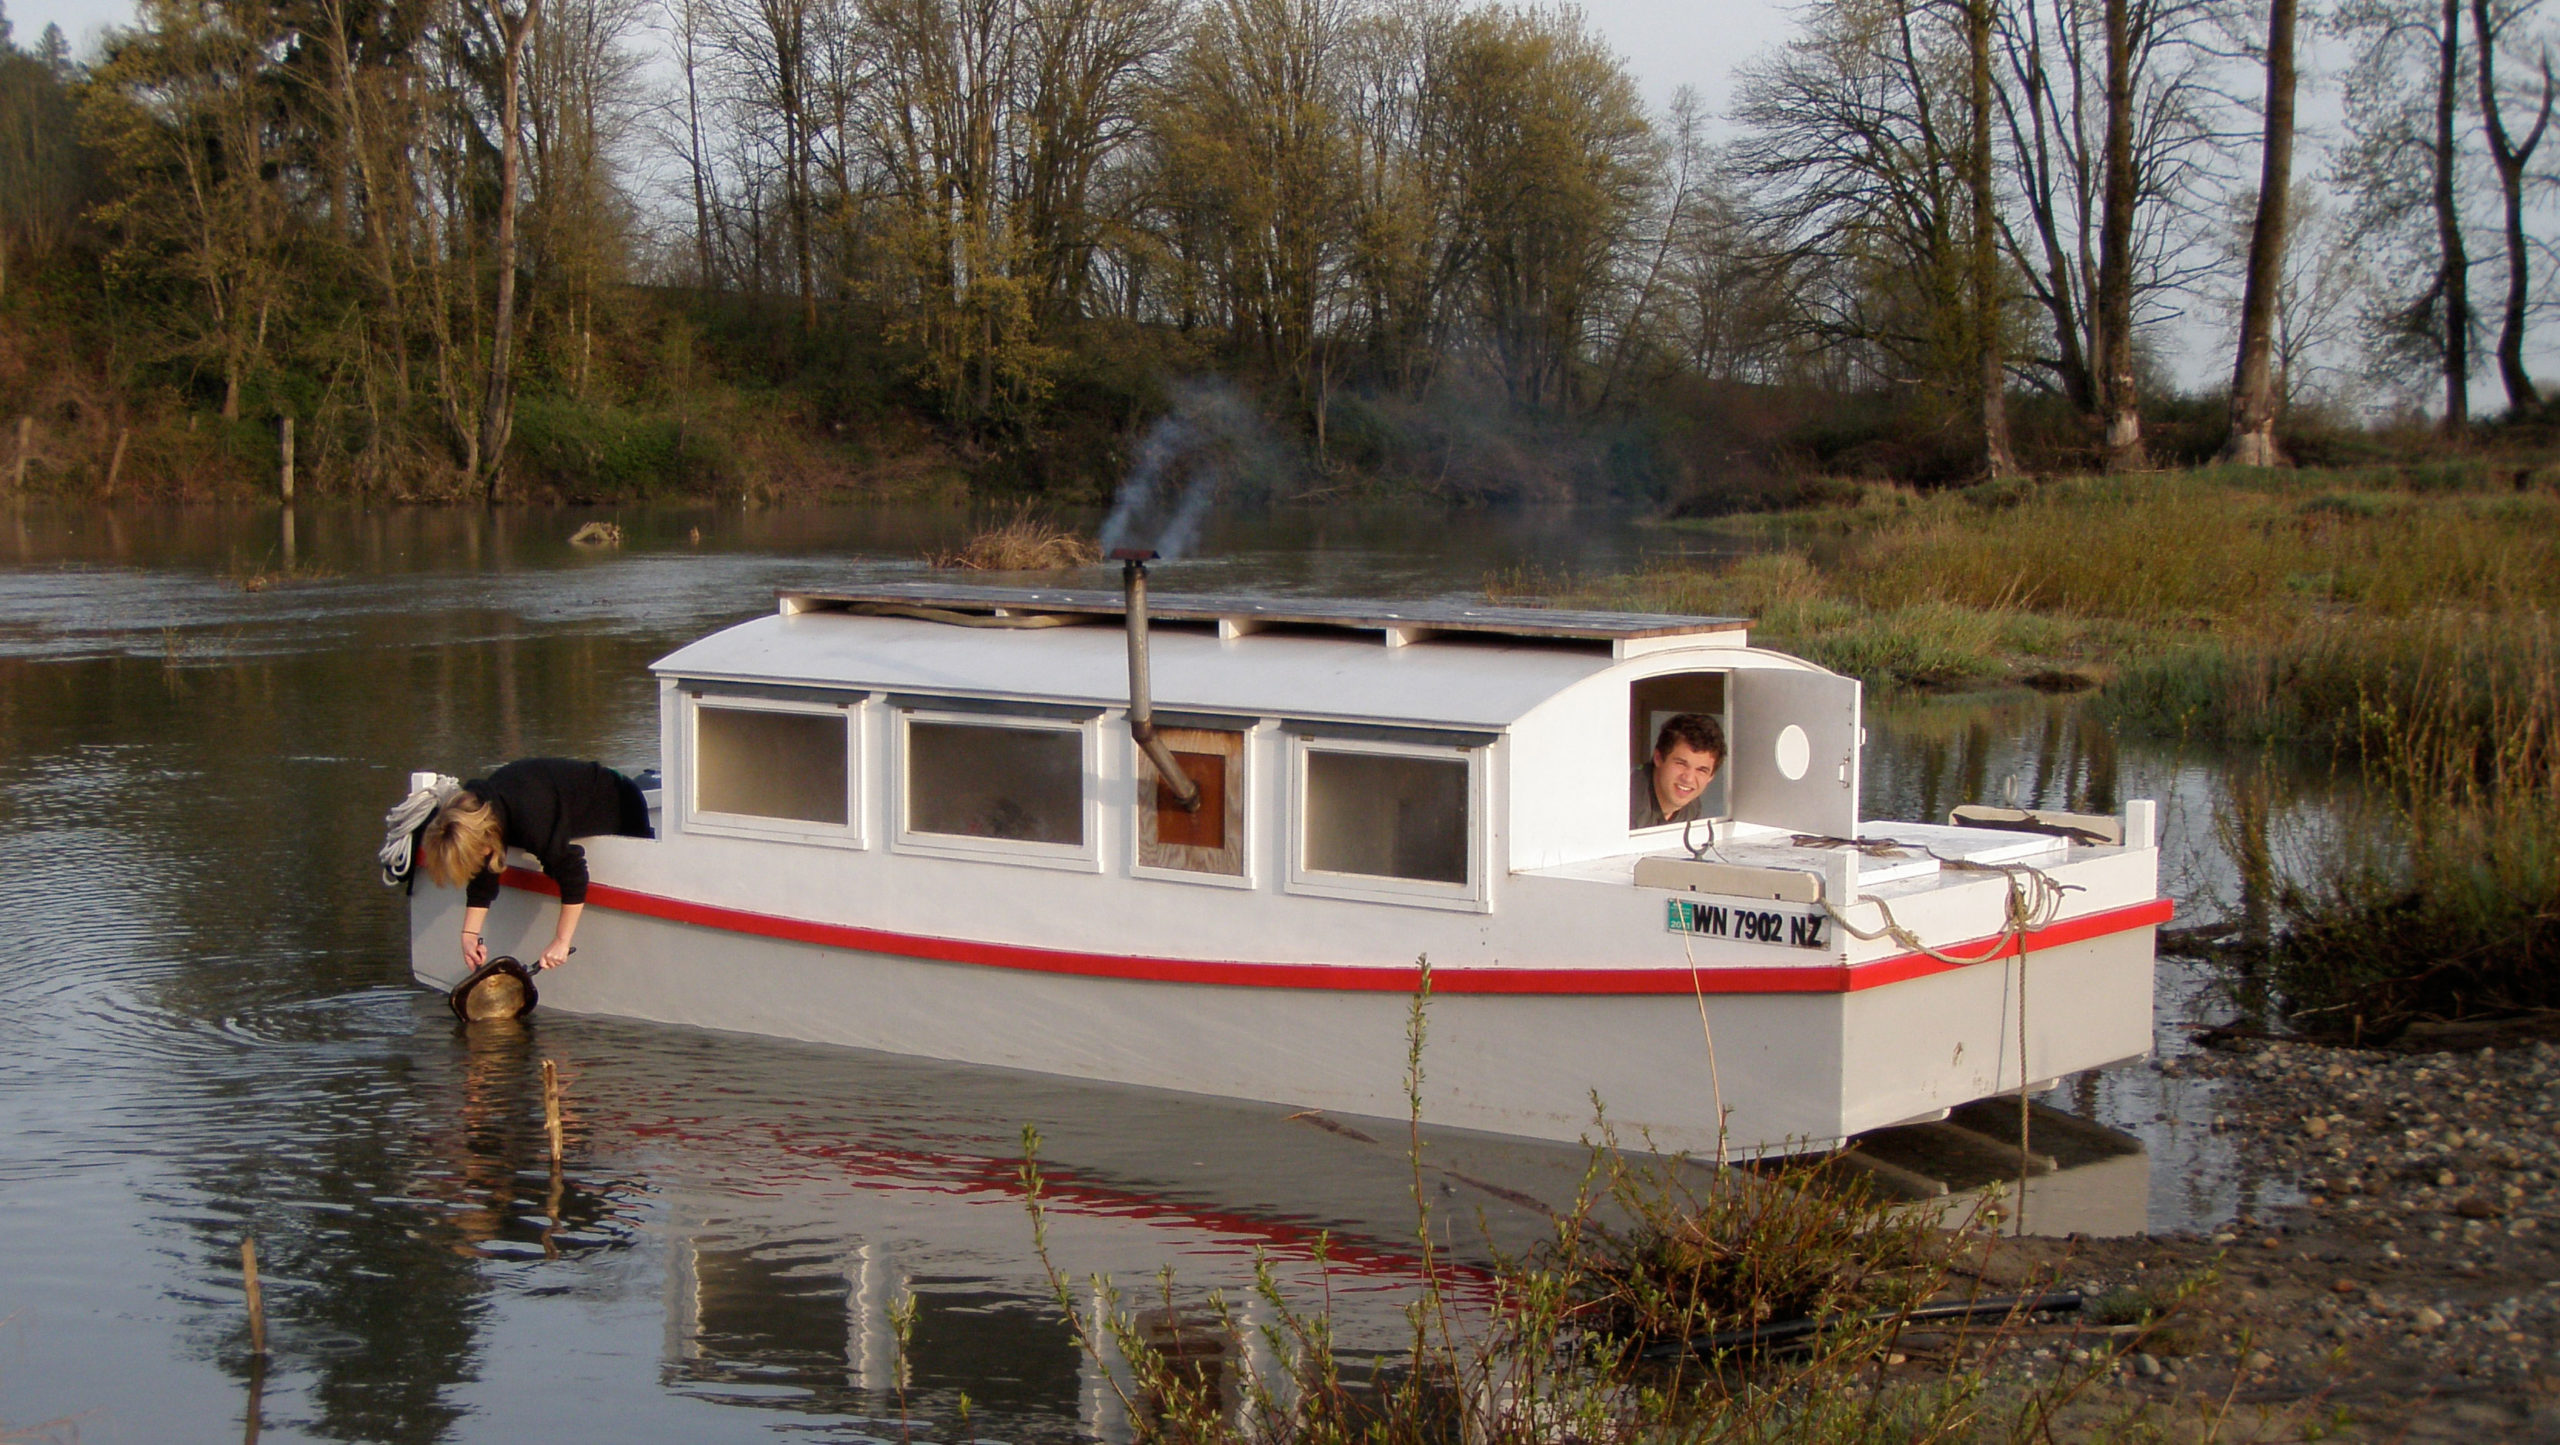
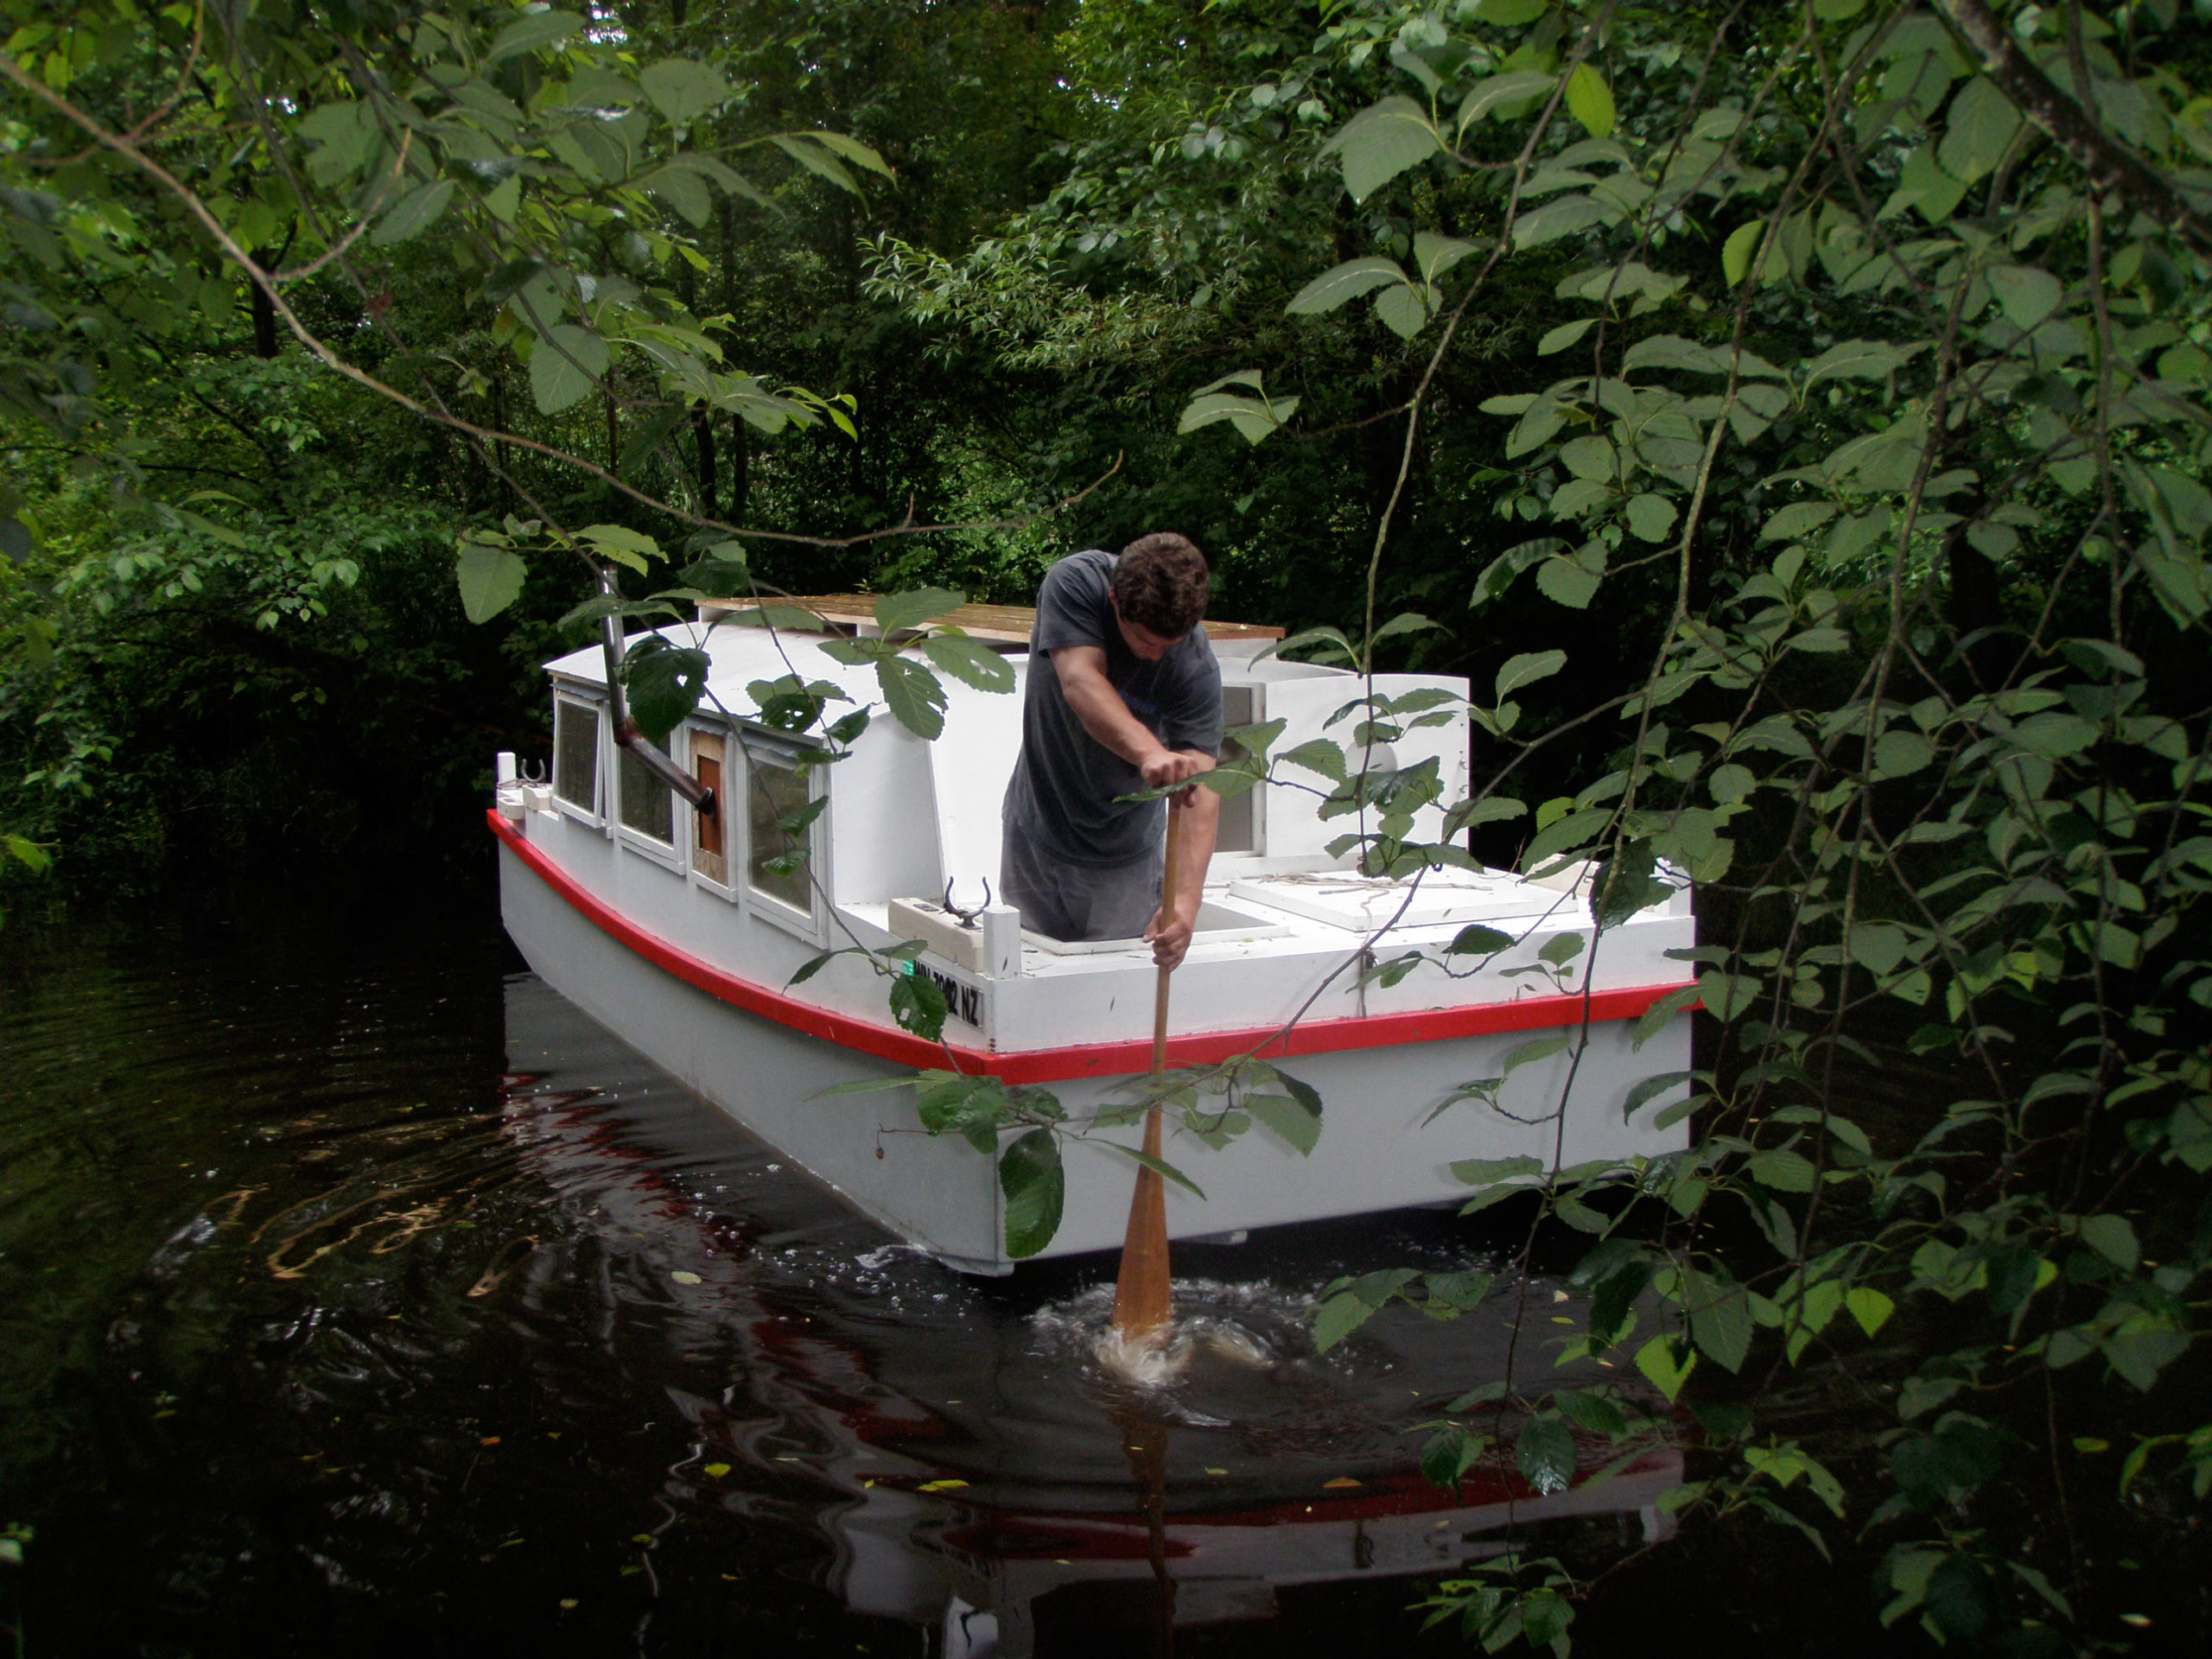
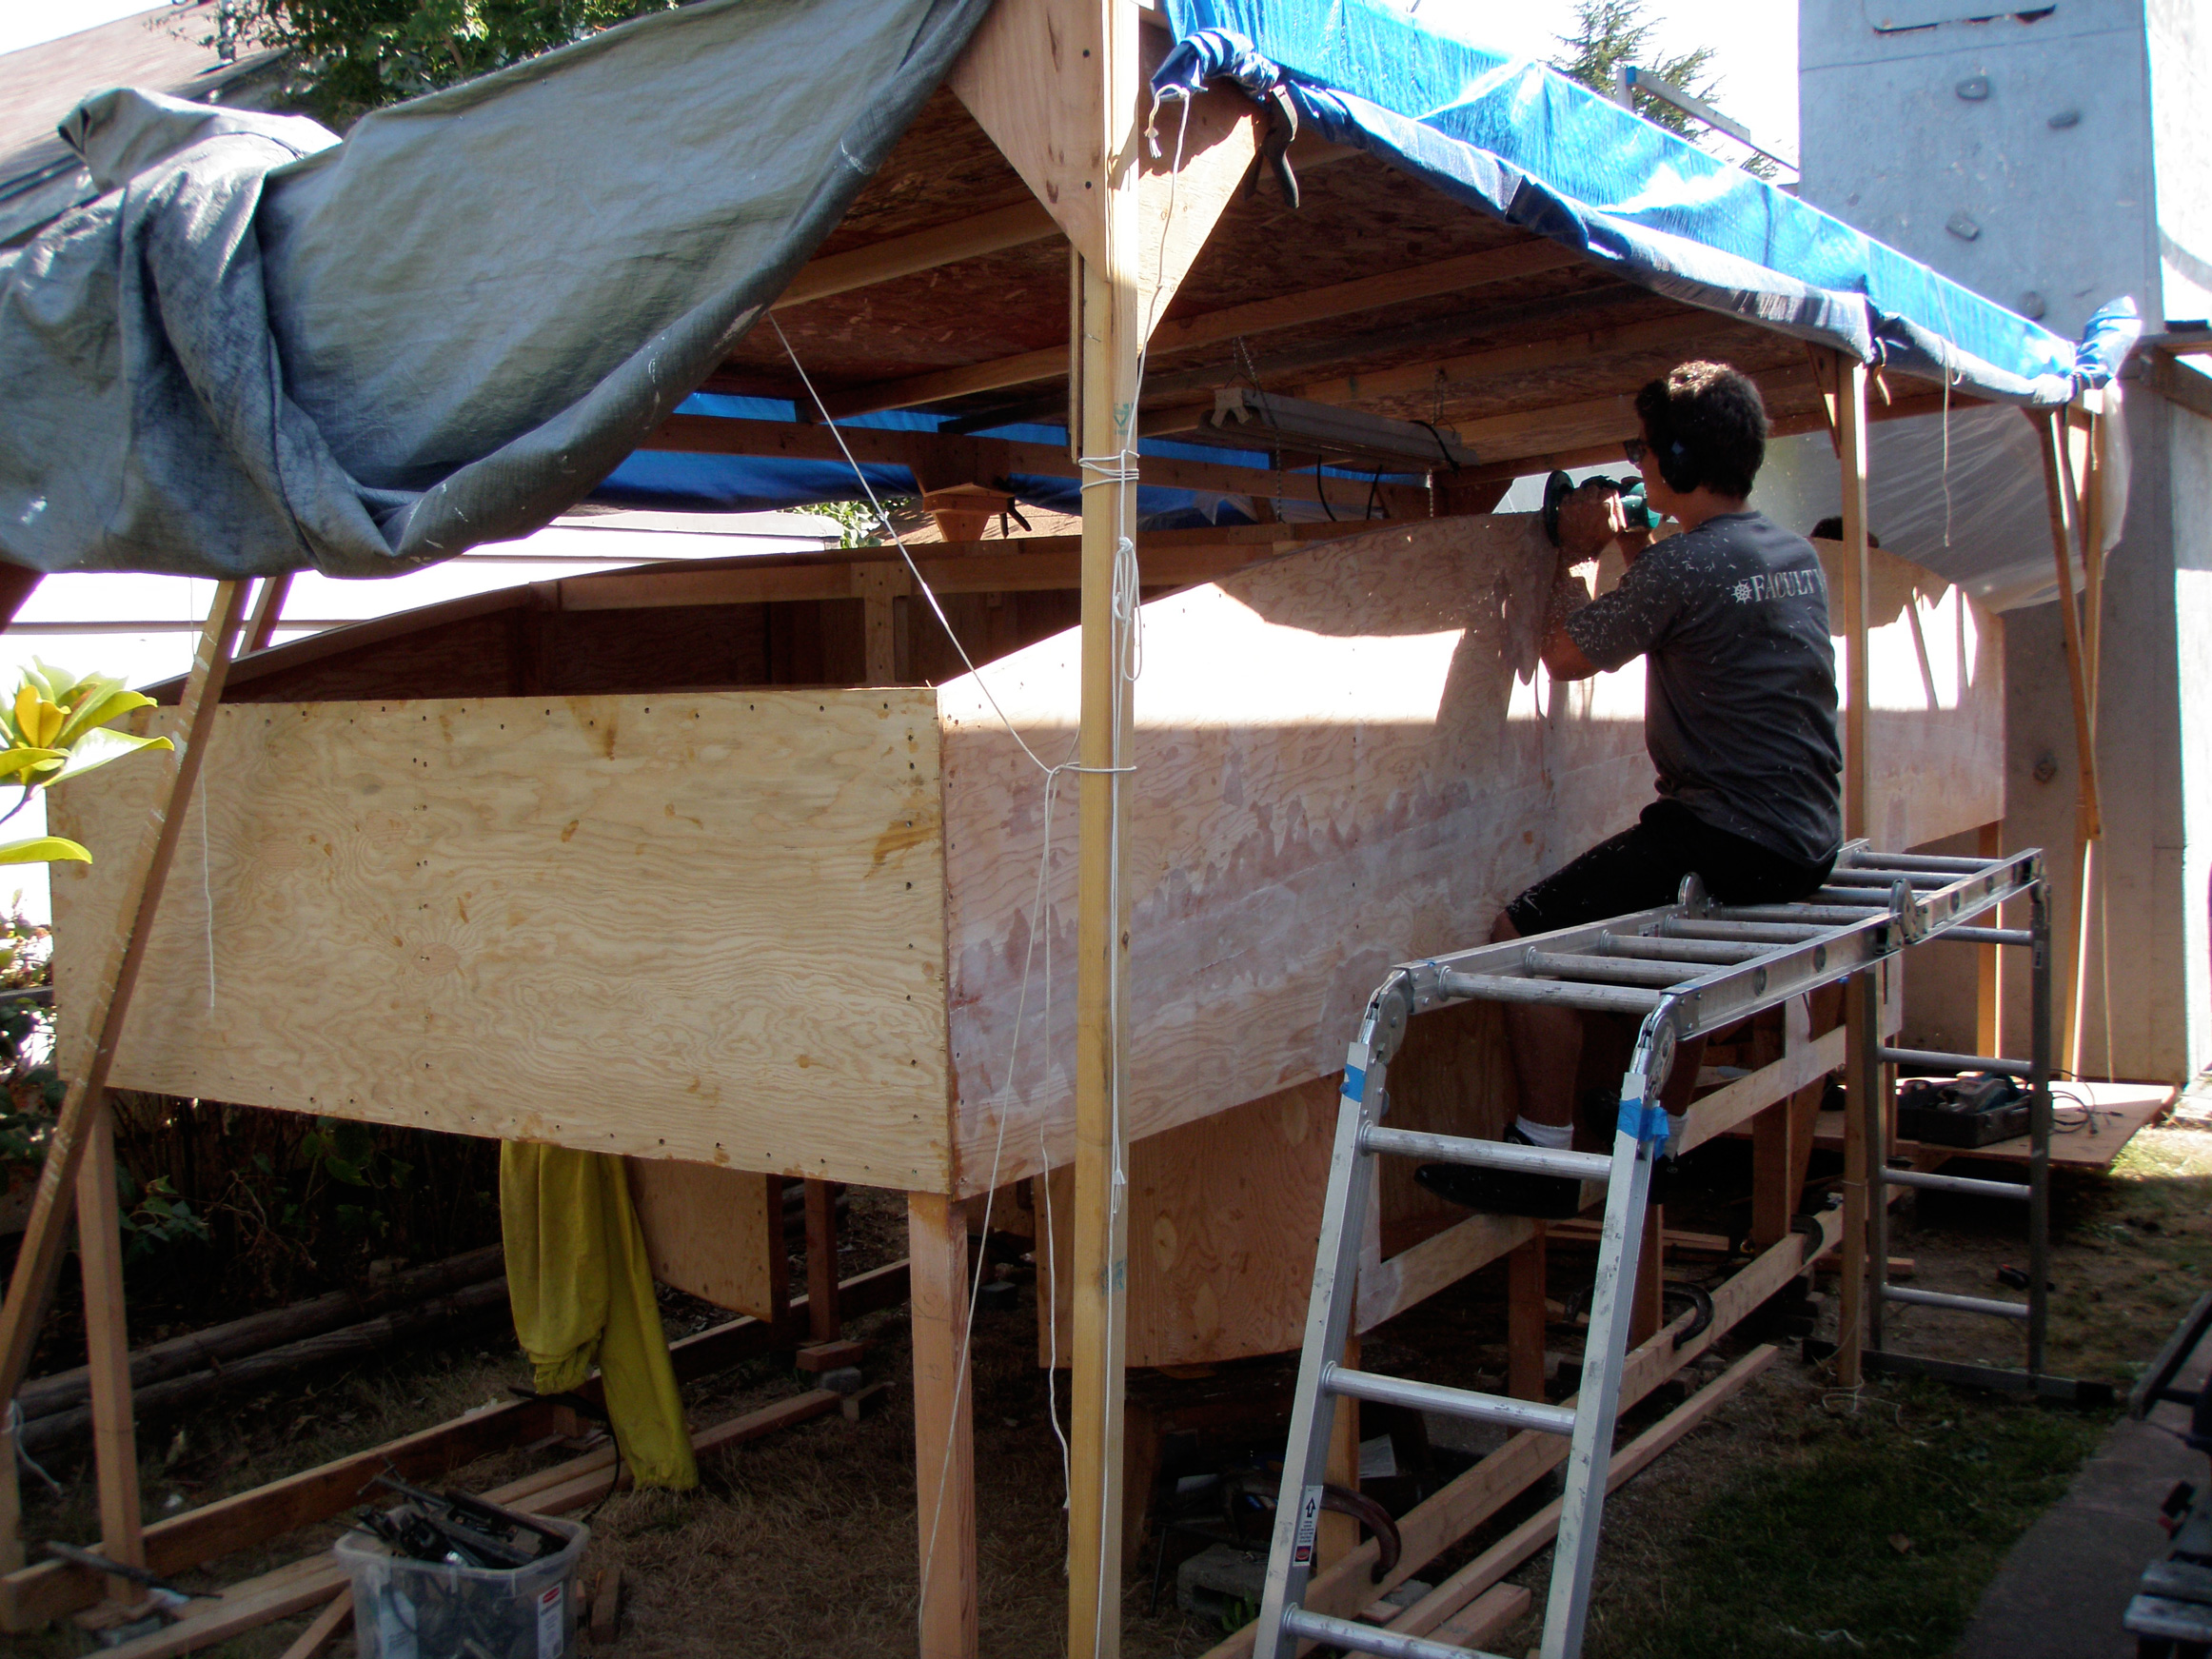
I’ve cruised thousands of miles in small boats and endured some miserable conditions, but I never had a Scarlett O’Hara moment: “As God is my witness, I’ll never be hungry again.” I was slow to catch on; the adventures that made me hungry, cold, wet, and tired only gradually lost their appeal and with each new boat I built for cruising I incrementally eliminated sources of discomfort and displeasure. I was quite happy with my Caledonia yawl ALISON as a camp-cruising boat until my son built BONZO, an Escargot canal cruiser. I decided I needed a cruiser like BONZO with a cabin, windows, and woodstove, but one that I could sail, motor and row like ALISON. I gave up the Caledonia’s rough-water ability for a boxier hull that could stay on a nearly even keel no matter where weight was placed, especially for dining and sleeping. I was drawn to Phil Thiel’s APHASIA, which he describes as a sampan-type hull. I enlarged the hull by 8 percent and modified the bottom to put some vee in the forward sections. It was a roundabout way of arriving at a garvey hull.
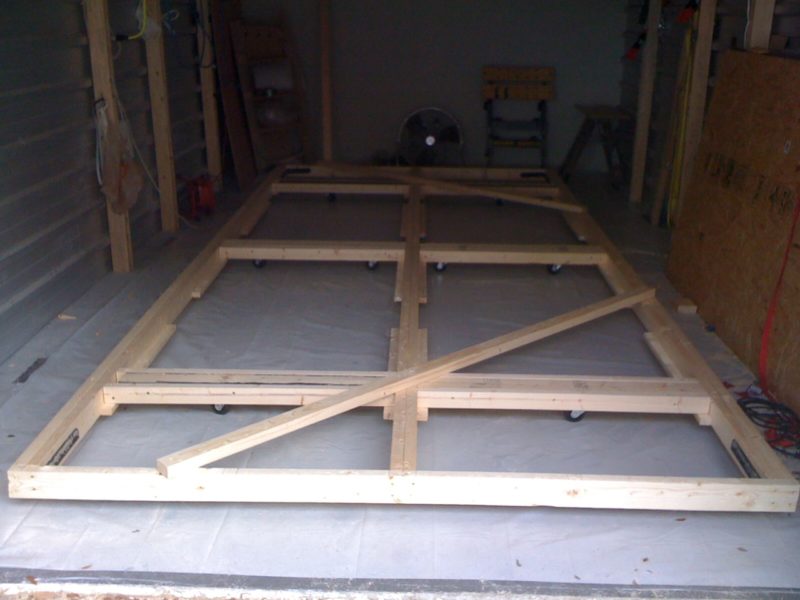
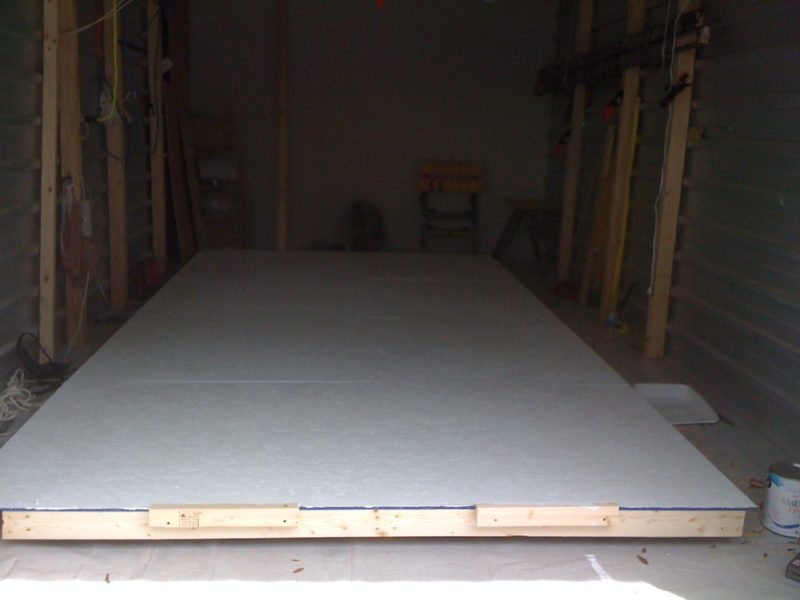
The hull went together quickly and I designed the interior as I went along, occasionally making sketches but more often using sticks and cardboard to mock up the accommodations. I had to get the hull out through a door, so the cabin was made to be removable. The centerboard trunk is placed off-center to keep it out of the way; it’s incorporated into the benches in the cockpit and cabin.
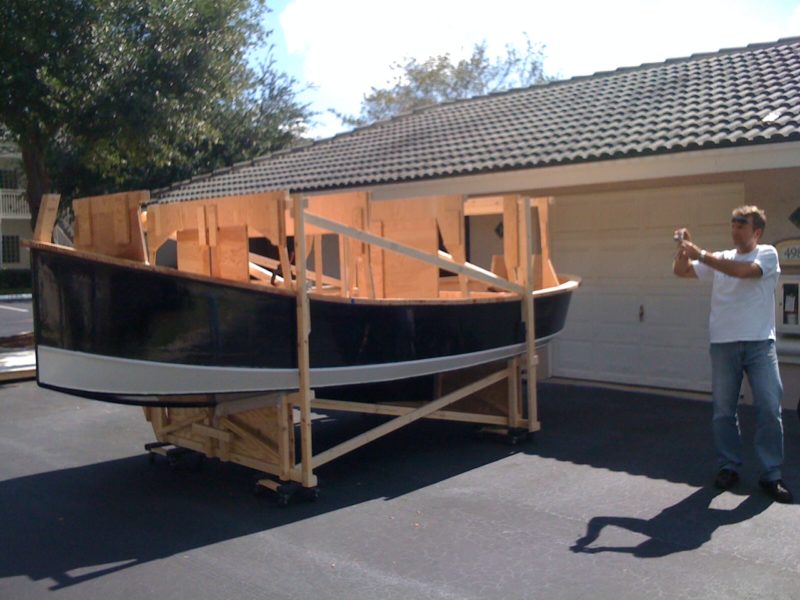
The cabin is built like a pop-top camper shell for a pick-up truck. Lowered, it provides a clear line of sight aft while I’m rowing; raised, it has good clearance for sitting in the cabin. I raise and lower the top by lying on my back and pushing the ceiling with my feet. Hinged support struts in the corners fall into place when the cabintop is raised. The doors have a removable center section to accommodate the 11″ of the cabintop’s travel.
In one corner of the cabin, a shelf supports a wood-burning stove I welded together from sheet steel; in the other corner there’s a small sink. A collapsible water jug set on the roof connects to the cabin’s plumbing and a heat exchanger made of copper pipe butts against the stove to provide hot water for the sink.
The passageway down the center of the cabin and cockpit has parallel sides and ledges to hold floorboards flush with the benches to create sleeping platforms in both the cabin and cockpit. Grabrails on the cabin roof are spaced to fit the cleats under the floorboards so they can be used as a catwalk or a sun deck.
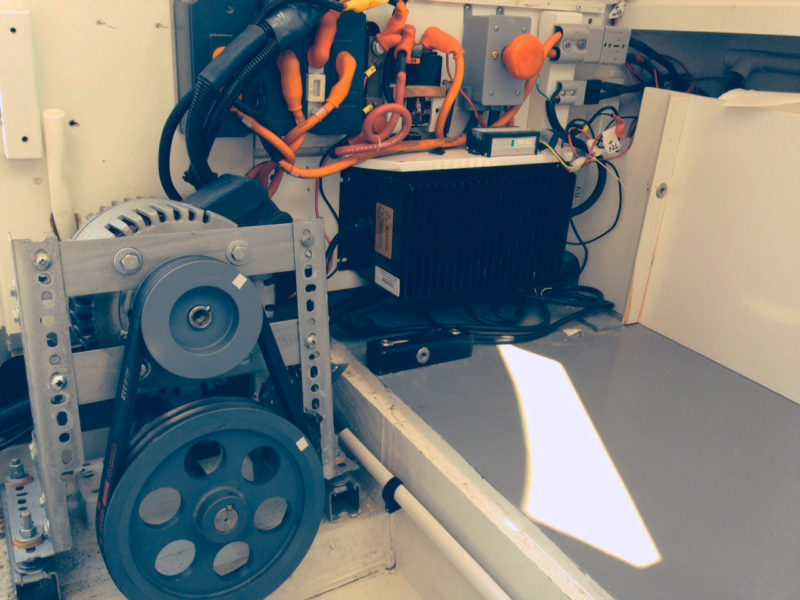
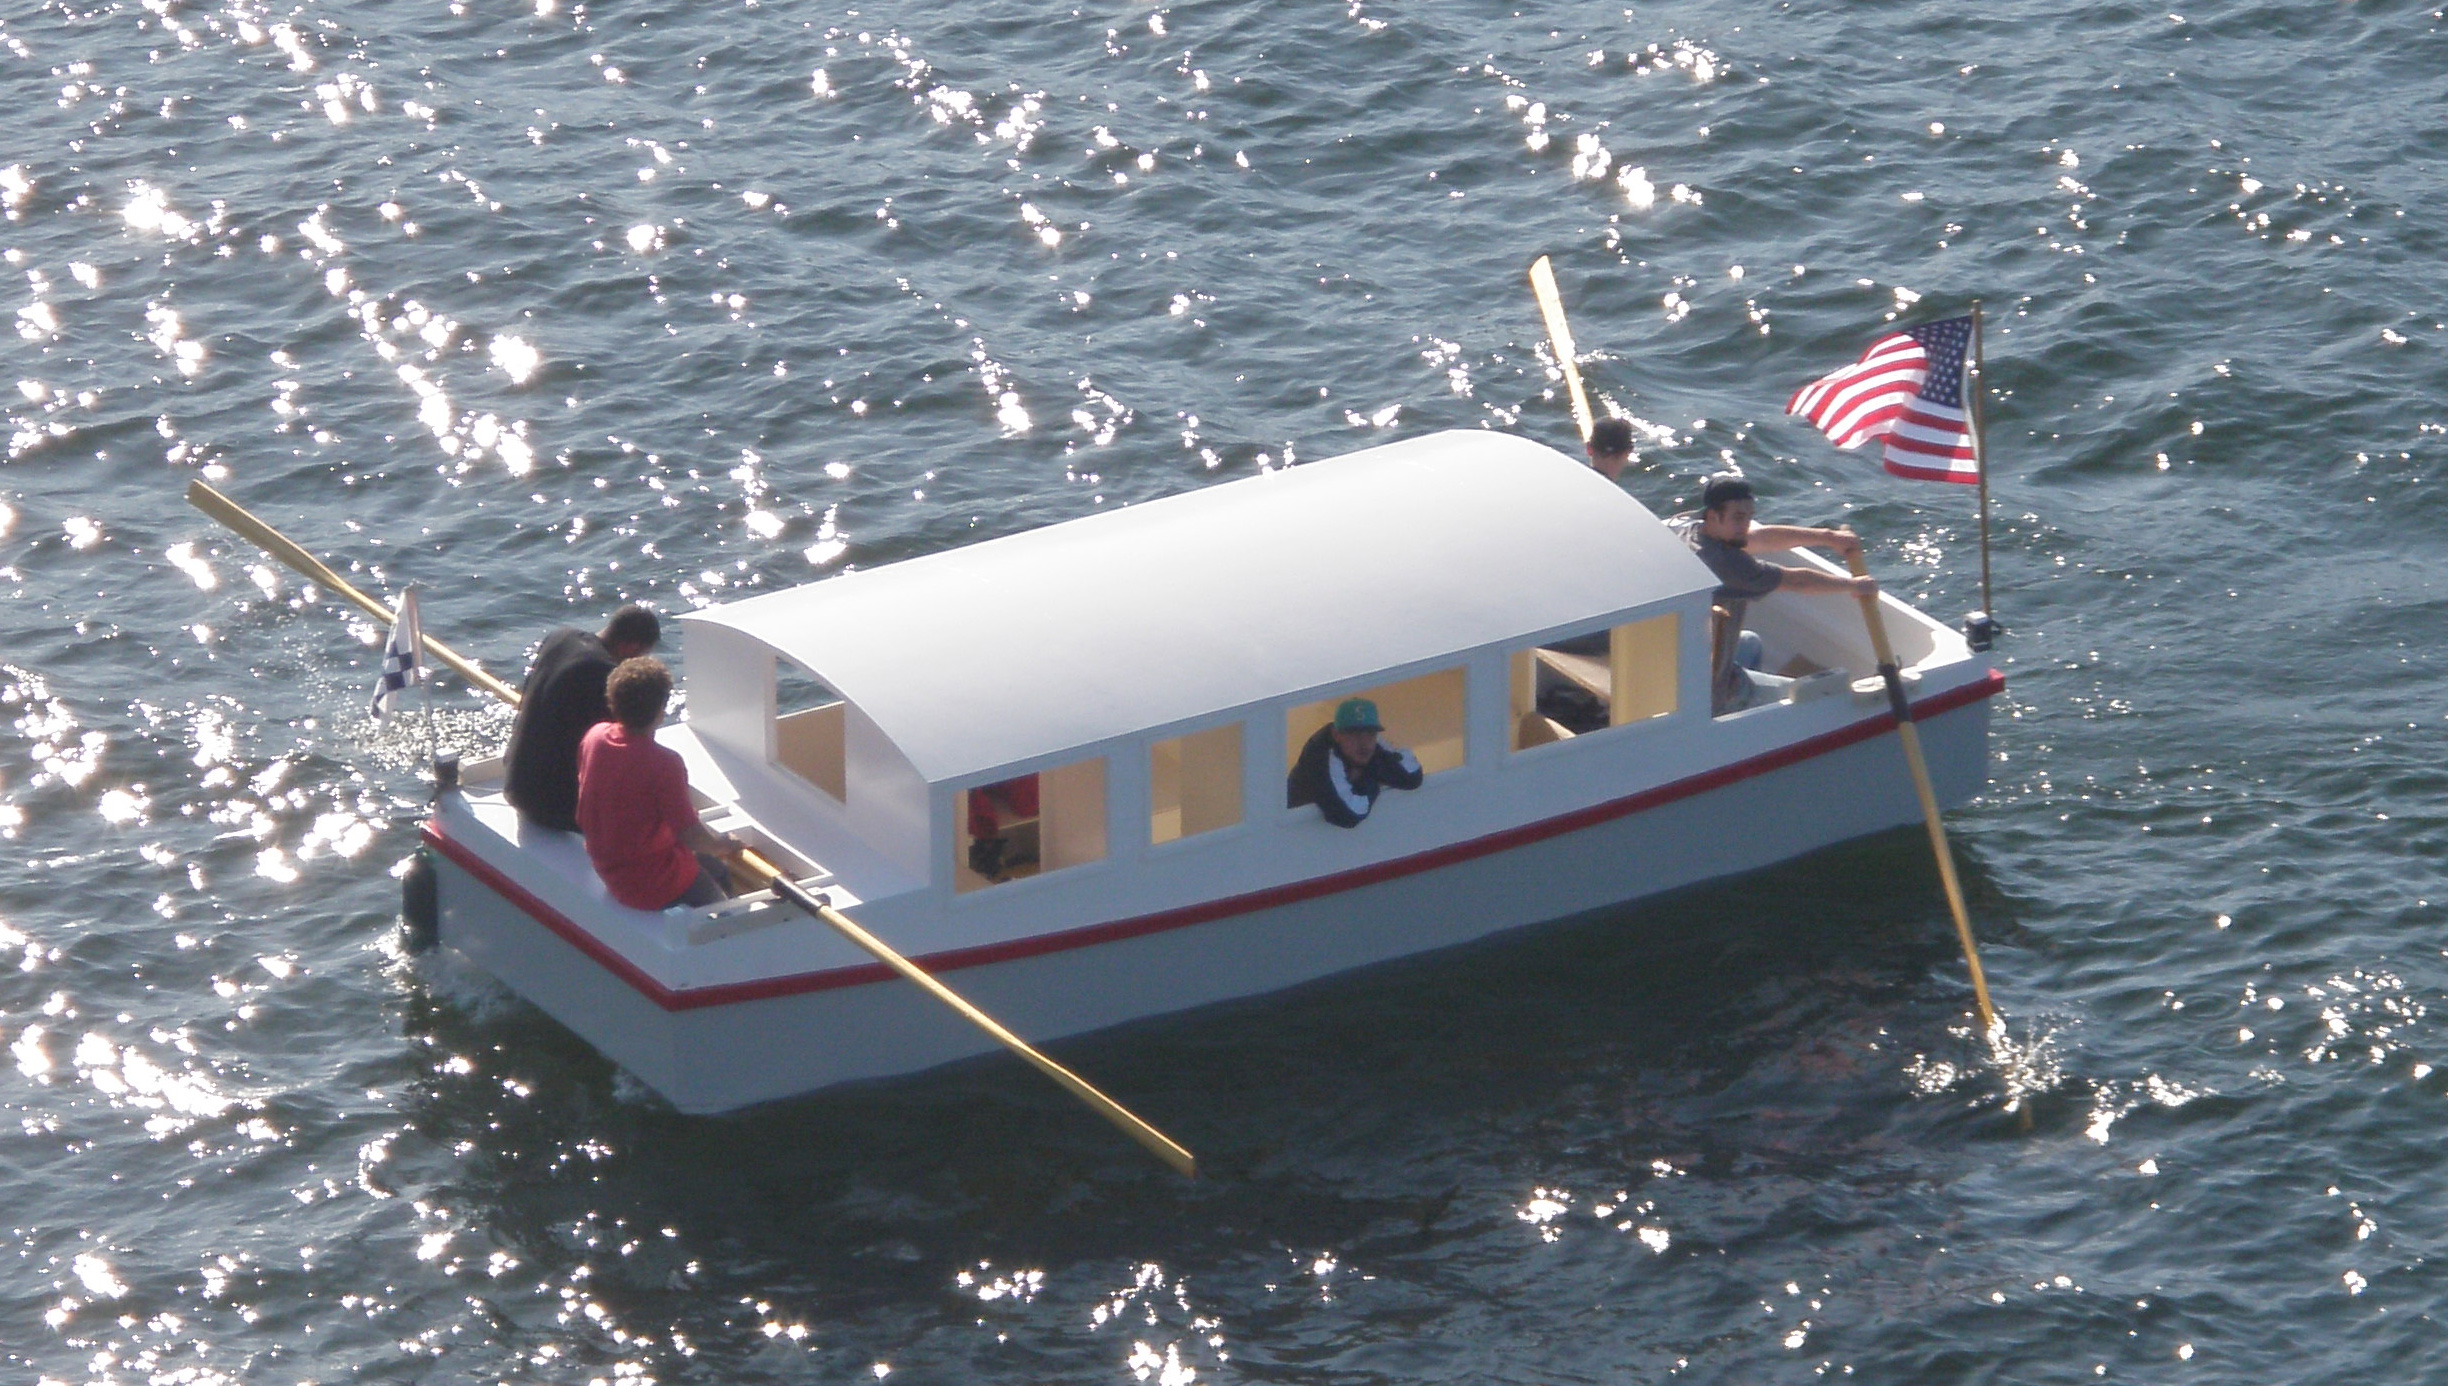
A tiller line runs through the cabin and around the cockpit and another line connects to the outboard’s kill switch. Having the motor and cockpit separated by the cabin cuts down on the noise. The cabin sides have ports that open to thole-pin pads for rowing indoors in cold, wet weather.
The masts and the main’s sprit and boom are all about 12′ long and can be stowed in the boat. The cabin’s windage gave the sail plan I’d drawn more of a weather helm than I like so I added a self-tending jib on a club for better balance. The jib, main and mizzen were all cut from the protected Dacron in the middle of a weathered roller-furling jib discarded by a larger sailboat.
The square sail was inspired after taking this same San Juan Island trip with my ladyfriend Rachel. I had, as is my habit, loaded the boat and set out without stowing things properly. We were motoring along Rosario Strait when a strong following wind developed. Rachel was napping in the cabin and I tried to set the sprit main by myself without first setting the mizzen and luffing. Every time I tried to clip the main sheet into the boom, the boat would veer off course. In my struggle I didn’t realize that I’d stepped on our dinner—a deli box of hot polenta—until I felt the corn mush squeezing between my toes. Tangled up in the main sheet, I decided to sit down and give up before I got pitched overboard. Rachel appeared in the cockpit with a spoon, reshaped the box, carefully scraped the polenta from my foot and the floorboards and put it back in the box, assuring that we wouldn’t go hungry that evening. After that trip I made the square sail specifically for taking advantage of an unexpected following wind: It goes up in an instant and the boat practically steers itself.
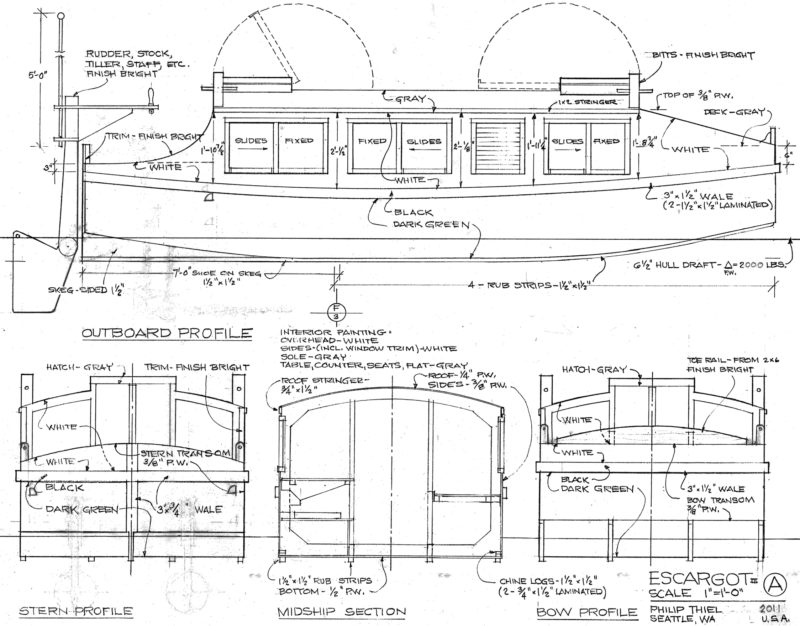
LOA: 17′
Beam: 6′
Depth: 25 ¾″
FAERIE
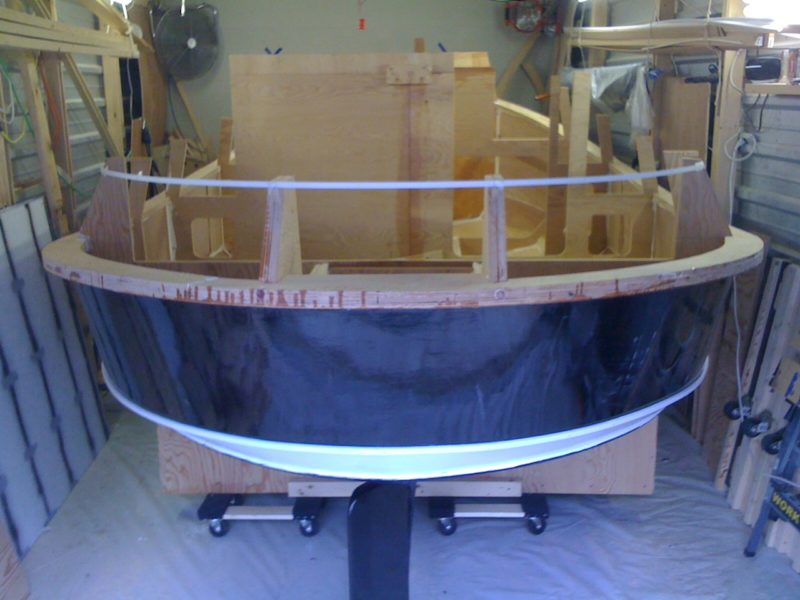
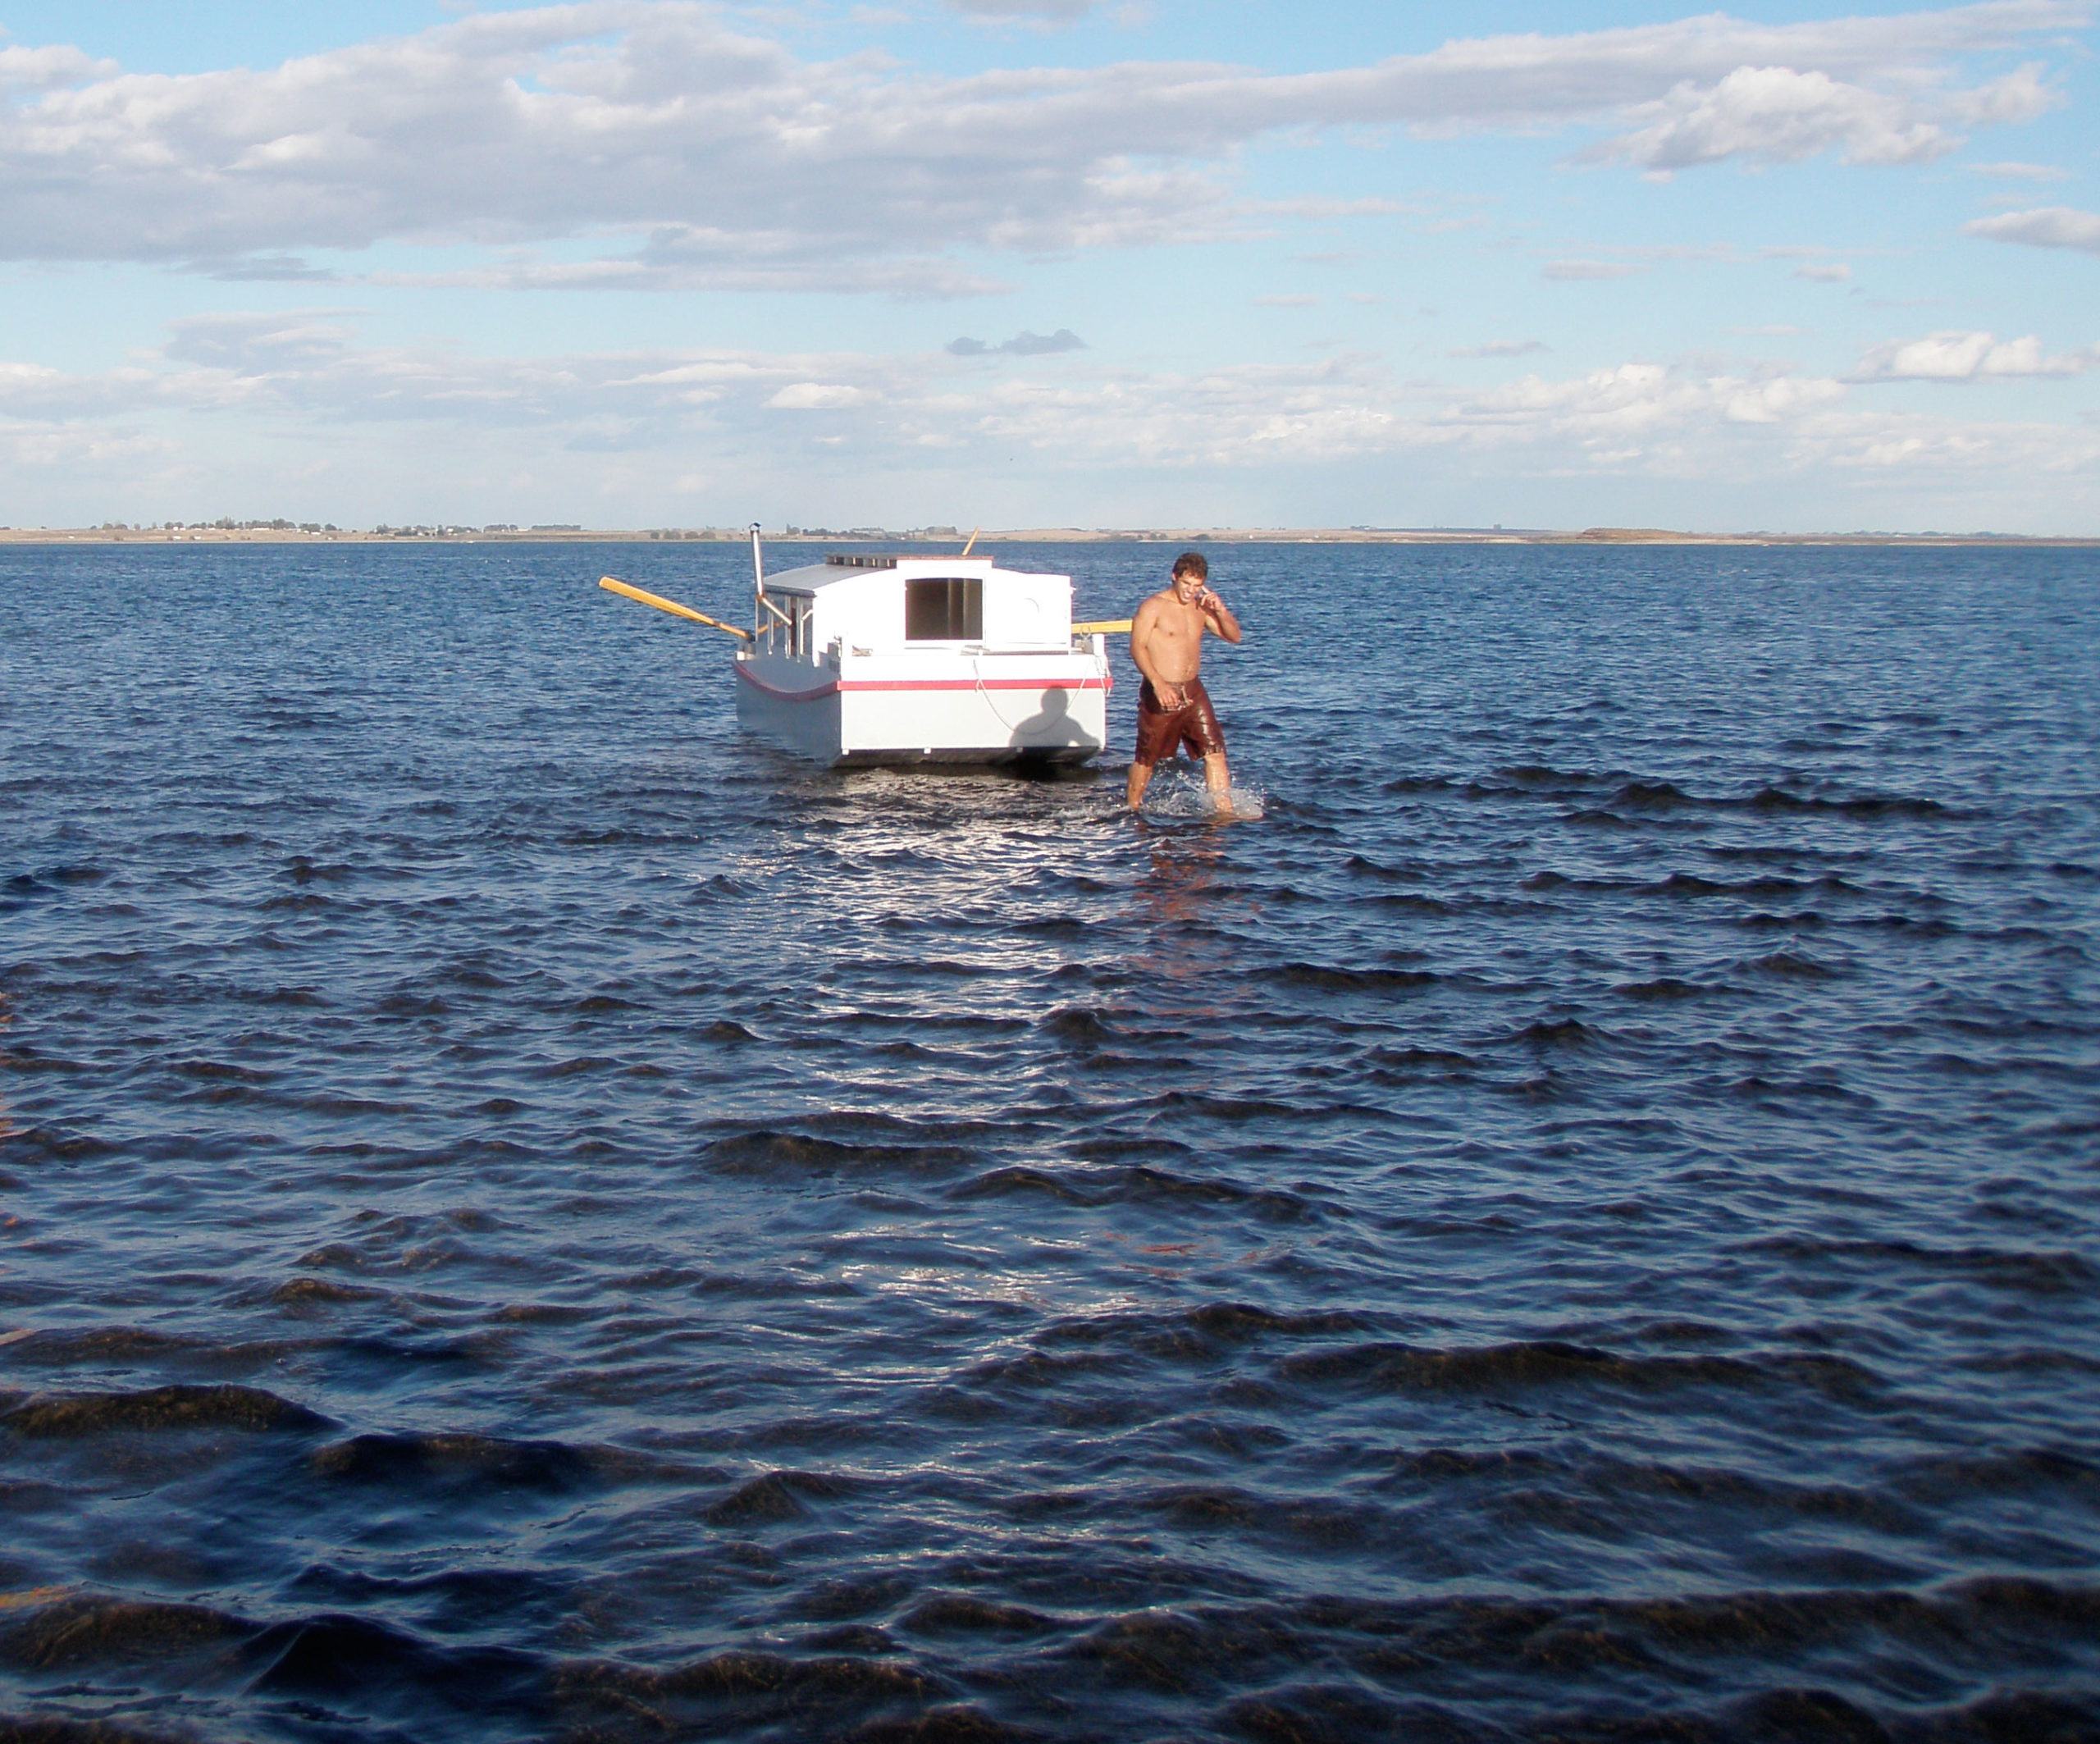
HESPERIA, laden with cruising gear, is too heavy to move if the tide goes out from under her, and with tides in my area ranging up to 14′, constant tending is required when she’s nosed up to a beach. I’ve used a few systems to put the boat at anchor from shore, but they are all time-consuming and require very long lines. I wanted a folding dinghy that I could stow out of the way in the cockpit, so the fit there determined its dimensions. The only boat I knew of that small was a coracle but while studying the type I came across the Fliptail, a dinghy that was very close to what I had in mind: a skin boat with a folding frame. I laminated bows that would fit the forward end of HESPERIA’s cockpit.
Folded, FAERIE tucks into the forward end of the cockpit, taking up a minimal amount of space. Grab rails on the roof hold cabin floorboards in place.
The Fliptail uses hinges, but I couldn’t find any that were the right size, shape, material, and price. I sketched many schemes for using bolts as pivots before figuring out the geometry that would do the job. The skin is Hypalon I had from an old pool liner. A plank set across the gunwales serves as a seat and if I need floorboards for a passenger or cargo, HESPERIA’s dining table is a perfect fit. The high freeboard gives FAERIE surprising carrying capacity. I’ve paddled with my son sitting in the stern, and our combined weight is about 415 lbs.
FAERIE feels a bit tippy with the paddler’s weight carried so high, but I haven’t yet capsized her. On beaches with a moderate slope I can paddle up to the water’s edge, lean back quite confidently and set the bow just barely up on the land and step out with dry feet. I used a zig-zag sculling stroke at first but later discovered old film footage of coracles ( Boyne Coracle, A Bygone Craft, and Peeps though a Window of the World) being paddled with a draw stroke and the blade slashing in an out of the water from one side. It provides much more power and drives the little hull as fast as it’ll go, which is about 2 knots.—CC
LOA: 56″
Beam: 40½″
Depth: 14½″
If you have an interesting story to tell about your travels in a small wooden boat, please email us a brief outline and a few photos.
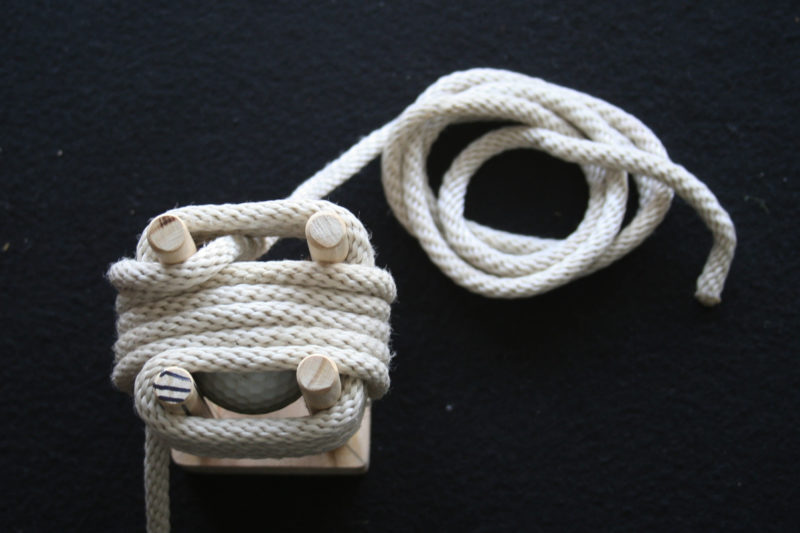
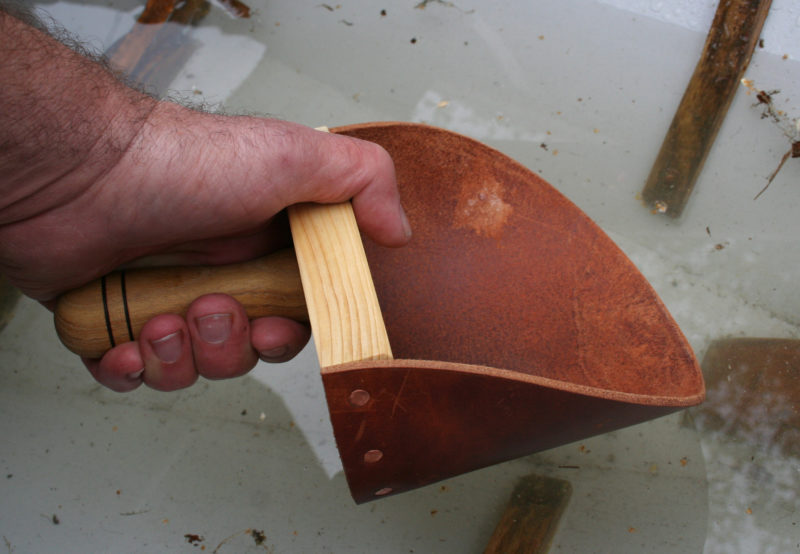
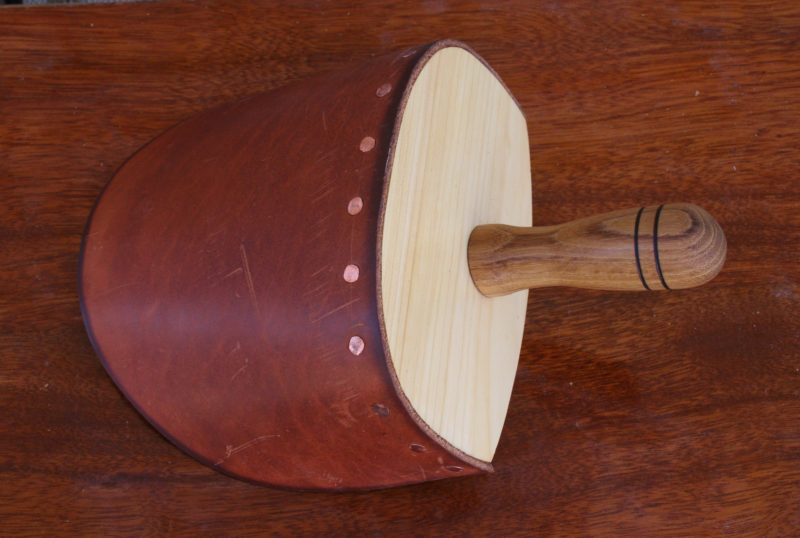
Friction will hold the cam lever in place securely even though the pin isn’t at top dead center.
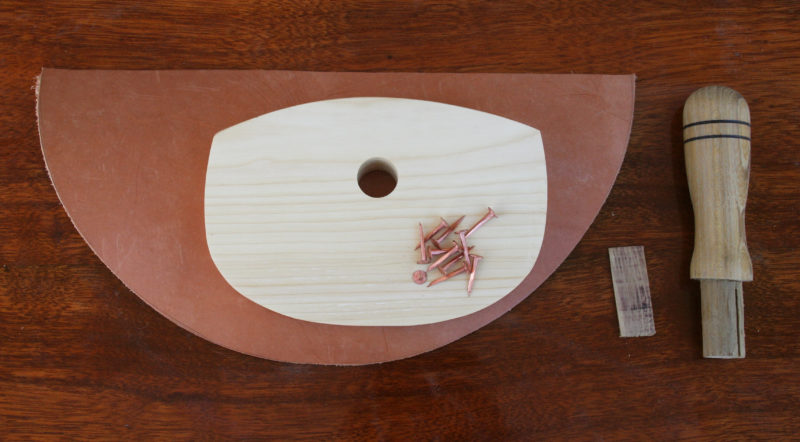
In 1979, when I built my first wooden boat, I had to gather up the tools I needed as I went along. When it came time to lay the planks on, I made a set of planking clamps with the reach to get across the plank to the lap. Now, 36 years later, I don’t recall where I found the pattern for them, but the cam-lever design is still my favorite. The clamps can be applied with one hand, leaving the other hand free to hold and align the plank, and they’re very fast to operate going on and coming off. When I needed planking clamps with a longer reach I later made another set, the more common variety with threaded rods to apply pressure. They do the job but take two hands to operate; by comparison to my first set they’re quite cumbersome. I’ve also made simple plywood clamps that require a wedge slipped under one end for pressure. They’re okay when I just need to add a lot of quick-and-dirty clamps to a plank already secured in place, but they’re quite fussy.
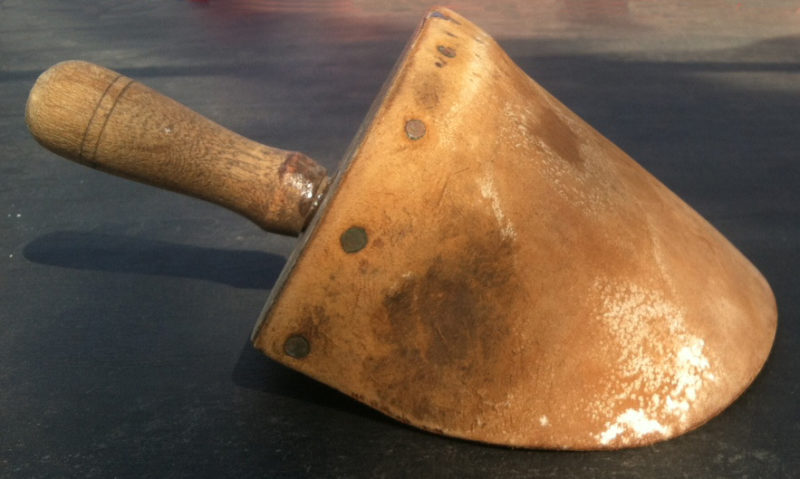
I made my original set of seven clamps (top) 35 years ago with oak from salvaged from a discarded dining-room table. The second set of three (bottom), in Alaska yellow cedar, was thicker, had a shorter reach, and like the first set, tore the hinges apart. I went back to the original design and replaced the hinges with the hardwood cheeks and brass pivot pins.
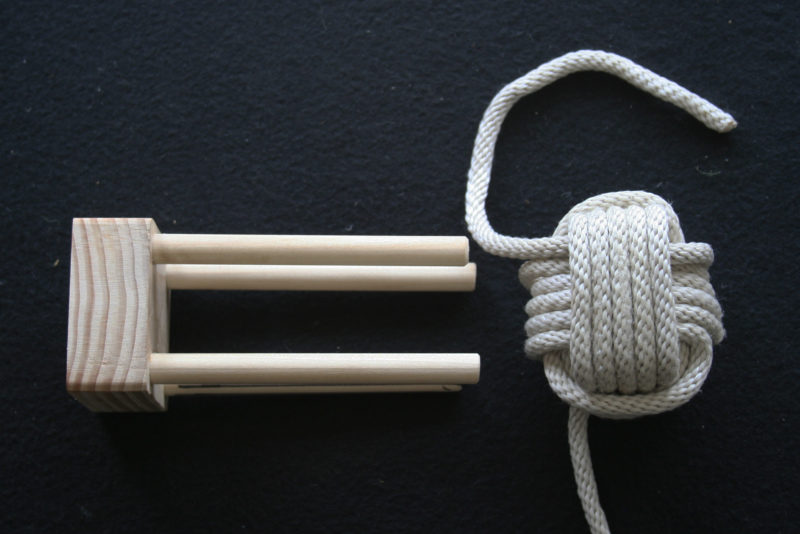
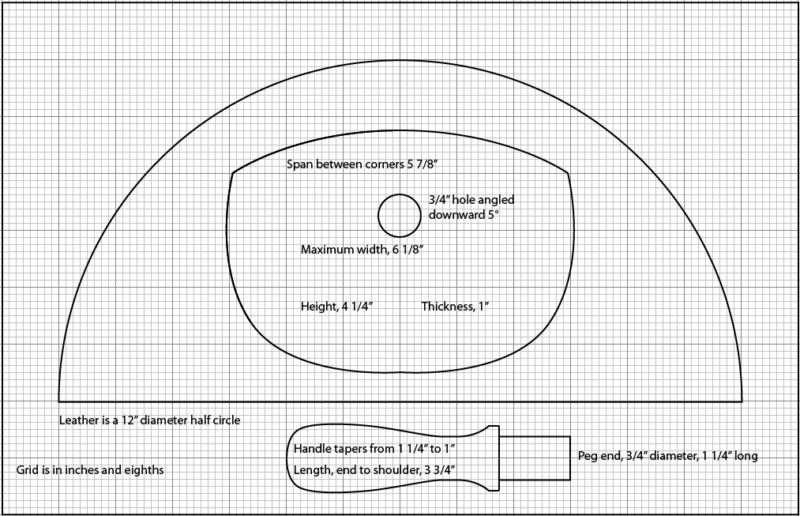
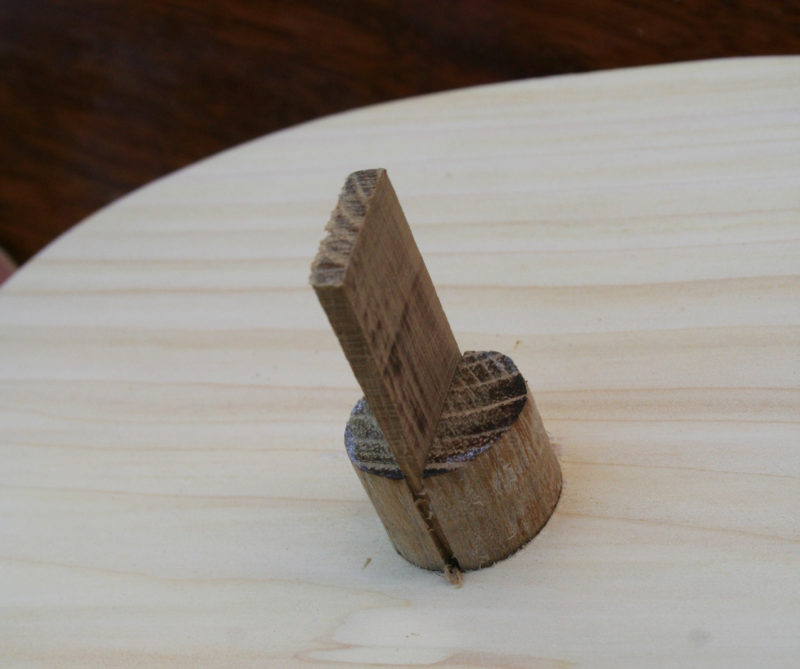
I bandsawed parts for my first set of cam-lever clamps from ¾″ oak. I used Alaska yellow cedar for a second set of three more clamps, opting for 1 ½″ stock to give the softer wood more strength. They’re a bit clumsy, and I’ve gone back to using ¾″ oak. The semicircular notch in the top jaw is easily cut with a hole saw chucked in a drill press. You won’t have the advantage of a pilot bit in the work piece, but if you use gentle pressure to get the teeth started they’ll cut without skating off target. You can also saw the notch out with a narrow bandsaw or sabersaw blade. When shaping the circular part of the cam handle, a perfect fit in the notch is laudable although not required, but err on the side of making the circle slightly oversized–it will have a better grip in the clamp jaw.
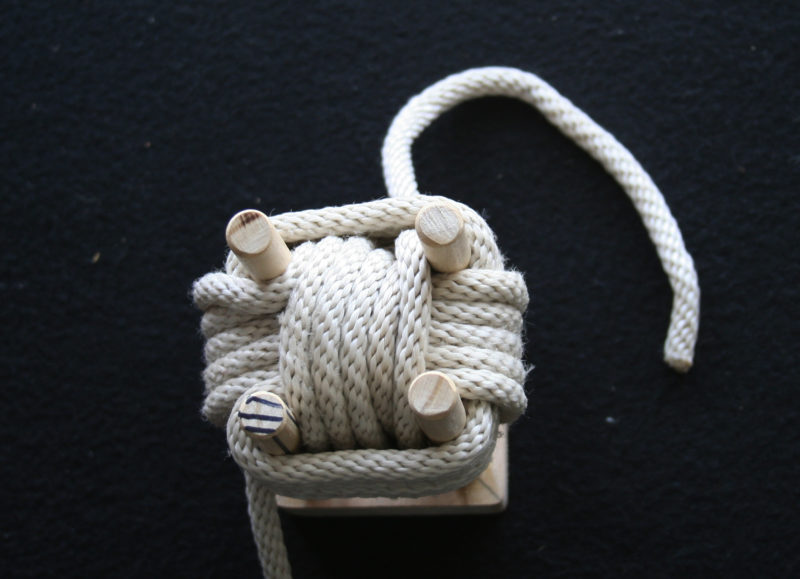
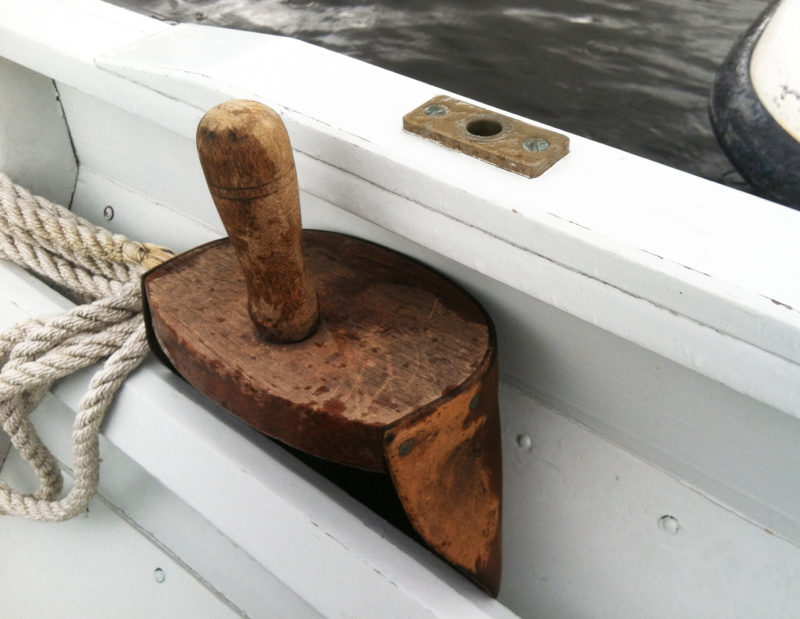
A spring set in holes in the jaws pushes the clamp open, and leather pads glued to the tips provide padding or the planking and prevent damaging misadventures with epoxy.
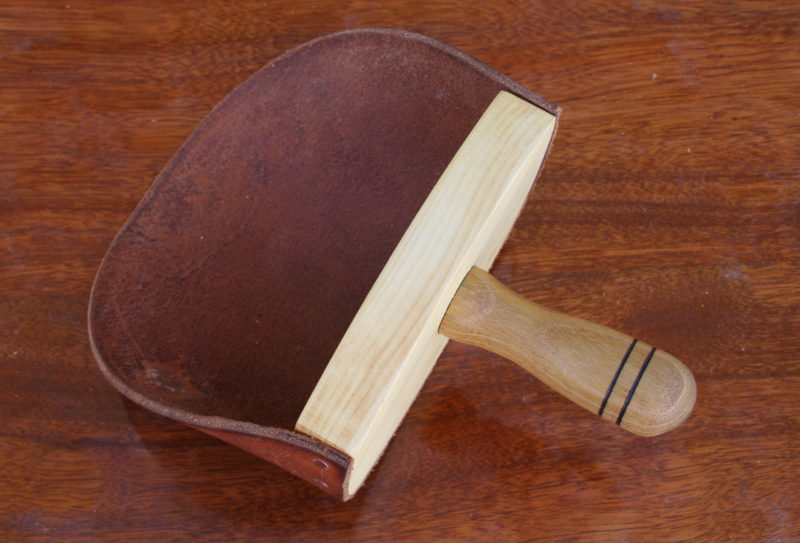
The straps are 1/16″×3/8″ plain steel flat bar. For the pivot pins I’ve used 1/8″ steel or brass rod. Sixteen-penny nails work well too, and their heads save time peening. For the spring to open the clamp, the parts must move freely, so stop peening the ends just before all the slack gets taken up. If you use a machine screw and nut instead of a rivet to hold the straps to the lower jaw, you can have a second hole to offer a wider setting, but I haven’t found that necessary. The 3/8″ hardwood plates on the end of the clamp are glued in place. The cam levers hold well before their pivot rods hit top dead center, so the clamp has a wide enough range to lock on planks of the various thicknesses generally used for small boats. I’ve used hinges to join the jaws, but those small enough to fit the ¾″ stock are made of thin metal and don’t hold up to the pressure. The hardwood cheeks and pivot rods have proven much more durable. Leather pads on the pinching ends keep the jaws from damaging soft planking and help the clamp release: If a bit epoxy gets on the clamp, it will leave a little leather behind rather take a bit of planking away.
If you already have a set of planking clamps that use threaded rods or wedges, you could make a set of three of these clamps and use them first to get the plank secured in place and then fill in with the others. They’re almost as good as having a helping hand.
Christopher Cunningham is the editor of Small Boats Monthly
You can share your tricks of the trade with other Small Boats Monthly readers by sending us an email.
Cinched tightly around the user’s face, the LandShark Survival Bag prevents heat loss far more effectively than a space blanket.
The Land Shark Instant Survival Shelter is a multipurpose survival bag that’s affordable, lightweight, compact, and reversible: international orange on one side and digital camouflage on the other. The orange is highly visible, critical for rescue at land or sea, and the camouflage side, meant primarily for military use, might come in handy if you want to take refuge ashore without attracting unneeded attention. The outer layers of the laminated material conceal and protect a layer of aluminized film that reflects heat to provide warmth without the bulk of insulation. The bag weighs 22 oz and is 6″×8″×1″ when stowed in its zippered pouch and 38″×80″ when unfolded. It is designed to fit any person up to 6′3″ and we found that two people could fit inside the bag, an asset for rewarming someone with hypothermia. The waterproof, ripstop material is much more durable than a pocket-sized aluminized Mylar blanket, and bag provides better protection from the elements and warmth retention than a space blanket. It comes with a plastic clip and a whistle attached.
I tried the bag outside with the air temperature at 45 degrees Fahrenheit and without sunlight. I was barefoot and wearing shorts and a T-shirt. Getting into the bag is as easy as putting on a pair of pants: It takes about 20 seconds. After getting in, I tucked my head inside and pulled the drawstring tight to create a dead air space. Within 10 minutes the temperature inside climbed to 63.5 degrees. For a second trial, to simulate a man-overboard rescue scenario, I hosed myself down with 41-degree water, and slipped into the bag. I felt an even more distinct sense of warming up than I had when I was dry. As the bag warmed up, my reading glasses even fogged up. After 10 minutes the internal temperature stabilized at 57.2 degrees. Creating the dead air space was critical to warmth, and the great advantage of the bag over a blanket. Keeping the opening small and tight around my face kept me warm. With even a small gap I could feel cold outside air getting in. I minimized conductive heat loss by sitting on a boat cushion or dry forest duff on land. If I rested on heat-draining surfaces like concrete, I could feel the cold.
Capt. David Bill
Turned inside out, the LandShark bag has a camouflage pattern for those times you’d rather blend in with the environment.
I tried using the Land Shark bag in the water, a use indicated on the manufacturer’s website. It is feasible to get into the bag in the water, and it may, as the manufacturer suggests, extend survival time, but it is not a substitute for the buoyancy provided by a PFD or the functional thermal protection of a wet suit or dry suit.
The bag’s aluminized layer, by reflecting radiated heat, also offers “tactical stealth” and can help evade detection by thermal imaging equipment. While that’s useful in a military application, the thermal cloaking must be kept in mind in a survival situation. We conducted a mock search-and-rescue trial with an infrared camera. A person inside the bag was virtually invisible. An arm or a head left uncovered by the bag provided a clear image on the camera monitor. If you are in a survival situation and visibility is obscured you’ll want to get at least partially uncovered if you believe rescuers are nearby. They may be using infrared imaging to find you.
The aluminized film also makes a strong radar reflection—good news for small wooden boats. When we set a 40′ yawl’s radar at a ¼-mile range and 1,000′ away, the outstretched bag, suspended 6′ above the water level, was a smaller target than the 30′ to 50′ sailing and power boats moored nearby but just as easily discernible.
SBM
Packed in its zippered fabric case, the LandShark, its whistle, and clip are compact enough to be stowed on the smallest boats.
The Land Shark bag is a compact and versatile piece of equipment for a make-do weather protection for someone who neglected to bring rain wear, an unexpected bivouac ashore, an impromptu radar reflector if caught up in reduced visibility, or a means of warming someone after a man-overboard rescue. It’s worth having aboard.
Capt. David Bill is a Sea Survival Instructor at Tabor Academy in Marion, Massachusetts, and writes about his adventures on his blog, Boats and Life.
The LandShark Survival Bag sells for $65 and is available online from Corporate Air Parts.
Is there a product that might be useful for boatbuilding, cruising or shore-side camping that you’d like us to review? Please email your suggestions.
The GravityWorks filter is designed to remove protozoa, bacteria, and particulates—the common contaminants encountered in American and Canadian backcountry. It is not intended to remove chemicals, toxins and viruses that are more commonly found in urban and agricultural areas and developing countries.
My wife and I spend summers at our Georgian Bay island cabin. Like many lakes in North America, the bay, a part of Lake Huron, is safe for swimming but its water is not drinkable. For years we brought tap water from home or the marina. When we went cruising, drinkable water was a large part of our provisioning.
We looked into purifying our water. Boiling it is a possibility but takes time, consumes fuel, and doesn’t filter out particulates. We tried chemical treatments, but the taste and the long-term health implications put us off. Hand-pumping water through filters seemed like a lot of work. Then we discovered gravity systems. There are a wide variety of these available, and we decided to get a compact system that we could use at the cabin and for boating or canoeing trips.
George Hume
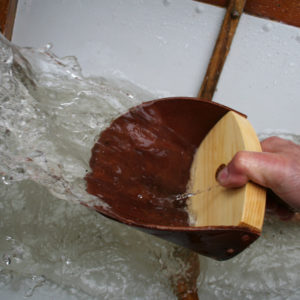
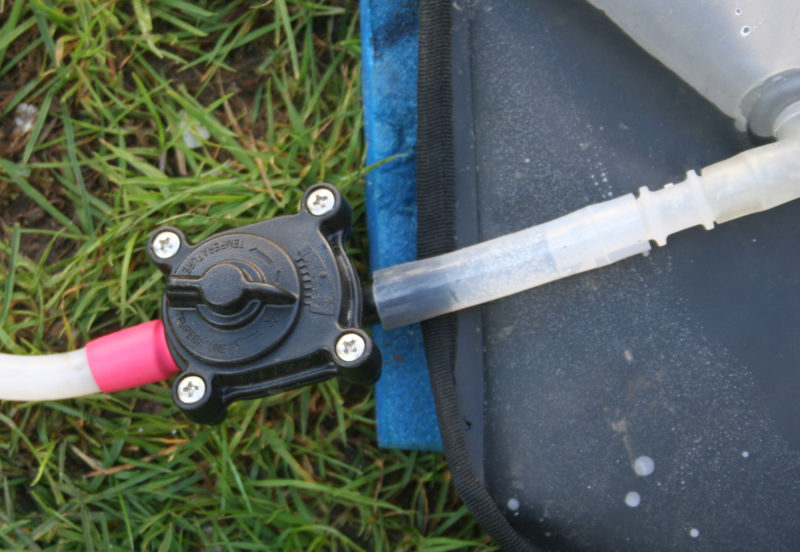
The water from the DIRTY bag flows through the filter, the optional Carbon Element (to remove compounds that affect the taste of the water), and past a pinch valve.
Platypus’s GravityWorks 4-liter water filter system consists of two 4-liter BPA-free plastic bags joined by a clear plastic hose with an in-line filter. The filter is a hollow-fiber membrane that is, according to the manufacturer, “effective down to 0.2 microns and meets EPA Guide Standards for the removal of bacteria and protozoa.” One bag is clearly marked DIRTY and the other CLEAN so they cannot be inadvertently mixed up. We added an optional charcoal filter as recommended to improve the taste of the filtered water. The water tastes quite pure without any trace of chemicals or impurities. Since we didn’t try the system without it, we can’t say whether it was necessary for our water. The rainwater we’ve collected from our cabin roof has a higher E. coli and pathogen count than raw lake water, but the test results of our GravityWorks samples have always shown perfect drinking water no matter what source the water came from.
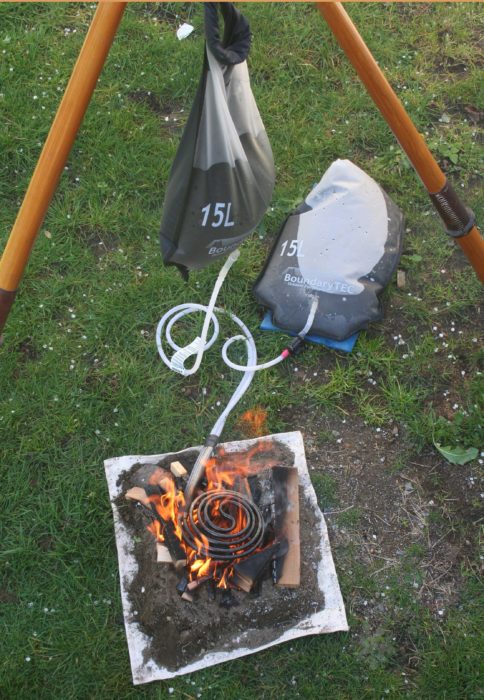
We fill the DIRTY bag with water from the lake or the cabin rain-barrels, hang it on a stub of a tree branch, and connect the hose to the valve at the bottom of the bag. That starts the flow, and a few minutes later we pick up the filled CLEAN bag, close its valve, disconnect the hose from the filter, and drain the clean water into our drinking-water pot. On a boat, just hang up the CLEAN bag on its strap and use it as the reservoir. We don’t completely empty the CLEAN bag but reconnect it to the system and then lift it above the DIRTY bag to backwash the filter.
Although the manufacturer claims GravityWorks will filter 4 liters in 2.5 minutes, we find it takes closer to 5 minutes, so we go on about our day and empty it when we next think about it. We refill the DIRTY bag and start the process over again. Filling an 18-liter pot does the two of us for about three days. We use the GravityWorks every morning when we have guests, but we have found no reason to go to a larger system.
The caveats are few. The filter cannot be drained completely once it is in use—it must be kept wet between uses and cannot be allowed to freeze. The filter has to be replaced after about 375 uses (1,500 liters/400 gallons) or more frequently if the source water is clouded with suspended solids in it. The filter is fragile, so do not drop it. If you do, have a spare on hand until you can have the water from the original filter tested. The replacement filter costs about $54.95. If you’re venturing into the wilderness, try out the filter before you go and carry a spare.
The GravityWorks is a boon to small-boat cruisers. It comes in a box 6″×11″×2.5″ so takes up very little space when empty, weighs less than a pound empty, and is ready to use anywhere fresh water is available (it is not a desalination device, so it cannot be used with seawater). We are very happy with the system and would recommend it to anyone wanting safe drinking water with minimum effort.
George Hume is a retired architect living in Toronto and summering on two of the 30,000 islands in Georgian Bay (one to call home and one to look at). He is a member of the Antique and Classic Boat Society, the Shallow Water Sailors and a Life Member of the Canadian Power and Sail Squadrons. He paddles a canvas-covered cedar canoe and is restoring a Mirror dinghy that he built in the ‘70s.
The GravityWorks 4.0L Filter System sells for $119.95 is available online, from outdoor retailers and direct from Cascade Designs.
Is there a product that might be useful for boatbuilding, cruising or shore-side camping that you’d like us to review? Please email your suggestions.
Andy Saunders’ Ranger 15, after two-and-a-half years in the making, sits pretty at the far side of the learning curve.
In 2011, at the age of 64, Andy Saunders went to his first wooden boat festival. It was held at Goolwa, South Australia, near the mouth of the River Murray. At the festival, Bob, an old friend, proudly showed him a stitch-and-glue canoe he had made at a workshop put on by Duck Flat Wooden Boats. “Andy, have a look at what I built in 10 days!” On the way home, Andy thought: If Bob could build a canoe, so can I! Undeterred by his lack of experience, the difficulty of procuring materials, the cost of the project, and not knowing where or how he would use a canoe, he bought plans for a Prospector Ranger 15, a 15′ wood-strip canoe by Bear Mountain Boats.
Only one of the lumberyards he contacted was willing to mill the 17′-long western red-cedar ¾″×¼″ bead-and-cove strips he needed, and only after he had gone to pick up his order did he learn that the yard had never milled strips like this before. They could only get the thickness down to 5/16″. The canoe would be heavier for the extra wood, but on the bright side, the yard gave him all of their short practice strips—almost enough for another smaller boat.
The bead-and-cove cedar strips kept the seams tight around the turn of the bilge.
Andy had his share of challenges to overcome. The instructions called for molds to be cut from plywood, but the plywood he’d bought warped after being cut; he started over with ½″ MDF. His first attempt at laminating the stems fell apart when the epoxy failed to set in the chill of the fall weather; for subsequent gluing tasks he employed a heater. But he made slow but steady progress, and could fit and glue two or three strips per side each day. He took a suggestion from a friend and mixed resin, hardener, and filler in a zip-lock plastic sandwich bag. With a bit of a corner cut off, he could squeeze thickened Bote-Cote epoxy into the wood-strip coves just as one would ice a cake.
After Andy applied fiberglass and epoxy to the hull, the canoe sat idle until he brought in friends to help with the finishing touches.
Within a few months he had sanded, faired, and ’glassed the hull with West System epoxy, but then his project sat idle for a year and a half. Andy ultimately called upon friends at Duck Flat Wooden Boats to help him finish the canoe. The canoe surged toward completion. Hoop-pine gunwales went on, gaboon plywood decks and bulkheads were installed, and a rosewood thwart and Shaw & Tenney seats took their places. Andy also purchased cherry paddles from Shaw & Tenney. In November 2014, about two-and-a-half years after starting the project, he launched his canoe.
The Ranger 15 is modeled on a classic Canadian frontier canoe and is designed to carry several months’ worth of provisions. Without a heavy load aboard, it floats virtually on top of the water and easily catches the wind. Worried about paddling on nearby lakes where the wind was strong and unpredictable, he waited weeks for a windless day to launch in a local man-made seawater lake.
He took the canoe out for a paddle, but in a few hundred yards the wind sprang up and became so strong he could not get back to his launch point. With no option left he had to scramble up the rocky embankment struggling with the canoe, leaving scratches on the bottom, but for the short time he was on the water, the Ranger showed it had stability and traveled straight and fast. He also saw that it would do much better with two paddlers. Andy repaired the canoe, leaving no evidence of the damage, and when he showed the canoe at a recent wooden boat festival, it attracted a lot of attention and compliments. Andy is looking forward to exploring some of the many swamps up and down the River Murray where the wind won’t be such an issue, and where he can appreciate the tranquility and wildlife with too much concern about any damage to his pride and joy. He knows the canoe will make a great bird-watching and fishing boat and be very safe, in the right conditions, to take his young granddaughters out on adventures.
Have you recently launched a boat? Please email us. We’d like to hear about it and share your story with other Small Boats Monthly readers.
Within the pages of Eric McKee’s Working Boats of Great Britain there are drawings of a 24′ Thames skiff attributed to W.A.B. Hobbs* at Henley-on-Thames in the very early part of the 20th century. Thames river skiffs were an evolution of the wherries used to transport cargoes and passengers up, down and across the Thames for many years before bridges and other forms of transport put them out of business. Although the vast majority of skiffs have been used for leisure purposes, they are worthy of inclusion in McKee’s book as so many of them have earned a living by being hired out.
Retired firefighter Lawrence Shillingford decided he wanted to build a version of the Hobbs skiff when he enrolled in the nine-month course at the Boat Building Academy in Lyme Regis, UK, in 2014. The workshop space there was limited so the design was scaled down to 21′ with a CAD program by tutor Mike Broome. The process was by no means simple, primarily because the boat already had very little freeboard. “It was just a question of tweaking it a bit,” Mike said “In essence it’s the same as the Hobbs boat but with more freeboard and a tiny bit more beam.”
Photographs and video by the author
Built in a shop with limited space available, ROSINA MAY is 3′ shorter than the century-old skiff that inspired her builder.
Although Lawrence had planned to retain the Hobbs boat’s two rowing positions, he realized during the lofting that the forward position would be too cramped and that the beam there would be too narrow. He found a drawing of a 21′ skiff with a single rowing position and decided to adopt its interior layout.
Although there is no such thing as a standard Thames river skiff, there are, as Lawrence puts it, “certain ways of doing things.” So, to find out more about skiff-building traditions and practices, he visited two Thames boatbuilding companies: Henwoood and Dean, and Richmond Bridge Boathouses where skiff builder Mark Edwards allowed him to walk around his workshop with a camera and measuring tape.
The building process began by setting up a temporary structure on the workshop floor to which the keel—laminated from two full lengths of oak with a slight amount of rocker—was temporarily fixed. The stem—with the inner part laminated for strength and the outer part solid for aesthetics—and the sternpost were then added. Epoxy was used in all glued joints.
The shapes of the 1″-thick transom and the nine building molds were determined during the lofting process, and the planned position of the top of each plank was also marked on the edges of each of them. Any inaccuracies in the planking lines of a clinker boat will soon be betrayed by the human eye, so after the transom and molds were fixed to the centerline and shored up to the ceiling, a batten was run between each set of planking marks to check the fairness and a few minor adjustments were made.
On each side of the boat there are six ⅜″-thick khaya planks and at the sheer there is a ¾″ thick saxboard, rabbeted so that its inner face is flush with that of the top plank. Lawrence worked from the bottom up, fitting the garboard plank first, a time-consuming process as it was rabbeted into the keel. The academy had obtained khaya, a type of mahogany native to Africa, long enough to do all the planks in one piece, although an entirely forgivable human error resulted in one plank having to be remade with a scarf joint in it. The plank laps were coated with varnish before they were fastened with copper rivets.
Lawrence remained faithful to the traditional Thames skiff system of discontinuous frames. The ⅝″-thick oak futtocks are closely fitted to the inside of the planking and have half joints where necessary. None of the futtocks are taken as far inboard as the centerline. Those in the ends of the boat nearly do and each of them is adjacent to a corresponding floor; amidships, the futtocks and floors are at different stations. Started at the bow, Lawrence riveted the futtocks and floors to the planking and removed the molds as he worked his way aft.
The locks are incorporated into the saxboards and have easily replaced bearing surfaces.
The saxboards were made from especially wide timber so that the fore and aft supports for the oarlocks are an integral part of them. Extended futtocks provide strength across the grain of the saxboards. Each oarlock consists of two vertical tholes and a horizontal sill, all oak and held in place by brass strips so they can be easily removed for repair or replacement.
It was a relatively straightforward process to fit the remaining parts of the boat, including the ½″ x ¾″ khaya rubbing strake; the oak breast hook and stern lodging knees; the stretcher with its three positions to fit rowers of different sizes; the oak and khaya rudder and its yoke; and the khaya thwarts and their oak knees. Time restrictions prevented Lawrence from including two details from the Hobbs drawing: He made slatted bottom boards instead of gratings, and the backrest for the cox’s seat is of oak and khaya rather than framed woven cane.
Another academy student who spent a great deal of time working on Lawrence’s skiff was Brooke Ricketts from Maryland. Brooke’s brother-in-law had felled an oak tree not far from Lyme Regis, and it was from this that the transom, rudder, yoke and seat back were made.
The boat was coated with Deks Olje—three coats of D1 saturating wood oil, applied wet-on-wet, followed by D2 high gloss oil finish—a combination that Lawrence believes will require less maintenance than varnish.
On the academy’s Launch Day in December 2014, Lawrence’s skiff was christened ROSINA MAY, in honor of his mother, and few months later I met with him in Weymouth—about 25 miles east of Lyme Regis—and launched ROSINA MAY from her trailer into the sheltered harbor. Although she felt slightly tippy when I climbed aboard—perhaps not surprising as a narrow waterline beam is an inherent part of the traditional skiff design—as soon as I was seated and rowing it was clear that she is comfortably stable.
It had looked to me as if the distance aft from the rowing thwart to the oarlocks might be too small, but I soon realized that it was just right. Lawrence told me that McKee’s book provided this and other such ergonomic dimensions and that he also had occasional doubts about them during lofting and construction, but centuries of skiff design were clearly proved to be of value.
Each of the students had been obliged to make an oar as part of the course—as well as a hollow plane for working the concave side of its spoon blade—and ROSINA MAY’s oars were made by Lawrence and Brooke. They are to the academy’s standard design but Lawrence and I agreed that oars with blades a couple of inches longer would be better suited to his skiff.
While seating of a sort is provided in the stern, the passenger who’ll be doing the steering sits farther forward to maintain proper trim.
It had been a long time since I had rowed while another person steered. Initially when Lawrence pulled on one of the yoke lines I thought we had been somehow pushed off course by wind or waves and that I should correct it. The reality, however, is that the very long keel gives the boat tremendous directional stability and it needs little help from the oarsman or coxswain to hold its course. Conversely this also makes her hard to turn, so a companion at the rudder is a welcome addition for rowing along a meandering river.
The Thames waterman’s stroke, the traditional form of rowing for a skiff of this type, is described in the Sept/Oct issue of WoodenBoat.
ROSINA MAY is quite heavily built. Lawrence realized she would be when he visited Mark Edwards’s yard but by then he was committed to slightly larger scantlings in some parts of the boat. However, Lawrence is happy that she is strong and, although he isn’t sure of her exact weight, on the launch ramp it was surprisingly easy for the two of us to pull her back up on a trailer with its tires only just touching the water and without using its winch.
Lawrence is contemplating a couple of modifications to the cox’s thwart and back rest to create more leg room. He would, after all, like to have a forward rowing position and so he is thinking of fitting small outriggers—removable for aesthetic and practical reasons—to get the oarlocks far enough outboard.
While Weymouth is geographically the most convenient place for Lawrence to trailer ROSINA MAY from his nearby home, he is looking for a suitable base for her on the River Thames, a wider piece of water where she would be able to mingle with a variety of other elegant rowing boats, and so clearly her natural habitat.
*According to Tony Hobbs, a member of the Hobbs boatbuilding dynasty who was appointed Royal Waterman to Her Majesty the Queen in 1981, he is W.A.B. Hobbs and the book’s reference should have been to W.A. Hobbs, his grandfather. However, the boat shouldn’t have been attributed to W.A. Hobbs. Tony is certain that the boat McKee measured in 1976 was built by Wally Downing in 1906. Downing’s name is inscribed, as is the boatbuilders’ custom, on the underside of the stretcher. At the time, Downing was working for E.T. Ashley of Pangbourne-on-Thames. Ashley’s business and the skiff were later acquired by Hobbs so when McKee measured the boat, she was then owned by Hobbs, hence the confusion, presumably. The boat is now in the Racing and River Boat Museum at Pangbourne.—NS
Nigel Sharp is a lifelong sailor and a freelance marine writer and photographer. He spent 35 years in managerial roles in the boat building and repair industry and has logged thousands of miles in boats big and small, from dinghies to schooners.
For a lines drawing and a table of offsets, email Mike Broome at the Boat Building Academy. Constructional details largely followed those of the 24′ Hobbs skiff depicted in Working Boats of Britain: Their shape and purpose by Eric McKee.
Is there a boat you’d like to know more about? Have you built one that you think other Small Boats Monthly readers would enjoy? Please email us!
What was left of the boat rotting in the brambles on the north shore of Clear Lake in Western Washington was once a very fast boat under oars. Back in the 1930s John Thomas “could row it across the lake, fill up two gallon jugs with spring water and row halfway back on one cigarette.” When John Sack, Thomas’s nephew, took over the lakeside family cabin in the 1960s, the boat had been sitting at the base of the largest pine tree on the property, unused for a decade.
In 1983 John asked me to build new boat to replace the one his uncle had thought of so highly. Rot had taken a heavy toll and although most of the sheerstrake was gone there was enough boat there to measure it and to show how it was put together. My search for the origins of the boat led to the lines of a lapstrake Whitehall Livery Boat in Maynard Bray’s Mystic Seaport Museum Watercraft. The shape, dimensions and many of the construction details—shortcuts for an easy, quick build—were a nearly perfect match. Bray writes: “…in spite of the quick and dirty way she is built, there is nothing at all second rate about her shape; she is one of the nicest modeled puling boats in the entire collection.” I ordered the plans and set to work.
Photos and video by the author except where noted
“There is nothing second rate about her shape; she is one of the nicest modeled pulling boats in the entire collection.”
The livery boat is 13′6 ⅝″ long with a beam of 3′7 ½″. It has seven strakes and steam-bent oak ribs on 5 ½″ centers, clench-nailed at the plank laps and riveted at the gunwale. The last two frames at either end take very tight turns at the keel, so supple bending stock is a must.
The keel and the keel batten (as they’re labeled on the plans) run nearly straight from stem to sternpost. There is no deadwood forming a skeg as on some Whitehalls, so the garboards, rather than turn upward to the transom, follow the keel and batten and twist to vertical at the sternpost, much they would in a double-ender.
The plans note that the boat has a one-piece stem. I’d be surprised if that were indeed the case. The aft end of the garboard and broad strakes run past the sternpost and are capped with a small triangular false sternpost, fastened after the planks are trimmed flush. The forward end of the garboard in the relic I saw has an odd jog around the outer stem (a detail that isn’t clear in the plans or the photograph in Bray’s book) that suggests the use of a false stem.
Lightly built, the livery boat makes rowing a pleasure.
The plans indicated that the garboards were run past the keel batten and then planed flat to accept the keel in the same manner that a dory’s garboards are planed flush with the bottom and protected by a false bottom. With rabbets and the time they take to shape eliminated from the stern and keel assembly, it seems unlikely that the stem would be of one piece and rabbeted to accept the hood ends of the planks. I built John’s boat with a two-piece stem.
Bray notes: “…what appears to be the keel is in reality only a chafing strip to protect the garboards from damage. Thus built, the garboard seam is hidden and cannot be caulked later.” To avoid problems with the seam between the keel and the garboard, I widened the keel batten, and the garboards overlap it much like any other plank lap for most of their length. With the oak keelson resting mostly on the oak batten for much of its length, it has a more solid footing than it would on the feathered edges of soft cedar planking. The 3M 5200 I used in the seams has kept the laps at the keel and the rest of the hull tight and leak-free for 31 years.
The boat is, as you might expect of a fast pulling boat, a bit tender. I can stand in it with confidence, but stepping upright from one thwart to another gets a bit twitchy. The stability picks up quite quickly so it doesn’t twitch far, but I prefer getting aboard or moving about with my hands on the gunwales. Seated, of course, the boat is comfortably stable. When I sit at the side of the center thwart, my 200 lbs bring the sheerstrake to the water’s surface.
The frames in very ends of the boat take some very tight turns. Better trim could be achieved with a passenger aboard by making the stern bench longer and adding a backrest to put the additional weight farther forward.
There are two rowing stations but a boat this size doesn’t gain anything by having two people at the oars—more power won’t make it go appreciably faster. One station is for rowing alone and the other for rowing with a passenger in the stern. The volume of the stern sections is carried quite high, so it’s best to have the heavier occupant at the oars. With John in the stern sheets and his daughter Mary at the oars, the boat settled down by the stern. Had they changed positions the boat would have trimmed well. The thwarts are set just 5 ½″ below the sheer, so the oarlocks are set in pads that add another 2″ of height for more clearance for rowing.
The plans call for thwart knees sawn from straight-grained ¾″ stock, certainly the simplest solution to bracing the hull, but I opted for bent knees for a less clunky appearance and adequate strength for the boat’s purpose. Simple blocks of wood secured to the center floorboard provide foot bracing adequate for casual rowing.
The hull’s very fine waterlines aft and ample drag keep it tracking arrow straight. If I were to build the boat again I might move the thwarts 6″ or 8″ to have the stern settle not quite so deep. For now, any cargo, like John Thomas’s gallon jugs of spring water, would serve the trim best when set in the bow.
The short waterline length makes the livery boat easy to maneuver. Changing course while underway takes few strong pulls on side, and at a standstill I could spin the boat through 360 degrees in 10 strokes, pulling one oar and backing the other.
For Mary Sack, John’s daughter, and her two brothers, rowing has been one of the pleasures visiting the family cabin on Clear Lake.
With a lazy pull at the oars I could poke along at a GPS-measured 3.5 knots and go almost as fast backing. A little more effort took me up past 4 knots. I peaked at 4 ¾ knots, about what I’d expect for a waterline length of just under 13′. Not being a smoker I didn’t try to see if I could get across the lake and halfway back on a single cigarette. At speed the wake’s transverse waves are small; there is no gurgling coming from the stern as the boat eases the displaced water back together. The boat carries well between strokes. The hull is light enough that when I swing my upper body aft during the recovery, the boat surges ahead.
Mary Sack
At a relaxed pace the livery boat is easily driven. Here, pushed hard, it does around 4¾ knots.
John, a devotee of racing shells, equipped the boat with folding bronze outriggers that increased the span between the locks by 13″. The arrangement worked well enough with his 9′3″ racing sculls, although the boat won’t go any faster; rather than increase the speed, the longer oars just lower the rowing cadence and for some, that’s a more pleasant way to row. The outriggers have sockets for the original rowlocks so the boat could still be rowed as designed, on the gunwales, with the 7′3″ spoon-blade oars I built for the boat. The shorter oars offer the higher cadence I prefer and more clearance over the legs for the stroke’s release and recovery. The clearance for the stroke was good for flat water I’ve had on the lake whenever I’ve rowed John’s boat, but there’s enough freeboard and enough clearance for the oars to take on the kind of chop a small lake is likely to generate when the wind comes up.
This boat is not a workhorse. Only 15½″ deep amidships (13¾″ measured inside), it hasn’t an abundance of freeboard for rough water or carrying heavy loads. Bray surmised that the design was for a boat that “might have been kept by a lakeside summer hotel for use by its guests.” The boat I built for John, like the boat his uncle took such pride in, was ideally suited to his lakeside cabin.
The plans from Mystic Seaport are on three sheets: lines drawings, a table of offsets, and construction details. If you’re unfamiliar with traditional lapstrake construction there are good books to guide you through the process—Walter Simmons’ Lapstrake Boatbuilding and Greg Rössel’s Building Small Boats, to name just two. Some of the “quick and dirty” details of the livery boat’s construction can actually fare quite well with today’s modern adhesive sealants, eliminate some fussy and time-consuming tasks, and get you on the water faster.
Christopher Cunningham is the editor of Small Boats Monthly.
A gray sky, and a river the color of silver: the morning is above all dreary. Enormous barges and small freighters disturb the calm of the Escaut River estuary. Tugboats come and go, some toward a liner ready to depart, others toward busy wharves in the harbor. Two leave the right bank at downtown Anvers, and are snatched up by the tide’s flood and carried upstream. On board, we are pleased this voyage we’ve imagined for a decade is now underway.
For my companion—Jean-Marie Huron—the exhilaration is short-lived: his kayak, VAILIMA, insists on veering to the right. I had many occasions to try mine, SILVERADO, but Jean-Marie didn’t board for the first time until the day before departure. The prospect of constantly adjusting his course for three weeks was more than depressing.
The route we intended to complete was Antwerp in northern Belgium to Pontoise on the outskirts of Paris via the rivers and canals. It had been completed 1876 by the writer Robert Louis Stevenson and his friend Walter Simpson. The future author of Treasure Island was then 27 years old and had reached a crossroads in his life. Although he wished to make his living as a writer, he acceded to his father’s insistence that he work as a lawyer in London. To escape this destiny, the young Scotsman saw only one way forward: to publish a book and hope that its success would be enough to sway his father.
He followed suit with what was a flourishing genre of the time: river adventure. The initial destination the two companions chose was Grez-sur-Loing, near Fontainebleau, where they could meet up with young impressionist painters—a merry group that included Fanny Van de Grift, a woman the writer had encountered some months earlier and for whom he had fallen head over heels.
Two aspects of An Inland Voyage, the book that Stevenson published about the voyage, touched me immediately: first, the course, which I found wonderful and even exotic despite its geographic proximity to my home in Bordeaux; and, second, its vagabond spirit, which struck me as reawakening an ethic of leaving much to chance, a dance with luck, relying on unplanned encounters and unfolding episodes.
As we paddled away from Antwerp, two workers in fluorescent orange vests hailed us from a high bank above the Escaut River: “Where are you going?” I would have responded, “Pontoise,” but Jean-Marie was more convincing: “Paris!” “Ah, Paris!” came the reply from above, “It’s beautiful, right? Like Antwerp, the capital of Belgium!”
Welcome to Flanders—where Flemish northern pride takes precedence over allegiance to Brussels in the south. We spent most of the day paddling in the busy Escaut and enjoyed the turn in the quiet river Rupel. Our plan was to stop in the city of Boom as our predecessors did. But as we found no place to disembark, we decided to try the lovely village standing on the other bank. Amusingly, our kayaks were housed for the night in a boatyard that specializes in high-speed motorboats.
All photographs by Jean-Marie Huron
Getting back to the water, as here in Verberie, France, was often challenging.
The second day started with an exhausting portage around the lock at Zemst. To clear that 27′ rise, we had to haul, pull, and push, grabbing alder branches and tufts of thorny weeds in our bare hands; then, to put in again, go under the astonished eyes of wizened fishermen lined up above—all this backbreaking work only to learn, a few minutes later, that the guardians of this fortress would have opened their gates, if we had only dared to ask them.
The welcome at the Royal Sport Nautique of Brussels, Belgium, was an enthusiastic one.
We landed at a float in front of the Royal Sport Nautique of Brussels, where a dozen club members awaited us. We had hardly disembarked before our kayaks were hauled out of the water, carried across the club’s graveled courtyard, placed on gentle cradles, washed, rinsed in fresh water, polished with soft cloths, photographed in front of the vine-covered façade, and, at last, sheltered in the vast boat shed among the club’s shells and skiffs.
Showers, dinner, and beds were all so rapidly organized that I could not help thinking of our predecessors and how their evening at Royal Sport Nautique degenerated. At first overjoyed by the good fortune of being celebrated by their Belgian hosts, they ended up being irritated by their obsessive attention. Were we to have an onslaught of questions about French rowing or kayaks, clubs, and champions, its waterways, its competitions? Would dinner turn into a nightmare?
As it happened we were only slightly interesting to the young athletes who stopped at the bar after their arduous training. Jean-Marie and I hadn’t been 20 years old for at least 20 years, so we talked with the elders, their trainers and managers. We spoke of the voyage, of the evolution of the Flemish language, of the intractable Belgian government. Of the Vilvorde, also, the industrial center whose riverbank we had traveled along just before our arrival. “The traumatic closure of the Renault factory in 1997 was a blow,” explained Marc Legein, the quiet, friendly president of the rowing program. The fallow industry has opened the way to gentrification and enticed oarsmen with water less toxic and air less nasty.
At Abbaye de l’Aulne, Belgium, the canal of the Sambre is served by very small locks.
We did not escape, however, our hosts’ curiosity about our kayaks. The idea to make these specialized boats for the project came from the documentary filmmaker Florent the La Tullaye, with whom I was originally intending to do the voyage. But it was only when I encountered Jean-Baptiste Bossuet, and discovered his boatyard, that making the boats became essential to the project.
The man comes across as a little surly, but he is direct and honest when giving his opinion, full of passion when it comes to describing the art of building a performance sailboat. Though solidly anchored in a tradition founded six generations earlier, Jean-Baptiste is no less open to innovation.
“Those who came before me were always searching for the most effective techniques of their times,” he insists. “I was raised that way.”
On my visit to the boatyard, situated at the entrance to the Bay of Arcachon on France’s southern Atlantic coast, I was taken with this wooden shed full of tools, shavings, and all sorts of sounds from saws, mallets, surfacing machines, radio and even the ducks that Jean-Baptiste raises. For my objective—the kayaks—all that remained was to convince the guardian of this temple. His response was tepid. There was a bit of suspense, but finally, we reached agreement: “Let’s go!”
After several attempts to stow gear on VAILIMA’s deck and in her two watertight compartments, Jean-Marie found the right combination. With a little less weight forward, his kayak tracked as well as mine. We slipped away late that morning, and it was nearly noon when we reached Brussels. The waterway was constrained by two high quays allowing no access to the city. We had to content ourselves with waves of dirty water reflecting off the graffiti-covered walls until we reached the first lock. We called the lockmasters: they would open for us but asked if we would go aboard the SAINT JEAN BOSCO, a barge that was behind us. The lock could not take all three boats, and the mariner was in a hurry. Doubly raised by the passage through the lock and by the height of the barge, we could finally see the Belgian capital.
The barge SAINT JEAN BOSCO got an early-morning start heading for Seneffe, Belgium, with a load Chinese silicone.
Our host asked: “Why not stay aboard until the next lock, or even farther if you like, until the inclined lock at Ronquières?” We didn’t hesitate long. The prospect of climbing 68 meters of slope aboard SAINT JEAN BOSCO, itself hauled in an imposing moving tank mounted on 600 wheels, was too tempting to resist.
The afternoon was sunny. We passed Anderlecht, a suburb in the countryside. From time to time, a small town, a group of windmills, or a factory came in view of the canal. Aboard the barge we came to know Valerie Rigole—daughter, granddaughter, great-granddaughter, and sister of Belgian mariners—and her husband, Matthieu, from Bordeaux. “When our daughter Lana was born,” Valerie recalled, “we were working at a campground. We enjoyed the work, but it was demanding and incompatible with the time we wanted to spend with our child. So we decided to get licensed as river captains.”
Aboard SILVERADO, Donatien waited for gates to open in the impressive lock at Marchienne, Belgium.
A lock approached. Matthieu bounded forward to prepare the mooring lines. I was taken with this quickness, which didn’t match my preconception of canal transport. “My family laughs at me,” Matthieu says, “They often say, ‘You are hyperactive and you live at 10 kilometers per hour.’ Aboard SAINT JEAN BOSCO there is always something to keep me busy, things to learn, I am always calculating and keeping myself informed.”
In the evening, a large plate of carbonara was the payoff for kilometers covered…without paddling. In the saloon, with its clean white partitions and its modern settee, Lana watched a Disney film on the flat-screen TV. We were far from Stevenson’s depictions of working life on the canals, but soon, as I was reading my hosts a passage from An Inland Voyage that evokes the peaceful life of mariners, Valerie exclaimed: “It’s exactly that! It’s in the photos of my grandmother, with the clothes drying on the line, the little mutt dogs, the flowers, the draft horses.”
A gentle breeze on the canal from Brussels to Charleroi provided an opportunity for SILVERADO (here) and VAILIMA to set sail and race.
The next day SAINT JEAN BOSCO was moored in front of the bucolic Central Canal, and we parted. We set out in the beautiful glow of a late-summer day, and wound through river bends amid pastoral and level countryside until we came to a long stretch lined by reeds and framed by wooded hills. A slight breeze was at our backs—an ideal time for sailing. I slipped the mast into its sleeve and set the battened sail up. The race was on. VAILIMA and SILVERADO, named after places Stevenson had visited, vied for the lead. Gaining from the slightest puff, playing the eddies to the utmost, SILVERADO edged ahead and but for the treachery of a bank ahead and the insidious backwash of fast-moving barge, my victory would have been certain.
Coming up on the Viesville lock I furled the sail round the mast, slipped its gray cloth cover over it, and put it in its place on deck. We “knocked at the door” of the lock, but it was shut tight for the night. We turned back and chose a copse of birches for our first bivouac.
For centuries Charleroi thrived on coal, glass, and steel. The factories survived World War II but the industry fell into decline in the years that followed. Rusting and idle, the factories are eerily quiet.
Ahead lay the ghostly industrial complex of Charleroi, the Sambre canal system, and the French border at Jeumont. Stevenson and his friend, put off by the number of locks, the frequent delays caused by river traffic, and the incessant rain since their departure, decided to take a train from Brussels toward Maubeuge, but we kept on paddling.
Most of the heavy industry in Charleroi appeared to be closed. The banks of the Sambre River made a ghostly picnic.
We arrived at the village of Pont-sur-Sambre, presenting, as Stevenson put it, “a most dubious sample of civilization.” We were dirty and tired. Jean-Marie had fallen first thing in the morning and had suffered a bruise. Our equipment was scarcely better. A bit of the brass stem band on VAILIMA had broken during a tight turn at a lock, and one of our portage carts was broken. Eight days out, we needed a break. We had, fortunately, been in touch with Michel Detrait, the mayor of Pont-sur-Sambre. We phoned him in the morning, and upon our arrival, his family–if not the whole village–was waiting for us, ready to help. At the grand brick house of Myriam and Michel Detrait, the dinner—a fondue of organic beef accompanied by chips and a cheesecake— was the beginning of our recuperation.
We were a very different team–shaved, showered, laundered, and restored by sleep–when we left the next afternoon. The day was made for boating. Under a blue sky I paddled in silence, following the track left by VAILIMA in water covered with yellow pollen.
The closure, in 2006, of the canal bridge at Vadencourt made it impossible to go all the way to Paris, avoiding the Central Canal, as the canal from Sambre to Oise has become a cul-de-sac. We went by truck from Étreux to Chauny and there rejoined the Oise. The absence of rain, while a welcome contrast to the incessant showers our predecessors suffered through, prevented us from launching at Vadencourt as there was not enough water in the river there for navigation. Downstream we confronted barriers of branches and rubbish, quagmires held by obstinate cattle, but soon enjoyed a string of the most sinuous and wild river bends we had seen since Anvers. An avid trout fisherman, Jean-Marie delighted in the outbreak of flies and the frequent strikes off his bow. For my part, I enjoyed the river scallops in the shallows, the escort by pair of green sandpipers, the bullet trajectory of martin-fishers, and a heron’s first try at flight.
The light was declining, the mist was gathering, and it was time to find a refuge. Ahead we saw above the alders and willows the pointed towers of a small Renaissance chateau. After arriving at the chateau du Plessis-Brion, the caretakers, Loic and Laetitia Marquet, put us up in their cottage. That evening we discussed stags, wild boars, and fox terriers while sipping a fine whisky.
The morning mist had not yet lifted when we started off. At the confluence of the Saint-Quentin and Aisne canal, the Oise becomes a river again. Barges passed us at full speed seemingly without seeing us, and industrial equipment and silos lined the banks. We passed Compiegne, then arrived two days later, in a drizzle, at Creil. At a bend of the river above Villers-Saint-Paul, we encountered Jean-Baptiste Fléret and Étienne Pillier, training in their rowing skiff. With their white outfits and their youth, they wouldn’t be out of place on a rowing team at Oxford in Stevenson’s time. Following their directions, we put in at the Étoile Nautique de l’Oise where they promised a secure place for our kayaks.
Situated on an island in the middle of Creil, the once splendid club seemed to be collapsing with the city, a victim of lost industry. That didn’t diminish at all the beautiful camaraderie of the oarsmen who gathered around us and admired our kayaks just as the oarsman at the Royal in Brussels had done. We were even saluted by some drunkards sprawled with their dogs under the willows on the opposite bank. After the oarsmen helped get our boats settled, the boat warden, a beekeeper, and several others complimented our kayaks on their great speed and their lustrous varnished mahogany. We soon found ourselves in a McDonald’s in a commercial zone with the two handsome oarsmen we had encountered on the water.
Near the village of Sassegnies, France, the Sambre meanders through farmlands and forests. The lock here was closed and we had to portage around it.
The next day, our 17th day, would be the last. All night, among the weights, the dumbbells, and other implements of sports torture scattered around the workout room of the Étoile, I tried in vain to sleep. One question, among them all, persisted: Where would we stop? At Pontoise? That seemed improbable given the distance yet to go. At Auvers-sur-Oise? The idea appealed to me for the connection with Grez-sur-Loing, which was Stevenson’s initial destination—and the one he and Simpson finally attained after abandoning their kayaks at Pontoise.
We woke up early determined to go as far as we could. It was around noon when we reached the lock at Boran-sur-Oise. But despite our insistence, the gatekeeper would not accept to let us in and no mariner would give us the lift we needed. We took it as fate, as it was clear that we had no energy left to haul our kayaks onshore and that the good luck that had followed us during our entire trip had run out.
We had a look at the small village of Boran-sur-Oise. Except for a strange abandoned nautical stadium from the 1950s at its entrance and a kebab restaurant in one of its few streets, it appeared to have remained the same since the 19th century. With its ever-present line fishermen, its willows, and its bell tower, we decided, with a glass of champagne, that it was not a bad place to end our humble voyage in the wake of young Robert Louis Stevenson.
As a journalist and a writer, Donatien Garnier was part of the Argos Collective, a group of French photographers, writers, and cartoonists dedicated to documentary journalism. After 10 years of focusing on seafarers, climate refugees, and travel, he turned his attention to literary projects. He is the author of “Le Recueil d’Écueils” (The Collection of Rocks), a combination of poetry and fanciful cartography, and of “Fluxus “ a volume of poetry published in the form of a scroll. He is currently working on a ballet adaptation of his documentary work about seafarers.
VAILIMA and SILVERADO
A Thousand Miles in the Rob Roy Canoe, published in 1866, inspired Robert Louis Stevenson a decade later to have built a pair of Rob Roy decked, double-paddle canoes and take his own trip on Europe’s rivers and canals. SILVERADO and VAILIMA continued the tradition nearly a century and a half later.
In An Inland Voyage, Stevenson wrote little about the boats. Only that one was built with “a strong heart and English oak” and the other of cedar. ARETHUSE and CIGARETTE were decked canoes, probably resembling the ROB ROY of John McGregor, the British pioneer of light-boat adventuring, used with double-bladed paddles. Jean-Baptiste Bossuet designed two kayaks in the spirit of ROB ROY, capable for sea or river, equipped with a removable sailing rig and flotation chambers, built as light and strong as possible but stable enough to let the photographer do his work. Jean-Baptiste designed a hull with sharp ends, sweet lines, and his signature, a plumb stem and sternpost. The kayaks measure 14′ 5¼″(4.4 m) long and 24¾″ (0.63 m) wide. The skin is 5mm mahogany plywood glued and copper-nailed to the red cedar structure, protected by fiberglass, epoxy, and varnish. A brass band protects the keel, and lengths of clear pine reinforce the sheerline.—DG
If you have an interesting story to tell about your travels in a small wooden boat, please email us a brief outline and a few photos.
Having the monkey’s fist and its heaving line tied together instead of all in one piece frees both to do other jobs.
When I’m camp-cruising, I carry gear that is simple and multifunctional. My heaving line and a monkey’s fist come in handy for a variety of situations. They’re traditionally parts of the same line, but having them separate makes both more versatile.
The separate monkey’s fist makes it possible to use other lines for heaving and to get lines over high branches when setting up camp. The line, 60′ length of ⅜″ laid poly, gets used for everything from tying the boat up at the dock, to setting my sea anchor, warping out of a crowded marina, anchoring, and setting up camp. Tied to the monkey’s fist, its light weight makes throws longer and keeps it afloat for easy retrieval.
The monkey’s fist is relatively easy to tie, taking only about 5 to 10 minutes. It is a series of wraps perpendicular to each other. The monkey’s fist here is tied with a length of manila around a round fishing cork with two ¾-oz fishing leads I’d inserted into it. The lead adds weight for better throwing without losing buoyancy. Golf balls also add some heft and aren’t so dense that a poly monkey’s fist won’t stay afloat with one at the core.
It’s easiest to insert the core after the second series of wraps begins. After the third series of wraps all of the slack is worked out from the bitter end and through the turns. The tail is usually spliced into the integral heaving line at the other end, but a short loop is what I use. The two ends of the line can be tied or spliced together to form the loop, but a quick-and-dirty finish is to cut one end flush and tuck the other in alongside it. Superglue keeps them in place. I finished the one shown here with a quick half-hitch braid around the loop.
When I need to toss a line, I tie it to the monkey’s fist with a clove hitch. There are a couple of different techniques for setting up to throw, but I prefer to coil the line (starting by tucking the tail end between two fingers so I can hang on to it when I’m throwing) into my non-throwing hand and then carefully transfer three or four coils of the line into my throwing hand with the monkey’s fist hanging about even with the bottom of the coils. It is important to coil the line properly. I coil both laid and braided clockwise into my left hand, adding a slight twist with the thumb and forefinger of my right hand to keep the coils loose and even.
I can consistently throw the line and monkey’s fist 50′ to 70′ with good accuracy. I try to get the monkey’s fist well past the target and slightly to one side to avoid hitting the receiver. With a little practice you can get fairly accurate with your throw.
Having a heaving line and monkey’s fist at the ready may just make a critical difference one day in an emergency, but in the meantime it can spare you the embarrassment of throwing a line only to have it land in a heap far short of its target.
A native Floridian, Thomas Head grew up working on his father’s home-built stone crab boat in the small coastal town of Inglis. He has 19 years of service in the U.S. Navy. His account of racing in the Everglades Challenge appeared in our November 2014 issue.
SBM photos
While a monkey’s fist can be tied by starting the wraps around your fingers, a simple jig makes the process faster and easier to master, especially with soft line like the braided nylon. The jig here is for a golf-ball core and ¼” line. The 7/16” dowels—just large enough to provide clearance for the third set of wraps—are set outside of the perimeter of a 1⅞” circle for a loose fit around the 1.68” ball. The finished monkey’s fists are, from left to right: sisal, finished with a spliced loop; poly, with the tail whipped to the heaving line; and braided nylon. Only the poly monkey’s fist floats.
The ¼” line covers the golf ball with wraps made up of five coils, here starting and ending at the striped dowel.
The second set of wraps is made around the first and the golf ball goes in halfway through this step. Note that the second wrap starts by crossing the gap between the first wraps. This is less obvious when tying without the jig.
At the end of the second set of wraps, the line goes directly into the gap under the first set.
The top view showing the start of the last set of wraps.
When every side of the knot shows 5 wraps, it’s ready to come off the jig.
With the last set of wraps complete, the jig can be slipped out. Chase the slack out in a couple of steps. Cinching the line up too quickly will bunch up the wraps.
You can share your tricks of the trade with other Small Boats Monthly readers by sending us an email.
The leather is stiff enough to push water forcefully and supple enough to keep from marring the boat’s finish.
Once upon a time the boat sharps on the Delaware River were sailing 15 footers with sail areas running to 400 sq ft. No self-bailers, no buoyancy tanks, no crash boats. When they capsized they had to right the boat, swim it to the bank, and bail. Bailers had to float and not damage the lightly built hikers, tuckups, and duckers. Wood and leather did the trick.
Joe Liener, who was running the wooden boat shop at the Philadelphia Naval Yard before he retired, taught me about duckers and about their bailers. A wood-backed leather scoop bailer gets into corners, doesn’t damage light framing, and can be plucked out of the water when you lose your grip. You can bail faster than a pump and, shaped right like any fine tool, the bailer is a pleasure to use. The handle is turned so you have a nice round fat part in your palm and it is angled just right so you can hook your thumb over the wooden back.
Ben Fuller
The lathe-turned handle is set into the bailer’s back at 85° for a more comfortable grip.
Making it is pretty easy The back ought to be a good 1″ thick and shaped like the stern of a catboat: a bit of flat on the bottom with some tumblehome at the top to help stiffen and support the leather. Cut out the back, then position and bore the handle hole. Angle the bit about 10 degrees. Make a pattern to mark out the leather; a thin plywood template will give you a solid edge to guide your cut. To do the handle, you’ll need a lathe. Before modern glues, the handles were cut where they went into the hole and wedged like an axe head. You can use a straight-sided handle but it’s just not as nice in the hand and you’d need to cut a mortise instead of boring a hole. The leather should be the heaviest you can find. Copper tacks fasten it to the back.
Scoop bailing is easier if you don’t have floorboards or can take up a section. The Delaware builders used to make removable floorboards, called floor flats, in three sections. Two ran either side of the centerboard or daggerboard trunk and one was aft, leaving a frame bay clear side to side just aft of amidships. These were held together by cleats on the underside and had turn-buttons to keep them in place in capsize. Old drawings show a two-handed bailer with a leather scoop bigger than mine but the one hander is all you need to deal with rain and spray that gets aboard.
Ben Fuller
Even after 40 years of use, the author’s bailer has lots of life in it. Unlike a cut-off plastic bottle, it won’t slide around after it has been tucked away.
I’ve had my bailer as long as I’ve had my ducker, a few years short of 40. I’ve releathered it and repaired the handle after using it to bang some blocks of ice out of the winter dory. It also works well for clearing snow. When rainy days put a few inches in the bottom, using the bailer is kind of fun. A hundred scoops with the right hand, another hundred with the left, seeing if I can bail fast enough to get a second scoop in the air before the first one hits the water. It’s my warming exercise before rowing.
Ben Fuller, curator of the Penobscot Marine Museum in Searsport, Maine, has been messing about in small boats for a very long time. He is owned by a dozen or more boats ranging from an International Canoe to a faering.
SBM photographs
The parts of the bailer, ready for assembly. Note the saw kerf in the peg end of the handle. The dark lines on the handle are made with a piece of wire wrapped halfway around the handle while it is spinning on the lathe. Friction chars the wood.
The hole for the handle is drilled at 85°. Careful repeated saw cuts get the flange of to sit flush against the back.
A wedge locks the handle securely in place. The wedge is as thick as the kerf is wide at its narrow end and about three times as thick at the other end. After driving the wedge home, saw the peg off flush. If you’re using an unyielding hardwood like maple for the bailer’s back, flare the hole with a rat-tail file to allow the handle’s peg end room to spread and lock.
Pilot holes drilled in the leather and bailer back will allow you to hammer 3/4″ copper tacks in without having them buckle or hook around in the wood.
An occasional application of tallow will protect and preserve the leather.
The bailer will hold about 3 cups of water, but will “throw” almost twice that.
Bailing as if it matters can move about 25 gallons per minute.
More interested in using the bailer than making it? Rodger Swanson, whose trailer review appears in this issue, offers them among his line of rowing accessories.
You can share your tricks of the trade with other Small Boats Monthly readers by sending us an email.
T-nuts slide in slotted aluminum box beams for a wide range of adjustments.
I have a small-boat business with an emphasis on tradition-based rowboats and rowing accessories and I usually do the fitting-out of hardware at my shop, often requiring that I pick up the a customer’s boat and return it when the work is completed. Recently, I’ve also been offering custom rowing craft intended for recreational use or racing. These boats range from 15′ to 20′, but they are lightly built and must be handled—and transported—with care. I learned early on that most damage to boat hulls is caused by improper transport, launching, retrieval and/or storage. Damage on the water occurs only up to 10 percent of the time. To avoid any problems in transporting boats, a proper trailer was in order.
Rather than reinvent the wheel, I chose to survey the transport choices my compatriots were making. At races and boat shows the most well-cared-for boats were transported on Trailex Trailers, with the SUT-350-S the apparent favorite.
The Trailex Company, located in Canfield, Ohio, has been offering well-designed and well-constructed aluminum small-boat trailers since 1966. They have national distribution, an excellent reputation for product quality and durability, and excellent customer service. Their SUT-350-S is just one of a score of small-boat trailers. It is 18′6″ long, 4′6″ wide, and weighs 155 lbs. I have two: one is equipped with a jack, winch and spare tire bracket options, and one isn’t, but will soon have those accessories. The 350-S is designed to accommodate boats up to 22′ in length with a maximum weight of 350 lbs. The lightly sprung leaf-spring suspension softens the jolts of bumpy roads.
Rodger Swanson
Designed to be sold as kits, Trailex trailer frames are bolted together, not welded. The light springs protect small boats from rough roads.
I’m now into my third year of 350-S ownership and continue to be totally pleased. The trailers allow me to transport my own boats and customers’ boats with perfect confidence. They are easily loaded, balance well and behave predictably and smoothly on the on the highway. The combination of light weight and good balance allows for safe and effective solo loading and unloading—particularly important for me as I work alone most of the time.
Tire pressure is critical: they are designed for 25 psi; any more will cause excessive bounce when on the road. The trailer frame is intended to be close to parallel to the road surface so avoid canting it with a hitch that is too high or too low. Trailex trailers have a low profile, you may have difficulty seeing your rig in your rear view mirrors. I have a pennant on a 4′ fiberglass shaft affixed to the transom of my own boats. This shows up well in the rearview, helpful in maintaining safe distance on the road and in backing up to launch sites.
In my line of work I can’t afford to have boats take a beating on the road. With the 350-S to back me up, life is good!
Rodger Swanson has been in the business of traditional rowing for 40 years. He specializes in hard-to-find accessories for fixed-thwart and sliding-set rowing, including the bailer featured in this issue. His “flagship” product is tallow, a traditional oar-leather and oarlock lubricant; he is currently the only remaining marine tallow producer in North America.
The SUT-350-S is shipped as a kit or available from the Trailex factory for an additional $100.
Is there a product that might be useful for boatbuilding, cruising or shore-side camping that you’d like us to review? Please email your suggestions.
At full power, DOCKHOUSE QUEEN scoots along at 7 knots.
Terry Everman grew up in a Columbia River tugboat family, and after a 30-year career in the shipbuilding industry, he built a tug for himself. It wasn’t big, like the tugs that he’d seen as a boy, but it was the biggest tug he could build in a one-car garage. He had gathered experience building other small wooden boats: 8′ MiniMax hydroplane, Phil Bolger’s Cartopper, Warren Jordan’s Baby Tender (a cradle boat), Mac McCarthy’s Wee Lassie, and a traditional Melonseed skiff.
Genie Cary
The curved stern was difficult to construct but has the right look for a tug.
The mini-tug started with measuring the garage that would be Terry’s workshop. A length of 16′ would leave him some room to get around the ends, and the 7′4″ beam left just 1″ of clearance on either side to get through the garage door. He began working up the design on a basic computer program. His friend Harry Schoenauer lent a hand fine-tuning the design before building began.
Terry Everman
The rolling building platform and the roll-over frame were sized to get through the garage with only 2″ to spare.
After a year devoted to designing the tug, the first project was to build an 8′ x 16′ rolling platform so the hull could be moved outside when it came time to roll it upright. Shaped panels of marine-grade plywood—½″ on the bottom, two layers of ¼″ below the side rail, and ¼″ for the bulwarks and house— gave the tug its shape. The rounded stern was essential for the classic look but a challenge to build. Thickened epoxy fillets strengthened the joints, and sheathing of 7-oz fiberglass cloth with epoxy reinforced and protected the hull. Empty spaces below the deck were filled with a poured-in foam mix for flotation. When the hull was finished, Terry and friends pulled it outside and rolled it over, and then pushed it back into the garage. The tug’s house was built in a separate garage and later set on the hull.
Terry Everman
The spaces between frames below deck were filled with poured foam for flotation.
Back in the garage, the tug was given its power plant, a brushless electric motor (72V, 350A) from Electric Motorsport. Powered by six 12-volt deep-cell marine batteries, the motor would produce the equivalent of 31 hp. A 14 pitch x 10″ propeller is driven through a 2:1 double V-belt reduction. The keel added to the V hull to protect the shaft and prop brought the tug’s draft to 24″.
Terry Everman
The electric motor sits above the drive shaft and is connected to it with a 2:1 double V-belt reduction drive.
Terry built DOCKHOUSE QUEEN in south Florida and completed construction in two years. He and his wife Sandy then towed the tug to their homeport in Cathlamet, Washington. The cross-country trip drew lots of compliments: people enjoyed the unique cartoon character of the boat. DOCKHOUSE QUEEN performs as Terry expected for a vessel with a sheer plan shaped like a watermelon and a one-ton displacement. At a minimal effort of 30 amps, she makes 4 knots. Top speed with a 150-amp draw is 7 knots. At a casual cruising speed of 3 to 4 knots, the batteries will provide power for several hours. “A quick charging session,” says Terry, “and she is good to go. No fueling fumes, messy bilges, or fuel-dock credit cards.” Terry entered DOCKHOUSE QUEEN in Cathlamet’s yearly Wooden Boat Festival, and she was awarded First in Class.
Afterword
Terry Everman passed away unexpectedly just two months after this issue was published, and now DOCKHOUSE QUEEN is in need of new owners. Please email me if you’re interested. Christopher Cunningham, Editor
In the comments below, Ed was interested in hearing more about the rolling platform. Terry replied with photos and details:
“I built the platform on casters mainly to move the structure from side to side because of the limited space. I even rolled it out, turned the boat around and rolled it back in for better access to the bow or stern. After the roll over, I supported the boat cradles on furniture dollies and rolled in back in the garage for finishing still with the ability to move side to side. The platform was dismantled. The option to move the boat around in the single car garage was a life saver and I was very pleased with the method.”
The platform frame
The platform with decking in place
Platform at the start of construction
After roll-over, the hull and frame rest on dollies.
Rolled back into the garage on dollies, the boat is a tight fit in the workspace.
I was sitting in the cabin of the Escargot canal cruiser BONZO, a boat my son, Nate, and his friend Bobby Calnan built the summer after they’d graduated from high school. It was a winter evening—cold and dark outside—but I had a fire going in the woodstove and a few candles lit. I heard a knocking on the hull and opened the door to find a woman peering over the transom. “Hi,” she said, “I just wanted to say how much I love your boat.” I invited her to come aboard and she climbed over the transom, a bit awkwardly because she was wearing a long skirt and fashionable leather boots with high heels. I couldn’t fault her for her attire because she’d just gotten off the bus on her way home from work. BONZO was on the trailer, high and dry in my driveway.
Photographs and video by the author
After spending a quiet and cozy night with BONZO aground on a gravel bar, Nate tidies the forward sleeping quarters while his sister, Alison, does the dishes. The rising tide floated BONZO for the downstream home stretch on the Snohomish River.
As a wooden boat, the Escargot is an unlikely charmer. It has a hull like a shoebox, only two curves to speak of, and is entirely bereft of brightwork and brass. Nonetheless, it has an ineluctable appeal inside and out. The cabin with its arched roof and stovepipe has the look of a gypsy wagon and the lure of running away from it all, in comfort. My father said of it: “The moment I step aboard, I’ve arrived.”
The cabin and the forward berths are separated by small bays for the head (left) and the wood stove (right).
The Escargot, like many of the small boats designed by the late Phil Thiel, is meant to foster the ideals of what the French called a flaneur. Charles Baudelaire described the flaneur as the “passionate spectator” for whom “it is an immense joy…to be away from home and yet to feel oneself everywhere at home; to see the world, to be at the center of the world, and yet to remain hidden from the world.” The Escargot steers us in that direction. As a “flaneur afloat” Phil aimed to “savor the shore-side pleasures at the ideal rate of speed—slowly. The faster you go through the environment the less you can enjoy it. At slower speeds the world around you reveals itself on a smaller, more human scale.”
Let’s get the Escargot afloat. Phil intended her for “use limited to sheltered inland waterways.” The canals he frequently traveled in France were his inspiration, and similar narrow waters free of wind and waves are where the Escargot performs most admirably. The barge-like hull is an 18′ 6″ by 6′ rectangle. The flat bottom meets the bow transom 6″ above the waterline and the stern transom just even with it. The cabin is 11′6″ long and divided into three sections: a cabin with a galley and a dinette/berth, twin berths partially tucked under the foredeck, and a 2′ bay in between for the head and a hanging locker. The foredeck and the cockpit are both about 3-1/2′ long.
In thin water it’s time to kick up the motor, stow the oars and haul the Escargot on foot.
Phil calculated the weight of the bare boat at 750 lbs; displacing 2,000 lbs, the Escargot will draw only 6″. Nate and I have pulled BONZO across shallows scarcely more than ankle deep. As you’d expect, the barge-like hull has exceptional stability. I have yet to ask passengers to shift their weight to trim the boat.
The Escargot is not a petite boat but its shallow draft gets it into some small waterways. Standing in a forward hatch, Nate explores a backwater frequented by beavers but not by boats.
We don’t have canals in the Puget Sound area, but there are a number of narrow sloughs where the rivers take their sweet time crossing the flatlands between the foothills and the Sound. Here the Escargot is quite at home: the water slips quietly under the bow and curdles up astern.
We’ve taken BONZO out on the local lakes and on the wide salt water of Puget Sound, and have had a few run-ins with wind and waves. In a bit of chop the bow transom will begin shaving the tops off the waves, and in anything much over 12″ high it will throw up some spray. The cockpit is far from the fuss and protected by the cabin, so it’s a good refuge for the helmsman. With only a 2.5-hp for power, BONZO carries enough momentum to keep moving forward through the waves we get in the lakes we frequent.
The kick-up rudder coaxes the Escargot through turns; steering with the outboard makes her much more maneuverable in tight quarters. While underway in a crosswind there’s enough steerage with the rudder to hold a course, but when idle, the bow will slip downwind. I’ve thought that a slot in one of the rub strips would make it easy to slip a daggerboard alongside the foredeck; it would resist the downwind drift of the bow and give the hull a point to pivot around.
Phil had originally designed the first two versions of the Escargot to be driven by a pair of SeaCycle pedal drives: “This pied-à-l’eau approach was, and remains the ideal. However, the pedal-drive unit I proposed using was not suitable for slow speeds and heavy loads.” SeaCycle’s drives are designed for light, easily driven catamarans the company makes, the largest of their boats being only 14′10″, 175 lbs, and capable of 12.8 mph. The pitch of SeaCycle propellers is not well suited to a boat the size, weight, and speed of the Escargot and couldn’t be pedaled at a comfortable cadence. (There are some Escargots in Germany that use pedal drives, but they’ve been outfitted with custom-made props.) The Escargot plans available now call for a 2- to 5-hp outboard. BONZO is powered by a 2.5-hp, four-stroke outboard that’ll get us up to about 4.5 knots.
The cockpit of SHAMBALA is built according to the plans. Builder Bryan Lowe omitted the hinged hatch over the companionway on the aft end of the cabin roof, but kept the one over the smaller passageway forward. Bryan steers SHAMBALA with his outboard. BONZO was ultimately outfitted and steered with the rudder drawn in the plans.
Building an Escargot Canal Cruiser
There are a few modifications we’ve made to the design. Our first experience with the design was aboard Bryan Lowe’s SHAMBALA, and we followed his lead and added 6″ to the height of the cabin sides. It’s a bit more complex than working with the standard 48″ width of plywood sheets and adds to the windage, but the extra headroom is a better fit for tall passengers. Bryan’s cockpit, built to the plans, felt a bit confined, so we lengthened BONZO’s by 12″. The easiest way to do that was to add the length to the flat part of the bottom to shift the aft third of the hull out past the cabin wall. We have more elbowroom for starting the motor and sharing the space with passengers.
The catwalk added to the cabin roof proved to be a popular perch aboard BONZO. The bow often allows stepping ashore with dry feet, though in this case, with very muddy boots.
Nate wanted a catwalk on the roof to use as a runway that he and his friends could use for diving on summer outings. It turned out to be a very pleasant place to sit with a commanding view, and it saved Nate and Bobby from making the hatches over the companionways.
Christened, launched, but not quite finished, BONZO experiments with oar power. With the cabin obscuring vision between oarsmen, synchronizing was difficult.
We added oarlocks at both ends of the boat and hatches on the foredeck to create footwells for the bow oarsmen. Rowing was a nod toward a human-power ideal we share with Phil, but ultimately it proved impractical for covering long distances. Even if we could get four oarsmen, the bow rowers couldn’t see the oars of the stern rowers and couldn’t row in synch with them. The hatches turned out to be useful for stargazing from the forward berths.
With the roof an extra 6″ higher, the main cabin has plenty of headroom and an open, airy feel.
The galley Phil designed for the main cabin has a built-in sink and a recess for a stove to starboard. Nate didn’t anticipate needing a permanent galley and opted to put seats on both sides so he could have a fourth berth. Large plexiglass windows in all of the cabin compartments let in plenty of light, provide expansive views, and, when open, a cooling breeze. The hanging locker was converted to make a space for a small homemade wood stove.
The number of modifications we made isn’t an indication that the design lacking in any way, but that it is easily adaptable to suit the needs of the builder. With so many straight lines and right angles, it’s very easy to shift things around for personal preference.
The Escargot is initially assembled upside down. Uprights on the transoms and bulkheads extend to a baseline to align them. After they are secured to the sides and the bottom, the extra length is sawn away.
The plans are exceptionally well detailed, covering every element of construction from the cutting schedule for the 23 sheets of plywood to the drain slots on the window molding. There won’t be much head scratching in the building, even for novice woodworkers. The instructions specify marine-grade plywood. We used marine-grade fir plywood for BONZO. It used to be pretty good stuff, but I’d steer clear of it now. Mahogany BS 1088 plywood costs more but has fewer defects, is easier to work with, and lasts longer.
Materials for BONZO cost about $4,000 in 2009. We didn’t keep a log of hours, but Nate and Bobby poked along through the summer and put on a big push, working nearly full-time in September to get her ready to launch before cold, wet weather set in.
Nate and his friends often take summer weekend cruises in BONZO. For myself there are two times each year when I especially like to be aboard: to celebrate my birthday and to do my taxes. It is (with apologies to Charles Dickens) the place to be in the best of times and in the worst of times.
Christopher Cunningham is the editor of Small boats Monthly.
Escargot Particulars
LOA: 18′ 6″
Beam: 6′
Draft: 6″
Bare Hull: 750 lbs
Recommended outboard engine: 2–5 hp
Print and digital plans, at $75, are available from the WoodenBoat Store.
With enclosed cabins and interiors chock full of amenities, a canal cruiser can be your home away from home while on the water. Check out a few adventure stories featuring these accommodating powerboats.
Sam Devlin’s Candlefish 13 began with a client’s detailed request for the design of an outboard skiff suitable for the lakes of Alaska’s Far North. It had to be light enough to lift up over the cab of a one-ton pickup truck towing a fifth-wheel trailer, narrow and short enough to fit on the roof rack, and as stable and as spacious as it can be within the restrictions on length, beam, and weight. Sam drew up plans to his customer’s specs and in the process imagined how he might adapt the design the boat for his own use: “a couple of weeks of moose hunting on a far northern lake with my friends Sven and Ollie.” To that end, the Candlefish 13 he’d build for himself would be able to carry three successful hunters and a half ton of moose meat, and still have about a foot of freeboard. When I took Sam’s Candlefish out on the waters of South Puget Sound on a sunny morning, it wasn’t brimming with camo and a carcass, but I wasn’t the least bit disappointed.
Sam took his inspiration for this little workboat from the pangas he admired on his frequent visits to Mexico. These remarkably seaworthy skiffs had generous freeboard to fight back the chop that came up with the afternoon winds and were narrow for greater efficiency and speed under the power of modest outboards. The Candlefish 13 is diminutive version of the panga with a length of 13′ 4″, a beam of 4′ 11″, and a bare-hull weight of 165 lbs.
All Devlin boats are built stitch-and-glue, a method Sam pioneered back in the late 1970s and ’80s. The thwarts, benches, and bulkheads reinforce the hull and leave the interior free of structural clutter. There’s no shortage of firm unobstructed footing. The cockpit sole is fairly flat, so to keep any water that gathers there from splashing underfoot it’s covered with removable honeycomb rubber mats.
all photographs by the author
The large compartment amidships keeps the cargo clear of the cockpit and its weight positioned for proper trim.
There is a watertight compartment just forward of amidships. Inside there’s room for tackle boxes, a two-piece boathook, a pair of aluminum breakdown oars, and a 6.5-gallon fuel tank. The tank puts the weight of the fuel, about 40 lbs when full, nearly amidships to help keep the boat in trim. The latch that levers the large gasketed hatch cover down tight and has a hole for a padlock to secure the compartment’s contents.
The cockpit is easy to sluice down with a hose. The forward footwell drains aft through an enclosed tube set in the amidships cargo compartment and into the cockpit and then out through two drains in the transom.
The forepeak has an open compartment for more gear and a deck recessed below the sheer and the bulkhead. Scuppers in the corners drain water overboard, so a muddy anchor, chain, and rode can be deposited there and sluiced down with a bucket of water without making a mess of the cockpit.
Spray-on truck-bed liner provides a thick, tough coating with a bit of texture for a non-slip finish.
The center compartment and side benches offer plenty of comfortable seating for the crew whether they’re enjoying the view or gnawing on fresh moose meat. A stout, bright-finished thwart puts the helmsman within easy reach of the outboard tiller, and its slick finish makes it an easy slide side-to-side to adjust trim or switch hands on the tiller. Ample transom knees provide a sturdy base for downriggers.
The bottom has a keel running aft from the stem and ending about a foot shy of the transom. At the aft half of the hull there are bilge keels at the sides, protected, like the keel, by stainless-steel half ovals. Two wedges, each about 10″ wide, serve as fixed trim tabs and keep the boat from hobbyhorsing with a light load aboard.
Sam uses spray-on truck bed liner for interior finish of many of his open boats. It looks good, is tough as nails, and provides good traction without wearing through your britches or elbows. He has used it on the exterior of this particular Candlefish too, an experiment that has been running for three years now. The texture likely adds some drag that knocks a bit off top end speed, but Sam hasn’t found that perceptible enough to change the finish to something smoother. I found very few signs of wear in the finish, even on the bottom. There was a scuff forward, a few small nicks on the corner at the bottom of the transom, but nothing that had come close to penetrating through to bare wood.
A deep gouge might be the only thing to convince someone that the boat is made out of wood. Sam is passionate about wood—“It’s God’s way of keeping me working every day”—but he’s practical about it. In a workboat it’s primarily a structural material, and he’s going to protect it with a durable, low-maintenance finish. I don’t punish my boats with hard use, so I’d opt for a slick exterior. Sam does flawless work with smooth, glossy, Awlgrip finishes, and I’ve often had to restrain myself from offering the dubious compliment of comparing it to production fiberglass and gelcoat. If you build your own Candlefish, you’d be at liberty to gussy it up with more brightwork, but the boat has an appeal that’s more than skin deep. Sam has an artist’s sensibility (his watercolor paintings can attest to that), and he designs boats with the form as the eye candy.
While the original design had to meet the customer’s request for a cartoppable boat, Sam has never been a fan of cartopping: “It’s hard on the boat, hard on the operator, and a miserable way to go.” I’d agree. My 85-lb decked tandem canoe is at the limit of what I can manage to get on and off my roof racks by myself. A trailer is a better way to transport the Candlefish with a great savings in time every time you launch: Your gear can stay aboard and the outboard can remain attached.
Sam’s Candlefish, the one you see here, serves as a utility skiff for his 37′ converted salmon troller JOSEPHINE. The skiff’s padded gunwale guard protects the mother ship when coming alongside, and its narrow bottom and bow eye, placed well down on the stem, contribute to its good manners under tow. When Sam and his wife are cruising Alaskan waters and JOSEPHINE’s at anchor, often in the company of two other couples aboard their own motor cruisers, he uses the Candlefish to shuttle gear and people: “I can carry all six of us and the dog in a hot minute.”
With the Candlefish’s 20-hp outboard at full throttle, Sam Devlin skims smoothly along at over 20 knots.
With a 20-hp Yamaha four-stroke outboard powering the Candlefish, she gets up and a plane with one person aboard in about 4.5 seconds and then with the throttle wide open flies along at 20½ knots. With two of us aboard, the Candlefish 13 topped out at just over 17 knots. She tracks well at all speeds and banks quickly and powerfully into turns: I quickly learned to use a soft touch on the tiller. A slight angling of the tiller sets the inside chine down, and the Candlefish carves smartly around.
The Candlefish maintains a level trim and good visibility at low speeds thanks to the centrally located cargo compartment and the fixed thwart that keeps the helmsman well forward of the tiller. The bow rises only briefly as she climbs up on a plane, and the skiff levels right out again.
Empty, the Candlefish 13 draws just 4 ½”. Throw in half ton of cargo and crew and it will draw about 9,” leaving plenty of freeboard.
The bottom is 36″ wide at the transom and not much wider amidships, so with just me and a light load of essential cargo in the center compartment, the Candlefish is a bit tender but she has plenty of flare and stiffens up as she heels. Settled deeper in the water with a heavier load, that moose for instance, she’d care much less where I planted myself.
Sam offers plans and patterns on paper and in digital format. He estimates the cost of materials for a do-it-yourselfer at around $850 and the time to build at 200 to 250 hours. Kits and finished boats are produced by Devlin Designing Boatbuilders upon request. They’ll use British Standard 1088 Marine Grade Plywood, 9mm (3⁄8″) for the hull and 18mm (3⁄8″) for the bulkheads. The exterior is sheathed with Dynel fabric and epoxy. The lumber that goes into the gunwales, seat edges, keels, breasthook and knees is either Port Orford cedar purpleheart or Honduras mahogany (plantation grown in Fiji).
The Candlefish 13 is a trim little skiff that packs a lot of potential into her short length. Lively running light and with the load-carrying capacity of a half-ton pickup truck, she’d be no stranger to work or play.
Christopher Cunningham is the editor of Small Boats.
For 15 years the Everglades Challenge has pitted paddlers, rowers, and sailors against a variety of sea conditions on a 300-mile journey from Tampa Bay to Key Largo. The rules of the race require that every vessel be launched by hand from the beach. The 2015 EC brought some approximately 107 canoes, kayaks and small sailboats of every description to the starting line at Fort DeSoto Park near Tampa Bay, Florida. It would be my fifth Everglades Challenge and my first with Wally Werderich, a 42-year-old Chicagoan with a respectable ultra-distance racing résumé.
My first EC, in 2003, was a trial by fire. In that five-day journey my partner and I battled through navigational errors, leaking spray skirts, headwinds, waves, sleep deprivation, and hallucinations. In 2006 I teamed up with veteran WaterTriber Marty Sullivan and we picked a plywood triple kayak to race in. We spent two months building the kayak and one month training in it. The race went perfectly, and Marty and I finished in a time of three days and six hours, a Class 1 (Expedition canoes and kayaks) record that has yet to be broken. In 2009 and 2013 I raced with other partners in the triple, CONDOR by name, and again finished first in the division.
On Friday, March 6, Wally and I spent the morning at my house in Orlando making some modifications to his kayak seat and trying to fit all of our gear in my car. We loaded CONDOR, picked up my girlfriend Stacey, our shore contact, and arrived at Fort Desoto Park just in time for the mid-afternoon roll-call of racers. We all go by aliases. Back in 2001, when I needed to pick my WaterTribe name, my young daughter was a fan of Buffy the Vampire Slayer so I came up with RiverSlayer. Wally chose Los Humungos.
During the pre-race meeting, WaterTribe Chief, Steve Isaac, went over the protocols. The EC requires more safety gear than any other organization I’ve raced with. For electronics alone, Tribers have to have a GPS, EPIRB, SPOT satellite messenger, cell phone, and VHF radio.
Stacey Roberts
Over 100 kayaks, canoes, and sailboats lined up on the beach for the 2015 Everglades Challenge. The Sunshine Skyway Bridge in the distance spans the entrance to Tampa Bay.
Over 100 kayaks, canoes, and sailboats lined up on the beach for Everglades Challenge. The Sunshine Skyway Bridge in the distance spans the entrance to Tampa Bay.
Following the meeting Wally and I transported CONDOR to the starting line. The full length of the beach was filled by boats, more than half of them sailboats. The forecast was for 15–20-mph winds out of the northeast. Back at the hotel Wally and I put bananas, cookies, beef jerky, Snickers, protein bars, Cheez-its, fruit cups, and PB&J sandwiches in ziplock bags—small amounts that we could eat throughout the race. Around 10 p.m. we had finished and headed for bed.
The hotel alarm clock went off at 5 a.m. and we quickly mixed up our powder drinks and took our remaining gear to the Jeep. After a quick stop for breakfast, we headed for Fort Desoto. It was still dark when we arrived, but the beach was awash with headlamp-wearing racers making final preparations.
Stacey Roberts
In the predawn light before the start at Fort Desoto Beach, Wally and Rod pack CONDOR with supplies and gear.
In the last hour Wally and I were able to fit all of our needed gear into CONDOR and Wally, donning a mask, cape, and tights like a Mexican Luchador wrestler, transformed himself into the great Los Humungos. I am all for having fun at the start; the suffering will come later.
At 7 a.m. there was no horn or gun signaling the start. Everyone just started pushing and pulling our boats to the water. The tide was low, and we had to haul across a sandbar offshore. With Wally seated forward and me aft, we were soon in deeper water and paddling away. Despite being in a kayak, Wally and I were both using lightweight canoe paddles—they’re less fatiguing than kayak paddles. I put the rudder down so Wally could steer, but in the rush to get under way, his seat had slid back and he couldn’t reach the rudder pedals. As a canoeist I don’t trust rudders: many kayakers get knocked out of races with various rudder malfunctions. I have plenty of experience steering CONDOR without a rudder, and we continued without any problems.
We expected rough conditions at the entrance to Tampa Bay, and about 2 miles into the challenge the wind and waves picked up. Soon we were surfing on 3–4′ waves. I was sure some of the less experienced Tribers would be having problems.
Stacey Roberts
The race was still on as CONDOR passed under the bridge to Santa Maria Island.
Soon we were in much calmer waters and going under a bridge linking the mainland to Anna Maria Island. As we approached a second bridge I spotted Stacey, right where she’d always been on previous races, calling out to wish us luck. I told her we would call her from Checkpoint 1 at Cape Haze Marina, and we continued southward.
Tom Ray
With the wind blowing out of the east, the sheetless two-meter sail provided little help. For Wally, still sporting his Los Humungos attire, and Rod lightweight canoe paddles are the best choice for the long haul in the kayak.
About 15 minutes later a sheriff’s boat sped past us heading north toward the channel. Five minutes later a Coast Guard boat followed. Some of the Tribers must have been having a rough go of it, but Wally and I were making good progress; trailing a couple of the leading kayaks, but I expected them to slow down after the first day and then we could reel them in.
We were going under a bridge near Sarasota Bay when another racer’s shore contact standing above us called out that the Coast Guard had declared a weather hold and we were supposed to head to shore. Wally got Stacey on his cell phone; she told him there were multiple rescues in the shipping channel and the Coast Guard had ordered all racers to shore. This seemed rather ludicrous since we were surrounded by pleasure boaters and recreational kayakers enjoying a calm sunny day on the water. None of the lead kayaks had stopped, so we told Stacey that we’d continue to Checkpoint 1 and call her in a few hours.
We passed a few other WaterTribers. Some knew nothing of the Coast Guard order and others had new tidbits of information. Several hours later Stacey gave us the bad news: After rescuing a dozen WaterTribers in distress, the Coast Guard canceled the race and requested that racers proceed to Cape Haze Marina and make arrangements to be picked up. I told Stacey we would camp there before deciding what to do. I felt bad for Wally. He’d paid the entry fee, took time off from work, and traveled to Florida, only to have the race canceled.
Wally Werderich
Bill Whale, Tribe name “Whale,” with a reef zipped in his sail and paddle in hand makes tracks in his outrigger-equipped decked sailing canoe.
We pulled into Cape Haze Marina about 8:30 p.m. After changing into some dry clothes, I spotted Bill Whale (tribe name, appropriately, Whale). He had just arrived in his sailing canoe and had met up with Bob, a friend who lived nearby. Bob drove us to a restaurant and over dinner Bill, Wally, and I decided to continue to Key Largo. Bill was planning to take the Wilderness Waterway through the Everglades. It adds about 30 miles to the trip, but winds through some spectacular scenery. This was my first chance to paddle through the entire waterway.
Bob dropped us off at the marina with directions to his house, 2 miles south along the canal. Thirty minutes later we spotted him by his dock. I would have been happy to camp in his backyard, but Bob had several guest bedrooms available. After a shower I quickly fell asleep in a comfortable bed.
We were up at 6 a.m. Bob advised us that the winds would be gusting from the east and suggested that we paddle out into the Gulf through Gasparilla Pass to avoid the wind and waves of Charlotte Harbor. We took his advice and headed into the Gulf of Mexico before turning south. The tree-lined shore blocked most of the wind, and we had good paddling conditions. As we passed North Captiva Island, Bill was under full sail and Wally and I had to paddle hard to stay with him.
Wally Werderich
Many stretches of water between the mainland and barrier islands were busy with boat traffic and offered no places to camp.
We turned east on a small channel leading to Sanibel Island. The inside route was crowded with motorboats, and we had to stop abruptly to keep from being run over by two speeding jet boats going at least 50 mph. We crossed paths with several Tribers in sailboats tacking back and forth as they neared the Sanibel Island bridge. One told us to watch out for the law: It seems another WaterTribe sailboat was stopped for “excessive tacking” by a police patrol boat and told to turn around.
Wally and I crossed under the Sanibel causeway while Bill went west to find higher clearance for his mast. We caught up with each other south of Sanibel Island. The sun was setting as we paddled by Estero Island. Bill suggested that we stealth-camp on Lovers Key, and two hours later we pulled our boats up there on a beautiful white sand beach. Lovers Key is a state park for day use only, but it’s the only undeveloped land in the area. As we set up our tents I noticed ATV tracks and hoped park rangers did not make nighttime inspections of the island. We were soon all inside our tents and asleep. We hadn’t been racing, but paddling 50 miles in a day is still tiring.
We were up and paddling by 6 a.m. Bill took advantage of the east wind and gradually sailed ahead of us. Wally and I paddled hard for about three hours and covered over 15 miles. We caught up with Bill as we approached Gordons Pass south of Naples. He suggested that we take a break at the park inside the pass. There was a lot of boat traffic, and a big catamaran sailboat suddenly turned in our direction. Wally and I sprinted out of the way; Bill had to turn around to keep from getting hit. When we finally made it to the park, Bill was still steamed about the near collision. We were all ready for the peace and tranquility of the Everglades.
Wally Werderich
CONDOR awaits its crew during a restaurant stop at Marco Island.
After a 30-minute break we continued along the inside route to Marco Island and boat traffic dwindled as we paddled through Rookery Bay. By 3 p.m. we had reached Marco Island. Wally and I talked Bill into stopping at a restaurant.
An hour later we were back on the water and paddling for the little town of Goodland, the last bit of civilization before we entered the Ten Thousand Islands. Our plan was to paddle through the archipelago and turn east to find an island suitable for camping. As darkness fell we ran into several WaterTribe sailboaters who asked if they could follow us. Wally and Bill looked at the charts and decided that Gullivan Key, about 5 miles away, would be a good choice. Wally and I led the convoy, and when we arrived at Gullivan the tide was out and we could not get close to the beach. We tried White Horse Key 30 minutes farther on and found ourselves in the same situation. Bill, Wally, and I were pretty tired and decided to drag our boats through the 2″ water to get to the beach. We tied the boats up on the beach and quickly set up our tents above the high-tide mark. About 1 a.m. I woke to waves crashing on the beach. I could see our boats in the moonlight; they were still tied up, but I wondered how high the tide would get.
None of us had slept well with the waves so close, but the good news was that we had plenty of water to launch off the beach. Today’s goal was Chokoloskee, the gateway to the Everglades. We cut through the Ten Thousand Islands and at 1:30 p.m. pulled into the ranger station on the north side of Chokoloskee Bay.
It was the hottest day so far, and we quickly headed for the store for some cold drinks, then to the ranger’s office for camping permits. Our first camp was 20 miles away and the next 36 miles after that. The ranger checking us in questioned us our ambitious plans—most paddlers in the Everglades travel no more than 10 miles a day—when another ranger recognized us as WaterTribers and said, “These guys know what they’re doing.”
Chokoloskee Island was 3 miles away. The Havana Café there, known for great Cuban sandwiches, would close at 3 p.m. and it was now about 2. Wally and I went into race mode. The tide was up so we paddled straight across the bay and we arrived in plenty of time. We ordered sandwiches for ourselves and one for Bill. There were a half dozen other WaterTribers on the island, and with strong winds forecast for the next few days, most were ending their trip. I thought we’d be able to make it to Key Largo. We’d camp two nights in the Everglades, arrive in Flamingo on Thursday afternoon, make an early crossing of Florida Bay on Friday, and reach Key Largo that evening.
Wally Werderich
There is a reason that the WaterTribe awards a gator tooth to racers who traverse entire Everglades Wilderness Waterway.
Bill, Wally, and I filled all of our water jugs for the Wilderness Waterway trip. I noticed that the tap water had a brownish tint and decided to buy a gallon jug of distilled water in the convenience store. I knew the owner of the store from previous races and asked him about the “brown” water. He said it was fine but that he would call his cousin, the Mayor of Chokoloskee to check on it. It pays to have access to the Choko power structure.
We left Chokoloskee about 5 p.m. and paddled into the Everglades. The Wilderness Waterway was marked by numbered poles and had park service campsites along the route. Shortly after nightfall, about 20 miles from Chokoloskee, we stopped on Possum Key at the camp known as Darwin’s Place. Arthur Leslie Darwin, the “Hermit of Possum Key,” moved here in 1945, built a one-room cinder-block house, raised rabbits, and cultivated bananas on 10 acres of land. He cooked using a gas stove and collected rainwater in a cistern. In 1957 Possum Key became part of the Everglades National Park, but Darwin was allowed to stay. He passed away in 1977 at the age of 112.
Wally Werderich
A pair of osprey keep watch over the Everglades woods.
The mosquitoes were in full attack mode, so we quickly set up our tents. As I drifted off to sleep with their constant humming outside my tent, I wondered how Darwin survived here.
We were in our boats by 7 a.m. and paddled through miles of bays and connecting rivers with the whole unspoiled area to ourselves. Green mangrove islands were all around us and egrets, herons, ibises, and osprey were everywhere. I noticed the distinctive boils that manatees make in the water. When one erupted near us, splashing CONDOR, Wally let out a squeal. After that we often joked about the “killer” manatees.
Wally Werderich
Soon after Bill, Rod, and Wally arrived at the Harney River Chickee, darkness fell and the bugs descended upon them.
Just before dark we reached the Harney River chickee, one of several freestanding wooden platforms in the Everglades that provide toilet facilities and tent sites. Bill heated up some water for our freeze-dried meals. We hoped that away from land the bugs would not bother us. But as darkness fell over us so did the no-see-ums, and I abandoned my wish to sleep under the open sky without a tent.
Wally Werderich
Bil Whale, with his mast down and outriggers stowed, leads the way through a passage choked with mangroves.
At daybreak we paddled the Harney River toward Oyster Bay. WaterTribers often struggle getting through narrow waterways here—The Nightmare and Broad Creek—but we hit the creeks at high tide and in the daylight and could pick our way through and around the overgrown foliage. At night and with mosquitoes buzzing, it would have been a lot tougher.
To reach Flamingo we had a lot of open bays to cross. The wind was howling out of the east, and Wally and I paddled hard across each windy and wavy bay, then waited for Bill to catch up before repeating the process. About 2 p.m. we arrived at the canal to Coot Bay. We were about 8 miles from Flamingo. The convenience store there would close at 5:30 p.m. When Bill caught up, we told him we would paddle ahead to get sandwiches and cold drinks. Wally and I again went into race mode. We worked hard paddling across Coot Bay in the wind and 2′ waves. Finally sheltered in Buttonwood Creek, we kept up a good pace over the last 5 miles to Flamingo. We made it to the store a few minutes before 5 p.m. I drank about a quart of cold chocolate milk over the next half hour. Bill came in about 40 minutes behind us, and we had cold drinks and a sandwich waiting for him.
Our plan was to leave Flamingo at about 5 a.m. for the 33-mile crossing of Florida Bay. The wind on the bay was currently out of the east at 15 to 20 knots; Friday’s forecast was for 20 to 25 knots. We needed to leave now. Bill was having some issues with his hands and decided to end his trip at Flamingo.
Shortly after 8 p.m., Wally and I said goodbye to Bill and headed east. We were leaving on a high tide and could cut across the open water and save some time. Much of the first half of Florida Bay is across shallow water, and you must follow the route marked by the occasional marker pole or you’ll run aground. Wally was closely watching his GPS route and giving me constant steering directions. We crossed through the Dump Keys and then made it through the passage that crosses the sandbar known as the Crocodile Dragover. As we entered deeper water, the waves increased to 2 to 3 feet under a forceful wind. Our progress was agonizingly slow. Wally and I had to paddle our hardest just to make 2 miles per hour. Every few hours we would take a brief break in the lee of an island.
About 4 a.m. Wally and I could see the lights of Key Largo, but I desperately needed caffeine to keep me awake. Wally split an energy shot with me and that was enough to make it to daylight. We aimed for the cell-phone tower at the Bay Cove Motel that marks what would have been the finish line for the Everglades Challenge. At 8:30 a.m. two tired paddlers made it to Key Largo. Even though the EC had been canceled and every racer who started would be officially listed as DNF—Did Not Finish— Wally and I did what we set out to do: We finished.
Rod Price is an Orlando-based ultra-distance paddling racer. In 2009 he and partner Ardie Olson won the canoe division of world’s longest canoe race—the Yukon 1000. He is the only racer to have completed North America’s six longest paddling competitions including: the Ultimate Florida Challenge (1200 miles), the Yukon River Quest (444 miles), the Missouri River 340, the Everglades Challenge (300 miles) and the Texas Water Safari (260 miles). At the age of 55, he continues to race. He is the author of Racing to the Yukon and Racing Around Florida, both available on his website.
The Chesapeake Triple
In 2005, Chesapeake Light Craft was looking for a team to race one of their boats in the 2006 Everglades Challenge (EC). Marty Sullivan and I were selected and given the option of picking any of the CLC boats to compete in. Since we were both paddlers, we opted for the Chesapeake Triple, a 21’ by 30” kayak.
Early in November of 2005, Marty and I received our kit, a box of panels precision cut by a CNC (computer numerical control) router from okoume (plantation-grown) marine-grade plywood. This was my first boatbuilding project and we worked on the boat steadily for two months in Marty’s garage. With detailed step-by-step instructions accompanied by a video, the kayak took shape quickly. The stitch-and-glue construction with epoxy and fiberglass produced a strong and light structure. After lots of sanding, epoxy-work and varnishing, CONDOR was ready for the water. We launched it January 2006 on Lake Virginia in central Florida. We had two months for training with CONDOR before the EC.
The Chesapeake Triple kayak provides a great mix of speed and stability. For the multi-day Everglades Challenge races, the middle cockpit is ideal for storing gear. The triple is so stable that I have built my seat up six inches to put me in the best position for using my preferred canoe paddle when racing. Since building CONDOR in 2005 I have paddled thousands of miles in rivers, lakes, bays and oceans. I have used the kayak in two 3-day Florida adventure races, four 300-mile Everglades Challenges, one 90-mile North Carolina Challenge and one 64-mile Okumefest Challenge on the Chesapeake Bay. —RP
If you have an interesting story to tell about your travels in a small wooden boat, please email us a brief outline and a few photos.
The varnish is wiped on in “panels.” Here Don is applying varnish to planks bordered by the thwart frame, transom, and stern seat compartment.
I had just finished again sanding out the wiggly, wavy, saggy results of my latest brushed varnish attempt on my wherry interior. I’d bought yet another quart of expensive marine spar varnish and was discouraged that I could expect most of it to wind up in the shop vacuum.
In the dusty reaches of my memory I recalled an article by a furniture maker describing his efficient wipe-on varnishing technique. Not having that magazine readily at hand, I used this new-fangled thing called the Internet and found a posting about using a pad-wiping technique with thinned varnish. I did a cursory scan of the instructions, tried my hand at it, and much to my surprise, it worked!
It wasn’t perfect but a major improvement over my brushed attempts. I’ve since refined the method to better apply it to the odd shapes of a boat, and present it here for others to experiment with and further refine. This treatise is for building up final smooth coats over epoxy or base coats of varnish. There are faster ways to build base coats that will fill wood grain.
Gather Your Materials
• Marine spar varnish (I use Interlux Schooner.)
• Brushing thinner (Interlux 333 thinner or this close approximation of it: 25% naphtha and 75% kerosene)
• Small foam brushes
• Paper towels (untextured or blue shop towels from hardware or auto parts stores)
• Cotton T-shirt material (don’t use the kind with ribbed texture.)
• Paper or plastic bowls (that are compatible with thinner)
• Disposable plastic mixing containers with graduation marks
• Stirring sticks
• Fine 3M Scotch-Brite finishing pads (#7445, white in color)
• Tack cloth
• Paint filter funnels
• Disposable gloves
The Process
Sand your base (epoxy or varnish) with at least 220-grit sandpaper—320 is less likely to cut through base coats. Wipe the dust away with a rag wet with thinner. Pour some varnish through a screened funnel into a mixing container, note or mark the volume, and add brushing thinner to double the volume for a 50/50 mix.
SBM
On his worktable Don has thinners, disposable gloves, blue paper shop towels, squares of cotton cloth, paper bowls, and varnish.
Crumple a couple of paper towels, and smooth a third over one side of the wad. Place the smooth side of the wad on a roughly 10″ square of T-shirt cotton and gather the edges around the wad to create a handle. Smooth out wrinkles on the working face. Make two of these pads.
Set out three bowls. Pour a bit of thinned varnish into a “do” bowl and straight thinner into an “undo” bowl. A depth of ¼″ to 3/8″ is plenty. Leave the third bowl empty.
Wipe down several square feet of the area to be varnished with the tack cloth. Place one of the T-shirt pads into the “do” bowl and let it soak up a supply of thinned varnish. Press the pad into the empty bowl to squeeze out excess. The face of the pad should have an even, wet look without drips or thick glossy areas.
Start at one end of a “panel”—a thwart, plank, whatever that is bordered by edges of some kind—and wipe smoothly in a straight line along the grain, leaving behind a thin but glossy film of varnish. Avoid lifting the pad from the surface by making turns at the ends of short strokes. For long areas, strokes all go the same direction.
Overlap the strokes slightly for a consistent wet edge. As the varnish load is depleted, usually within a few strokes, reload and press out the excess as before.
SBM
While applying varnish to the panel over the forward compartment, Don missed a dime-sized patch of sanded varnish. Rather than go back over the area on this pass, he’d get it covered with the next coat.
Holidays? Not to worry, you’ll get them in subsequent coats. DO NOT, under penalty of endless frustration, go back into wet areas to correct them.
Before the varnish in the panel has time to begin flashing off its solvent, use a nearly dry foam brush to tip out the irregularities that occur at the ends of strokes or where you come up against obstructions. Start at the obstruction and very lightly tip back into the smooth area, lifting the brush off the surface as you go. You can also correct still-wet drips or sags with the foam brush. Use a wetter foam brush to get into corners or other areas the pad can’t reach, then blend back into pad-applied areas with the drier brush.
If the foam brush fails to fix errors of excess varnish while things are still wet, grab your undo pad, dip it into the thinner bowl, press it moist, and wipe down the whole panel. Recoat immediately.
Continue with adjacent panels. The goal is to keep a wet edge. The undo pad can refresh a wet edge that is at a panel perimeter such as a plank lap.
With masking tape protecting the painted hull, Don can move with the speed necessary to wipe on the thinned varnish.
When you’ve finished with the first coat, allow it to dry to the point the surface of the earliest coated area does not feel sticky to touch. That may be only an additional half hour or so depending on how long the whole job has taken. You may notice streaks or areas that are not as glossy. Don’t fret; these tend to decrease with subsequent coats. Some folks have seen a reduction in streaks by increasing the varnish in the thinned ratio.
Use a light touch with a 3M white scrubber to dislodge bugs and lint nits. If the scrubber drags, the varnish isn’t quite dry enough. Wipe with a tack rag in preparation for the next coat.
Make up a new varnish pad and repeat as above. You should be able to get at least three coats on in a day, roughly the same as one coat of brushed varnish. The next day you can continue without sanding unless there are drips, runs, or errors you want to correct. Eight to a dozen coats over two to three days will build up a nice depth of finish. Overall, wiped-on varnish will achieve good results with much less sanding labor. It takes practice and even though I don’t get perfect results, the boat will look pretty nice when I step back from my work. An annual light wet-sanding with 320-grit and three or so coats of wiping varnish should get you through a season depending on local conditions. Wiping-on varnish also works well for scratch repairs.
Don Aupperle apparently inherited his fascination with boats from his father, and has cobbled together many, beginning with an Eastern Idaho canal sailing raft made of borrowed fence posts and advancing through wood-and-canvas kayaks to several plywood sailboats, graduating only recently to current stitch-and-glue technology. A Seattle resident, his day job is product design. Or is really it maintaining his 39′ cruising sailboat?
More Varnishing Techniques
Whether you’re just getting started in the world of varnishing your boat, or need some tips on repairing and maintaining your finish, our thorough guides have everything you need. Click the links for each article to learn more.
I used Don’s method to apply new varnish to the exterior of a lapstrake Whitehall I built in 1983. The boat had been well cared for, but it was showing signs of age. The existing varnish was in good shape and I chose not to go to bare wood to smooth the surfaces. I used odorless mineral spirits for a solvent—it was what I had on hand—and started out with a 50/50 mix with West Marine Admiral’s varnish. Wiping varnish on was much faster than brushing, and the thinned varnish as it came from the pad was much less likely to sag or drip than straight brushed-on varnish. I had recently refinished a dory with brushed varnish and the fresh coat would often look fine before I left it to dry, but an hour later sags appeared. The wiping varnish goes on much thinner and dries much faster, so sags were an infrequent occurrence. It also greatly reduced the time during which dust and bugs could get caught on the surface. When I did get sags, they’d be dry and sandable the next day. Sags of brushed-on varnish never seemed to cure; they could stay gummy for days if not weeks. I applied three coats of wiping varnish per day for three days. I was getting matte streaks and increased the amount of varnish in the mix. That and better lighting greatly reduced the problem. I was pleased with the results, easily the best varnish job I’ve ever done.
You can share your tricks of the trade with other Small Boats Monthly readers by sending us an email.
The Premium RailLight comes with a variety of attachment options.
RailLights may look like the post lights sometimes used to illuminate garden paths, but these solar-powered LED lights are designed for boating. They can provide for general illumination in a cockpit tent, cabin, or shore-side camp, and can, for some boats, serve as all-around white lights for navigation.*
SBM
A piece of oak with a large tapered hole for the mast and a 1″ hole for the Premium RailLight serves as a way to use it as an all-around light.
Constructed of marine-grade stainless steel, the lights are topped with a solar panel and light sensor epoxied in place. A small switch protected by a waterproof rubber boot, is tucked beneath, allowing the user to turn the lights on and off manually or to choose an automatic setting that activates them in the dark and shuts them off when daylight arrives. The units run on rechargeable batteries that, according to the manufacturer, will last for three to four hundred charges and up to three years. I appreciate that the RailLights are designed for batteries to be replaceable by the user, a feature significantly extending the potential life of the product.
SBM
The Mini RailLight has hardware for attaching it to a stanchion or rail. The wooden base is homemade.
I tested both models: the 14″ tall RailLight Premium, with four LEDs, and the 11″ tall RailLight Mini, with two LEDs. The Premium has a more pronounced glow than the Mini but both were easily visible from about 2,000′ away, even in the perpetual twilight of an urban environment. The Mini with its smooth frosted surface and uniform light is better suited for task lighting. The Premium’s ribbed globe produced a dappled light, making it better for general area illumination. Neither was so bright that they significantly diminished my night vision.
The lights are water resistant, and after being subjected to several showers, there was no change in their performance. They charge up in daylight, even under cloudy conditions. In direct sunlight a two-hour charge , the best opportunity I could get this time of year, produced about one hour of light. Charging during partly cloudy days in late March produced 4 to 6 hours of light. The manufacturer notes both lights can produce “up to 8 hours of light on a full charge.” On the summer solstice here in Portland, Oregon, 8 hours and 20 minutes separate sunset from sunrise, so the RailLights may not be able to fill in as anchor lights. The Premium flashes as an alert when it is low on power. Given the simple, sturdy construction and basic solar technology, the potential for problems with these lights seems low.
SBM
Simple homemade wooden bases adapt the RailLights to tabletop or thwart-top use.
Each Raillight comes with mounting gear that can either clamp to a rail or be screwed into a flat surface. For small boats, a homemade mounting system will probably be most effective.
No matter how many batteries I have tucked away, I always worry that I’ll run out and regret how many have to go into the trash when they run through their charge. If you’re a worrywart like me, a RailLight in your quiver will allow you to focus on your adventure, not your gear.
Bruce Bateau sails and rows traditional boats with a modern twist in Portland, Oregon. His stories and adventures can be found at his web site, Terrapin Tales.
The RailLight Mini retails for $29.99 and the Premium for $39.99. Both are available from numerous retailers and direct from Davis Instruments.
Is there a product that might be useful for boatbuilding, cruising or shore-side camping that you’d like us to review? Please email your suggestions.
A fire with flames rising through the coil will heat water more effectively than a bed of coals.
This ShowerCoil system is fantastic! With a fully stoked fire and a bit of practice, I could heat 4 gallons of water in just over 11 minutes and take a pleasant, warm, and long-lasting shower.
The heart of the system is an aluminum-alloy coil that heats water as it flows through the coil from an elevated bag supplying cold water. Water drains from the bag through heat-resistant silicone tubing, and a hollow braided-wire sheath protects the tubing where it joins the coil and the heat of the fire is most intense.
SBM
The heart of the thermostat is a bimetallic coil that operates a valve gate.
The hot-water tube filling the lower water bag has a small thermostat that regulates the temperature of the water by adjusting its rate of flow into one of the water bags.
SBM
The supply bag needs to be elevated about 3’ to provide the coil and thermostat with an adequate flow of water. Here it is suspended from a tripod of oars.
The two 15-liter (4-gallon) roll-top water bags are quite durable and versatile: their clear fronts and black backs make them well suited for solar-heating water; interchangeable fittings allow them to be used as general-purpose water bags; sealable roll-down tops with buckles allow them to serve as dry bags; and when equipped with the valves on the short hoses, they work as compression bags for packing bulky soft goods.
SBM
When the ShowerCoil is used with a camp stove the sheathing over the tubes needs to be supported. The supplied Y-stand (lower right) was too short for this stove, so a twig filled in for it.
A fully stoked campfire with flames rising through the coil is required to get water nice and hot. My first fire was mostly coals, which produced just a lukewarm shower. You can also use a camp stove to heat the coil: A steel heat deflector distributes the flame around the coil, and a prop supports the sheath over the tubing. My stove heated the water in just under 10 minutes. In camps where I could make a fire, I’d prefer to do the heating with wood and save on stove fuel.
Spring Courtright
The water bags also serve as drybags and solar water heaters.
A full water bag weighs about 36 lbs, challenging for me to manage and too heavy for me to hang up high on a tree branch. The instruction manual that comes with the kit has directions for easily lifting a full bag of heated water using ropes and carabiners, but I just used the bag half to three-quarters full.
Spring Courtright
A ratcheted clamp on the silicone tubing regulates the flow to the shower head.
One of the nicest features is the pinch valve on the shower-head hose which adjusts the levels of flow so the shower can be a luxurious rush of warm water or a prolonged sprinkling. With the valve wide open for wetting down, closed for soaping up, and opened again for rinsing, I had plenty of warm water to bathe and wash and rinse my long hair. The long hose on the showerhead makes it easy to direct the spray where it’s needed and make the best use of the water.
A hot shower is something that’s easy to take for granted at home, but it’s a great luxury in the wilderness. The ShowerCoil is a truly great outdoor shower setup.
Spring Courtright has been sea kayaking for over 15 years, leading and assisting day trips and multi-day trips in Washington and British Columbia. She has taught sea kayaking, stand-up paddleboarding, canoeing, backpacking, through the Olympic Outdoor Center, Outward Bound, Naturalists at Large, YMCA Earth Service Corps and Colorado Mountain College.
The ShowerCoil system is available from BoundaryTEC for $99.95.
Editor’s note:
I gathered some data on my own trials with the ShowerCoil. In an ambient temperature of 61°F a small fire of woodshop scraps burning under the ShowerCoil heated a full bag of water from 58° to 100° in 12 mintues with the thermostat set one click down from high. I switched bags and ran the heated water through again with the thermostat set on high. That brought it up to 120°. Hot! I added some cold water to the bag and brought the temperature down to a good level for bathing, around 105° to 110°. The full bag of heated water provided a 5 ½ minute shower with the valve wide open.
I also used the ShowerCoil with a single-burner propane cannister stove rated at 10,000 BTU. The stove didn’t provide as much heat as the wood fire and the rate of flow was much slower: After 12 mintues the lower bag was half full of water at 98°. I was impressed that the thermostat was doing its job well, dramatically reducing the rate of flow to suit the cooler fire. The heat transfer of the coil may have been made less effective by the layer of creoste that had built up after several wood-fire trials. Water flowing through the coil keeps its surface relatively cool resulting in the tarry buildup. Removing the creosote with oven cleaner, as recommended in the instructions, would improve heat transfer. To retain heat in the hot water bag I put a piece of foam padding under it to insulate it from the ground. It would be a good idea to insulate the bag further by putting a coat or a blanket over it.
I set one half-full bag, clear side up, out in the sun. In 2 ¼ hours it warmed 58° water up to 82°, not bad considering the low angle of the March sun over just the last half of the afternoon.
Is there a product that might be useful for boatbuilding, cruising or shore-side camping that you’d like us to review? Please email your suggestions.
With winds gusting above 25 knots on the Willamette River, three school staffers pushed the boat hard. The cockpit-controlled adjustable jackstay proved handy.
Wind & Oar Boat School is a Portland, Oregon, nonprofit that teaches boatbuilding not only for its own sake, but also to give meaning to math, science, design, and practical problem solving. As part of a workplace readiness program in the summer of 2013, students were tasked with building François Vivier’s Ebihen 16. With a long bowsprit, plumb stem, and workboat carrying capacity, the Ebihen 16 has the look of traditional English Channel fishing boats of northern Brittany and Normandy.
The women in the class showed great attention to detail and were cutting terrific gains by the time they got to the sheer plank. The inner/outer stem construction avoids having to cut rabbets. The outer stem is laminated with 1/8” fir.
MA CHERIE was built for Norm Eder, a Portland resident, avid boater, and one of the school’s board members. He wanted a boat big enough to take grandchildren out sailing in comfort and yet small enough to fit in his garage. The hull measures 16′ on deck and has high topsides keep the crew dry, accommodations for an outboard motor, a steel centerboard, water ballast tanks, and built-in foam flotation. The roomy cockpit has three storage areas to keep miscellaneous gear out from underfoot. Vivier has drawn several sail plans for the Ebihen; Norm opted for the gunter sloop rig.
The top frame of the ballast tanks is being glued in either side of the centerboard trunk. Getting the tanks watertight along the outboard wall proved challenging, but thickened epoxy was a good friend. The two compartments next to the motor well will be filled with foam for flotation.
The construction was complex for such a small boat and provided lots of learning opportunities for the student builders. The plywood parts were cut on the school’s CNC machine, and each plank was cut in three pieces with puzzle joints in between and reinforced with fiberglass when assembled. Students finished planking the hull, rolled it upright, and went on to install the motorwell, flotation compartments, and ballast tanks.
The bowsprit bitt is off center so that the tip of the bowsprit ends up on center. Flotation foam fills the entire compartment forward of the bitt.
Edensaw Woods supplied Sitka spruce for the spars. One piece was 6″ x 10″ x 26′, too big to be milled at the school, so students hoisted it on their shoulders and walked it three blocks down the street to have it planed and resawn at a commercial woodworking shop. After making the spars, there was enough spruce left over to use for the decking. Strips of dark zebra wood provided contrast for the blond spruce.
Discussion about the seat layout revolved around making the center thwart removable, or installing benches in place of it. Ultimately, the students decided to go with the designed fixed center thwart, even though there was no intention of rowing the boat. Vivier shows thole pins in the design, however.
Bronze hardware and wooden blocks came from the Wooden Boat Chandlery of Port Townsend, Washington. For custom-made bronze hardware— mast partner, traveler, and both bowsprit brackets—and a galvanized steel centerboard, the school enlisted Portland’s Silver Eagle Manufacturing.
Ready for sailing trials, MA CHERIE shows off her custom-made bronze hardware. Note that the shrouds for these early trials are made taut with tension knots.
Launched on the Willamette River, MA CHERIE carried five adults and performed well. A 6-hp Suzuki outboard provides auxiliary power. Three Wind & Oar staffers conducted sea trials in November with winds blowing over 25 knots, and even in rough water MA CHERIE was solid, comfortable, and dry under all points of sail. Even with the ballast tanks empty, the leeward rail stayed reassuringly high above the water. Half filling the ballast tanks put the boat on even more solid footing.
During sea trials in strong wind, the bowsprit bowed under the strain, an issue later fixed by adding whisker stays.
Owner Norm Eder reports that MA CHERIE is a delight to sail and easy to sail singlehanded. He can get the boat on and off the trailer by himself, and has developed his system for rigging and getting underway quickly. The Wind & Oar Boat School would build another Ebihen 16 only by special request because of the complexity of the build, but for a competent home boatbuilder, the project is certainly within reach, and the rewards on the water merit the effort.
Have you recently launched a boat? Please email us. We’d like to hear about it and share your story with other Small Boats Monthly readers.
In 1913, shortly before the start of WWI, England’s Boat Racing Association (BRA), a small club of sailing enthusiasts, called for a design to comply with the following requirements: length 12′, beam 4′8″, and a single 100-sq-ft sail with no battens; she should be a capable rowing boat as well as a good sailing craft, suitable as a tender for larger yachts. The winning design was submitted by an amateur designer named George Cockshott (1875–1952). Eight of the first BRA 12-footers, as they were then known, were built by the Shepherd’s Boat Yard in Bowness on Lake Windermere in northwest England at a cost of £25 each. Several members of the West Kirby Sailing Club near Liverpool ordered BRA 12s and with typical English humor named them after the Royal Navy battleships of the time: DREADNOUGHT, THUNDERER, BELLEROPHON, and SUPERB.
Collection of the Author
The scene of racing in the 1950s on a lake near the city of Haarlem in the Netherlands is very much the same as it is now.
The design’s popularity spread rapidly. In 1914, eight boats presented themselves at the start of a race in Karachi, then in India. Belgium and Holland adopted the BRA 12s with great enthusiasm. Development of the class in England was curtailed during the war, but in the neutral Netherlands the class flourished and toward the end of WWI there were some 140 of the little boats sailing there.
After the war, voices in England called for an “improved” BRA 12, and the well-known naval architect Morgan Giles came up with a design promised to be faster, more seaworthy, and easier to row. Belgium and the Netherlands by then had the largest fleets of BRA 12s on the water, and they fiercely opposed the adoption of a new design that would make theirs obsolete. The International Yacht Racing Union (IYRU) was called in to arbitrate the situation. While the IYRU approved of the new design, the Low Countries prevailed, and in 1919 at the IYRU meeting the original Cockshott design was officially adopted as a new International class: the International 12-Foot Dinghy.
Roger Smith
While the 12′ dinghies are built for racing under sail, they’re outfitted with oarlocks and rowing thwarts to fulfill the class requirement that “each boat shall be built, equipped and finished complete in every respect and so as to be fit for use as a useful yacht’s centerboard dinghy.”
The class is a one-design, meaning that every boat must be identical and have a valid measurement certificate. With their close tolerances, these dinghies were not meant to be built by amateurs, but over the years many have been home-built. Certification required “each boat to be carefully built in strict accordance with the drawings and this specification, and the greatest care must be taken to ensure that all boats are as nearly alike as possible in every respect. Minor deviations from standard may be permitted, at the discretion of the Council of the Association.” The class specifications list the dimensions and material of every part of the boat: the centerboard must be 1/4″ soft steel plate; the steam-bent frames would be of American elm, ½″ thick by 5/8″ wide, spaced 7″ on center; spars were to be solid spruce, although the gaff could be of bamboo; and the 12 strakes are 5/16″ clear straight-grained fir—though later oak and mahogany were allowed as well. Fastenings were screws, bolts, and clench nails and copper, brass, or yellow metal throughout. The hulls might leak when first launched for the season, but after they were fully immersed for a day or so they’d be tight and dry. These dinghies were no lightweights. The 2012 building rules for the Dutch measurement certificate stipulates that the “dry” weight of the bare hull must be a minimum of 229 lbs (104 kg). A new top-of-the-line, race-ready wooden 12-footer built in Europe today can cost as much as €25,000 (about $30,000 US). A good used one can set you back $6,000 to $14,500.
International yards such as Abeking & Rasmussen and de Vries Lentsch built many 12’ dinghies in the 1920s and ’30s, and many of these are still sailing today. The Italian Riva family, famed for their classic speedboats, are also a well-known builders of these boats. Two years ago in England, Stephen Beresford of the Good Wood Boat Company launched a new dinghy with sail number GBR 50.
David Stephenson
On Ullswater, a lake in NW England, Richard Fielden and Stephen Berrisford sail in Force-7 winds on the maiden voyage of dinghy GBR50. She’s one of the few 12-Foot dinghies with reef points.
The dinghy was adopted as the singlehanded boat for the 1920 Olympics in Antwerp. The Dutch took the gold and silver medals—a predictable result, since the only boats entered were the two Dutch ones. The 1924 Paris Olympics saw a French design as the singlehander, but in 1928 at the Amsterdam games the 12 was again chosen as the solo class. Twenty countries competed and this time the Dutch were outclassed: Sweden took the gold, Norway the silver, and Finland the bronze.
The status of the 12-footer as an International class was terminated in 1964, and its popularity declined after that. Despite that, many countries maintained active 12′-dinghy class associations, and upgraded the class rules to suit their sailors’ demands and circumstances. The conservative Dutch changed their rules to improve safety and ease of boat handling: They allowed self-bailers, boom vangs, transom drain holes, and insisted on flotation bags. In Italy, the Associazone Italiana Classe Dinghy 12′ was far more progressive, allowing aluminum masts and booms, pop-up rudders, plywood construction, and, horror of horrors, fiberglass hulls. The Netherlands, Italy and Japan are the current hotbeds for the class, and there are small fleets in Germany, Slovenia, Switzerland, Japan, Lithuania, France, and Turkey. In recent years new boats have been built in Canada, Argentina, the Far East, and the US.
Wietske van Soest
After jibing in a very strong wind, the bow can dig in but experienced sailors have no trouble maintaining control.
Sailing the 12 does not require great athletic abilities. Anyone can enjoy these boats, whether for relaxation or competition. In light weather the boat is a great singlehander; racing regulations allow a maximum crew of two. The standing lug rig requires the crew to move the yard to the leeward side of the mast with each tack. This is accomplished with tripping lines run port and starboard from the throat. The yard is slightly curved to facilitate this movement, but it still takes a bit of practice. Timing is the key: At the moment that the boat moves through the eye of the wind the yard will slide across with little effort. Sailing in a blow can be hair-raising, particularly on a run with the wind dead astern. With the mast only a few inches aft of the bow, the boat often tries to become a submarine but moving the crew well aft can allow a following wave to flood over the transom. Balance is the key and under ideal conditions one can nearly get the boat on a plane. Jibing in a stiff breeze is practically impossible, and many a racing sailor will tack through a 270-degree turn at a downwind mark. While a reef would be advisable under those conditions not all 12s have them.
Roger Smith
Five dinghies come about in the 100th anniversary race at West Kirby. The woman skippering the Dutch entry #688 is 81-year-old Tonnie Surendonk.
In 2008 an international yearly competition began, aptly named the Cockshott Trophy, and in 2009 the Cockshott family donated a silver challenge cup—first won by George Cockshott in 1902—to be awarded to the overall winner on points each year. Turkey, Italy, and the Netherlands hosted events counting toward points in the years 2010 and 2011 when there were 137 and 178 competitors, respectively; understandably, not all started in all the races. Holland dropped out of hosting the competition, as that country only allowed wooden-hulled boats whereas fiberglass hulls were allowed by the others. In 2012 France, Germany, and Slovenia joined in hosting trophy-point races, with a total of 16 countries represented.
Roger Smith
On the 100th anniversary of the first race of International 12-Foot Dinghies two Dutch crews race on England’s River Dee near West Kirby in 2013.
In 2013 and 2014 the Royal Loosdrecht Watersport Club hosted the centennial celebrations of the International 12-Foot Dinghy in the Netherlands, with an astonishing total of 187 boats entered, including four brand-new boats. The granddaughter of George Cockshott, Jane Rowe, and her husband Ernest came over from England to take part in the celebrations. Both the Italian and Dutch Post Offices issued special stamps commemorating the centennial. The Associazone Italiana Classe Dinghy 12′ issued a magnificent book: Il Dinghy 12′ Classico Italiano. The Dutch association published their own impressive book, Twaalfvoetsjol: 100 Jaar Klasse (Twelve-Foot Dinghy: 100 Years a Class).
When George Cockshott submitted his drawings to the Boat Racing Association in 1913, it is doubtful he envisioned that a hundred years later the little 12-footer would have a registration in Italy of well over 2,300, that in the Netherlands sail numbers for the wooden 12s have reached nearly 900, and that his granddaughter and 10 countries would be represented at the centennial celebrations of his design.
Evert Moes was born in the Netherlands in 1934 and in his teens campaigned his 12-ft International, H391, PIGLET. After emigrating to Canada in 1960 he became involved in wooden boat building. His latest project was the building of a 9′ 9″ Nutshell Pram from scratch with a modified lug rig similar to the International 12-footer. In summer he sails the waters of the British Columbia’s Gulf Islands.
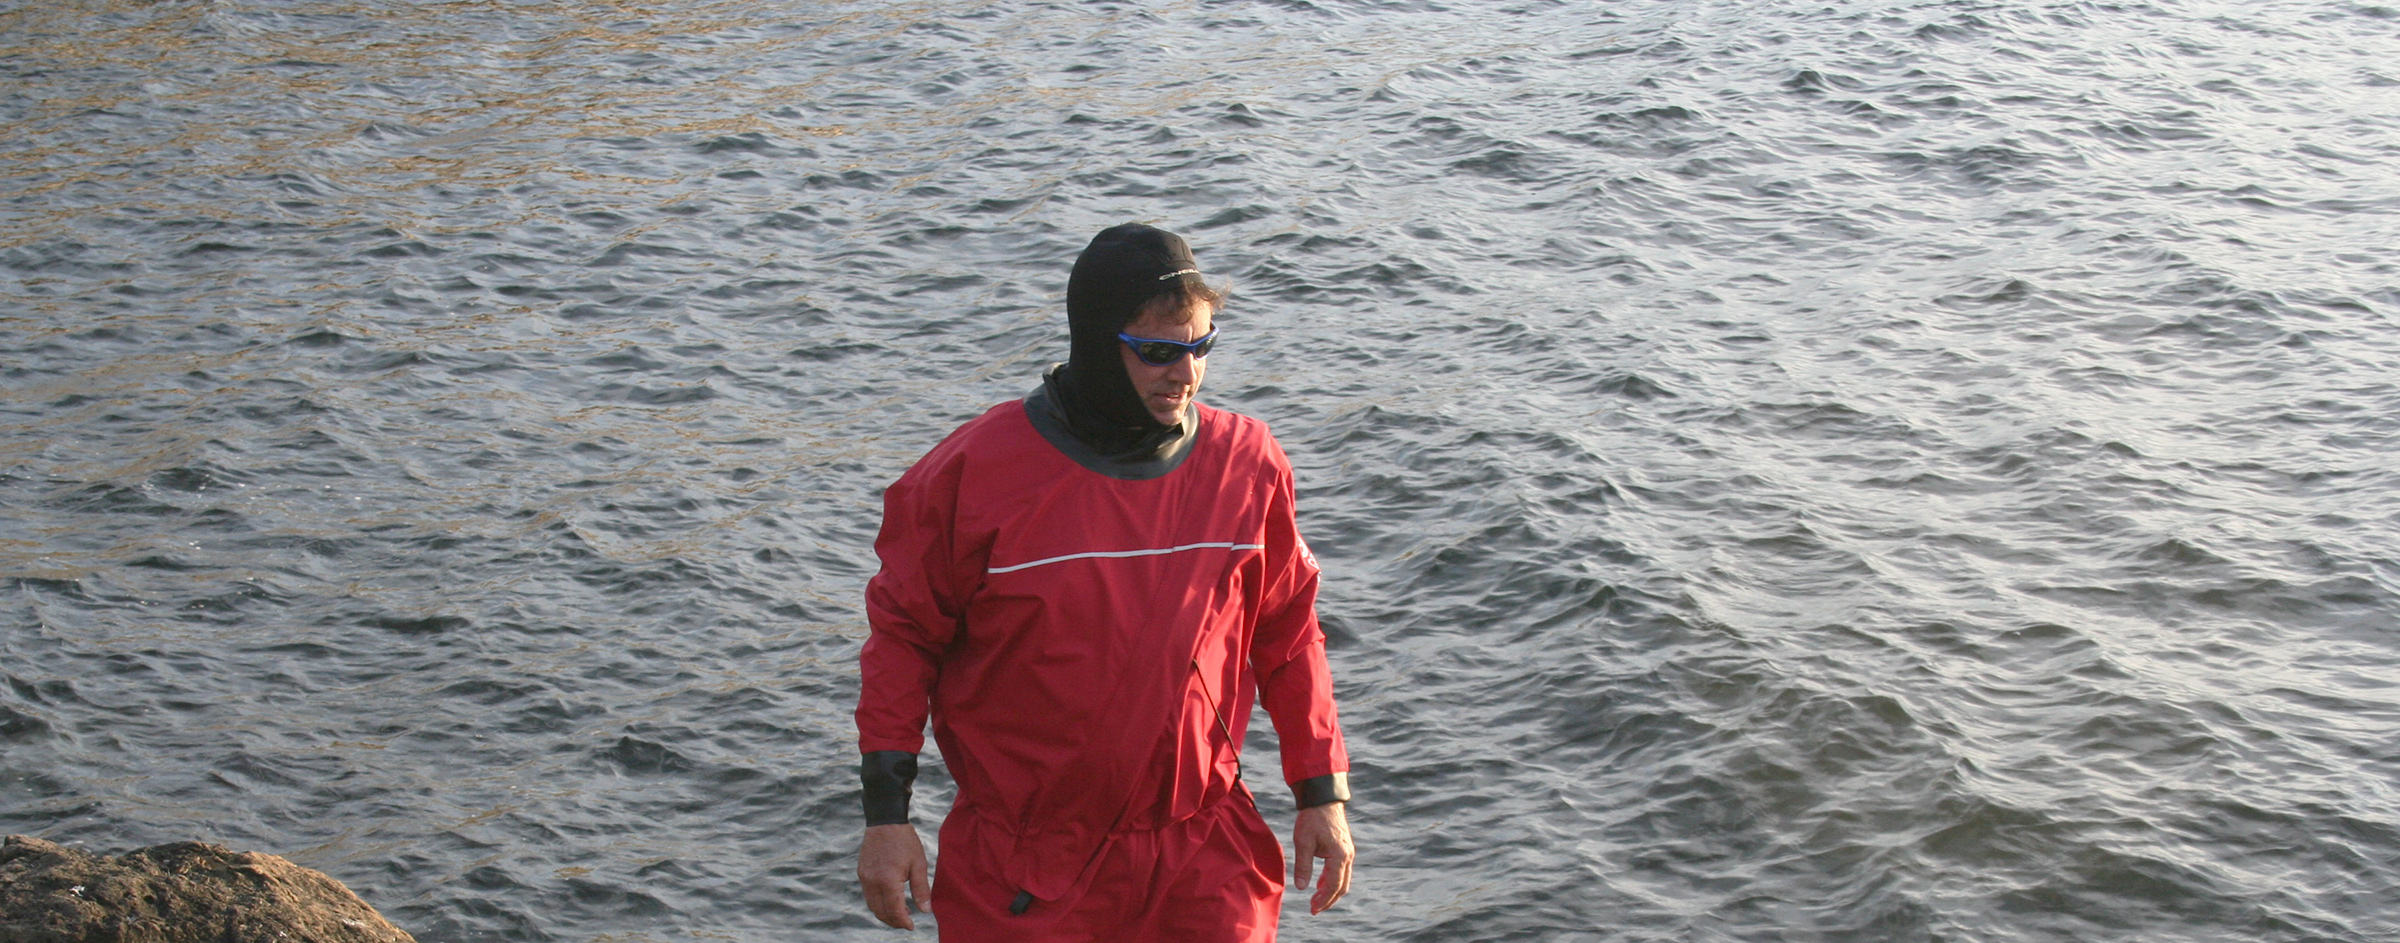
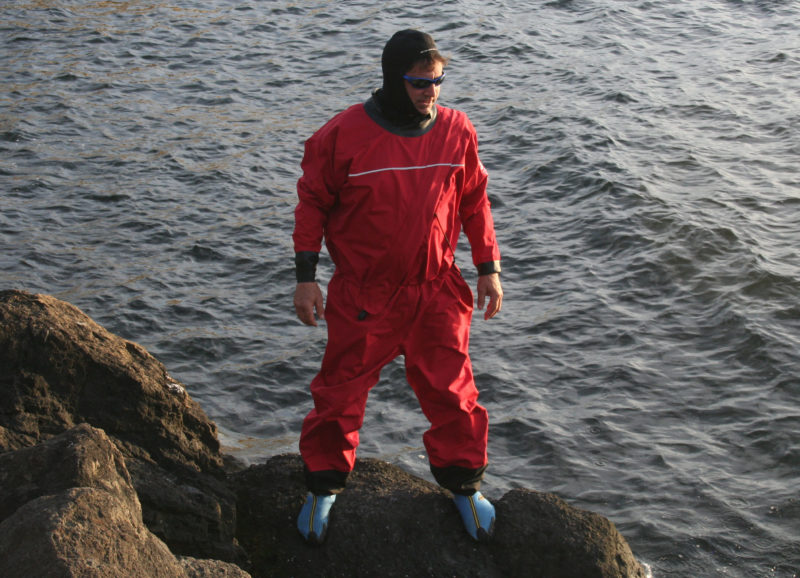 all photographs by Nate Cunningham
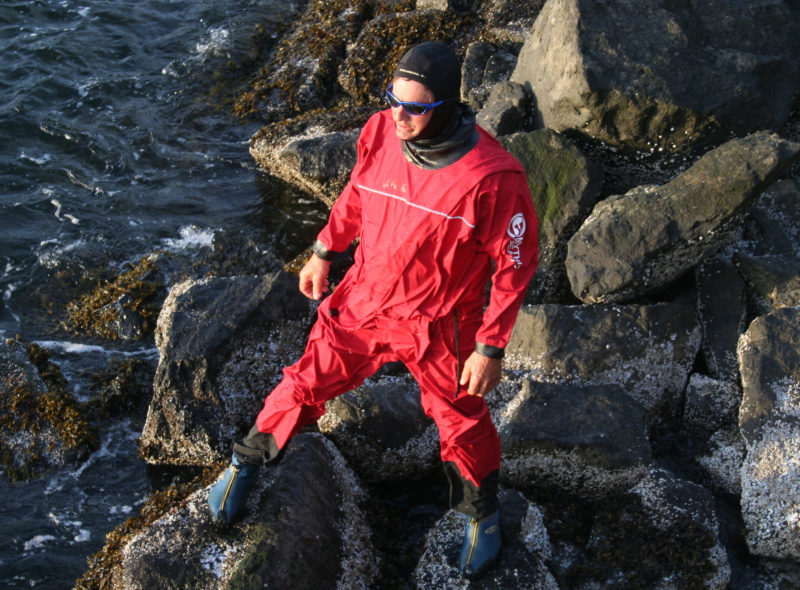
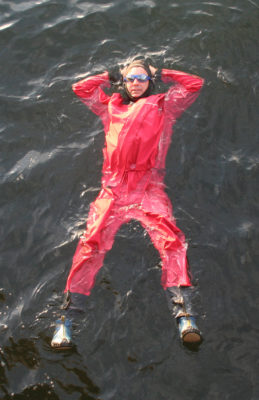


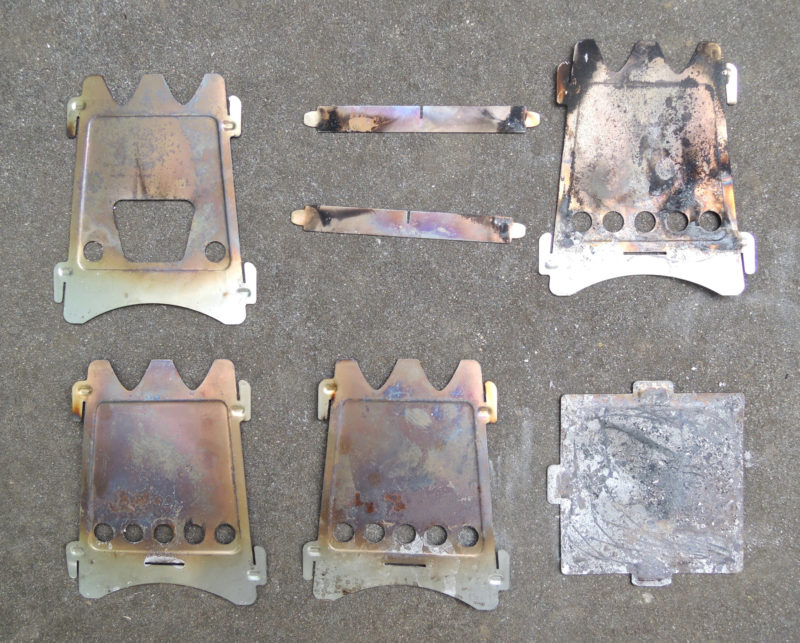

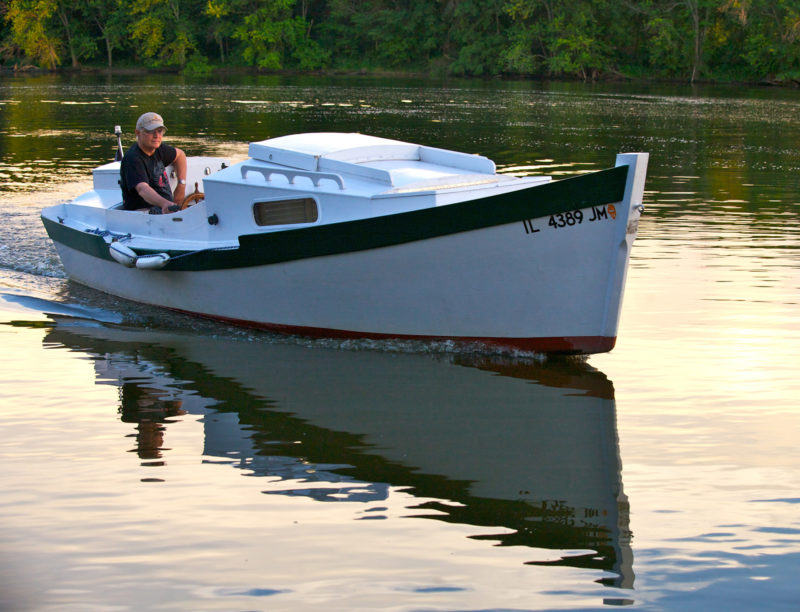
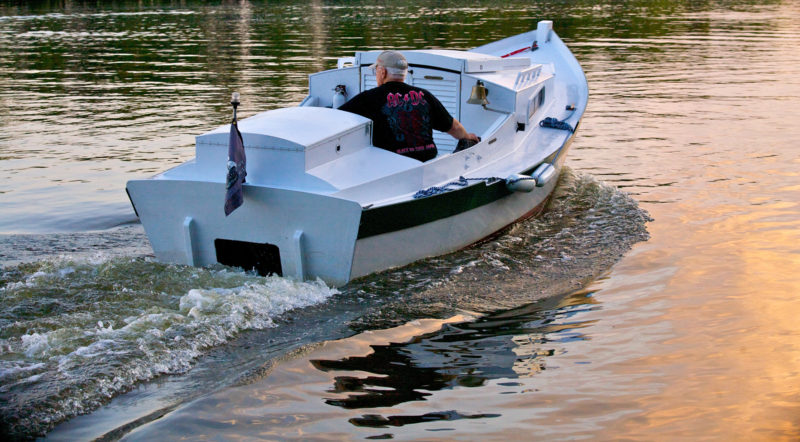

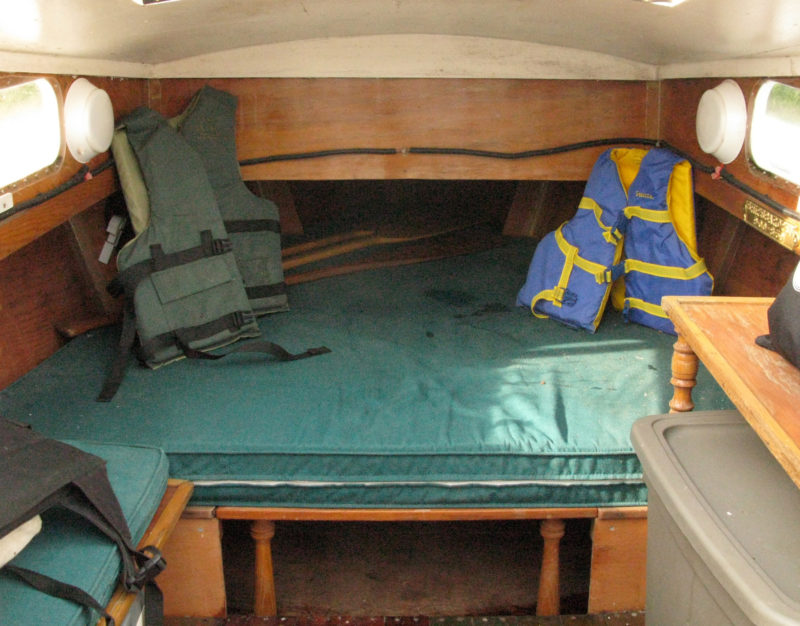
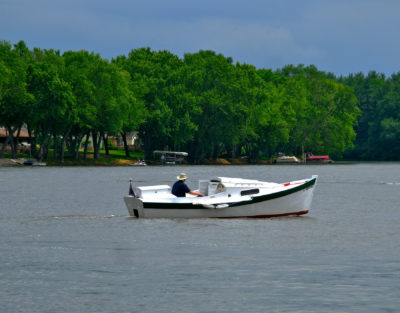

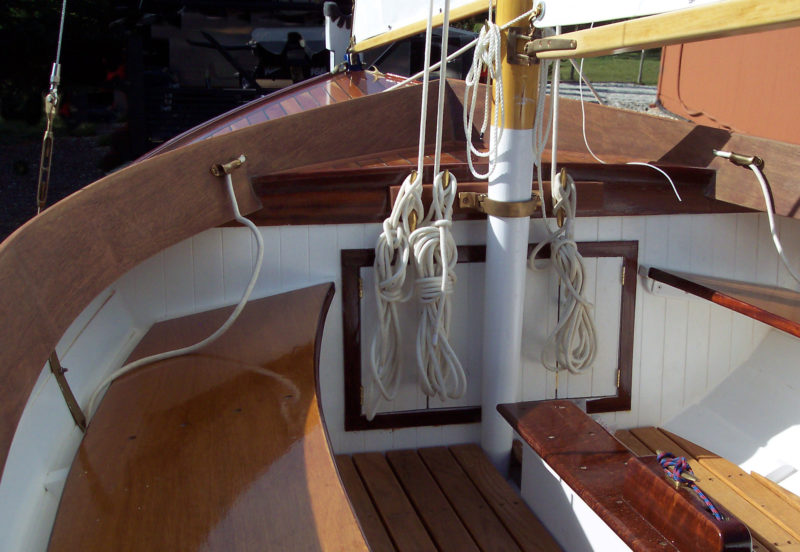
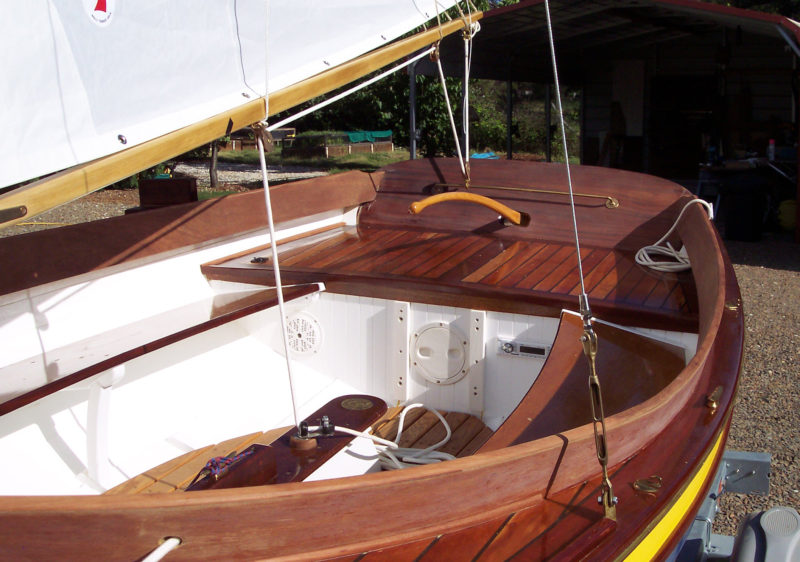
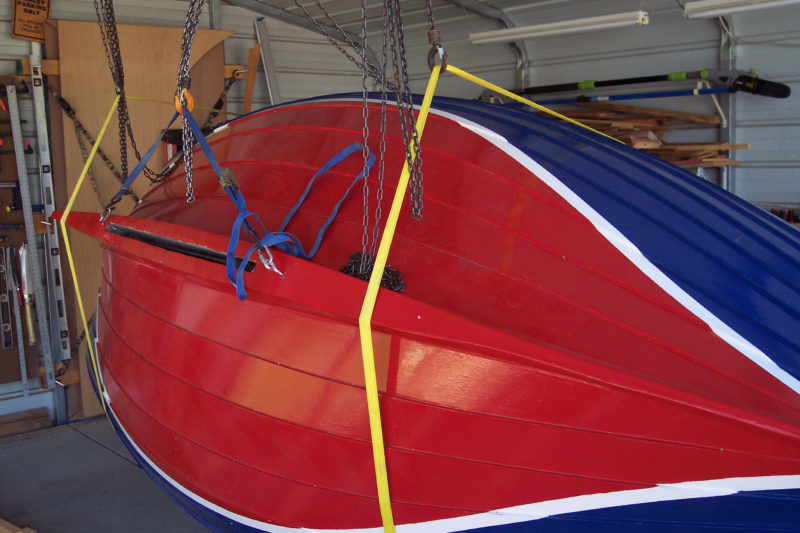

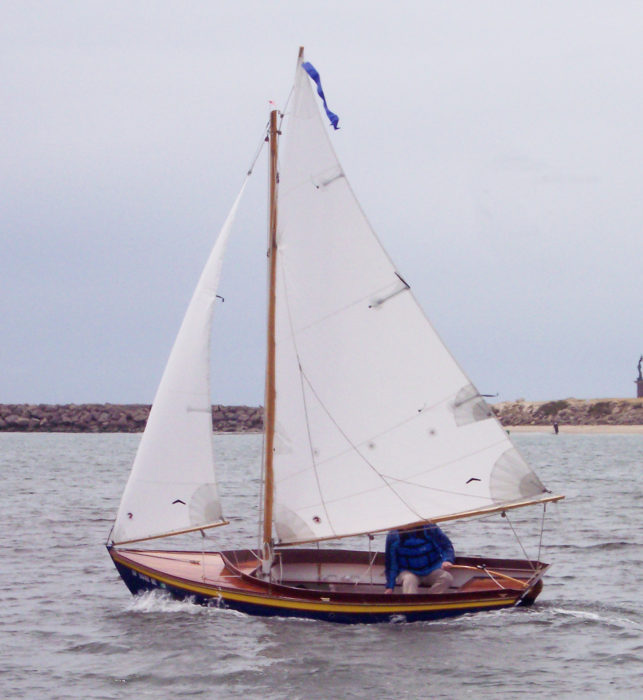
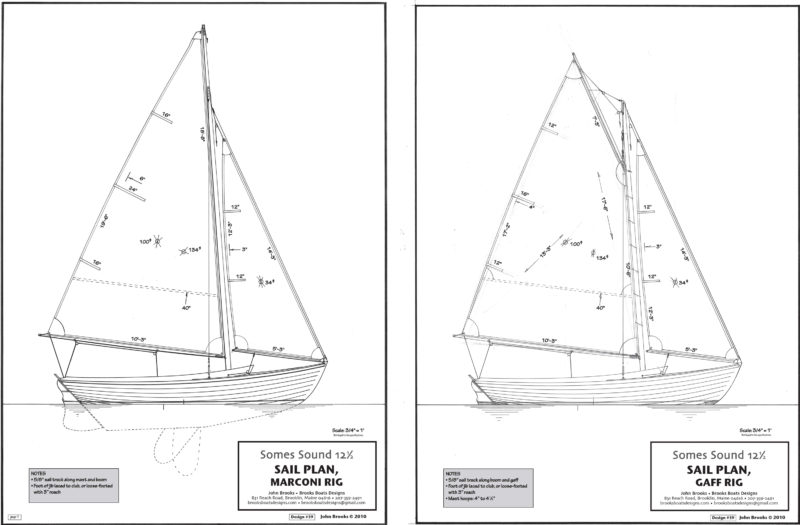
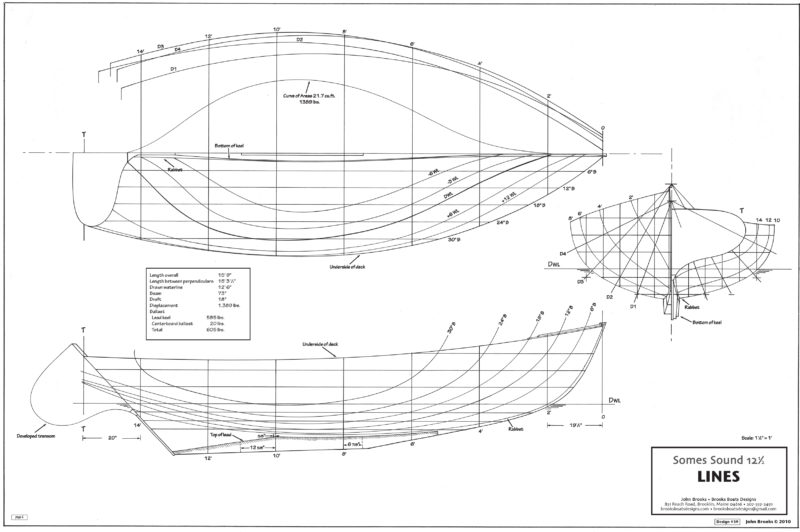
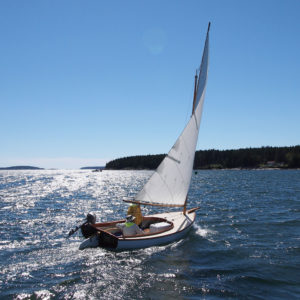
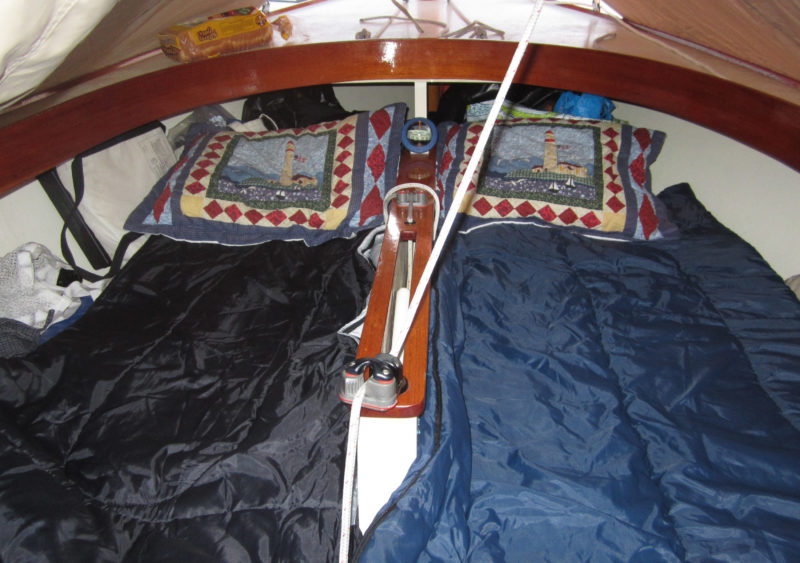
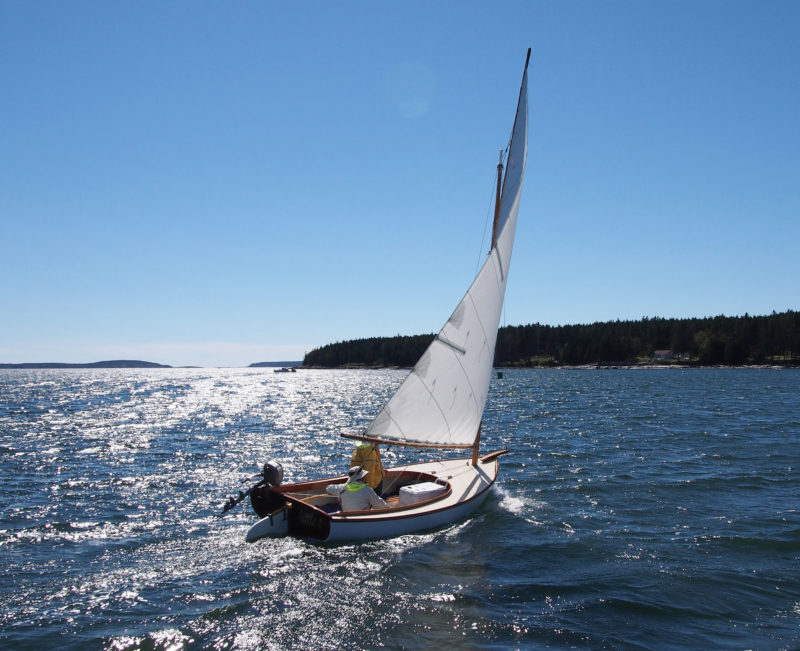
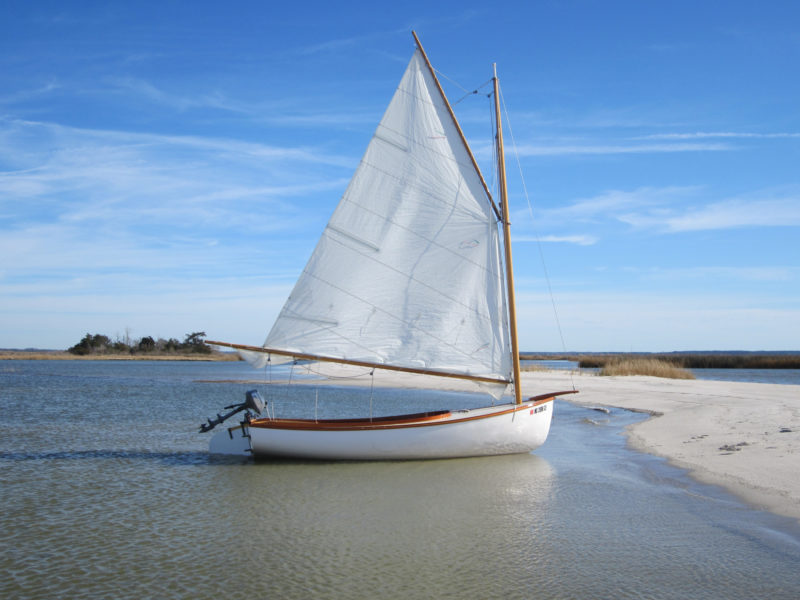
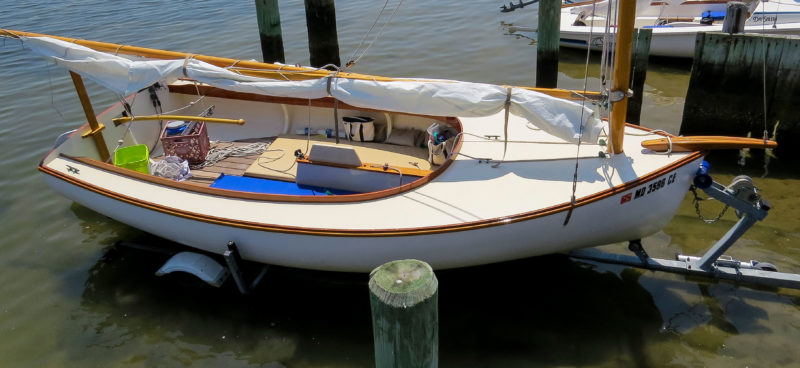
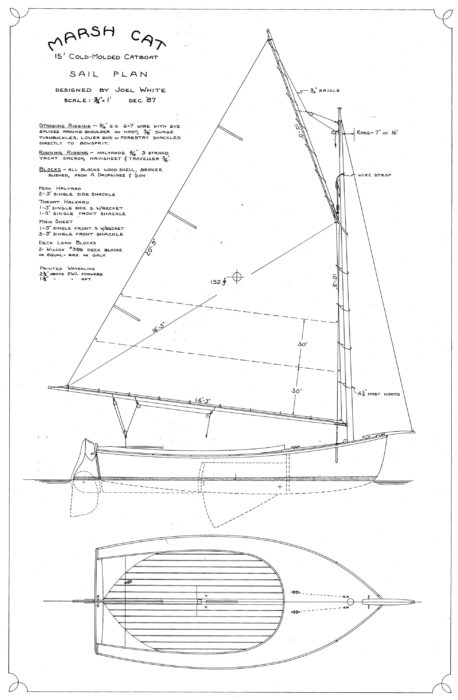
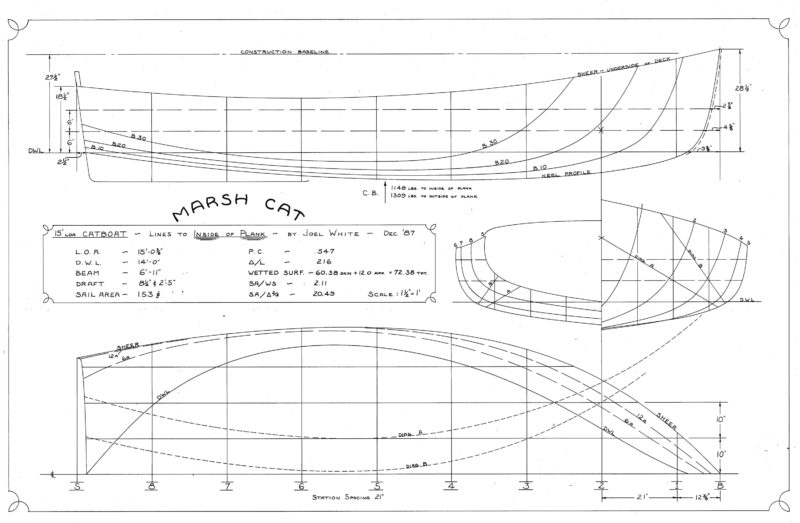
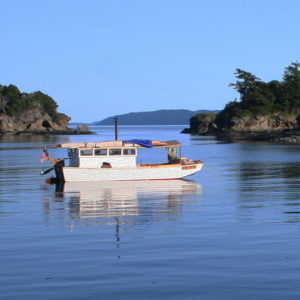
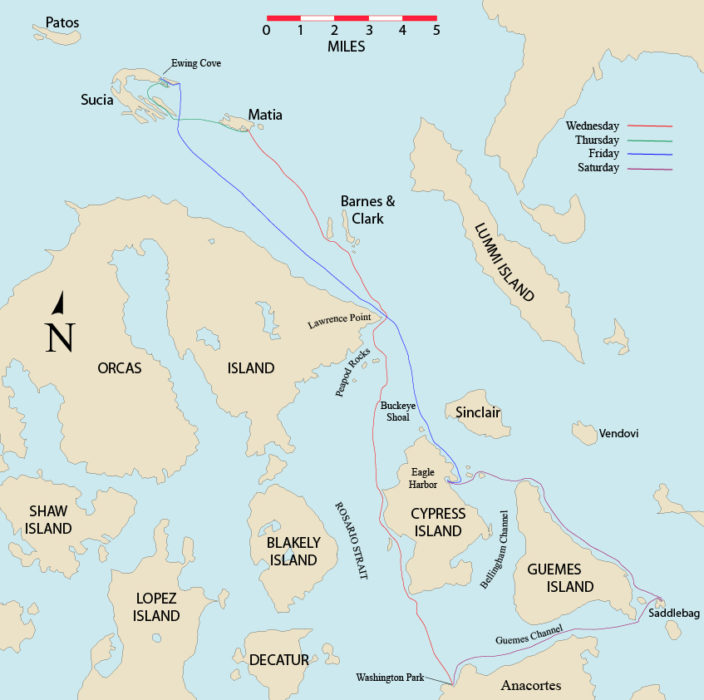

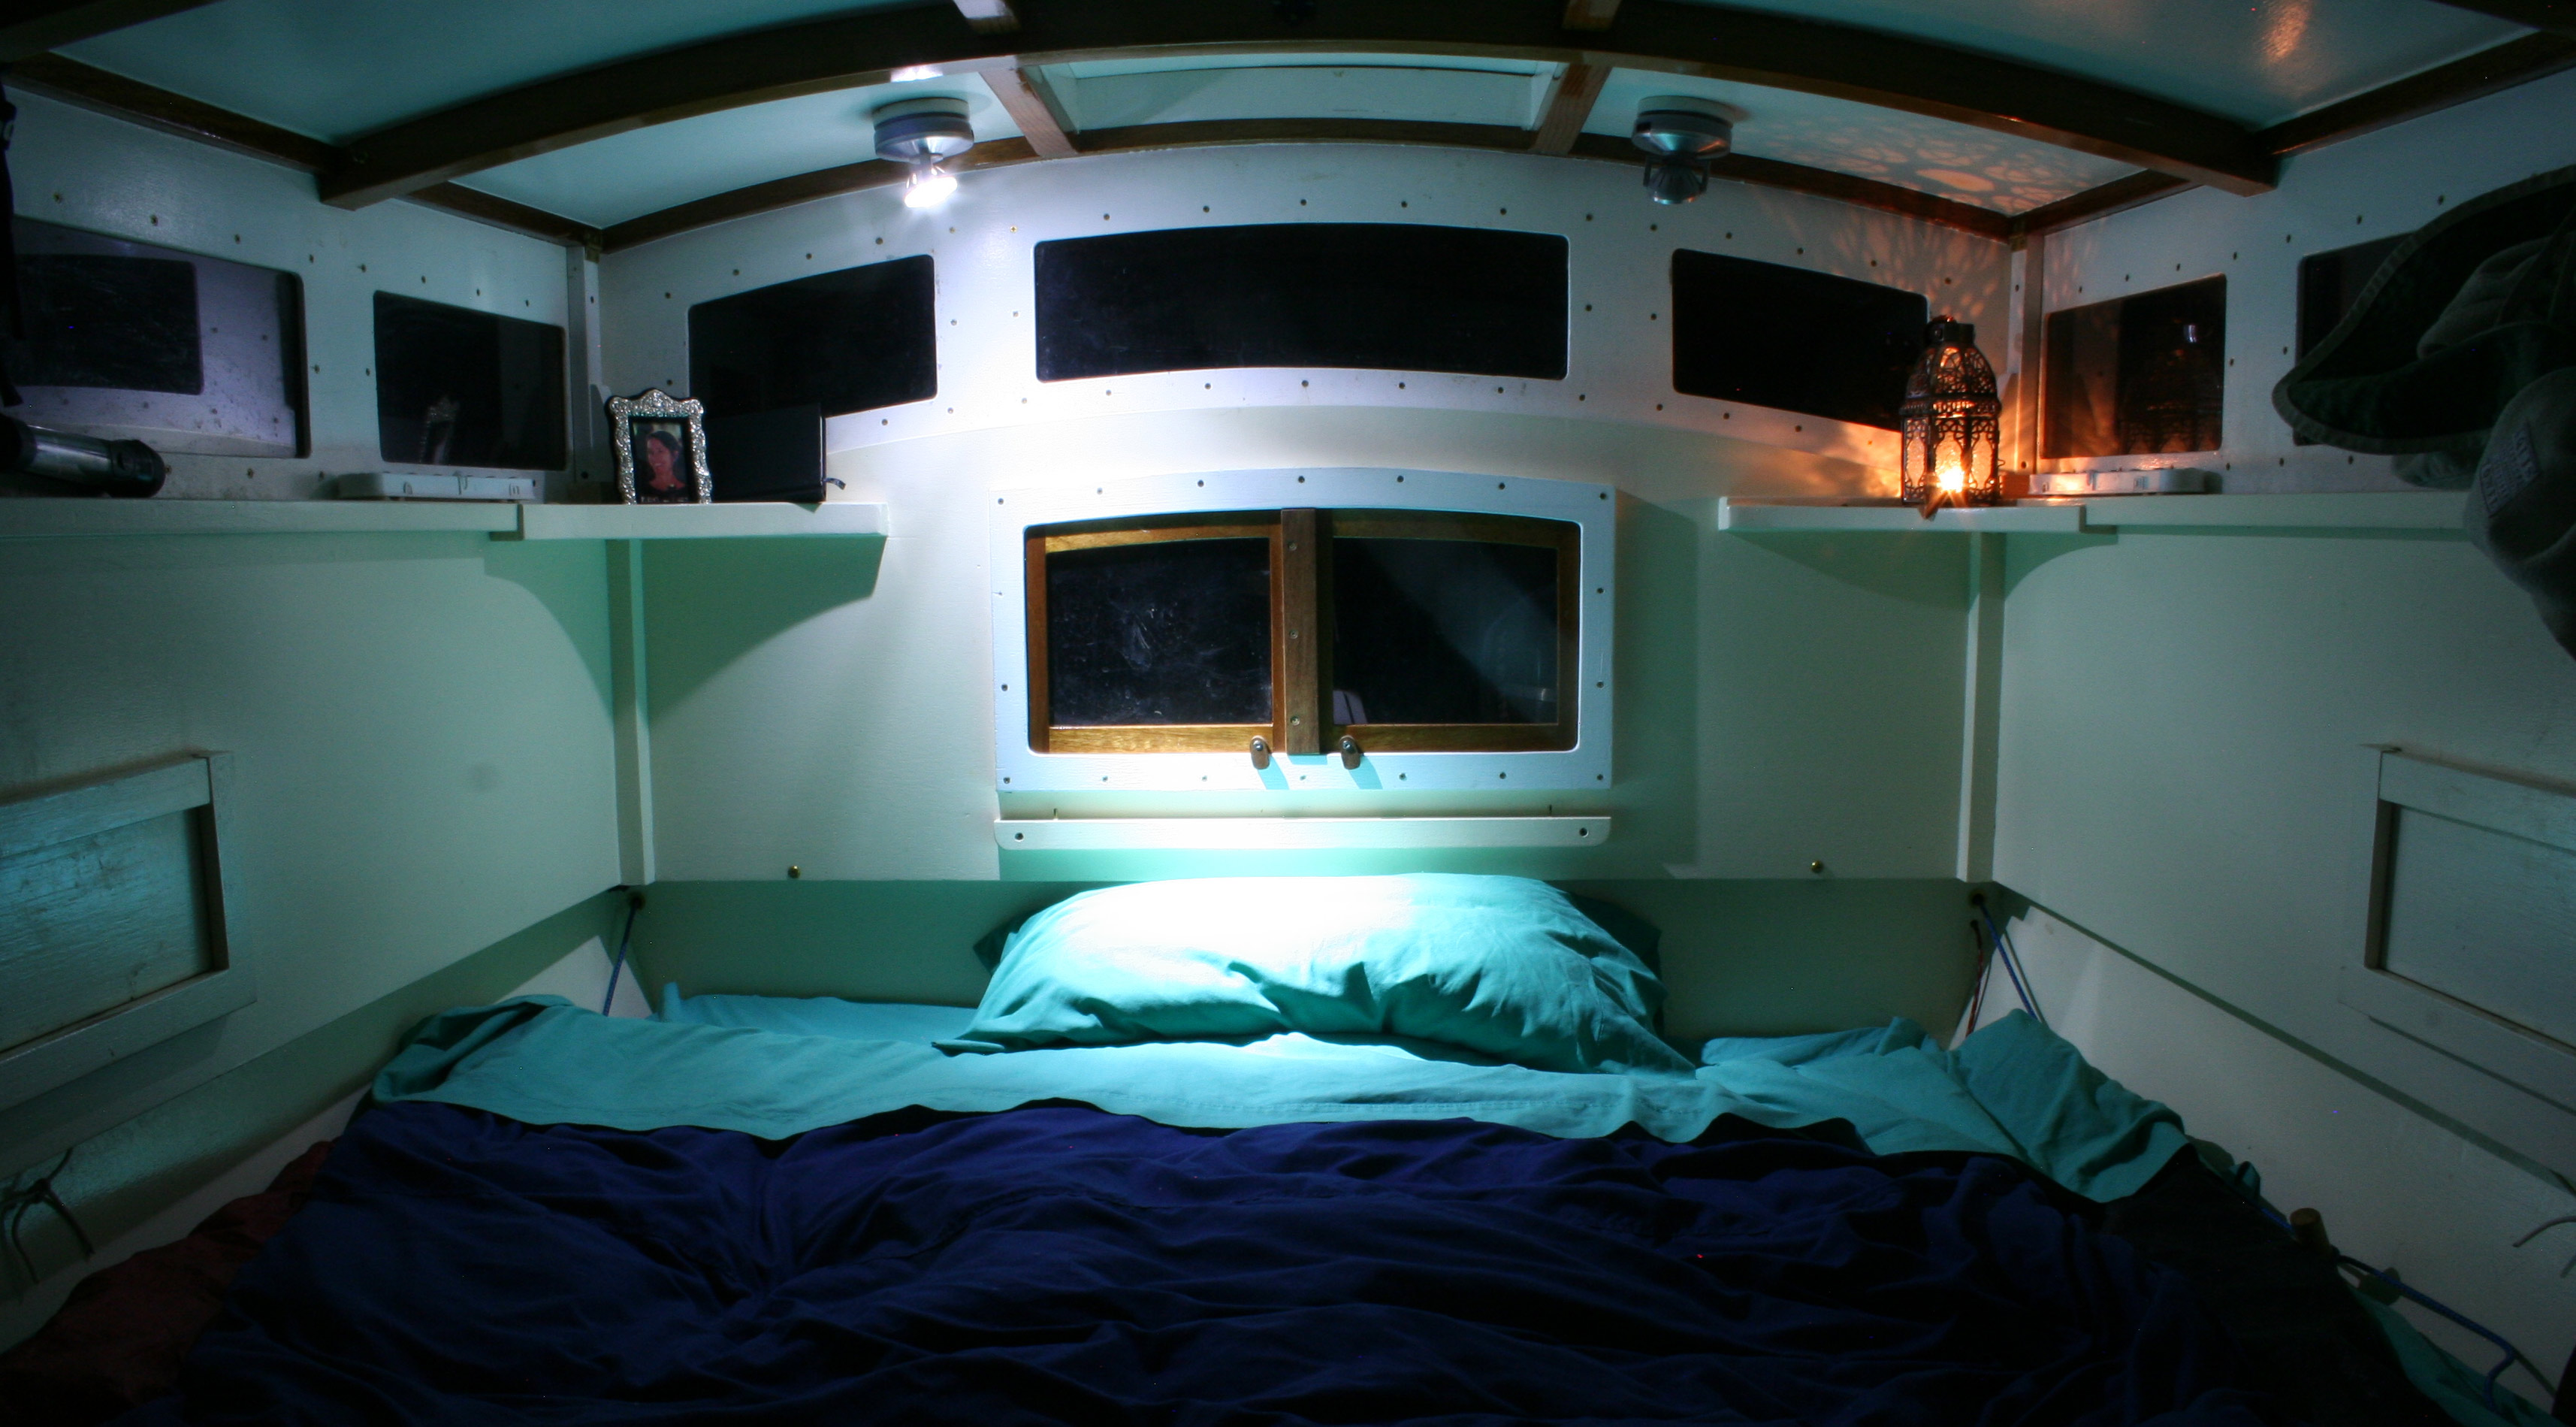
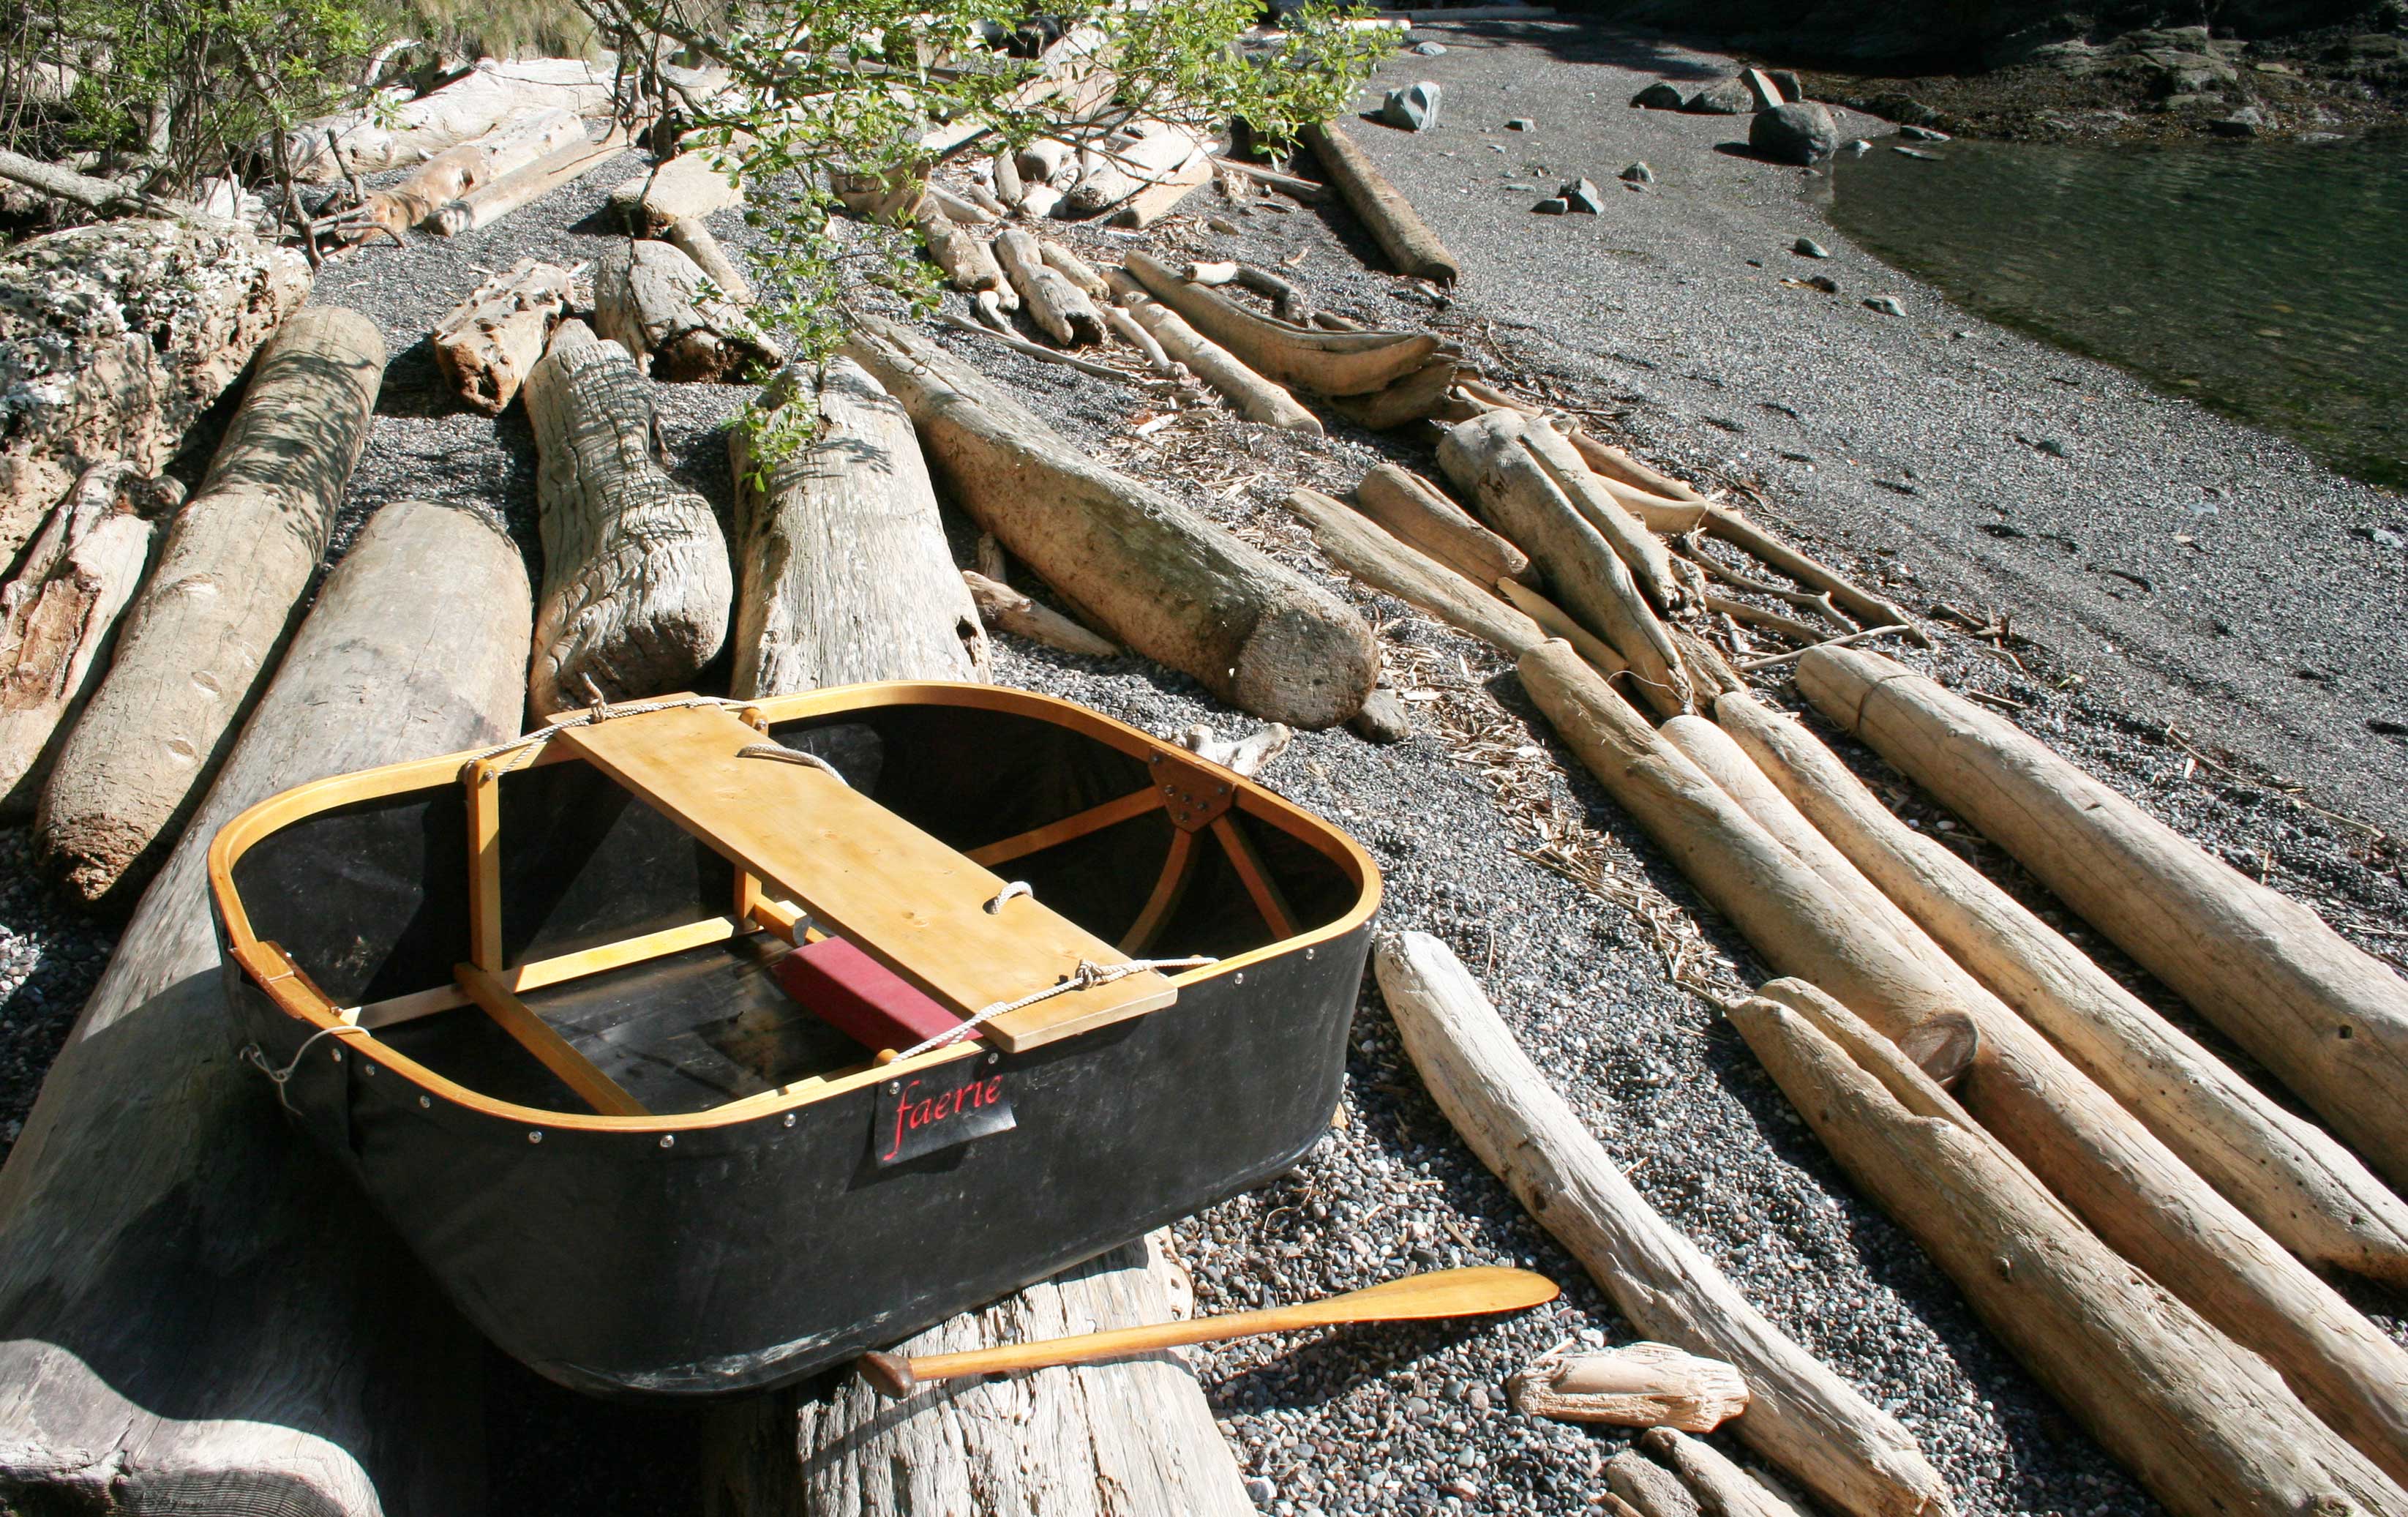
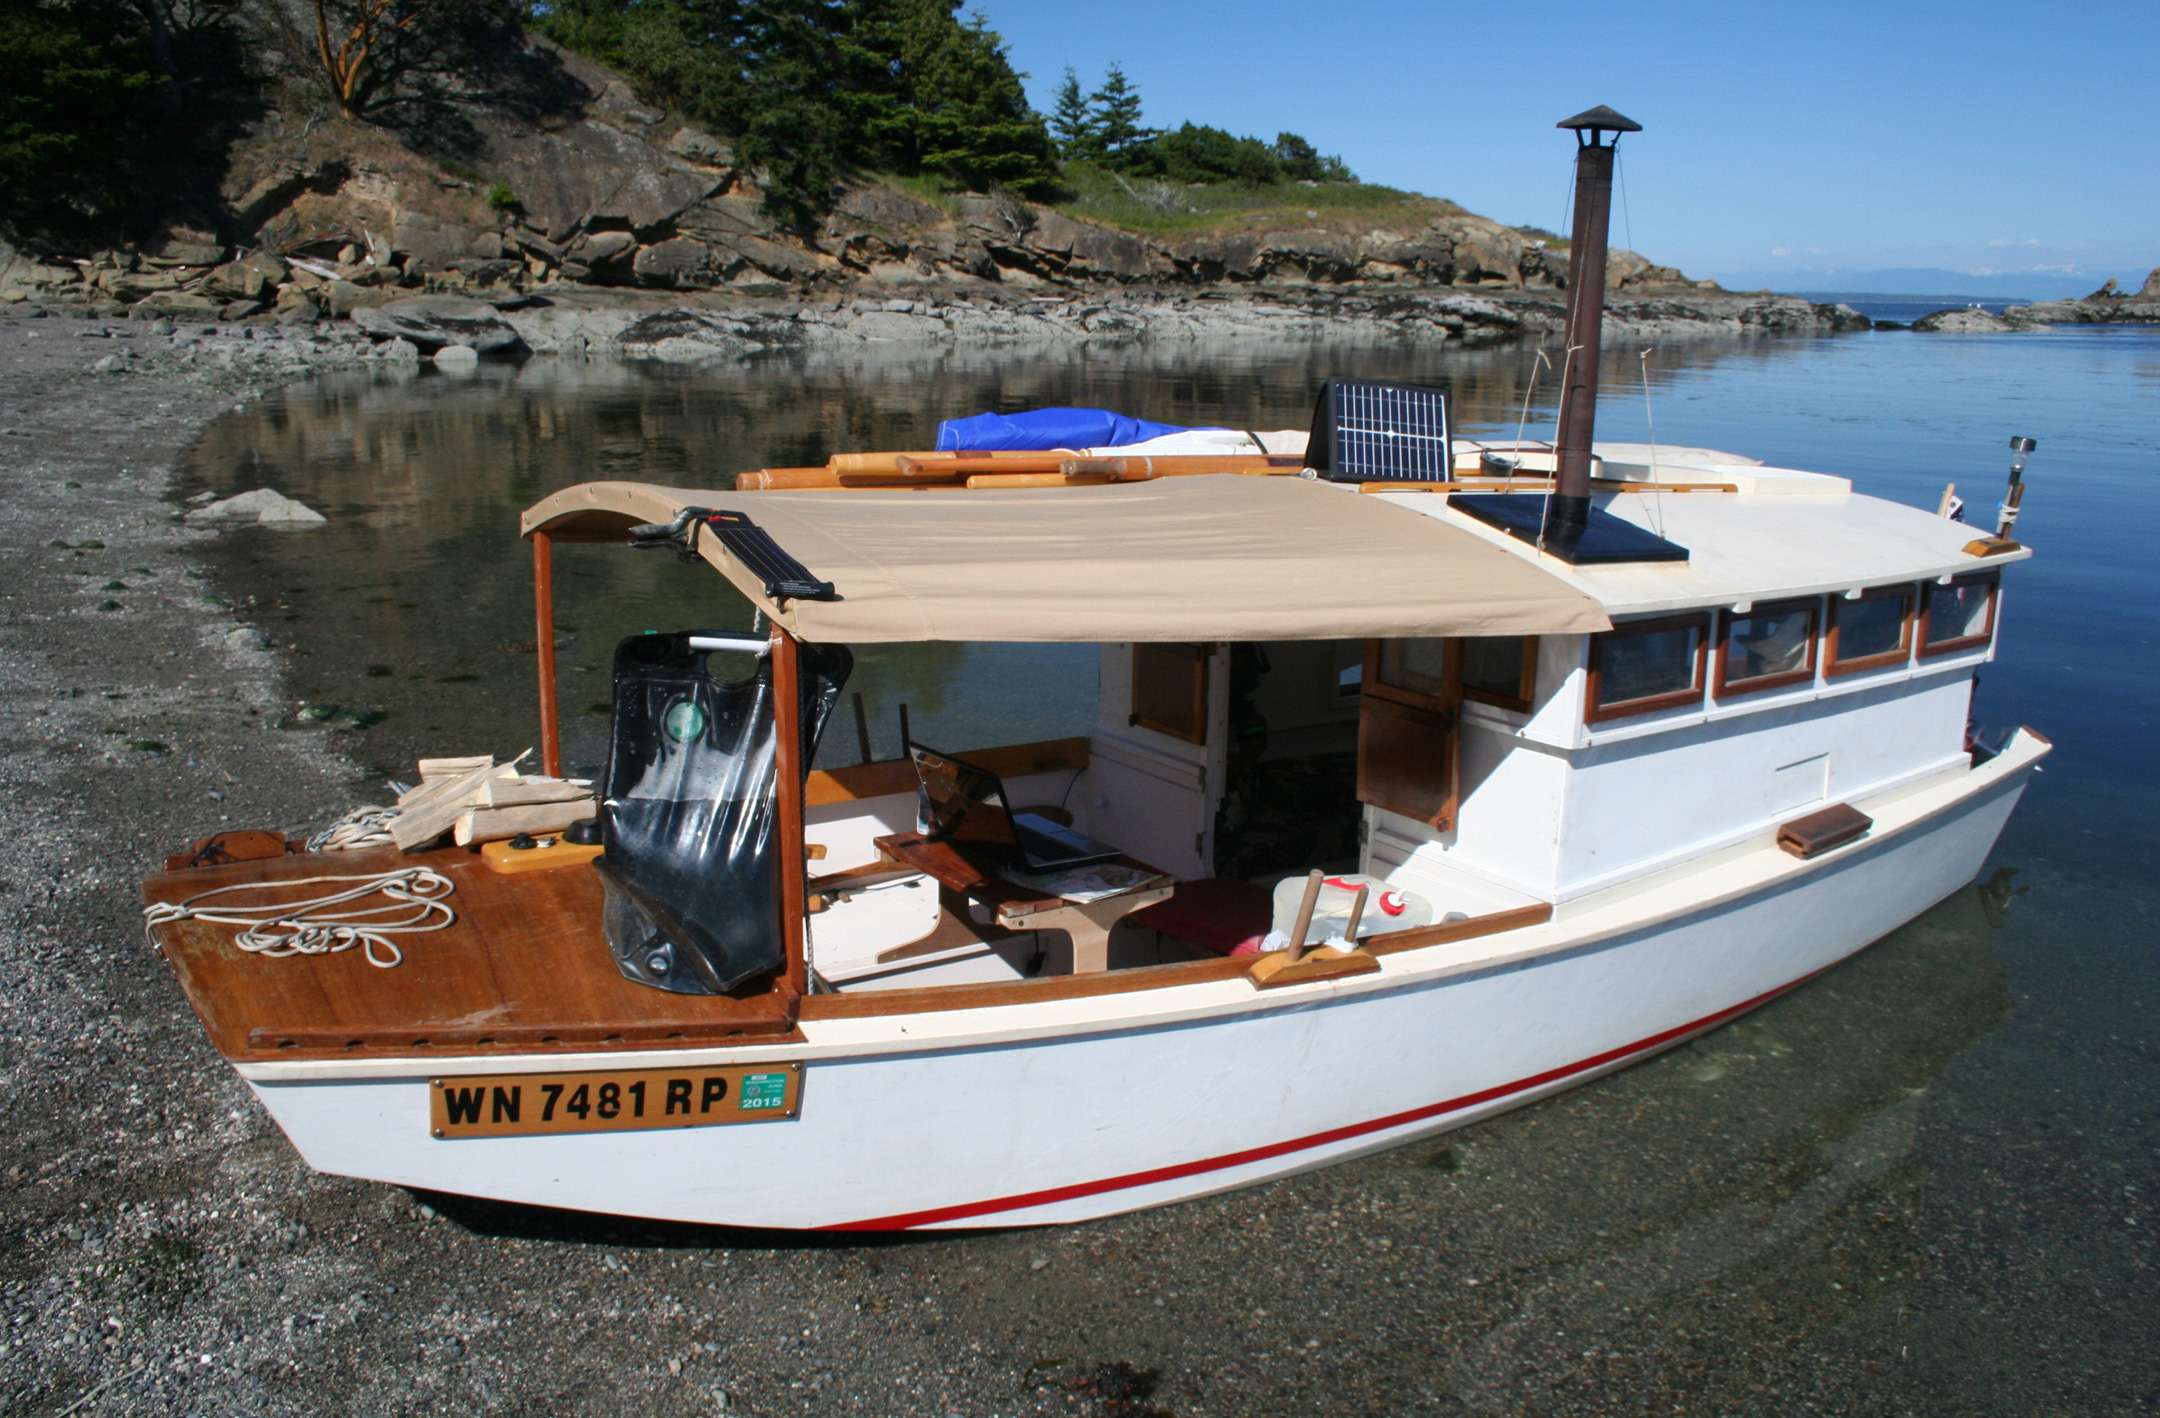


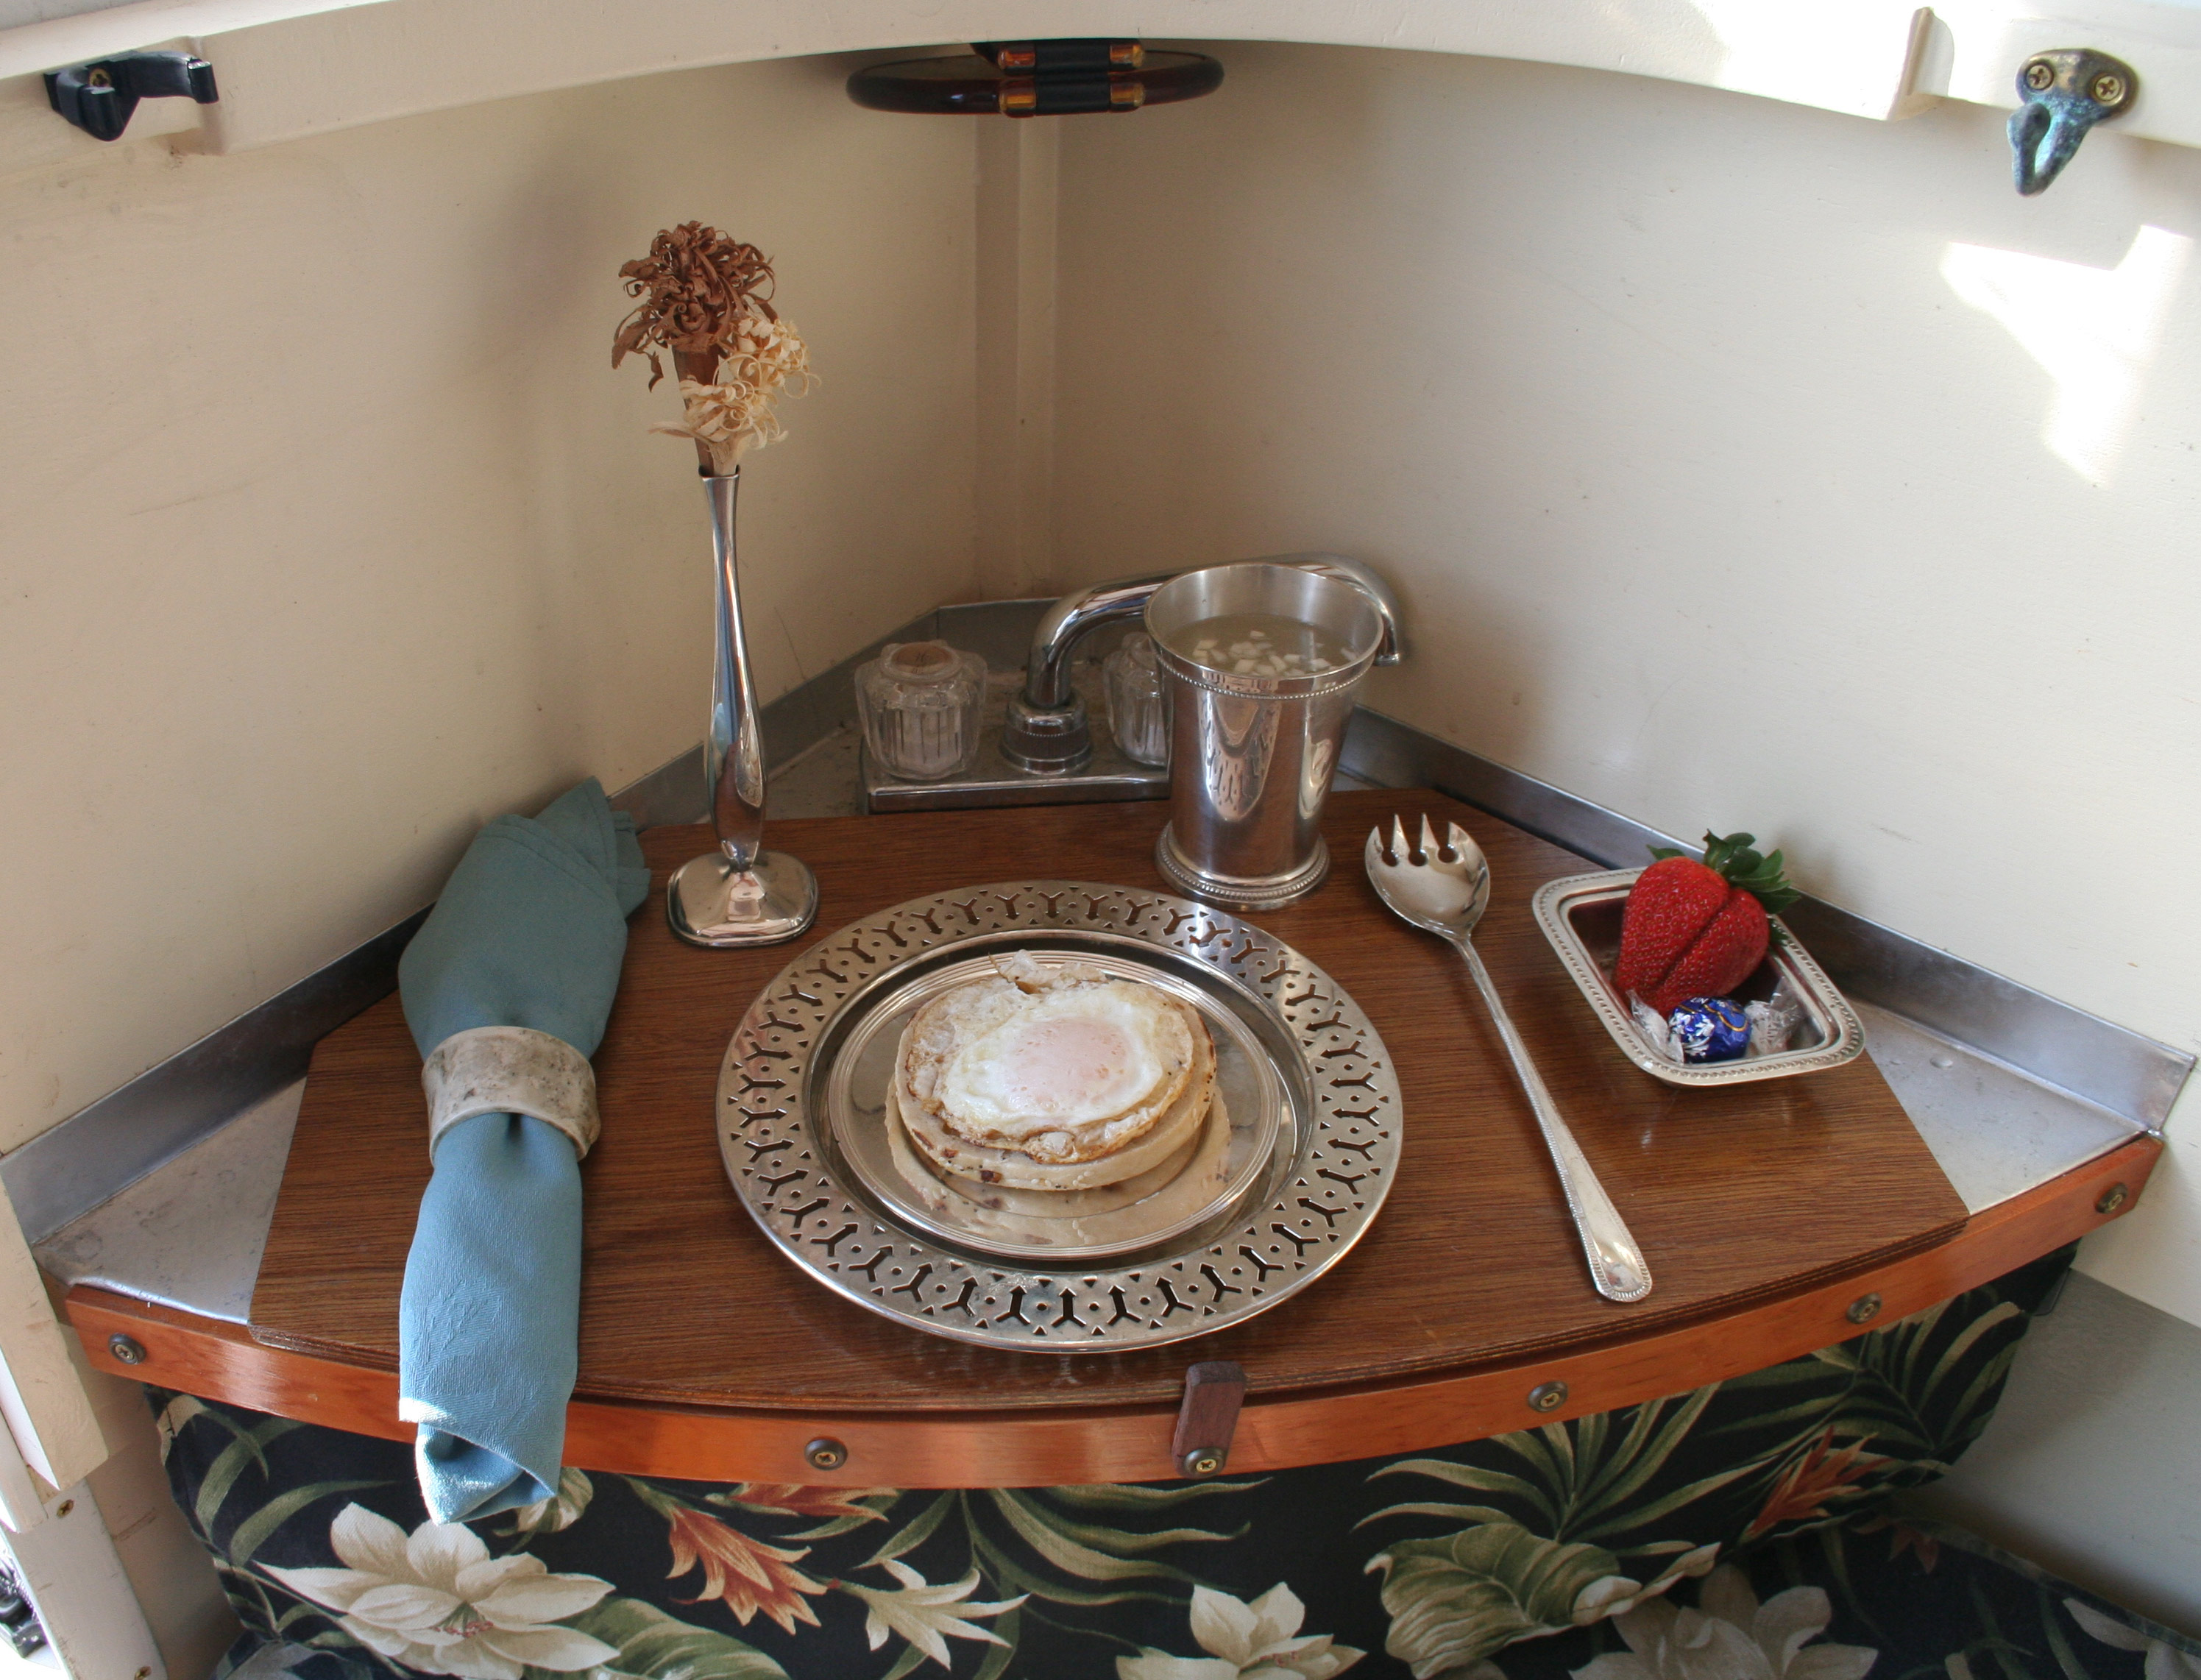
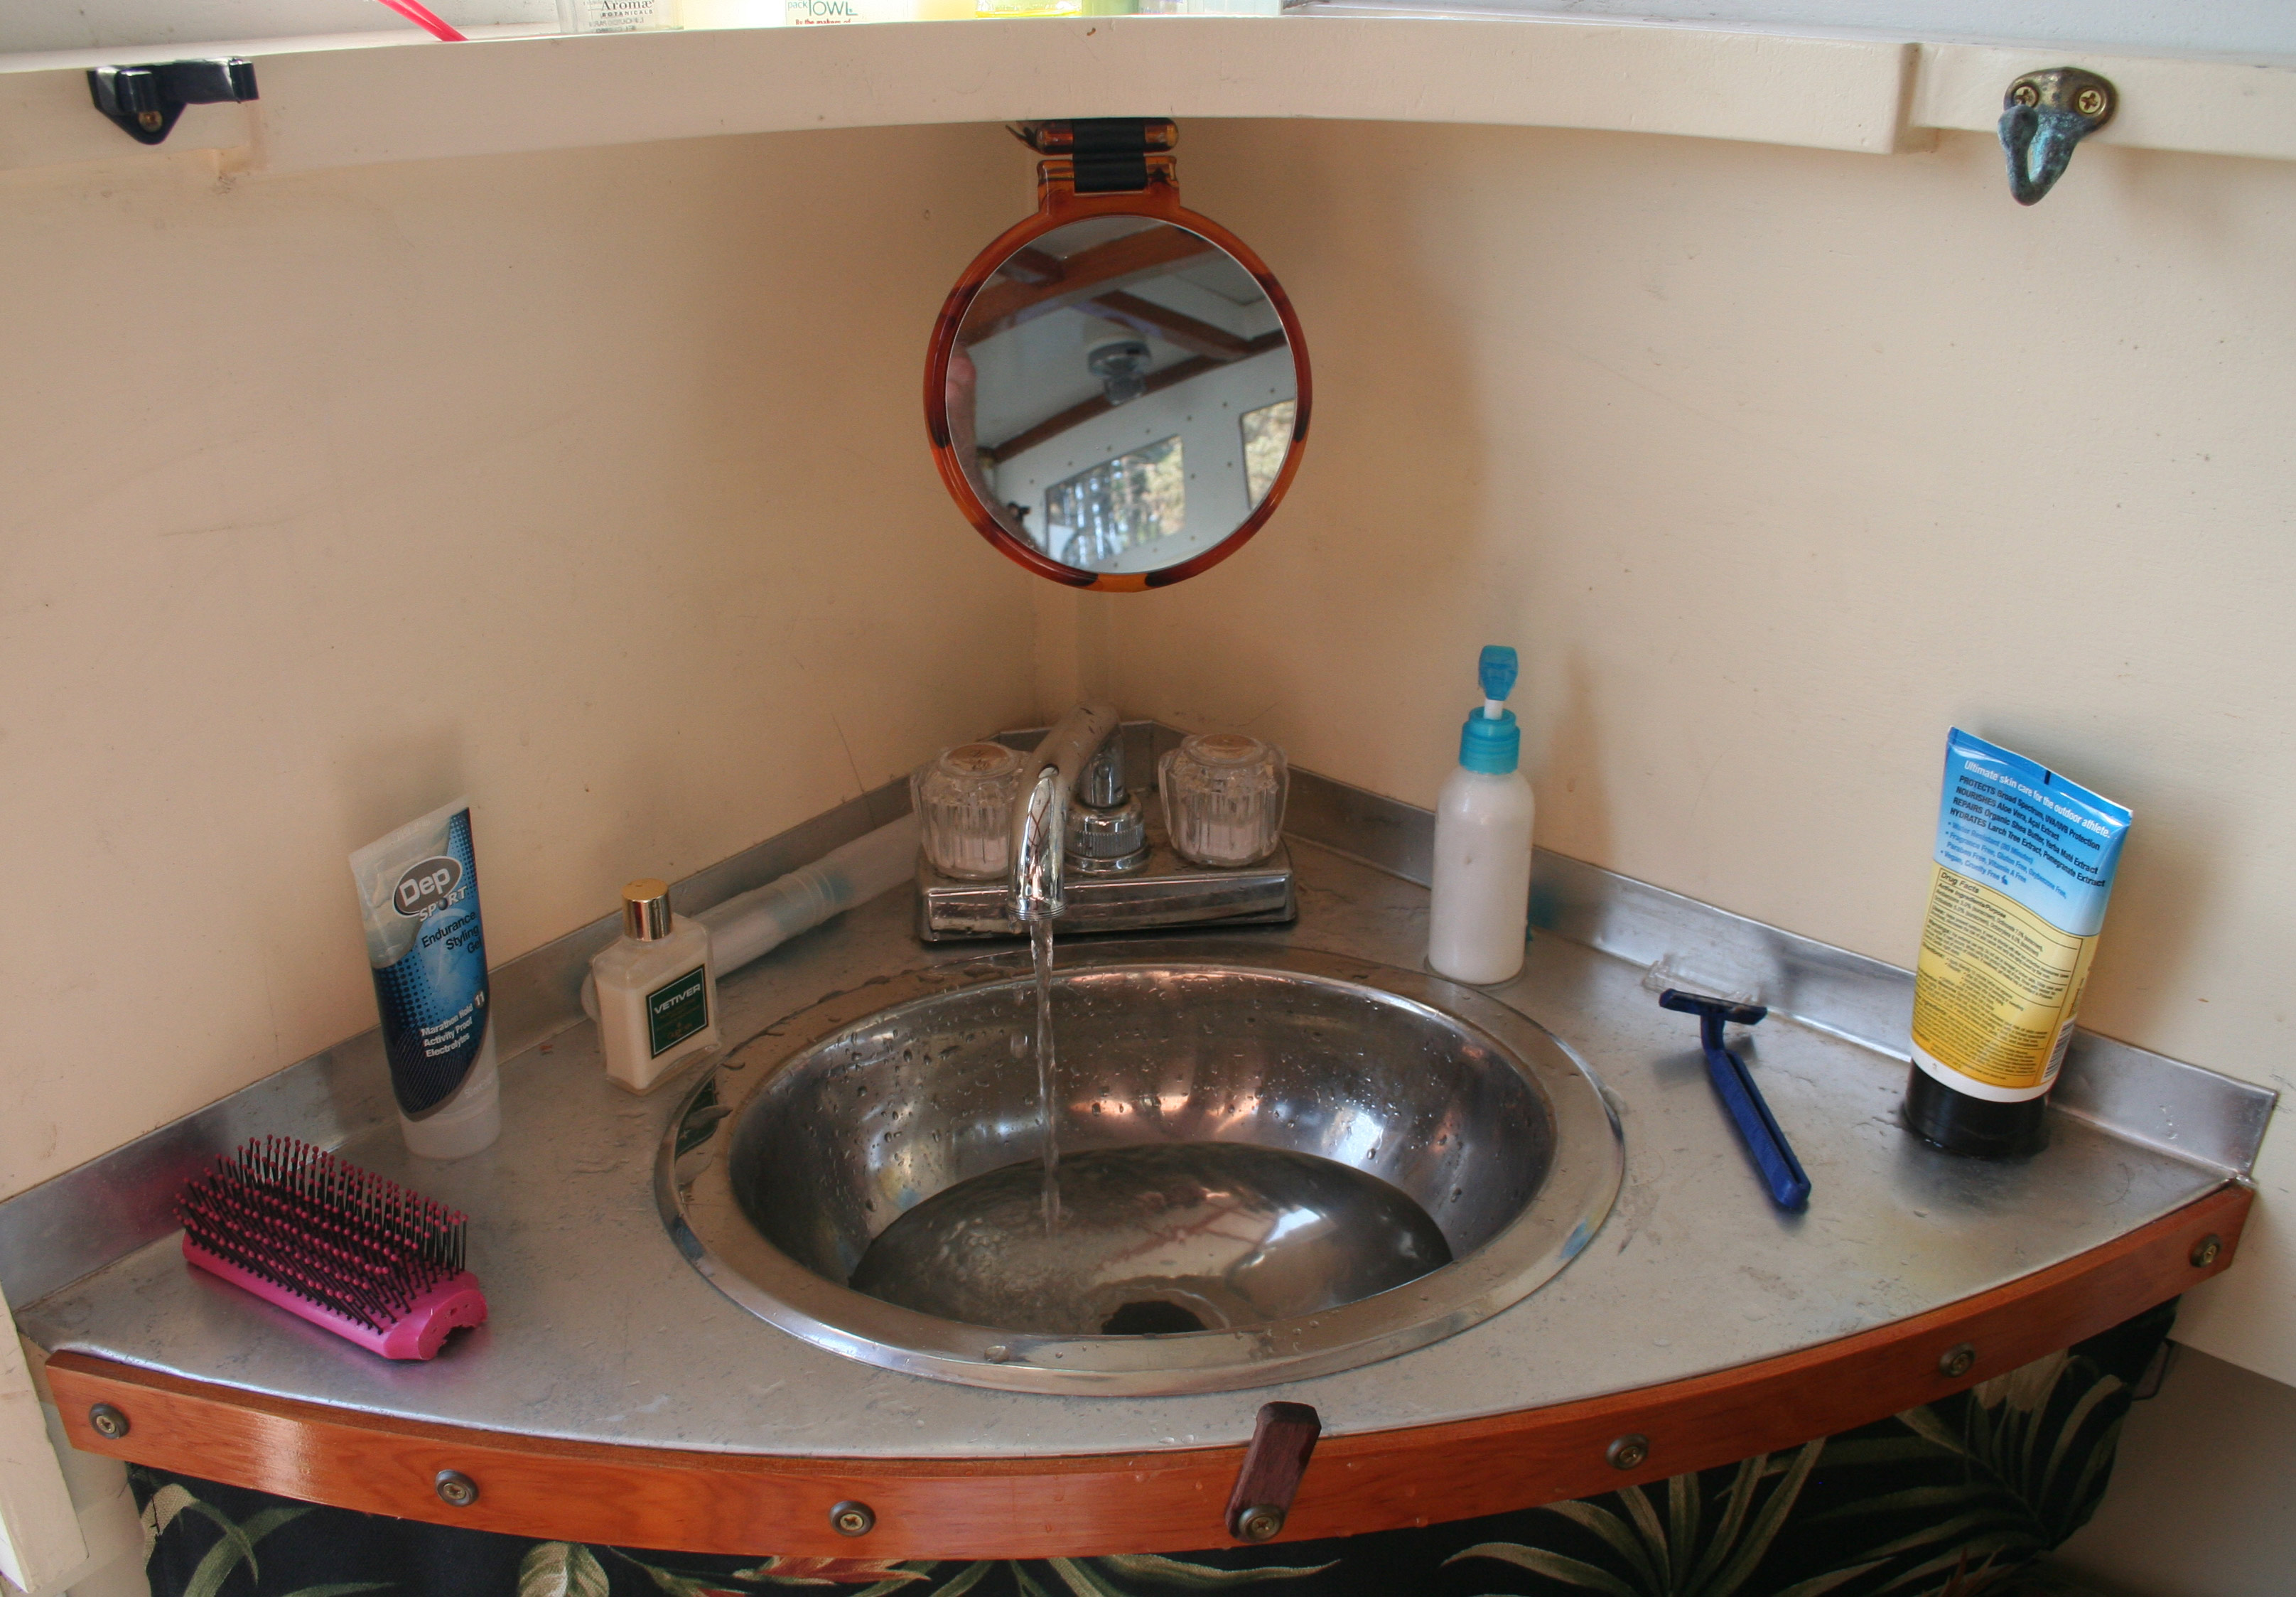
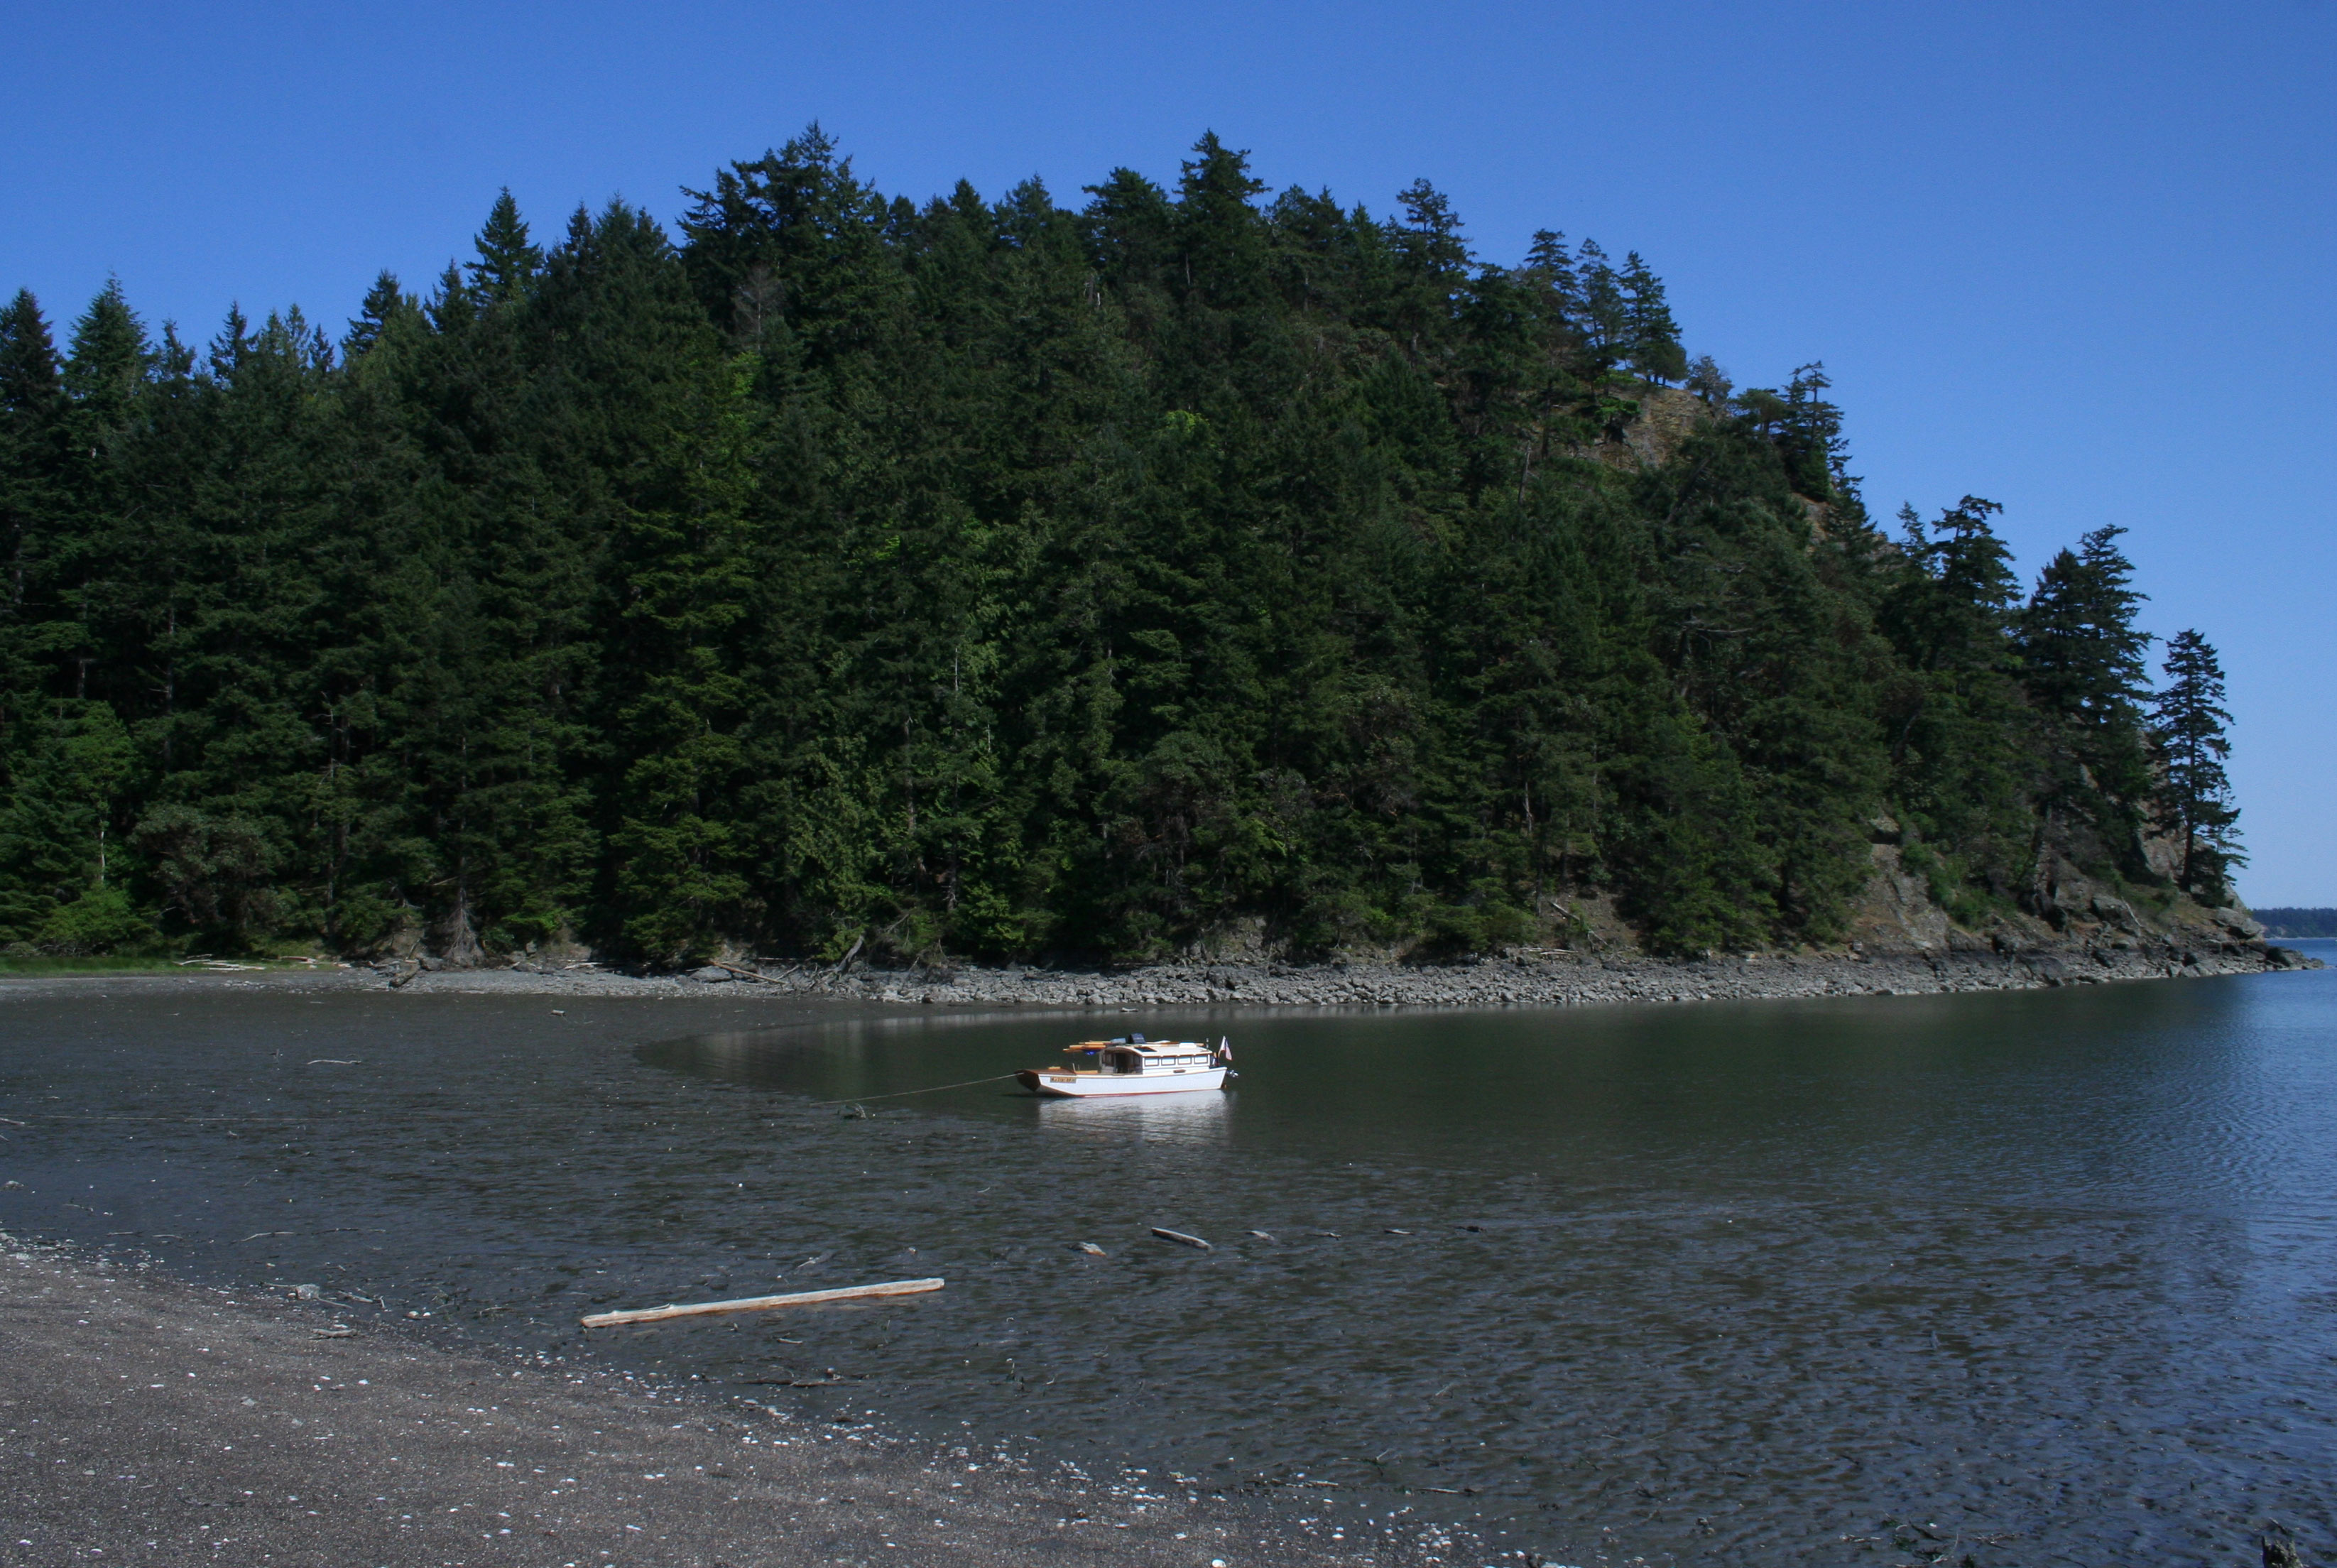
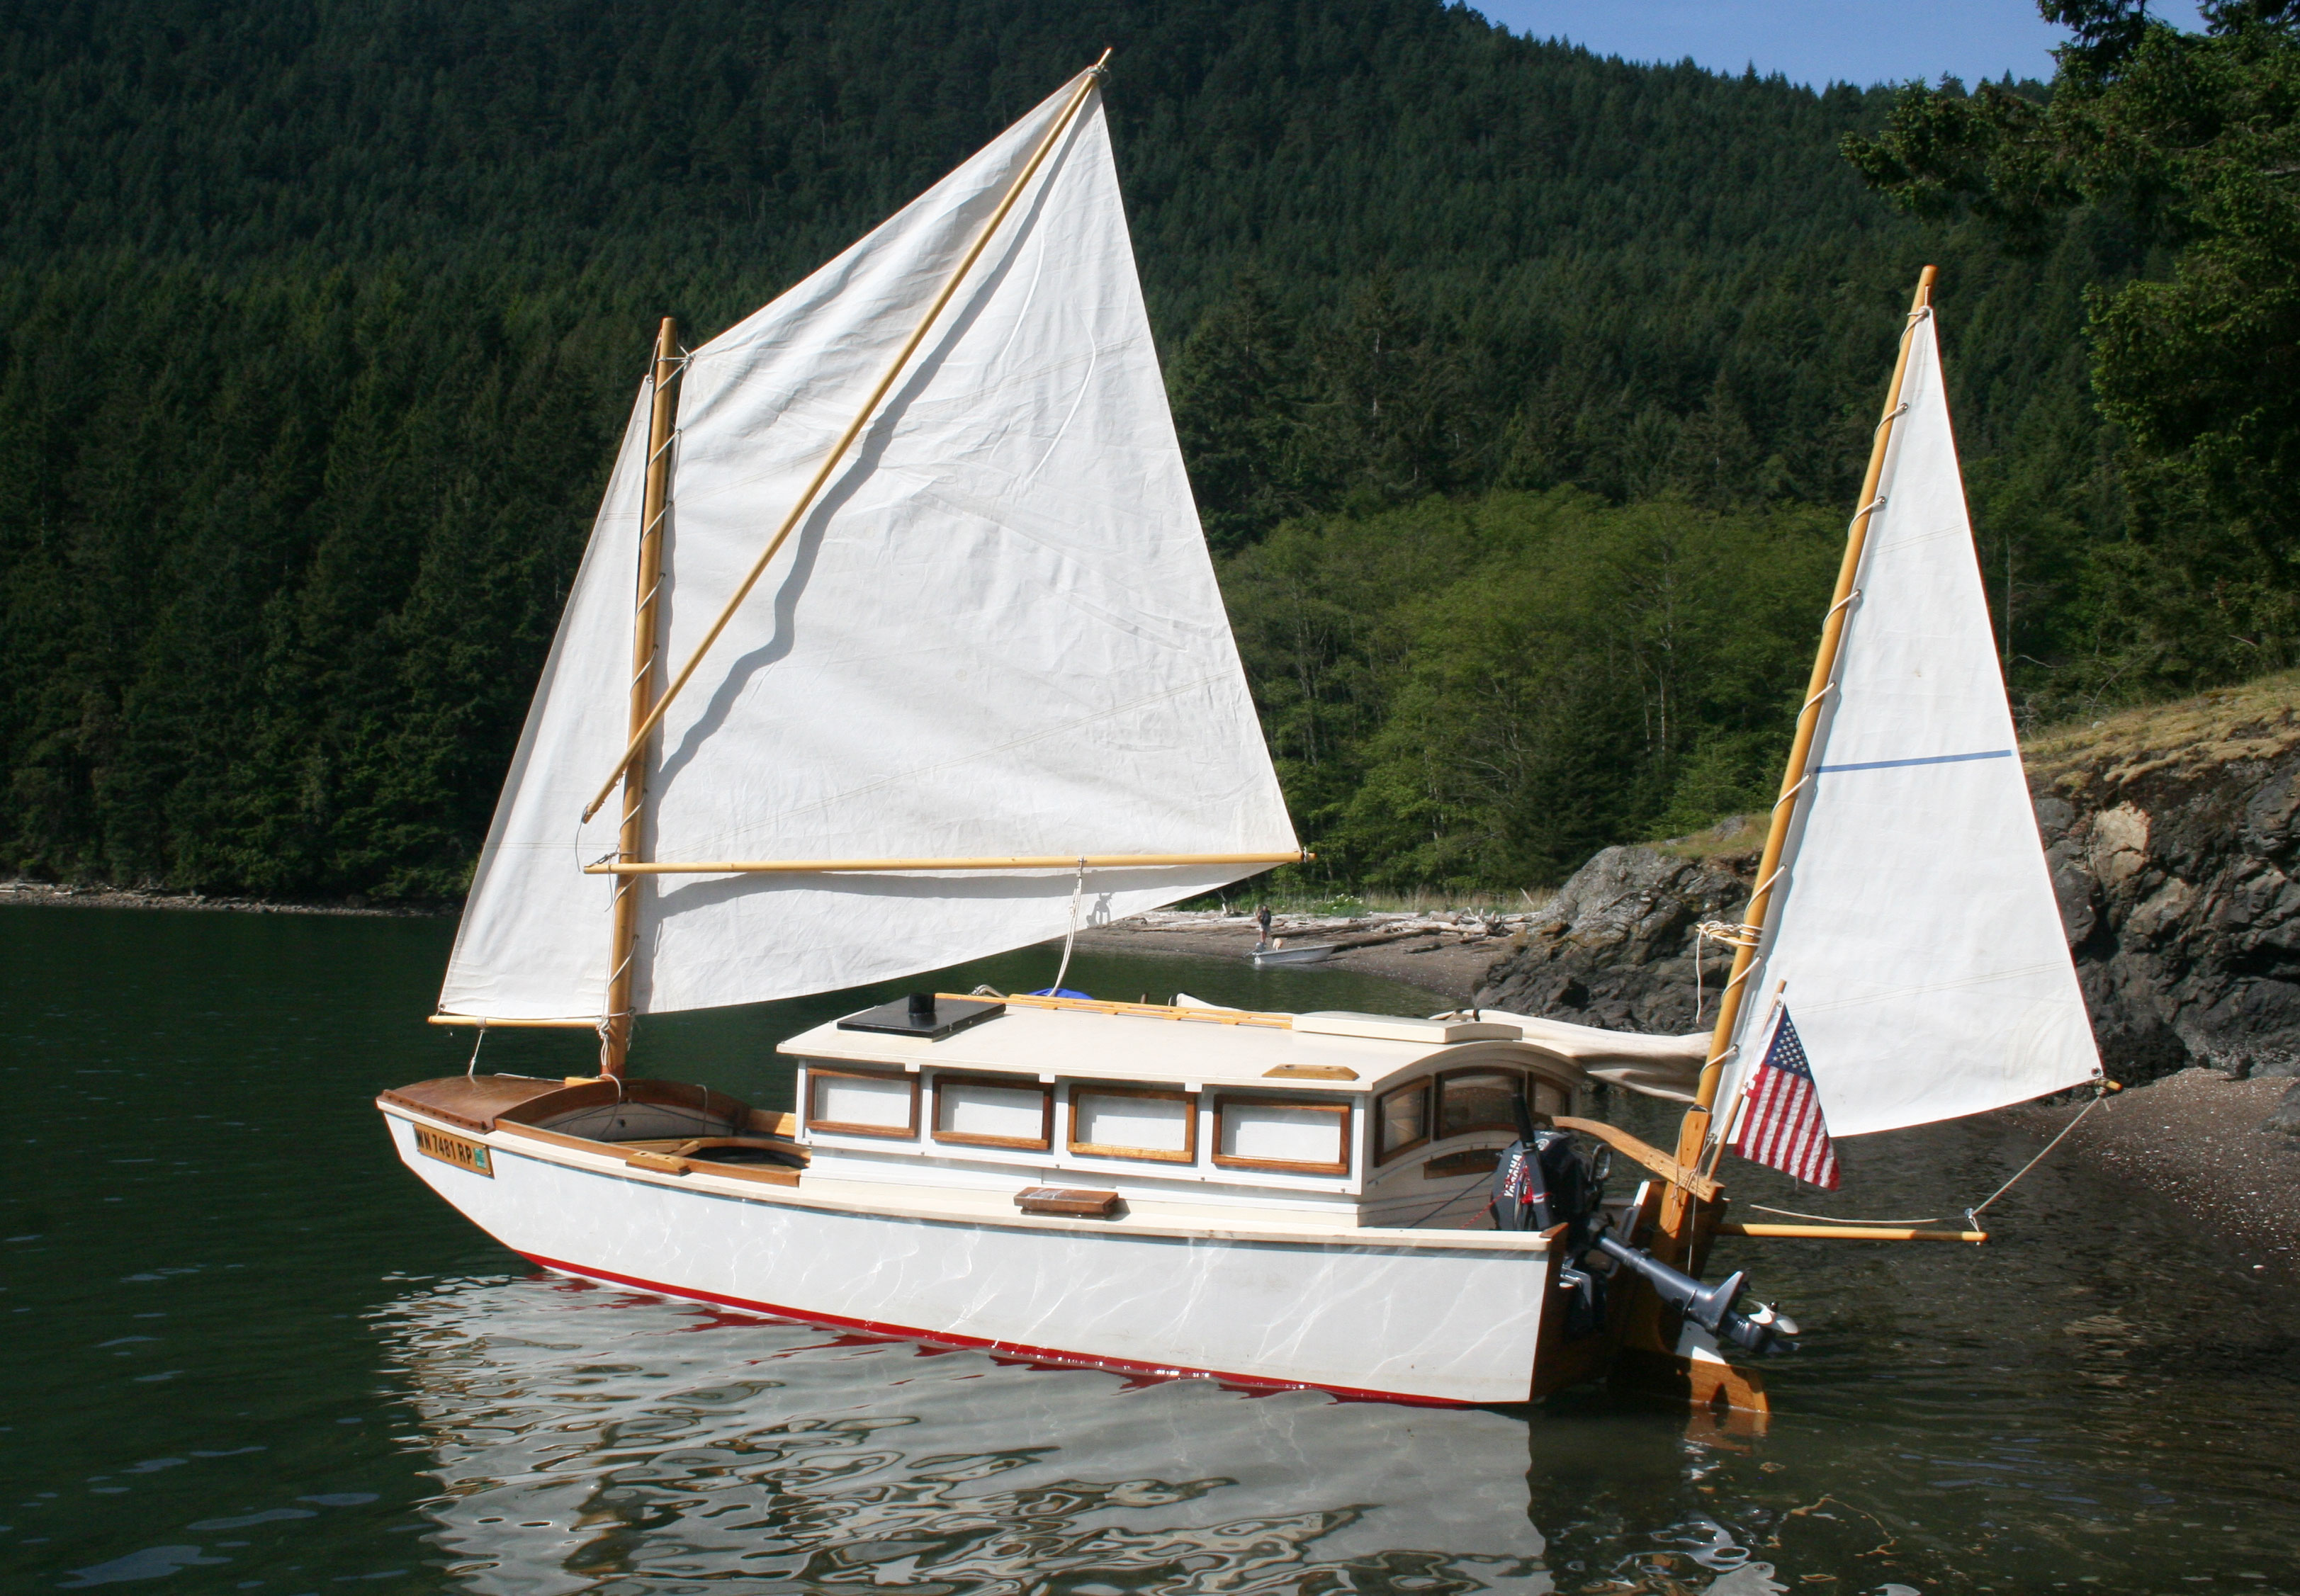
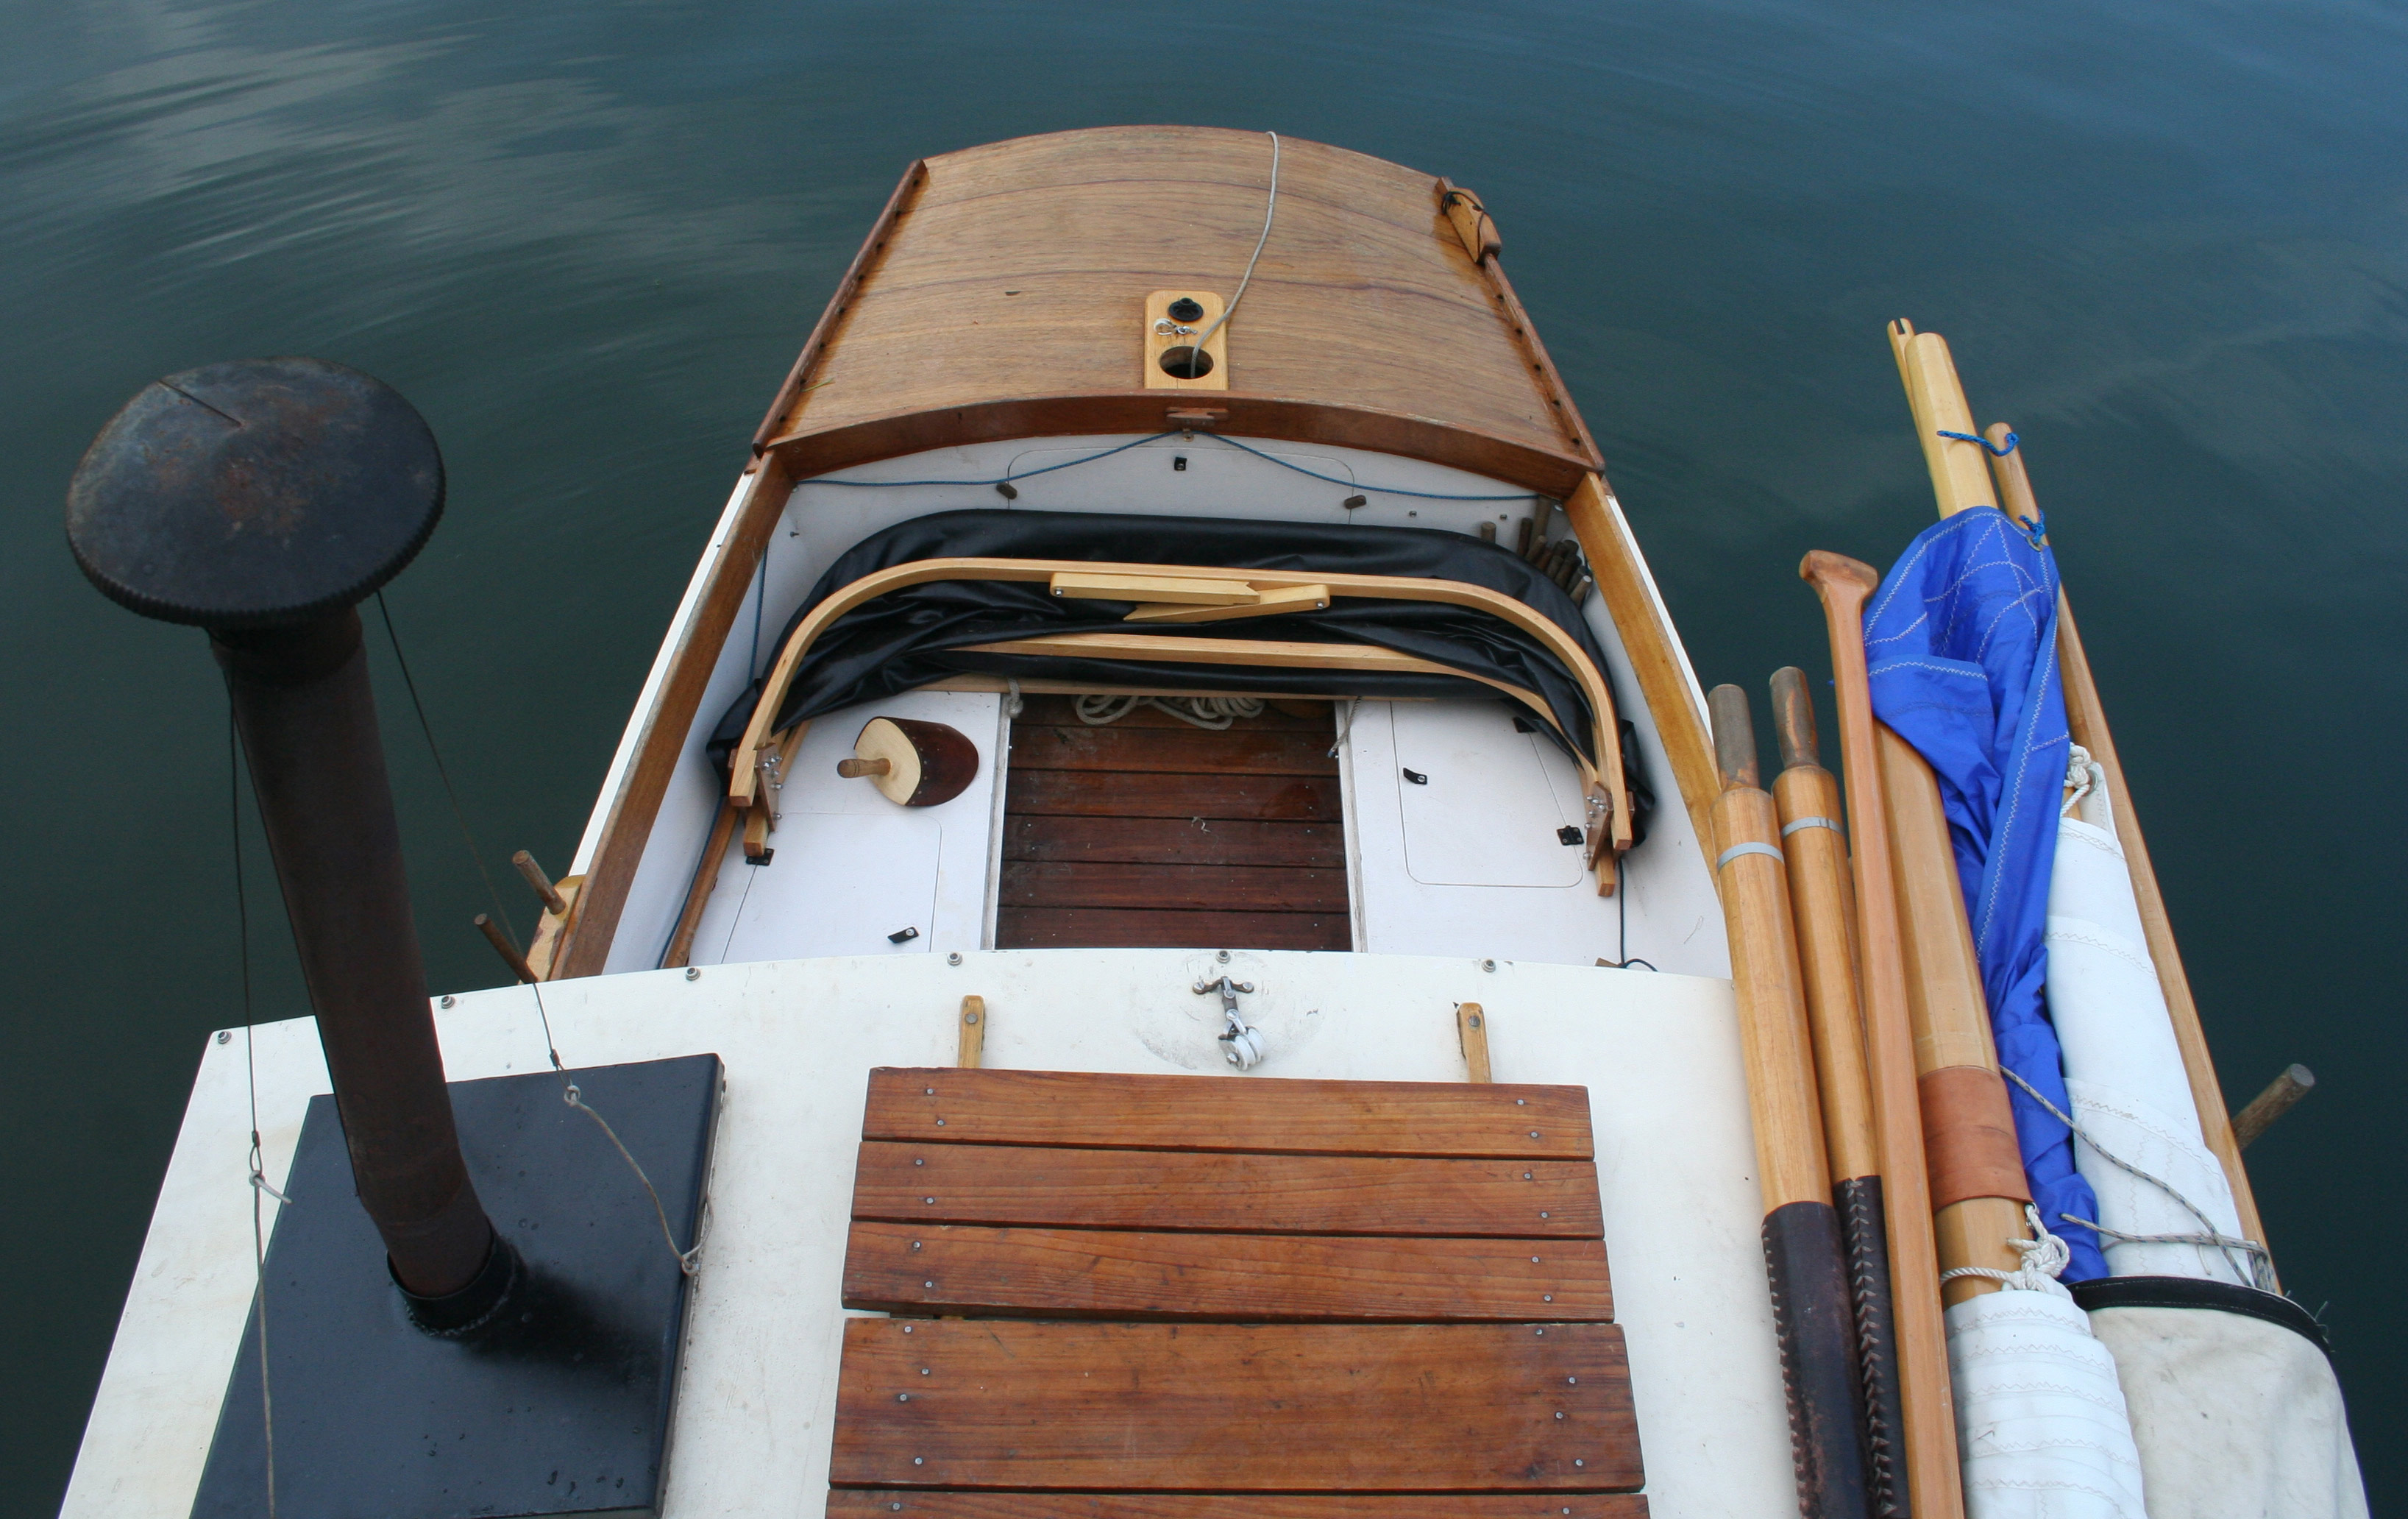
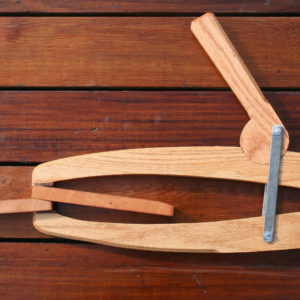
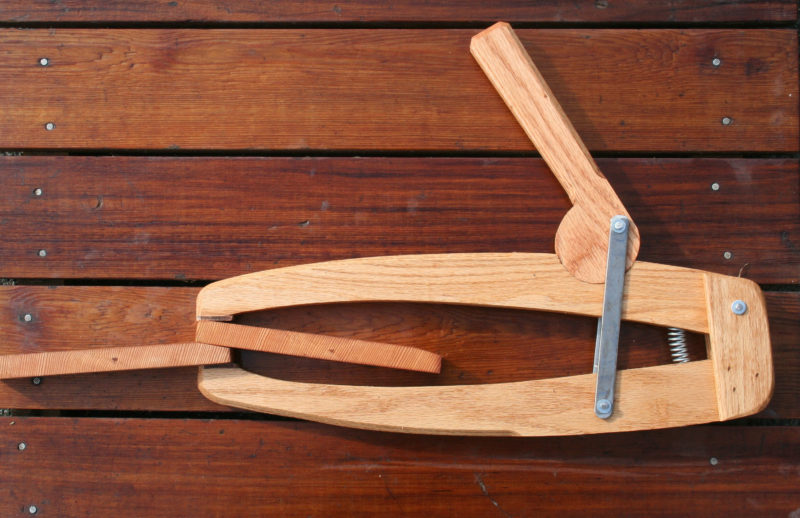
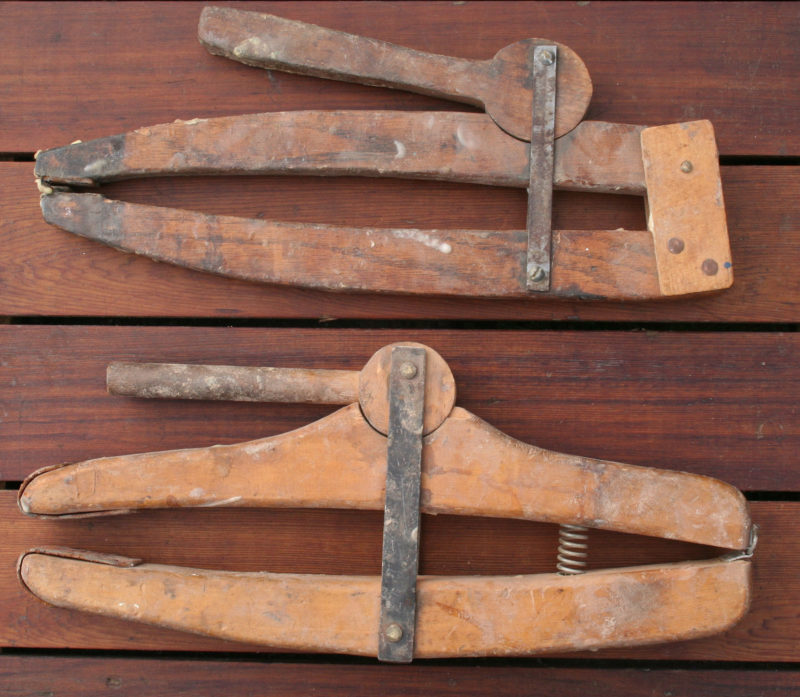
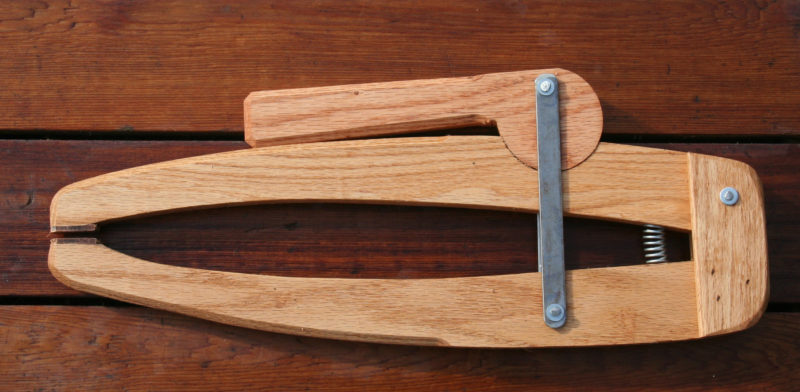
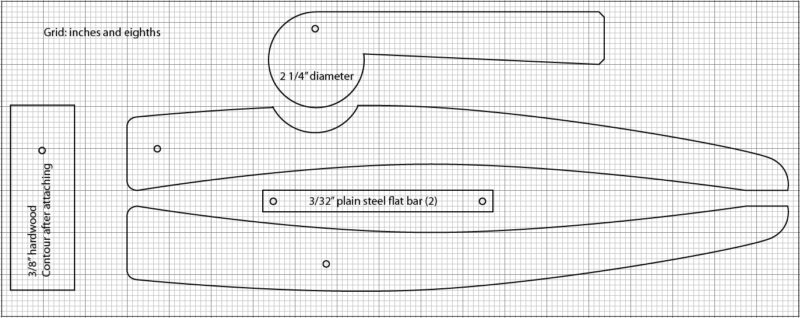 If you already have a set of planking clamps that use threaded rods or wedges, you could make a set of three of these clamps and use them first to get the plank secured in place and then fill in with the others. They’re almost as good as having a helping hand.
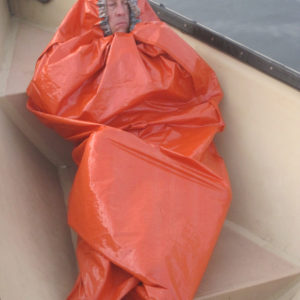
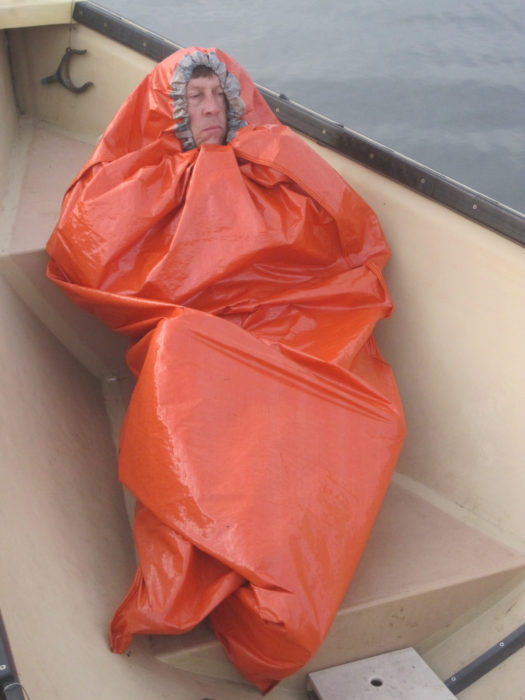

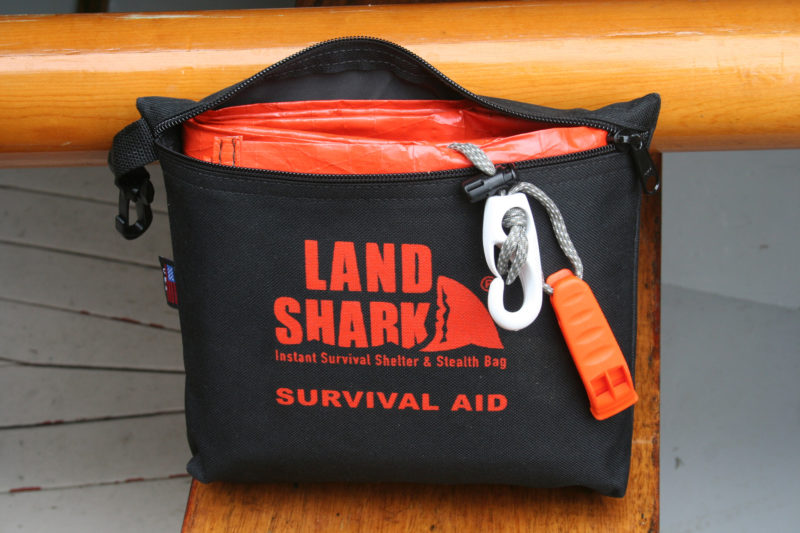


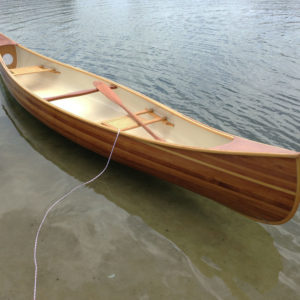
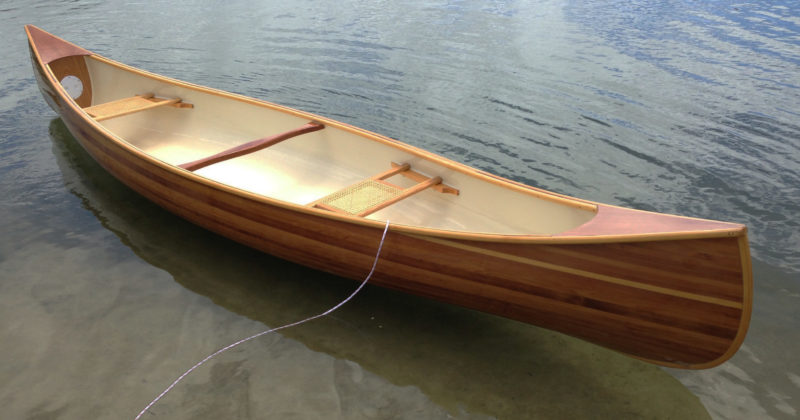
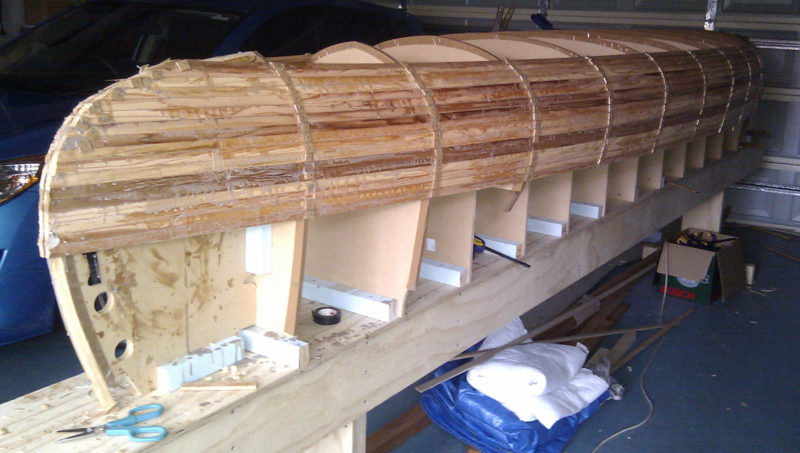
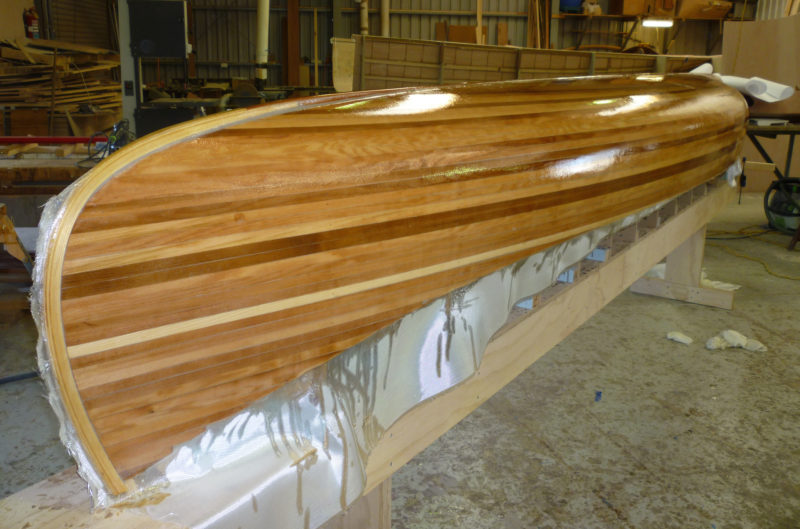

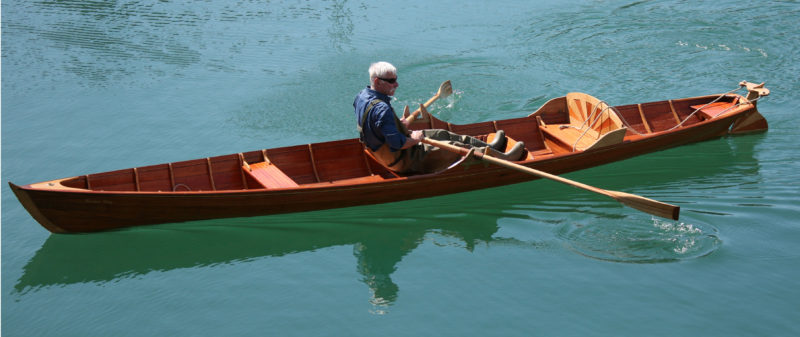
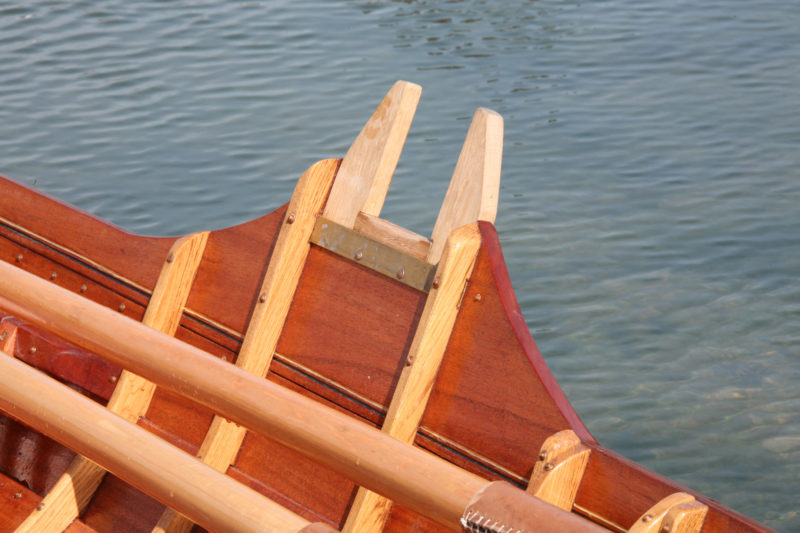
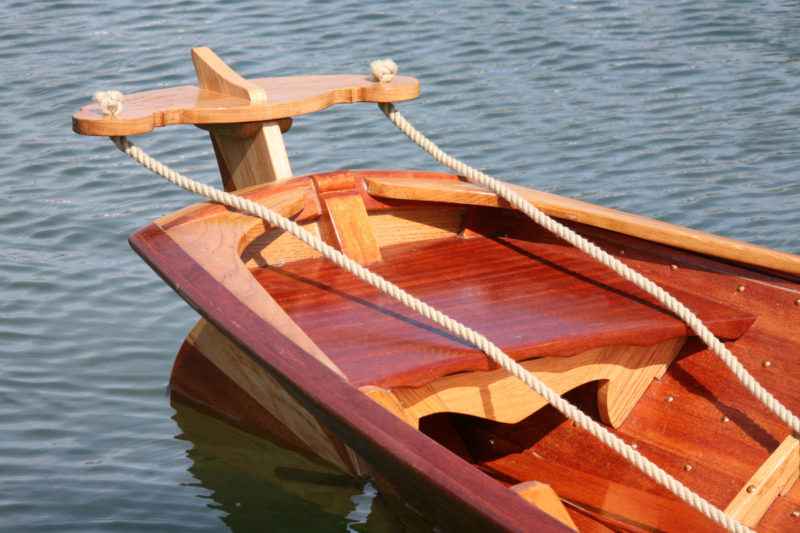
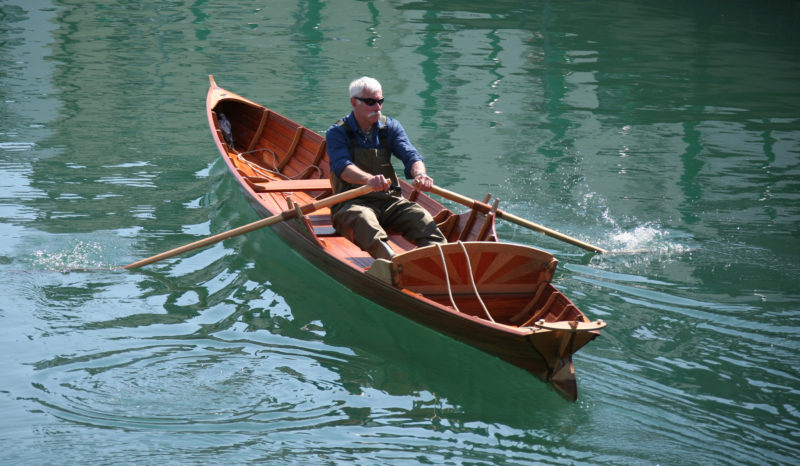
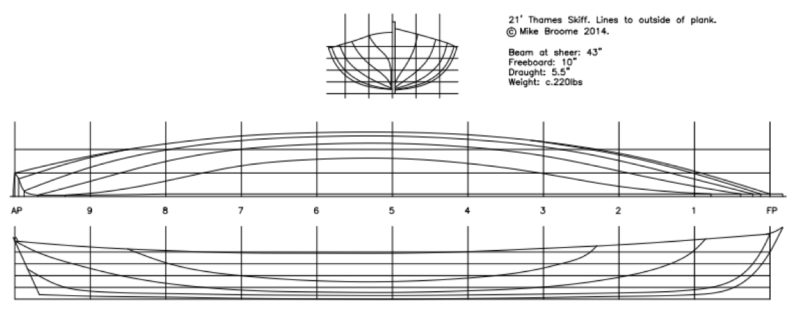
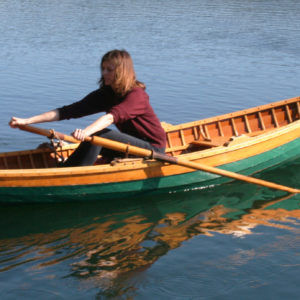
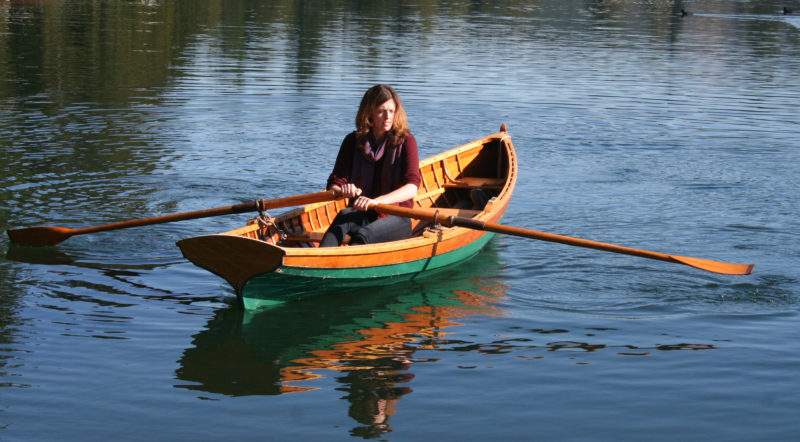
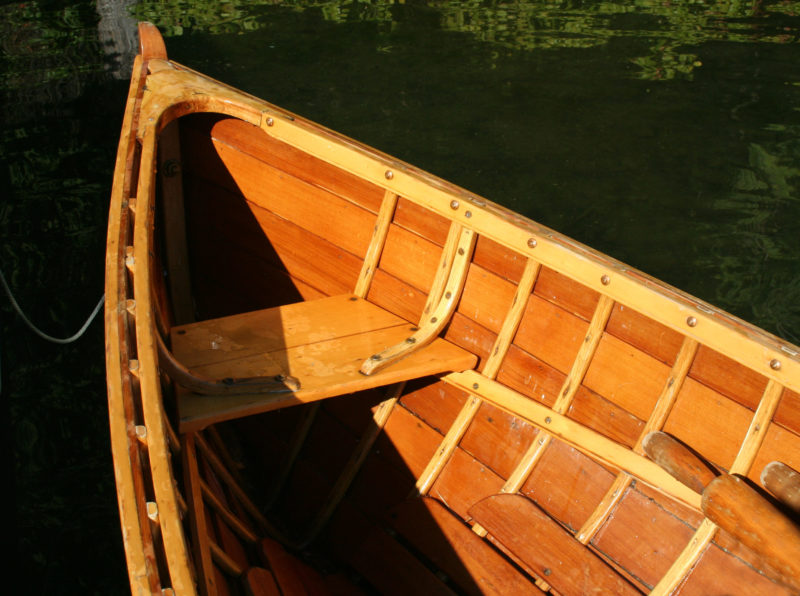
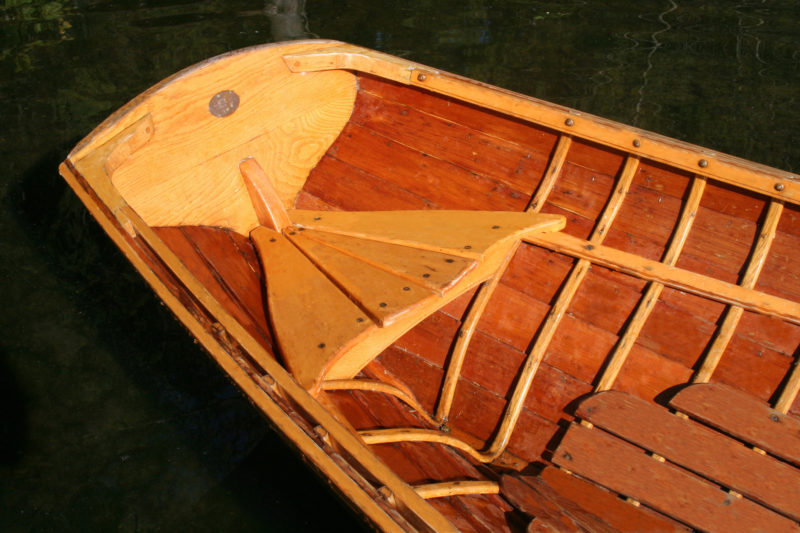
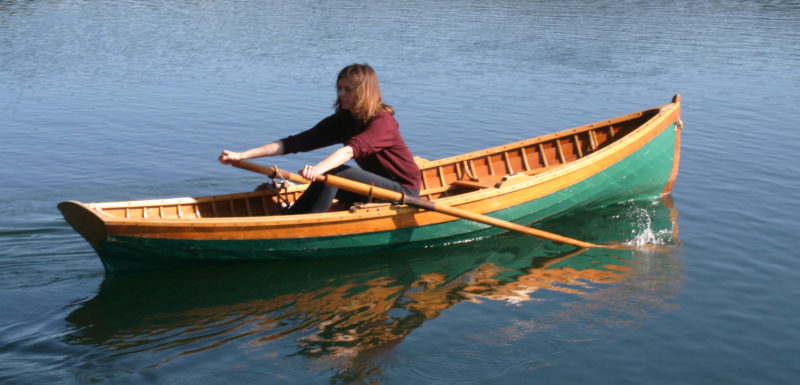
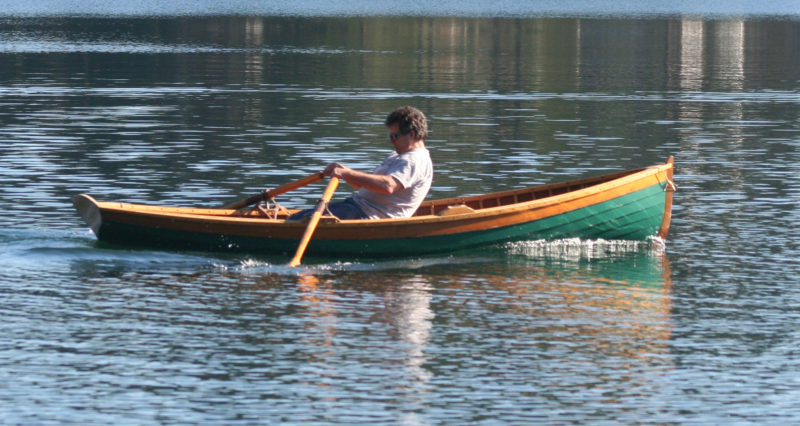
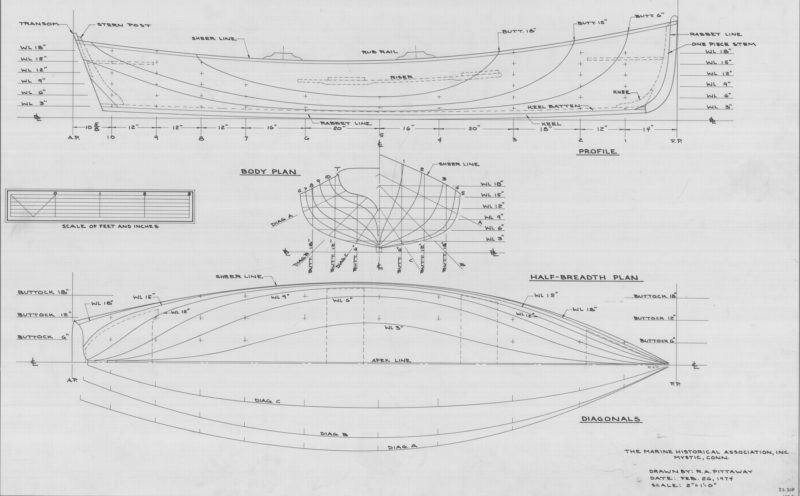
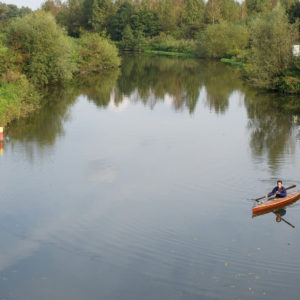
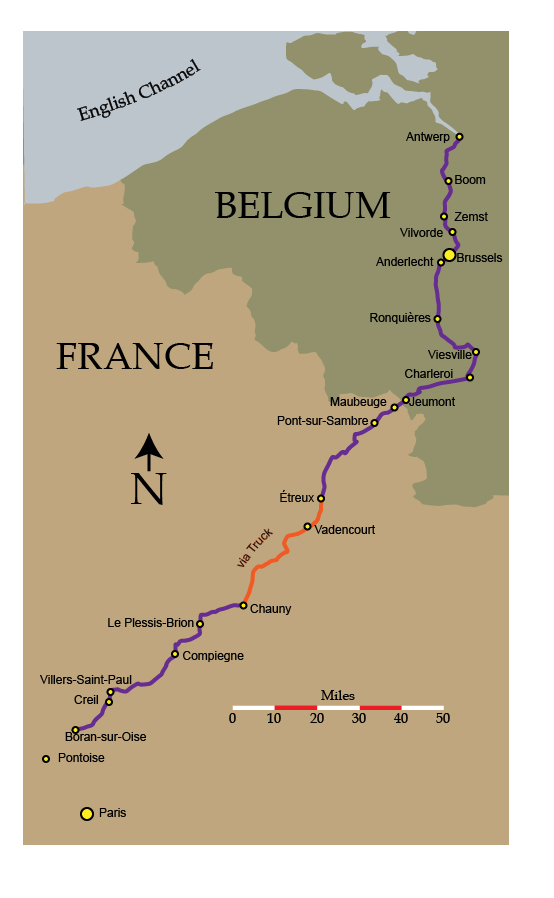 Two aspects of An Inland Voyage, the book that Stevenson published about the voyage, touched me immediately: first, the course, which I found wonderful and even exotic despite its geographic proximity to my home in Bordeaux; and, second, its vagabond spirit, which struck me as reawakening an ethic of leaving much to chance, a dance with luck, relying on unplanned encounters and unfolding episodes.