I started building boats in 1978, and only once was I able to collect enough crooks for a boat, a New York Whitehall. Its breasthook is apple, the six thwart knees and the bookmatched pair of quarter knees are cherry, and the transom knee is Alaskan yellow cedar. I think they’re easy on the eyes, and even though the boat is now 32 years old, the knees are as good as new. Crooks of sufficient size were hard to find, difficult to season without checks, and awkward to saw into workable stock. In other boats I’ve made straight-grained, laminated, and steam-bent knees, but none took a nice shape as well as the ones I made from crooks.
Back in February, Ben Fuller and I were corresponding about a variety of ideas for articles, and he wrote, as an aside to a comment on boom jaws: “And don’t get me started about clunky, short-toed fat knees.” When I was looking at knees in the small boats at the Wooden Boat Festival in Port Townsend this past September, I saw a lot of short-toed knees and thought it was time to get Ben “started” and have him write an article. While most of the knees at the festival were one-piece, straight-grained knees, one boat had some very nicely shaped half-lapped knees, but the joints that showed—vertical on one face, horizontal on the other—didn’t look right. I had a boatbuilder friend take a look at them, and he agreed that the shapes were good but the glue lines spoiled the effect. too
These knees are very nicely shaped, but the curves can’t compete with the rectilinear filler blocks and seams.
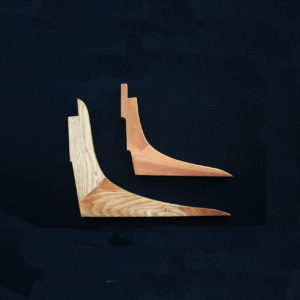
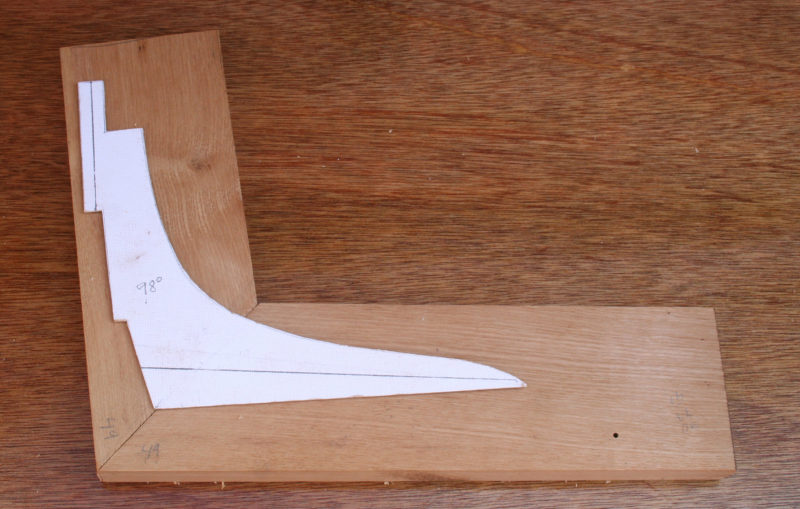
I made some sketches of other ways to make knees using straight-grained lumber, and thought that an angled joint would look much better. The easiest way to join two pieces in a mitered corner would be with a spline. I had made two-piece breasthooks with splined joints, and they’ve held up well over the years. The method should work just as well on knees.
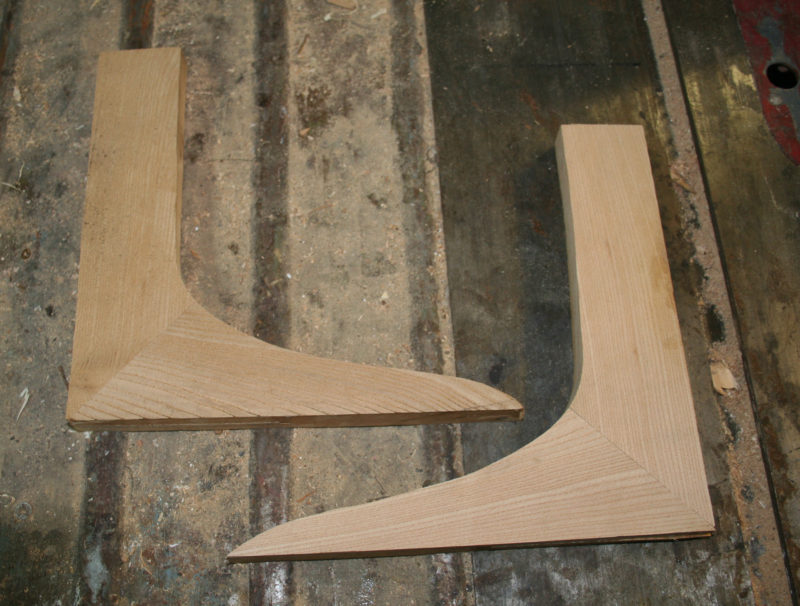
I don’t have a boat in the works, so I made up some knees that could fit boats that I’ve already built, but they would be objets d’art at best. I made one in breasthook fashion with table-sawn kerfs running parallel to the angled miter edges. That worked, but left the spline exposed.
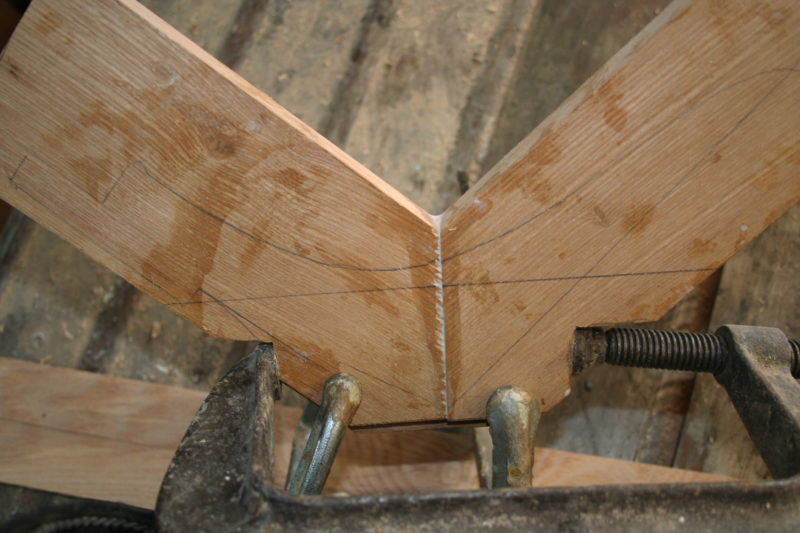
I then cut kerfs perpendicular to the miter edges, cutting about 1/2″ shy of what would become the curved edge of the knee. That was the way to go. The first mitered-and-splined test pieces were joined at a right angle, and when I cut the knee to shape to fit the slightly obtuse angle of the boat, the miter wound up well above where the knee would meet the thwart. I changed the angle of the miter to a 98-degree angle to match the flare of the side at the thwart, and then, by using slightly oversized stock, I would be able to arrange the template for the knee to put the miter angle where I wanted it as well as fine-tune the run of the grain in the ends of the knee.
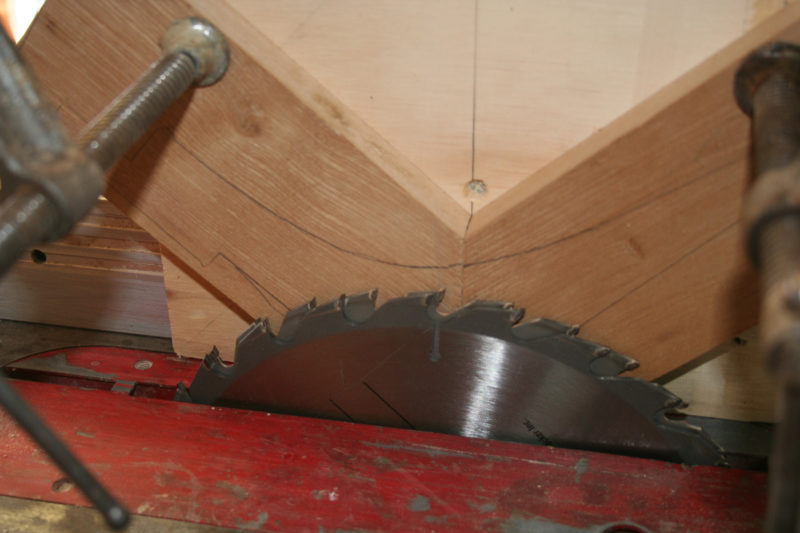
The kerfs cut at a right angle to the miter joint are quite deep. That increases the gluing area, which I think will make the joint quite stable. When I need knees for the next boat I build, I’ll make them this way, mitered and blind-splined.
Kerfs cut parallel to the miter joint will leave the spline visible after the knee is shaped.
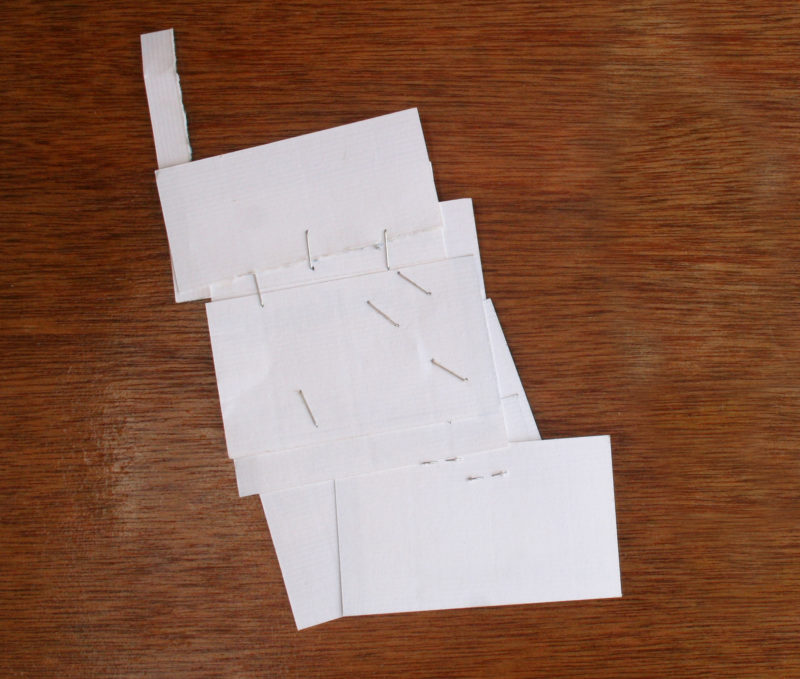
I initially made a business-card template for just the upright leg, not a pattern for the whole knee. The left edge and the bottom fit the contours of the lapstrake planks and the thwart.
I started by making right-angled blanks for knees and cutting the toes before tracing the planking contours from the template on the upright. That approach didn’t give me the best run of grain on the upright nor control over the location of the miter joint.
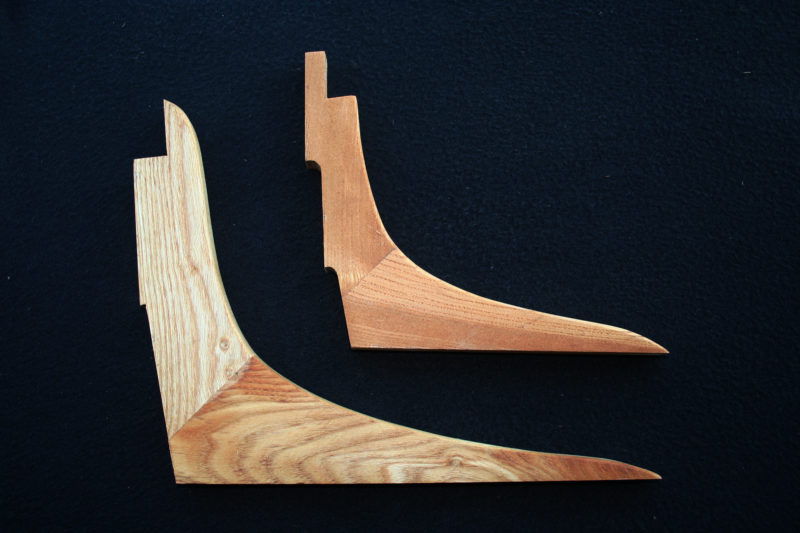
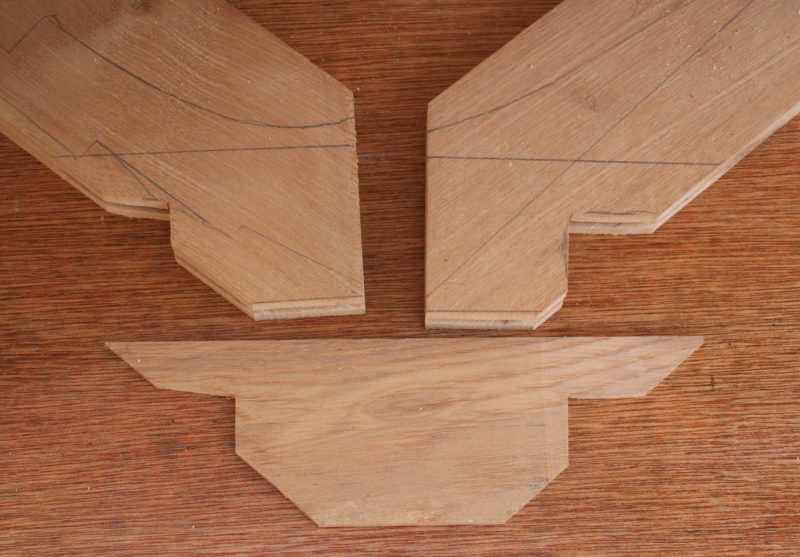
Two early versions of splined knees had the miter joint higher than I had wanted and had poor color matches despite having each knees sections cut from the same piece of wood.
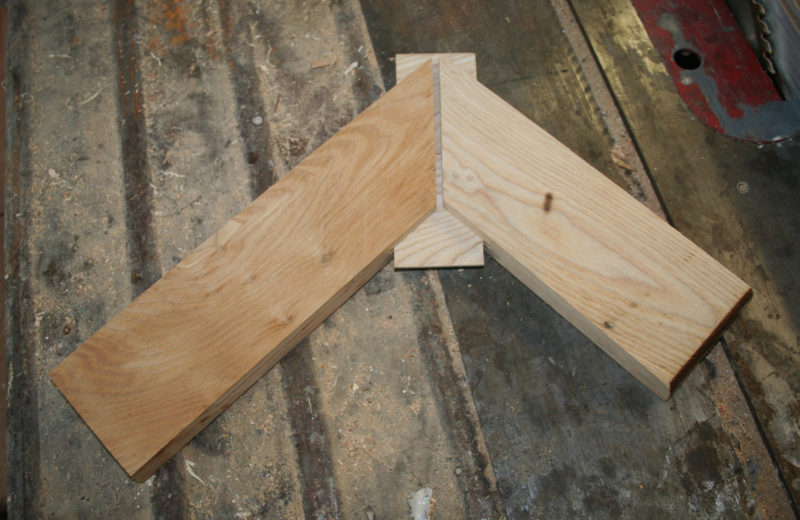
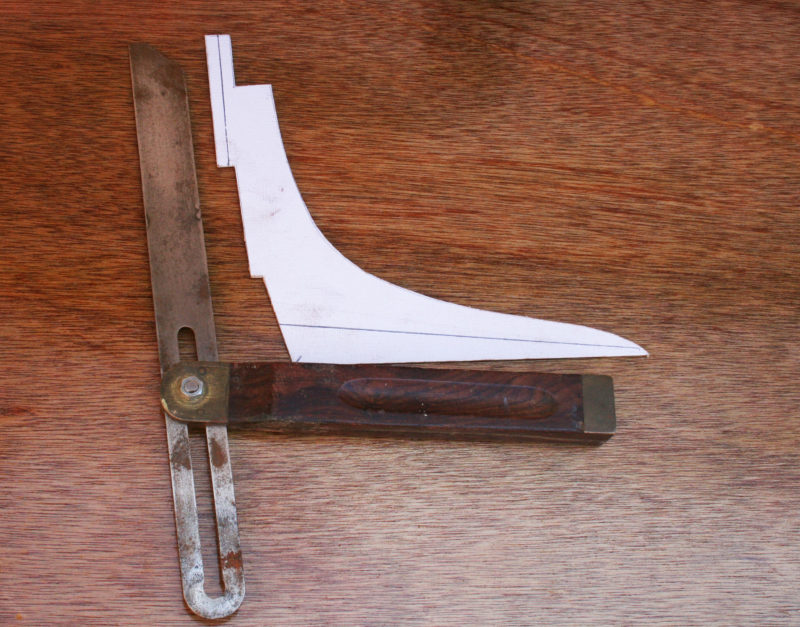
For my next trails I used the business-card template to make a full pattern for the knee. The pencil lines show the direction I want the grain to run in the finished knee. I set the bevel gauge to record the angle between the line, in this case 98 degrees.
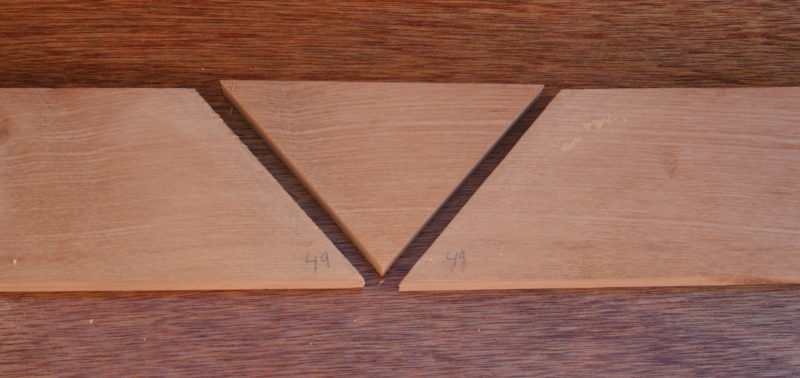
By making two cuts and “wasting” the triangle, I can get a better match of grain and color. When I made a singe cut and flipped on piece to get the angle, the color should have looked the same, but the angle the grain takes at the surface catches the light in different ways. Flipping one piece gave the wood a different look that was quite evident at the joint.
With oversized stock I could adjust the pattern to get choose the best run of the grain and the location of the miter joint that looked best.
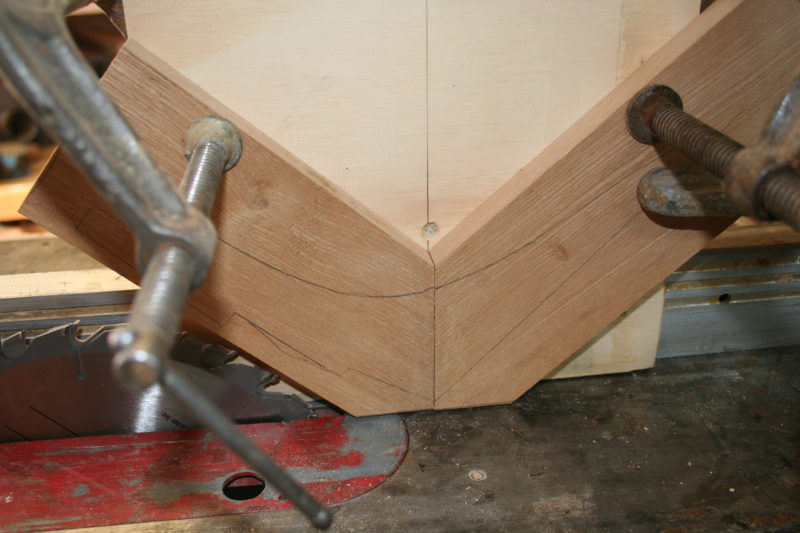
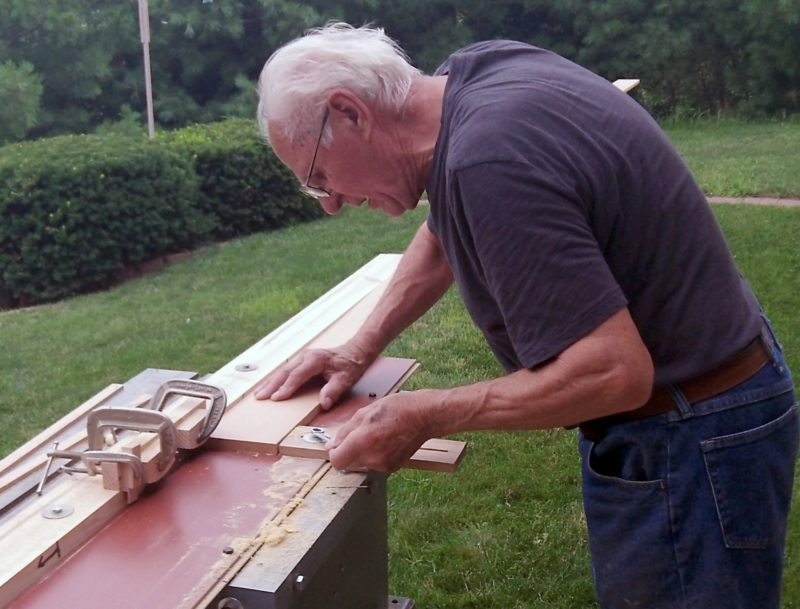
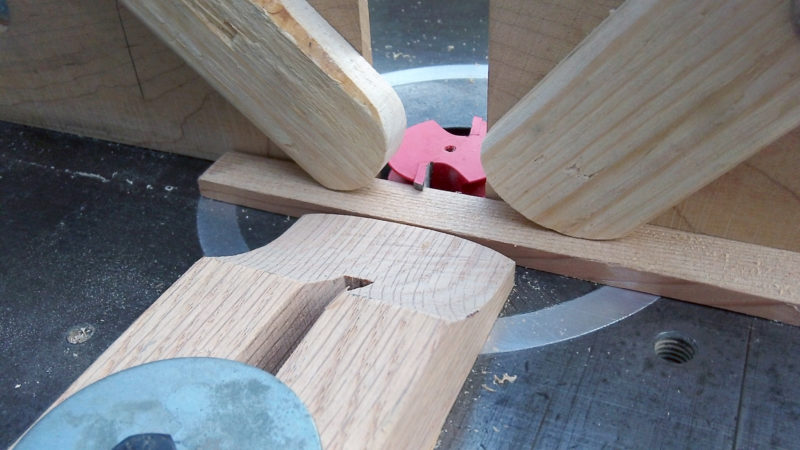
I used a shop-made tenon-cutting jig to cut the kerfs for the splines. It straddles and slides along the rip fence. Cutting off the corners of the two pieces being sawn removes wood that doesn’t need to be run through the saw. I have two blades stacked on the saw arbor to cut a 1/4″ kerf.
I set the depth of cut to fall short of what would eventually be the inside face of the knee.
Oversize blanks provide extra wood to make notches for a clamp to squeeze directly across the joint without slipping. The spline has a little more wood sawn off so the clamp won’t bear against it, preventing the clamp from squeezing the joint closed tight.
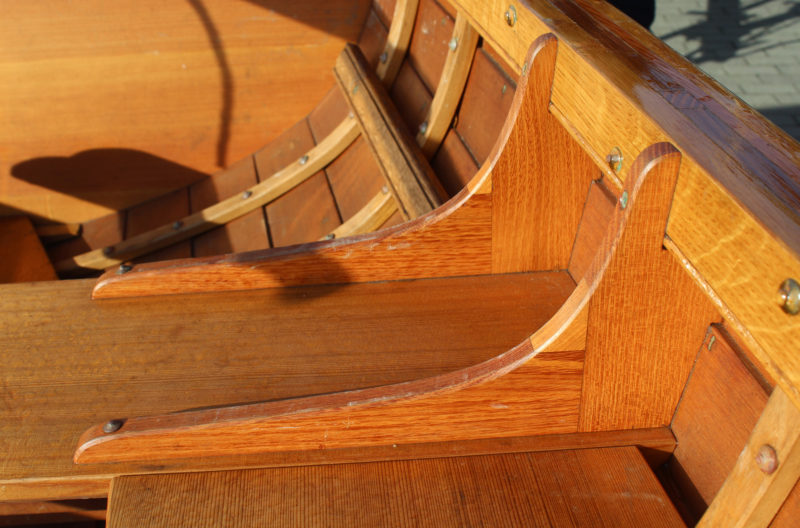
A large clamp squeezes the miter joint tight and two small clamps squeeze the wood tight against the spline.
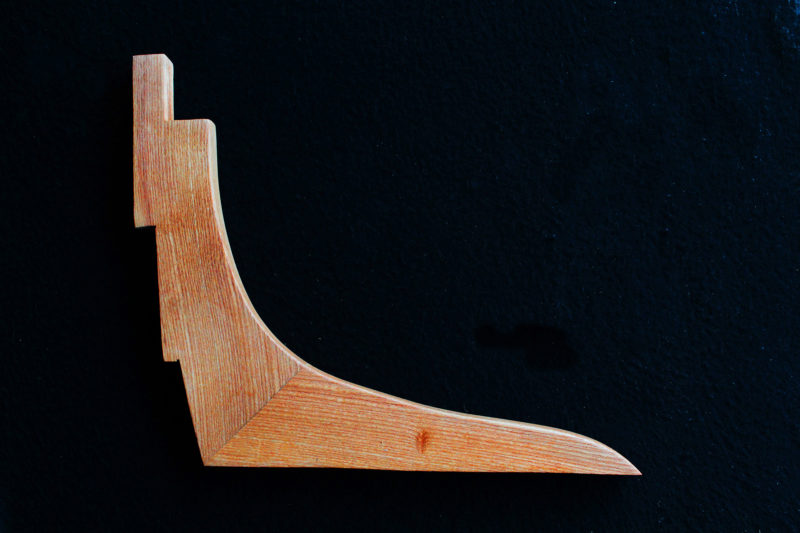
The finished knee has a close match of grain and a good placement of the miter joint.
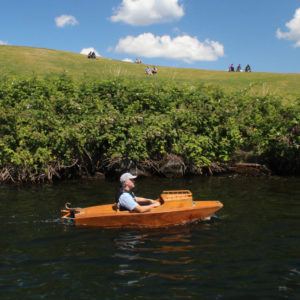
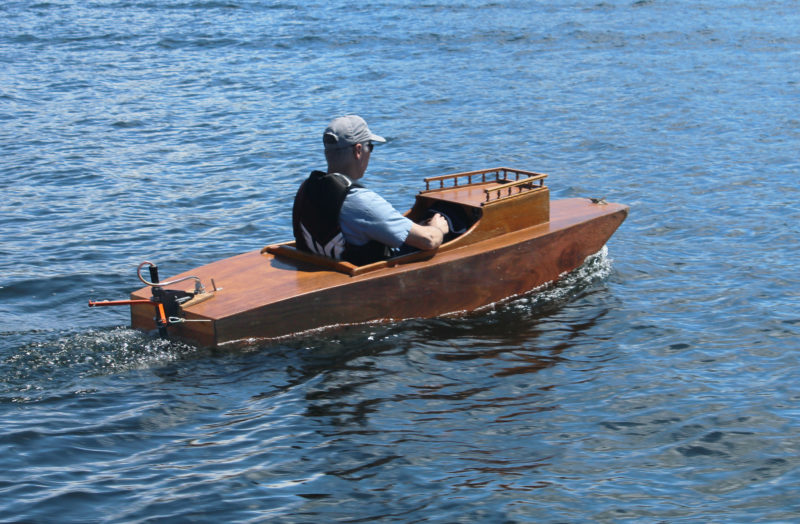
If you tend to take yourself too seriously, here’s a boat that can fix that. Paul Elkins’s Little Miss Sally is an electric micro-boat for which whimsy is as essential to its operation as its 12-volt battery. I first saw the boat on a YouTube video. In it, Paul slides her out of the back of his pick-up truck. A man with a horseshoe moustache, sunglasses, and a camo cowboy hat says: “That’s baaad. You gonna ride that thing? Sweeet!” The video has over a million views. That was my first hint that the boat might have a broad appeal.
Paul has invented and designed lots of things: several boats, bicycle camper trailers, micro shelters, and odd things such as paint-can stilts. He describes himself as a “conceptual artist”; he’s more interested in exploring ideas and creating things than capitalizing on them. Most of Paul’s creations get little more than a photo on his website or a video on YouTube, and then he’s off to the next idea. Little Miss Sally is one of 10 creations for which he has drawn plans.
The boat is roughly 8′ long, 30″ wide, and 14″ deep. While the 42-page instruction manual gives detailed dimensions for all of the pieces, the exact overall dimensions aren’t listed. They’re not really necessary, and the focus of much of Paul’s work is just on getting things done. His full list of materials and tools, measured drawings, and step-by-step instructions and photographs will make it easy for a novice to put the boat together. If you have even a modest background in woodworking, you might be able to get the boat assembled in a weekend and be ready for wiring and paint or varnish.
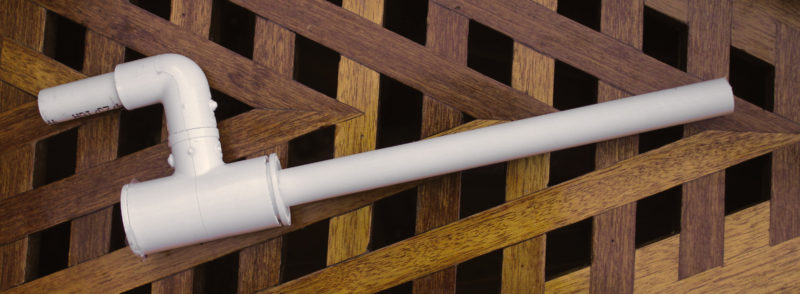
photographs and video by the author
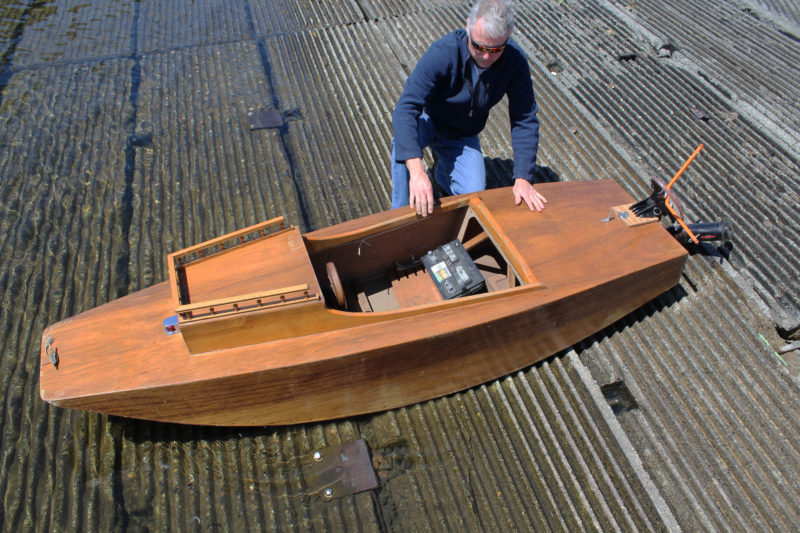
At the launch ramp, Elkins sets the 12-volt deep-cycle battery behind the angled panel that serves as a backrest. The trolling motor’s shaft has been shortened and its controls moved to the dash panel forward of the wheel.
Little Miss Sally has a scow-like hull of 1/4″ mahogany marine plywood. The vertical side panels are sprung around the transom, the bulkheads that define the cockpit, and a horizontal wedge-shaped bow piece. Intermediate framing reinforces the sides and decks. The bottom panel is wrapped in a continuous sweeping curve from the bottom of the transom to the forward end of the sheerline. The one-piece plywood deck, the bottom, and the sides are all nailed to 3/4″-square longitudinals.
The hull’s deep rocker and the weight of the 12-v battery give the boat good stability.
The plans include an optional profile in which the bottom runs straight aft from the lowest point of the hull to a deeper transom. Paul’s suggestion is that the alternate hull “might go a little faster and carry a little more weight.” A few of the Little Miss Sally builders who have pictures of their boats on Paul’s site appear to have chosen this deeper stern, but without any additional weight aft, the extra displacement merely lifts the stern, pitching the bow down. The boat may still perform satisfactorily, but it looks out of trim and the otherwise jaunty sheerline suffers. It’s an 8′ boat. It’s not going to go fast or carry a lot of cargo, so you’ll be better off sticking with the original design.
The cockpit was a comfortable fit for the reviewer’s 6′ frame and his size-13 shoes.
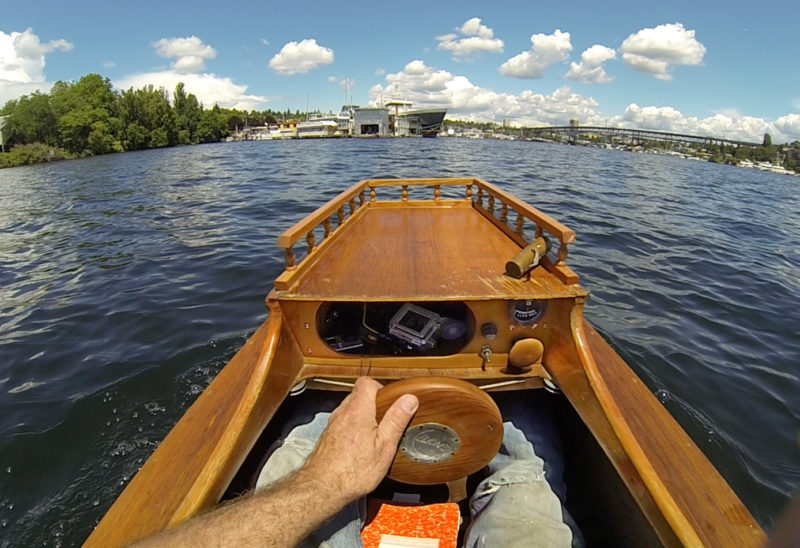
The pine cockpit coaming sweeps up to form the superstructure; its roof is surrounded by a fiddle rail to keep lunch and sunglasses from slipping overboard. The instrument panel has an amp-meter, a switch for running lights, a horn, and a dial control for the electric motor. The adjacent compartment has room for day-trip sundries. The wooden wheel turns on a length of steel tubing with the steering lines wrapped around it.
Little Miss Sally’s outboard motor is a modified 32-lb-thrust trolling motor. The shaft is shortened and the controls, with a bit of extra wire, are moved to the instrument panel. A steering bar, its ends angled back about 45 degrees, is secured to the motor shaft with stainless-steel hose clamps. A deep-cycle 12-volt battery occupies the space under the aft deck, just behind the cockpit.
While the plans call only for a block of foam for flotation in the bow, the stern compartment should also be fitted with foam, leaving only space for the battery, to support the stern in the event of a swamping.
The exterior gets a layer of fiberglass and epoxy before the skids that protect the bottom are fastened in place and the finish is applied.
The weight of the boat without the battery and motor aboard is about 65 lbs, so it’s not too heavy to cartop if you’re strong enough to make the lift or have a way to raise to it one end at a time. Readying the boat for launch takes just a few minutes. These are the steps to getting underway: the motor must be pinned to its mount and plugged in; the rudder lines must be clipped to the yoke; and the battery must be put in place through a hinged panel in the aft bulkhead. The plans don’t specify a line to tilt the motor up for launching and landing, but it would be easy enough to rig one.
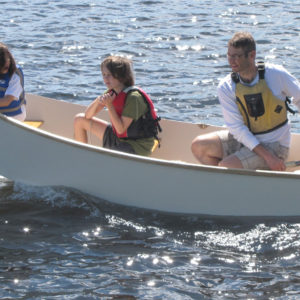
Getting aboard Little Miss Sally is a bit like getting into a kayak, except the weight of the 12-volt battery gives the boat a lot more stability. I had no trouble climbing aboard or exiting at a high dock, a task that isn’t easy with a kayak. Once I planted myself in the cockpit, the boat felt rock-solid; the deep rocker of the bottom put my weight down low. With my 215 lbs aboard, Little Miss Sally had more than 6″ of freeboard, but the boat doesn’t have Coast Guard rating for a safe load, and should be used with caution, and only on calm, protected waters
You’ll need a two-piece kayak paddle for backup propulsion; there’s room in the cockpit for it. Slats kept me off the bottom, so the seat of my pants would have stayed dry if any water had splashed aboard. The aft bulkhead, angled at 75 degrees, makes a comfortable backrest, and in spite of the boat’s small size the accommodations didn’t feel at all cramped. With my elbows resting on the low coaming, I felt as if I were driving a convertible sports car with the windows and the top down for a sunny day.
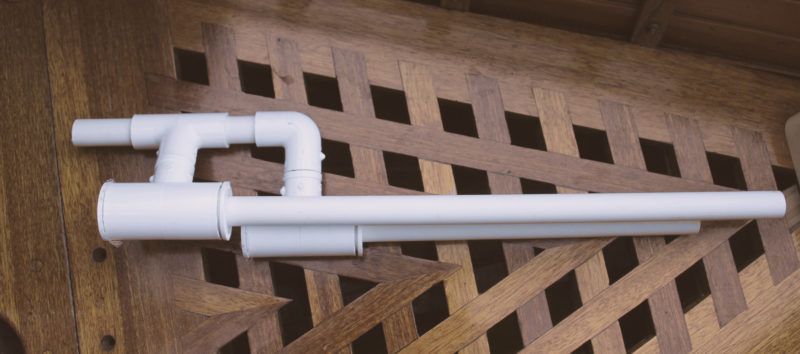
The hull is made of two sheets of 1/4″ plywood and about 25 board feet of lumber.
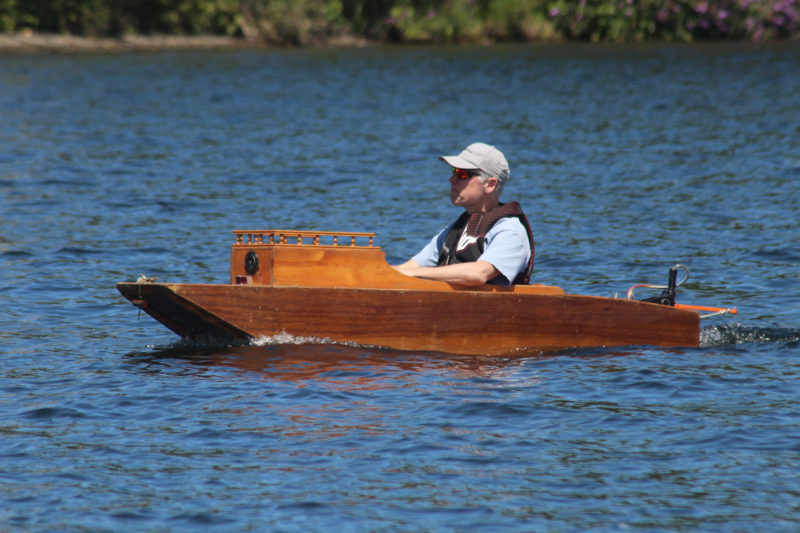
At full throttle I made a GPS-measured 3 knots. Paul thought he may have made a mistake when he rewired the boat for our outing, and the motor wasn’t getting up to full power. Judging by the sound of the motor, I’d be inclined to agree with him. I have a similar trolling motor, and it has more oomph and makes more of a whine when running wide open. Paul estimated the top speed somewhere between 4 and 5 knots. I was quite content with making 3 knots. Being so close to the water on all sides exaggerates the sensation of speed.
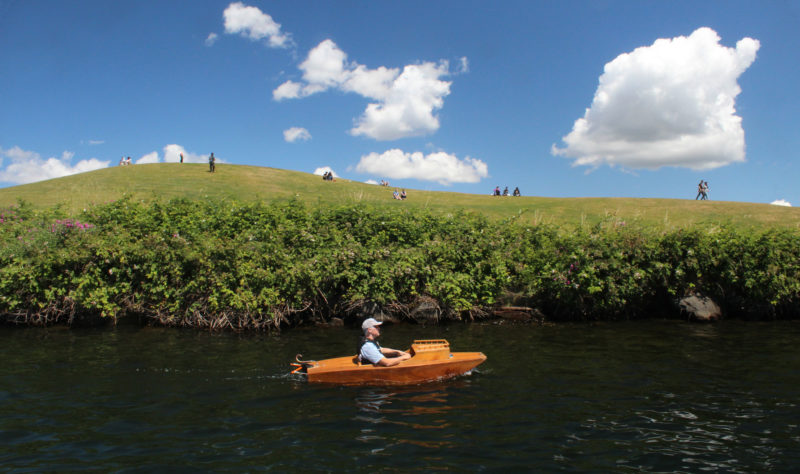
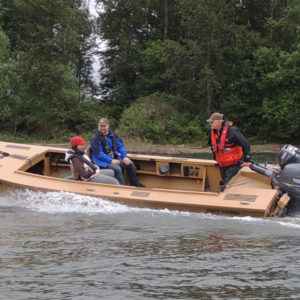
The water on the lake was scuffed only by a light breeze, so I had a pretty smooth ride. Little Miss Sally just bobbed over the boat wakes I encountered. A boat as short as this one tends to follow the contours of waves, rather than plow through them as a longer boat would, and even if a wave did spill over the bow, the superstructure would keep the water from getting to the cockpit.
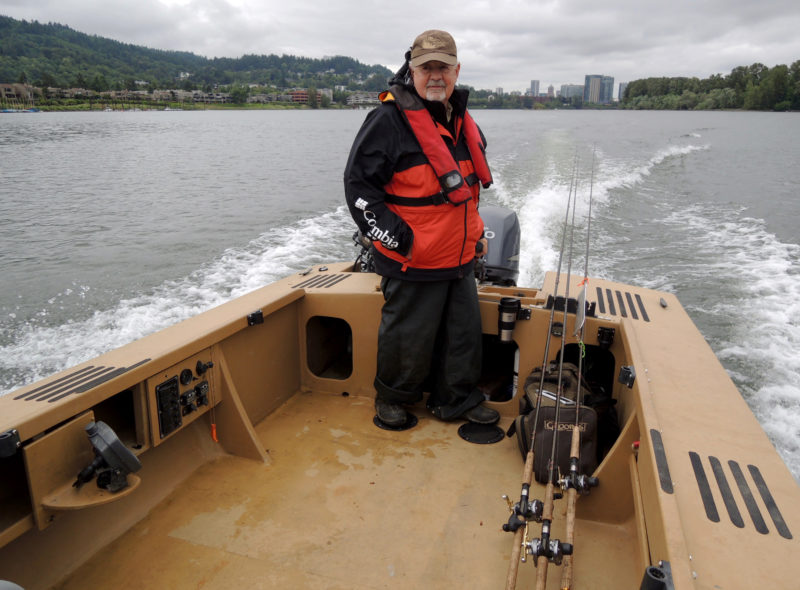
Elkins’s micro-boat provides a comfortable seat for watching the panorama of protected waterways unfold.
The little steering wheel does its job well. My hand dwarfed it, and along with the push-button electric horn it made me feel as if I were riding one of those coin-operated kiddie rides at the entrances to department stores (but without even a hint of embarrassment).
I didn’t have a chance to run the boat long enough to work through the battery’s charge, but Paul reports taking leisurely outings of 6 to 7 miles aboard Little Miss Sally and spending a whole afternoon, up to 6 hours, with frequent stops to enjoy the sights on Lake Union and other sheltered waters in Western Washington.
After I returned Little Miss Sally to the launch ramp, Paul took her back out to enjoy the rest of the afternoon. A man working with a utility crew, dressed in a Day-Glo orange vest and a hard hat, approached me at the top of the launch ramp and asked about the boat. He said he was planning on getting his first boat and needed something that wouldn’t take up a lot of room at home. He thought Little Miss Sally would be just the thing for lake fishing, and would offer an economical way for him to get out on the water without a whole lot of fuss. There’s nothing silly about that.
Little Miss Sally Particulars
[table]
Length/8′
Beam/30″
Weight (without battery)/65 lbs
[/table]
Plans for the Little Miss Sally are available from Paul Elkins. The 42-page downloadable PDF manual with dimensioned drawings costs $20.00.
Is there a boat you’d like to know more about? Have you built one that you think other Small Boats Monthly readers would enjoy? Please email us!
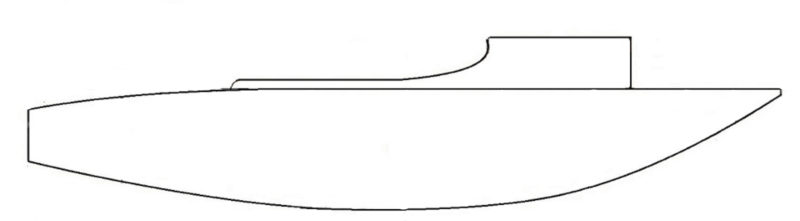
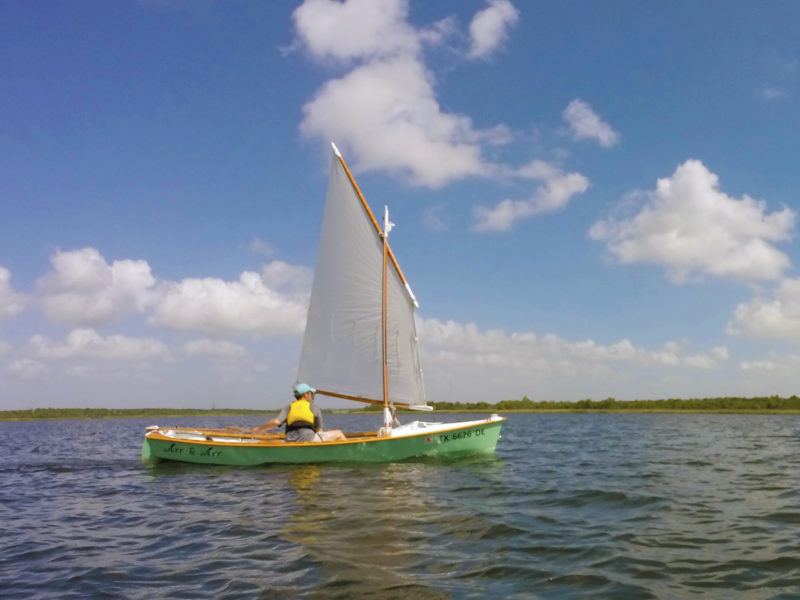
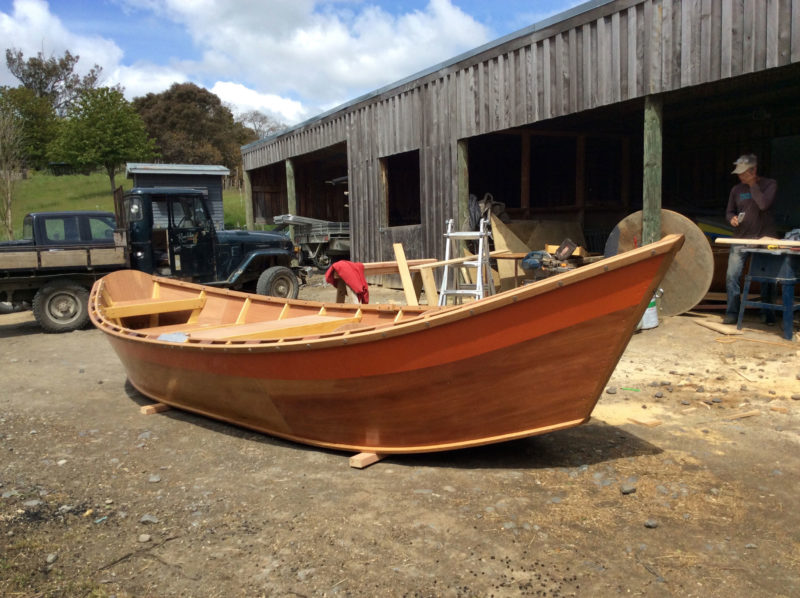
Flint is a 14′ 10″ open boat Ross Lillistone originally designed for Eddie Guy, who lived on an island in Moreton Bay, Australia, and traveled between the island and the mainland by rowboat. Eddie was disappointed with the boat he had been using and asked Ross to design one better suited to the task. The Flint is designed primarily as a rowboat, and moves quickly and easily under oars. It’s designed to track well even in a crosswind, to handle chop without pounding, and to handle longer voyages under the power of a small outboard. It has ample freeboard forward and a sharp, flared-V forefoot with more curvature than seems possible from plywood. The bottom fills out to a shallow V amidships and rises just enough aft to give the waterline the clean exit of a double-ender.
Flint was designed to reach displacement speed with ease, and it takes very little indeed to move it well: one pair of oars, the tiniest of outboards, or a small sail. Although it can exceed theoretical hull speed by at least a knot, it’s not designed to plane. Any outboard much more powerful than 2 hp would be overkill and would, in fact, throw the trim off and distort the waterline that normally makes it so effortless to drive. (After Lillistone received a number of requests for a boat along the lines of Flint but which could take advantage of more horsepower, he designed Fleet, similar to Flint in most respects, but with a fuller stern that can support a heavier outboard and readily rise to a plane.)
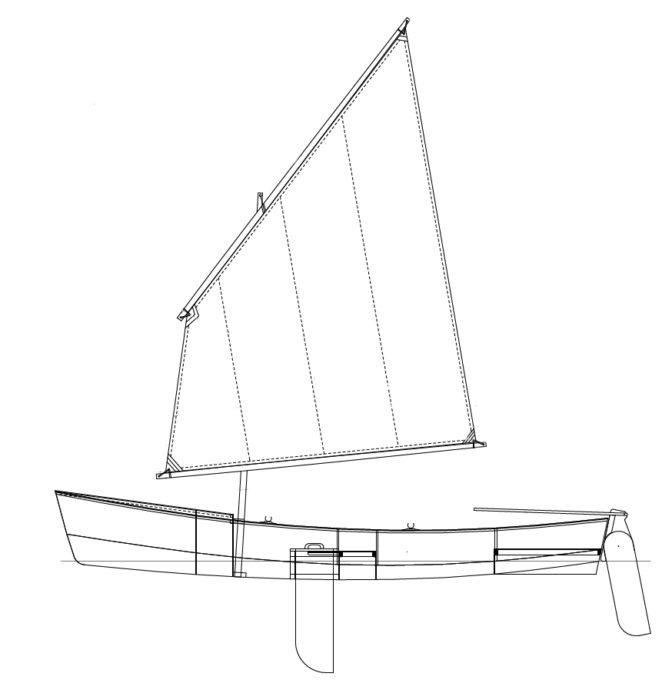
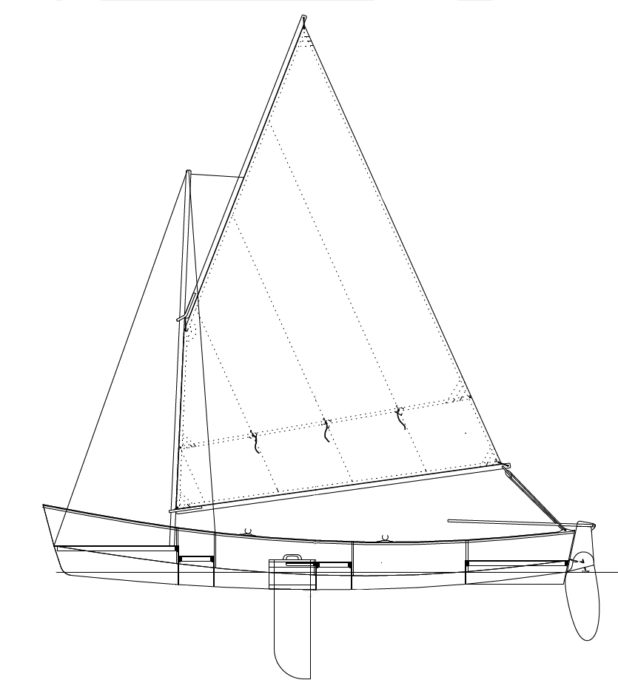
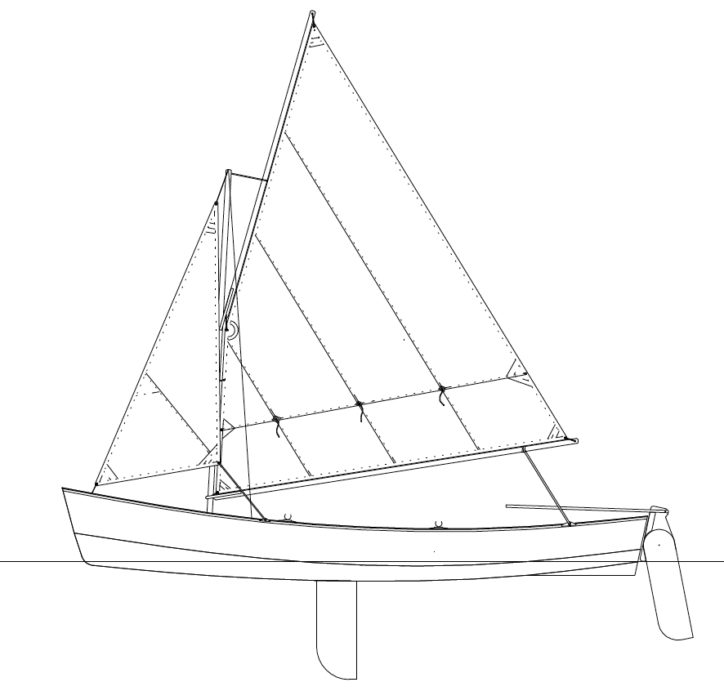
Some of Flint’s earlier builders experimented with a variety of sails, and the boat handled them so well that Ross returned to the drawing board and ultimately offered three sail rigs with the plans. The rigs include a 55.7-sq-ft balance lug, a 64.5-sq-ft gaff cat, and a gaff knockabout sloop with a 54-sq-ft main and a 10.5-sq-ft jib.
photographs and video by the author
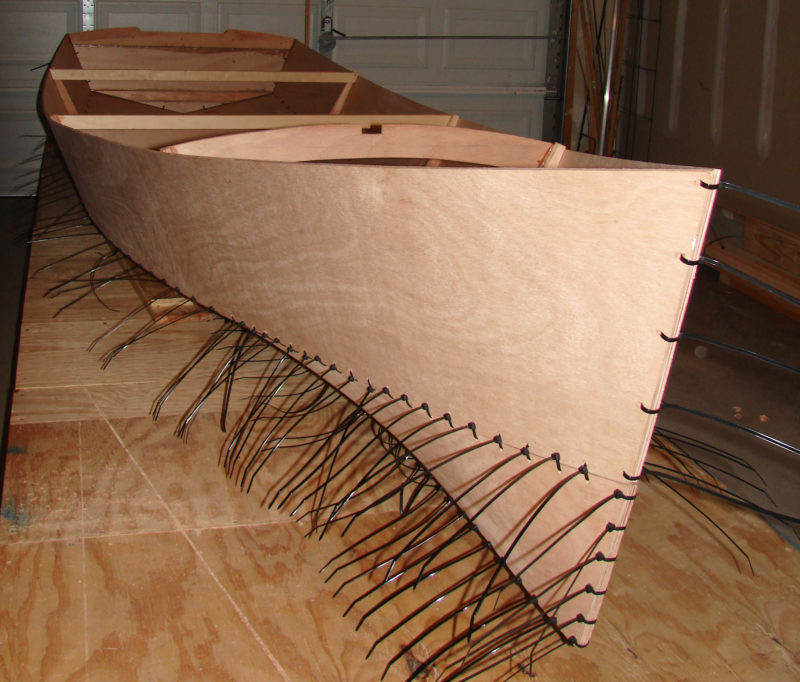
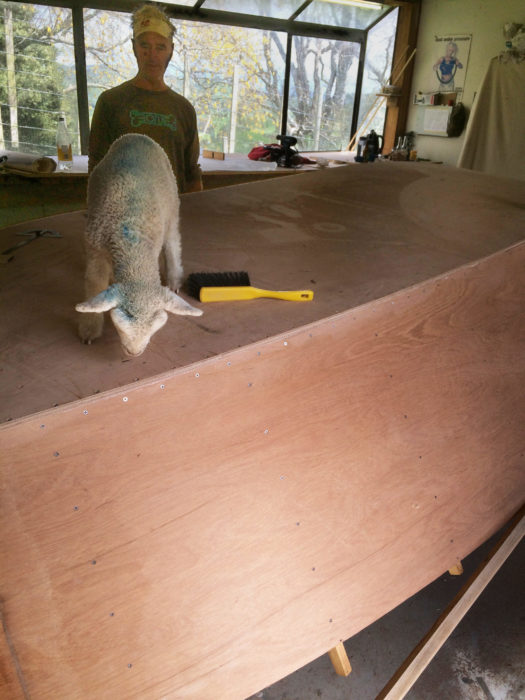
The bottom panels have quite a bit of twist in them, but good marine plywood will take the strain and provide fair and symmetrical curves. Cable ties rather than copper wire held the panels together until epoxy bonded the joints.
It was Flint’s versatility that attracted me. Like many boaters, I wanted an “everything” boat that I could row, motor, or sail. I wanted to snorkel from the boat, explore the shallowest of inlets, and take camping trips with my wife and enough provisions for several days of crisscrossing the waterways between beaches. I also wanted to try my hand at fishing and so had that in mind when looking at plans. All that had to be in a safe boat that I could build myself, and would fit in my garage. Out of all the designs I looked at, Flint seemed most able to fit the bill.
Flint’s plans are available in either metric or imperial units and include all the drawings and specifications necessary to build the boat with or without the sailing option. The plans included dimensions for spars and sails for all three rigs, and plans for both 7′ and 7.5′ oars. The instructions are thorough and clear enough for a first-time builder like me. If a builder has questions, Lillistone is generally accessible via his website, his blog, or a Facebook group discussion page.
The boat is capable of carrying up to four people can be built as a rowing boat to weigh less than 100 lbs, light enough to cartop on midsize to larger vehicles.
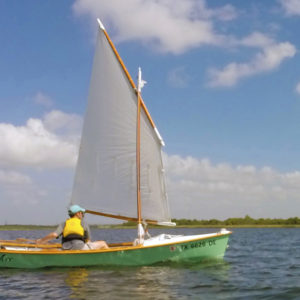
The balance lug rig, carrying 55.7 sq ft of sail, is the most modest of the Flint sail plans. The gaff cat and the gaff sloop rigs both carry 64.5 sq ft.
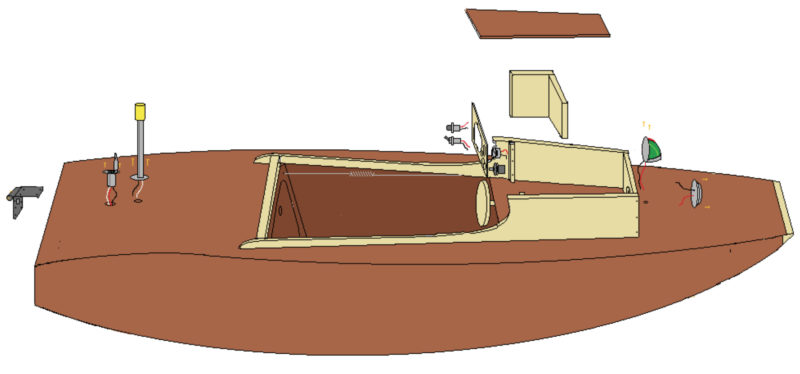
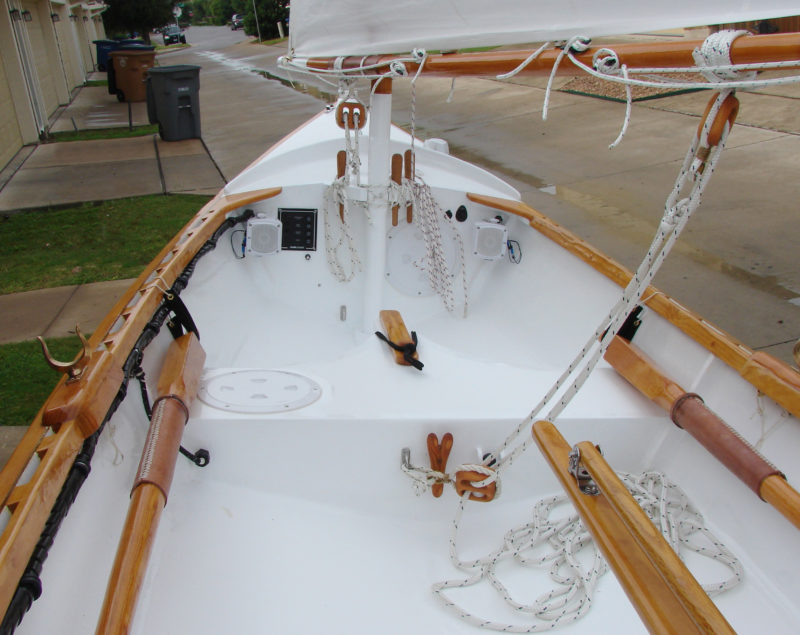
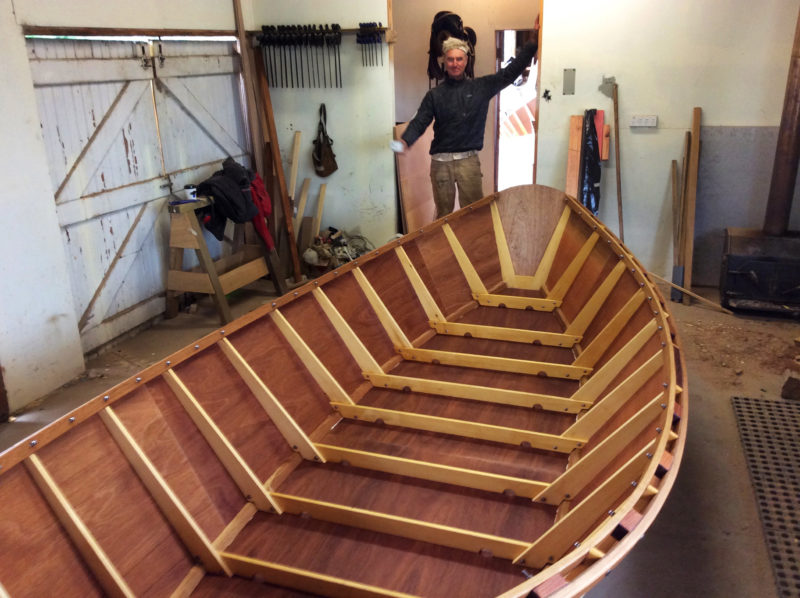
I chose to build the balanced-lug version, which uses only one sail and an unstayed mast that can be stepped or unstepped in moments. This balanced-lug rig’s mast partner is designed as part of a foredeck and a bulkhead. This configuration eliminates the forward rowing station but the enclosed compartment increases the built-in flotation by another couple of hundred pounds. The configuration for the gaff rig has a forward rowing station and a lower buoyancy compartment.
Flint can be built without the sailing option using just four sheets of 1/4″ plywood and about 20 bd ft of dimensional lumber. Adding the sailing option requires a fifth sheet of plywood and another 15 bd ft of lumber for the spars. The construction method is stitch-and-glue and does not require a strongback. To get the correct curvature into the twist at the forefoot, the plywood should be marine-grade and high quality. For dimensional lumber I used Douglas-fir.
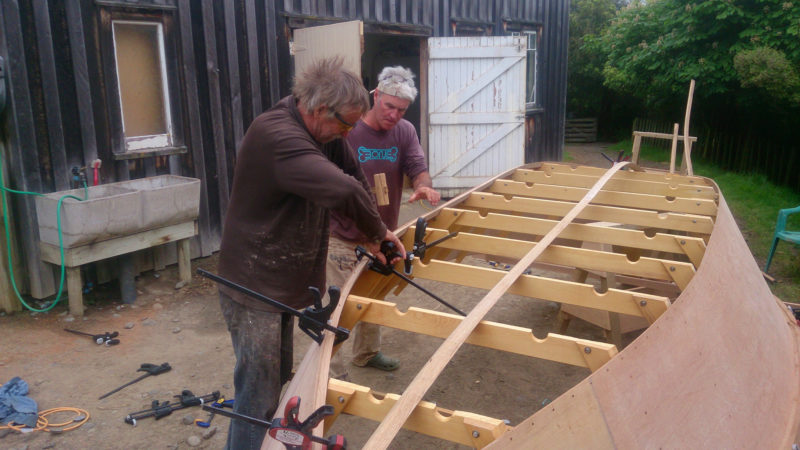
Pairs of the plywood sheets are scarfed together before drawing and cutting the side and bottom panels. Flint’s hull panels, main bulkheads, and transom went together more smoothly than I thought they would. I was concerned about that twist going into the plywood at the forefoot as planned, so much so that I waited until after that step to announce to family and friends that I was building a boat. But I followed Ross’s guidelines and instructions, and everything came together exactly as the instructions said it should. The pieces didn’t go together quickly, mind you. They required snugging down the cables ties a bit here, a bit over there, then a bit here again, methodically drawing the bulkheads down into the bottom panels to pry them apart and twist and creak that forefoot into shape. Stitching the boat together took hours with only me at the task, but it was a smooth and pleasing process. Seeing the boat rise out of two dimensions into three in a single day was extraordinarily satisfying.
Although I spent about 18 months of weekends building my Flint, other builders report having completed theirs in as little as two months. I used primarily hand tools; made my own oars, spars, belaying pins, rope-stropped blocks, and a jam cleat; and sewed up the sail from a Sailrite kit, all of which contributed significantly to my construction time.
Flint’s stability is about what I’d expected for a hard-chined lightweight boat with a displacement-type hull. If I’m the only significant weight on board, she’ll dip to whichever side I move to, gaining some stability once that side fully engages with the water. I’m familiar with this sort of motion, so it’s not disconcerting. When I put my 175 lbs fully onto a gunwale, the boat will ship water over that side, but it’s easy to move around in the boat as long as I keep a hand planted somewhere for balance.
The configuration for the balance lug rig, seen here, has one rowing station. The gaff rig configuration has a second forward rowing station forward and a low flotation tank instead of a foredeck.
The Flint has three watertight buoyancy compartments that, by my rough calculations, add somewhere around 400 lbs of positive flotation. In capsize drills with the sail in place, the Flint does not want to turn completely turtle. My Flint rides low enough on its side that the spars lie flat instead of driving tip-first beneath the water and allowing the boat to capsize further. During my capsize test, after I had the spars and sail flat on the water, I put my weight on the tip of the mainmast, and although that did push the yard and most of the mast beneath the water’s surface, the Flint still didn’t turn turtle.
It takes little effort to reenter after a capsize by rolling in sideways over the gunwale, and the cockpit does ship quite a bit of water with that reentry, but if you’ve gone overboard in a capsize, there will already be some water aboard. With only me aboard, I can swamp the Flint only so much and any water higher than the daggerboard trunk will flow out through the slot, leaving only about 3 cu ft to bail out. It can be completely swamped and still move under oars.
The Flint’s sharp entry keeps it moving smoothly through a chop and its skeg helps it hold a course in a crosswind.
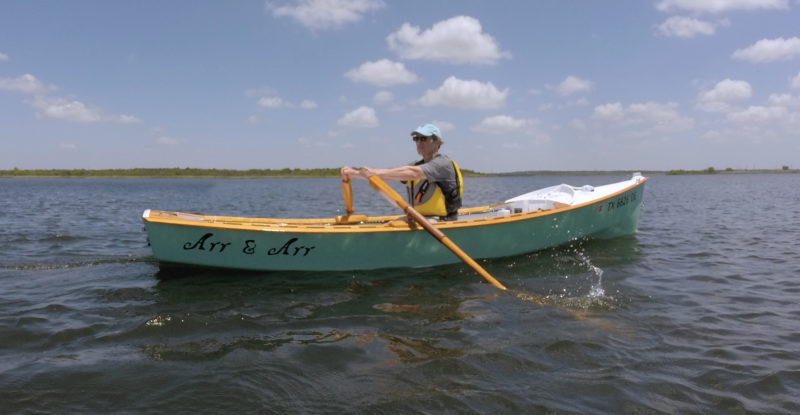
Under oars I can do just under 3 knots at a sustained pace and almost 4 knots at peak effort. An experienced oarsman should easily be able to add another knot to each of those figures. I sometimes use a 30-lb-thrust trolling motor for auxiliary power, which pushes her at just over 3 knots. Ross reports a 2-hp outboard gets to 3 1/2 knots on idle and more than 6 knots using at about half-throttle with four people aboard.
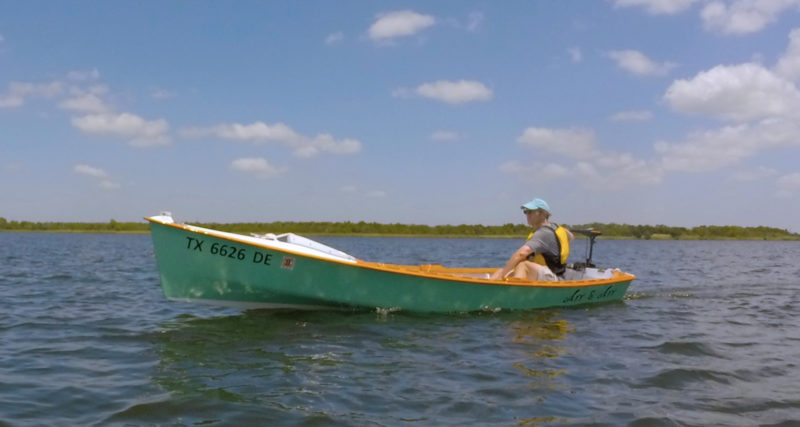
The Flint can manage more power than the 32-lb thrust trolling motor shown here, and while a 2-hp outboard will push a loaded Flint around to 6 knots, the boat doesn’t have a flat run meant for planing.
The balanced lug rig is simple to sail and provides plenty of power. It’ll push the Flint at 4 or 5 knots easily, and I’ve had it surge up to 7 knots on a run single-reefed in 20-knot gusts. The boat points to within 50 degrees of the wind and sails well on all points, even when reefed. The helm stays almost perfectly balanced. When sailing close to the wind in stronger wind and chop, whoever’s on the main thwart will catch some spray, but she is otherwise a dry sailer.
I transport my Flint on a trailer, and launching and retrieval are easy, even when I’m by myself. When I’m setting it up for sailing it takes less than half an hour to rig the boat. It typically takes longer because the boat draws admirers wherever we go, and I get to chatting about her.
I’m extremely pleased with my Flint. It comes as close to an “everything” boat as I can imagine. Although it’s usually true that a jack-of-all-trades is the master of none, Flint seems to me to be an exception. It’s master of a couple and a praiseworthy jack of the rest.
Roger Siebert is an editor in Austin, Texas. He rows and sails his Flint on local lakes, and recently trailered it to a few of his favorite places on the Florida coast. This was his first time building a boat.
The mid-1990s were a mixed time for me. I had a fine house, a great job, a beautiful wife, and two lovely children—but I was boatless. My wife and I had sold our 32′ double-ender after our first child was born and we hadn’t found anything within our price range to take its place. So when yacht designer Nigel Irens was looking for guinea pigs to build a kit boat he and Ed Burnett had created, I jumped at the chance. It might not have been the oceangoing vessel I dreamed of owning, but it would at least get me back on the water. It would also mark a small personal milestone since, despite working as a journeyman shipwright for several years, I had never built a boat from scratch.
Salty Dog Media
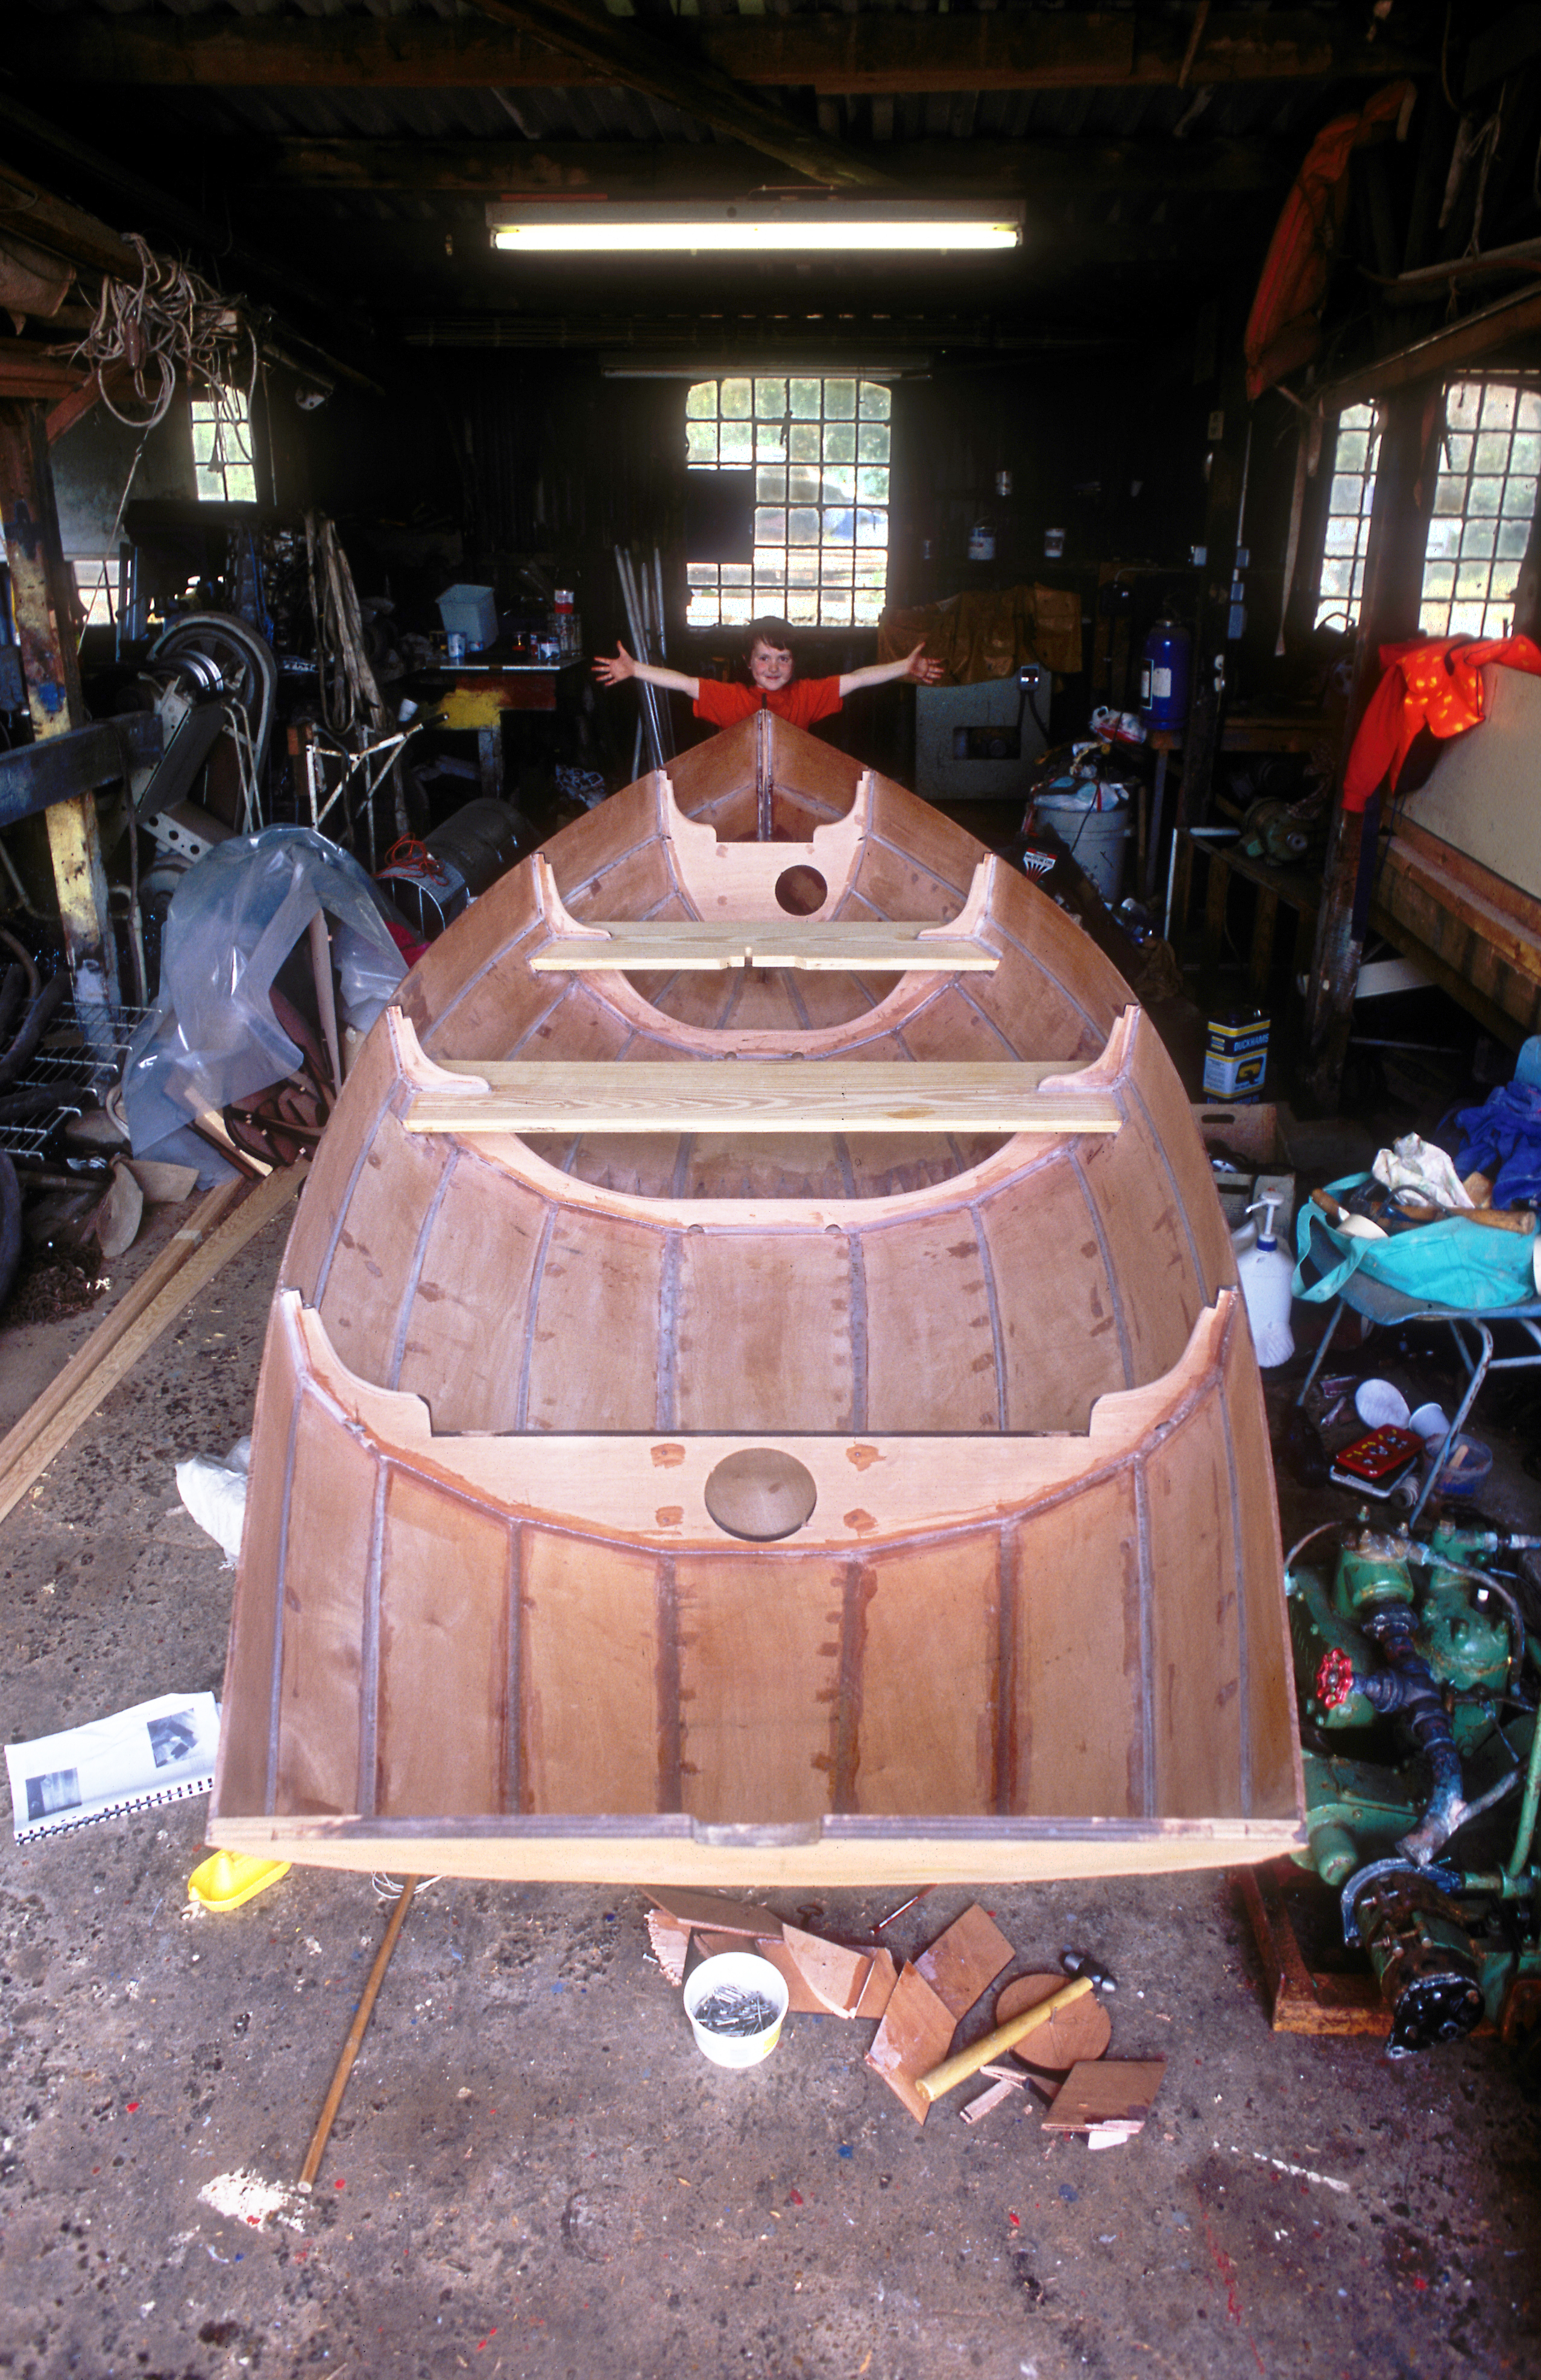
June, 1997. Midway through building the skiff at the Lewes Rowing Club shed, just outside Brighton. That’s my oldest son Sam, then 5 years old (now 24, and quite a bit bigger than me), who helped with the build.
The Western Skiff, as Nigel called his new design, was a slender 14′ dinghy intended for rowing; it had a small lug rig to use as auxiliary power and an elegantly raked transom to discourage the use of an outboard. The kit—seven sheets of plywood for the boat and two sheets of MDF for the jig, all precut and ready to assemble, along with several gallons of epoxy and various interesting-looking powders—arrived in Cornwall where we were on holiday. My children—Zennor, 8, and Sam, 5—and I had great fun assembling the jig, using wedges to lock tenons in place. Getting the planks fair proved a bit trickier, but I managed to get the basic structure assembled in time to put it on a trailer and drive the 300 miles back to our home just outside Brighton, in East Sussex.
Salty Dog Media
September, 1997. We launched the skiff at Seaford Beach in East Sussex. It was an exhilarating first sail. I sat in the bottom of the boat, as the designer had recommended, to keep my weight low. The first outing couldn’t have been better—apart from nearly breaking a friend’s leg when a big wave dumped the skiff in his lap.
It took all my spare time plus two weeks’ holiday spread over four months to complete the skiff, but finally in July 1997 we launched her in the azure waters off Seaford beach. There was a brisk onshore breeze blowing, which created a small surf, and within minutes the boat was flung into the lap of a friend who had come to help launch her. The boat still bears a scar from that incident, as no doubt does he. But that breeze also showed me how fast the skiff could go under sail; I had an exhilarating couple of hours tacking up and down the 2-mile-long beach. As you might expect of a dinghy primarily designed for rowing, she was extremely tender under sail, and even with her modest 61-sq-ft balanced lugsail, she would capsize in a thrice if you didn’t ease the sheet in time. But that was all part of the excitement, and I immediately felt very comfortable with the boat, as if we had struck a personal rapport.
Nic Compton
September, 2009. My wife-to-be Anna and I took a rare foray off Brighton beach with our daughter Betty, who was about 4 weeks old when this picture was taken. We had repainted the skiff black and varnished the thwarts, which had previously had been just oiled, for a slightly ironic piratical look. The trouble was that no one got the joke.
After the initial sail off Seaford, I kept her on a trailer at a rowing club on the river Ouse, in Sussex, with occasional trips rowing upriver to Hamsey or sailing downriver to Newhaven. My kids loved those forays upstream, and their evident pride as they steered the boat past familiar landmarks made me glad I could pass on a tiny piece of my boating life to them. On the downstream trips, I learned to “shoot” the bridges by lowering the mast on the approach and raising it on the other side. The one time I forgot, the almighty crash of wooden spar against stone wall made sure I never forgot again. Miraculously there was no damage.
Despite being only 14′ long, the skiff could be a sociable boat, and the 90-minute trip to Newhaven was an opportunity to cement friendships. On one occasion a friend astonished me by pulling a flask and china cups out of his rucksack and proceeding to pour us both a cup of tea. It doesn’t get much more English than that.
Over the years, I tried giving the skiff a proper name. First she was HARA, Greek for joy and the name of a favorite haunt when I was child growing up in Greece. Then I decided to go ultra-traditional and named her SALLY, after my mother. But somehow neither name stuck, and I’ve always simply referred to her as “the skiff.” It’s taken me nearly 20 years to realize that I don’t need to force a name onto her and that “the skiff” is perfectly good, full of romantic connotations and richly evocative in its own right.
Nic Compton
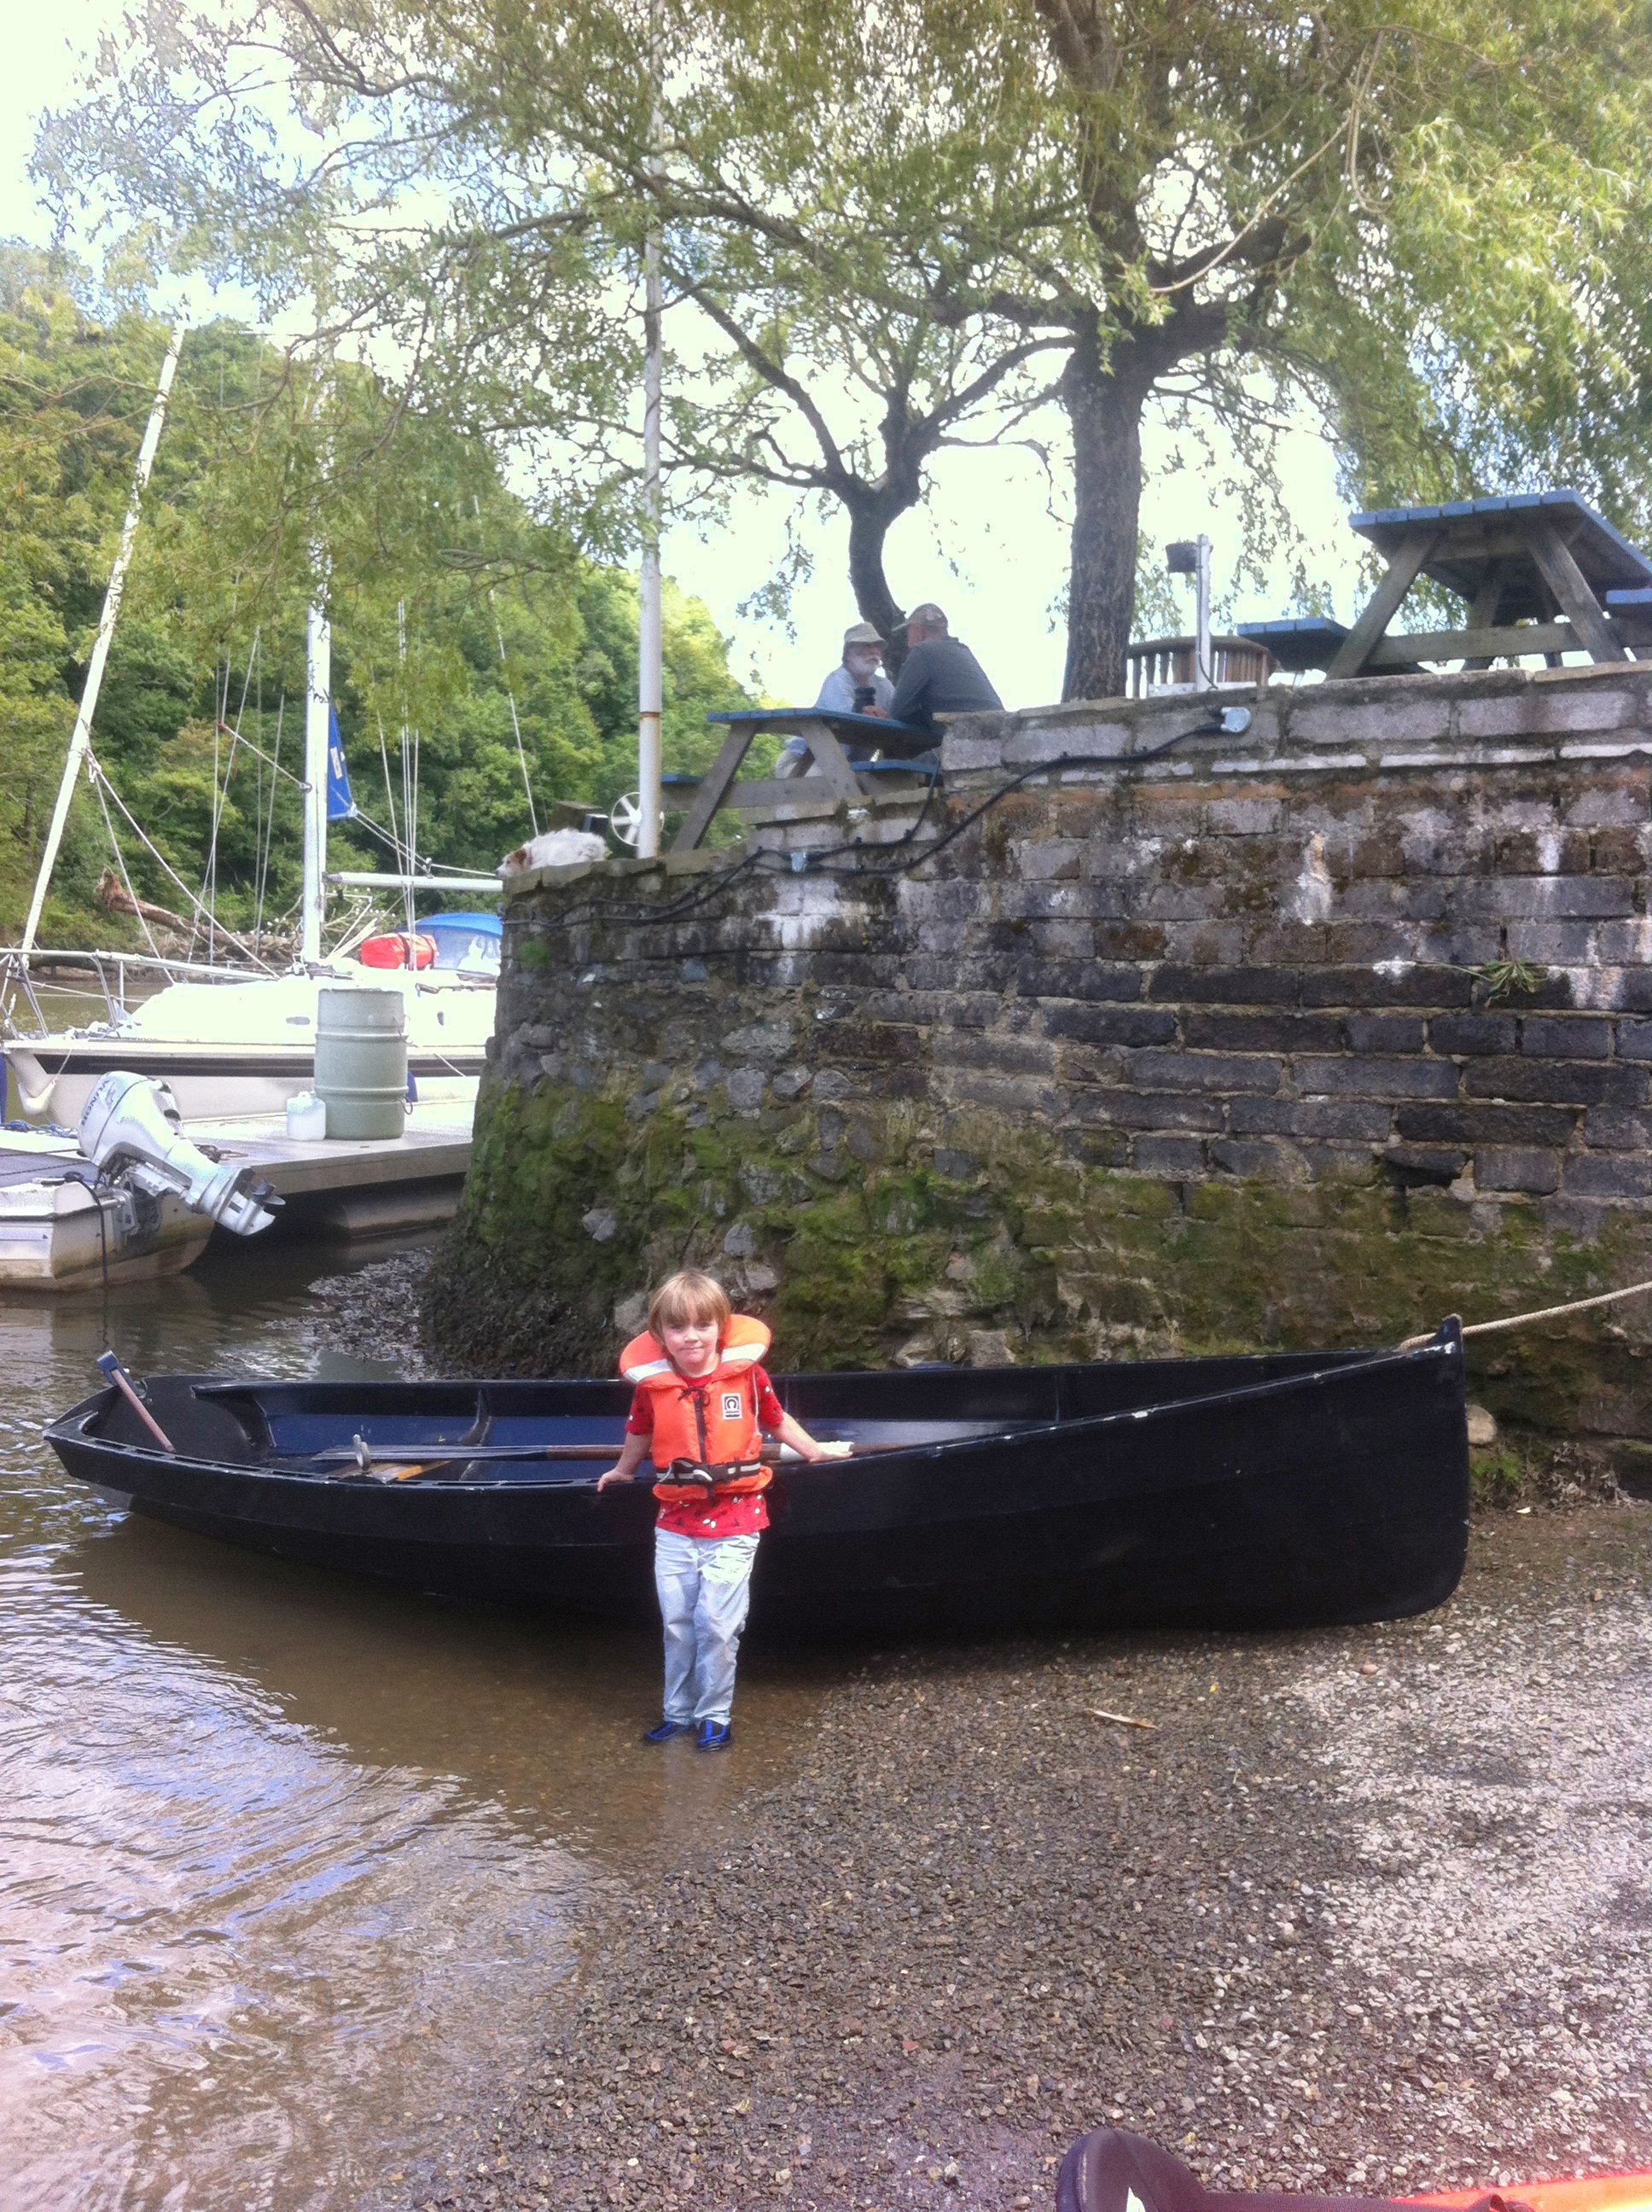
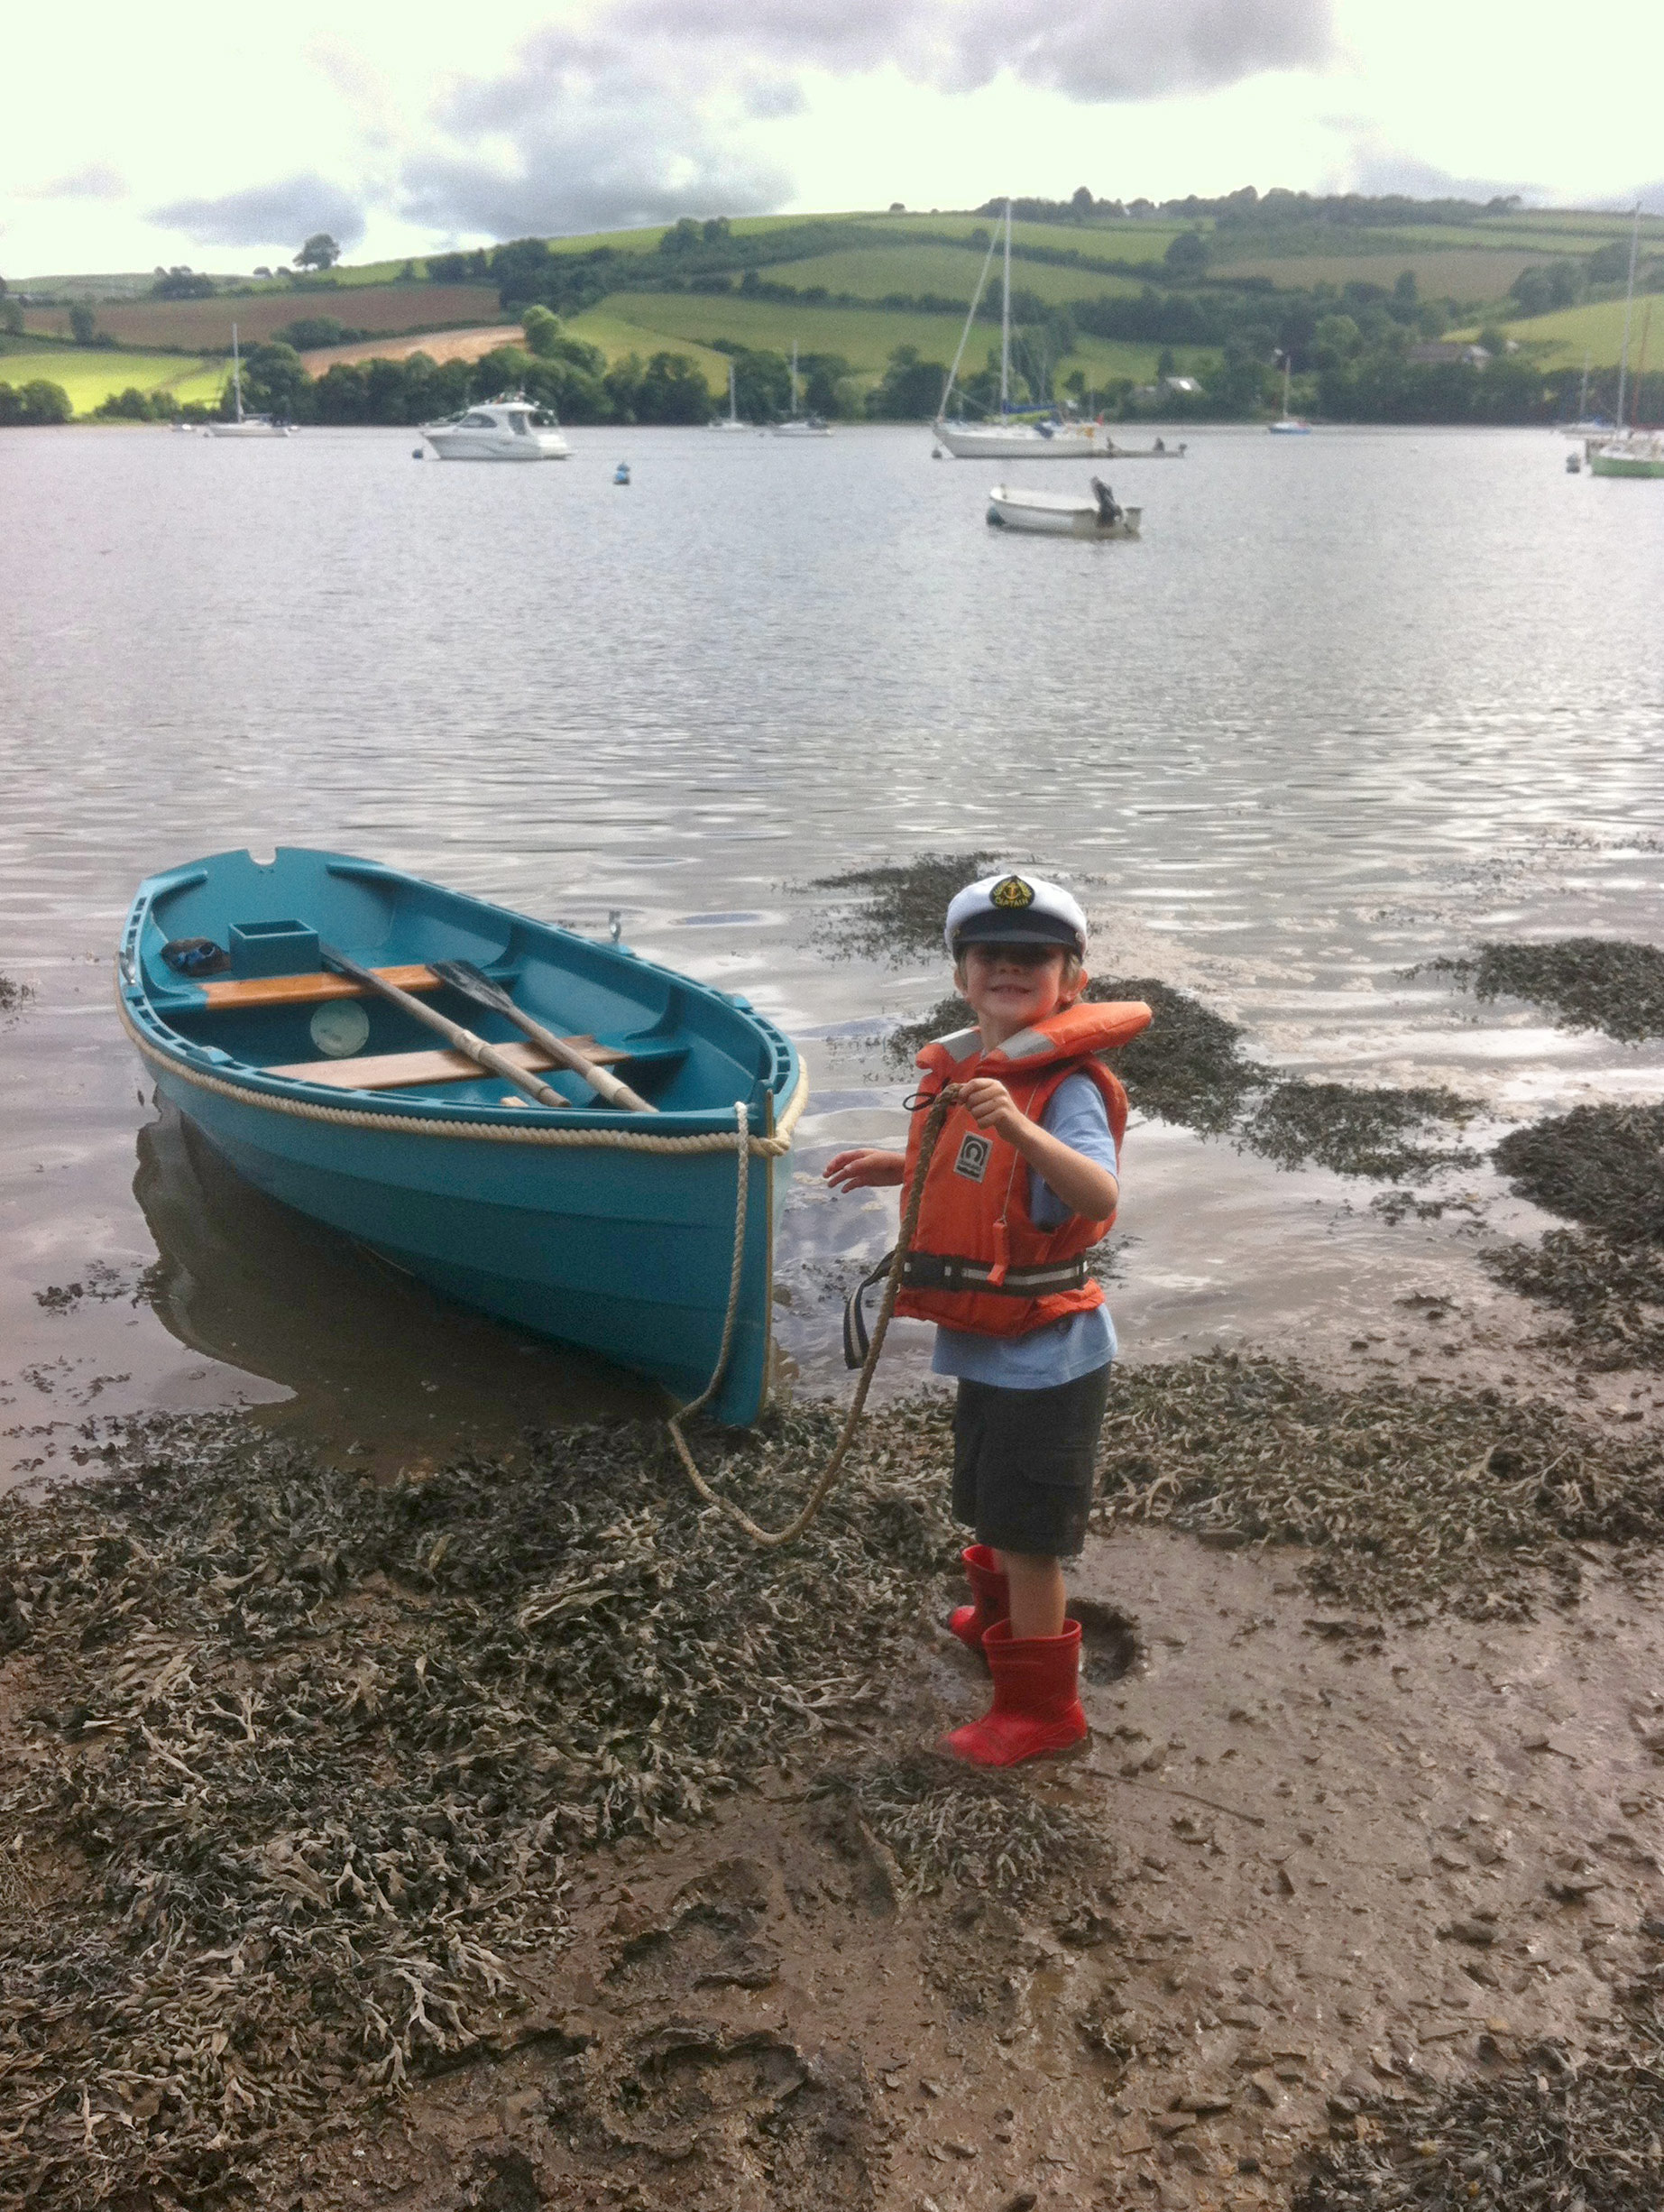
July 2015. Two days after we moved to Devon we rowed to the Maltsters Pub, once the haunt of UK celebrity chef Keith Floyd. My son Sol was just 5 days shy of his 4th birthday.
Three years after the skiff was launched, I was divorced and living alone on an old 12-ton cutter in nearby Newhaven. Between the heaps of scrap metal and the depressing housing estates, I had a small oasis in the muddy creek where I moored my yacht. Here, the skiff was moored alongside and when I came home from work, if the tide was up, I went for long rows, lit up by the lights of the ferry terminal. In the summer, friends visited and we would sail upstream and bathe in the river. After sitting in front of a computer all week, the skiff provided true solace.
Anna Compton
July 2015. As we were heading down the exquisite Bow Creek on the River Dart, just a mile or so away from our new home, I started teaching Sol to row. The skiff has been a perfect way for me to pass on my love of boating to my kids.
After eight years living on my own up a muddy creek, I decided to sell my cutter and buy a flat in trendy Brighton. For a while, I kept the skiff on the beach, with a plywood cover to keep intruders out, and launched her for the occasional row or sail. But Brighton is a better place for partying than boating, and I have to admit the skiff entered into a period of neglect as I made the most of being a bachelor again. When I discovered part of the plywood lid had been ripped off and used for a beach fire, I decided to put her back on her trailer and keep her, for want of anywhere better, in a friend’s garden. Over the next few years, I parked her wherever I could and, as the cover I’d put over the boat deteriorated, the neglect deepened and so did my guilt.
Nic Compton
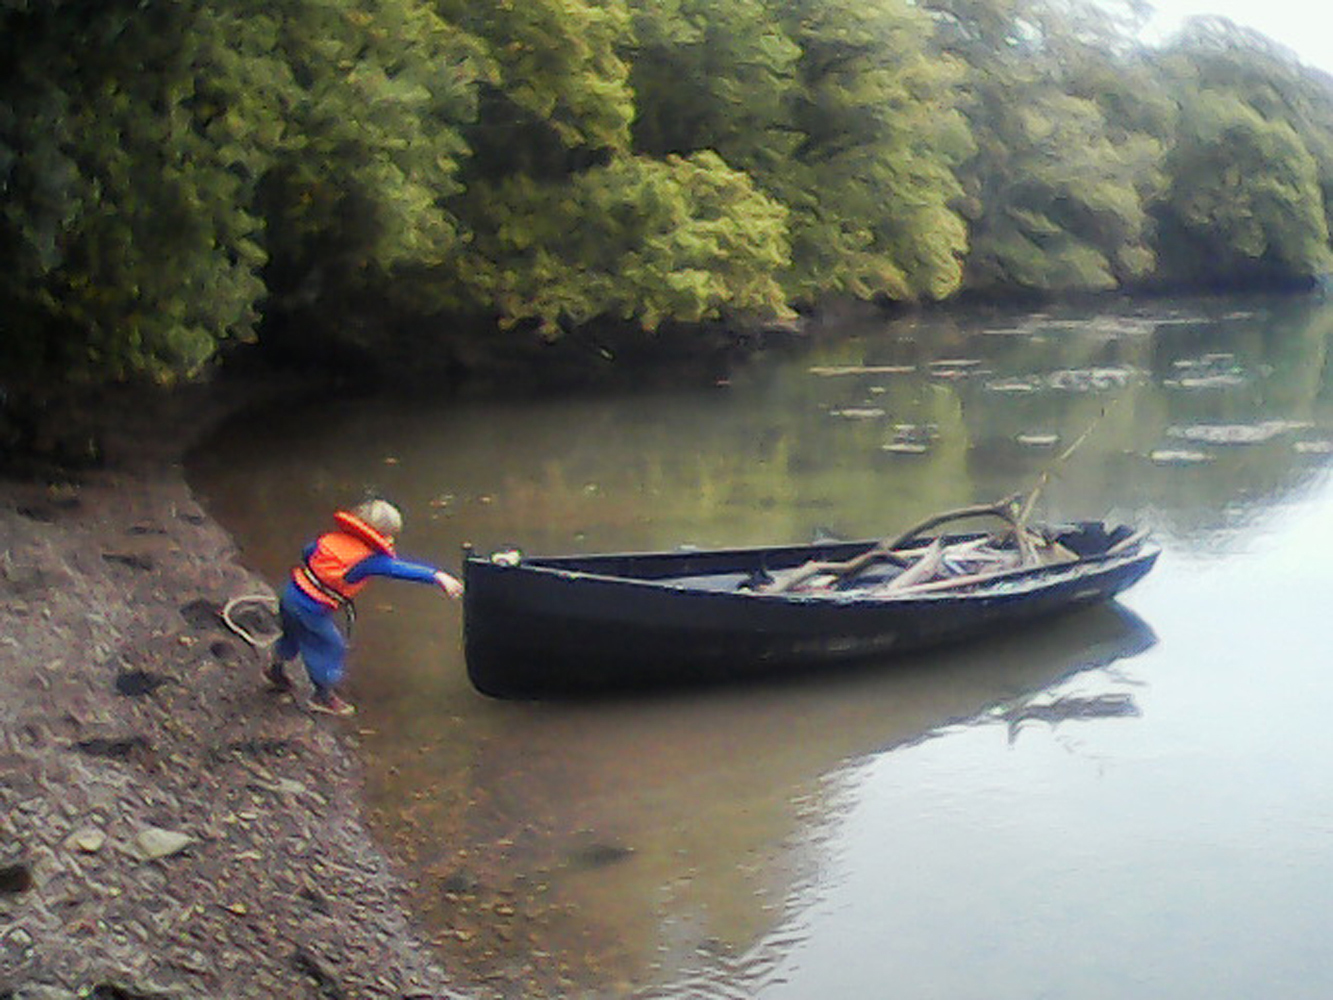
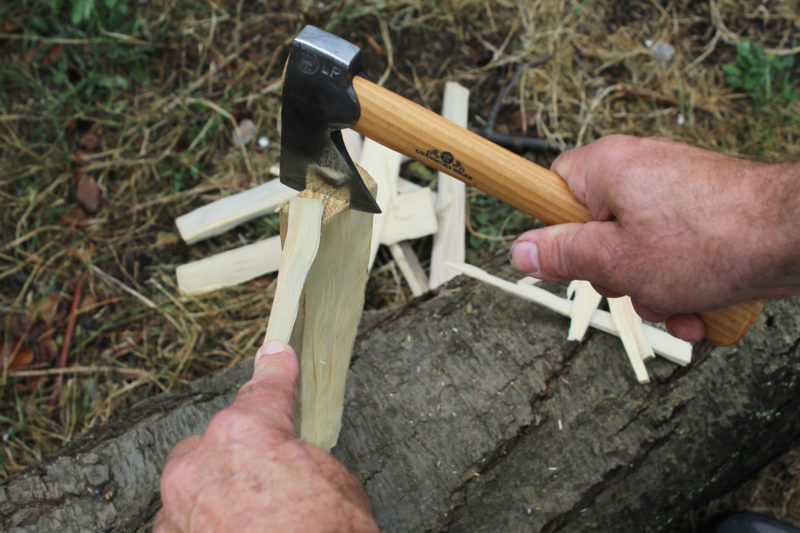
October, 2015. It rained solidly for a month after we moved and, as our house hadn’t been lived in for more than a year, it was extremely cold. Sol and I made weekly trips with the skiff to collect firewood.
Then I met my Anna and two years later we had a lovely daughter—Betty, now aged 7—and then a lovely son—Sol, now 5—and the skiff fell further down my list of priorities. Soon after meeting Anna, in the first flush of optimism, we made one half-hearted attempt at cutting out some of the rot and repainting her, but sailing from Brighton was just too little return for so much effort. As the bills piled up, I thought about selling the skiff, but I always had a feeling that our circumstances might change, and that somehow she might become the ideal boat once again. Or, to put it another way, I always knew that if the skiff didn’t have a place in my life, that probably meant I was probably not leading the right life, and when the balance was redressed she would regain her rightful place.
Nic Compton
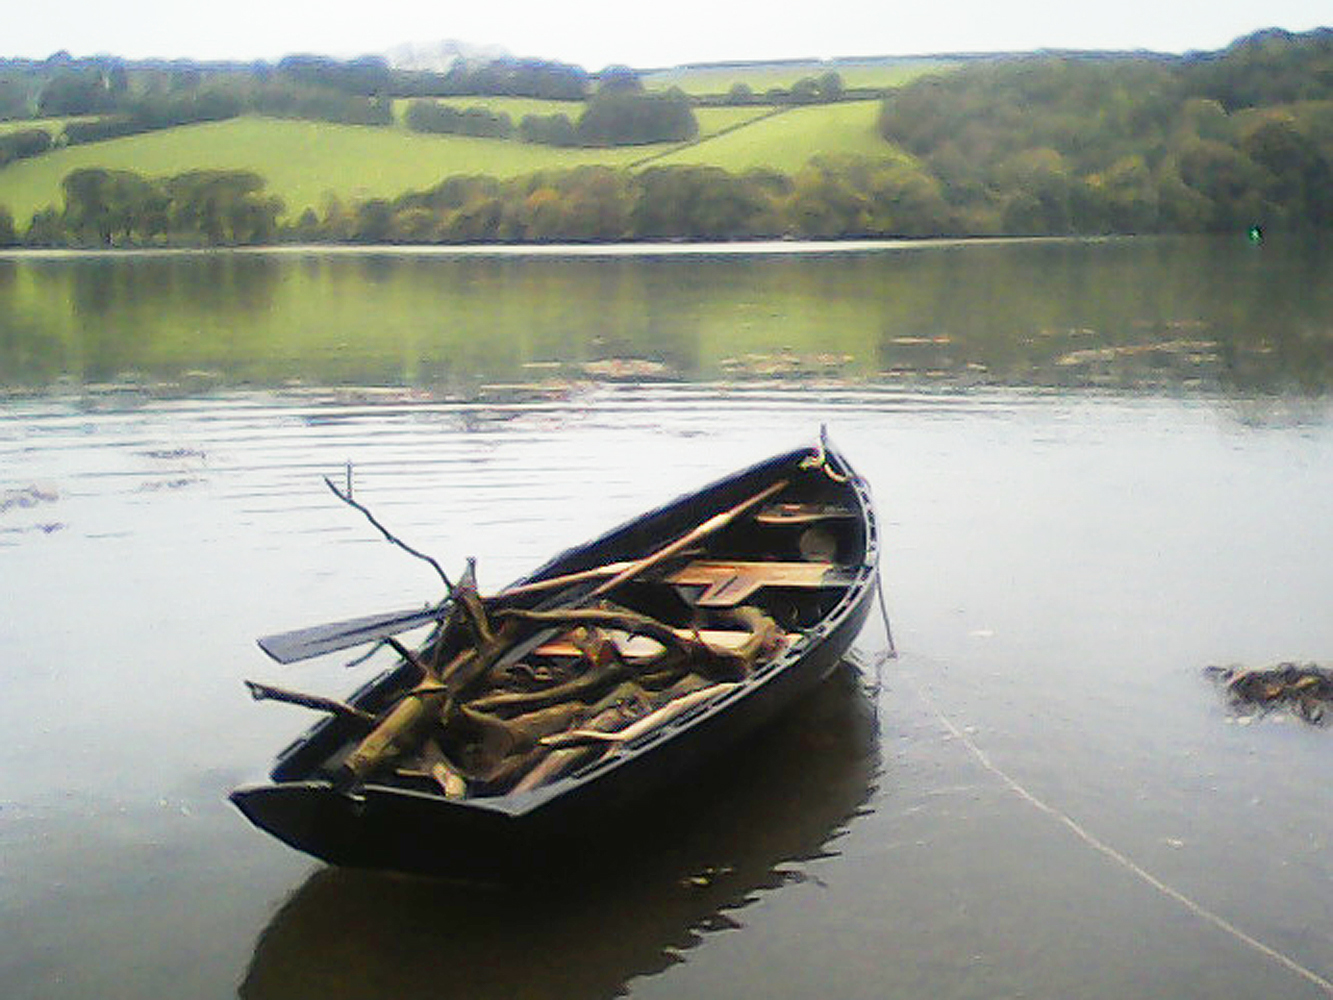
October, 2015. The firewood we gathered was mostly the local oak which had “seasoned” while floating in the river. Once it had dried out it burned perfectly.
Not everyone shared my despair. Our neighbors told us that far from finding the sodden hulk parked opposite their front door a nuisance, they enjoyed having her there and thought she added character to the neighborhood. Another friend expressed the same sentiment when I parked the skiff in her front drive where it became an object of curiosity for visitors, who could always be sure of finding “the house with the boat outside” in a row of nearly identical modern houses. Even in her deteriorated state, it seemed, the skiff could still bring pleasure, and I couldn’t help feeling a glimmer of pride.
Eventually Anna and I could take city life no more, and in July 2015 we upped sticks and moved to a beautiful village on the River Dart, in Devon. Straightaway, we launched the skiff in the tidal estuary that flowed within sight of our bedroom. She proved an ideal boat for exploring our new environment, and for the first six months we went out almost every week, either rowing to nearby pubs or collecting driftwood off the nearby beaches to chop up into firewood. The only limitation was that, while most of the other families we met had boats with outboards and could happily nip up and down the river at almost any state of the tide, we were limited by how far we could row, which, with two adults, two children, and (eventually) a dog on board, wasn’t all that far.
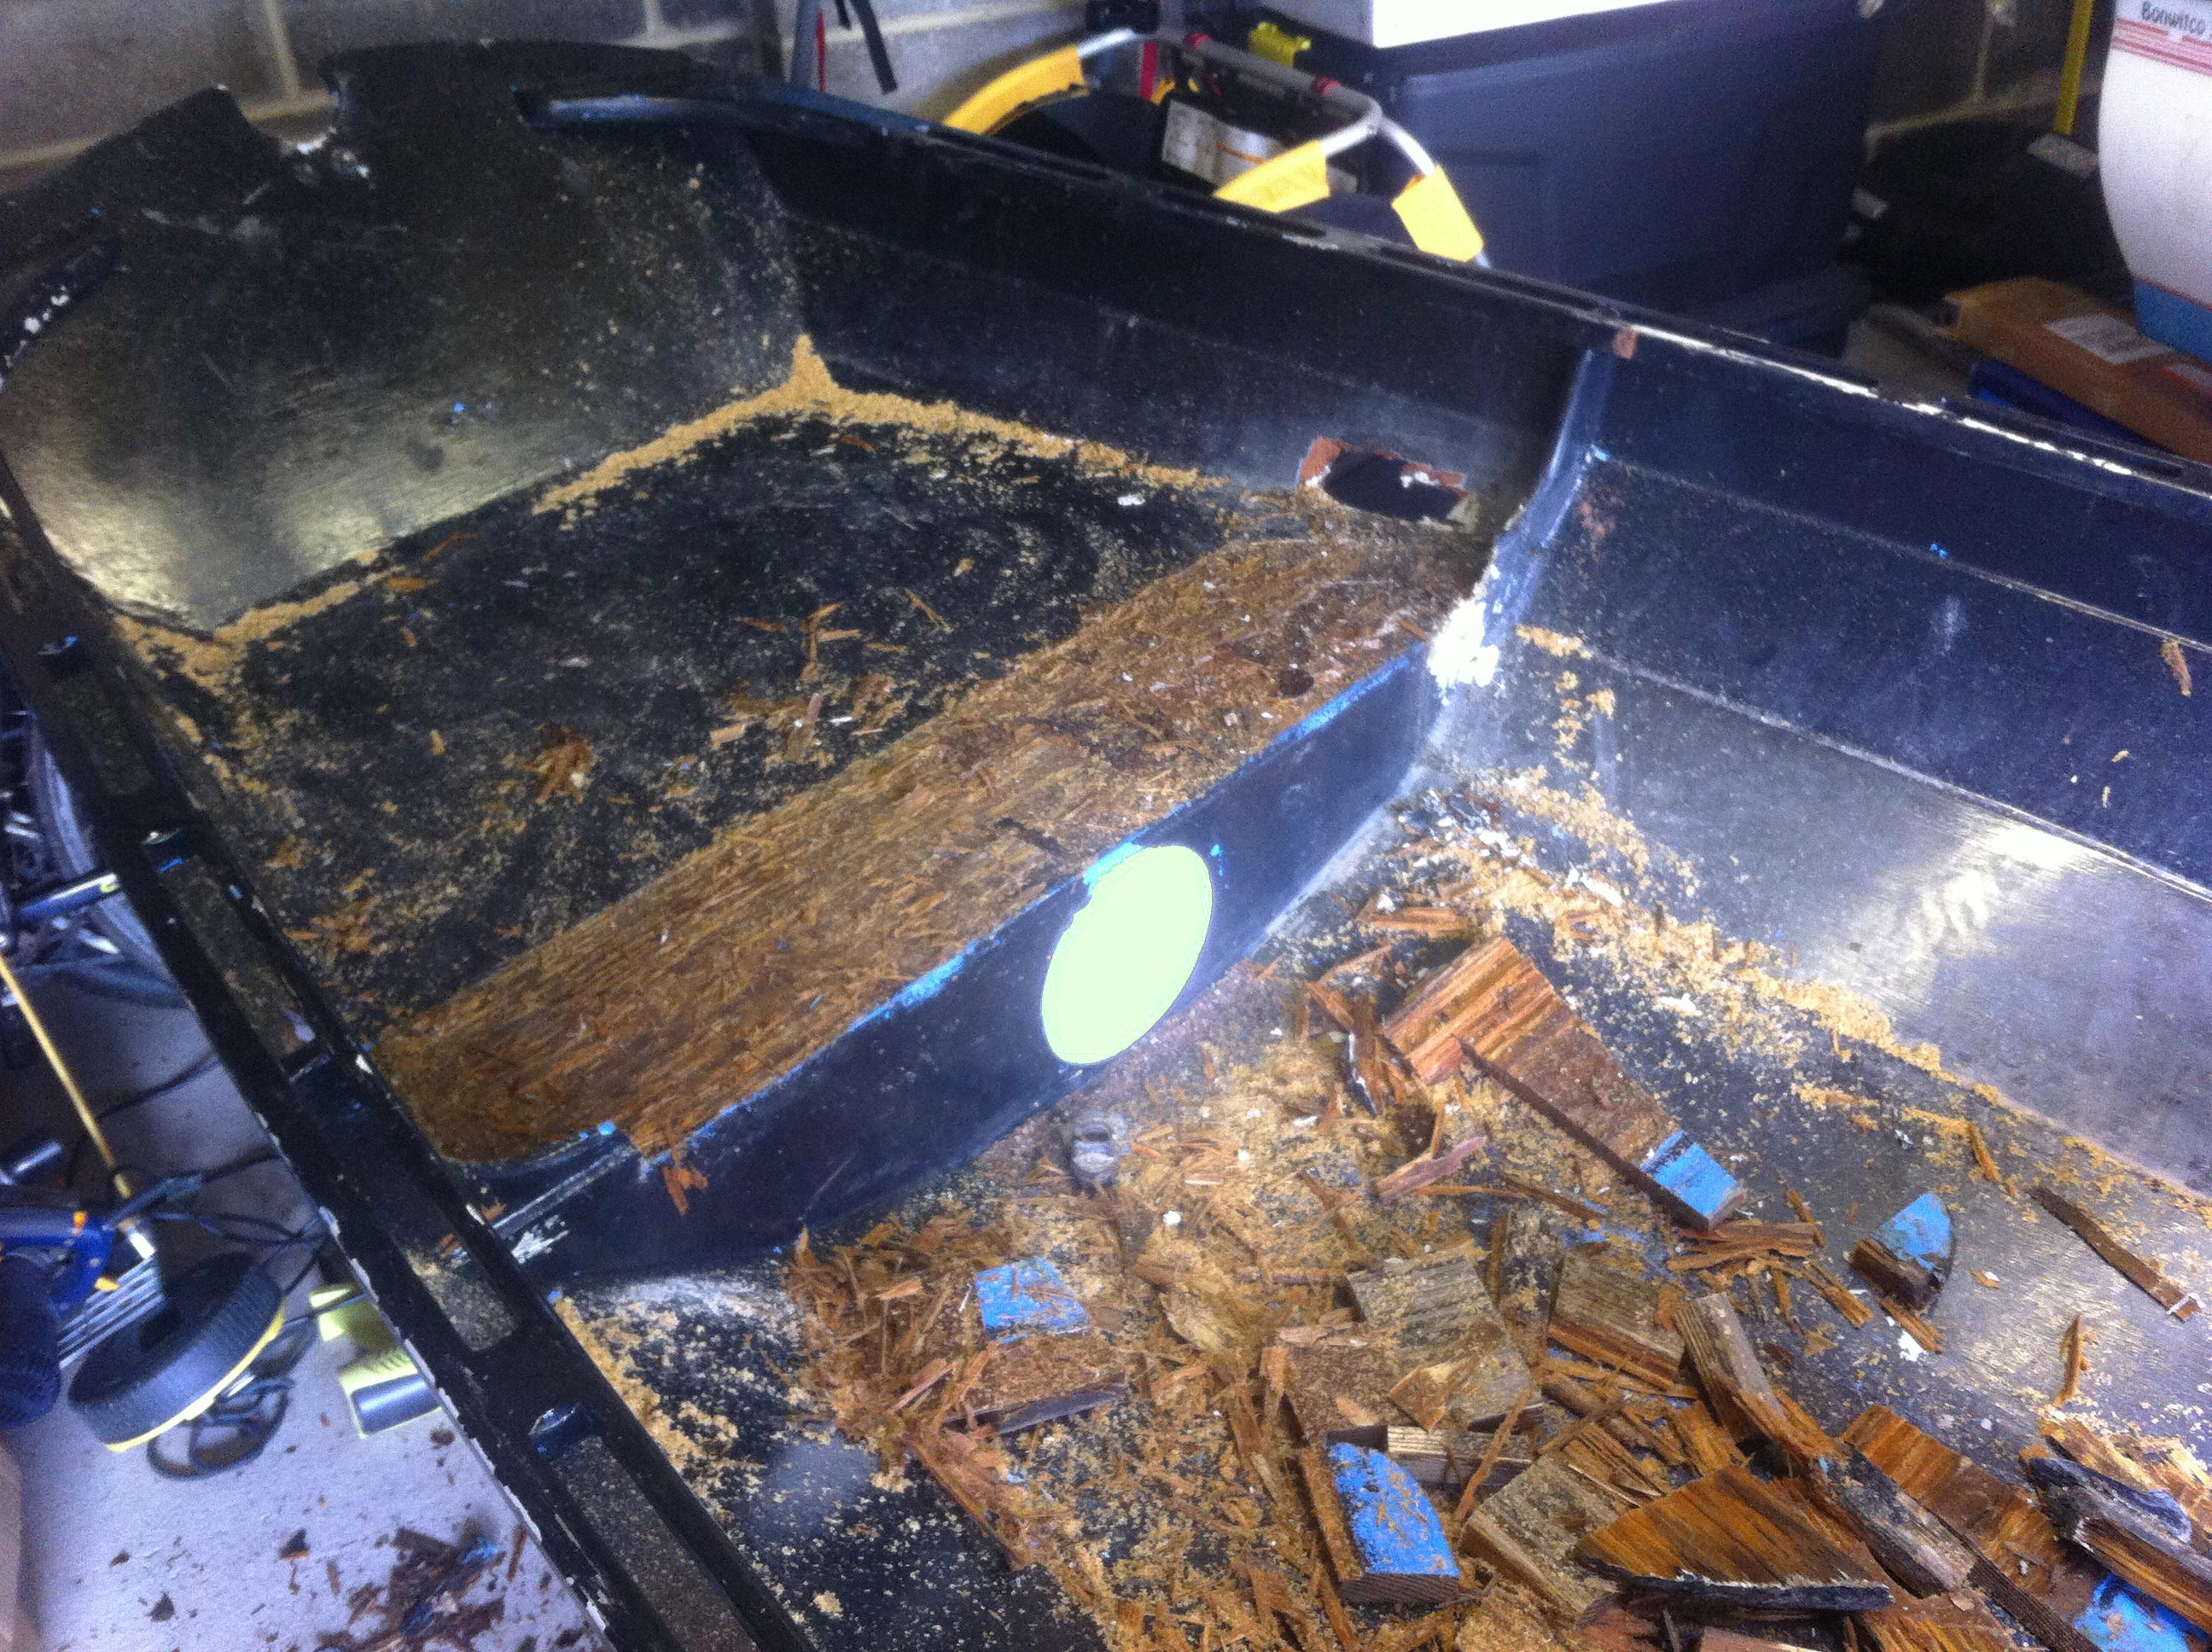
We left the skiff on the jetty that autumn, and by winter’s end she looked in a very sorry state. The rot at the ends of the thwarts had spread because the drainage channels there had a tendency to get blocked up. And when I turned her over I found gribbles had wormed their way into the keel.
The skiff, to my eyes, was still the exciting lightweight rowing dinghy, the legendary Nigel Irens design that I had built with my own hands all those years before. She had stood by me in good times and bad, and still gave me a thrill riding the little wave that built up on the stern quarter when the wind clashed with the outgoing tide. But to most other people she must have just looked like a sad old wreck.
Nic Compton
March, 2016. My poor neglected skiff. Nearly 19 years after being launched, the fore and aft thwarts were rotted away where the drains at either end got blocked. The damage spread into neighboring bits of plywood.
I decided to take her out for a major overhaul, and began to think the unthinkable. What if we fitted an outboard on her, in spite of the transom meant to prevent that? The very idea had always been an anathema to me, but I began to see that if we put a well through the aft buoyancy tank, it needn’t be intrusive or detract from her performance under sail and oar. I consulted with Nigel and, to my surprise, he was very relaxed about the idea. He agreed that a well was the way to go, and even suggested the outboard could be positioned on the centerline if I were to cut out the aft end of the keel.
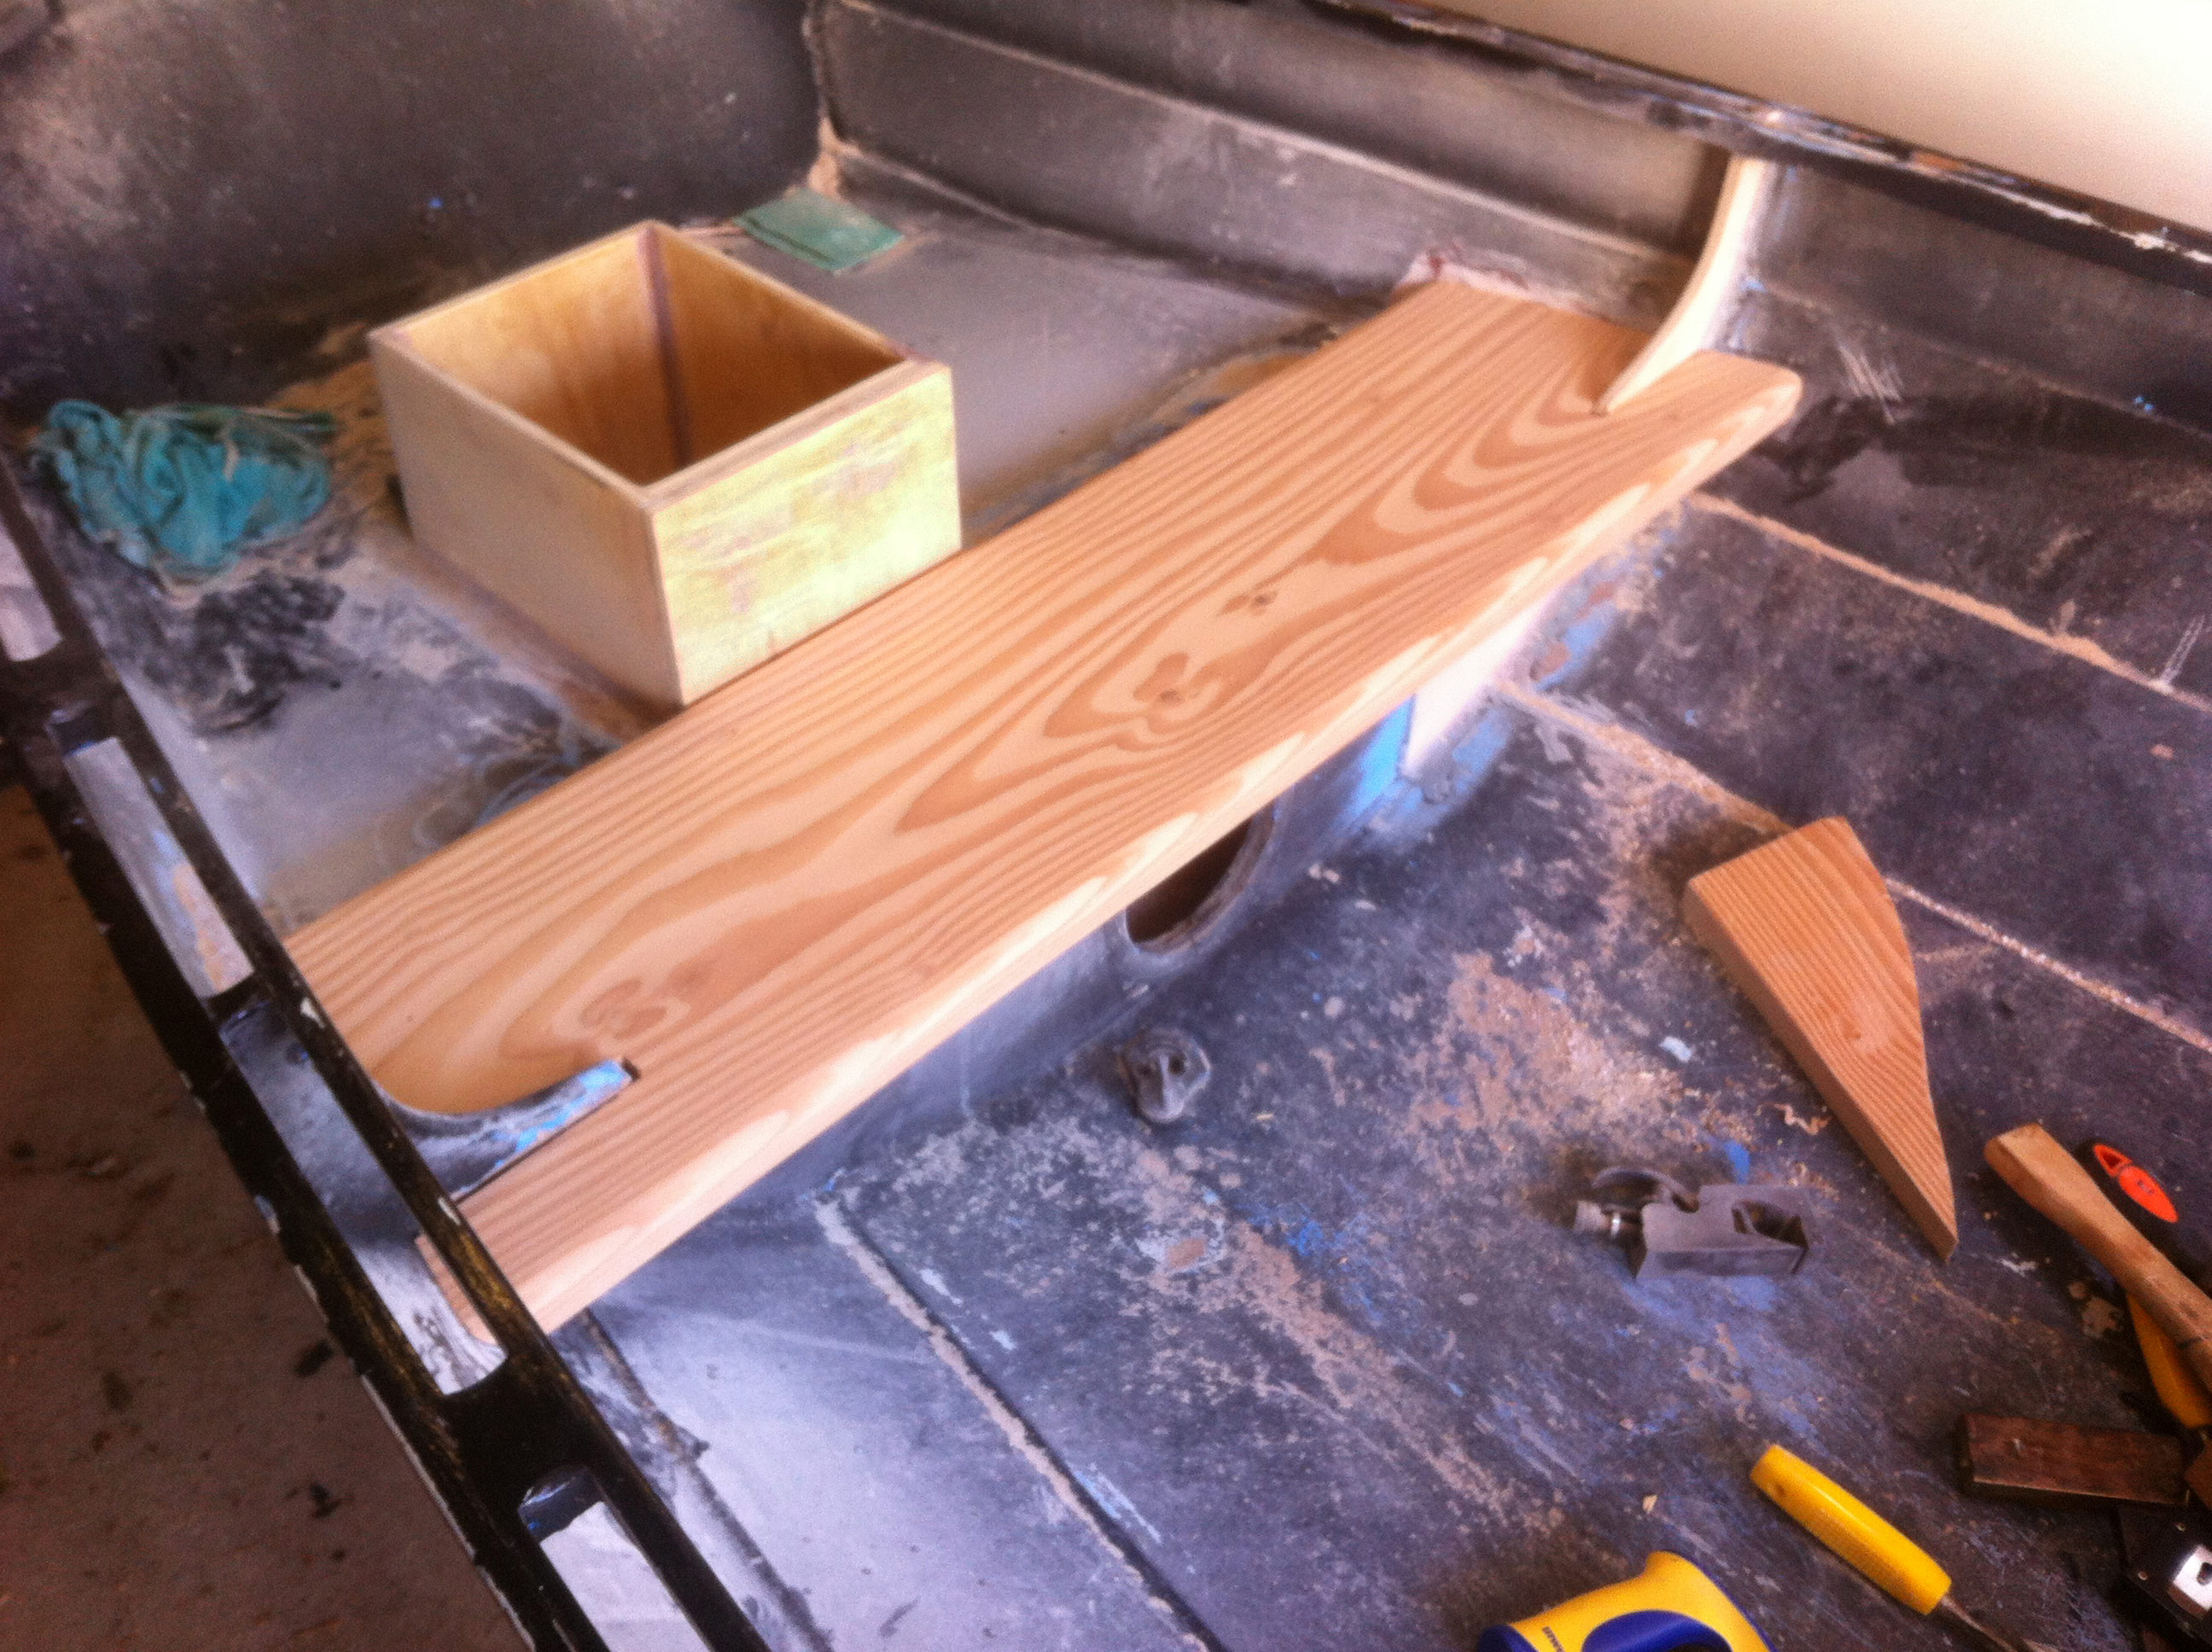
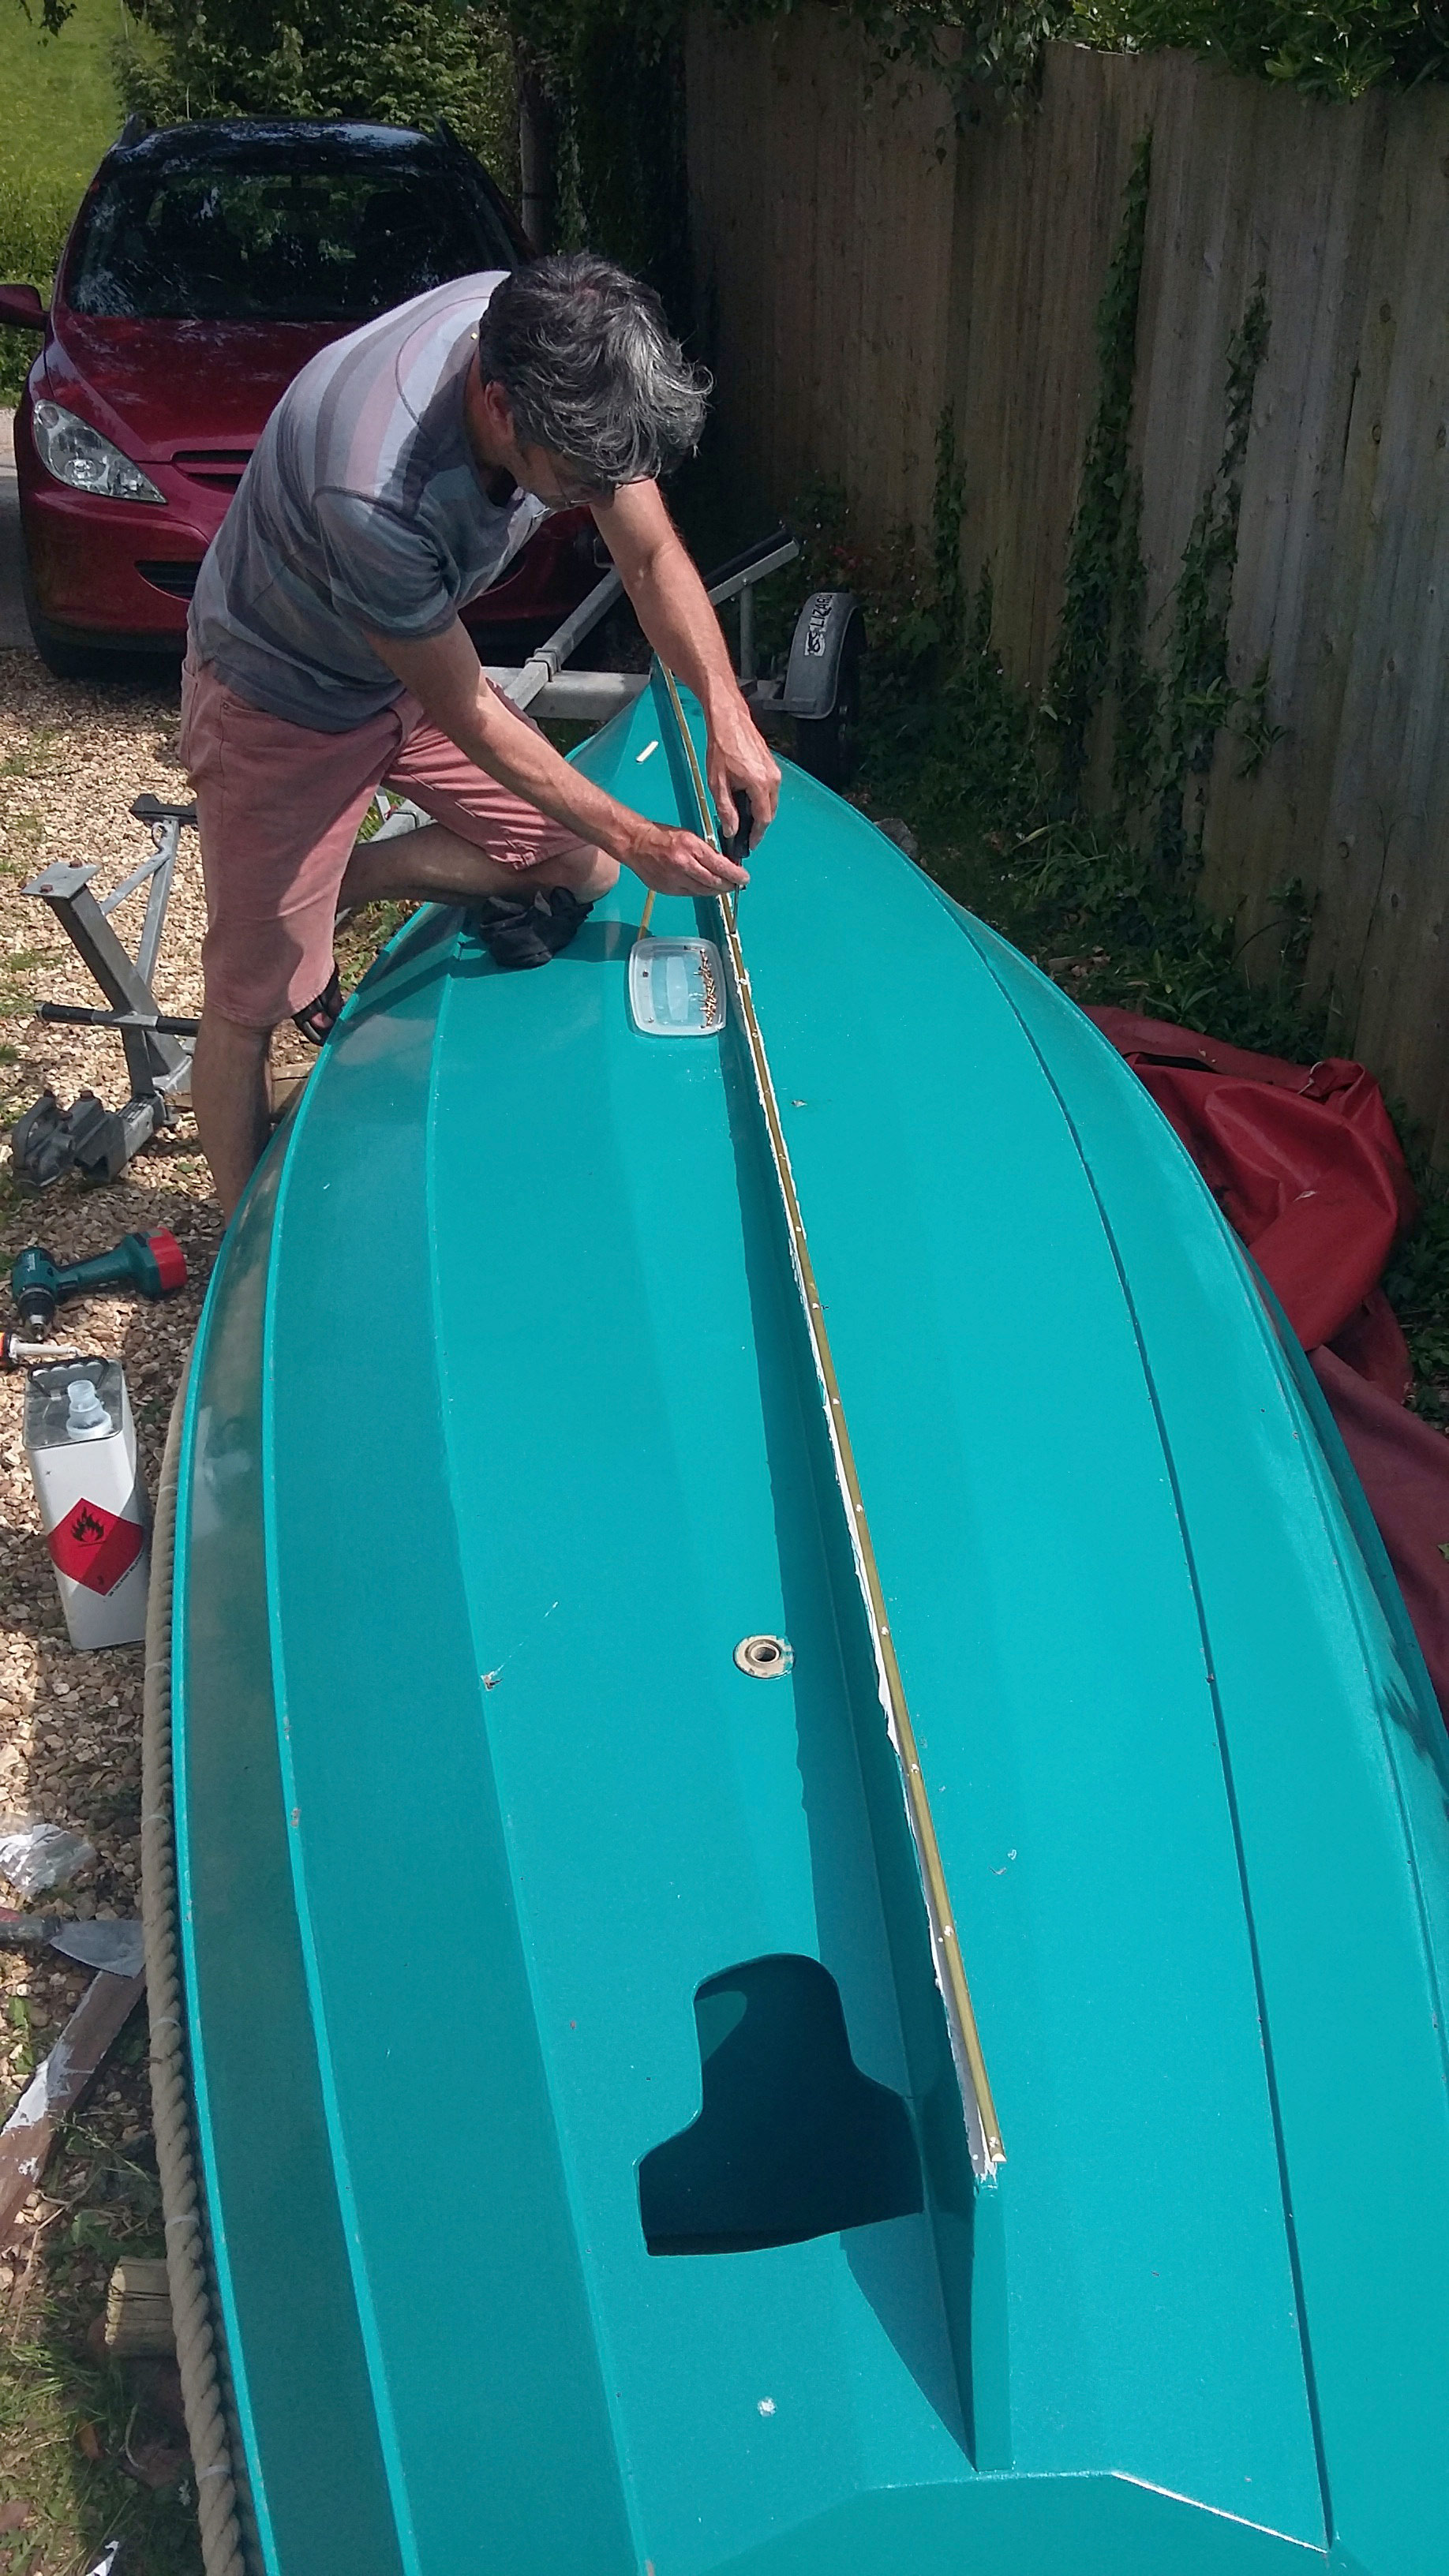
The refurbishment, as often happens, turned out to be more extensive than I had expected. I replaced both the forward and the aft thwarts, and cut out and patched new sections of planking and bulkheads where the moisture had spread into the plywood. I repainted inside and out and made a couple of important upgrades for her new life on the river: a rope fender around the bulwarks to protect her when coming alongside docks and brass strips on the keel and bilges to take the brunt of being dragged up and down beaches. The overall effect was pretty dramatic and made me look at her with renewed affection—like when the one you love dresses up for a party and you see her as if for the first time again.
Nic Compton
April, 2016. I fitted a new thwart made from some locally sourced Douglas fir. I made the drains much bigger this time and sealed the thwart’s end grain with epoxy. I built the plywood outboard well to the side of the centerline.
As for the outboard well, I couldn’t bring myself to cut the keel and instead made the smallest well possible directly next to it on the starboard side. The well itself was made out of 12mm marine ply, with three layers on the forward side, lapped over the new stern thwart to spread the load of the outboard. I shaped the hole through the hull to the dimensions of the propeller and skeg, and used the cutout to make a lid to close the hole while under oar or sail.
Zennor Compton
June, 2016. We were constantly dragged the boat up and down shingle beaches, so fitting a brass keel band was an absolute necessity and one of the best things I’ve done for the boat’s longevity. The outboard well’s aperture is shaped for the motor’s lower unit and propeller. I kept the cut-out to make a lid which fits into the hole from the inside; it reduces the drag and noise while I’m rowing.
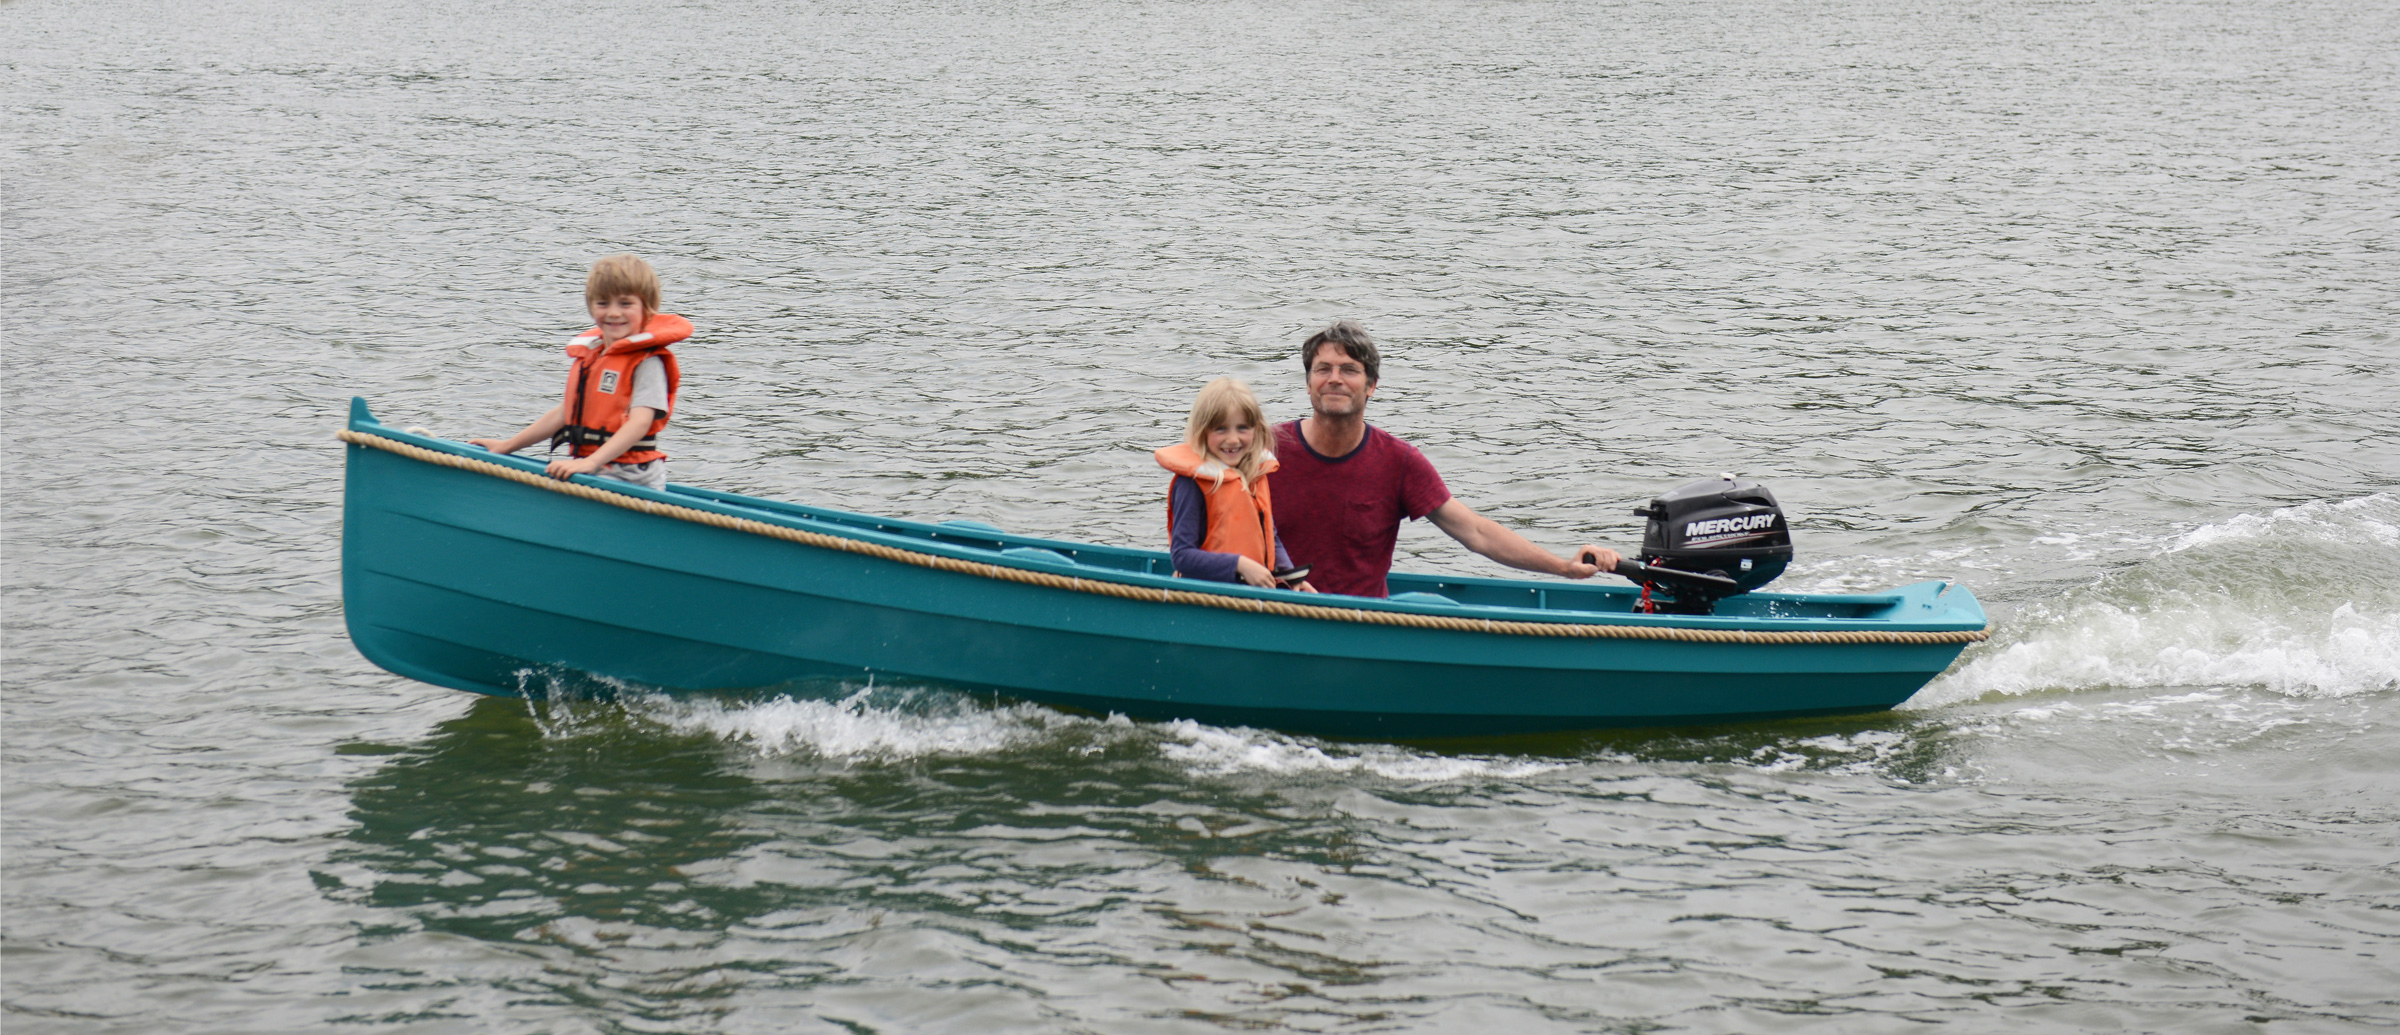
We relaunched the skiff at the beginning of June of this year, and the effects were immediate and dramatic: “A life-changer,” as my neighbor put it. The outboard conversion was a great success, performing far better than I had expected. Even laden down with the whole family, including dog and picnic, she nipped along at quarter-throttle under her new 3.5-hp engine.
Zennor Compton
June, 2016. During the trials with the new engine, it was obvious that the tilt was wrong and pushed the bow up. I had made the outboard well parallel with the aft bulkhead, but it clearly not vertical. I’ve since added a couple of wooden shims to adjust the angle. I’ve also borrowed an outboard extension so I can sit on the middle thwart and put my weight farther forward. The 3.5-hp outboard was bigger than we needed; a smaller, lighter 2.5 hp would have provided plenty of power.
The river suddenly opened up to us. Before, we had been confined to rowing only a mile or two upstream or downstream; we now had the run of the whole river, and beyond. Using the tide to our advantage we sped 4 miles upriver to Totnes in half an hour and 5 miles downriver to Dartmouth in 40 minutes. For the first time since coming to the village, we headed out to the open sea to explore the spectacular Mew Rock, now just an hour away. Even more importantly, perhaps, the skiff has embedded us in the local community, allowing us to join social events on the river that would have been out of reach before.
Zennor Compton
June, 2016. Sol got dressed up for our first trip with the reborn skiff after restoration. We launched from a shingle beach just around the corner from our home.
The skiff is still a joy to row, and the outboard, quite unexpectedly, has made her even more so. Because the skiff is so light, Nigel always used to recommend carrying a couple of jerry cans of water as ballast to give the boat more momentum when I was rowing alone. Now, the outboard does that job. When not in use, it fits snugly next to the centerboard case and provides the ideal extra weight in just the right place.
Zennor Compton
July, 2016. The skiff is ideal for outings with Sol, Betty and our dog, Winnie. Any more than that, the ride gets a bit wet.
In due course, I intend to rerig the skiff to teach my kids to sail, so she still has potential waiting to be unlocked. But, in the meantime, there’s no doubt that the outboard has breathed new life into old bones and brought the skiff back into our lives as a much-loved member of the family. And it’s not just in my head this time, as friends and strangers now tell me how good she looks, and one person even asked to buy her. Although few had noticed what an amazing boat she was all along—after all, what’s a coat of paint?—I can’t help but feel immensely proud of her.
Zennor Compton
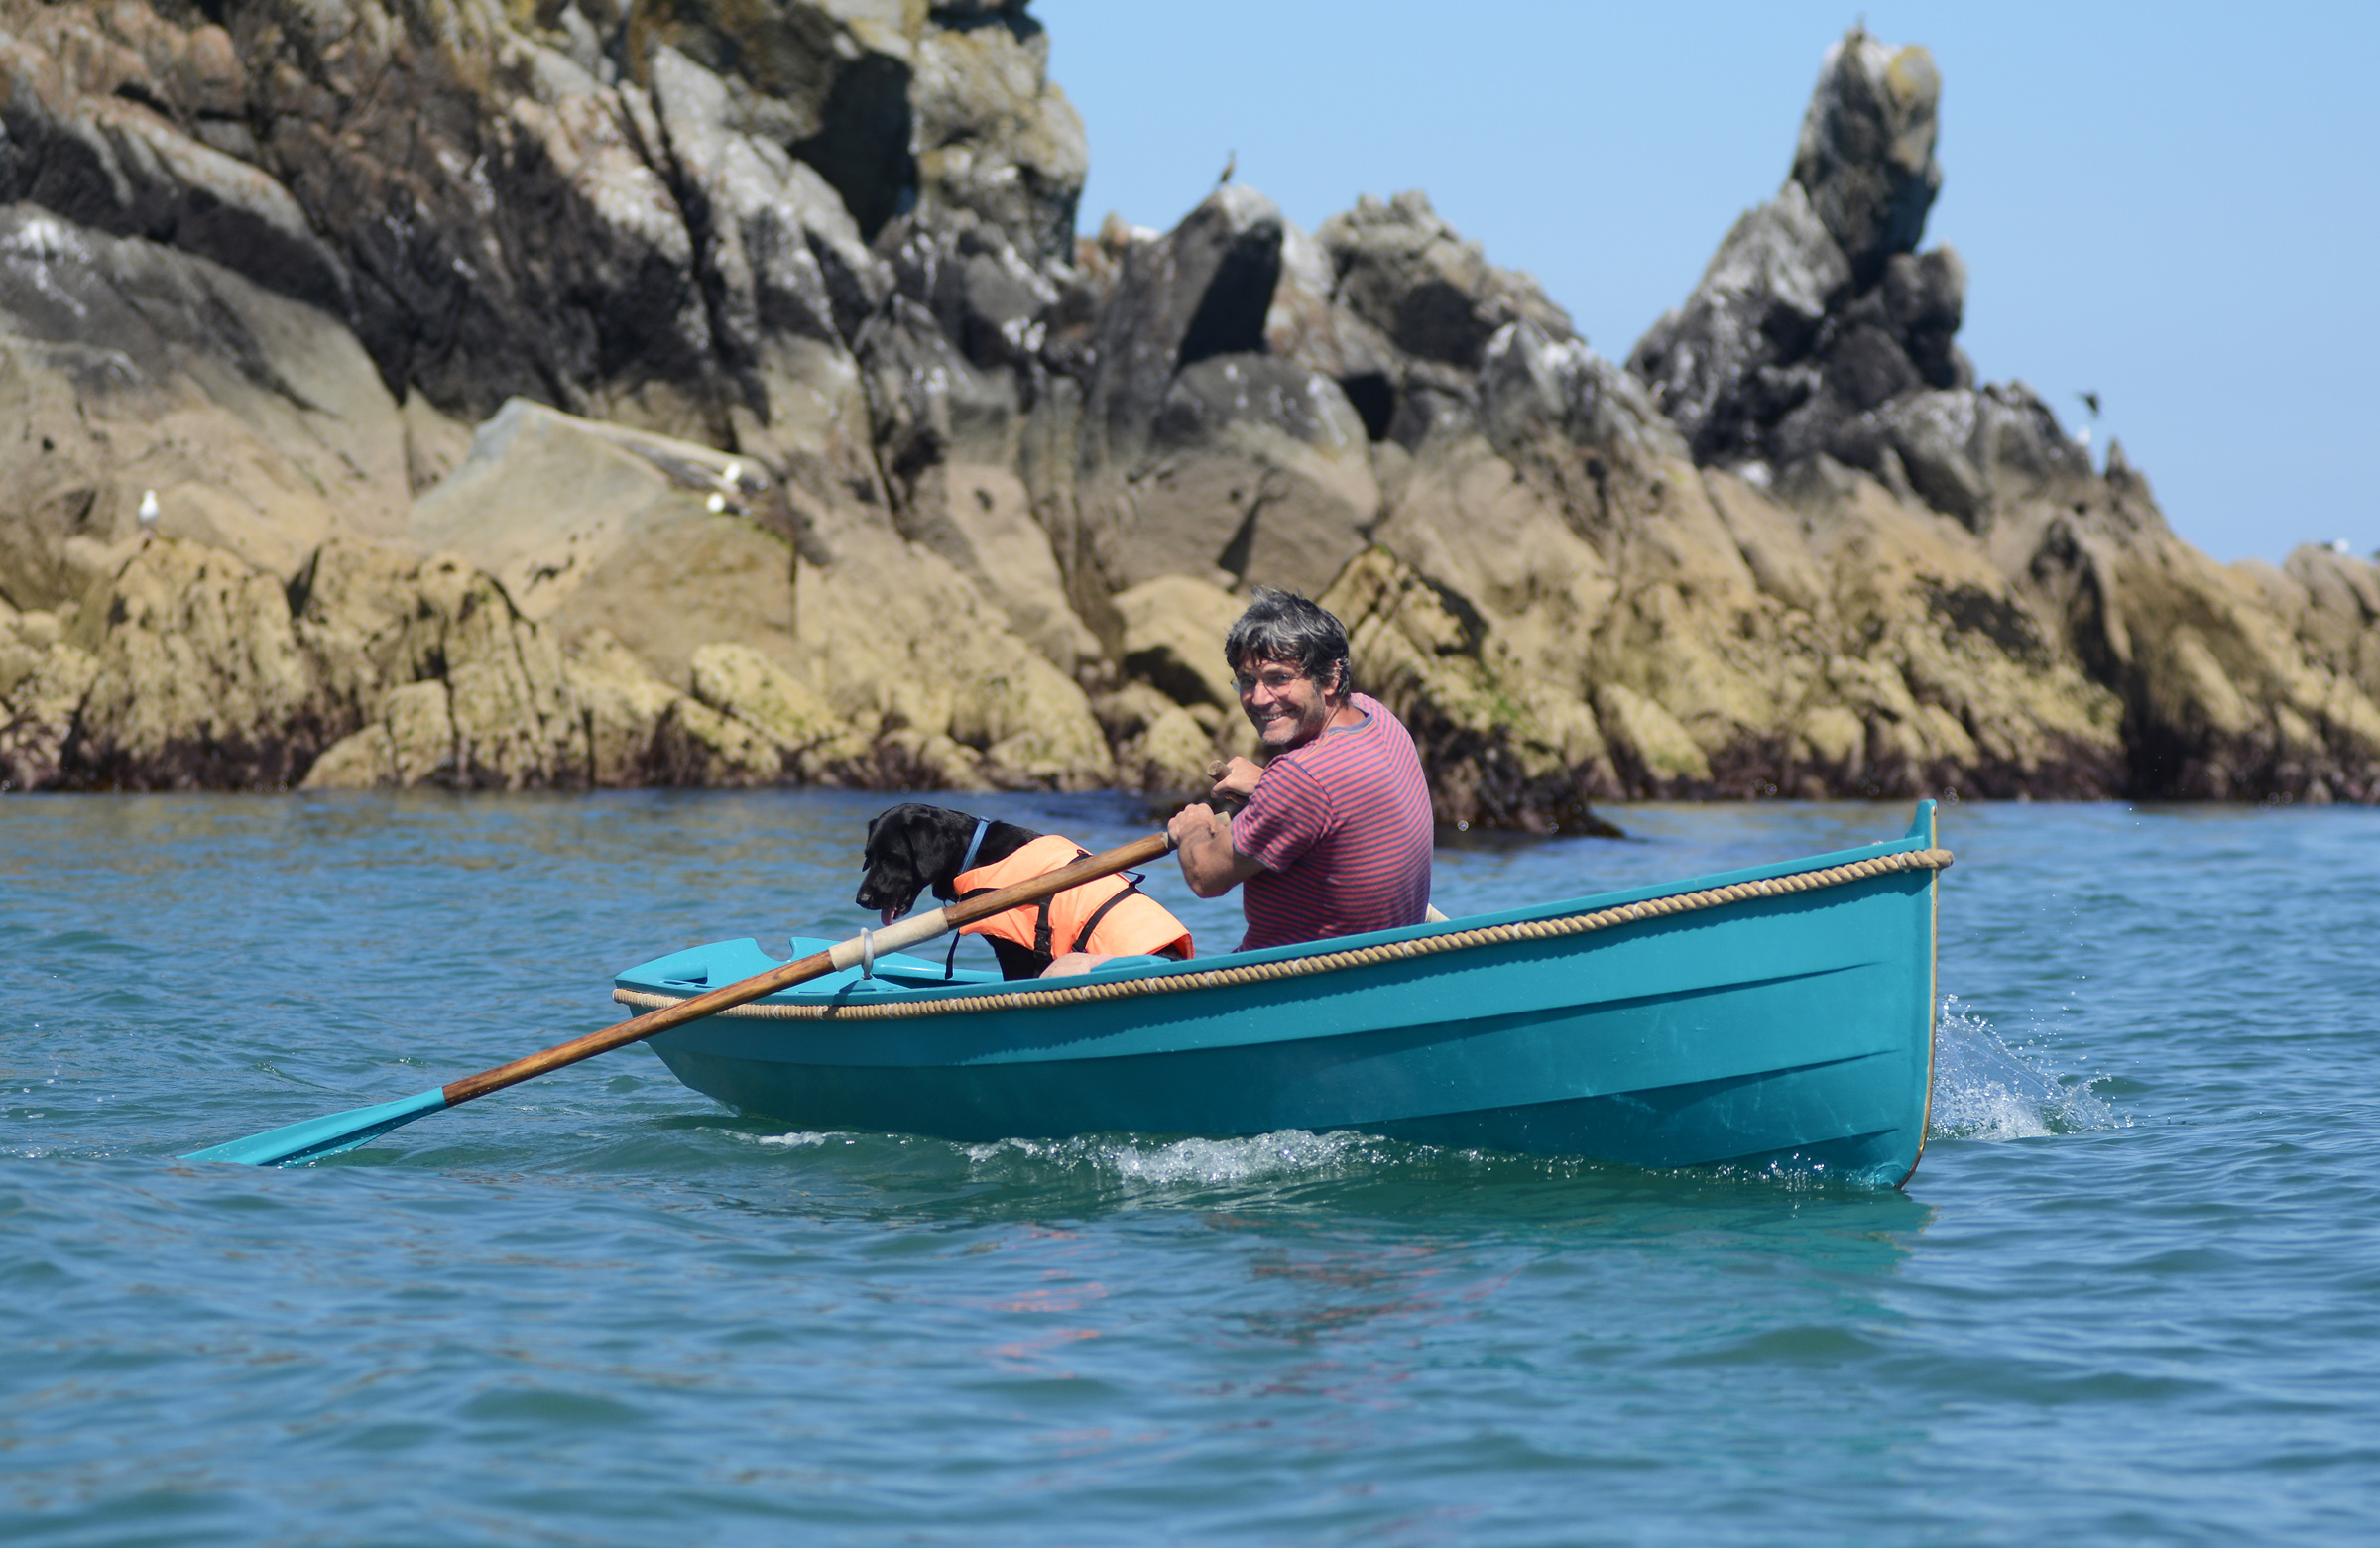
July, 2016. With a lid covering the outboard hole and the outboard itself providing ballast forward, the skiff rows better than ever. Just outside Dartmouth we usually see ten or twelve seals whenever we go to the Mew Stone.
Since I built the skiff, I’ve owned three yachts, ranging from 25′ to 36′. But while the bigger boats have come and gone, the skiff has remained constant, and my appreciation of her has deepened. And, in unexpected ways, she has acted as a kind of compass, pointing me to the kind of life I want to lead.
Nic Compton is a freelance writer/photographer who grew up sailing dinghies in Greece. He has written about boats and the sea for more than 20 years and has published 12 nautical books, including a biography of the designer Iain Oughtred. He currently lives on the River Dart in Devon, U.K., and owns two boats designed by Nigel Irens.
If you have an interesting story to tell about your adventures with a small wooden boat, please email us a brief outline and a few photos.
Boats have several places where two surfaces come together at an angle, and special pieces—breasthooks and knees—are used join them together and add strength. Breasthooks are V-shaped blocks at the acute angle at the bow and, on double-enders, at the stern as well. Knees are supports closer to a right angle, and on open boats they’re most often quarter knees joining gunwales to a transom or seat knees supporting the topsides at the thwarts.
Christopher Cunningham
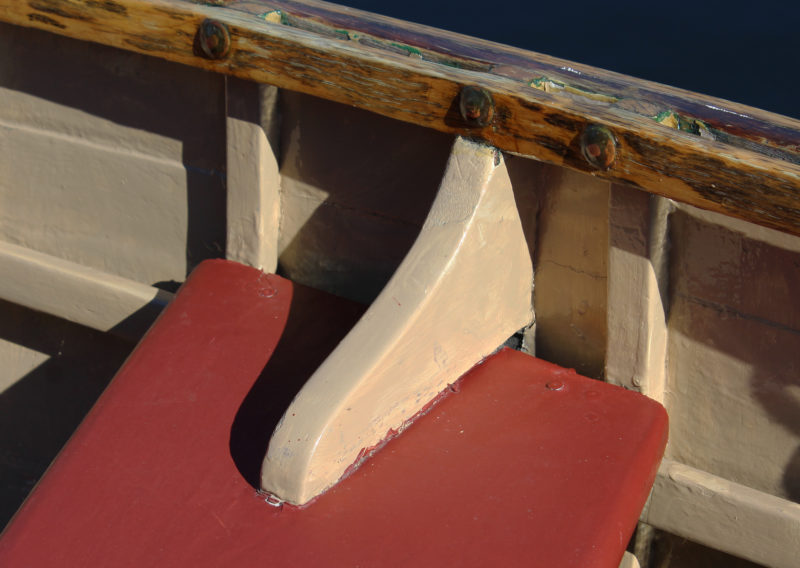
Short, blunt-toed knees, like this one in a Davis boat, are quite common. Devoting a little more time and thought to knees will give them a lighter, more elegant appearance.
Knees and breasthooks made of solid blocks of straight-grained wood can be serviceable, but if the toes (the knee’s extremities) are fattened up too much to make up for the weakness of the cross-grain there, they don’t do much for a boat’s appearance. Pieces made from grown crooks are stronger because the grain runs with the loads, and much handsomer because they didn’t need to be bulky. Indeed, when carefully shaped they elevate the boat’s structure from “good enough” to art.
Christopher Cunningham
This apple-crook breasthook is in a New York Whitehall built in 1983. Well cured before it was installed, it hasn’t checked or separated from the surrounding structure.
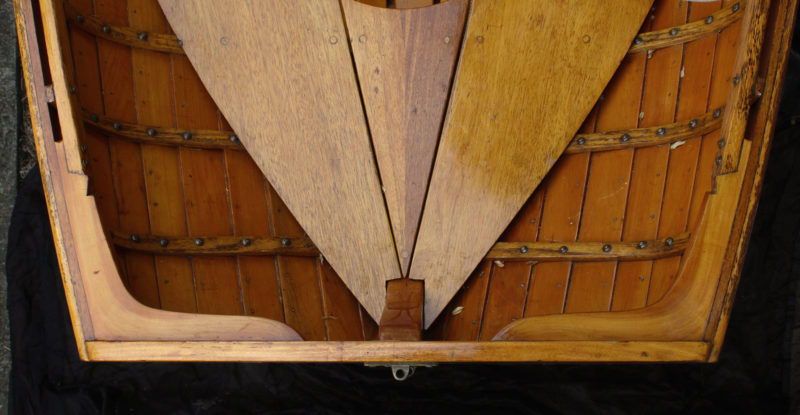
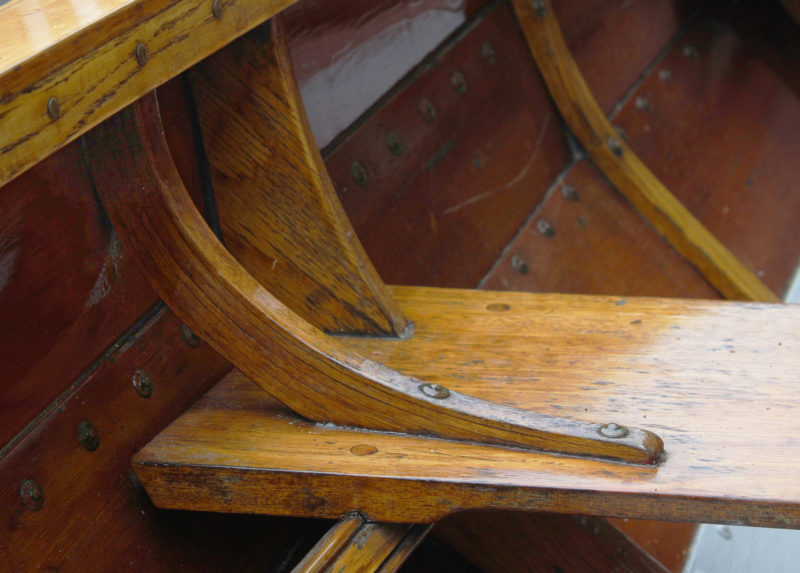
Christopher Cunningham
The grain in the Whitehall’s bookmatched fruitwood quarter knees not only follows the angle between the transom and the sheerstrake, it curves into the transom at the ends of the toes.
In former days when open boats commonly went alongside larger boats, seat knees were essential to the boat’s structure and were sometimes massive, keeping the sides from being stove in. Tenders and ship’s boats typically had two seat knees at each end of a thwart. With today’s light, glued-lapstrake construction they can be equally important in reinforcing the structure.
Christopher Cunningham
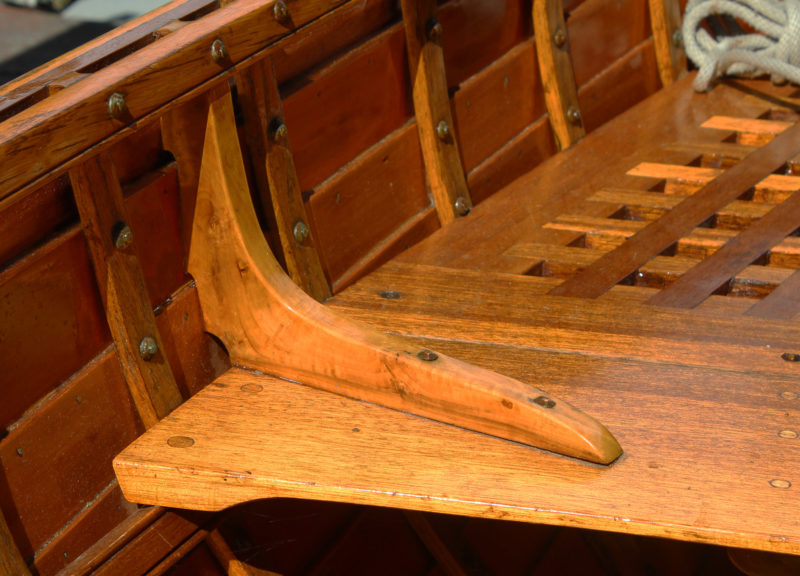
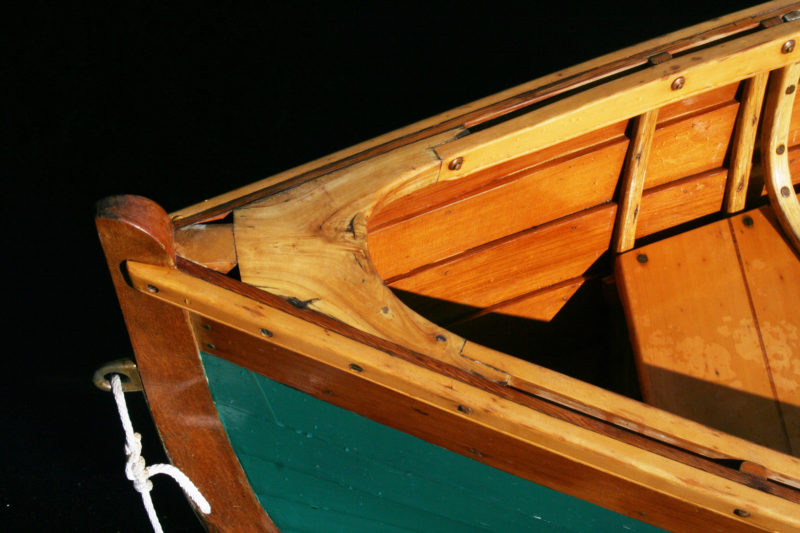
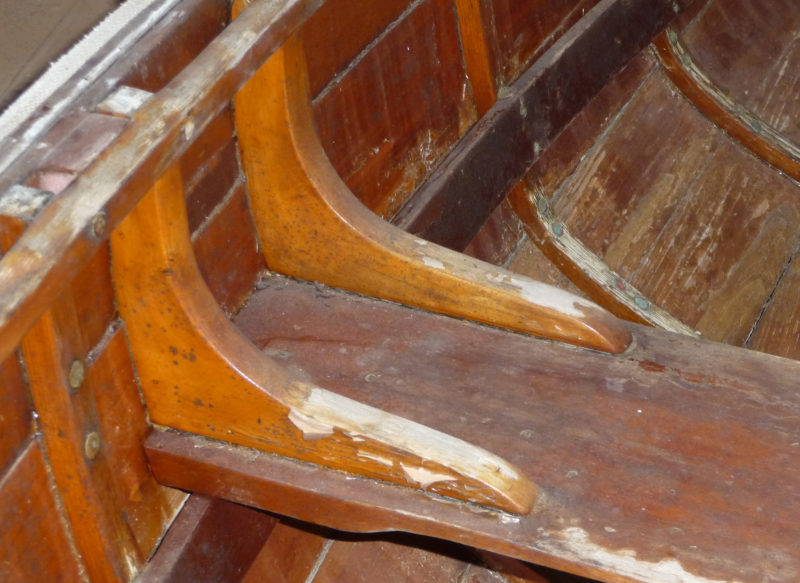
This fruitwood crook in the New York Whitehall braces a thwart that serves as mast partner. The toe is slender enough for rivets to be used to make the attachment.
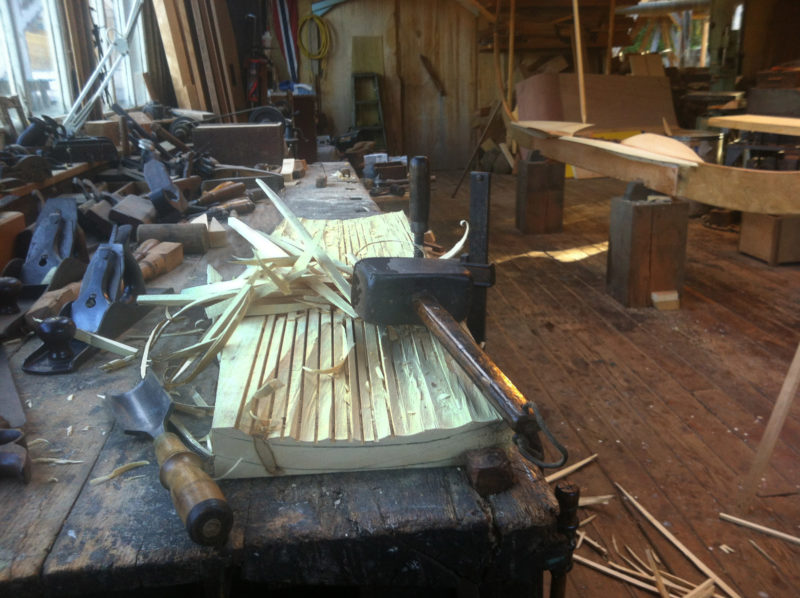
The traditional thwart knee was a marvel of simple joinery. The part that supports the sheer plank was often carefully locked into the gunwale structure. Some were set on top of the thwart, either parallel to its edge or at an angle to it. Their toes might have decorative points cut at their ends. Others were fastened to the vertical edge of a thwart and carefully shaped in a show of lightness and elegance.L-shaped grown crooks were prized pieces of wood, but as they became scarce, many boatbuilders who built substantial numbers of boats went to metal knees. Today it is hard for most boatbuilders to find grown stock needed for traditional knees. Aside from requiring the trees to harvest, the crooks have to be cured without developing splits and sawn into flat pieces prior to shaping.
Ben Fuller
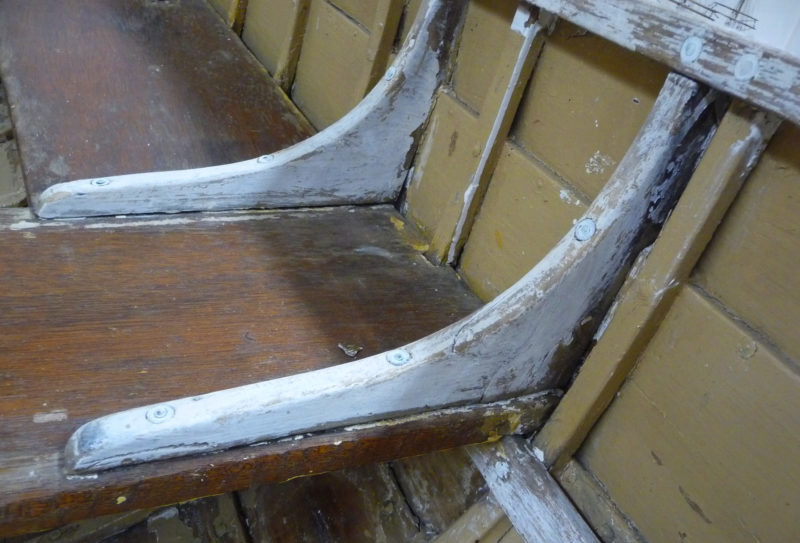
The cross grain shows up clearly in this knee but it was made out of stock wide enough to give it a nice shape. The knees in the author’s Antonio Dias-designed Harrier are screwed to the seats from underneath.
In knees sawn from straight-grained stock, the toes are often blunt and thick, their length limited by the width of the stock used and their height, making up for weak cross-grain, requiring screw-fastening from underneath the thwart. It doesn’t have to be that way. With laminations and reliable glued joints, it isn’t hard to recapture the look and strength of natural knees. Steam-bent knees can provide a sweeping curve and slender toes, but they require blocking to provide the support of a solid knee. Stock can be created by laminating narrow strips of wood; knees can be built with half-lapped or splined pieces much the way that today’s builders emulate the natural crooks once used on dory frames.
Ben Fuller
Steam-bent knees backed by a block of matching wood are every bit as functional and attractive as those made from a grown crook.
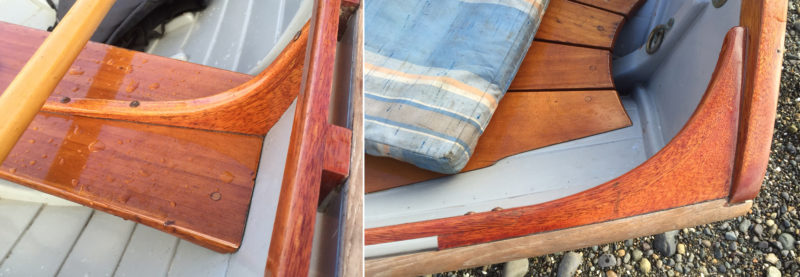
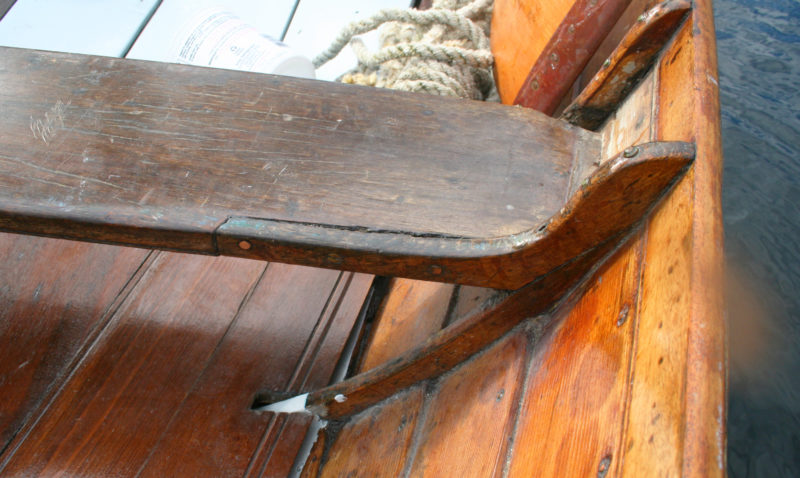
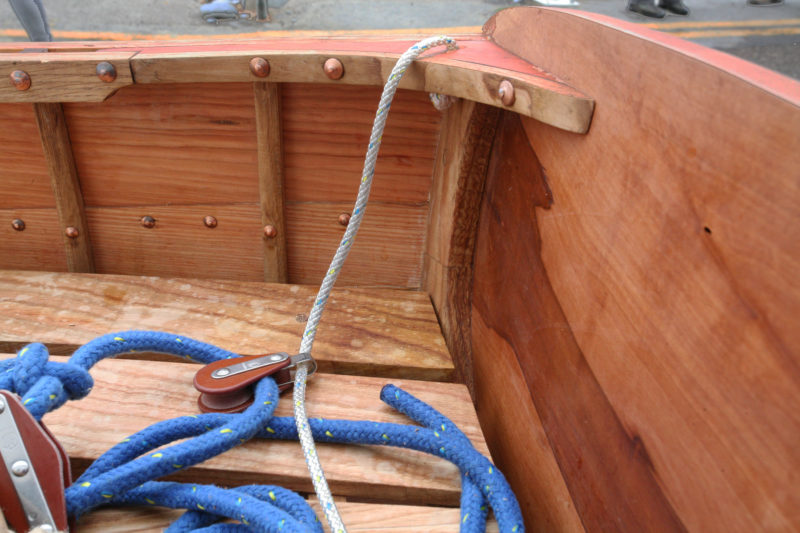
Christopher Cunningham
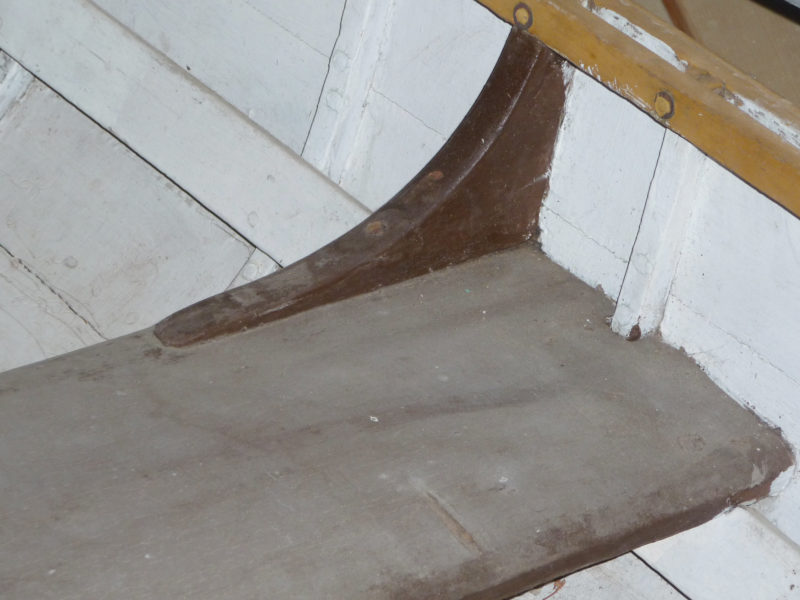
This mitered knee for a lapstrake boat has a broad spline running across the angled jolt. For details on making this type of knee, see this month’s From the Editor column.
Looking at these details on boats from an earlier time will train your eye. Spend the same kind of time on these details that you do on the rest of the boat; they’re what you’ll see every day. When master boatbuilder Joe Liener used to encourage novice boatbuilders to make parts like knees and breasthooks a little lighter, he wasn’t talking about trimming a few ounces of wood. It was his way of encouraging boatbuilders to consider grace and beauty in the work they do.
Ben Fuller, curator of the Penobscot Marine Museum in Searsport, Maine, has been messing about in small boats for a very long time. He is owned by a dozen or more boats ranging from an International Canoe to a faering.
A Gallery of Breasthooks and Knees
Christopher Cunningham
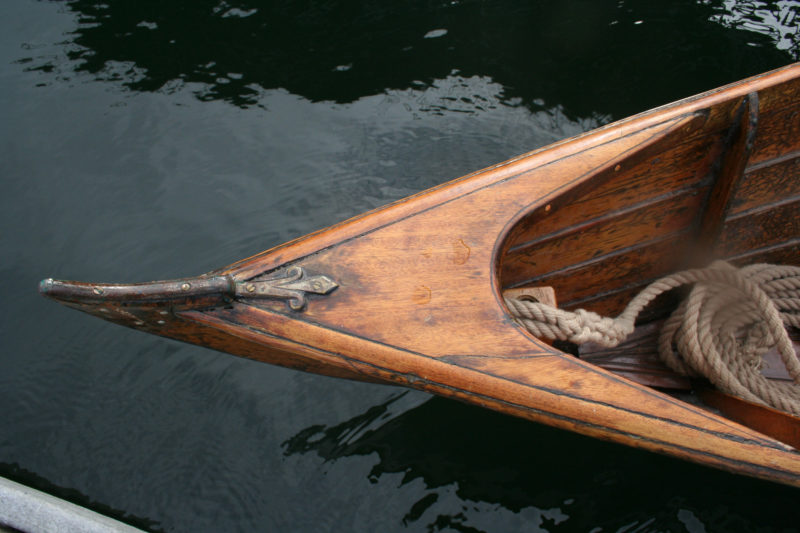
This wherry built by Cooper and Sons in Shrewsbury, England, in the late 1800s has a breasthook made of a single piece of straight-grained wood. The inner edge is scribed with a decorative groove.
Christopher Cunningham
The quarter knees in the Shrewsbury wherry have exceptionally long toes.
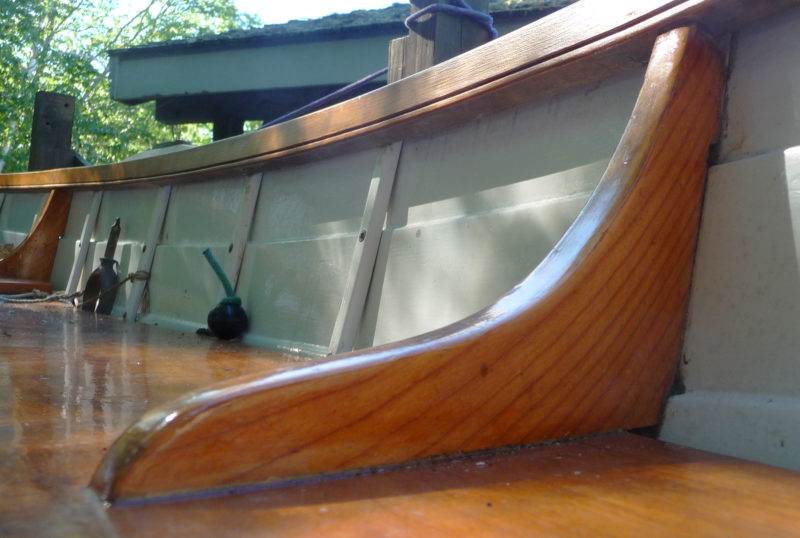
Christopher Cunningham
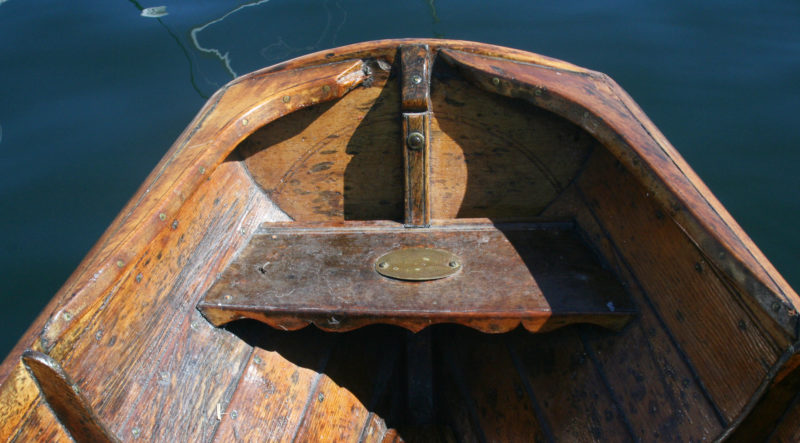
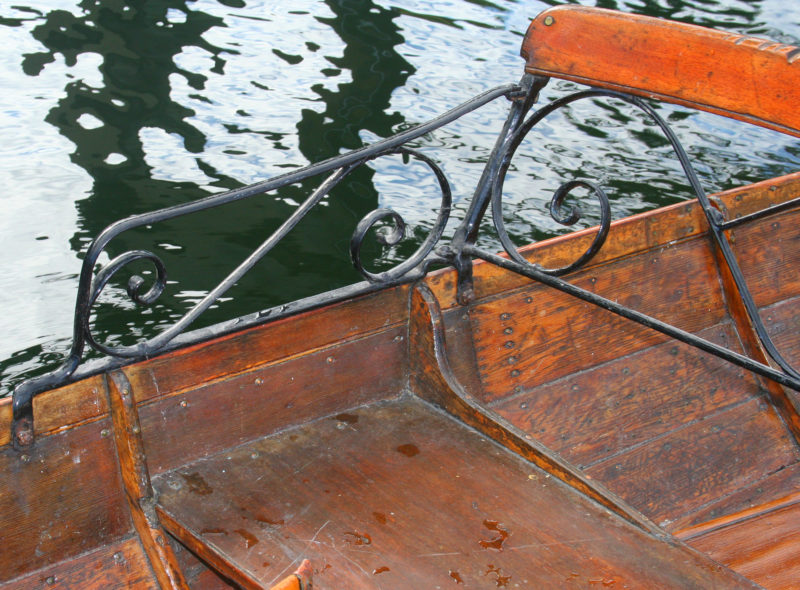
The wherry’s passenger seat has slender knees with long, elegant toes.
Christopher Cunningham
Thwart knees are occasionally built into the edge of the thwart they support. This knee in the wherry is cut from a crook and becomes a frame head.
Christopher Cunningham
This laminated mahogany knee in a Chamberlain gunning dory is wide enough to provide strength without a filler block backing it.
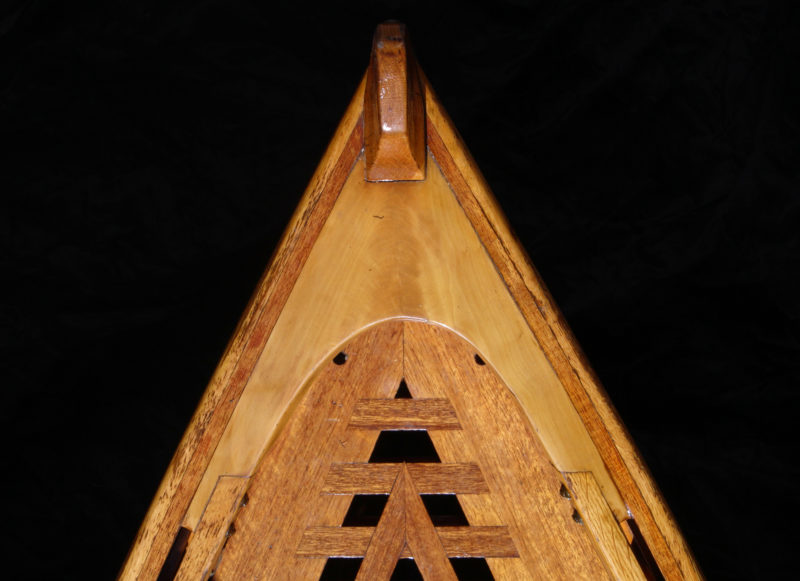
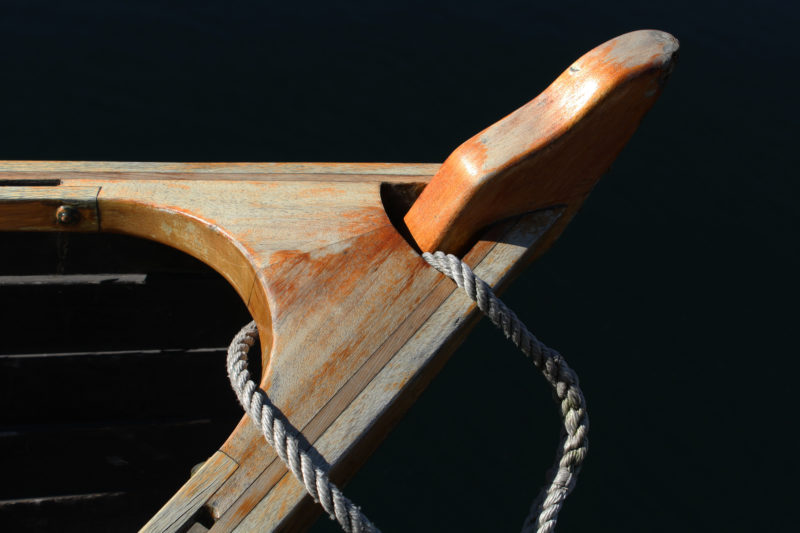
Christopher Cunningham
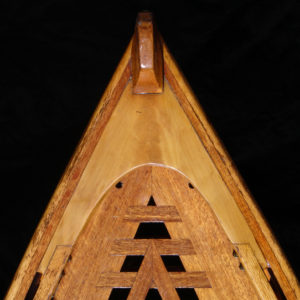
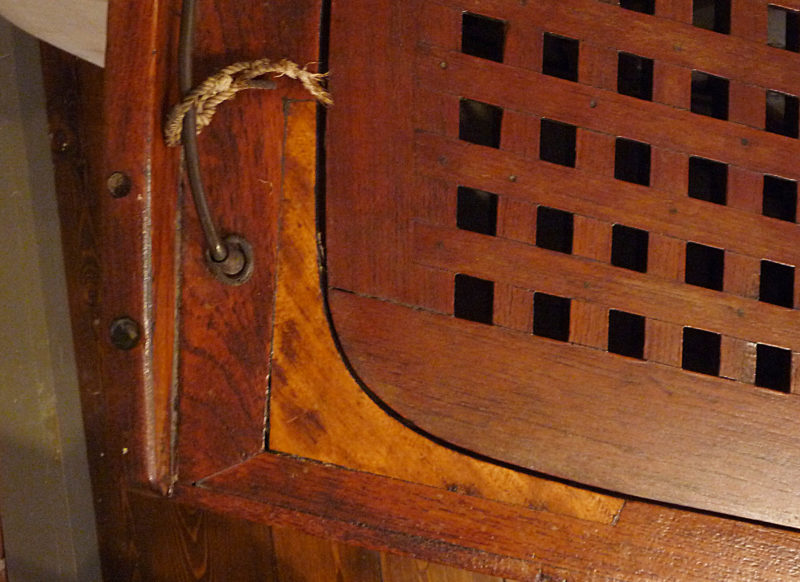
This breasthook in a Hvalsoe 13 is curved along its forward edge and set apart from the stem. This makes fitting easier, avoids an area that tends to weather poorly, and offers a convenient place to anchor a painter. The two halves of the breasthook are held together by epoxy alone, and while the joint has held up well for over 20 years, keeping the varnish in good shape will assure the bond doesn’t fail.
Christopher Cunningham
The grain of the crook used for this 1982 Whitehall’s breasthook is clearly visible.
Ben Fuller/Penobscot Maritime Museum collection
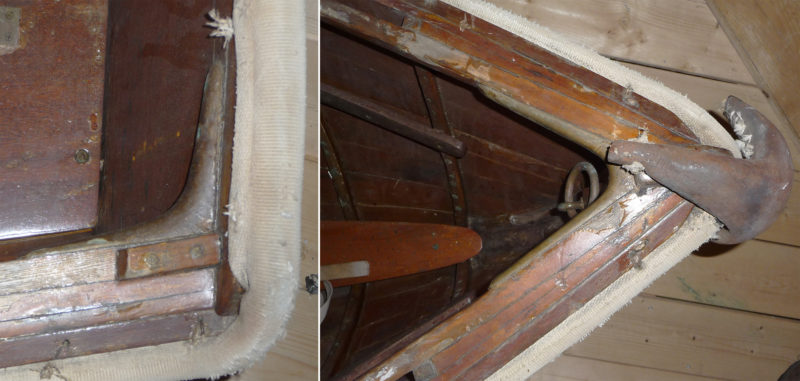
These double knees are from a tender built in the mid-coast area of Maine in the 1930s. The boat is as nice as anything turned out by the more highly regarded boatbuilders of Massachusetts or Rhode Island.
Ben Fuller/Penobscot Maritime Museum collection
Pointed toes add a distinctive touch to LITTLE ELVA, a 16′ captain’s gig built in 1881 by a carpenter aboard the Downeaster sailing ship CORA. The gig was built along the lines of a workboat, but intended for pleasure outings and given some fancy woodwork.
Ben Fuller/Penobscot Maritime Museum collection
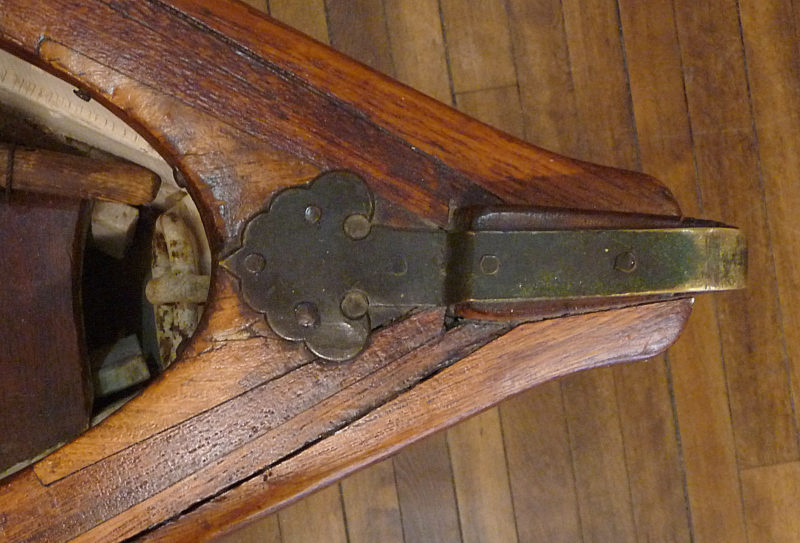
LITTLE ELVA’s dainty quarter knees were let into the inwales and a cleat across the transom.
Ben Fuller/Penobscot Maritime Museum collection
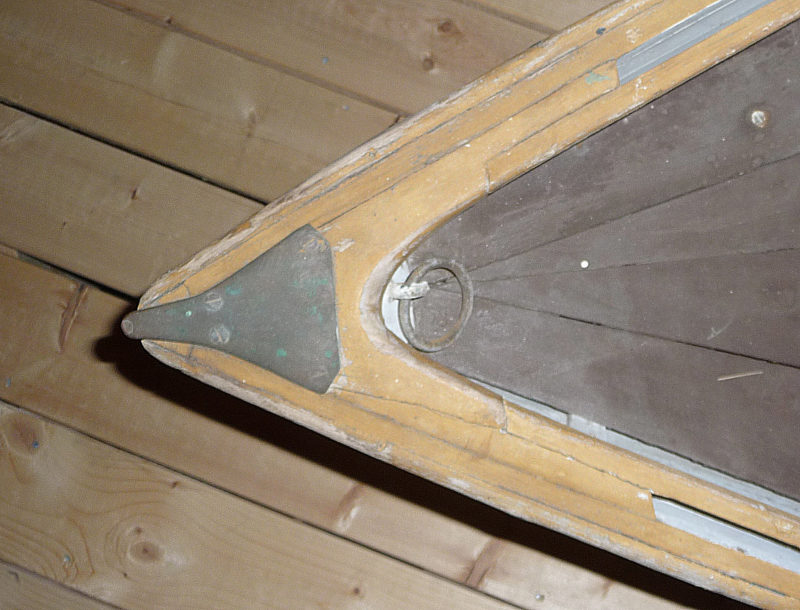
The LITTLE ELVA breasthook was also let into the inwales.
Ben Fuller/Penobscot Maritime Museum collection
The quarter knees and breasthook in this Lawley-built tender are bronze and well suited for a boat built in great numbers.
Ben Fuller/Penobscot Maritime Museum collection
When Lawley switched to metal breasthooks and quarterknees, the tenders still had nicely shaped wooden thwart knees. Eventually these too were done in bronze.
Ben Fuller/Penobscot Maritime Museum collection
This thwart knee on one of the small rowboats built in Vinalhaven, Maine, is a good example the of fine work that was just another day in the shop for the boatbuilder.
Ben Fuller/Penobscot Maritime Museum collection
The ordinary Vinalhaven rowboats were built with an eye toward lightness and interesting curves.
Ben Fuller/Penobscot Maritime Museum collection
Elegance was once the norm even on working peapods. The builders didn’t think about it, they just did it.
You can share your tricks of the trade with other Small Boats Monthly readers by sending us an email.
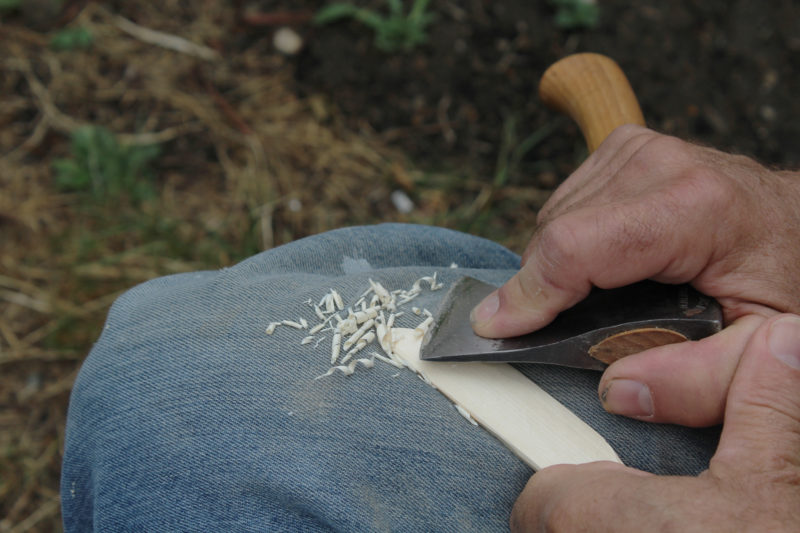
Liquid detergents go to work faster than powdered varieties. Bodywash and shampoo will also work. If you still see suds through the window after 30 seconds of washing, you can use less detergent for subsequent washings.
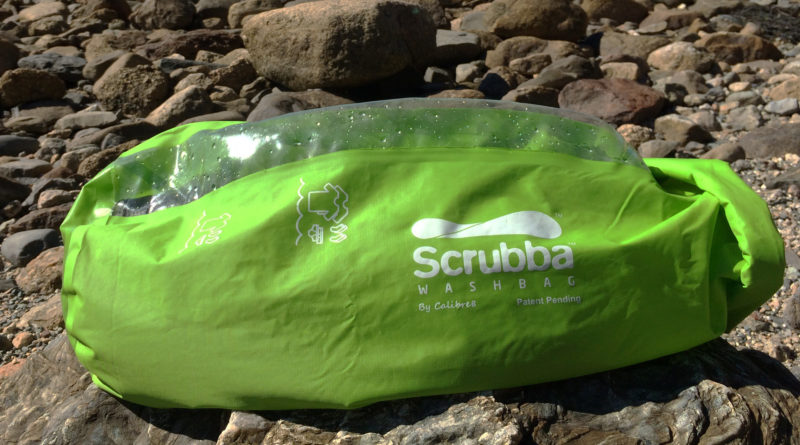
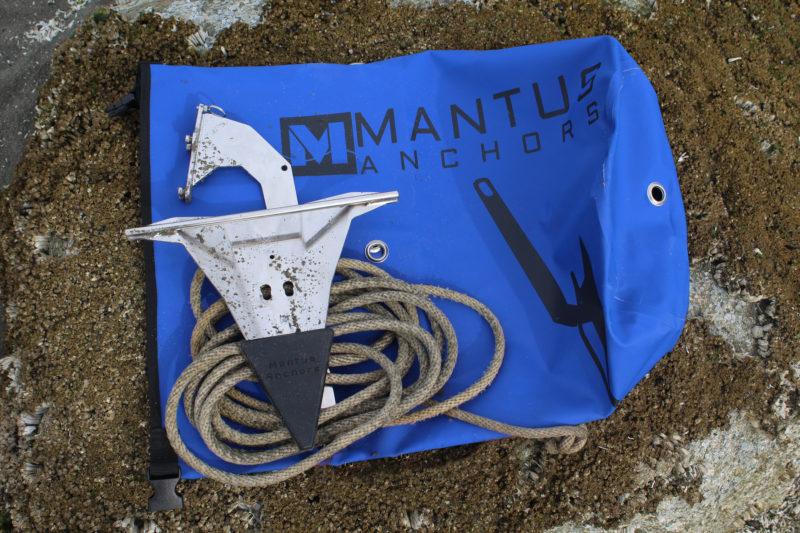
The Scrubba wash bag first came to my attention through an online cruising forum that has occasional posts about laundry gadgets, and it struck me as an innovative solution to a backcountry traveling problem: dirty clothes.
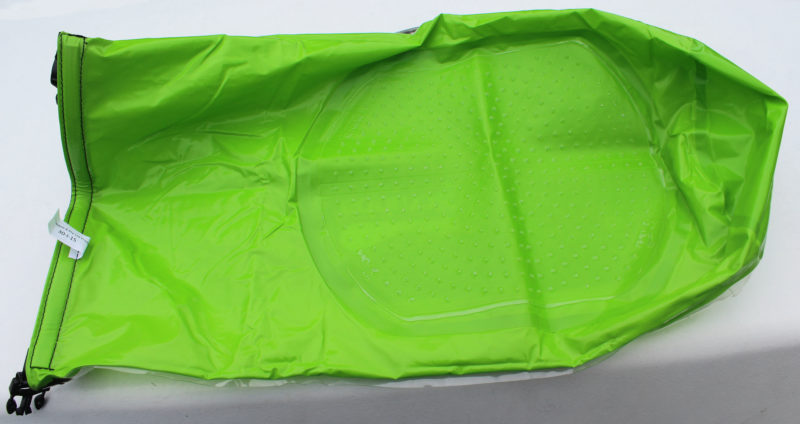
The Scrubba is essentially a dry bag, but instead of keeping water out, it keeps water, detergent, and dirty laundry in. It has a clear panel for seeing what’s going on, a flexible textured washboard panel inside, and a valve to let air out. It’s well made. All of the seams are consistently and cleanly done, the stitching is top-notch, the buckle is sturdy, and the whole thing weighs just 5 ounces. Folded, it’s quite compact— smaller than a sandwich—which is particularly valuable for camp-cruising in small boats where space is limited. The Scrubba can serve as a dry bag when it’s not being used for laundry.
SBM
If you turn the Scrubba inside out, as you would to dry it after use, you can see the interior washboard surface.
The instructions are printed on the bag as simple drawings, and two fill lines with illustrations showing the size of awash load: a small load is one shirt, one pair of unmentionables, and a pair of socks; a large load is double that. Put clothing and a gallon or more of water to the appropriate fill line, add a small amount of detergent, close the bag by folding the top down and buckling it, and then release most of the air through the valve. Then work the bag by hand, rubbing the clothes across the interior washboard as if you were kneading bread dough. Washing for 3 minutes is recommended for a “machine-quality wash” and 30 seconds is for a “quick traveler wash.” After washing, pour the dirty water out, and repeat of the wash process without soap for the rinse cycle. Following the rinse wring out the water and line-dry.
SBM
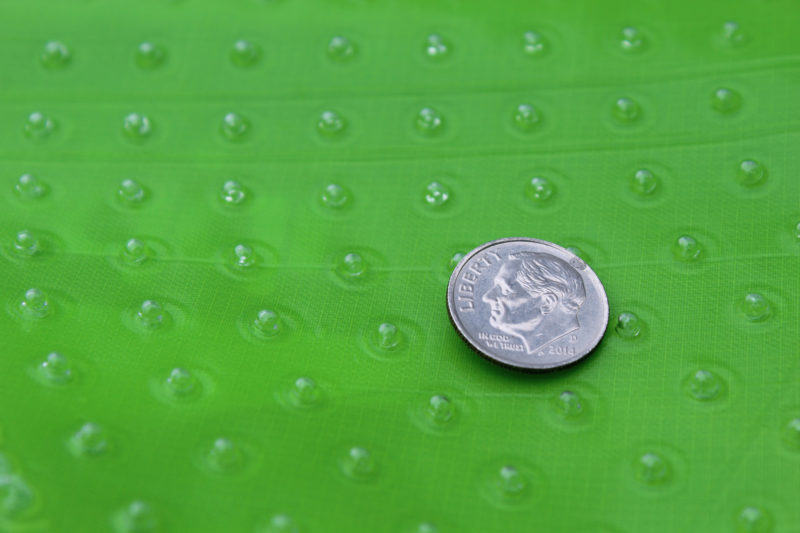
The washboard surface is made up of small molded urethane knobs.
I washed some galley towels as a good first test. They were a little greasy and had a bit of salt water in them, so they weren’t drying. The wash cycle created some very satisfyingly dingy wash water. For the next batch I washed my mostly cotton leggings with a skirt attached (kind of bulky), my really sweaty technical T-shirt I had been wearing while gardening, and a few cleaning rags. For this larger load that filled the Scrubba to the upper fill line. I kept an eye on things through the window to make they all came in contact with the washboard.
Everything came out nice and fresh, and I came away with a really positive feeling about the Scrubba. The process was easy, and I wasn’t put off by its small capacity compared to a washing machine—camp-cruising demands smaller loads done more frequently. I would recommend the Scrubba to any traveler who needs to do laundry. It goes beyond being a nifty piece of gear, as getting salt water and bacteria out of clothing can make for a healthier, happier excursion.
Anne Bryant, WoodenBoat’s associate editor, lives aboard MIMI ROSE, a 32′ wooden cutter.
The Scrubba is available from selected retailers as well as direct from the manufacturer for $55. It can be purchased as a Wash and Dry Kit for $99.95, which includes a microfiber drying towel, a clothesline, inflatable hangers, and a carrying case.
Is there a product that might be useful for boatbuilding, cruising or shore-side camping that you’d like us to review? Please email your suggestions.
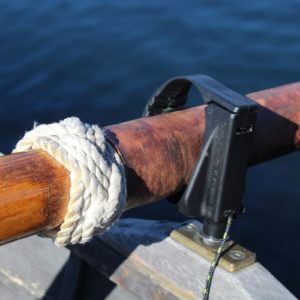
Gaco oarlocks apply the mechanics of racing oarlocks to recreational rowing.
I had been curious about Gaco oarlocks for a long time, and finally decided to buy a pair to see how well they work. Instead of rotating in the socket like a normal oarlock, the Gaco’s molded copolymer cradle for the oar rotates around the pin. That’s how locks on racing shells work, and it eliminates the kind of wear that leads to a sloppy fit for conventional oarlocks. I rowed my sneakbox from Pittsburgh to Cedar Key, Florida, using conventional bronze oarlocks, and after two-and-a-half months of rowing the pins and sockets had worn considerably, even though I greased them every day, often more than once a day. As a consequence, the locks developed a lot of play, my catch wasn’t as crisp as it should have been, and the rowing was noisy.
Whatever wear there is in a Gaco lock is likely to occur much more slowly. The pin of a standard lock acts as a lever against the sides of the socket, and the pressure at the top of the socket and pin can be more than double the pressure applied by the loom against the horn; the place where the pressure is highest is also where friction occurs. The Gaco lock separates the pressure and the friction: The bottom of the pin still pries in the socket, but the friction occurs at the top of the pin directly forward of the oar and is spread over a much broader area.
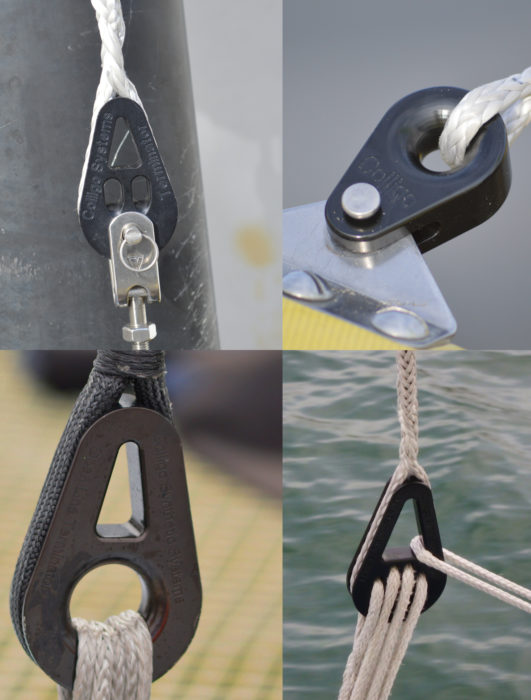
I’ve never been a fan of circular oarlocks that are fixed to the oars. When the oars are shipped, the locks have to come with them, so I needed to change the way I handled the oars. Instead of taking hold of the looms to set them in the locks as I’ve been accustomed to, I grab the locks instead and the oars come along as I set the pins in the sockets. My other complaint about round oarlocks is the damage they do when they slide down the loom and hit the roots of the blade. On my spoon-bladed oars that’s a particularly difficult area to carve, and it looks good only if dings left by the oarlock aren’t spoiling the lines. The Gaco locks, at 6 oz each, are a bit lighter metal equivalents, and the plastic isn’t as apt to leave a mark.
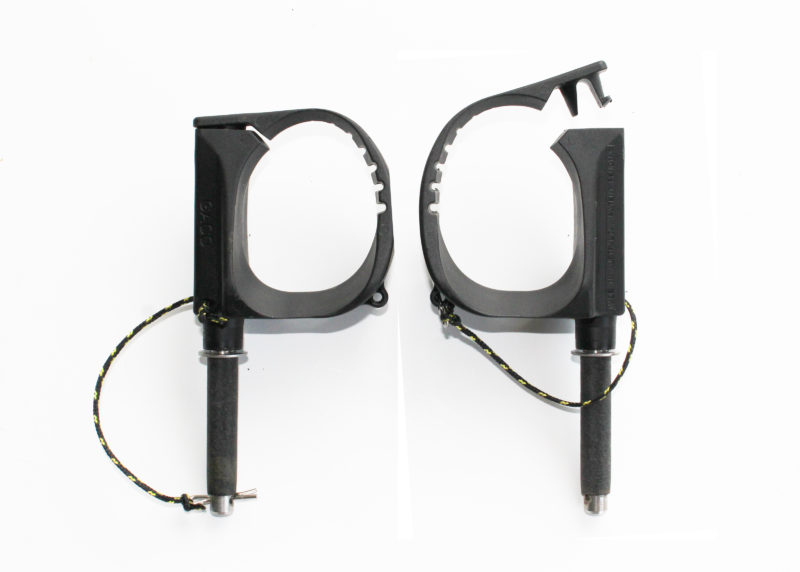
The locks open to be installed on oars. Sleeves installed over the pins adapt them to fit standard oarlock sockets.
The Gaco oarlocks fit oars up to 2 1/4″ in diameter (leathers included). You open the top of the lock by inserting a screwdriver in a slot to release the gate, making it possible to put the locks on oars with collars in addition to leathers. The Gacos are kinder to oar leathers than standard locks are. The bearing surface of a #1 bronze oarlock is about 1/2″ wide and has a radius of 7/16″, so the pressure on the leather is quite concentrated. The Gaco’s bearing surface is 1 3/4″ wide and almost flat. That should keep leathers from getting compressed and make them last longer. The vertical axis of the Gaco’s oval shape allows for the movement of the oar as the blade moves up and down during the stroke, and the horizontal axis is short to eliminate the slop of looms sliding back and forth.
In my rowing trials the Gacos worked well. They were quiet and smooth. A short lanyard and hitch-pin clip was included with each lock. The clip is can be inserted in the hole at the bottom of the pin to keep the lock in the socket, but the boat I used for testing had too much depth in the oarlock pad and the inwale to allow me to do that. I doubt I’d use it anyway. If a wave hits an oar blade hard enough to pop the lock out of the socket, I’d rather have that happen than have the handle driven down hard against my leg.
I quickly warmed up to the Gaco locks. They’re inexpensive and do their job well. While I was rowing I wasn’t aware of them at all, and that’s the best compliment I can offer any oarlock.
Christopher Cunningham is the editor of Small Boats Monthly.
Gaco oarlocks are made in Australia and available direct from the manufacturer: $25 for the plain version, or $29 for the version reviewed here with the lanyard and clip.
Is there a product that might be useful for boatbuilding, cruising or shore-side camping that you’d like us to review? Please email your suggestions.
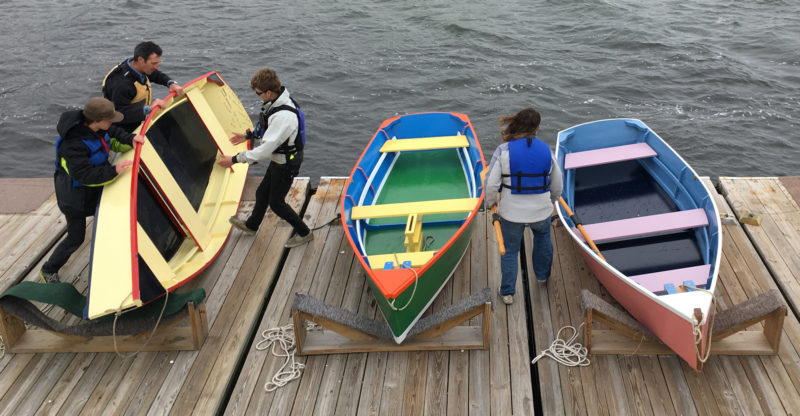
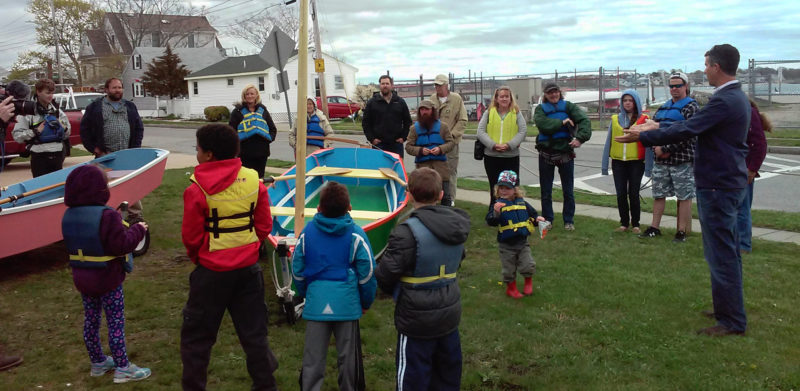
Richard and two students roll MISSY D alongside ANDREA McCOY (center) and GLOBAL EXPLORER (right).
On a hot summer day in 1995, JoAnn Tschaen, a social worker, visited a family with seven children, down on their luck and living in a run-down tenement in the north end of New Bedford, a Massachusetts coastal town 10 miles east of the Rhode Island border. For these kids, the cooling breezes of Buzzards Bay were a world away; Tschaen set out to change that and find a way to get these kids and others like them involved in boating. Three years later, the Community Boating Center (CBC) was established. The Center is now situated on the shore of Clarks Cove on New Bedford’s south end. It has its own pier, floating docks, and a fleet of about 100 boats, ranging from a 7′9″ Optimist dinghy to a 23′ Sonar, a one-design keelboat.
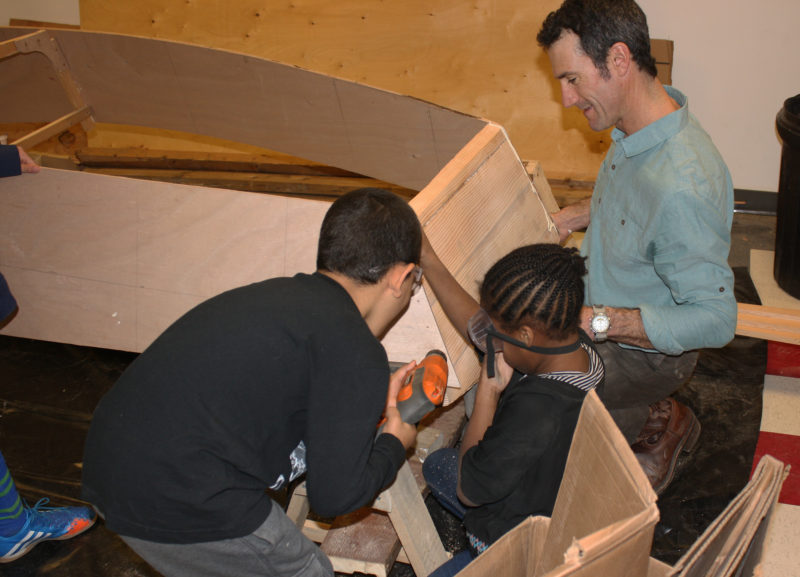
Richard Feeny looks on as two young students fasten a side plank to the transom.
The young builders enjoyed painting and came up with some brilliant color schemes.
Education, whether in teaching life values or STEM disciplines (science, technology, engineering, and mathematics), has always been at the center of the Center’s mission. Sailing was initially the means of engaging kids, but boatbuilding soon followed. The CBC is using the Building to Teach program created by Joe Youcha, a former director at the Alexandria Seaport Foundation and a contributor of many articles published in WoodenBoat magazine. Joe was also part of the team that created the Bevin’s Skiff, the boat used in the Building to Teach program.
The boat launch party was a celebration of youth and determination.
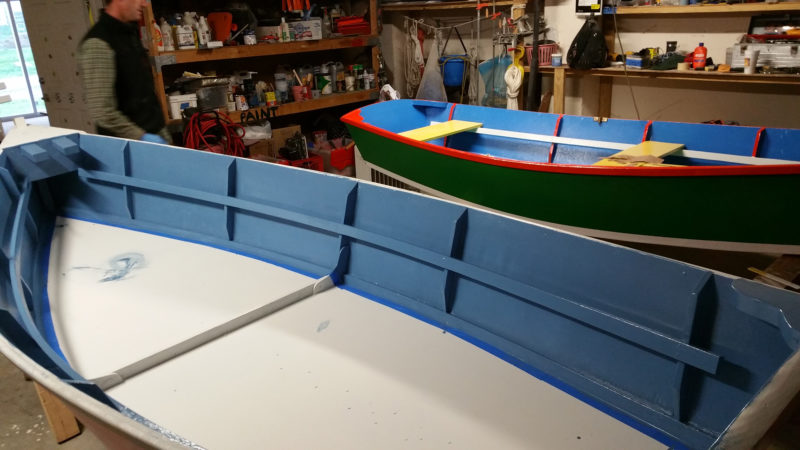
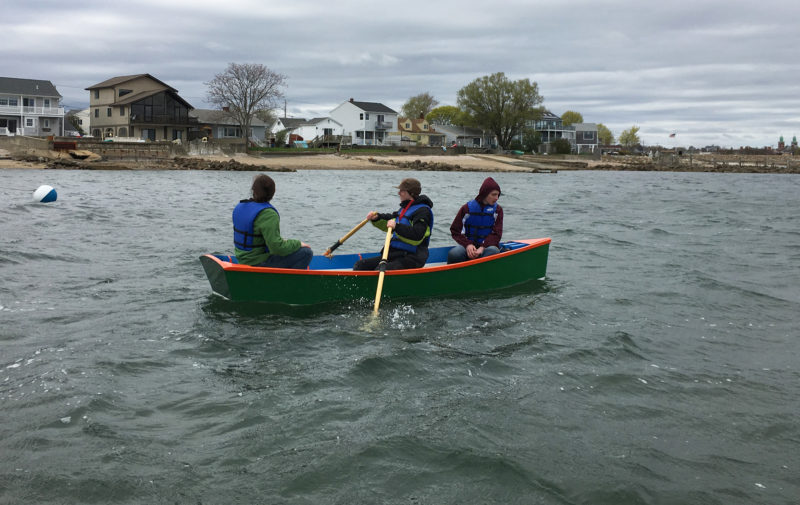
GLOBAL EXPLORER was built by students from New Bedford’s Global Learning Charter Public School.
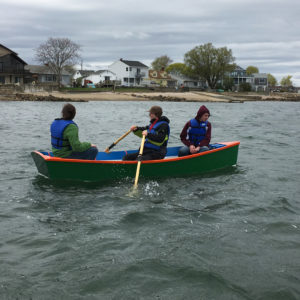
The kids at the CBC took part in that program and built three Bevin’s Skiffs, christened MISSY D, ANDREA McCOY and GLOBAL EXPLORER. As a warm-up to the full-sized project, many of the kids built scale models of the skiffs. “They love the measuring, drawing and cutting, and problem-solving. They are captivated by it,” says Richard Feeny, CBC’s Education Coordinator. Under his direction, the students began building three of the 12’ skiffs. They picked up tools, some for the first time in their lives, and went to work with marine plywood, fir, white oak, bronze boat nails, caulk, and paint. They used a few screws, but, according to Richard, “it’s a lot more fun to swing a hammer than turn a screwdriver.” Driving bronze boat nails also provides more opportunities for problem-solving. One swing of the hammer can bend a nail. Was the pilot hole too small? Can the nail be straightened and driven home? Does it need to be pulled and replaced?
MISSY DENNISON, MISSY D for short, was built by students from the Dennison Memorial Youth Center.
The goal for the kids is to aim for better than 1/8″ accuracy. The relatively relaxed standard allows the kids to keep the project moving and prevents frustration from getting in the way. Polysulfide caulk makes up for any gaps and makes the boats serviceable.
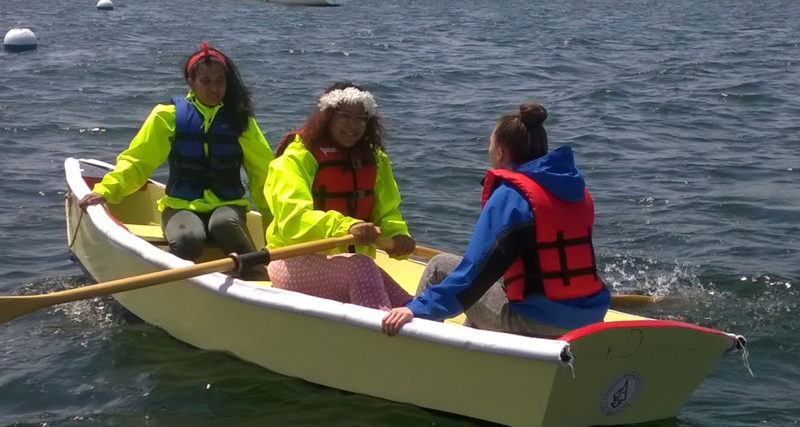
Students from the Andrea McCoy Recreation Center built ANDREA McCOY. McCoy. a New Bedford resident, was among the talented young amateur boxers killed in a 1980 plane crash in Poland. This skiff is equipped with a daggerboard trunk and a mast step and will eventually be sailed.
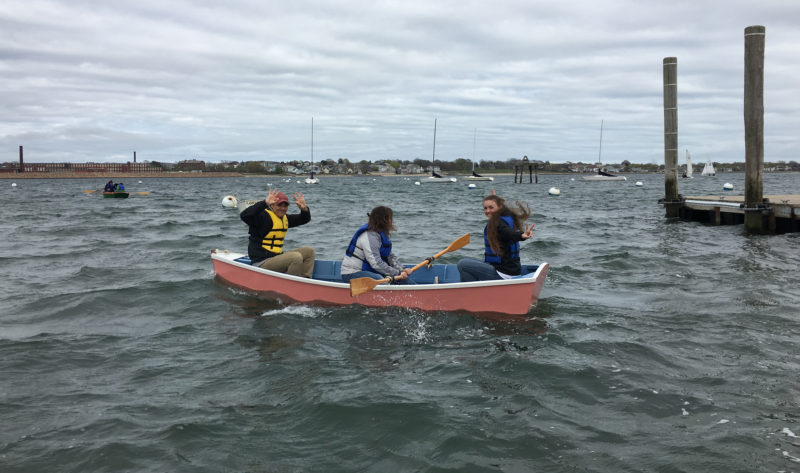
MISSY D, GLOBAL EXPLORER, and ANDREA McCOY were carried to the CBC dock and launched on an unseasonably cold and windy day. The excursions the kids took were short but represented the culmination of months of work. For Richard the launching was “magic. They built these things from scratch, and now they’re cruising around the harbor. They get in a boat and look back at the city, and there’s a perspective shift—and you don’t know where it will take them.’’
Have you recently launched a boat? Please email us. We’d like to hear about it and share your story with other Small Boats Monthly readers.
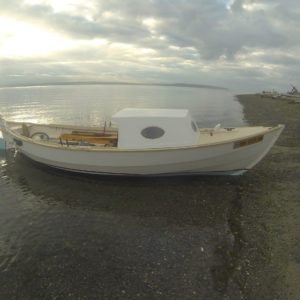
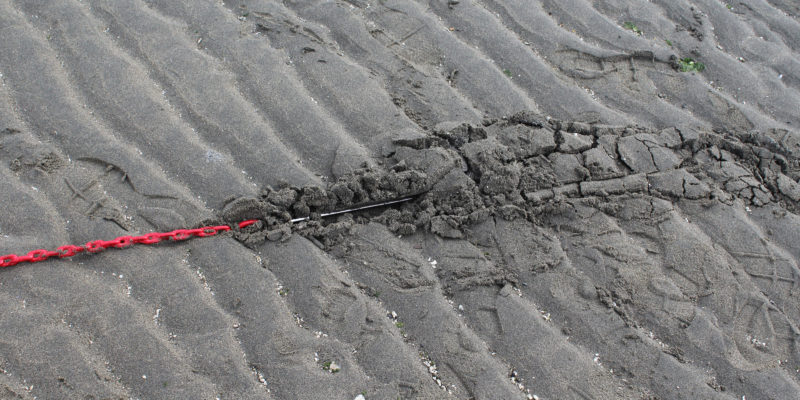
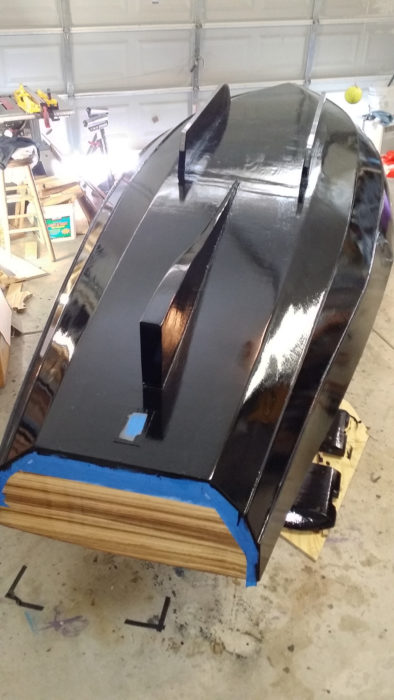
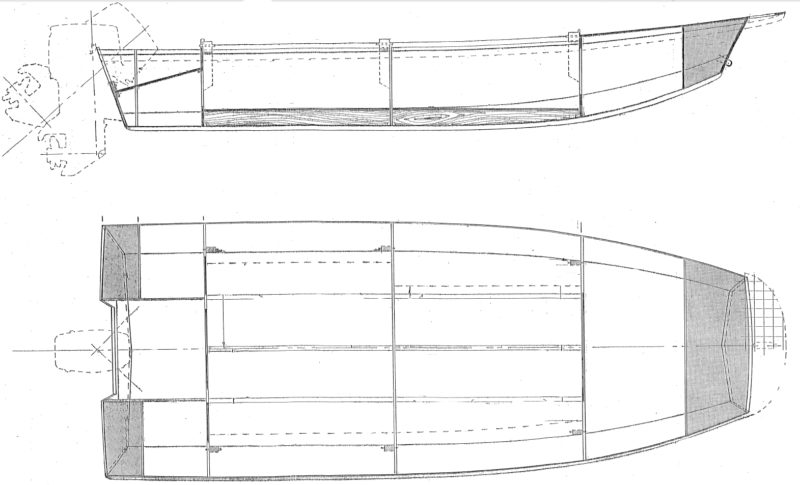
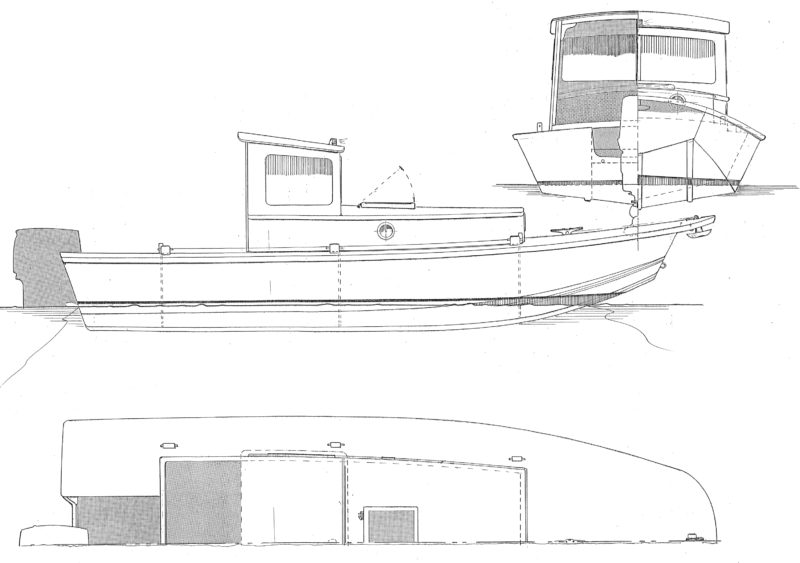
I made the cabin strong enough for me to crawl over it. But while I could get to the foredeck for anchoring, tending to the mainsail was awkward. The cabin was better suited to motoring.
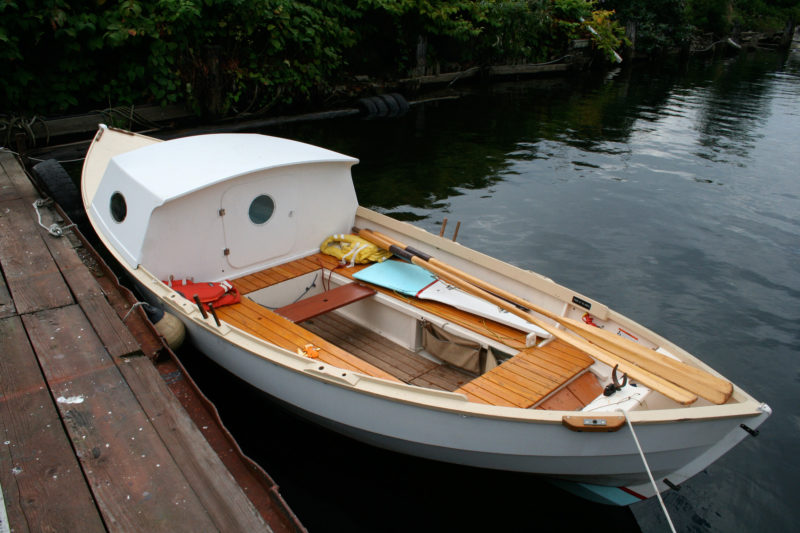
In 2004, my kids, then 14 and 11, and I decided a Caledonia yawl was the boat we needed for cruising. While I was building the hull I revised the plans to make the interior as comfortable as possible for them.
When I was about their age, my father took me and my older sister backpacking every summer. He liked to keep things simple, and the only camping shelter we ever had was a big piece of Visqueen, 4mm black plastic sheeting. On a sunny day it provided shade, but radiated its own sweltering heat; on a stormy day it let the wind and rain fly through. I thought I could do better by my kids, so I made a removable plywood cabin for the yawl.
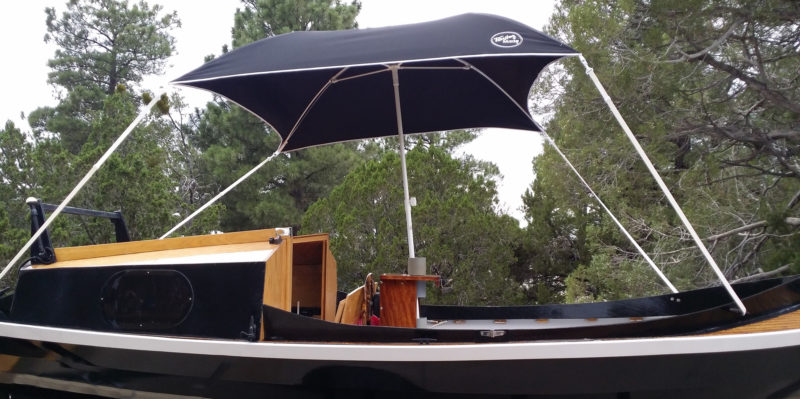
When the boat was finished, we did one island-hopping cruise with the cabin in place, and that convinced me to replace the cabin with a collapsible dodger that wouldn’t block my way to the mainmast and foredeck like the cabin did. The cabin sat in the side yard for a decade getting mossy.
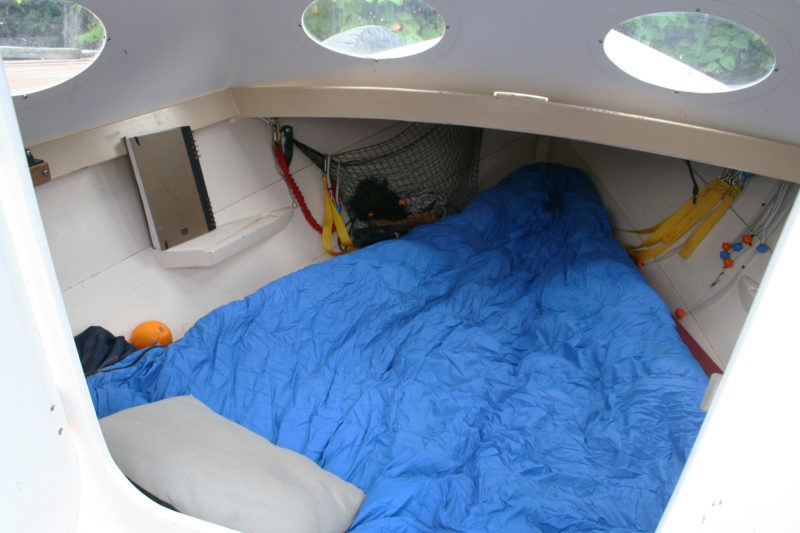
The forward compartment is compact but cozy and well sheltered from wind and rain.
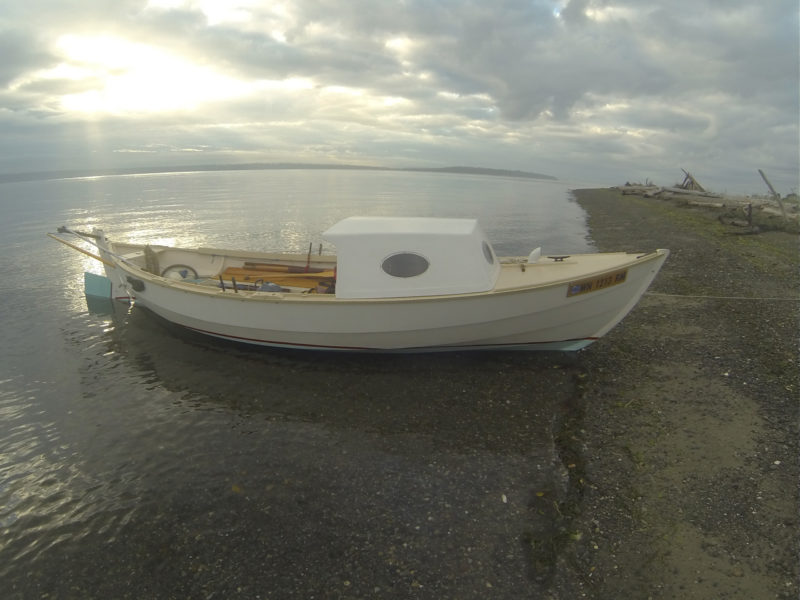
I’d never slept under the cabin, and this year I wanted to give that a try and to see how it fared as a pilothouse while underway. I cleaned it up and drilled a few holes in the back wall for a steering line and a kill-switch cord. I made a two-armed rudder yoke to replace the one-armed Norwegian tiller arrangement, but that had a rather ungainly look to it. I realized that I could use the one-armed tiller by putting the boomkin in place and running the steering line through the pulley normally used for the mizzen sheet. That arrangement worked well for steering in the cabin, and I could keep the tiller pole in place to steering in the usual manner in the cockpit.
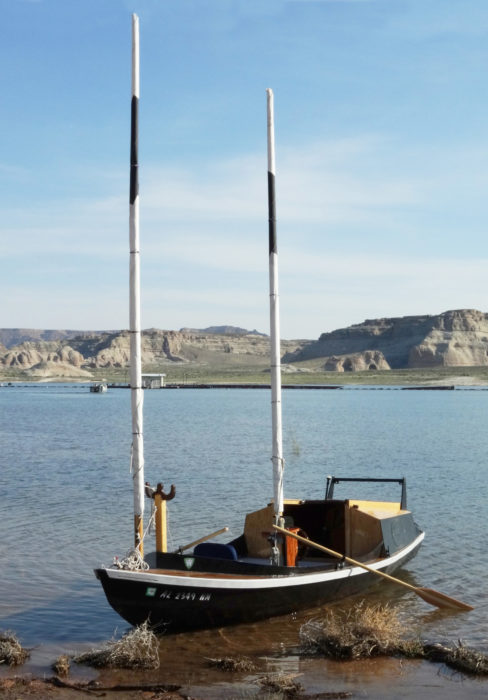
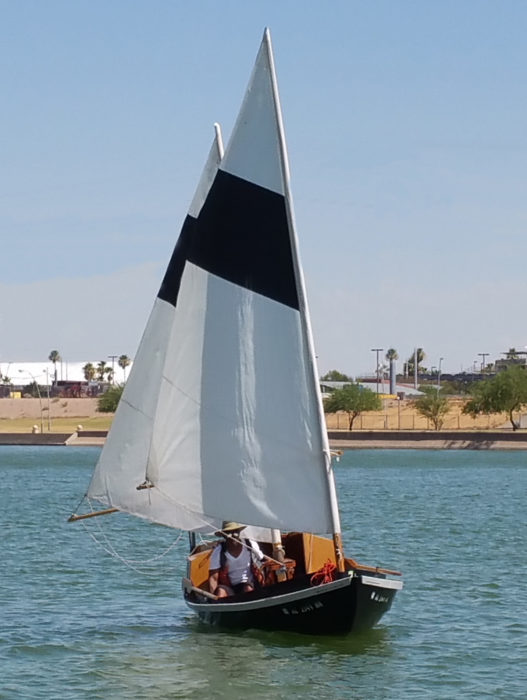
With the sun peeking through the morning clouds, ALISON is ready for motoring east across Puget Sound.
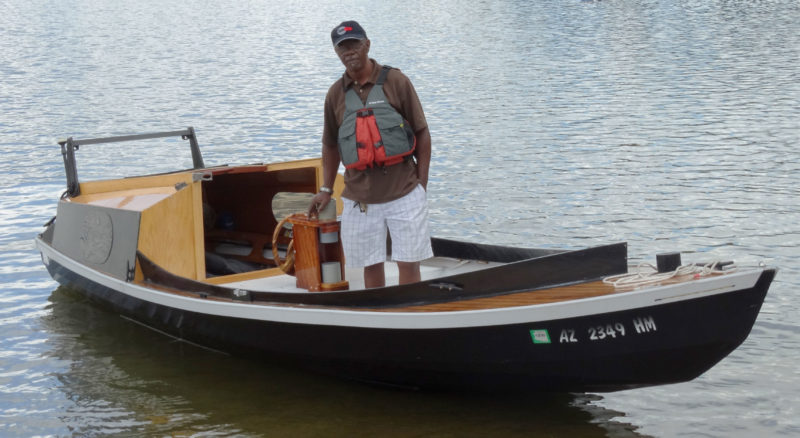
On a cool, overcast Saturday afternoon in August I launched on the west side of Puget Sound, just north of downtown Seattle and motored the 6 miles across the sound to Bainbridge Island. The cabin was a cozy place for motoring—out of the wind and somewhat isolated from the noise of the outboard. The boat required little help holding a course, so all I had to do was sit back and keep any eye out for vessel traffic.
I spent a quiet night anchored at Port Madison, a mile-long dog-legged inlet at the north end of Bainbridge. The forecast was for showers overnight, and although they didn’t materialize, I would have enjoyed listening to the rain on the cabin roof. It’s a pleasant sound when you’re under something more substantial than a flapping plastic tarp. I woke at dawn and rowed out of the inlet to make a quiet exit, then started the motor and retreated to the cabin for the crossing back home.
The cabin is back in the yard again, and while I don’t know when I might use it again, I can’t see parting with it. There may be a time when I can go out with it, listen to the rain, and fall asleep warm and dry.
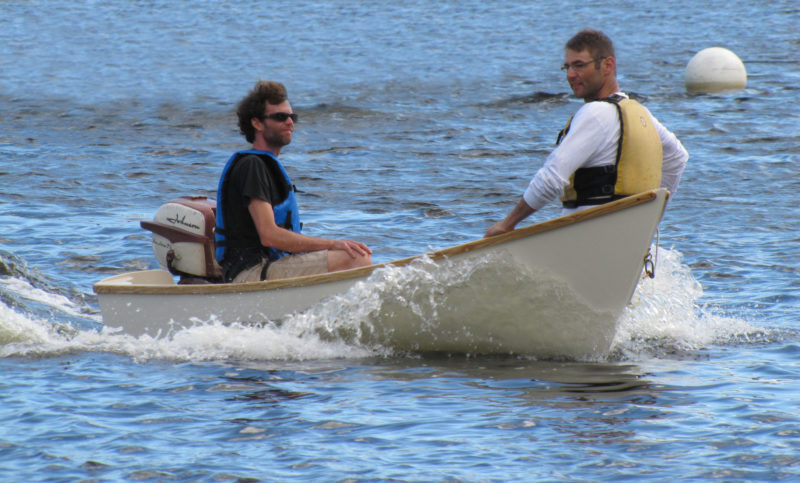
Clint Chase designed the Compass Skiff for the Compass Project, a Biddeford, Maine, nonprofit that works with kids. “We needed a really small, easy-to-build boat for a weekend boatbuilding festival we do every summer,” he said. “I came up with this little outboard skiff that would be easy and quick to build, stable and safe for kids on the water. It will get on plane with a 6-hp outboard; it’s a lot of fun.”
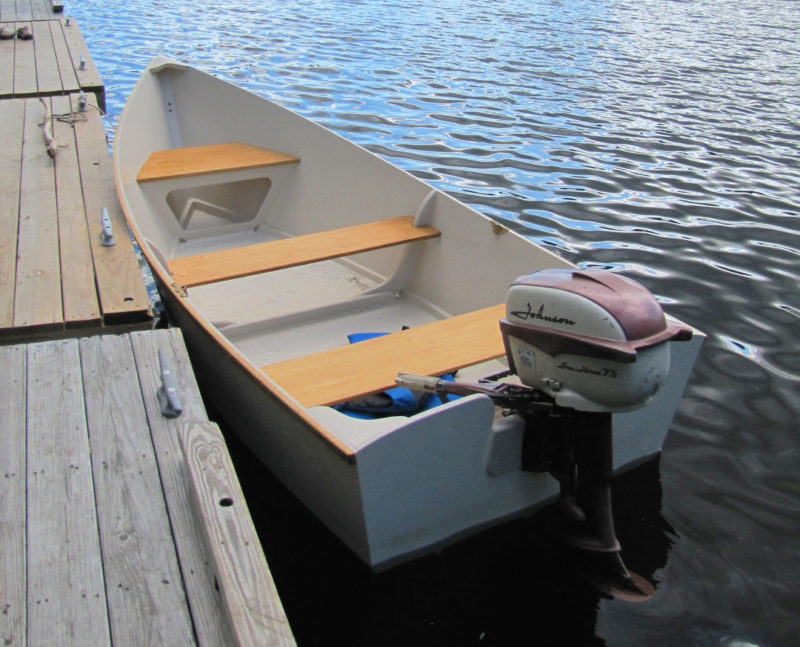
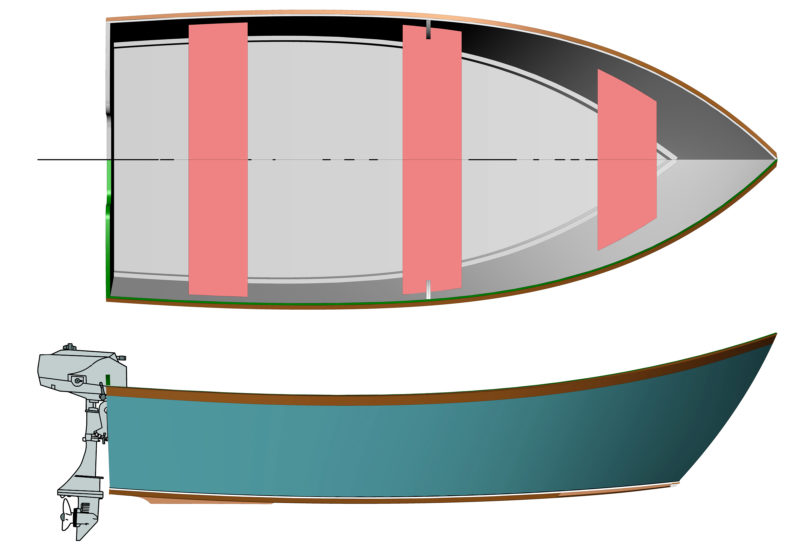
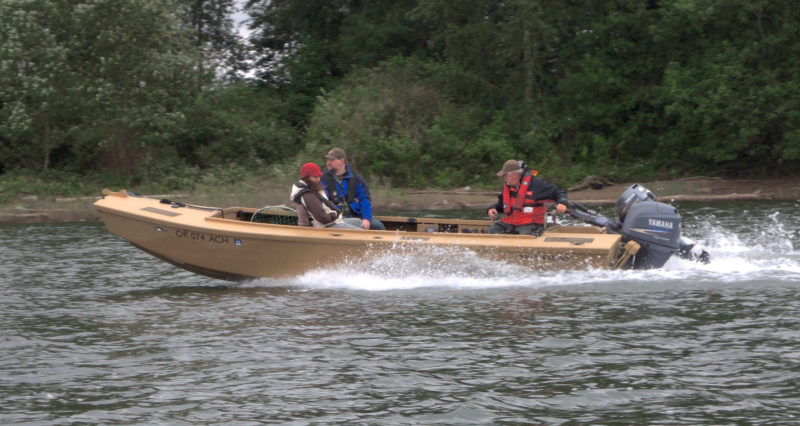
Powered by a 3.5- to 6-hp outboard, the Compass Skiffs is well suited to rivers, lakes, and other protected waters. It could also serve as a tender or lightweight excursion boat. For such a small boat, it has a high bow and a lot of freeboard and can handle the chop in an exposed anchorage. With a draft of just 3″ (with the motor up), you could do some serious gunkholing with this little vessel. A slot in the aft bulkhead provides a place to keep a paddle handy for maneuvering in close quarters, and a pair of 7.5′ oars can serve for quiet exploration or as a backup in case the motor dies. There is no skeg to help the skiff track well for rowing, but Chase notes “the boat is very light so using oars will be no problem.”
photographs by the author except as noted
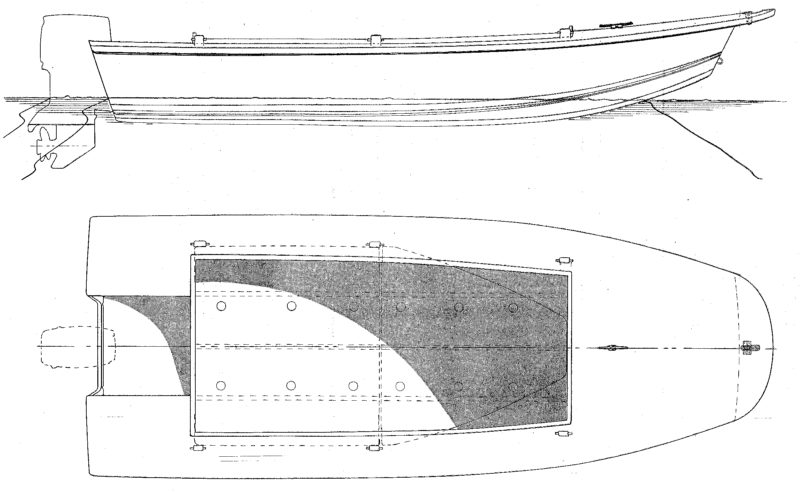
The simple interior arrangements keep the skiff light and quick to build. Floorboards would be an easy addition to make to keep gear dry.
At 9′6″ long and with a beam 4′1″, it would seem the diminutive skiff would have trouble carrying the 6′4″ designer, yet the Compass Skiff has plenty of room for someone as tall as Clint, along with gear and even two small passengers. Weighing just 100 lbs, it can be easily transported with a light trailer or, with sound roof racks, by cartop. The Compass Skiff is available as plans and in a variety of kit options for do-it-yourself boatbuilders. A complete kit can be put together over a weekend and then be ready for paint and varnish.
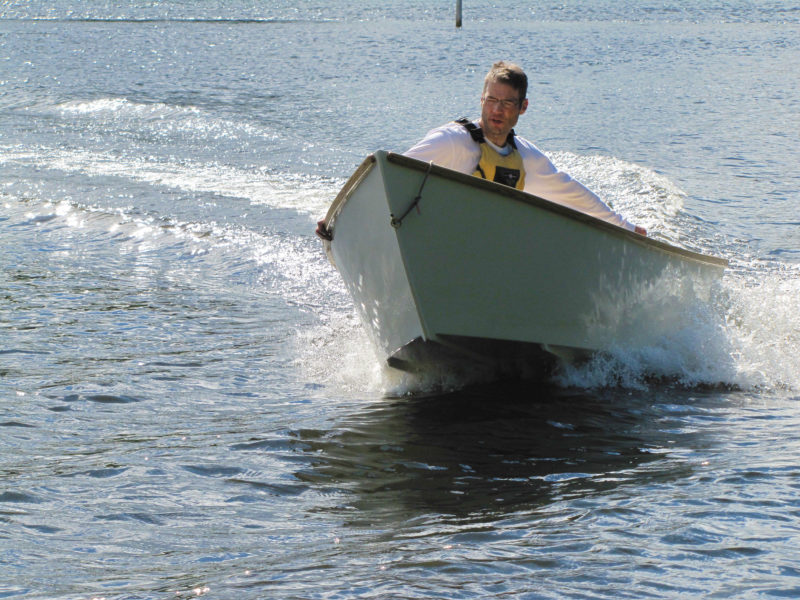
At full speed the skiff made tight turns with ease.
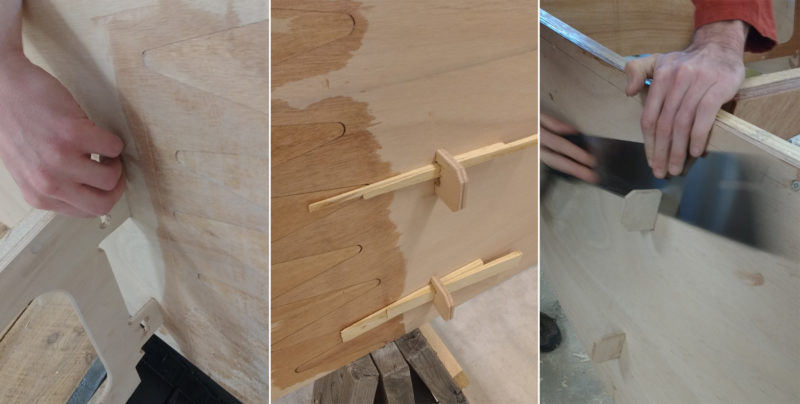
The complete kit includes hardwood keel members, spruce chinelogs and stem, white pine thwarts, and easy-to-bend ash rubrails. The false stem is supplied in either ash or mahogany. The panels for the sides, bottom, and transom are computer-cut from 9-mm okoume marine plywood. The finger-jointed sides come together with a bit of epoxy in about 30 minutes. When they glue has cured the sides are assembled around two short ring frames, one in each end, and a ’midship frame using a tab-and-lock system of assembly that eliminates the need for a strongback. Tabs on the sides of the frames fit snugly in slots routed in the side panels, and after they are inserted, wedges slipped through holes in the tabs bring the sides up tight against the bulkheads. The sides of the forward frame are cut with a slight arc to accommodate the subtle compound curve the plywood sides take approaching the stem. The middle frame is squeezed by the side panels and doesn’t require the holes and wedges, though there are tabs and slots for accurate placement. The tabs are sawn off after the hull has been glued together.
courtesy of Chase Small Craft
Bulkhead tabs are inserted in mortices in the side panels (left), and those with tabs with slots are locked in place with wedges (center). Note the finger joints used to join plywood panels. The tabs are sawn flush after the epoxy has cured (right). The tabs at right are for the center bulkhead and don’t require the slots and wedges.
The forward ends of the side panels are screwed and glued to the beveled spruce stem, and the aft ends to a 3/4″-thick transom laminated with two layers of plywood. After the chine logs are installed and planed flat with a block plane, the bottom is screwed and glued in place. The epoxy-and-fiberglass kit includes fiberglass tape to protect the outside of the chine. After the assembly of the hull, the breasthook, stern quarter knees, short seat risers, seats, and oarlocks are installed.
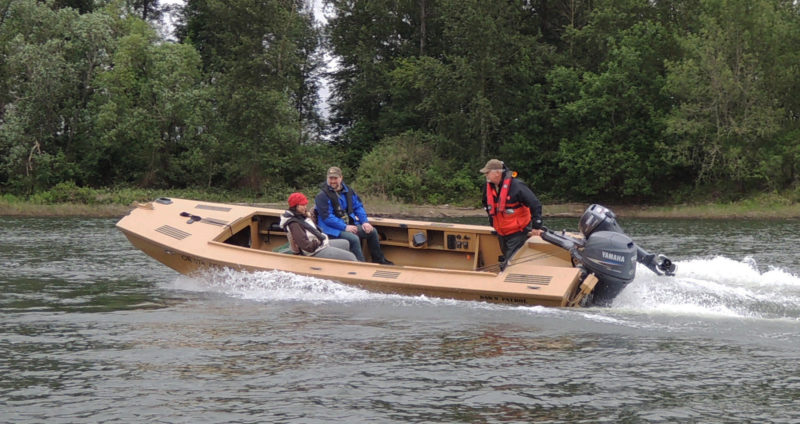
With the bow heavily loaded the Compass skiff curled up an impressive wake, but kept the occupants dry.
When I saw the Compass Skiff arrive on a trailer at the town landing in Saco, Maine, just across the Saco River from Clint’s shop in Biddeford, the boat seemed dwarfed by the trailer, Clint’s small car, and even his two kids. The words that slipped out of my mouth were, “Cute boat,” but he seemed to agree. “It is cute,” he said.
On the afternoon we tested the Compass Skiff, the wind on the river was blowing steadily at 12 to 15 knots. We were on a body of water that is normally protected, but the wind was coming straight down the river valley and kicking up a 6–10″ chop. I envisioned a wet test ride.
We used a 1950s-vintage 7.5-hp Johnson outboard for our trials. Clint did a quick solo test. The borrowed engine was heavier and had more horsepower than he intended for the boat, and its weight, combined with Clint’s weight and that of the fuel tank, meant the stern sank heavily and the bow stood high in the air.
I took a turn at the helm, also solo, and had the same problem. We needed to get the helmsman’s weight farther forward. Clint ducked into a waterside thicket of trees and grabbed a fallen branch of about four feet long. He tied the stick to the throttle as an improvised tiller extension. Now, riding from the middle seat, Clint was able to keep the bow down and get on plane. Clint recommends using an outboard with no more than 6 hp and with the lighter weight of today’s motors, and with the ability to adjust their angle to the transom, it should be easier to achieve the ideal trim. A proper tiller extension will make it easier to keep a tight grip if you have to shift your weight forward.
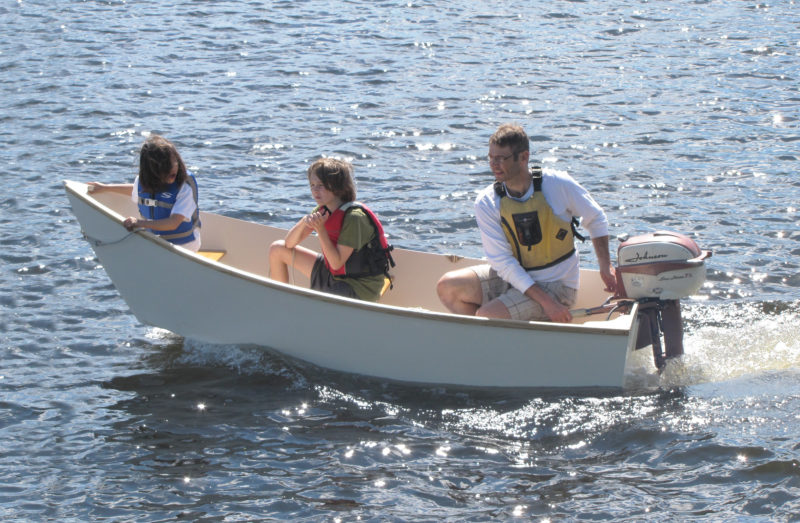
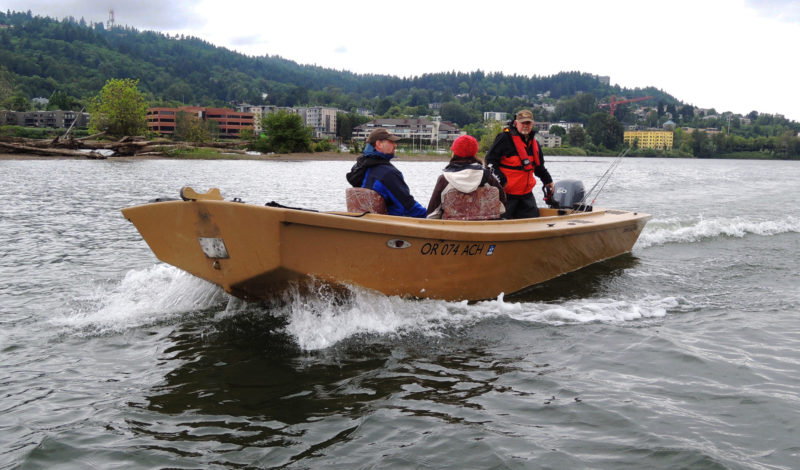
With Clint and his kids aboard, there’s still room and enough freeboard for one more. You can see here that the tilt of the outboard contributed to making the bow riding high during the sea trials.
When Clint’s two kids got in the boat, they sat forward and he returned to the stern seat and removed the improvised tiller extension. Now, with weight balanced nicely, the boat skittered effortlessly across the chop. They did lap after lap around a broad basin in the Saco River, then Clint gave each of the kids a turn at the helm and the boat appeared to handle nicely in young hands, even on a blustery day.
Clint brought the kids back to the dock, and I got aboard. With Clint in the stern and me in the bow the payload was at least 375 lbs. I was anticipating getting hit with a bit of spray, but even as he gunned the outboard we stayed dry. The high bow and ample freeboard were doing their job. Clint navigated through the wind chop and then, in an added test of seakeeping ability, did tight circles and crossed through our own wake as well. The little skiff performed admirably, and no one got wet.
At the end of the day, after pulling the boat back aboard the trailer, I was pleased by how easy it was to manage the skiff. When the boat got cock-eyed on the trailer, we just lifted it up and centered it.
For someone who is crunched for storage space in the garage or needs a nimble tender, the Compass Skiff could be a good solution. And, as Clint proved with the Compass Project and his own children, it could also be a good boatbuilding project to do with kids and an ideal vessel to get them off to a good start learning how to handle a small powerboat.
Peter Van Allen is a fanatic for small craft that keep him close to the water, whether it’s a surf ski, a sea kayak, a paddleboard, or a single-fin surfboard. He is based in Yarmouth, Maine.
Compass Skiff Particulars
[table]
Length/9′6″
Beam/4′1″
Draft/3″
Depth amidships/17.6″
Recommended power/3.5- to 6-hp outboard
[/table]
Clint Chase does business as Chase Small Craft. The Compass Skiff is available as plans and plywood ($1,117.50), and a complete kit ($1,725.77).
Is there a boat you’d like to know more about? Have you built one that you think other Small Boats Monthly readers would enjoy? Please email us!
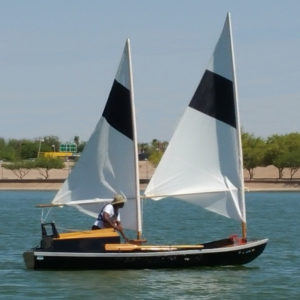
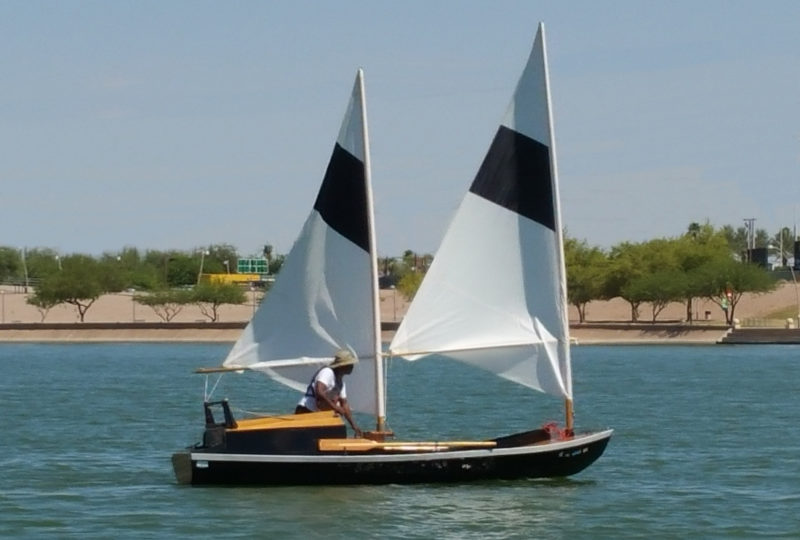
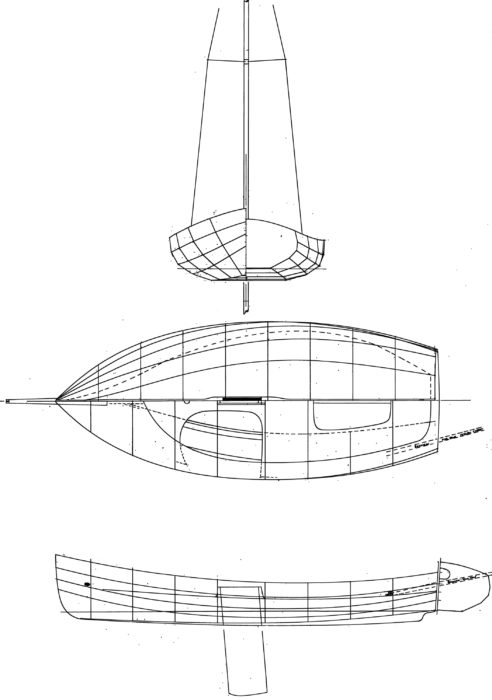
Iain Oughtred’s Guillemot is a multipurpose boat intended for rowing and for sailing with either a gunter or lug rig. He designed the boat 25 years ago and based it on the lines of a 19th-century ship’s boat or large yacht’s tender. It is intended to accommodate three adults comfortably, but could take as many as five over short distances in benign conditions.
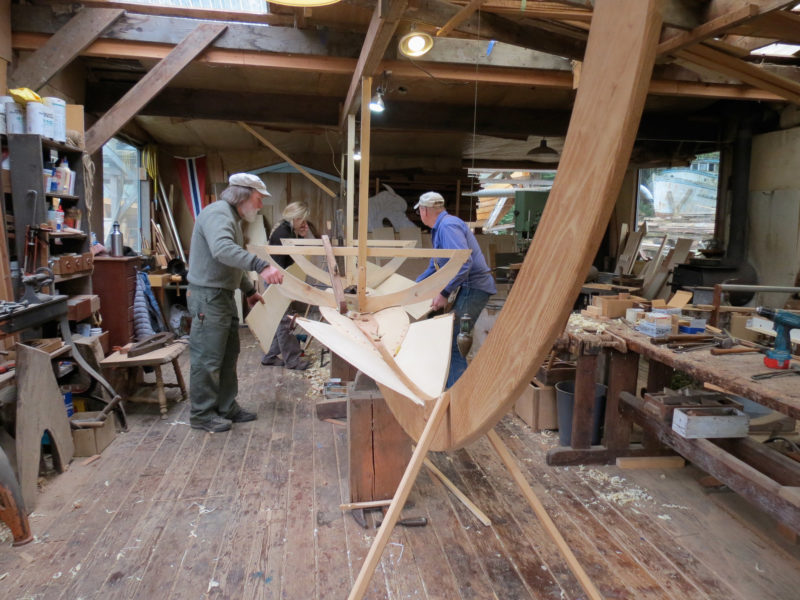
Oughtred is best known for applying contemporary glued-lap plywood construction to traditional hull forms, and the Guillemot was primarily intended for that method. Glued-lap plywood has several advantages: it is easier to source the materials, easier to build, and results in a lighter boat. The Guillemot can also be cold-molded, strip-planked, or built in traditional lapstrake.
Regina Frei, a student at England’s Lyme Regis Boatbuilding Academy, opted for traditional lapstrake construction. Of the 319 sets of plans for the Guillemot sold to date, Oughtred believes that about 10 percent of the boats built have been traditional lapstrake, but suspects that percentage has increased in recent years. A glued-lap plywood hull is normally around 125 lbs; a traditional lapstrake one would be about 25–40 lbs heavier.
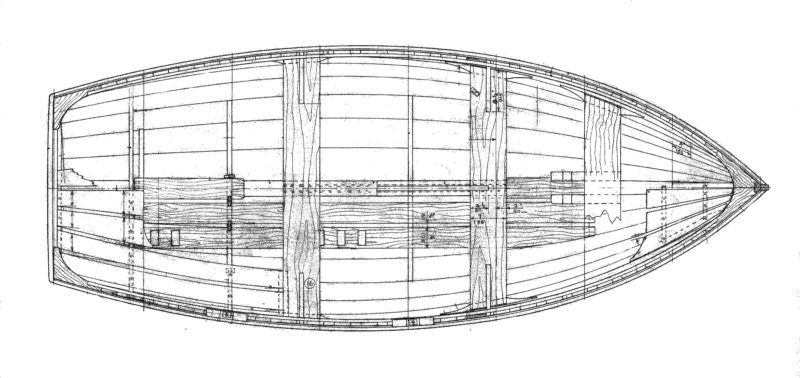
The plans include full-sized patterns for the stem, transom, floors, and temporary molds, and no lofting is required, but the Academy requires that students begin their projects with lofting, so Regina drew the lines from the offsets included with the plans, faired them, and created her own patterns. Oughtred’s drawings provide guidance for traditional construction, including scantlings for planking and steam-bent frames, frame spacing, and a recommendation for nine or ten strakes instead of the eight on the glued-plywood boats.
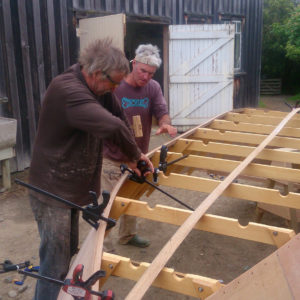
photographs by the author
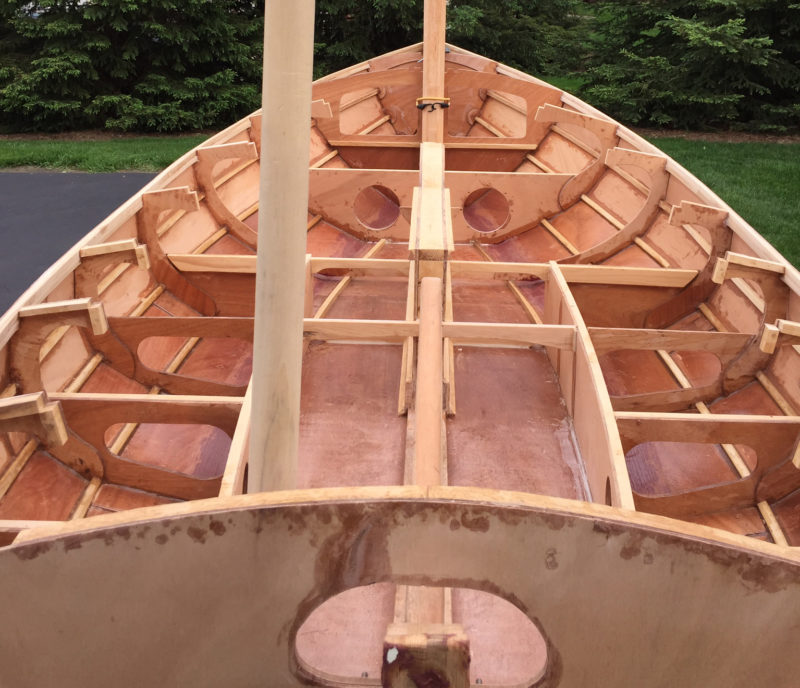
Building the Guillemot in a traditional manner provides lots of interesting and appealing details that are often absent in the glued-lap ply construction commonly used for Oughtred designed boats.
Aside from the applewood from her Swiss homeland that Regina used for the transom, she purchased sustainable materials and locally sourced timber as much as possible. The Douglas-fir for the spars came from the Stourhead estate less than 50 miles away from Lyme Regis, and the larch planking stock came from Scotland. (British boatbuilders generally agree that the farther north larch is grown, the better it is.) The ribs, thwarts, and stem were made of English chestnut, and the rest of the centerline structure, along with the inwales, outwales, and sheerstrake rubbing strips, were of Forest Stewardship Council (FSC) certified oak. When an adhesive was required, she used a bio-based epoxy.
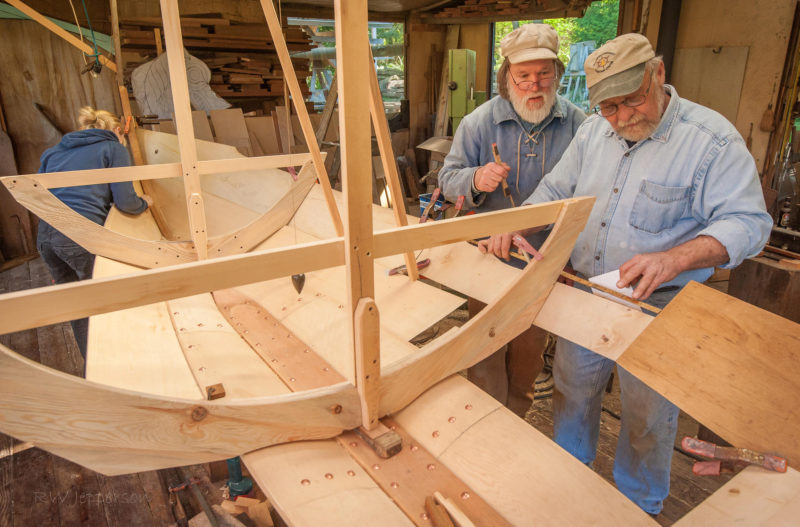
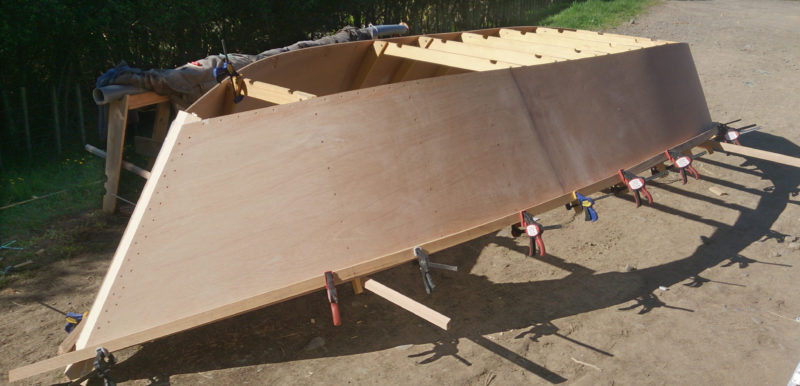
Oughtred’s plans for glued-ply construction specify that the hull should be built upside down, but he agrees with Regina’s decision to build her boat right-side up to allow easier access inside the hull for clenching nails or, as Regina chose to do, peening rivets. The assembled centerline was set up on a base structure, and seven temporary molds were then fitted on the keel hog and braced with supports going up to the workshop ceiling. Regina initially lined the hull for eight strakes, but this convinced her that she would be wise to follow Oughtred’s advice and fit a ninth strake. She then re-spiled accordingly, to more easily get the planks to follow the shape of the boat.
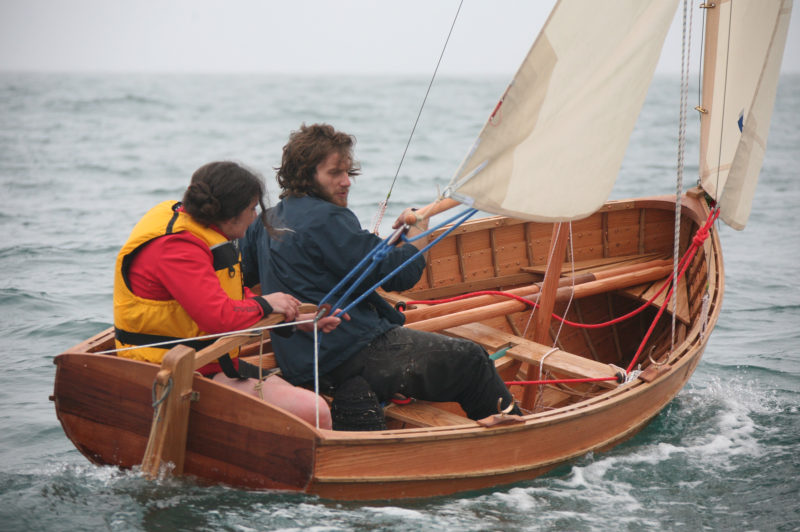
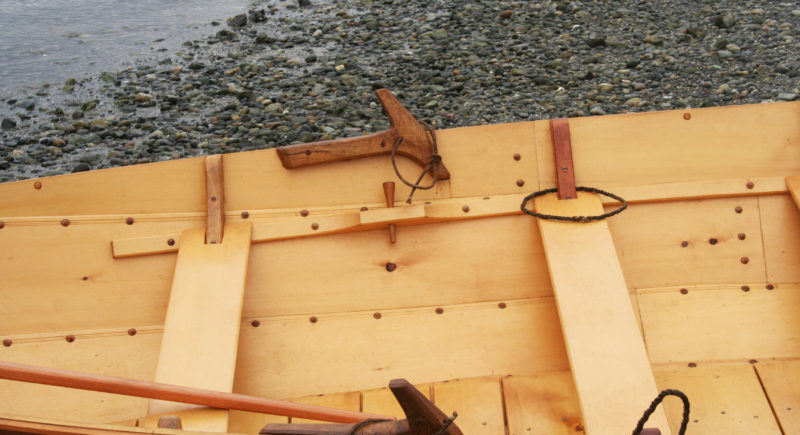
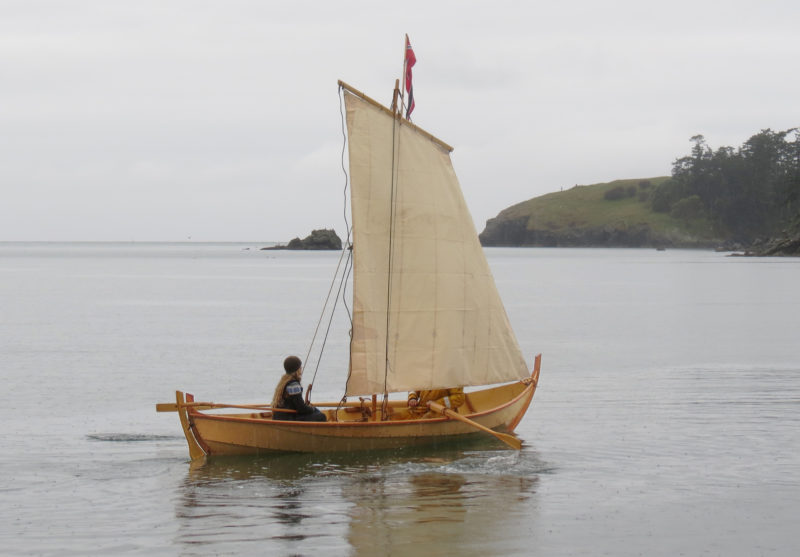
The Guillemot has two rowing stations, spaced about 3′ apart—close, but not impossible quarters, for rowing in tandem. Two stations come in handy for a single rower managing wind and passengers.
Regina had to steam the forward ends of the bottom three strakes and the aft ends of the top three so the 5/16″ larch planking could take the twist required by the shape in those areas. With planking complete, she removed the molds, fitted the centerboard case, and then steamed in the 1/2″ x 5/8″ English chestnut ribs and riveted them in place. The two thwarts followed, and instead of using the sawn knees indicated in the plans, she fitted a single steamed chestnut knee at each thwart end. Oughtred felt that single steam-bent knee might not be strong enough: “I would suggest that two each side should be adequate. Very neat, in fact; a lot more comfortable if sitting on the thwart, leaning against the gunwale, which you can’t really do, with the usual single knee.” Installing the seats in the bow and stern came next, followed by the oak outwales, inwales, and rubbing strips.
The whole boat was coated, inside and out, with a “boat soup” of tung oil, linseed oil, turpentine, and Stockholm tar, the last coat of which also had some Japan drier in it.
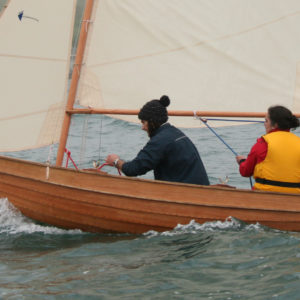
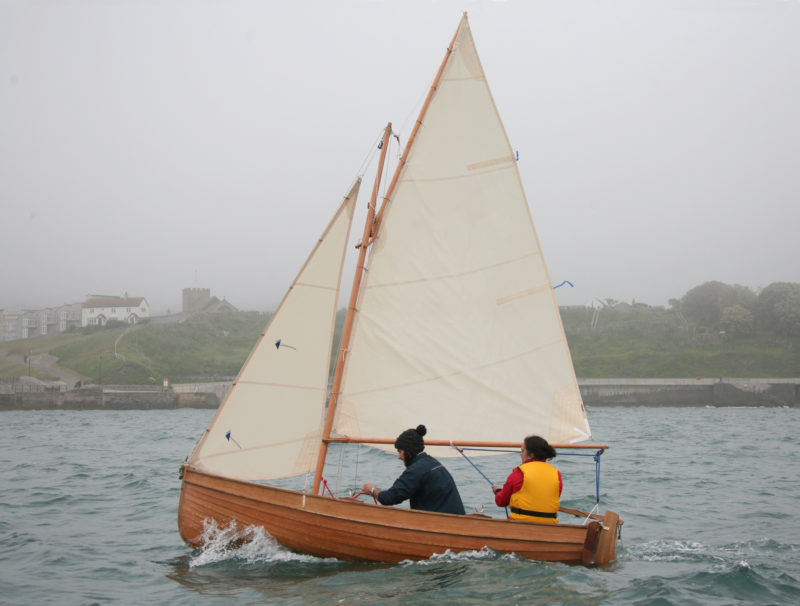
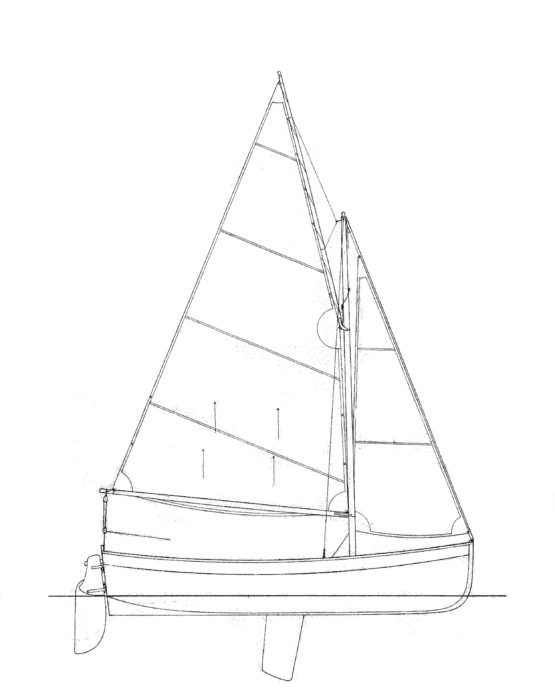
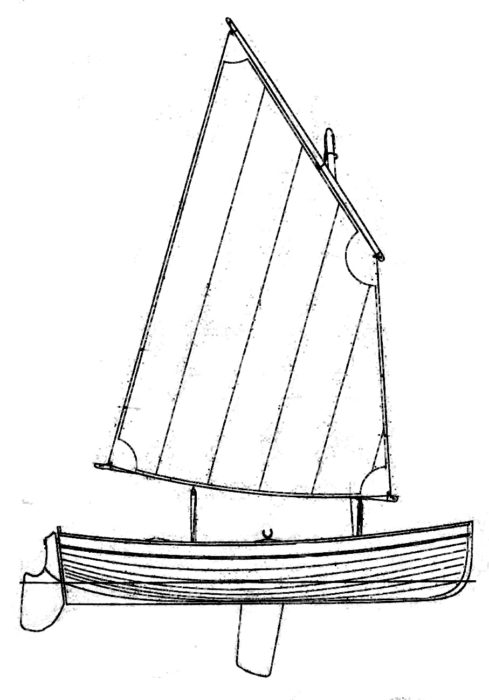
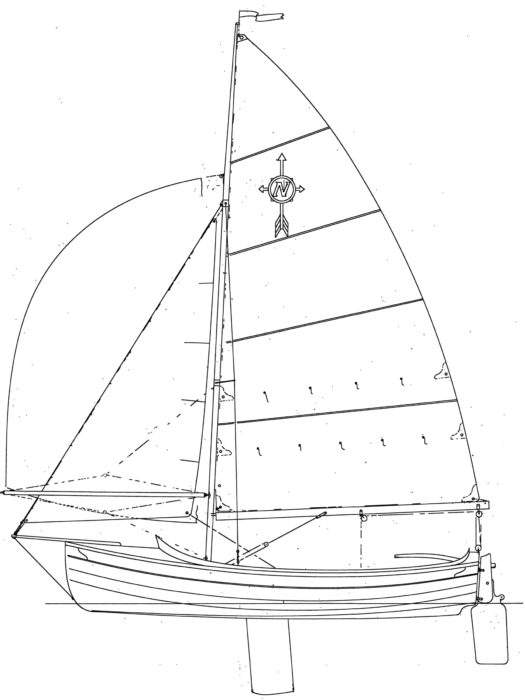
The sloop rig here carries 72 sq ft of sail. The plans include options for single sails: a balanced lug rig, with boom, carrying 64 sq ft of sail; and a standing lug, loose footed, carrying 55 sq ft.
Regina opted for the gunter rig with 72 sq ft of sail (the lug rig has 62 sq ft), “because it looks nicer and it will be more interesting to sail with a jib as well as a mainsail.” The mast is stepped on the keel hog immediately forward of the forward rowing thwart with no deck-level support. It has two shrouds anchored at the gunwale and a forestay connected to a bronze stemhead fitting that also takes the jib tack. The lug rig has an unstayed mast with partners spanning the gunwales at sheer height. Oughtred is considering adding something similar, perhaps at thwart height, to the plans for the gunter rig to allow easier stepping for the singlehander, although shrouds would still be required to brace the mast and provide support for the jib.
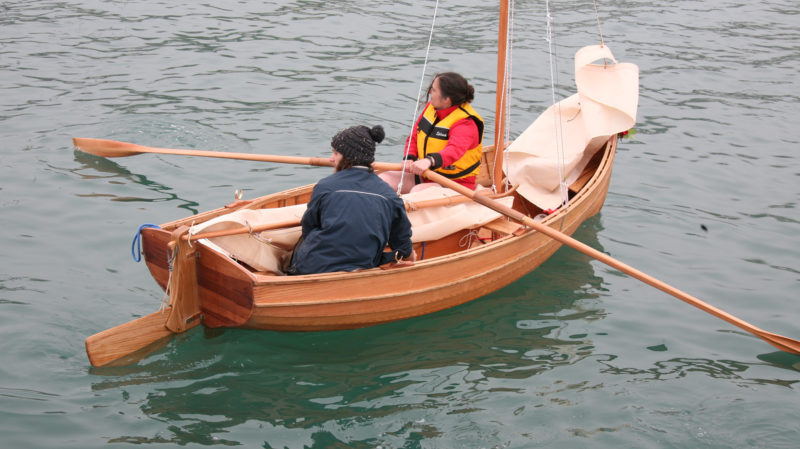
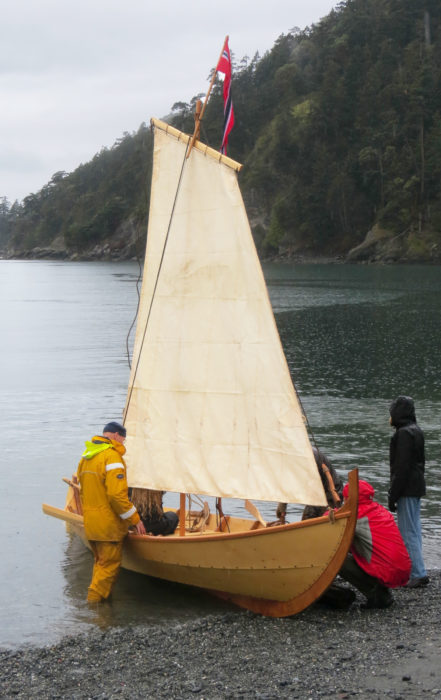
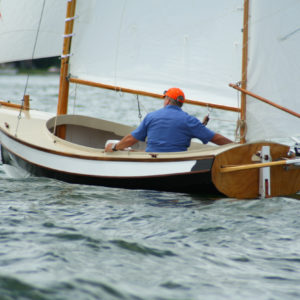
As soon as Regina’s Guillemot, christened LEAF, was launched, she rowed her out of the Lyme Regis harbor while her crew—Dan Adam-Azikri—prepared the rig. She rowed from the forward of the two rowing thwarts, and this would have been perfectly satisfactory but for the fact that the yard, boom, and sail were on the centerline ready to be hoisted, requiring Regina to row from an offset position. The centerboard and rudder blade were lowered, the sails that Regina made during a weeklong sailmaking course at the Academy were hoisted, and LEAF was underway. There was quite a chop in Lyme Bay for such a small boat, and only one other boat dared venture out of the harbor to sail. LEAF appeared to handle the conditions nicely, and I soon got the chance to see this up close after Regina and Dan rowed back into the harbor to fetch me.
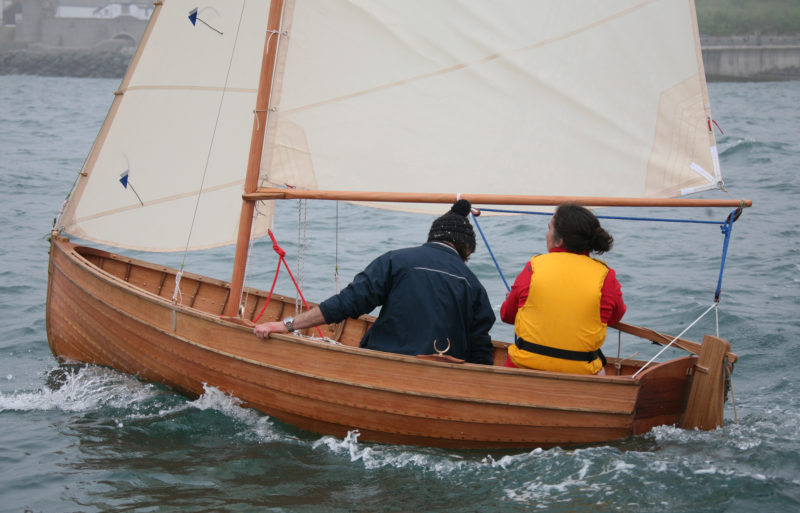
The generous freeboard and firm bilges give the keep the Guillemot dry and steady in gusting winds.
Although there was some initial concern that the boat might be a little crowded with three of us aboard, the larger crew did give us an advantage in rowing and hoisting sails: Regina and Dan took an oar each in the aft rowing position and kept us head-to-wind while I sat comfortably in the bow seat and hoisted the sails from forward side of the mast. Dan and I then sat on the sternsheets benches either side of the tiller and took turns steering while Regina sat on the forward thwart and moved from side to side as we tacked to keep the boat level. We quickly got used to this arrangement agreed that it didn’t feel at all crowded. Had it been windier, we would have needed to get more of our weight to windward, but there would have been adequate space for us to do so.
The Guillemot’s performance was impressive. The gunter rig was easily managed, and we never seemed in danger of getting caught in irons when tacking. It was surprisingly easy to steer through the waves both upwind and downwind. The freeboard was just enough to give us a reasonably dry ride. While the wind was fairly constant, in the gusts that we did have, we didn’t have to react quickly to spill the wind from the mainsail or move our weight to the weather rail to keep the boat under us. It was clear that Oughtred had put an emphasis on safe, steady sailing so “you don’t have to hang out to keep her upright.” Still, the Guillemot was enjoyably lively. Oughtred later told me that he himself had been quite surprised at how lively the Guillemot was when he first sailed one.
The mast for the gunter sloop rig is supported by shrouds and a forestay, not a mast partner.
Regina–an experienced rower–later had a chance to row LEAF properly without having the mainsail and its spars in the way. She was by herself in the boat rowing from the forward thwart and was really pleased with the performance. Oughtred later told me that although that is the favorable position for a singlehander as the boat is currently configured, it would be better still to have single ’midships thwart aft of the opening in the top of the centerboard case where the rower’s weight would put the Guillemot in better fore-and-aft trim. He is thinking of adding this to the plans as an alternative to the two thwarts that LEAF has.
The Guillemot is a really nice and functional all-round sailing and rowing boat and it will take a small outboard, too. The boat is eminently suitable for two or three adults, or perhaps better still, a family of four with young children. It is especially pretty when built in the traditional manner.
Nigel Sharp is a lifelong sailor and a freelance marine writer and photographer. He spent 35 years in managerial roles in the boat building and repair industry and has logged thousands of miles in boats big and small, from dinghies to schooners.
The year 1971 was a turbulent time on college campuses all across America. Newscasts were full of antiwar protests, civil-rights marches, and sit-ins with loudspeakers blaring the words of Bob Dylan’s eclectic poetry and the songs of screamin’, whiskey-voiced Janis Joplin. As a student at a small college in South Dakota, I desperately needed a challenge—a major change, something radical and outlandish. I longed to upset the whole program, question authority, move to a foreign country, and exchange this reality for a new set of faces, a new location, a new language.
With more daring than common sense, I began the search for an adventure. Amsterdam or Copenhagen? Kathmandu or Timbuktu? Oslo? Oslo. For this disgruntled college student, the fjords and mountains of Norway seemed irresistible. I had Norwegian ancestors and knew a handful of words and some basic phrases. The countryside rivaled the Swiss Alps and university was tuition-free. An excellent choice!
With a backpack, an overstuffed duffle bag, and soaring expectations, I began a year of university life at 60° north. Autumn brought cold mountain winds and winter brought on darkness. The Norwegian language became an obsession. I spent hours walking the cobblestone streets of Oslo, immersed in the living language and culture. On many a winter day I found inspiration in the wooden ships in the harbor, their decks blanketed with snow, their rigging whistling in the darkness.
Susan Wood
A serene and idyllic setting, Ulset Båtbyggeri lies below Vettafjell along the shore of Kari Havet on the island of Aspøya in western Norway.
Norway is a land of forests—a valuable natural resource for millennia. The oak, beech, and Scots pine were valuable trade goods on the European continent and the British Isles. Norway furnished planking for East Indian spice traders, masts for the British navy, and even ready–to-assemble boat kits for the treeless Hebrides islanders. In Norway, the forests provided the raw material for talented craftsmen. From their ornately carved medieval log farmhouses and barns, to their brilliantly engineered and decorated stave churches, Norwegians were masters of woodworking even before the time of the Vikings. Of all the rich history and long traditions in this land, the wooden boats and ships have long stood alone as masterworks of function and beauty.
Over the course of that winter I returned again and again to the Viking Ship Museum to see the elegant 9th-century longships: Oseberg and Gokstad. These are two of the finest examples of their type that have ever been unearthed, and the artistry of those shipwrights from 1,200 years ago would profoundly influence my life’s vocation in the years to come.
At the close of one academic year at the University of Oslo, I traveled north and west into the fjord country and the home of my ancestors, and there found a vibrant, ongoing tradition of woodcarving, folk music, and boatbuilding. This “homecoming” led to many rich relationships that have grown into deep and lasting friendships. The Norwegian Viking ships and stave churches had fostered my insatiable desire to build by hand, and even after I had earned a bachelor of arts degree in Philosophy and English back in South Dakota, I longed to create tangible, functional objects with wood.
My chance came when a close friend in Upstate New York invited me to join him in building a log cabin with 88 white oak trees, axes, drawknives, augers, and a team of mules. Over the course of this work, I became a woodworker drawn to simple tools and the efficient use of materials. I was ready to get back to the elegant small boats of the fjords in Norway.
My third cousin, Martinus Kleivset, was a Norwegian boatbuilder who could offer assistance in finding a master in need of an apprentice. Building on his father’s knowledge and reputation and many builders before him, he had developed a respectable shipyard on Skålvikfjord. Just up the hill from the fjord and shipyard lay the farmhouse where my great-great-grandfather’s portrait still hangs in the parlor.
Martinus was a man of dry wit but not one to be trifled with. He put me to work scraping and painting his house (a test of endurance, I’m sure) and after several weeks, he announced that we would cross the Halsa fjord to the island of Aspøya to visit Nils Ulset at Ulset Båtbyggeri.
Susan Wood
Nils O. Ulset reminisces over building the first geitbåt with Jay Smith at Aspøya in those early years.
As a young foreigner with only an urban introduction to the Norwegian language, I had little idea what was being discussed when I was introduced to Nils. His dialect is one I am still working on mastering. However, it was agreed I could begin work, with the understanding that there was no English spoken in this shop. So in August of 1977, I began building traditional lapstrake boats at Ulset Båtbyggeri on Aspøya. My feet were planted on the path I had hoped to find.
The boatworks at Aspøya is just off the narrow road that circles the island. Built on pilings at the edge of the fjord, it is nestled at the base the island’s highest peak and overlooks an inlet flanked by farms and steep hayfields. Walking the lane that meanders its way down to the boatworks, I could easily imagine the setting several hundred years earlier when small lapstrake faerings were the only transport and a necessity for survival in these coastal communities. Thousands of faerings were built each year by scores of builders, often in one- or two-man shops that dotted the coast from Oslo to the Lofoten Islands. Here I stepped into just such a shop, entering by a loading ramp to the second floor, and that unmistakable smell of Scots-pine pitch filled the air. Wood shavings covered every inch of the floor; sawdust covered every other surface except the polished handrail leading down a steep set of stairs to the floor below. There, an old faering rested with oars alongside.
Susan Wood
Another newly completed geitbåt, with bright finish and pine-tarred rails, awaits delivery at the boatworks on Aspøya in the district of Nordmøre.
The stock designs in this shop were 24′, 26′, and 28′ lapstrake double-enders with inboard diesels. There were two on the main floor, planked and framed, and there was another on the railways. Among the six of us—four boatbuilders, a joiner, and the master—there was very little discussion about the work and even less chatter regarding other matters. I was introduced to each of the workers on the first day and worked many weeks alongside them before actually having a conversation. They came to work, put in a hard day, and went home to their families.
Eventually, Nils and his sons became my close friends. Nils, one of the kindest men I have known, grew comfortable building in wood as a boy and assisted in his father’s cabinet and furniture shop, but he had always been drawn to boatbuilding. In his early teens he had built a few prams in the local Nordmøre style, but after World War II he set up a workshop and designed the larger powerboats that were quickly gaining in popularity. Ulset Boats became widely known for their fair lines, fine proportions, brightly finished planking, and mahogany cabins.
Nils Ulset and Jay review details on another of the many geitbåts built at Ulset Båtbyggeri.
At the start of my apprenticeship I helped fasten planking, cleaned up scrap and rippings at the bandsaw, swept floors, and, at the end of each day, dumped barrels of shavings into the fjord. After several months I was given a small work area, a bench with hand tools, and began taking direction from Nils directly in building small boats. We began with a 12′ pram (ferge) working the gains and lap bevels, and I got a good introduction to making sawn frames and riveting. We progressed quickly to a 15′ transom faering (tværskotting) with scarfs and hood ends to master. Another pram and a 15′ runabout with foredeck, mahogany-framed windshield and stern sheets took us into the summer. These were certainly valuable exercises in lapstrake construction, joinery, and the importance of a fair line, but none of these boats had the striking elegance of the older, wide-planked faerings in the boathouses (nausts) and small-boat museums.
By this time I had become comfortable enough in the local dialect to chat a bit—when appropriate—and I mentioned my curiosity about the local workboats common in the 19th century, and broached the idea of building one. Nils thought it a good challenge and arranged to borrow a fine, wide-planked 21′ double-ender, a true geitbåt built in 1902, and we began building the first replica. It would be christened DEN FØRSTEFØDTE—the firstborn.
The geitbåt has been the stock workboat in the district of Nordmøre for over 500 years. Its origins lie in the small faerings of the Vikings and though some evolution in plank lines has occurred, many of the structural elements remain the same after 1,200 years. The last of the builders of these traditional faerings was Ola “Saksa” Reitan, from Halsa, who received an award from the King of Norway in 1933 as one of Norway’s finest boatbuilders. When asked how many boats he had built he replied, “Ja, I built 10 boats a year and have been building for 60 years.”
Geitbåts ranged in size from 17′ to 30′ and were essential transportation for farmers and fishermen who lived along the fjords. The name, meaning “goat boat,” refers to their ability to climb a wave with the ease of a goat climbing atop a rocky precipice. Those who have sailed them will certainly attest to this.
Leah Kefgen
In Jay’s shop in Anacortes, Washington, beginning the carved garboards for the geitbåt was a daunting task for the crew building the boat.
What makes this boat so exceptional isn’t the stem or the stern, the sheerline, or the freeboard. It is the keel and the garboards that harken back to a time before sawmills when keels and planks were riven from raw logs, and boats were essentially carved with axes, drawknives, smoothing planes, and sheath knives. These boats were built quickly, but with exacting dexterity. Each stroke of the axe had purpose; every pass of the plane was intentional. It was not unusual for two men to complete a 21′ geitbåt in two six-day work weeks.
The keel is taken from a 6″ × 10″ timber and carved to a T-shaped cross section, creating a shallow bilge and a narrow keel. The shape allows the garboards to be riveted to the keel, as opposed to being spiked into a rabbet. This eliminates the issues of the garboards leaking over time. This positive fastening of the garboards gives the boat a foundation for longevity where other construction methods often fail.
Susan Wood
Jay, Leah, and Torolf carefully bend the broad strake’s aft planks into place as the geitbåt takes shape in Anacortes.
The garboards are made from short cants 2 1/2″ to 3″ thick, 16″ wide, and carved concave and with a bit of a twist, with a final thickness of around 1/2”. Each garboard is done in sections: one plank section forward, one aft, connected by the flat middle (midtstykke) plank. The forward ends of the broadstrake planks are also carved from cants, giving a concave entry and even more lift and stability in the bow. The carved planks not only give the boat its character and its stability, they also are quite sculptural. This carved, concave bottom, when viewed early on in construction, resembles the form of a bird in flight.
Bob Jepperson
With Jay looking over his shoulder, Vern Lauridsen prepares a pattern for the third strake’s forward plank sections.
Every plank, every thwart, station, and “room” (the space between frames) in a geitbåt has a name, often with profound meaning. The wide forward planks at waterline, for example, are the fram kjempe or “those who do battle.” The garboard is the hals, meaning “throat.” Once the garboards and forward broad planks have been fastened, planking becomes rather straightforward.
Christopher Cunningham
The natural grown oak oarlocks, treenail-fastened through the sheer plank, are witness to the boatbuilding traditions little changed since the Viking era.
Sawn floor timbers are fitted and installed at this stage; they’re fastened with trunnels (treenails) fastened with their button heads outboard and slots and wedges inboard. Trunnels are typically centered in the plank width and doubled in very wide planks. With garboards and broad planks in place and floor timbers fastened, the planking can continue. Planks are 16″ to 18″ in width, which allows a 20′ geitbåt to be planked with four strakes, with the sheerstrake tapering up to the sheerline and running out there, just forward of the aft stem.
Susan Wood
All hands are ready to assist as the new boat is taken off her blocks and freed from her overhead shoring beam.
The hull form is much like a codfish: full in its forward section, slender aft. The sheer rises to the bow and is a bit lower at the sternpost. The sternpost is laid back a bit whereas the stem rises nearly to plumb, but not beyond. The planking is completed when the sheer planks are fitted and fastened; they’re installed with plenty of extra width, allowing for the striking of the sheer with an axe, a momentous occasion that requires a keen eye and a refined sense for balance and symmetry.
All of the interior framing is of grown crooks with minimal scantlings and trunnel fastenings. The end-most frames, shaped like wishbones, are canted inward. Thwarts are fitted on crossbeams and held in place by the upper frames, but are not fastened, which allows for freedom of movement and comfort when rowing long distances for extended periods of time. The traditional oarlock (kjæppa) is taken from the trunk and a branch of a birch tree, with the trunk section fastened along the sheer; the oar rests in the crotch of the branch. This part of the tree is inherently strong and durable. A 9″-diameter grommet, made of withe from a willow or birch sapling, is reeved through the oarlock to keep the oar on the return stroke. Withes are extremely tough and readily available. (Our English word, withe, comes from Old Norse vi ð r, meaning willow). The gudgeons and pintles are an ingeniously simple work of Norse wizardry, as is the steering system with its athwartships rudder arm and infinitely versatile push-pull tiller.
The geitbåt carries a single mast with a large, asymmetrical mainsail that functions as a main and a jib together. A sheet, a tack up forward along the rail, a halyard and vang from the yard aloft, and a series of reefpoints make for a simple, efficient sailing rig.
Susan Wood
On launch day the Anacortes Friday Guild and compatriots raised the TJÆLD off the trailer and carried her to the Puget Sound shoreline. Note the aft ends of the sheer planks ending at the sheer, a few feet forward of the sternpost.
To build a replica of a classic wooden boat under the direction of a highly accomplished master builder is a truly exhilarating experience. A true master of the trade is able to visualize at once the three-dimensional, T-shaped keel or the hollowed and twisted garboard plank, commit it to memory, and reproduce the piece at his bench with extraordinary ease and accuracy. The apprentice should not expect a verbal analysis of the work but must learn through observation and practice. The reward for good work may be as inconsequential as a simple nod or a smile; inferior work is merely set aside for some other use and a second attempt is begun. At the close of each work day, stepping back to eye the fluid lines, the dynamic physical form, and the minimal scantlings—all so neatly seated in a bed of shavings and woodchips—the boatbuilders would scarcely gave a thought to the day’s wages as part of the equation.
Susan Wood
On launch day, the TJÆLD was christened by rowing in a circle three times with the sun, an old Norse ritual.
Within days of blocking and plumbing the backbone, we fastened floor timbers and upper frames, installed trunnels. We notched and beveled the thwarts and dropped them into place, each capturing a frame head port and starboard. Rubrails and oarlocks, rudder and tiller all came in rapid succession and early one Thursday afternoon we threw open the double doors to the north and launched DEN FØRSTEFØDTE.
Christopher Cunningham
Leah and Jay take the TJÆLD for an early morning rowing tour at the Wooden Boat Festival in Port Townsend, WA.
After my extended period of living abroad, my homecoming to America, was a thrilling, joyous occasion, but also left me with sadness over the loss and separation. Seventeen years passed before Nils and I, once master and apprentice, would again plank a geitbåt together. I had returned to the States, settled in Anacortes, raised a family, built faerings, planked fishing boats, repaired classic yachts, and redesigned yacht interiors.
In Norway, Nils carried on the tradition of lapstrake boats of the fjords of western Norway. Ulset Båtbyggeri became a one-man shop again as it had been in the ’60s and ’70s, with Nils as the boatbuilder. Nils never stopped building, even in retirement. For another 23 years repairs came steadily into the shop, along with commissions for new geitbåts. He was asked: “So Nils, how many geitbåts have you built over the last 20 years?” “Oh, I’d have to say three geitbåts a year, maybe four, and a handful of repairs, you know.” He gained a reputation as the builder of historic replicas, and literally carved out a second career for himself. He built his last boat in 2014 at the age of 89, always bright, cheerful, and up to the task with a bandsaw, a planer, and nine simple hand tools.
Susan Wood
TJÆLD is prepared for sea trials on a blustery Northwest winter’s day.
On each of my return trips to Norway, Nils would ask, “Have you built a geitbåt in America, now?” and I would promise that I would soon. For many years I had been setting aside “geitbåt planks,” grown crooks, and the finest locust, oak, and Alaska yellow cedar, hoping someday to take the time to build a geitbåt on my own, but it was a group of close friends who take the credit for making it happen. On Fridays at my shop I welcome volunteers, usually three or four locals, and they eventually came to be known as The Friday Guild. After completing several small lapstrake projects together, they agreed to attempt a 20′ geitbåt with carved garboards, natural crooks and trunnel fastenings—quite a challenge for a handful of apprentices. Fridays quickly became the high point of the week with everyone poring over the next plank scarf or inserting more rivets and roves. I took the role of teacher, allowing them to accomplish the task themselves. We emphasized trusting our eyes and hands, believing that if it looks right, it is good. Plumb bobs and spokeshaves were always at hand. After many months of Fridays, the last of the planking was fastened and the guild had only the rudder, spars, and oars left to make.
Susan Wood
Leah is at the helm for TJÆLD’s maiden voyage at Bowman Bay on Fidalgo Island.
On a blustery winter’s day in 2014, the Friday Guild, with family and friends gathered on the beach for the launching (sjøsetting) of TJÆLD (Oystercatcher), the first geitbåt on Puget Sound. I mailed photos to Nils proving that I did finally build a geitbåt in the USA. And what did Nils say? His response was a simple, “Ikkje så værst, gutt.” Not so bad, my boy.
Jay Smith does business as Aspøya Boats in Anacortes, Washington. He now has a 38′ Viking ship replica is now under way at and the Friday Guild is assembling the backbone for a new 18′ Nordfjord færing.
If you have an interesting story to tell about your adventures with a small wooden boat, please email us a brief outline and a few photos.
Lowering the centerboard and “tacking” can make rowing to weather easier than fighting the wind head on.
When comparing rowing and sailing strategies for an oar-and-sail boat, it is easy to assume that rowing a direct leg upwind might prevail over a sailing a zigzag course to weather. Fighting for the short, straight line with oars makes sense. But does it always?
When I want to go rowing, wind is not usually a deterrent. A good stiff row is sometimes just what the doctor ordered. I have dealt with strong headwinds, and while feathering the oars helps to a point, and adrenaline does wonders, a couple of years back I got stopped dead in my tracks. Mind you, this was merely a day outing with plenty of residences and docks lining the lakeshore, nothing terrifying or life-threatening, but the wind piped up on the nose with an unexpectedly strong punch and brought my 16’ sail-and-oar boat to a standstill.
After a determined effort got me nowhere, I tried something different, something I had read about and dismissed: I lowered the centerboard and began tacking upwind while rowing.
As soon as I bore off, the motion of the boat eased. With the influence of the centerboard, the boat settled on its own heading and everything became easier. The oars were not laboring directly against a headwind. The boat heeled a little bit from the force of the wind, but this was not a hindrance. I made steady progress to windward with a relatively relaxed stroke. It took a few hard pulls to bring the bow across while I was “short-tacking,” but that was nothing compared to beating my brains out directly against the wall of the wind. I could have carried on like this for some time.
On another occasion I was rowing upwind with the centerboard down and matched tacks, with a close-hauled 25′ sailboat, and we reached our common destination at about the same time. I don’t think the other skipper was greatly experienced and could have made better speed, but the wind that day was quite strong and my unwitting competitor did, by and large, keep his sails filled. On another day out in the wind I traded a couple of tacks with a fast-looking 30′ sloop. He was pushed over hard a couple of times and was probably making 6 knots against my 2, so there was no pretense of keeping up, but what struck me was that we seemed to take very similar headings on our respective tacks.
In more moderate conditions I will row straight away to windward without the added drag of the centerboard, making perhaps a couple of knots. I can take a break and bear off, at which time employing the board will dramatically reduce leeway. I don’t make much more speed and eat up far more ground, but rowing is relaxed. The reduction in leeway seems worth the additional wetted surface and drag of the board.
This business of tacking with the centerboard employed while rowing seems to work best with a whole lot of wind. This could be useful if you’re trying to get to weather under sail and are overwhelmed. When my 16-footer is reduced to three reefs, the ability to work to windward is greatly hampered if not eliminated, and skating on the edge of a knockdown is not fun. When I bear a few degrees off rowing into a strong headwind, the boat pounds less as the waves are quartered rather then met head-on. But without a centerboard or a daggerboard, most boats will make a lot of leeway. Lowering the board will eliminate leeway, dampen the roll, and bring the boat up closer to the eye of the wind rather than beam-to or worse.
Carrying on with the oars, the sensation is similar to that of being under sail. Some of the forces at work under sail seem to be at work here. In my experience, eliminating leeway is not a dramatic enough description for what is occurring when tacking under oars into a strong wind. There may be more at work than greater directional stability with the board down. I suspect lift is being generated. Rowing straight into the wind, the board will have no angle of attack and so would generate no lift, but bearing off, the hull slips sideways to some degree; coupled with forward motion, the centerboard would have a positive angle of attack and create lift.
Exactly how and when a centerboard becomes of benefit to the rower will vary with every boat and skipper. But there is no question in my mind that when the wind pipes up, the centerboard represents another tool in the rower’s quiver. Rather than turning away and retreating, forward progress might still be possible.
Eric Hvalsoe of Hvalsoe Boats builds and restores boats in Shoreline, Washington, and cruises the waters of the Salish Sea. He wishes to thank to Ian McColgin for “this crazy idea.”
You can share your tricks of the trade with other Small Boats Monthly readers by sending us an email.
The IceMule cooler is a dry bag within a dry bag with insulation in between the two.
Meat and cold drinks are two commodities I consider essential for a weekend on the water. To keep the former at a safe temperature and the latter chilled, a bulky rigid cooler is the usual solution. But why would you crowd a small boat with an item that takes up a lot of space, performs only one function, and is useless once its contents are gone?
Enter the IceMule cooler: it looks like an ordinary dry bag, but it incorporates an insulation system designed to keep iced food and drinks cold for up to 24 hours. Once the food is consumed, you can roll the IceMule up into a compact, easily stowed package, or use it as a dry bag.
IceMule makes several different models but the cooling system for all of them is the same: an exterior of coated material and inner waterproof liner sandwiching a layer of insulation. A valve is used to inflate the enclosed pocket of air to provide additional insulation or increase the amount of padding the cooler can provide if it’s being used as a dry bag to protect fragile equipment. Once contents are loaded into the bag, the top is folded down and clasped with snap buckles.
A shoulder strap frees up your hands to carry other things. The valve near the top of the bag allows you to add air to the interior layer of insulation to help trap cold and deflate the bag to roll it up for storage.
I tried the 15-liter Classic Cooler on a couple of 80-degree days. Its exterior and interior materials were similar to urethane-coated nylon and felt tough and durable. Fully loaded and with the top rolled and secured, the Classic Cooler is approximately 10″ in diameter and 18″ from bottom to top. When empty the cooler was easily rolled up and secured in a mesh storage bag measuring 4″ in diameter and 15″ long. Its soft exterior and single padded shoulder strap made carrying a full cooler comfortable, even on a half-mile walk. The IceMule Pro coolers are made more like backpacks and have two shoulder straps and a waist belt.
Using a frozen bottle of water (here with the orange cap) saves the melt water for drinking but doesn’t keep the contents of the IceMule as cold as loose ice does.
I packed the IceMule with a variety of provisions and found that it easily held a gallon of milk or eight 12-ounce beverage cans. Even without adding ice, previously chilled items remained cool for a few hours, long enough for an afternoon outing. I like to take plastic bottles of frozen water on a trip; they serve as ice packs and as they melt they provide cold water for drinking. However, when used in the IceMule they kept chilled only the items they were in contact with. Packing the cooler with loose ice cubes or chunks of block ice produced the best results. After about 16 hours there was still plenty of ice in the IceMule; after 20 hours there was still a small amount of ice remaining, and after 26 hours the drinks, sitting in now-cool water, were still cold enough to enjoy. As with any cooler, the downside to using loose ice is the resulting water is wasted and fresh products like meat and vegetables must be kept in waterproof containers.
For weekend outings and for traveling between ports where ice and fresh supplies are available, the IceMule Classic is a sturdy and effective cooler. As the weather cools with the coming of fall, the cooler can be used to carry a hot meal with a heated gel pack. Good food and cold drinks make happy sailors.
Bruce Bateau sails and rows traditional boats with a modern twist in Portland, Oregon. His stories and adventures can be found at his web site, Terrapin Tales.
IceMule coolers are available online from the manufacturer and at numerous outdoors retailers. The medium Classic reviewed here retails for $59.95.
Is there a product that might be useful for boatbuilding, cruising or shore-side camping that you’d like us to review? Please email your suggestions.
The Mantus anchor has a sharp tip to cut through seaweed.
I’ve been using the same anchor for about 45 years, and I had never given much thought to more recent models until I saw the Mantus dinghy anchor. Its shank and fluke can be separated to make it a more compact bundle for storing, and it has a point so sharp that it needs a guard to keep it from getting into mischief.
Four studs hold the stock to keyholes in the fluke. The small hole accepts a spring-loaded locking pin.
Mantus came on the scene in 2012, and the company web site notes this smallest version of their anchors is “designed to be used as a kayak anchor or a dinghy anchor. This anchor weighs only 2 lbs and is recommended for boats to 16′.” Mantus has a sizing chart for their anchors and there the dinghy anchor is designated as suitable as a lunch hook for boats up to 16′ and 1,000 lbs. Their lunch-hook category is defined as use in “expected winds under 25 knots.” In a well-protected anchorage, the dinghy anchor should be able to keep you secure for overnight stays.
I tested the 2.5 lb Mantus, a 4-lb Danforth, and a 4-lb Bruce with a 4′ length of chain and a 36′ rode.
I pitted the Mantus against two heavier anchors: a 4-lb Bruce and my old 4-1/2 lb Danforth. While the Mantus is listed as a 2-lb anchor, my scale had it at 2 1/2 lbs. I measured the area of the Mantus fluke at 21.25 square inches, significantly smaller than the Danforth’s flukes at 35.5 square inches.
The Mantus could bury itself in just twice its own length.
In the wet sand uncovered by a low tide, the Bruce anchor behaved more like a plow than an anchor; it clawed a furrow for as long as I pulled it. The Danforth’s points dug in quickly and it buried itself, as much by heaping sand up over itself as by digging deep. The Mantus dove into the sand and buried itself by going deep under the surface. Both the Mantus and the Danforth travelled about 5′ when they stopped cold. (Tested underwater, the anchors traveled farther in sand before stopping. In a measurement I made at home a 20.8-oz beach rock weighed only 14.3 ounces when suspended in water. The weight of sand underwater must be similarly reduced by the amount of water the sand displaces, perhaps by 30%, and would offer less resistance to and anchor.)
None of the anchors could get a purchase on a rocky stretch of the intertidal. The Bruce skipped merrily over everything. The Danforth and the Mantus would occasionally catch hold, but neither could get deep enough in rocks averaging 2″ to 3″ in diameter to stay put. The Mantus had a slight edge over the Danforth: It never flipped, caught more often, and offered more resistance when it did. To be fair, this area of rocks would be poor holding ground for any anchor a small boat might carry. I returned to the beach with my old fisherman’s anchor. It is 34″ long, spans 20″ between the tips of the flukes, and weighs 19 1/2 lbs. It was harder to drag across the same rocky area, but drag it did. It couldn’t bury its fluke more than about 3″. (Its performance on wet sand was erratic; more often that not it dragged a fluke rather than bury it.)
I didn’t have a bed of slippery seaweed for trials so I used four layers of 4-mil plastic sheeting, secured at one end to keep them from sliding. The blunt-tipped Bruce and Danforth, as I expected, skated right across, but the Mantus, with its sharp point, poked right through, tore a hole, and dug into the ground. I suspect it could dispatch kelp with equal ease.
The bag and tip guard, included in the kit, keep the anchor and rode isolated from other gear.
Mantus has a one-piece version of the dinghy anchor in galvanized steel with the shank and fluke welded together. Both versions come as a kit with a 50′ length of 5/16″ double-braid line that has a stainless-steel thimble spliced in one end, and a heavy-duty, roll-top bag. The bag is built like a dry bag but it has five grommets to let the water collected by the rode drain out.
I was impressed by how well the Mantus measured up, especially in comparison to my larger and heavier Danforth and even my big fisherman. The dinghy anchor’s sharp point and effective geometry give it a very big bite for its size.
Christopher Cunningham is the editor of Small Boats Monthly.
Nate was used to sailing a sloop and found that the trimming of the sails on the schooner had more impact on steering than speed.
Nate Morrison wanted a small, easily managed boat that he could use for fishing and sailing during the day and sleep aboard at night. He spent months looking for an affordable used boat that would fit the bill, but came up empty-handed.
Undeterred, he expanded his search to include plans for a boat he could build for himself. It took him several more months to find plans for a boat that would meet his requirement and not exceed his skills. “I was not a woodworker, or any kind of craftsman, for that matter, so building a boat would be a big deal.” His search came to an end when he found the Schooner 18, designed by Fred Shell of Shell Boats.
Nate Morrison
The Schooner 18 is designed with sturdy skeg and a pair of bilge keels to give the boat a level stance when pulled up to a beach. The zebrawood transom makes a handsome accent to the painted hull.
Shell describes the 18′ boat as “a luxurious daysailer for two to four, with pretenses of being a basic cruiser for one or two.” The hull has a skeg and a pair of bilge keels, so it sits upright and sails without having to deploy a centerboard or daggerboard. The unstayed masts slip into sleeves in the leg-o’-mutton sails, and the sprit booms are quick to rig and self-vanging. Removing the sprits and rotating the masts to roll up the sails is all it takes to strike them. The Schooner has just three lines to tend to: a single sheet for the foresail and a double sheet for the main. These features met Nate’s requirements for a simple rig. The cabin has a 6’6” sleeping platform that Nate says “works well for one person, but you have to be willing to spoon if there are two of you.”
Dilsie V. Morrison
During long lulls in the wind, Nate wraps the sails around the rotating masts. The crutch forward and the gallows aft support the rig when it’s taken down.
When Nate taped the plans on the garage wall, he already had a name for the boat he was about to build: BOB, for Boat On a Budget. He was afraid he’d make costly mistakes as he figured out the building process, so he built a trial hull with cheap plywood. He worked out the bugs on a full-sized model when he got everything to fit together properly, he disassembled the trial hull and used the pieces as templates.With his confidence bolstered, he began the glued-lap construction with good plywood.
Nate Morrison
Nate rigged an umbrella for protection from the merciless Arizona sun. This square one with straps on the corners is designed for use on boats.
Nate went shopping for some mahogany for the transom, but at the lumberyard he found a beautiful piece of zebrawood that he “could not live without.” He also prettied up the plywood deck with some vertical-grain Douglas-fir from the deck of a derelict keelboat and trailer he’d been given to salvage.
Nate went the extra mile with his boat’s electrical system. Tucked under the cockpit bench and accessible from the cabin, he has a stereo and amplifier, a solar charge controller, a fuse block, and wiring and controls for a bevy of comforts. Nate’s able to enjoy a stereo and amplifier, LED running lights, speakers that include a subwoofer, a reading light, a cooling fan, and some lighting strips recessed under the deck to give the cockpit a blue glow at night. He modified the rudder to take an electric trolling motor.
Bill Onley
When there isn’t enough wind for sailing, Nate can leave the sails ashore and head out under power. BOB’s rudder has an electric trolling motor built in.
BOB was a year in the making. Nate had to stop working for two months following open-heart surgery, and during the time he spent recovering he daydreamed about his boat. “It gave me a reason to get well,” he says.
Dilsie V. Morrison
The winds on the Arizona reservoirs are often light; the boat needs breezes of about 10 mph for the helm to respond well.
He now sails BOB on Arizona’s inland waters, including lakes Pleasant, Powell, Roosevelt, and Patagonia. His little schooner is a fishing boat, a rowboat, and a family picnic boat, and, as Nate puts it, the result of “limited skills, limited tools, and unlimited dreams.”
Have you recently launched a boat? Please email us. We’d like to hear about it and share your story with other Small Boats Monthly readers.
As I was working on our review of sound signaling devices in our August 2016 issue, I took a look on the web for homemade foghorns. I found quite a number of websites and videos that showed how to make foghorns and train horns out of common plastic pipe and fittings. A trip to the hardware store for some 1/2″ PVC pipe and fittings, and 30 or 40 minutes of puttering in the shop was all it took to come up with a few configurations that made a sound that I liked.
The parts are common plastic pipe and fittings. Only the two reducers need modifying: The one at the back of the horn (left) is shortened and the one at the front reamed out to let the pipe slip through.
The core of the horn is a 1″ x 1″ x 1/2″ T fitting and two 1″ to 1/2″ reducers. One reducer gets shortened up with a hacksaw. (Don’t try using a bandsaw—cylinders like plastic pipe do dangerous things in one.) The cut then gets sanded flat. The other reducer needs to have the stop inside removed so that 1/2″ pipe will slip through. The short reducer is inserted into one end of the T with a piece of freezer bag. The other reducer goes into the other end of the T, and a piece of 1/2″ pipe slips through until it comes in contact with the freezer-bag membrane. You blow through the small hole in the side of the T and adjust the 1/2″ pipe to get a tone. You can change the mouthpiece angle with pipe and angled joints. The length of the pipe slipped through the reducer will determine the horn’s pitch. You can use a long pipe or a short length of pipe—about 6″ so you can still get a grip on it to adjust it—and, if you like, connect a funnel to the pipe. The sound I liked best came from a 24″ length of pipe. It had a deep, resonant, rattling tone.
If I were on the water and heard the deep sound of that 24″ horn coming through the fog, I’d start making tracks fast, thinking I was about to get run down by a freighter. And there’s the problem. You can’t give other mariners the impression that you’re something you’re not. The USCG Colregs specify the frequencies that vessels can use: 70–200 Hz for a vessel 200 meters or more in length, 130–350 Hz for a vessel 75 meters but less than 200 meters in length, and 250–700 Hz for a vessel less than 75 meters in length. (If you’d like to hear what those ranges sound like, check out this online tone generator.)
It looks like a horn and has an authoritative voice but this version with the long funnel has a low tone that only a ship can rightfully use.
I sometimes have trouble distinguishing octaves coming from different instruments and couldn’t compare the sound of the tone generator and the horn with any certainty, so I loaded a free tuning app (Pano Tuner for Android) on my phone and found my 24″ pipe was 130 Hz, two octaves below middle C on the piano. If I were to use that horn aboard the biggest of my boats in the fog, I’d be masquerading as a vessel between 250′ and 650′ long. Too bad, I rather like the sound. The lowest tone I can use is 250 HZ, or just a bit below middle C. That’s a 12″ pipe.
While the funnel my have the look of a horn, a straight pipe has a sharper more distinct sound.
This homemade horn may look like it belongs under the galley sink but it is loud and measured up well against all of the lung-powered horns we reviewed. It is practically indestructible and the parts cost less than $5.
I found it easy to get carried away with making horns. I thought a dual horn might be worth investing a couple of dollars more, and indeed a two-tone horn has a sound that’s hard to ignore.
It’s easy to join two horns with a T fitting. This dual horn sounds like a big-rig truck.
Pete Markantes and his son Jason built DAWN PATROL for hunting, crabbing, and fishing in the waters of the Pacific Northwest. Their Honker is one of Sam Devlin’s suite of small, hunting-oriented outboard-motor boats. Its broad cockpit and stable garvey-style hull make for a workhorse of a boat, and its straightforward construction allows novice boatbuilders to create a functional, adaptable craft that can accommodate a group of fishers or hunters.
When I asked Pete, “Why not just get an aluminum jet sled, like everyone else?”, he smiled. “It’s the customization.” A home-built boat is not at all like a factory-made model, where buyer is stuck with features decided upon by the manufacturer. Even as they were building the boat, Jason put a lot of thought into outfitting it. “I just stared at it in the garage. What if we put a second depthfinder over there, and a rod holder there…?”
video and photographs by the author
The customizations to this Honker keep fishing gear readily accessible and out from underfoot. Just visible to the helmsman’s right is an additional cutaway in the aft deck to accommodate a trolling motor.
The Honker plans call for an 18′3″ hull, with a beam of 7′ and a capacity of 1,580 lbs. The drawings are detailed enough to enable assembling a seaworthy boat and yet leave plenty of flexibility for options to suit the builder’s needs. Pete opted to stretch the hull to 20′, which provided an extra 2′ of cockpit length over the stock design, allowing DAWN PATROL to carry two small layout boats, each capable of carrying and concealing single duck hunter. The chines and sheer run straight and parallel from about amidships aft, so for builders wishing to lengthen the Honker, Devlin notes that “the hull lines on the panels are very easy to extend, and we have had fully half of the boats built as the longer version, by simply adding onto the aft ends of the side and bottom panels.” He also recommends cold-molding an additional 1/4″ layer of plywood onto the bottom of the boat to make it stiffer and stronger for heavy-duty use.
The open cockpit easily seats four adults and their gear. The 14″-wide side decks make a useful spot to perch while under way, fishing, or hauling in a crab trap. The width of the decks and straightforward plywood construction supporting them provided the structure for the Markantes to add small shelves and trays for hunting and fishing gear.
The Honker was designed to take a 60-hp outboard and make 30 knots.
The plans call for Devlin’s stitch-and-glue method, which consists of temporarily joining plywood pieces together with wire, then bonding them together permanently with epoxy and fiberglass. All exposed wood is coated with epoxy to protect it from the elements. The hull, deck, and cockpit sole are made of 1/2″ okoume marine plywood. The plans don’t recommend a specific paint treatment, but Pete found that two coats of Kirby’s flat marine alkyd enamel has proved durable. Pete had previously built two other boats, so he had the skills and the tools to build the Honker in about 350 hours, which is close to the designer’s estimate of 320 hours.
Pete initially powered the Honker with a Yamaha F115 four-stroke outboard, which can readily switch between prop and pump propulsion by changing the lower unit, but at 377 lbs it proved too heavy, resulting in poor trim and uneven performance at speed. He replaced it with a Yamaha F60 four-stroke outboard at 249 lbs, which gave the Honker better balance and as much power as it can comfortably take. Devlin recommends a 70-hp motor, but 10 years ago, when DAWN PATROL was constructed, the F60 was the best choice—its weight was the equivalent of today’s 70-hp outboards. An electric-start, power-tilt Yamaha T8 is used for trolling and alternate power. Pete’s Honker cruises at about 22 to 25 mph even when it is fully loaded with gear and four adults.
The fuel economy is excellent, Pete reports, noting that only about 4 to 6 gallons of fuel are consumed “after a full day of fishing, which consists of 2 hours of running on plane with the F60 and 4 to 6 hours of trolling with the T8.” The fuel tank location is not specified in the plans, but based on previous experience Pete chose a custom-made 21-gallon fuel tank, which he installed permanently under the fore deck. The location of the tank and weight of the fuel help to balance the boat for improved performance, compared with storing gas in portable tanks in the rear. The fuel lines are run under the side decks, instead of the bilge, making it easy to check for leaks and to conduct maintenance.
The V in the forward sections of the hull smooth the ride when running in a chop.
Some Honkers have been constructed with side-console steering, but the boat is intended to be steered by the outboard’s tiller. The helmsman can stand or sit on the aft bulkhead or a folding chair set in the cockpit. Standing provides the best field of view. Pete is 5′8″, and when he’s seated in a folding chair the view over the bow is acceptable at modest speeds, and slightly better when he’s seated on the aft deck. I’m 6′1″, and I found sitting on the deck and standing to be equally good since the bow didn’t rise much into my field of view ahead.
DAWN PATROL is used extensively on the Lower Columbia River, where the influence of tide, river current, and wind can cause challenging conditions. Spray sometimes comes over the bow, but Markantes finds the boat capable of handling wind and waves comfortably. Devlin is confident in the Honker’s seaworthiness close to shore and on open-water and I found that DAWN PATROL was steady and smooth in mild chop and when crossing the wake of other motor boats; no matter how the four passengers were arranged, the trim felt even. The boat goes from a standstill to plane in about five seconds.
Devlin writes that “duckboats are overloaded most of their lives, are used in inclement weather most of the time, are run in waters too shallow most of the time, and encounter sea conditions that would turn a normal boat’s hair white. They also have to maneuver well in tight conditions and have passengers constantly boarding and exiting the boat with lots of weight and gear.”
Pete customized the boat with an electric system based on a 12V absorbed-glass-mat (AGM) battery. He installed tachometers and digital run-time counters for each motor, as well as running lights, power outlets, GPS, depthfinders for both the skipper and guests, LED lighting under the gunwales, and a removable LED spotlight on the foredeck.
In accordance with Coast Guard guidelines, DAWN PATROL was equipped with flotation. Markantes diverged from Devlin’s recommendation—solid foam with air space around it to prevent rot—choosing instead a combination of solid and two-part foam poured into three separate, enclosed compartments, one located at the bow, and two on either end of the stern.
Devlin offers a removable plywood pilothouse option for the Honker. It provides standing head room aft, from which one could steer with a side-console setup, as well as a lower area forward that covers approximately half of the cockpit. The structure would keep the crew dry in rough water or rain, and could serve as a humble cabin for an overnighter. To avoid taking up valuable cockpit space, Pete decided against the cabin and created instead a custom-made blind covered with artificial grass that allows the boat to transform from fishing vessel to camouflaged hunting craft in about half an hour. “With all this cockpit space, we can have three or four people hunting at once,” he told me.
DAWN PATROL illustrates just one variation that can be created using the Honker form as foundation. The plans are detailed enough to produce a solid boat that is highly customizable to suit intended use. Based on a classic and simple form, the Honker is a really practical boat, capable of adventuring in big water, yet with a shallow enough draft to ply backwaters, or even land on a beach. For its size, the Honker has a lot to offer.
Bruce Bateau sails and rows traditional boats with a modern twist in Portland, Oregon. His stories and adventures can be found at his web site, Terrapin Tales.
John Welsford’s Navigator is a 14 1/2′ centerboard beach cruiser and daysailer built in glued-lapstrake plywood. Welsford offers several rigs for this pretty little boat: Bermuda racing sloop, a lug yawl, and a gaff yawl. Being attracted more to traditional boat types and rigs, I chose to build the gaff yawl. The combination of the Navigator’s jaunty sheerline and yawl sail plan gives her character, and indeed, she can be built with as much character and tradition as the builder would like without appearing quaint. The choice of rig, sails, materials, and paint and finish schemes can place her comfortably in the 19th or 21st centuries or anywhere in between.
Scott Koss
If the Navigator reviewed here is not large enough to meet your needs, Welsford offers plans for a larger version called the Pathfinder. It is 19″ longer and 7″ wider than the Navigator.
Welsford’s plans show an option to mount a small, low-powered outboard on the boomkin, but most builders have opted to mount outboards up to 5 hp on a bracket fixed to the transom. I use a 24-volt, 1-hp electric outboard to help move her along to and from the dock and to get me home when the fickle Midwest winds die. The instructions note placing oarlocks 350 mm (13 3/4″) aft of an optional seat installed for rowing, and many builders equip their boats for rowing. I did too and found that the Navigator is not well-suited to long-distance rowing because of its 5′10″ beam and challenge of placing rowlocks either on the cockpit coamings or gunwales. I mounted locks on the coaming, which leaves about 9″ between the lock and the gunwale, causing the oars to rub on the gunwale. The Davis pattern fold-down oarlocks I used brought the lock inside the coaming. Side-mount or angled-mount rowlocks mounted outside of the coaming would provide more clearance for the oars over the gunwales. My seat for rowing is on top of the centerboard case, which gets me by but is not ideal for any long stretch of pulling. Doing some experimenting with the rowing accommodations and geometry may improve upon the arrangement I currently have.
The Navigator has a near-vertical stem giving way to a sharply curved forefoot and a very fine entry, enabling the boat to slice through a stiff chop with a minimum of fuss. The forward sections have a nice flare above the waterline that helps to keep the bow from diving too deeply into waves. The hull’s flat bottom and firm bilges provide for excellent stability. The sheerstrake curves gently upward and inward to meet the slightly raked transom with a touch of tumblehome.
Welsford originally designed Navigator as a race trainer to serve the needs of a local sailing club near his New Zealand home, but the club opted for an existing class boat. He later modified the design for another client wanting a dinghy for extended open-boat cruising. The changes included a large locker forward of the mainmast as well as two side lockers under the cockpit seats to keep gear away from spray and from any water that might enter the boat. These also form airtight compartments to lend buoyancy in the event of swamping. These compartments, the openness of the cockpit, and the space under the side decks provide ample storage space for camp-cruising and still leave room for four to enjoy an afternoon’s sail.
John Florance
Battens set in the frames and bulkheads simplify shaping and fastening the planks. The mizzen mast is set to port to keep from interfering with the tiller.
Building a Navigator is a straightforward proposition. Welsford provides 11 detailed sheets of plans that include a comprehensive accounting of fastenings, materials, and hardware, as well as helpful suggestions for rigging. Welsford’s concise building instructions have just enough detail to point novice builders in the right direction for getting things done properly and efficiently, while allowing them to make decisions based on personal preferences. Being able to choose between aluminum or hollow bird’s-mouth spars, plywood-sheet or laid-teak decking, fancy do-it-yourself wooden blocks or hardware-store pulleys, and varnish or paint is much of the great fun in building a Navigator.
The project fits nicely in a single-car garage; perfect for the amateur builder who may not have access to a dedicated shop. Navigator is put together upright on a strongback. Bulkheads and frame stations are cut and assembled from marine-grade plywood and attached to the bottom panel along with the keelson, stem, and transom. Longitudinal stringers connect the bulkheads and frames and provide the builder with glue-and-screw landing places for the plywood plank edges. The amidships frames anchor the centerboard trunk, while the compartments in the bow and the cockpit seating provide flotation to both ends of the boat. Four strakes bring us up from the bottom to the sheerline. Once the hull is planked up, the boat is flipped upside down for fiberglassing up to the waterline, the addition of the keel, skeg, false stem, and outside finishing work.
At this stage, I reconfigured the strongback lumber to create a cradle on casters that would allow me to move the boat within the garage as well as roll the project outside or back in as necessary for decking, interior appointments, and rigging.
Welsford specifies either a box-laminated wooden mast, or an aluminum one. I opted to build a hollow mainmast of Sitka spruce using the bird’s-mouth method; dimensions are fully specified in the plans. The mast is just under 14′ long, and the gaff-yawl version of the boat allows all the spars to fit comfortably within the length of the hull for easy transport. The boom, gaff, bowsprit, mizzen, boomkin, and sprit boom are solid, laminated of spruce or pine.
The mast for the yawl rig I chose is stepped through the foredeck just ahead of the cockpit coaming; the mast of the sloop rig is stepped through partners just aft of the coaming. To make rigging easier, I chose to build-in a mast hinge, which saves me from having to step the mainmast by myself when solo sailing, and keeps my boat almost completely rigged as it sits on the trailer. The mast is designed with tensioning stays to keep the jib’s luff straight, and the standing rigging makes a hinged mast a reasonable modification. I made sails from a Sailrite kit cut to the dimensions specified in the plans; there are finished sail packages for this Navigator available online from several sailmakers.
Scott Koss
The plans call for a motor mount on the boomkin, roughly square to the normal orientation. Most builders use a conventional bracket fastened to the transom.
I launched my Navigator, PUFFIN, on June 5, 2016, after two-and-a-half years of working on the boat nights and weekends. Dedicated builders have completed it in a few short months; the build time is largely dependent on the builder’s choice of fit and finish, and, to a lesser degree, by one’s skills at the outset of the project. This being my first scratch build, my learning curve was steep, and much time was spent on the “pondering stool” and repairing mistakes that simply couldn’t be overlooked.
The Navigator is a good little boat. PUFFIN weighs in at just over 350 lbs, a bit heavier than the 309 lbs listed in the plans. She is easily trailered, and with a hinged mainmast (see WB No. 237, March/April 2014), I can rig her at the boat launch and get her in the water in 10 minutes or less. Joel Bergen, the man behind the informative Joel’s Navigator Site, has posted a video in which he rigs his Navigator, outfitted with a standard mast, in just under 30 minutes.
John Florance
The control lines are lead aft along the centerboard trunk for easy access while solo sailing. The decking covering the plywood seating is a personal touch by the author. The spaces under the foredeck and seats provide ample room for stowing cruising and camping gear.
The Navigator’s initial stability is excellent for a boat of its size. I am a solid 200 lbs and have no difficulty standing in the boat while it’s afloat and moving through the cockpit for rig and trim adjustments. For a lightweight dinghy, Navigator handles open water gracefully and with an easy movement, and is faster than it looks. It sails wonderfully on a reach or a run; into the wind, it neither points as high nor runs as fast as I would like, but that may be typical of a gaff rig. If you’d like your Navigator to do better to weather, the alternate Bermuda rig with an aluminum foil-sectioned mast would be the better choice. In 15 knots of wind, my Navigator stays remarkably dry and upright and can do 8 knots on a broad reach, even while fully loaded. Without a cargo of four people aboard, she heels more and offers a more thrilling ride, and can certainly reach higher speeds. One advantage of the yawl rig is the ability to sheet the mizzen in hard and drop the main and jib. This allows her to heave-to with her head pointed nicely into the wind while the crew enjoy a break or take in a reef or two on the mainsail.
Scott Koss
The gaff yawl rig has a 28-sq-ft jib, an 88-sq-ft main, and 21-sq-ft mizzen. The insignia on the main is the author’s personal mark for his Navigator, PUFFIN.
My plans for PUFFIN include daysailing around the Milwaukee harbors and marinas, inland-lake sailing, camp-cruising the Apostle Islands, and possibly even an attempt at racing in the Everglades Challenge. Welsford’s Navigator is good-looking, well-founded, and perfectly suited to those adventures, either singlehanded or crewed. For boatbuilders aspiring or expert, she represents a doable, enjoyable challenge that will provide years of admiring glances no matter where she sails.
John Florance was raised in Mexico, and as a child learned to sail Hobie Cats on the Bay of Acapulco. He has sailed extensively on Lake Michigan, in Mexico, and the Caribbean. He and his family often vacation in the Caribbean and sail -chartered monohulls among the islands. PUFFIN is his first scratch-built boat. He has posted a video of PUFFIN under sail on his YouTube channel.
Brian Megaw, a river guide on New Zealand’s North Island, thought there must be a better way to run the Whanganui River. On this historic river that meanders through the verdant mountains and canyons of Whanganui National Park, commercial trips were limited to paddle-your-own canoe rentals. From what Brian saw, most couples zigzagged back and forth arguing, capsized in the river’s small rapids, and got to camp exhausted, having completely missed the enchanting beauty of the steep, sinuous, forest-draped gorge. Why not bring dories to New Zealand? They would fit right into the scenery and the ancient Maori traditions of the river. Passengers could relax, soak in the beauty, eat a decent meal before dark, and enjoy the skills and knowledge of trained boatmen. Brian had seen the Grand Canyon dory in the States—an elegant, stately wooden boat that gives a great ride and brings pleasure to the eye and soul.
After a roundabout search and many missed connections, Brian found a master dory builder, Andy Hutchinson, in Dolores, Colorado. Andy builds decked dories in the stitch-and-glue method, which requires a good deal of fiberglass work. Brian was hoping for something a bit quicker and more affordable, without decking. And he wanted two boats. Andy called a boatbuilder friend of his in Flagstaff, Arizona: me.
I build plywood-on-frame boats. They come together quite quickly, especially with the free-form assembly method I prefer. It is an old-fashioned way to build, but it eliminates the need for a strongback and provides a good, durable construction method for the kind of open boats Brian wanted.
“Yo, Brad,” said Andy, “Wanna go to New Zealand and help build a couple dories?”
“Hard to say no.”
The boats we planned to build were the classic Briggs Grand Canyon dory, originally designed and built in 1971 by Jerry Briggs of Grants Pass, Oregon, for environmentalist Martin Litton to use in his fledgling company, Grand Canyon Dories. At Litton’s behest, Briggs designed a modified form of his classic Oregon drift boat, the Rogue River Special, and called it the Grand Canyon dory. It is still—even 45 years later—considered the most beautiful, most functional, sweetest-rowing river dory ever built. Of the 36 boats Briggs built over the next dozen years, all but one are still serviceable. The originals are considered by dory aficionados to be the Stradivarius boats of the river. Andy, his wife Kate, and I are proud owners of three of them.
To build a boat in the free-form method I use, you need very accurate plans. It’s a bit like stitch-and-glue in that you don’t need to build a massive form to fit the pieces to, but all of the pieces must be precisely cut before they’re assembled. Previous attempts to perfectly define and replicate the unique, sexy lines of a Briggs had fallen short. Fortunately, Andy’s dory, COTTONWOOD, had never undergone a full rebuild and was one of the last Briggs-built boats still in its original form. We used it to pull off an extremely precise set of measurements. I lofted the lines, adjusted for errors, and packaged the drawings to hand-carry to New Zealand.
With our tight schedules at home, we had less than a month to build both boats. Insane, but possible, we hoped. Andy finalized arrangements with Brian, and we left for New Zealand. Well, I left. Somehow Andy’s work visa got stuck in the process. It was up to me to get things rolling, and rolling fast.
Brad Dimock
The pasturelands of New Zealand are almost painfully green. Armies of sheep keep it as well manicured as a golf course.
Brian met me at the airport in Palmerston North on New Zealand’s North Island. We bought tools: a cheap tablesaw and a beautiful set of cordless hand tools. We drove an hour north to the small farming town of Taihape, headed east on a narrow winding road to a rural area called Pukeokahu, then up a narrow, steep dirt track to a weathered, gray sheep shed on top of a hill. No matter what direction I looked, the rolling, mountainous terrain was everywhere shorn to an electric green, and dotted with thousands upon thousands of sheep. In New Zealand, where sheep outnumber people, it’s not an uncommon sight.
Inside the sheep shed was a cluttered chaos of old busted tools, plumbing parts, boxes of archaic farming gear, and a large pile of lumber. An enclosed room within the shed was our designated shop, big enough to build one boat. An attached open bay would house the second boat once we cleared away a mountain of old machinery. On the far side of the bay was a pen full of a half dozen orphaned lambs. Their incessant bleating was my musical entertainment for the duration of the project; their odor became mine. Although there was electricity (most of the time), there was no phone, no cell coverage, no Internet. The wind howled. It was cold. It rained. Our insane schedule–two boats in three-and-a-half weeks–no longer looked that good.
Brian and I climbed back in the van and descended into the narrow gorge of the Rangitikei River, where Brian, his wife Nicola, and their married daughter Janey run a lodge in the Rangitikei River valley. In addition to food, grog, and lodging, they offer horseback riding in the hills and whitewater rafting trips. It is a regular stop on tourists’ itineraries, and business had been good. A large dinner and plenty of beer improved my spirits, and I soon collapsed in my room.
The next morning Brian dropped me off at the sheep shed with a pack lunch, a coffee pot, and a handheld radio to communicate with him and with the lodge. I began clearing and organizing the shed, moving the aforementioned mountain of debris into a back room. I unearthed a small woodstove in the corner and started a roaring fire–my salvation in this drafty shop. I built a lofting table by the window, made tool shelves, and organized the lumber Brian had acquired: marine mahogany plywood for the skin, clear Port Orford cedar for framing, and white oak for the gunwales and chines. I knocked together a couple sawhorses. Brian and I hauled a large load of lumber into a cabinetry shop in Taihape to be surfaced and ripped down to sizes I could work with. Finally ready to begin, I laid out our new and untested plans and began cutting and assembling the frames.
Brad Dimock
On a sunny New Zealand morning outside the sheep shed we assembled the first free-form hull. We immediately began using the hull as a form on which to steam-bend the chines and gunwales.
Each evening Brian retrieved me, plied me with dinner and a bottomless mug of beer, and sent me to bed. Each morning, after coffee and breakfast, he dropped me off at the shed. I would start a raging fire and get to work, all the while hoping Andy’s visa would come through soon.
I had built quite a few drift boats and dories before and had devised many tricks and techniques in my well-equipped shop back home. But here in my mountaintop exile, most of my familiar tools—bandsaw, router jigs, hundreds of unique hand tools for different angles and tolerances—were missing. I had to devise new ways to cut scarf joints, clamp 4′-wide seams, and many more commonplace things that had suddenly become quite challenging. I made crude jigs from scrap lumber, employed wedges to make clamps. Fortunately most of my inventions worked.
Kate Thompson
After steam bending and scarf-jointing a full-length chine log, Andy and I finished the precise compound-angle end cuts to fit it tightly into the hull.
For steam-bending chines and gunwales, Brian and I cobbled together a steambox made from plastic sewer pipe with wooden end plugs, an old 5-gallon solvent can for the boiler, and a large but terribly old and rusty stove burner to supply a propane flame. The gas orifice was missing, so, having no alternative, I hammered a piece of hardwood into the gas port and drilled a small hole. Common sense would advise against making a wooden part for a gas stove, but it actually worked. It had kind of a sooty, yellow flame, but it was plenty hot.
The clock ticked on. I started early in the morning, cut wood, assembled parts, glued up side-panels, oiled the wood, stoked the fire, ate, drank, slept. A week went by. Fortunately Brian could occasionally break away from the lodge to help. A couple of Brian’s boatmen stopped in from time to time to land a hand. Derik, an American guide, was my stalwart helper when his schedule allowed. Kirk, another American, showed up a when he could.
Brad Dimock
The sweet sweep of a Briggs boat’s gunwales—and the relief of completing a hull–brought a gratified smile to Andy Hutchinson’s face.
I tried to keep my materials coming before needs developed, sending in my shopping lists by radio. Most days someone from the lodge was making the half-day run into Taihape, and could buy basic hardware or lumber for us, or the full-day run to Palmerston North where most everything else was available if you knew what the Kiwi name for it was: “Lodge to Dory Central. Brian is leaving for town. Do you need anything today?” Skreeech. “Dory Central to Lodge. Tell Brian we need another liter of turps. And a hundred more 40-cm stainless-steel coach bolts. And we need the Tasmanian Blackwood if it has been cut.” Squawk.
By the tenth day we had finished all 20 frames, two stems, and two transoms–and all were sanded and oiled. We had cut and scarfed–but not yet bent or glued up–eight chines and gunwales. And we had scarf-cut and glued together all four 20’ side panels and both bottoms.
Brad Dimock
The inspector general approves the new hull. The young Kiwi farm girls painted our favorite lamb blue.
Brian had left for Palmerston North that morning with a large list of odd items to hunt down. And—hurrah!—picked up Andy, whose assistant I had originally signed on to be. Andy had flown in the night before with his wife Kate–also a boatman and good hand in the shop. They rolled up to the sheep shed late that afternoon. We embraced with relieved smiles all around, and celebrated. We knew it was overly optimistic, but we still hoped to finish the boats in time to do an overnight trip on the Whanganui. We had fourteen days to turn this pile of sticks into two finished boats.
The following morning we cut out two side panels, marked and drilled them for screws, and assembled the first hull. With proper preparation, free-form hulls usually come together suddenly, in just over an hour, a gratifying reward after long preparation. No doubt the Kiwis were thinking, “Thank God the real boatbuilder finally arrived and we can see some results.” With one hull shaped we fired the steambox and began clamping all the oak chines and gunwales into shape, gluing them into full-length pieces as soon as they were cool and dry. The next day we built a second hull. For the next week we danced between steam-bending, gluing chines and gunwales, installing chines and bottoms, and rolling the boats upright to begin notching the frame heads for inwale installation.
Brad Dimok
With seat and oarlocks in place and her paint stripes and varnish still drying on a New Zealand hilltop, we called her done.
Every day each assemblage of raw lumber looked more like a boat, more graceful, more refined, and even sexier as completion crept ever closer. The gunwales were fit tightly, bolted into and onto the boat in graceful arcs, sanded smooth, all corners routed to a round edge, and then oiled. The crude forms abruptly and dramatically became elegant art, first one boat, then the other.
We employed the old Oregon-style finish, sealing the outside with epoxy, varnish, or paint, depending upon its exposure. We went with a varnished exterior with an earthy color stripe painted along the top third. We oiled the gunwales and interiors to preserve and show off the beautiful woodwork. Eight days after Andy and Kate arrived, the hulls were complete.
With growing optimism we began outfitting: seats, floorboards, oarlocks, fly decks, bow and stern eyes, and a host of other finicky details. Another five days passed, and late one Friday we cut and installed the final piece—the floor of the last sidebox—on time, with hours to spare, even. Champagne flowed.
Brad Dimock
In the howling wind Brian Megaw and I crafted the double-stack loading system, assembled from an old farm trailer, weathered planks, rotting carpeting, two barn hinges, and a box of drywall screws.
On Saturday, Andy and Kate took the morning off to paddle the Rangitikei, while Brian and I headed for Taihape to borrow a trailer and invent a loading and transport system for two dories. Two padded planks bridged the gunwales of the lower boat. A pair of carpeted wooden ramps pinned onto these cross planks allowed us to side-load the upper dory with its rockered bottom nesting in the lower boat’s sheer. Another miracle: it worked. That evening we hauled two very sexy boats down to the lodge. By a small, calm stretch of the river, we unloaded the top boat for a test run. She rowed like a dream. She was most definitely a Briggs. After several victory laps around the eddy we reloaded the boats and packed them full of gear for our inaugural float down the Whanganui.
Richard Player
Hours after completing the trailer modifications, we parked by the shore of the Rangitikei to see if the boats would actually float. An open boat like this weighs only around 300 pounds.
Brian’s dream of dories on the Whanganui was a tremendous gamble. It was a new concept and had to pass through labyrinthine layers of government inspection, inquiry, and approval. More importantly, the idea had to be embraced by the Maori iwi (tribes), through whose homeland the river flows. The Whanganui is unique, being the first river in the world to be granted personhood, with rights of its own–a concept confusing to the western capitalist mind, but perfectly natural to the Maori.
The machinations of government are slow, and the deliberations of the Maori iwi are slower yet. Brian had long enjoyed working with the Maori, if not the federal bureaucracy, and the giant leap of faith we were engaged in was his best bet: Build beautiful boats, prove they can work on the river, present his case, and cross his fingers. He believed the wooden boats would resonate with the heritage of the Maori wakas (dugout canoes) that once plied this river. He asked the Maori to help name the boats.
Over drinks one evening, Brian talked about Martin Litton, who brought dories to the Grand Canyon during his victorious fight against proposed dams there. I was amazed at how familiar Brian was with the details and nuances of the tale. For him, Litton was a true hero and role model. Brian, an ardent environmentalist in his own right and a man of great heart, hoped to use his own company to bring awareness to regional issues and work toward solutions. He told me, “I don’t really give a damn if this makes money. In the end, I just want to have made a difference.”
Richard Player
It is always an emotional moment when a new boat first kisses the water. This 100-yard stretch of the Rangitikei is a rare calm moment in an otherwise frothing cascade.
Early Saturday morning we piled into the van with Brian, Nicola, and two friends: Tommy, a Maori horseman who worked with Nicola, and Sam, a Sri Lankan guru of sorts who had been encouraging the Megaws to pursue their wildest dreams. We drove past the great snow-capped Ruapehu and its brother volcanoes, Ngauruho and Tongariro, which gave birth to this island and formed the headwaters of the Whanganui. At Taumarunui, where the Ongarue River meets the Whanganui, we stopped for the typical Kiwi snack, meat pies. On a point of land where the two rivers meet, we unloaded the boats, dropping one into each river. Nicola’s father, Old Brian, waved goodbye and headed to Whakahoro to meet us downriver the following afternoon.
Brad Dimock
At the confluence of the Whanganui and the Ongarue we loaded the new boats for their first journey. We quickly floated out of civilization and into the Whanganui Gorge.
We were at the beginning of the so-called Whanganui Journey, one of New Zealand’s nine “Great Walks” and the only one that offers the option of traveling on a water trail rather than a footpath. It officially ends some 90 miles downstream at Pipiriki. Although we only had time to go partway, we were giddy to have finished the boats in time for this overnight trip. The boats ran every bit as beautifully as we had hoped. The natural wood and earth tones of these graceful hulls exquisitely complemented the jungle-green walls of the gorge.
Brad Dimock
Andy Hutchinson recognized the familiar feel of a Briggs boat as he entered a rapid on the Whanganui River. Oregon drift boats like these are rowed with the boatman facing the high prow, which is, technically, a highly evolved stern—and transom behind the boatman is a truncated bow.
Andy, Kate, and I took turns rowing one boat, while Brian and Nicola traded off in the other. Sam paddled merrily along in an inflatable kayak. Even our Maori friend Tommy, who was far more comfortable on a horse, took the oars. As we floated, Tommy pointed out different trees, birds, and landforms, and told us of their lore.
We set up camp at Ohinepane and Brian cooked dinner. I wandered about the area and kept finding myself back at the river, looking at our two newborn “daughters” tied against the shore. I caught Brian and Andy staring at them as well. I rolled my sleeping bag out on the floor of one boat and drifted to sleep looking at the constellations in the Southern sky.
In the morning we loaded up, rowed, stopped to explore an old farm, and gawked at the many waterfalls along the way. The palms, tree ferns, and wide variety of deciduous trees changed textures endlessly. Dense, feathery, viney, rolling hills gave way to steep rocky cliffs. Late that afternoon we found Old Brian at Whakahoro, loaded the boats, and returned to River Valley, knowing that we’d only seen the warm-up act of the Whanganui. Andy, Nicola, and I packed for a long drive to the airport the next morning.
Brian Megaw
The dories enter their career of professional servitude on the Whanganui River amid a jungle of tree ferns and waterfalls.
A year passed and Brian’s vision fell into place piece by piece. His Whanganui River dories gained government approval. The Maori iwi accepted his business plan. Twelve months after the boats were completed, Maori elders convened at Pipiriki in a moving riverside ceremony to bless and christen the boats. In the tradition of Martin Litton, who named his dories as memorials to places of beauty desecrated or destroyed by man, the boats were named for two of the river’s tributary streams that had been diverted as part of the Tongariro Power Scheme: TE WHAIAU (The Current Follower) and OKUPATA (My Little Droplets of Water). The names could not be more fitting, in homage both to the watershed of the Whanganui, and to Martin Litton, who died at the age of 97, just weeks after our boats were completed. As the boats’ builders, we were honored and moved to have played a role in this story, and delighted to see the design migrate across the Pacific and take root in another magical place where a river is revered.
Brad Dimock builds all manner of boats at Fretwater Boatworks in Flagstaff, Arizona. In the summer he rows dories through Grand Canyon, and teaches Building the McKenzie River Dory at WoodenBoat School in Maine. TE WHAIAU and OKUPATA are still running the river for Brian Megaw and Whanganui River Dories.
If you have an interesting story to tell about your adventures with a small wooden boat, please email us a brief outline and a few photos.
Dyneema rope, with spliced-in stainless-steel thimbles and simple lashings, makes strong, do-it-yourself standing rigging.
For small boats with standing rigging, steel was once the only choice, and it had to be ordered from a rigging shop with its fittings installed. In recent years Dynex Dux and STS, made from Dyneema SK-75 high-modulus polyethylene (HMPE), have become available. While high-strength fiber rope has been around for some time now, it was very expensive and available for large yachts only. It now costs about the same as stainless-steel cable, and the fittings used with it cost less than turnbuckles and toggles. These ropes have low-stretch characteristics similar to those of stainless-steel cable, are lightweight and soft, won’t rust or scar brightwork, and can be spliced easily without special tools. For trailer sailers, these synthetic ropes will not kink and are easier to coil up and stow when the mast is down.
HMPE braided rope is stronger than steel cable, but it initially has some “constructional stretch” as the fibers are squeezed into a tighter braid as load is applied. Once the settling is complete, the rope only exhibits “material stretch,” the characteristic of the fiber from which it is made. Dynex Dux and STS have had the constructional stretch removed in the manufacturing process by being subjected to heat while under tensile load. Another stretch characteristic of these ropes, called creep, is the elongation over time when under load. Creep is virtually nonexistent in steel cables, but is measurable with synthetic fiber ropes. For both Dynex Dux and STS, the amount of creep in normal usage on small boats will not be a factor. Highly stressed, tall rigs with high standing preloads may require an occasional tightening, but for most small craft with relatively floppy rigs, or trailer sailers that are tensioned every time the rig mast is set up, it is insignificant.
The HMPE rope can be a direct replacement for steel cable, and the tensioning hardware can be changed to less expensive lashing lanyards. Colligo Marine offers an array of special thimbles, deadeyes, and other terminals designed for fiber rigging so a do-it-yourselfer can make shrouds and stays. Many of these fittings are designed to connect to existing tangs and pins for direct replacement of metal cables.
courtesy of Colligo Marine
A few of the Colligo fittings designed for use with Dyneema line.
For small boats, the stainless-steel rigging cable can be replaced with Dyneema SK75, Dynex Dux, or STS fiber rope of the same diameter as the metal cable. The fiber rope will be 50 percent stronger with similar stretch characteristics. The minimum diameter for Dynex Dux is 5mm; for SK75 Dyneema or Amsteel line it’s 3mm (1/8″). Amsteel isn’t heat treated, so use a size larger than metal cable to offset the additional stretch. For thimble terminals, use heavy-duty terminals or complete ring sailmaker’s thimbles about 50 percent larger than specified for the line diameter, for extra strength and to give a larger bearing surface for the lanyard. If the rope is larger than 3/16″, consider using the Colligo Marine Terminator fittings with tensioning lanyards. Colligo Marine offers lashing and splicing instructions and other helpful videos on their website.
High-strength fiber rope offers an attractive rigging system for replacement of metal cables or original construction. It costs about the same as stainless-steel cable, and the fittings cost less than turnbuckles and toggles. It is easy to splice, so the boat owner can make up cables to length very quickly. Colligo Marine is currently claiming a working life for of 8 years in the tropics, more in northern climates. Stainless-steel rigging typically lasts 20 years, but has been known to fail at the terminals in less time. For small boats that are often covered when not in use, the life of the fiber rigging is greatly extended.
John Marples has designed, built, and rigged many sailing vessels. His portfolio includes dozens of wood-epoxy composite sailing and power multihulls to 65′. He operates Marples Marine, a multi-hull design and engineering firm in Penobscot, Maine.
Editor’s notes:
The Brummel eye splice is commonly used for Dyneema rope. Passing both ends through the rope at the base of the eye locks the slippery braided line, and then a long tapered tail is buried inside. The simple Brummel splice works as a first splice because both ends can be threaded through. The second splice, on the other end of the line, requires a different technique because the eye can’t be passed through the braid. For details, refer to the Colligo Marine videos.
SBM photographs
If you don’t have fids for braided line you can make them from aluminum knitting needles.
Here a length of 3/16″ Amsteel line is going to be spliced around a brass thimble. The bight is pinched around the thimble and marked where the two sides come together. The tail that will be buried in the core of the line at the end of the process should be 72 times the diameter of the line.
Prior to inserting a fid, the line is pushed together to open the braid. The black mark made in the previous step is visible here in the middle of the loosened braid.
The fid takes the end of the line through the loosened braid.
The end of the line is pulled through until the marks meet each other.
The end of the long side of the rope is threaded through just below the mark.
The line now has each end threaded through, and when the eye is opened up for the thimble, the intersections will lock against each other.
The eye needs to pulled open forcefully to get thimble snapped in.
To make room for the end to be slipped through, a fid is pushed down the center of the line, loosening the braid.
The fid emerges after it has passed through several more inches of line than the tail will occupy.
After the fid is removed, the braid remains loose. A bit of tape around the end of the line stiffens it enough to slip through the loosened braid.
The loosened braid gets pushed over the taped end.
When the tip emerges from the opening left by the fid, it can be pulled out.
With a straight pin holding back the loosened braid, the tail is marked in 12 equal increments.
A single strand is pulled out at each mark.
When all 12 strands have been teased out, they are each cut with a sharp knife or scissors.
After the strands are cut the tail has a uniform taper. The pin holding the loosened braid back will be removed so the tail can be pulled into the line.
As the braid is pulled out, the tail disappears inside, leaving a long gradual taper away from the thimble.
—CC
Addendum
Reader Anthony Johnson asked how an eye can be spliced into the other end of the line if the long end can’t be passed through the hole. You could create the second eye in the same manner as described above, by installing the thimbles only after both eyes have been created. To make room for the first eye splice, enlarge the hole in the second eye splice that the long end passes through by prying two fids against each other in it. For occasions like Anthony’s stanchions, where the long end can’t be passed through the hole, there is the modified Brummel eye splice, illustrated here.
The eye for the thimble is to the right. At the point where an opening has been made to run the long end of the line through in the standard Brummel, the short end is inserted instead.
The short end is pulled to shrink the loop.
As the short end is pulled further, the loop disappears and the hole it has been passed through becomes inverted.
After widening the inverted hole with a pair of fids, the thimble’s eye is passed through.
Continuing to pull the eye through creates a small loop that will get pulled through the inverted hole and undo the inversion.
The Small Hatchet is a great tool for splitting kindling. Using a stick to keep the workpiece upright keeps the fingers at a safe distance from the sharp blade.
Daniel Beard, in The American Boy’s Handy Book, wrote, “At least one or two good sharp hatchets should form a part of the equipment of every camp; it is astonishing, with their aid and very little practice, what a comfortable house may be built in a very short time.” It’s no longer acceptable, as it was in 1882, to chop down live trees to build the cottage, beds, tables, and chairs Beard describes in his chapter on camping in the woods, but a sharp hatchet is still a useful tool to have while camp-cruising.
During my Inside Passage cruises (Sea Trial Part I and Sea Trial Part II) I used a hatchet to split firewood and kindling, to make and drive tent stakes, to make floats to keep a mooring line from snagging on rocks during a midnight low tide, and even to fashion a slender rudder to hold a steady course while rowing.
The hatchet’s slender blade can take a sharp edge, fine enough for whittling. Here a bit of maple, split from a fallen branch, is on its way to becoming a butter knife.
The finest hatchets I’ve owned are made in Sweden by Gränsfors Bruks, a small company founded in 1902. The steel they use is recycled and processed to create an alloy that is hard enough to take a good edge yet not so hard that the blade is brittle. The cutting edge that comes from the factory is almost razor sharp and stays sharp, even after chopping through well-dried hardwood. The handles are made of hickory—a tough, dense wood long used for tool handles because of its impact resistance and a degree of flexibility that absorbs some of the shock of chopping so the vibration isn’t all transmitted to your hands. The handles are soaked in linseed oil and then finished with beeswax. Each tool from Gränsfors has the initial of the maker stamped into the steel alongside the company seal—a crown over the initials GBA. Both of my hatchets have “LP” on the side of the poll indicating they were made by Lennart Pettersson.
The Small Hatchet is small enough to be tucked into a pants pocket.
My Gränsfors Small hatchet has a 10″ handle and weighs just 12 1/2 oz. The blade, with its cover on, is 5″ long and fits in my back pocket. It takes an edge as sharp as the best of the chisels in my shop: the slightest nick of the blade will draw blood. The head of the axe fits nicely in my hand for carving. The poll and the blade came polished to a mirror finish. Pettersson, an avid fisherman, designed the hatchet and gave the poll smooth, rounded edges to make it suitable for use as a fish club. The blade is thin enough that Gränsfors even suggests it can be used to fillet fish. The handle is sanded smooth and slender enough for me to grip for carving. The leather is vegetable tanned, in keeping with the company’s goals to minimize environmental impact.
For heavier work, the Gränsfor’s Large Carving Axe has a textured handle for a better grip and a larger, heavier head.
My Gränsfors Large Carving Axe has a 14″ handle and 4 1/2″-long blade. It weighs 2 lbs 3 oz. The handle is textured, bearing the slight scalloped tooling marks of what I presume is a router lathe, providing a non-slip grip. The lower curve of the handle fits nicely into my hand, and the flared end knob keeps it from slipping through my fingers. I’ve owned this axe for at least a decade, and its head (like that of the Small Hatchet) is still solidly attached to the handle. Gränsfors dries the hickory properly so that it swells up under normal humidity and locks in the axe eye.
These tools will surely outlast me. I’ve stamped my initials on the head just around the corner from those of Lennart Pettersson. There’s room for more initials from the generations to come.
Christopher Cunningham is the editor of Small Boats Monthly.
Gränsfors Bruks distributes its products through retailers around the world. The Small Hatchet retails in the U.S. for $130. The Large Carving Axe is available in the U.S. for $185. The Gränsfors tools are handmade, not mass-produced, so filling an order may take months.
Is there a product that might be useful for boatbuilding, cruising or shore-side camping that you’d like us to review? Please email your suggestions.
A small boat in a crowded waterway is easily overlooked by other boaters. So what do you do when it’s imperative to attract the attention of another boater, especially one who is bearing down on you? A VHF radio is a key piece of equipment that’s usually useful for communicating with commercial vessels, but it’s not the most immediate way of making your presence known to pleasure craft. A whistle might help, but if you really want to be heard over the roar of a motor, what you need is a portable horn.
I went looking for a horn that is loud, compact, and durable. Because low-impact boating is my goal, I also wanted one that doesn’t require disposable compressed-gas cartridges. For vessels under 12 meters, Coast Guard regulations regarding air horns are vague—“A vessel of less than 12 meters in length…shall be provided with some other means of making an efficient sound signal”—but common sense dictates that a warning blast should be heard a couple of hundred feet away, and ideally further. A friend and I got out on the water and tested six horns over a distance of 500 ft and then 1,000 ft. Five models seemed worthy of consideration by small-boat users.
The reliable Perko horn has been around for decades and has a hole for hanging it up where you can get to it in a hurry.
The Perko Fog Horn ($25) is constructed of aluminum with a white, baked-enamel finish. It is approximately 12″ long with a 3″-wide flared end. The nylon mouthpiece creates a somewhat tinny, party horn-like sound. Blowing this horn required little effort, and it could be heard plainly at 500 ft, but was less discernible at 1,000 ft. It’s simple, maintenance-free, and easily stowed.
The Bellow horn has an unusual shape but a good sound and no metal parts that would be subject to corrosion.
Shaped like an old-fashioned cowl vent, Attwood’s 8″ by 2″ Bellow horn ($12) is made of thick, bright-orange plastic. The user blows into a small tube on the rear of the cowl. Despite its toy-like appearance, the sound produced is hardy, high, and clear, even at 1,000 ft. Unlike other horns, the Bellow can be blown softly as well as with more force, enabling the user to produce a variety of volumes, all at the same tone. The instructions note that the diaphragm on the bottom of the horn requires occasional replacement with “household plastic wrap,” but a piece of freezer bag or 4mm plastic sheet is much less likely to tear when installed.
SeaDog’s horn is small but produces a loud signal.
Measuring in at 7.25″ long by 1.25″ at the wide end, Sea Dog’s stainless-steel horn ($34) was the most compact model—it fits in a pocket—and the loudest for its size. It produces a sporty, trumpet-like toot and sounds more bold and definite than the Perko or Attwood horns, even at 1,000 ft. Its rigid body and solid metal mouthpiece make it unlikely to wear out from use or baking in the sun, and because of the sturdy construction, it would be difficult to crush or dent it accidentally.
Innovative Lighting’s electric horn comes with a mounting bracket to keep it handy.
Innovative Lighting offers an electronic horn ($25) powered by a common 9-volt battery. Made of water-resistant, molded plastic with rubberized surfaces on its pistol-style grip, it has a button operated by the user’s forefinger. A loudspeaker at the top emits a synthetic “ZZZ-T, ZZZ-T” sound that reminds me of an amped-up cicada. The non-traditional sound is clear and, rated at 112 decibels, is easily heard at 1,000 ft. It will certainly get someone’s attention, though, as a fog signal, it may not be readily understood by other boaters.
The EcoBlast horn has a very loud sound and is recharged with air.
Attwood also produces the Eco Blast Rechargeable Air Horn ($34). It consists of a canister and a 5″-long plastic horn. The horn has a threaded brass insert that screws easily onto the top of the canister. A small red button unleashes a powerful and unmistakable warning. The EcoBlast is rated at 120 decibels and louder than any of the horns I tested. The canister gets pumped full of air with a handheld bicycle pump. If the horn isn’t being used, the canister holds air pressure for days on end, and you can use a tire gauge to see how much air is in the can and charge it up before you launch. After around 15 short blasts or a continuous blast lasting 5 seconds, it needs to be refilled, and it takes a strong pair of arms to get it up to full pressure—100 psi—with a small hand pump.
These horns can all be found for under $40, making them a bargain on the safety-to-cost ratio. Given the circumstances small-craft owners are likely to meet—an encounter with other craft, various emergency situations, becoming fogbound—these horns can be an essential piece of your safety equipment.
Bruce Bateau sails and rows traditional boats with a modern twist in Portland, Oregon. His stories and adventures can be found at his web site, Terrapin Tales.
Editor’s notes:
To make measurable comparisons of the horns, I put a decibel meter app (Sound Meter for Android) and a pitch tuner app (Pano Tuner for Android) on my phone. The decibel meter didn’t seem to do well at close range—many of the horns peaked at the same level—so I set my phone by the front door and looked at it through a pair of binoculars, 40′ away at the back door. The measurements are lower than they would be if measured at the source and for comparison only:
[table]
EcoBlast/87 dB, 730 Hz
Innovative Lighting/72 dB, 133 Hz
Bellow/72 dB, 433 Hz
SeaDog/66 dB, 467 Hz
Perko/65 db, 440 Hz
[/table]
The do-it-yourself horn I made measured 67 dB, 258 Hz with a 12″ pipe, 67 dB, 206 Hz and with the 18″ long funnel, and 61 dB, 121 Hz with a 24″ pipe.
One short blast means “I am altering my course to starboard.” Two short blasts to mean “I am altering my course to port.” Three short blasts to mean “I am operating astern propulsion.”
When a power-driven vessel is leaving a dock or berth, she shall sound one prolonged blast.
In or near an area of restricted visibility, whether by day or night, a power-driven vessel making way through the water shall sound at intervals of not more than 2 minutes one prolonged blast.
When vessels in sight of one another are approaching each other, and from any cause, either vessel fails to understand the intentions or actions of the other, or is in doubt whether sufficient action is being taken by the other to avoid collision, the vessel in doubt shall immediately indicate such doubt by giving at least five short and rapid blasts.
Is there a product that might be useful for boatbuilding, cruising or shore-side camping that you’d like us to review? Please email your suggestions.
Dave’s canoe is as much at home on a muddy creek bank as it is in an art gallery—it was shown at the Galesburg Civic Art Center. Dave, a professional photographer, is no stranger to the art world.
Six years ago, a nearly fatal injury landed Dave Hupke in the hospital. While his life hung in the balance, he imagined what he would do if he were to have the good fortune to live beyond the age of 46. As a teen, he had been a Boy Scout guide at the Charles L. Sommers Wilderness Canoe Base in Ely, Minnesota, and later, as an Eagle Scout, led trips through the Boundary Waters Canoe Area. He had fond memories of wilderness paddling and of the beauty of cedar-strip canoes. He decided that if he walked out of the hospital he’d build a canoe.
David’s father, Horst Hupke, had the tools and his skills as a woodworker to hasten progress on the canoe project. Note the splitter secured by the smallest clamp. It holds the work to the fence and keeps the cedar from binding on the saw blade.
Horst’s spindle shaper, equipped with cutters for matching beads (shown here) and coves, made it possible to do quick and accurate milling of the strips.
A month passed and although Dave was weak, scarred, and had lost 30 pounds, he had survived. He had a long road to recovery before he could begin work on the canoe. Three-and-a-half years later, he had his strength back and was back at work. He had the time and the energy to devote to building his canoe.
His father, Horst, had been a craftsman in northern Germany before immigrating to the States, and is, despite his 82 years, an energetic and adroit woodworker. Horst was eager to lend his support to Dave’s project and offered up his woodworking expertise, his woodshop, and his garage.
Dave and Horst used duct tape to hold the strips to each other and clamps and wedges to hold them to the molds, avoiding the use of staples and the holes they leave after they’re removed.
Dave searched the web for plans and came upon the canoes of Ray Klebba of White Salmon Boat Works in the town of White Salmon, Washington. Ray’s 17′ Kenosha design was very much like the canoes Dave had admired in his days as a Scout. Dave ordered a set of plans and even before they arrived, he and Horst started milling western red cedar into cove-and-bead strips. The 18′ planks were too long to handle in Horst’s shop, so they moved the tablesaw and then the shaper out to the driveway. A set of shop-made fences, hold-downs, and guides assured the strips were milled accurately and uniformly.
Dave’s woodburned insignia included two bottle caps to remind him of the Root Beer Lady of Knife Lake.
With the milling finished, Dave sorted the strips by color, from blond to chocolate brown. He added some birch to the building materials for bright accents and to pay his respects to the birchbark ancestors of his canoe.
With the hull ‘glassed, the canoe is ready for the gunwales, seats, and decks.
Dave and Horst worked together building the strongback, setting up the forms, and stripping the hull. With the planking complete, Dave designed an insignia for the bow of his canoe. The woodburning design included a hoop and feathers to honor the Native American origins of canoes. At the top Dave added a bottle cap, acknowledging The Root Beer Lady, Dorothy Molter. Molter made root beer in her cabin on the shores of Knife Lake and sold it to countless canoeists who paddled through what became the Boundary Waters Canoe Area (BWCA). When the BWCA was established as a wilderness area, Molter would have been forced to move, but the outcry from loyal canoeists led to permission for her to stay. She remained in her lakeside home until her death in 1986. Inside the outline of the bottle cap are the joined letters, HR. They stand for “Hol-Ry,” a greeting used by the canoeists of the Sommers Wilderness Canoe Base. Hol-Ry was the name of a rye cracker, made in a Duluth bakery, that didn’t break when stuffed in a pack, and didn’t spoil during backcountry voyages.
Rather than use pre-woven seat caning, Dave did the weaving himself, a job that takes time, patience, and focus.
Dave made two paddles for the canoe, one straight and the other bent-shaft, and decorated them with the same insignia he put on the canoe. He and his friend Andy Look won the wooden canoe division of the 13.5-mile Abe’s River Race on the Sangamon River in Illinois.
While the insignia on Dave’s canoe bears symbols of a fondly remembered past, the canoe itself grew out of hope in the face of an uncertain future. What better way could there be for Dave to celebrate a second chance at life than to take to the water in a wooden boat he built with his father?
Have you recently launched a boat? Please email us. We’d like to hear about it and share your story with other Small Boats Monthly readers.
When I read Quill Goodman’s account of his Race to Alaska in 2015, I was amazed at how difficult the conditions were. He, Dylan, and Mitch were always working against headwinds and often sitting out storms. I’ve been up the Inside Passage twice, and my two experiences were so different from each other and from Quill’s that you wouldn’t guess it was the same place.
My first trip was gray and grim and I promised myself I’d never do the Inside Passage again.
In 1980 I rowed and sailed a 14′ Chamberlain dory skiff from Mukilteo, Washington, to Prince Rupert, British Columbia. I covered about 700 miles in a month, most of that by rowing. The weather was, with few exceptions, mild and I never stayed ashore to wait for favorable conditions. There was a lot of rain that year and some days were downright miserable. At the end of a wet day the palms of my hands would be saturated with water and almost completely white, looking more like cauliflower than human flesh. Before I could start dinner I had to dry my hands out over the camp stove to get them ready to do anything more refined than hook around an oar handle. My roll of toilet paper was protected in a Tupperware container that was only translucent but through it I could clearly see the black speckles of mildew. While I never sat out a storm, there was one that I should have. It crept up on me while I was on Gibson Island at the north end of Grenville Chanel. I’d been taking advantage of a rare southerly to do some sailing, and stopped on the north side of the island to have lunch and scandalize the sprit mainsail. The wind had been brisk, and with a 3-mile crossing ahead, I thought reducing sail would be prudent. I rowed out of the glassy water in the lee of the island, and the wind suddenly hit the sails like a sledgehammer. It was instantly blowing a near gale and I had to sit on the transom to keep the bow from plowing under. I didn’t dare go forward to cast off the sheets—I’d cleated the main while I was rowing. I held on and hoped I’d survive the crossing. I did and took a picture of myself upon landing, one of several I took during my lowest moments on the trip, as a reminder to never to row the Inside Passage again. The next day I rowed to Prince Rupert and called it quits.
My second trip was a walk in the park with fair winds and sunny skies.
In 1987 I did the Inside Passage again, from Anacortes, Washington, to Juneau Alaska. I’d built a 21′ replica of the Gokstad faering for the trip, and my then wife and I had an easy time covering 1,000 miles in eight weeks. Only four days of rain interrupted the sunny days. Warm and very pleasant following winds, “dry sou’easters” as they were called, gave us many opportunities to raise the square sail and relax under clear skies as the miles slipped by. With the calm conditions we had a wide choice of anchorages and never had to negotiate breaking waves to get ashore. The only damage to the boat in the entire trip were scratches in the varnish, one from nicking a dock in the Powell River marina, and the other from sliding the boat off the tram into Oliver Inlet after making the portage by rail at Admiralty Island. The worst part of the trip was a toothache that forced us to stop a couple of days in Nanaimo while I got a root canal.
As I write this, the winner of the 2016 R2AK is already in Ketchikan, having sailed the Inside Passage from Port Townsend in 3 days, 20 hours and 13 minutes, beating last year’s winning time by more than a full day. A lot of the Inside Passage quickly slips by at that pace. We’ll have to wait to see who comes in last this year. If that team’s experience has been anything like Quill’s, that’s the story I want to hear.
Subscribe For Full Access
Flipbooks are available to paid subscribers only. Subscribe now or log in for access.