The teak floorboards in my Caledonia Yawl have served me well since I launched the boat in 2005, but, like me, they’ve grown much grayer over the past 19 years. I’ve accepted that change of color for myself, but I thought it would be worth trying to restore my floorboards to their youthful appearance.
Photographs by the author
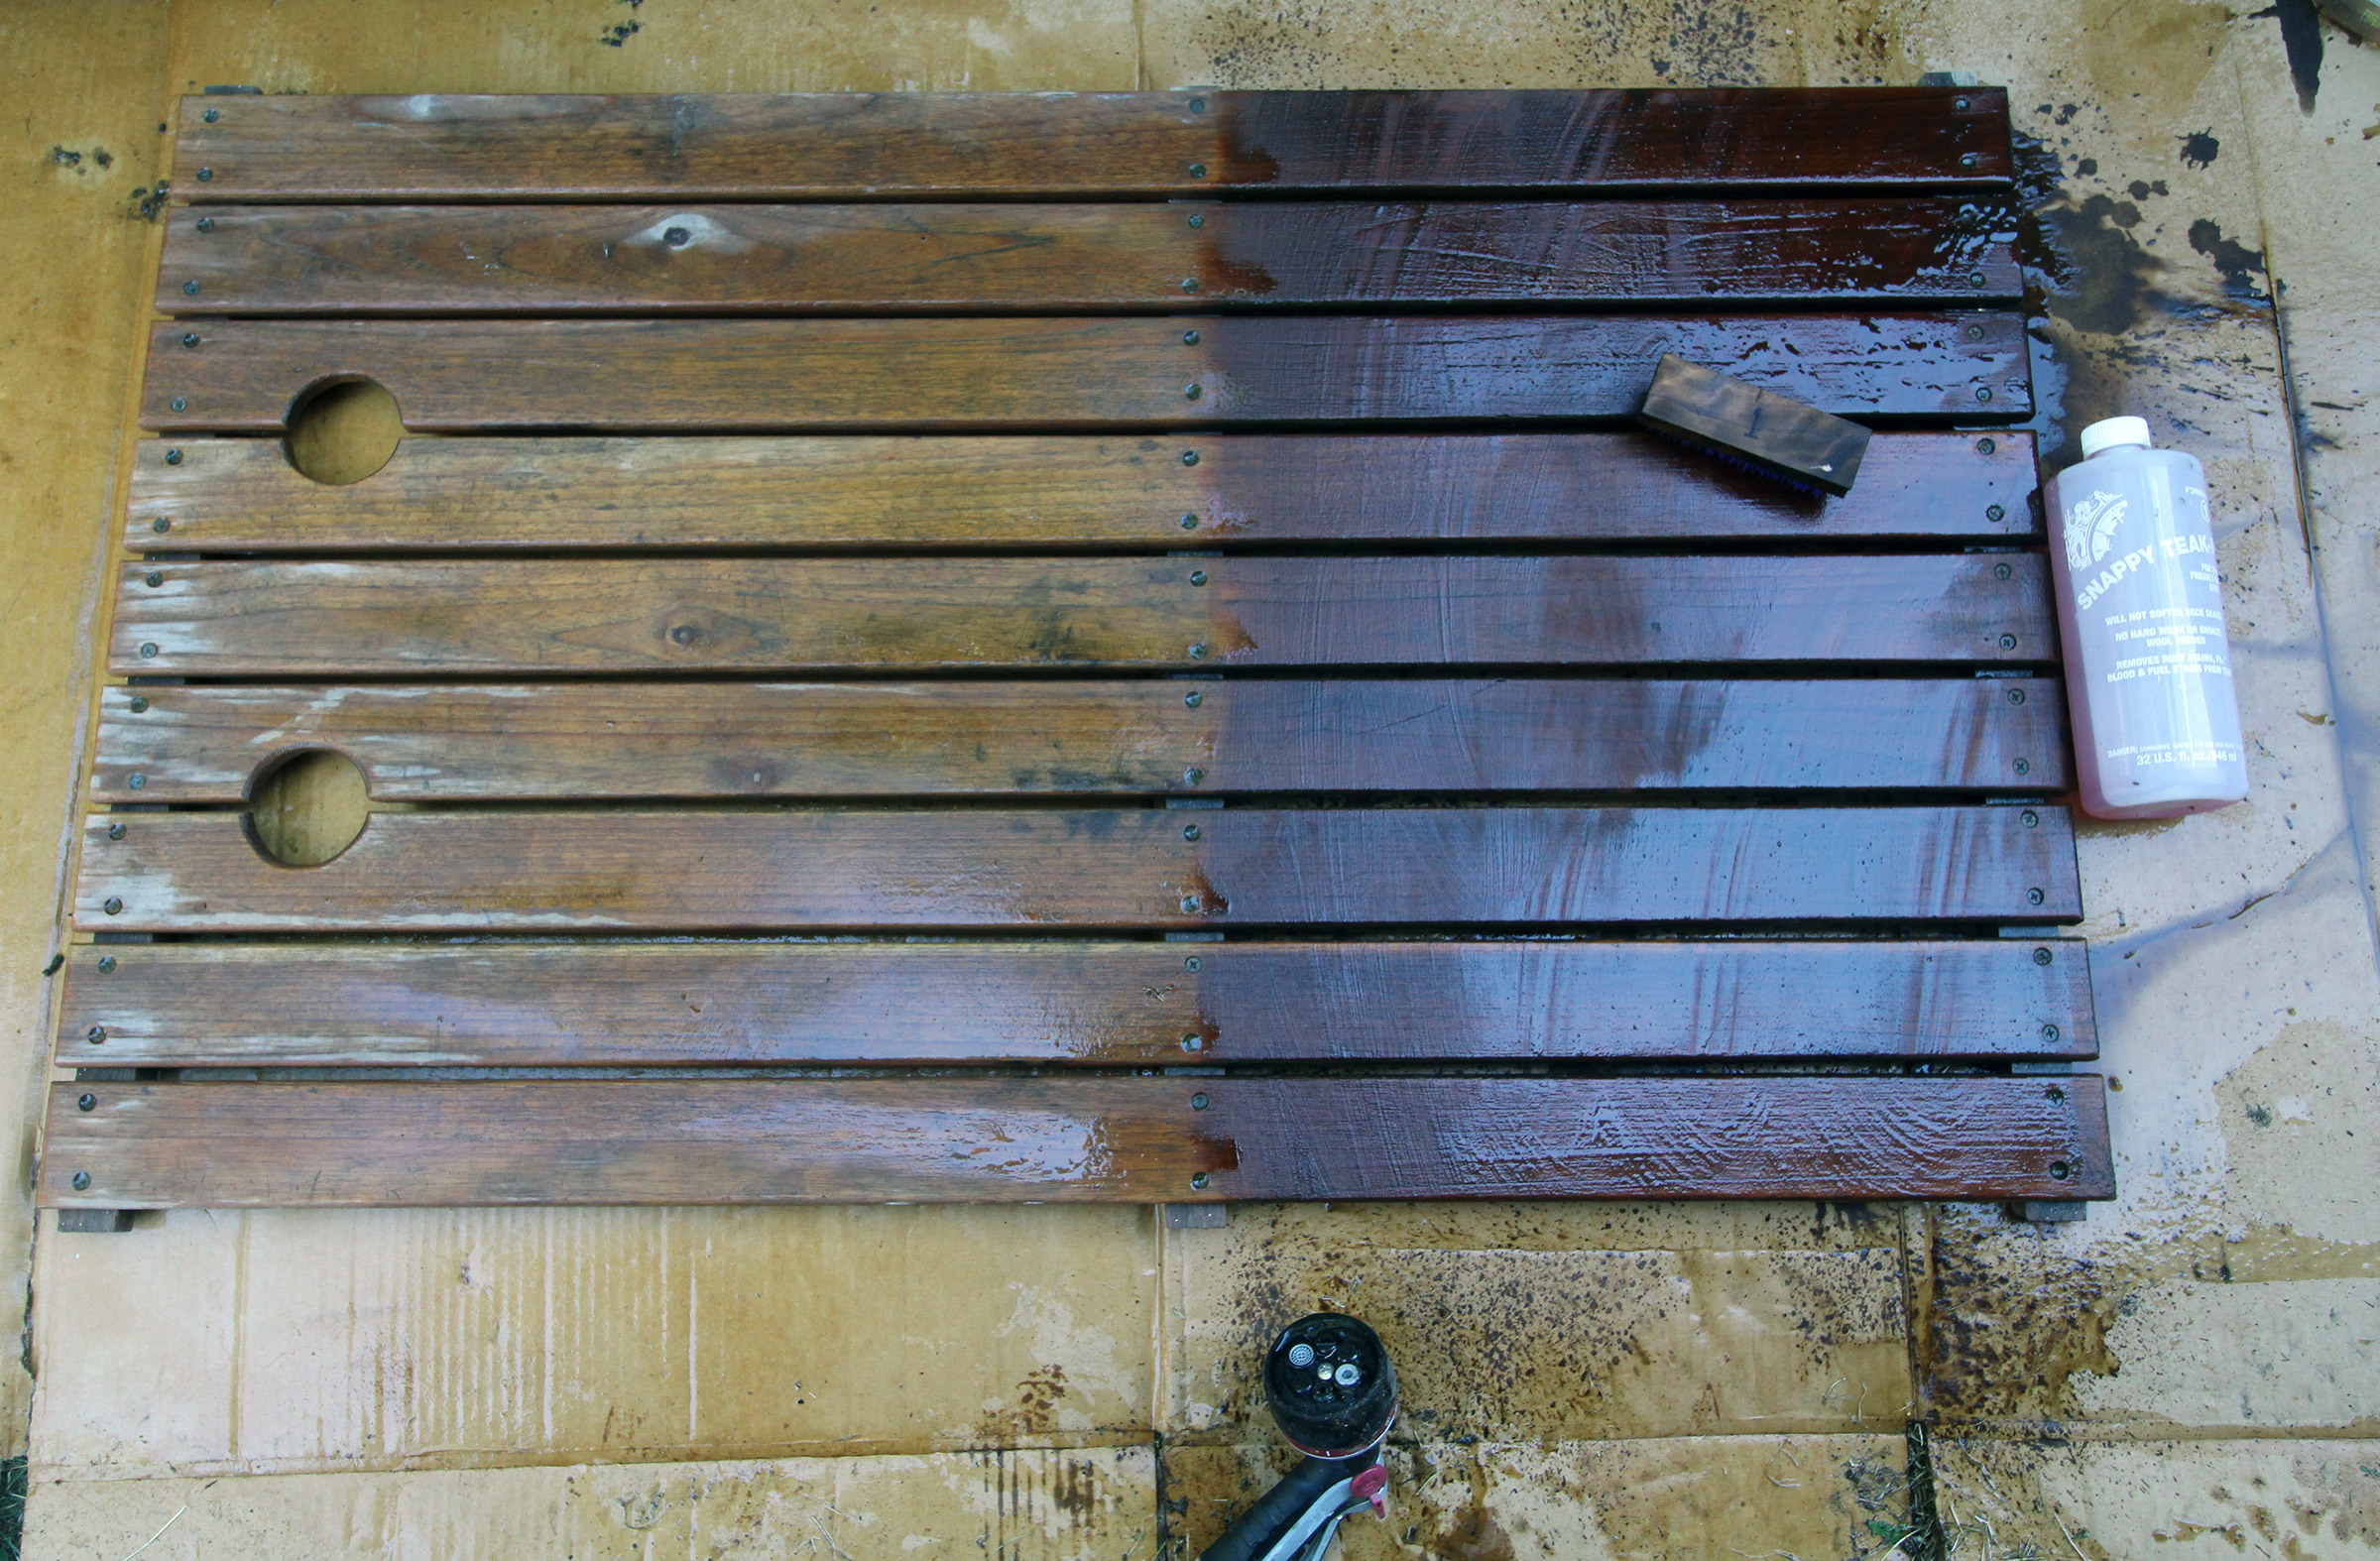
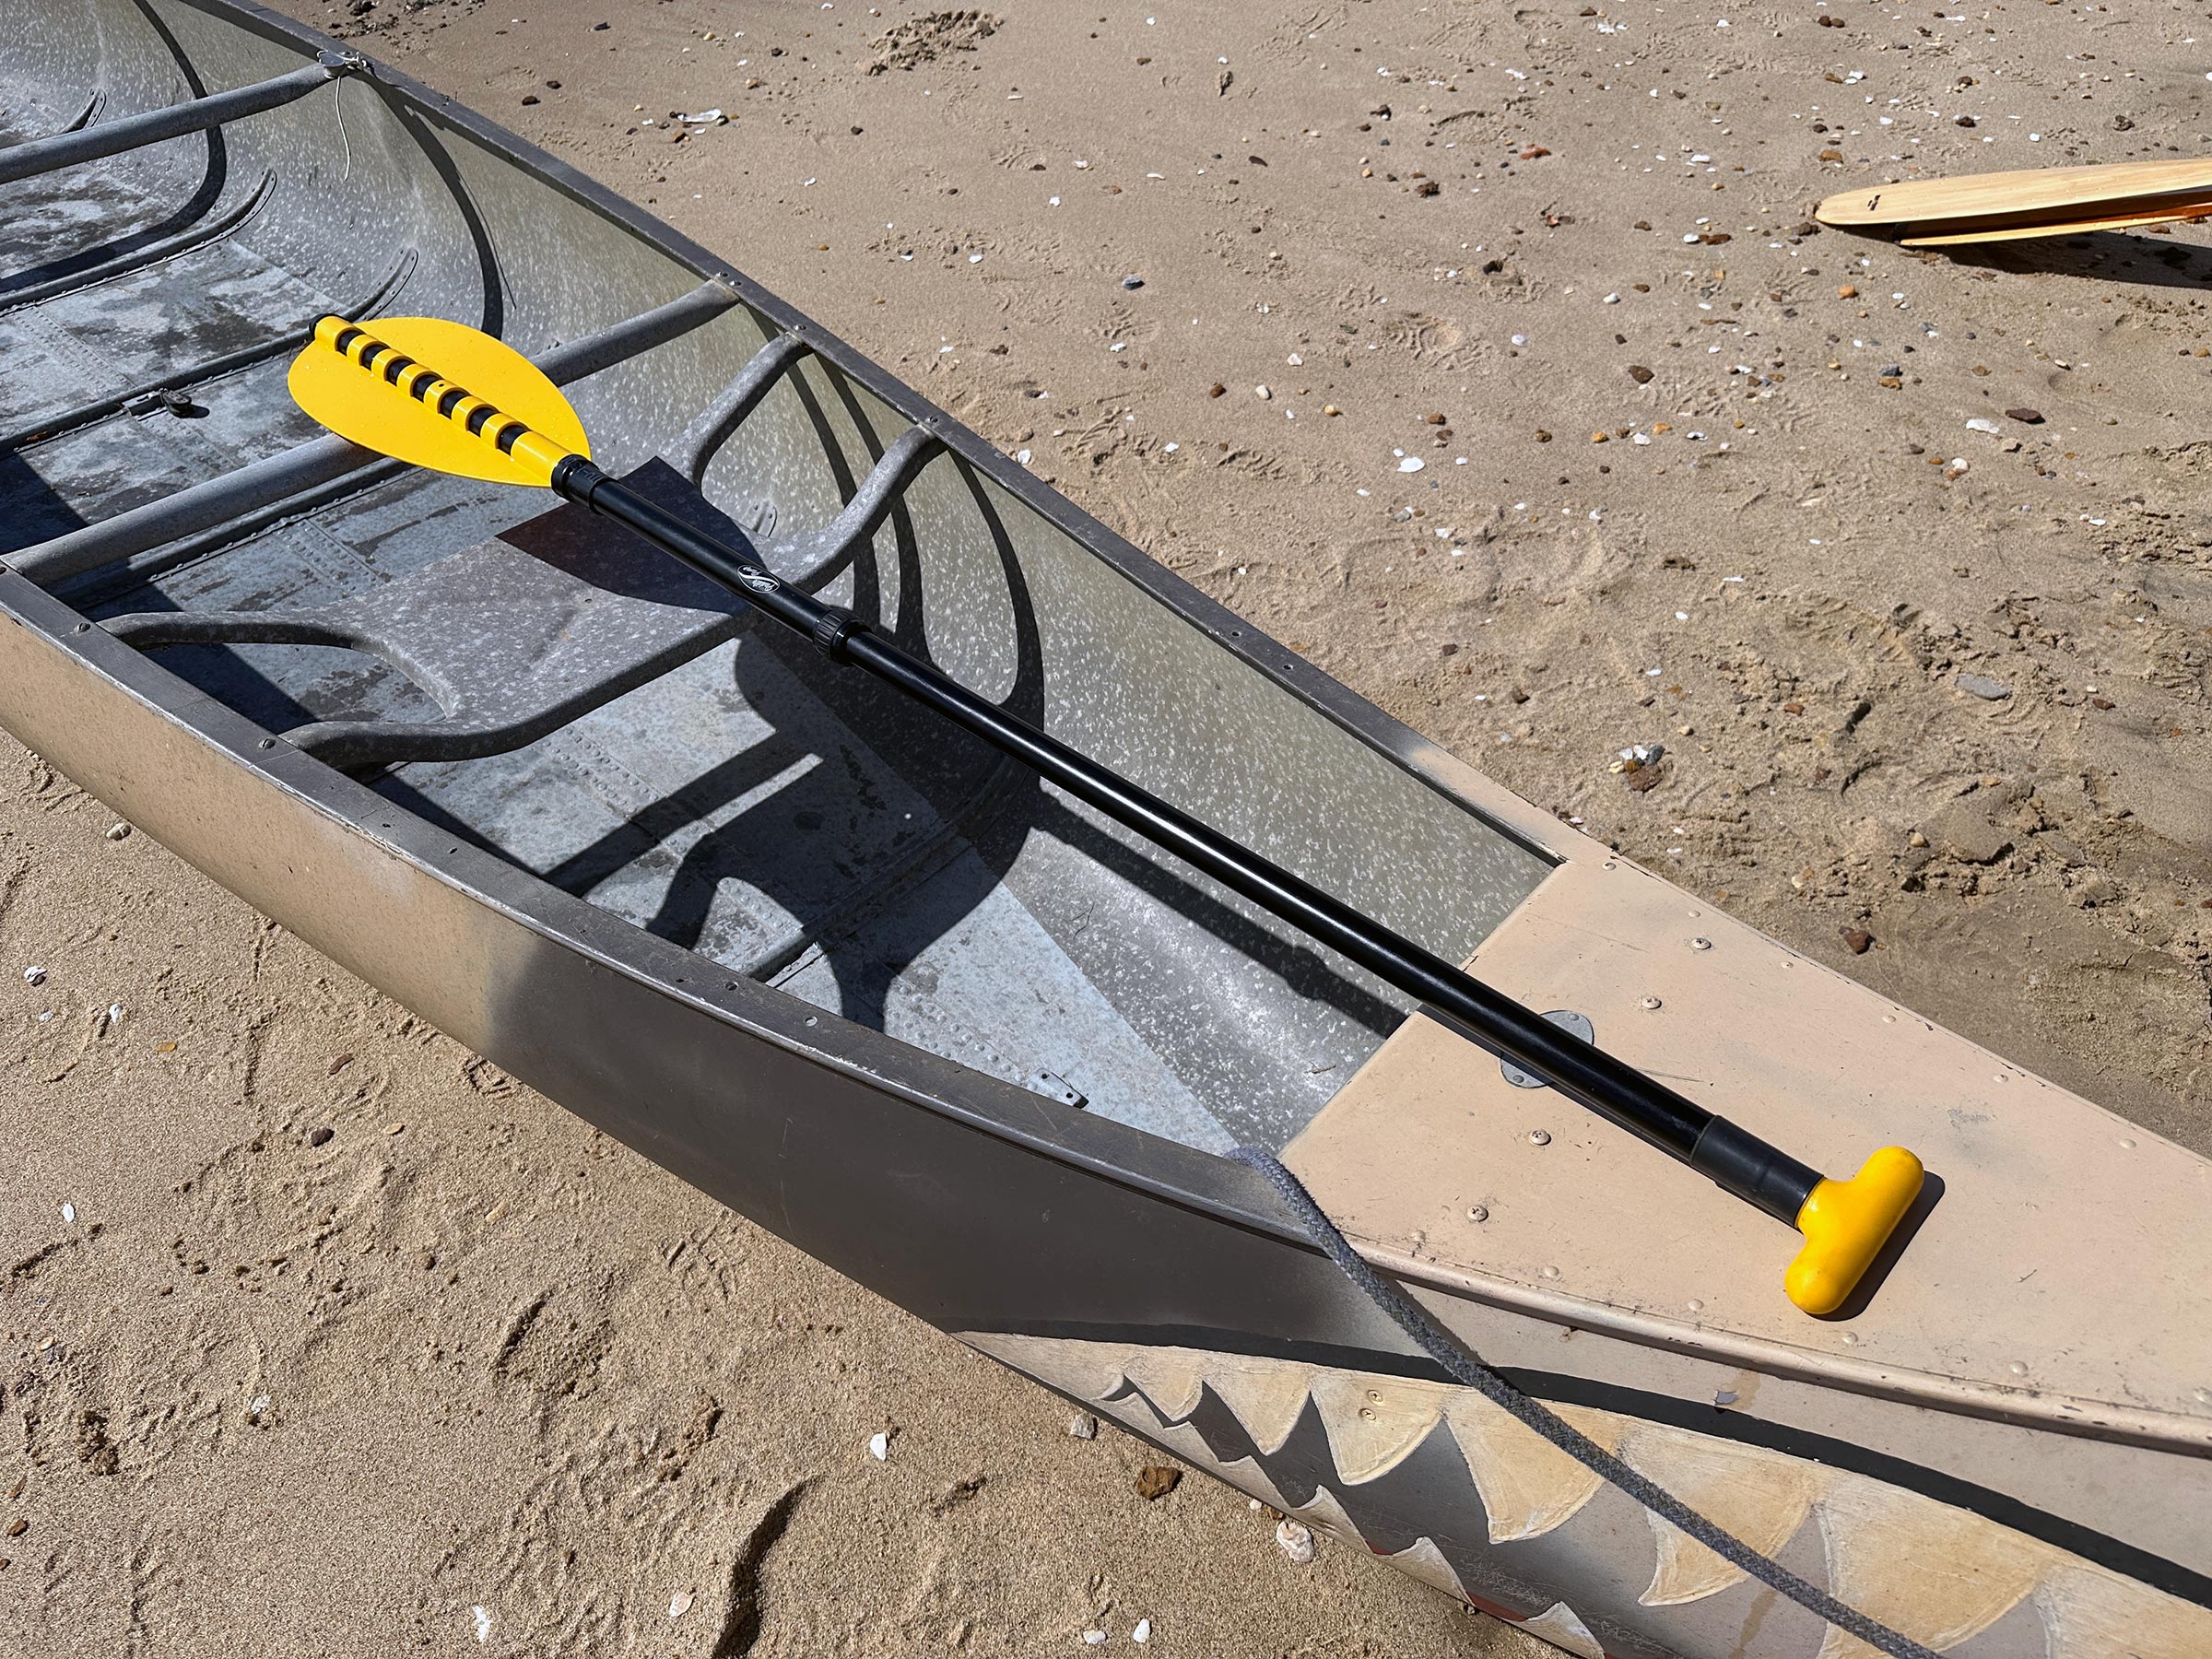
After 19 years, my Caledonia Yawl’s teak floorboards had lost the glow of their original color. I had wiped them down once with boiled linseed oil, but that only picked up the black of shoe soles and smeared it on the wood.
I had seen how well Snappy Boat Care’s treatment had brought the brilliant color back to a weathered teak outdoor table and bought the two-part kit of Teak-Nu to remove the gray and a bottle of Snappy Teak-Nu Sealer to restore the color.
The Formula #1 component of Teak-Nu, applied with the supplied scrub brush, removes the weathered surface of the teak. The floorboards are kept wet throughout the process of using both Formula #1 and Formula #2.
Formula #1 is a solution of sodium hydroxide, an alkali commonly known as lye or caustic soda and a common ingredient in cleaning products. The instructions on the bottle include warnings about contact with the solution so I wore gloves and safety goggles and did the application outdoors. Given the age of my floorboards, I used Formula #1 full strength. Teak in better shape than mine could use a 1:1 dilution. After wetting the floorboards with fresh water, scrubbing the solution on the wood with the included stiff-bristled brush turned the teak black and the solution thickened with the removal of the deteriorated wood on the surface.
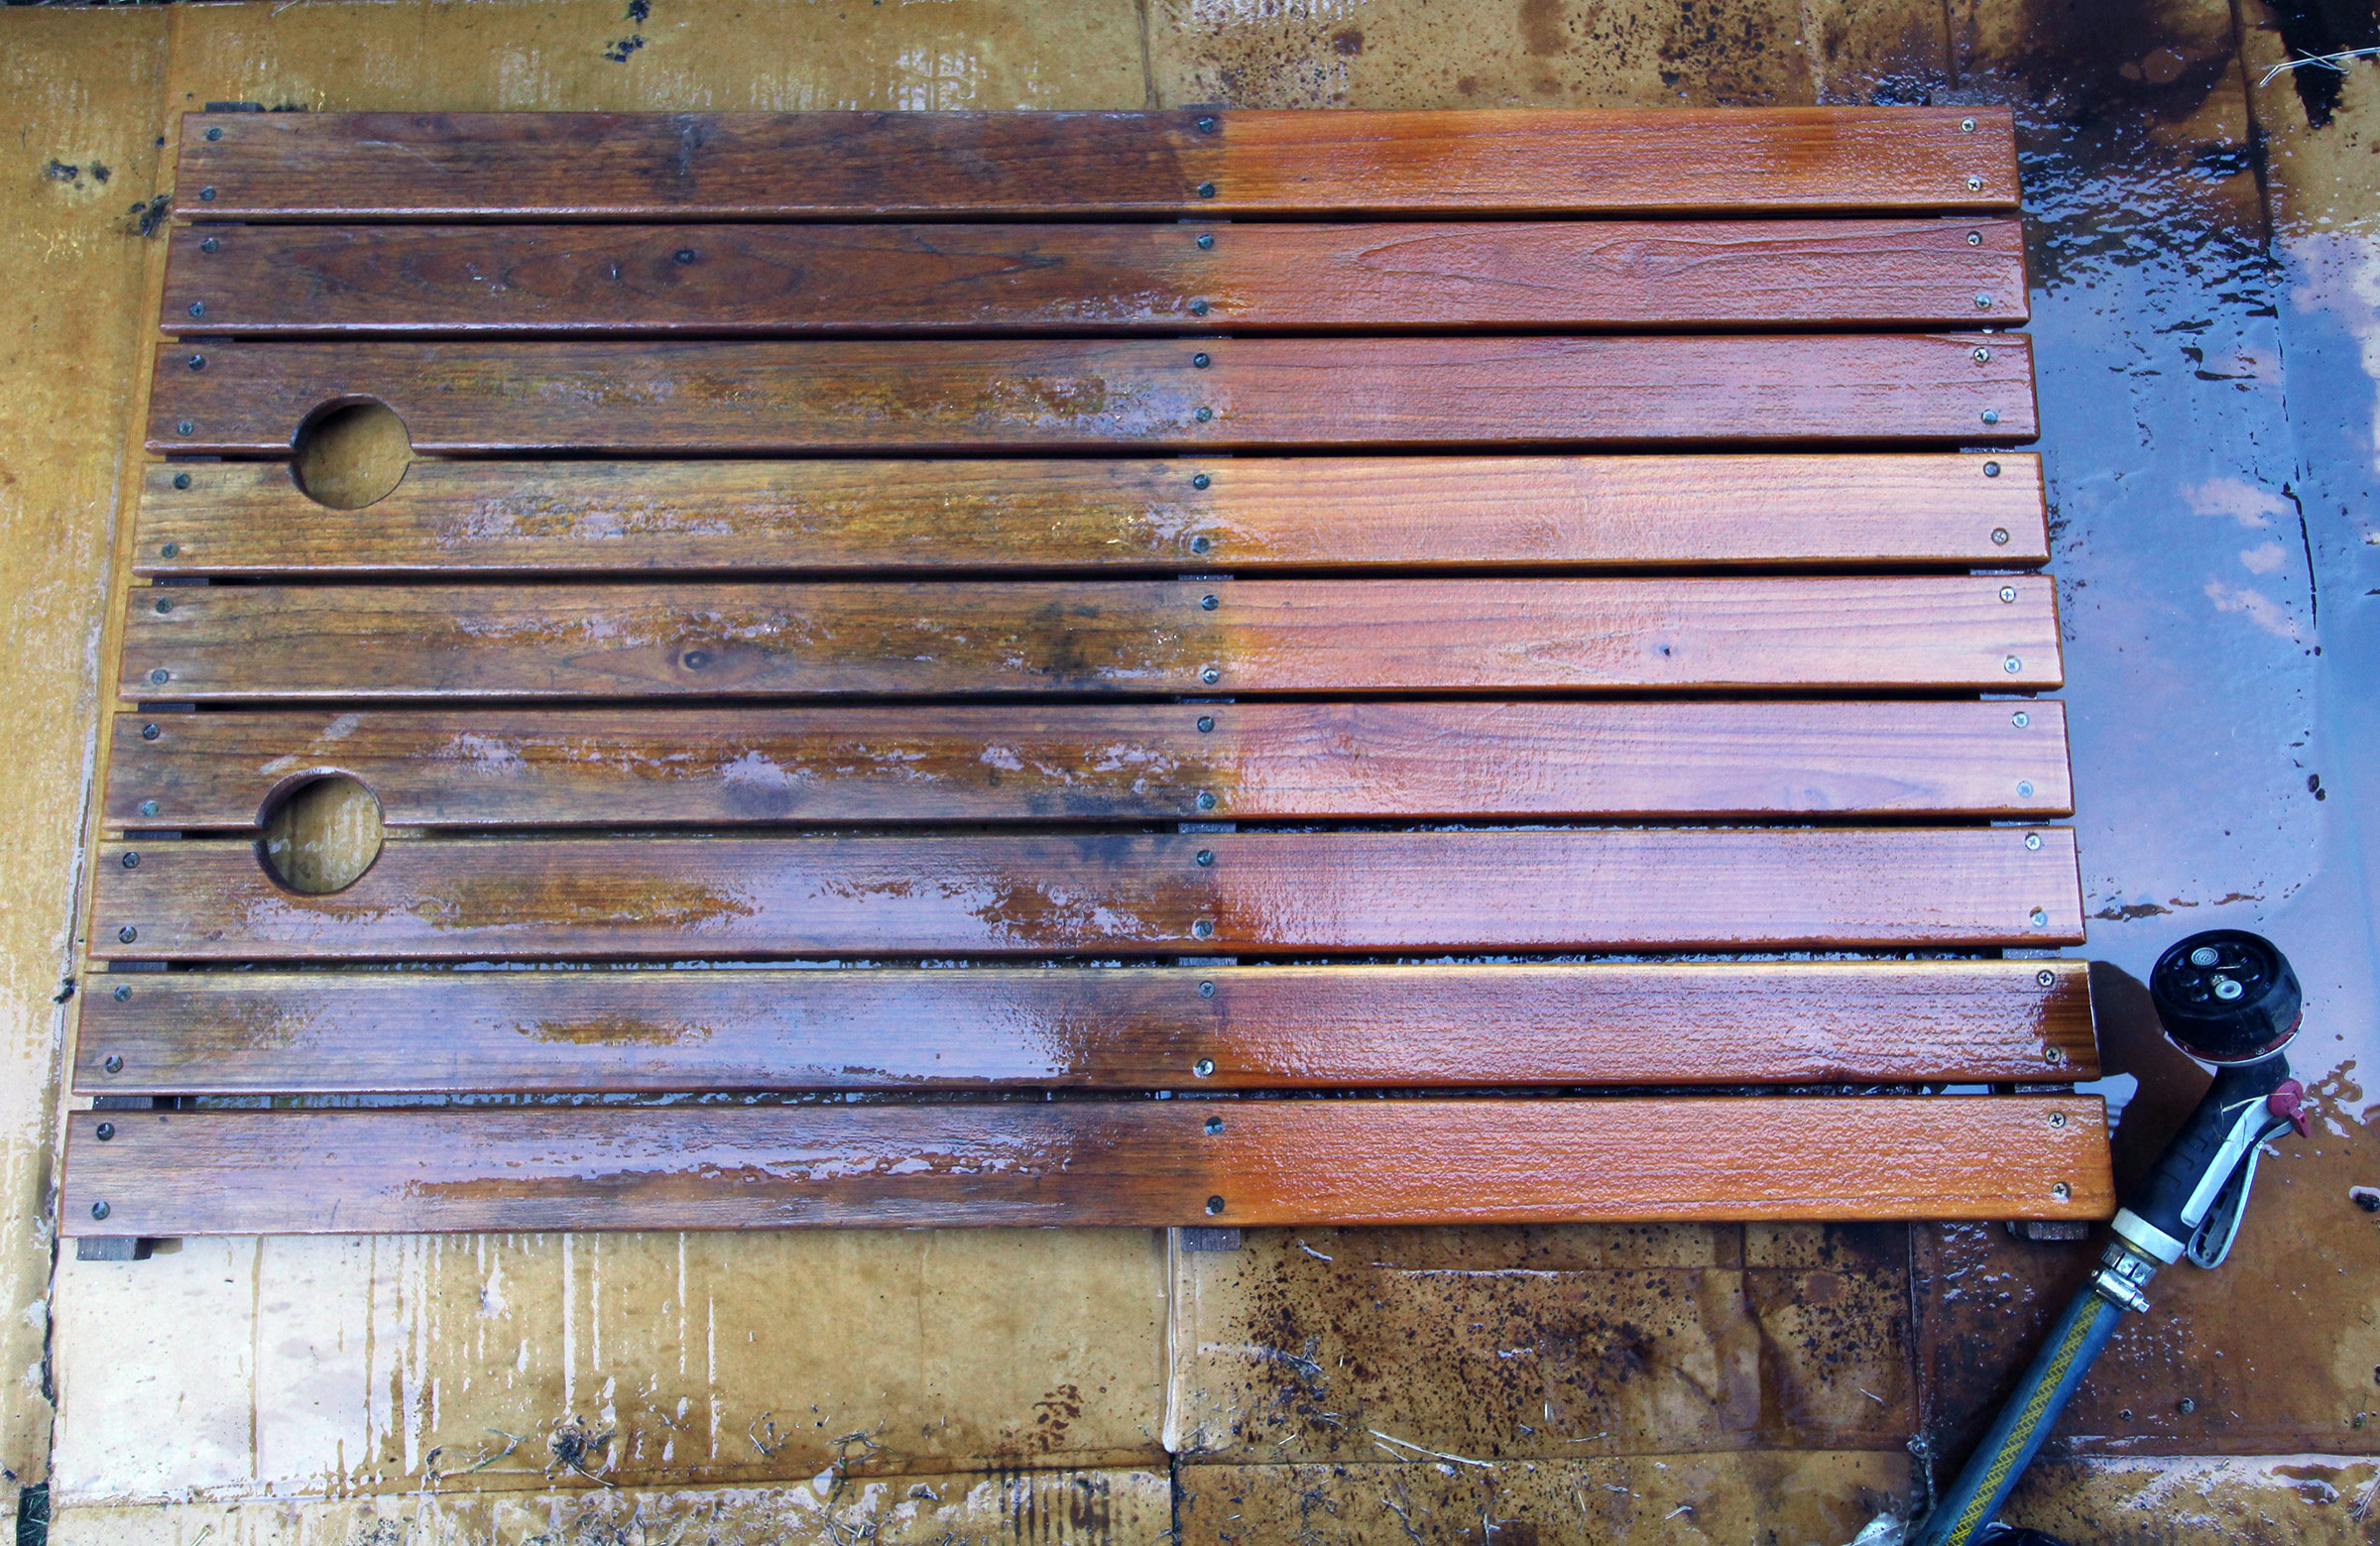
Formula #2 neutralizes what’s left of Formula #1 after it’s rinsed off. Any black that remains needs only a bit more formula and brushing.
After a fresh-water rinse, I followed the same procedure scrubbing Formula #2 on. Its solution of hydrochloric acid neutralizes the alkaline #1 and removes the black from the teak. (The reaction of the acid with the sodium hydroxide forms sodium hydroxide—ordinary salt—and water.) After a fresh-water rinse, the floorboards had most of their color back, but several areas remained black. A bit more scrubbing with #2 cleaned them up.
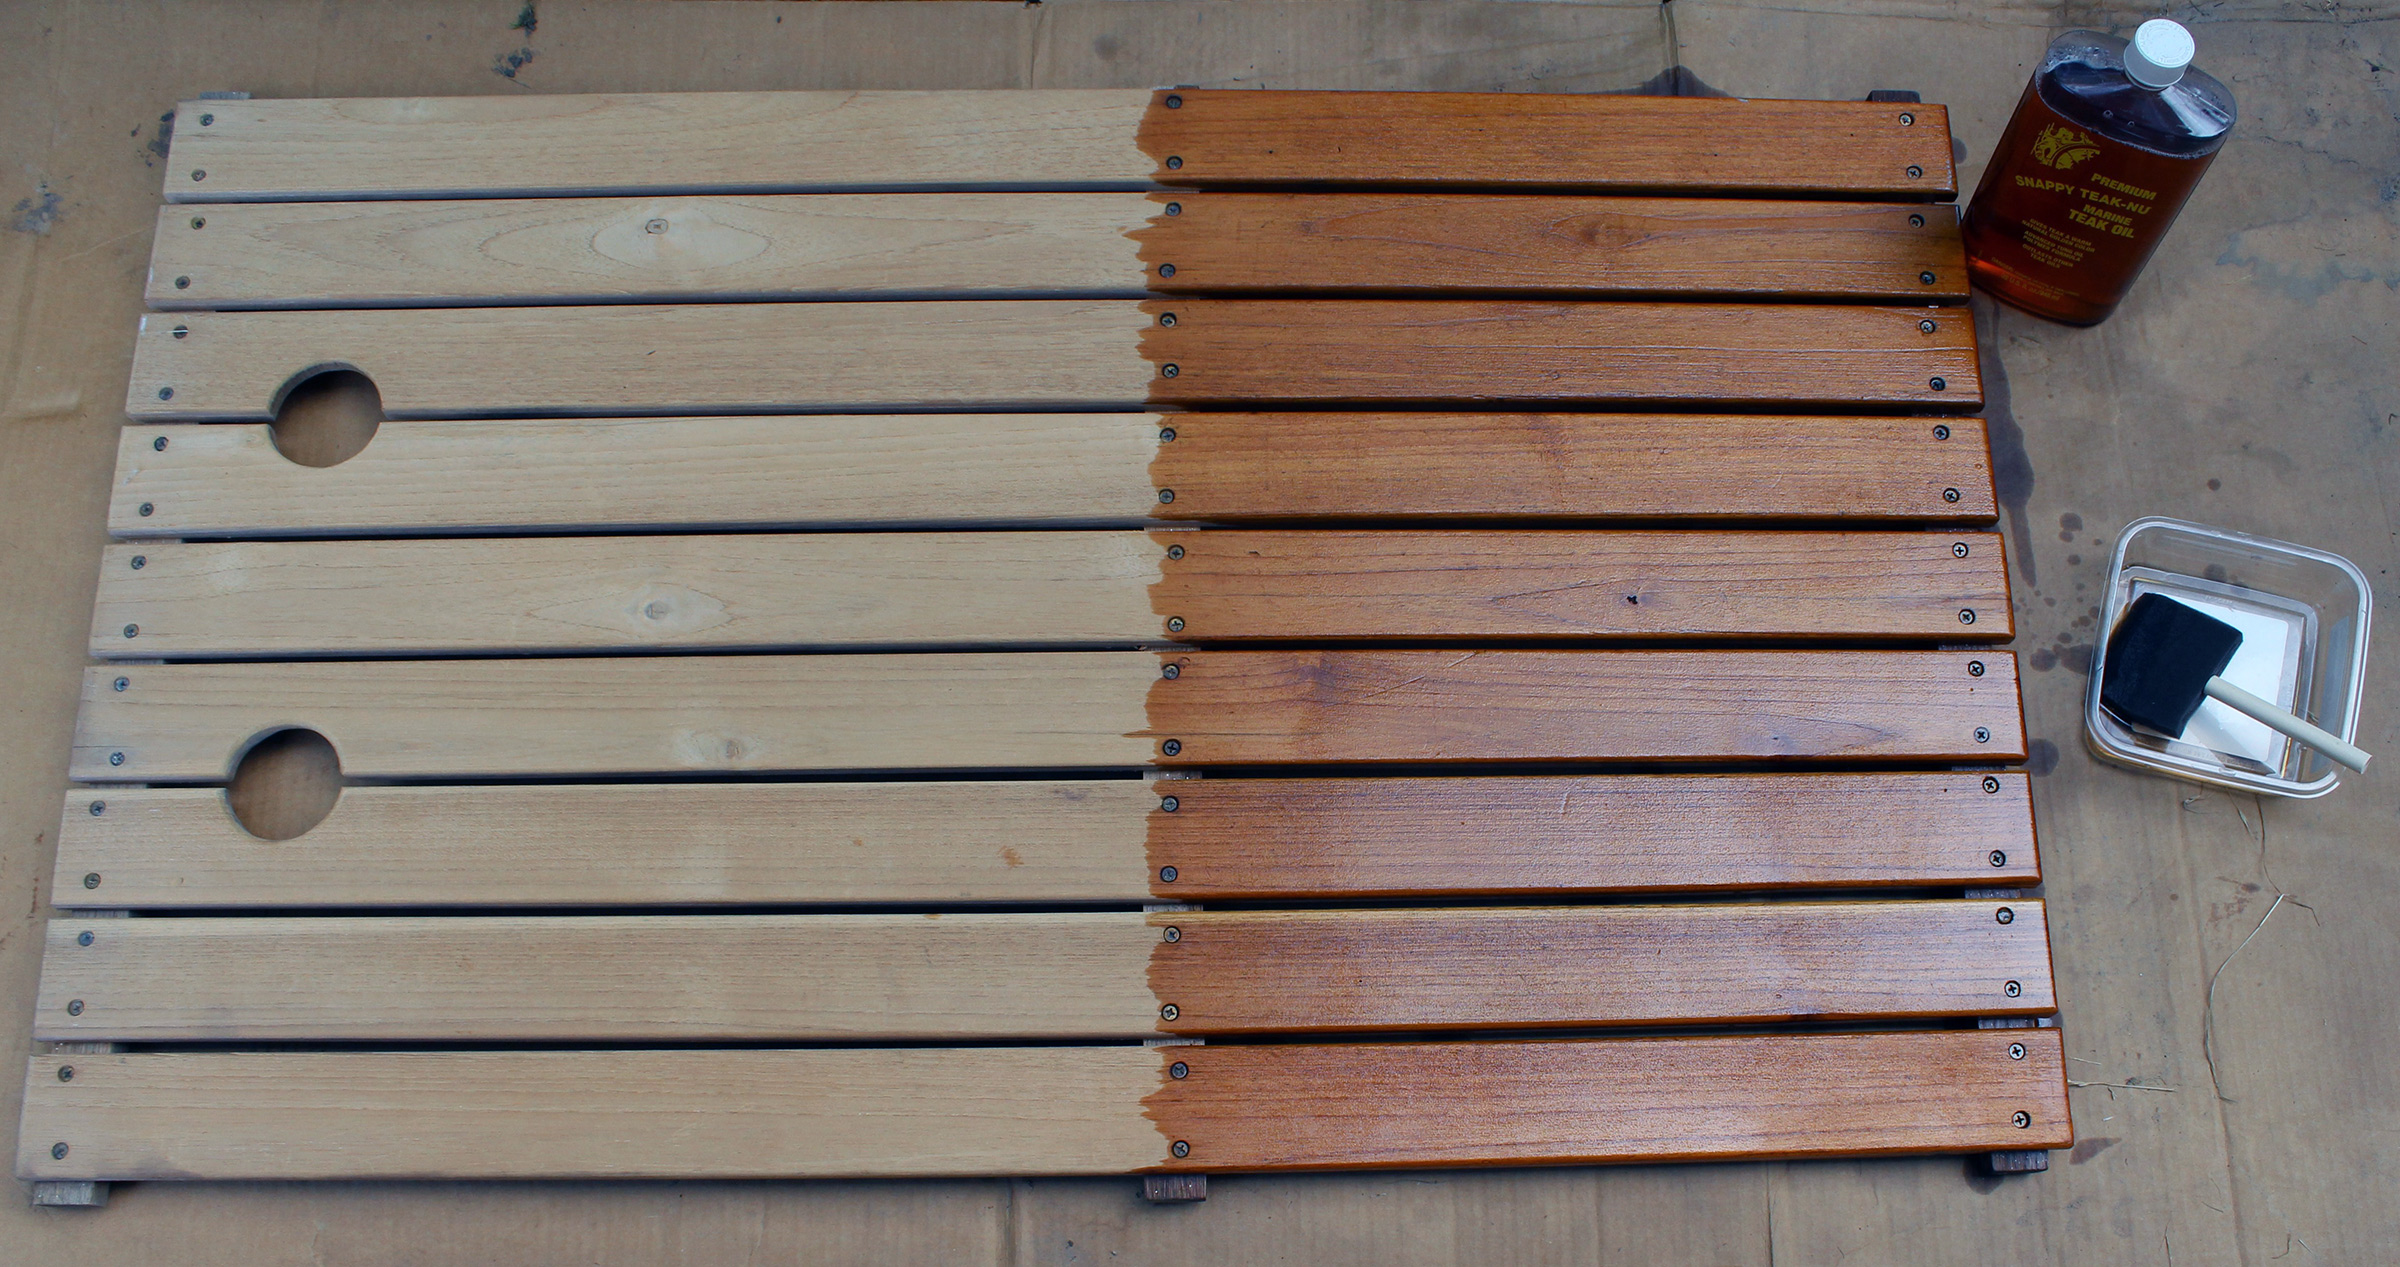
After the teak has dried it has “that freshly sanded look” (at left) and the application of Teak-Nu Marine Teak Oil restores the color (right).
While the color was fully restored after the final rinse, once the floorboards had dried overnight, the teak turned a very pale tan color, what Snappy calls “that freshly sanded look.” To bring the warm color back to stay, the teak needs to be oiled and for that, Snappy has Teak-Nu Marine Teak Oil, a tung-oil polymer formula. A foam brush turned out to the best means of applying the oil as it laid down a uniform coat on the floorboards’ top surfaces and squeezed easily into the gaps between the slats to coat the edges. After sitting for 5 minutes, the oil needs to be wiped down with a rag. After the floorboards dried overnight, they had a few pale spots, but a second lighter application of oil brought the color up to stay.
Restoring the color of the teak didn’t take much time, little more than an hour spread over two days, and was well worth the effort.
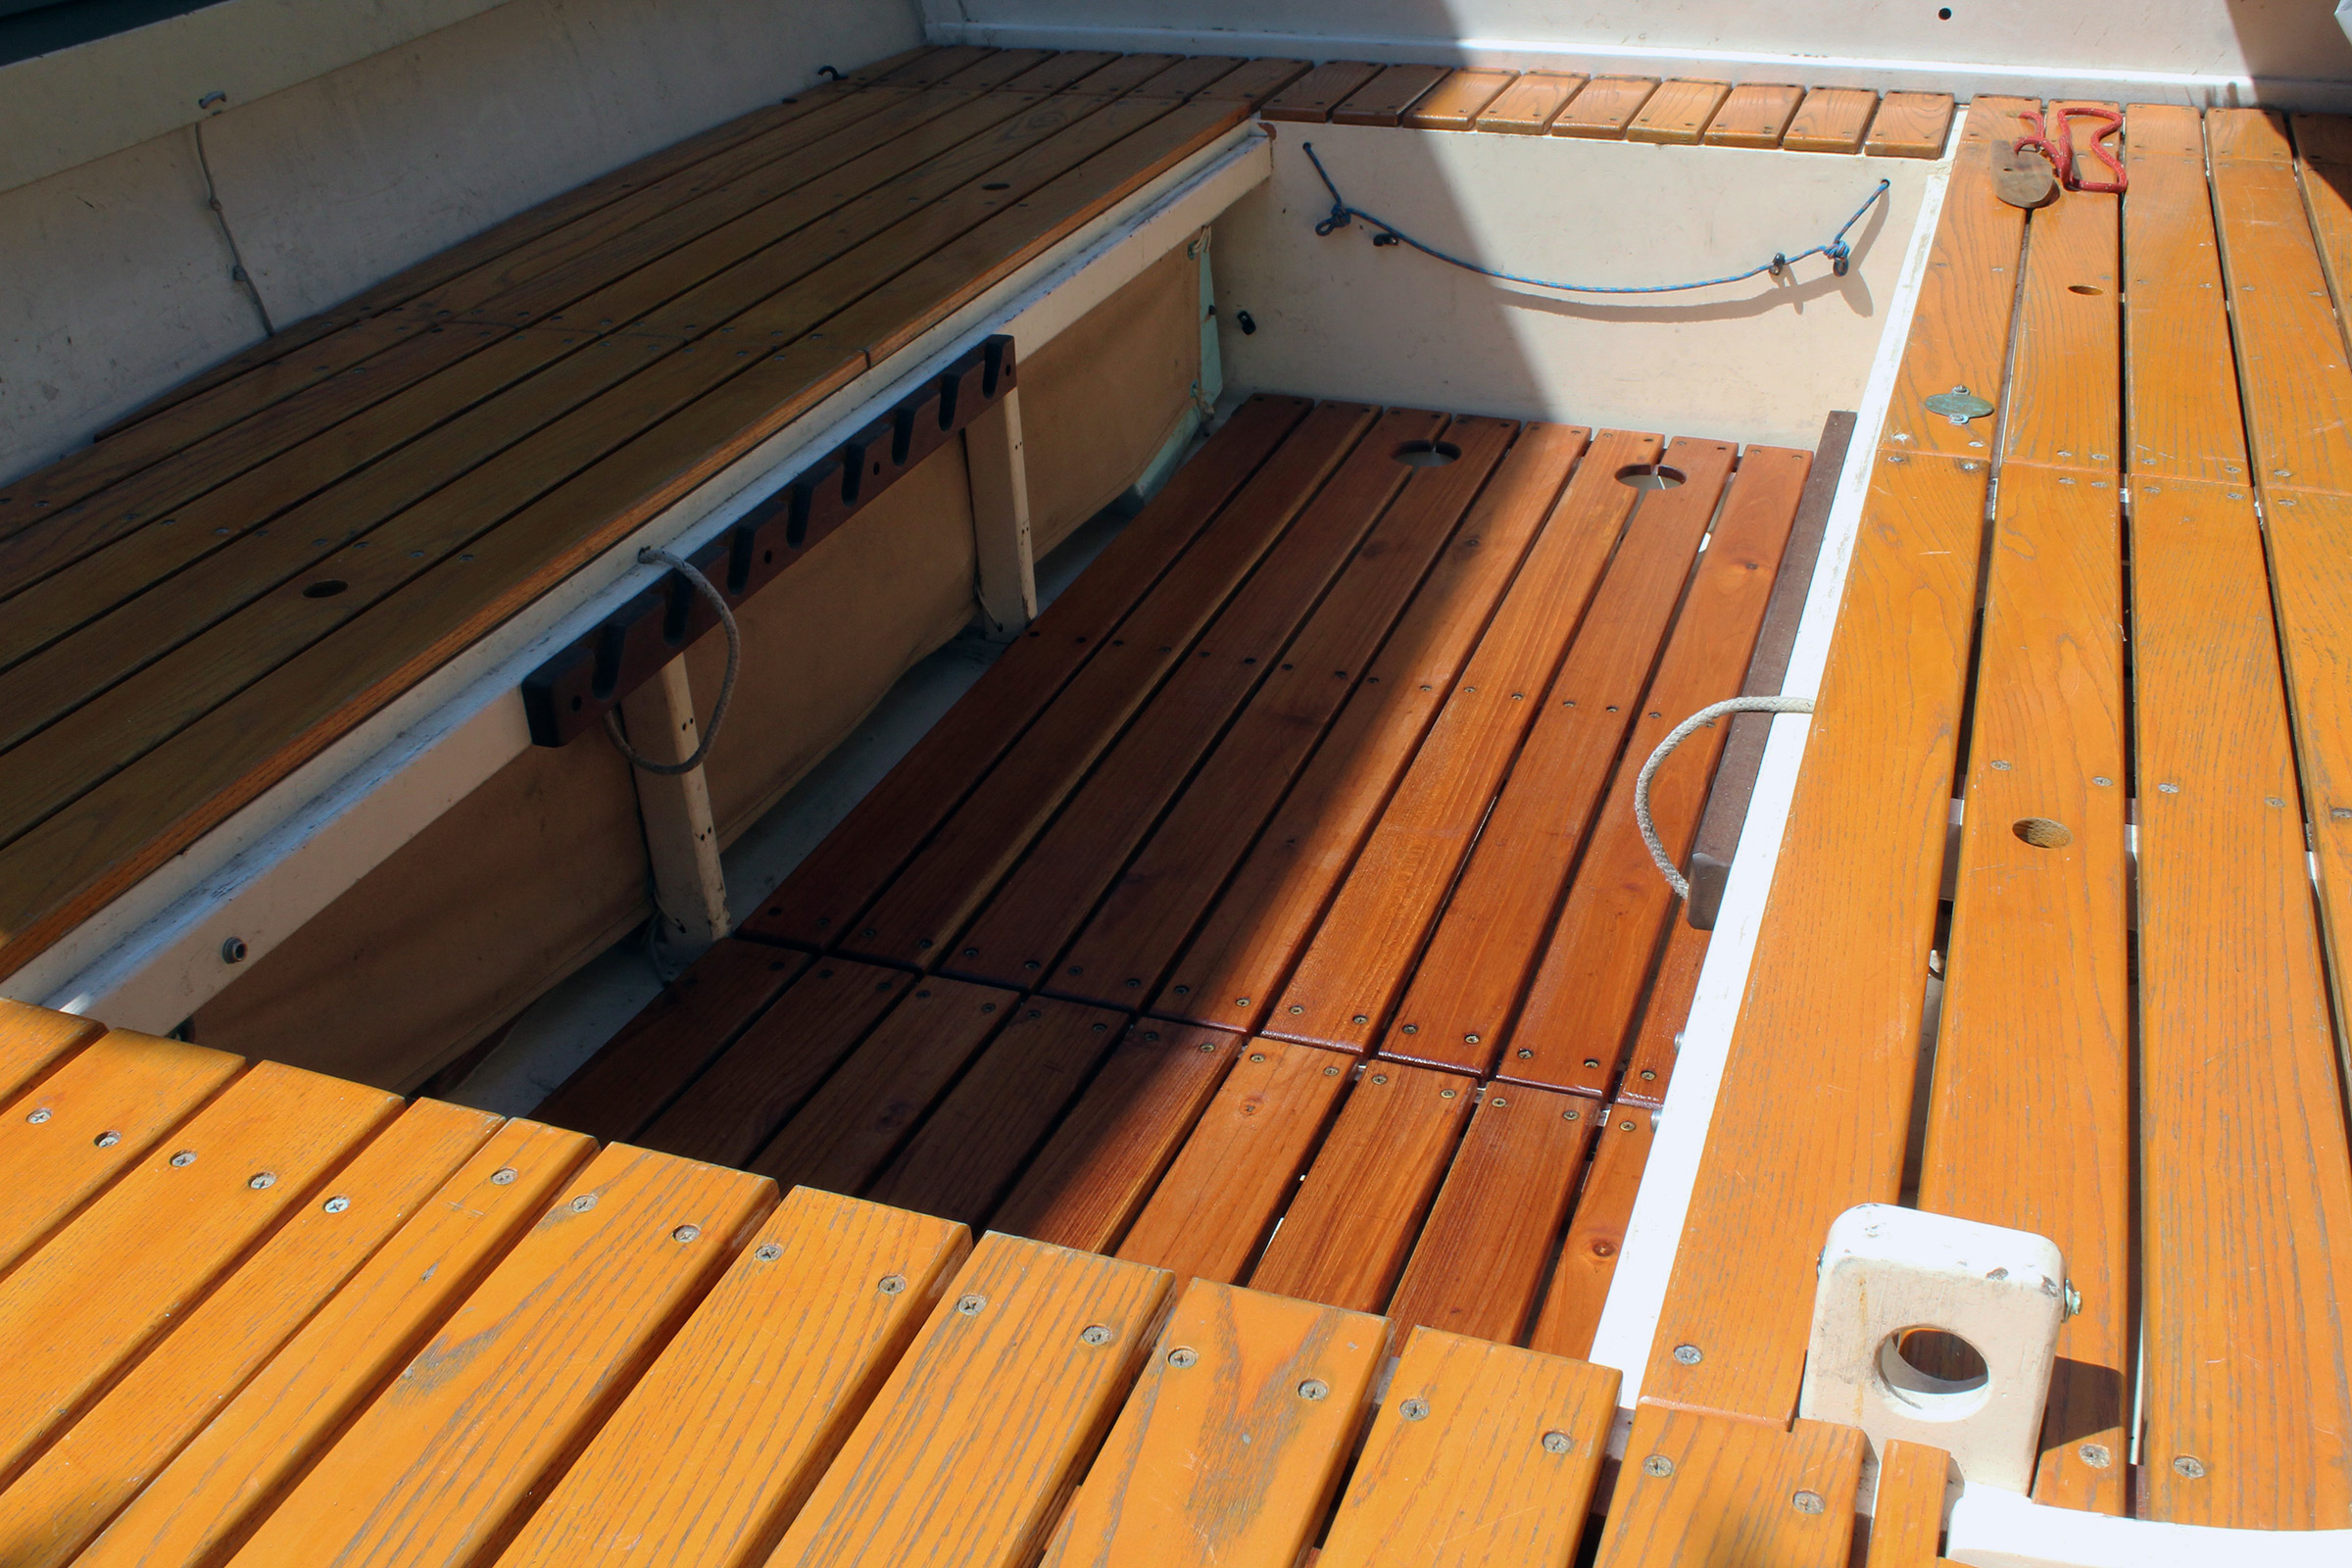
Set back in place in the cockpit, the restored floorboards have the color that had disappeared so long ago that I’d forgotten how much it contributed to the appearance of the boat. And the larger of the two floorboards, raised from the bottom of the boat to serve as my dinner table, now gleams with the colors of amber and polished bronze and I don’t have to hide it with a tablecloth.
The Teak-Nu products were easy to use and lived up to my expectations. I have three more floorboard panels in the bow of the yawl. I have more than enough in the 32-oz bottles of Formulas #1 and #2 to restore them, and plenty of the Marine Teak Oil to bring them up to the same like-new appearance. As the instructions recommend, I’ll apply fresh coats to all the floorboards at the first signs of weathering to keep them a pleasure to look at.
Christopher Cunningham is the editor of Small Boats.
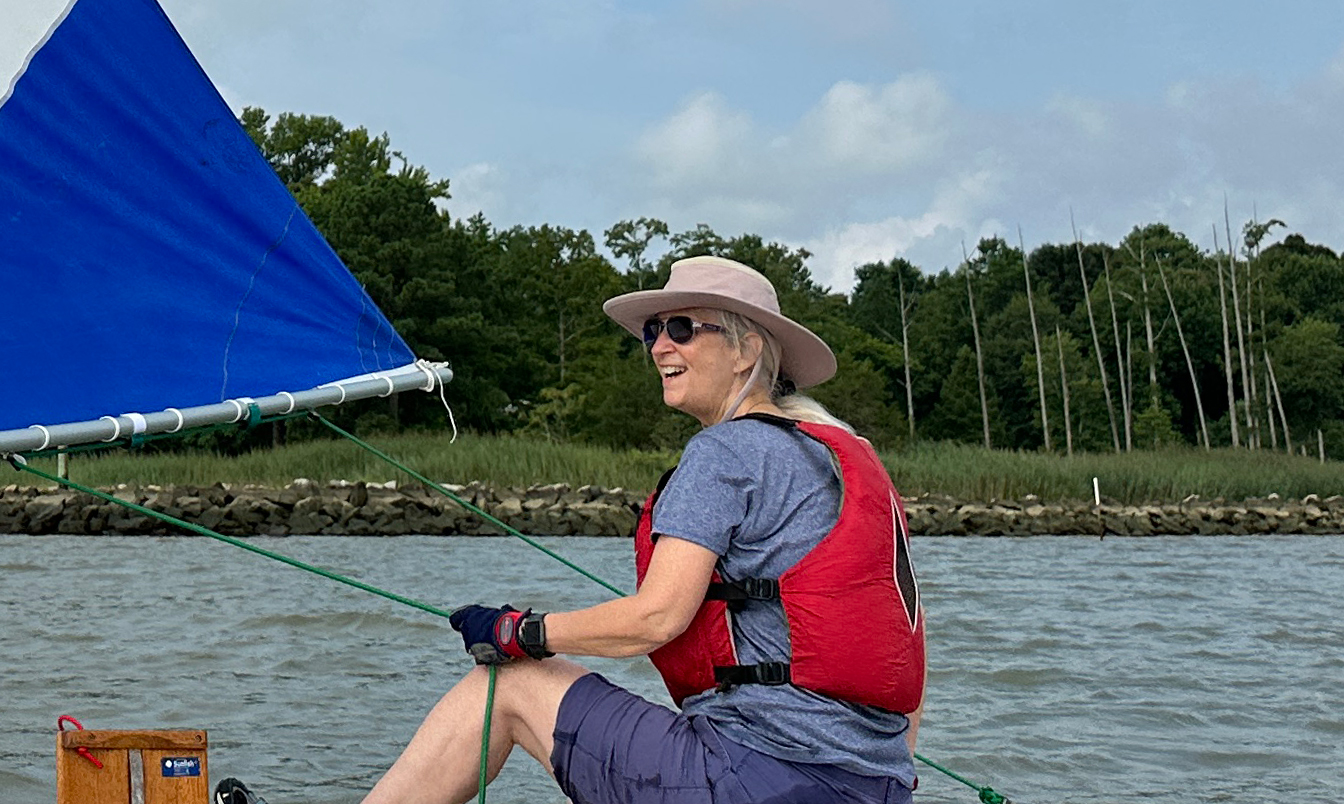
When we go boating, Audrey and I are rarely without hats to keep the sun off our heads and protect us from the occasional rain shower. As a lifelong sailor, Audrey has quite a collection of hats. She recently added the Tilley LTM6 Airflo Sun Hat to her collection and it has quickly become her favorite.
The Tilley company was founded by Alex Tilley in 1980. Tilley was a sailor who couldn’t find a hat to his liking, so he designed one to protect against sun and rain and to stay put during a blow. The cotton-duck Tilley became popular with both sailors and other adventurers.
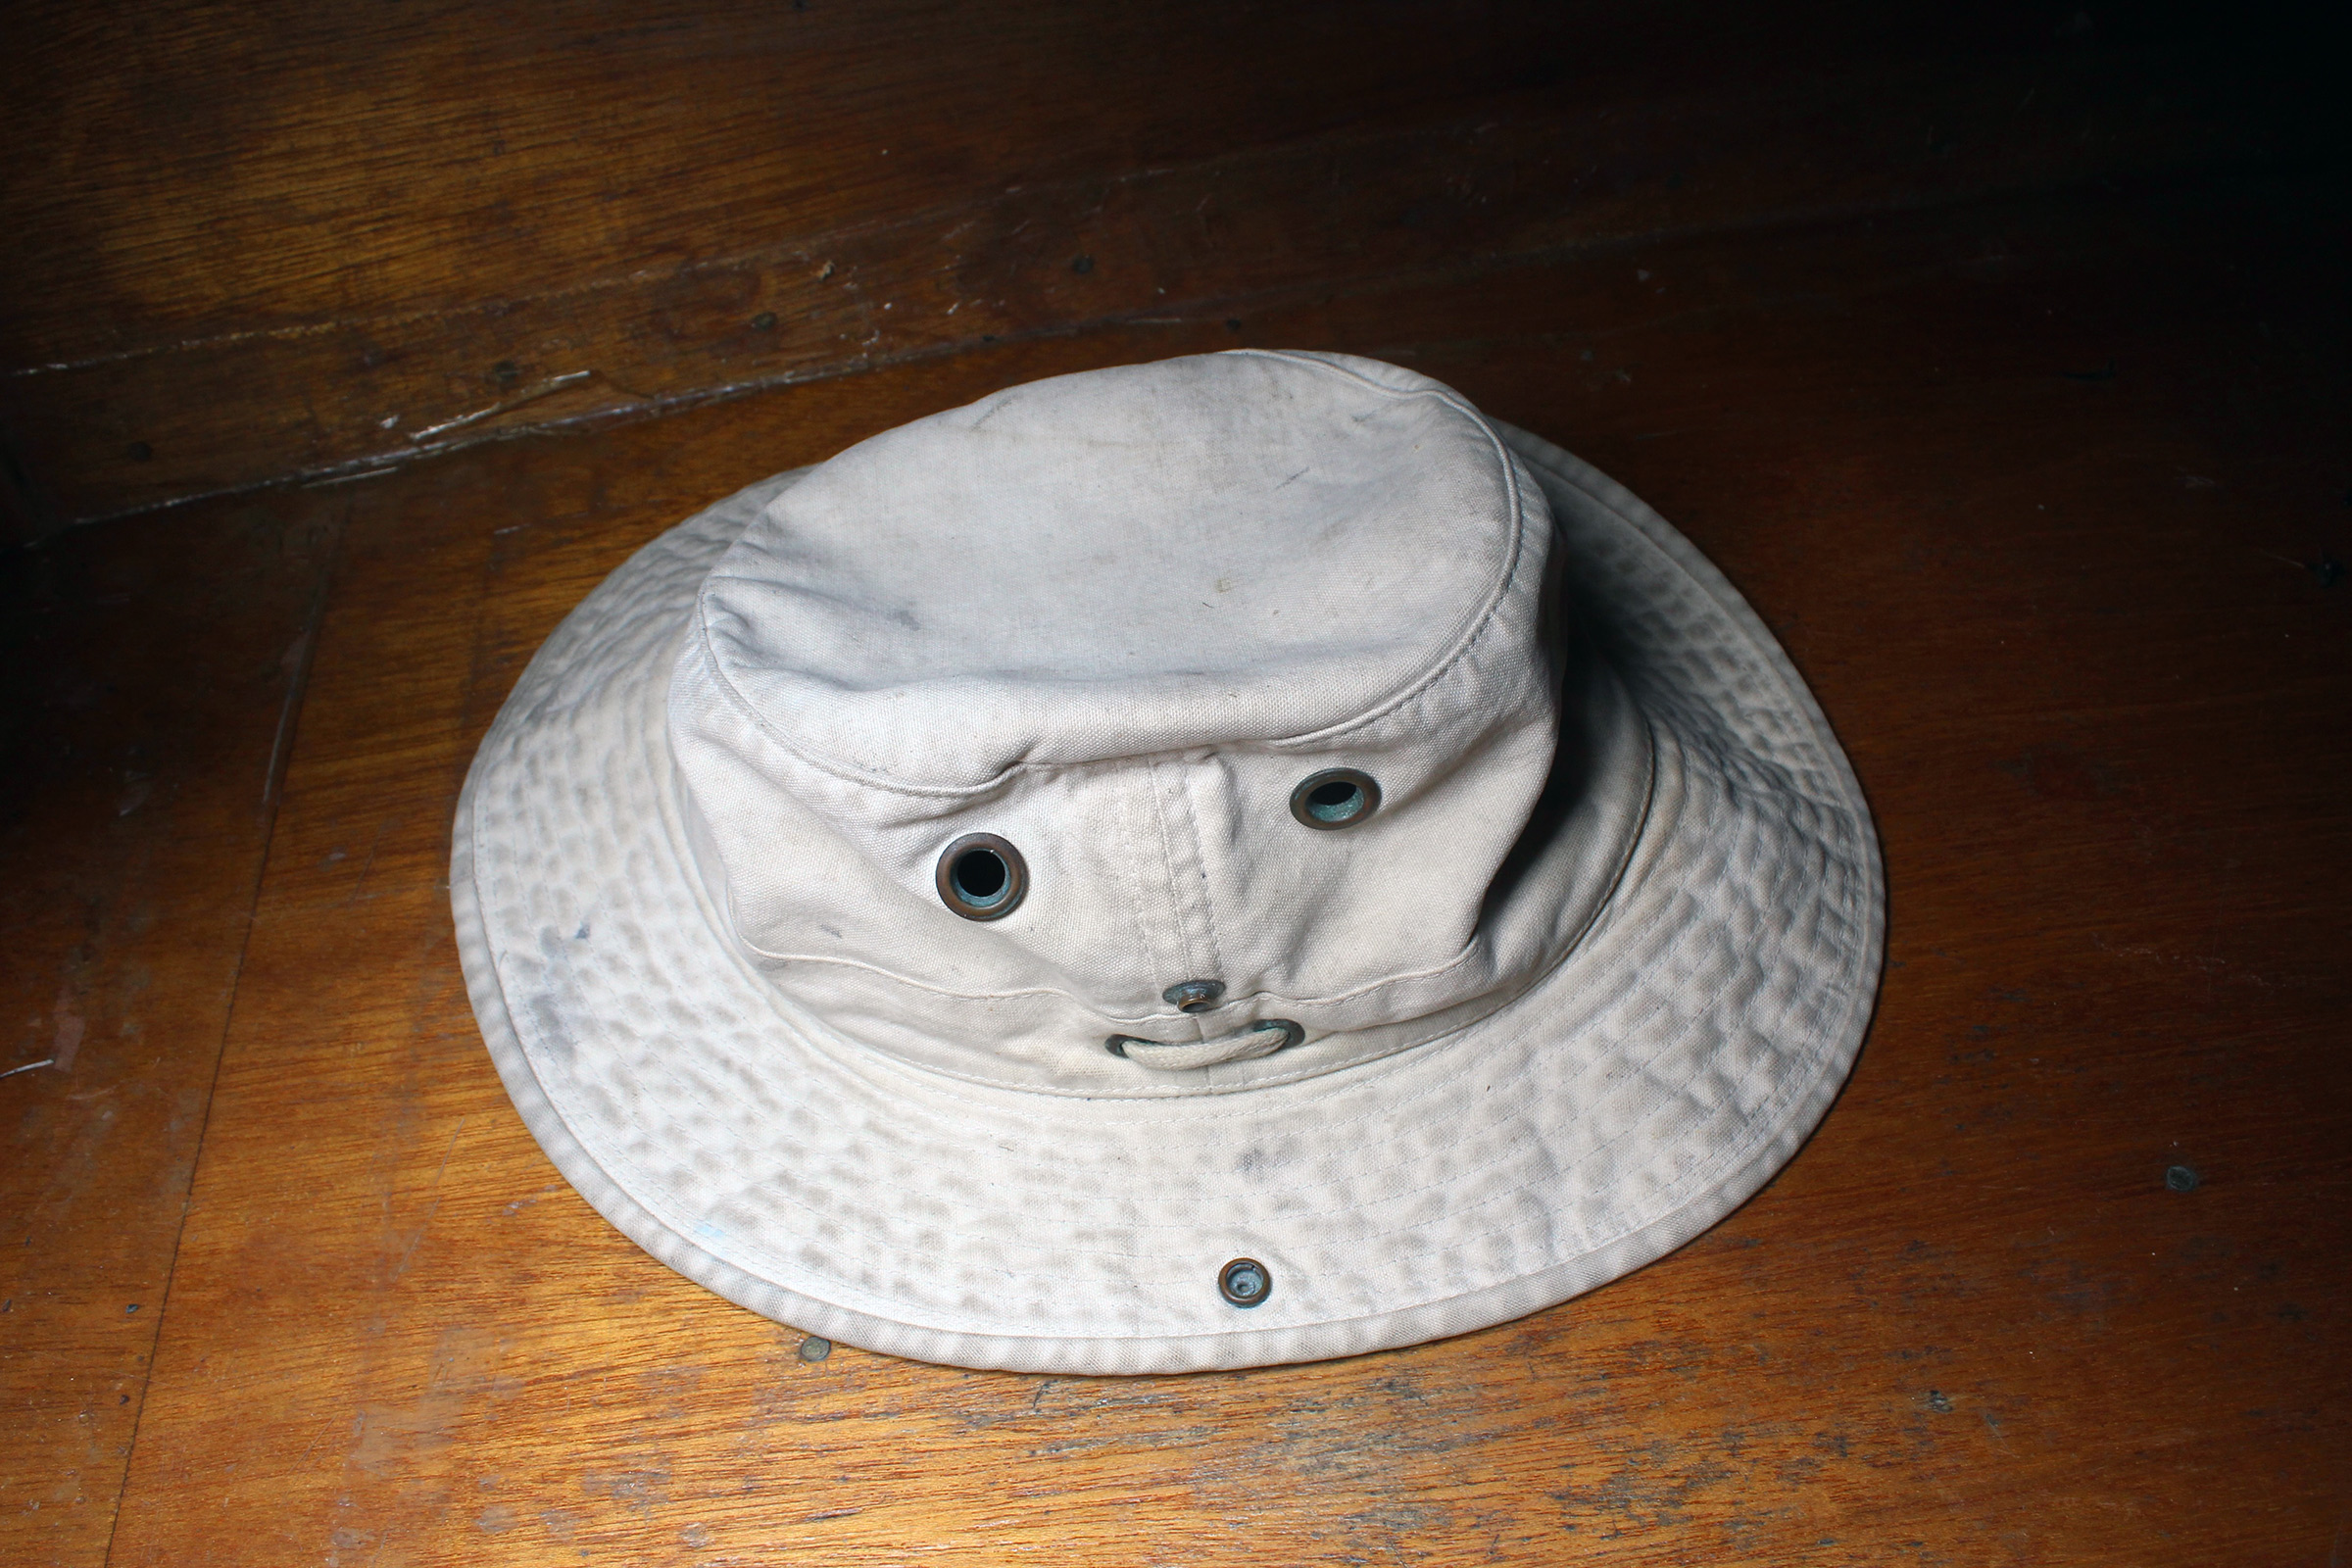
Christopher Cunningham
This original Tilley Endurable is 30 years old and still under warranty. The label sewn in the crown notes that the hat will be “replaced free if it wears out. (Yes, put it in your will.)”
The LTM6 Airflo is one of the latest evolutions of the original design. As with other Tilley headwear, the hat has UPF 50+ sun protection and a nicely sized brim to protect Skipper from the sun. The brim and crown of the LTM6 have been reduced slightly and given more shape than the original Tilley. The brim measures 2 1⁄2″ on the sides and 3 1⁄2″ on the front and back, and has a stiffener inside the circumference of the brim to help hold the desired shape. The side crown height measurement is 4″, creating a slightly lower profile that is well suited to sailing in a stiff breeze and ducking the boom. The crown also has an oval shape that is narrower in the front, which creates a more natural and comfortable fit. These design elements combine to make a hat that is a better fit for Skipper than her original Tilley.
Photographs by the author
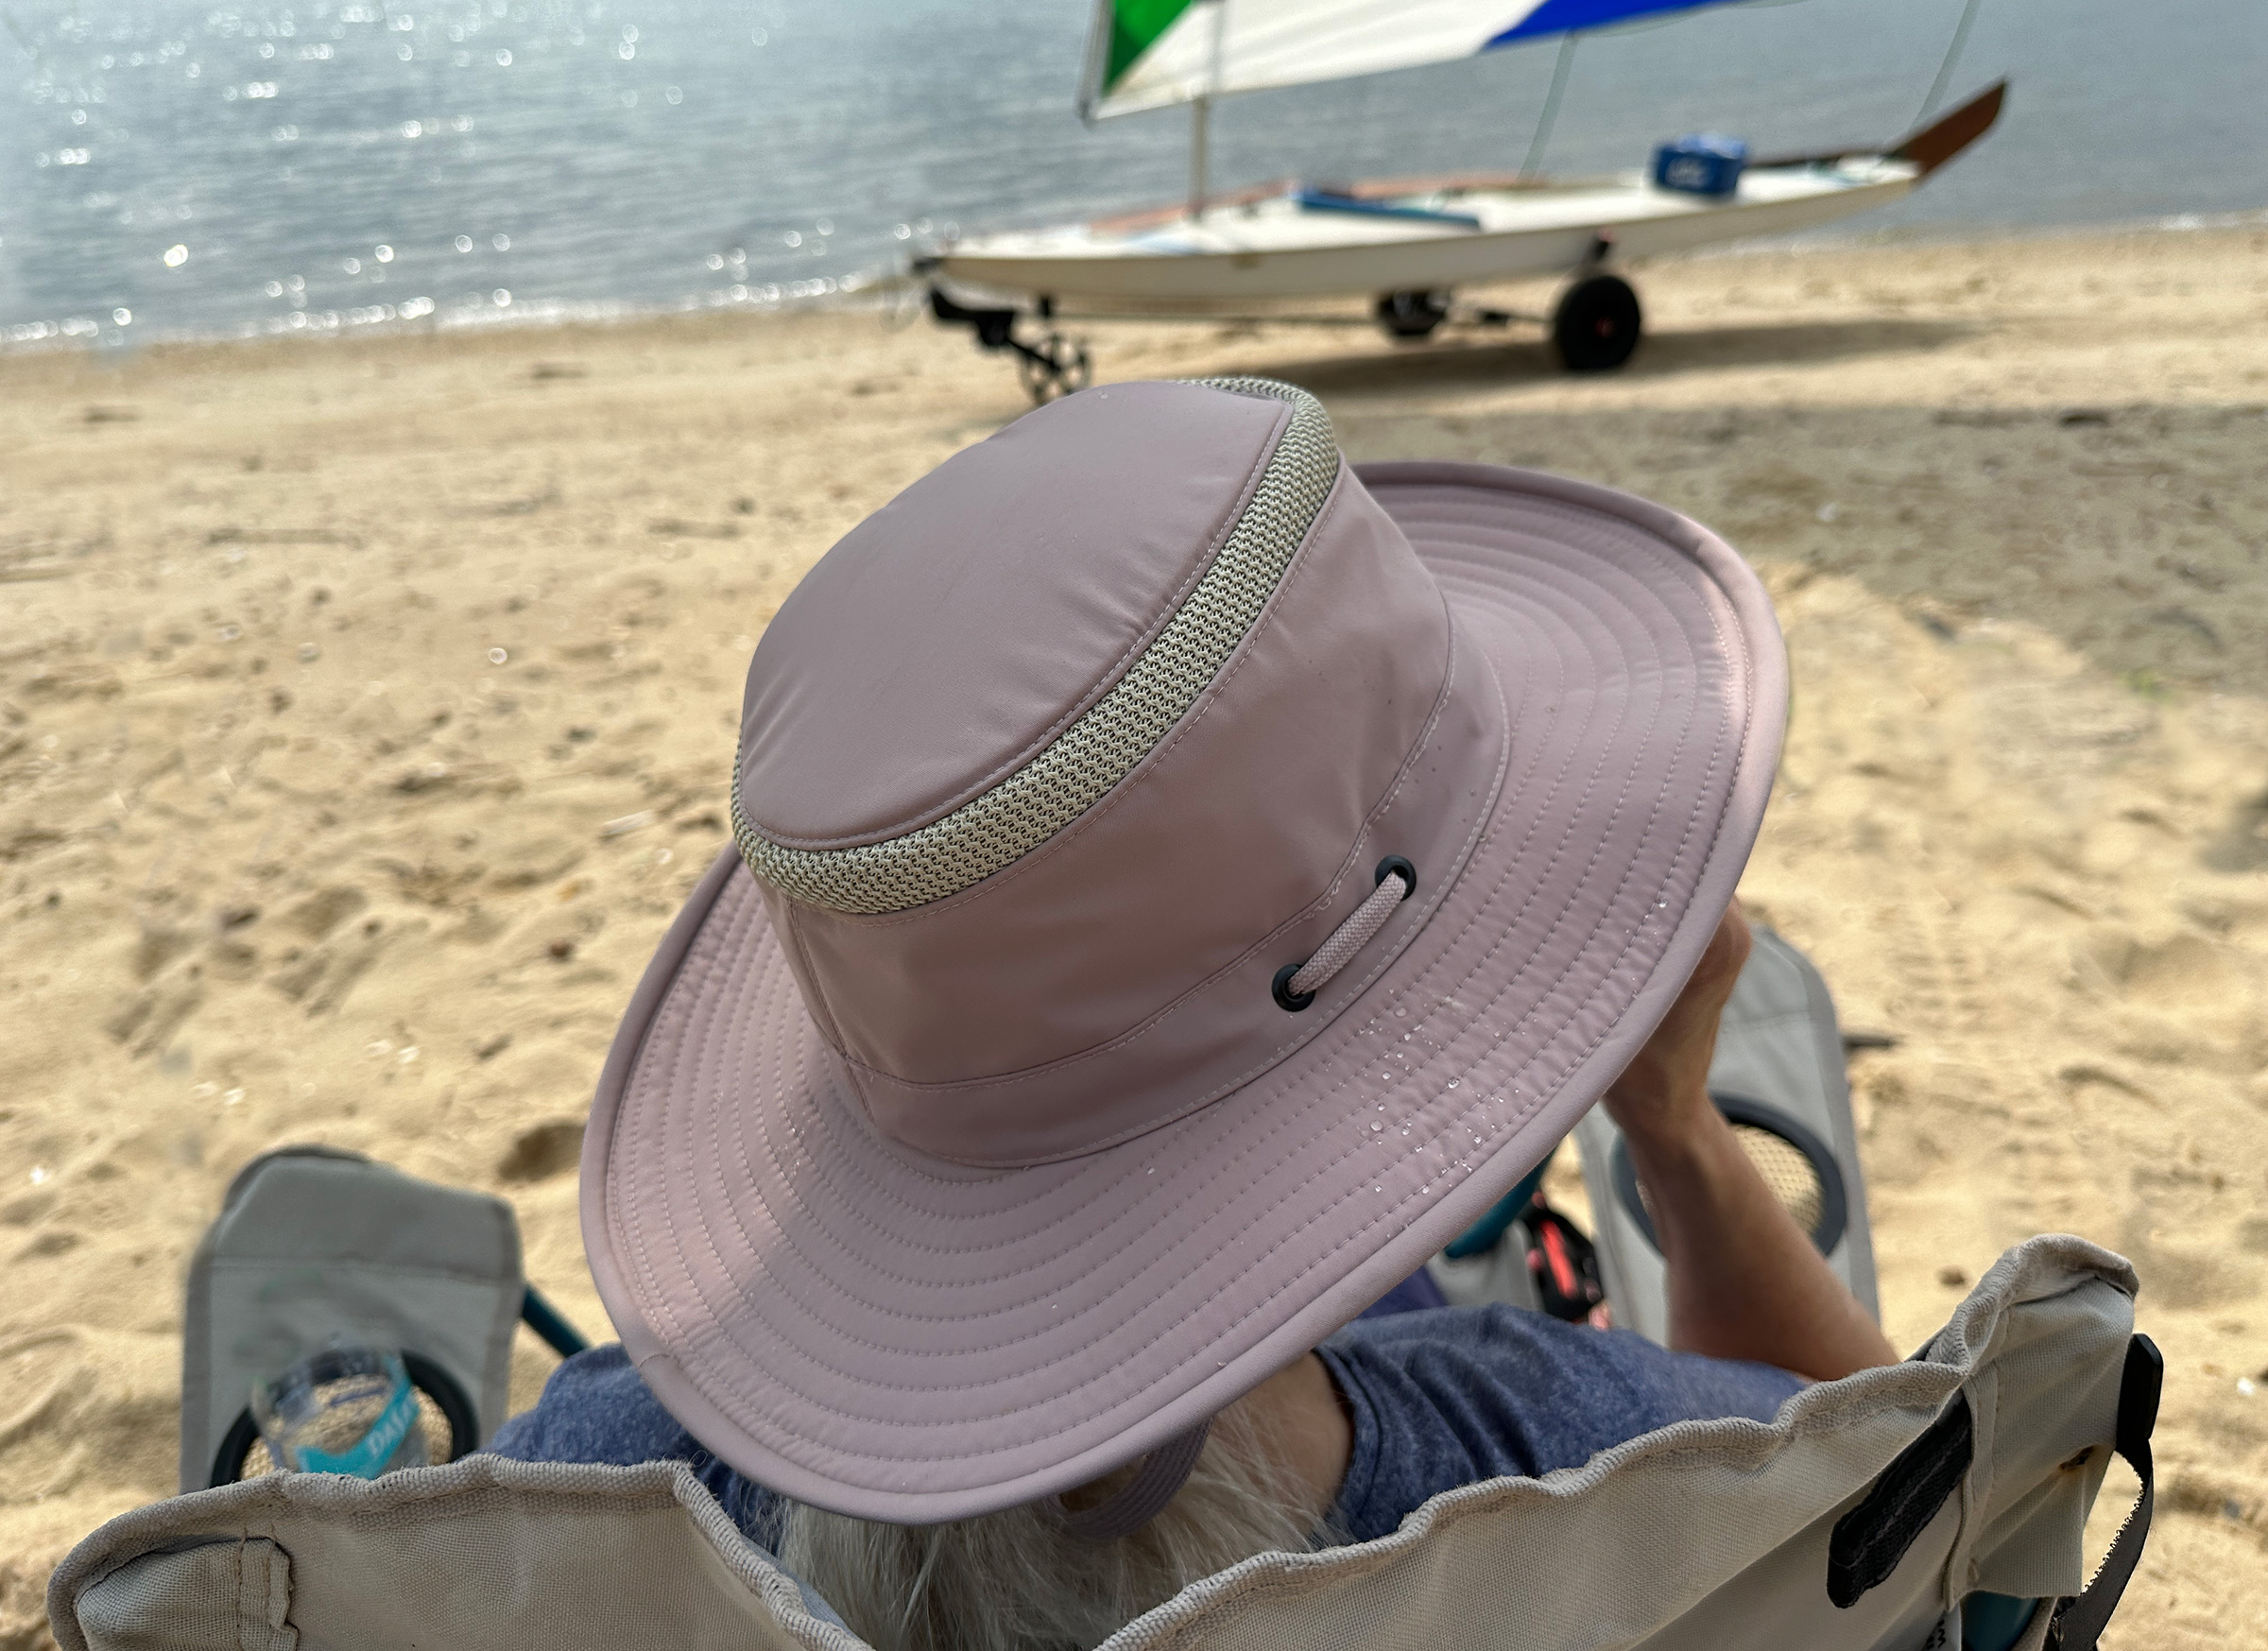
The fabric and design of the LTM6 Airflo combine to make a hat suited to both sun and rain. Made from recycled nylon with a water-repellent coating, it keeps the head dry in a rain storm, while the mesh around the crown prevents overheating on a sunny day.
The LTM6 is made from 100 percent recycled nylon treated with a PFC-free polyurethane water-repellent coating. The hat weighs 4 oz and has a 3⁄4″ band of mesh around the top of the crown that provides excellent ventilation to the top of the head. Another welcome feature is a small Velcro pocket on the inside top of the crown where small items, such as cash or a small cool pack, can be stashed.
The hat has a lower profile and is more form-fitting than the original Tilley. With a strap that can be worn beneath the chin or at the back of the head it stays put in most wind conditions.
The hat is held securely in place by a strap that is adjusted with slip knots. The continuous cord can be placed under the chin or the back of the head, so that the hat stays put in wind from all directions. If the strap isn’t needed, it can be easily tucked away inside the Velcro pocket or tightened so that it does not droop down. One other use for the strap could be to tie up the sides of the hat. For her hat, Skipper chose a soft mauve color, which is dark enough on the underside of the brim to soften the sun’s glare/reflected from the water. There are two color selections for women and eight for men.
The LTM6 hats are washable, and more importantly, buoyant. Like the original Tilley, they are guaranteed for life. This guarantee, along with excellent customer service and a piece of gear that does the job and looks good doing it, make the Tilley LTM6 a sun hat to consider.
Audrey (Skipper) and Kent Lewis log their maritime adventures at Small Boat Restoration, always wearing hats.
The LTM6 Airflo Sun Hats for men and for women are available from Tilley for $99.
Is there a product that might be useful for boatbuilding, cruising, or shore-side camping that you’d like us to review? Please email your suggestions.
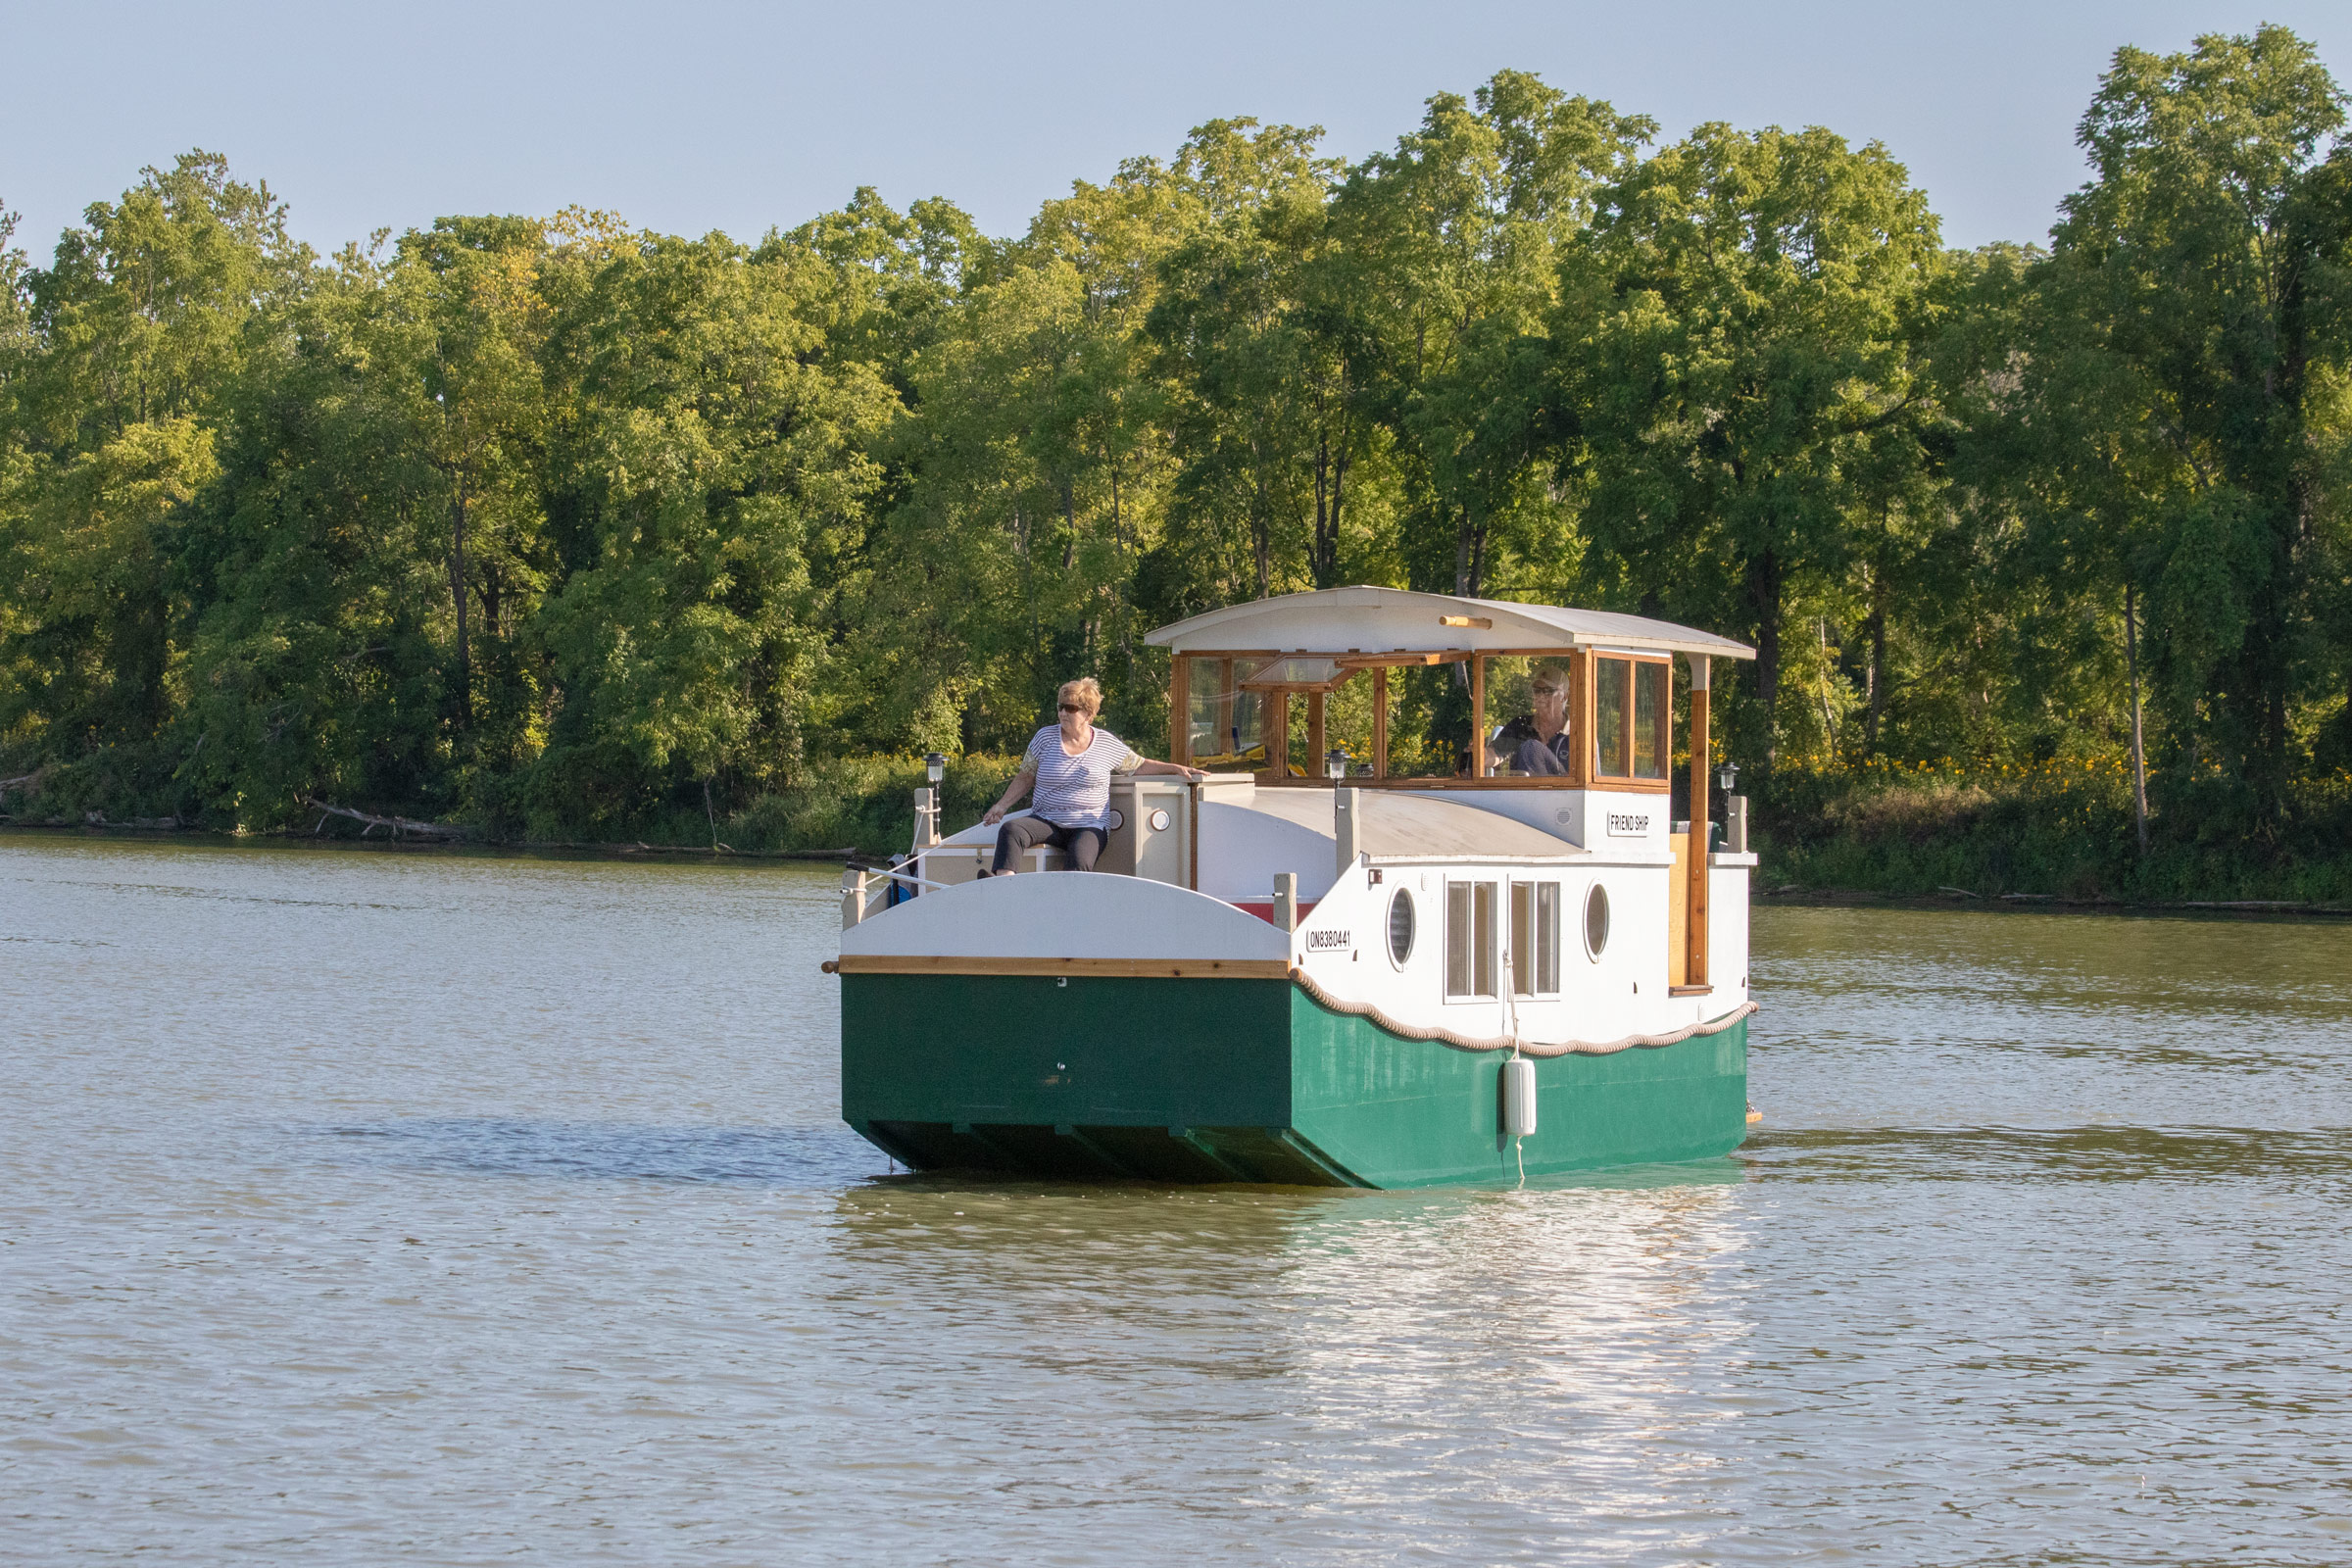
Oliver Ilg’s journey to wooden boat building has been neither straight nor obvious. Leaving university in Brazil with a degree in physics (which he later augmented with an MBA), he was hired as a product engineer for a German car manufacturer. Four years later, he moved to another German car company in Brazil where he worked first as assistant to the general manager, and later as director of sales and marketing for the firm’s luxury cars. In his late 20s he was involved in building a 53′ steel yacht for his father, but it was not until his 40s that he left cars behind and became fully immersed in a nautical world.
In 2003, Oliver founded Sterling Yachts, building “modern classic fast trawler cruisers for the U.S. market.” The company adopted automotive-manufacturing techniques, outsourcing components and bringing them together in a proprietary assembly line. Within five years, says Oliver, Sterling Yachts had shifted its geographical focus and become a top player in the local market, introducing innovative craft like the Sterling Legend 28, the first Brazilian diesel/electric hybrid leisure motorboat.
Photographs by Oliver Ilg
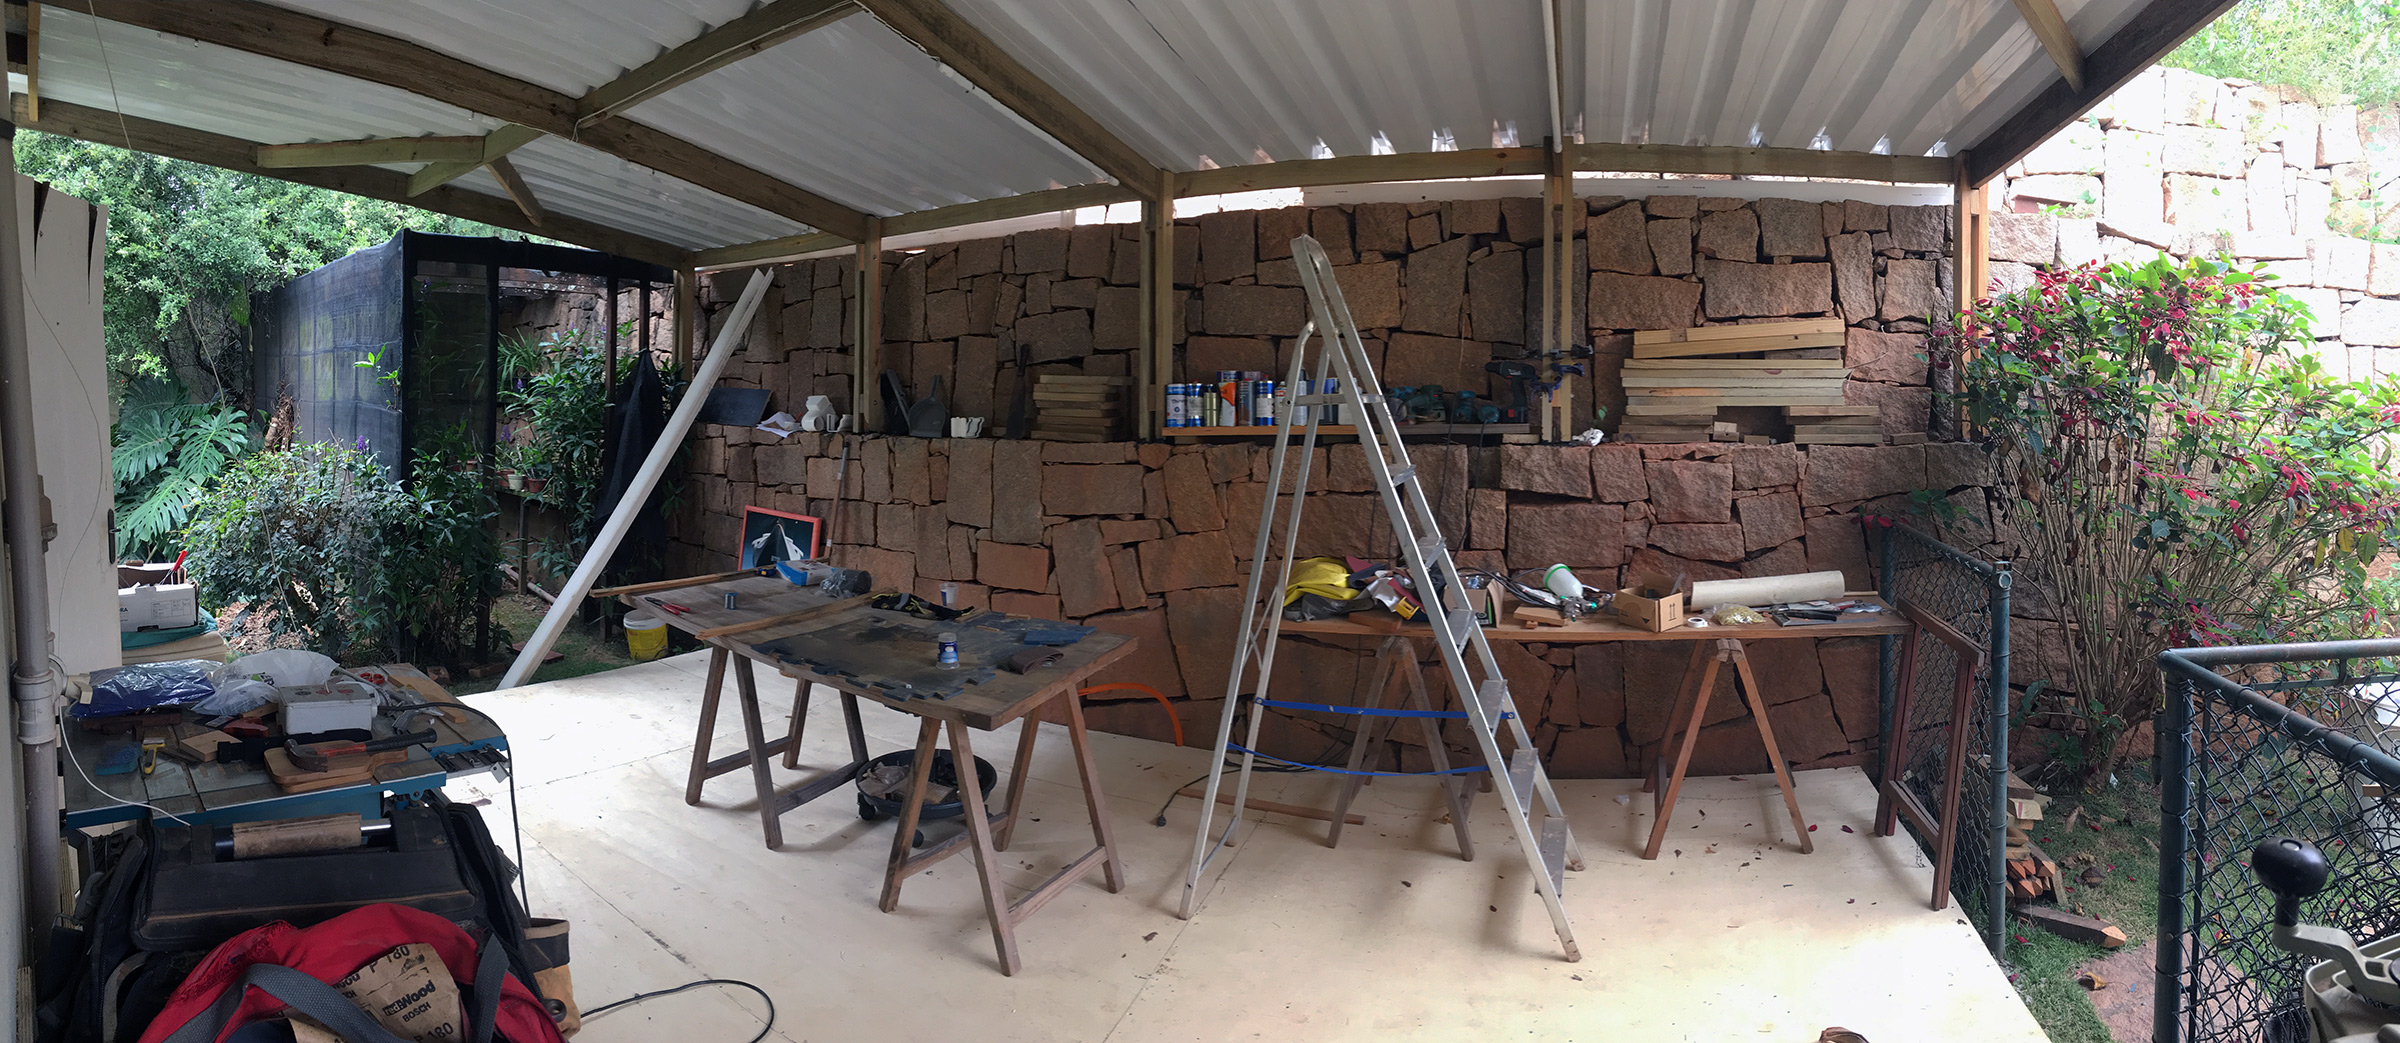
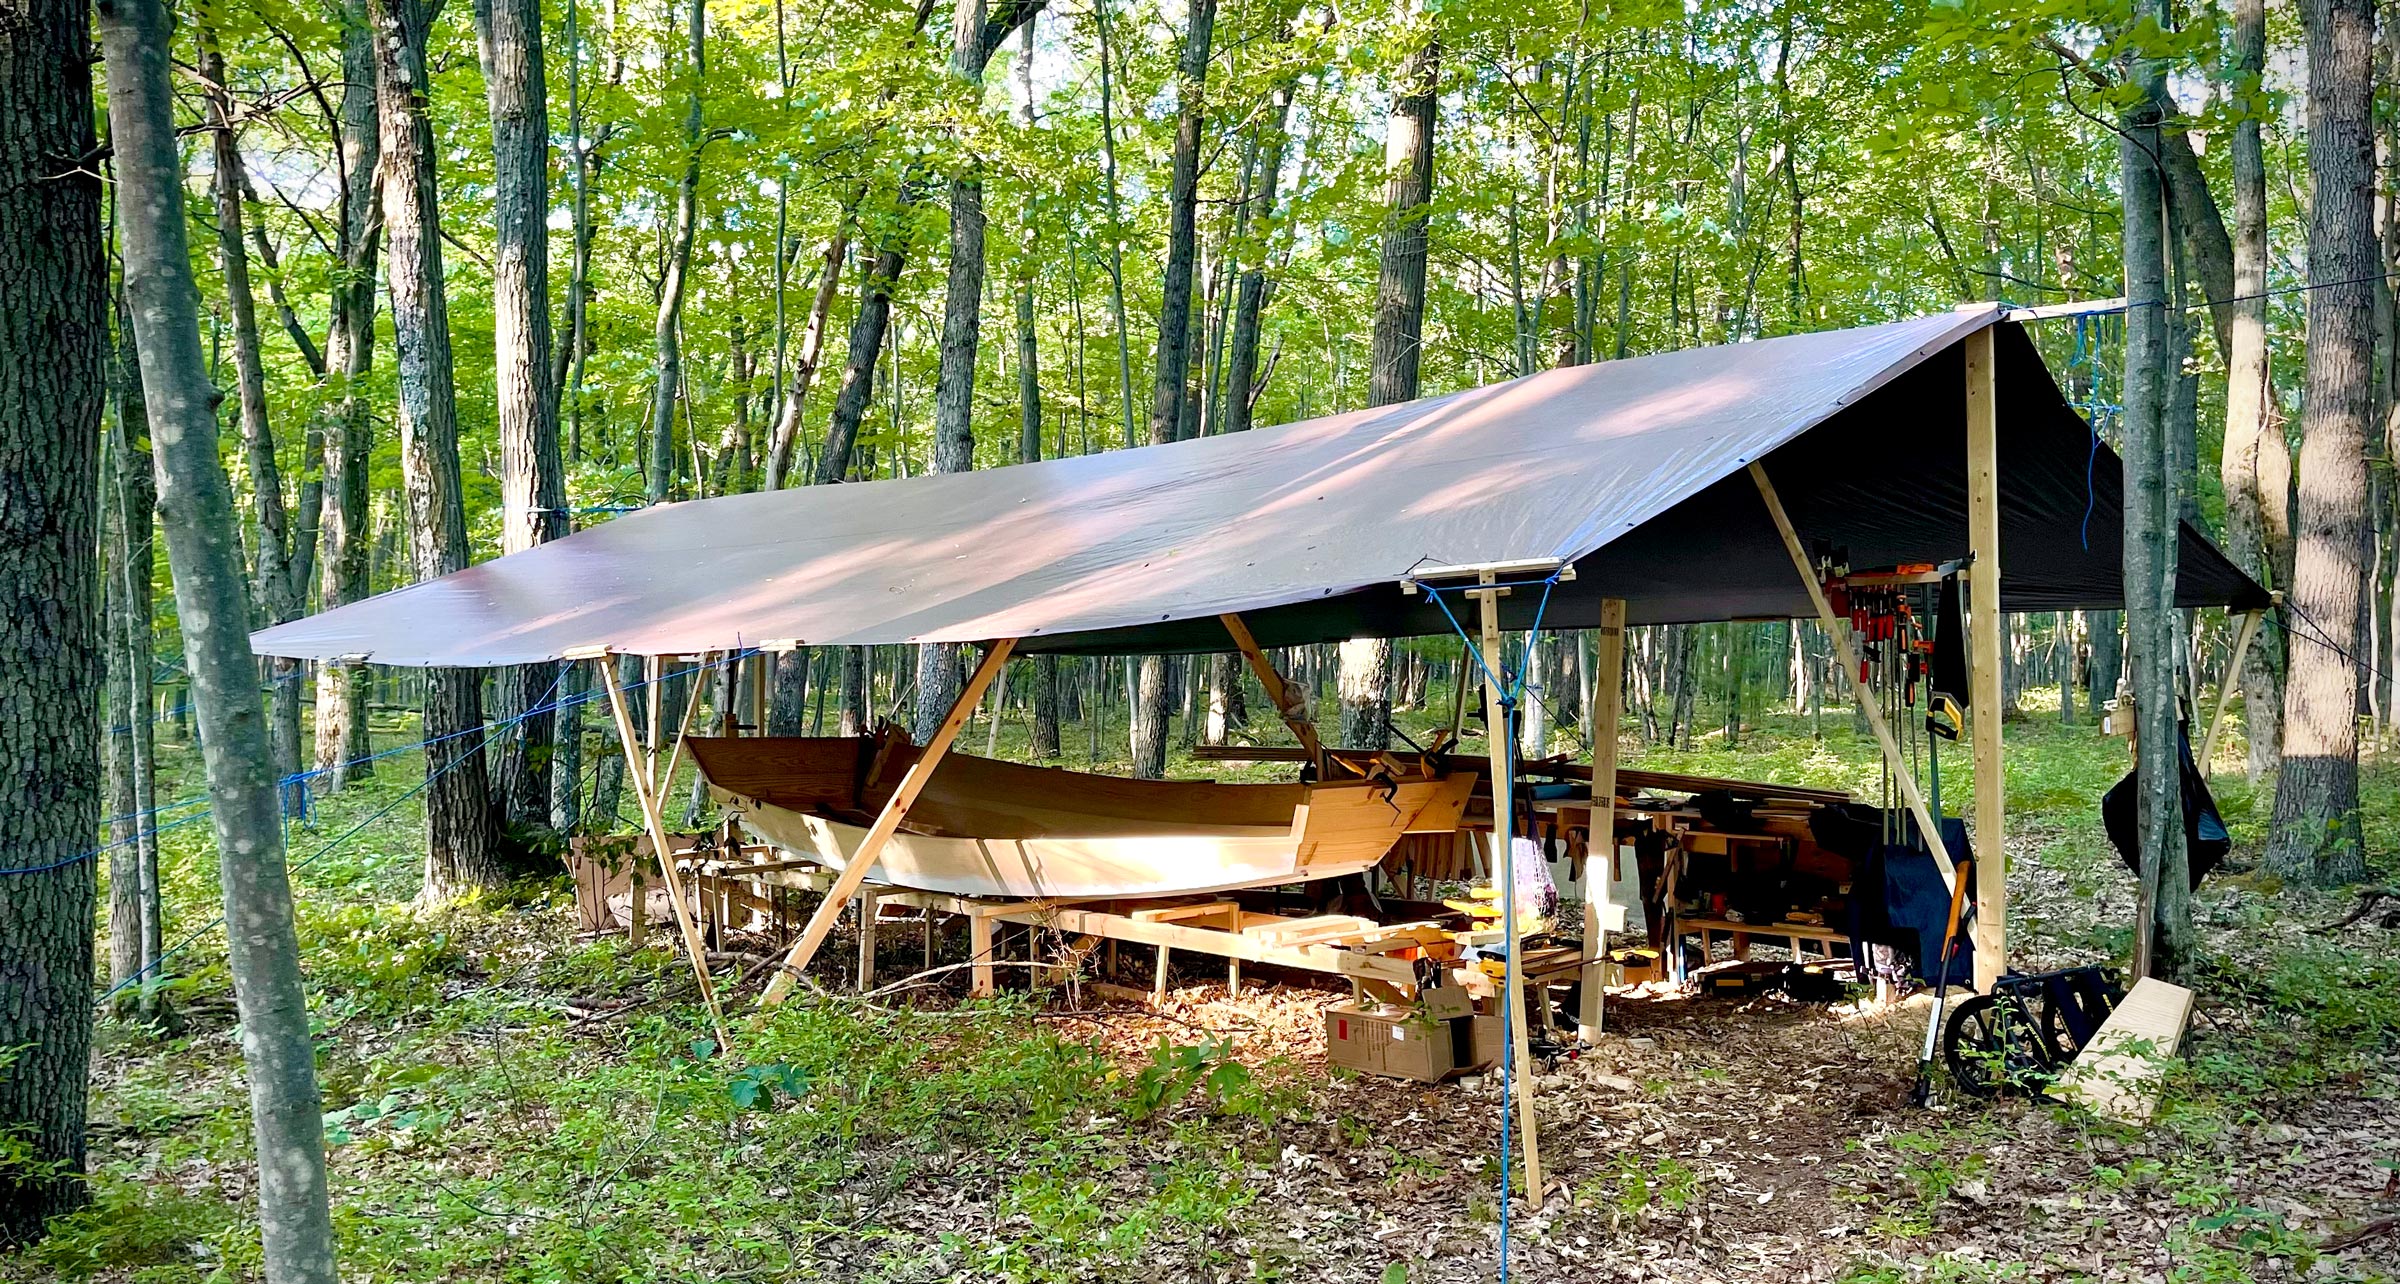
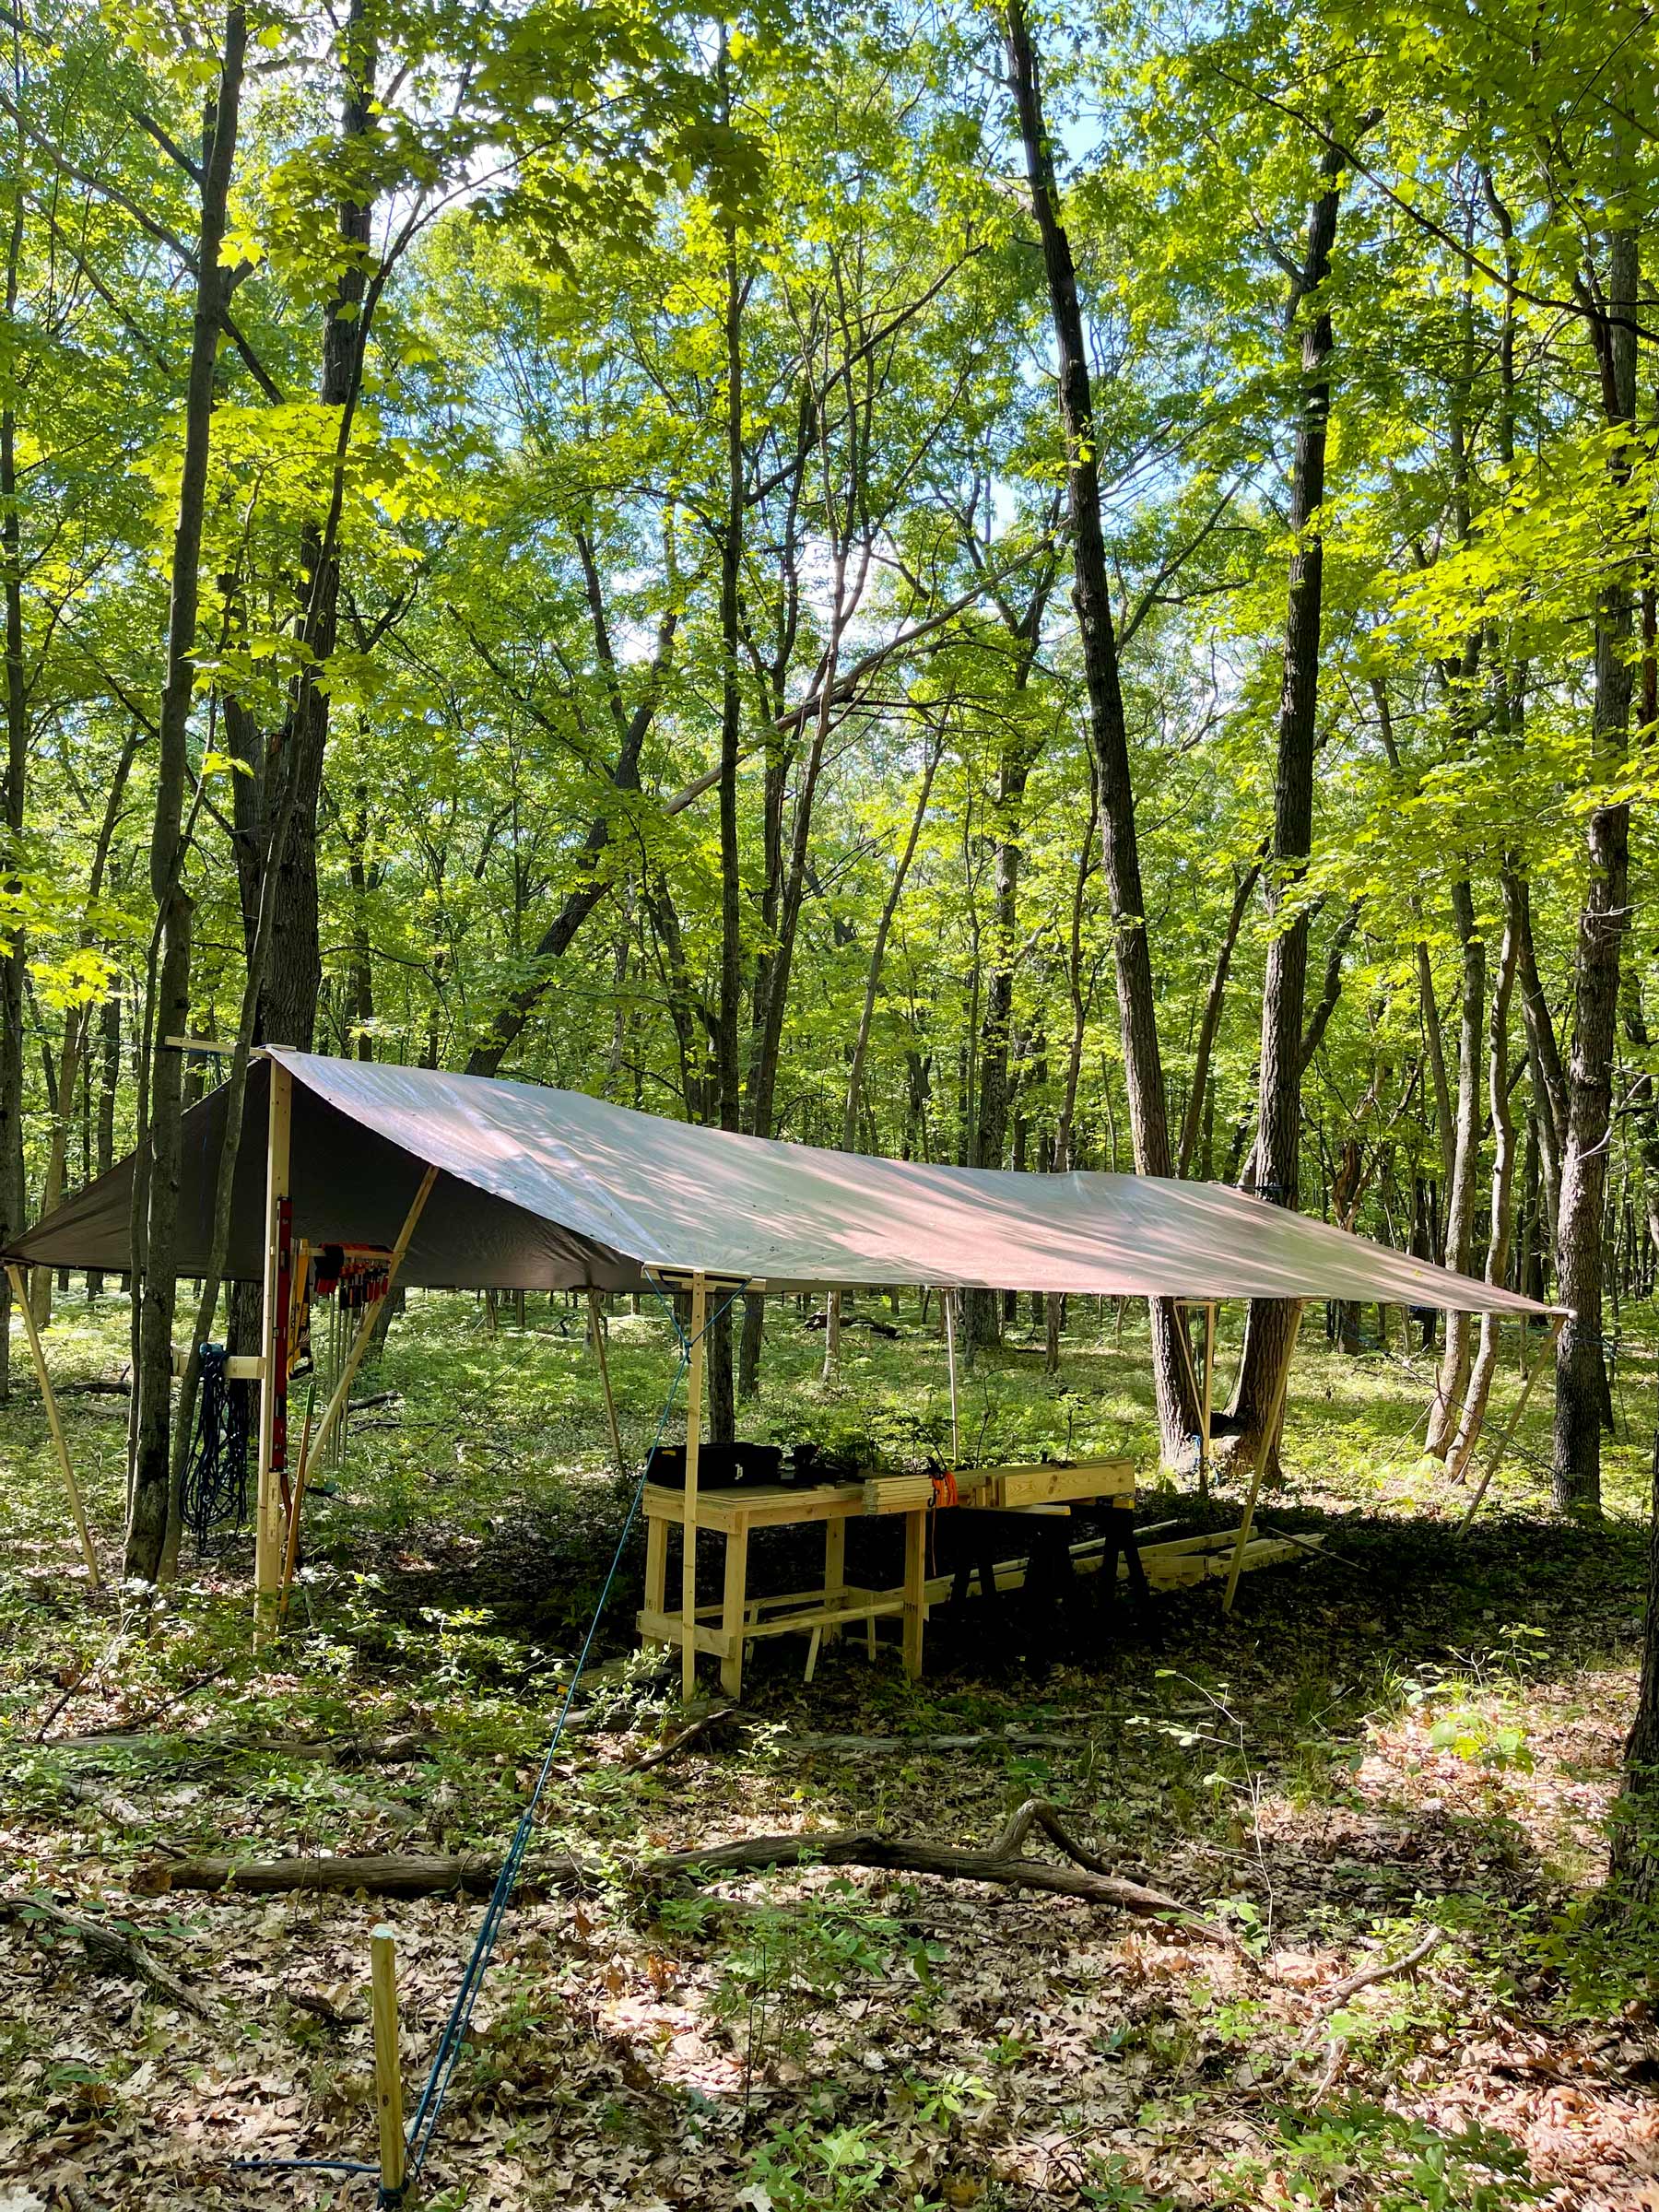
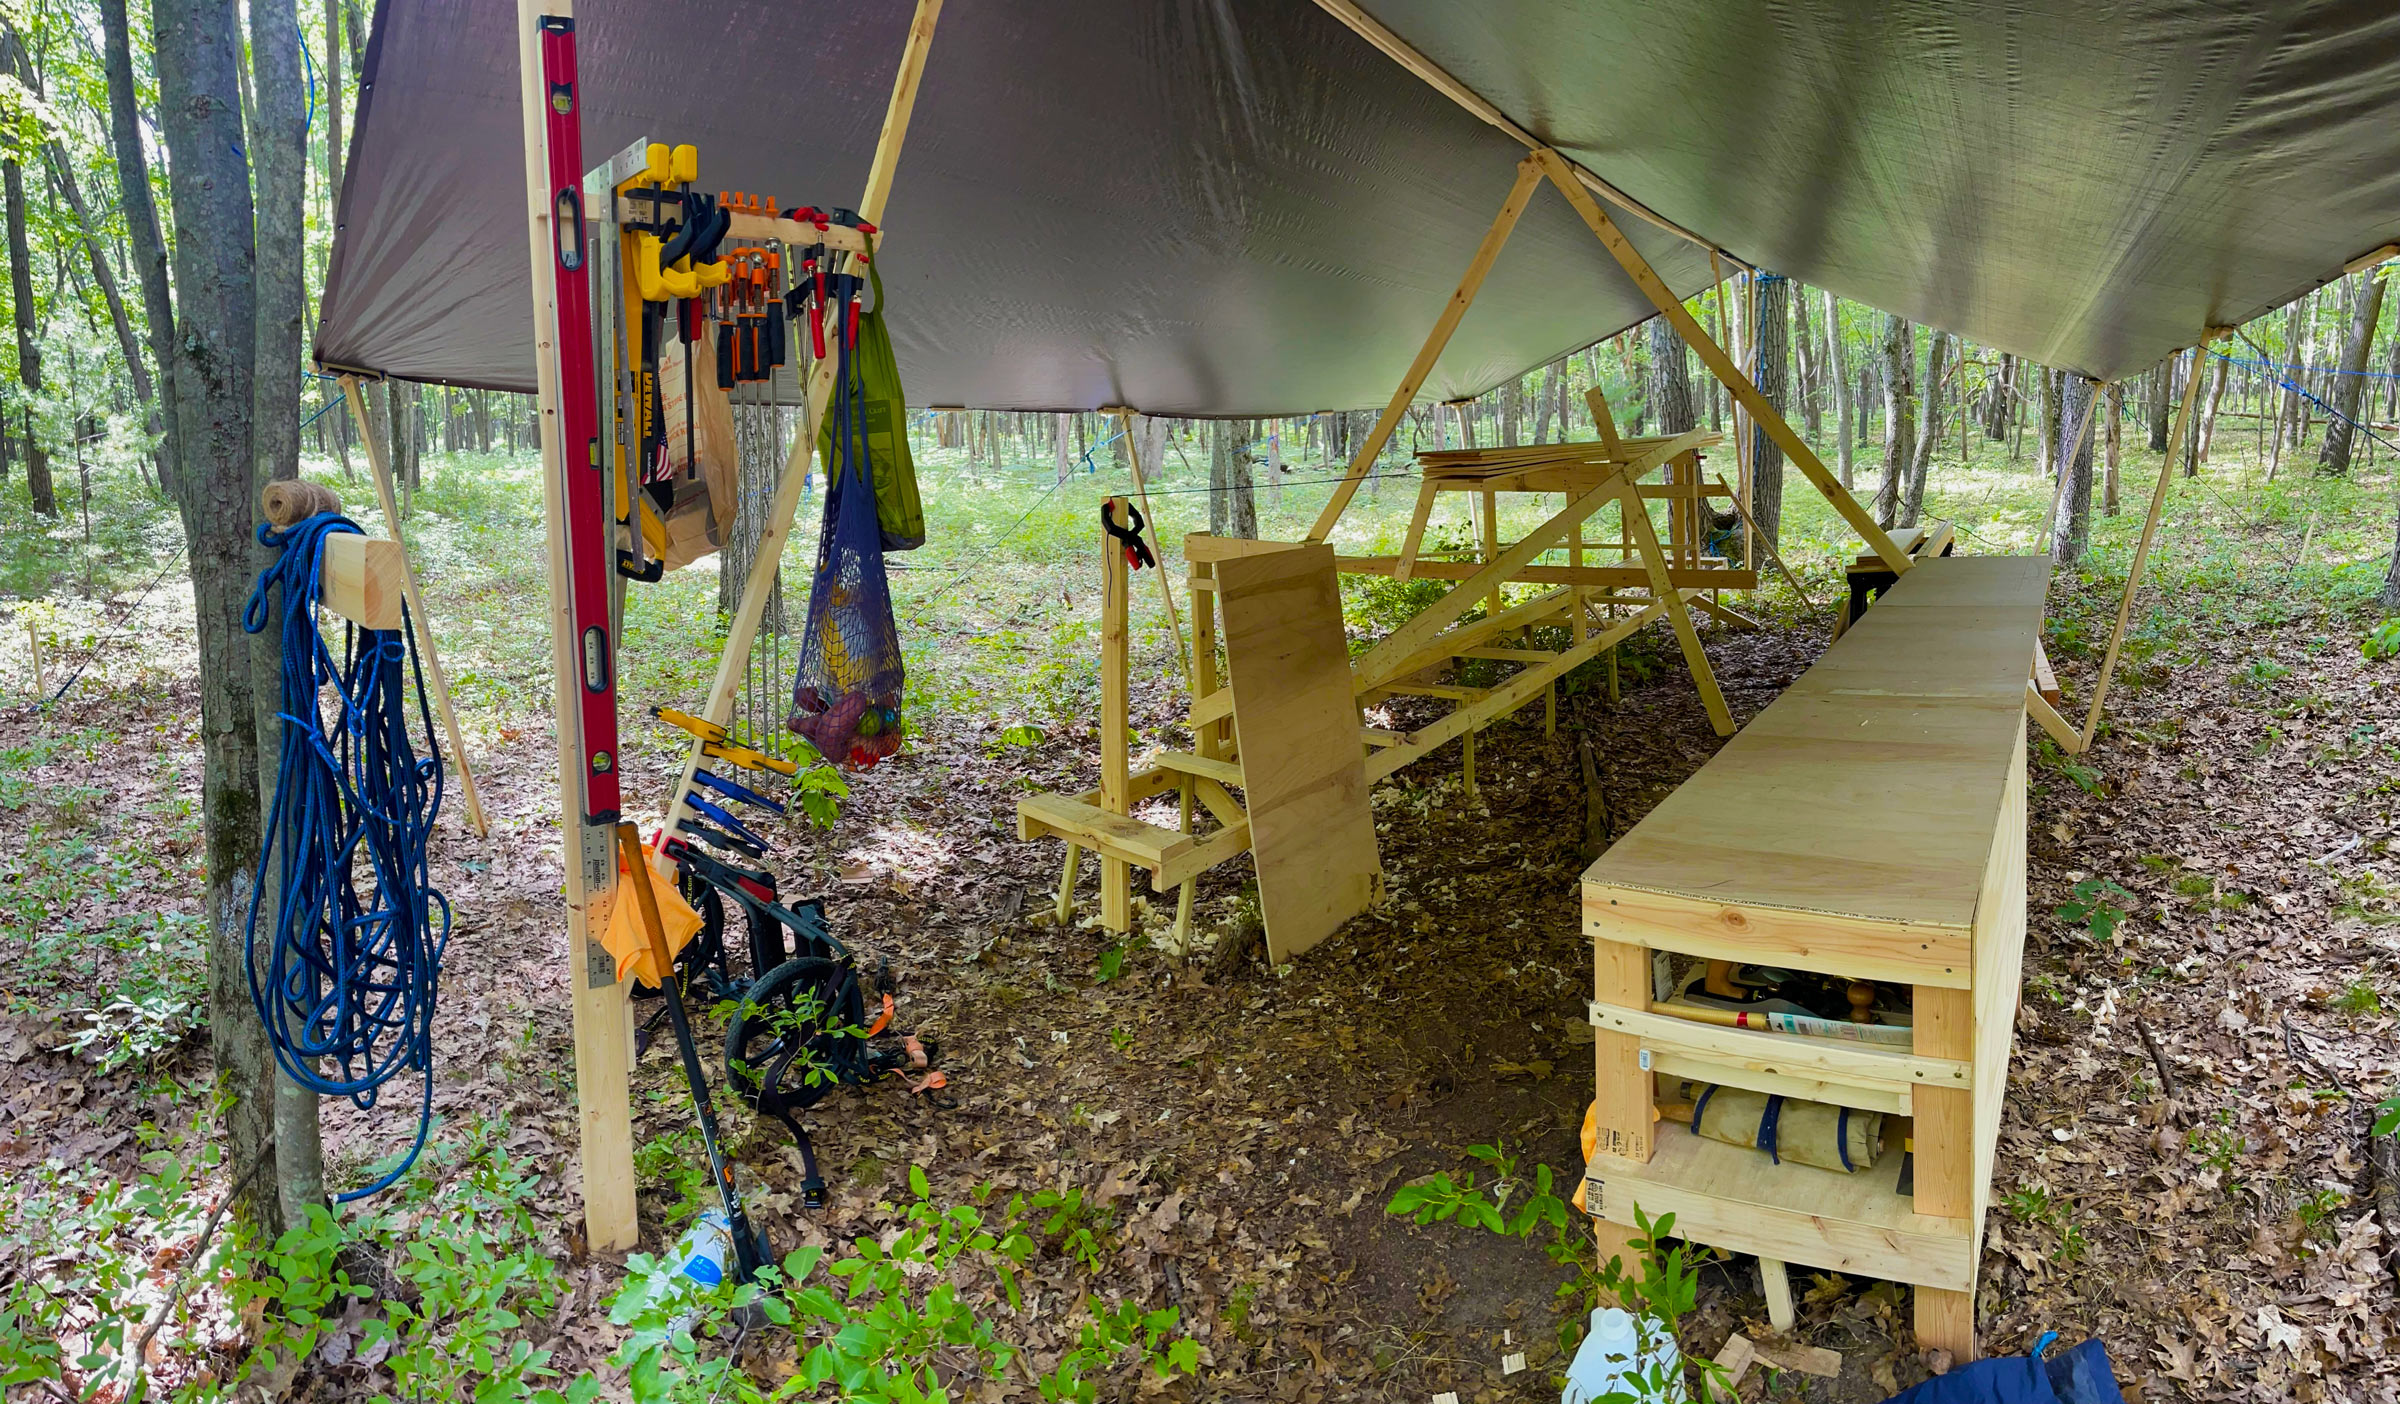
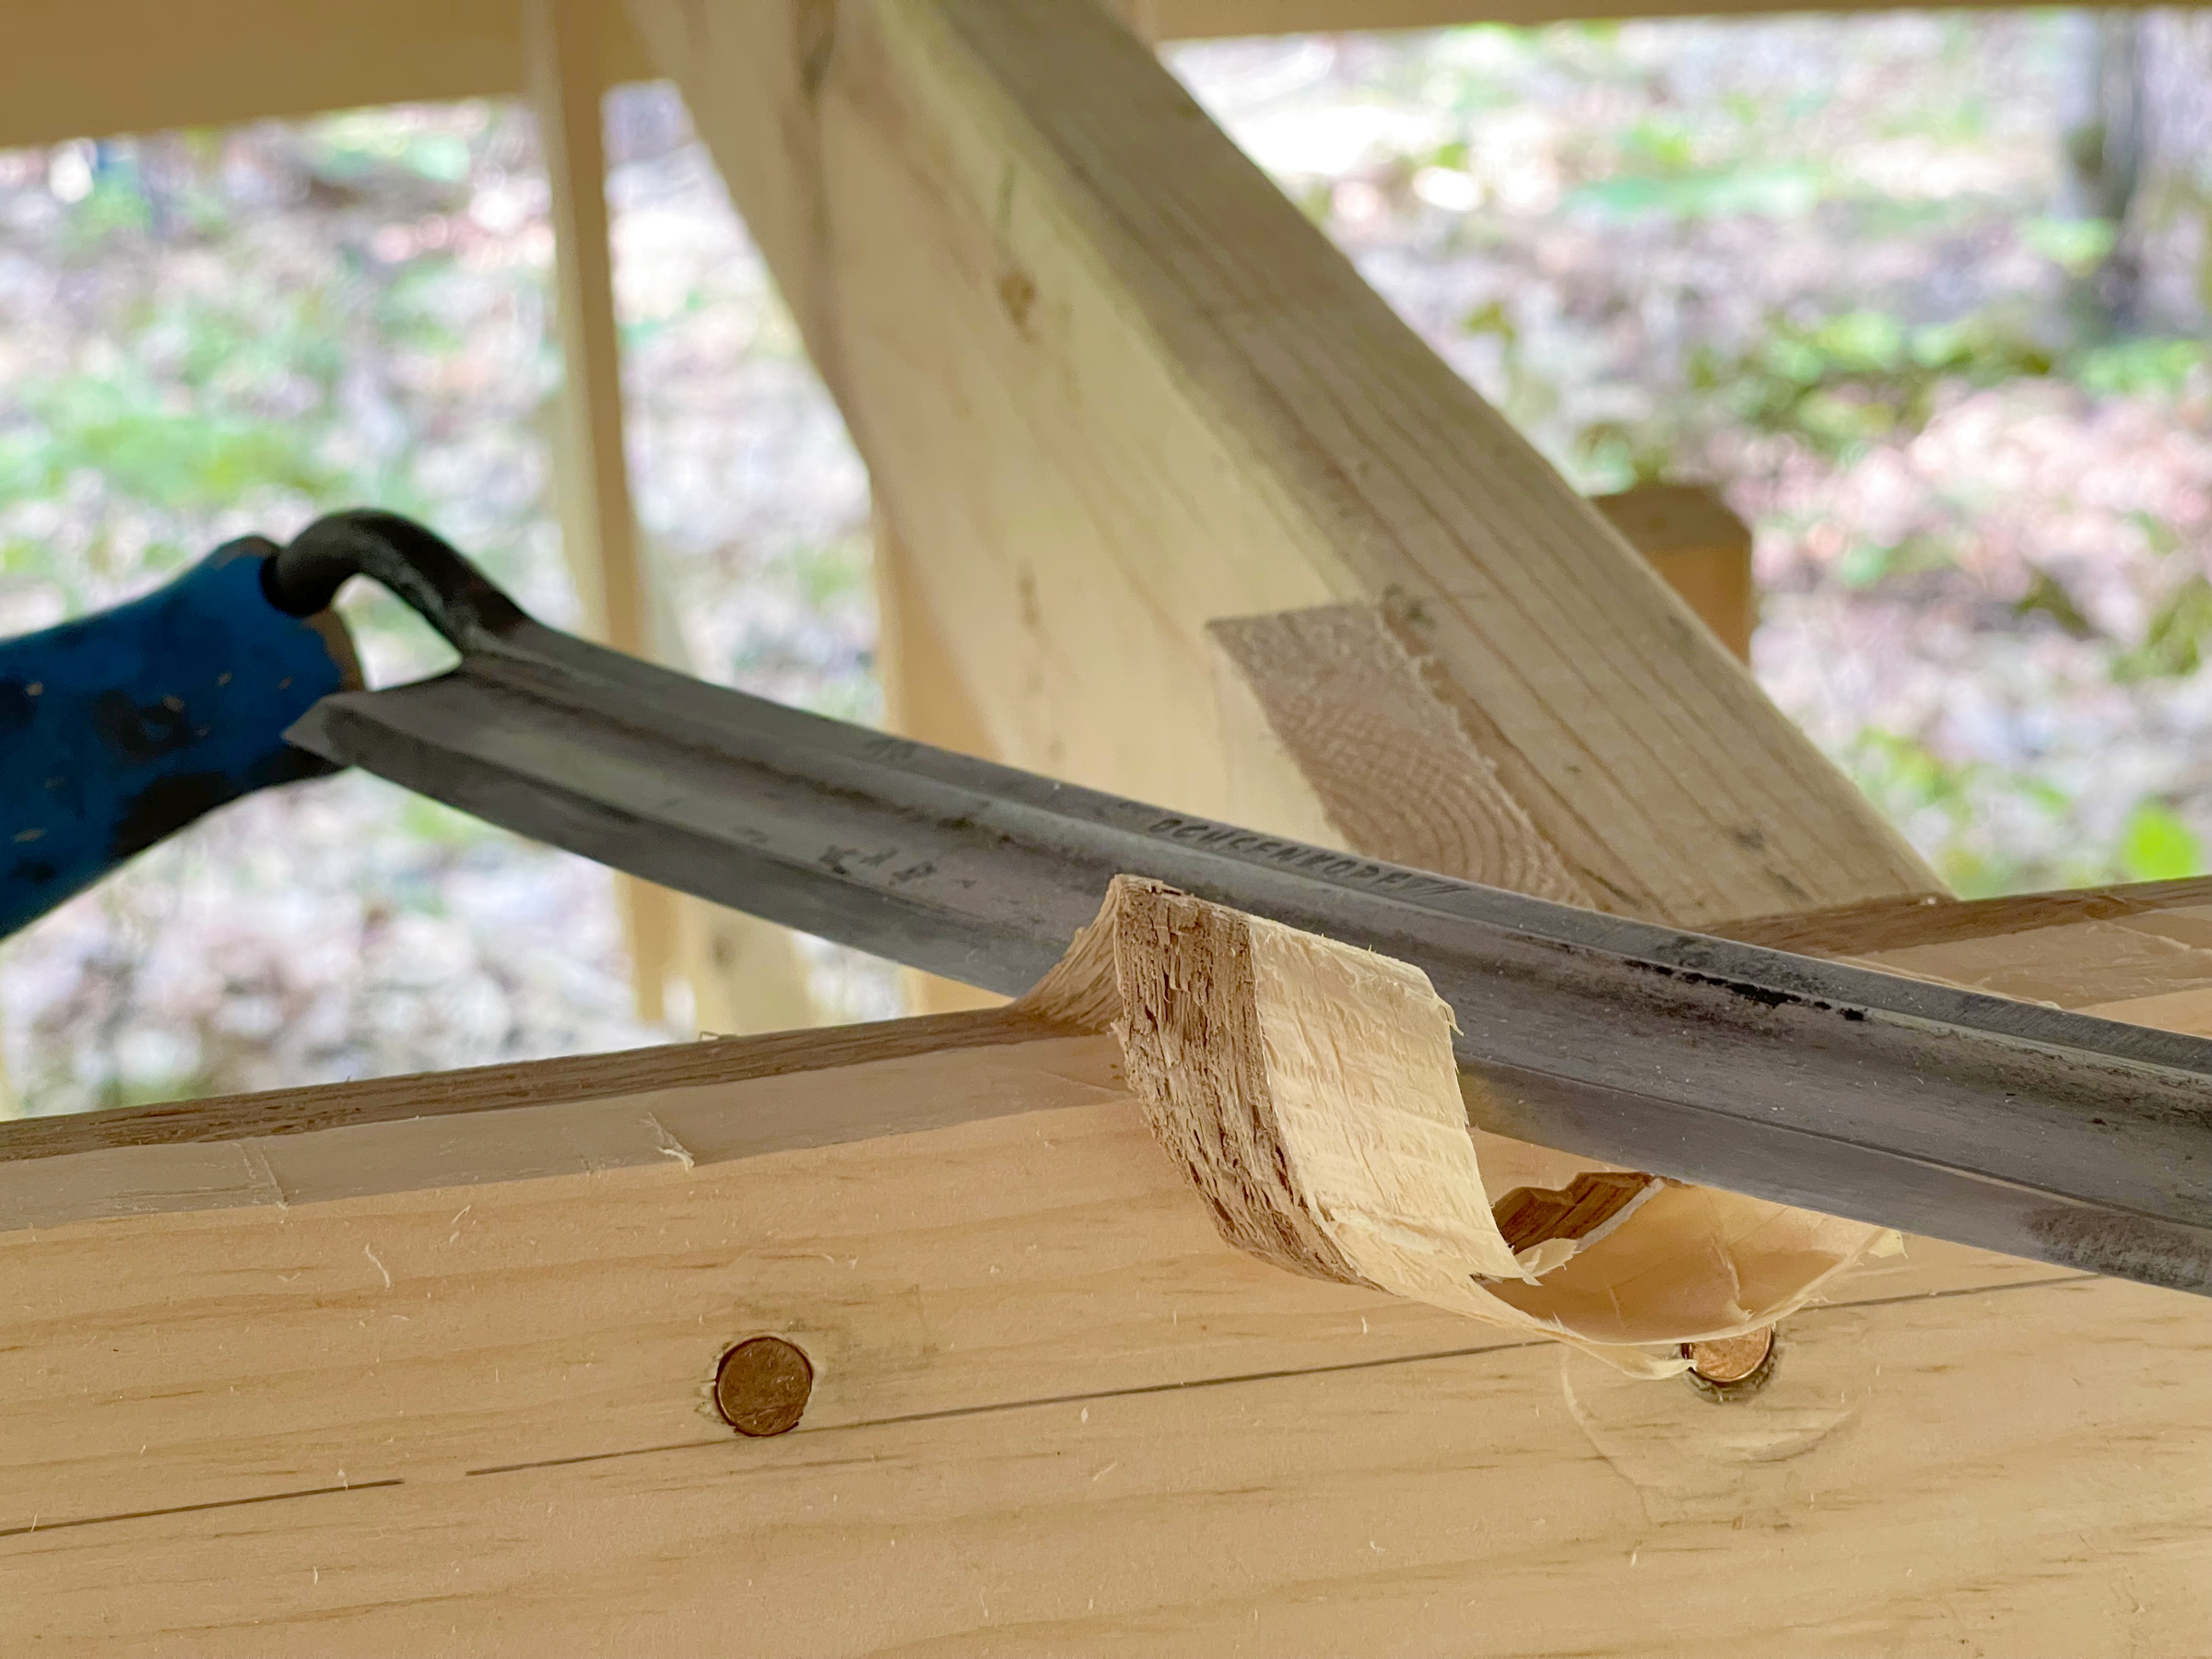
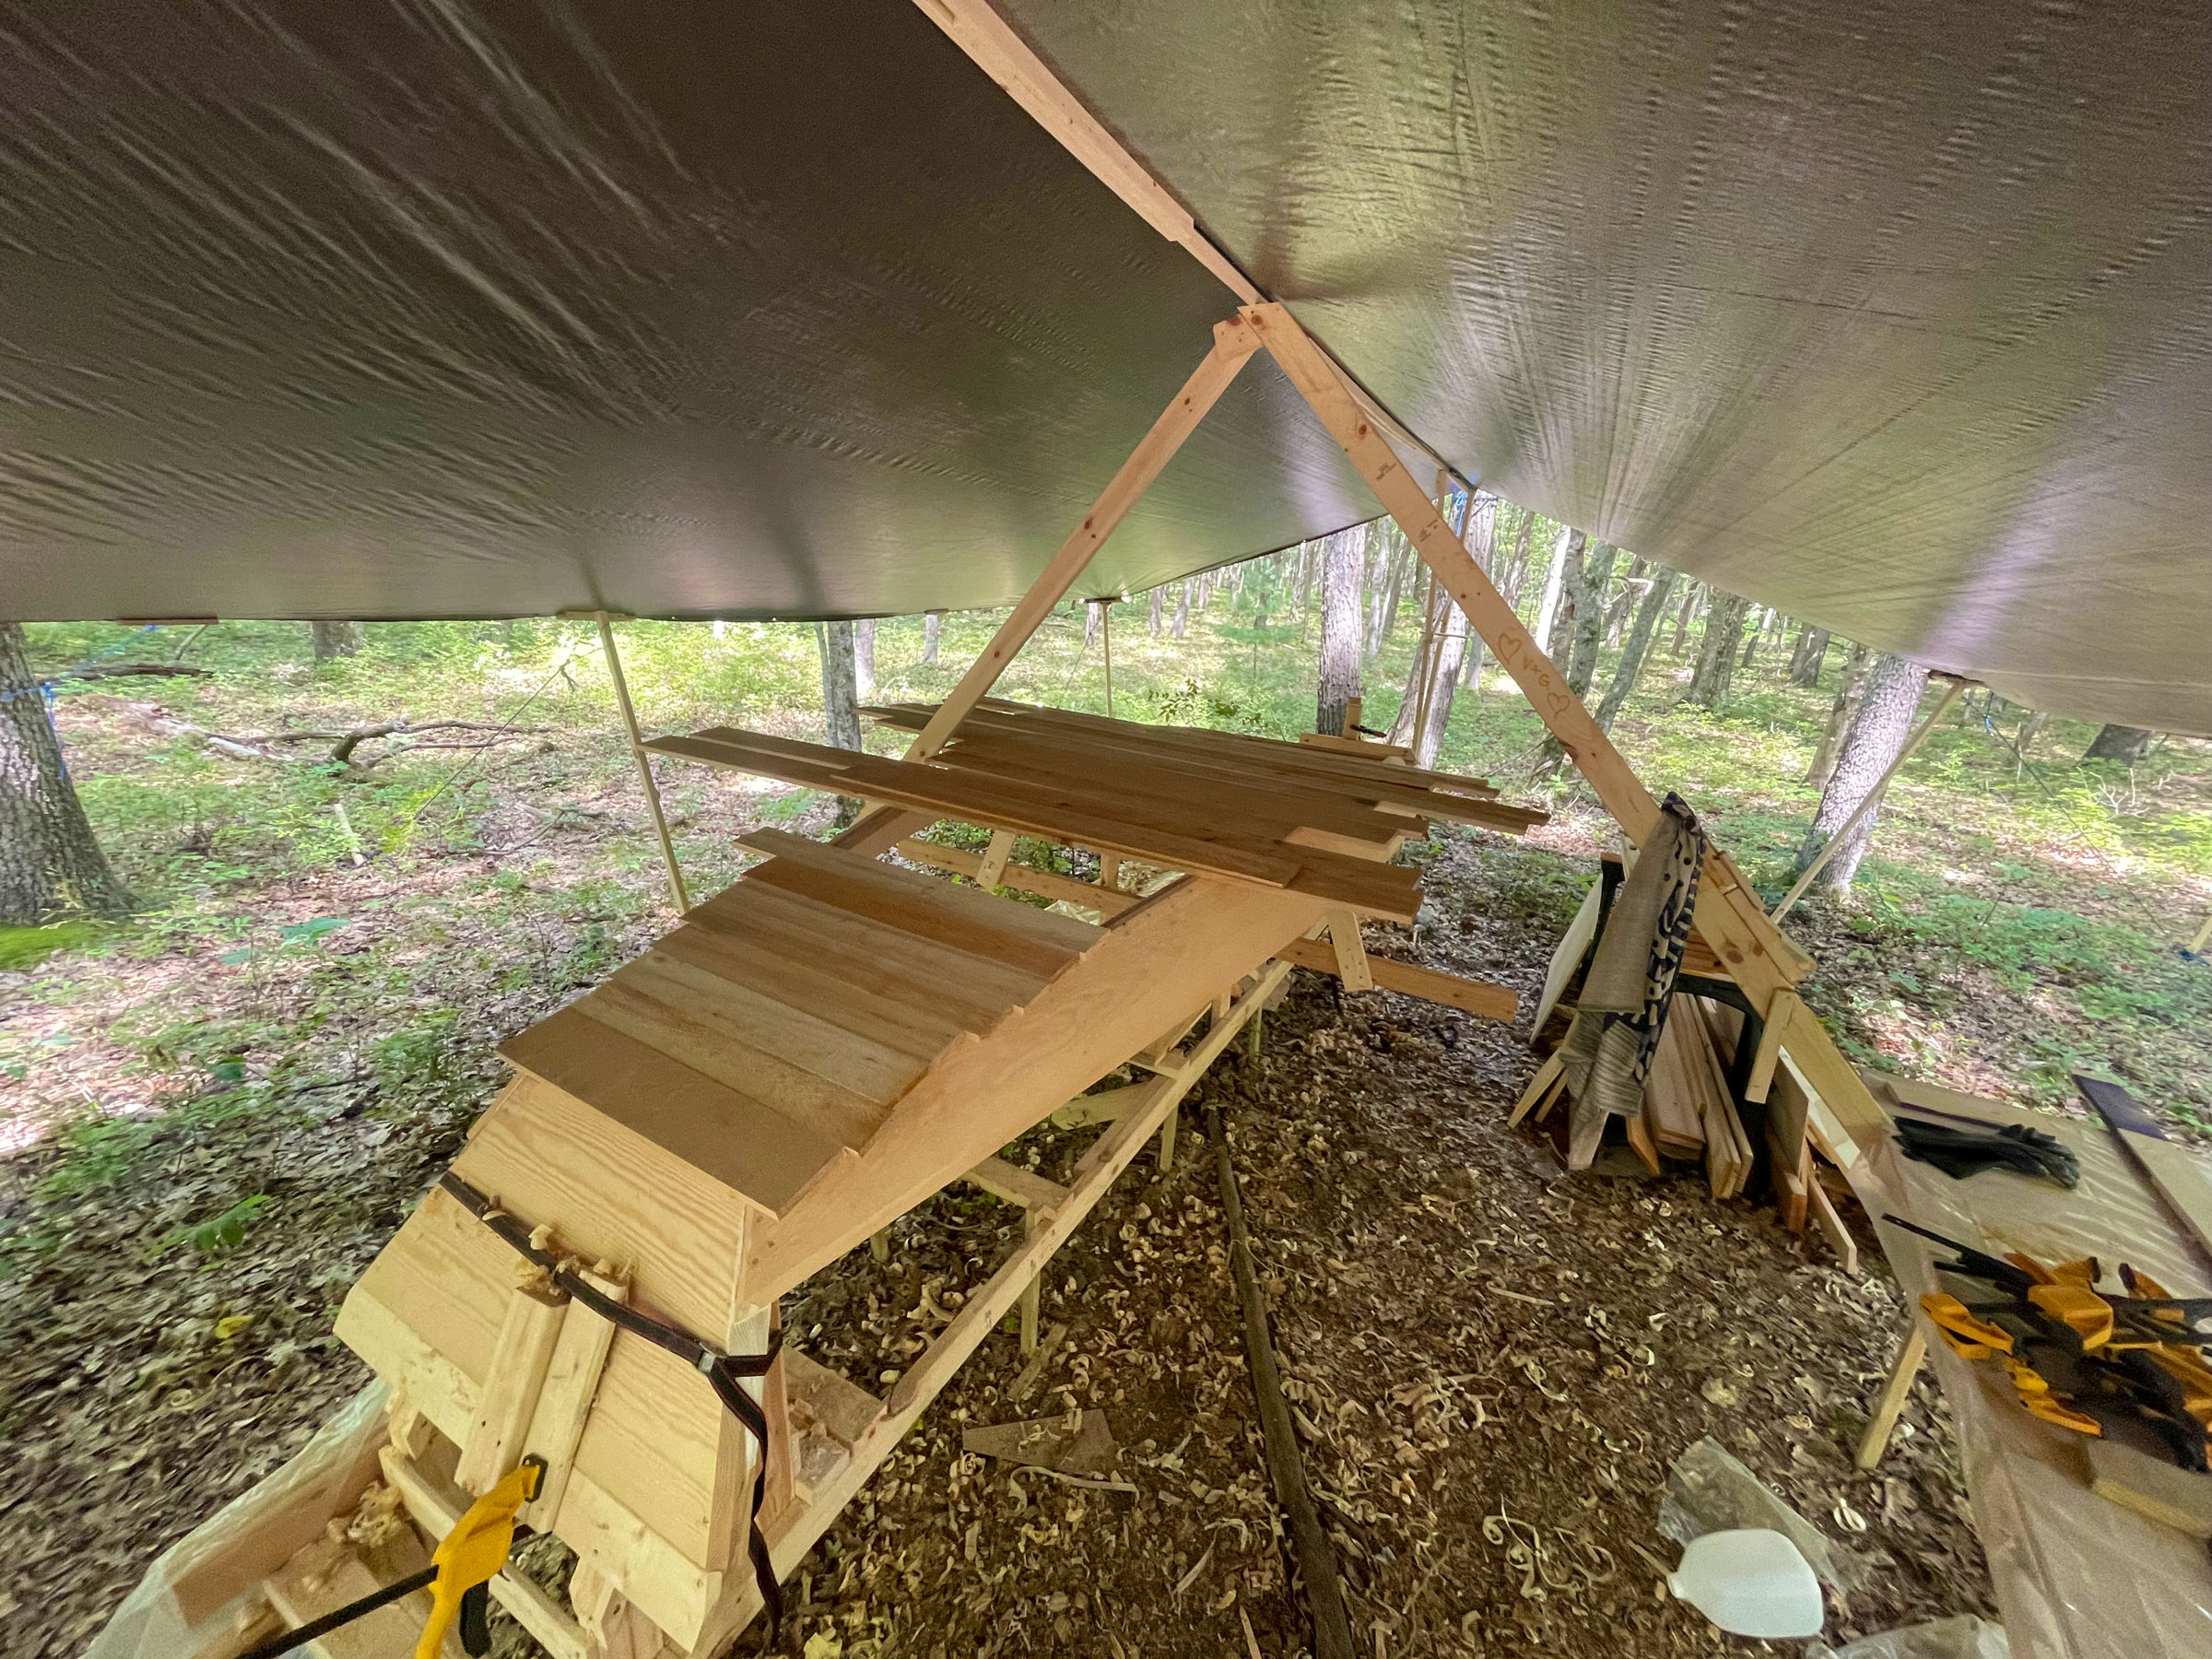
Oliver built his backyard workshop between his house and an old stone wall. He left the ends open for ventilation but when it comes time to paint or varnish, he can close them off with retractable vinyl curtains. The workshop’s roof is steel panels while the floor is construction-grade plywood.
But, in the midst of all the gleaming chrome, shining gelcoats, and high-tech production lines, Oliver indulged himself in his own projects—“small wooden boats that I built after hours at the shipyard.” It started, he says, with a flat-bottomed rowing skiff, loosely based on the Catraia workboat of northern Portugal. “I built it of plywood and epoxy for a friend.”
Following the success of that first build in 2010, he constructed several small boats over the years, but when Sterling Yachts evolved into a custom-yachts project-management firm and ceased physical operations, the shipyard closed, and Oliver was without a workspace. He had a choice, he says: stop building his beloved “woodies” or find an alternative shop. He went home to his own backyard.
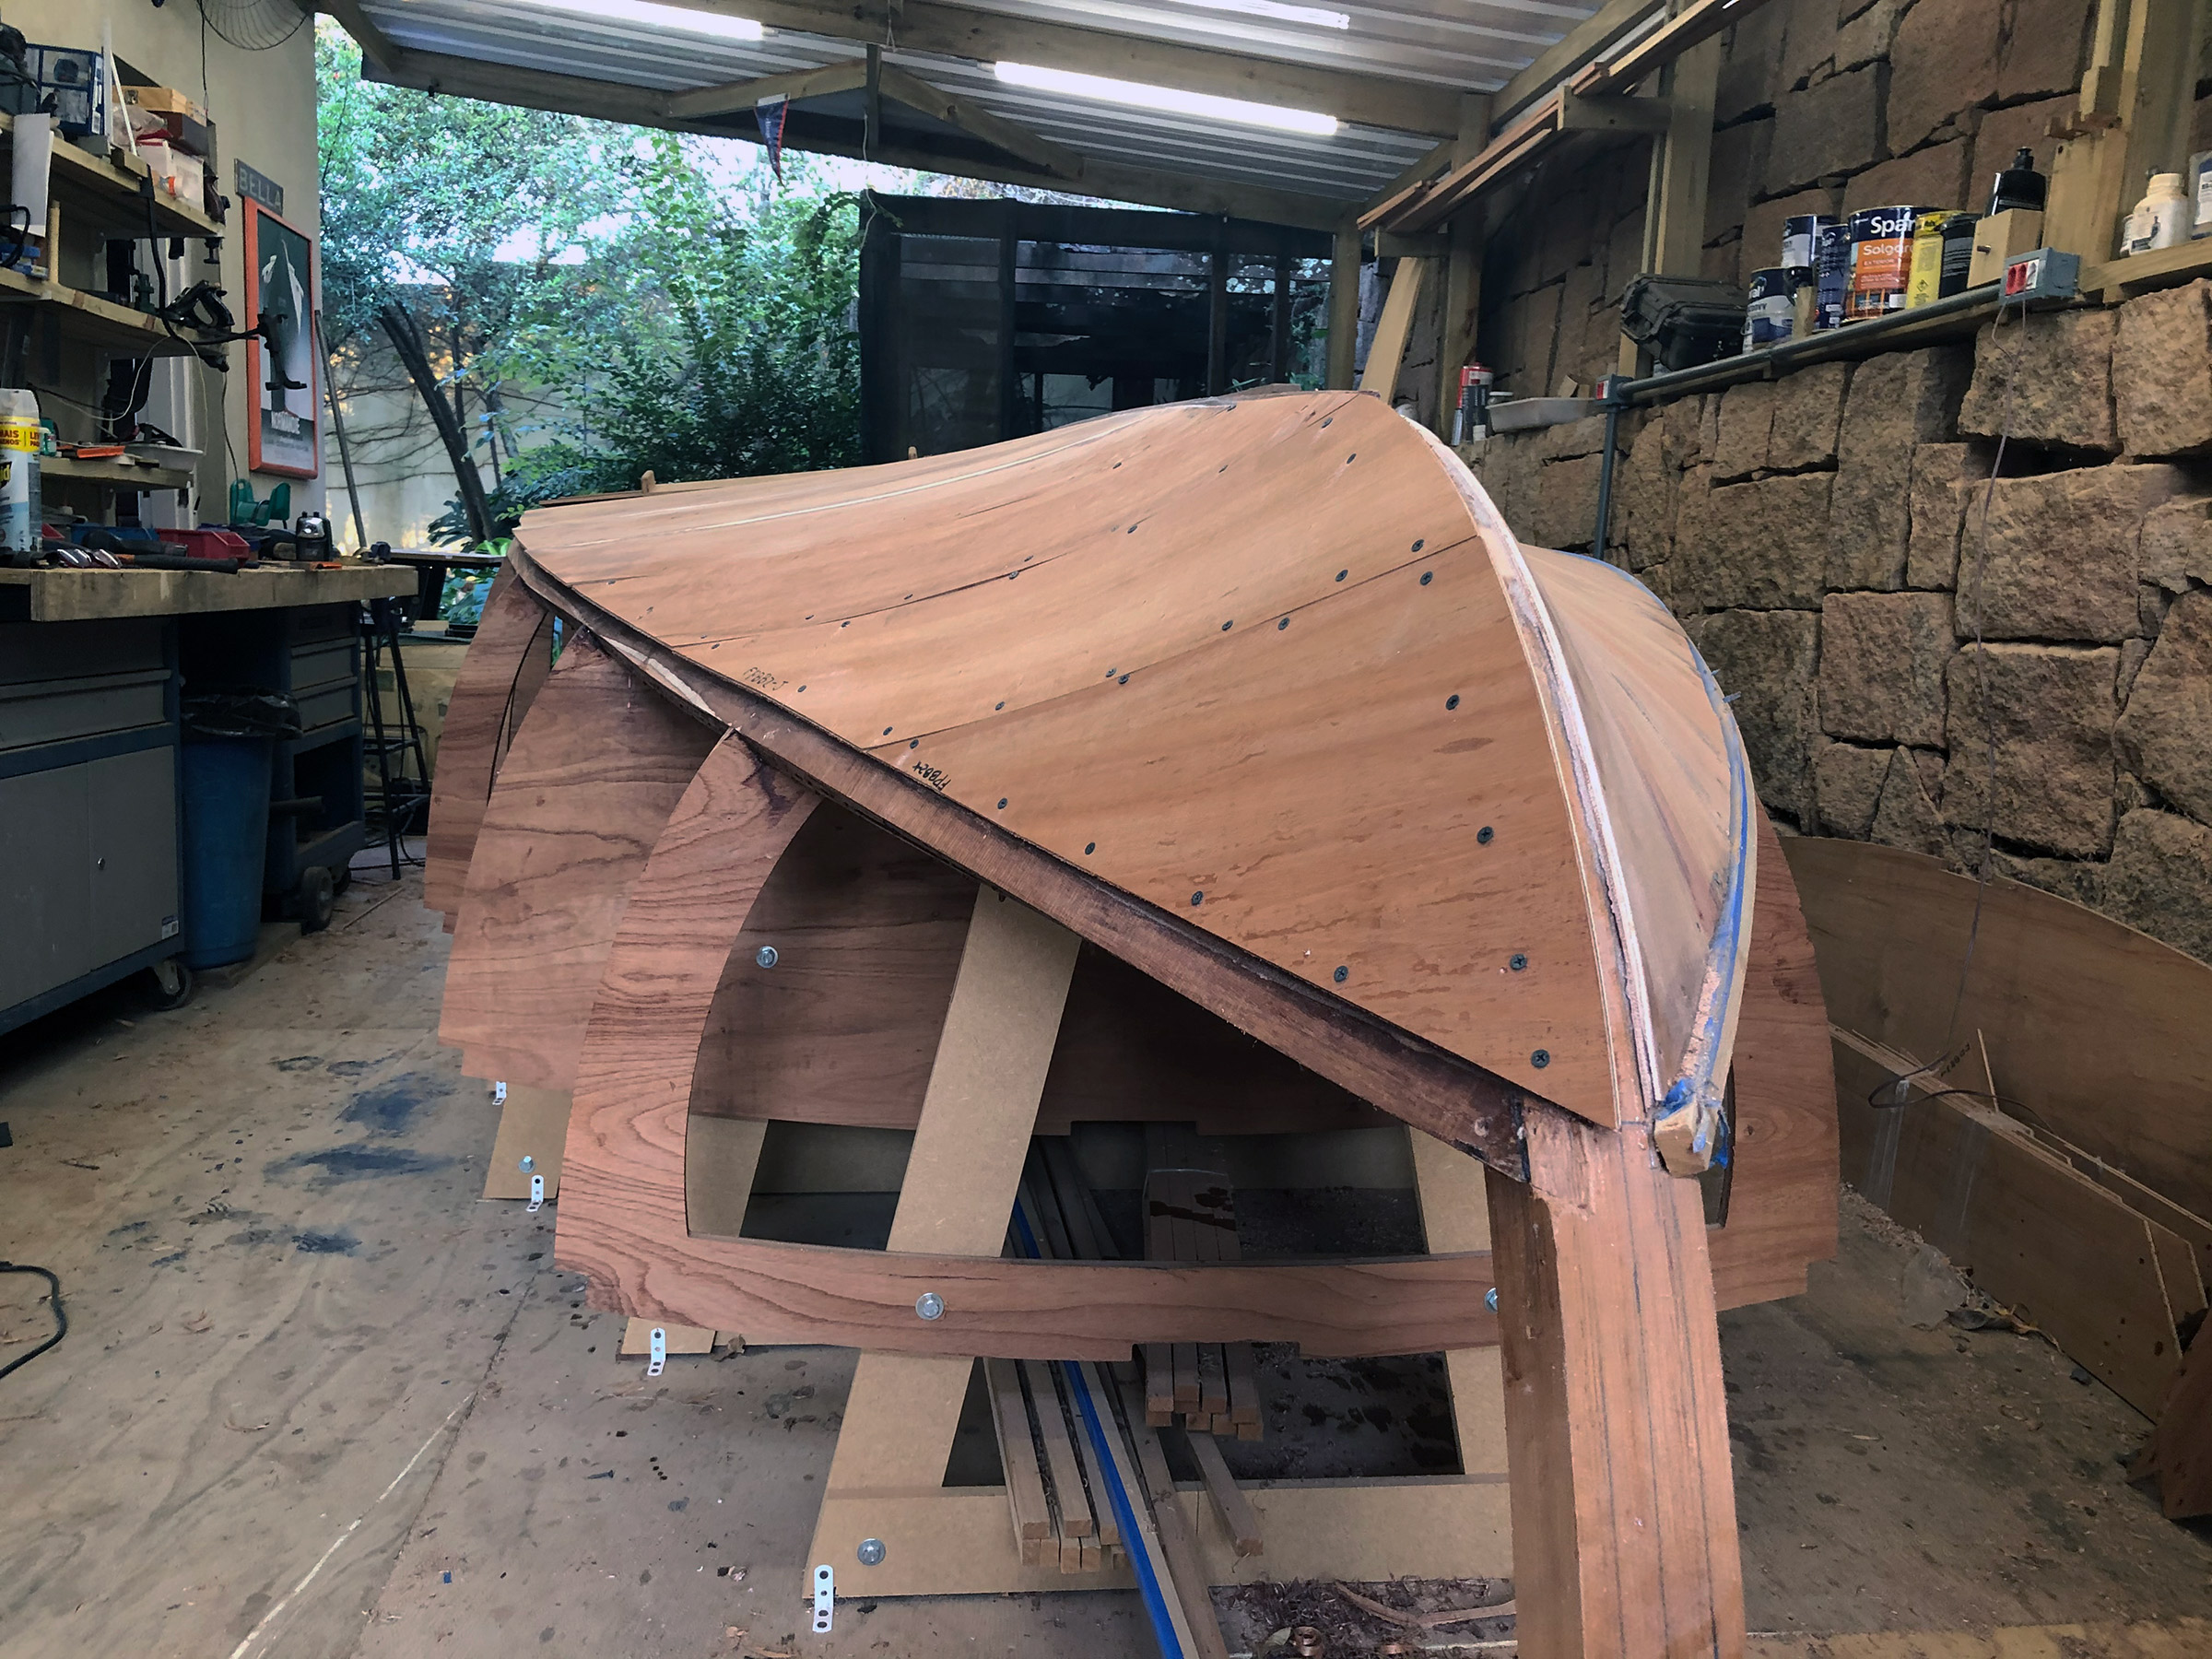
The bottom of the hull is marine plywood laid on the diagonal. In the after sections Oliver used two layers of 9mm plywood, but forward, where the curves are tighter, he used three layers of 6mm.
Oliver lives in Campinas, a city in the state of São Paulo in southeast Brazil. Campinas lies on the Tropic of Capricorn 90 miles inland from the country’s Atlantic coast and, Oliver says, has “relentless sun.” If he was going to continue boatbuilding, he needed a covered shop with plenty of ventilation and natural cooling. He chose a spot between a stone wall and his house. “Shielded by insulated steel roofing and sturdy plywood flooring, I left it open at both ends but installed retractable vinyl curtains to keep out the rain and to stop any dust flying around when I’m painting. I equipped the shop with basic woodworking and high-end power tools—a tablesaw, thickness planer, miter saw, bandsaw—and various handheld tools. I’m particularly proud of my hand planes, which I maintain with great care. I call the shop my Sterling Maker Space.”
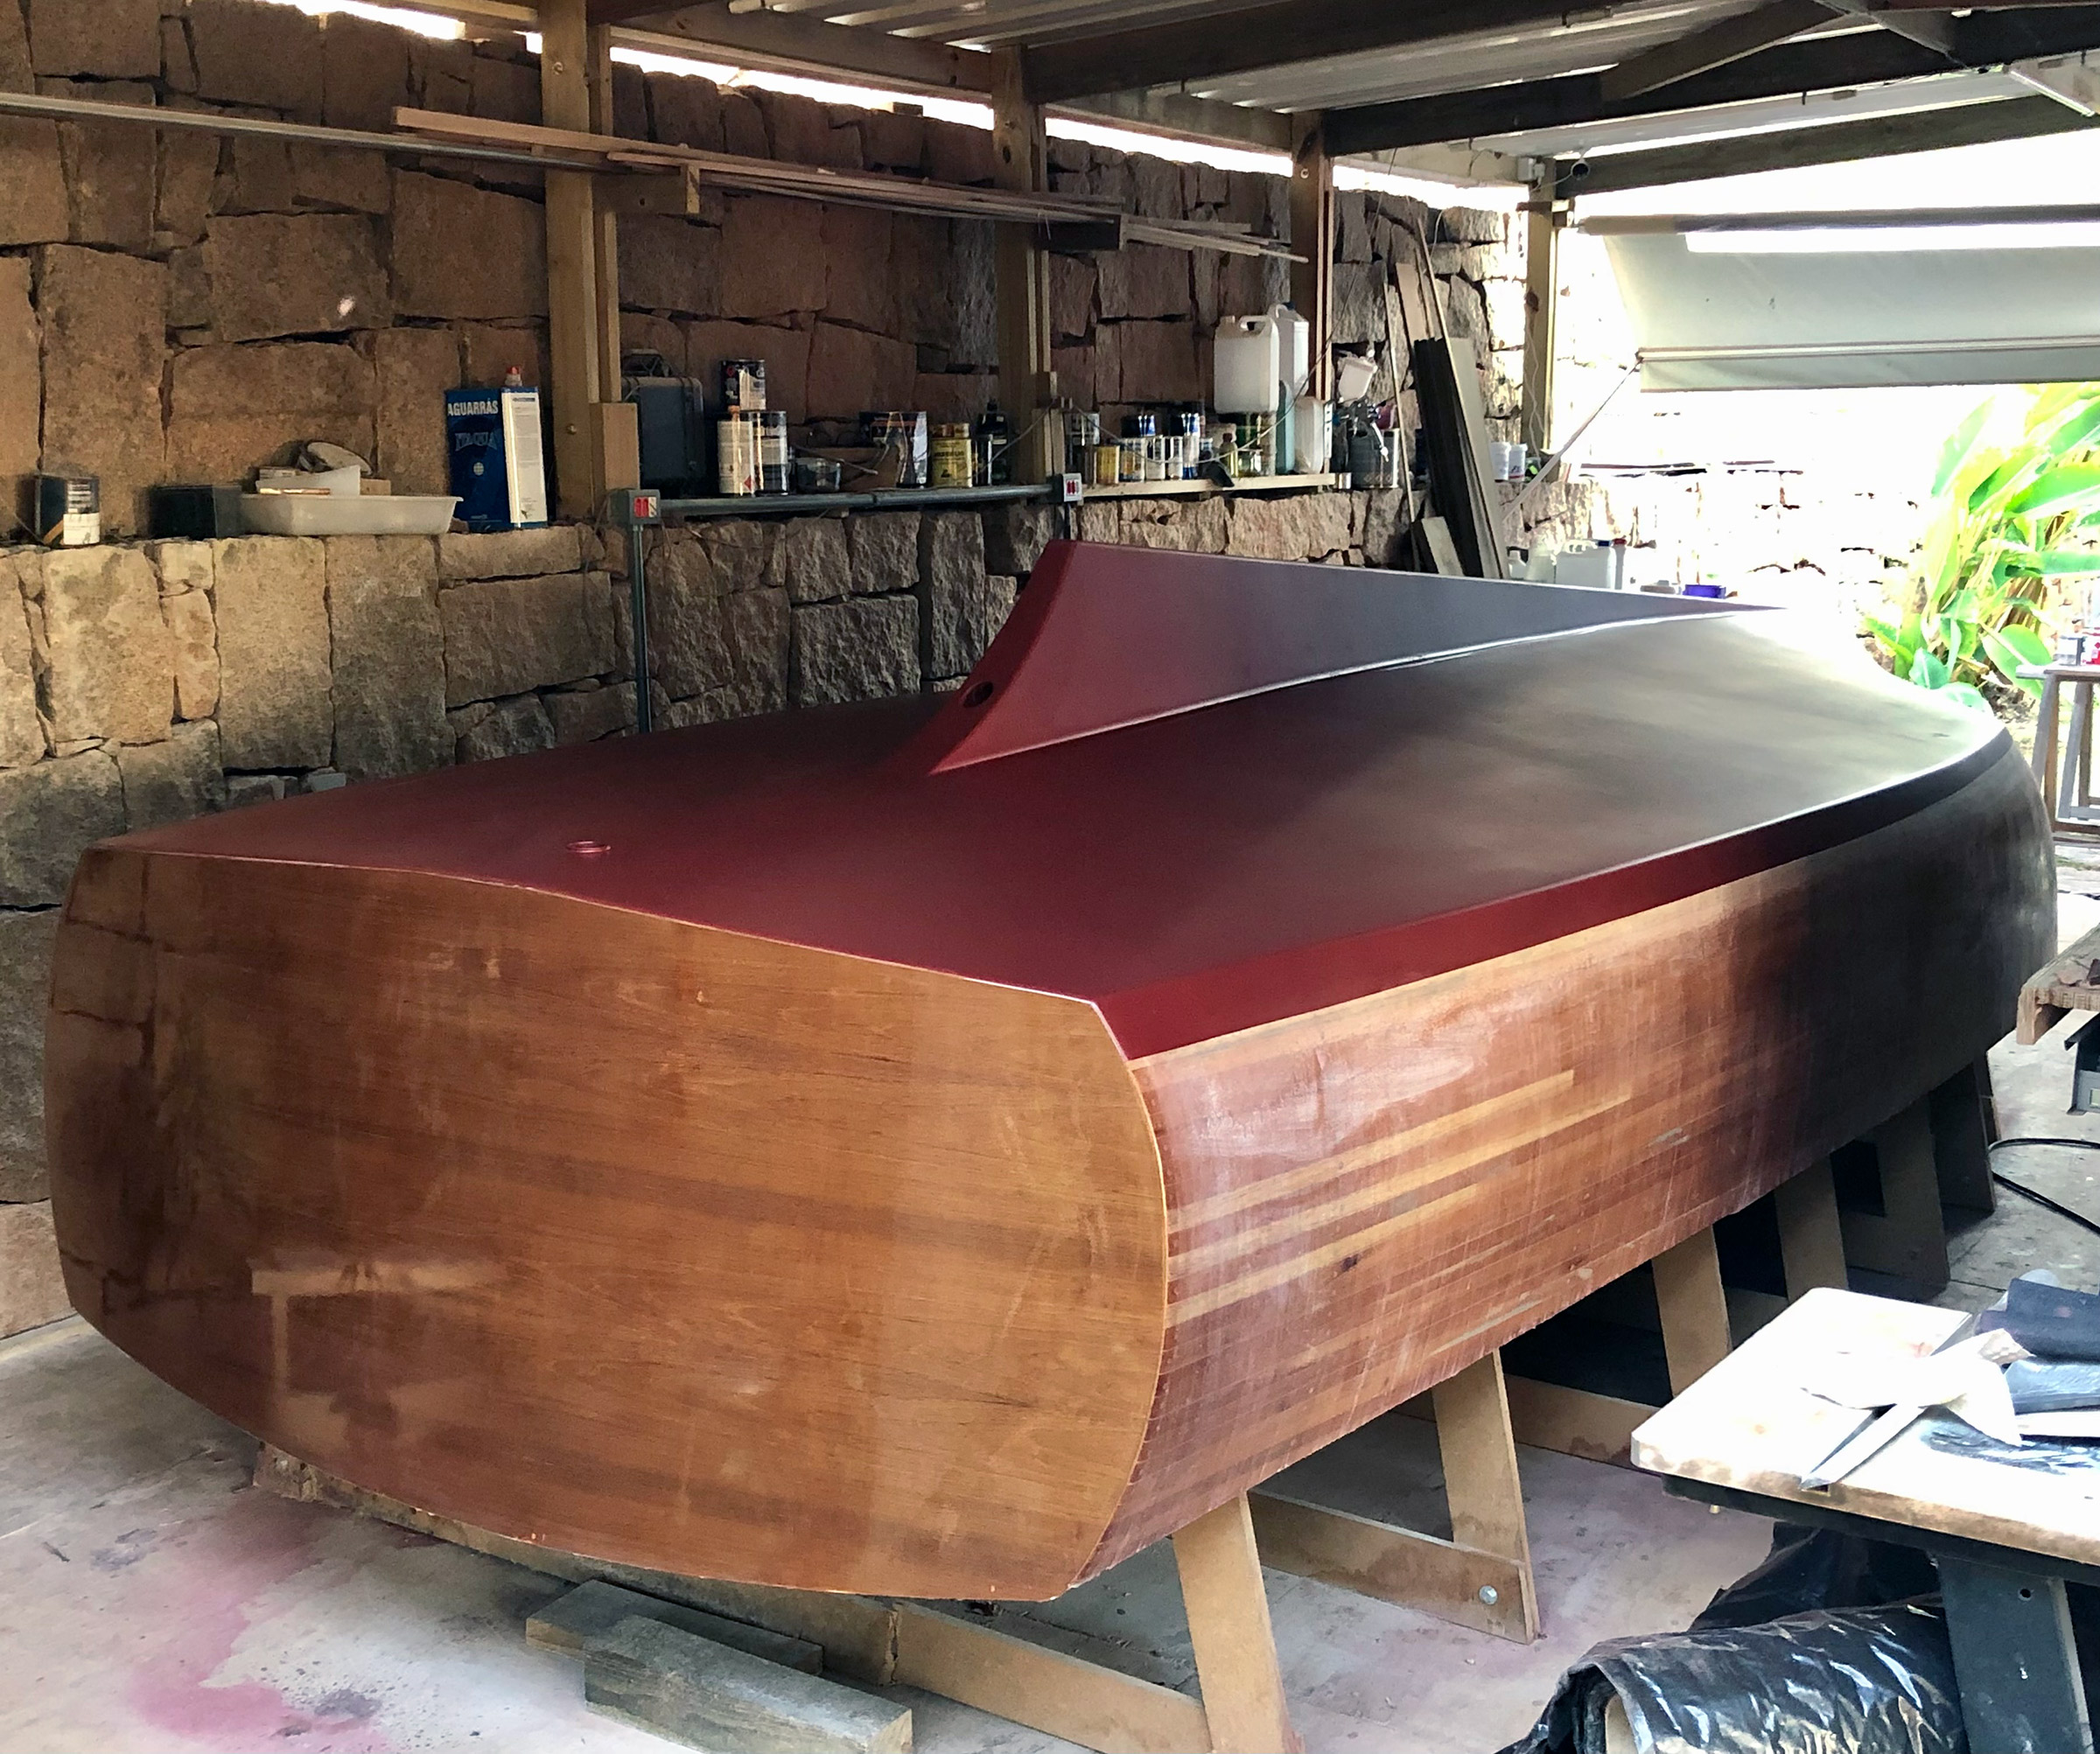
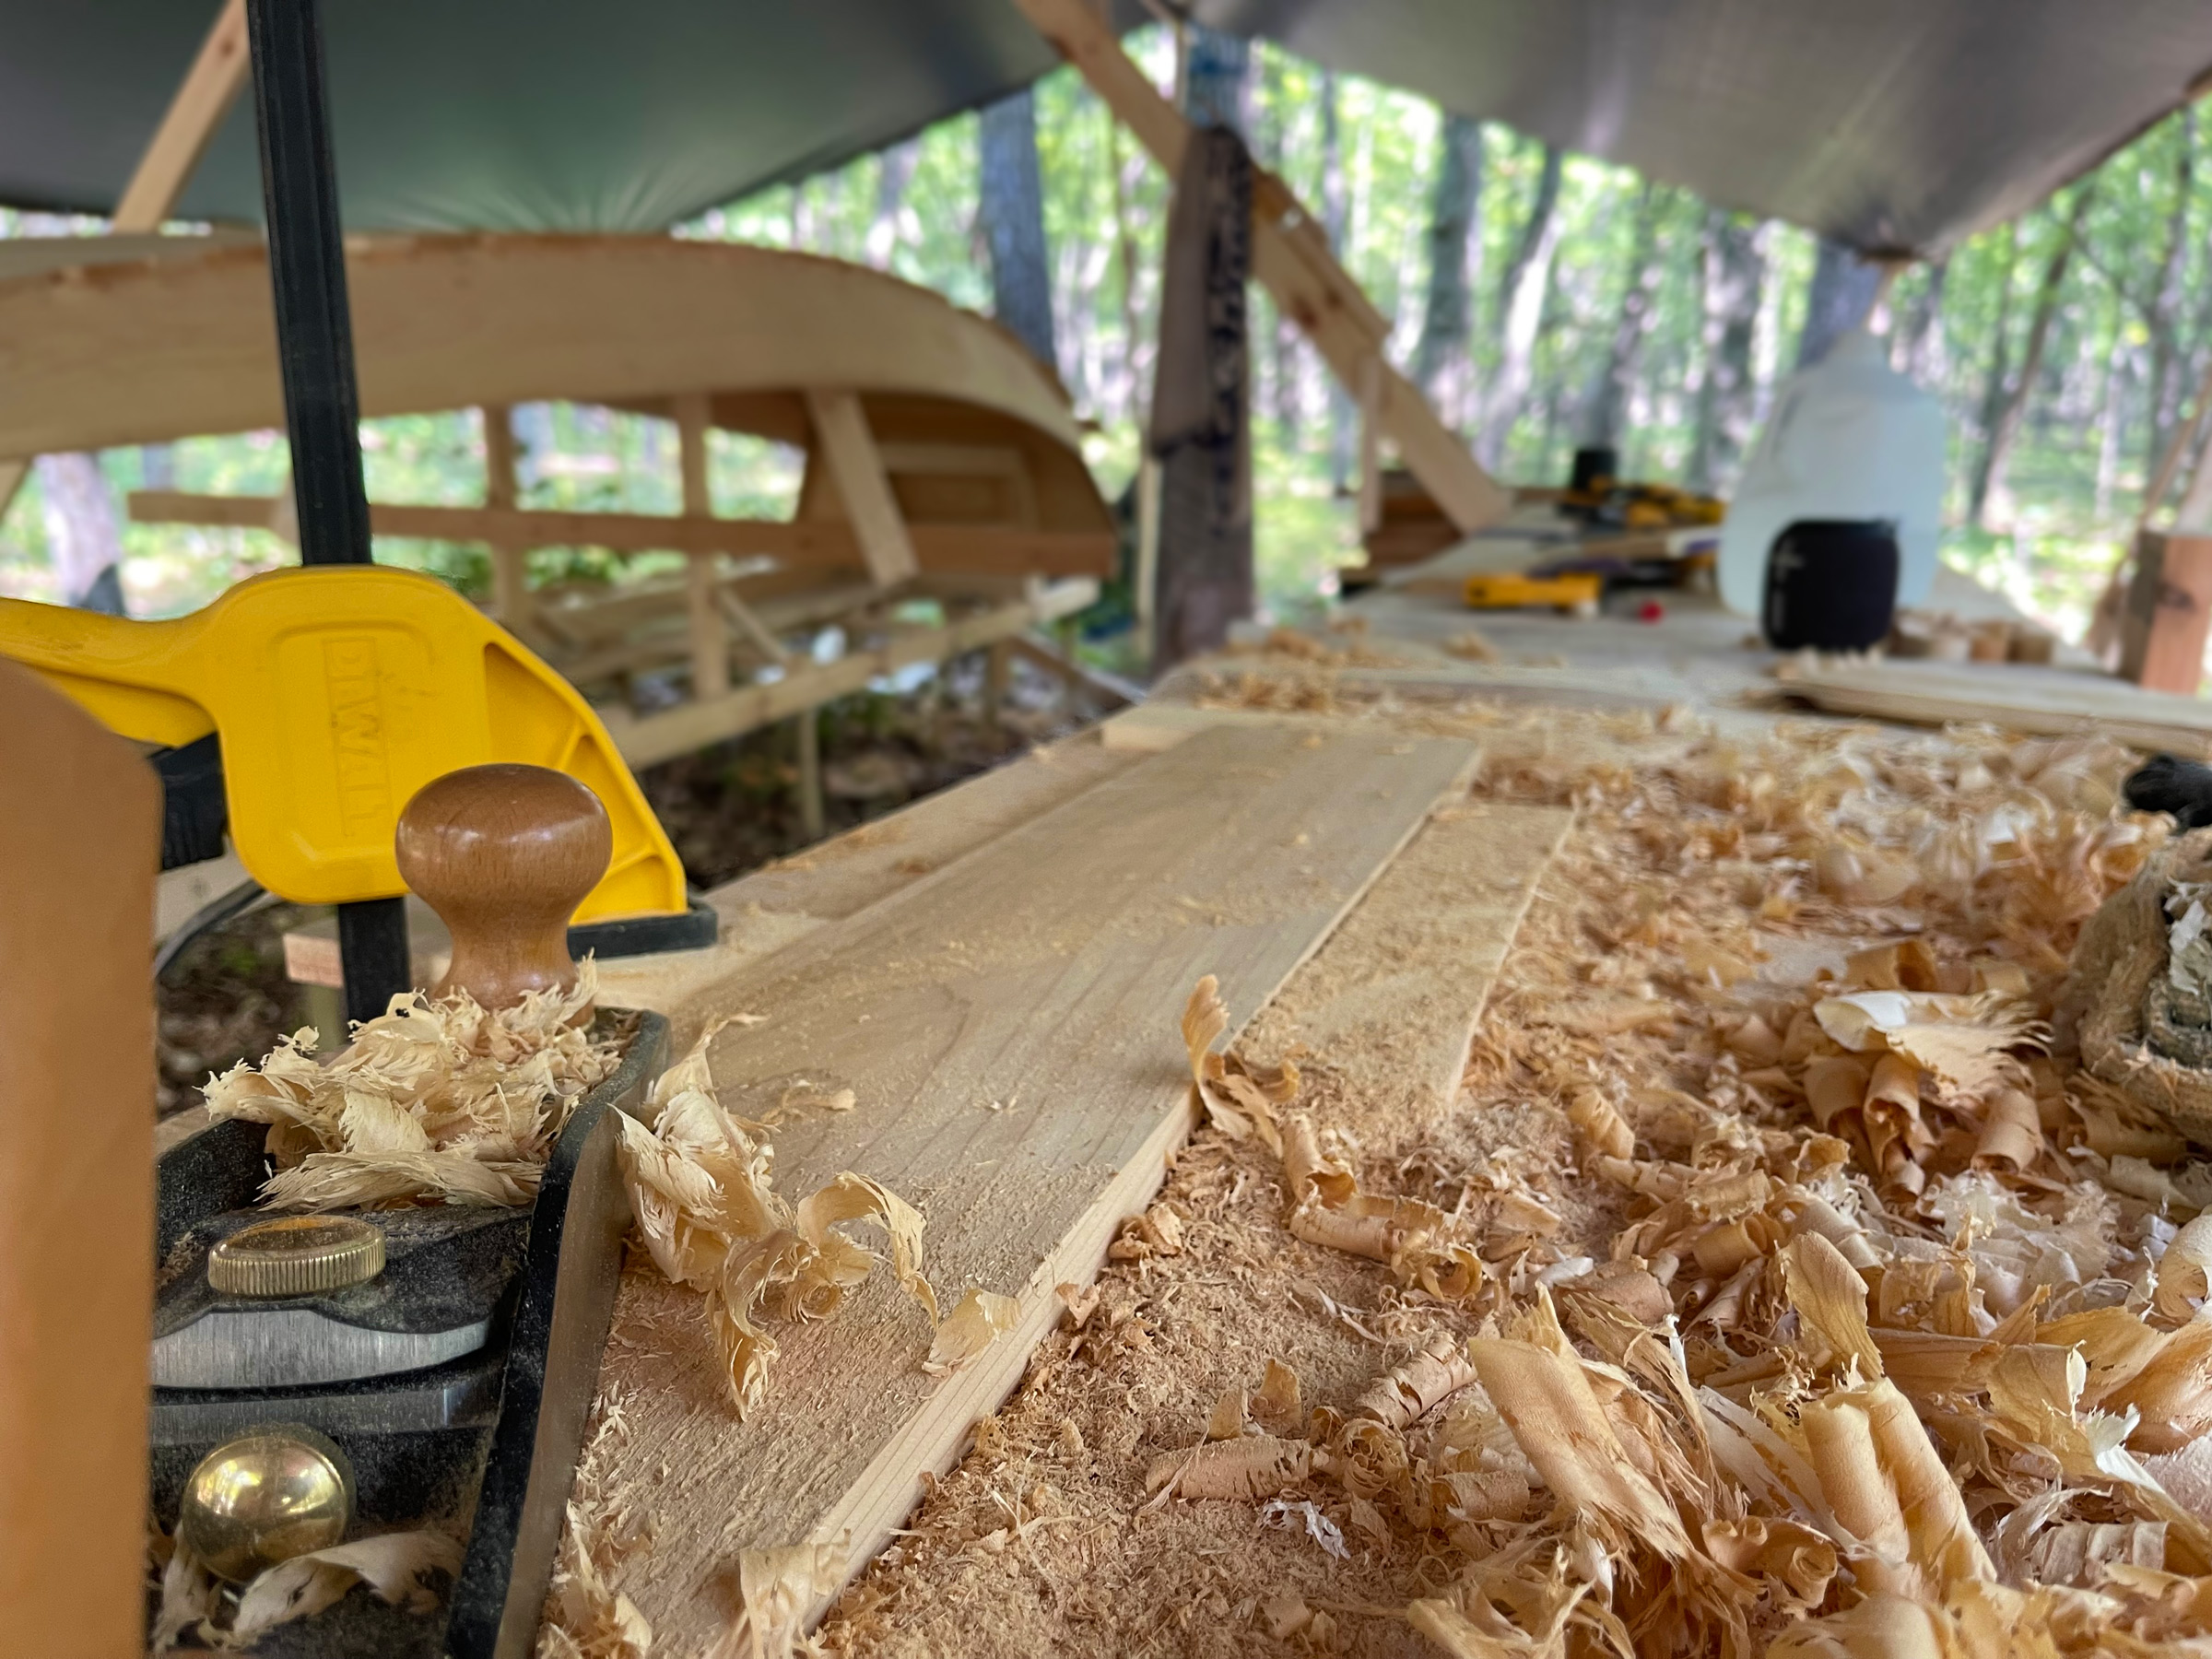
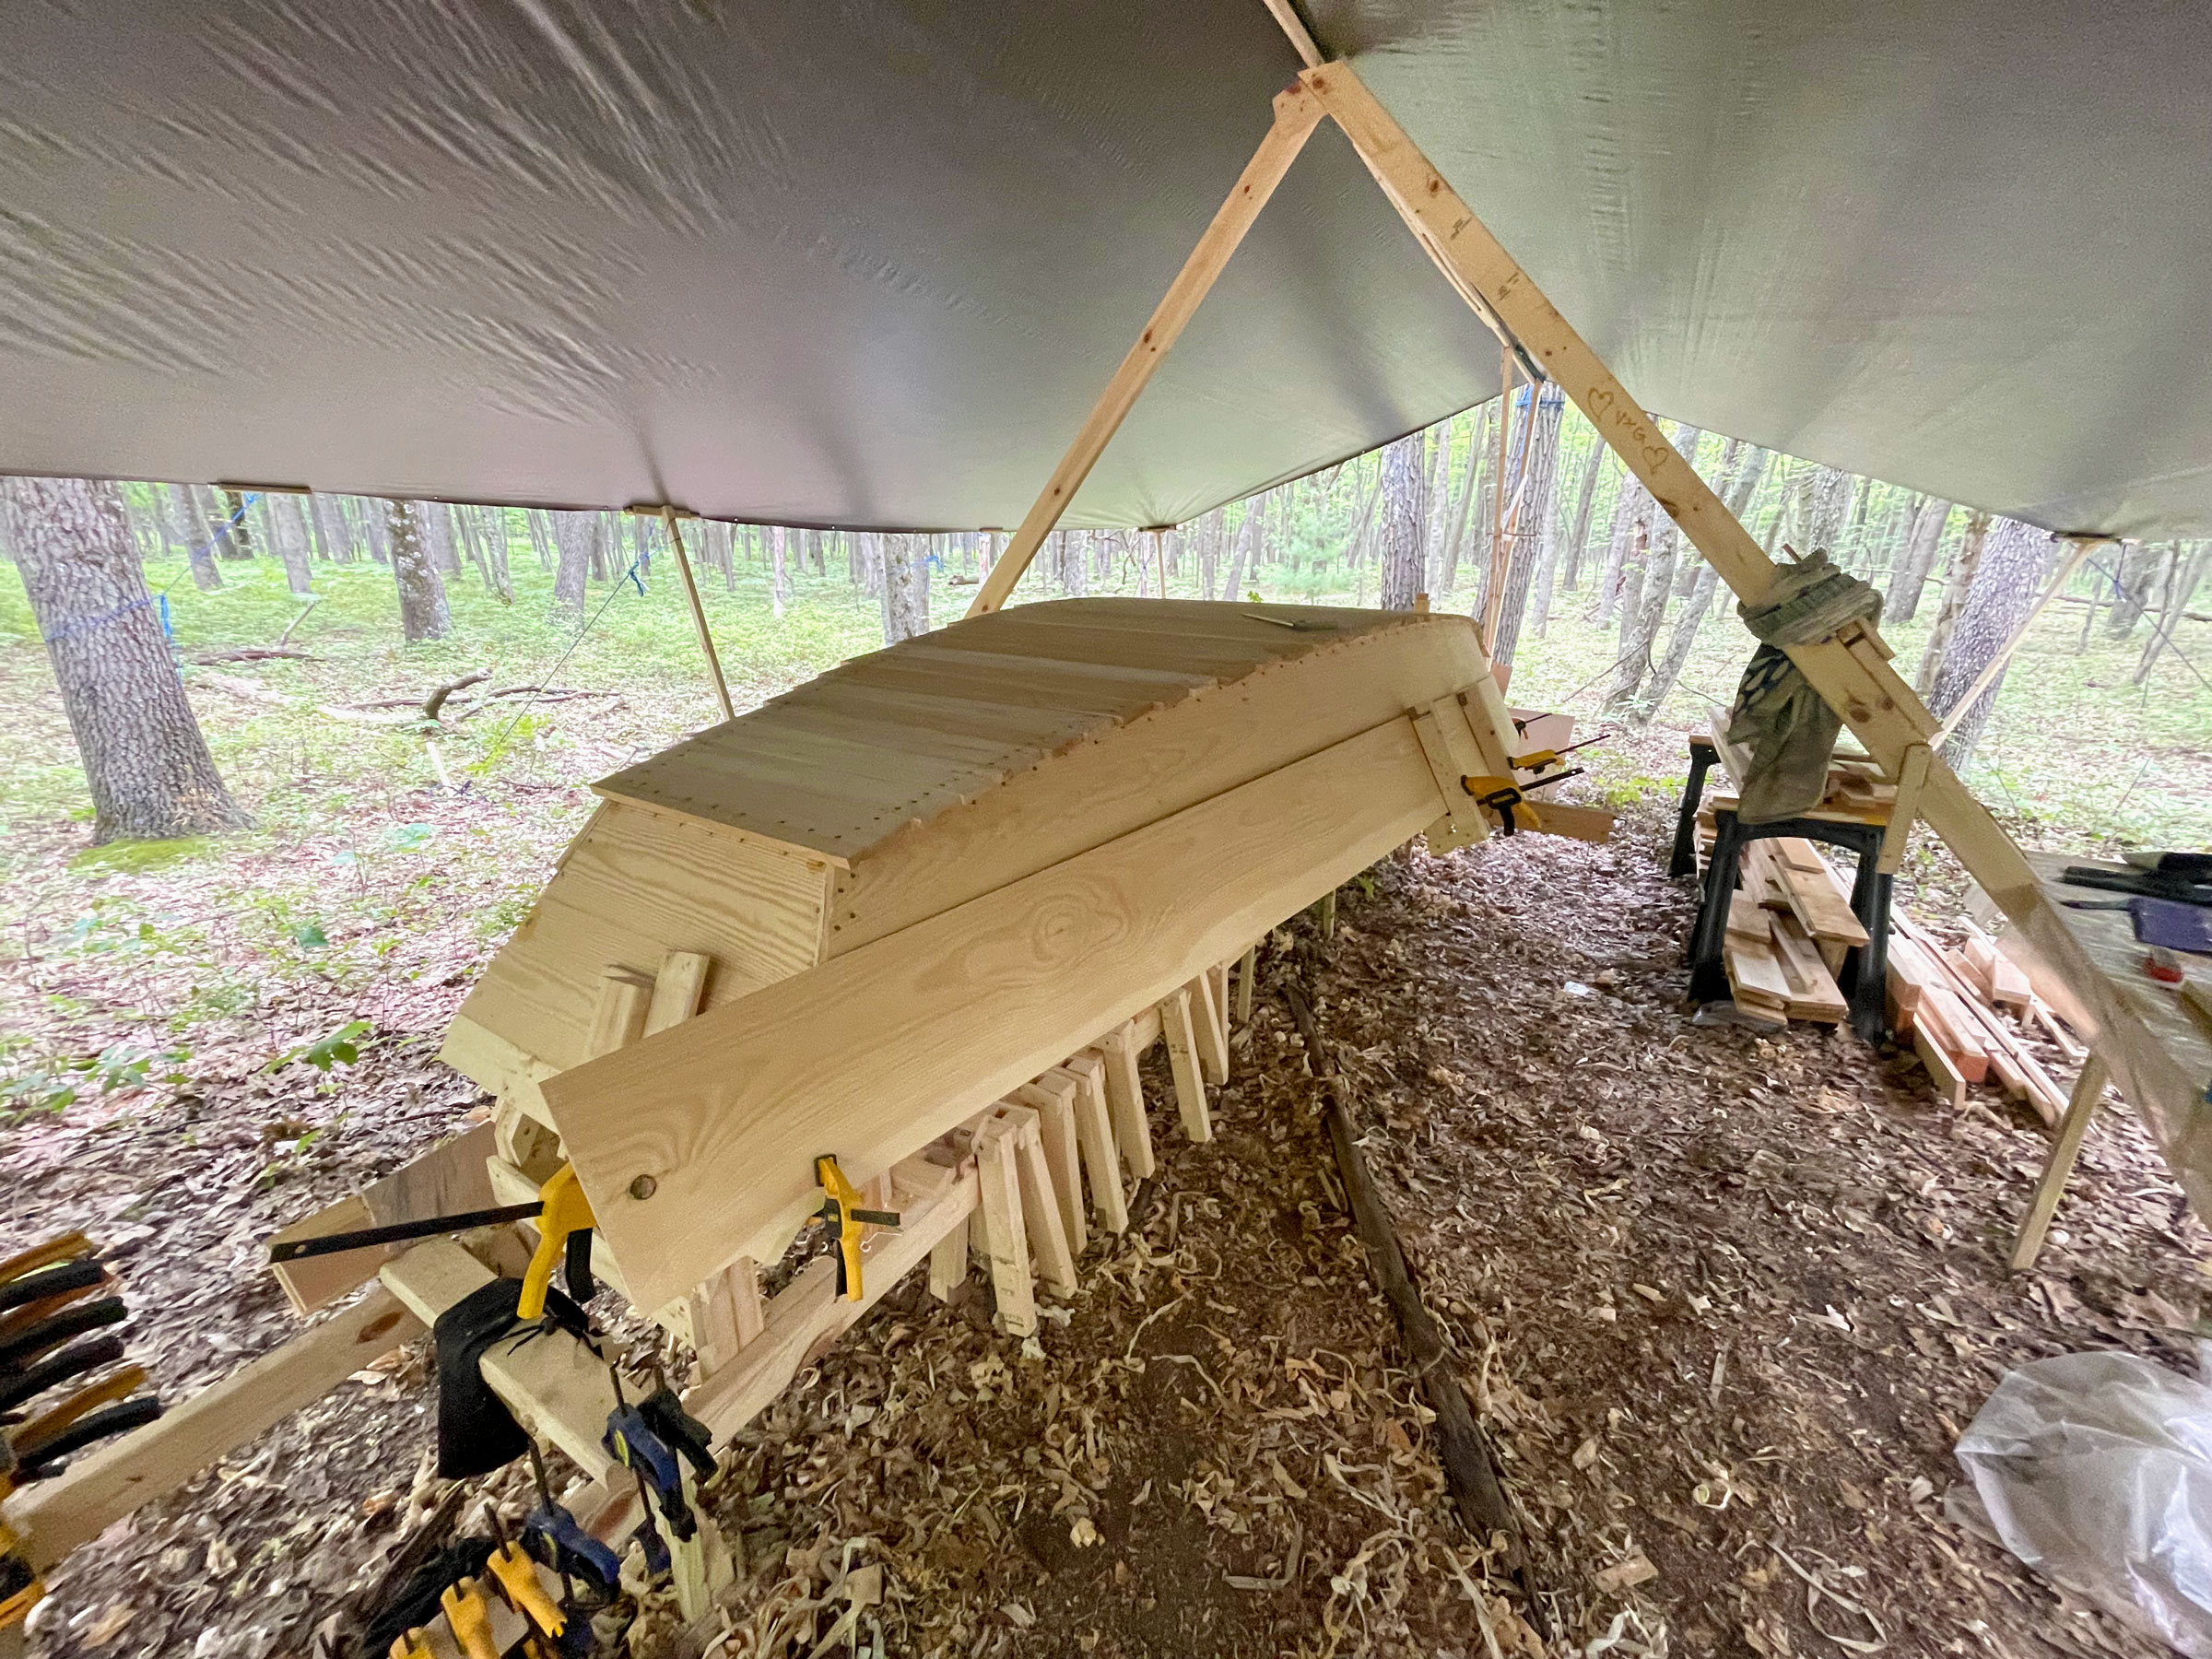
With the hull construction complete, Oliver applied the bottom paint before turning the boat over. The topsides are strip-planked cedar coated in fiberglass and epoxy. The transom (which he left bright-finished) is teak.
Oliver’s first at-home build was a 16′ Duck Trap Wherry, designed by Walt Simmons of Lincolnville, Maine. “She was built using modern methods—epoxy, plywood, fiberglass—but she’s classic in appearance…altogether more elegant than my first project,” Oliver says. But his most recent build has been his most ambitious to date.
As construction continued on the now-upright hull, Oliver took his time to check the ergonomics of his interior-layout design. Here he is seen figuring out the exact position for the chemical toilet, which would be concealed beneath the foredeck.
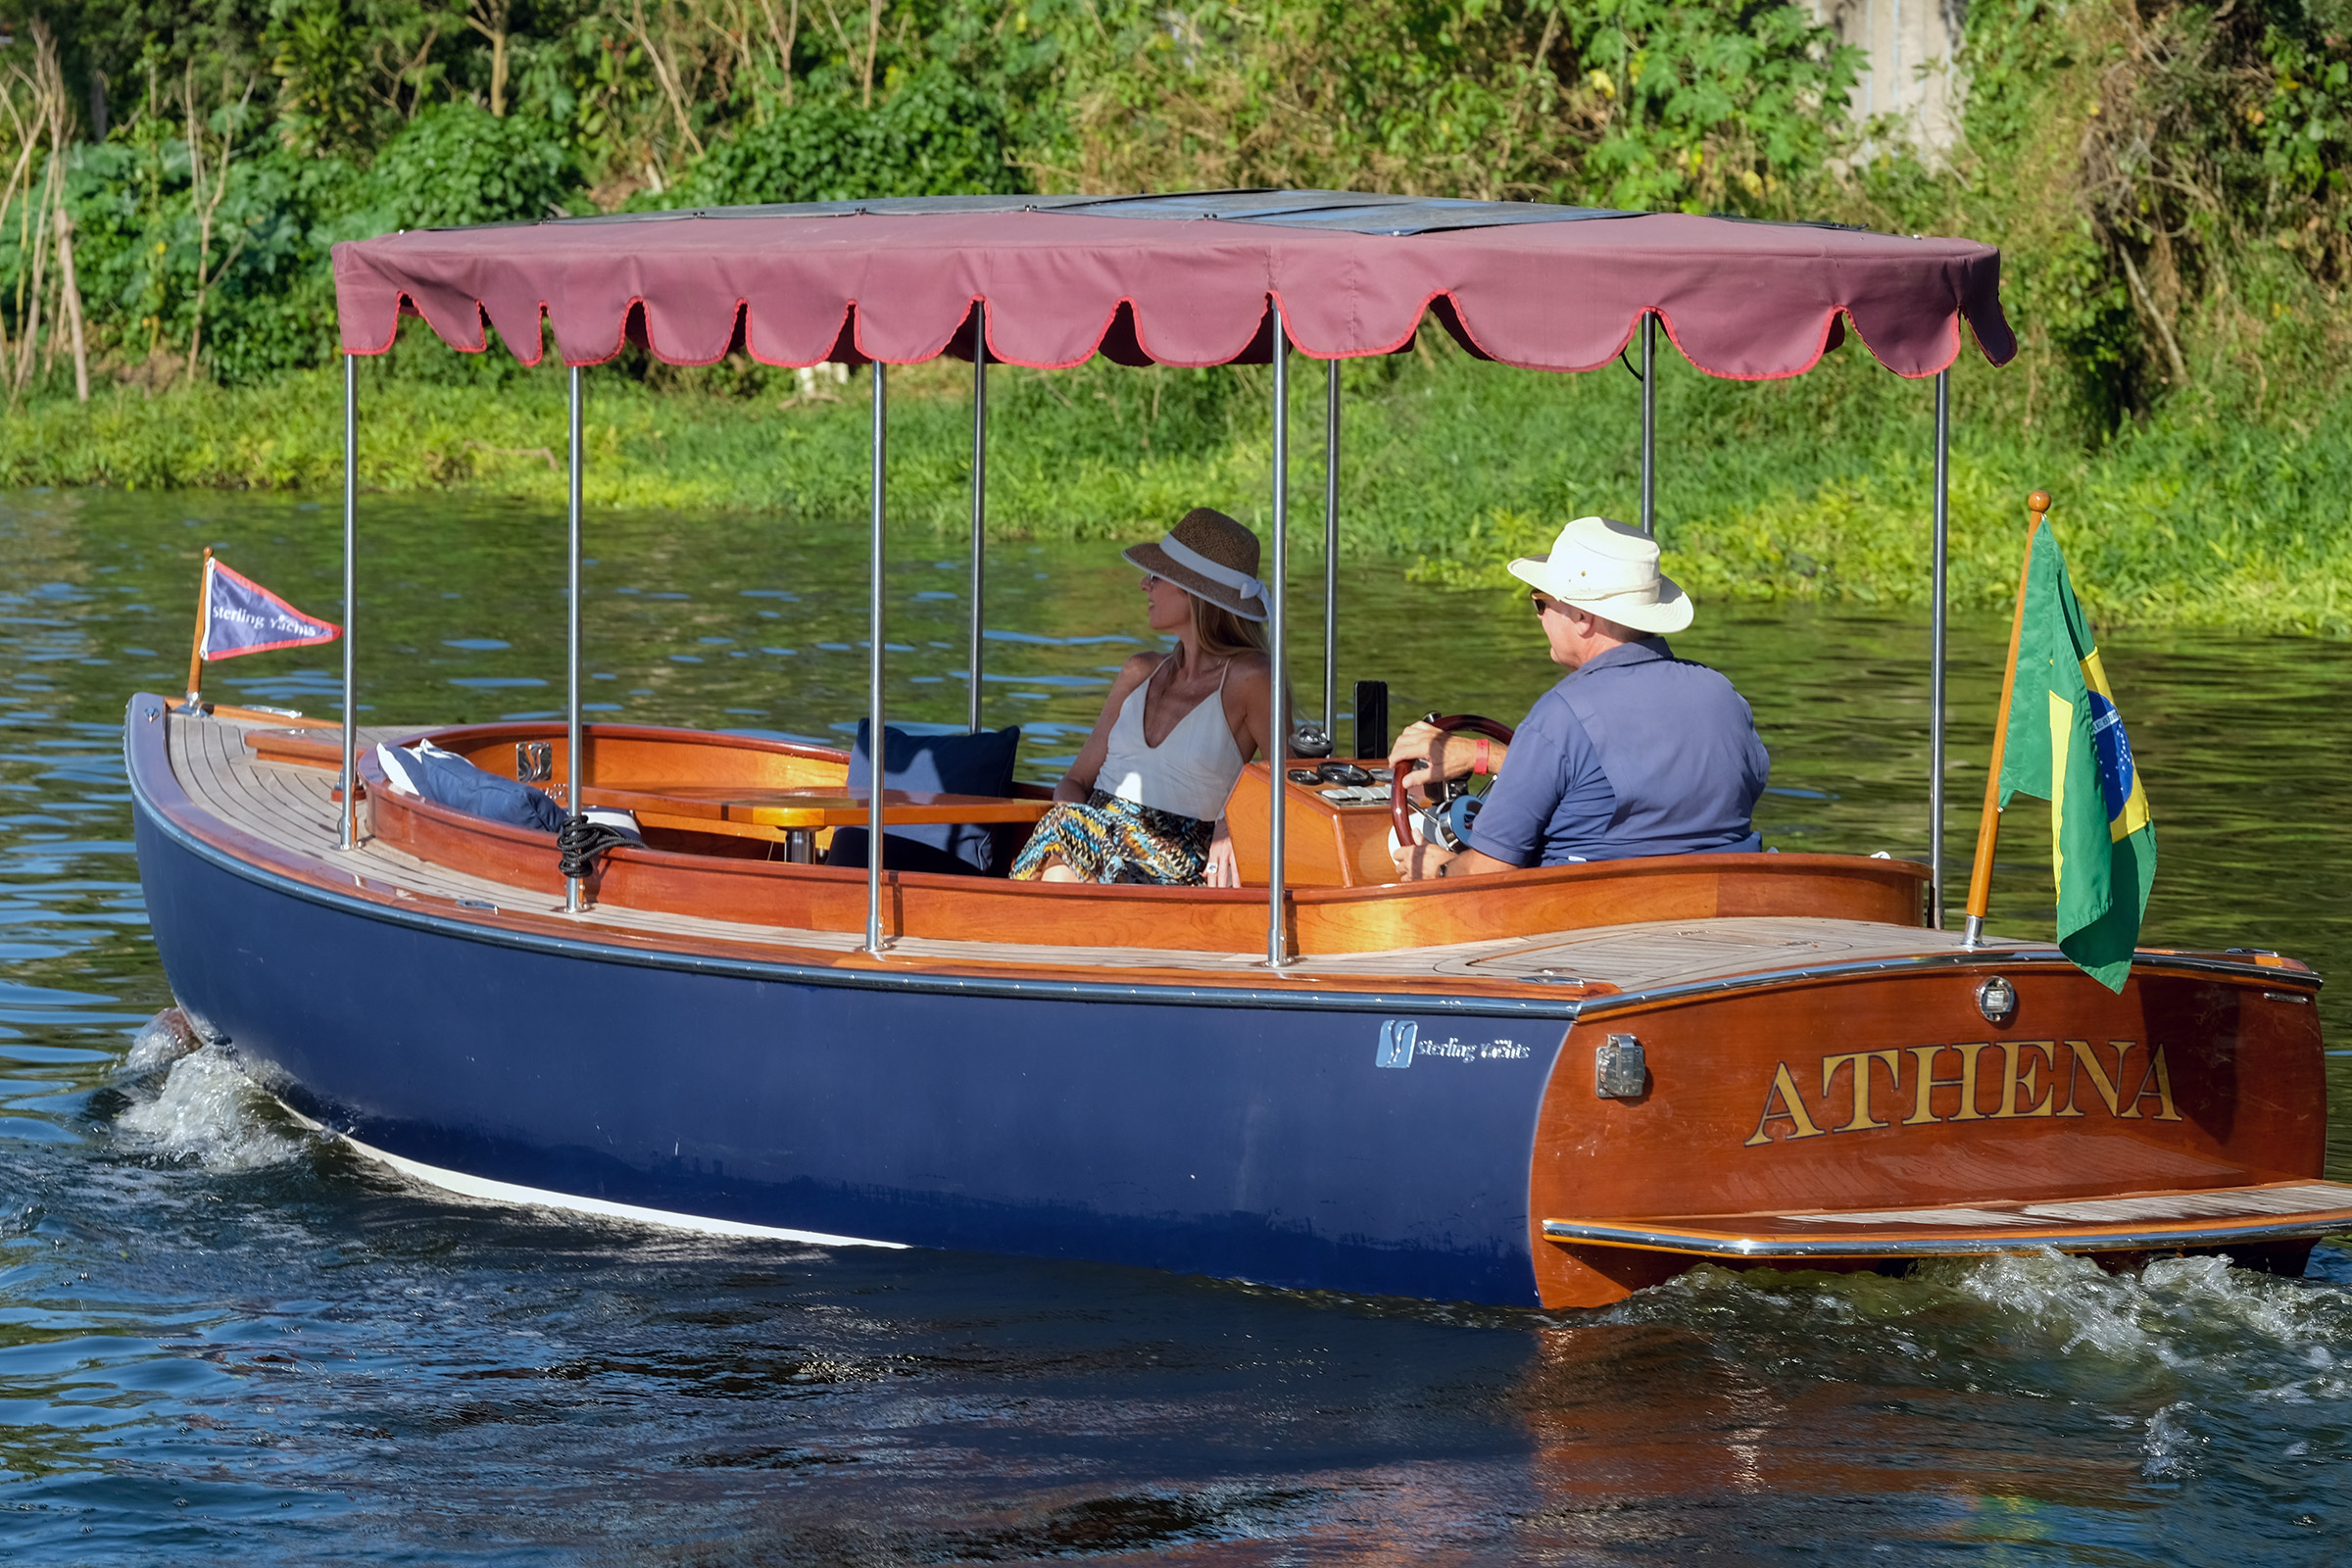
He had in his possession a Vetus EP2200 electric motor, and it sparked the idea of building a customized harbor launch. He collaborated with Walt Simmons and together they altered the plans for the Duck Trap Launch to fit Oliver’s vision. Construction would closely follow the Duck Trap original, but propulsion would move from an outboard engine with center console to the inboard electric Vetus motor. The depth of the keel would be increased to protect the gear and rudder, the overall length would be stretched by 3′ to 20′, and the interior would be redesigned. In the original design the steering position was centrally located, but Oliver was keen to maximize passenger space and comfort in his launch so moved the console aft, leaving plenty of seating space forward for four passengers and maintaining seating for two more either side of the helmsperson. He also added an awning that provides shade along the entire length of the cockpit and offers a platform for an array of solar panels.
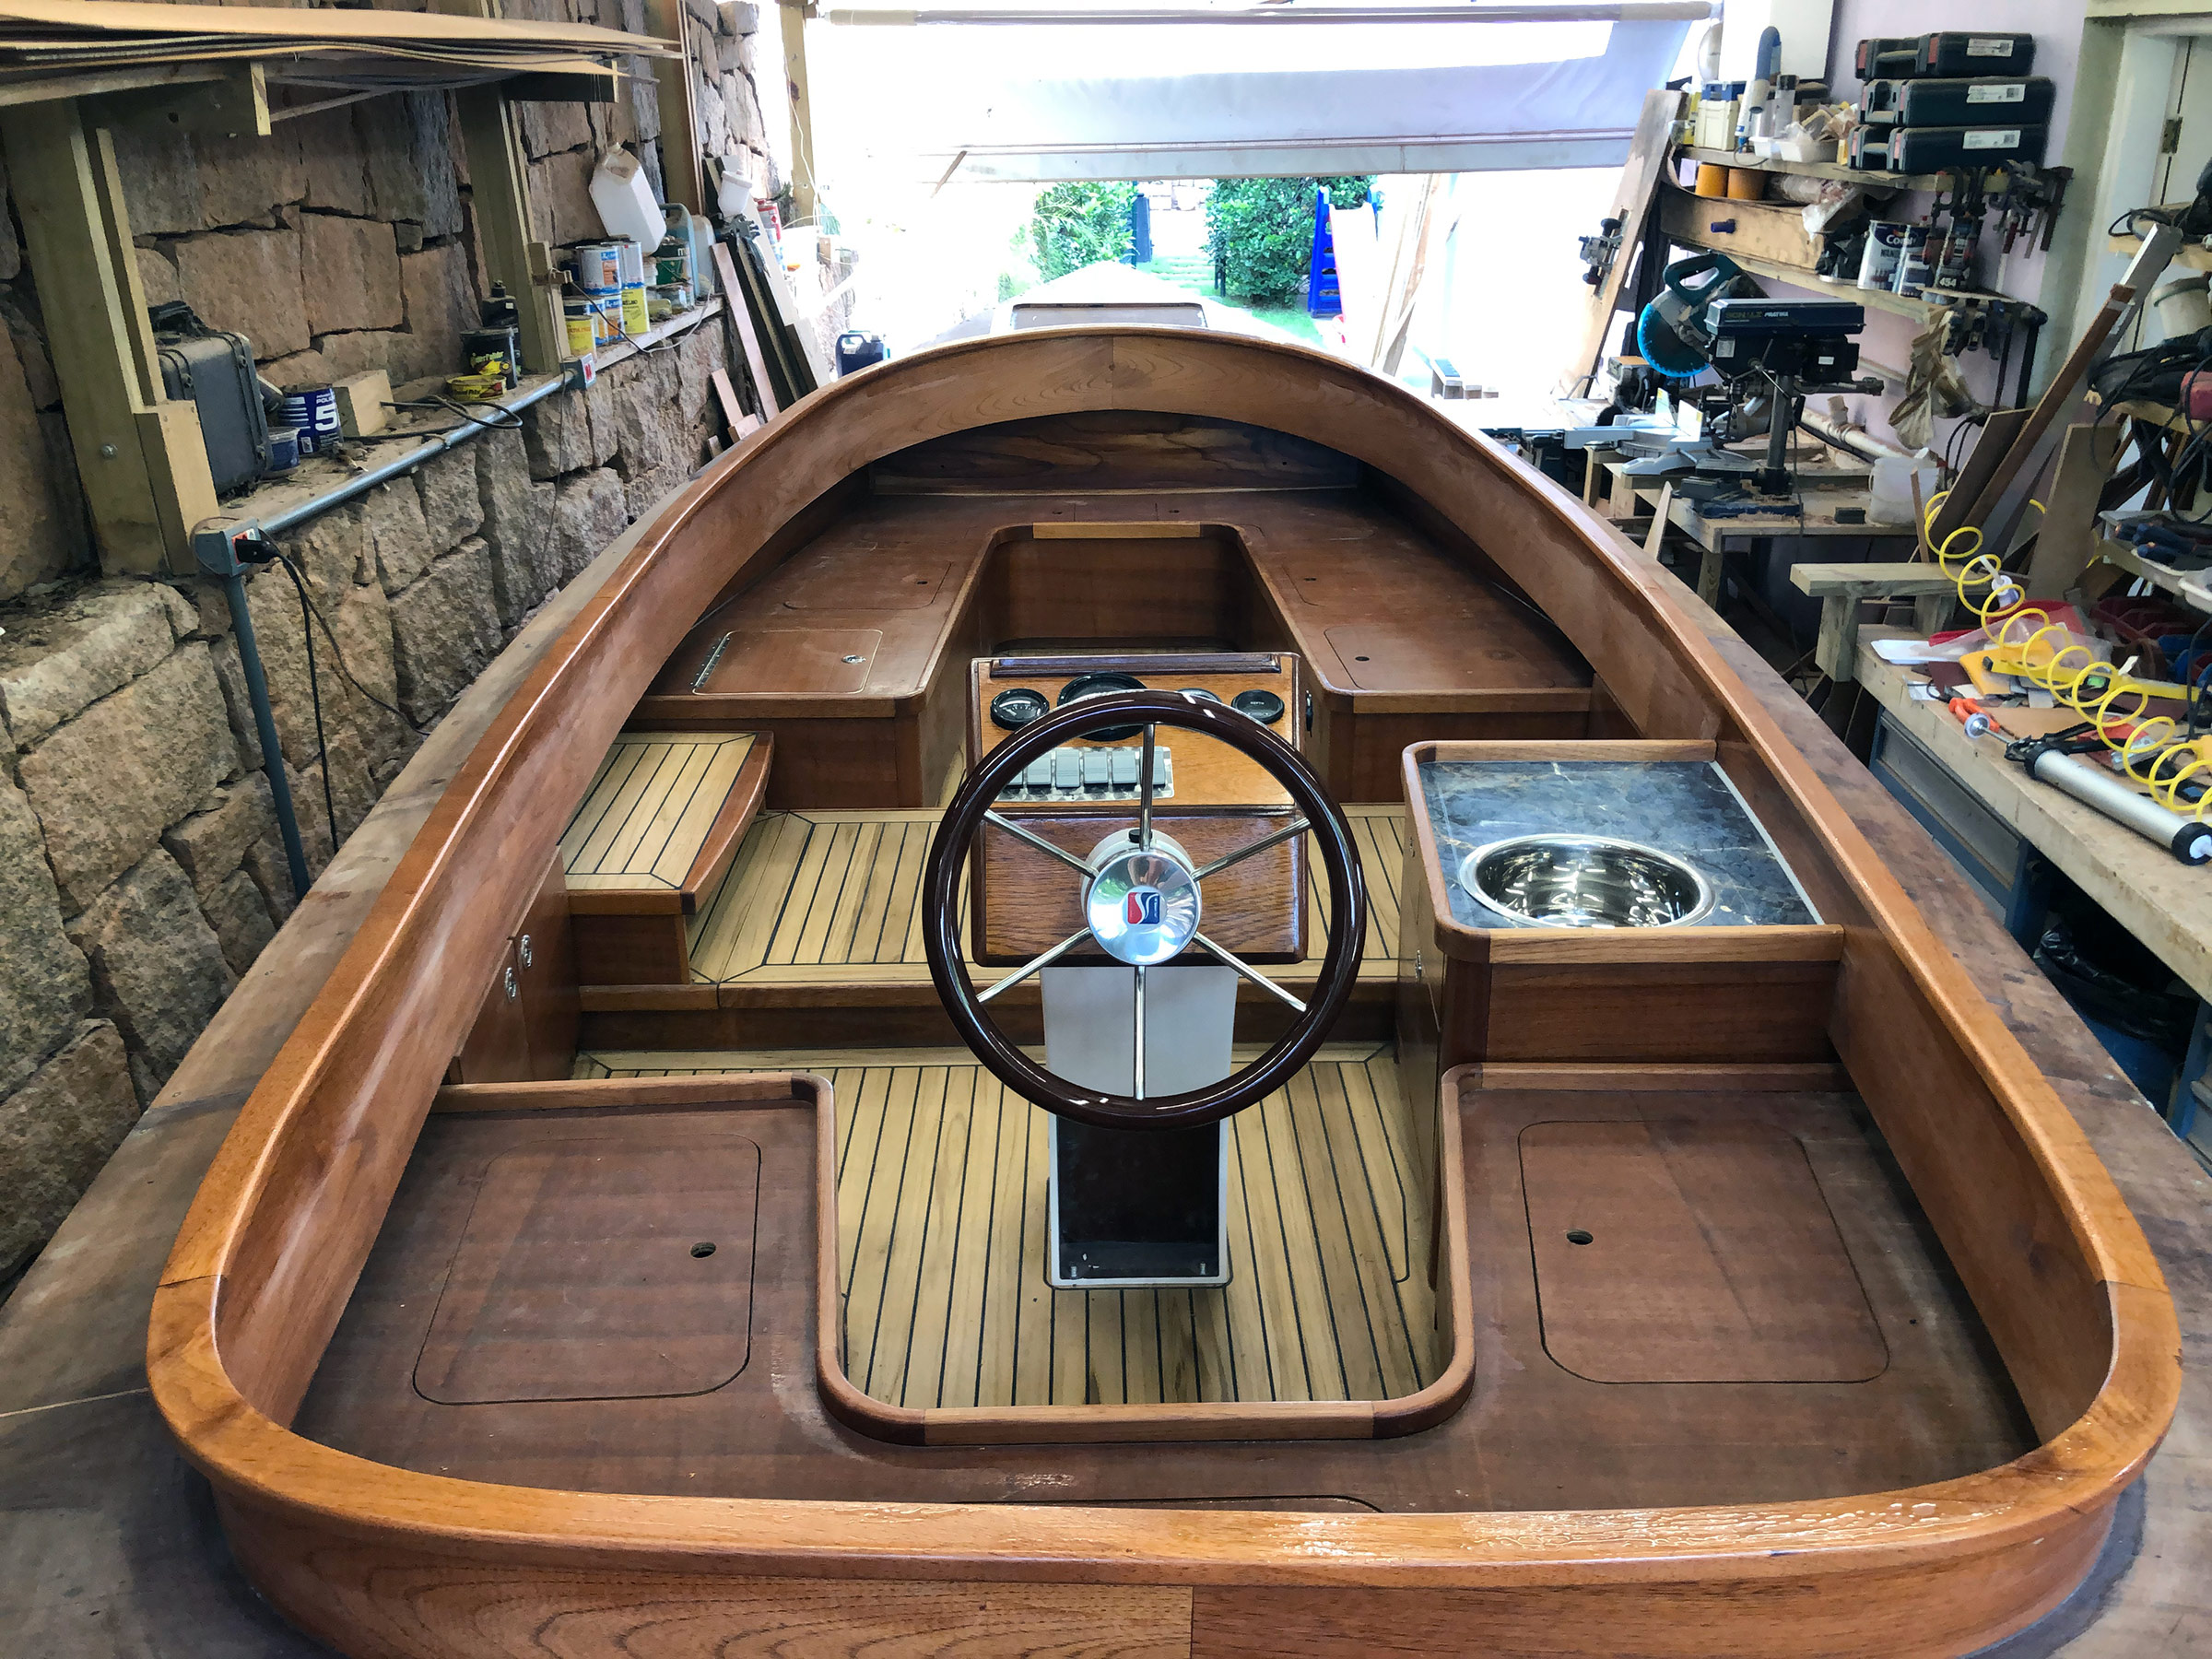
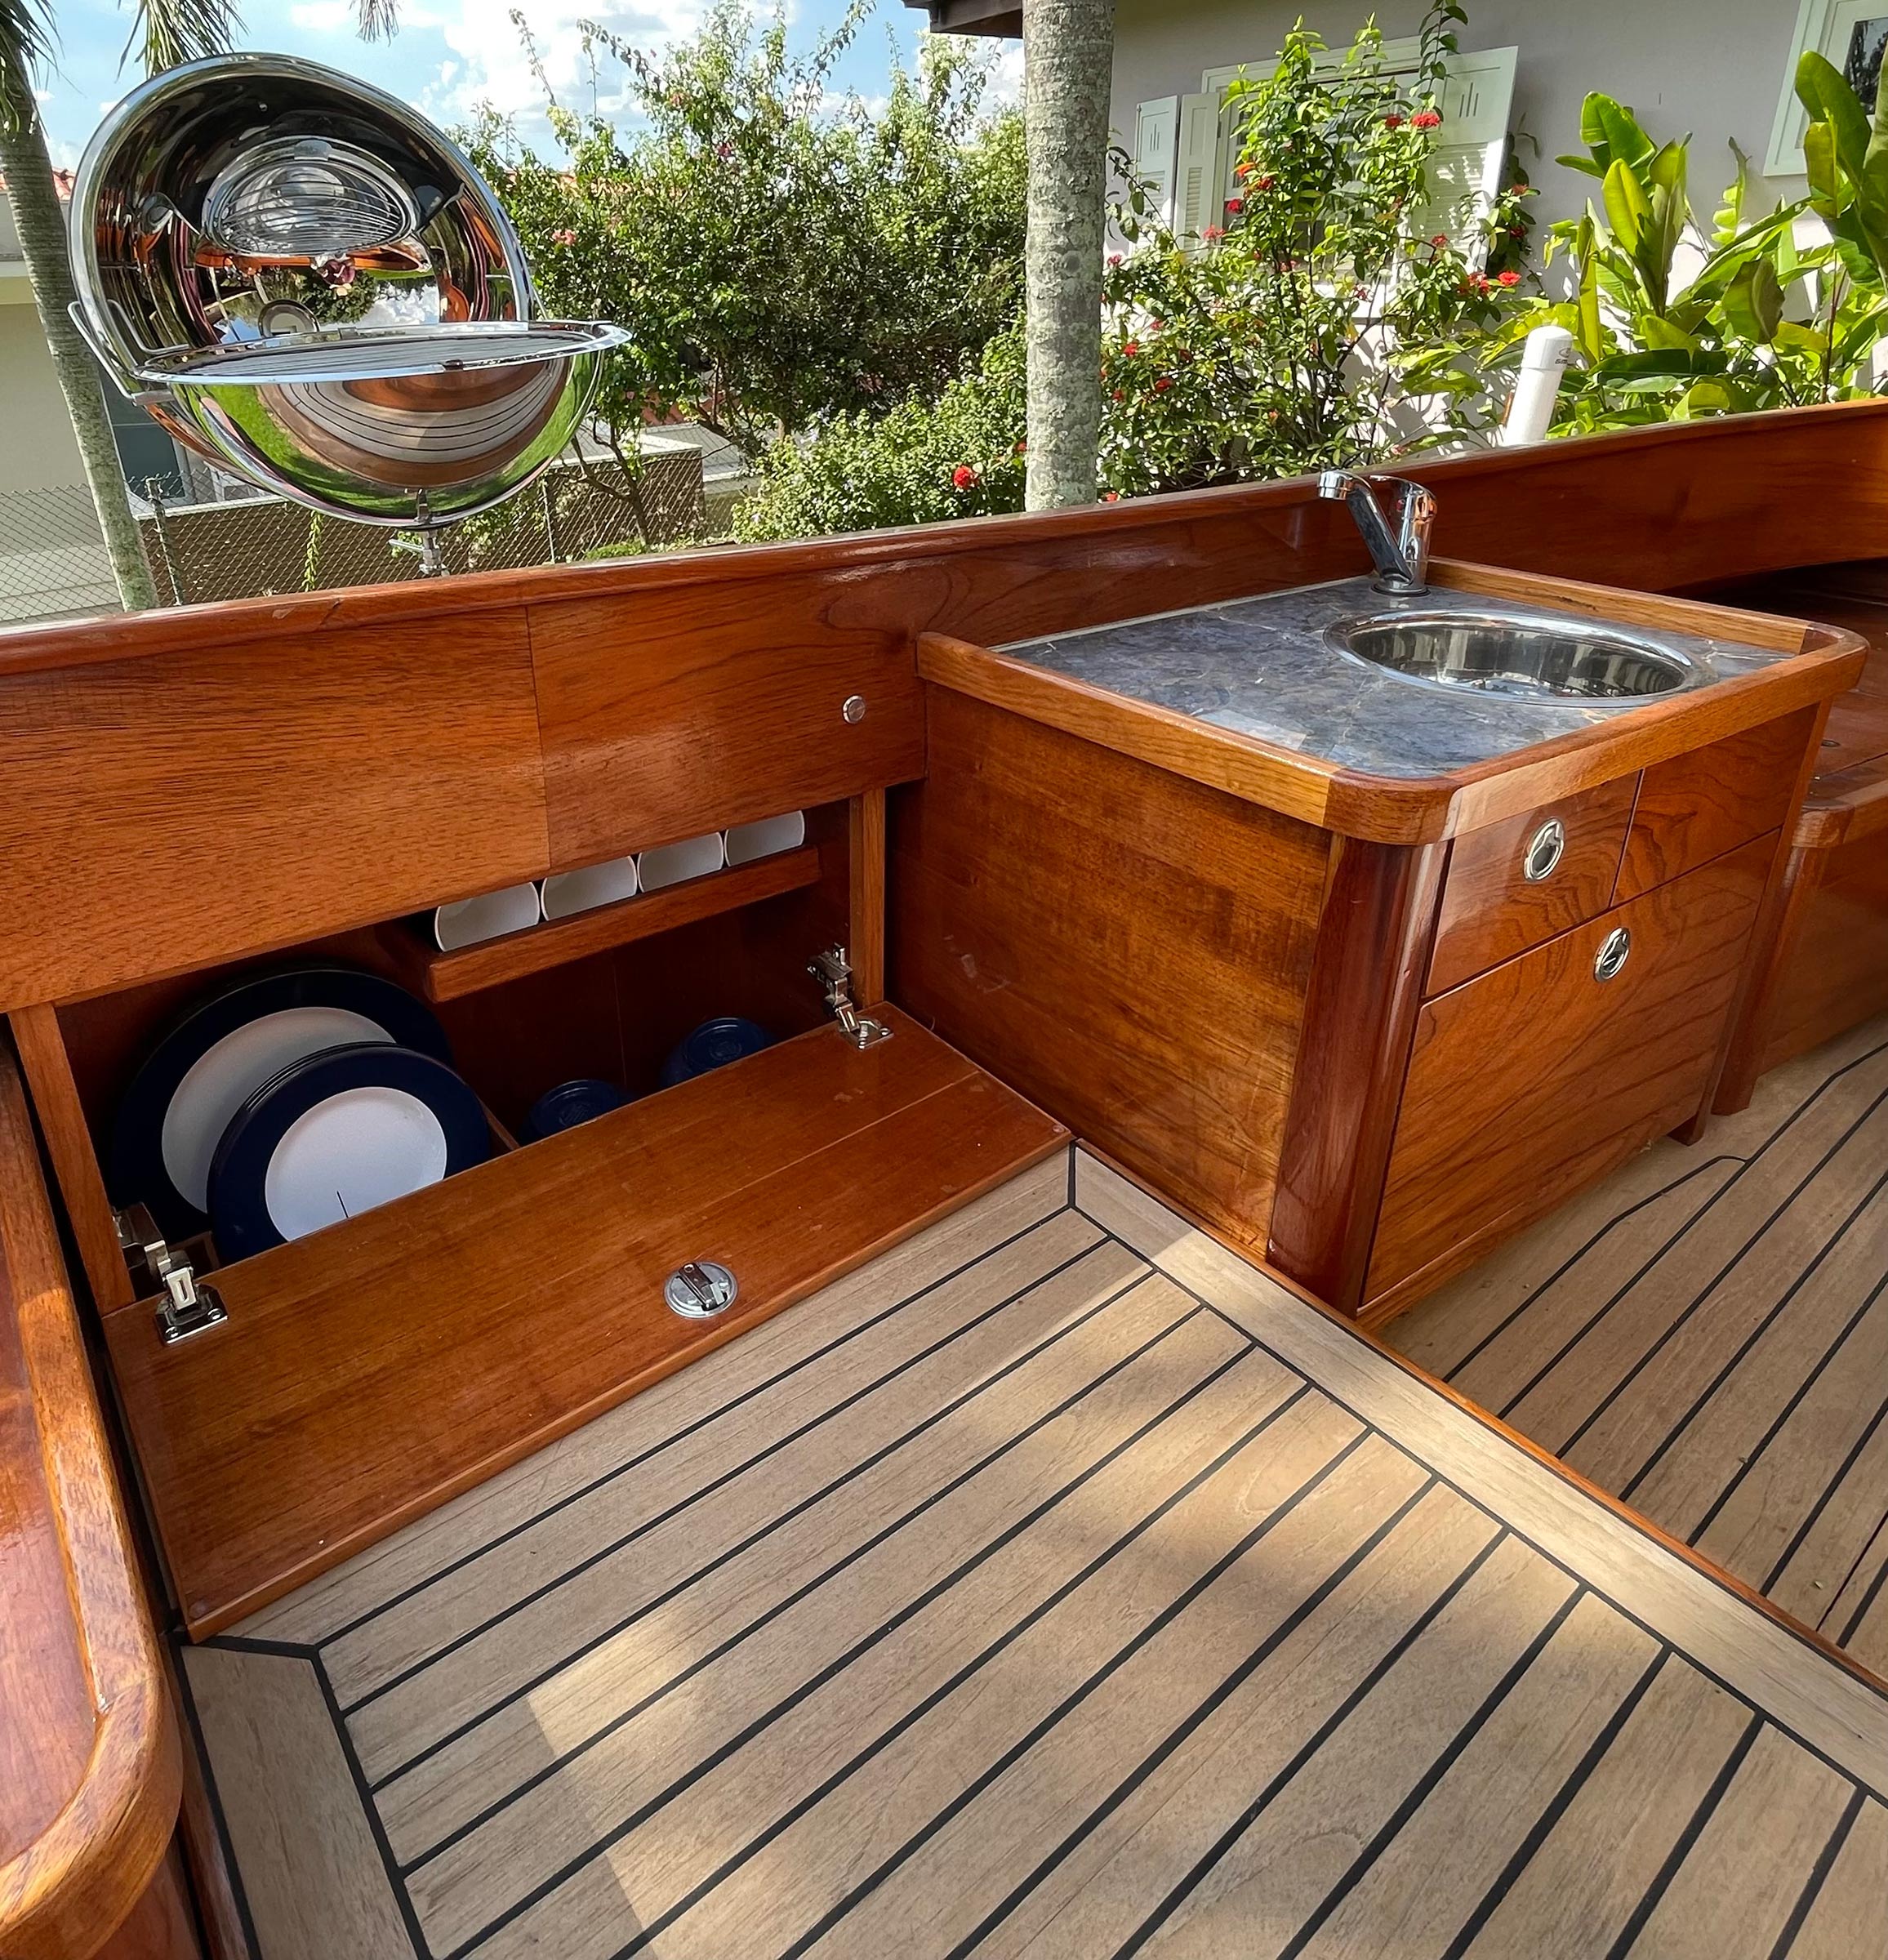
Oliver designed the cockpit with “comfort” in mind. The wrap-around seating forward and in the stern can, he says, accommodate seven people but the optimum is a party of four. To starboard is the galley, to port, beneath the step provided for easy access on and off the boat, is concealed an icebox and bar.
Oliver added his own touches of style and comfort to the launch’s interior. The motor and well-vented lead-acid traction batteries (AGM batteries are hard to source in Brazil and LiFePO batteries, which he would have preferred, were too expensive) are centrally located beneath the cabin sole for optimal weight distribution. This freed up the space that would have been occupied by the 25-hp outboard-engine well, and which Oliver has converted into a storage locker and a placement for a hot-and-cold shower. It also houses the hydraulic steering cylinder. Up forward there is more storage under the foredeck where, as well as the anchor and lines that would typically be housed here, there is a chemical toilet. Wrap-around benches in both the bow and stern conceal more storage, and amidships, Oliver has found space for a 60-qt icebox and bar to port, a sink with hot and cold water, a stone countertop, a chinaware locker, and a gas camping stove to starboard. “A morning coffee is never a missed pleasure,” he says.
The combination of laid natural teak with varnished mahogany and marine plywood offset by highly-polished stainless-steel fittings creates a high-end look and feel. The galley has a ceramic-coated granite countertop with stainless-steel sink and hot and cold water. There is a propane-gas stove and barbecue (seen here mounted on deck) that are stowed away when not in use, and a dedicated cabinet for chinaware.
The construction of ATHENA, named for the Greek goddess, would take Oliver three-and-a-half years, and as he puts it, “consume 1,500 man-hours.” He converted the paper plans from Simmons to CAD files which he then outsourced to a “trusted workshop where they converted them into CNC-machined parts,” but otherwise Oliver worked alone, with occasional hands-on assistance and constant encouragement from his mother, Eva, and his partner, Luciana Bacchi. “I adhered closely to the Duck Trap construction,” he says. “The bottom is 18mm cedar plywood, and the topsides are strip-planked cedar covered in an outer layer of fiberglass and epoxy and painted matte midnight blue. I crafted the deck from solid laid teak over plywood. I like the timeless elegance it brings.”
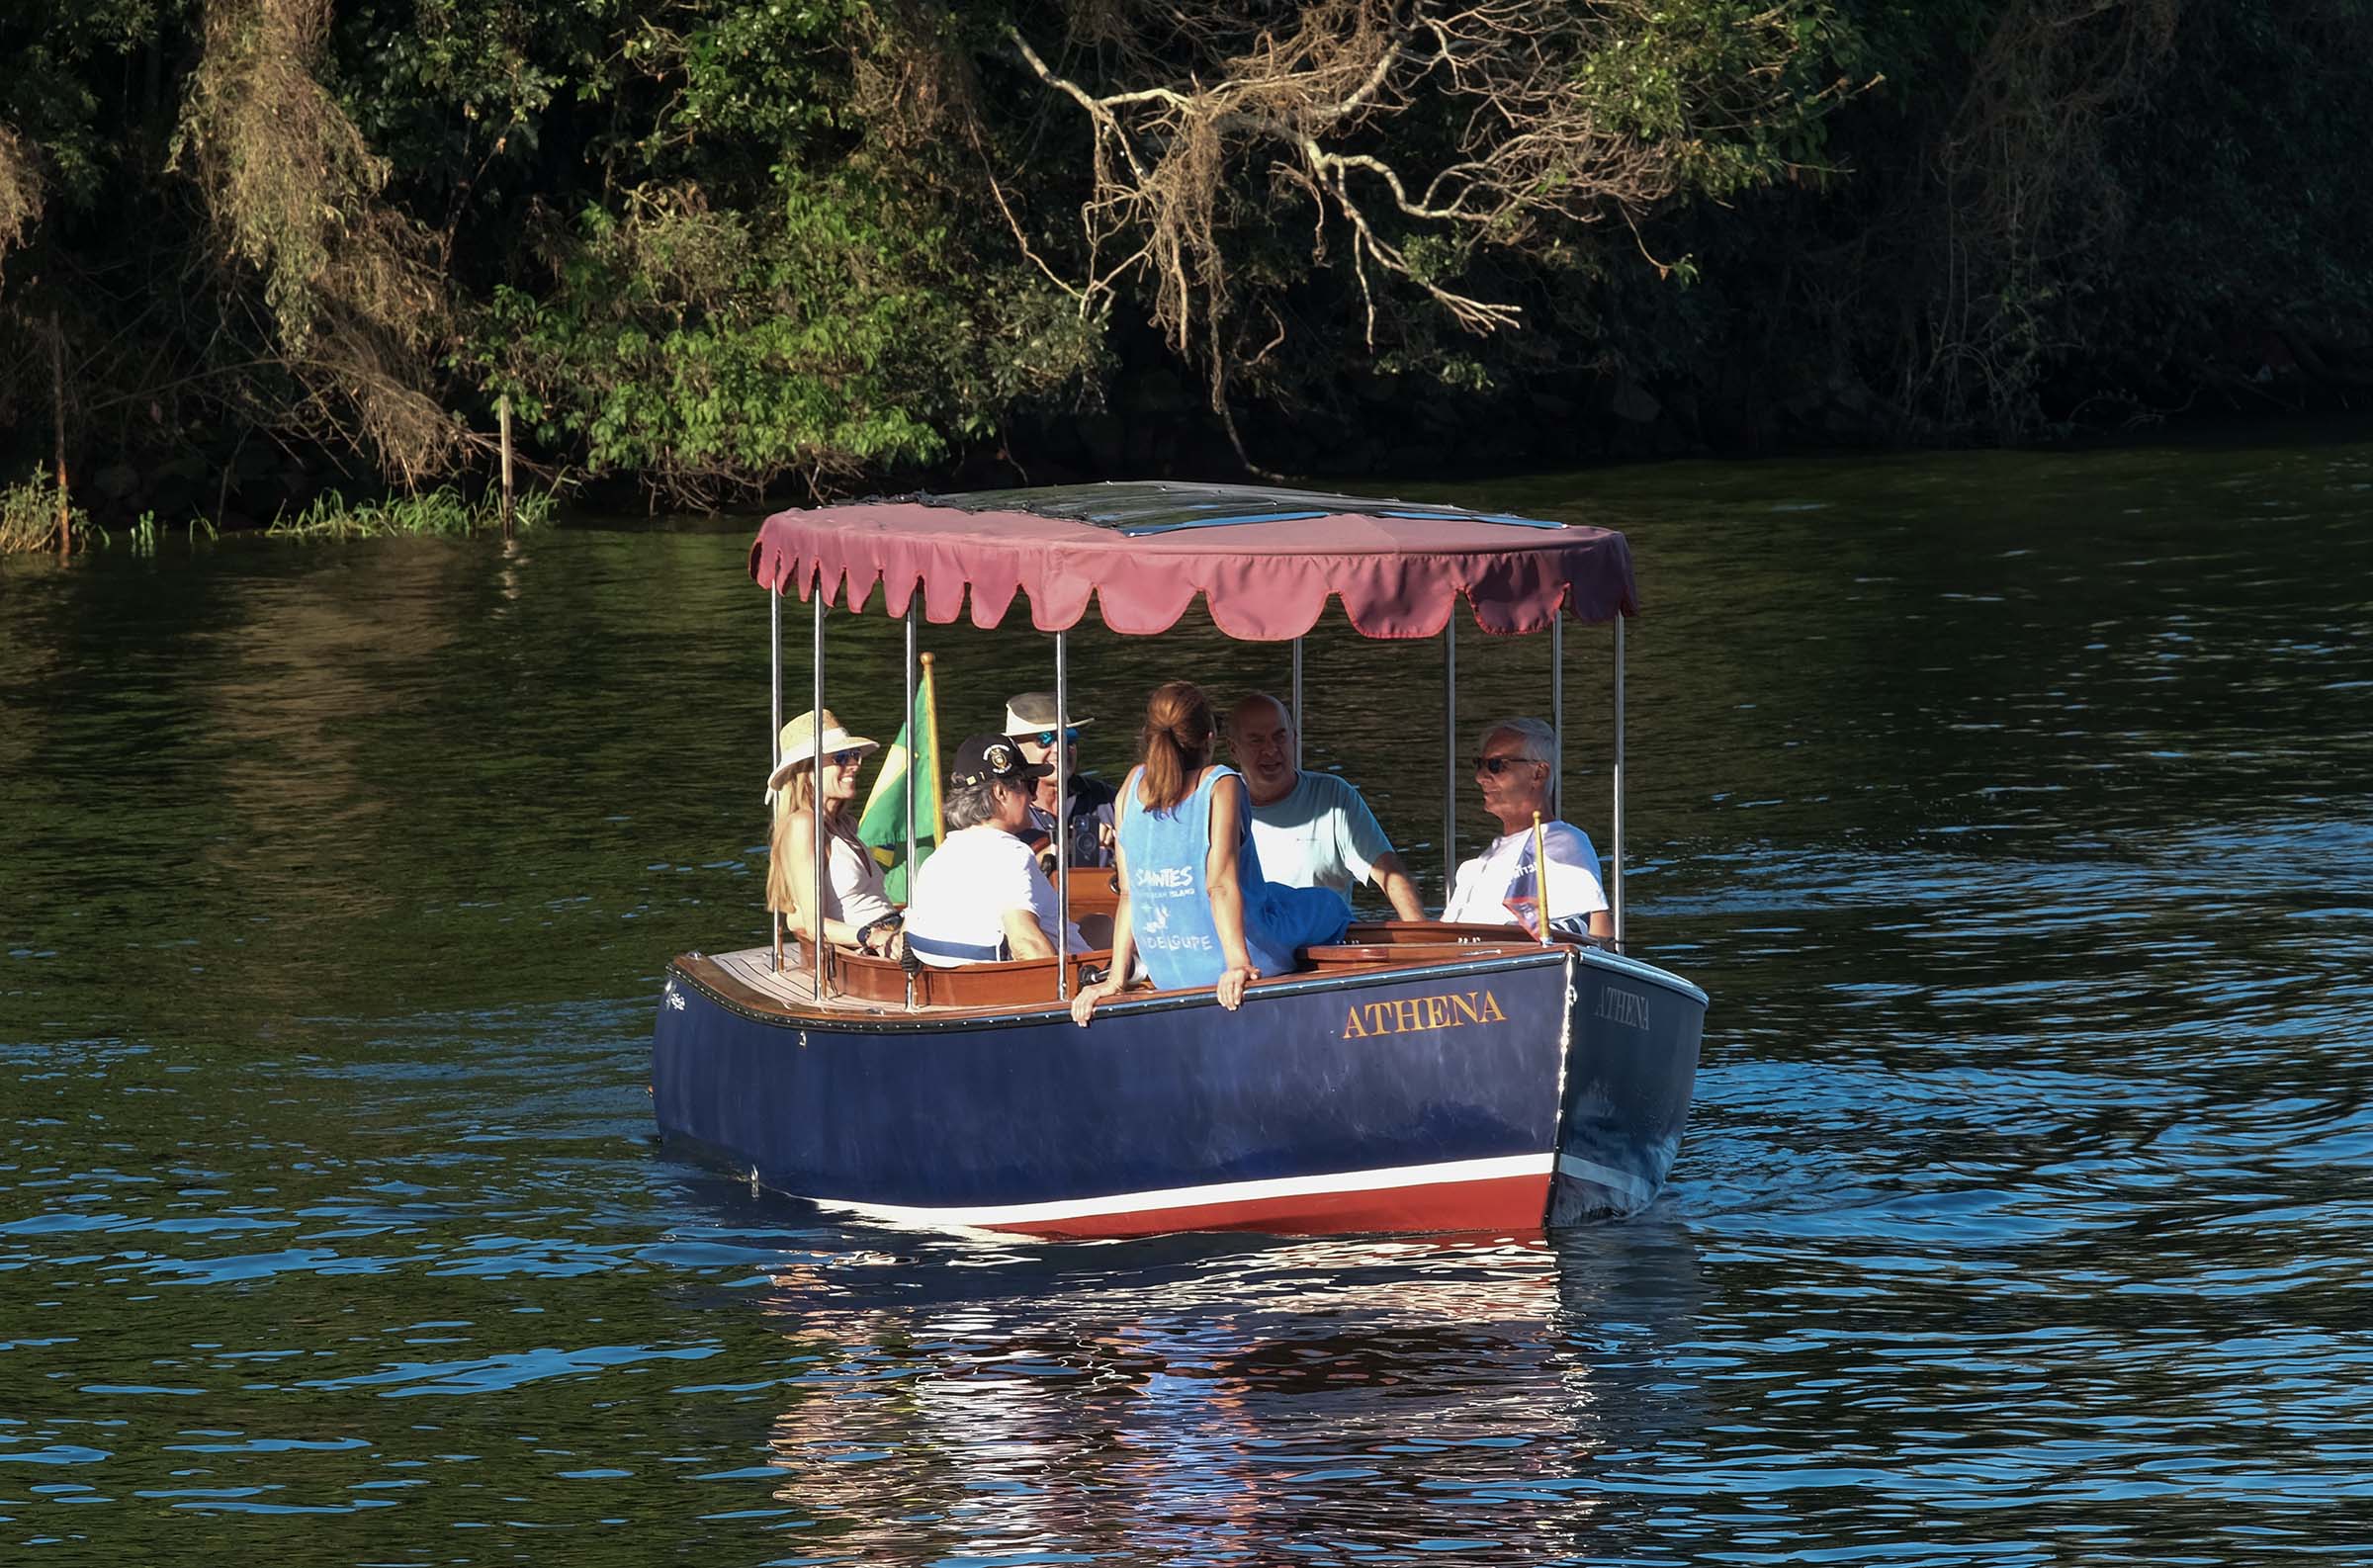
Pepe Melega
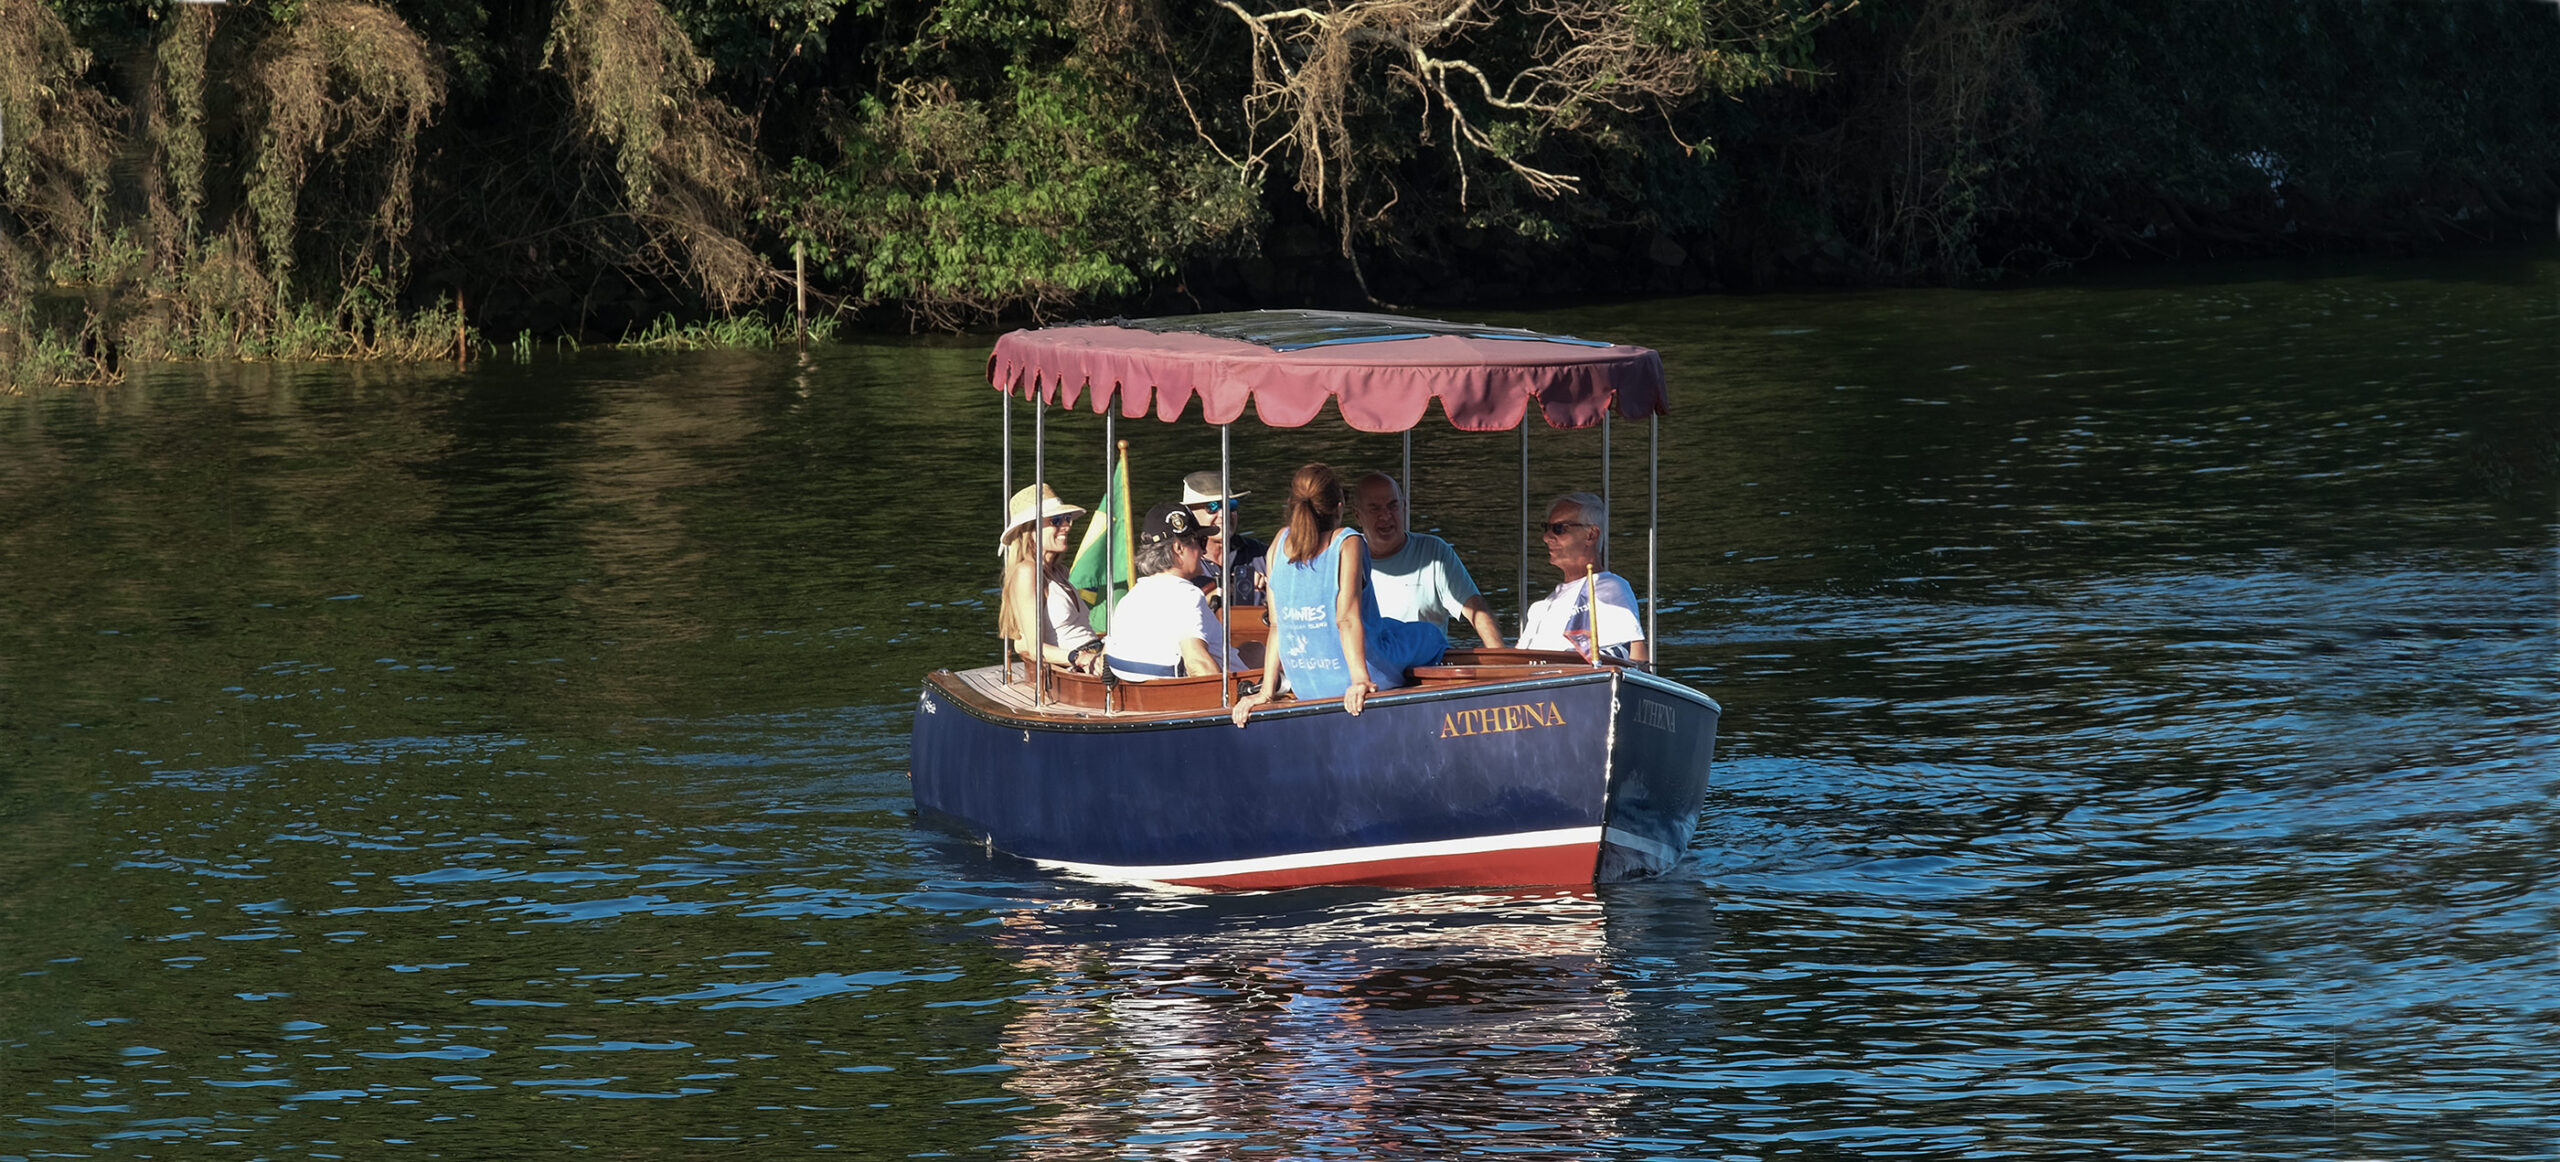
ATHENA has proved popular with family and friends and, even with six people on board, is not crowded. Gentle trips on one of the local man-made lakes, have become social events and such scenes as this, says Oliver, are ATHENA’s “typical mission.”
Where Oliver’s background in high-end cars came to the fore was in the finish and, most particularly, in the interior, which he says, combines comfort with functionality, but with an attention to detail that exudes luxury. The cabinetry is a mix of marine ply and solid wood with inset stainless-steel latches and hinges. The teak-laid decks follow intricate patterns. The caprail atop the solid teak cockpit coaming is Brazilian cedar. LED lighting concealed at the base of the benches provides a warm and intriguing illumination at night. On the teak transom, beneath 15 coats of varnish, ATHENA is spelled out in midnight-blue-outlined gold leaf, applied by Oliver, who “had to master the skill because there are so few artisans in Brazil capable of gold-leafing.”
ATHENA was launched early in 2024, but Oliver still has more to do. He plans to build an “enclosure beneath the canopy to give more protection from the elements, and to make overnight or weekend trips more comfortable. In the bow, the table already lowers down to the height of the wrap-around benches so that it can convert into a double bed, making extended trips possible.”
Pepe Melega
With just himself and partner Luciana onboard, Oliver says ATHENA is more than comfortable, and with the electric motor she cruises easily and quietly so they can enjoy the peace of the lakes. He still plans to build an enclosing structure beneath the canopy so they can go for overnight or weekend trips.
ATHENA has, Oliver says, more than lived up to his expectations. “She’s perfect for gunkholing in the calm bays of several man-made lakes around Campinas. And when she’s not in the water, she sits on a custom-built trailer in the front yard, always ready for the next adventure.”
Jenny Bennett is managing editor of Small Boats.
Do you have a boat with an interesting story? Please email us. We’d like to hear about it and share it with other Small Boats readers.
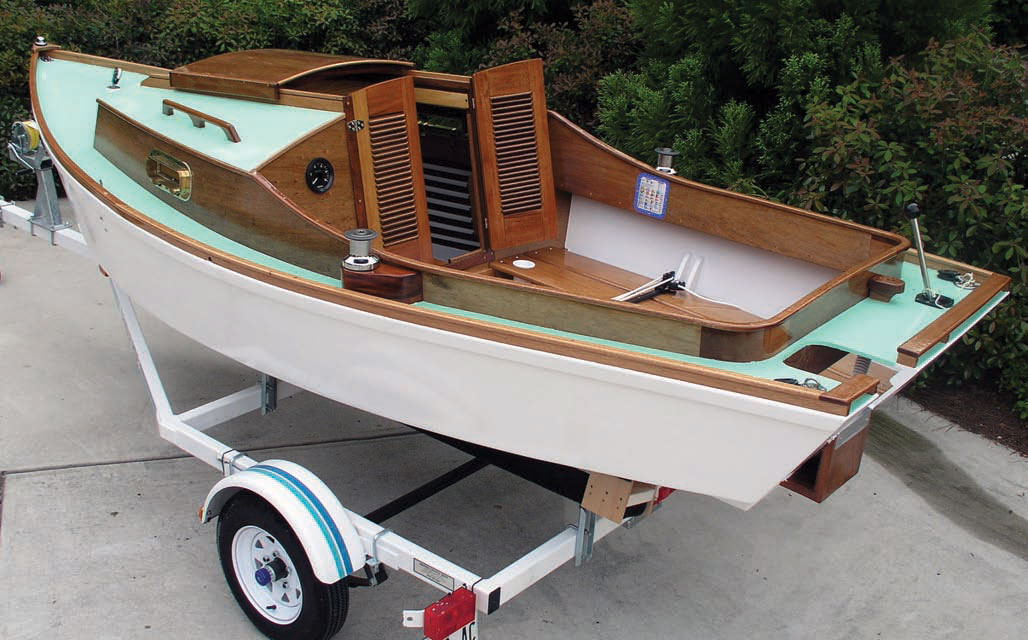
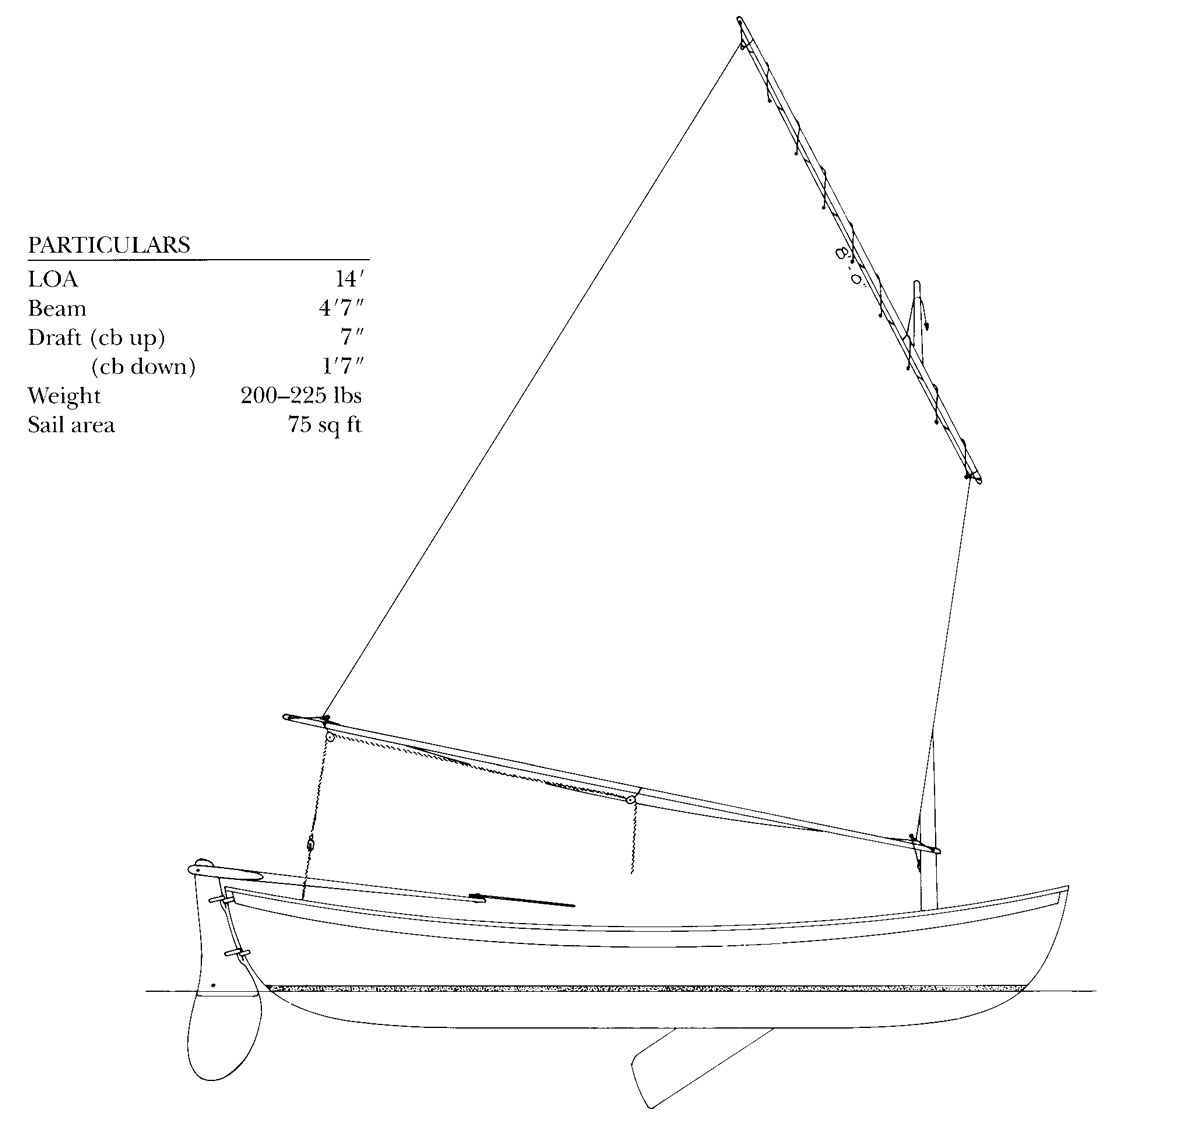
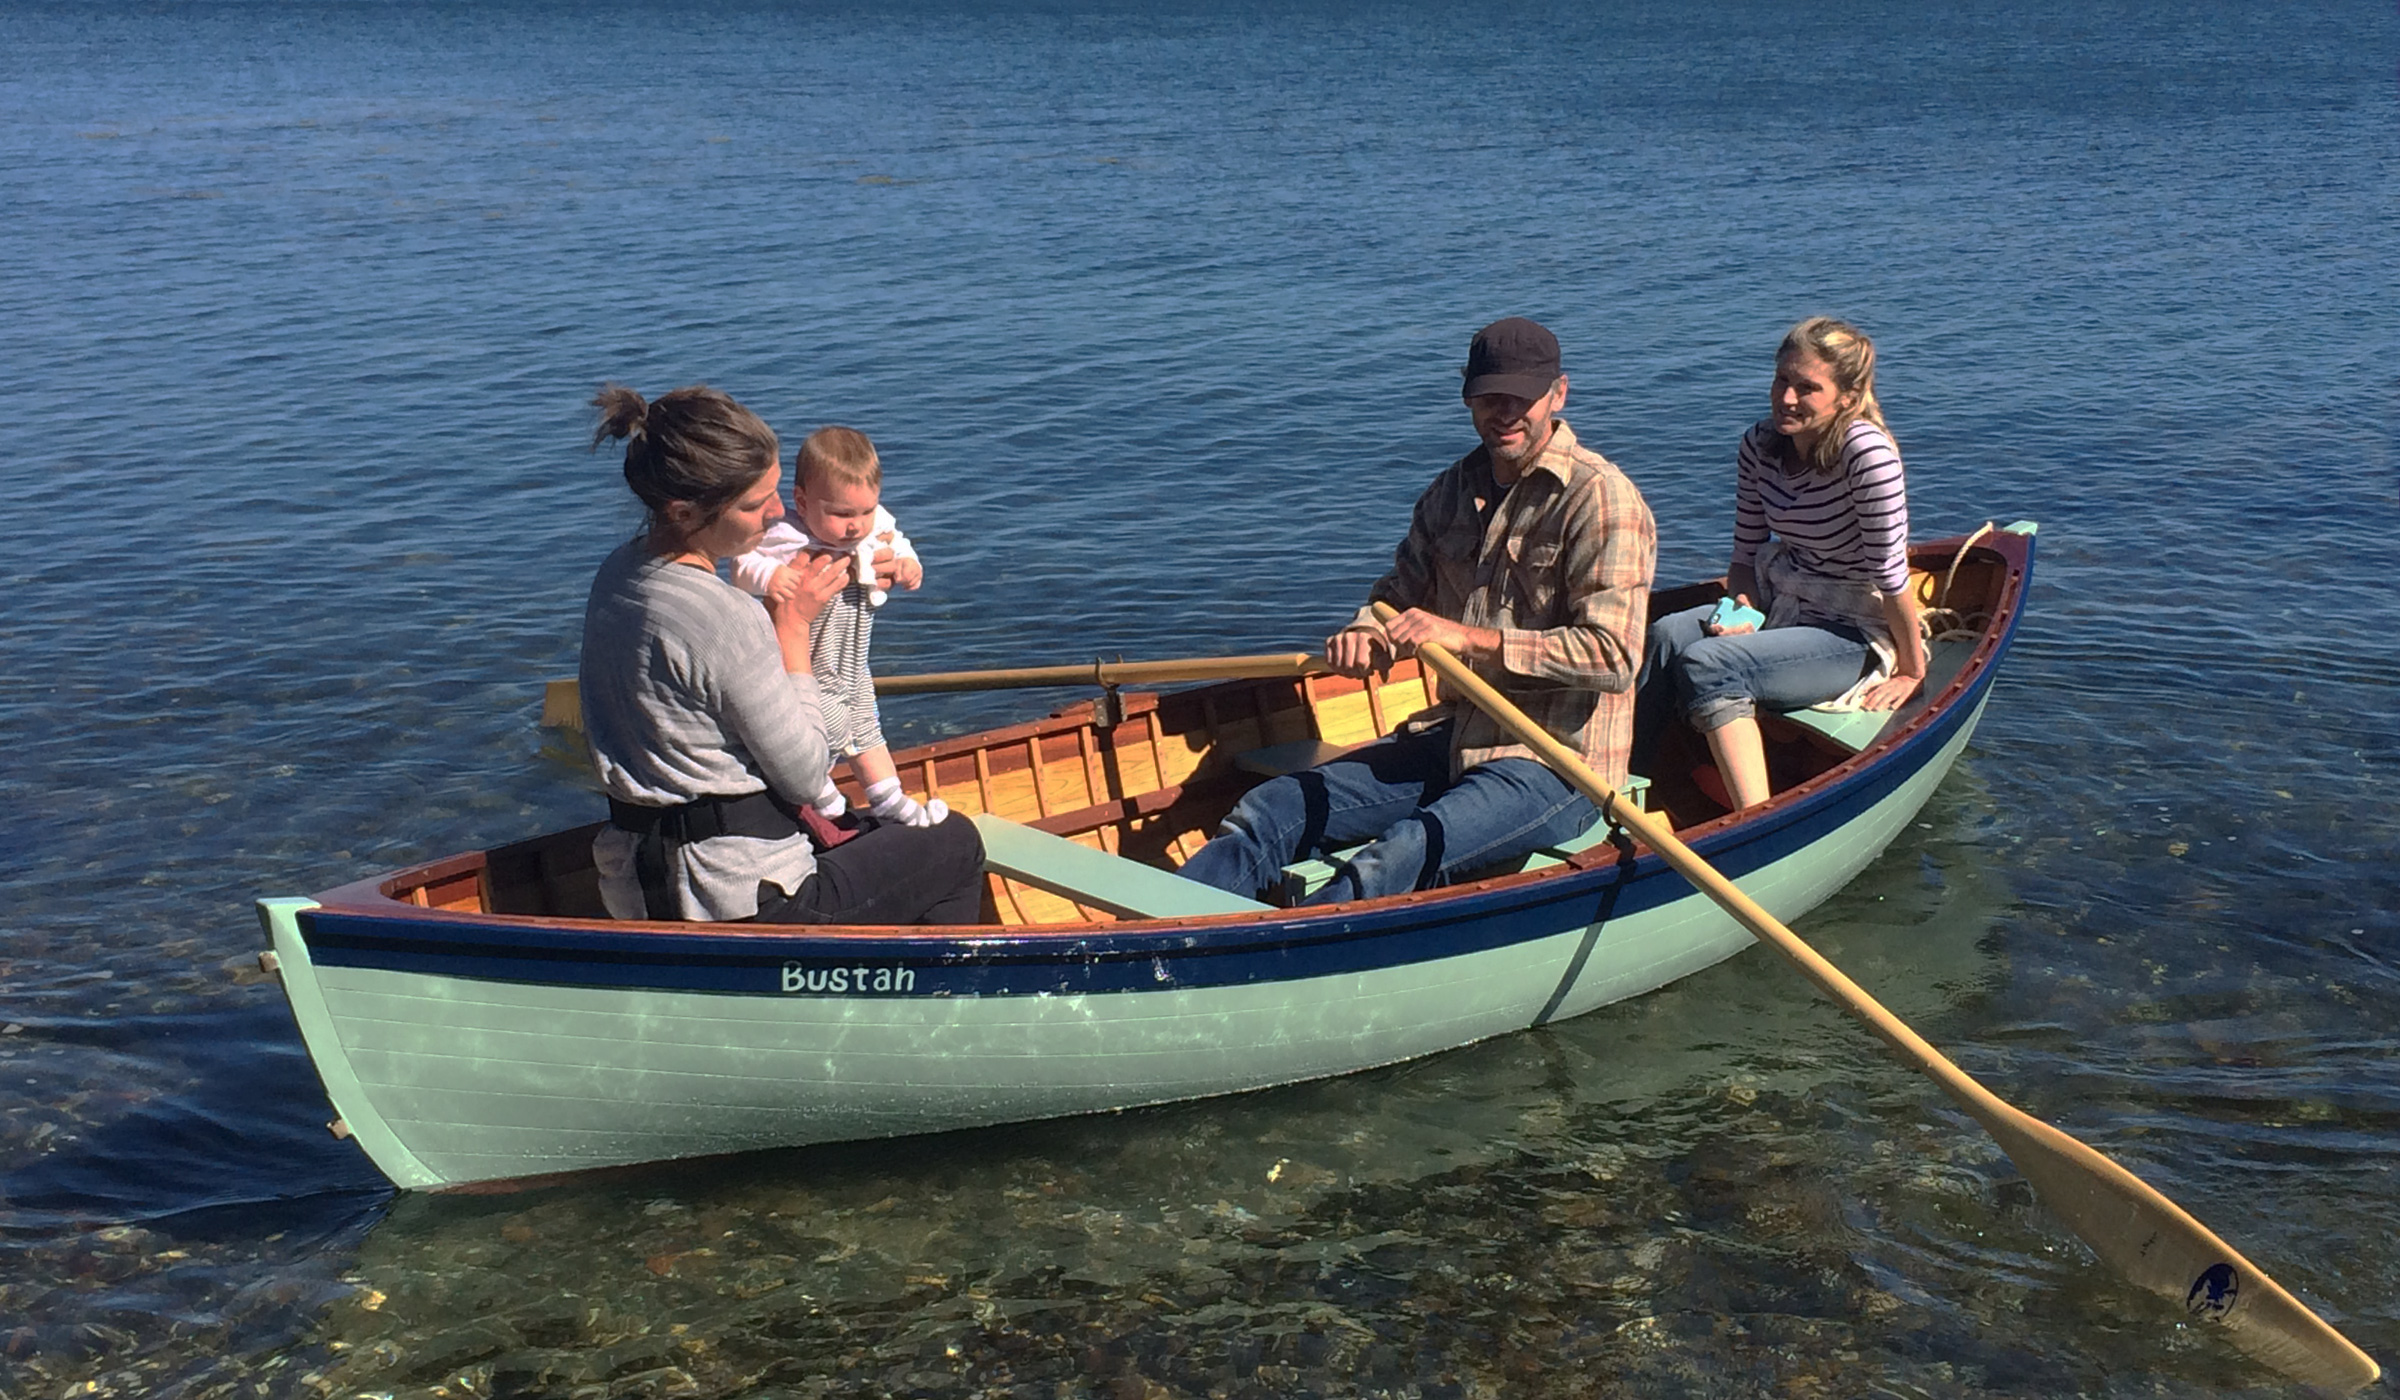
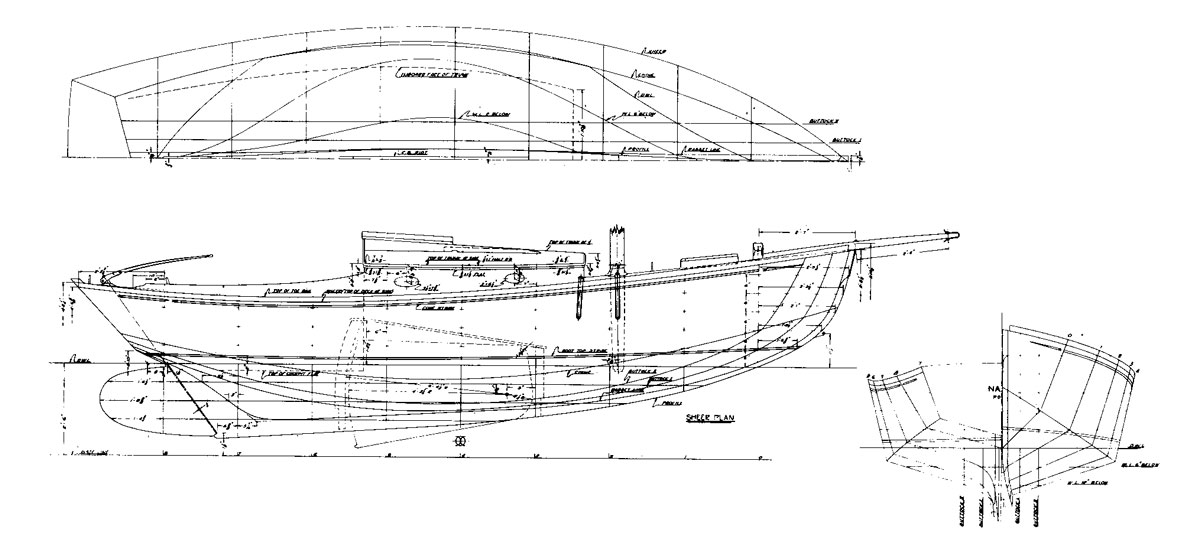
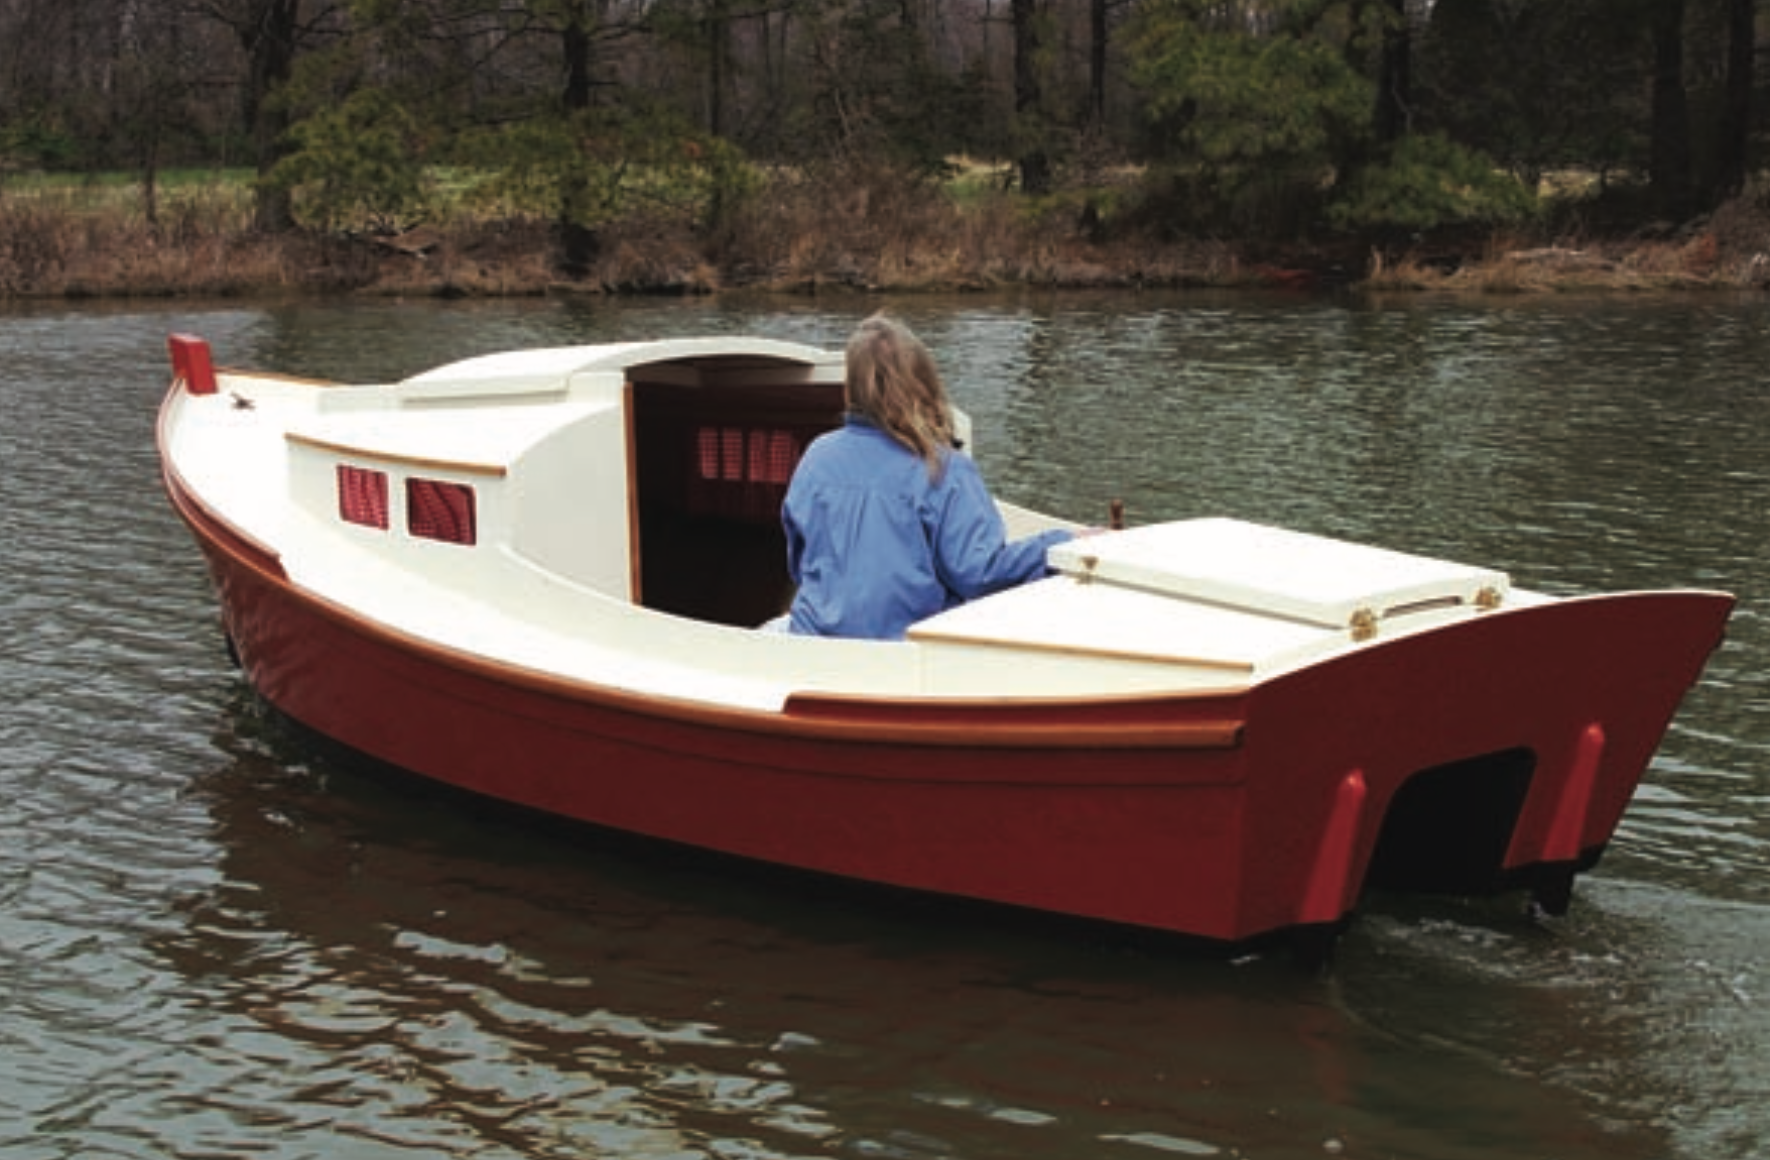
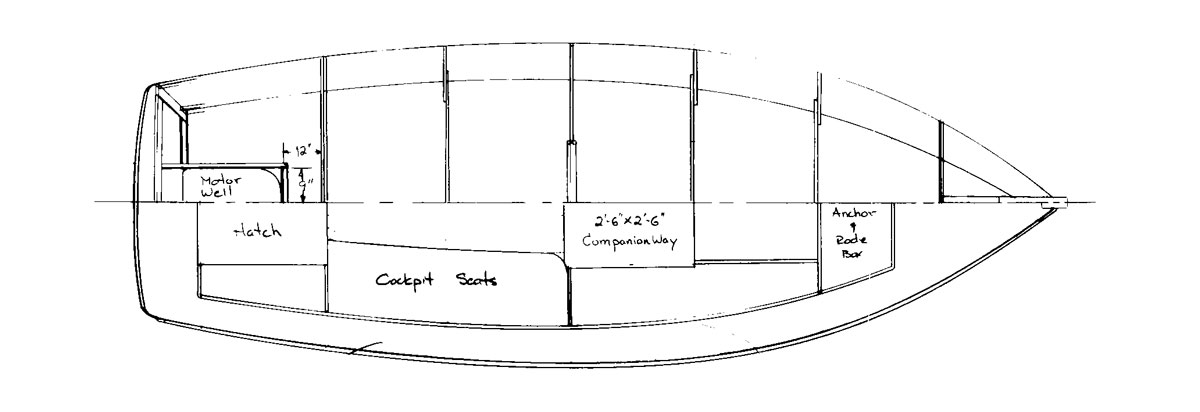
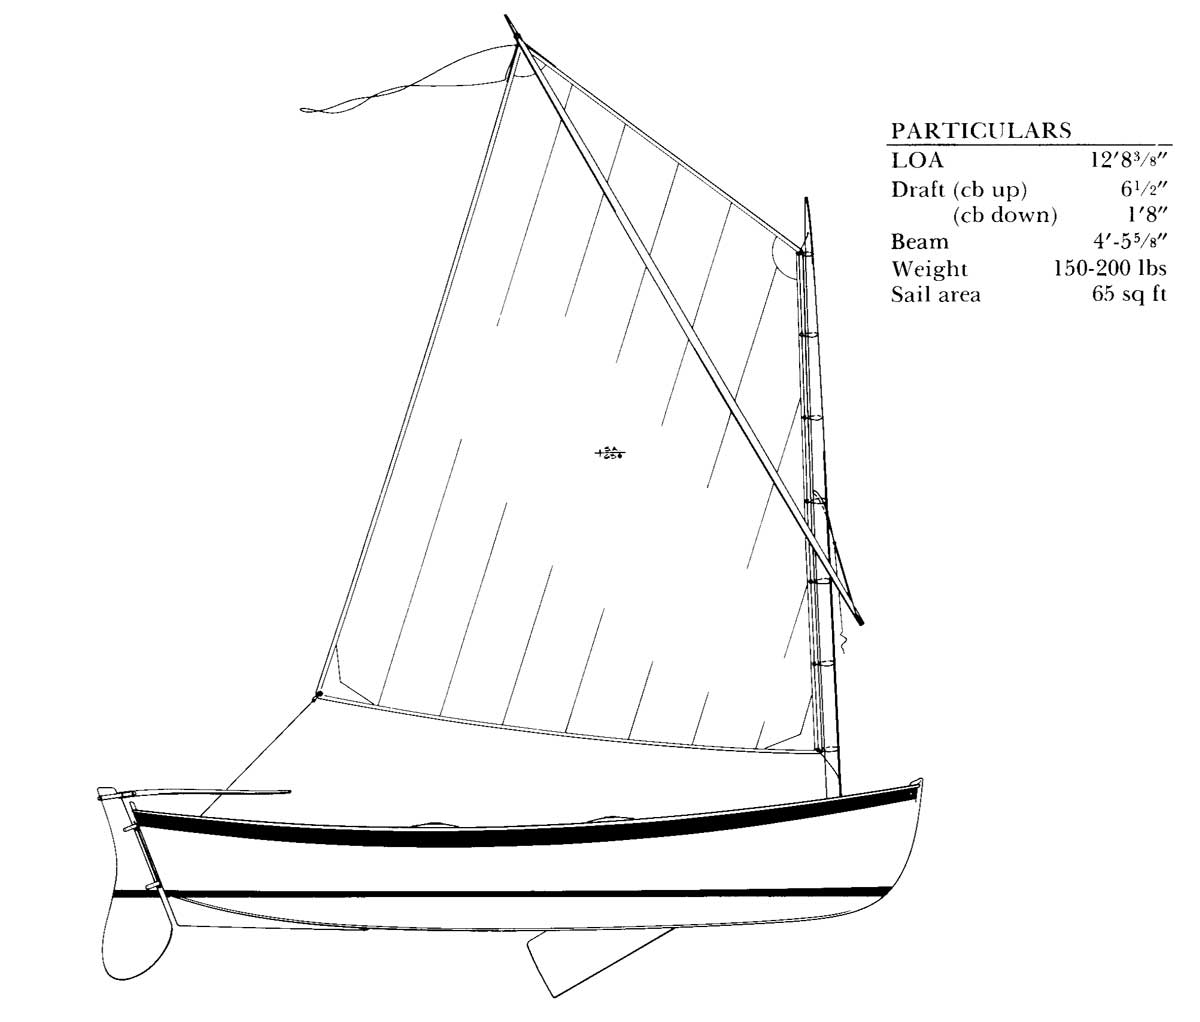
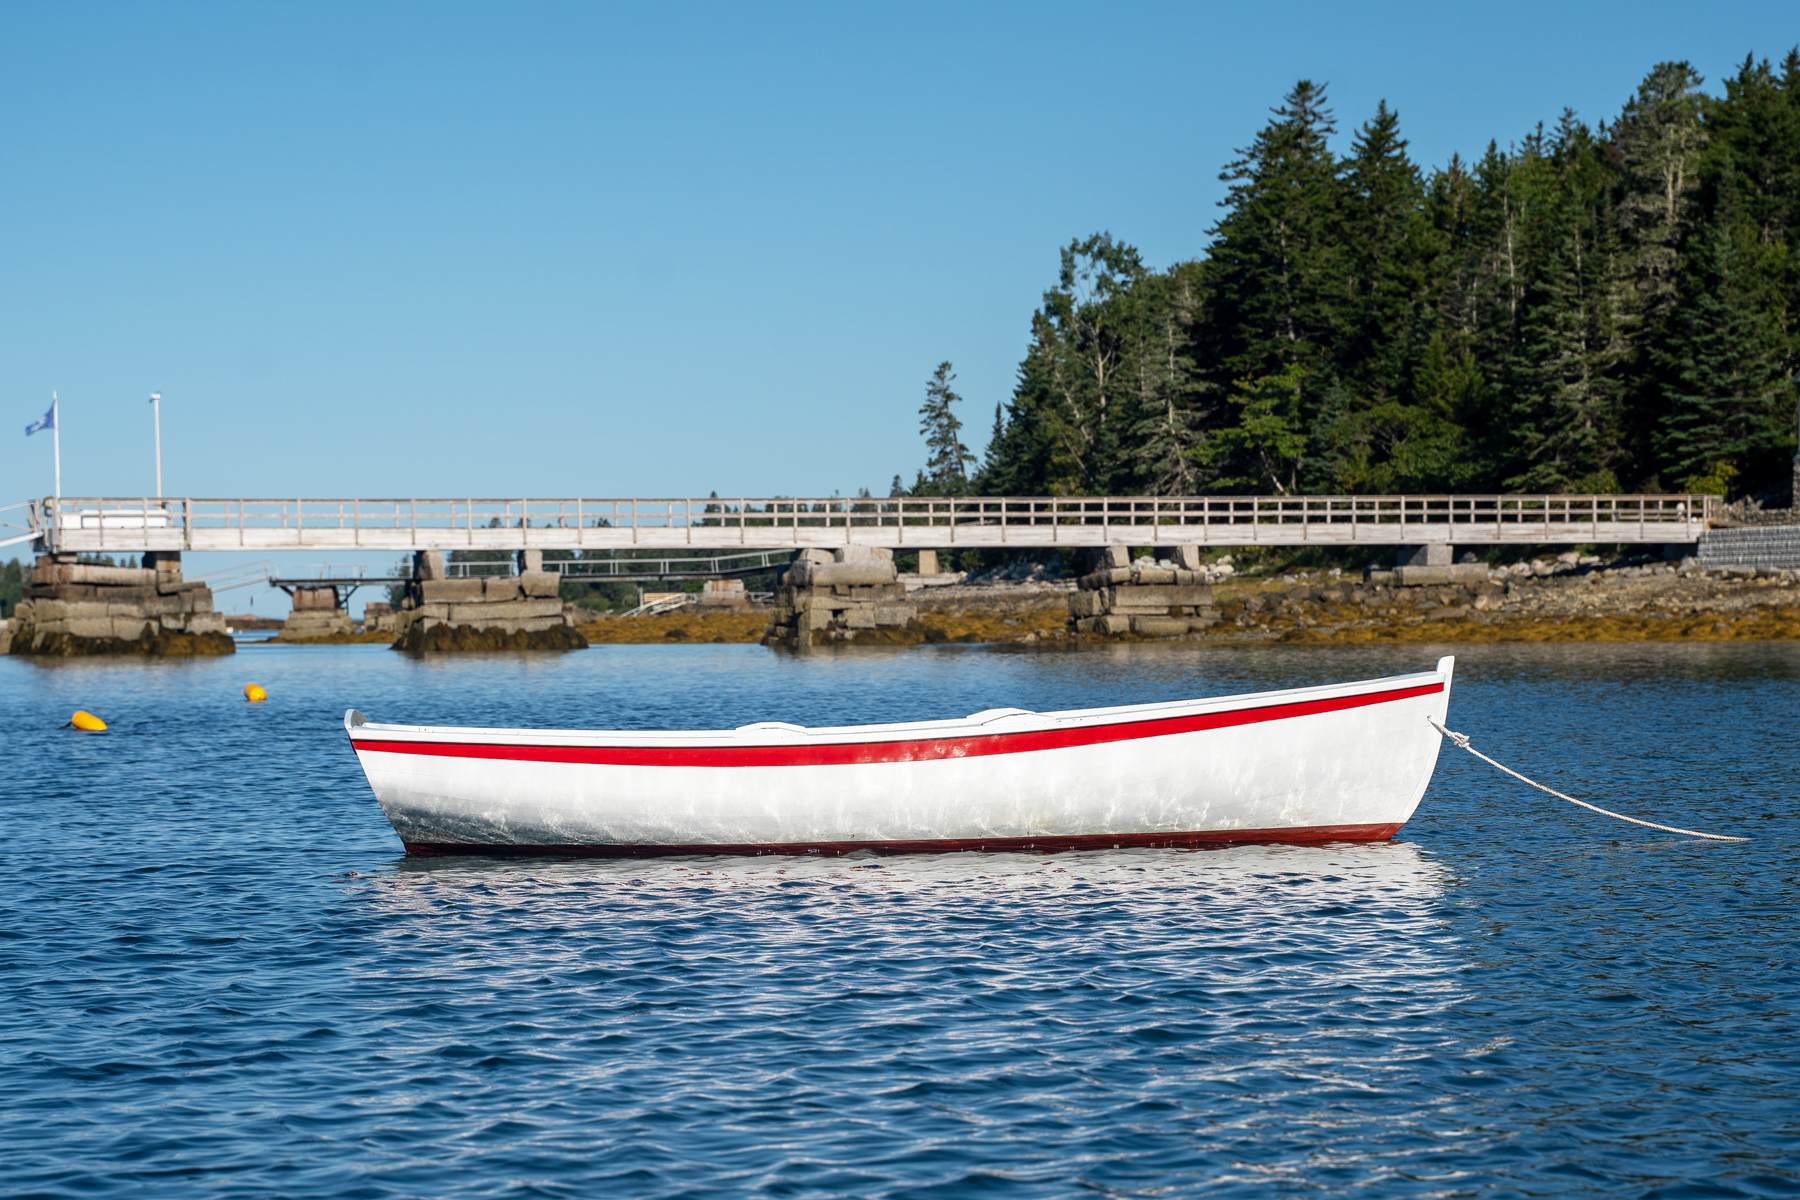
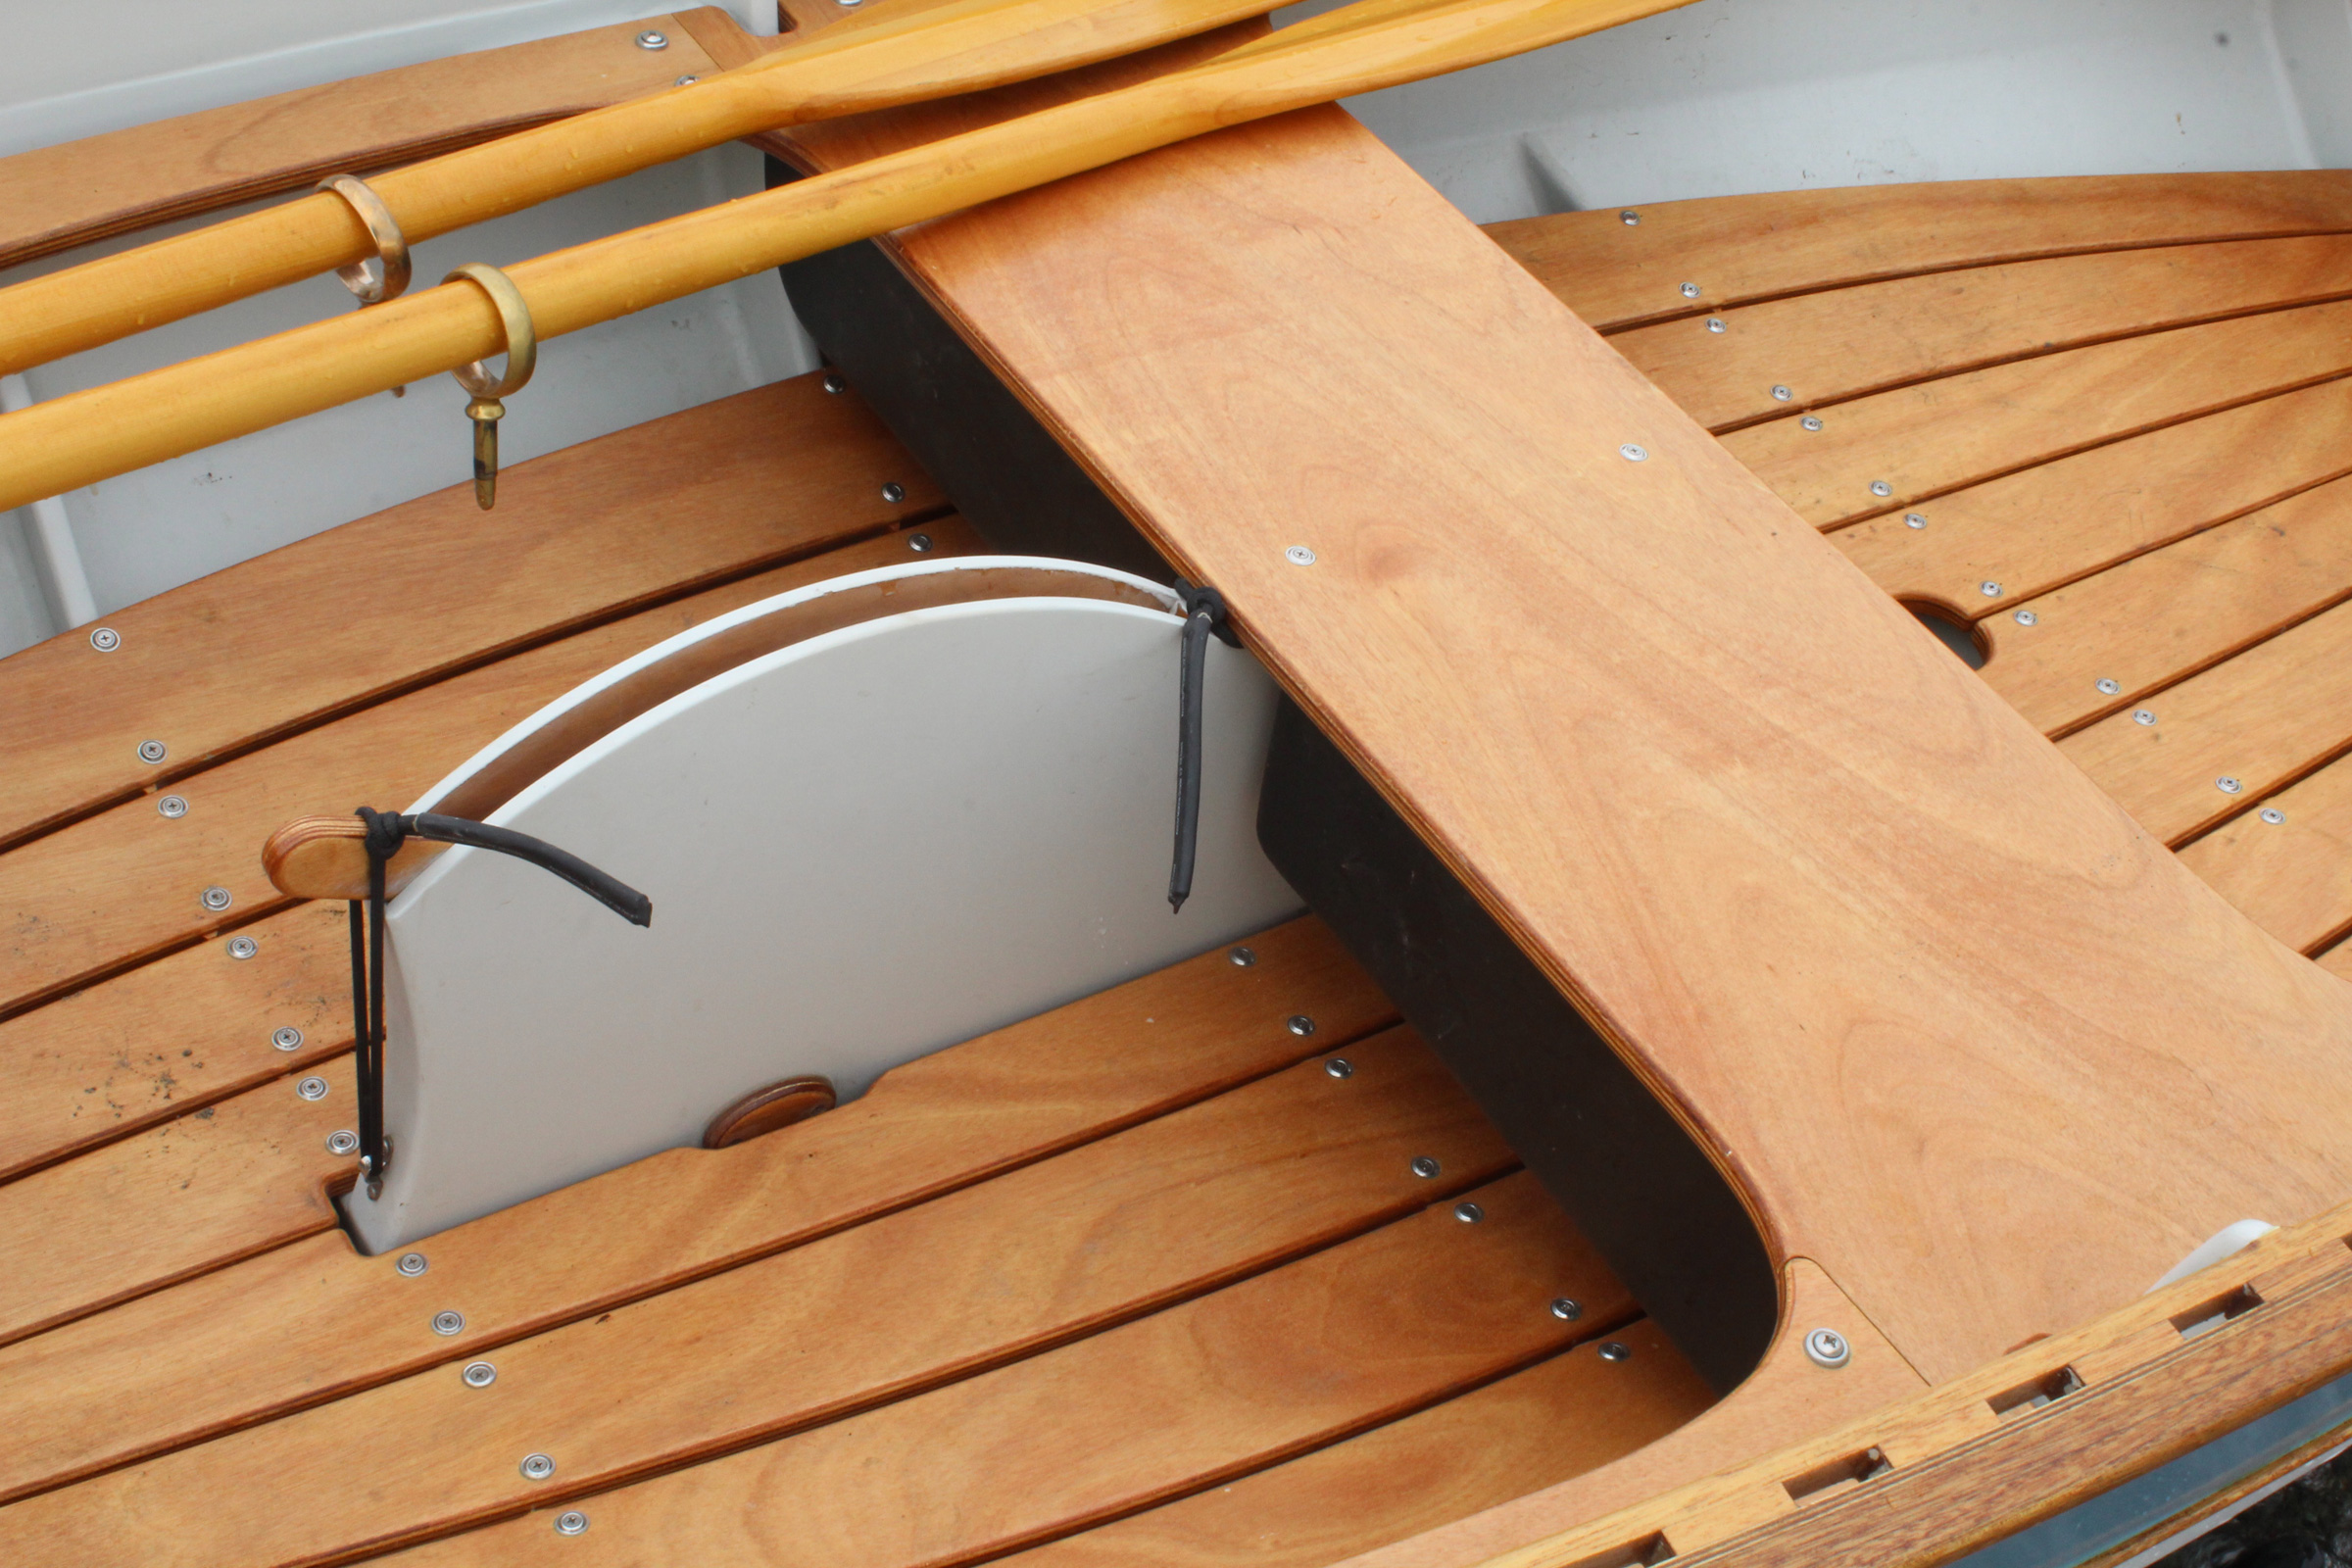
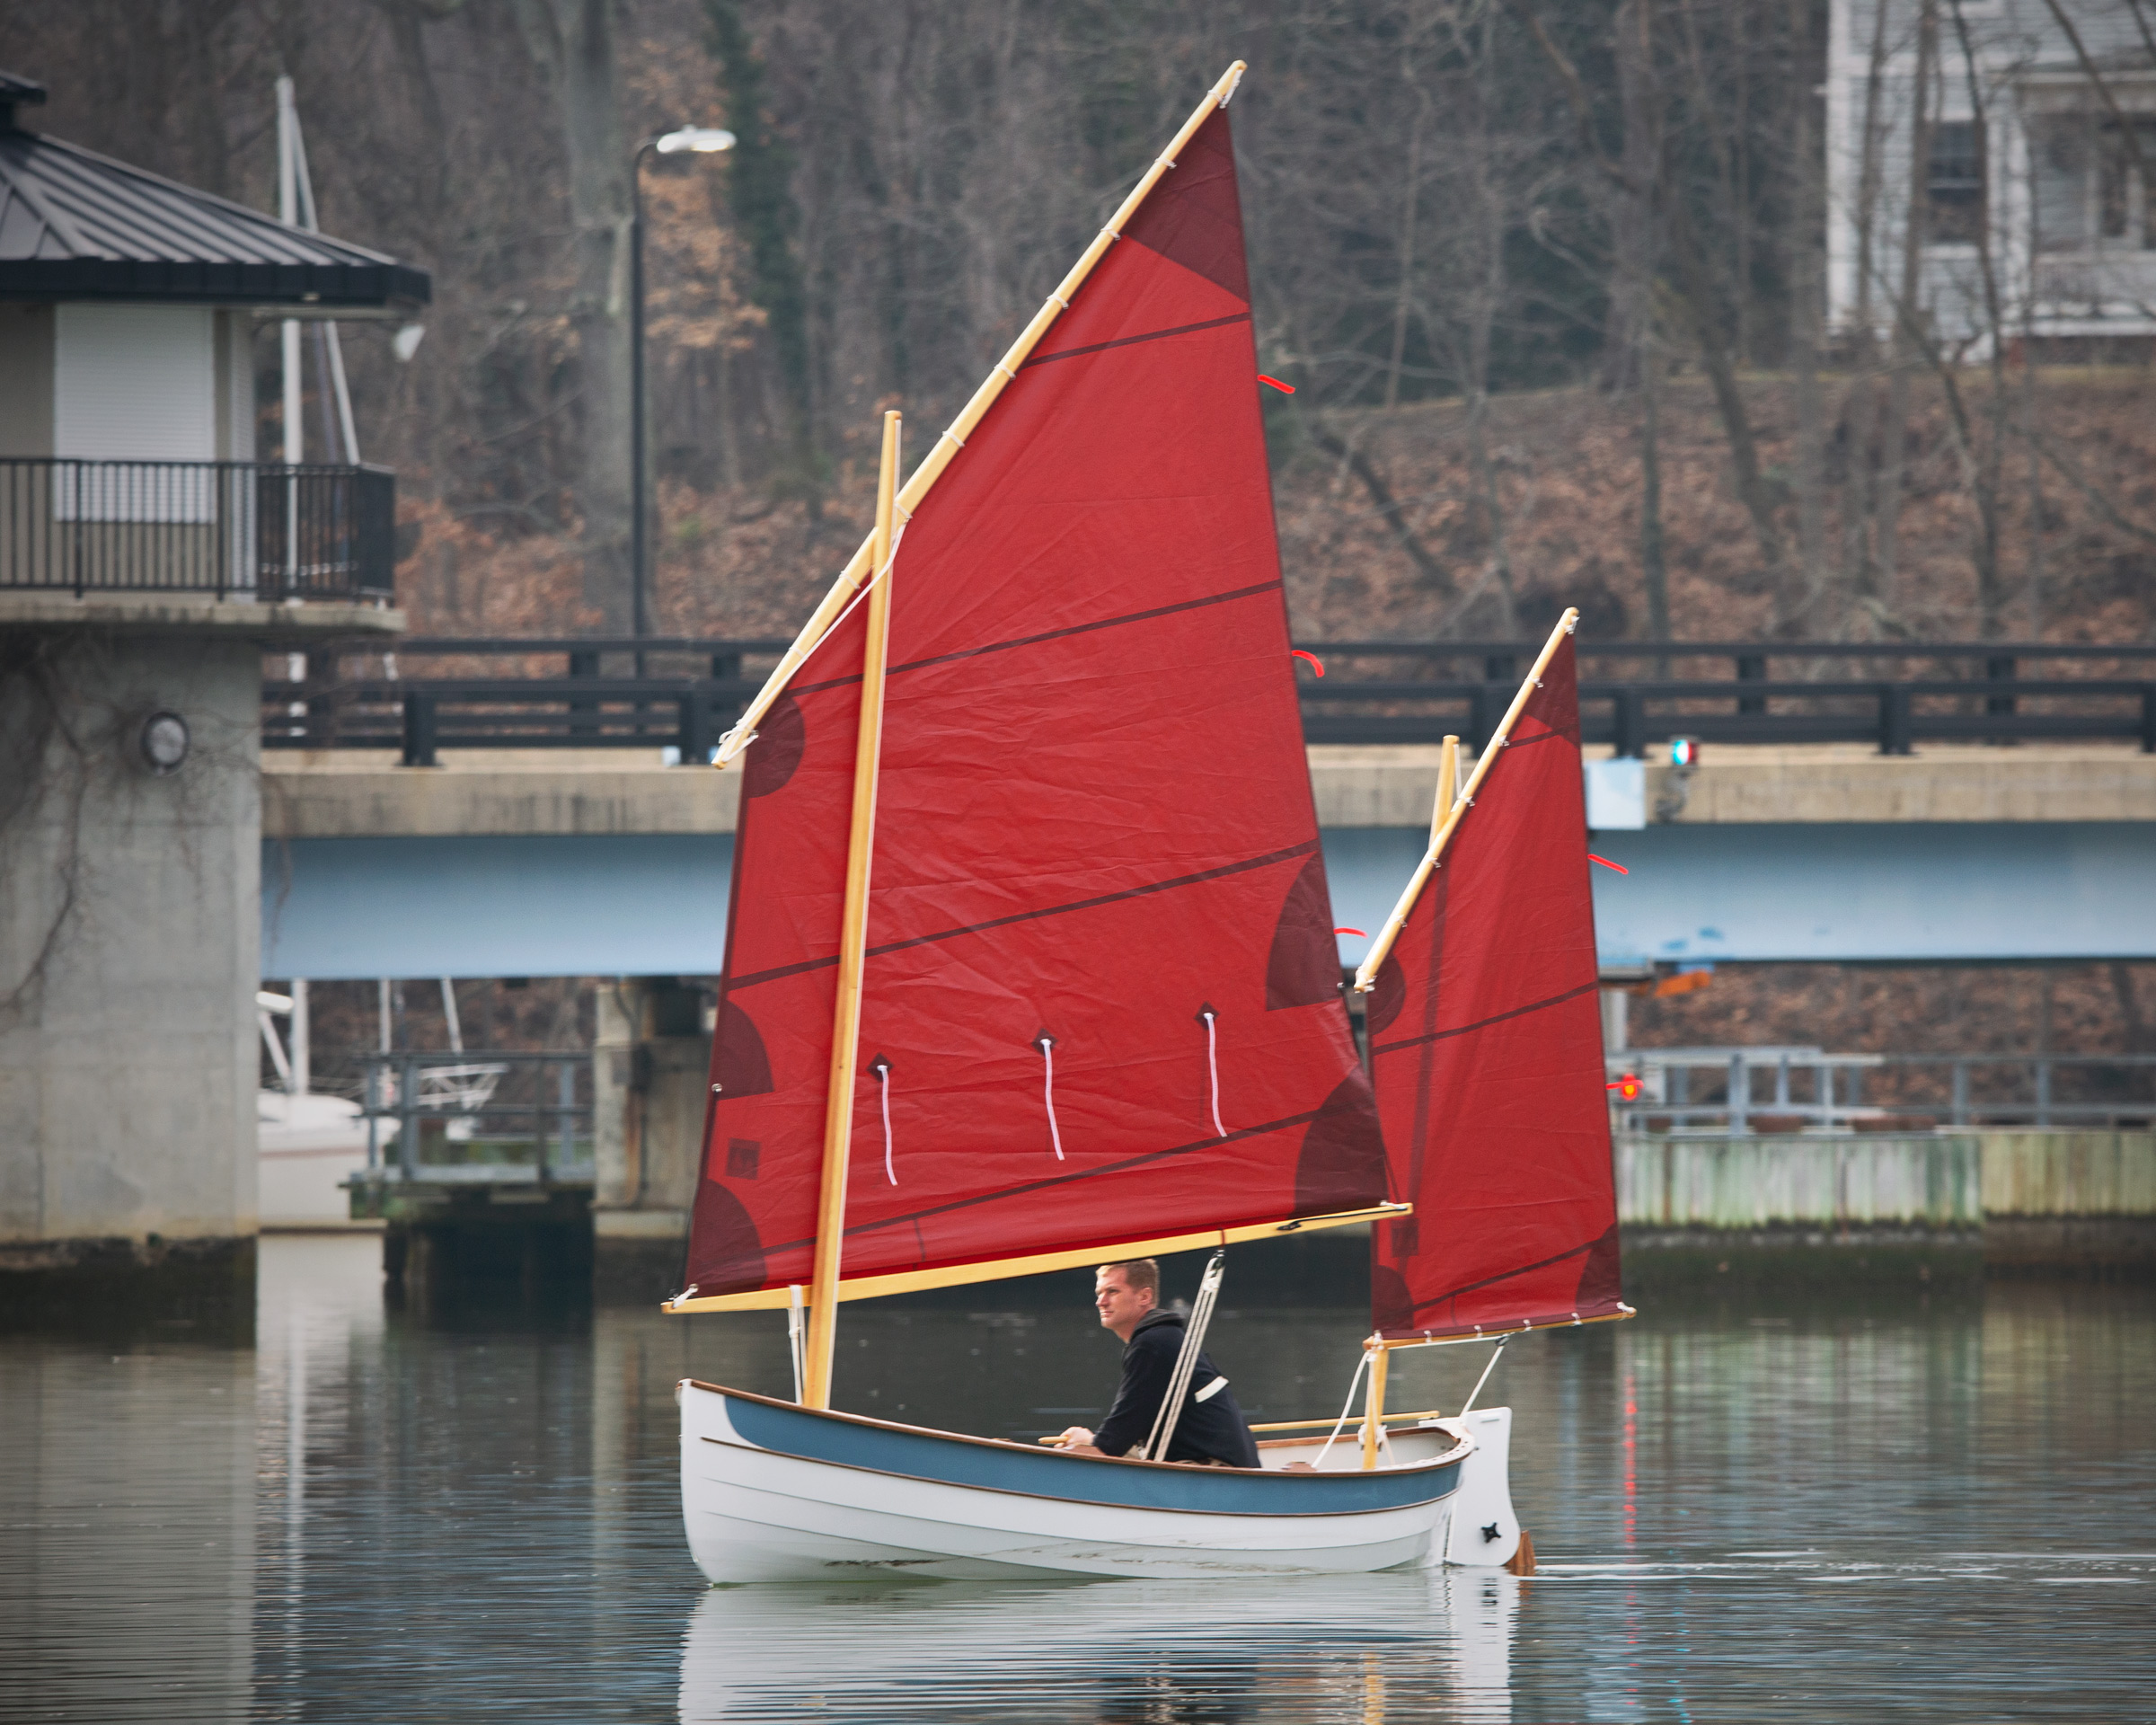
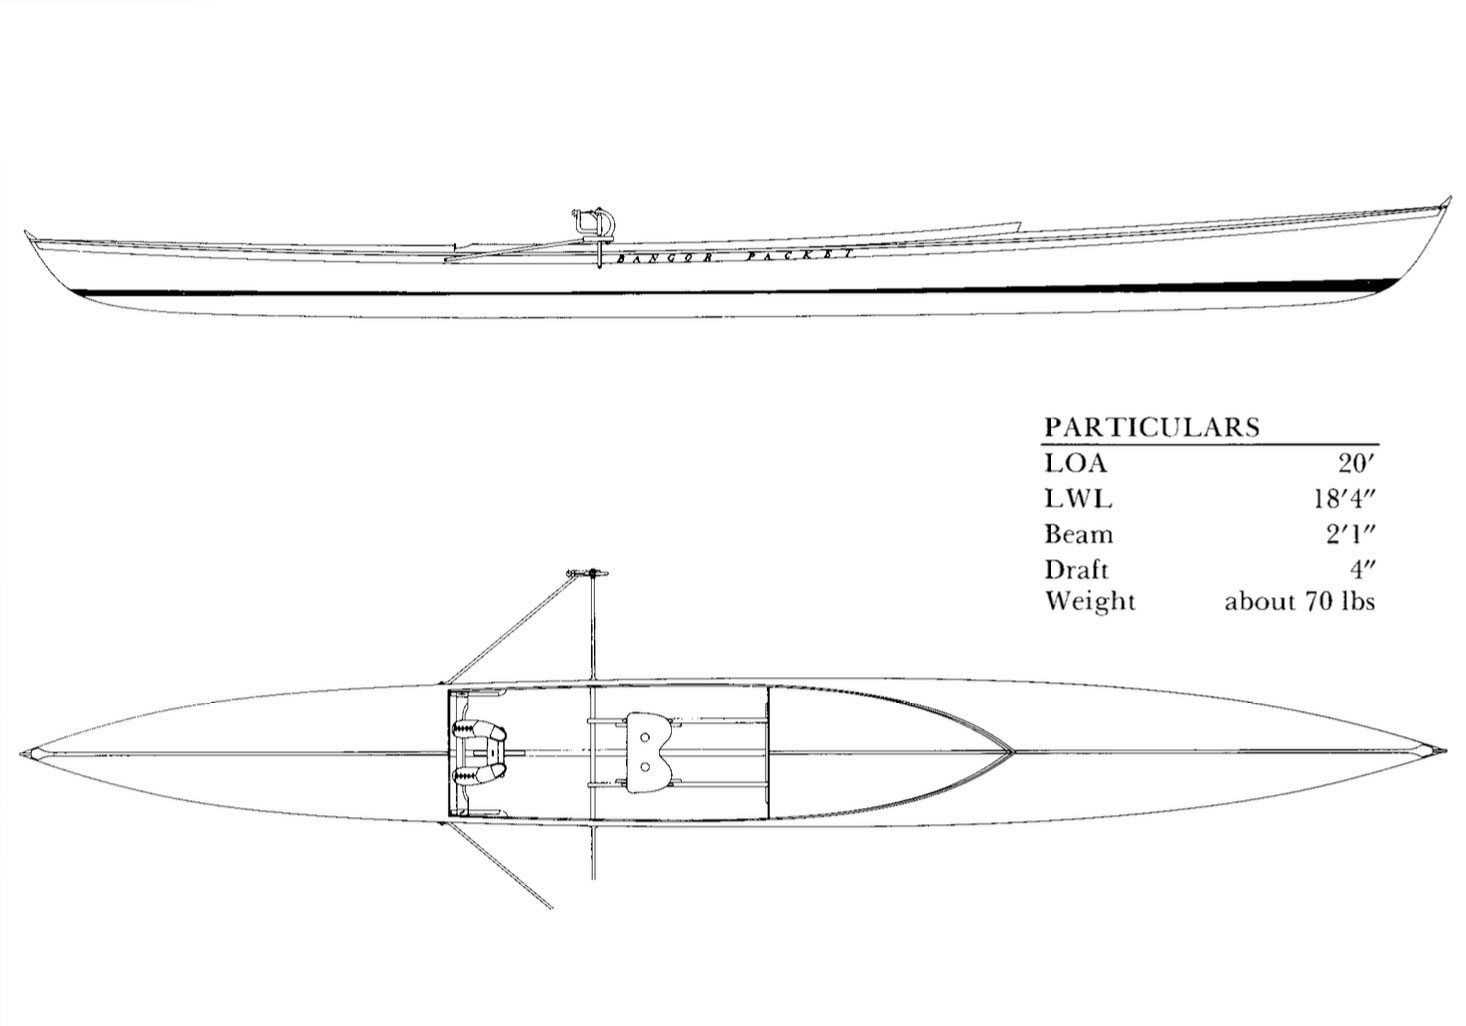
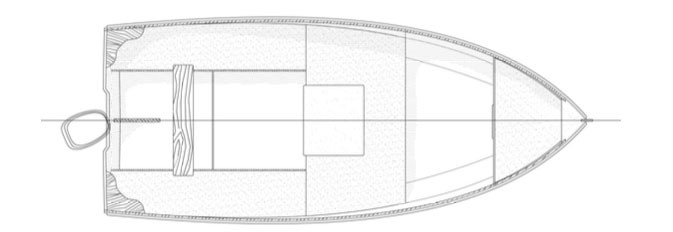
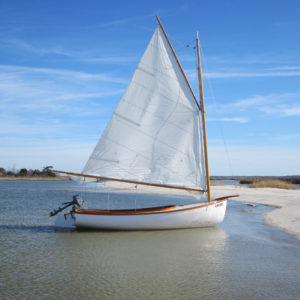
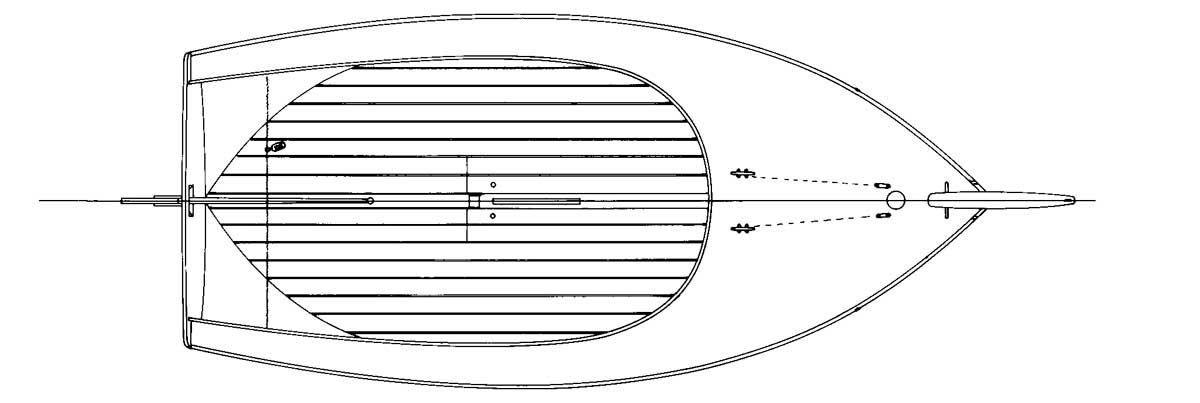
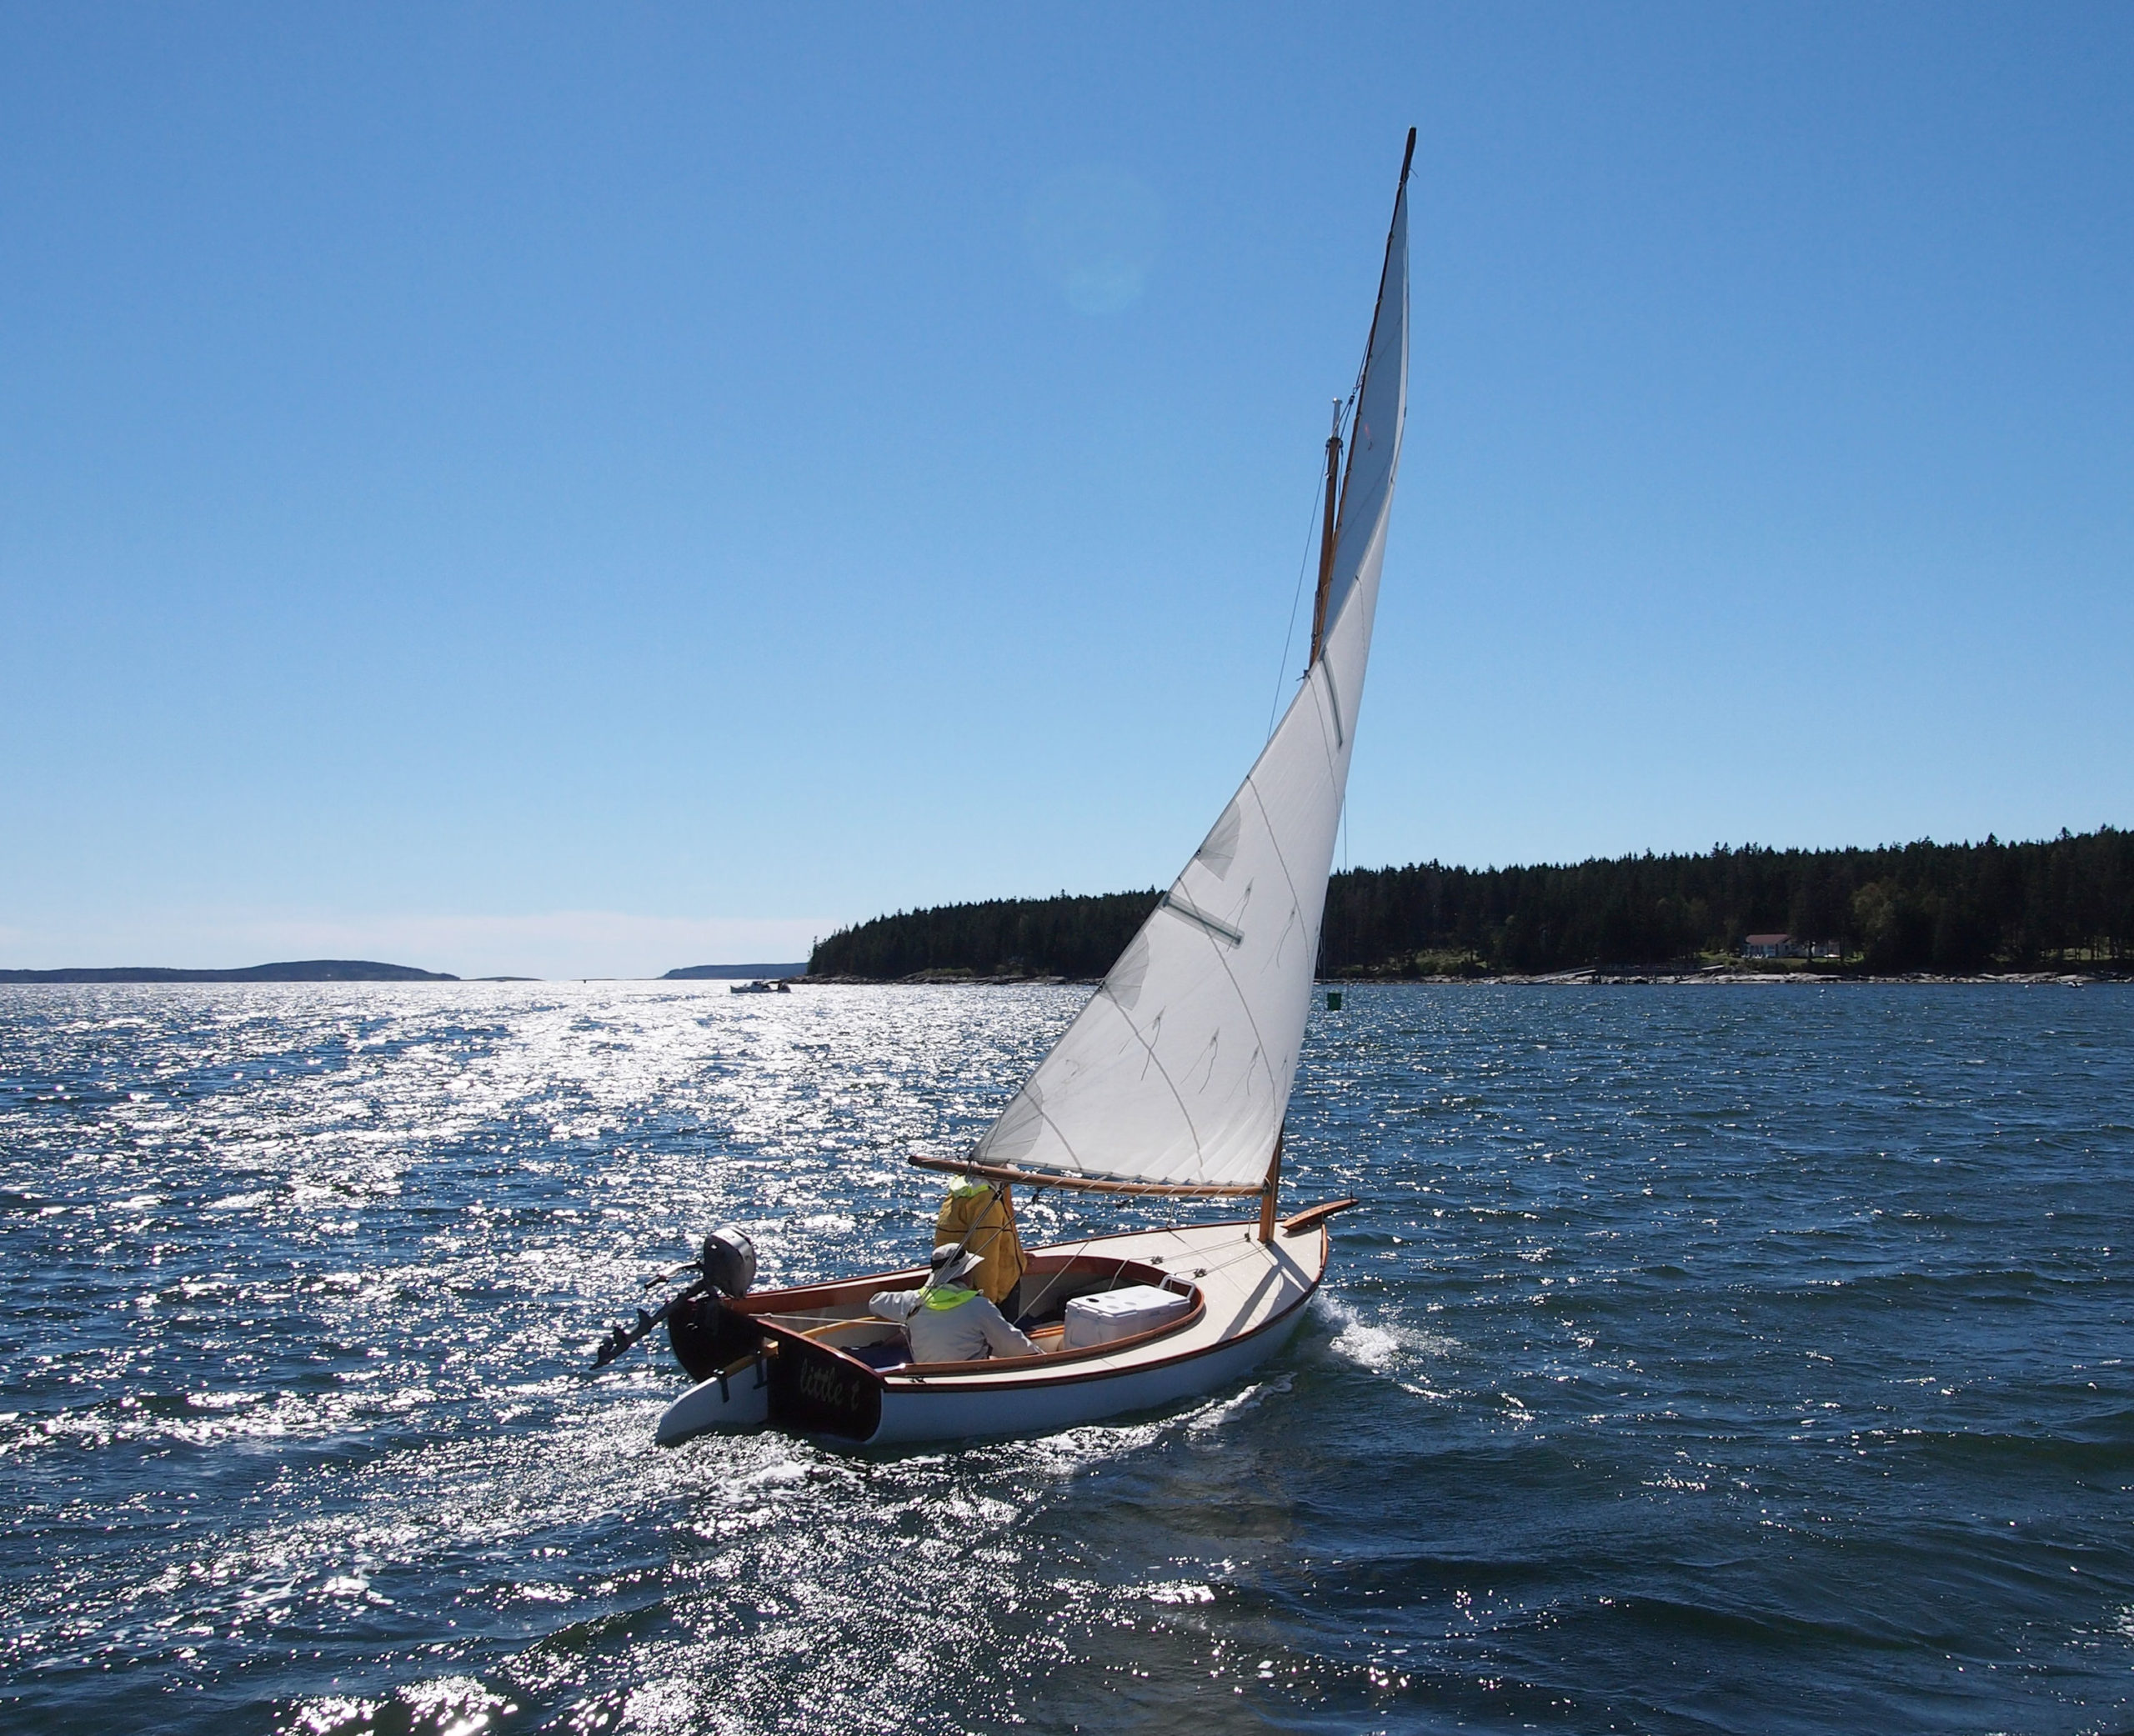
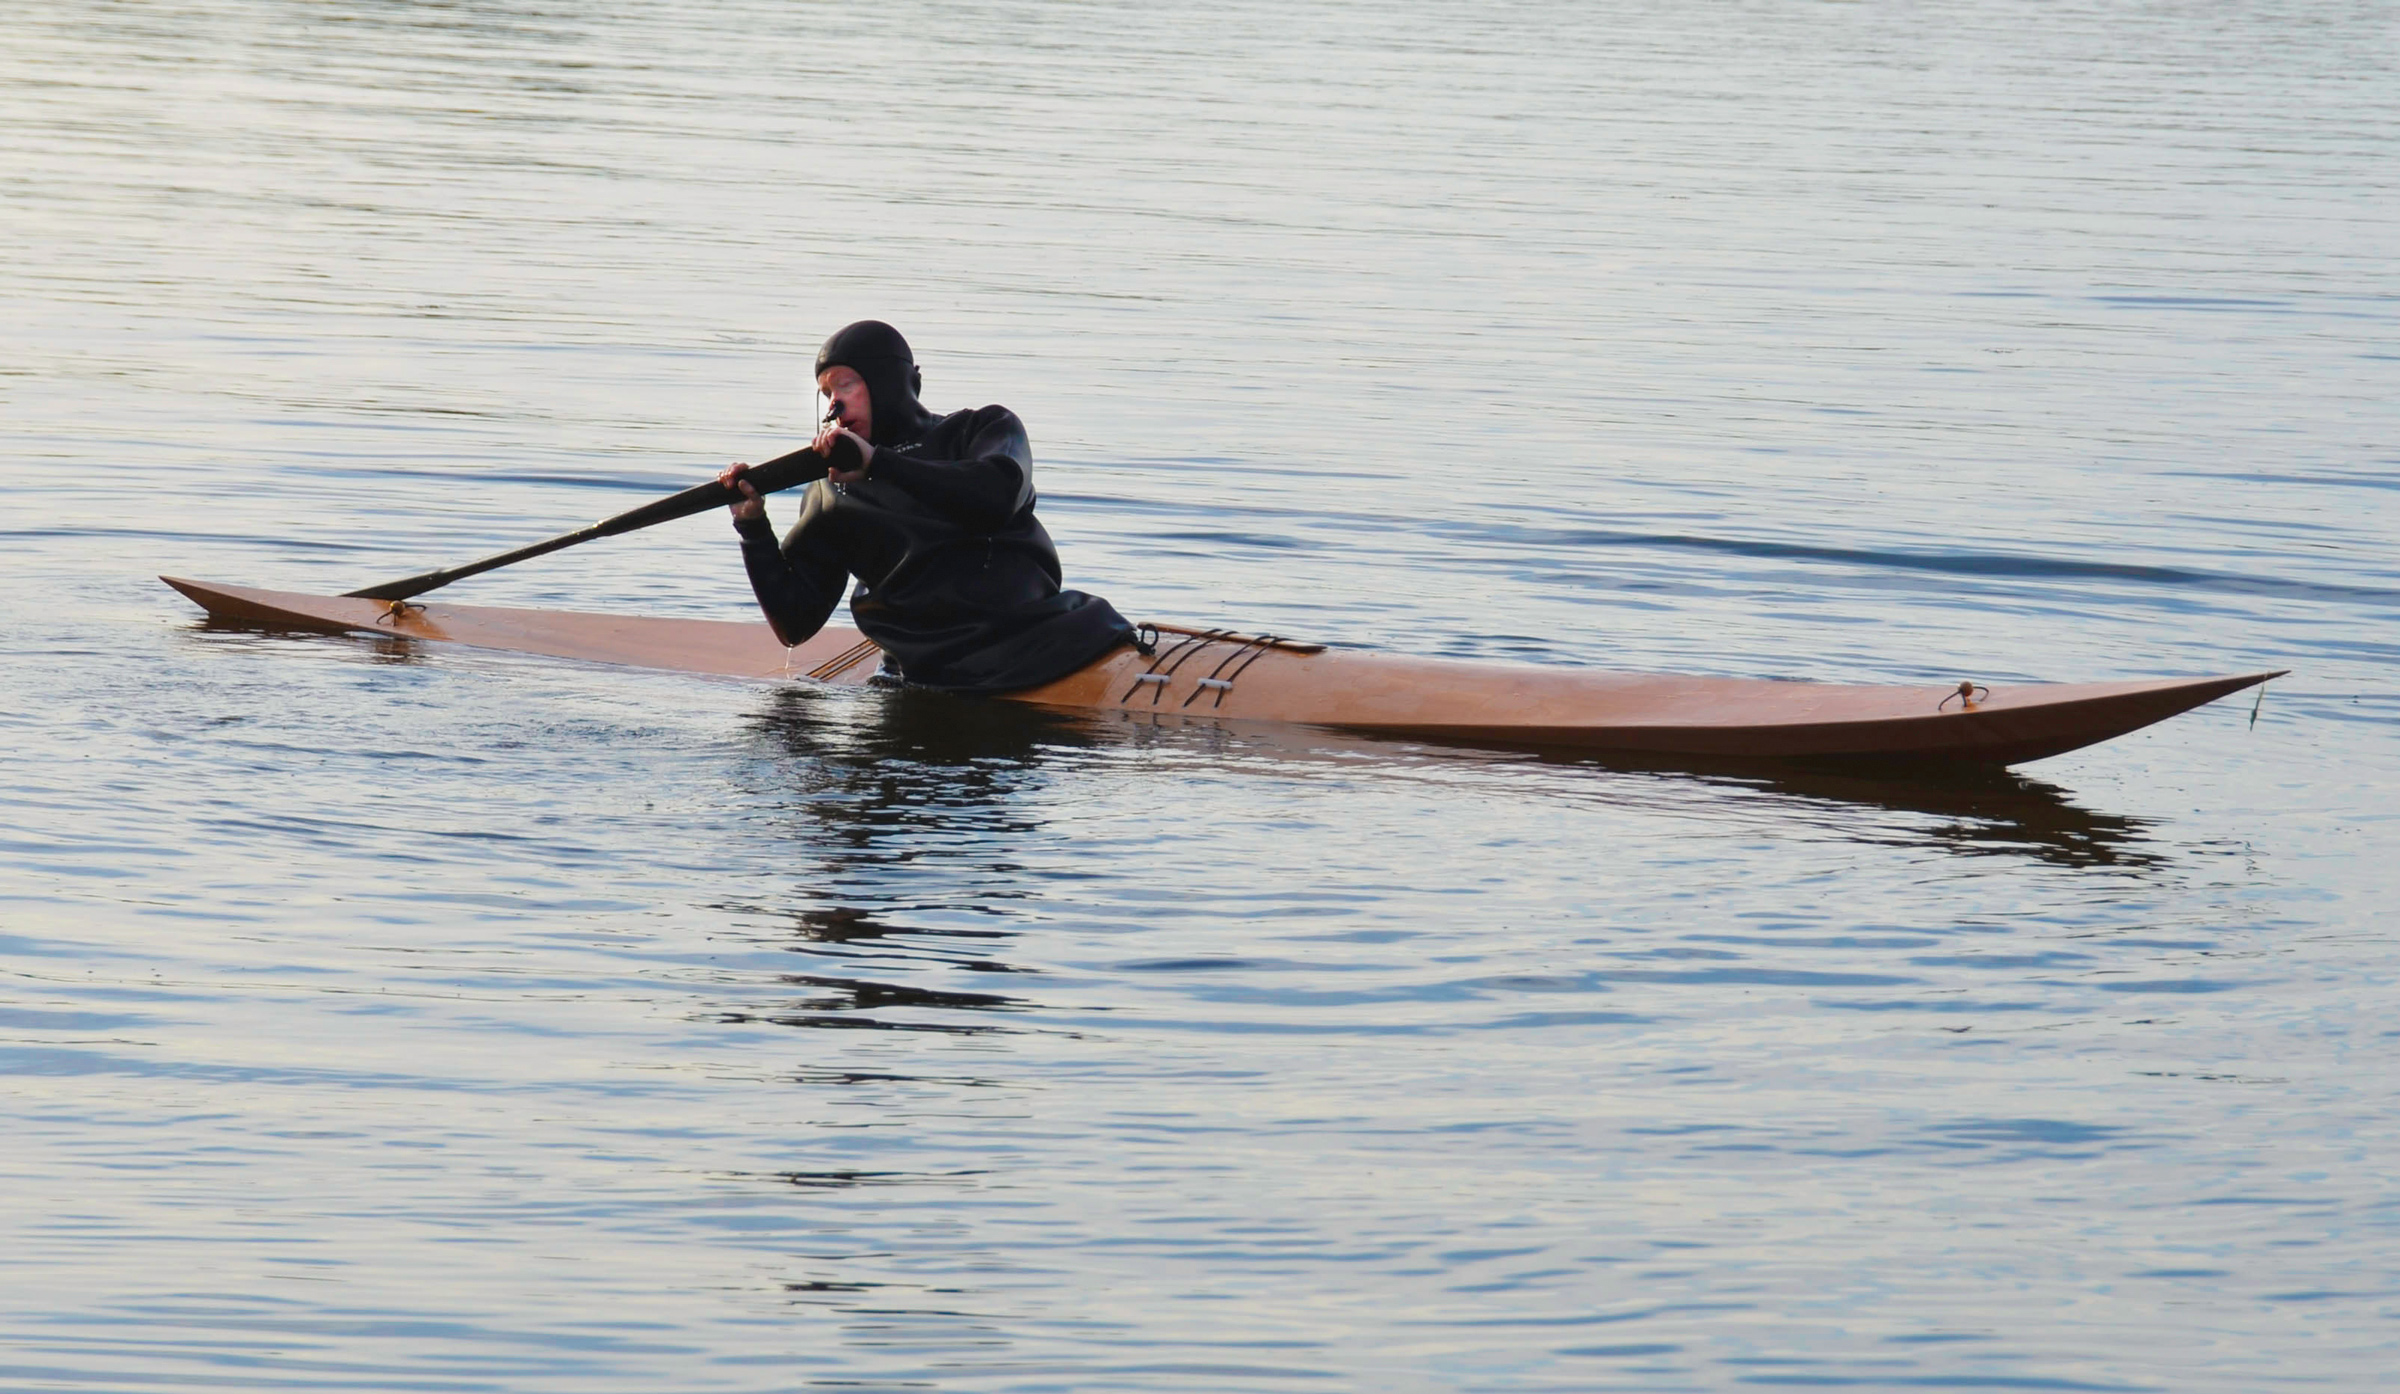
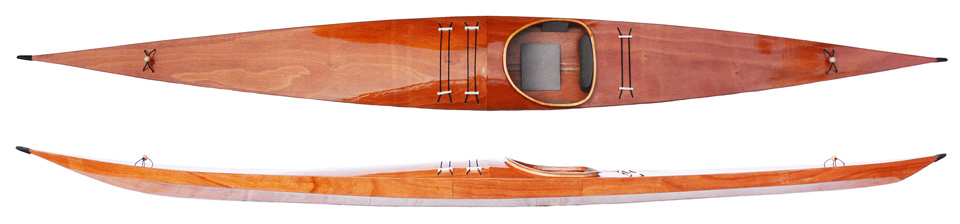
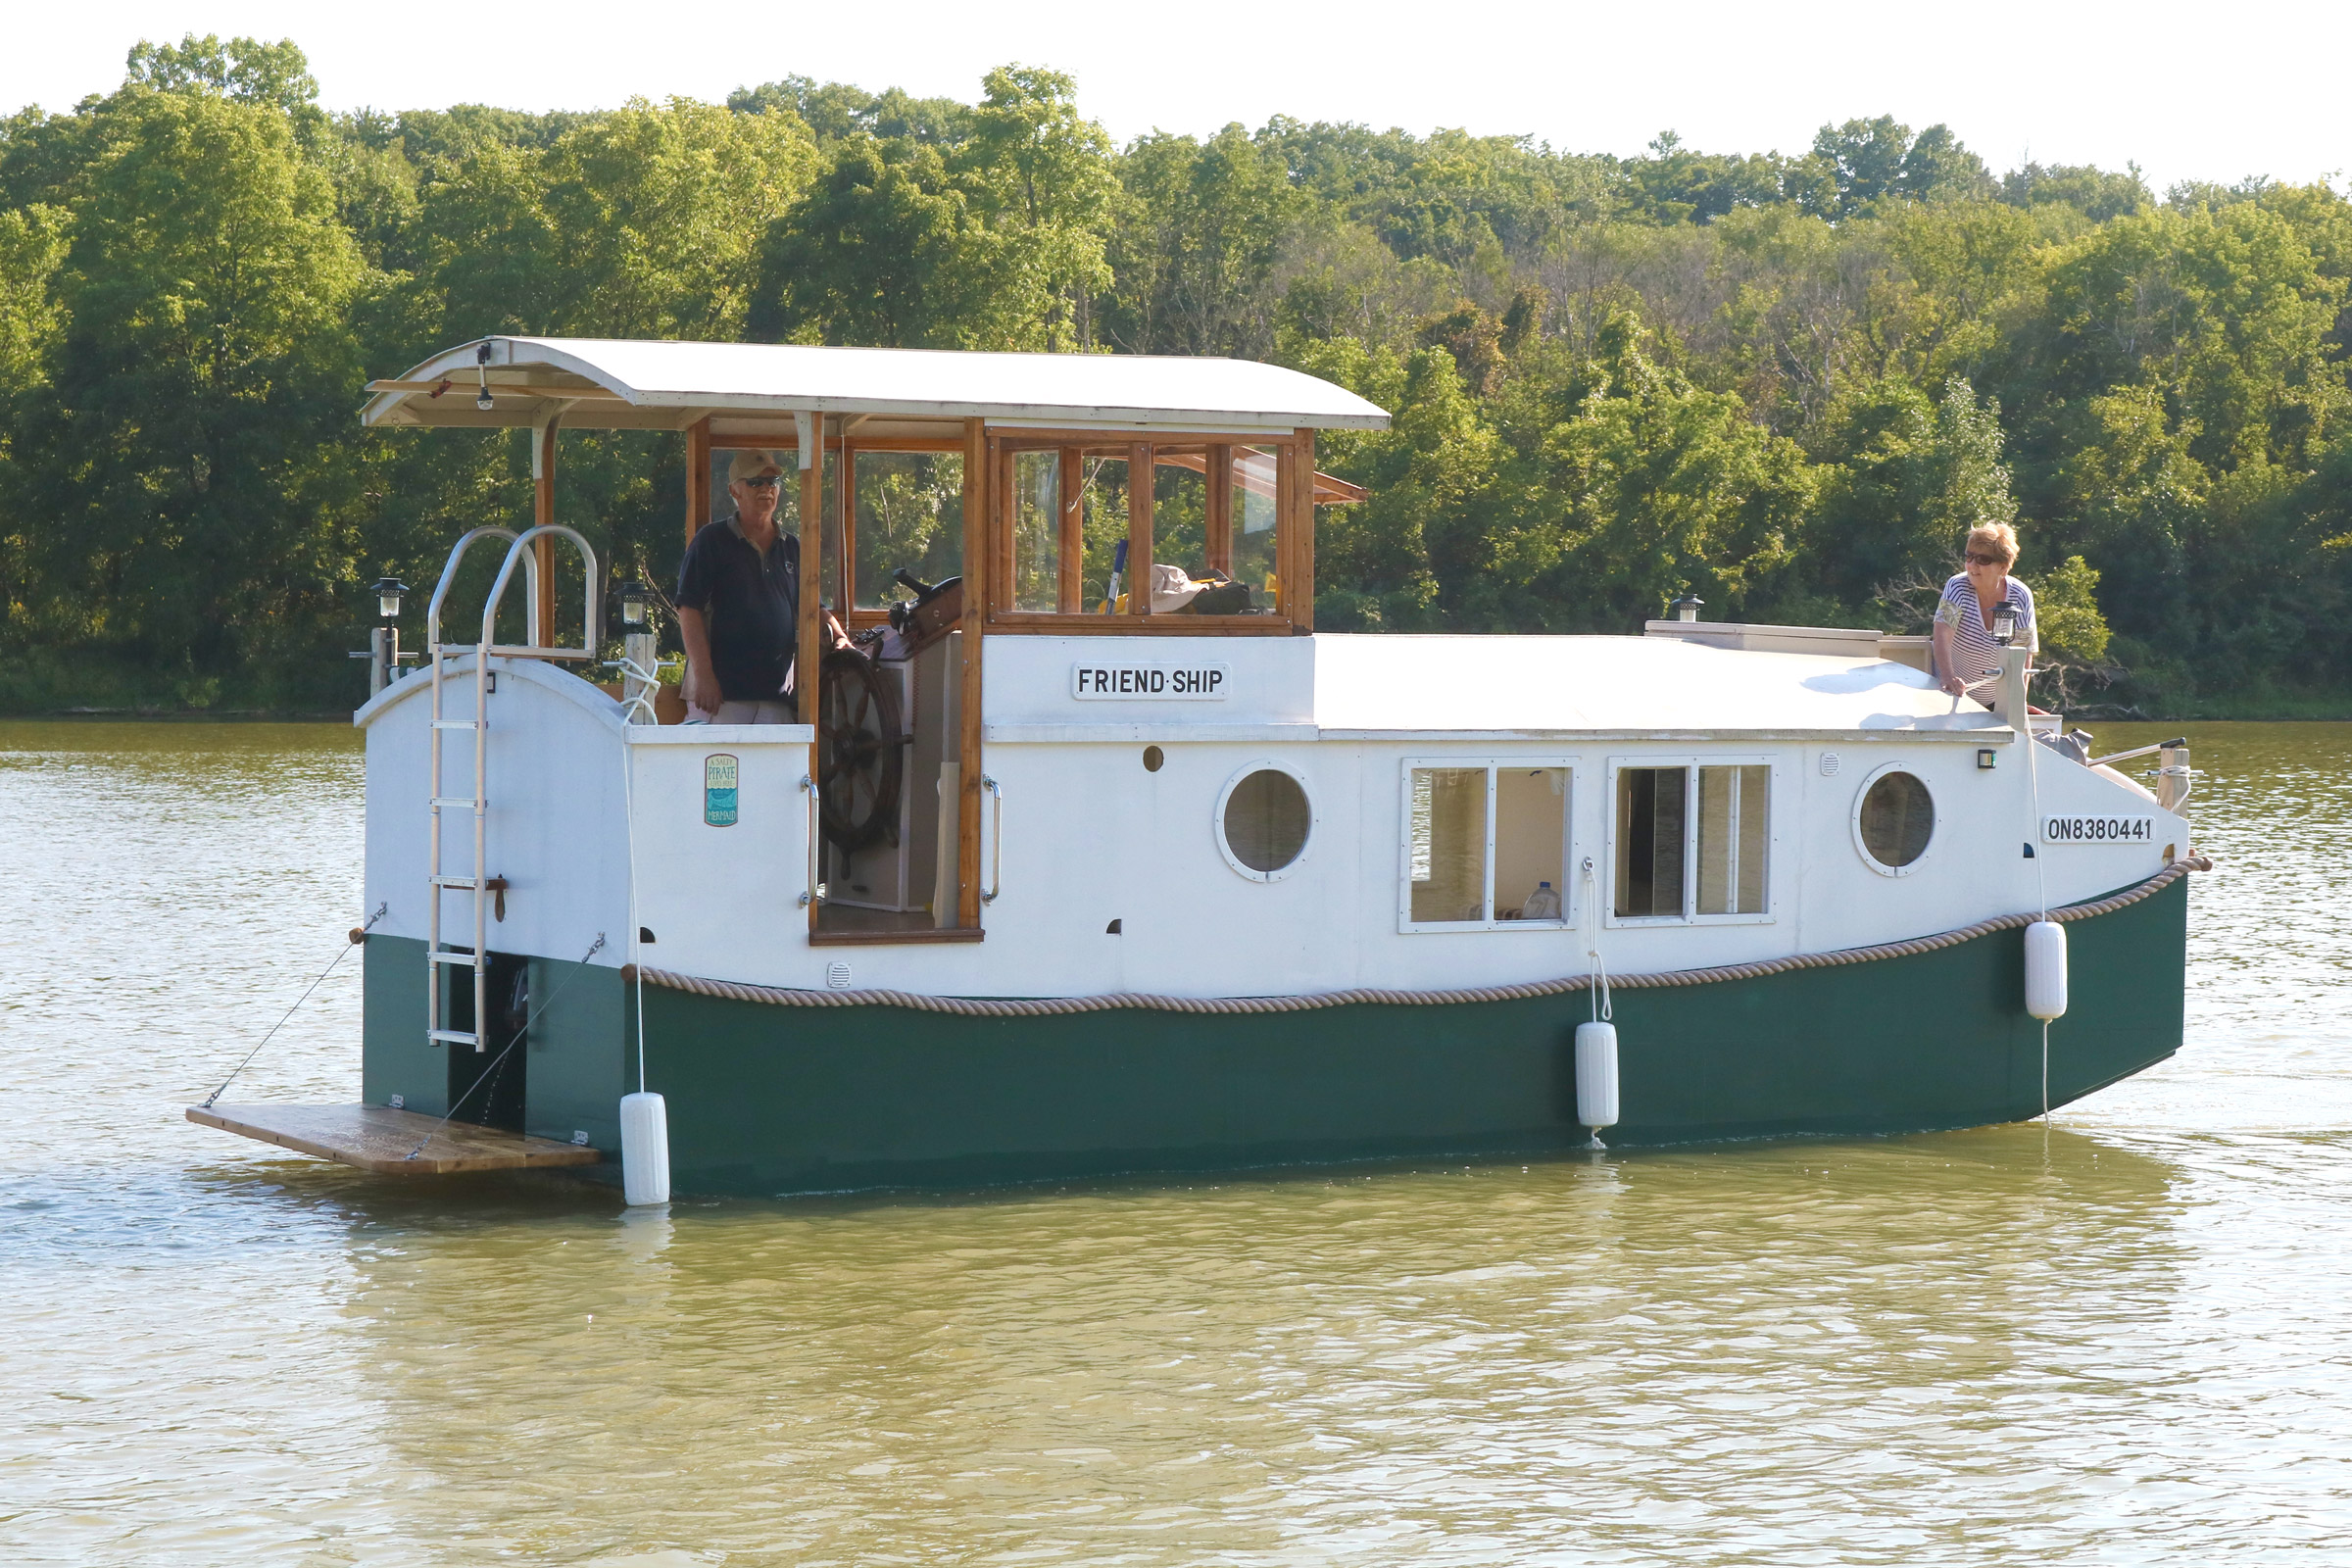
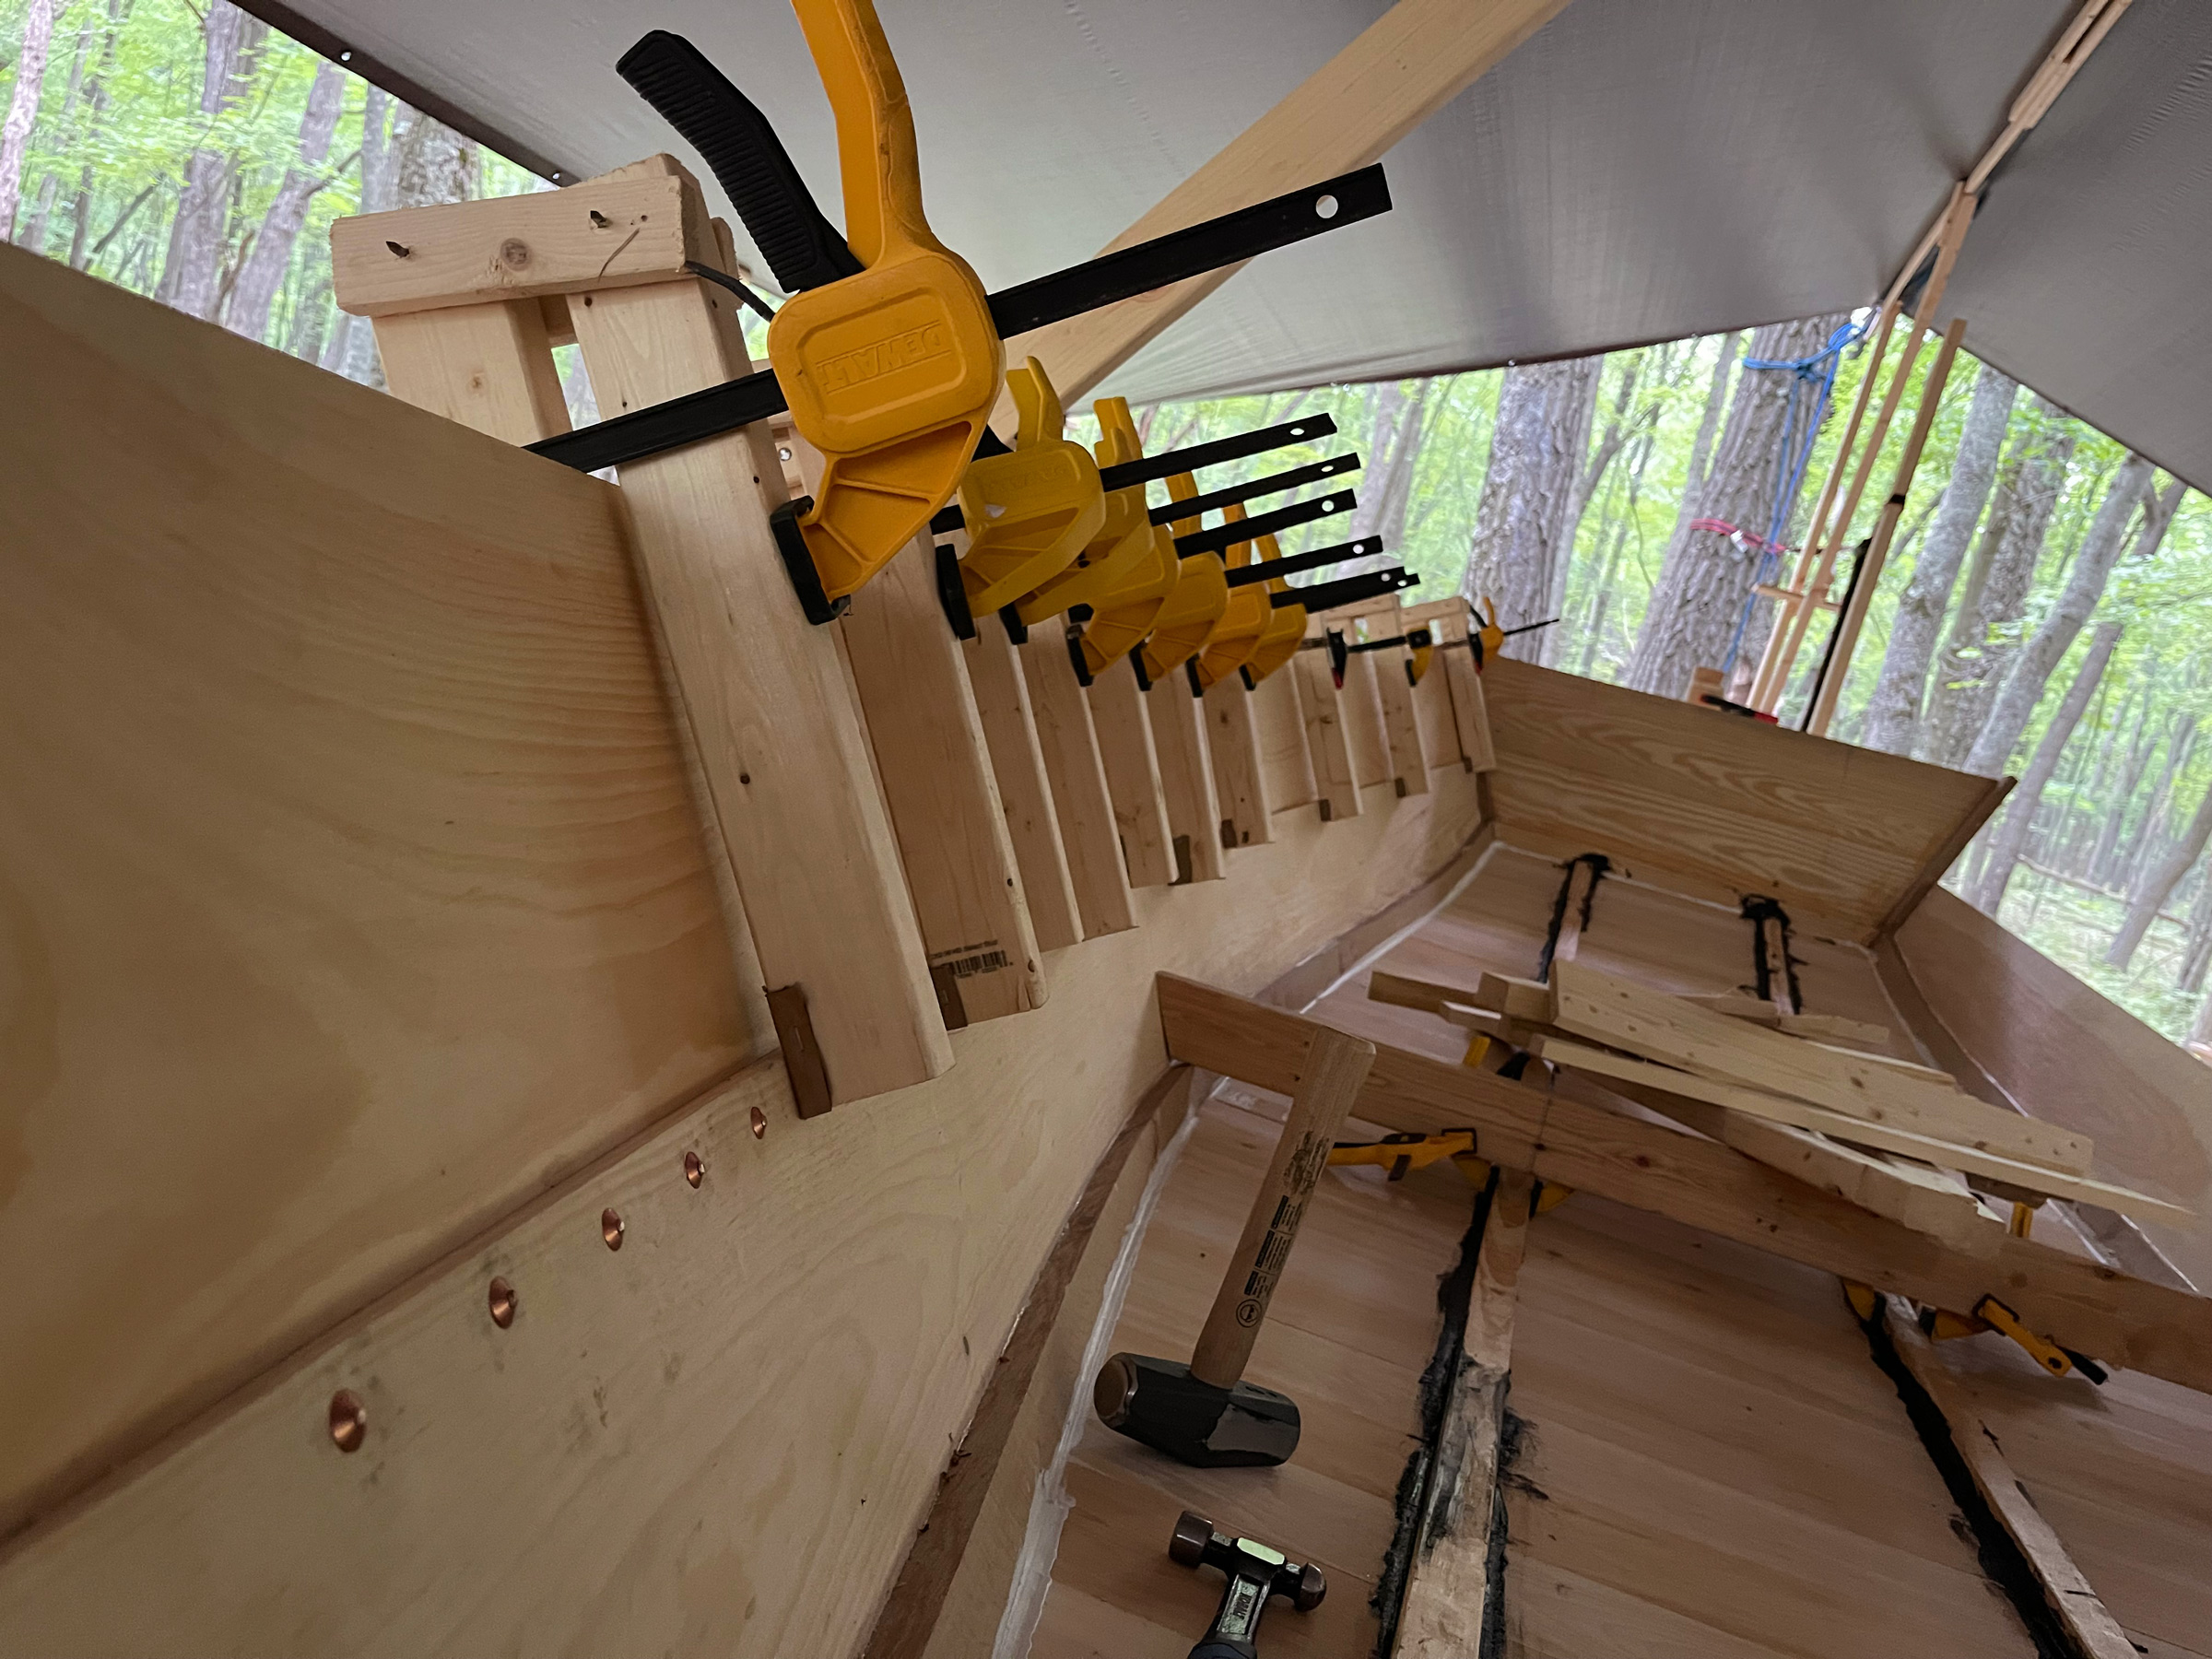
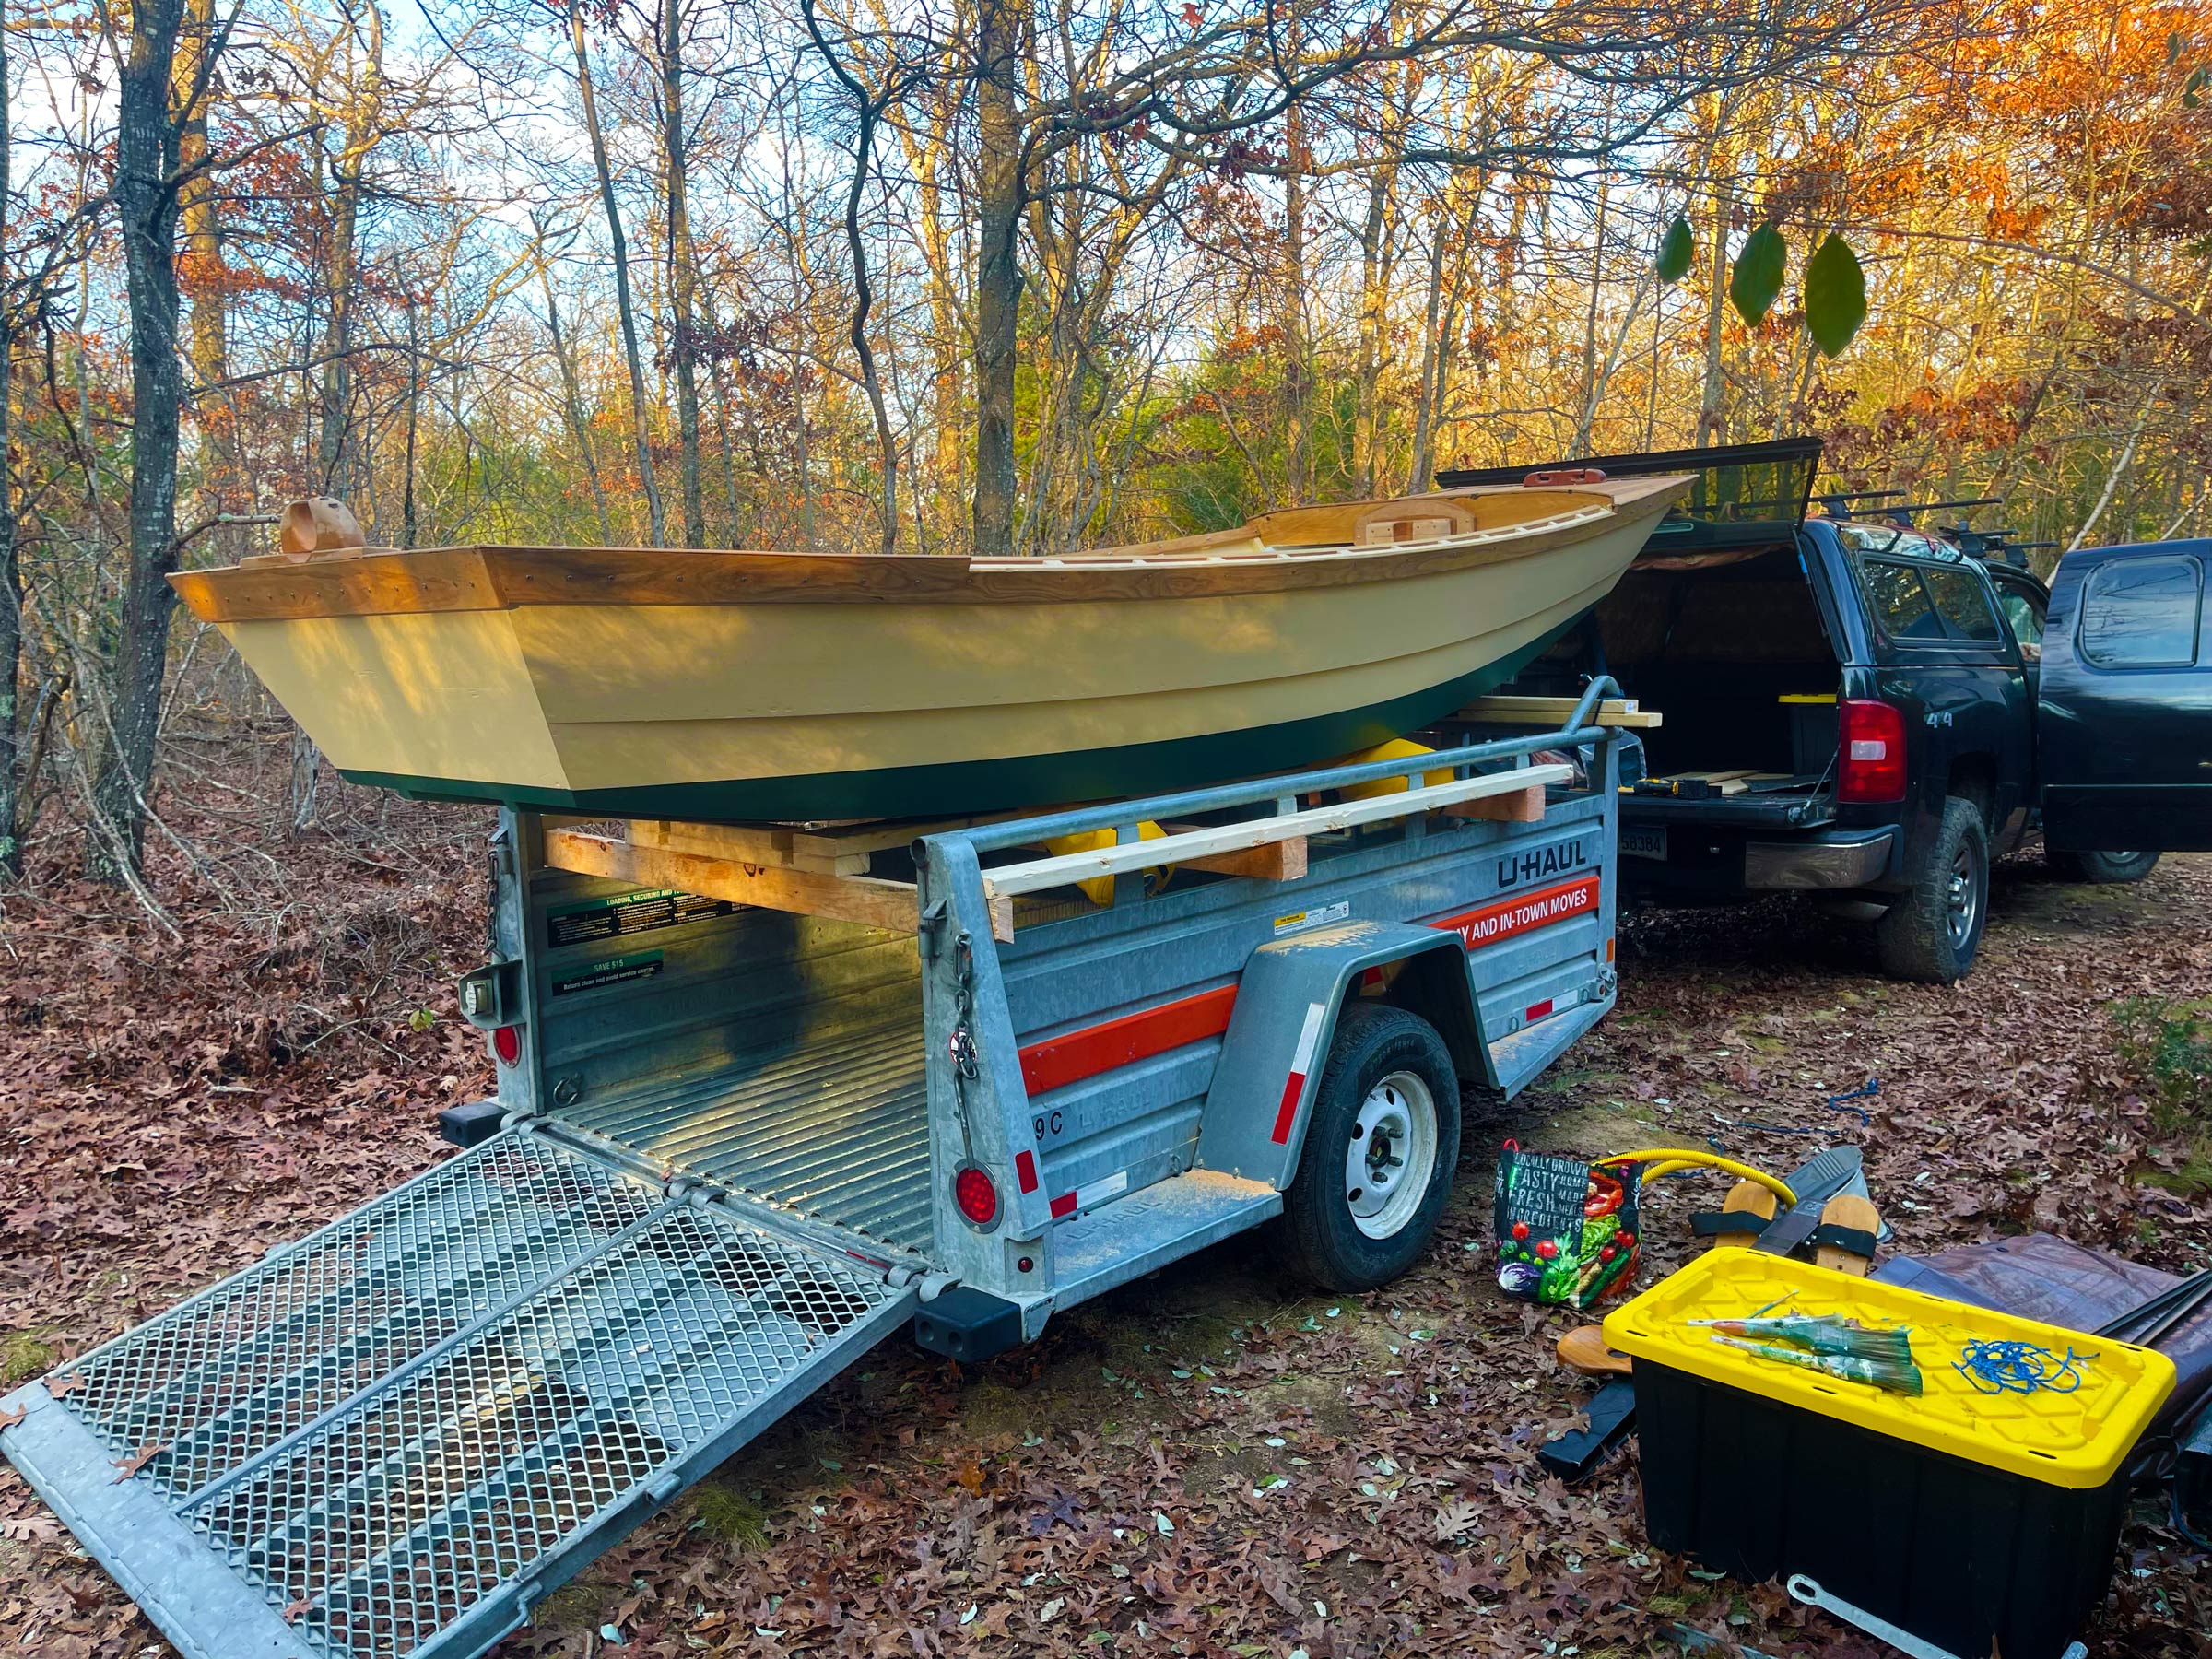
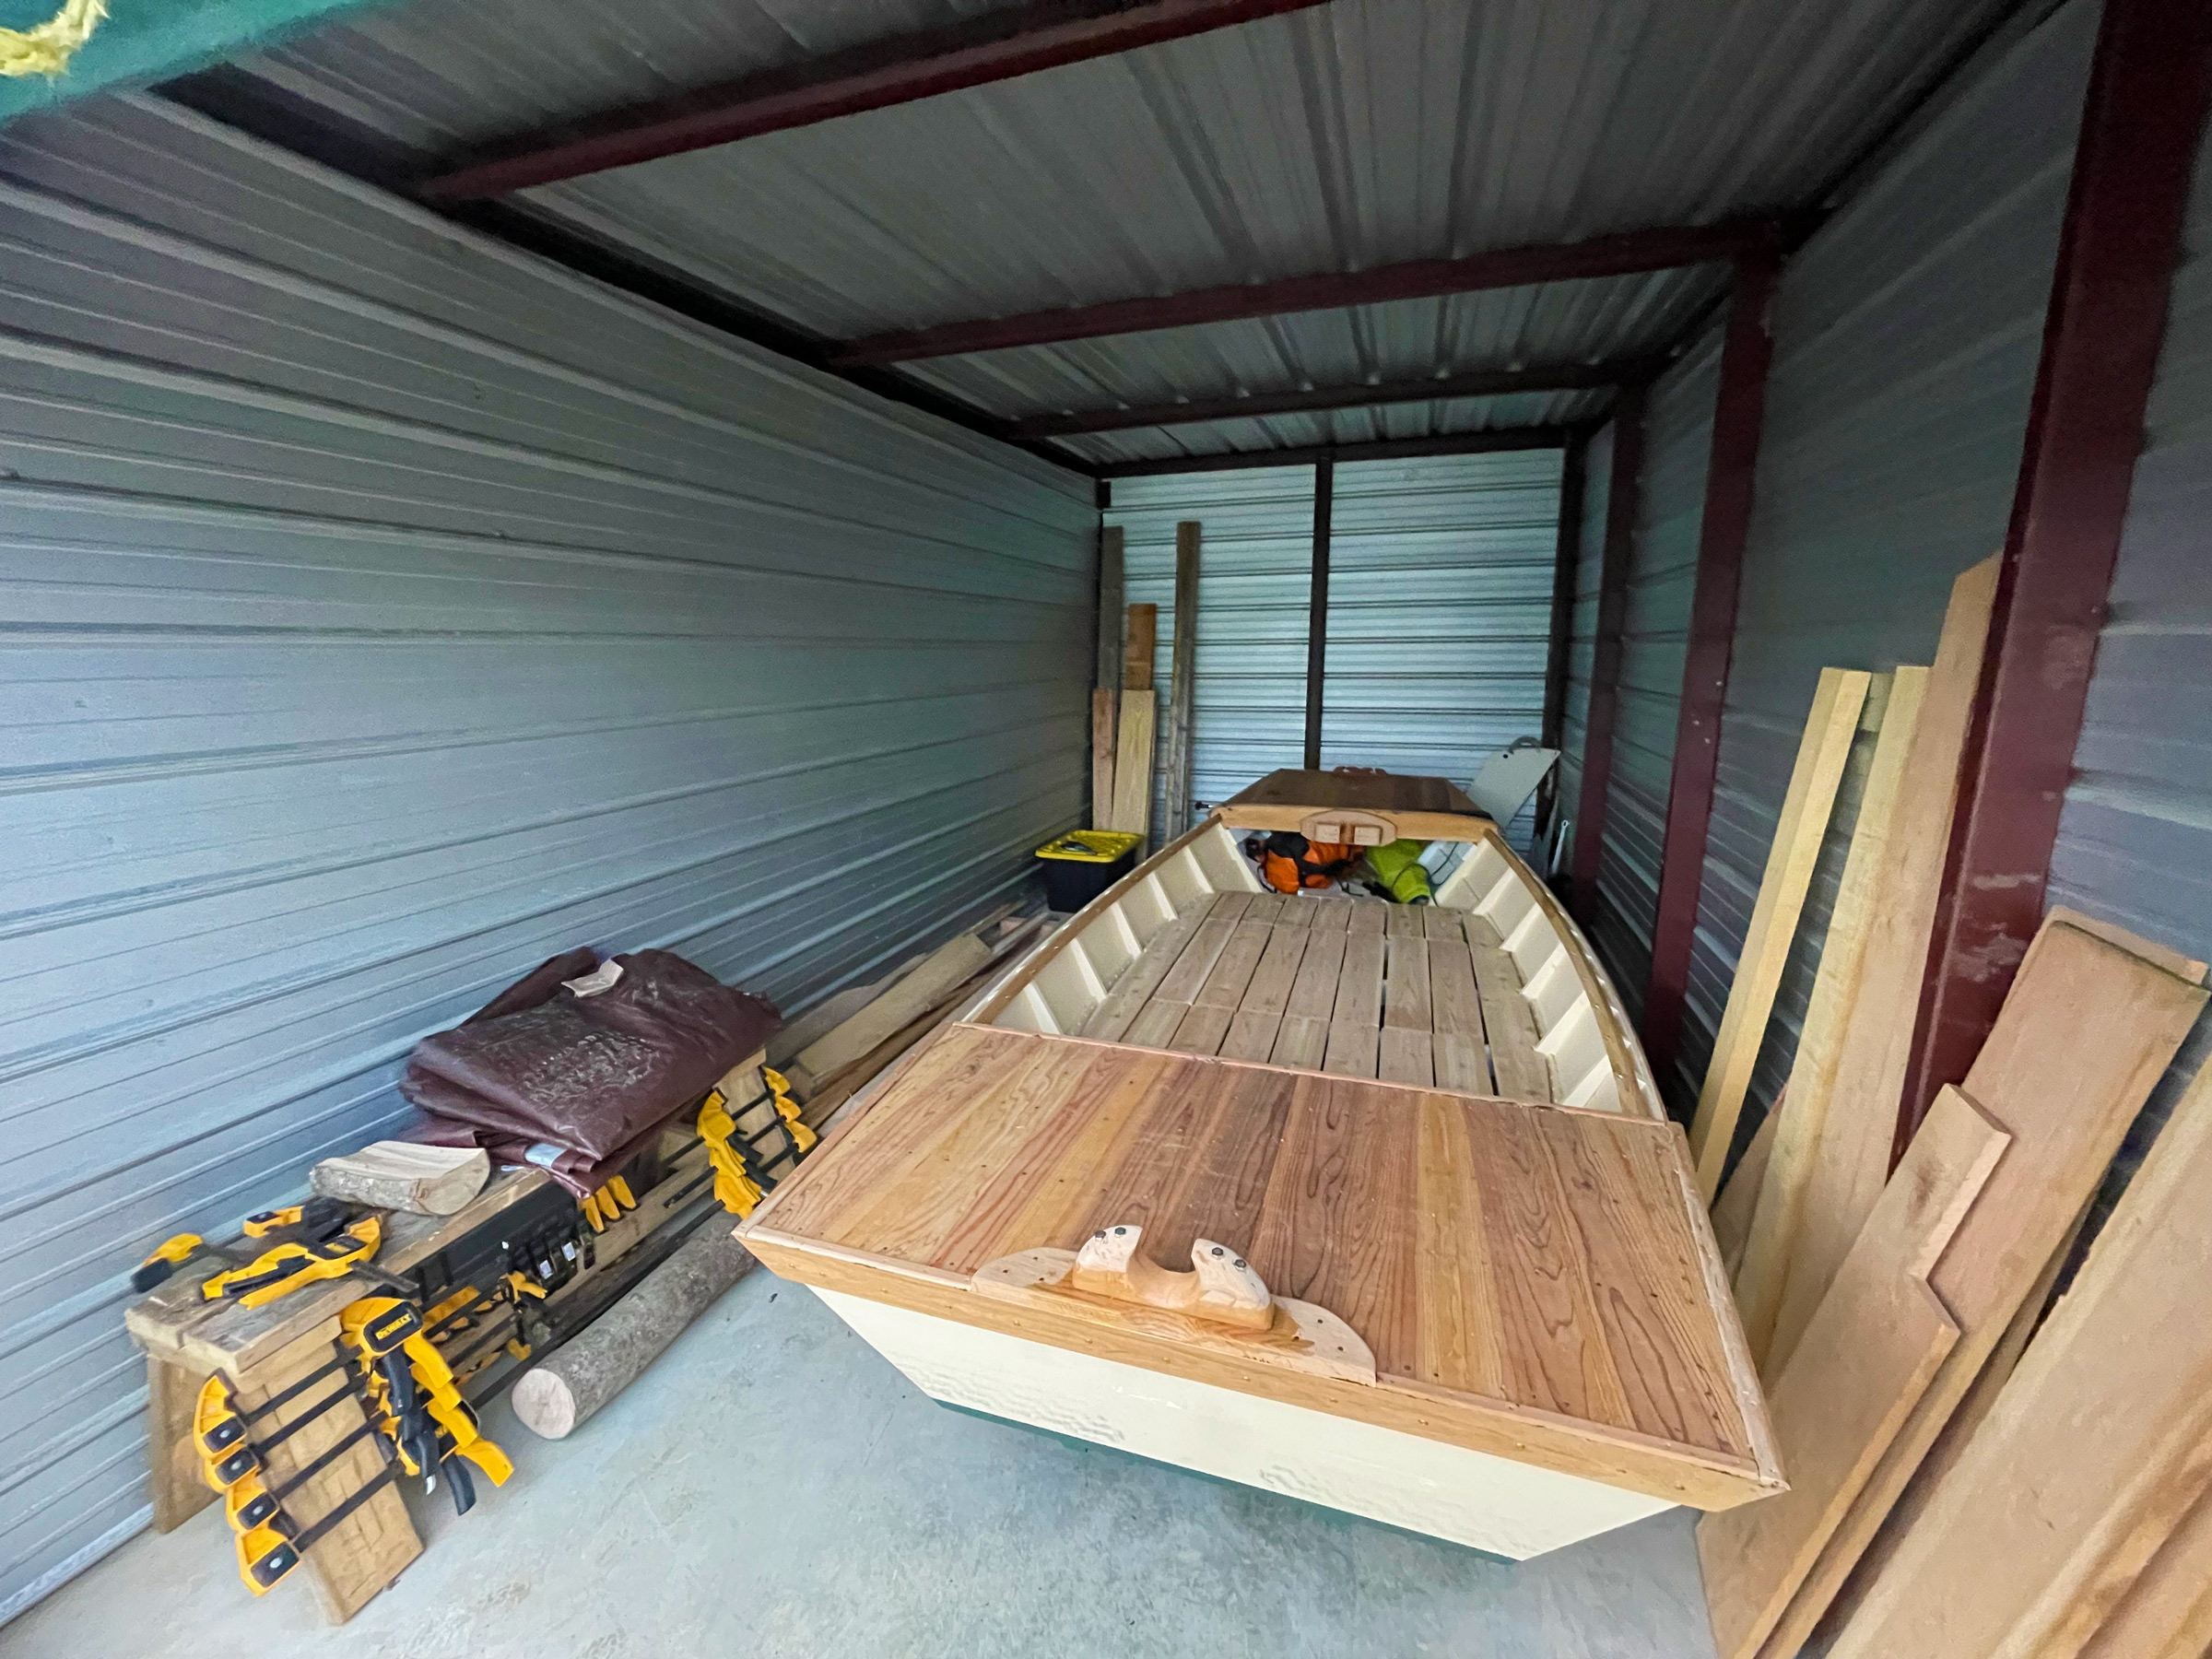
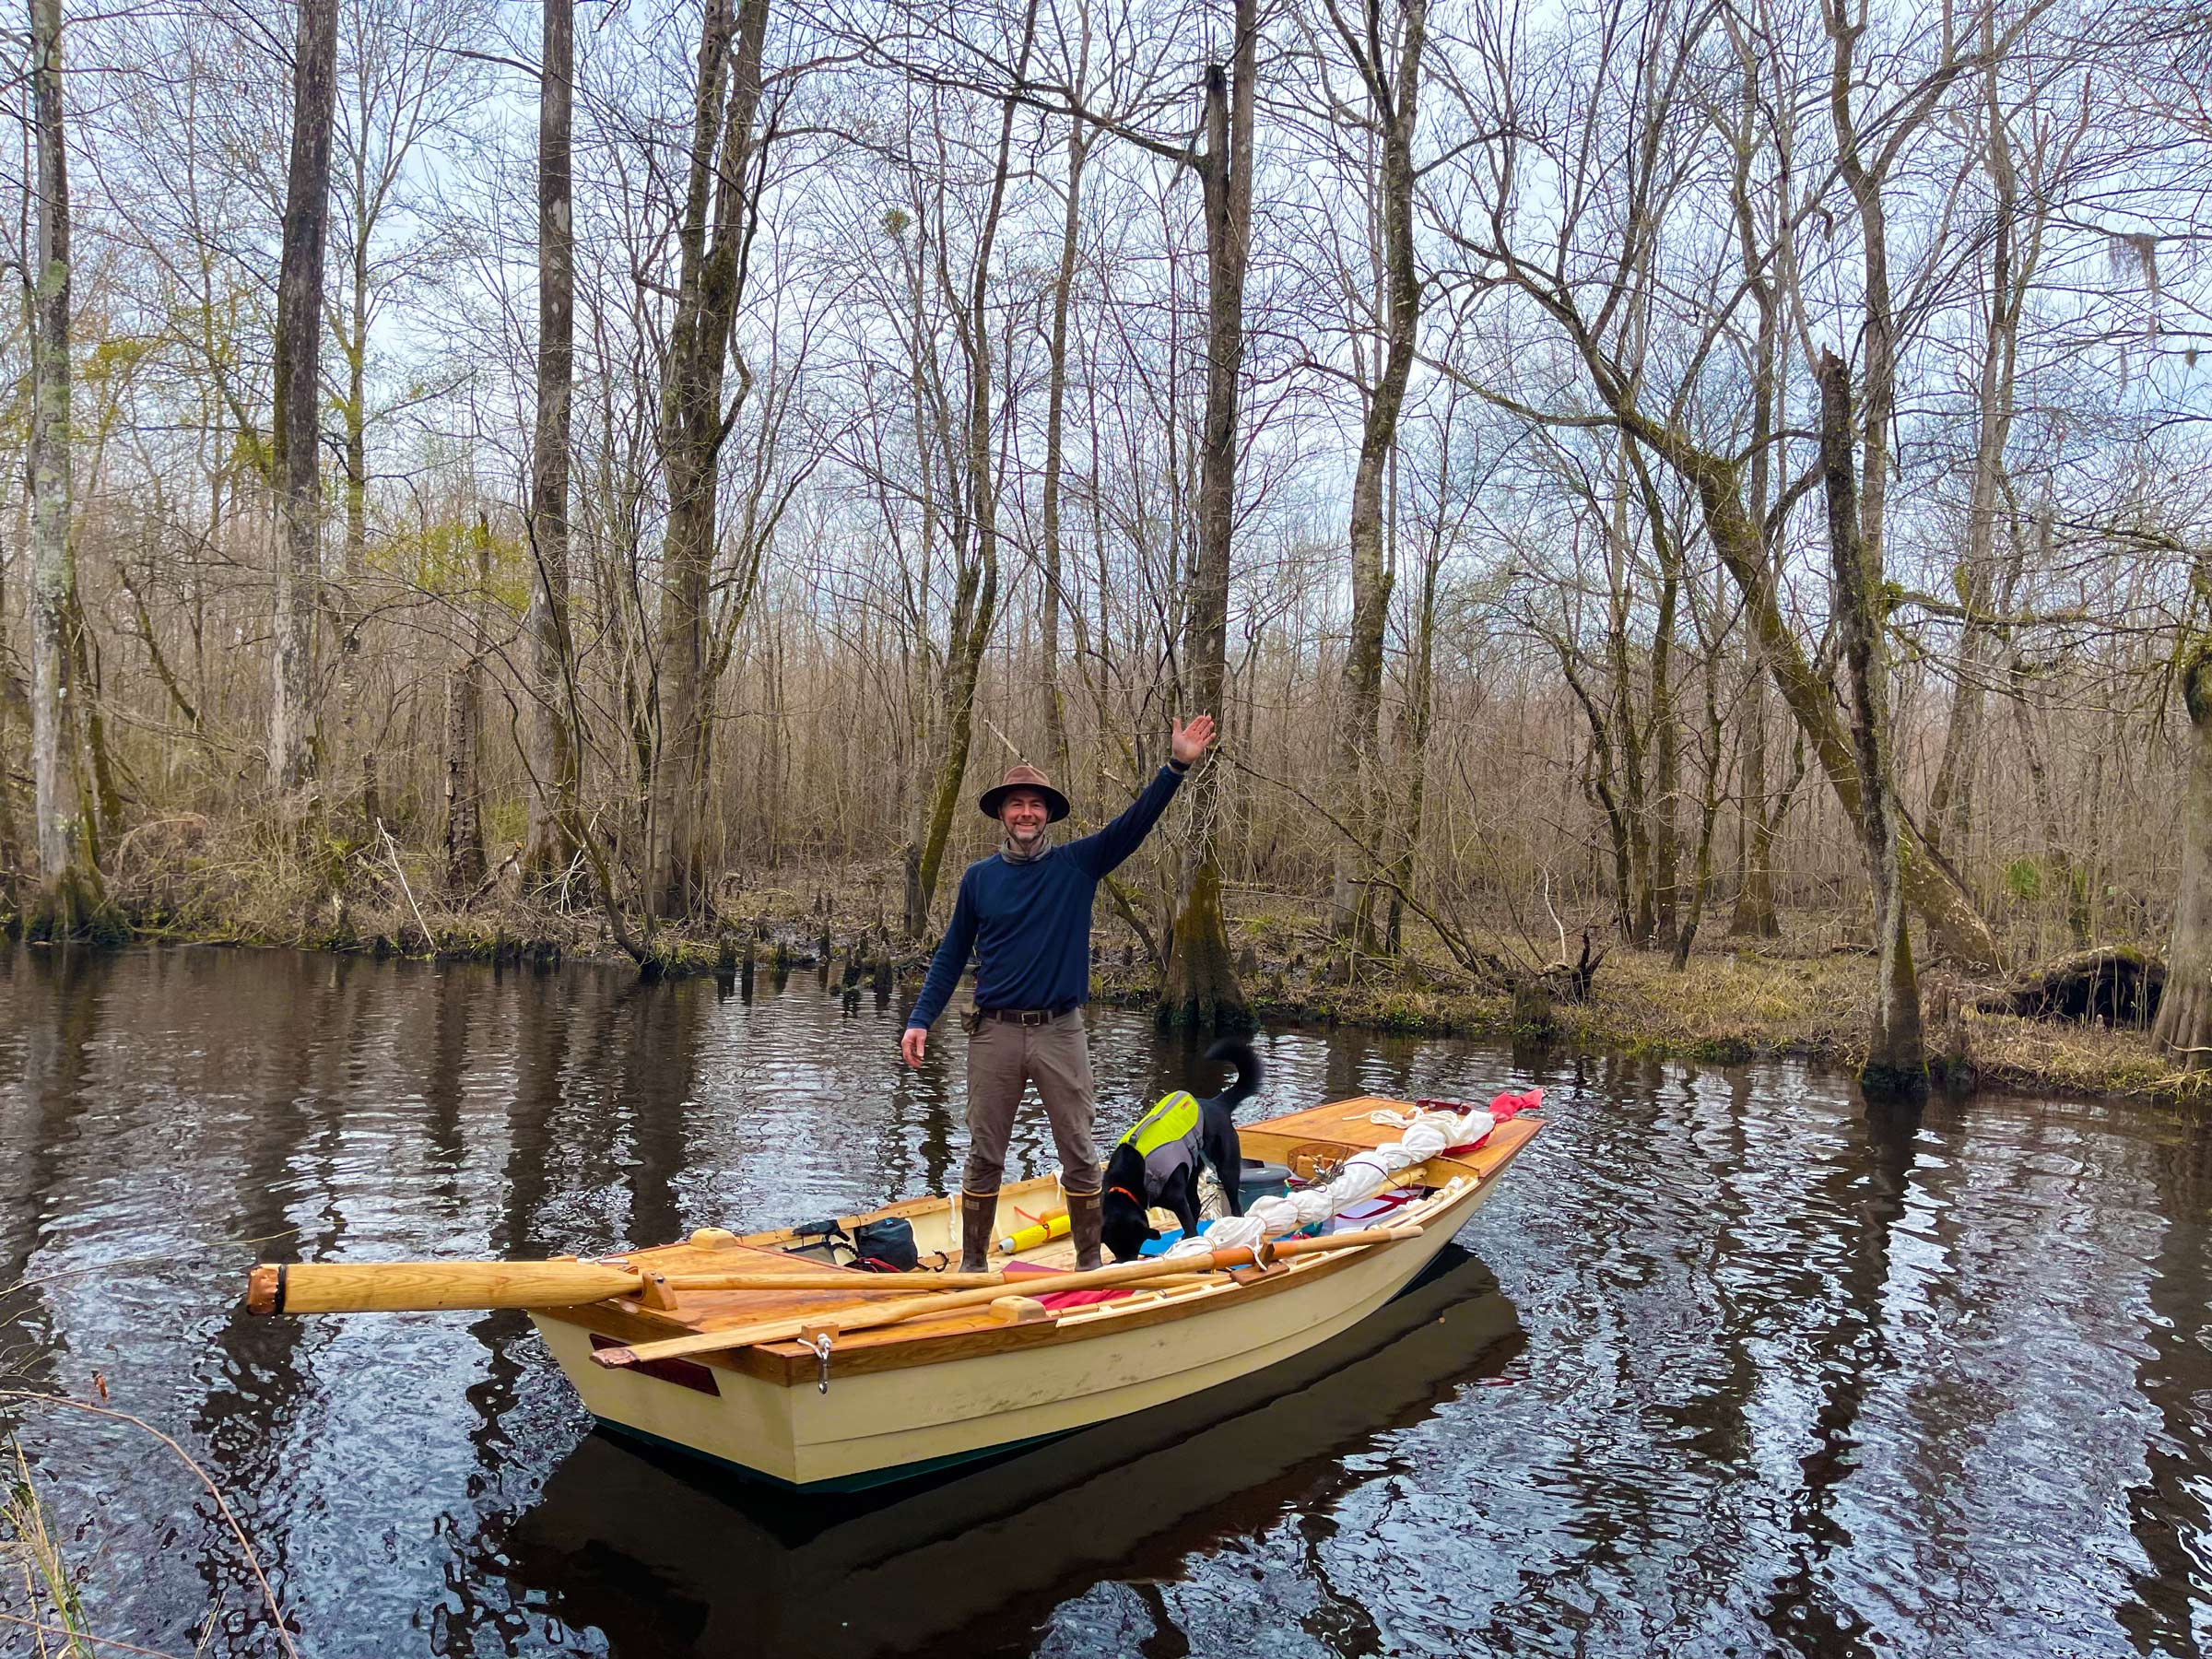
The Nancy’s China design is a marriage of the big and the small. It’s the biggest boat you can fit in a garage and the smallest boat you would want to sleep on. It’s the biggest boat you might pull with a Volkswagen van or equivalent low-powered four-banger, displacing less than 800 lbs, but it’s fit for some pretty big water, with a sailing rig that easily spills excess wind and a slug of ballast to help hold you upright. It’s sufficiently romantic, too: salty, wooden, pretty, but built with the modern stitch-and-glue method that designer Sam Devlin of Olympia, Washington, has taken to far greater lengths during the past 30 years.
Dave Wagner
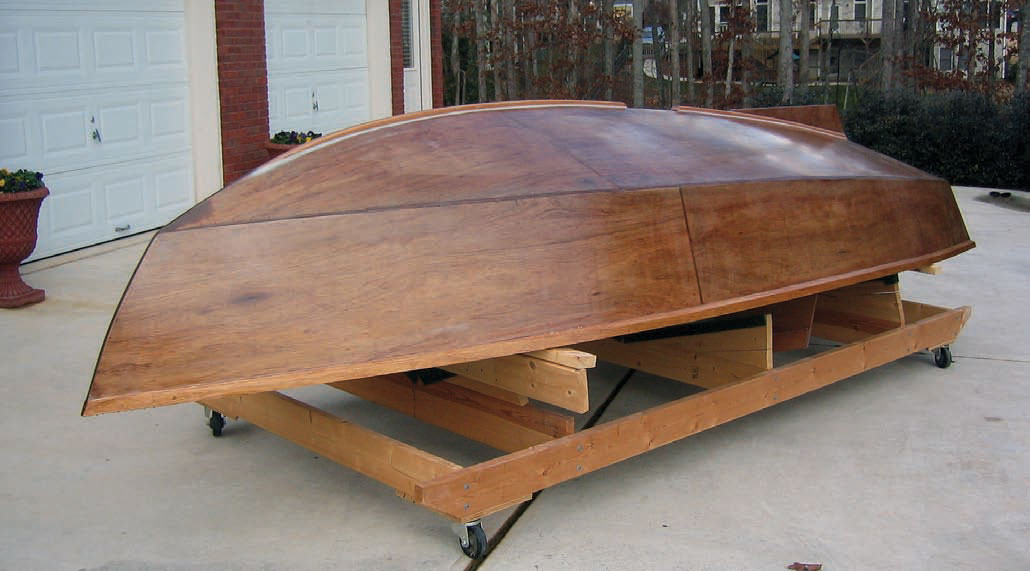
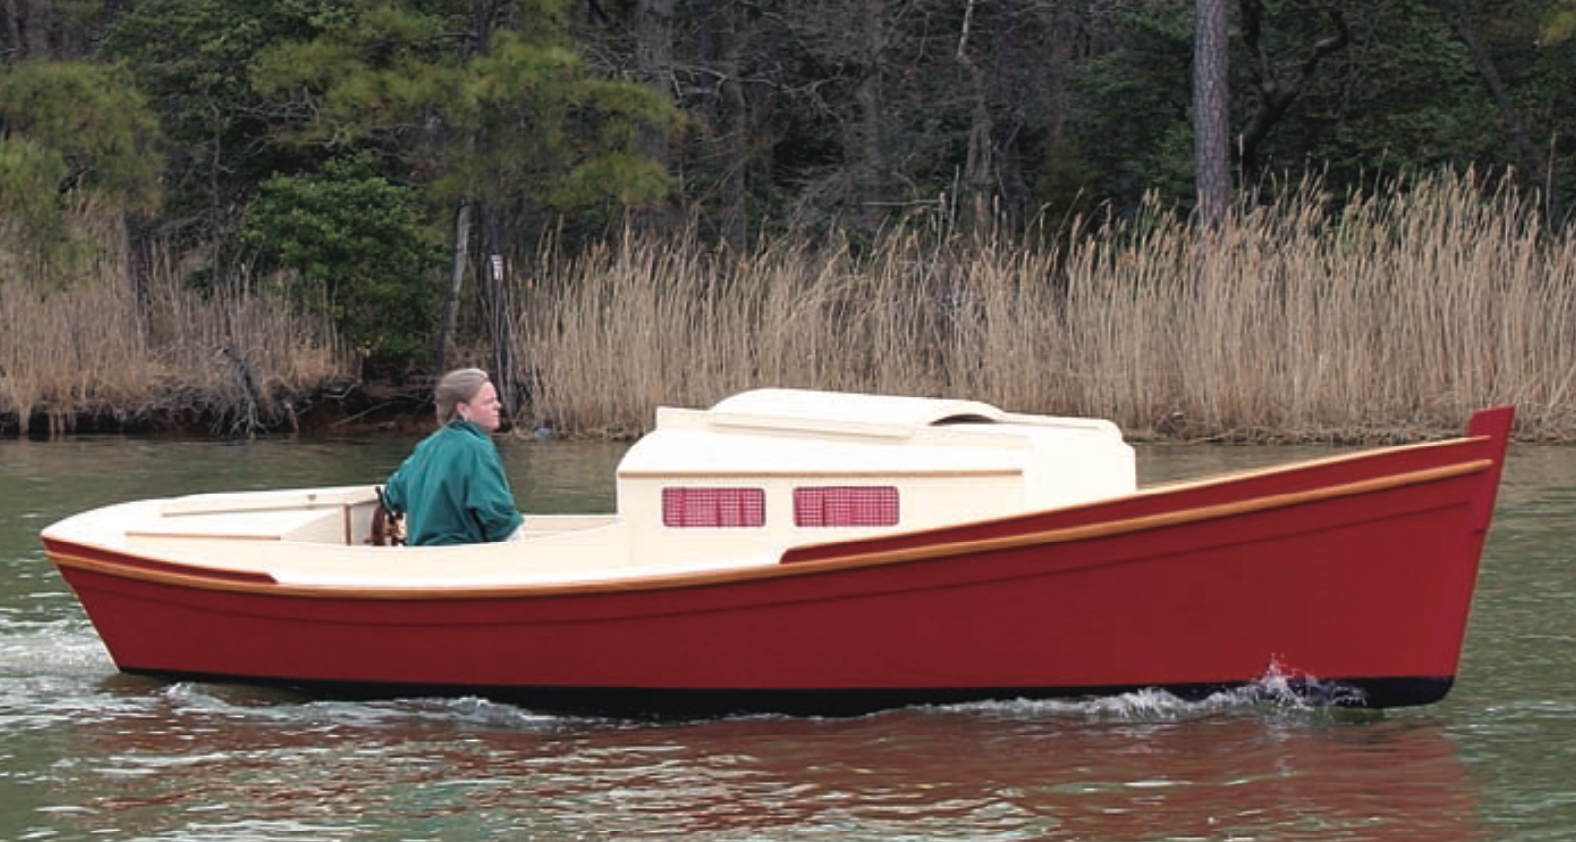
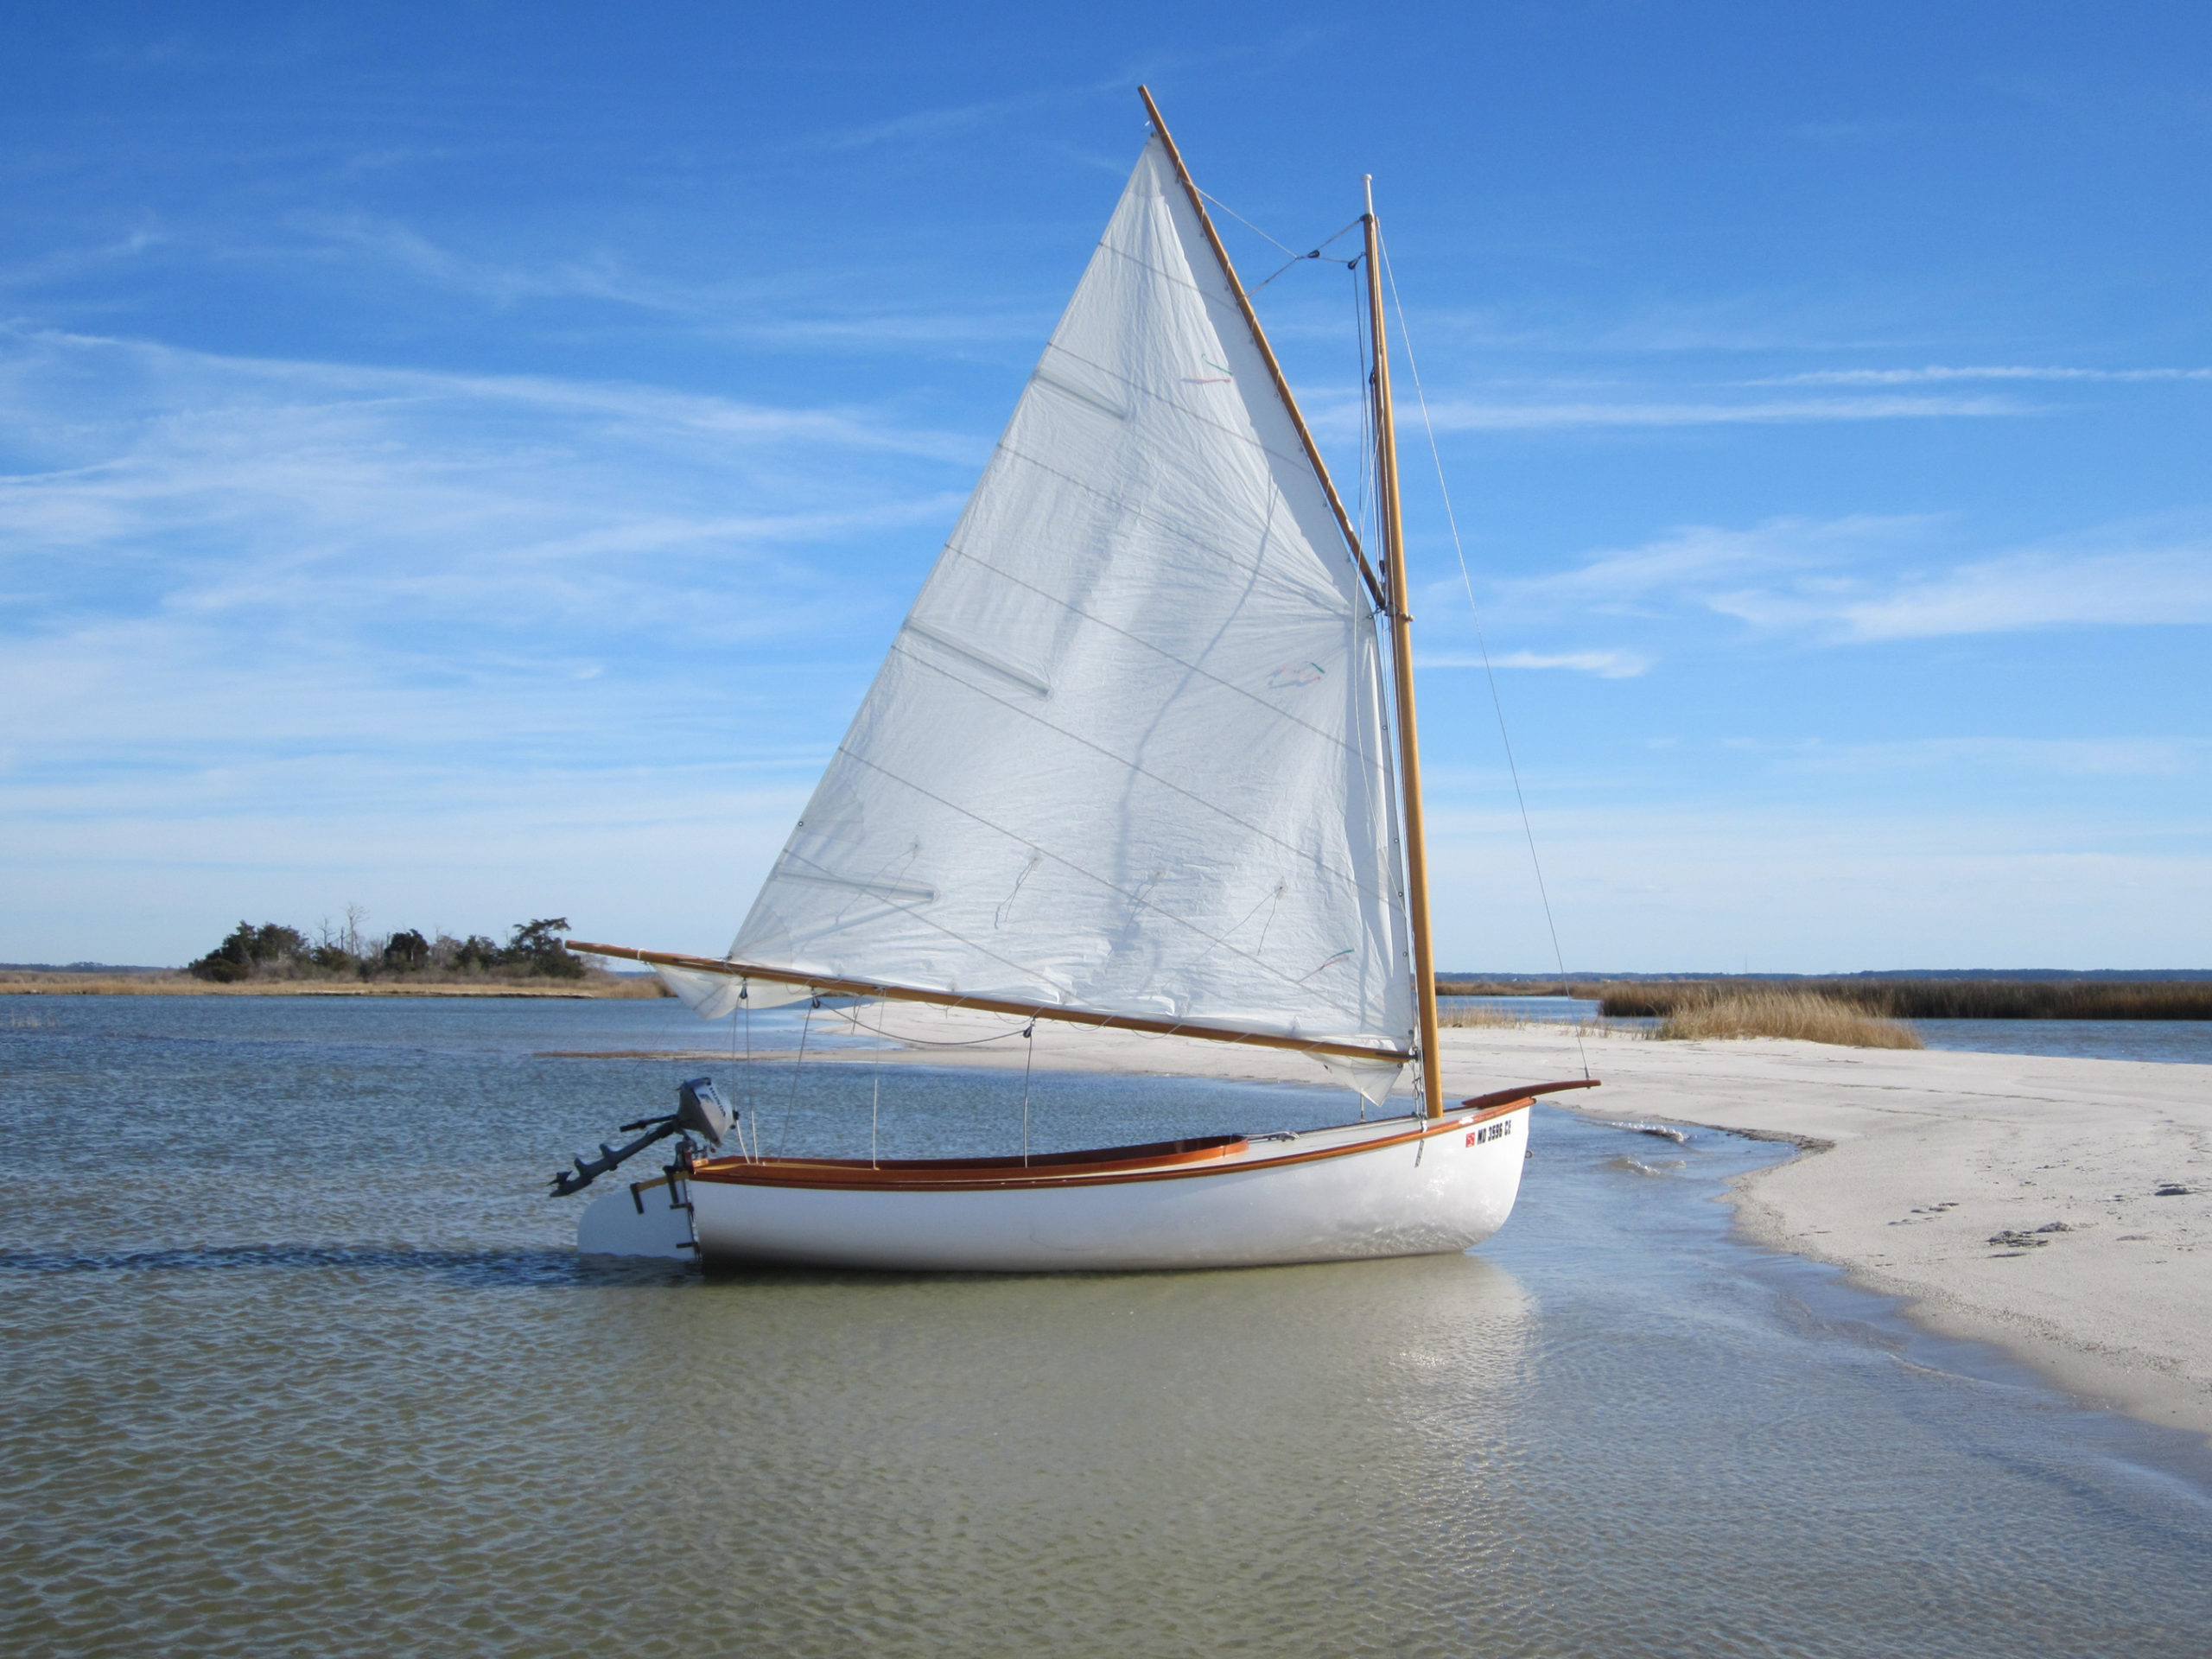
At only 15’2″ of overall length, Sam Devlin’s Nancy’s China design is meant to live comfortably on a trailer. Dave Wagner of Georgia showed how even a small boat can be fitted out as a proper yacht.
Necessity was the mother of this invention. Devlin lost contracts to build three larger sailboats when then-President Ronald Reagan froze the Federal Reserve. His customers couldn’t get loans to finance their boats, so Devlin designed a smaller, more spare boat that could be bought with cash. Soon after, First Lady Nancy Reagan paid several thousand dollars for each setting of new White House china, igniting a storm of controversy. The cost of just one place setting would pay for one of Devlin’s boats, inspiring the name Nancy’s China.
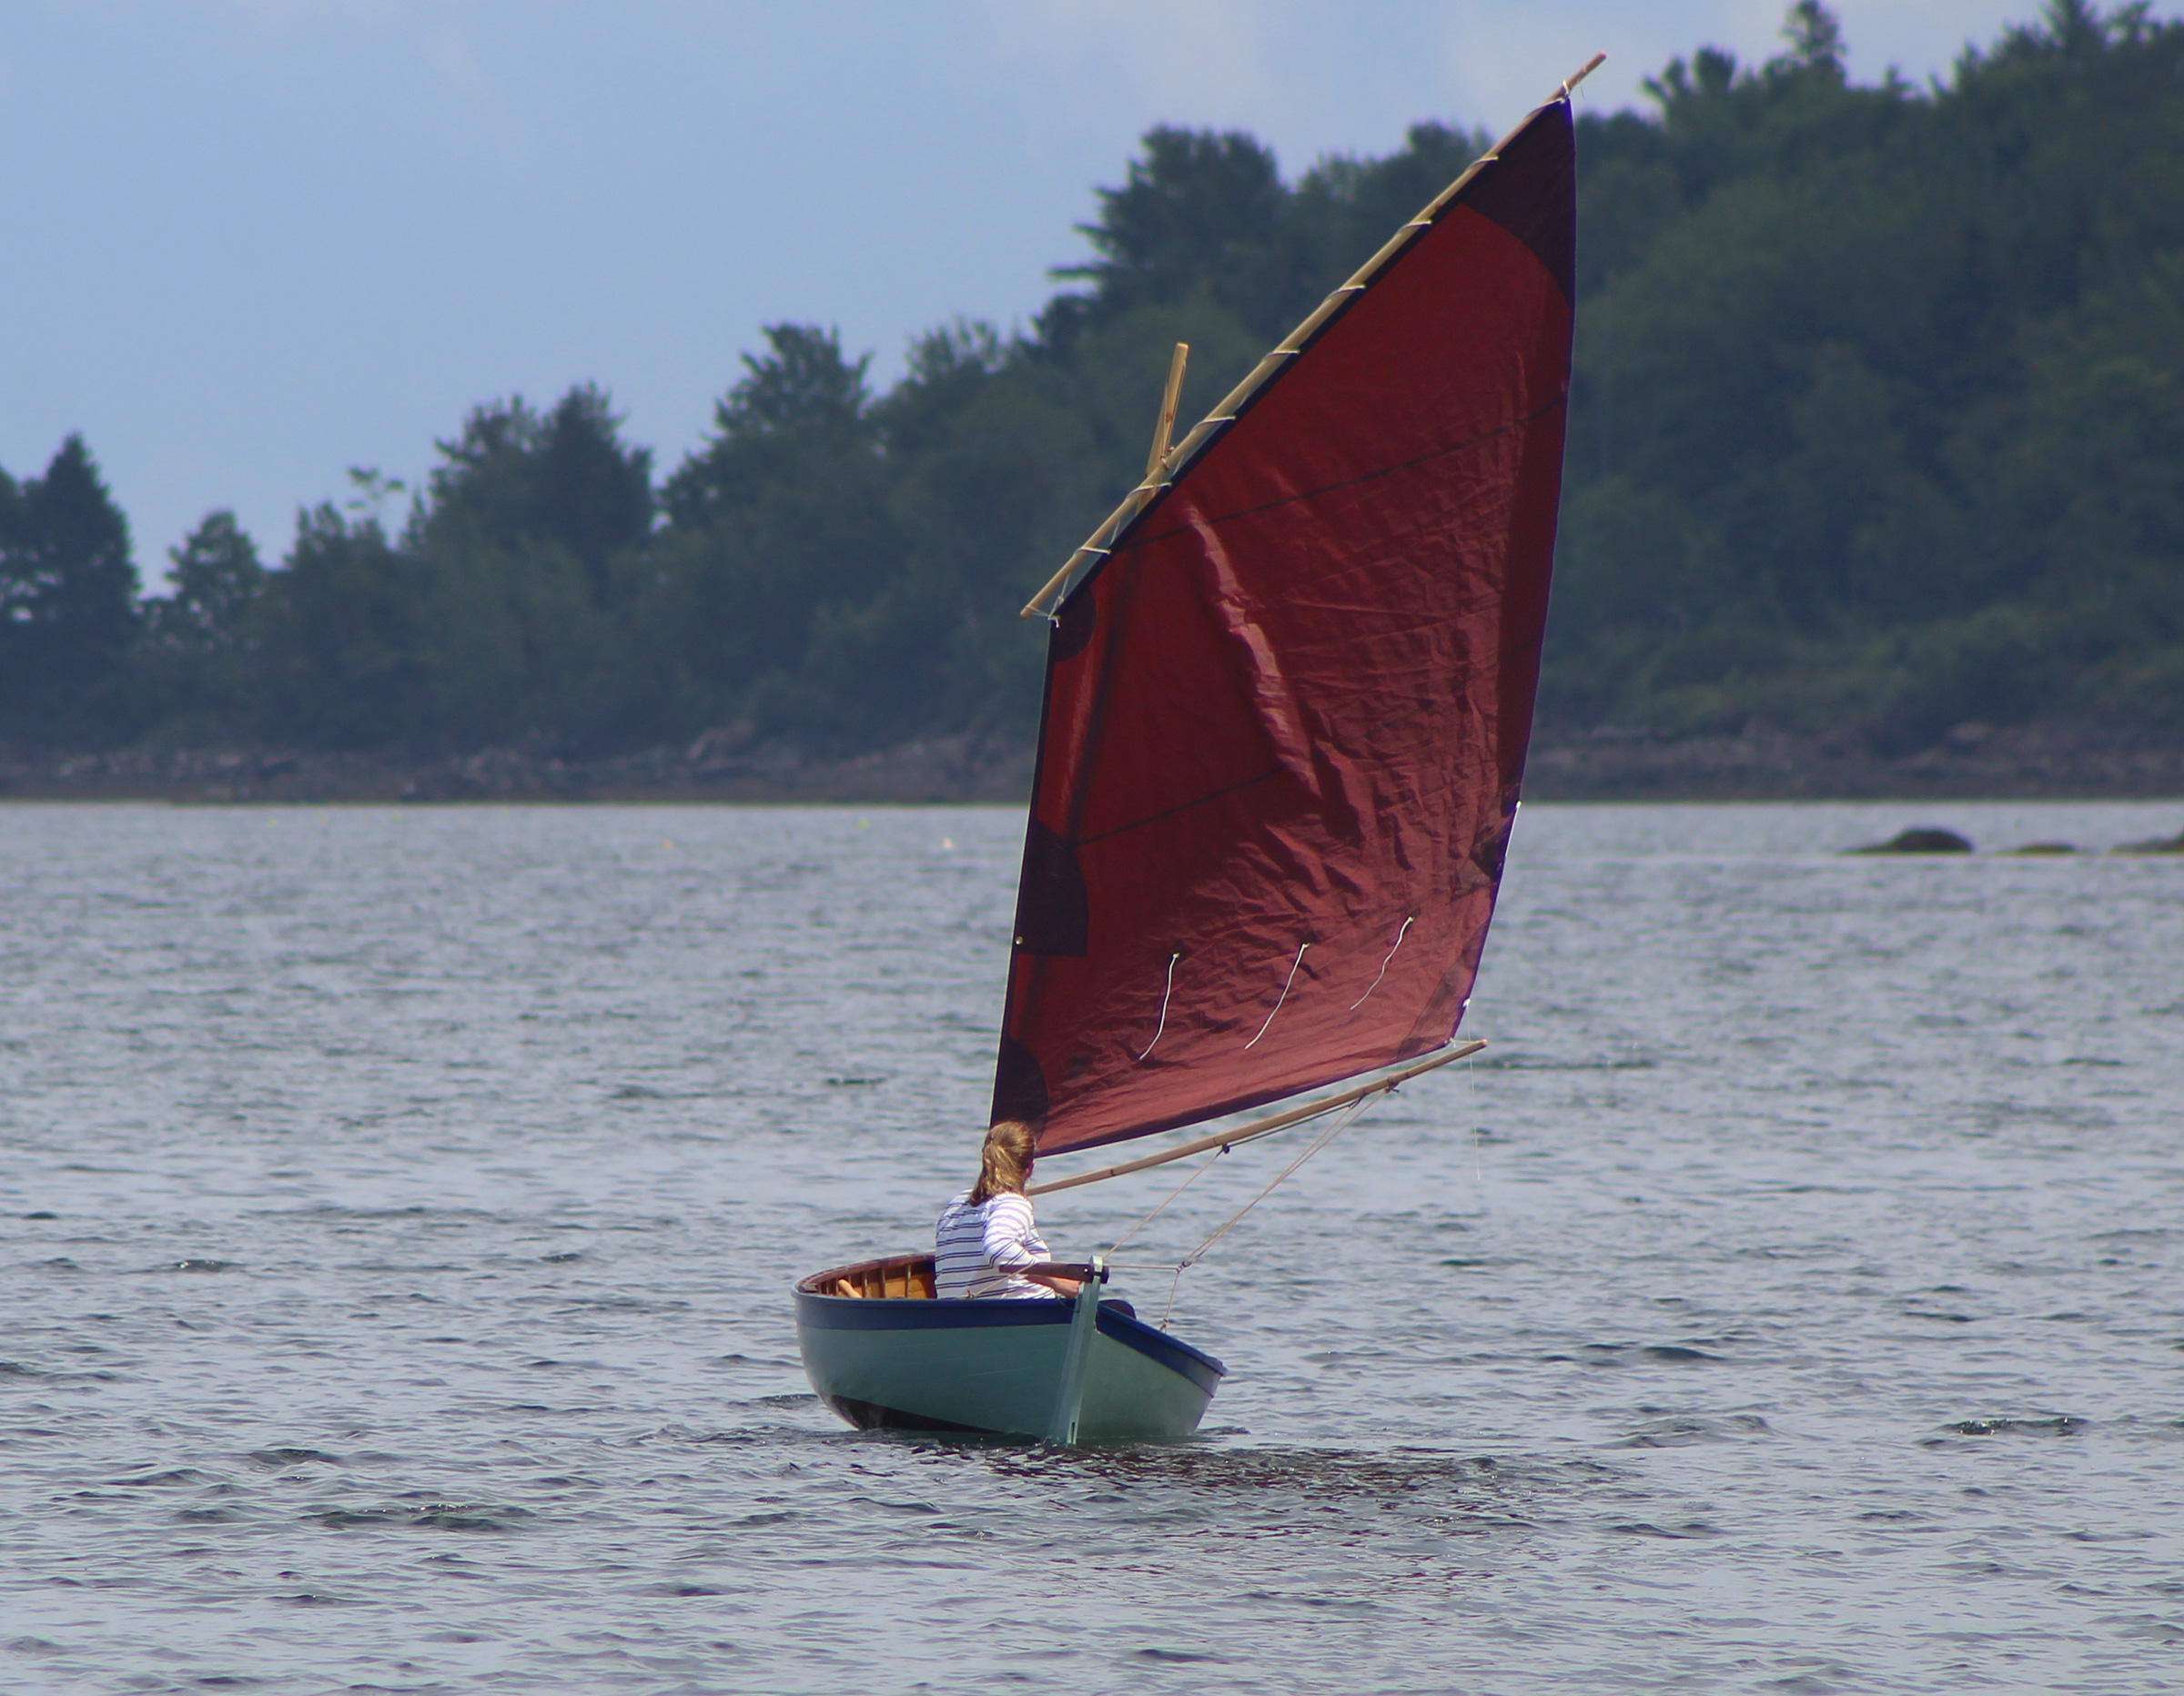
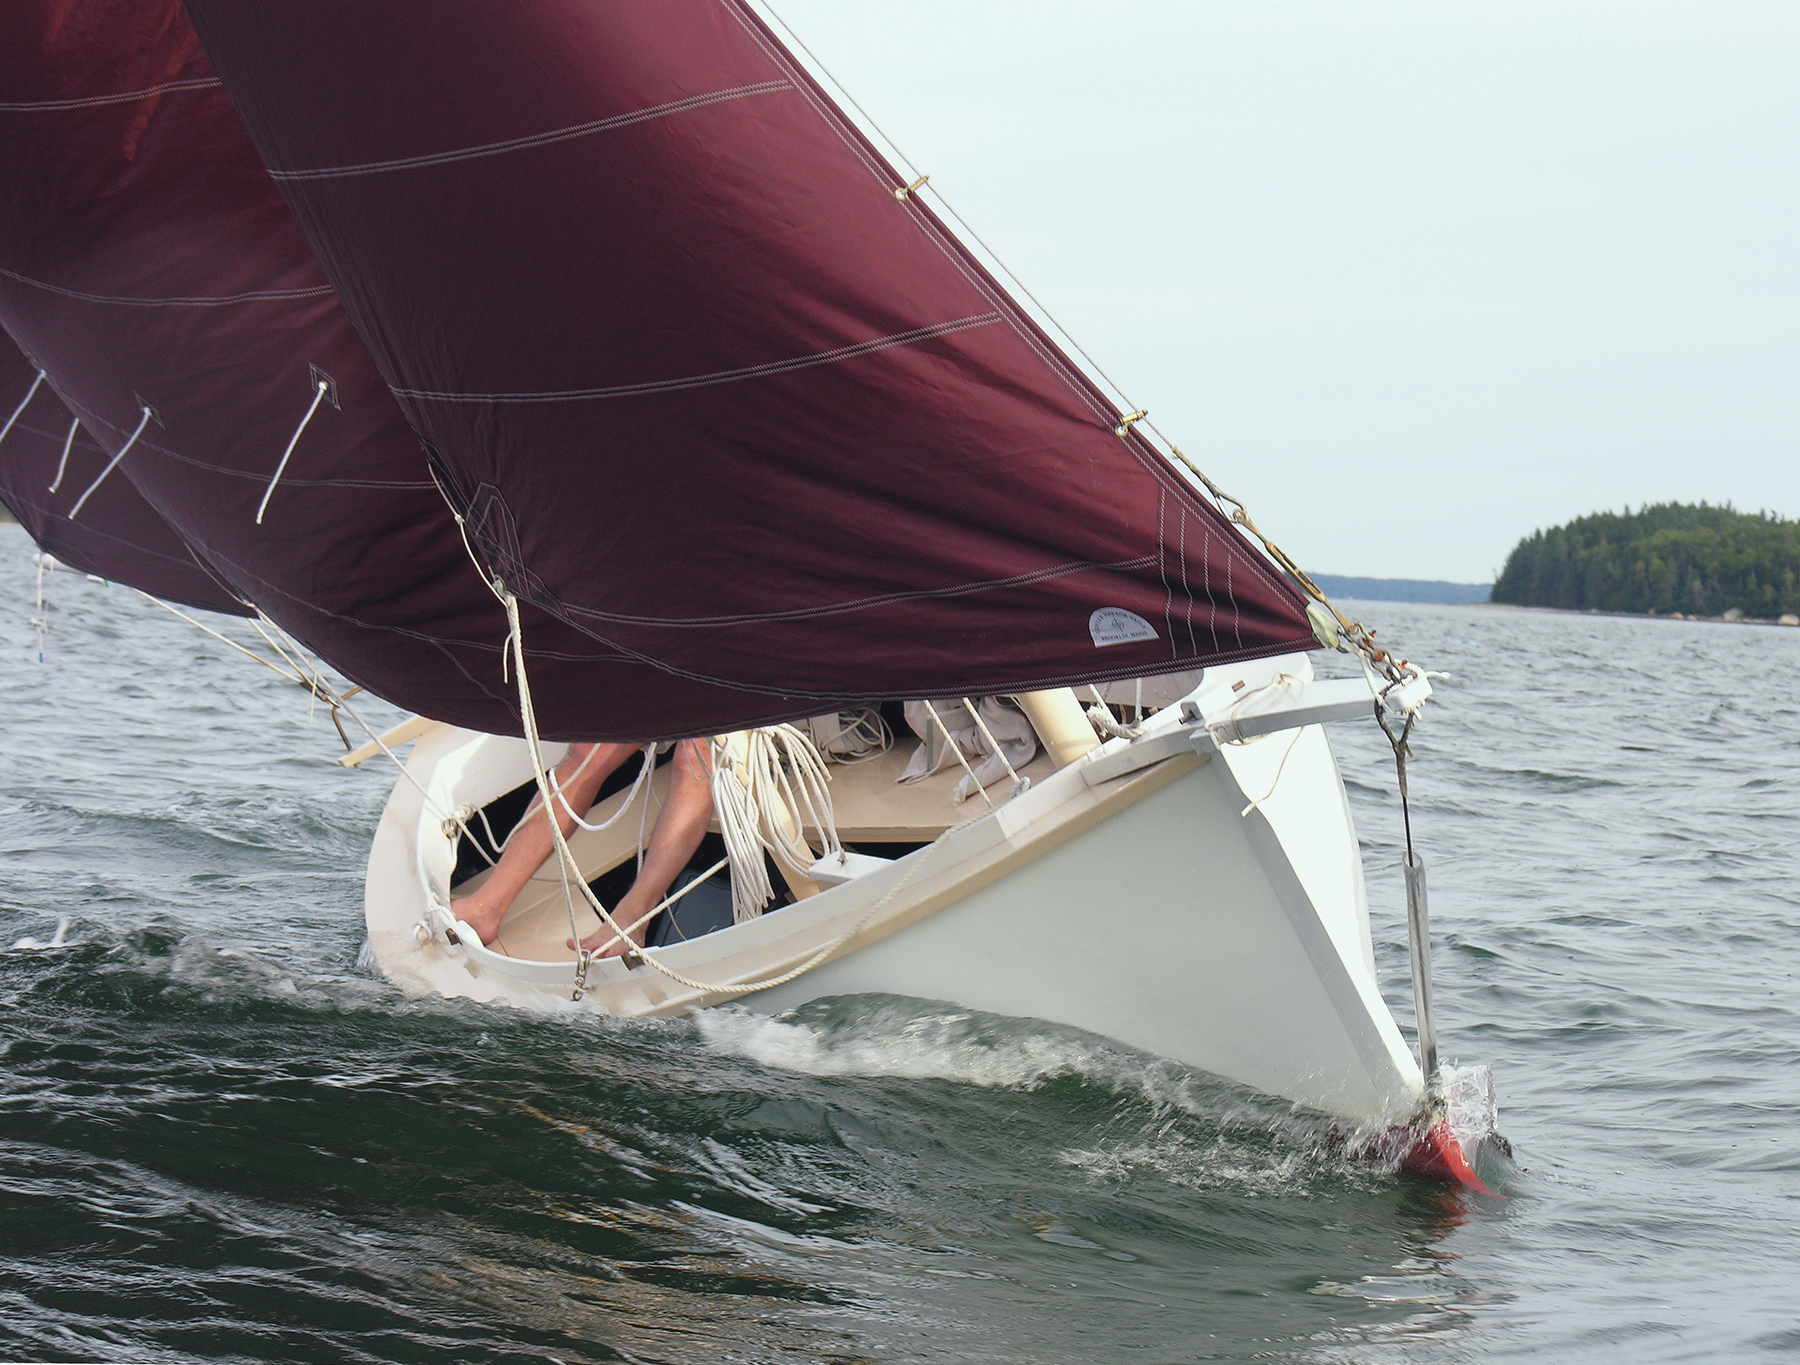
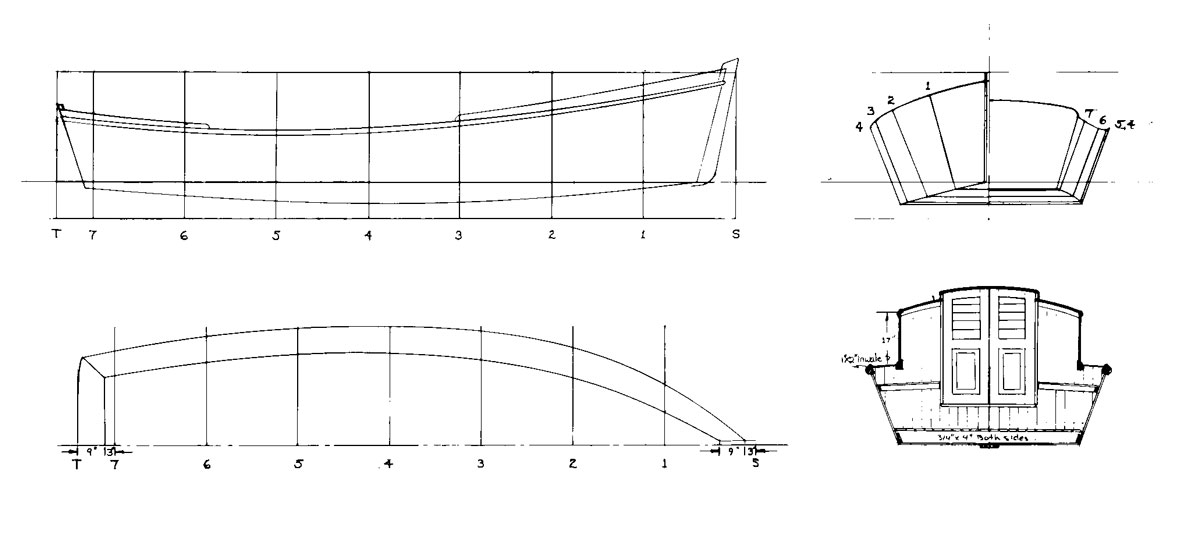
The 15′ 2″-long boat’s simplicity is typified by its sprit rig, a centuries-old throwback used by Mediterranean merchants and the fisherman in Ernest Hemingway’s The Old Man and the Sea. A long spar runs from the mast near the tack to the peak of the four-sided sail, transferring forces high on the sail to the lower part of the mast and helping to eliminate the need for shrouds. In really big wind, the sprit can be unshipped and the sail “scandalized” as a sort of emergency reefing system.
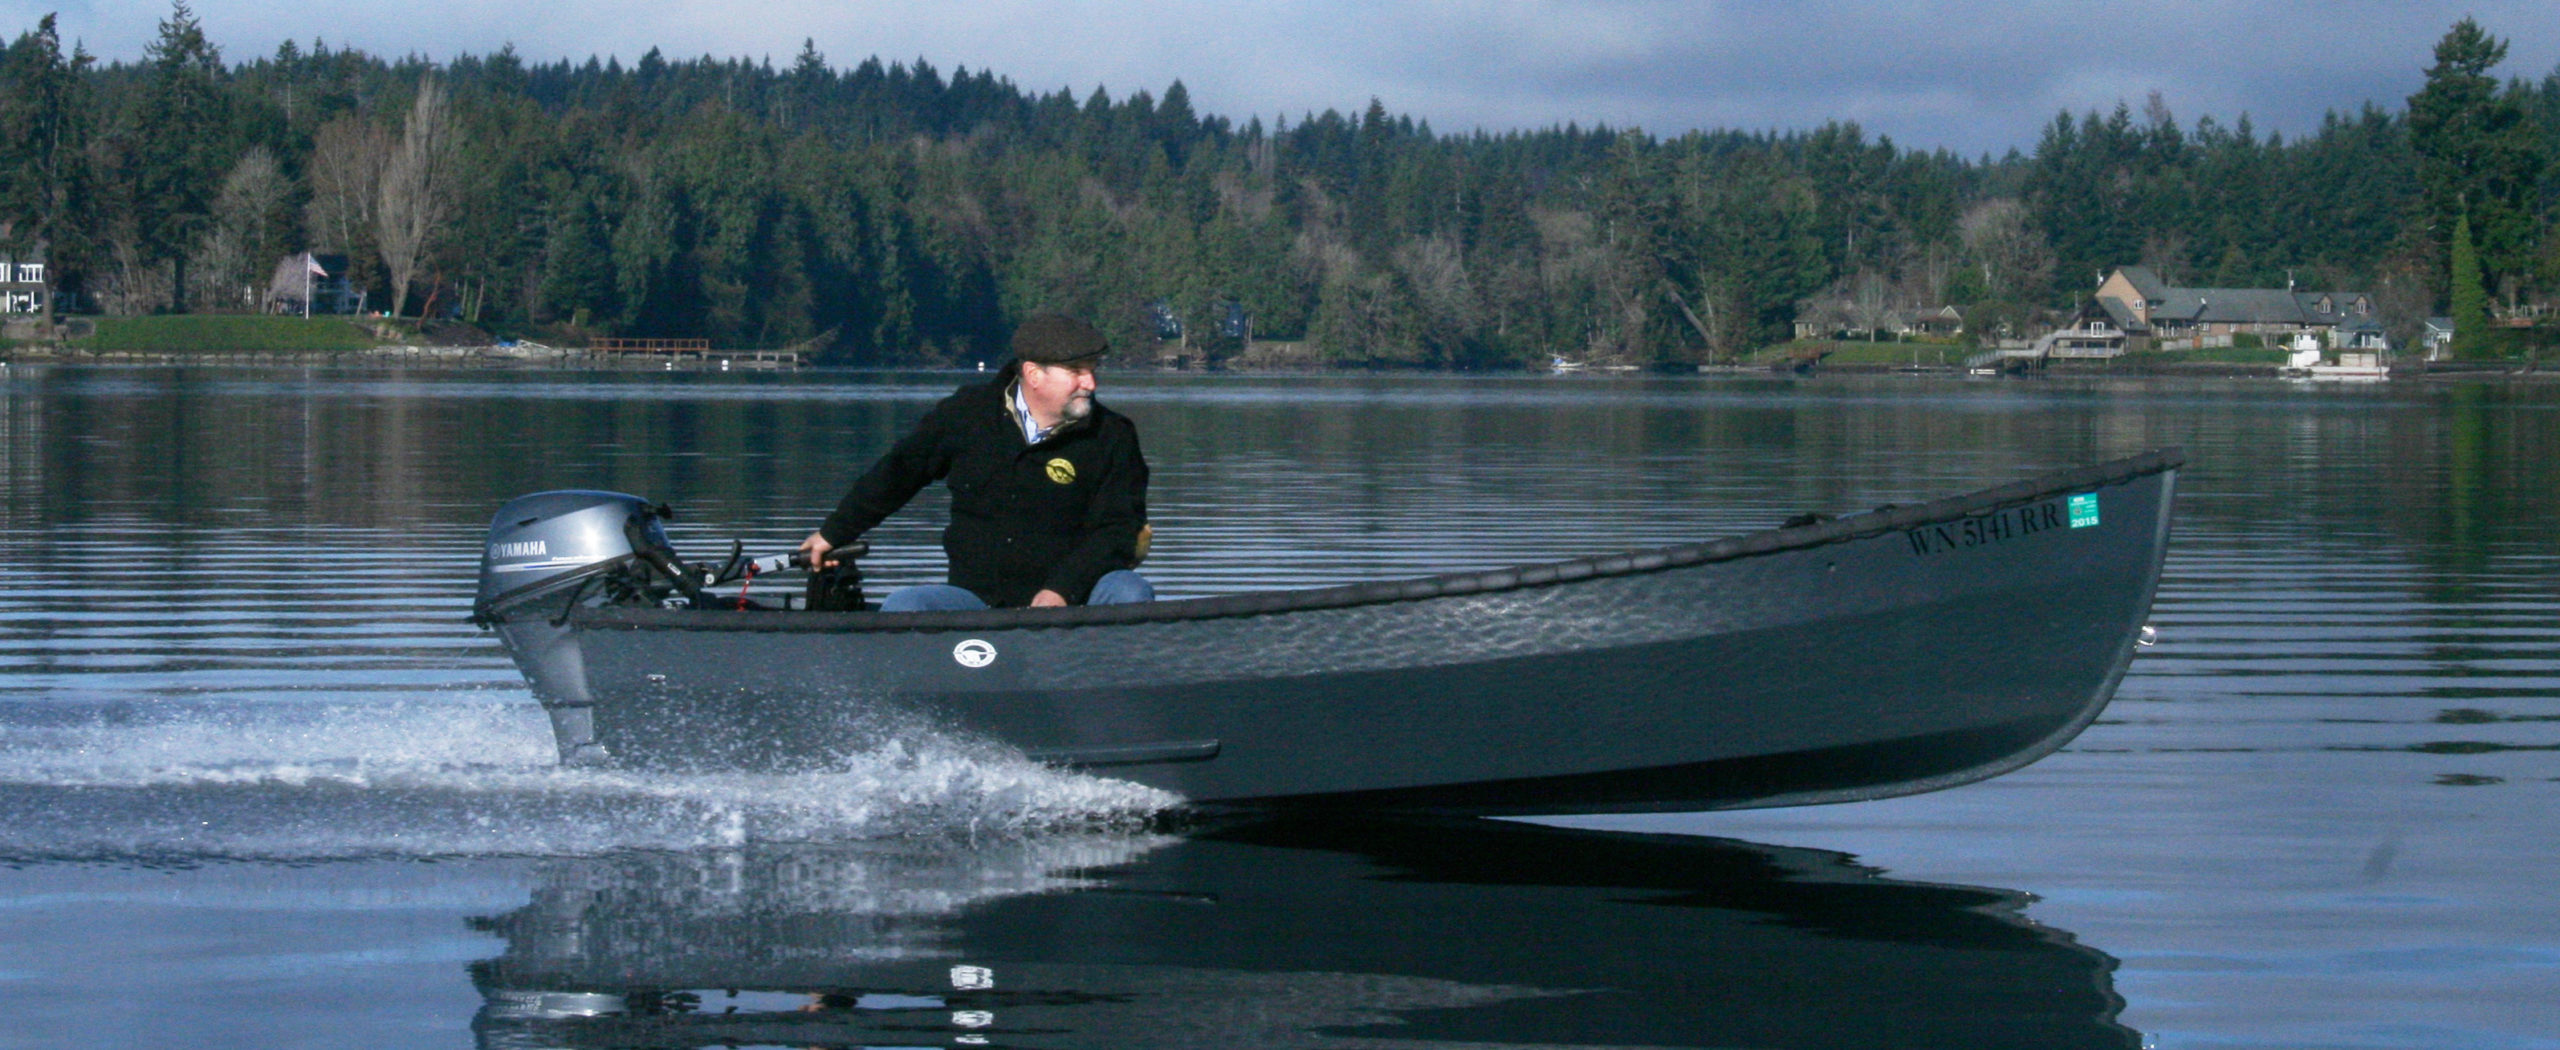
The sprit rig also lends itself to relatively easy trailer-sailing. You step the mast—which some might find a bit on the heavy and ungainly side—unfurl the sail, attach the mainsheet, and you’re good to launch. Once on the water, you can rig the halyard and then the sprit and the “snotter” line that controls its lower end, and you’re ready to sail. A weighted daggerboard in a trunk is another simplification, with the happy benefit of making this a potential beach cruiser. Oars serve as auxiliary power. Or, a mere 2-hp outboard on a transom bracket will get the boat to hull speed in calm conditions.
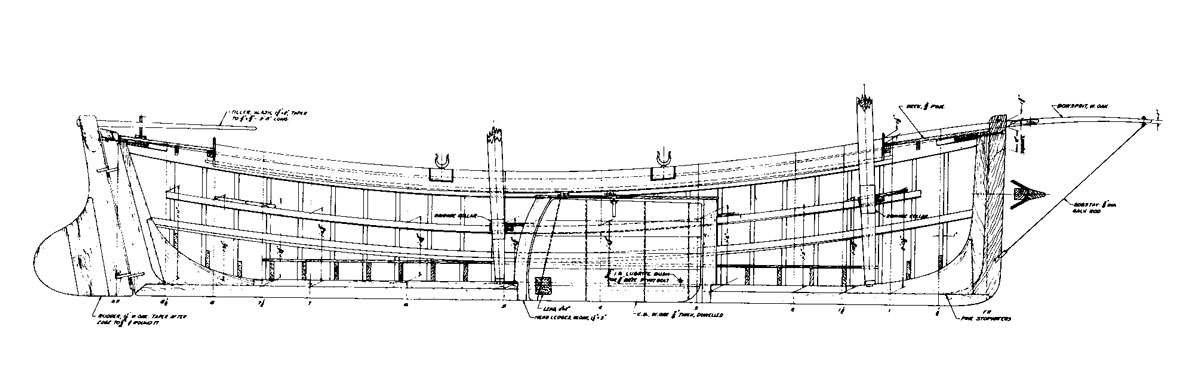
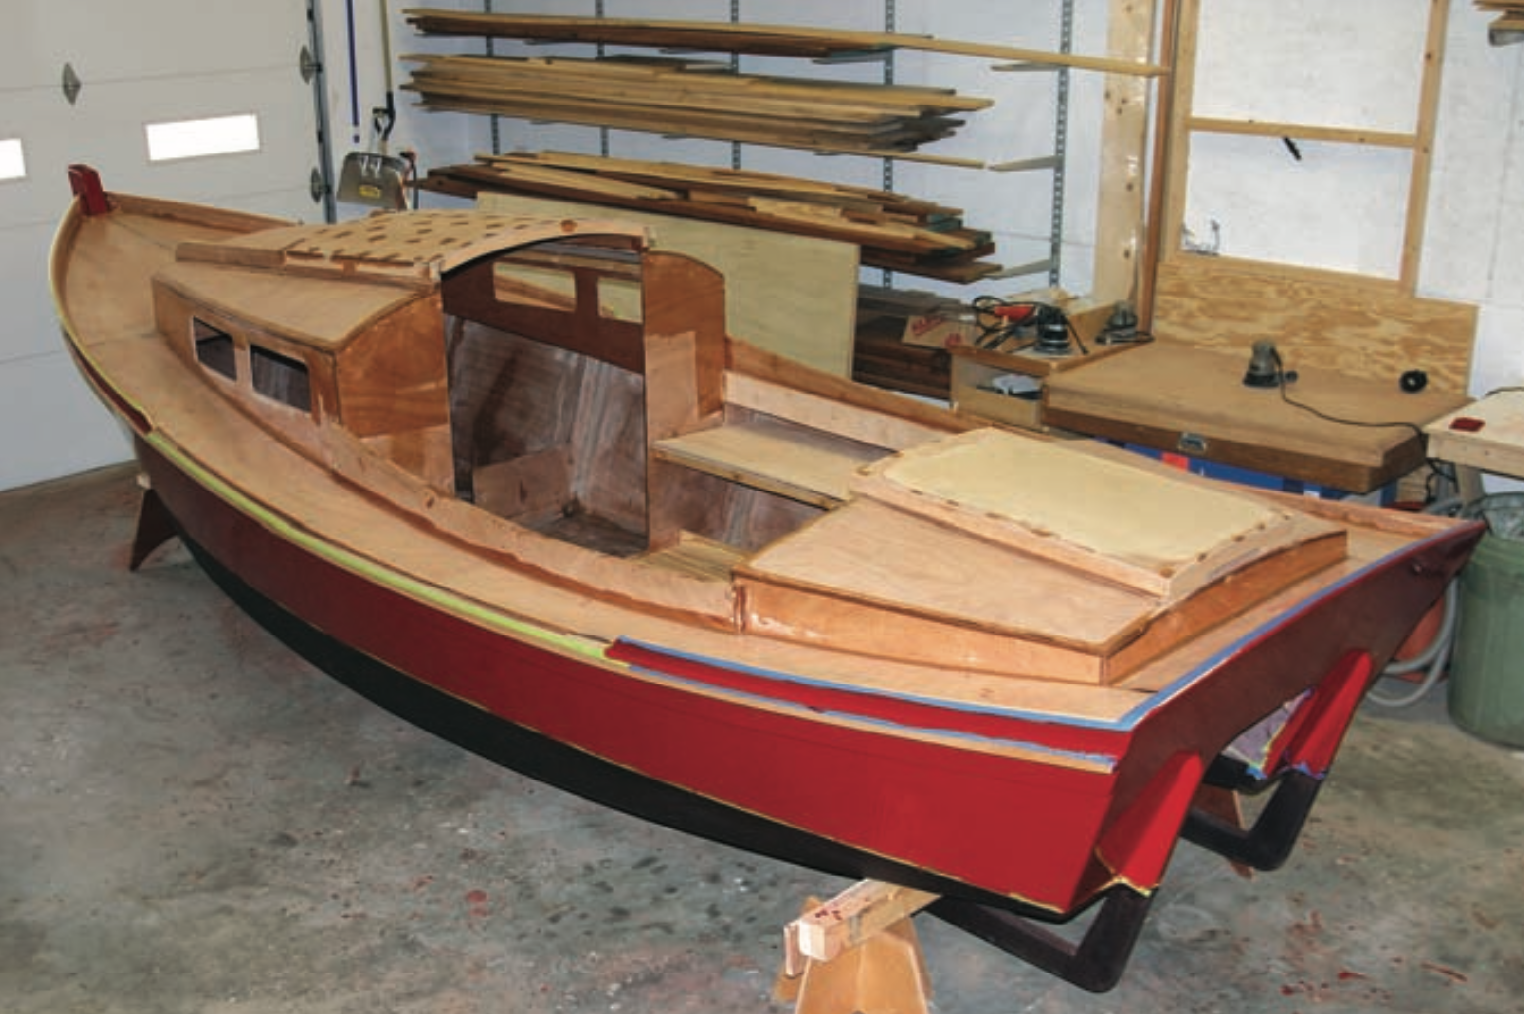
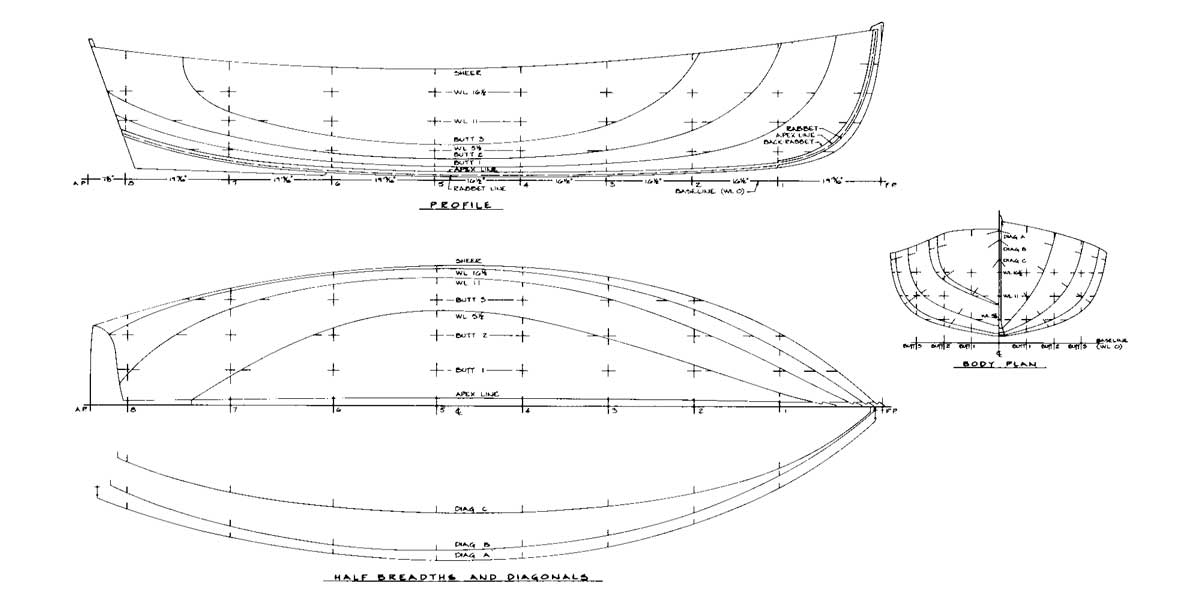
The boat’s simplicity extends to its construction. No building molds are required; the boat essentially shapes itself as the builder cuts and wires together the side and bottom panels and transom. The tools list calls for little more than what most homeowners already have on hand, plus a suite of epoxy supplies and an electric sander.
Dave Wagner
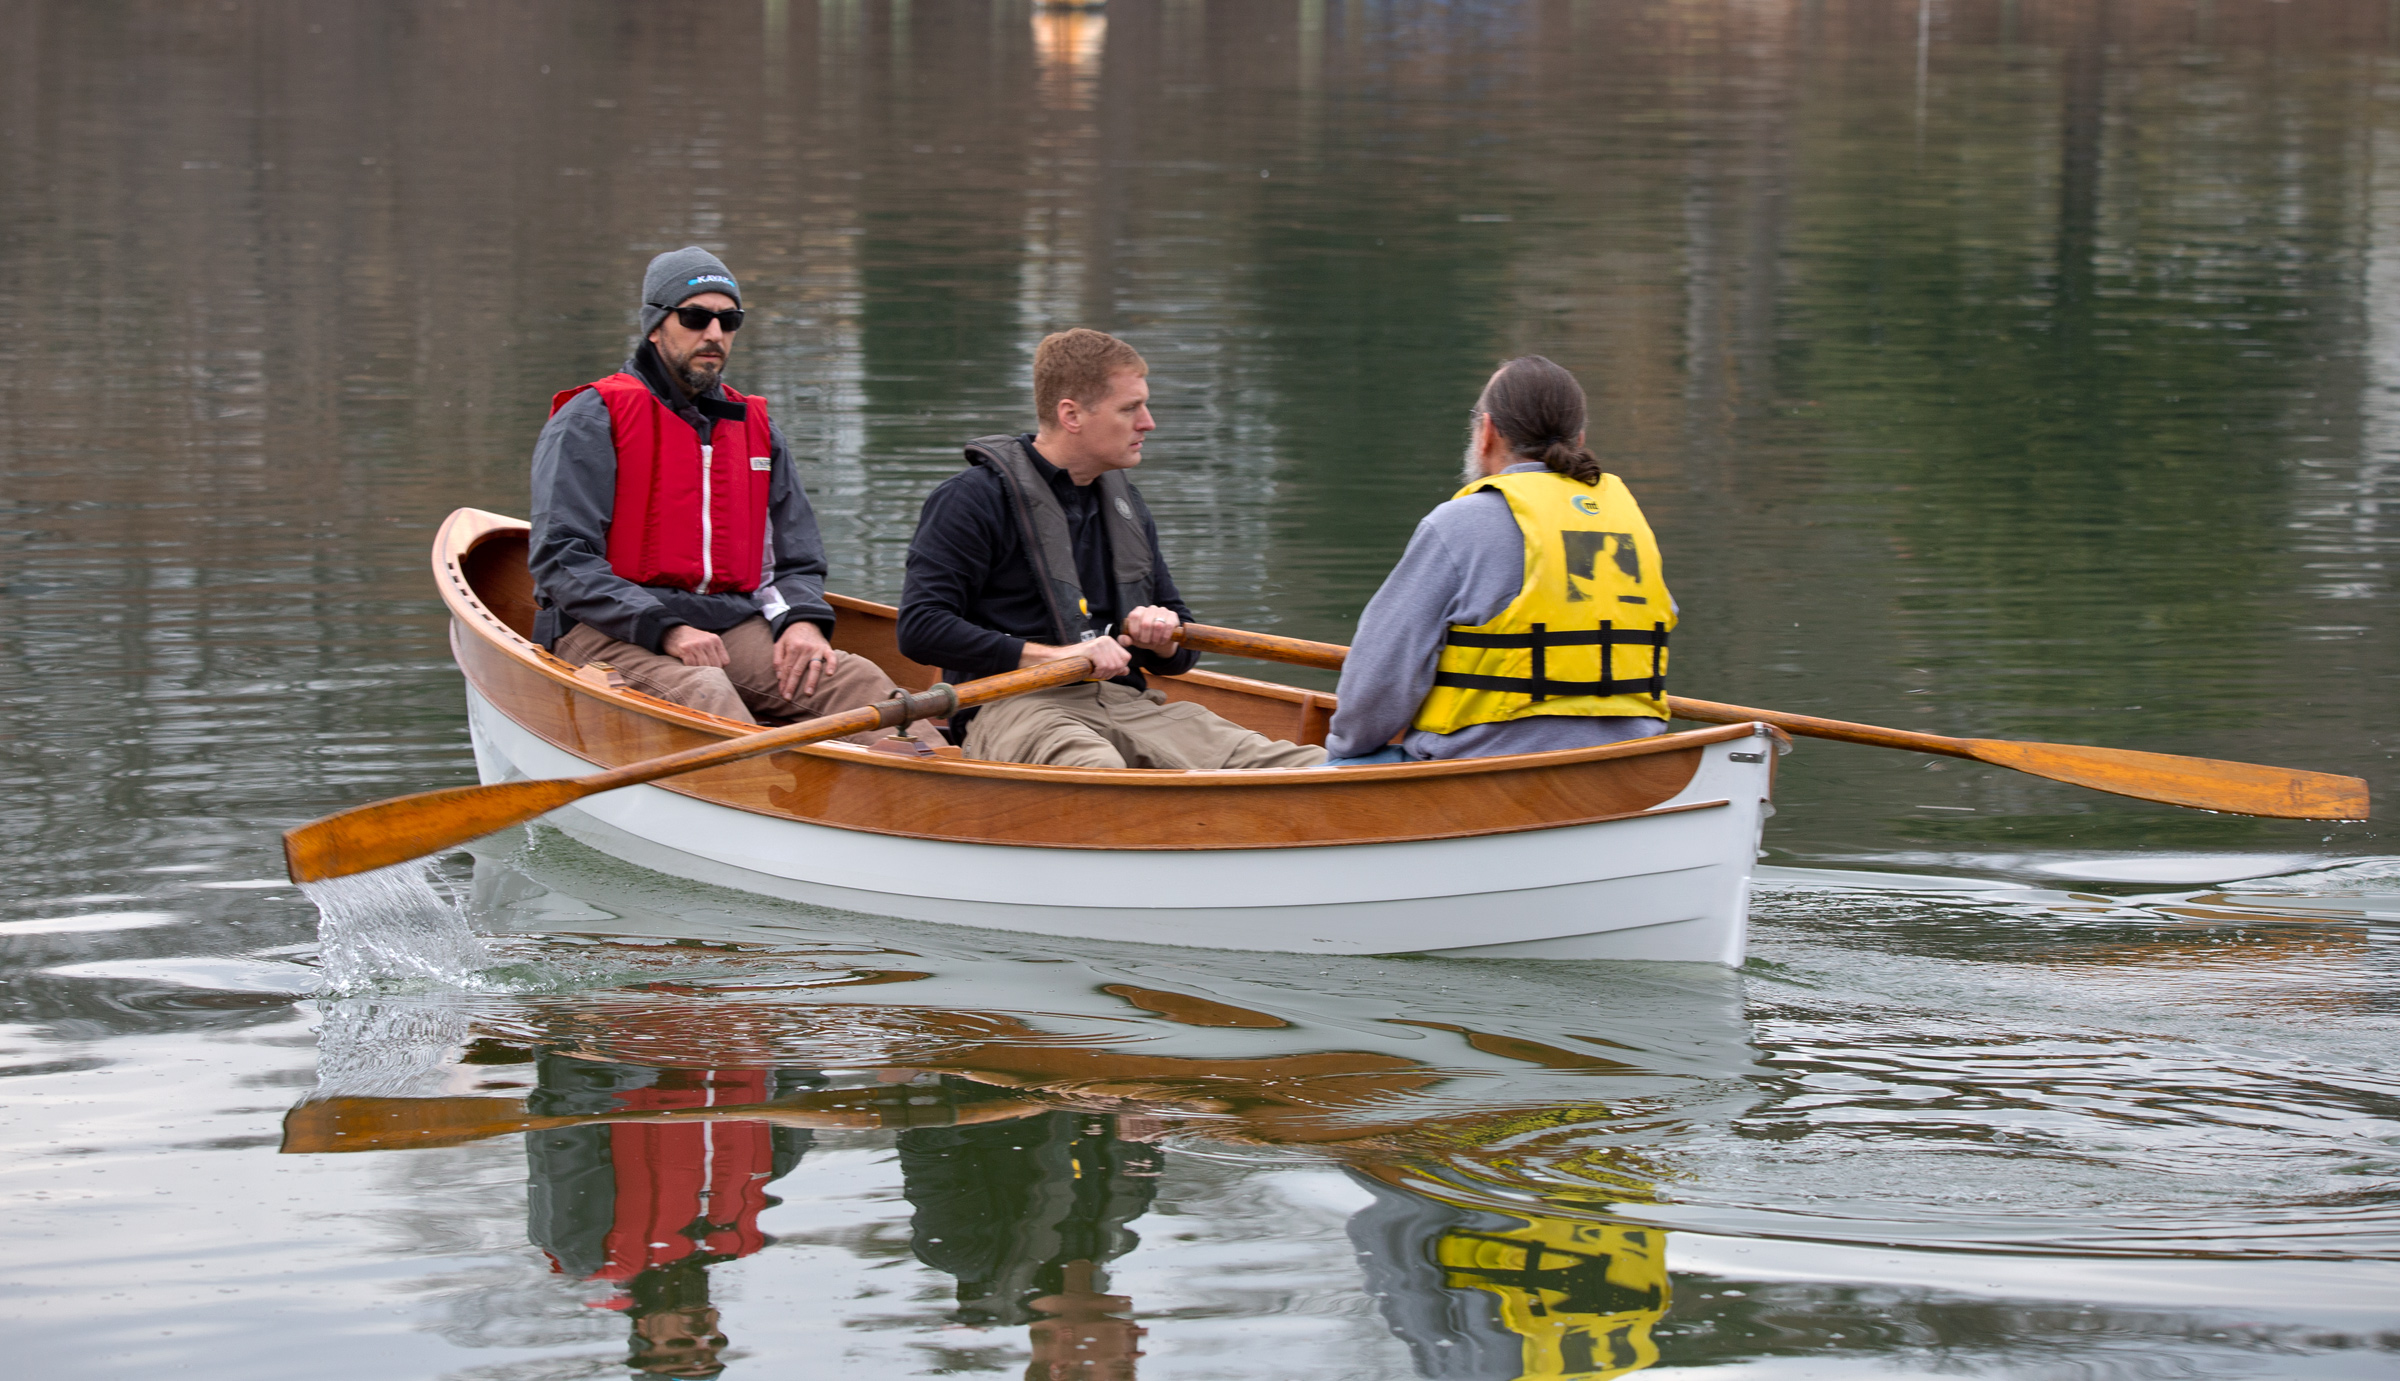
Hard-chine construction lends itself to plywood stitch-and-glue construction, which is the method designer Sam Devlin uses exclusively, on boats up to 45′ long. Dave Wagner set up his building form on casters so the entire boat could be easily moved.
Which is not to say this would be an easy boat to build. Dave Wagner, who may have the most tricked-out Nancy’s China ever built, spent 720 hours over more than two years building his boat. Devlin’s $85 construction plans include nine pages of drawings and a 28-page narrative. Devlin doesn’t presume you are a boatbuilder, but he does expect customers to be somewhat self-sufficient and willing to solve problems as they emerge.
“When they’re done with the approach that we use,” he says, “they’re boatbuilders.”
Would-be builders seeking an overview of the stitch-and-glue technique can read the book Devlin’s Boat Building or watch the basic technique in the video “Wooden Boatbuilding” with Sam Devlin.
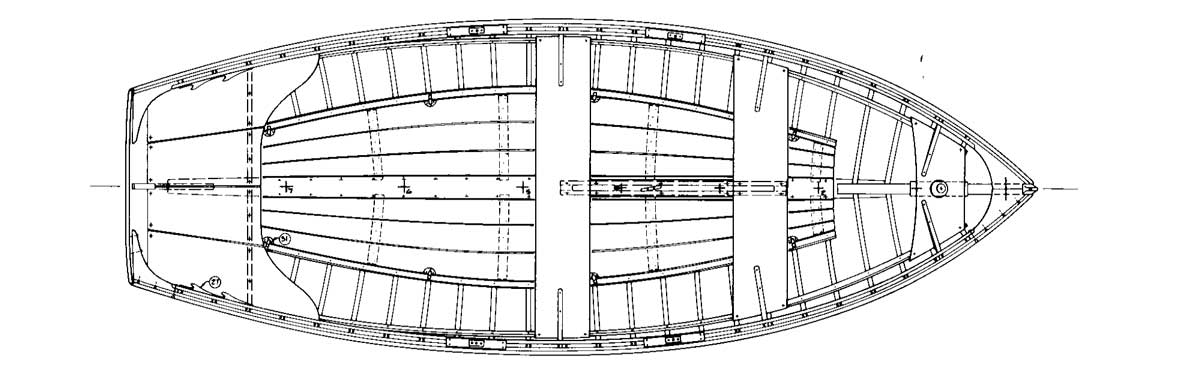
I sailed a Nancy’s China for several years and it did a fine job of staving off the urge to get a larger, more complicated, and more expensive craft. I’d bought it used and a bit worn, and it turned out to be Nancy’s China No. 1. Inspired as the steward of a quasi-historic vessel, I ended up repainting every surface, replacing the seats with mahogany and doing a variety of odd jobs that, on a larger wooden boat, can become one’s sole occupation. But this is a wooden boat you can work on and sail, which I did quite regularly on Seattle’s Lake Washington.
In a way, the boat is a great template upon which to personalize a boat with minor and not-so-minor modifications. I ran the hauling part of the snotter, which is the line controlling the sprit’s tension, back to the cockpit, so I could tweak the sail’s draft—or fullness—without having to venture forward. I attached a brailing line (see WoodenBoat No. 165), which let me furl the sail up against the mast in a matter of seconds. I painted the hull green and the deck and house Bristol beige. She was a right proper beauty of a boat.
Leaning back on my oiled mahogany planks, I started seeing the boat as half-craft, half-furniture—a floating living room that was pleasant to look at and be in. I decided to call it WHIM in honor of the boat’s slight and free spirit, and the line from Ralph Waldo Emerson’s essay “Self-Reliance:” “I would write on the lintels of the something because it feels right, because it is beautiful, because it offers up visions of leaving town and work in order to fish and float like Huck Finn or spend a gusty day sprawled on the coaming like the carefree boys sailing the sprit-rigged catboat in Winslow Homer’s Breezing Up.
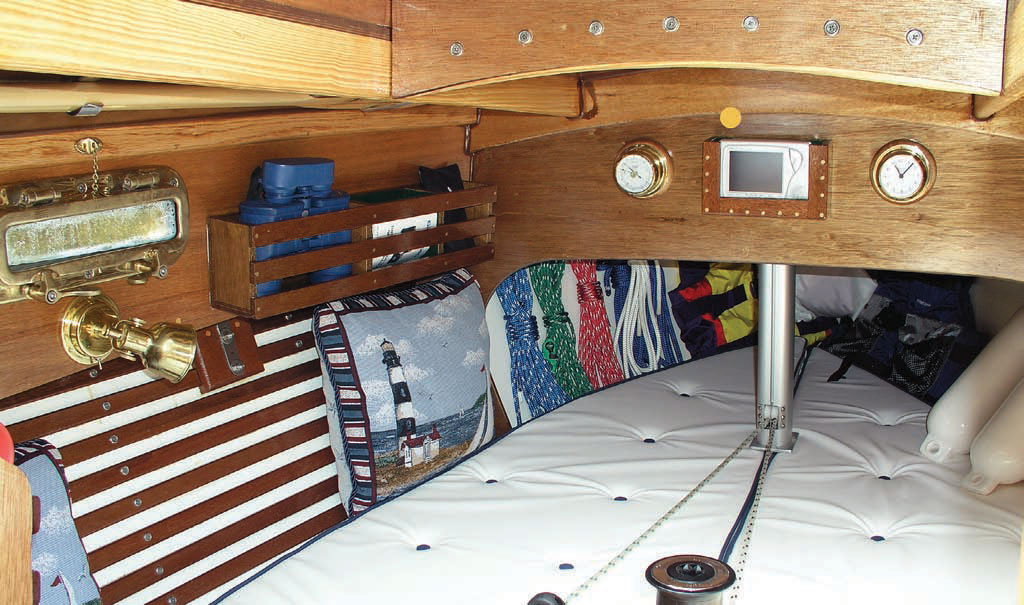
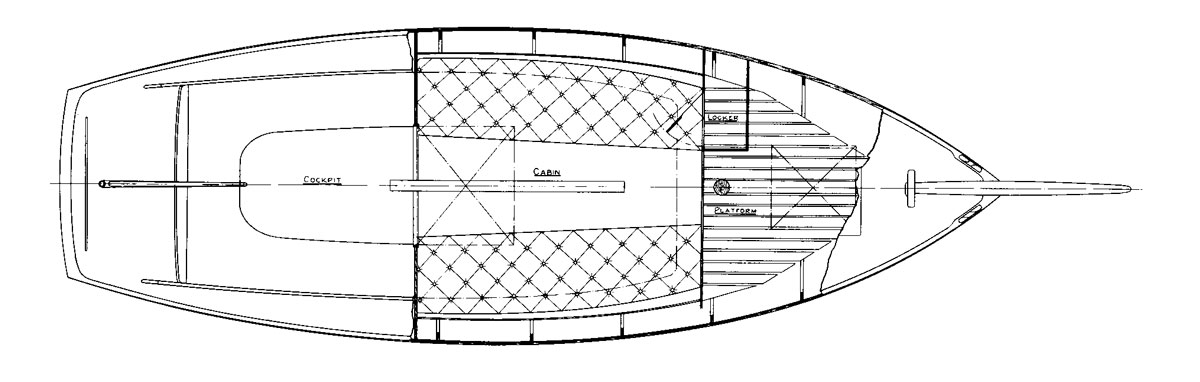
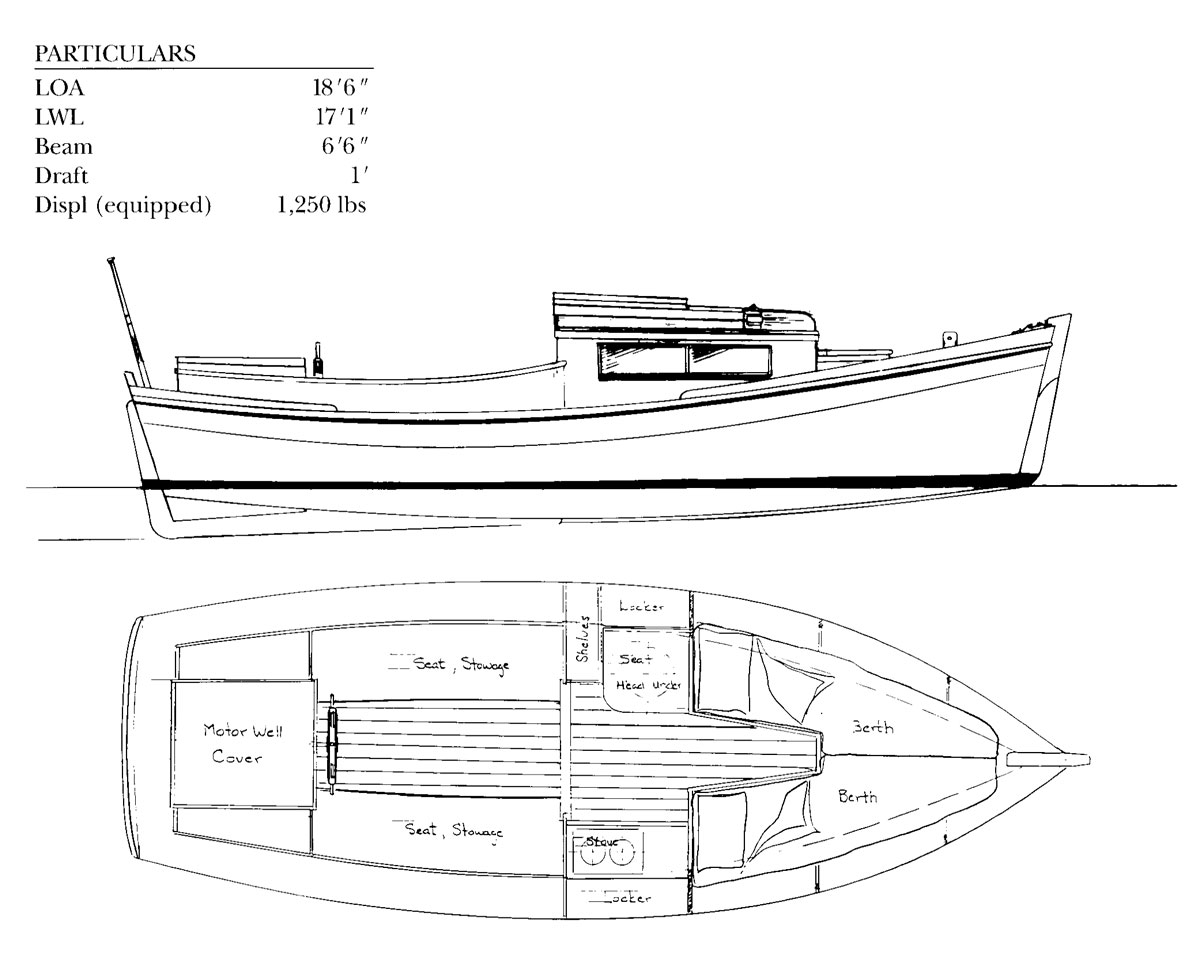
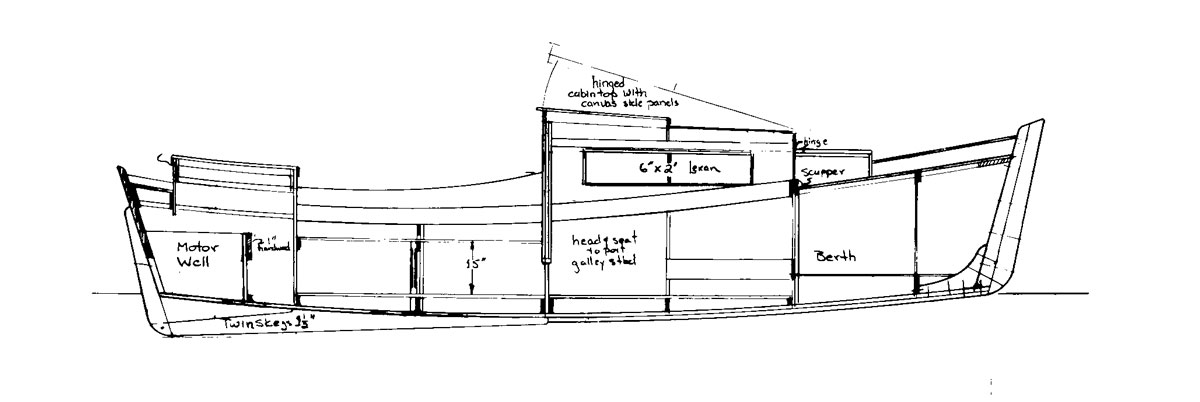
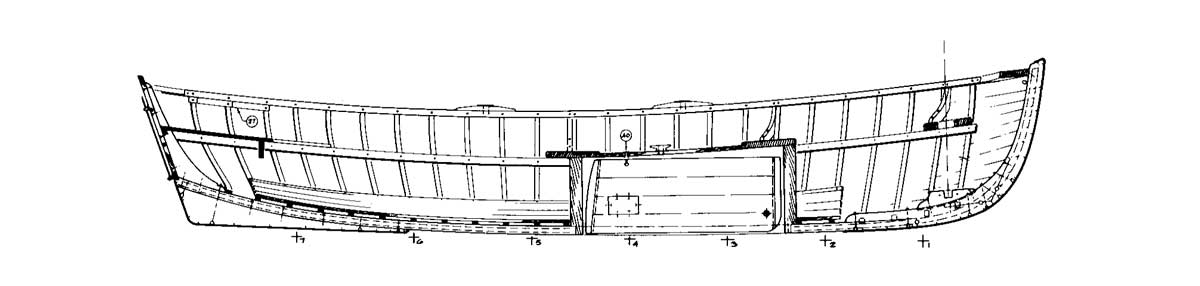
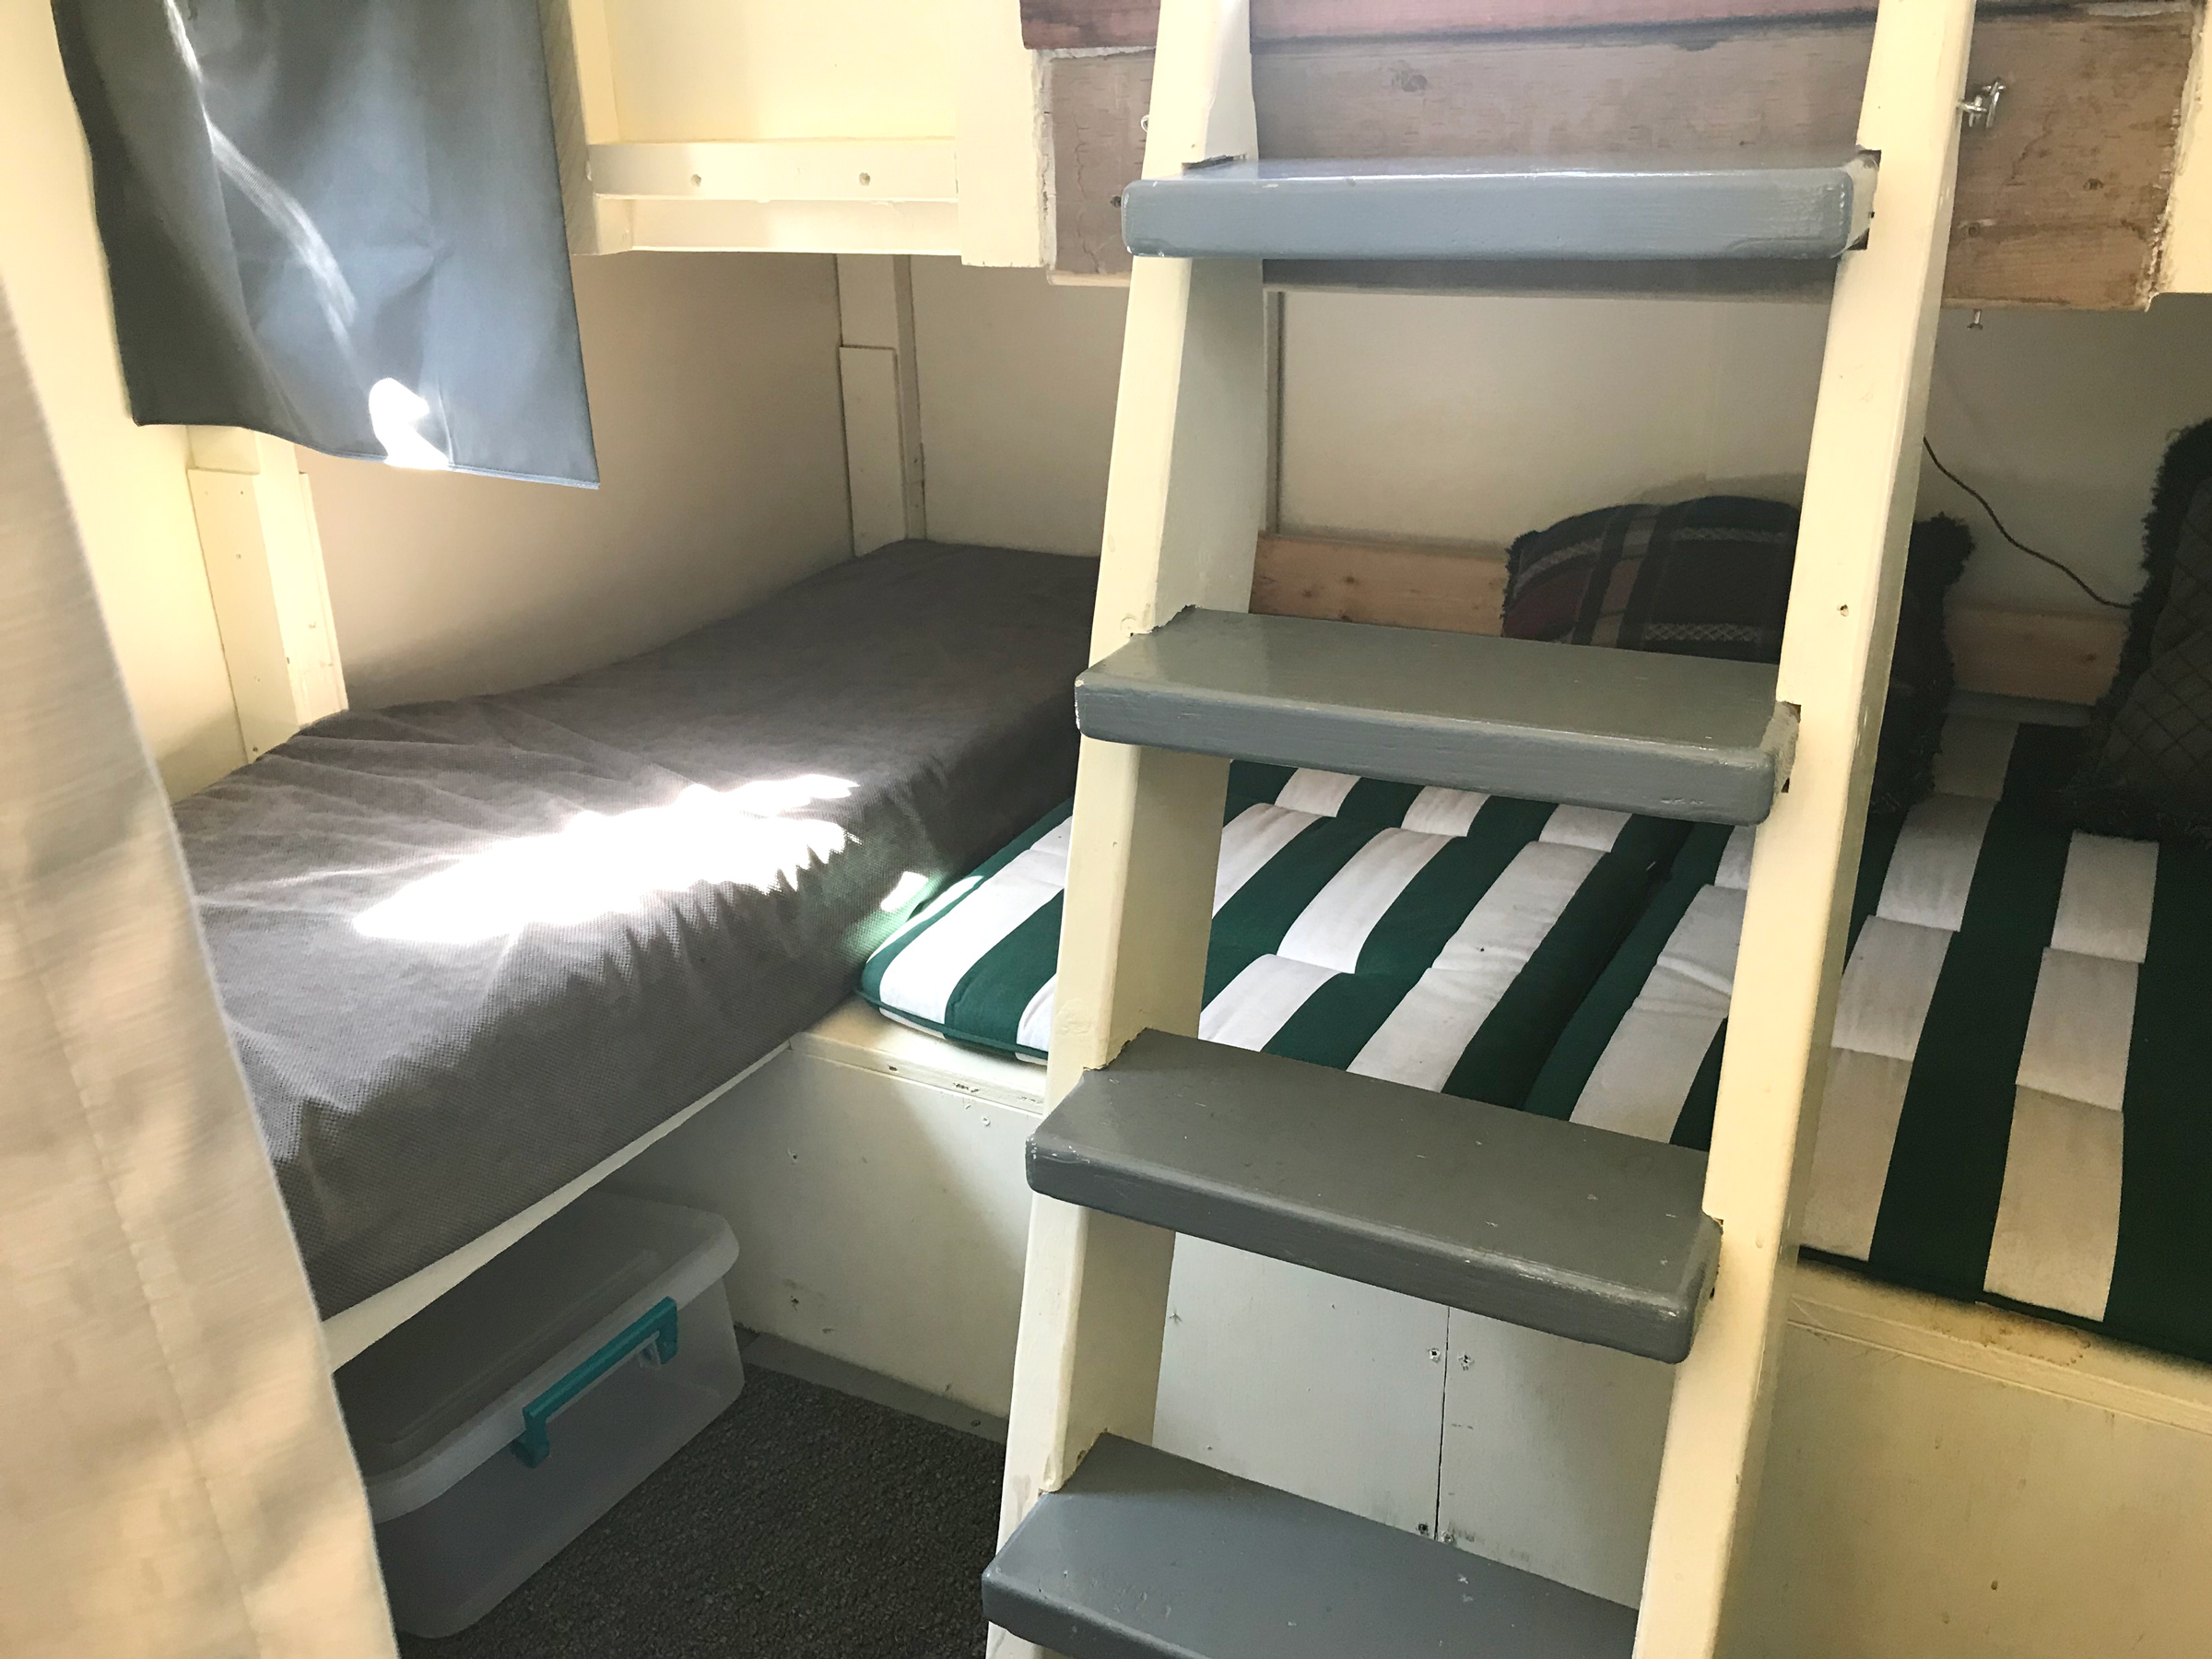
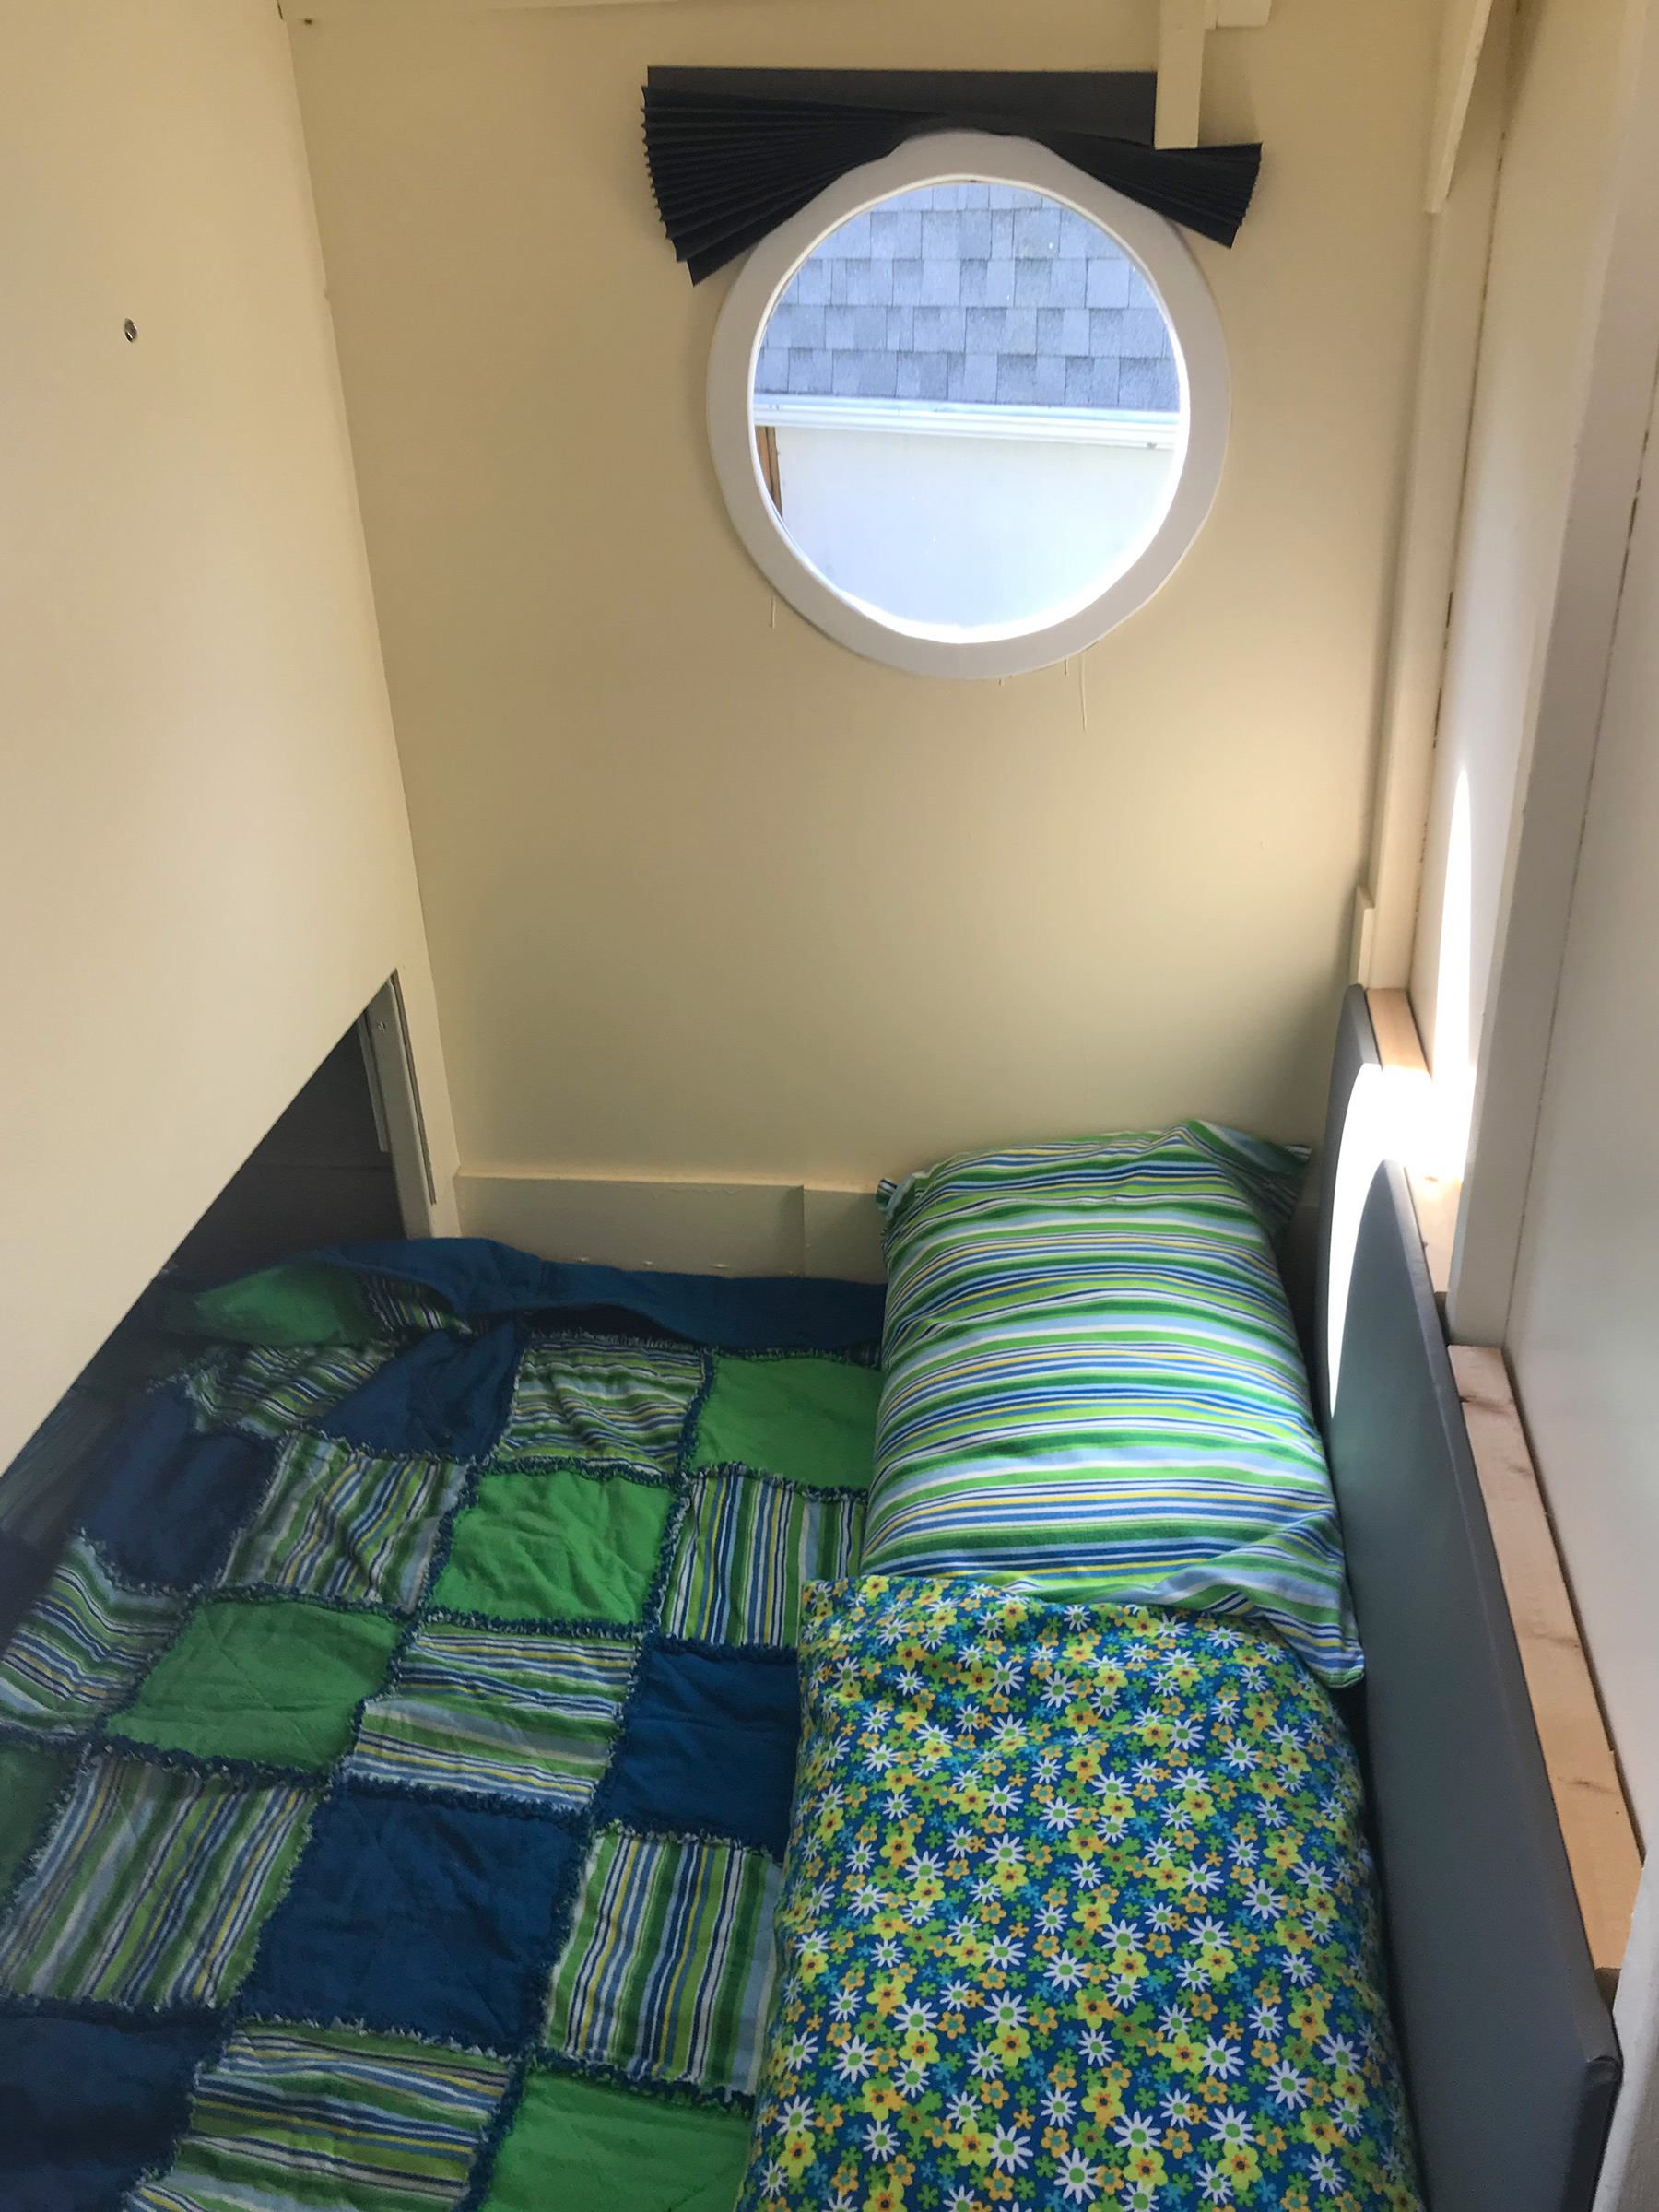
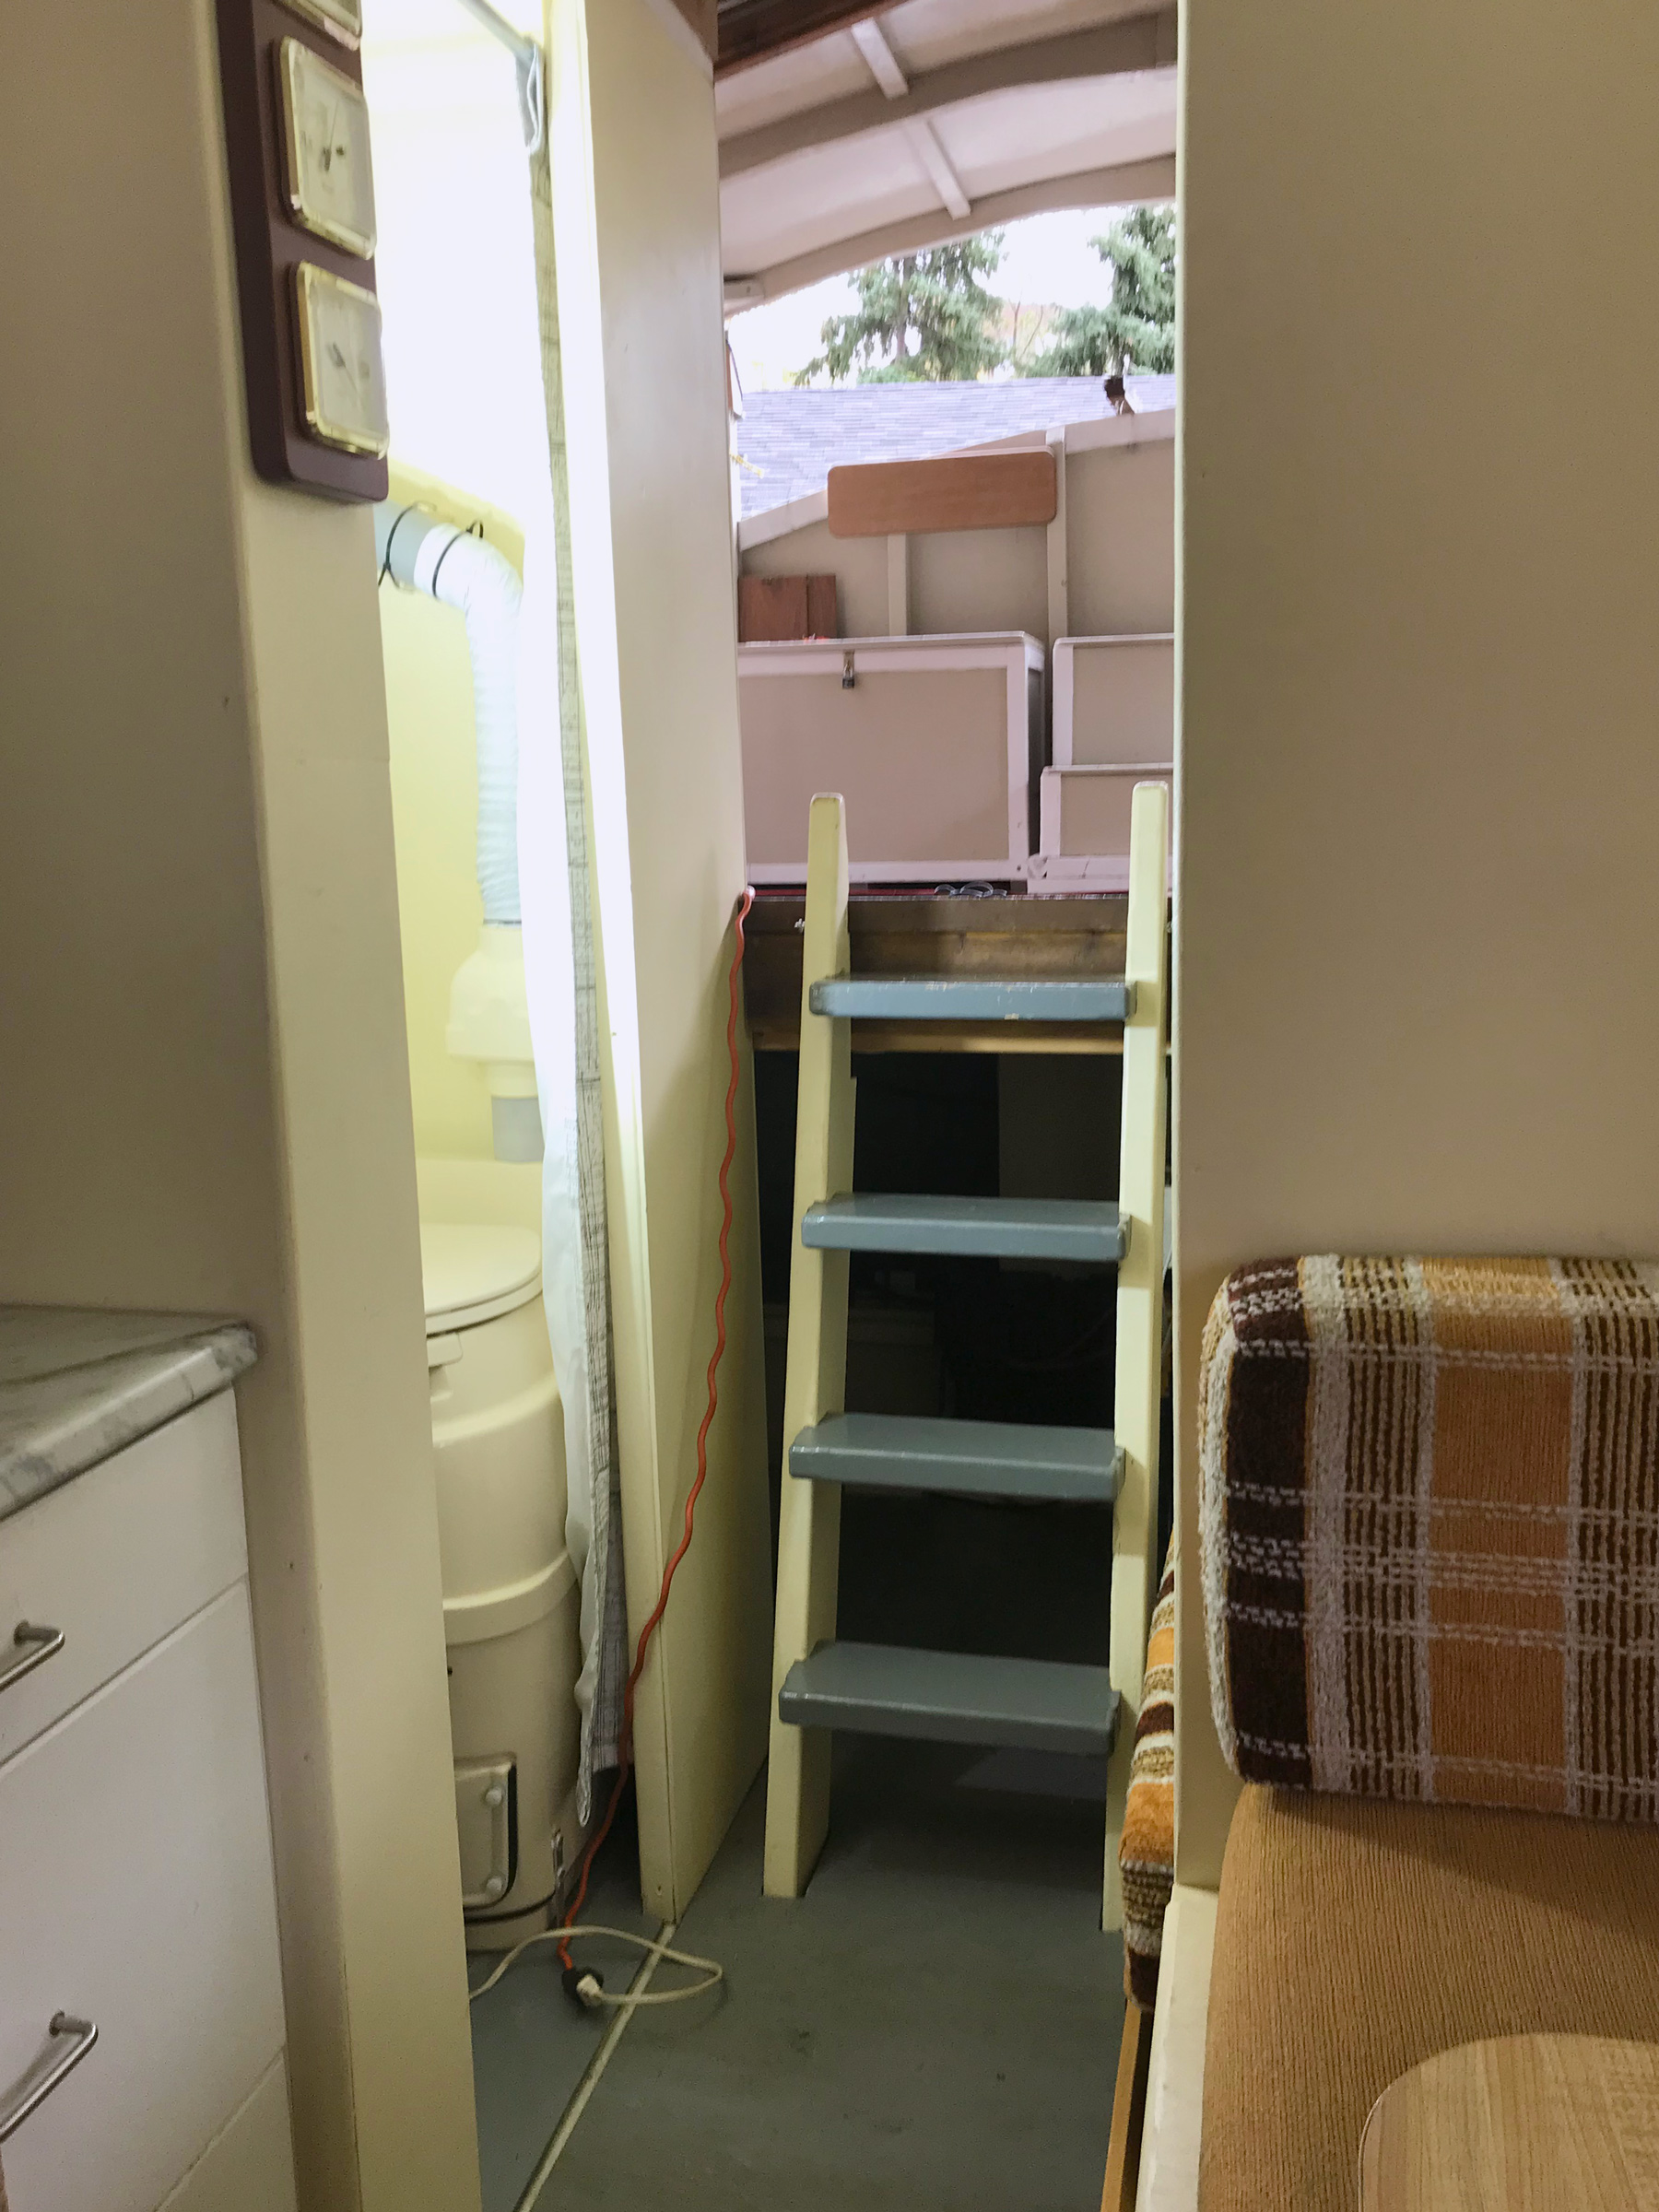
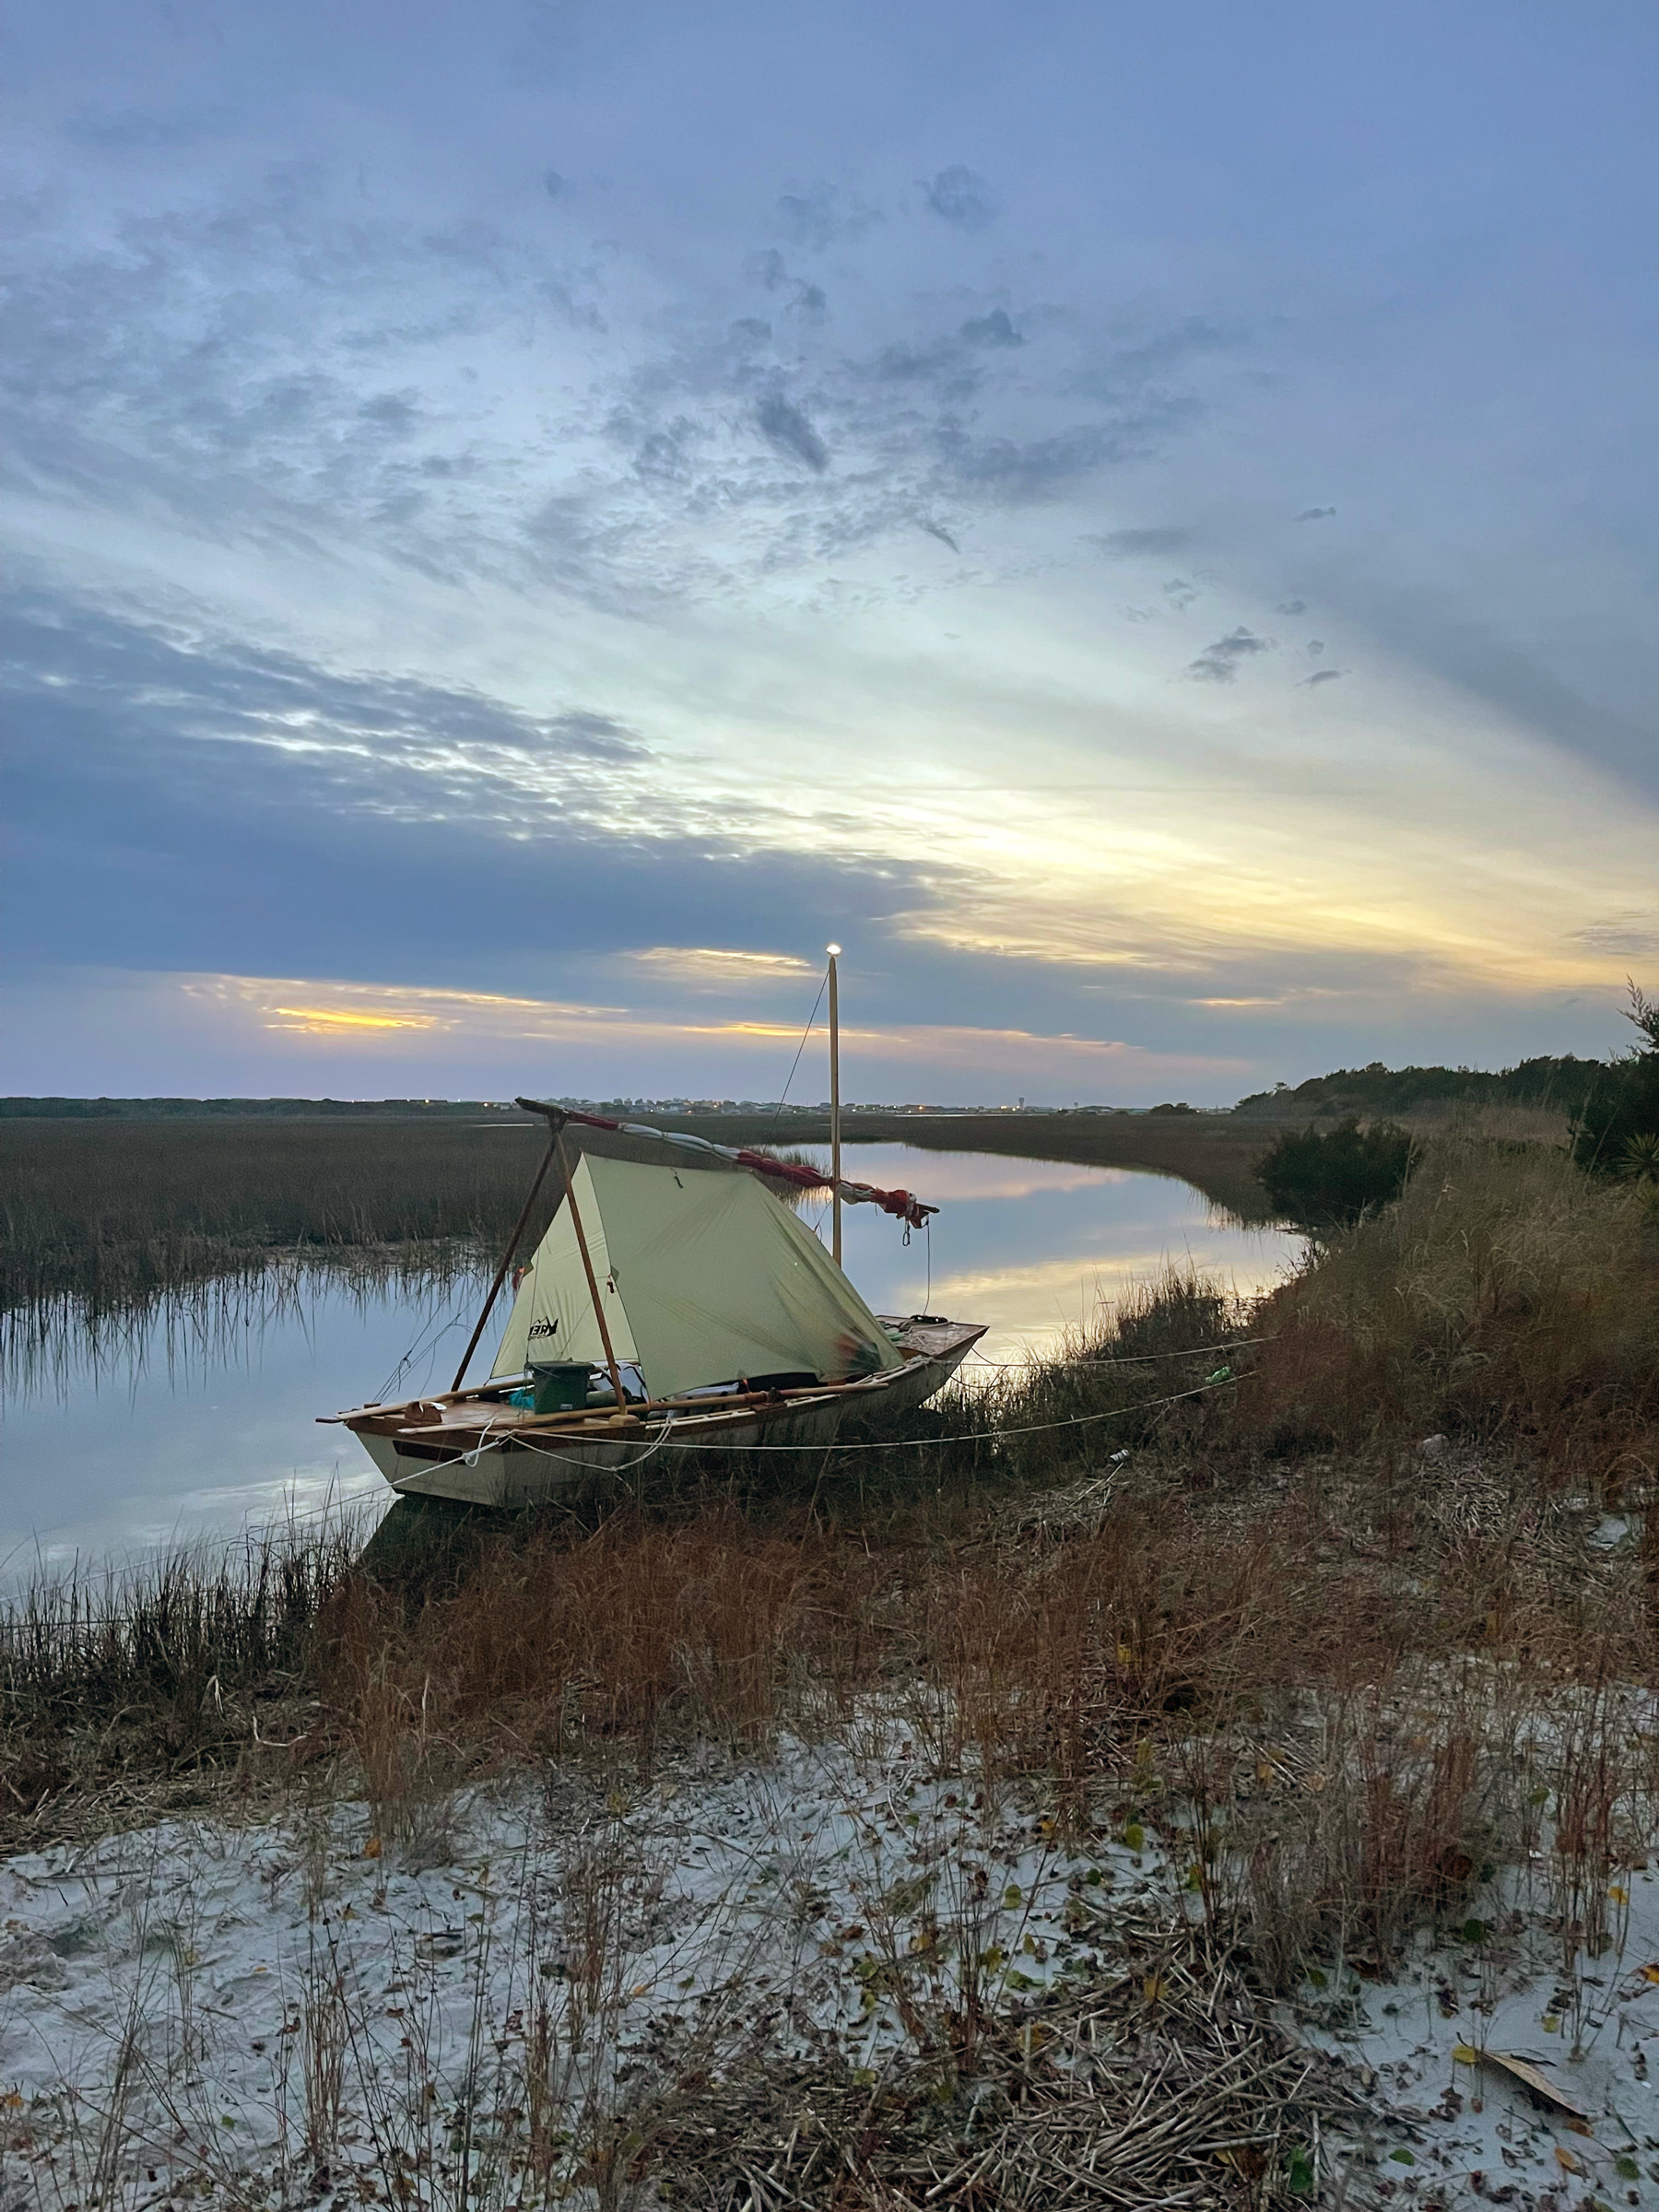
The Nancy’s China comes in an open, daysailer version, but I liked the original deckhouse version. It holds a lot of gear, including a portable toilet and camping supplies, and two people can sleep quite comfortably on each side of the daggerboard trunk. The house also gives the appearance of a proper pocket cruiser capable of taking one to new gunkholes, coves, and beaches far from home.
Dave Wagner
You won’t find many 15’2″ LOA boats that have interior lights, storage racks, bronze portlights, clock, barometer—and even a 4″ color television set—all of which personalize a design for a builder like Dave Wagner.
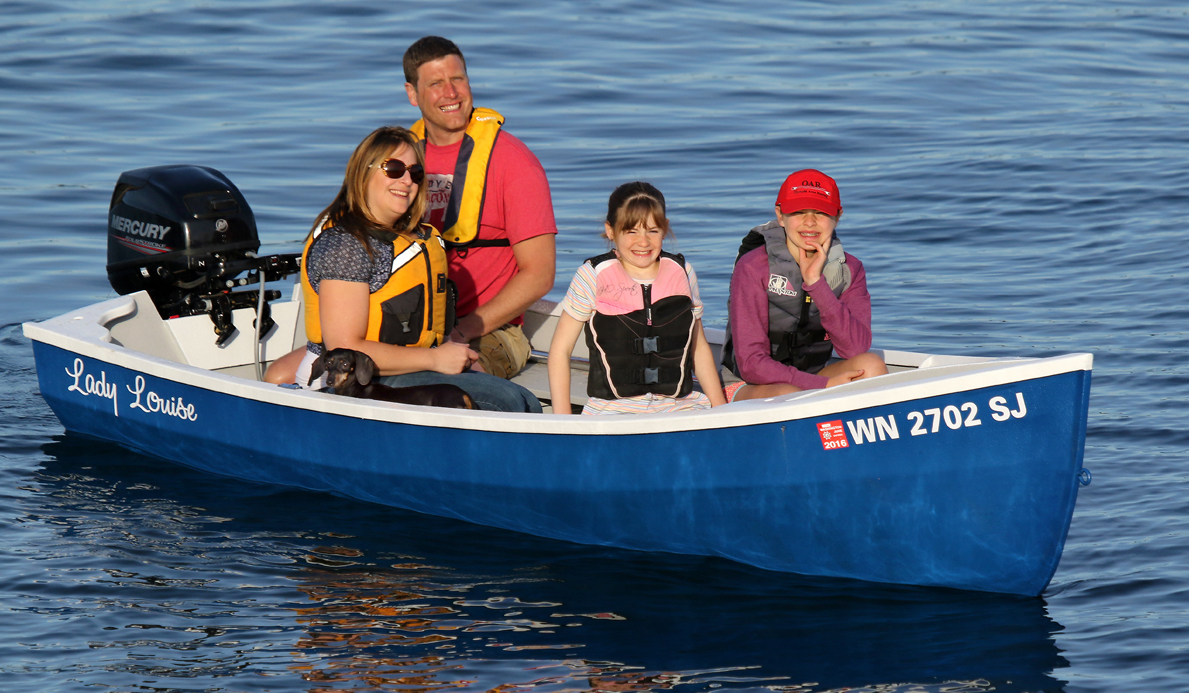
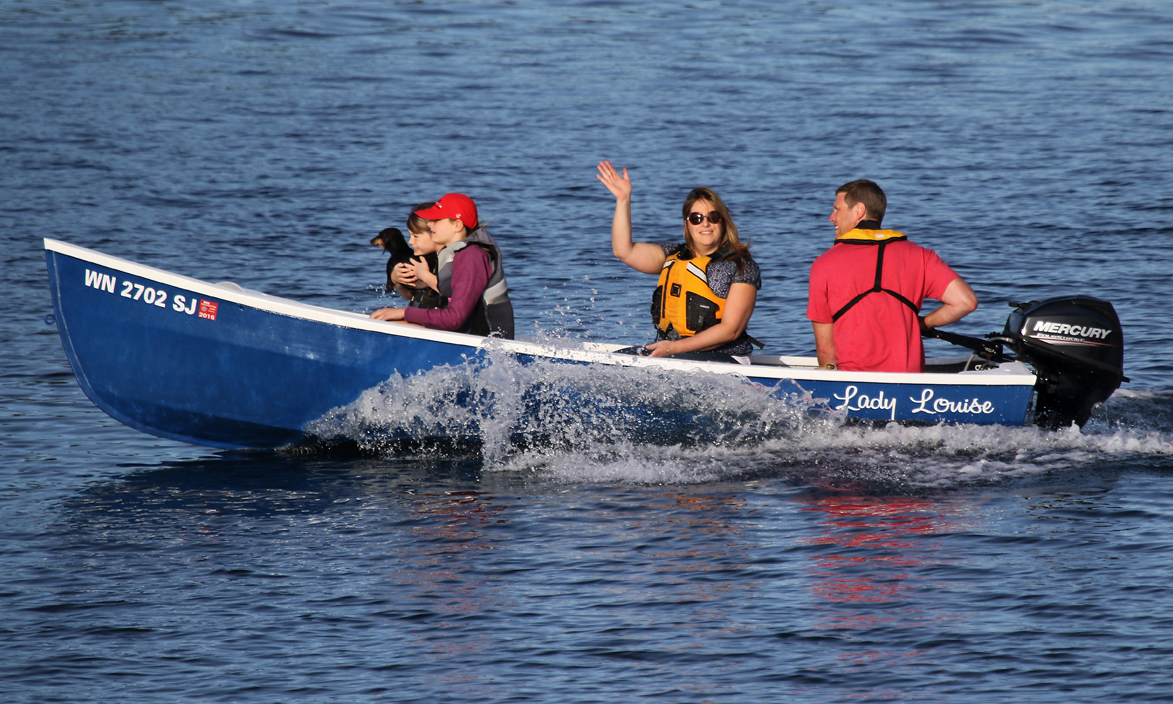
WHIM can accommodate a crew of two adults and four kids but is just as easy to sail singlehanded. I found that I could stand in the hatchway and run the halyards, or I could stand on the little foredeck to safely raise sail and hop back to the tiller. In light wind, I would steer from leeward, reducing the wetted surface, holding the sail shape, and getting my head close to the water as it swept by the neatly curved rail.
The boat’s working jib is a bit wimpy for the light airs around Puget Sound, but a genoa adds speed and serves as a gennaker with the help of a boathook in the skipper’s spare hand. In bigger wind, the boat, steadied by 285 lbs of ballast, would stiffen up before my heart reached my throat. The flat bottom can pound in rough water; but this can be solved by heeling to where the hard chine creates a V-shape that more gently parts the waves.
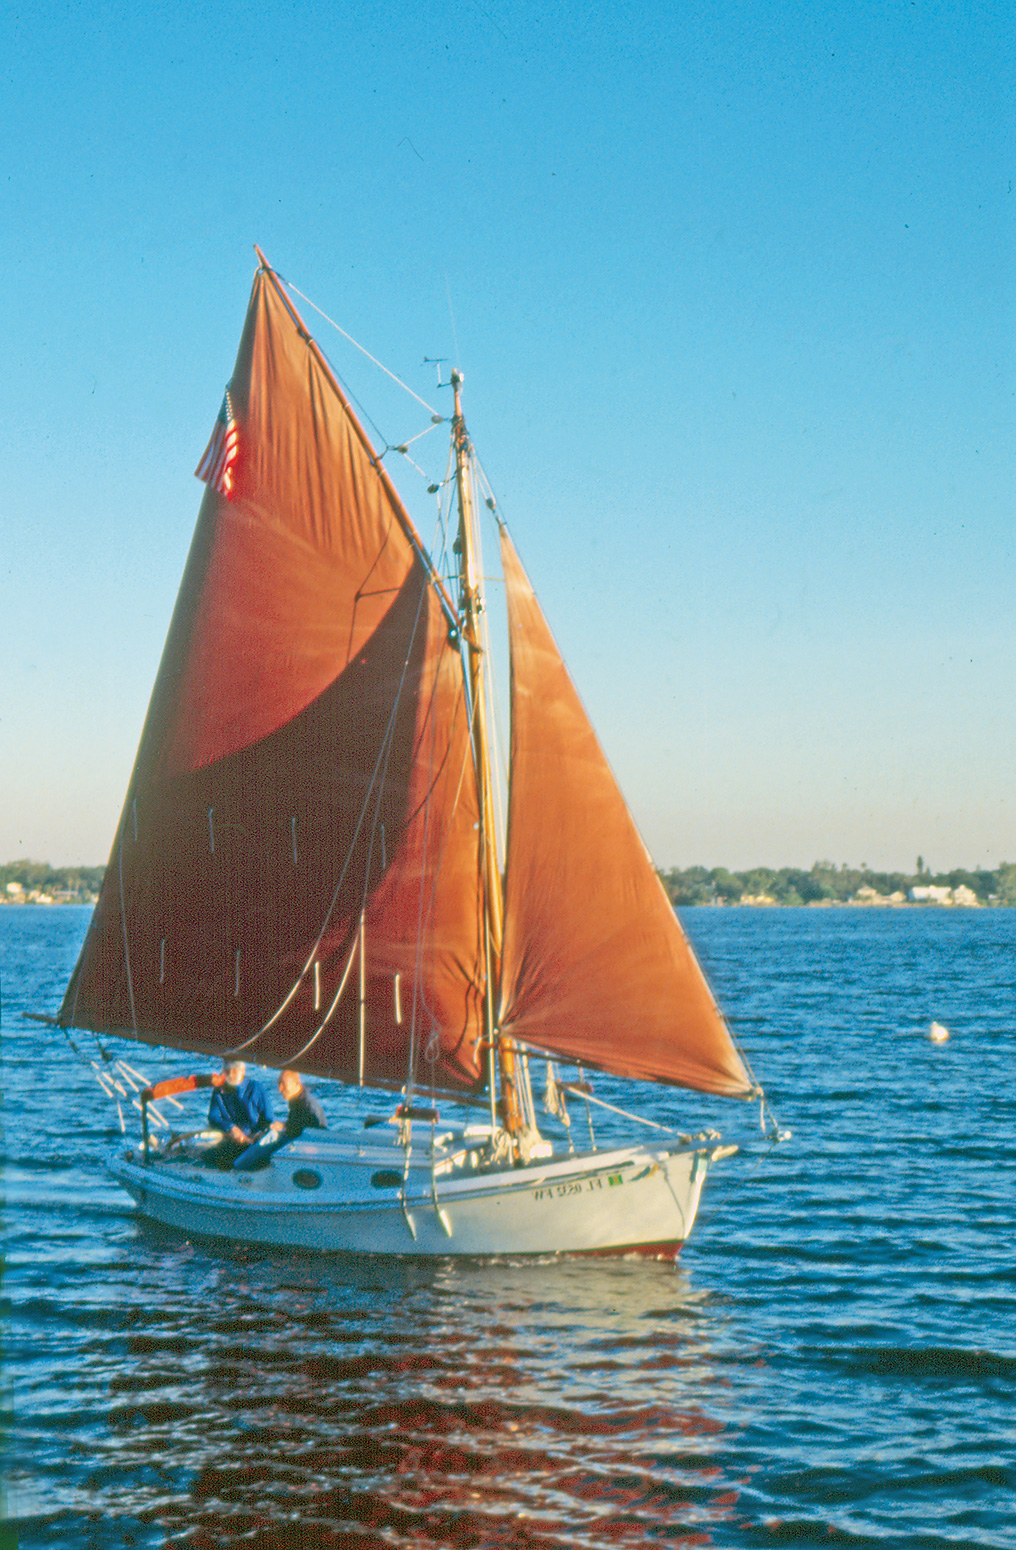
To windward, the boat is wanting, owing largely to the way the sail twists away from the wind at the top of the sprit. A marconi rig is likely a better close-hauled performer and one of myriad sail plan variations that would work with this design. Indeed, I regularly sailed past a gaff-rigged version moored on Lake Washington, and Devlin’s web site features five versions of the sail plan, including an aluminum-masted marconi rig and another with a deck-stepped, carbon-fiber mast. Roller furling, bronze port lights, a self-bailing cockpit—heck, even radar—are all optional, but the boat’s charm remains its simple elegance, which I spent many a moment admiring on the dock or from across the garage.
Looking at the curve of its sheer and imagining how it would follow the line of the trough it would soon be making, I sensed for the first time the fondness that makes some owners inordinately attached to their boats. And I’ve seen it in the people who streamed by to admire WHIM at the Lake Union Wooden Boat Festival at The Center for Wooden Boats in Seattle. The boat sat dwarfed by almost every other boat on the dock, but one afternoon I saw an older gentleman looking at it from a little distance. For the longest time he just stared and smiled, and I think we shared the same thought: it’s a small boat, but a boat only has to be big enough to hold a dream.
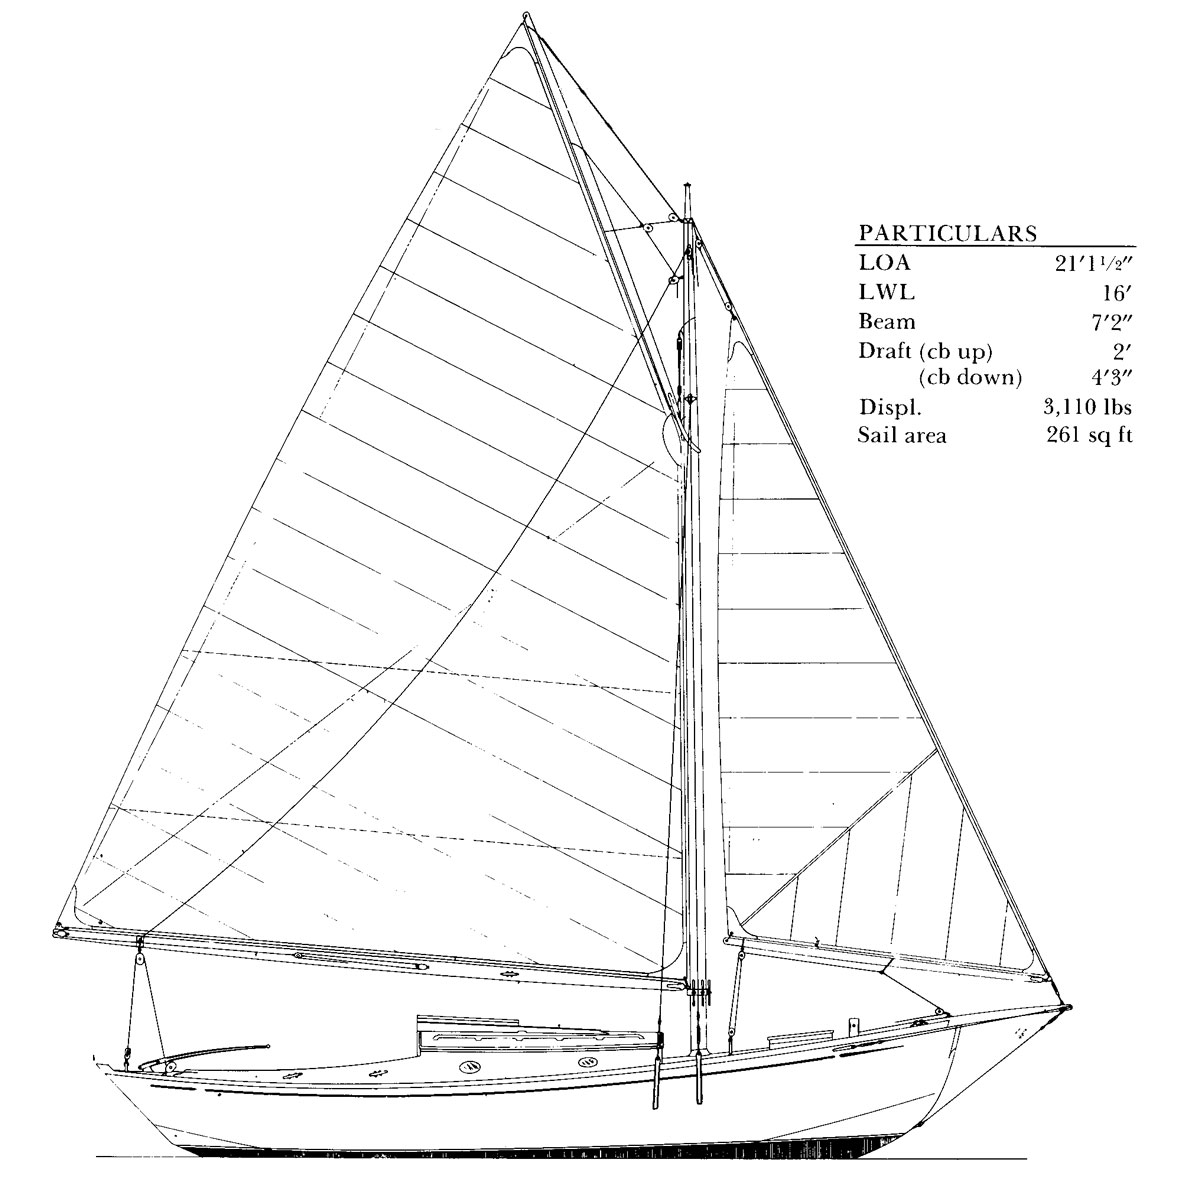
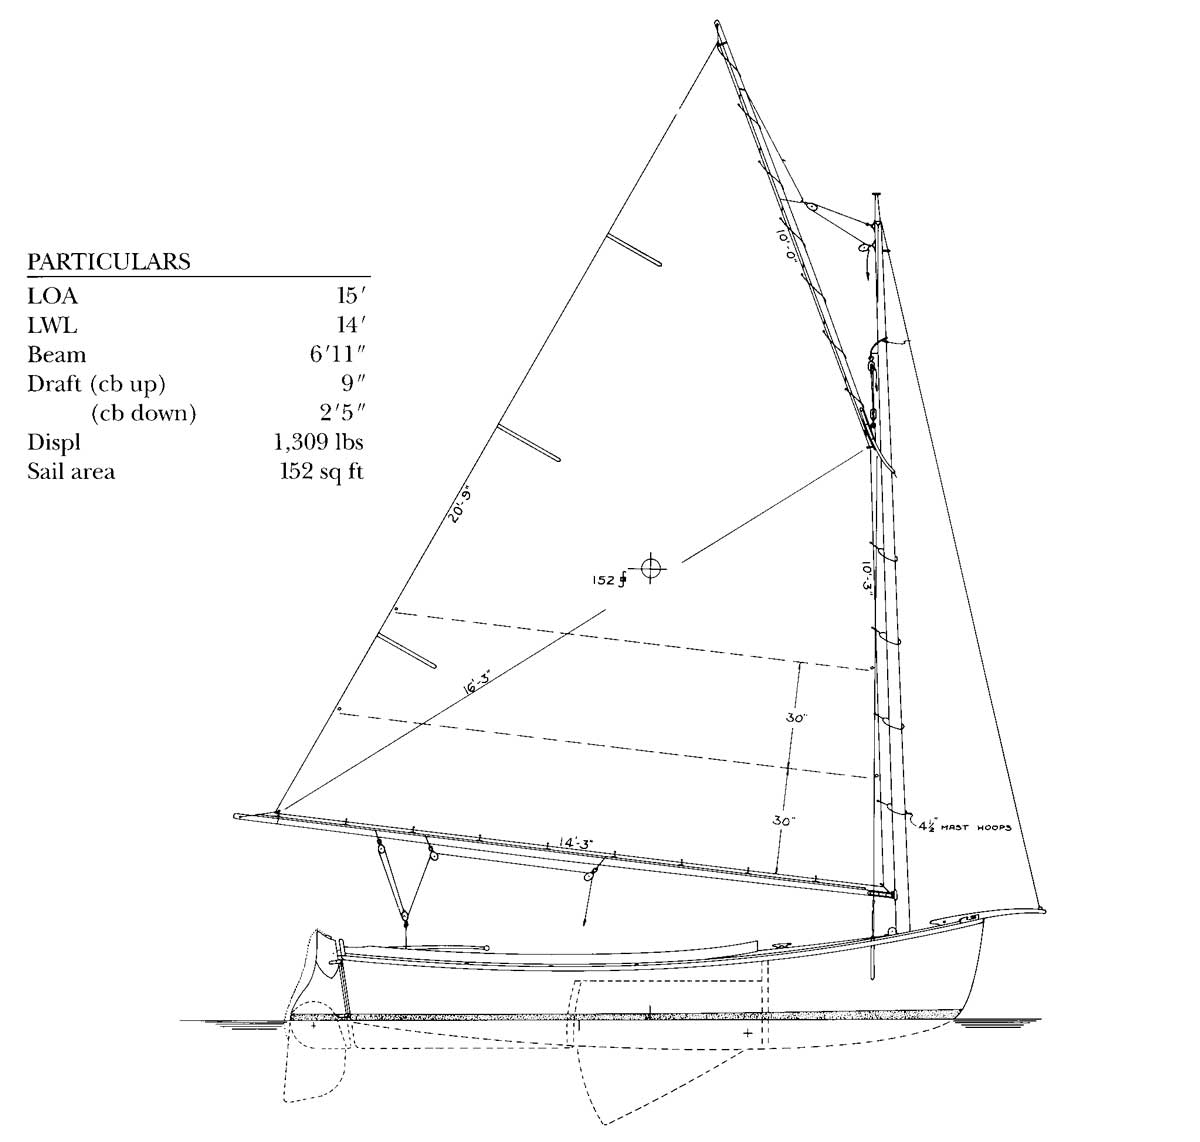
Nancy’s China Particulars
LOA: 15 1/2′
Beam: 6′
Draft:
Board up: 10″
Board down: 6’9″
Weight: 800 lbs.
Devlin Designing Boat Builders
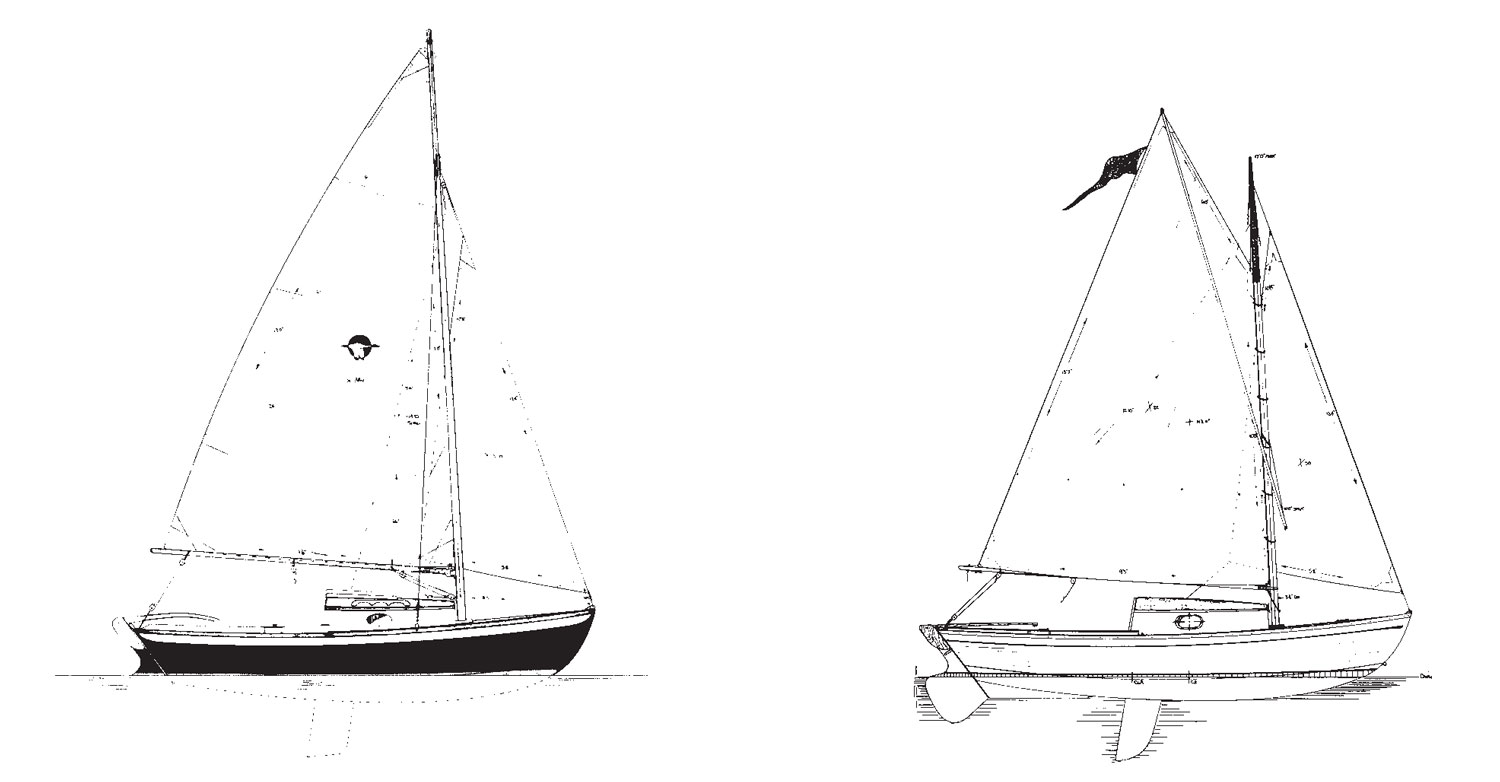
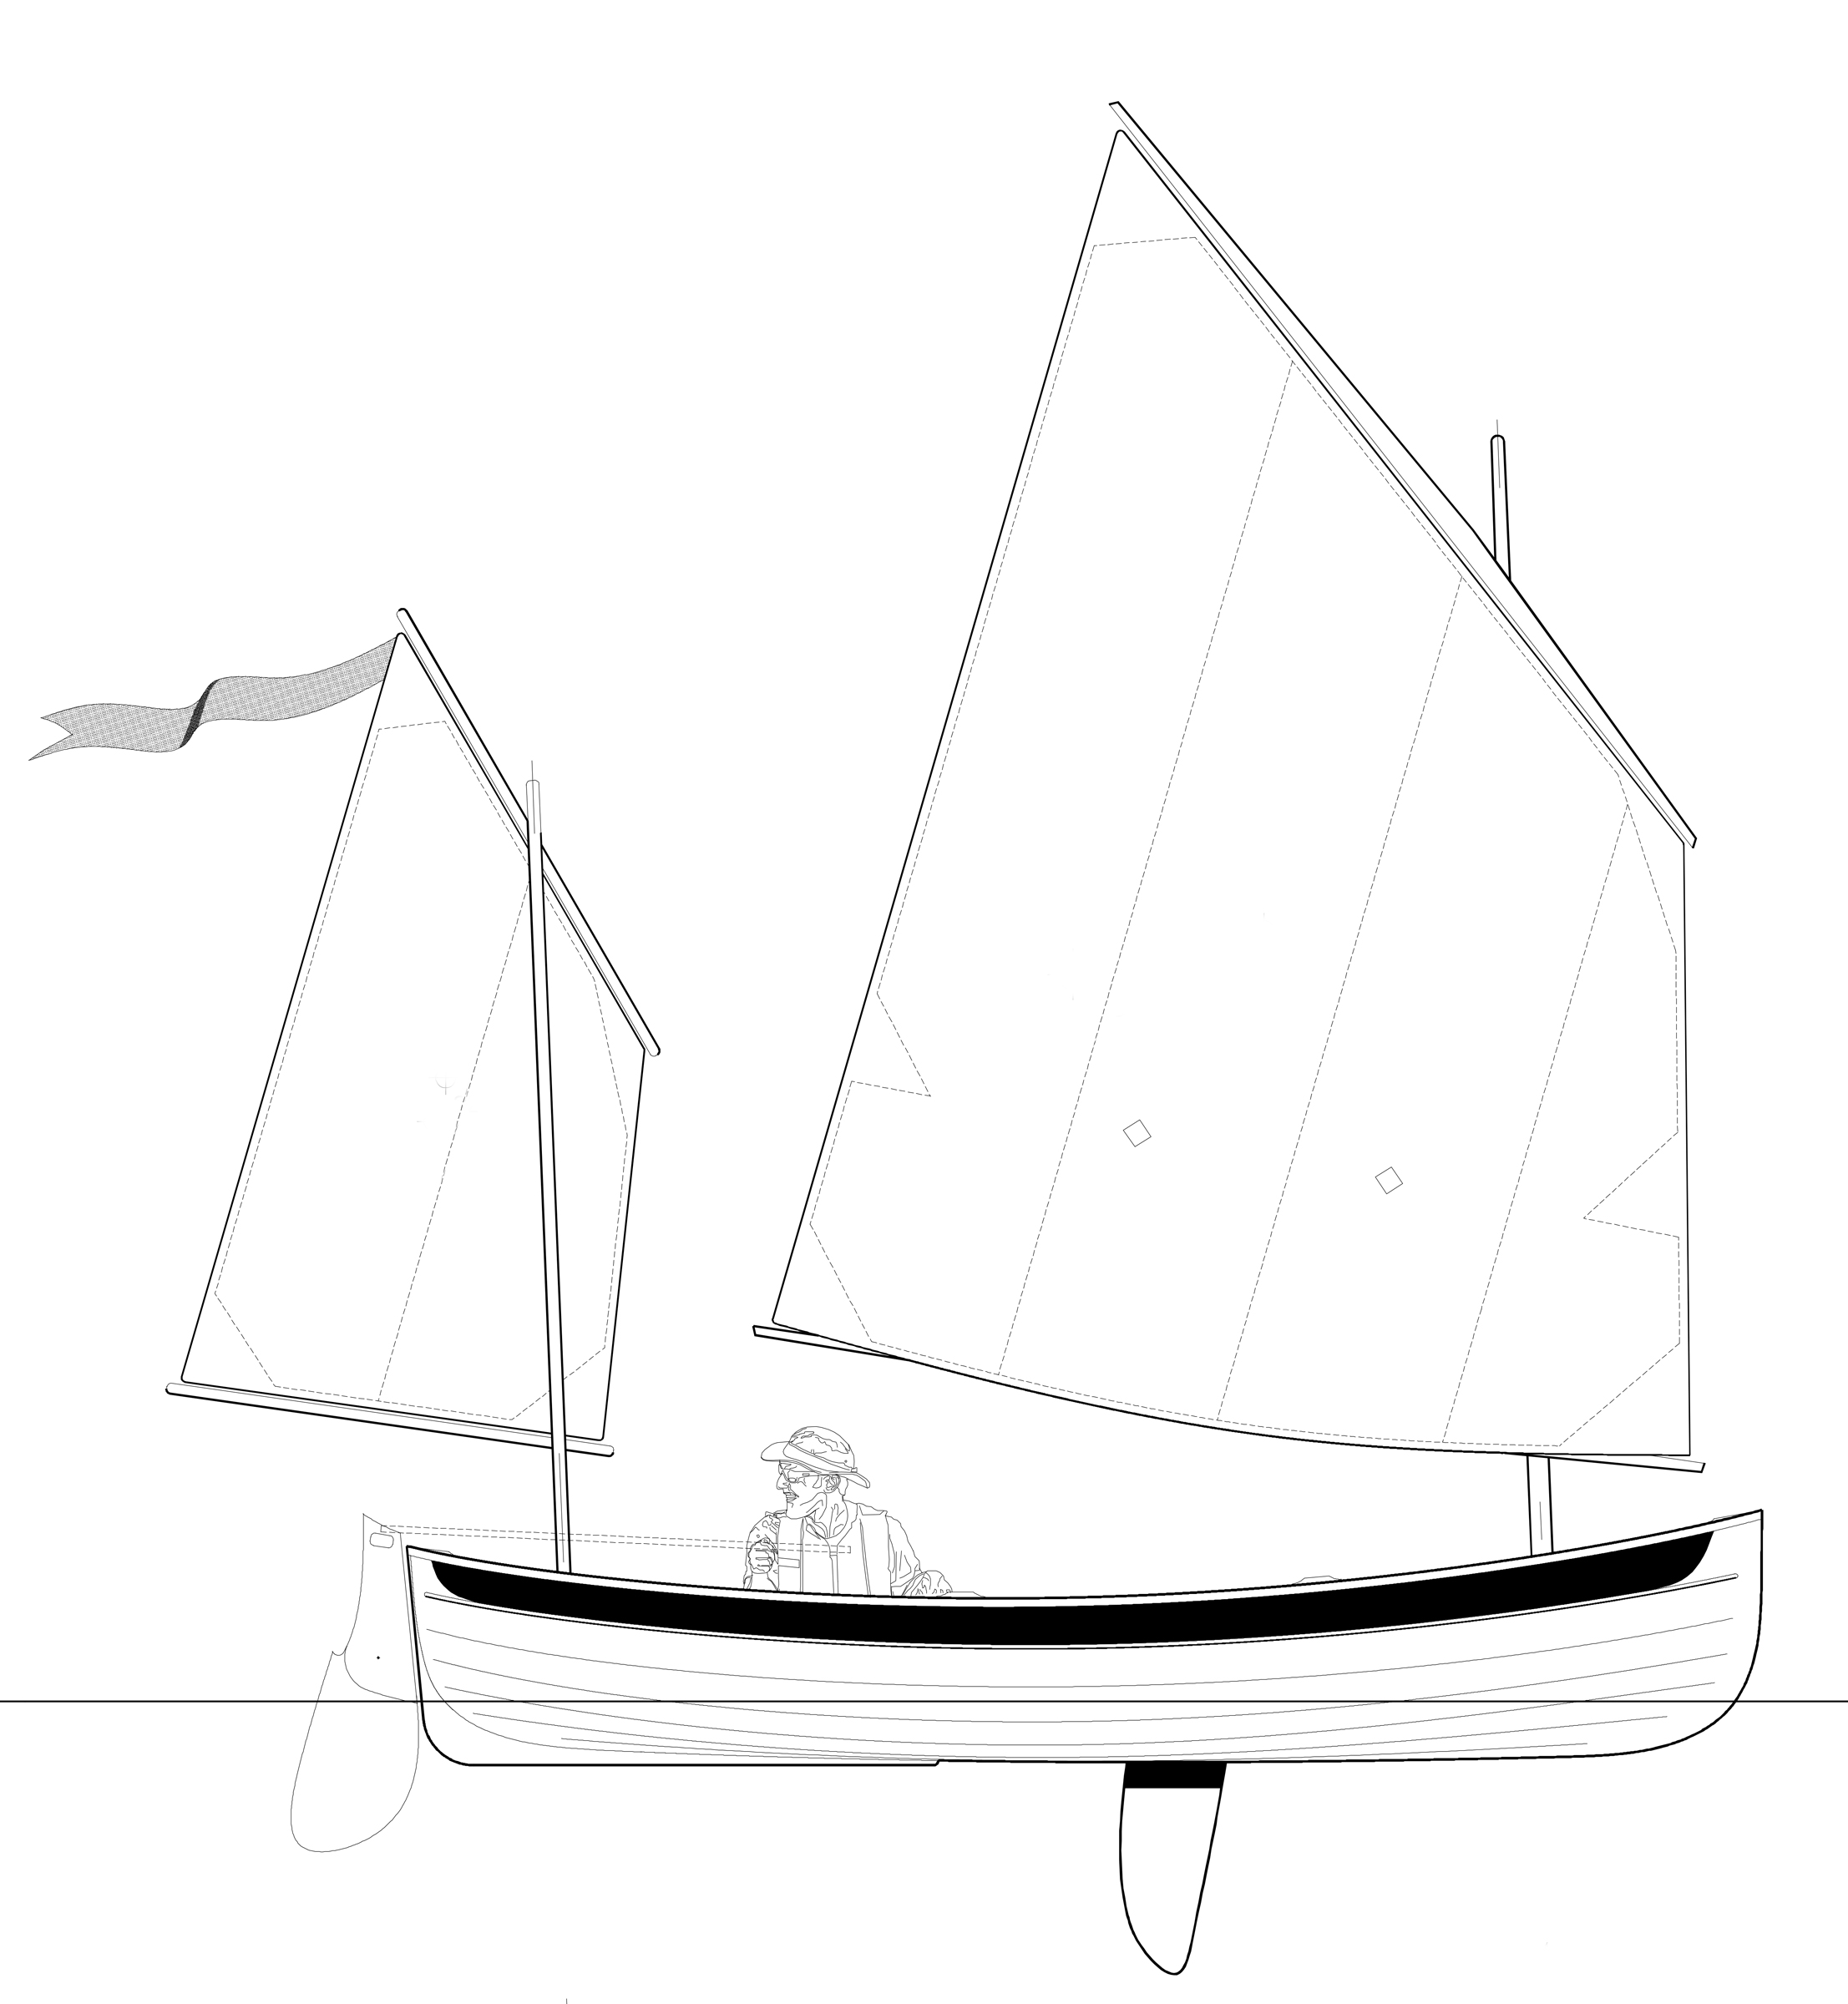
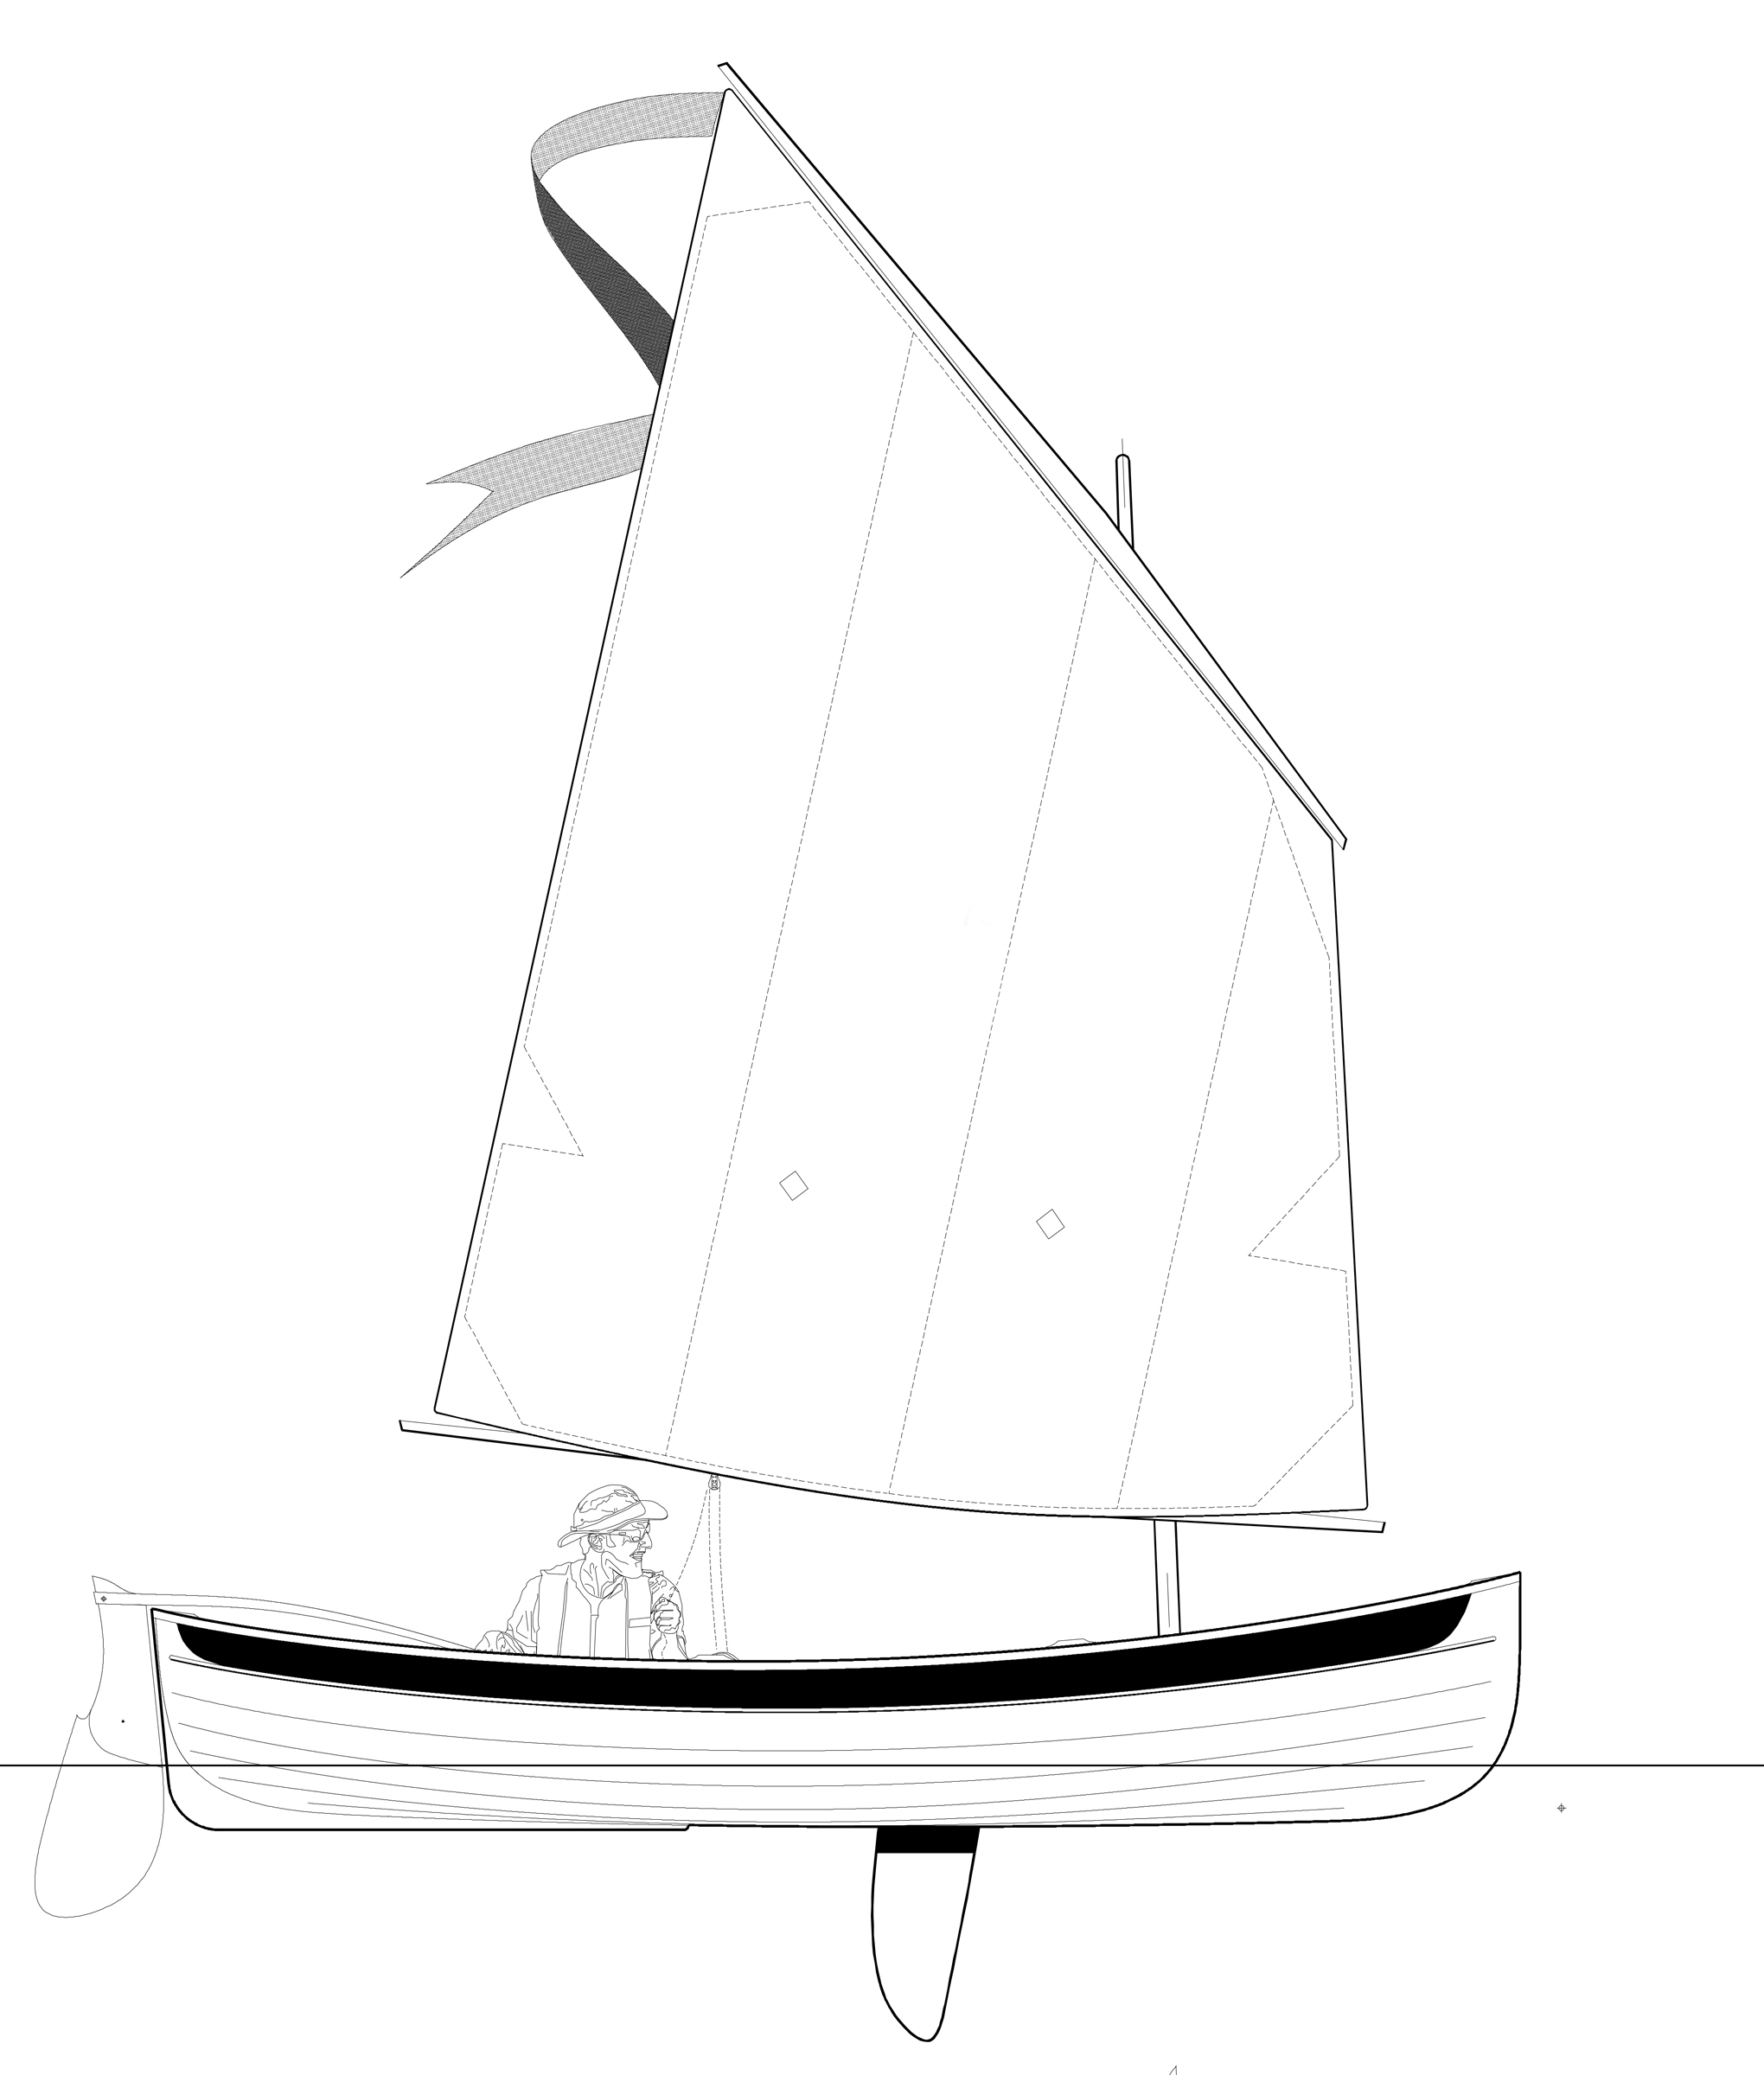
Rig alternatives include a marconi sloop (left) and a similar rig with a sprit-rigged main (right).
Devlin Designing Boat Builders
Sam Devlin of Devlin Designing Boat Builders, Olympia, Washington, designed Nancy’s China as the smallest imaginable pocket cruiser.
More information on Nancy’s China and other Devlin boats can be found at Devlin Designing Boat Builders, 2424 Gravelly Beach Loop Rd. N.W., Olympia, WA 98502; 360–866–0164.
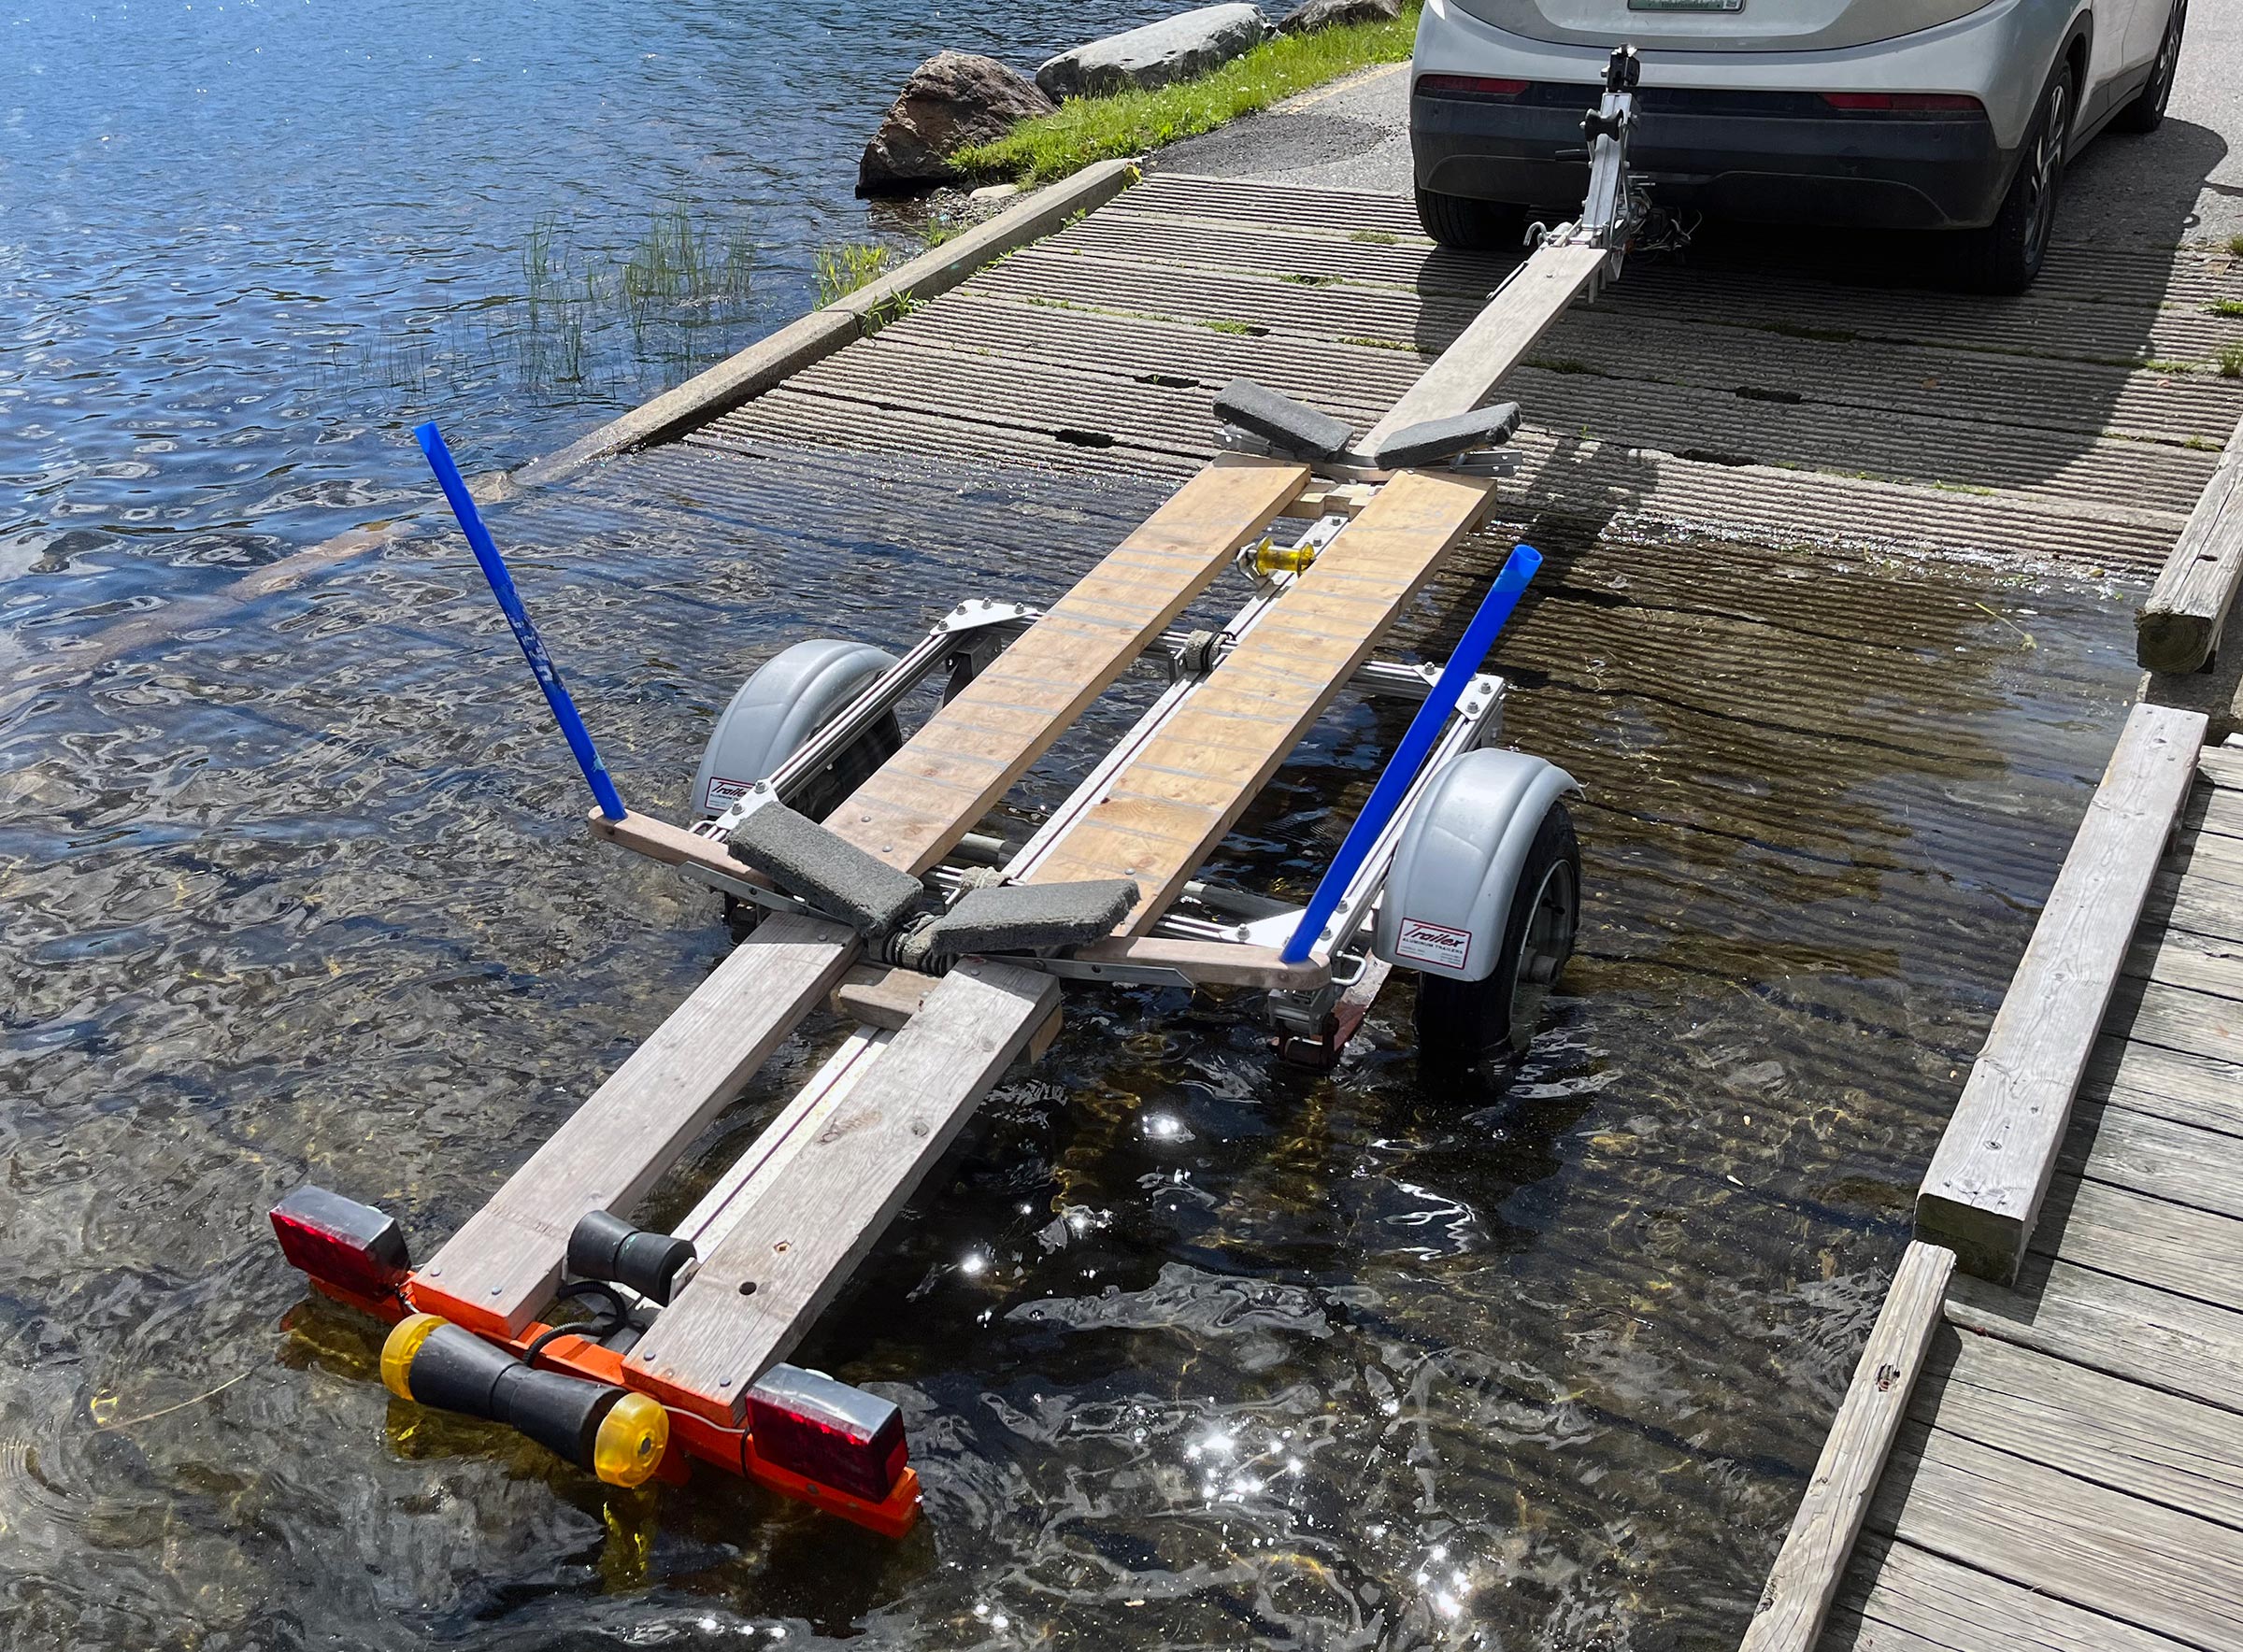
Little boats are…well…little. By my definition, they can be towed by four-cylinder cars and ride on trailers without brakes. They are usually less than 400 lbs and often are powered by only wind, muscle, or both. The smallest ones can be placed on roof racks and carried atop a car. They are the types of boats that don’t force you to get rid of one because you want to get another. Little boats can accumulate.
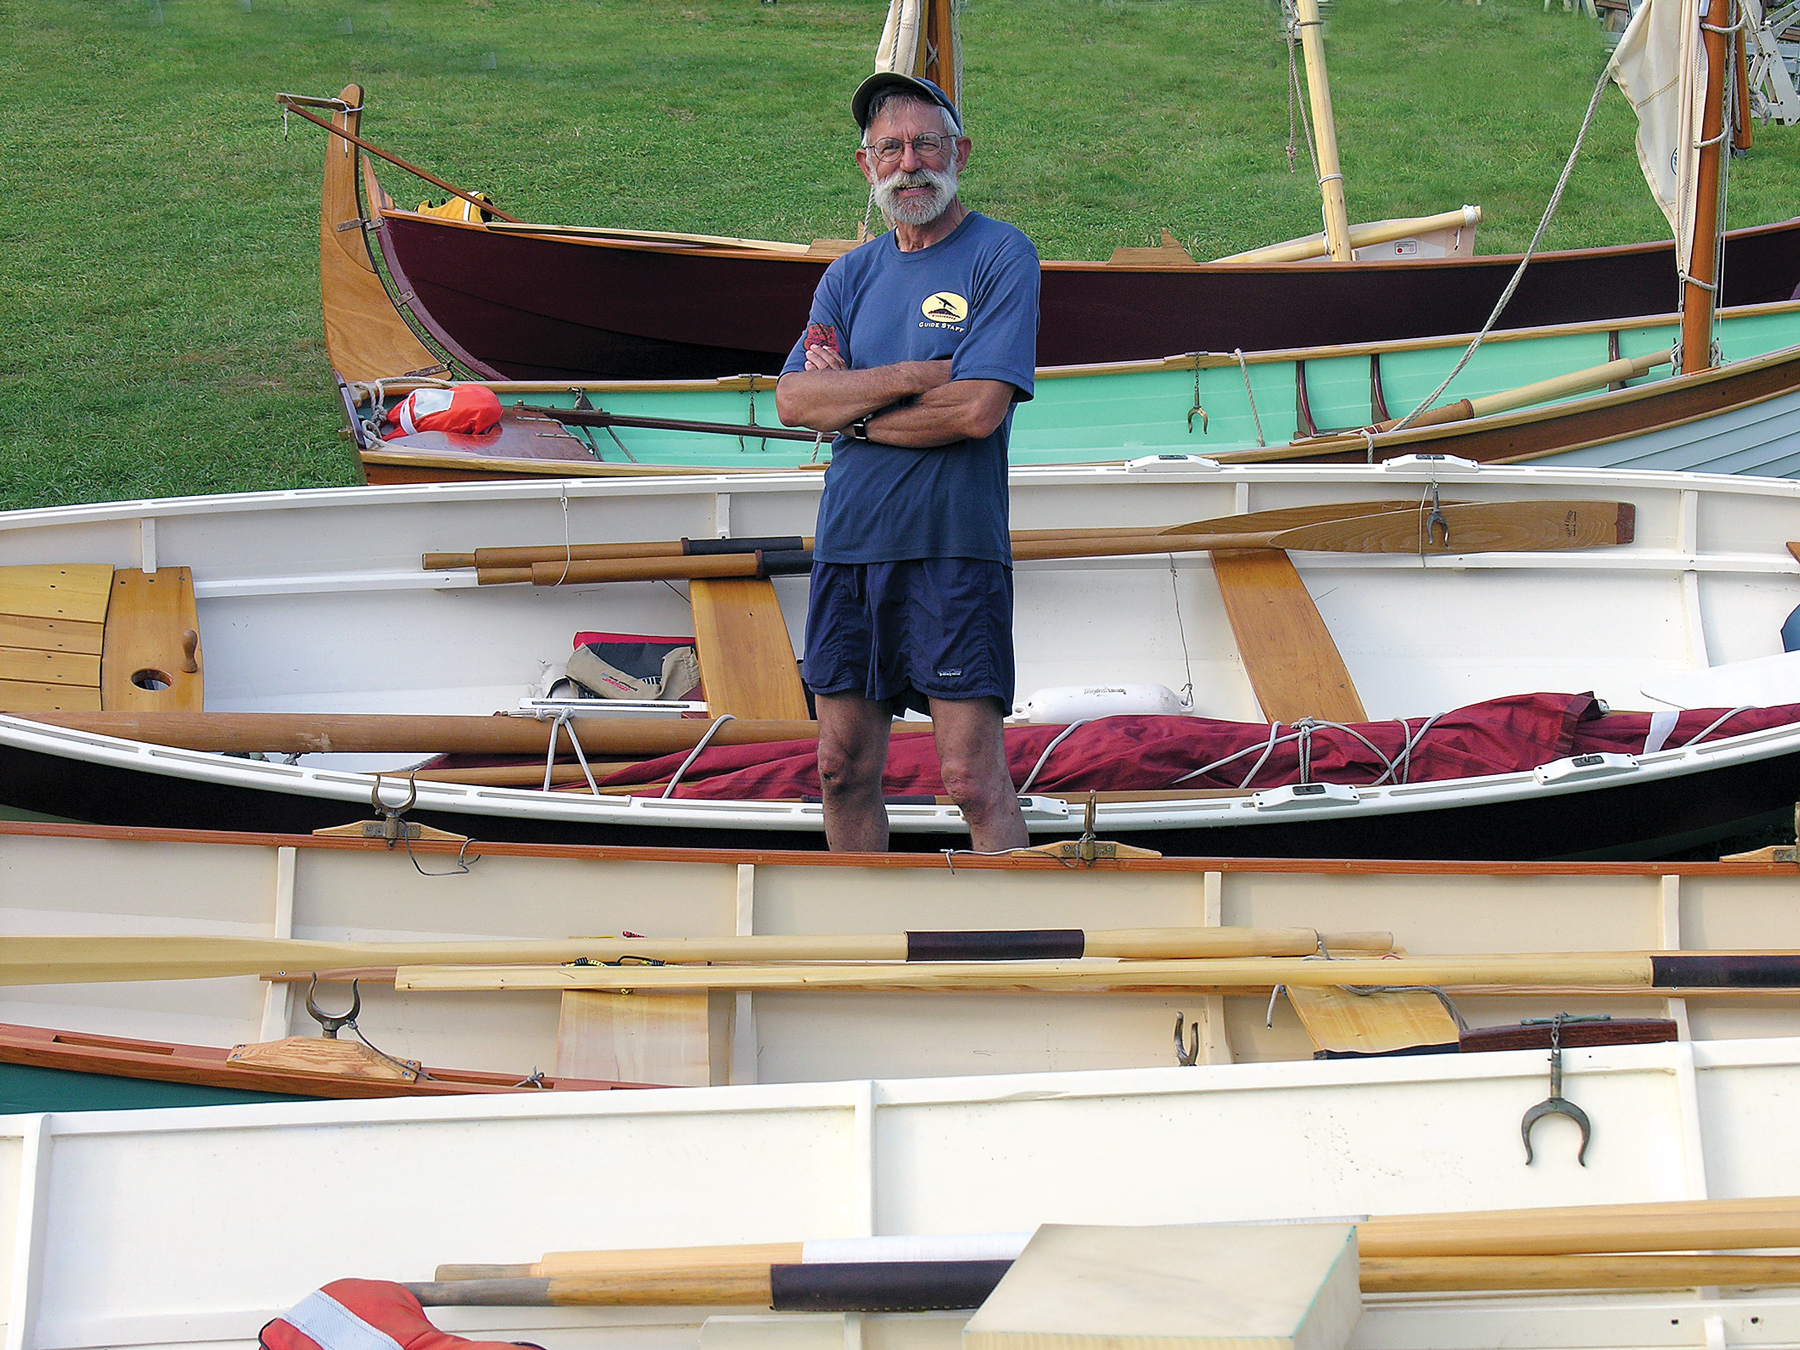
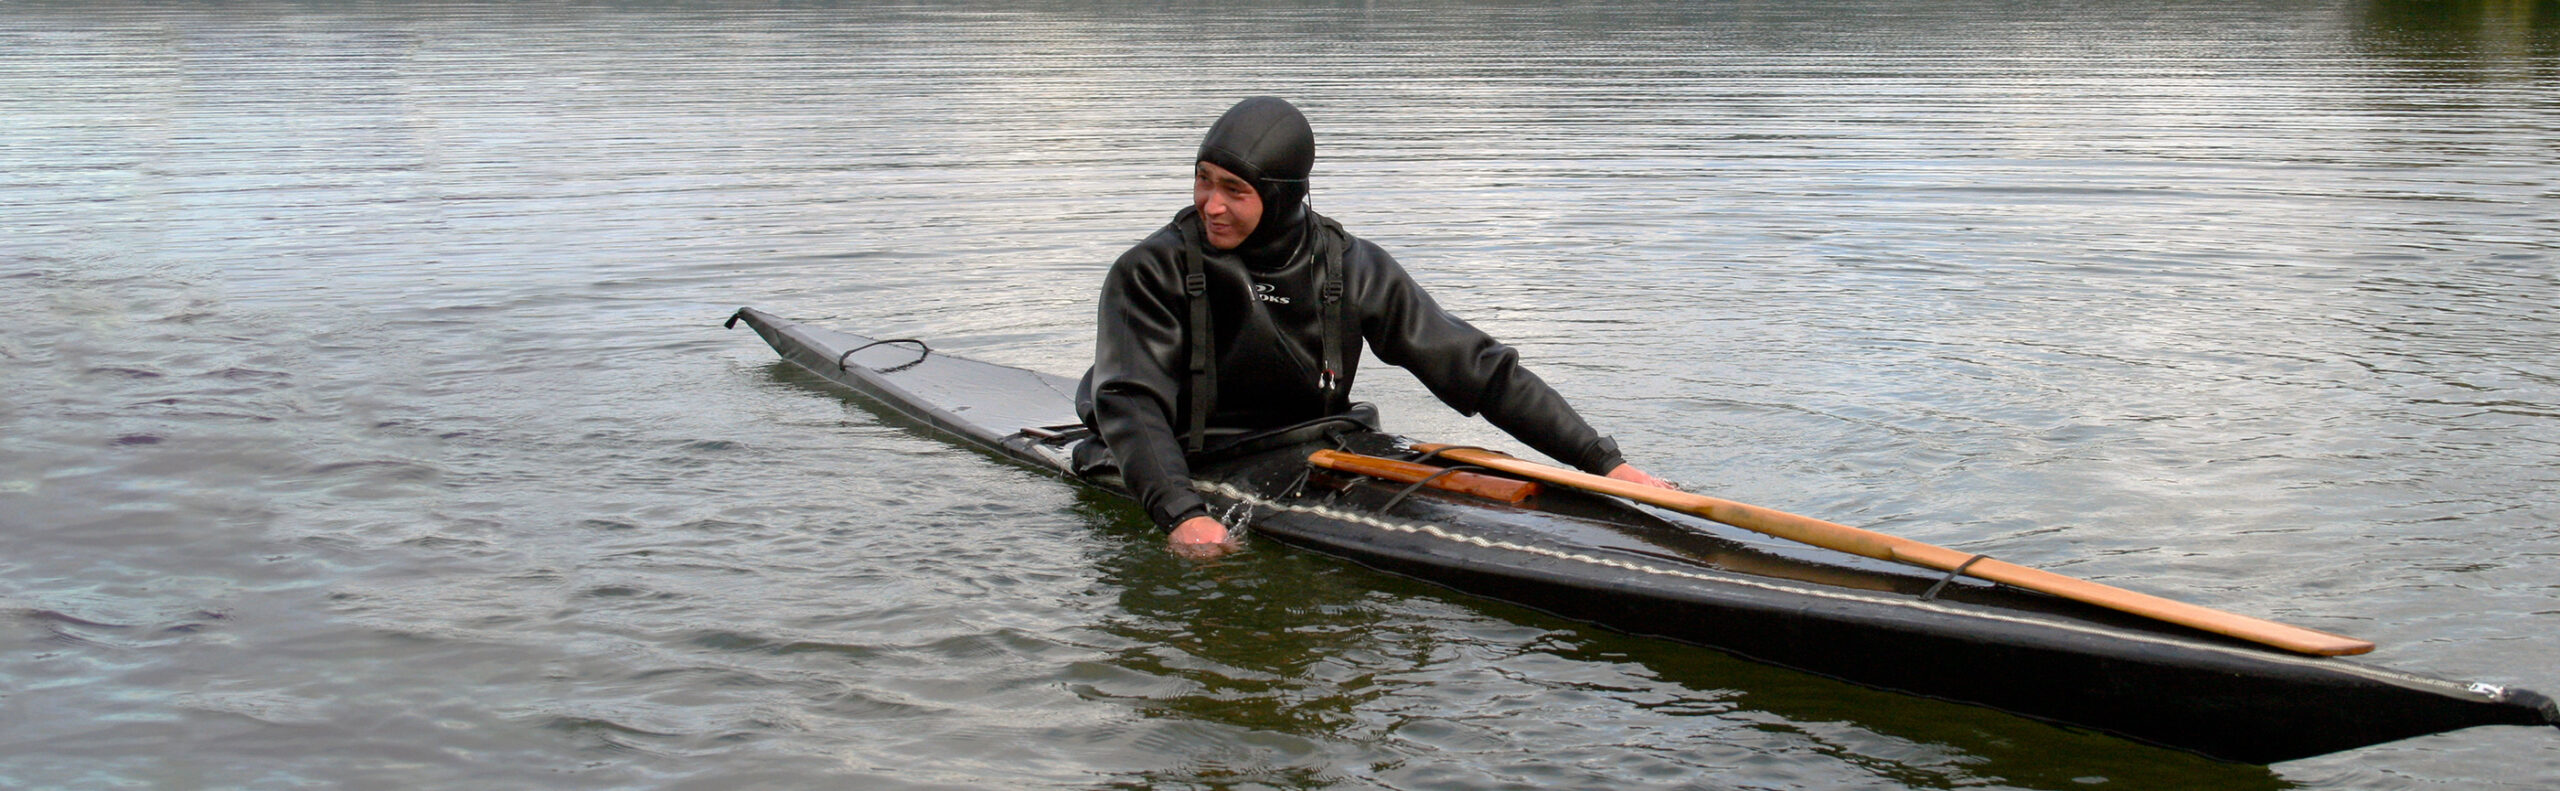
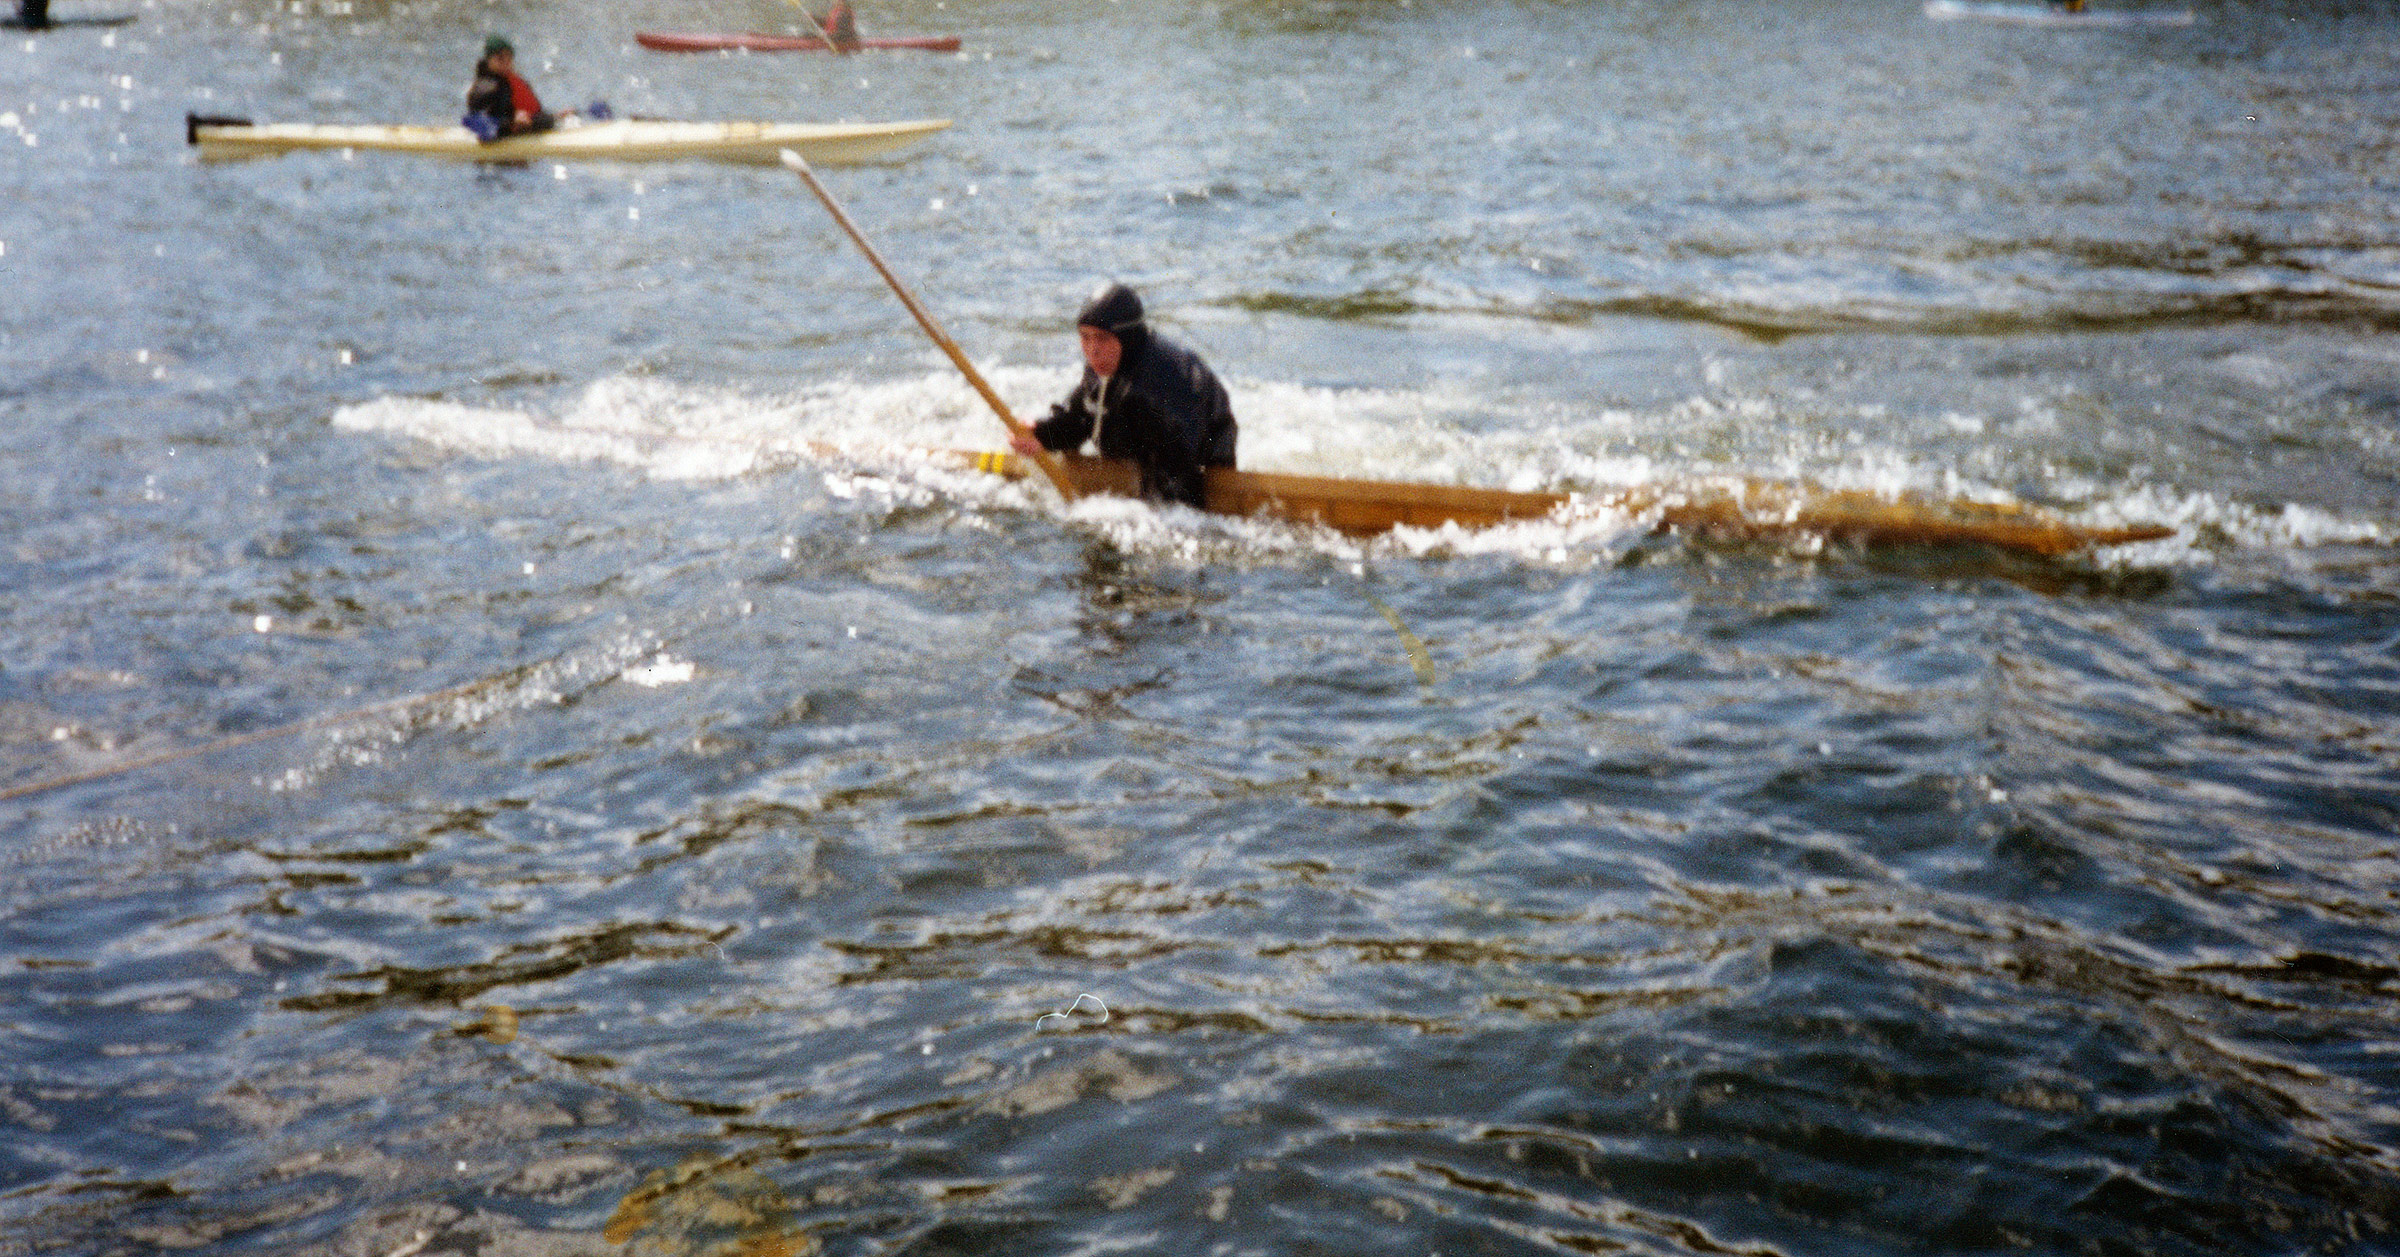
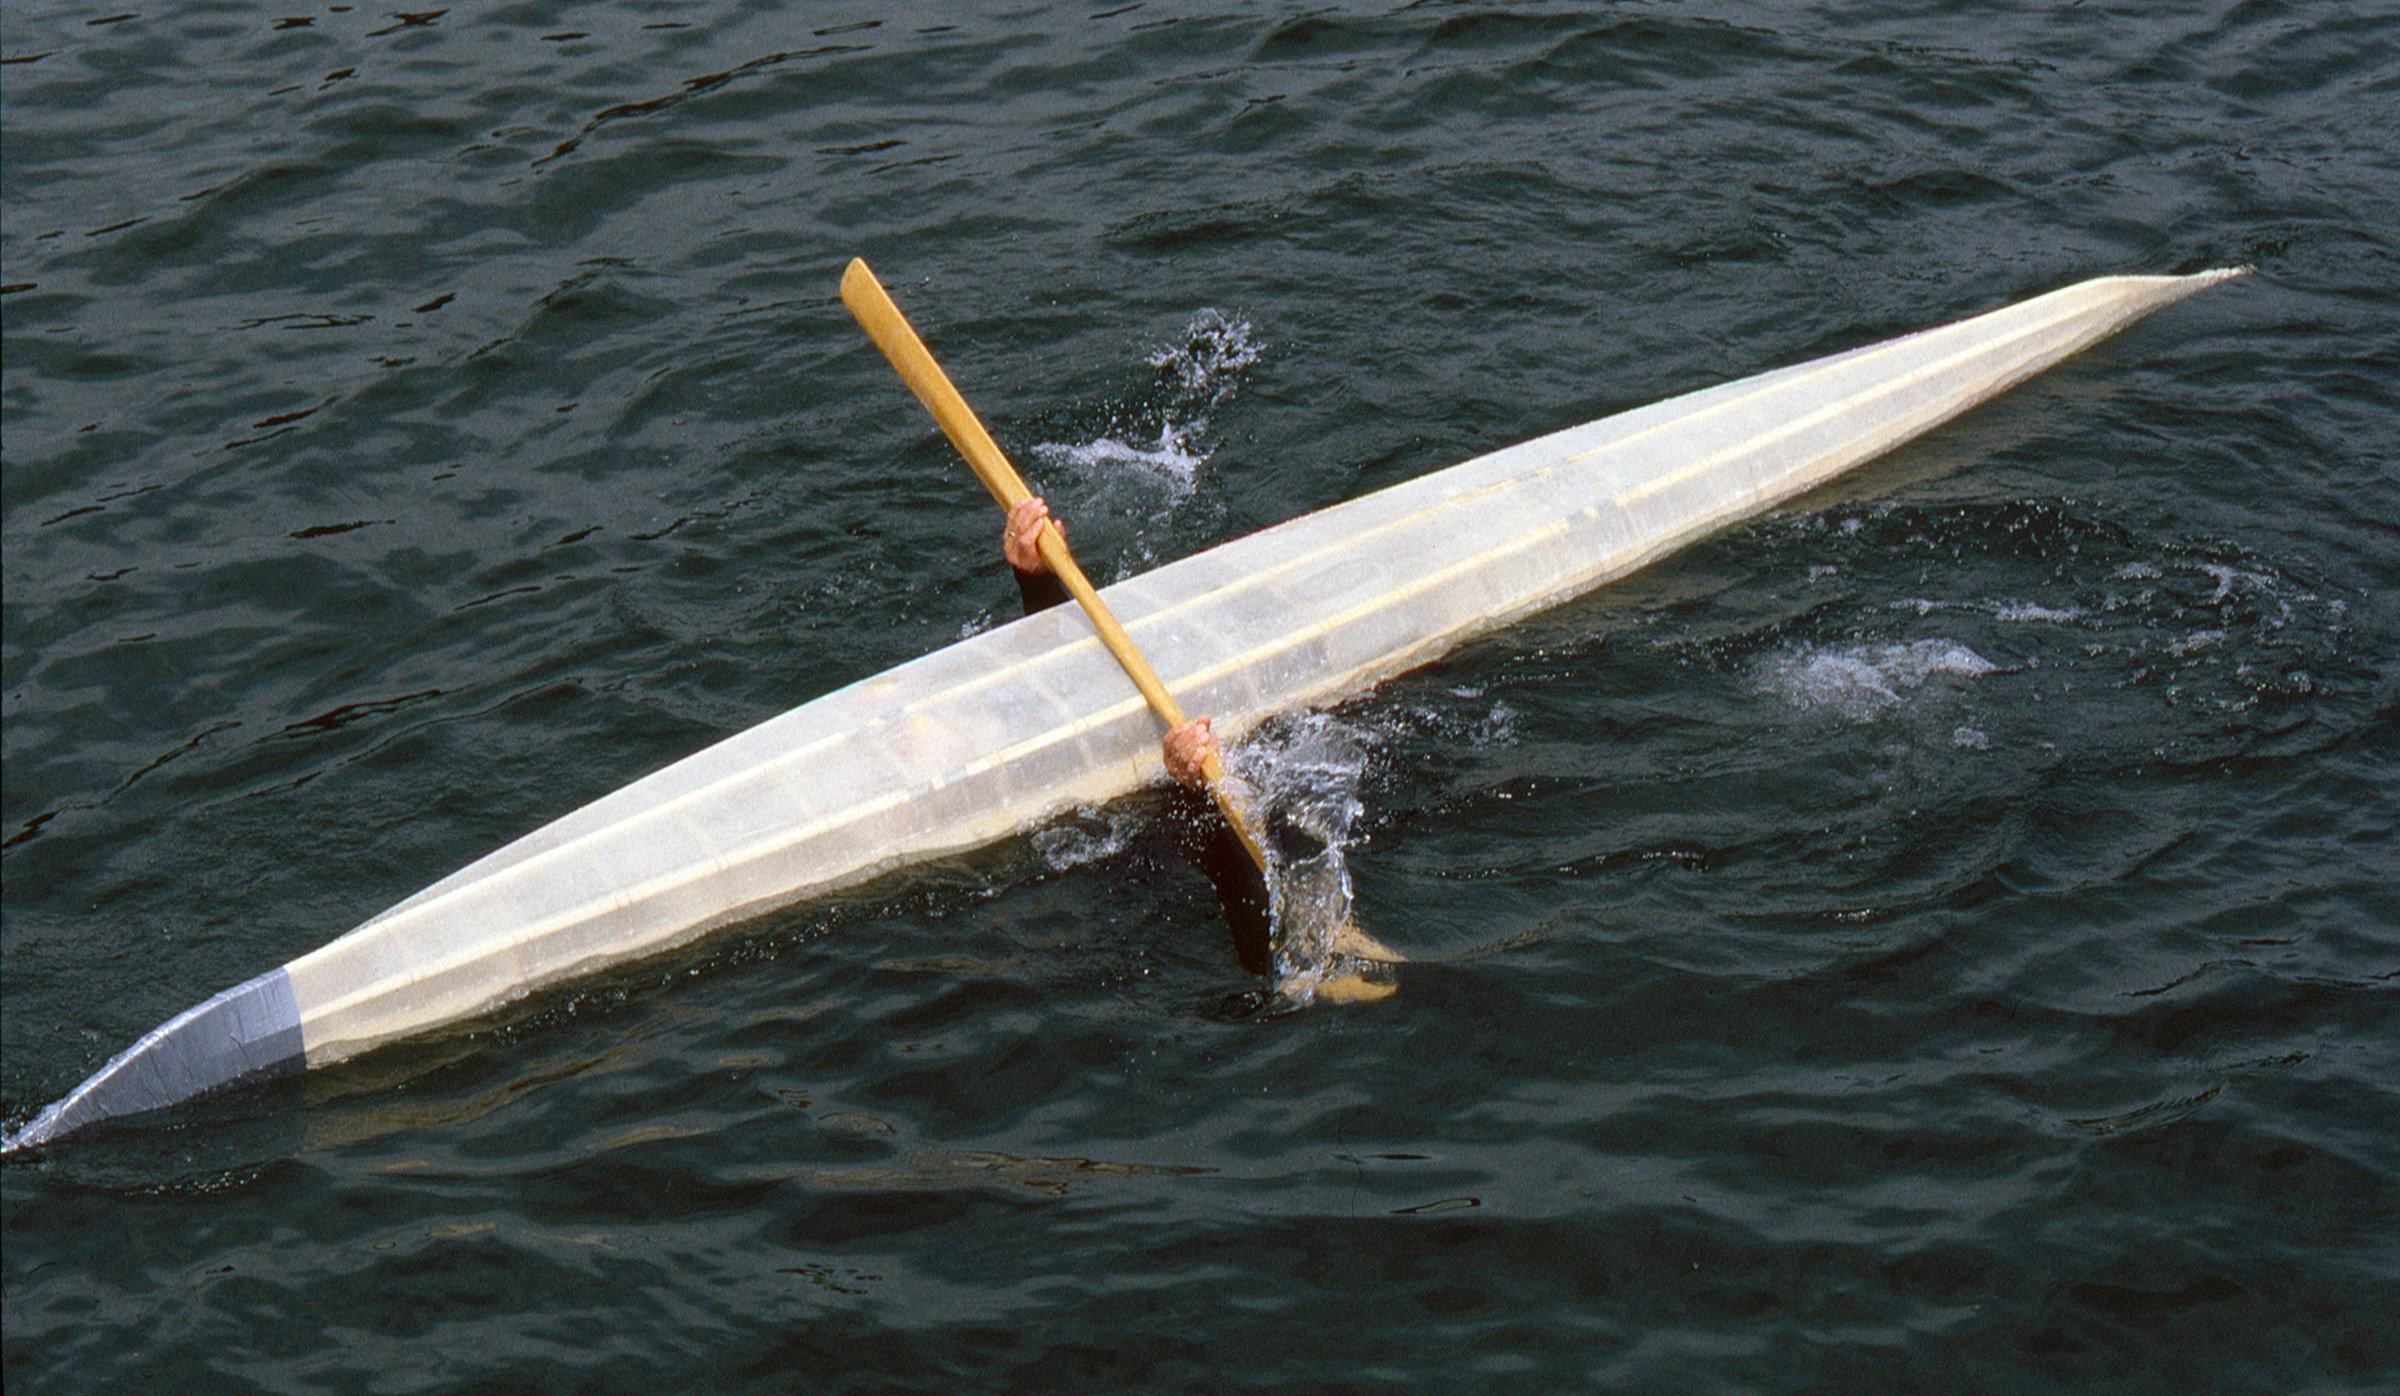
My friend Peter Duff once observed that I had 100′ of skiffs. Two hundred feet is more like it, I suspect. I had 16 boats at last count, and have been fortunate enough to never have to get rid of any. Because they are small, each has its own feel in the water, providing a different kind of boat experience. My boats range from a state-of-the-art high-tech sailing canoe to a pine tar-finished traditional Norwegian double-ender. In addition to forcing me to develop on-the-water skills, my fleet of small craft has made me develop skills in organizing, storing, and transporting boats. The following is some of what I’ve learned from years of living with little boats.
Photo by Matthew P. Murphy
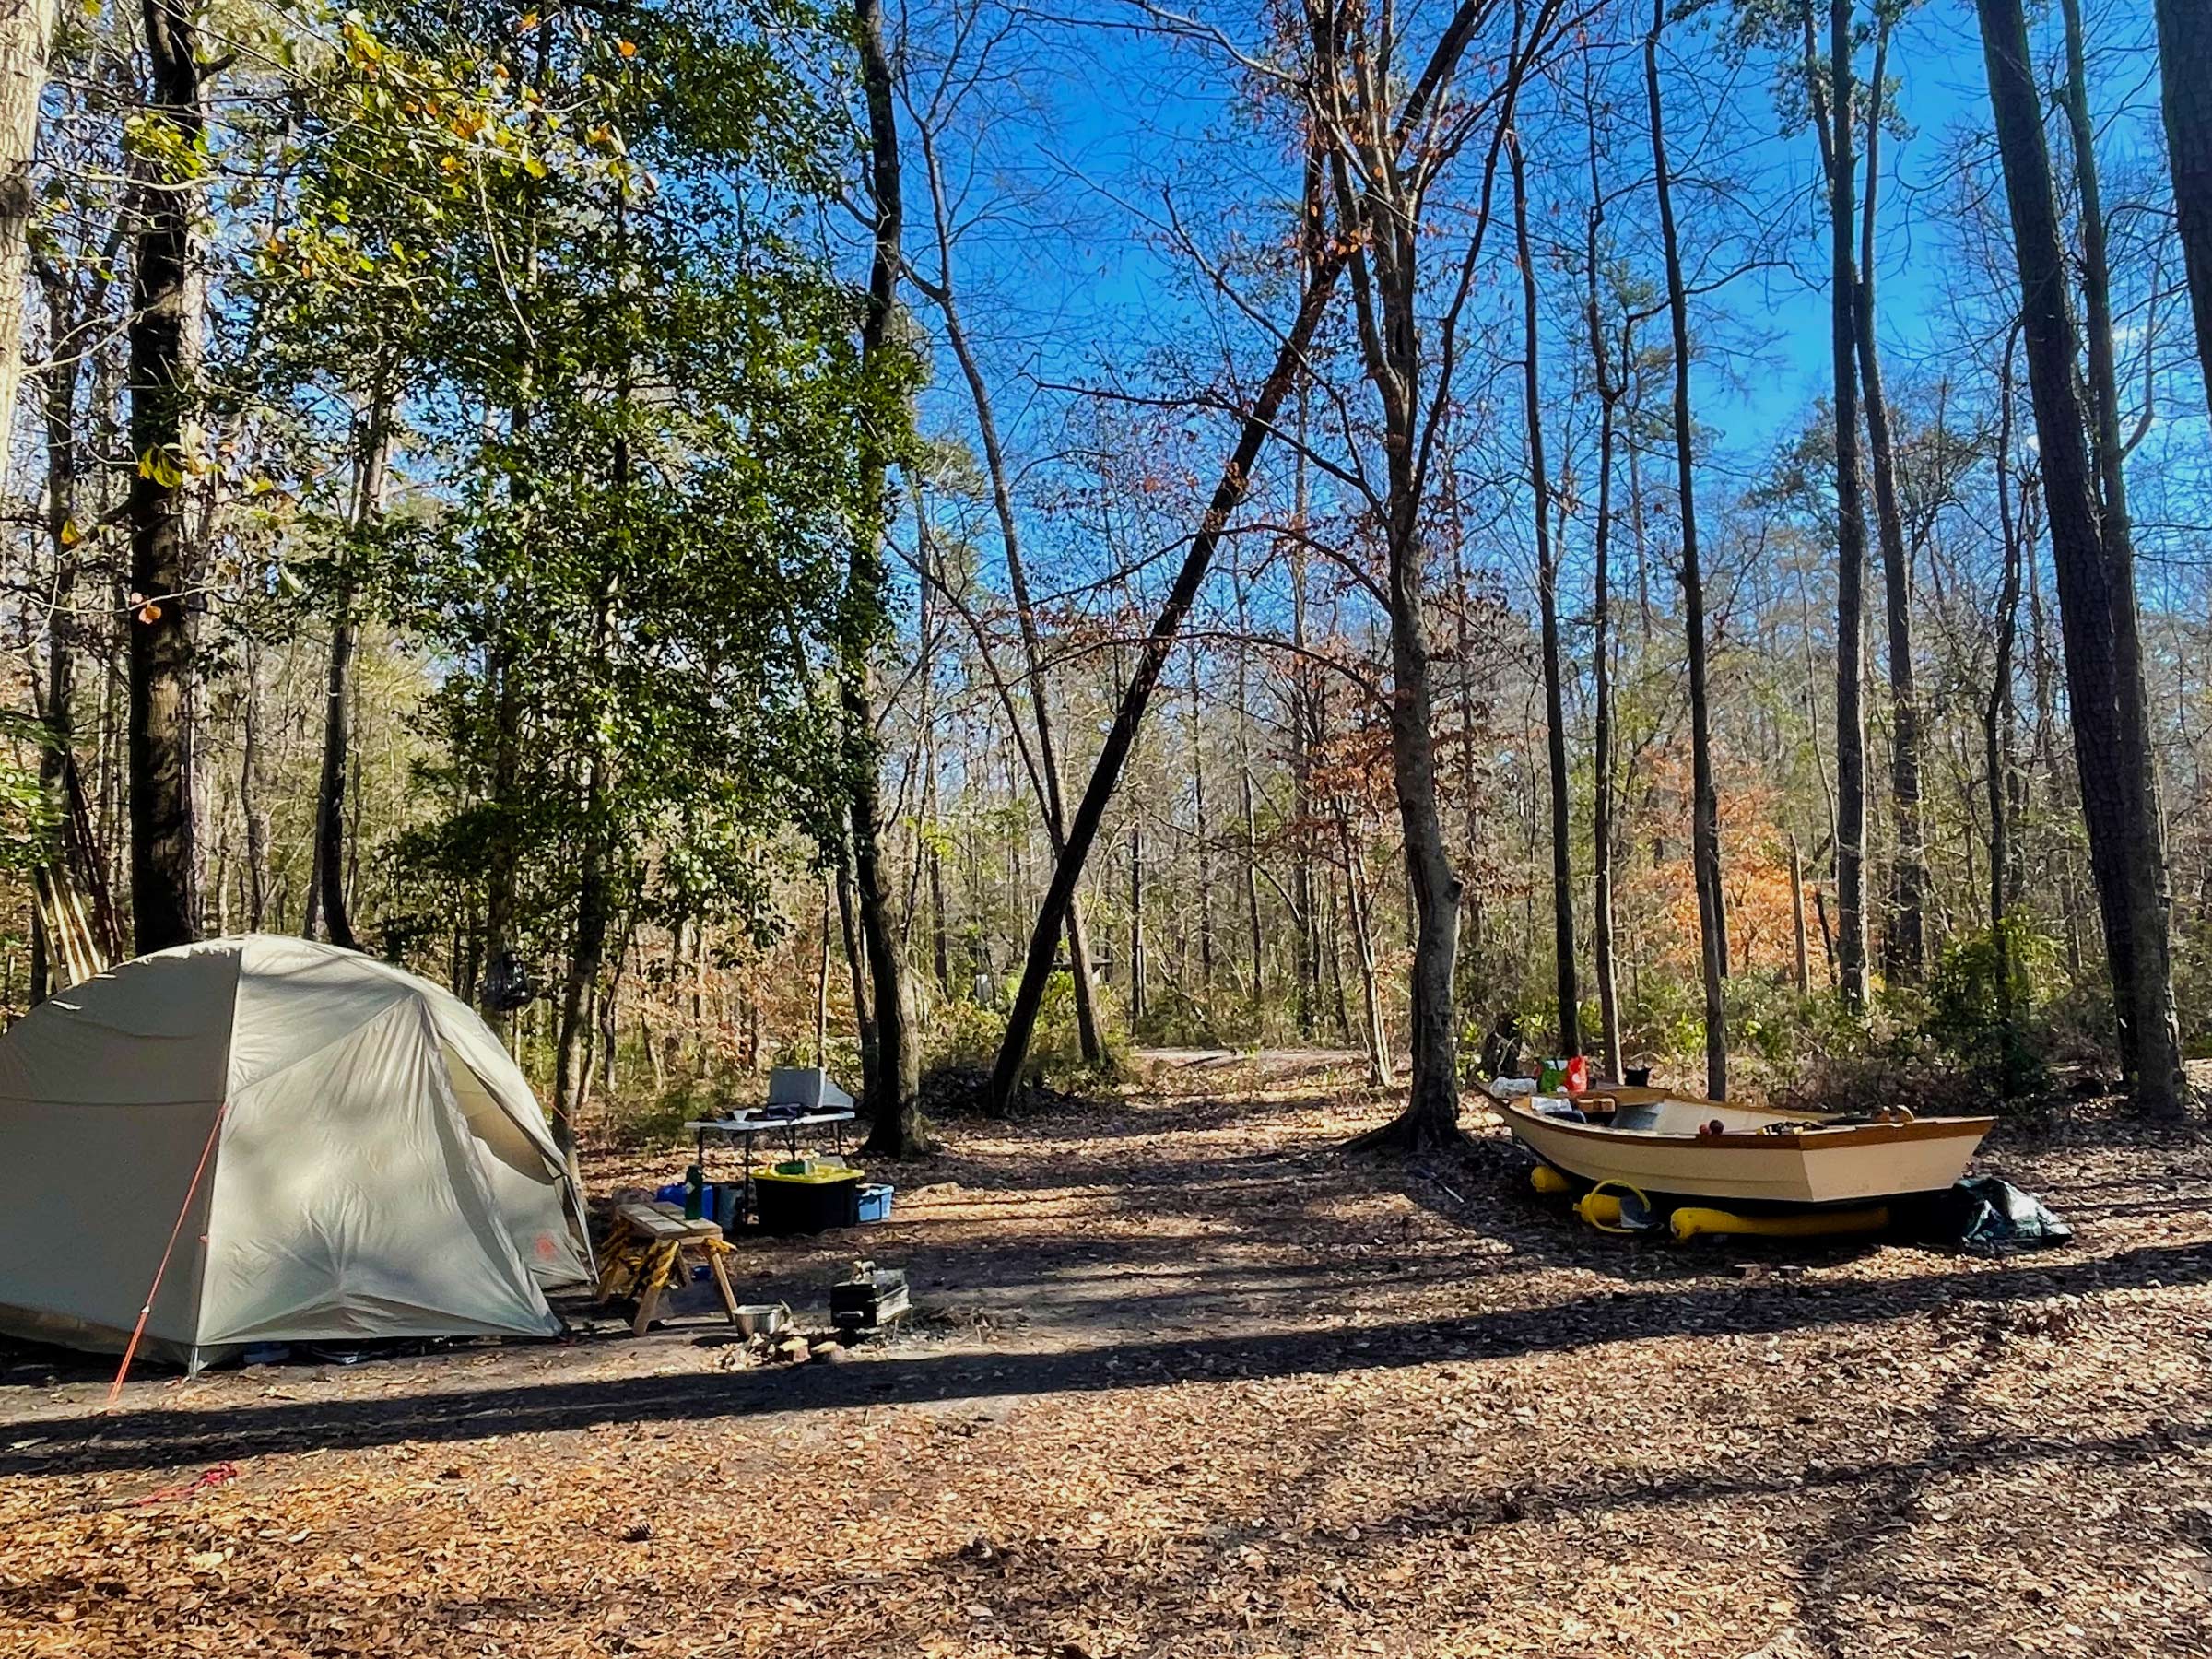
Author Ben Fuller stands with a fraction of the fleet at last summer’s Small Reach Regatta. “With small boats comes stuff,” he says. Knowing how to organize and transport that stuff is the key to living with little boats.
Boat Storage Solutions
When not in use, my boats live mostly on land rather than on moorings or at docks. They get tucked into the tops of garages, onto racks outside, and stored on trailers.
Keeping boats out of the sun, rain, and snow is critical to long life and low maintenance. A shelter can be as simple as a tarp tied over the boat, but a tarp takes time to get on and off. It’s better to store a boat under a solid roof.
1. Joe’s shed
When I first started down the traditional-boat path, I was in the Chesapeake Bay region and met Joe Liener, a retired master builder from the Philadelphia Naval Yard. He had built several small boats, and his boat shed itself was a small wonder. It was a simple pole building just big enough for a couple of skiffs to hang in it about 3′ off the ground. The end of the shed served as a spar and oar locker. The shed also had a winch for hoisting boats aloft.
Joe had run a pipe through the upper portion of the building from end to end, along the centerline. One end of the pipe stuck out the building, and here a crank could be fitted. There was a pair of cables attached to the pipe that ran down and through sheaves in the ends of two 4′, 2″ x 4″ hoisting beams. Each cable ended in a ring. To hoist a boat, the boat was rolled into place on a cart. The 2 x 4 beams went under the boat and the ends hooked onto the rings. Joe then cranked and the boat would rise. When the boat was high enough, slings went under it and were hooked up to the building’s collar ties. The beam was then unhooked and readied for a second boat to be hoisted up into the other side of the building, or just left in place for lowering.
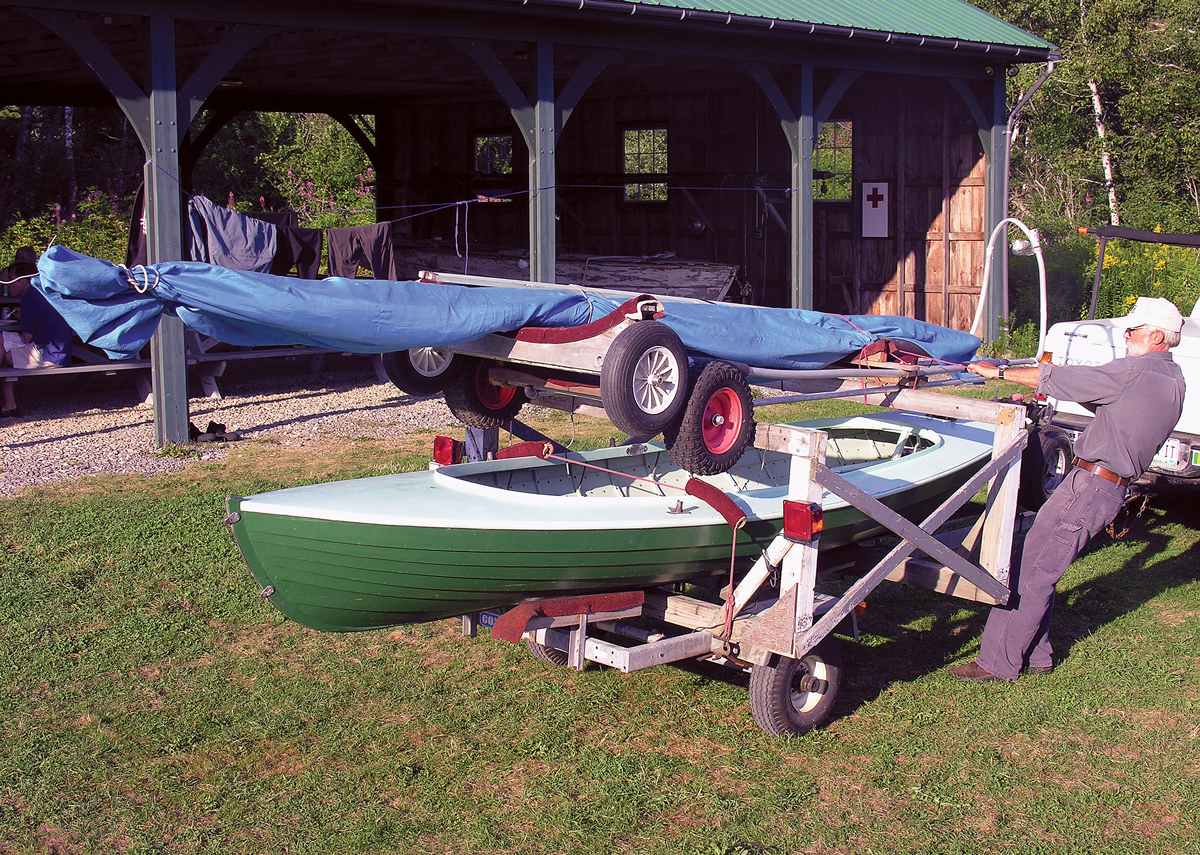
2. Instant Garages
Today there are a number of companies that make instant garages. These structures make great boat shelters. A boat and trailer can be rolled into them. Smaller boats can get tucked on the ground on rollers behind and alongside, and there is room left for garden tools. (A dirt floor is kind to traditional boats but can make rolling a little difficult.) With slings and wooden strongbacks a couple of kayaks or spars can be slung from the roof. I don’t know how long the roofs last. Mine, which is out of the sun, is going 10 years now. While these are “temporary” shelters, they may require building permits. Check with your local authorities.
3. Your Home Garage
Real garages are ideal for small-boat storage, even if they also have to house cars. Most of them have enough height for boats—sometimes surprisingly large boats—to go above the vehicles.
Slings can be used to hold most boats. I have used everything from pot warp to padded webbing, depending on the boat. I like to use a screw-eye on one side and a hook on the other. For a canoe or kayak, the far loop stays fixed and the one toward the door gets unhooked from a low step-stool. To place the boat on a car, one end of the hull is lowered to the roof rack and then slid out of the other loop. If you need to get the boat lower, for maintenance or repair, you can do this procedure with sawhorses rather than roof racks.
Harken is now making a nice set of blocks and jam cleats for hoisting little boats off roof racks (visit www.hoister.com for details).
For heavy loads and general utility, I made a boat hoist from a trailer winch. Its line leads from the winch up to the peak of the garage, and then down to a ring. Two lines attached to this rig each lead to a strongback with a bolt at its center. Attached to this bolt is a turning block; the line leads through this block and then dead-ends, creating a 2:1 purchase. There are two such purchases—one at either end of the boat—so, the entire load is lifted by a 4:1 purchase. The hauling part goes from the garage’s peak to the winch through fairleads on the wall. The winch is mounted to a stud on the garage wall.
The lifting procedure is simple: The boat goes under the strongbacks. Slings (mine are old seat-belt webbing) are slung under the strongbacks and around the boat. Then you crank on the winch, and a couple of hundred pounds of boat head for the ceiling. I have set mine up to handle a couple of boats with carabiners on the hoisting end so I can switch the winch from one boat to the other. Each has its own strongback. Do use safety lines with this after you get the boat up. Cleverly placed, these can help distribute the weight, which is important for a traditional boat. The safety lines can be padded with carpet.
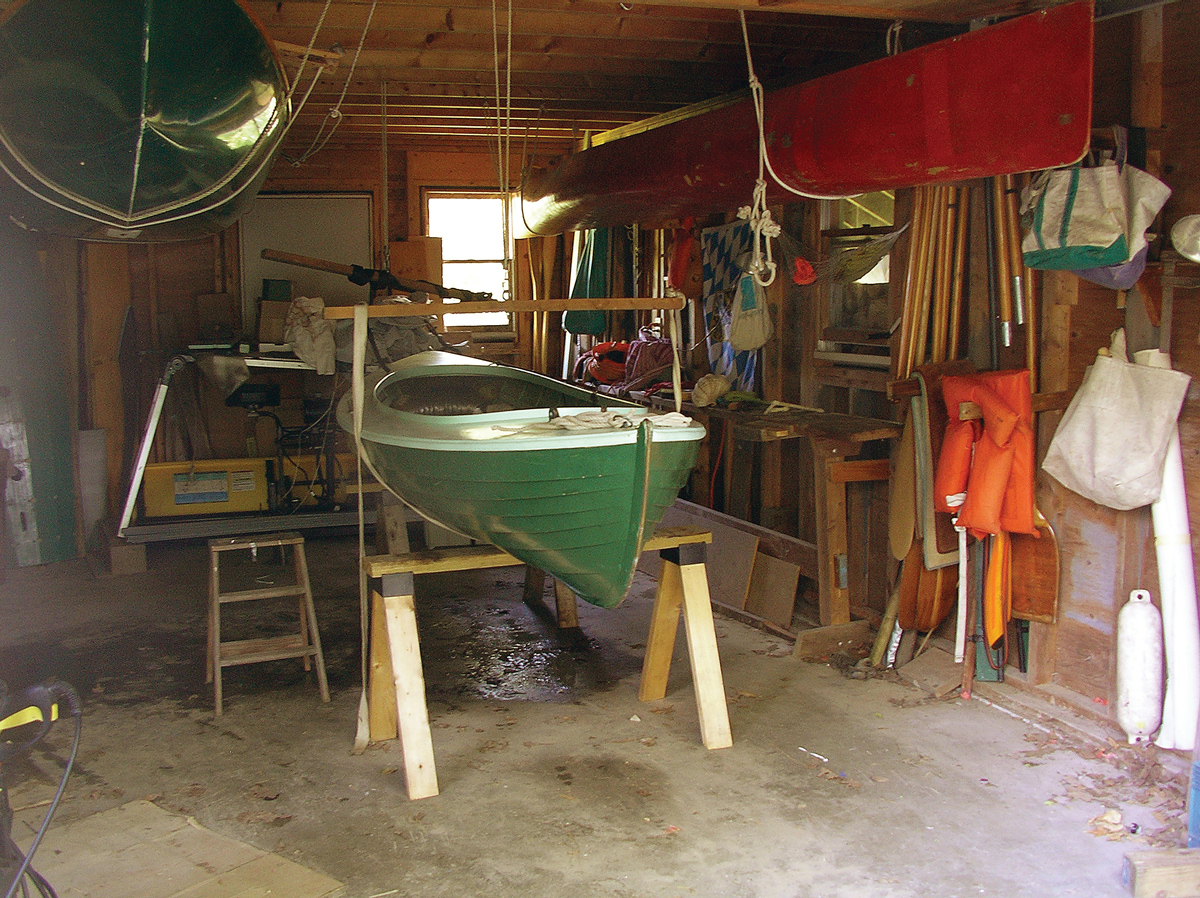
Photo by Ben Fuller
The author’s garage. He owns 16 boats (at last count) and many of these live aloft in this structure. They are hoisted there by means of a trailer winch adapted to the purpose.
Boat Storage Is Where You Find It
Other storage spots can be found, depending on your ingenuity. I have hung boats upside down under decks, which can keep a remarkable amount of sun and rain off them. I have racks built onto deck support posts. I once had no garage but did have a screen porch with a high ceiling where boats were hung. And when I lived in an apartment I built a rack that ran over a couch for a couple of kayaks—the functional equivalent of an upper bunk.
Storing Boat Gear
With boats comes stuff: anchors, electronics, life jackets, oars, paddles, spars, navigation gear, and coolers. Then there is gear needed to move boats on land: tie-down lines, rollers, padding, chafing gear. Depending on one’s neatness quotient, sometimes it is difficult to keep this gear in order and ready for instant use. No matter how many boats you own, an organized system of on-land storage is imperative.
Using not much more than furring strips, you can make racks by nailing pieces to the studs inside an unfinished garage. They can be horizontal or vertical. Horizontal racks can handle oars and spars that are longer than the height in the garage. Mount them high enough so other stuff can go underneath. In my garage it’s easier to go vertically. Oars go handle-down and are leaned up in the bays between the studs in a corner. Rudders often fit right in between studs. My long oars go right at the gable ends where there is space between the garage ceiling and the rafters. For really long stuff, I can find diagonal space at the end of the garage or use horizontal racks or slings.
For paddles you can nail a pair of 1 x 2s (furring strips) to both sides of a stud and use them as a hanging rack. Paddles then hang on the shoulders. To keep them from turning, a third 1×2 is nailed at the level of the lower blade. Softwood 1 x 2s also work very well to hang PFDs, loops of line, and anchor or other gear bags.
Traditional sails tend to stay on spars. They get lashed on and stay on the spars during the season. Some have lots of small lines attached, like reefpoints, sheets, and halyards. For trailering and storage, a long, loose, slippery bag works well so that you don’t have to tie things up in a tight bundle.
Those of us who live in rural areas have to deal with mice. I brought a sail in to the sailmaker once, and all I said was that it had been moused. He laughed and said how big were the holes? Mice are really fond of sails for bedding. The best defense seems to be to hang sails in bags or bundles. Mice seem reluctant to go down thin lines. Squirrels are not, so a second line of defense, a tightly closed bag, seems to also be in order. If sails are too big and heavy to hang, tightly sealed plastic bags with mothballs may help.
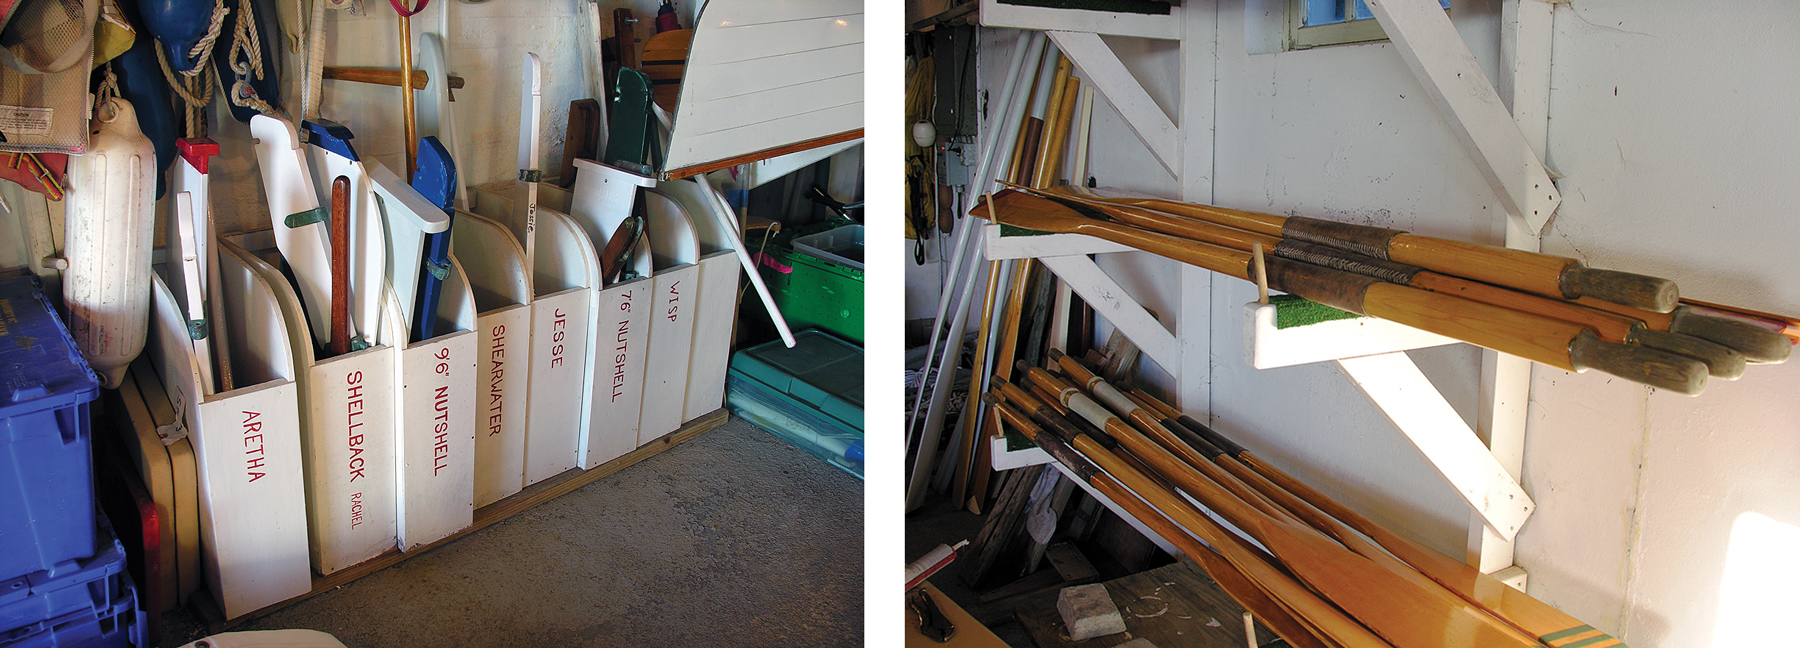
Photos by Matthew P. Murphy
With boats comes stuff. These two photographs show portions of the storage system at WoodenBoat School in Brooklin, Maine. Each small boat has its own gear case, and these are “shelved” library style. Oars live on purpose-built racks, and are color-coded by length. Each pair has its own symbol emblazoned on the blades, for quick matching.
Boat Transport
Trailers and Roof Racks
A glance at any marine supply catalog will tell you that there is a lot of good trailer gear on the market. It is mostly aimed at outboards, boats that typically are shorter for their beam and weight than traditional oar and sail boats. Small non-motorized boats can easily be 17′ long yet weigh a tenth of similar-length outboard-powered craft. Trailer modifications are in order for such boats.
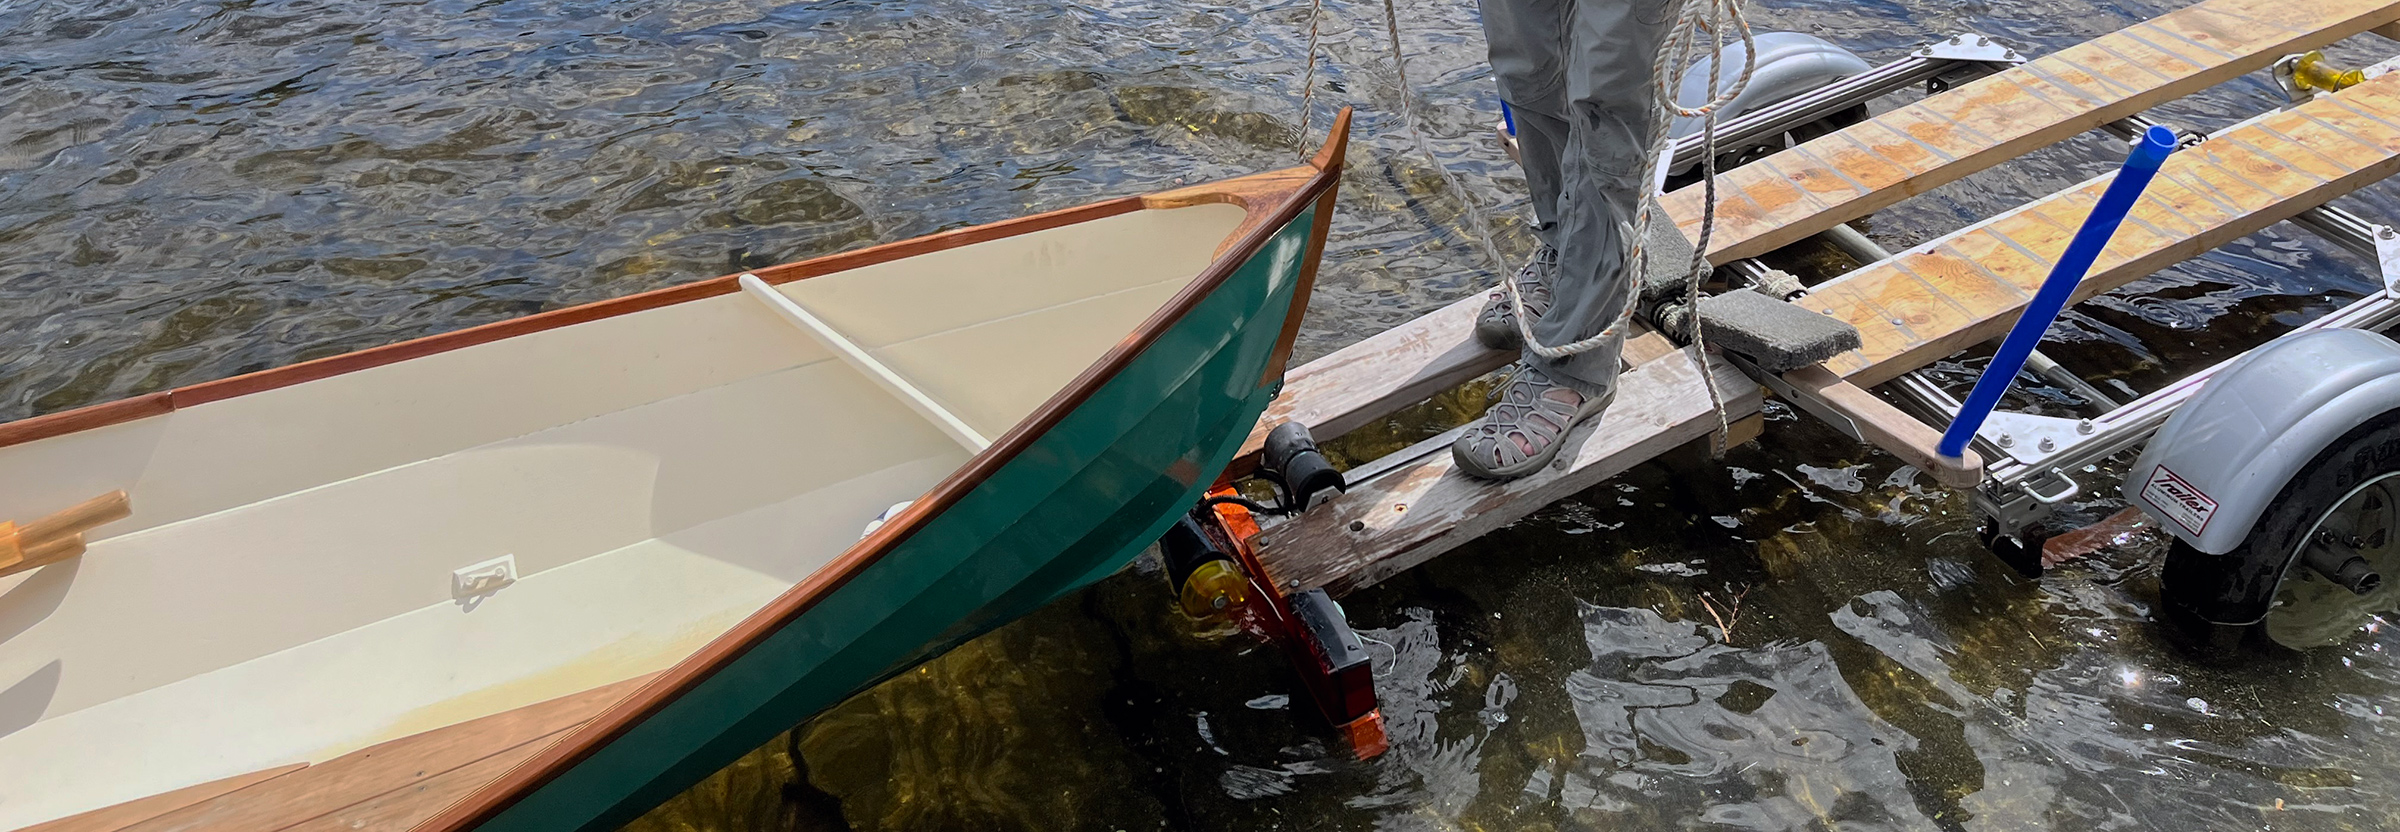
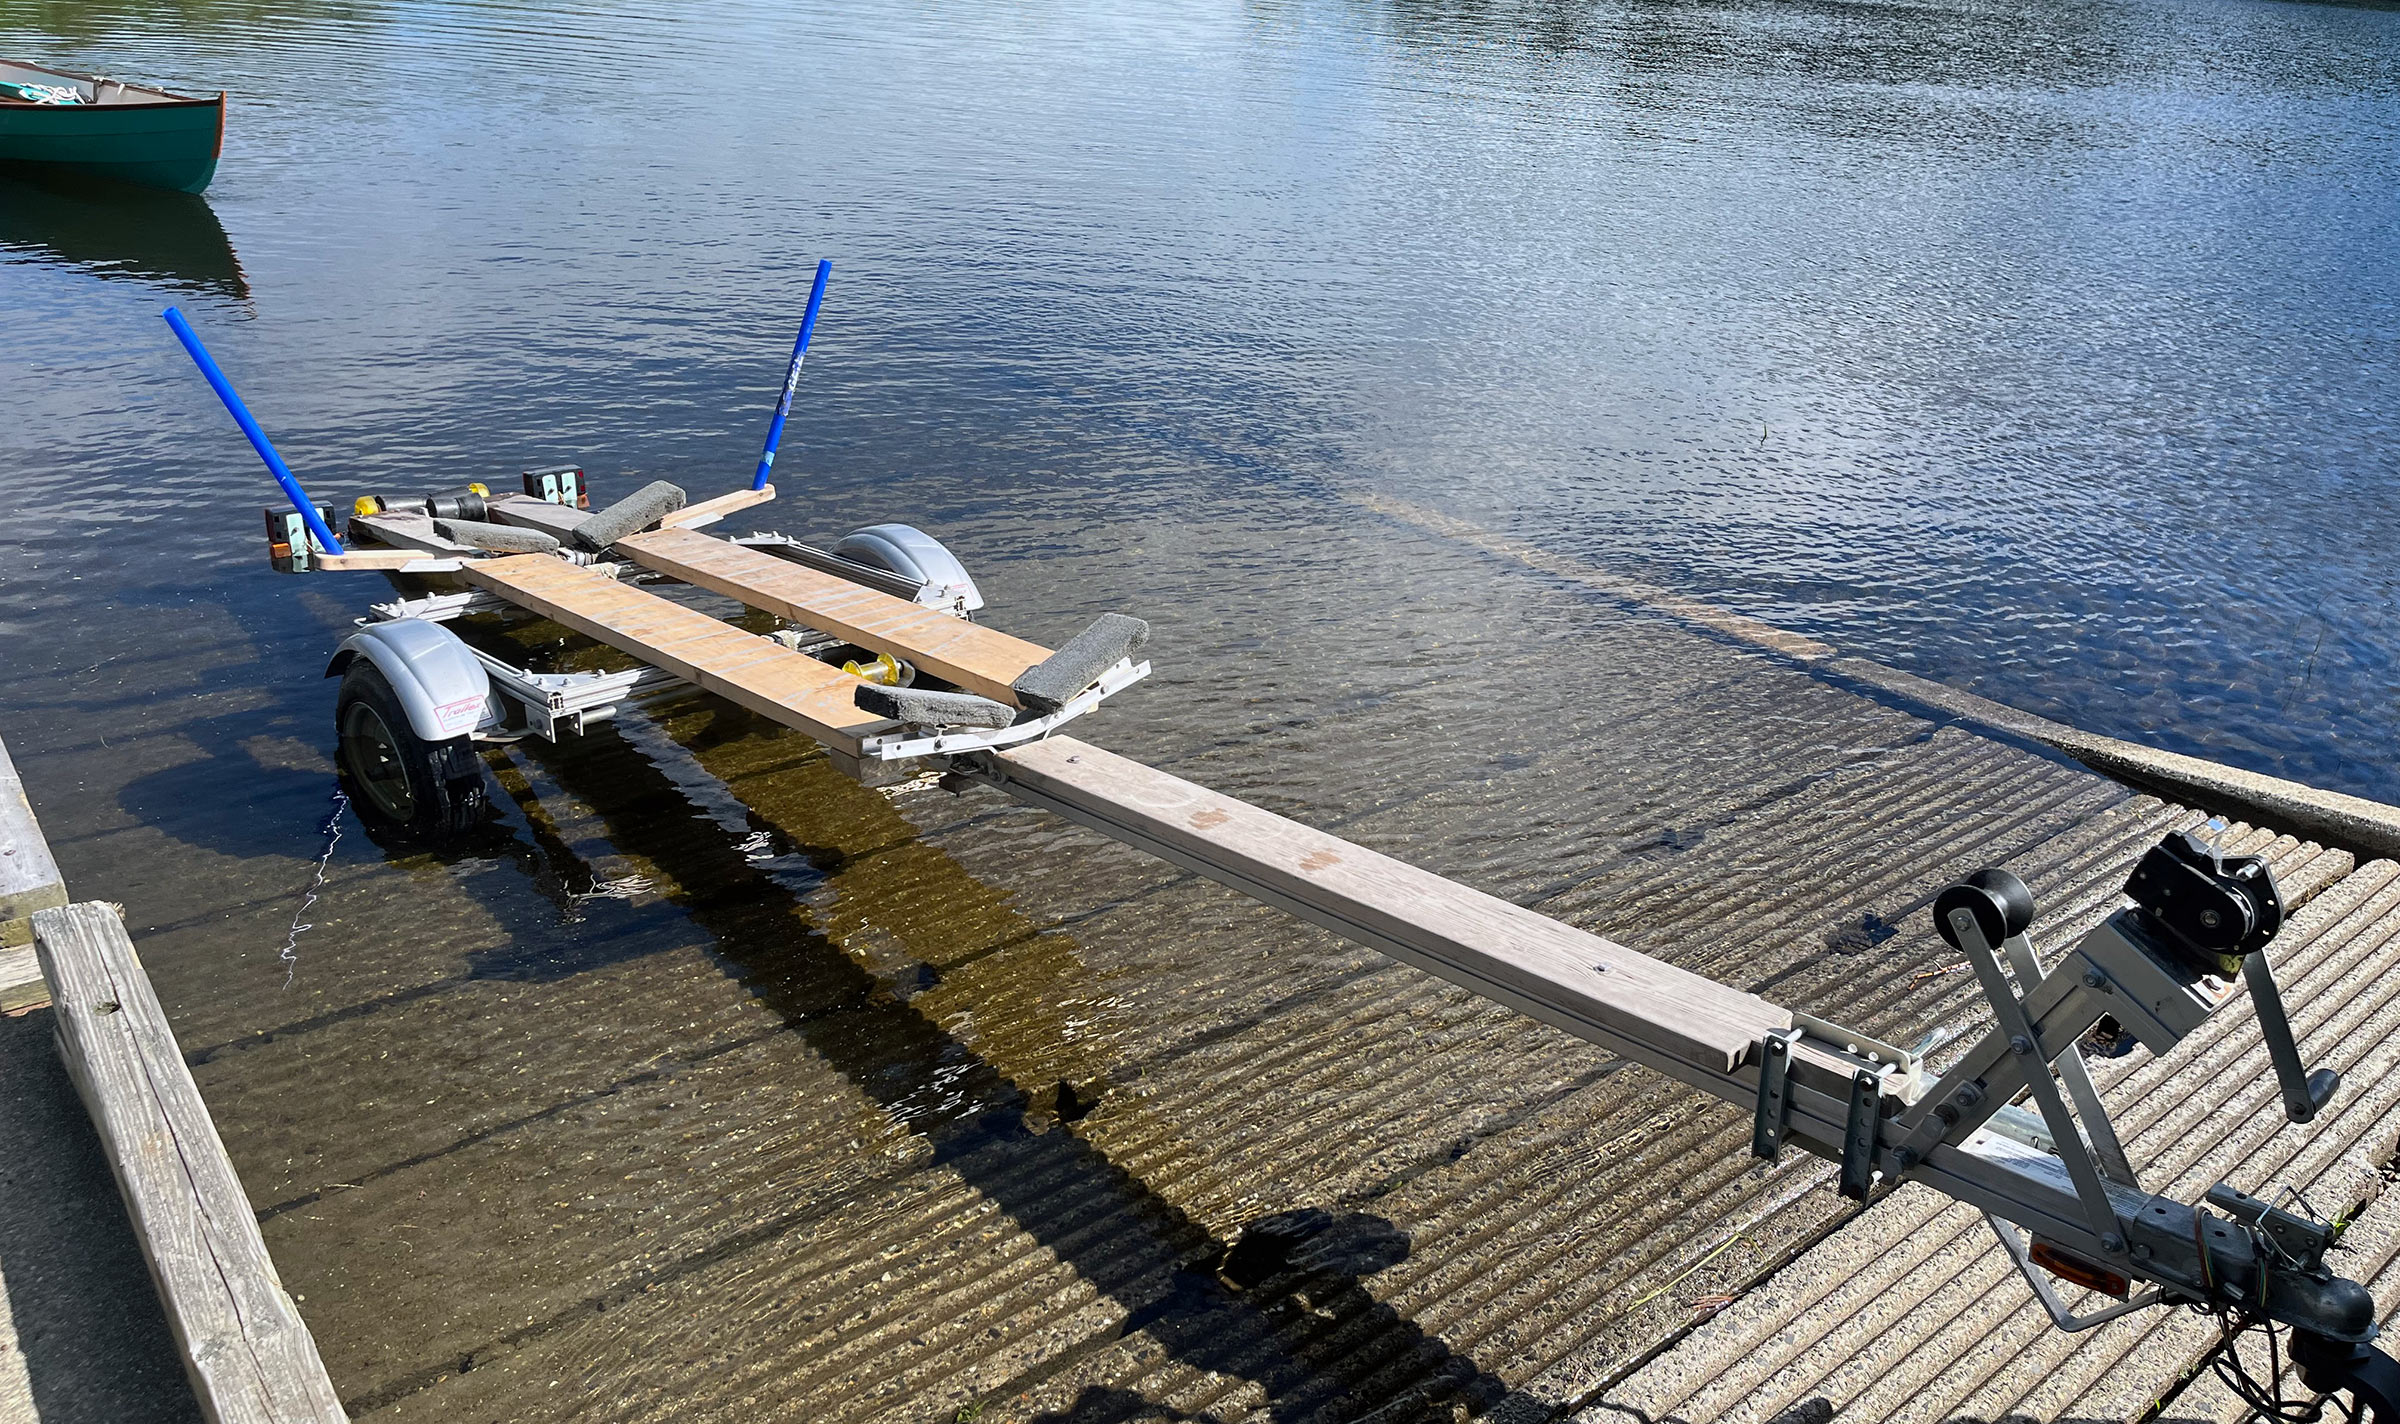
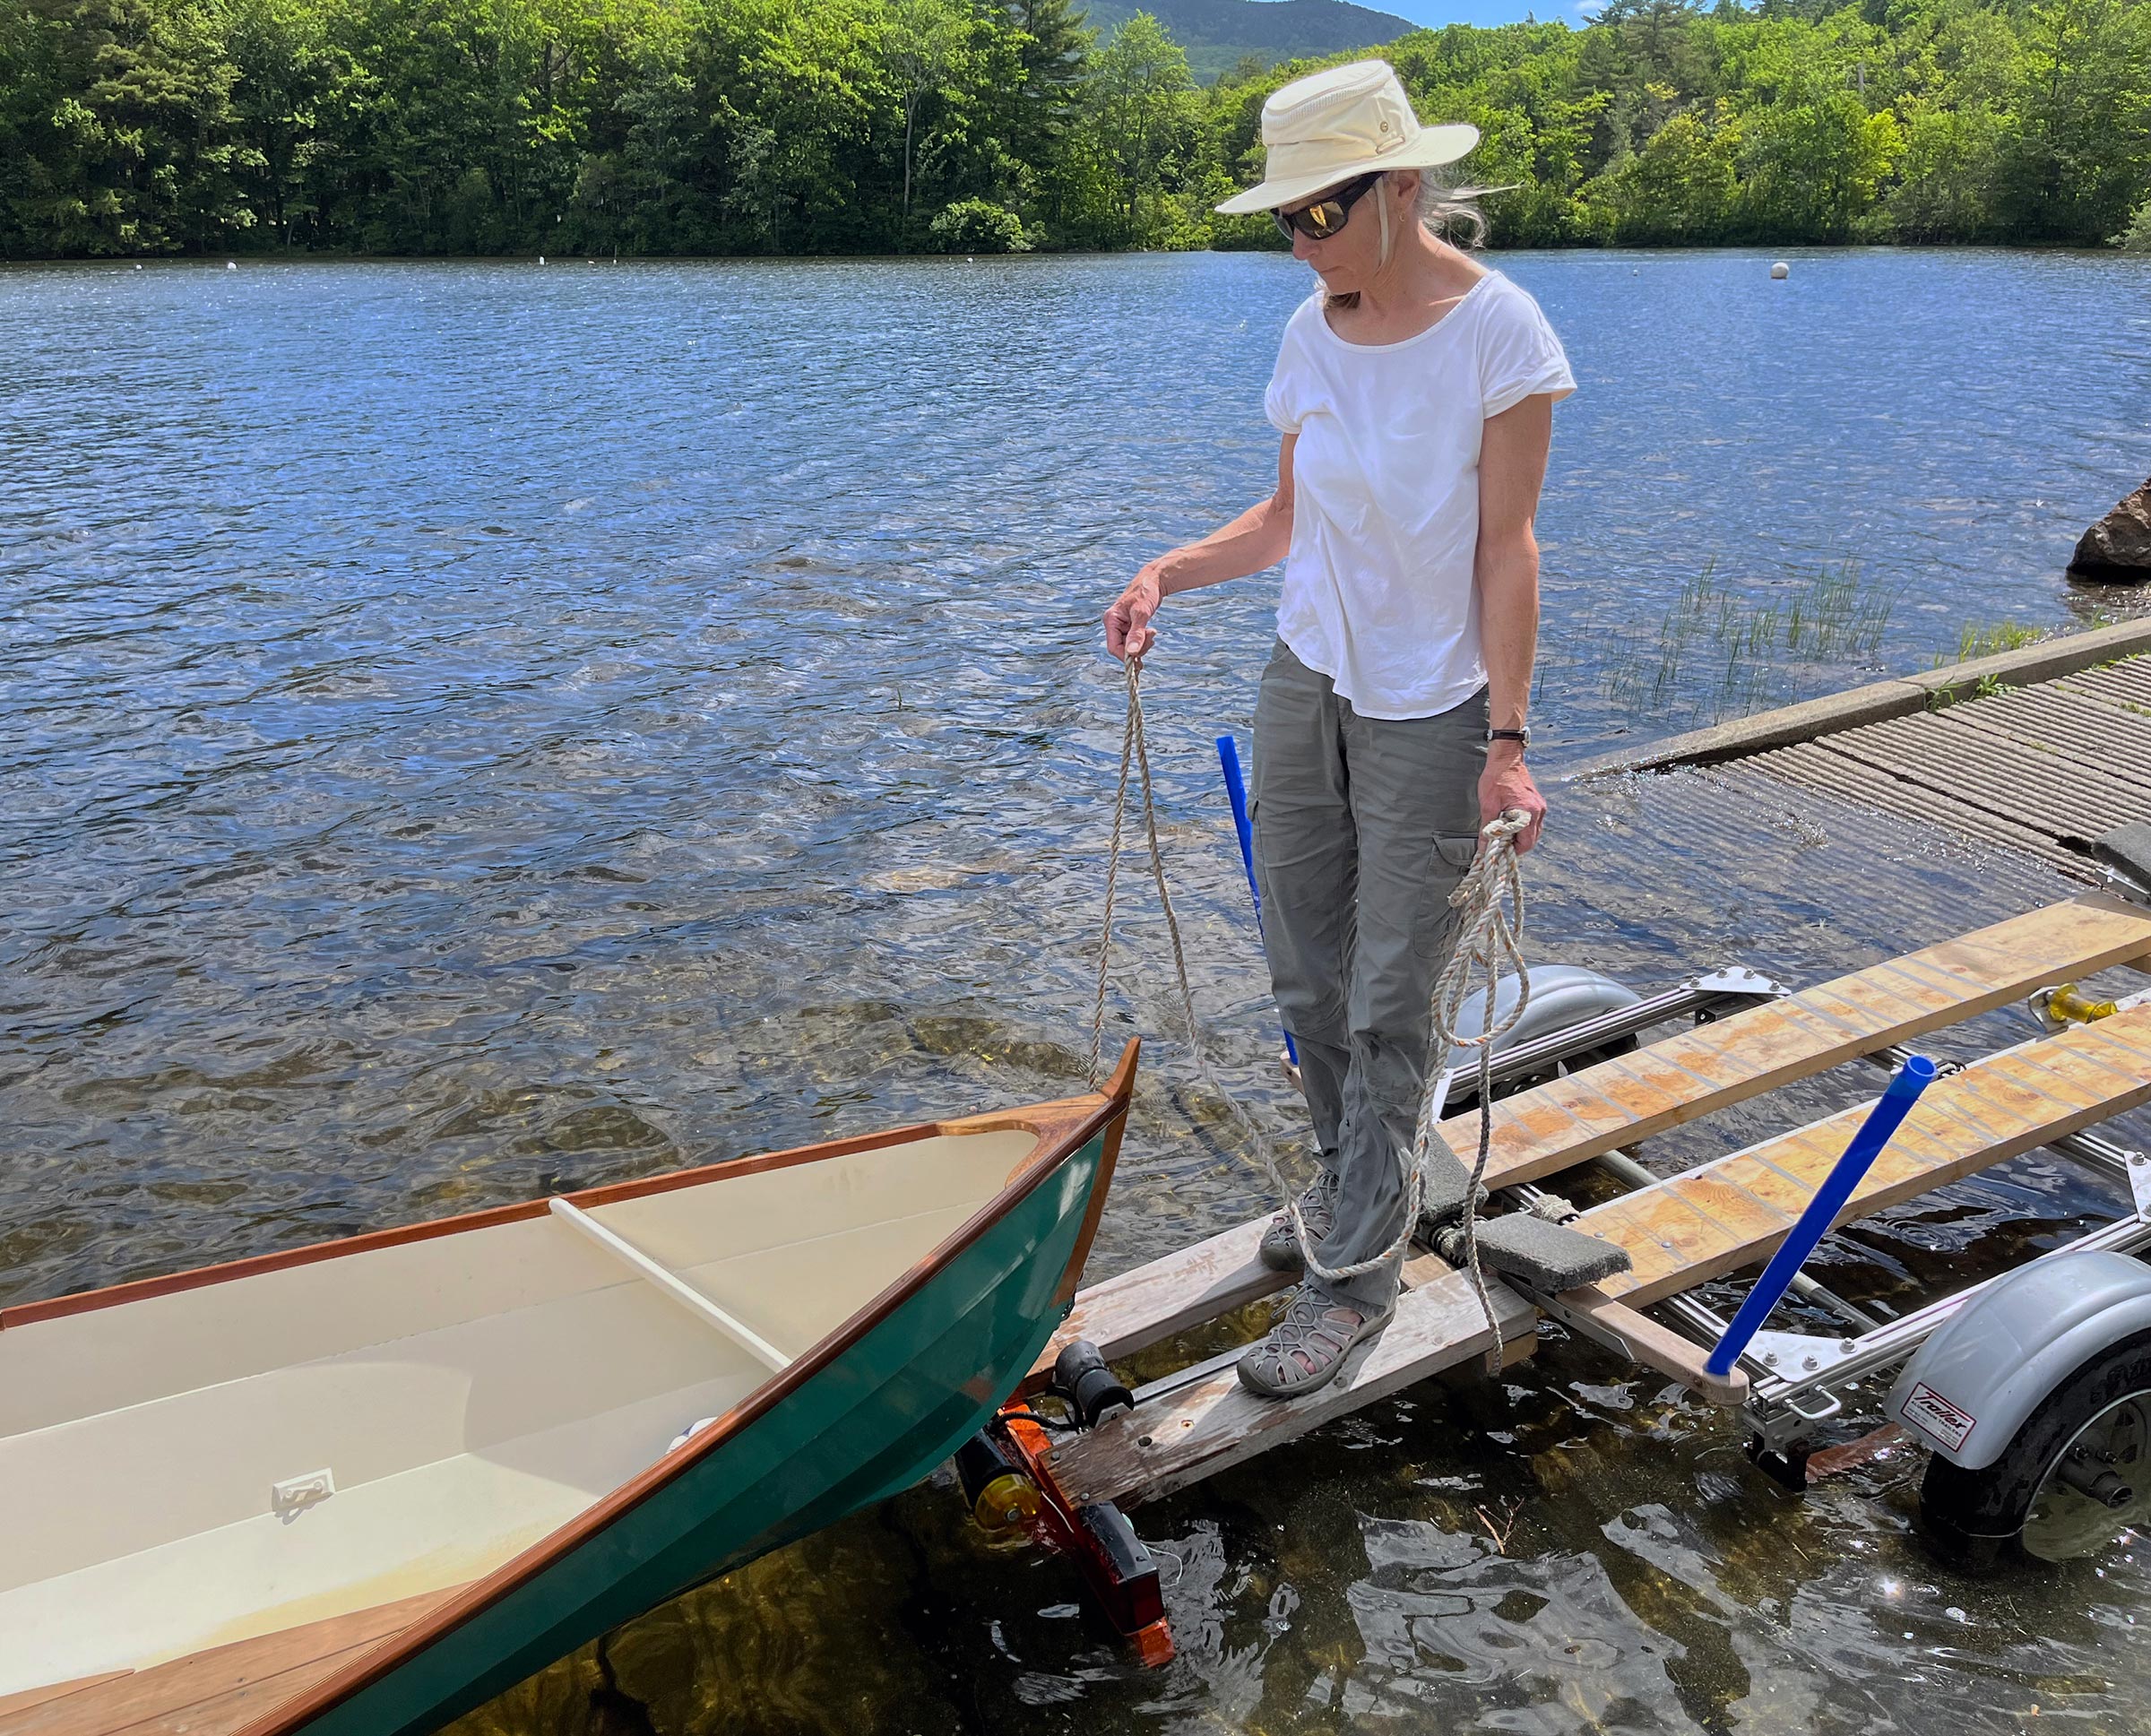
On and Off the Trailer
Big boats live on trailers or in the water. Small boats, however, are often owned by people with more boats than trailers. Trailers must be shared, so boats must be moved. The rules of this are simple: Never lift what you can roll or hoist, and never lift more than about 70 lbs.
Small boats are easily rolled on and off trailers. PVC pipe provides a ready durable, inexpensive source for rollers. Let’s assume your boat is on the ground on rollers and needs to get onto a trailer. Back the trailer up to the boat’s stem, and hook up the winch cable. Lift the trailer tongue or, if you have one of the older-style break-back trailers, lower the rear. Then start cranking in. If the trailer end is under the stem, you’ll find that the trailer rolls itself under the boat. After the boat hits the balance point, the tongue comes down and you crank it in the rest of the way.
To reverse, lay out the pipe rollers behind the trailer, then chock the wheels. Start pulling the boat off onto the pipe rollers. At some point you’ll need to ease the stem down onto the pipes.
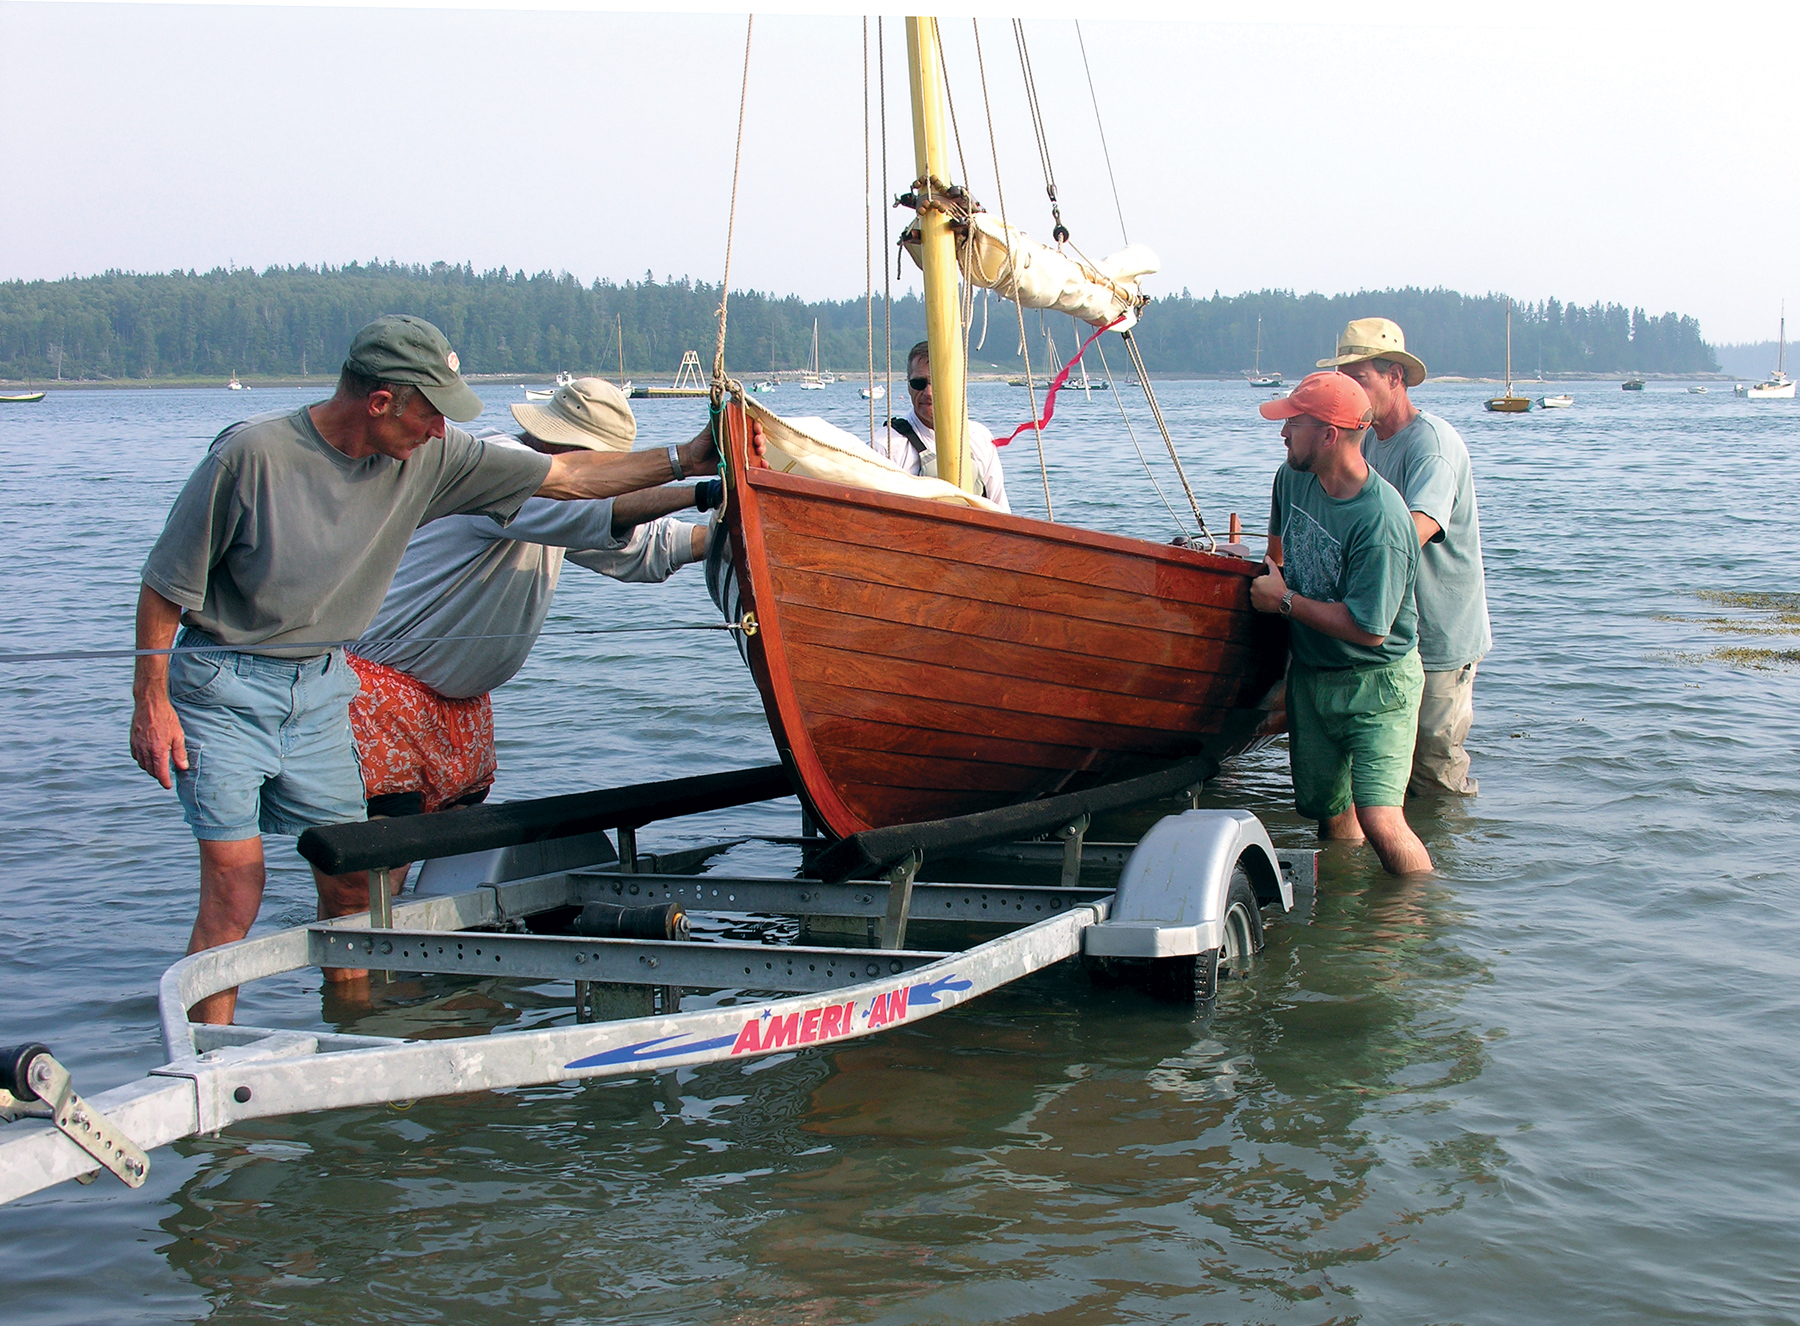
Photo by Matthew P. Murphy
Many hands make light work. Carpeted bunks are generally kinder than rollers to the bottoms of small wooden boats. They distribute the weight more evenly, thus minimizing the risk of hull deformation during transport.
Trailer Selection
Small-boat trailers are usually at the bottom of the weight-capacity range. If you get one that is too big, the springs can be too stiff. But make sure that you get one with a long-enough tongue to take small unpowered boats. A 200–300-lb Whitehall or dory can be 18′ long, much longer than the equivalent small outboard boat.
There is a new family of aluminum trailers that have appeared on the market in the last few years with aluminum bolt-together frames. Trailex is perhaps the best known of these, and it is light enough to be used as beach dolly. A newcomer, catering especially to the canoe/kayak market, is the Rack and Roll which uses common factory roof-rack bars and accessories to support the boats.
A flatbed trailer like those for snowmobiles can carry a couple of small boats side by side, and be used for other jobs when not boat toting.
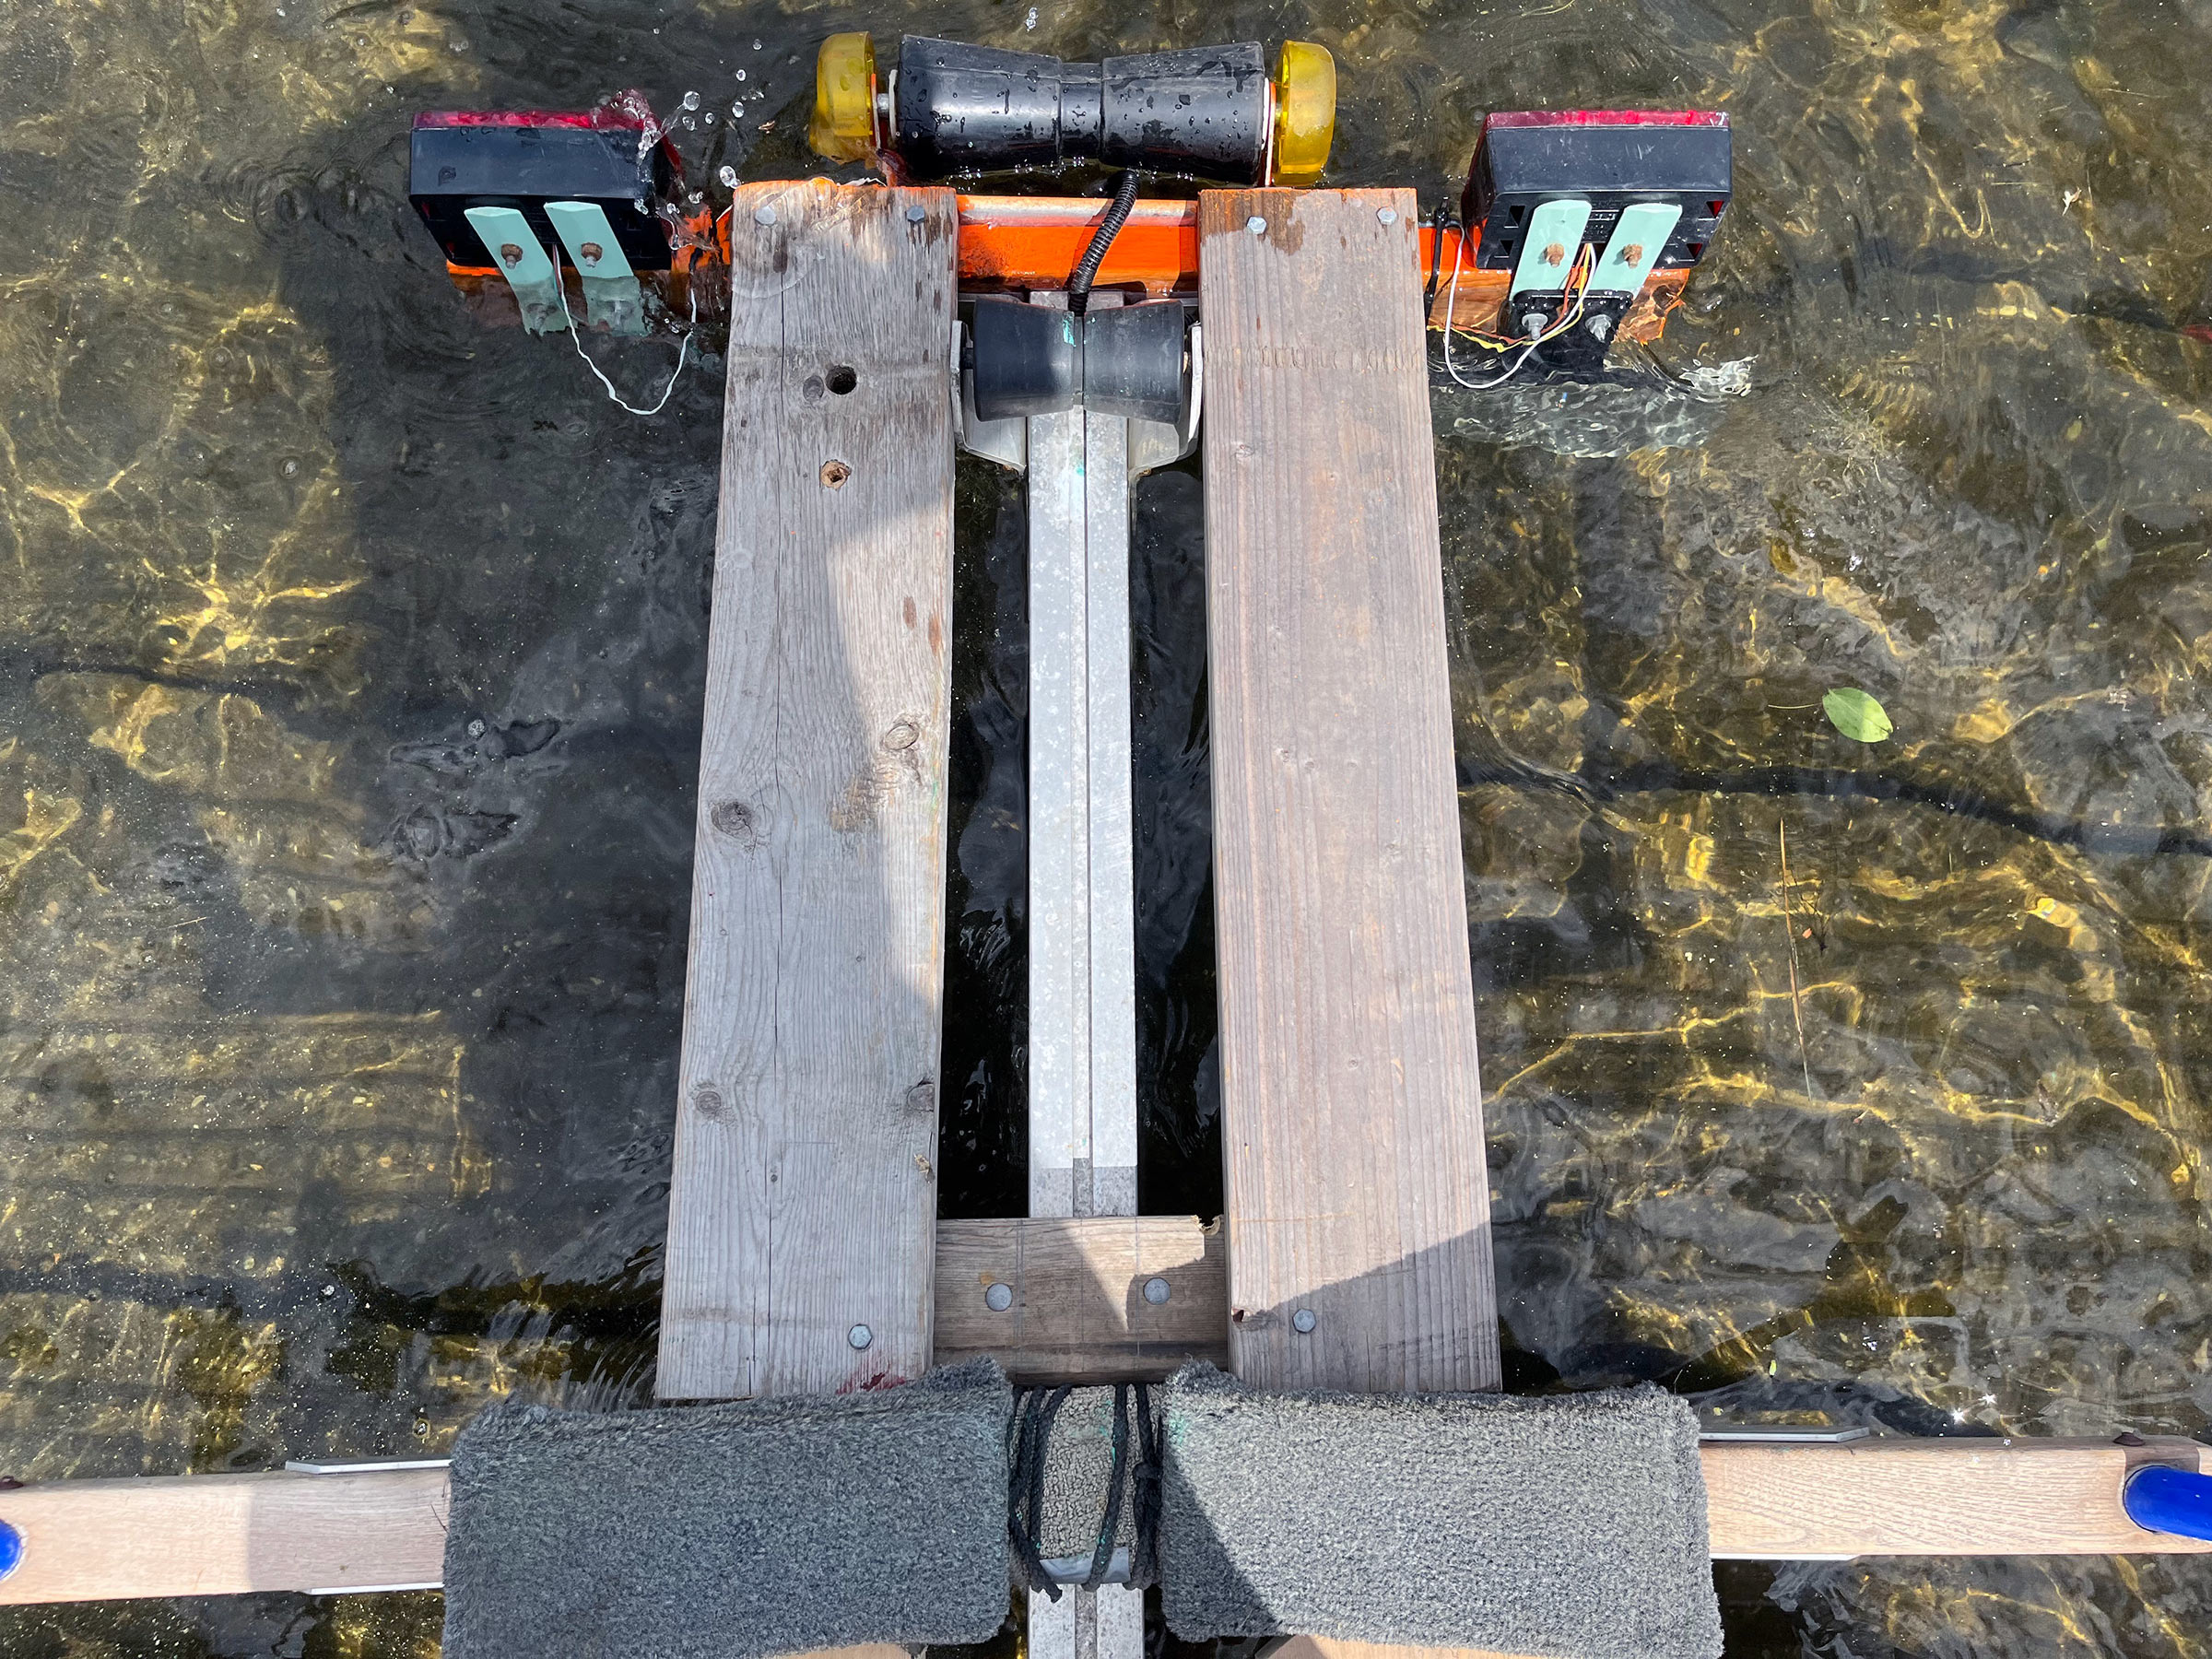
There are arguments about bunks versus rollers. Rollers make loading and unloading easy and are really good for heavy boats. But most small boats don’t need them and can live happily on carpeted bunks. I like to use the roller hardware down the centerline of most trailers to mount a bunk that provides full keel support; this is especially useful for flat plank keels. I can spring the forward end a little to conform to the boat’s “rocker,” or longitudinal bottom curvature. To make it easier to slide a boat off, toss a bucket of water at the keel before launching. If you use the trailer for multiple boats, you may need to move the winch stanchion. Mark the trailer to make it easy to adjust and keep those bolts, as well as bolts used for adjustable bunks, well lubricated. I leave a roller at the very end of the trailer adjusted at just below bunk height to help the boat on and off.
Shorter masts can go on roof racks, but for longer ones I like to put a V-bracket on an extension that is fitted onto the winch post; a second post is mounted via pintles to the rudder gudgeons. The horizontal mast, lying on these posts, then becomes a ridgepole for a cover.
Of course, any boat that is carried right-side up is fitted with a nice threaded drain plug (and there is a spare plug in your parts kit).
Double-Decking a Trailer
Double-decking creates a two-story trailer. I like to double-deck my trailers for a number of reasons. The main one is to carry more boats, but the cross bars that support the upper deck are also a good place to carry a dolly, oars, and rigs. The stanchions are a great place to mount lights, and there is the added bonus of being able to see the trailer if there is no boat on it. I have also found the stanchions useful in supporting boats that have plank-on-edge keels without using bunks under the bilges.
I make mine by starting with 44s as a base and for stanchions. You can get nice galvanized hardware to make the joints. You will need cross braces and diagonal braces; the cross bars are 2 x 4s on edge and must be through-bolted to the posts after half-lapping the posts. The height should be enough so that the bars don’t need to come off for most of the boats that you are loading. Bars can be removed and replaced as long as they clear the boat amidships. If you don’t want to build an upper deck, you can buy one. Seitech makes multiple-boat aluminum racks that bolt together and fit on your trailer of choice.
The main disadvantage to double-decking is that you are limited in beam to the spread of the posts. Also, the cross-bracing restricts leaning into the boat. I have thought about building gear-carrying boxes for daggerboards and rudders in between the stanchions, but so far have not. I have used the stanchions to mount sides for a temporary box trailer.
Photo by Matthew P. Murphy
Double-bunking a trailer. Author Fuller secures a Delaware ducker and its associated gear on his modified trailer. The lower bunk carries the boat; the upper bunk is free for another boat or, in this case, two dollies and a rig.
Trailer Balance and Maintenance
No matter the trailer, you need to check tongue weight. If the weight isn’t enough, the trailer can fishtail. If it’s too much, the tow vehicle’s suspension and trailer hitch can be in jeopardy. For little boats, 50–75 lbs seems about right—just about all you want to lift onto a hitch ball. For years I said that I didn’t need a third wheel at the tongue. Life is much better now that I have one, but those wheels only roll well on hard-packed dirt or blacktop. A length of line affixed to the trailer tongue to help lift and tow it by hand saves your back. If the tongue weight is too much, you can move the trailer axle. Most factory trailers are set up on the assumption that there is an engine in the boat’s stern. Small sailing and rowing boats have their centers of gravity amidships.
Trailers need maintenance. Small-boat owners can usually keep their wheel bearings out of the water, which will substantially reduce problems. To do this, sometimes wading is needed; I try not to go deeper than my knee boots. Systems like the spring-loaded grease fittings called “Bearing Buddies” help keep the bearings greased. They are designed to prevent hot bearings from sucking in cool water. But best is not to have the problem. Of course, a grease gun, extra grease, a scissor jack, and a spare tire are part of your kit.
Trailer lights are always a problem. Mounting them high on the posts of a double-deck rig helps keep them working, but even then mice can get to the wiring harness which is usually neatly run inside the trailer tubing. The first time this happened to me, I restrung a new harness. The second time I taped the wiring harness to the outside of the trailer frame and let mice have free run of the trailer tubing. A lighting board hung on the boat transom is another good solution.
Some states have rules that say how long a load can extend aft of a trailer’s lights. You may need a flag or in extreme cases need to make a light bar that goes onto the boat, something required in Europe. The light bar has the added advantage of electrics that never get near the water.
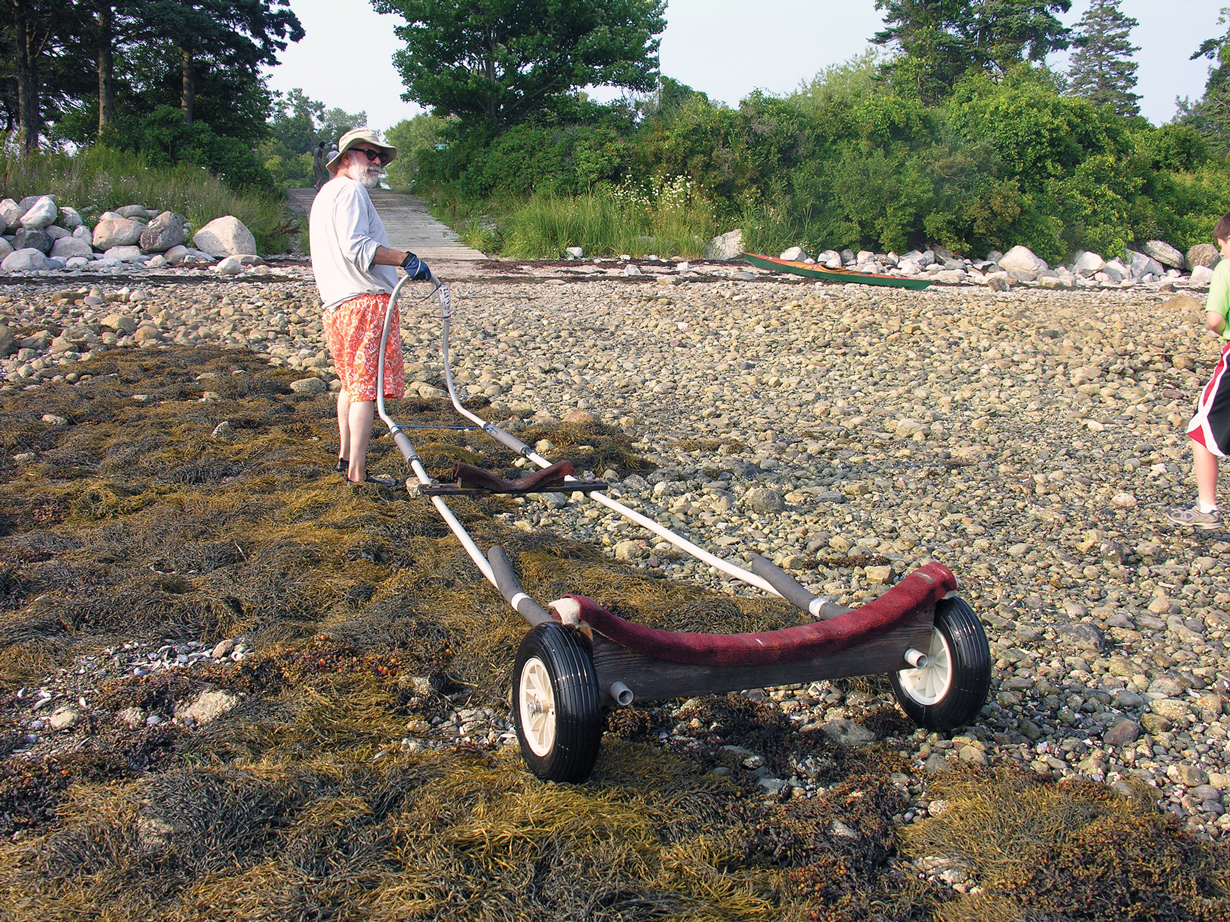
Hand Dollies
A beach dolly makes it easier to get boats on and off trailers and much easier to launch in places where trailers and cars can’t go. These are common among one-design sailboat racers. To load the trailer, you roll the boat up to the trailer, lift the stem onto the rear roller or bunk, hitch up the winch, and crank. Or, if the boat is light, just push it on. In Europe, beach dollies are often integrated into trailers, so that the dolly gets slid onto the trailer with the boat on it. Hand dollies or beach dollies are really useful in shallow water when you have to submerge the dolly to get the boat on and you may be a ways out in the water.
The largest line of boat dollies in the United States is produced by Seitech. They use aluminum extrusions held together with proprietary hardware. They also make a nice line of wheels with durable plastic roller bearings. Seitech’s wheels are removable, making it possible to tie the dolly to a roof rack or turn it upside down and lash it to a boat being trailered.
Lightweight aluminum trailers like those made by Trailex for boats less than 250 lbs can also be used as hand dollies. Canoe and kayak dollies are made by a number of companies. They are commonly of the kind that strap onto the bottom of the boat. Look for those with wide tires for sand and rough trails, and be sure they have non-corroding parts. Plastic wheels and bearings are good, as these will be immersed. Some of these dollies can be broken down so they’ll fit into the hatches of a kayak.
Making Your Own Dolly
Dollies can be home-made. The frame can be galvanized iron or heavy-gauge aluminum conduit, or PVC pipe. Wheels can be made from plywood using worn-out small airplane tires or bought from Seitech—whose hubs have nice, corrosion-free plastic bearings. Making wheels means cutting out plywood discs fitted to the inside diameter of what ever tire you find and then a wider one with a lip to catch the tire. Two sets are needed for each wheel, and these are bolted together. The tires need inner tubes. Drain holes will make it possible to get rid of water that seeps in between the tube and tire.
A dolly’s bunks can be cut to fit a particular shape, have a simple V that catches the boat’s keel, or be a webbing strap. Simplest may be to make the after bunk of two 2x0s or 2x12s sawn to shape, then glued together. Drill holes in the lower corners to take whatever frame stock you want to use. Then glue and screw the two together after cutting a bevel on each piece so you have a nice V-shaped groove for a piece of aluminum tube for an axle. Or if you are using Seitech wheels, you can use their stub axles. These axles get some screws in them to fasten them into the groove. The bunk is then carpeted with indoor-outdoor carpet of the variety used on trailer bunks.
For a forward bunk, I usually fasten a couple of wedge-shaped pieces of wood onto a board and then U-bolt or lash it to the dolly.
I have seen dollies made from recycled baby carriages and bicycle and garden cart wheels. These have the disadvantage that they are subject to rust, but can be had at virtually no cost.
Photo by Matthew P. Murphy
A home-made beach cart. It’s assembled from off-the-shelf wheels, electrical conduit, and pipe insulation.
Cartopping
The neatest and most ambitious cartopping rig I ever saw was a setup where a small catamaran was being roof-racked on a van and the owner could get it on and off by himself. This was sometime in the 1980s, and the owner had made “hull carriers” that hung down from the 2 4 rack so that when the boat was up there, hull on each side of the van, the door had just clearance to open. The after one had rollers. To load, he rolled his cat on a pair of dollies close to the rear. He then lifted the bows up and rolled the boat so the bows were resting on the rack rollers. Then he walked to the stern and pushed.
Recently I saw a Mazda Miata rigged out with a rack to carry a kayak. The owner had light U-brackets made that were set up to fasten to the towing eyes on the car’s underbody. A bar joined them, adding rigidity. The kayak went on the cross bars of the U-brackets.
But you don’t have to go to those extents. Manufacturers have plenty of products that purportedly make it easier. Indeed, these are engineered systems based on a set of bars. Specialty items attached to these bars make for easy and safe carrying of kayaks, canoes, and other small boats—either on their bottoms (in the case of kayaks) or upside down (in the case of canoes and small boats).
On and Off the Roof
At the local put-in the other day, I watched a couple struggle to get their canoe loaded on top of their SUV. The SUV was too long and high to let the couple press the boat high enough to get it onto the racks. They had to worry it onto their racks, which is not a nice way to end a pleasant paddle. Recently coming back from a 10-mile race and paddle, getting my 45-lb kayak to my roof racks would have hurt. But I had design help. The bow of my boat went onto the after rack, the stern on the ground. Picking up the stern and shoving was about all I could manage.
The goal of any loading system is to let one or two people easily load boats weighing up to 150 lbs or so—and letting one person load what they can carry but perhaps not lift onto a high rack. Your objective is to only lift one end of the boat at a time and then slide or roll it onto the rack.
Possibly the simplest way, if your rear rack is far enough aft that you can get the boat’s bow on it, is sliding the rack through a piece of PVC pipe before you put it together, to act as a roller. For loading and unloading you put one end of the boat on it, roll it on, then slide it out of the way when the boat is up.
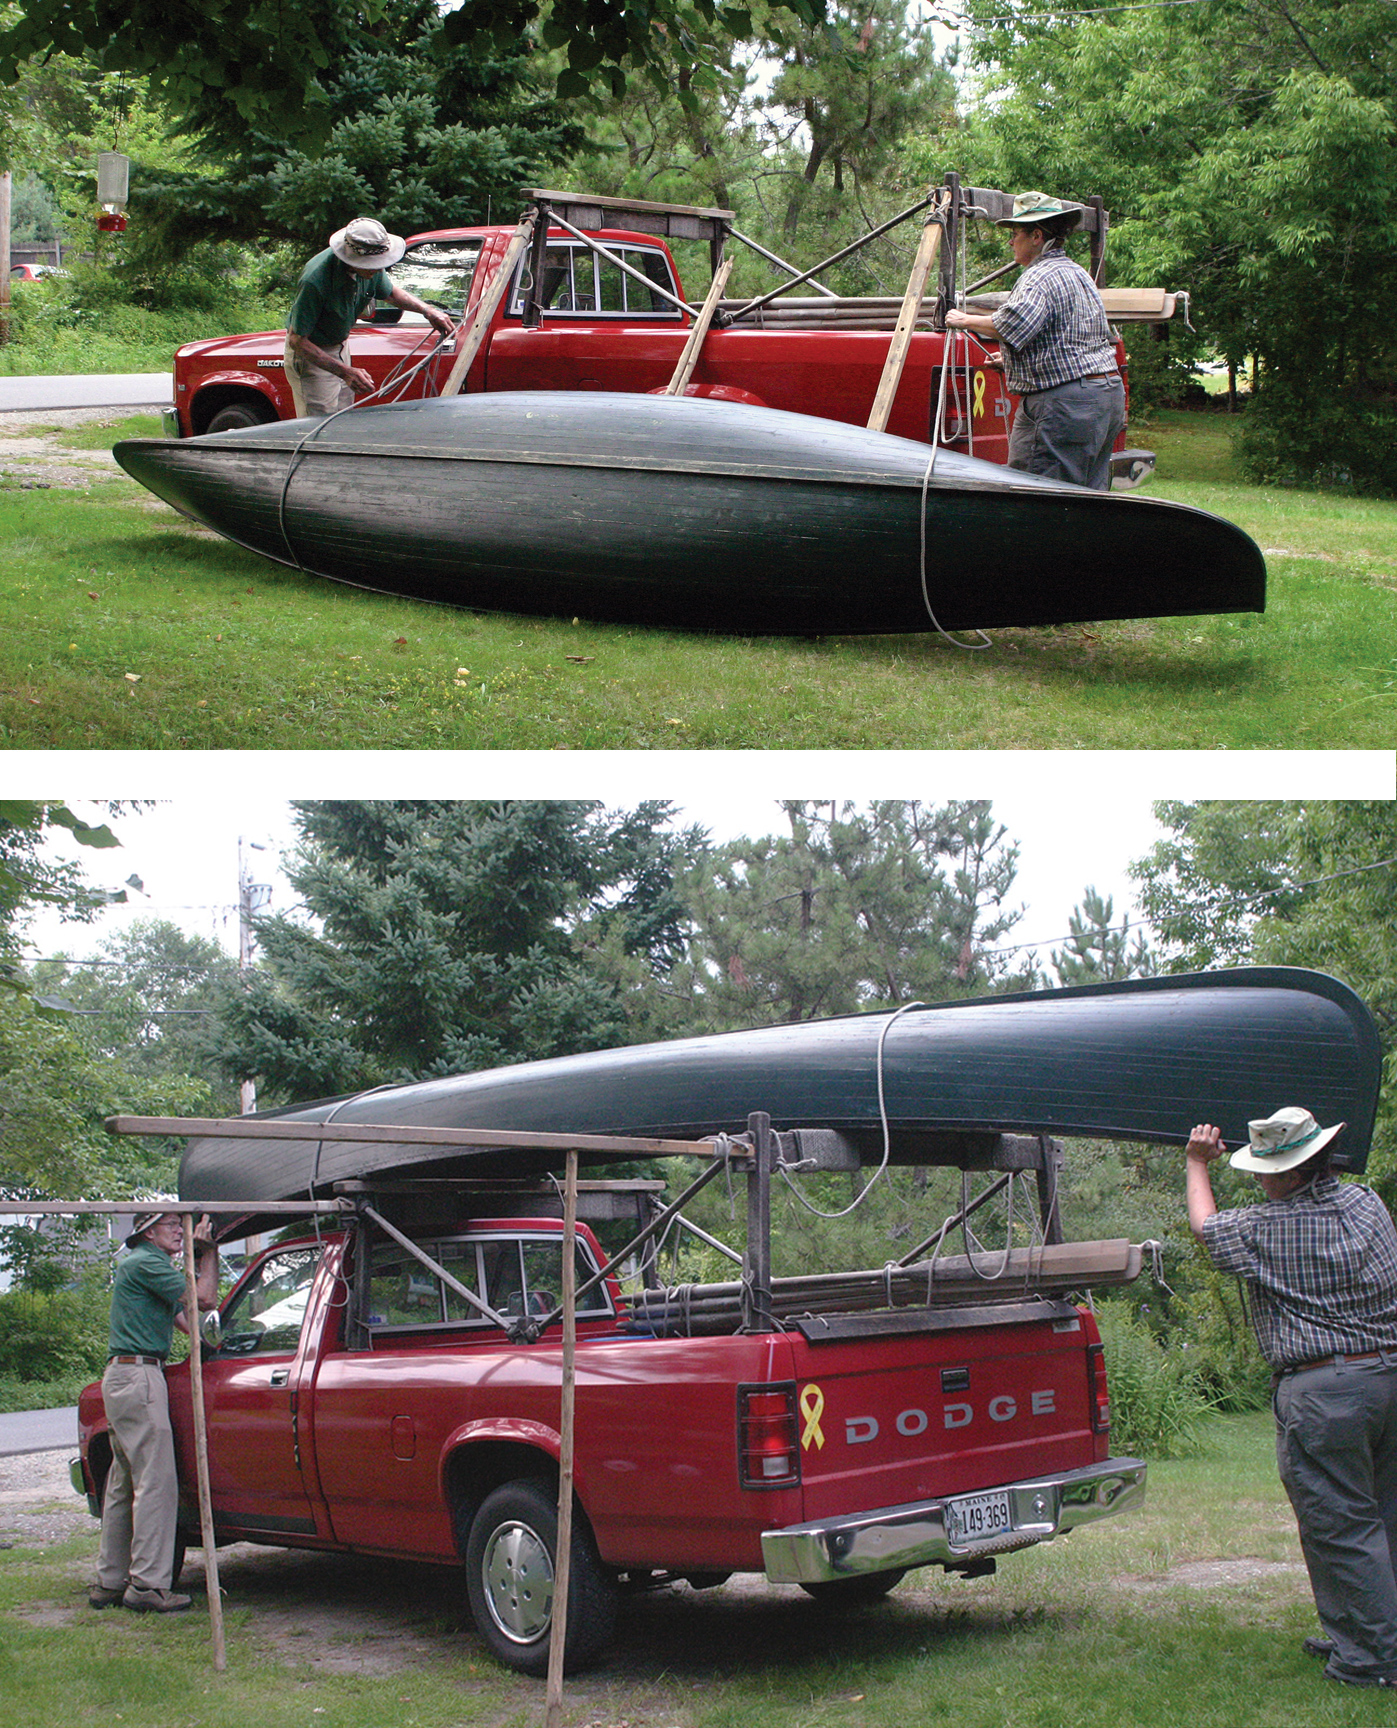
My friends Susan and Sam Manning have thought more about do-it-yourself loading methods than most of us. They have a nice wooden truck rack. Using holes and the right length of line, they’ve lashed a couple of long beams to each bar, creating an inclined plane to the ground. Their canoe rolls up next to it on a converted baby buggy. They can then parbuckle with rope or lift each bar up, working together to raise the canoe and then slide it onto the racks. For unloading, the long beams have legs that can be lowered.
Photos by Karen Wales
A back-saving truck rack. In the first photo, the canoe rests on diagonal beams; these beams articulate on the secure wooden truck rack. In the middle photo, Sam Manning is about to raise the diagonal beams to horizontal, and prop them in that position with sticks. In the final photo, the canoe, now at altitude, is simply slid into place on the truck rack, and secured.
Car Selection
Modern aerodynamic cars are not roof-rack friendly. Rack makers have worked hard to accommodate them, but there is nothing as easy as the old gutters. The earliest gutter-mounted racks that I used were Quick and Easys that fastened to a 24—not friendly to the wind, but they were easy on and off. These cars had nice steel bumpers around which tie-down lines could go, or you could drill holes and put in eyebolts. Sometime in the early 1990s the gutterless car and truck made these obsolete.
The racks that work with the gutterless cars need precise siting and adjustment, and hence they tend to remain mounted on vehicles—which is not necessarily good for door gaskets. Some of the newer utility-style vehicles have factory-built-in racks. These should be checked carefully for load specifications, as cosmetic racks won’t do at interstate speeds. The best ones I have seen are the fore-and-aft racks which let you then use a relatively easily removable cross bar.
Dedicated roof-rackers look for older cars. The square box pre-aero Volvo wagons let you put a rack right at the after end of the car, letting almost anything be easily slid up from the ground. My early-’90s Saab 900 works the same way. A 17′ boat can rest on the ground with its bow on the roof rack and not contact the rear hatch.
SUVs are difficult. The lift is high, no matter what you do. In my old age I find that getting 60–70 lbs up to SUV height is hard. Hence I prefer vehicles whose racks come to shoulder height.
Roof-rackers also look for pickup trucks. A rack at the rear and one forward on the cargo bed can easily be put into place. They can range from heavy-duty lumber carriers with extensions over the cab to 2 4s bolted together. Here in Maine, we sometimes see wooden racks that are works of art with steam-bent braces. Those with camper backs can set up roof racks with the aft rack close enough to the rear to slide boats up. Mine has a hard tonneau cover, and that proved a problem to find thin plates to go under the tonneau onto which to mount the racks. Some people with camper backs also use these plates. When I found a rack and plates from Oak Orchard Canoe, I got only one rack and slid it forward so that the cover goes up as high as possible, and then I have a bar on the cab. The single rack is positioned so that I can slide a boat up on it after resting the end on the ground. The forward one is set so that a 17′ boat drops on it neatly when it hits the balance points. A rack on the cab used to be a problem for the boats but is less so now that truck frames don’t move much.
Tying Down on Modern Cars
Tying down is another challenge. One can tie to the rack, which works pretty well. Loads should be tied to the vehicle fore and aft as well, something I don’t do for short slow distances but should. The problem is finding an attachment point in a universe of plastic fairings and crumple zones. Thinking about this before buying is good. Look for vehicles that have towing eyes under the bumpers. A trailer hitch can work as a good tie-down point in the rear.
You can also make what rock climbers call chocks. These are knotted pieces of webbing that can go into holes and be captured by rear doors or hoods and trunks. Most vehicles have holes in the sheet metal at the lips of hoods and trunks. A knotted or toggled piece of webbing can go into the hole, leaving a loop hanging out. When the hood or trunk is closed (if the load is short), you could get some paint chafe, so soft webbing is good.
The Rear Cantilever
You can also make a frame that extends the range of your racks to the rear of the vehicle. A roller on the end lets you slide a boat up. Thule has one now for kayaks that is a metal frame onto which pads and bunks are clamped with a roller at the end. Fittings allow you to pull it back, and slide the boat up. Then you can slide the frame forward so that it bridges the roof racks nicely.
Oak Orchard Canoe, , in upstate New York has another solution to sliding boats up from the rear. They have a roller mounted on a metal bracket, and the bracket is thin enough to fit between the top of the cargo door and the roof. You open the door, insert the roller, then close the door. You then have a roller where you need it. They have a number of other hardware items to make loading and carrying easier that work with the racks of the main suppliers.
Thule has also developed a kayak lift system with a rack that extends out and down from your roof rack. You set the boat on it, tie it down to J saddles, and then a couple of hydraulic cylinders help you lift it up and slide it into place. It’s an award-winning design and an ingenious feat of engineering. And it’s expensive.
Or is it? I know at least one person who attributes a chronic back problem to poor body mechanics while lifting and dragging boats. The expense of two surgeries— both in lost work time and the operations themselves—are far greater than carefully engineered trailers and roof racks. If you’re to live well with small boats, it’s good insurance to invest thought and/or money into storage and transportation systems. You’ll save your boats. You’ll save your relationships. And you’ll save your back.
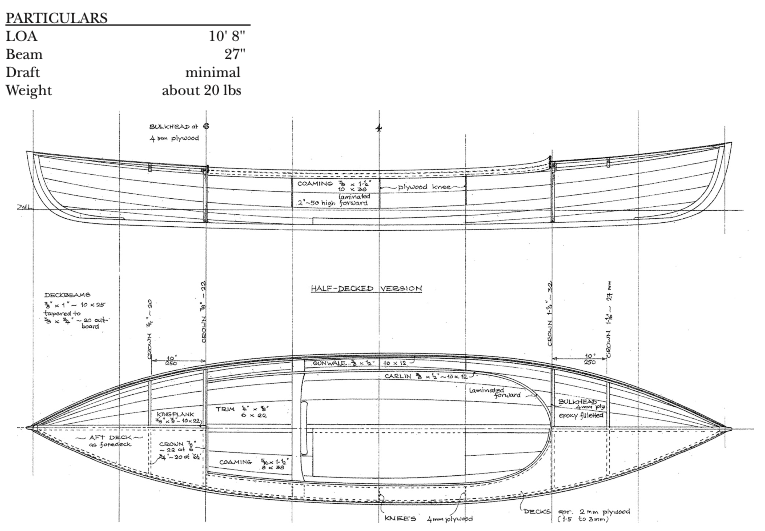
Nessmuk (pen name of George Washington Sears) wrote “the light, single canoe with double-bladed paddle is bound to soon become a leading, if not the leading, feature in summer recreation” in his 1888 classic camping tome Woodcraft. While diminutive canoes paddled in the manner of kayaks may not be the latest summer craze, their charm hasn’t waned. Iain Oughtred’s Stickleback is his version of the Nessmuk line of canoes built by the Rushton Canoe Company in 1880s. At 10’8″ it is only 2″ longer than its ancestor, but has the same beam (27″) and roughly the same weight (20 lbs.).
Particulars and drawings for half-decked version
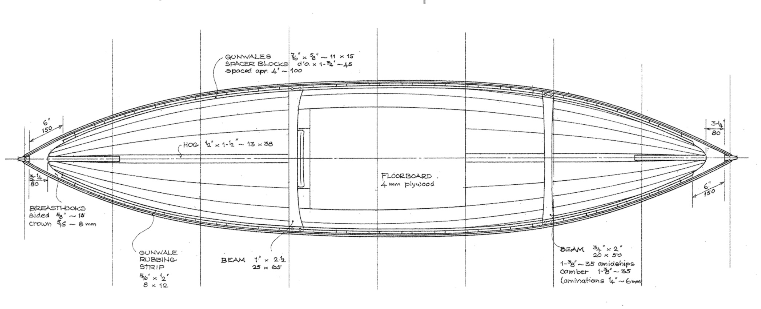
The Stickleback is meant for glued-lap plywood construction, with only two thwarts and a floorboard required to brace the 4mm plywood planking. The five sheets of drawings include full-sized patterns for the seven molds, drawn with five strakes and marked for an optional seven-strake version. The forms could also be used to cold-mold or strip-build the hull, though with a longer build time and the loss of some very sweetly lined planking laps.
Being as small as it is, the Stickleback is not a one-size-fits-all canoe. Oughtred offers three optional station spacings to stretch the length to 10’2″, 11’2″, or 11’6″.
Plans
The plans include details for building a decked Stickleback with a 5’3″-long cockpit. The addition of two 4mm bulkheads and 2mm decking would add minimal weight and provide dry storage compartments and flotation for safety’s sake.
The double-bladed paddle described in the plans is appropriate for a canoe in the Nessmuk style. The drawings and dimensions provided should be guidance enough for shaping the blades. Making the paddle, as simple as that is, will be the most complex part of the Stickleback project. Get both the canoe and the paddle started at the same time and you can work on the paddle during the otherwise idle times while epoxy is curing on the canoe.
Plans
No lofting is required and basic woodworking skills should suffice. The Stickleback building plans include five sheets of drawings and 16 pages of instructions and notes from the designer.
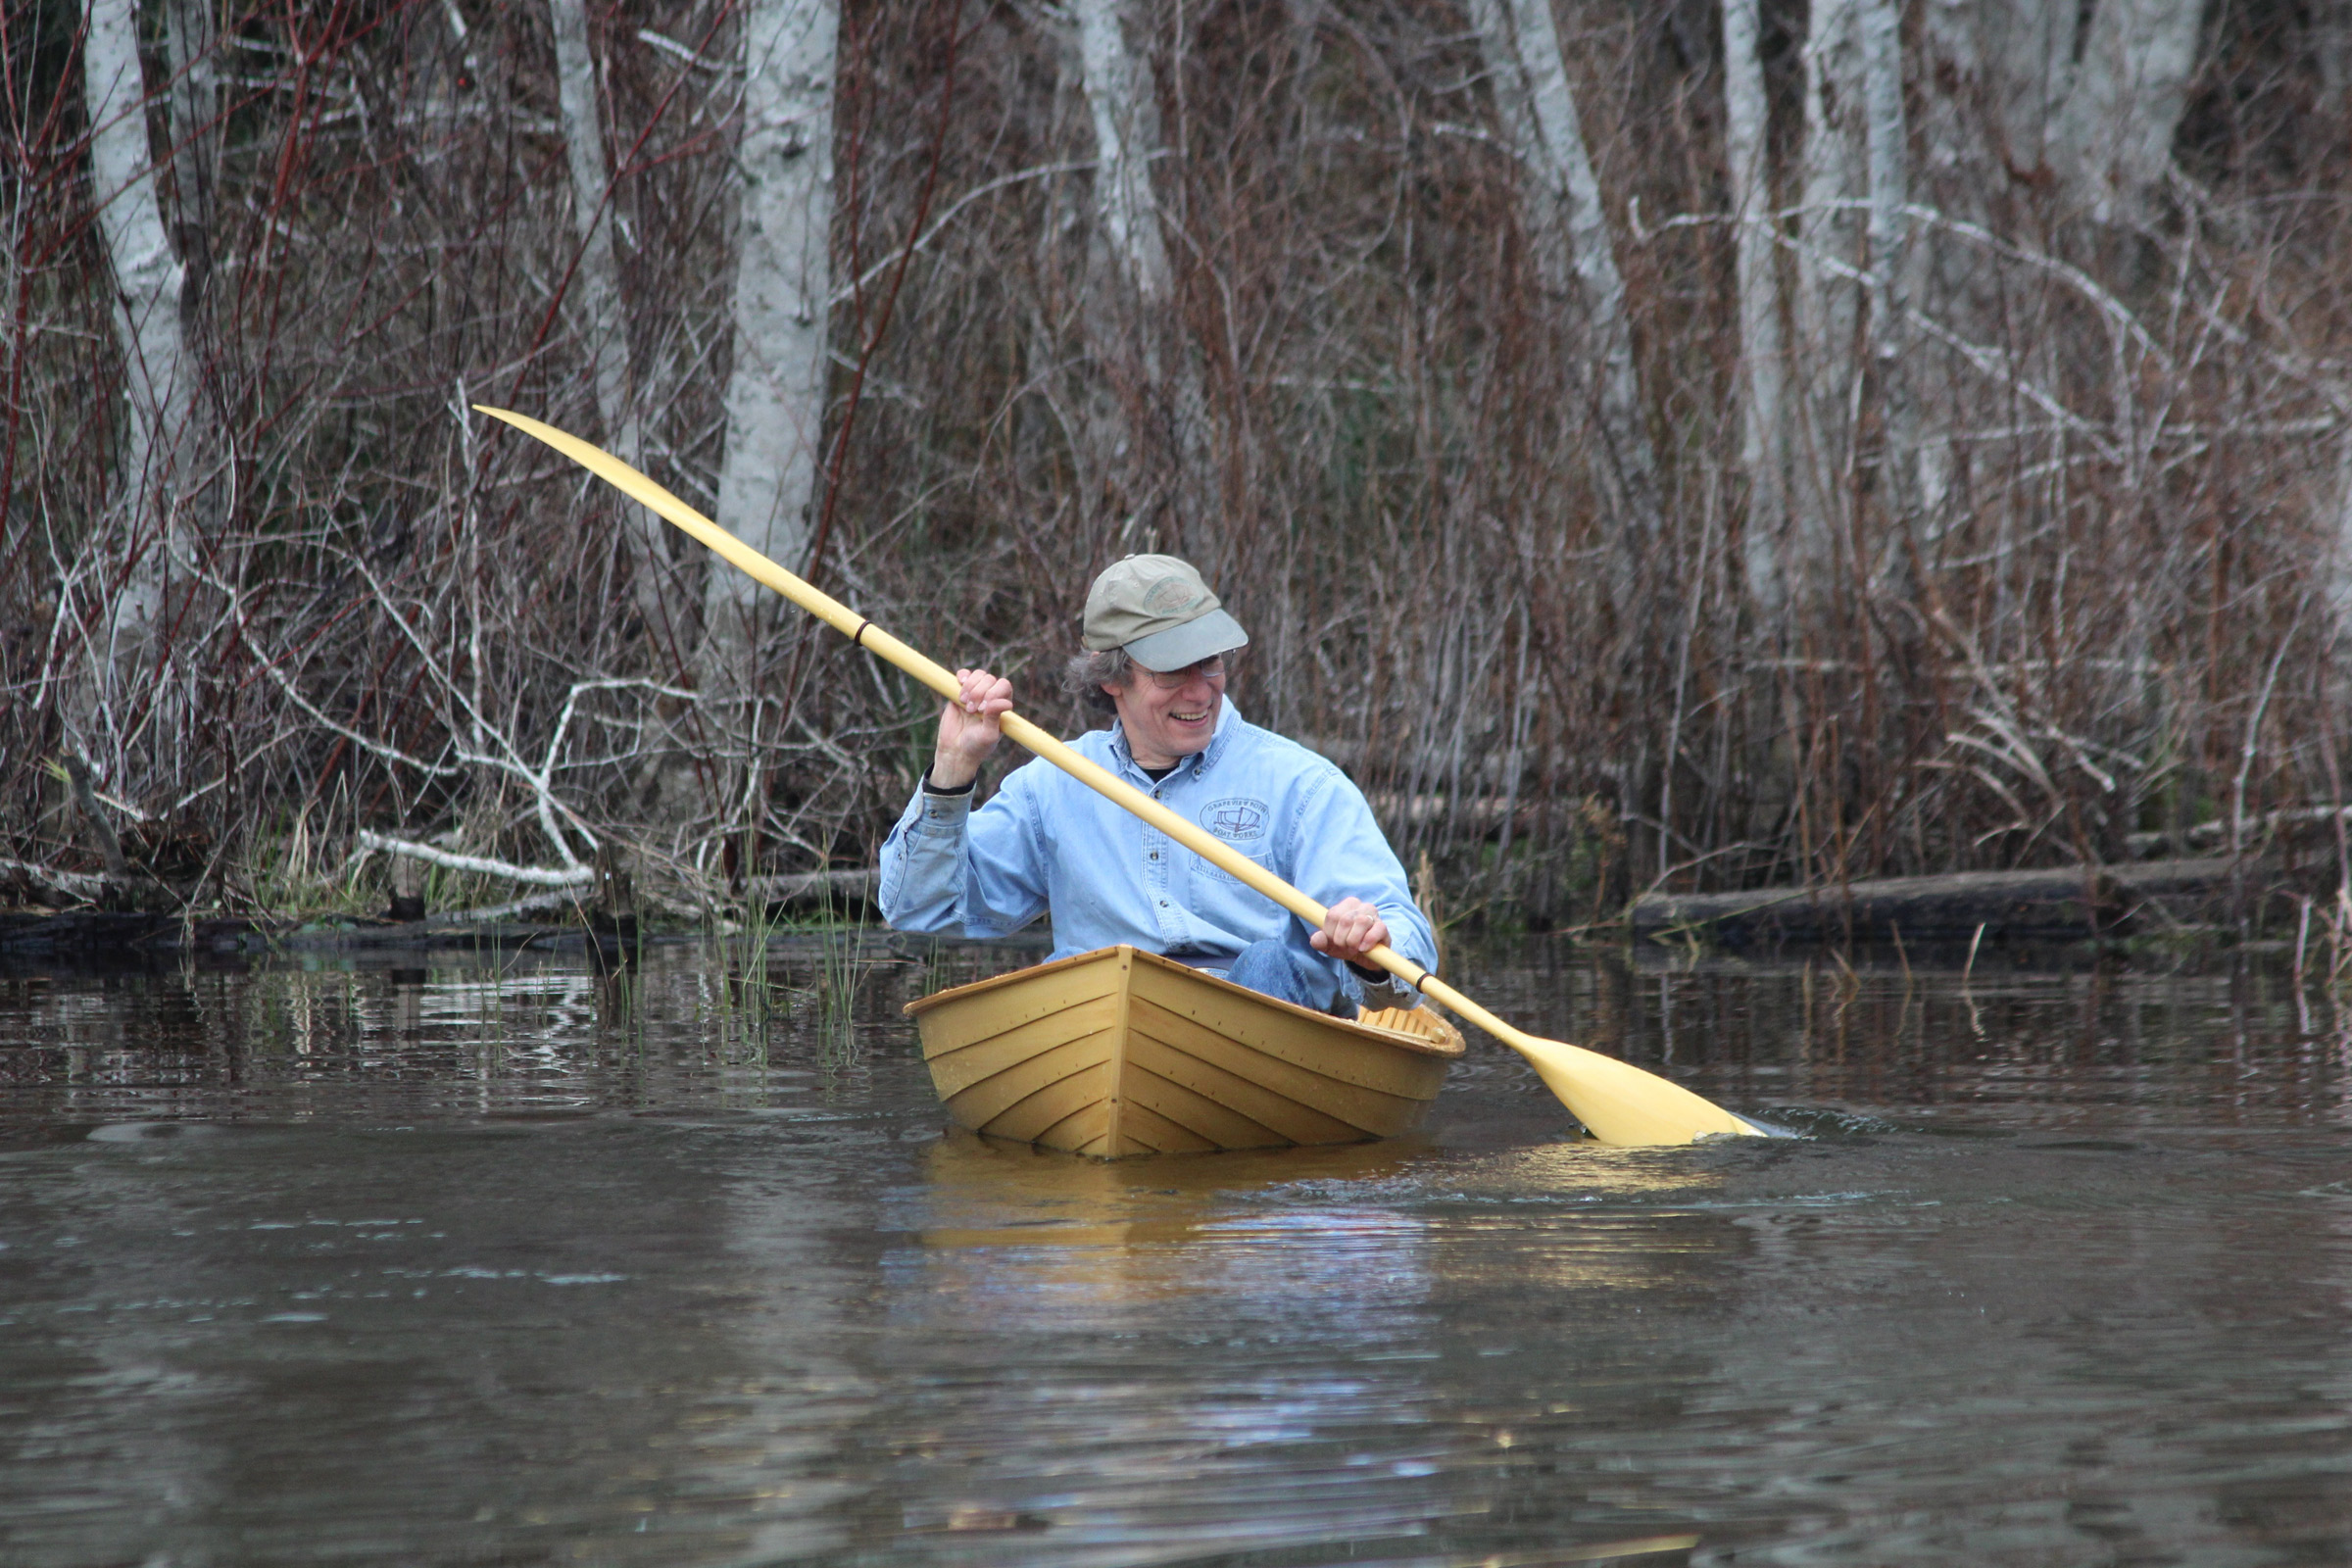
Completed 10’8″ Stickleback Canoe Images
At its designed waterline, the Stickleback draws 4-1/4″, and with 220 lbs aboard, it needs not quite 6″ of water to float free of the bottom.
Tom Regan
While speed isn’t going to be a strong point for any canoe under 11′ long, the Stickleback can move smartly, track well, and maintain its stability when pushed hard.
The double-bladed paddle described in the plans is 8′ long and has a blade 21″ by 6″. A 1-1/4″ copper tube is indicated as a means of joining the two halves feathered left or right or unfeathered, not as a take-apart paddle. In the one-piece feathered version that Tom, pictured here, built the two halves are permanently scarfed together.
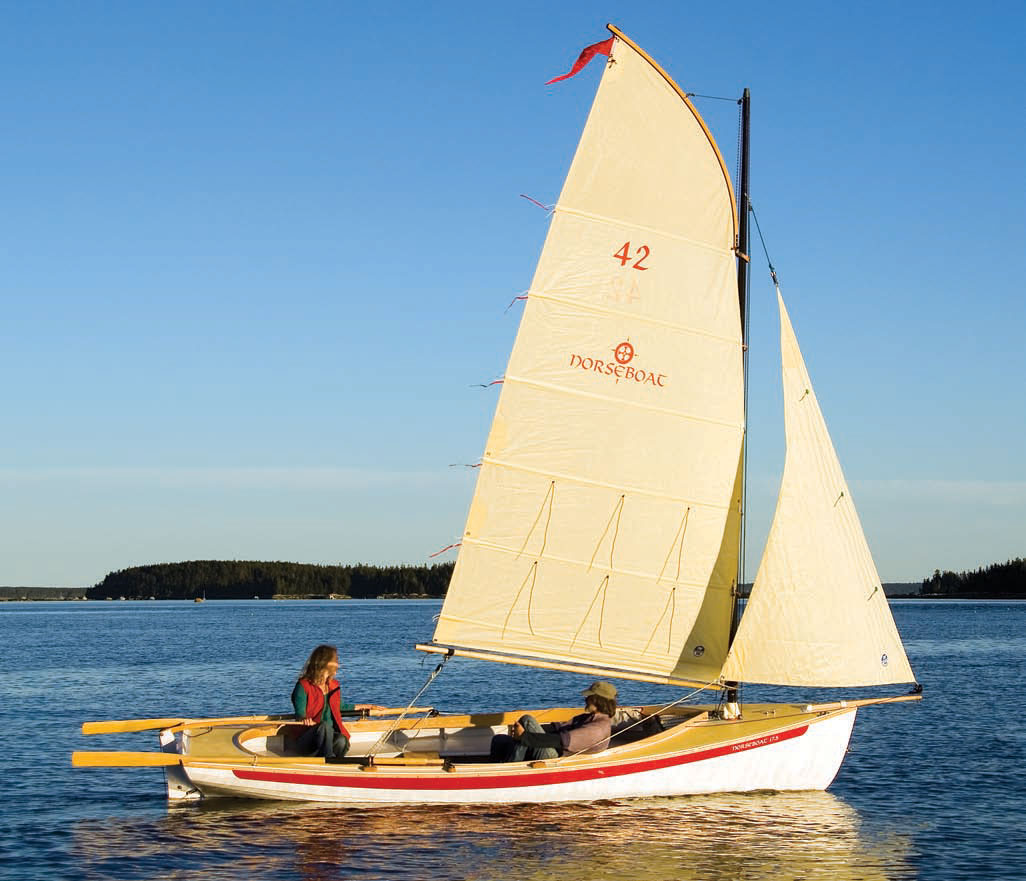
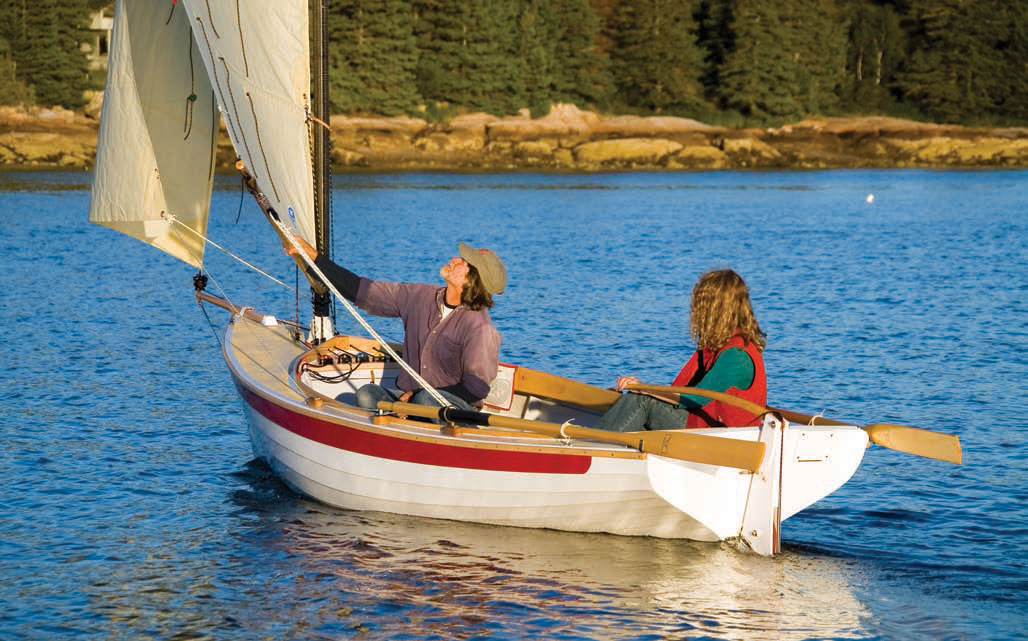
My hackles rose several years ago when I first caught sight of a NorseBoat, shining there across a well-manicured boat-show lawn. As a genial fellow exhibitor, I introduced myself to the owner and complimented him on his glossy showboat with all those strings and gadgets.
Benjamin Mendlowitz
The 17’6″ NorseBoat is daysailer/camp-cruiser with a surprising range of abilities. The boat sails well, and there is ample storage for camping gear. There’s also sleeping space for two well-acquainted passengers.
As a wooden-boat builder showing a competing design, I then retreated to my traditional cave and dismissed the NorseBoat’s glistening attributes under the all-damning epithet “fiberglass.” Oh, how times change, at least for those of us willing to evolve. With five or so more years of small-boat building and cruising experience under my keel, I have now happily taken a look at the newly minted wooden kit version of the NorseBoat.
This boat requires more study time per foot than most small craft. Besides an attractive hull and an unusual sail plan, she has more bells, whistles, and unexpected features than a 1970s conversion van—certainly more than any boat in her class. What is that class? Well, perhaps we’ll call it the small camp-cruiser, intended to give two compatible adventurers seaworthy transportation for themselves and a few days’ worth of gear, with a bit of shelter and comfort thrown in.
Imagine luxury sea kayaking without the paddling or the schlepping of gear and boats up and down the beach. Imagine exploring Cape Lookout, the Apostle Islands, or the Maine Island Trail, the Keys, the Bahamas or Baja…
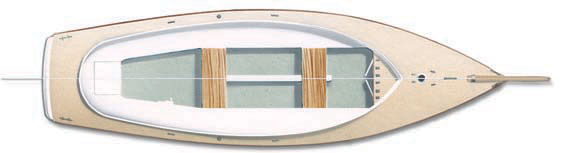
Designer Chuck Paine and NorseBoat president Kevin Jeffrey have collaborated on a lovely, traditional-looking hull, perhaps a little leaner than most. Her pedigree makes reference to New Jersey beach skiffs and English day boats. She’s a lapstrake daysailer, decked fore and aft, with side decks and a modest coaming. A pair of thwarts joining continuous side benches and stern sheets complete the interior. You might well daysail six people.
The high-aspect, pivoting centerboard and kick-up rudder imply her capabilities, and the lockers under her decks and benches hint at purpose, but none of these show her hand. For this, you must rig her up. This sleeper of a hull carries a radically nontraditional rig. She’s a jib-headed catboat, or a cat sloop, or something, with a fully battened gaff main set loose-footed on the boom.
The peculiarities, or perhaps better said, “distinctions” of this beautifully conceived and executed rig are legion: a two-piece carbon-fiber mast, unstayed; a fascinating curved gaff; a roller-furling jib; multiple mainsheet/traveler positions in the cockpit with a sliding strap on the boom; color-coded running rigging with matching deck hardware; the quite forward mast position and short mainsail foot which combine to allow the skipper to sail in apparent boomless luxury. This unconventional marriage of hull and rig has engendered a really fine sailing boat. She’s handy, responsive, quick, and very close-winded.
The jib is far more than the amusement I suspected it to be; it contributes significant power. The boat was noticeably slower on the wind when the jib was furled. Conditions on my trial sails didn’t warrant reefing, but she was well set up for quick and convenient reefing, and the full battens would contribute to manageable furling. NorseBoat’s savvy attention to detail becomes more apparent when considering the livability of the hull. Jeffrey has either experienced or cleverly anticipated the many travails of the small-boat cruiser.
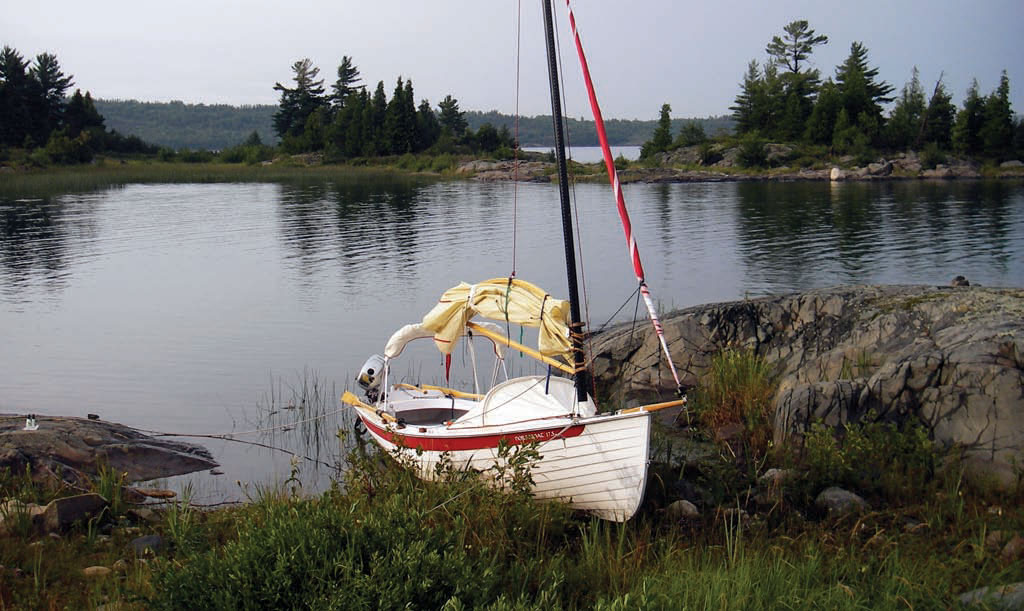
Benjamin Mendlowitz
A two-piece, unstayed carbon-fiber mast, along with a roller-furling headsail, mean minimal setup time for the NorseBoat. She can be trailered to just about anywhere and set up quickly for a camping expedition.
Storage is ample in the form of both closed lockers under the decks and open bays under the side benches. Pack in a few dry bags and stuff sacks, and all your gear has a home. Shelter has been provided in the form of a bimini aft (on a 17′ boat!) and a dodger forward, and both can be rigged while sailing. At anchor or on the beach the two combine with a zipon tent to make living aboard a dry, warm, and bug-free idyll.
So where do we sleep? Stowable filler boards drop in to bridge the thwarts and side benches, creating a sleeping flat of a size that will seem more than reasonable to companions willing to share a two-person tent, with the added luxury of a contiguous sheltered living space in the sternsheets. Further thoughtful details abound. Particularly keen are the brackets mounted on the transom that allow the oars in their sockets to be swung aft and lashed outboard, out of the cockpit and out of the way.
Subjective impressions? NorseBoat is perfectly stable in that hard-to-characterize small-boat way. She’s initially tender; where you stand and sit matters, but she is not going to turn over at the beach or mooring. I stood on the foredeck under sail in light winds with no great need of artistry or athleticism. Rumor has it that one can stand on the side decks as well.
She is billed as a sailing and rowing boat. She can, indeed, be rowed, but she is not a fine pulling boat. She’s far too heavy for that, especially when you imagine her loaded for her intended purpose. She rows reasonably, but not fast. If you’re becalmed and on a schedule (silly you…), I suppose you might make a passage under oars, especially rowing double. Fortunately, she is such a fine sailer that the oars will be mostly harbor auxiliaries. I certainly cannot imagine complicating her life or yours with an outboard motor.
While on the subject of oars, that clever storage setup is great for nights at anchor, but not while under sail. A skipper scrambling to sit up to trim a heeling boat will find herself perched on a rather stressed oar loom rather than the washboard, testing spruce, bracket, and bum. The wooden mast hoops appear anachronistic on a fully battened sail, especially on the carbon spar. Maybe it’s just the mixed media catching my eye, but the hoops seemed oversized and allowed a large range of motion in the luff of the sail relative to the mast. The main needed to be coaxed to the lee side of the mast after tacking, like many other fully battened rigs.
Finally, that distinctive curved gaff is… mesmerizing. It strikes a magnificently natural line when viewed from the helm, organic, fair and powerful. When viewed from ashore, however, or from a passing boat, it looks merely unusual. I cannot decide if it doesn’t look right just because it is different, because the mast is so far forward, or perhaps because it just isn’t quite right. No need to quibble, I suppose.
Courtesy NorseBoat
NorseBoats can be purchased at various level of completion. This one is a production fiberglass model. The boat carries an outboard motor—a complication that many camper-sailors will want to avoid, as the boat is easily propelled by oars that stow on the side decks.
One of the greatest fascinations with the NorseBoat has to be that it is available as a kit, as well as partially or completely assembled. It is certainly the most capable and complete camp-cruising kit package I know of. The demo boat I sampled was beautifully put together by Dagley’s Boats, the Nova Scotia shop producing the kits. Materials and hardware were well selected, and methods and techniques were logical and appropriate.
Certain caveats must be offered, though. The kit manual and DVD were unavailable in time for this review. With the complexity of this project, the quality of those instructions will be critical, especially with an $80-per-hour meter running on the customer support phone. Boaters and builders tempted by this great boat will need to shop deliberately. Carefully read and consider the specifications and pricing. Hull components, sailing rig, oars, and accessories are priced and packaged in various combinations and options. I don’t suspect that there is any intention to mislead, but the marketing copy merits fine analysis to understand what you are getting for how much.
And yes, Virginia, some boatbuilders dare to try to make a living. Don’t be shocked that the price of a kit is more than the cost of five sheets of plywood. There are a variety of small wooden boat designs that serve as very able camp-cruisers. Graham Byrnes’s Core Sound boats, Iain Oughtred’s Caledonia and Ness Yawls, and Arch Davis’s Penobscots are a few successful ones that come to mind. Sailors interested in such boats can build them, or have them built, then spend time (some of it amusing and pleasurable indeed) designing, fabricating, and rigging all of the comforts that will make a campcruising adventure a pleasure.
The NorseBoat is a complete, well-conceived, and well-executed package that will save all that time and trouble. Let’s get one and go play boats!
NorseBoat Particulars
LOA: 17′ 6″
Beam: 5′ 2″
Draft: 9″/3′ 1″
Displacement: 530 lbs
Max. load: 1,090 lbs
Sail area: Main: 105 sq.ft., Jib: 34 sq.ft.
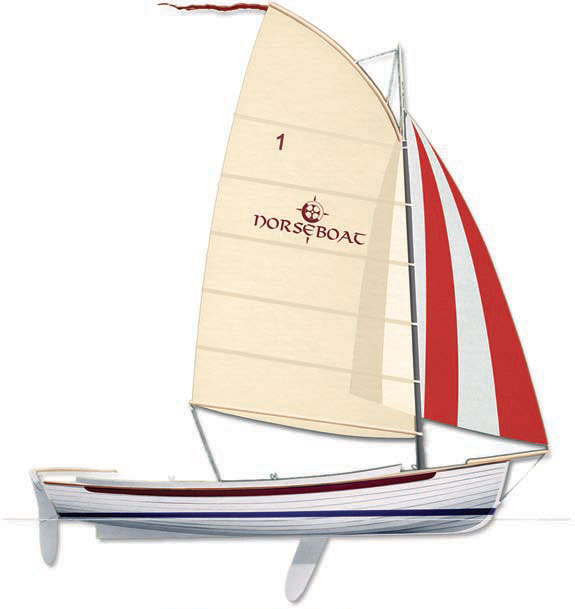
NorseBoat’s sail plan is distinguished by a curved wooden gaff.
The accommodations are enclosed by a sloping tent, which provides considerable headroom aft.
For sleeping, short boards fill in the spaces between the seats and thwarts; these boards stow out of the way when not in use.
For information on kits and finished NorseBoats, contact NorseBoat Limited, RR 1, 241 Point Prim Rd., Belfast, Prince Edward Island C0A 1A0, Canada; 902–659–2790, Email: [email protected].
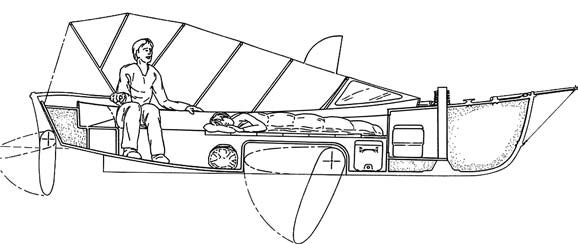
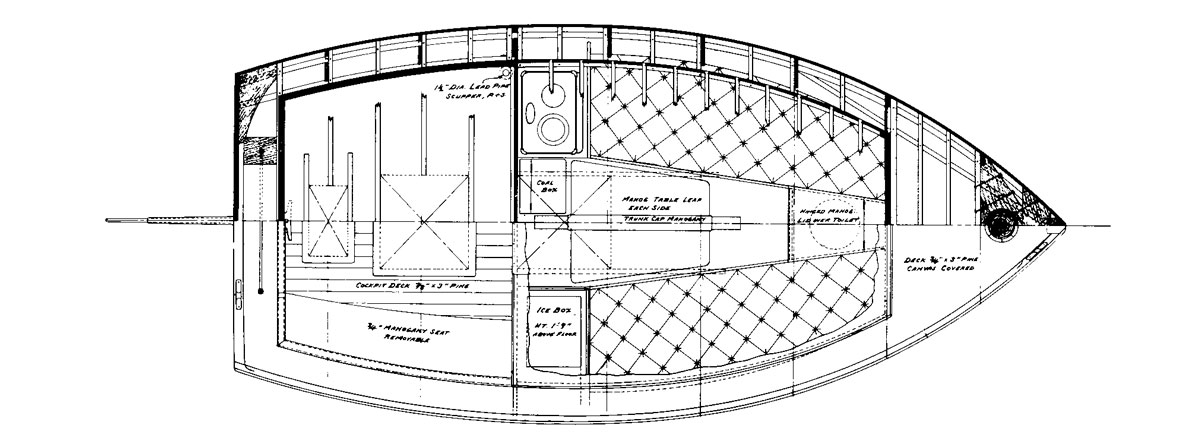
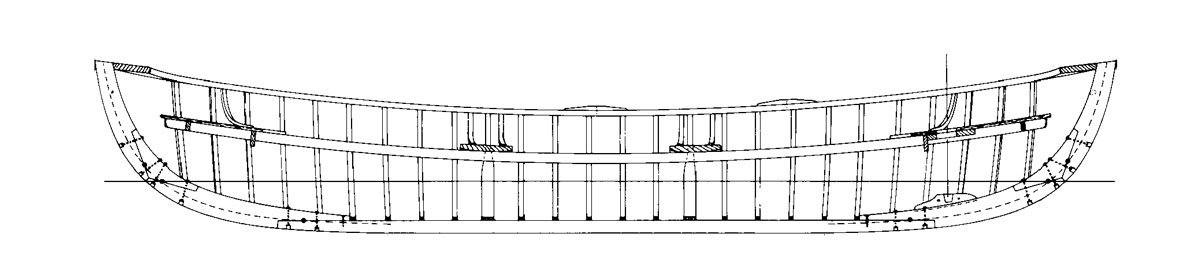
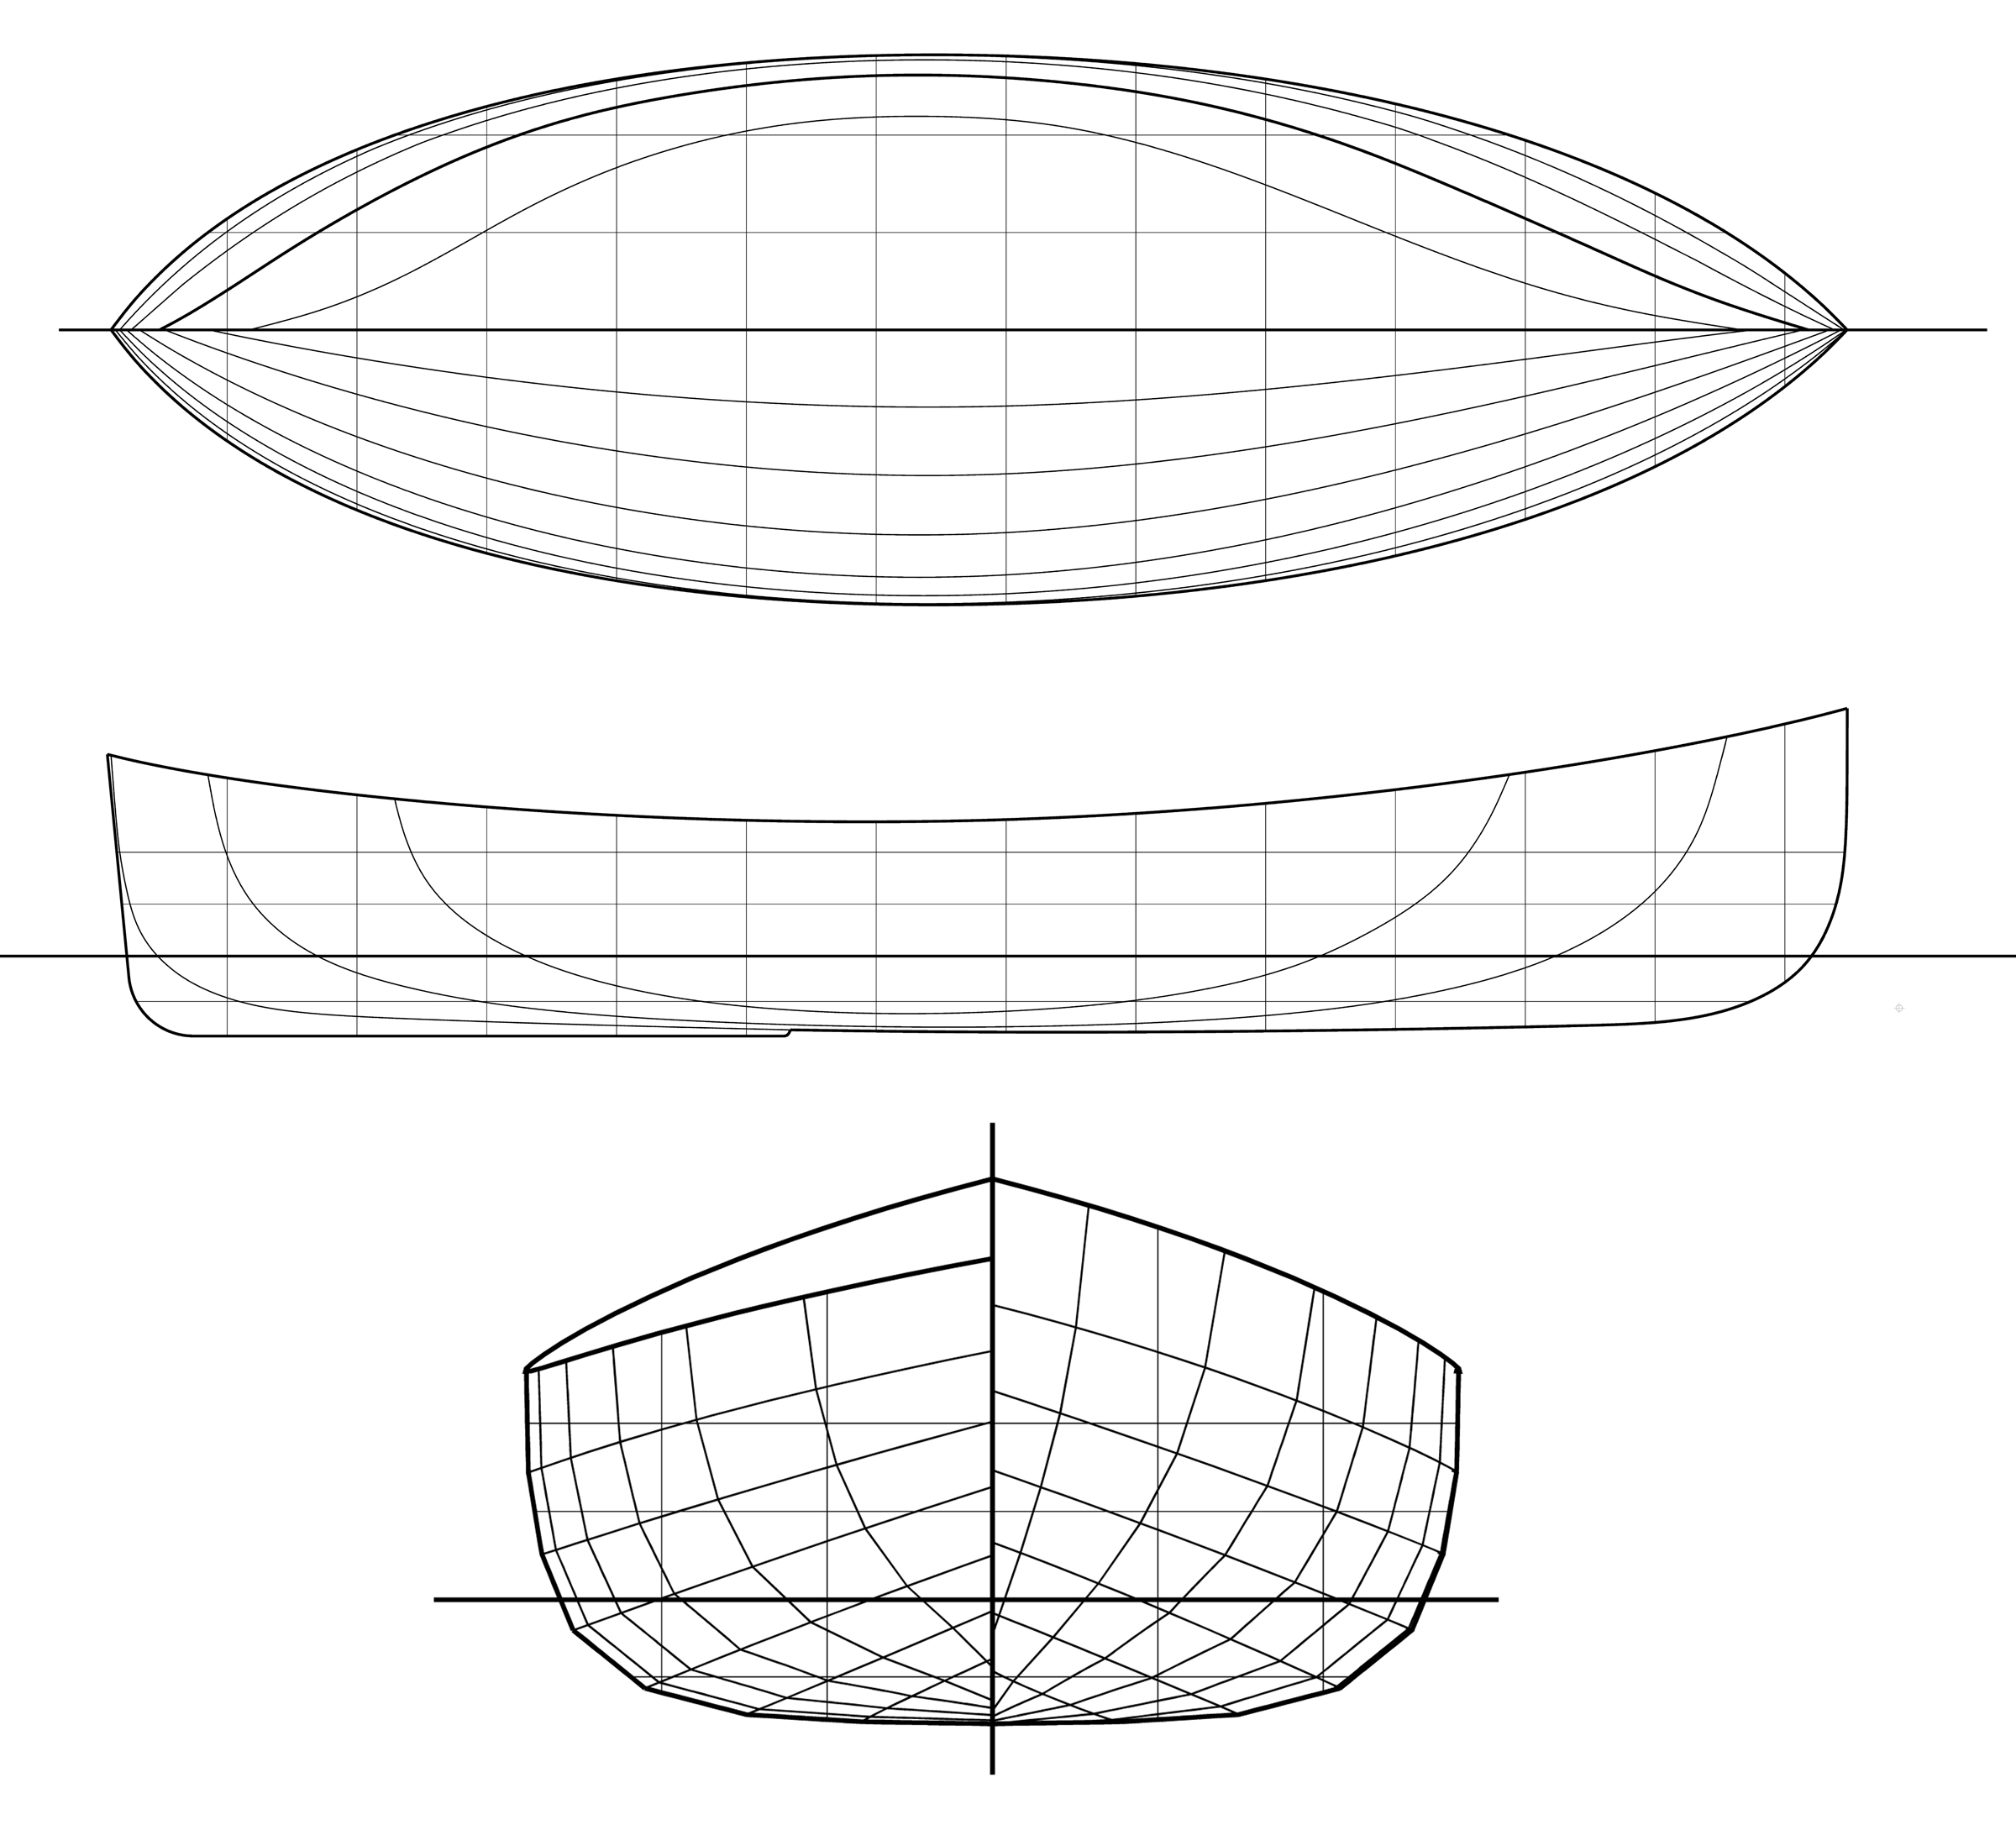
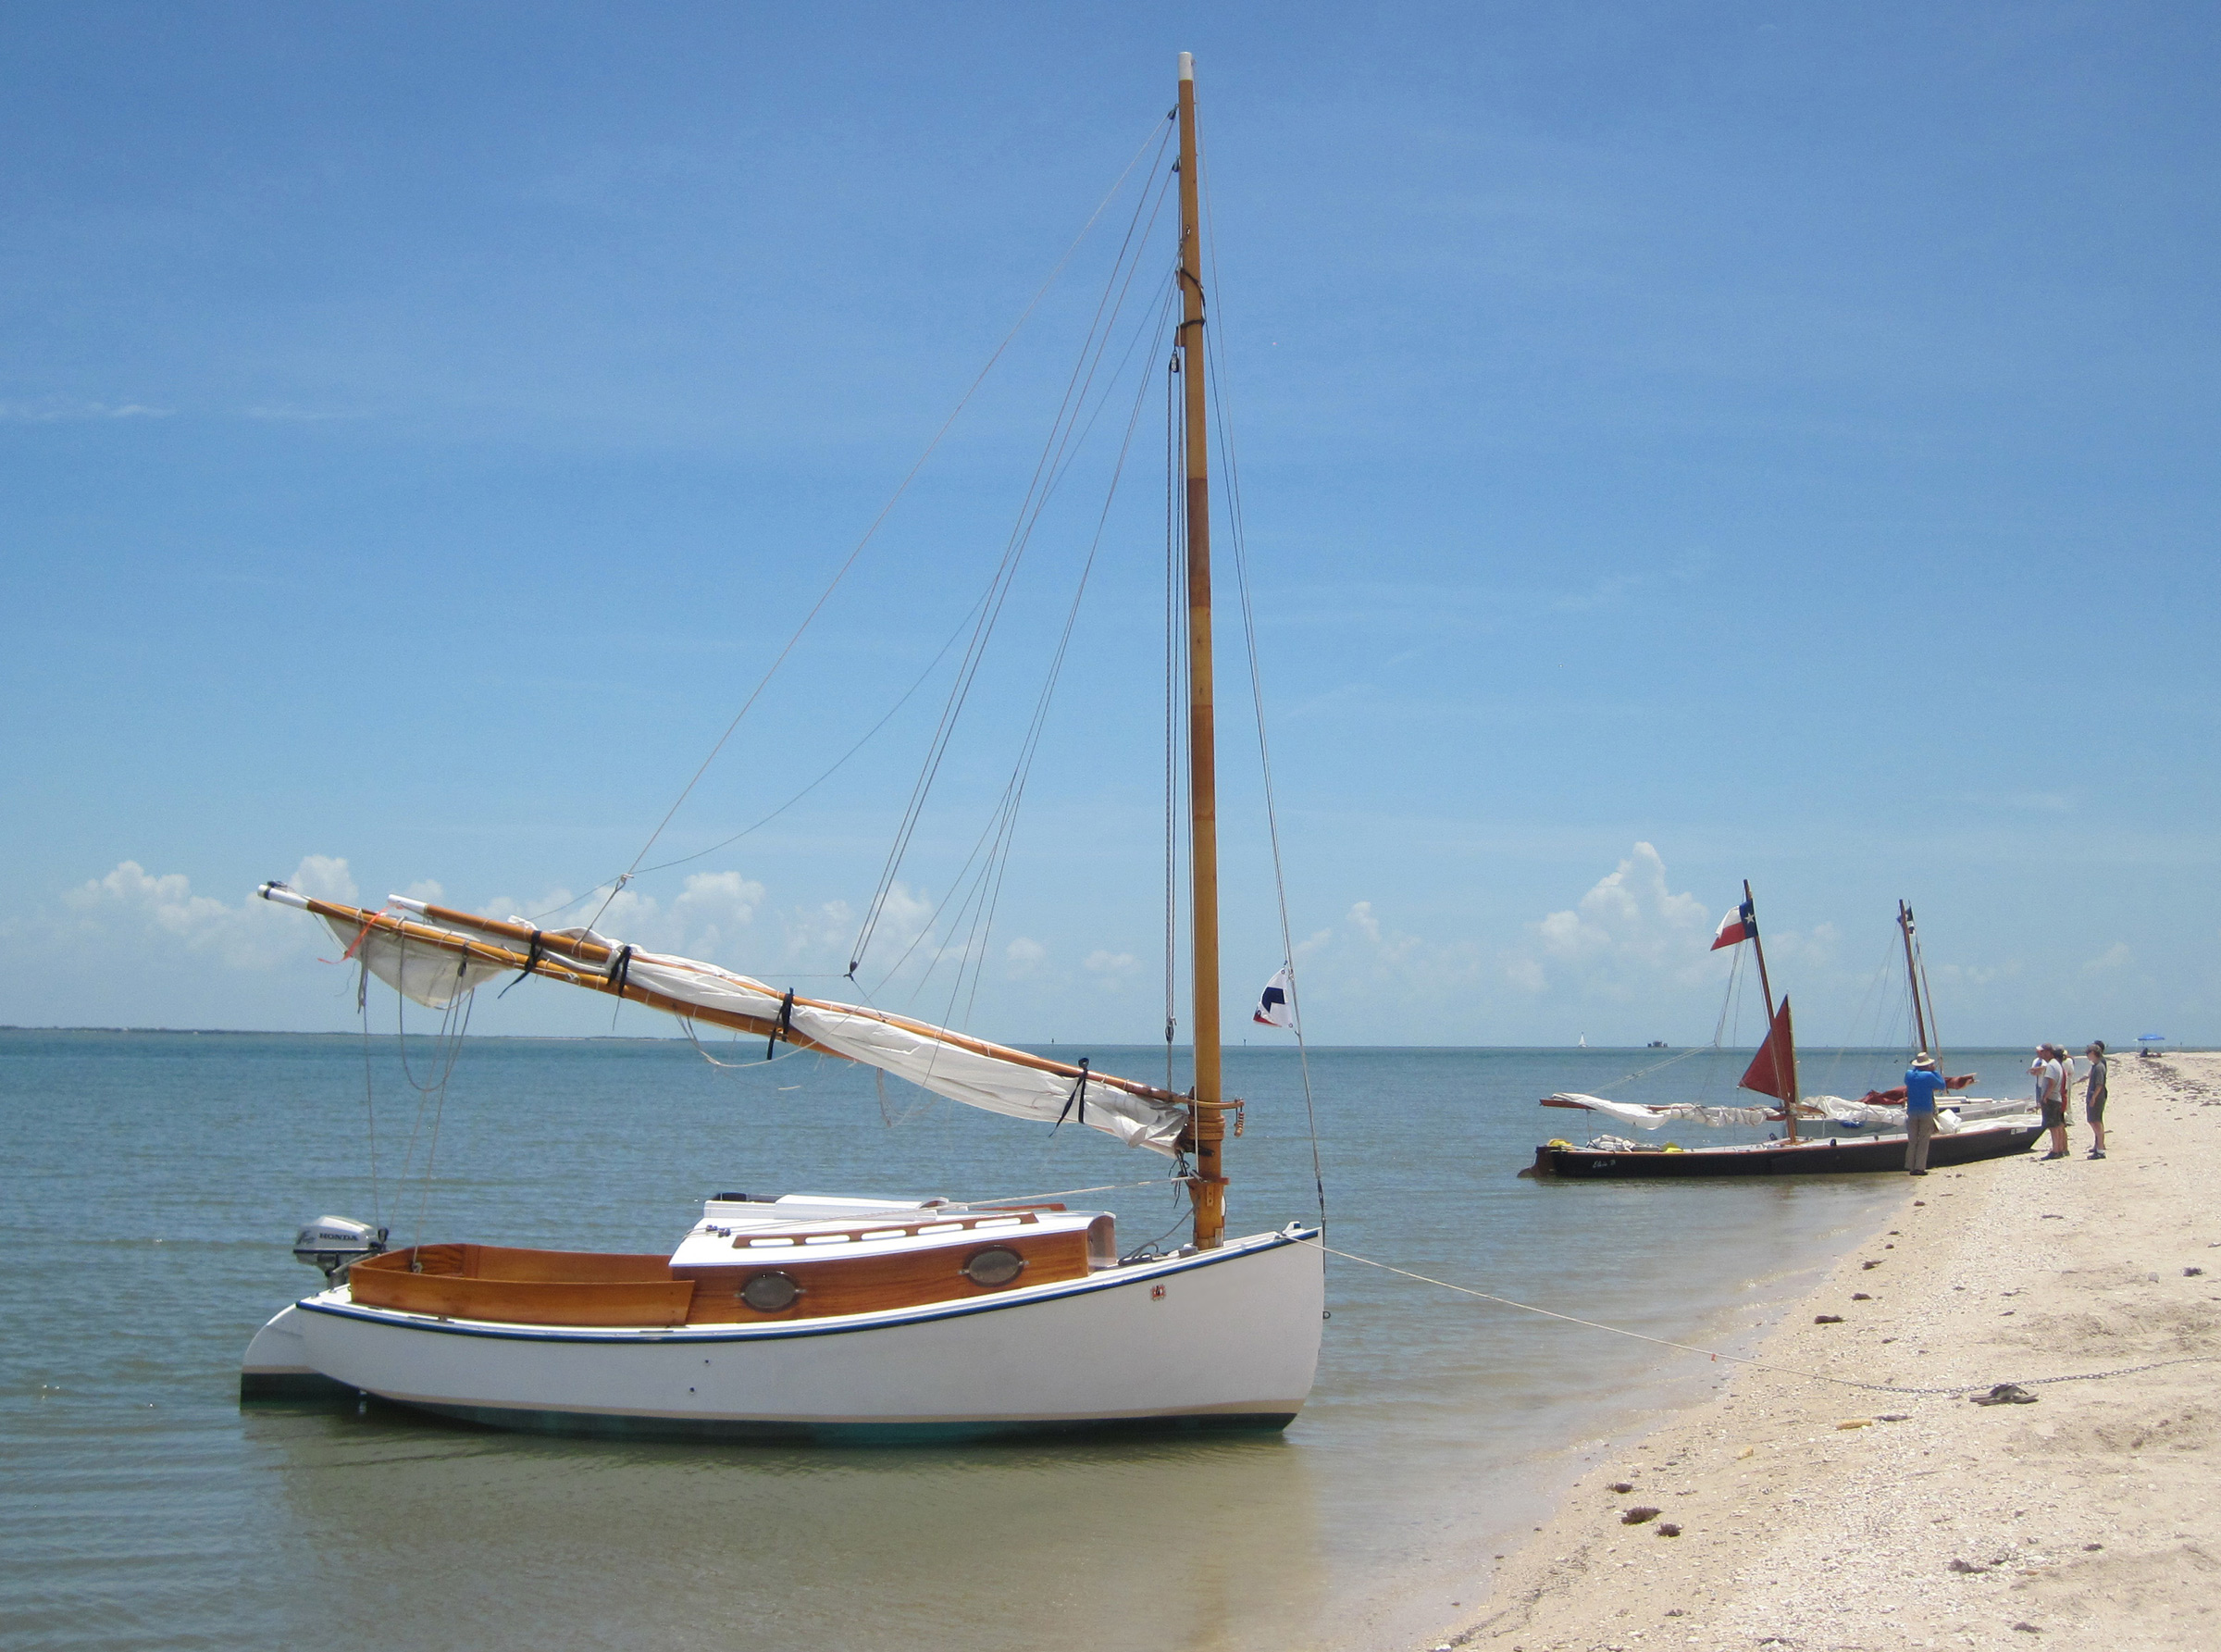
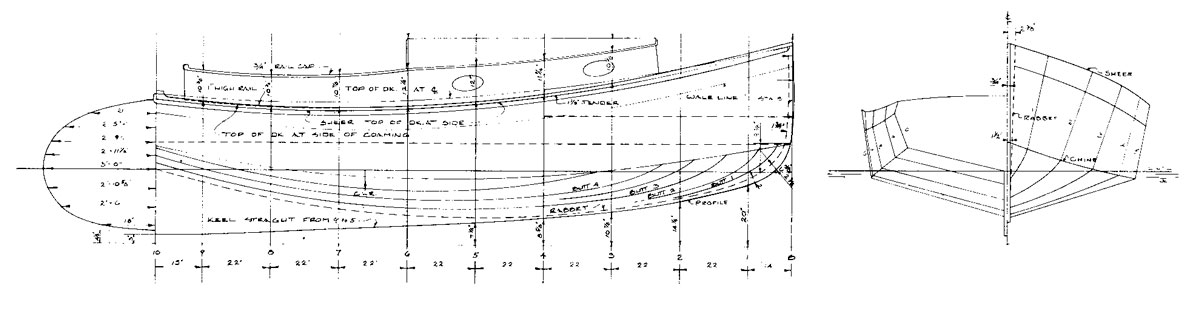
If your taste runs more to the traditional, and if your building skills are correspondingly more advanced, this 18-footer by Fenwick Williams might be worth considering. She’s only slightly larger than the Wittholz catboat (WoodenBoat Plan No. 48) and has about the same cabin arrangement; however, her hull is carvel planked and round bilged—shaped just like the old-time cats that Cape Cod builders were noted for.
Designed in 1931 at the height of the Great Depression, Williams’ first catboat was intended as an inexpensive craft for people who couldn’t afford larger boats.
Williams, who first drew this boat in 1931 for himself and has added to and improved her since, had the amateur builder very much in mind. The drawings show a sawn frame at every station; these take the place of, and save having to build the usual temporary hull molds. Added later, in between each pair of these sawn station frames, are a couple of conventional steam-bent frames. To eliminate steam-bending elsewhere, the cabin sides and coamings are shown with corner posts, perhaps giving a less graceful appearance than the traditional oval shape, but making those assemblies easier to build.
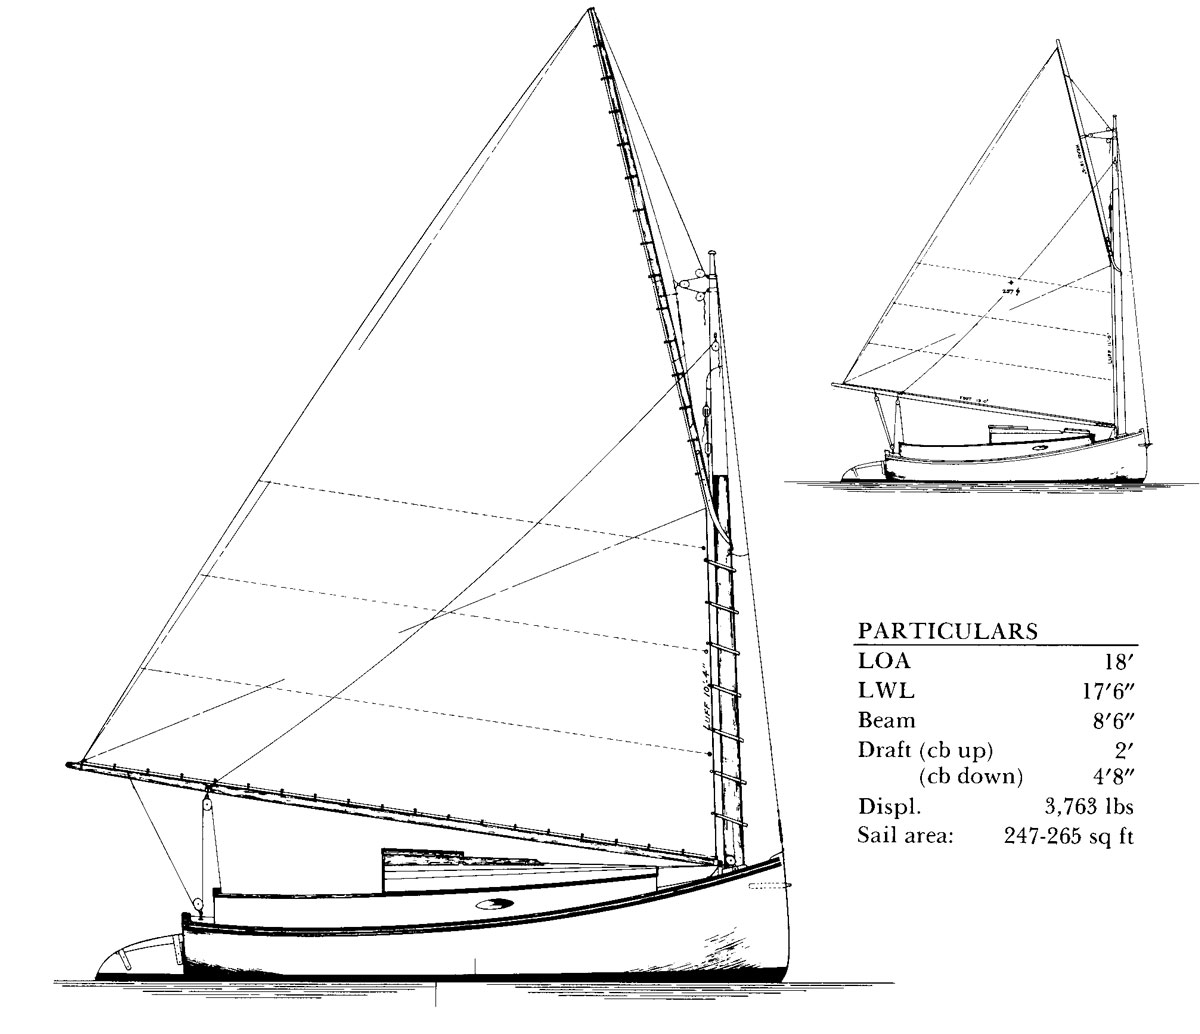
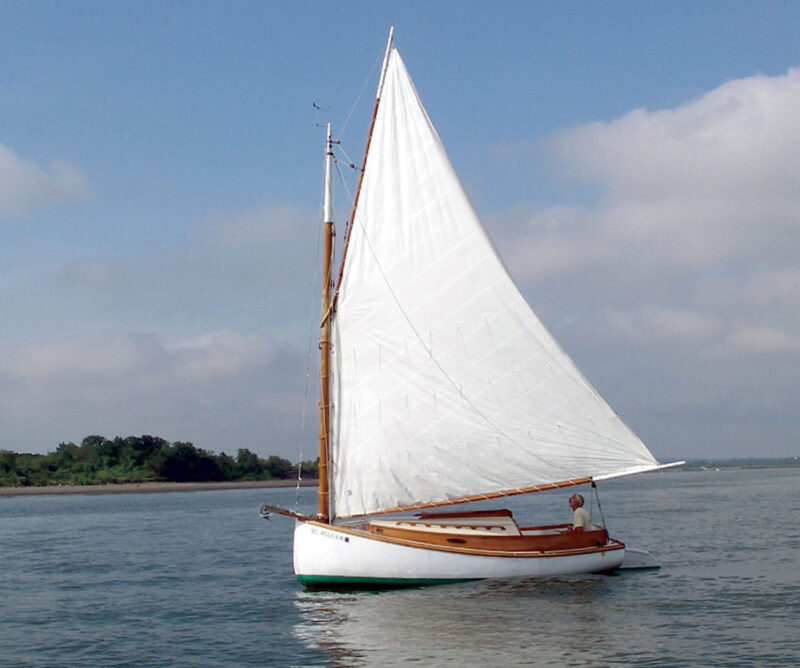
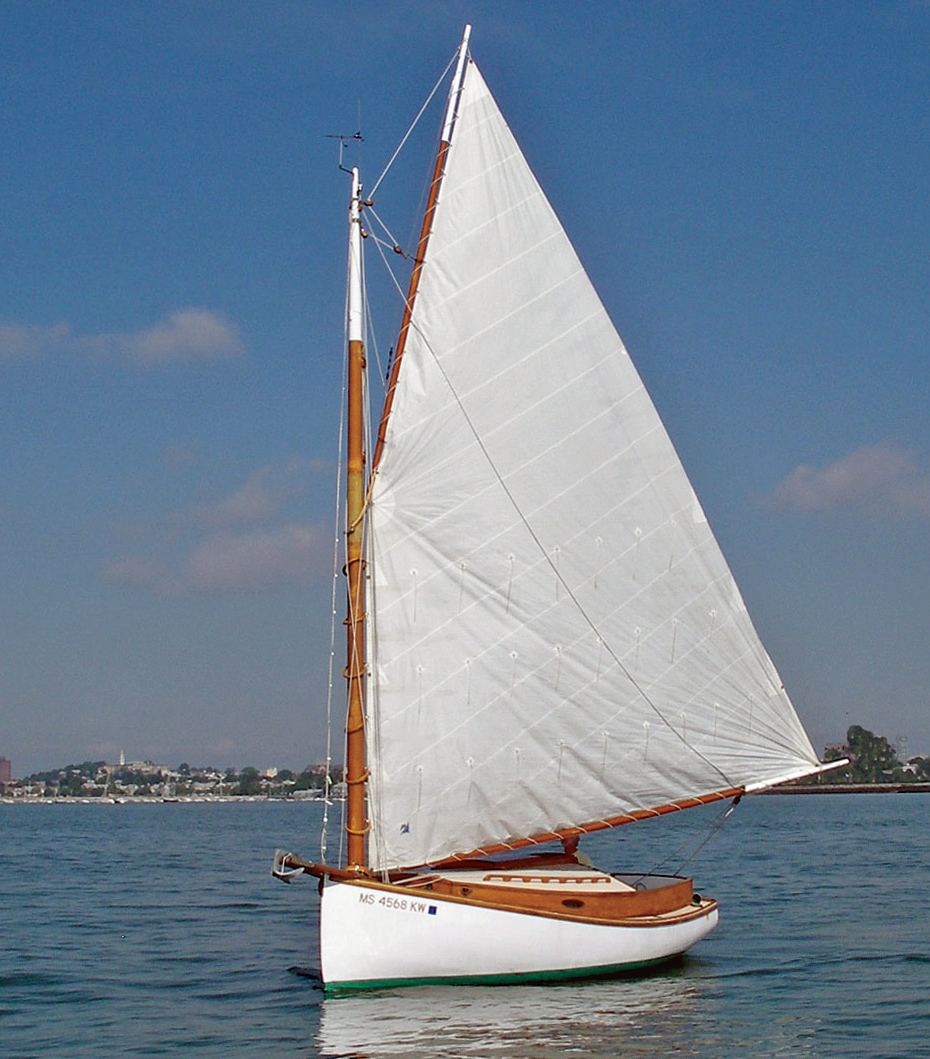
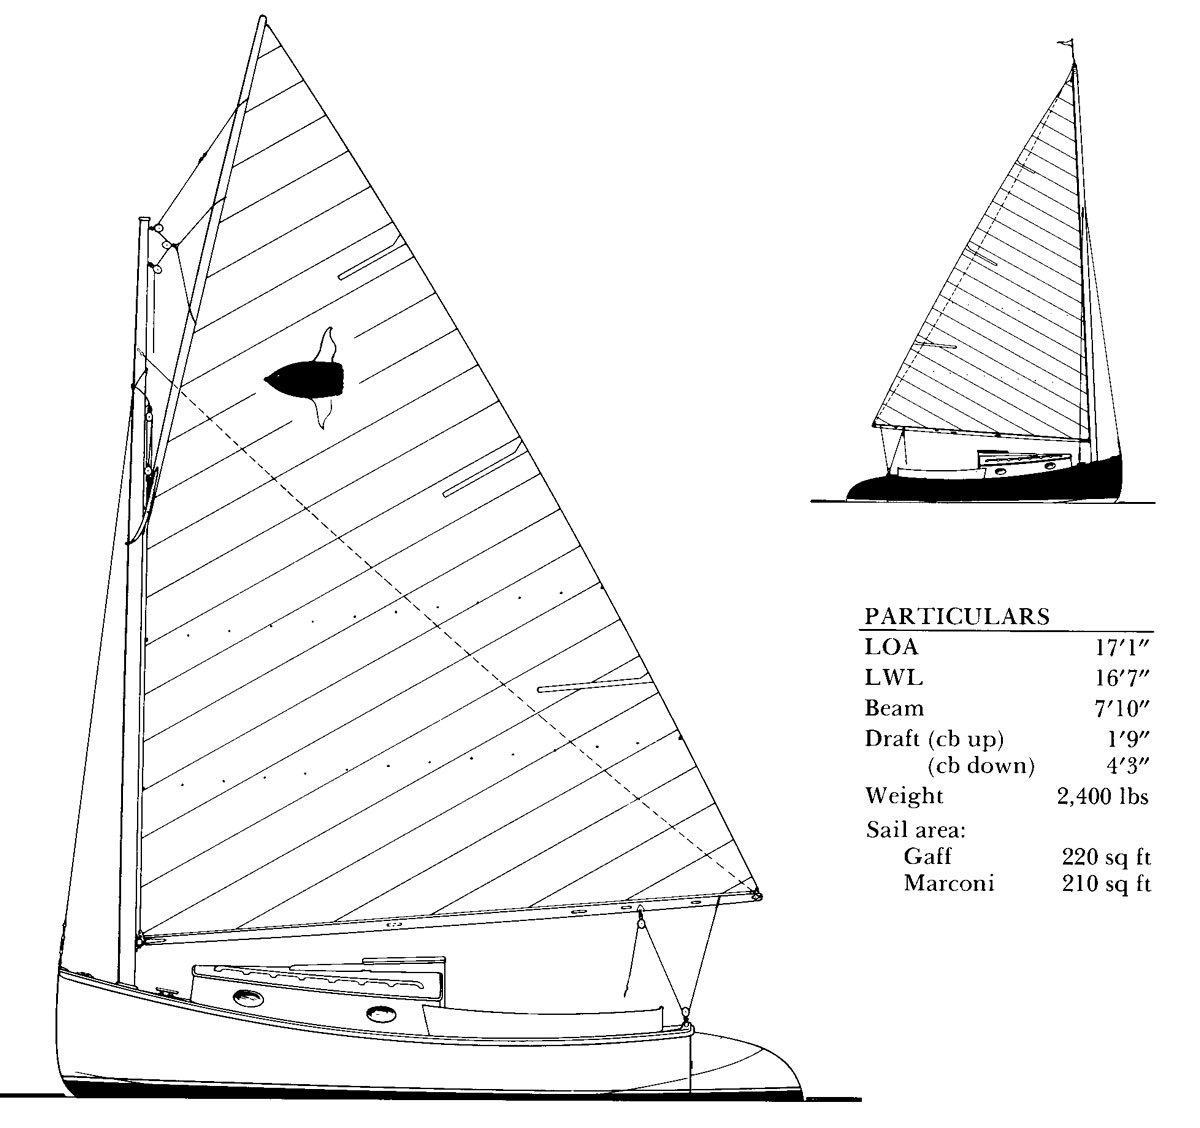
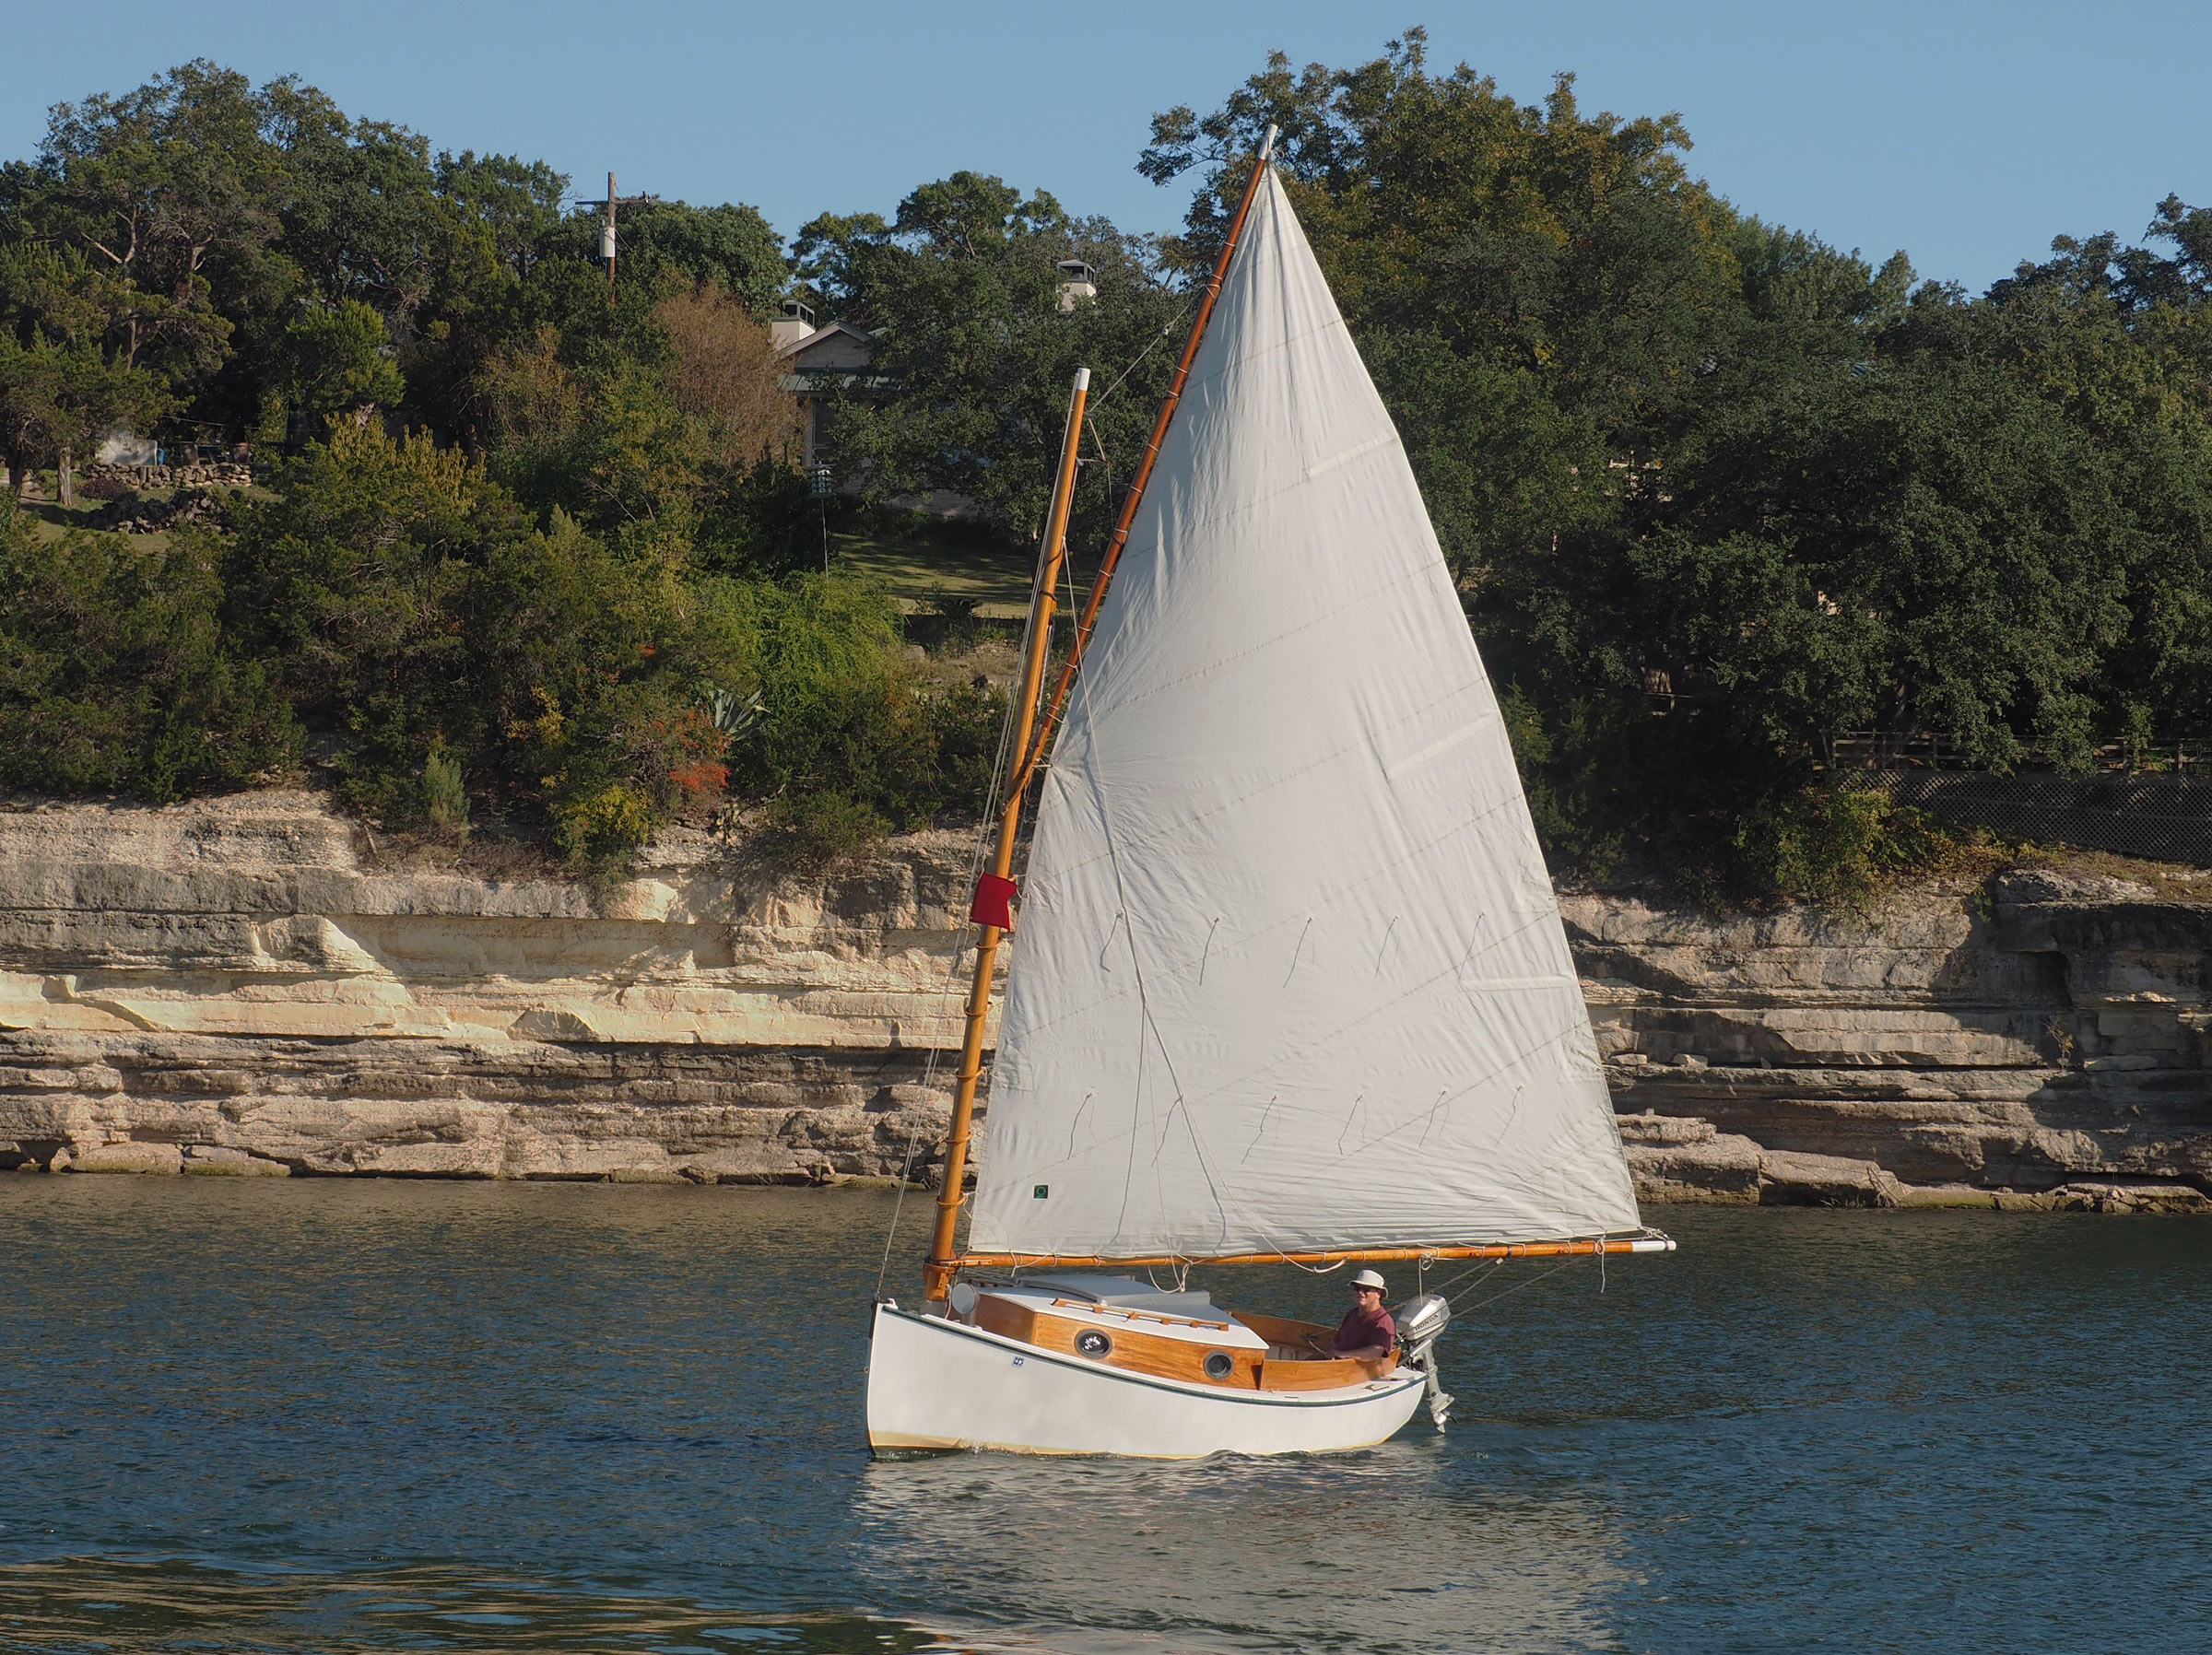
The boat features a single gaff sail with its mast stepped forward.
The original sail area was 247 sq ft, and if you want her rigged conservatively, this is probably the best size. In later modifications, Williams increased the sail area a little; there are sail plans for both 257 sq ft and 265 sq ft. There are also drawings for a shorter oval-shaped cabin with matching oval coaming, an outside ballast keel, conventional all-bent frames, and an inboard engine.
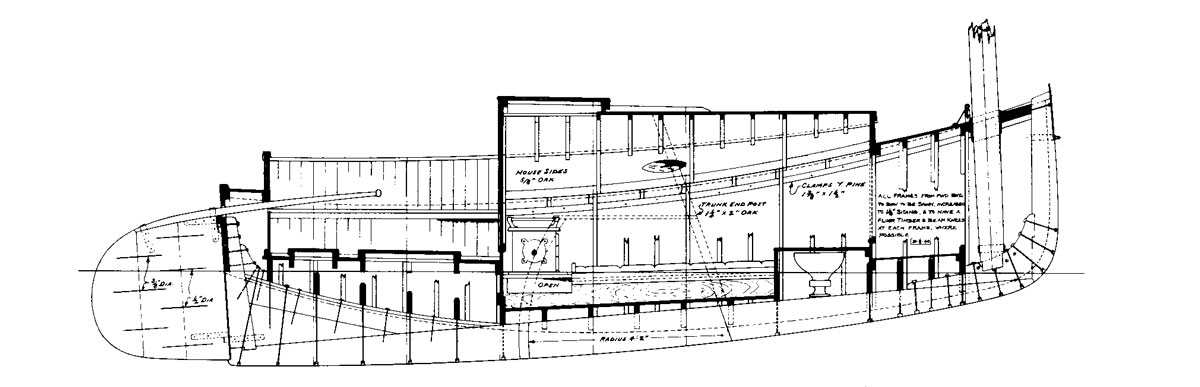
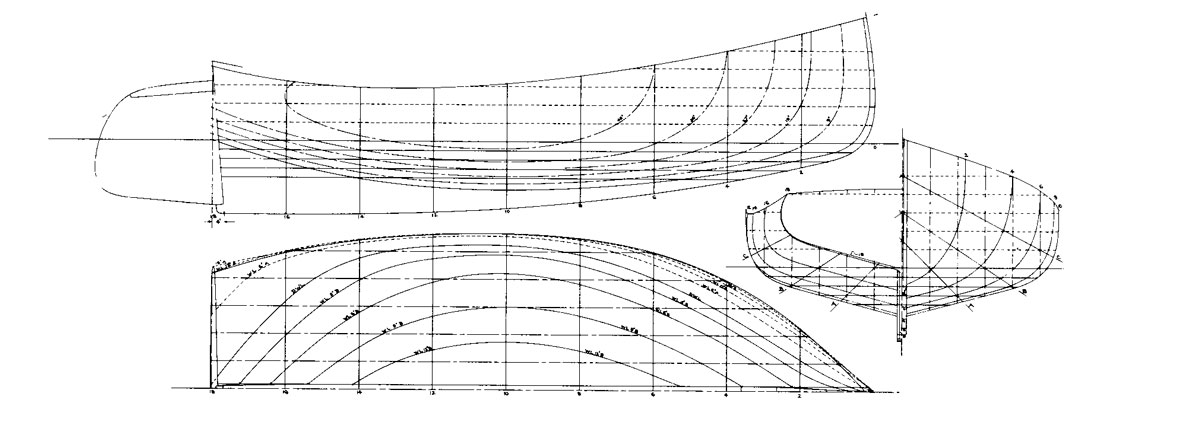
Plans call for carvel planking and solid backbone timbers.
This beautiful and traditional Cape Cod catboat from the dean of catboat designers, with her shallow draft, stiffness under sail, and overall roominess, could be just the cruiser you’re looking for.
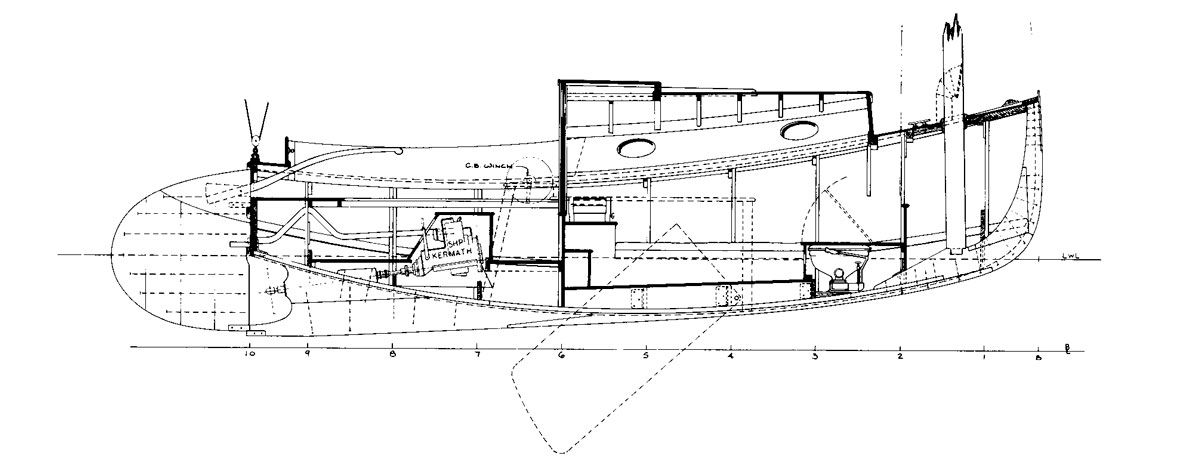
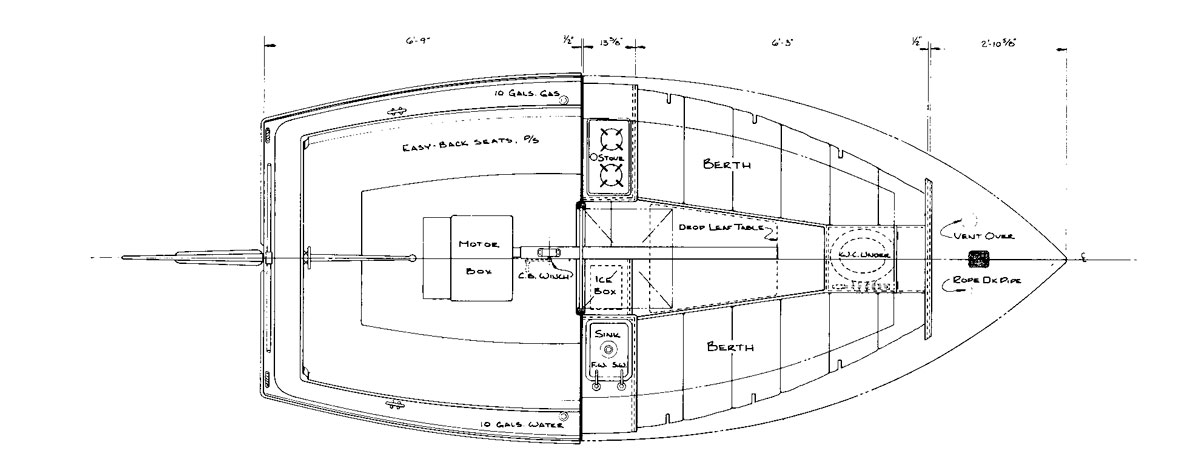
Arrangement plan
The set of plans for the Williams Catboat comes in 11 sheets including: four sail plans, lines, offsets, construction, outboard profile, cabin construction and sections, and keel model. WB Plan No. 56. $125.00.
Plan 56
DESCRIPTION
Hull type: Round-bottomed, centerboard catboat w/optional keel
Rig: Gaff cat
Construction: Carvel planked over sawn and steamed frames
Headroom/cabin (between beams): About 4′
PERFORMANCE
* Suitable for: Somewhat protected waters
* Intended capacity: 4-6 daysailing, 2 cruising
Trailerable: Yes; permit required
Propulsion: Sail w/auxiliary Speed (knots): 2-6
BUILDING DATA:
Skill needed: Advanced Lofting required: Yes
Alternative construction: Cold-molded, strip
PLANS DATA
No. of sheets: 11
Level of detail: Above average
Cost per set: $125.00
WB Plan No. 56
Completed 18′ Williams Catboat Images
F. Marshall Bauer
Some of the catboat’s traditional characteristics are the single gaff sail with its mast stepped well forward, cat’s-eye (elliptically shaped) portholes in the cabin sides, and a barn-door rudder.
Photo by F. Marshall Bauer
Ghosting along on a starboard tack, LYDIA shows Fenwick Williams’s saucy sheerline to good advantage. The green bottom, without a boot-top, is reminiscent of old-time yachts.
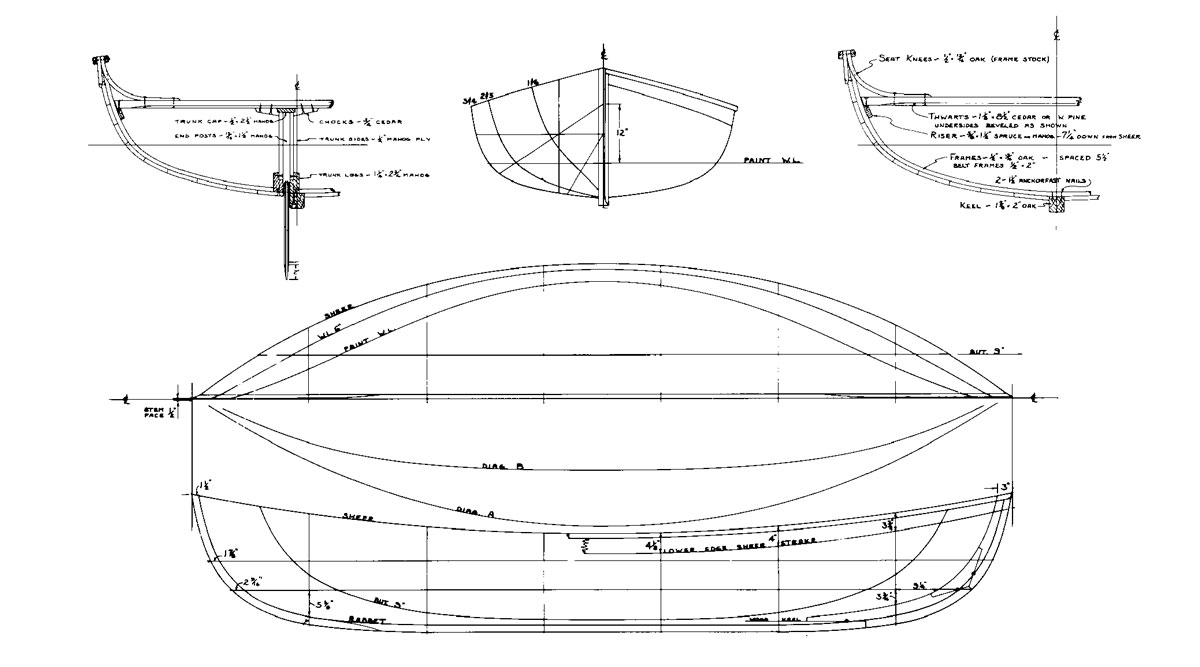
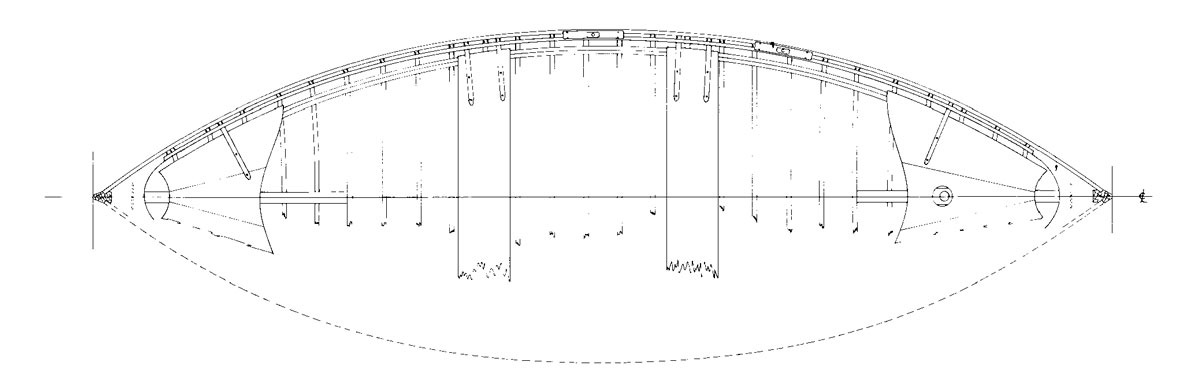
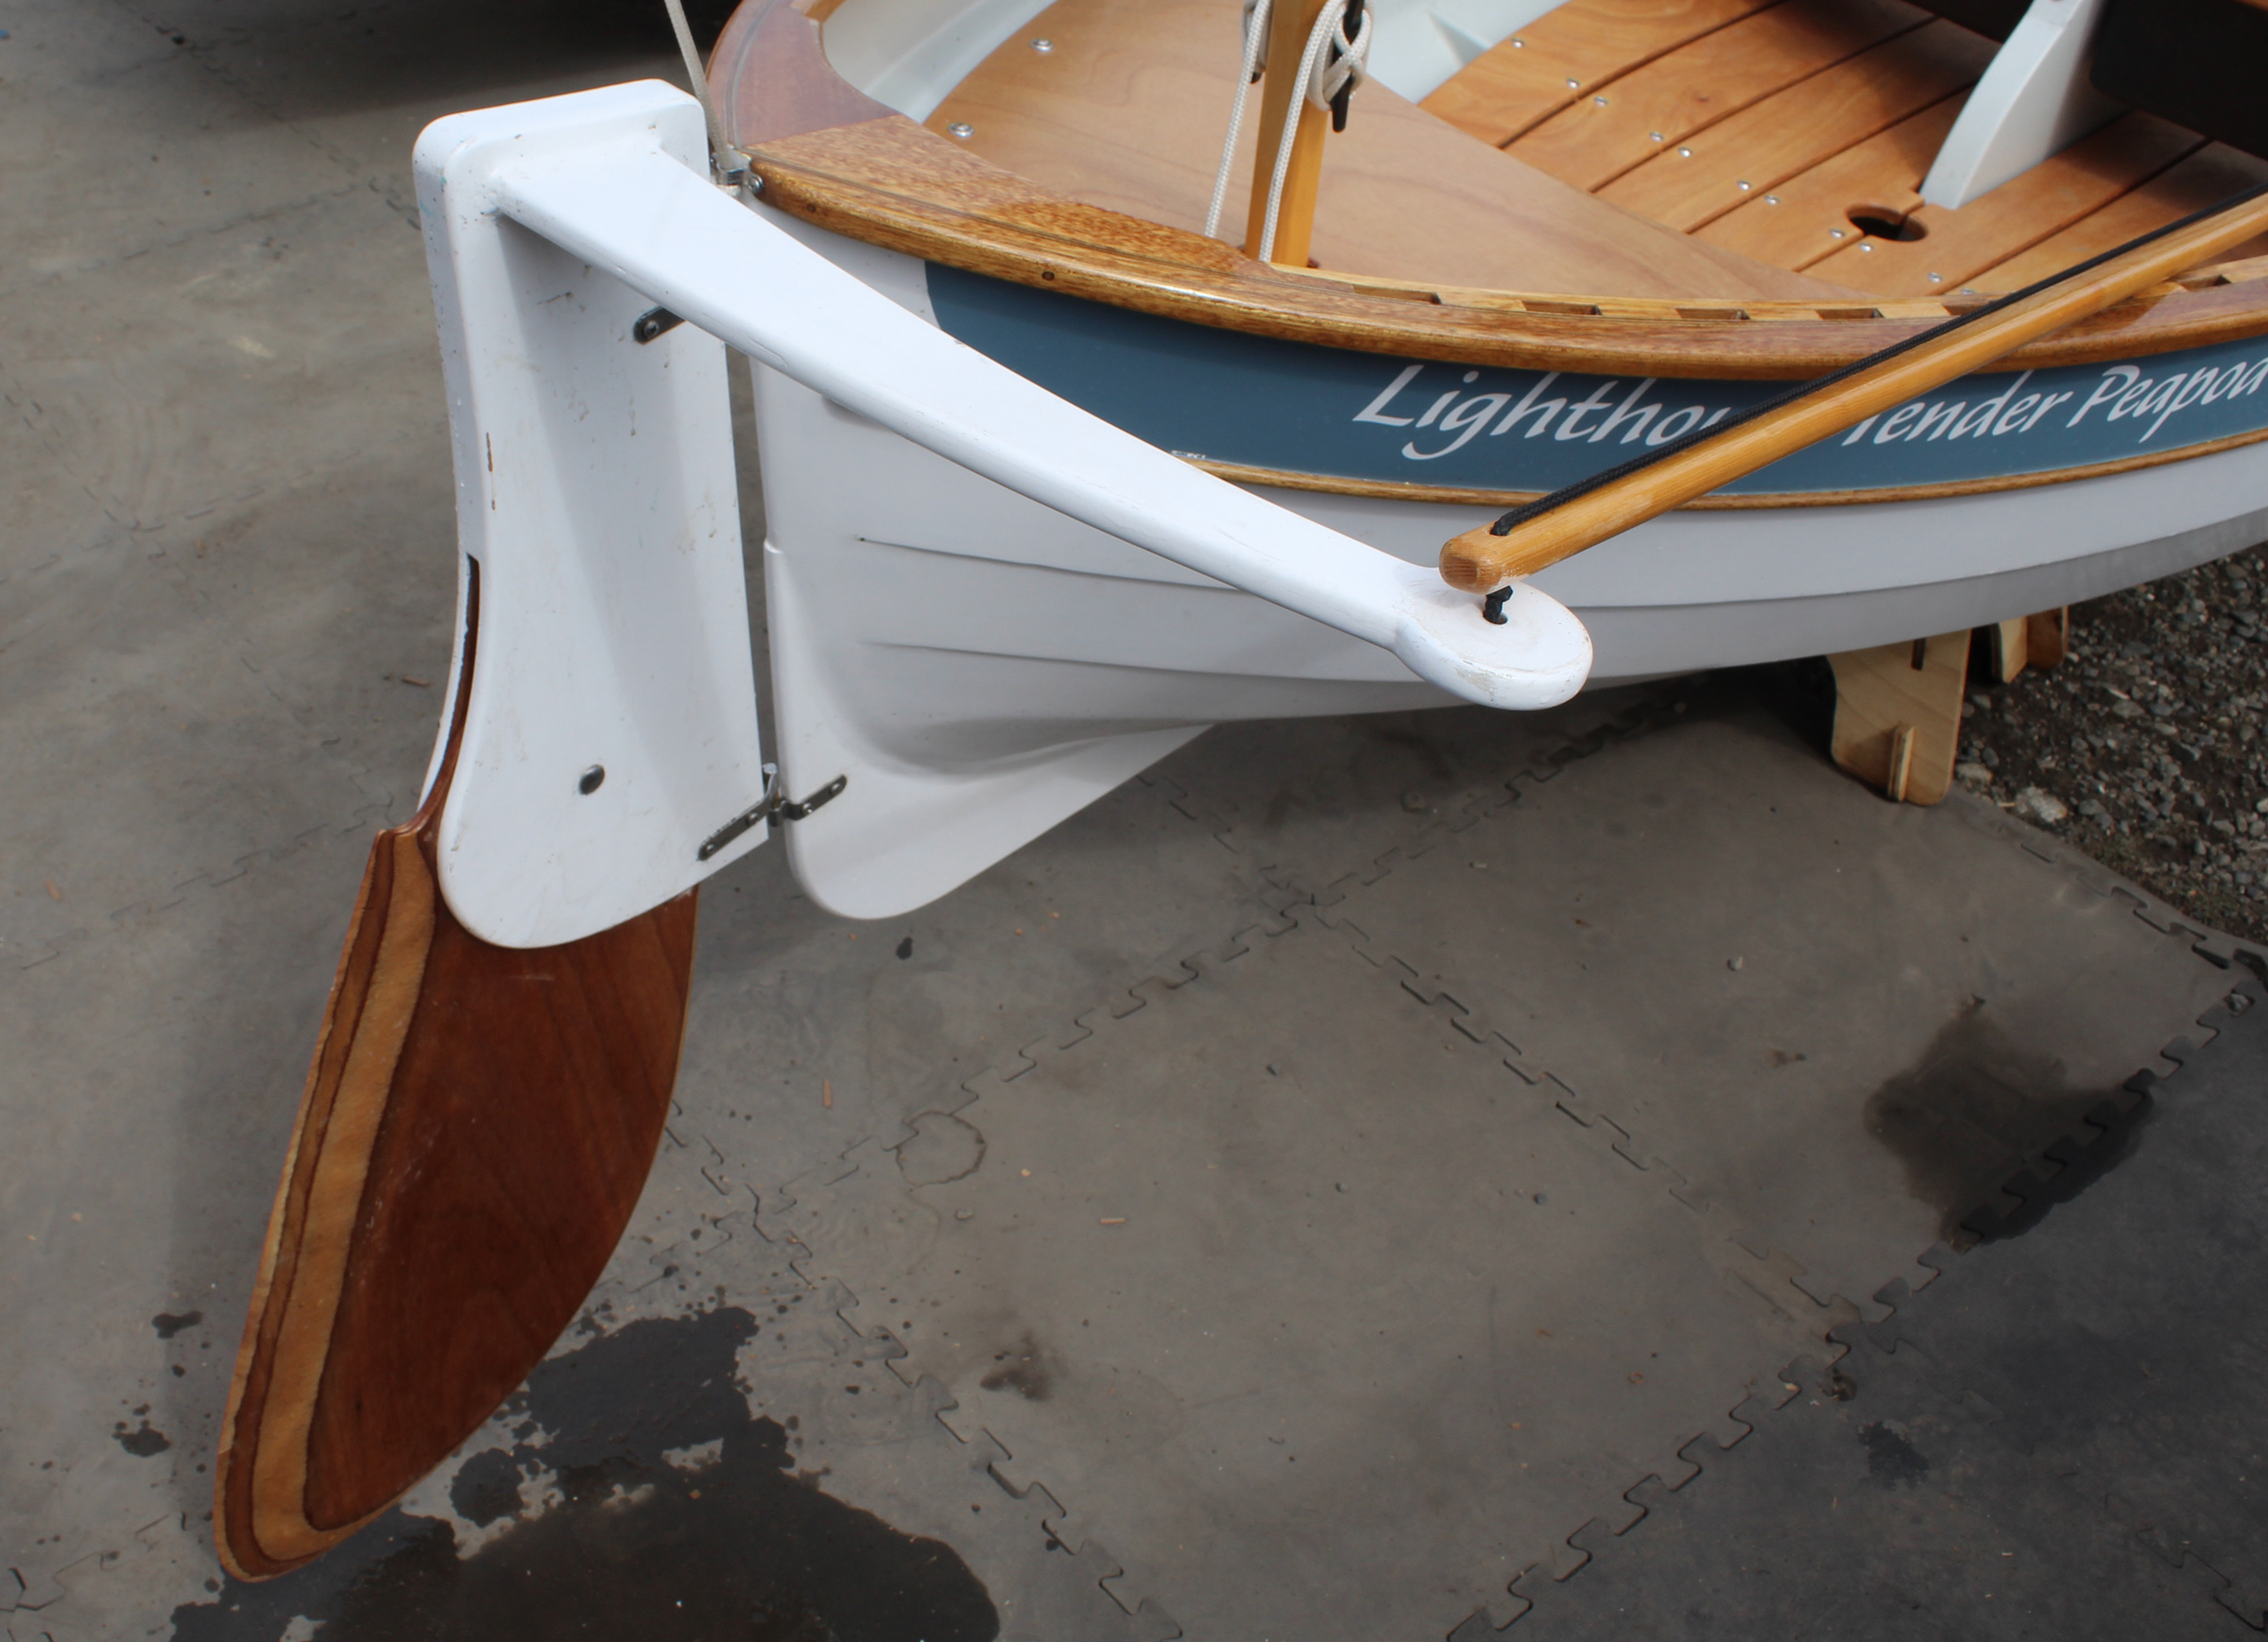
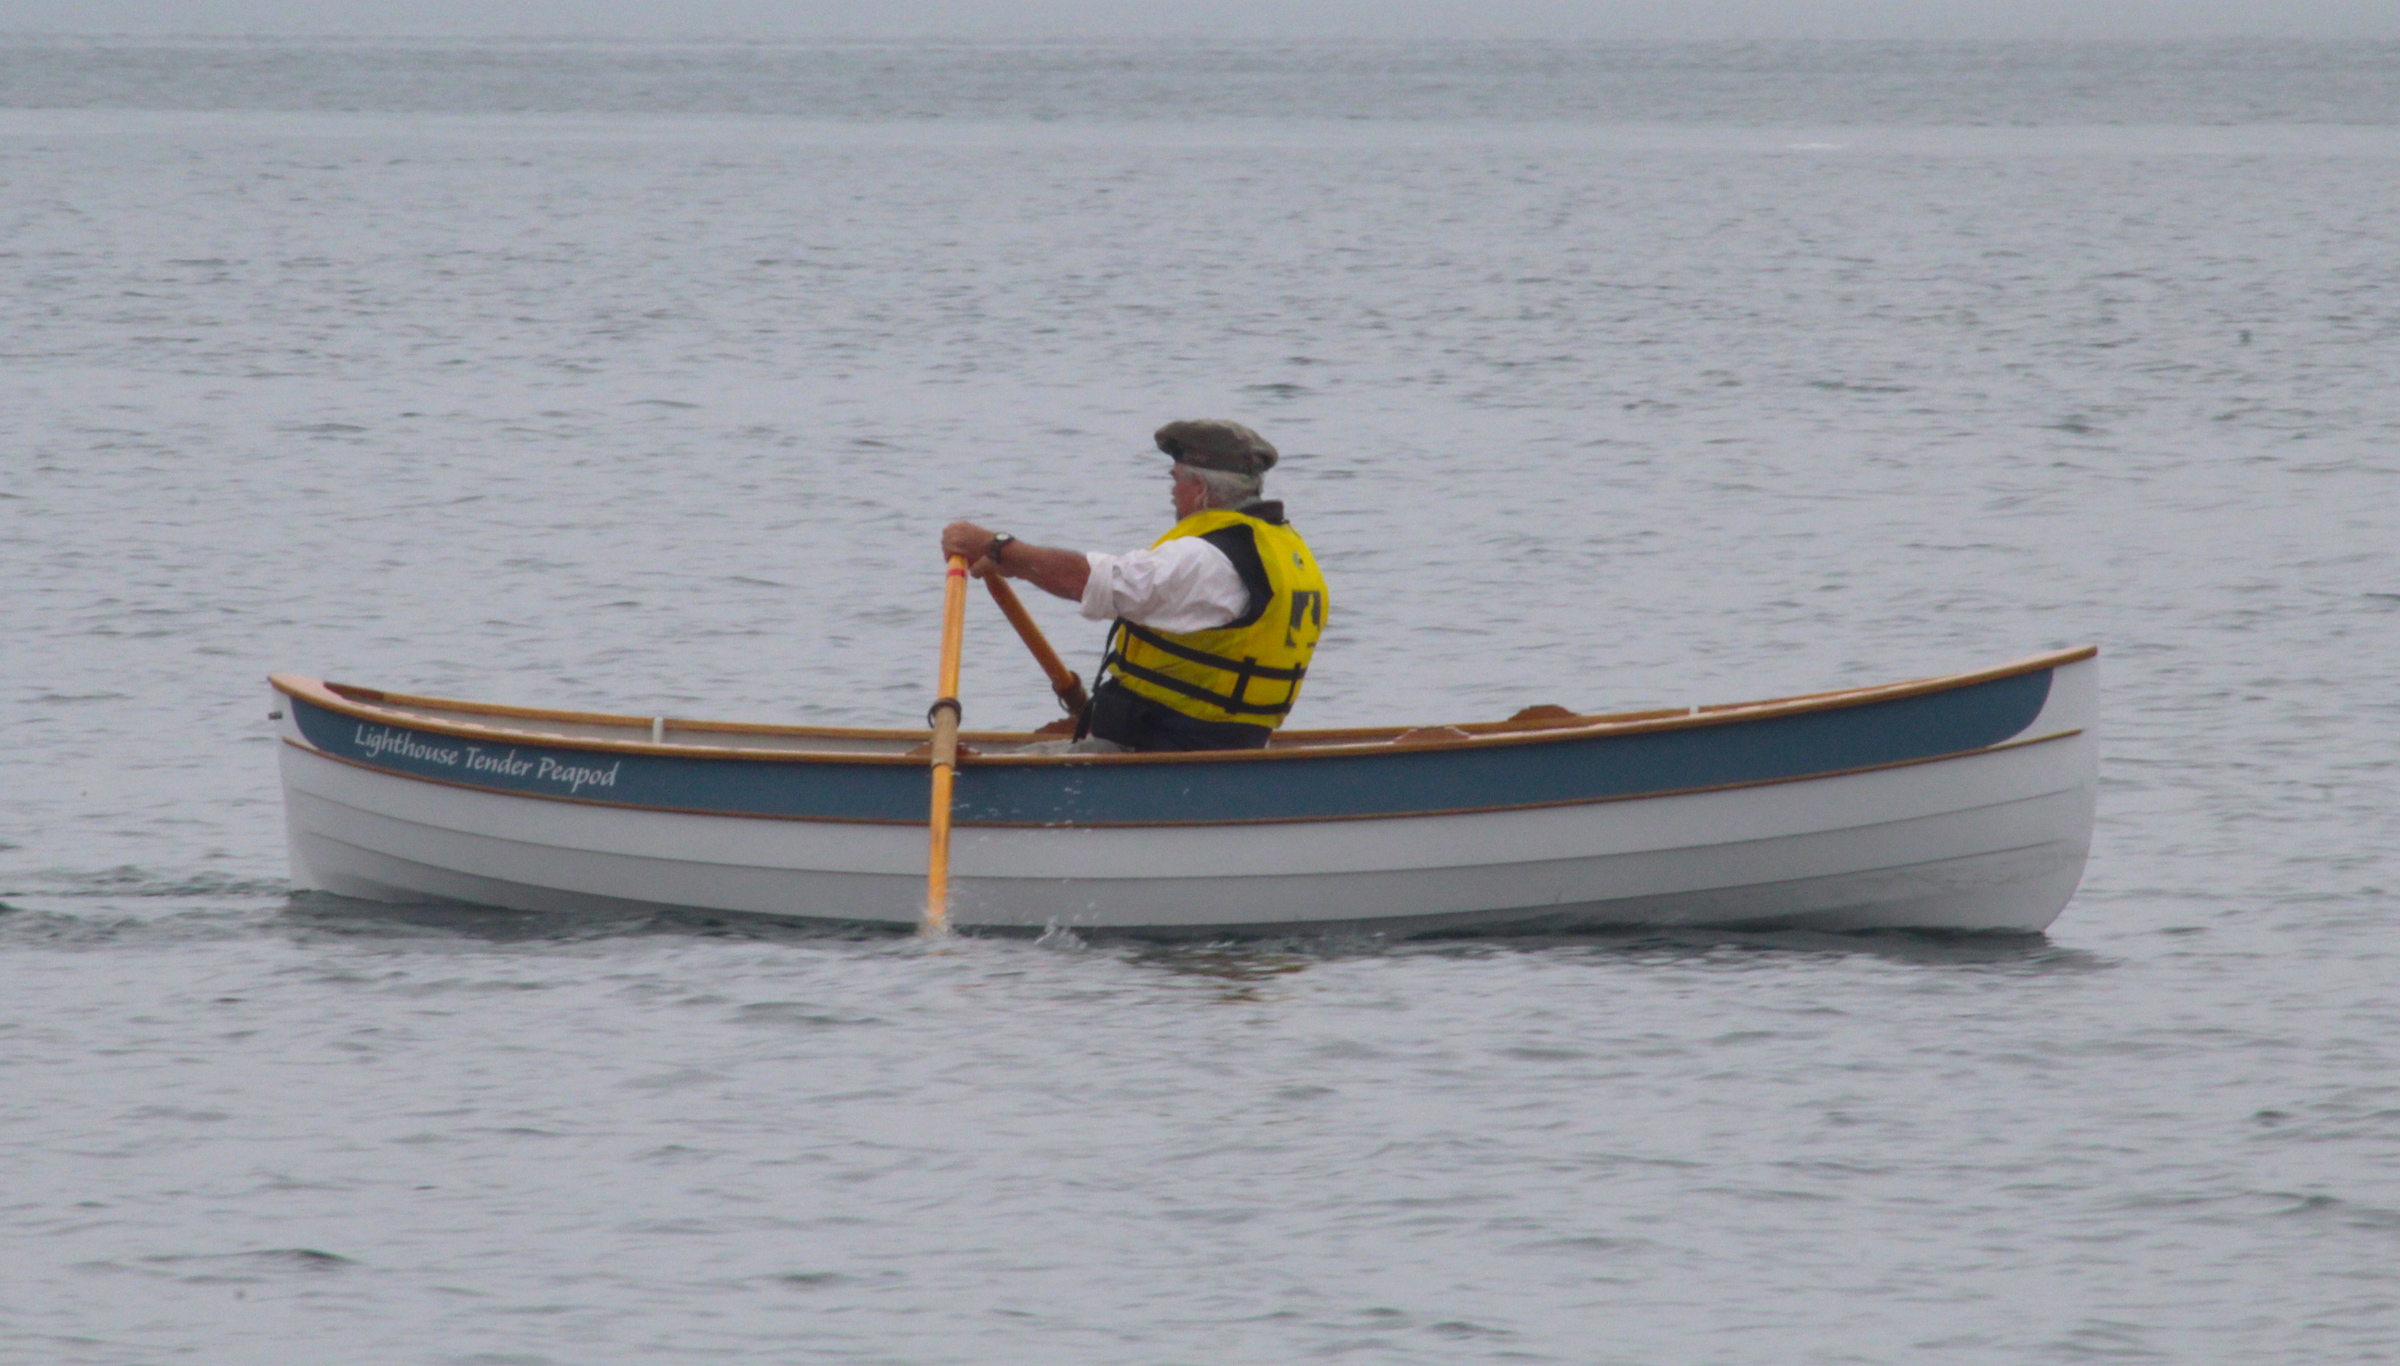
Peapods, which evolved as inshore working boats, were seen all along the Maine coast at the turn of the century. Used for lobstering, clamming, and all kinds of waterfront work, the original boats were usually 14′ to 16′ long and a bit flatter-floored and straighter-sided than most recreational peapods you’ll see today. This made them burdensome and stiff, but even heavily loaded they would row easily. And seaworthy! A good peapod was comfortable in conditions that would make you wish you were close to shore were you in another type of boat.
The Maine Coast Peapod is a design for traditional plank-on-frame construction.
Joel White’s lovely Maine Coast Peapod incorporates the best of these traditional properties. She will carry a big load and row easily, and is as seaworthy as a small open frames, all fastened together with good, honest bronze and copper. While not simple to build, this would be a great first project for someone interested in learning traditional boatbuilding techniques. She’ll be as fun to build as to use and when you step aboard your finished pod, you’ll know you’ve got a real boat under you-stable and solid.
Profile view
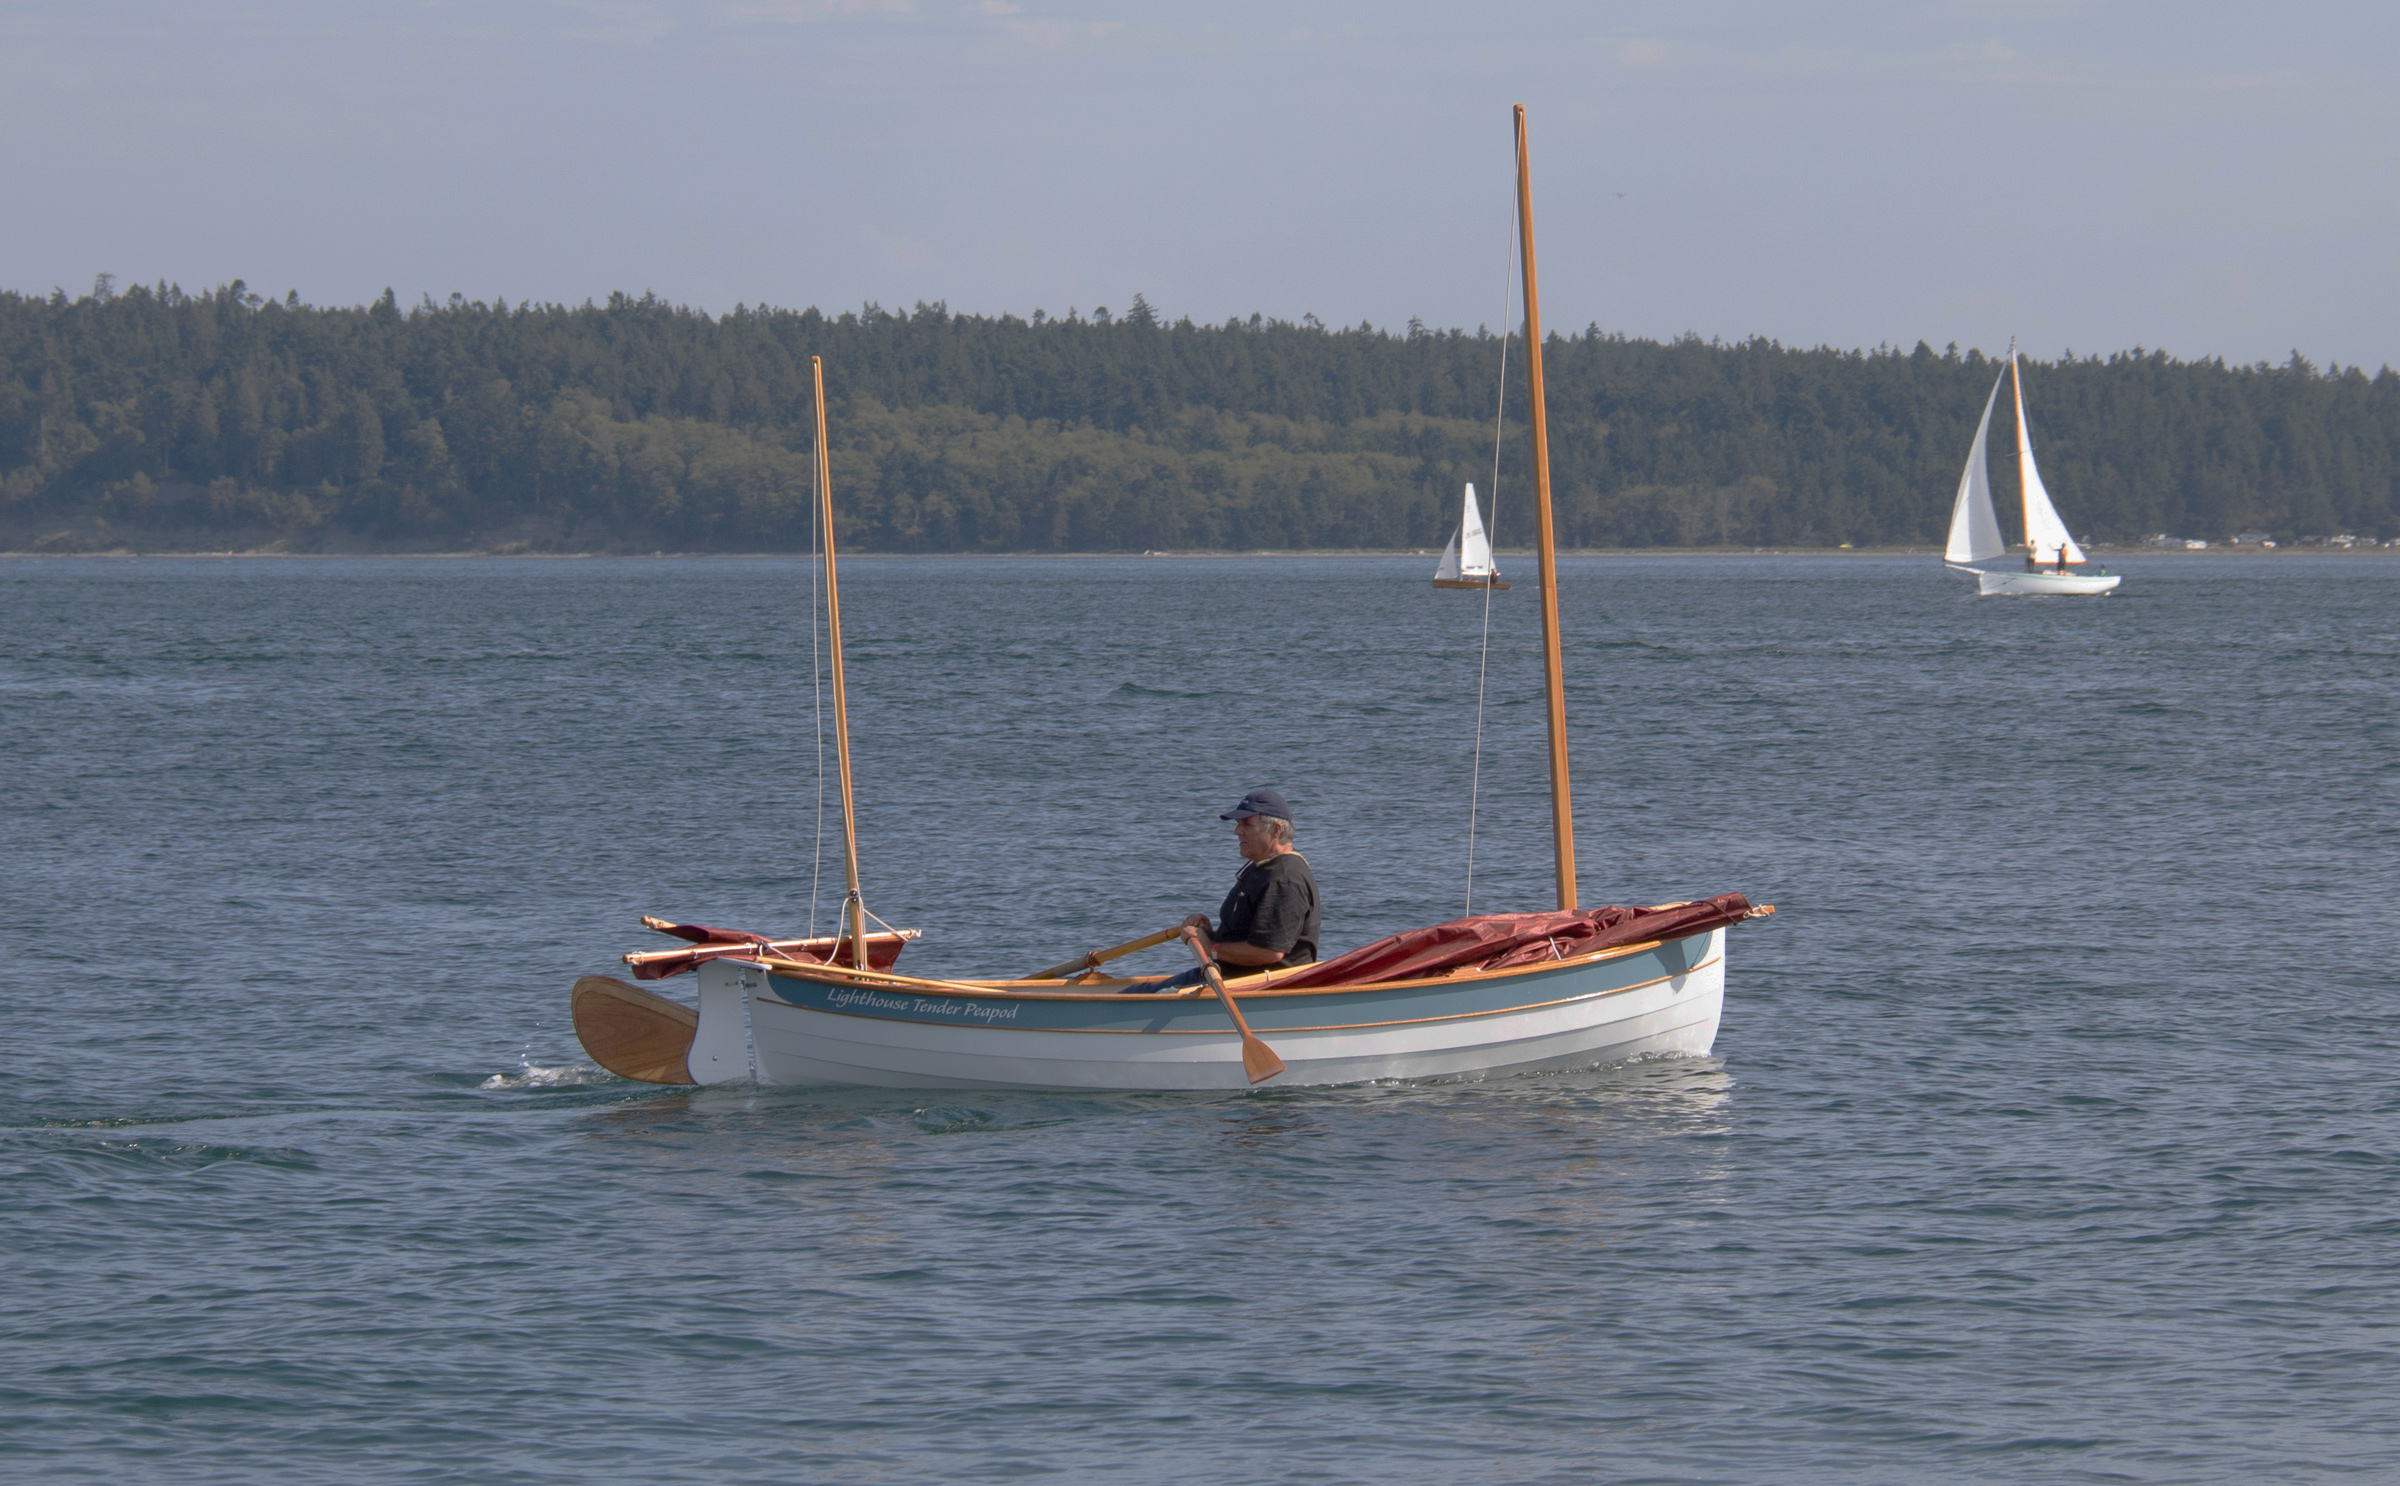
The standard lug rig, while not traditional for peapods, provides plenty of low-cost power. It is easy to make and sail; and the spars stow completely within the boat when not in use. The mast is unstayed-no standing rigging to kink, tangle, or snap. As a bonus, this boat can be rigged to sail in about two minutes.
Boatbuilders with moderate carpentry skills should handle the carvel planking construction well.
Plans for the Maine Coast Peapod consist of four sheets: lines, construction, lug rig sail plan, and full-sized patterns for molds, stems, and belt frames. No lofting is required. WoodenBoat Plan No. 94, $60.00.
The boat is designed to carry a lug rig with a boom, yard, and 12′ mast.
According to Nelson Zimmer, this little centerboard sloop, designed in 1946, has drawn inquiries throughout the years-an indication of her wide appeal.
Zimmer Gaff Sloop plans call for carvel planking construction over sawn frames.
Though only 21′ overall, the V-bottomed sloop has many of the features of a real deepwater vessel-a strong sheer, a bold stem profile, a well-proportioned cabin trunk, and a high-peaked gaff sail plan. The hull is beamy, with a very short aft overhang ending in a counter stern. Handling her would be very easy. Both her mainsail and jib are self-tending, and there are no running backstays to worry about. She should be reasonably fast and quite stable, with a sturdy oak backbone and 750 pounds of inside ballast. The boat displaces 3,100 pounds.
The five sheets of plans include drawings of above-average detail.
The five sheets of plans are very carefully detailed, and construction is straightforward and well-thought out. She has sawn frames at each station, around which the hull is set up and planked. Intermediate frames reinforce the bottom planking, while the topside seams are backed up with fulllength fore-and-aft battens. Her hull is strengthened by a full set of lodging and hanging knees-unusual to see in so small a boat.
With hard-chined sections and sawn frames, you won’t need a steambox.
Below, simplicity is the theme. There are two settee berths, a single built-in locker, and a large platform forward for gear stowage, to which a large hatch in the foredeck gives easy access. An outboard engine is optional.
The cabin has about 3’7″ of headroom between the beams.
This strong, sprightly little sloop is best suited to daysailing and camping/cruising.
Included in the Zimmer Gaff Sloop design plans are a special “Spar and Fitting Details” sheet (see WoodenBoat No. 58) and a complete rigging and block list of 60 items. WB Plan No. 44. $75.00.
Zimmer Gaff Sloop Design Highlights
DESCRIPTION
Hull type: V-bottomed, centerboard
Rig: Gaff sloop
Construction: Carvel planking over sawn frames
Headroom/cabin (between beams): About 3’7″
Featured in Design Section: WB No. 58
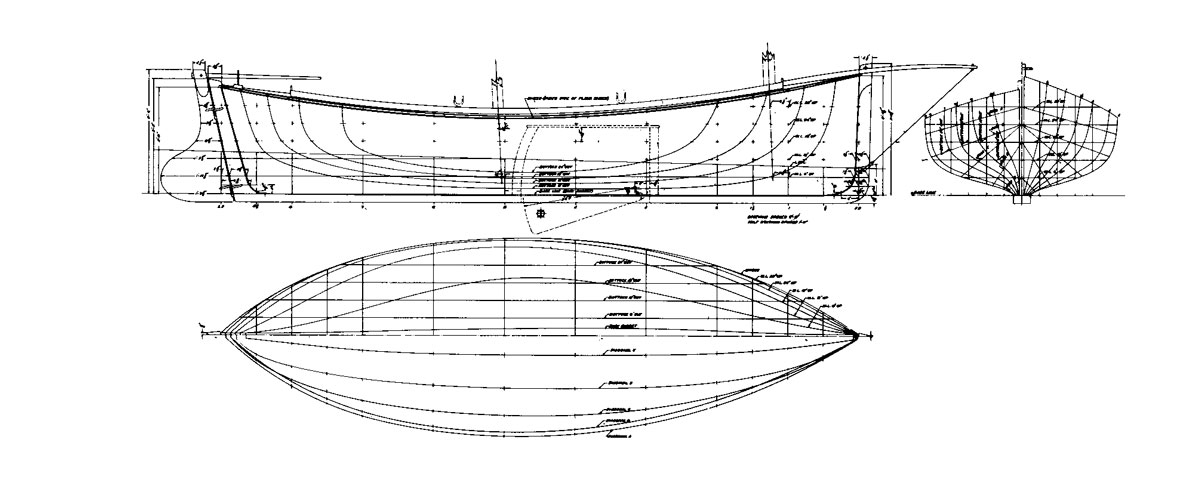
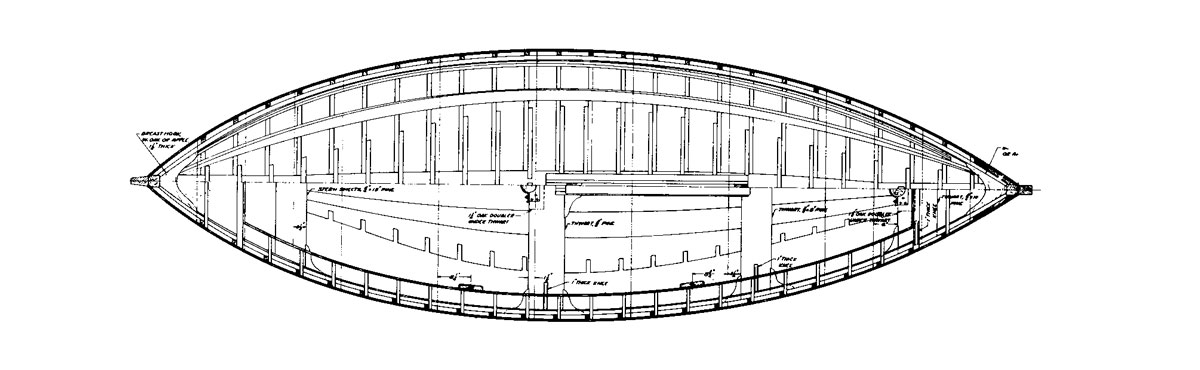
This boat is an historically accurate 18′ version of the well-known, reputed Mackinaw boat, a sailing and rowing shallop type that was popular on Lakes Michigan and Superior in the late 1800s. The originals, which ran 26′ or more, were known for their speed and seakeeping abilities, and this smaller version should exhibit many of the same endearing qualities.
Construction of Zimmer’s Mackinaw is straightforward plank-on-frame. Other building methods seem appropriate: lapstrake (traditional or glued), strip-plank composite, or cold-molded.
Designed by Nelson Zimmer, the Mackinaw Boat has a LOA of 18′ 8″, a 6′ beam, and draws 1′ 6″ with her centerboard raised. Her shoal draft will enable her to poke about in shallow waters and ground out at her mooring at low tide without trouble.
The traditional plank-on-frame construction will satisfy experienced hands and teach newcomers.
Her spars and gear are simple and inexpensive. An unusual detail is the main and mizzen halyards’ arrangement, combining peak and throat into one line for each sail. Oars serve as auxiliary power. Being long-keeled, she won’t tack very quickly, but with the right breeze, she’ll provide a good turn of speed. This roomy, shoal-draft boat will give a good account of herself in a broad range of wind and sea conditions, and with a variety of loads. She could be trailered, or simply hauled up on the beach for winter.
The 27′ late-19th century Mackinaw (drawn by Howard Chapelle from a half model) influenced designer Nelson Zimmer.
The plans for the Mackinaw Boat show good detail, and an experienced amateur or a professional would be able to build her. Although she is best suited for carvel planking, some similar boats have been built lapstrake. We recommend white cedar and oak, but red cedar, yellow cedar, or western fir would be alternative choices. The denser woods such as hard mahogany should be avoided.
Set the station molds perpendicular to the keel, and bend in the frames with the same orientation.
Further information is available in WB No. 45, WB No. 23 in the “Tidings” and “Designs” sections, and in Howard Chapelle’s American Small Sailing Craft. (This last reference is for the original.) WB Plan No. 14. $60.00.
Mackinaw Boat Plan Highlights
DESCRIPTION
Hull type: Round-bottomed double-ender with centerboard
Rig: Gaff ketch
Construction: Carvel planked over steamed frames Featured in Design Section: WB No. 23
PERFORMANCE
* Suitable for: Somewhat protected waters
* Intended capacity: 3-5
* See page 112 for further information.
Trailerable: Yes
Propulsion: Sail, oars, outboard Speed (knots): 3-5
BUILDING DATA
Skill needed: Intermediate to advanced
Lofting required: Yes
*Alternative construction: Lapstrake, strip, or cold-molded
PLANS DATA
No. of sheets: 3
Level of detail: Average
Cost per set: $60.00
WB Plan No. 14
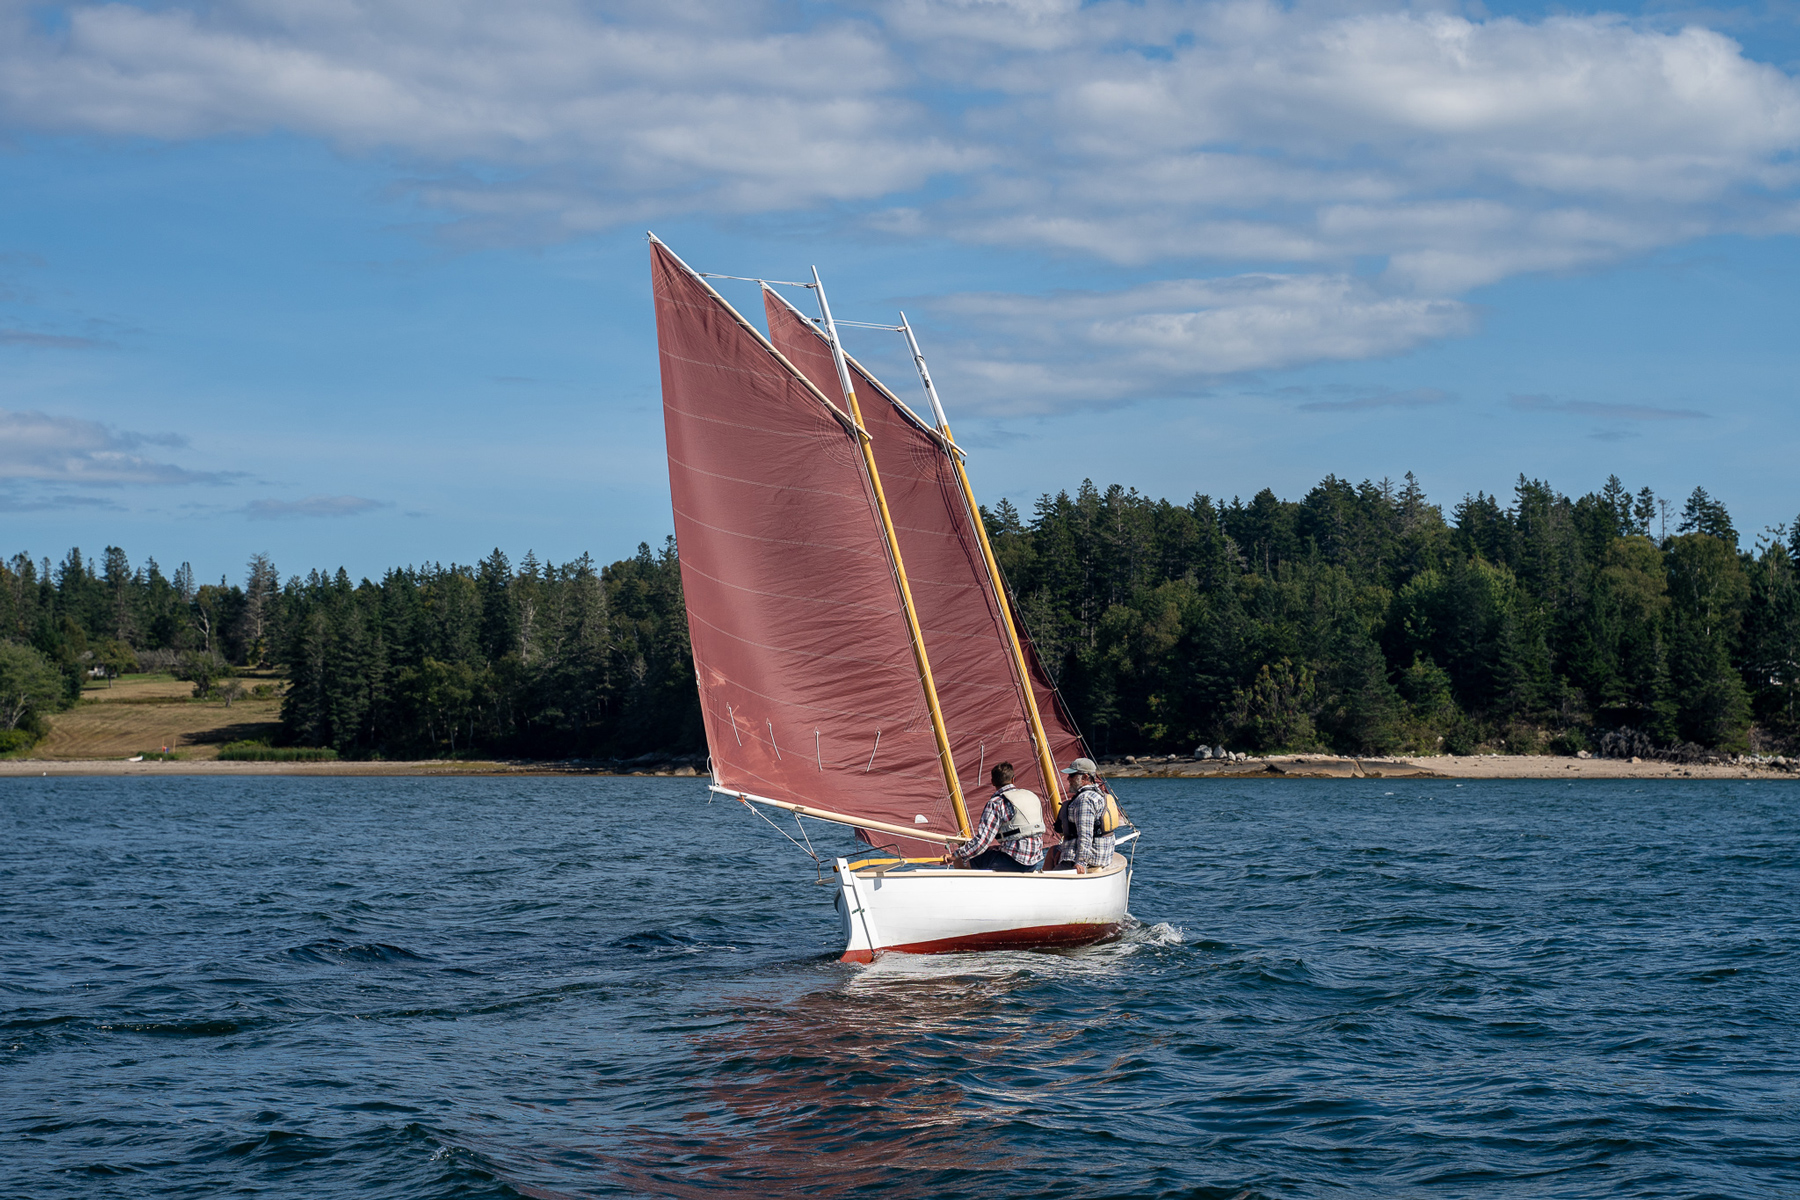
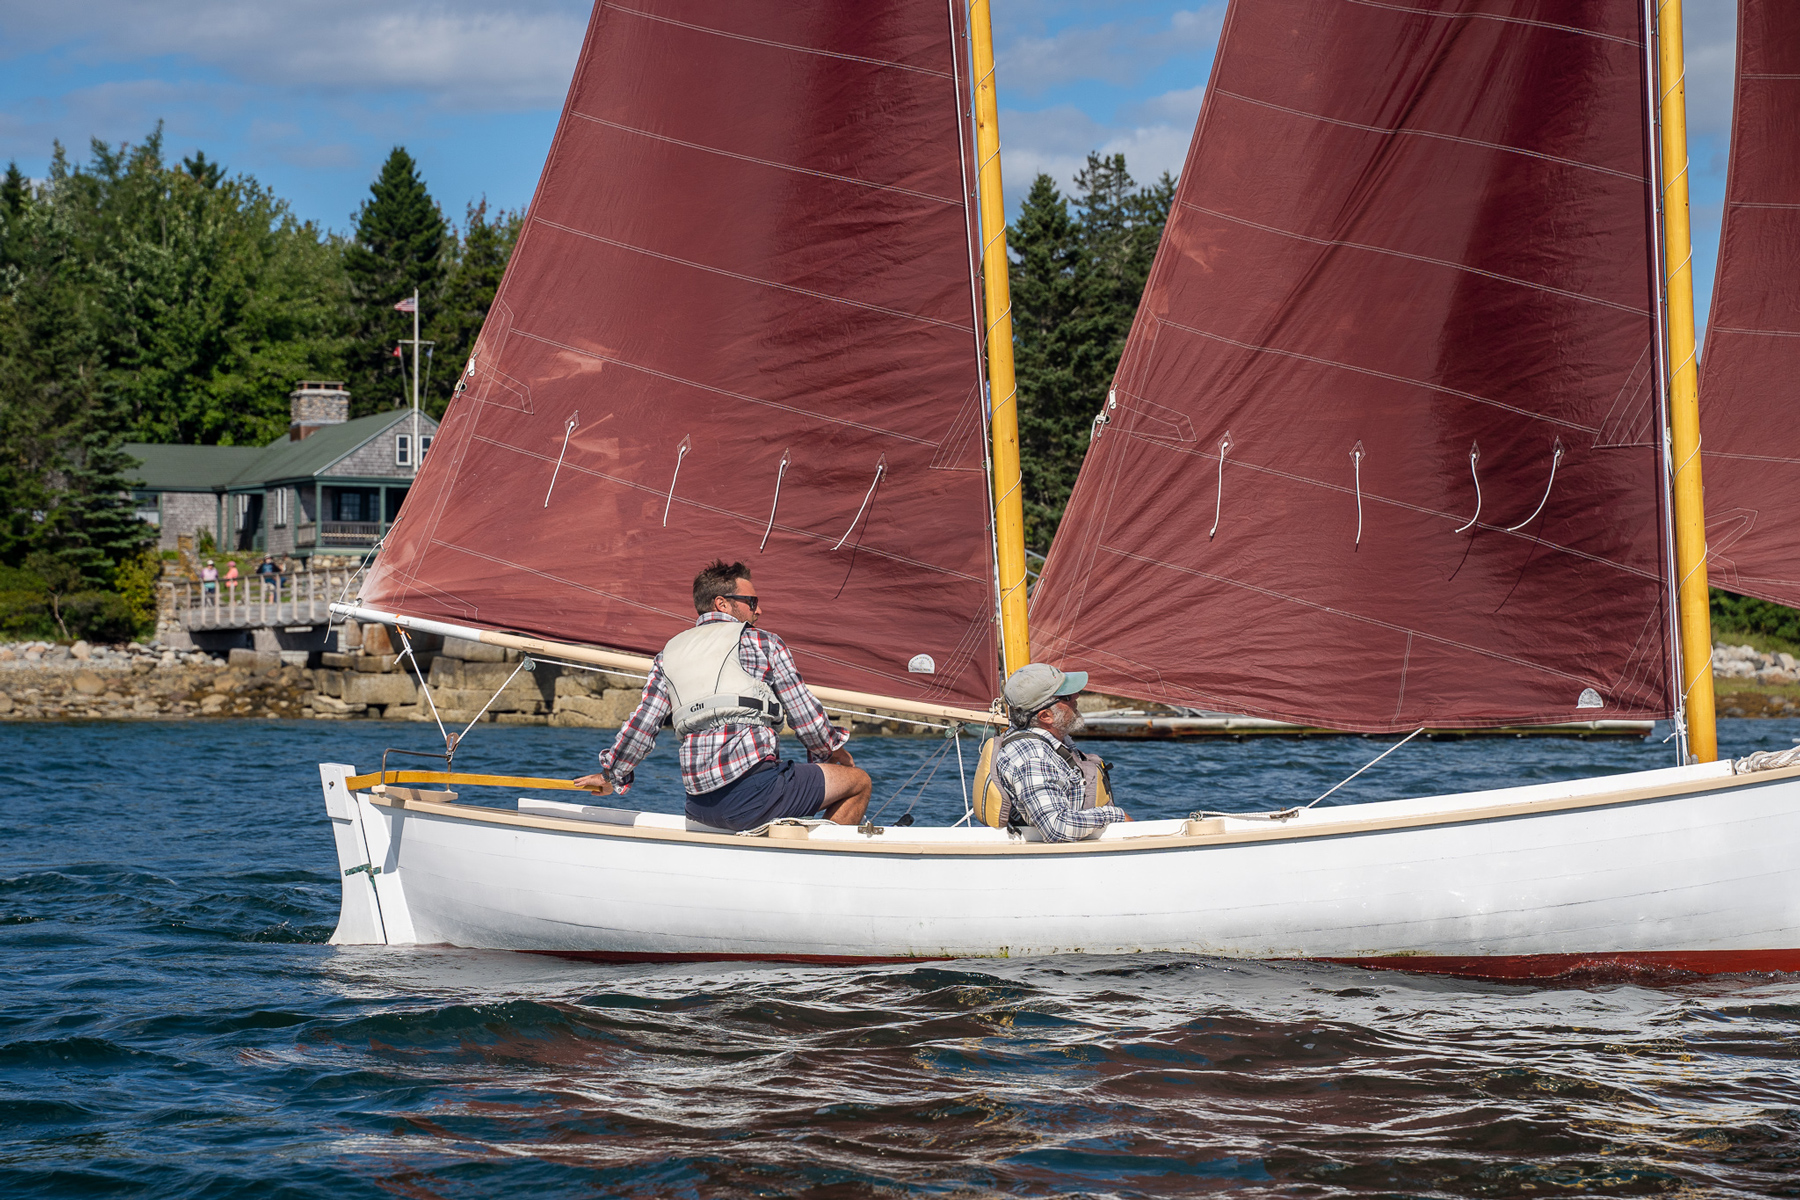
Completed 18’8” Mackinaw Boat Images
Photo by Matthew P. Murphy
This 18’ Mackinaw will sail in a range of conditions, though the first reef must be taken early. The reef nettles seen flying here are on the mainsail; they’re the last of four options, before dousing everything and proceeding under bare poles.
Being long-keeled, she won’t tack very quickly, but with the right breeze, she’ll provide a good turn of speed.
The plank-on-frame construction features Northern White Cedar planking and White Oak for the keel, frames, and centerboard trunk.
Inspired by an old Howard Chapelle design (see WB No. 82, page 114), Karl Stambaugh demonstrates that we need not mimic the short, fat, and inefficient stock outboard cruisers of the 1950s.
Redwing provides pleasant, airy accommodations for her crew and for the engine. A Chesapeake-style sunshade can be rigged over the cockpit.
Redwing’s nicely proportioned hull will be easily driven at moderate speeds in more or less protected waters. Although 5 hp will do the job, a 10-hp, four-cycle outboard would be a nearly perfect (if somewhat expensive) match. Quiet, dependable, and economical of fuel, these motors are loved by all who own them. To reduce noise, Stambaugh drew an insulated motorwell. We suspect you’ll hear the hiss of the bow wave during lulls in conversation. As with all motorwells, you should provide adequate ventilation and check that the well’s dimensions will permit your motor to tilt up fully.
Inboard profile
Unlike the traditional skiff construction specified by Chapelle, Stambaugh calls for sheet plywood and epoxy. Short of being holed, a hull built to these plans has no excuse for leaking a single drop, ever-a desirable characteristic, as bilgewater in flat-bottomed boats soon invades the accommodations. And Redwing’s plywood hull can live happily on a trailer.
Profile and body plan
Stambaugh’s drawings are filled with worthwhile details. For example, he shows a drip groove routed into the bottom of the rubrails. Gravity and surface tension will cause water flowing from the deck to drop from the rails at the groove rather than running down, and staining, the topsides.
Arrangement plan
Because of her relative silence and sharp control, the Redwing outboard skiff will be welcome in most any harbor. But we see her as in the evocative sketch on the title page of this book: pressing far upstream past the cattails.
Redwing design plans contain four sheets, including the arrangement plan, hull lines and offsets, and construction drawings. WB Plan No. 108, $70.00.
DESCRIPTION
Hull type: Flat-bottomed
Construction: Plywood planking over sawn frames
Headroom/cabin (between beams): About 3′ 6″
PERFORMANCE
* Suitable for: Protected waters
* Intended capacity: 1-4 day tripping, 2 cruising
Trailerable: Yes
Propulsion: 5-10 hp outboard engine
Speed (knots): Up to 6
BUILDING DATA
Skill needed: Intermediate
Lofting required: Yes
* Alternative construction: None
PLANS DATA
No. of sheets: 4
Level of detail: Average
Cost per set: $70.00
WB Plan No. 108
Completed Outboard Skiff Cruiser, Redwing Images
Photo by Bill Thomas
Designer Stambaugh estimates the materials cost for a Redwing 18 at about $5,000 (not including power). This figure assumes high-quality materials and finish.
Photo by Bill Thomas
The motor lives in an enclosed box, and is nearly silent. Cruising speed is about 6-9 knots, depending on choice of power.
Photo by Bill Thomas
At only 850 lbs, Redwing is of an ideal weight to tow behind an average car. But she’s also capacious, and will carry a couple and their gear on an expedition.
These plans have evolved from some modifications made by Joel White and WoodenBoat on the design of a Herreshoff Columbia model lapstrake dinghy now in the collection of Mystic Seaport Museum. Plans for the original 11 ½′ version were published in Building the Herreshoff Dinghy by Barry Thomas and were the basis for this 10% enlargement.
Spencer Lincoln
Particulars
Because lapstrake boats are vulnerable to plank damage when used as beach boats on rocky Maine shores, it was decided to go to smooth-planked carvel construction, with the plank thickness increased from 3/8″ to 1/2″. A pivoted centerboard was adapted so that the board could strike bottom without harm to itself or the trunk. A single boomless sprit rig gave the boat shorter spars and gave the crew less aggravation.
Spencer Lincoln
Line drawing
The plans for the Catspaw Dinghy are very detailed and include full-size mold patterns which, if used with the building instructions contained in WB Nos. 26, 27, and 28, should make this lovely round-bottomed boat easy to build for an amateur. Full-size patterns for the stem, transom, rudder, and station molds are included with the lines, offsets, construction plan, and sail plan. Lofting is not required. If one is determined to build a round-bottomed boat, this could make an ideal first one.
Spencer Lincoln
Profile, body plan, and half breadths and diagonals.
WoodenBoat’s Catspaw Dinghy carries three people in comfort; more can be accommodated if conditions are calm. Two people can carry her for short distances, as in loading on a truck or trailer, or lifting up and down a beach. She’s a good all-around boat, rows easily, sails well, and tracks well when towed. Although we are not enthusiastic about the idea, she could be powered by a small outboard. She is very seaworthy. Check out this installment of our Aboard Small Boats video series to catch the Catspaw Dinghy in action. WB Plan No. 12. $60.00.
Spencer Lincoln
Top view
Additional Reading
Need more detailed steps for building your Catspaw Dinghy? Purchase a print or digital copy of How to Build the Catspaw Dinghy from the WoodenBoat Store. This overview manual includes 32 pages of step-by-step instructions with plenty of detailed steps and black-and-white construction photos.
Plan 12
DESCRIPTION
Hull type: Round-bottomed, transom stern, centerboarder
Rig: Spritsail
Construction: Carvel planked over steamed frames
PERFORMANCE
* Suitable for: Protected waters
* Intended capacity: 3-4
Trailerable: Yes
Propulsion: Sails, oars, outboard
Speed (knots): 2-4
BUILDING DATA
Skill needed: Intermediate
Lofting required: No
* Alternative construction: Lapstrake or strip
Helpful WB issues: WB Nos. 26-28, or monograph
PLANS DATA
No. of sheets: 6
Level of detail: Extreme
Cost per set: $60.00
WB Plan No. 12
Completed Catspaw Dinghy Images
Joel White’s Catspaw Dinghy is an adaptation of Nathanael Herreshoff’s Columbia Dinghy.
JESSE performs best under fairly sizable oars — 7½′ or better—and has two rowing stations.
Drawn by a professional designer for his own use, Tursiops is a most personal and versatile craft. Properly handled, she can cross incredibly wild water, find a placid pond, and leave the tranquility untouched.
Tursiops combines moderate speed with comforting behavior.
She’s wide at her rail (28″) — most American touring kayaks carry about 24″ beam, and many British boats are 22″ or less. This relatively great beam takes little from her top speed and practically nothing from her touring pace, but it makes Eskimo rolling more difficult. The point is that she won’t capsize easily — and if she does go over, “wet rescues” will be easier than for narrow boats. In any case, her beam and nicely shaped ends give her gentle manners — there’s no treachery in this kayak.
Construction Profile
Designer Mike Alford describes the criteria that led to Tursiops’ creation: “My goal was to get across four or five miles of open water from the mainland to a string of uninhabited barrier islands. I needed to carry a fair amount of camera gear and a day’s rations. Any number of boats might seem satisfactory for this purpose, but the catch was that I didn’t want to stake a boat out or worry about tide stranding, vandalism, or motor theft. A sea kayak offered all the mobility and rough-water survivability called for, and had the advantage that it could stow unobtrusively under a bush.”
The Alford Sea Kayak can be Eskimo rolled, but not easily.
Tursiops’ graceful lines belie her simple construction — she has one of the prettiest sheet-plywood hulls we’ve seen. Alford has done a nice job of working the transition from the peaked foredeck to the flat (for securing gear) afterdeck-often an awkward area in similar designs.
Frames and bottom construction drawings.
This friendly kayak might be a nearly perfect “impulse boat.” She’ll ride happily on top of your car waiting to explore a stream running unnoticed under a highway bridge, and she’ll tackle open water with equal enthusiasm.
Plans for the Alford Sea Kayak include four sheets of drawings that show lines, offsets, construction, profile and deck arrangement, and include patterns and templates. WB Plan No. 85. $45.00.
Plan 85
DESCRIPTION
Hull type: V-bottomed
Construction: Plywood over web frames
PERFORMANCE
* Suitable for: Protected waters
* Intended capacity: 1
Trailerable: Cartop
Propulsion: Double-paddle
Speed (knots): 4-5 1/2
BUILDING DATA
Skill needed: Basic to intermediate
Lofting required: Yes
* Alternative construction: None
PLANS DATA
No. of sheets: 4
Level of detail: Above average Cost per set: $45.00
WB Plan No. 85
I grew up with a peapod. It was 6″ long and my father had whittled it, probably before I was born. It was one of the many models he had made that taught me to appreciate the beauty of the forms of boats. I was especially fond of this delicate double-ender, but despite having built real boats for decades now, I never built a peapod. I very much liked the type, but I was unwilling to tackle the challenge of carvel planking. So, when I saw the John Harris–designed Lighthouse Tender Peapod from Chesapeake Light Craft (CLC), I was eager to row and sail this adaptation of the classic type, updated to easy-to-build plywood construction.
Christopher Cunningham
The plywood adaptation of the peapod has a combination of lapped planks on the upper strakes the edge-joined planks on the lower strakes. The smoother bottom is easier to cover with fiberglass and less vulnerable to abrasion.
John had taken his inspiration from a working peapod built in around 1886 in Washington County, Maine. It was the same peapod I had been drawn to in American Small Sailing Craft. Author Howard Chapelle notes that particular peapod was, when the lines were taken off in 1937, the last of its kind ever built Its type was used for lobstering near Jonesport up to about 1938. John’s Lighthouse Tender Peapod has a shape very similar to the original working boat; the chief differences in the new boat are a sternpost that is nearly vertical rather than raked, and the absence of a keel, which allows his boat to sit upright on the beach.
The boat, built from a kit, is 13′ 5″ long with a beam of 52″, and is a combination of CLC’s LapStitch construction and standard stitch-and-glue. The three upper strakes are LapStitch, with overlapping edges, which cast shadows that highlight the curves of the hull. The lower three strakes are edge-joined, making it easier to apply fiberglass to the bottom and avoid the vulnerability of proud plank laps. The combination of different seam types isn’t as visually jarring as it might sound. I didn’t notice it until I crawled under the boat while it was resting in slings.
Christopher Cunningham
The thwarts are joined by plywood side pieces that aren’t intended as benches, but rather as part of a system that stiffens the hull for sailing. A block of flotation foam, painted black, hides in the shadow under the bow seat.
The seating arrangement includes stern sheets, a center thwart, and a seat forward that incorporates a mast partner at both its aft and forward edges. The three seats are made contiguous by narrow extensions that are somewhere between side benches and lodging knees. The combined structure, bolted together, gives the hull the stiffness to resist the torsion created by sailing forces. The plywood pieces are not glued to the hull, so they can all be removed for refinishing when the time comes.
Fixed underneath the seats are blocks of foam for flotation. The foam is painted with a flexible coating that resists chipping and wear. The coating is black and surprisingly inconspicuous in the shadows cast by the seats. The floorboards are fastened to the frames with stainless-steel screws and finishing washers so they too can be removed for maintenance. Aft of the centerboard trunk is an opening in the floorboards for a bilge pump.
Christopher Cunningham
The lever that operates the centerboard has loops of bungees to hold it in position. Note the black flotation blocks under the thwart.
The centerboard is braced by the center thwart and extends forward from it with an open slot for the lever that raises and lowers the board. Bungee loops slip over the lever to hold the board in position with some give if it strikes an obstruction while the boat is under sail. The rudder has a kick-up blade with a bolt and a star knob that adjusts the friction that holds the blade down or up. The skeg extends about 6″ abaft of the after stem before it curves upward. It allows the gudgeons to line up vertically, so the rudder is easy to attach while the boat is afloat and is more effective for steering than a rudder that pivots on an angled axis. The rudderstock has a fixed arm extending to starboard for a Norwegian tiller that reaches around the mizzenmast. I’d prefer a removable arm to make the rudder more compact when stowed, though that arrangement is more complex to build and would have to be much heavier. A cord connects the tiller and the arm, providing a very simple, flexible joint, which is kept from getting sloppy by tensioning the cord in a clam cleat at the forward end of the tiller.
Christopher Cunningham
The rudder stock has a fixed arm for the attachment of a Norwegian tiller, which works around the mizzen.
The spars are all rectangular in section with rounded corners. They’re tapered to minimize weight and achieve a pleasing appearance. The mainmast is laminated with three pieces of fir, and the mizzen is a single piece of spruce. In the kit they arrive with precut scarfs ready to be glued together. The main is a balance lug sail, loose-footed, and has an area of 73 sq ft. The mizzen is also a balance lugsail with its foot laced to the boom and has an area of 22 sq ft. The Peapod has an optional rig, a cat-rigged balance lug with an area of 79 sq ft.
Christopher Cunningham
The Peapod is a nimble boat under oar power and a pleasure to take out for a quick, uncomplicated outing.
When I stepped aboard the Peapod while it was afloat just off a cobble beach, its stability was readily apparent. I could lunge over the side and move about with ease. Sitting on the end of the center thwart, I rested my shoulders on the gunwale to look over the rail and still had plenty of support and freeboard. It was easy to imagine pulling a crab trap up over the side. My first task to get ready for sail was to lower the rudder blade. Leaning over stern, wrapped around the mizzen to reach the blade, was a further test of the double-ender’s stability. In a boat with a transom there would be some beam at the stern to support my weight off center, so I was surprised the Peapod didn’t mind having its tail end twisted.
Chesapeake Light Craft
For rowing through the lulls, the sails are easily dropped out of the way and the rudder blade retracted to clear the water.
With a fluky wind blowing at 12 knots and gusting to 15, I set out with the full main and mizzen set, just right for the conditions. For stiffer breezes, the first reef is to remove the mizzen and move the main from its forward position aft about 15″to its other step. The second reef is made by pulling the main about 24″ down to the boom in a traditional slab reef, which is made easy by the reefing lines on the luff and leech and three reefpoints. On a reach, the Peapod made 4 3/4 knots in 1-1/2′ wind-driven waves and rolling freighter wakes. The Peapod was quite lively and bobbed like a cork. The bow rose quickly and I never saw any spray, let alone have any come aboard. And I didn’t see any water sloshing up out of the open top of the centerboard trunk.
Chesapeake Light Craft
The yawl sail plan offers a total sail area of 95 sq ft.
The bow rounded up smartly with the helm a-lee for tacking, and then slowly crept across the eye of the wind; it didn’t get caught in irons, but I took to backing the main to snap it across. The Peapod did well to windward and in gusts resisted heeling quickly, giving me plenty of time to react by easing the sheet or rounding up.
I only sailed the Peapod solo, and for the gusty conditions I was most comfortable kneeling in the bottom rather than sliding across the center thwart. There was plenty of room for two more people. The full ends would give the additional crew room to move athwartships and shift weight to windward.
Chesapeake Light Craft
There is an optional sail plan for a lone 79 sq ft mainsail. With no mizzen in the way, a common tiller can be used.
For rowing, with both sails and spars resting in the hull and the rudder blade cocked up, the Peapod performed well. The retracted rudder barely touched the water so it didn’t drag or interfere with tracking or turning. The skeg gave the boat good directional stability without hindering maneuvering. The boat scooted along at 3 knots with a lazy effort, held 4 knots at an aerobic exercise pace, and did 4-1/2 knots in a short sprint. The Peapod has two rowing stations, one for rowing solo or with two passengers, and the other, about 32″ farther forward, for rowing with a single passenger in the stern. With three men aboard, the hull still shows two-and-a-half strakes above the water. There is plenty of freeboard. Chesapeake light Craft set the capacity at 650 lbs.
Chesapeake Light Craft
With three men aboard, the Peapod sits nicely on its lines and has plenty of freeboard.
With the Lighthouse Tender Peapod, Chesapeake Light Craft has brought a modern construction that is easy, inexpensive, and light to a traditional form that isn’t within reach of a beginning boatbuilder or well suited for recreational pursuits. It has the pleasing shape of its predecessor and the simplicity and ease provided by modern construction.
Christopher Cunningham is the editor of Small Boats Magazine.
Lighthouse Tender Peapod Particulars
[table]
Length/13′ 5″
Beam/52″
Hull weight/160 lbs
Draft, rowing/6″
Draft, sailing/30″
Sail area/95 sq ft
Maximum payload/650 lbs
[/table]
Kits for the Lighthouse Tender Peapod will be available from Chesapeake Light Craft sometime in February, 2020.
Is there a boat you’d like to know more about? Have you built one that you think other Small Boats Magazine readers would enjoy? Please email us!
No doubt about it, a catboat has more room for her length than almost any other boat. And here is about the smallest possible catboat you’ll find with real cruising accommodations for two. Inside her cabin, there’s sitting headroom above her two V-berths and a toilet between them, a stove aft on one side, and a sink and icebox aft on the other. Still, her cockpit is huge — six or seven adults can be comfortably seated for daysailing. If you’re most interested in seaworthiness, build the version with the self-bailing cockpit which, incidentally, has a big hatch for stowing the outboard auxiliary; if it’s shelter and a backrest you’re after, there’s a deep cockpit option.
Particulars
Options, in fact, abound on these drawings. There’s a plan for a fixed outside ballast keel rather than a centerboard; there are drawings for a rabbeted mahogany wale strake at the sheer, a plan for anchor-handling bowsprit and one for the installation of an inboard engine. You can fit her with either of the two rigs that are shown — gaff or marconi.
Inboard Profile
Like her smaller sister, Corvus, this 17-footer is designed to be easily and efficiently built. She is set up on her nine sawn frames, then planked and decked with 3/8″ plywood. She’s also designed with trailering in mind — her beam was kept under the 8′ limit, she won’t dry out in the sun and then leak when you launch her, and she’s very easy to rig and get underway. She’d be a wonderful boat for taking overland to distant waters.
Sheer and Body Plans
Plans for the Wittholz Catboat come in 11 sheets, including outboard profile, sail plan (with spar and rigging details and bowsprit arrangement), lines and offsets (with or without mahogany sheerstrake), construction, keel construction details and plan for open cockpit model. WB Plan No. 48. $90.00.
Arrangements
Plan 48
DESCRIPTION
Hull type: V-bottomed, centerboard (optional keel)
Rig: Gaff or marconi cat
Construction: Plywood planking over sawn frames
Headroom/cabin (between beams): About 4′
PLANS DATA
No. of sheets: 11
Level of detail: Above average
Cost per set: $90.00
WB Plan No. 48
Completed Wittholz Catboat Images
Monte Copeland
The keel version of the catboat has its greatest draft 13-1/2′ back from the stem, so it can be brought fairly close to shore. The bundled boom and gaff have been hiked up by the peak halyard to provide more headroom in the cockpit.
Sheila Harnett
The 220-square-foot sail here is held to the mast by hoops and lashed to the gaff and boom. The plans not using sail track along the boom.
It’s hard to find plans for a sliding-seat rowing craft that strikes a happy balance between an out-and-out high performance craft and a traditional Whitehall-type pulling boat that has been fitted with small outriggers and a seat that slides. To fill this void, WoodenBoat arranged with Joel White to sell the plans for such a “compromise” boat of his design — and it’s indeed a beauty.
Dave Dillion
Particulars
The Bangor Packet was designed with fun, exercise, and improved stability in mind — not to mention classic good looks. With a beam of 2′, she is proportionally wider than the usual shell or single scull, giving her noticeably more stability and allowing the rower to sit lower down inside the boat, rather than on top of it. As you can judge for yourself from looking at the plans, she still has nice long lines for speed, yet with some flare to her sections up forward and a graceful sheer, she is both better-looking and more seaworthy than the average competition boat.
Dave Dillion
Plans
Construction is cold-molded for light weight and strength. The hull is built upside down with three layers of 1/16″ red-cedar veneer glued to each other over a building jig. The stems are of laminated strips of 1/8″ Sitka spruce. A light plywood deck is fitted for seaworthiness, but is removable, being bedded rather than glued to the hull, and attached with oval-headed screws whose heads are left exposed. For cleaning and painting the interior every few years, you simply take off the deck. Weight of the finished hull is 55 pounds; the sliding seat and outrigger assemblies boost the total outfitted weight to about 70 pounds.
Dave Dillion
Plans
The first few boats were built over a trap-type jig made of the usual station molds with 3/4 x l” pine ribbands let into them and spaced about 1 ½” apart. This is still the easiest setup for building one or two boats, but it means that temporary staples have to be driven in abundance to hold each layer in place while the glue dries.
A solid building form is now used; while this is more time-consuming to make, it allows vacuum-bagging of all three layers at one time and eliminates the need for most of the stapling. It greatly decreases the production time. The 9’9″ racing oars really move her along, and there is usually a waiting line at her builder’s float to get aboard and try the fun. Being so close to the water, the feeling of speed is quite extraordinary.
Dave Dillion
Line Drawings
Plans for the Bangor Packet Rowing Wherry consist of five sheets, and include lines and offsets, outboard profile and deck plan, construction plan, and full-size loftings of stem and sternposts. WB Plan No. 36. $60.00.
Completed 20′ Bangor Packet Rowing Wherry Image
Lightweight and reasonably seaworthy, the Bangor Packet Rowing Wherry features a sliding seat and outriggers.
Sam Devlin designed the 13′ Candlefish skiff for a woodsman who wanted to haul it to Alaska’s Far North on his truck’s roof rack. That limited the boat’s size, but not its versatility. The hull form was inspired by the pangas that Devlin admired during his stays in Mexico. Like the pangas, the Candlefish has a high bow to cut through sloppy seas and a narrow beam to get the best speed and fuel economy from a small outboard.
Candlefish Particulars
The construction, typical of Devlin boats, is stitch-and-glue plywood. The interior of the hull is braced by three bulkheads. The two amidships support a broad seating area and enclose a voluminous compartment where the fuel tank sits and where gear can be kept dry and safely locked up. The forward bulkhead provides access to more storage and isolates a recessed foredeck from the rest of the boat. You can haul up a muddy anchor, chain, and rode, pile it on the deck, and pour a bucket of water over it, and the mess drains out through scuppers. A plank seat for the helmsman spans the cockpit between two side benches; a half frame underneath it strengthens the aft third of the hull.
Construction
The transom will take an outboard of 6 to 25 hp. With 20-hp at the stern, the Candlefish will speed a solo operator along at over 20 knots, and at 17 knots with a passenger aboard. The boat carves turns smartly and with its narrow beam it banks into them like an airplane. With a load of 1,300 lbs, the Candlefish won’t be moving quite so fast but it will still have over a foot of freeboard even at the lowest point on the sheer.
Open version
For a 13’4″ skiff the Candlefish 13 has more than its fair share of potential. You won’t have any trouble figuring out what it can do for you. If you need a bigger boat, Sam drew up two larger versions: the Candlefish 16 and the Candlefish 18. The Candlefish 16 can be built with an interior like that of the 13, or with just side benches for seating and an open cockpit without the central storage compartment. The Candlefish 18 adds a pair of plywood longitudinal bulkheads to brace the bottom and provide additional enclosed storage compartments. Plans for the Candlefish 13, Candlefish 16 and Candlefish 18 include detailed scaled drawings and offsets for the transom, bulkheads, and planks.
PERFORMANCE
Suitable for semi-protected waters
Intended capacity: 1-4
Trailerable
Propulsion: Outboard 5–20-hp (13′), up to 30-hp (16′), and up to 70-hp (18′)
BUILDING DATA
Skill needed: Beginner to intermediate
Lofting required: No
PLANS DATA
No. of sheets: 7 (13′), 9 (16′), 10 (18′)
Supplemental information: No
Level of Detail: Above average
Plans Format: Print or Digital
Cost per set: $85 (13′), $85 (16′), $155 (18′)
Related Publications: Devlin’s Boatbuilding Manual
Catboat owners tend to be a pretty devoted bunch and will seldom countenance any disparaging remarks on the type. There are some good reasons for their affection. Foot for foot, it would be hard to find a bigger boat than a catboat.
The great beam that provides all that room makes a catboat sail on her feet-having lunch while sailing is not such a scramble. For those who enjoy relaxed sailing rather than fiddling with lines, a catboat’s single, self-tending sail will be just the thing. And then there are submerged rocks and ledges to be avoided and, here too, the catboat excels, for with such shallow draft you can usually see an underwater obstruction before there is any threat.
Joel White’s long experience with small catboats shows in the Marsh Cat’s lines. With slightly less beam and a bit more bow overhang than many of her type, she will display good manners to go along with her good looks. Her cold-molded construction results in a light, tight hull that is well suited to trailering.
White’s six sheets of plans leave little guesswork for the beginner, and they include many touches that would make an old salt nod with approval. Since there are no reverse curves in her hull sections, planking veneers should go on without a fuss. This will not be a quick boat to build, but she’ll be long lasting and relatively low in maintenance requirements.
The six-sheet set of plans for the Marsh Cat Catboat includes: lines, full-sized patterns (for molds, stem, and expanded transom-no lofting needed), construction, sail and spar plans, lumber and fastening list, full-sized hardware drawings, and even directions for making ballast bags. WB Plan No. 95, $90.00.
The Shrike-R kayak profiled in this issue is unusual among boats. It isn’t designed to go anywhere. It isn’t even meant to stay upright. As a rolling kayak, it’s made to be capsized, intentionally, and be rolled upright by the paddler. I’ve built two Greenland-style skin-on-frame rolling kayaks and the total distance I’ve covered in all the years I’ve paddled them would be measured in yards rather than miles. Their use could really only be measured in rotations. While my interest in rolling a kayak began as a way to recover from a capsize without having to bail out, rolling for the challenge and satisfaction of it began with meeting Maligiaq Padilla, Greenland’s leading national kayaking champion.
Photographs by and from the collection of the author
Maligiaq won the Greenland National Kayak Championship nine times with his first win coming when he was just 16.
Maligiaq was born in 1982 and grew up in Sisimiut, a town above the Arctic Circle on the west coast of Greenland. A great-grandfather on his mother’s side was a seal hunter who lost his life when a seal he had harpooned dragged him and his kayak so violently that his back was broken. Maligiaq’s grandfather, Peter Johnsen, was the last of the kayak hunters in Sisimiut, and kept to the old ways after the other hunters in the area took to outboard skiffs.
In 2008, Maligiaq took part in a Greenland-style kayaking event at Lake Sammamish in Washington. The black kayak in the foreground and the off-white kayak that Maligiaq is stepping over are the two rolling kayaks I built and brought to the event. To the right of Maligiaq are the harpoons I made and to the right of the black kayak is my fabric version of a sealskin float of the type used by Greenland hunters.
John Heath, who was Maligiaq’s host during his visit to the U.S. in the late 1990s, wrote: “When Maligiaq was a small boy, he was riding in a rowboat with his grandfather when his grandfather’s gun accidentally discharged. With his hand badly injured, Peter was unable to row the boat. Even though he was only four years old, Maligiaq managed to row the boat to shore. Maligiaq’s father says that ever since that incident, Maligiaq and Peter Johnsen have been ‘as close as two coats of paint.’”
In 2008, for his demonstration on Washington’s Lake Sammamish, Maligiaq used my rolling kayak, paddle, and throwing stick. I’d made the kayak for travel, so the skin has a long zipper (the white stripe on the starboard bow) and the frame can be taken apart and packed into a ski bag and a duffel.
Peter taught Maligiaq about kayaking and how to hunt from one using a harpoon and a rifle. In 1994, Maligiaq learned to roll a kayak at the age of 12. The following year he entered the Greenland National Kayak Championship and won every event held for his age group. At the age of 15, he was teaching other teenagers in Sisimiut’s kayak club how to roll. In 1998, he competed with the adults in the national championship and as a 16-year-old was the youngest-ever winner. He went on to defend his title as champion eight times in the years that followed.
With the paddle and throwing stick tucked under the deck lines, Maligiaq is setting up to fall backward and roll up with just his hands.
Also in 1998, Maligiaq was invited to Maryland to be a special guest at the Delmarva Paddler’s Retreat, an annual event for North American devotees of the Greenland-style kayak. He brought with him his sealskin-covered kayak as well as his tuiliq—a sealskin paddling jacket. The kayak had been damaged in transit, and while he was able to use it for his demonstrations, it was hooked to one side and couldn’t hold a straight course. Maligiaq spoke very little English at the time, but he had a friend, John Heath, at the retreat who took him under his wing. John, a well-respected authority on traditional kayaks, had met Maligiaq in 1995 on one of his research trips to Greenland. After Delmarva, John drove Maligiaq to his home in Houston, where he stayed with John and his wife, Jessie. At the Southwest Canoe Rendezvous in Huntsville, Texas, Maligiaq demonstrated kayak rolling, with John providing narration.
The two events filled up the week or so that Maligiaq had planned to stay in the U.S., but after the Rendezvous he asked John if he could stay in Houston with him. John agreed and the short visit stretched out to 13 months. John and Maligiaq took road trips to both coasts, visiting kayaking clubs all along the way. During his time in Houston, Maligiaq built a new kayak in the Heaths’ garage.
The Walrus Pull involves securing a rope to the deck lines and leading it under the kayak. The other end of the line has a half-dozen people pulling hard and fast on shore. Here Maligiaq is keeping the kayak from flipping backward and driving him underwater. While this technique is part of the Greenland rolling competition, it was a matter of survival for hunters. It is the very circumstance that took the life of Maligiaq’s great-grandfather.
I was working in Seattle as the editor of Sea Kayaker magazine when John called me. I had struck up a friendship with John in the early 1980s after his son David found me at a 10-day boat show building a two-hole baidarka, which John had documented in 1962 and published in Bark Canoes and Skin Boats of North America. David recognized the frame, put me in touch with his father, and John and I stayed in touch until his passing in 2003. John wanted me to meet Maligiaq and we agreed on a rendezvous at a small lake east of Seattle.
Allunaariaqattaarneq or Qajaasaarneq are rope gymnastics that are included in the Greenland National Kayak Championships. The dozens of maneuvers were developed to provide strength and agility training for kayakers. Here Maligiaq is coaching me through flipping backward around the ropes. Maligiaq showed me another exercise where he sat on the ropes, as if on a swing, and made a full horizontal 360-degree turn without using his hands, lifting one leg after another over the ropes on each side. I tried it and managed to get turned around without falling off. Maligiaq said I was the first person he’d seen outside of Greenland who could do the exercise.
Maligiaq had a cold, but even though he wasn’t feeling well he did his rolling demonstration, with John narrating, seamlessly transitioning from one technique to the next. Each roll was more challenging as he held the paddle in increasingly awkward ways and eventually did rolls without it, using only his hands and then with one hand held against his chest. It was an impressive performance that left a deep impression on me not only for his skills but also how generous he was with his time and willingness to perform for an audience of one while he was not feeling well.
After meeting Maligiaq, I practiced Greenland rolling techniques and began doing my own rolling demonstrations at sea kayak symposiums. When I was invited to the Mediterranean coast of France to demonstrate Greenland kayak construction and rolling techniques, the attendees helped me assemble my take-apart rolling kayak by installing the pegs and lashings. After the canvas skin was slipped over the frame and zipped closed, I did my repertoire of rolls. The kayak sits very low in the water with the aft deck nearly awash, which makes difficult techniques like hand rolling easier.
Maligiaq’s English was still moving toward fluency at that time, and I had the impression that he was also rather shy, so I didn’t pepper him with questions as much as I would have liked and those that I did ask were often answered by John on Maligiaq’s behalf. Maligiaq did have a quick answer when I asked if he’d found any American food he liked: “beef jerky.” It reminded him of dried seal meat.
The balance brace is not a skill tested in the Greenland championship but it was one Maligiaq showed me and after I learned how to do it I demonstrated it here in a borrowed kayak in Brittany. The position is a good way to be stable and relaxed in that point halfway between capsized and upright. Manasse Matheussen, a Greenland hunter and the winner of the 1949 World Kayaking Championship in Denmark, could even sleep in this position. He wouldn’t go hunting with anyone who couldn’t do this on lengthy days of paddling.
After seeing what Maligiaq could do with a kayak, I came to appreciate rolling as more than a means of recovering from a capsize. I’d built a handful of Greenland kayaks as seagoing vessels but I was intrigued by all the variations and the gymnastics rolling required. I built two new kayaks for rolling, making them shallower and narrower until the second one floated me with the aft deck a fraction of an inch above water level. The difference that made for rolling, especially lay-back rolls, was a game changer. Instead of my putting a lot of effort into raising myself up onto the deck, the stern of the kayak sank and scooped me up.
One of the Greenland championship skills I practiced after meeting Maligiaq is paddling upside down. In competition, points are awarded for the number of meters traveled this way.
I never got anywhere near Maligiaq’s level of skill. He could do a straitjacket roll with his arms crossed over his chest. I peaked at rolls that were several lesser degrees of difficulty. The only thing I could do better than Maligiaq was make a bigger splash when I capsized.
Whenever I came to the end of a rolling demonstration, I would tell the audience that I would conclude with the trick Maligiaq used to finish his demonstrations. After I slipped out of the cockpit I would pay my tribute to him by doing pushups on deck.
Maligiaq visited the Seattle area again in 2008 and 2009 for a Greenland-style kayaking event. As a young man in his mid-20s he no longer seemed shy and had a ready smile and excellent English. In the years since I had last seen him, he had been promoting not only the Greenland kayak arts but also Alaska’s traditional kayaking. Generations of native Alaskans had grown up and lived without the kayaks that had sustained their ancestors for millennia. Maligiaq sought out the elders and brought their knowledge back from the brink with youth classes in 33 schools around the state. Students built more than 200 kayaks in those classes.
During the 2008 event, I asked Maligiaq to have a picture taken with me. He agreed, but only after saying “You’re too tall.” His name means “medium-sized wave” in Greenlandic.
After 10 years in Alaska, Maligiaq—married and the father of a son and a daughter—returned to Greenland in 2020 where he continues to pass on his knowledge of traditional kayaks. One American paddling magazine acknowledged Maligiaq as “perhaps the greatest sea kayaker in the world.” A fellow Greenlander says in his homeland Maligiaq is regarded as an inuktialak, a great human being.
The modern sea kayak has evolved far from its roots as the hunting tool of the Inuit. The comfortable cockpit, reassuring stability, and heavy construction of today’s typical touring kayak make for an easy ride, but at no small cost. The first paddle in a light, narrow, V-bottomed West Greenland-style kayak is a revelation. The boat accelerates quickly and easily, it edges and turns willingly, and rolls can be executed with aplomb.
The Shrike line of kayaks from CNC Kayaks is based on measurements taken from an original Inuit Disko Bay kayak now in the collection of the Canadian Museum of Civilization in Ottawa, Canada. Construction of the Shrikes is as simple as it can be, using light plywood, fiberglass, and epoxy to re-create the look and feel of the native boat while retaining the safety offered by solid bulkheads and fiberglass sheathing.
CNC Kayaks
The full-size Shrike offers a roomier cockpit and higher freeboard.
Nick Crowhurst and his son Christopher (CNC stands for Christopher and Nick Crowhurst) have shared a lifelong passion for traditional kayaks and paddling skills. The original Shrike was created by Nick, and the design was later modified by Christopher to answer calls for one version optimized for touring and another ideal for rolling.
The plans and instructions are offered for free through their website and invite builders to first select one of three basic versions, and then fine-tune that design to create a boat that’s an exact fit for the kind of boating they have in mind. The principal options affect the deck and cockpit; all versions have the same hull shape below the waterline, and therefore will have a similar feel on the water.
David Dawson
The Shrike range is built stitch-and-glue, and the detailed instruction manuals and full-sized plans are available at no cost from the designers. I used 3mm okoume plywood and, wanting to keep the weight down, was careful not to overdo the fiberglass and epoxy.
There are three versions. The Shrike is the original Shrike from which the variations were developed and features the Greenland hull with a modern, keyhole cockpit. This boat would be an easy first step into Greenland-style kayaking. The Shrike-Too has what’s come to be known as an ocean cockpit. Much shorter than today’s standard cockpit designs, it keeps the paddler tied to the boat more effectively. Or, with period leather and bone outfitting, the Shrike-Too could be made to look much like its skin-on-frame forebears. And the Shrike-R is designed expressly for practicing rolling. It has a much lower deck than the other two, reducing the volume and weight of the kayak to facilitate rolls, while its wider version of the ocean cockpit allows more upper-body flexibility.
Nick and Christopher don’t stop with these choices. A chart is included suggesting scaled versions of the plans to match the boat to the paddler’s weight. And all three versions can be built with the hull’s side panels trimmed to any of seven heights. Also, the curve in the forward deck can be eased for a snugger fit. Add to that the options of a skeg, a day hatch, and whatever deck rigging is desired, and you’ll have yourself a bespoke watercraft.
David Dawson
Everything about my Shrike-R is minimal. I chose the narrowest side panels, the lowest-profile foredeck, and a deliberately snug cockpit, all with an eye on speed and excellent rolling capability.
I wanted a boat to develop my rolling skills, so I went to the Shrike-R. I was seeking a very minimal boat—deliberately low in the water and snug-fitting for effortless rolling. The chart in the building guide told me that a 92% build would be the best fit for my weight.
The manual is as detailed as any I’ve seen, with step-by-step instructions illustrated with color photos. They are written with the first-time builder in mind, full of tips for the novice. If, for example, you’re unsure about scarfing plywood panels, they detail an easier method: butting panel ends together and applying ’glass tape to each side.
No lofting is required to build a Shrike—full-sized patterns for all parts are provided as a printable PDF file. (For those who can use them, .dwg and .dxf files are also available.) The single PDF was created at 50-percent scale, so the printer needs to double the size, printed at 200 percent. The required paper width is 24″. I went to my local office supply store, which has a printer that can easily do this. The result was a roll of paper 2′ wide and about 22′ long.
Caroline Dawson
It is a squeeze to get into the cockpit of my intentionally compact Shrike-R but the effort pays off—once settled in I instantly feel well connected to the boat.
The kayak is built stitch-and-glue style and starts by transferring the patterns on the printout to 3mm marine-grade plywood. I used okoume because it’s light, available, and less pricey than the alternatives. After the pieces have been cut out, the builder has everything needed to stitch-and-glue the hull together. The deck goes on by gluing it down to light sheer clamps that have been fit inside the assembled hull—the easiest way I know to close-up a plywood kayak.
The building manual says the Shrike can come in at 32 lbs. Mine is a couple of pounds under that, but it is also possibly the smallest Shrike ever made. If care isn’t taken or extra fiberglass is added to make the boat stronger, the weight will go up quickly.
Outfitting can be done to the builder’s preferences, but it is important to maintain a low seating position in boats of this type. A 1″-thick sheet of Minicell or similar foam is all that’s needed. A higher seating position throws off the dynamics of these responsive craft. A block of foam is suggested for a footrest. More Minicell or a commercial back band can be used behind the seat.
My boat took about $650 in materials to build. There are very few commercially available kayaks that compare with the Shrike, but those that do cost around $4,000 to $5,000, and some are heavier.
Caroline Dawson
The Shrike-R’s maneuverability is remarkable. The light weight, narrow beam, and minimal wetted surface all contribute to swift acceleration and rapid, controlled turns.
I deliberately made my Shrike a tight fit. I chose both the lowest side-panel height and the lower profile of the masik, a laminated wood arch that determines the height of the foredeck and reinforces the front of the cockpit. I finished the boat with a coat of marine enamel. Outfitting is Minicell foam for footrest, seat, and backrest.
I put a single hatch in the afterdeck and a drain plug in the front. One cross of bungee in front of the cockpit, and a second behind, and the boat was ready for trials.
Once I had squeezed myself in, my Shrike-R felt very lively on the water. This I expected, having paddled similar boats before. Beyond that, I felt more connected to the boat than any other kayak I’ve been in. And it wasn’t just the tight fit: the smallest movement brought an immediate response in the kayak. The magical mix of light weight, narrow beam, and minimal wetted surface—all in a boat that the paddler truly wears—allows the Shrike to accelerate and turn rapidly. Imagine the way a fish darts when startled. Lift a knee and the Shrike edges immediately, which admittedly takes getting used to, but then the kayak digs in and holds just the right angle to carve a turn.
There is good secondary stability here, despite the anticipation created by the very low initial stability at rest—well, it really doesn’t want to rest. Once under way, the hull’s motion through the water and the repeated, steadying plant of the paddle blades bring stability. Confidence in the boat comes with experience. The low deck on my Shrike-R reduces reserve buoyancy below that of the Shrike and Shrike-Too versions, but even so I’ve never capsized accidentally. Deliberately? It must be hundreds of times.
I wanted a rolling machine, and that’s what I have. There’s no question that if I cannot pull off a roll, it’s me, not the boat. Since working with the Shrike-R, I’ve advanced from the standard and storm rolls I already had down to some of the other Greenland rolling techniques, and most recently I developed a reliable roll with the norsaq, the short wooden spear-throwing stick used by the Inuit. I have my sights on perfecting the hand roll. And will I ever pull off the straitjacket roll, a roll with no paddle and arms crossed over the chest? If I do, it will be in this boat.
The Shrike family of boats isn’t for everyone. But it can’t be beat for the kayaker who wants a sports car of a boat that’s lighter, quicker, and nimbler than the typical production touring boat. The potential builder should understand that getting the most out of a traditional kayak does take time and practice. The strong inputs that become habit to control a heavier, long-keeled sea kayak will prove too much for the agile Shrike. It will feel flighty at first, but as its paddlers learn to drive the boat with finesse, they will also discover that they can maneuver easily and gracefully.
Caroline Dawson
The Shrike-R is the rolling machine I was looking for. I’ve been able to work on and improve techniques I already knew and am mastering new ones. And, while there’s not much internal volume to accommodate gear for camp-cruising, with the Greenland paddle it’s easy to achieve and maintain a good cruising pace.
There are negatives. The seating position is lower than typical of sea kayaks, and some will find this uncomfortable even after taking the time to get used to it. Others may never get used to the wiggly quality of the hull at rest. The Shrike is not the right choice for birdwatching, fishing, or photography. Having one hand, if not both, on the paddle, with a blade in the water, are important elements of stability. The largest variation of the Shrike could be packed for camping, but standard sea kayaks offer much more internal volume. But those who seek performance will come to love the way the Shrike and paddler engage to meet the water. The paddling experience is more fluid, more elemental.
I strongly advise using a Greenland paddle. The Shrike all but demands it: the two are literally made for each other, and sculls, braces, and rolls are all more smoothly and easily executed with the traditional tool. Moreover, once you have developed a good forward stroke with the Greenland paddle, you’ll find that it’s very easy to maintain a quick cruising pace in the Shrike without overstressing arms and shoulders. The Inuit had it right all along.
David Dawson lives in Pennsylvania but stretches his passion for boating up and down the East Coast, paddling and sailing the waters from Maine to Florida. Since retiring in 2012, he has built six kayaks and a sailboat.
Shrike-R Particulars (can be scaled to suit builder preferences)
Is there a boat you’d like to know more about? Have you built one that you think other Small Boats readers would enjoy? Please email us your suggestions.
My love for Phil Thiel’s Friend·Ship canalboat began in September 2011 when I read an article by Christopher Cunningham about Phil’s quiet and simple boats (WoodenBoat No. 222). I reread the article multiple times and daydreamed about the day that I could have a floating RV on which my whole family could live aboard for extended lengths of time. Harry Bryan’s article on shanty boats in WoodenBoat No. 224 pushed me into action, and I called Phil to purchase the plans for his Friend·Ship.
Our first call was interesting, as he asked me why I wanted the plans and if I understood the purpose of the design. While Lake Ontario is literally at my back door, its open water is not what the Friend·Ship is meant for. I explained to Phil that the province of Ontario has hundreds of kilometers of canals and rivers and small lakes for which the Friend·Ship would be perfect. Satisfied by my response, Phil sold me a set of plans. They included one page of written instructions, construction specifications, building procedures, and 13 pages composed of measured drawings and joinery details.
I pored over the plans and used the scaled frame drawings as full-sized patterns to build a 23″ model at 1:12 scale to visualize how the boat would go together and how it would look completed. I sent pictures of my model to Phil, and he loved it.
Beth and James Kenney
The plans leave the wheelhouse outfitting up to the builder. The companionway hatch can be raised for easier access to the cabin.
The building procedures for the Friend·Ship were the same as those used for his smaller canal cruisers like the Escargot and L’Ark. The assembled frames are to be erected upside down on a level floor and the hull and sides completed from bottom up to the roof line in that position. The plans are clear and detailed and the construction is uncomplicated with just a few simple curves—one for both the wheelhouse and cabin roofs and one at each end of the hull. At 23′ long, 8′ wide, and 10′ 6″ high, the Friend·Ship is as large as my whole dining room and would need an even larger space to complete the work or turn the hull over.
Phil had calculated that the flip-over weight of the completed hull—without the roof, wheelhouse, and interior structures—would be between 1,000 and 1,400 lbs. My several readings of the plans convinced me that most amateur builders, including myself, could not build the Friend·Ship hull upside down and then roll it upright. Phil told me that he had sold lots of plans, but at that time he knew of no one who had built the Friend·Ship as planned. (A Tennessee-based Friend·Ship builder was able to roll-over his completed hull using slings and chain hoists. In anticipation of the boatbuilding project, he had built a 30′ × 45′ workshop with a 16′ ceiling. —Ed.)
I told Phil that I planned to build the frames, then cut each one into two pieces along a line 3′ above the baseline of the boat’s bottom. I could then build the bottom on a ladder building form which would place the bottom only 4′ above my driveway. After I finished it with epoxy, ’glass, paint, and rub strips, I could roll the hull upright with roughly half the effort and half the space rolling the whole boat would require. With the hull portion upright, I’d reassemble the frames, top to bottom, and finish the upper half of the boat. Phil gave his approval and wished me success.
Beth and James Kenney
The dining table can be lowered to rest on bench-front cleats to create a double berth. Under the countertop stove, the galley has an open space for a portable cooler.
I also needed to study how I would use the boat. The rivers and canals in my area would be miles from the house, so the boat would live on a trailer. To keep the boat and its projecting sheer guard and roof eaves within the 8′ width limit on the highway, I reduced the overall hull width from the designed beam of 8′ to 7′ 8″. I then designed a flatbed trailer specifically for the Friend·Ship and had it constructed by a local trailer builder while I worked on the boat.
As directed by the instructions, I used spruce 2x4s from the local lumberyard for the framing and 44 sheets of marine plywood: 1⁄2″ for the bottom, 3⁄8″ for the sides, and 1⁄4″ for the cabin and wheelhouse roofs. I bought enough epoxy to coat every surface of the hull both inside and out.
During the winter of 2018, I completed and cut the frames in my basement, and in August 2019 I started construction of the bottom of the hull in my driveway. The ladder building form placed the plywood bottom only 4′ off my driveway.
After completing the hull, including epoxy, fiberglass, paint, and rub strips, I could, with helpful neighbors, flip it right-side up, rejoin the frames, and complete the boat. In August 2021, the completed hull was on its trailer, and I launched it to check for leaks. After spending a year working on steering, power, electrics, wheelhouse, interior finishes, and other details while the hull remained on the stabilized trailer, I launched the fully finished boat, weighing an estimated 2,200 lbs, and made its first test run in August 2022. A small open foredeck allows for sitting, handling mooring lines, and storage of external propane tanks and anchoring gear. A hatch and twin doors with screened vents lead down a ladder to the forward cabin where the single 6′ bunks on either side are curtained off from the main cabin and have storage underneath. Between the bunks there is a 3′ by 4′ area with 6′ standing headroom and space to turn around. Large round windows, port and starboard as specified, provide excellent lighting.
Beth and James Kenney
The forward compartment houses two single berths. The ladder provides access to the foredeck.
The main cabin has a dining table and two benches with storage beneath them, and lowering the tabletop to bench level makes a 6′-long double berth on the port side. The galley on the starboard side has a sink, with countertop on either side of it for a propane stove and meal preparation. Underneath, there is a cabinet for storage and an open space for a large portable cooler. This cabin has over 6′ headroom and two windows on either side which slide open for light and ventilation. I built the sliding windows exactly to the detailed plans and they work very well. They have 1⁄4″ acrylic panes and screens installed on the outside.
In the plans, the head is on the starboard side directly aft of the galley. At the request of the first mate, I moved the front wall of the head forward by 6″ to accommodate the installation of a self-contained composting toilet, which needs a bit more room than a portable toilet requires.
On the port side, aft of the dining area, is a 6′-long double berth with the foot of the bed extended beneath the floor of the wheelhouse. A fixed round window over the head of the bed illuminates the space and provides a view to the outside.
Beth and James Kenney
The foot of the double berth in the stern is tucked under the wheelhouse deck.
A four-step ladder leads from the main cabin up to the wheelhouse, which occupies the back 6′ of the Friend·Ship. The top of the wheelhouse is removable and allows for raising and lowering the boat’s profile for reduced windage when trailering long distances, and ease of wrapping for winter storage. It weighs about 150 lbs, which makes it a task for two or more strong people. In the future, I hope to design a mechanism to handle this job in a more practical manner.
The wheelhouse has two box seats at the transom, one for gasoline storage and the second for safety equipment. Between them, I changed the motor cover into a step/seat allowing access to the swim ladder that’s mounted on the curved transom leading down to the swim platform I added across the stern. The platform is hinged to pivot against the transom when not in use.
The shelf flanking the companionway at the forward end of the wheelhouse has room for navigation instruments. I installed an illuminated compass and video monitor connected to a camera at the bow, which allows the skipper to check the blind spot directly in front of the boat.
The plans leave it up to the builder to make the arrangements at the helm. My steering has a single-cable steering link that snakes under the wheelhouse floor and connects with the motor from the starboard side. On the port side I installed a 100-year-old 36″ wooden steering wheel. I’m only one step away from the wheel and motor controls, even when looking out from the wheelhouse along the starboard side.
Beth and James Kenney
On the starboard side, aft of the galley is a curtained compartment for the head. The ladder leads to the wheelhouse where a storage box serves as a seat. To its right, the cover for the outboard is built with a step to climb over the transom.
On that starboard side, under the wheelhouse floor, I installed the electric panel, with two batteries: one for house power and the second for starting the outboard. This space is accessed by setting aside the ladder to the wheelhouse.
When registering my Friend·Ship, I learned that state regulations require a secondary manual-propulsion system. My solution was to build a 14′-long sculling oar of white ash which is inserted through a hole in the center of the transom just above the floor of the wheelhouse. I keep it stored along the underside of the wheelhouse roof with the handle projecting through a hole in the wall forward and a few inches of the blade extending aft just past the roof. My estimate for the towing weight was 3,500 lbs including the motor, interior fittings, and trailer. I used a six-cylinder Chevrolet van for towing and the boat easily followed, but with only front-wheel drive, I quickly learned it didn’t have the traction to pull the loaded trailer up the launch ramps, so I upgraded to a four-wheel-drive Ram pickup truck, which handles all the demands.
Although the Friend·Ship looks like a large vessel, it is light for its size and about as easy to haul, launch, and retrieve as if it were a much smaller boat.
The plans recommend an outboard of 5 to 10 hp; I installed a 9.8-hp four-stroke with remote controls and a high-thrust propeller. The four-stroke option has proved to be quiet and highly fuel-efficient. At cruising speed with the motor cover in place we can hold conversations in the wheelhouse without raising our voices. A single 3.17 U.S. gallon tank of gasoline provides more than 11 hours of cruising.
Charlene Mitchell
For those who prefer open-air boating, the plans include an option for a folding bimini in lieu of the wheelhouse. The transom ladder and folding swim step are an individual addition.
The 9.8-hp motor can push the Friend·Ship at 5 knots, which is 1 knot under the theoretical hull speed for a 19′ 6″ waterline. Backing off to three-fourths throttle the speed drops to a steady 4 knots. Even reducing to half throttle, we were able to maintain the constant 4 knots. At one-third throttle the boat maintains a miles-eating 3-knot cruising speed. We can run a 10-hour day of cruising on less than a tank of gasoline. I often smile as boats costing 10 times as much fly by, because we will both eventually end up at the same location.
On our first cruise, the Friend·Ship struggled to hold a heading as the stern would slide side to side, requiring helm turns, lock-to-lock, to try to maintain course. Thiel’s smaller barge-hulled canal boats, the Escargot and the JoliBoat, each have a skeg on the centerline, but that element isn’t included in the Friend·Ship plans. While a similar single skeg would have been adequate to give the hull directional stability, I could not easily install a skeg on the centerline with the boat sitting on the trailer, so I designed twin skegs that I could through-bolt to the framing members on either side of the motorwell. The skegs are 7′ long, 1 1⁄2″ thick, and 7 1⁄2″ deep at the stern and 1 1⁄2″ proud of the hull at their forward ends. The skegs work well, provide full control to the helm, and the boat now follows a heading like a train on rails.
Charlene Mitchell
For trailering or storage, the wheelhouse roof is deigned to be lowered. The window sashes are all installed with loose-pin hinges, top and bottom, and can be removed and stowed in the cabin. The posts supporting the aft end of the roof are also demountable.
The Friend·Ship can easily accommodate six to seven family members for day trips and has berths for six for overnight outings. It is a perfect boat for long, leisurely trips on sheltered small lakes, rivers, or canals. I have even used it on Lake Ontario during times of calm or light winds while keeping an eye on the weather.
Building Friend·Ship is well within the abilities of woodworkers with modest abilities, even without a large shop or construction site. My estimated cost was $15,000 CDN ($11,000 USD) including both the trailer and motor. The Friend·Ship is truly a trim and proper little ship that turns heads everywhere we go, both on the road and in the water.
James Kenney of Burlington, Ontario, studied mechanical engineering in college and retired in 1999 from a successful 34-year career as an international marketing manager to open a martial arts school. Now an 8th Dan black belt, he still teaches over 25 hour per week. At the age of 10 he received his first boat, a wooden semi-dory rowboat, which he later converted to sail. The Friend·Ship was James’s seventh completed wooden boat project. Now entering his 80s, he may have one more small-boat project in him (with his first mate’s approval).
Friend·Ship Particulars
Length: 22′ 9″
Beam: 8′
Draft: 9″
Height above waterline: 9′ 9″
Power 5 to 10 hp
Is there a boat you’d like to know more about? Have you built one that you think other Small Boats readers would enjoy? Please email us your suggestions.
I should begin with a confession: I am quite ignorant about wooden boats, even about boats in general, but I do love them. For as long as I can remember, I’ve been tying logs together and trying to get on the water in whatever small boat came my way. I had a coastal cruise in mind, but I couldn’t find the boat I wanted for anything close to a price I could afford, so it was clearly time to build one myself.
After reading whatever books about building wooden boats I could get my hands on, I was convinced that I could turn a pile of lumber into a boat with little more than a handsaw and a hammer. I just needed a workshop.
Greg Goodman
Because we camp year-round, we tend to wear out a succession of large tents that we use as our primary shelter, so we ended up spending this summer in our smaller backpacking shelter. It was cozy with both of us and our dog, but with the long days and minimal bugs, it worked quite well. The big tarp overhead was a blessing when some heavy summer rainstorms blew in.
However, my girlfriend Vida and I do seasonal farm or winery work, and our housing is provided only while we are working. In between jobs, we are on the move. I once tried to build an umiak, while in work housing, getting as far as the backbone and a pile of ribs, but couldn’t complete it before we had to move. I used some of the time I wasn’t working to hunt for an affordable workshop. Finding none, I recalled a bit of family land in western Michigan: a 20-acre parcel of woods owned by a loose collection of my relatives, none of whom apparently had ever been to the property. It could be the perfect spot to hide away and build a boat.
So, in June 2023, with work finished up in New England, Vida and I loaded our truck for the move to Michigan. On the way, we made detours to used-tool shops, Craigslist meetups, and woodworking stores, and acquired the tools I thought I would need for an off-grid boat build. When we arrived at the family woodland, a deep roadside ditch and a dense understory blocked the way into the property. We drove farther along the road into the adjoining national forest, parked, pointed ourselves toward the land, and hiked a half-mile through the trail-less woods to the site of our future home and workshop.
Greg Goodman
The shop and workbench are awaiting the next step in the project. It was set up quickly in a simple way, and I didn’t really work out how to organize the space until the real project began. For quite a while I was stuck firmly in the analysis paralysis phase. The delay did give me a chance to see the shop through our first rainstorm and confirm it would stay dry and remain standing in the wind.
It was late summer, and an unbroken canopy spread overhead, letting in little shifting patches of sunshine as the leaves murmured and waved in the breeze. The trees near where we’d parked had trunks barely bigger around than my thigh, but as we drew near to and entered the family property, the trees were much larger, the forest more open. Oaks and maples with trunks often too large to wrap my arms around arched high overhead in a vaulted ceiling of green. Being immersed in a lush landscape of living trees made me realize that whatever wood I built the boat with would originally be taken from a forest somewhere; a precious resource not to be taken for granted. Vida and I stopped at a quiet, open patch of sandy soil surrounded by the forest; it would be the site of our home and my boatshop.
Greg Goodman
The basic shop and workbench came together quickly, and it remained a work-in-progress as things went along. I was continually adding little shelves and dividers to organize tools under the bench, and I kept lengthening it to better accommodate work on longer pieces.
We had spent years living out of tents and in short order set up our camp: a two-person tent, portable charcoal grill and propane camp stove, and a few tiki torches, all under a big green tarp printed with a leafy pattern that blended in with the woods. We dug a little firepit in the sand and I fashioned a rough stand for our water jug, to make pouring from it easier. While Vida organized our things within the living space, I looked for the flattest open spot for the shop, which would be sheltered by a 20′ × 30′ tarp. I wanted to build a simple frame under the tarp to give the covered area enough height to work under. After I’d found the right spot, I went to the local hardware store for lumber while Vida explored our surroundings.
Each of the four back-to-camp walks was made awkward and slow by the bundle of lumber riding on the rolled-up towel that padded my shoulder. I set up a wooden frame to support the tarp and stretched it over the workspace. In the shade beneath it, I could feel the breeze and building heat of the day as I watched the shadows and sunlight dance from the forest floor to within my shop. The shop would be sheltered from the summer storms that would roll in, but in fair weather I’d be free from confining walls.
Greg Goodman
When I stumbled on a photo of Pete Culler’s rowing and sailing sampan design, I knew I was getting very close to the boat I wanted. Its length-to-beam ratio, rocker, and flare of the sides became my starting point. I sketched Pete Culler’s hull, then firmed up the dimensions and shape I wanted for my own design. I left the interior blank, deciding it would be easier to lay out when the hull’s shell was complete and I could see how much space I had to work with.
It had been a busy first day and, as the sky changed colors above the darkening trees, we roasted sweet potatoes in a small fire, cooked some rice and lentils, and opened a bottle of sparkling wine. We let the fire die down while the birdsong and drumming of woodpeckers faded into a quiet evening. As dusk turned to darkness we crawled into our tent, and the sounds of the lively forest night began. There was no wind, but some nocturnal animals were making the leaves rustle, an owl hooted from a perch close by, and coyotes yipped and howled in the distance.
Greg Goodman
Initially I used the strongback as a sawing bench, as I am doing here while ripsawing the boards I glued up for the transoms. The low height seemed easier to work with for longer cuts. In the end I found that a slightly higher level worked better for me, and I switched to using the backside of the workbench where the ground brought me up to a good level.
In the morning, after coffee and oatmeal, we took a walk in the woods with our dog, Turtle, before I made another trip to the hardware store for materials for the boatshop. The walk back was especially awkward carrying 8′-long half-sheets of 1⁄2″ plywood for my workbench. I had them ripped to width at the store so I didn’t have to tackle that chore with my handsaw—a cordless drill was my only power tool. When the shelves were finished, I loaded them with my tools and prepared to get to work on the real project.
There was just one small cause for delay: I hadn’t yet decided which boat to build. I scanned the books I’d brought and skimmed through design catalogs online (my phone had great service at our campsite). I was looking for something easy to build, sleek enough to row all day, short enough that it would not require scarfing every single plank and longitudinal piece, and stable enough to accommodate fishing, a rambunctious dog, and a novice sailor in a breeze. I wanted to do near-shore sail-and-oar cruising and have space to sleep and cook aboard as well as stowage for a couple of weeks’ worth of food and water. I knew I’d found my boat when I stumbled on the many slab-sided scow types. Pram-bowed garveys, sampans, and traditional wooden johnboats all seemed to have the right stuff: johnboats could carry heavy loads, garveys were fast downwind sailers, and sampans rowed well. But the designs I found were either too big or too small, and few had the lapstrake construction I was drawn to.
Greg Goodman
I started beveling the chine and garboard with the drawknife, initially just eyeballing for fairness by looking at the bottom edge compared to the crosspiece of the single mold I used. The long, curving blade meant I could get big sweeping, slicing cuts that removed a lot of material very quickly.
While I had been searching for a design, I had been gathering materials by prowling Craigslist and visiting local sawmills and lumber outlets.
I bought thick stair treads of lovely, clear, yellow pine being sold from the back of an abandoned semi-trailer, white oak boards from a huge local lumber distributor, northern white cedar from a father and son sawing local woods at low cost, and bargain-priced white-pine boards from another local sawyer. Only the stair treads were surfaced on all four sides, so in my growing pile I had a lot of lumber I would have to smooth and plane to thickness by hand.
Greg Goodman
The huge pile of northern white cedar seemed like more than enough to plank the bottom of the boat until I started sorting for clear pieces or those with only small tight knots. Starting to lay them out made it easier to see the boat taking shape.
Eager to begin, I gave up on finding plans and made a simple drawing of the boat I thought would work. The plan and body and profile had just a few lines to them: sheer, chine, and transoms. The boat was simple enough that I didn’t need to loft it. I drew the lines of a 15′ boat with a 5′ beam at 1:12 scale on the top of my workbench, not to take measurements but to visualize the shape and proportions. I mostly fit things to the parts of the boat as I went along.
Greg Goodman
I screwed down a few thin pieces of wood to the workbench to use as stops for the bottom planking while I planed it to the proper thickness. A trigger clamp and a small block of wood on the outside edge were then enough to hold the board securely. I sharpened the jack plane’s blade with a very slight curve on the corners to allow for a smooth final surface without plane marks.
I was ready. I started with the two transoms, which would be glued from my perhaps-too-thick boards of 1 1⁄4″ southern yellow pine. Daunted by my first big rip cuts without power tools, I decided I’d better sharpen my 26″ handsaw. I made a saw vise from a scrap piece of pine and clamped it to my workbench with the saw teeth sticking up just to the gullets. I did my best to sharpen the ripsaw’s chisel-like teeth. I’d done the job half-heartedly before, and the results made it clear that it would take practice to do it properly. But with every little challenge I realized that each day’s work, even if learning how to sharpen a saw, was as much the point as was finishing the project. Every day I worked, I was building a boat, and it didn’t matter if I didn’t finish it or it didn’t float or I didn’t like what I ended up with. It was all part of the experience I was after.
Greg Goodman
I considered attaching the side planks while the boat was upside down, thinking this could make it stiffer before I rolled it over. But I decided that riveting the lap with the garboards in that position would be unnecessarily difficult, and flipped the boat before continuing with the second strake.
As I ripsawed two 16′ pieces of 1″ white oak to make the chine logs, I flipped the pieces over and back again to make sure the kerf followed the lines I’d drawn. I grew frustrated and wondered just how long it was going to take. But in that moment of impatience, it occurred to me that slow progress was acceptable, and could even be pleasant. Every little step in the process, one after another, could take me down the long and winding path I’d chosen. As the saw purred and let fall a flurry of sawdust, each stroke took me along the beautiful grain of that lovely piece of white oak.
But as a wandering mind on a rocky path causes a stumble, the blade wavered from the line. I backed the saw, realigned it, and focused on each little bite the teeth took out of the pencil mark. There was no need to rush to the end of the cut. I took a break to sharpen the saw and got back to my little oaken path that was redolent with a warm, nutty, vanilla aroma.
Greg Goodman
The bottom was primed, and the runners were fitted and bedded in roofing cement. At that point I flipped the boat and was ready to put on the second strake. The low morning sun would sneak in under the tarp edges and illuminate the waiting project.
When I left our camp to pick up stock for the side planking, I expected I’d need to have the boards planed to a finished thickness of 1⁄2″ as that task seemed too great to tackle with hand tools. When I reached the sawyer’s place, he let me clamber about in his dusty barn to look over huge stacks of eastern white pine that had been cut in New Hampshire, somehow landing in a massive stack in this barn in Michigan. Thick joists, fissured and dark with age and draped in cobwebs, served as handholds as I wobbled across the tops of 10′-tall tilting towers of planks. The metal roof radiated a sauna-like heat, and a mix of dust and sweat was soon streaking down my face. Some boards were warped and checked, damaged by too-tight strapping. Others had been cut comically short and seemingly served only to fill and balance a tilting stack. Long after the owner had grown bored and left me to hunt on my own, I found a stack with beautiful, wide, clear boards. I know white pine is looked down on because it is soft and prone to rot, but I’d heard enough budget-minded folks praise its surprising quality as planking stock. The boards were 16′ long, a laborsaving 12″ wide, 3⁄4″ thick, and cheap. I climbed down with each find and eventually had a pile of lovely stock perfect for planks.
Greg Goodman
The simple hinged fingers I made from lumber scraps and nails allowed me to use the trigger clamps to hold the laps together. When parallel, the gap between the fingers was maybe a millimeter smaller than the doubled planks. I used little cardboard pads to make sure they didn’t mar the planking excessively. The roves were mismatched to the rivet size, and wanted to jump off after I snipped the rivets to the right length. It slowed the process, but the end result seemed to be plenty strong.
I carried the boards to the friendly owner and waited while he took them to his thickness planer. When he was finished, he walked me to his shop space to pick up the wood. Chatting with me on the way, he said, “And don’t worry, I made sure to set the planer for a very generous half inch. It’s really an old machine, and doesn’t leave a good finish, but it will be easy to clean up from there.” We got to the wood, I took a look, and wished I had just used the full-thickness boards. The newly planed boards looked like some Lilliputian woodworker had surfaced them with a tiny adze, strolling along, randomly texturing the wood more than achieving a uniform thickness. In my early days of advice-seeking for the project I had asked about thicknessing, or at the very least, surfacing, rough-sawn planking by hand. I was told not to bother, the savings weren’t worth the time. For better or worse, I now had the chance to do some surfacing with a hand plane, on a larger scale than I’d anticipated.
Greg Goodman
After a good bit of priming and painting on the inside, I installed the deckbeams. They were probably way too thick and way too close together, but being pine they were fairly light, and I hate the feel of a flexing deck under foot. I figured that without any plans to rely on for scantlings I would rather go for “definitely rugged” than “maybe adequate.” I have blocking between the beams to accept the bolts to attach the cleats, and a white cedar coaming that will get a white oak rub strip on top at a later date.
It was hard at times to smooth the vast surface of even one side of those rough-planed planks. But as I worked, I learned to keep my plane blade sharp. I started with frequent tearout, even when I tried to focus on the grain direction. But by the last board I was taking big, long strokes, easily slicing the peaks from the jagged surface as the long sole rode smoothly over the rough wood. I saved the final smoothing of all the boards for the end, and the plane took big unbroken gossamer-thin shavings, translucent and dimpled with wavering grain. Working down the rough surface turned out to be a pleasure and a valuable learning experience.
It was time to shape two of those newly smooth planks into garboards. My saw-sharpening had really improved, and after the white oak, the long sweeping curves in the thin white pine were a dream to saw. With each step of the build, I learned how to work efficiently and economically. Quicker than I would have believed, I had scarfed and steamed the chine logs, bent them around the single mold to attach them to the transoms, and hung the first side planks. I was flying along.
Vida Stamey
Moving day! When the time came to leave Michigan and head to Rhode Island, the cart I made to haul out the boat worked surprisingly well for seeming so wobbly. The canvas cover helped to protect the hull from being scratched or filled with debris while being dragged through denser parts of the forest.
I had been pulling the best of the northern-white-cedar boards from my massive pile for the bottom planking then setting them across the chines of the boat, when a yelping, whining bark suddenly echoed through the woods. I saw Turtle bark angrily into the forest and then begin darting frantically through its sparse understory. She ran in a circle and then flung herself to the ground, driving her face into the dirt. I ran over calling her name and she finally came to me, only to take off again wiping her face on the dirt and with her paws. The smell was unbelievable, like someone had thrust a burning tire under my nose. It made my eyes water as she approached. She had been skunked. Vida ran over with a jug of water and a small towel, and we wiped down her face and flushed the burning, nauseating spray out of the dog’s eyes. Just as her barking subsided, and Vida and I could stop yelling back and forth to each other, I saw two people approaching through the woods. Matching brown shirts, guns holstered at their hips, big stars pinned to their chests—two sheriff’s deputies. I can’t imagine what their first impression was, after they watched me running around shirtless, screaming, chasing a crazed dog.
Vida Stamey
I cleared this road through the woods for access to campsites I was clearing for a campground project. It made for a great sunny space to work on boat parts. I turned a simple firewood rack I’d made into a sort of shaving bench and used it to make the oars. The looms were thick enough for me to sit on while I used the drawknife to shape them.
They told me that a local hunter monitoring his game camera had called the sheriff’s department to report seeing me drive into the national forest, day after day, park my truck, unload a stack of wood, and walk off into the trees. The deputies sent to investigate were clearly caught off guard. A boatshop in the woods was not what they’d thought they would find. Evidently aware they were approaching private land, they’d stopped right at the property line, finding it as I had done, with a smartphone navigation app that shows lot boundaries. I welcomed them across the imaginary line that served as our threshold, and they crossed into our campsite. Turtle settled down, I put a shirt on, and hoped they wouldn’t notice my bare feet, black from the dirt-floored shop space. The deputies were quite intrigued by the project, one of them being a member of the marine unit of their department, and were glad to have a little tour of the shop and boat. We all laughed a bit about the situation, and before they left, they assured me that my truck was parked legally and out of anyone’s way. We spent the rest of the day trying to wash the stink from Turtle, wondering what our little tent would smell like with her in it.
Greg Goodman
Another move: this time leaving Rhode Island for North Carolina. Every time we loaded the boat, we got a little better at getting it on and off the too-high trailer that was the only style available for one-way moves and had the benefit of providing space for tools and materials below the boat.
With the campsite at peace again, the slow work of ripping, jointing, and surfacing the northern white cedar for the bottom planking was an absolute joy. Greg Rössel, author of Building Small Boats, describes cedar, “It is very decay resistant; stands up to abrasion very well; has low shrinkage; resists puncture; and is sinuous, pliable, and tougher than a boiled owl. It can be scarfed to get desired lengths.” The shorter pieces for a cross-planked bottom wouldn’t require scarfing for length, so I had only its best qualities to enjoy. The easy sawing, fragrant shavings, and glass-smooth finish from a sharp plane made the wood a pleasure to work with. Despite its workability, my jointing was less than perfect, and I had a few planks that were not well-fitted across their full length. This was a concern, as I was planning on tight-seamed bottom planking, without goop or caulking to keep the water out. But when the time came to plank the bottom, the cedar’s softness let the planks pull snugly against one another and made it look like I’d done a perfect job. When I had finished prepping all the planks, I had gained far more practice with the planes and saw than I’d expected: it took about 45 planks to cover the bottom.
Before the newly fashioned bottom planks could be fastened in place, I had to plane the unbeveled chine logs and garboards. I’d left them square, thinking I’d have better luck getting the bevels right when I had some bottom planks ready to lay across the span to check for a good fit.
Greg Goodman
The storage unit in North Carolina was a bit tight for working on the boat, but it was great to have a place to leave it and return to resume work. Not owning a trailer, being camped on public land, and regularly moving meant we couldn’t work on the boat where we were staying as we had done in Michigan.
I did the first bit of heavy stock removal with my drawknife, which peeled away long, thick curls of wood that crinkled into spiral sculptures around my feet. It was good fun, and I was excited by the fast progress, but to finish with a fair surface I needed to use my jack plane. The plane sliced long twin ribbons of oak and pine, and the wavy surface was quickly flattening. I was close to finishing the beveling when the plane hung up slightly, though it didn’t feel like grain tearing. I pushed through and the plane left behind a long oval of brilliant bronze in the middle of the cut. The sharp steel blade had sliced through one of the bronze ring nails holding the garboard to the chine. I was clearly getting better at sharpening, but I’d driven in the nails too close to where the bottom would meet the chine. Many of them were going to be exposed if I continued planing. If I left a little of the chine log unbeveled, I could save myself from cutting into the nail-filled chine and still have a wide enough landing for the bottom planking. Despite the ease with which the plane had sliced through the one nail, it would be foolish to keep forcing the blade into more of them, and I switched to the Shinto rasp. Even though the hacksaw blades form which it’s made can cut metal, it otherwise is not as well suited to the job as a plane, and the beveling took much longer than I’d hoped. Finally, I smoothed the rough surface left by the rasp with a sanding board and was ready to attach the bottom planking.
Greg Goodman
Our last campsite before launching was on the White Oak River in North Carolina. Having the launch site right next to the tent kept me extra motivated as I worked on the finishing touches to the boat. Other visitors to the river were quite interested and excited to see a wooden boat being built and launched.
I always tried to finish up the day’s work just as I started to tire and grow impatient; continuing would be counterproductive. Vida and I would head off somewhere in the area for a walk with Turtle. Within a 20-minute drive we had lakefront sand dunes, a winding riverside trail, and a little lake warm enough for taking a short dip. Often, we’d use an outing like that to stop at a local roadside spring and fill up our water jugs and buy fresh eggs that we could keep without refrigeration. Between the fresh eggs, sprouts we always had going in camp, and the fresh loaves of bread I baked in our Dutch oven, we ate well indeed. There was a farmers’ market not far away, and over the summer we bought many baskets of berries and peaches and apricots, as well as local meat and vegetables. When folks started to notice we were regulars at the market, someone finally asked what we were up to, guessing before I could answer, that we were traveling artists. Maybe so.
For a while, building went smoothly. The bottom planking fit well and a few light passes with the jointer plane eliminated the small steps from plank to plank where I hadn’t gotten the thickness quite right. I used more ring nails and a layer of bedding compound where they attached to the chine. Vida joined me for painting the bottom, and the boat was quickly ready to flip. Flipping the hull right-side up wasn’t as hard as I had expected, though I did resort to a wooden frame and some rope and pulleys to hoist and rotate the surprisingly heavy hull.
Greg Goodman
The day before launching I finally got the sailing rig set up, and with a gentle breeze in camp could get a feel for how it would work. The pack raft in the background has been my tender on a few boats now.
With the bottom done and the boat right-side up, I turned to the remaining side planks. The wide boards meant only two strakes were needed. I made a dozen simple planking clamps to extend the reach of my trigger clamps to close the laps between the garboards and the sheer planks. They worked very well and held the planks firmly together. I had never installed a copper rivet and rove before, but after I watched a video about riveting on my phone, it made the process a total non-event. A straight line of shining copper rivets and roves, pressed lightly into the planking, advanced along the lapped joint, replacing the crude clamps. The garboards and sheer planks were straight along the edge where they met and ran parallel with each other offset by the 1″ lap width, so bevels were not necessary. I just had to cut gains to bring the plank ends together on the transoms, which I did using a metal guide that held my 1″ chisel, essentially turning it into a little shoulder plane, perfect for the task at hand.
Things now came together quickly. The dirt floor of the shop was covered in wood shavings and sawdust; most of my lumber pile had disappeared from the stack and become part of the boat.
Greg Goodman
Launch day! It didn’t take much of an incline (though it looks gentler than it was) to make the quite-heavy boat unmanageable. Taking a turn of rope around the tree kept the boat’s downhill motion under control.
I enlisted Vida’s help again for painting on primer, while I made and fit the nine frames on each side. I found some cheap pine for the deckbeams, and rough-sawn western red-cedar fence pickets that I would surface and use for the decks.
I had started this project crawling through every task. Every tool to sharpen, every stroke of the plane, every big saw cut, they all were slow, challenging, and generally ended with barely satisfactory results. Now I turned the rough-sawn wobbly-edged fence pickets into dead-flat, straight-sided pieces of decking with less effort and time than I had put into my crude 2×4-and-plywood workbench just a month prior.
With our funds now running low, Vida and I had to work again. It seemed that the boat was nearly finished, but we had to leave the camp and find a new place closer to potential employment. I had assumed we’d load the boat on a dolly and haul it through the woods, but I had grossly underestimated its weight. As I lowered it onto the dolly, it almost instantly fell to the side, bending the wheel hubs and the brackets that held the wheels to the frame. It was back to the truck and out to a hardware store, where I bought wheelbarrow wheels and threaded rod for an axle. With some shimmying and sawing I turned the strongback into a trailer, with a 2×4 up front for me to lean into while dragging and shoving the boat along. The trailer was ungainly and wobbly and carrying the excessively heavy burden of the boat and strongback. I can’t say exactly how long it took to get the boat out to the road where we had parked. I tried not to keep track of time. It was only a 15- to 20-minute walk on foot, even when I hauled materials in. But the width of the boat made the sparsely wooded forest seem suddenly dense, and the wheels couldn’t roll over more than a small stick or hummock. The nearly straight path we’d worn from truck to campsite was no help. I meandered along an absurdly circuitous route through the forest. I often walked ahead to check spacing between trees, backed up, and cleared brush. All the while I was smiling thinking of the overland haul as the boat’s first journey.
Vida Stamey
Lightly laden, the boat bounded upriver against the slight current with ease. I was used to rowing much sleeker craft and wasn’t prepared for how well a boxy boat can move through the water.
Vida and I drove back to New England with the boat in tow on top of a rented utility trailer. We settled into another camp at an abandoned and extremely overgrown Christmas tree farm in Rhode Island. I worked clearing roads and campsites, and Vida found a job at a local vegetable farm. I was allowed to clear some space in a wooded area of the farm for my new boatshop, which I made much smaller and simpler. This time I put up a simple rope ridgeline and used a much smaller tarp, only 16′ by 20′. Some smaller spruce Christmas trees had grown perfectly straight, reaching high for sunlight in the now-dense planting. I felled and barked one of them, setting it aside to dry, thinking it would probably make a great mast. Vida and I worked, and I pecked away at the remaining boat projects.
Luckily, we had landed close to another small family-run sawmill. The whole family worked together, turning out piles of beautiful lumber, and providing great friendly service. They sold me a nice rough-sawn ash 2×10 that I could use to make a pair of oars. I worked, again, without power tools. After roughly sawing and shaping the oars, I snapped out a rectangular piece of thrift-store saw blade, and filed a hollow into one edge to make a scraper I could use to remove the plane and spokeshave marks from shaping the oars. They were much heavier than they would have been if I’d used spruce, but I’ve snapped enough paddles and oars in the past to know I wanted something rugged to propel a sure-to-be heavy craft. Despite their heavy weight and rough finish, I was proud of them, especially after I’d laced the leathers on them, and protected the blade tips with folded copper sheet.
Vida Stamey
Launch day was my first time sculling a boat. I had made a raised sculling notch over the stern to have an alternative way to propel the boat and to hold the steering oar in place while sailing. I found sculling to be delightful, and when the river became very narrow and clogged with downed trees, it became essential.
Everyone had told me that making and installing the myriad small pieces were the real work of building a boat and took the most time. I’d been doubtful, but after making the maststep, partner, floorboards, cleats, fairleads, oars, and tholes, I was convinced. It seemed like I would never be done with every little piece. Then—all of a sudden—the mornings were frosty, and it was too late to do all the oiling and painting I wanted to get done before launching, and I was greatly disappointed.
With the frost came the end of our work, and it was time to move again. With a job waiting for Vida in Virginia, but still a couple months away, we had another spell of free time and headed south early. As the new year kicked off, the boat got dragged onto a rented trailer once more, with my tools, scraps of wood, and half-finished bits tucked underneath, and we headed for North Carolina to be someplace warm, quiet, and closer to Vida’s upcoming job. I was determined to put the boat in the water before another big move, and I didn’t care if all the work was finished or not. We got a storage unit and used it for a workshop, commuting to the unit from wherever we’d camped in the nearby national forest. After we painted the boat and oiled the oars, spars, decks and all the little bits of trim with boat soup (a mix of pine tar, linseed oil, and turpentine), the next move was to a campsite on the banks of the White Oak River. I roughed out a few final pieces, but any remaining details that could be ignored were left unfinished or absent. I was just too eager to get on the water.
Vida Stamey
Turtle is investigating her new floating home while I wave farewell and start what I thought of as sea trials: a few days rowing down the river to see if the boat felt suitable for venturing off into bigger water.
A few days after the move, a short spell of cold weather and frosty mornings gave way, and we woke to a sunny morning, full of birdsong, warmer than any day for weeks. It was easy to forget it was still winter. The meandering swampy river was perfect for a first sea trial. We blew up our beach rollers, and slowly rolled the boat to the water. To reach the river we had to lower the boat down a steep muddy bank with a line secured to a cleat on the bow. It was a tense moment, as it was the first cleat I’d made and I had no clue what kind of load it could take. As the boat dangled precariously at the water’s edge, with the rollers bent and twitching over logs and rocks in the bank, Vida held the line while I kept the rollers in position and guided the boat over the uneven terrain. Finally, the stern dipped inch by inch into the water, its wide flat expanse rising easily, lifting the boat off the first roller, and then the second, and then swoosh: the line was released, and the boat slid out into the dark swampy water. We pulled the nose back to shore and christened her the MUDDY TURTLE. We celebrated by pouring ourselves each a glass of sparkling rosé, with a splash over the bow for the boat as well.
Floating high and easy and drawing about 7″, her simple workboat lines and finish were perfectly at home in the dark-stained water and among the cypress trees. Already a little muddy from her trip down to the river, the name MUDDY TURTLE instantly felt appropriate, and I was glad I’d taken the time to carve the little mahogany nameplate and burn in the lettering. It gave a little more presence to the big flat trapezoidal transom. I stepped from the shore straight onto the foredeck, and perched at the very bow of the craft, surprised to be comfortable and easily able to balance. I shoved off with the coppered blade of my oar and walked easily back to the stern to drop it into the sculling notch.
Greg Goodman
About 10 days after launching, I anchored in a little tidal stream next to Fort Macon in North Carolina. I was starting to get into a rhythm, and finally stopped worrying that I would wake up floating on my sleeping mat while the boat was filling with water around me.
Within 24 hours of the launch, I was underway on a test row down the river with Turtle while Vida headed to the river mouth to set up camp where we would rendezvous. A few days later I got to the end of the river, but I didn’t want to stop. So, Vida took the truck and headed to work in Virginia, while Turtle and I set off for bigger water to see just what the little boat could do. The short sea trial turned into a six-week meandering solo cruise, exploring almost 400 miles of North Carolina’s bays, rivers, and ocean coast. My beautiful little boat came to prove that ignorance can, when it comes to boats, lead to bliss.
Greg Goodman grew up alongside a little river in Connecticut. Eventually he realized that his backyard stream flowed out into Long Island sound, and ultimately connected his yard to the whole world. He became instantly interested in using small boats to enjoy all the beautiful places bound together by water. Travel in many forms has dominated his life thus far, and he has been almost constantly on the move for the last 18 years, stopping for seasonal work, or spectacular places that occasionally keep him in one spot for more than a season. He is rarely without some kind of small boat, and has enjoyed many miles of paddling, rowing, and sailing in the U.S. and abroad. He is currently making his way to Washington state, to find work, build another boat, and then kick off another water adventure.
If you have an interesting story to tell about your adventures with a small boat, please email us a brief outline and a few photos.
When my partner, Marti Wolfe, got a Drake 17, a 17′ 4″ double-ended rowing boat, she bought an aluminum SUT Trailex trailer, which is popular among small-boat owners. Trailex is one of the few companies that makes trailers specifically for light boats, including those for rowing and paddling.
Most small-boat trailers, built for the ubiquitous outboard skiffs, have Y-shaped frames to accommodate the breadth of the transom, and stiffer suspensions to support the weight of the motor. Even the lighter of such trailers may have a 1,000-lb capacity. But Trailex’s SUT line of small-boat trailers are sprung for much lighter loads and thus give lightweight boats a softer ride. The SUT-220-SA, which Marti bought, is for boats up to 17′ and 220 lbs, and the larger SUT-350-S is for narrow boats up to 22′ and 350 lbs. These SUT trailers have a single central beam that extends between and beyond the wheels. While the small roller on its back end supports the stern of the boat, it makes a small target for the bow of a returning boat. And the beam itself is no place to stand for either launching or retrieving.
Photographs by the author
The tail end of the trailer was little more than the slender aluminum beam, seen here in the center. Two 2×4s secured to it support the two 2×6s that provide a walkway to the end of the trailer. The roller, with end caps, offers a wide target for retrieving the bow without damaging it.
Marti launches her Drake 17, LJ, in salt water daily, and to protect the trailer bearings, she keeps them out of the water. This leaves the boat perched above the water and since standing or walking on the trailer’s slender center beam is out of the question, she has to wear boots and wade to handle the boat at the ramp.
After we set-up the trailer with rollers, bunks and guide poles, I wanted to add a walkway so Marti could walk safely to the back of the trailer to launch and recover the boat. Over the wheels, the rectangular frame of crossbars and siderails could support a plank to make a walkway, but we needed to add crosspieces to support an extension of the walkway over the tail end of the center beam. At Marti’s suggestion, we removed the taillights and bolted a 32″-long 2×4 to the pair of now-empty L-brackets. The spacing of the bolt holes in the L-brackets just happened to make it possible to use the bolts to anchor the frame of a 10″ roller. I used an extra-long axle for the roller so I could add end caps, which would prevent damage to a bow that misses the target.
The trailer’s crossbars support the back ends of the 2×6s that serve as the middle section of the walkway. Their forward ends are lag-bolted to a 2×4 secured to the trailer tongue.
The 2×4 crosspiece worked brilliantly. We painted it dayglo orange to make it more visible when the trailer has no boat on it. I attached another 2×4 crosspiece to support the forward ends of two 2×6s. This 2×4 is about 17″ long and spans both the 2×6 walkway pieces and the 6″ gap between them, which is required by the small roller fixed to the trailer’s center beam. The 2×4 lies flat on the beam and is secured with carriage bolts on either side of the beam. The ends of the bolts are slipped through holes in a 1″-thick hardwood cleat that spans the bottom of the beam. Nuts and washers finish the connection. The 2×6s are set on top of the two crosspieces and are secured with lag bolts, finishing the aft part of the walkway.
A single plank secured to the tongue serves as the forward end of the walkway. If something wider is preferred, 2×4 crosspieces, like those used on the other sections of the walkway, can support a pair of planks.
For the center section, I cut 2×8s to fit the length of the square frame formed by the trailer’s aluminum crossbars and siderails and secured the planks with carriage bolts and hardwood cleats. For the forward walkway, I bolted a single 2×8 to the trailer tongue with nuts captured in the channel molded into the extrusion. It was a rather fussy chore, and I would recommend, instead, using the paired bolts with a wooden cleat as described above.
With the walkway complete, I mounted the taillights on top of the 2×4 at the back rather than on its face to minimize the chance of the boat’s stem hitting them. Instead of going to the hardware store and buying mending plates, I used short lengths of a salvaged fiberglass sail batten to connect the lights to the 2×4. The wires for the trailer’s lights led through the central extrusion and had enough extra length to reach the lights in their new positions, farther from the centerline. I had to drill a hole in the wooden cross bar through which I could run the wires. I ran ground wires from the lights (which are no longer in contact with the metal trailer) to bolts connected to the trailer beam. Mounting the trailer lights high has the added benefit of keeping them out of the water. I haven’t yet fixed the 2×4 to allow the left taillight to illuminate the license plate. A little auxiliary light or taking a couple of cuts off the corner of the 2×4 will do the job.
There’s enough slope on this boat ramp to keep the trailer bearings out of the saltwater and yet bring the back end very close to the water, making it an easy lift to bring the boat up onto the end roller. The walkway provides a secure platform from which to handle the boat
Improving a trailer to make handling small rowing and sailing boats easier will depend on the trailer. Some kind of walkway is well worth fitting to any small-boat trailer. The Y-shaped frame of most trailers makes it an easily applied addition as the parallel extremities of the Y provide convenient support for added cross bars. But with just a few pieces of common lumber and a free weekend, you can add a walkway to even a light Trailex single-beam frame. Now Marti can walk LJ out to the end of her trailer to launch and recover her boat.
Ben Fuller, curator emeritus of the Penobscot Marine Museum in Searsport, Maine, and former curator of Mystic Seaport and Chesapeake Bay Maritime Museum, has been messing about in small boats for a very long time. He is owned by a dozen or more boats ranging from an International Canoe to a faering.
You can share your tips and tricks of the trade with other Small Boats Magazine readers by sending us an email.
Small boats limit what can be carried aboard and gear that has multiple purposes saves valuable space. We always carry a paddle and a means to bail, so when we came across the Paddle Pump, we were eager to give it a try.
Kent Lewis
With the shaft fully extended and locked with the collet, the Paddle Pump is 60″ long.
The Paddle Pump was created by two Maine seaplane pilots, who often had a need to pump out a pontoon or move a plane a short distance to or from a dock. The beavertail blade offers good power and the locking collet facilitates a range of shaft length adjustments from 36″ to 60″. The compact storage length of 36″ makes it easy to store in the small cockpit of our Sunfish and is a good length for paddling our Grumman 17 Double-Ender canoe. The blade measures 7″ wide at the widest point and is just over 17″ long. Overall, the paddle has a nice balanced feel.
The Paddle Pump ejects water on the downstroke. Here at the end of that stroke, the paddle is at its shortest length, 36″, which will fit in even this Sunfish’s small footwell.
The Paddle Pump weighs just 1.4 pounds, and while that is more than our custom-made spruce paddle, the durable materials used can take a beating whether inside a bilge or while fending off docks and obstacles. The pump valve is designed to tolerate sand and grime from bilges. The shaft is made of anodized aluminum and the blade and handle are made from an ABS mixture of recycled plastics. Plans are in the works to source future blade materials from captured ocean waste.
The Paddle Pump can move 5 gallons of water per minute at 10 strokes per gallon. The valve action is smooth and, unlike the more common small-boat pumps, the Paddle Pump discharges water on the downstroke and through one side of its T handle. The stroke length and rate can be varied to suit the user. Skipper prefers shorter strokes with a faster turnover rate while I like a full draw of water for each pump. The shorter stroke can also allow the pump to be used in constricted spaces. A hose extension is available to help move water overboard in larger boats. That said, we found that the pump can shoot water, without the hose, well over 20′—handy for summertime water fights. The T handle provides a secure/firm grip, and we found that the optional float sleeve accessory gave us a more positive grip on the metal paddle shaft. The paddle will float for a couple of minutes without the sleeve; by adding the float sleeve we ensured that the paddle will stay afloat ready to help keep us afloat.
Audrey and Kent Lewis have pumped bilge water from the Gulf of Mexico to the Pacific and now in the Tidewater Region of Virginia. Their small boat adventures are logged at Small Boat Restoration.
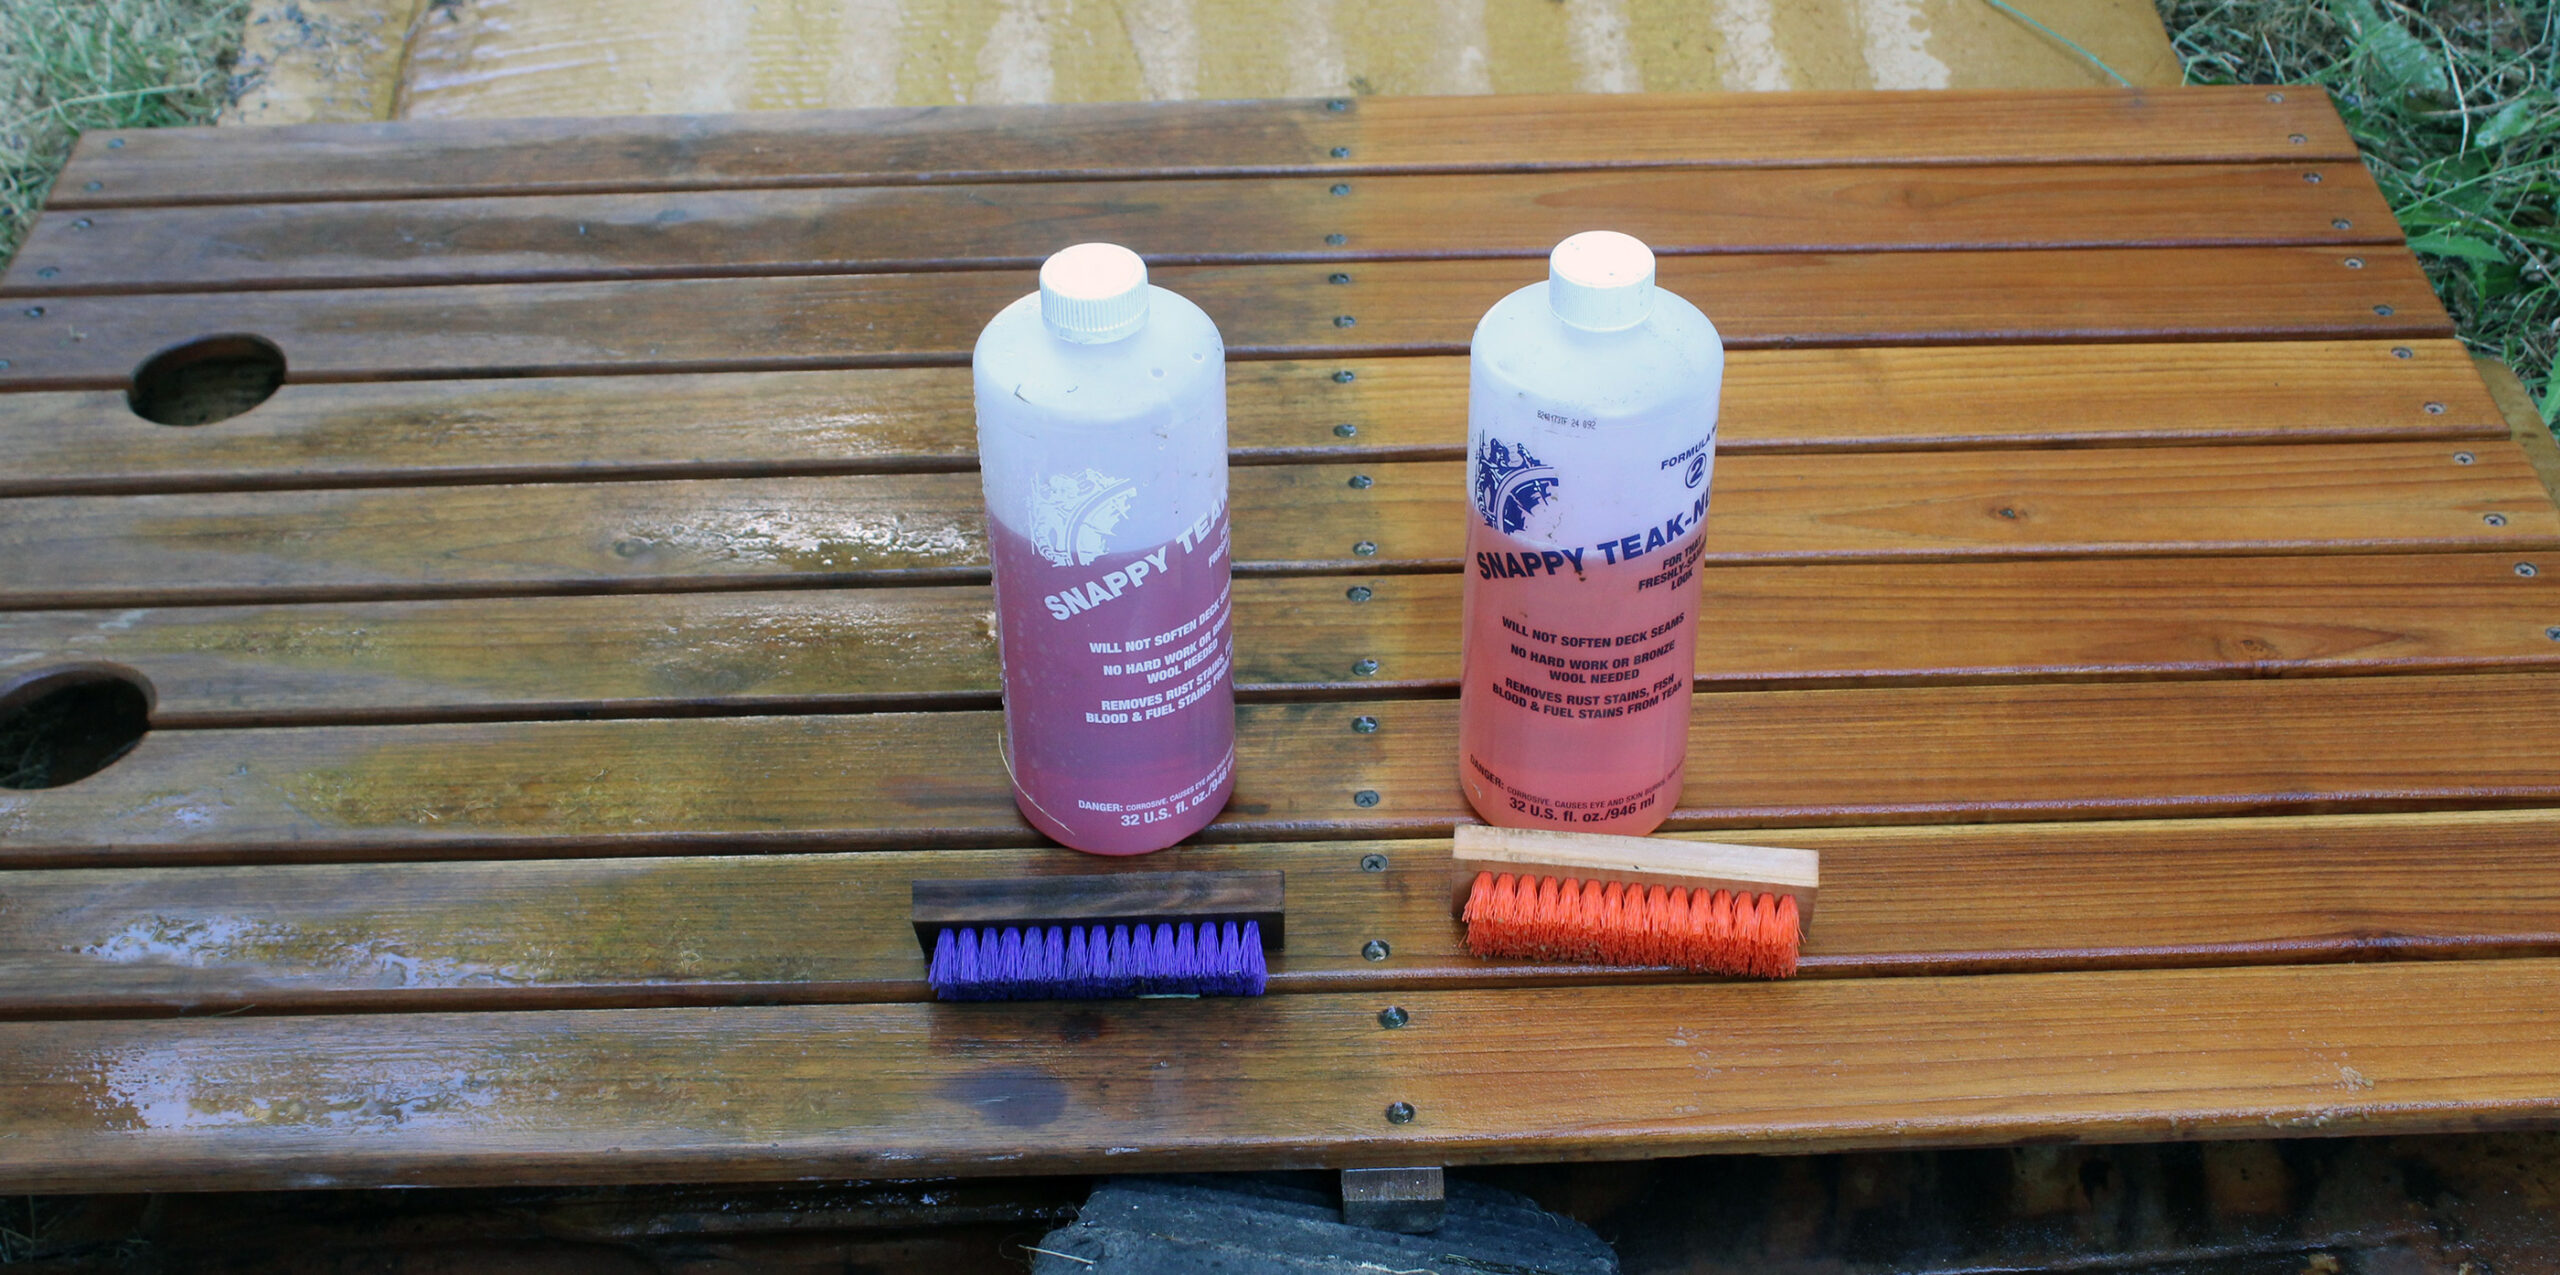
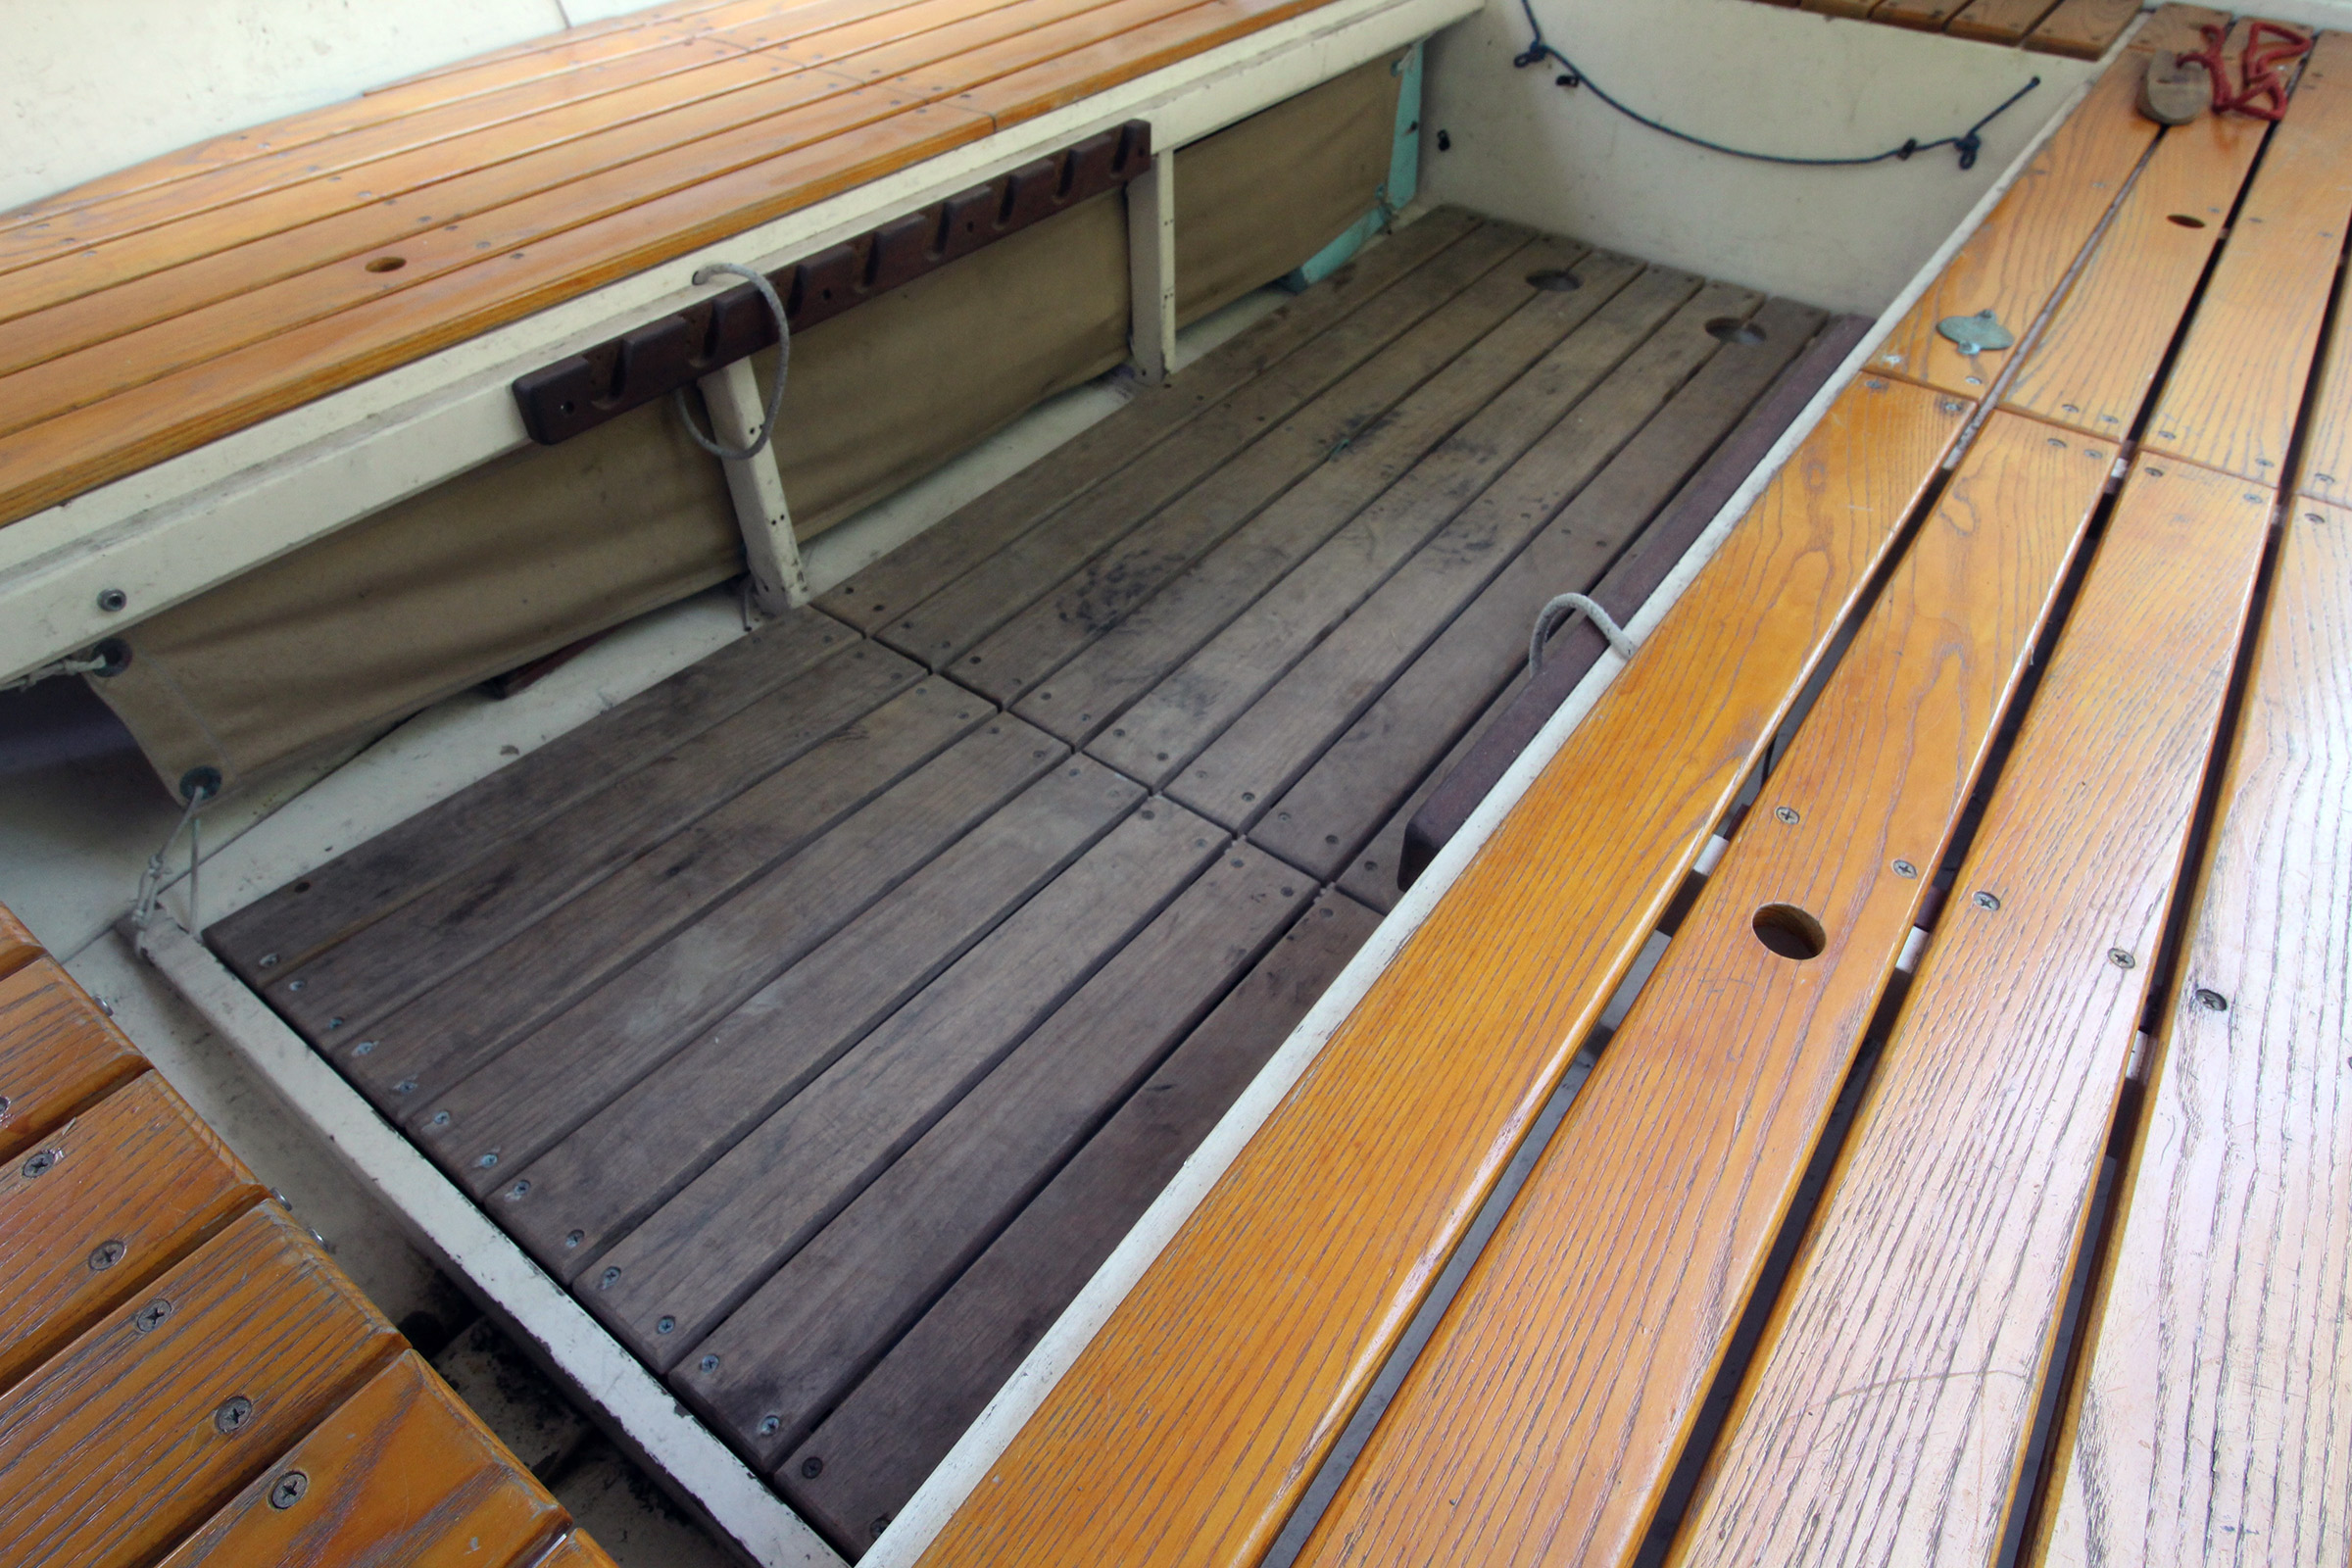 Photographs by the author