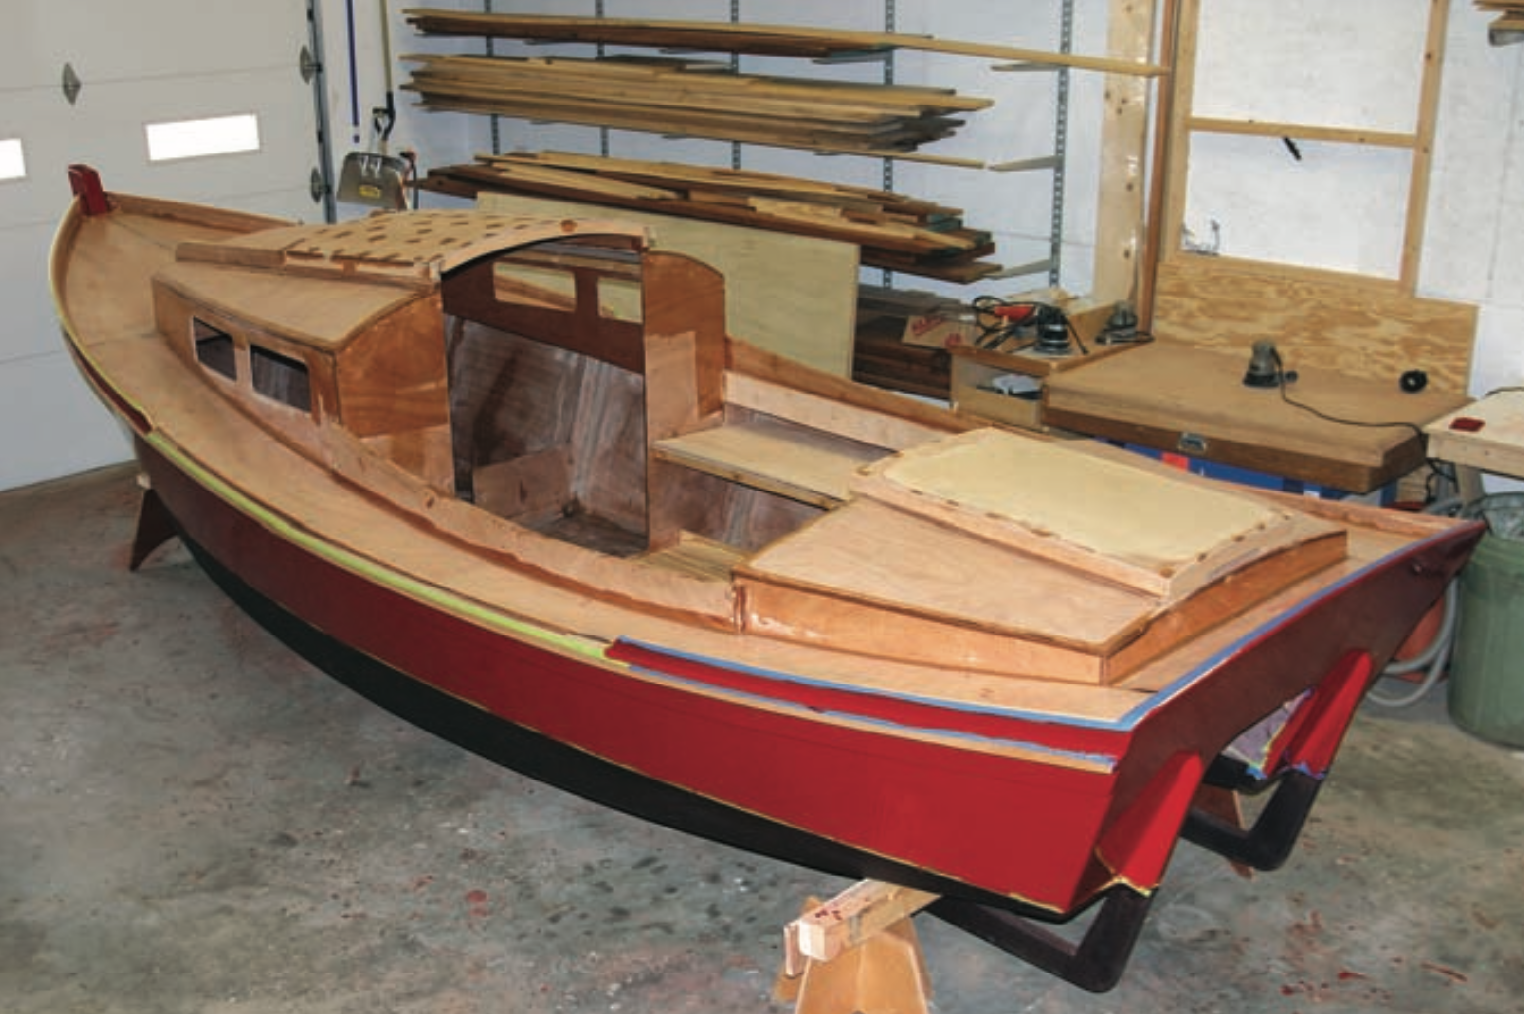
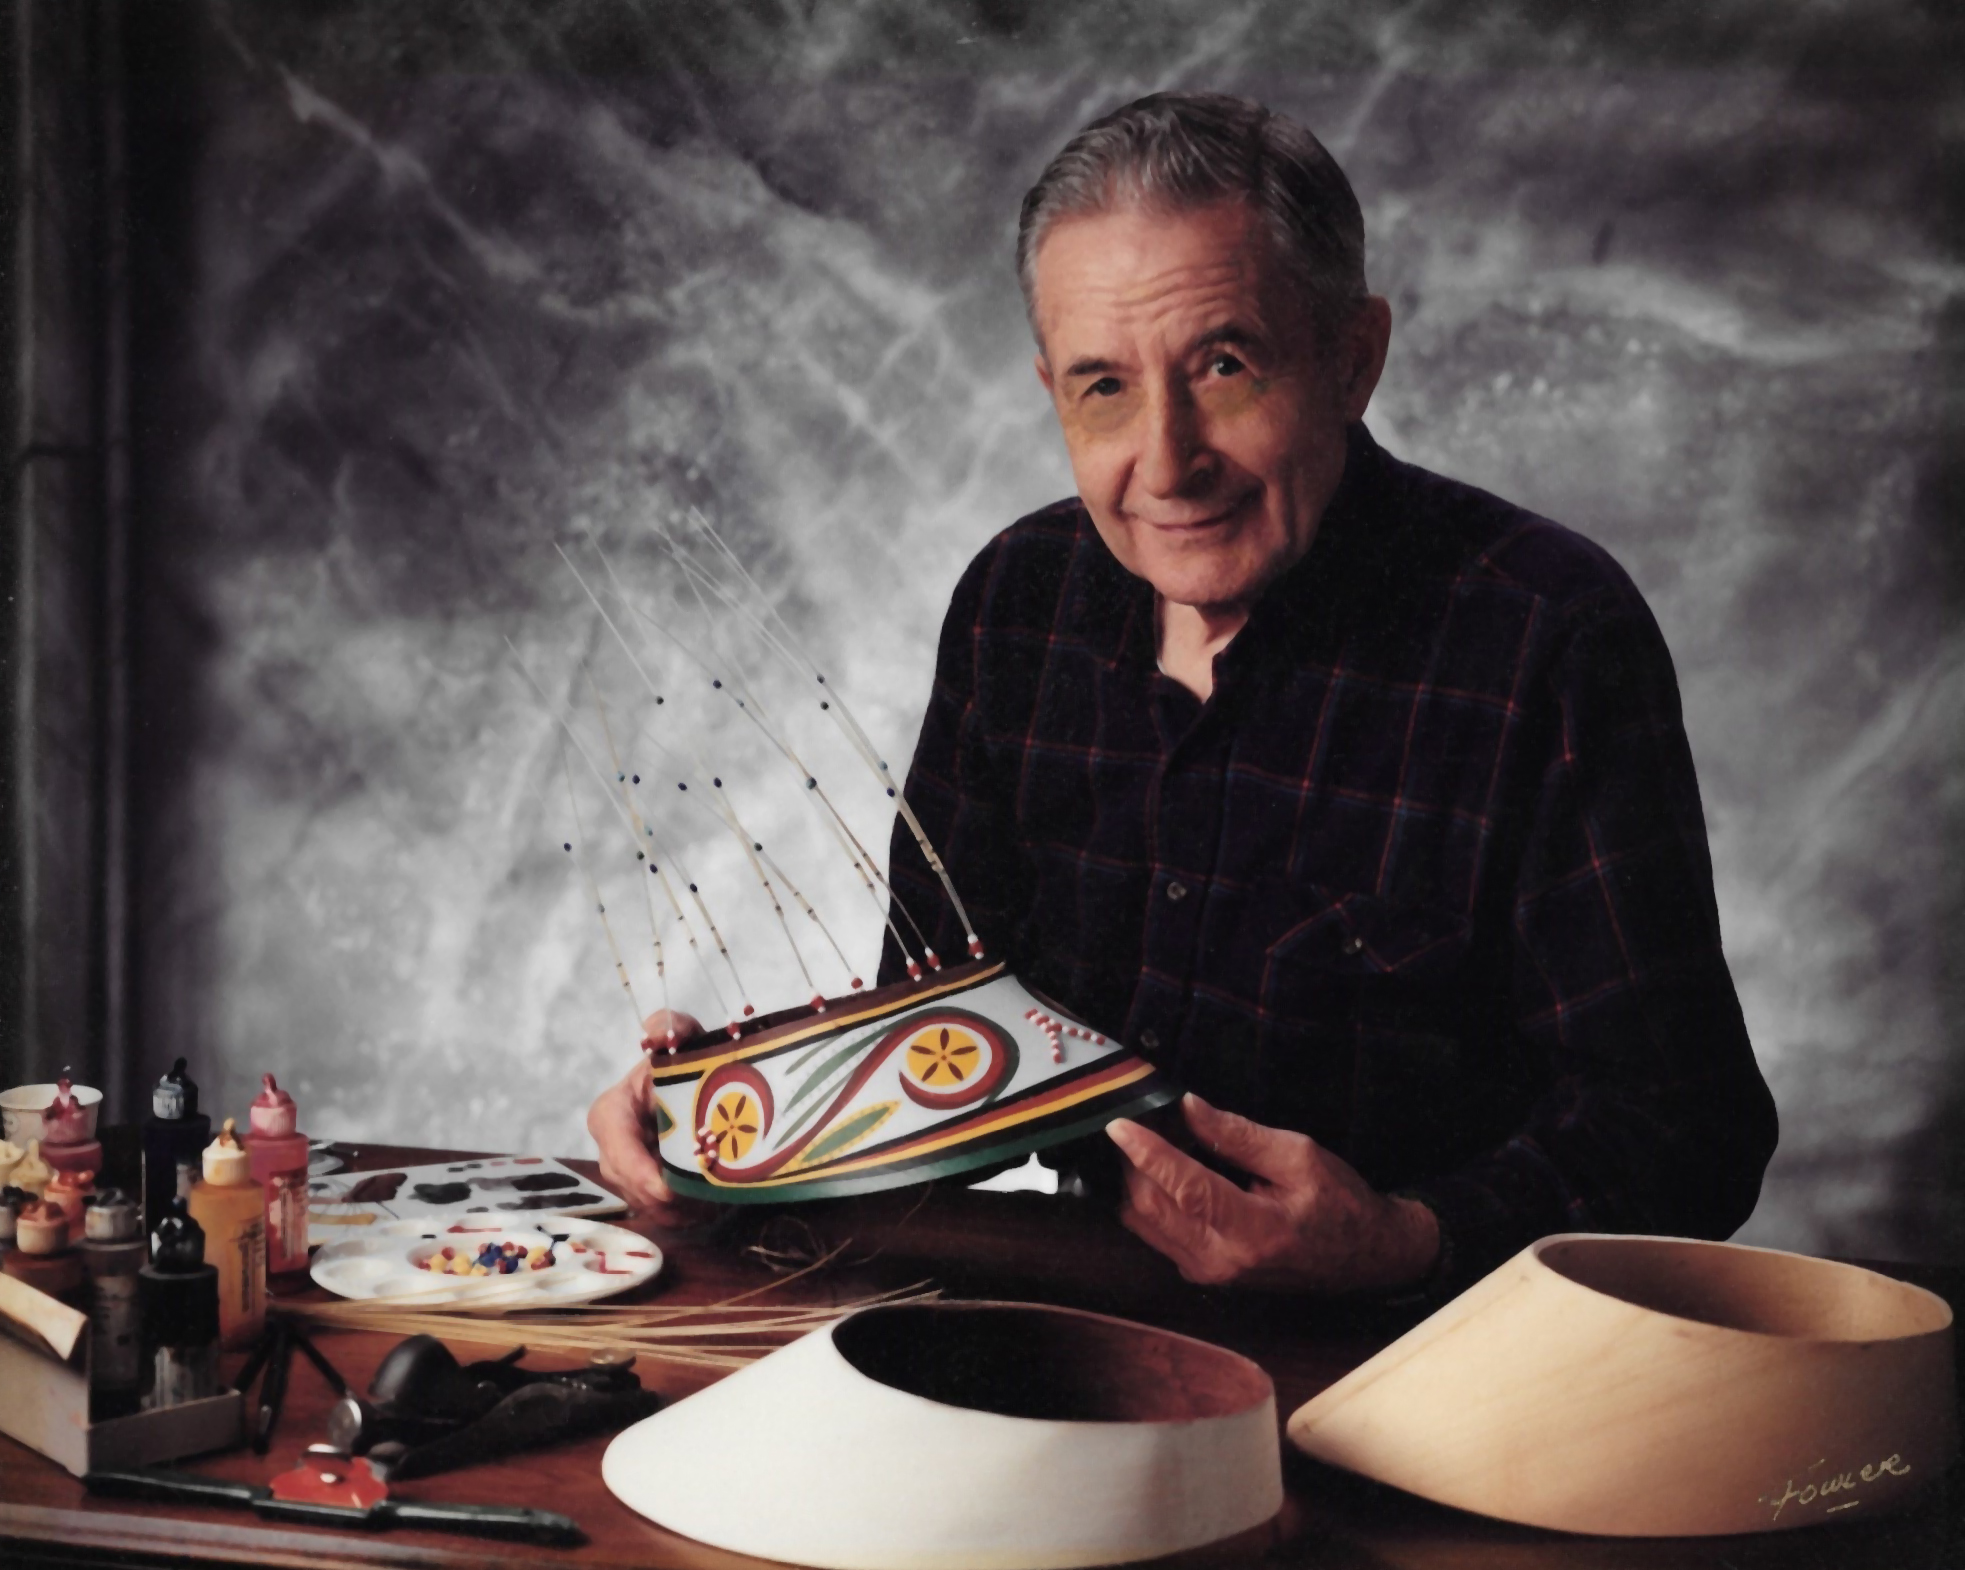
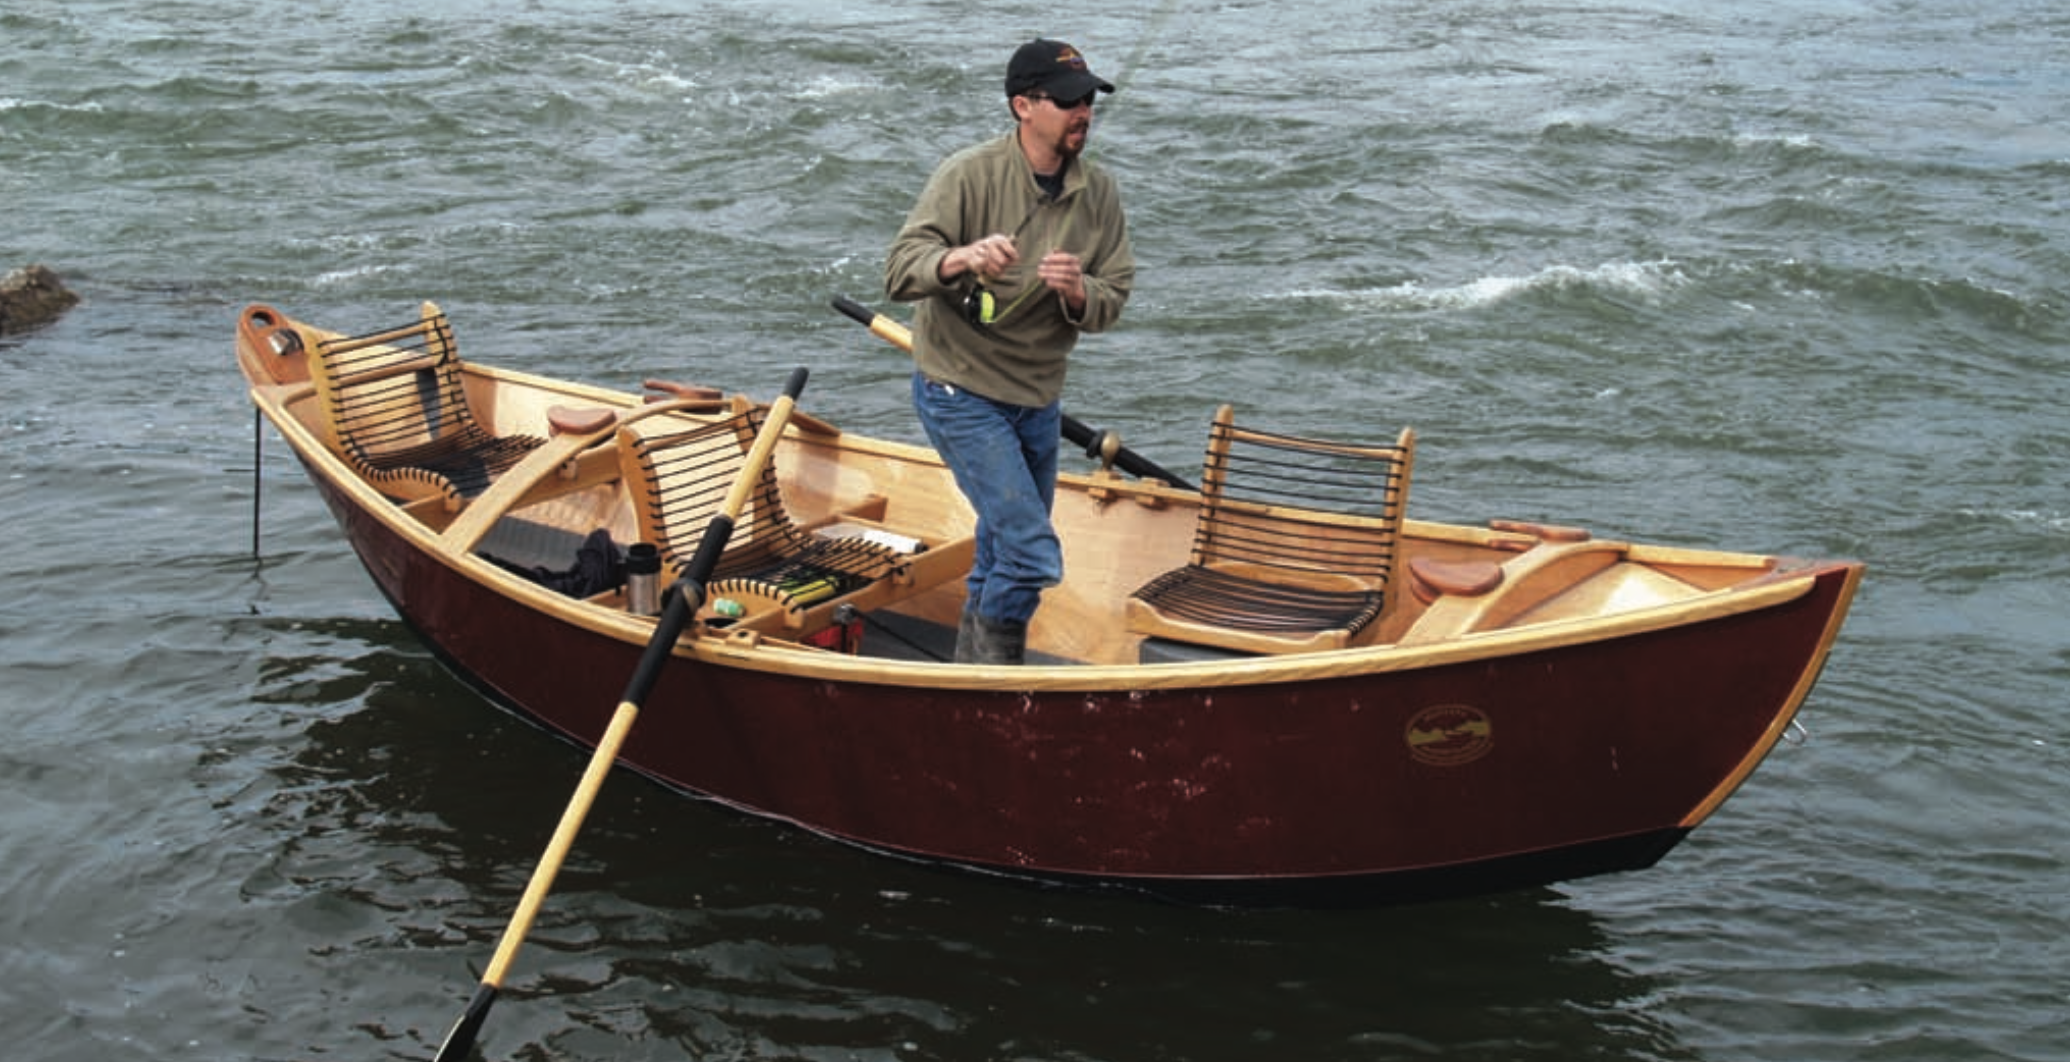
Walter Baron, of Old Wharf Dory Co., designed the Lumber Yard Skiff (LYS) with commercial watermen in mind. It had to be simple, easy, and quick to build, and rugged enough to live at least 10 years in constant hard employ. He would build it of readily available materials—underlayment plywood for the topsides and bottom, clear spruce 44s for the stem and sternposts, and any suitable hardwood for the rails and shoes. Baron has since discovered that skiffs built with these materials have lived longer than he anticipated—and have done so without the benefit of coating the wood with epoxy. Paint on the outside, oil on the inside has been the rule, though some owners have had the outside fiberglassed.
He offers a 16′ standard LYS, a 16′ LYS Sport, and a 20′ LYS—plans or completed boats—and now prefers meranti marine plywood for the topsides and bottom and clear fir for the frames. He fastens the boats with stainless-steel screws and Sikaflex marine adhesive.
Baron, who’s been building boats for about 30 years, can knock together a LYS in about 40 hours, if he needs to hurry. A rank amateur with basic woodworking skills might double that time. When he’s finished, he’ll think that every minute was well spent, because the boat probably will exceed his expectations. Like most simple designs, especially ones that are easy to build, the LYS required more thought than we imagine. Baron took his inspiration from the Brockway skiffs, which were built by Earle Brockway in Old Saybrook, Connecticut, and well regarded along the coast from Connecticut eastward through Cape Cod.
Photo Courtesy of Old Wharf Dory Co.
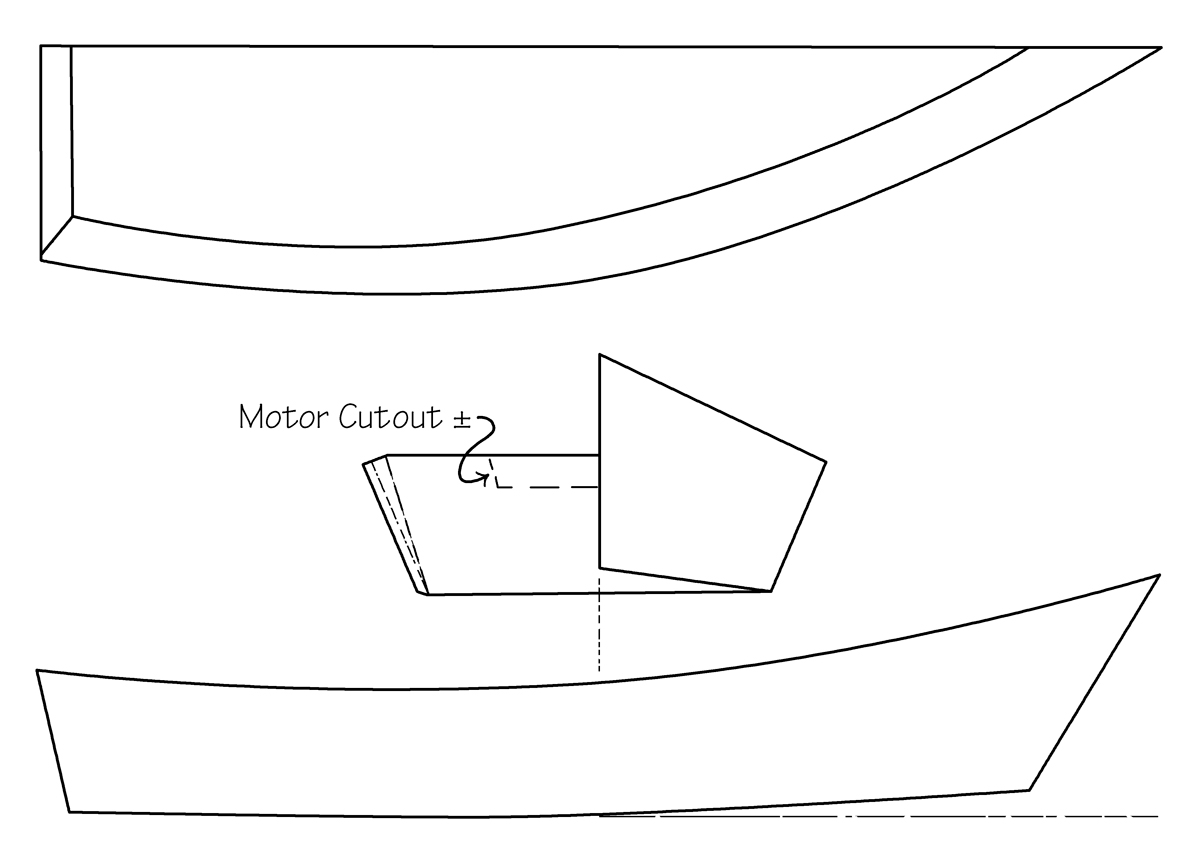
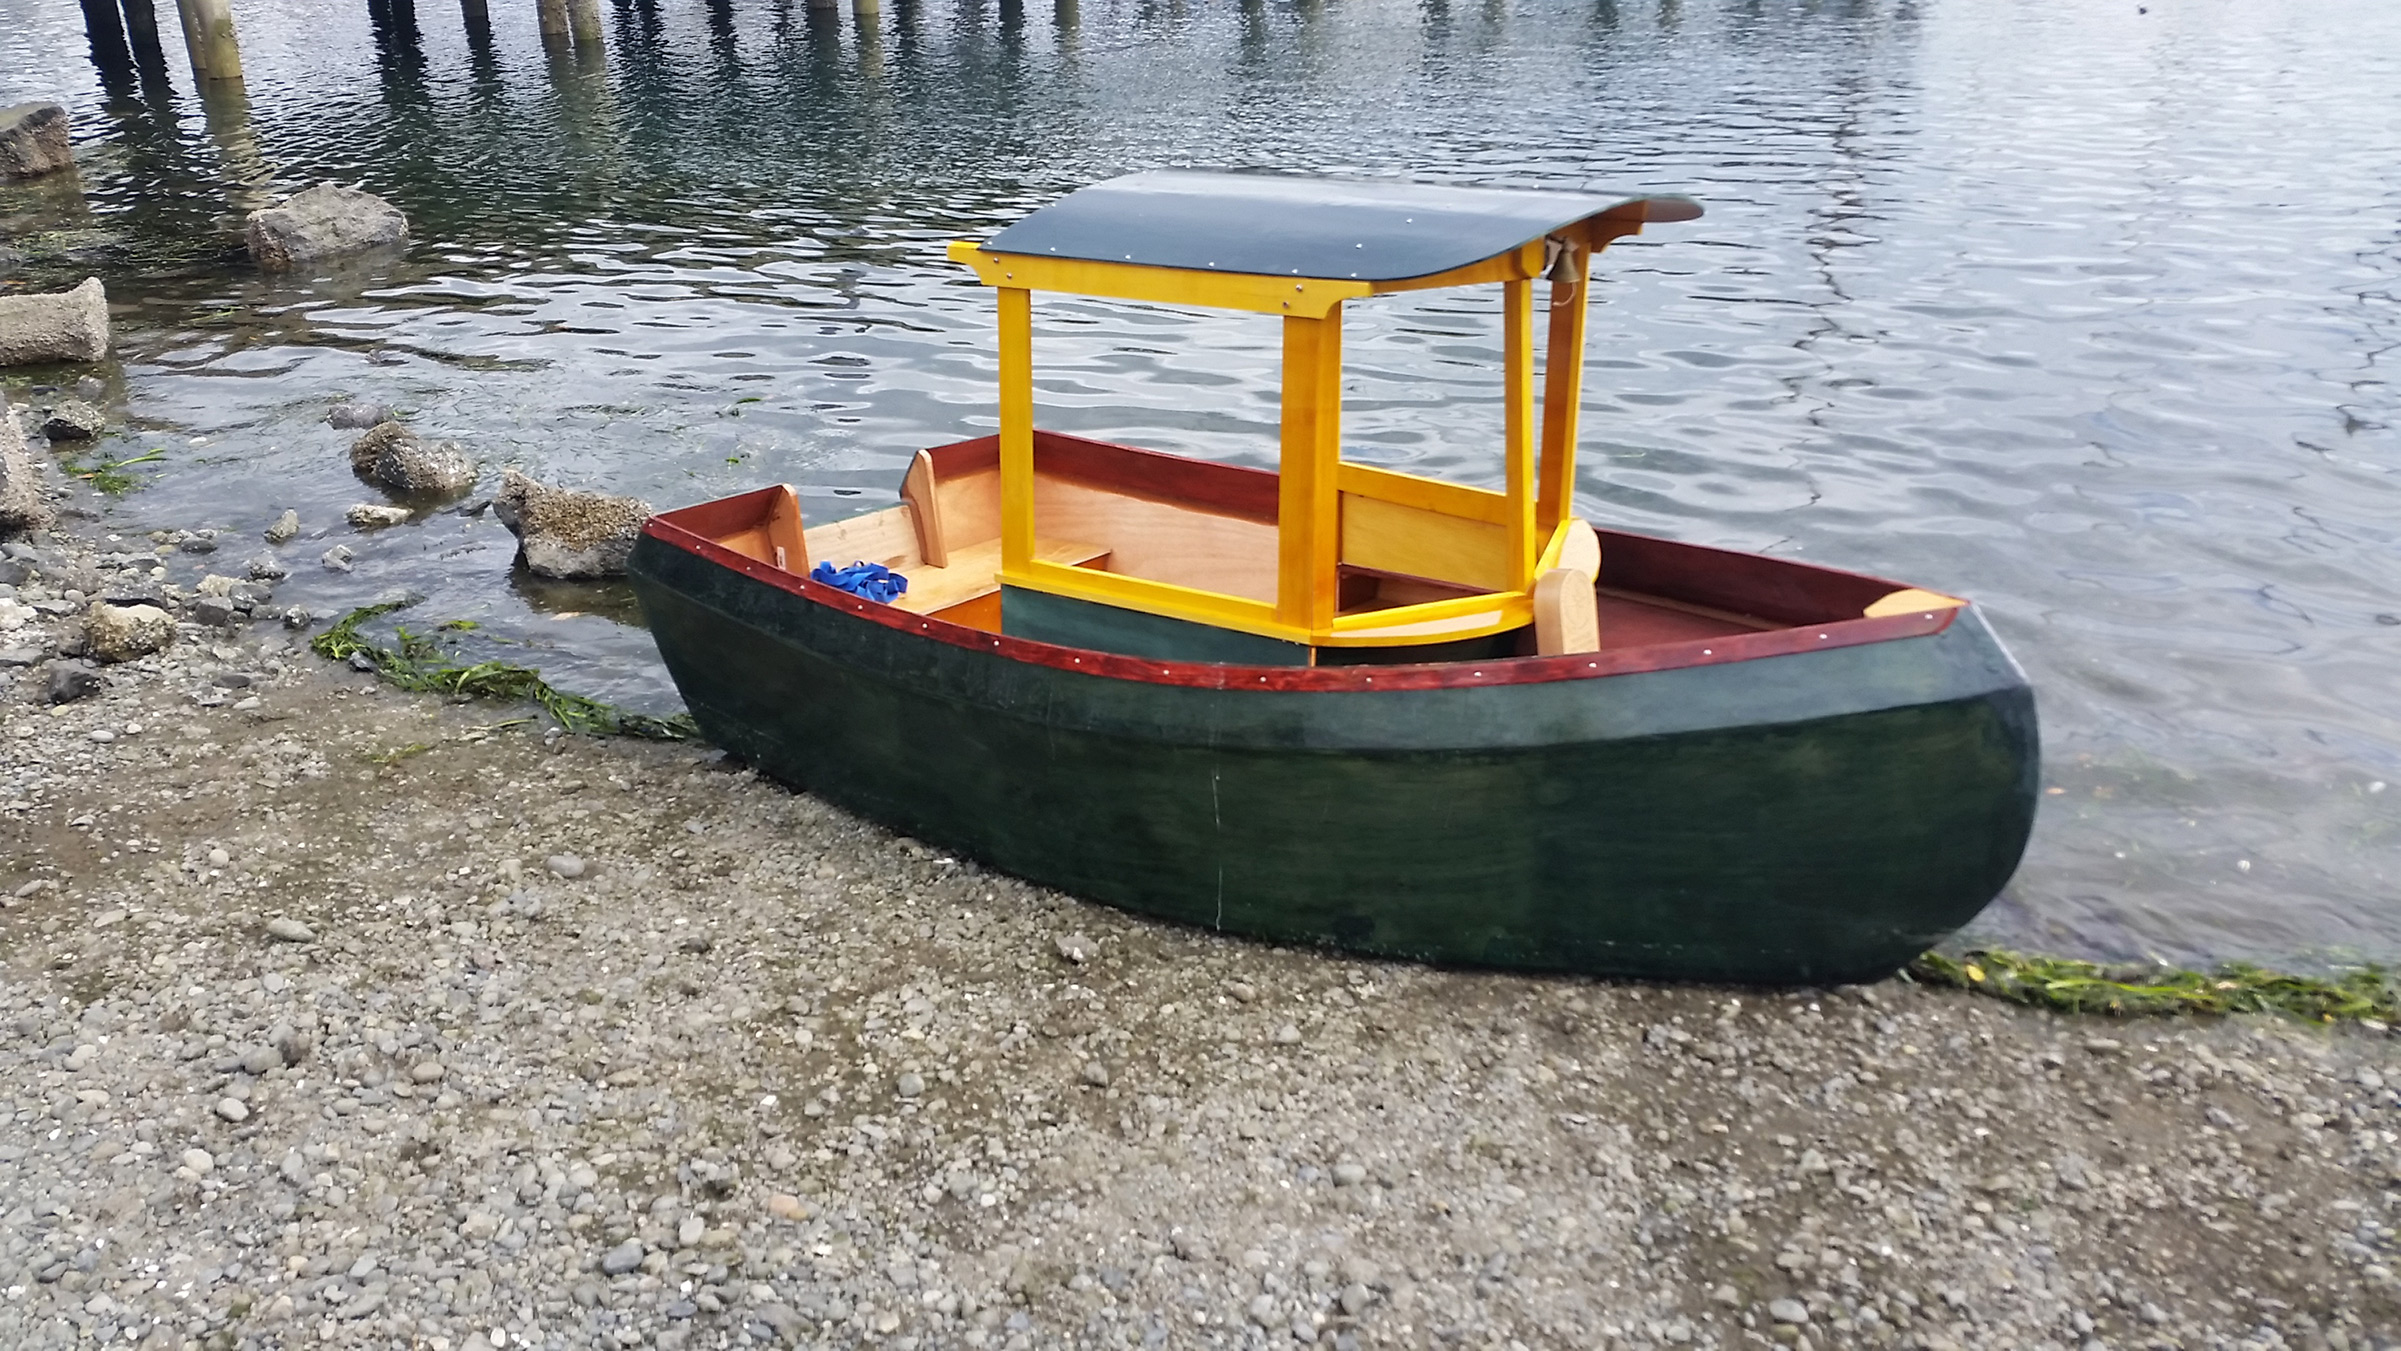
Walter Baron’s Lumber Yard Skiff is so-named because its materials can be procured from local lumberyards. The boat is rugged, inexpensive, stable, and meant for a variety of purposes—from fishing to recreation.
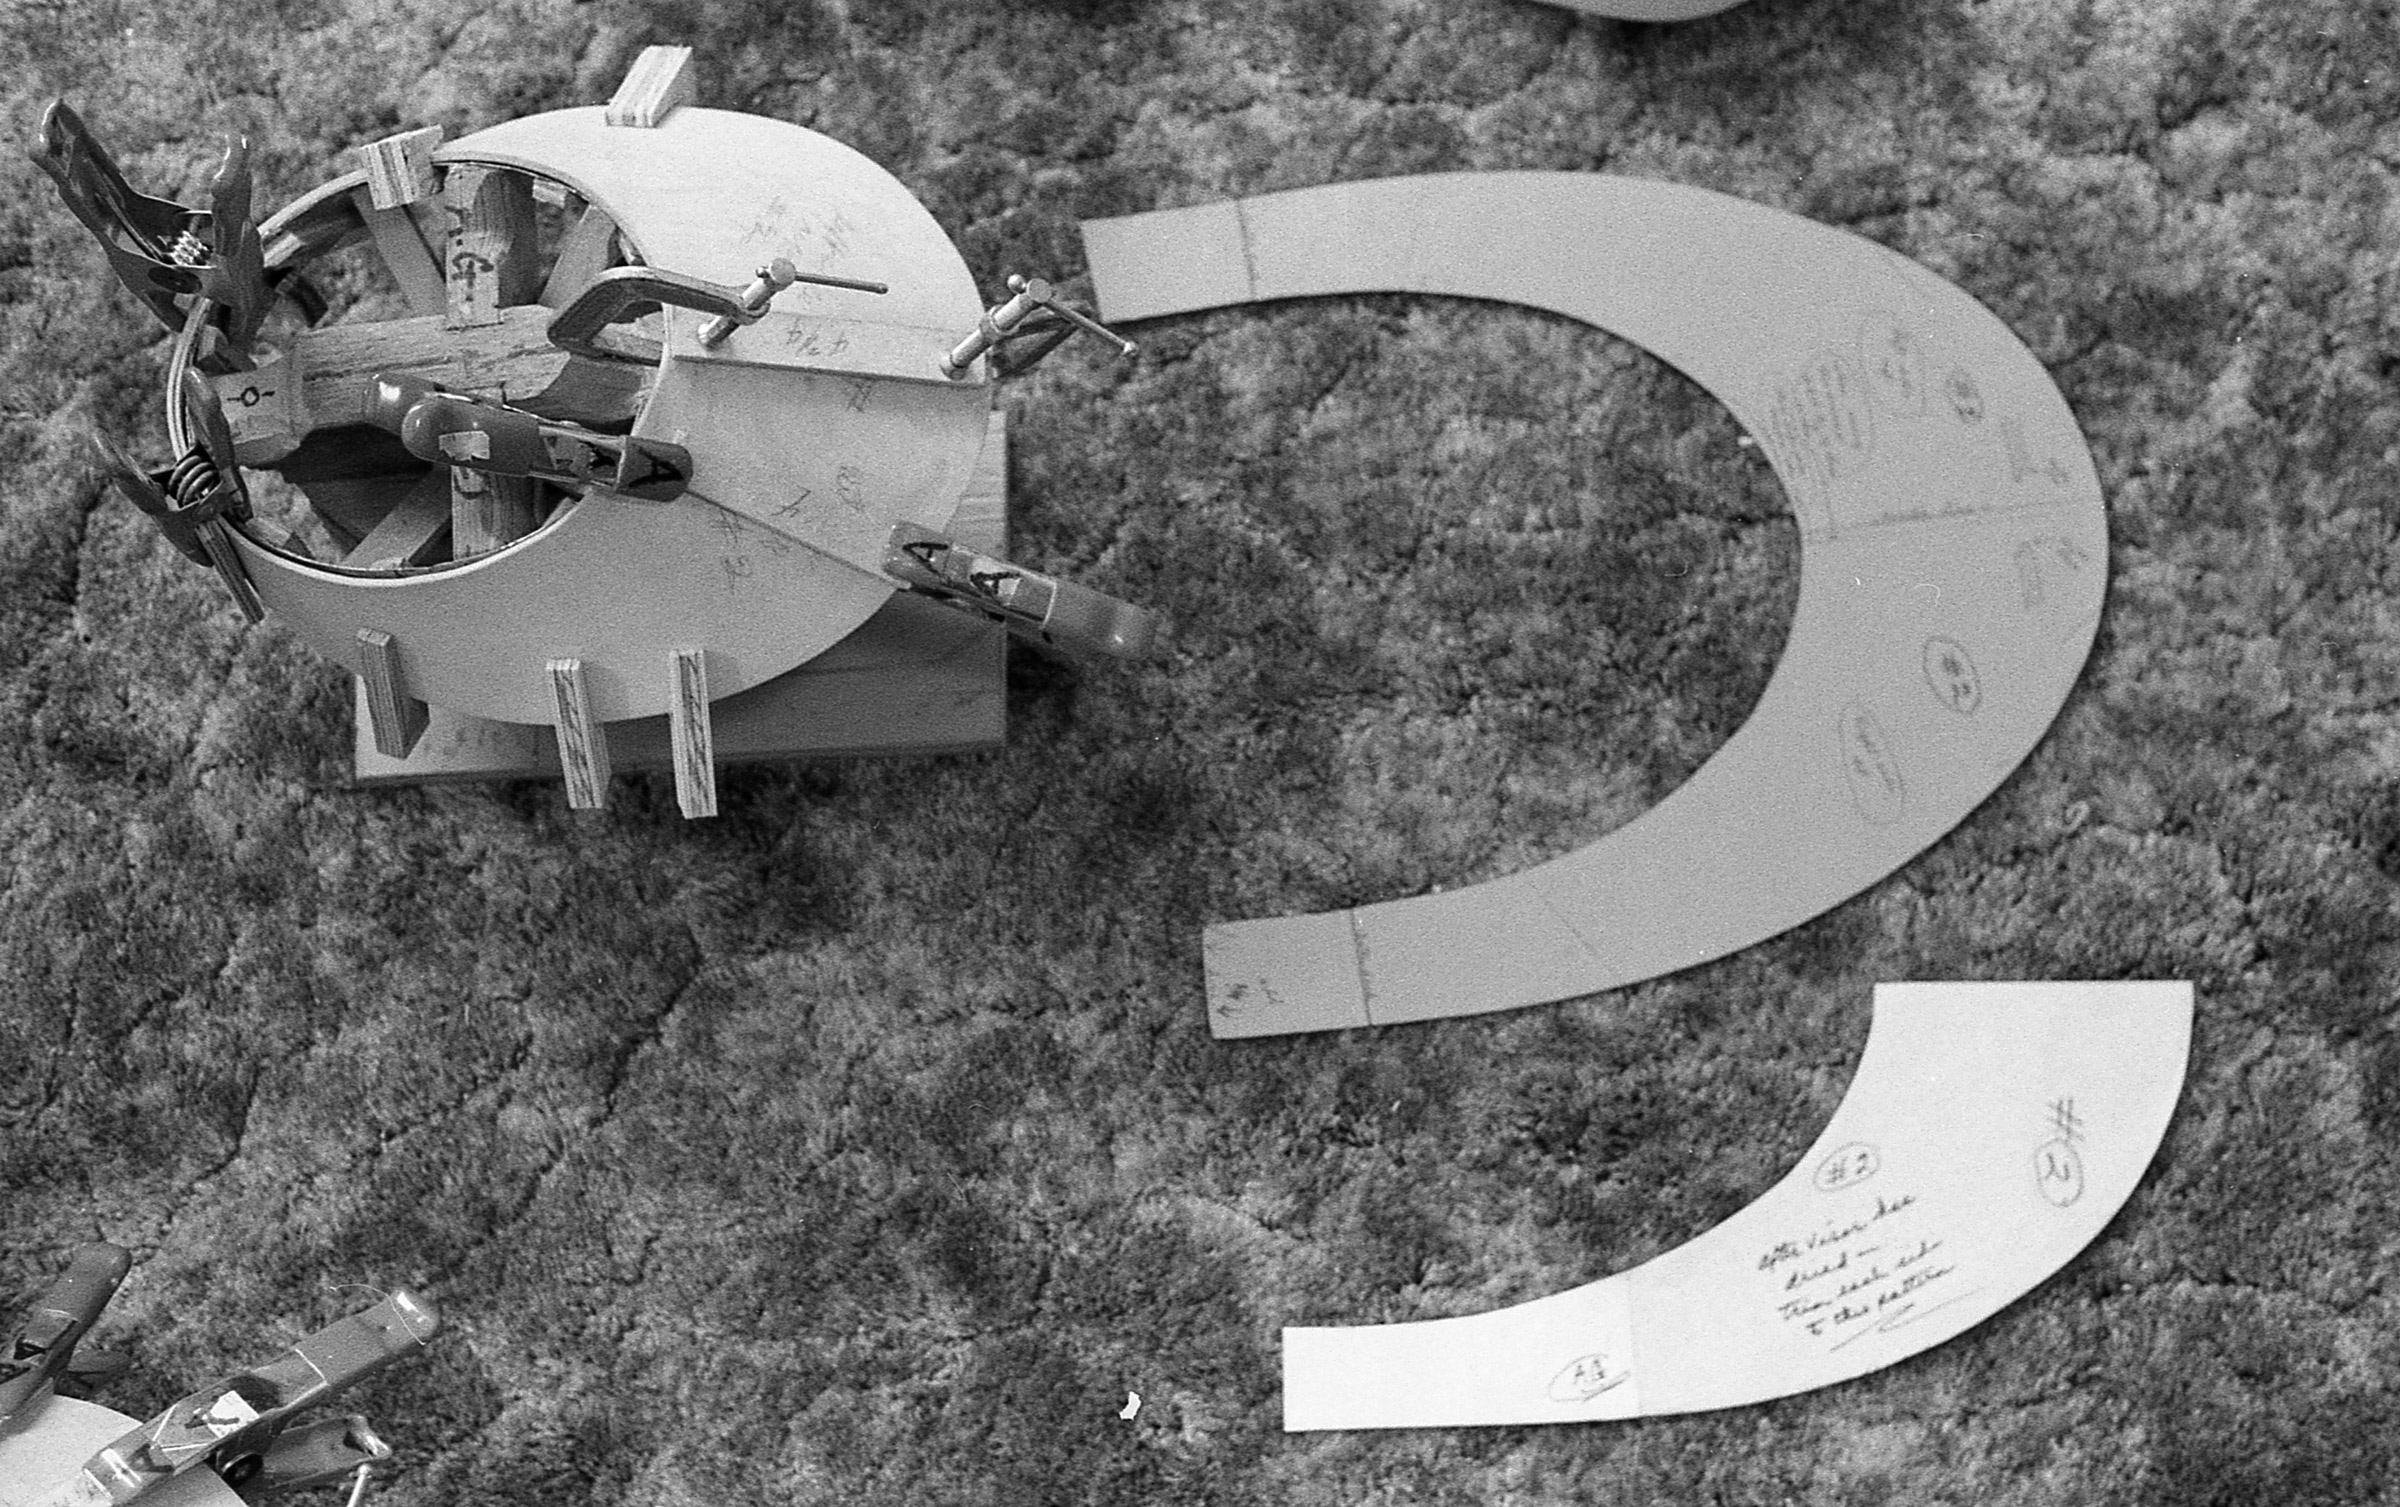
“I designed these boats using plywood models built to scale,” Baron said. “The sheer is the hardest part.” Even workboats should be attractive, so Baron took great care in getting the sheerline just right. Drawing an attractive sheer on a flat-bottomed boat isn’t the problem here. Having that sheer look right in three dimensions is another thing altogether—they can get all wonky. Baron solved this problem by making a model.
Working on the theory that wood—even plywood— will take its natural course when you bend it around a specific point, Baron established the shape of the topsides and the bottom at the same time. He wanted a fine entry so the skiff would provide a decent ride in a chop, and he wanted substantial beam aft to make it stable for hauling traps and to reduce the influence that shifting weight has on her handling. With these criteria in mind, he located the point of maximum beam well aft. A moderate delta shape is the result.
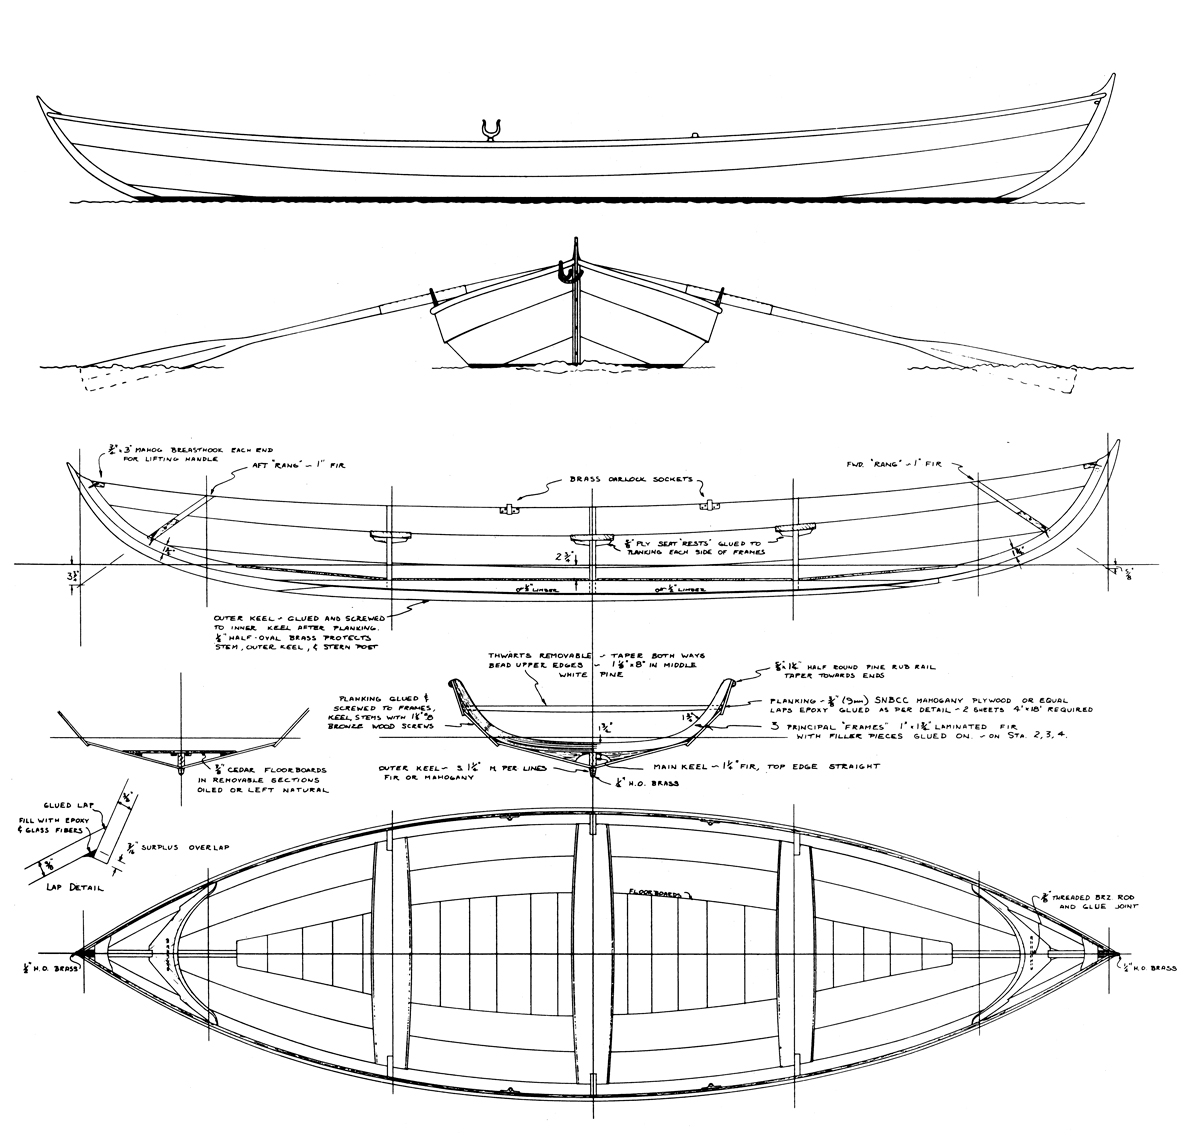
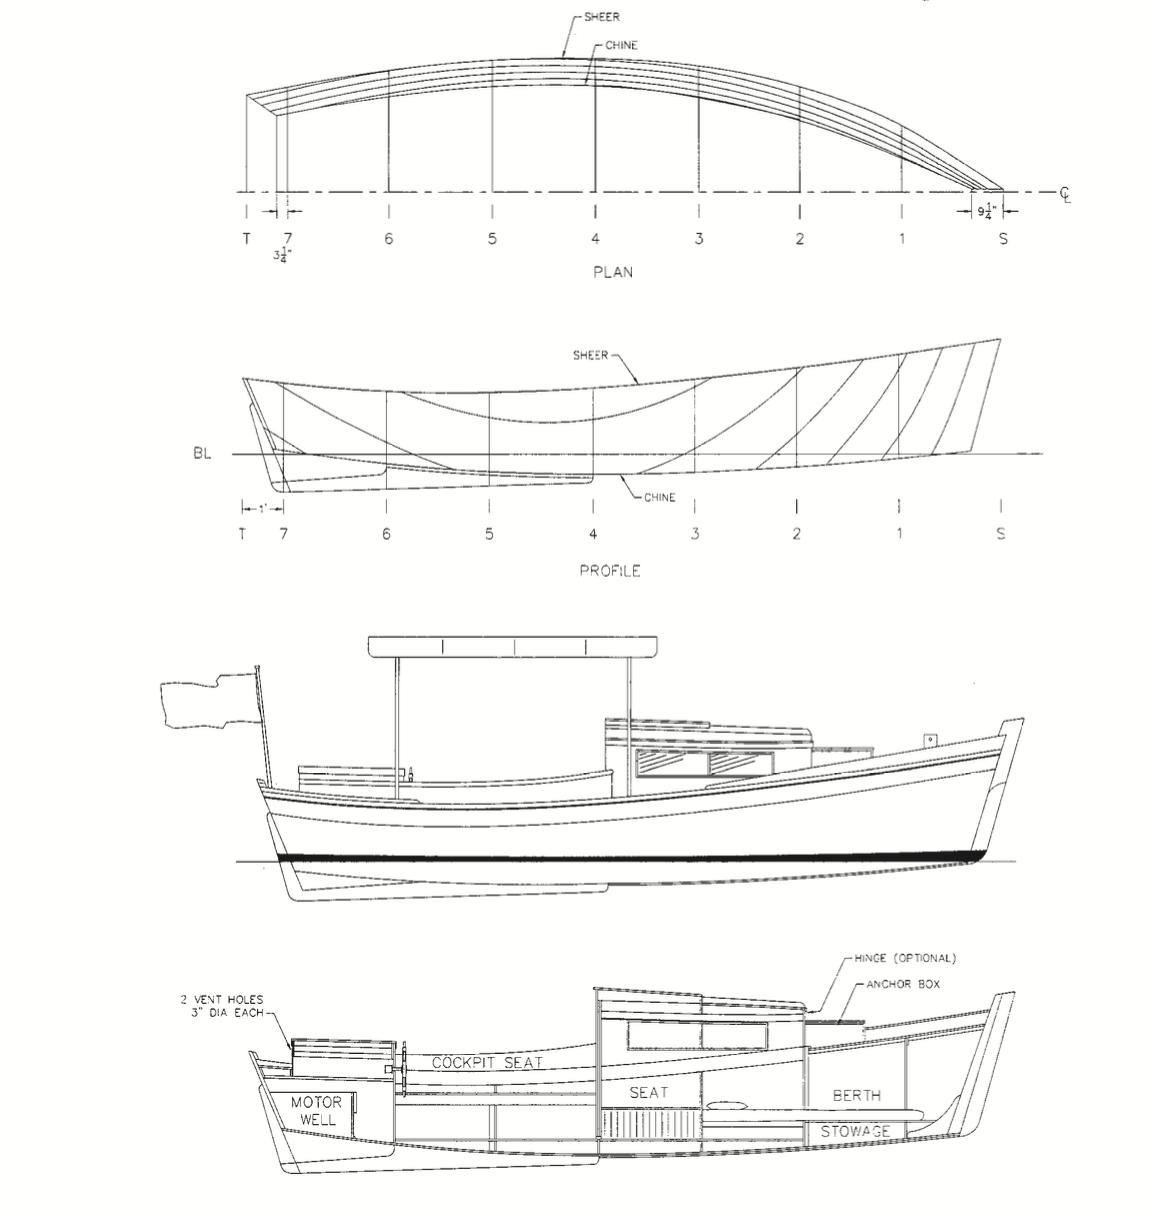
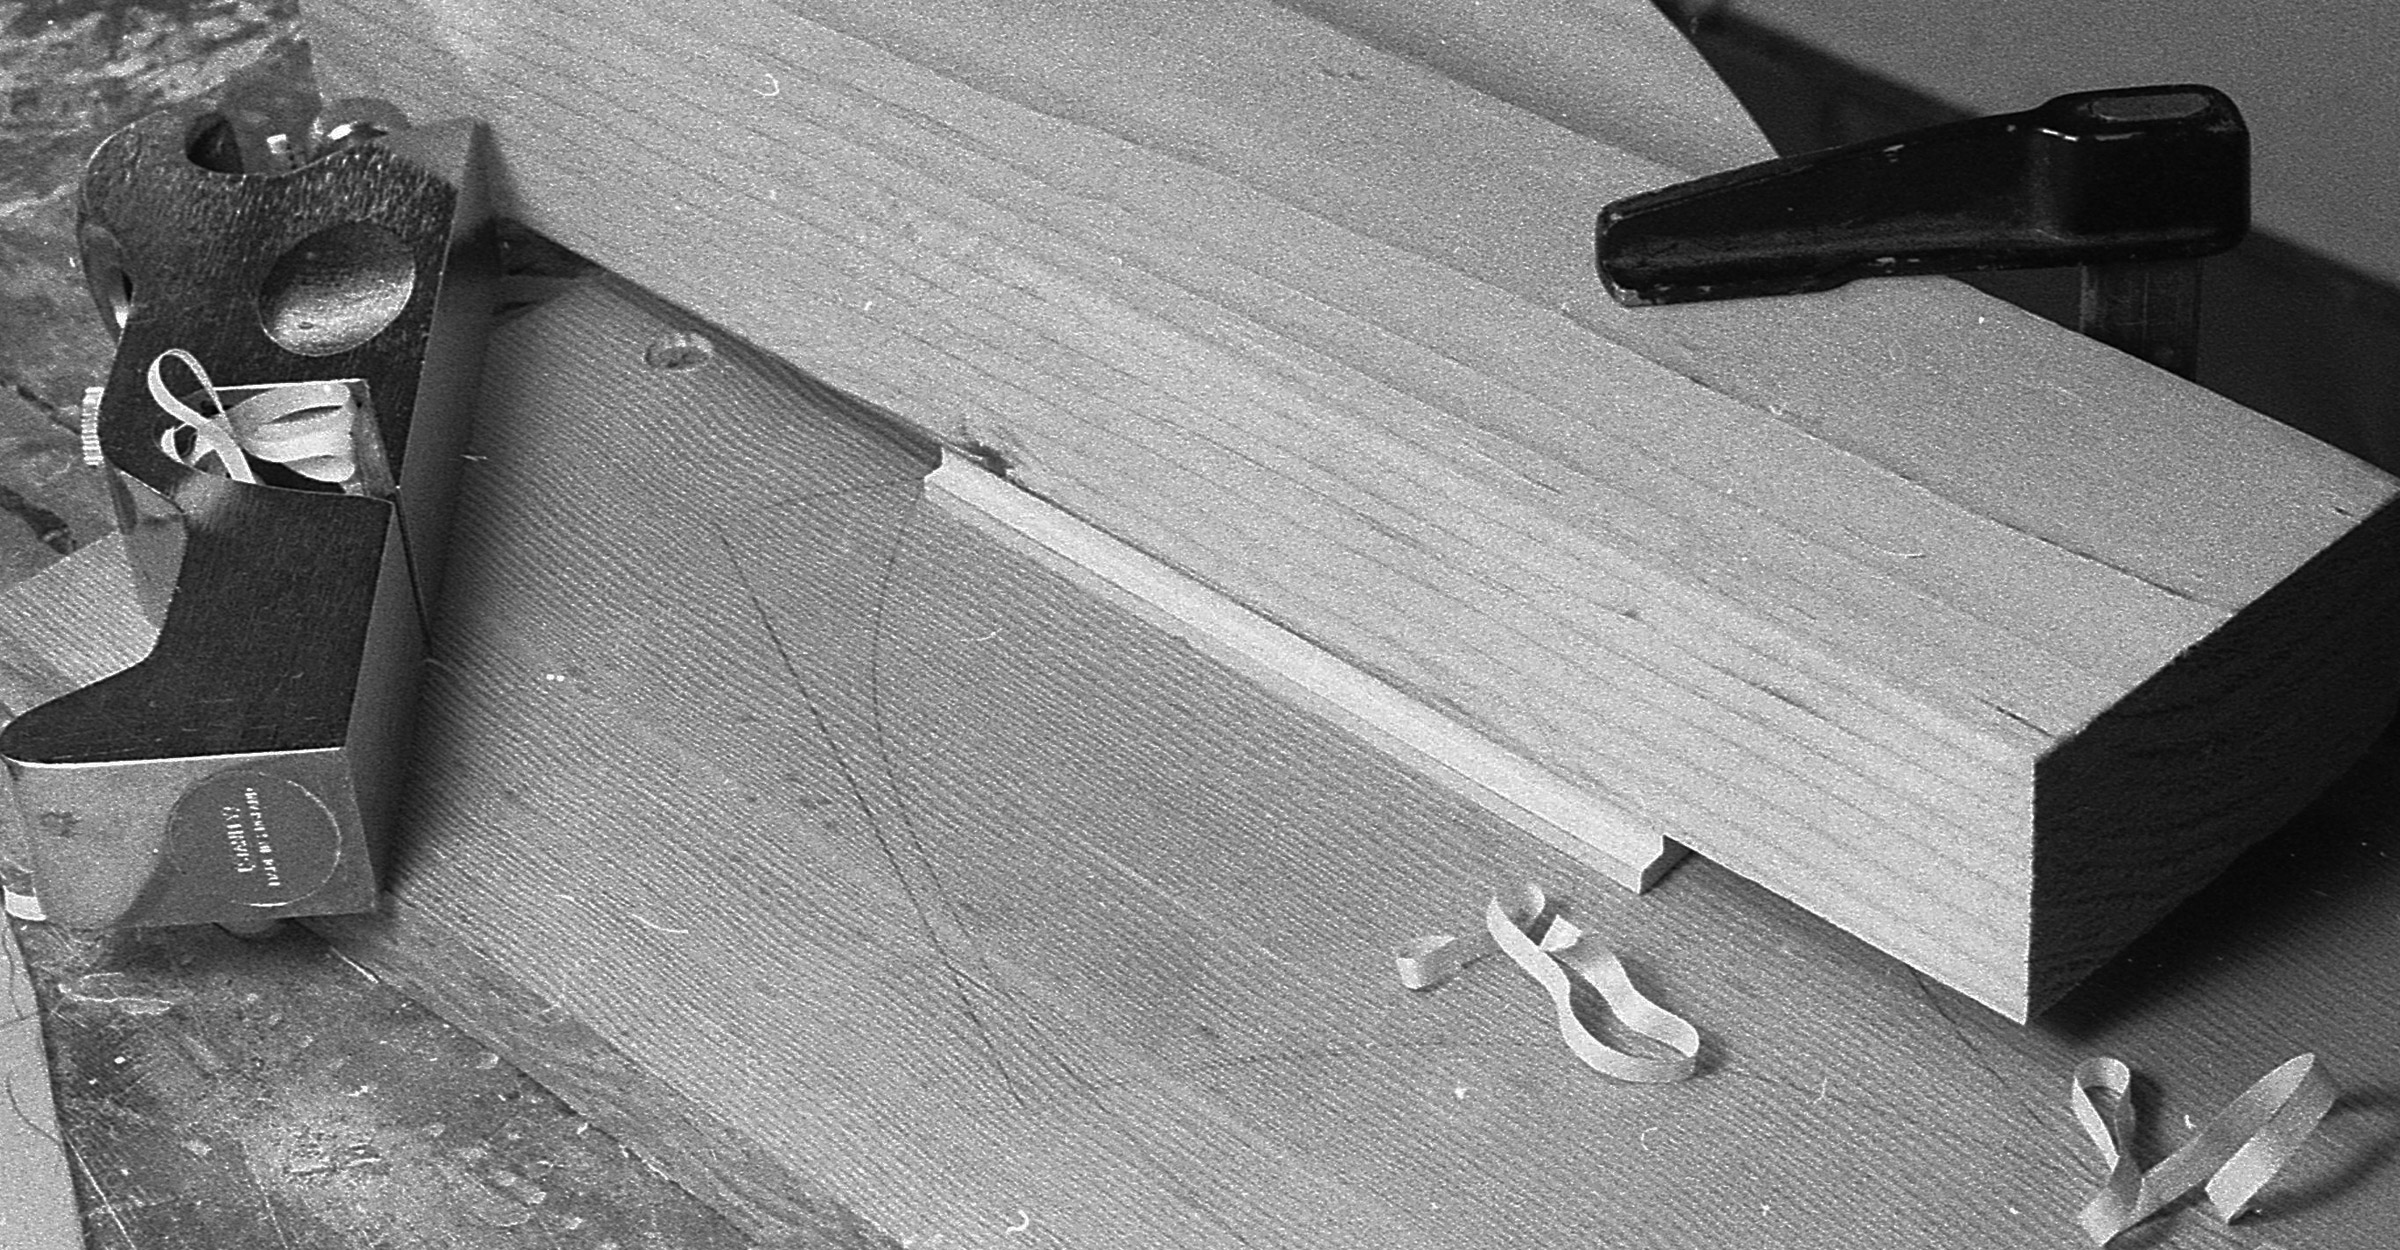
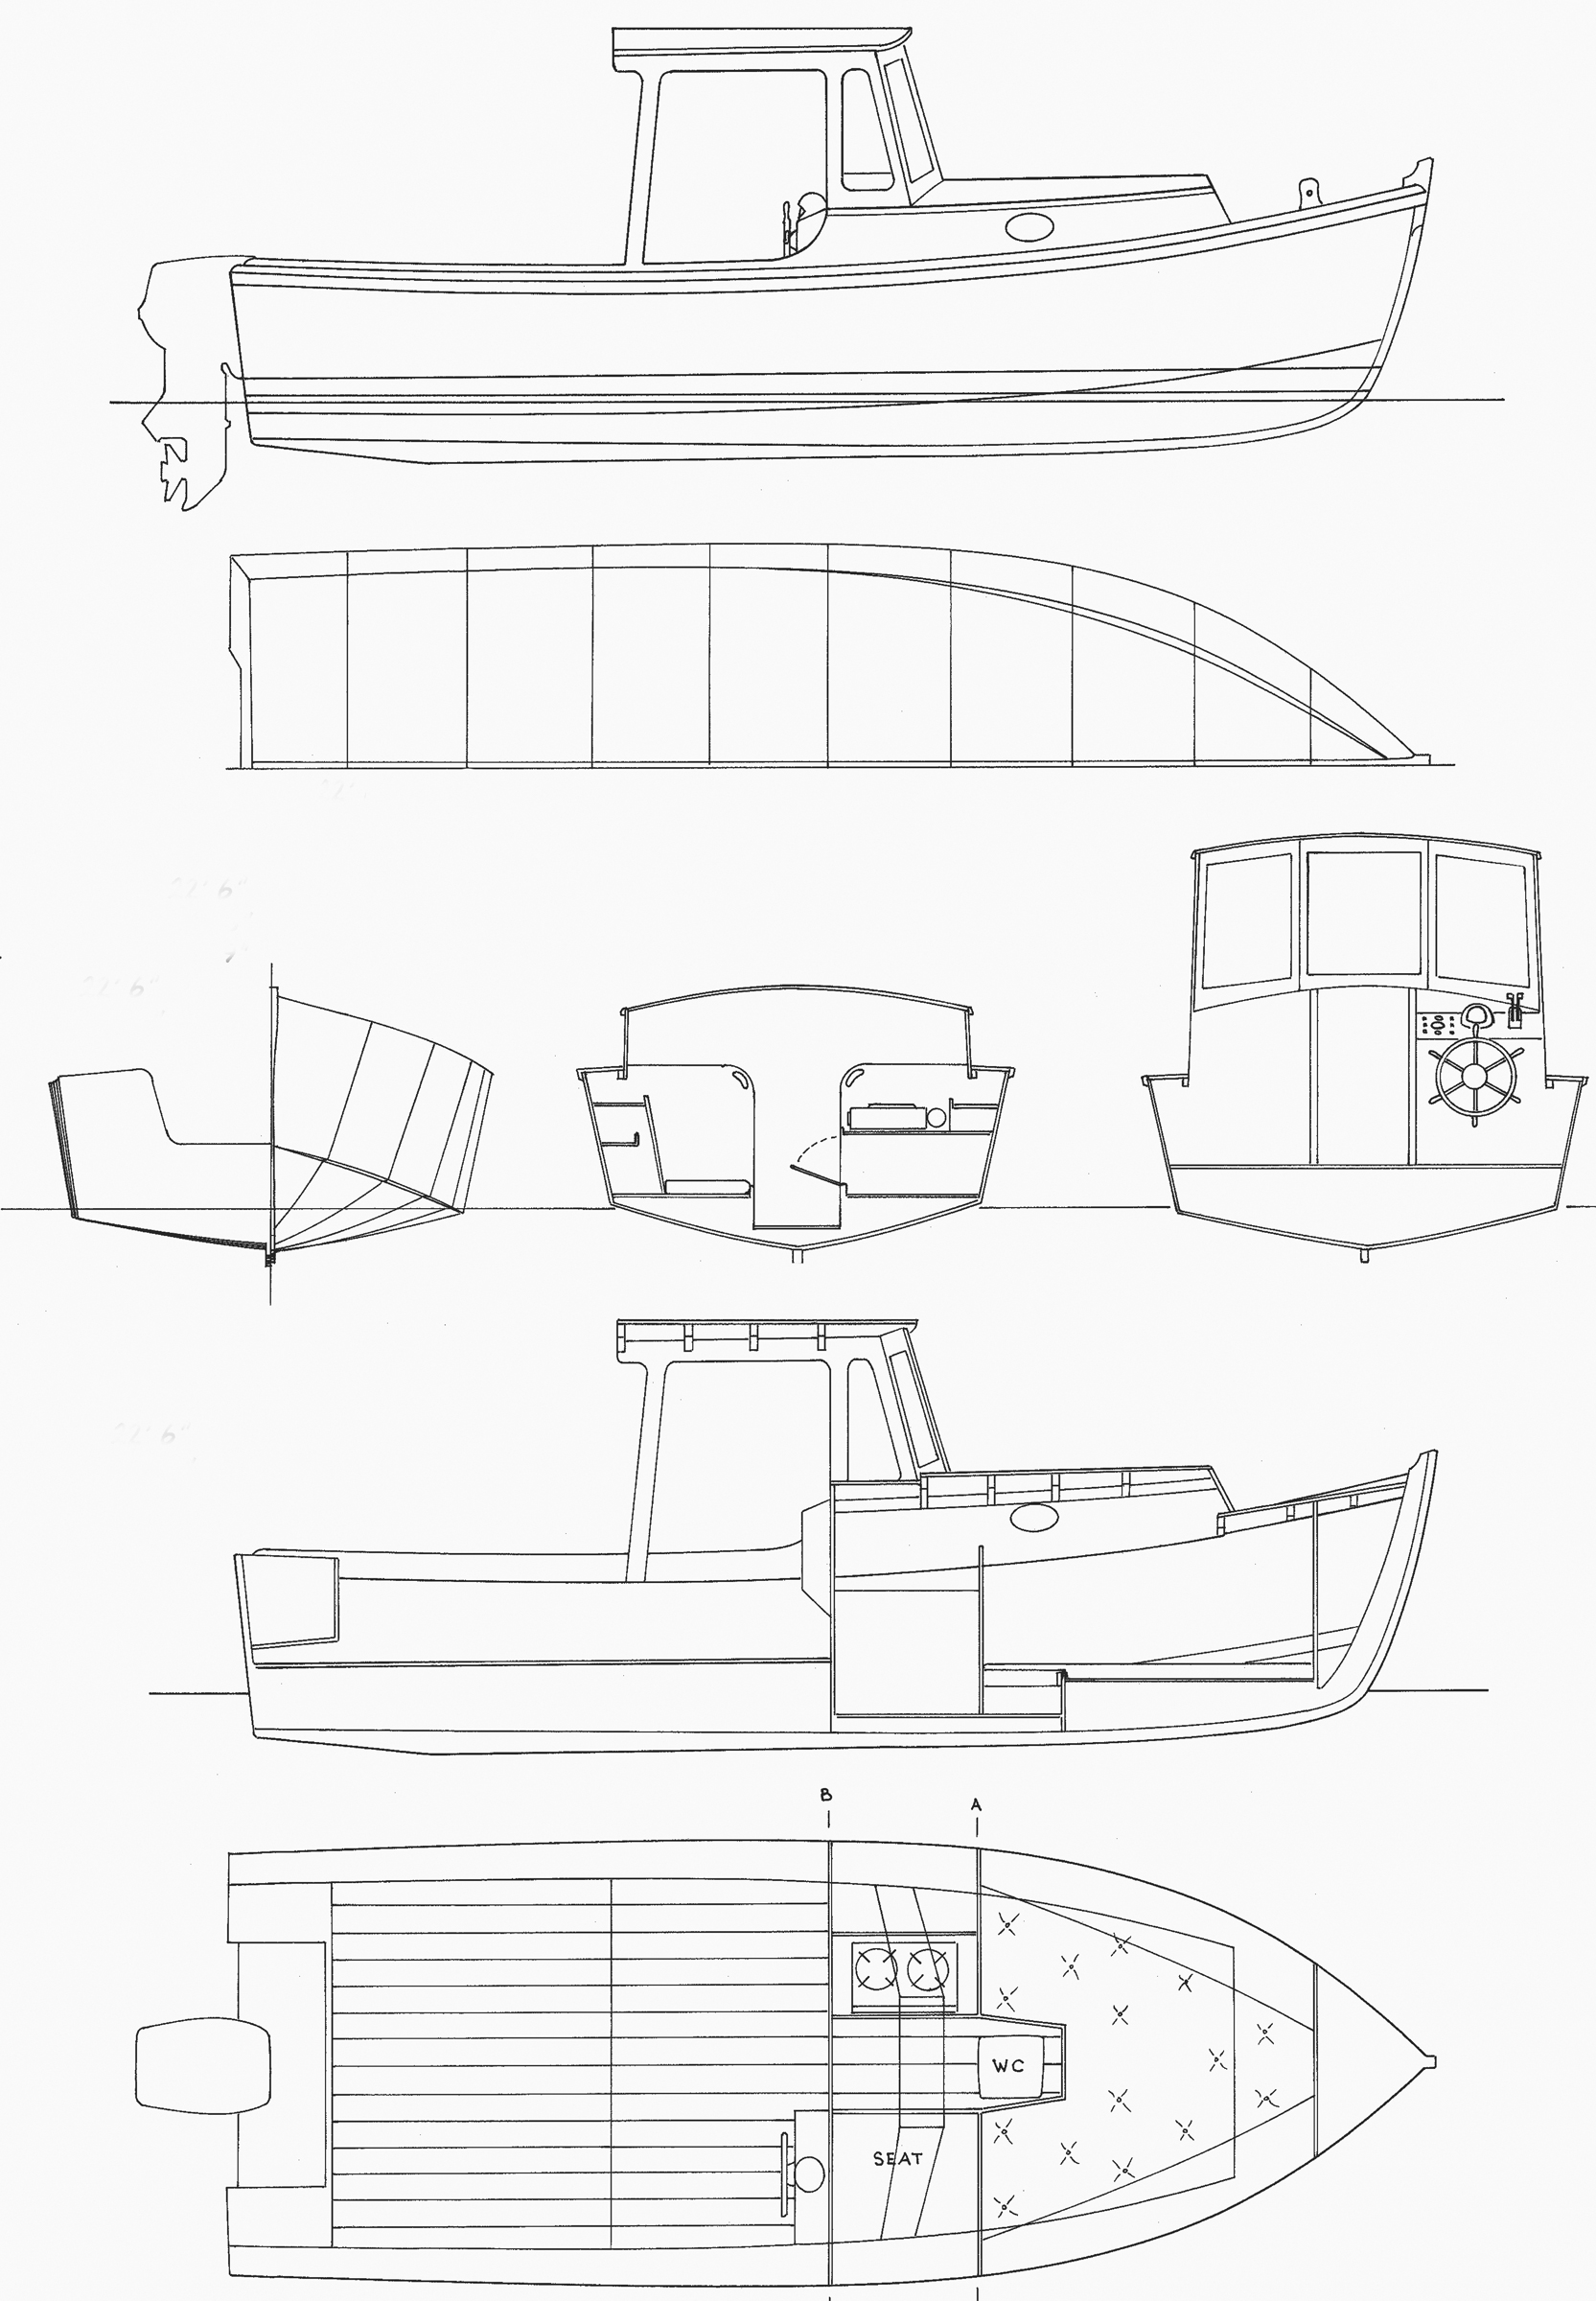
After he bent the plywood topsides to the shape he wanted, he had to determine the arc he’d have to cut into the topside panels, as they lie flat on the floor of the shop, to permit a gently rockered flat bottom. One way to do this is to scribe a straight line, bow-to-stern, on the topside panels when they’re bent around the spreader. This line will be perfectly parallel to a level floor The rocker (longitudinal curvature) can then be added. Cutting along this line gives the panel the exact arc it needs to fit the bottom to the LYS. After Baron was satisfied with the shape of the boat, he enlarged his tracings onto full-sized ply- wood sheets—two 1⁄2″ sheets per side on the 16-footer, and two-and-a-half 3⁄4″ sheets per side for the 20-footer. Baron uses butt blocks to make panels of the appropriate length. He got the stem and two sternposts from a single 12′ fir 4 4, the bevels of which he’d determined from building the model. Baron made the transom from two pieces of 3⁄4″ meranti.
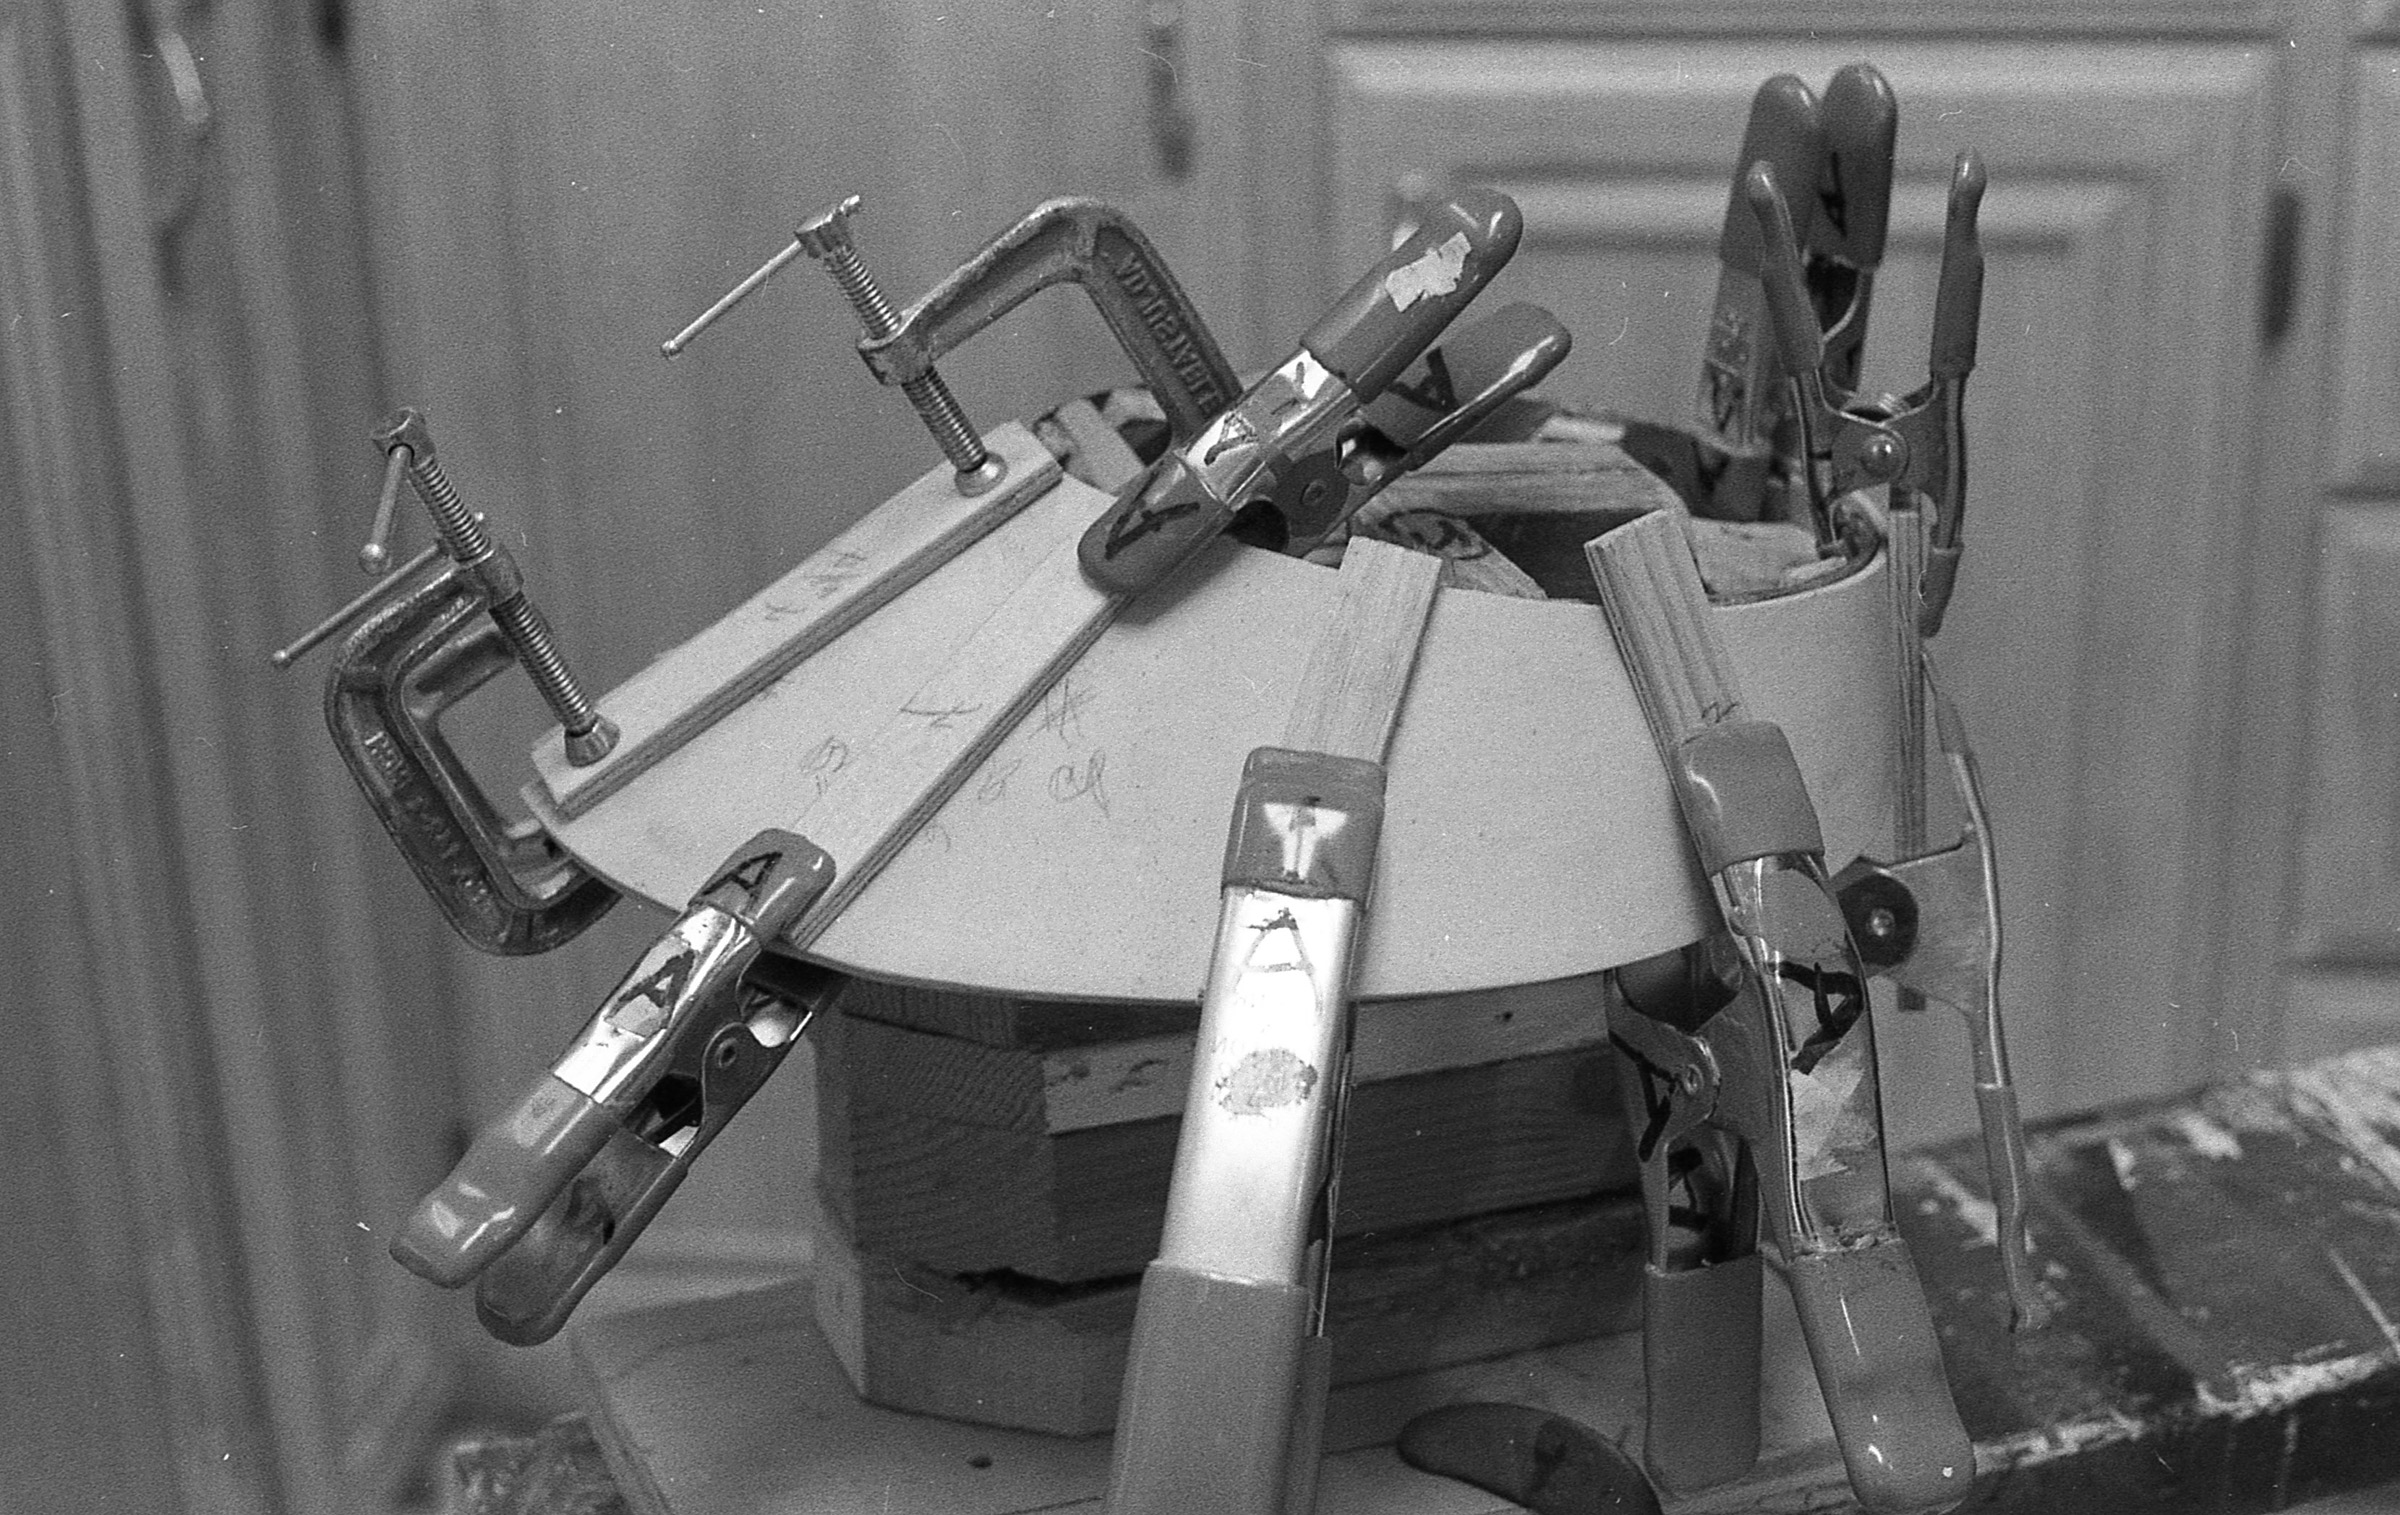
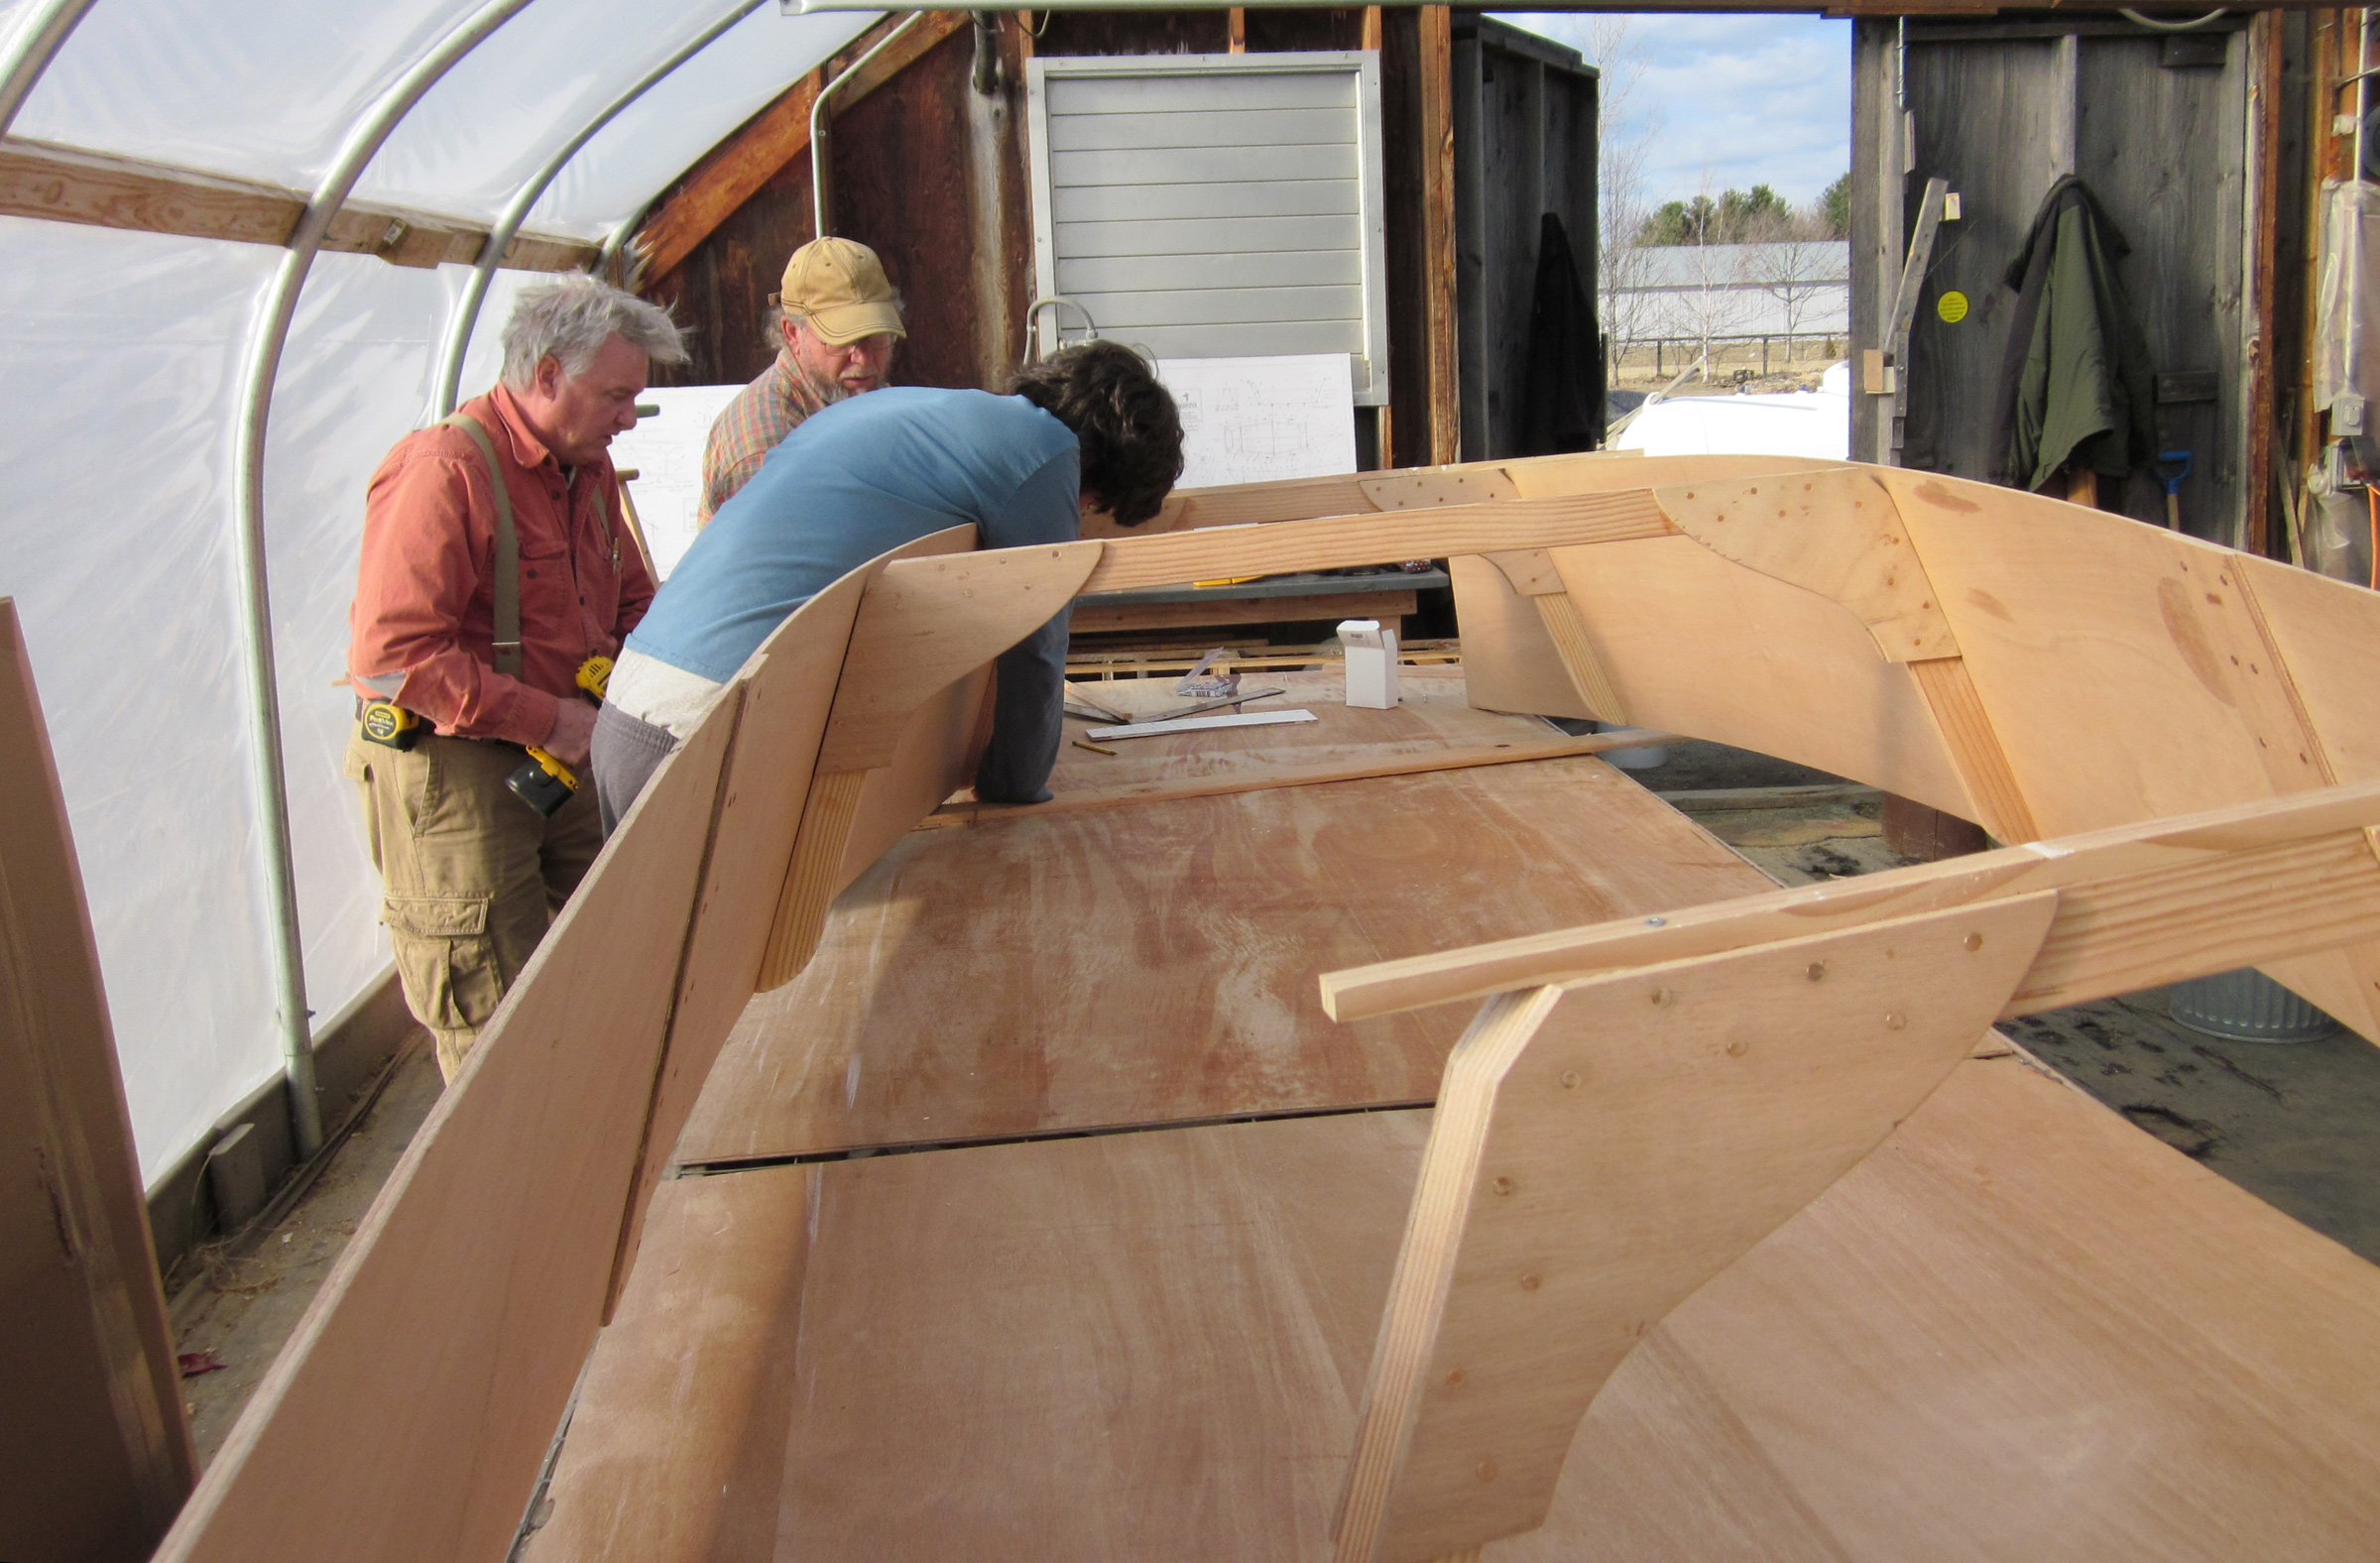
Construction starts with the components assembled bottom-up. The stem and sternposts act as the buildingjig. You don’t need a strongback. Simply fasten the side panels to the stem and sternposts, install the transom, and insert the spreader. You’ll need a Spanish windlass to draw the topsides together, especially at the stem. Baron said that installing the chine logs is the most difficult part of the process, because bending them into the shape described by the curve of the topsides can crack the wood. Baron has varied the thickness of the chine logs to ease this process. His instructions will help you decide the proper dimensions.
After you’ve installed the chine logs, you’re ready to fit the bottom. Lay the plywood sheets in place and trace their shapes along the outside. Cut to the lines, join the pieces with a butt block, and the bottom is ready to install. Fit the hardwood shoes to the bottom, turn over the boat, and install the frames, knees, and rails. You’ll cut the side frames from 2″ X 8″ clear fir and the rails from 5⁄4″ X 3″ Brazilian redwood or other suitable hardwood.
Courtesy of Old Wharf Dory Co.
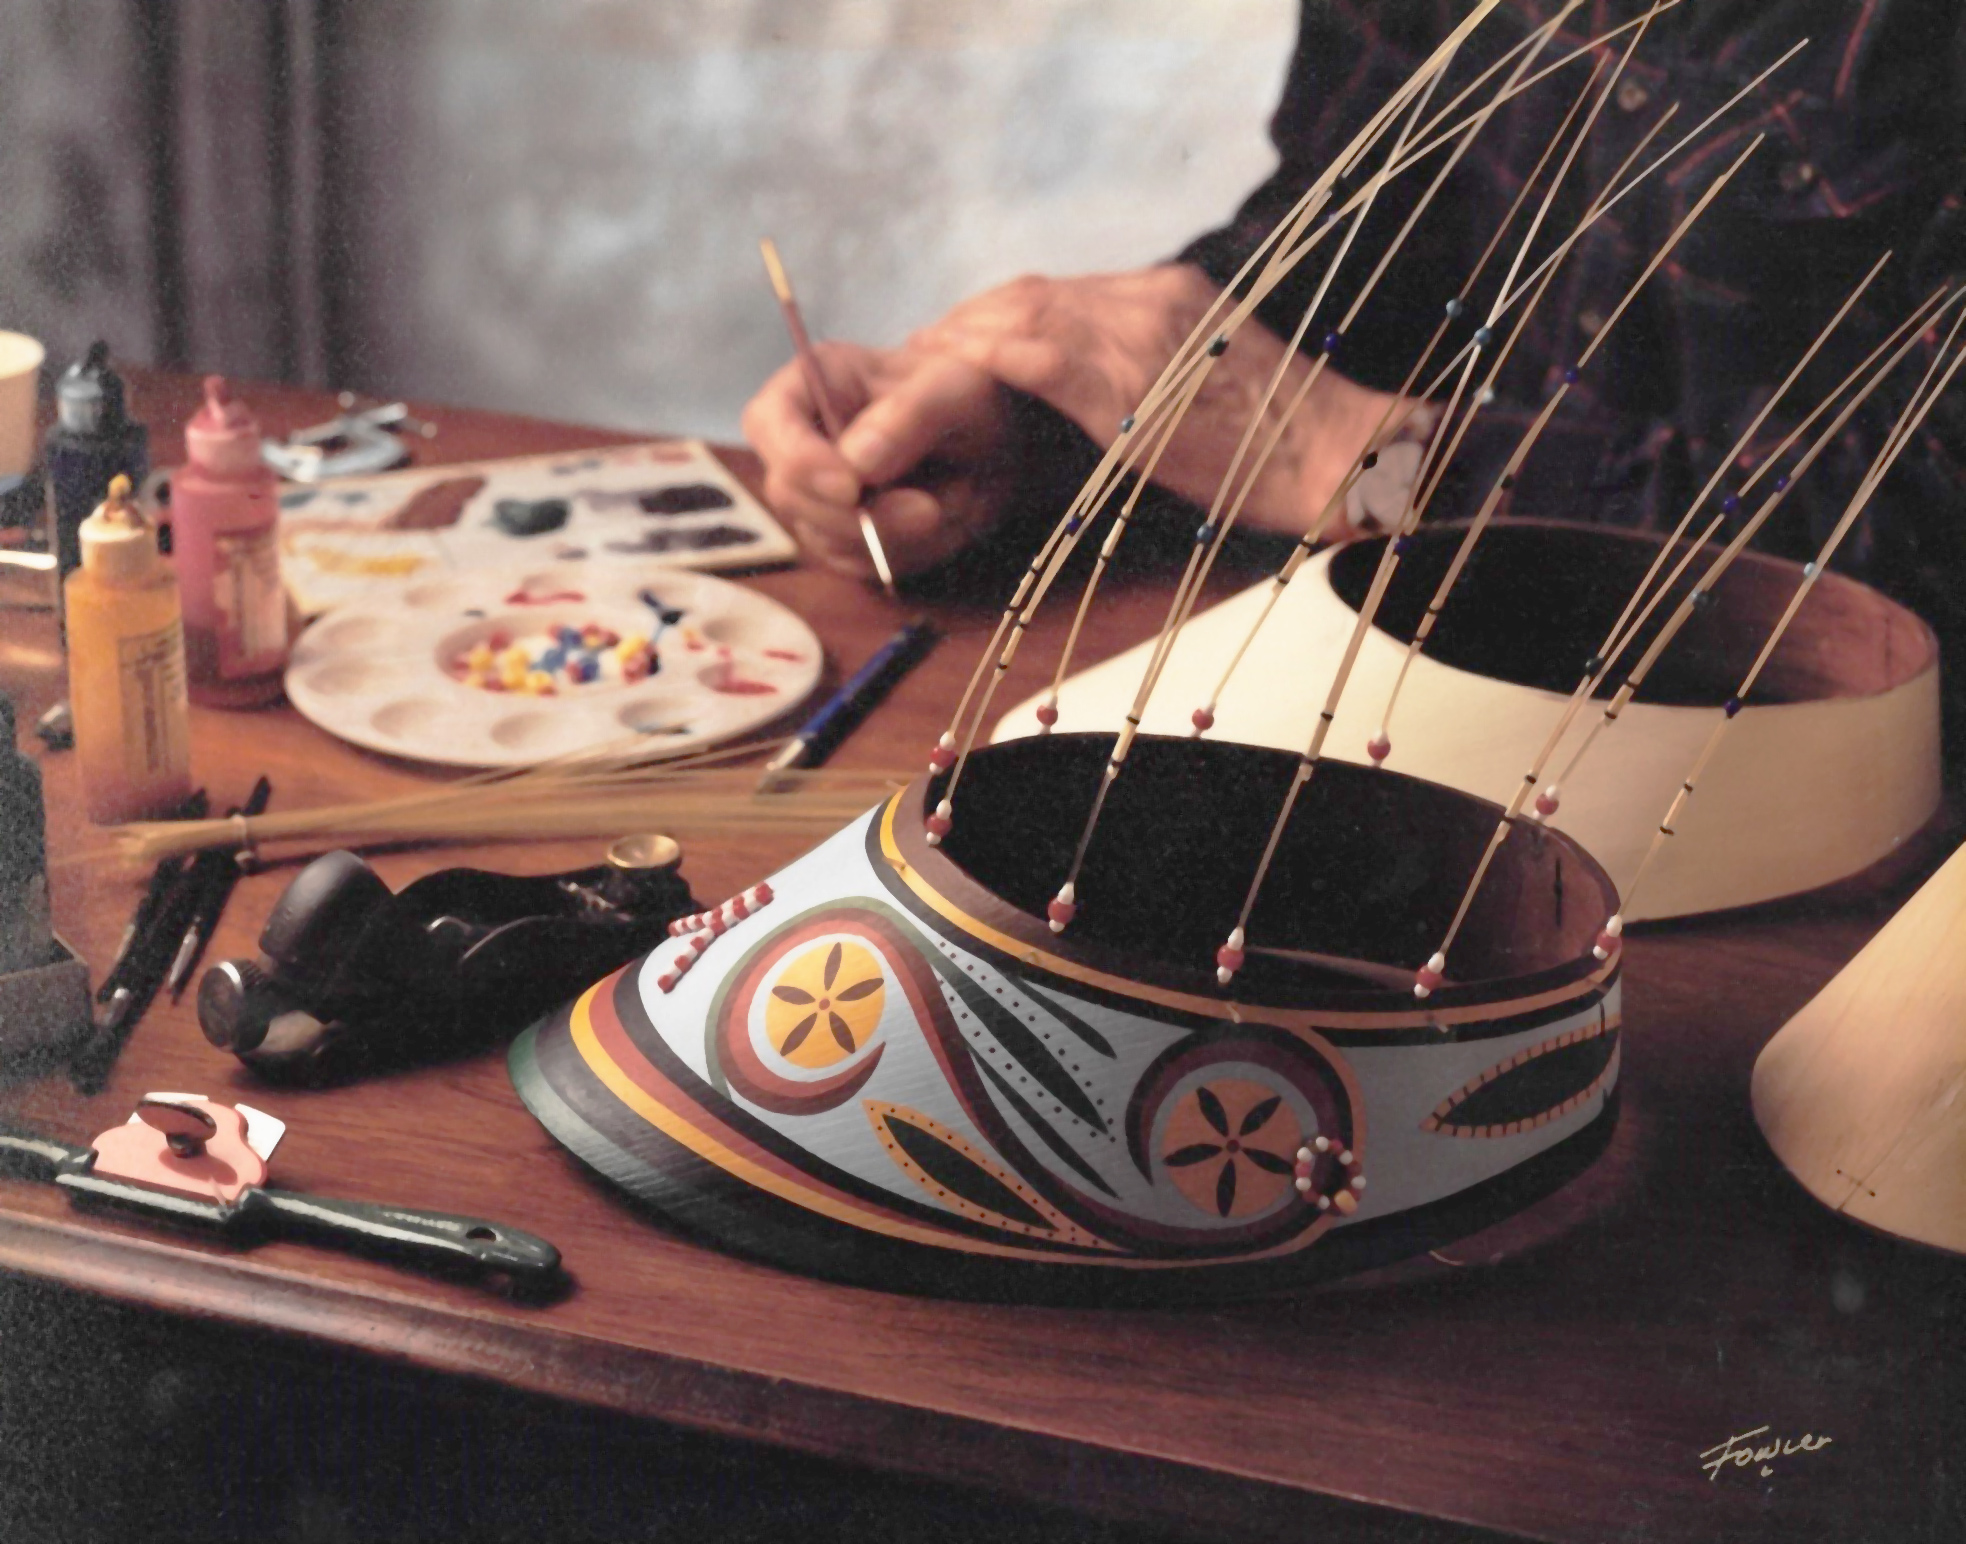
Construction is simple and straightforward; here, the after ends of the side panels have just been cinched in tight to the transom and fastened.
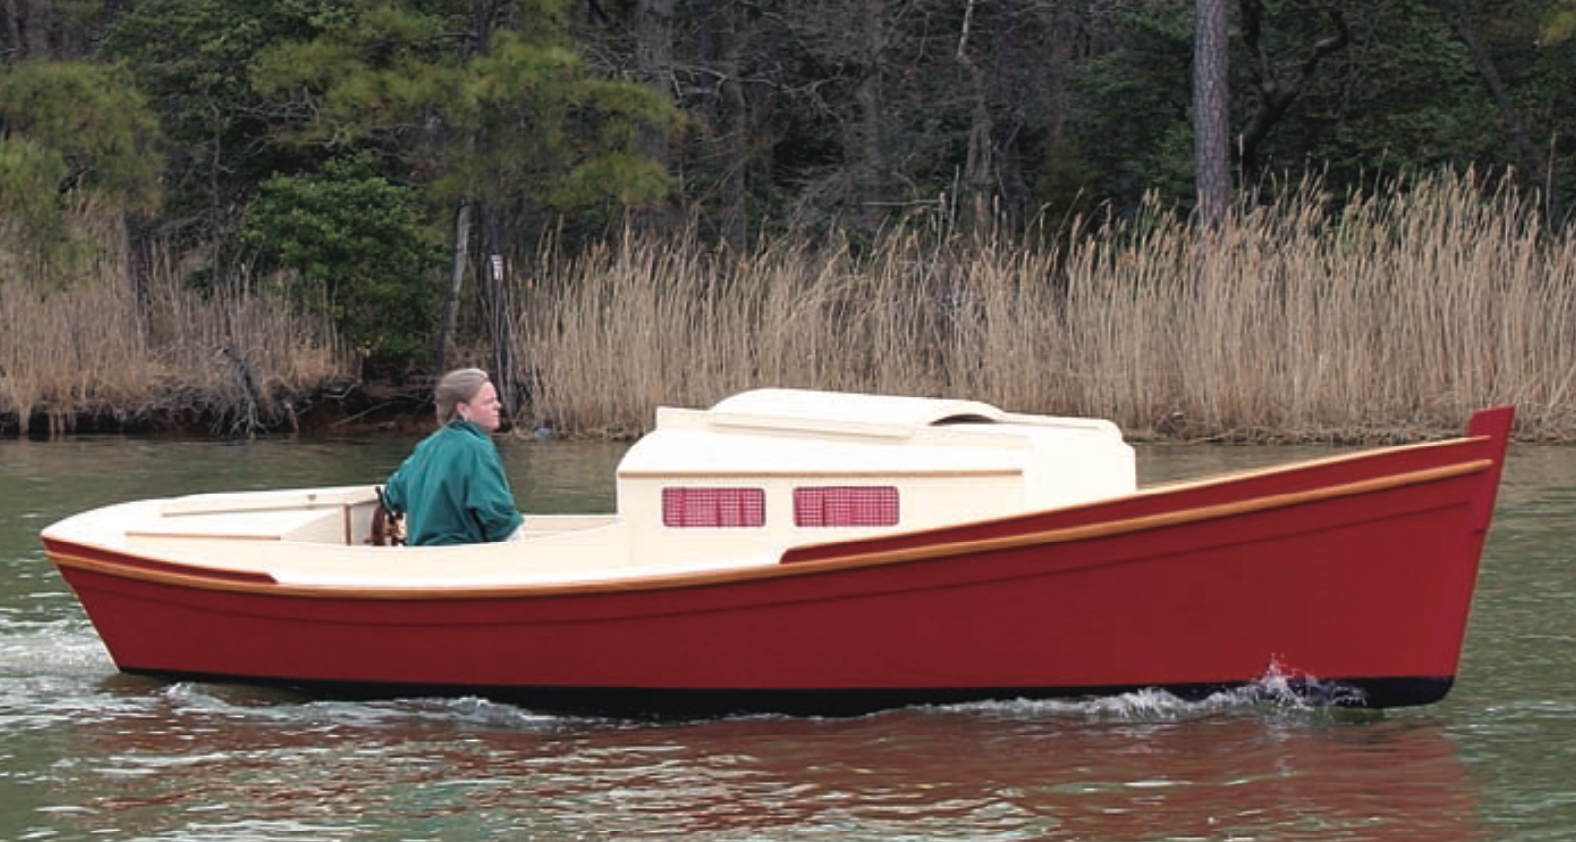
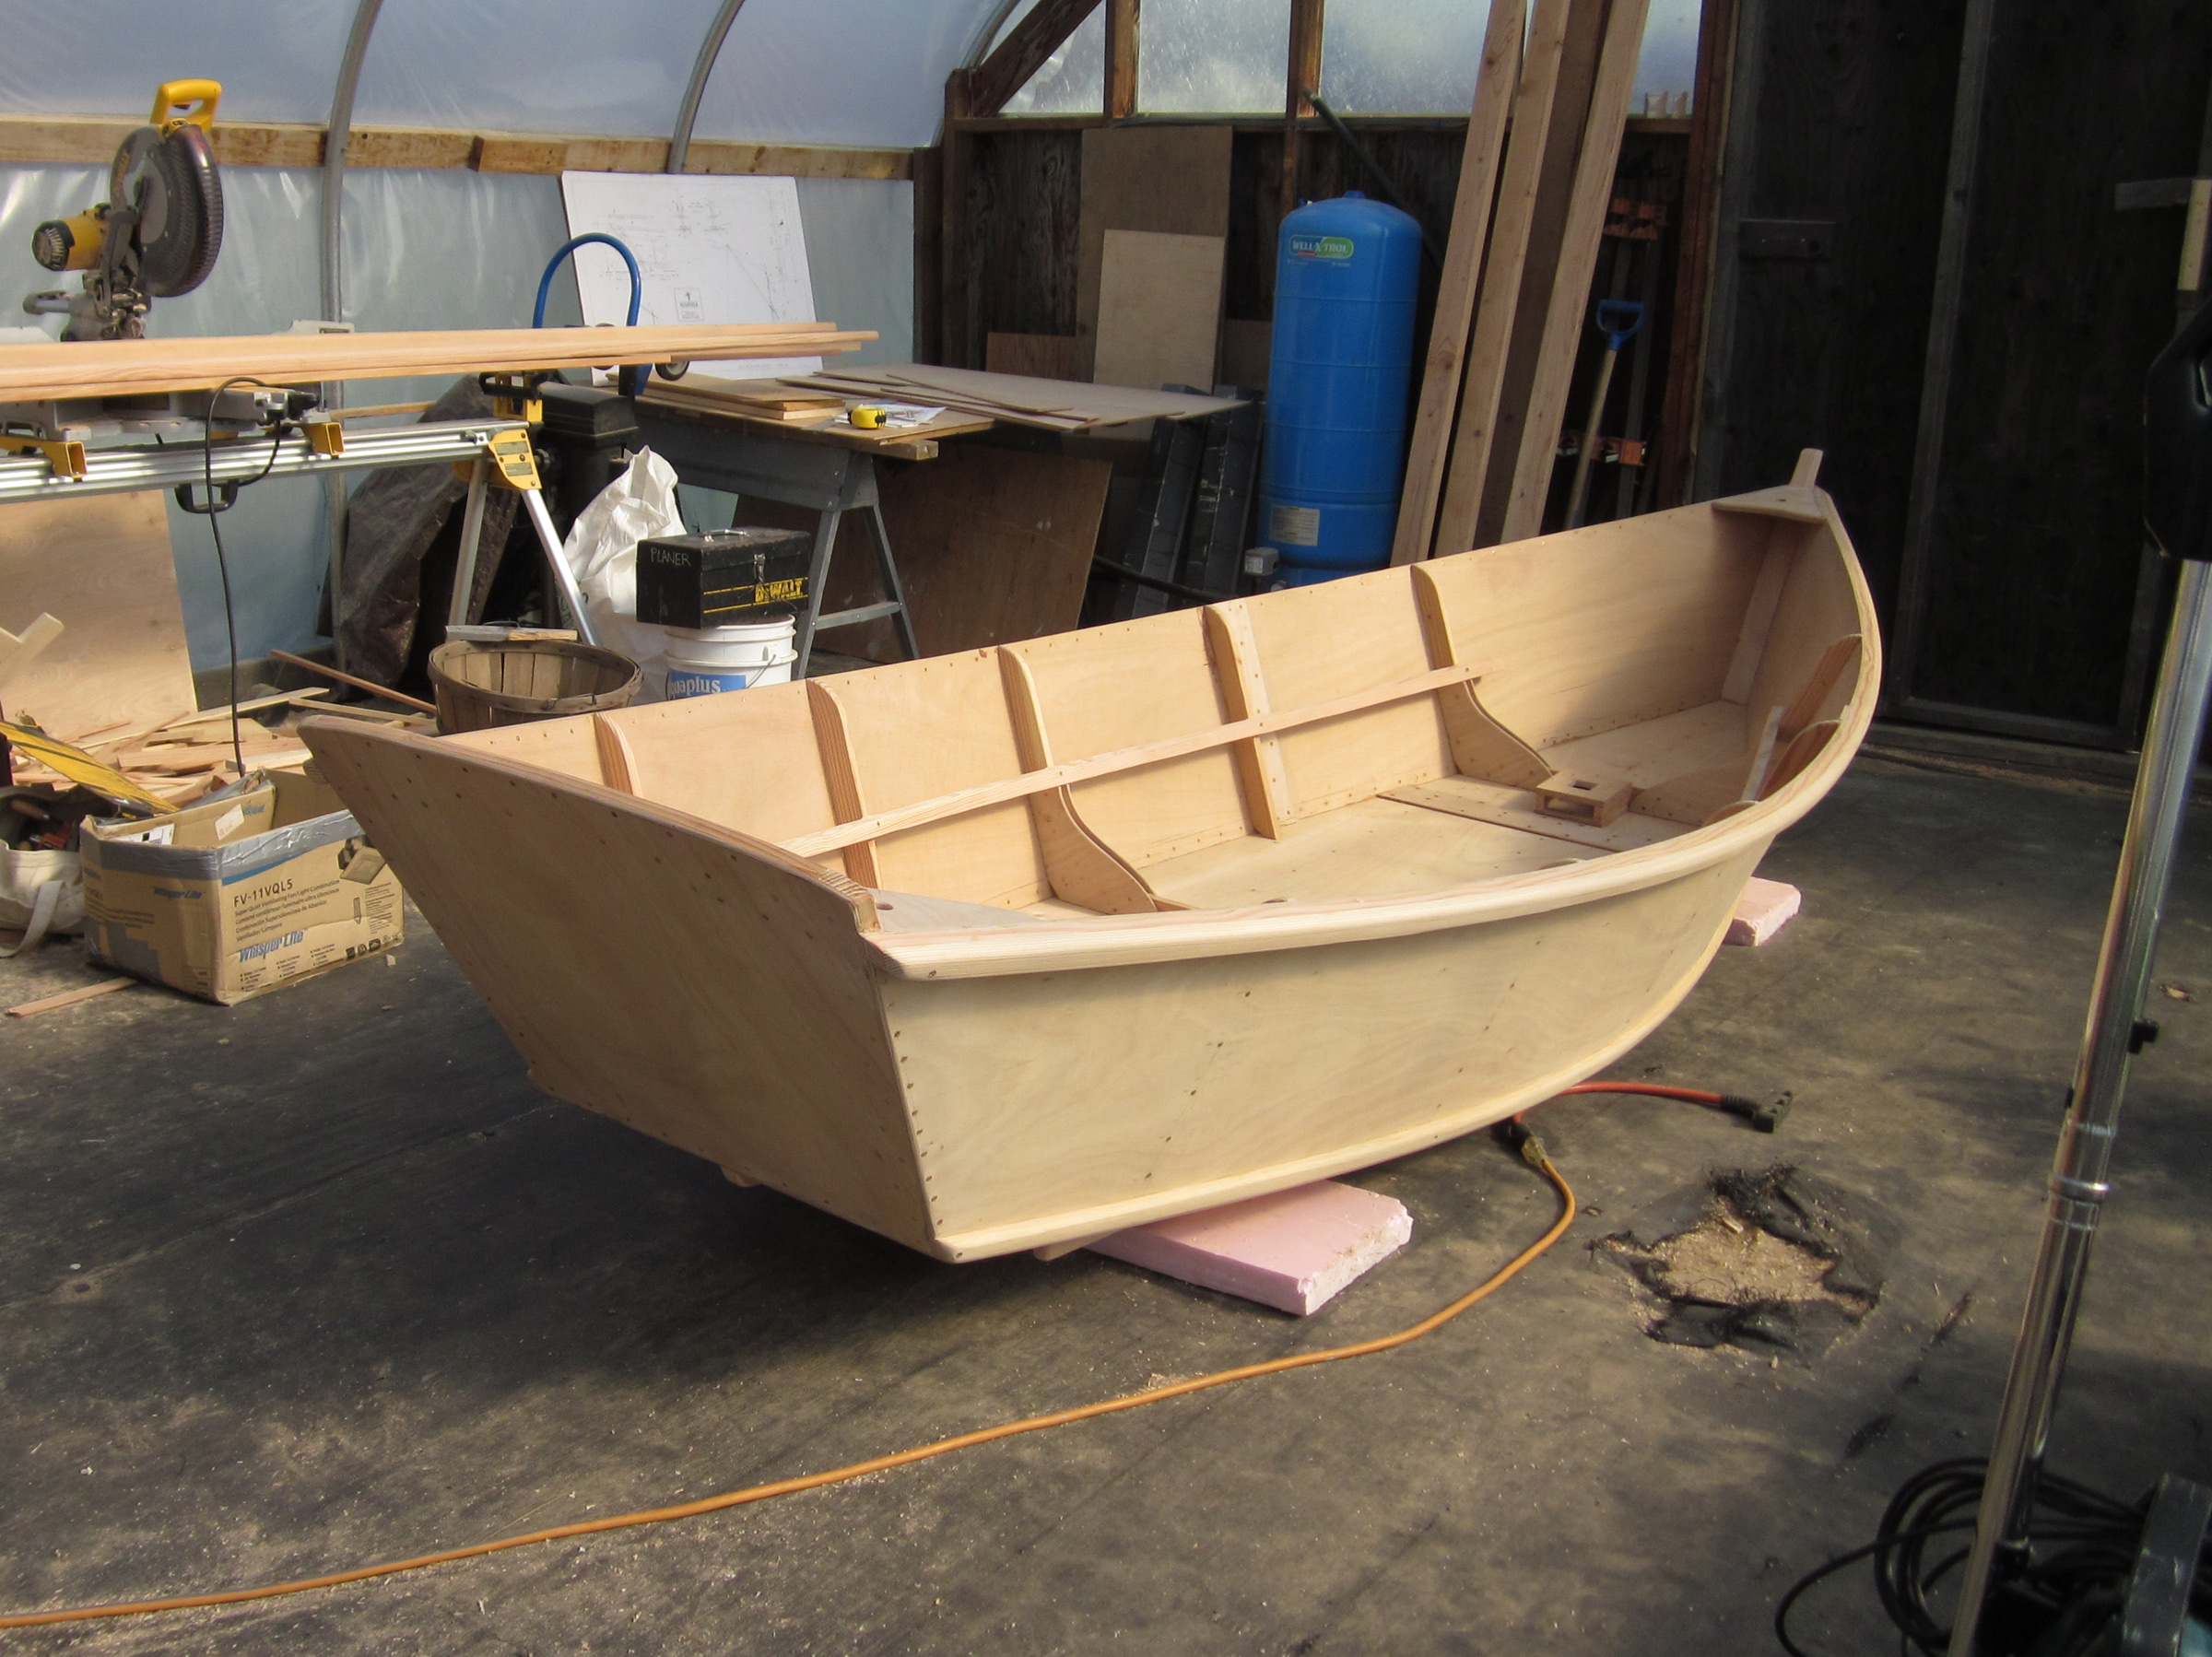
Of the 150 or so skiffs Baron has built, some of them have side decks and some don’t, depending on each owner’s preference. Side decks definitely add class to the overall design, especially if you varnish the coamings and rails or paint them a contrasting color. Clam diggers seem to prefer a deck, because it gives them a relatively stable platform on which to rest their buckets.
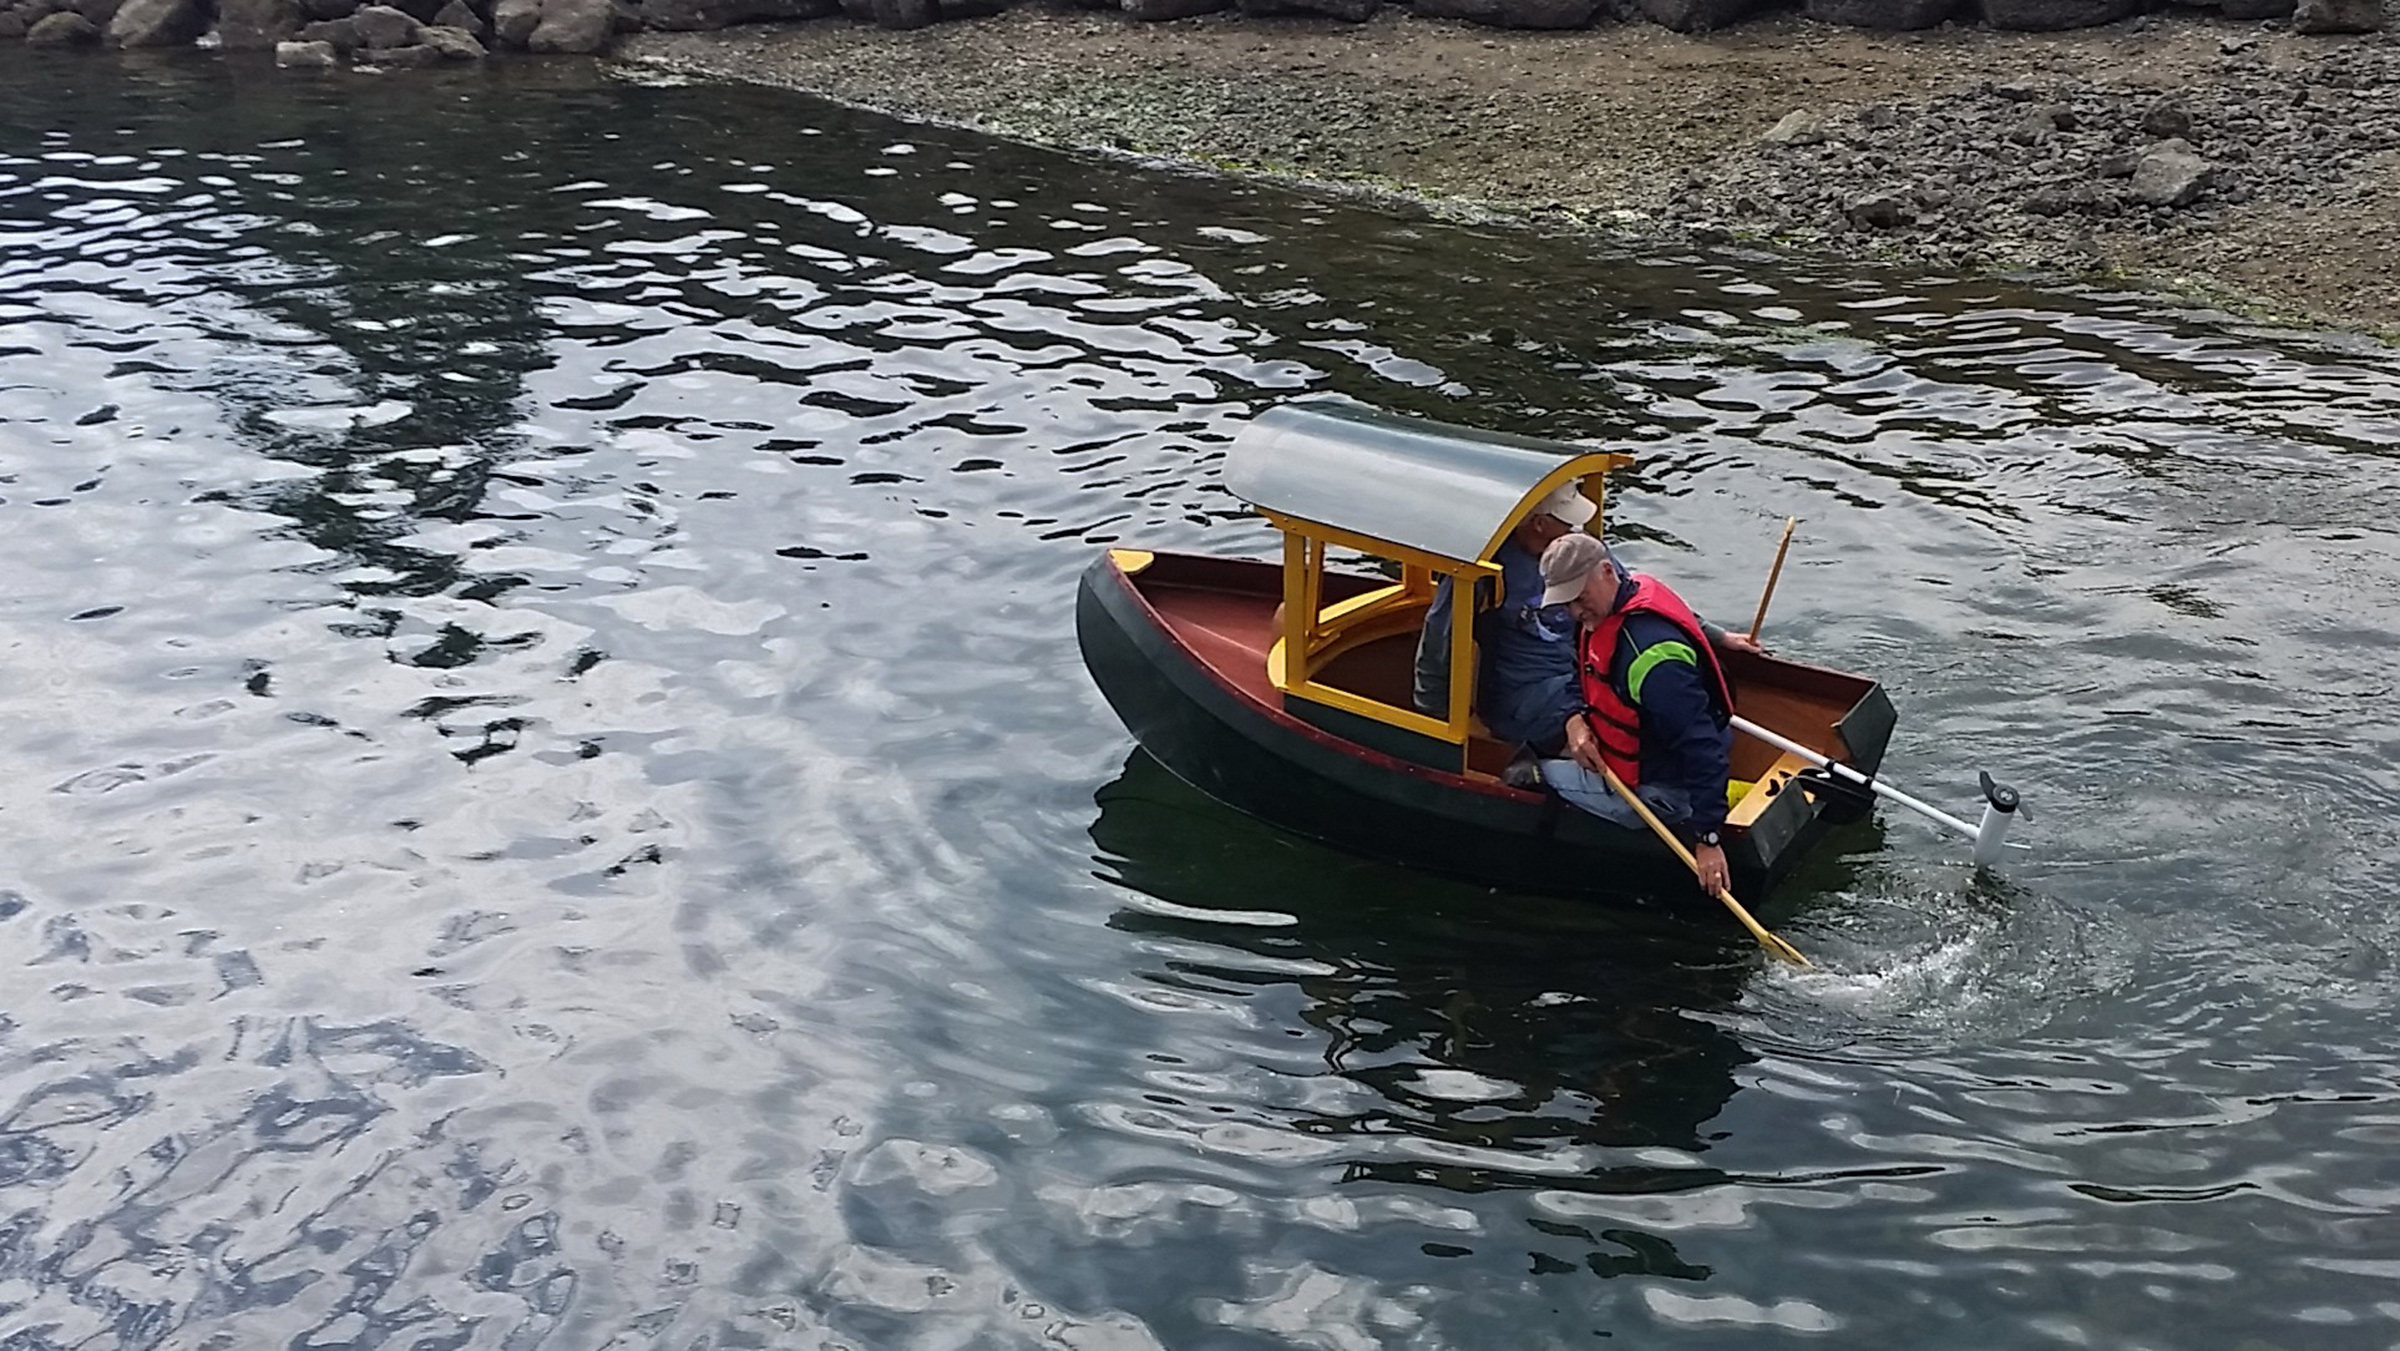
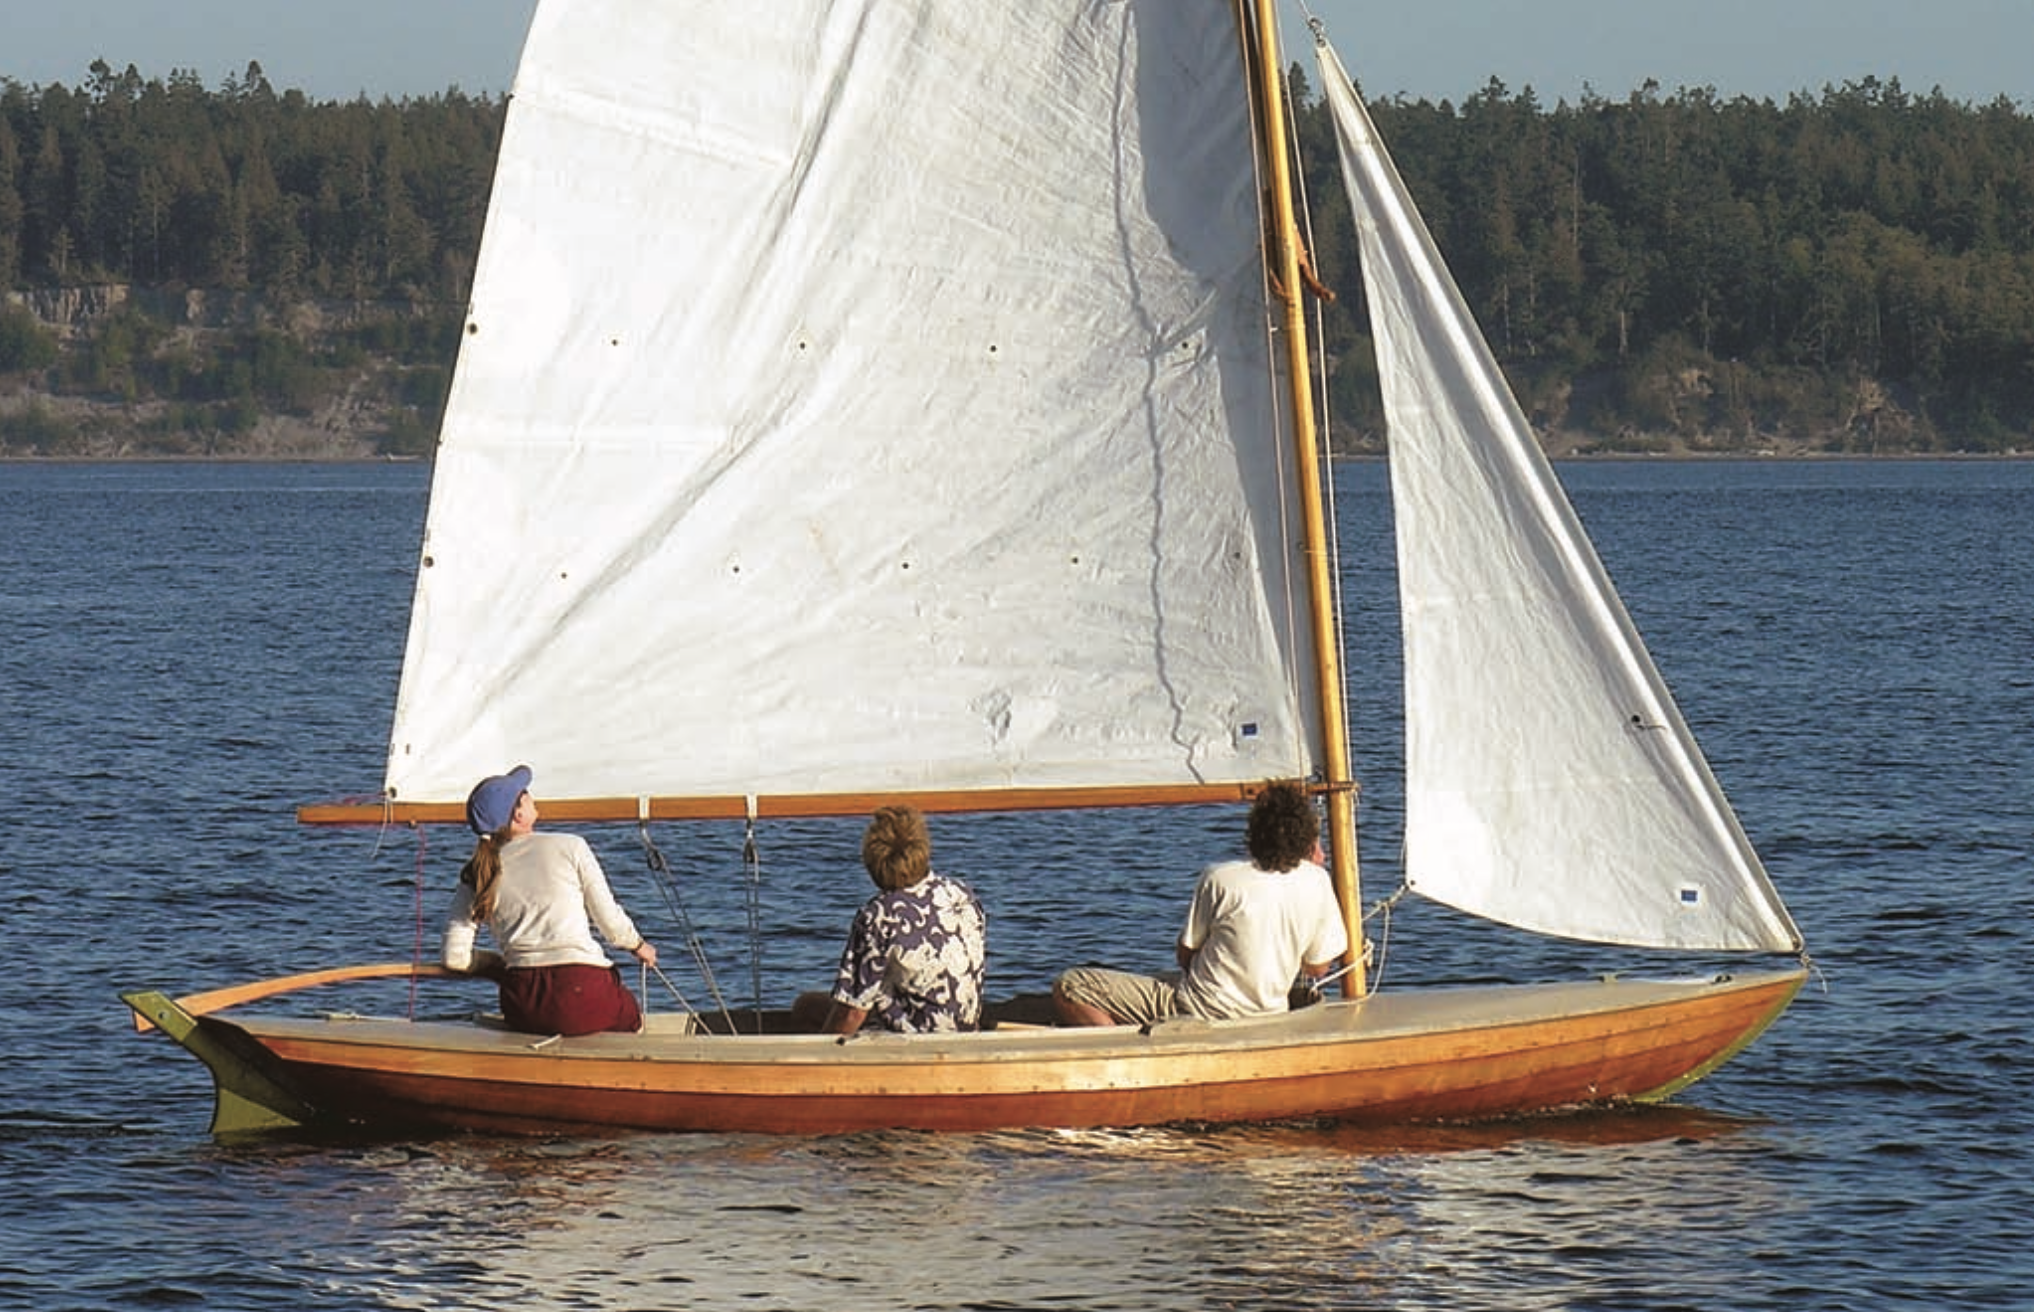
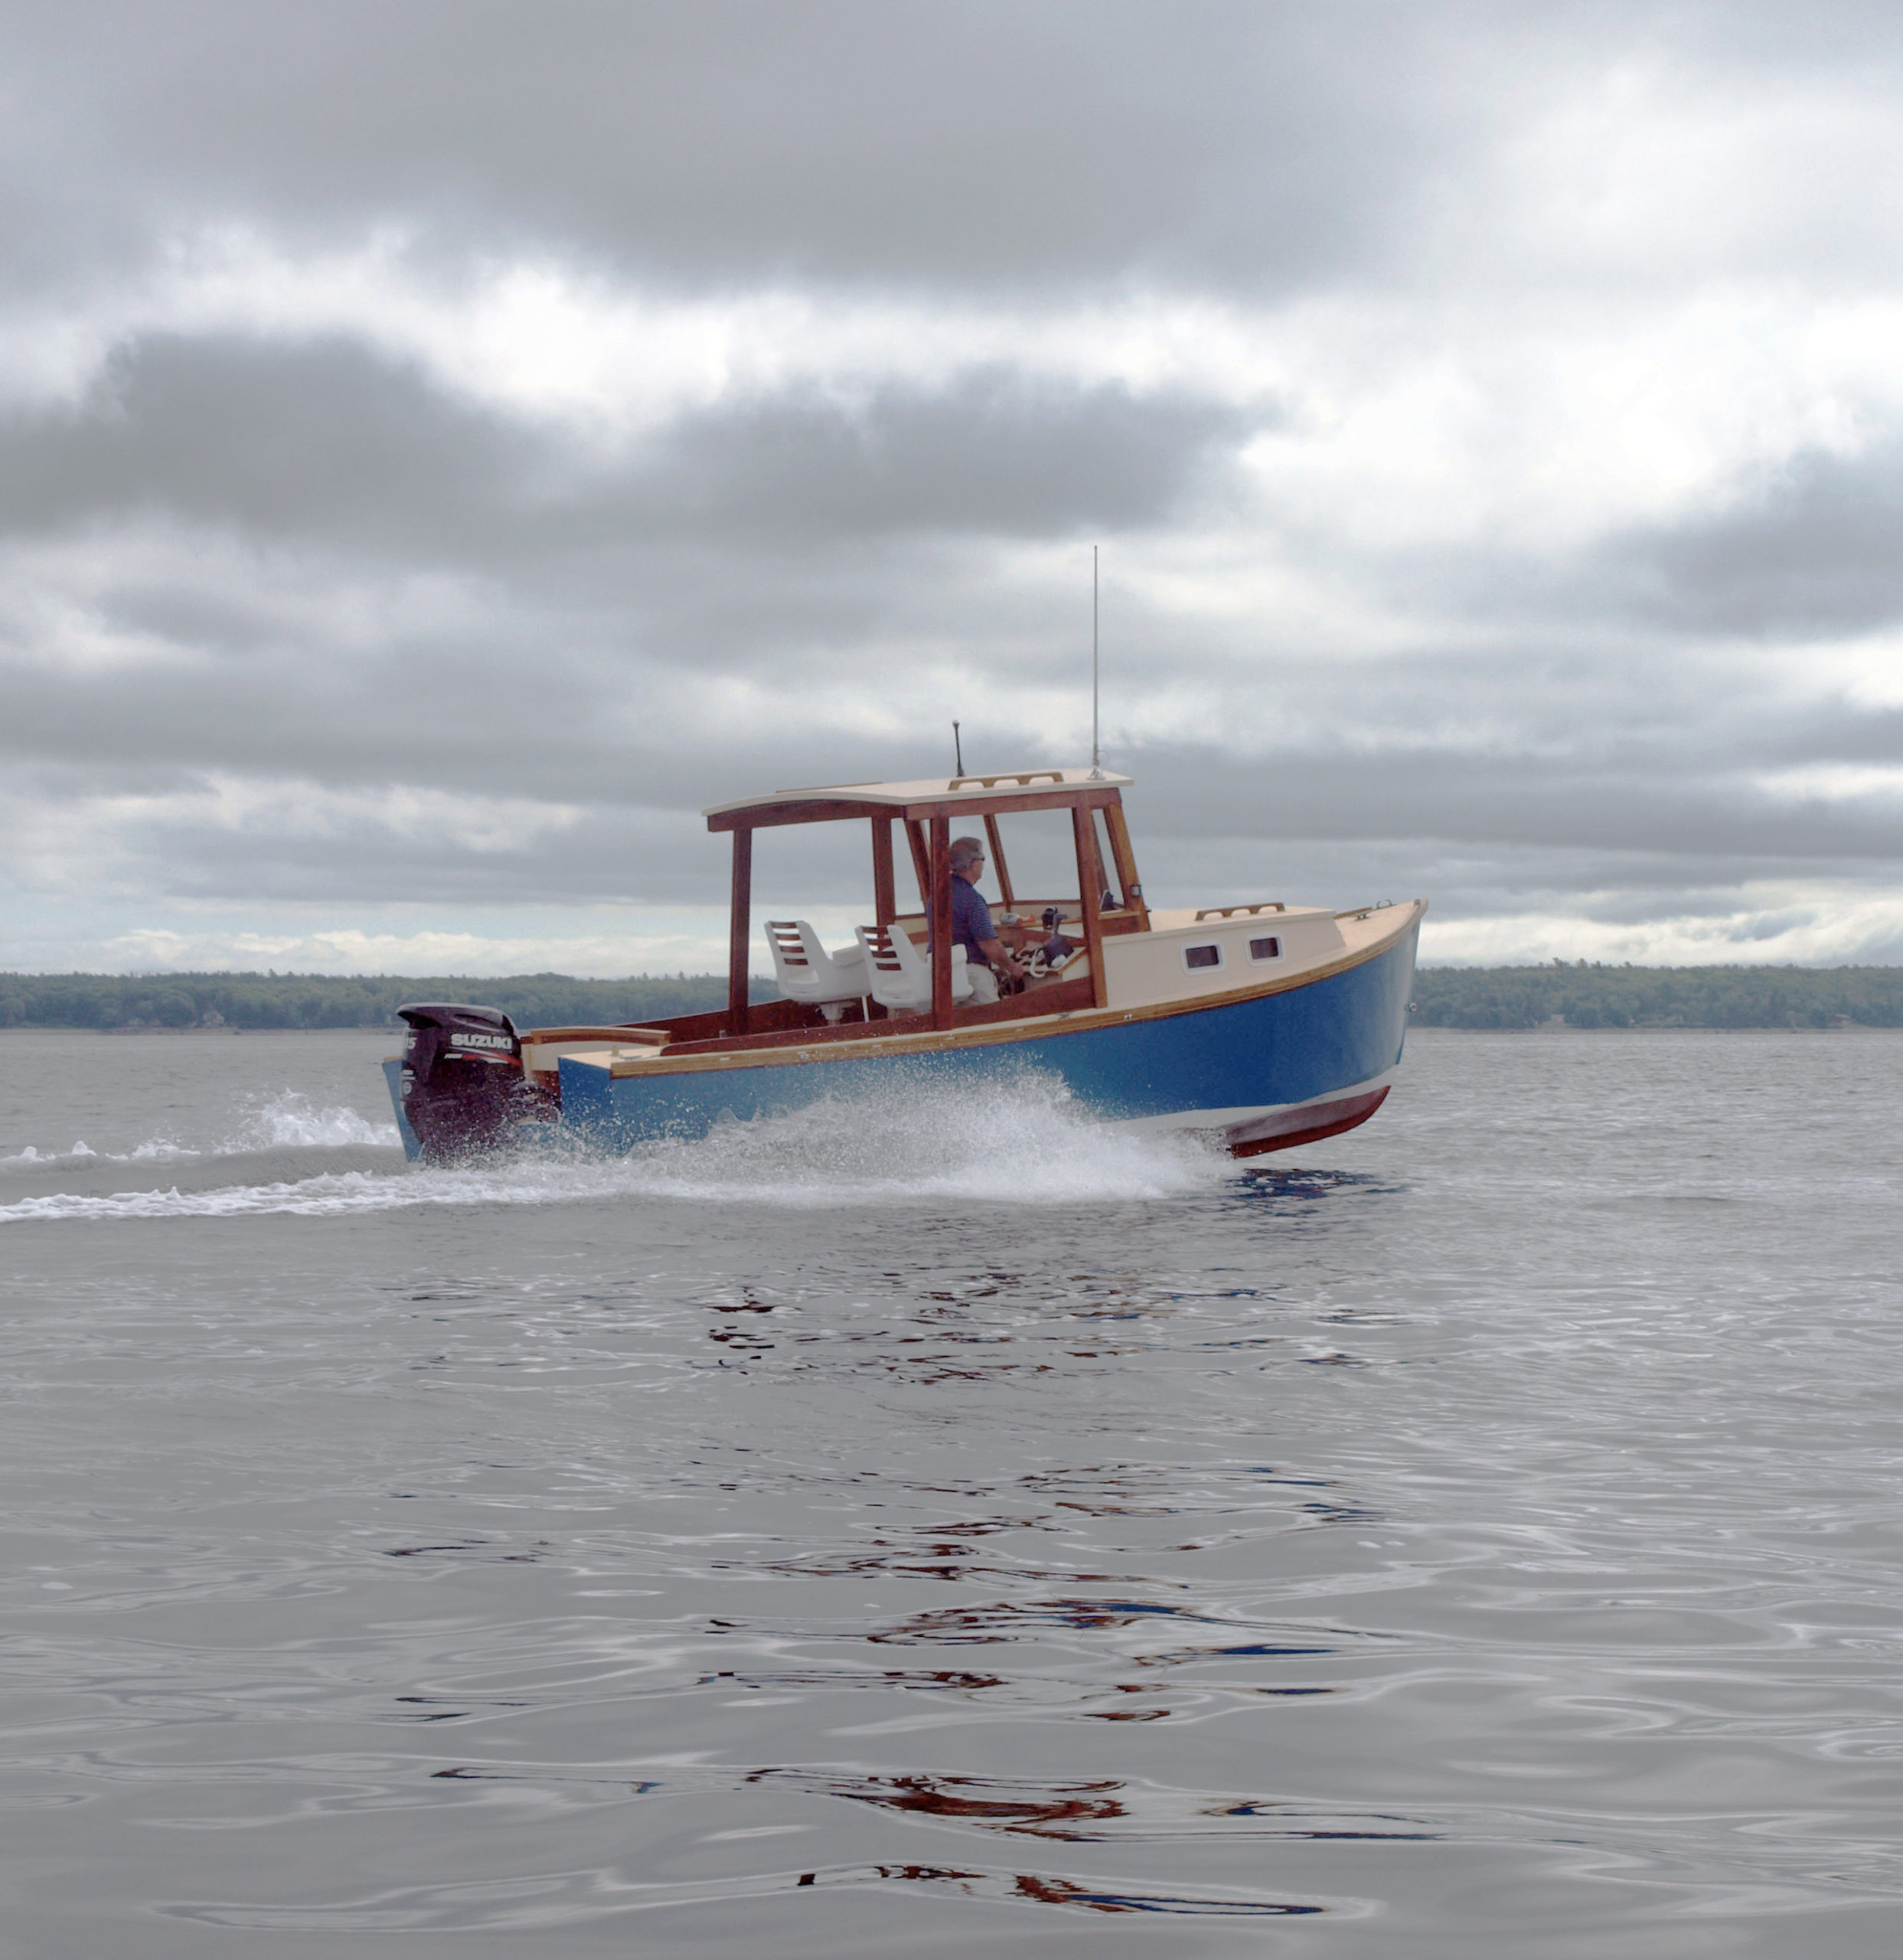
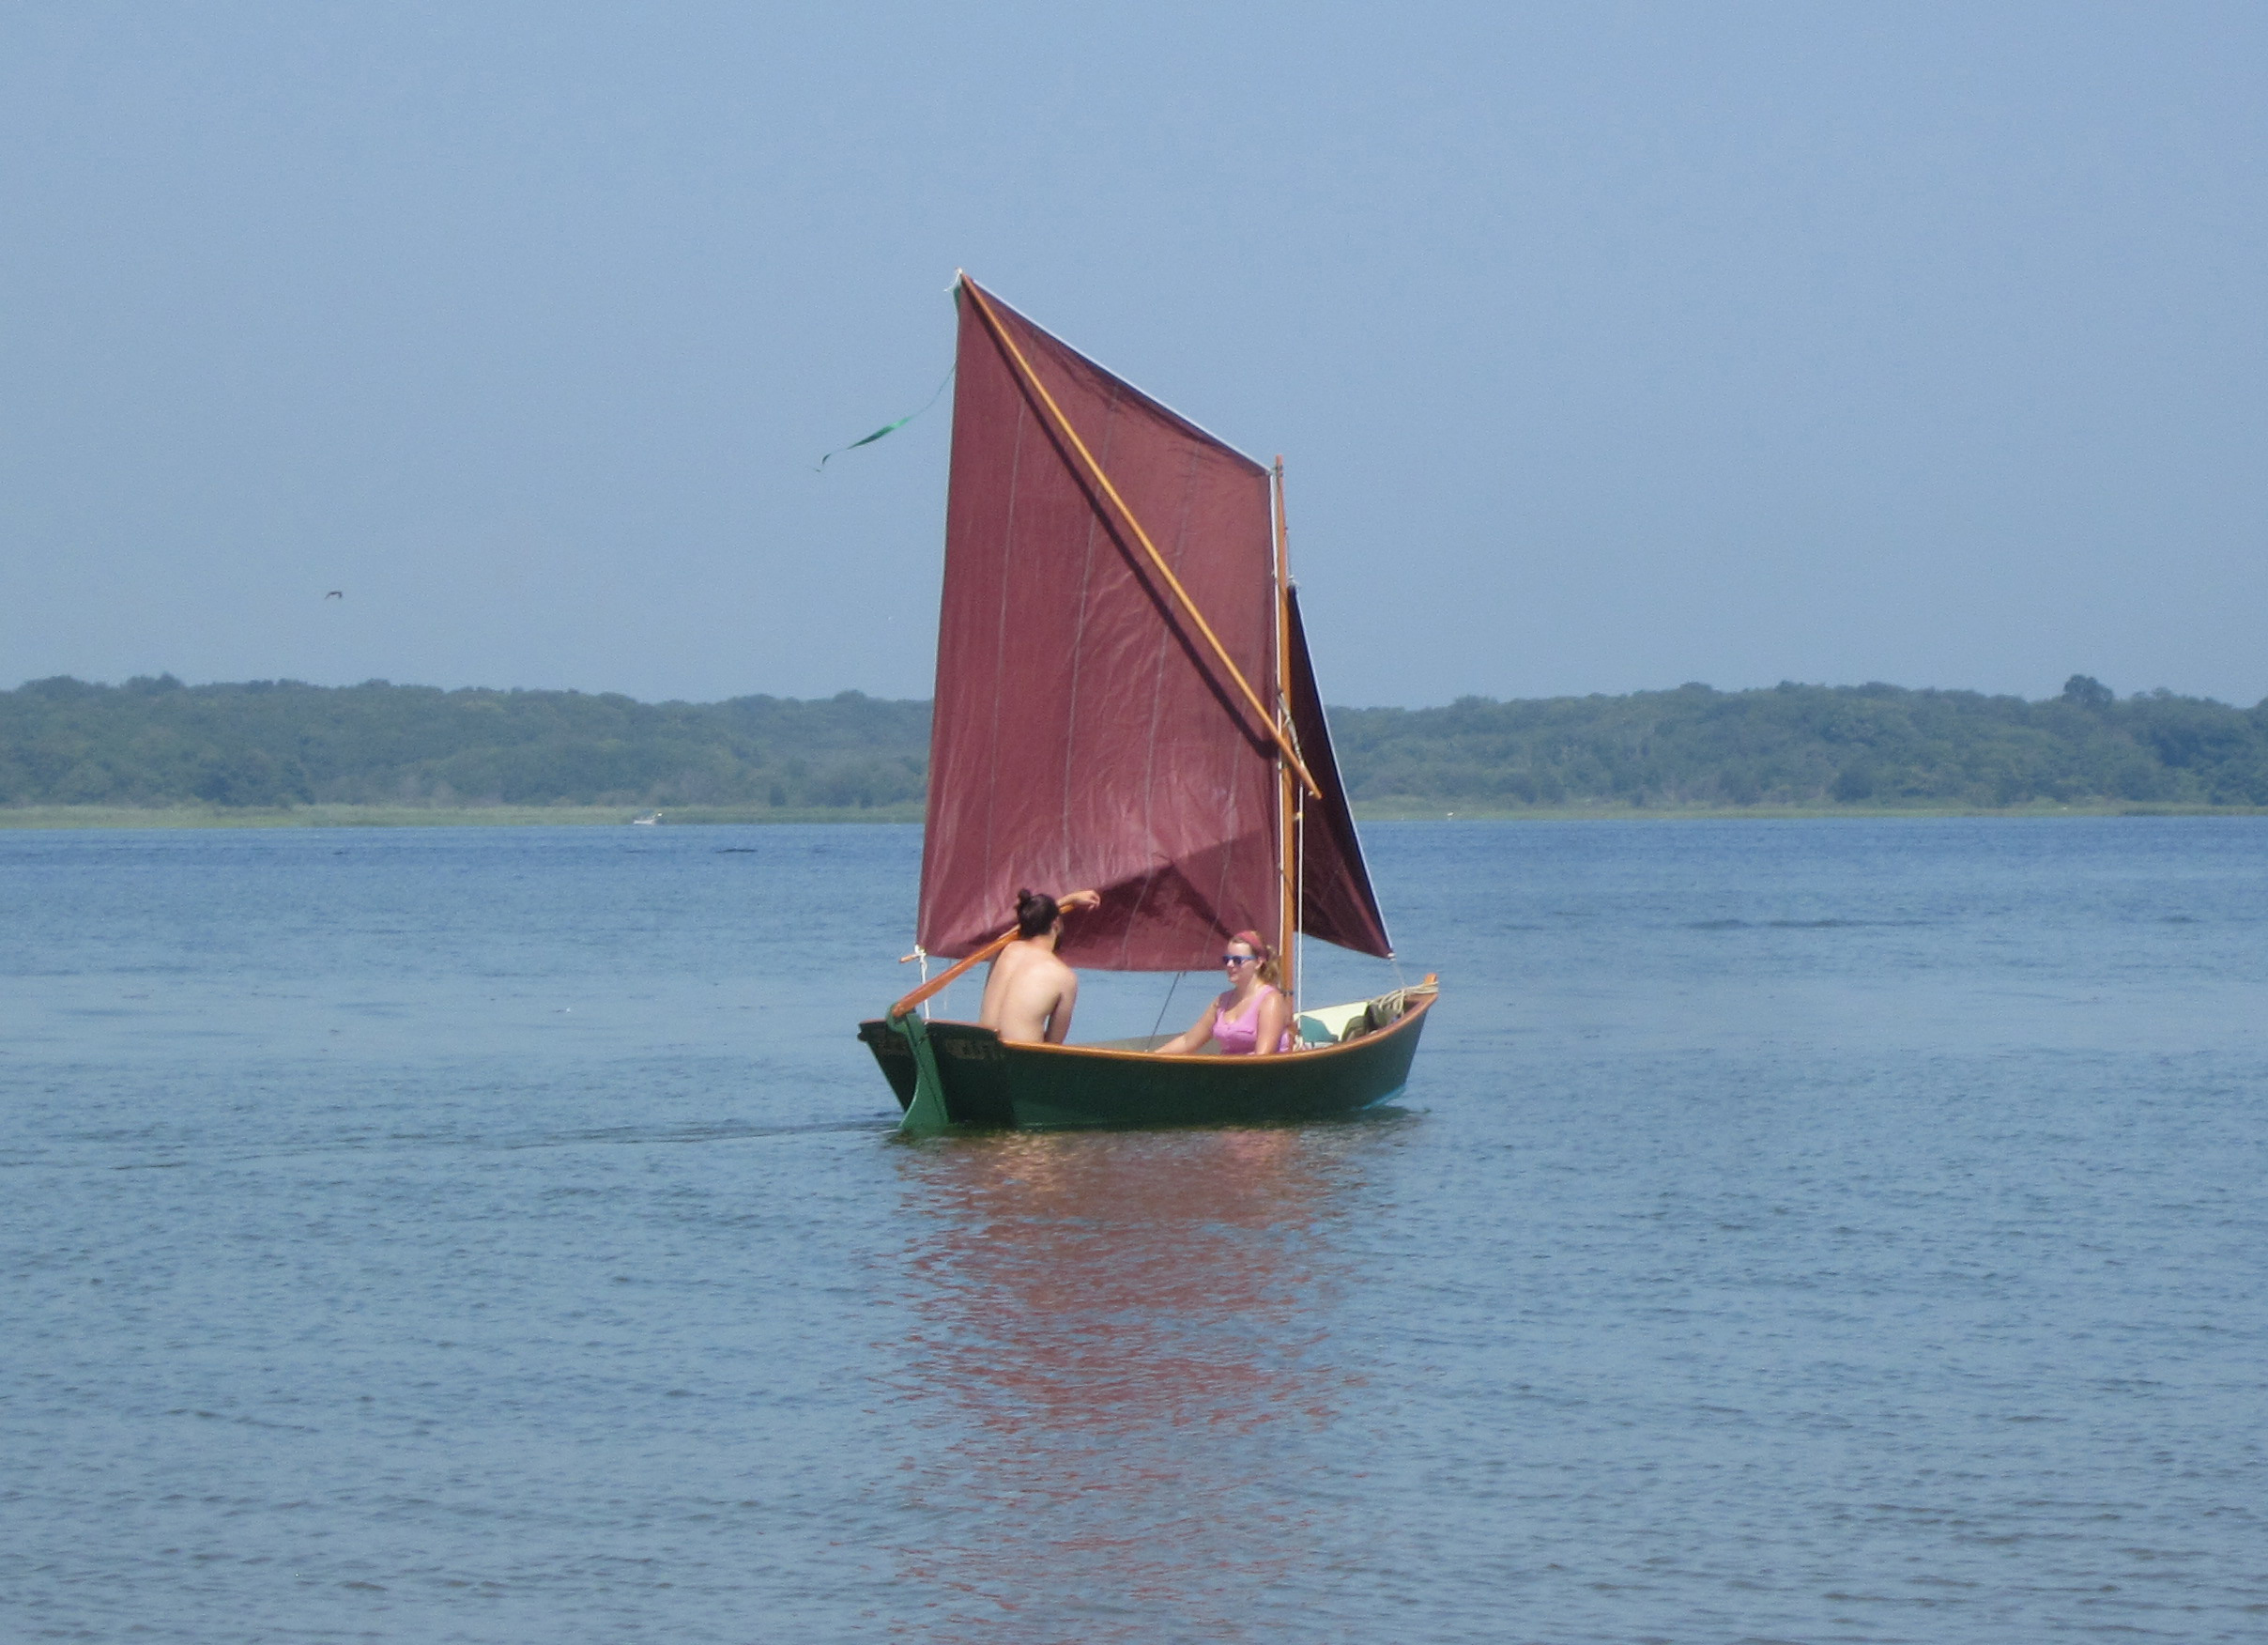
Side decks or not, the LYS has an unmistakable personality—a presence on the water that begs for attention. Baron and I got together for a short run aboard a 20′ LYS that’s owned and used heavily by a clam digger who works one of the plots granted to local watermen to raise and harvest clams. Moored bow-to in a slip at Wellfleet Harbor, proud bow standing clear of her “modern” plastic companions, she left no doubts about her purpose. Like most things designed around a function—the original Austin Mini of 1959, for example—the LYS gets under your skin. “What a cool boat,” I said to Baron.
Courtesy of Old Wharf Dory Co.
The plywood hull has been fiberglassed and inverted, and is being given side decks.
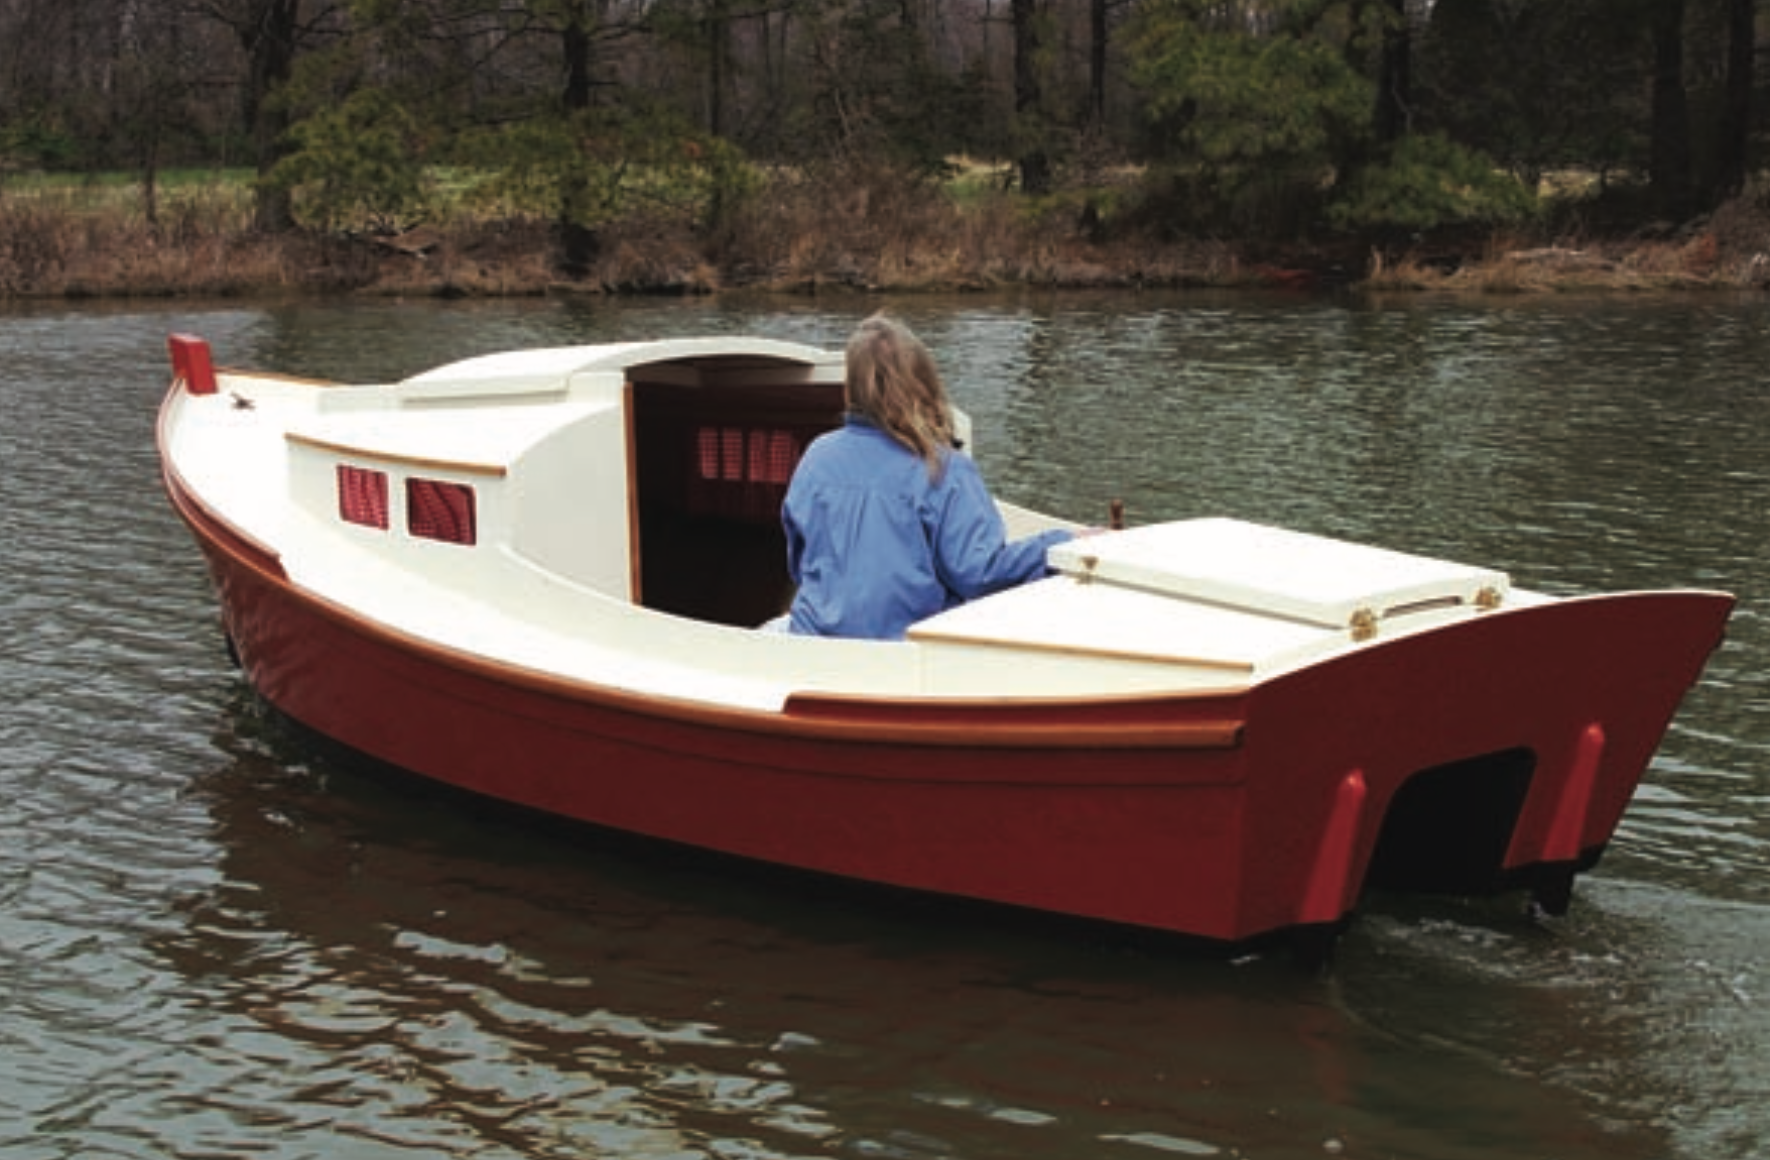
Her cockpit is nearly 21⁄2′ deep and makes a person feel safe. As I climbed aboard, I stood for a moment on the side deck. The LYS curtsied slightly and then rose to her level stance. Her flat bottom made short work of damping that tiny bit of roll there in the slip, and later in the confused seas and motorboat wakes of the outer harbor she proved to be equally adept.
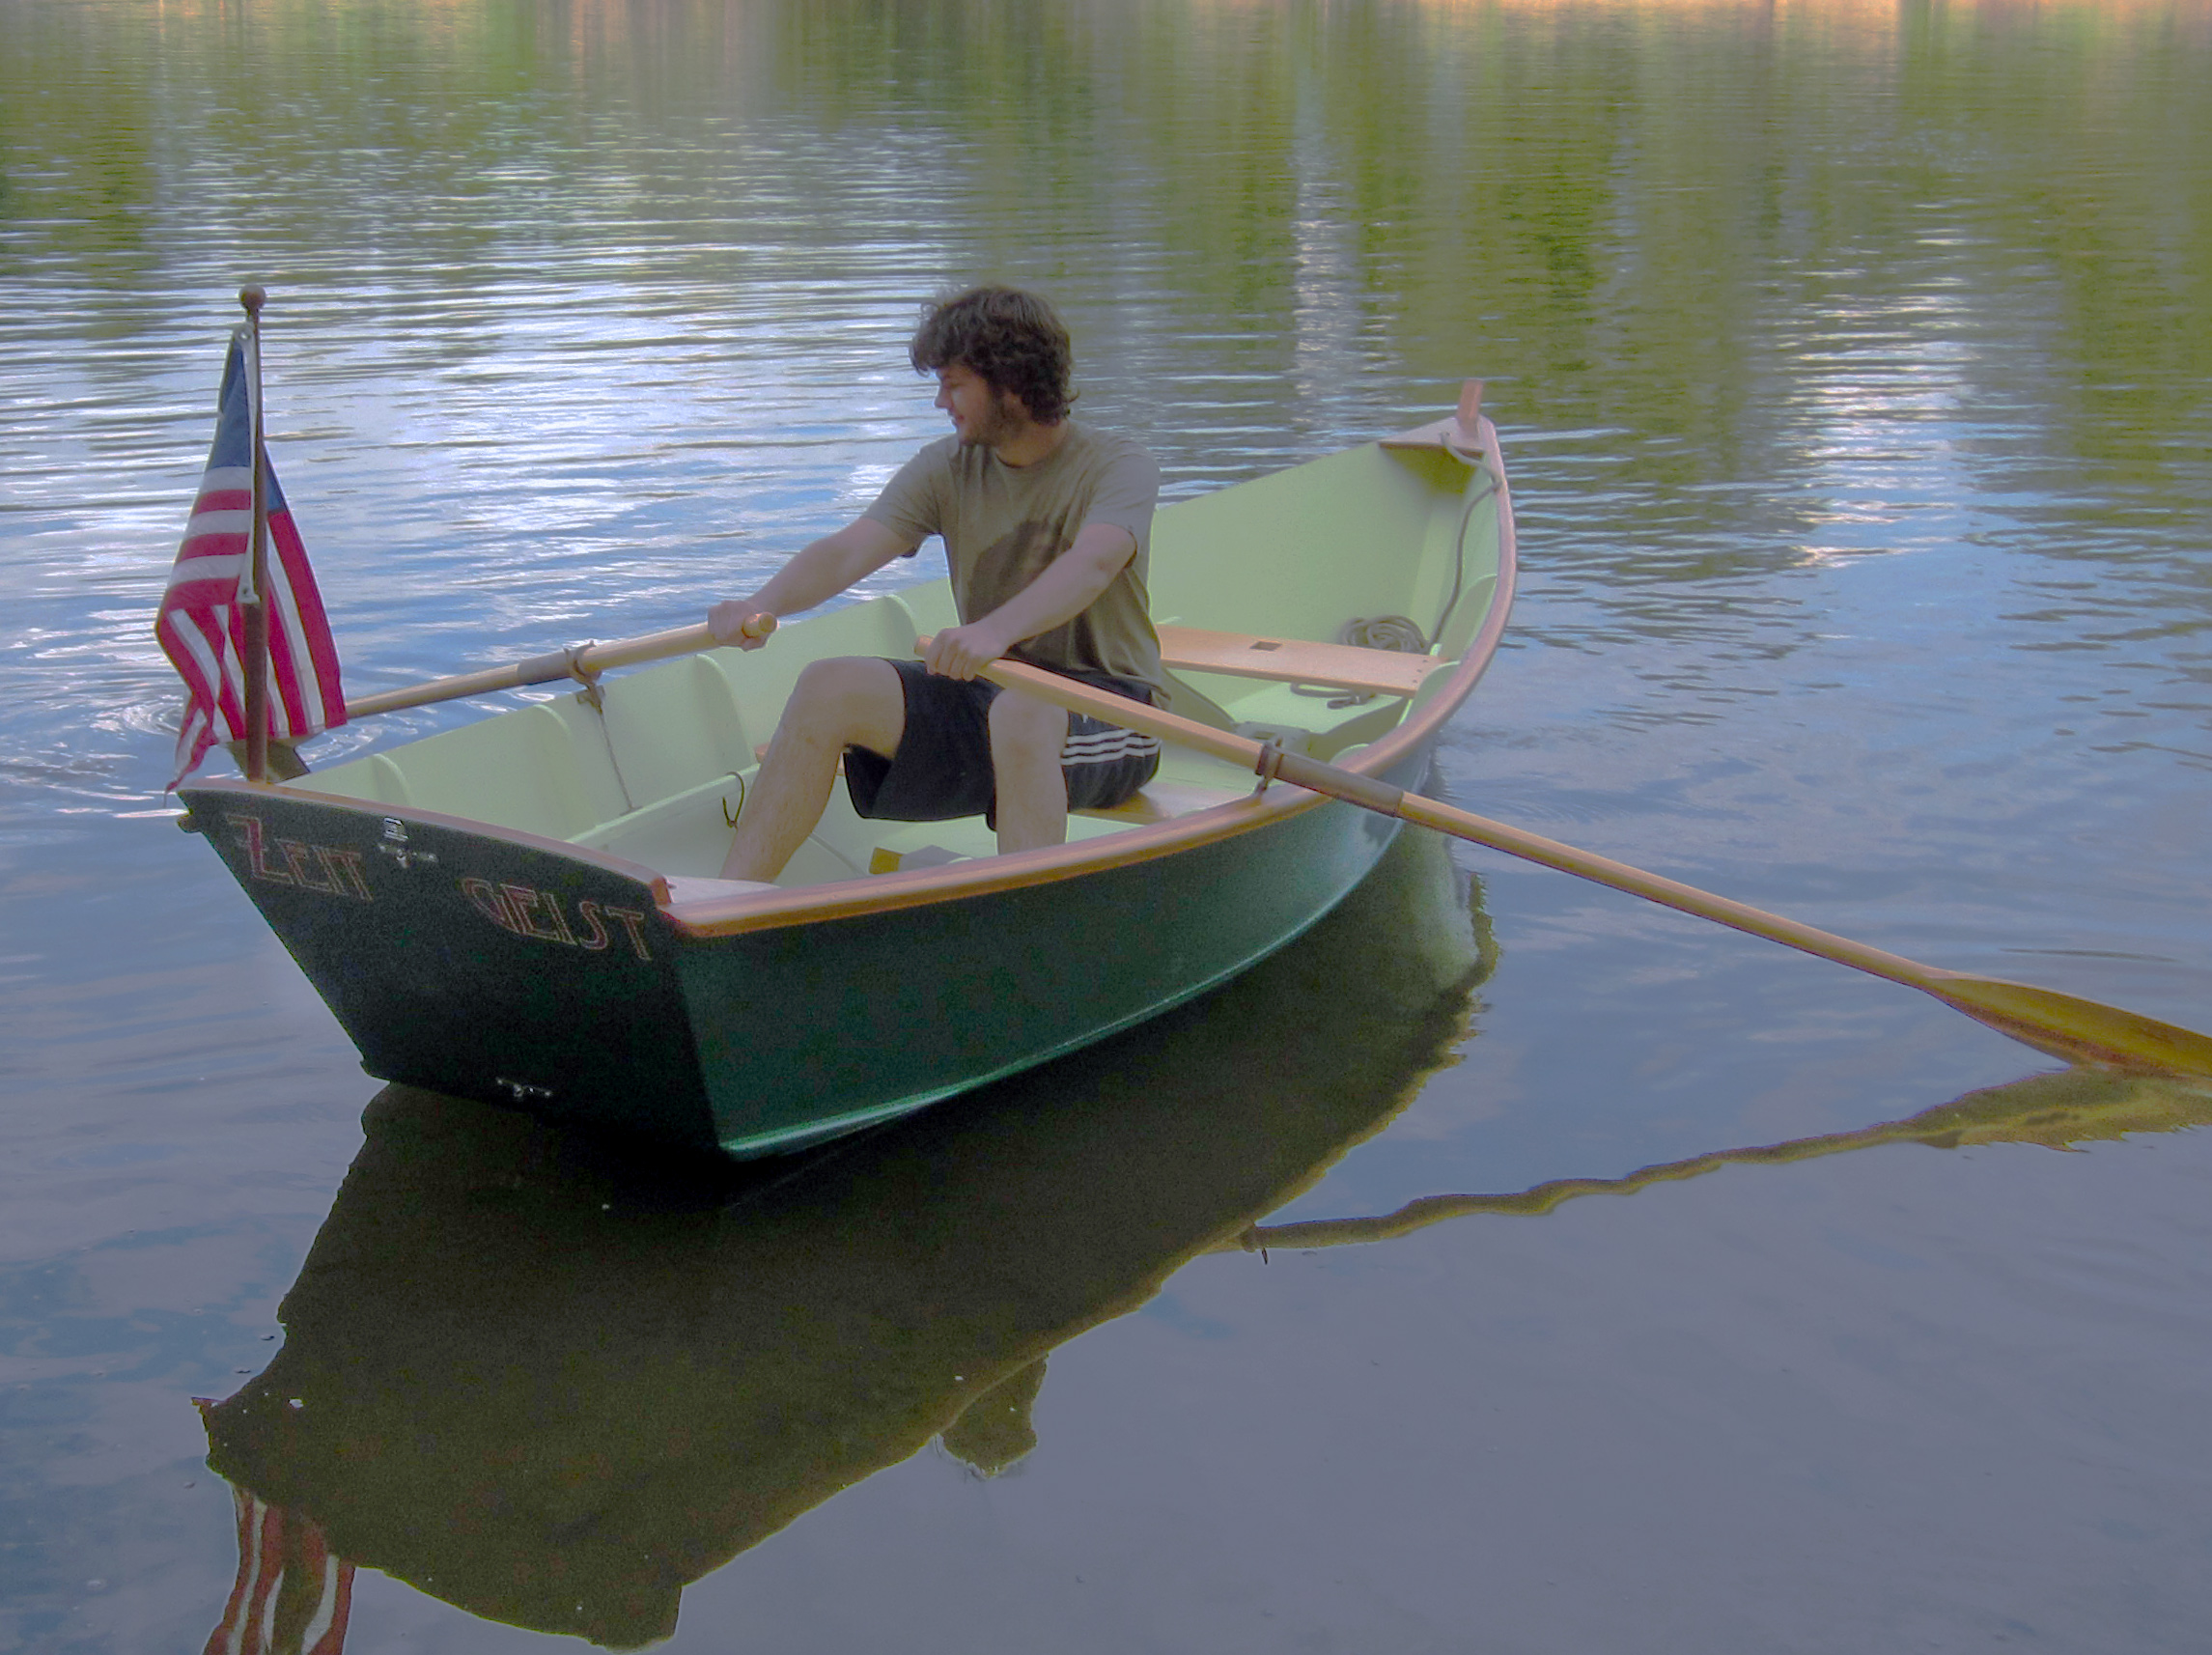
Although the LYS is perfectly content at displacement speeds, she planes at about 12 knots and will stay on plane at about 10 as you back off the throttle. A 75-hp Tohatsu outboard powered my ride and could push her along at 20 knots or more in flat water. In the washing-machine conditions we experienced, exceeding 15 knots seemed foolish. As you can imagine, a flat-bottomed boat pounds in the rough stuff if you don’t slow down. On the other hand, the ride of the LY S 20 was good for her type. In the turns at speed, she leans in the way a V-bottomed boat does, just not as steeply. If you shift a substantial amount of weight to one side or the other, she will carve a turn on her chine the way a West Greenland kayak does.
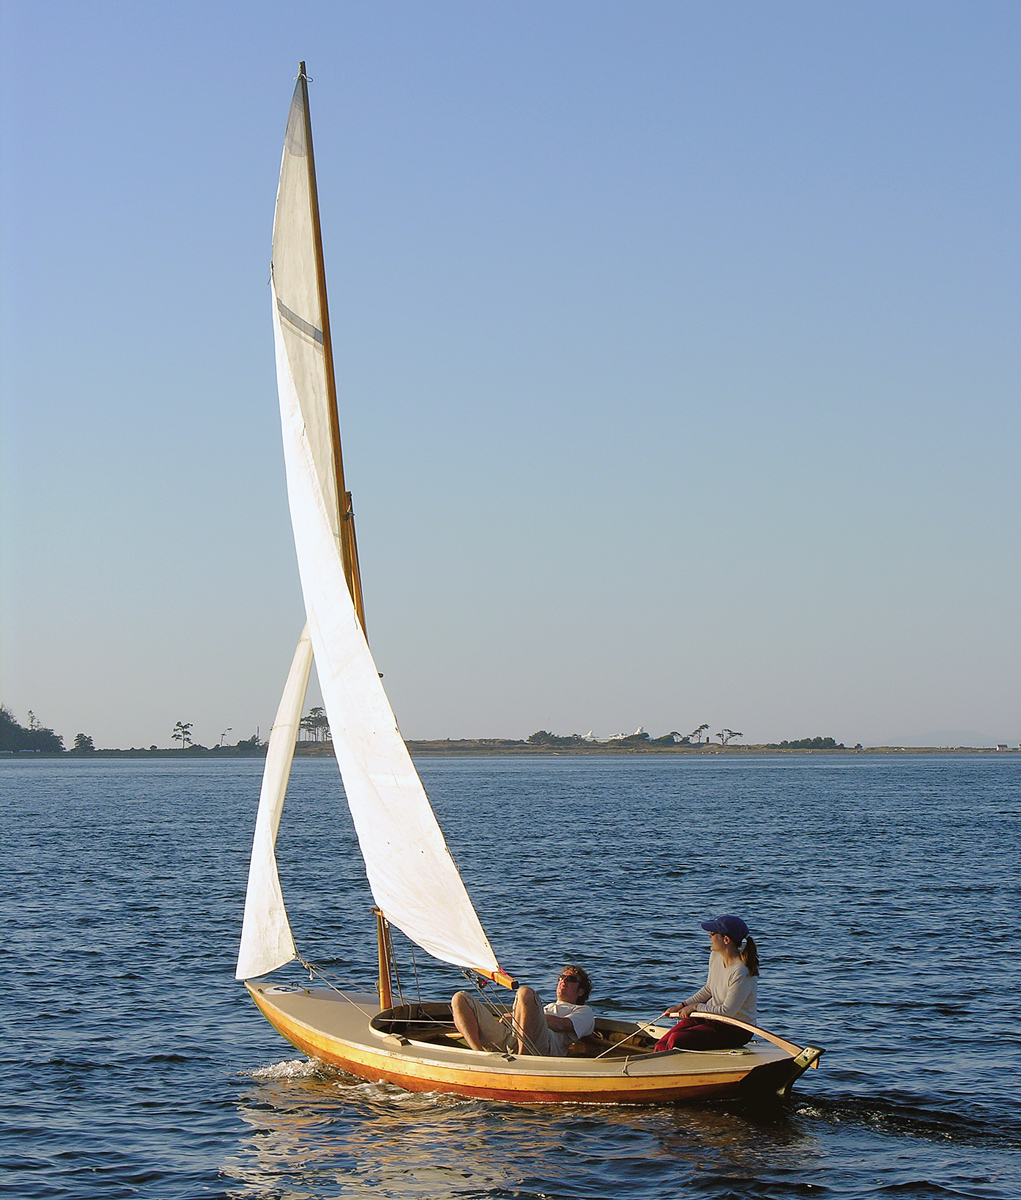
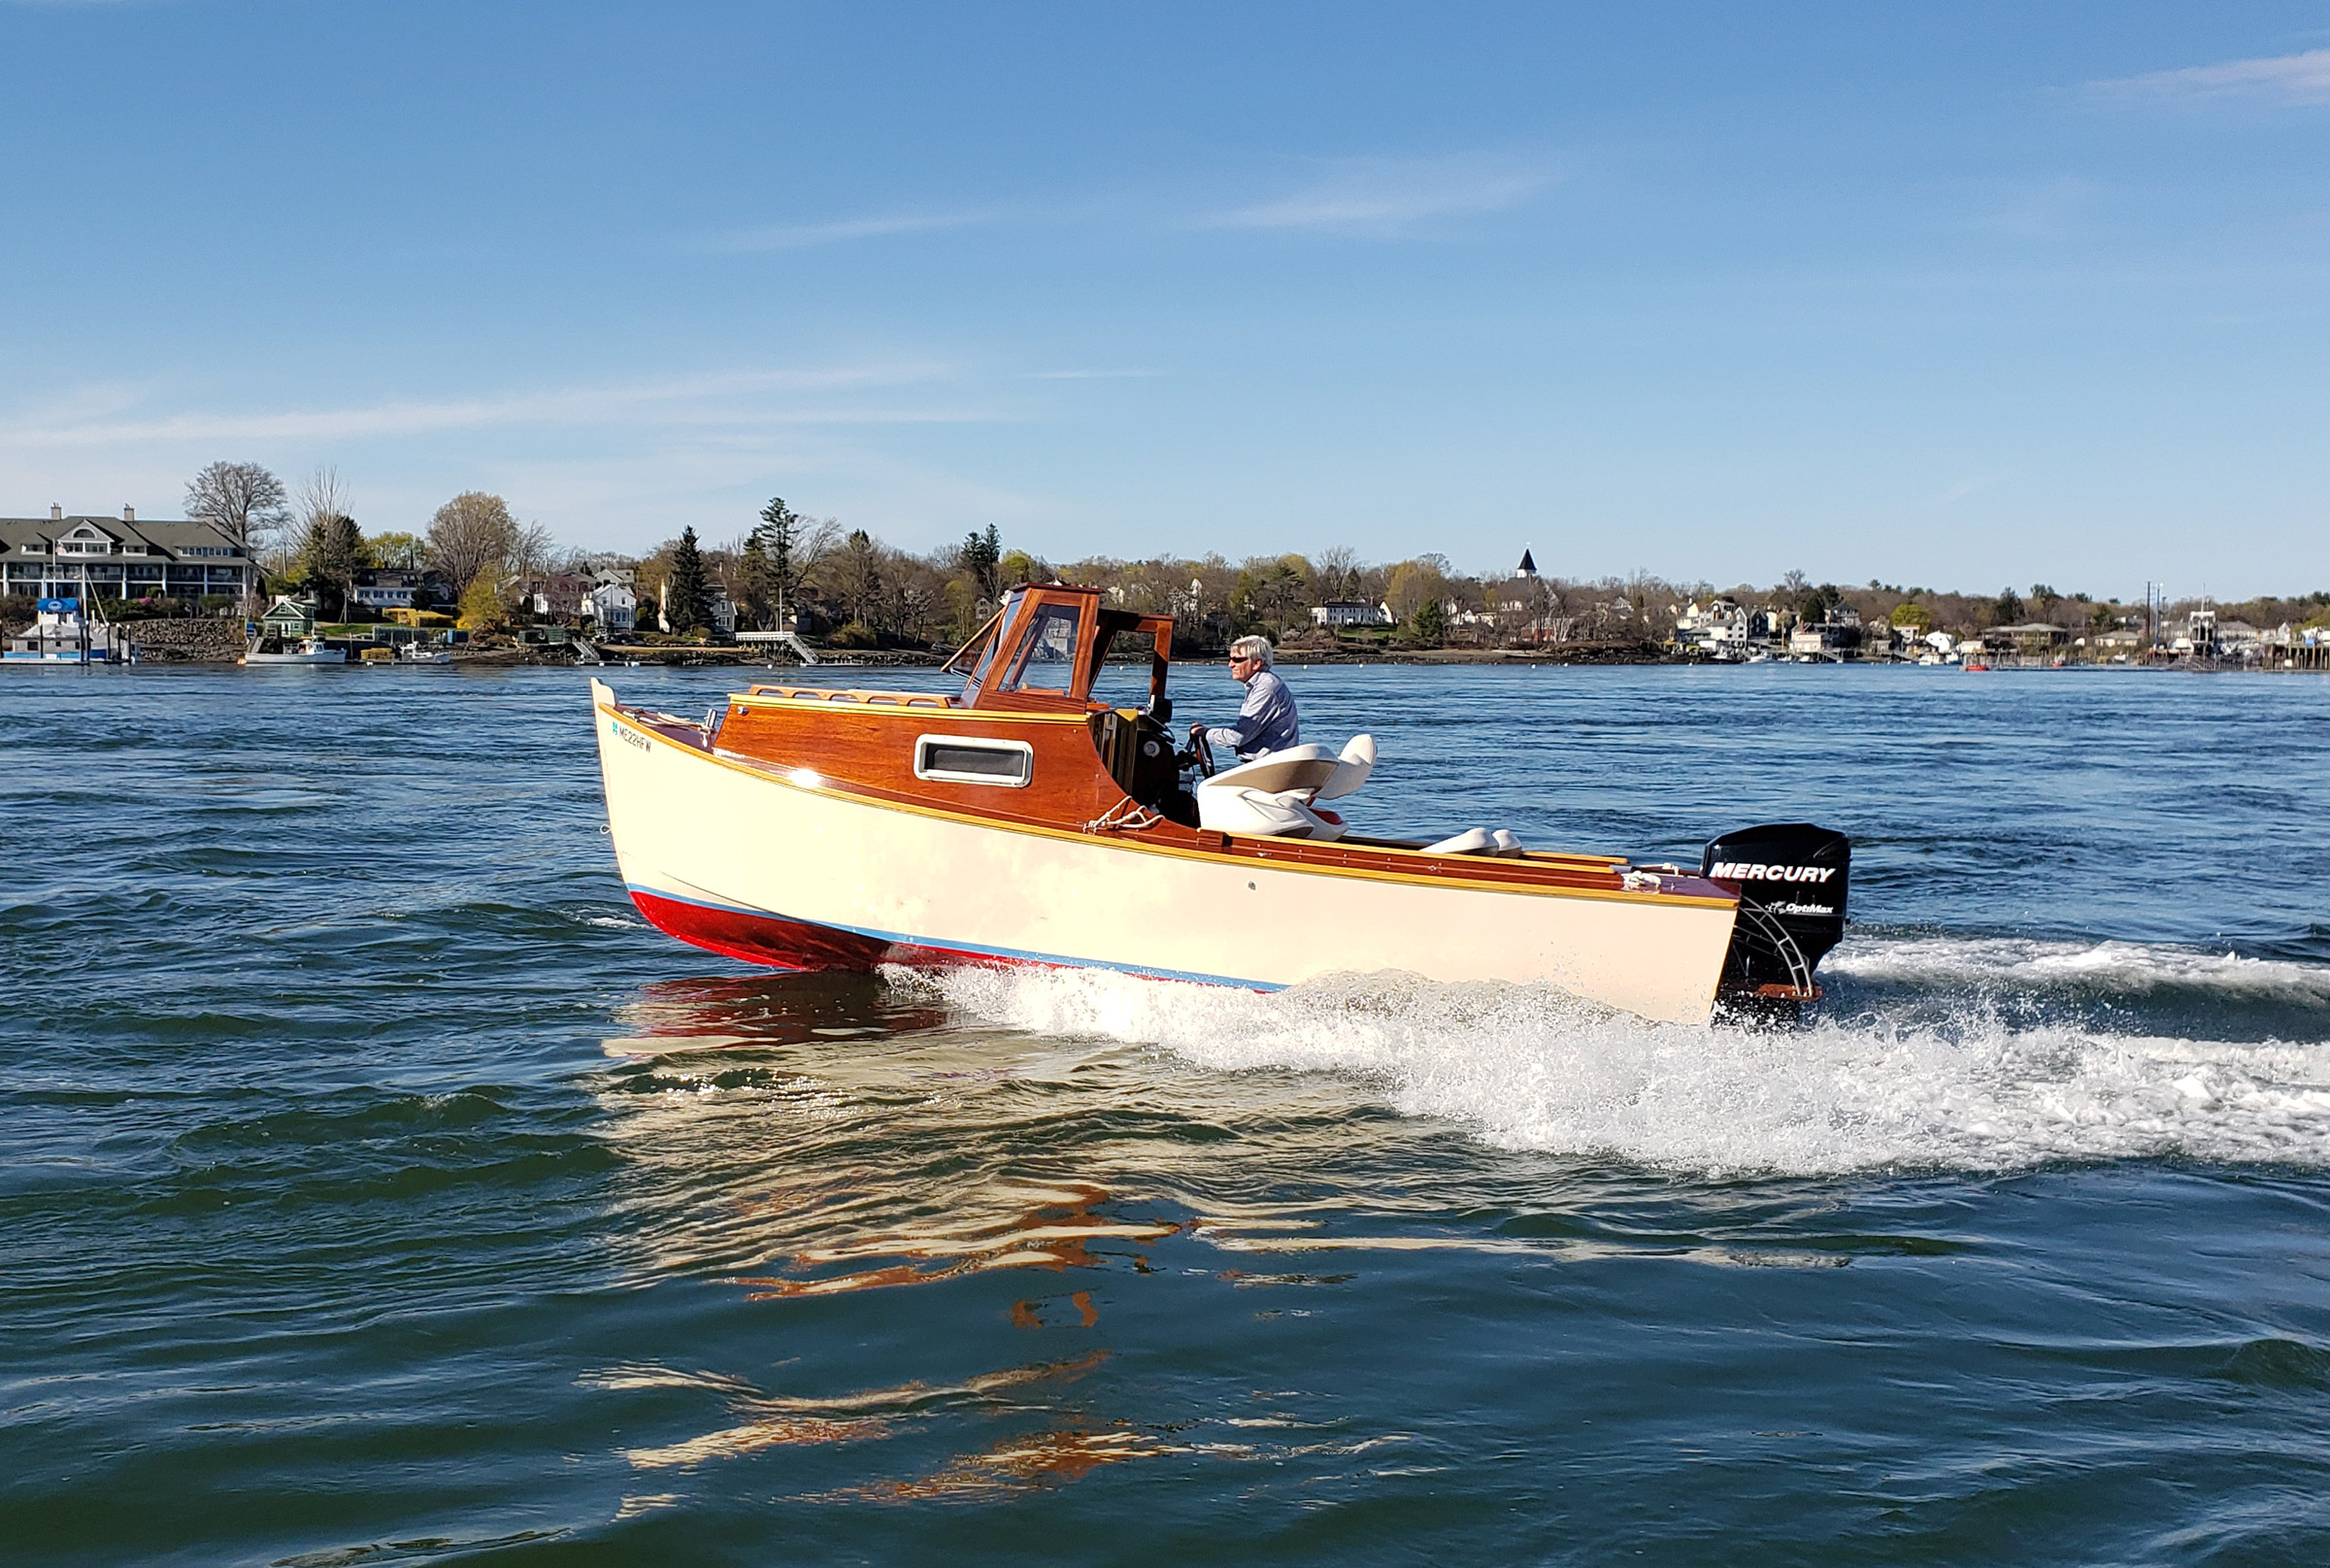
Though I saw her only in photos, the LYS Sport 16 would be my choice if I ever decided to build a boat. Dressed up in a varnished mahogany steering console, bright rails and cockpit coaming, and with side decks and a relatively large foredeck (kind of an extension of the breasthook), she’s fit to carry her skipper and mate to the yacht club for dinner. On this model, Baron narrowed the transom a bit, which gave the LY S Sport a 4.5″ rocker (the standard 16 has a rocker of 2.74″ ). The bow is a little higher, too, and the package just seems more elegant. Baron charges $8,950 (less motor and trailer) for a fancy Sport 16. The bare hull is $3,250; plans are $50. A bare hull for the standard 16 sells for $2,650, and the bare 20 for $3,850. Plans for these are also $50.
Courtesy of Old Wharf Dory Co.
The completed skiff can be operated with simple steering, or a console can be added (see previous page).
I don’t know where you’d find such versatile, able, and handsome boats for less money spent on materials or less time spent building. The price of a new outboard—70 hp maximum for the LY S 20 with console steering, 50 hp for a tiller-steered 20; 30 hp for a tiller-or console-model LY S 16—will far exceed the price of the boat, even if you pay yourself at $50/hour shop time. Each model’s flat bottom and reasonable weight ease trailering, launching, and retrieving. The clam digger who loaned us his boat told me that he’s carried as much as 2,000 lbs of clams aboard his 20-footer. Other commercial users have related similar tales of exceptional payload, so you shouldn’t worry if you want to transport a crowd of family and friends to an island for a picnic. The LYS can handle it— and a whole lot of other jobs as well. When it wears out, take a chainsaw to it and build another one—you’ll still be ahead of the game.
This Boat Profile was published in Small Boats2008 and appears here as archival material. Plans for the LYS are available from Old Wharf Dory.
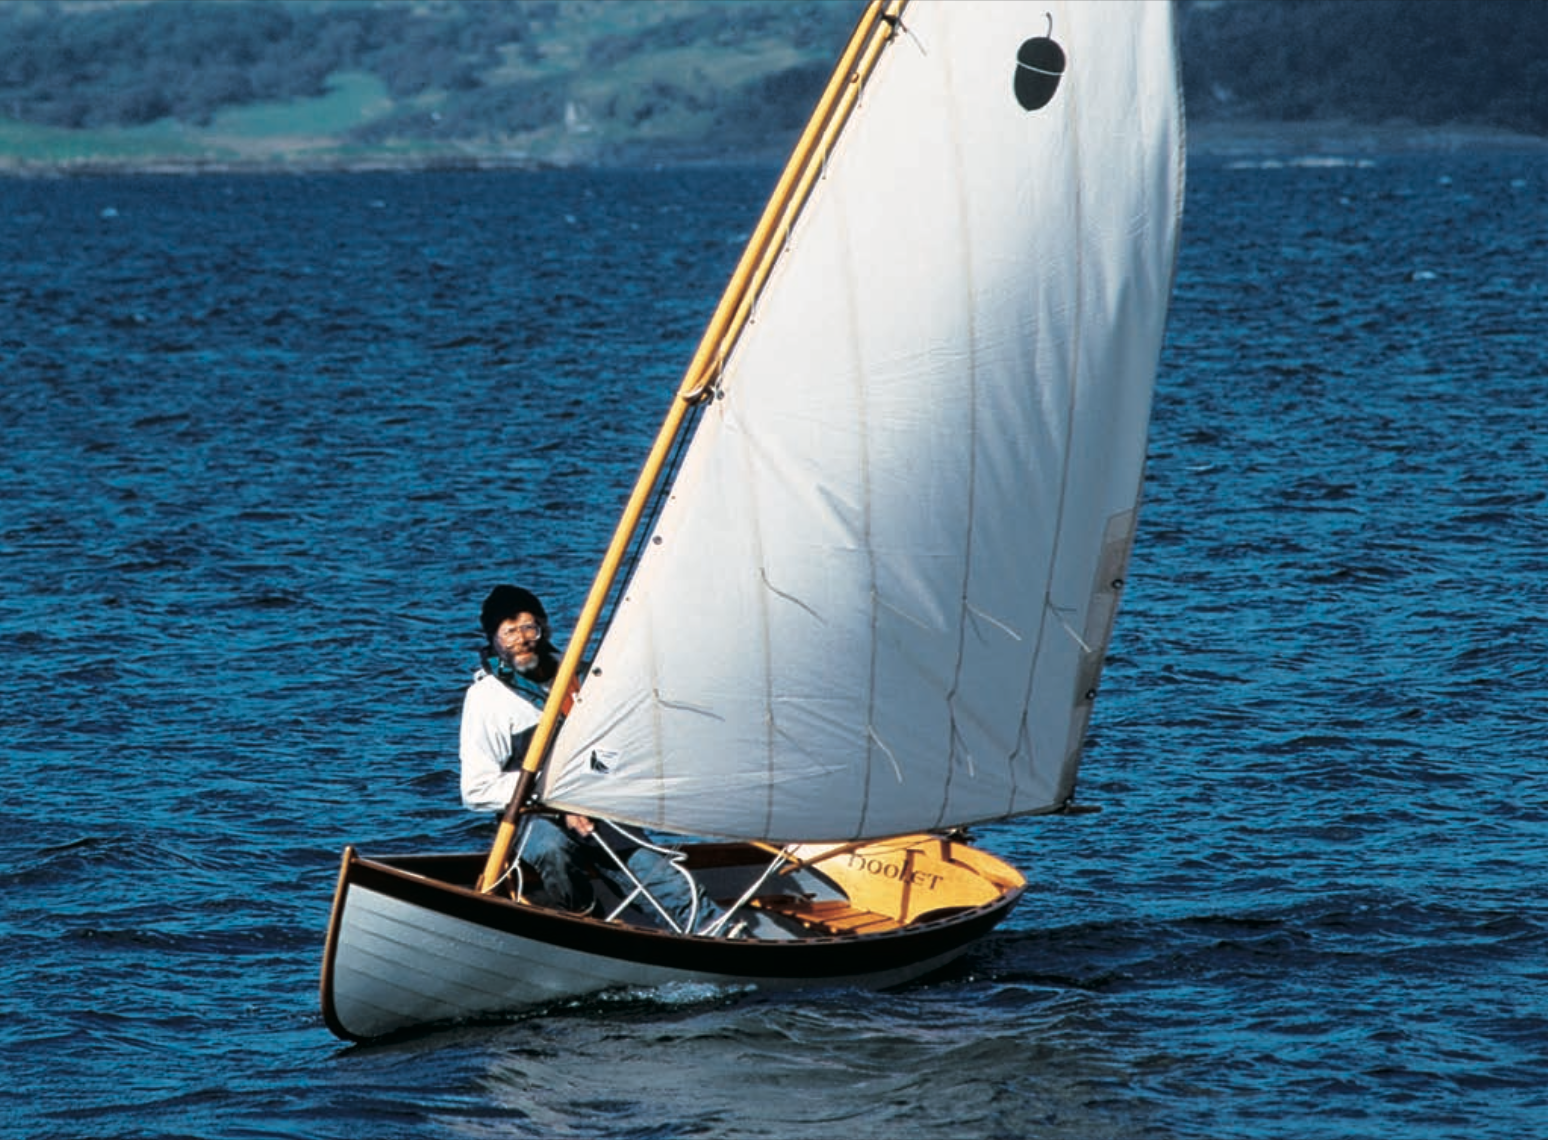
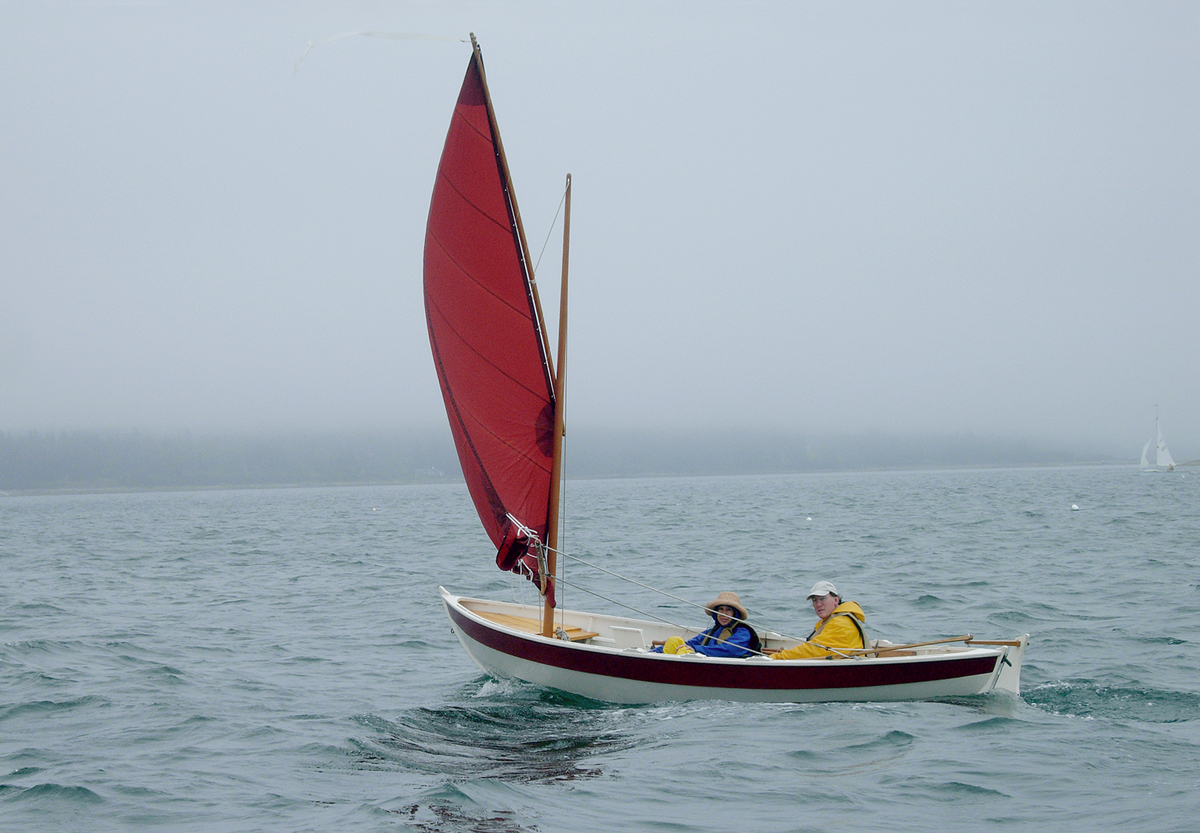
Take a shapely traditional boat, add an artist’s eye and a practical touch, update it for the way we live now, and you may have found tomorrow’s classic. This is the case for Iain Oughtred’s Acorn skiff. More than that, the design worked so well that it became a turning point for the creator’s career. Now in its seventh refinement, the Acorn, in its various sizes, remains one of Oughtred’s most popular designs. Acorns can be found from Oughtred’s native Australia to his adopted Britain, and from the West Coast of the United States to the East Coast, where its workboat roots are found. It will, no doubt, continue to be built for years to come.
Back when Oughtred first designed the boat in the early 1980s, he also compiled an annotated directory of wooden boat builders in Britain, finding some 300 around the country struggling with precious little encouragement. The directory and the boat helped raise awareness of wooden boats there. Maynard Bray, writing in WB No. 56, described the Acorn as an ideal lapstrake plywood boat for an amateur to build, “a sweet-lined, slippery little jewel.” The magazine also described her construction and has sold her plans ever since. “It gave me the funds and encouragement to continue [designing] when I might have stopped,” Oughtred reminisced.
The traditional type on which the Acorn is based is the Whitehall, which takes its name from Whitehall Street in New York City, where former Navy apprentices started building the type in the 1820s in the same general shape as pulling gigs or wherries. These boats had long, sharp bows, plank keels, rising floors, slack bilges, and flaring sides. “The after sections were slightly hollow at the garboards, and the transom was heart shaped,” historian Howard Chapelle wrote. Soon, they were built as stock boats and used by many people needing to move about America’s harbors, including ships’ chandlers, insurance adjusters, and pilots—and also for sailors going ashore to boarding houses and brothels. They rowed well and were sometimes sailed.
Photo by Kathy Mansfield
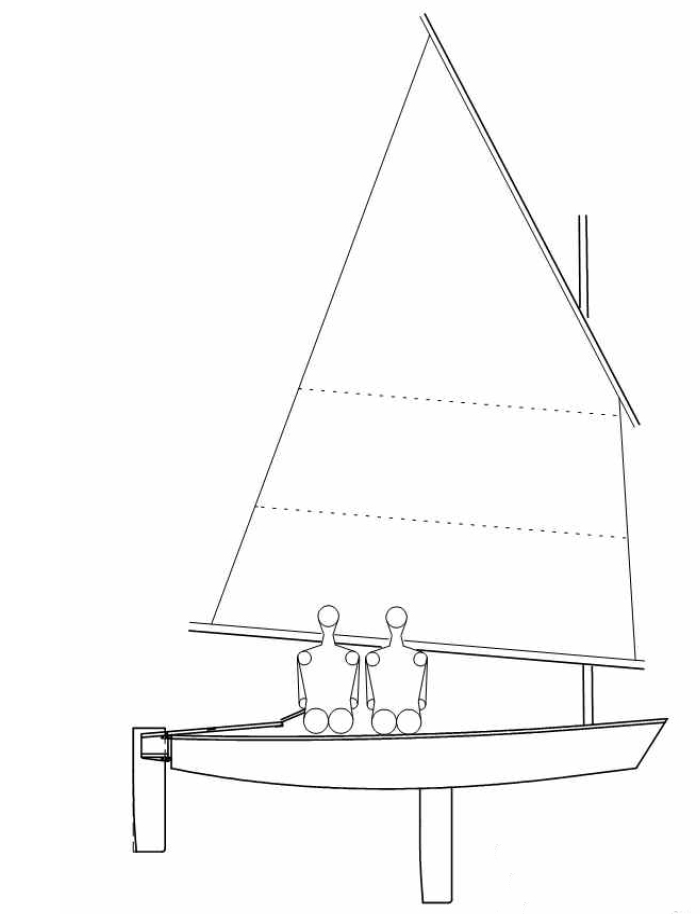
Designer Iain Oughtred’s Acorn 13 has evolved from a series of designs, starting with a 7′ 10″ dinghy. With his 11′ 8″ Acorn, he used a finer hull for rowing and sailing, and the 13′ version of the Acorn is simply the 11′ 8″ version stretched by spacing the construction molds a little wider.
Inspired by the refined Whitehall shape, Oughtred gave the Acorn skiff a clean entry, rounded bilges, a classic sheerline with beautifully tapered planks, and a wineglass transom. The shape of the sheer, with its low freeboard, provides two comfortable rowing positions, and the boat’s narrow waterline beam and lean hull sections aft under the transom’s curves give her good directional stability and a good turn of speed under oars.
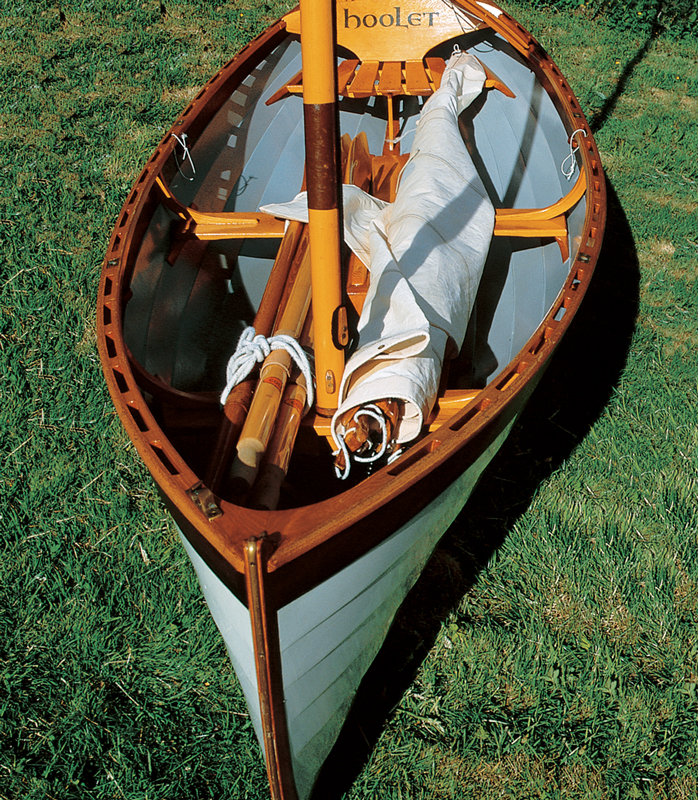
By using epoxies and modern building methods, Oughtred’s plans stipulated very light construction. The lapped joints of her plywood strakes, when glued together, act like stringers, stiffening the hull longitudinally. With eight strakes per side and no frames or stringers, she’s light enough to be lifted on top of a car and transported. The knees and floors are laminated, so no steam-bending is necessary. Oughtred first designed an 11′ 8″ version, primarily as a rowing boat. With the Acorn 13, which is set up for both sailing and rowing, the forefoot is a little deeper and the transom smaller, and any loss in buoyancy aft is made up by having a longer boat where passengers can spread out. The designed building frame has been raised slightly, with molds shifted farther apart, making the building process easier, with just seven strakes a side. The plans, much revised, now include full-sized mold patterns so no lofting needs to be done. The beautifully drawn seven sheets of plans also give hull lines, a table of offsets, construction plans, sail plans, spar and rigging details, and drawings for both straight-and spoon-bladed oars. Detailed instructions and notes are included.
Oughtred suggests a nominal 1⁄4″ plywood for the hull, using okoume with mahogany or other hardwood outer veneers, or perhaps solid mahogany if a tougher hull is required. She can also be traditionally built, strip-planked, or cold-molded. Much of the complexity of a traditional boat has been cut out: she takes about 160 hours for an experienced person to build, with an additional 30 hours for the sailing version’s spars, daggerboard and trunk, and rudder.
I first saw an Acorn 13 skiff in Scotland, near Inverary on the banks of Loch Fyne, on a day when the blues and greens of the mountains shaded down to iridescent hues on the loch, and the water lapped on the pebbles of the beach across from a castle. A sailing skiff seemed to waft along on no breeze at all, and there was a spontaneous movement of people walking down from the lochside pub to have a look. The talk seemed to turn from boat construction to whisky, and it was only later that I learned that the boat had been built by students and Oughtred had fitted her out himself, making the floorboards, thwarts, spars, and other fittings from a very close-grained Douglas-fir that in its earlier life had been used to hold whisky in a Scottish distillery. Its golden color was perhaps partly the long, slow maturing of wood and whisky together.
Photo by Kathy Mansfield
Plywood lapstrake construction not only makes the boat lightweight buy also keeps the interior uncluttered and easy to clean.
The boat, named HOOLET, Gaelic for a little owl, looked perfectly at home on a loch, and her elegant, classic rig also packed in plenty of traditional detail. There were adjustable parrel beads on the jaws of her gunter spar, and the halyard and downhaul lines led down to belaying pins set in forward thwart, which supported the mast. I’d used belaying pins on a schooner and a medieval replica, but I found they worked fine on small skiffs, too.
The rudder fitted and lifted quickly, leaving a single-hander time to concentrate on the daggerboard in shallow waters: we were to find that very useful in a strong wind. But for the moment, there was little breeze, and even though four of us piled into a boat built for three, we ghosted along nicely, slipping past becalmed yachts and tacking almost under a bagpipe band playing on Inverary’s pier. With a sail area of 48 sq ft, she’s probably a bit overcanvased, but we were happy to have that extra power. She would have slipped along beautifully singlehanded. Her long, narrow waterline gave good directional stability but meant it was best not to put the helm over too quickly or too far when tacking, rather like her traditional forebears. There are several rigs to choose from in Iain’s designs: gunter, spritsail, and standing lug. All are fun to use and no doubt give the boat different sailing performances and characters.
There was another chance to sail HOOLET, this time after a night of rain and with a gale forecast for later in the day on the boisterous west coast of Scotland near Loch Melfort. First, I rowed her. She pulls beautifully, as mannered and elegant as the finest Thames skiff from farther south, quickly picking up speed and maneuvering neatly. But it would be a pity never to sail this boat. She can be well behaved with a small sail, a reef, or an extra passenger, but she came alive as we rounded the point into a very stiff breeze. She also proved Maynard Bray’s comment about the original Acorn skiff: “Make no mistake—she is neither particularly stable nor particularly burdensome. If you’re looking for a boat that you and your passengers can clomp around in, stay away from this one.” Oughtred suggested she’d suit retired Moth skippers in a good wind. Her round bilge meant that she was less stable when boarding her, but now she was up and flying, steady and responsive as long as you remembered not to spin her but to sail her around in a tack. Her clean interior made moving about easy, the crew sitting forward of the centerboard trunk. Iain is himself an excellent sailor, and his boats are built to his standards.
Only once have I succumbed to the danger of writing about beautiful boats—the danger being, of course, falling for the boat you have described. It was all about Oughtred’s Acorn 13. The feeling starts with a deep longing, subjective comparisons with alternatives, and eventually the checkbook comes out as another boat is added to the family fleet. There is always an excuse—and in this case it was like buying a work of art that had a practical use. Our daughter happened to be along at Inverary and was just the age to covet the control of her own boat. Plus, we lived near a river, not a lake, so a good rowing skiff would be ideal for summer evenings after work, with sailing a weekend option. The gunter rig would be easy for lowering under bridges. And what a jewel of a boat it is….
The Acorn 13 has the Whitehall type’s fine ends below the waterline and a lovely wineglass-shaped transom. To make the 13-footer, the 11′ 8″ version’s construction molds are simply spaced more widely. Sprit, lug, and gunter sail plans are available, each with identical sail area.
This Boat Profile was published in Small Boats 2008 and appears here as archival material. Plans are currently available from The WoodenBoat Store, P.O. Box 78, Brooklin, ME 04616; 800–273–7447; www.woodenboat.com.
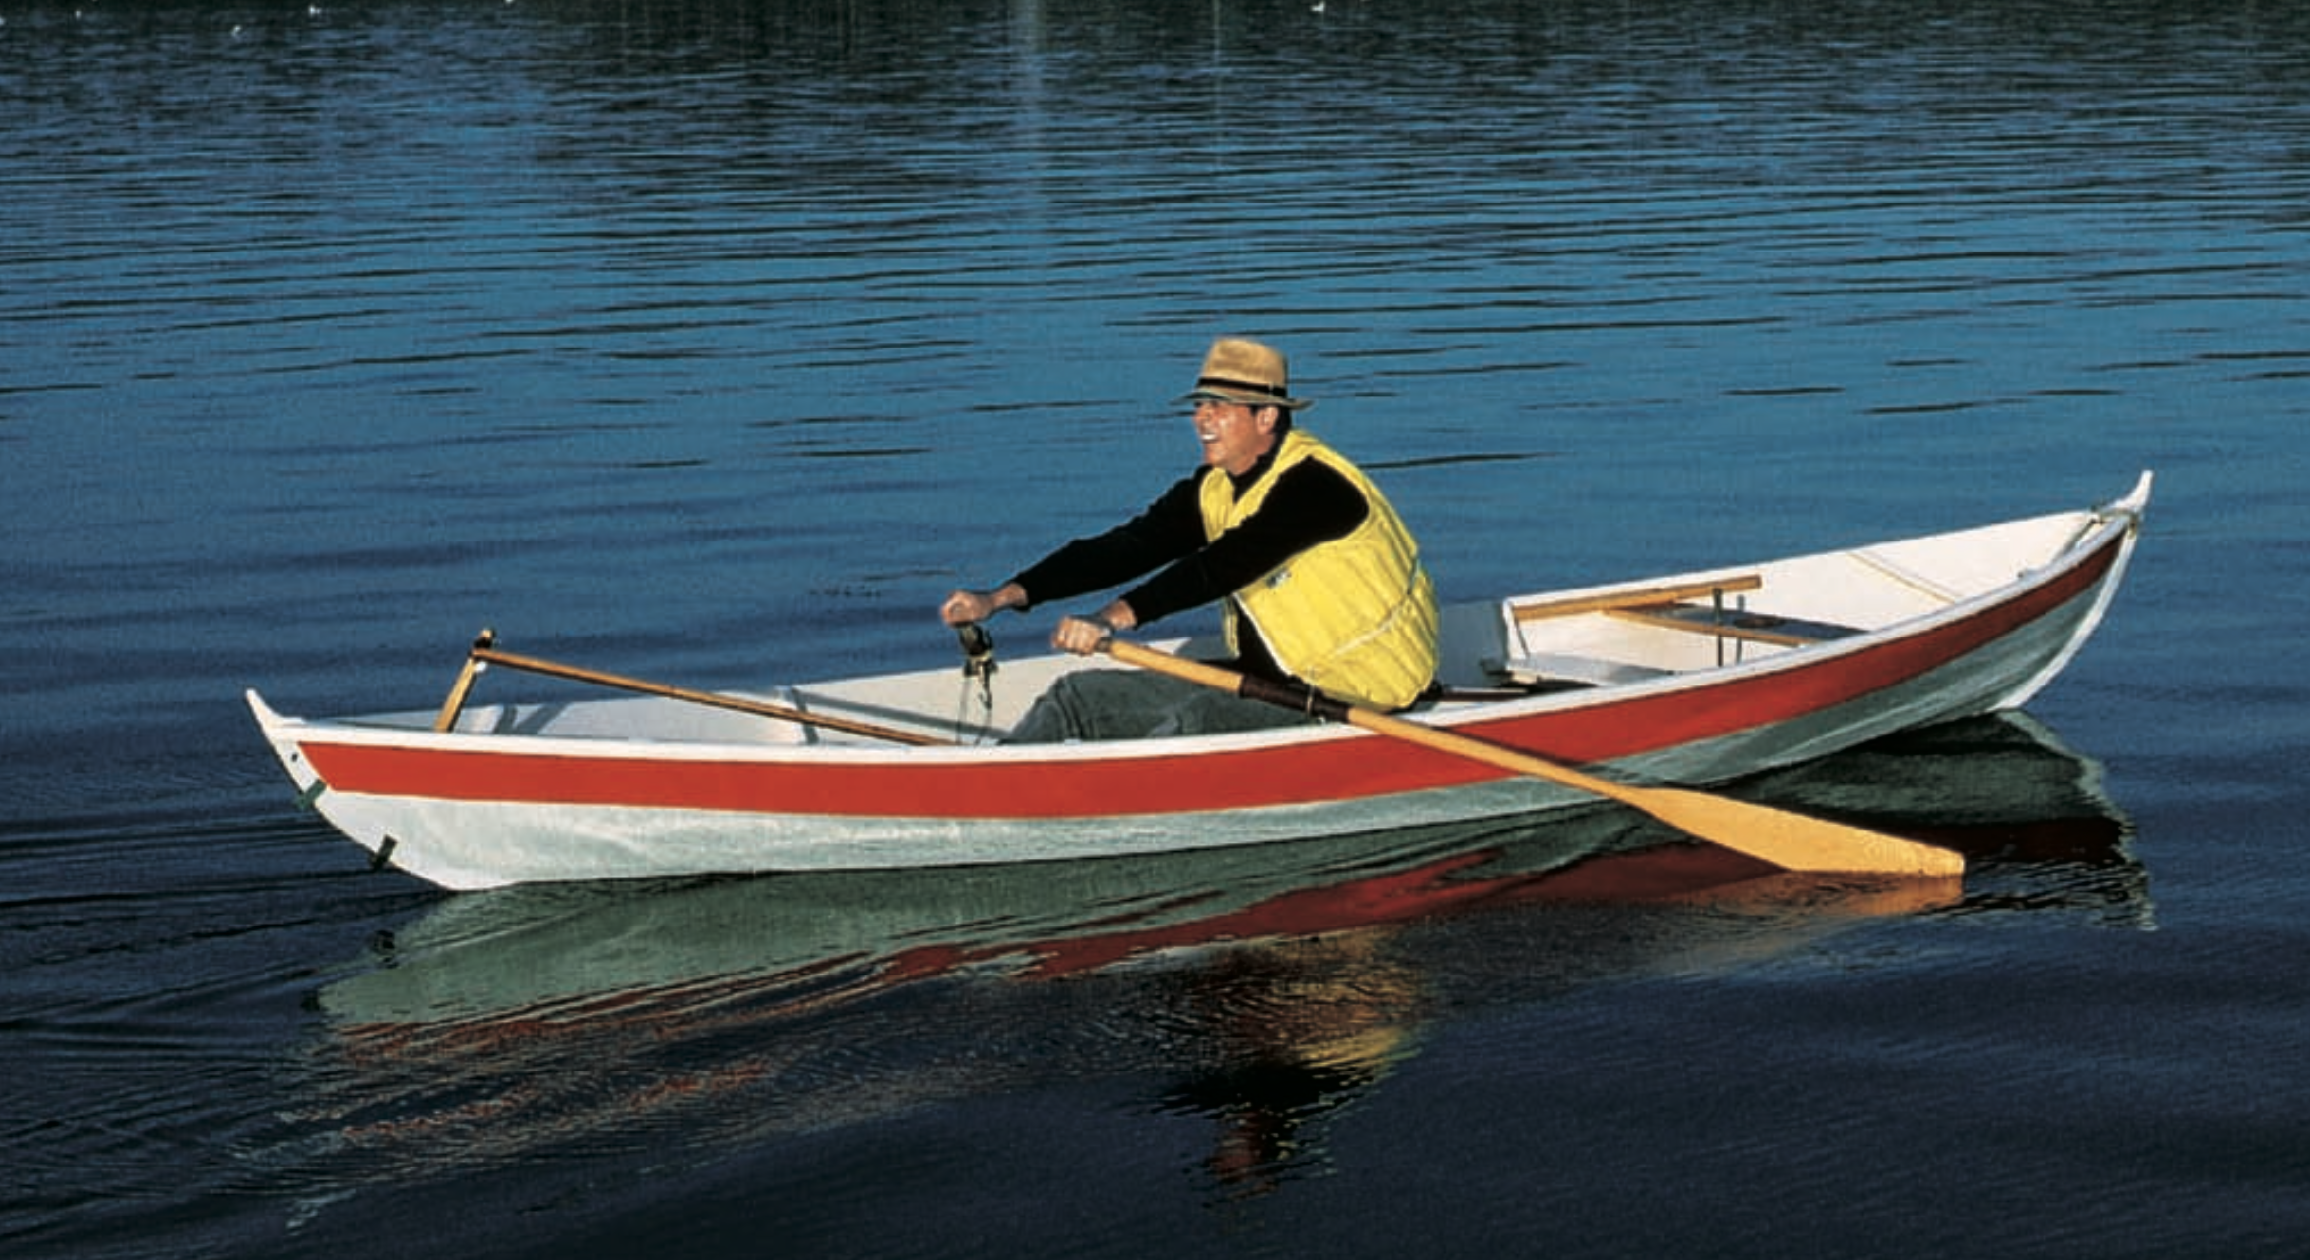
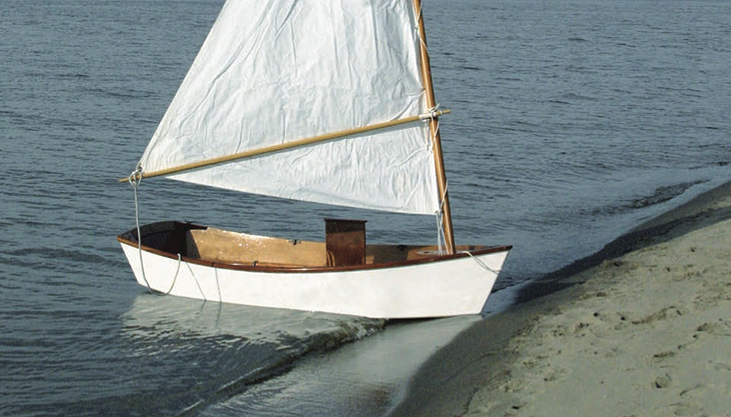
Shearwater might well be the best all-round pulling boat at the WoodenBoat waterfront—at least she was, before we installed a centerboard trunk.
When Joel White drew this elegantly simple 16′ double-ender, he recalled the traditional boats of western Norway. (At first, he named the new design “Joelselver.”) The hull’s narrow breadth at the waterline permits a slender immersed shape. Above the water, Shearwater’s sides rake outward, which provides buoyancy and reserve stability for the able little boat. The strongly raked sides also produce sufficient breadth at the rails for efficient long oars. Deliberately low freeboard reduces windage, and wind is a persistent enemy of oarsmen. Shearwater makes good speed when pulled with moderate effort, and she carries (glides) well between strokes.
A slight touch of rocker (fore-and-aft curvature) to the keel gives maneuverability, but this skiff retains adequate directional stability. Shearwater can turn quickly, and yet she handles well in a following sea. Boats with dead-straight keels and sharp ends might get us to windward quickly, but they often transform into tripping and broaching monsters when we’re running off.
Photo by Benjamin Mendlowitz
Shearwater, shown here under oars with her push-pull tiller stored aboard, rows beautifully. Her rig might be considered auxiliary propulsion, while the oarsman is the primary engine.
This plywood-lapstrake skiff goes together easily. WoodenBoat School students built our boat in less than two days. The eight sheets of building plans include full-sized paper patterns for frames and other components. Lofting, that is re-creating the hull lines at full scale, is not required…but paper has a nasty habit of shrinking, stretching, and slipping. Unless you work in a climate-controlled shop, you might want to redraw the lines on the floor or on sheets of white-painted plywood.
The act of lofting is inexpensive, educational, and clean. Many of us consider it good fun. Perhaps most important, it allows us to build the boat in our minds before cutting into costly mahogany plywood. For a friendly primer on this subject, see the “Lofting Demystified” section of Greg Rössel’s book Building Small Boats (WoodenBoat Publications, 1998).
The hull’s strakes (three per side) hang on three laminated frames. This glued-lapstrake hull almost demands the use of epoxy as an adhesive—for its gap-filling properties as well as its strength. While the epoxy cures, we’ll temporarily secure the strakes with steel drywall screws driven through the laps along the entire length of the hull. Let’s not forget to remove these ferrous fastenings, and to fill the resulting holes, sometime before painting. Where the strakes cross each frame, we’ll employ bronze screws. These fastenings of eternal metal will remain in place for the life of the boat.
Joel White drew a standing lug rig to provide auxiliary propulsion for Shearwater. This simple arrangement offers low-centered, easily controlled power and short spars that can stow in the boat for trailering. Unlike most modern rigs, it requires no standing rigging (stays, usually of wire rope, that support the mast). We’ll need only a little store-bought hardware. Just two blocks (pulleys) are specified on the plans.
Photo by Benjamin Mendlowitz
Rigged for sail, Shearwater makes a handy camp-cruiser. The one shown here, a larger, deeper 18′ version of the original, explored islands in Maine in mid-August.
Take some care in sewing and setting the lugsail. It appreciates having sufficient draft (don’t cut it too flat), and it likes to have the halyard secured to the yard in just the right place. Casual experimentation during the first few sails should reveal the proper setup. Keep sufficient tension in the luff (the sail’s leading edge) by tightening the downhaul (a short line at the forward end of the boom). As the yard comes down at day’s end, it does so head-first. Grab hold of that stick before it takes aim at your head. Minor cautions aside, this rig seems reasonably tolerant of inattentive setup.
After we become accustomed to the Norwegian-style push-pull tiller, Shearwater sails fast and handles well in light and moderate air. As the breeze comes on, the helm gets heavy and the bow begins to punch through waves. It’s time to strike the rig. Joel knew well the foolishness of pressing a low, narrow, undecked skiff in strong winds. He viewed this skiff as a pulling boat, with auxiliary sailpower.
WoodenBoat’s Shearwater spent two years as a pure pulling boat. Then, yielding to temptation, we commissioned the addition of sailing gear. The resulting clutter of spars and the hydrodynamic drag caused by the centerboard trunk degraded the boat for rowing.
If we look at Shearwater’s bottom, the narrow slot into which the centerboard retracts appears harmless. In fact, it generates considerable drag. A long time ago, I rowed and sailed prototype fiberglass skiffs that had been laid up without gelcoat (the opaque, and often colorful, outer layer of pigmented resin seen on most ’glass boats). The translucent hulls allowed us to study water flow and wave formation as we looked out through the hulls while sailing—educational, and far more entertaining
than network television.
Photo by Benjamin Mendlowitz
Shearwater is a lithe, easily built adaptation of a traditional Norwegian design—the oselver, or Os estuary boat.
As the boats moved through the water, we observed extreme turbulence in the after ends of their centerboard trunks. When we’re rowing, energy to drive this undulating light show must come from us. Even the strongest man can produce, at full effort, but a fraction of the power available from wind or mechanical contrivance.
After we learned the magnitude of increased drag, sailors worried about loss of speed—even when they were not racing. Oarsmen begrudged wasting their limited energy. In order to reduce drag, we sometimes covered the offending slots with neoprene flaps secured with bronze half-round and screws. Today, I’m told that we might use Mylar tape (slit longitudinally with a sharp knife after being applied to the hull). Perhaps you’ll consider rigging your Shearwater only for rowing. We tampered with perfection and spoiled it.
Although she’s not big compared to other 16-footers, this boat has plenty of room for solitary beach cruising. We’ll row through the morning calm and sail on the afternoon’s breeze. When we hit the beach, we can roll or drag the 150-lb cruiser up and away from danger. After supper, we’ll lift out the thwarts, and the floorboards will make for a comfortable bed. If we’ve rowed a long stretch at a fair pace, sleep should come easily.
Shearwater’s glued-plywood construction will withstand drysailing more handily than her solid wood cousins. She’s lighter, too, making for a more nimble recreational craft.
This Boat Profile was published in Small Boats 2008 and appears here as archival material. Plans are available from the WoodenBoat Store for $75 (as of 2022).
The Technique article in this issue, “Checked Plywood Repair” by Kent and Audrey Lewis, is one that I took a special interest in. Several of the boats I’d built, and the teardrop trailer I’d built using the same materials and methods, have been showing areas of plywood that had checked. Work that had held up for years was being undone and I wasn’t sure why.
The oldest of the boats is the gunning dory I built for my father in 1980. John Gardner’s The Dory Book, published in 1978, was my guide for both my introduction to boatbuilding and the plans for the dory. It was the second planked boat I’d built, the first being a Marblehead dory skiff. With the exception of the garboards, both were traditionally built with red cedar planks on oak frames, all finished bright. I had taken Gardner’s advice and used plywood for the garboards to avoid the splitting he noted that happens to the short grain at the ends of natural lumber garboards.
A section of the port garboard in the stern of the gunning dory had the worst of the checking. I had hoped sanding and painting would cure the problem, but after three efforts over the course of several years, it was clear paint wasn’t the solution.
Several years ago—after the dory was kept at my dad’s rowing club, outside, under a tarp that I frequently found not fully covering the boat—the inside faces of the painted fir plywood garboards developed pronounced checks. Looking back again at my copy of The Dory Book, I saw I had underlined “plywood garboards,” but I did not mark what followed: “…plywood does not stand prolonged soaking and drying as well as natural lumber. However, this fault in plywood may be overcome to a large extent by sealing it with plastic.” I know now that by “plastic” Gardner meant “epoxy,” but 44 pages separate his garboard advice from his description of epoxy, and that description only indirectly connects it with “plastic” and covers only the use of epoxy as a bonding adhesive. So, I had only primed and painted the plywood.
I no longer have the dory skiff. In the mid-’80s, I think, I had sold it to a man who took it to Alaska. It last turned up on eBay in Connecticut in 2013, and the pictures posted with the ad seemed to indicate the boat was in very good shape. If it had been stored out of the weather, the plywood garboards might have been in good shape, even after 40-plus years. While building the skiff, I had studied Gardner’s 1977 volume, Building Classic Small Craft. In it, he notes that when using plywood for dory construction, “…coat the surface of the wood with paint and special sealers to prevent it from soaking up water too fast or drying out too quickly.” While several of the boats detailed in the book are made of plywood with joints covered with fiberglass tape set in epoxy, none of them are given overall saturation coats of epoxy. Instead, “before any paint goes on the plywood…the boat should be thoroughly soaked inside and out with a good wood preservative.”
In Gardner’s defense, at the time he wrote these two books, epoxy was still fairly new to amateur boatbuilding. The Gougeon Brothers on Boat Construction, which introduced wood/epoxy composite construction, was published in 1979 and provided a better understanding of the uses of epoxy. In the chapter, “Wood as an Engineering Material,” the Gougeons wrote, “our basic approach is to seal all wood surfaces with WEST SYSTEMS resins. This includes those that come into contact with air as well as those in contact with water.” Later books on composite construction, such as Devlin’s Boatbuilding, published in 1996, offered similar advice: “And always be sure to seal all plywood edges and surfaces with epoxy to ensure maximum longevity and help prevent moisture invasion and veneer degradation.”
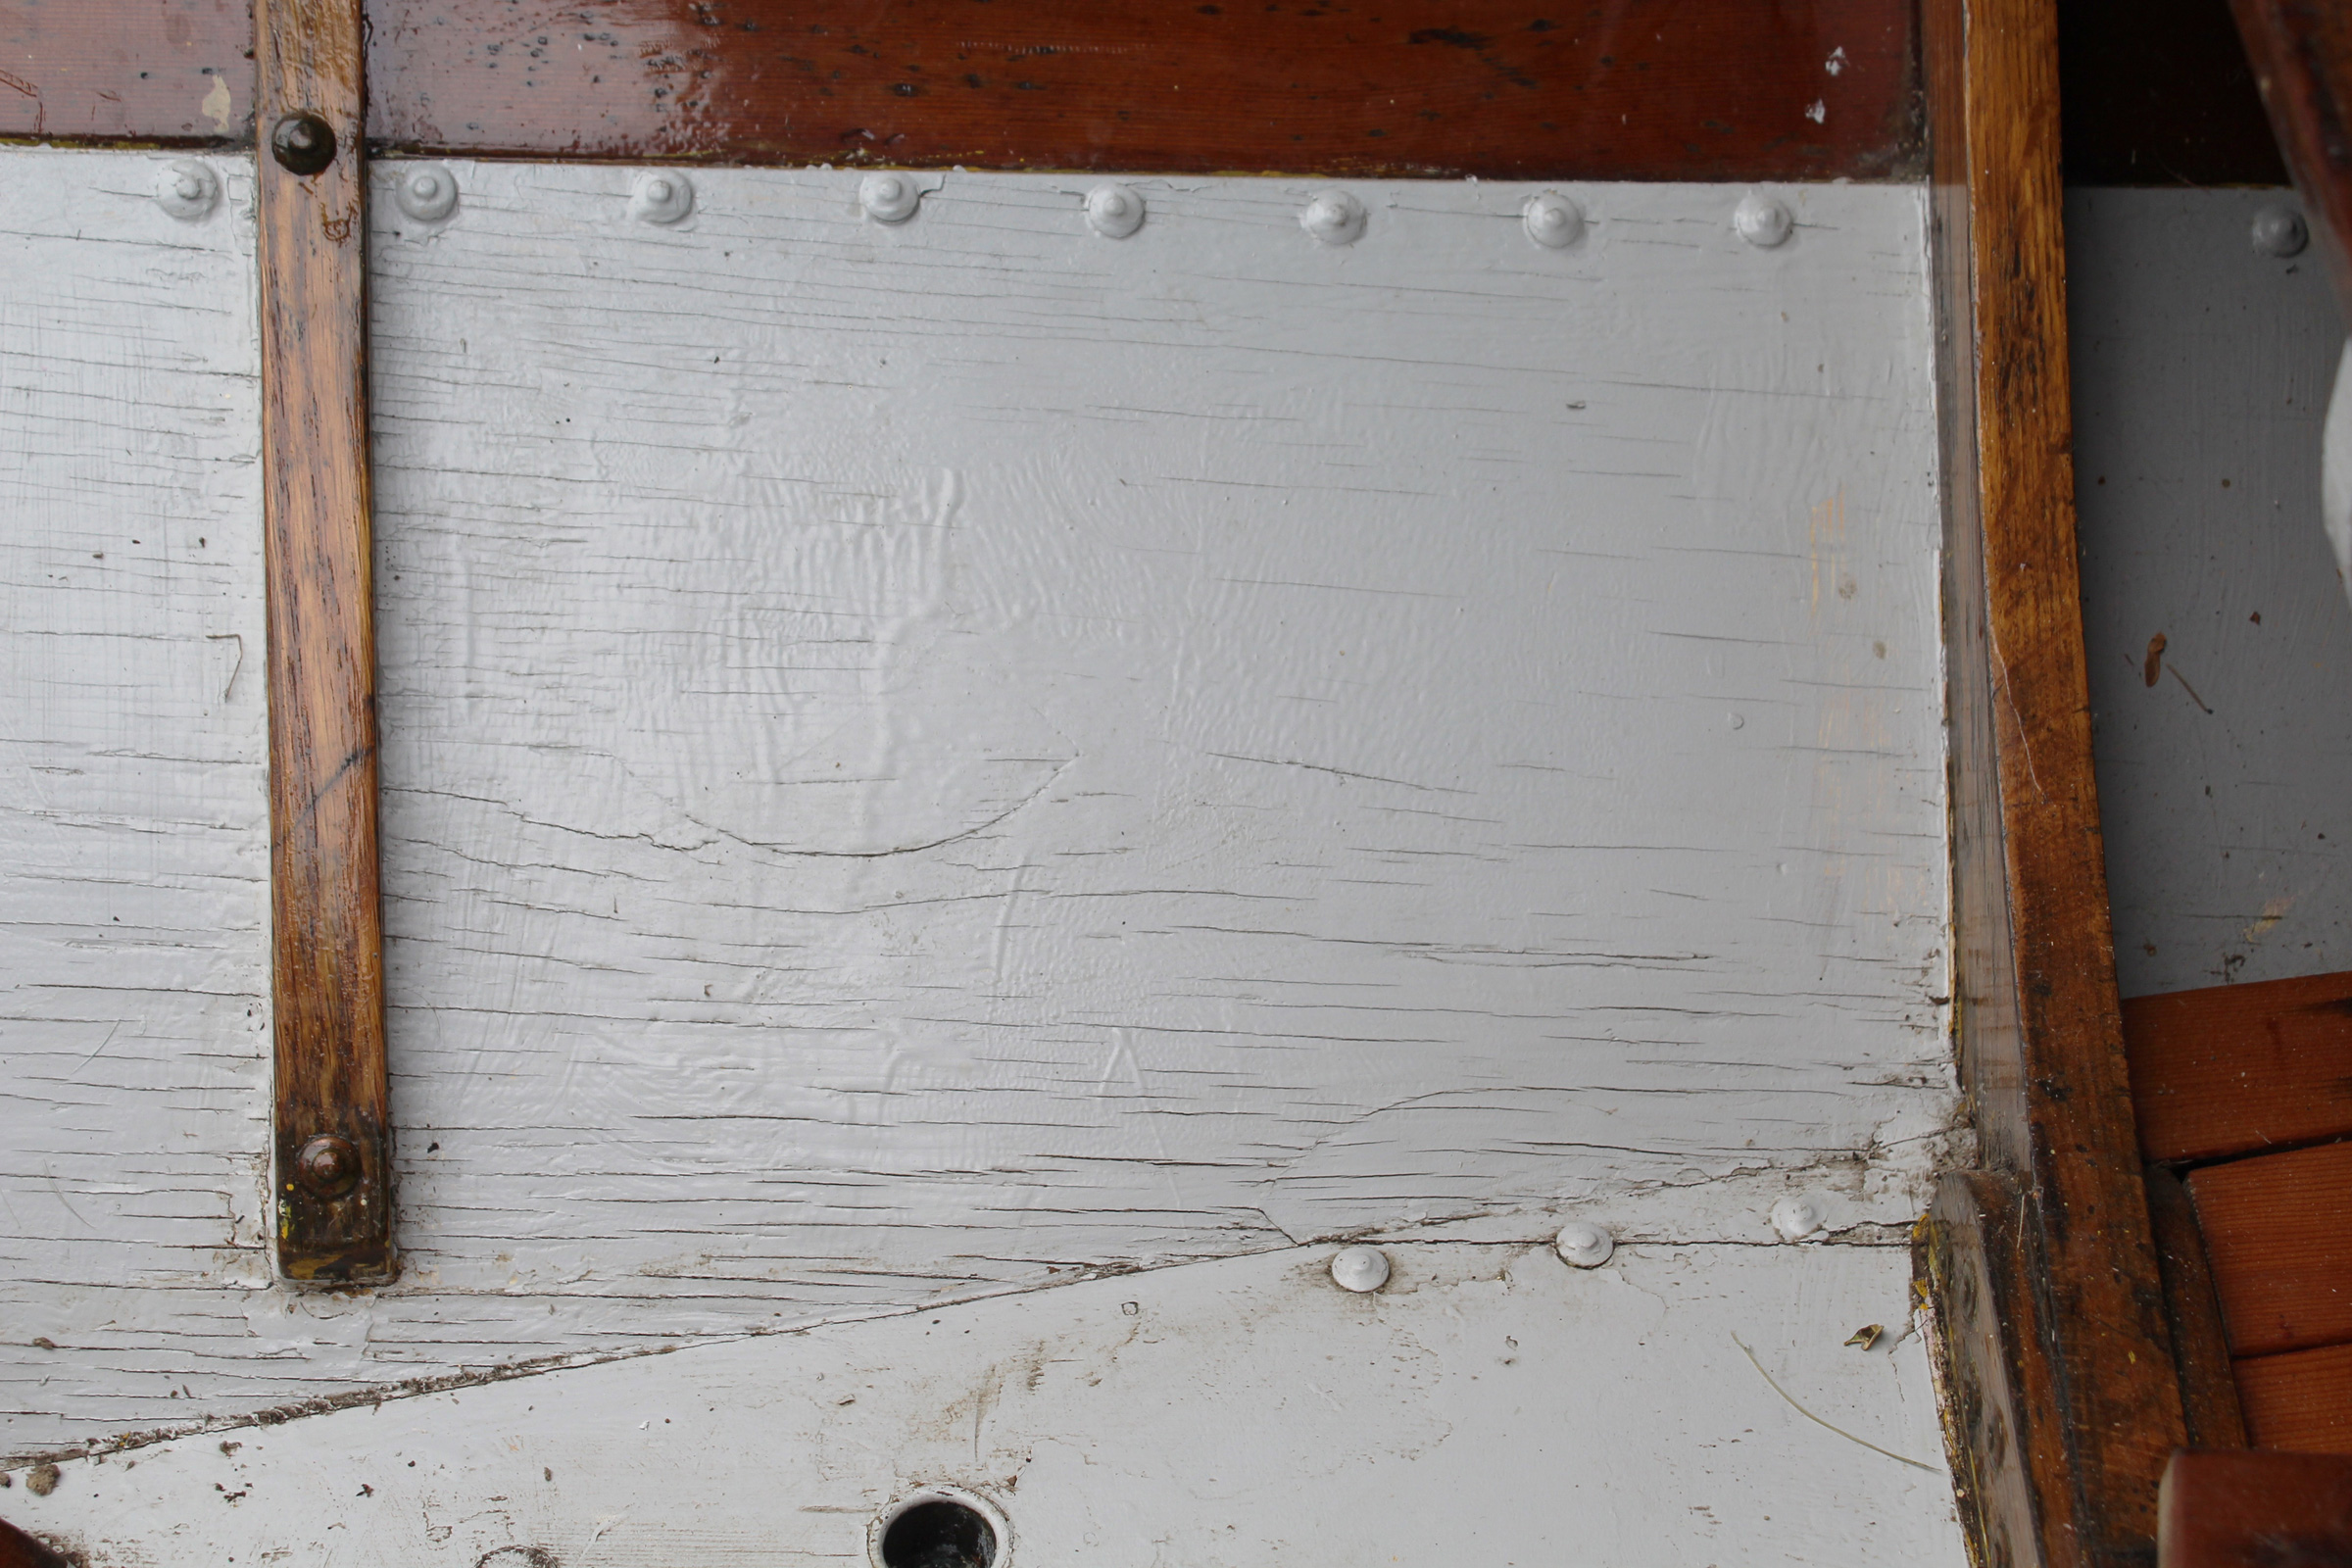
The checking on the Caledonia Yawl’s paint is quite fine, but I suspect the cracks will grow with time as temperature and moisture take advantage of the access to the mahogany plywood underneath.
For most of the boats I built in later years, I used a traditional approach and rarely used plywood. Then in 2003, I switched to glued-lap plywood construction to build Iain Oughtred’s Caledonia Yawl. I used his 1998 book, Clinker Plywood Boatbuilding Manual, as a guide and finished the BS-1088 with plywood primer and semigloss alkyd enamel, without first sealing it with epoxy. Oughtred was of the same mind and noted “I have never coated a boat with epoxy.” My Caledonia’s finish held up well during the 16 years the boat was kept in my garage, but it had to give up its place for another boat and spent 3 years outside under tarps. The paint has now developed a barely discernible pattern of fine checks.
The application of fiberglass on the Escargot was a bit slipshod and there was a gap between pieces of fiberglass. While epoxy covered the exposed plywood in between, that alone wasn’t able to keep the fir plywood from checking.
In 2009, when my son Nate and his high-school pal decided to build an Escargot canal cruiser, I steered them to marine-grade fir plywood because it was less expensive than the mahogany options. The instructions called for sealing, priming, and finishing with marine or deck paint. Nate and I had seen another Escargot—built of fir plywood and painted—and noticed that the finish had checked. We would prevent that by sheathing the exterior surfaces in fiberglass and epoxy. After a dozen years of being parked on the driveway on the sunny south side of the house, covered with poly tarps, the Escargot’s plywood is without checks, with one exception: a 1”-wide gap between spans of fiberglass where the wood was protected by epoxy alone. Some significant cracks in the paint have appeared there.
HESPERIA’s sides are in need of being sanded and coated with epoxy, if not epoxy and light fiberglass. I’ve marked a rectangle in pencil for an area to sand for a test.
The following year, 2010, I built HESPERIA, my garvey camp-cruiser, using BS-1088 plywood and finished with primer and paint. Only the cabin roof got a layer of fiberglass to give its 1/4″ plywood additional strength. The boat spends its time outside under tarps, and the painted surface is now covered with fine but easily noticed checks.
A small section of the mahogany plywood on the teardrop trailer shows that epoxy does help prevent, or at least forestall checking. Just above the patch of checking at the bottom there is a band of intact paint that covers a seam between plywood sheets. The epoxy applied to that joint coated some of the plywood around it and protected it. The pencil marks indicate another area that I would sand and apply a test coating of epoxy.
A teardrop trailer that I built in 2013, and now parked in the back yard, is in even worse condition. I’d built it with the same materials I’ve used for boats, and the plywood on the roof cracked so severely that a couple of years ago I had to peel loose veneer off and fill the voids with ’glass and epoxy before sanding the whole top to bare wood and applying 6-oz ’glass cloth and epoxy. The varnished mahogany plywood sides are badly checked in spite of being sanded and revarnished at least twice; the painted front end looked fine when I ’glassed the top, but it is now checked. I noticed one small area flanking a joint between plywood panels that was still in good shape. It had been protected by the epoxy I’d squeegeed alongside of the seam.
My plywood Greenland kayak, built in 1994, has been outside for much of its life and doesn’t seem much the worse for it.
Two of my boats have survived for decades without any evidence of checking. One is a plywood Greenland-style stitch-and-glue kayak I built in 1994. It is sheathed inside and out with fiberglass cloth and epoxy, primed, and painted. While the kayak’s red topcoat has been worn away in places, there is no evidence of checking despite being stored outside for decades, sometimes covered with a tarp, other times exposed to the weather.
The paint along the kayak’s keel has been worn away by beach launchings and landings, but there is no sign of checking.
The other boat with its finish still unchecked is a decked lapstrake tandem canoe I built in 1988. I got the design from Canoe and Boat Building by W.P. Stevens, published in 1889, and followed the construction method describe by Thomas Hill in his 1987 book, Ultralight Boatbuilding. He, too, wasn’t in favor of an epoxy coating, writing “I do not recommend epoxy saturation for these canoes. Some people believe epoxy applied to plywood prevents checking. I’m not convinced.” He cites two boats that were badly checked in spite of five coats of epoxy on a transom in one case, and epoxy and fiberglass on the deck in another. I followed his advice and finished my canoe with primer and enamel.
My lapstrake plywood canoe is 33 years old and still has only its original varnish and paint and primer.
Aside from the wear and tear caused by use, the paint and varnish on the canoe I built in 1988 has never been refinished and yet is still in good shape and So why did HESPERIA, which had received the same finish, fare so poorly after just 11 years? What differentiates the two is how they have been stored. That canoe has always been out of the weather, either in a basement, under the eaves on the shady side of a house, or in a garage. The cruiser has had only tarps to shelter it and they’ve done little to mitigate the effects of hot summer days.
While the advice I’d gathered over the past about using plywood fell into two camps—pro-paint and pro-epoxy—the experience I’ve gathered from the boats I’ve built says they can’t both be right, but there is a part of the discussion that seems to be missing from all of the books I’ve read: Where is the boat going to be stored? Primer and paint are inexpensive, get a boat finished quickly, and can last decades if kept out of the weather. Sunlight and moisture will take a toll on the plywood of a boat kept outdoors, even if under a tarp, and for those boats, epoxy saturation and fiberglass sheathing will add to the weight, cost, and labor but will buy time.
After 20 years spent building, then sailing our beloved 38′ ketch, a Herreshoff Nereia, on the Great Lakes and St. Lawrence River, there came a point when Louise and I agreed we were done with big-boat sailing. We wanted to be able to trailer our craft to lakes and rivers we had yet to explore. She was happy with her sea kayak; I wanted something bigger, faster, and more stable—a mothership I could keep on a trailer and ready for expeditions to Quebec’s Lower St. Lawrence and the Saguenay Fjord.
I needed a break from sail, and a motor, even an electric one, was never an option. The new craft would weigh less than 100 lbs, float in a puddle, be launchable and recoverable with either trailer or dolly, and have adequate storage for camping gear, a portage cart, and a week’s provisions. It would be as fast and weatherly as an ocean kayak and considerably more stable. Ideally, it would even be able to carry a passenger in comfort.
I combed the classifieds and small-craft websites and ultimately had to stop dreaming about finding the ideal boat and set my sights on building one. If I was to build, I would need to get the work done during the summer months, when I could turn our garage into my shop. Because I wouldn’t have time to loft and to build a strongback, it would have to be a stitch-and-glue kit.
In the spring of 2020, my son and I had been discussing what kind of boat we would need to compete in the Race to Alaska (R2AK). In the process, we looked at entries from previous years, including Colin Angus’s Rowcruiser. The pandemic put an end to our plans and two years of R2AK, but I found myself interested in another Angus sliding-seat design, his Expedition Rowboat. At 18′, with a beam of 35″ and a 3″ draft while carrying 300 lbs in three watertight compartments, the Expedition’s main access hatch is wide enough to accommodate a partially dismantled medium-sized mountain bike and collapsible trailer—or a passenger.
Photographs by Louise Duff
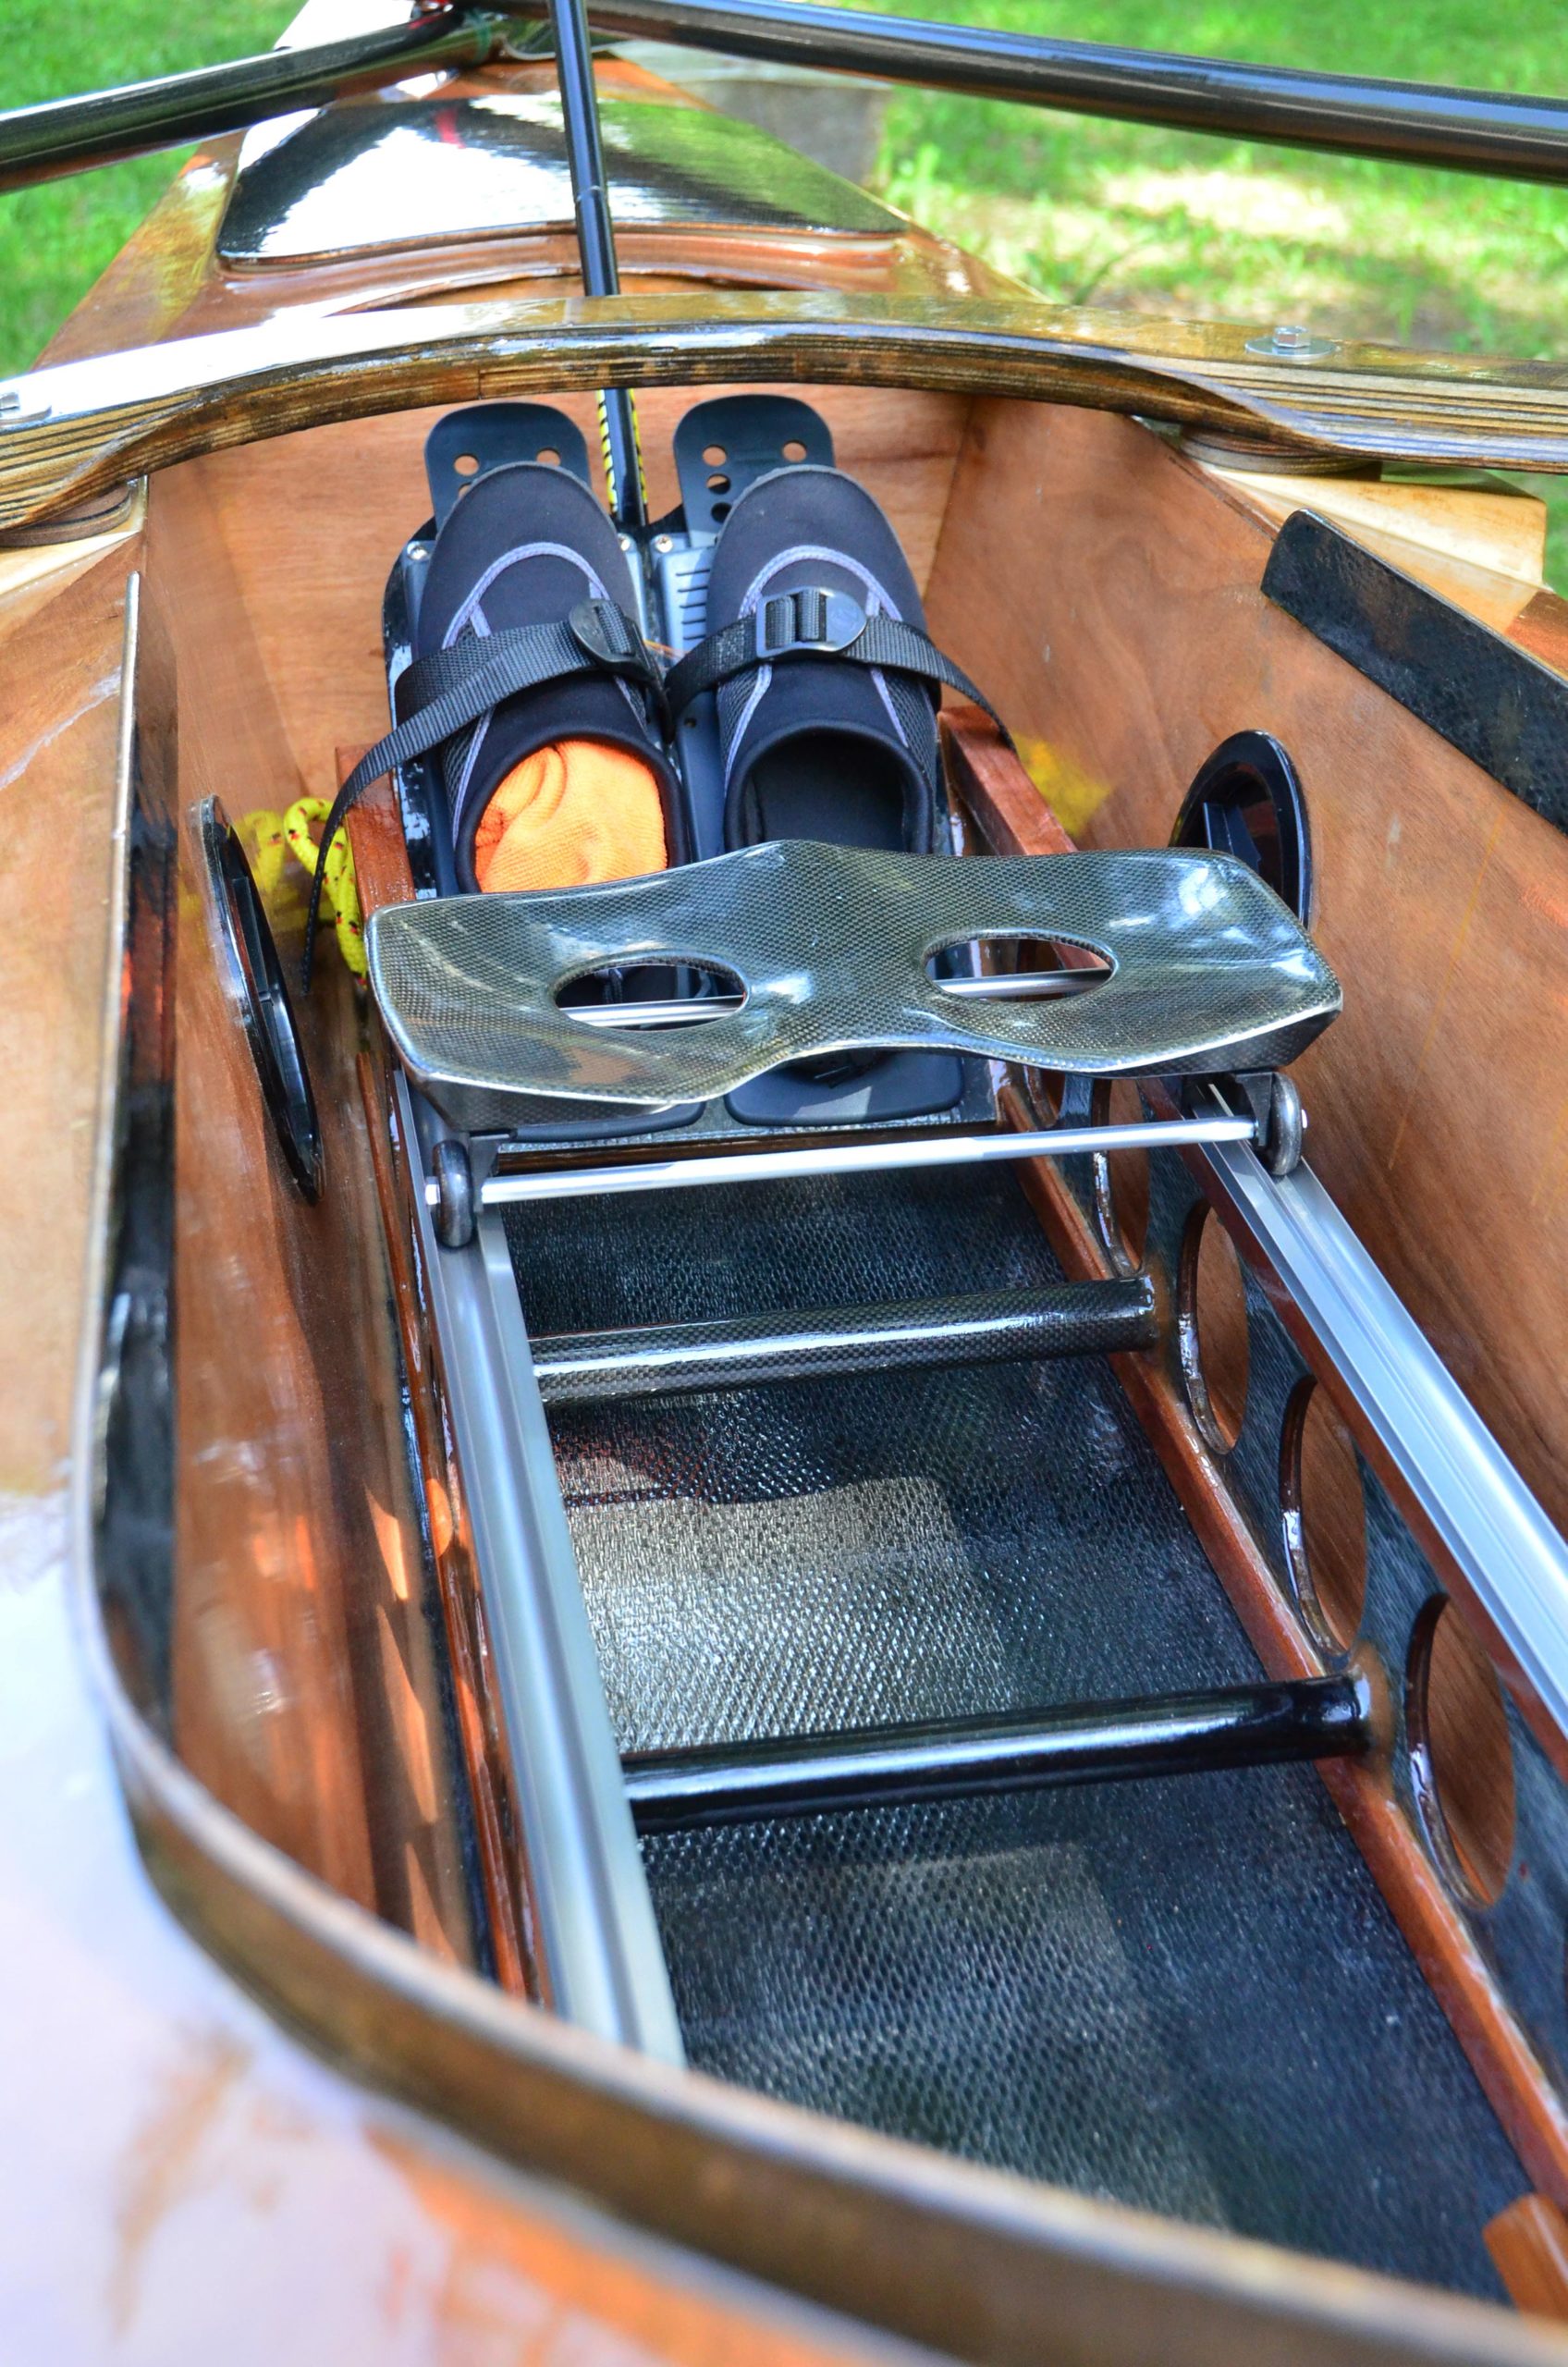
The sliding-seat kit includes a carbon-fiber seat which rolls on wheels with stainless-steel bearings. The aluminum tracks normally rest on a base made of common lumber; the arrangement here incorporates thin plywoods and carbon fiber to save some weight.
I ordered an Expedition kit and a sliding-seat kit. (The kits were among the last sold by Angus Rowboats; the company now sells paper digital plans as well as DXF files that a CNC-equipped shop can use to cut the plywood parts.) I’ve built or rebuilt a dozen boats from various states, but this was my first kit build. And as this boat was likely to be the last I’d build, my goal was to produce a natural-finish light-as-possible showboat with hidden hatch hold-downs and the addition of carbon fiber to add stiffness to the hull and, I admit, because I like the look. The manual gives builders a wide latitude in some construction aspects while cautioning where instructions must be followed. Angus also assumes a certain skill level. Often, I found myself consulting the Angus Builder’s Forum and Chesapeake Light Craft’s excellent how-to site.
The outrigger, as specified in the plans, is made of pine or other softwood lumber to keep it light, and sheathed in fiberglass and epoxy to give it the strength and stiffness required to keep it from flexing.
The sliding-seat kit included a carbon-fiber seat, anodized aluminum tracks, Concept II oarlocks and footplates, stainless-steel hardware and a construction manual including full-sized templates required to cut the wooden components, which include parts for the ¾″ fir-plywood box frame that supports the tracks. A boomerang-shaped outrigger is separate from the frame and instead bolted to the deck, which, according to the designer, make a stiffer platform for the oarlocks than outriggers attached to the frame. His plans call for two 3/4″-thick pieces of pine or other softwood, lap-jointed in the middle and fiberglassed top and bottom.
I was determined to keep all-up weight of my Expedition below the designed 85 lbs. Having added roughly 7 lbs of carbon-fiber reinforcements, I would subtract those 7 lbs elsewhere, starting with the sliding seat. Built as designed, it would weigh 14 lbs. I used ¼″ sapele plywood, faced it with carbon fiber, and mortised it into 7/8″ Honduras mahogany rails top and bottom. My seat structure weighs just over 6 lbs. Like the designed version, it drops into the cockpit and is held in place with guides epoxied to the floor. The Angus-designed unit is held by slots that interlock with slots in the frame.
I saved some heft in building the outrigger to the same plan form but laminating two thicknesses of 1/2″ birch plywood and carbon fiber, and giving it a foil cross section. The rigger is bolted to two angled wedges epoxied to the side decks. I added 1/2″-thick blocks under the deck beneath the wedges to provide a more solid landing for the washers and nuts that anchor the bolts that secure the outrigger. I found the most challenging task was identifying and shimming the outrigger to the right height to put the oarlocks at the correct distance from the sliding seat. The manual directs builders to the Angus website, where the relationship between footrest, oarlocks, and sliding seat is well explained in considerable detail. A range of settings is possible, based on the size and experience of the user as well as on how the boat is to be used. For rough water, for example, adding spacers between the outrigger and its bases raises the oars to improve clearance over the legs during the recovery of the strokes.
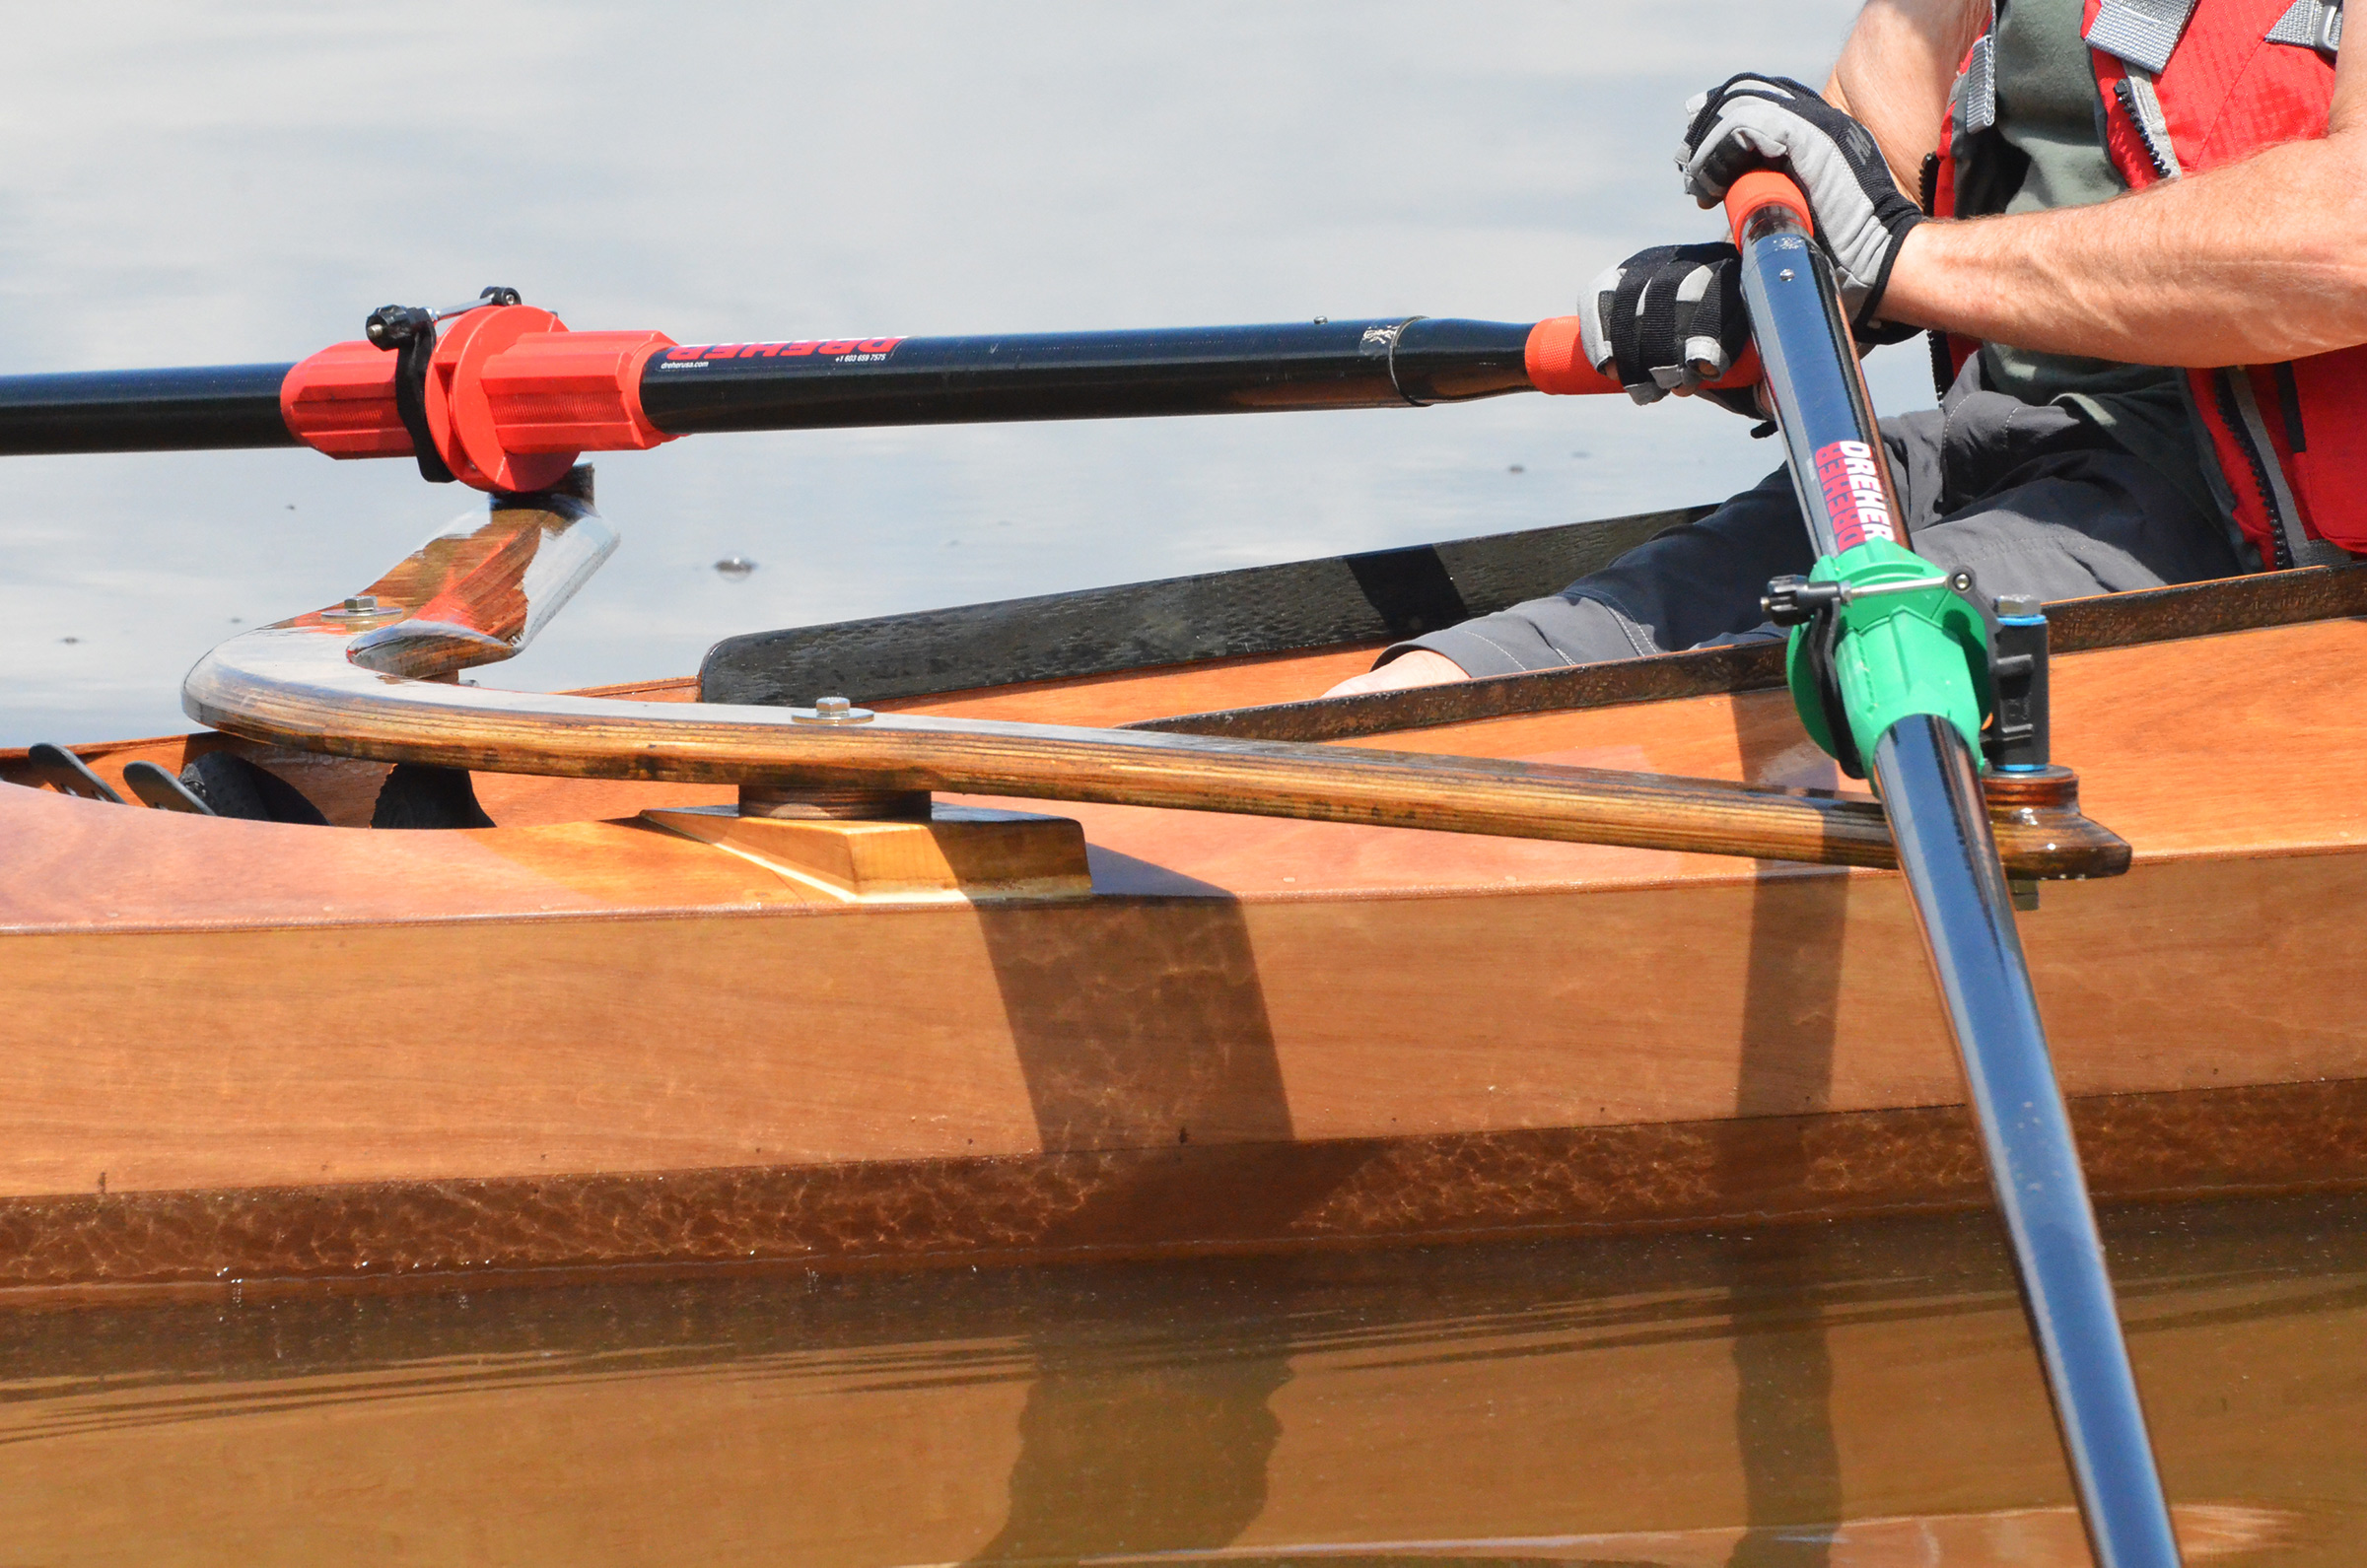
Angus Rowboats offers plans for hollow-loomed spoon-bladed oars, but I opted to purchase carbon fiber Macon-blade Dreher sculls from Chesapeake Light Craft.
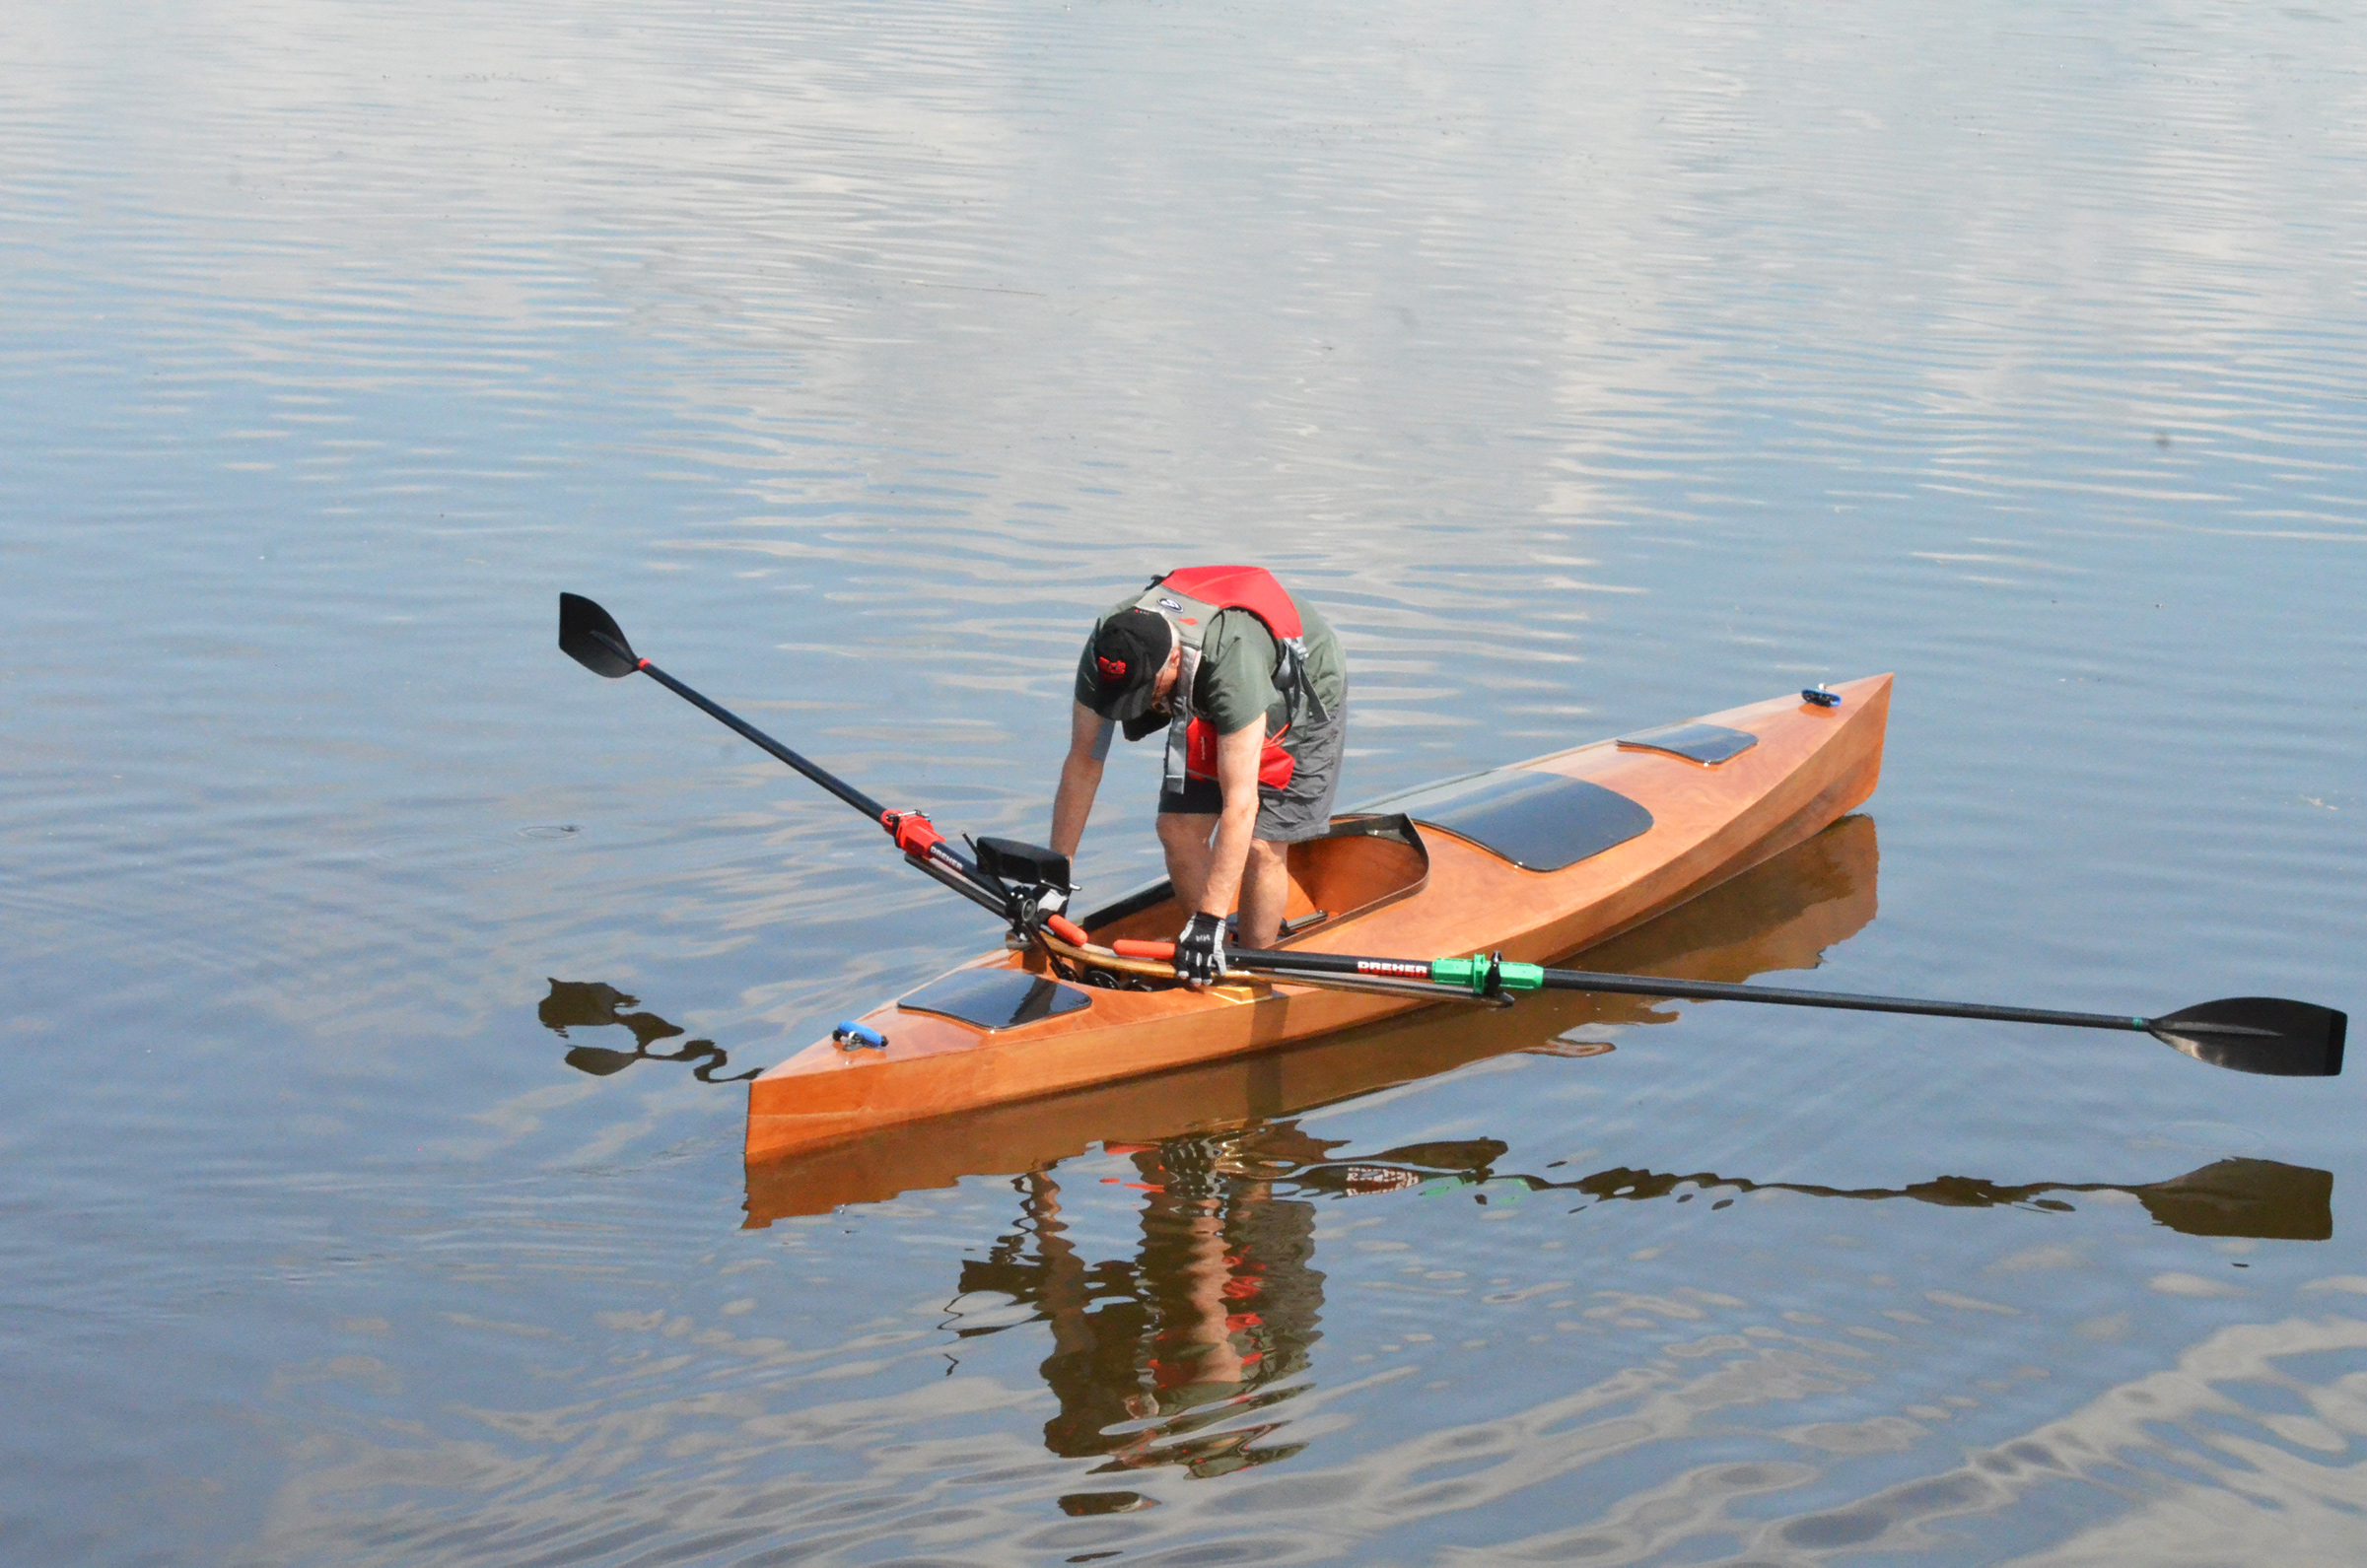
I modified a used trailer to fit the Expedition Rowboat. Two months after the kit was delivered, I launched my boat.
The hull provides sufficient stability for moving about in the boat. Gear stowed in the aft compartment can be accessed by moving to a kneeling position in the aft end of the cockpit.
Boarding the Expedition was a pleasant surprise. Compared to our kayaks, it provides a very stable platform. From the beach, with the boat afloat and parallel to the water’s edge, I grasp the outrigger arms with each hand, push the sliding seat forward, and place a foot in the middle of the cockpit floor. Then I shift over that foot and settle onto the seat. Boarding from afloat, I lift the near outrigger arm onto the dock, then lower myself in, and lift the arm from the dock by heeling the boat to the other side. On the water, I can take a break, hands off the oars, without having to head for the nearest dry land.
For a day’s outing, there is plenty of room for warm clothes, foulweather gear, floating towline, hand pump, food, and water in the rear watertight chamber, a roomy compartment immediately behind the outrigger accessed by a hatch secured with an internal bungee system. Everything inside is within arm’s length of the cockpit. Self-adhesive neoprene weather-stripping applied to the edge of the hatch covers serve as a gasket. The plans call for 1″ polypropylene straps to hold the hatches down; I use an internal bungee system. I have yet to see any water get past the gaskets.
The main cargo compartment is just forward of the cockpit and reached through a 26″ x 30″ hatch. A two-piece kayak paddle lives here, ready for tight situations when the boat’s 20′ oar span is a disadvantage. Paddling while facing forward and kneeling on the cockpit floor provides great control.
In sheltered waters, the main hatch can be removed and a folding seat installed—set against the bulkhead—to make ample space for an adult, two kids, or the dog to survey the passing scene in luxury.
I keep weight out of the compartment in the bow. Its 8″ by 10″ oblong opening is closed by the deck’s smallest hatch and there’s not much space in it compared to the two other compartments, but it’s ideal for storage of the pool noodles that serve as fenders when alongside a dock. I dog this hatch down tight for obvious reasons.
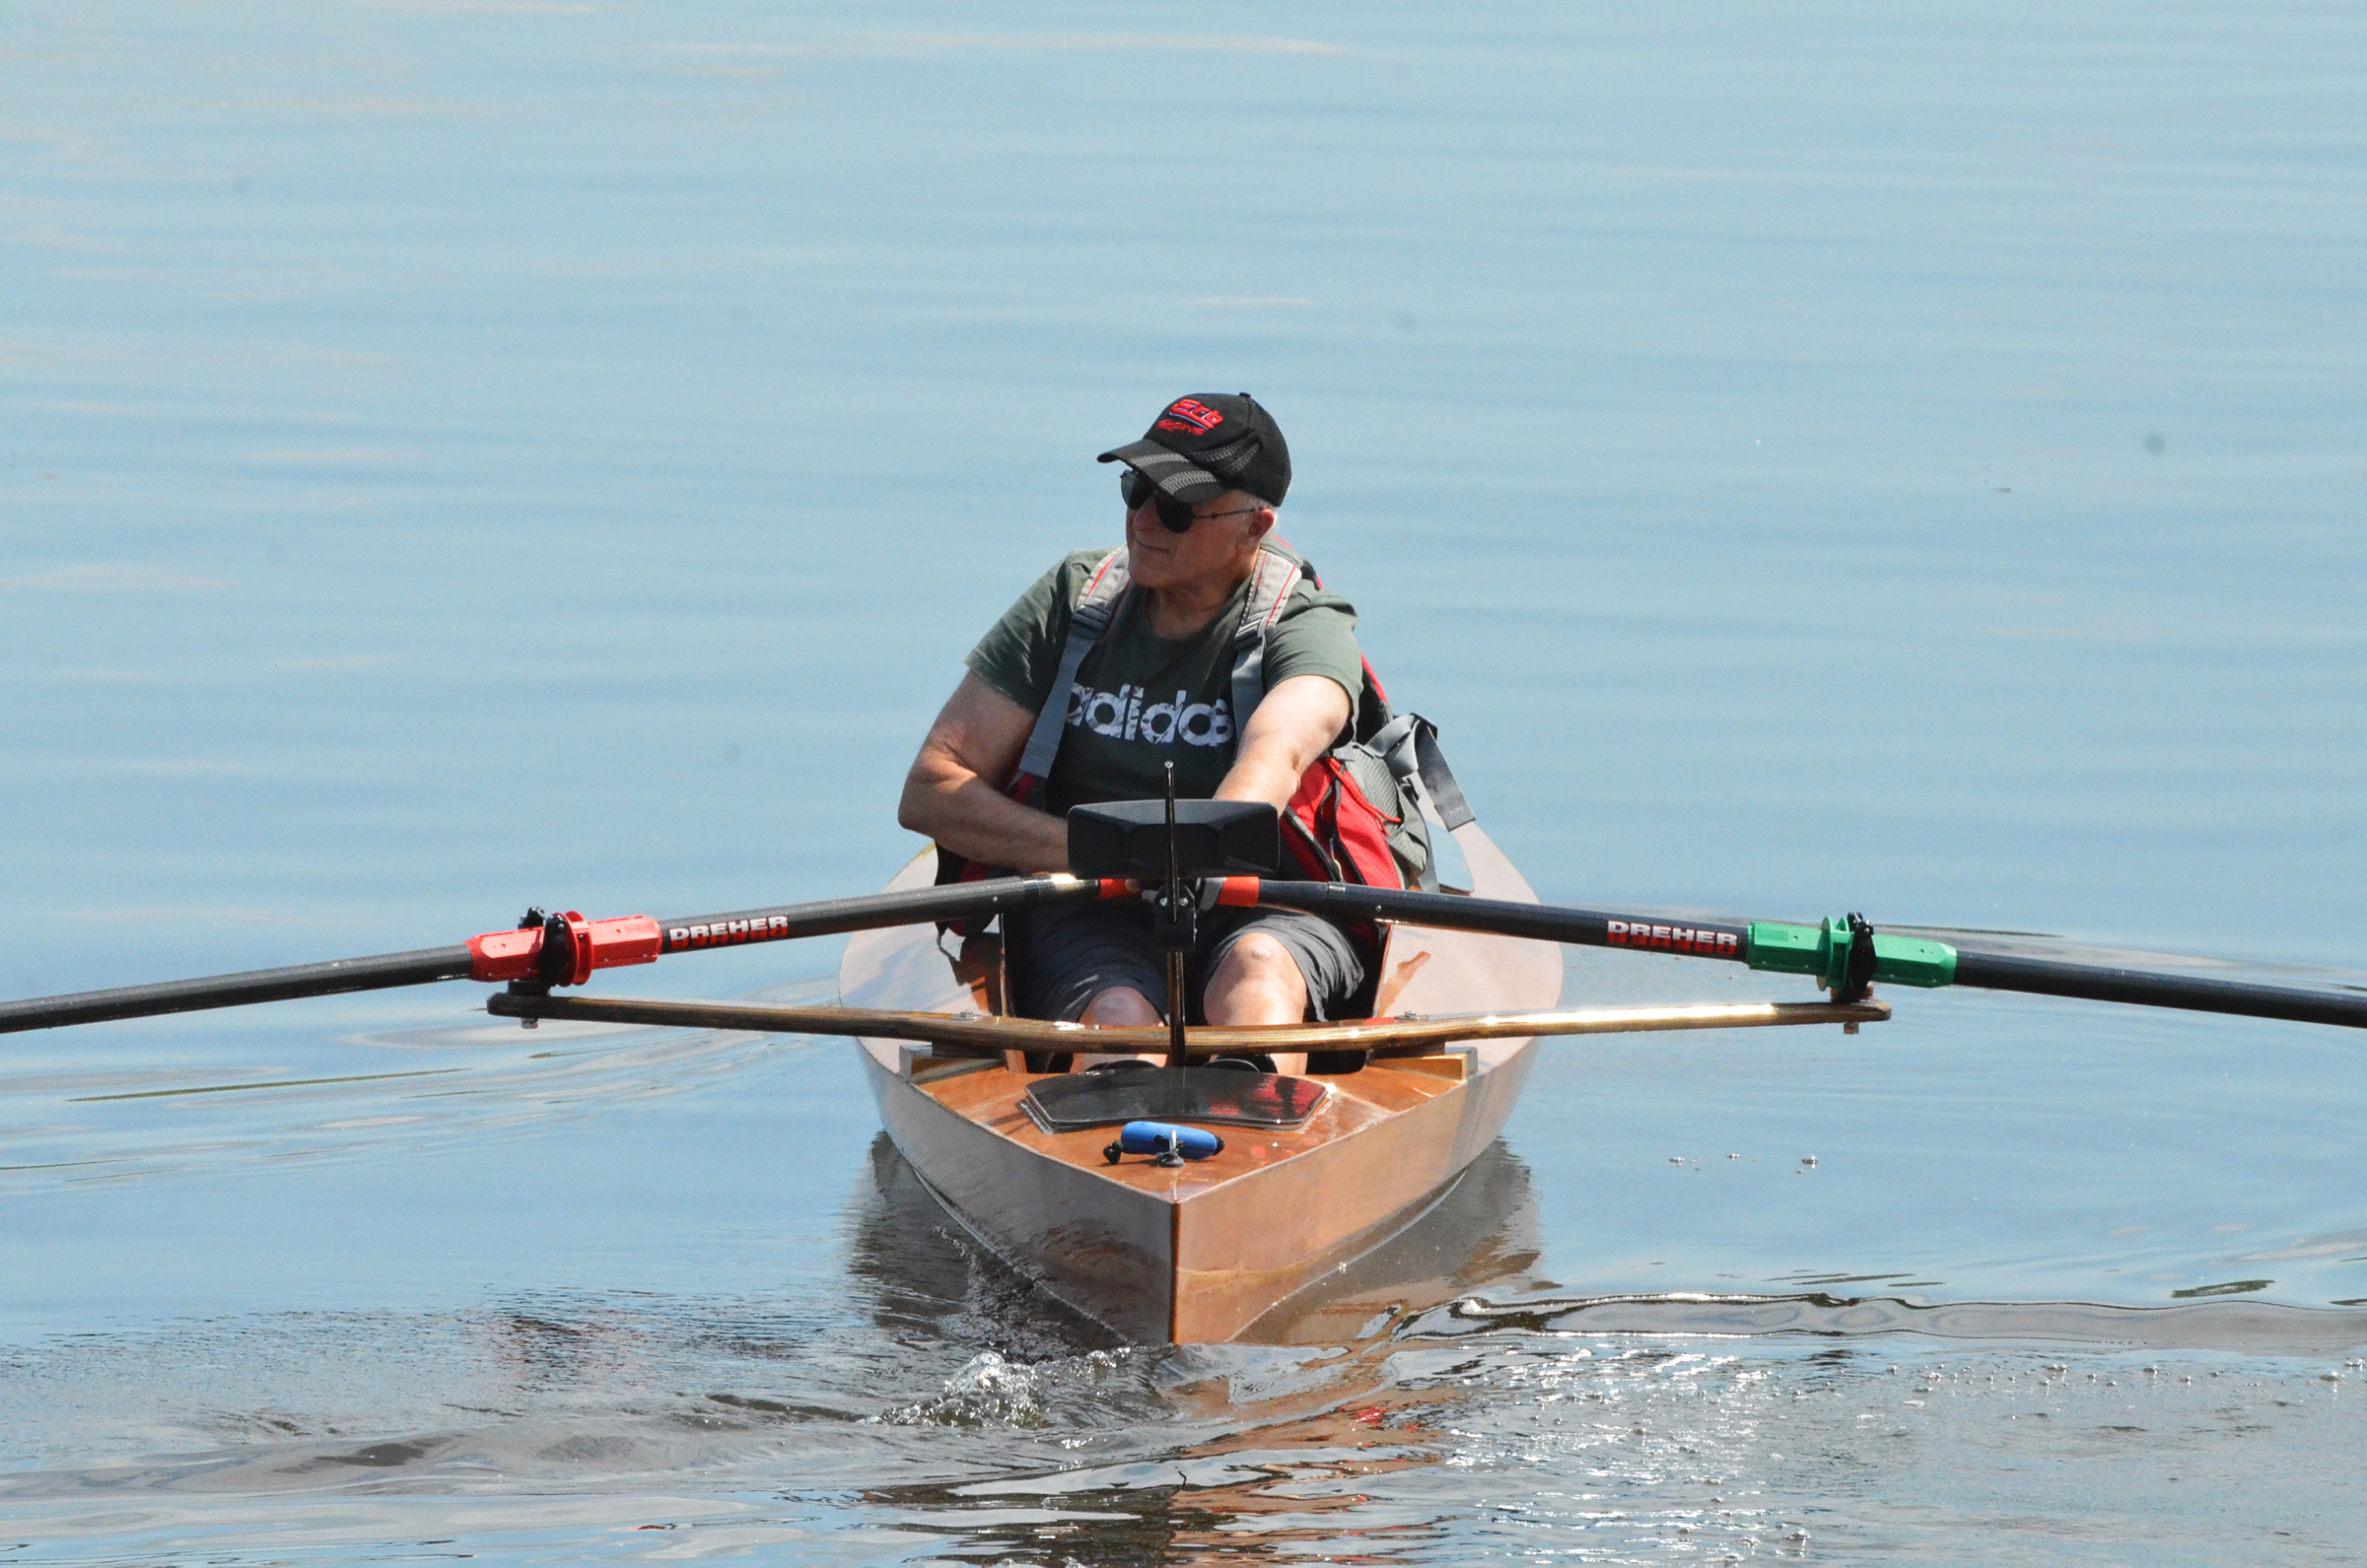
The author can easily maintain the Expedition Rowboat’s listed cruising speed of 4 knots. The manufacturer sets the boat’s sprint speed at 7 knots.
The Expedition accelerates to a cruising speed of about 4 knots and holds it with minimal effort at the oars. The speed made good is impressive, even with a novice like me at the oars. I stay even with experienced sea kayakers in all conditions and pull steadily ahead in rough water. Without a payload, the Expedition tends to pull its bow slightly clear of the water when the rower’s weight is in the stern at the catch, but the boat tracks very well, holding its course in most conditions without correction.
The view over the stern shows the 35″ beam, which gives the boat its stability and high cargo-carrying capacity.
The Expedition thrives in wind and waves. In late October, I headed up the Ottawa for a circumnavigation of Carillon Island, into the teeth of a northwest wind that built to perhaps 18 knots. Within an hour, the rollers were topping 3′ and a swell was building. I was able to average close to 4 knots upwind. The hatchet bow tends to cleave the waves, while the flat bottom, turtleback foredeck, and reserve buoyancy amidships contribute to a dry ride, even in choppy, confused seas. With the boat’s shallow draft and its lack of a keel or skeg, I could cross the sandbars downstream from the island. With the wind and waves on the beam, the boat would leecock, forcing me to pull harder on the leeward scull to hold a course, but at no point did the craft threaten to become unmanageable.
Off the wind in a big following sea, the Expedition is rock solid, something I often wished for in our kayak. Sometimes I raise the oar blades and hold them square to the wind like sails, letting the boat surf as I sit back against the coaming. Despite the absence of a rudder or skeg, there’s no tendency to broach or head up. Occasionally, a wave might break on the aft deck, but the water never makes it to the cockpit.
This coming summer, with Louise paddling her kayak alongside me, I’ll be rowing my Expedition Rowboat with a full payload of camping gear, including pots and pans, real food, and even a two-burner propane stove. Camp-cruising life is good when your boat can carry the comforts of home.
Introduced to sailing at the age of six, Jim Duff is a lifelong racing sailor and canoeing and kayaking enthusiast. An apprentice shipwright at 17, he has built or restored many boats, including a one-off aluminum Herreshoff Nereia. A semi-retired journalist, editor, and talk radio host, he has rediscovered the simple joys of rowing on the Lake of Two Mountains, a widening of the Ottawa River west of Montreal, where he learned to sail.
Expedition Rowboat Particulars
[table]
Length /18′
Beam/35”
Weight/85 lbs
Volume/62.3 cu. ft.
Cruising speed/ 4 knots
Sprint speed/ 7 knots
Maximum touring load/ 600 lbs
[/table]
Digital plans for the Expedition Rowboat which include full-size PDF plans, a detailed manual, and XF files for plans to be cut at a CNC shop are available from Angus Rowboats for $139. The carbon fiber sliding seat and rigger hardware kit can be purchased for $229.
Is there a boat you’d like to know more about? Have you built one that you think other Small Boats Magazine readers would enjoy? Please email us!
The Oz Goose was love at first sight. Or was it finding a love lost? There is something wonderful about sailing a light, responsive boat. I grew up in The Netherlands in the 1970s and spent all my spare time sailing my 8′ dinghy. Since then, I’ve sailed and often raced dinghies and yachts in many countries, on seas and ocean. But the thing that got me into sailing was the response of a light boat, the chuckle of the water at the bow, and the pride of sailing a boat that was actually mine. Fifty years later, I am as hooked on my Oz Goose as I was on that first dinghy.
The Oz Goose is a squarish plywood sailing dinghy measuring 12′ long and 4′ 2″ wide. The “Oz” in its name indicates the nationality of the designer, Michael Storer, who hails from Australia. The Oz Goose is one of the many boats inspired by the Bolger Brick. The pilot version of the Goose was 8′ long and 4.2′ wide; later versions were the current size, 12′ by 4′ 2″. Only a handful of prototypes were built, but in 2014, when Texan sailor Ian Henehan started posting videos of an early Goose planing up to 12 knots in moderate wind, the design drew sailors’ attention around the world. It even surprised Michael that his “experiment” could sail so fast and so well. A MK2 version was developed, with a simplified construction method that made the boat lighter. With new plans available, the Oz Goose soon appeared in Europe, North America, Asia, and Australia. The Oz Goose fleet and community grew quickly through Family Boatbuilding Weekends, when families and community groups can build boats for themselves in just a few days. Sailing clubs popped up; I joined one that regularly brings together more than 20 Oz Goose boats to sail for fun and competitive events.
The plans come in the form of a 115-page manual illustrated with color photographs and a wealth of drawings. Measured drawings provide the shapes of the plywood pieces and the easy-to-follow instructions cover almost everything in detail. In addition to the instructions provided for the standard timber-framed construction, there are clearly marked directions for those who prefer to use fillets of thickened epoxy at the intersections of the panels; filleted joints can save time and may be cheaper. The build doesn’t require many tools: pencils and measuring tapes, a cordless drill/screwdriver to put in temporary screws, a jigsaw, and a hand plane. A random-orbit sander speeds finishing work. When we encountered problems, the Goose Facebook group proved very useful with detailed answers in a few hours or overnight, and there are now also some excellent YouTube videos with coverage of specific sections of the building process. Just search for “Oz Goose sailboat construction.”
Photographs courtesy of the author
The Oz Goose layout is as simple as it gets. Both the rudder and daggerboard are retracted here, the daggerboard in its trunk and the rudder in its open-backed box with a bungee holding it in place.
The rectangular shape of the boat makes it simple to mark out and cut its components. Only the 12′-long hull sides and the flotation tank sides have curves—sheer and chine—and they are all identical so only two curves have to be drawn and faired. The rest of the parts are straight-sided rectangles.
The Oz Goose is laid out around two full-length buoyancy tanks that form the cockpit sides and side decks. In the middle of the boat is the daggerboard trunk, instead of a centerboard trunk. It simplifies construction and maximizes cockpit legroom. The rudder blade is held by a ¼″ shock cord in an open-backed box. It can be set at any height and provides light and accurate steering in any depth of water. If the blade strikes an obstacle it swings back and, after passing over, snaps back down again.
The daggerboard and rudder are given foil cross-sections using the templates provided in the manual and scaled online by the designer. Especially for racing, it is most important to shape them accurately and keep them in good condition.
When an Oz Goose heels, much of the flat-bottomed hull rises above the water which significantly reduces the wetted surface area, adding to the potential for speed.
The 13 1/4′ tapered mast has a hollow box; the detailed instructions make it easy to build. The manual includes instructions for making the 11′ boom either hollow or solid. The 10 ½′ yard is solid. The Oz Goose flies an 89-sq-ft balance lugsail. Several measured drawings for making the sail are provided. For those who prefer a sail less expensive than custom-made or sewn at home, there are instructions for making the sail from a poly tarp and double-sided tape. Commercial sails for the Goose typically have two reefs.
Fittings for the rigging are simple and straightforward. For such a high-performance boat, the hardware list is tiny: three simple blocks, one horn cleat, and some rudder hardware. You can opt to have an adjustable downhaul and outhaul by purchasing and installing additional hardware, but rules for the Oz Goose class don’t allow racers to make adjustments with such devices during a race, so rich and poor are on an equal playing field.
Working evenings, odd days and weekends, it took me around two months to build the boat. A group on Facebook indicated building times from around one to perhaps six months. With the cost of materials relatively low here in the Philippines, our self-built boat cost under US$1,000. In North America, the cost of the boat, sails, and fittings, may come to about $2,000.
At 110 to 130 lbs, the Goose is light enough for two adults to carry to the beach or place on a roof rack. The boat can be sailed solo or with a crew member, for casual sailing or racing. The Goose even has space in its cockpit to fit three people and in light wind it still sails fine, even with those three aboard.
Senior sailors find it less taxing to move about in the ample, uncluttered cockpit and will enjoy the Goose more than other small dinghies. There are several disabled people who have also taken to sailing the Goose, reassured by its high stability. If you do manage to capsize a Goose, the buoyancy provided by the side tanks will let you bring the boat upright by using the daggerboard as a lever, and the cockpit won’t take on any water.
The popularity of the Oz Goose got a significant boost from videos of it sailing at high speed, but it was initially developed for sail training and family outings.
In light winds, you might normally sit well forward while going upwind, but with the Goose, the square bow needs to be out of the water or you will be plowing the waves like a bulldozer. The boat comes alive once the right trim has been achieved, and very little water ends up on the foredeck. When the wind picks up, and especially when bigger waves are building, we sometimes sit really far back. Sailing on a reach is easier, and the helm and crew position are essential to keeping the boat level and getting it to plane, which is a rewarding experience in a Goose. It loves to plane and the transition from displacement mode to planing is hardly noticeable. When sailing with two, it is important that they sit right beside each other in that correct location to squeeze out the best performance from the boat. And with two, the Oz Goose sails at the same speed as singlehanded boats, allowing for fleet races with mixed crews, including adult/child, adult/teen, two teens, two adults, and solo sailors.
When the wind and waves are up, shifting the crew weight aft keeps the bow high and the ride dry.
Even with a double reef in heavy wind, the boat sails remarkably well and is controllable on all points of sail. One needs to be proactive with the sheet—keep it in hand. In gusts, a common reflex would be to steer the boat higher while relaxing the main just a bit but, in my experience, in a Goose it is better to bear down and release the main quite a bit to keep the boat flat and maintain speed. As soon as the wind allows it, I will pull the sheet in, then steer back on course.
Contrary to expectations, the lugsail performs better when the sail is to windward of the mast and creased by it.
With the sail either on the downwind or upwind side of the mast, there is sometimes a very different feel on opposite tacks, especially right after coming about. We have found that neither port-rigged nor starboard-rigged boats will lose out when sailing side by side. Interestingly, our “Geesers” have found that the supposed “bad tack” of the lug has been wrongly attributed to having the sail on the windward side of the mast; it is actually the opposite. When the sail presses against the mast, acceleration is instantaneous after tacking. On the opposite tack, when the mast does not contact the sail, it is harder to find the speed and angle combination. The trick is to find the same speed as on the other tack before trying to point high. Being too greedy by pointing high before finding speed will fly back in your face.
In the absence of waves and with light to moderate winds, the Goose will glide over the water not like a goose, but like a swan. The speed and ease of sailing under those conditions is just awesome. I find owning and operating a Goose very thrilling. Having been a Laser sailor a big part of my life, I am still surprised by how well this dinghy sails under all conditions. Racing a Goose is highly competitive and rewarding, and the entire vision behind it will make sailing very affordable in most economies and communities.
Thom Kleiss was born on the water, on a houseboat in The Netherlands, and has been sailing since the age of four. Now living in Ireland and the Philippines, water is never far away. He is passionate about dinghy sailing development, is the Commodore of the Bere Island Watersports Club in Ireland, and is active in senior Laser racing in Singapore and Oz Goose sailing development in Taal Lake Yacht Club in the Philippines.
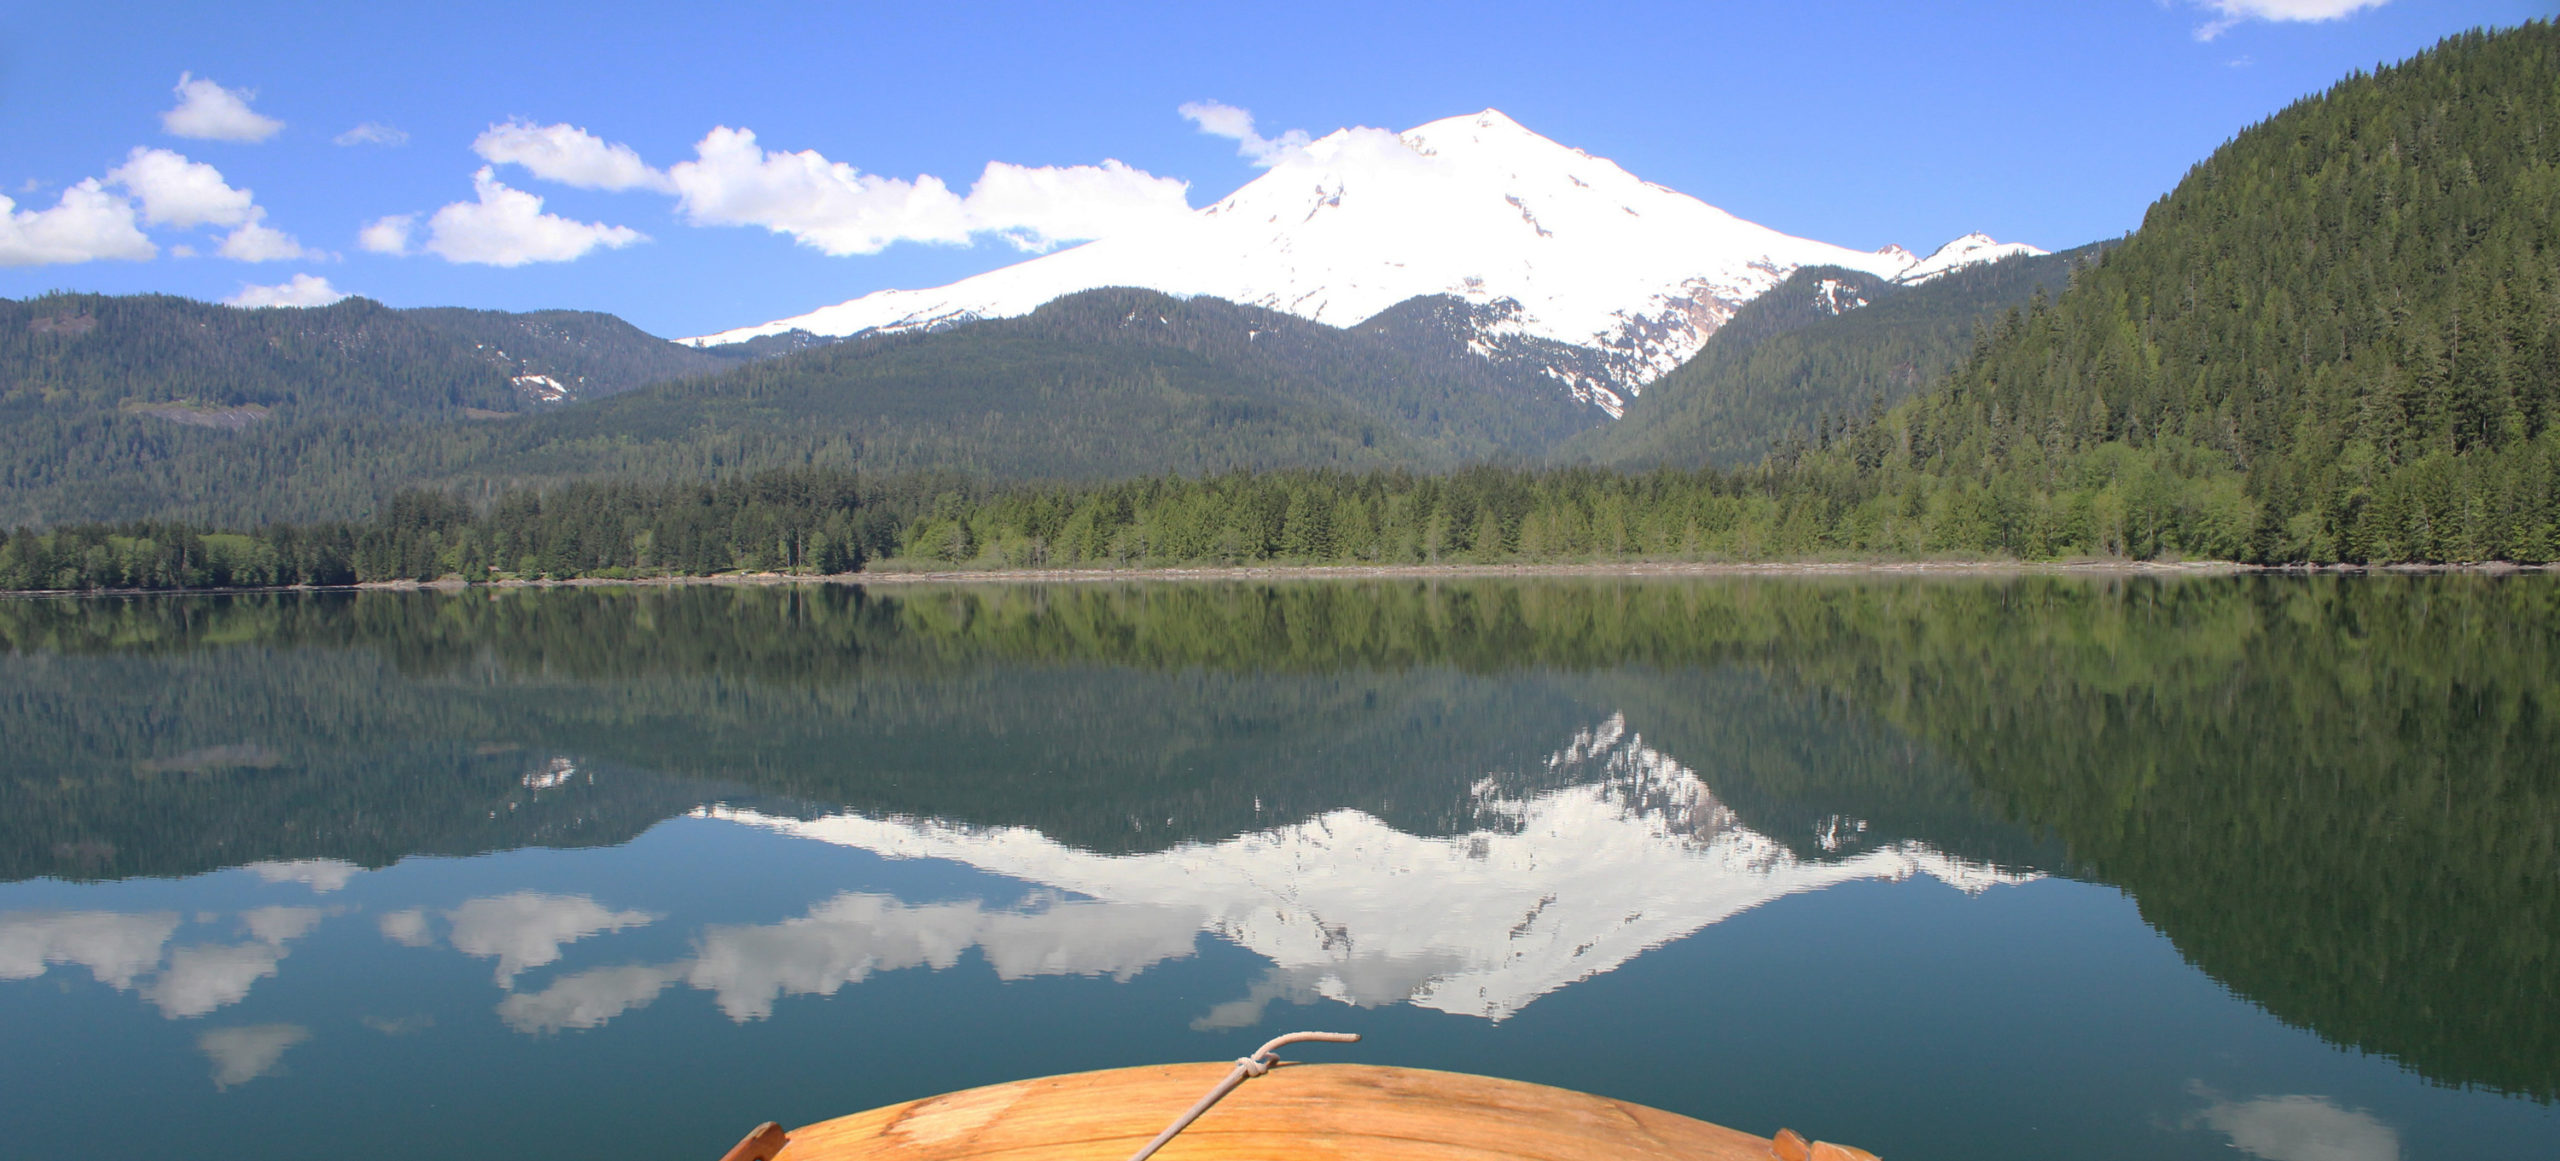
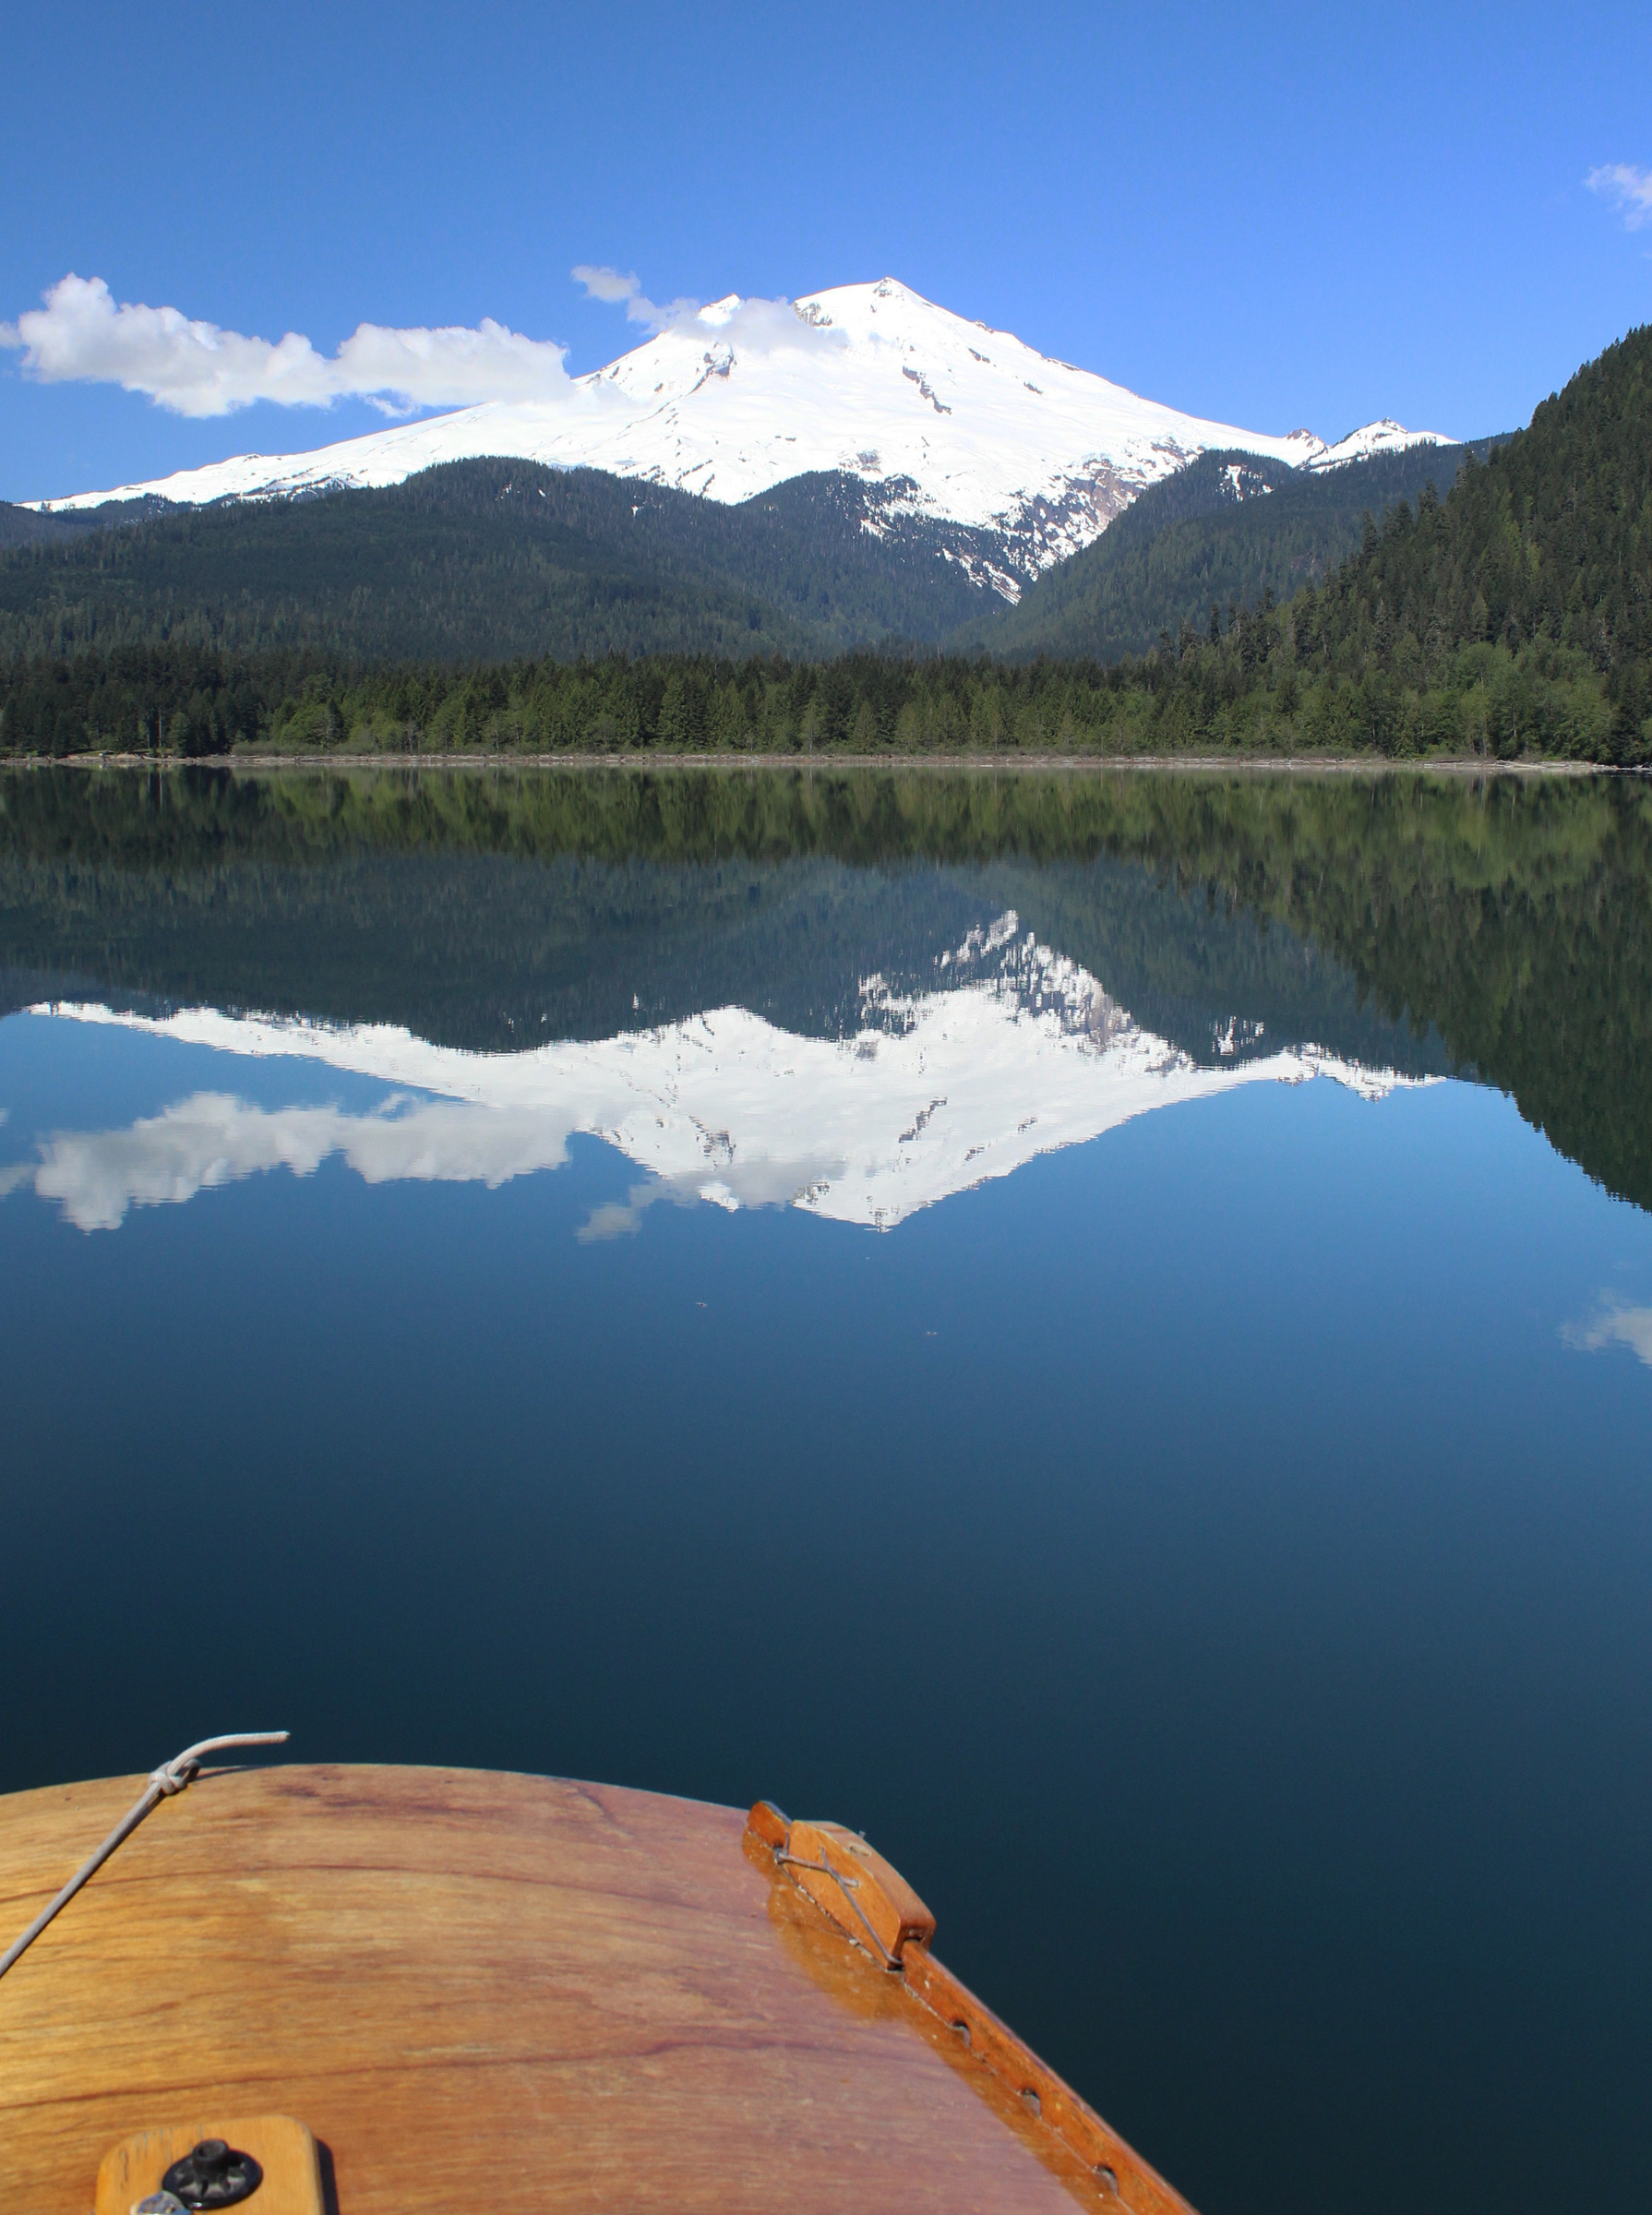
Mount Baker was all but invisible from the ramp at the south end of Baker Lake, just 10 miles from the summit, the third highest in Washington. A pale gray overcast had wrapped around the volcano’s 10,781′-high summit and the diffuse afternoon light had blended the snow fields and glaciers with the clouds. Only a few jagged obsidian-black lines—bare rock faces angled toward the peak—betrayed the presence of the mountain.
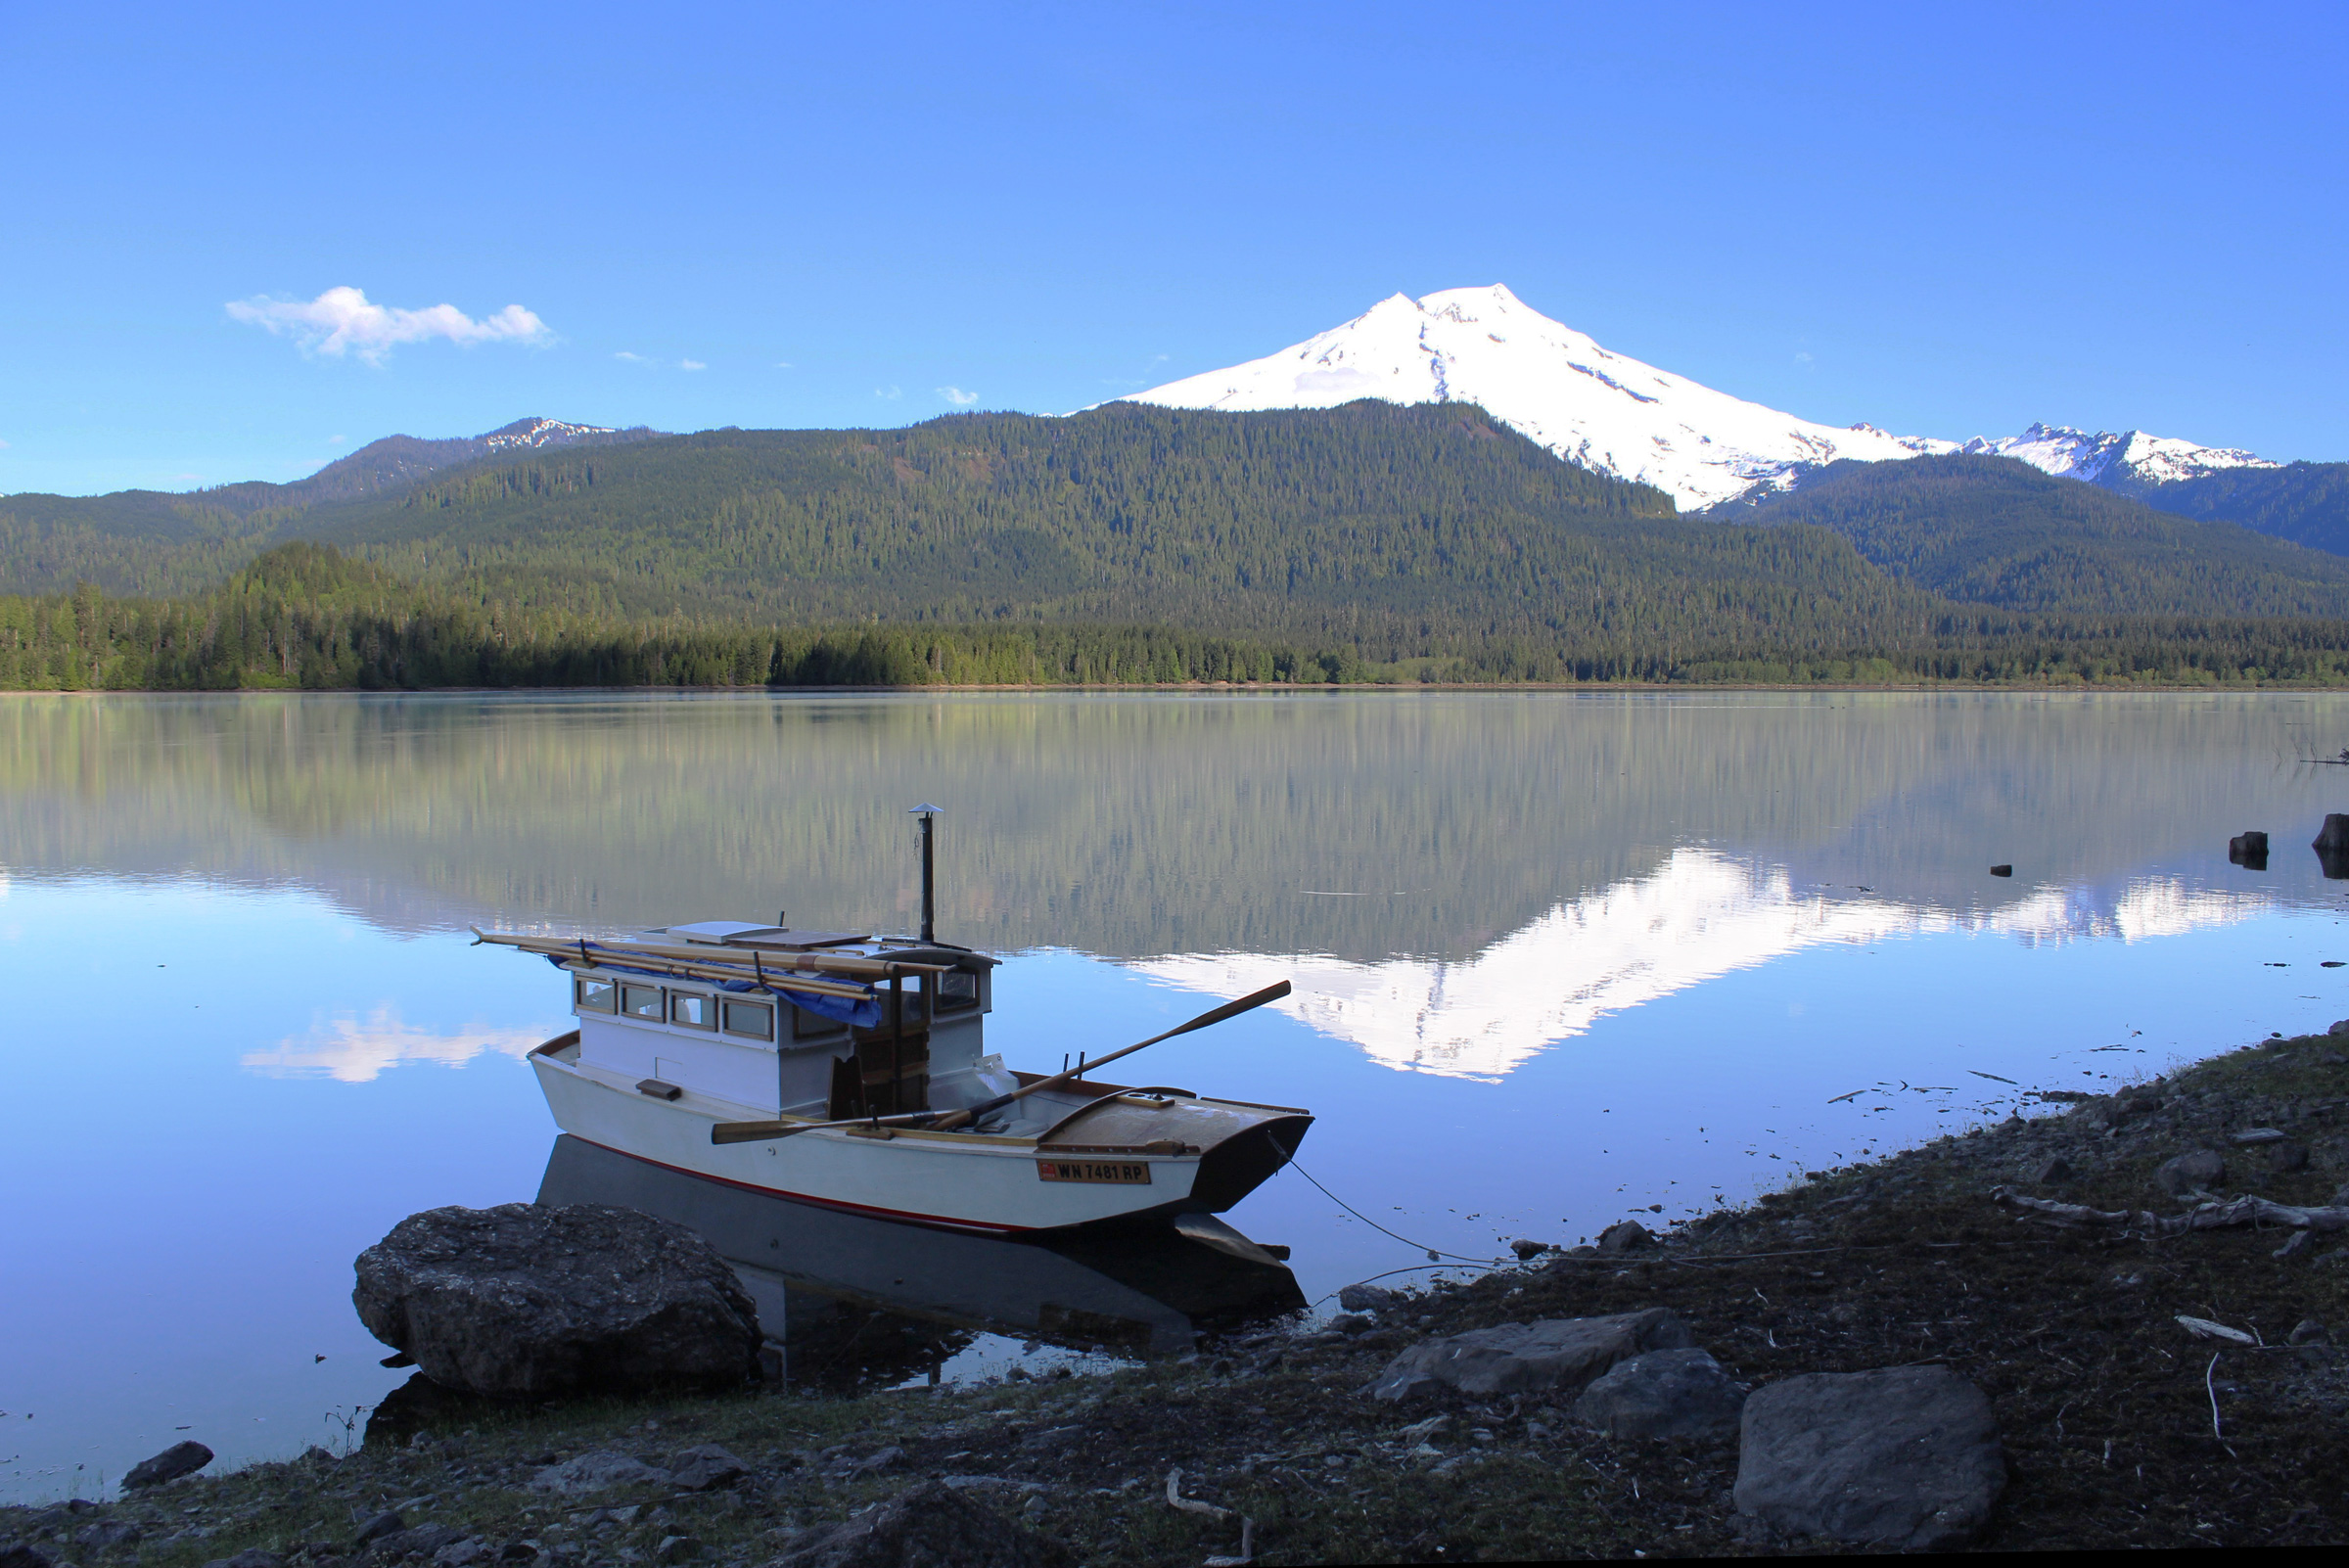
It was midafternoon on a Wednesday in May, more than a week before the start of the summer camping and fishing season, and my 17′ garvey cruiser, HESPERIA, was the only boat at the ramp. The level of the lake, a reservoir created by a dam hidden around a forested point of land to the south, was down by at least 10′, and only the last 20′ of the dock was afloat. The rest of the molded plastic sections lay on the ramp like discarded mattresses.
Photographs by the author
The cove at Anderson Creek was one of the only places on the eastern shore that looked like a suitable anchorage.
I rowed out into the lake and headed for the east shore. It was the less-developed side of the lake where there were only walk-in campsites. Just 0.6 mile from the ramp I reached a slender point of land where a row of trees, evenly spaced and straight like the teeth of a comb, had been blackened by fire. The side of one tree, as thick as a telephone pole, had its bark turned to a 12′-high face of cracked and buckled charcoal.
Anderson Creek was picturesque but rather noisy.
I rowed into the bay nestled on the north side of the point and poled ashore at the mouth of Anderson Creek. A gravelly bar 30 yards long, tapered and hooked like a shark’s dorsal fin, guarded the mouth of the creek, which tumbled in a white froth over and around a streambed of speckled granite boulders. The little cove would have made a good anchorage, but while the sound of the waterfall was pleasant, I didn’t think I’d be able to fall asleep to it.
I rowed around Anderson Point and headed up the shore. There wasn’t another cove anywhere near and I turned back to the creek to settle in for the night. There were two snags sticking out above the water, one a boat-length from shore, the other about 100’ farther out. I decided to secure HESPERIA between the two. The weather report had been for very light winds, 4 mph or less, and I didn’t need the protection of a cove.
I tied one of my 75′ anchor rodes to the snag farthest from shore and paddled to the other as I paid out the black rode. When I came to its end, I tied in the white rode and made my way to the other snag. I pulled HESPERIA out to the middle of the lines and tied the painter in with a Prusik hitch.
For dinner, I set the grill on the cabin roof and toasted a boxed pizza while I watched the daylight slip from the lake. A beaver swimming out from shore showed only its snout and the curve of the back of its head, looking like a motorized model of a torpedo-stern runabout. It turned around and swam back to shore into the dark reflection of the trees, its wake a trail of silver slivers of reflected sky light.
The flanks of the mountain were growing dim but for one soft-edged patch glowing in a light reflected through a hole in the cloud layer blanketing the top of the mountain.
Roger Siebert
.
The evening had turned cool so I started a fire in the wood stove and soon a dusty, dry heat filled the cabin. When it was getting too warm, I pushed the cabin-roof hatch cover back and as the heat escaped I felt the cool air drawn in through the open ports in the cabin side. I set up the sleeping platform and cushions and spread one sleeping bag over them, laid down and pulled a second sleeping bag over me. The stove was down to embers and a tangerine glow from the mica window lit the cabin. In the stillness that surrounded HESPERIA, the faintest sounds in the cabin weren’t made inaudible by any other noises. The stove, cooling as the embers dimmed, creaked several times before falling silent. Bubbles in what was left of the can of seltzer I’d opened were snapping; I drank the last few sips to put an end to the racket. For a while I wondered if the sound of my breathing would keep me awake. The cabin cooled and I pulled the third sleeping bag over me and I was soon asleep.
When I woke in the middle of the night, the lake was illuminated by starlight and the only featureless black was the forest on the far side of the lake, ruler straight across the bottom, its top edge crumpled. Mount Baker’s snowfields were bright enough to bring the mountain out of its silhouette. The overcast had cleared and the mountain had shed its veil but for a wisp of a cloud trailing from its summit.
The summit of the mountain caught the first rays of the morning light.
At the first hint of the morning light the windows on the side of the cabin facing shore were dark, indistinguishable from the cabin wall, and those facing the open lake were four rectangles of iron gray. I checked the time on my phone, it was 4:48. Five minutes later, the soft quavering whistle of a songbird brought an end to the night’s silence. Soon, the summit of the mountain caught the first of the light spilling over a hidden horizon to the east and glowed a cotton-candy pink.
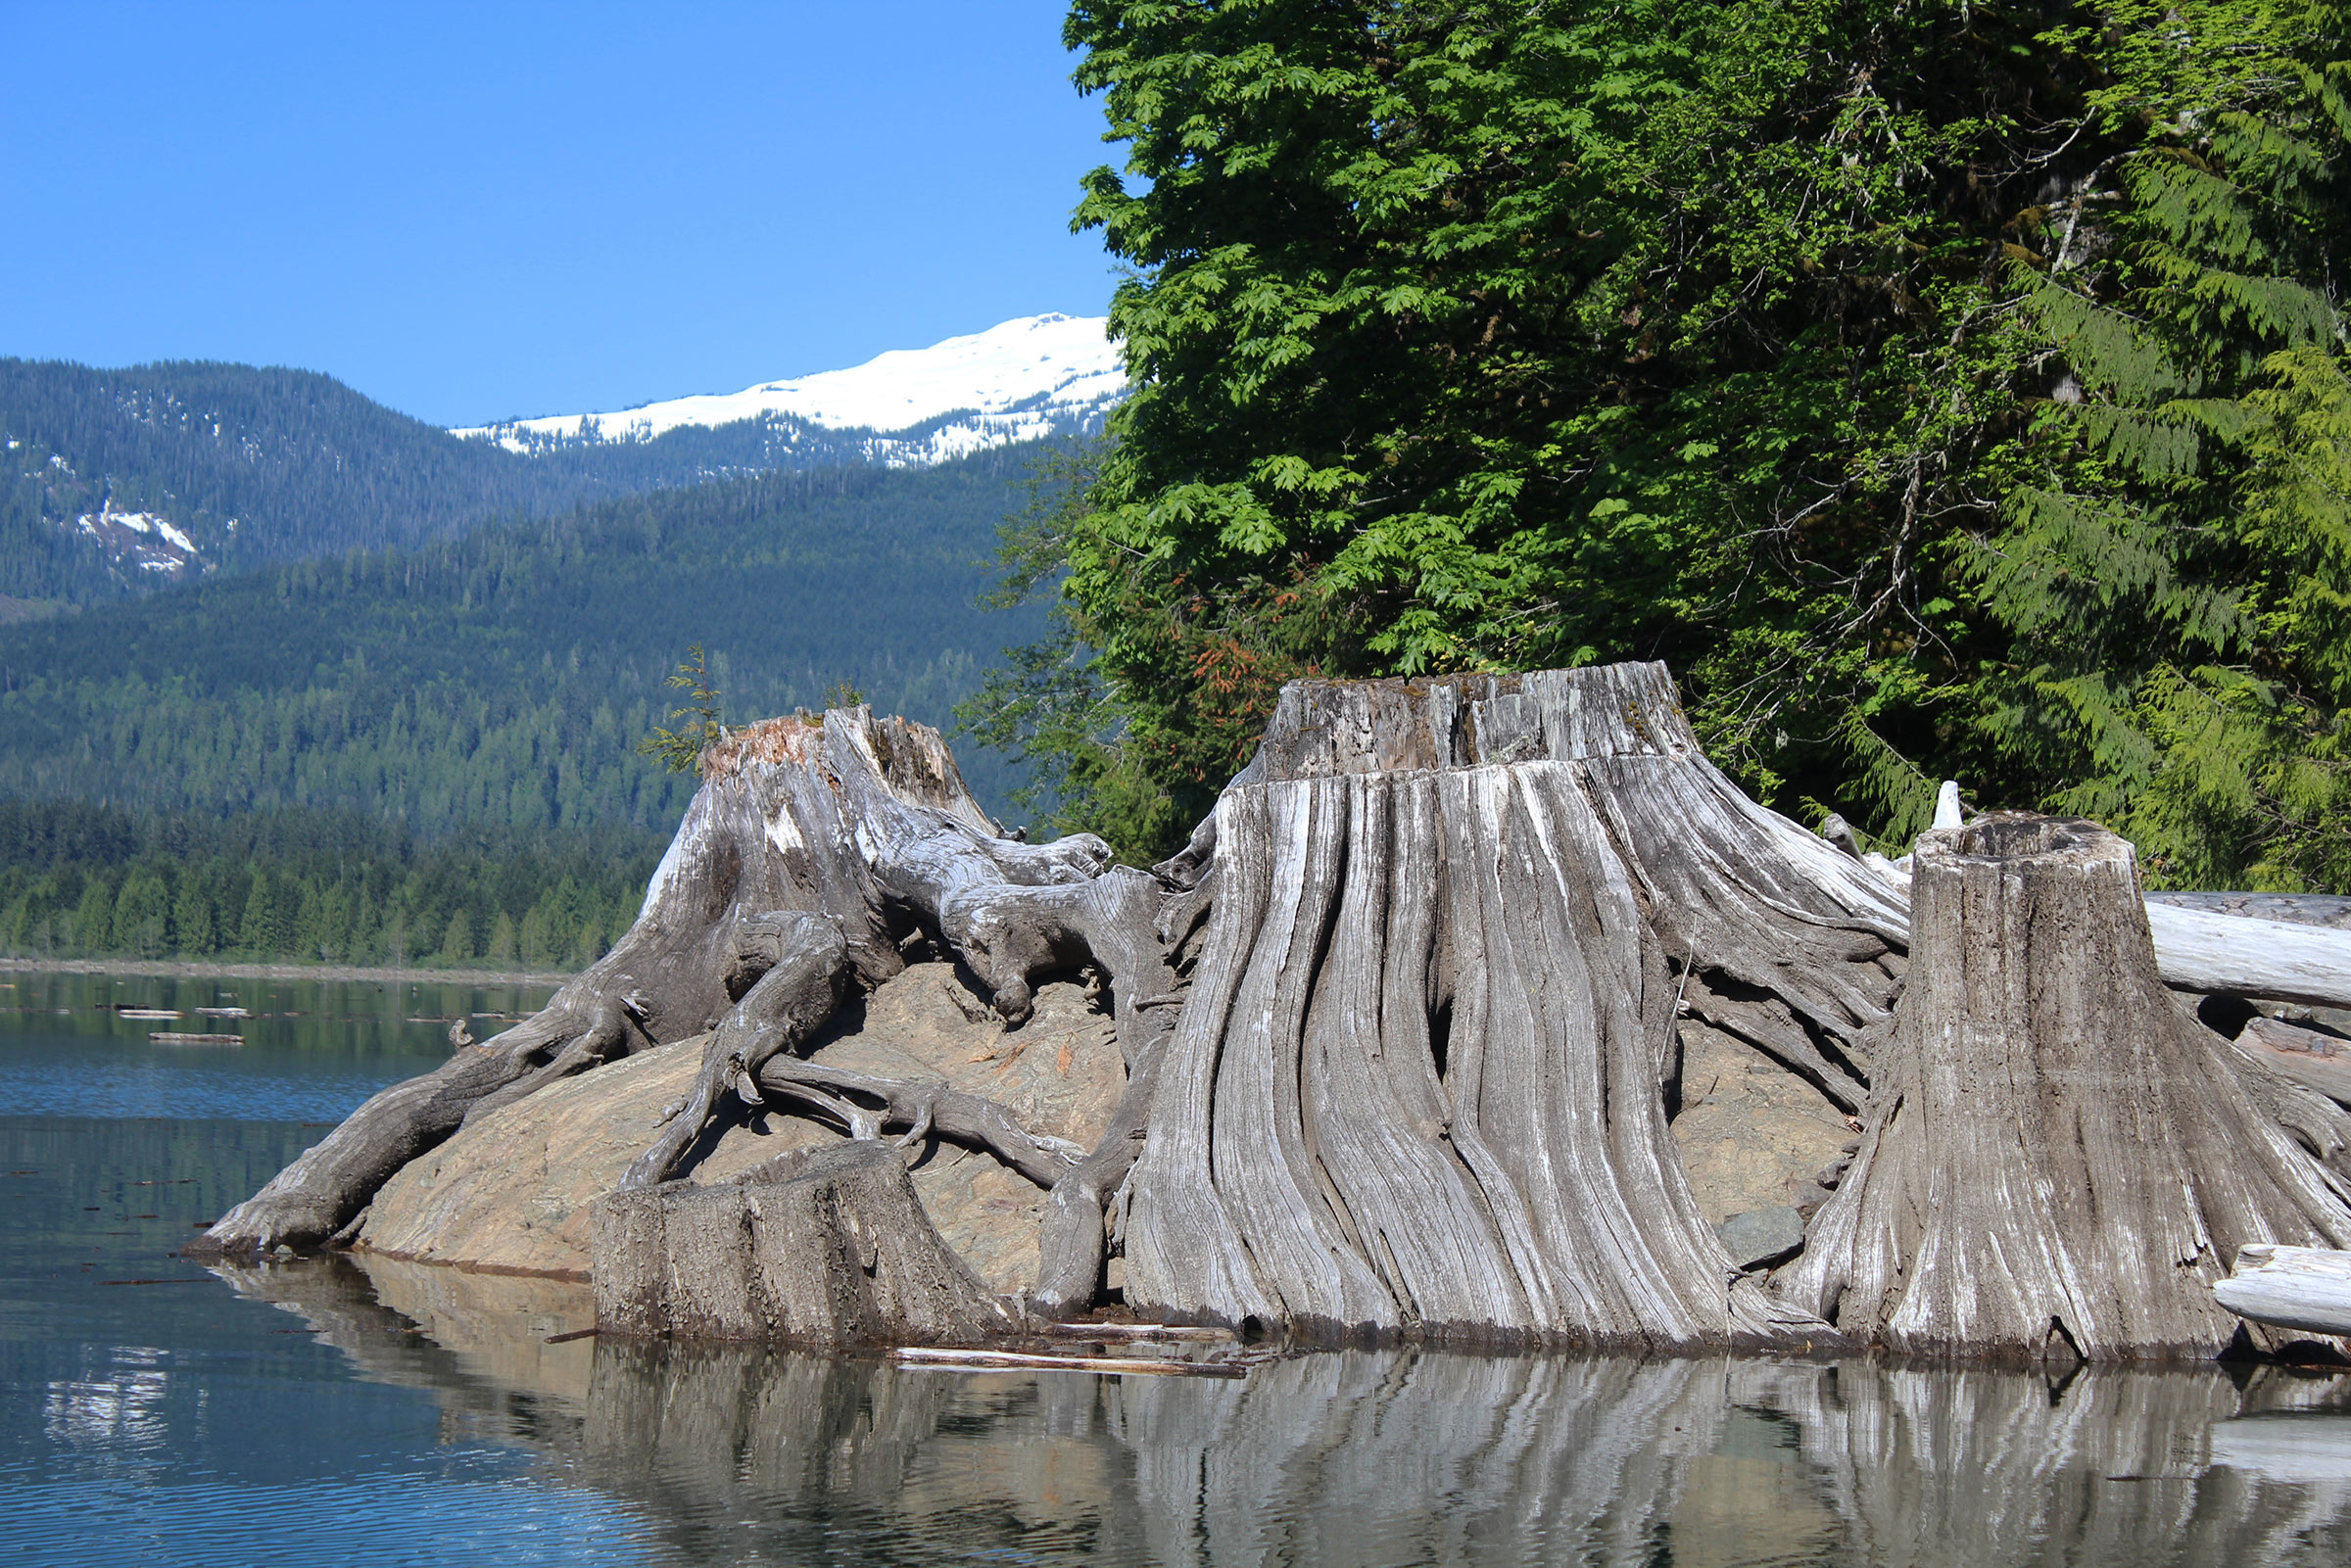
It took a dozen strokes to get HESPERIA and her load of cruising gear going. I rowed north making close to 3 knots and leaving a winding trail of bubbles. The water around the boat was flecked with cinnamon-colored pine needles and, just offshore, driftwood was scattered all across the lake as if a high tide had cleared the beaches of scraps of wood. I rowed past what must have been a stump floating upside down. Its silvery gray tangle of roots had long ago been stripped of bark and turned into a medusan mane of serpentine locks. All along the shore, in the band of gravelly earth uncovered by the low water, there stood more fluted stumps, upright. Some bore the axe-cut notches loggers made for their springboards to get high enough above the flared bases of the trunks to cut through the thinner waists. Above the band and just 10 yards from the water were alders and young red cedar, both with their branches bearded with pale green moss.
I rowed toward a stretch of beach that appeared to be free of large rocks and stumps. I slipped the oar handles forward and coasted in. I had brought my bathyscope, thinking it would give me a clear view of whatever lurked underwater, but all I saw in its dark interior was a glowing rectangle of jade green. The shore was so steep that I could only see bottom when I was a boat length away from landing. I crawled on the foredeck, and when the bow was hanging over dry ground, I stepped ashore. The soil was loose and slumped into the water when I put my weight on it. I leaned out and tied the painter to the root of a stump just back from the water’s edge, then used the line to pull myself up to dry ground. There wasn’t much to explore. The steep, loose ground made for difficult walking and the brush at the edge of the woods was too thick to pry a way through.
I continued rowing north, still in the shadow of the steep ridge to starboard; the western shore of the lake was washed in light except for one dark arc cast by the highest peak on my side of the lake. Two geese swimming out from shore honked to one another. The echoes coming from the woods a half-second later were muffled and sounded like a pair of dogs barking a mimicked reply.
In the early morning, I rowed in the shadow of the ridge that towered over the east side of the lake. The edge of that shadow was cast on the shoreside woods across the lake just above HESPERIA.
I stopped at a low point where the shore was wider and not so steep. There was a broad stump at the water’s edge; most of its center was missing but I could pace off the width of the platform left by the loggers after they had felled the tree. It was 15’ across at its widest point and could have filled one of my bedrooms at home. I gathered some loose driftwood sticks from around the stump for firewood; some were too thick to break across my knee, so I cut them down to size by dropping a rock as big as a bowling-ball on them.
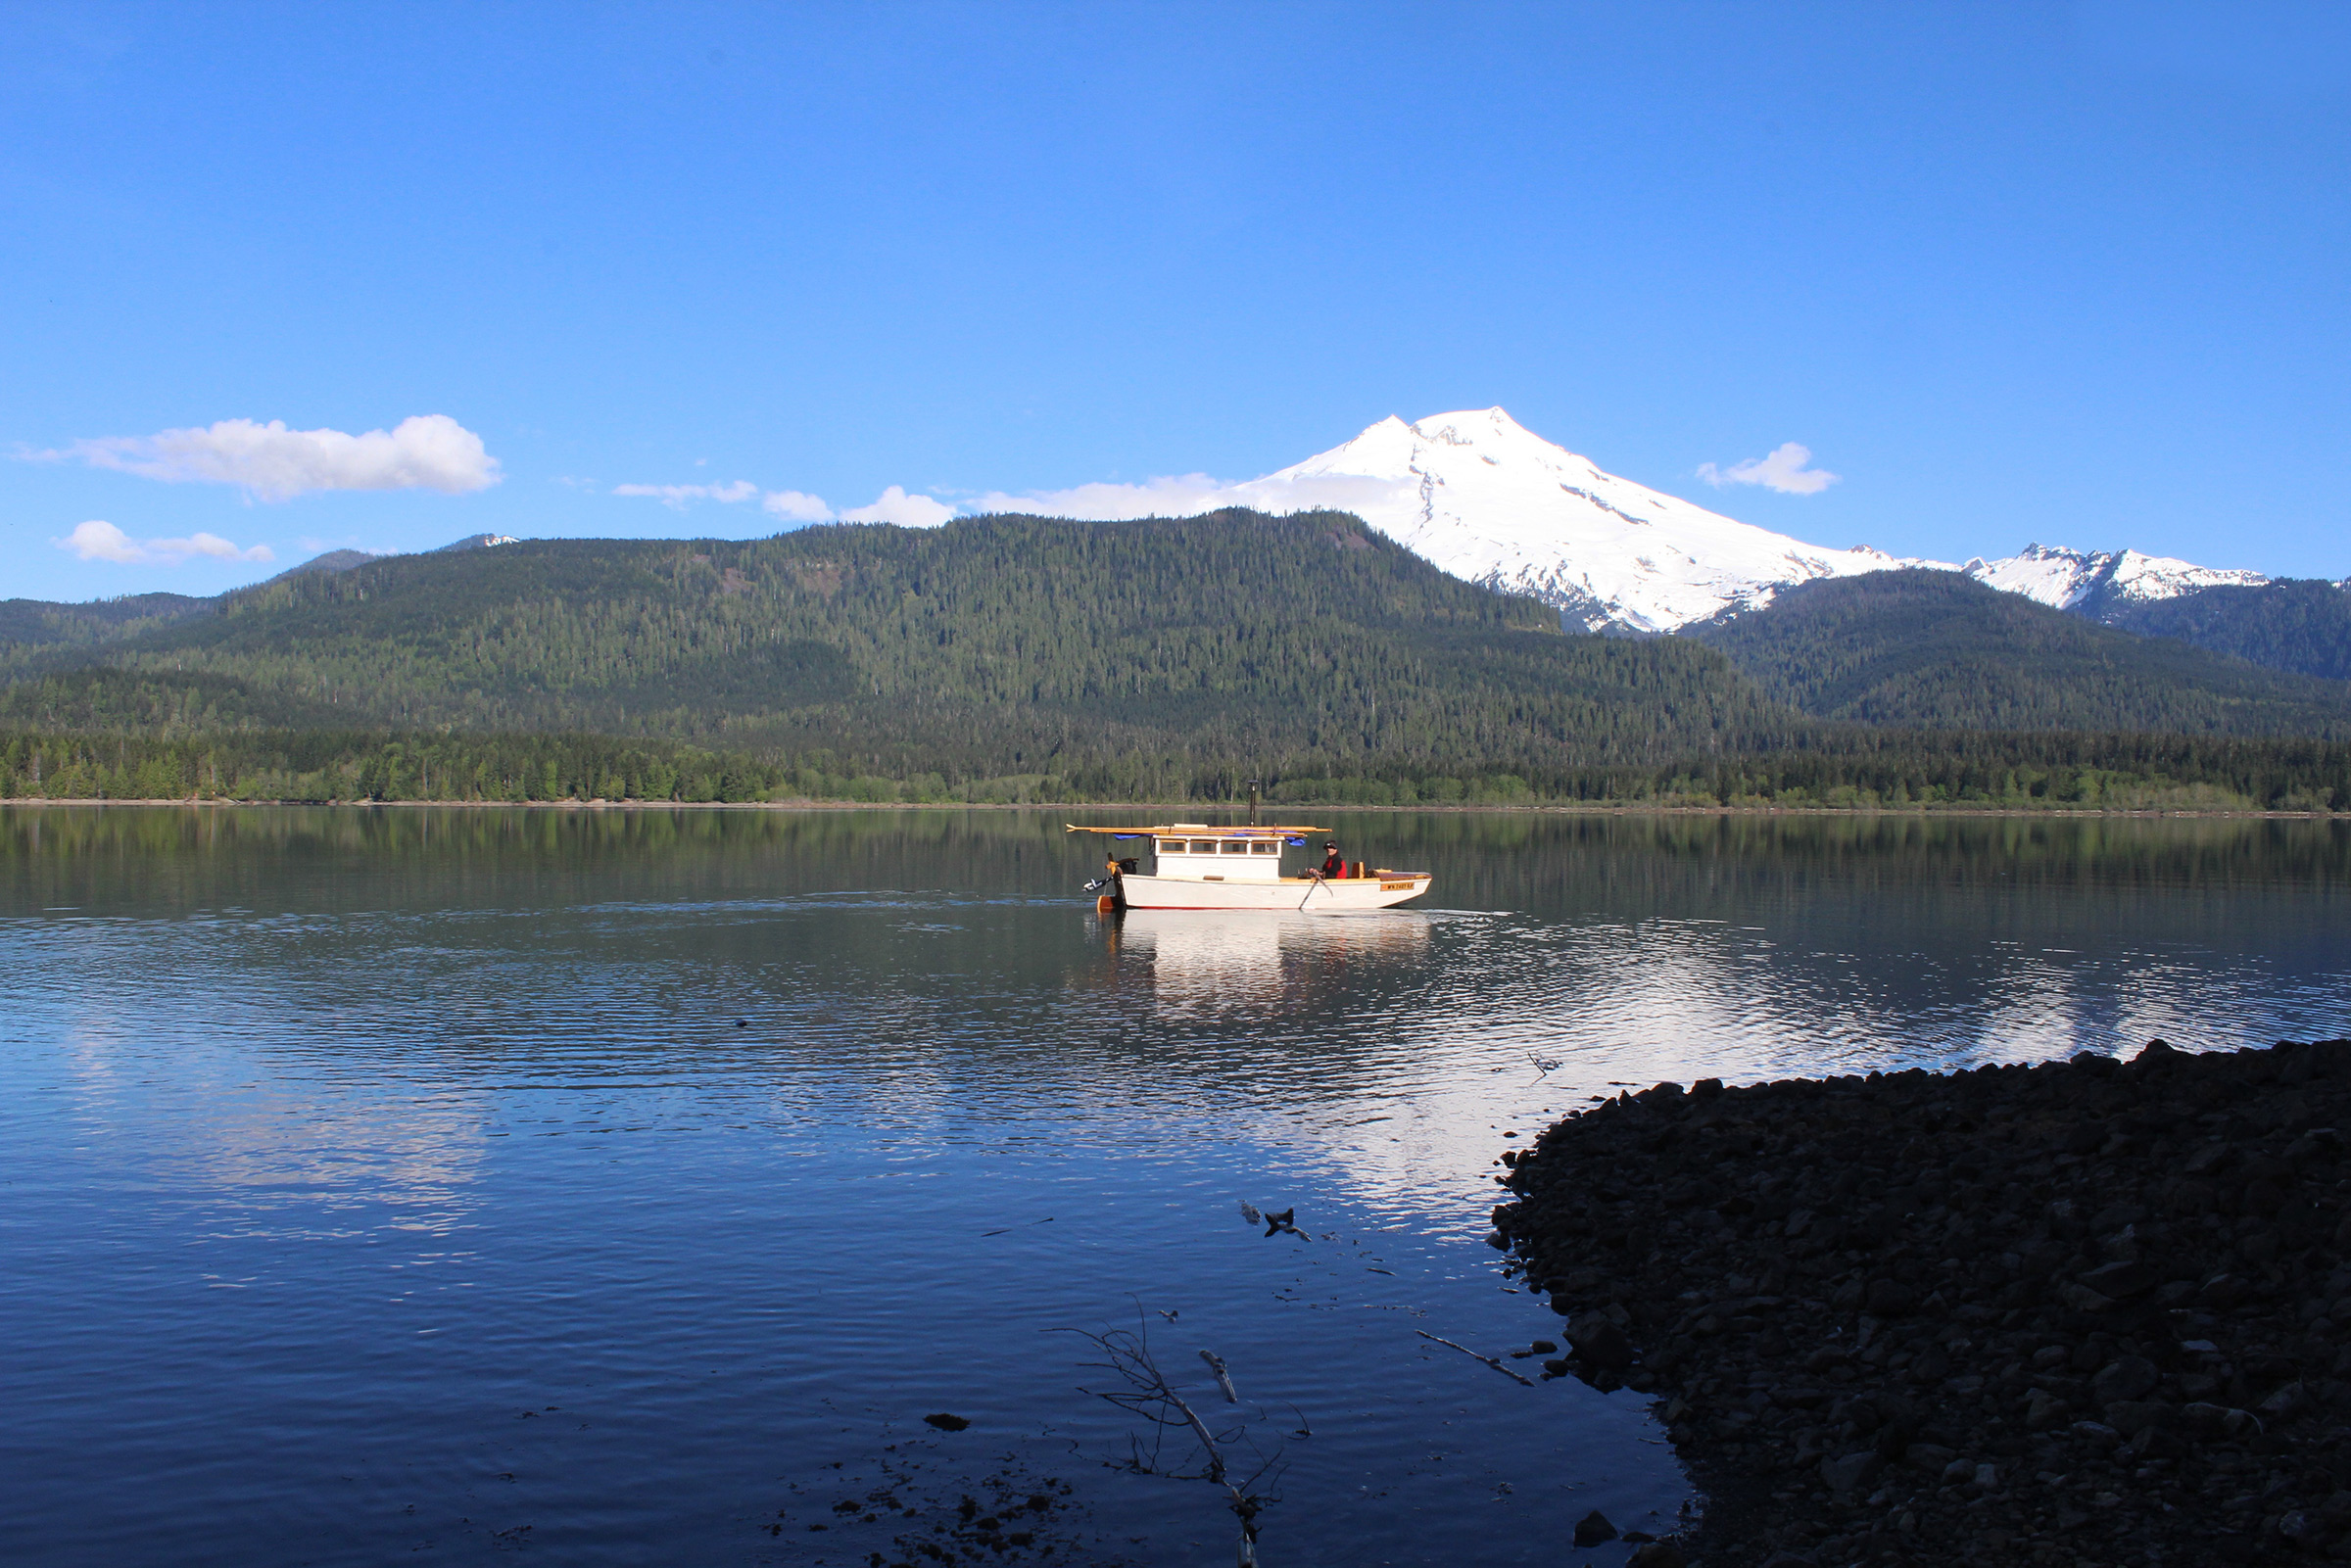
On Thursday morning, I rowed past the campground at Cedar Grove. There wasn’t wind enough to sail, and motoring seemed too disruptive to the quiet start of the day, so I rowed.
As I left, the two geese flew south, one trailing 3′ behind the other, and when I could no longer hear their honking, the only sound was the whisper of a creek hidden somewhere in the woods. The sun crested the ridge and the first rays of sunlight cast sharp-edged shadows across the cockpit. The trees covering the steep slope of the ridge were still in shadow and although the sky was clear, a soft blue haze was in the air and the trees appeared as if across a smoke-filled tavern. A breeze-borne gossamer thread gleamed white against the dark, distant slope.
I heard the rush of a power boat approaching from the south and could make out the swath of its wake spreading across the lake behind it. Even a mile away it sounded like a vacuum cleaner in the next room. As the boat raced along the far side of the lake, its wake cut a pale-blue scar across a mile of the foothills forest’s dark reflection. The boat, an aluminum outboard skiff with a pilot house, passed by me 1/4 mile off and by the time its corrugated wake hit HESPERIA—shaking the cabintop and rattling the mast and spars resting on the roof—it was almost out of sight to the north. A minute later I heard the muffled hiss of the wake hitting the eastern shore.
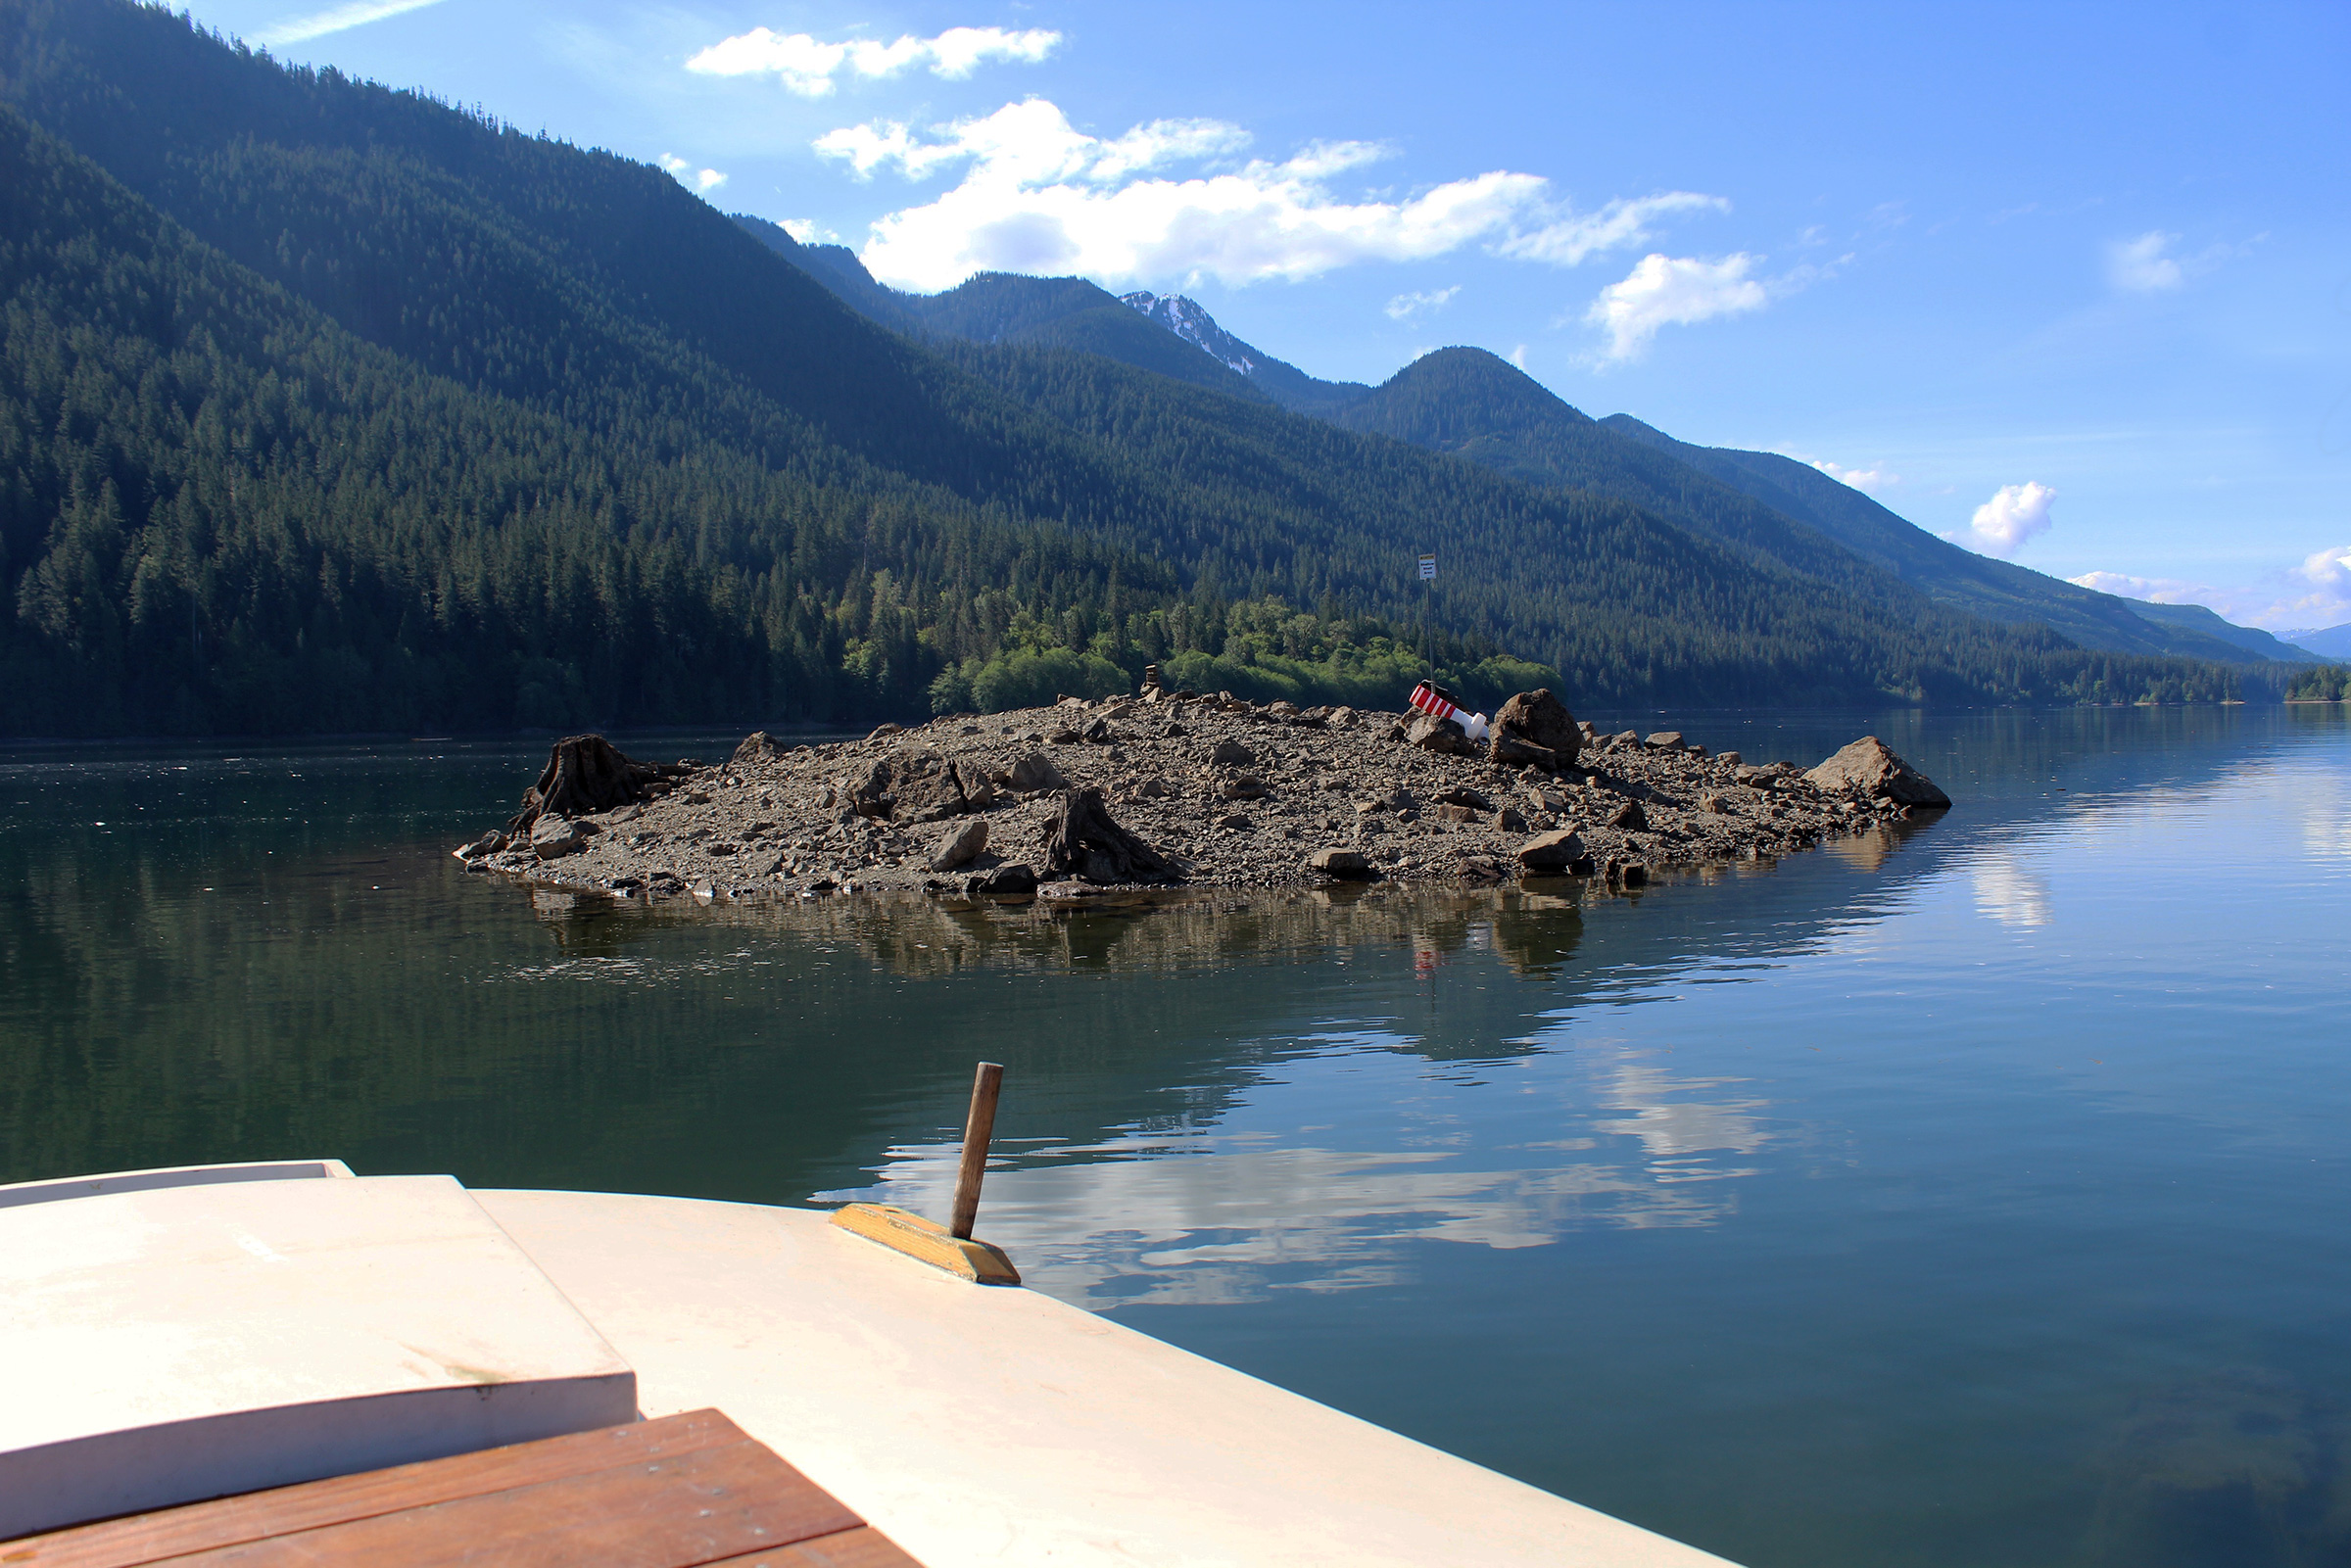
This mound of rocks in the middle of the lake is normally underwater when the reservoir is full. A few stumps indicate the islet was once a tree-covered hill rising more than 200′ above the Baker River valley floor.
With HESPERIA trailing only a wake of curdled water, I rowed to a rocky islet in the middle of the lake. It was only about 15 yards across and 8′ high. A sign on a post planted at the top read “Caution Shallow Shelf Area” in print too small to read at a safe distance. Aside from two age-blackened stumps the rock-strewn mound had the look of a landscape on a lifeless planet.
To feel a little less smug about my boat’s quiet passage, I climbed across the cabin roof and planted myself in the aft cockpit and fired up the outboard. There is not much space there, less than 24″ from the top of the transom to the back of the cabin. The outboard is set in a notch on the port side and I stand in the middle straddling the boat’s tiller, steering by turning my knees to the side.
To the west, Mount Baker loomed over the valley that cradles Boulder Creek, a stream that is fed by the water dripping from the ice and snow that cover the peak’s eastern slope. From the lake, Baker appears to have two summits. The southern peak is a symmetrical pyramid with one edge dotted with exposed rocks, the other a smooth slope of snow. The northern summit looks like a wheeling humpback whale—a long smooth arc with a short, blunt fin.
I had quickly covered about a mile from the islet and cut the motor so I could take some notes. As HESPERIA coasted to a stop, I felt a cool breeze on my back. I had missed it while I was underway. I started the outboard again and tuned back to take in the stretch of the east shore that I had let go by unnoticed. I went as far south as the beginning of the cat’s paws.
The breeze was light, but it was still well worth backtracking upwind under power to cover the same ground under sail.
I cut the motor, tilted it up out of the water, and HESPERIA drifted farther south into the flat calm. I climbed over the cabin, lifted the mast from the rooftop and stepped it through the partners on the foredeck. After I tied the square sail’s lower yard to the base of the mast, I unrolled the sail from the upper yard and let it drape itself over the foredeck in loose folds. When I raised the sail, there was just enough wind to belly it out from the mast and HESPERIA slipped forward. Water chuckled under the bow, and a piece of driftwood about the size of a hot-dog bun passed under the hull, tapping as it went; it sounded like the hesitant knocking of a stranger at someone’s front door.
The breeze was a mixed blessing. It gave me a chance to sail but erased the reflection of the mountain
The shore I was headed for lay east of Swift Creek and had a long stretch of low beach with a tilted head-high stump standing in the middle of it. About 50 yards out, I could see the bottom and the water was quickly getting shallower. I grabbed my long stand-up paddle, slipped between the foot of the sail and the lower yard and crawled over the foredeck. With the sail still gently pushing HESPERIA, I used the paddle to steer clear of the rocks scattered on the bottom. When there was only 1′ of water, I stopped HESPERIA with the paddle’s copper-guarded blade pressed into the bottom.
In the time I took for the break to walk the beach and have breakfast, the anchor, which I had set in dry ground a few feet beyond the water’s edge, was awash, not just with the lapping ripples but by a rise in the water level. I guessed that in sweeping across the lake, the southerly had shifted the water north.
With the sail and mast back on the cabin roof, I used my push-pole to navigate the shallows while I stood in the forward cockpit with a good view of the bottom. When the water was deep enough to reach the 6’ on the pole shaft, I moved to the aft cockpit to switch to outboard power.
I motored into the lee on the other side of the lake, just past the dogleg. I turned east and passed through what looked like a tide rip, littered with driftwood and forest debris. Straddling the tiller, I steered by shifting my knees from side to side like a slalom skier, and HESPERIA lumbered through turns around the larger logs. Where the debris was thickest, I took the moor out of gear and coasted through.
The upper half of the lake, angled to the east northeast, was calm. The forest pressed up against the shore in an unbroken palisade for the first 3/4 mile. I stopped the motor and let the boat drift around a blunt point where there was a stand of slender trees their tops bereft of foliage. Pairs of their uppermost branches, set directly opposite each other had grown at right angles to the center trunk before making tight turns to point straight up, tapering to fine points and looking like Salvador Dali’s waxed mustache.
I came ashore at the first beach I found. It was littered with driftwood, so I took my hatchet with me to gather firewood for the stove. I hoped I might find some old-growth, tight-grained Alaskan yellow cedar. Like western red cedar, yellow cedar driftwood is distinctive for its silvery color and smooth surface. I tested several pieces with the hatchet, chipping away a bit of the surface, and most were red cedar with fine grain, about 30 rings per inch, and a rich, mellow fragrance that distinguishes it from the more piquant scent of newer growth. One piece of driftwood, a lozenge-shaped piece with fuzzy blunted ends, was bright yellow and looked a little like yellow cedar, but I could rule that out with a quick sniff. The fragrance was unfamiliar, but I decided it was Douglas fir, well aged. I’m not much of a drinker, but while I was sampling the logs on the beach I felt as it I were at a wine tasting.
It was hot walking the shore under a bright sun, so when I got back aboard I set up the canopy over the cockpit before I started rowing again. In the shade, I continued along the shore, and the still air lying over the water cooled me as I rowed through it.
With the canopy keeping the heat of the sun off me, I could feel the layer of cool, still air lying on the water.
As I rowed, sunlight reflected by the water on the starboard side painted dancing patterns on the underside of the canopy. The light concentrated by the convex curl of the wake created flowing bands of light that changed shape and position in time with every stroke of the oars.
A corn-meal-yellow butterfly, about the size of a one-dollar coin, caught up with and passed HESPERIA to port. It bettered my 3 knots in spite of all its darting and dipping. At times it dropped so close to the water that it almost fell into its reflection, but it stayed aloft for as long as I could see it. It angled away to the north shore and had a good mile to go before landing there to take a rest unless it found a log along the way.
I could hear voices carrying across the water from the opposite side of the lake. I saw no camps or boats in the direction of the sound, even with binoculars. I couldn’t make out a word being spoken; only the vowels reached me and the consonants, without breath behind them, dissipated in the air somewhere over the lake.
On the near shore, I heard the rush of Silver Creek long before I reached its mouth, which was flanked by two finger-like bars of lead-gray rock and gravel. At the root of the bar on my side was a 10′-wide path that had been cleared of large rocks, a landing made by boaters in the past. Standing on the foredeck, I paddled toward it, sat down, and stepped off before the bow struck bottom. I tied the painter around a football-sized rock and walked to the undercut bank of the woods where stump, 12′ tall, leaned out over the bar. Its exposed roots were worn smooth, having been used for steps and handholds to climb the bank. At the top, some camper had lashed together a driftwood ladder with black plastic twine and left it on high ground for safe keeping.
On the high ground there was a campsite with a fire ring, a bench made of split logs, and a square, level, tent platform of compacted sand. A few yards deeper in the woods I found the trail that parallels the east side of the lake and walked east, hoping to find some nettles to cook for dinner. The narrow path was flanked by thick brush, but there were no nettles, just patches of fiddlehead ferns with their curled tips looking like green caterpillars with bronze-colored fuzz. I hadn’t ever harvested ferns before and couldn’t be certain they were the right kind or at the right stage to eat, so I let them be.
I slipped HESPERIA’s painter from the rock, shoved off, and hopped on the foredeck. HESPERIA moved a few feet out from shore and then pivoted around in her own length. Still on all fours on the deck, I noticed that the boat was heeling to port, hung up on something under the starboard side. I dropped into the cockpit and put my weight on the port rail, but when I paddled, the boat only spun around.
Leaving Silver Creek, I took a break from rowing and operated the outboard from inside the cabin. A loop of line around the perimeter of the cabin and the cockpit allows me to steer from anywhere in the boat. The woodstove is at the left, with a metal screen protecting the plexiglass windows from the heat radiated by the stovepipe.
I stepped into the water, waded to the starboard side, pulled the gunwale up, and pushed. HESPERIA slipped sideways and settled back on an even keel. A few feet away from me there was a small stump lying on its side underwater. One of its roots was sticking straight up and, on its tip, under 3″ of water, was a thumbprint-sized patch of white paint. I took a break from rowing and retreated to the comfort of the cabin for a bit of motoring.
Noisy Creek tumbled into an inlet that had been turned into a broad, sandy plain by low water in the reservoir. HESPERIA rests at the water’s edge, left of center.
Noisy Creek was only 3/4 mile farther along the shore. The cove that the creek flows into has a mouth 200 yards wide. With the reservoir running low, most of the cove was occupied by a bar of sand and gravel, which pushed the creak to a 20′-wide channel on the north side. On the east side there is a shallow dead-end channel that had once been gouged out by the creek. I set HESPERIA’s bow on the sand and walked along the creek, which flowed lazily in an emerald-green stream near the lake; higher up, it tumbled in a froth through a maze of chest-high boulders.
An obliging breeze nudged HESPERIA to the top end of the lake, where the Baker River winds through a valley in the middle of the North Cascade Mountains
Leaving Noisy Creek, I motored around its eastern headland into a breeze that was herding glassy ripples toward the end of the lake. Although there were only 1-1/3 miles left to go to the mouth of the Baker River, I took the canopy down and set the square-sail.
As I came closer to the end of the lake, I saw no sign of the river, only a 1/2-mile-wide barrier of tangled pewter-gray driftwood backed by a thicket of fluttering alder trees all of the same height as if it were cropped like a hedge. A few hundred yards from shore I dropped the sail and mast and switched to the motor. I piloted HESPERIA from the forward cockpit, standing up to scout the water ahead, holding the cord connected to the outboard’s kill switch. The water turned from lapis blue to chalkboard green—the lake-end shoals extended much farther from shore than I had expected. I steered hard to port and aimed HESPERIA back to deep water. At the north corner of the lake, where the line of alders butted up against the base of the ridge that bordered the river, I turned west, uplake.
East of the cove where I came ashore for the evening, Mount Blum, to the left in the shadow of a cloud, looms over the plain of alder trees at the mouth of the Baker River.
The late-afternoon wind had strengthened and I needed a protected cover for the night. Just 1/2 mile from the lake’s end along the north shore was a semicircular cove 50 yards wide and half as deep, backed by a copse of alders leaning at odd angles to each other. I pulled the bow up on the sand bank of the bar on the south side of the cove and tied the painter to a driftwood log.
It was an early end to the day, so I had time to relax. I took a dip in the cove, scattering dozens of inch-long salmon fry ahead of my feet as I gingerly shuffled into the cold water. I warmed up with a nap in the cabin.
I set HESPERIA up for the night with two anchor rodes—the black one tied to a root in the foreground, and a white one to a log on the far shore—and then secured the boat in the middle.
When it was time to get situated for the night, I set up the same arrangement and spanned the cove with my two rodes, with one end wrapped around a log on the beach to the south and the other tied to a thick root exposed above the bank to the north. With HESPERIA tied in at the middle of the cove, I set up the butane stove in the cockpit and heated up a dish of chicken Parmesan with pesto tortellini and watched the stream of driftwood moving along the shore.
The afternoon breeze had drawn everything that floats to the end of the lake where, hitting the dead end, the driftwood circled to the north along the 1/2-mile course I’d taken. As the eddy flowed past the mouth of the cove, some of the driftwood, large pieces and small, veered around HESPERIA, got caught on the rode, and piled up. With a short length of line, I took out the slack in the rodes and got them to span the cove above water level. I also secured HESPERIA to the line to set the boat perpendicular to the rodes. The water inside the cove was also swirling, a back eddy to the eddy, and a 10′-long split of a log and a 12′-long trunk with a root fan had set themselves against HESPERIA’s stern. Standing in the cabin hatch I used my push-pole to aim them, one at a time, at the shore and gave each a hard shove.
Still hungry, I heated up a pan of pad thai and watched the ongoing parade of driftwood inch by. With the bow facing out of the cove, I had a view across the valley of the Baker River to the 7,685′ summit of Mount Blum. A 16’ log trunk with a trumpet-bell flare of root crooks crossed within a few feet of the bow. I gave it a shove with the push pole but it didn’t go far before it veered into the gravel bar. At dusk, the breeze ceased and the gyre came to a stop. I turned in, knowing I could sleep well.
I woke in the middle of the night for a bathroom break and stepped out of the cabin to use the porta-potti in the cockpit. I stayed for a while looking up at the sky and picked out Ursa Major and Ursa Minor from the vast sprinkling of stars that I never see from my home in an urban sky. A shooting star drew its sudden slash of white light across the western sky and disappeared behind Mount Blum’s north shoulder.
At 7:02 a.m., the sun rose over that same summit and daylight angled through the windows into the cabin. I dressed and stepped out to the cockpit. The varnished foredeck was beaded with dew, all except for the curve of a finger-wide band on the sun-facing side of a loose length of white anchor rode. The light reflected from the 1/2″ line was enough to evaporate that small area of dew. The cabin roof was the opposite—its only dew was on the perimeter of the eaves and the grid of the roof’s arched beams and carlins. They had held back the warmth of the morning’s fire in the woodstove.
The water in the cove was still and a pellucid green, with the same color and eerie depth seen in the edge of a thick plate-glass door. The cobble-strewn bottom, where it was visible, had no color of its own, only subtle tints and shades of the green. Where the trees at the edge of the cove cast their shadows, the bottom was black as if deep beyond measure.
With the warmth of the morning came a slight breeze that set the driftwood in motion once again. The wind was not from the river valley at its head, and it pushed all of the drift back to where it had come from; a thick mat of it was coming for the cove.
Baker Lake is a reservoir created in 1959 when the Upper Baker Dam was finished. Before the river valley was inundated by the 312′-tall dam, the forest was logged up to the surveyed waterline, leaving countless stumps underwater.
I left the cove and rowed along the shore and across the mouth of Shannon Creek. Its alluvium spread a few dozen yards from shore, making the water there shallow, in some places barely deep enough for HESPERIA’s 8″ draft. The shallowest area I drifted over was marked by gouges left by driftwood that the wind had pushed across. One sinuous trace was as wide as the trough of a gutter; another small enough to have been made by reaching over the side and dragging a thumb across the bottom. I paddled out to deeper water where the stumps loomed like apparitions risen from the silt.
As I rowed beyond Shannon Creek, I adjusted my distance from shore according to the slope of the bare ground at the perimeter of the lake. I rowed close only where the land backing the shore was steep and the tips of the trees were arrayed in tiers at least as steep as the seats in an IMAX theater. Alders occupied the front rows just above the water; their trunks were ash gray and scarcely concealed by the airy distribution of their branches. Many of the older trees had trunks about 1′ thick that leaned out over the shore and some had manes of moss draped along their backs. Mount Baker was hidden from view, but the valley of Noisy Creek provided a glimpse of Bacon Peak’s serrated granite flank and sharp 7,070′ summit.
As I watched the mountain emerge from this point of land, I paddled past a rock outcropping that trees had wrapped their roots around.
As I approached the lake’s dogleg, I didn’t want to miss the first glimpse of Baker. It didn’t seem right to be rowing with my back to the mountain and seeing it only after it had made its entrance from behind the curtain of the lake’s steep north shore. I stowed the oars, got my short paddle, and sat on the foredeck with my heels touching the water. It took about a dozen strokes to get HESPERIA moving again and then her weight helped carry her forward. The bow transom blocks a full canoe stroke so I paddled as I do a coracle, pulling the blade straight back and then slashing it out to the side before it hits the bow. Done smartly, each stroke’s swirling puddle slaps the hull, clapping out the offbeats of the cadence.
The first glimpses of Mount Baker were specks of white that slipped through the scrim of cedar, spruce, and fir branches. Then a wedge of white emerged from the shingled leaves of a maple. I was soon afloat with the reflection of the mountain almost touching HESPERIA’s bow. I sat motionless to keep HESPERIA from disturbing the mountain’s twin.
This was how I wanted to remember Mount Baker and Baker Lake—an image made possible by being aboard the only boat on the lake.
By now, it was late morning, and I feared fishermen getting an early start on the weekend would soon be tearing across the lake. I didn’t want to see Mount Baker’s reflection splintered by their wakes, so I tidied up the cockpit and headed home.
Christopher Cunningham is the editor of Small Boats Magazine.
If you have an interesting story to tell about your adventures with a small boat, please email us a brief outline and a few photos.
We have spent some time with plywood boats over the last several years, both vintage and new, and a common problem that we have had to address is cracks that can develop in the outer veneer of the plywood. When plywood is made, the wood fibers are stressed from their original shape to form flat veneers, and over time the wood dries out and the fibers shrink. Repeated wet-dry cycles and sun exposure also can cause damage to veneer protected only by paint or varnish. The cracks, also referred to as checking, can be very fine or larger fractures that form a rough surface. At worst, there can be voids where bits of veneer have chipped off.
Photographs by the authors
The fir plywood deck was showing every bit of its age, some 70 years. The area in front of the sander has been partially sanded, removing the high spots created by the checking of the top veneer.
Applications of epoxy, both straight and thickened with silica, have been very effective in repairing the plywood and preventing further checking. Epoxy has adhesive and sealing properties that are superior to those of paint. Applied to bare wood, epoxy stabilizes the grain and provides a protective barrier to water intrusion. It provides a solid base for subsequent applications of varnish or primer and paint. If the surface being restored is especially rough, as it can be with fir plywood, fairing compound can make it smooth.
We built our Penobscot skiff with okoume plywood five years ago. The instructions provided by designer Arch Davis prescribed two coats of epoxy to seal the grain of the veneer before applying fairing compound to smooth the irregularities caused by the plywood and fastener holes; primer and polyurethane paint on the hull; and alkyd primer and paint for the topsides. The plywood has not checked and the finish is still smooth.
A foam roller is used to apply the first coat of epoxy, sealing the wood grain and filling the voids created by the checks in the plywood. Subsequent coats of epoxy, applied after sanding, will level the surface. Here WEST System’s 105 epoxy resin is being mixed with the 207 special clear hardener as a way to achieve a bright finish.
Arch’s advice got us thinking about using epoxy on a 1953 Alcort Sunfish. The painted fir plywood deck had extensive checking. We sanded it back to bare wood and applied two coats of WEST System 105 Resin with 207 Special Clear Hardener, which sealed the grain and gave the deck a nice bright finish. That deck has not checked since 2013. We store the boat in our garage when not in use, so there was no need to varnish over the epoxy to protect it from the sun’s UV rays.
We also used epoxy to treat two plywood Alcort Sailfish. The Standard Sailfish had the original 1950s deck and hull panels, which we sanded to bare wood; the Super Sailfish got new plywood for the bottom. It was easy to roll two coats of epoxy on the new plywood as well as on the sanded original panels, sanding between coats. Both Sailfish were to be painted, so we could apply an epoxy-based fairing compound and sand the surface smooth before priming and painting. There has been no checking on the old or new plywood since 2016 and 2019, respectively. The Standard Sailfish was painted with alkyd enamel, and the Super Sailfish was painted with a one-part polyurethane. A wide variety of paints can be used as long as they are applied over a good epoxy-compatible primer.
For small cracks and larger voids—bits of veneer that have come loose—we have used TotalBoat’s THIXO (epoxy thickened with silica) to fill the voids and provide a smooth surface for fairing compound, primer, and paint. The THIXO can be applied over sanded, clean surfaces, so it was not necessary for us to remove well-adhered paint to get to bare wood. We have not had checking through the silica-thickened epoxy either; it is stronger than straight epoxy.
Application of epoxy is just as easy as painting and restores checked plywood to like-new condition. It is not necessary to apply fiberglass cloth unless cloth is desired for specific high-wear areas. And, if you’re building a new boat, coating the plywood with epoxy before painting or varnishing is a step well worth the time and expense.
When not treating checked plywood, Audrey and Kent Lewis mess about in their armada of 16 small boats. Their adventures are logged at www.smallboatrestoration.blogspot.com
For the editor’s perspective on checking and his repairs inspired by this article, see “Checking My Work” in this issue.
You can share your tips and tricks of the trade with other Small Boats Magazine readers by sending us an email.
By the time I built my Caledonia yawl in 2003, I had done enough cruising to understand that I needed a boat that was not designed only for the usual functions while making way. Whether I sailed, rowed, motored, or even stayed put on any given day, I knew that every day I would need to eat and sleep. Two cruises up the Inside Passage made it clear that there were not always places to camp and even if there were, the inevitability of biting bugs and the chance of biting bears kept spending nights ashore out of the picture. I redesigned the yawl’s interior to include accommodations for cooking, eating, and sleeping.
That made life aboard much more comfortable, but I hadn’t given enough thought to another certain daily occurrence, using the toilet. I remedied that oversight with my next cruiser and built a place for a small porta-potti. Aside from the convenience it provides, it minimizes dependence on shore facilities and frees me from the less convenient system of wrap-it-up-and-pack-it-out I had practiced when I was camp-cruising by kayak.
The Dometic 972 is the first porta-potti I bought. (I later bought a second for my son to use on his boat.) It is 12-1/2″ tall, 14-1/2″ wide, and 16-1/2″ from front to back. Empty, it weighs 11.9 lbs. Its upper half has a 2.3-gallon freshwater tank for flushing, and is rated for up to 26 flushes.
Photographs by the author
The Dometic 135 has a push button (upper left) for the pressurized flush, and a gauge (lower right} to indicate the level in the holding tank.
Made of ABS plastic, the Dometic is the heavier of the two toilets and is more rigid.
The holding tank has a a pivoting spout and a twist valve that remain open while pouring and to assure an even flow that’s less likely to splash.
At the back are a piston air pump to pressurize the tank for push-button flushing, and a threaded cap for the freshwater fill. The lower half houses the holding tank. A slide valve opens and closes the opening to the upper unit bowl and a clear insert in the front indicates the tank’s fill level.
A latch at the back holds the top and bottom together until it’s time to empty the holding tank. With the top removed, the tank is sealed by the slide valve and the capped pour spout. Both have rubber gaskets to make them airtight. The pour spout pivots to an angle convenient for emptying the tank into a plumbed toilet, and a small vent, when opened, assures a smooth, even flow.
The Thetford 135 is constructed in much the same way, and is 12-1/4″ tall, 13-1/2″ wide, and 15″ front to back. It weighs 8.9 lbs. The 2.6-gallon freshwater tank is rated for an average of 27 flushes, and a bellows-type water pump does the flushing. (The instructions indicate there is a piston pump option, but I can’t find it online.) The bottom half has a push-button air vent and a recess for storing a container of deodorizer.
This Thetford 135 doesn’t have an indicator for the level of the holding tank.
The Thetford, also made of ABS plastic, is slightly flexible and impact resistant. The glossy finish is easy to clean.
The Thetford’s air valve is a spring-loaded push button. With the right grip on the handle, you can hold the button down while pouring.
Both porta-potties have bracket kits for securing them to a floor to keep them from sliding around if the boat they’re used in heels or rocks. The lids and seats are removable for cleaning.
To prepare the toilets for use, I fill the freshwater tank and pour a liquid deodorizer and digester in the holding tank. It makes for an easier pour when I get back home from the outing.
Because I bought the smallest available porta-potties, compact enough to carry aboard my cruising boats, it was to be expected that they wouldn’t be as easy and comfortable to use as the toilets I have at home, which have higher and longer seats. The seat of my standard-bowl toilet is 15-1/2″ from the floor and the opening is 8-1/4″ wide and 10” long while the toilet I use most often has an elongated bowl with a seat 18″ high with a 12″ by 8-1/4″ opening. Although the porta-potties have seats with comparable opening widths of 8″, they are only 12″ high. I can elevate the porta-potties by rearranging floorboards, but the short opening of the seats takes some getting used to. The Dometic’s is 8-7/8″ long and the Thetford’s 9-3/8″, so a bit more concentration and attention is required by the user. I don’t do as much reading on the pot as I do at home, but I have done a bit of rowing.
I have used the Thetford on my recent cruise on Baker Lake and the Dometic on several solo three-day cruises and on a weekend cruise with four relying on it exclusively. I have always had capacity remaining in the holding tank of both porta-potties.
A neat trick I picked up off the web for leaving a porta-potti clean for the next user is to give the bowl a spritz of cooking oil from a pressurized can. Pam is a well-known brand; I use a house brand of organic extra-virgin olive oil. It comes in handy in the galley too.
Emptying the holding tank of either porta-potti is easy—just pivot the spout, uncap it, open the air vent, and pour the waste into a toilet at home. I follow up with a few rinses until the water I pour out runs clear. I can’t really say how well the deodorizer works—I always revert to a habit I picked up when I was changing my kids’ diapers and wear my workshop respirator with the charcoal filters for organic vapors.
I still make rest stops at parks, but more often I’m in undeveloped places where there are no facilities. There, my porta-potties make it much easier to leave no trace.
Christopher Cunningham is the editor of Small Boats Magazine.
I hadn’t given much thought to water bottles. For decades, I’ve used the usual bicycle water bottles for bike riding and wide-mouth Nalgene bottles for boating and camping. You open the valve or lid, take a drink, and close it up. It was as simple as can be. At least until I chanced upon the Spray Bottle from Lunatec. It is made of BPA-free plastic and comes in four sizes: 650ml, 750ml, 1,000ml, and 1.5 liter. The bottle sides are marked with milliliters and fluid ounces.
The lid is what makes the Spray Bottle interesting. At its center is an air pump that provides pressure; its cylinder extends down into the bottle and the piston rod rises from the center of the lid. When the bottle is pressurized, the gray disc in the middle is the trigger for the spray.
The intake for the pump is a slender, flexible tube with a 3/4″-diameter cylinder attached to its end. It has a screen on its bottom and a weight inside which helps shift the intake to the lowest point of the bottle, no matter what position it is in, even upside down.
The other end of the hose slips over a stem in the bottom of the lid. It has ridges to hold the tube in place and a small hole. When the tube is covering the hole, water is delivered in a steady stream, called Stealth Mode. Slip the tube down slightly to uncover the hole and the water comes out in Pulse Mode, much like a water flosser. Stealth Mode conserves pressure and is best for drinking and misting. Pulse Mode conserves water, and the impact it creates is better suited for cleaning.
Photographs by the author
When the bottle is held upright, the blue intake rests in the bottom of the bottom. The nozzle is at the mist setting, which is evidently handy for making rainbows.
The nozzle on the front to the cap is threaded, and turning the nozzle clockwise creates a cone of fine mist. Turning the nozzle counterclockwise narrows the cone to a stream that gets progressively more slender and forceful. Turned further counterclockwise, the nozzle will come off and the water will spray in three jets for a miniature shower and the maximum flow of water
When the bottle is filled to the mark on the side of the bottle, there’s an air space left for pressurizing the bottle. Six pumps are all that’s required at the start; more as the water is used and the air space increases.
For one of my early trials, I took the bottle biking. The 750ml size was a good, snug fit for the bottle cage attached to the bike frame. Using the Spray Bottle had significant advantages over my standard bike bottle: I didn’t have to operate a valve with my teeth for starters, nor did I have to tip the bottle up to get the water to come out. With a half-empty standard bottle, I have to look around it to see the road ahead, and when I squeeze it, the water comes out in unpredictable ways. Because I’m usually breathing hard, I often end up coughing.
With the bottle inverted, the intake rests against the lid. The nozzle is set at stream.
With the Spray Bottle, I can drink with the bottle well out of my field of vision and the stream is gentler and easier to control. The only downside was that the road vibration twisted the piston-plunger cap off somewhere without my noticing. I was able to replace it with a piece of HDPE plastic with a 5/16″ hole drilled in it. It went on quite tight without having to cut threads.
For camping the Spray Bottle works well for washing dishes with the stream, cooling off with the mist. Irrigating cuts and washing sand off feet are easier with water under pressure than water just poured. Wherever water is needed, a pressurized stream is usually an advantage.
Lunatec offers an optional Spray Tube for added convenience. The 33″ hose has a fitting that attaches to the bottle-lid’s nozzle. It includes a trigger lock so the flow can be controlled by a slide trigger on the hand piece. A magnet on the side opposite the trigger provide an option for hands-free use, and all of the spray patterns are provided by an identical nozzle cap.
One of the things I found especially satisfying is taking a sip of water when I’m in bed and wake in the middle of the night, parched. With a Nalgene bottle, it takes two hands to unscrew the lid, then I have to sit up to drink, and I often tip the bottle too much and get water running down my cheeks onto the bedding. With the Spray Bottle, I can operate it with one hand, and because I can hold the bottle on its side (or use the optional Spray Tube), I don’t even have to lift my head—just bring the nozzle to my mouth, and press the trigger. I barely have to wake up to wet my whistle, and that alone made the purchase worthwhile.
Christopher Cunningham is the editor of Small Boats Magazine.
Lunatec sells the Spray Bottle directly and through online retailers. I bought the 750ml Spray Bottle from Amazon, where I discovered it, for $30. The Spray Tube costs $15.
Is there a product that might be useful for boatbuilding, cruising, or shore-side camping that you’d like us to review? Please email your suggestions.
One of the busiest demonstrations at the Port Townsend Wooden Boat Festival—when it is not hampered by a pandemic—is the Edensaw Boatbuilding Challenge. Boatbuilding contests aren’t new to wooden boat festivals; in their early incarnations they were for amusement and not really about boatbuilding. Some of those early events were sponsored by the maker of an adhesive caulking and the boats, built “quick and dirty,” reliably offered plenty of poor joinery to showcase the remarkable capability of the company’s product. The less likely they were to float, the more interest they drew and the grand finale, a short race under oar, paddle or sail, was often the first and only times the boats were used.
In 2013, Edensaw’s Boatbuilding Challenge shifted the focus of the contest to creditable boatbuilding. The company specializes in high-quality lumber and plywood for marine use, so it would make good sense that the boats built under their banner wouldn’t be disposable. And, while the launching of seaworthy boats may not generate the train-wreck fascination of the good old days, festival goers could learn a thing or two as the boats were being built and admire the craftsmanship of some talented, albeit rushed, boatbuilders.
Jon Lee, of Everett, Washington, began building boats while he was in grad school training to become an engineer, and reviewed his Pocketship for Small Boats last spring. He doesn’t need much prodding to build yet another boat, so when his father, Bob, suggested they build a boat at the 2018 Boatbuilding Challenge, that was impetus enough for Jon to set the ball rolling. The Lees needed a design and two more builders to fill out their team. Being an engineer, Jon began with the math. The contest rules set the hours the teams could work: from 9 in the morning to 11 in the evening Friday and Saturday, and from 8 to 1 on Sunday. Those 33 hours times four builders gave a total of 132 man-hours, less the time for breaks and epoxy curing. Jon looked for a boat design that had more going for it than the right construction time. It would have to be sturdy, fun, useful, and attractive. The Lees knew their team would be up against some skilled boatbuilders, and decided they “needed something with extra character and charm.” They chose stitch-and-glue construction out of the same calculus of showmanship: “It is flashy and crowd-pleasing to have a boat-shaped object within a few hours of starting.”
Their criteria led them to Glen-L’s Tubby Tug. Glen-L calls their design #362 “a 9′ tugboat for kids of all ages.” Jon and Bob, noting that they fit the design’s target demographic, settled on the tug as the boat they’d build for the challenge. “Our reckoning was that the charming looks of the boat would go a long way toward winning the prize.”
Photographs courtesy of Team Critical Path
The work area was sheltered by a tent and each team had a 10′-wide space. To the north there was a nice view across Admiralty Inlet to Whidbey Island, but there wouldn’t be idle time to enjoy it.
The Lees gathered the rest of their team, Christopher Street and Ron Doll, with Ian Curtis subbing on Saturday when Ron had other obligations. The rules allow for some preparations before the start of the challenge, so the team marked their 10′ sheets of okoume plywood. There wouldn’t be time to paint the boat before the time was up, so they dyed the plywood red, green, and yellow so the bright colors would shine through the epoxy and fiberglass, a touch calculated to score points with the judges.
At 9 a.m. on Friday, the starting whistle trilled and the five teams, all sharing the shelter of a large tent, went to work. Critical Path, as the Lee-led team called itself, was flanked by some stiff competition: The Northwest School of Wooden Boatbuilding was to one side building a plywood pram, and a group of pros from Gig Harbor was on the other making a very bold move by building a carvel-planked rowing boat.
Under the rules, the plywood could be coated with epoxy prior to the start of the contest. The first day’s work began with sawing out the parts.
Jon had built a few boats and Ron had a kit kayak to his credit, but for the three other members of the team, the tug would be their first foray into boatbuilding. Jon carefully choreographed each step of their build around epoxy curing times. The hull would have to be finished that first day and ‘glassed by quitting time at 11 p.m. so it could be worked on the following day. The team often had four saws going all at once—circular saws cutting out the plywood pieces with their long sweeping curves and jig saws working the tight radiuses. Jon soon went to work with a drill making holes for the stitching part of the tug’s stitch-and-glue construction. The glue part was a risky departure from the norm of epoxy tack welds, which would simply take too much time to cure. Beads of thick super glue were applied to the joints instead and cured instantly with a spritz of accelerant. The wire stitching could then be removed, followed by epoxy filets and ‘glass tape. By lunchtime the hull was stitched together.
A reporter was interviewing Bob as Jon cut the wires holding the bow together. The super glue held until he cut the last wire and then the bow split open. He slapped the plywood ends back together and held tight as Ron and Chris quietly rushed to his aid and drilled new holes and installed new stitches. Bob kept the reporter at bay and she was none the wiser (and deprived of a scoop).
By evening, the hull was ready for fiberglass sheathing but, after taking a break for a late dinner, team Critical Path was spent. By missing this step in the schedule, the boat would only be shy a few finish coats of epoxy at the end.
Fiberglassing the hull had been scheduled for the end of the first day, but it was a bridge too far. The second day started with applying epoxy to the ‘glass.
On Saturday morning, they were all feeling rather ragged. Bob and Chris worked on the pilothouse, and Jon worked with Ian—who was raring to go—on prepping the hull for sheathing with a coat of epoxy.
Shortly after lunch, it began to rain. Hard. The hull, still wet and set at the edge of the wall-less tent, was getting pelted with rain. The crew rushed to move the hull to the center of the tent. Jon was under the edge of the tent at the moment the wind dumped the water pooling on its roof right on his head. He was soaked, but it was good for a laugh all around. They kept working for a while before calling it a night.
While the hull was being built in stitch-and-glue fashion, the pilothouse started with a timber framework that would support plywood panels.
On Sunday the hull was ready to be flipped upright, but the pilothouse was not coming together neatly, so some of its stitch-and-glue joinery was peppered with screws and brads. The most obvious flaws were covered by decorative pieces that Ron quickly designed, made, and applied.
Ron put some finishing touches on the pilothouse. He drummed up some of the decorative elements to hide flaws in the work.
The whistle signaling the end of the contest blew at 2 o’clock sharp, just as the boatbuilding school team finished adding a coat of latex house paint on their pram. Team Critical Path were done a little early, after adding all of the finishing touches they could think of. The Gig Harbor pros realized they had taken on more than they could manage with the carvel hull and threw in the towel the night before. The two other teams had finished a 20′ catamaran and a collapsible pram.
With the boatbuilding phase of the contest over, it was time to wheel the mini-tug to the launch ramp.
The four launch-ready boats were paraded to the ramp at the end of the marina in the middle of the festival grounds. The Tubby Tug was already getting a lot of attention and admiration. With the boat set in the water, Jon and Bob climbed aboard. The rules don’t allow motors, so they were armed with canoe paddles. Their efforts at paddling were no match for the breeze that was sifting through the marina and the tug bobbed and weaved between a pier and the rocks lining the marina’s banks. The catamaran took off like a shot and the collapsible pram actually rowed circles around the tug.
The contest rules didn’t allow the use of motors, so the electric outboard couldn’t be deployed. Canoe paddles supplied the legal auxiliary power.
The boatbuilding school’s pram, painted and equipped with oars and a sailing rig, took the top honors and the catamaran was awarded second place. The judges called third place a tie between the collapsible pram and the tug.
Team Critical Path lined up with the fruits of their labor: from left, Christopher Street, Ron Doll, Jon Lee, and Bob Lee. Ian Curtis, the Saturday reliever, wasn’t present for the Sunday launch.
Jon, Bob, Chris, Ron, and Ian were all pleased with their work. The Tubby Tug has a fair and sound hull. An electric outboard borrowed later that afternoon proved it could perform well with appropriate power. At the close of the festival, Bob took the boat home and in the weeks that followed rebuilt the pilothouse and gave the whole boat a proper finish. He rigged it for electric propulsion with controls and steering in the pilothouse.
The Tubby Tug went home with Bob to get finished properly and used by the Lee family.
The Tubby Tug will have a useful life following the contest and be enjoyed by the extended Lee family. The tie for third place has already been turned into a win.
Do you have a boat with an interesting story? Please email us. We’d like to hear about it and share it with other Small Boats Magazine readers.
In the 1950s, Howard Chapelle drew an 18′ sharpie power skiff. He called her Campskiff. She was designed for the low-powered 5–10-hp outboard motors of the day and was intended to take her crew into the backwaters and creeks of the Eastern estuaries. For her hull planking, Chapelle called for 1⁄2″ cedar or mahogany. The bottom was planked with the same material, but was a full 7⁄ 8″ thick. For ward, the lines drawings show a full hull and a stem that just settles in at the waterline. Her proportions are nearly perfect.
Some 30 years later, designer Karl Stambaugh revisited the design, and the resulting Redwing captured the intent and all of the grace of the earlier sharpie. A close study of the two boats shows some well-thought-out improvements. With a LOA of 18′ 6″ and a beam of 6′ 6″, Redwing is bigger than Campskiff. She also has more freeboard and a finer entry. From any angle Redwing’s sheer is lovely, which is no easy feat for a flat-bottomed skiff. The house, motor well, and gracefully curved coaming complement the hull shape and add greatly to the boat’s appeal and function. The designer points out that Redwing is a light boat, 850 lbs, but she will carry heavy loads. With a motor, fuel, and batteries aft in the well and crew sprawled out in the cockpit, it will be necessary to place ballast forward, maybe several hundred pounds of it, depending on what gear is aboard, in order to trim the hull. The bottom of the stem should ride just below the waterline when the boat is at rest. Thus trimmed, handling in tight quarters even with a breeze up should be fine.
Photo by Bill Thomas
Karl Stambaugh’s REDWING 18 is a plywood boat based on a Howard Chapelle design of traditional construction. Stambaugh designed his version “to make her easier to build while keeping the traditional appearance of the Chapelle design.”
Stambaugh’s Redwing is built of plywood. The first boats to this design were assembled “glue-and-screw” fashion; a “stitch-and-glue” version was later drawn. If you build stitch-and-glue, you might find the relatively quick assembly time and the bombproof filleted joints are worth the hassle of working with all that epoxy and filler. Once the hull is finished, the lion’s share of the remaining work is “traditional” plywood boat building. It’s fun stuff.
Marine-grade okoume is a near-perfect material for this type of hull. The boat’s sides are built of 12mm plywood and the bottom is created from two layers of the same material. The outside is sheathed in ’glass set in epoxy, and the results are strong and tight—just the thing needed for a cruiser that might live on a trailer. The side planks come together at a beefy, solid-wood stem. The house and deck, like the hull, are built from 12mm plywood. The deck is sheathed with Dynel cloth set in epoxy, but the weave is not filled. This makes for a strong, watertight finish that mimics the appearance of a canvas deck but requires little maintenance; and it won’t leak. The cockpit has wide seats curved to match the hull’s shape. These, coupled with high coamings, offer great comfort and space to spread out and relax while underway or tucked in for the night.
Photo by Bill Thomas
Redwing might be the ultimate gunkholer. She’s designed for exploring thin and narrow waterways—places too tight for a sailboat to tack. At the end of the day, she provides ample camp-style accommodations.
Stambaugh has worked up a simple, electric propulsion system for Redwing. A small, stock 2-hp electric motor, the kind designed to be bolted to a cavitation plate, is mounted in the motorwell and driven by batteries stored forward, under the berth. With the exception of the custom-fabricated mounting bracket for the motor, all the components are off-the-shelf items. As configured, the range is about 40 miles at a leisurely 3 knots, which is a perfect speed for exploring creeks, small inland lakes, or quiet backwaters.
Most builders will probably choose to power Redwing with an outboard motor nestled in the sound-insulated motorwell. A 9.9 four-stroke is ideal, but a smaller engine will serve. One of the advantages of the 10-hp engine is that most come with electric start and a small trickle charge alternator. Steering harnesses that work with these engines are stock items, a real plus for the builder. At about two-thirds throttle, Redwing will move quietly though the water at 6+ knots and burn a half gallon of fuel per hour. On a boat as uncomplicated as Redwing, I’d keep the systems simple. A well-maintained outboard, one battery, running lights, and (just in case) an electric bilge pump are about all the complication Redwing or her crew should have to endure.
Photo by Bill Thomas
Designer Stambaugh estimates the materials cost for a Redwing 18 at about $5,000 (not including power). This figure assumes high-quality materials and finish.
Another place to avoid complication is with the cabin layout. There is a lot of room to get creative with the arrangements on an 18′ boat, but on Redwing there is room for a full-sized and comfortable V-berth, a head tucked under a seat, a fair-sized galley flat, and plenty of organized storage. Stambaugh has drawn a hard dodger for Redwing that blends in perfectly. It extends over the companionway and runs aft to the motorwell, fully sheltering the cockpit from rain and sun, without blocking the helmsman’s view or stifling the breeze while at anchor. As drawn, this awning complements the boat nicely, turns the cockpit into a living space, and can be removed easily and stored ashore if it’s not needed.
It’s the contemplated voyages in Redwing that really capture my imagination. Though designed for sheltered waters, she is capable of dealing with moderate wind and chop. Watch the weather and plan carefully and, as with any boat, be aware of her limitations. That said, I have seen Redwings along the coast of the Carolinas and on Georgia’s south coast, the Sacramento River Delta, and on Chesapeake Bay. I know of one being built in southern Maine, and I’ve seen one on Lake Michigan—trailered in from some landlocked state. The possibilities along the Florida coast alone seem limitless. Thanks in part to their shallow draft of 1′ 0″, these boats can and do get around.
Photo by Bill Thomas
The motor lives in an enclosed box, and is nearly silent. Cruising speed is about 6-9 knots, depending on choice of power.
Suitable cruising grounds abound, and if they lie far from home, a midsize car has plenty of muscle to get the boat, her gear, and her crew to the water. Redwing offers plenty of adventure in a manageable package. Keep the gear simple: a stove that can be used below on the galley flat or moved to a cockpit seat, a dishpan for a sink, and a cooler make a fine galley. I think I’d replace the V-berths with a large berth flat, which offers more sprawling room. When such a flat is outfitted with fold-up seat backs, it provides comfortable seating below. If you cruise in cool environments, there is room for a small wood heater to chase away any dampness and to boil the morning coffee. For adequate ventilation, there should be at least four opening ports in the cabin sides. Two small bronze opening ports mounted in the forward end of the house might also be welcome in warmer climates.
Photo by Bill Thomas
At only 850 lbs, Redwing is of an ideal weight to tow behind an average car. But she’s also capacious, and will carry a couple and their gear on an expedition.
Redwing works in so many ways. She is not a big boat, but she does offer the trailer-bound boater a literal (and littoral) world of options. She is economical to build and almost miserly in her fuel consumption. She is comfortable in a simple, uncomplicated way and easy to maintain. Owning a boat like Redwing would, I think, prove to be a joy and not a burden.
Plans for Redwing 18 include nine sheets, and the construction specifications include both glue-and-screw and stitch-and-glue. A full-sized frame plan is also available.
This Boat Profile was published in Small Boats 2008 and appears here as archival material. If you have more information about this boat, plan or design – please let us know in the comment section.
Bill Hayward loves to explore rivers. His method for For the design of this boat, it is hard to believe that doing so involves the use of efficient and environmentally responsible propulsion, and his favored designer is Paul Gartside of Sidney, British Columbia. His first collaboration with Gartside was a 20′ pedal-powered boat, which he took on an 18-month journey from Alberta to the Gulf of Mexico, up the East Coast, into the Hudson River, then on to the St. Lawrence River and finally to Halifax, Nova Scotia. For his most recent voyaging boat— WAYWARD—he resorted to the use of an engine-powered 24′ 3″ hull that is also the result of a collaboration between owner and designer. Hayward wanted a boat for a journey through some of the rivers of the United States and eventually for a cruise on the canals of Europe. As of this writing, Bill had taken the new boat on the upper Mississippi from St. Paul, Minnesota, to St. Louis, Missouri. From there he traveled up the Illinois River to Chicago and into Lake Michigan. An overland trip by trailer took the boat to Halifax. The canals of Europe still beckon.
Photo by Wyatt Lawrence
An easily driven hull needn’t be unattractive, as designer Paul Gartside has proved with WAYWARD, which relies on a 25-hp outboard for propulsion.
For the design of this boat, it is hard to believe that Hayward could have done better than to choose his friend Gartside. The designer and builder, who emigrated from Cornwall, England, to Sidney, turns out one lovely design after another. A visit to Gartside’s web site will give you some idea of the scope of his work, his attention to detail, and an extensive lesson in boatbuilding. Under “frequently asked questions,” for example, you will learn what books he recommends and you can read his detailed information on boring shaft holes, installing shaft tubes, strip and lapstrake planking, and leathering oars.
From the beginning, the dream and the reality of this boat had what this writer feels is an advantage over the majority of powerboats on the water today. The owner recognized the advantage of designing for displacement speeds. It is quite possible that the Earth’s atmosphere cannot support healthy human beings with the present level of pollutants being dumped into it. Our increasing use of fossil fuels for pleasure puts an ironic twist on the literal meaning of recreation. By traveling at 6 or 7 knots rather than at planing speeds, Hayward will easily double his mileage and thus cut his boat’s level of polluting in half. He finds as well that noise is minimized and comfort is optimized at this modest cruising speed, and he seems to get there just as fast.
In my own campaign to promote modest power and speed in boats, I frequently hear the argument that equates speed with safety. Specifically, the owner wants a boat that can hightail it for the nearest shelter when a thunderstorm bears down on him. This may be a good plan for the crew of an overloaded aluminum johnboat, but the weatherwise skipper will not be caught by surprise. A well-designed boat will allow him to ride out a squall in complete safety if not absolute comfort. This boat and skipper can take care of themselves.
Photo by Wyatt Lawrence
Gartside’s client, Bill Hayward, favors cruising in inland waterways. He has already taken WAYWARD through the upper Midwest and was preparing to send her over to Europe for extended canal explorations.
With a length of 24′ 3″ and beam of 6′ 4″, WAYWARD is narrower than average. This contributes significantly to her efficiency, allowing her to be pushed easily with a 25-hp four-stroke motor. The trade-off is a bit more rolling in a beam sea. This, according to the owner, has been an entirely acceptable compromise, since she was not designed as an offshore boat.
The lines show a fine entry. She will not slap and pound as she works upwind. The lines aft show a good compromise between running straight to a deeply immersed transom, as in a true planing boat, and rising to meet the transom at the waterline, which is the ideal for slow-speed work. The slightly immersed transom is narrow and will not create significant drag, yet it will provide additional buoyancy to hold up the motor and straighten the lines enough to give an extra knot or two of top-end speed.
The skeg extends below the hull a generous 8″ aft. This seemingly simple addition will be a big help in directional stability, but it can be hard to get right. Powerboats steer by swinging their sterns to port or starboard. If the skeg is square-ended and close to the engine, it will feed turbulent water to the propeller, causing it to race in a tight turn. The designer has given a slant to the aft edge of the skeg and called for a taper as well. The owner reports no problems.
WAYWARD’s hull is planked with 5⁄8″ strips of Western red cedar and sheathed inside and out with 17-oz biaxial cloth set in epoxy resin. As long as every care is taken to assure that water cannot penetrate the sheathing, this construction technique will allow the round-bottomed hull to go together relatively quickly and economically. There is no framing as such. Floors, bulkheads, and joinery combine to stiffen the hull. Decks are 1⁄2″ plywood, and the housetop is laminated of three layers of red cedar, eliminating the need for beams. Windows are made of 1⁄4″ laminated safety glass.
Photo by Wyatt Lawrence
An enclosure keeps the four-stroke outboard out of sight, where its quiet operation won’t disturb the peace of a morning and where it won’t interrupt the lines of the hull.
A diesel inboard installation would have nearly doubled the mileage of this boat. It would be the best choice if efficiency were the only criterion, but the advantages of the outboard are significant. These include a considerably lower cost (particularly when the whole installation is considered), a quieter engine, and a more open cockpit arrangement. Diesel fuel is not always easy to find, especially when cruising inland waters.
A motorwell is always more complicated to build than an open-transom installation. One reward is quiet operation, and I’ll bet you can hear the bow wave as easily as the motor. Also, the well at least partially hides that big gob of technology perched on the stern. Motors ought to be tilted up when the boat is moored, in order to avoid marine growth in the cooling passages, and this is especially true in salt water. Failure to do so can result in expensive repairs. Unfortunately, WAYWARD’s engine rises when tilted, and the cover that encloses the tilted engine will be a big presence. The owner felt that the top section of the enclosure did not fit with the sleek lines of the hull and cabin, so he removed it.
Motors in wells often suffer from poor ventilation, causing them to stall, particularly when shifting at idle speed. When the boat is moving forward, exhaust through the propeller hub is carried quickly astern, but at idle speeds or in reverse, fumes can fill the enclosure. The designer has provided a vent hatch at the forward face of the well, a simple solution should this problem occur.
A low profile usually not only makes a boat better-looking but also reduces windage, so there is no attempt here to gain standing headroom under the shelter. A sliding hatch allows the crew to stand up while cooking. Steering is by either of two sticks linked together along the starboard side, one under the shelter and one outside. The preferred steering station is the after one, with the helmsman standing on a raised section of the cockpit floor. Stick steering is not quite as intuitive as wheel steering, but it has the big advantage (especially in a narrow hull) of taking up considerably less space.
Photo by Wyatt Lawrence
WAYWARD’s cockpit is well thought out for direct contact with the surroundings, and yet protection from the elements. Her accommodations are simplicity itself.
In the cockpit, four stanchions support an array of solar panels. The structure forms some shelter from the elements as well as convenient handholds in rough going. The owner has added canvas and clear plastic panels to this fabrication, adding considerably to the protection it affords. The solar panels were not as necessary as was originally thought, as the engine’s charging system was able to provide most of the power needed to keep the batteries topped up.
Fuel tanks located under the cockpit seats are generous because of the boat’s intended use and give a range of 220 nautical miles.
The short, stout bowsprit for handling the anchor makes great sense, particularly for a singlehander. The anchor can be set and retrieved from the cockpit if necessary.
WAYWARD’s accommodations are basic, and that’s as it should be. Complicated systems add expense, weight, and the likelihood of time lost to repairs. She has a generous freshwater tank under the V-berths, and a holding tank under the cockpit seat. A sun-heated shower has been a great comfort.
There is plenty of room for singlehander Hayward’s needs, although a couple undertaking his ambitious voyage would want to be a good fit. WAYWARD should be great for weekending and for day trips, and the grandchildren could nap peacefully to the sound of the bow parting the waves.
We have been obsessed with fast powerboats for so long that good efficient designs are hard to find. WAYWARD is a good example of what promises to be an exciting new era as we adjust to new environmental priorities.
Any designer has to balance the owner’s intentions with his own sense of proportion and style—and Gartside delivers on both counts with WAYWARD. The cabin echoes his larger powerboat designs while remaining in proportion and appropriate to the use. Accommodations are all that’s required and no more. Above all, she’s an easily driven hull that will be economical and stylish at the same time.
This Boat Profile was published in Small Boats 2008 and appears here as archival material. If you have more info about this boat, plan or design – please let us know in the comment section.
I’m sitting in my truck in a parking lot just off I-95 in Lewiston, Maine, awaiting the arrival of Ray Frechette, of Great Falls Boat Works, and his Core Sound 20. It’s a beautiful day—not a great deal of wind, it’s true, but the air is fresh after weeks of sticky humidity, and the sky is blue and full of the promise of an early fall. We are meeting here, before going down to the coast for an afternoon of sailing, because it is a mile or so from one of Ray’s garages, in which he has a Core Sound 17 that he wishes to show me; as he put it on the phone, “that way you’ll see the two boats and know that, really, they’re the same, just stretched.” I have seen pictures of the CS 20 on the designer’s web site, but when Ray pulls in off the road I am unprepared for the sweetness of her lines.
I have never been too keen on hard-chined hulls, considering them to have a tendency to slab-sidedness and flat sheers—all well and good on a flat-bottomed rowing skiff, but on a sailing boat? For today, my bias turns out to be ill-conceived: the Core Sound 20 has a sweet sheer, a gentle-radius curved deck, and, with her hull painted cream with contrasting red bottom paint and dark green covestripe, is anything but slab-sided.
Designed by Graham Byrnes, the Core Sound 17 was a development of his earlier Spindrift 10-footer and Bay River Skiff 17. The latter, inspired by the traditional work-ing skiffs of the Hatteras area in North Carolina, was conceived in the late 1980s as a “good utility boat that could be rowed, motored, and sailed. A boat that was rugged, yet not too heavy, and could be used for both line fishing and crab potting either commercially or for pleasure…. The bottom shape is a moderately shallow V form, with a shallow V running aft. This allowed very shallow draft without the inherent problems of flat-bottomed boats, such as pounding and poor directional stability.”
Photo by Jenny Bennett
The Core Sound 20 is easy to beach, and its centerboard trunk is offset to one side of the keel to prevent stones from wedging their way into the slot, where they can foul the board.
Then, in 1994, Byrnes was approached by a new client who wanted to sail a Bay River Skiff across parts of the Gulf of Mexico. Faced with the prospect of sending the boat out into “real blue water,” Byrnes decided to develop the design: “Skiffs, as a type, have the inherent tendency to produce boats that may be wet due to their low freeboard, straight stem, and flat bow sides…. The BRS is far drier than traditional skiffs [but] will take spray and tend to carve through a wave. The points of design [that were] kept [were] the ease of planing and stability downwind, as well as the cat-ketch rig.”
The resulting design had developed convex forward sections with a deeper V, which, being more buoyant than the skiff-type bow, “rides over waves and takes nicely to large bluewater conditions.” Furthermore, says the designer, “the higher freeboard and additional length in the foredeck, combined with full-length side decks, make this an extremely dry boat with exceptional load-carrying capacity.” The boat, launched in 1995, was named the Core Sound 17. In the ensuing 12 years, 200 plans have been sold, and at least 171 boats built.
Since then, the Core Sound has been both stretched and shrunk—to the 20 and the 15—but at all sizes, the premise has been the same: to create a simple, strong, load-carrying boat that can be towed on a trailer, rowed, motored, and is an especially good performer under sail. Growing up with racing skiffs in Australia, Graham Byrnes has little time for boats that do not sail well. “I don’t believe that amateur builders should be consigned to building little plodders; why design down for them? What’s the point in building a boat if all you end up with is something that goes out on the water and just ‘sits’ there? You want a boat that’s going to look good and be safe, but that’s going to actually go somewhere.” In this last respect both the Core Sounds have proven themselves time and again—perhaps nowhere better than in the Everglades Challenge races in Florida Bay when, in 2005 and 2006, the designer beat all comers in his Core Sound 17 (by more than eight hours in 2006); in 2007, in a one-off Everglades Challenge (EC) 22, he shattered the record by a further nine hours.
Photo by Jenny Bennett
The cat-ketch rig is simple and efficient, with no standing rigging. The sprit-booms fitted to each sail are well clear of the crew during tacks and provide excellent control on all points of sail.
The boats are light—with rig, the 17-footer weighs as little as 350 lbs, and the 20-footer, 500 lbs—and achieve respectable speeds in very light airs; but, thanks to their hull design, they are also remarkably stable and capable of carrying full sail in 25-knot winds. At hull speed, the 20 races along at 6 knots, but it will plane in as little as 10 knots of wind and has been recorded doing 12 knots.
Ray Frechette has been building glued plywood boats for many years. By the time Byrnes won the Everglades Challenge, he had already built a couple of Core Sounds. Anticipating more interest after the sensational victory, Ray asked Byrnes to design a building jig for him to speed up production. Last year he launched the first jig-built 17. She differs from her sisters slightly: Ray explains that Byrnes had “wanted to fine up the bow to give a drier boat when planing; he also altered the stern a bit to balance it. The downside is that with the finer bow you can only stow 8′ oars along the centerboard trunk and under the foredeck; in the earlier model you could get in 9′ oars, which are definitely a better length.” (Oars 9′ long can be accommodated by stowing them alongside the seats.)
Built not just for speed but also for day-sailing and camp-cruising, the Core Sounds have impressive storage space within the watertight side benches, beneath the foredeck, and aft between the transom and stern bulk- head. There is a place for everything and, in the 17 that Ray shows me, there are optional raised floorboards up for ward to give yet more (but not necessarily dry) storage space beneath, as well as a large sleeping platform. With an optional spray dodger-tent, the boat, despite its length of only 17′, would have ample space for two adults to take a weekend or even a week away.
Photo by Jenny Bennett
At between 500 and 600 lbs fully rigged, the Core Sound 20’s light weight and shoal draft make her an easy boat to launch from a trailer.
Having been introduced to both the 17 and the 20, I set off with Ray and his 15-year-old son, Josh, to go sailing. We head for the public launching ramp in Portland, Maine, and within 20 minutes of our arrival Ray has stepped the two aluminum masts, straightened out the running rigging (all the while apologizing that he has not yet rigged this particular boat with “jiffy” rigging), bent the sails on to the mast tracks and sprits, and we are ready to launch. There is still little wind, and I am secretly anticipating an afternoon of drifting, perhaps even rowing back to the ramp late in the day. But we are here, and the weather and company are fine, so we back away from the dock.
At first my suspicions seem vindicated—we are sailing, yes, but apparently not at any great speed. Then Josh pulls out the GPS and, to my astonishment, in perhaps 4 knots of wind the Core Sound 20 is cruising along, closehauled, at 4.4 knots—yet there is no fuss, no noise, no effort; the helm is balanced, the boat stable. With only 155 sq ft of sail, I could perhaps be forgiven for expecting little of the boat. But combined with the lightweight hull, the cat- ketch rig is both efficient and versatile. The low center of effort produces less heeling motion; the sail area is well balanced fore and aft, and in gusts the masts will bend to flatten the sail and depower the rig. In most winds, the sails can be left sheeted in to tack themselves and, with no booms, there’s no fear of being hit over the head if you forget to duck. Downwind, the rig is beautifully balanced sailing wing-on-wing, and—I’m reliably informed by both Ray Frechette and Graham Byrnes—when running in a strong wind if you let the sails go forward of the beam, it will stabilize the boat. On the rare occasion that you miss a tack and momentarily find yourself in irons, you simply back the main and the boat pivots smartly away from the wind. Sailing into a beach or dock downwind, the sheets can be let go and the sails will fly forward of the masts. To heave-to the mizzen is simply sheeted in, the main allowed to run free. Finally, both sails are rigged with double-ended sheets so that the helmsman always has an end close to hand—whether sitting to leeward or windward—and there’s never a need to lean across the boat to grab a sheet when it’s least convenient.
Within minutes the Core Sound 20 has proven herself and Ray, Josh, and I settle in to enjoy our afternoon. On a reach, we play with the optional mizzen staysail that gives us an extra 100 sq ft of sail area, and, in these light airs, another knot or so of speed; we beach for lunch at Fort Gorges, running the boat up the shingle but not worrying about getting small stones in the centerboard trunk because it is offset and not touching the beach; and we sail back to the ramp late in the afternoon to load the boat back on the trailer ready for the tow home. It has been a pleasure, and I find myself wondering if I can somehow arrange a windier outing on another day—or maybe Graham needs crew for the 2008 Everglades Challenge?
Both boats are built stitch-and- glue using plywood, 3⁄8″ on the bottom and 1⁄4″ on the sides. Masts are three-piece aluminum, require no standing rigging, and can be stowed in the boat.
This Boat Profile was published in Small Boats 2008 and appears here as archival material. If you have more info about this boat, plan or design – please let us know in the comment section.
If you have seven days to race 90 nautical miles through the Canadian Gulf and San Juan Islands in a small craft powered solely by sail or oar power, this is the boat to enter. A Mower dory has been the top-finishing sailing craft in one such arduous race—called the Shipyard School Raid—each of the past two years.
Then again, if racing the clock doesn’t appeal, but you’re looking for a classy yet practical camp-cruiser for extended gunkholing—and perhaps an amateur boatbuilding challenge—this could very well be your boat.
The 18′ plank-on-frame Swampscott sailing dory is not only good-looking; it also sails fast and rows tolerably well. And nearly a century after its racing hull was conceived by noted yacht designer Charles D. Mower (pronounced with a long “o,” as in “lawnmower”), the Mower dory is still competitive.
Photo by Matthew P. Murphy
The 18′ Mower Dory is an evolution of the beach-launched fishing boats of Swampscott, Massachusetts. Fishermen were skeptical of these boats when the type debuted in the early 1900s; these dories gained respect rapidly, however, for their windward ability and dryness.
“It was built to be a Raid winner,” said dory co-owner and Raid racer Quill Goldman. Raid organizer and yacht designer Tad Roberts concurs that “the Mower dory is a competitive Raid boat because it can be rowed very quickly when required and sails really well in both light and heavy wind—in fact, she sails better than most with an experienced crew.”
Inspired by a fellow racer’s Mower-designed 21′ X-dory, Goldman and his friend and business partner Richard Lyons picked the 18′ Mower dory out of the lineup of small boats John Gardner presents in his well-known book Building Classic Small Craft, Vol. 2 (International Marine, 1984). “I remember paging through the book and thinking, ‘That would be a great boat,’” Goldman said.
Then the two co-owners of Barefoot Wooden Boats— a boatbuilding, restoration, and charter company—set about making modifications to the Mower dory plans based on their requirements for long-distance racing. Goldman and Lyons swapped the leg-o’-mutton main for a sliding gunter rig, added a kick-up rudder blade extension and a second set of oarlocks, and called for sheathing the plywood bottom with Kevlar for superior abrasion resistance upon beaching.
The Silva Bay Shipyard School on Gabriola Island, British Columbia, which graduated both Goldman and Lyons in the early 2000s, is where the men turned to commission two Mower dories. Students at the school built one Mower dory, SWORDFISH, in 2005–06, and another, BARRACUDA, one year later. Further modifications to the second boat included lowering the profile of the center-board trunk so it was flush with the thwarts, enabling a second rowing thwart to be installed forward of the first.
When rowing long distances as a team, Goldman and Lyons find it most efficient to sweep only two oars with rowing stations staggered, switching sides when their arms tire. When under sail, the jibsheets are long enough for the helmsman to handle from the stern, so the dory can be singlehanded.
“It’s really versatile, the way it rows, the way it sails,” said Goldman. “It’s light enough that two people can drag it up the beach and push it back in the morning.”
“And the unstayed rig is so simple, one person can ship and unship the mast,” added Lyons.
For this review, we sailed and rowed SWORDFISH on Port Townsend Bay, the finish line for the 2007 Raid. Surprisingly, the Mower dory wasn’t as tender as it looked, as we found when switching places and tucking in a test reef. The helm was responsive in a light breeze, and the hull rode high and light. (With the centerboard up, the Mower dory draws only 4″ to 6″, depending on the load.) The wide laps made for a quiet ride. And the hull’s graceful curves drew admiring looks along the waterfront, as the sheerline of a Swampscott dory is bound to do.
Photo by Matthew P. Murphy
This Mower dory carries a gunter rig. The class was originally powered by a low-aspect sail plan—a so-called “leg-o’-mutton” rig.
Charles Mower was destined to become design editor of The Rudder magazine in the first decade of the 1900s, but he was only 23 in 1898 when he designed a 21′ racing dory for the Swampscott Club. What came to be known as the X-dory was highly competitive against the Alpha dories of Salem, Massachusetts, and the Beachcomber dories of neighboring Marblehead. Although it was Mower’s first commissioned design, it has stood the test of time.
This 18′ Mower dory is essentially a scaled-down X-dory, John Gardner concluded after the more than 40-year-old blueprints came into his hands in 1978. “In fact, it appears that Mower had one basic dory hull that he considered to be the ultimate Swampscott dory hull,” he wrote in Building Classic Small Craft. “In adapting it to a number of varying requirements he made some minor and superficial changes, but always without altering the fundamental characteristics of his original 1898 design for the Swampscott Club.
“The success of the X-dory was so outstanding that there was little incentive to attempt to improve upon it, and good reason not to risk spoiling it, even to a minor extent.”
In readying the plans for publication, Gardner notes that his principal departure from the original Mower blueprints was to suggest the addition of a rowing thwart “and the other minor changes that will make it possible to row this boat.” Gardner also recommends the addition of flotation if the vessel will see recreational use, especially by children. He is convinced the Mower dory’s beaminess (at 5′, it is 8″ to 10″ wider than the average rowing dory of the same length) makes it a stable sailing craft. And he points out that a number of sailing rigs may work equally well on the hull, as the dory’s extra beam and her side decks and coamings mean it can safely carry more sail than narrower dories of the same length that are entirely open.
There is one shortcoming: in his blueprints, Mower included but one sectional view of the dory and only a few basic dimensions. Gardner included some additional drawings of his own in his book, but a full set of plans does not exist. “Apparently he [Mower] expected that prospective builders would be familiar with standard dory construction,” Gardner noted.
This assumption gave Al Brunt pause. “I wasn’t that familiar with dory construction to begin with,” said Brunt, the head instructor at Silva Bay Shipyard School who oversaw construction of the two Mower dories. “I sort of had second thoughts when we were lining up to do the first Mower with the limited plans we had. [But Gardner’s book includes] a table of offsets, and that’s all you really need.”
Brunt said the dory was a good teaching boat, requiring a variety of techniques such as both sawn and steam-bent frames, and a plywood bottom combined with cedar-planked topsides. “Some pretty awkward angles” required full-sized mock-ups, including one detailing where the transom meets the bottom and garboard planks. Again and again, the instructors, students, and owners put their heads together to problem-solve design issues in true team fashion. In the end, Brunt said, “it was a wonderful, challenging project figuring everything out.”
Amateur builders considering the Mower dory are directed to Gardner’s The Dory Book (International Marine, 1978; Mystic Seaport Museum, 1987), which contains an extensive section called “How to Build a Dory,” including instruction on how to read a table of offsets.
The last word goes to builder Brunt, who is mightily impressed by the performance of the boat he’s twice taken from drawings to varnish. “It certainly scoots,” he said of the Mower dory. “It’s surprising how quick it is. It sails like a witch!”
John Gardner recorded numerous boats for amateur construction. He published these in two volumes of Building Classic Small Craft. The Mower dory appears in the second of these books.
This Boat Profile was published in Small Boats 2008 and appears here as archival material. If you have more info about this boat, plan or design – please let us know in the comment section.
I began building reproductions of traditional Inuit kayaks in 1978 after the first kayak I’d built—to my own design—taught me how little I knew about kayaks. The Hooper Bay was the first of the reproductions I built to explore the technology of Arctic cultures whose survival depended upon kayaks; it was followed by several Greenland-style kayaks. The most sophisticated of the designs I built to was an Aleut baidarka collected in 1936 and housed in the Lowie Museum of Anthropology (now the Phoebe A. Hearst Museum of Anthropology) in Berkeley, California. I visited the museum and was given access to the collection storage area to see the unskinned frame. It was beautifully carved, and each piece of wood was finely textured with the marks of the edge tools that had produced it. The baidarka was undoubtedly the work of a highly skilled craftsman and I was sure there was much I could learn by reproducing it.
My baidarka clearly showed that the Lowie specimen had been very fast and had remarkable seakeeping abilities. It sparked my curiosity about Aleut kayaking equipment; I next made an Aleut paddle and bilge pump. I was also intrigued by the bentwood visors the Aleut hunters wore. Called chagudax̂, they were beautifully painted and often decorated with long, arching, walrus whiskers. To keep the whiskers from interfering with throwing a harpoon, they were usually set on only one side of the chagudax̂. The visors not only shielded a hunter’s face from sun and rain, they also put his eyes in shadow to conceal them from skittish prey. And by some accounts, the underside of the chagudax̂ made distant sounds more audible.
Andrew sat with some of his work for formal portraits that were used years later for a posthumously published book, Chagudax̂: A Small Window Into the Life of An Aleut Bentwood Hat Carver. It was co-edited by his daughter, Sharon, and published in 2012.
As I was researching the visors, I learned about Andrew Gronholdt. He was born in 1915, on Popof Island on the eastern end of the Aleutian Island chain. His father was a Dane and a boatbuilder, and his mother was Aleut, or Unangan, as the people of the islands refer to themselves. Andrew learned woodworking from his father and later in life put those skills to use working as a shipwright. His interest in his Unangan heritage led to study of the chagudax̂. Andrew became the recognized authority on the making of them, and classes he taught spawned a revival of the skills.
The patterns painted by Andrew on this chagudax̂ are remarkably similar to those painted on a chagudax̂ collected in 1778 by an expedition to Unalaska Island led by Captain James Cook.
I was surprised to learn that Andrew lived in Edmonds, Washington, my hometown. I paid him a visit in 1993; he was 78 years old then, soft-spoken, cordial, and very willing to show me his work. He had both chagudax̂ in various stages of completion and a finished qayaatx̂ux̂, an even more elaborate type of headwear with a long bill and a conical shape with a closed crown. Several years later, when I was visiting the Smithsonian’s Museum of Natural history in Washington, D.C., I saw that very qayaatx̂ux̂ on display in an exhibit of Aleut culture.
This photograph and those below by Christopher Cunningham
A chagudax̂ like this with a long bill and well decorated would be worn by an experienced and successful hunter. I saw this chagudax̂ first at Andrew’s home, and a second time, years later, on exhibit at the Smithsonian Institution.
Andrew kept the decorative elements of his chagudax̂ true to historic examples, though they weren’t exact replicas of those preserved in museum collections. His long-billed visor here combined an ivory figure inspired by one chagudax̂ and painted patterns from another. Both of the originals are in the Museum of Anthropology and Ethnography in Leningrad.
I was daunted by the complexity of carving required by the qayaatx̂ux̂ and focused on the simpler chagudax̂. Andrew let me trace several of his patterns and showed me how he bent the shaped wooden pieces over bending forms he’d made of galvanized sheet steel.
Andrew had bending forms for chagudax̂ of different shapes. He did the steam-bending in his kitchen with a plastic sheet on the floor to catch the inevitable drips. His legs, here in the corner of the kitchen cabinets, are the only photograph I have of him.
This bending form has steamed parts clamped to it. Two C-clamps hold a small caul over the half-lap joint; spring clamps and homemade clothespin clamps pinch the wood to the form while it cools. The full- and half-patterns are the ones associated with this particular form.
To retain its new shape, the freshly bent wood stays on the form while it cools and dries. After the wood has taken a set, the size of the chagudax̂ can be fine-tuned a bit by adjusting the overlap of the ends at the back.
He told me he made walrus whiskers from nylon weed-whacker monofilament. To straighten it, he would stretch wraps of it on a board with two nails in it and warm the monofilament with a heat gun. To taper a straightened length, he’d put one end in a drill and spin it while pinching it with sandpaper.
For making artificial walrus whiskers, I wrapped weed-whacker monofilament between two nails and took the curl out of it with a heat gun.
Using Andrew’s dimensions, I tapered each half of the chagudax̂ from a thickness of 1/4″ at the center of the bill to 1/8″ at the end of the arm at the back. A plank with dowels set at the outline of each piece held it in place for planing. I used vertical-grain Port Orford cedar, leftovers from planking for my Whitehall.
The two halves of a chagudax̂ are joined by a half-lap at the centerline. With a block of wood clamped on as a guide, a rabbet plane cuts the lap.
Like Andrew, I used galvanized flashing to make my forms. The zinc coating keeps the steel from staining the steamed wood that gets wrapped around it. With this form, I would soon find out one of Andrew’s refinements that I had missed: the ends of the wooden cross pieces need to be cut down to provide room for clamps.
The holes for the lashing at the lapped joint are drilled at an angle to keep it centered over the seam both outside and inside. I glued the joints to make the lashing job easier.
After I finished painting my first chagudax̂, I started making a second.
While my chagudax̂ is a good match here for my Aleut baidarka, I’ve never risked wearing the visor while paddling it. As it is in the Unangan culture, the chagudax̂ is much more than a utilitarian object.
I was quite grateful for the time I spent with Andrew and went home equipped with what I needed to know to make my own chagudax̂. I made two, carefully painted both with Unangan-inspired designs, and adorned one with the faux whiskers. To give the glass beads used to decorate the whiskers a local touch, I made them by spinning molten glass on a bicycle spoke coated with kaolin as a parting agent. I collected glass from old debris uncovered by low spring tides: broken beer bottles for brown, a Noxzema jar for blue, and a Ponds Cold Cream for white.
I had put too much work into the two chagudax̂ that I’d made to risk damaging or losing them while boating, so I kept them as works of art and remained curious to know how they would work. I had been experimenting with PVC plastic cut from drain pipe to make megaphones and found that an 18″ section of 4″ drainpipe, cut down one side and heated for about 8 minutes in an oven at 170 degrees, would create a flat sheet 13-1/4″ wide—just a fraction of an inch shy of the tracing I’d made from Andrew’s patterns.
With my PVC visor, I heated the one-piece blank in the oven and molded it to my head for a perfect fit. The painted design is taken from the family crest brought from Scotland by my seventh great-grandfather.
After cutting the blank for the chagudax̂ from the sheet, I heated it again, a little less this time, and bent it into shape, let it cool, and then drilled and lashed the overlap. I painted the underside a dark brownish red, as Andrew did his hats. For the top, I didn’t adopt the Unangan patterns for my own, but used elements from my family’s private signal. After the paint was well cured, I custom-fit the visor by giving it a few minutes in the oven, then molding it on my head and letting it cool there. With contact along the entire perimeter, it has a comfortable fit, even where the bill’s edge makes contact with my forehead.
My PVC visor was quite plain by Unangan standards, but it proved to be eminently practical for cruising.
On my cruise at the end of last summer, I quickly grew to like the PVC chagudax̂. In bright, hot, sunlight it darkened the overhead glare in a much wider area than a baseball-style cap and protected the tops of my ears from sunburn. In a downpour, I wore it under my cagoule hood and was well shielded from the rain. And a chagudax̂, whether wood or PVC, doesn’t get soggy. It does indeed have an acoustic quality, though I noticed it mostly when I was motoring: when I looked down into the boat it made an almost startling amplification of the motor behind me. If the top of my head gets cold, I can wear a stretchy watch cap either over or under the chagudax̂. Thanks to Andrew, this versatile part of Unangan technology has found a place aboard my boat.
Andrew died in 1998 at the age of 82, and I regret that I had paid only one visit to him. There surely must have been more about Unangan culture and kayaking that he could have taught me. When I was doing more research at the time that I was getting ready to make my PVC chagudax̂, I read that he and Elisabeth, his wife of 65 years, had a daughter, Sharon. I searched the web for her and was ultimately able to connect with her through a Facebook page. I emailed her about my visit with her father and attached a photo of my chagudax̂, including the one I’d made from PVC drainpipe. I was a little worried about how she might react to taking Andrew’s inspiration away from the Unangan bentwood tradition and interpreting it in plastic. I was relieved when she replied: “You are a true Unangan! Our people made do with the materials available to them, right?”
In the late fall of 2018, I started doing what most folks in Maine do during the cold weather after our boats are put away: thinking about our next boat. My wife and I had just finished the summer with our 19′4″ Simmons Sea Skiff and started to make a list of attributes for the perfect boat to explore the waters of our home state.
We loved our Sea Skiff but it was not dry or comfortable in a steep chop, boat wakes, or the bone-jarring standing waves that form on the Piscataqua River. Our new boat would be heavier and have a more forgiving hull shape. It would be easy to trailer with a half-ton pickup and have a cabin with a V-berth for sleeping as well as an open cockpit for fishing and sitting out in the fresh air. It had to be something I could build in my home shop and, naturally, attractive. My wife and I love wooden boats and could not think of considering anything else.
Over that winter, I haunted a lot of forums and websites and found my way to a monthly newsletter by boat designer and builder Arch Davis of Belfast, Maine. It provided a wealth of helpful information, pictures, and testimonials about his boats, including the Jiffy V-22.
The following March, I happened upon a classified ad listing an essentially new boat, engine, and trailer at a very reasonable price. The pictures weren’t great but the boat was intriguing. I kept coming back to the ad and eventually realized the boat was an Arch Davis Jiffy V-22. The seller said it had only been in the water once, to break in the motor. The boat was powered by a 2011 Mercury Optimax 150-hp outboard that had just one hour clocked on it. I mailed a deposit, made the drive to see the boat, and bought it.
The boat is beautiful, with lots of gleaming mahogany and ash, and first-class fit and finish including lots of brightwork. Eventually we can foresee the cabintop and side decks being finished with paint or Dynel as most V-22s seem to be. This boat’s wheelhouse was not completely true to Davis’s design. Instead of a hard cabintop, the boat came with a bimini top and canvas sides.
Arch Davis
In this Jiffy V-22, built by John Edwards, the wheelhouse is built according to the plans. The tall windows and high cabin roof provide plenty of standing headroom at the helm.
The Jiffy V-22 is 22′ 6″ long, has a beam of 8′ 6″, and draws just under 2′. With its cabin, it is reminiscent of classic Maine lobsterboats, and is designed with a V-berth, a seat with access to storage space, and a small galley cabinet to accommodate a two-burner portable stove. Our cabin has shelving on each side for storage, space for a porta-potty, a long shelf along the cabintop on each side, and hatches in the cabin sole. Our boat has two opening side windows and a hinged skylight vent, all with screens. There is some storage below the cabin sole.
Dave Ranta
The cabin in the author’s boat offers berths for two. A panel covers the footwell when it’s time to turn in and the two cushions, here propped against the sides forward, complete the V-berth.
The cockpit area is large—6′10″ by 9′. The layout of our boat followed the recommended location of the wheel and controls. The design leaves open the options for cockpit seating and accessories. Forward, we have two high, fixed seats with footrests. The helm converts to a leaning post. The cockpit is set up to be self-draining.
The author’s Jiffy V-22, with its canvas wheelhouse in place, is equipped with a 150-hp outboard. It’s above the range specified in the design, but will get him home in a hurry if bad weather is coming in.
We have trailered our Jiffy V-22 with three different half-ton pickups. We’ve put in at five locations so far and found that we could launch and retrieve the boat with no issues at any of them. Launch time at a ramp is no more than five minutes; retrieval is a bit longer, 10 minutes, because of winching. We don’t back the trailer completely underwater at launch or retrieval: the boat rolls off easily on the ramp when launching, and when reloading, I winch it most of the way out of the water and up the trailer’s roller bunks. Arch Davis reports the displacement of the boat when loaded with fuel, passengers, and motor at 3,350 lbs. Estimated towing weight with the trailer is just under 6,000 lbs. Our boat sits high on our trailer because of the rollers and requires a 10′-high door to get in our shed. A different trailer set up could probably reduce that to a 9′ door height. We have a dual-axle trailer and it cruises well behind our truck at 65 to 70 mph on the highway.
Courtesy of Arch Davis
This Jiffy V-22, built by Robert Mason, carries a 115-hp outboard, the maximum power recommended. He reports the boat does 35 mph at 5,800 rpm, cruises at 25 mph, turns in its own length, and runs very dry.
Power for our Jiffy V-22 is a Mercury Optimax 150-hp two-stroke outboard. Davis recommends power in the 60- to 110-hp range, so we’re a bit overpowered. The original owner told me that sometimes he needed the extra power to get back to the ramp a little faster when the weather changed. I’ve never gotten to wide-open throttle when underway. At 6,000 rpm the boat does over 30 mph. I’m guessing it could get to 40 mph with this outboard, but speed for the sake of speed isn’t that interesting for us. The Optimax 150 weighs in at 455 lbs. A 115-hp four-stroke outboard ranges from 386 to 500 lbs. I’m not advocating for a motor of the size we have, but it does not seem to overload the boat.
Courtesy of Arch Davis
KAREN V, a Jiffy V-22 built by Alan Nephew, is rigged for fishing with rod holders port and starboard at the cabin-roof perimeter and a live-bait well hung from the transom.
The engine is fueled from a 40-gallon stainless-steel vented tank below the cockpit sole. Fuel consumption, of course, varies greatly with speed. The Optimax sips fuel at trolling speeds— just 0.7 gallon per hour—but, according to the gauges, guzzles 9 gallons per hour at high speed. We tested the boat on Casco Bay by running the boat as if it were a displacement hull traveling at 7 knots, and fuel consumption was between 0.9 to 1.2 gallons per hour. We’ll probably repower with a four-stroke motor in the 90-hp range someday.
Dave Ranta
The author’s Jiffy V-22, with its canvas wheelhouse in place, is equipped with a 150-hp outboard. It’s above the range specified in the design, but will get him home in a hurry if bad weather is coming in.
This is our first “big boat,” quite unlike the light, flat-bottomed or semi-V hull skiffs we’ve previously owned. Having a boat with a cabin and a V hull is new, too; in fact, we’ve never owned a boat that I couldn’t pick up one end or the other with another person helping me. This boat is a completely different experience. We love the way the Jiffy V-22 feels on the water. We can cut through wakes and chop with comfort. The boat is dry. It seldom takes a wave or spray that isn’t handled by the chine and windshield. We can get on a plane quickly but also enjoy taking it easy and traveling around at lower speeds. The boat handles well. It responds to small adjustments of the wheel and handles turns at higher speeds without skidding. It is also easy to dock, especially compared to other lighter boats we’ve had that are more affected by the wind.
Arch Davis
On the Jiffy V-22 built by John Edwards, handrails make it possible to tiptoe along the gunwale to get to the foredeck.
After a couple of shakedown cruises in and around the waters of Portsmouth Harbor, we’ve traveled up the coast from Kittery to Ogunquit, Maine, out to the Isles of Shoals, in Casco Bay from Portland out to Jewell Island, and have made several trips on Sebago Lake. It’s a comfortable ride while underway—we felt secure and comfortable on all of these trips. On one outing, we had six adults onboard for a day and the handling was fine; with all the power available, we saw no reduction in either speed or acceleration. Control was still good, and I really didn’t notice much difference while I was at the helm.
The cockpit feels safe and secure, and provides a good balance between being able to handle docklines and fishing gear over the side while feeling safe moving about in moderately choppy water. We did one overnight—our first ever—at Pepperell Cove in Kittery. The cabin is roomy enough for two to sleep and has enough extra space for the porta-potty and making coffee, etc. The opening windows and skylight that we installed allow for plenty of fresh air.
Dana Ranta
The Jiffy V-22 purchased by the author was built with a fabric top to enclose the helm. During fair weather it could be removed to take in the fresh air.
As I mentioned, our boat was built without the cabintop that Arch Davis designed and with a different, lower windshield. We have removed that windshield and I have replaced it with one that matches the original design proportions with the addition of a center window sash that opens to allow airflow into the cockpit. If I were building the boat new, I’d recommend at least one windshield window being openable; it got warm and stuffy on hot days when the top was up. We’ve decided to run the boat this summer with the canvas top, once again. Being mostly fair-weather boaters, we like the option of running the boat with an open top. In early- and late-season boating, there is likely a lot to be said for having the hard top. We’ll make up our minds on that after this season.
We’re happy with the Jiffy V-22. Arch Davis has designed a boat that can be trailered to the places you’d like to explore with the capabilities to handle the conditions you might encounter. We have never taken this boat on the road or the water where folks haven’t given us a thumbs-up or a “Nice boat!” shouted across the way. It really is a nice design.
Dave Ranta lives with his wife, Dana in Cape Neddick, Maine. Dave manages a utility construction team based in New England. Since moving to Maine in 1982, Dave has had a number of different small boats, all wooden. He and Dana enjoy fishing, lobstering, and taking the Jiffy up and down the Maine coast and to the large lakes.
Jiffy V-22 Particulars
[table]
Length/22′ 6″
Beam/8′ 6″
Draft/9″
Displacement/3,350 lbs
Power/65–115-hp outboard
[/table]
Plans for the Jiffy V-22, which include full-sized Mylar patterns, drawings, and building manual, are available from Arch Davis Designs for $325 plus postage and handling. Inquire for plywood kits.
Is there a boat you’d like to know more about? Have you built one that you think other Small Boats Magazine readers would enjoy? Please email us!
Conrad Natzio originally designed the 14′ Sandpiper for a workshop and demonstration at the Boat ’99 show in the United Kingdom. The first four of these attractive little sailing and rowing skiffs were built by groups of beginners with a bit of supervision over a four-day period at that show, using only the hand tools found in a typical do-it-yourselfer’s kit. The primary considerations in Sandpiper’s design were the ease and speed of construction. The Sandpiper is intended for sheltered, shallow water, and inland sailing or rowing. The weight was kept to a minimum to make trailering and launching quick and easy.
My 17-year-old son, Kyle, built the Sandpiper as his senior project that he needed to complete for graduation from high school. Neither of us had built a boat before, but a boat that could be built by beginners in four days gave us hope that we could complete the task in the four months left in the school year. Before ordering the plans, we spent a few hours taping together cardboard strips cut from cereal boxes to create some crude models and prove to ourselves that such an attractive hull shape could actually be achieved by using flat, straight-edged panels.
The plan set supplied by Conrad included two large plan sheets with scaled drawings, and a 10-page booklet—a reprint from Practical Woodworking, the magazine that sponsored the Boat ’99 project—with detailed instructions and helpful photos taken during the construction of the prototype. Our boatbuilding project was given a boost by a master-carpenter neighbor who agreed to become Kyle’s advisor for the project and let us move some of his power tools into our greenhouse-turned-workshop. While this gave us the advantage of having an array of tools considerably beyond the average household toolkit, as well as invaluable woodworking advice whenever we needed it, none of the techniques required to build this little skiff would be beyond the scope of the average skill set.
Photographs by the author
Instead of building the sides of the skiff around frames fixed to a strongback, the sides are bent and the frames are built into them. A long table extended with sheets of plywood supports the work; a strongback is not required.
Construction of the Sandpiper hull is fairly straightforward and requires four sheets of 1/4″ plywood and some 3/4″ lumber for frames and longitudinal elements. Neither lofting, strongback, nor building jig is required. A set of sawhorses that can be fastened to the floor bring the work up to a comfortable level and provides a firm foundation for any required planing or sawing. We made the frames out of 3/4″ Douglas-fir that had been milled from big-box-store 2x4s and then assembled to the plan dimensions with double plywood gussets. (When our carpenter neighbor noticed the finished 3/4″ pieces, he remarked that we could have saved a lot of time by just by buying 3/4″ fir flooring.) Most of the fastening was done with bronze ring-shank nails and polyurethane glue. The straight-edged side panels were glued up from two pieces of 1/4″ marine plywood, as was the bottom panel. To get the lengths needed for the sides and bottom, each panel required a butt-block joint, secured with glue and copper rivets. The 1/4″-thick butt blocks were hardly noticeable in the boat’s interior, and the smooth seams on the outside almost disappeared under a few coats of paint.
The straight-edged panels get their shape from the curve from stem to transom; the bottom gets its rocker and the sheer its sweep from the sides’ flare.
After the ends of the plywood sides were cut to the angle specified in the plans, the attractive hull took shape by bending them around the ’midship frame. We constructed the three main frames and the transom frame from our pile of 3/4″ stock, carefully choosing the best, knot-free pieces. Once the sides were bent and secured to the frames and transom, we flipped the hull over onto a pair of sawhorses to work on the external chine logs, which provide a wide surface for attaching the bottom. They, along with the plywood sides they’re attached to, need to be planed to create a flat surface to accept the bottom piece. A 4′ level was all it took to check the accuracy of the bevel. The oversized bottom panel is held down with weights and traced inside and out to create a perfect fit.
The completed Sandpiper was remarkably light. Conrad claims 132 lbs for the hull, and I think Kyle’s build came in very close to that weight. When doing any seasonal maintenance while the boat is on the trailer, I can easily lift one side up and slip a foam block or cushion under it to gain a little extra clearance over the trailer bunk. I can roll the skiff off the trailer singlehandedly, but I prefer another set of hands if I need to roll it over for any bottom work.
Trailering the Sandpiper is almost effortless, even with our four-cylinder car. It slides easily on the trailer’s carpeted bunks and, if we are planning to sail, we hang the rudder in advance. The design calls for an endplate of double-layered 1/4″ plywood, 4-1/2″ wide on the bottom of the rudder, which keeps it even with the bottom of the hull. The endplate gives the rudder a better grip in the water, especially when the boat is heeled while sailing. The twin bilge keels, as they are called in the plans, are 3”-deep runners on the bottom that are designed to give the Sandpiper windward sailing ability in thin water. They also serve as helpful guides between the trailer bunks to keep the boat aligned on the trailer during launch and retrieval. Set well away from the centerline, these runners turn the boat into a steady platform on the beach, and they help to protect the bottom when dragged over a log or gravel bar on the river.
With a solo rower aboard, the Sandpiper sits lightly on the water.
The three thwarts in the design provide ample seating, and Kyle has made river rowing outings with as many as five young people aboard. The center thwart and forward thwart serve as the rowing stations. We have never shipped two pairs of oars, and that likely would require a passenger in the stern for trim. The bilge keels keep the Sandpiper tracking beautifully under oars while the generous rocker in the hull allows for easy, graceful turns. The boat carries its way well between strokes. The 8’ oars we use are too long to stow beneath the thwarts, so we usually bungee them to the seat risers on either side. When the boat is rigged for sail, the bow thwart is crowded by the mast, but it is still usable as a rowing station for short pulls without dropping the sailing rig.
The bilge keels help with windward sailing in shallow water, but for sailing in deeper water, Conrad includes a scaled drawing for a Bolger-type leeboard, which leaves the space in the center of the boat completely open. A passenger can sit on a cushion between the forward and center thwarts and, with an extra cushion for a backrest, have a comfortable, safe position low enough to be clear of the foot of the sail during tacks or jibes. The absence of a centerboard trunk makes it easy to switch positions and stay on the upwind side. For our camping trips, we added two removable sections of slatted floorboards either side of the central frame to help keep gear and our rear ends dry. The floorboards would be useful for a solo camp-cruiser to provide a flat, dry platform for sleeping, but they also add some unneeded weight. Since we are mostly daysailing in protected waters, we leave them in the garage until they’re needed.
With three aboard, the boat still has plenty of freeboard.
Conrad gives some indications of possible flotation schemes for the Sandpiper in his booklet. Included with the plans are pictures of Conrad singlehandedly capsizing and refloating the boat, but it is evident that he is in shallow water on a calm day and probably standing on the bottom. There is room in both the bow and stern to build in airtight or foam-filled flotation compartments. We considered adding rigid foam under the thwarts or lashing inflatable beach rollers to the seat risers, and if more ambitious expeditions were anticipated, those type of additions might be wise. In our protected sailing grounds, we have not felt that those extra measures are necessary.
The plans provide drawings for a standing (balanced) lug sail or a spritsail sloop with a mainsail area of 57.6 sq ft and a jib of 12.7 sq ft; we chose the latter, and added a sprit boom to keep the sail in a better shape when going downwind while also keeping the cockpit free of low-hanging lumber. The spritsail rig appealed to us for its traditional look and the lightness of each spar. We anticipated a lot of close tacking while river sailing, and liked the idea of being able to back the jib to aid in those maneuvers.
The main is laced to the mast with the throat lashed to the masthead. While it can’t be lowered, removing the sprit and folding the sail along the throat-to-clew diagonal—known as scandalizing—is an effective way of reducing sail area. The jib has a halyard and its two sheets are led through cam cleats set in oarlock sockets (as learned from an article on techniques in this magazine). The mainsheet has evolved from getting looped behind the aft stub of the riser and changed from side to side on each tack, to running through a pulley lashed to the sprit boom and a fiddle block on a rope horse over the tiller.
The single leeboard slips over the gunwale; its two parallel legs, set inboard, straddle the central frame rib. The leeboard’s lateral area is especially effective for sailing closehauled and, with a little practice, the board can be raised easily when coming into a beach or to reduce drag when sailing off the wind. The leeboard sets parallel to the flared side, so it is close to vertical when set on the windward side, and sharply angled when to leeward, but we have not seen much difference in the leeway made from one tack to the other while leaving the board set on one side. The leeboard does not pivot, so we have suffered a few unfortunate groundings at speed that snapped one of the supporting legs. This season we will be experimenting with a pivoting board set on a robust frame.
The spritsail sloop rig carries 57.6 sq ft in the main and 12.7 sq ft in the jib. The sprit boom was added by the builder to increase the spread of the main on downwind runs.
The only major modification we made to the original design was purely an accommodation for this aging skipper. The sprit rig uses three spars (mast, sprit, and sprit boom), which all stow within the boat for trailering. For 10 years I was happy picking up all three spars with the sails laced on and slipping the mast butt through the forward thwart and into its step. But last year, on increasingly unsteady legs, I found it more difficult to get the mast raised safely. We have constructed an oak tabernacle so that I can easily and safely pivot the rig upright. With this new arrangement I hope to derive another decade’s enjoyment of this sweet little boat.
One of the nicest things about the Sandpiper is the number of gratifying compliments it receives, whether launching in the Connecticut River near our home, in coastal waters around New England, or sitting on her trailer in the driveway. The building, use, and maintenance of this fine little craft have taught us all some valuable lessons and provided countless hours of enjoyment. It can carry a small family to less crowded beaches for a picnic, handle a little rough usage by a group of teenagers, and, with a few more minor modifications, may yet propel this older person gracefully into the sunset. Easy on the eyes, quick to launch and rig, it is just plain fun to sail.
Dan Pratt lives in the Pioneer Valley of Western Massachusetts where he almost swallowed the anchor 30 years ago to start a small organic farm. Canoeing on rivers, lakes, and ponds for over a decade left him wanting more than just the wind in his hair, and created a craving for wind in a sail. Having turned his back on small-boat racing and Buzzard’s Bay camp-cruising so many years ago, he was delighted when his youngest son took up boatbuilding.
Sandpiper Particulars
Length: 13′ 9″
Beam: 4′ 8″
Hull weight: 132 lbs
Sail area, sloop: 70 sq ft
January 2024: The designer’s website is no longer active but plans are still available. You can reach designer Conrad Natzio via email at c.natzio@btinternet.com or by phone in the UK at +44 1394 382537.
Is there a boat you’d like to know more about? Have you built one that you think other Small Boats Magazine readers would enjoy? Please email us!
Maybe it was not meant to be. My cousin, Mark Kelly, and I were halfway through the second day of a nine-day trip from Alligator Point, Florida, to Pass Christian, Mississippi, sailing MYRNA C, my Norwalk Island Sharpie 23. On the first day, we had made only 17 nautical miles despite sailing for 10 hours. We had 310 nautical miles to go.
Photographs by the author
I trailered MYRNA C from Pass Christian, Mississippi, to Alligator Point, Florida, one month prior to the trip to maximize the vacation time Mark and I would have for sailing. Jim Hill let me keep my boat at his dock on the canal, which is just across the street from our family’s house. We made final preparations for departure here.
On this second day, the aluminum booms of the main and mizzen clanged against their blocks as we wobbled west, several miles off of St. George Island’s shore, which was visible only as an eggshell-thin line of sand, dotted with pastel beach houses. We had strayed farther out into the Gulf of Mexico searching for stronger winds, but the wind continued to fall away to a meager 6 knots.
The sun burned through the overcast sky and radiated heat like a stove in a sauna. A long, nauseating swell rolled from the southeast. The mainsheet hung limply over the lifelines and drooped into the water. The trip was at risk of turning into nine days of motoring and Mark, an avid canoeist who had done very little sailing, began to talk up the advantages of paddling.
He and I had conceived this trip in the summer, when the winter COVID surge was a theoretical risk. Amid life in endless quarantine, it had slipped my mind until we were catching up on the phone in December after I had been vaccinated and Mark expected his shot within days. Suddenly, a trip together seemed possible.
As we sailed across Apalachicola Bay on the second day, we spread the spinnaker out on the cabintop to dry. We had tried to fly it that morning in an attempt to continue sailing offshore in order to avoid the Intracoastal Waterway, but the wind was too low and the swell too high to keep it flying
As an internal-medicine resident in Los Angeles, Mark had been working the COVID wards, and was burned out. In my general-surgery residency in New Orleans, we were spared primary responsibility for COVID patients, but we did make the tracheostomies, place feeding tubes, and insert long-term dialysis lines for the sickest patients. Mark and I needed a break from seeing the dissolution of life from the virus. Both of us needed renewal.
But what we had found so far on our much-needed vacation was frustration. Defeated by two days of light winds and sail-collapsing swells, we turned on the outboard and headed for Government Cut, a man-made 500-yard-long passage through St. George Island. As we approached, two granite-boulder jetties reached out from the low, barrier island sand to lead us from the Gulf into Apalachicola Bay. On the east side of the Cut, blocky mansions leered imperiously over the inlet. From their second-floor porches, wooden steps poured down to boardwalks that stretched across the scrubby dunes and the bay to their docks and their boats. On the west side of the Cut, the other fragment of St. George was uninhabited; palmettos, sabal palms, and sea oats held the wild dunes in place despite storm surges washing over it and the constant scouring of wind and tides.
Once we motored clear of the island, we raised the sails again, more out of obstinacy than from anticipation of pleasant sailing. There still wasn’t much wind and we crept northward, making only around 3 knots. The bay’s water was dirt-colored and the sky remained dull and gray, amplifying the malaise on board. Mark’s enthusiasm seemed to be waning, but he stayed upbeat, perhaps to counter my worries over whether he was enjoying himself.
A dredging pipeline ran along the channel from the Cut to Apalachicola, attended by barges and tugs. The grease and rust, thick ropes and cast-iron cleats contrasted with our bright blue, dainty plywood hull and white sails. As we passed one barge, we saw two workers in tattered jeans, gray T-shirts, and survivor orange life jackets sitting on spools of cable. They were hunched over, gazing into their phones, oblivious that we were passing within 50’ of them. The indifference of the workers toward us underscored my growing feeling that our whole trip was flawed and futile.
Roger Siebert
.
It took us two long hours to make the 6-nautical-mile crossing of Apalachicola Bay. The town of Apalachicola, occupying the point of land where the Apalachicola River spreads into the bay, was largely hidden behind tall, tan-colored reeds. Above the reeds, silver roofs flashed between runs of rolling pine. We passed under the Highway 98 bridge and started the engine again—the river’s current was too much for the meek breeze—and motored along a sleepy, salt-aged riverfront. Shrimp boats in every color of flaking paint lined the bank, tied up to listing, sun-desiccated docks.
We stopped in town for several dozen oysters and a few beers as consolation for two windless days, then continued up the river (which is part of the Intra-Coastal Waterway) at dusk, toward St. Joseph Bay. Starlight slipping through spindly cypress on the banks guided us up the main channel. The engine banged away like a lawnmower. Two hours later, we dropped anchor for the night in Lake Wimico.
After beer and oysters at Up the Creek Raw Bar in Apalachicola, we motored up the ICW at dusk. The railroad emerges from the swamp to cross over a swing bridge, which was in the open position for boat traffic.
Warm, yellow light glowed from the cabin as we raised the centerboard and rudder, reducing our draft to a scant 12″. Mark set out the cushions on his berth to starboard of the centerboard trunk. Forward, I put sheets over my half of the V-berth, the other half occupied by our bags. We fell asleep to the sound of the centerboard occasionally shifting in the trunk; the water and wind were still.
The cabin on MYRNA C is more like a floating tent than a yacht. She is just shy of the bare necessities.
We woke in the morning to fog so dense that we would never glimpse the shore of the lake. Mark pulled out the galley kit from the port side of the centerboard trunk. We put the Coleman stove just in front of the cabin hatch and got coffee going. The main boom was tied off to a stanchion to starboard to keep the sail away from the heat rising from the stove.
I wasn’t thrilled to be in the ICW, but Mark loved seeing the swamp up close. As we motored along Searcy Creek, he spotted several bald eagles, herons, and osprey.
The water remained still—not good for sailing, but excellent for making a hash of potatoes, onions, egg, and Manchego cheese while motoring. As I cooked, Mark steered us by GPS out of Lake Wimico and then 7-1/2 meandering nautical miles in Searcy Creek, flanked by dense stands of cypress and red maple standing over an endless swamp. The remaining 5-1/2 nautical miles to St. Joseph Bay were along the ruler-straight, Gulf County Canal, a 100-yard-wide cut flanked by clear cuts, building-sized piles of sand, and a shipyard. Osprey and bald eagles winged overhead, making do with what wilderness loggers had left behind.
As we emerged from the canal, men in waders wandered the turtle grass shallows of St. Joseph Bay casting for trout. The opaque, gunmetal blue water was motionless as if turned viscous and the air was thick with humidity. We motored across the dead-calm bay to St. Joseph Peninsula, where we tied up at the state-park marina to wander the powder-white dunes, at 35′, the highest in the state. As we walked the beach, the southeast swell that had frustrated our efforts to reach this place in the Gulf pushed foam up the sloping beach in lazy, draping ribbons.
The forecast that evening called for a nor’easter to bring winds of 15 to 20 knots, and we intended to sail overnight to make the most of it. I tried to prepare Mark for what the night might bring—wind-driven spray, enough tension on the sheets to make trimming a real effort, and the likely need to reduce the amount of sails we had up to go faster. It wasn’t getting through.
The now three windless days had given him the impression that sailing was only longing for wind that never seemed to come. I was nearing the same conclusion. If this front failed to materialize, then it was likely that our vacation was headed toward a bailout far short of MYRNA C’s slip in Pass Christian—and a mess of logistics.
But as we walked, the southeast breeze strengthened slightly. The undifferentiated gray sky formed billowy cumulus over the mainland to the north. The approaching low was sucking moisture toward itself. The atmosphere was charged with impending change.
Mark stopped and asked, “Do you feel it?” I did. We hurried back to MYRNA C.
Approaching across St. Joseph Bay, a nor’easter brought the wind we had been waiting days for.
After a gentle sail north on the bay side of the peninsula, we rounded the tip of St. Joseph Peninsula and passed through the 2-nautical-mile gap into the Gulf, just as the nor’easter was nearly on us, starting to spit rain, and accelerating the southeast breeze to a robust 15 knots. The booms were eased just beyond the lee rail, which was barely above the sea rushing around its curve. Mark and I were perched on the opposite gunwale and the windward chine below us was flying several inches above the water. We were making 6.5 knots: the stem churned a steady cream of white water and the trough of our bow wave stretched aft, just shy of the stern.
About ten minutes later, the front swept in. The sabal-palm-lined coast vanished behind the rain and the wind seemed to be pulled by its ear from southeast to the north. The breeze hissed through the masts and rigging. Whitecaps crowned every wave; foam sheared off the crests and streaked across the troughs.
The lee rail was now buried under the jade sea almost continuously—not how the MYRNA C likes to be. We needed a reef, stat. Mark brought the bow into the wind and handled the sheets and halyards as I crawled onto the foredeck, the EPIRB in my zippered life-jacket pocket and trailing a long tether, to drag down the crackling mainsail. As I tied two reefs into the main, I turned back to see Mark staring at me, as if astounded that he had decided to take time off from Los Angeles’ COVID ICUs to spend his vacation with a lunatic who would undoubtedly cost him his own life. It was about 5 p.m. by the time we got the reef in.
The wind had strengthened to 20 to 25 knots with higher gusts. MYRNA C, flying only her double-reefed main, felt spry despite these conditions, a special feature of sharpies as they have no heavy keel to make their movement in heavy seas laborious. Nonetheless, Mark was finding the sea state difficult. After briefly ducking into the cabin, he emerged to complain about the smell of gasoline, and then vomited into the cockpit. He then got back on the rail, his eyes fixed ahead. The only way through this was through it.
We started making our way west again. We were about 20 nm from the inlet at Panama City and 4 nm off the coast. Everything was gray now, and then, as the sun dipped below the horizon, just black.
The wind had shifted a little more to the east and we sailed on a close reach toward Panama City, whose lights appeared then on the horizon as an apocalyptic mauve glow. The only other lights were the flashes of green and red spray dashing in front of our navigation lights and our headlamps on the sails as we watched the luff.
We reached closer to shore along St. Andrews State Park, and in its lee, we were able to raise the reefed mizzen. We made 6 knots in the calmer waters. The city’s glow outlined sabal palms growing behind the dunes and farther west, condominium towers, dark but for a few lit windows, swirled with mist. Around 9 p.m., we reached the Panama City inlet. We turned on the engine with relief for once, and motored through the choppy ¼-mile-wide pass. Three small Coast Guard boats, whose lights we had seen coming in from offshore, overtook us. I wondered if the crews were surprised we had not called them for assistance.
Grand Lagoon, Panama City’s harbor, was pitch black, and its channel-marker lights were lost in a deceitful mashup with lights on shore. Mark and I had to yell to hear each other over the din of the engine and the wind. We first tried to tie up at the state park landing. Mark stood on the bow—his sea legs seemed to be coming in—dockline in hand. As we neared the dock, I could tell he was wavering between fending off or jumping on to land. He made the leap, but came up short. I heard the splash and then silence. Just to port, I saw his headlamp shining up through the water from the muddy bottom.
Damn, I thought, all that hard sailing and Mark knocks himself out right when we get to shore. I yelled, “Mark!” And then I could just make out Mark’s silhouette. He was standing in about a foot and a half of water. Fortunately, his headlamp had fallen off his head and only it was underwater. He was soaked and shivering. He got back on board and into dry clothes. This wasn’t going to be a good place to tie up.
I looked at the chart for other options. We decided to try Bay Point Marina. Back in the black harbor with our spotlight, we noticed that some channel pilings had no sign boards. On others, the reflective tape fluttered in the wind like tell-tales. Ahead, where we expected to see the lights of the marina, there was only more darkness.
We looked again at the chart and GPS. By those accounts, we were in the middle of the marina, but in reality, we were surrounded by open water. I later learned that the marina had been destroyed a couple years prior by Hurricane Michael, and all the pilings and docks had been pulled up to start fresh.
We threw off our anchor. Mark went to sleep without dinner. I made a peanut-butter sandwich for myself, then rearranged my area of the cabin into equally disorganized arrangements, burning off adrenaline from the day until I could sleep.
We woke to gray. The water was gray. The storm-tattered condominiums to the north were gray. The clouds were gray and drizzling. The northeast wind blew, unabated. Across the harbor to the southwest, in a cluster of marinas, boats bobbed in their slips, windward lines taut. Hundreds more boats were stacked in giant dry-storage racks; hundreds of thousands of horsepower, cold and still. On board MYRNA C, swinging on her anchor, we prepared for the day.
I suggested to Mark that we could take the sheltered ICW to the town of Destin, but the crucible of the night before had not daunted him at all. We would return to the Gulf, and this time hug close to the beach to exploit the north wind without subjecting ourselves to the chop.
Amid the gray, we raised our sails, still deeply reefed from the night before, and shot east back through the Grand Lagoon. We jibed into the roiling inlet, where the outgoing tide joined the northeast wind to drive MYRNA C, running wing-on-wing, to sea. A thin slab of slate-blue clouds lay across the horizon to the south. Gray clouds stretched up overhead all the way to the northern horizon where purple clouds assembled, a bullpen of rain bands to come.
With the temperature in the 50s and the wind blowing at 20 knots, Mark, right, and I bundled up for the run from Panama City to Destin.
The Gulf was lonesome. For the 45 inlet-less nautical miles between Panama City and Destin, we were the only boat making the passage. All day, we sailed past an endless white sand beach. Perched on top of the dunes, there was an equally endless stretch of beach homes and condominium towers, packed tight like books on a library shelf. They all looked empty today, spoiling the landscape for nothing. The wind tumbling past the buildings came at us in furious gusts separated by long lulls. We eased offshore to where the wind began to run free and steady again.
We ran a beam-to-broad reach and averaged 6 knots. The sharpie shines off the wind; its flat bottom more like a surfboard than sailboat. As the wind gusted upward of 20 knots, the boat strained to crest its bow wave. When I was at the tiller, my biceps burned from fighting the weather helm. Every 30 seconds or so, balance returned as MYRNA C hurtled down the face of a wave, soaring past her hull speed. We carried on this way for about 7 hours. Our top speed for the day was 9.5 knots.
Squall after squall renewed the winds on our starboard quarter, though the blows diminished over the course of the day. By late afternoon, our full spread of white sails was back aloft, bright against the sapphire of the sea and the still gray skies.
Choctawhatchee Bay was pouring out of the inlet at Destin when we arrived at 4:30 p.m. The murk of the bay carved a sharp demarcation through the limpid water of the Gulf. Despite the ebb flowing against us, we still made 5 knots through the 300-yard-wide entrance, though we soon after needed an assist from the engine to get under the twin-span bridge where the bay funnels into inlet. We then headed west for Brooks Bridge Marina on the ICW, where we planned to tie up for the night.
As we slipped through the shallows along the sandy, pine-lined bay shore of Okaloosa Island, we looked behind us, to the east, to see that the sky had darkened beyond anything we had seen all day. Beneath the towering clouds, an army of whitecaps advanced across the bay. A chill curled into the cuffs of my jacket sleeves. Then the rain came, pouring over us like ice water. The thrill of surfing down waves all day drained out the scuppers.
Since we were running downwind, we tried to sail through the squall with full sails but even though the unstayed carbon-fiber masts flexed to dump air, it wasn’t enough to hold off an untamable weather helm. We took down the main, and carried on with mizzen for a while, and then with just the motor to reach the marina. Freezing and beaten down, we huddled in the cabin. I called a friend of mine from medical school, Robby Ashley, who lives in nearby Fort Walton Beach. He came to pick us up for laundry, pizza, and a much-needed night on shore.
Robby had to get to the hospital for work by 6:30 a.m., so we got an early start the next day. Exhausted from the previous two days of sailing in the Gulf, we decided to take the well-protected ICW for the 35 nautical miles to Pensacola.
As we motored out of the marina, there was a northerly breeze blowing across the ICW, so we raised sails immediately. The first 10 nautical miles of the ICW here are called The Narrows. On the still water, we ghosted past bright green manicured lawns at the foot of brick and stucco homes. About a third of the way through, the channel takes a quarter-mile dog leg to the north. For 20 minutes, we tacked upwind in a 70-yard-wide channel between marsh islands to round the corner. Then, tall pines obstructed the wind almost completely, and our progress slowed to 1.5 knots. We heard the morning announcements from the PA system of a nearby school as if we were in homeroom ourselves. Songbirds flittered in the trees, singing. White egrets strolled the shore, poking in the marsh for breakfast.
The calm seemed inescapable, and I suggested giving up and turning the engine on. Mark questioned my purity and, being stubborn, I took the bait and we carried on under sail. Within a few minutes, the lee rail descended, and we were on our way again. We accelerated past Hurlburt Field Air Force Base, its runway allowing a roaring breeze to run free and blow across the channel.
After days of overcast skies, the sun finally warmed us up as we sailed down breezy and protected Santa Rosa Sound from Fort Walton Beach to Pensacola Bay.
The passage slowly widened, and soon we had made it through the Narrows and into Santa Rosa Sound. Overhead, the cerulean sky was covered by a thin, patchwork of clouds that the sun burned off as the day progressed. We made a joyful 5.5 knots on crisp, blue water topped with tumbling white caps. Santa Rosa Island lay to our south, a long, electric-white bar of sand, too skinny and low for homes or trees. To our north, the mainland shoreline, mostly pine dotted with modest beach homes, arced like velvet rope along a queue before running straight west toward the rendezvous with Pensacola Bay at Deer Point. There, we turned north to work upwind for Pensacola Harbor under a spotless sky.
Gusty winds in Santa Rosa Sound demanded frequent sail trimming and repositioning of crew weight.
That evening, we anchored in Bayou Chico, a mile from downtown, sandwiched between a tugboat base, a salvage yard, a highway bridge, and the very proper and trim Pensacola Yacht Club. An acrid, oily odor wafted over our still anchorage. Amid these implements and rewards of industry, we watched an osprey perched on a mast devour a catfish, blood dripping onto the deck below.
We sailed off anchor in the morning, tailed by the tugboats trudging to the day’s work. We slipped past the yacht club and emerged into another shining blue day on Pensacola Bay. We headed south for the Gulf with 10 knots of breeze on our quarter.
We made it out of the Pensacola Bay’s inlet—the 2/3-mile gap between Santa Rosa and Perdido Key’s slender eastern peninsula—and sailed into the emerald Gulf, and crossed over a shallow, sandy bar on the west side. The water was so clear we could see individual grains of sand on the bottom 3′ below us. But the wind soon died completely and our speed dropped below one knot. Unfortunately, we had to motor.
Needing a break from the engine on our way from Pensacola to Stone Quarry Bayou, we anchored in the emerald waters offshore of the Flora-Bama Bar and waded ashore to see what the fuss was about.
A few hours later, exhausted by the noise, vibration, and monotony of the engine, we anchored just off the beach from Flora-Bama Bar, a notorious live music venue situated on the Florida–Alabama state line. We waded ashore in waist-deep water, holding our dry clothes, wallets, and towels above our heads. On this cool day in early March, about three dozen snow birds (northerners who spend the winter in Florida) were playing Bingo in an outdoor covered area. The crowd was a far cry from the raucous spring breakers I had associated with the place.
Upstairs in a dim, neon-lit lounge, two gray-haired men strummed covers of songs by Merle Haggard, John Prine, and Hank Williams. We sipped cheap draft beer and downed a few dozen oysters. The wind strengthened in the afternoon, but it was from the west, useless to us: MYRNA C does not excel upwind. We stayed for another couple of sets. In the late afternoon, we motored 10 more nautical miles into Perdido Bay. Just before dark, we dropped anchor in tiny Stone Quarry Bayou, a 1,000′-long by 200′-wide pine- and cypress-lined cove.
After anchoring next to a shipyard in Pensacola, waking up to pine and cypress in Stone Quarry Bayou was a welcome change of scenery.
We woke up pre-dawn to get motoring through the ICW out of the way. As we prepared to leave, a fiery sunrise traced delicate pine trunks as they rose to filigreed crowns. By 8 a.m., we were done with the engine and had entered Bon Secour Bay, in the southeast corner of Mobile Bay.
We weren’t thrilled to be motoring after leaving Stone Quarry Bayou, but the still water at sunrise made up for the racket of the outboard.
With a steady 10-knot east wind, we pushed west, wing on wing, at 4 to 5 knots. For a couple of miles, we were shadowed by a lone man in a beat-up center-console tending his crab traps. His line of white buoys ran along the channel like a string of pearls. His black Lab stood in the bow, barking at the pelicans that swarmed the boat at each trap.
We crossed the vast lower end of Mobile Bay sailing wing-on-wing. For much of the way over, we puzzled whether the oil platforms there were still active.
We sailed steadily across the vast Mobile Bay, some 20 nautical miles. Old oil platforms dotted the horizon. A rust-coated small tanker with a Greek flag slogged up the bay—we had passed from Florida’s tourist beaches to the industrial coasts of Alabama and Mississippi.
On the west side of the bay, we slid under the Dauphin Island bridge in the Pass aux Herons with a 12-knot breeze at our back. We had entered Mississippi Sound, my home waters, after six days of sailing. I went below for a nap. My ear was pressed against the plywood hull and I heard chirping under water. I came back up on deck to find Mark, who was born in Wisconsin, grinning as a pod of a dozen dolphins swam alongside us. They stuck with us for two hours, Mark’s entire shift at the helm.
We used paper charts for navigation, and the handheld GPS to keep track of our top speeds. Here, Peter measured the distance across Mobile Bay.
With the exception of Dauphin Island to the east, the barrier islands in the Sound are National Seashore and so have remained undeveloped. Though not protected, the mainland from Mobile Bay to Pascagoula is lowlands and marsh with only scattered, small settlements. While the area appears pure and untouched, squiggly purple lines on the chart indicate pipelines running between the islands, rushing oil from offshore platforms north to refineries in Pascagoula.
Once well into the Sound, we headed northwest to the marshes between Pascagoula and the town of Bayou La Batre, which, from what we could tell from the binoculars, is home to a large shrimping fleet and a casino. We anchored in an old channel near a sandy, pine-lined road that ended in the ruins of a wharf. With the gray sky, pale marsh grass and sunless sunset, the place felt haunted. We imagined it was once the coastal access for an antebellum plantation.
Mark’s birthday brought strong winds and this sunrise as we hit the trip speed record, 10.7 knots, heading from the marshes near Bayou La Batre to Ocean Springs just after dawn.
We woke at 3:30 a.m. the next day to take advantage of the forecast strong northeast breeze to sail to Ocean Springs and then carry on to Cat Island.
We sailed off anchor in the dark, the sky faintly lit by the hellish glow of Pascagoula’s refineries, and headed south to stay clear of the shallows along the mainland. As we moved deeper into the Sound, the wind, uninhibited by the trees, gathered strength. Soon we were steaming along with full sails, wing-on-wing, in 20 knots of breeze, pushing an average of close to 8 knots.
At the first rays of morning light, we turned up to a broad reach. The weather helm became irrepressible. Mark, who was a sailing novice just a week ago, suggested a reef. I agreed that we were close to that, but I wanted to try to adjust the sails first. I eased the mainsail and immediately, a great burden was released from the boat. Perfectly balanced, with pressure on the tiller no more than if we were sailing at 4 knots, we accelerated to an exhilarating 10.7 knots. For 30 minutes, we careened down wave after wave on 10-knot runs until rising winds and shoals forced us into a heading further upwind that required reefing the sails.
We carried on past a tangle of navigation aids outside Pascagoula’s refineries and on to Biloxi Bay, which led us into Ocean Springs. The town sits on rolling hills that run right down to the water, a unique topographic feature in these coastal plains. Giant live-oak trees spread their canopies over streets and homes. The downtown is vibrant with restaurants and shops, though the pandemic seems to have taken its toll: the family-run deli I had eaten at the last time I was here was now shuttered. We had greasy egg-and-cheese bagel sandwiches at Lil’ Market and visited the art museum to see Walter Anderson’s watercolors of Horn Island, which he visited by rowing an unseaworthy skiff 6 nautical miles from the mainland.
It was by then early afternoon, and we needed to set sail to make the 12-nautical-mile open-water crossing to Cat Island, by nightfall. We cruised Biloxi Harbor, past its crowd of casinos on wharfs over the water—Harrah’s, Golden Nugget, Hard Rock, and Beau Rivage—before turning into the Sound. A 12-knot north wind carried us at 5 to 6 knots.
Smugglers Cove on Cat Island was our last and best anchorage.
Cat Island is T-shaped and, oddly for a barrier island, its beach runs north–south, which is perpendicular to nearby Ship Island and every other barrier island on the north Gulf coast. Midway along the beach, a 4-mile extension of high ground runs east–west with dense pine and live oak forest anchoring its spine.
We made it to Phoenix Shoal at the southern tip of the beach at 5 PM. We crossed the 2′-deep bar with the centerboard up and the boat heeled way over, taking advantage of our shoal draft to cut miles from the end of the passage. We settled up against the beach in Smugglers Cove as the sun fell below a cloudless horizon.
In the last year, because of the isolation imposed by the pandemic, I’ve spent some 10 nights anchored at Cat Island. Of all the barrier islands in Mississippi Sound, it is the only island where development, save a couple radio towers peeking above the tree line, is invisible. The only sounds come from the wind, waves, and birds. It is my place of total peace.
Mark understands the appeal. We kedged close to the beach and went for a short walk in the twilight before returning to the boat. It was our last night—and Mark’s birthday. We celebrated by adding a can of chickpeas and tuna to the mac and cheese.
The beach at Cat Island is expansive and silent.
The next morning, we didn’t rush to return to land. Mark was due to return to the ICU in Los Angeles, and I was headed to Houma, Louisiana, in the bayou, for two months on a rural surgery rotation. We woke at daybreak and went for another walk. The tide was way out, and the beach stretched wide like a desert, with sand so white it looked like snow. Trash cans swept from the mainland in the spate of hurricanes last fall, were half-buried in the beach. A large, rusting tank leaned against the dunes, the sea air doing its best to dispose of it. We crossed over the shoulder-height dunes to a sandy road crowded by forest that took us into the interior. Within minutes Mark spotted two birds on his bucket list: an American kestrel and a Mississippi kite.
The interior of Cat Island teems with birds soaring over marsh creeks lined with pine and oak.
Shortly after, we reluctantly hoisted our sails and eased away from our anchorage, headed 10 nautical miles northeast, home to Pass Christian, Mississippi. Despite nine days of constant motion and hard sailing, neither of us was exhausted. We had been renewed.
Peter Sawyer is a general surgery resident in New Orleans, Louisiana. He learned to sail when he was 11 years old at Camp Sea Gull, a seafaring summer camp on the North Carolina coast. He has been at it ever since.
The author wishes to thank his parents, Paul and Jonette Sawyer, for providing a home base for this trip at their home in Alligator Point, Florida, and for asking questions that needed to be asked. He apologizes to his mom for making her worry and to his dad for having to hear about it. He also thanks their neighbor, Jim Hill, who let him keep MYRNA C at his dock for a month prior to the trip.
If you have an interesting story to tell about your adventures with a small boat, please email us a brief outline and a few photos.
Skipper and I have been pushed around by boat trailers since we were kids, and between the two of us we have been taking road trips with boats for over a century. Gearing up for this year’s boating, we got together with our friend Eddie, a professional trailer builder, to compare notes on best boat-trailering practices.
The item at the top of our list is keeping the boat light. While a boat for cruising can carry a lot of gear when it’s in the water, it should not be loaded down with excessive weight while on a trailer. Eddie has seen bent axles as a result of overloaded boats, and Skipper and I, with plenty of experience repairing damaged boats, know that lightly built hulls don’t tolerate the extra load. And, for the sake of the trailer, the combined weight of the boat, the gear it has aboard, and the trailer itself should not exceed the trailer’s total capacity, which is noted on the manufacturer’s tag. We load as much of our cruising gear as possible—especially the heaviest things like fresh water, anchors, and trolling-motor batteries—in the tow vehicle. Shifting the weight will ease the stress on the trailer, improve its performance on the road, and keep the boat and its gear from getting damaged. Trailers for small boats may have springs but not shock absorbers, so the boat and the gear will get a much bouncier ride than you do in the towing vehicle. The impact of the boat on the bunks or rollers and of the gear against the boat can cause damage.
Photographs by the authors
Moving gear out of the boat and into the towing vehicle makes trailering safer. Along with the cruising gear we carry in the car is a set of tools for any roadside fixes the trailer might need.
The few items, such as rudders and oars, that are transported while on the cockpit sole get cushioned with beach towels. We use throwable cushions and our old PFDs as padding for the spars that ride in the boat and use docklines to tie them down. Sail ties secure the furled sails to keep them from flapping and wearing at freeway speeds. We use a transom-saver on our 15′ runabout’s outboard to keep its weight from straining the transom. When we trailer our 19′ sailboat with the motor in its inboard motorwell, we rig a line from the part of the transom that spans the well to the lower unit to reduce the effect of road bounce and stress on the motor mount. Centerboards should be secured and prevented from dropping in case whatever normally holds it retracted in the trunk fails. We have bunk rollers placed to support the keel at the middle to aft portion of the trunk slot to prevent the board from dropping down and leaving a trail of sawdust on the pavement. Locker and hatch lids should be locked or pinned lest they take flight on the freeway.
Full fuel tanks are heavy but not safe to carry in the passenger compartment of the towing vehicle; even the vapors coming from an empty can are unhealthy. Transporting them securely tied to a roof rack is advisable if the vehicle can accommodate them or consider carrying empty containers in the boat with a plan to fill them when you get close to the put in. Plastic containers will do less damage to the boat than metal gas cans.
Inflate the tires up to the maximum pressure indicated on the sidewalls. Air hoses at gas stations are inconvenient and often charge for the use, hand and foot pumps are impractical, so an electric inflator is a good investment in tire maintenance. Fill tires when they are cold, before you drive—the maximum indicated takes into account the increase in pressure due to hot weather and long highway drives. Check and fill the towing vehicle’s tires while you’re at it. Lug nuts usually stay secure as long as they have been properly torqued after a wheel change, but to be on the safe side, bring a lug-nut wrench along on the first tire check of the season.
Pull on the tops of the tires to check for loose bearings—there should be some play, but no more than 1/8″— and leave the window down for the first few miles of a trip to listen for a squeaky or crunchy bearing. It may need some grease. If it has the play required and grease doesn’t eliminate the noise, the bearing may be bad and unsafe on the road, especially at freeway speed. It’s best to head home and replace both bearings in that hub. (When one bearing fails, it usually heats up the grease, the grease fails, and then the other bearing is compromised.)
Ratchet-strap mechanisms are very powerful and should be used carefully to avoid damaging the boat.
Surprisingly, not all folks use boat straps aft or transom straps, but we recommend them. We use over-center straps or ratchet straps, because we have not had good experiences with the cam-buckle straps. Ratchet straps can exert more than 2,000 lbs of force; they should be snug but not so tight that they stress and crack the hull. We also tie a second line from the bow eye to the trailer bow stop to supplement the winch hook; some trailers come equipped with a safety chain for the bow eye.
At around 1 mile, 10 miles, and 100 miles, as well as whenever we stop, we check the boat and whatever is stowed aboard and tug all of the straps to see if they’ve loosened. We check the bearings and tire sidewall temperatures with a touch to make sure they’re not getting hot. We also check the lights.
A padlock on an outboard will help keep the mounting screws from vibrating loose on the road and discourage theft in a hotel parking lot; we use locks on trailer couplers as well. If you have a hitch receiver, a locking receiver pin or a cable lock from trailer to tow vehicle provides additional security against theft. A boat cover designed for trailering will prevent an open boat from becoming a swimming pool during a downpour, and provides a bit of security for any gear kept aboard during overnight stops. If you trailer an open boat without a cover, be sure the drain plug is removed, because there needs to be an escape path for water if it rains. Some folks have built and installed drain-plug keepers near the trailer coupler to serve as reminders to remove and install the plugs.
To deal with breakdowns on our long-range trips, we carry a grease gun, rags, either a spare set of grease-packed bearings or a hub with bearings already installed, along with the spare tire, a tire inflator, lug wrench, and jack. Our small toolkit contains boat registration, channel-lock pliers, screwdriver, duct tape, multipurpose tool, and is adorned with a BoatUS sticker with the toll-free number to call for tow assistance. We live large and pay for the BoatUS tow package that includes both water recovery and land towing for not only the boat trailer, but for the tow vehicle as well. AAA and Good Sam also offer boat-trailer towing with RV membership options.
Plan for a slower trip than you’d make without a trailer; it will be easier on the boat and easier on the nerves. Once in transit, Google Maps on your smart phone, your vehicle nav system, or other GPS driving aids will show real-time delays that factor into tactical trip planning. Maneuvering in tight spots requires skill; in rest stops we usually head to the trucks-with-trailers side for the added room and exiting without backing. At stores and gas stations we head for places where there aren’t any other cars. If we do get in a tight spot, instead of backing down or trying to turn the entire rig around, we’ll unhook the trailer, turn vehicle and trailer separately, hook everything back up, and be on our way.
As a former Marine aviator and a current Airline Transport Pilot, I have always had checklists to get me safely from place to place. Having one for trailering assures that Skipper and I arrive at the launch with boat and trailer in good shape.
“Clark” Kent and Audrey “Skipper” Lewis mess about with their small armada of 15 boats and four trailers. Their boat-trailer trips have included hauls from the Gulf Coast to the Pacific and back, and up to the Great Lakes. Next stop, the Chesapeake. A sample checklist can be found on their blog, Small Boat Restoration.
Eddie English of Milton, Florida, owns and operates Eddie English Co., Inc. creating custom boat trailers for the past three decades.
Editor’s Note
Trailer lights are my most frequent boating problem, so I’ve learned to check them often. When I go boating solo, it takes me a few trips from the car to the back end of the trailer to check the turn signals, tail lights, and brake lights. The first two functions are easy enough—those lights can be turned on—but for the brake lights, I need something to press and hold the brake pedal. I used to lean a brick against the pedal, but I’d always leave it at home—I wouldn’t want it flying around in the car in the event of an accident. I’ve since made four devices to press the pedal, and the two here have worked very well.
Photographs by Christopher Cunningham
This brake-light tester has a piece of plywood with a 1/2″-wide slot to slip onto the brake pedal. A pivoting stick 10″- to 12″-long works like a kick-down door holder. The sharp square edge at the bottom of the stick helps it grip the floor mat or carpet.
This 32″ length of 3/4″ dowel extends far enough beyond the steering wheel that, when its cord is tightened, it can depress the brake pedal. A skinny V-shaped notch in the dowel’s end holds the cord tight.
The 32″ dowel was too long to store inconspicuously in the car, so I cut it in half and used a 6″ length of 1/2″ plastic water pipe, sawn down one side to fit the dowel, as a sleeve to join the pieces. The ends of the dowel are tapered slightly to make them easier to insert into the pipe.
When the dowels are bundled with the pipe and wrapped with the cord, the device is easier to store. The notch in the end of the dowel keeps the cord tight.
If the trailer lights don’t pass muster, I have to find where the problem is. After reading the article Kent and Audrey wrote on LED trailer lights, I made the switch from incandescent fixtures, so burned-out bulbs and corroded sockets are no longer an issue.
A trailer-light tester can check the wiring connection on the towing vehicle.
I have an inexpensive tester that plugs into the vehicle socket. It will illuminate its LEDs to verify current coming for left and right turn signals, tail lights, and brake lights. If any of the tests fail, checking the fuses is easy enough and doesn’t require groveling at the back bumper. The trailer-light circuit can have its own fuses, so the vehicle’s tail lights aren’t always an indication that power is getting to the trailer plug.
If the fuses are good, the trailer-wire plugs may be the problem. The four-wire flat plugs I have don’t seem to age well and their contacts get corroded. I clean the pins with a brass-wire brush and the sockets with a cotton swab dipped in vinegar. The vinegar, a mild acid, will loosen corrosion and spinning the swab will wipe it off. On occasion, using a pair of pliers to pinch the plug to tighten the sockets is required.
Far too many times, I’ve checked the condition of the trailer just when I’ve hooked it up to hit the road. It’s best to allow time before departure for doing any maintenance and repairs.
You can share your tips and tricks of the trade with other Small Boats Magazine readers by sending us an email.
Several years ago, on a hot June day, my wife and I were hiking in the mountains well above treeline. Our path took us over exposed rock ledges, talus fields, and high south-facing meadows. We were without protection from the sun for most of the day and finally ran out of water; I was on the verge of heatstroke. All ended well, but I realized the benefits of a trekking umbrella, something I had seen quite a few times in the mountains but had ignored as serious equipment with practical applications, including for my boat voyages.
I did some research and found EuroSchirm, a German manufacturer that makes a wide array of umbrellas, including many specifically for trekking. They are thoughtfully designed, light, and made of tough composite parts. I purchased a Swing Liteflex, a 7.4-oz medium-sized non-telescoping umbrella that is 25″ tall and 39″ across. This one I originally intended for hiking, but it has seen use on my boats as well. I also purchased the extendable Swing Handsfree, which is 30″ tall in the retracted position, 43″ tall when extended, and 45″ across. This umbrella comes with two clasps that attach to the shoulder harness of a backpack so a hiker can, as the name suggests, walk hands free. While the attachment possibilities are intriguing, I was more attracted to the longer shaft as it would offer more options for lashing and positioning in my boat. The silver-colored, UV-reflective coat that would provide extra protection from bright sunlight was not easily available in the U.S. at the time I ordered the Handsfree, but it is now.
Photographs by the author
The Swing Handsfree, with its 13″ extension, was designed to clip into a backpacker’s waist belt and shoulder strap. In a boat, the extra length provides more options for propping or lashing the umbrella in place.
The umbrellas come with a nylon-sleeve case, which has mesh sides to allow water to drain and air to circulate. It would be wise to use the sleeve case when the umbrella is not in use, especially in the marine environment. I didn’t, and found that the polyester canopy of my Handsfree suffered some small holes when it snagged on corners or fasteners. The holes, fortunately, have not grown any larger. Otherwise, the polyester canopies are tough and light. The silvery UV coating on my Liteflex added very little weight and seems to be even more robust than the non-coated Handsfree canopy.
The umbrella frames are made of fiberglass composite and won’t corrode. They flex, rather than bend or break as aluminum or steel might. The umbrellas resist getting blown inside out, and feel solid in hand when it’s windy. The opening and closing mechanism is smooth and precise. The canopy stays taut across the frame, even in extended wet and windy conditions. The frame ends are tipped with plastic caps to avoid eye injury. The umbrellas are light and the company’s stated specifications are all accurate. The Handsfree is listed at 366 grams (12.9 oz) and this is exactly what my kitchen scale indicated when I weighed it.
With a “sail area” of about 11 sq ft, the Swing Handsfree can lend a hand on downwind passages.
The Swing Handsfree is now my main boating umbrella. The longer shaft, when extended, offers more options for securing it to the boat and its two adjustable fastening clips could be helpful on calm days when taking a break in the open with a strong overhead sun. Likewise, my passengers can use it to for shade or as a sail when I’m rowing downwind.
After four years, the extendable shaft on the Handsfree has started to become a bit cantankerous because the twist-locking mechanism has lost some effectiveness. EuroSchirm instructs customers to “turn the handle softly until locking—without violence” and this advice should be heeded. I have been quite gentle with my umbrella, but it now slips if I’m not diligent in unlocking and then locking the shaft. Access to the mechanism for a home repair seems quite difficult if not impossible.
The shorter Liteflex does not lend itself to being propped up in the cockpit, but it is my choice for handheld use while walking beaches and shoreline ledges on sunny and rainy days, as well as for quick use on the boat. One afternoon I was caught in a torrential thunderstorm in Casco Bay [say in Maine?] while cooking dinner. After quickly throwing canvas over my cockpit, I hunkered down for half an hour under my Liteflex and stayed completely dry while I enjoyed the storm.
Using an umbrella for cruising started as a novelty idea but quickly evolved as my standard practice. The EuroSchirm umbrellas stow easily, and their construction have put up with robust use. When the weather calls for shade or shelter, there is little else as satisfying as popping up the canopy and taking refuge underneath.
Christophe Matson lives in New Hampshire. At a very young age he disobeyed his father and rowed the neighbor’s Dyer Dhow across the Connecticut River to the strange new lands on the other side. Ever since he has been hooked on the idea that a small boat offers the most freedom.
The Swing Liteflex and the Swing Handsfree are available in the U.S. from EuroSchirm USA for, respectively, $46.35 ($50.50 for Silver) and $63.90 ($66.90 for Silver). For Germany, Spain, France, and the UK, visit EuroSchirm.com.
Is there a product that might be useful for boatbuilding, cruising, or shore-side camping that you’d like us to review? Please email your suggestions.
One bright, windy morning on an island off the coast of Maine I finally decided I no longer wanted to cruise with my iso-butane backpacking stove. A cold front had passed the night before and the wind was coldly streaming in from the northwest. I was attempting to boil water for soft-boiled eggs, and the roaring flame sputtered inefficiently while I contorted my body around the stove to block the wind. Suddenly, while awkwardly repositioning myself, I knocked the top-heavy assembly over onto the rocks.
I wanted a stove that would be better suited to small-boat camp-cruising by providing a wide stable base, be more windproof, and yet remain neatly stowable where space was at a premium. I also wanted to do more cooking than just boiling water. After much research, the stove that met these requirements was the venerable Trangia 25-8.
Trangia, a family-owned Swedish company, has been making camping stoves since 1925. Their stoves and cooking hardware are modular, with most of the components nesting within each other for compact storage. Pots, pans, and kettles allow all sorts of camp cooking, from boiling water to pan-searing scallops or making chili. The Trangia 25-8 works with multiple burners and fuel types, and the wide base and windscreen make for a solid cooking platform that resists all but the most howling winds. A wide variety of other accessories expand the cooking options even more.
Photographs by the author
The Trangia system is designed to nest the stove parts and cooking pots in a compact package.
The Trangia comes in two sizes, the 27 which is smaller and suited to one person, or the 25, which is larger and better suited to two. The 25 is about 8-1/2″ wide and 4-1/2” tall when stowed. It comes with a frying pan, a 0.9-liter kettle, a 1.5-liter pot, and a 1.75-liter pot. The windscreen base assembly and the pots can be chosen in different materials depending on what the discerning chef requires. I chose the Storm Cooker 25-8 UL/HA for the ultralight aluminum windscreen and hard-anodized aluminum cookware. Plain aluminum, stainless steel, and non-stick coated are also available. All the items are also available separately so mixing and matching of different materials is possible.
The stove was designed in the 1950s around an alcohol burner. The back side of the base is perforated with holes to provide airflow to the burner while the shield protects the flames and retains heat
The wide range of fuel options is especially conducive to camp-cruising. The standard is the brass alcohol burner, which is compact and completely silent. Making coffee during a peaceful early dawn on the beach is a joy with this quiet burner and a welcome departure from other more powerful burners that disrupt tranquility. A simmer ring, with a pivoting metal plate, attaches to the top of the burner and allows flame regulation—perfect for cooking pancakes, which are easy to scorch on other stoves.
The Trangia system can also operate with canister fuel, shown here, and liquid fuel delivered by a bottle pressurized by hand with a built-in pump.
Using the alcohol burner aboard, however, is strongly discouraged as the open top of the unit is liable to slosh and send burning alcohol into the boat.* When I’m cooking on the boat, I use the Multi-Fuel burner. This burner can be used both for hand-pressurized white-gas fuel tanks or iso-butane cartridges that are readily available at most outfitters. The Multi-Fuel burner clicks into place where the alcohol burner is normally located and it provides a strong, steady heat without the risk of an upset and spilled fuel, but it produces more noise. Also available is the Gas-burner, which is less expensive than the Multi-Fuel burner, and uses only iso-butane cartridges.
The wide range of Trangia accessories increase customization options. I get a lot of use out of my 4.5-liter Billy pot. It is perfect for steaming clams and mussels on the beach and, when not in use, the Trangia fits neatly inside the Billy which is then in turn placed into my 5-gallon galley bucket with plenty of room to spare for the rest of my cooking equipment.
The Trangia stove system, with its wide and stable base, wind resistance, versatility and compactness, is a winning combination for small-boat cruising. It has become one of my most cherished pieces of kit, and has re-kindled the simple joy of cooking while camping.
*See the Comments below for more on the risk of using an alcohol burner in a small boat while afloat. Ed.
Christophe Matson lives in New Hampshire. At a very young age he disobeyed his father and rowed the neighbor’s Dyer Dhow across the Connecticut River to the strange new lands on the other side. Ever since he has been hooked on the idea that a small boat offers the most freedom.
The Trangia Storm Cooker 25-8 UL/HA is listed by Trangia for $112.20 with the spirit burner and $157.90 with the gas burner. Burners are available separately as accessories.
Is there a product that might be useful for boatbuilding, cruising, or shore-side camping that you’d like us to review? Please email your suggestions.
Riley Hall was born and raised in Gig Harbor, Washington, a quiet town nestled around a narrow, mile-long inlet that shares the town’s name. The shoreline is bristling with piers and the water is dotted with boats at anchor. Surrounded by boats, it was only natural that Riley began building and working on them at a young age. He kept at it through high school and began restoring a 1940s-vintage canvas-covered cedar-strip rowing boat at home. For his senior-year project, he chose to work at the Gig Harbor BoatShop, documenting and disassembling hull #2 of the Ben Seaborn–designed Thunderbird.
After graduating, his interest in the restoration of old boats led him to move across the country to Rhode Island to study at Newport’s International Yacht Restoration School (IYRS). While enrolled there, he spent winter evenings and weekends restoring a 1963 Snipe. After graduating from IYRS in 2012 he got a job maintaining and restoring mostly classic racing yachts at Baltic Boatworks in nearby Bristol.
During the time he had been on his career path—restoring large yachts and working boats—Riley had been toying with the concept of small boats built from a single sheet of plywood. He designed and built his first one-sheet rowing skiff while home for Christmas in 2014. He had brought the paper patterns for the skiff with him to Rhode Island and shared them with Don Betts, a local boatbuilder who had built a 31’ six-oared Cornish gig, and the one-sheet skiff Don built led to two more, built with the help of a group of Sea Scouts.
After about six years at Baltic, Riley moved back to Gig Harbor in 2018 to take a job with Harbor History Museum. There, as a restoration/preservation specialist, he was put in charge of the volunteers restoring the 65′ purse seiner SHENANDOAH, which was built in Gig Harbor in 1925.
The SHENANDOAH project kept Riley busy during his working hours but left him with some free time and a creative impulse to design and build something new.
Working in the studio above his parents’ garage, he built three more one-sheet rowing skiffs, trying new iterations of the concept each time. The 2.5-hp four-stroke Yamaha outboard he had for his 16’ Calendar Island Yawl set him to wondering what kind of speed it could produce with a boat made of a single sheet of plywood.
Cocktail Class Racers naturally came to mind. Developed in 1939, they’re outboard-powered racing skiffs with a length of 8′ and a beam of 4′, just like a sheet of plywood, and limited to 6-hp motors—8 hp for racers who weigh over 200 lbs. They top out at 26 mph, far beyond the potential of Riley’s 2.5, so, with racing off the table, he was free to lavish attention on aesthetics and let visual elements from racing kayak, vintage bicycles, Beetle Cats, and ’50s nostalgia work their way into his design process.
Riley Hall
In Riley’s one-sheet scheme, the curve of the sides took their shape from the outline of the bottom.
He started with a wedge shape for the hull: a plumb stem to part waves and a flat run for planing. As he explored the shape with a model of stiff paper, the sides came together in a way that suggested a raised foredeck and stem with a reverse rake. The foredeck required a break in the sheer to sweep down to the stern, which, as Riley put it, “revealed a slightly strange shape, like little ears, between the side and foredeck standing out as rather odd and unconventional. I decided it was similar to what you see on racing kayaks, which look cool and go fast, so why not?”
Riley Hall
Riley built AVANTI in the space above his parents’ garage. The room was meant to be an art studio for his father but got hijacked by a climbing wall and a boatbuilding project. At this phase of the construction, the idea of adding fins to the coaming was taking hold.
Riley started construction in a workshop space over his parents’ garage. With the shape established by the model, Riley could take the pieces apart from each other to “expand” their shapes and scale them up on onto a piece of plywood. After cutting the full-sized panels from plywood and fairing the panels, he temporarily assembled them with Gorilla tape, fine-tuned the shape, and used the plywood “skin” of the hull to take measurements for the boat’s two frames.
After Riley had installed the foredeck and a Beetle Cat–inspired coaming, he invited his father, Curtiss, an art teacher at the high school Riley graduated from, for a consult on aesthetics. As soon as he laid eyes on the boat, Curtiss said, “It looks like a Studebaker Avanti.” The iconic Avanti, a high-performance car with a distinctive “reverse rake” on the front end of its side panels, was Studebaker’s swan song, released in 1962 as the company was closing down.
Curtiss’s comparison set the boat’s name, AVANTI, Italian for forward, and pointed to an automotive aesthetic direction for the rest of the project. Riley had been looking to Herreshoff’s boats for a suitable shape for the aft ends of the coaming, but nothing looked quite right on AVANTI. While the Studebaker coupe didn’t have fins, it was produced in the final years of the fin craze, and the combination seemed to work for the boat.
Riley Hall
The name plate is a copy of the one that adorned Studebaker’s Avanti coupes in the ’60s.
For steering, Riley opted for handlebars instead of a wheel. Cocktail Class Racers require that the drivers lean far forward to keep their bows down and they’re forced to wrap their stomachs around the wheels. Riley found a bow fitting at a marine thrift store that could have easily been a classic-car hood ornament; the nameplate his dad made, replicating the one Studebaker put on the Avanti, was the finishing touch.
Kathy Hall
AVANTI sits nicely on the water with the outboard’s 48 lbs and Riley’s 140 lbs aboard.
AVANTI emerged from the garage measuring 7′2″ long with a 3′ beam and weighing just 40 lbs. And with the little 2.5-hp outboard providing the power, AVANTI will get on plane and look good doing it.
Kathy Hall
Riley’s Aunt Stephanie provided the proper headwear and eyewear for sea trials.
As for Riley, whether he’s skimming across Gig Harbor aboard AVANTI, working on SHENANDOAH, or keeping busy with his free time, he’ll be making good progress in the same direction he always has, forward—avanti.
Do you have a boat with an interesting story? Please email us. We’d like to hear about it and share it with other Small Boats Magazine readers.
Small-boat snobs, take heart. A census of any marina will reveal hundreds of large auxiliaries sitting idle most weekends, while easy-to-use kayaks and canoes are proliferating. Are very small sailboats the next big thing? A friend of mine with a serious cruising sailboat confided that lately, most movements of his boat are in the service of reaching a protected creek or harbor where his young family can deploy a fleet of kayaks and sailing dinghies.
Tiny sailboats offer ridiculous fun in proportion to their cost. For my purposes, “tiny” means “light enough to lift on top of my car even when I’m tired.” The lightest 15-footer requires some muscle to manage on and off the water; 8-or 10-footers require almost none. If I’m tired I won’t consider doing the trailer dance with a 15-footer, much less getting my 6,000-lb Folkboat under way.
At about 9′ and 75 lbs, Karl Stambaugh’s Weekend Dinghy is in my “tiny sailboat” sweet spot. An adult of average strength can cartop it on anything with roof racks. If you have a pickup truck or van, it takes seconds to slide a little flat-bottomed skiff like this into the back for transport. With Karl out of town I had a chance to test this. He left the boat in his yard for me; I lifted the boat by the center thwart and swung it onto my shoulder for the 15-yard walk to my Ford Econoline van. I lowered the stern to the ground, propped the bow on the floor of the van, and slid the boat in. It took about 40 seconds. With practice, there’d be smoother choreography and less danger to my back or the boat’s finish. The cargo van swallowed the 9′ dinghy whole, the bow just reaching the front seat.
Photo by John C. Harris
At 9′ long and a shade over 3′ wide, the Weekend Dinghy will fit on top of most—or inside of some—vehicles.
At the marina where I keep my Folkboat, I eased the Weekend Dinghy out the back of the van and over the edge of the dock. Oars, sprit, water bottle, sandwich, and iPod followed. To get it out of the way, I mounted the mast in its step for the trip across the anchorage.
Most dinghies this size are prams, to yield maximum waterplane for stability and volume. Stepping down from the dock, I was reminded that this boat is pointy at one end—step in the narrow bow section, and the dinghy will go transom-over-chocks, wetting my trousers and voiding the iPod warranty. Be careful to step to the center in 70-lb boats! The Weekend Dinghy’s bow is handsome and improves handling on all points, but embarking crew should think of the boat as a 7′ 6″ pram with a bow fairing on it.
At the first oar stroke, I appreciated the extra bow. While a pram dinghy will make a sort of slushing noise under way, the Weekend Dinghy glides silently. I crossed the anchorage and passed my gear into the Folkboat. I stowed the 13′ 3″ mast and sail on the Folkboat’s port side deck. The mast isn’t much longer than a whisker pole, and not at all in the way even aboard the 26′ Folkboat.
Photo by John C. Harris
The Weekend Dinghy may be kept a simple rowboat, or rigged to sail.
As I tacked down the Rhode River in 8–10 knots true, the Weekend Dinghy towed without fuss. So little fuss, even, that when the painter slipped off the stern cleat, I didn’t realize it was gone. Nearby yachts started to swarm around the handsome dinghy bobbing in the channel, thinking it perhaps abandoned. Awakening, I crash-jibed and tacked back up, the distance affording me a chance to appreciate the Weekend Dinghy’s deep sheer from a distance, and to wonder how quickly I could build a replacement for Karl if the dinghy was plowed under by the monster sedan cruiser that was bearing down in the channel.
I could build one pretty fast. Quick building, in fact, was in Stambaugh’s design brief. Quarter-inch plywood sides are stitched to a 3⁄8″ bottom using plastic wire ties. Thickened epoxy bonds and seals the seams and forgives almost any tyro mistake. The three seats are 1⁄2″ plywood, and a single plywood frame amidships spreads the sides to a beam of 40″. A mahogany rail stiffens the sheer, and fiberglass fabric sheathing outside contributes to rigidity. A breasthook and quarter knees provide excellent handholds, and their compound bevels aren’t going to deter an amateur. The Weekend Dinghy’s near-instantaneous assembly has made it a popular subject for “family boatbuilding” glue-a-thons, where parent-child teams build a basic hull in three days.
Rowing, towing, and lost-dinghy exercises completed, I sailed back up the Rhode River and anchored off a popular beach. I rowed ashore for a rigging session. The Weekend Dinghy begins life as a basic rowing dinghy, and may be converted to sail with the addition of a daggerboard trunk and bolt-in maststep. Stambaugh’s mast partner scheme folds up and stows away in a few moments. You can have it in and out in a flash, clearing the forward thwart for rowing with a passenger seated astern. The 33-sq-ft leg-o’-mutton sail is laced to the mast, and there’s a sprit boom. No fiddly hardware; everything is lashed, keeping the rigging cheap and simple. In less time than it took to unbutton the Folkboat’s mainsail cover, I had everything set and drawing.
Photo by John C. Harris
This boat tows without fuss. It’s an ideal sailing tender from which to explore quiet anchorages.
For absolute simplicity of construction, the rudder is a plate of 1⁄2″ marine plywood. Simple rudders like this suit family boatbuilding events and impatient builders. But as I hung over the transom in deep water off the beach, trying to line up the pintles and gudgeons as the boat backed down under sail, it occurred to me that builders sailing off a beach would do well to spend an extra hour or two on a kick-up rudder.
The Weekend Dinghy bore off and sped away under sail with assurance. Light and easily driven, the dinghy’s handling was crisp on all points. Such a light hull doesn’t like being pinched, but I tacked through 90 or 100 degrees and didn’t hang up in stays. The sprit rig’s vanging effect yielded docile off-wind handling, with no twist in the sail to set the boat rolling.
This is carefree sailing. In really small sailboats, the weight of an adult overpowers the small sail in modest breezes. Keep your weight low and centered, and it’s very hard to have a mishap. Still, stay in warm water. Unless you glue some foam under the seats, there’s no positive flotation. If a boat this small swamps, self-rescue is unlikely, so keep a weather eye and don’t get too far from shore.
Photo by John C. Harris
The Weekend Dinghy, designed by Karl Stambaugh, is a quickly and simply built stitch-and-glue skiff.
Boats like this are “personal watercraft” for the enlightened. Sitting on the floor with the side panel providing good back support, you are inches above the water and 21⁄2 knots feels like 9 in a big auxiliary sailboat. In fact, 21⁄ 2 knots is about what you’ll see in light air. Think of that as a nice walking pace—you can cover a lot of miles on a Saturday afternoon. The boat’s too small to plane, except perhaps in heavy air with a 45-lb child prodigy sailor at the helm. But it’s such fun for a single adult. Bring a seat cushion, and disappear for hours of shoreline and marina exploration, burning no oil and bothering no one.
Alas, 8 out of 10 readers will ask if they can mount an outboard. Because the transom is lightly built and there is no integral flotation, the short answer is “No.” The long answer is, “Why would you sully such a boat with an outboard?” A noisy, expensive outboard motor that costs more than the materials is crazy on a boat that rows and sails this well. A sputtering outboard dinghy shatters the tranquility of a beautiful anchorage, whereas a nice wooden rowing and sailing dinghy enhances it.
A fleet of Weekend Dinghies darting around the harbor on the evening breeze is a beguiling vision. A cruising family should have two, or even three or four of these in tow, to be set loose upon reaching the anchorage for impromptu races and fleet actions. Sailors young and old will sharpen their skills. They may even give up the marina bills for good and spend their weekends in wholesome dinghies like this one.
This Boat Profile was published in Small Boats 2008 and appears here as archival material. Plans and kits for the Weekend Dinghy are available from Chesapeake Marine Design.
One might logically figure that drift boats just…drift. That the river current is their main source of locomotive power. And a long set of lightweight oars are more for maneuvering than for serious forward or reverse motion.
Jason Cajune, who designs and builds premium wooden drift boats at his Montana Boatbuilders shop near the Yellowstone River, says a lot of fly-fishing guides view their boats simply as a form of transportation rather than as a tool to help them catch fish. “I see a lot of guides take their clients down the river and drop them off on a bank to fish from shore. That doesn’t make any sense to me.”
To be sure, rowing a boat upstream with three persons aboard can be strenuous and a good upper-body workout. The same can be said of working quickly from one side of the river to the other to get within casting distance of a good-looking eddy where a trout might lurk in the shadow of the bank, playing the current. In between these bursts of activity, manning a drift boat is indeed quiet, reverent work, the hull making no sound or leaving any wake as it moves at the same speed as the current. It’s not unlike a ride in a hot-air balloon—silent and seemingly inert, suspended in its medium.
Photo by Dan Spurr
Drift boats, whose lineage goes back to the McKenzie River type from Oregon, have proven to be nimble whitewater boats and excellent fly-fishing platforms. The Freestone Classic 15 model, by Montana Boatbuilders, is available in kit form.
The basic drift boat form evolved from various sources: among the boats that made their way from the East Coast to the West Coast in the 19th century were log-driving bateaux and fishing dories. These flat-bottomed types were later adapted for use on Oregon’s McKenzie and Rogue Rivers, where they were given considerably increased rocker to help them confront whitewater. Their ends are fine, and some early drift boats were double-enders. The stern probably would still be as pointed as the bow were it not convenient to lead an anchor rode over a transom. Drift-boat anchor systems are marvelously simple: a small grapnel-type anchor is suspended over the transom at the end of its rode, where it is remotely deployed and retrieved by the helmsman, who never has to leave his seat. A cam cleat secures the rode.
On a fine spring morning, Cajune and I floated one of his Freestone Classic models down the Yellowstone River from Pine Creek to Carter’s Bridge, a distance of about seven miles. To the east the jagged summits of the Absaroka Mountains were still snow-covered, and to the west the early sun shone on the sage-covered backside of the Gallatin Range, the soil reddening in the light. Ospreys and eagles flew over the river looking for the same thing we were: trout. It was, Cajune said, a “guide’s holiday,” one of those few precious days between the Mother’s Day hatch, which marks the traditional beginning of the summer fishing season, and the arrival of tourist fishermen from around the country and the world. I manned the oars while Cajune cast a streamer into the eddies forming along the banks. “Fish like slower water near shore,” he said, “because they don’t have to work as hard, and they feel safer from birds, but they also want to be near fast water where the food is.”
Photo by Dan Spurr
With the grapnel set, the drift boat stays put while the fisherman focuses on his casts. The athwartship timbers are fitted with thigh braces, giving two fishermen plenty of support while at anchor or while the oarsman brings them near the best fishing holes.
Because the drift boat is essentially flat-bottomed, construction logically lends itself to plywood, taking good advantage of its superb physical properties. Owing to their relatively small size—nearly always under 20′ and often less than 16′ long—many drift boats can have topsides and bottoms built from two sheets of plywood scarfed together. The 4′ width of standard plywood sheets has, to an extent, dictated the design of wooden drift boats. At Montana Boatbuilders, the choice is 9mm (3⁄8″) okoume mahogany plywood panels stitched and glued together, though stitched and taped is a more accurate description of modern methods in which narrow strips of fiberglass cloth or “tape” are applied to the seams on top of fillets, and wetted out with epoxy resin. In the finished boats that Cajune builds for his clients, the standard bottom is a sandwich of fiberglass and Kevlar over a honeycomb core, with an exterior covering of a 1⁄4″-thick high-density polyurethane material that can withstand a sharp strike from a rock. The inside of the bottom panel is given a coating of Speedliner, a rubberized material designed for truck bed liners. It won’t dent if a tool is dropped on it and also provides excellent traction. This type of bottom construction is optional with Montana Boatbuilders’ kits; the standard kit is built out of plain plywood. In either case, the bottom is the jig around which the topsides are formed.
None of Cajune’s designs have frames. The narrow, radiused transom of the Freestone Classic is made up of three layers of 3mm plywood. (For the kits, a simpler flat transom is included, but a builder wanting a radiused transom could laminate his own.) White oak is used for gunwales, bench seats, and most other trim, especially if it needs bending.
After a few miles on the river, Cajune handed me the rod in exchange for the oars. “Okoume is hard to beat for strength-to-weight ratio,” he said. “A good plywood boat is much lighter than one in fiberglass or aluminum.” And a lighter boat, he added, is easier to row upstream. “When you find a spot in the river you want to fish,” he continued, “a good guide will work the boat in a loop so he can return to the spot.” That means rowing upstream and across the current, which requires effort, but effort that is diminished by a lightweight, easily maneuverable boat. A light boat also is easier to hold stationary in the current, or, if you want to have a little fun, surf a standing wave.
Photo by Dan Spurr
Sawyer Cobra oarlocks are an accessory designed to work well with rope-wrapped oars for whitewater rowing.
Kits are available for the company’s 13′, 15′, and 16′ Freestone Classic models and the 15′ and 16′ Freestone Guide models, but not for the more complex Kingfisher and popular Recur ve design. The Recurve’s sheerline rises dramatically amidships. Forward and aft, the sheerline takes pronounced dips to reduce freeboard, making it easier to get in and out of the boat; drift boats aren’t accessed from docks, but from some pretty awkward places. Around here, the shorelines often are choked with cottonwood and willows. Cajune’s larger models have more beam at the chine—up to 58″ as opposed to 48″— and so are more stable, enabling an angler to stand more securely at the rail to reel in a fish. Beam at the oarlocks ranges from 64″ to 75″.
Cajune has invested in a small CNC (computer numerically controlled) machine for precision cutting of pieces. Kits include all necessary wood, fiberglass, fastenings, and epoxy. They’re designed for home builders who are expected to supply their own tools, sandpaper, paint, and varnish. A 60-page step-by-step manual with photos and drawings is included, and a DVD is in the works. Advanced woodworkers might simply purchase the plans.
When we hauled the boat out at Carter’s Bridge, a fellow sauntered up admiringly. “That’s a damned fine-looking boat,” he said. Such words are seldom bestowed on fiberglass and metal drift boats.
Montana Boatbuilders
Flat-bottom and straight-sided construction make plywood the logical planking material for a drift boat. A 60-page manual accompanies both plans and kits.
This Boat Profile was published in Small Boats 2008 and appears here as archival material. If you have more info about this boat, plan or design – please let us know in the comment section.
Subscribe For Full Access
Flipbooks are available to paid subscribers only. Subscribe now or log in for access.
 Photo Courtesy of Old Wharf Dory Co.
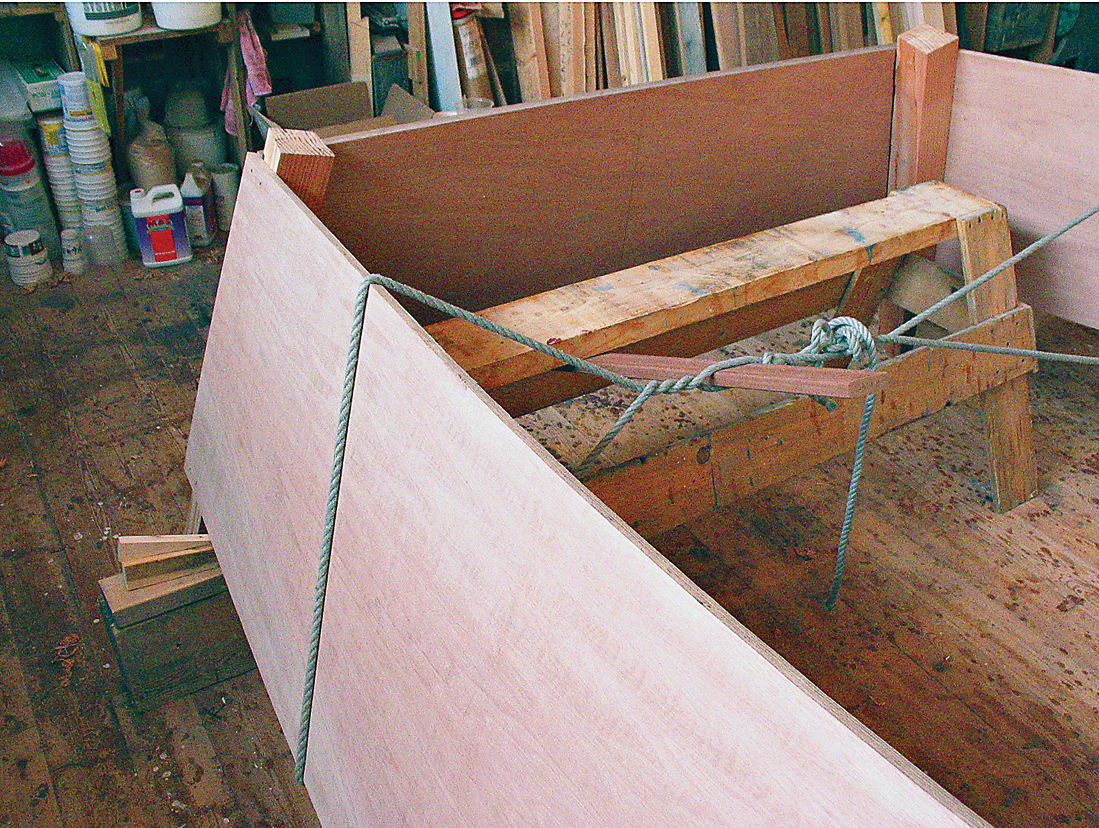 Courtesy of Old Wharf Dory Co.
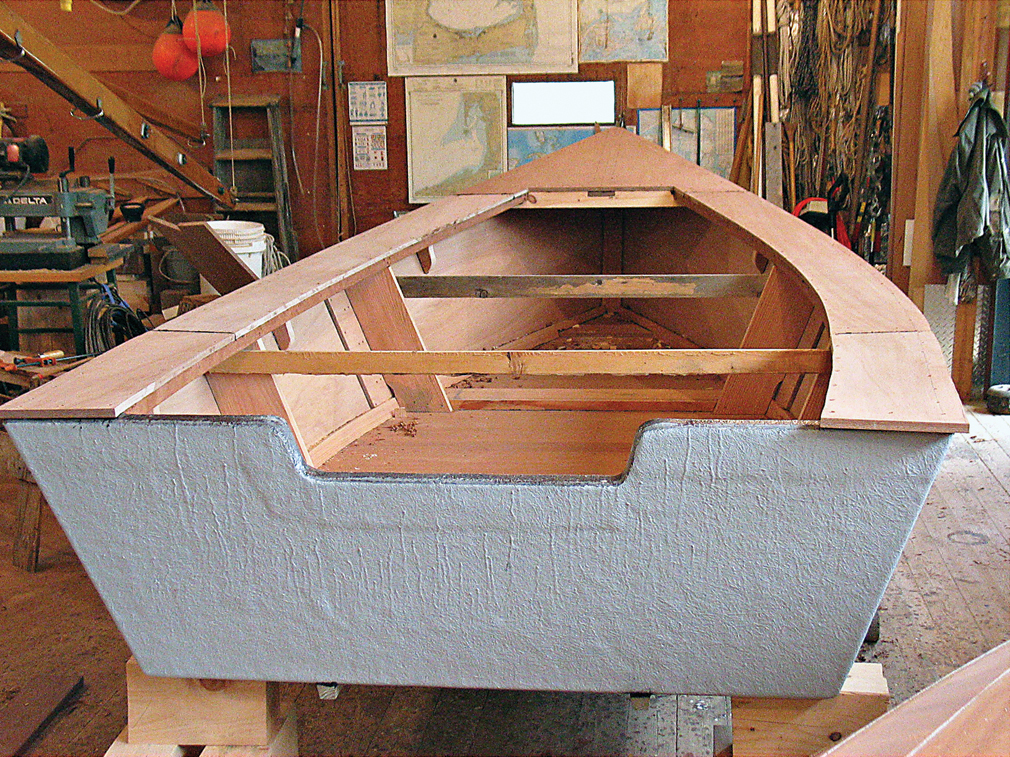 Courtesy of Old Wharf Dory Co.
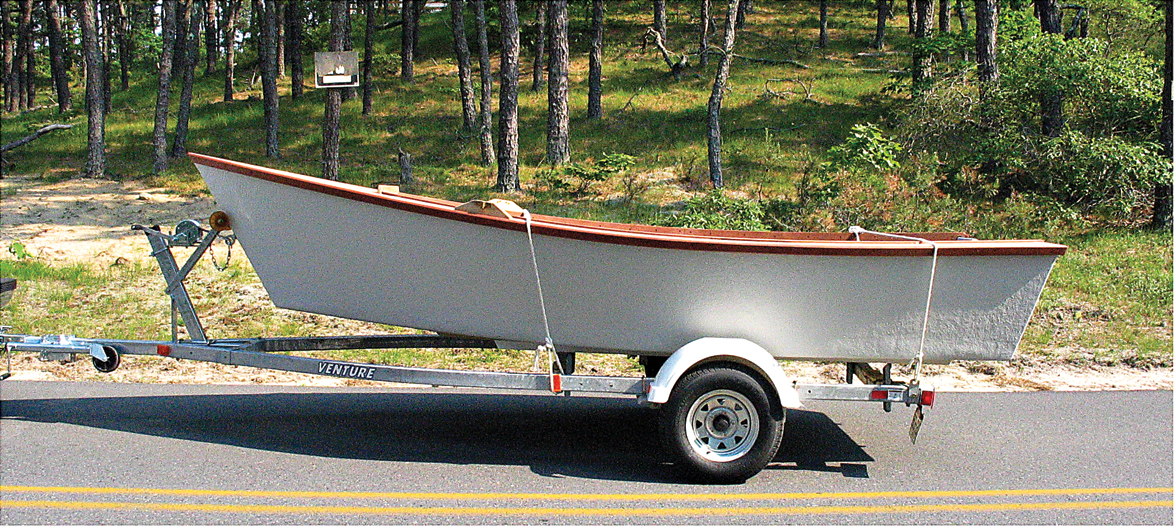 Courtesy of Old Wharf Dory Co.