America’s Great Depression was in full swing in the mid-1930s when The Detroit News held a design competition for a simple, inexpensive racing iceboat that could be built in a garage or basement workshop, and be easily transported on top of a car. The result was a 12′ craft that appealed to Detroiters looking for an affordable diversion from their economic woes. Initially called the Bluestreak 60, the sleek boat was first seen skimming across nearby Lake St. Clair during the winter of 1936–37. The name was later changed to DN 60 (for Detroit News and the boat’s sail area).
Iceboating, or ice yachting, began more than 400 years ago in Scandinavia and other northern European countries. Wooden boxes rigged with sails and mounted on skates carried goods and passengers along the frozen canals of Holland through the mid-1700s. As early as the American Revolution, iceboats were sailed on the Hudson River and, in the late 1800s, lumbermen in Michigan logging camps sailed the scores of local lakes for recreation.
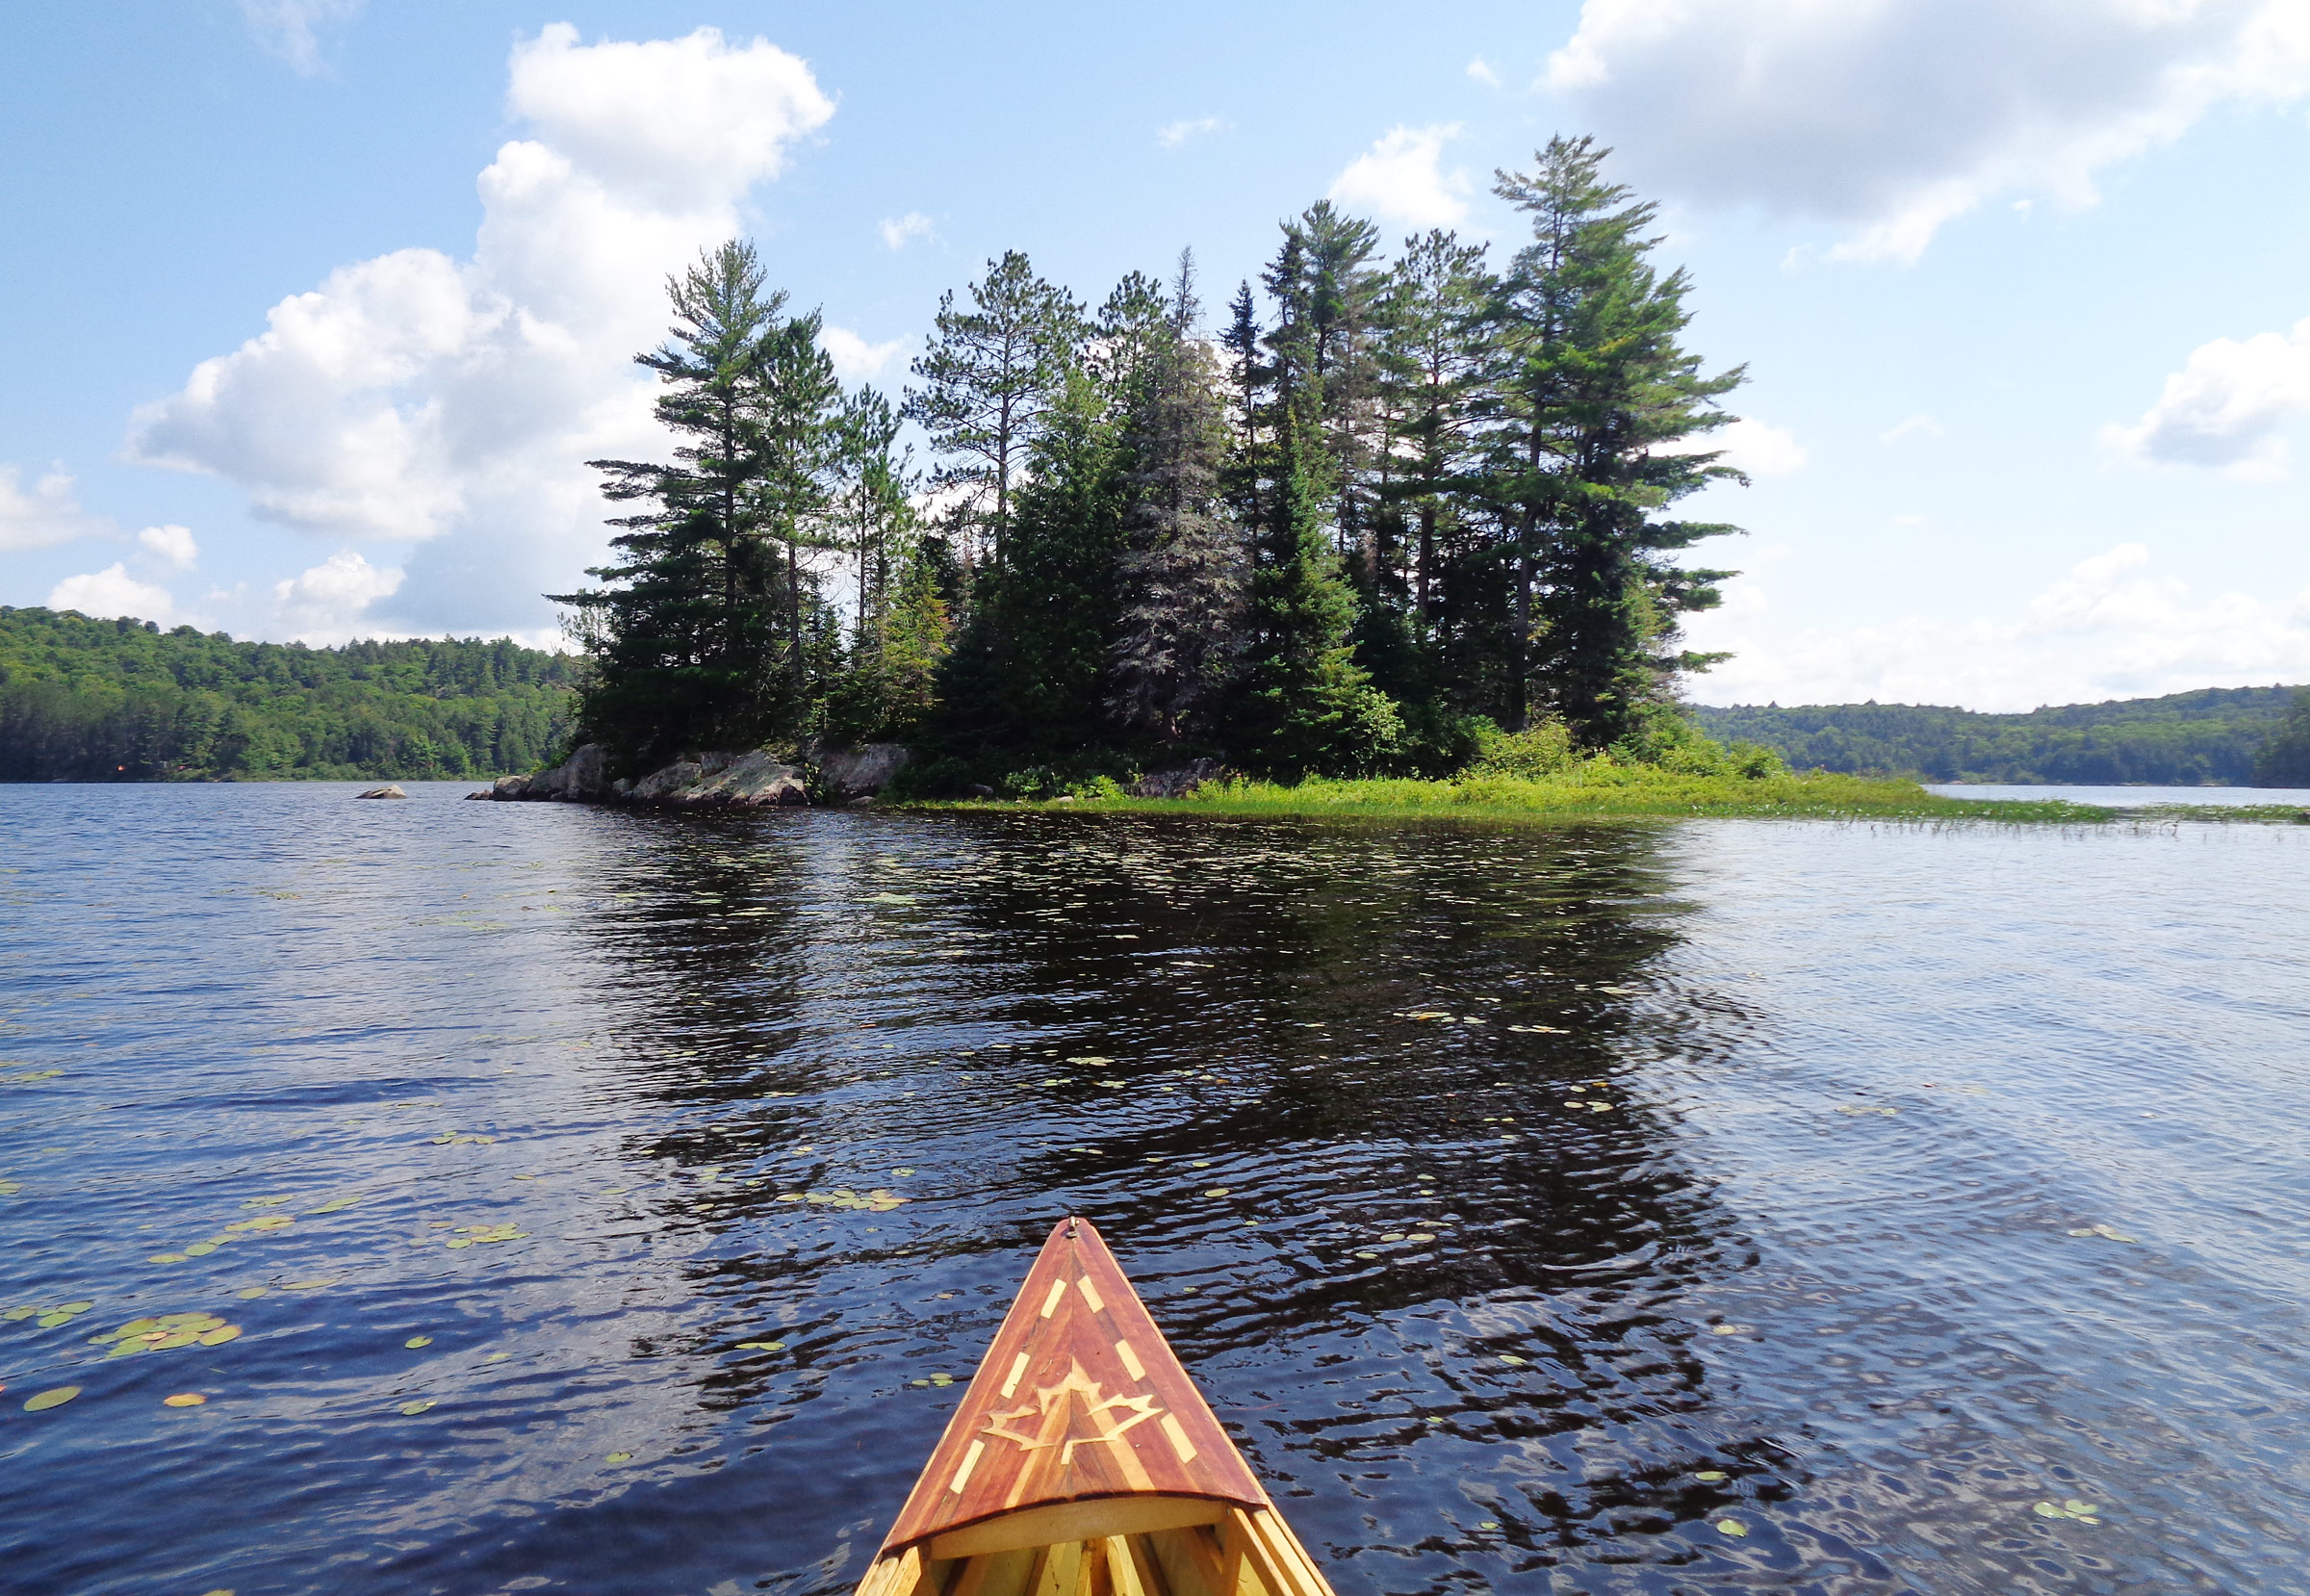
Gretchen Dorian
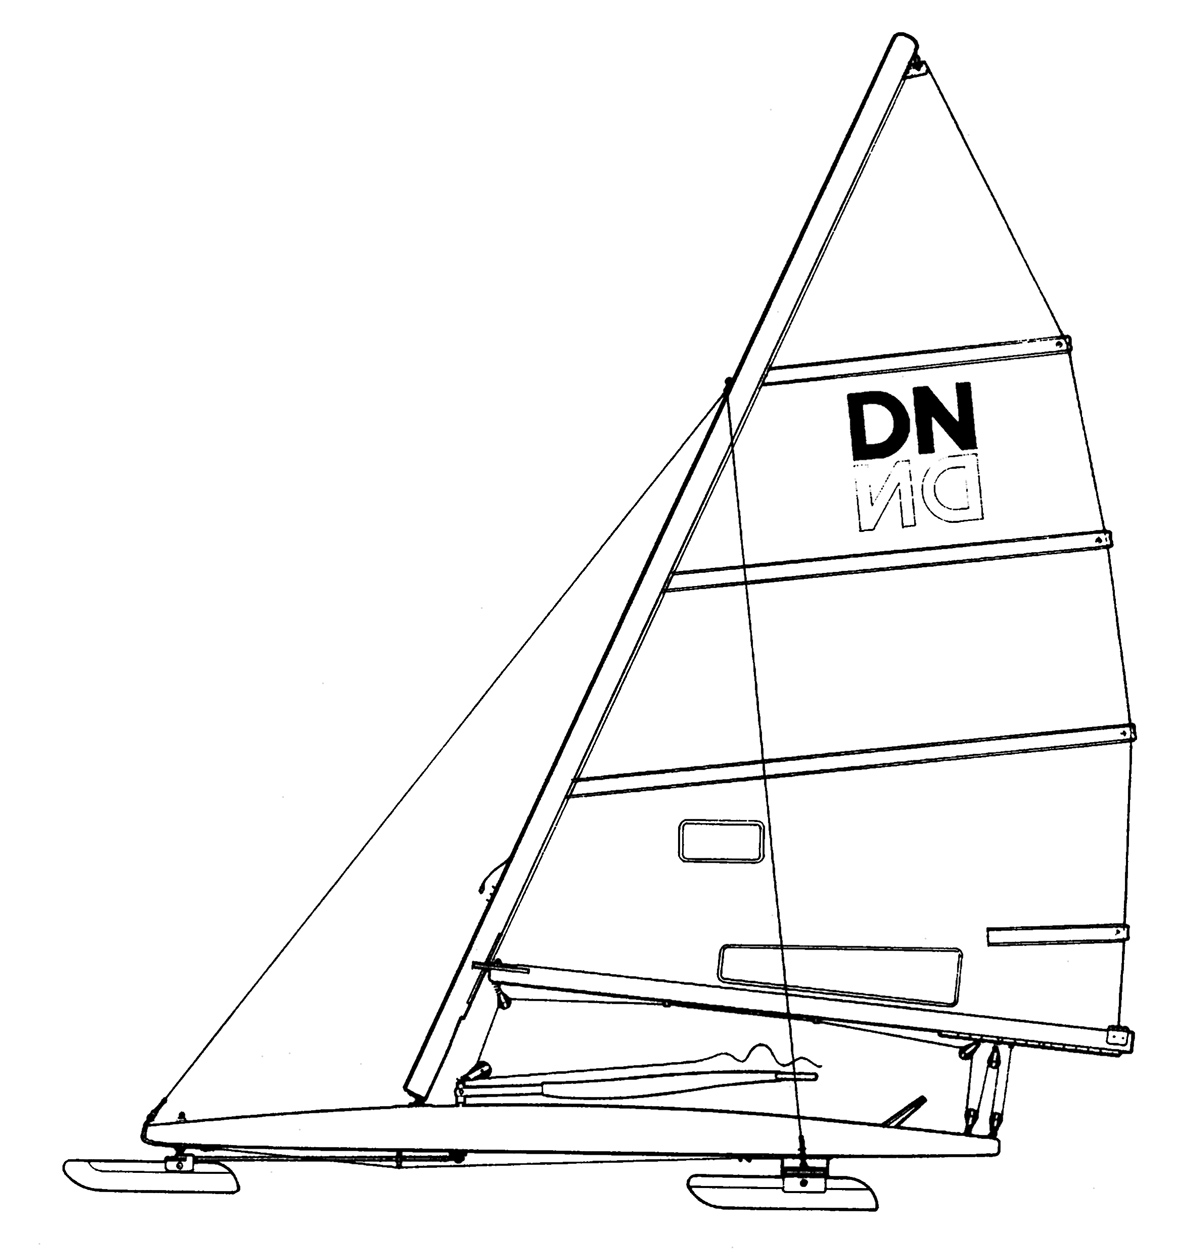
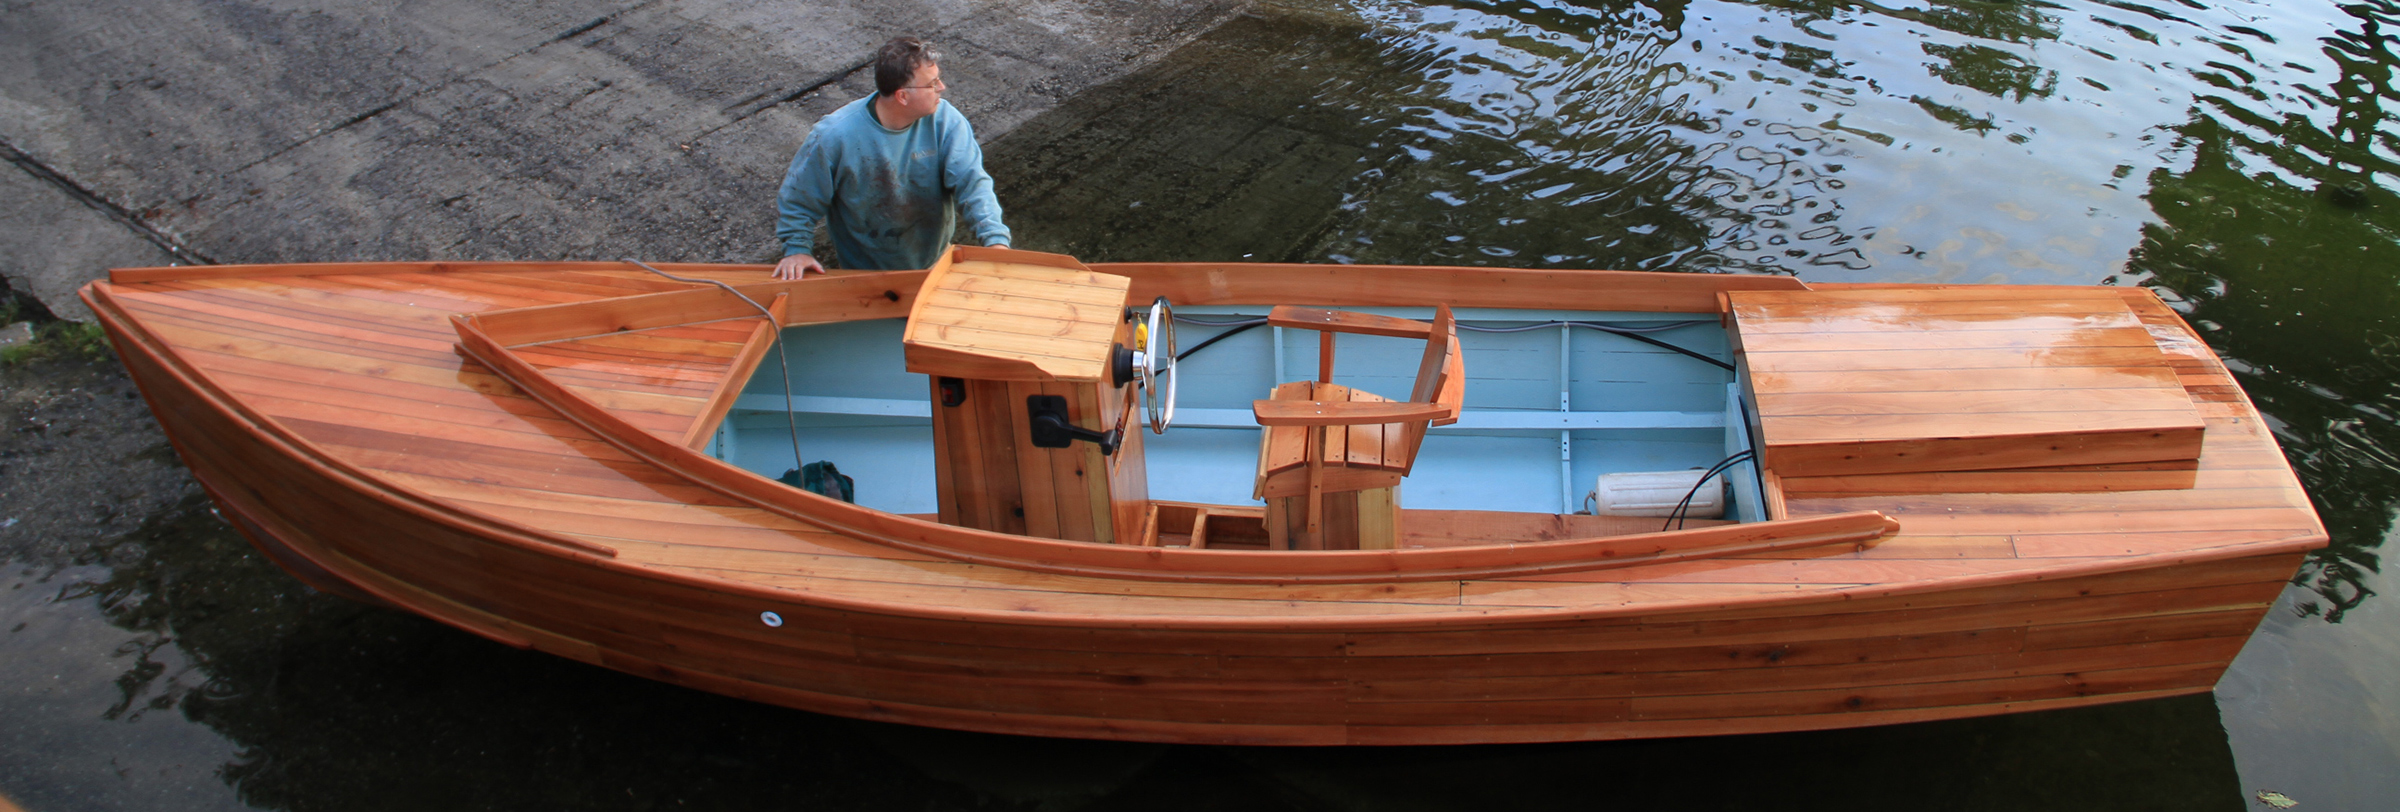
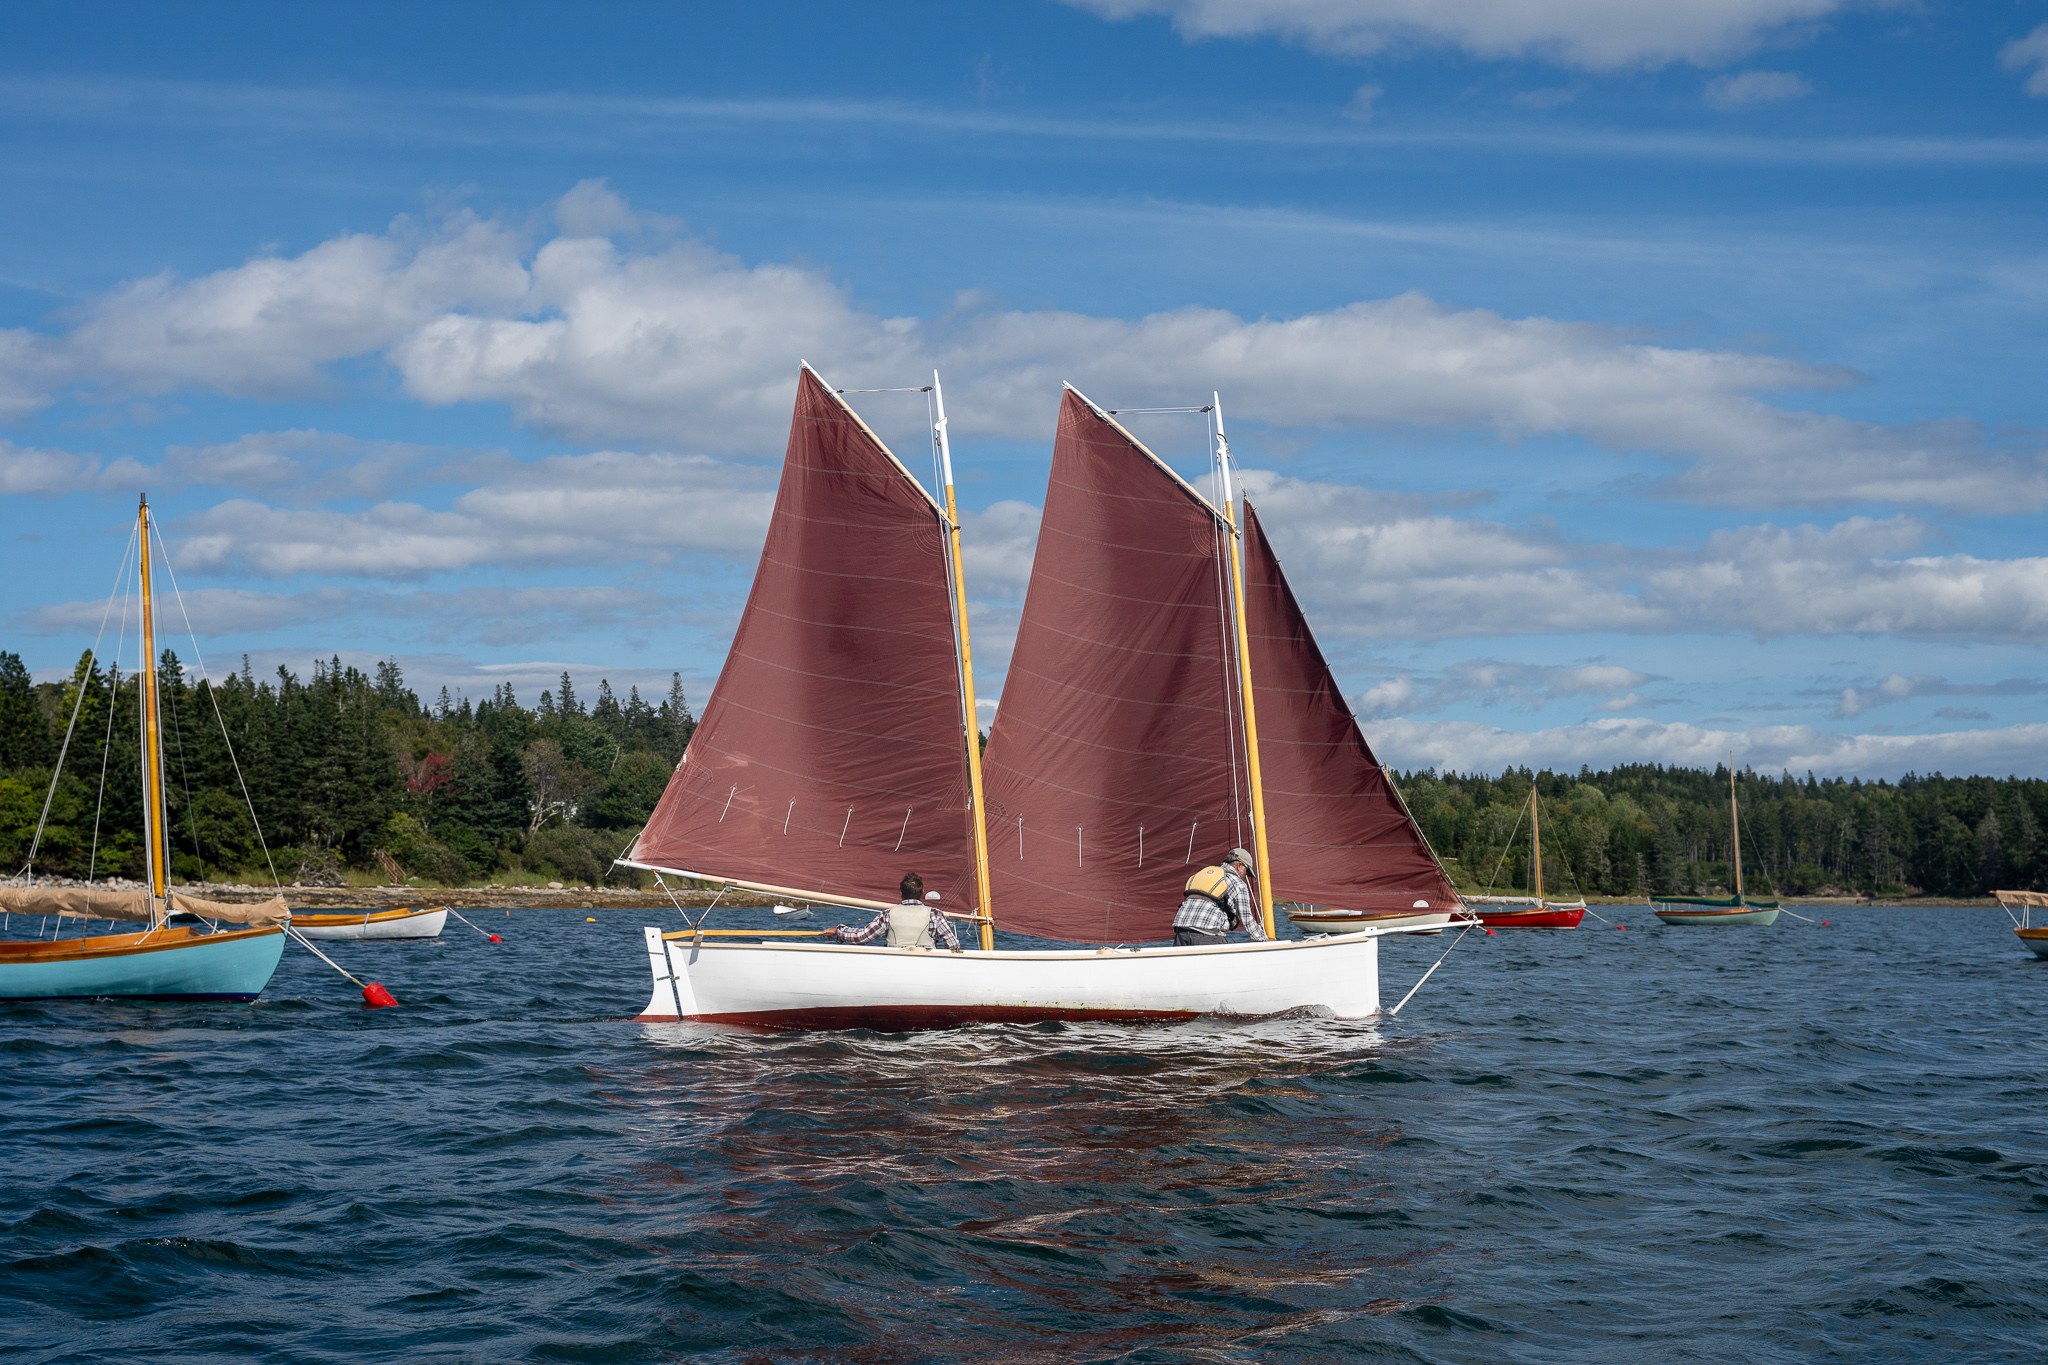
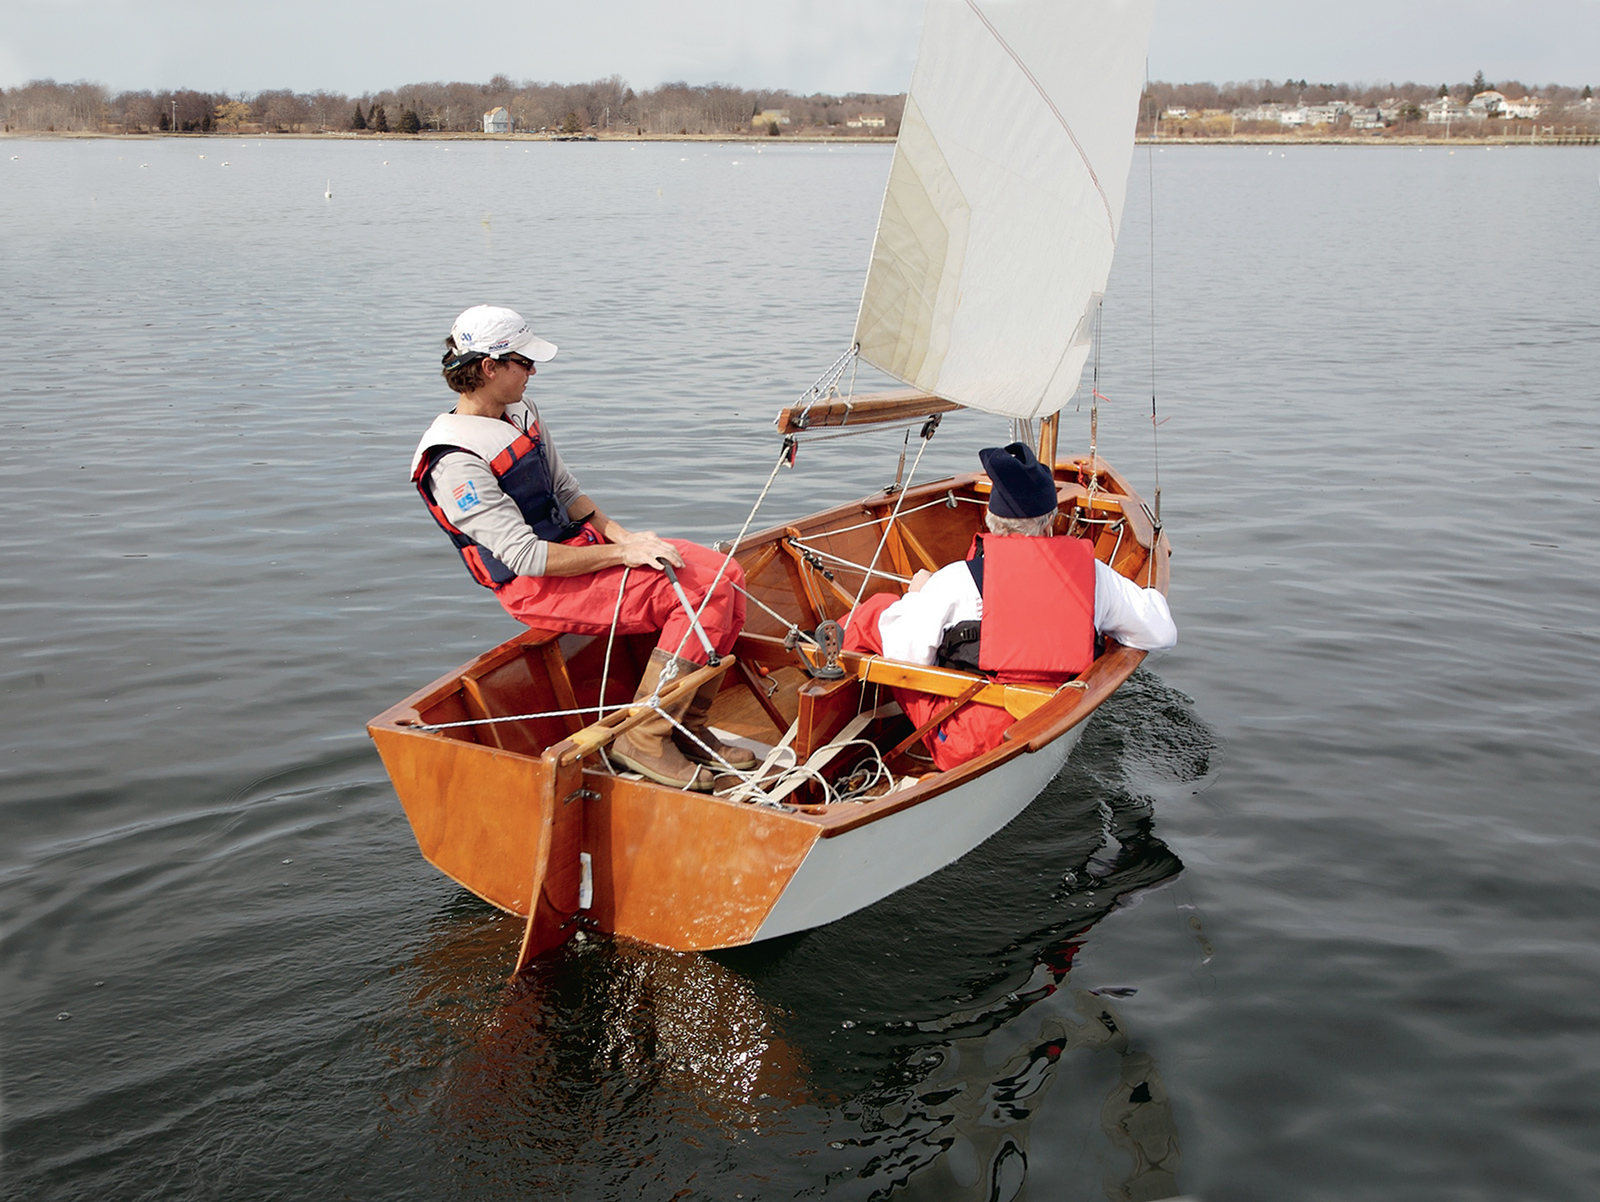
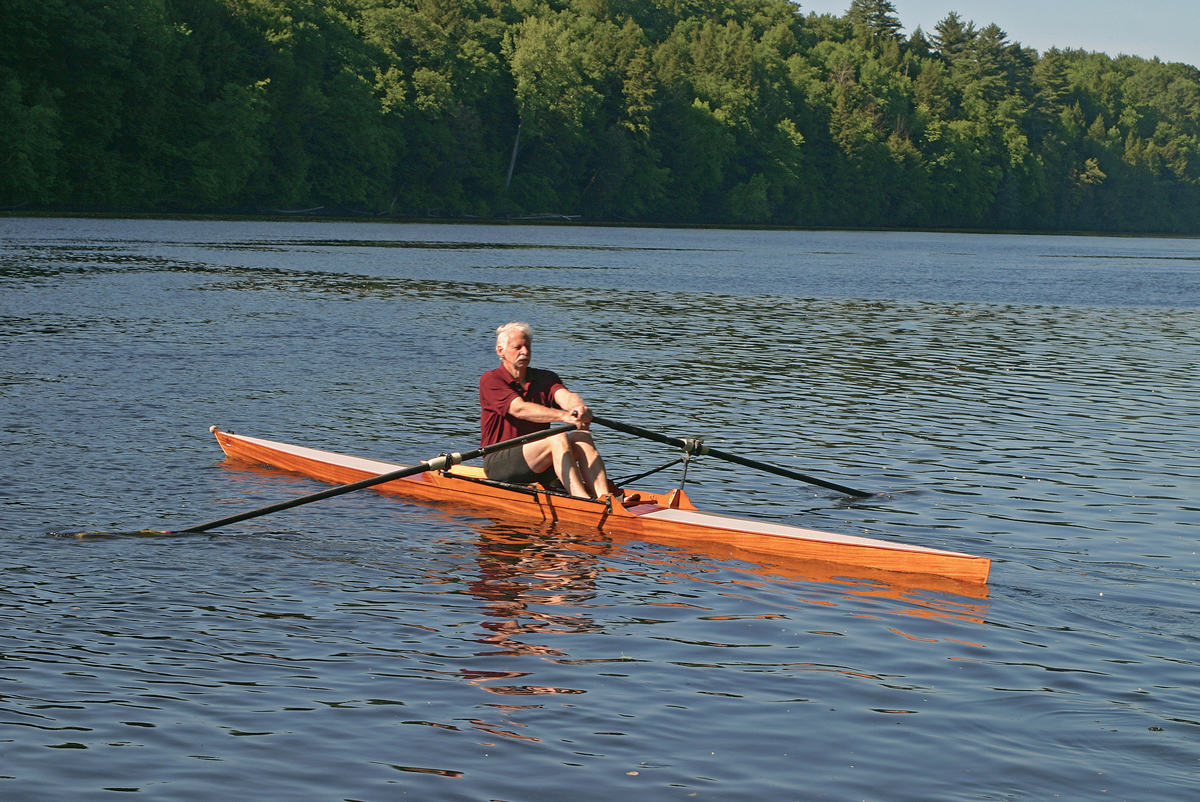
Simple to build, exhilarating to operate, the DN 60 is an excellent “hard-water” boat. Developed in the Detroit area, it offers plenty of excitement to thrill-seekers in northern climes.
By the 1930s, iceboating had become a sport for the wealthy, including Franklin D. Roosevelt and Detroit auto magnates, who sailed large iceboats that were out of reach financially for most folks. The arrival of the affordable DN put a new face on iceboating.
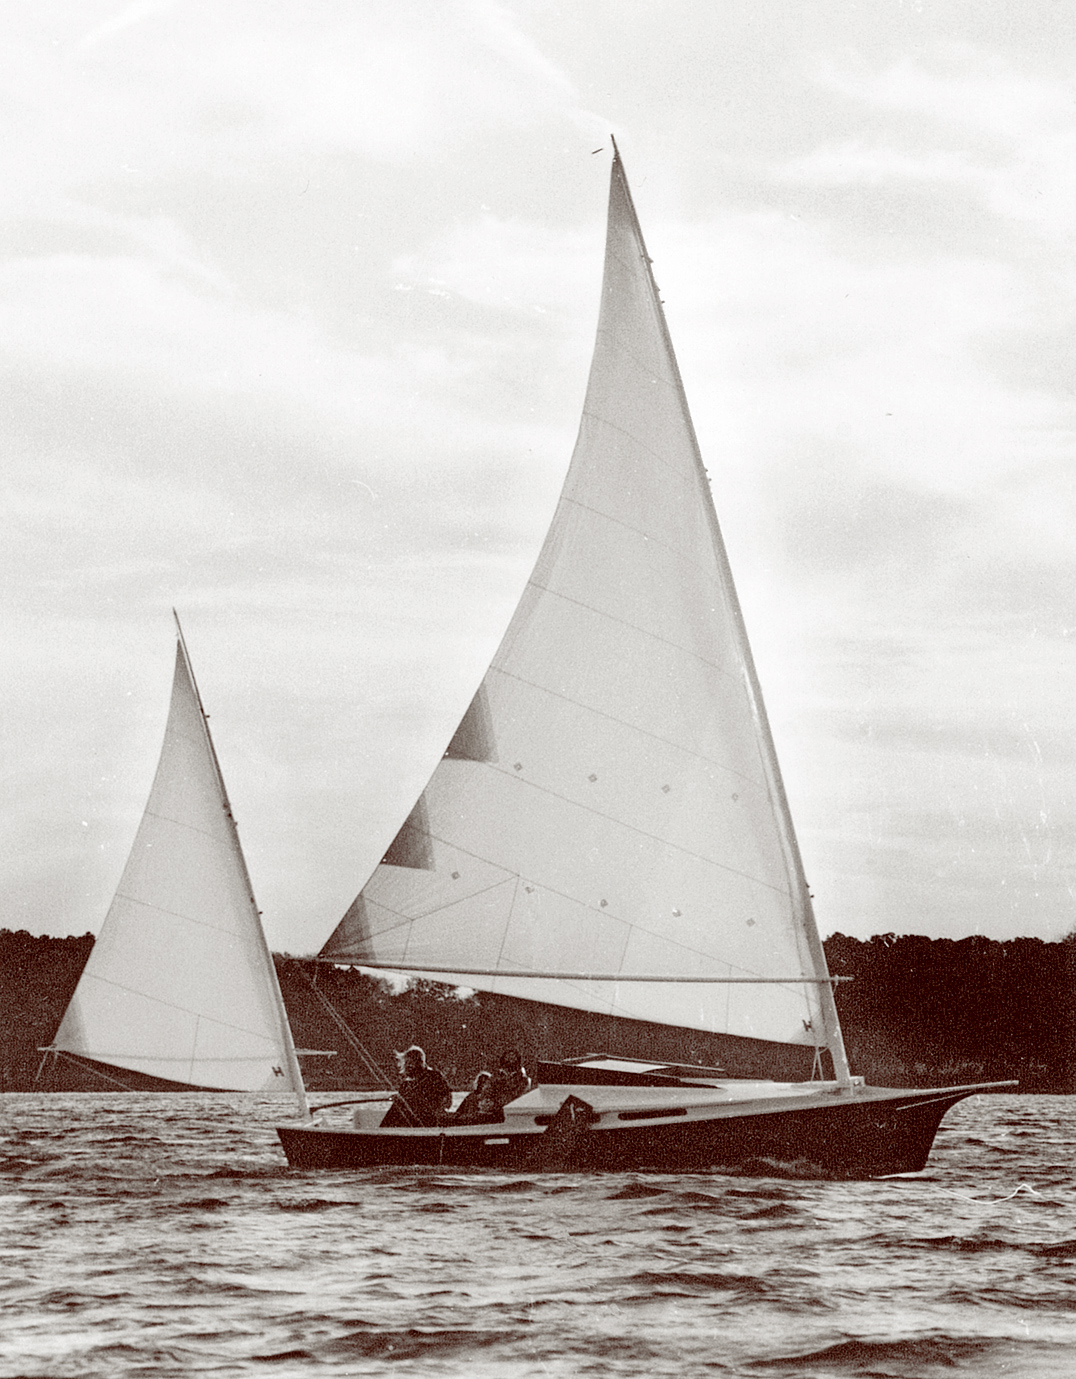
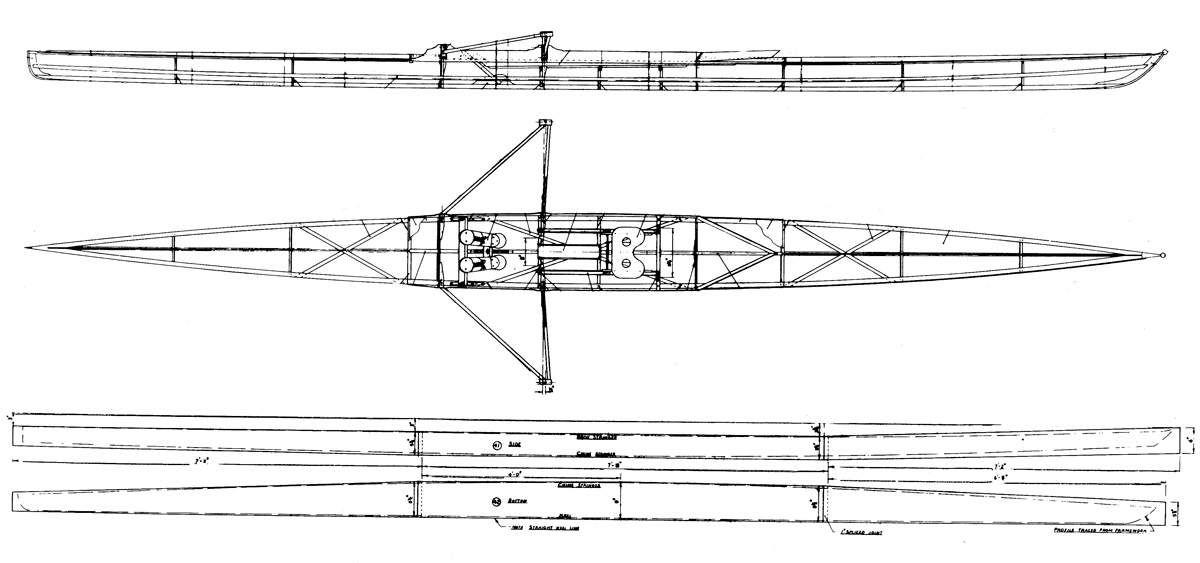
Over 70 years after it was introduced, the swift and diminutive DN 60 remains the world’s most popular iceboat class, sailing under the auspices of the International DN Ice Yacht Racing Association, with more than 2,000 members split about evenly between North America and Europe. The present DN 60 retains the basic design of the original model, though sails and gear continue to be refined. The 12′, open-cockpit hull, which is a snug fit for its skipper (to the point of his virtually wearing it), rides on three runners: one under the bow, which steers the boat, and two under either end of an 8′-long plank fitted across the opposite end to provide stability. DNs, fully fitted out, typically weigh 100–150 lbs.
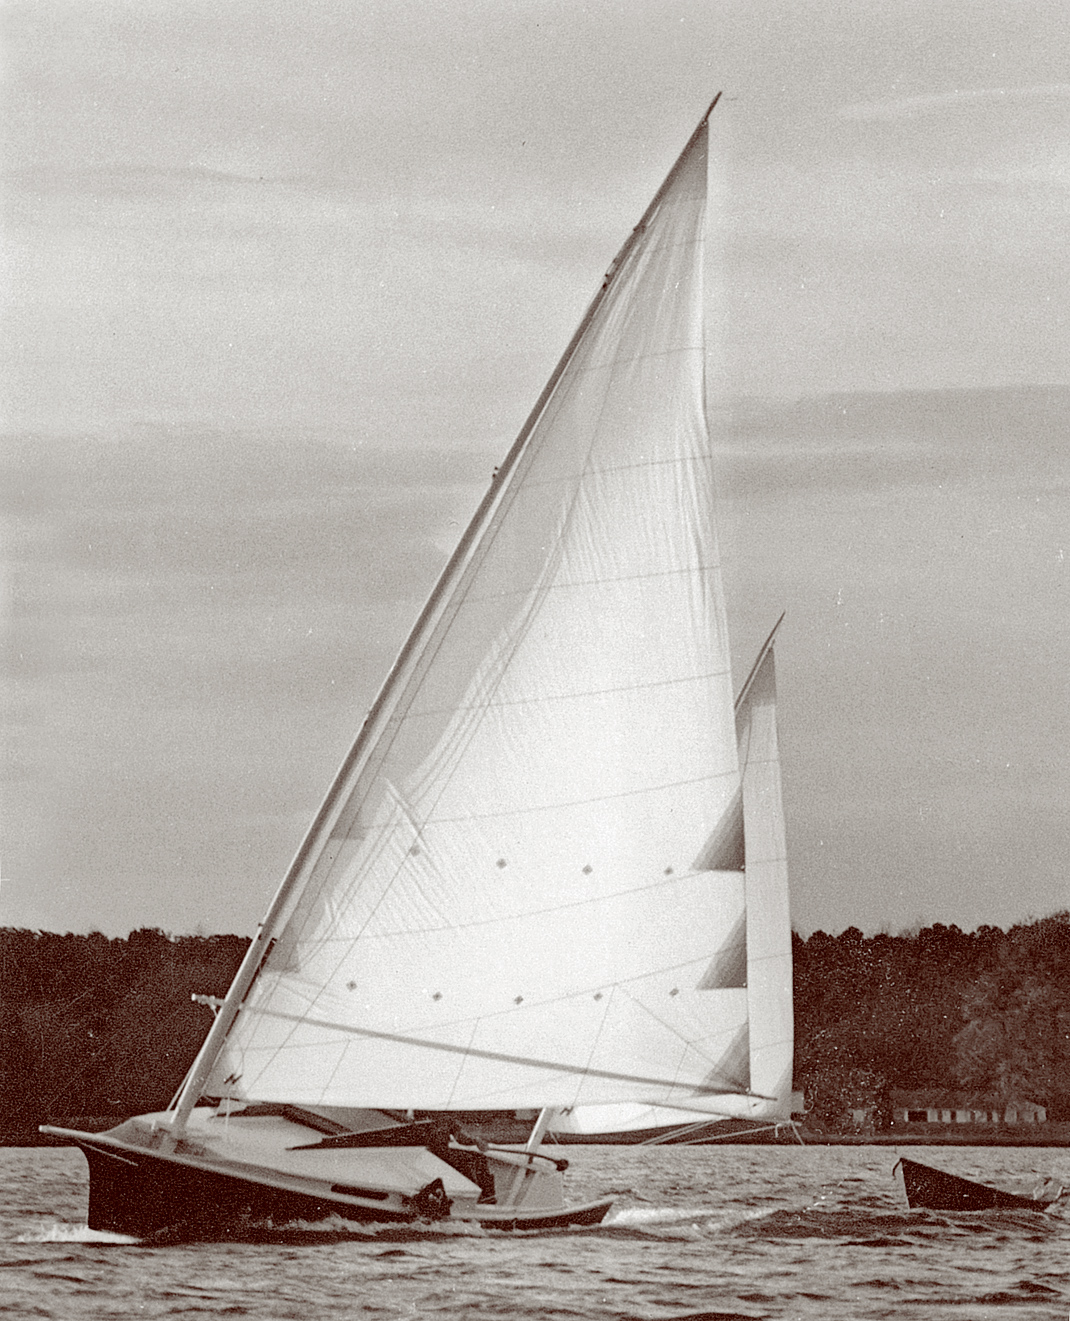
From its earliest beginnings in the sawdust-strewn Detroit News hobby shop, the focus of DN builders and owners has been to make the boat faster and more competitive on “hard-water.” The DN slides along on its honed 1⁄4″-wide steel runners—much like ice skate blades—at up to five times the speed of the wind, their speeds exceeding 60 mph. Catching a breeze, the skipper hauls in the mainsheet to trim the sail, and the light-weight boat begins to accelerate. As the windward blade lightens, the runner plank lifts gently off the ice, forcing the skipper to hike out (shift his weight) to balance the craft. Only the wind and the clanging of runners on the ice break the silence.
Sailing 130 degrees off the true wind, the DN hits its top speed. “It’s an incredible happening,” says Meade Gougeon, who, along with his brother Jan, has been sailing and racing DNs since the early ’60s. “As the [apparent wind speed] goes up over 50 mph, you have trouble staying connected with the ice.” DNs also perform remarkably well in light air, unlike the big iceboats.
Gretchen Dorian
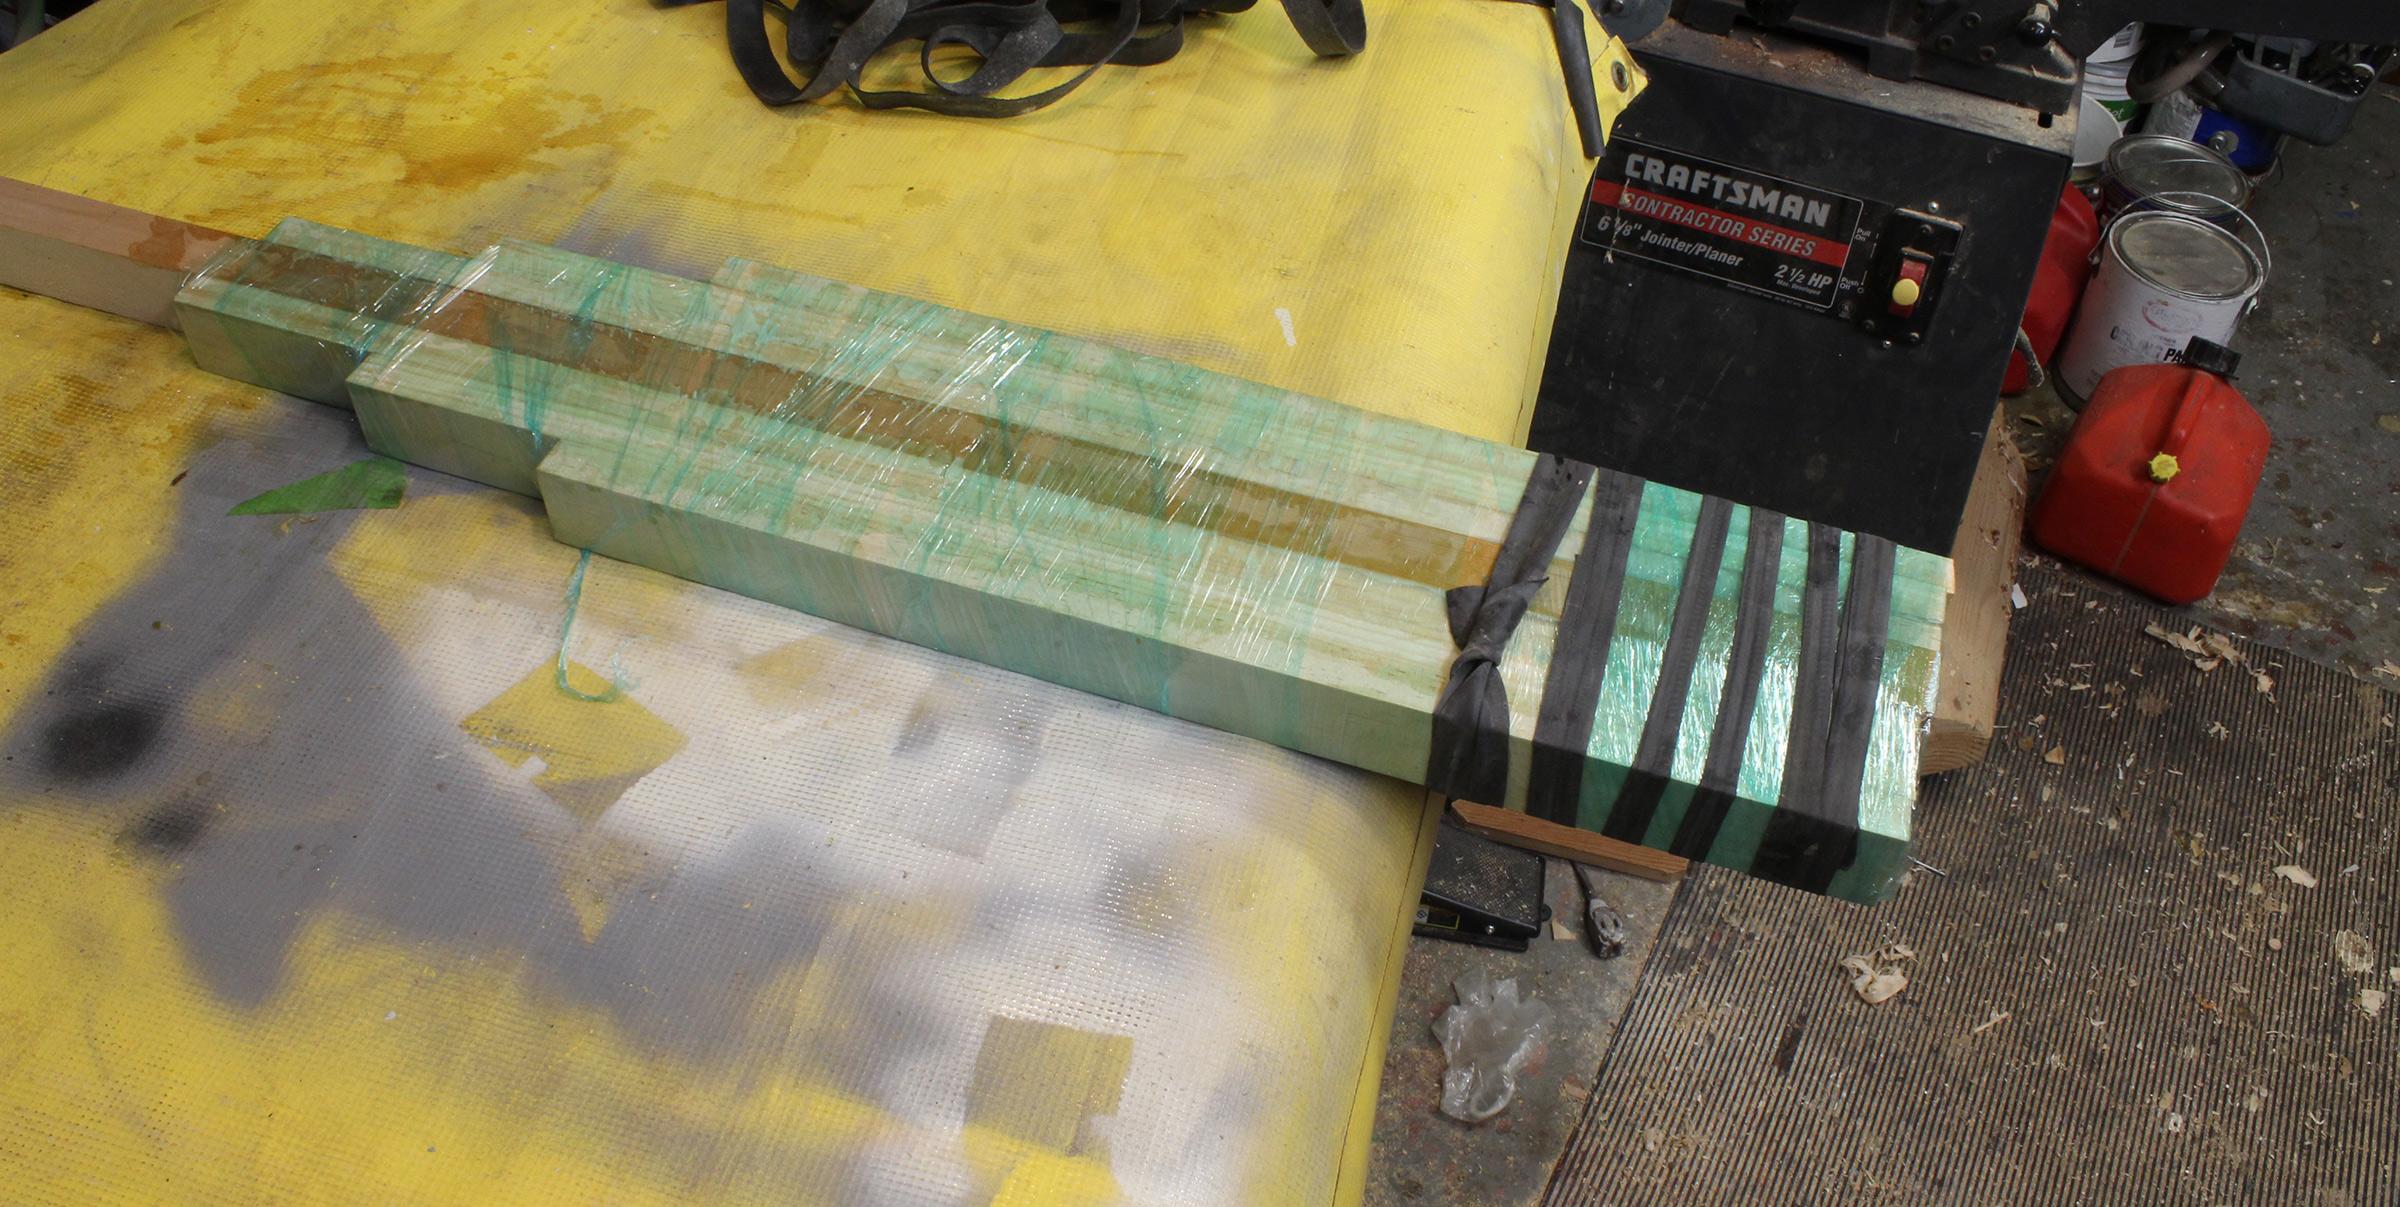
Meade Gougeon skates along in his own DN 60 at interstate highway speed. Meade and his brother Jan have made significant contributions to the sport, their bonding system making the boats stronger, more resilient, and more accessible to the home builder.
For 30 years following the launch of the first fleet on Lake St. Clair, the DN—with the exception of minor modifications—was virtually the same wooden boat, which was susceptible to damage from moisture and extreme cold. By the late 1960s, the Gougeon Brothers, working in their Bay City, Michigan, shop on the Saginaw River, produced a stronger and lighter DN by using a new epoxy bonding and sealing system (known today as the WEST System), which they had developed. This eliminated the problems associated with bare wood being exposed to the elements. It was a significant breakthrough, offering a new-generation iceboat.
The DN proved to be an excellent test subject, because of the high stress loads to which its components were exposed. The vast expanse of ice on Saginaw Bay offered ideal laboratory conditions. Five years and 200 DNs later, the Gougeons sold the building segment of their business to concentrate on further development and production of their WEST System, but they had left their mark on the boat and sport.
Gretchen Dorian
As apparent wind speed tops 50 mph, it can get difficult to remain connected to the ice.The tapered fuselage, almost wing-like in profile, helps to retain her footing.
On any given winter weekend in the United States, Canada, and Europe, hundreds of hard-water sailors flock to the best ice on which to race or simply take another electrifying ride. On Wednesdays during winter months, designated Internet sites list ice conditions for the coming weekend and forecast wind velocities. Along with other regattas, the North American Racing Championship race is held each winter where ice conditions are conducive to competitive racing. It’s not unusual for DN sailors to travel 200–500 miles to find smooth ice.
As many as 50 percent of the sailors you’ll find competing in any of these regattas have built their own boats. Meade Gougeon calls the DN “a tinkerer’s dream,” because it can be built in a home workshop, with minimal space and without the need for expensive, heavy-duty tools. Best of all, materials are relatively inexpensive, which appeals to would-be 21st century iceboaters, just as it did to Detroiters during the Depression years.
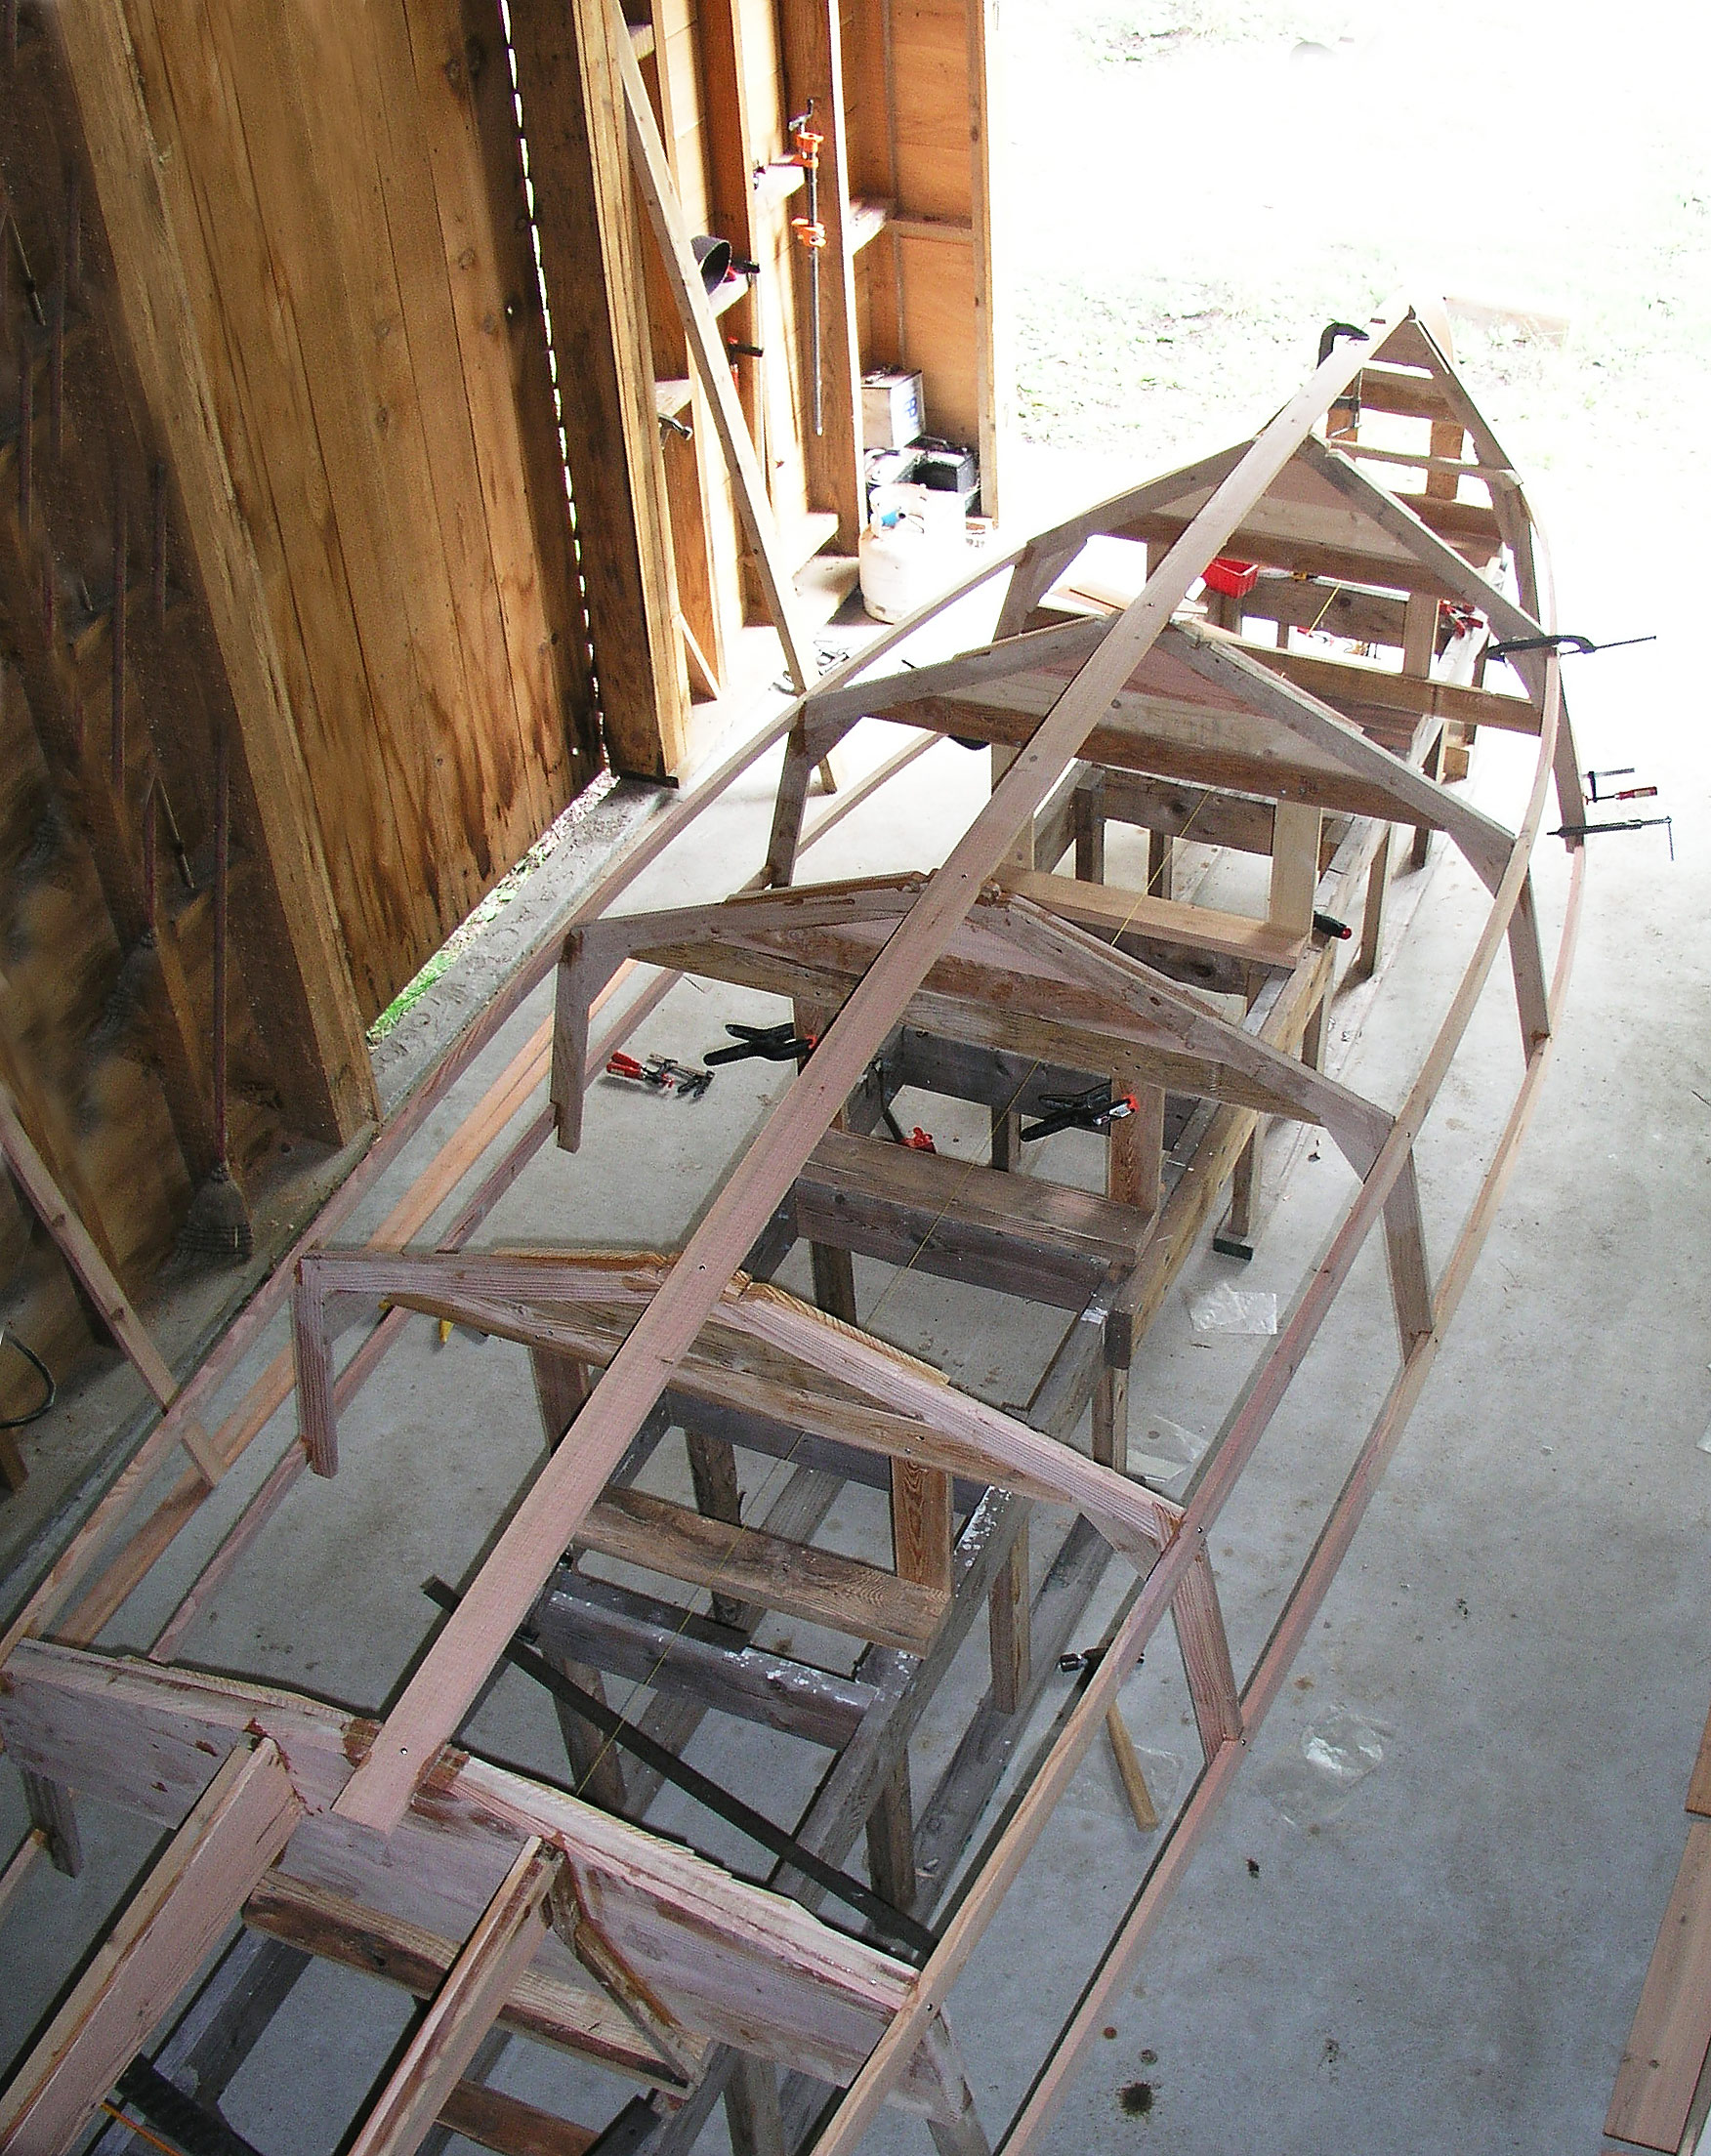
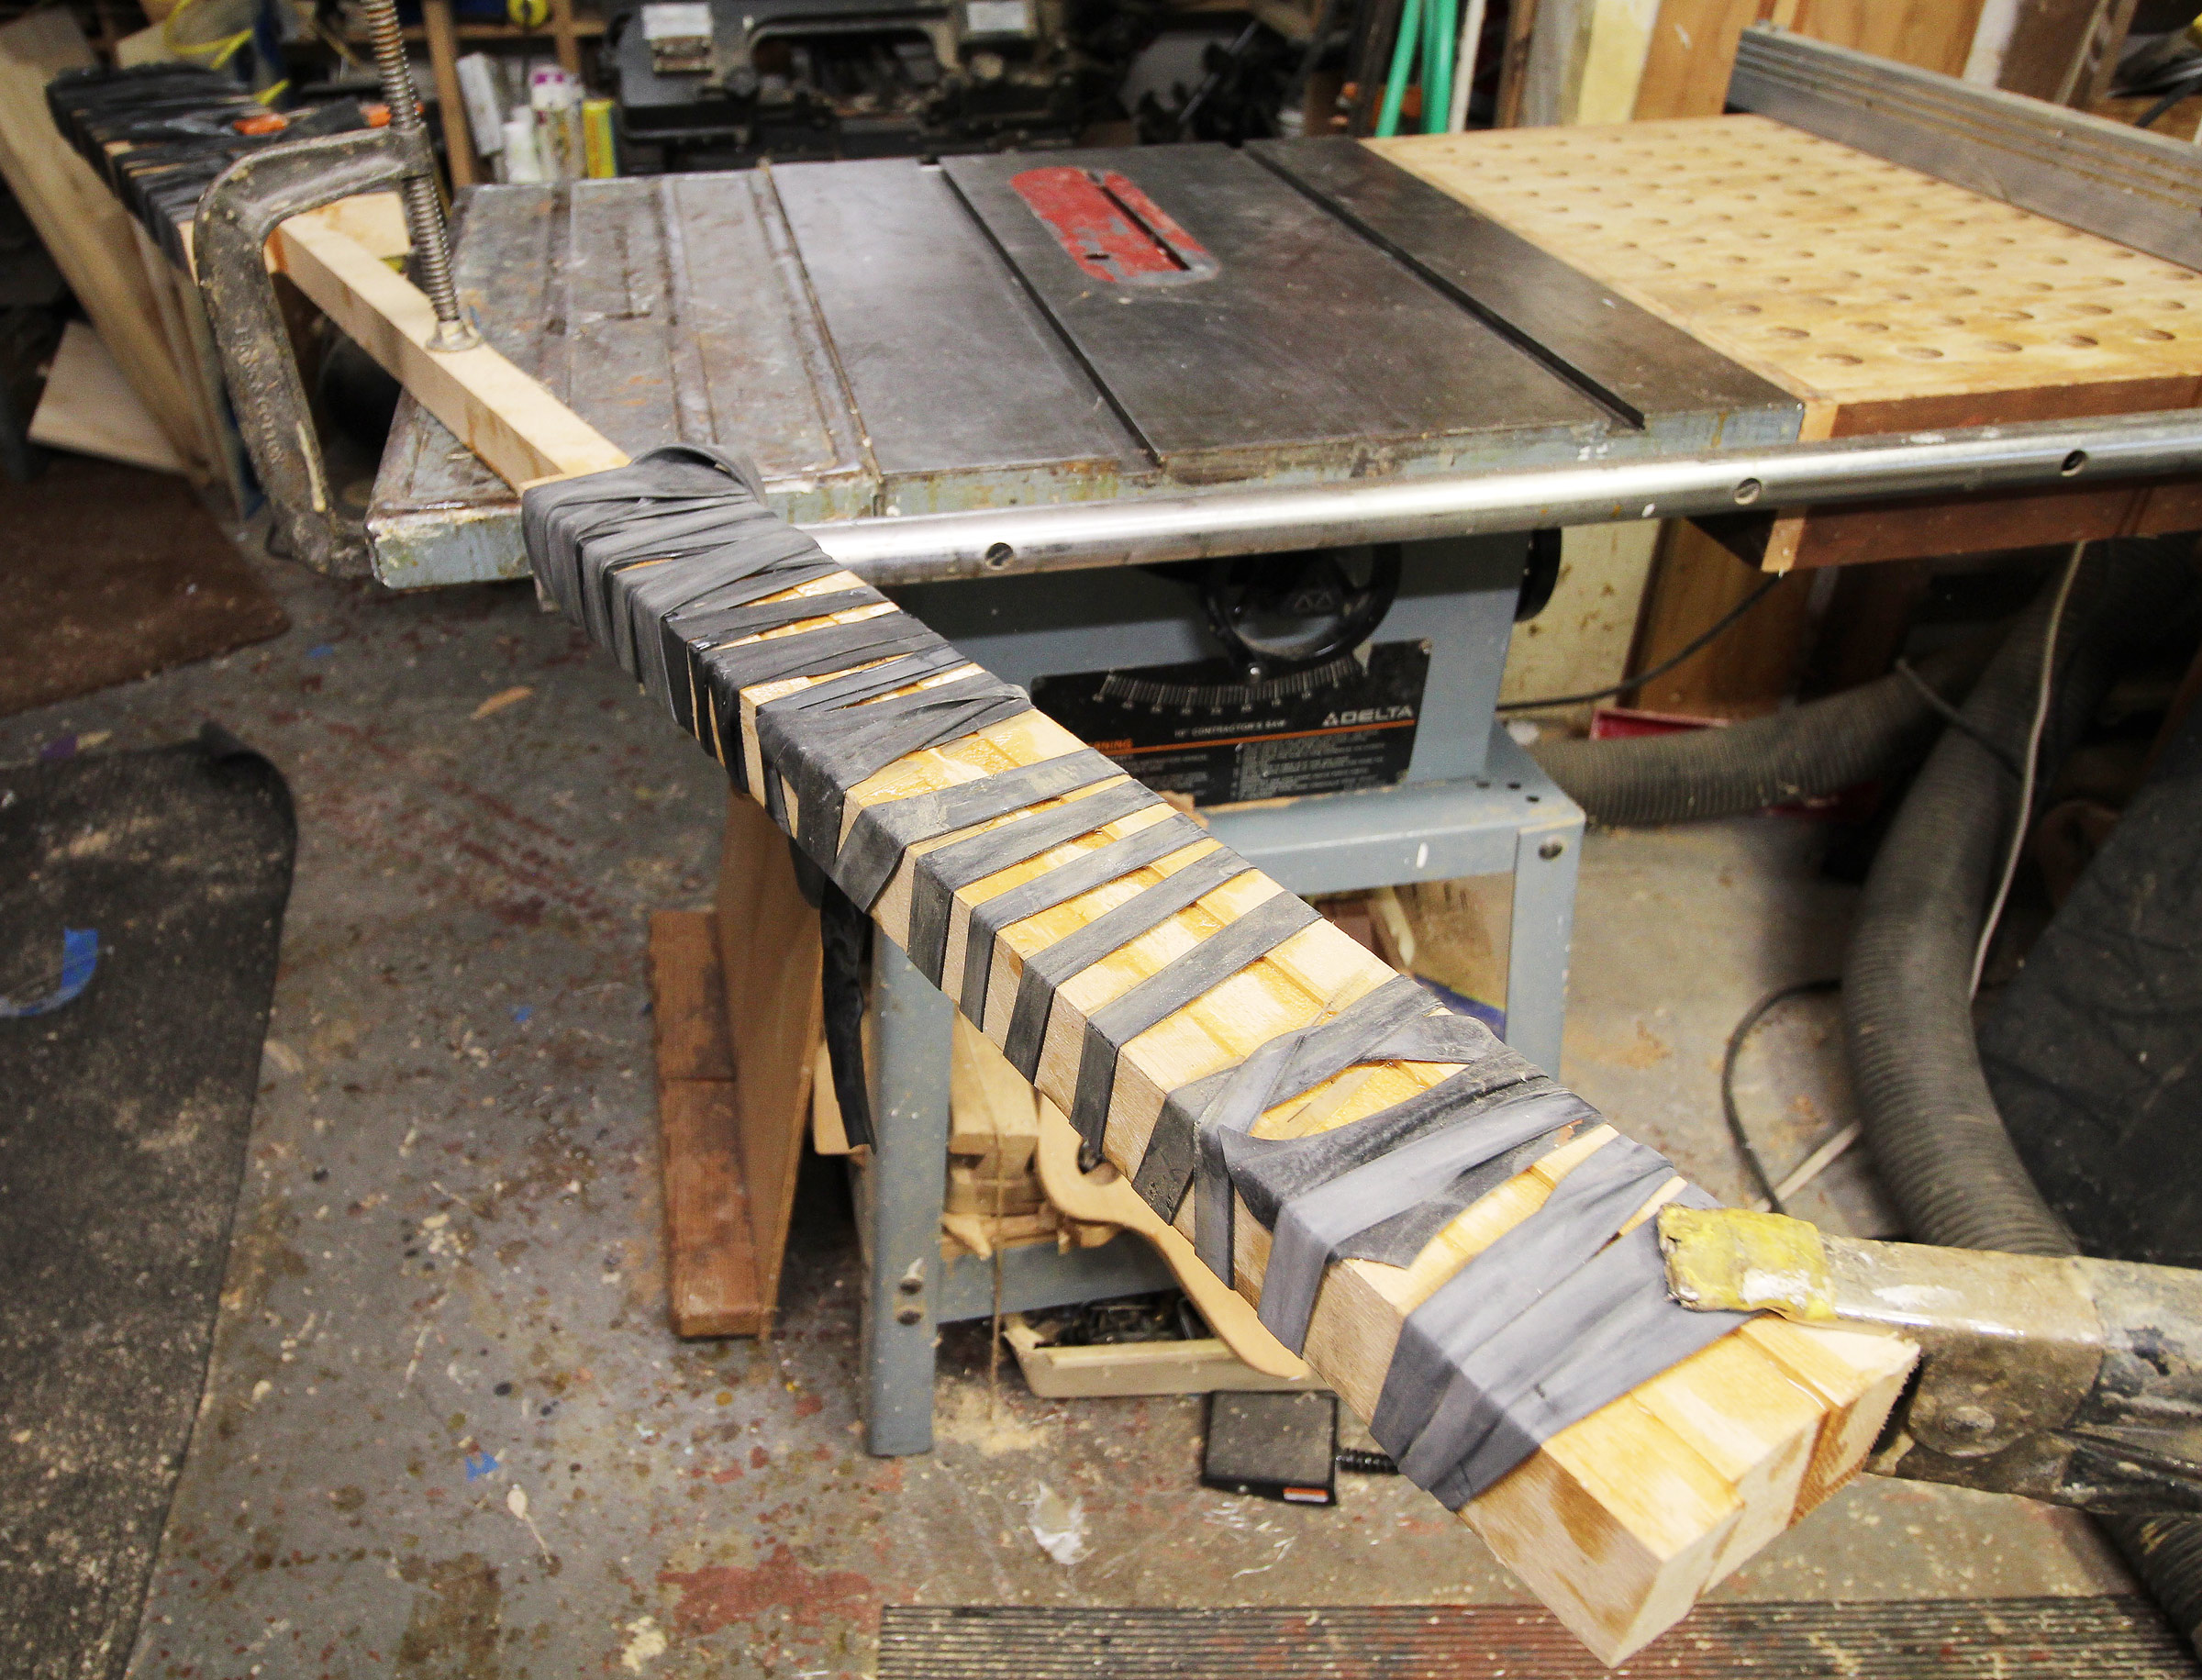
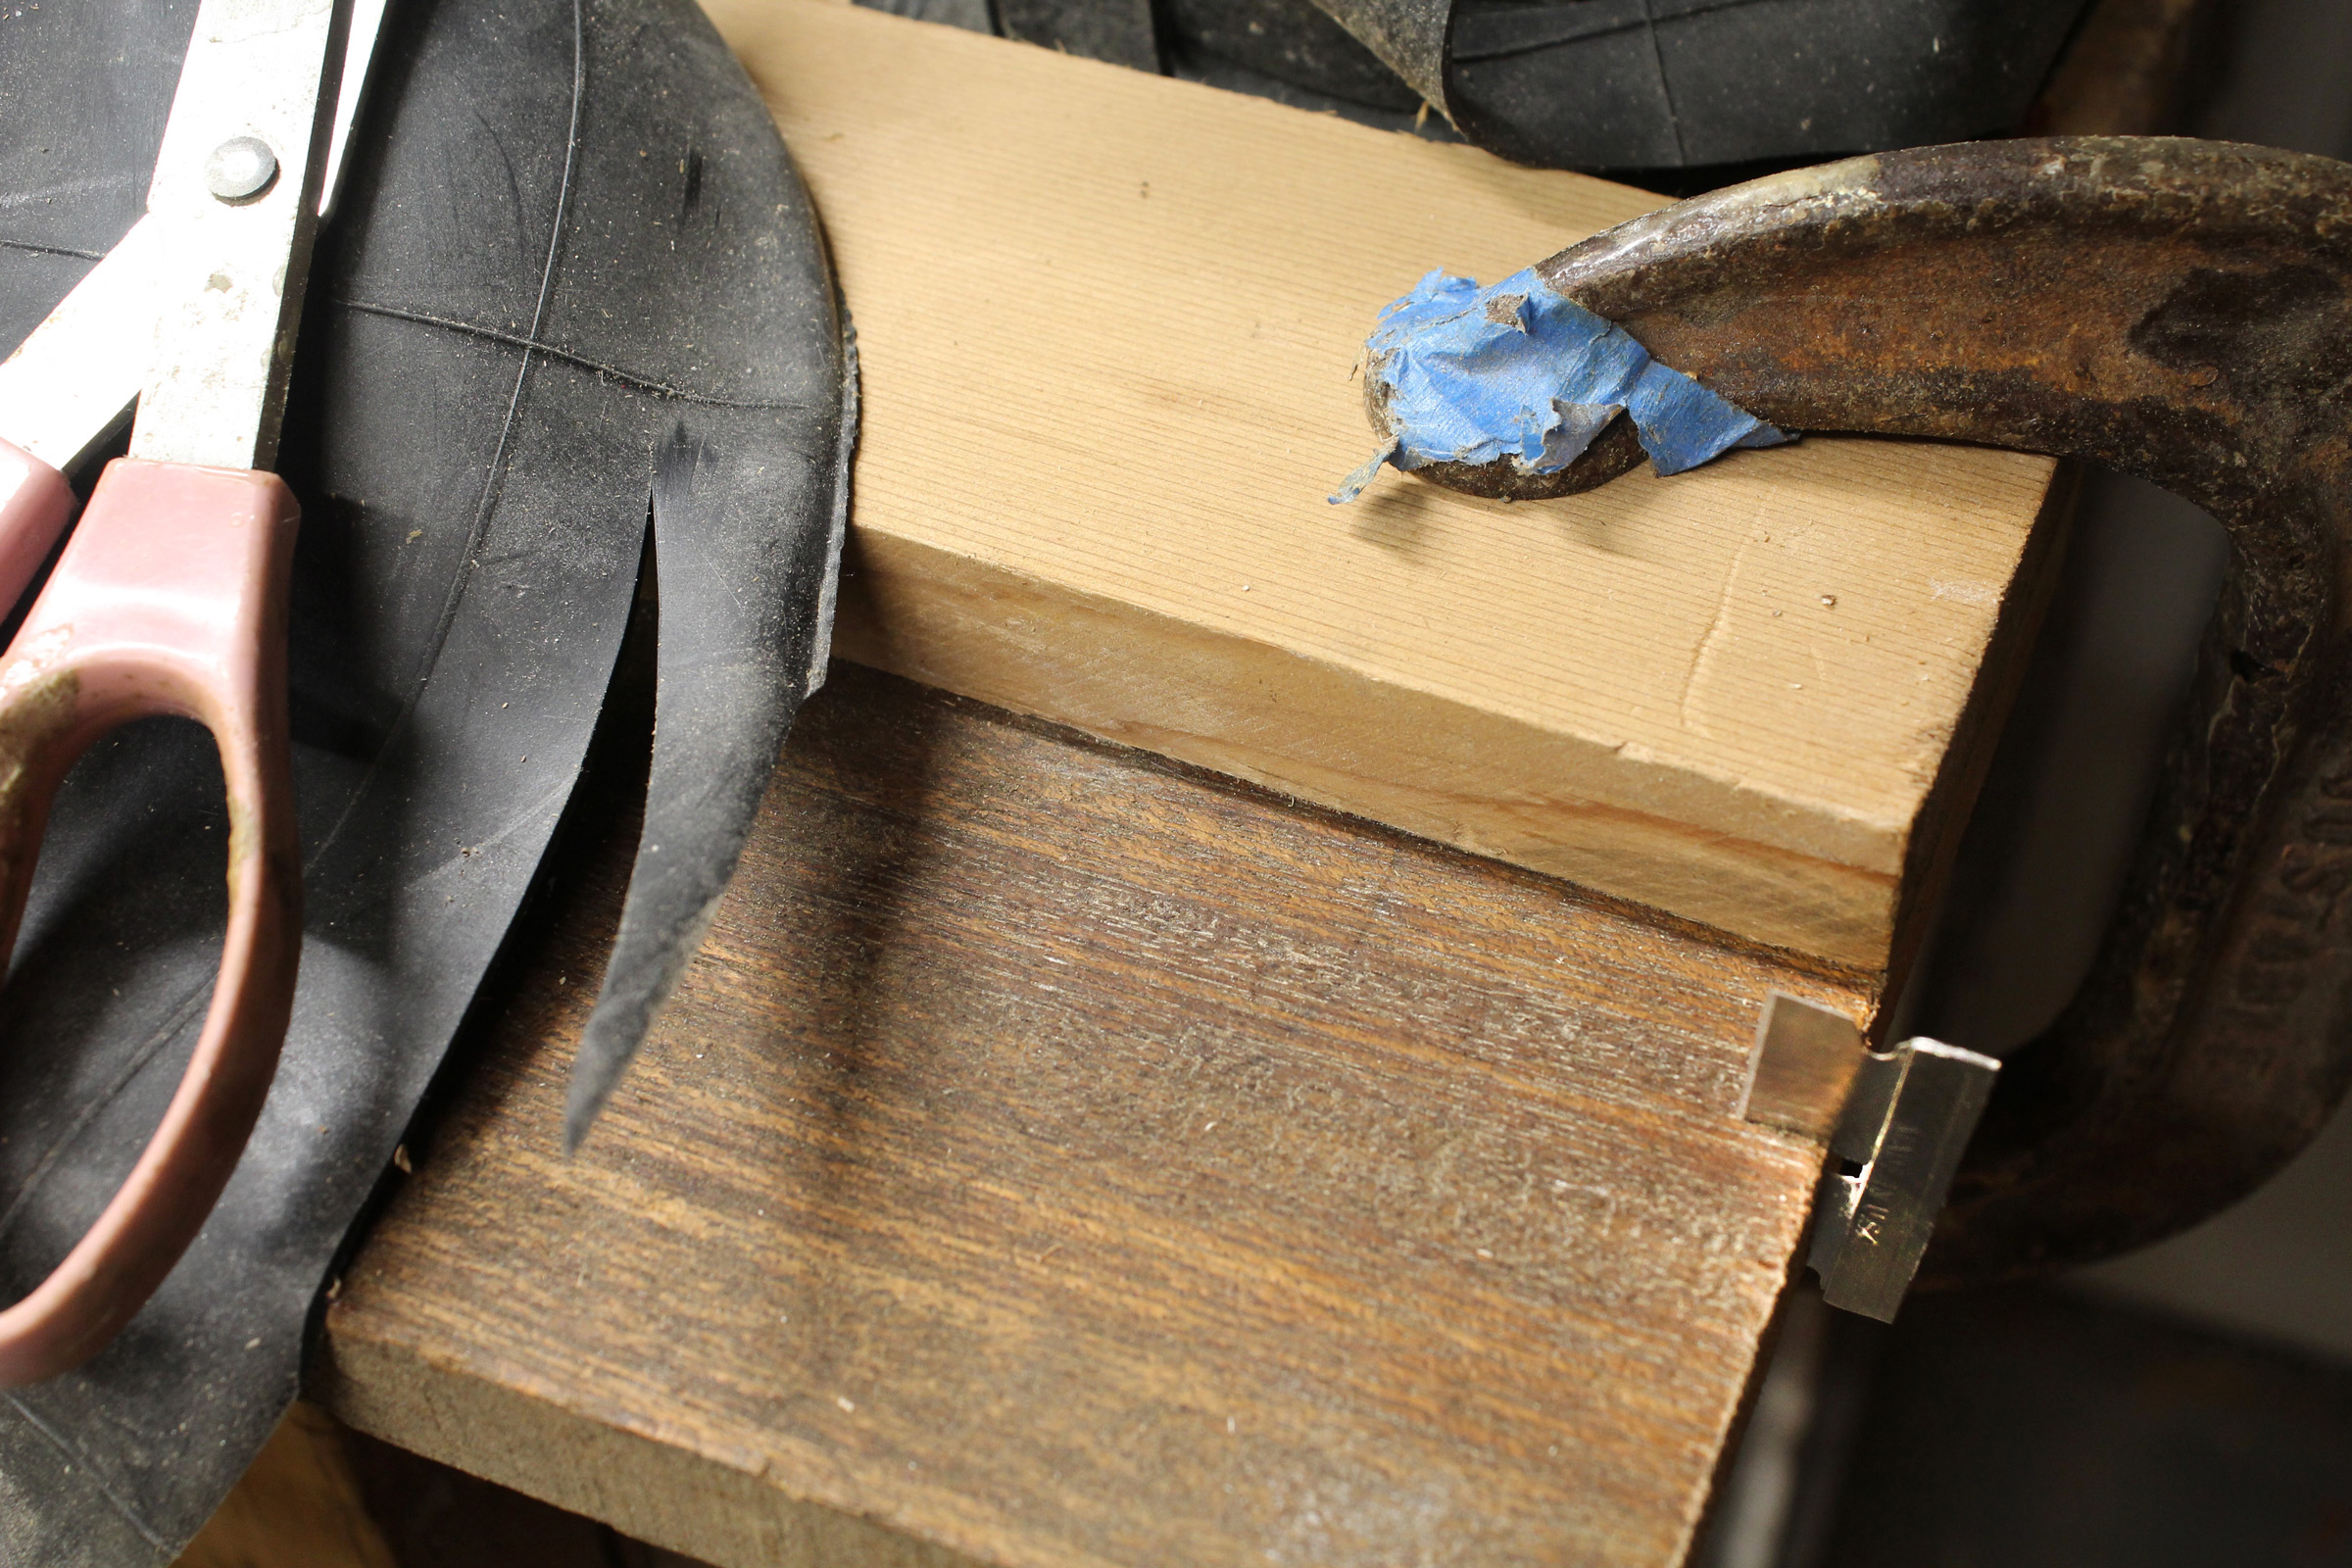
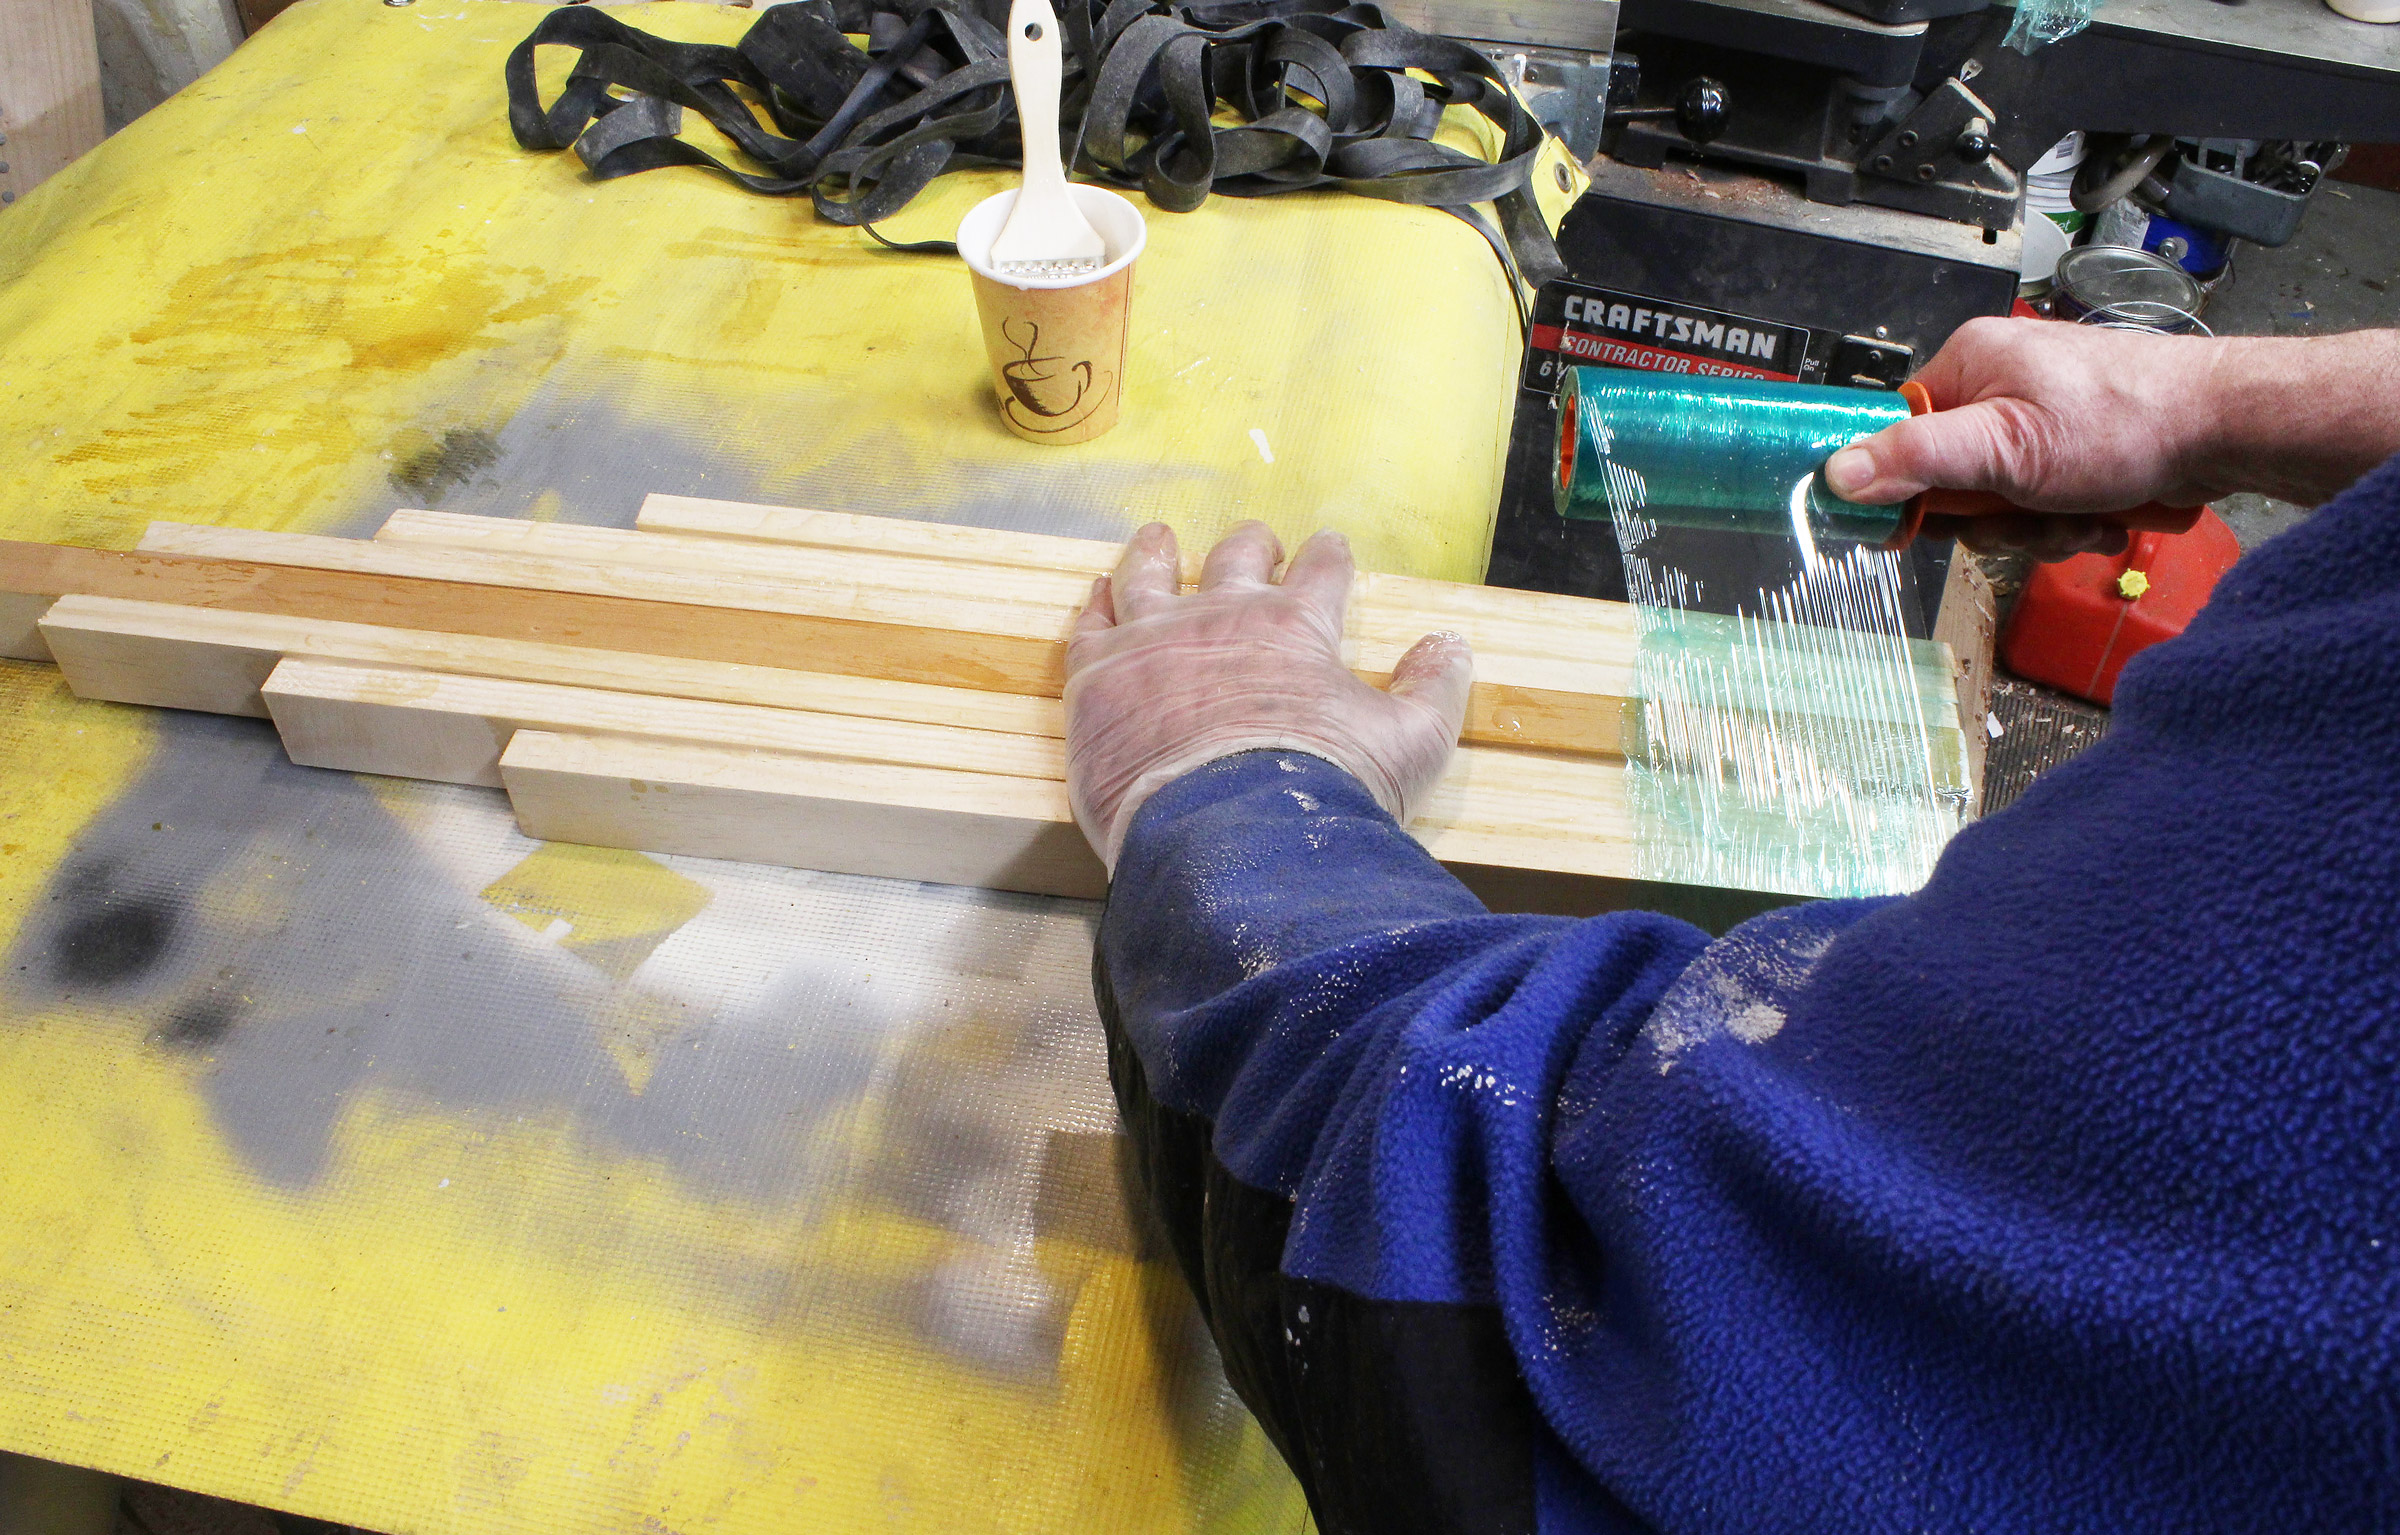
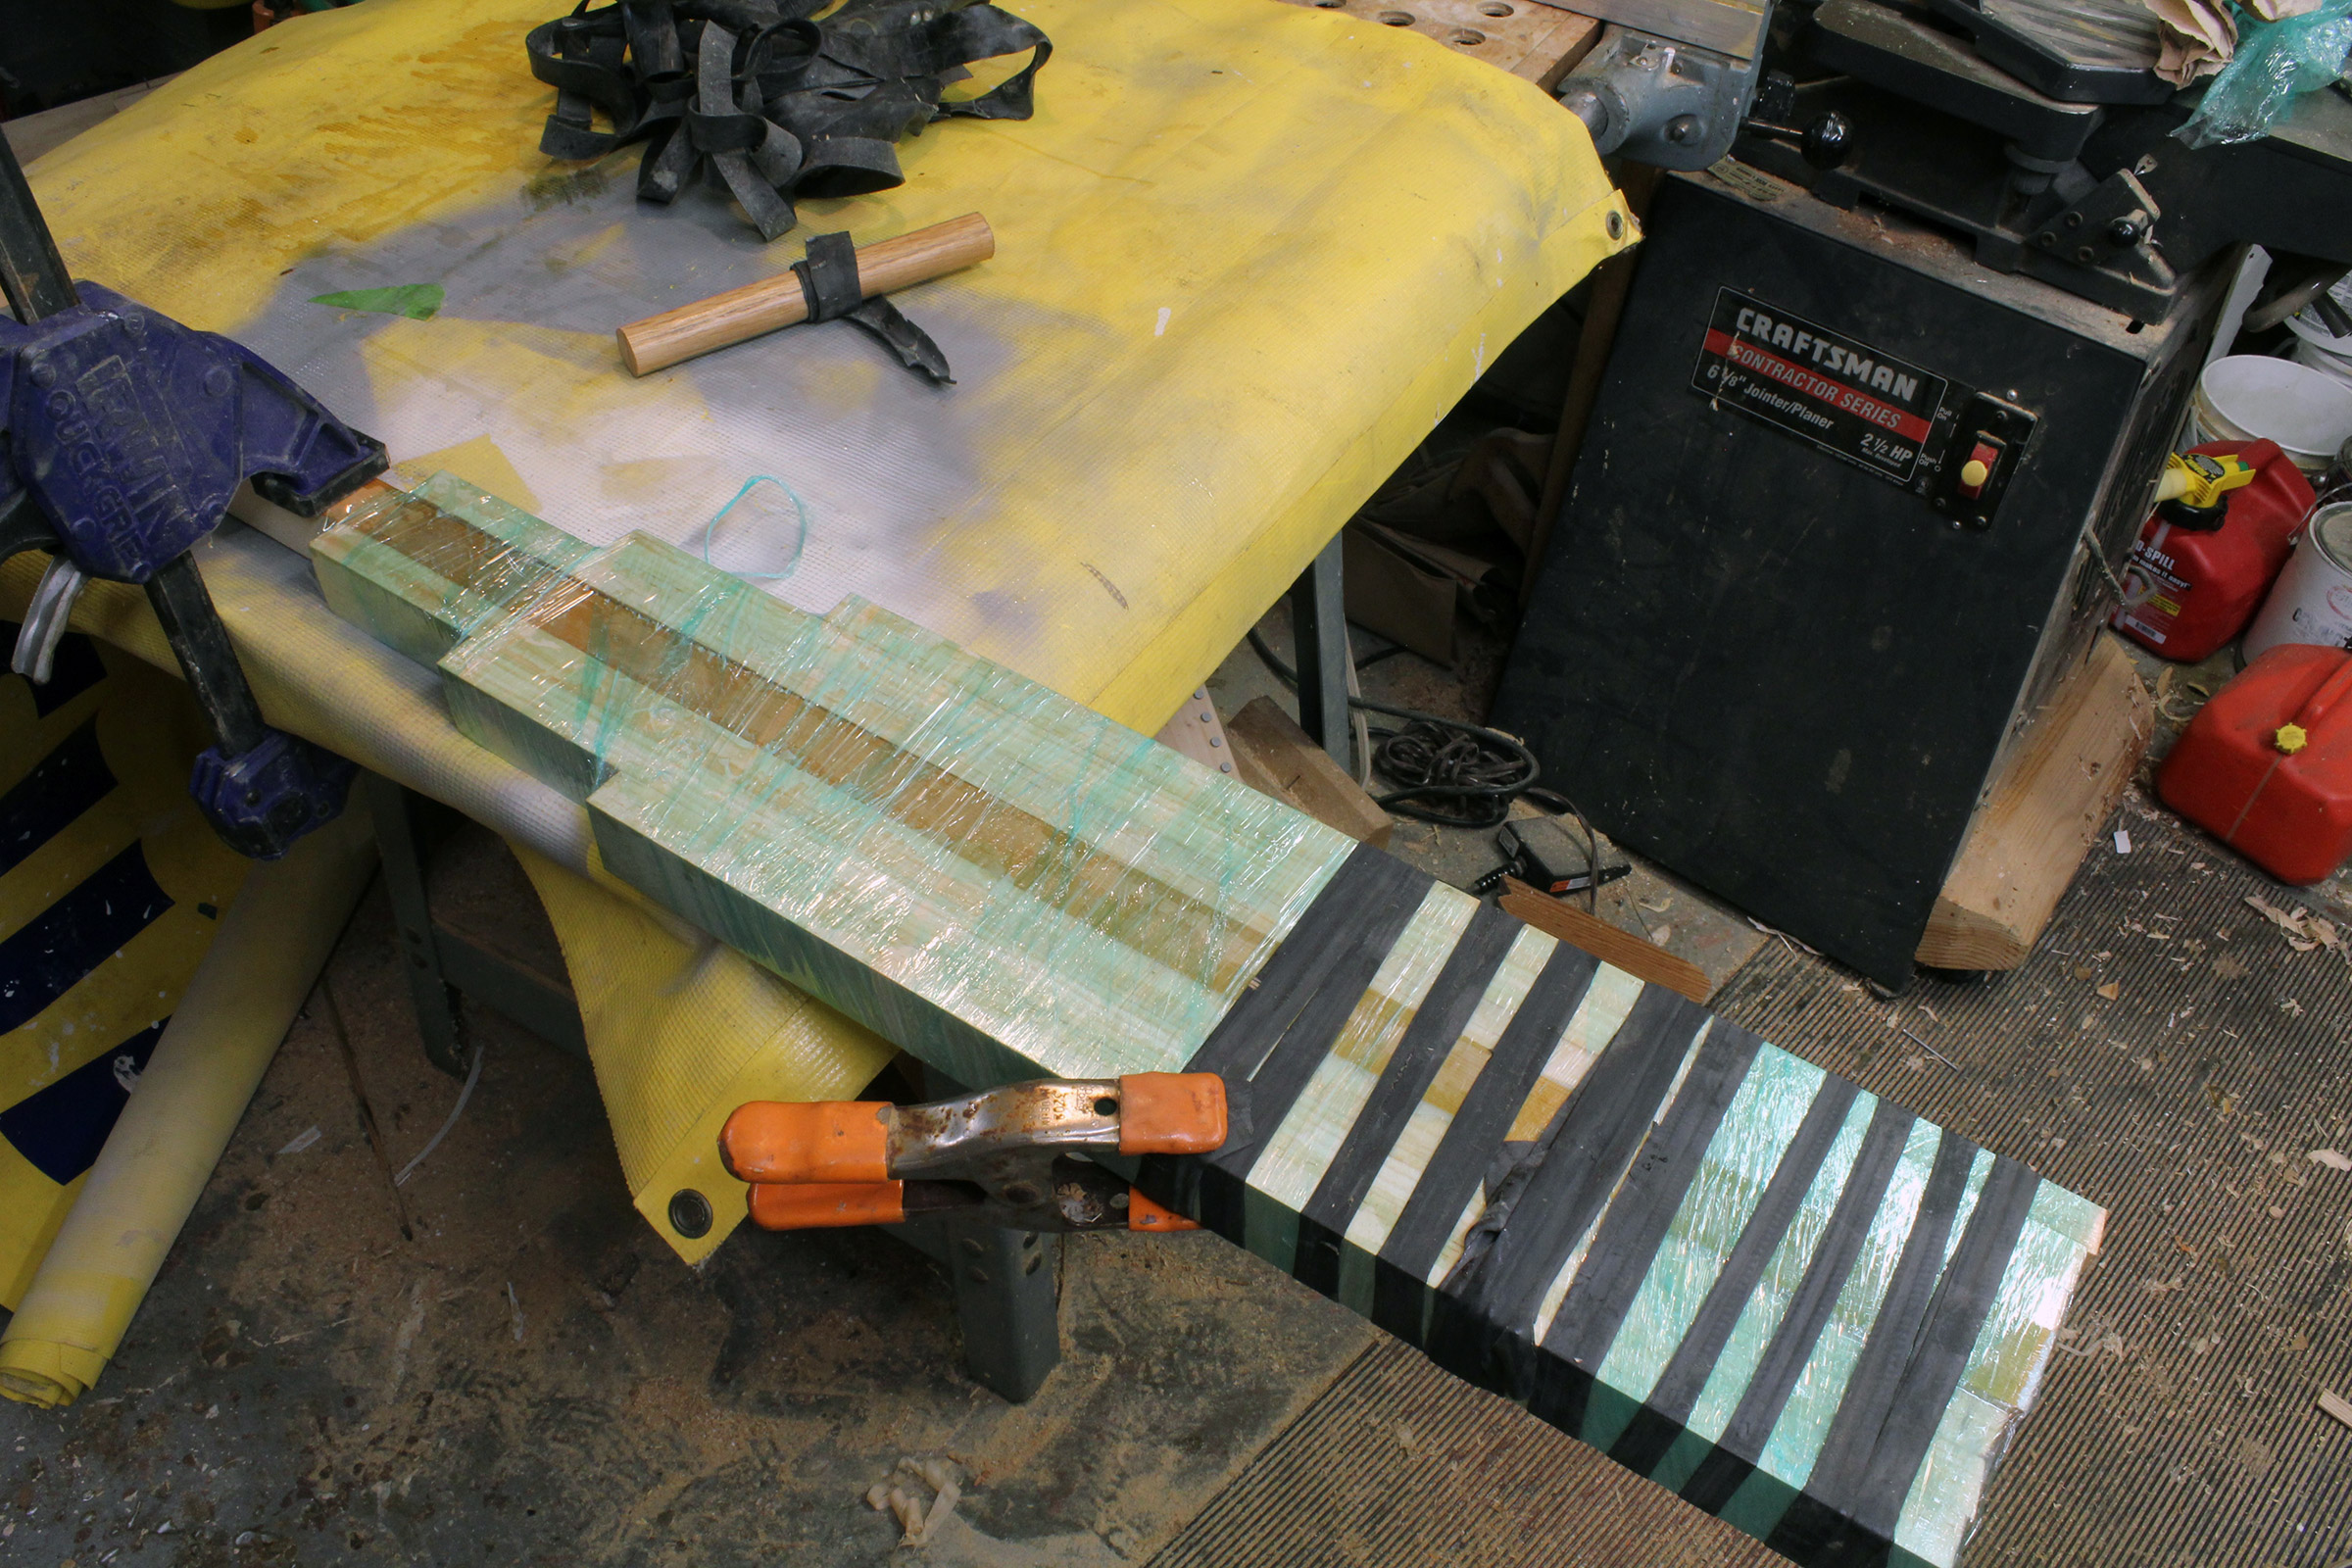
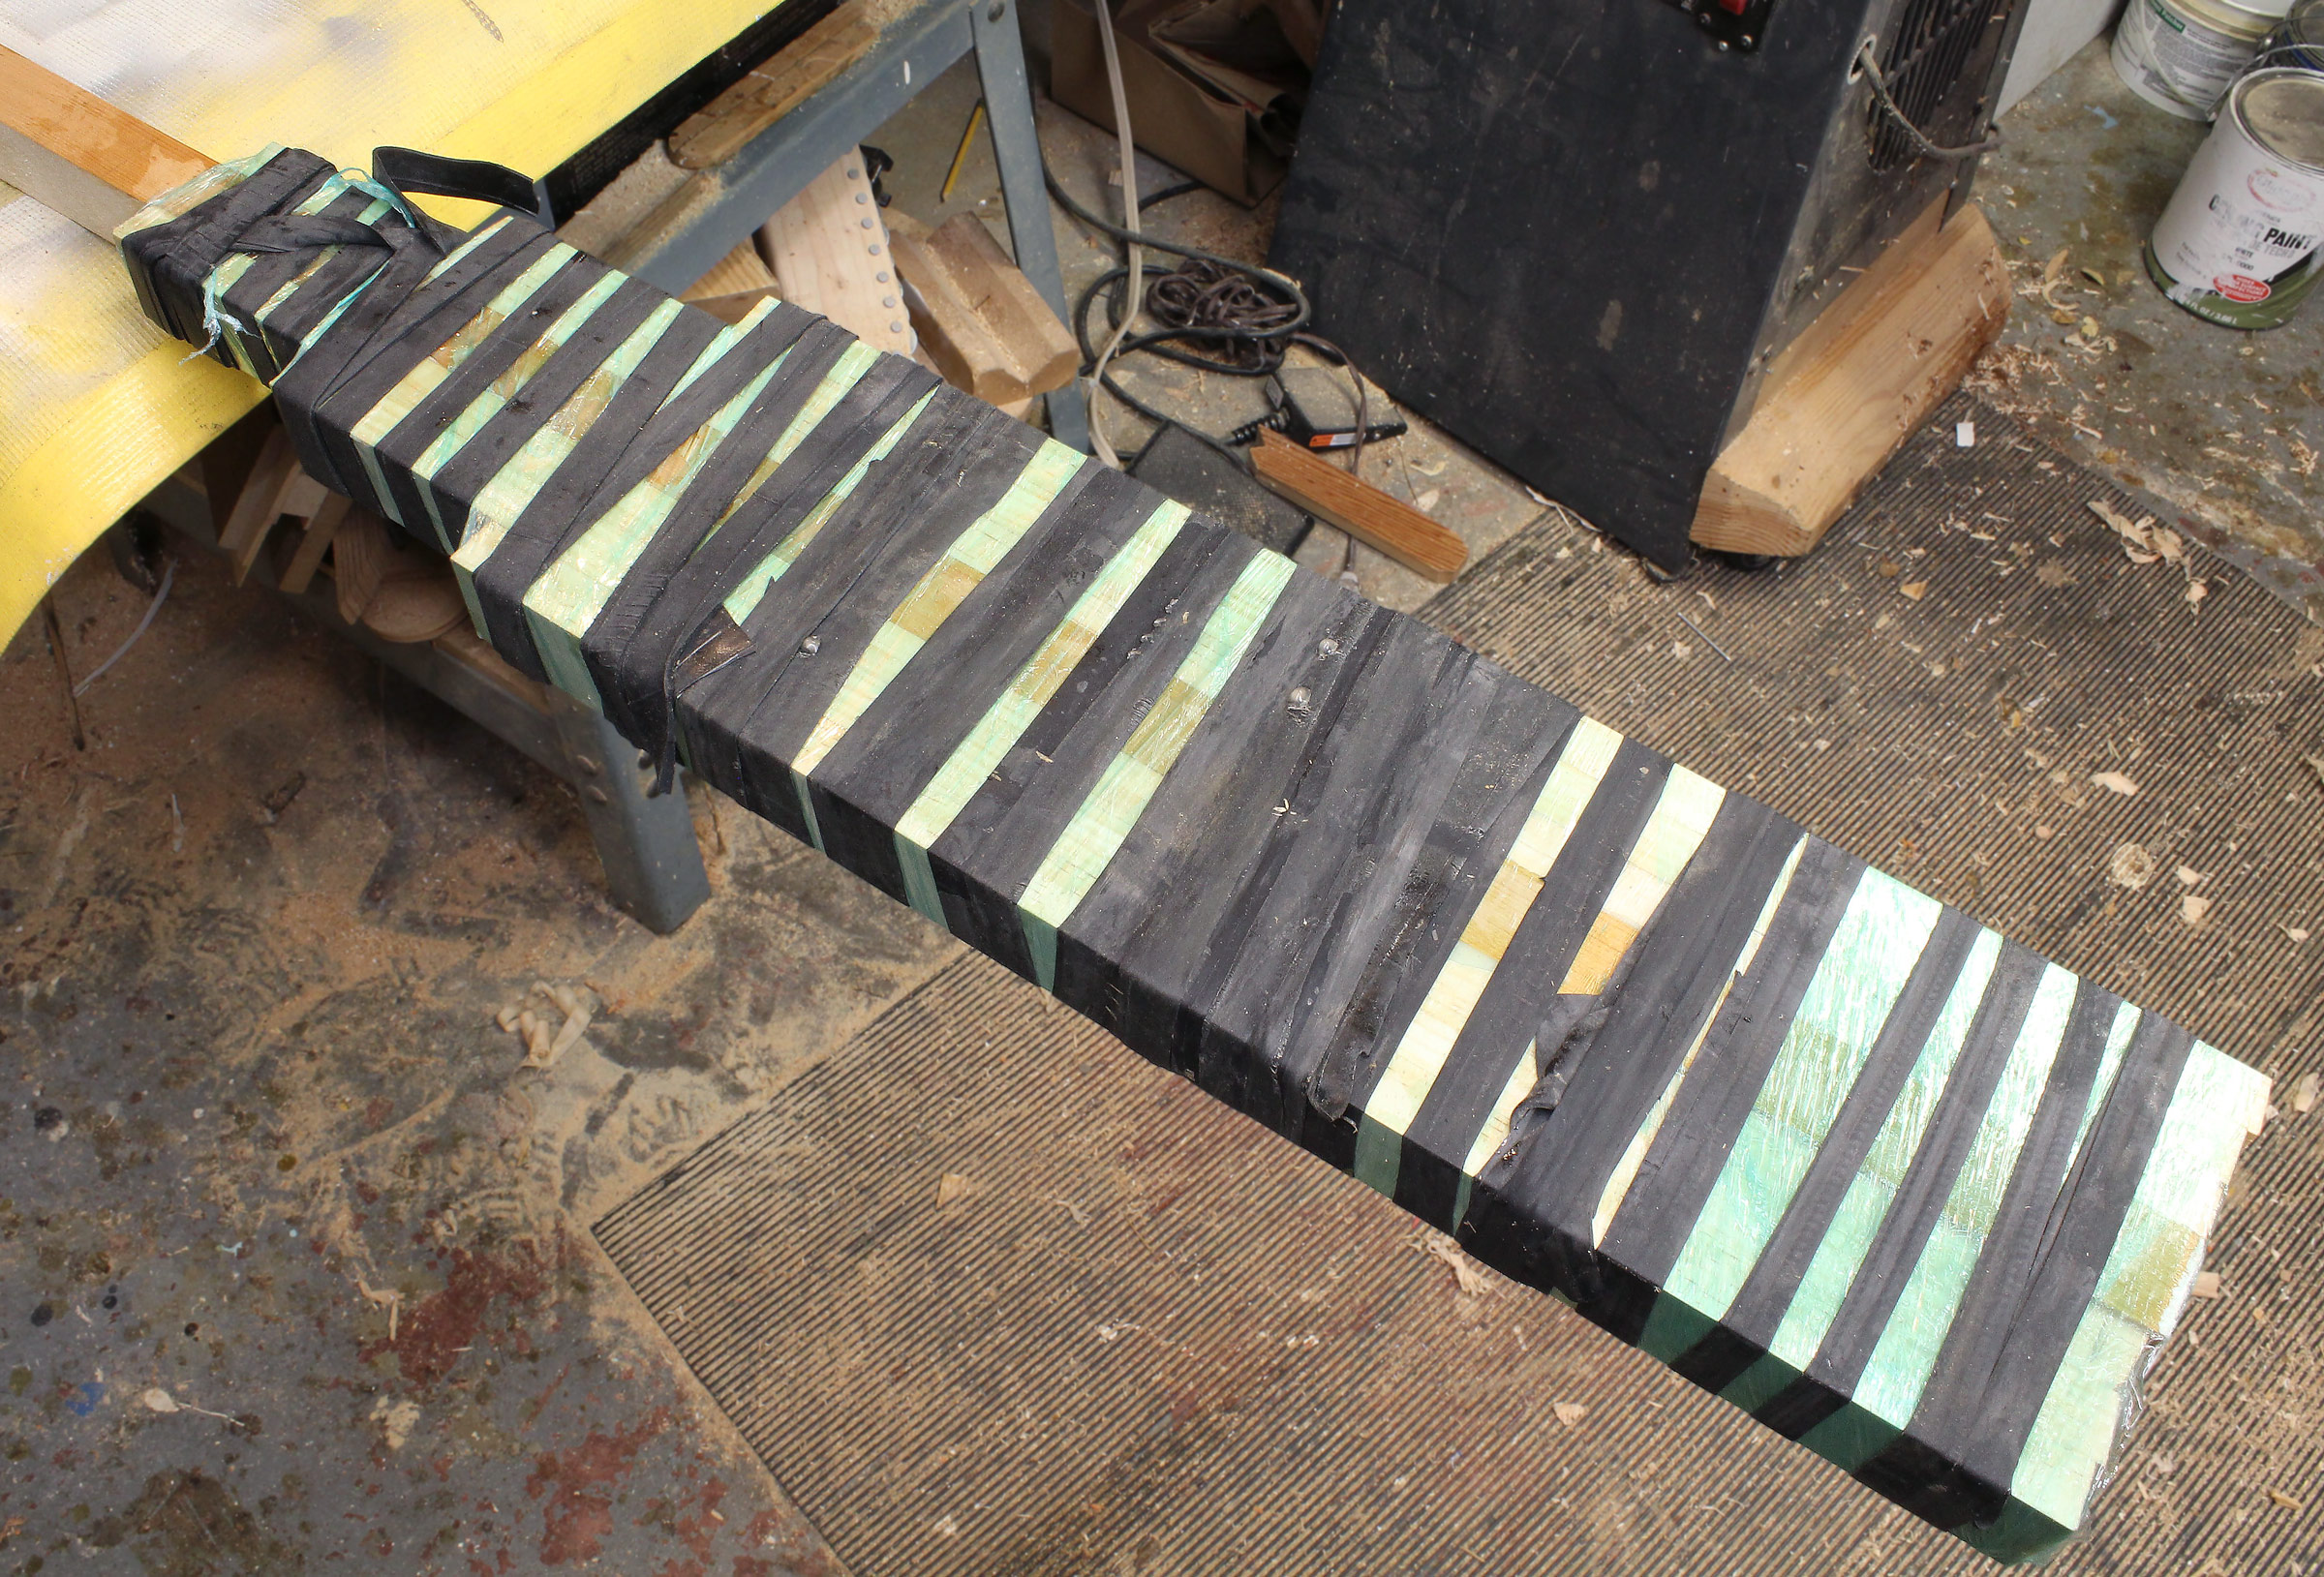
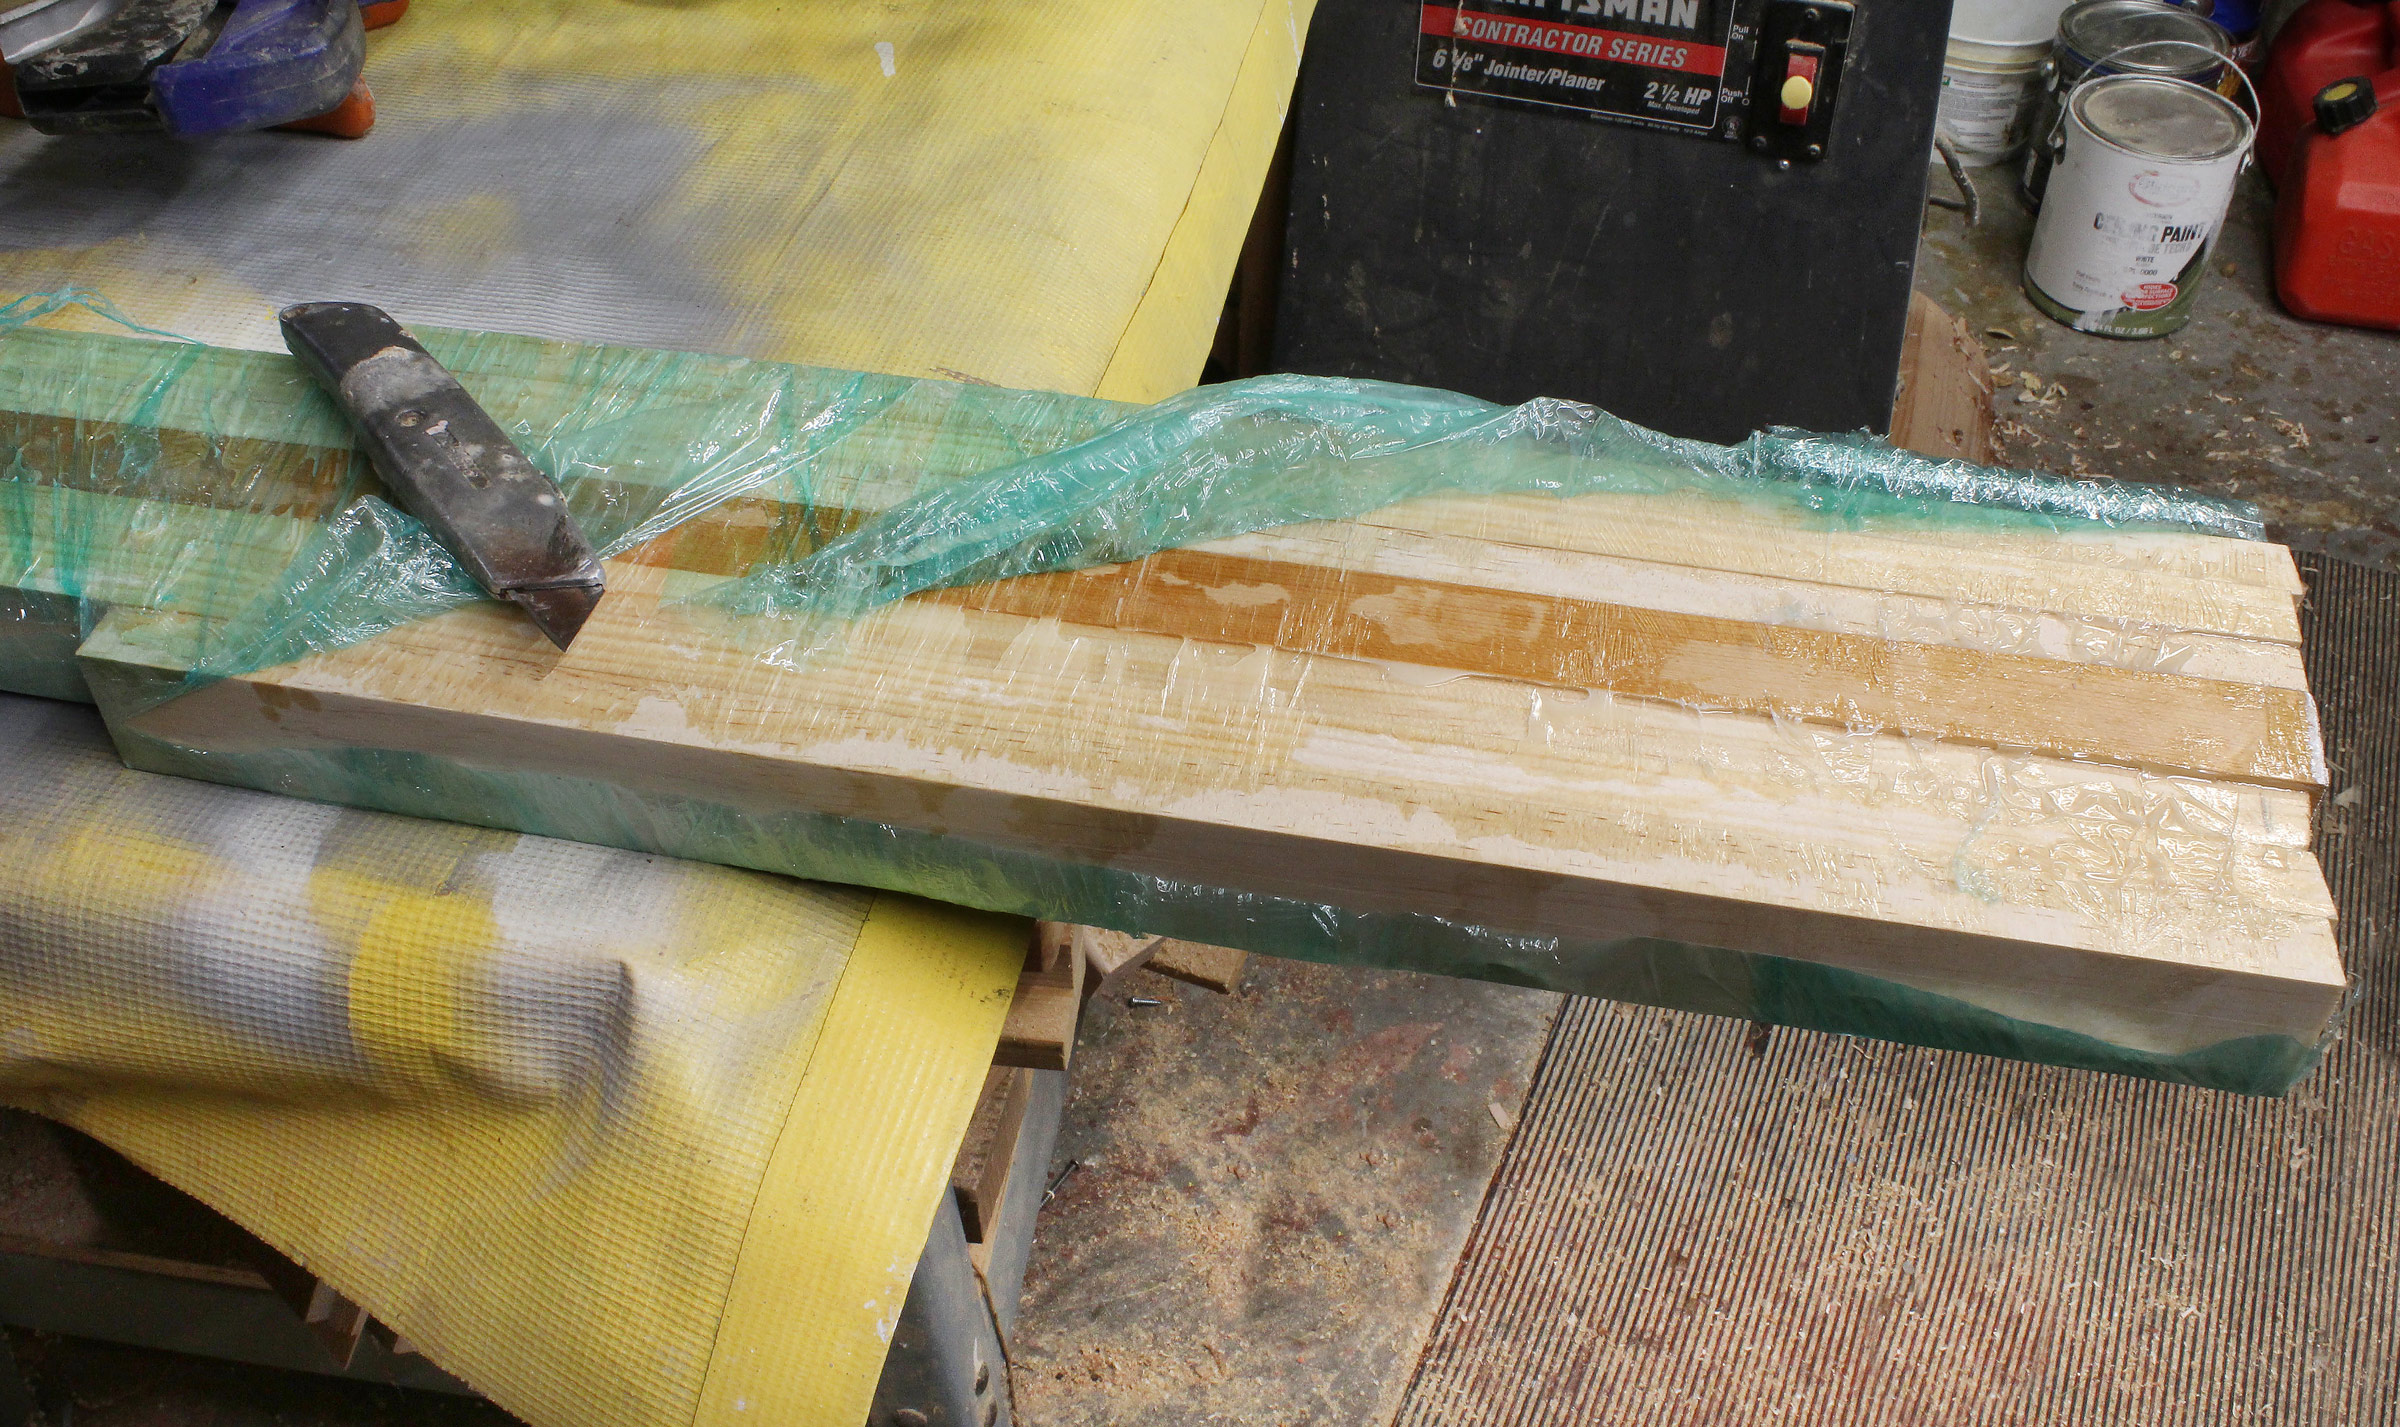
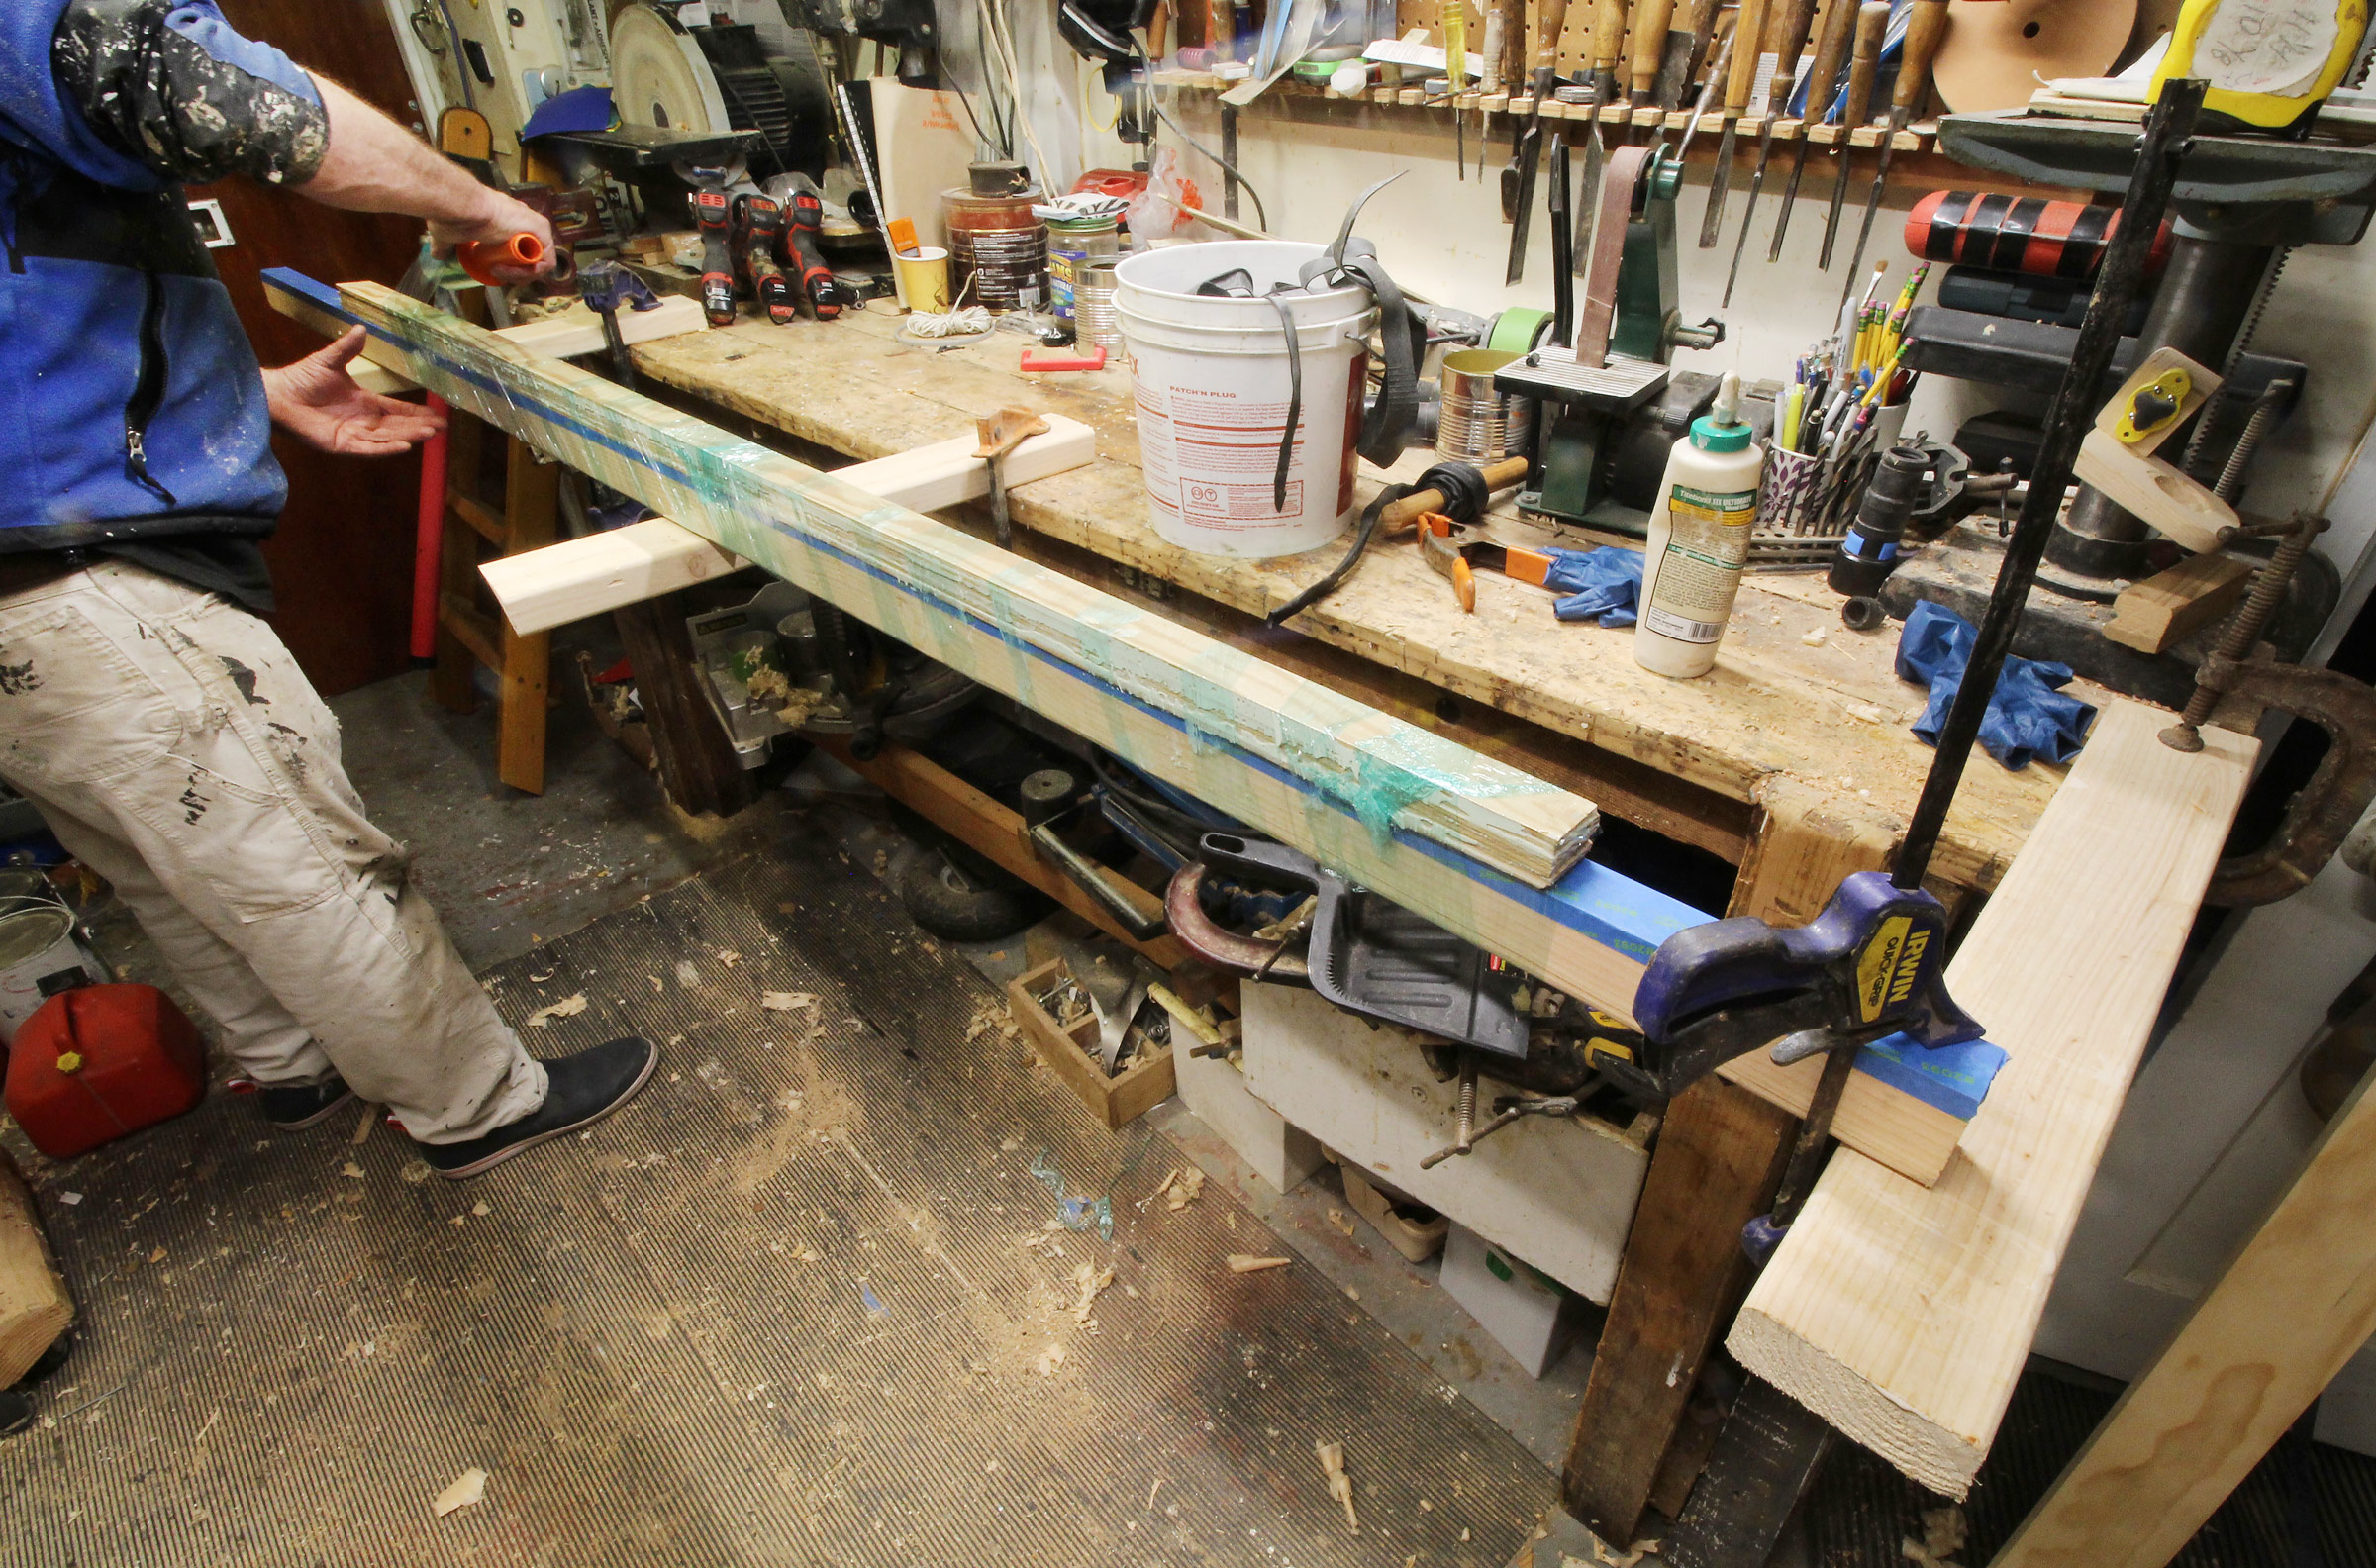
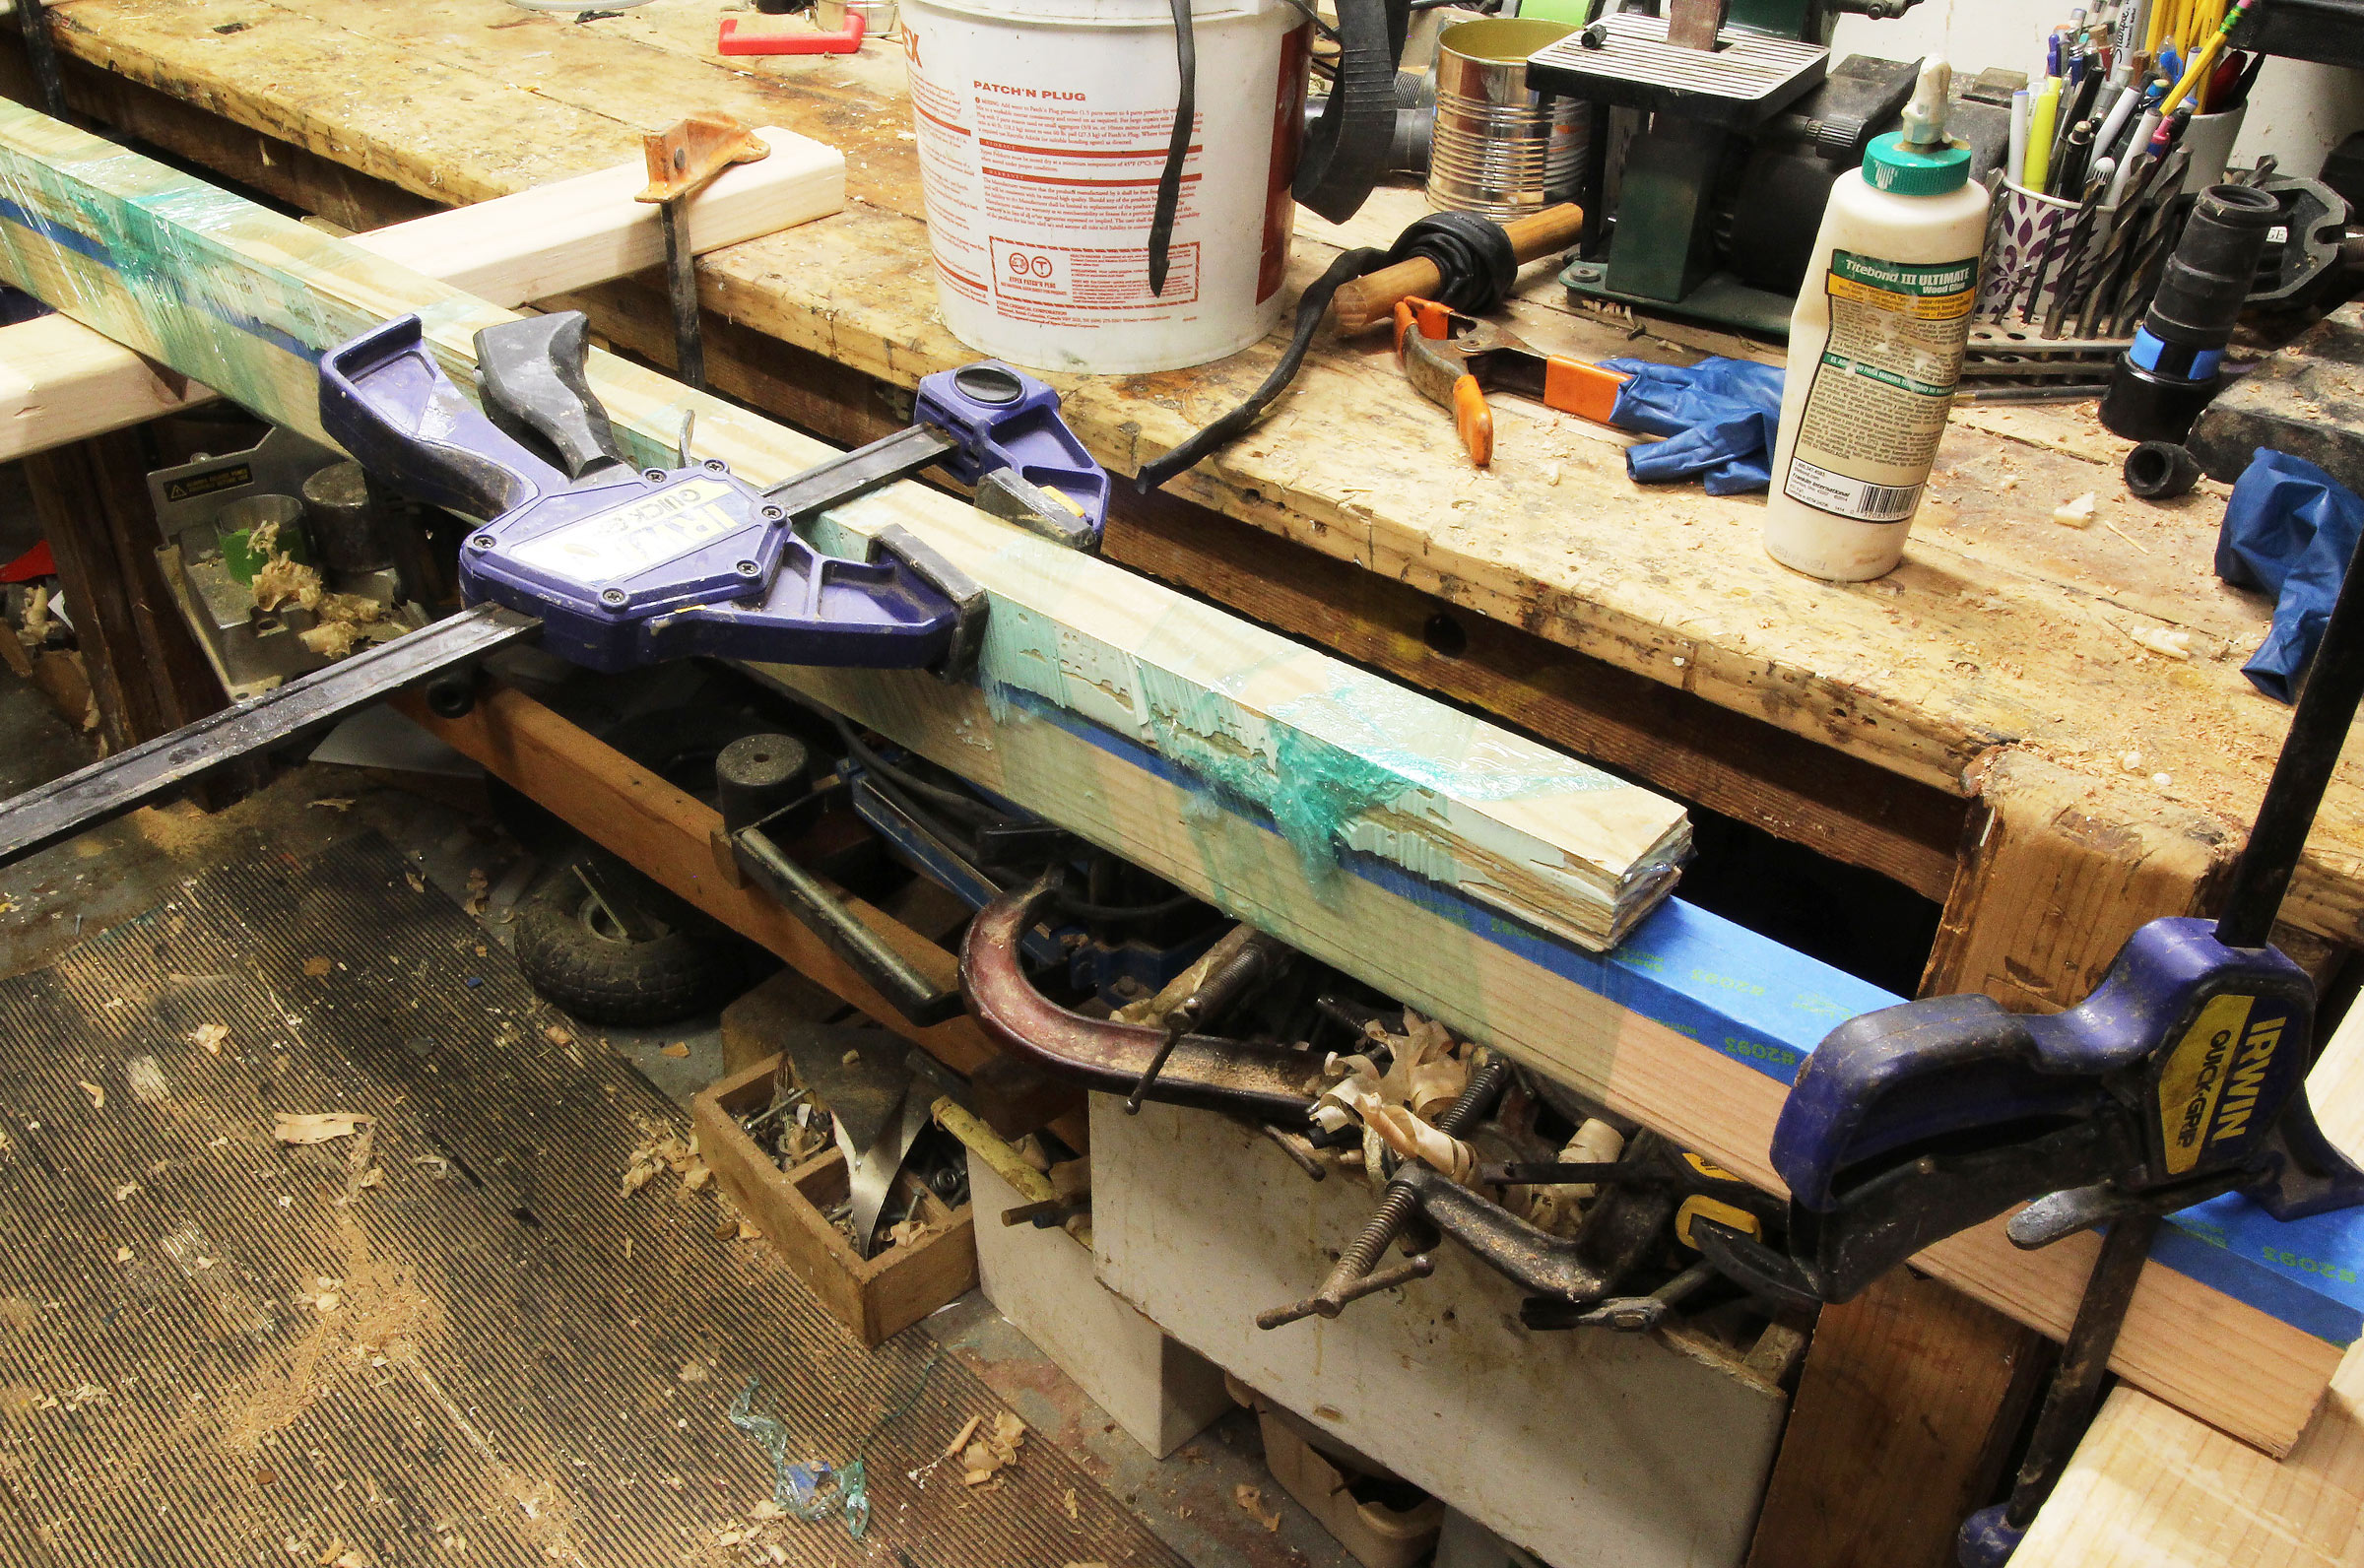
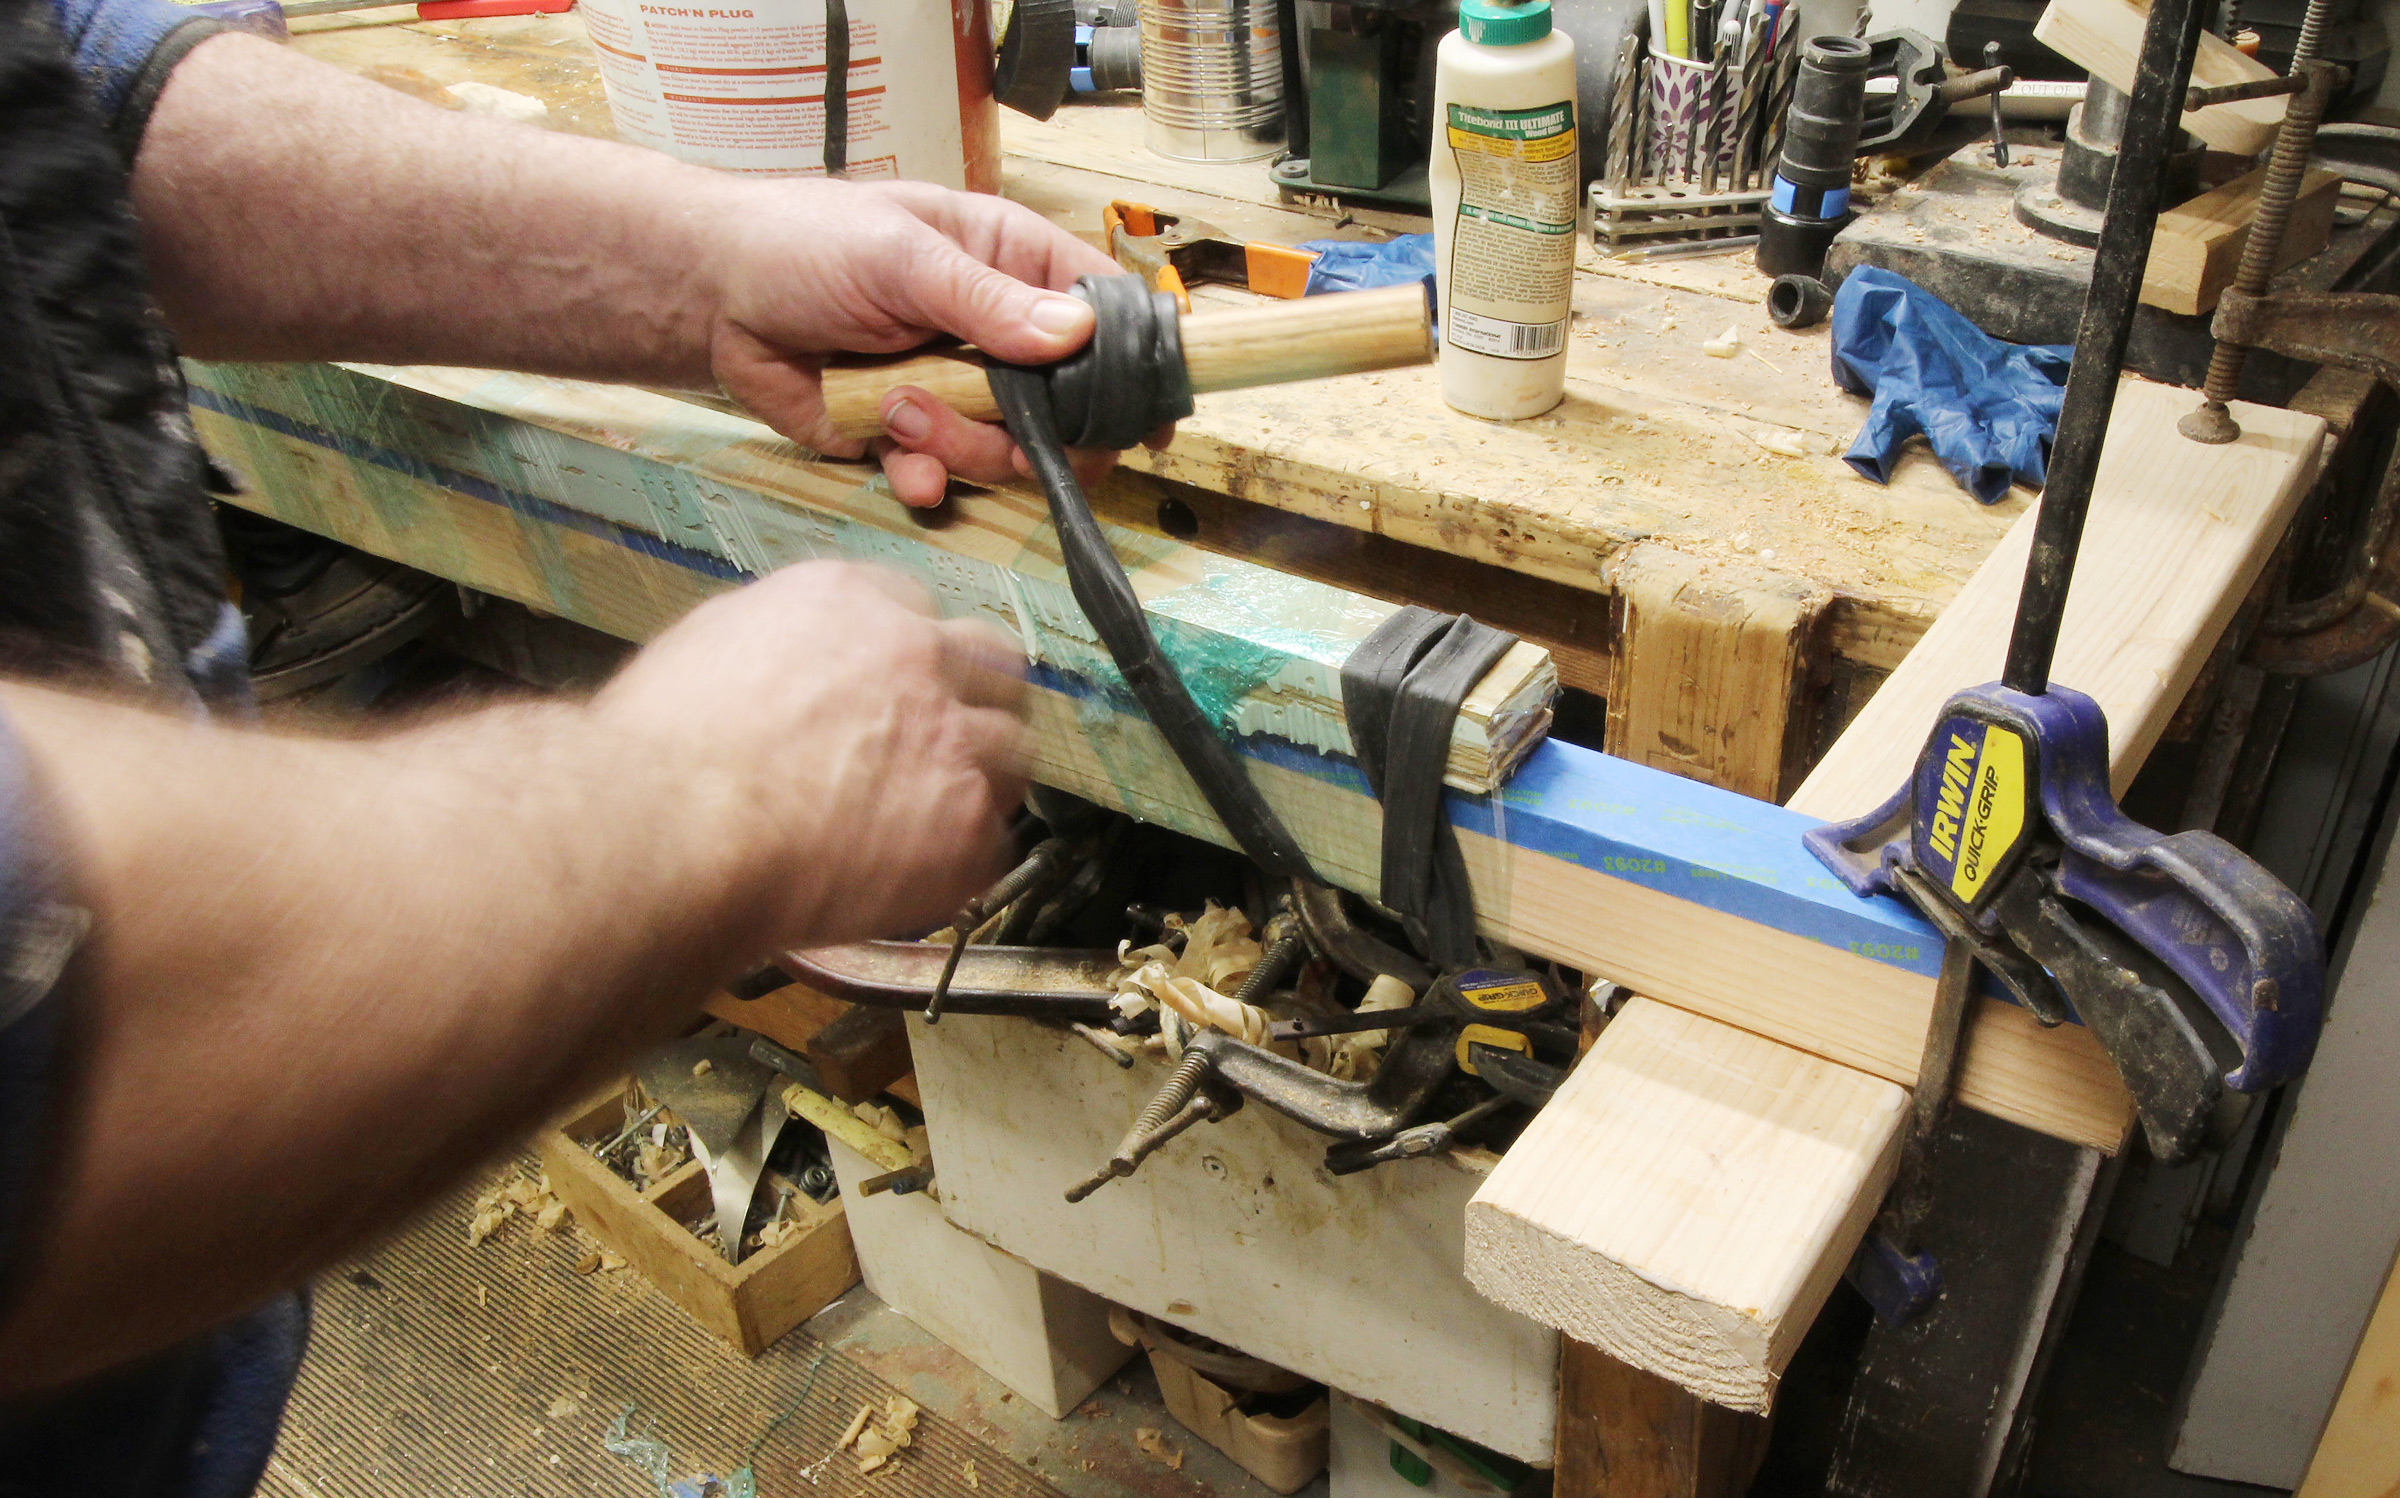
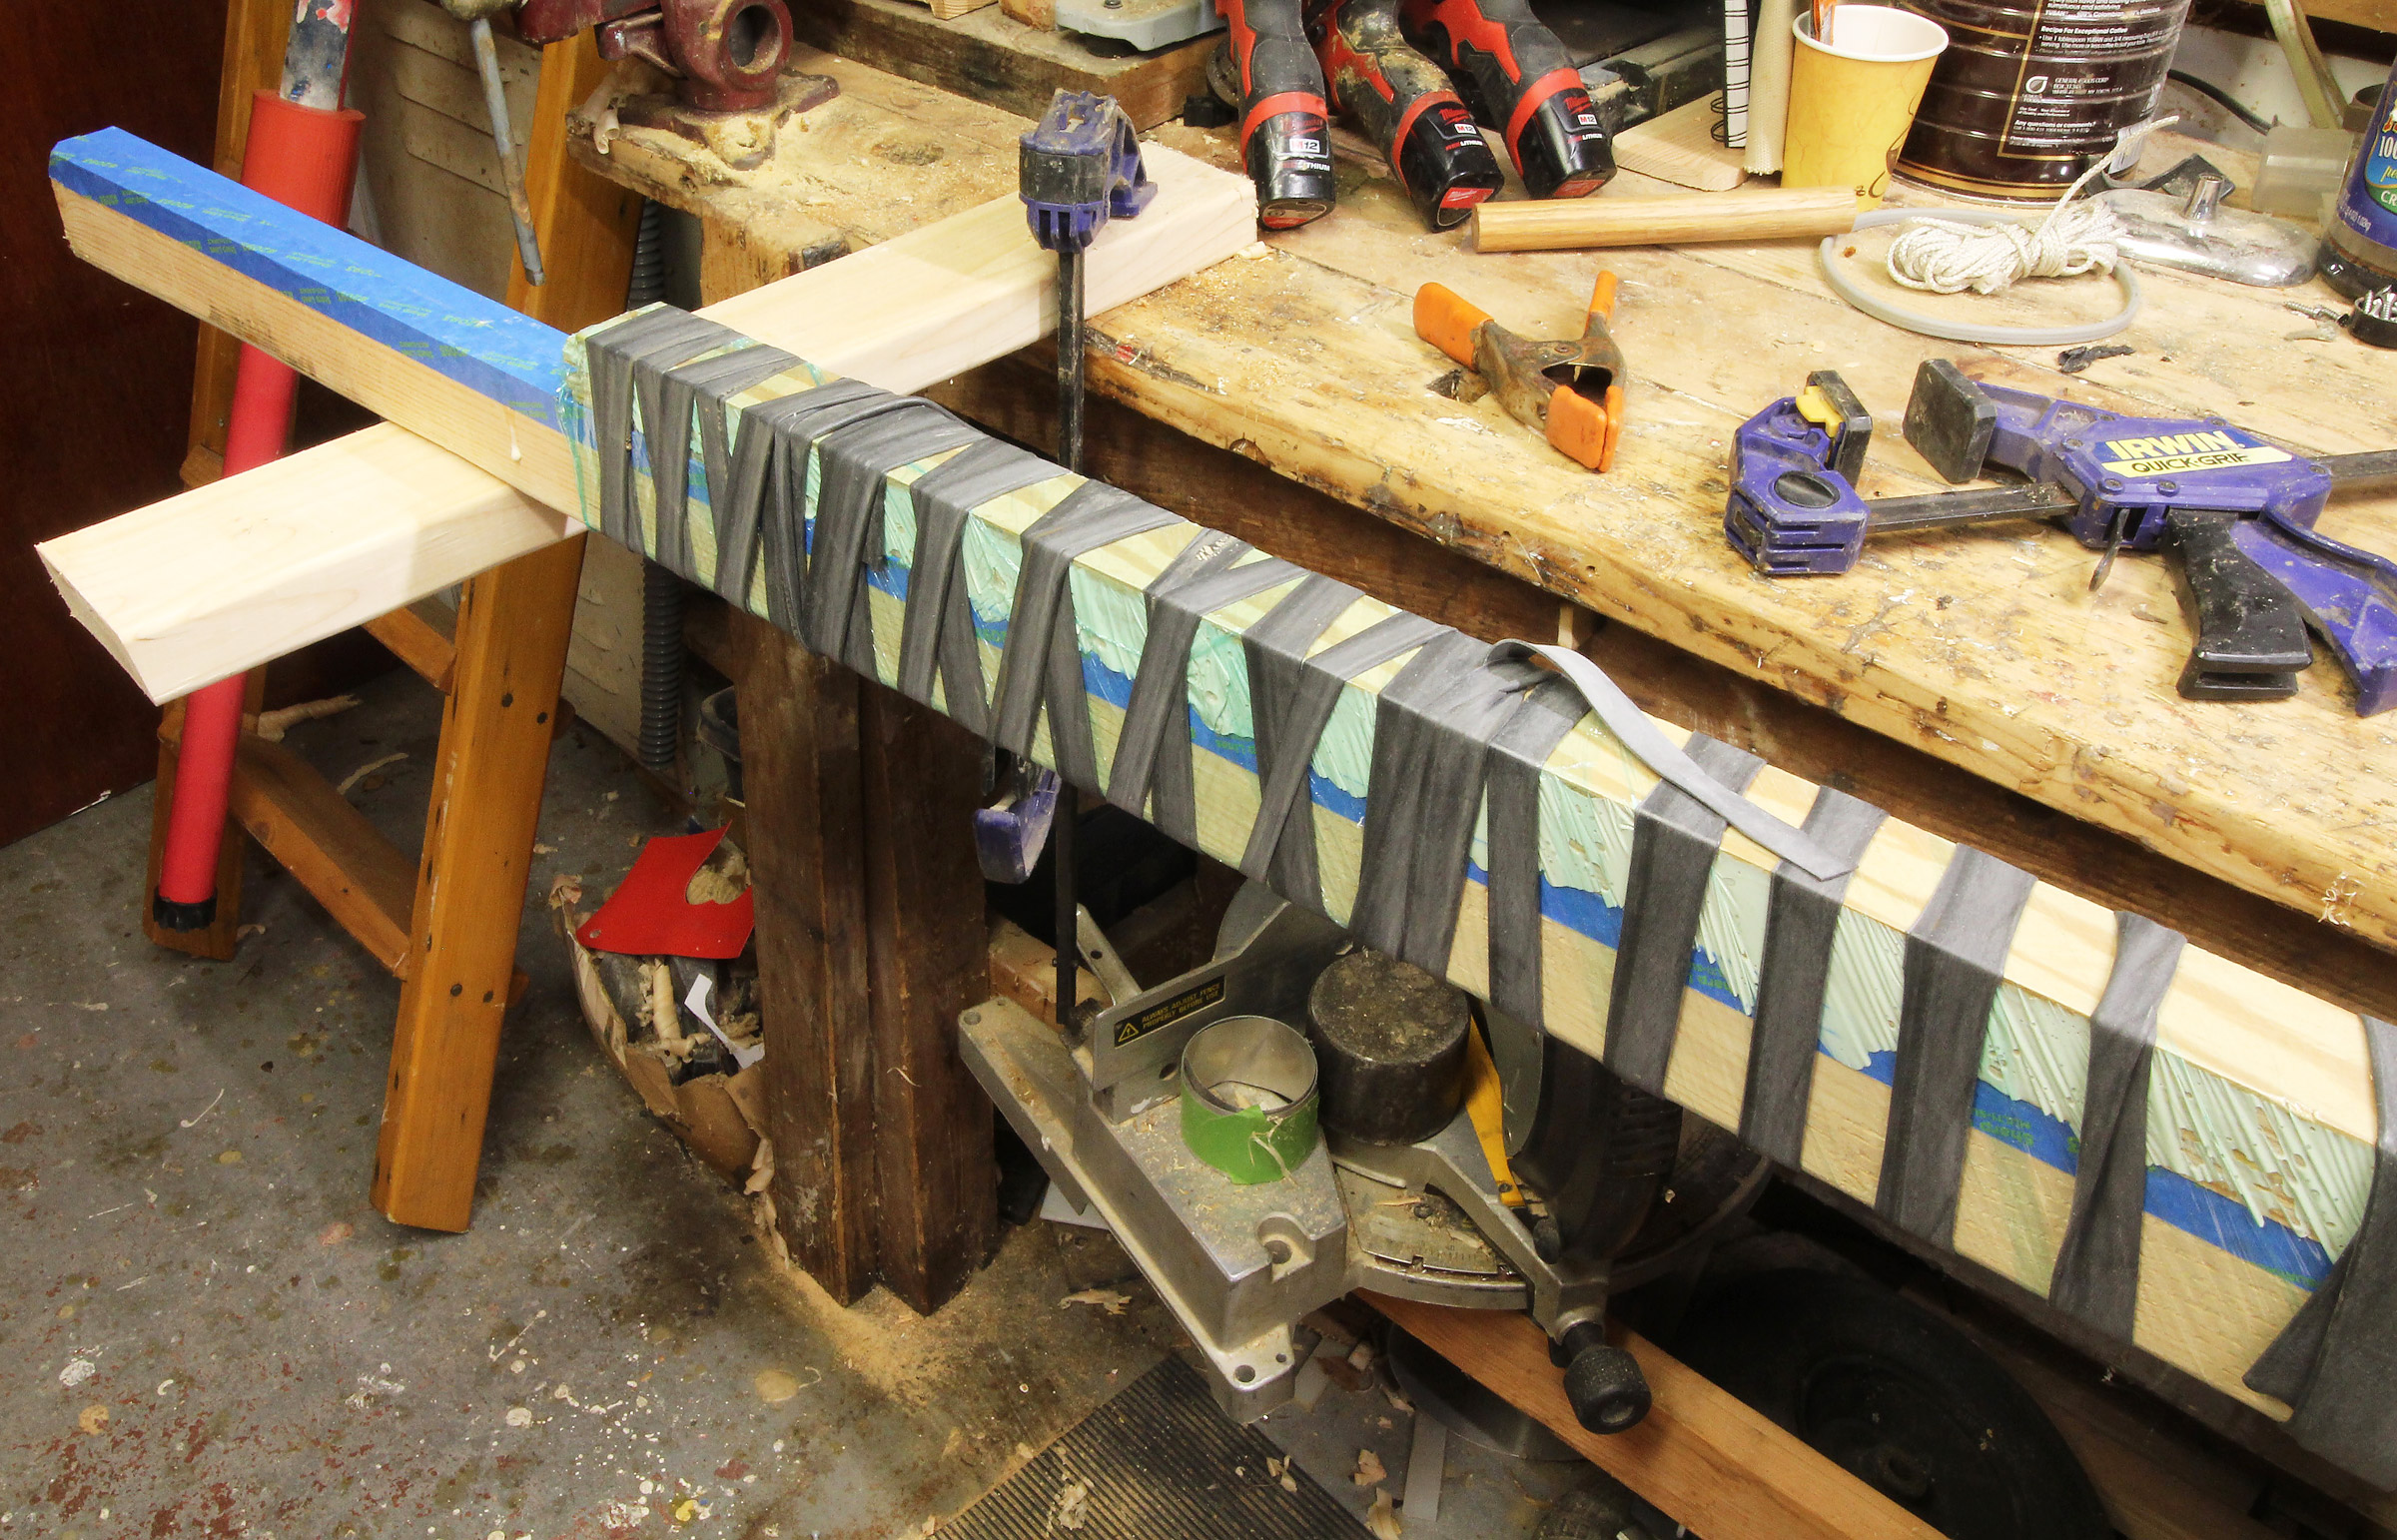
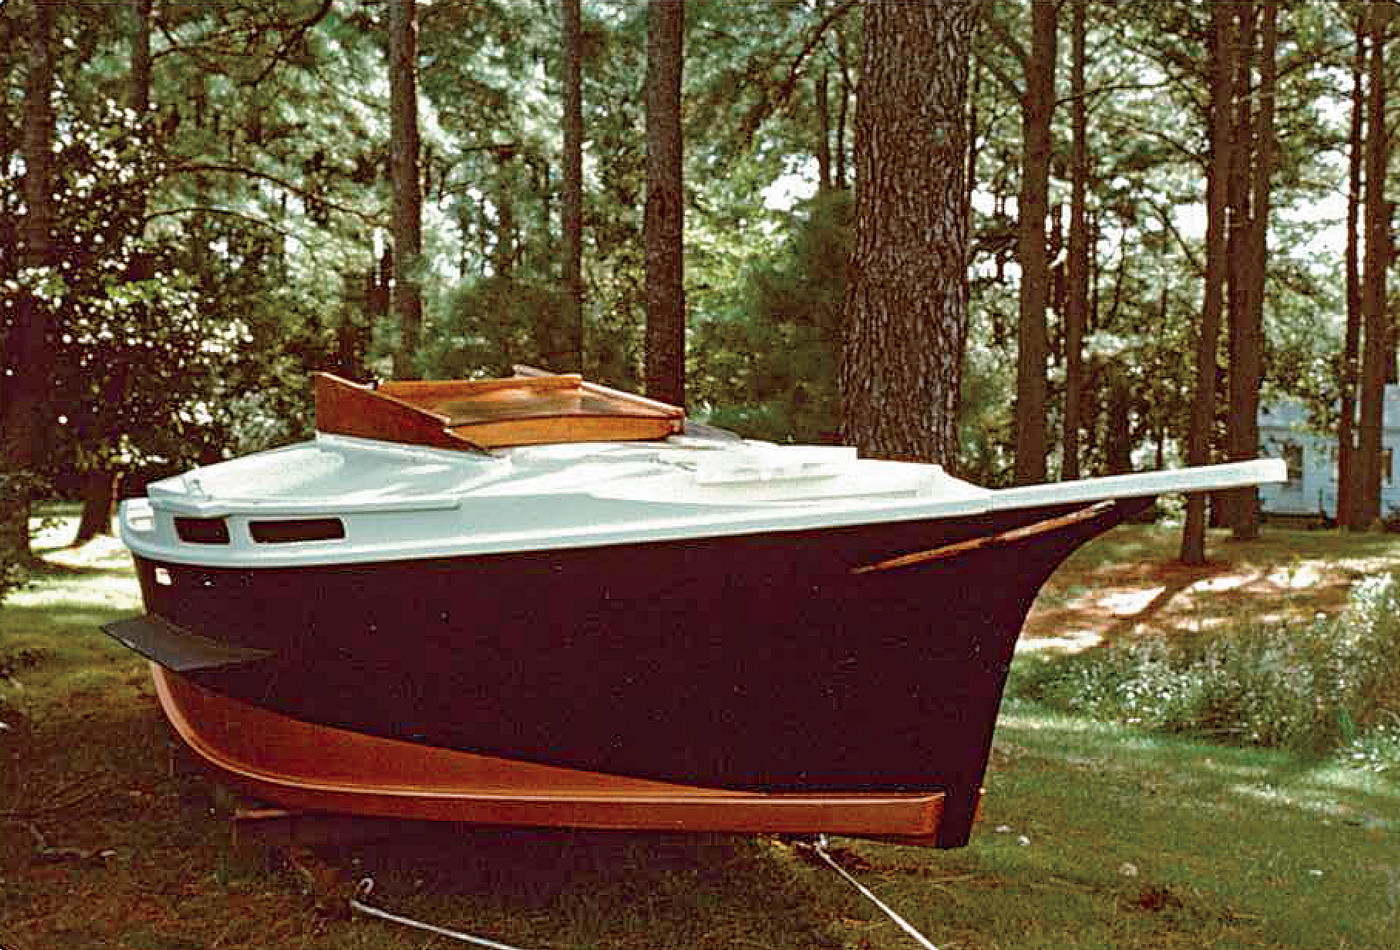
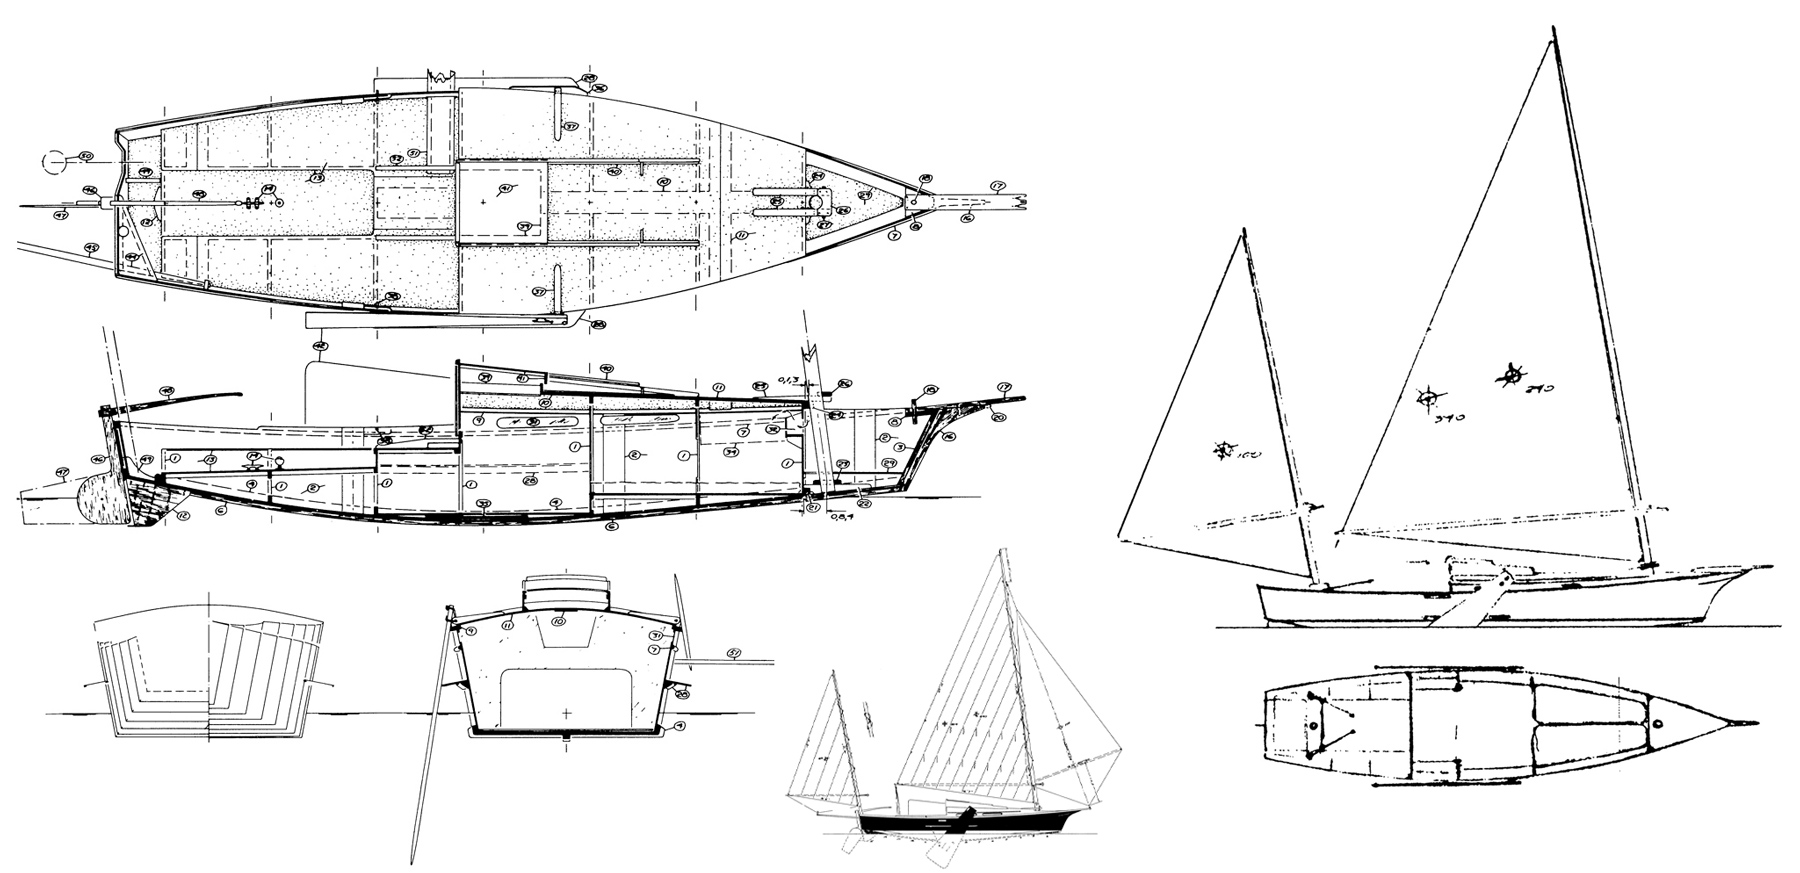
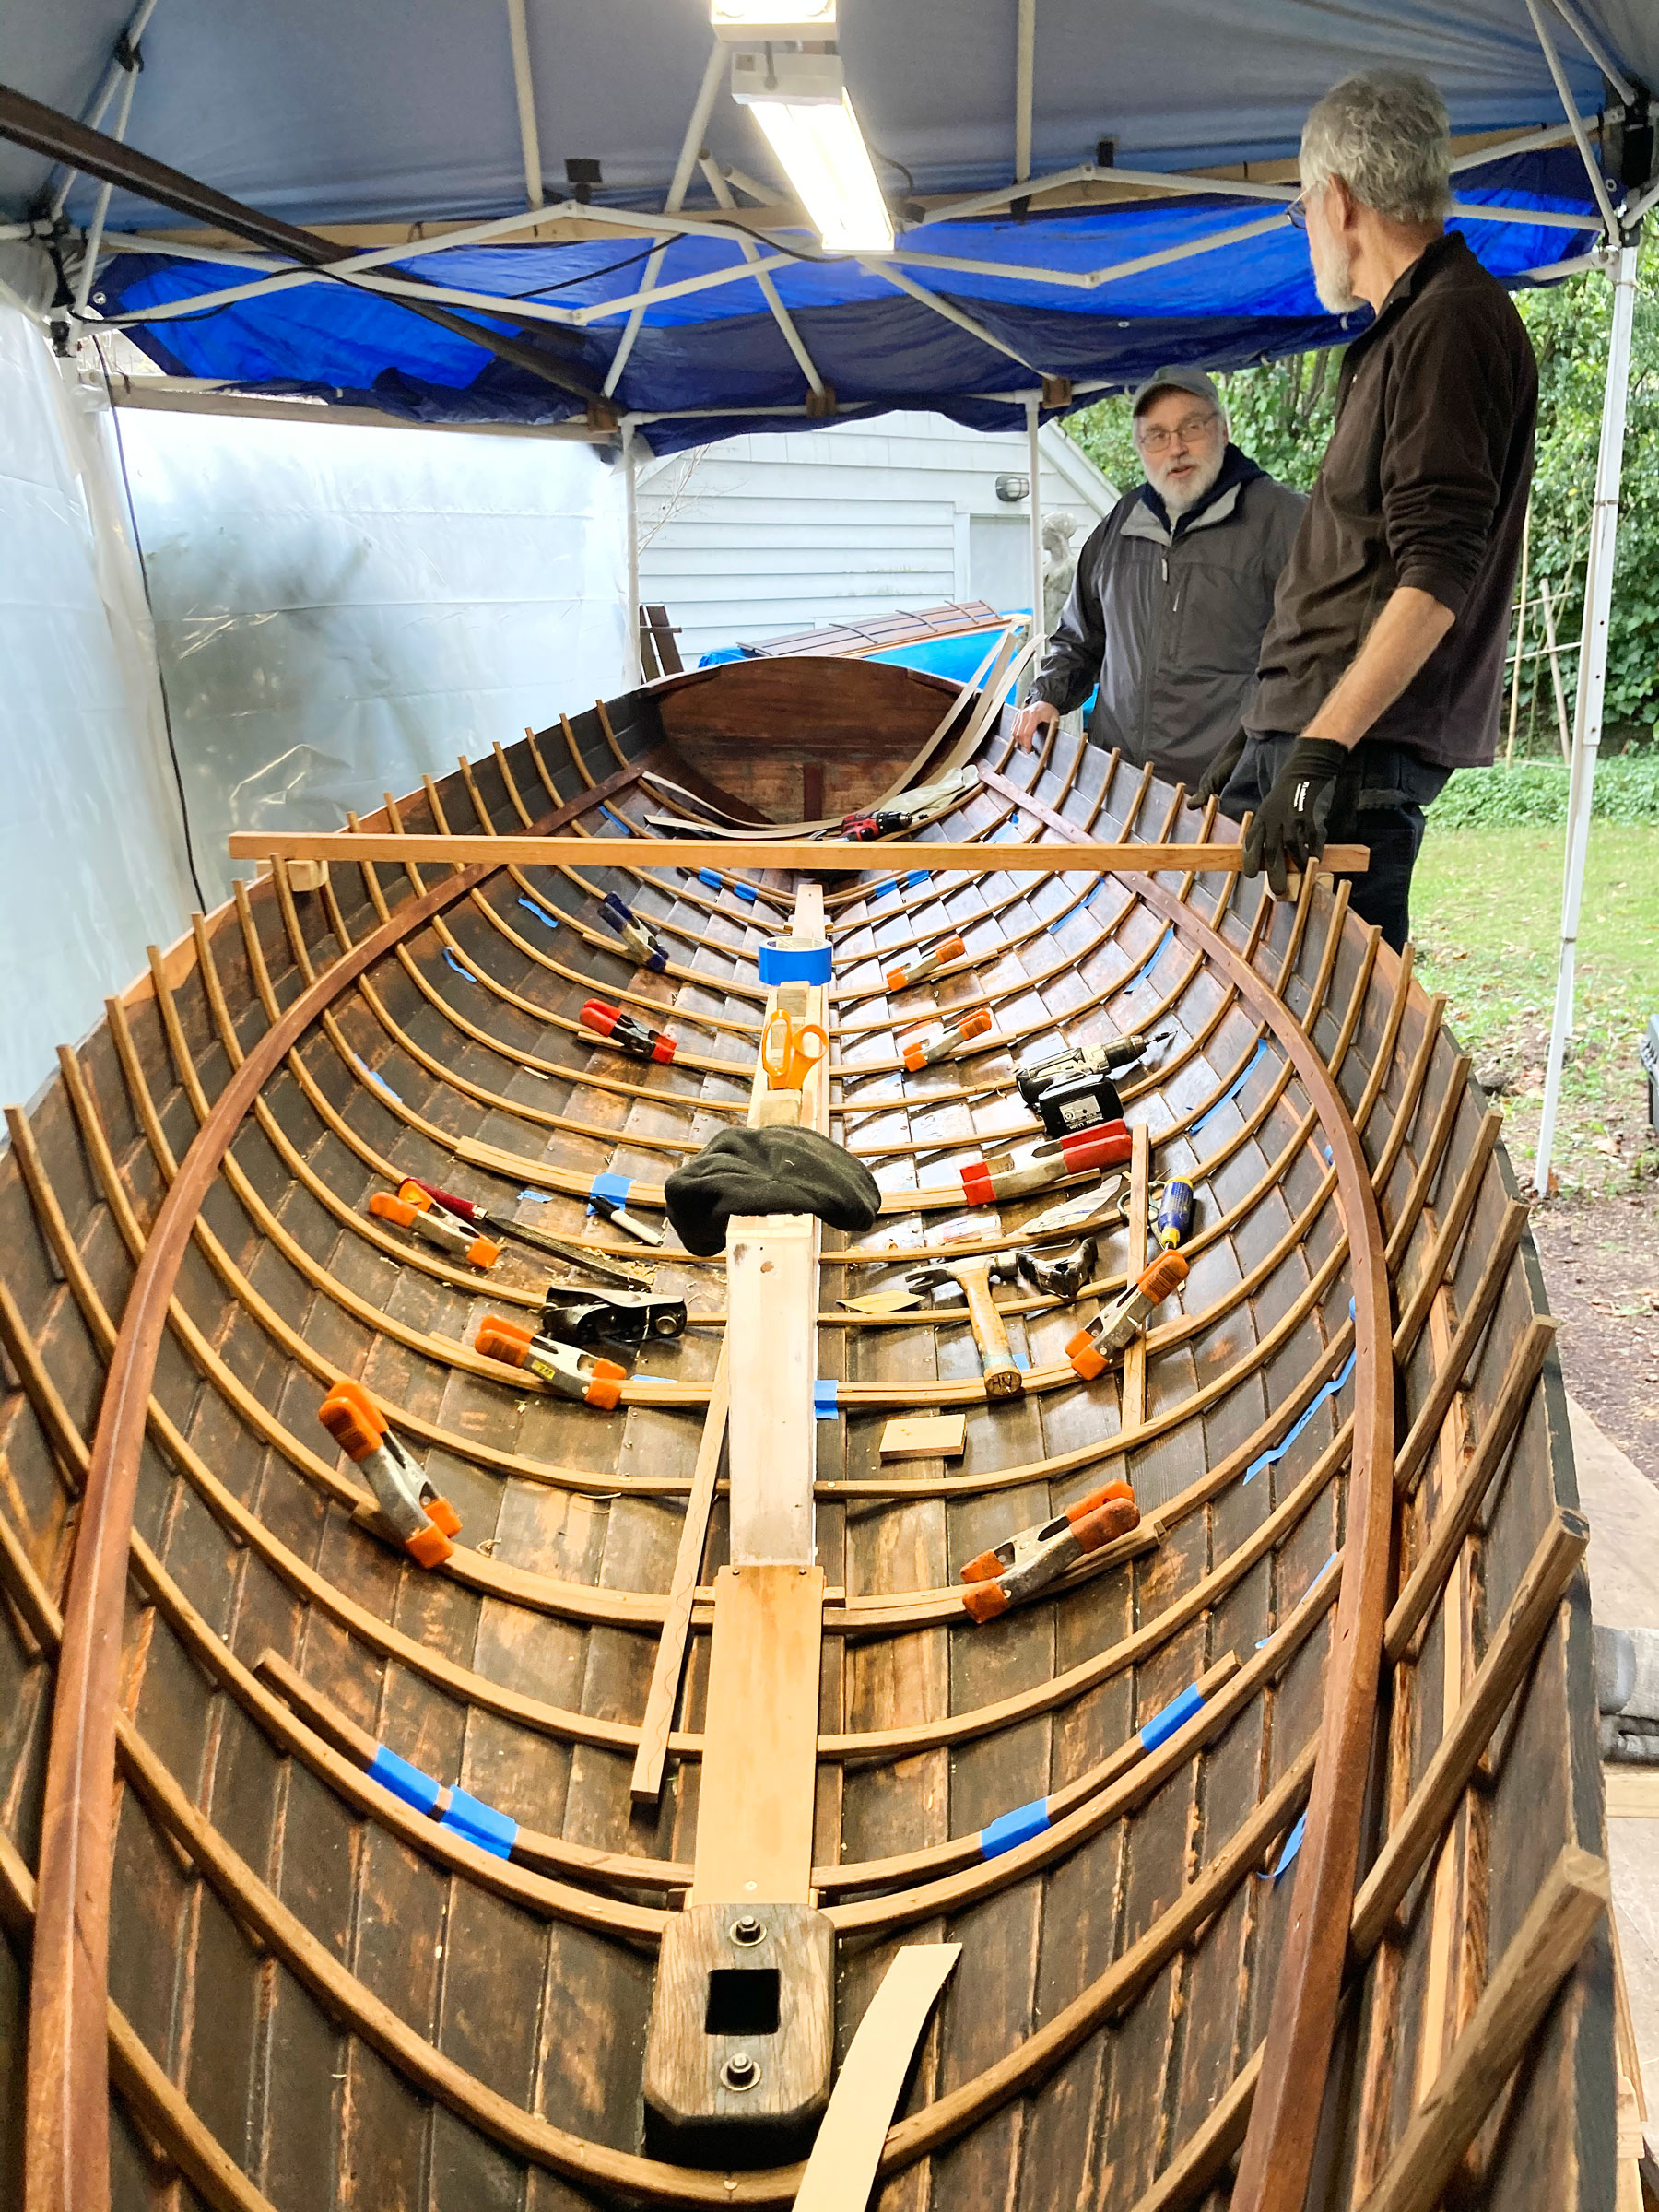
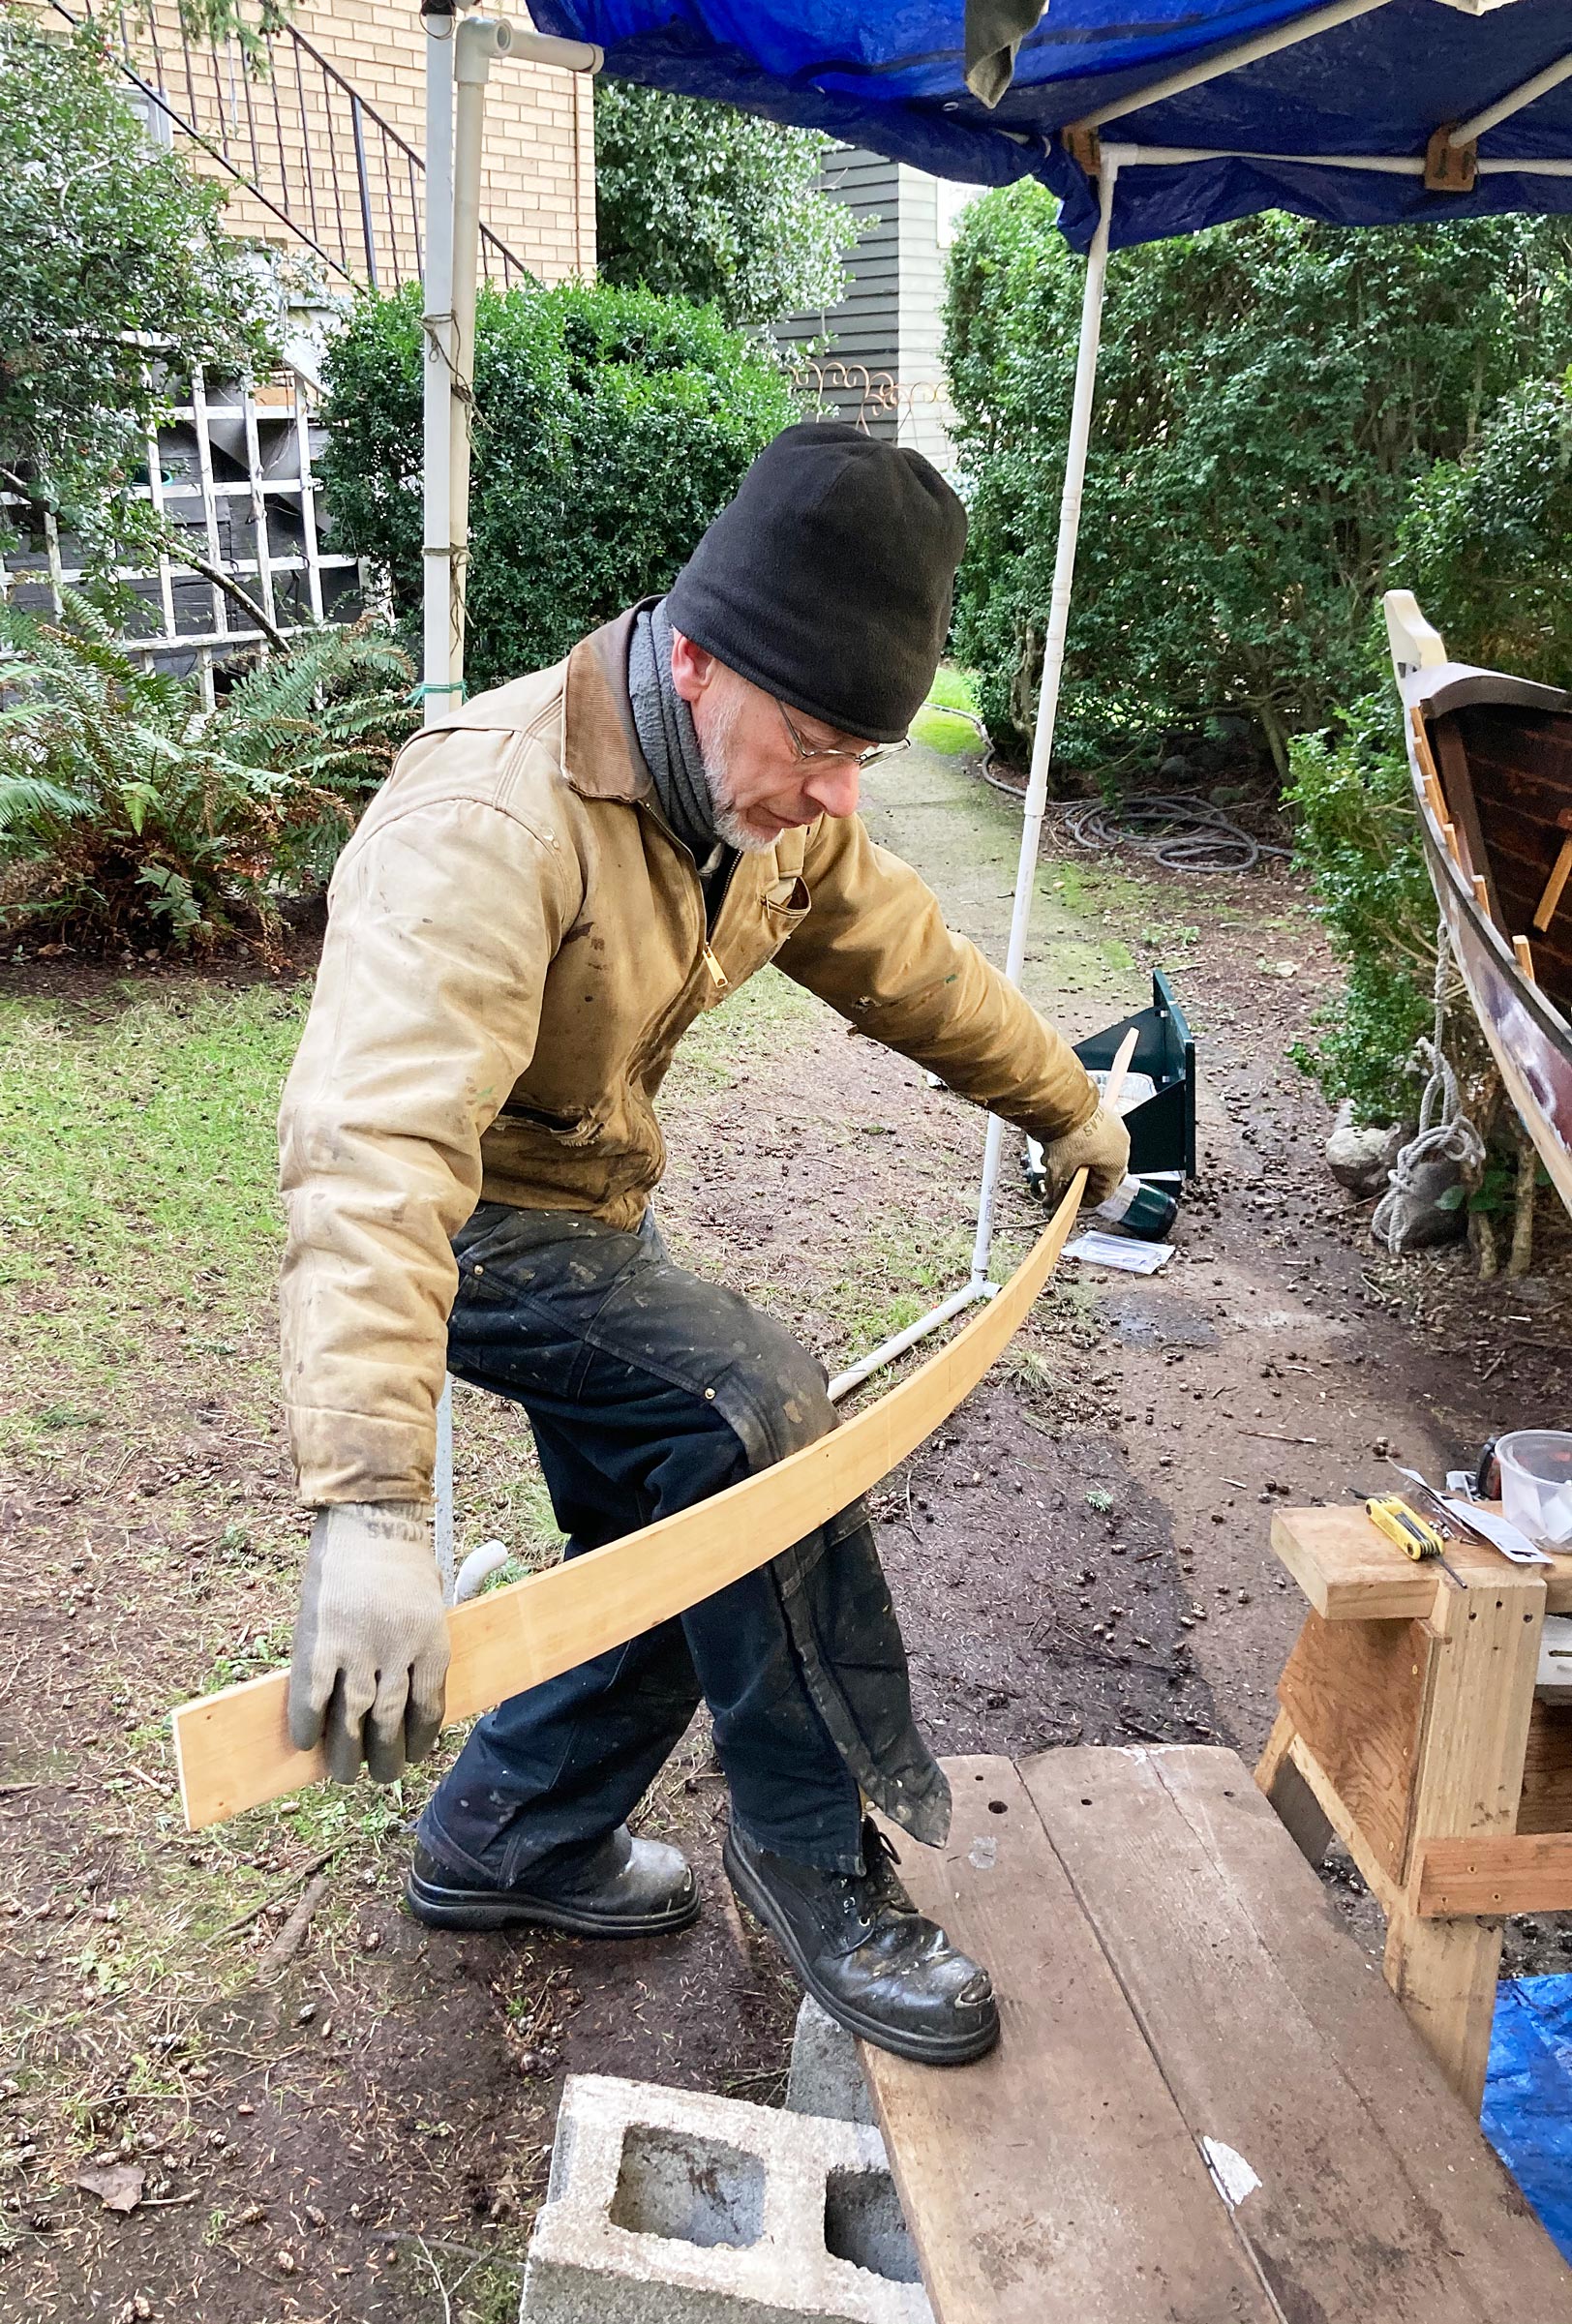
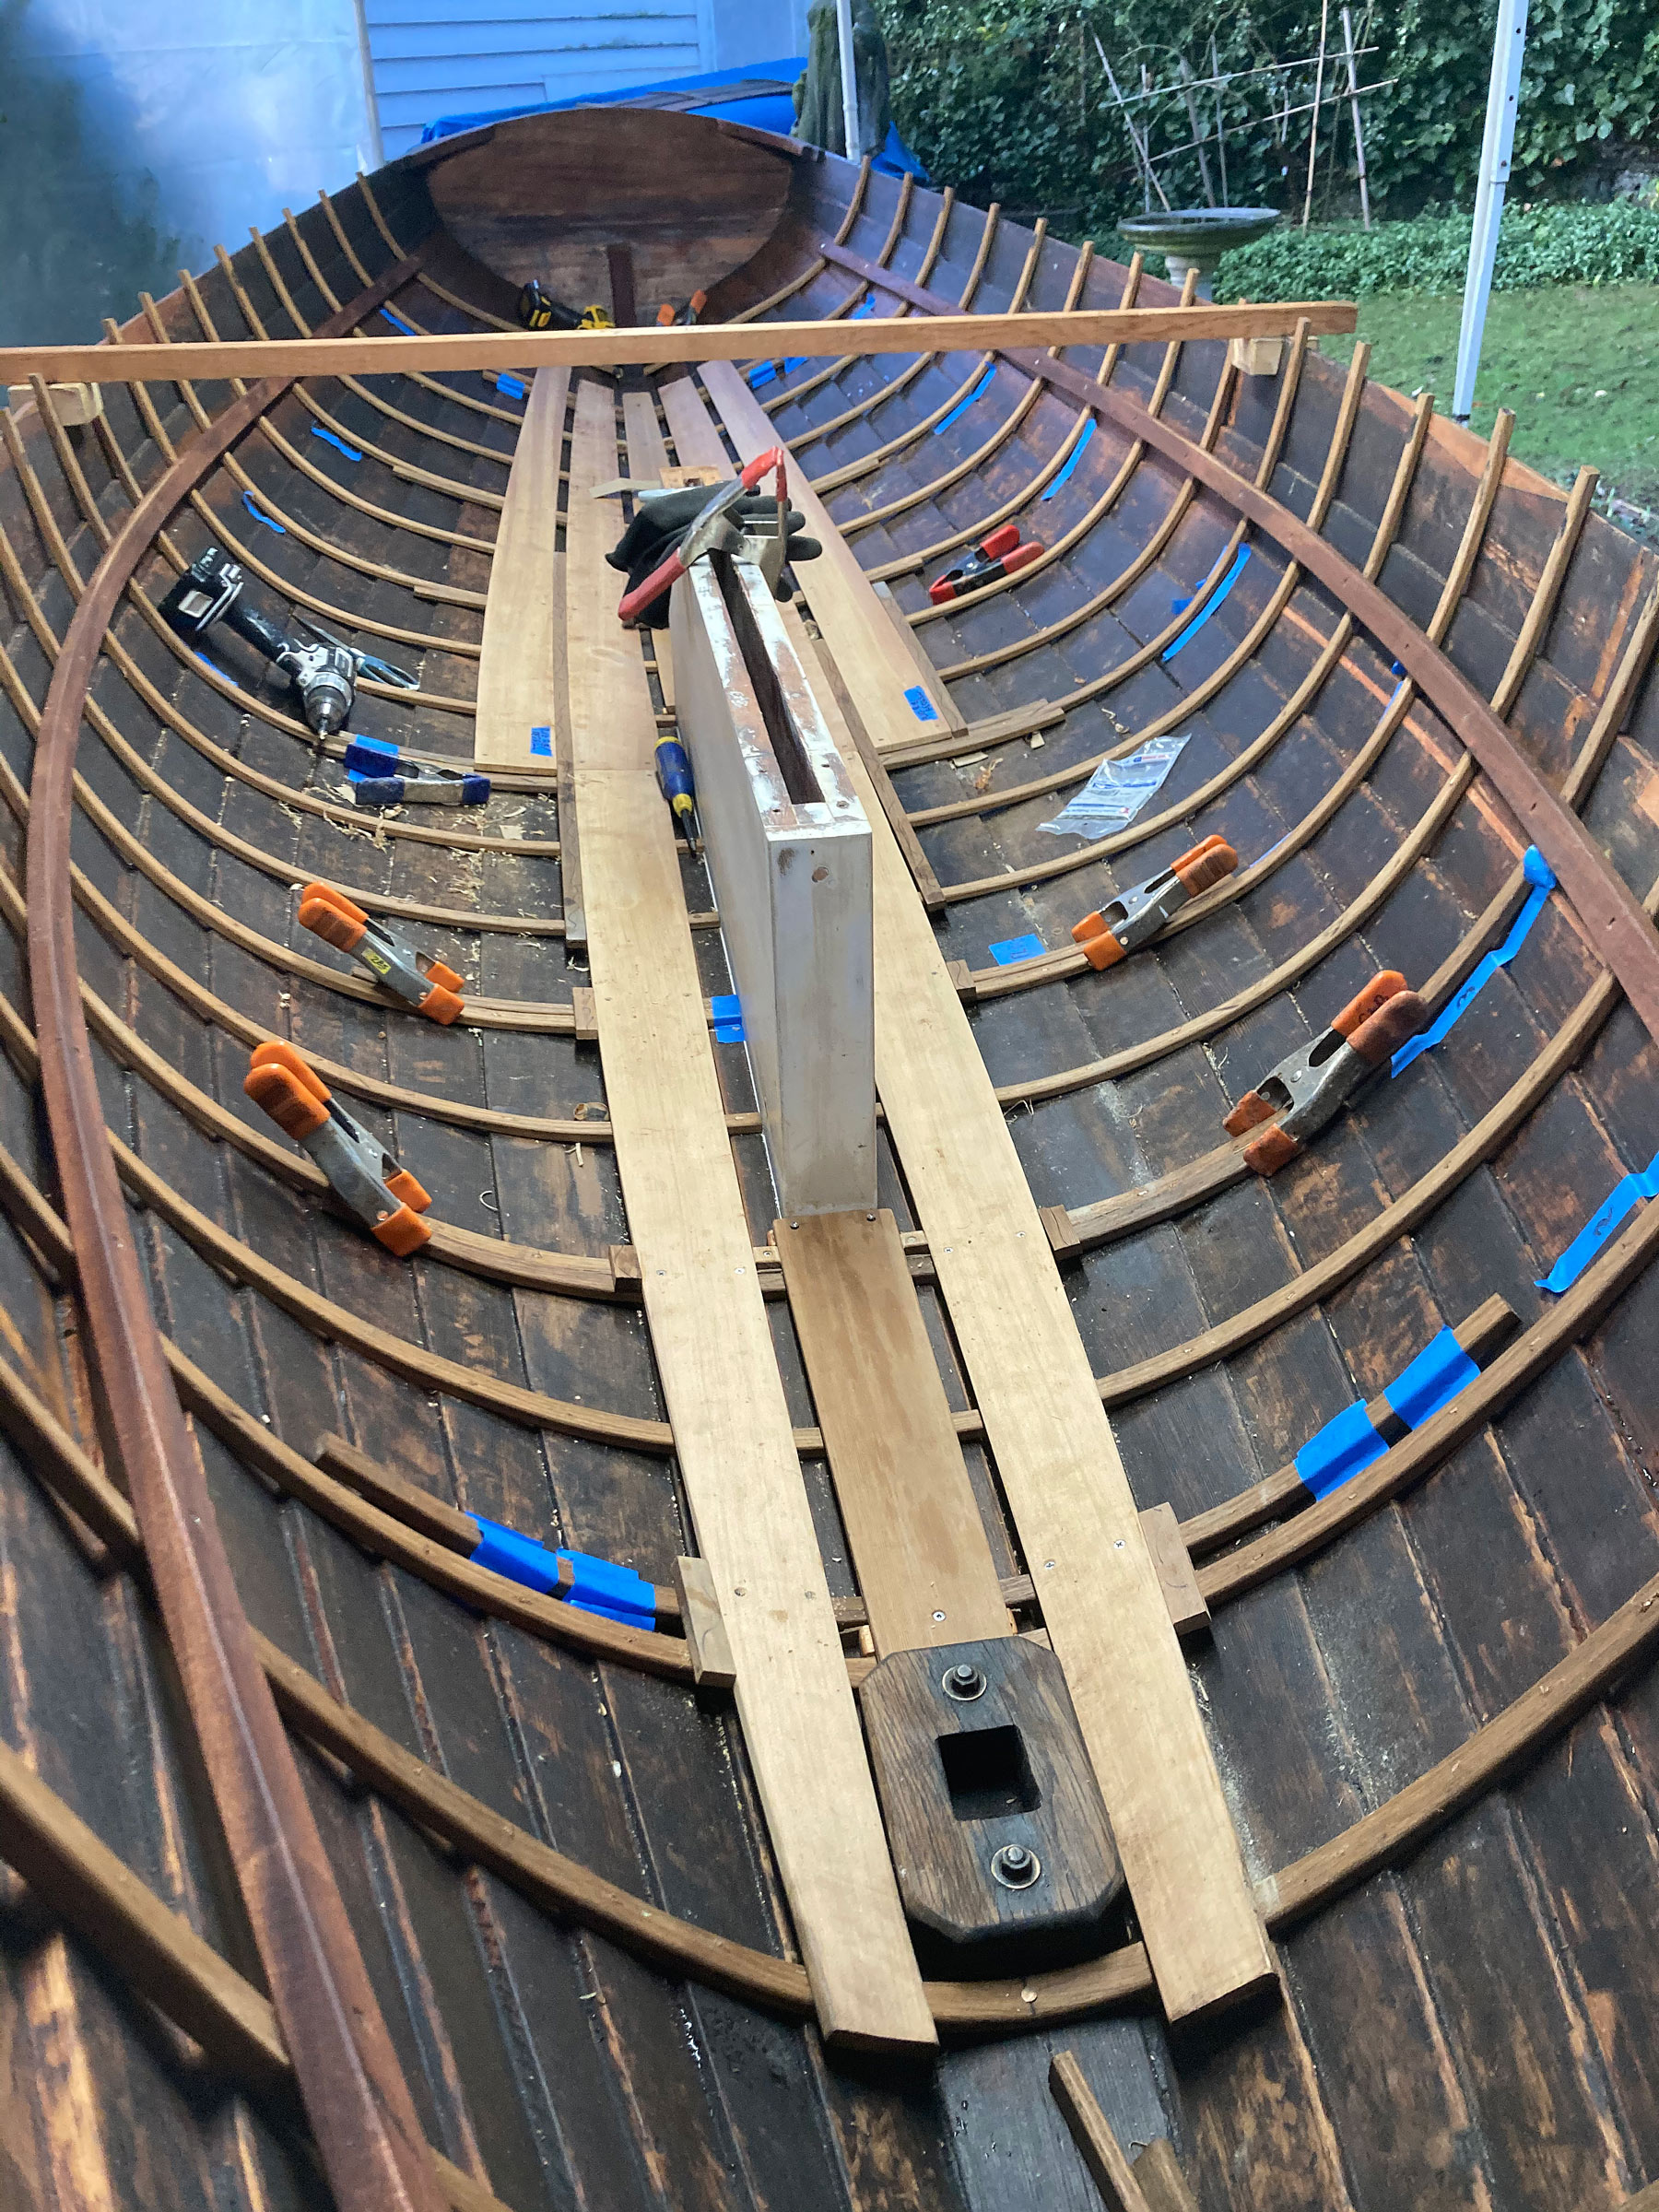
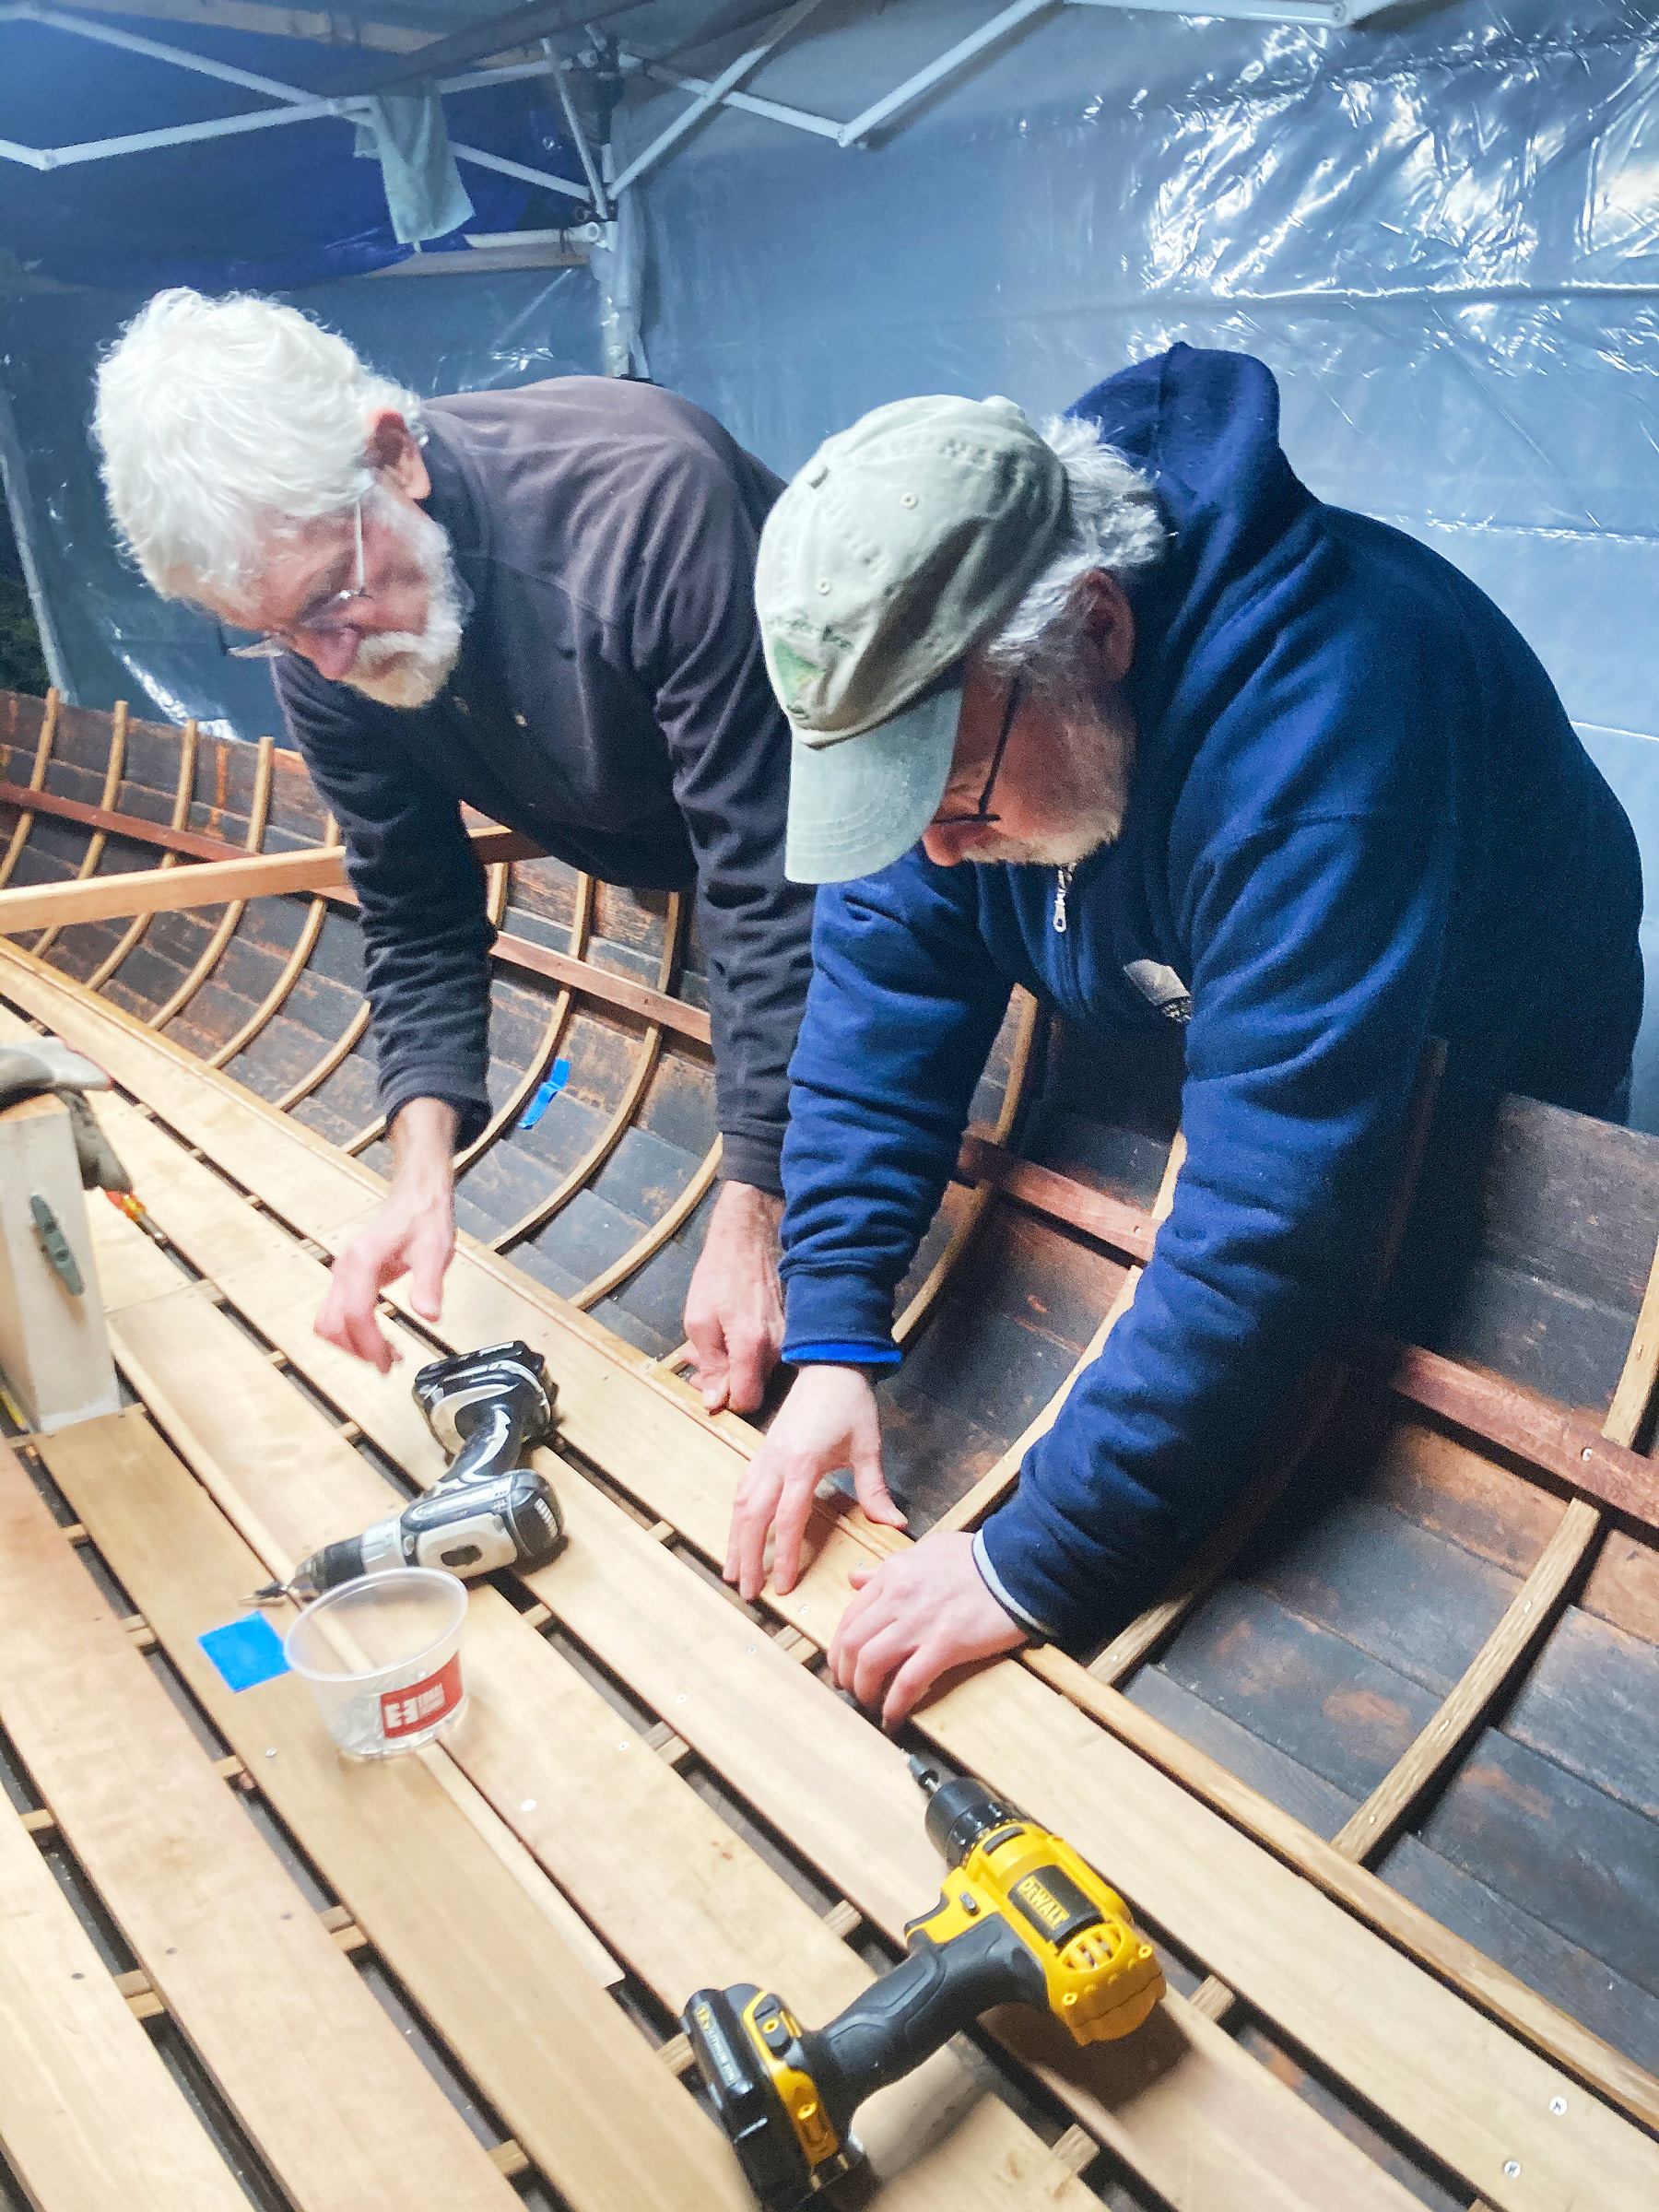
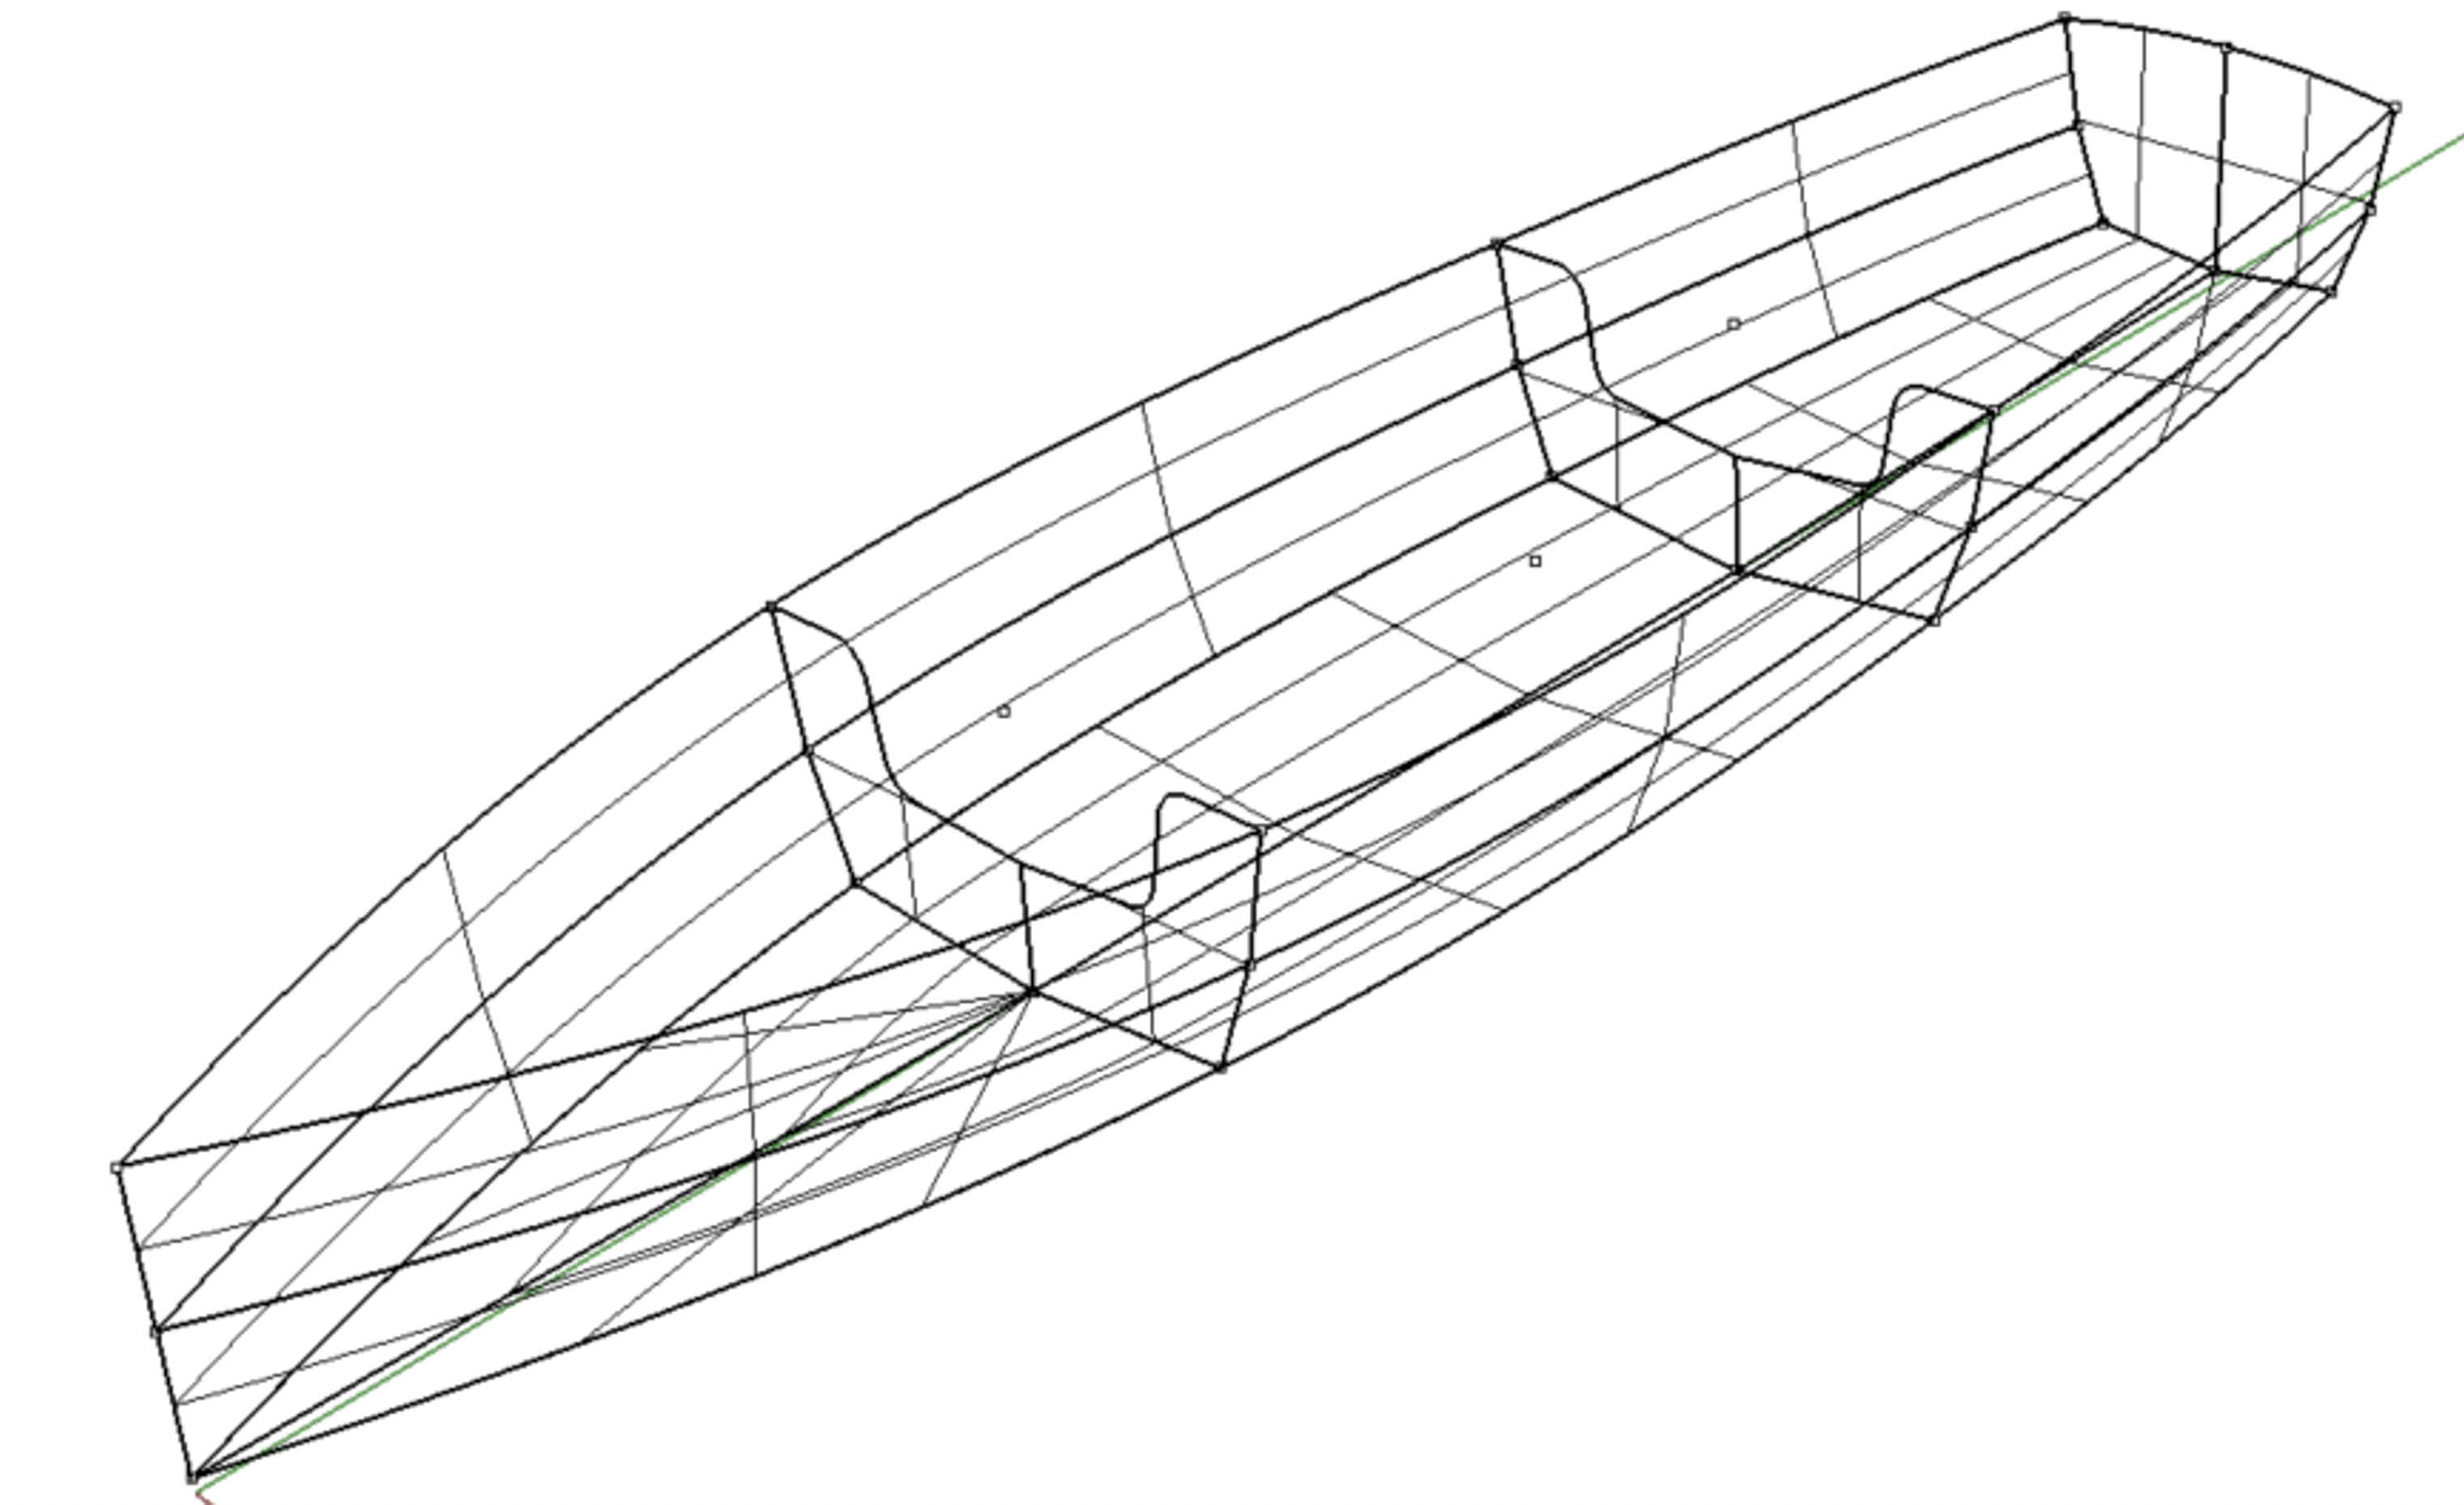
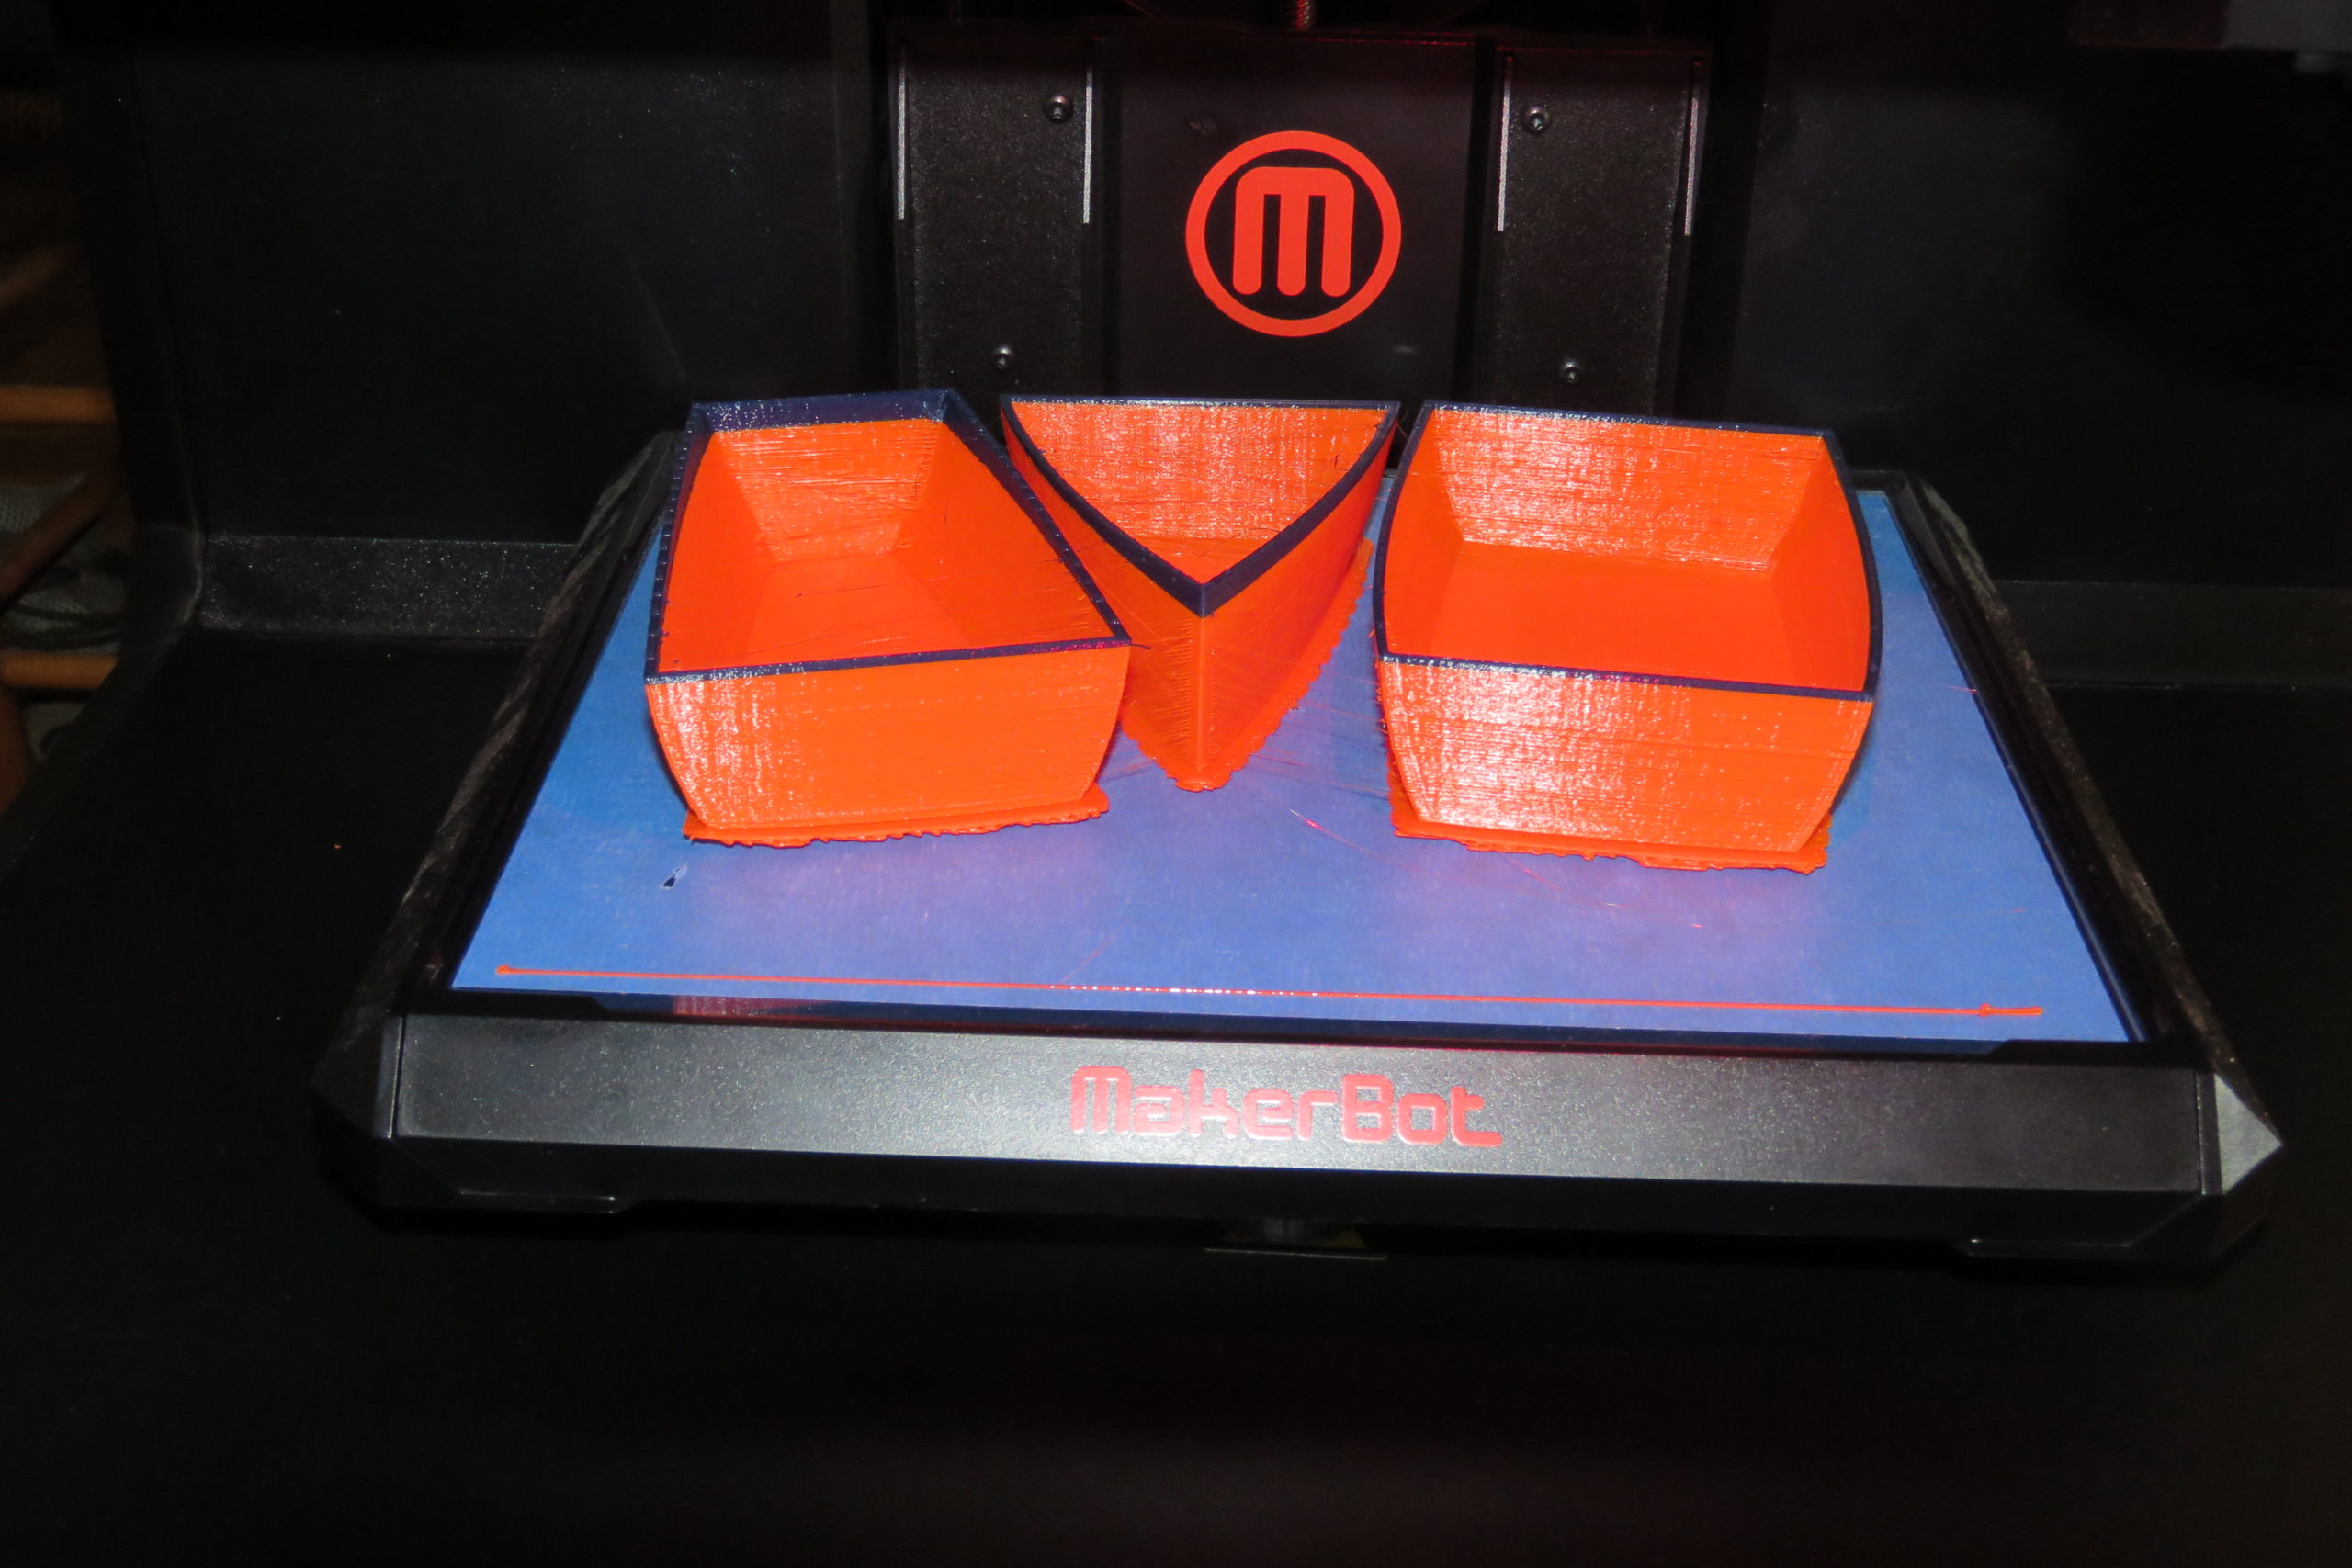
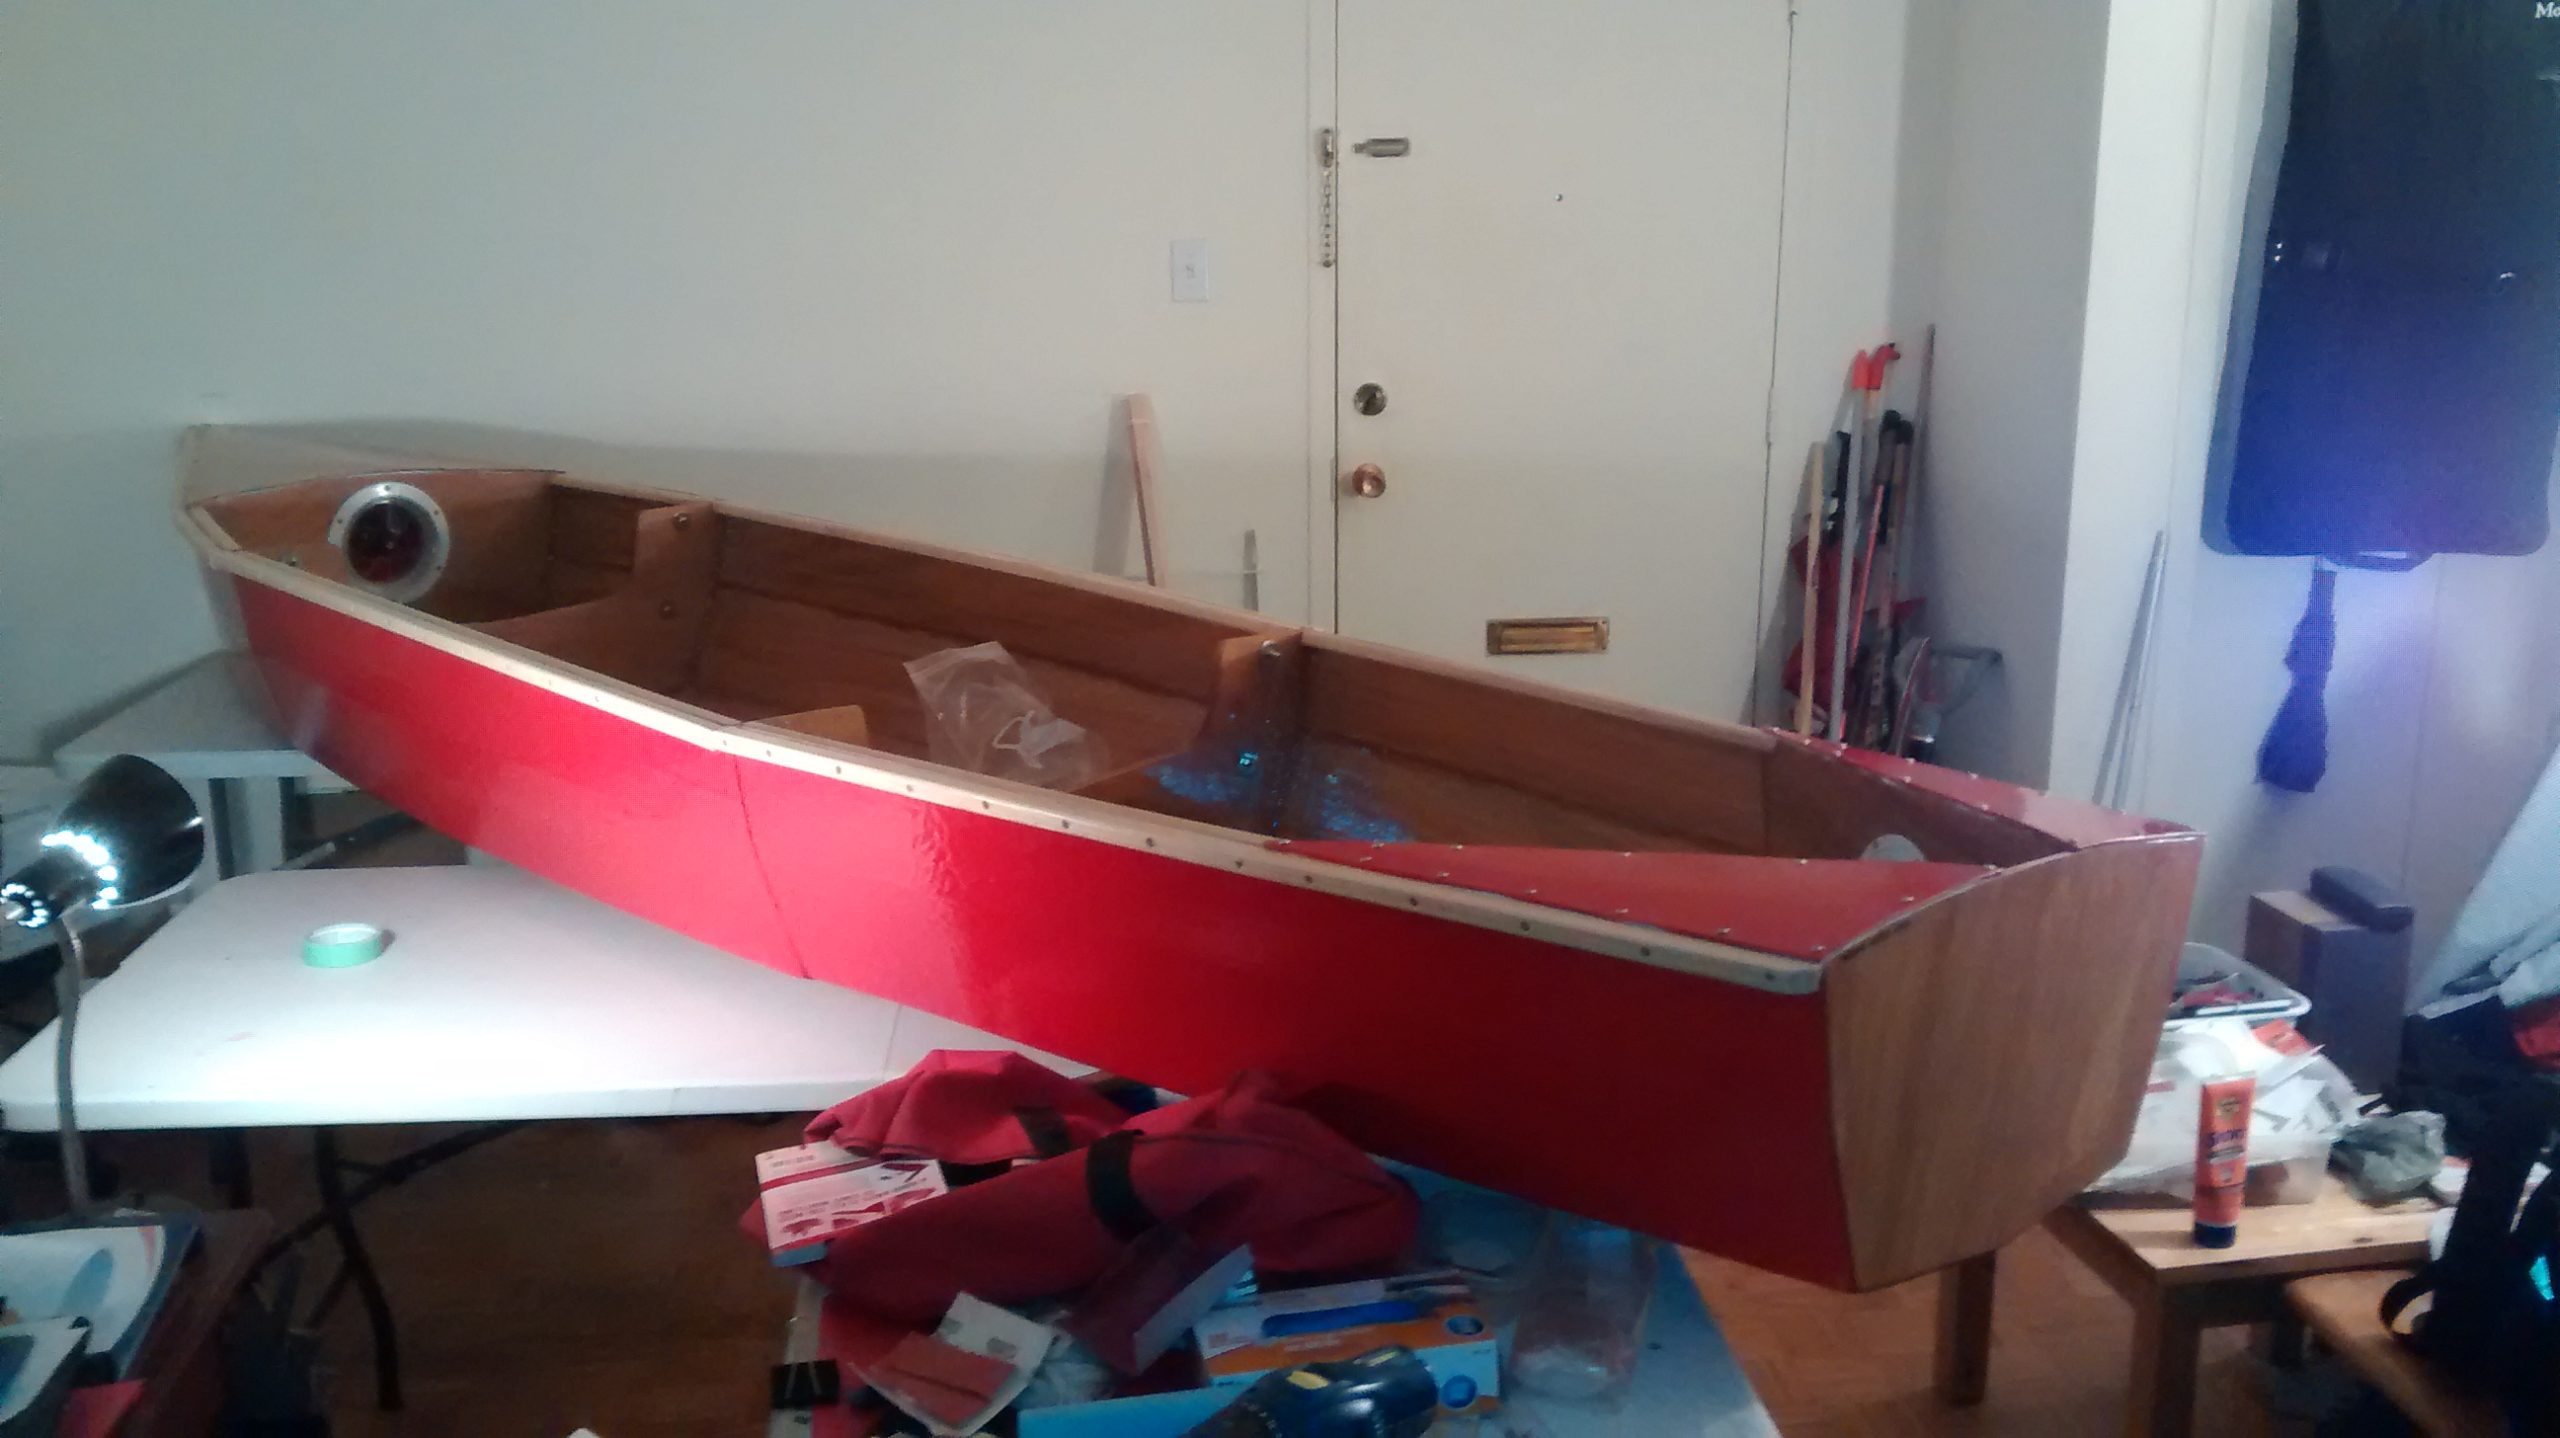
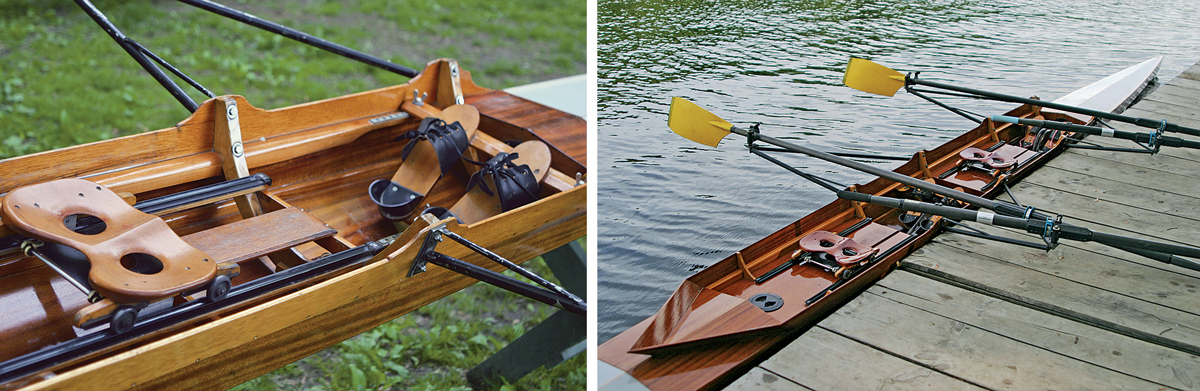
The most challenging aspect of building a DN is the hull (also called the fuselage), which may weigh between 42 and 50 lbs. First-time builders often purchase an assembled but unfinished hull, without hardware, from a supplier. Others choose to work from scratch, following readily available plans. Either way, the hull is constructed from 1⁄8″ marine-grade plywood (Sitka spruce and Douglas-fir are favored) on a jig, using low-tech traditional boatbuilding methods in combination with the modern high-tech processes pioneered by the Gougeons.
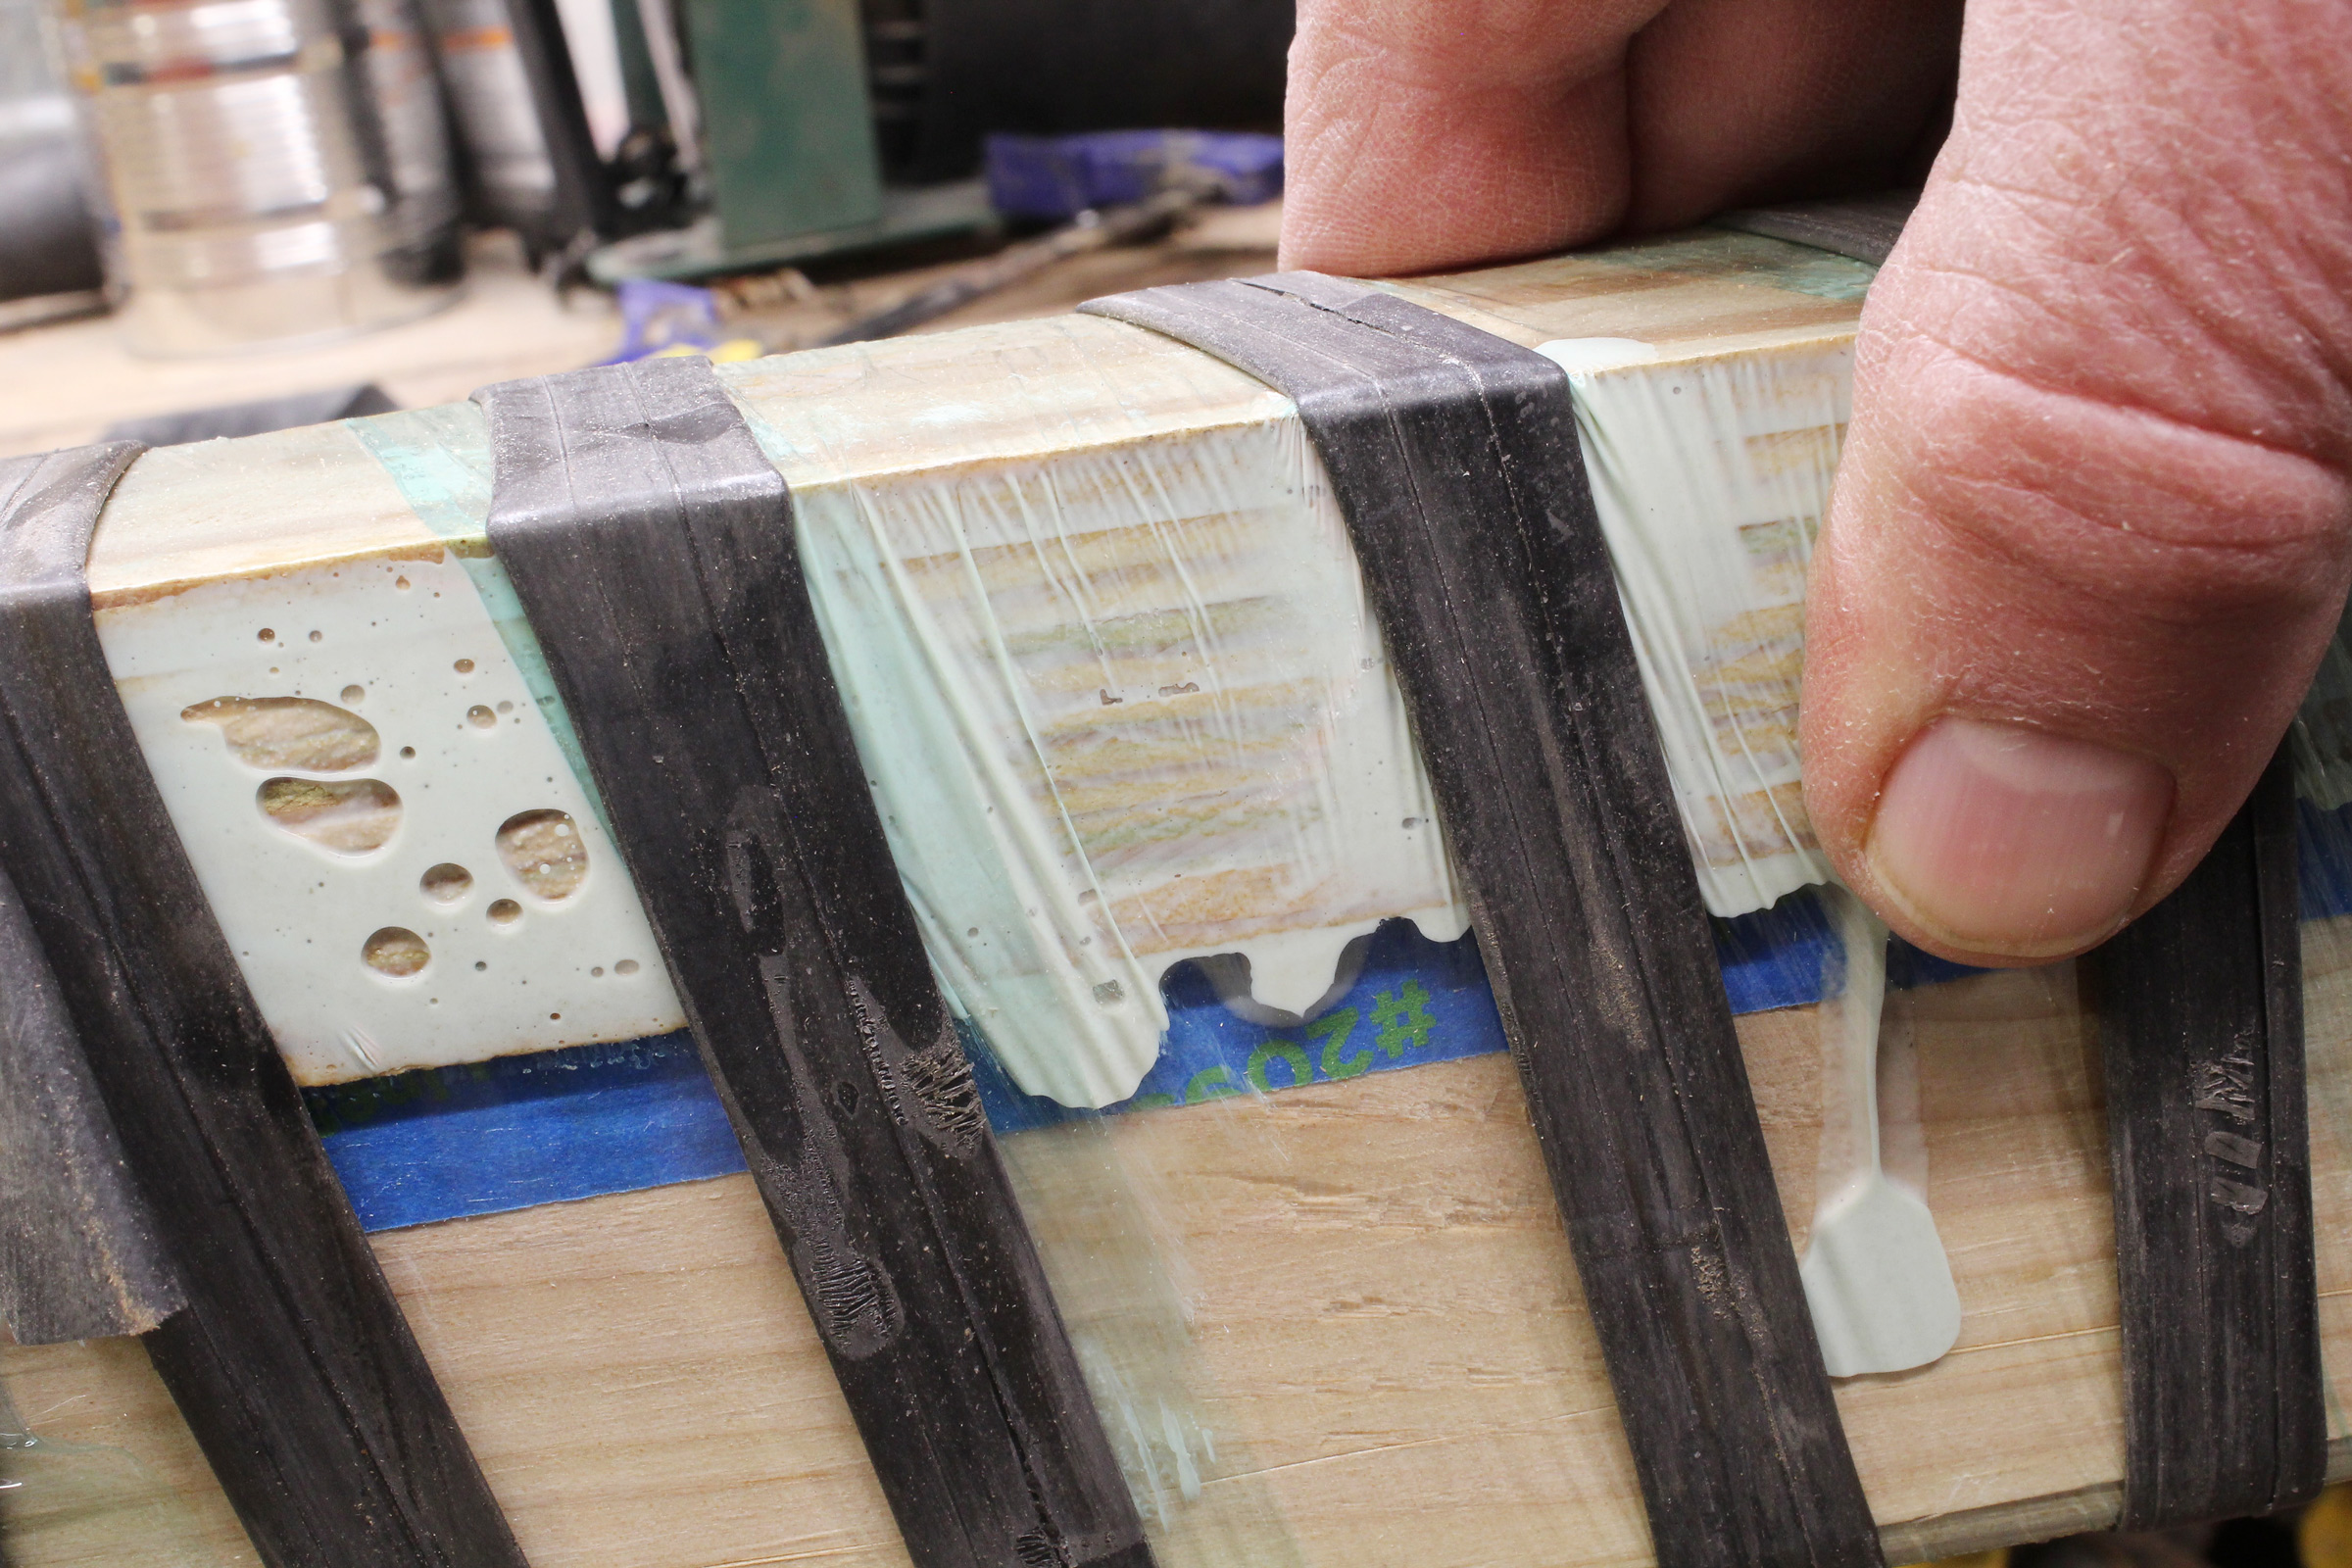
The components—side panels, stem, bulkheads, floor, seat, and stringers—are bonded together and then sealed in epoxy, creating an extremely strong, lightweight structure. The runner plank—8′ long, 6 1⁄2″ to 7 1⁄2″ wide, and 1″ to 15⁄8″ thick—is the only remaining solid wooden component, often made from white birch, Douglas-fir, or ash, and weighs 15 to 20 lbs. These wooden components can be finished bright or painted.
Gretchen Dorian
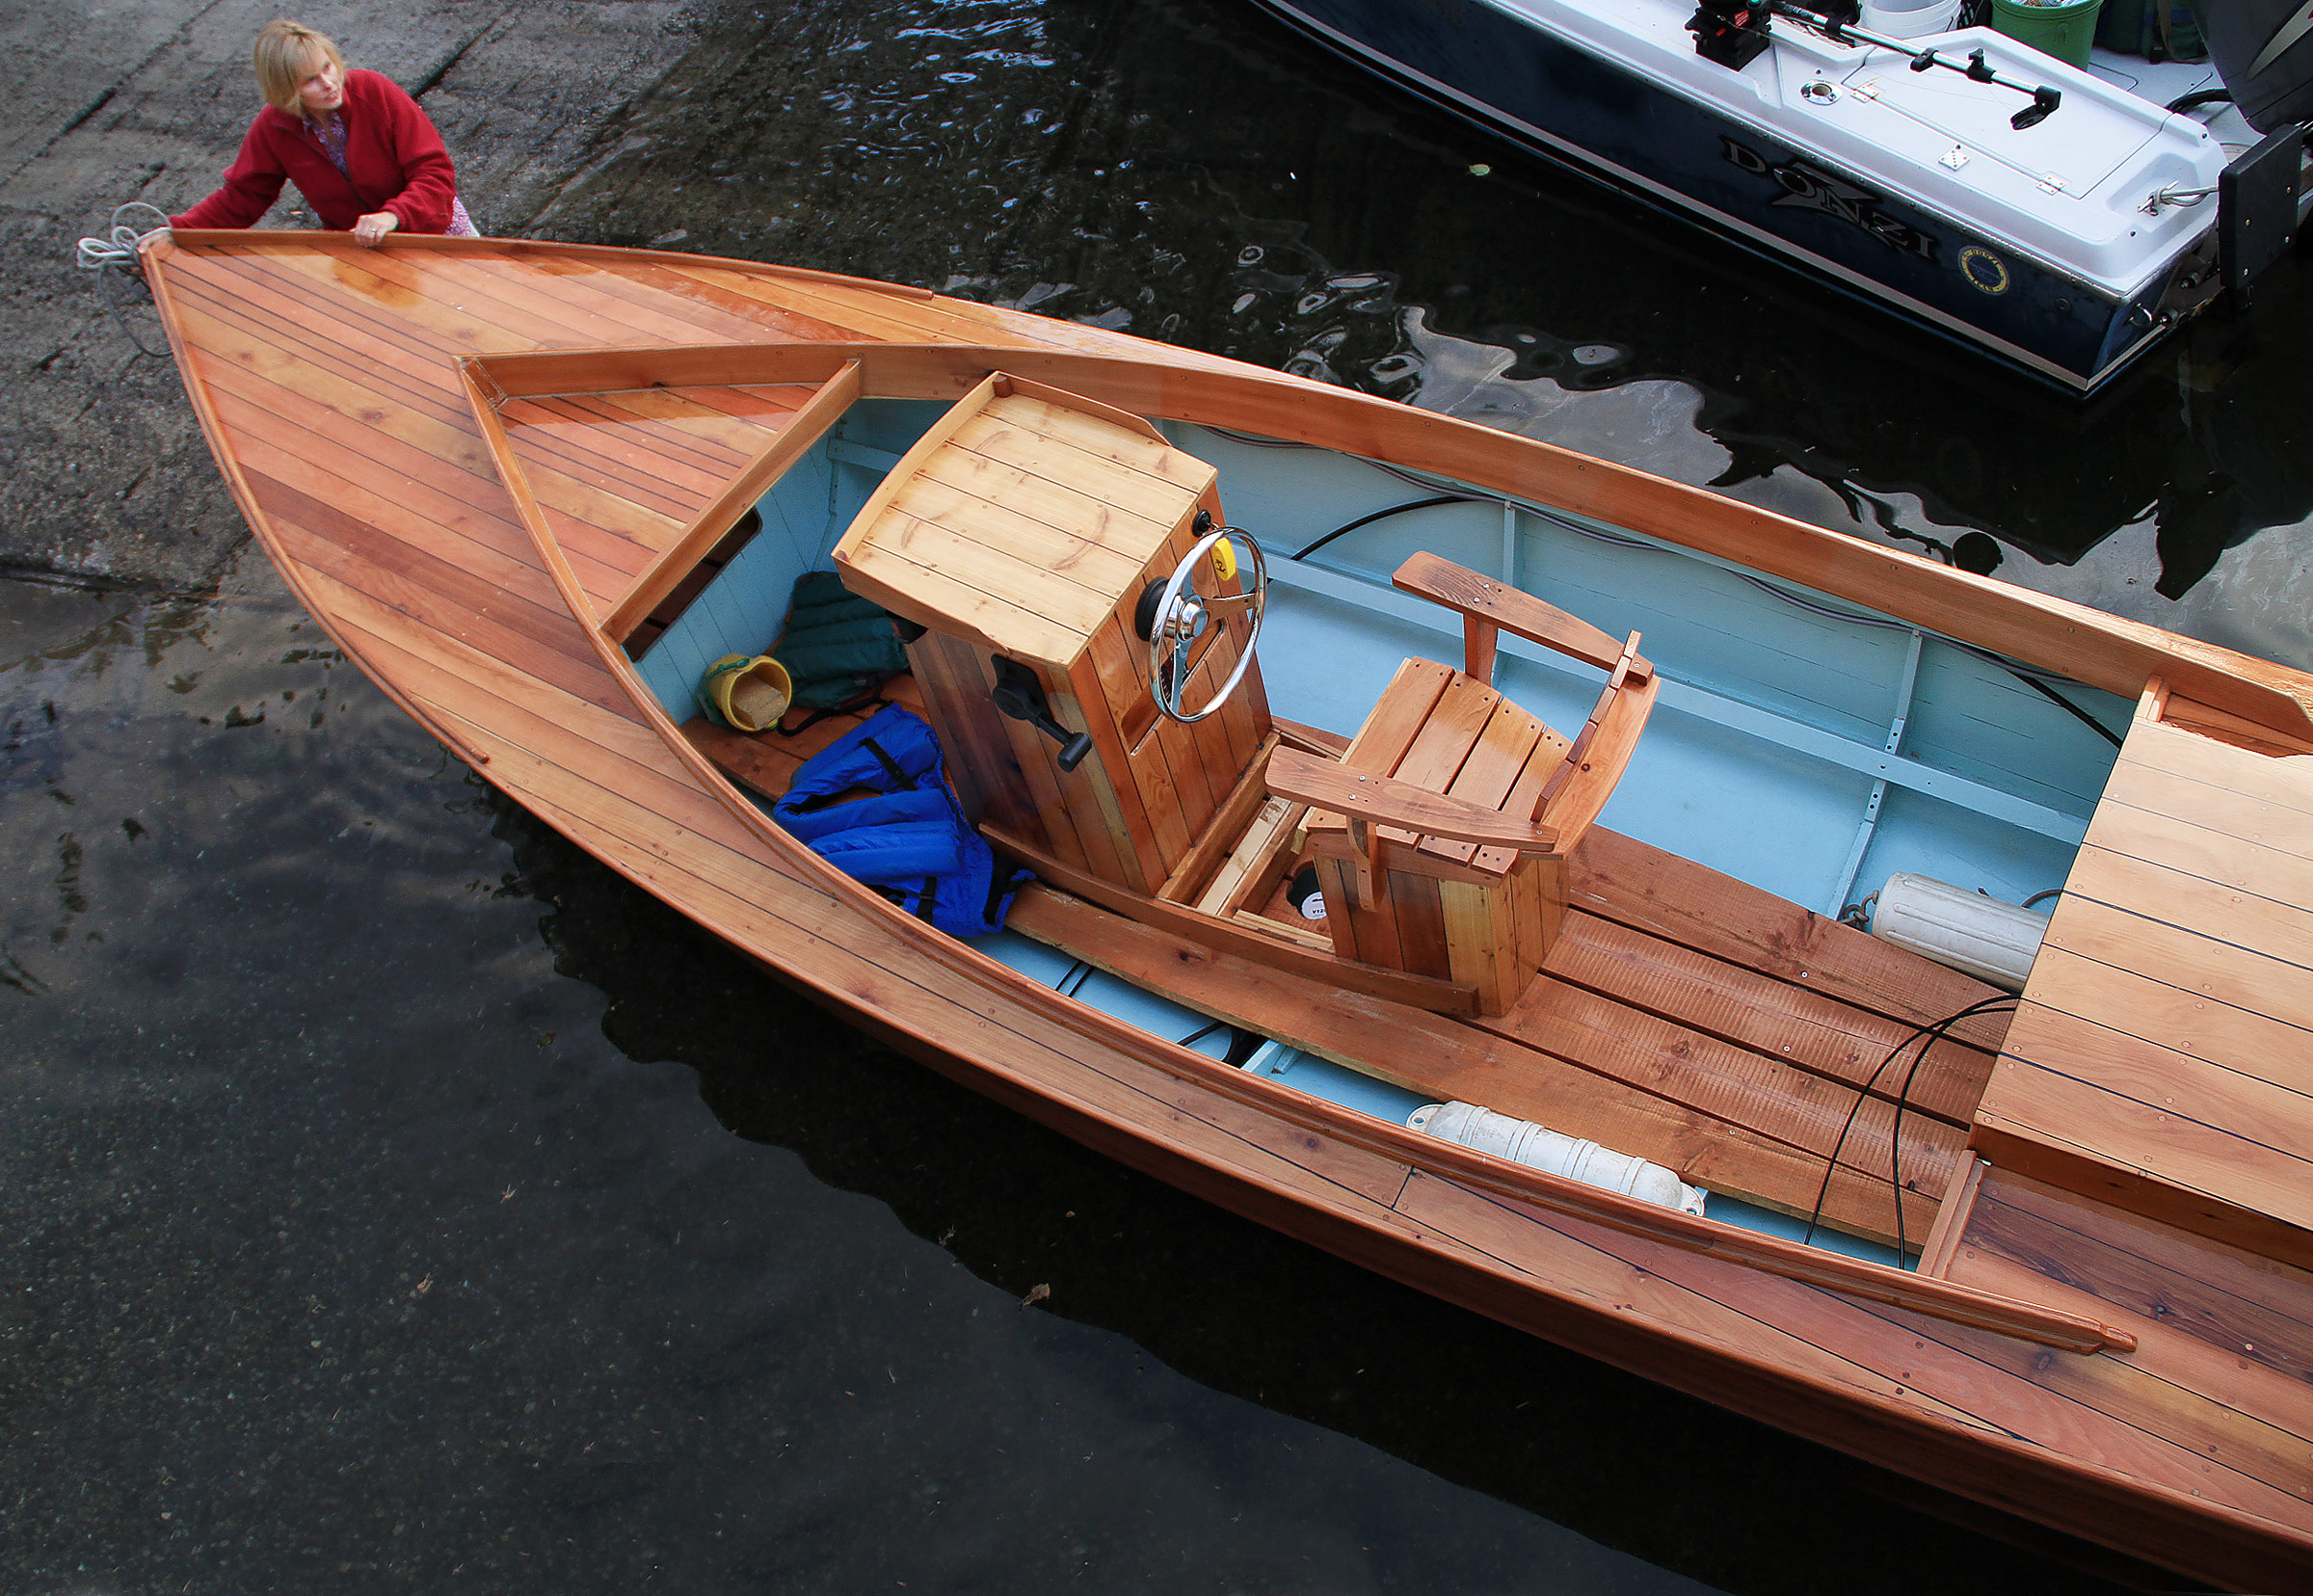
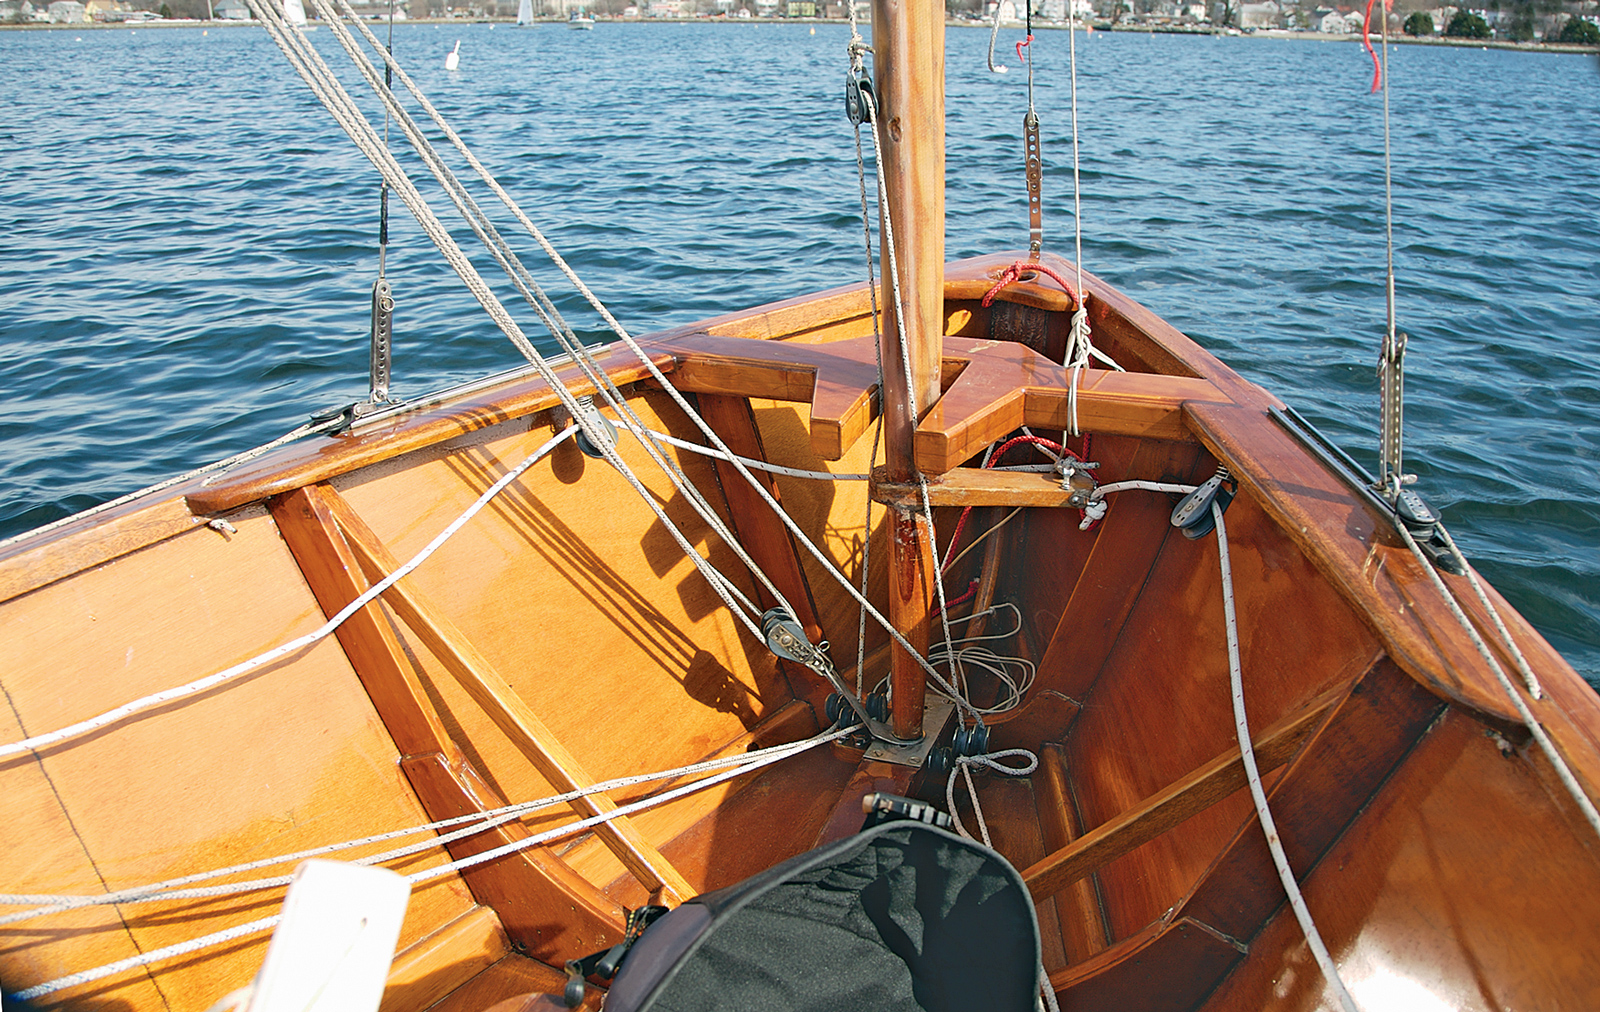
The cockpit, with its humble tiller, is as simple and as inviting as the little red wagon of childhood days—only this little cart goes a whole lot faster.
DN masts (which can be no longer than 16′ or less than 15′ 6″) and booms (which must be no more than 9′ long) are made of aluminum, wood, carbon fiber, or fiberglass. Masts without stays, but complete with hardware and a halyard, can weigh no less than 15 lbs. That heavily loaded spar is the most likely component to require replacing over time. Booms can be hollow and have no weight restriction.
The remaining pieces, like runners and hardware, are generally purchased and attached to the hull according to specific instructions that ensure the greatest sailing efficiency. Runners weigh 7 to 15 lbs each. Hardware is bonded to the fuselage with epoxy. Sails are usually purchased from sailmakers.
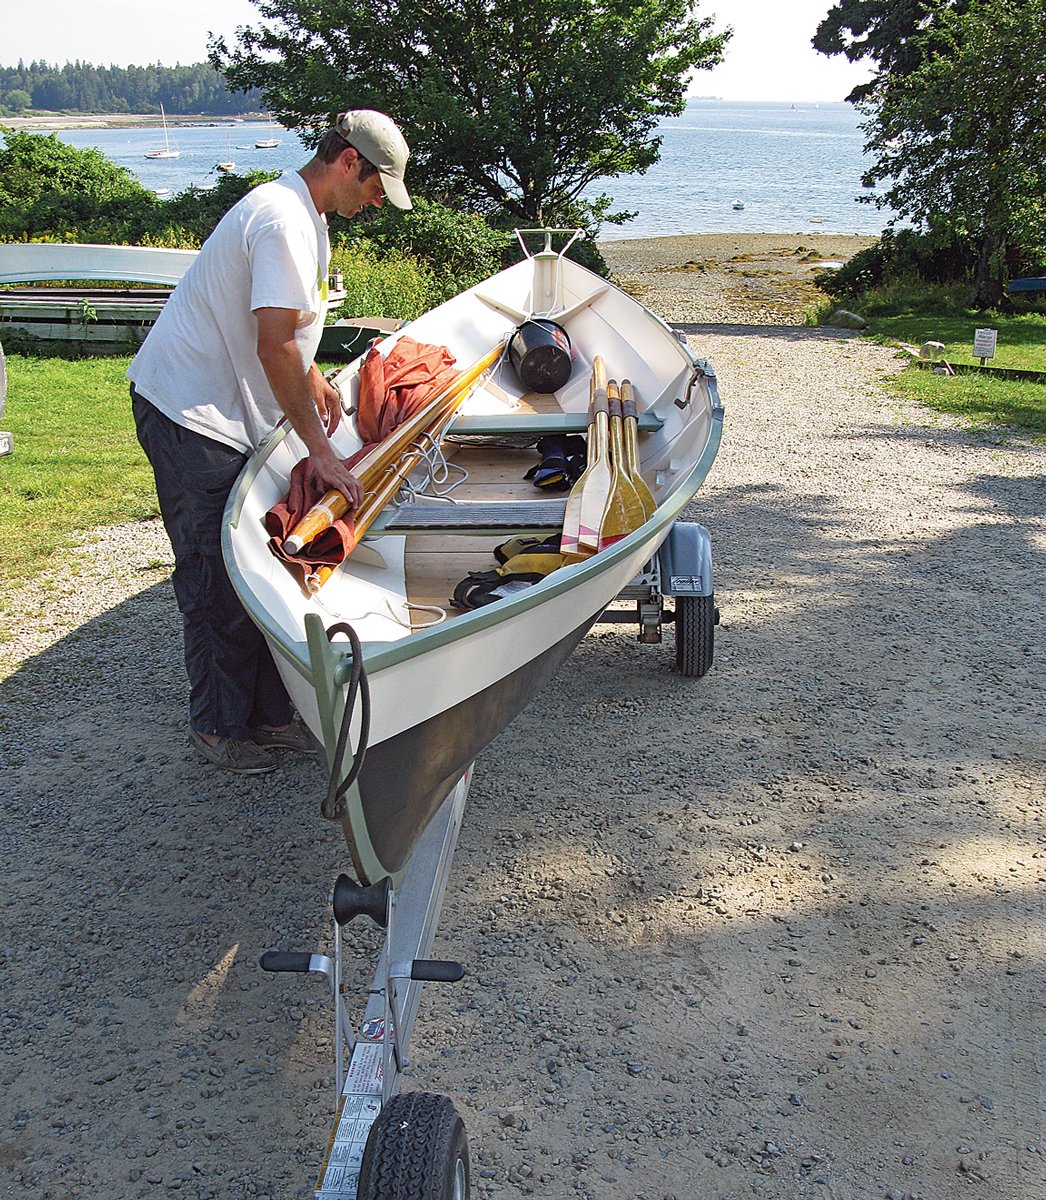
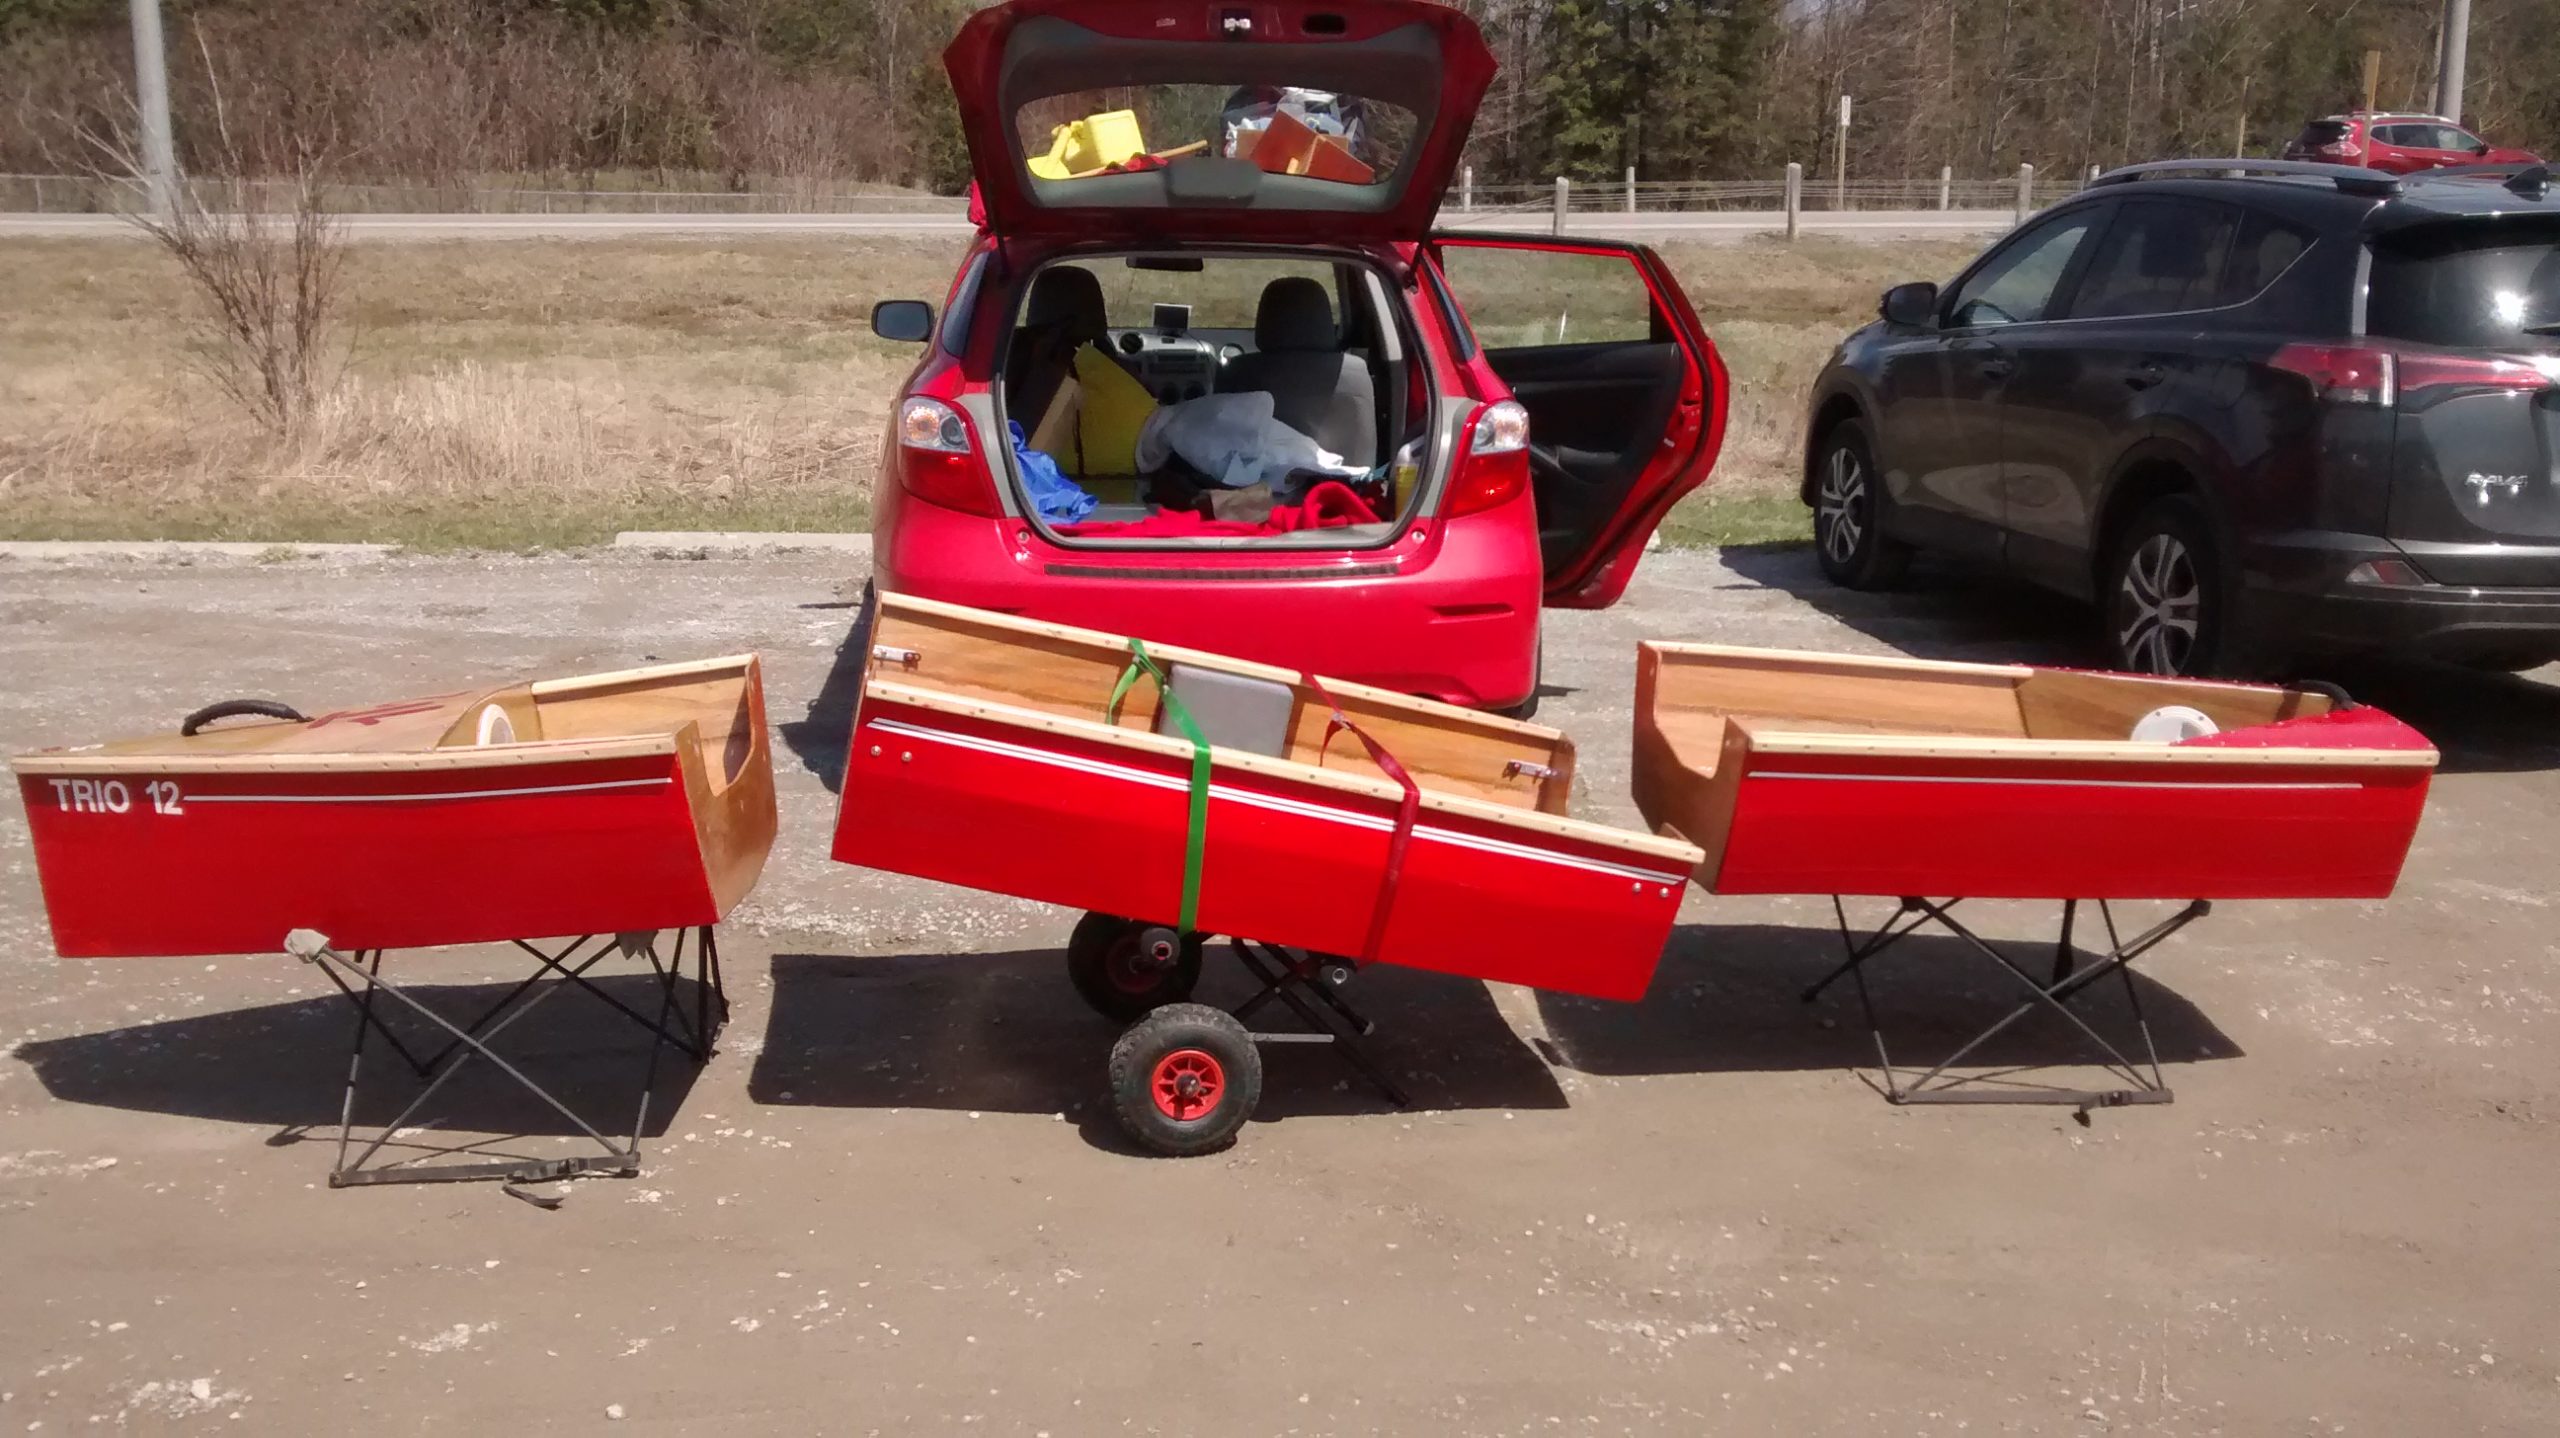
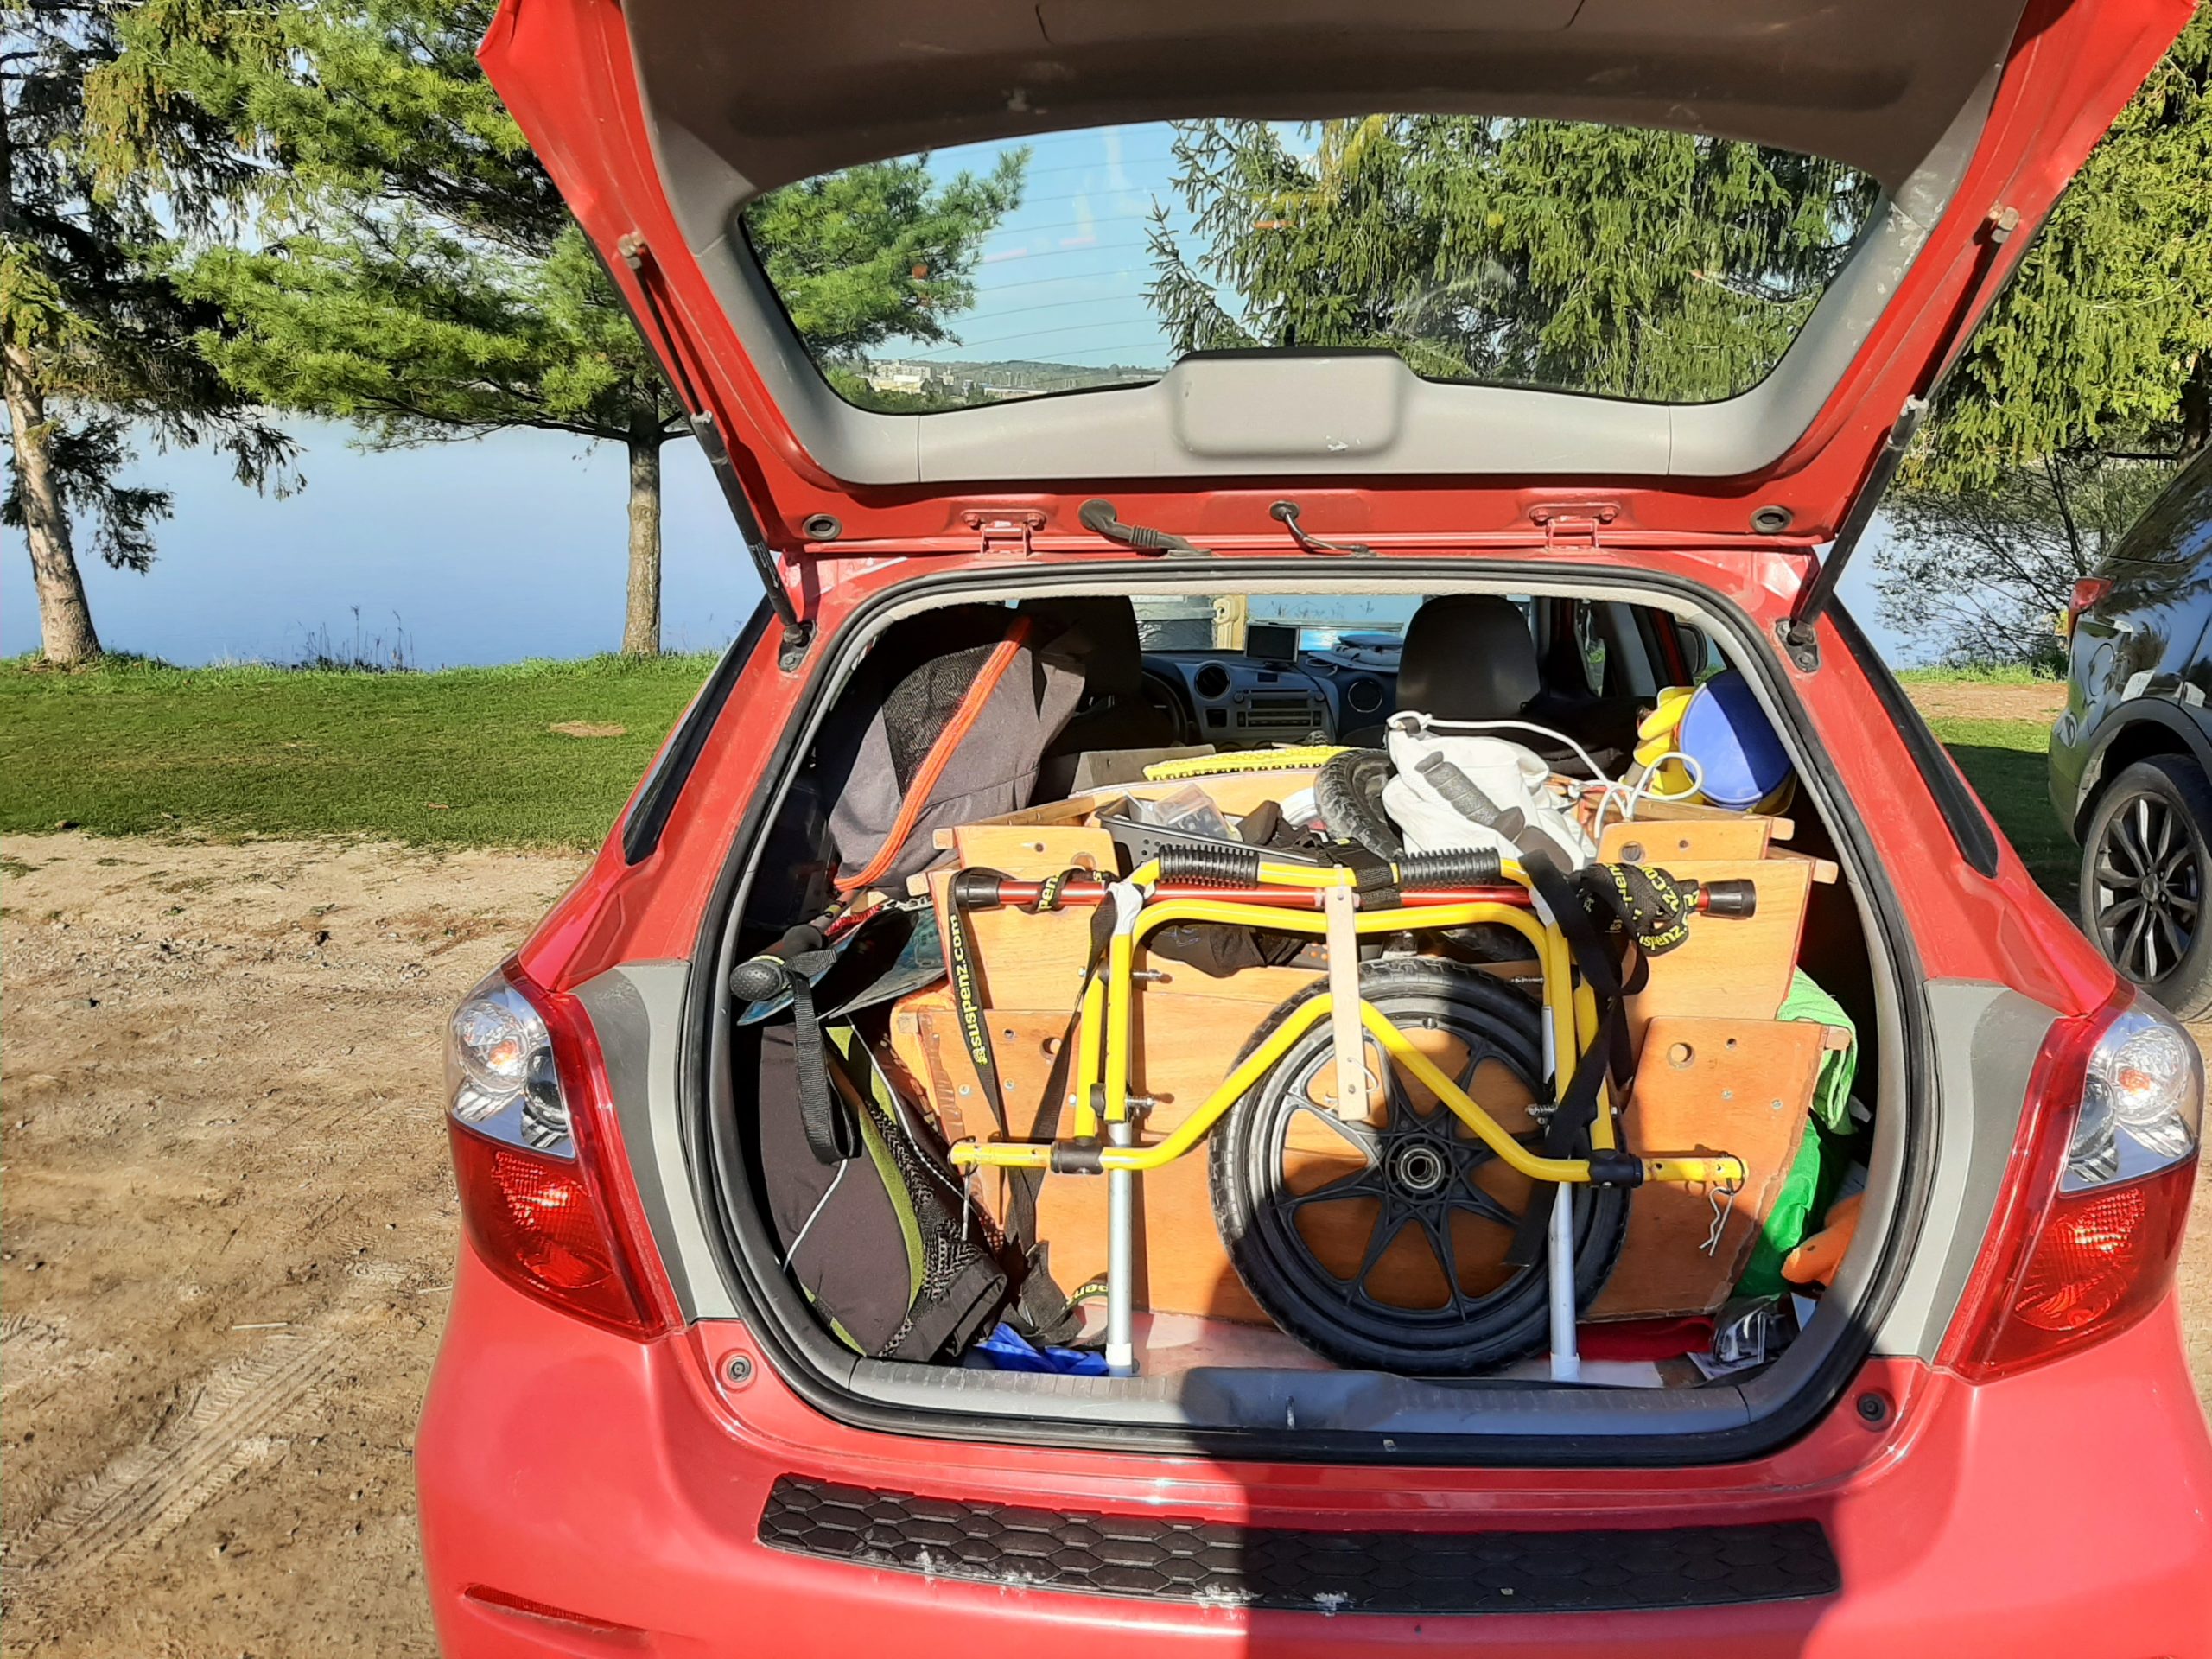
Conveying a DN to a regatta is usually a simple matter of cartopping the fuselage and long components, although Meade Gougeon carries up to three DNs inside his van. Once at the site, it takes approximately 15 minutes to set up and rig a DN thanks to push-pull pins. After that, the joy of sailing across a mirror-smooth hard-water lake awaits the skipper. “It grows on you,” says Meade. “It’s sailing in its most basic form.”
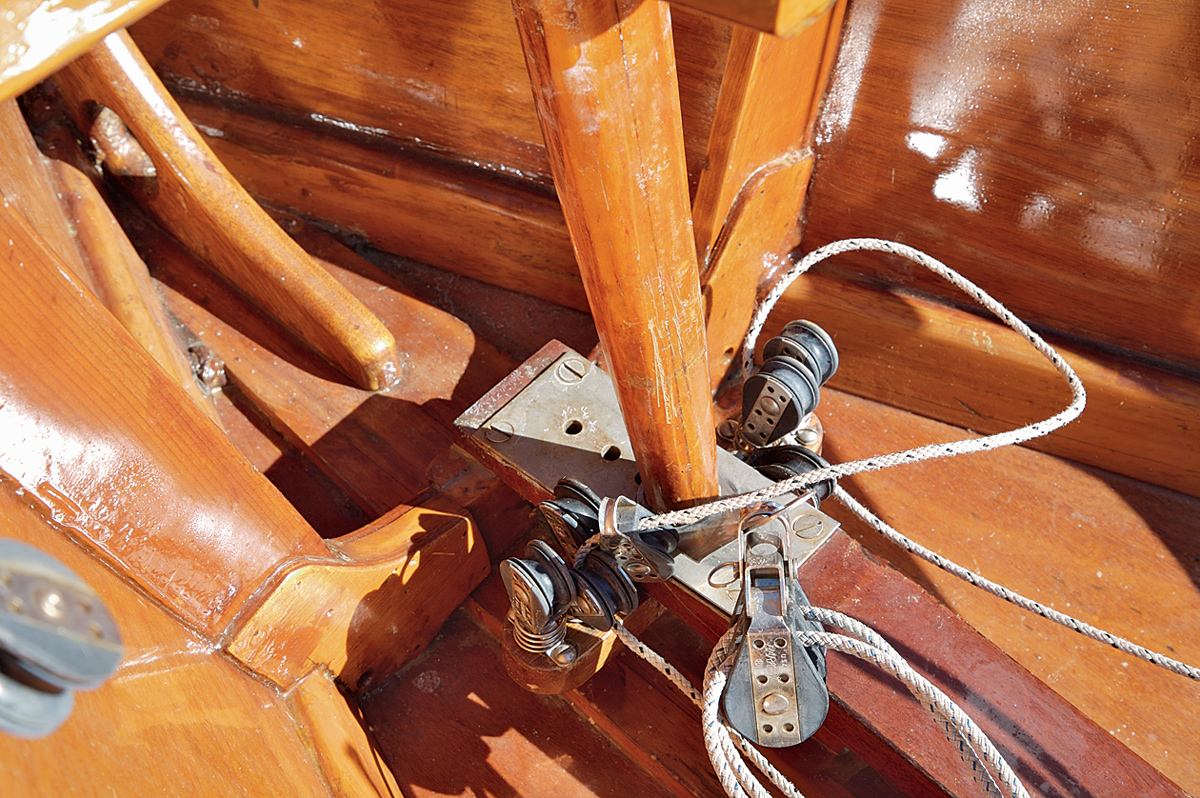
High speeds and sometimes instant, violent jibes put extreme loads on the mast and rigging. Not surprisingly, mast replacement is common among racers.
Plans for the DN 60, as well as sources for unfinished hulls and parts, are available from several suppliers listed on the IDNIYRA website.
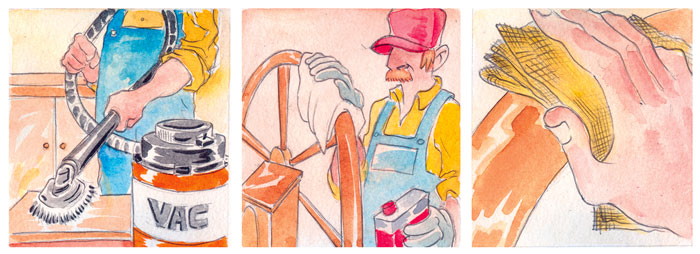
In my years of teaching boatbuilding and repairing wooden boats, I’ve noticed many mistakes owners make in the upkeep of their boats—common practices, done with good intent, that can often do more harm than good. I’ve distilled these into a list of the ten most common ones I’ve observed. Being aware of these things should help to eliminate some frustration and expense. My list loosely follows the common order of seasonal work, from springtime commissioning to autumn haulout.
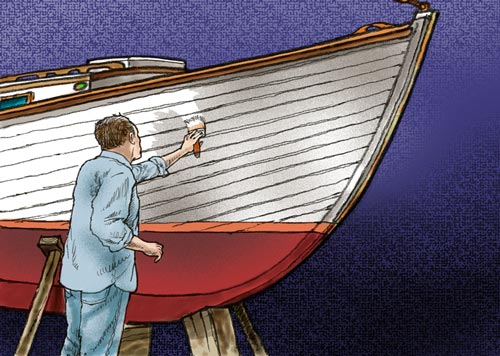
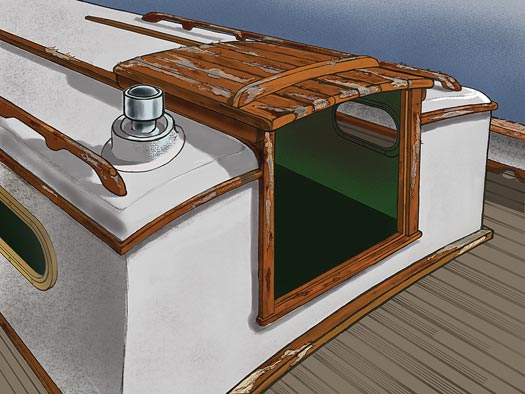
At some point, our boats spend time out of water. Whether hauling out for the winter, or for just a few weeks of maintenance, it is important to keep an eye on your hull’s moisture content. Is the paint cracking at the seams? Can you see through the seams? If so, it’s important to get some moisture into your boat so she will swell up before you paint, and even before you sand. Why do this before sanding? Because if the seams are open, dirt and sanding dust can work into them, and even good vacuuming doesn’t always clear them out. Painting then traps this debris in the seams. As the planks then swell after launching, their edges will encounter that accumulated crud. Chances are that a bit of stray sanding dust won’t hurt the seams after one year, but over a span of years its accumulation will restrict plank swelling and possibly cause leaks.
JAN ADKINS
Sanding and painting a dry hull invites dust and debris to accumulate in open seams, potentially restricting the ability of those seams to swell.
Before painting, a bit of “pre-swelling” by means of wet towels, a sprinkler, or some other method should close the seams. Resist the temptation to put more than a few inches of water in your bilge: boats are engineered to keep water out, and not to hold it in.
There’s another common malady caused by inadequate swelling, and I often end up repairing the resulting damage. Many boats have their planking screwed directly to the transom edges. When the transom’s thickness shrinks with drying, the plank ends can stand proud of the transom. It’s tempting to want to sand these projections off. But after several years of sanding plank ends flush with a dried-out transom face, critical planking material is eliminated, and splits develop at the fastening holes. Rot may soon follow. The well-intended sanding has eliminated the “relish”—the all-important material between the plank-end fastenings and the ends of the planks. Leave those projecting plank ends alone. After the transom swells back up, everything will align.
2. Additional caulking when the boat is dry
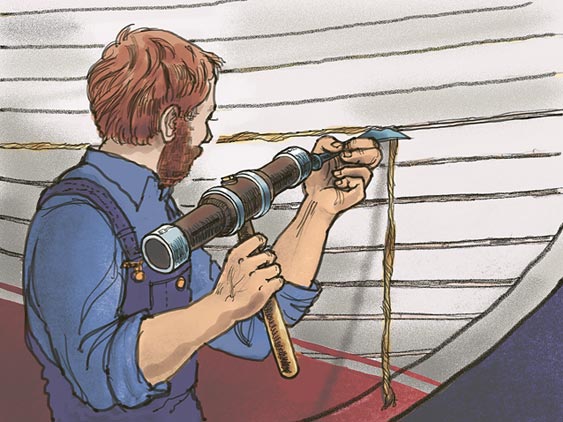
“I could see right through the seam, so I added some cotton!” That’s a common refrain I hear when a leaky boat comes into the shop. Caulking requires care. If you can see light through your seams, my first advice would be to wait. Even with a severely dried-out boat, you can’t assume it is going to be a leaker until it is back in the water and swelled tight.
KATE MCMILLAN/JAN ADKINS
Adding caulking to a boat when it’s dry can damage the seams. It’s best to swell the hull before determining that the caulking is inadequate.
There are many ways to get the moisture back into a dried-out hull, but if you are pressed for time and aren’t able to wet your boat before you launch, you can drive some really squishy stuff into the seams so that you can promptly get the boat back in the water. Slick Seam, a soft, waxy product made by Davis Industries, is the standard for this treatment. It is effective, but rather messy when it squeezes out. It also has a reputation for clogging sandpaper. For these reasons, it’s typically used below the waterline as a spot-treatment on problem seams.
Dried-out topsides that have been given a fresh treatment of seam compound will likely end up with a bunch of seams emphasized by proud beads of squeeze-out after a boat is launched the planks have swelled up. These beads might look bad, but their presence indicates a healthy boat because the seams have closed up naturally upon swelling. If you’re after a mirror-like paint job, you’ll have to scrape and sand that compound flush when the boat comes out of the water at the end of the season—and then maintain the hull’s moisture content so the seams don’t open again.
3. Overcaulking
This is an extension of the previous item. I have pulled enough caulking out of boats—layers and layers of strata, caulking on top of caulking—that I start to feel like a geologist. Before driving in new caulking, you must first take out the old stuff.
KATE MCMILLAN/JAN ADKINS
Overcaulking a hull can put undue pressure on the fastenings and frames.
If your boat is leaking, the caulking might be bad; it is, after all, a natural fiber, and it can rot. Reef out the old caulking (see sidebar below) and replace it; adding more on top of what’s there is only going to damage the seams.
Driving in excess caulking by means of a caulking iron essentially forces a wedge into your boat’s seams. It can increase the shear, or lateral load, on your plank fastenings as well as increase the width of the caulking seam. As the planks swell with moisture after the boat is relaunched, the pressure that builds up between the plank edges can actually put tension in the frames and tear them apart, like a rope snapping in two. The effect is especially bad with dense mahogany planking; cedar is more resilient and forgiving. Even if frames don’t break, you will likely have compressed the planks beyond their ability to return to their original widths because of a phenomenon called “compressive set”: if a swelling piece of wood is restricted to a specific dimension, it will never swell beyond that dimension in the future.
A Shop-made Reefing Hook
The tool of choice for cleaning out old seams is a reefing hook made from the tang of an old file or a flat-head screwdriver. Using a propane torch, heat the tang or the screwdriver tip to red-hot. Then, bend the handle (or tip) a little past 90 degrees and quench the hot metal in water. File the business end of the tool to the sectional shape of the seam. Judiciously placed in the seam and dragged along, such a tool is very effective at removing old cotton and compound. —Eds.
4. Wrong fastening type or size
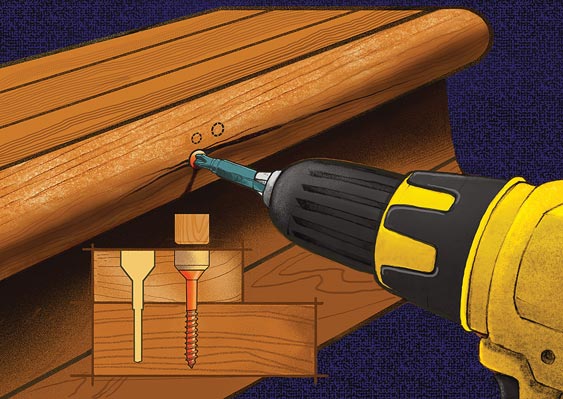
Imagine this: You remove a piece of varnished wood every year for 20 years so its finish will remain perfect. The screw holes become fatigued. Or imagine a badly corroded screw holding a plank to a frame; its threads have weakened and lost their grip, and the wood surrounding the screw hole has deteriorated to the point that it will no longer hold a fastening of this size. In either case, the screws spin uselessly in their holes, and the most convenient remedy is to replace them with larger or longer ones. This tactic only works with proper preparation. If you simply jam a larger screw into an existing hole, the new screw will likely be too big for the original hole, and the countersink not deep or wide enough; the screw may also be too long. The result can be disastrous, with one or more pieces split. If you’re increasing the screw size, you must drill a proper pilot hole for the new screw, and this includes the pilot hole for the screw’s threaded portion, a clearance hole for the unthreaded shank, and a properly sized countersink for the screw head. If there is inadequate material for a larger fastening, it’s better to plug the old pilot hole with a whittled, epoxied-in plug and then redrill it for a screw matching the original one’s size.
KATE MCMILLAN/JAN ADKINS
Refastening with a larger screw, without redrilling the hole for the new screw size, can cause wood to split. A properly drilled screw hole includes these three elements: (1) a countersink, (2) a shank-clearance hole, and (3) a pilot hole.
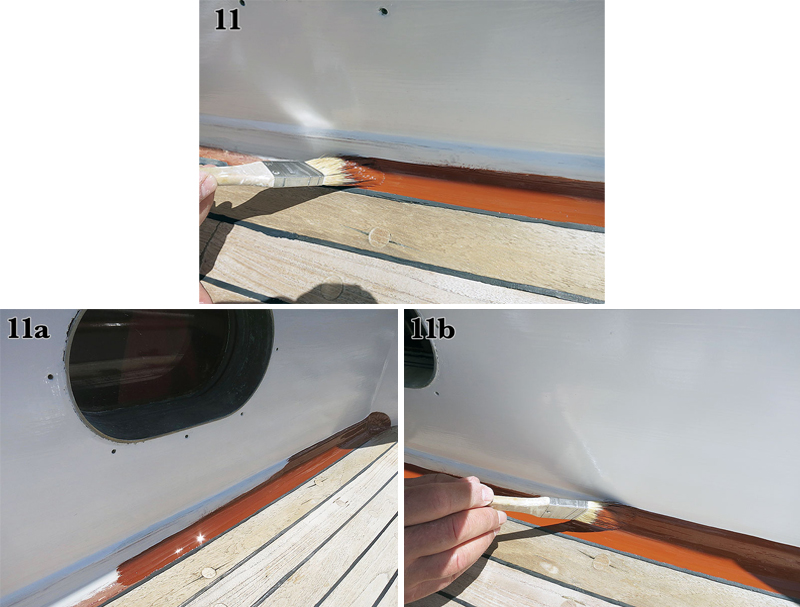
5. Inadequate varnish
If you don’t have the time to prepare for and apply enough coats of varnish, you might think about another strategy. In my experience, a boat is not going to take the all-day, every-day abuse of the summer sun without a minimum of six coats—and afterwards at least one, but preferably two, maintenance coats per year. Anything less than that invites deterioration, which will require scraping back peeled or yellowing varnish to fresh wood and rebuilding the finish in that area. You might also end up sanding back graying wood to a fresh surface, and in the process lose some critical wood thickness. Varnish requires commitment.
KATE MCMILLAN
If time or money constraints preclude the proper maintenance of a bright finish, it’s better to use paint.
If your time and budget don’t allow you to maintain brightwork, consider paint or oil instead. Boiled linseed (see WB No. 254) is the oil of choice for most boat finishes; unlike raw linseed oil, it dries fast and forms a film. While oil is the easiest finish to apply, it does not give the same protection as a coat of paint, and it tends to blacken as it ages. It also is not as effective a moisture barrier as paint or varnish. However, when kept up, it makes a perfectly fine and time-proven finish, and it can keep rot at bay.
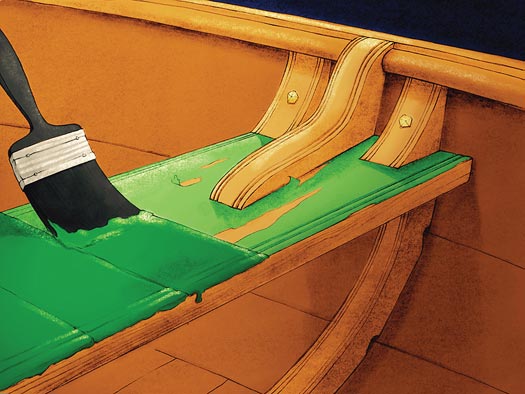
6. Inadequate preparation for paint
If you are going to paint, prepare your surfaces properly. Sand off all the gloss of the previous coat. For bare wood, rough up the surface adequately; too fine a sanding can burnish the wood, making it more challenging for paint to stick. Also, if you can, paint the whole piece. I often see thwarts with only their tops and edges painted, and the bottoms left bare. If moisture can get into one side easier than the other, it can ruin the finish and possibly warp the board. If at all possible, paint even what you aren’t going to see; it will make the wood more stable and protect against rot-causing moisture intrusion.
KATE MCMILLAN
Hasty preparation for painting can lead to trouble. All loose and flaking paint should be scraped away; surfaces should be sanded; and hidden areas, such as the undersides of thwarts, should be coated.
7. Inadequate pre-launch cleaning
Before you launch for the season, make sure your boat is clean. Get as much crud off as you can while the bilges are dry and you have access to a vacuum cleaner. Sanding dust accumulates everywhere. You likely gave the boat a good cleansing before painting, but that’s never good enough. Sanding dust finds homes in plank seams and at the junction of your keel and floor timbers; vacuum these areas using a crevice tool and a brush attachment. Water will pass more freely through limber holes if there’s not a lot of debris sloshing around in the bilge. A clean bilge will also help keep the pump from clogging.
KATE MCMILLAN/JAN ADKINS
Before launching, take advantage of water-free bilges by vacuuming them thoroughly. This will save wear on the bilge pump—and potential clogging—and it will allow water to flow freely through limber holes.
After the boat is launched, keep her clean. If I had my way, we would cruise barefoot and eat out of feedbags. There’d be no grit from shoe soles or bits of food to fall or get blown everywhere. But that shoeless vision isn’t always practical, so be vigilant with a broom and dustpan. And really watch out for stray potato chips: not only will they do an amazing job of plugging up your cockpit drains and scuppers, but the stains from the grease will have your decks advertising what you had for lunch.
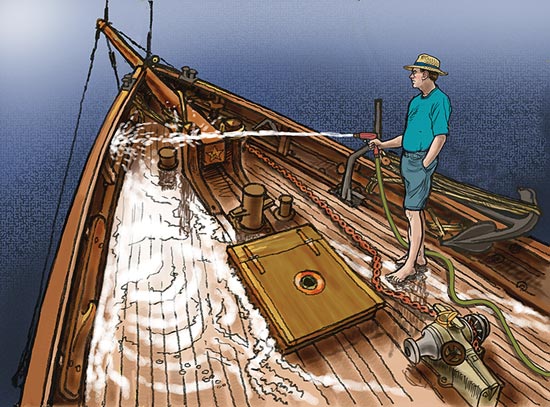
8. Freshwater washdown
A clean boat is super important. When dirt accumulates in a crevice, it holds moisture, and the next thing you know you have rot. You need to wash that dirt off—but not with fresh water. A regular freshwater wash-down with a dock hose is fine for fiberglass boats, but not wooden ones. The fungus that causes wood rot requires warmth, wood, and water—fresh water, to be exact. Frequent freshwater wash-downs, especially in concealed, poorly ventilated areas, can thus exacerbate rot.
JAN ADKINS
Regular freshwater wash-downs can promote rot in decks and top timbers. It’s best to sluice decks regularly with salt water, which helps to prevent rot.
Salt water is the answer. Old-timers sluiced their decks with salt water regularly, to keep planks swelled and rot at bay, and you should, too—especially after a rainfall. Salty water prevents rot fungus from growing and it also keeps deck planking nice and tight. Even your dinghy, if it’s traditionally planked, deserves a good dousing of salt water after you’ve bailed the rainwater out of it. Afterward, of course, bail out the salt water.
Having a squeegee or chamois to wipe standing water from seats and other horizontal surfaces prevents your own bottom from getting wet. It also prevents wear and tear from the salt left on that finish you worked so hard to apply.
In addition to salting, you might consider a canvas cockpit cover to prevent large amounts of rainwater from finding its way into the boat. A cover can virtually eliminate pumping on a boat that is otherwise tight. It also eliminates bird guano, which fouls finishes and bilge pumps. Just make sure the cover isn’t tacked down too snug; too tight a seal can restrict air movement and encourage mildew.
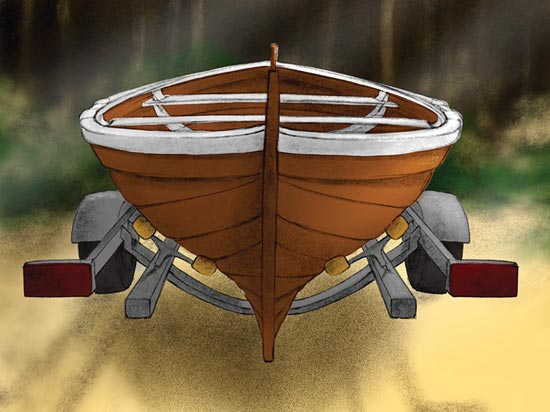
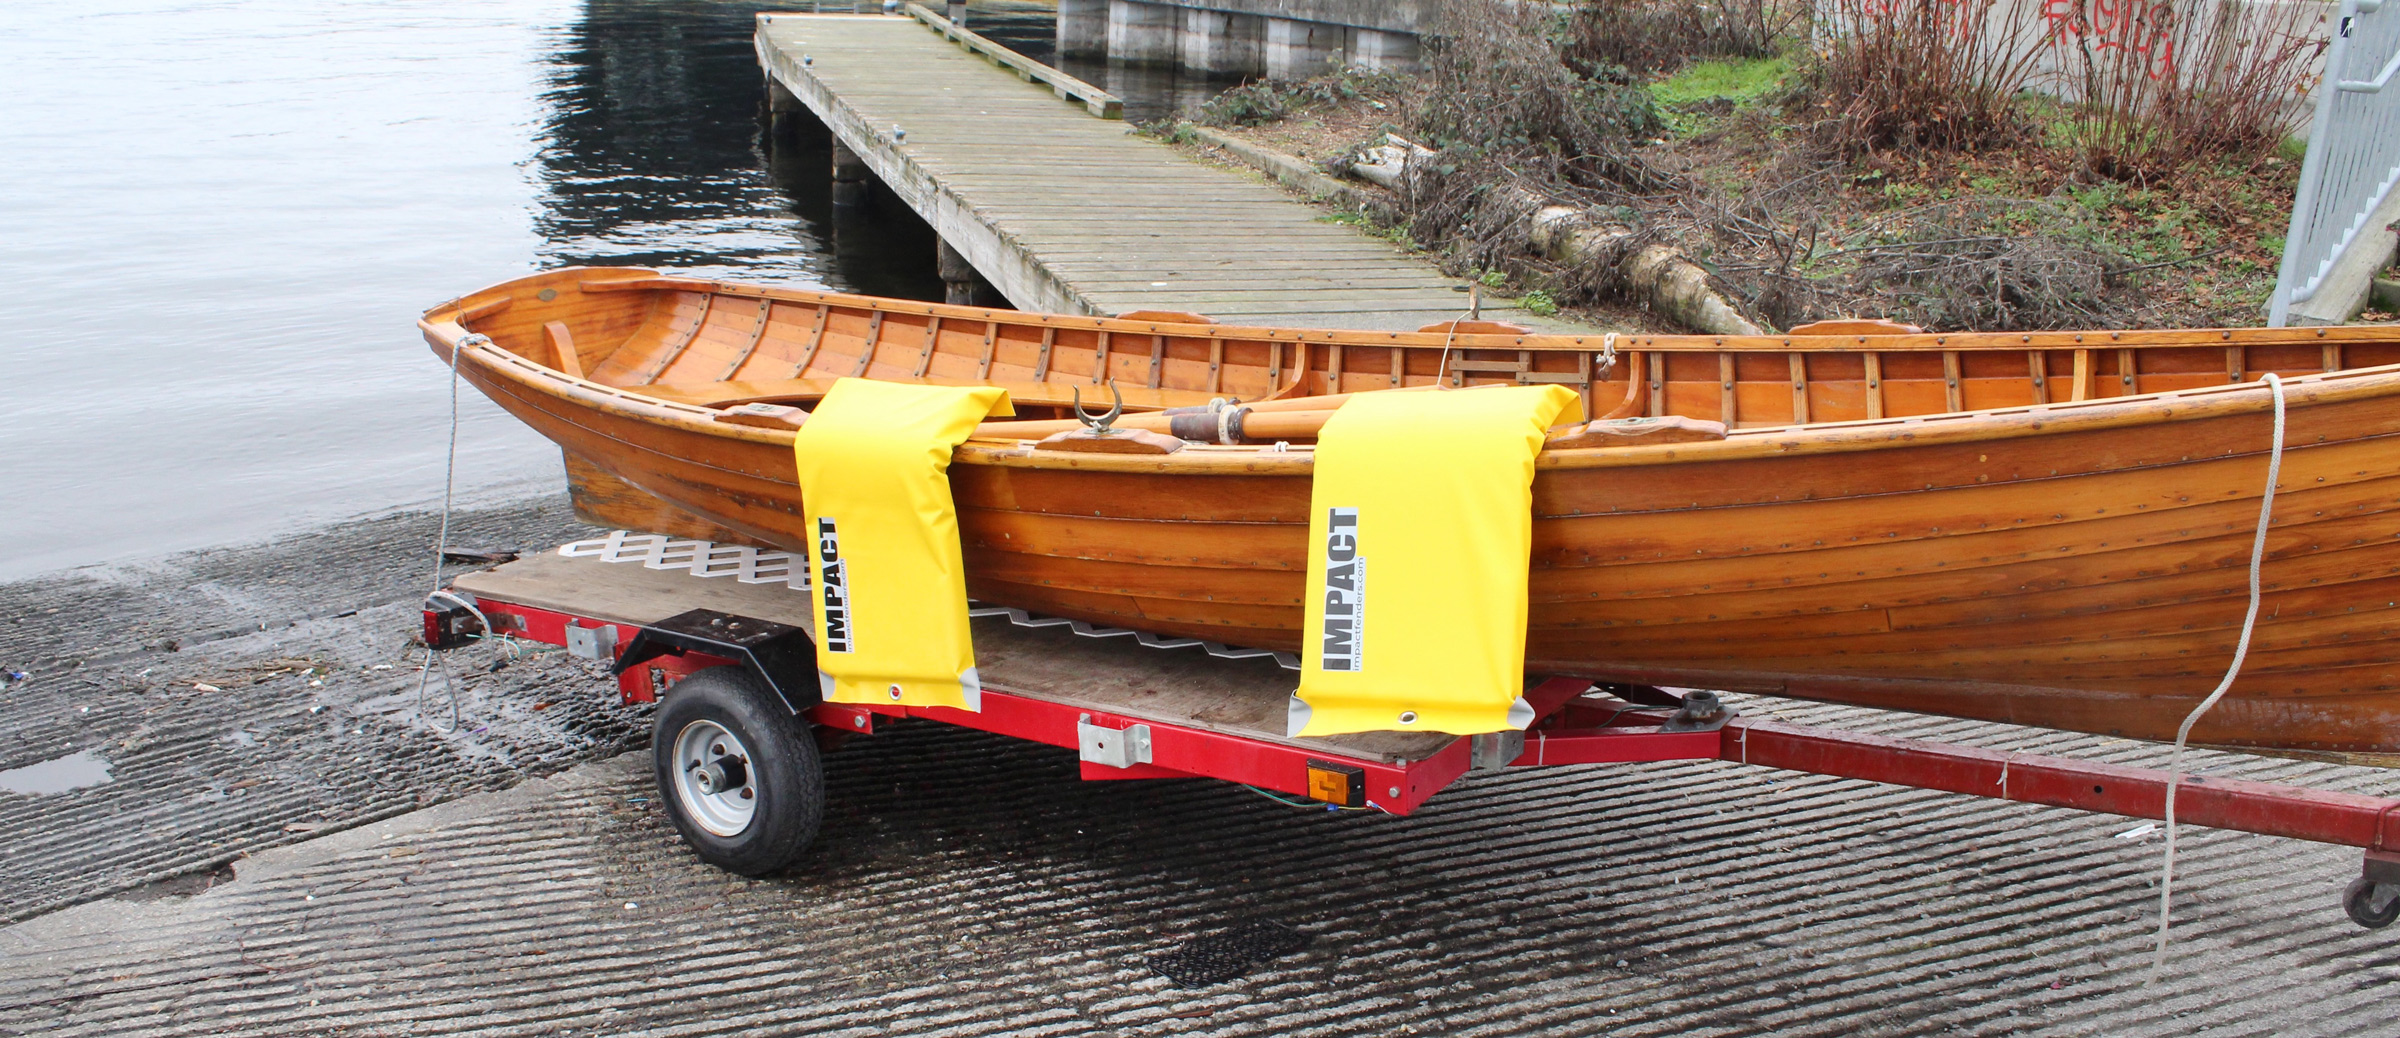
9. Improper support on the trailer
When the season is over and it’s time to haul your boat, you must be sure it will be properly supported on the trailer; errors in this department can lead to major work.
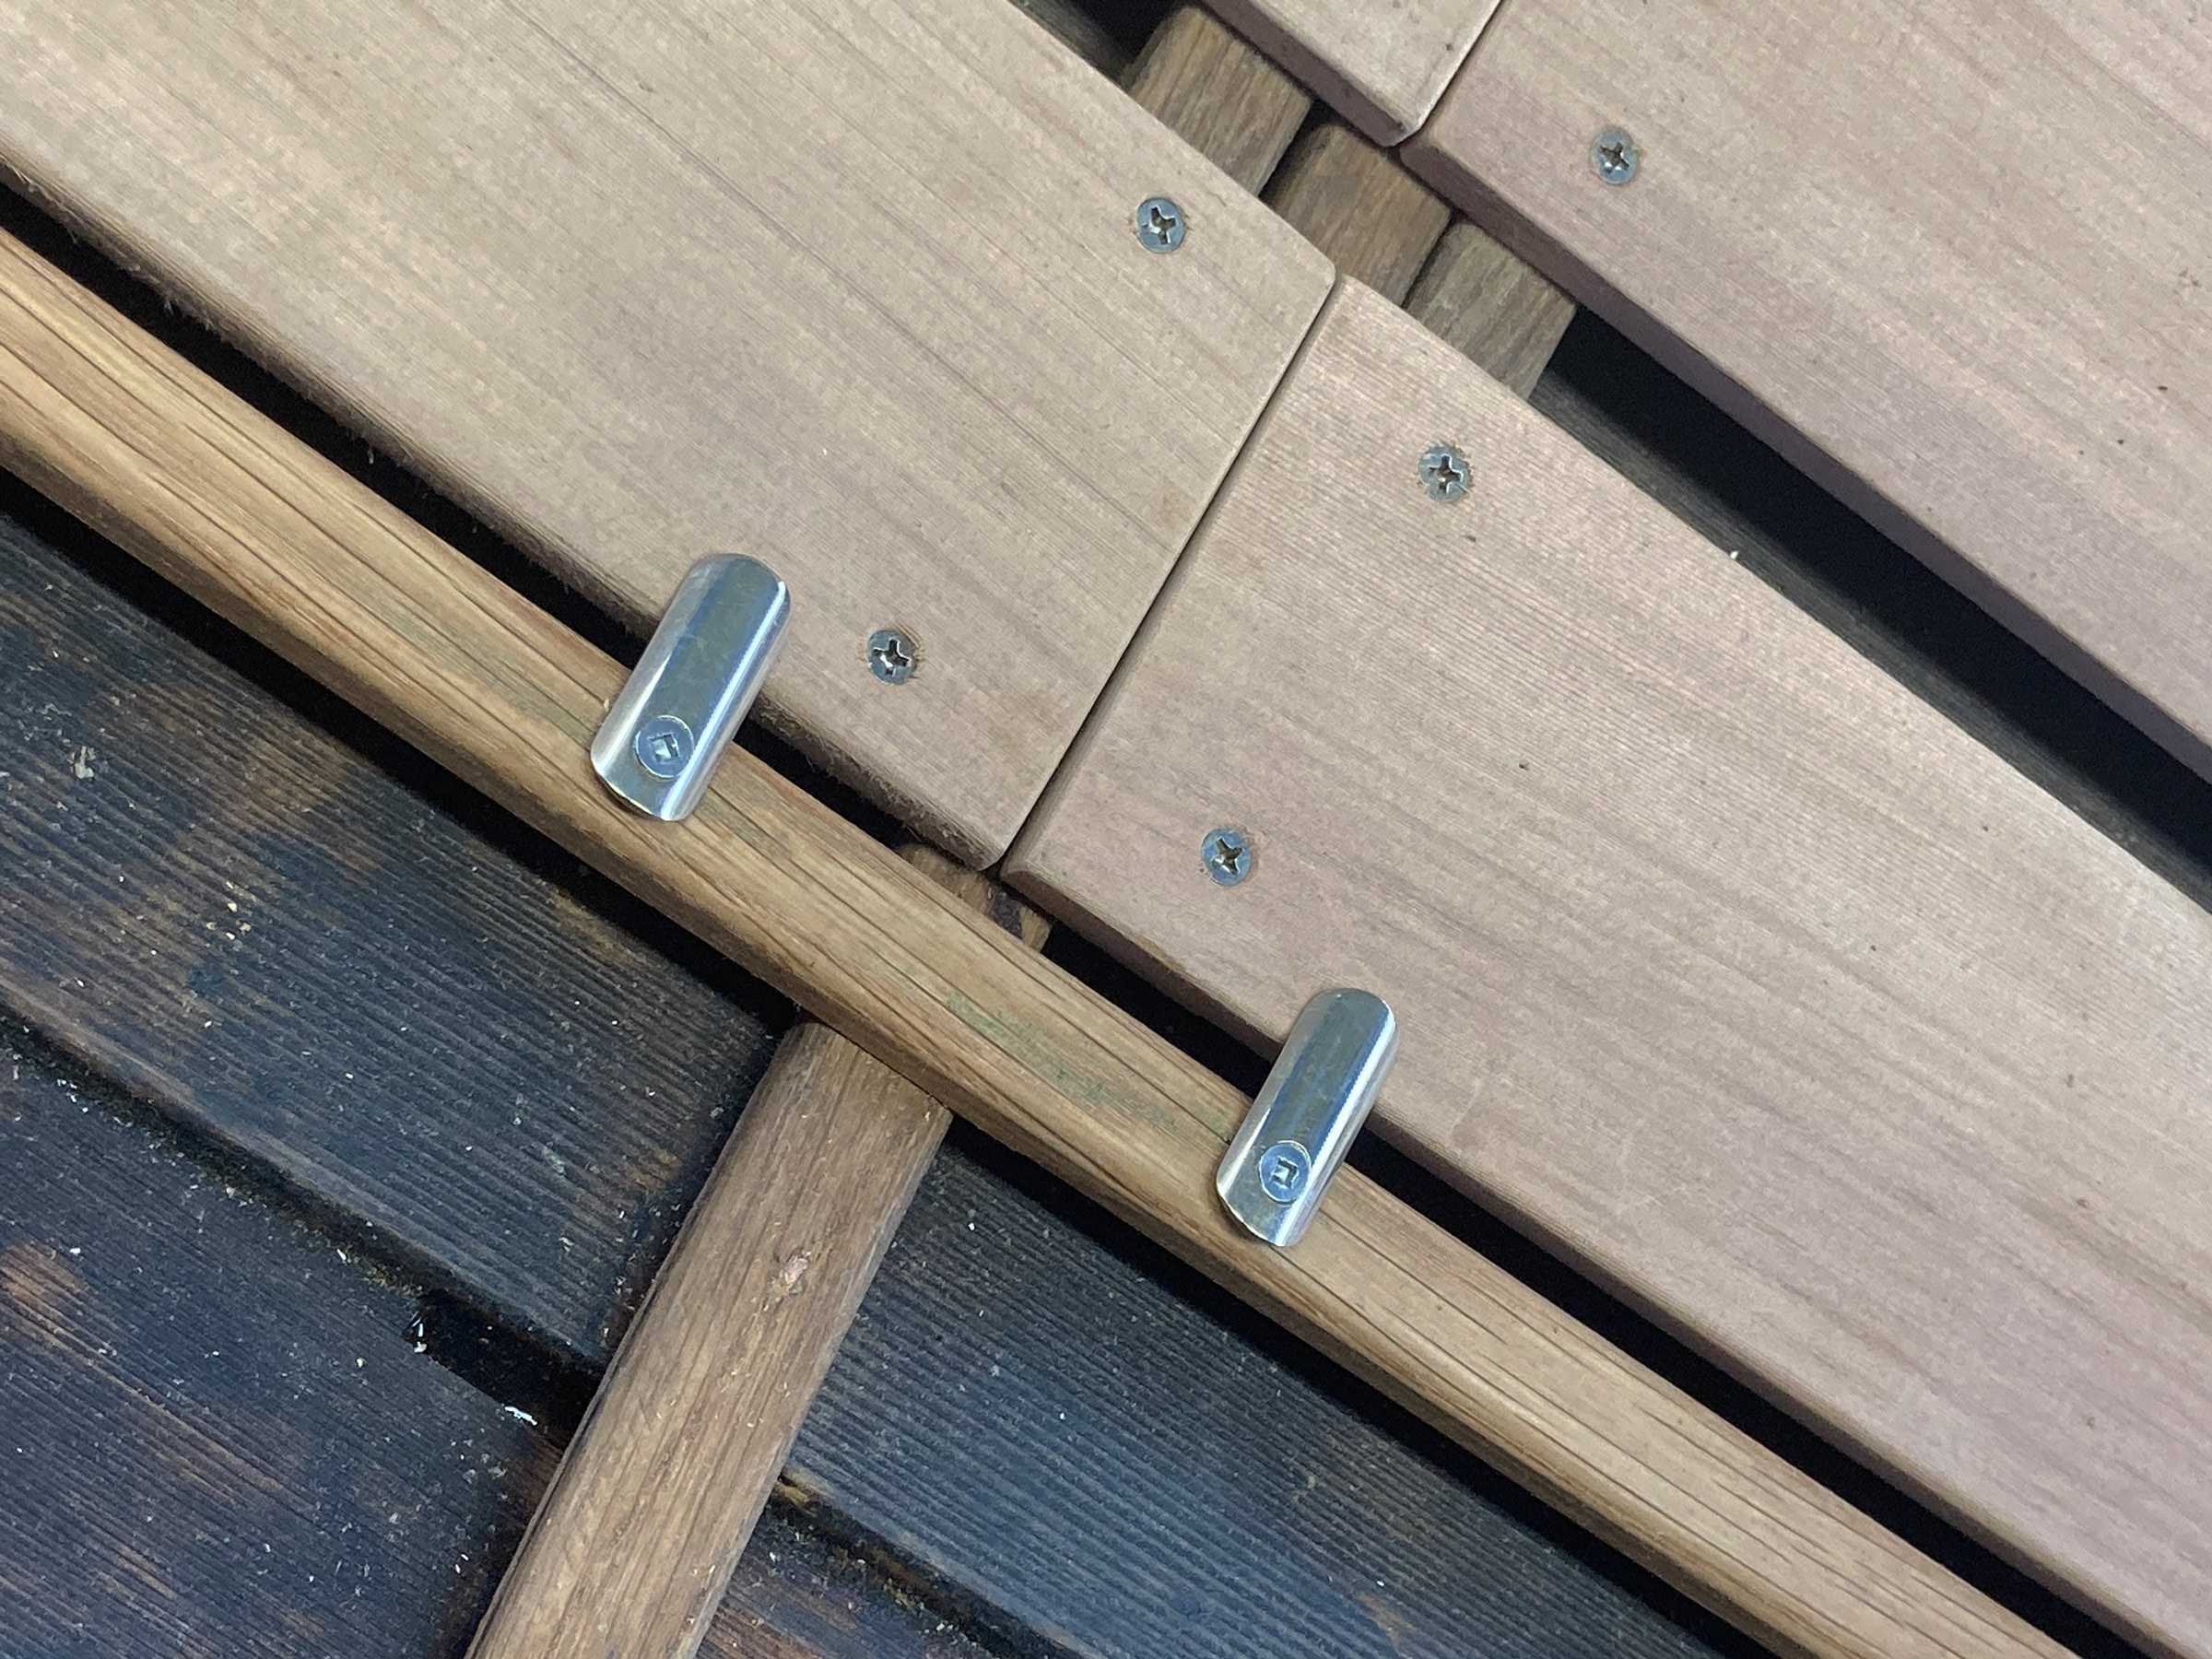
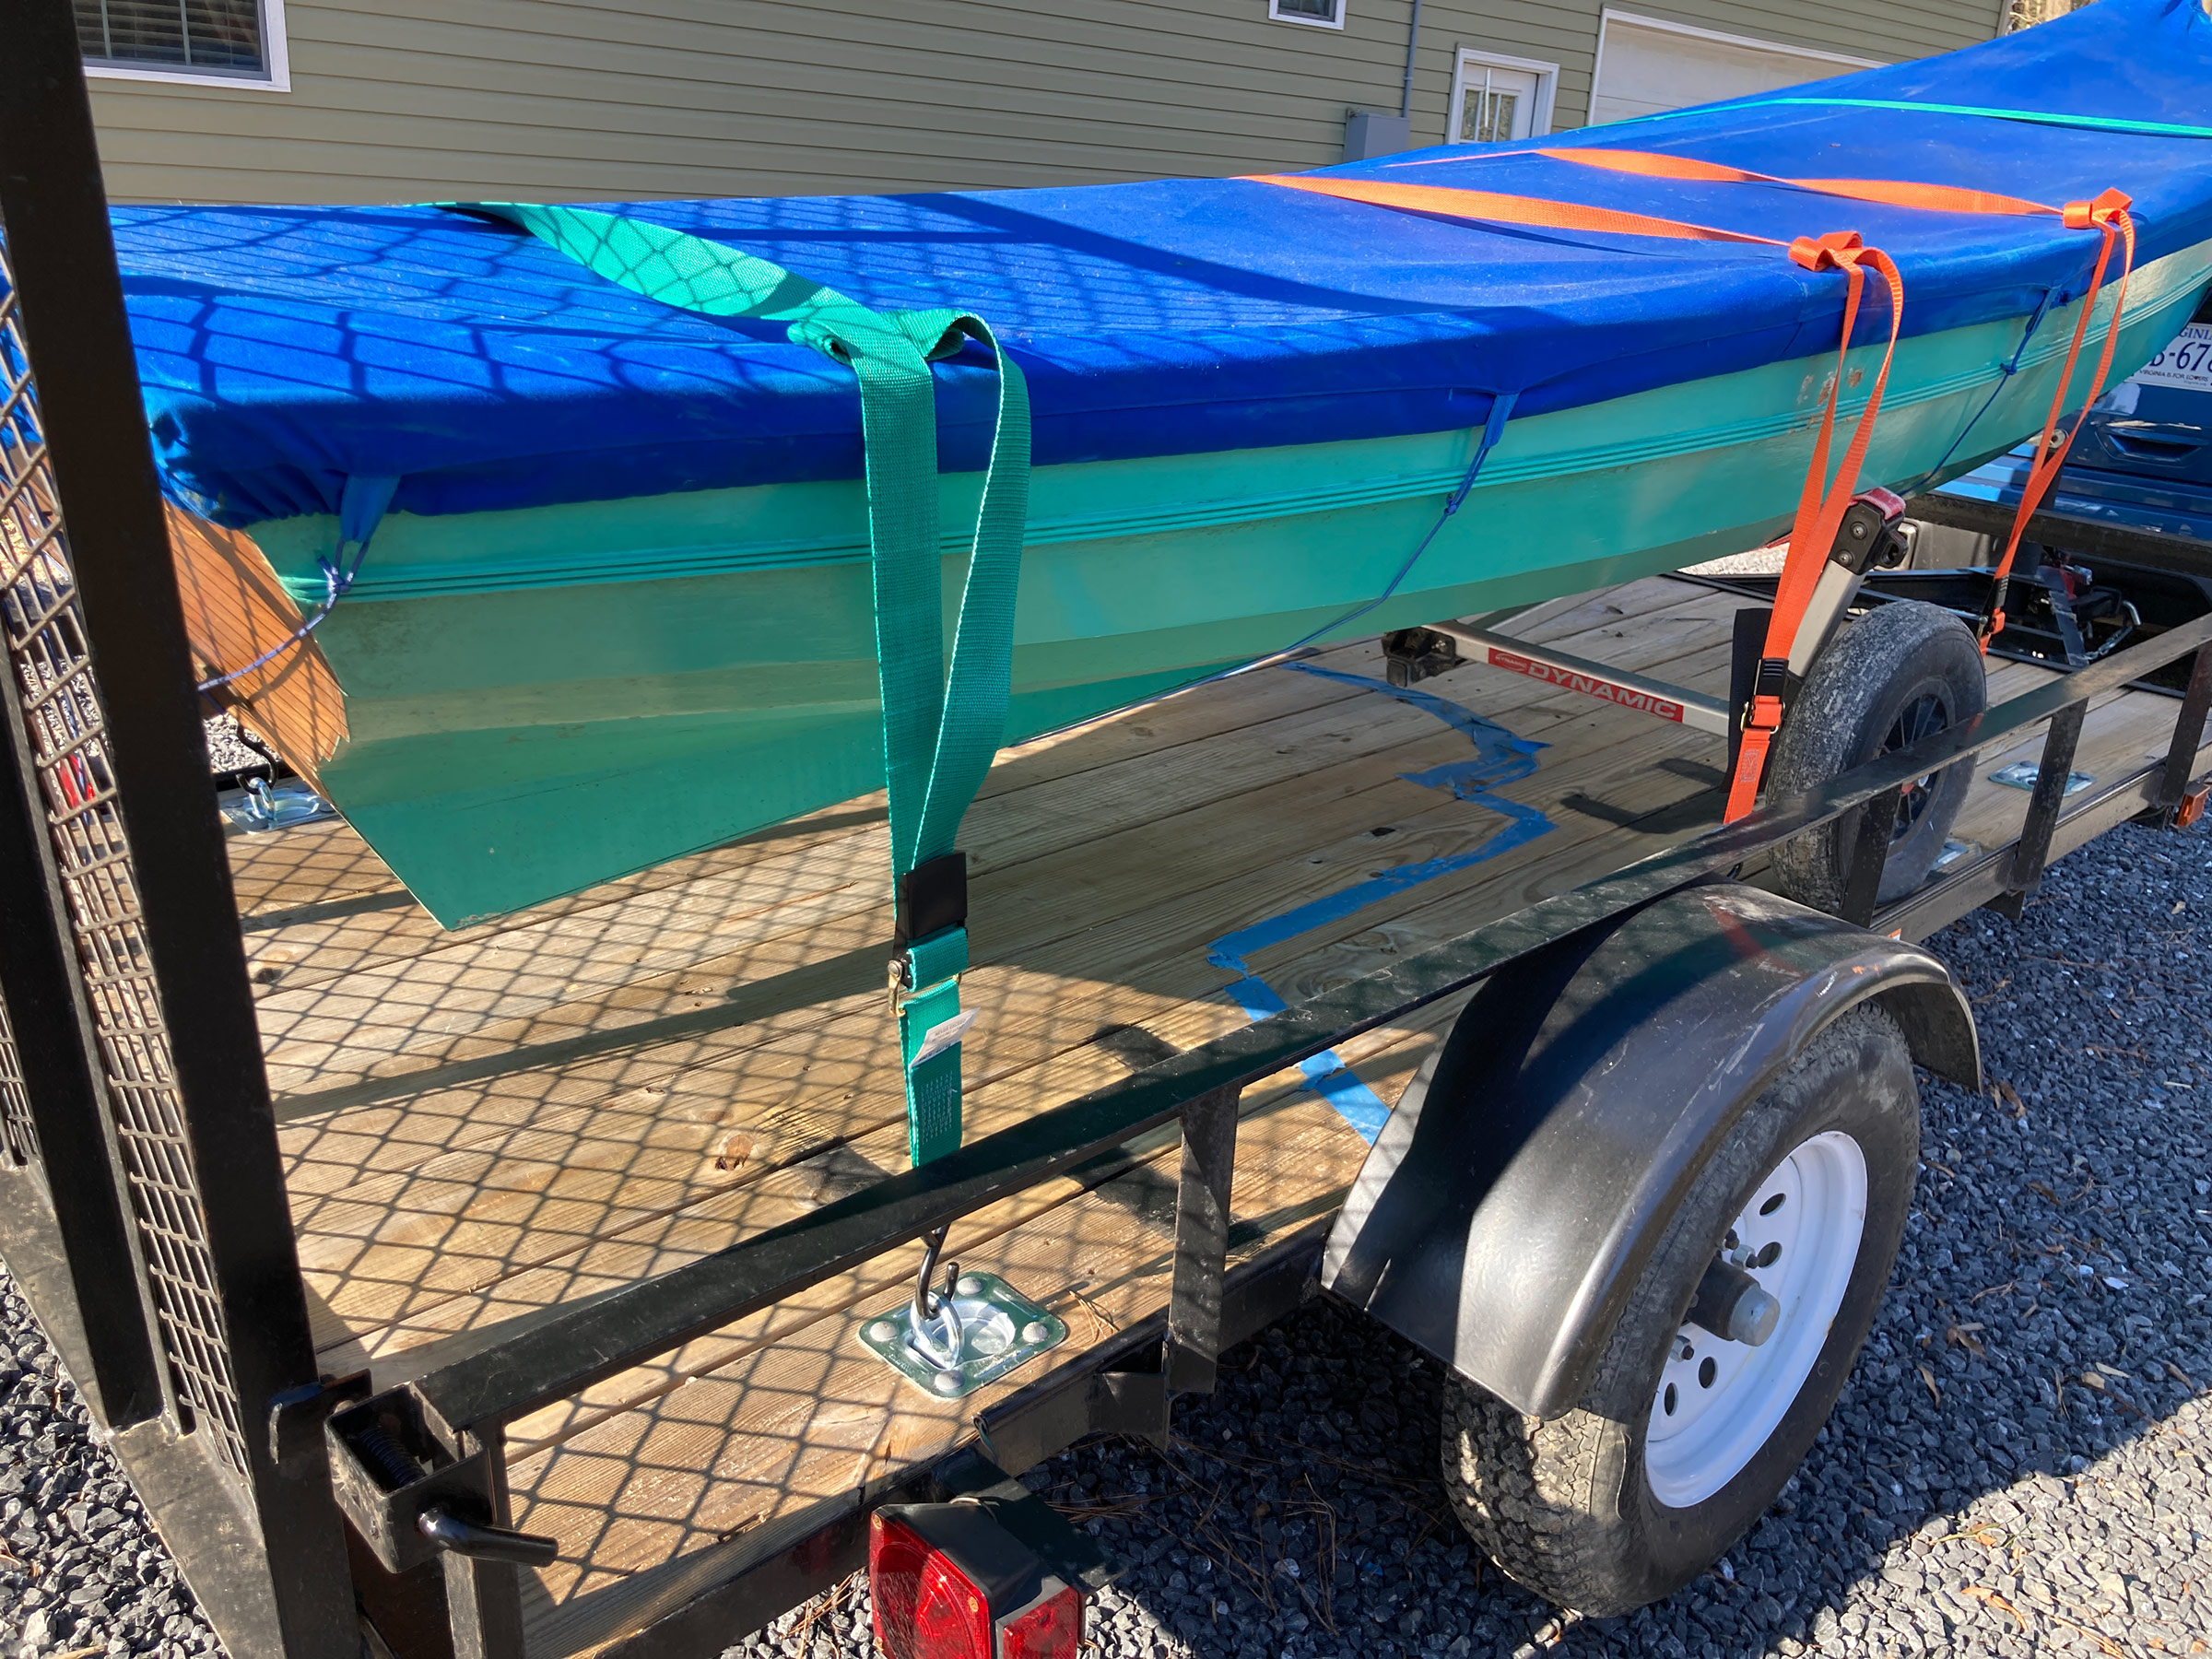
First, make sure the weight of the boat is distributed evenly along the length of the keel. If your trailer has bunks or stands, think of them as kickstands only. They are there to prevent the boat from falling over, but they should not hold the entire weight of the boat. You should be able to loosen one whole side and careen the boat over. Rollers are generally bad for planked wooden hulls: they tend to point-load the hull, rather than distribute the weight evenly. If the centerline structure is not supported, bunks or stands can press themselves into the sides and bottom of the boat. Most hulls aren’t built for these pressures, and they will deflect in those areas. The hull was built to have uniform pressure all over, not in a few localized places.
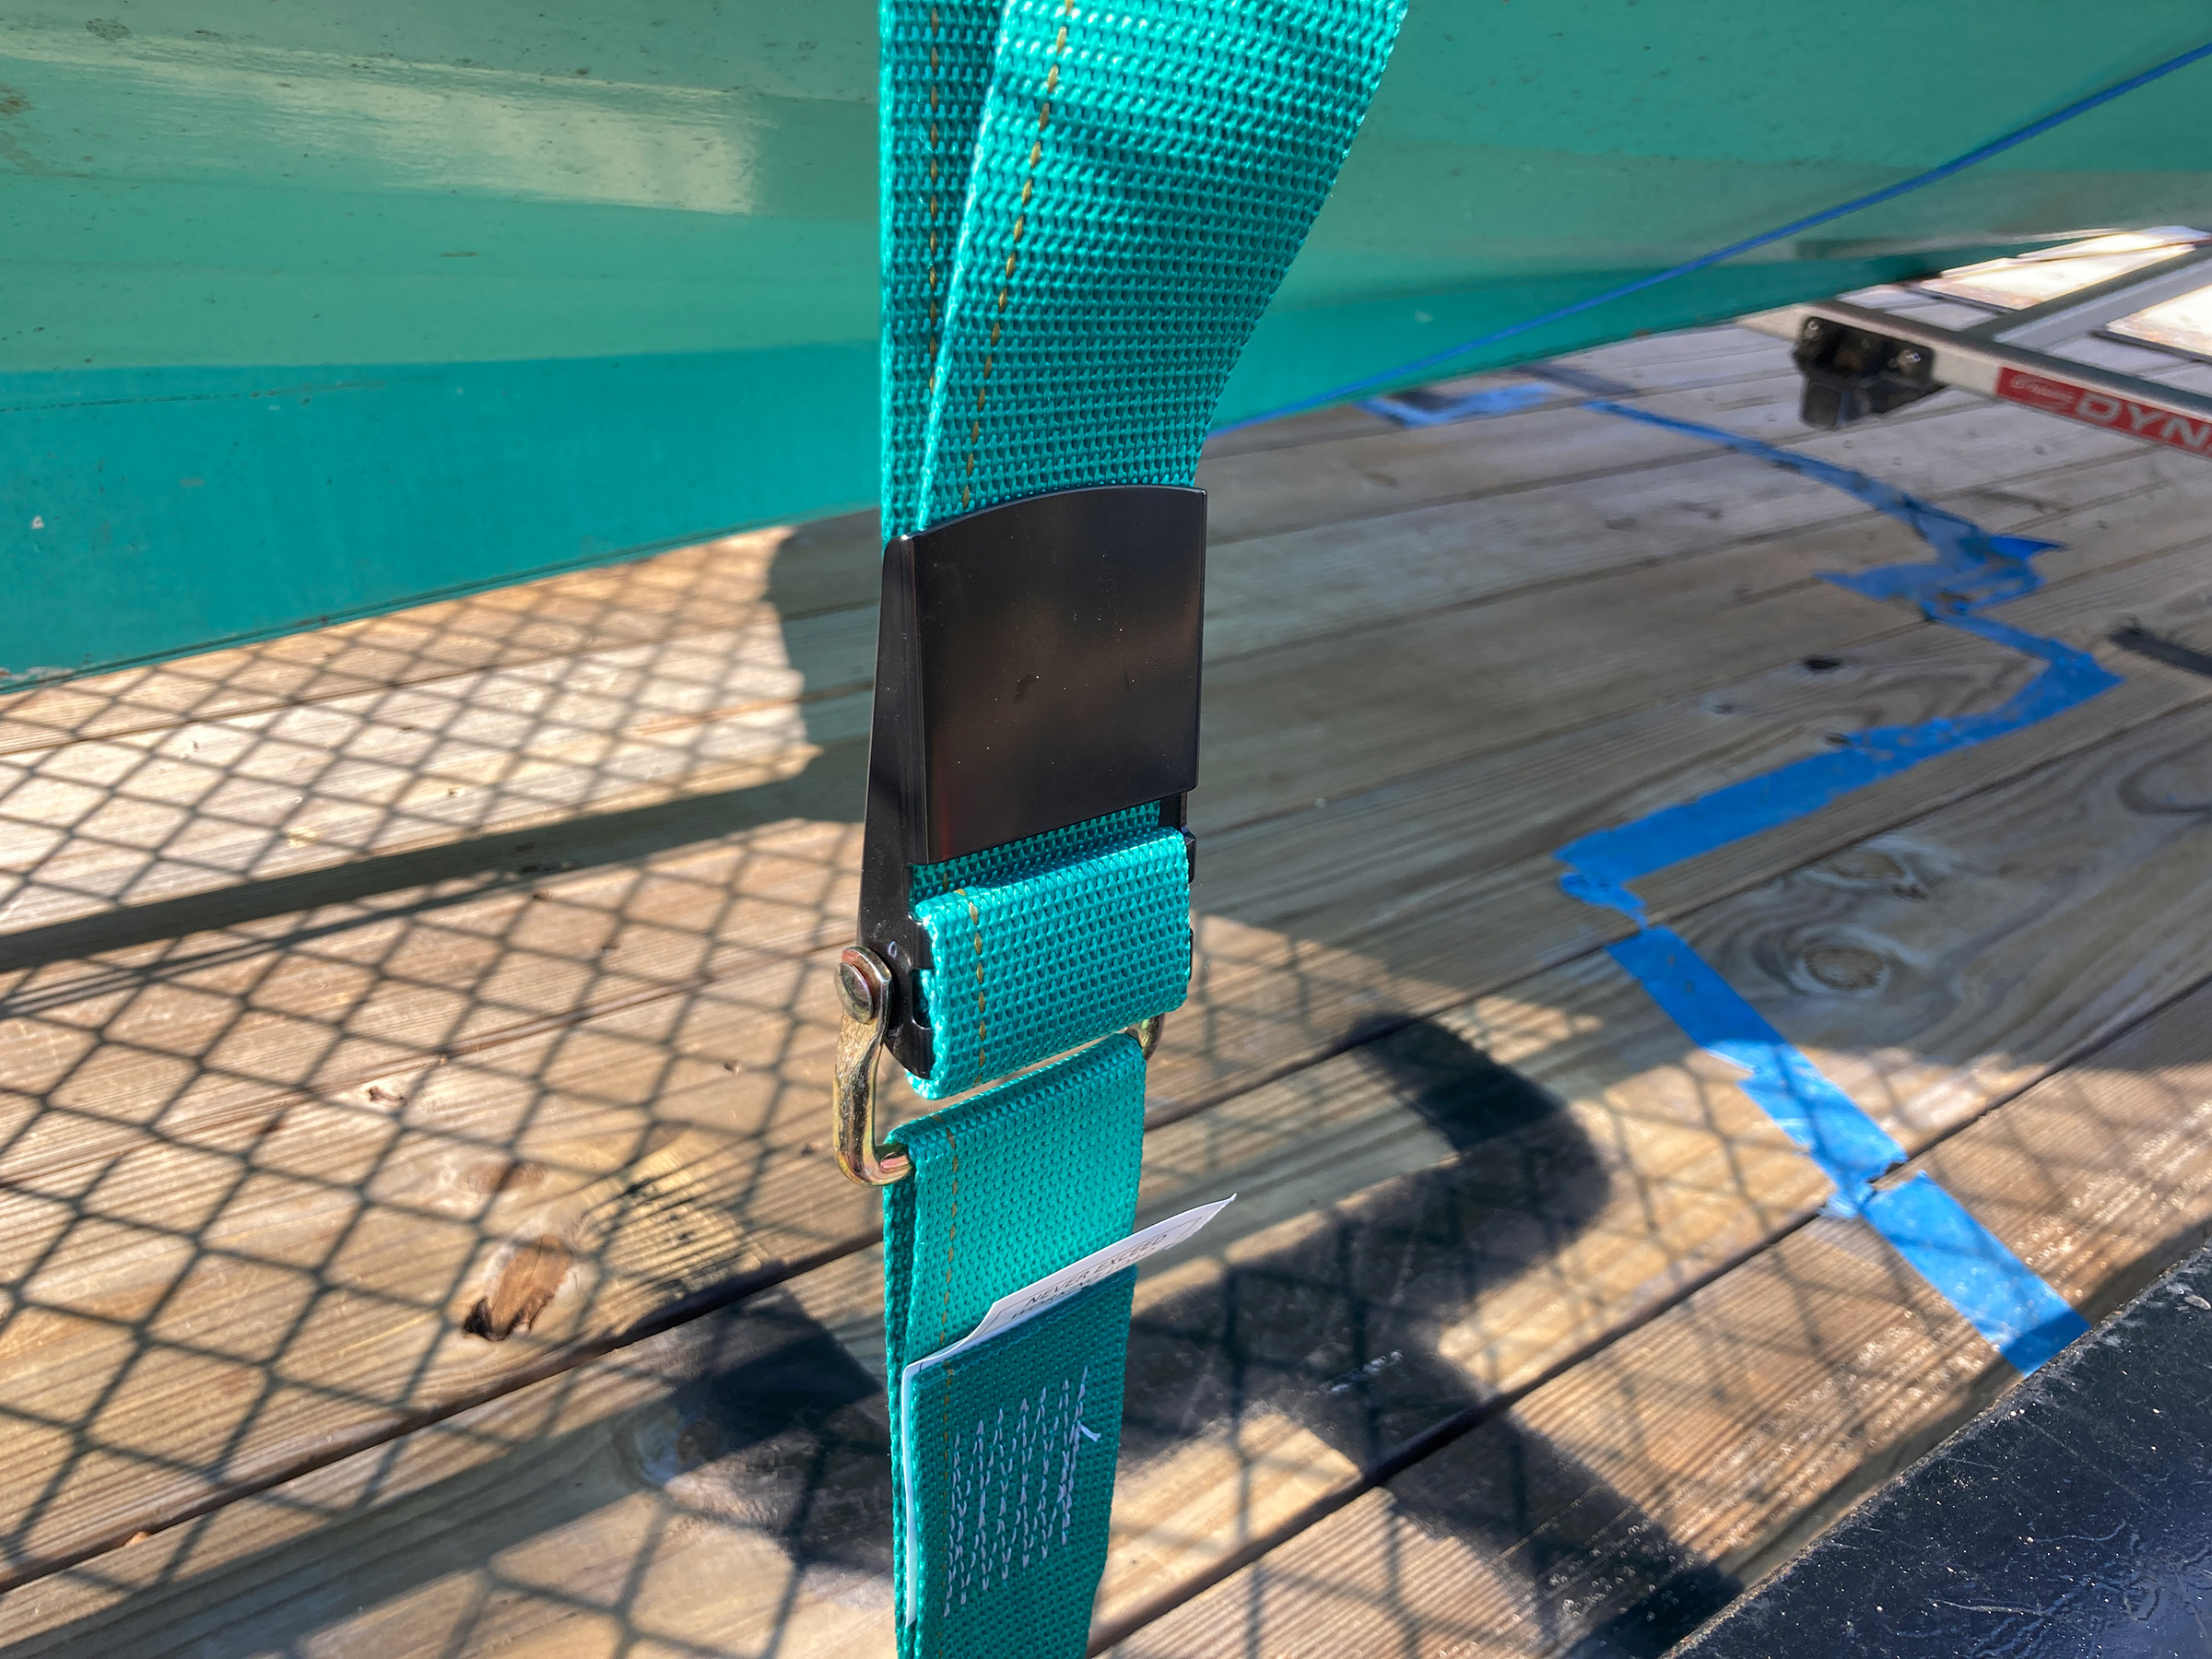
The problems caused by improper trailer arrangements can be magnified when coupled with ratchet straps. These straps are convenient and easy, but also powerful enough to split a plank. Use them with caution. I prefer using rope and a trucker’s hitch; this provides adequate pressure for keeping the boat from moving during transit. With the weight centered on the trailer, and with the trailer winch holding your boat forward, your strap should be tightened only enough to keep the boat and trailer together, to prevent bumps in the road from doing any harm. If your boat has a drain plug and is stored outdoors on a trailer, pitch the hull so the plug is at the low point and any water will run out if your cover leaks.
KATE MCMILLAN/JAN ADKINS
Trailers equipped with rollers to support a boat’s bilges are fine for many fiberglass boats, but can cause plank-damaging point-loading on wooden hulls.
KATE MCMILLAN
Carpeted wooden bunks provide support all along the length of the bilges, while regularly spaced blocking or rollers support most of the boat’s weight along the keel.
10. Improper storage
Before the boat is put away for the winter, it should be thoroughly hosed off with fresh water and all surfaces allowed to dry. Salt draws moisture which, due to decreased airflow and sunlight, invariably grows mildew during storage. Also, I have seen a fair bit of animal damage to wooden boats by porcupines and squirrels attracted to a salt lick. With this cleanup accomplished, keep in mind these four aspects of storage that promote a wooden boat’s good health: support, shelter, ventilation, and humidity. Ignoring any of these items can lead to damage.
KATE MCMILLAN
Proper on-land storage includes adequate support, shelter, ventilation, and humidity.
Support
As with trailering, a boat that’s improperly supported on land is likely to go out of shape. If it has long overhangs, gravity will attack those first. Jackstands, shores, or some other sort of prop underneath the bow and stern will minimize their tendency to droop. If weight is concentrated on the stands rather than along the keel, the hull is likely to deflect in those areas, damaging planking and frames. As with trailering, the first step to properly storing your boat is to concentrate its weight along the centerline, typically on blocking.
When a boat does start to go out of shape, its seams can open up. When they do, an unsuspecting owner might be tempted to drive caulking into those seams when light shines through them. Caulking helps a boat hold its shape, and so this added caulking only reinforces the damage caused by poor support.
Shelter
The goal of sheltering your boat is to keep rainwater out of the bilge and to keep it from drying out too much in the wind and sun. Rainwater will either promote rot or, if it freezes, will expand and damage the planking. Wind dries wood the same way it causes chapped lips. Sun drives moisture out of planking and hull timbers. A good shelter helps keep the boat swelled tight by maintaining adequate humidity.
Shelter options range from purpose-built boathouses to humble tarps; the choice depends upon the size of your boat, your environment, and your budget. A dirt-floored shed provides the best storage for the least annual effort, as it tends to naturally regulate ambient humidity. A canvas cover, however, drawn down over the topsides, also can do a fine job of protecting a boat: the fibers of such covers tend to swell during rain to shed water, and their shrinkage in dry times permits healthy ventilation. Shrink-wrap, often considered the bane of wooden boats, can actually be a good option, too, as long as it’s adequately ventilated and carefully blocked away from the hull to avoid sealing in moisture.
No matter what you build for shelter, or where you store your boat, the focus should be on keeping a balance of moisture both inside and outside of the hull. A dirt floor is a good place to start as it typically stays damp. If you have a wooden floor—or in the worst case, concrete, which draws moisture from the air—you may have to supply moisture at some point if you want to keep your boat from drying excessively.
Ventilation
Air must circulate around and within a stored boat. On the interior, it’s best to pull up a few floorboards, and to leave drawers and locker doors open in order to promote airflow. Having the hull sit in the dirt or wet grass will promote rot. So, in addition to providing support, keel blocking allows airflow. Use blocks, sawhorses, or whatever is appropriate to your situation to get the hull off the ground.
Humidity
A stored boat requires a balance of fresh air and consistent humidity. One strategy to ensure that the wood holds its moisture is to do some painting before the cold weather sets in. In New England, it is common to do all maintenance in the spring. But if the base coats on both the topsides and bottom are solid all winter, and the interior is humid but exchanging air every so often, a boat might just require only a spring touch-up instead of an extreme makeover each season.
Humidity can be maintained if necessary with plastic drapes tenting the boat from the toerails or waterline down to the floor, perhaps with humidistat-controlled humidifiers or even buckets of water placed strategically around the tented-off area beneath the boat.
Darin Carlucci teaches sailing, building, and restoration at The Carpenter’s Boat Shop in Pemaquid, Maine. He and his wife, Serafina, are raising two girls, and he is also busy building a house for his family.
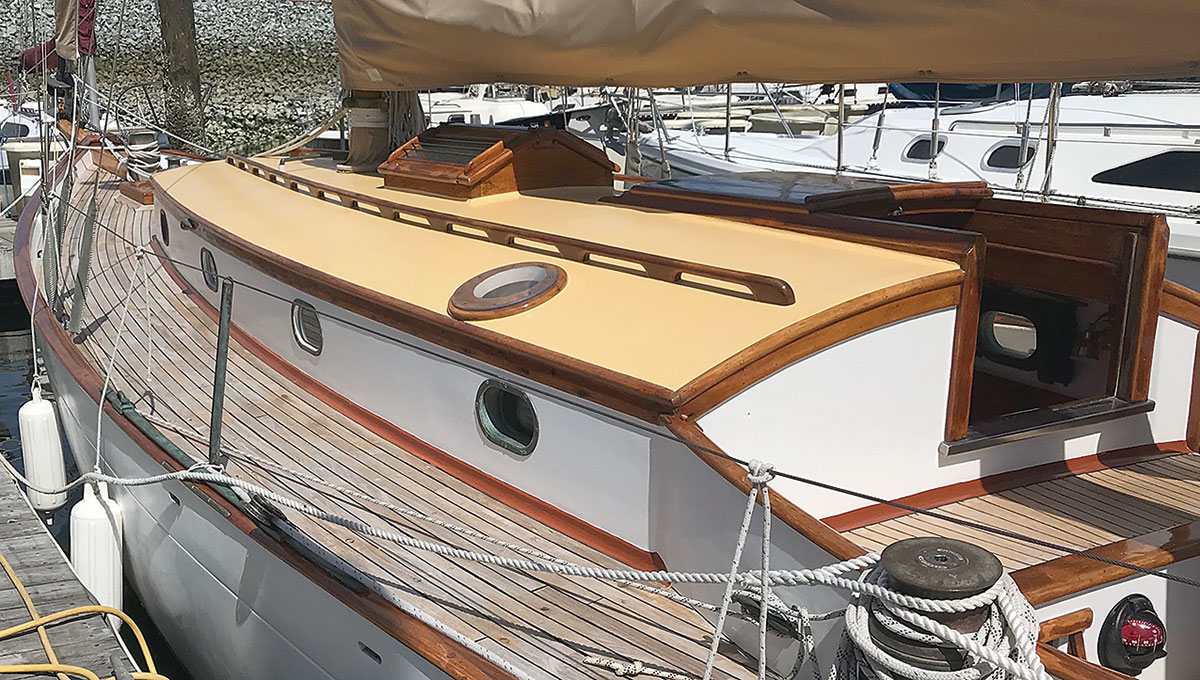
Many years ago, one of the big varnish manufacturers had a regular advertisement showing a cowering boat owner eyeing a brightwork project with a feigned expression of terror, and saying “Vvvvvvvvarnish?” Such fear is a common sentiment among would-be and occasional varnishers, and for good reason: Varnish provides excellent protection while showing the beauty of the wood, but it takes a consistent commitment of time and skill each year to maintain it. And achieving a good bright (aka varnished) finish in the first place requires careful surface preparation and application.
There are myriad pitfalls that can compromise the job along the way, and a lack of maintenance during the season can ruin a fine job. Paint, frankly, is a better option for those who lack the time or inclination to maintain varnish. Indeed, vast expanses of paint (cabinsides, for example) accented by bright trim will look much better than poorly maintained varnish. Varnish, however, is not only rewarding aesthetically; because it’s transparent, it also can reveal potential areas of rot that show up early as dark, discolored spots before they become a serious problem.
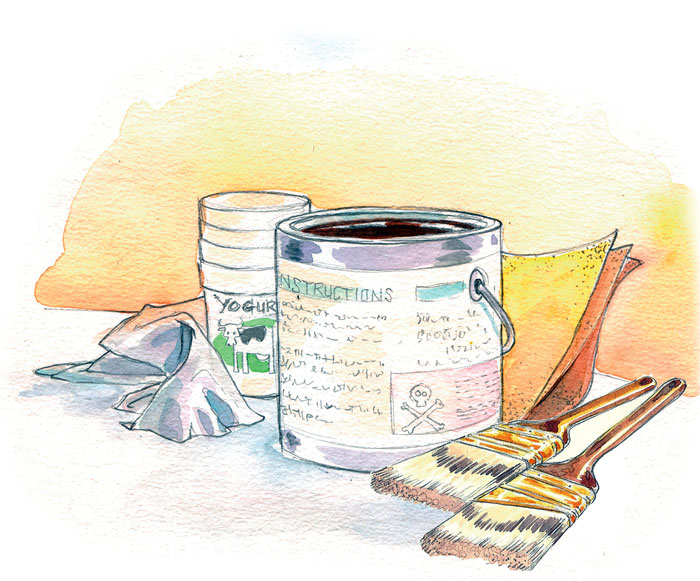
Simon Adams
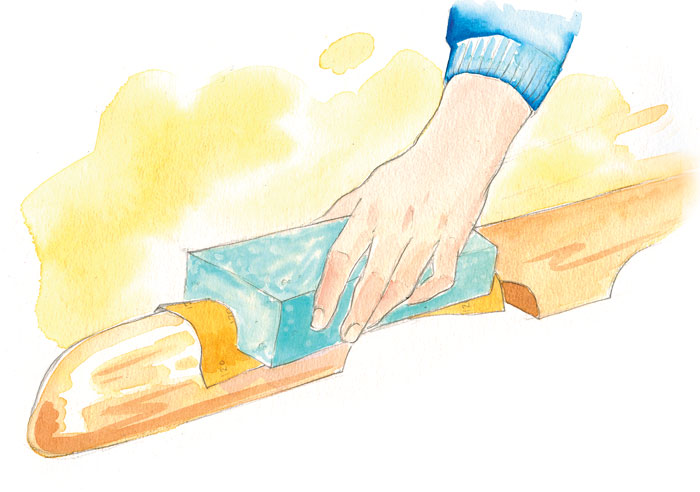
A block of foam insulation can be shaped to a contoured surface to create a custom sanding block.
Some great books and articles have been written on the topic of varnishing (see Further Reading at the end of this article). For those seeking a more succinct lesson than those tomes provide, all major varnish brands include on their labels a concise set of instructions. I’d wager that that’s where most of us take our initial varnishing advice. Yet, due to the space constraints of the can, these instructions are typically printed in a barely legible type size, and they leave some room for interpretation—especially for the first-time varnisher.
So, the goal of this article is to interpret the varnish can—to give a bit more depth to those instructions, without writing a book. A can might say to remove all dust. We’ll look at how we do that, and the other basics of varnishing, leaving aside tangential concepts such as two-pack systems, spray application, wood staining, and stripping of old finishes.
All labels will tell you the wood must be clean and dry before varnishing. But there are a few other considerations, too. Painters and varnishers have an old adage: “It’s 90 percent prep work.” Divots and unevenness in the surface will telegraph into the finish coat, so be sure to get your bare-wood surface as smooth and scratch-free as you’d like it to be when finished. If you can live with raised and uneven grain, then a thorough sanding is all it takes. But if you’d like a mirror-smooth finish, now is the time to begin working toward that.
Large, flat surfaces such as transoms and cabinsides can be sanded with sticky-back sandpaper, which comes in a roll, mounted on a hard-rubber sanding block. Alternatively, the surface may be scraped smooth with a cabinet scraper—essentially, a small rectangle of thin tool steel with a uniform burr worked into its cutting edge; when drawn across the wood surface, the cabinet scraper raises the finest of shavings. Rounded and faceted surfaces may be hand-sanded without a backing block, but achieving consistent contact between the paper and the surface can be challenging in this scenario. A better approach is to create a custom backing block from blue foam insulation. To do this, cut off a block of foam of appropriate size, form a piece of 80-grit sandpaper over the surface to be sanded, with the grit side facing out, and rub the foam block back and forth over it until the shape is transferred to the foam. You now have a shaped block to which you can apply your paper. This works especially well on long, straight facets and rounds, such as handrails, railcaps, and half-round trim.
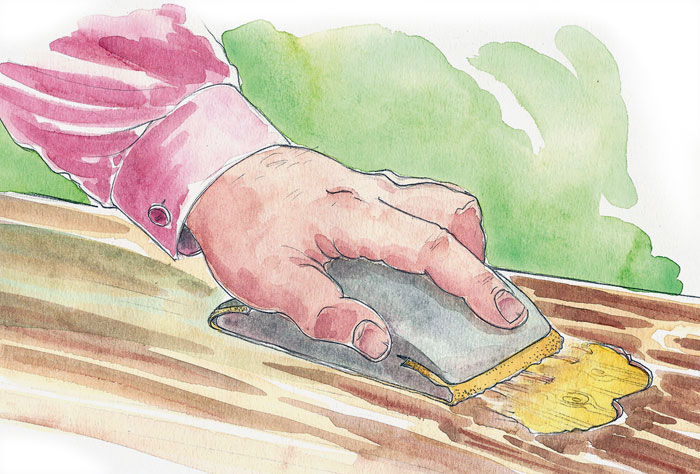
Simon Adams
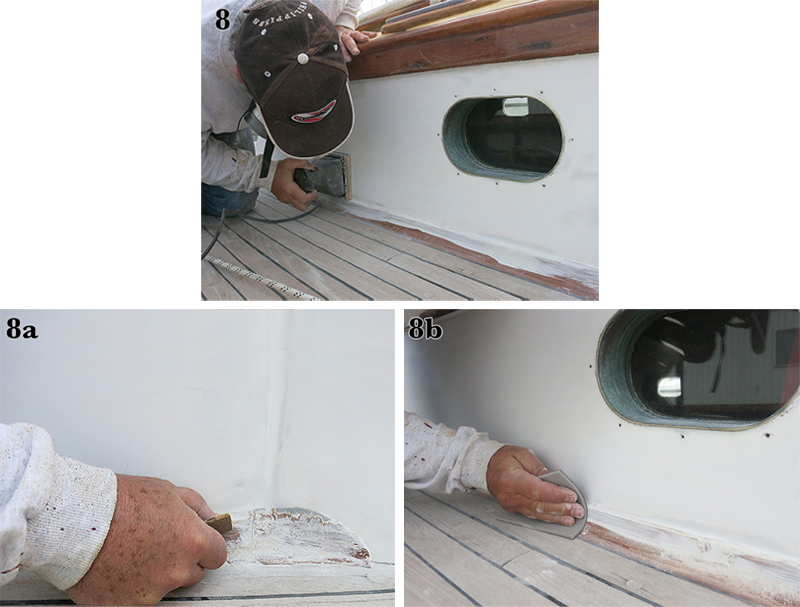
Blisters in a varnished surface must be scraped away. The hard edges of the resulting craters must then be sanded flat before the crater is built up with new varnish. Use a backing block here; don’t create a divot by focusing your sanding efforts on the bare wood.
A quick survey of varnish labels reveals strong disagreement over what grit of sandpaper to use before the all-important first sealer coat is applied. One can I looked at specifies using 80-grit on bare wood, while another says 120. And still another recommends 180–320-grit paper. The theory of the coarser grits is that they’ll give the varnish more “tooth,” or mechanical adhesion. Lower-density woods will easily soak in the initial coat of varnish, so a finer grit is a good choice here; denser woods may require a coarser initial sanding, so extra care must be taken to sand with the grain to mask the scratches, because a fine finish requires no visible scratches in the bare wood. For most wood species, 180-grit is a good choice. The sealer coat (which we’ll cover shortly), if thinned properly, will penetrate the wood’s surface to give adequate mechanical adhesion.
Preparing Previously Varnished Surfaces
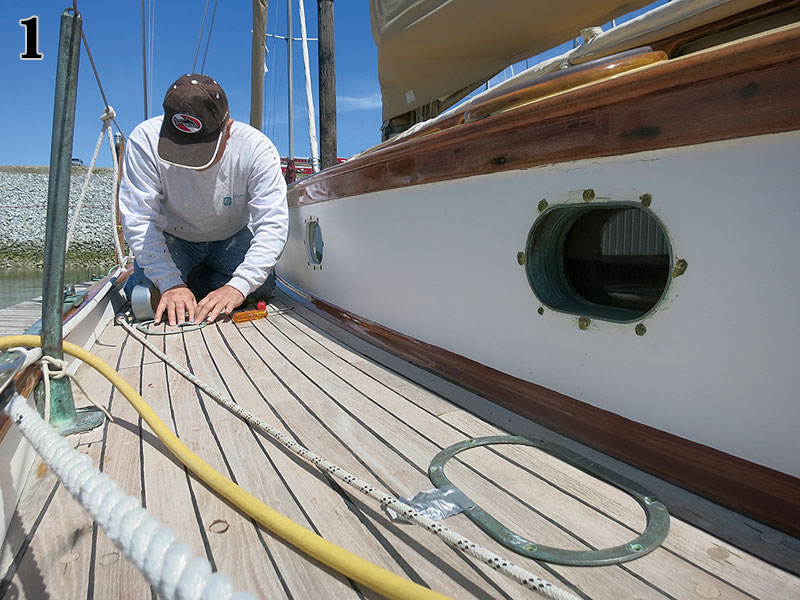
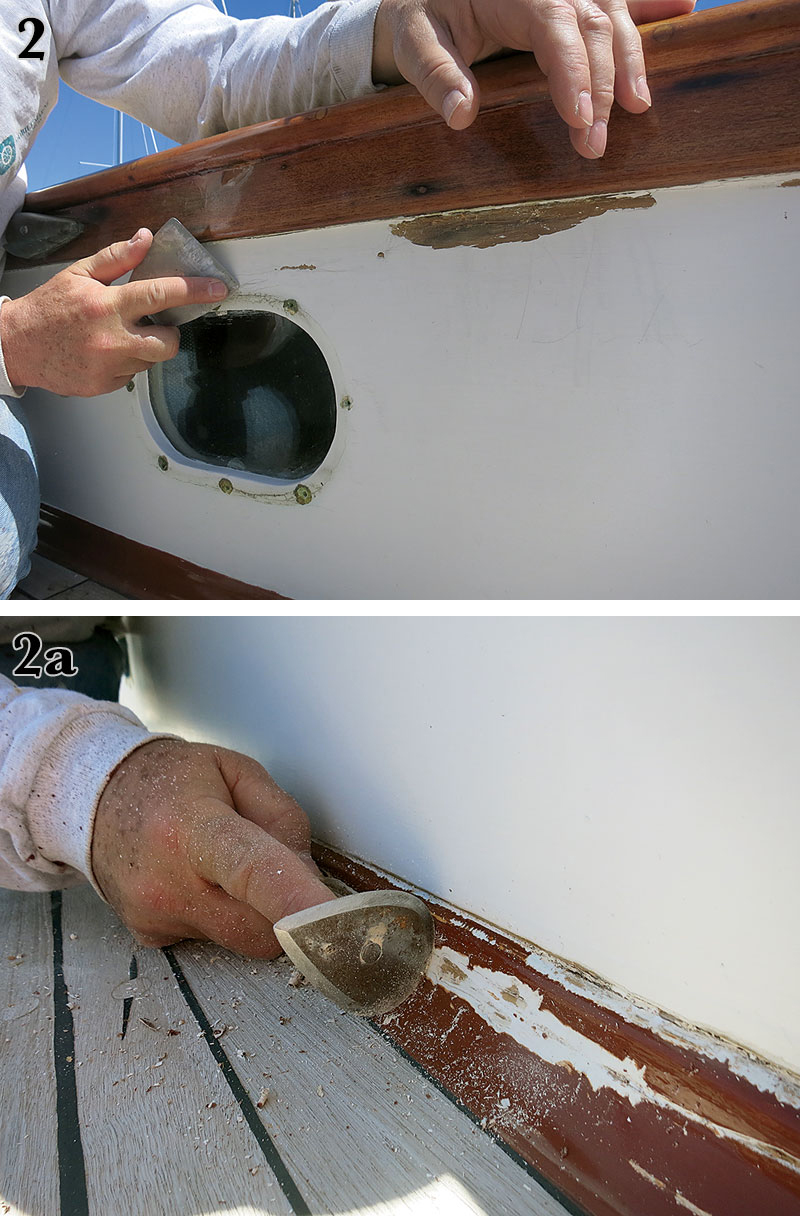
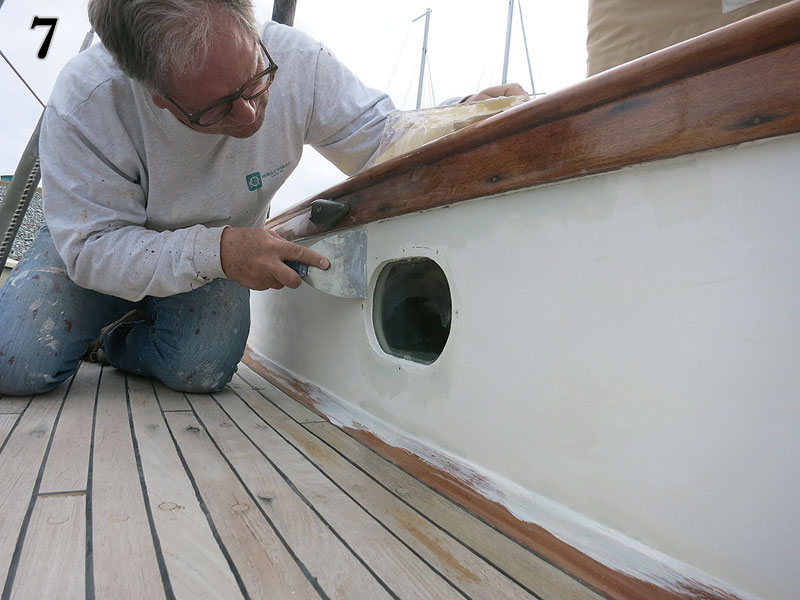
If your task is to apply a maintenance coat or two to an intact finish, rather than to varnish bare wood, then you must first clean the entire surface of grit and dirt, and then sand it with fine-grit paper; 220–320 grit is the right choice for this. But before you get started on that task, you should survey the surface for yellow blisters. These telltale marks show where the varnish has separated from the wood, and they must be carefully scraped away to bare wood before sanding can proceed. (If the surface is littered with these blisters, or if the majority of the finish is peeling, then you must strip the entire piece to bare wood—a process we won’t cover here.) A 1″ hook scraper, filed sharp, is the ideal tool for scraping away small blisters. It’ll dull quickly as you use it, so keep a file handy, and sharpen the scraper’s blade as soon as it can no longer remove fine ribbons of varnish—which will be fairly often if you’re scraping frequently. Don’t do this sharpening on deck; the fine steel dust will rust and make a mess.
If you’re scraping bare spots in a finish that’s been stained, then you have another challenge ahead: These bare spots must either be restained to match the surrounding finish, or you must live with the contrasting patches. Likewise, scraped patches in unstained mahogany are likely to contrast at first with the surrounding finish, though they’ll blend in as the finish ages. On the other hand, if you’re working on teak, you’ll find that scraped bare spots blend beautifully and immediately with the surrounding finish.
Scraped bare spots must have their edges “feathered”—the hard transition from bare wood to varnish must be sloped by careful sanding. The goal here is to gradually thin the varnish around the edges of the crater, but to not remove wood. A sanding block is recommended, and careful use of a scraper can speed things up. With the scraping and sanding done, it’s time to apply a sealer coat to the bare spots—to “spot-prime” them—and then to apply three or more “build coats” to these spots (see application instructions, below).
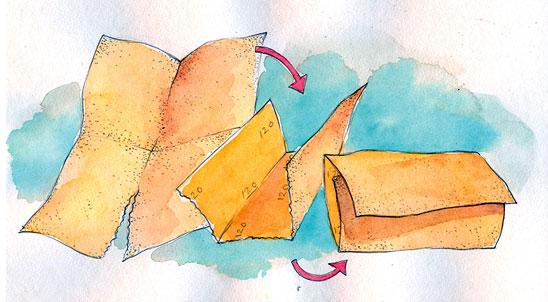
Folding Sheet Sandpaper
For sanding long pieces of trim, handrails, spars, oars, and such, you’ll likely be using 9″ × 11″ sheets of paper. These should be folded and then cut into quarters. These quarters are then folded in thirds, as shown in the photograph, so that none of the grit surfaces touch. When one surface becomes clogged and no longer cuts, flip the paper over for a fresh surface. When that one is clogged, unfold and refold the paper to expose the final unused surface. This can also be done with half sheets—though for surfaces typically requiring pieces this large, you’ll likely want a sanding block.
Simon Adams
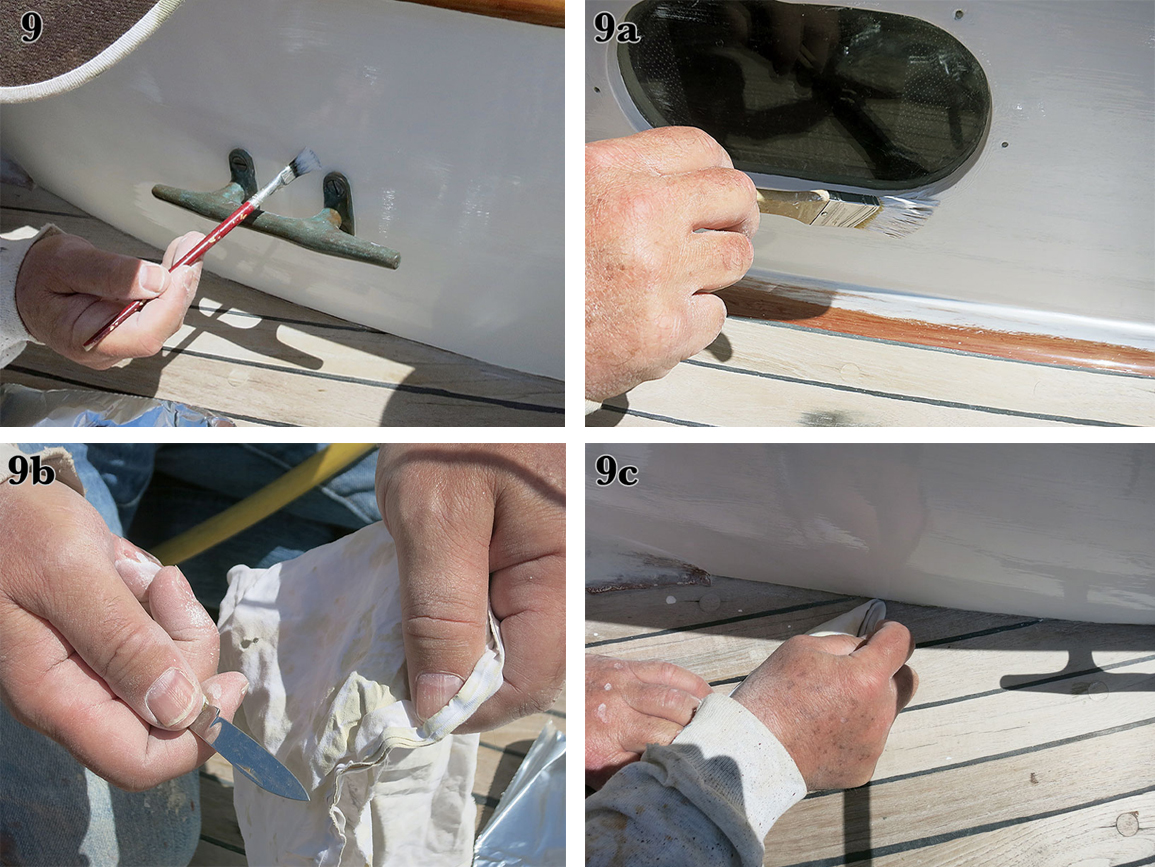
Sanding between coats creates dust; clean it up with this three step process: (1) vacuum, (2) wipe down with solvent, and (3) wipe with a clean tack cloth.
Sanding and Dust Removal
With scraping and spot-priming out of the way (if you had to do it at all), it’s time to sand the entire surface. This is a step that often befuddles the novice varnisher: The goal, after all, is to build up a thick coat of varnish on the wood. This must be accomplished by applying multiple coats, and you must sand between these coats, typically, to get the later coat to adhere to the earlier one. But in the process of doing this, you want to sand away as little of the previous coat as possible. A light touch and a fine grit are required for this task. If the finish is in great shape, then use 320. If it’s beat up or requires some leveling, then use 220.
There are two exceptions to this sanding-between-coats rule. The first is a technique called “hot-coating,” whereby a subsequent coat is applied to one that’s not yet fully cured, so the two actually melt together, chemically. If you’re new to varnishing, then I suggest you stick to the tried-and-true methods outlined here, and not be lulled by the promise of less sanding. The second exception involves wood coatings specifically formulated for no sanding between coats. They save the time of sanding. And they save material, as there’s no specter of sanding away the previous coat. Sanding between coats, however, has the incidental benefit of dulling the previous coat, giving a nice sharp contrast between varnished and unvarnished areas when you’re actually applying the stuff. Unless the light is just right, you can’t always see where you’ve been when you don’t sand between coats, and thus you risk “holidays” in your finish (see “Applying the Varnish,” below). The other drawback of not sanding between coats is that you lose the chance to eliminate the previous coat’s imperfections. Sags, dust, bugs, lint, unevenness, and other sins are repaired or eliminated with each successive sanding. My caveats notwithstanding, not sanding between coats is a significant time-saver, and once you’ve mastered the art of basic varnishing, it might prove worthwhile to look into these no-sanding-required formulations.
Simon Adams
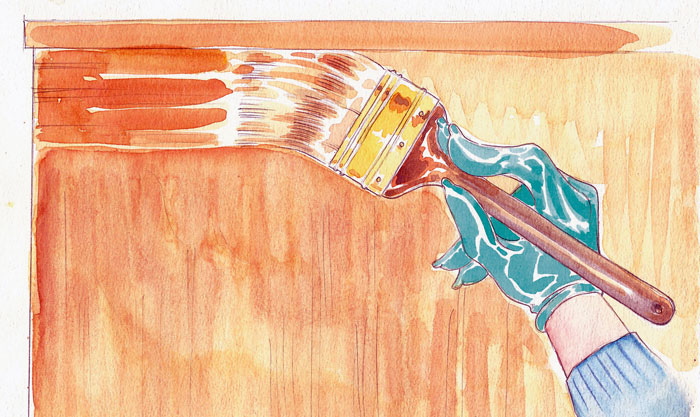
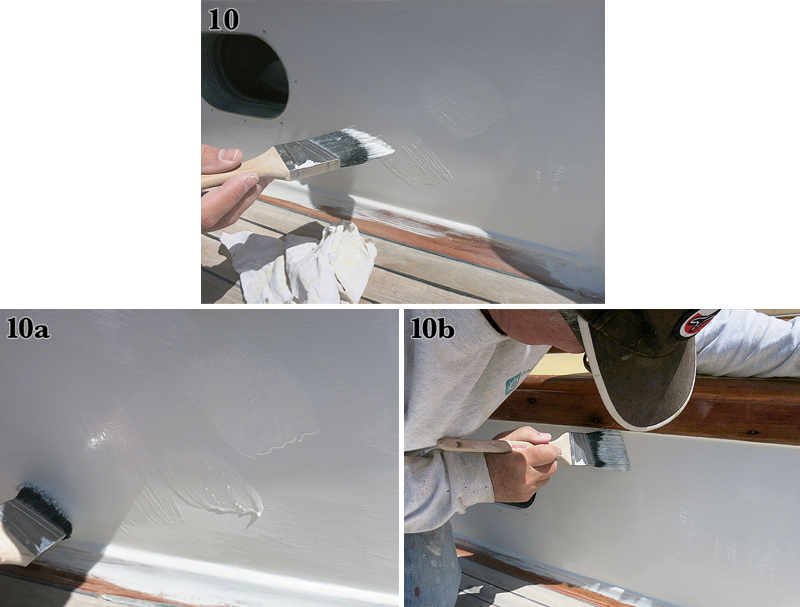
Apply varnish by first brushing it on vertically, and then drawing it out horizontally with long, even strokes. Don’t overwork it in an attempt to make it mirror-smooth; trust that it will level out before it cures.
It seems antithetical to do all of that sanding, and then to be instructed to apply varnish only to a surface that’s clean and free of dust. But take heart: There’s an established protocol for removing dust from a surface. First, vacuum as much of it away as you can, using a clean brush attachment on your shop vacuum. If working outside, you can use compressed air to blow off the dust. Second, wipe down the surface with a rag that’s been dampened—not soaked—with paint thinner or some other solvent that won’t leave a residue. The rag itself should be clean and free of lint. The third and final step is to wipe the entire surface with a painter’s tack cloth.
Applying the Varnish
The man who taught me how to varnish had a rule regarding time of day: He’d never begin applying varnish outside after about 2 p.m. on a summer day. Why? Because humidity on uncured varnish will dull and cloud the finished product. I had this lesson driven home the hard way several years ago when, pressed by schedule to get a coat of varnish on my mast, I did the job after work, at 5 p.m. I knew better, but I guess I thought I was invincible. Within a few hours, the dew dropped on the partially dry varnish, and the next morning the finish on the “up” surface of the mast was cloudy, dull, and textured, while the down side was clear and shiny. Cool, dry weather—classic New England fall conditions—is best, as the varnish has a chance to level out before it cures. In fact, getting your varnish done in autumn is a great way to manage your varnish maintenance, as you’ll feel like a genius for having it out of the way come the press of spring and the promise of boating weather. One word of warning on this: The short, cool days of fall typically require an indoor workspace, because the dew dries late in the day and falls early in the evening.
The first coat on bare wood is the sealer, which should be thinned adequately enough to allow it to seep into the wood before it cures. When it dries, the sealer should all but disappear into the wood; there should be no ambition to achieve a heavy gloss finish at this stage. Thinning is typically specified as a percentage of the varnish in your pot, and the range specified by manufacturers varies depending upon the viscosity of the varnish. One brand of thick-bodied varnish calls for 50 percent thinning for sealing purposes; less viscous, more forgiving varnishes are generally thinned only 10 percent.
Don’t varnish straight out of the can. Instead, pour your varnish through a medium or fine paint strainer into a clean container. This filtering step is especially important if you’re using a previously opened can, because globs of cured varnish can inhabit the rim and find their way into your finish.
Once the sealer coat has dried, it’s time to scuff it with 220-grit paper—just enough to knock down any hardened fuzz on the surface, and to dull the shine, if there is any. With this done, wipe down the surface with thinner applied to a clean lint-free rag, follow with a tack cloth, and apply the next coat. Some manufacturers will recommend that this next coat be thinned by 25 percent, while others will counsel full-strength varnish at this stage. Again, your best bet is to follow the can’s instructions.
The ideal is to not thin your varnish at all for the subsequent buildup coats, but the reality is that your brush will drag after a while on hot days or on long jobs as the solvent in the varnish flashes off. A fraction of a capful of proprietary thinner should thus be added occasionally, to make the varnish flow properly.
Good brushing technique is a matter of experience and concentration. I have good days and bad days applying varnish, probably because I do it only a few times a year. Here are some of my common pitfalls, and how I’ve come to avoid them:
Sags—It’s incredibly disappointing to look back at a surface that was varnished only five minutes ago, and to see an unfixable sag propagating down it. Varnish, you see, has a short window during which it can be worked. Once it starts to set up—to skin over—further brushing will only make it worse. Let’s consider varnishing a sailboat’s cabinsides: I like to apply the varnish in adjacent vertical bands and, once the brush has been emptied of varnish, to brush these out horizontally. This technique “meters” the varnish consistently, and avoids great sags in the middle of the surface. The place I always get into trouble when doing my cabinsides is under the half-round trim that defines the top edge of the cabin. Varnish loads up under there, and no matter how carefully I inspect the area before moving on, it always seems to release a sag or two. To avoid this, I now mask the cabinsides and varnish the trim first, and then freehand the cabinsides once the trim cures. It takes a bit more time, and some tape, but the saved frustration is worth it. If you find a sag in a cured buildup coat, scrape it away carefully before sanding for the next coat.
Dust—This is a disappointing defect, too, though I must say that a small bit of dust in the varnish seems to disappear once the boat is in the water. Perhaps it’s that our focus shifts to other things once the season is underway, or we absorb the boat as a whole, rather than as a brightwork project. Anyhow, don’t despair if you get a bit of dust in your buildup coats. The time to really be attentive to this is when applying the top coat. Varnish on a still day, vacuum, wipe, and tack the surface carefully, even wet down the shed floor if your situation allows you to do so, and use a clean brush. If you still pick up some dust, remember: This is an ongoing process, year after year. There’ll be time for perfection next season.
Holidays—“Holiday,” as you likely know, is the painter’s affectionate term for places that didn’t receive finish, and should have. They are typically a mental concentration issue, though occasionally they may be the result of inadequate amount of varnish on the brush. Be aware of them. Avoid them. And know that you’ll get better at brushing the more you do it.
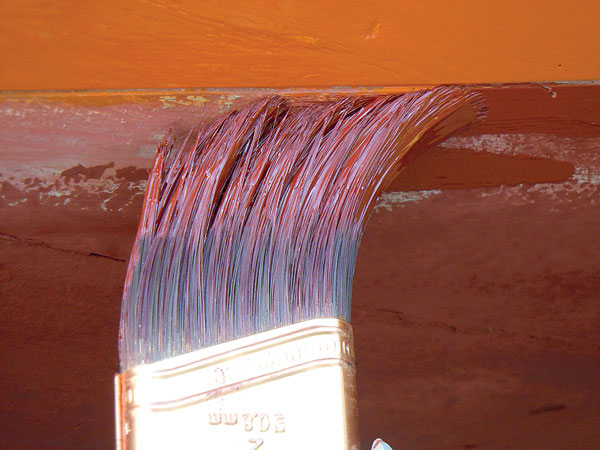
Brush marks—Brush marks are the result of one of two things: Either the varnish has been overworked to the point that it was curing while being brushed, or it was applied in short, choppy strokes that began in the “wet edge.” The wet edge is the “front,” if you will, of wet varnish that’s advancing along the unvarnished surface as you apply the finish. Always complete your brushstroke into this edge, rather than originating it there. And apply it in long strokes that unload the brush evenly. Short, choppy ones will pile up the varnish unevenly, possibly leading to sags. The idea is to spread a coat of uniform thickness, one that’s sufficiently thick to shine, but not so thick that it will sag. Whatever it takes to achieve this should be done: Speed of application, a good-sized badger-hair brush (1½″ or 2″), easily spread varnish (add retarder on warm days and accelerator on cold ones), and a “feel” for the process, all help.
People new to varnishing often balk at the idea of five to seven coats, thinking it an excessive amount. But that’s typically the minimum required to build up a good and durable varnish finish that will last all season—again, with sanding between each coat. You’ll know you’re sanding a fresh coat too soon if the varnish gums up your paper; you must wait to sand until the varnish doesn’t do this, but rather turns to fine dust. It takes one to two coats per year to then maintain a varnished finish in a temperate climate, and more in the tropics. A few months of neglect in hot summer sun will result in a dull finish, and a little more than that will often result in cracking in the surface, and eventual peeling.
Brushes: Bristle or Foam?
Badger-hair bristle brushes are the standard for serious varnishers. They are worth their cost, because they hold plenty of varnish and release it evenly and cleanly—that is, with minimal brush marks. With careful cleaning and storage, they can be used year after year. Cleaning typically requires three rinses in clean thinner, with a twirl in a paintbrush spinner between each rinse. Then they can be soaked in kerosene or diesel and spun out before being wrapped in a clean rag and hung from a hook for the season; to use them again, soak them in thinner to wash off the kerosene, spin them out, and they’re ready to go. Never store them in a can of thinner, because remnant varnish solids will settle to the bottom of the can, contaminating the brush.
Foam brushes are disposed of after use. Their downsides are: (1) They don’t hold as much varnish as a bristle brush, so they must be dipped more often and thus long, even strokes can be a challenge; (2) they lose their stiffness after a period of time; (3) they don’t work well cutting into tight spots; and (4) they add to the solid-waste stream. Nos. 1, 2, and 3 are generally considered to be acceptable trade-offs for small jobs, or in situations where prompt brush cleaning is challenging or impossible. The solid-waste issue must be balanced against the chemical-waste issue of cleaning brushes with solvent. Neither one is zero-impact.
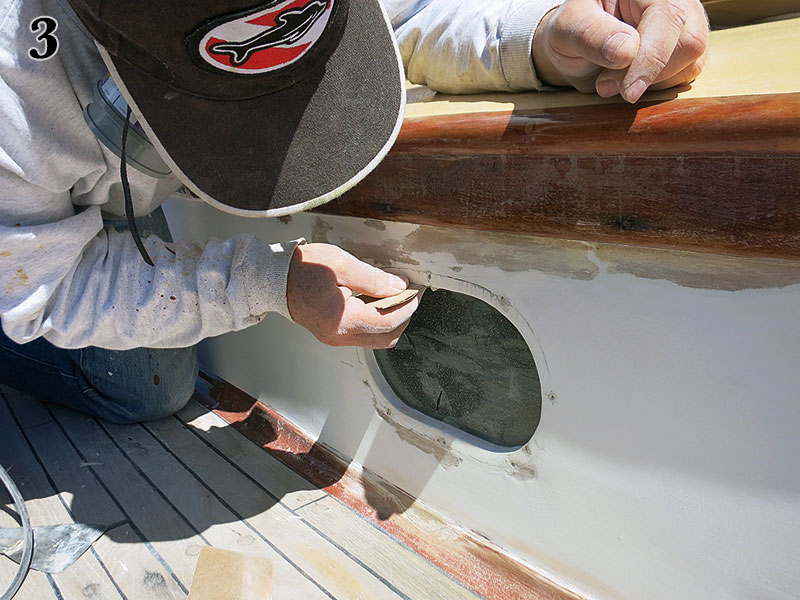
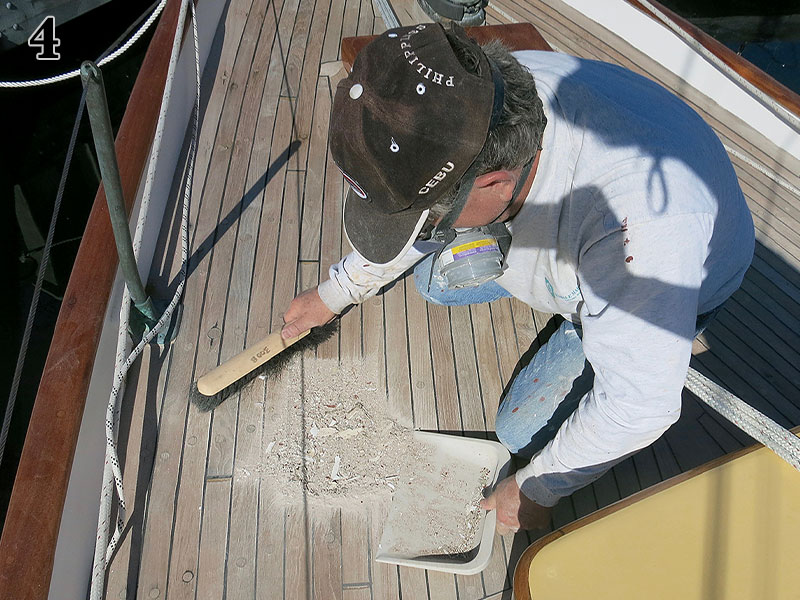
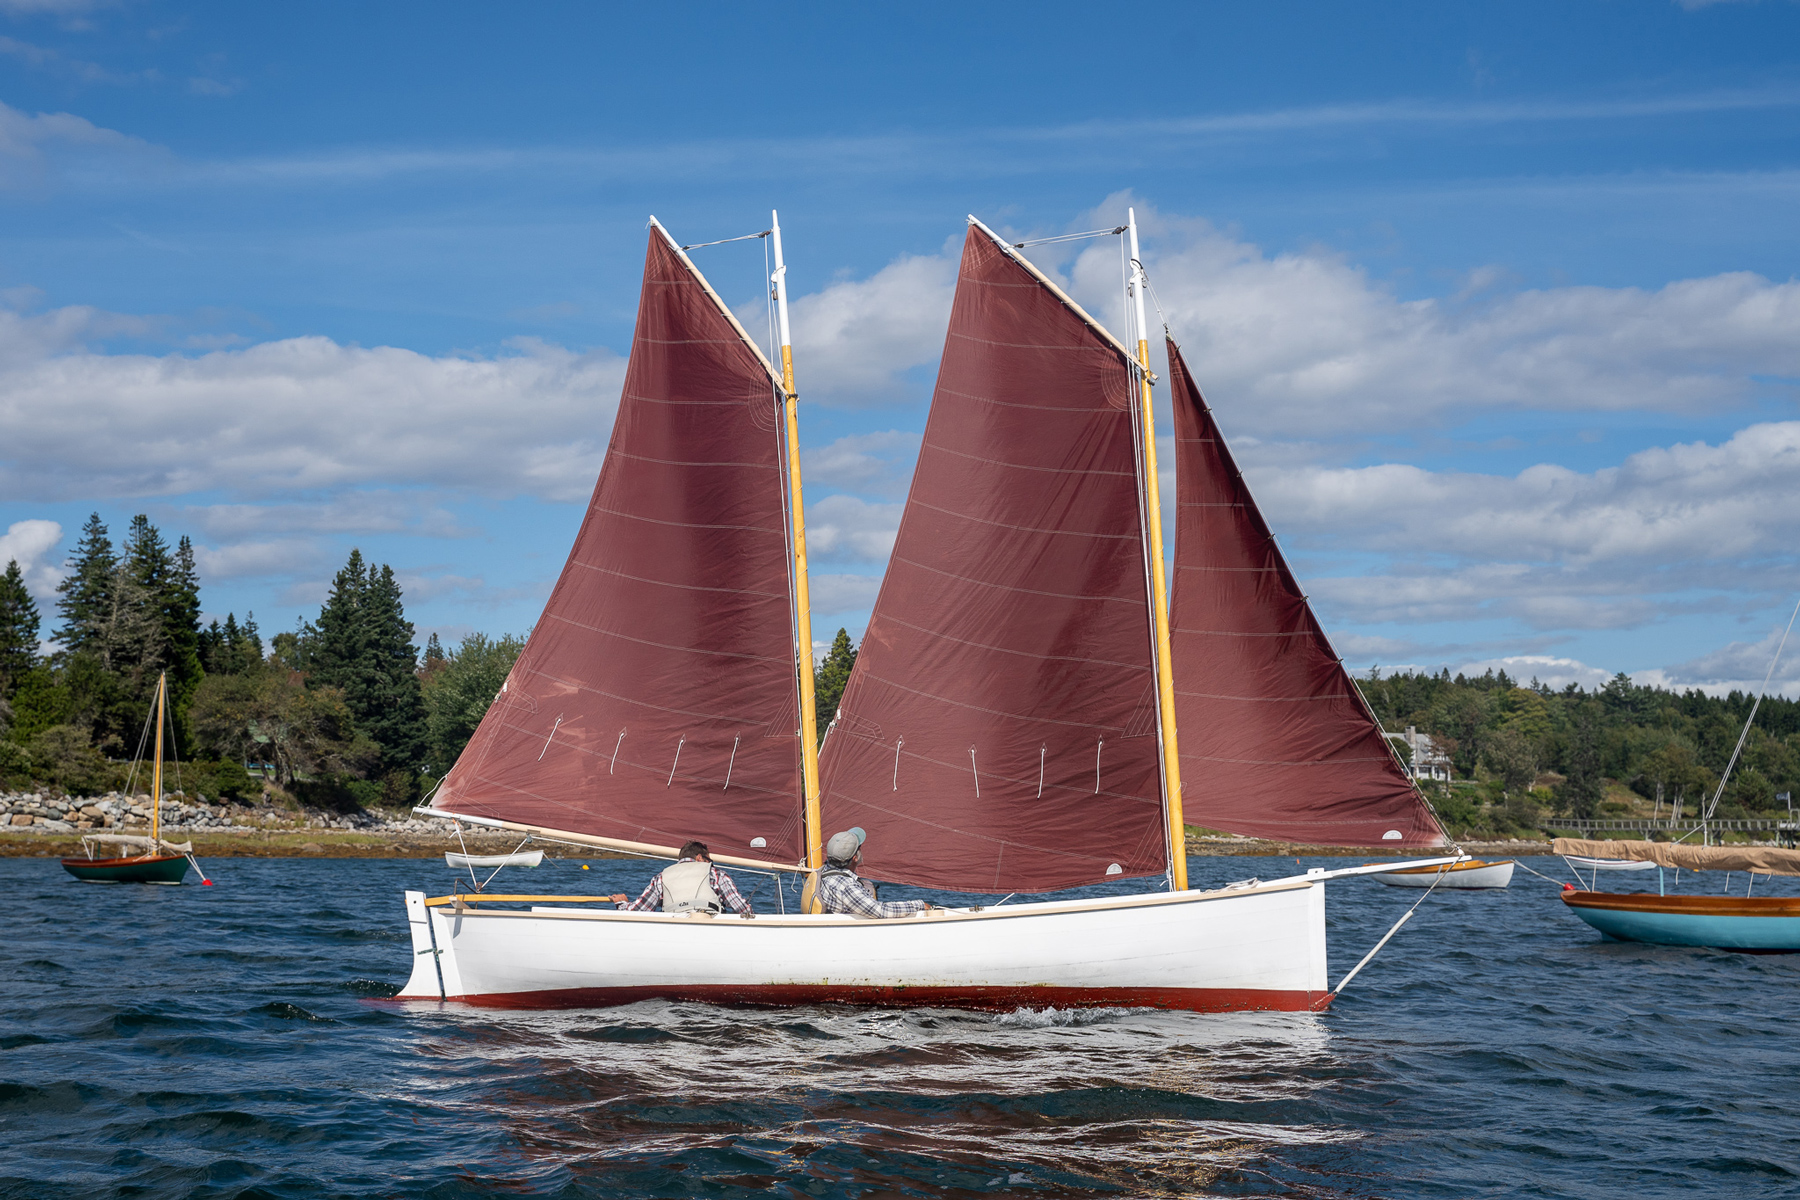
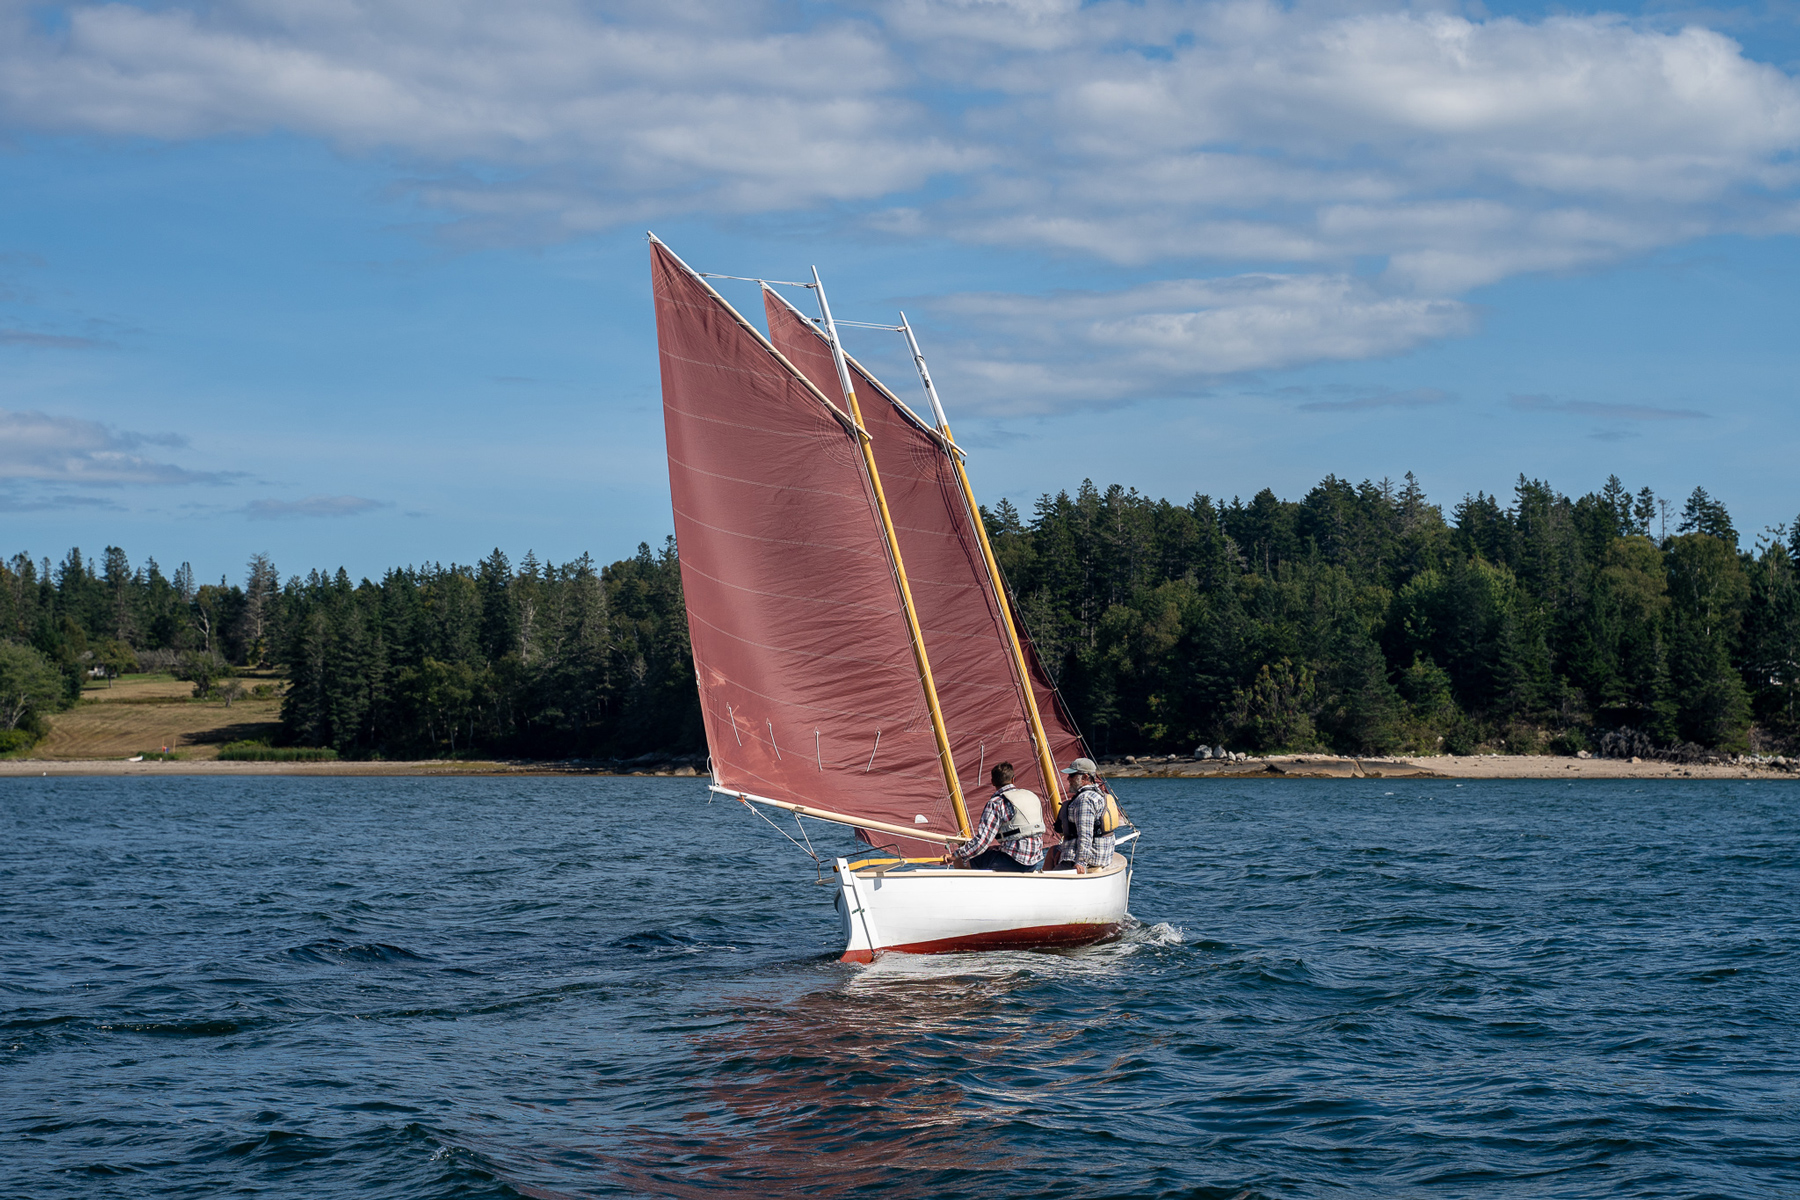
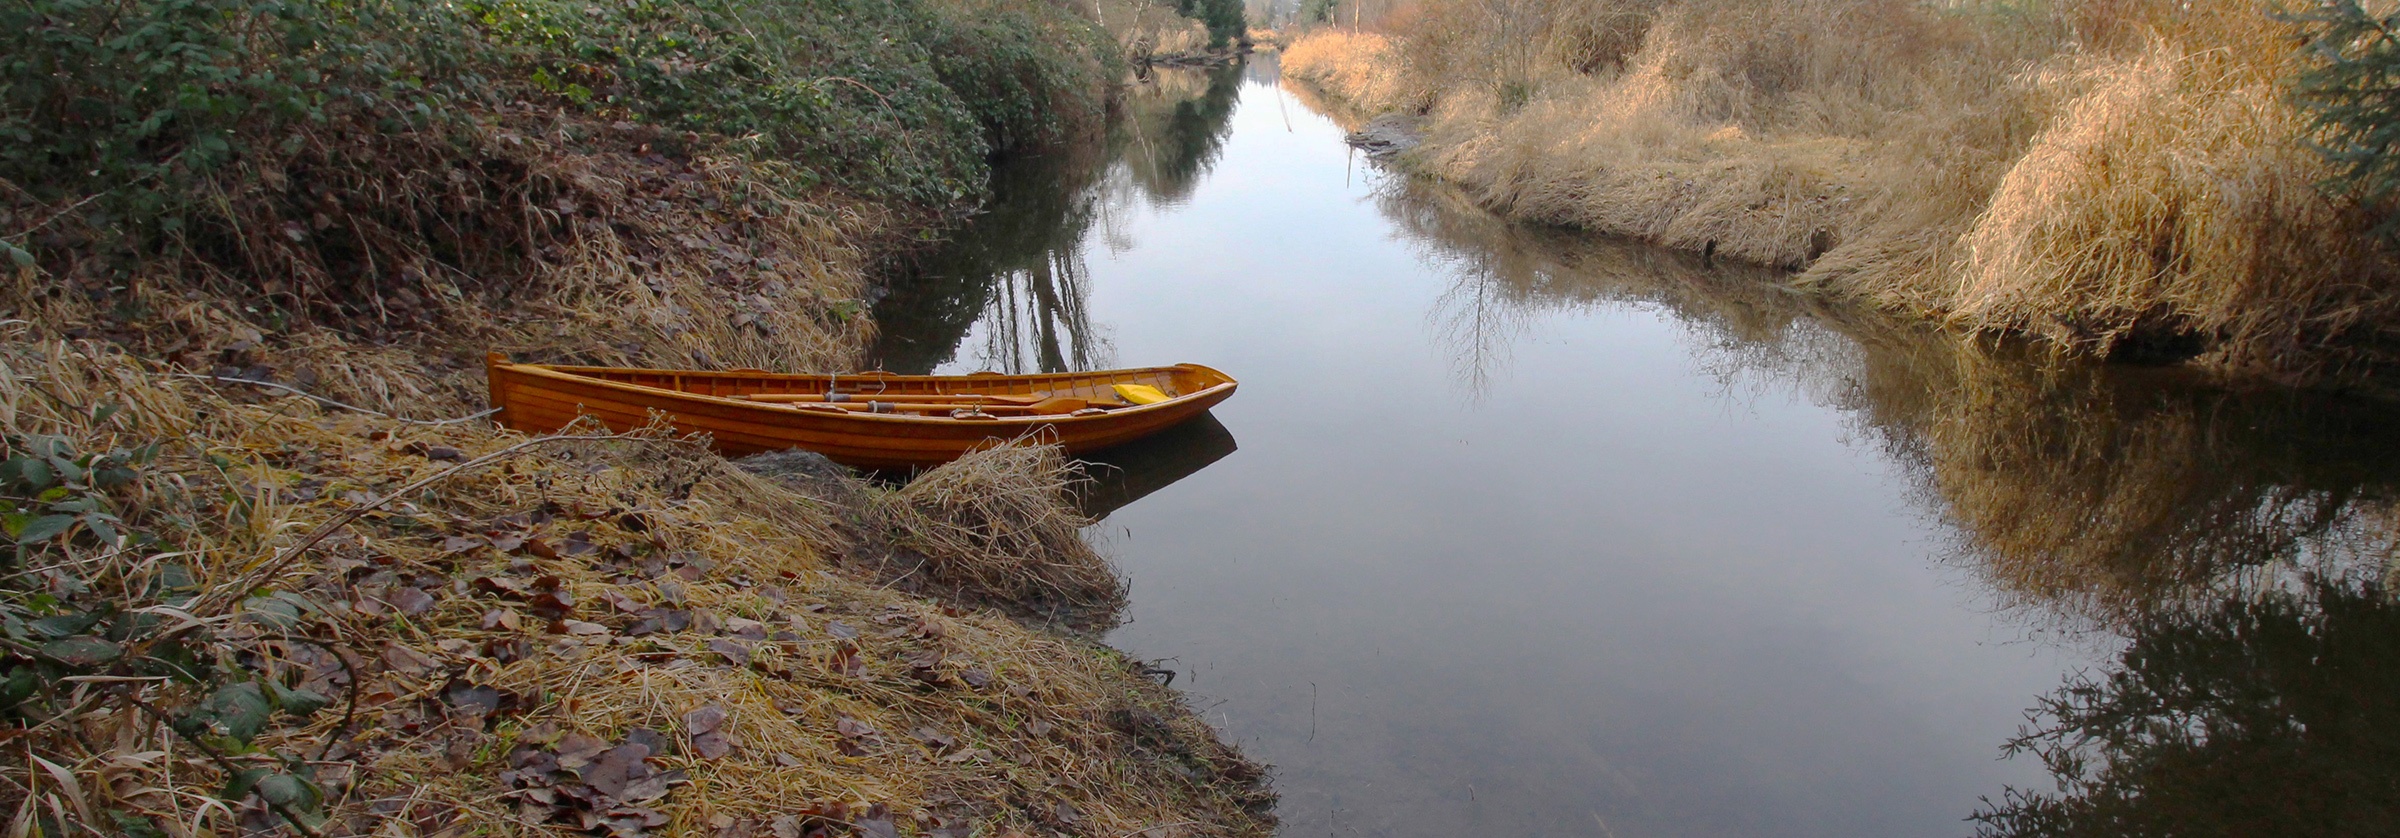
Of all the boats I’ve built and cruised with, my sneakbox LUNA is the one that has meant the most to me from gathering the materials to build her to having her see me safely through my most challenging voyage. All the planking for her cold-molded deck and hull came from a large western red cedar driftwood log I towed by kayak to my home beach and split by hand with a maul and wedges. I constructed the sneakbox in a cabin/shop I’d built deep in the foothills of Washington’s Cascade Mountains where my electricity came from alkaline batteries and the running water was the South Fork of the Sauk River, a lazy stone’s throw from the front door. When her hull had enough of a finish to be weatherproof, I hauled her on a sled towed by a snowmobile 14 miles to the roadhead and moved to another utility-free cabin on Lopez Island.
LUNA was meant for a winter cruise from Pittsburgh, Pennsylvania, to Cedar Key, Florida, by way of the Ohio River, the Lower Mississippi River, and the Intracoastal Waterway skirting the Gulf of Mexico. For two-and-a-half months in the winter of 1985, she carried me 2,400 miles through storms, floods, ice, darkness, log jams, and whirlpools.
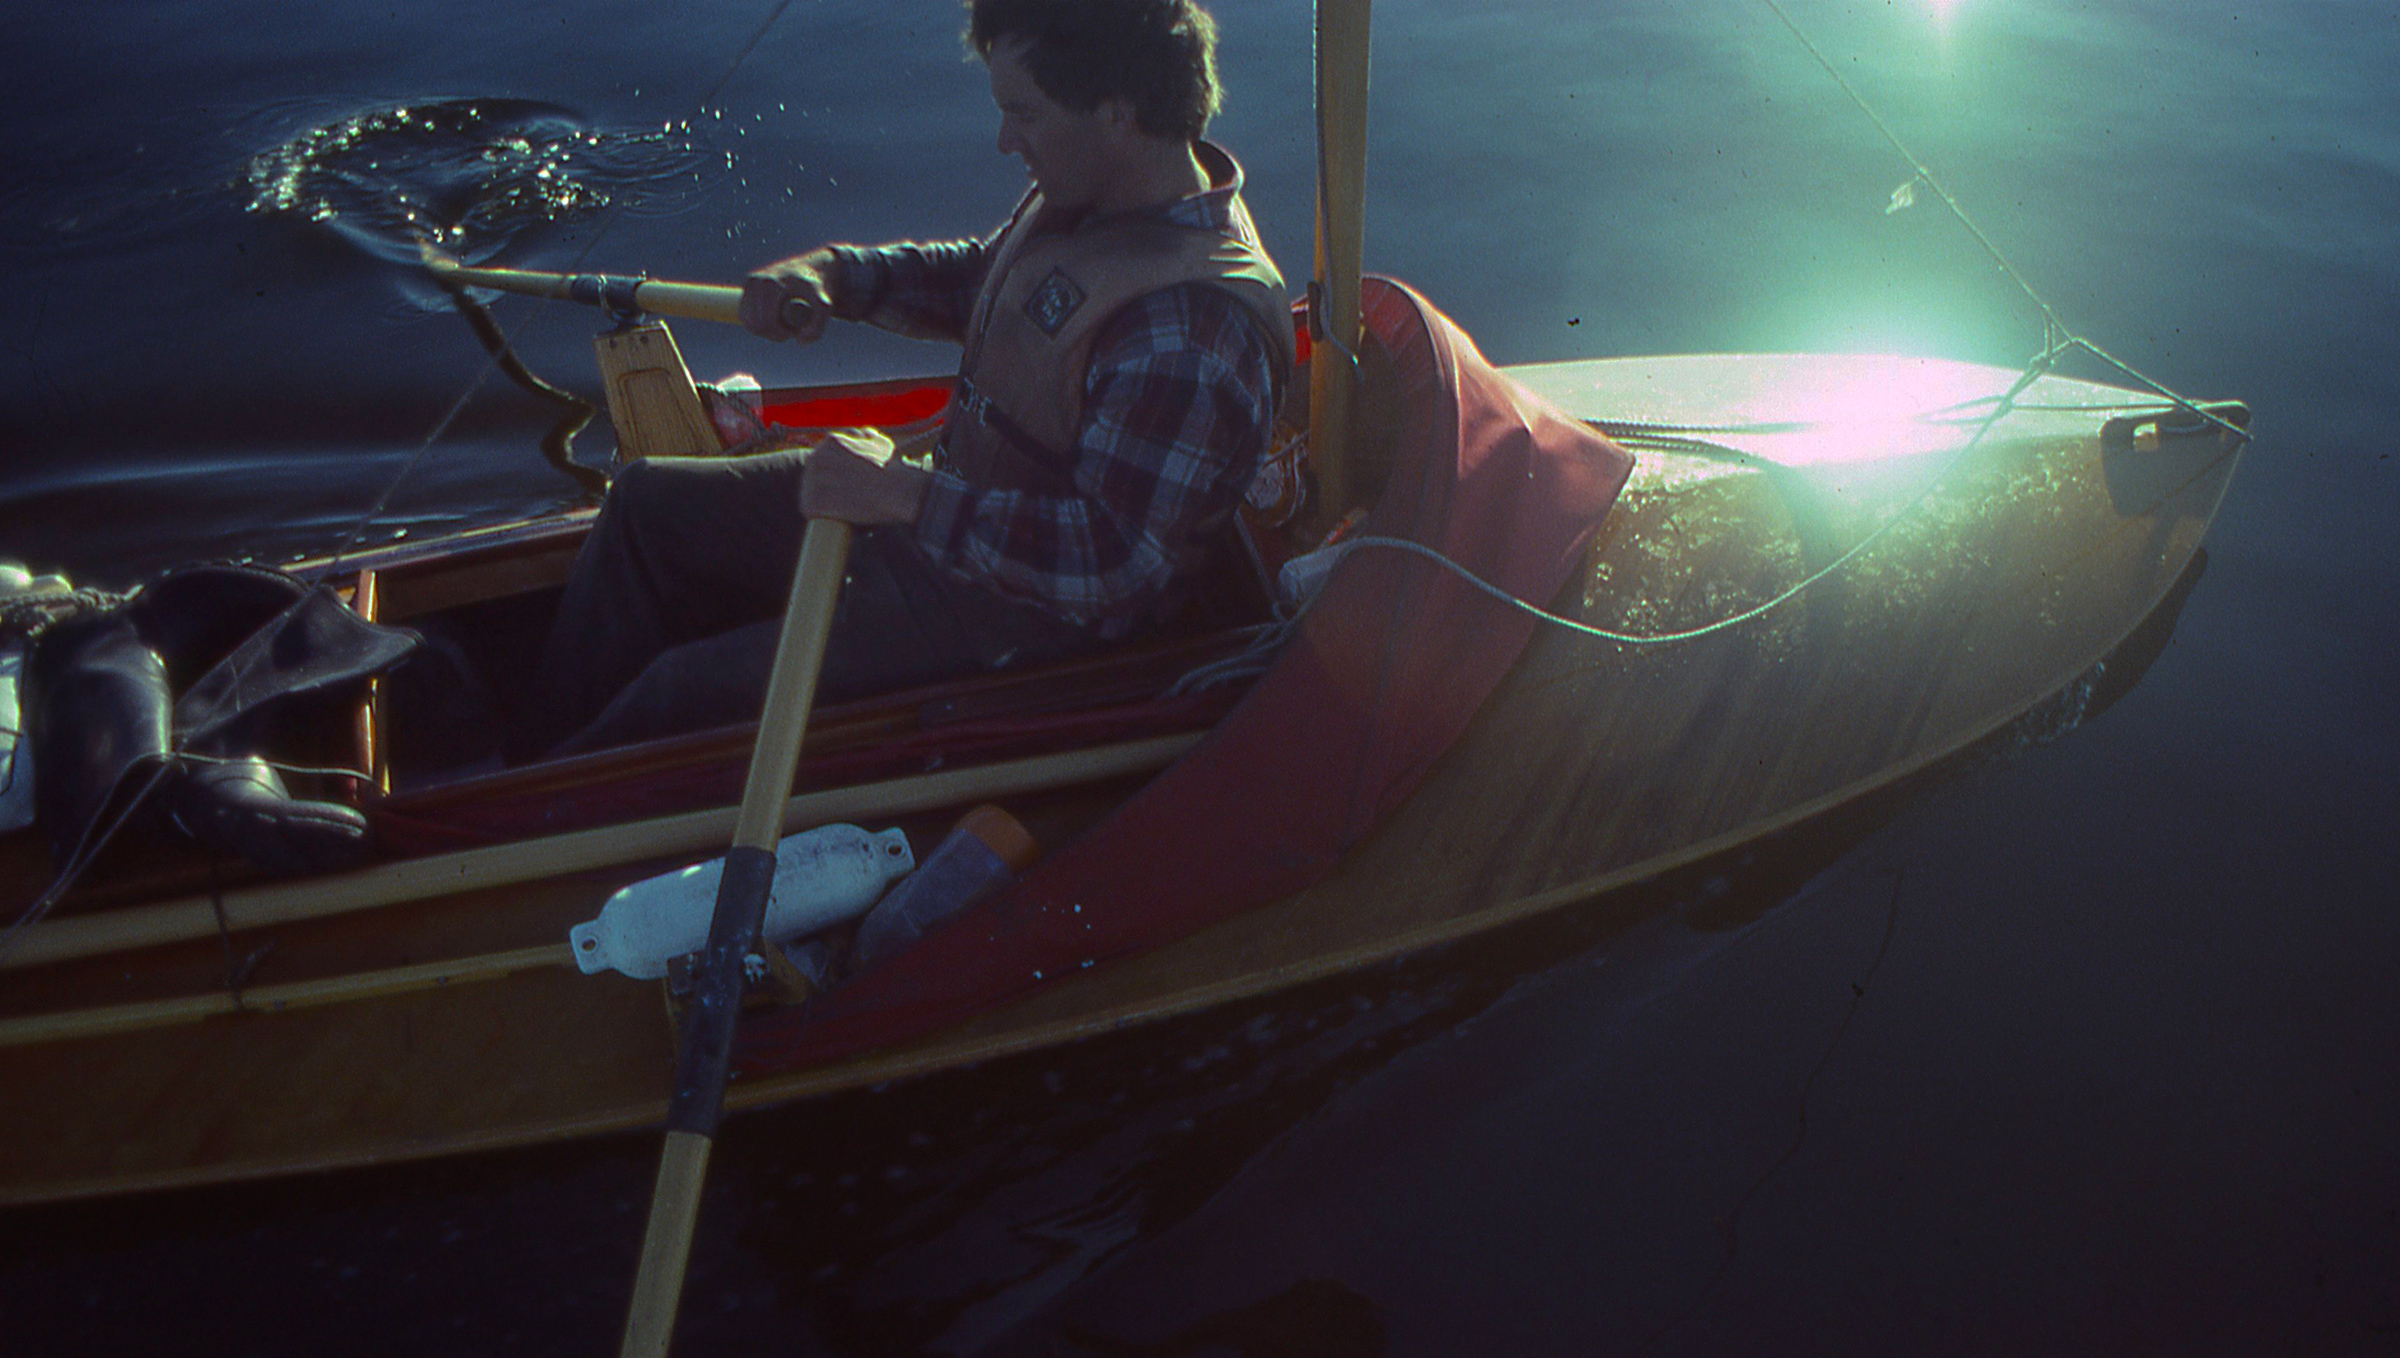
On this morning in 1986, I was rowing about a mile off Florida’s Gulf coast on the last day of 2-1/2 months of rowing and sailing from Pittsburgh. I had my camera strapped to the end of LUNA’s boom.
After that adventure, I moved on to other boatbuilding projects and took LUNA out only a handful of times. I last rowed her nearly 20 years ago; since then she has been in the garage, set on edge, leaning against a windowless wall. I caught a glimpse of her bow poking out from the shadows every time I pulled one of my other boats out of the garage.
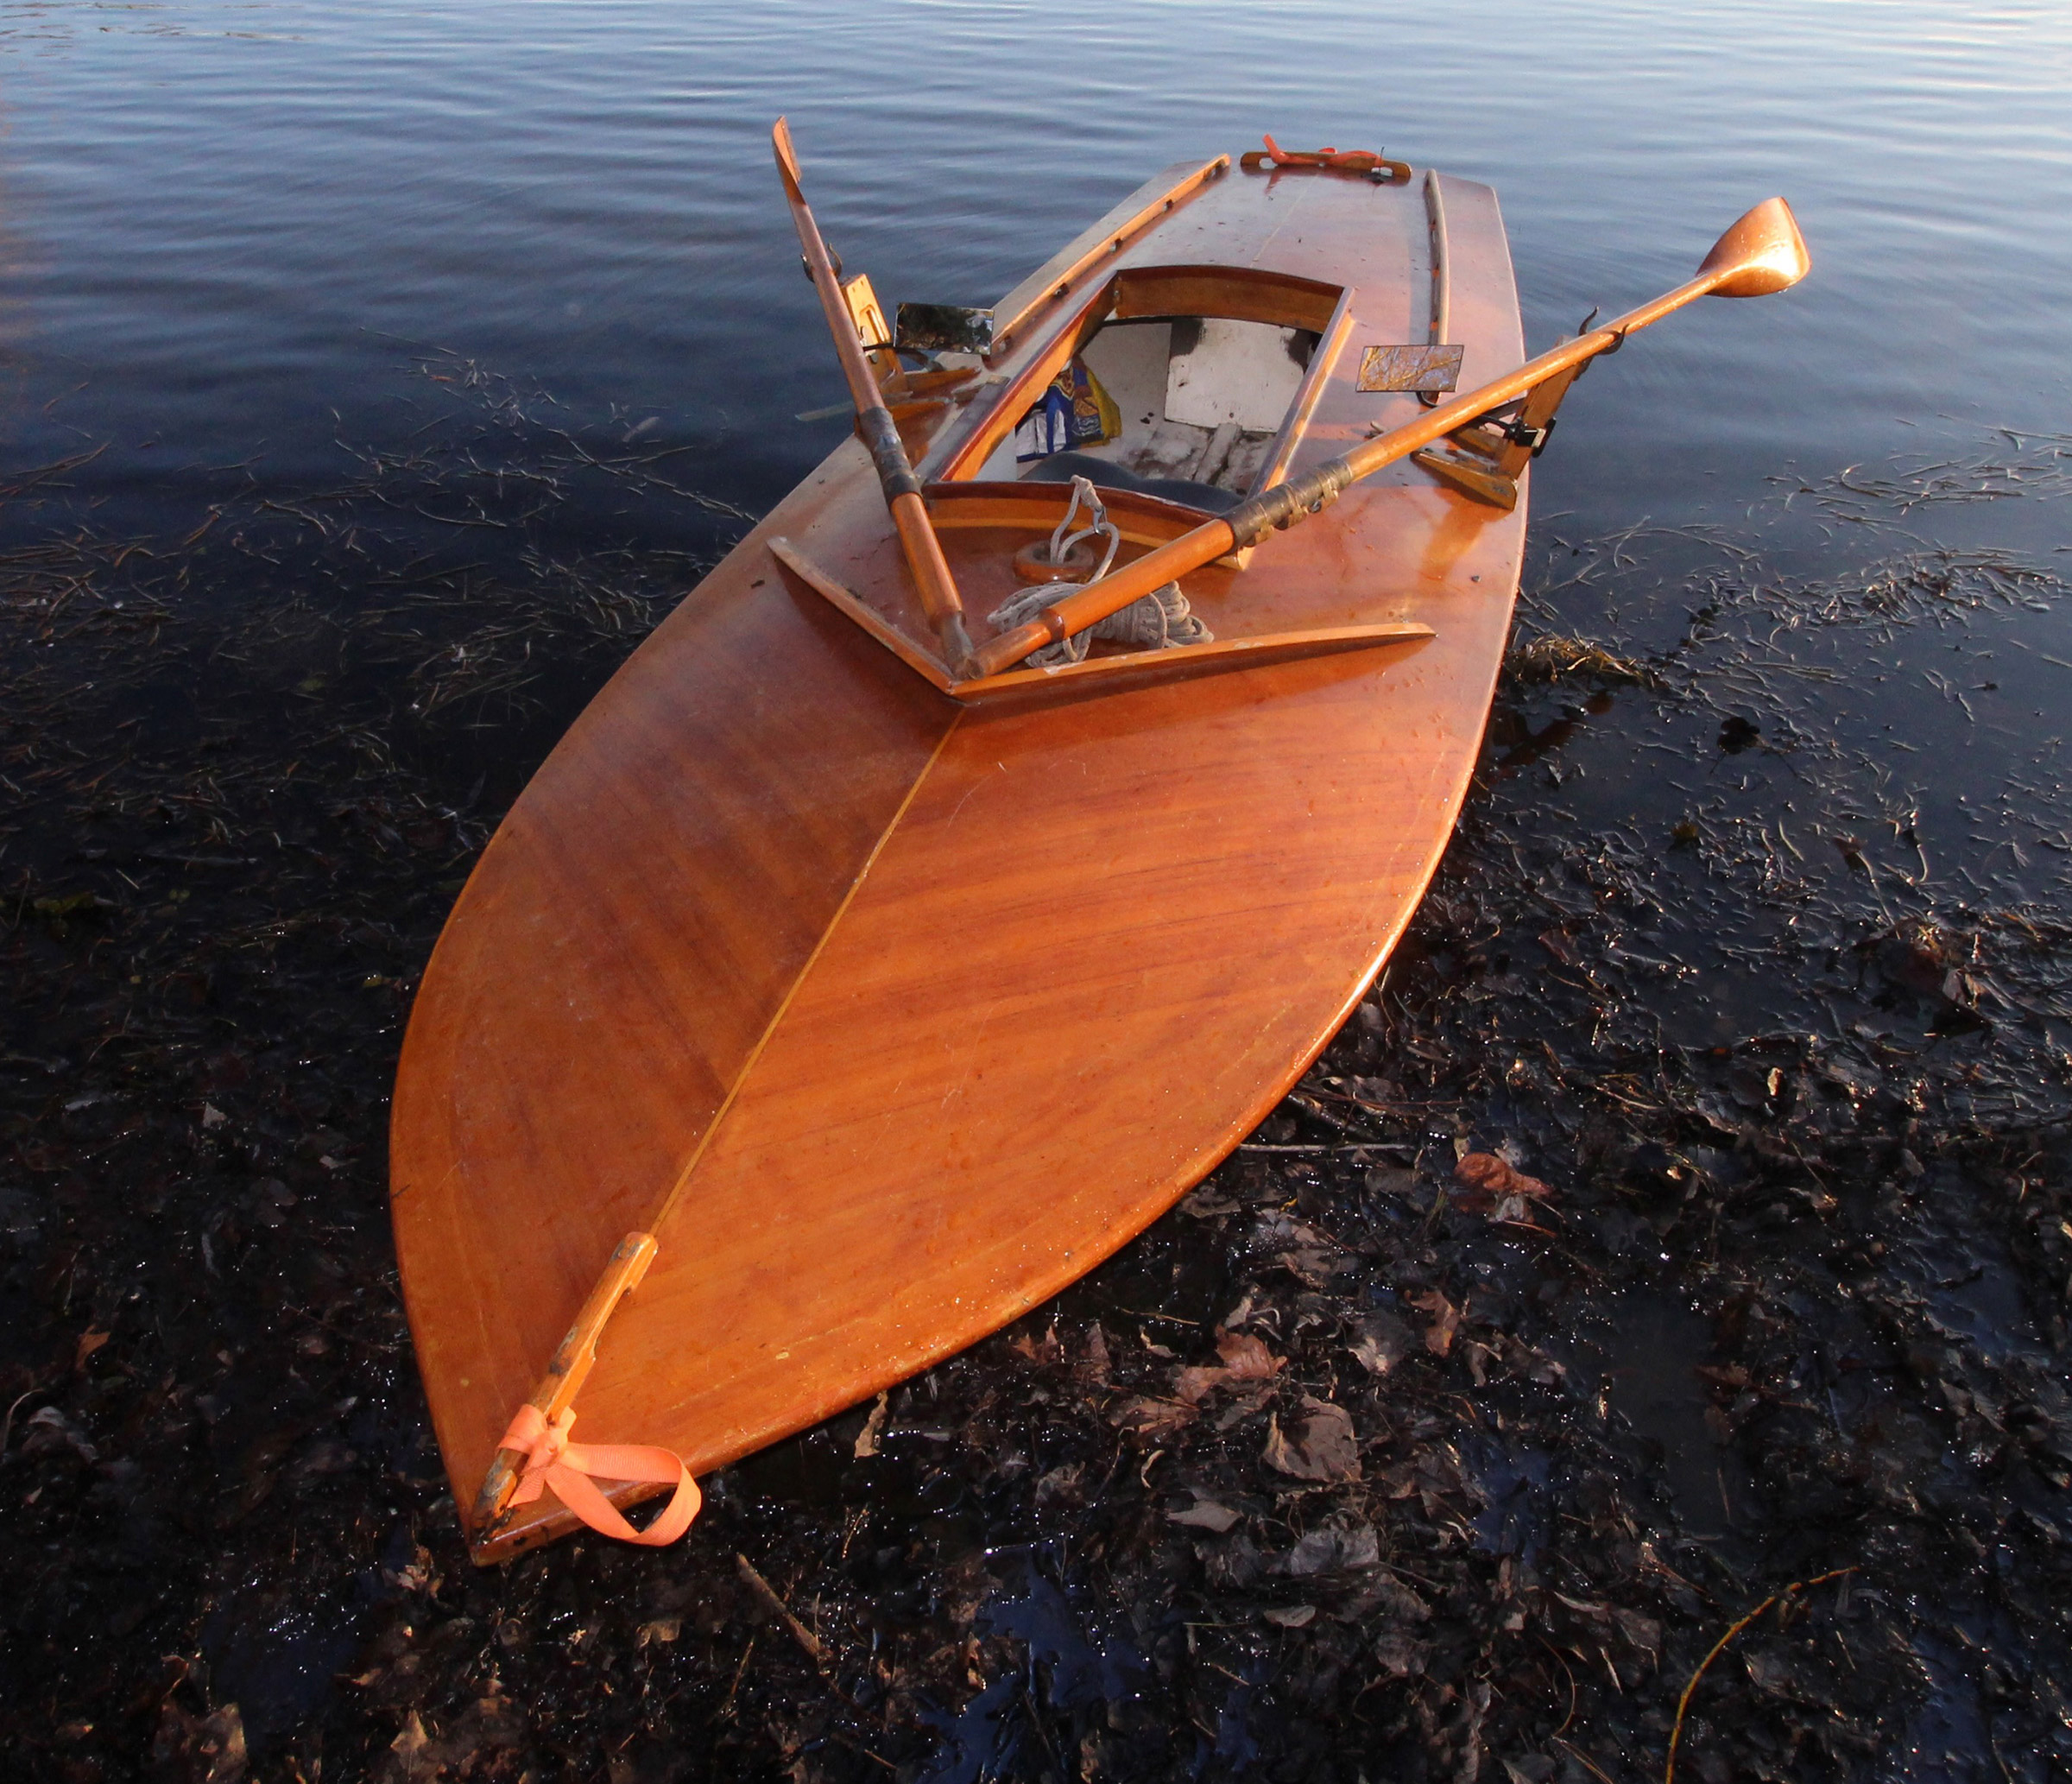
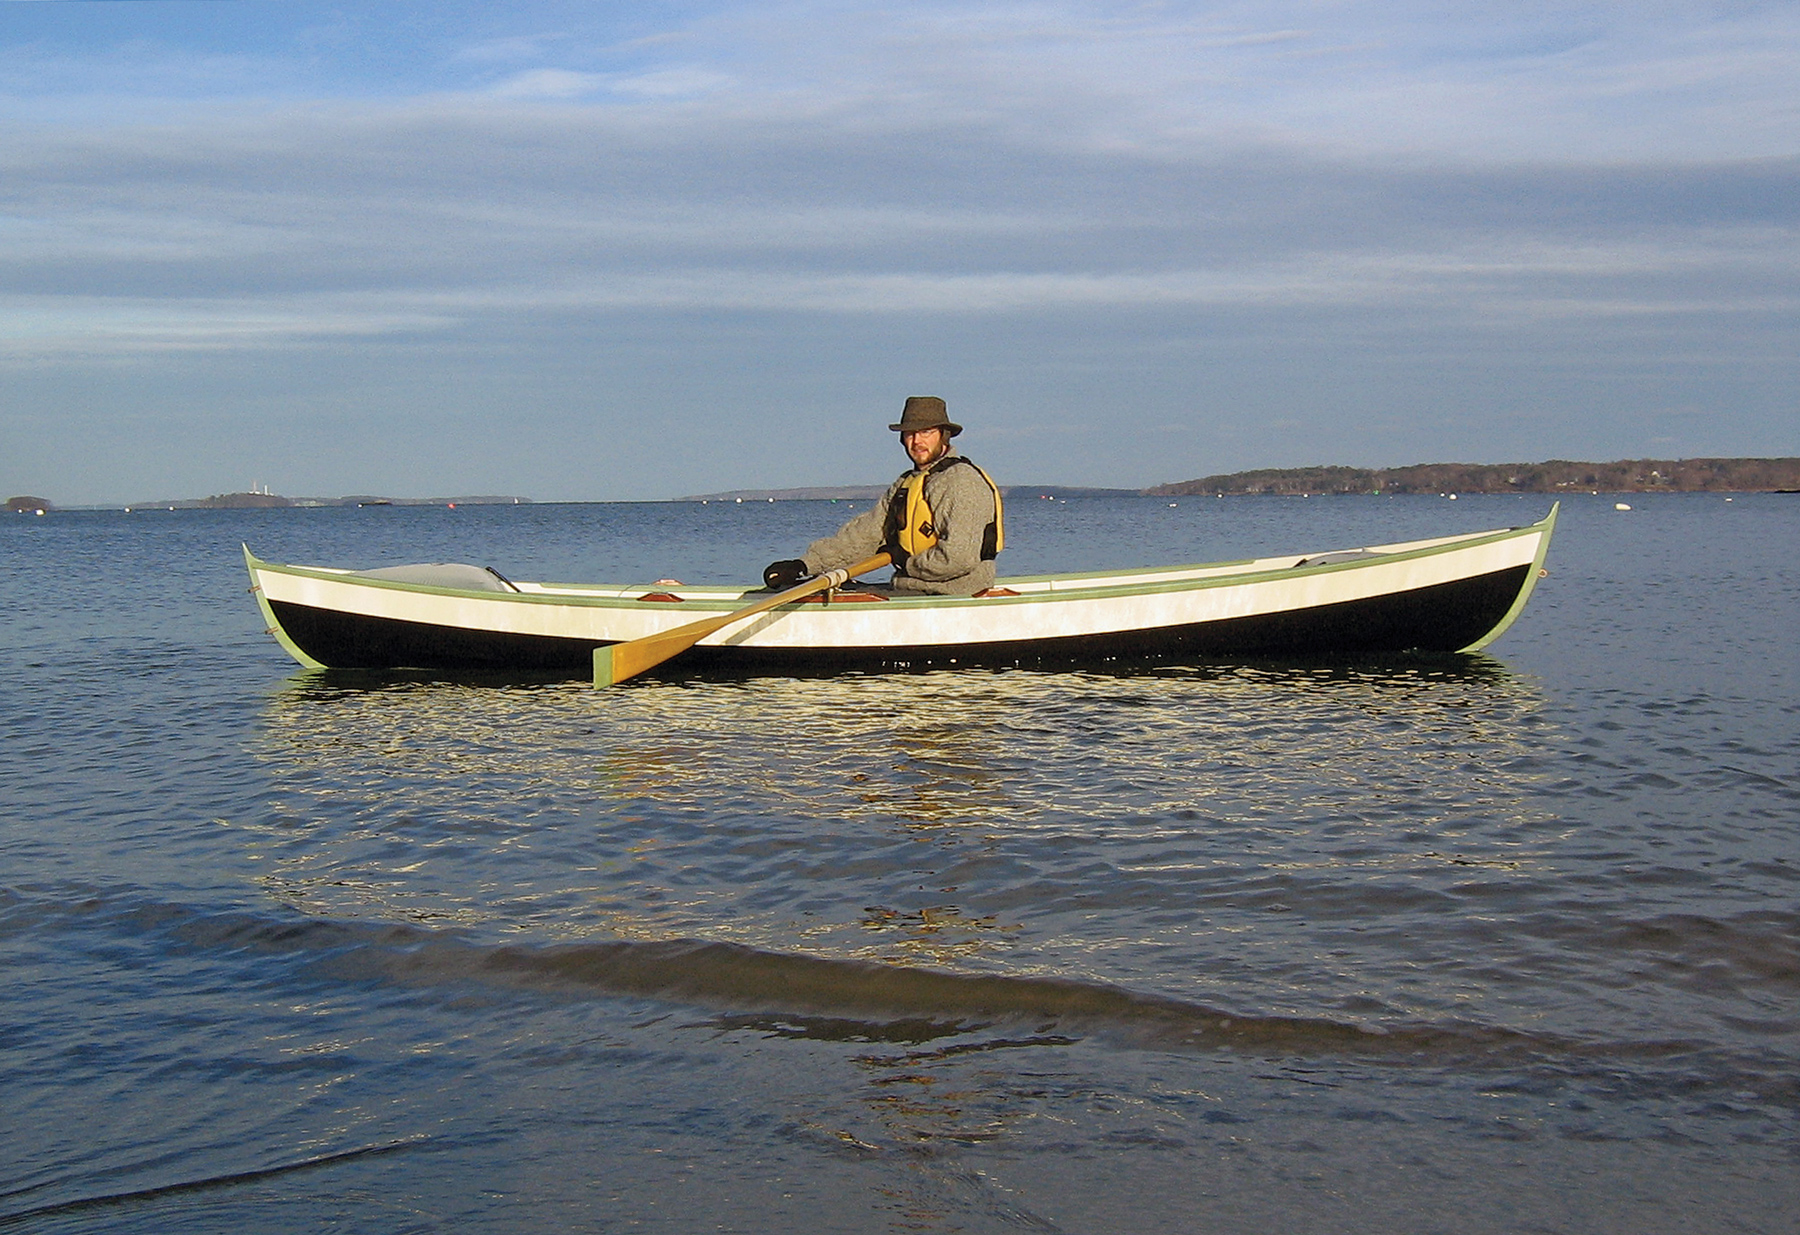
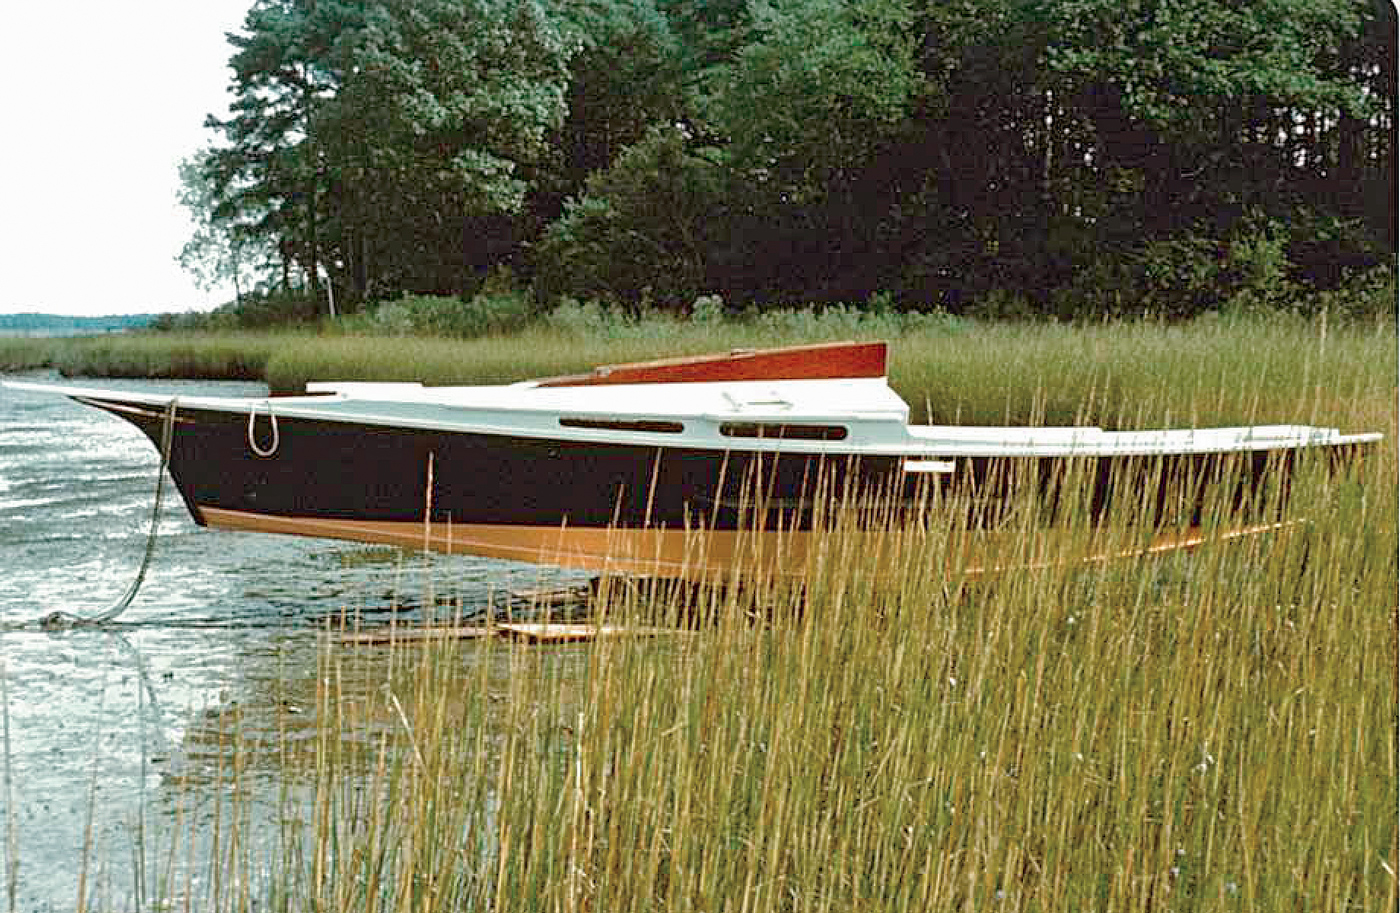
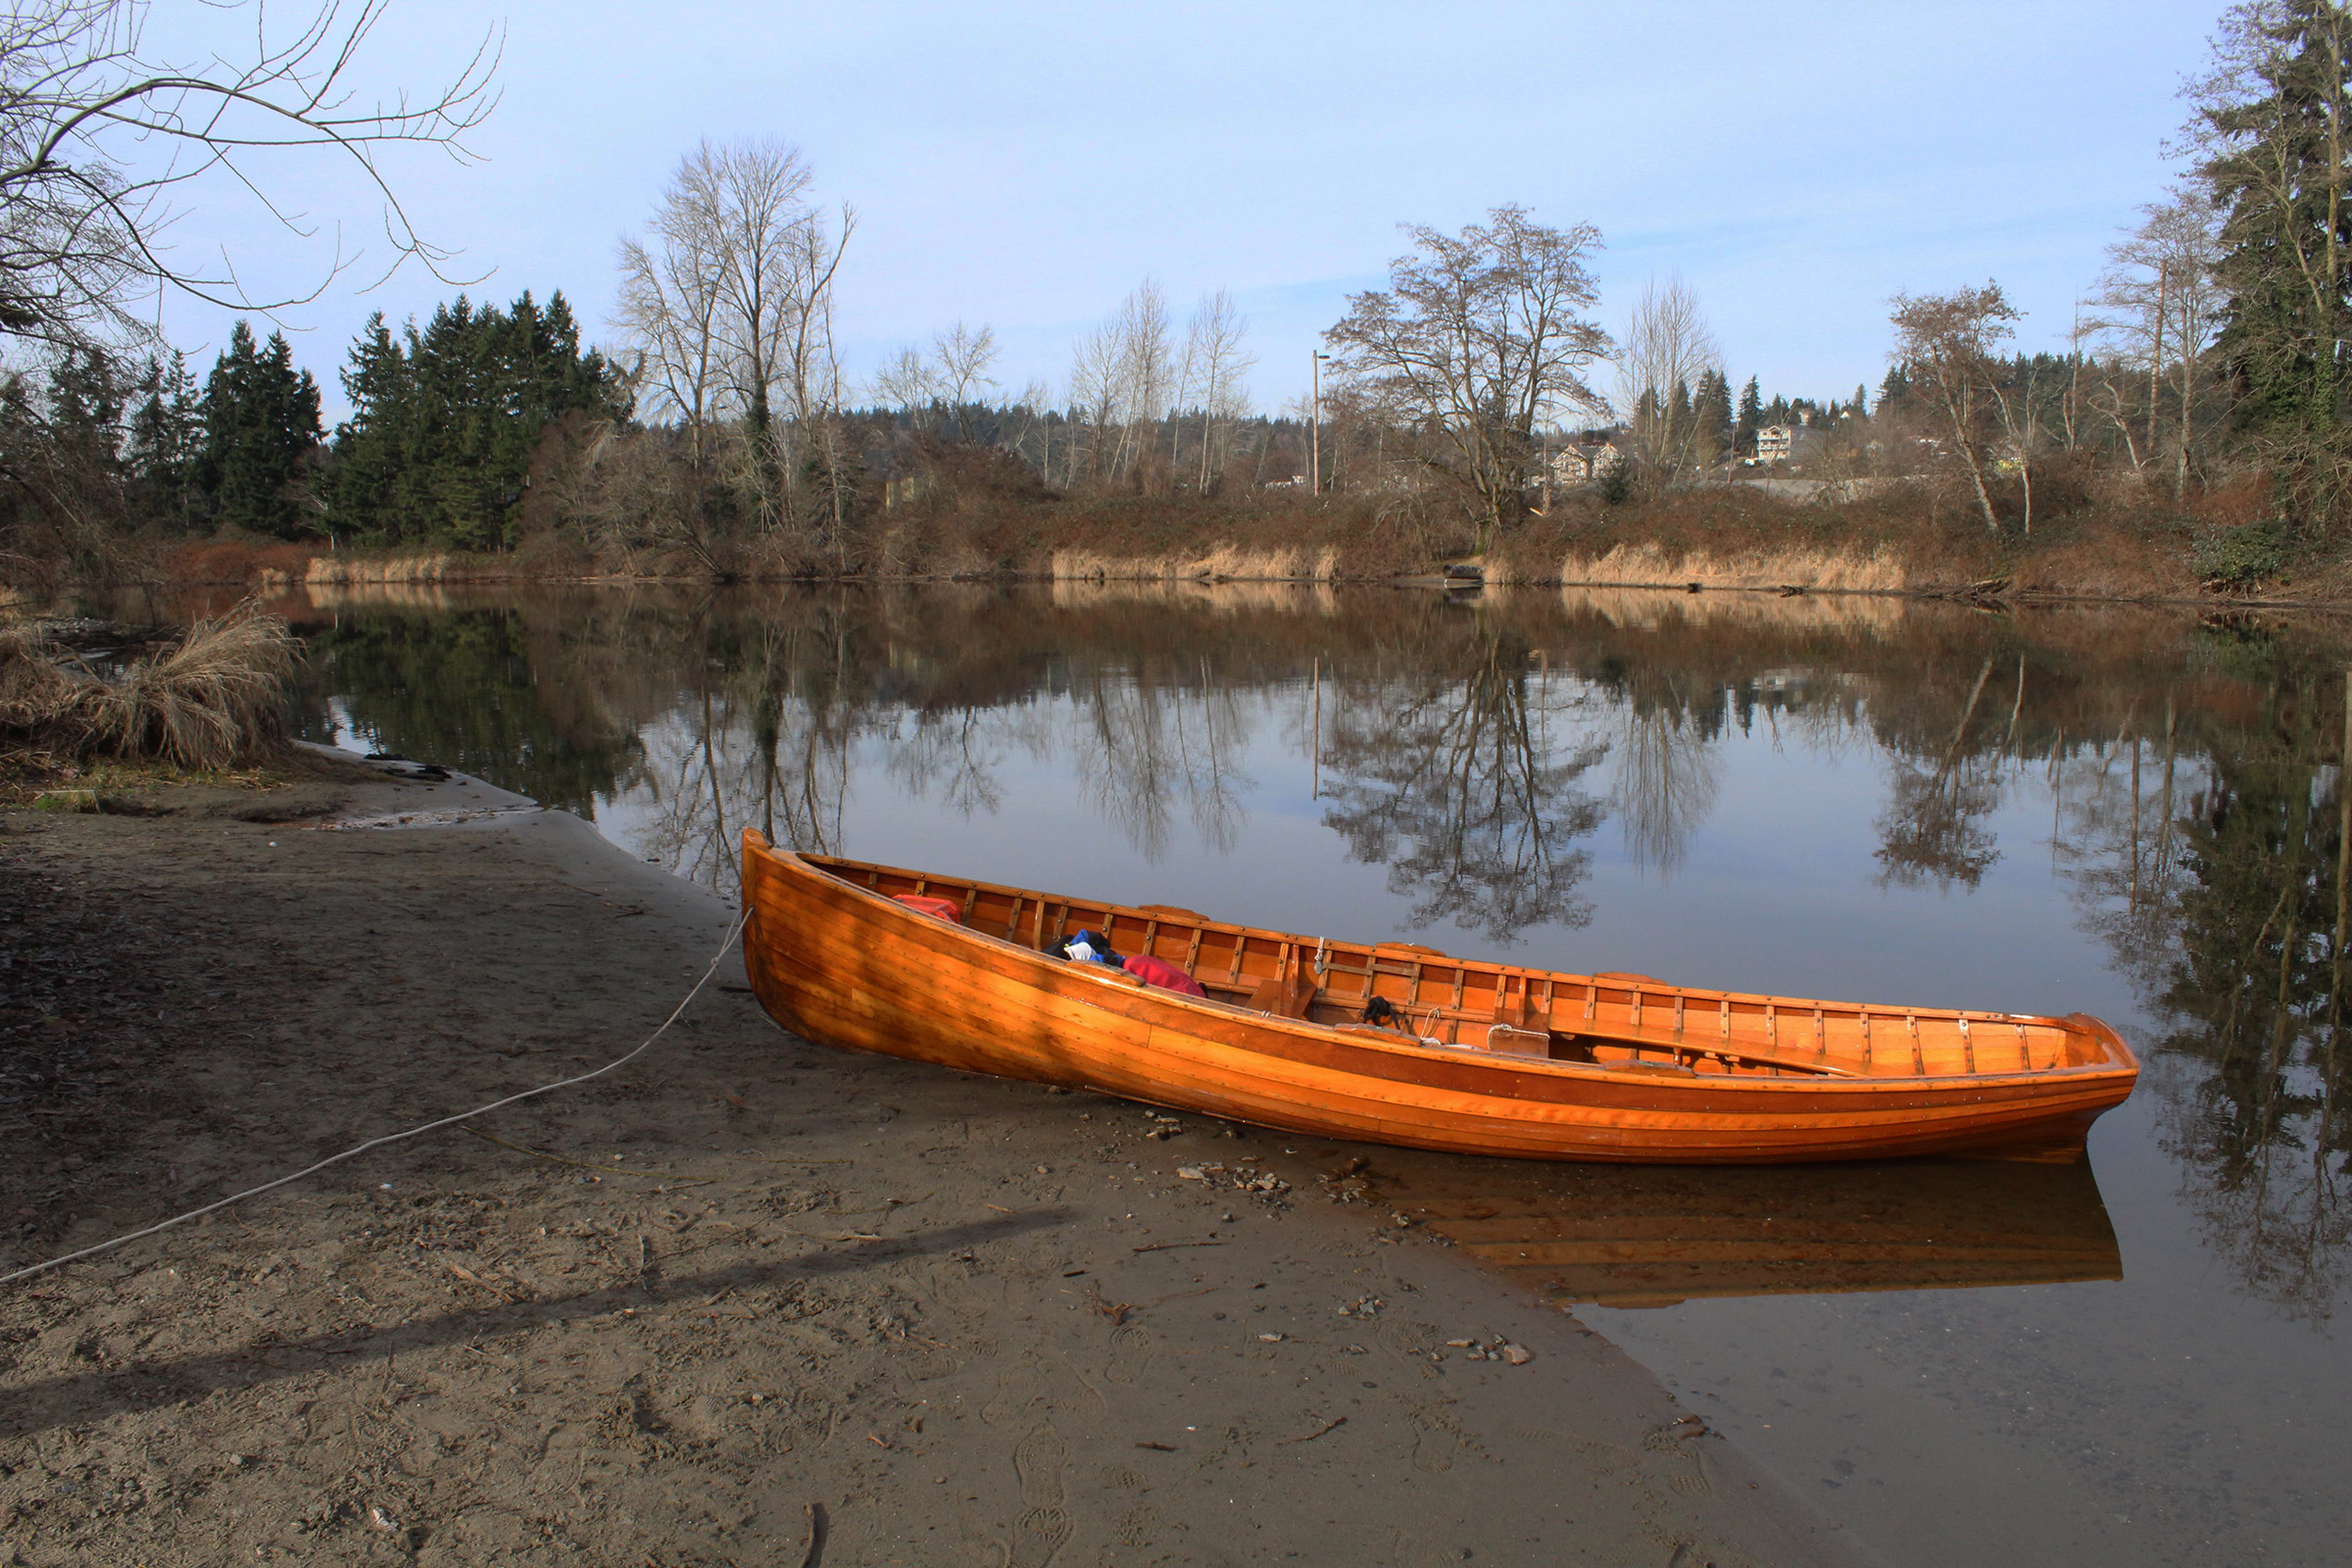
LUNA is in good shape for a 38-year-old boat entirely planked in western red cedar from a single driftwood log.
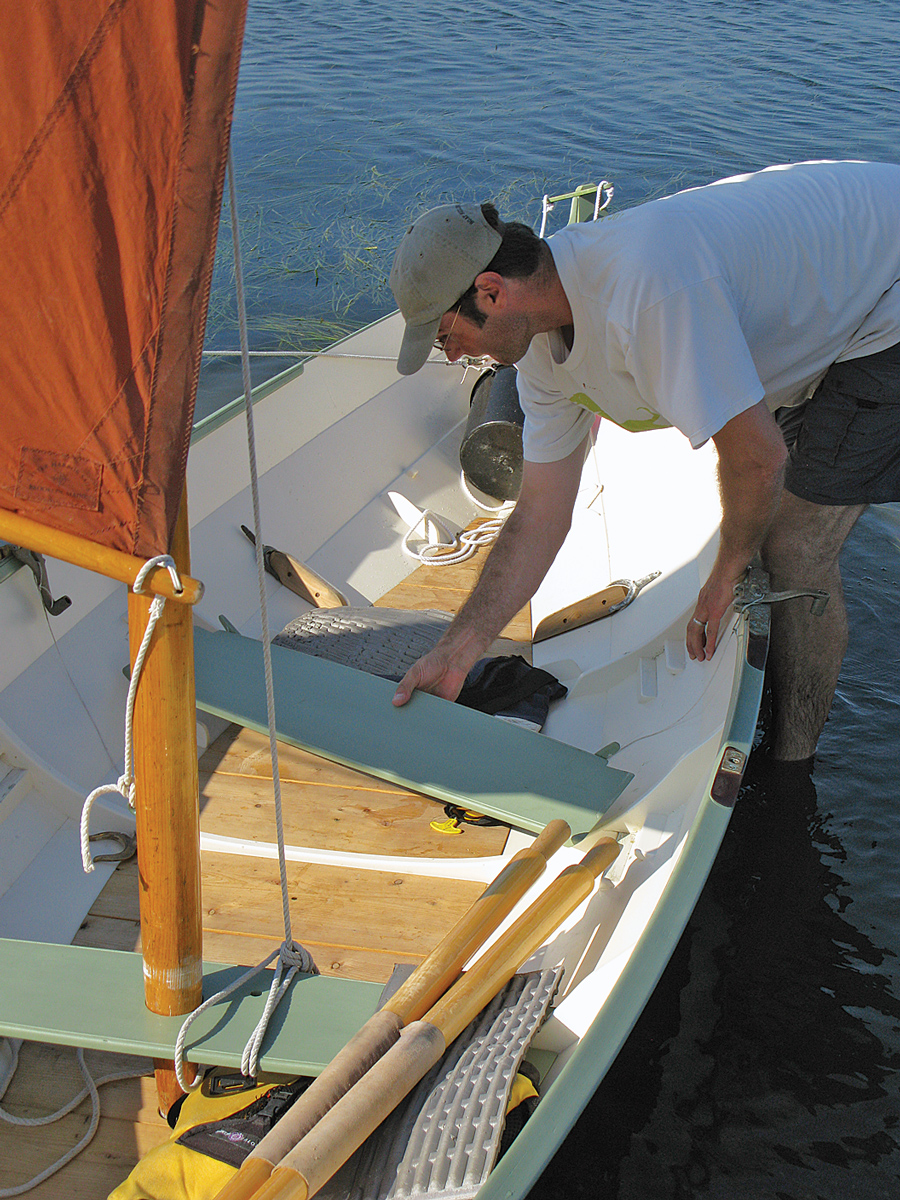
Drawn by the fond memories of my cruise, I decided I’d try to spend a winter night aboard LUNA. I moved the boats that had hemmed her in for so long, lowered her onto a dolly, and wheeled her into the back yard. After I hosed the dust off, LUNA looked to be in very good shape, none the worse for her decades of idleness.
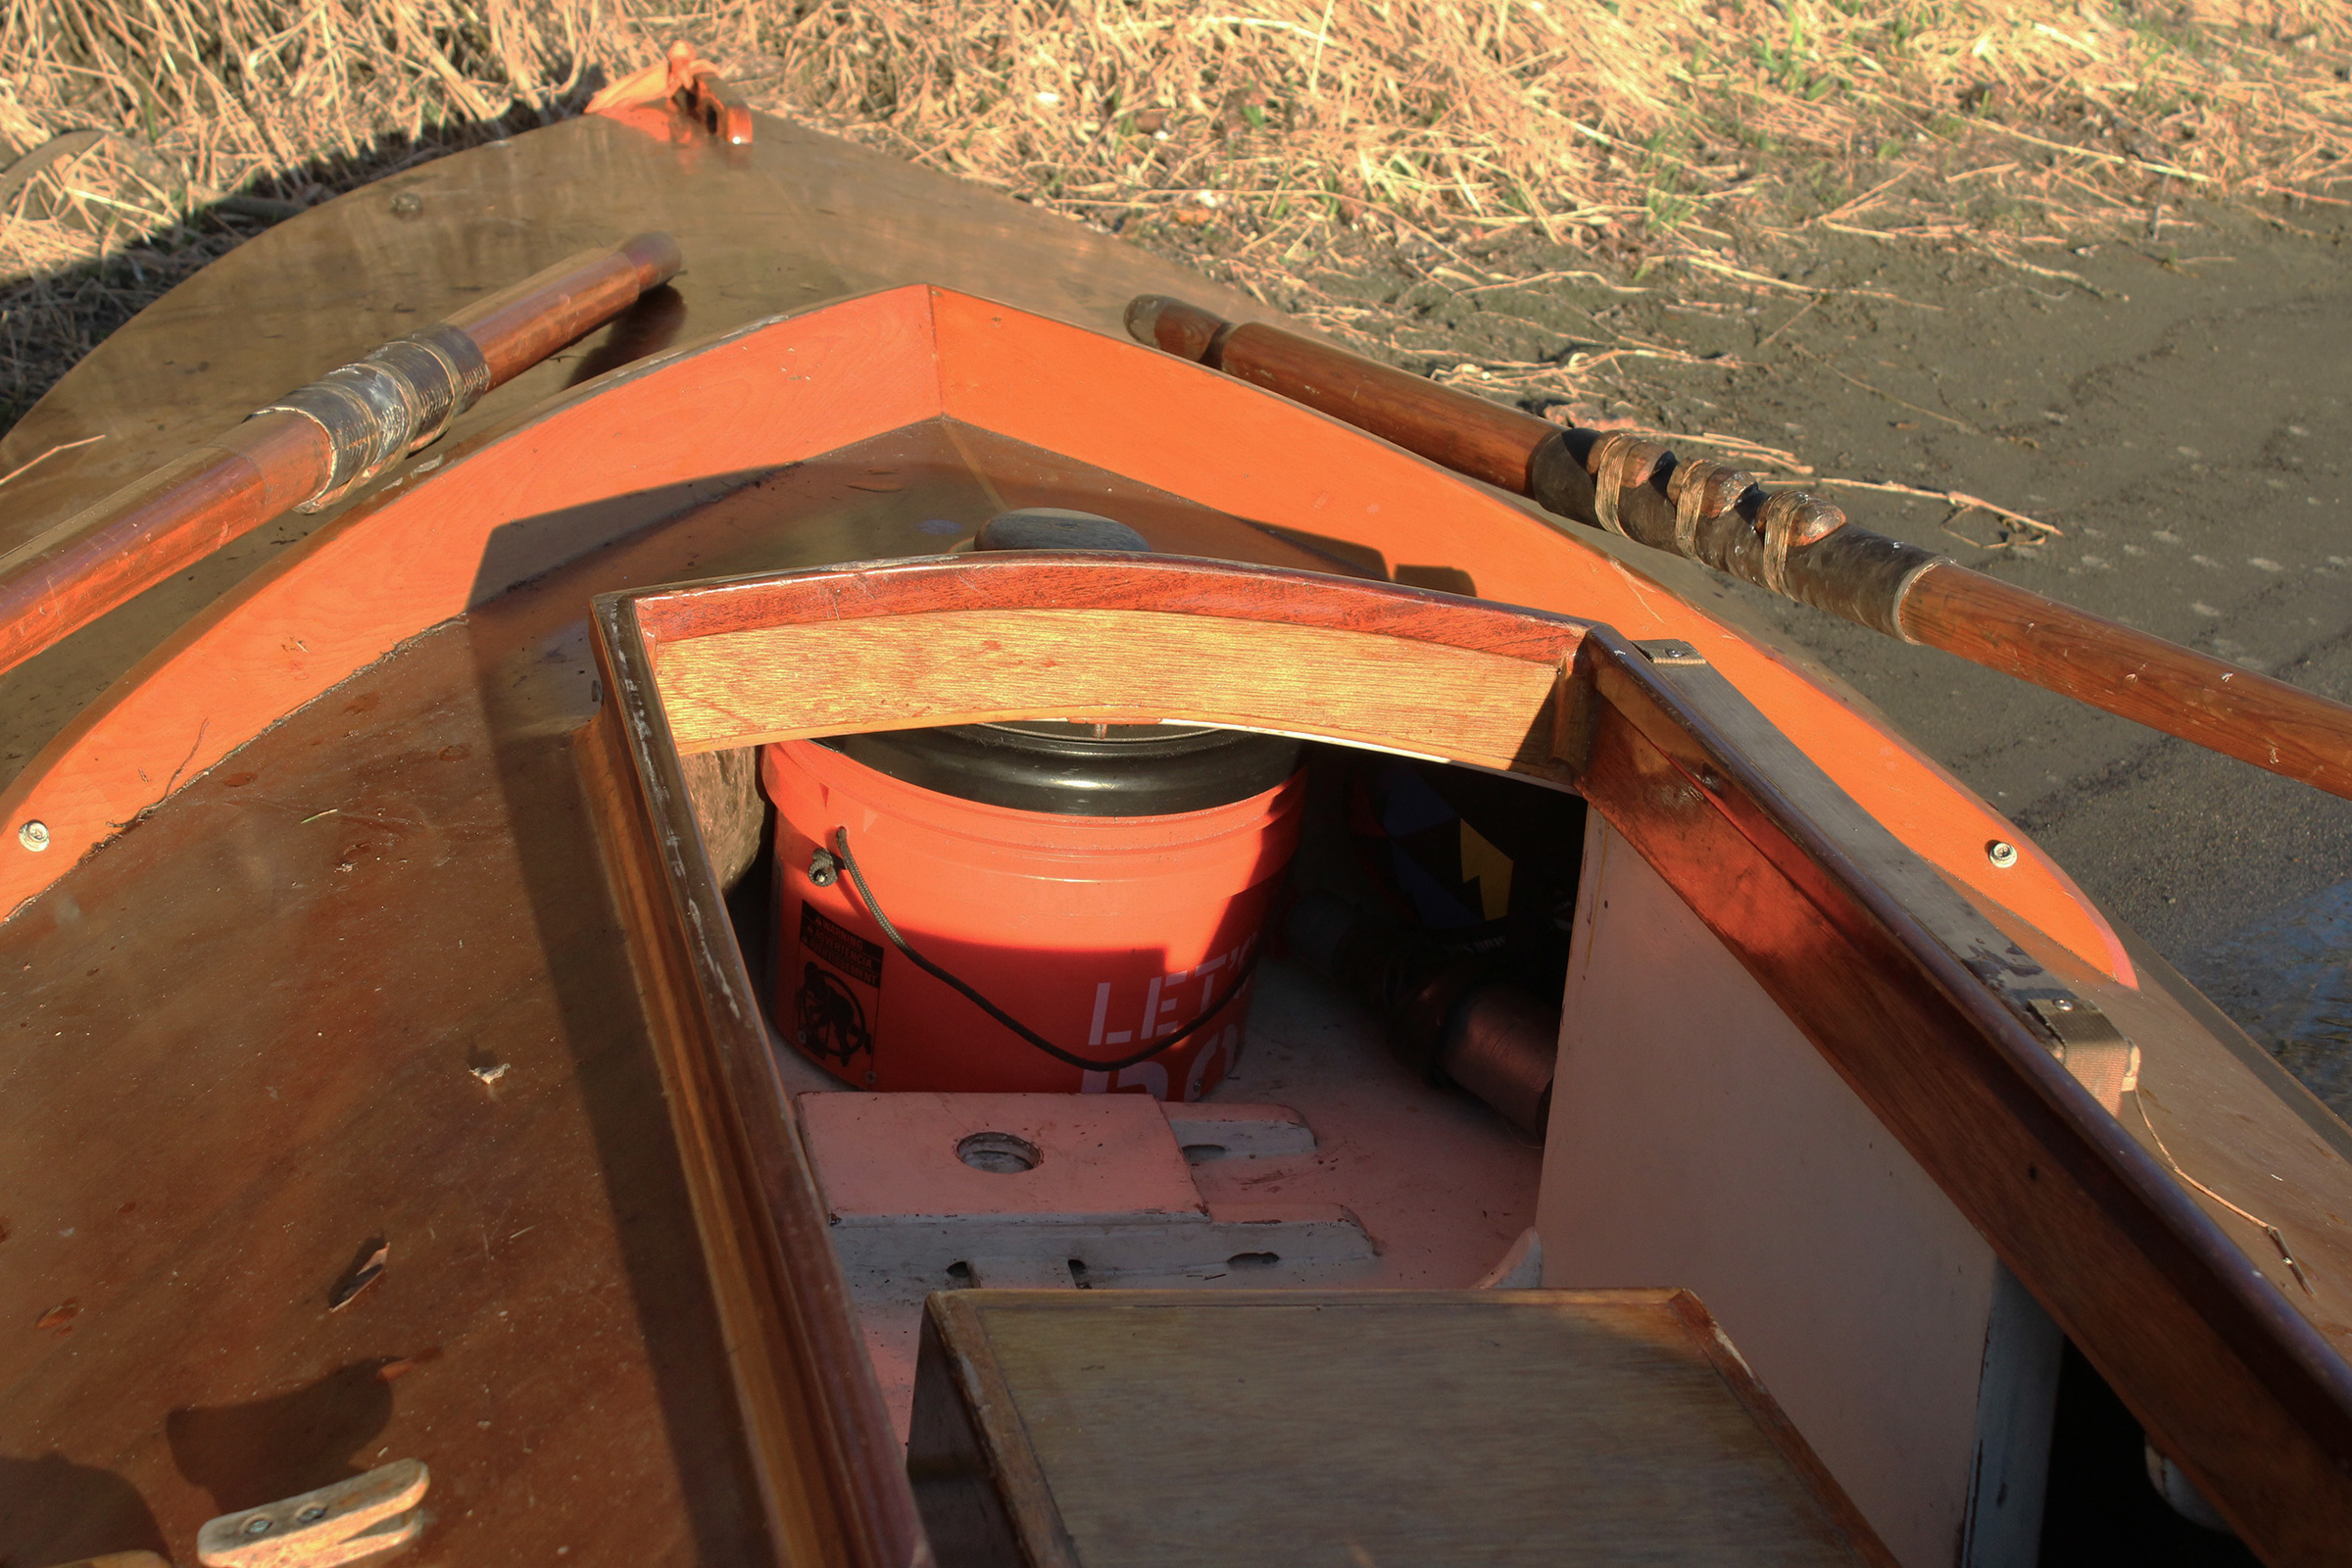
The hatch had been damaged during the cruise, so I fixed the cracks in its mahogany frame and gave it a fresh coat of varnish. The two bronze bolts that anchored the braces for the folding oarlock stanchions needed to be replaced and then LUNA was as fit as she was when I first built her. There was even some luster left in the only varnish she’d ever had. While the boat sat in the back yard, I tried taking a few naps in the cockpit. With a sleeping pad and a pillow, I was quite comfortable and once even drifted off to sleep.
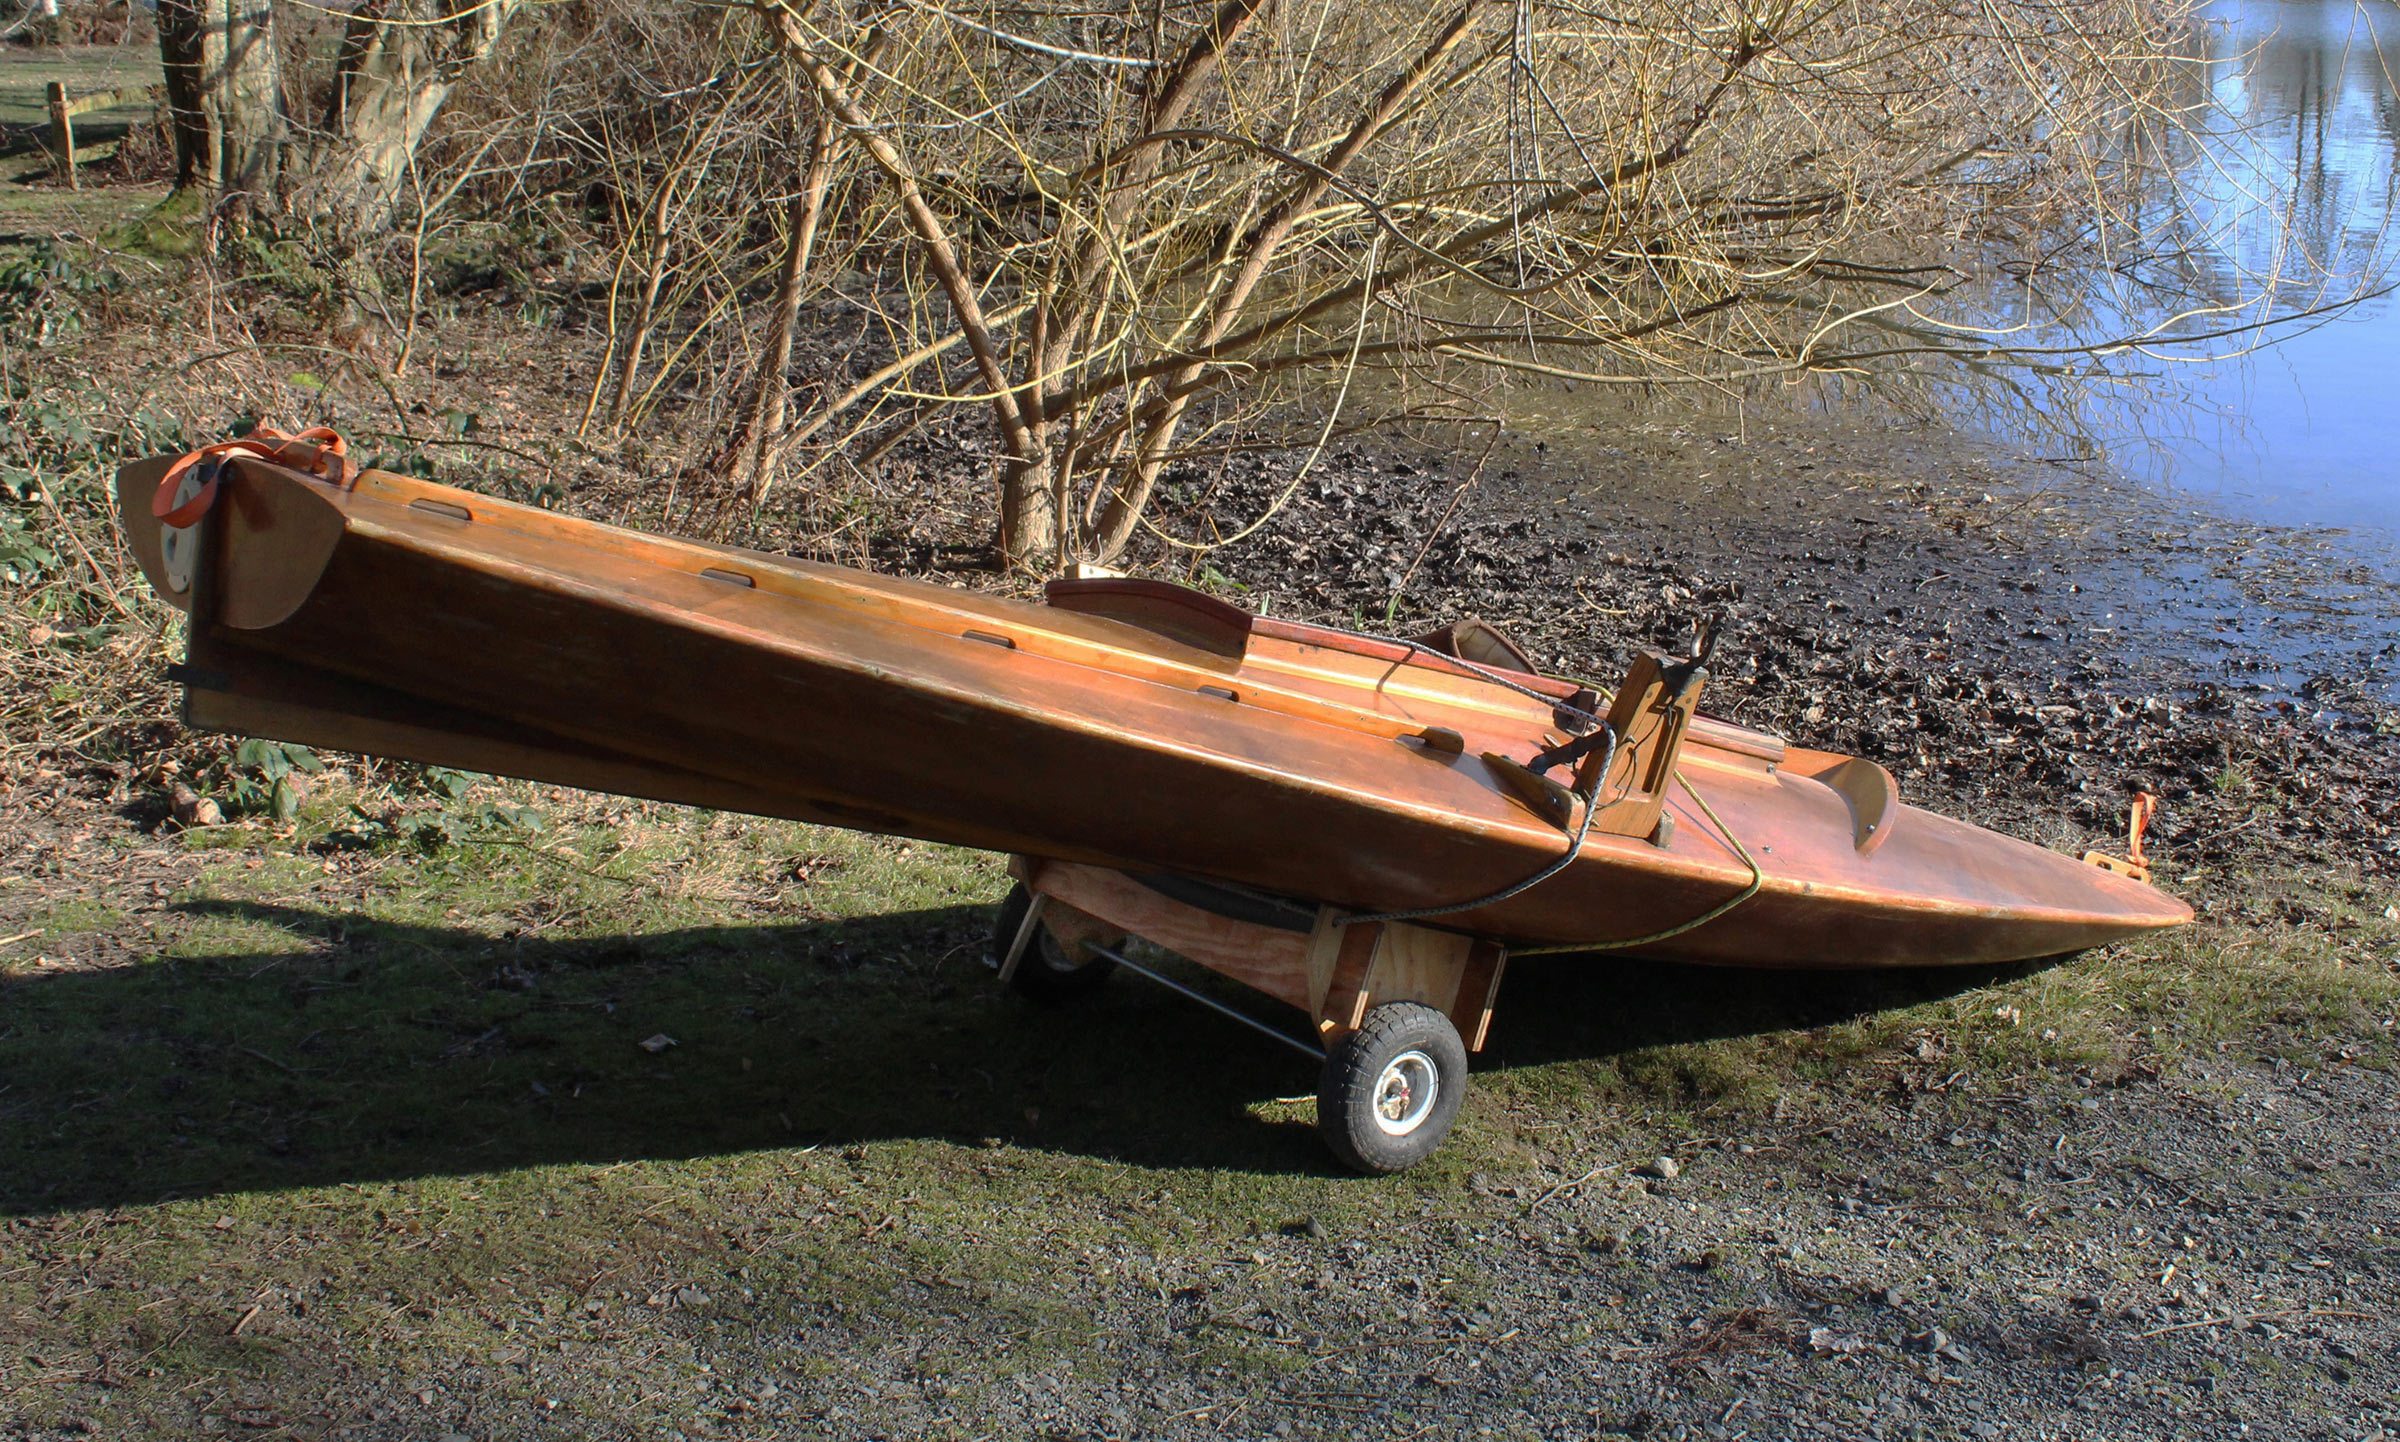
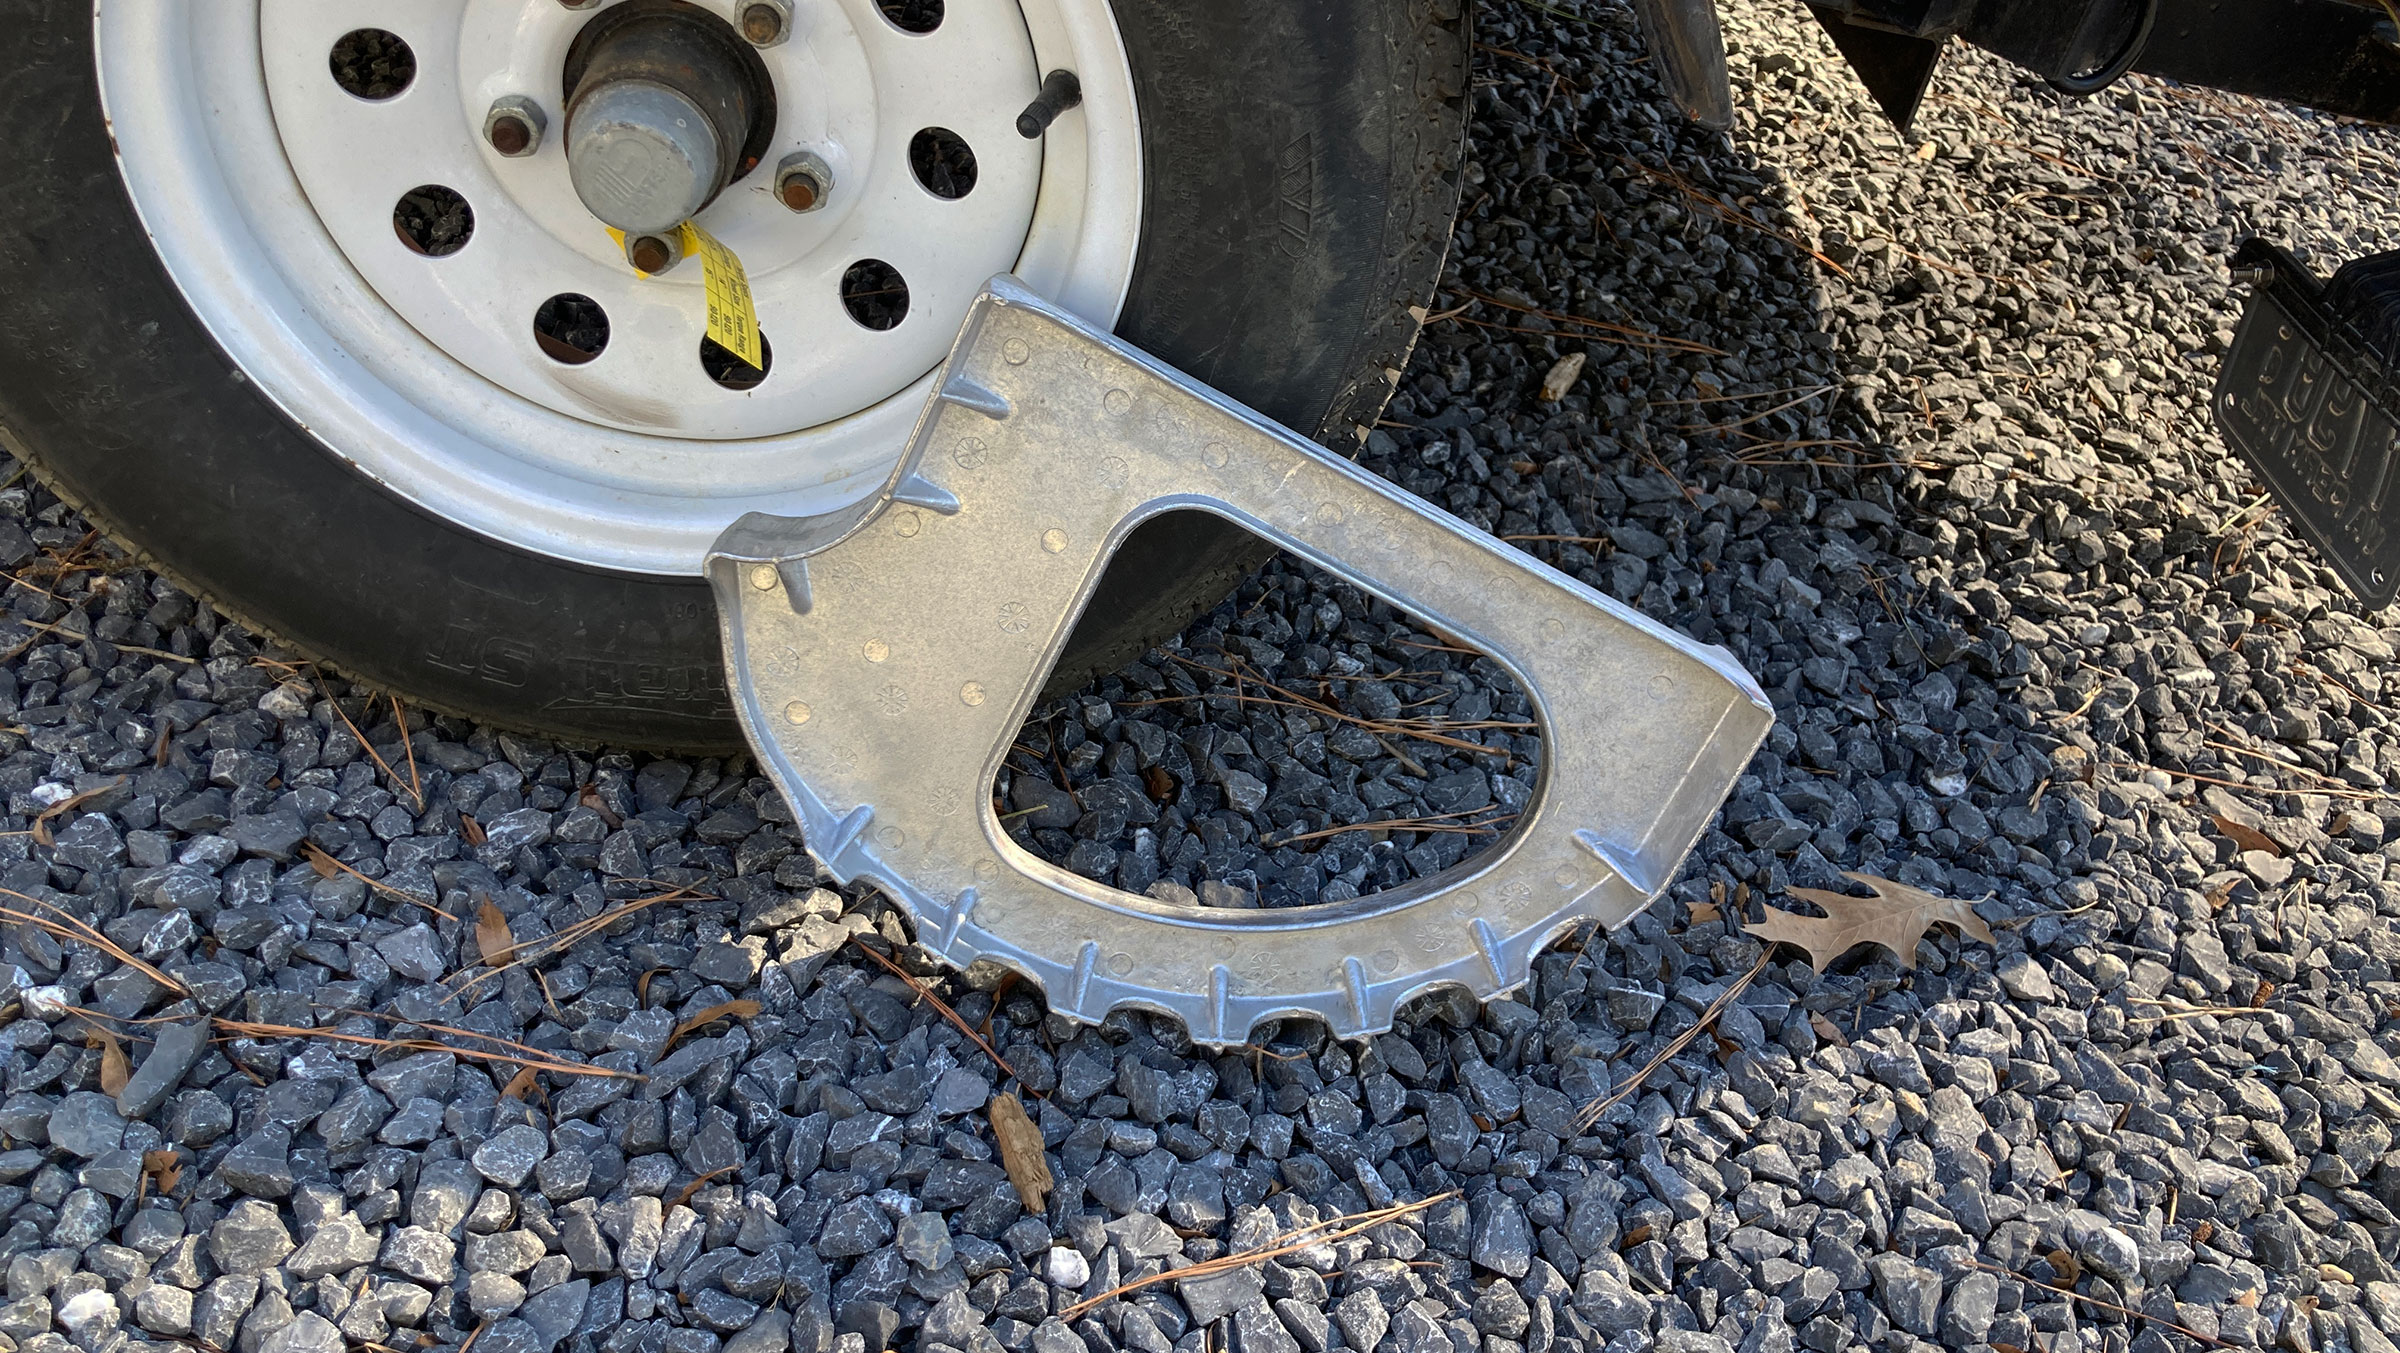
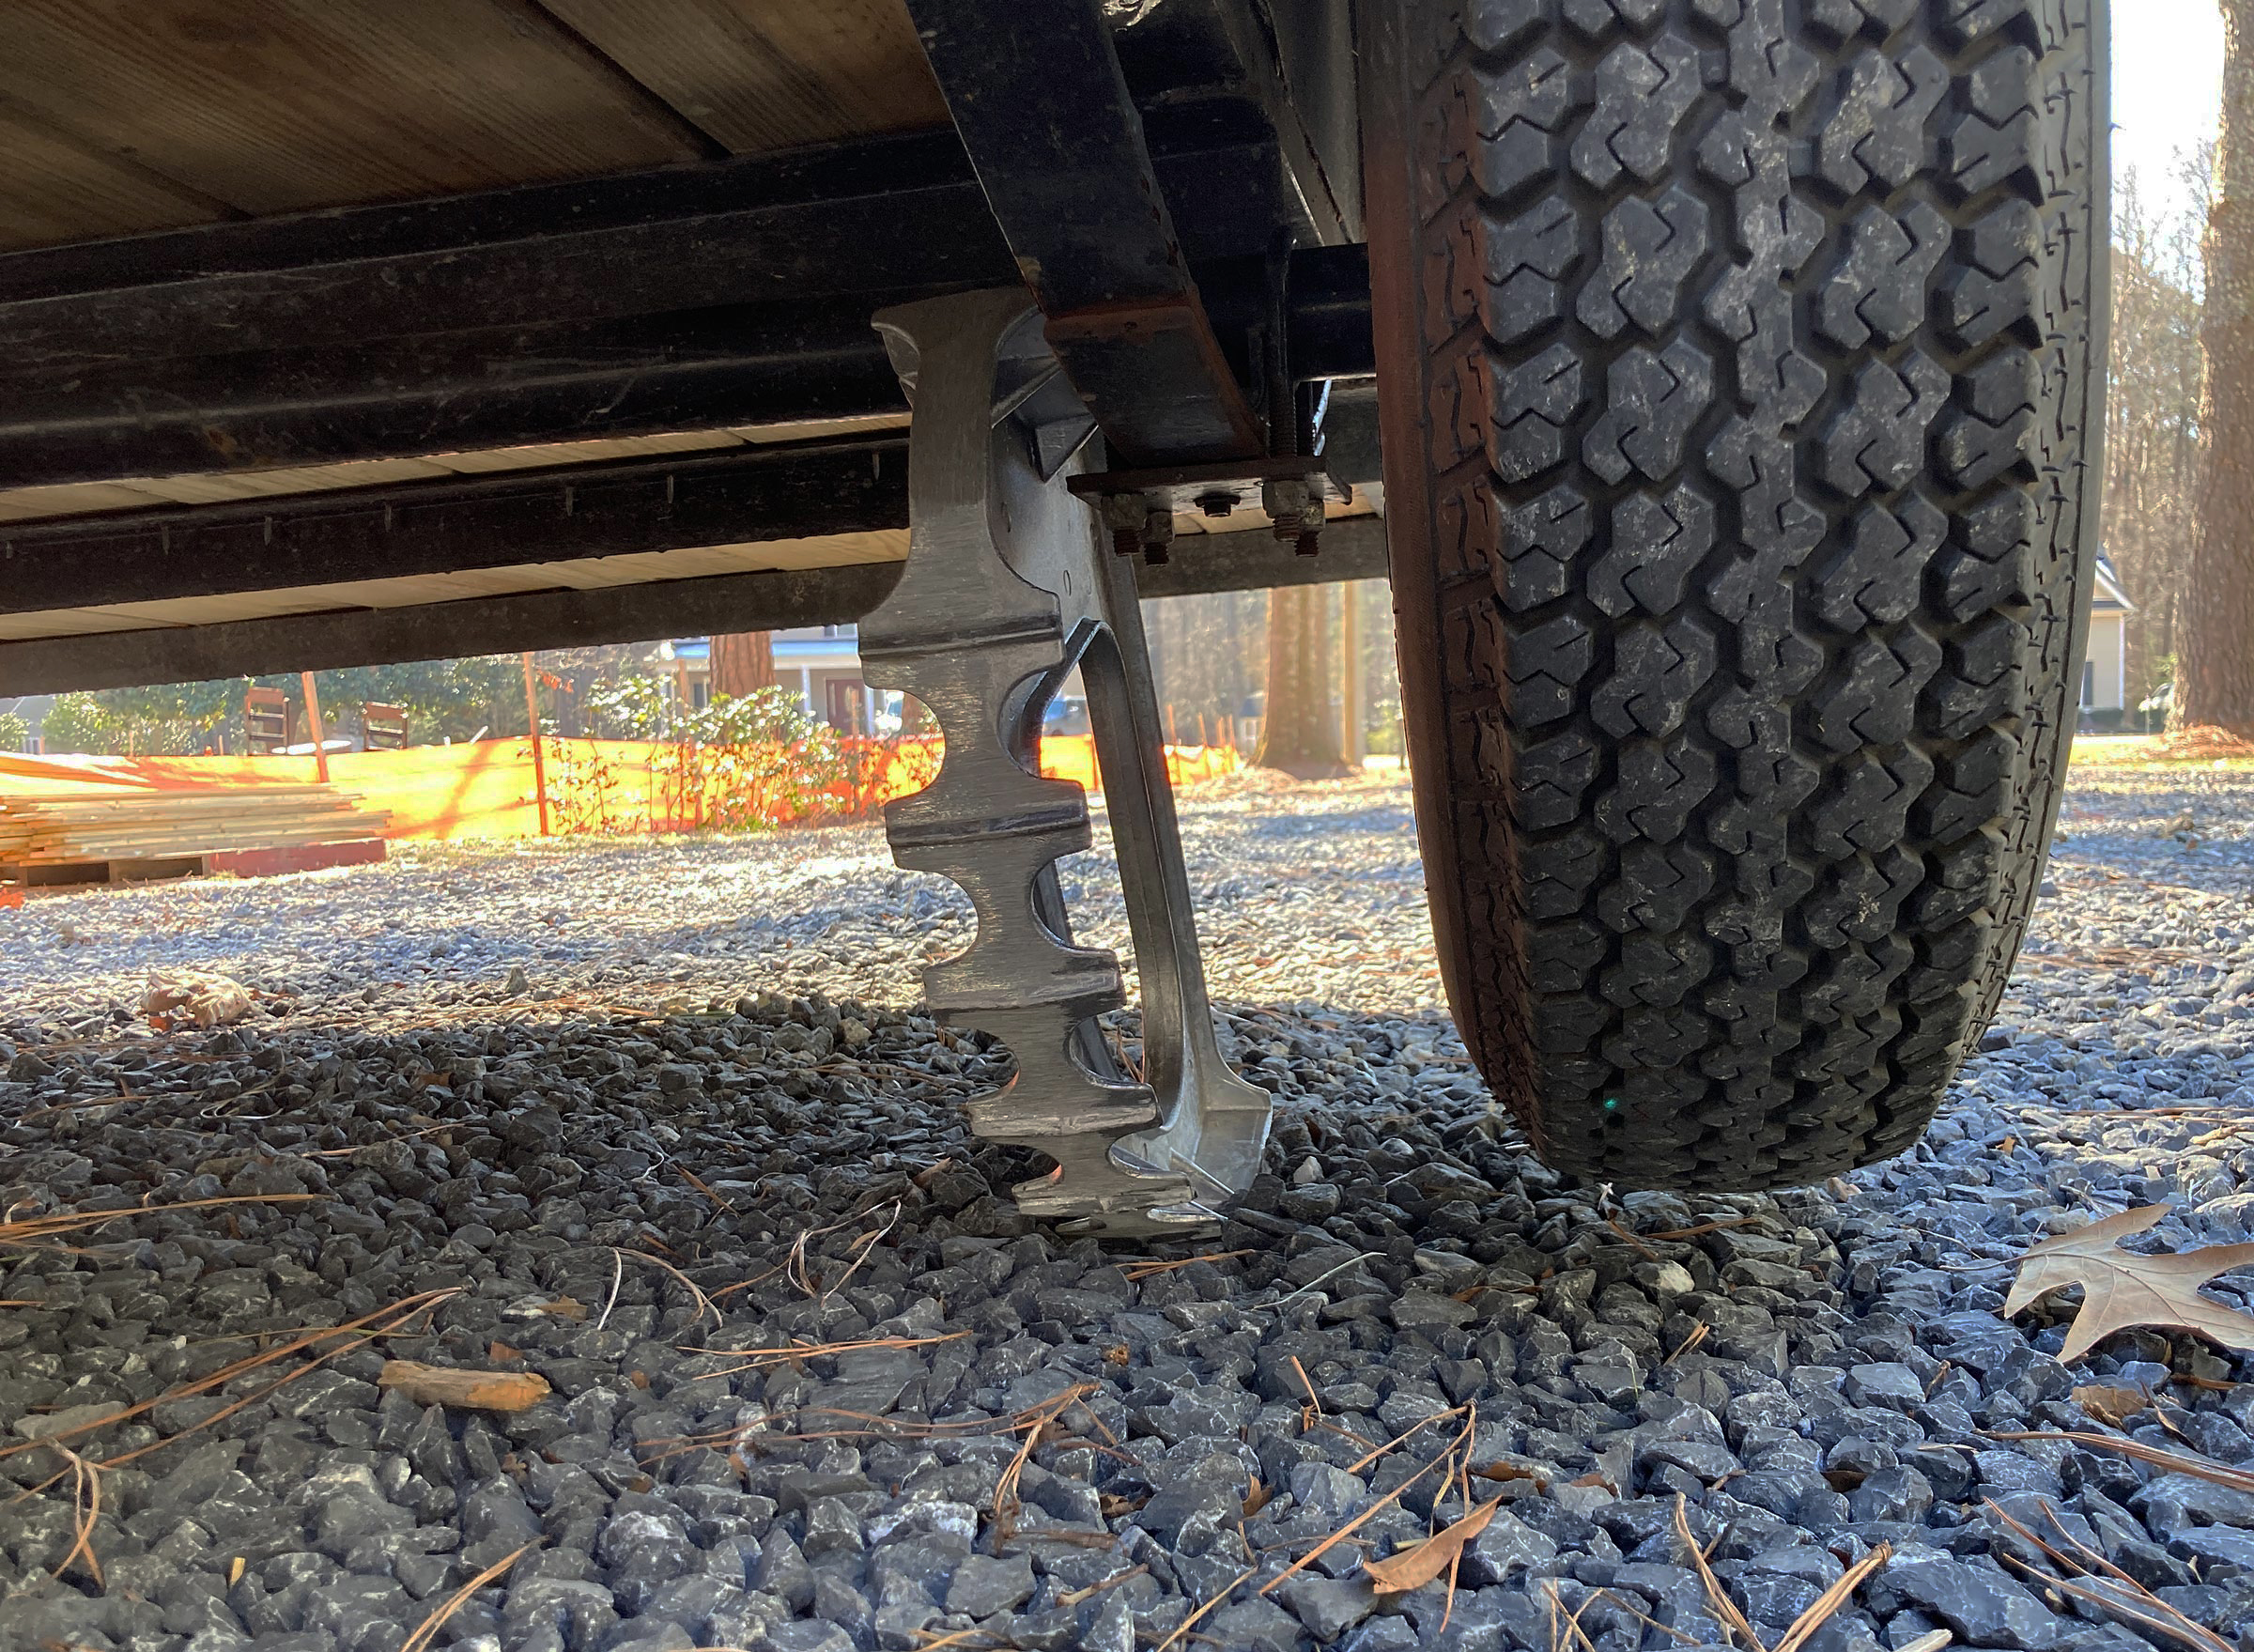
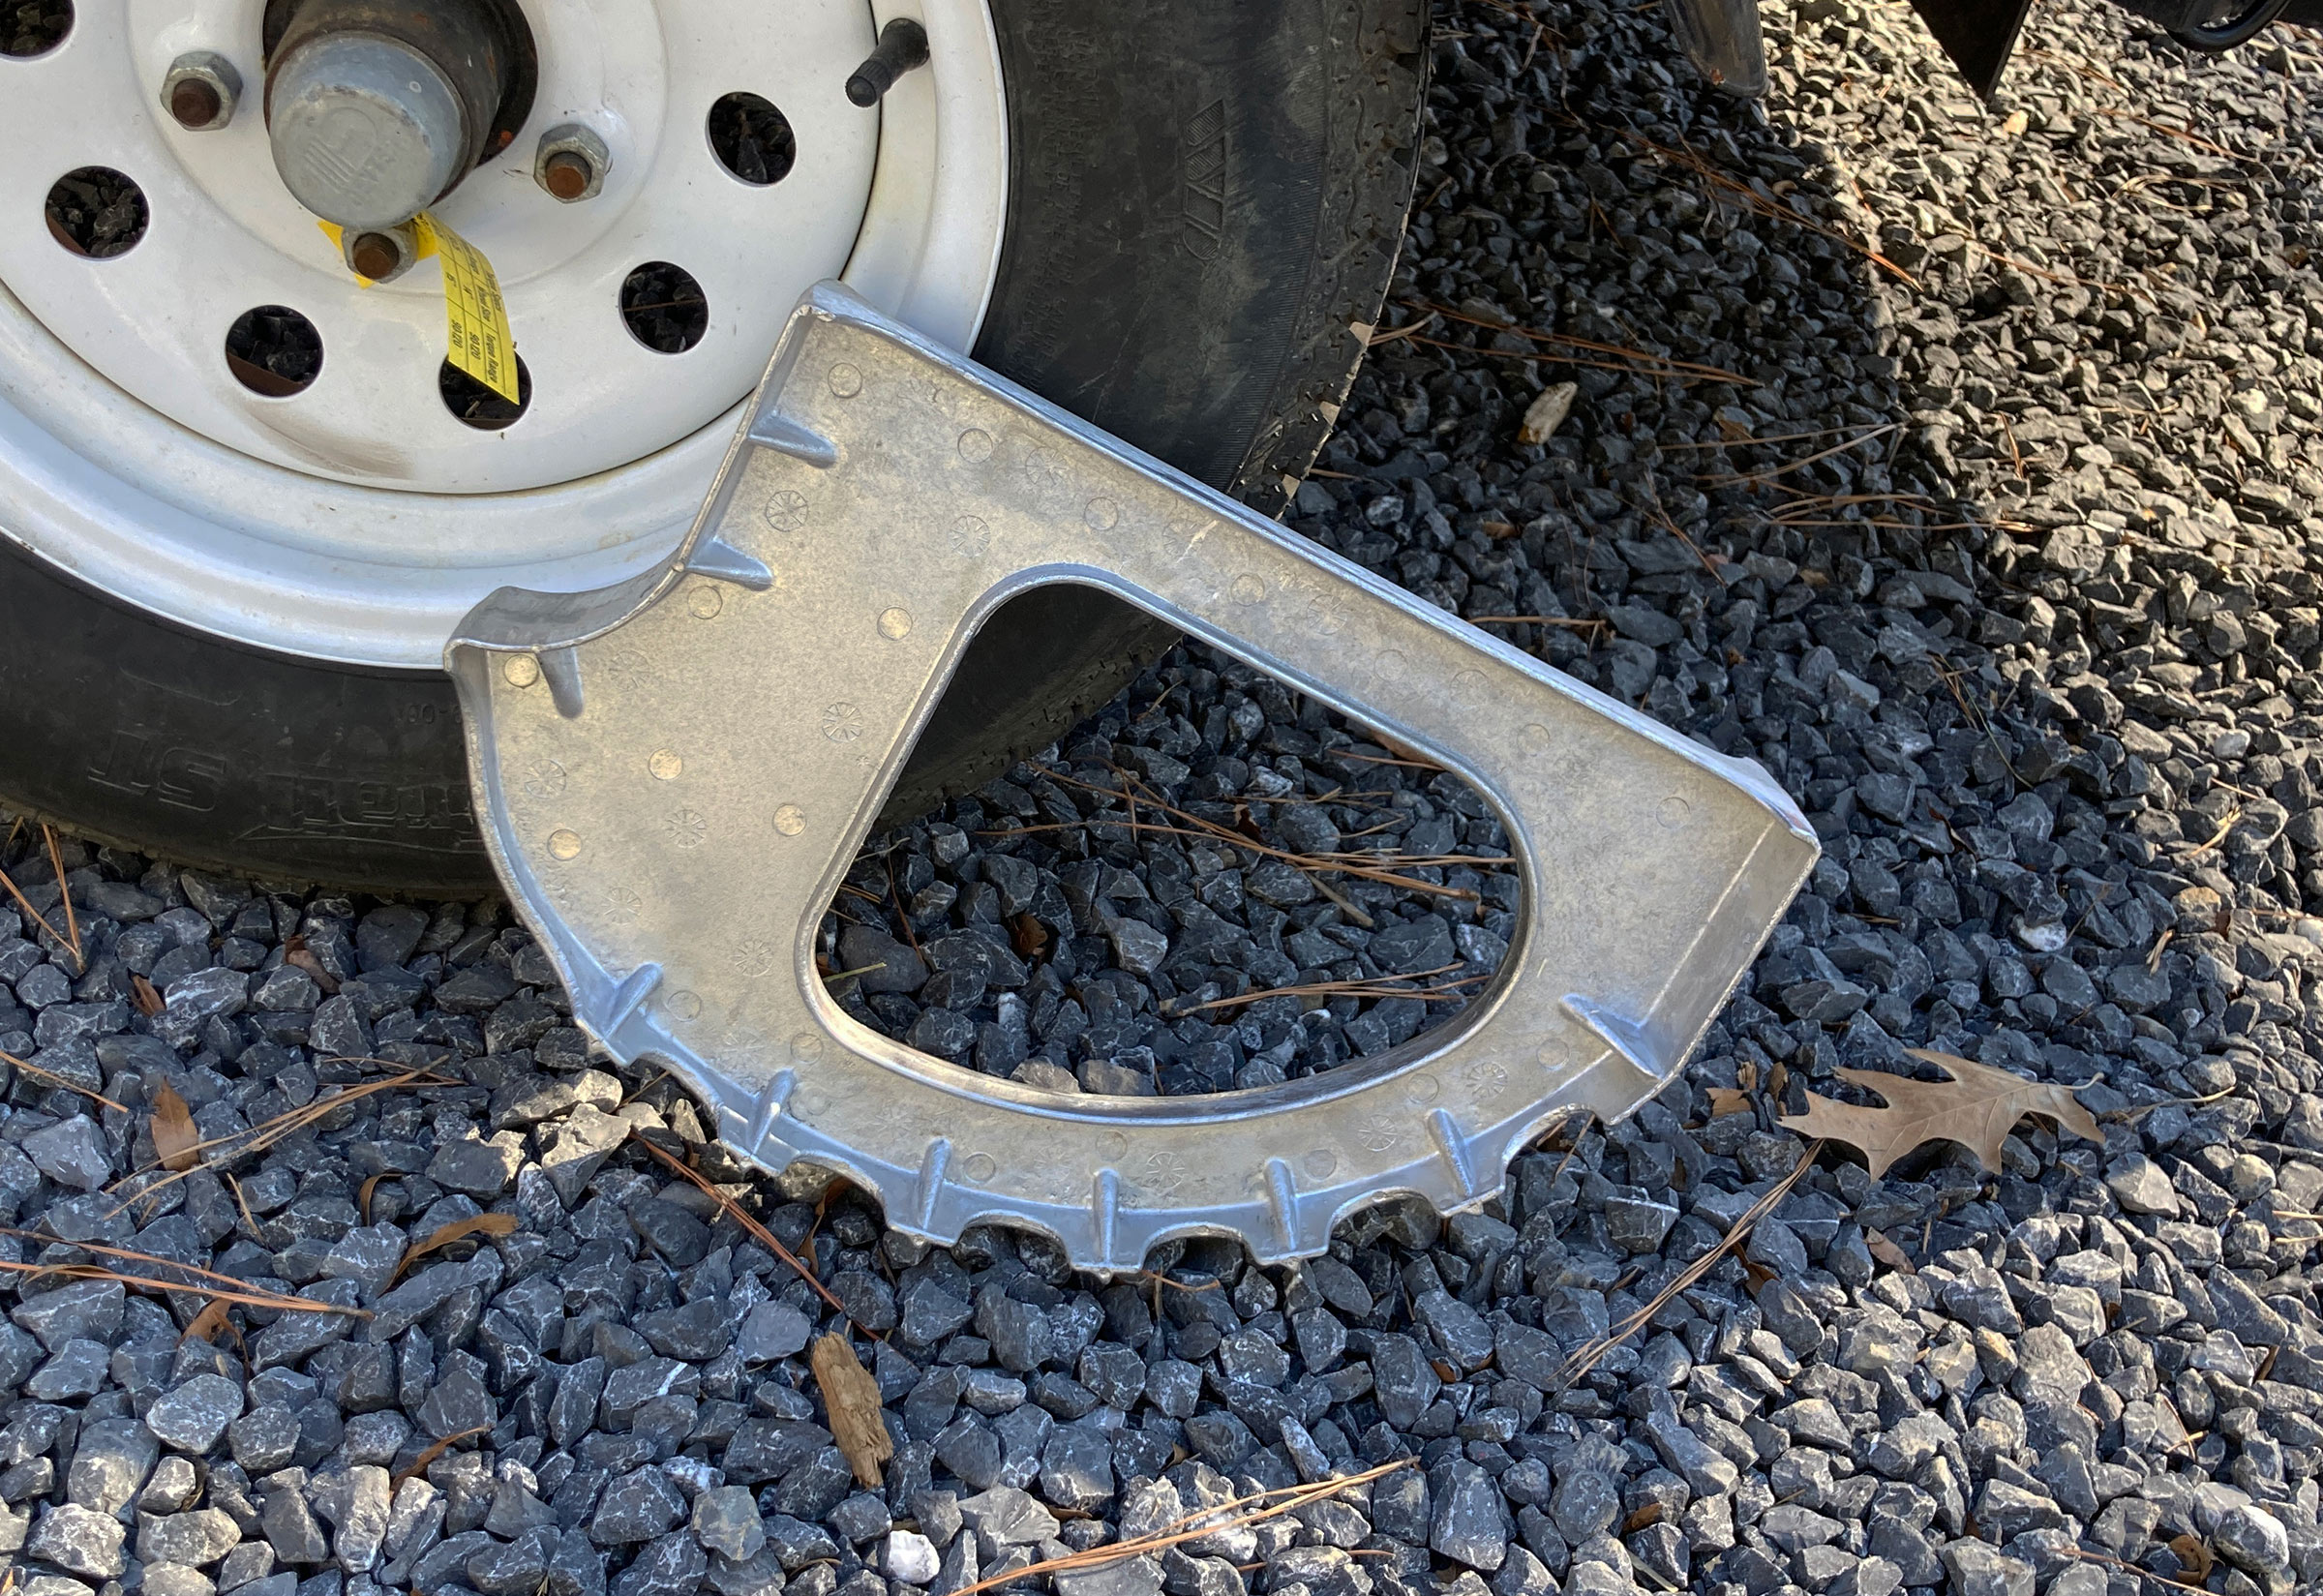
I made the cart for LUNA from old hand-truck wheels and interlocking pieces of 3/4″ plywood. The only part I had to buy was the 36″- length of 5/8″ steel rod for the axle. I didn’t take a cart with me on my 1985-86 cruise because I didn’t have room for it or the need for mobility ashore. I was always at the water’s edge.
For an overnight outing I wouldn’t be filling the boat for a month’s-long cruise, and there would be room to take a few accessories that I once would have considered unnecessary. Thirty-seven years ago, I could lift LUNA’s 135-lb hull to my shoulder and carry her for a short distance, but now I need to be much more cautious about my back, and so I made her a cart of plywood and hand-truck wheels.
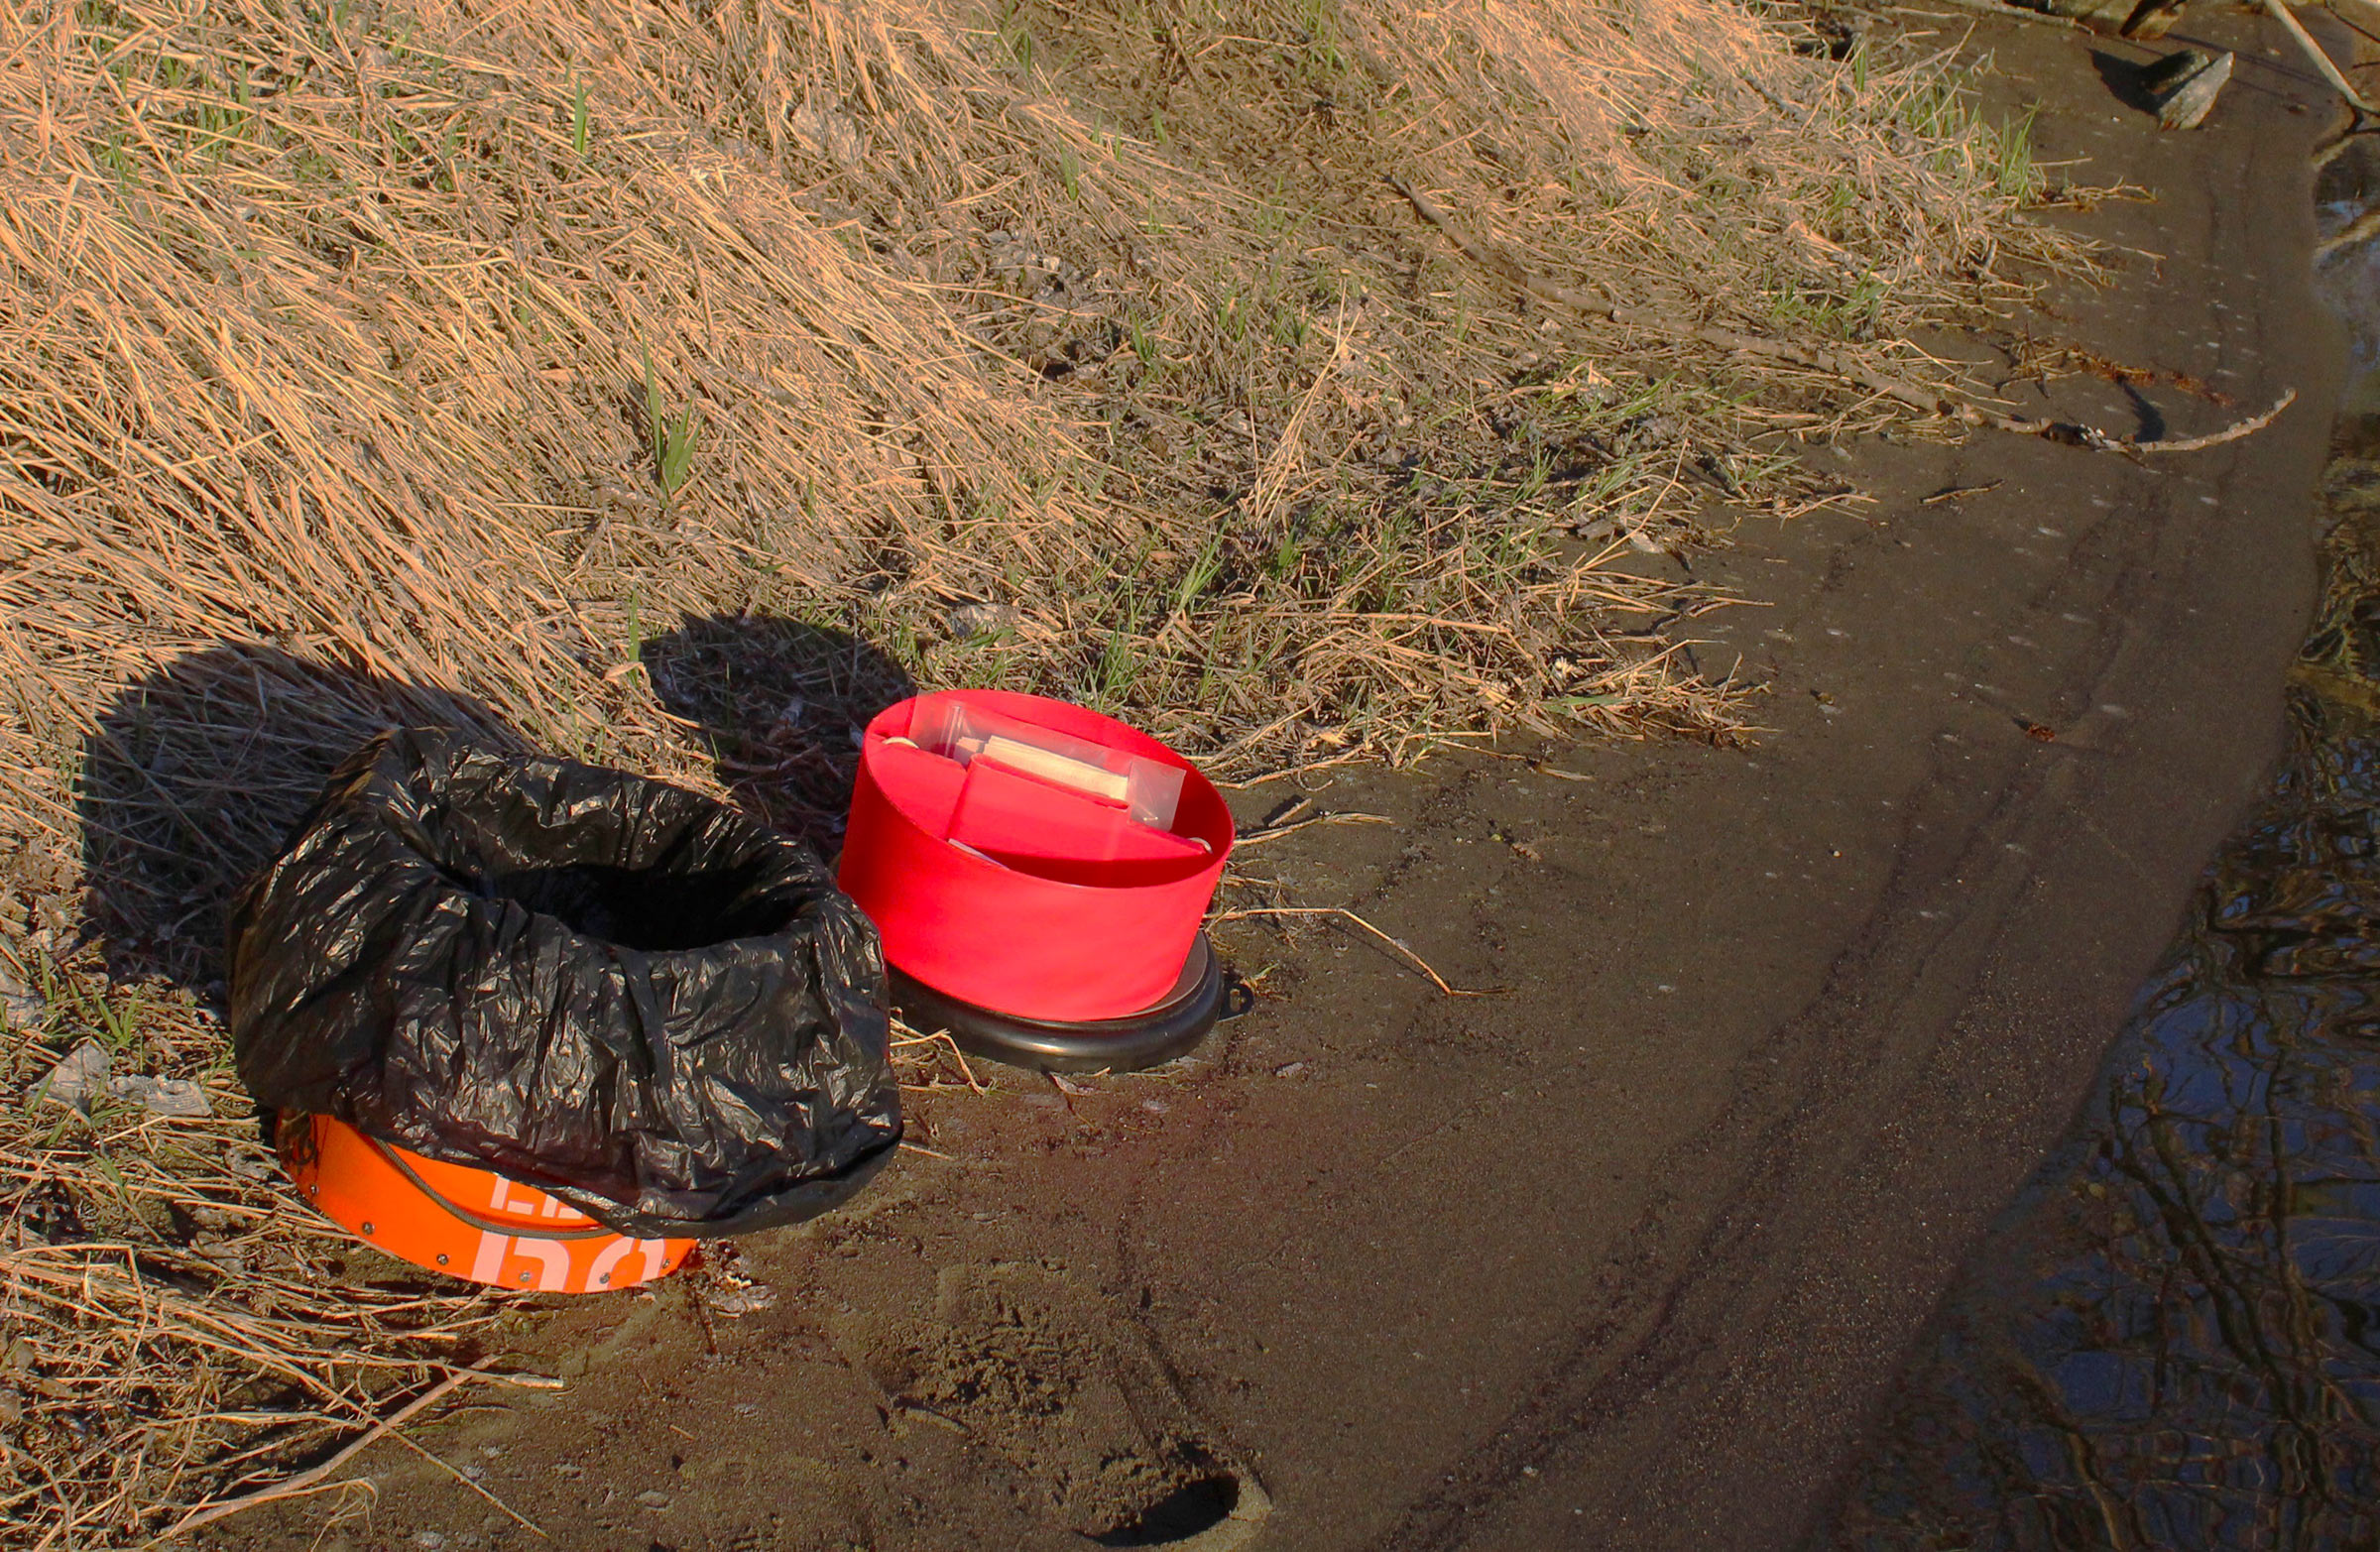
Finding I couldn’t see as well over the bow as I used to, I resorted to a mirror clipped to each oarlock stanchion.
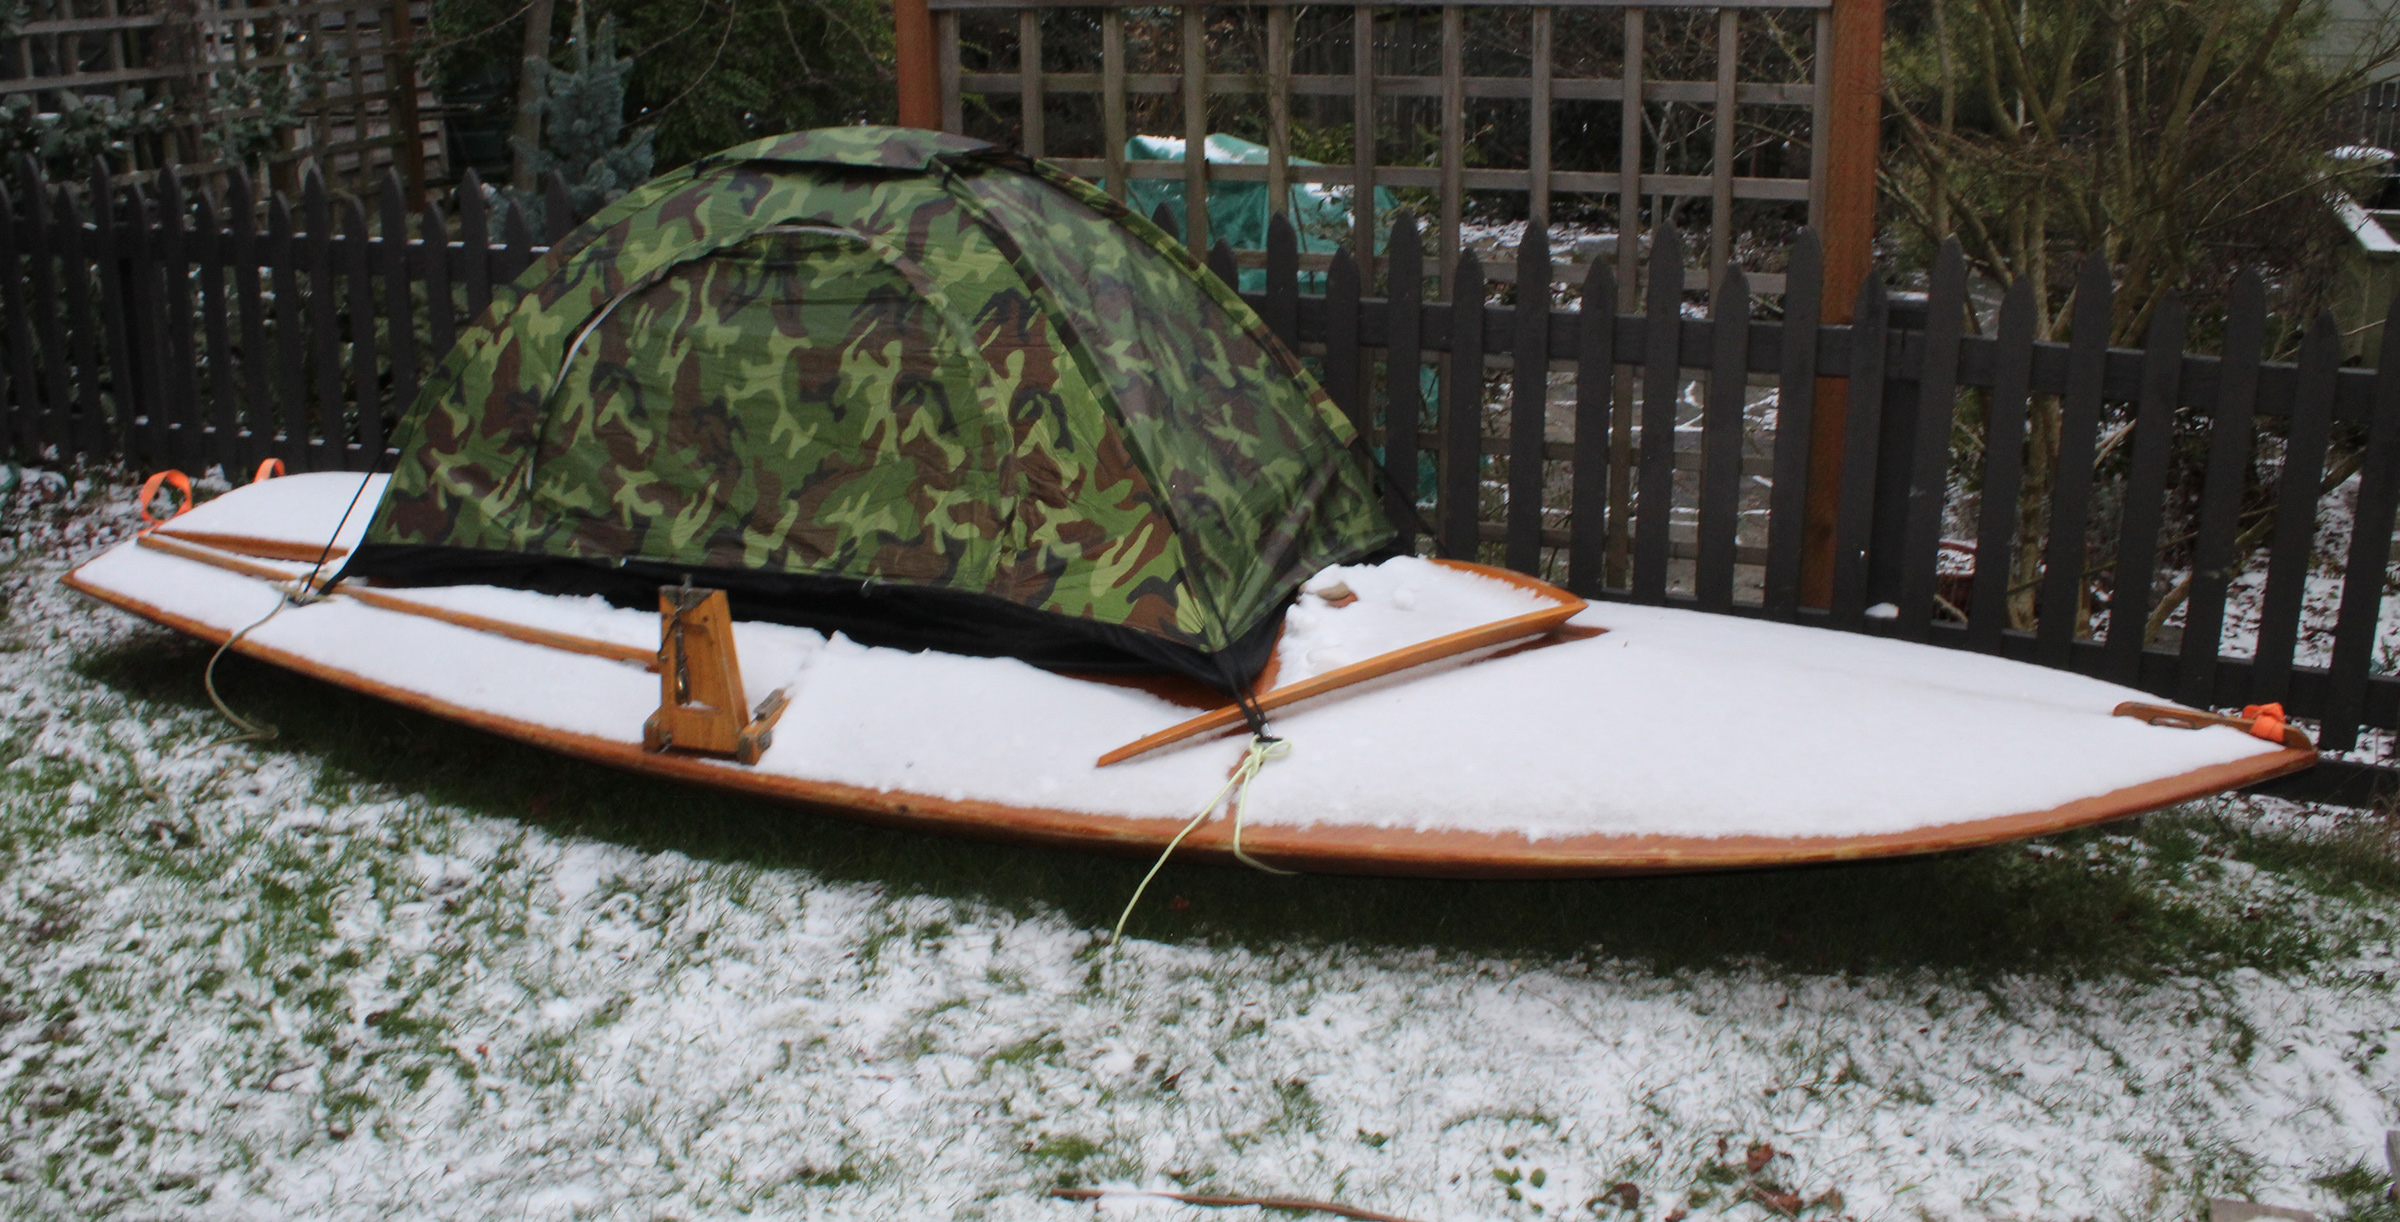
I also mounted two wide-angle mirrors to help me see where I was headed. During my long voyage, I had never felt the need for mirrors on LUNA and felt pride in how far I could turn my head to look over the bow. My neck doesn’t provide the same range of motion now. To offer more shelter, I bought a $27 tent and cut a hole in its floor to fit around the cockpit coaming. There had been a few rainy nights on my cruise where I had just pulled the hatch over the cockpit, but I discovered in my recent backyard naps that I’d lost the tolerance for that.
The night I’d planned to sleep aboard LUNA while in my back yard, I gave up before an early morning dusting of snow.
I chose a cold February night to sleep aboard LUNA in the back yard. I slipped a self-inflating sleeping pad in the bottom with one end tucked under the foredeck and the other butted against the footboard as I had during that winter cruise long ago. It took me a long time to get into the sleeping bag. Once in, I was able to lie on my left side, as I normally do, but I was far from comfortable. There wasn’t room to put one knee on top of the other, so I had to stagger them. I had plenty of room above me because of the tent, but I was facing the port side and felt boxed in. My chest tightened. This wasn’t going to work, and I couldn’t afford to spend a sleepless night with this trial. I clawed my way out of the sleeping bag and sat up in the cockpit. I tried to put my shoes on, but my feet seemed to be out of reach. My knees don’t bend as they used to, and it was made worse by the confines of the cockpit; I had to pull on a shin to get a foot close enough to put a shoe on. I retreated to my bedroom.
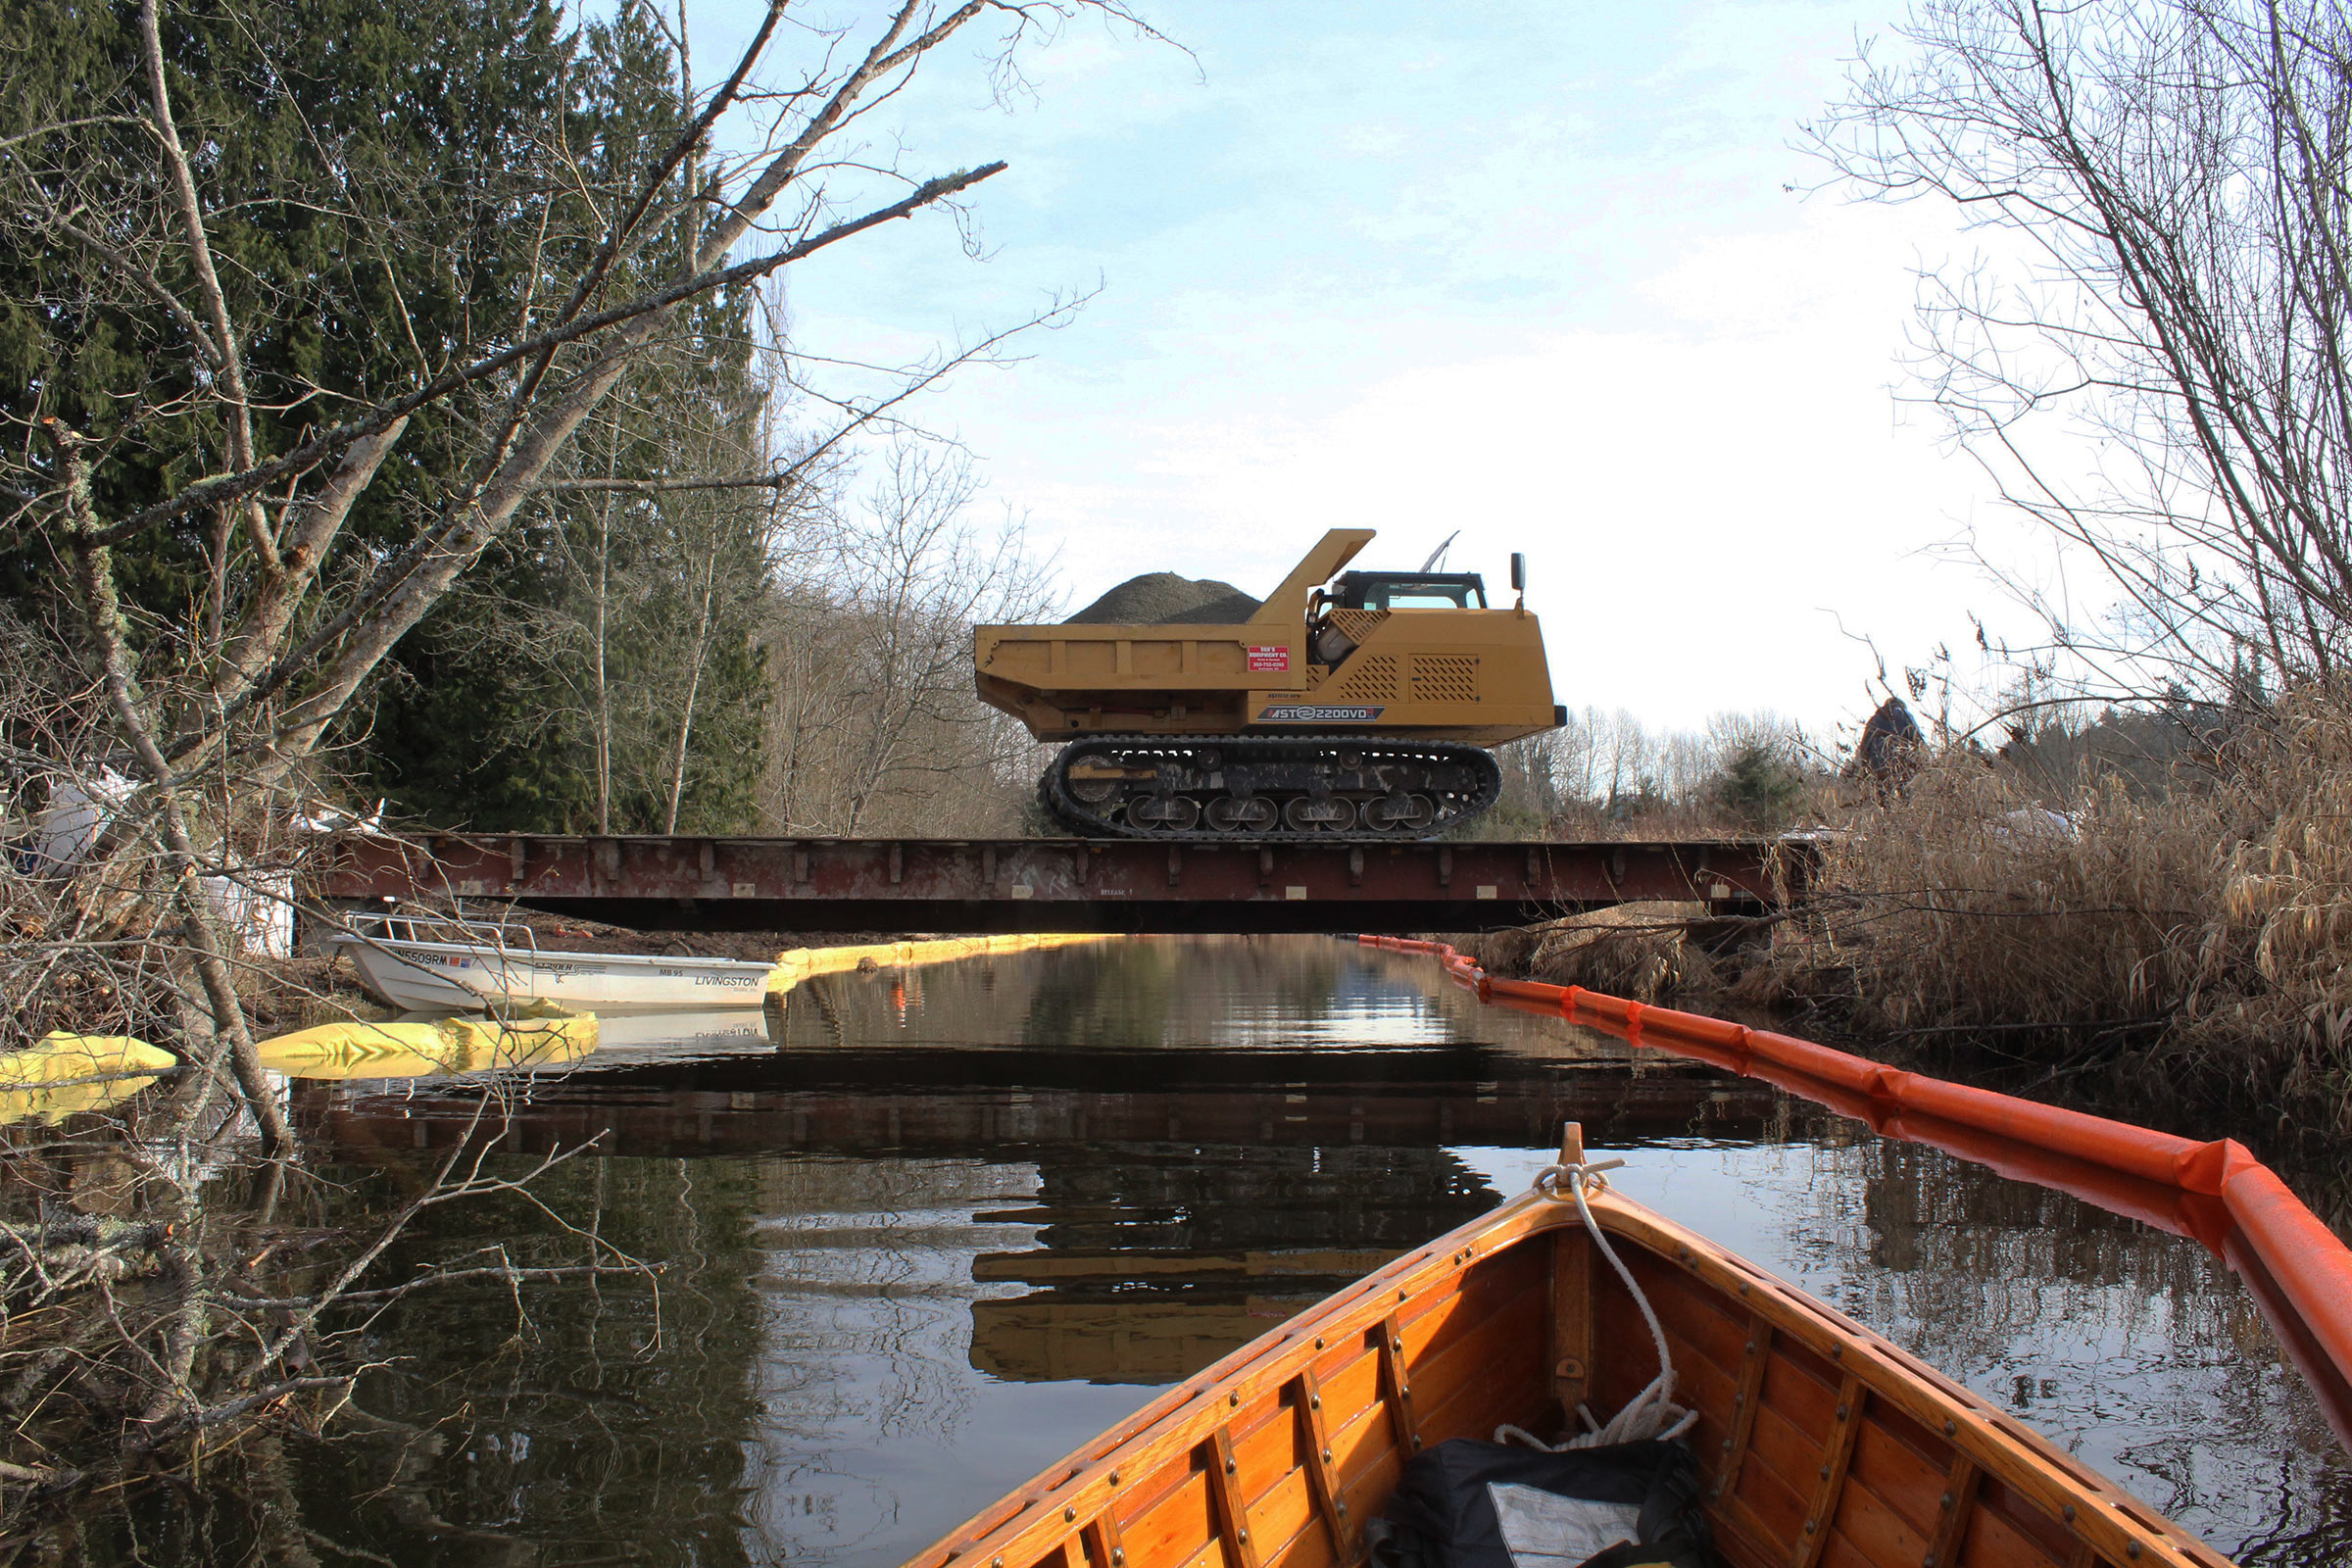
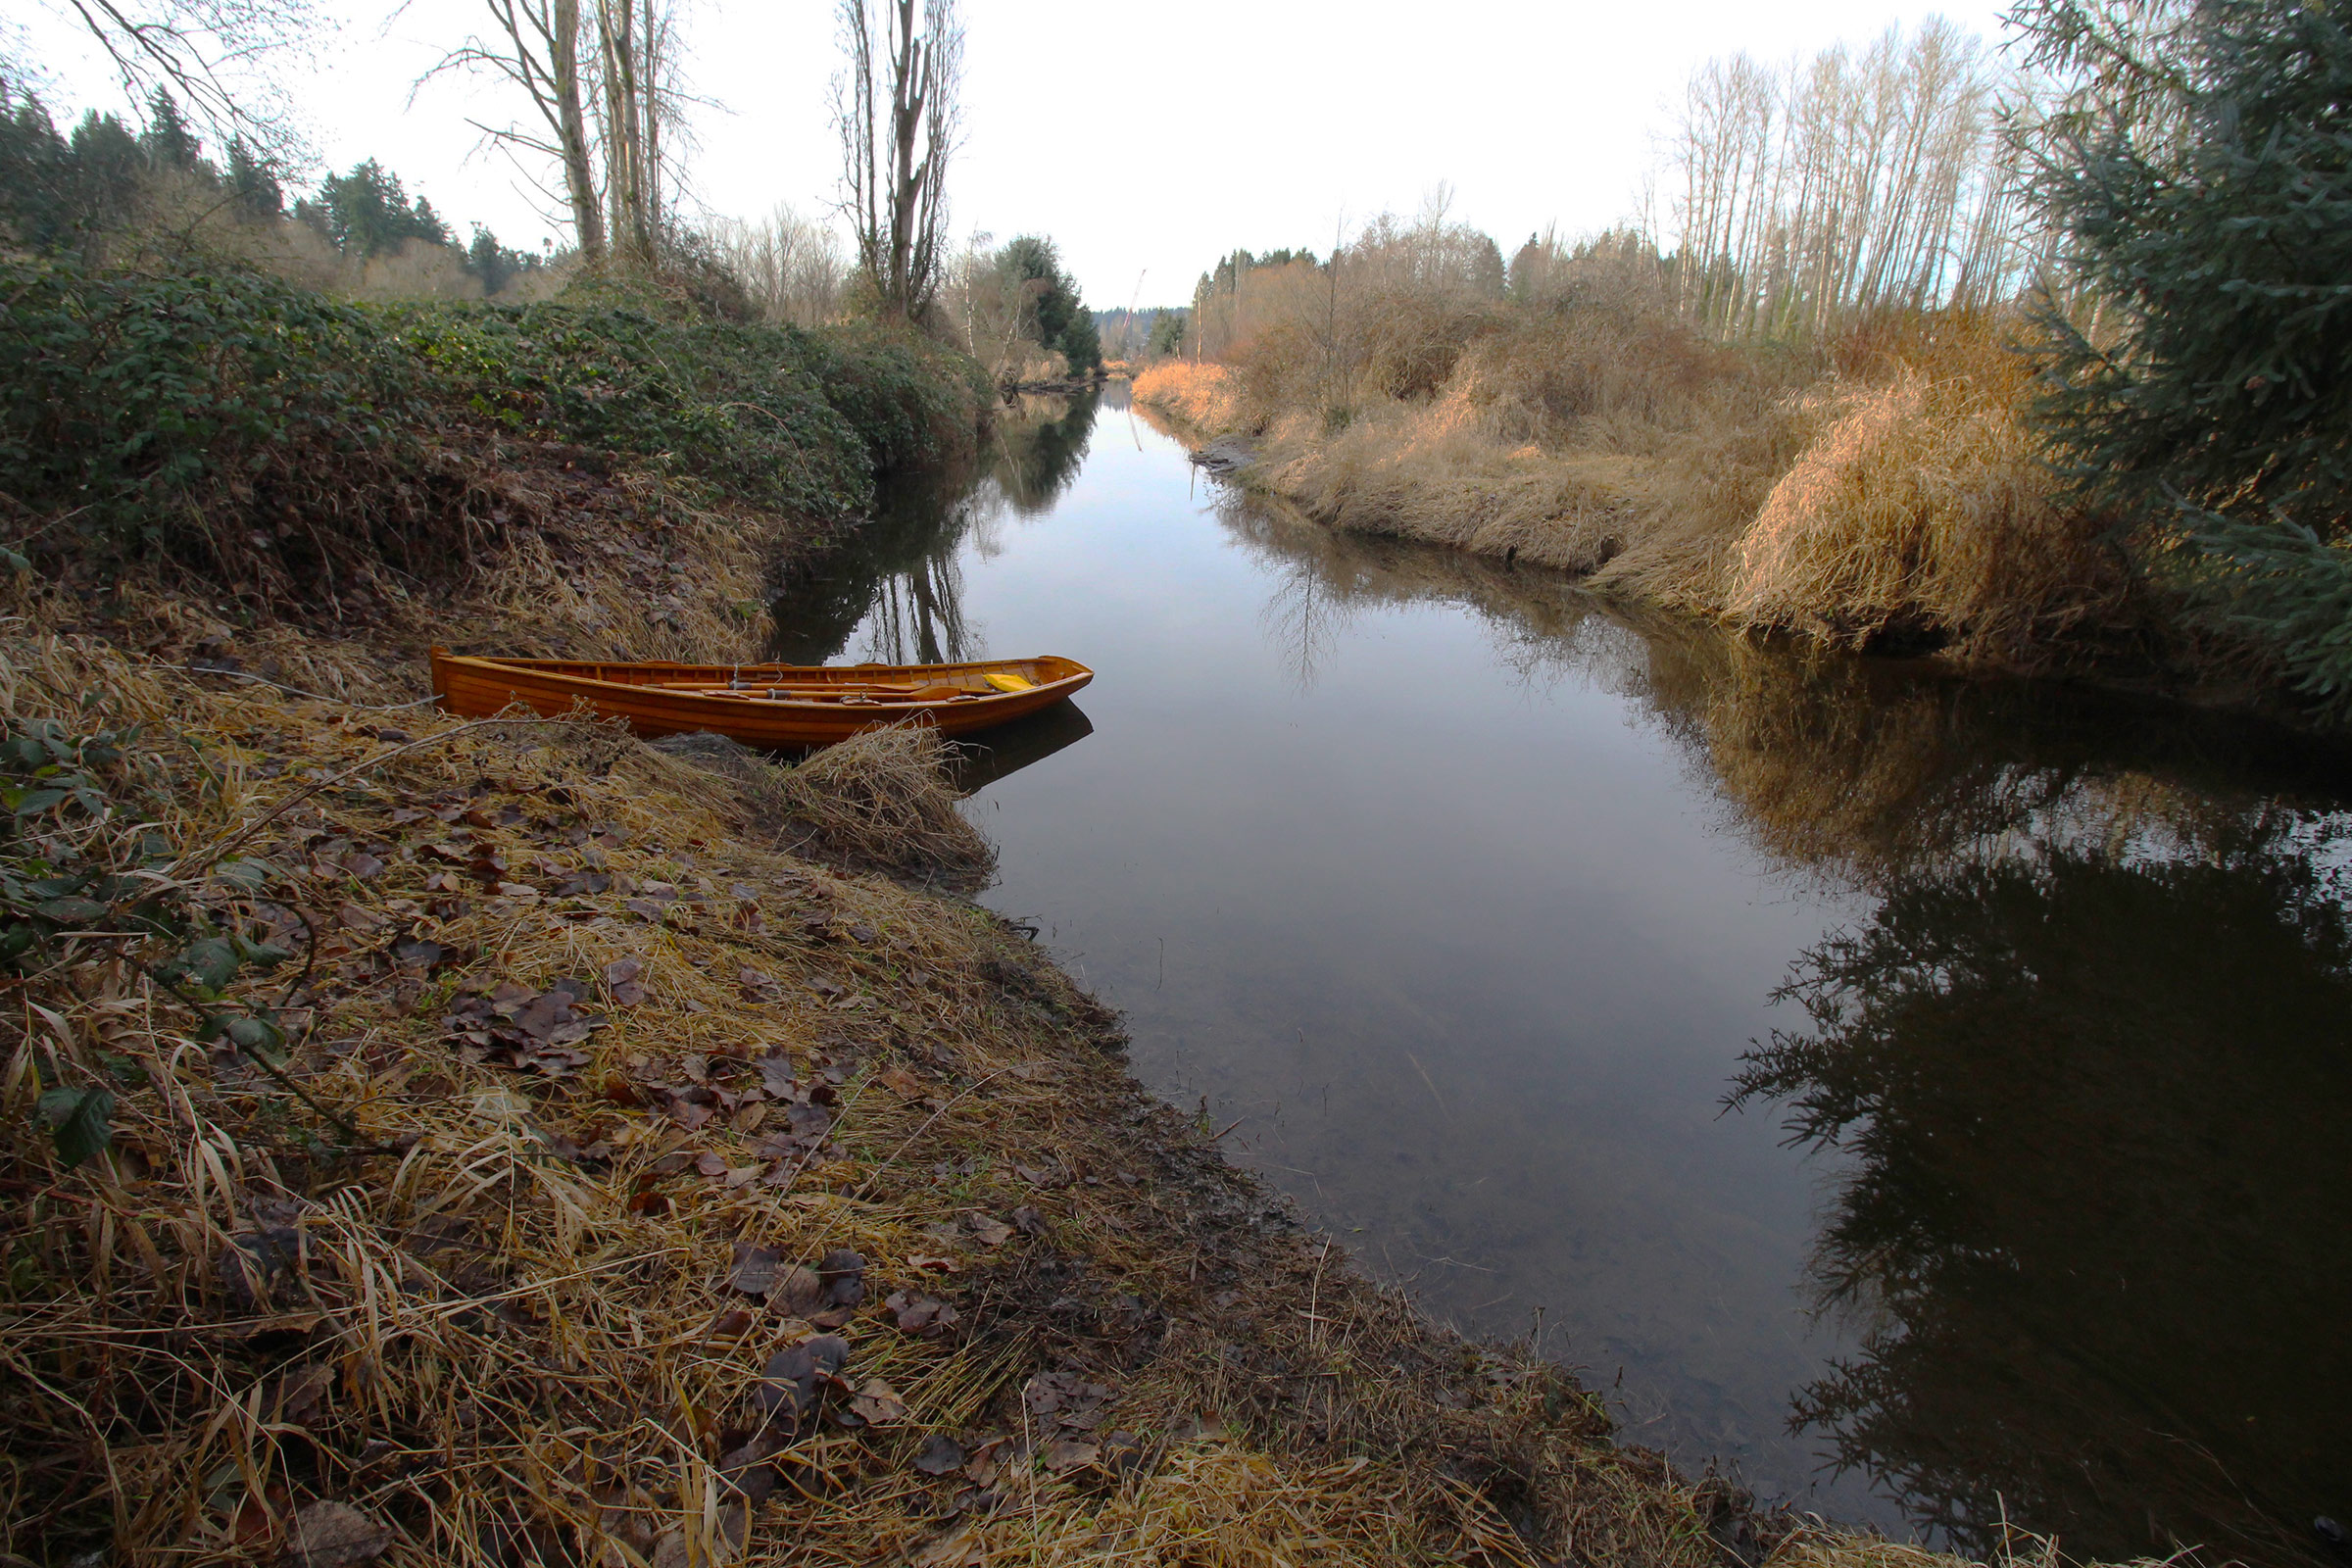
I hadn’t entirely given up on the idea of sleeping aboard LUNA and a few days later drove with her on the roof racks to a lake where I planned to spend a night. I lowered her to the cart and rolled her to the water’s edge. It was just a 150-yard row to the only island on the lake, a tree-crowned islet one-third the size of a football field.
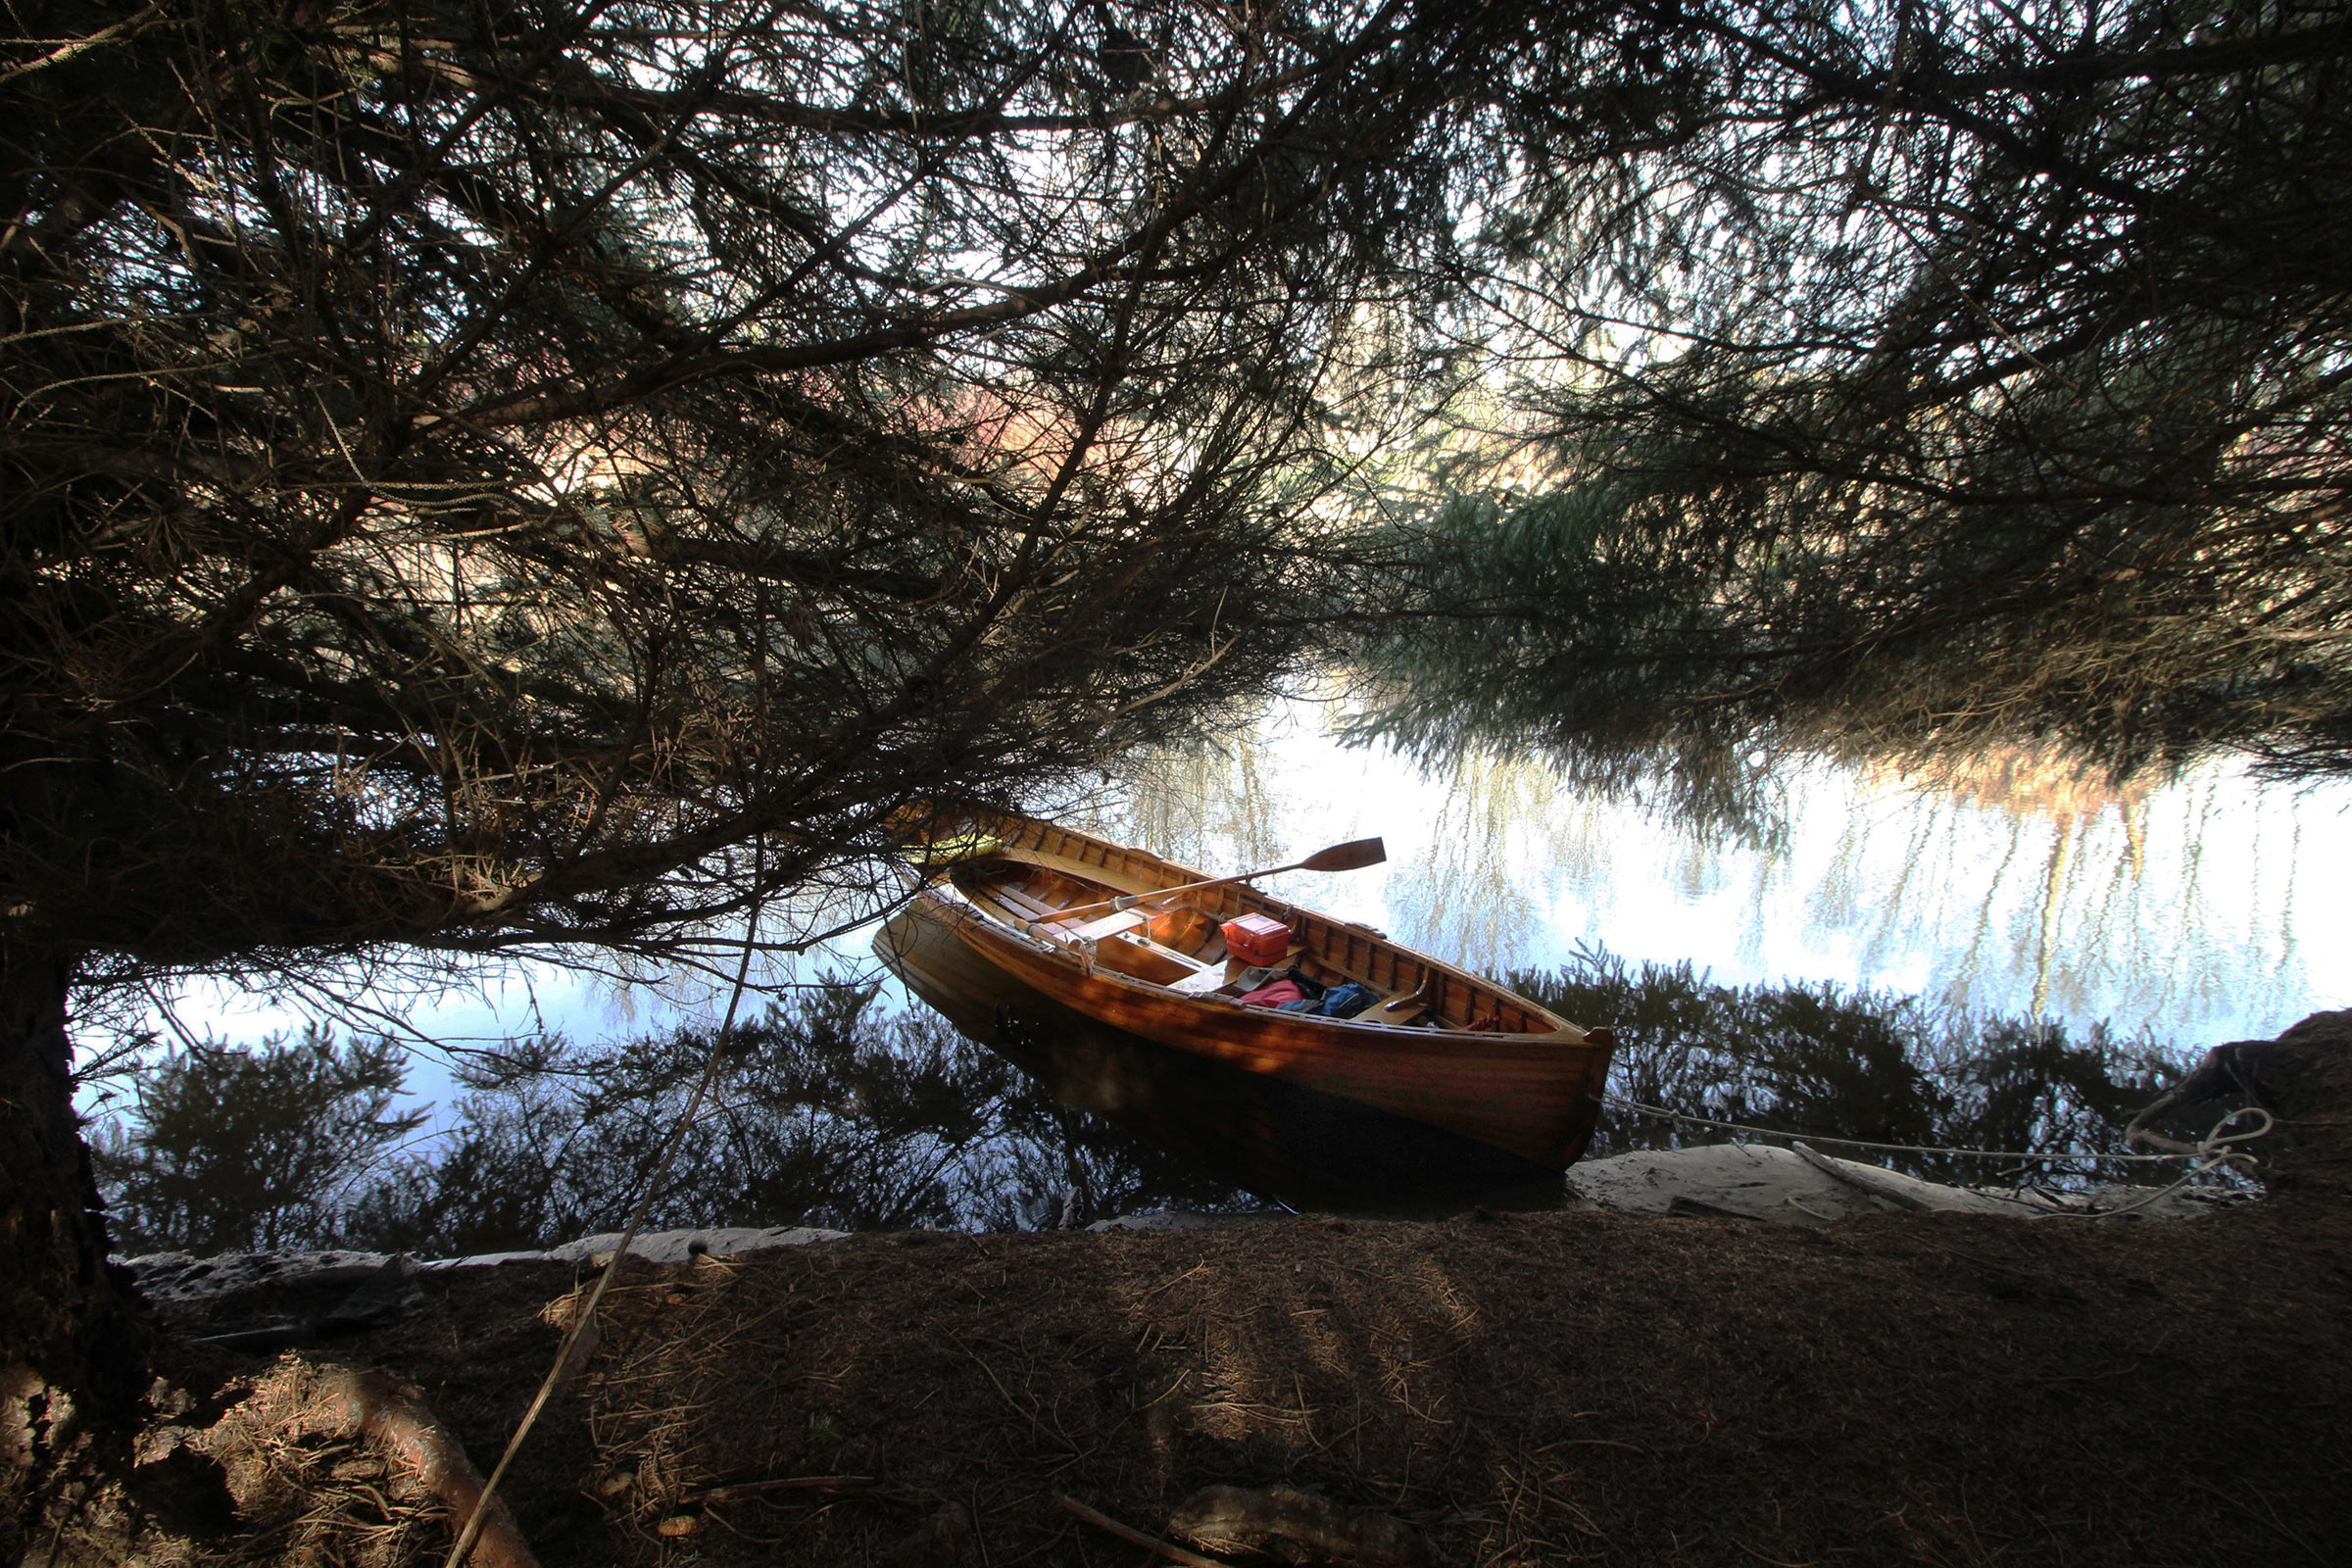
This little cove was where I had imagined spending a night aboard LUNA.
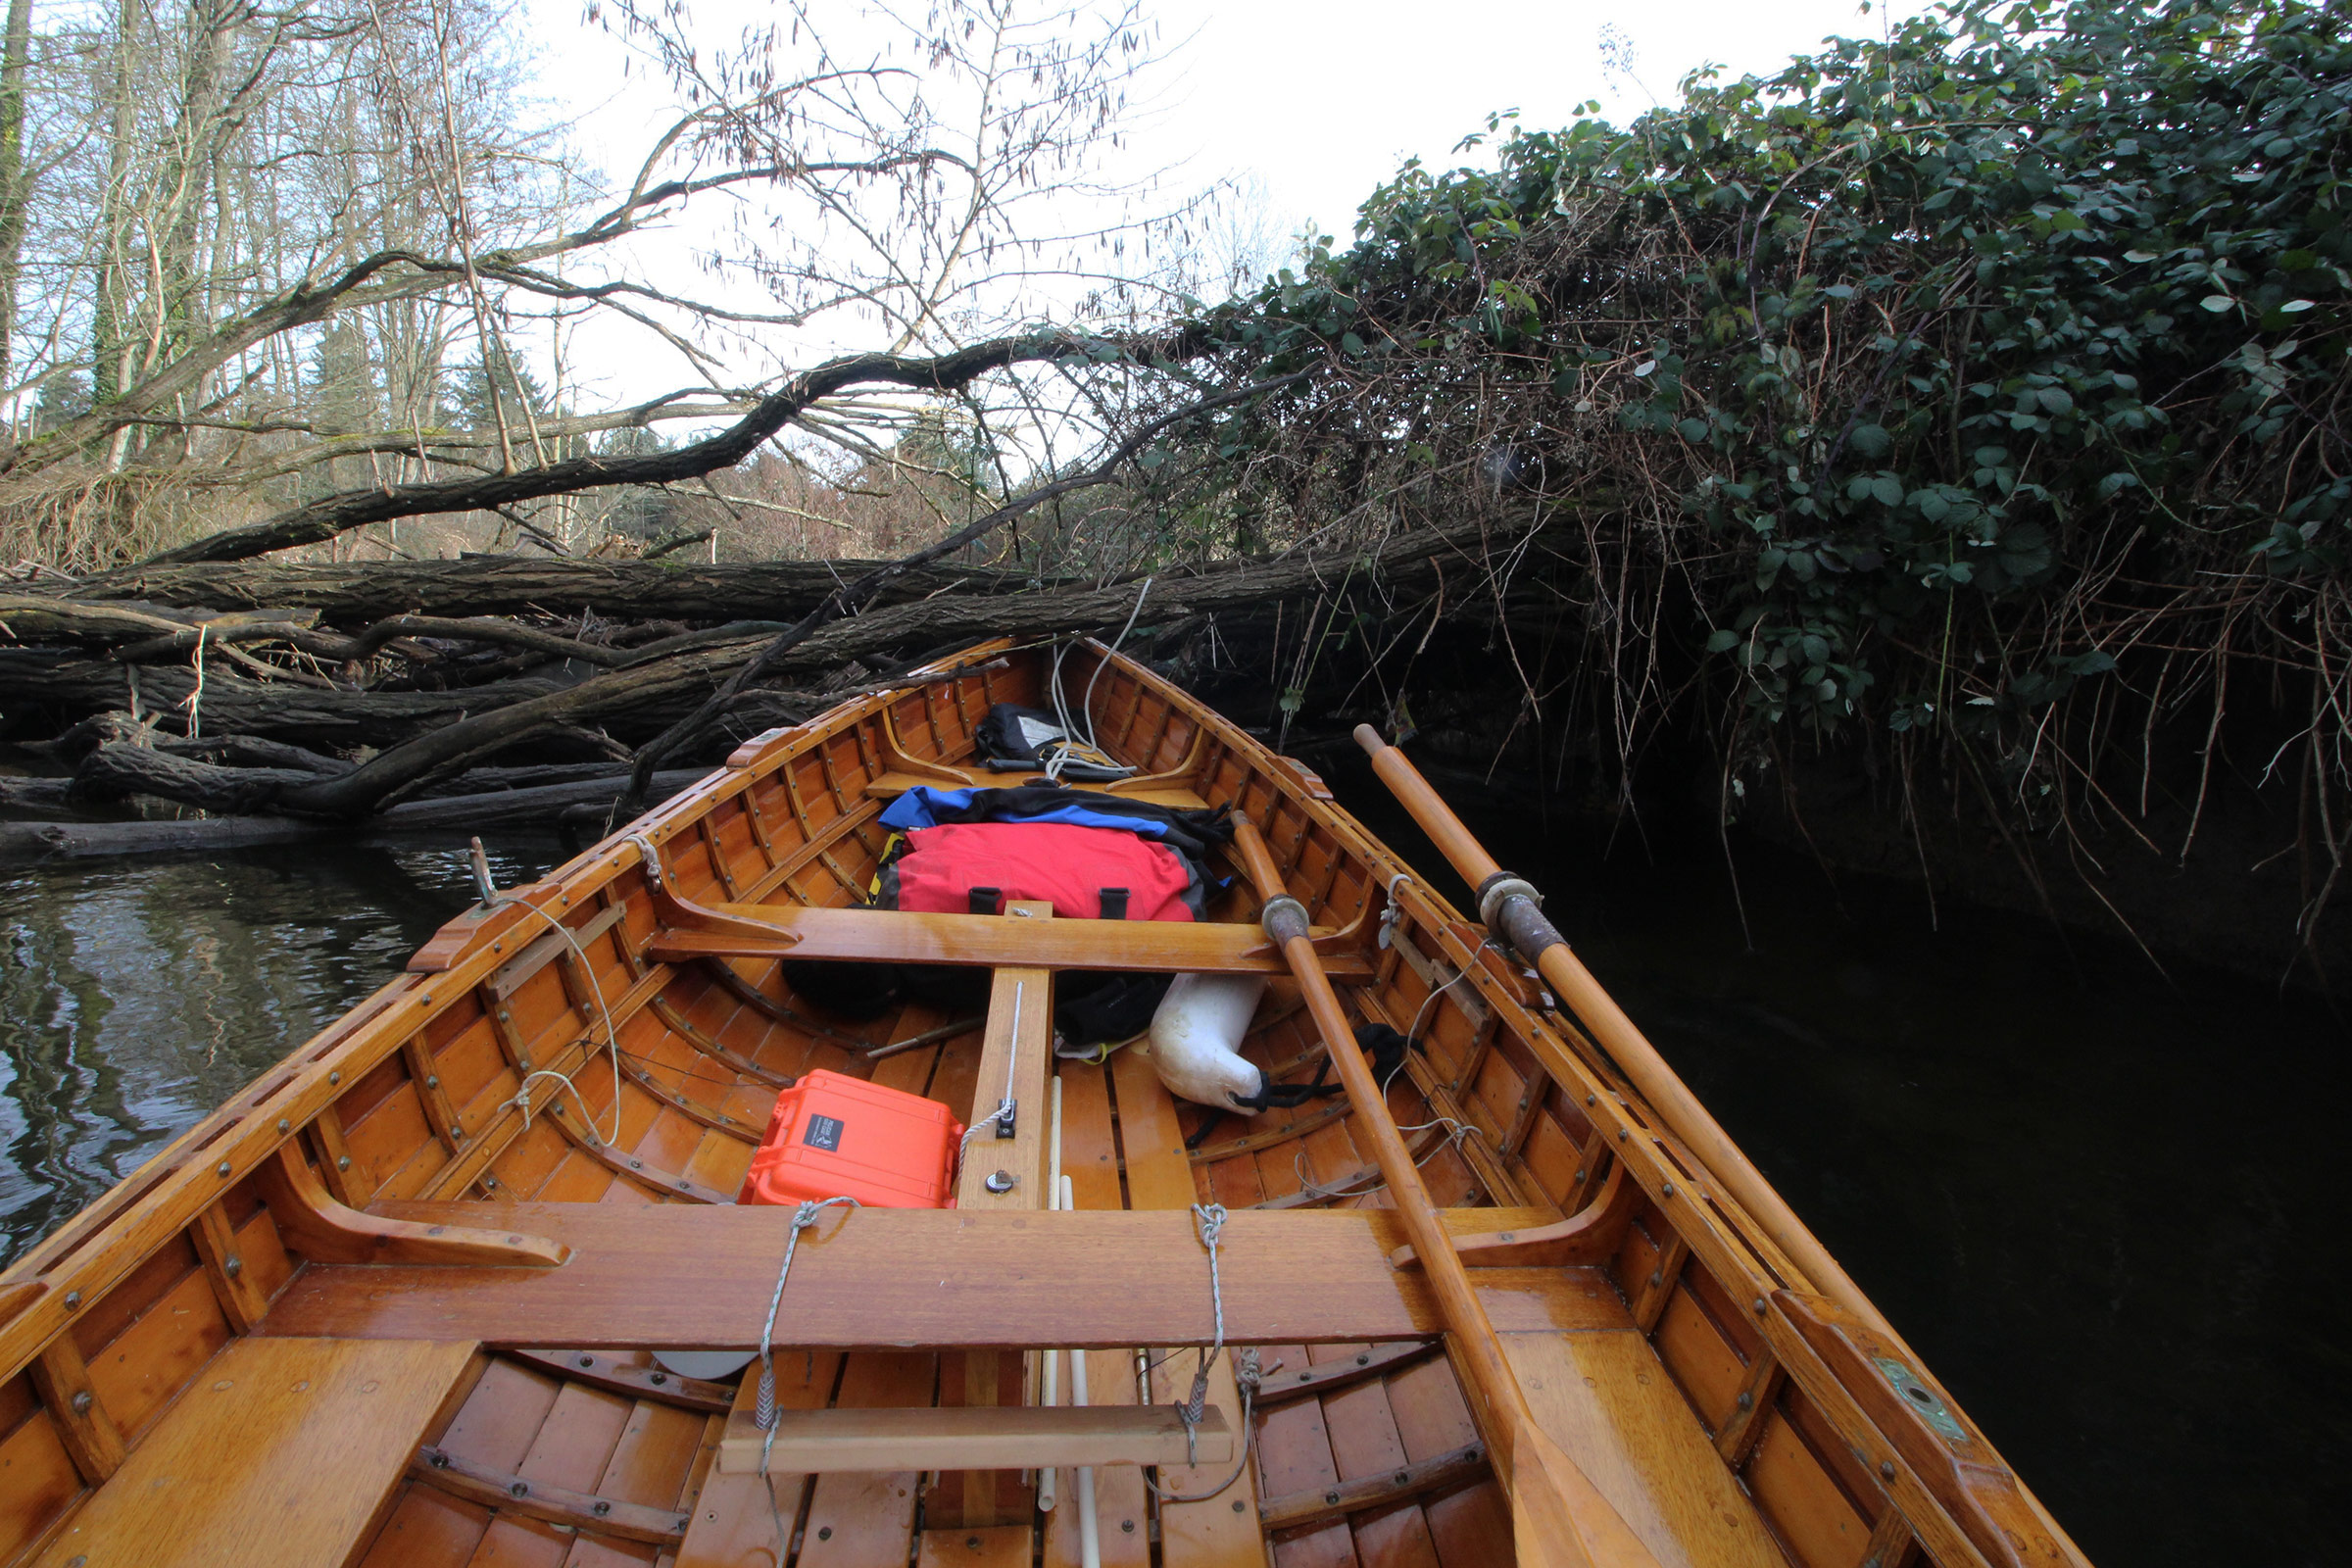
On the east side of the island, there is a cove just wide enough for LUNA’s oar span. Once there, I backed in and crawled aft across the deck just as the brass strip on her skeg ground against the rocks, bringing the boat to an abrupt stop.
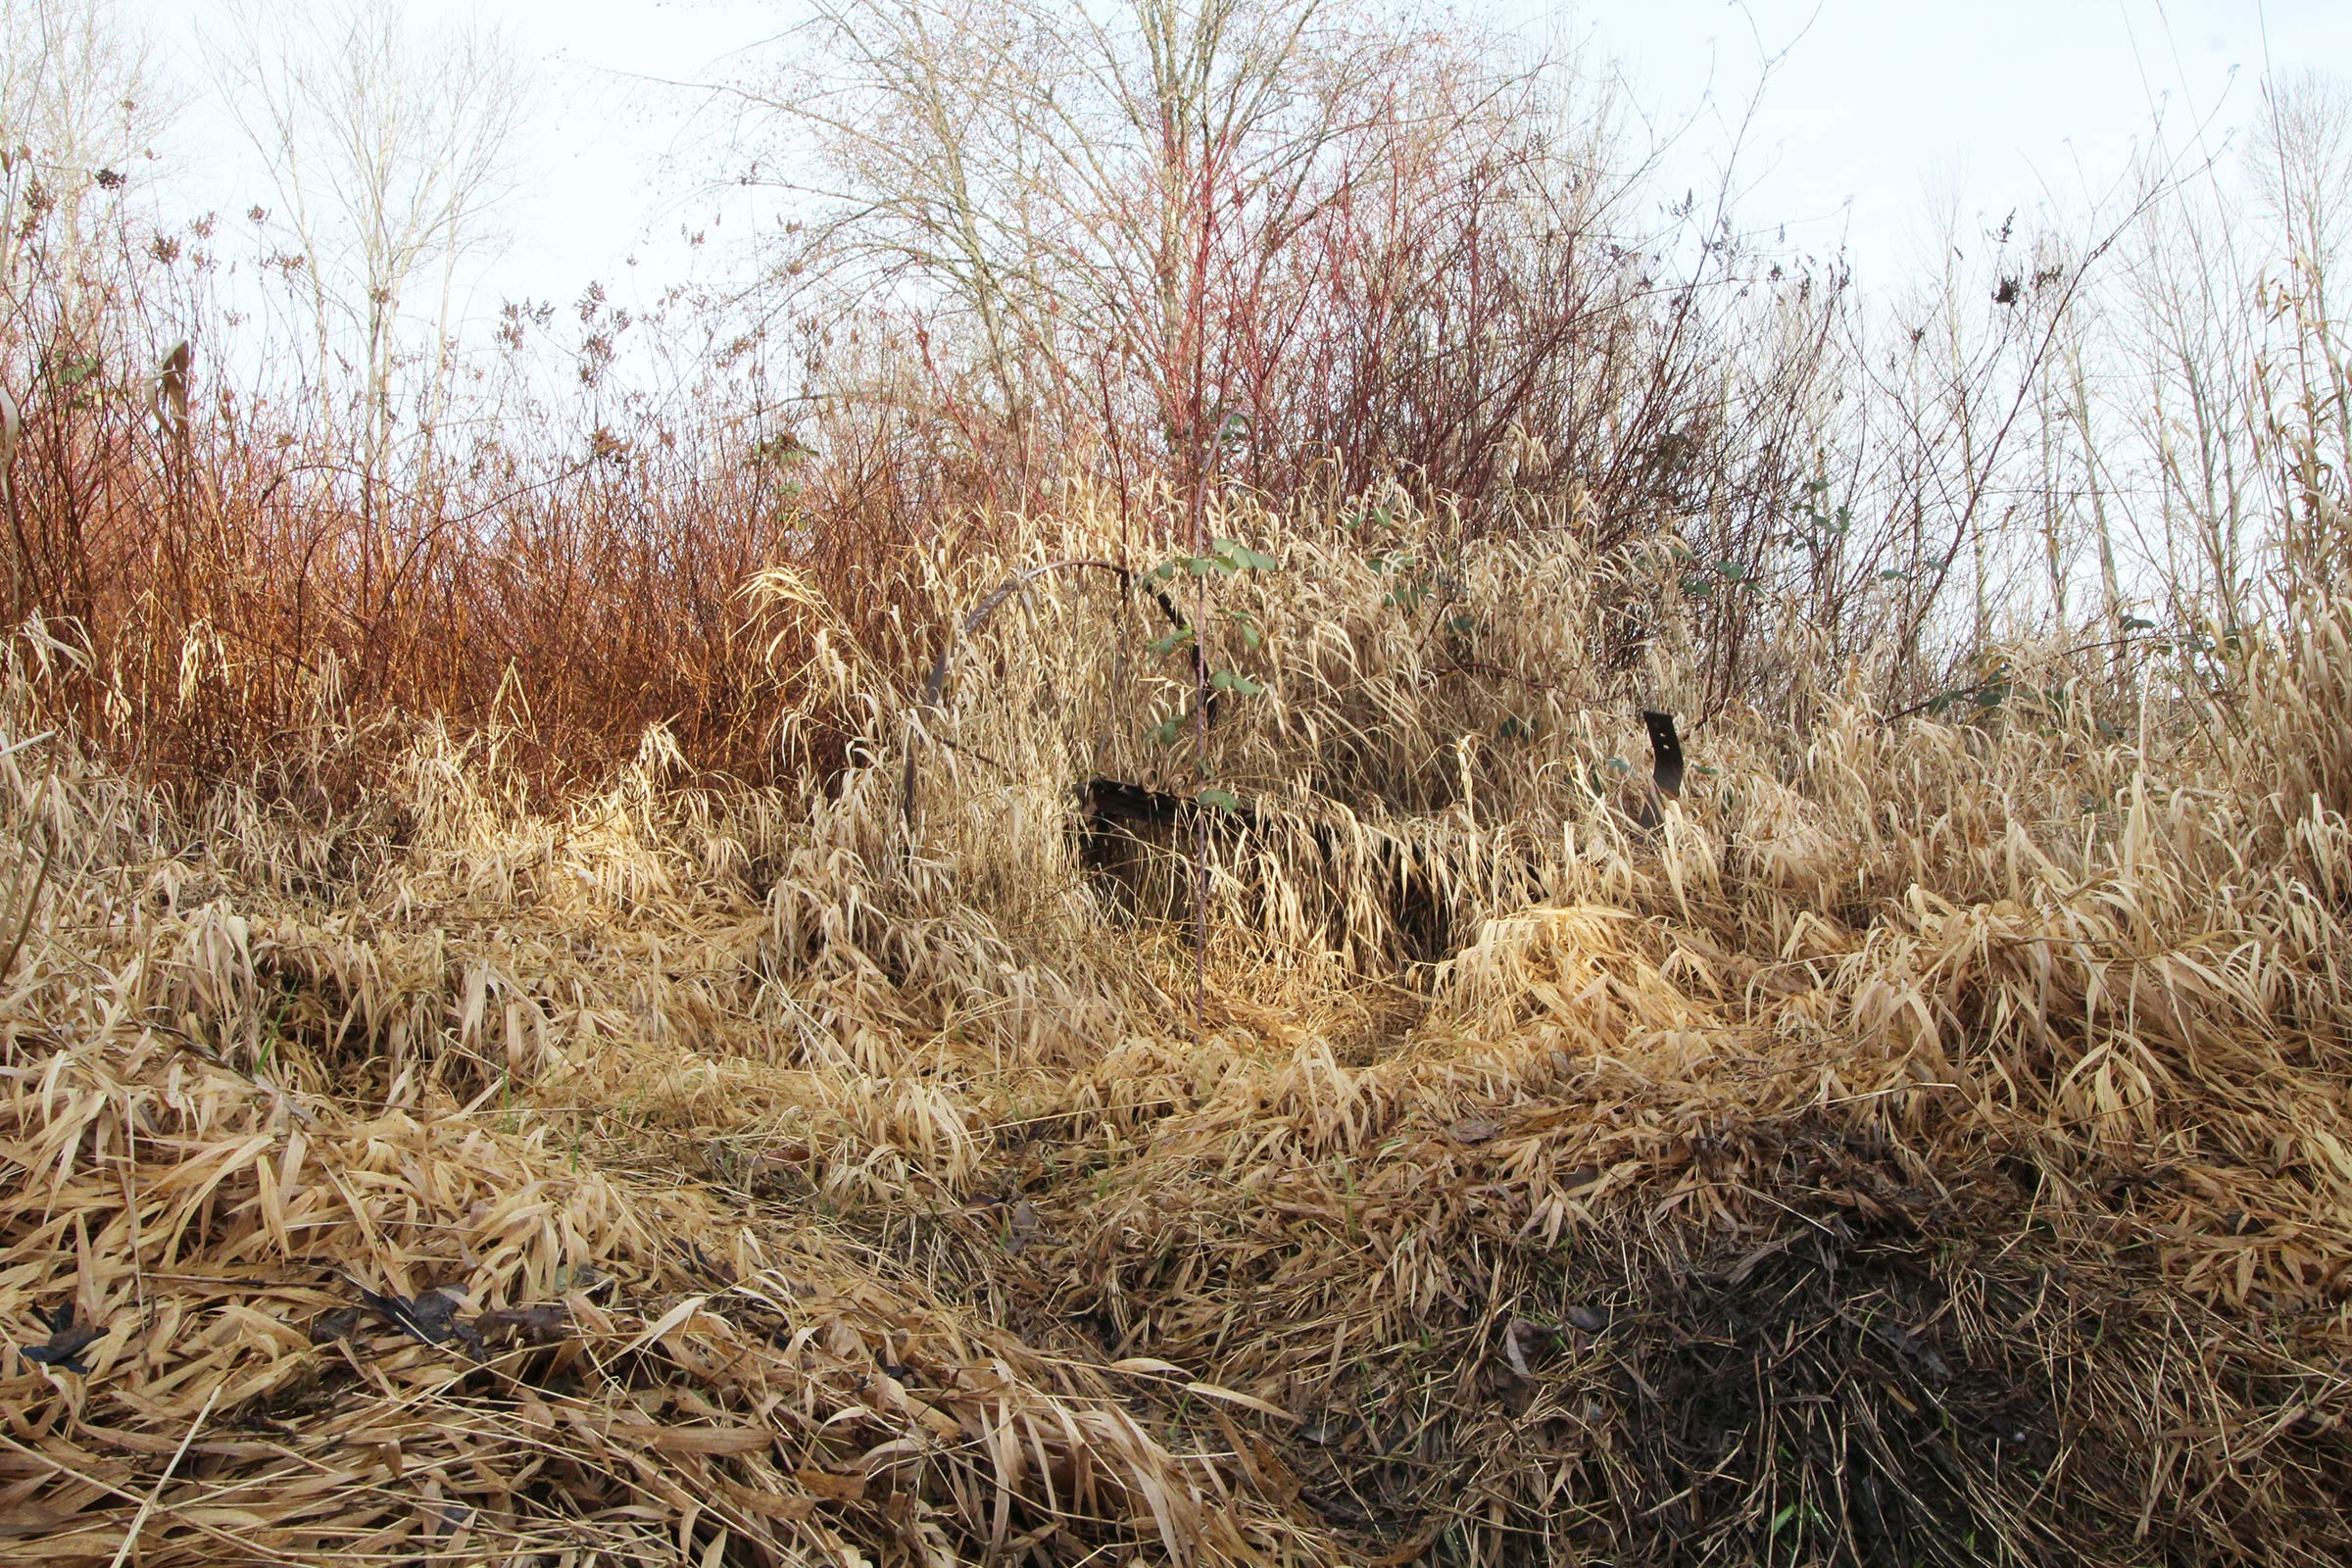
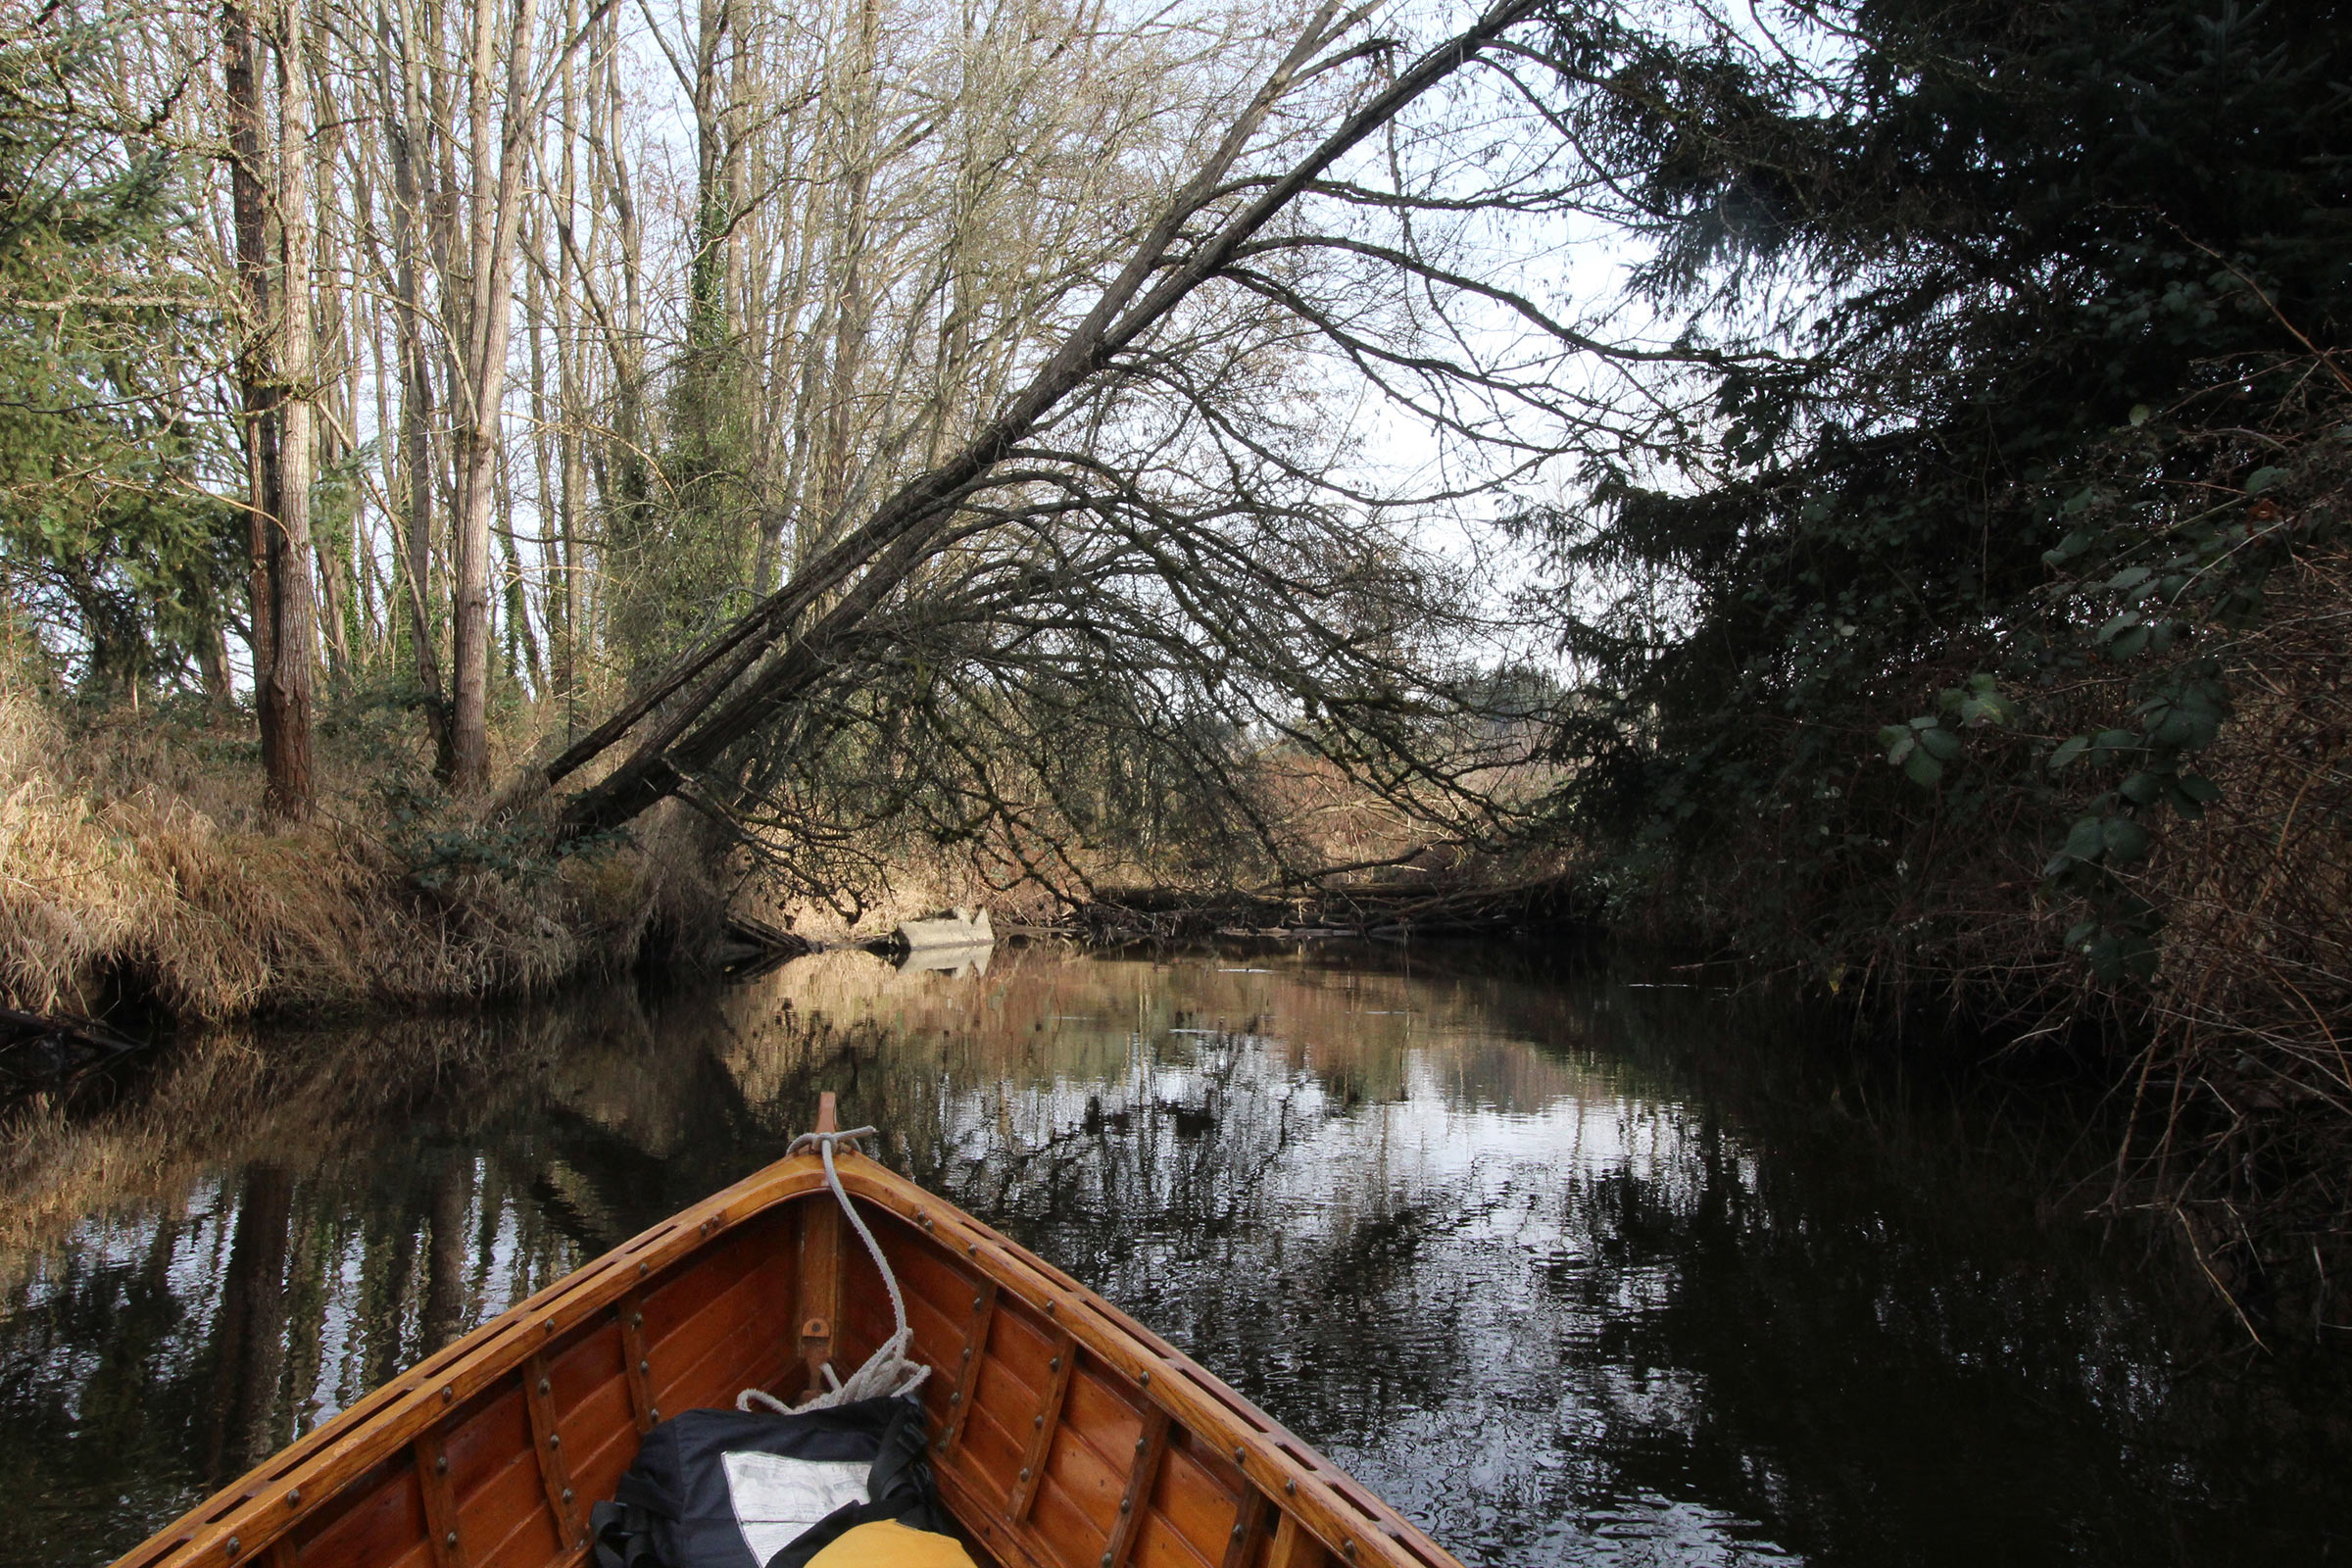
I stepped ashore with the painter in hand. At the foot of the island’s knot of alder and maple trees the ground was bare; geese had eaten whatever ground cover there might have been and paved the island with a greasy black smear of poop. It didn’t invite walking across the island.
Returning to LUNA, I struggled to find solid footing and keep my balance. To keep her off the rocks I stepped into the water and waded out to her. The muddy bottom was every bit as slippery as the island and I lurched aboard. My momentum carried LUNA across the little cove into a web of overhanging branches that scraped across her deck like fingernails on a blackboard. She surely must have wondered who this lumbering oaf was who had dropped so heavily into the cockpit. I coiled the painter and pushed off the bottom with an oar until I was clear of the tangle.
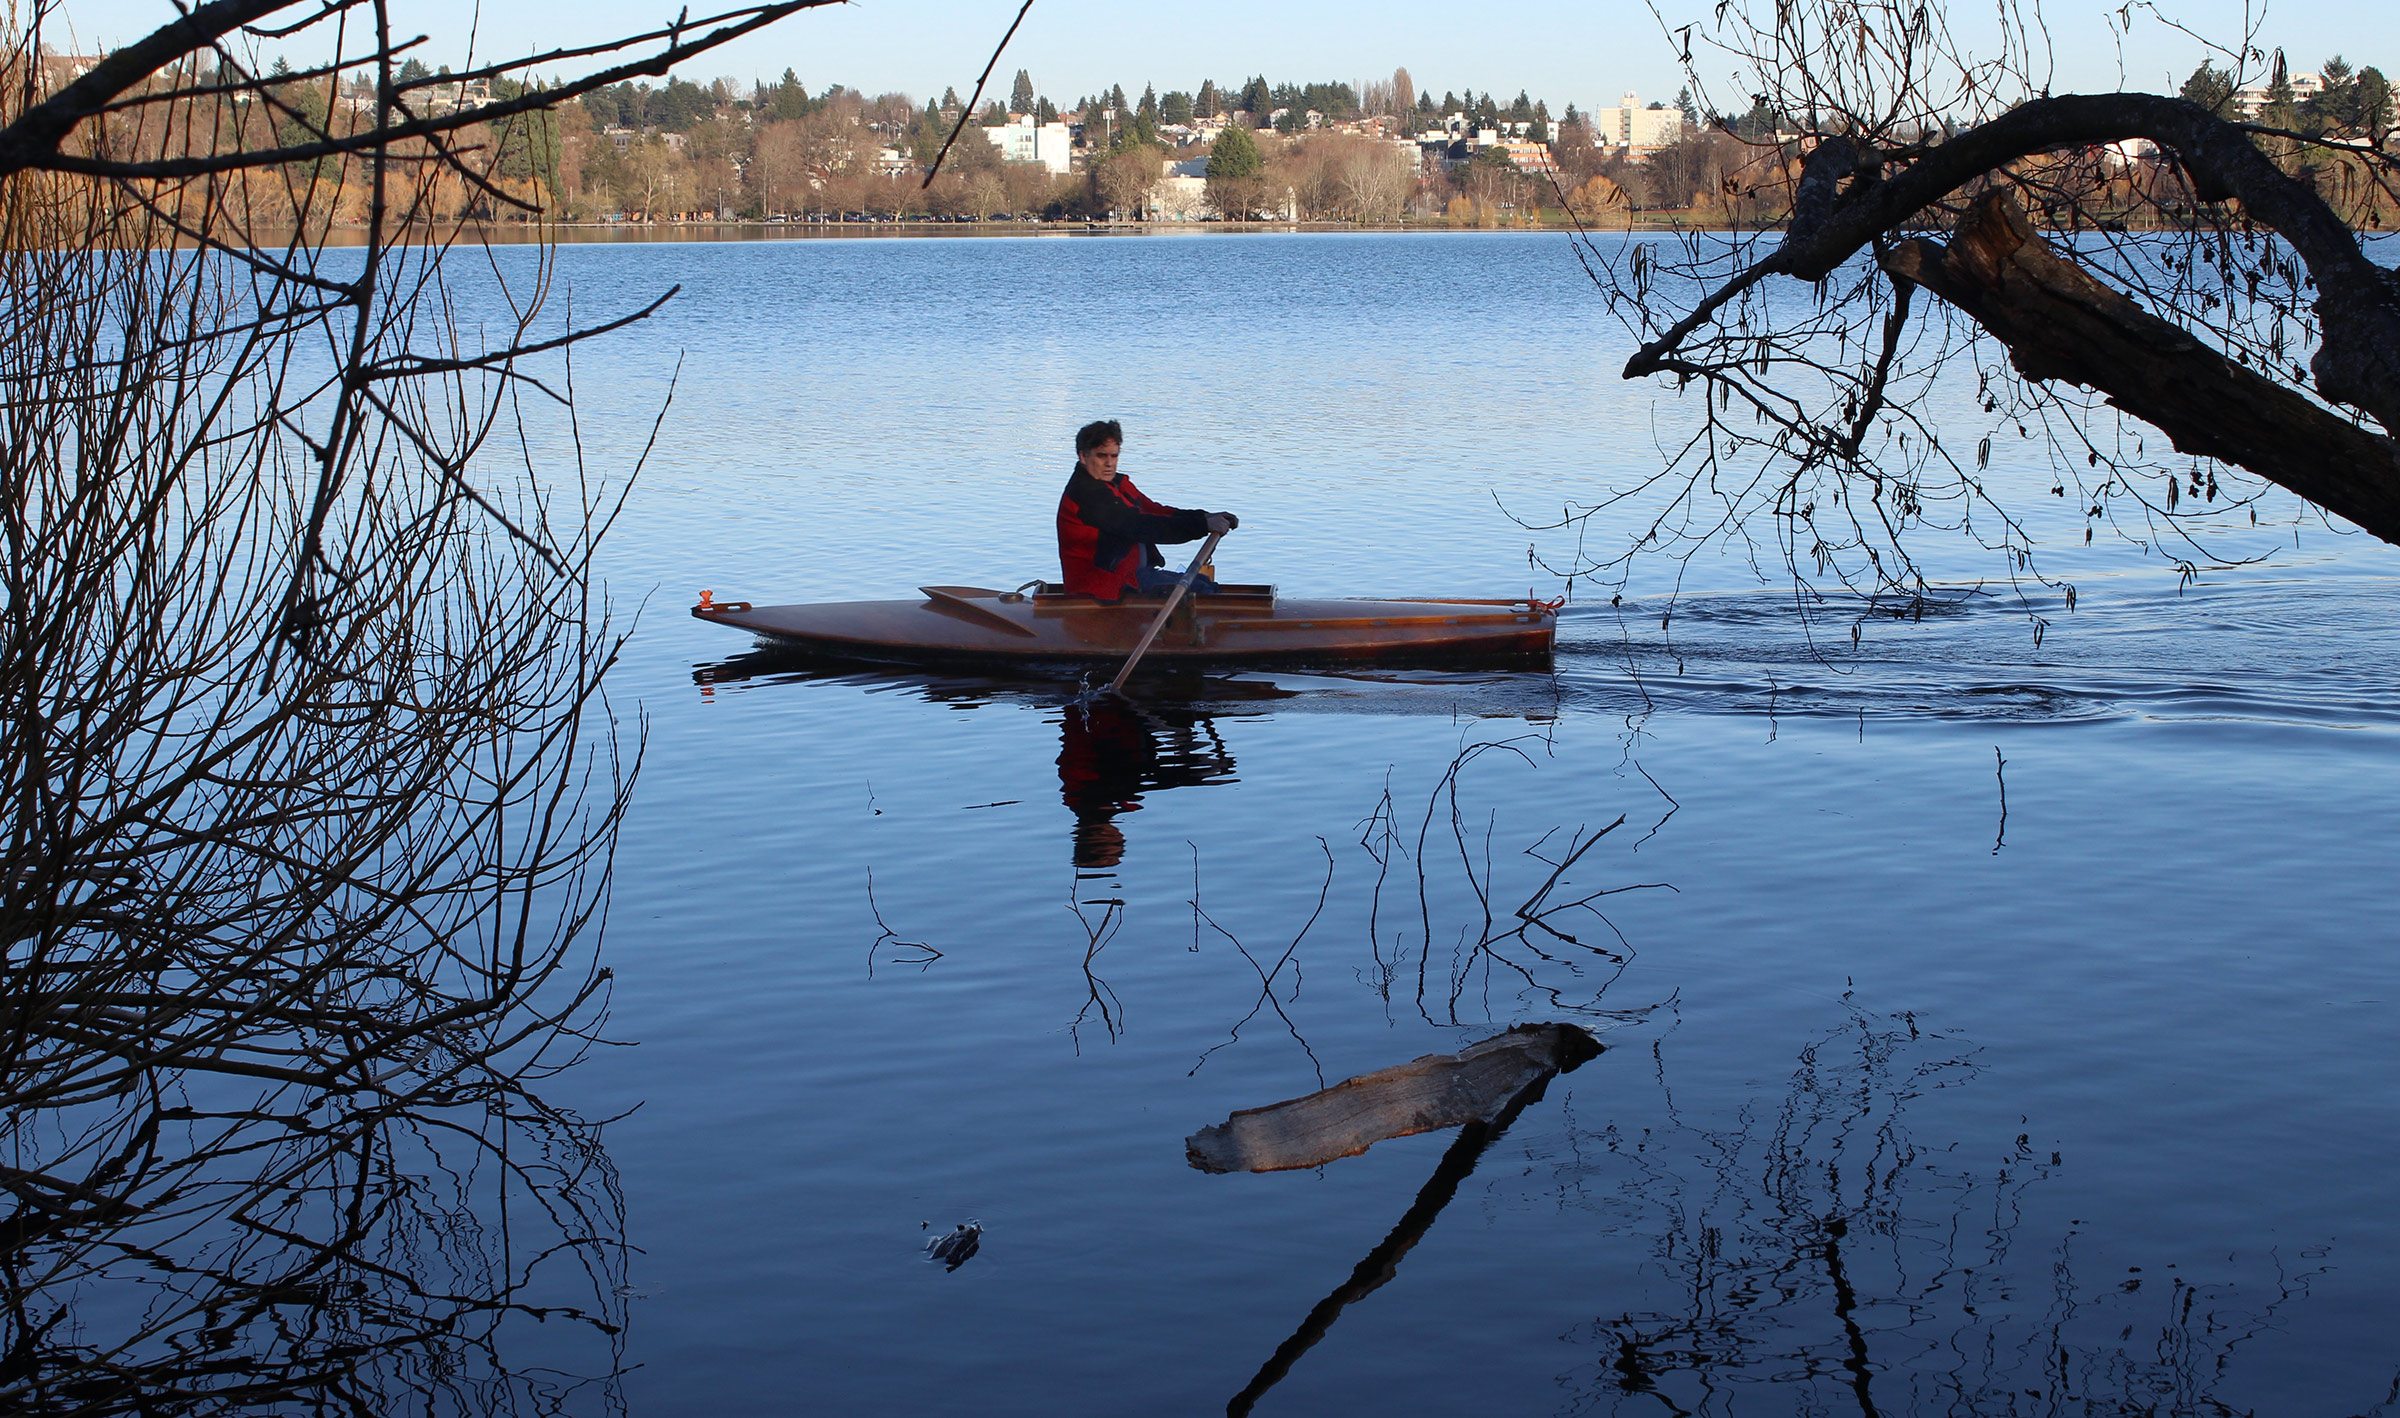
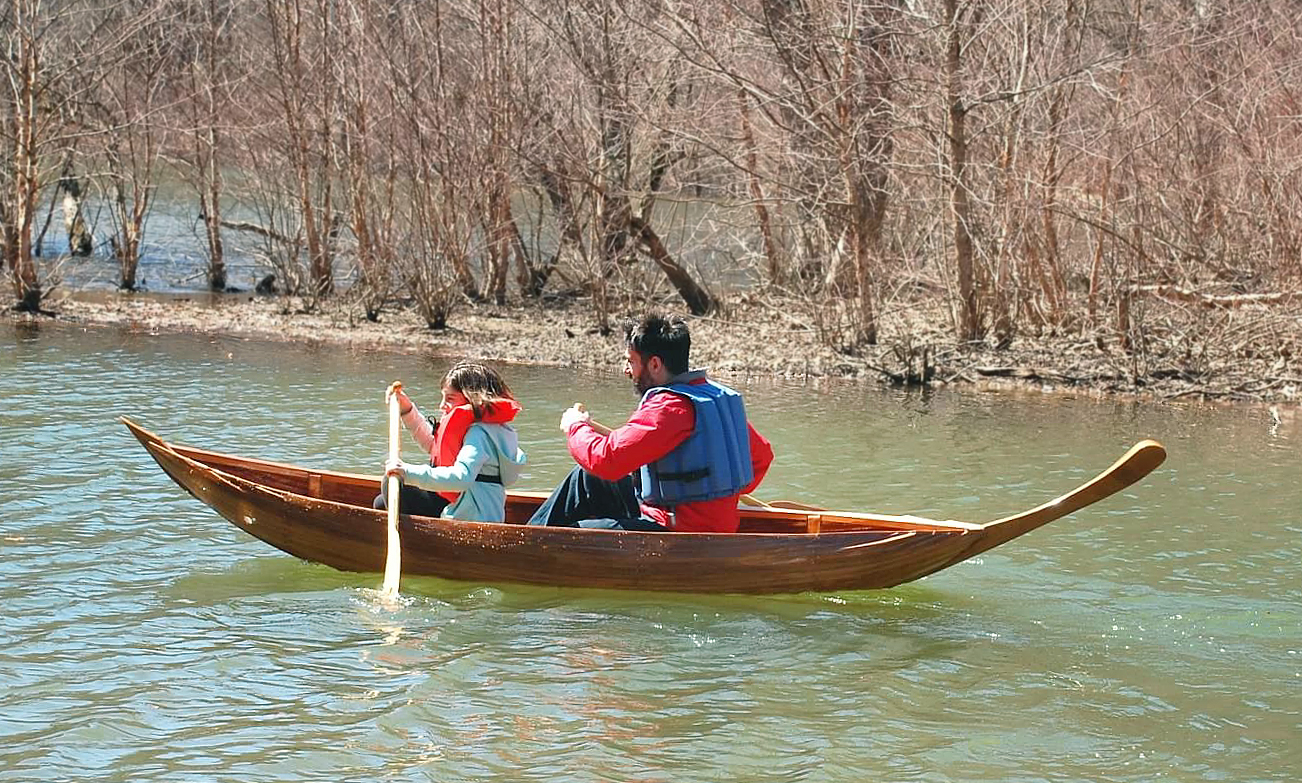
LUNA and I enjoyed each other’s company best while rowing together.
I rowed away from the island into the middle of the lake and sat with my hands resting on the oar handles. I had hoped that spending a night aboard LUNA would rekindle how I’d felt during that winter cruise 36 years ago. It was a voyage unburdened by purpose and free from the gravity of land—a voyage to a goal so distant that it lacked all urgency. There was just LUNA and me, together in each fleeting moment. My efforts to recapture that feeling weren’t being thwarted by LUNA. What I had more truly been trying to reconnect with was my youth, and I was only making myself painfully aware of my age. Nothing about LUNA had changed, but I was not at all the same person.
I felt the warmth of the afternoon sun on one side of my face and the chill of a feather-light breeze on the other. LUNA made music of the ripples lapping at her hull. When I took to the oars and rowed north, my breath grew deeper and stronger with the rhythm of rowing. I let the feathered blades skim across the water between strokes and felt the water as fully as if it were touching the backs of my hands. LUNA glided across the water with the hiss of water swept under the bow. She had awakened from her long slumber and surged ahead, leaving a champagne trail astern. I’d like to think she recognized me.
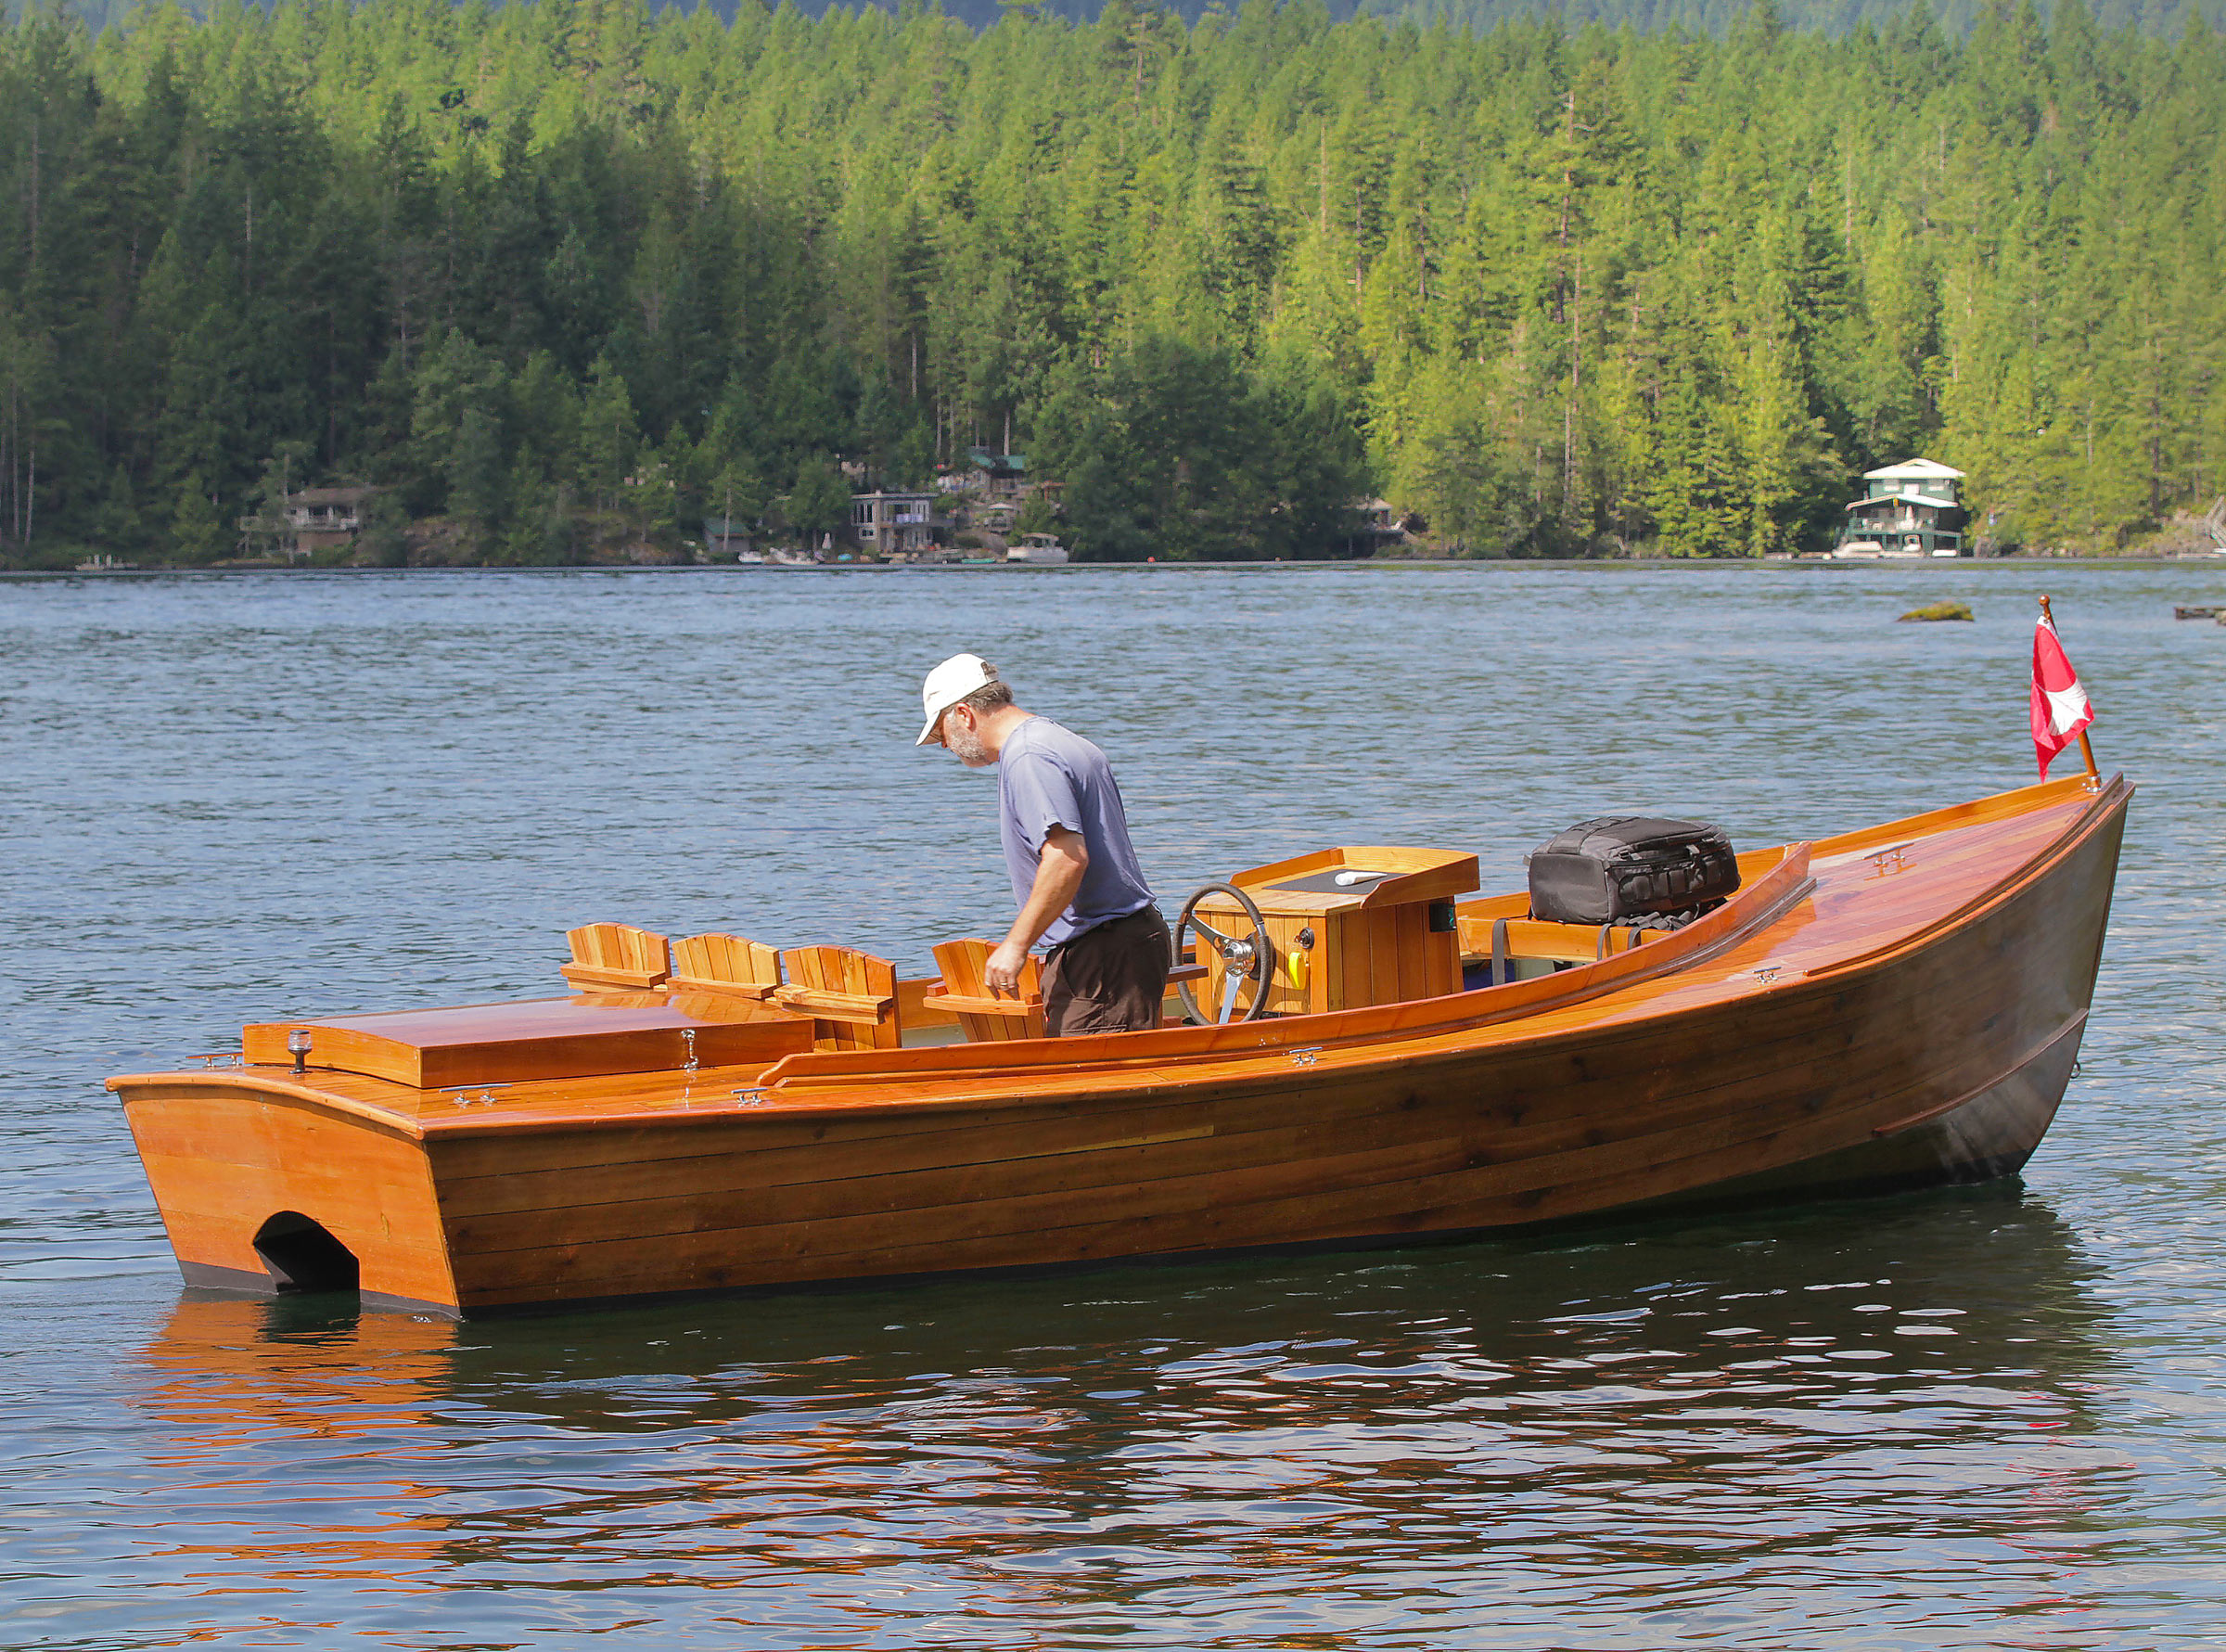
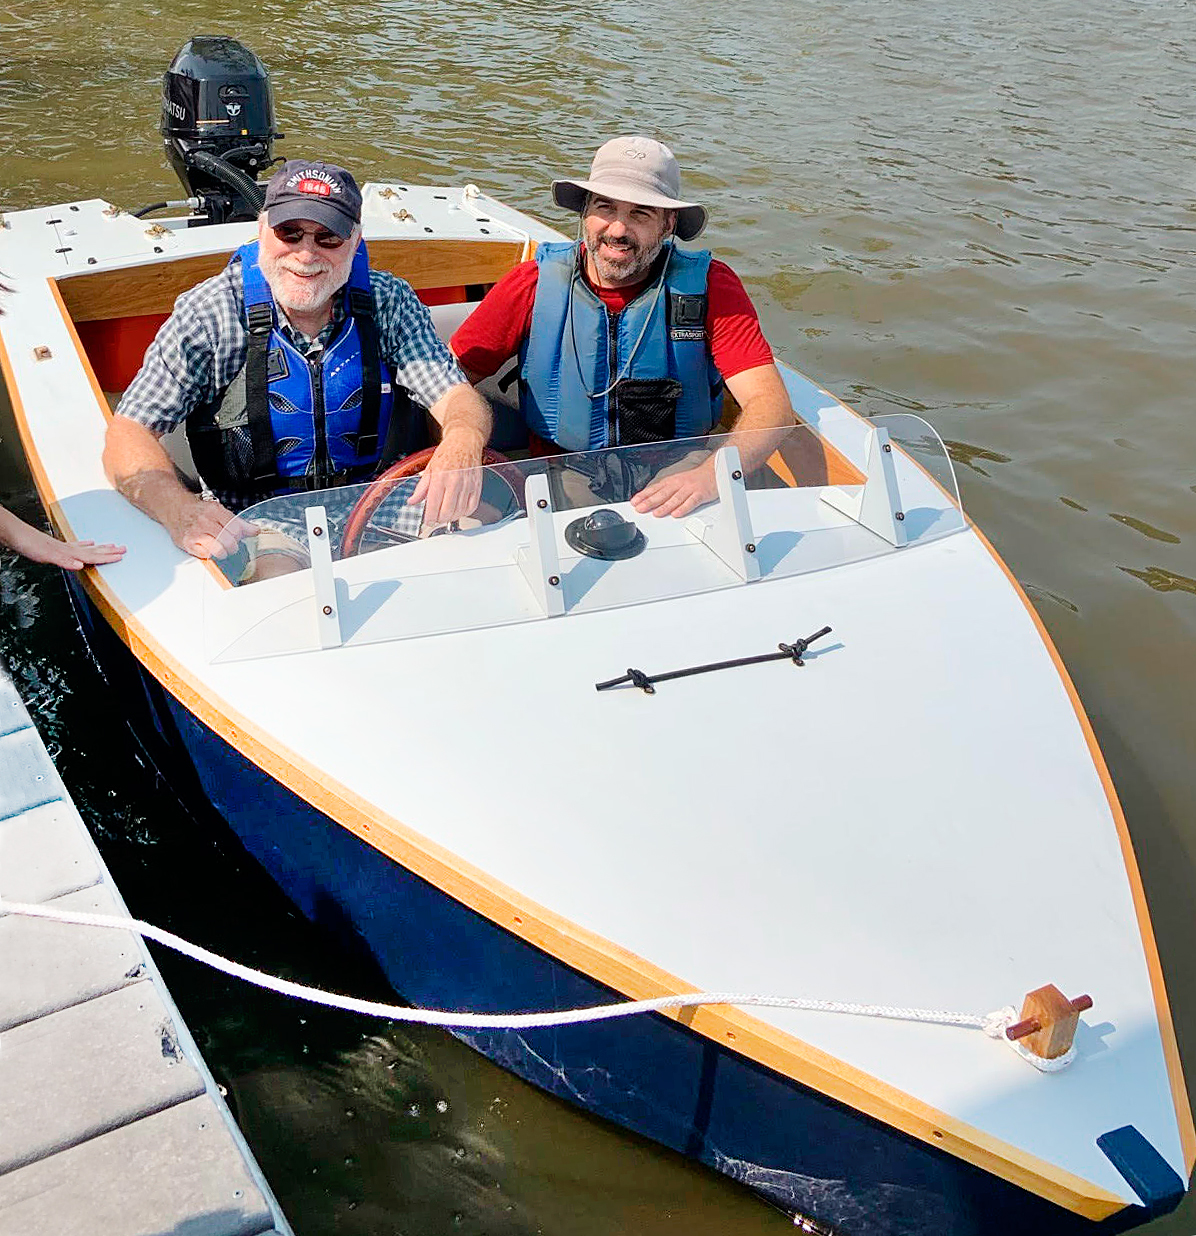
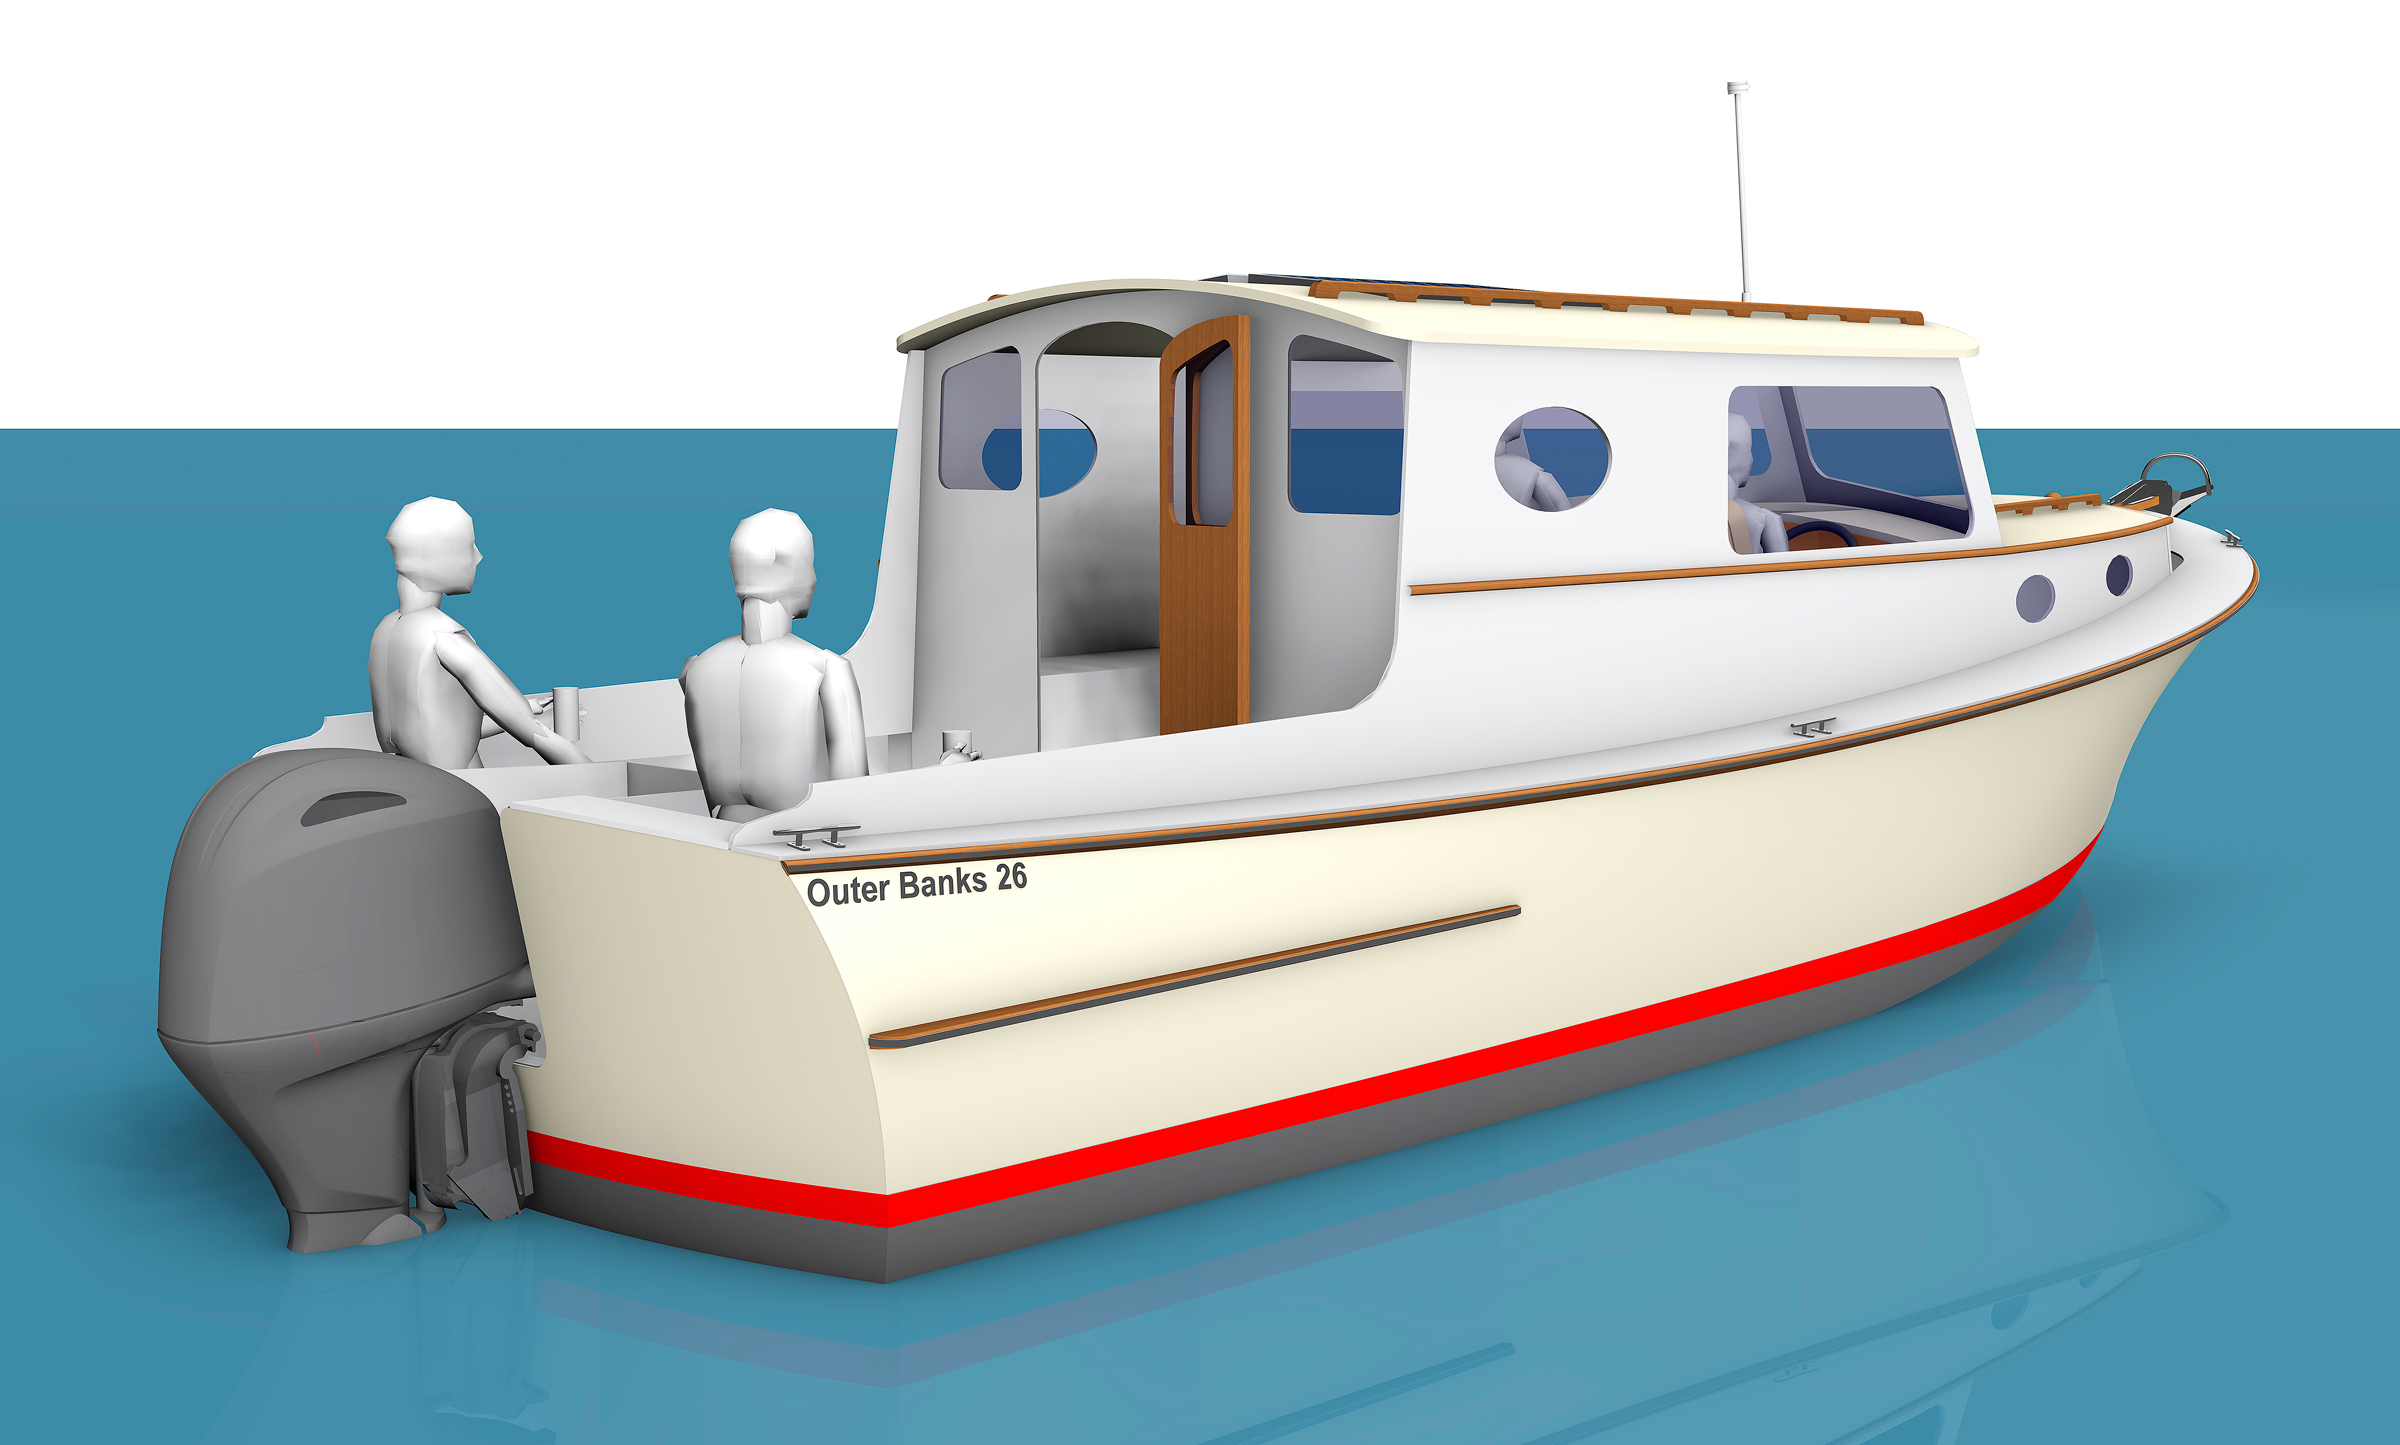
The summer high-pressure systems that bring sunny days to the Salish Sea are known for their accompanying lack of winds. After cruising British Columbia’s Discovery Islands in a small sailboat, I decided I’d enjoy the area more aboard a small motorboat, one that I could use to poke and prod my way along the meandering coastline, tucking into the small bays along the way.
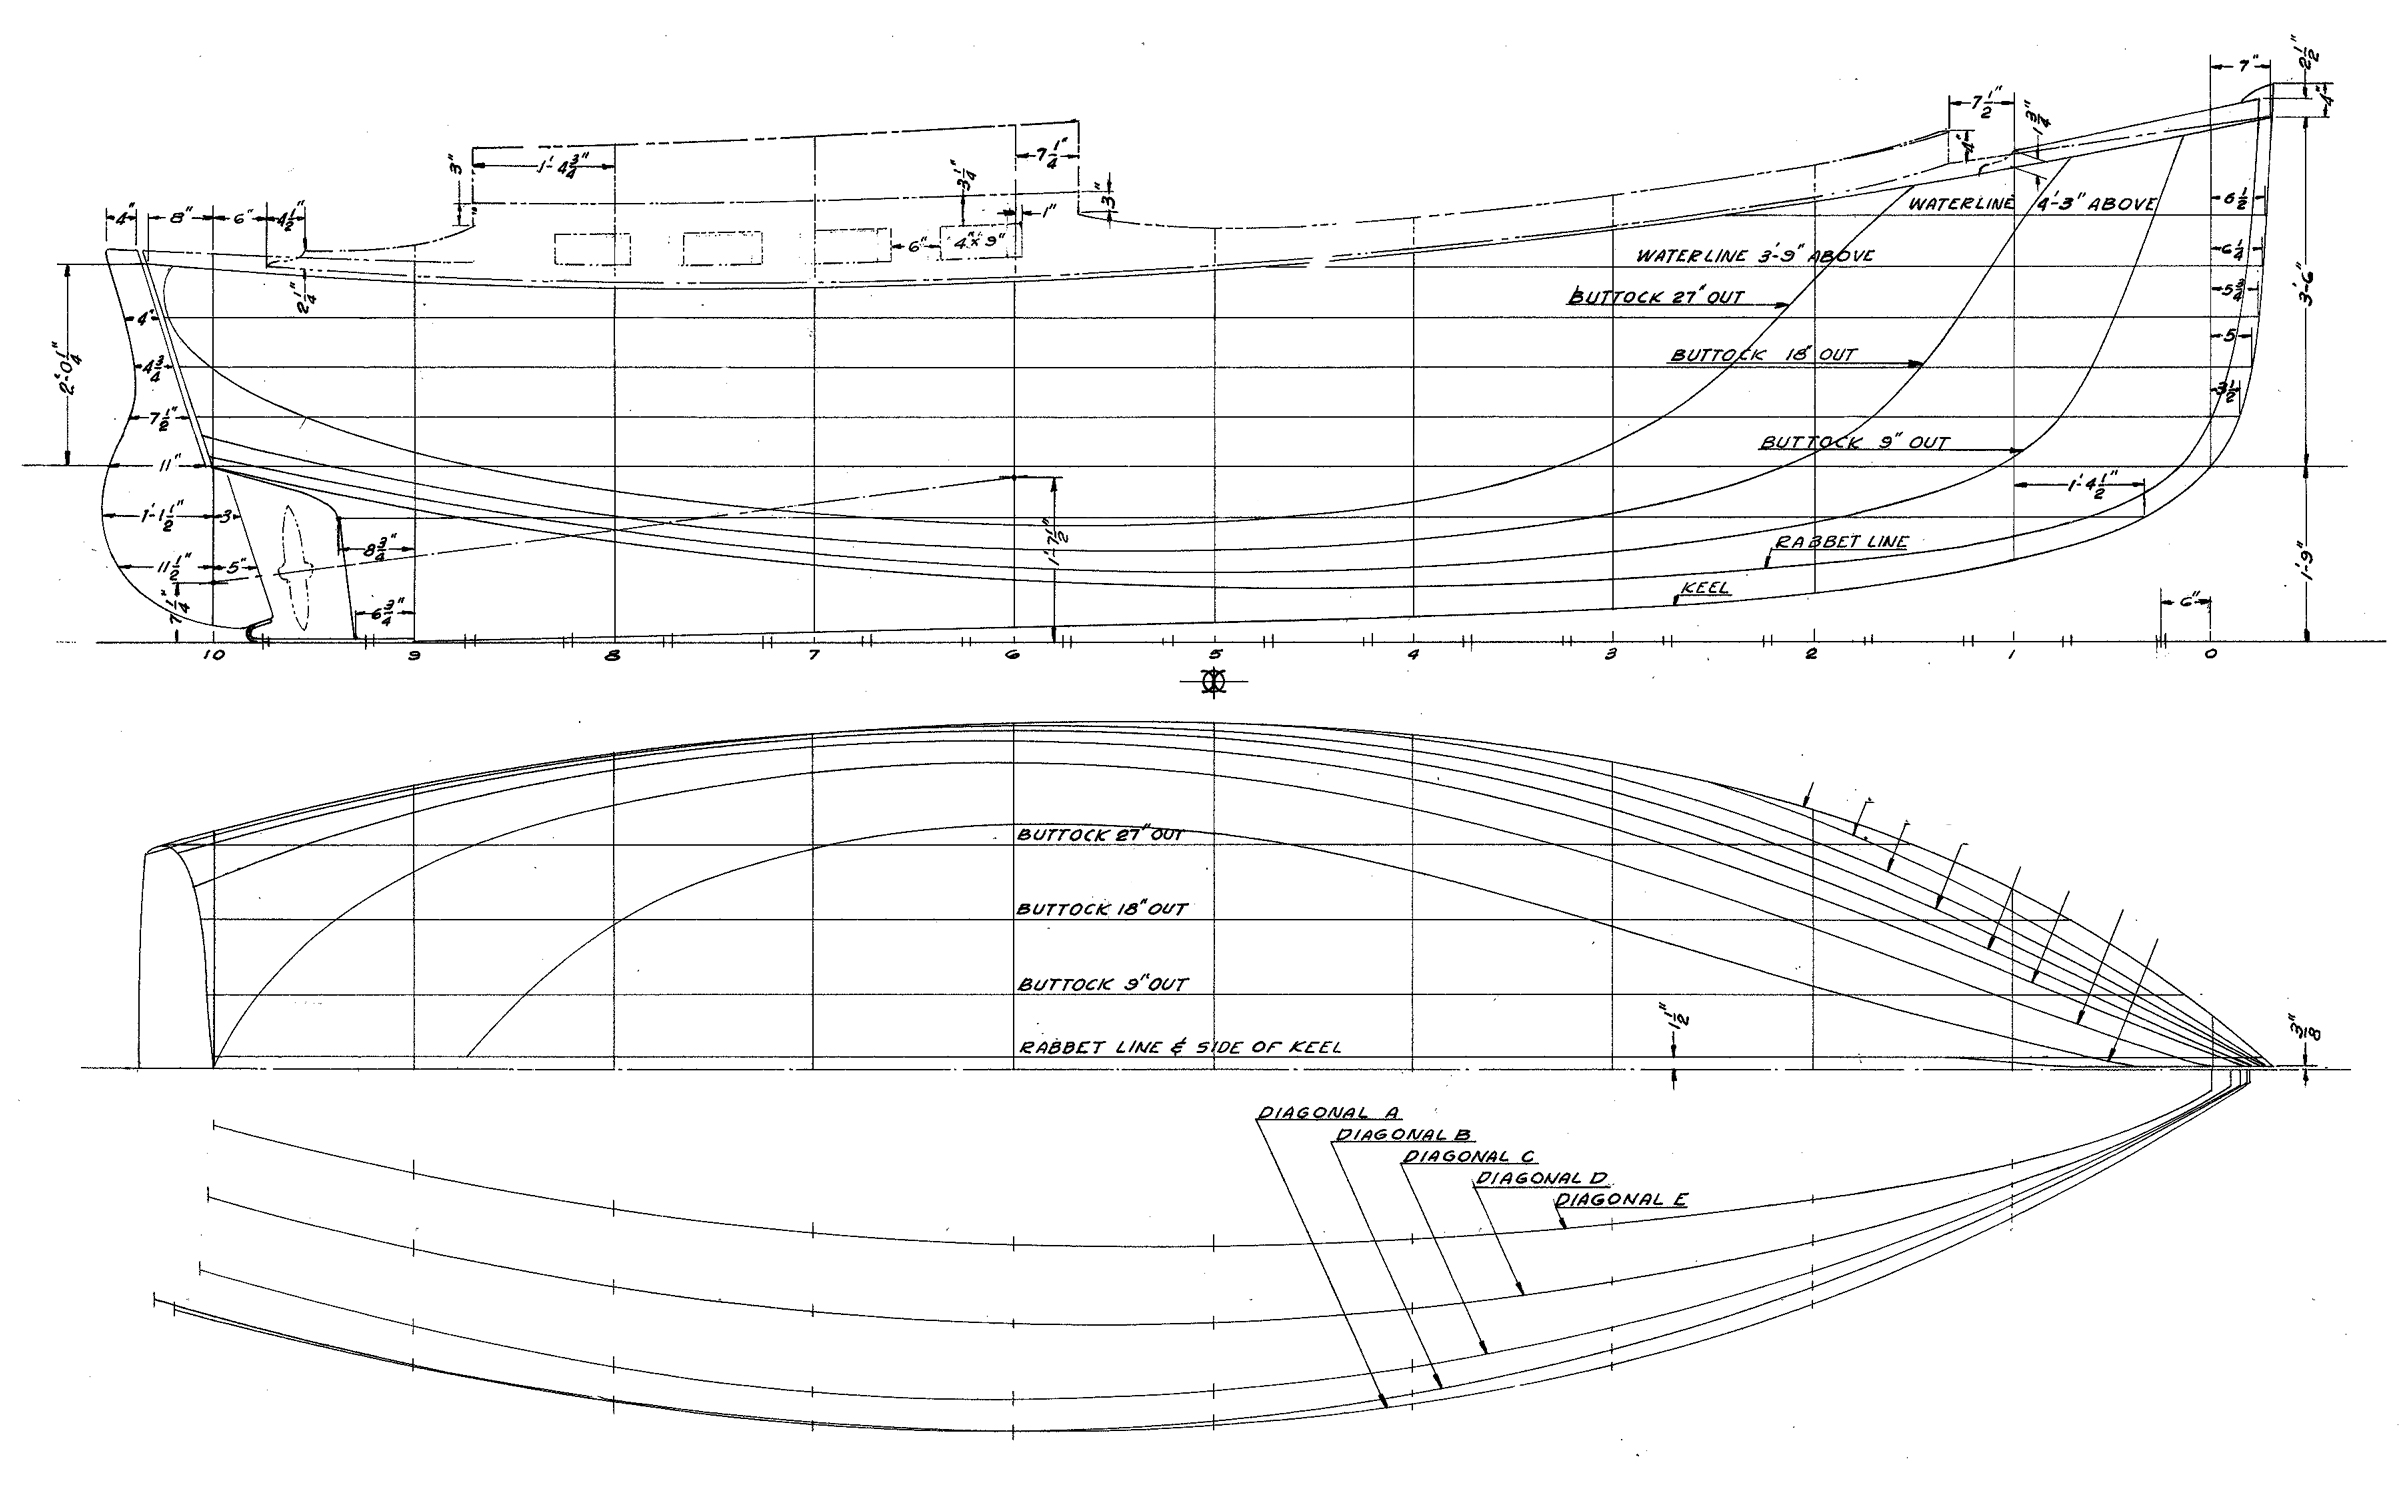
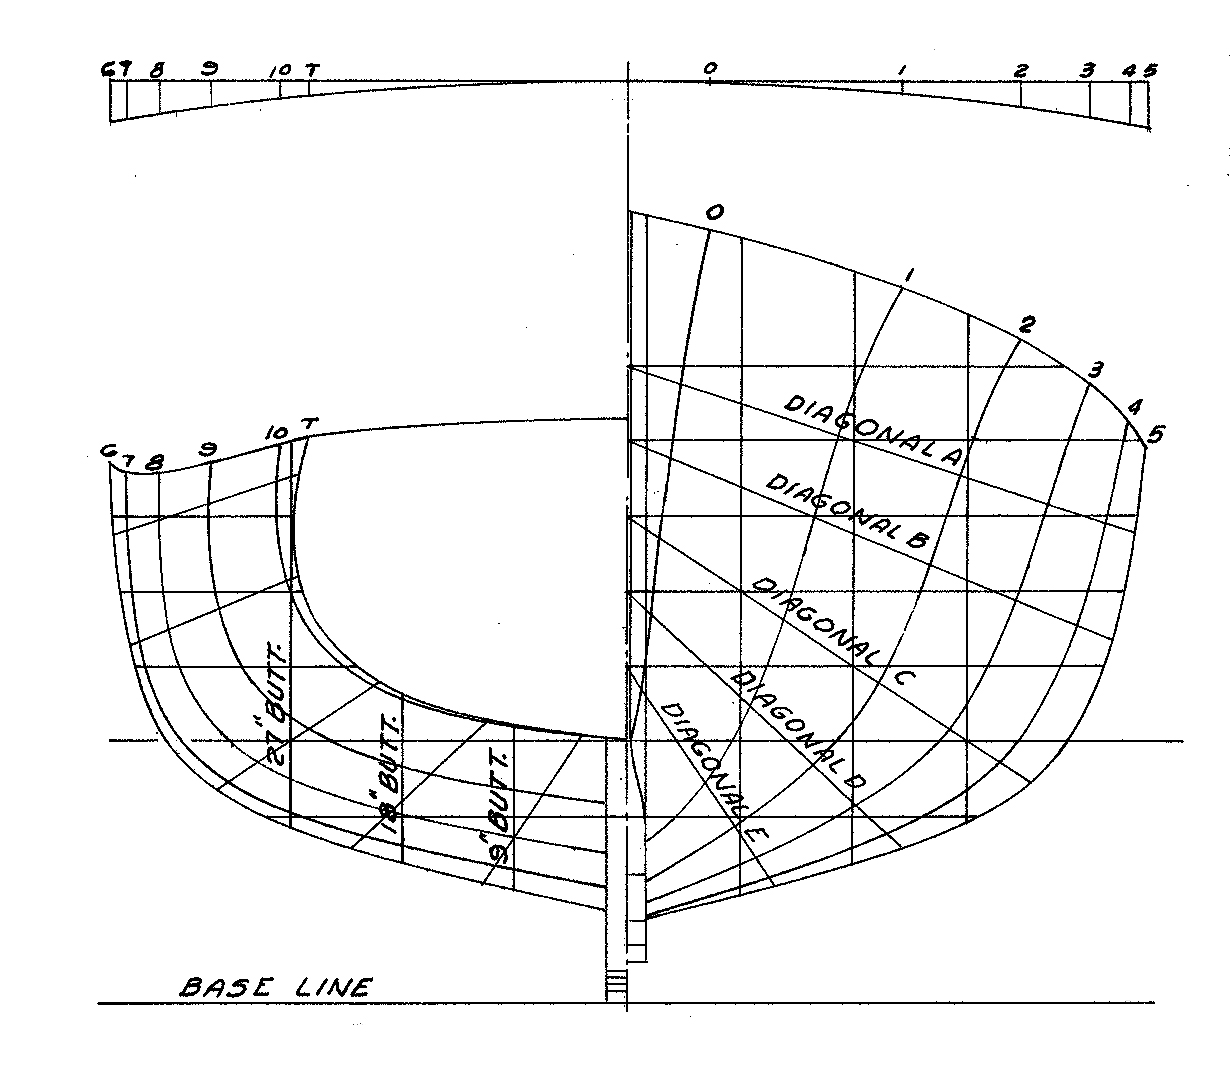
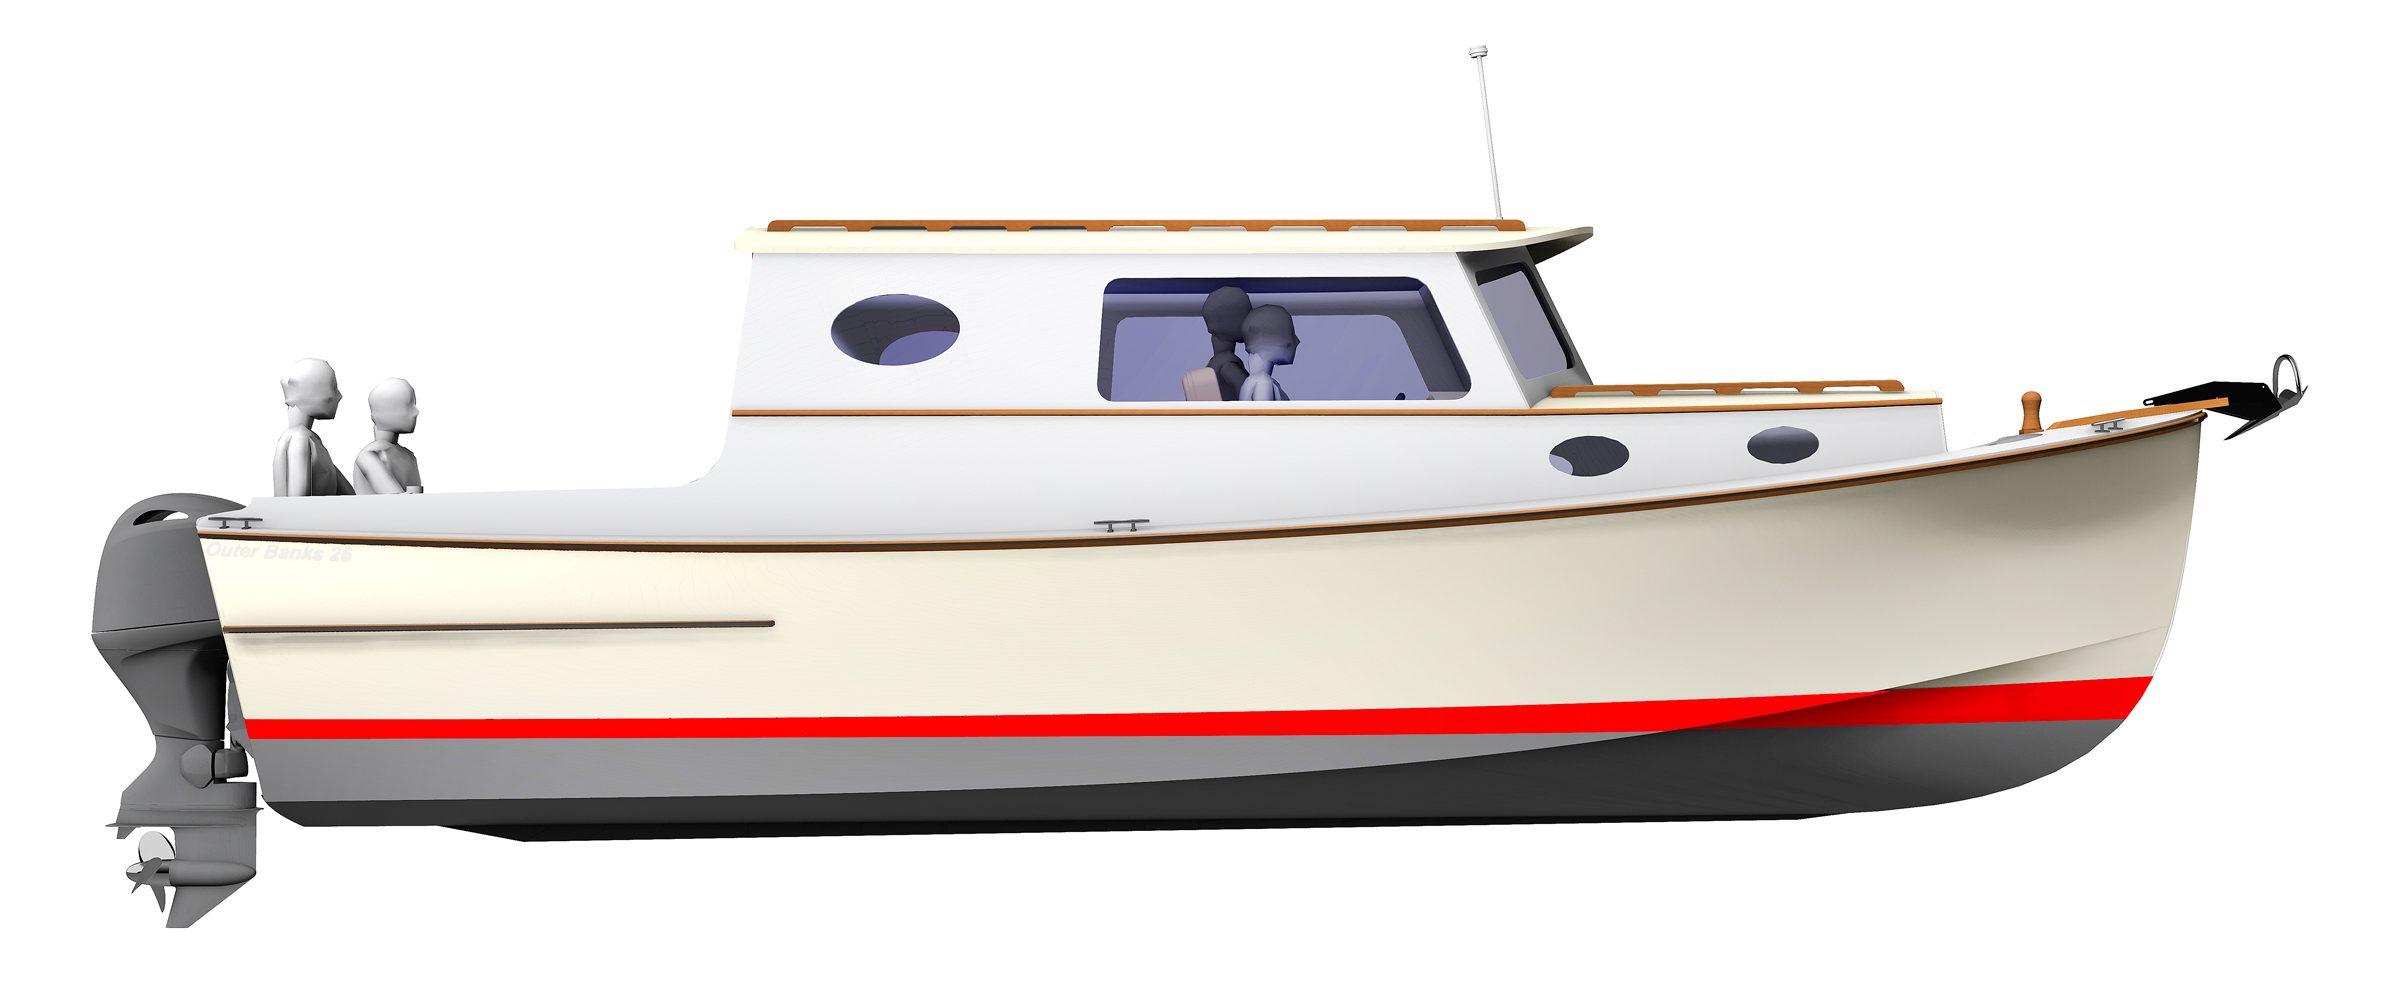
I began a search for a suitable small motorboat to build. I studied the offerings from local designers who knew my local waters, but ultimately settled on a boat by Harry Bryan, a boatbuilder/designer based on Canada’s opposite coast. In 1998, he envisioned an update to the deep-V inboard-powered boats William Hand developed from 1900 to 1920. “The hulls Hand developed,” Harry writes, “do not skip along the surface of the water like fully planning boats. They will, however knife through the water at well over displacement speeds. Hand commented that he could recommend these boats without reservation as wholesome, steady, fine little sea-boats capable of really surprising speed.” Harry wanted to combine the advantages of the deep-V hulls with the clean and efficient four-stroke outboards, which were emerging at the time he was studying Hand’s work. Harry’s design was the Handy Billy 21.
I was sold on the boat’s classic lines, and its construction seemed to be within my abilities and budget. Fortunately for me, WoodenBoat ran a series of articles in 2001 on how to build the 21′ Handy Billy in issues 159 through 161, and I used them as my guide. At 21′, the boat is very close to the dimensions of a typical garage. I had enough room for it, but if a smaller Handy Billy is a better fit for the workplace you have available, Harry offers an 18′ version.
The Handy Billy’s long, lean, semi-displacement hull would marry well with Harry’s intention to use a modest outboard, just 25 hp, with electric start. His plans include three sheets of drawings—lines and offsets, construction details, and miscellaneous details—and a 21-page booklet. The plans detail batten-seam construction with 5/8″ cedar planking on oak framing. The outboard is enclosed in a covered well, so the boat can move along quietly and with little disturbance to the environment or the crew.
Photographs by and courtesy of the author
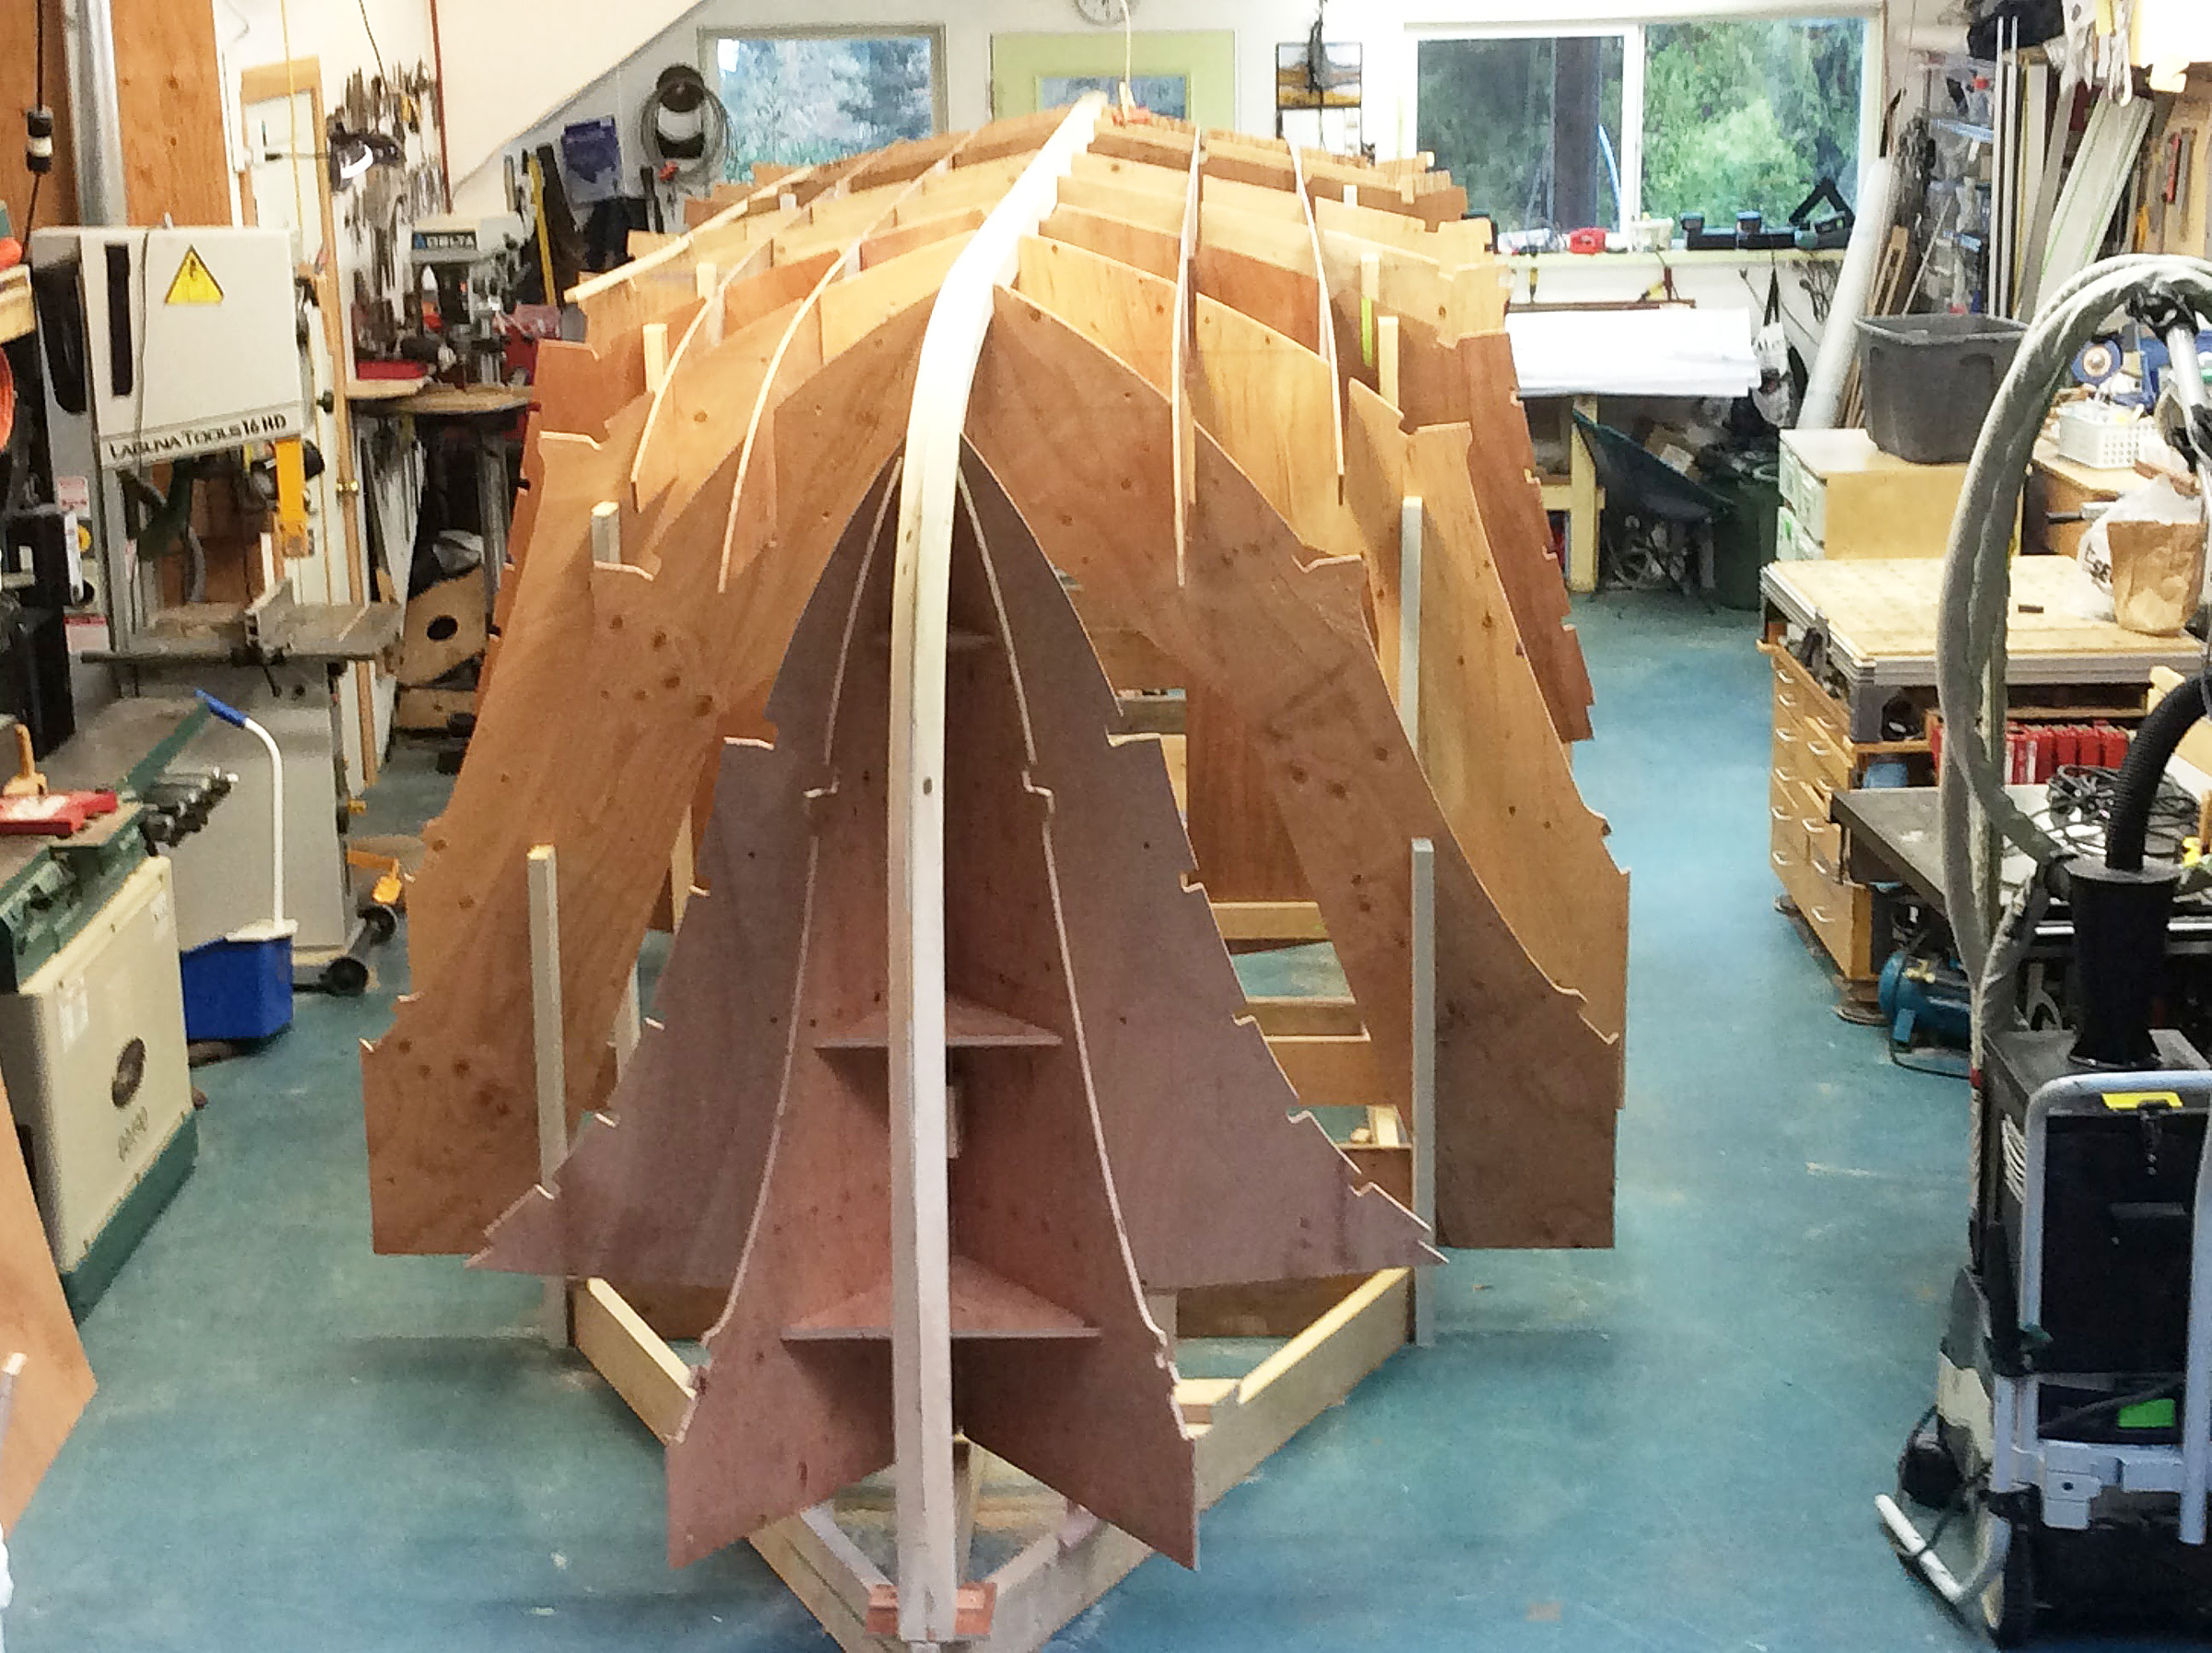
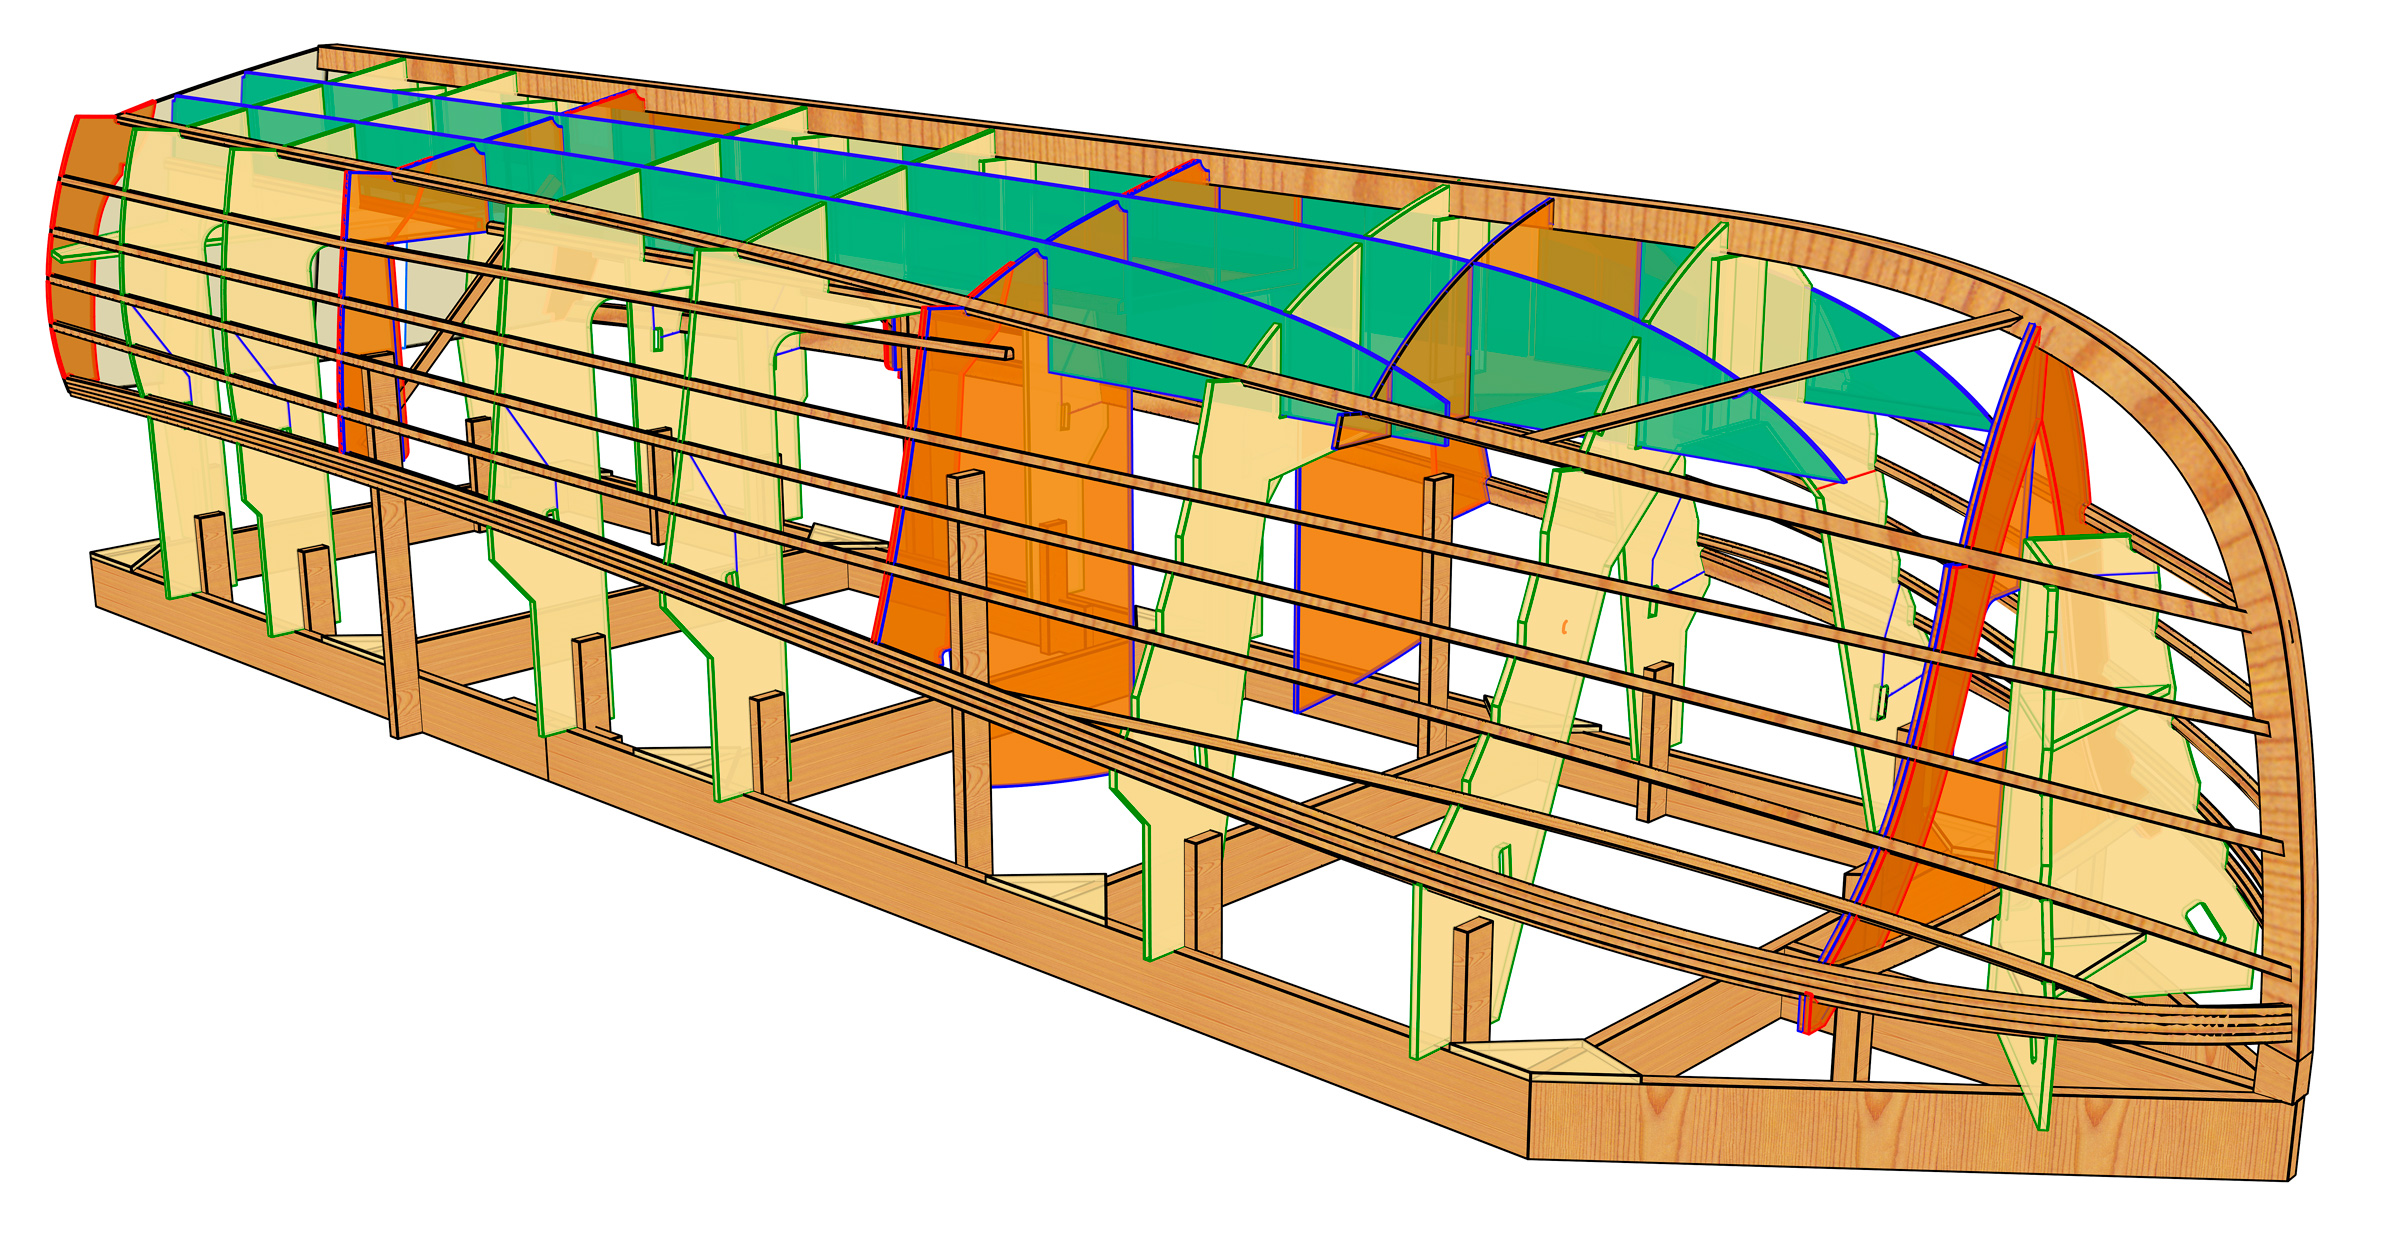
The Handy Billy was designed for batten-seam construction and the battens would be let into the frames. The author opted for cold-molding, which didn’t require the battens.
Harry’s website designates this build as best for someone having intermediate skills. It is helpful to have some skills in woodworking (cutting, fitting, and shaping) and problem-solving, but having good work habits and a capacity for project management and planning will also really pay off. For anyone new to boat construction who is contemplating this design, it would be worthwhile to attend a workshop course and/or study many of the great books on construction. An intermediate project like the Handy Billy is mostly about having the perseverance that it takes to learn and to see the project to the end.
Building on my experience gained from constructing a plywood flat-bottomed sailing skiff, I waded in guided by the three WoodenBoat articles. They seemed to cover most, if not all, aspects of the procedures. Construction went as I had imagined with only a few difficulties. I did not have an easy time bending the single-piece sheer clamps into place as they wanted to split. Eventually, I did get them to fit. Today I would laminate the sheer clamp in place using more easily bent pieces.
The batten-seam construction would have three planks above the chine and four below. Like the William Hand boats that were its inspiration, the Handy Billy has a high and fine entry that will cut through chop.
While the framework is designed for batten-seam construction, Harry offers a single-sheet drawing by Doug Hylan for plywood construction. Harry’s website also notes the hull can be strip-built, but there are no instructions for that method. I went with cold-molding the hull; as with plywood construction, it eliminated the need for the seam battens in the framework. I applied 1/4″ x 3″ western red cedar in three layers with the outer layers laid fore-and-aft sandwiching a middle diagonal layer. The exterior has 6-oz fiberglass set in epoxy.
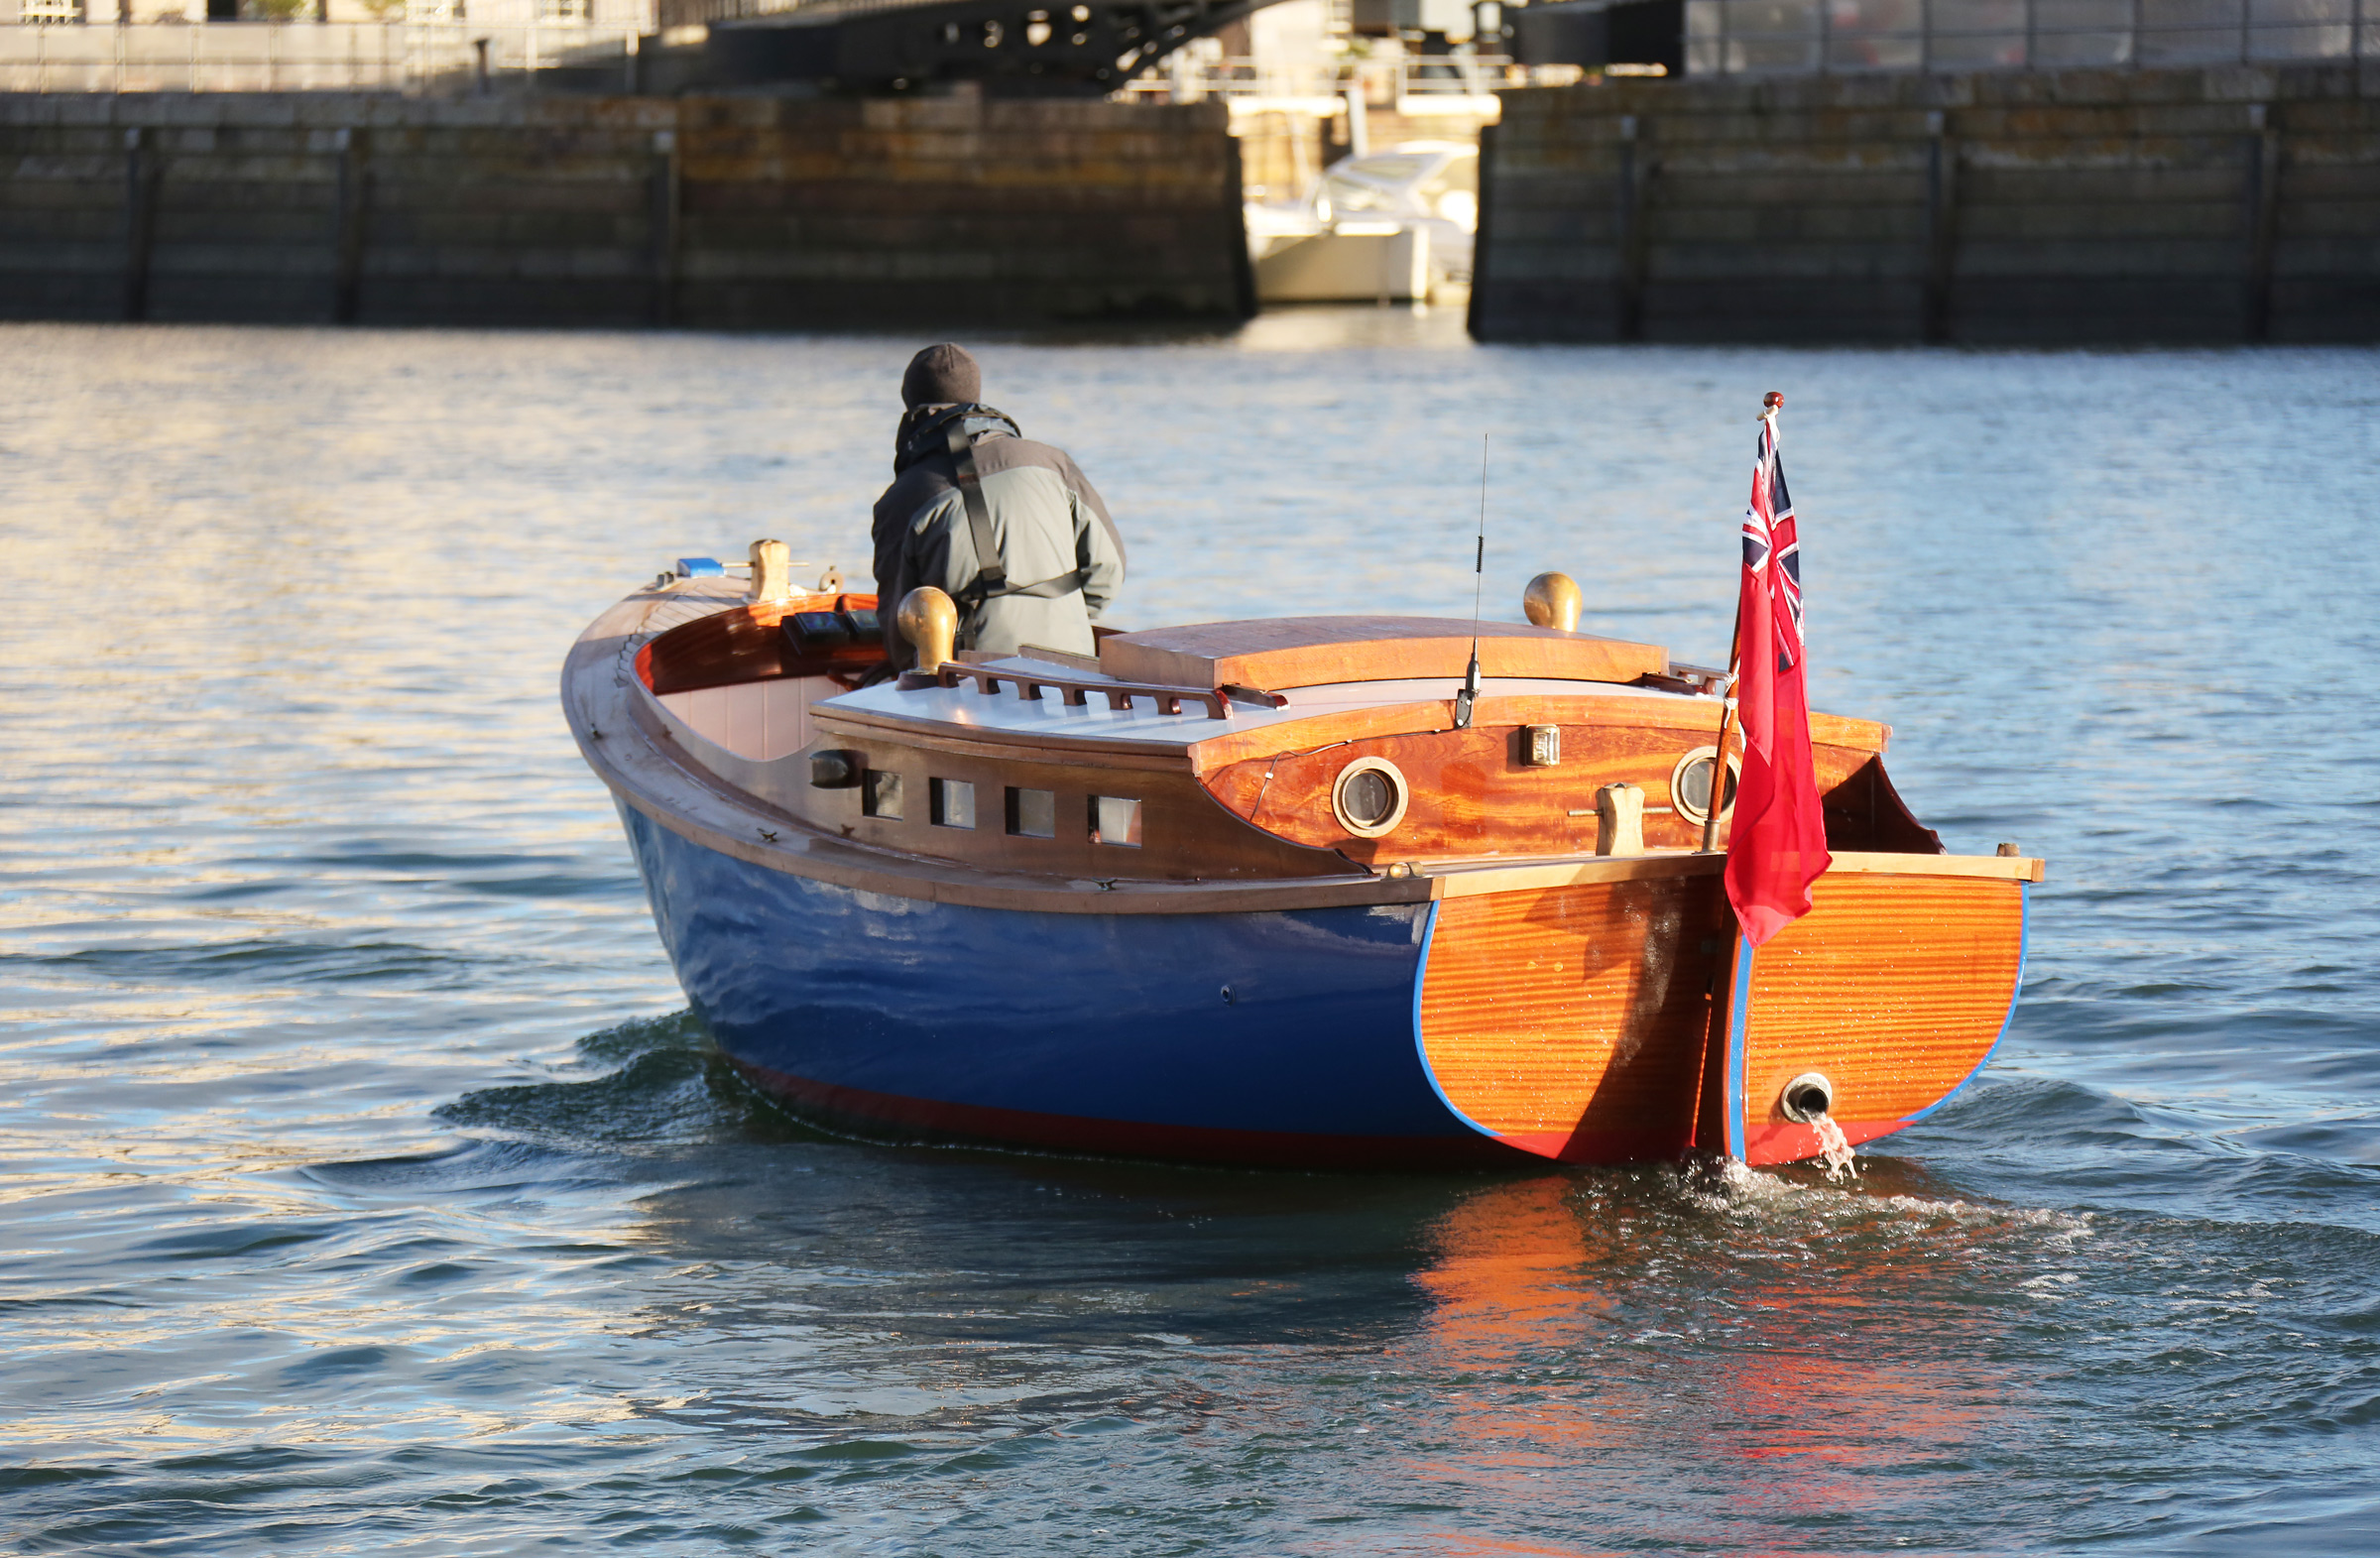
Harry writes in the Handy Billy booklet: “Motor boats have always carried with them the burden of noise.” He addresses the problem “by placing the engine within the hull and adding a barrier of acoustic insulation. The result is probably the most quiet outboard boat on the market.” To make sure the motor you’ll use with the boat will fit its housing, Harry notes that it is advisable to have it on hand in case you need to modify the well and engine box to provide full range of motion for the outboard.
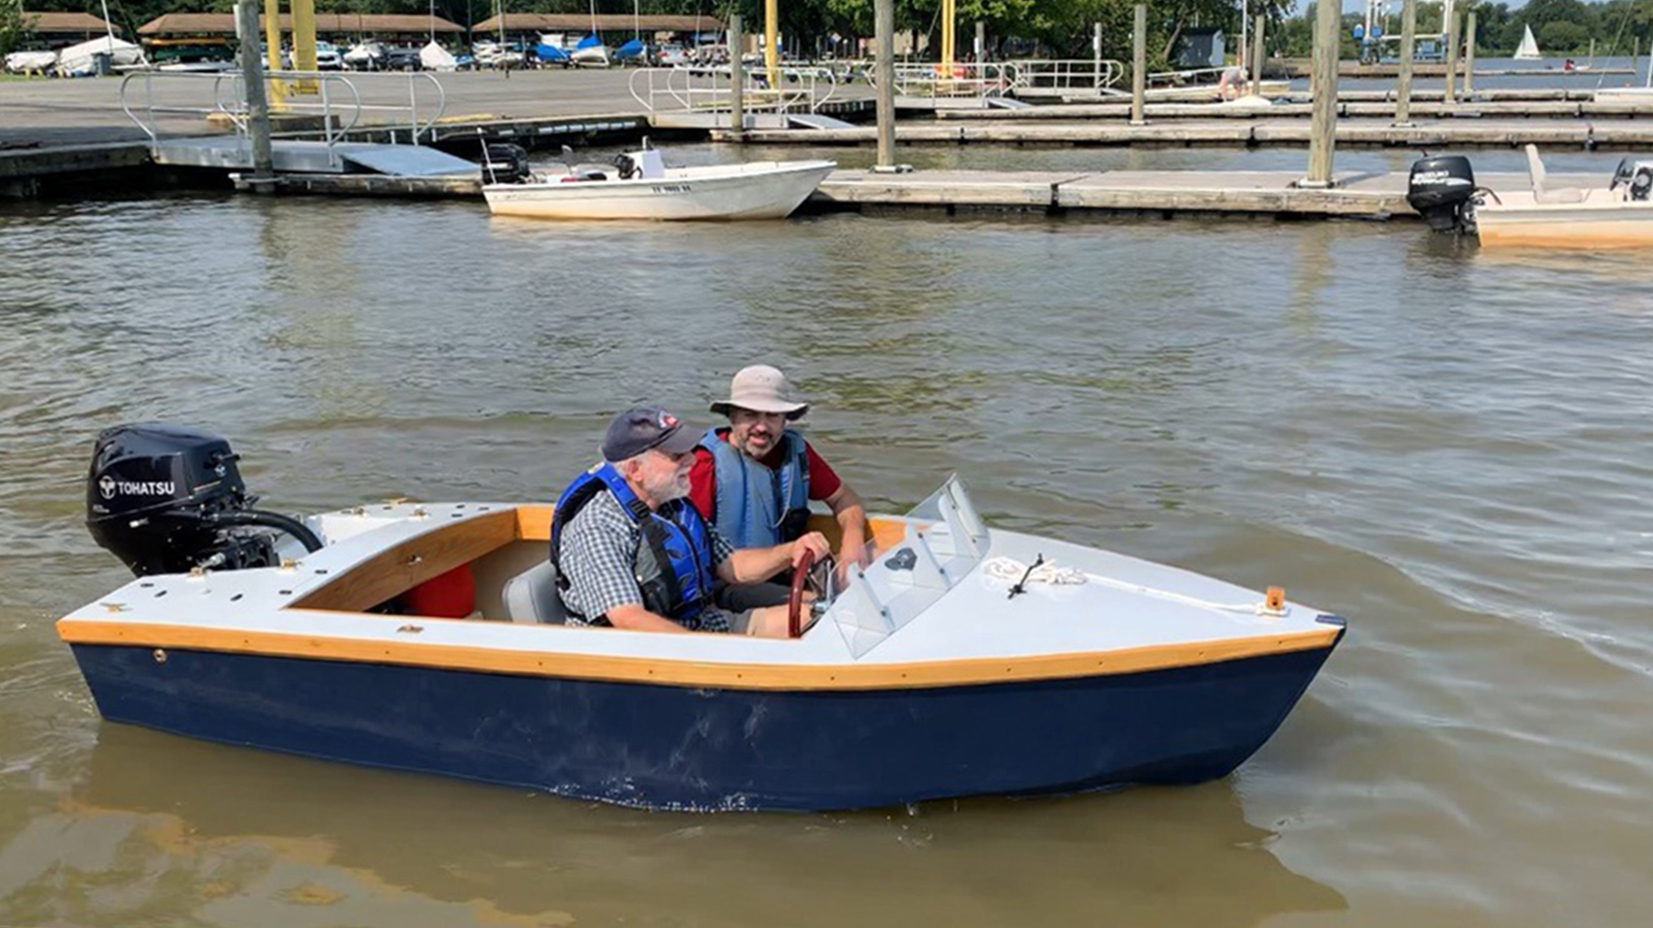
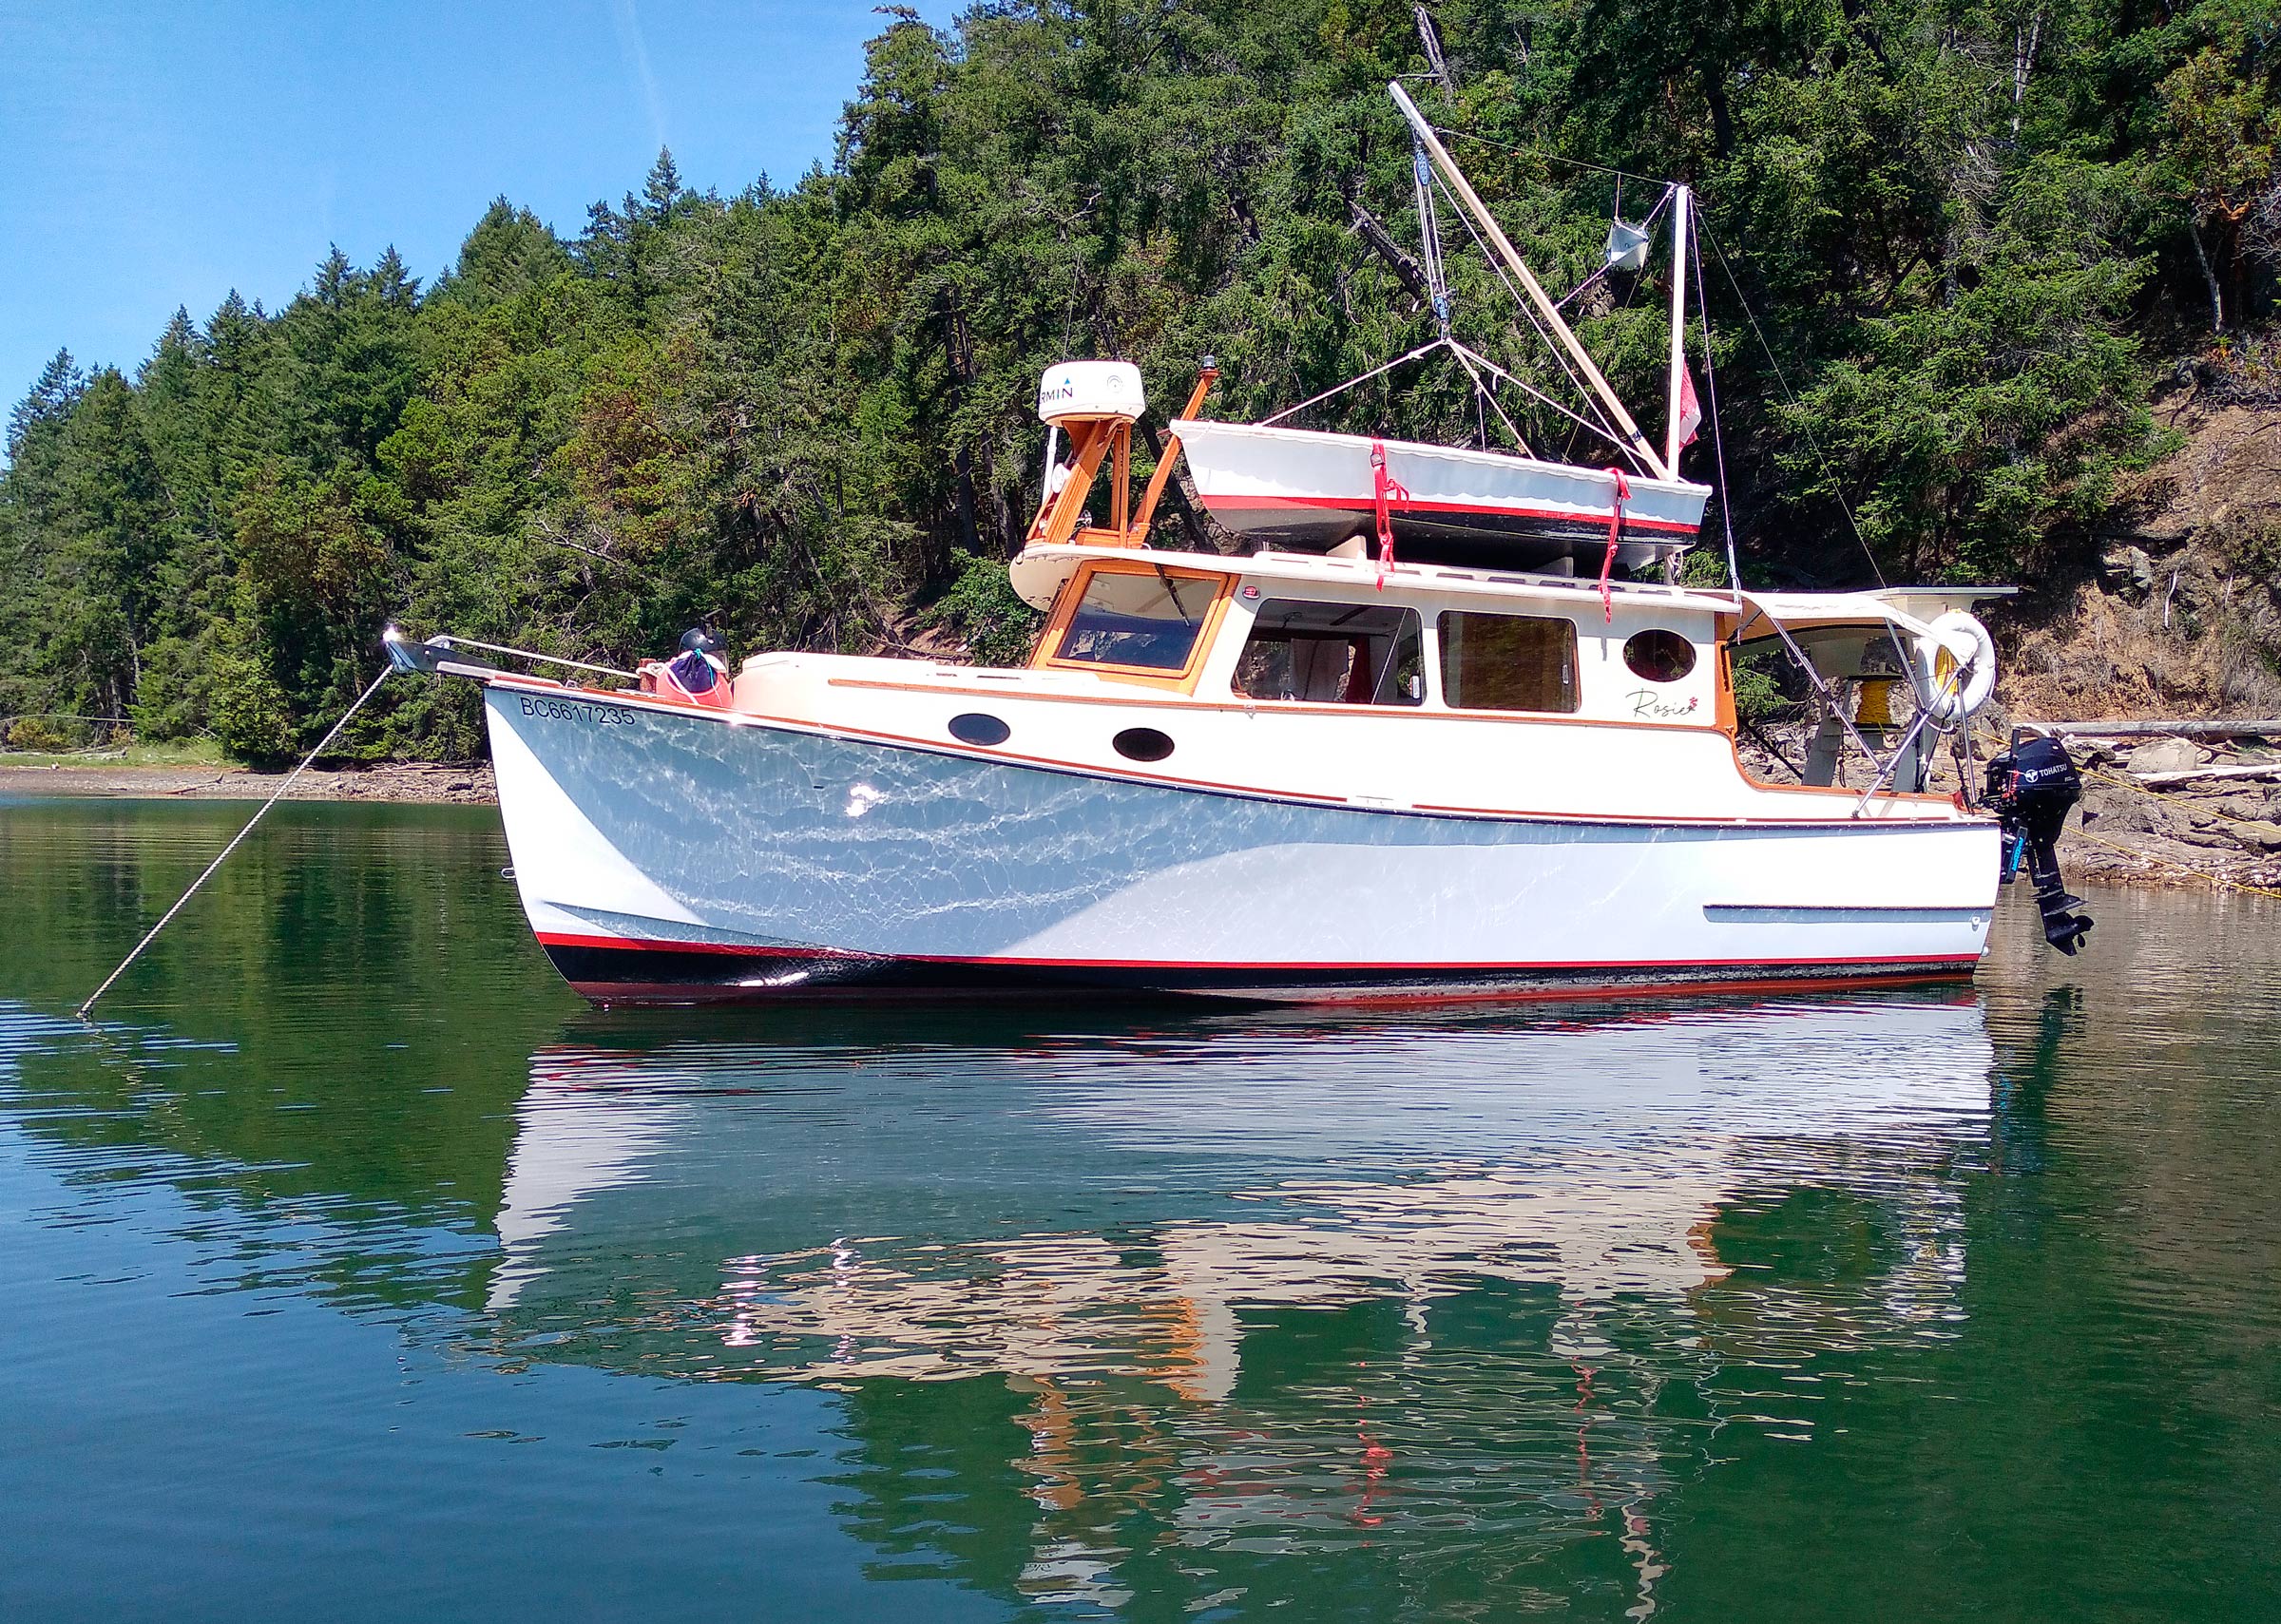
The Handy Billy weighs around 1,300 lbs; an electric winch and guides on the trailer simplify launching and retrieval.
Towing the 1,300-lb boat and its trailer may require an SUV or a pickup truck. Launching at the ramp is straightforward. I have a 2,000-lb single-speed winch that is adequate for hauling out. Trailer guides have proven their worth to me while loading and unloading such a heavy boat by myself.
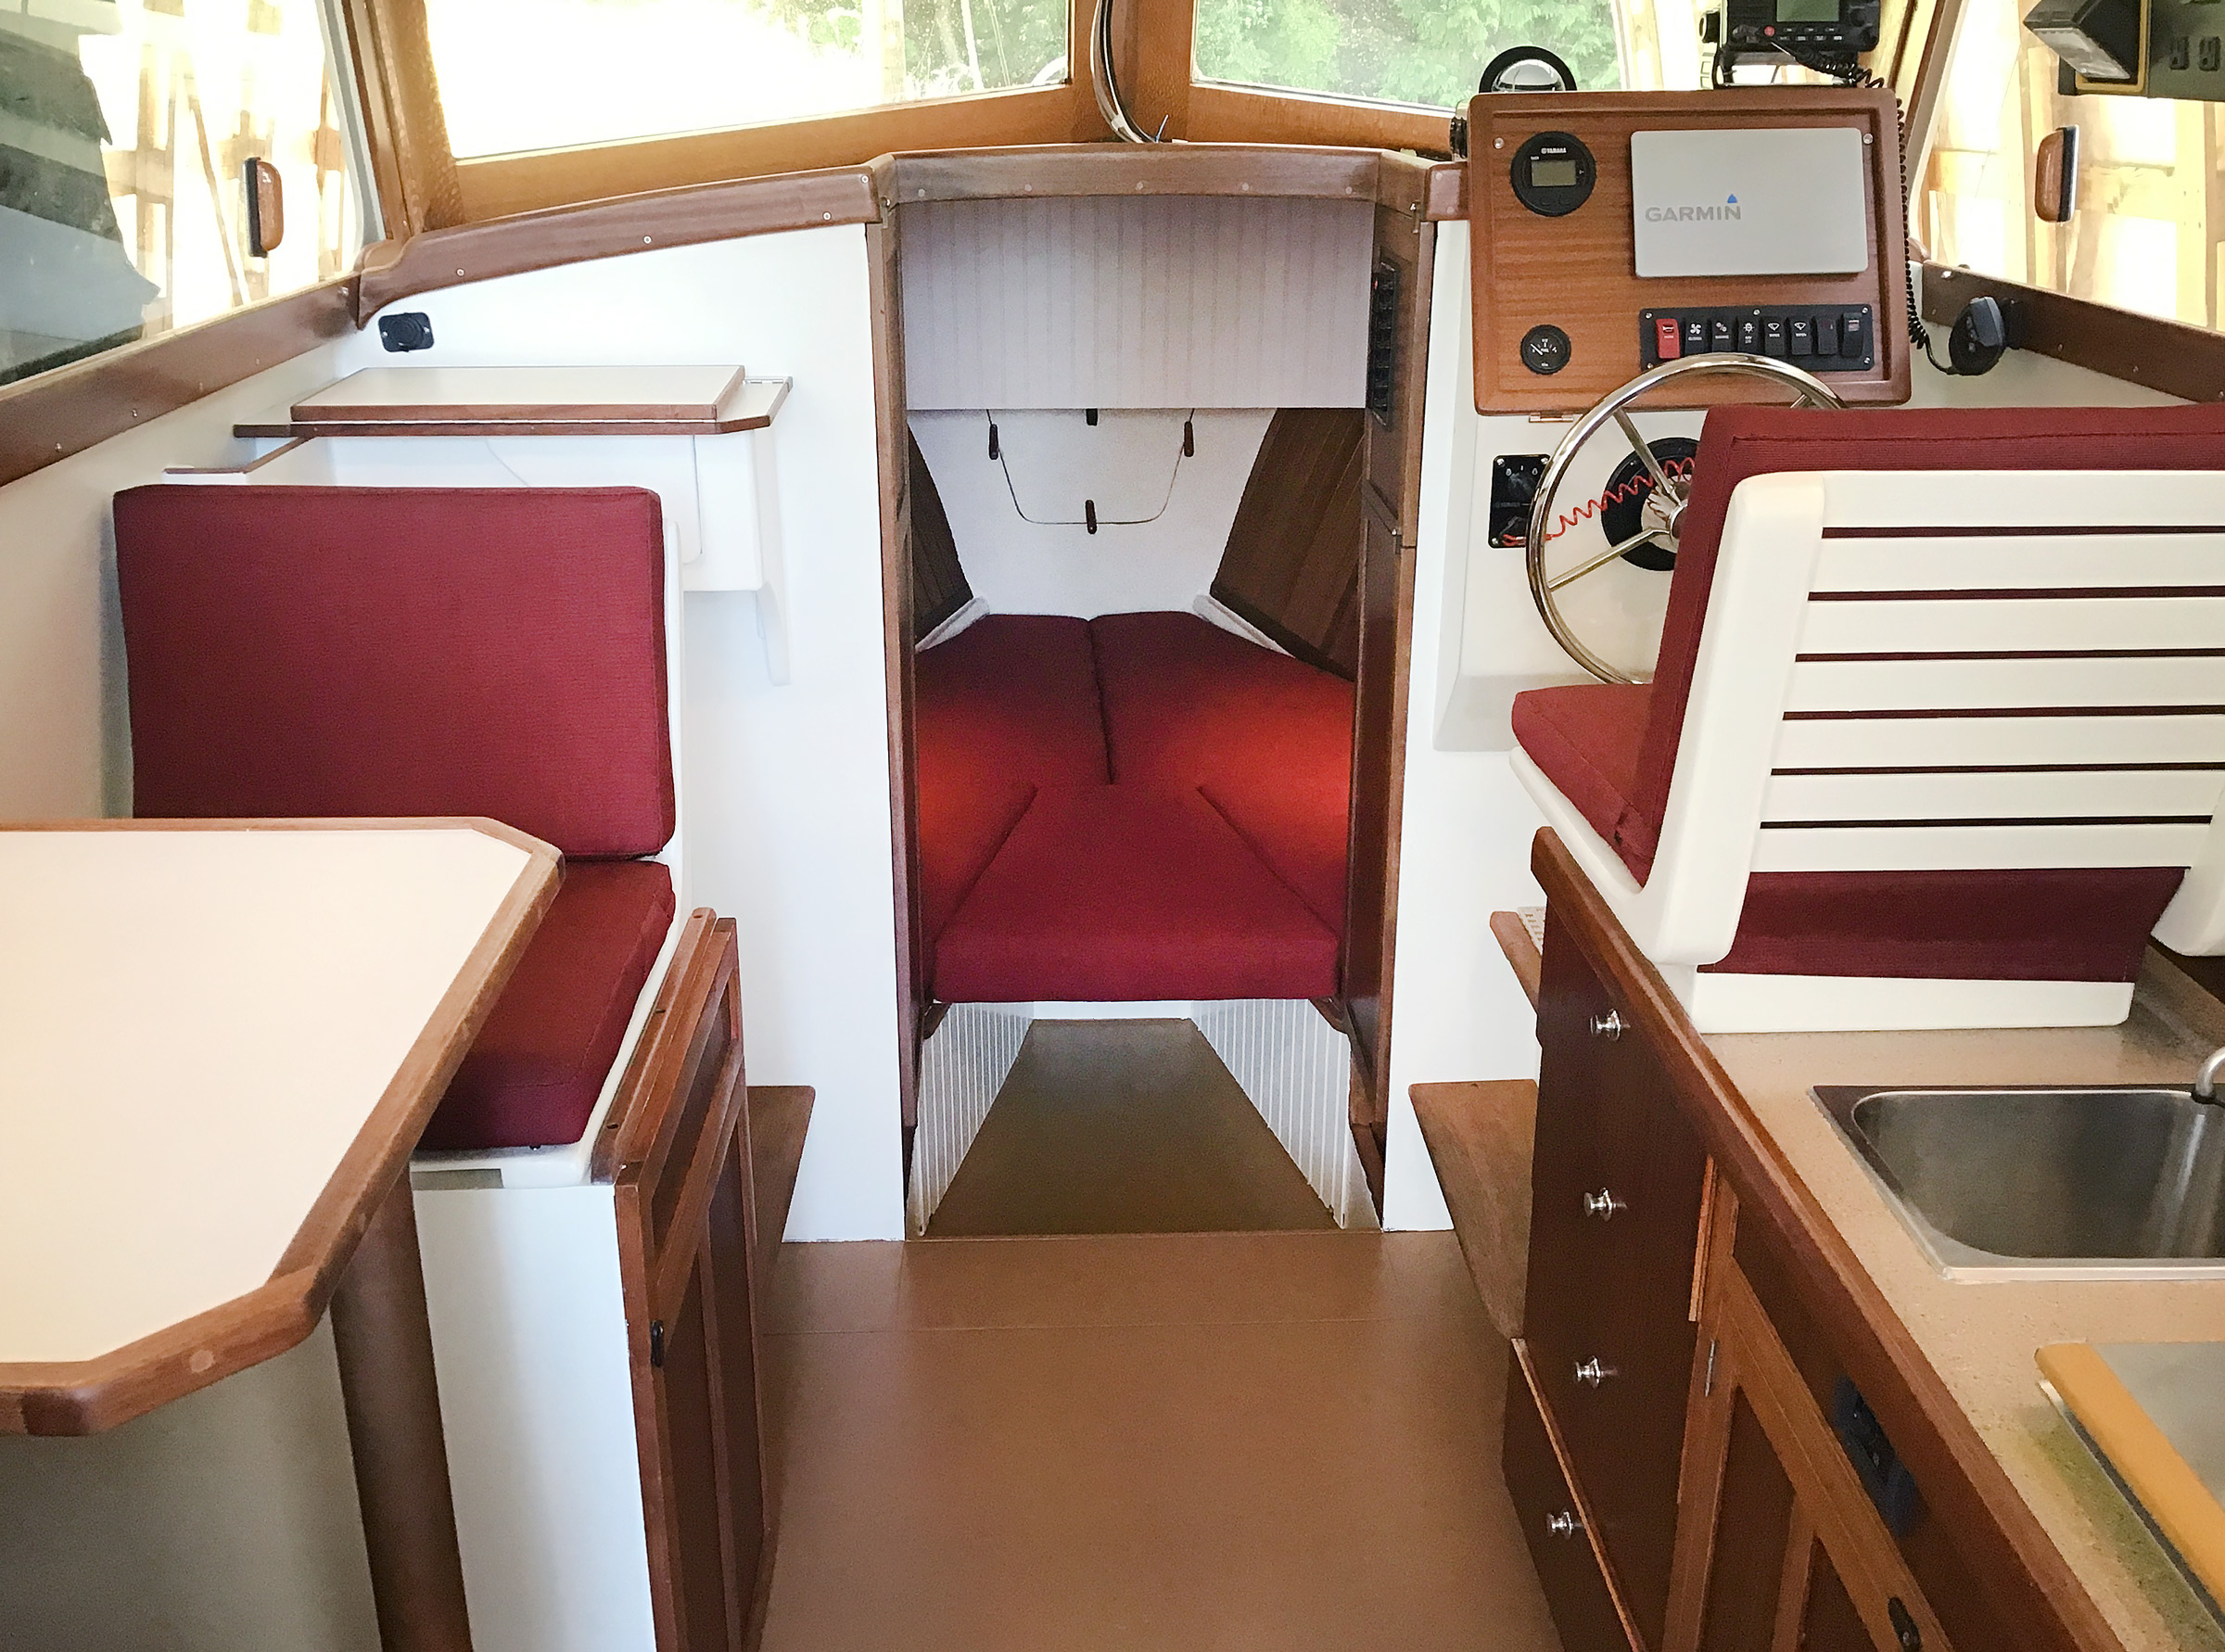
There is adequate room around the center console for passengers to move safely about the boat. Just below the aft end of the foredeck is the opening for the shelf that holds the fuel tank.
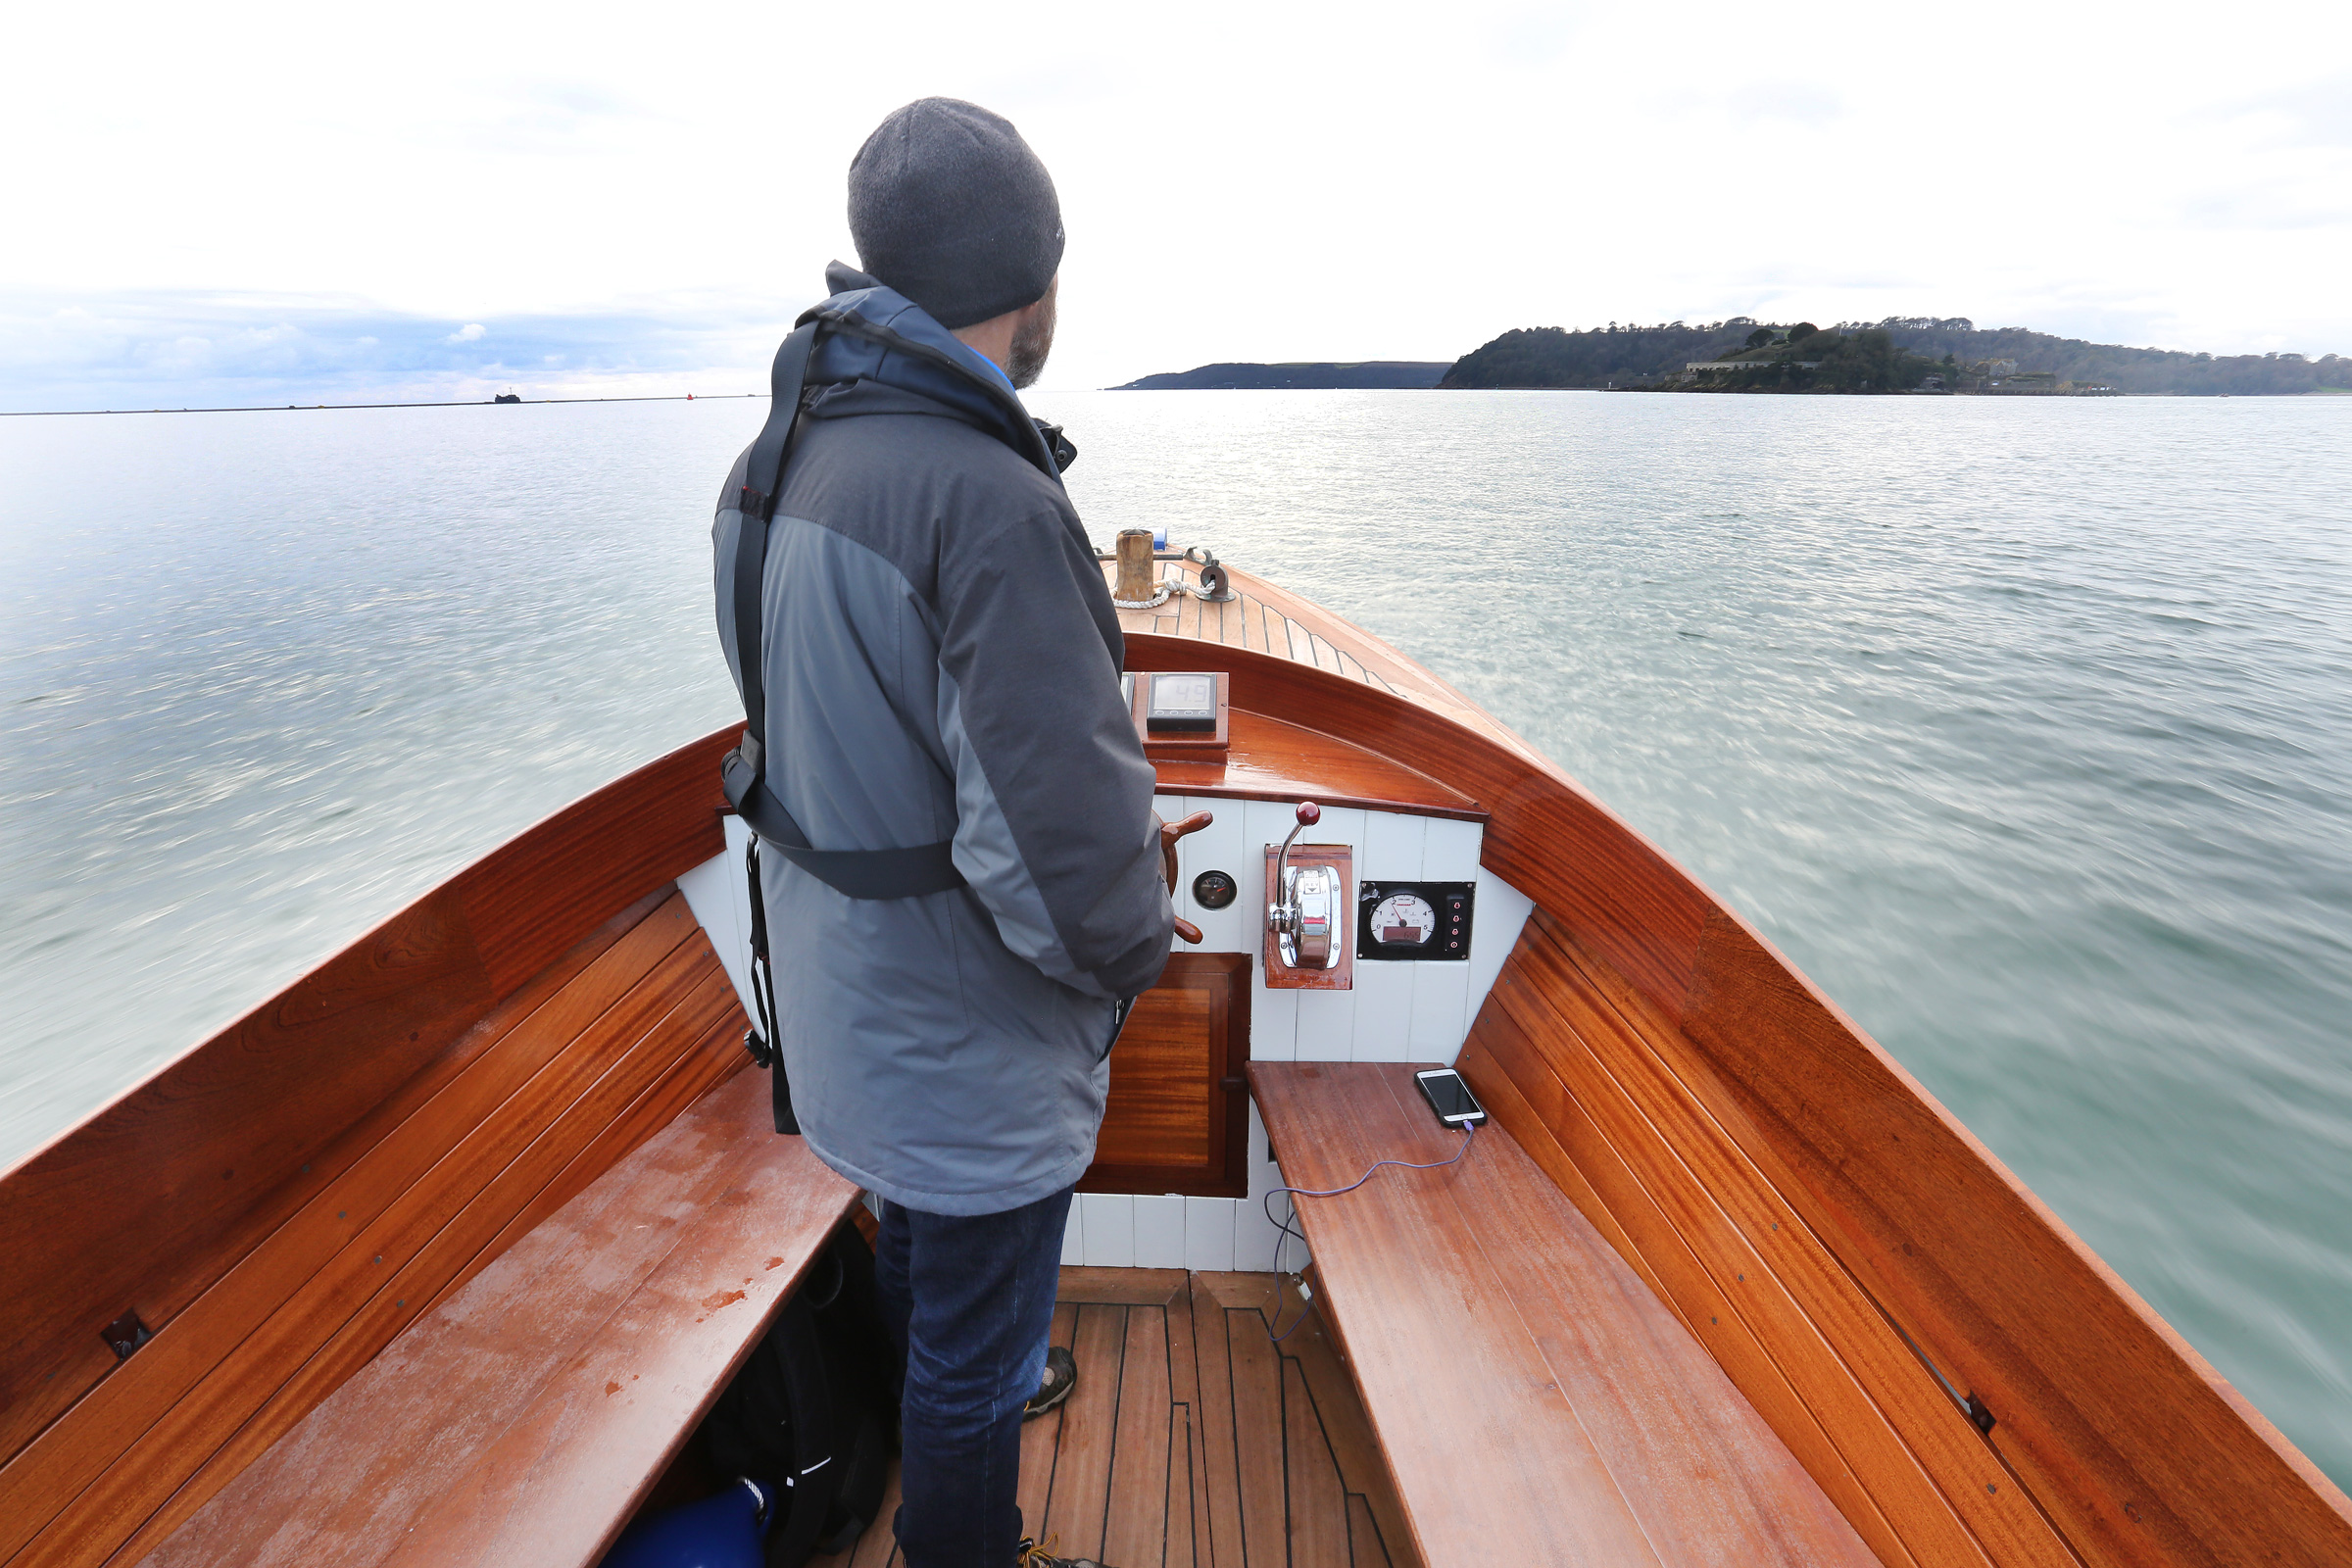
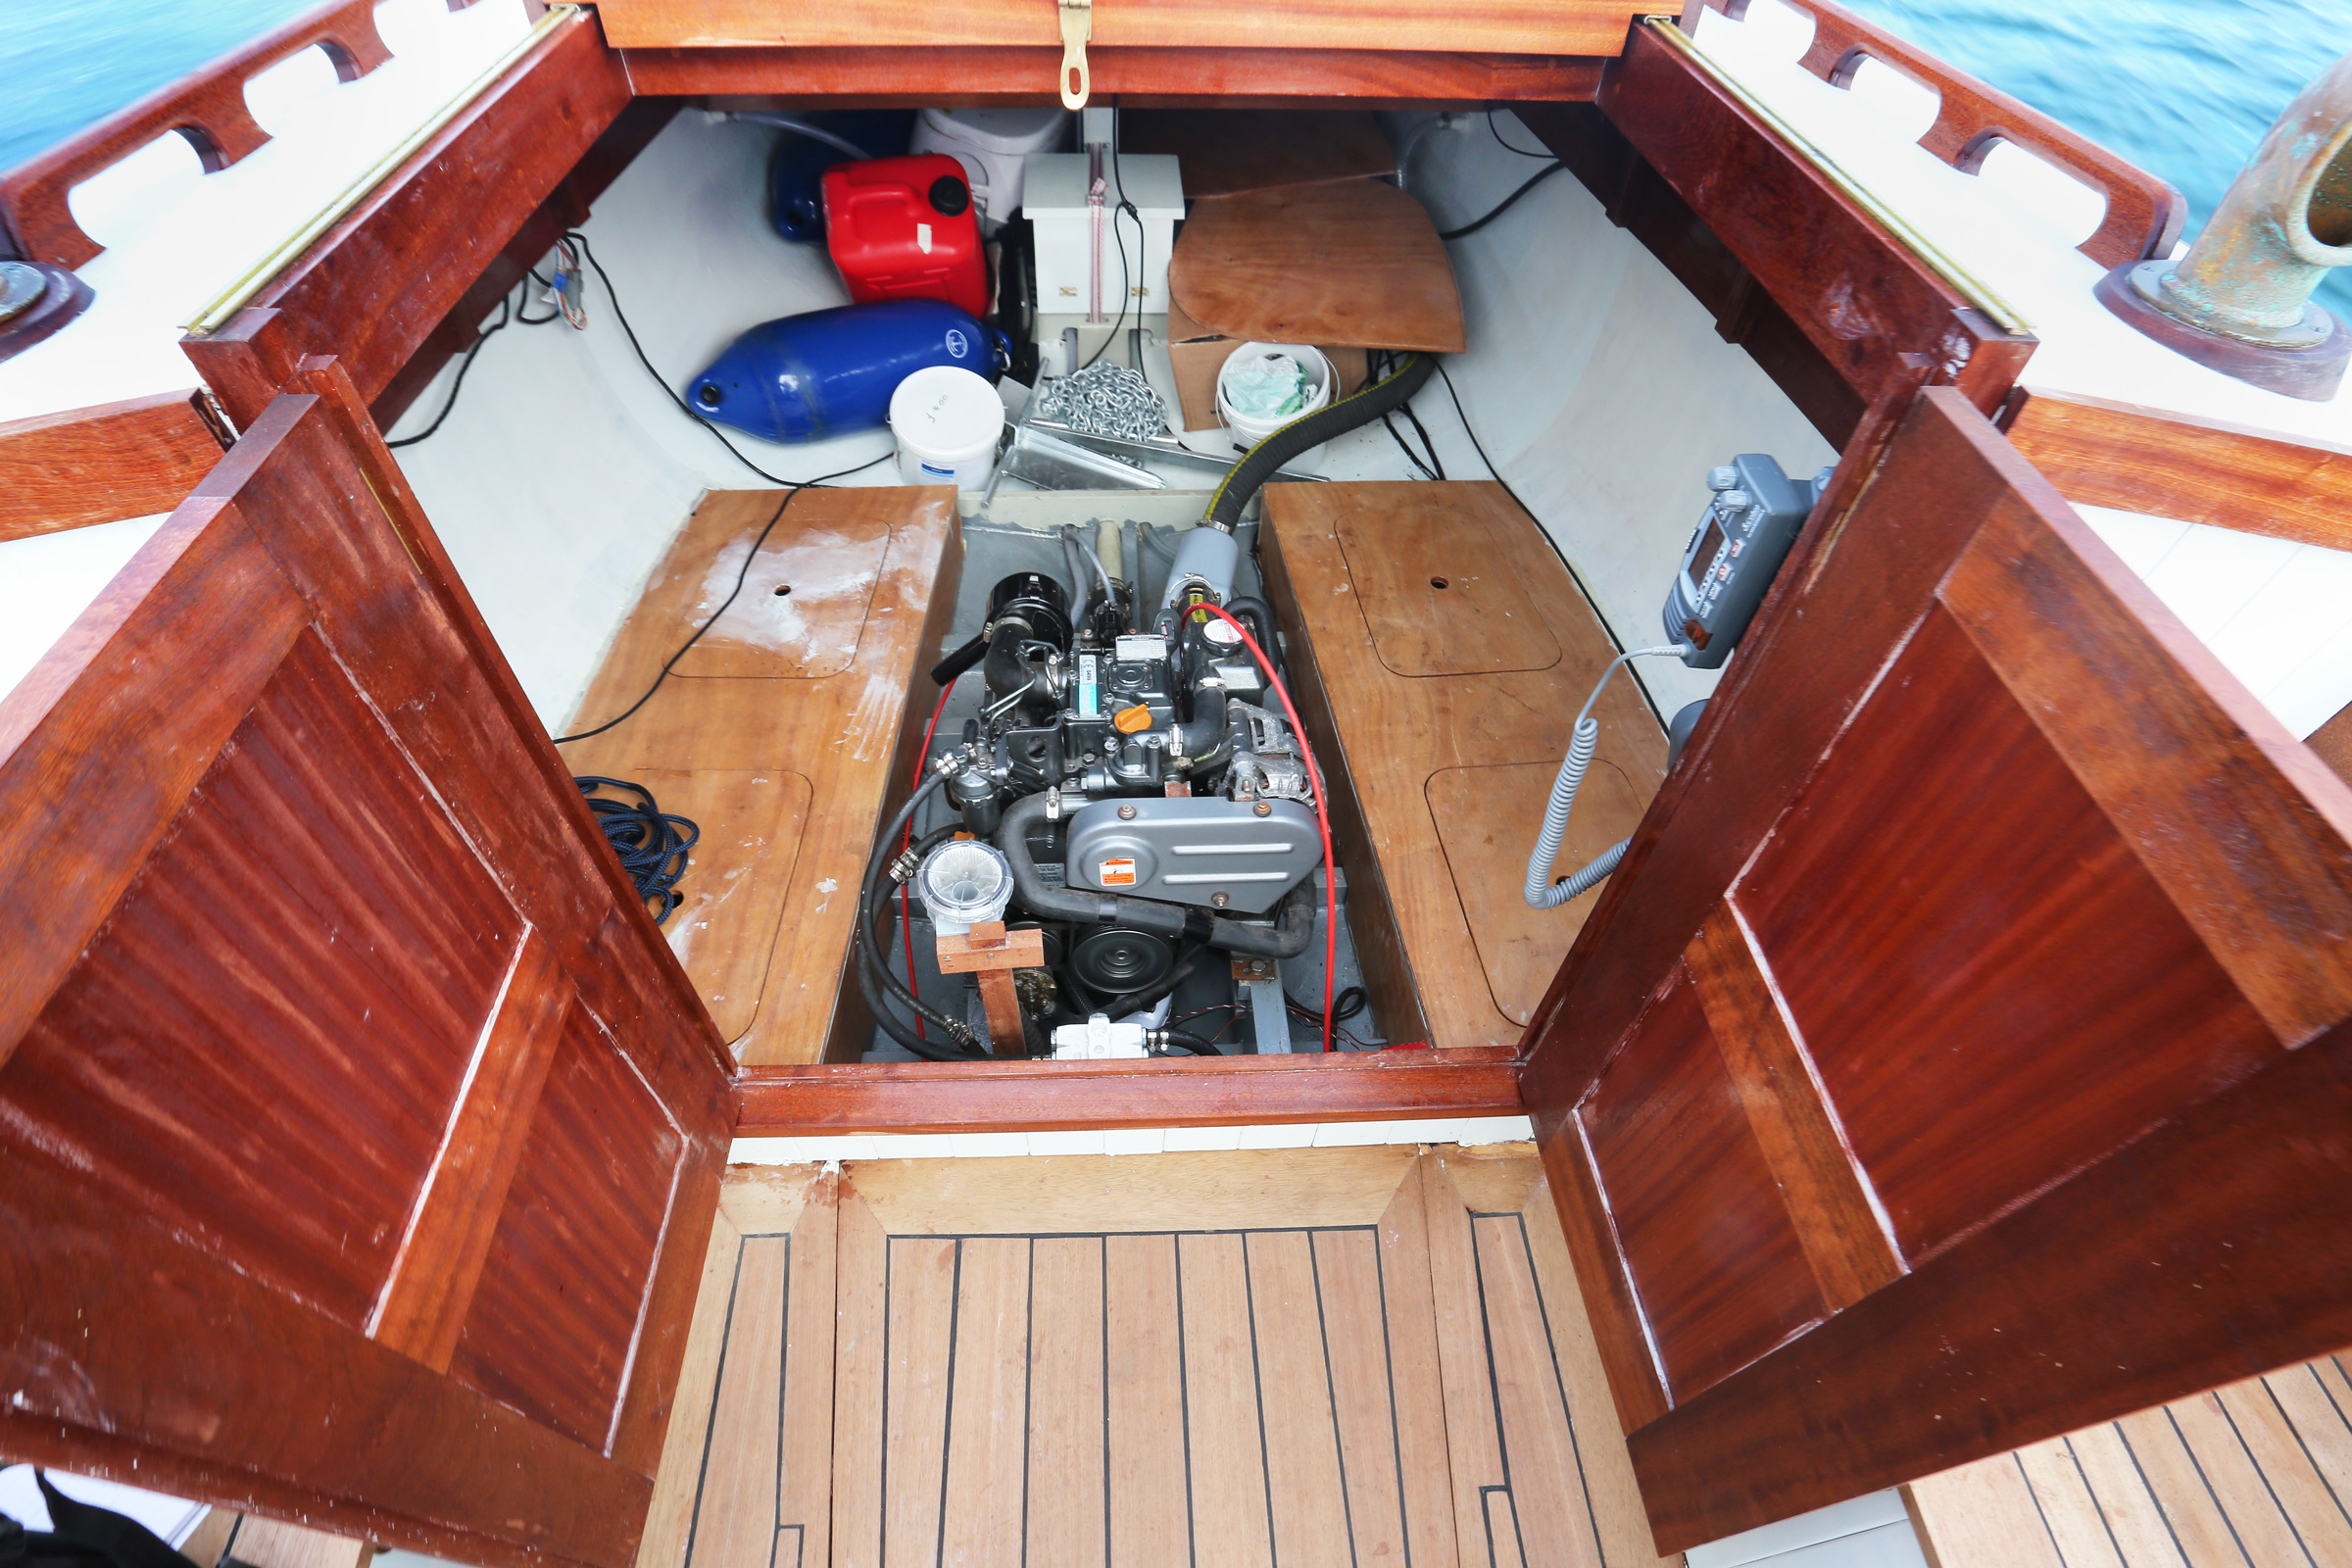
The cockpit is 13′ x 5′ and has enough space to move around while tending docklines and attaching fenders. It is deep enough to give you the feeling of being inside rather than on top of the boat. The center console gives the skipper an unobstructed 360-degree view and has room for instrumentation, binoculars, sunscreen, sunglasses, and other items. Forward of the helm there is a thwart with room for extra clothes in dry bags. In front of the engine compartment there is a bench seat with a fold-down backrest that gives access to two small storage compartments that are approximately 15″ x 15″ x 24″ deep on either side of the motorwell. There’s plenty of room to stow fenders under the rear bench. Beneath the foredeck, the Handy Billy has a shelf for the fuel tank and another above it for a fire extinguisher, spare ropes, and other items. I recently refitted the gas tank shelf with a sliding shelf to allow for easier access when refueling. The boathook and spare paddle are hung on hooks fastened to the inside of the frames. Flotation is not mentioned in the plans, but it could be put forward under the deck and in the rear compartments alongside the engine if desired.
The cutout for the motorwell is the only visible sign that the Handy Billy has an outboard motor for power. The large hatch on the back deck provides easy access to it.
I went with a 20-hp four-stroke motor, but on many occasions, especially with guests aboard, wish that I’d stayed with the 25-hp suggested in the Handy Billy instructions. The trade-off would be a marginal increase in gas consumption, but it would be worth the increased speed and power. With the 20-hp motor, the boat does get up to a top speed of 17 knots in a steady and gentle manner. The boat slices through the chop and is dry in all but the most extreme conditions, the ride is smooth and comfortable, cornering is steady and predictable, and the boat is easy to maneuver in tight spots and while docking. Passengers ride on the forward bench which trims the boat nicely and allows for easy conversation during all but the highest speeds. I have confidence in the Handy Billy’s abilities to handle moderate conditions on lakes and other protected waters.
The Handy Billy was not an overly difficult project, but it did come with a steep learning curve. In my 20 years with the boat, I have gained many skills as a builder and owner. Today, I use it for video recording, work for which the boat is very well suited. It would make a fine addition to a lakeside cottage as a runabout for fishing or transporting in style. It’s a charming boat that continues to resonate with admirers wherever she goes.
Steve Cormack is a self-taught amateur builder with a workshop in Pender Harbor, British Columbia. He started building boats nearly 40 years ago and has completed several small plywood kayaks and strip canoes. In addition to the Handy Billy, he has built two sailboats: a Selway Fisher Ptarmigan pocket cruiser and a Blackswan 22 for cruising. He is currently finishing a 32′ Lake Union–style dreamboat based on a Katherine 30, designed by William Hand Jr.
Handy Billy 21 Particulars
[table]
Length/21′
Beam/5′10″
Weight/ approx. 1,300 lbs
Capacity/1 to 8
Propulsion/ 8–15-hp outboard for displacement speeds, 25 hp for planing
[/table]
Plans for the Handy Billy 21 are available through Bryan Boatbuilding for CAD $80. Plans for the Handy Billy 18 are available for CAD $80. A single sheet of information for plywood construction for both versions is available for CAD $25.
Is there a boat you’d like to know more about? Have you built one that you think other Small Boats Magazine readers would enjoy? Please email us!
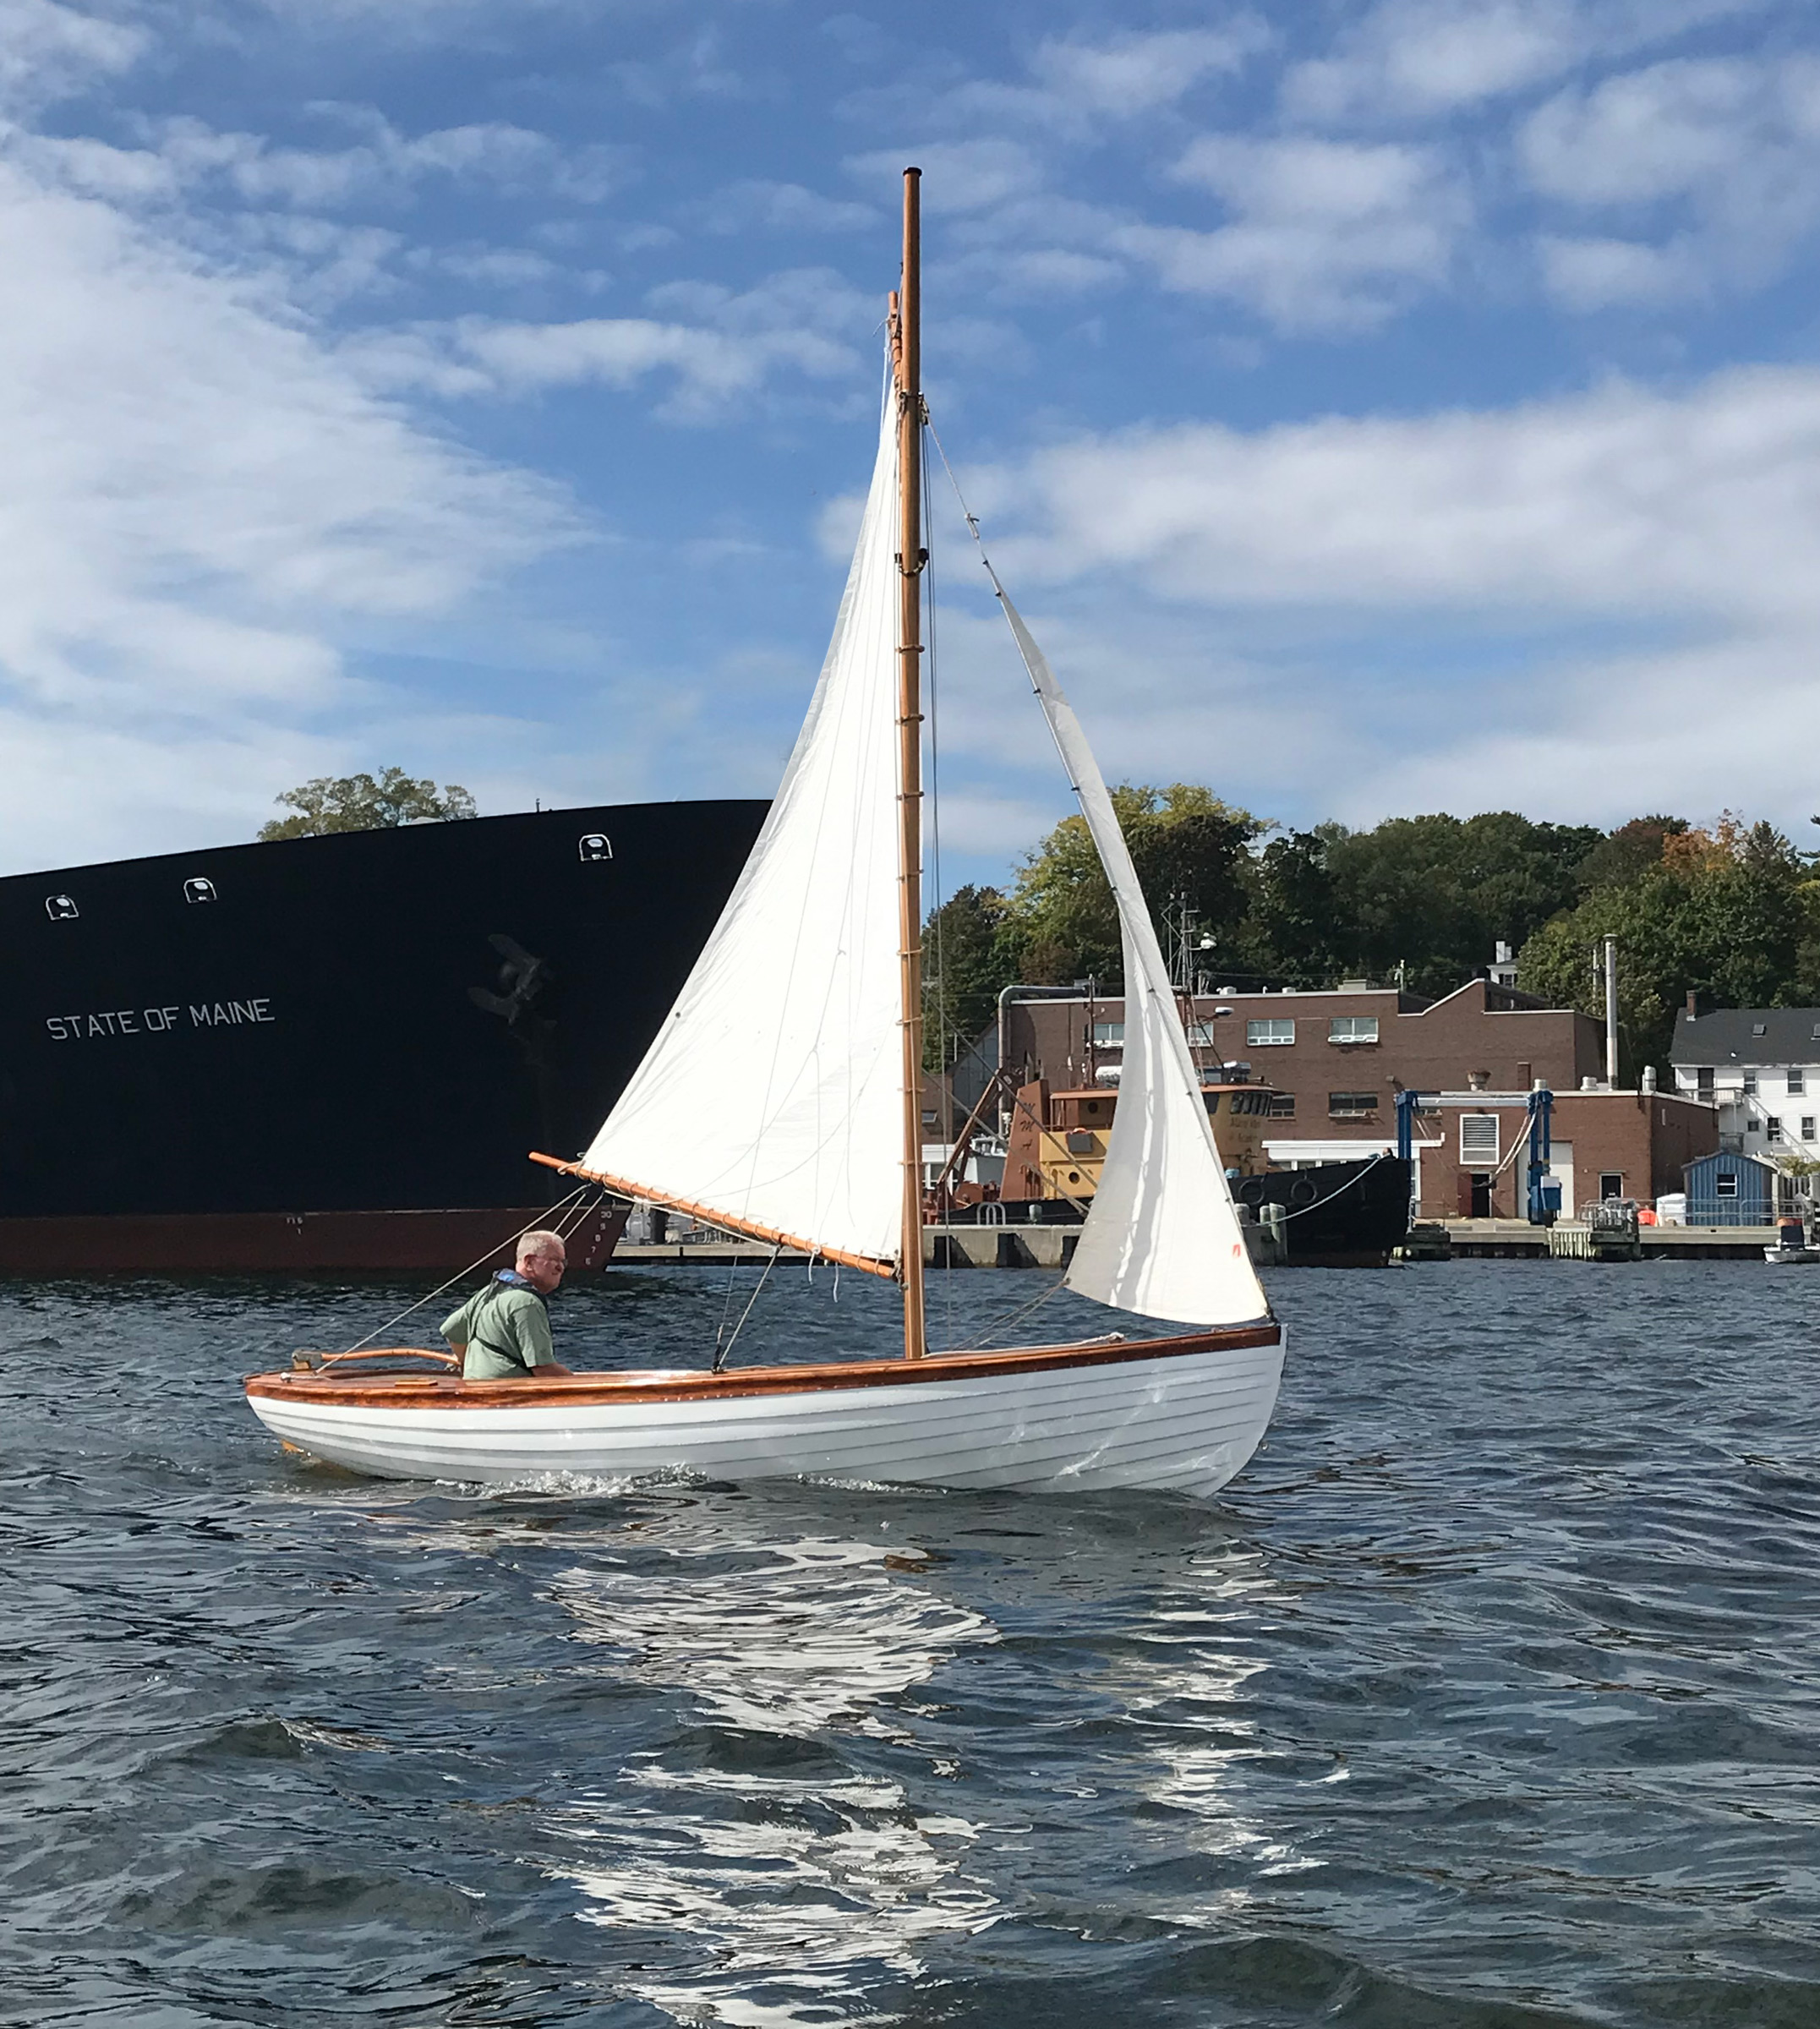
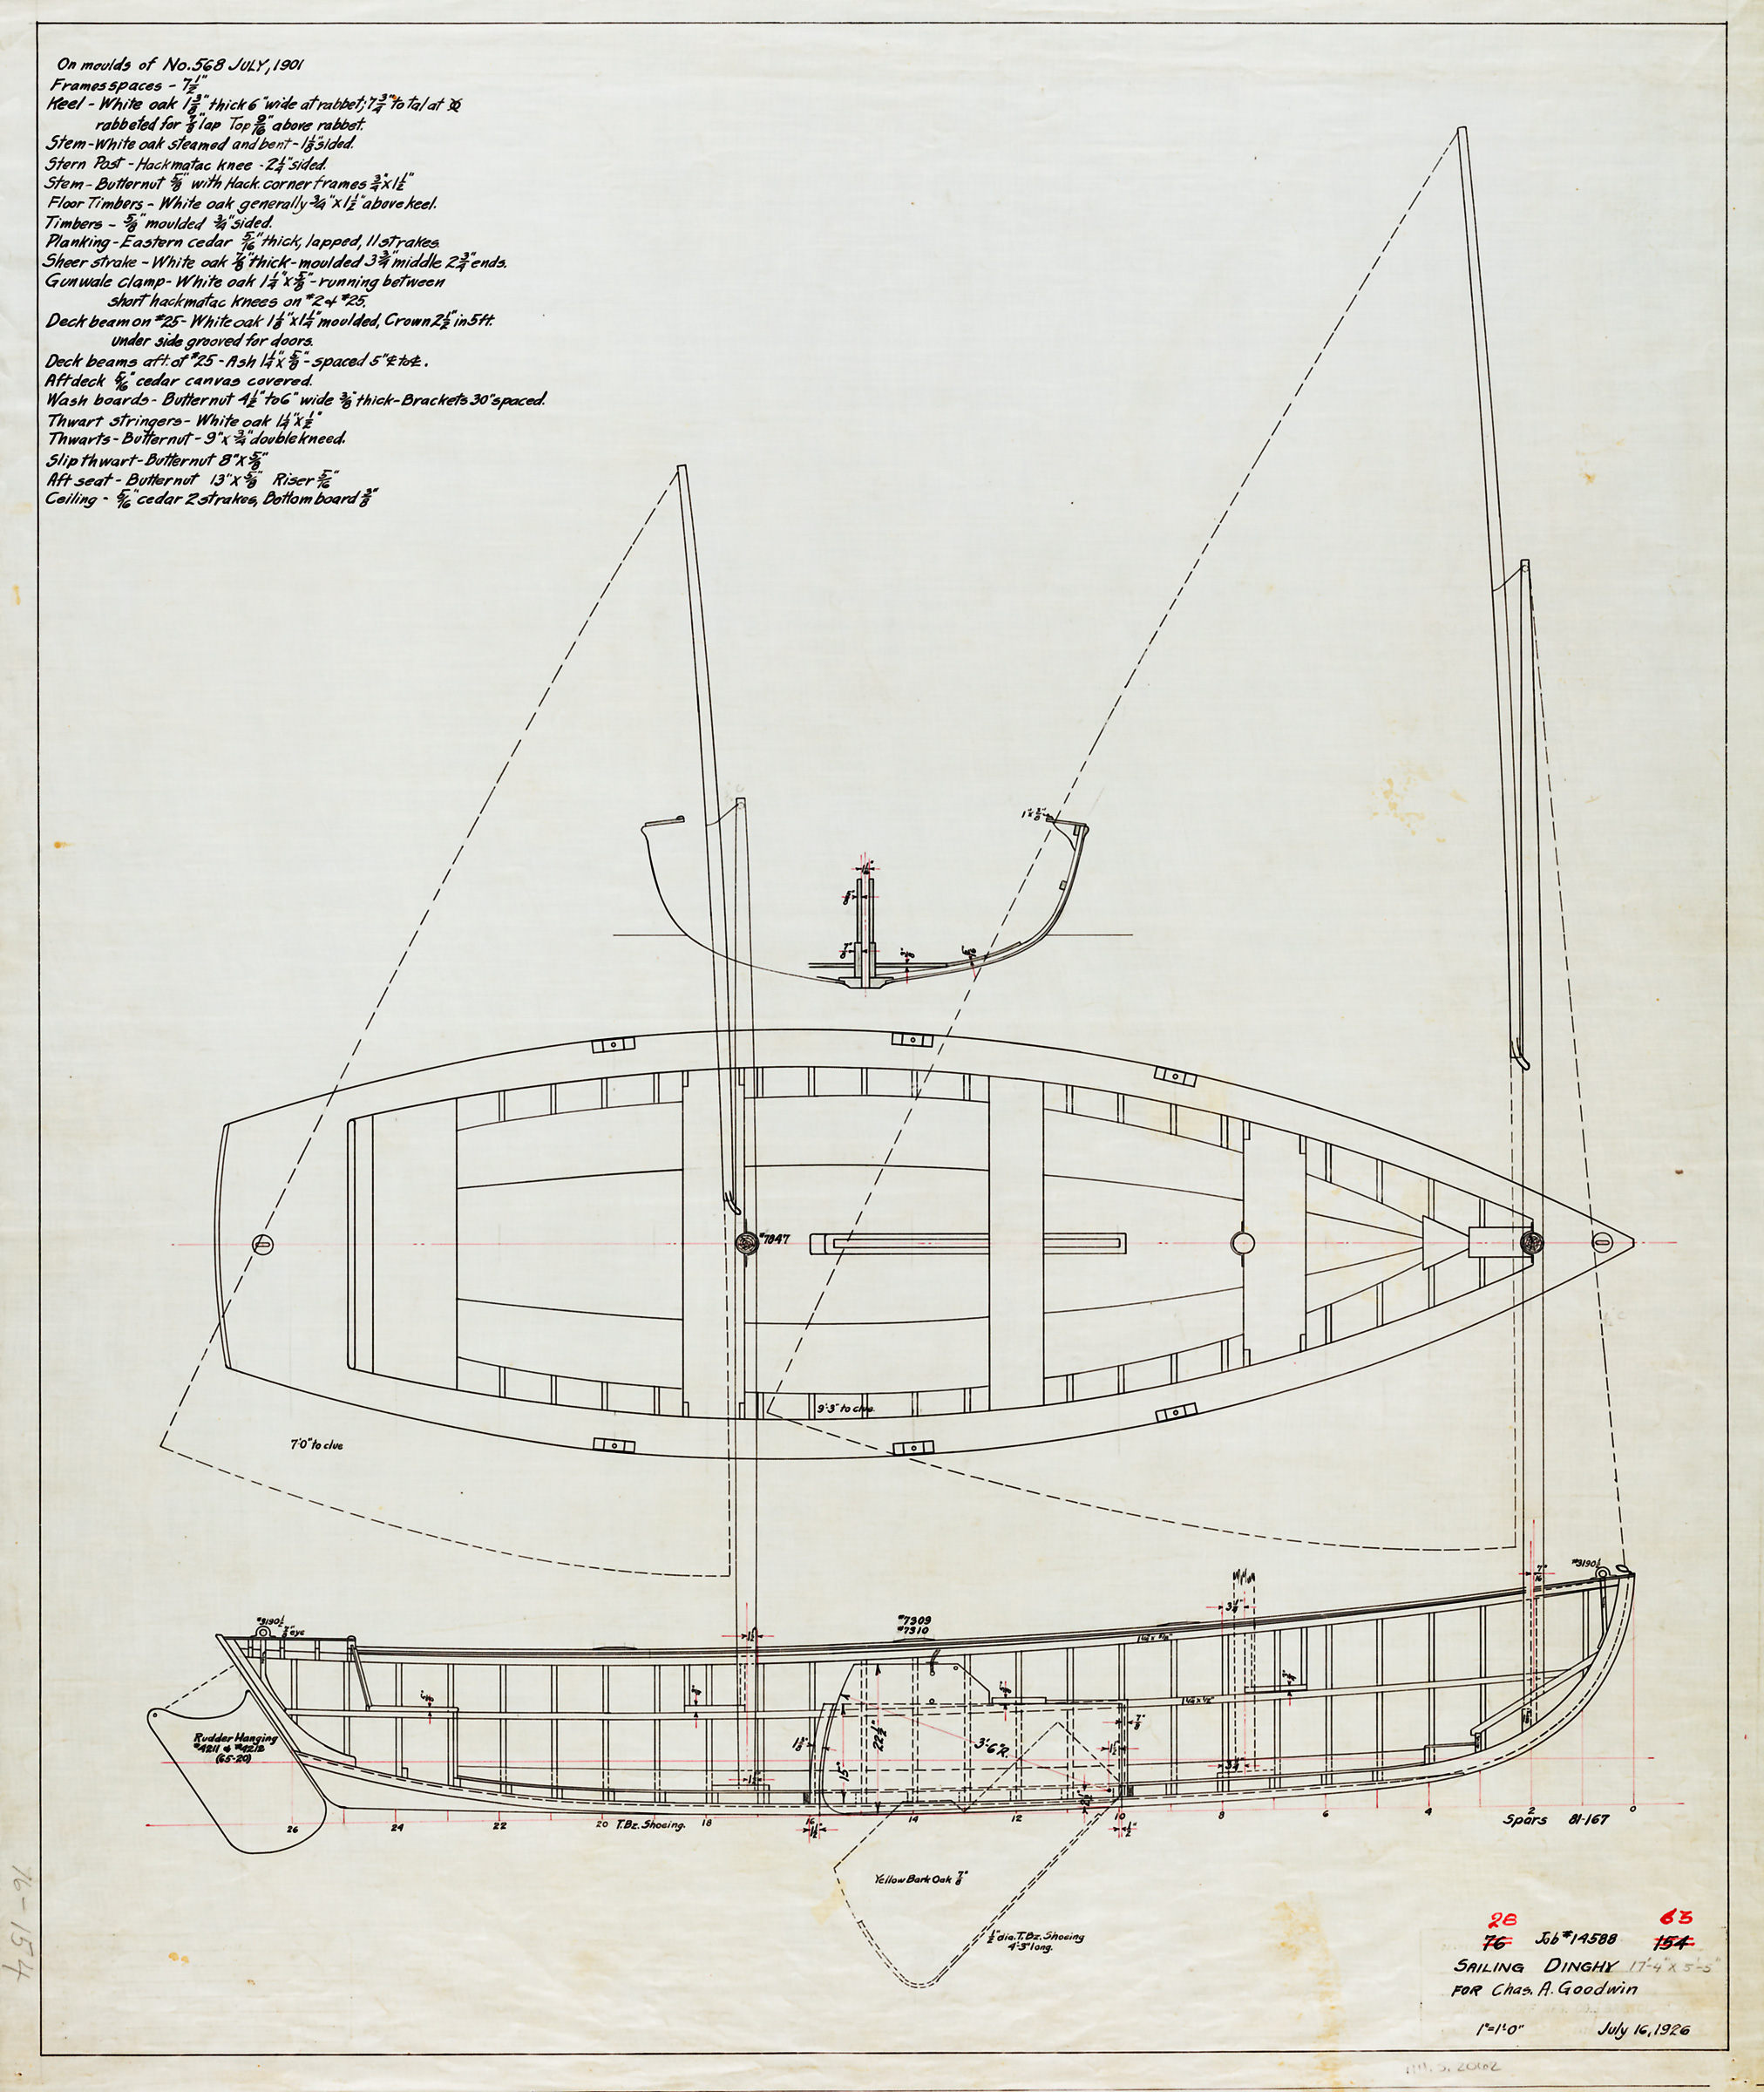
SUN DANCE II is a sprightly 17′ sailing dinghy whose design dates back to 1901. The original boat of the series from which she emerged, designed by N.G. Herreshoff and built by the Herreshoff Manufacturing Company, was a daysailer meant to be carried aboard the 189′ Gardner & Cox–designed steam yacht COLONIA owned by Frederick G. Bourne. An avid yachtsman, Bourne was president of Singer Manufacturing, the sewing machine company, between 1889 and 1905. He was also a member of several yacht clubs and commodore of the New York Yacht Club from 1903 to 1905. Bourne, with these bona fides, had a refined taste in boats, and knew what he wanted in a daysailer when he commissioned COLONIA’s dinghy. Herreshoff went on to build 36 Colonia dinghies, as boats built to this design and its variations have come to be called.
SUN DANCE II is a copy of a Herreshoff-built boat called GARRYOWEN, which was launched 1926. GARRYOWEN was built for Charles Goodwin, who visited the Herreshoff shops in late June that year and placed an order, on the spot, for a daysailer for use at Essex, Connecticut. Based on correspondence in the archives of the Herreshoff Marine Museum (HMM) in Bristol, Rhode Island, Goodwin seemed to have been considering Coquina, a 16′8″ cat-ketch that Herreshoff had designed for his own use. The day after Goodwin’s visit, Herreshoff wrote him suggesting he consider something else:
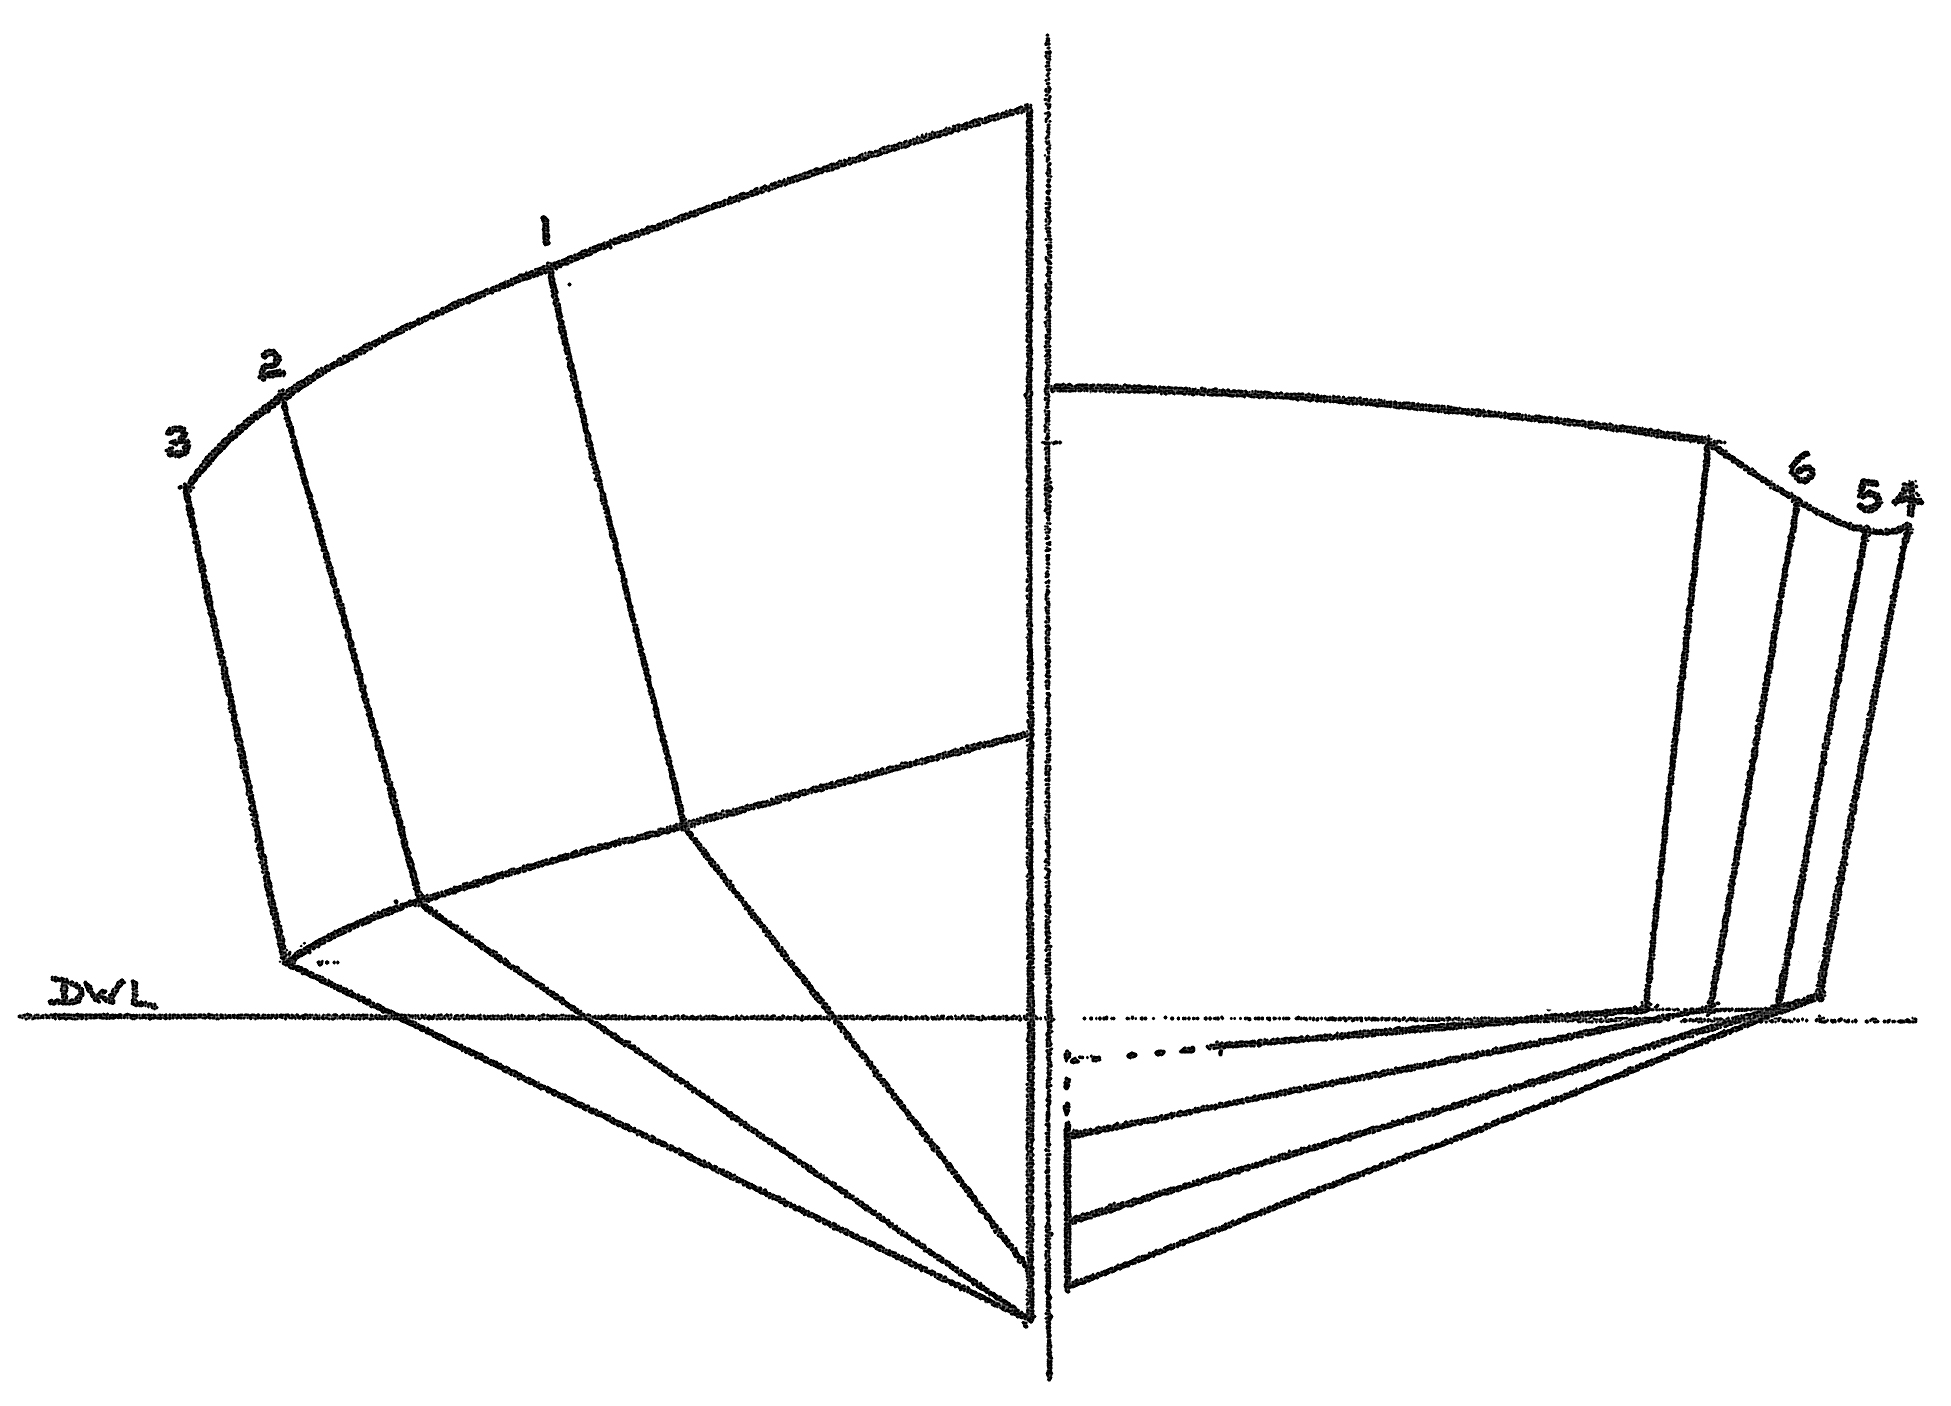
“We have moulds for another boat…which I think would make a better boat for you and probably as fast under ordinary conditions. I am enclosing profile and half breadth of deck of each for comparison which will show better by holding paper up to light. This later design has an over hang forward which gives very graceful lines.”
Herreshoff went on to give the boat’s dimensions as “17ft 2in extreme length, 14ft 8in waterline, 5ft 5in beam, 24in deep and 16 1/2in freeboard at midsection.” He further described the floors as being “a little flatter than Coquina, giving a much fuller builge [sic] and of course much more natural stability and capable of carrying larger sails. Boats built from this model have usually been rigged with mainsail & jib and the last had jib-headed [aka Bermudan] mainsails set on short masts with yard having jaws in sails. If the extreme length of 17ft 2in is used the two masted rig could be used, but if the boat is made much shorter probably the jib & mainsail rig would be desirable to get sufficient sail area.
“The hull of this model 17ft 2in long would probably weigh 300lbs and with all gear on board except ballast nearly 400lbs.”
The resulting boat had frames—presumably of oak—spaced 7 1/2″ apart. She had a 5/8″ butternut transom and was lapstrake-planked in 5/16″ white cedar. The stern deck was also planked in 5/16″-thick white cedar and sheathed in canvas. Coamings and sternsheets were butternut. SUNDANCE II, a copy of GARRYOWEN, was built around 1975 to the original scantlings but trimmed in mahogany, as was COLONIA’s original dinghy. The builder’s identity is obscure. She carries the signature molded Herreshoff sheerstrakes—an eye-pleasing sculptural detail that eases the transition from topsides to deck edge and offers additional wood for deck-edge fastenings.
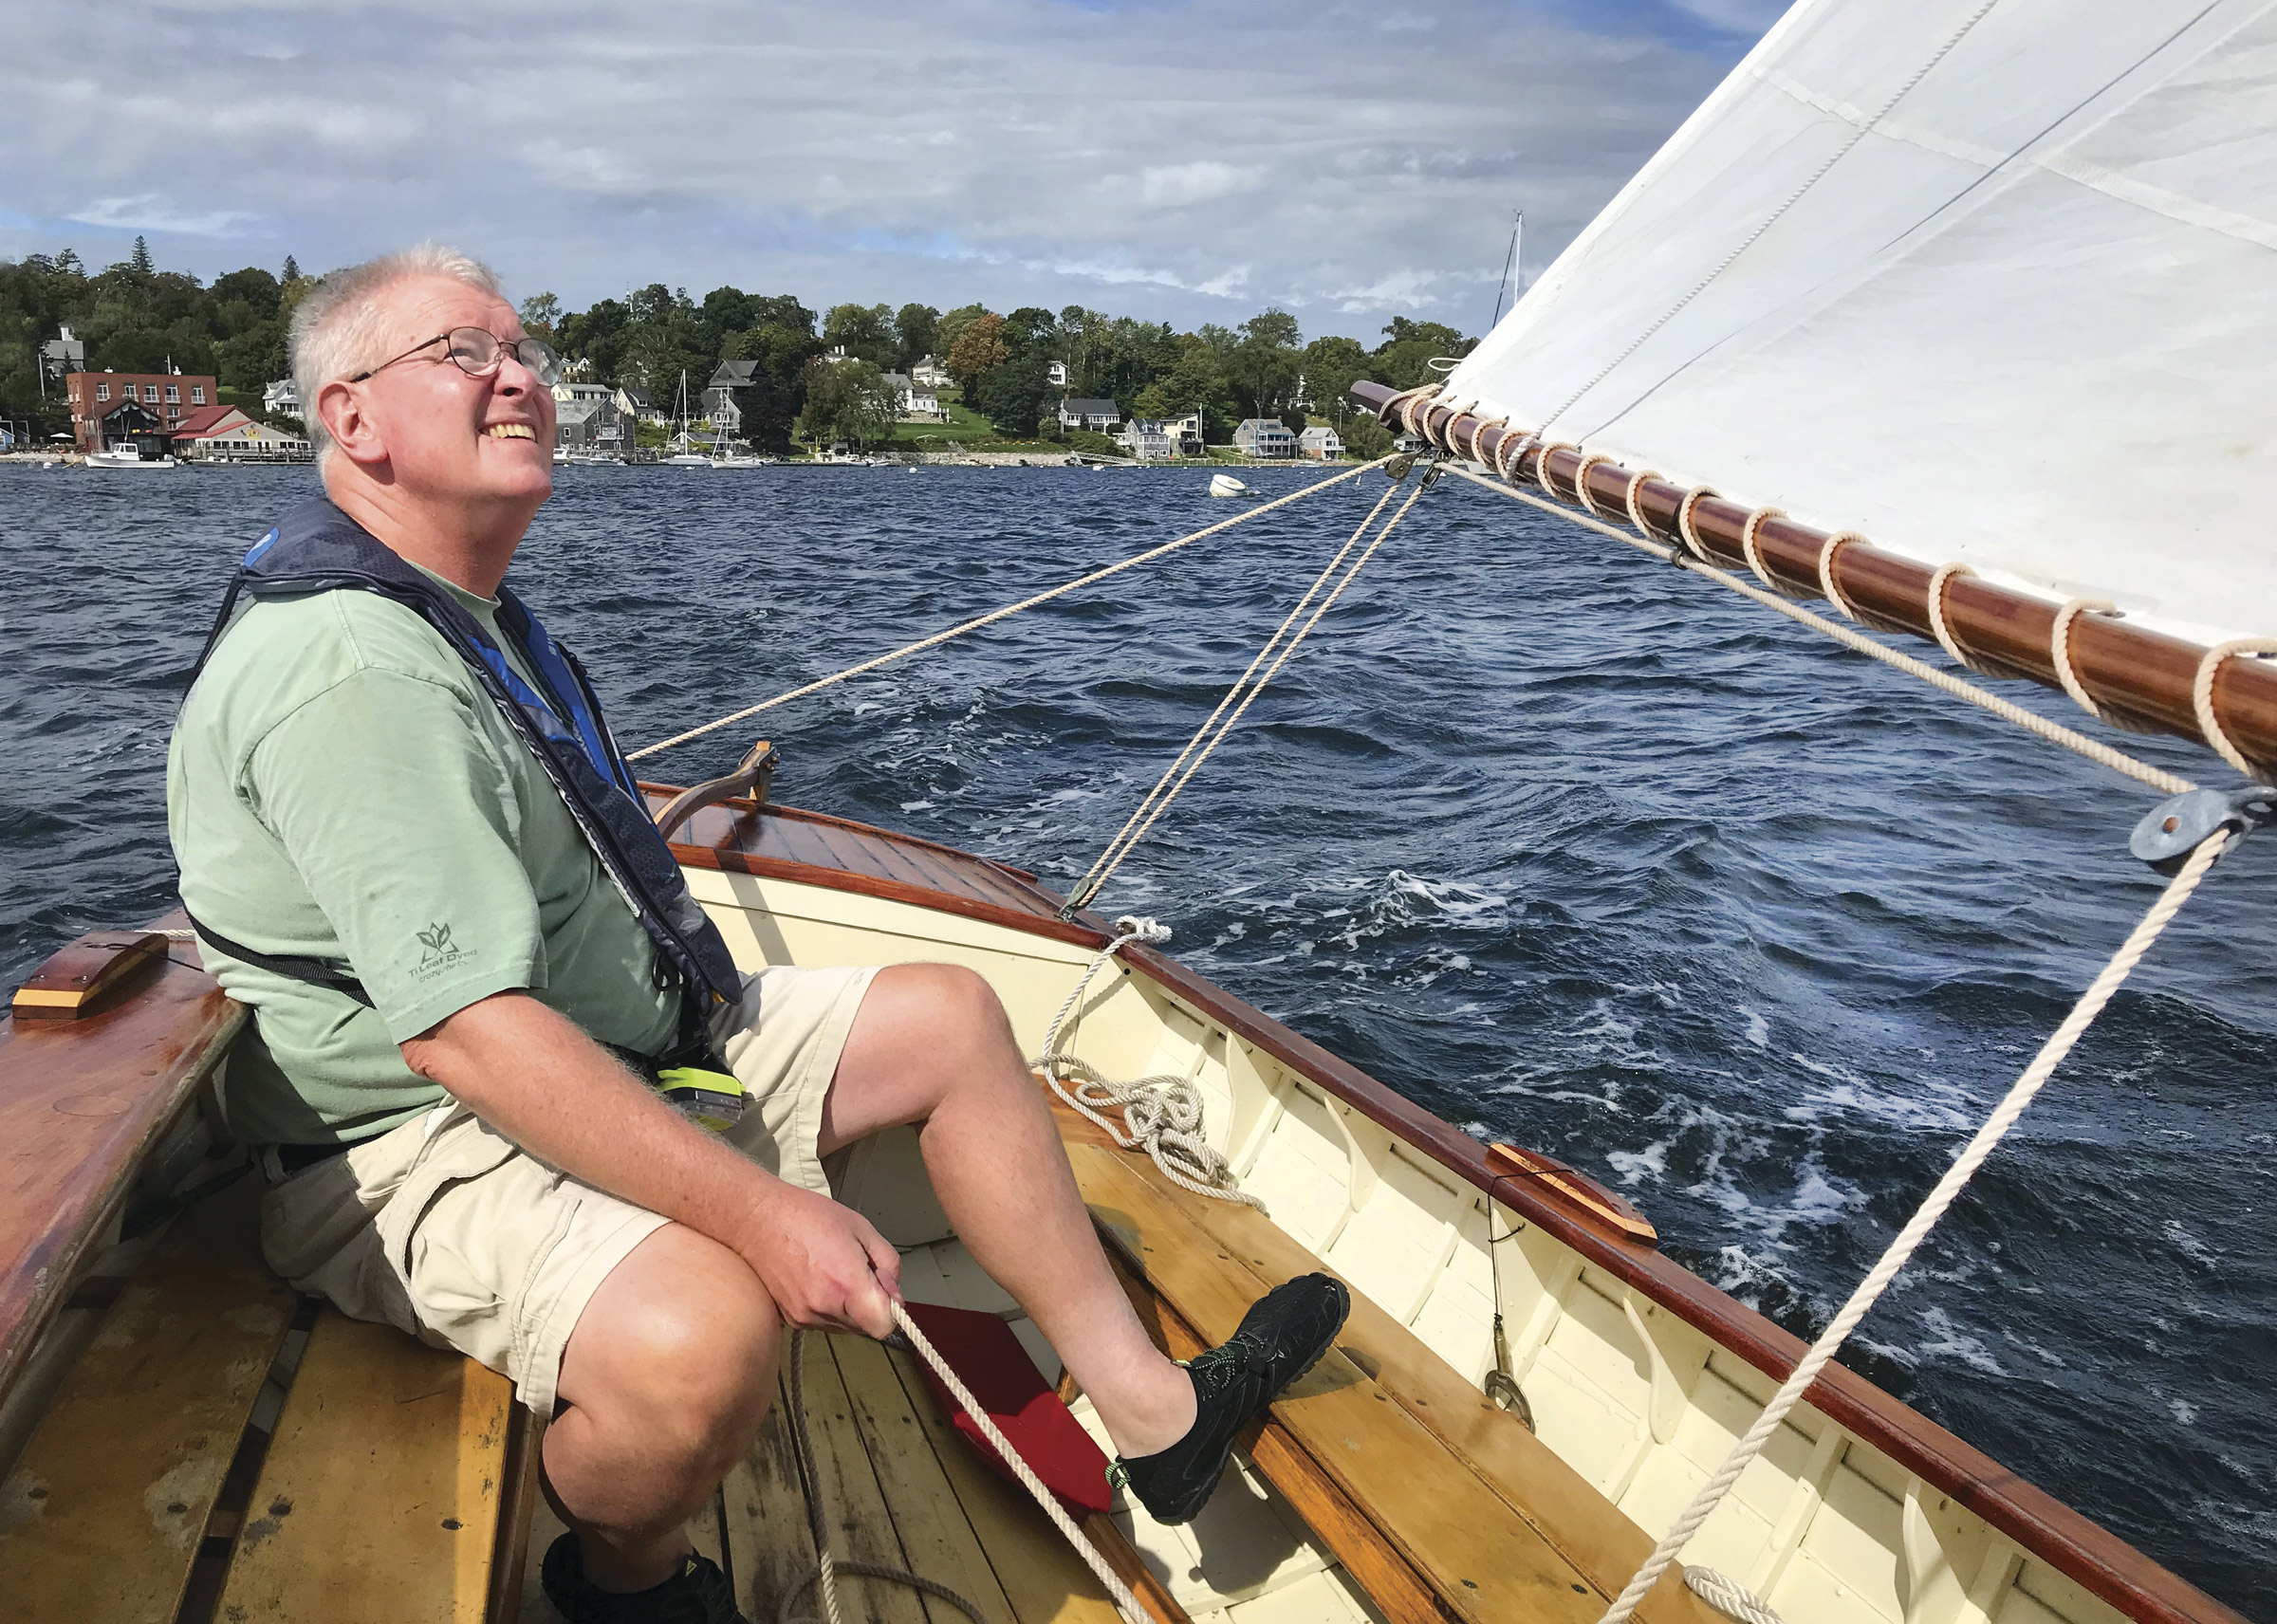
Photographs by the author
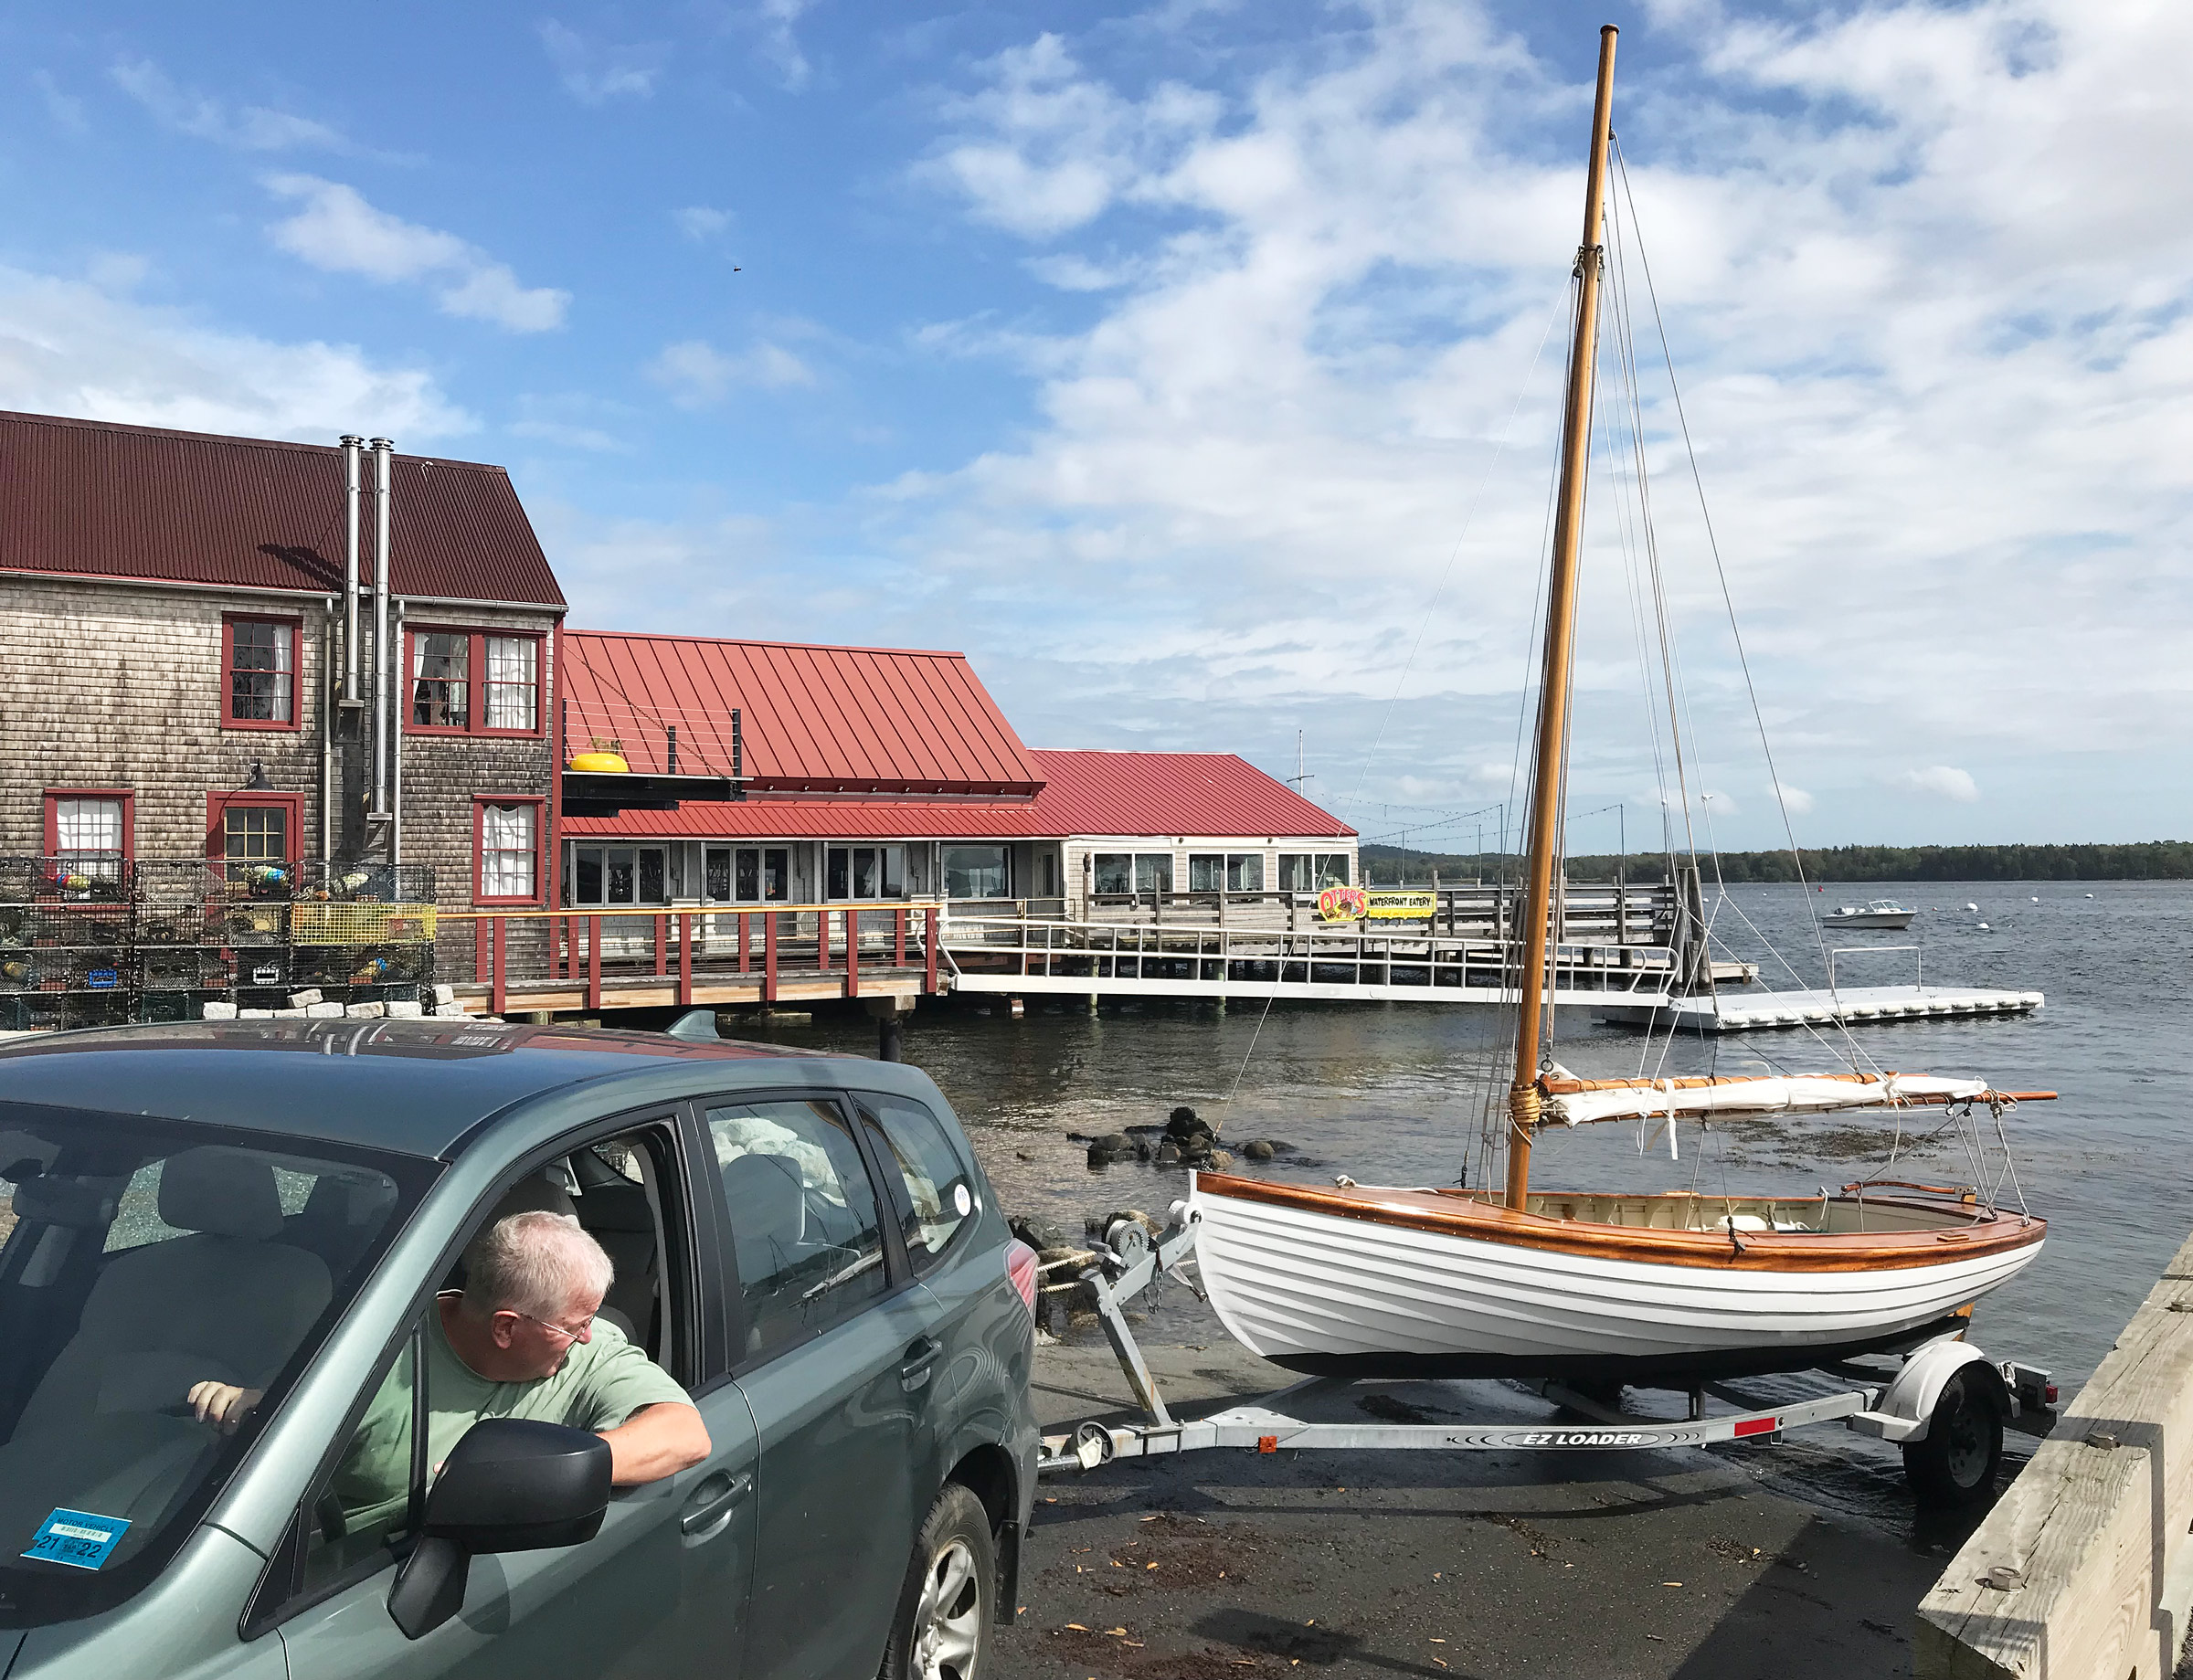
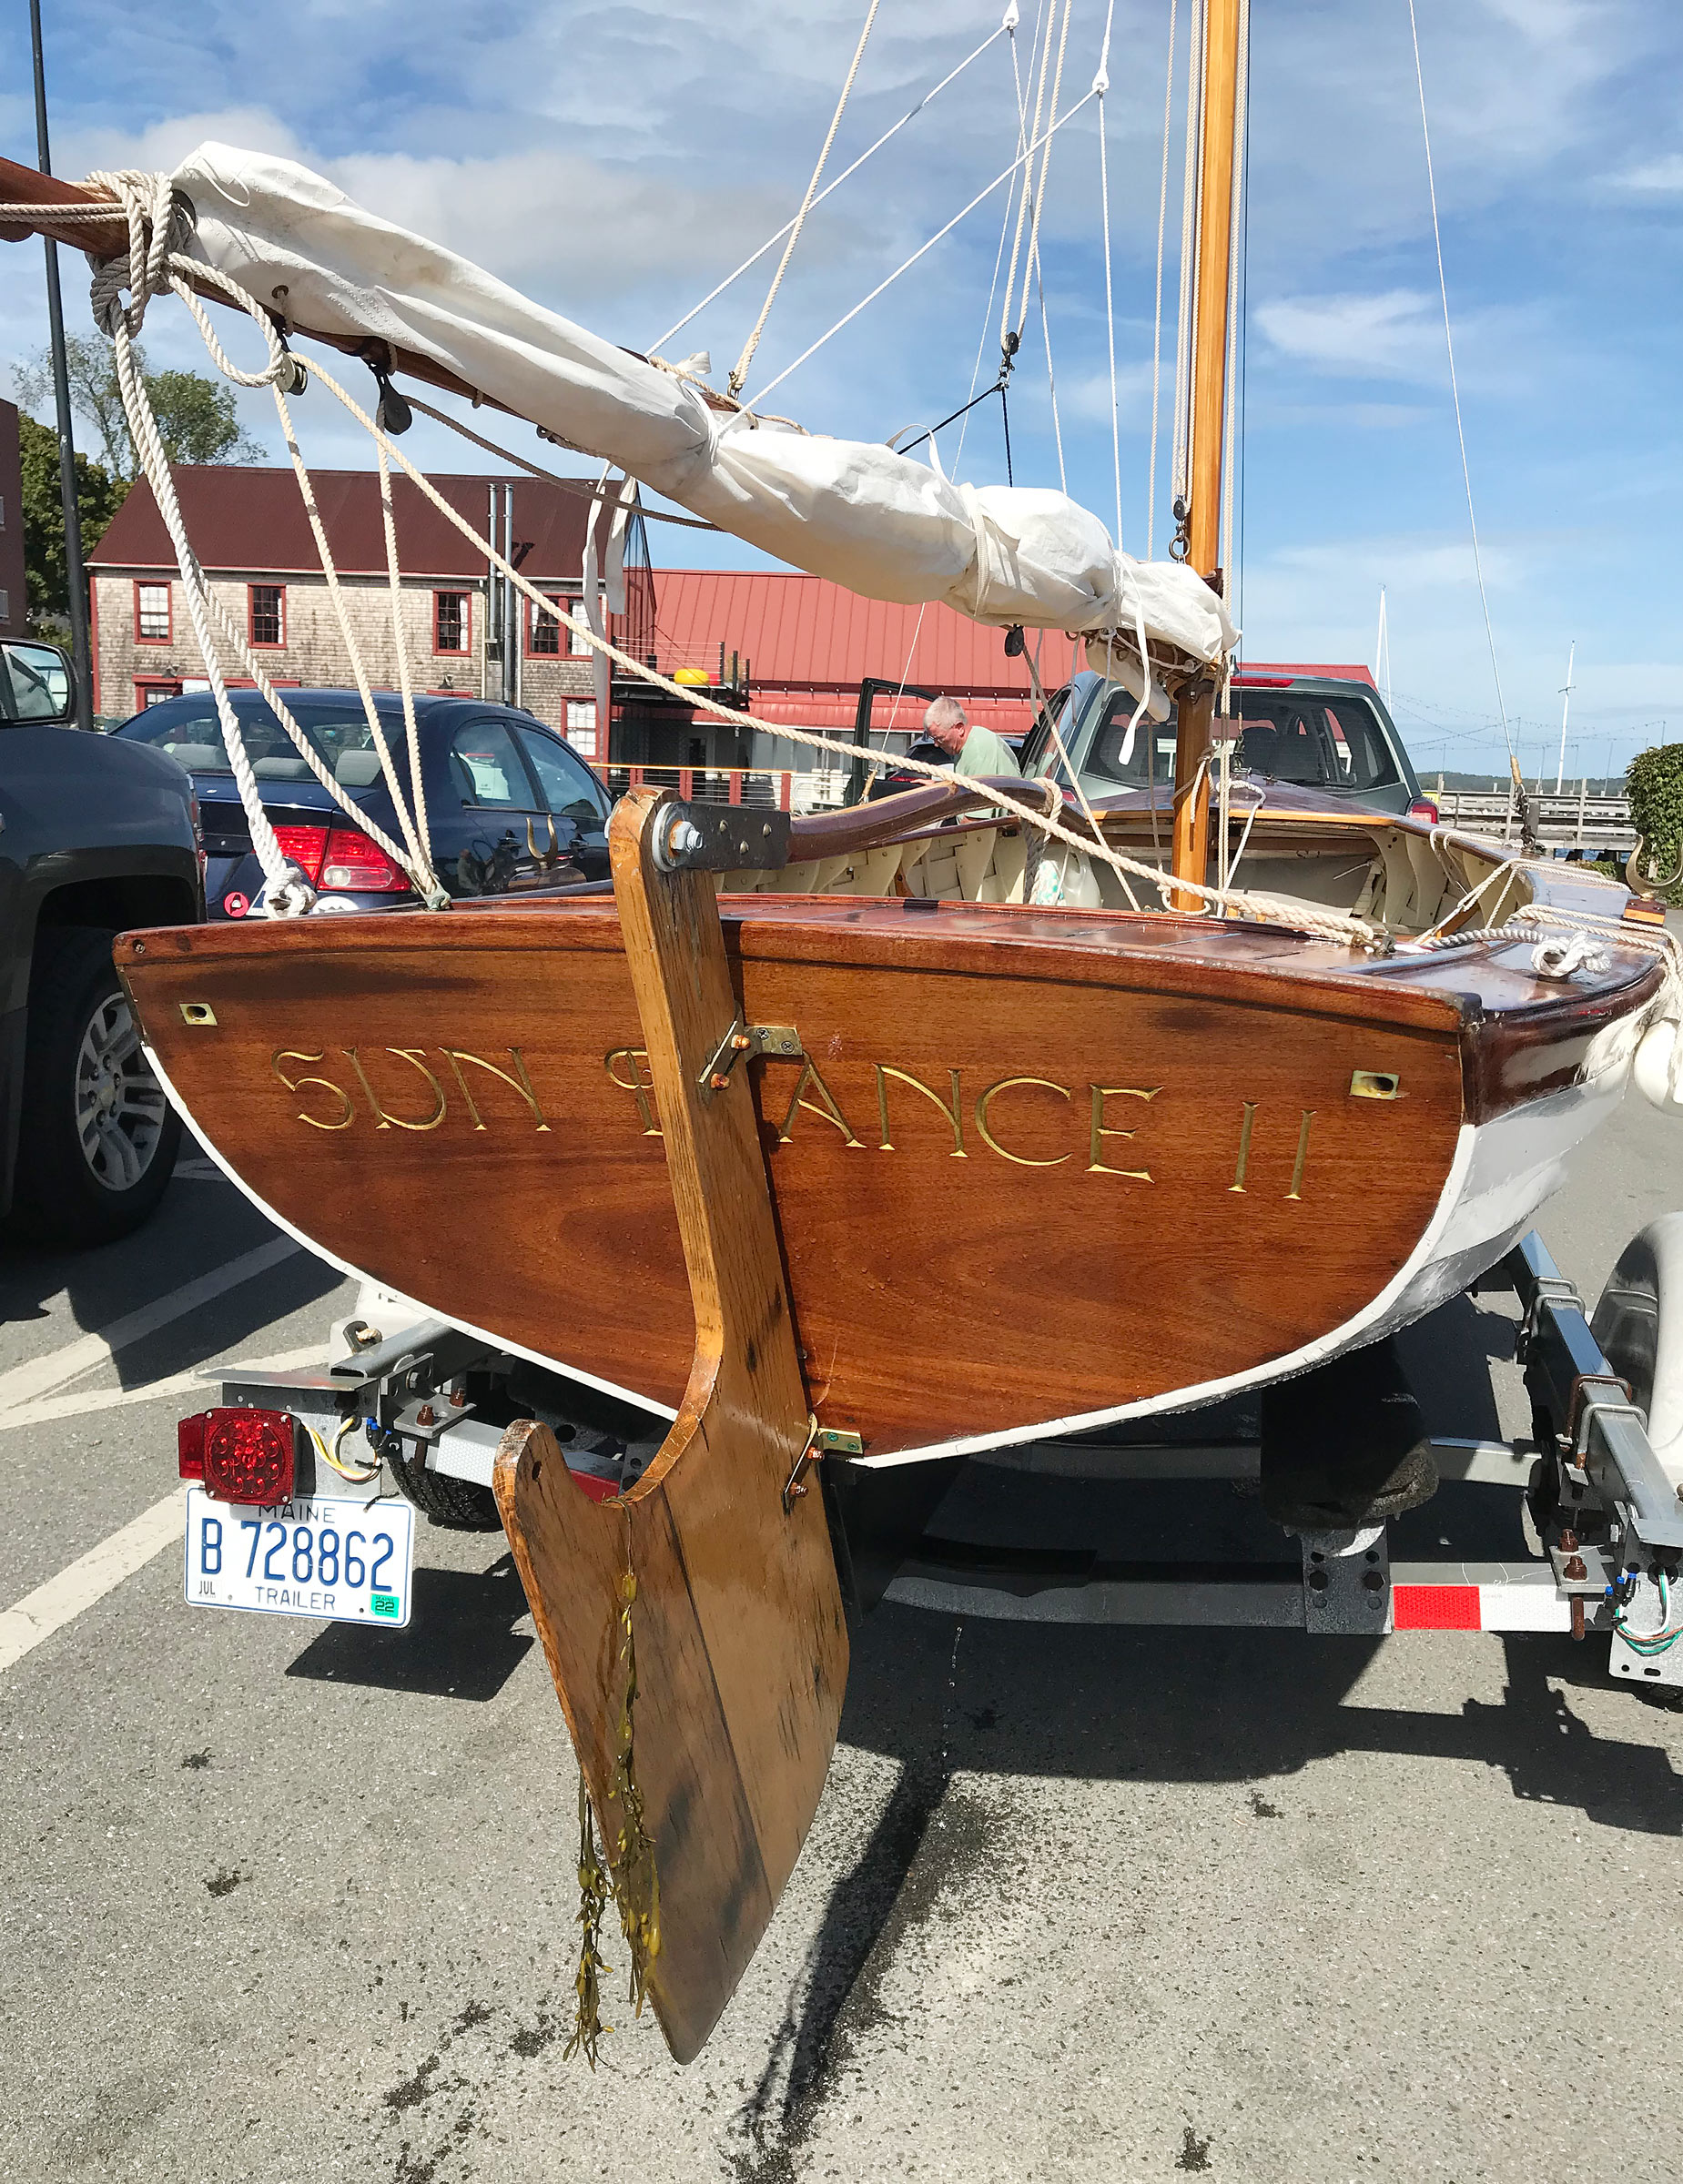
David Gardner hauls his 17′ daysailer, SUN DANCE II, on the ramp in Castine, Maine. The boat was designed by Nathanael Herreshoff in 1901, and numerous modified versions were built over the ensuing decades.
In classic “barn find” fashion, SUN DANCE II’s current owner, David Gardner, found her in 2017 at a yard sale near Castine, Maine. “From a quarter mile away,” he recalls, “I knew it was a Herreshoff.” David, at first, thought the boat might be a Coquina, a design recently made popular through the efforts of Maynard Bray and Doug Hylan, who redrew the plans for glued-lapstrake plywood construction.
David purchased the boat, embarked upon a restoration, and began researching its origins. In consultation with Bray, he determined that it was built to the design of COLONIA’s sailing dinghy. As is the case with most N.G. Herreshoff designs, there are no published lines for this boat. Herreshoff’s design process began with the carving of a half model which, once refined, he would measure on a purpose-built device in order to develop a table of offsets. Those offsets would be used to create a full-sized body plan, and then molds.
David spent two summers restoring SUN DANCE II. He was then a vice president at Maine Maritime Academy in Castine, where he had access to the boat shop, the sail loft, and lots of expert guidance. In the background is the academy’s training ship, STATE OF MAINE.
Luckily for David, lines weren’t required for his refurbishing of SUN DANCE II. She had a few fiberglass patches, which David left in place, but “structurally,” he said, “she was pretty sound.” He spent two summers bringing SUN DANCE II back to sailing condition. He was working then as an administrator at Maine Maritime Academy in Castine, and so had access to the school’s well-equipped boatshop—not to mention a fair amount of expert guidance.
Although the hull was intact, the boat’s details and finish needed attention. “The centerboard was splitting apart,” he said, so he built a new one—a five-stave affair, weighted with about 4 -1/2 lbs of lead to sink it. The sole needed replacement, so he used the old one as a template in constructing a new one. He also removed a small bowsprit, which was never part of the design. He built a new mast, joining the staves using the bird’s-mouth joint technique, and he built his own sails in the Maine Maritime Academy sail loft.
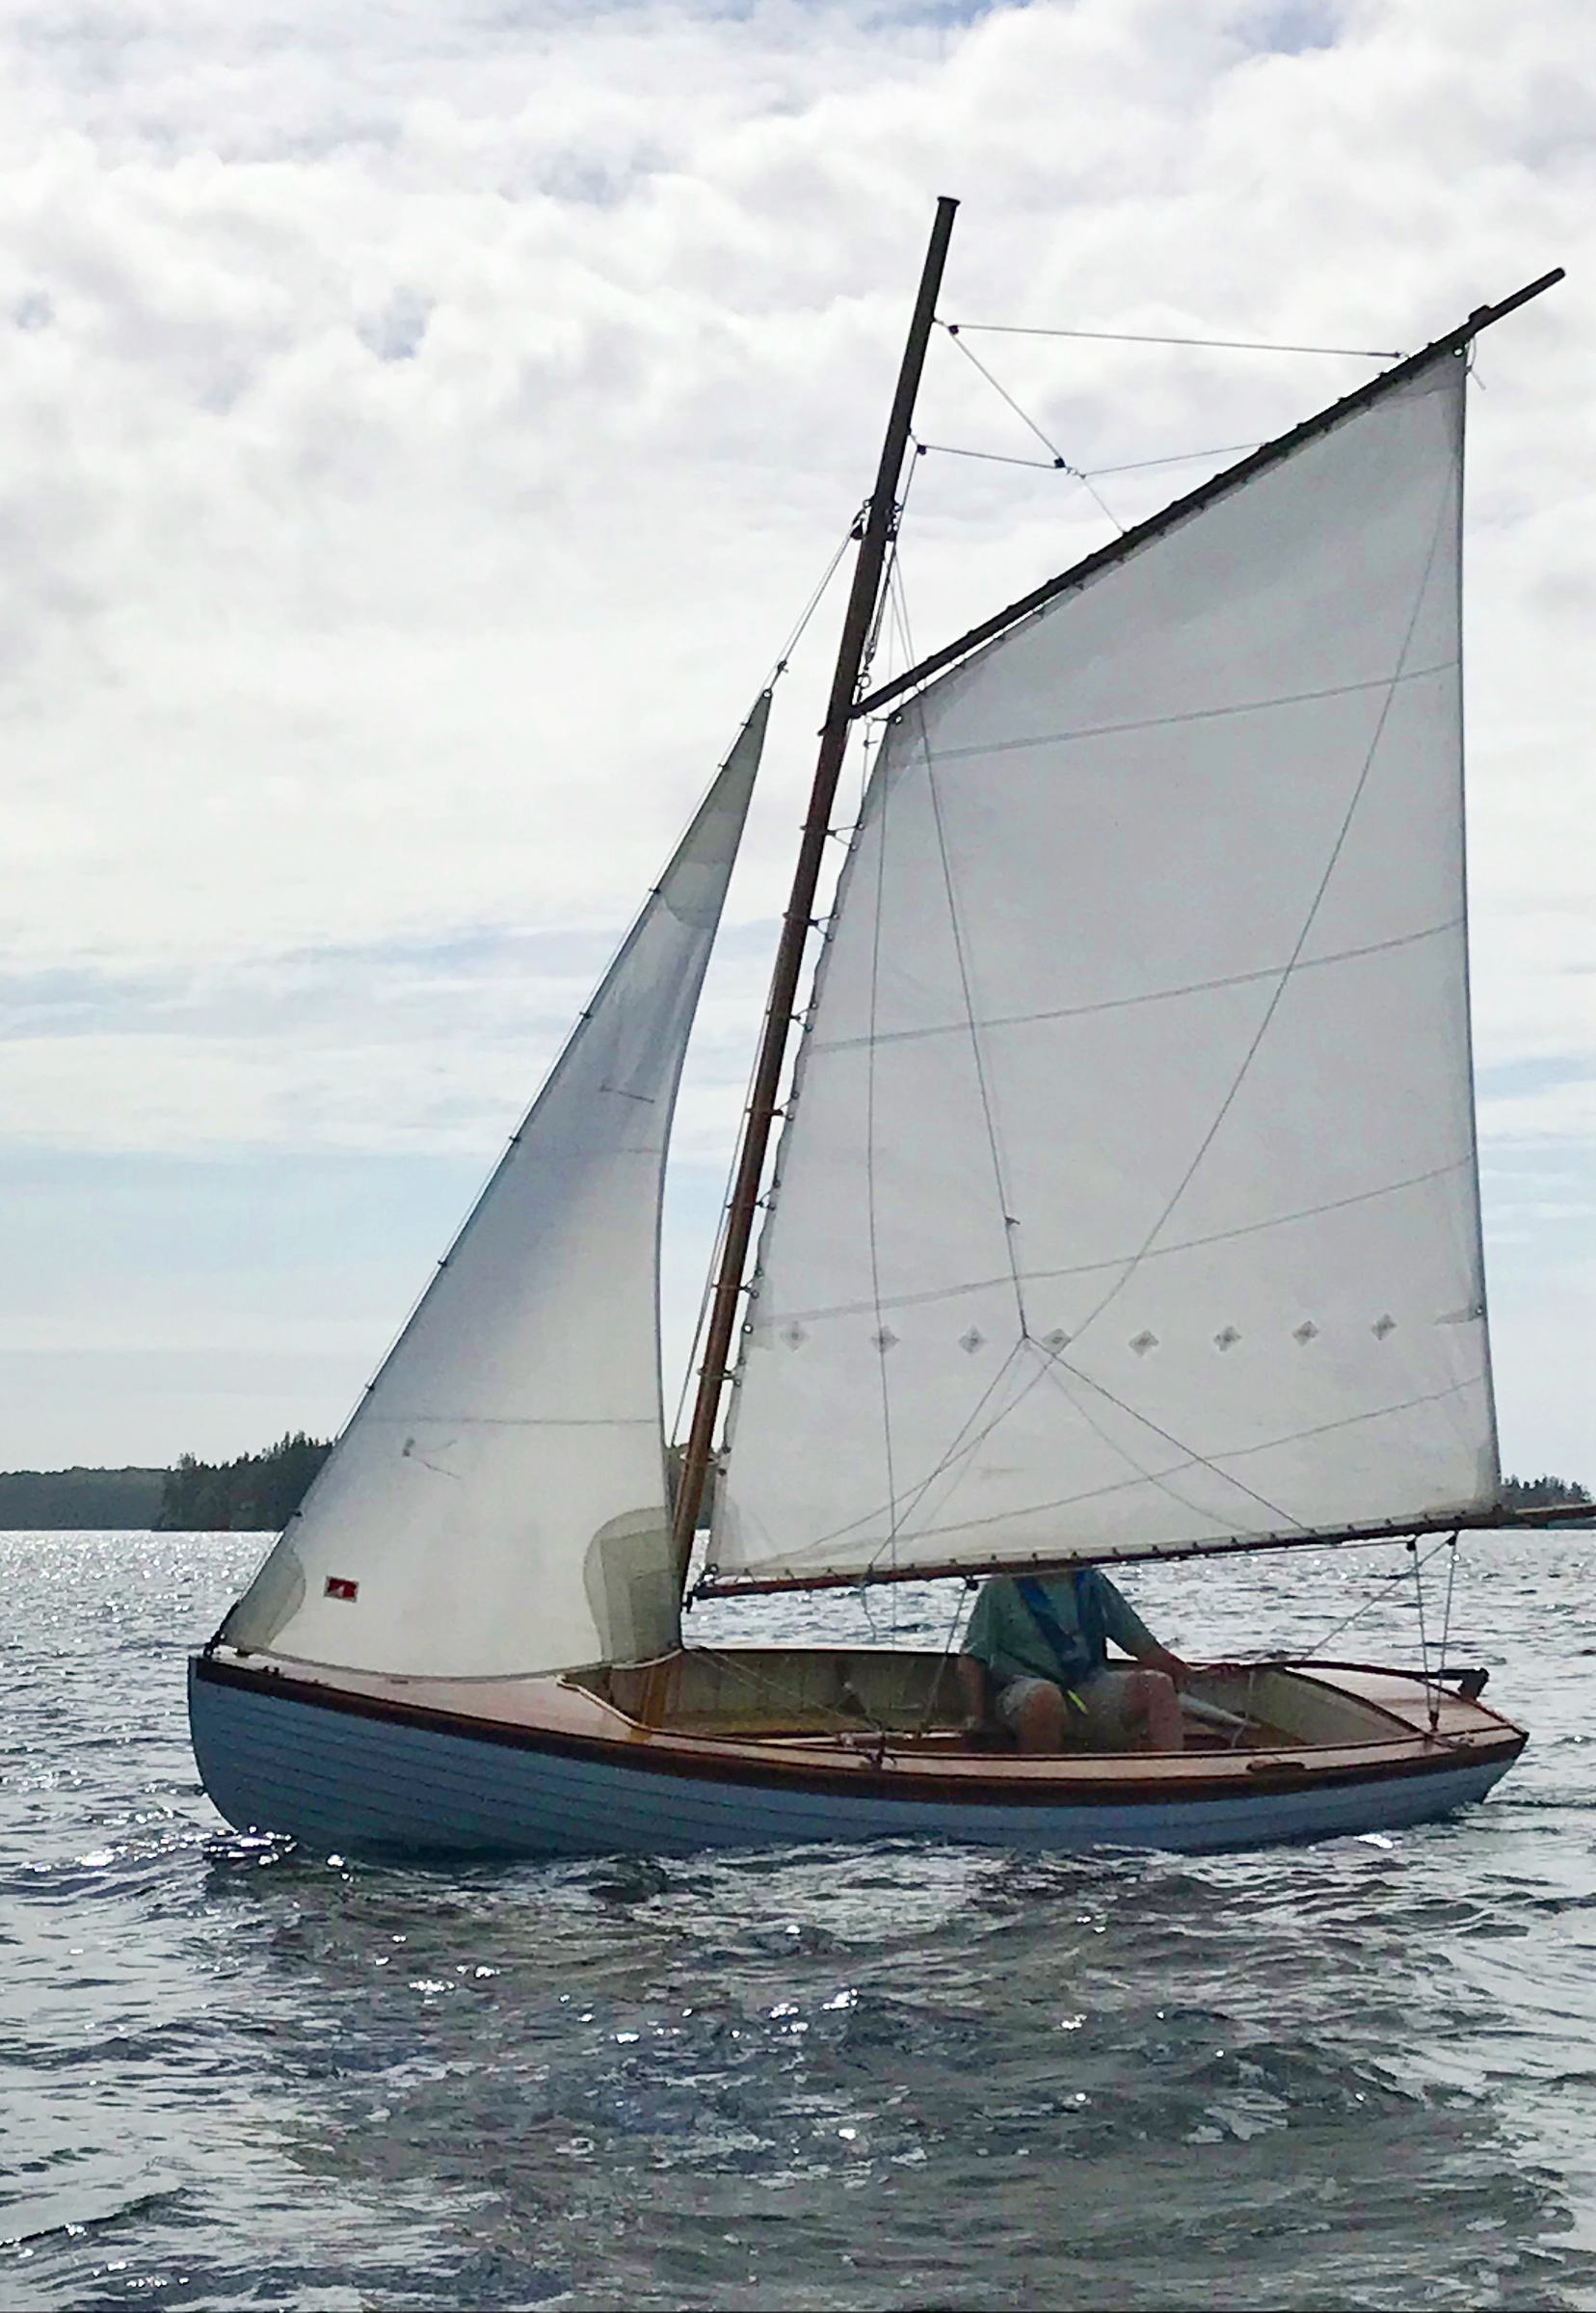
When David found SUNDANCE II for sale at a local yard sale, the rig had been modified to a marconi sloop—with additional maststeps to configure the boat as a cat yawl. He consulted the original Herreshoff drawings to build a new rig and made the sails himself.
The boat, as found, was marconi rigged with a “crummy old solid-wood mast” that was warped. “It was clearly not original,” David said. She had about 94 sq ft of sail, and there were two maststeps, so it could be alternately rigged as a catboat or a sloop. David found the original 1901 gaff sail plan and drew up a new sail plan based on this. He notes that the boat “had suffered from some crude carpentry over the years.” He went to some lengths to correct this but was mindful of the fact that he wanted to sail the boat. And so, he struck a careful balance between functionality and originality.
“A restoration purist might frown at some of the stuff I’ve done,” David added. Maybe they would, maybe they wouldn’t. In the several times I’ve encountered SUNDANCE II at the Castine Town Landing, she has swelled a crowd of admiring visitors.
I was one of those admiring visitors in 2019 when I first met David and SUN DANCE II at the landing, soon after he relaunched her. I had a similar reaction to David’s when he first encountered the boat: There was something distinctly Herreshoff about her, but she wasn’t quite a Coquina. David unfolded her story for me, and we resolved then to go for a sail—and finally found the opportunity to do so last fall.
Launching and retrieval are straightforward processes with SUNDANCE II, though David is considering keeping her on a mooring.
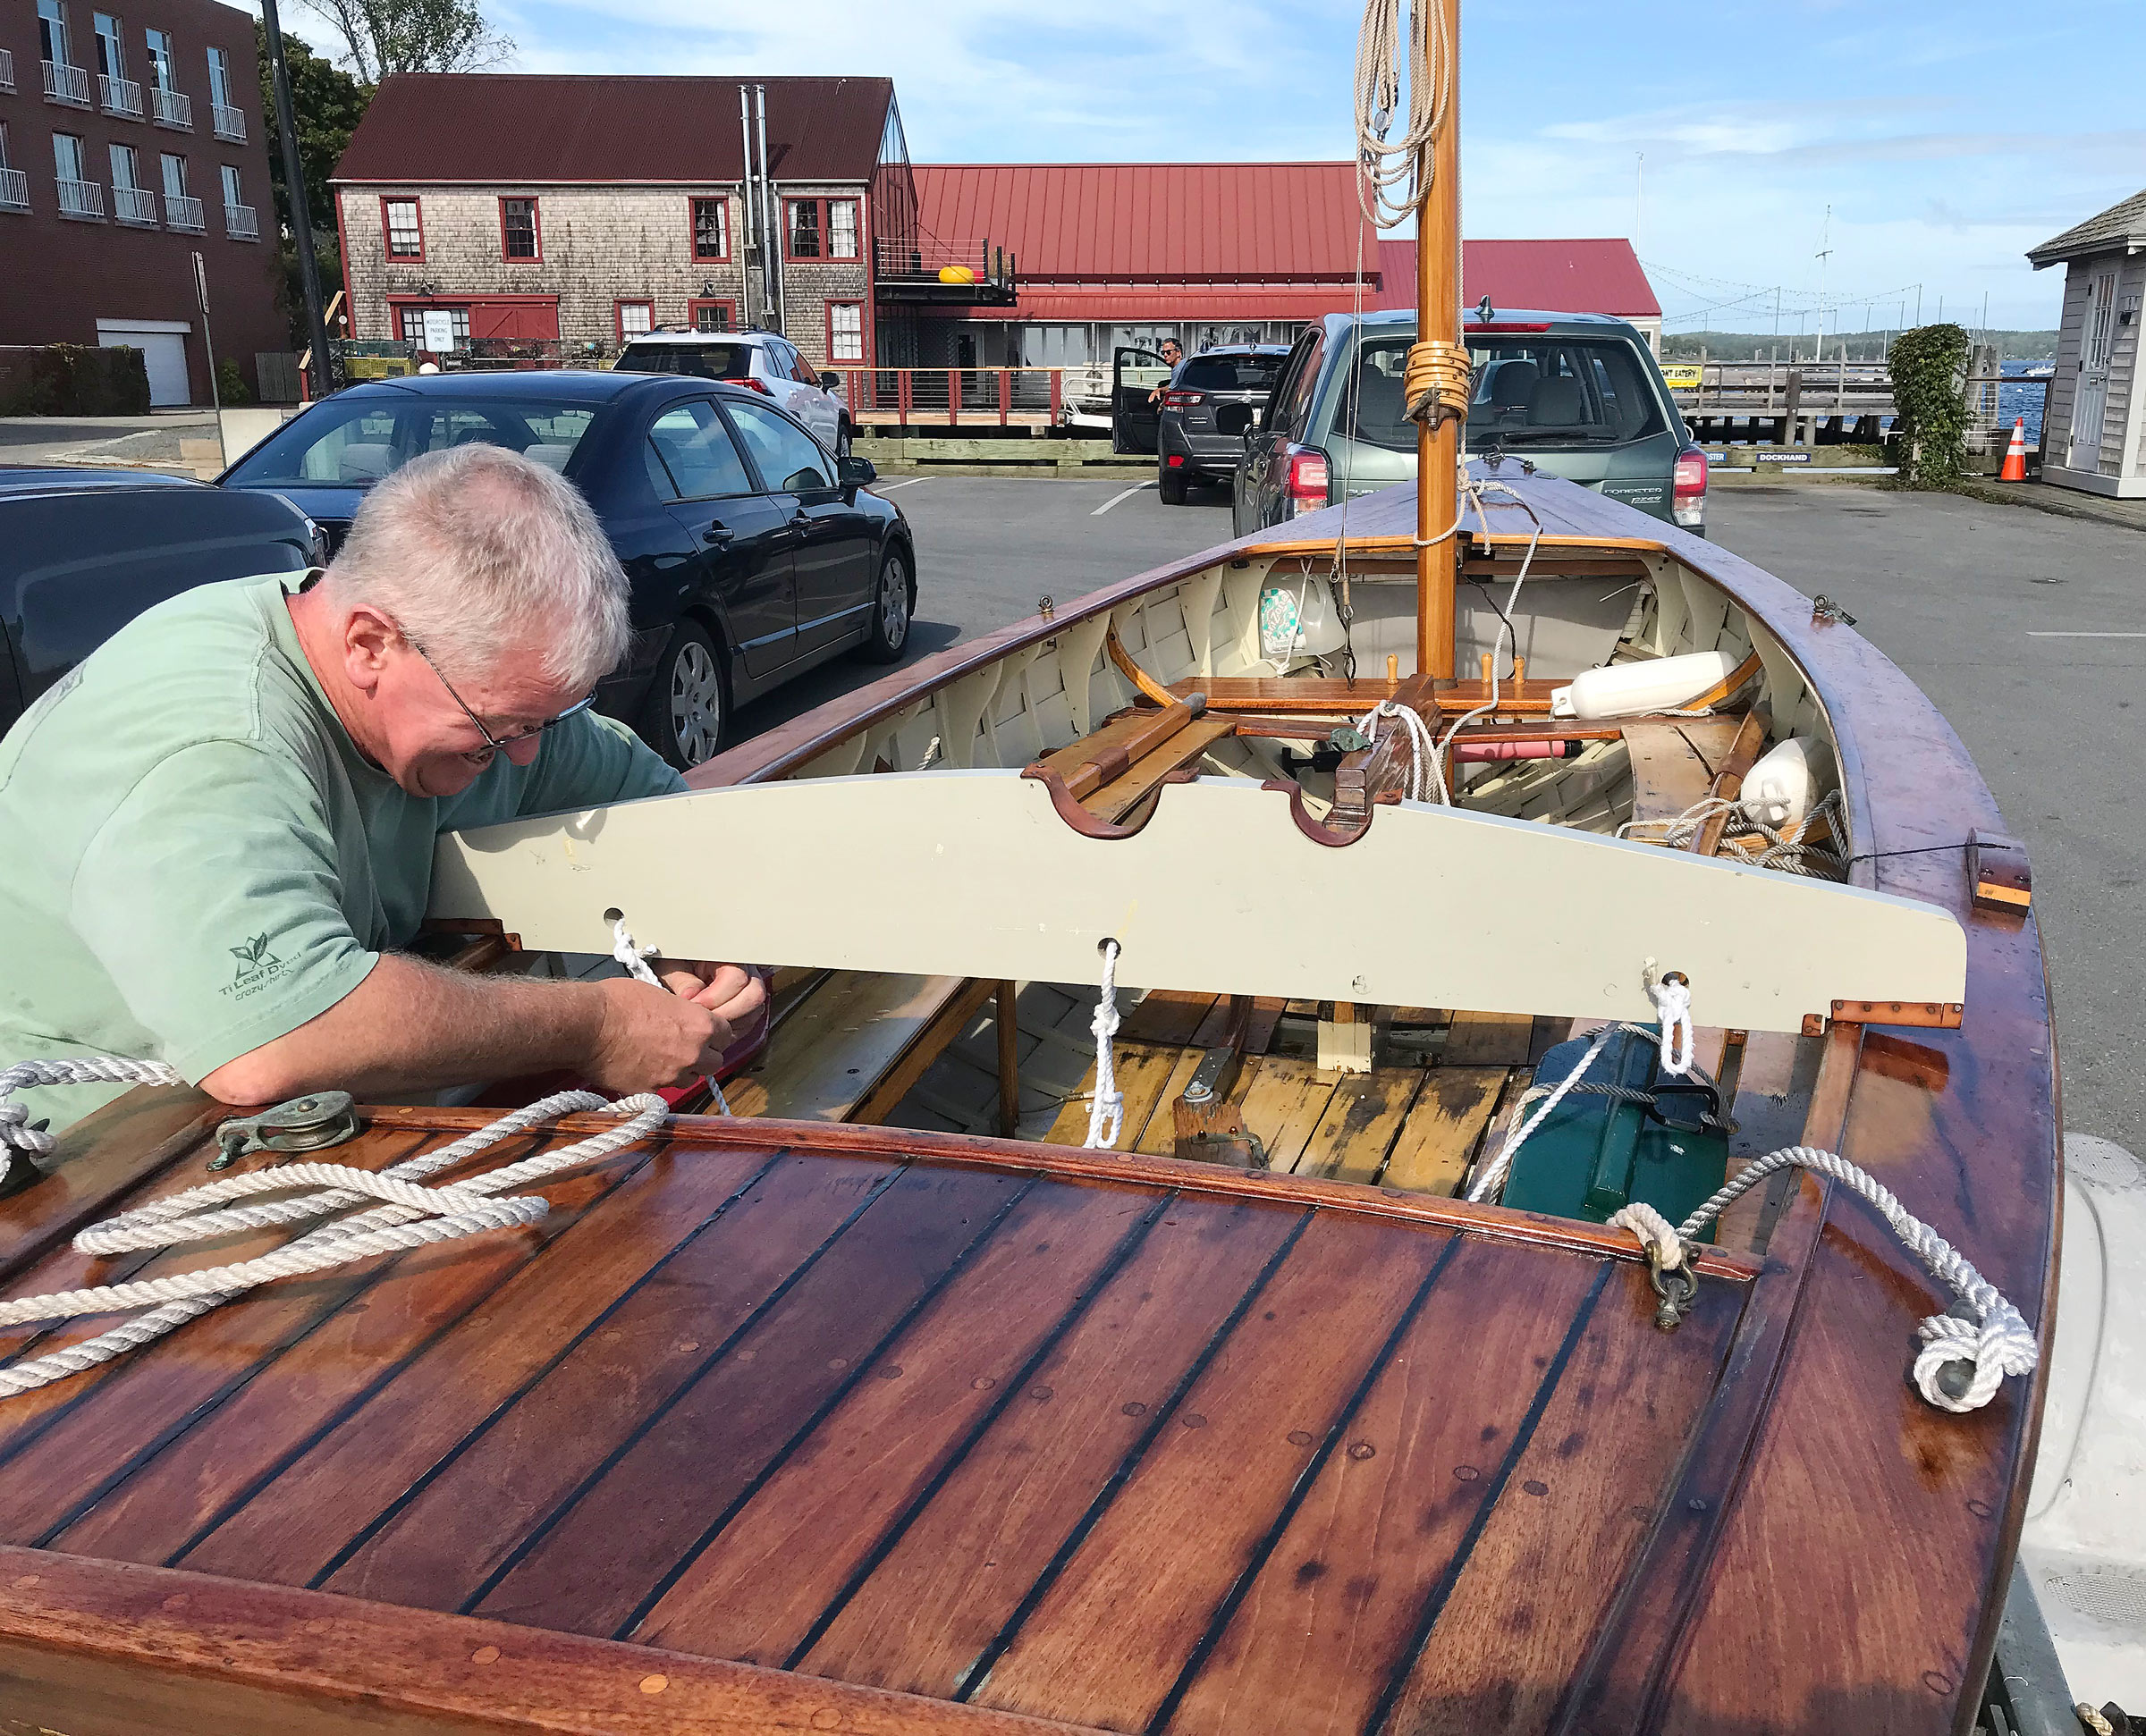
I met David in the parking lot of the landing on the day of our outing. The boat was on a trailer behind his Toyota Rav4, with the mast laid in a custom cradle on deck. He rigged and prepared the boat—an operation that took about 20 minutes working by himself —and stepped the mast through the hole bored in the thwart. David then secured the shroud and forestay lashings, launched the boat, paddled her to the float, rigged the sails, and we were off.
This custom spar cradle allows the mast, boom, and gaff to be securely carried on deck for trailering and storage.
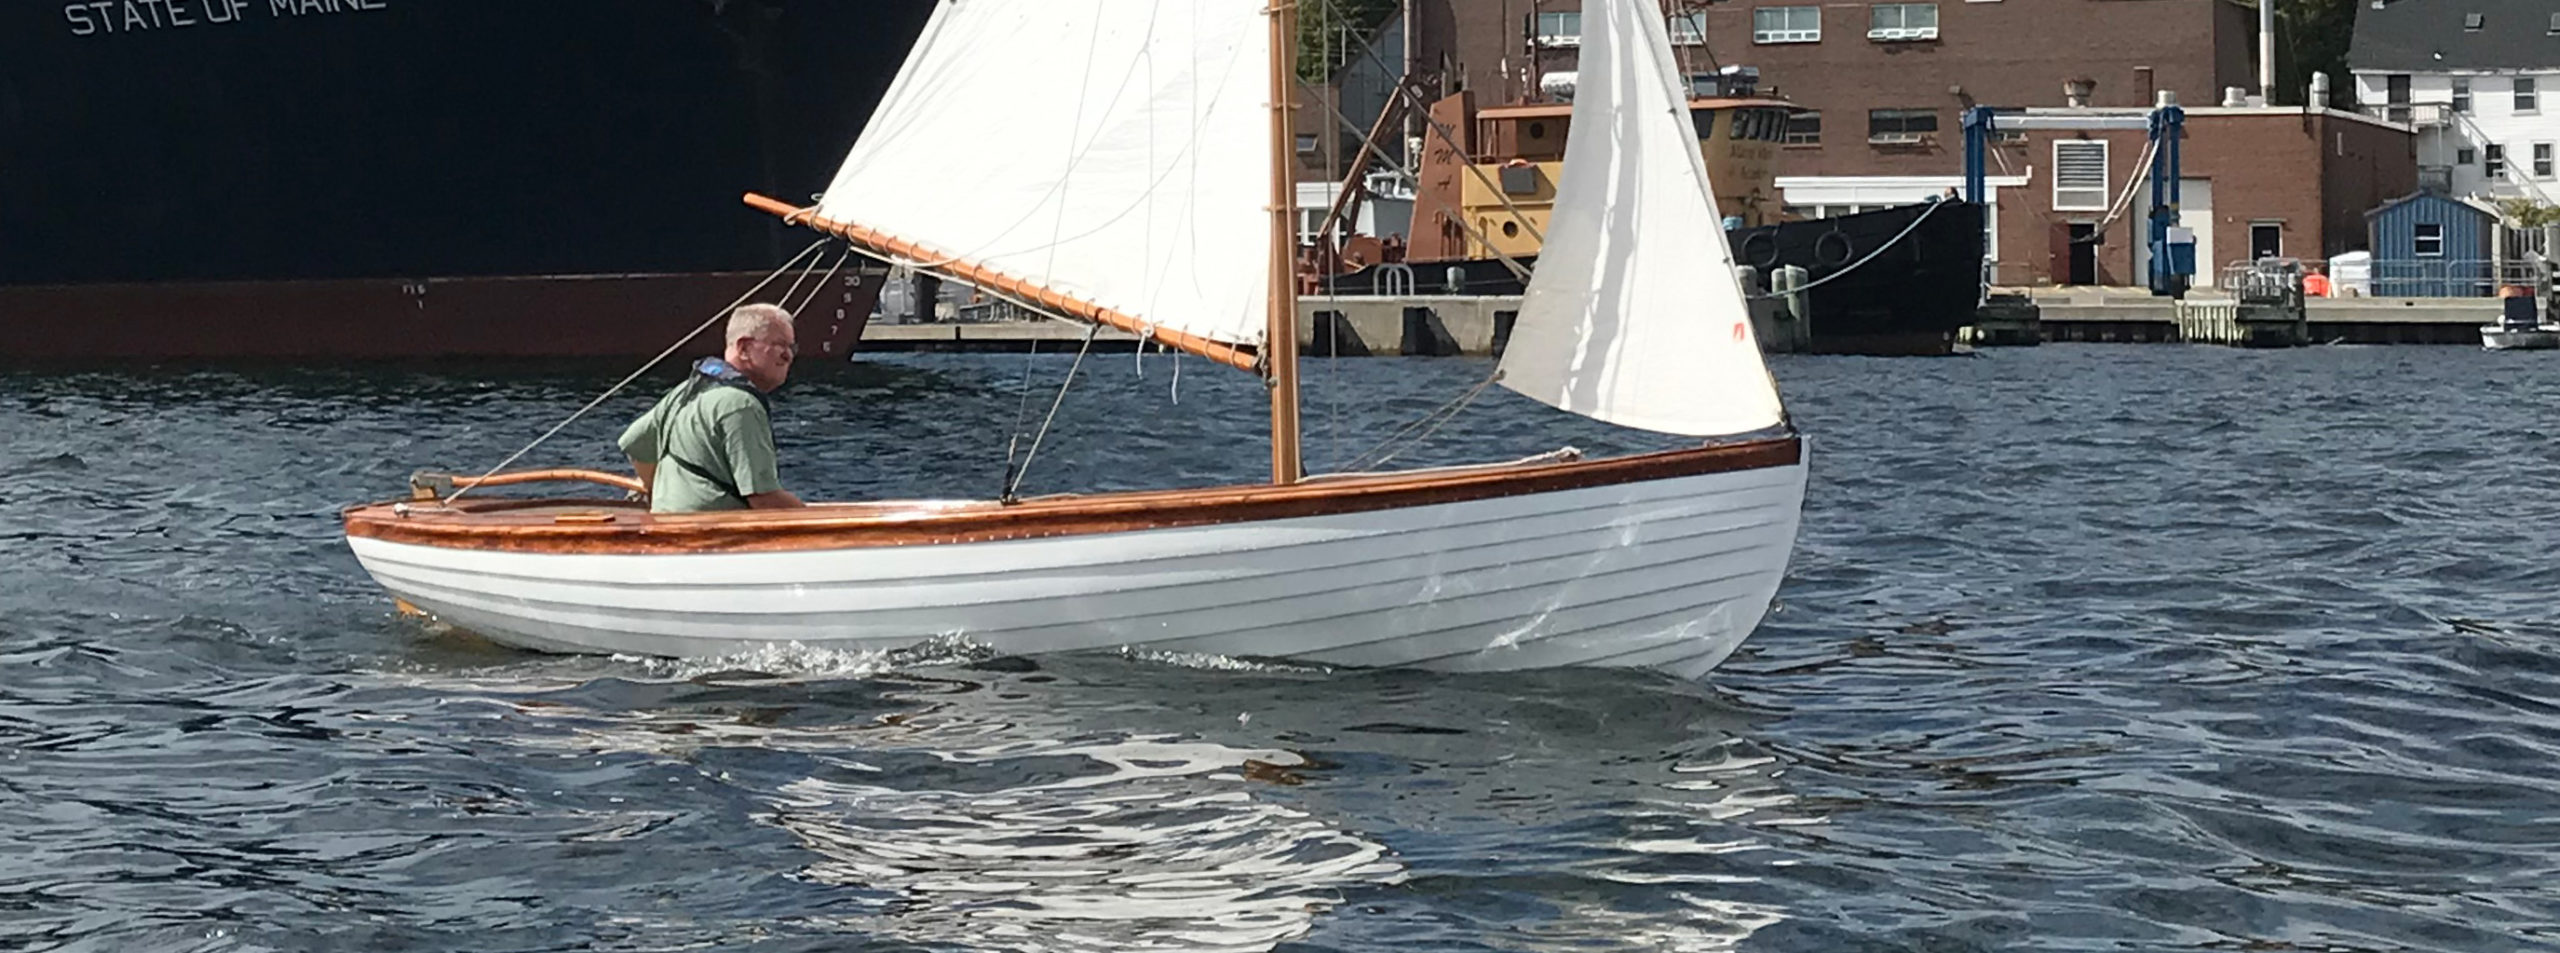
It was gusting to about 18 knots that day, and I was immediately impressed with SUN DANCE II’s acceleration, as compared with her keel-configuration cousin, the Herreshoff 12-1/2. I’ve often thought of the 12-1/2 as a little big boat. It has the feeling of a true displacement boat, notably as the wind comes up and she begins drawing a quarter wave. SUNDANCE II’s acceleration is more reminiscent of a racing dinghy—but a comfortable one with bench seating, traditional appearance, and the capacity to carry two grown men.
The boat was easy to rig. The halyards are made off to belaying pins in the mast partner/thwart, and the sheets lead easily to the helm. In puffs, she would heel to the deck edge and then stay there—though it was imperative that the skipper keep the mainsheet in hand and remain alert. Crew-weight distribution mattered. That boat carries 120 lbs of lead ballast in the bilge and, despite, flotation foam in the bow and stern, capsize recovery would be a considerable project.
David Gardner at the helm of SUNDANCE II. The main and jib sheets are led to within easy reach of the helm, allowing for easy singlehanding.
The boat is quick in stays and responsive to changes in sail trim. She was easy to singlehand, with the mainsheet led through a turning block on the top of the centerboard trunk and the jibsheets within easy reach of the helm. The seating is comfortable, with easy bracing against the leeward seat when the boat heels.
For a middle-aged sailor seeking a combination of excitement, comfort, and traditional good looks, the Colonia dinghy is worth serious consideration. Building one would require some research, as well as an advanced grasp of lofting and boatbuilding. The 36 iterations built by Herreshoff were adjusted, sometimes considerably, to meet the owners’ needs, though the offsets for the original boat, taken from the model, are archived in the Hart Nautical Collections of the MIT Museum in Cambridge, Massachusetts. There are copious construction and detail drawings in those archives, as well as at the Herreshoff Marine Museum. This material is cited in The Herreshoff Catalogue Raisonné, a vast online catalog of Herreshoff material from both collections.
Matthew P. Murphy is the editor of WoodenBoat magazine.
Colonia Dinghy Particulars:
[table]
LWL/17′ 3″
Beam/5′ 6″
Draft, board up/7.75″
Draft, board down/3′
[/table]
MIT Museum
.
Readers searching for plans and details in the Catalogue Raisonné should be sure to read its discussion of copyright and seek permission and high-resolution files from the MIT or HMM archives, as needed. (The MIT Museum, at this writing, is in the process of moving and is thus closed to research requests, but that situation is forecast to change in the near future.)
Would-be builders who are captivated by this boat, and want an easier path to commence building, might give Coquina a close look, just as Charles Goodwin did back in 1926. Joe Brennan’s cold-molded Coquina appeared in the November 2014 issue of Small Boats. The highly detailed plans package assembled by Maynard Bray and Doug Hylan is available from Hylan & Brown Boatbuilders.
Is there a boat you’d like to know more about? Have you built one that you think other Small Boats Magazine readers would enjoy? Please email us!
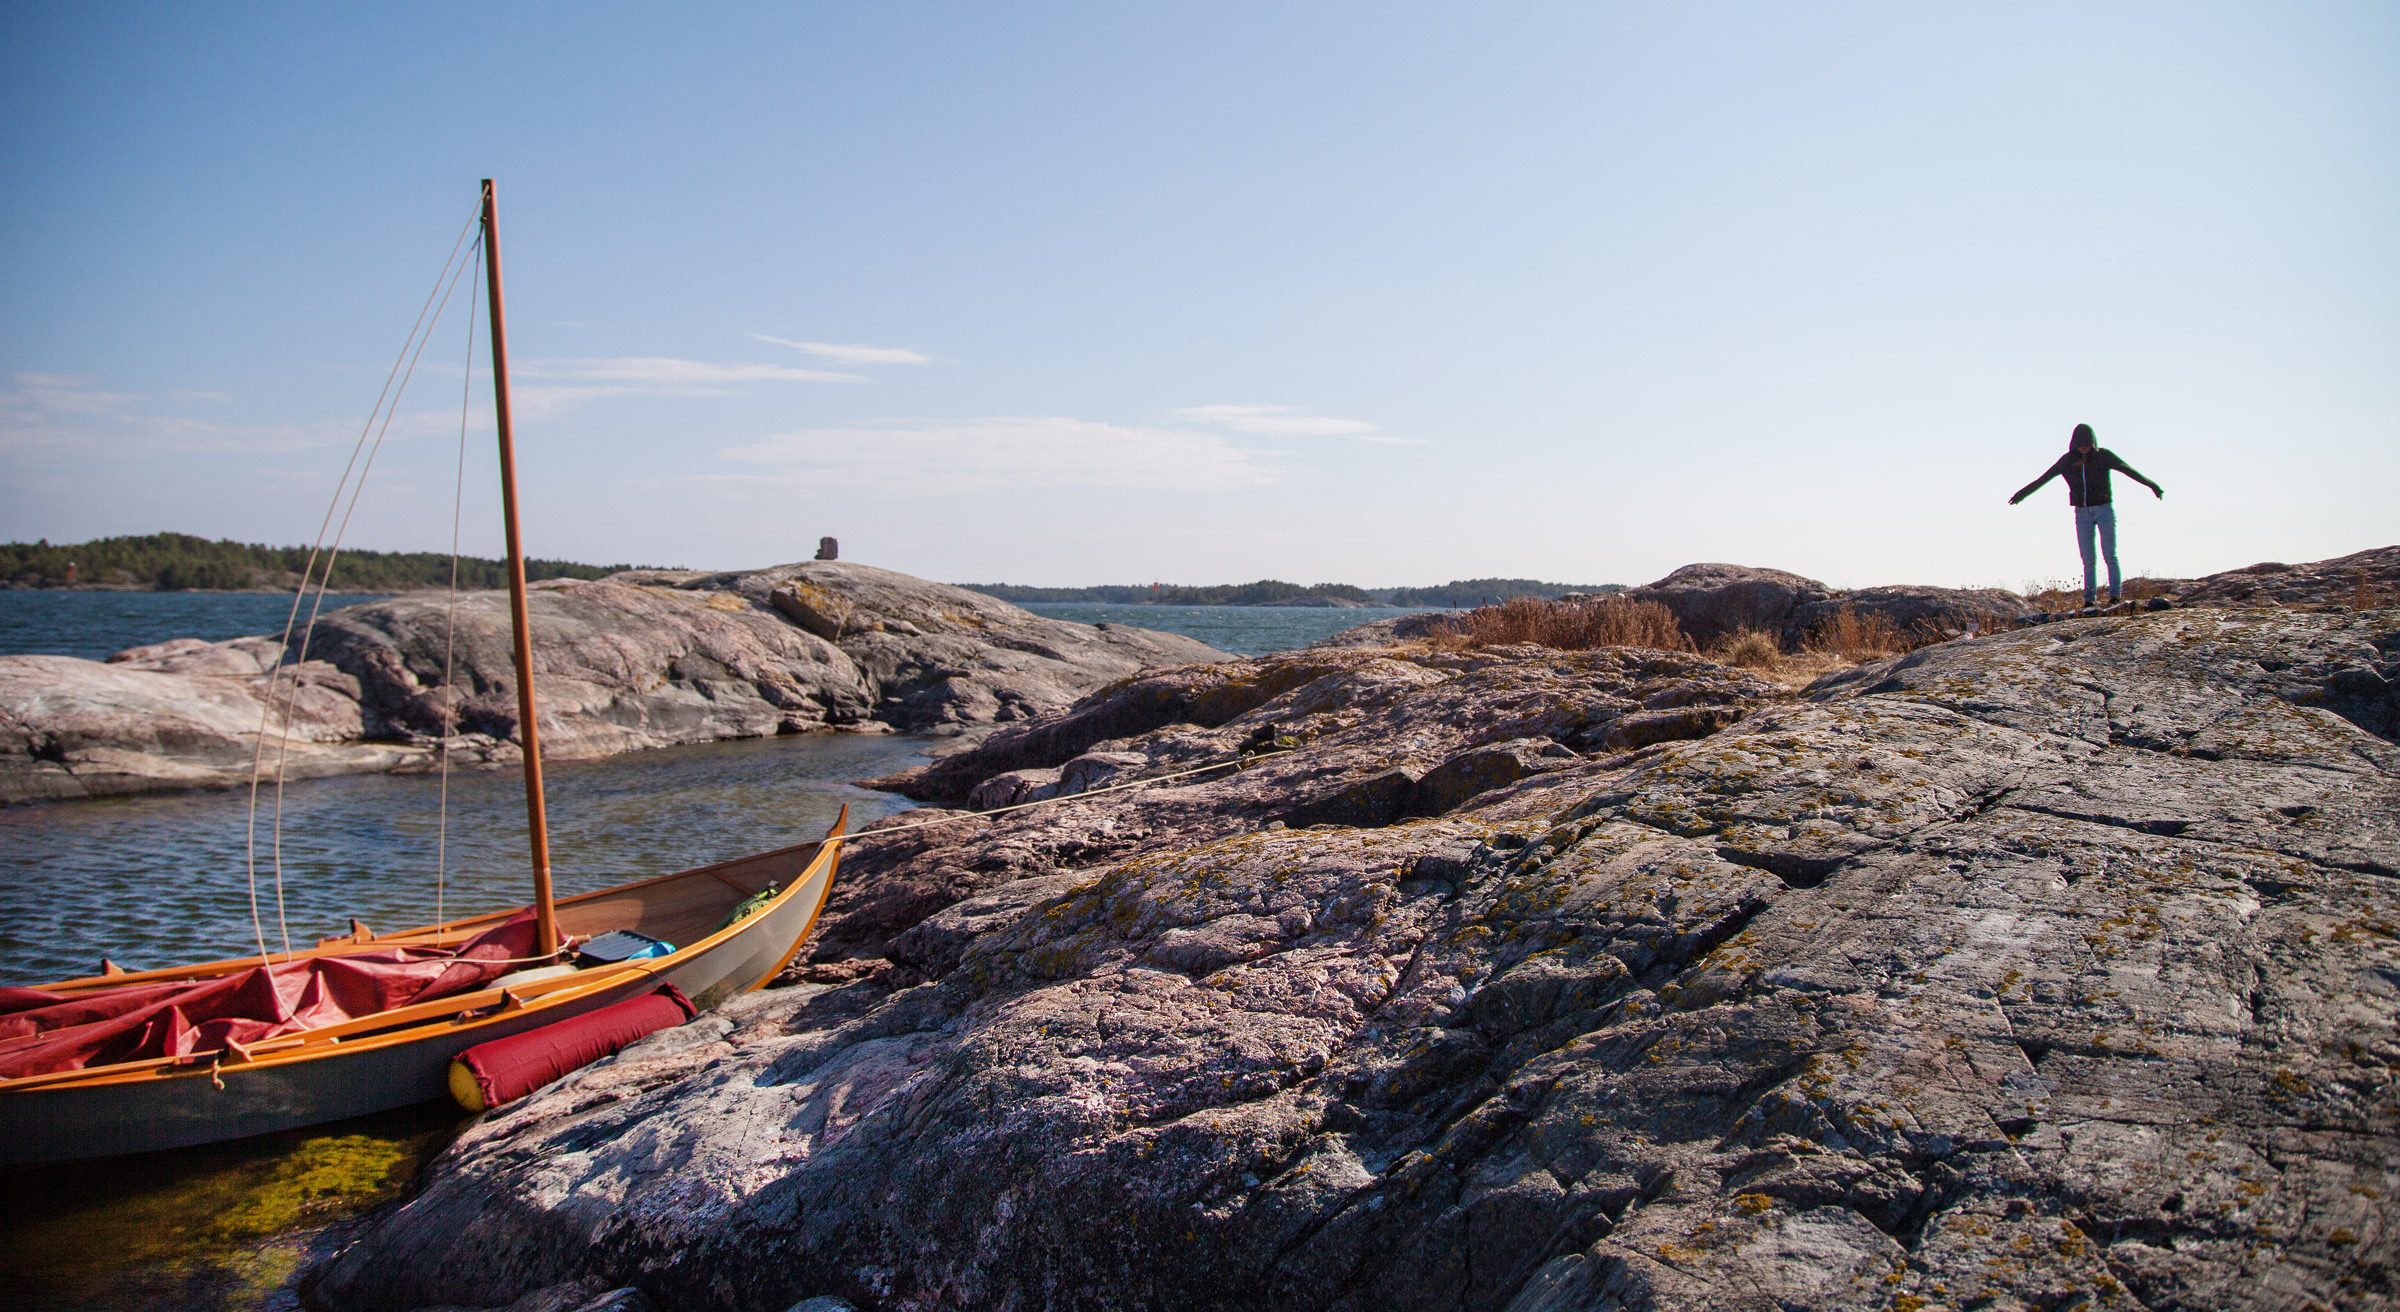
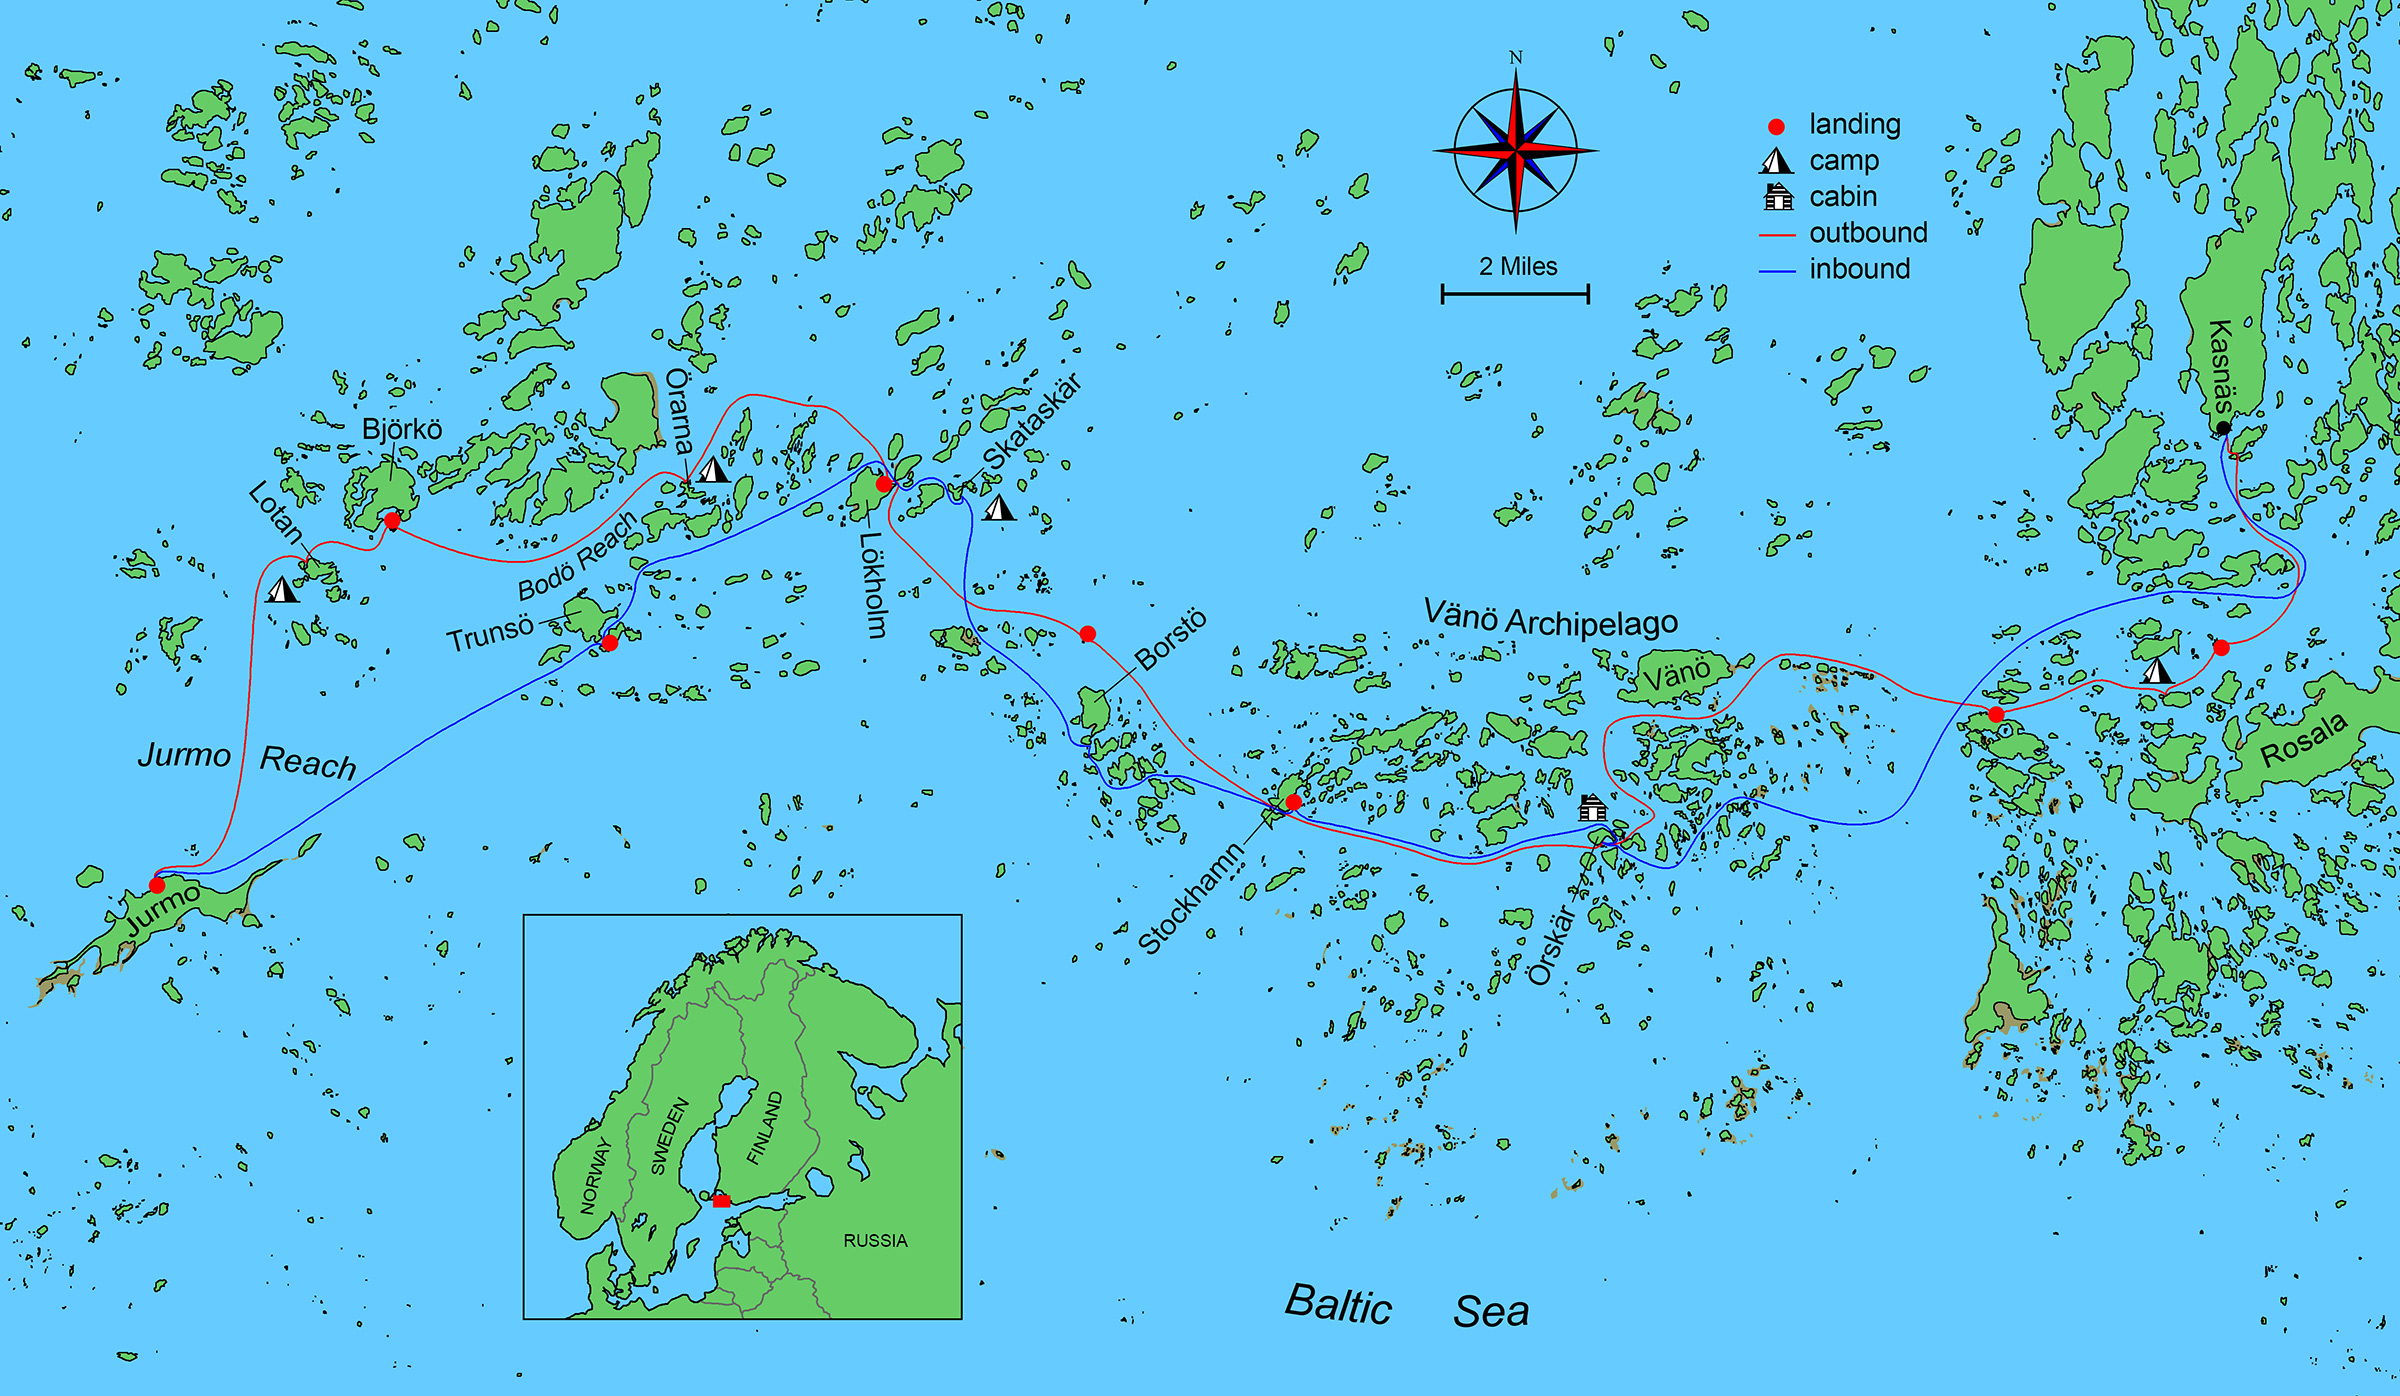
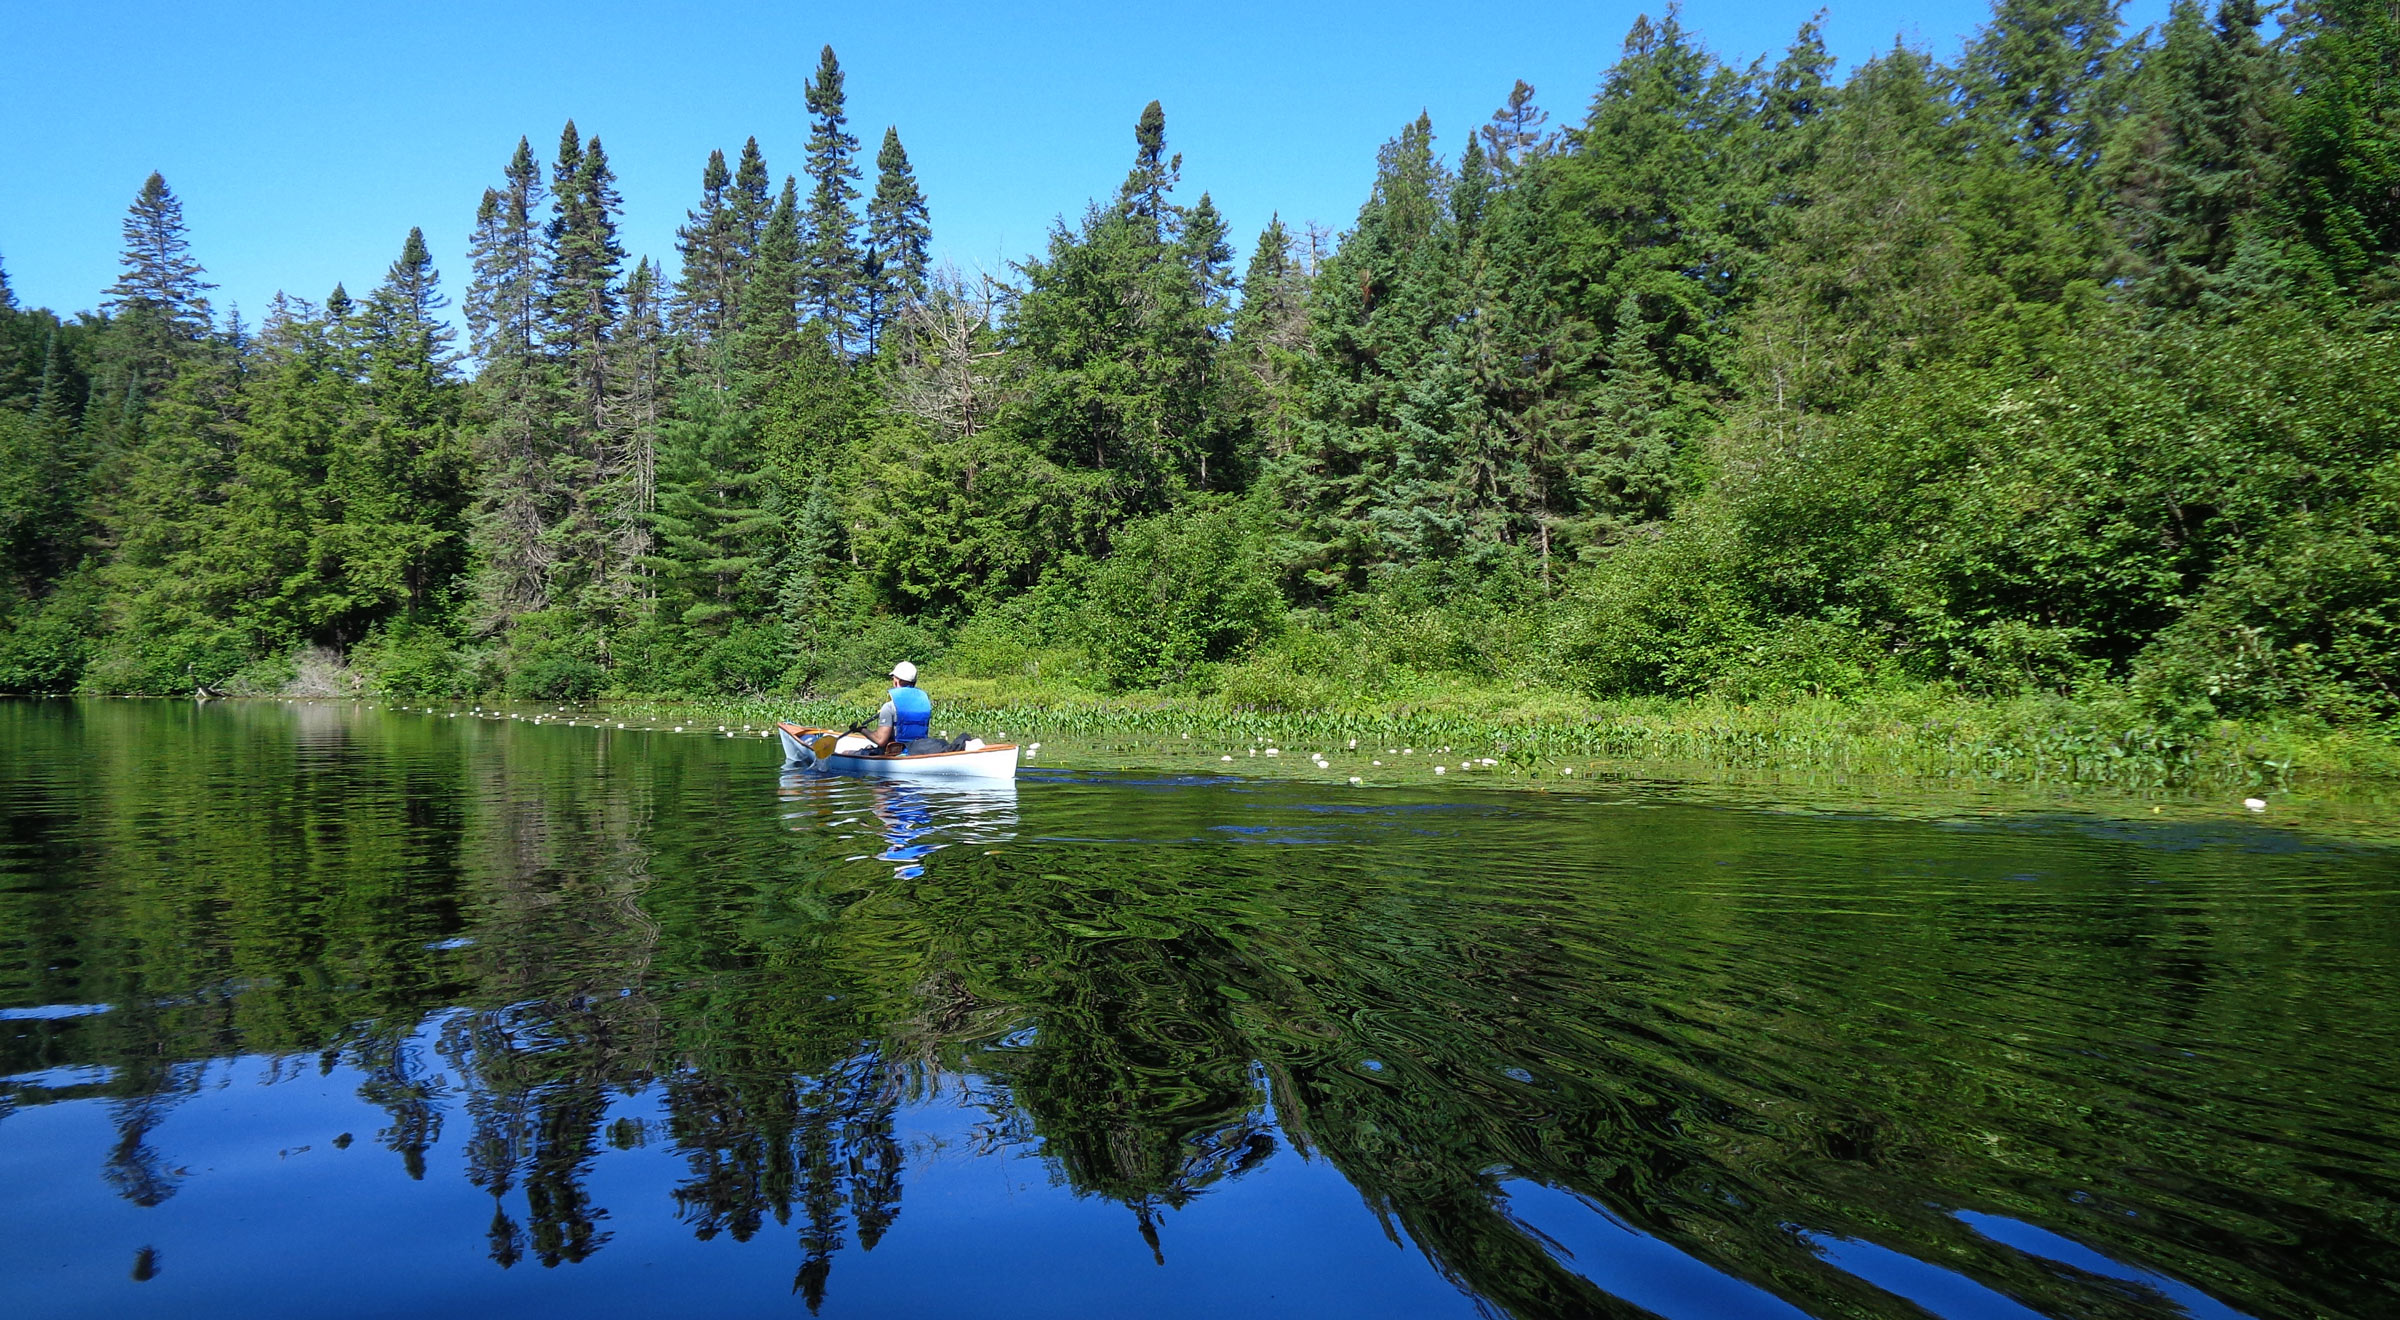
We launched our 14′ Elf faering, ELDIR, in the emerald waters of the harbor at Kasnäs. Once a remote, sleepy fishing village and ferry terminal, Kasnäs is now a bustling resort with a hotel, spa, and minigolf. A 47-mile drive from the mainland and situated at the end of a road that crosses four islands, including Finland’s largest island, Kasnäs is at the crossroads of the many passages that weave through the myriad islands of the country’s Archipelago Sea. One of the passages would give us a shortcut to the outer archipelago and the island of Jurmo where Inari, my 16-year-old daughter, was going to spend some time with her mother in a rental cabin. We decided to make a sail-and-oar adventure out of getting her there.
Roger Siebert
.
The gray lapstrake hull and varnished interior of ELDIR, our little Iain Oughtred–designed plywood faering, certainly stood out from the flock of white fiberglass hulls as we loaded camping gear and prepared for sailing. We got many compliments from people passing by with their boats as ELDIR sat loaded and swaying at the end of a pier. It was late in July, and the forecast for our launch day and the week beyond promised brisk winds, so we had tied in a reef. We hoisted the lugsail, and ELDIR quickly picked up speed as we passed the harbor’s outer piers and headed to our first and somewhat protected 3-1/4-nautical-mile passage south toward Rosala. At 3-1/2 miles long, Rosala is one of the largest islands in the crowded archipelago. In the 14- to 18-knot westerly wind and on a closehauled course against a sharp 1′ to 2′ chop, we soon were pelted by spray on our faces. Avoiding an early tack, we turned east and rounded an island no more than 100 yards across that was capped with a thick stand of dark, tightly packed pine trees.
ELDIR does not have a centerboard or a daggerboard, and the unobstructed interior provides plenty of space for me and Inari. We sat on the floorboards and, with our weight low in the hull, ELDIR acted more like a ballasted ship than a 150-lb dinghy. The boat was very steady in spite of the wind and choppy water; we had no need to shift our weight to avoid excessive heeling. In previous cruises ELDIR had proven to be extremely seaworthy for her size, feeling secure even on rough passages.
Photographs by the author
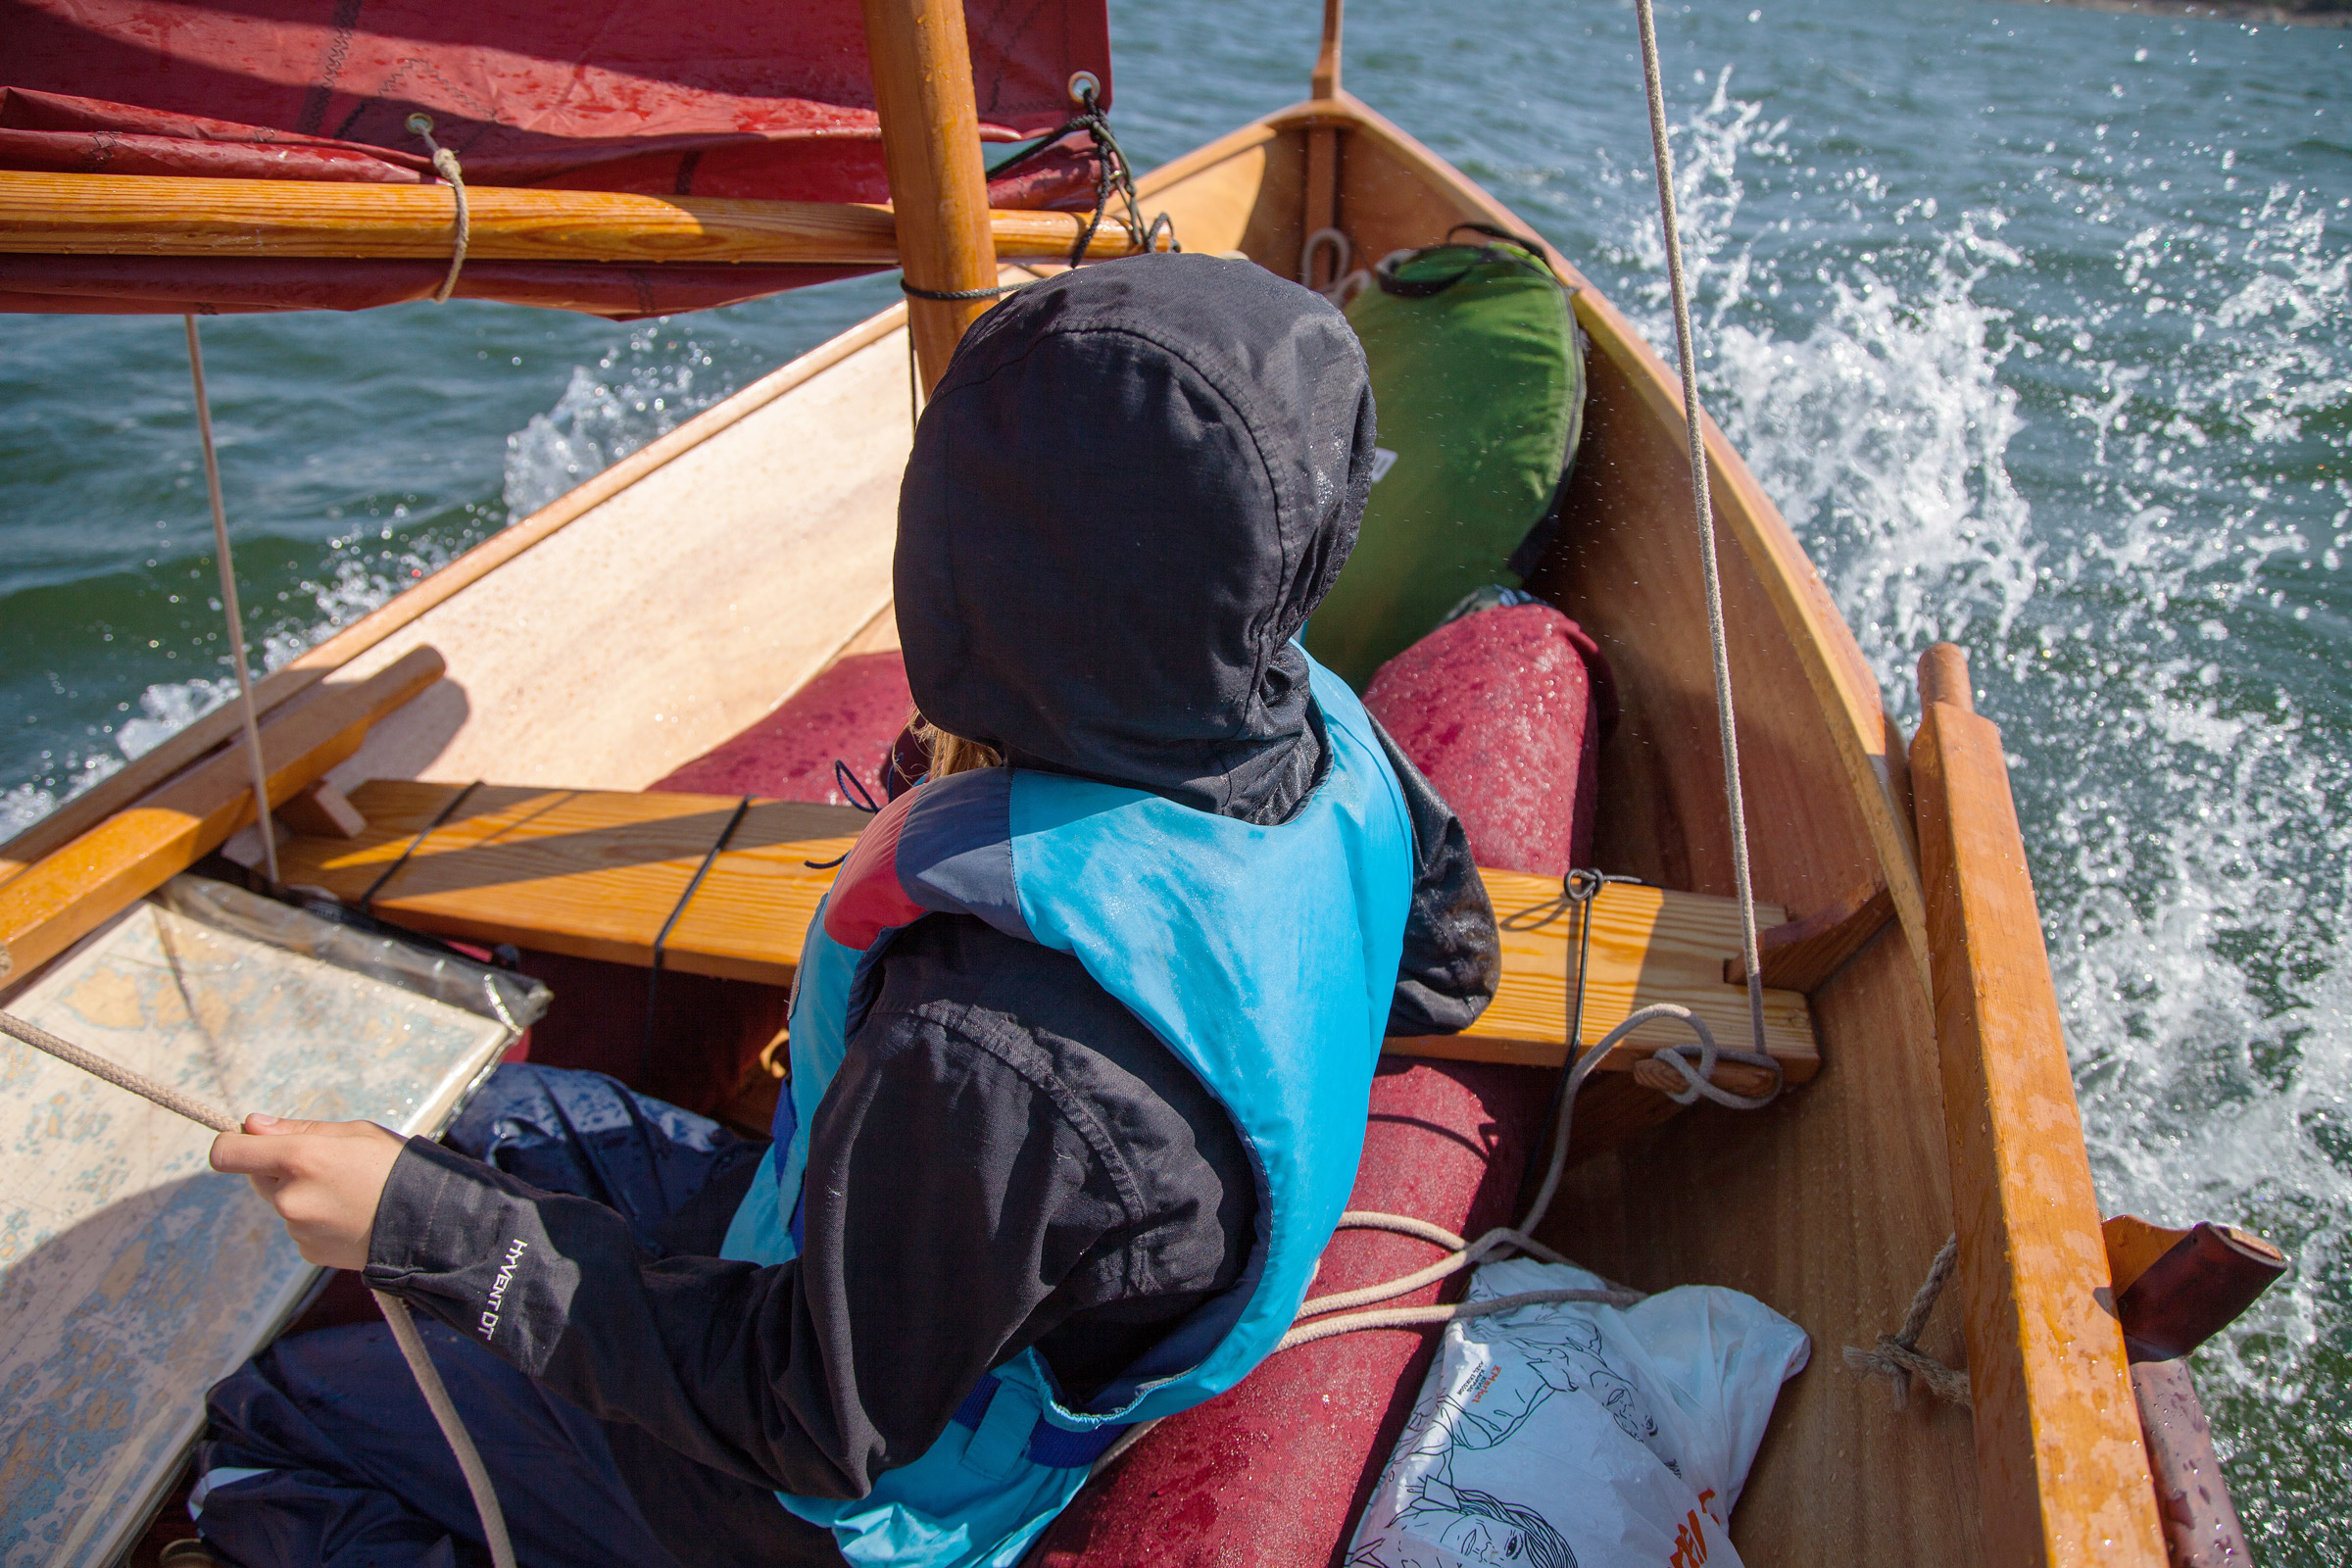
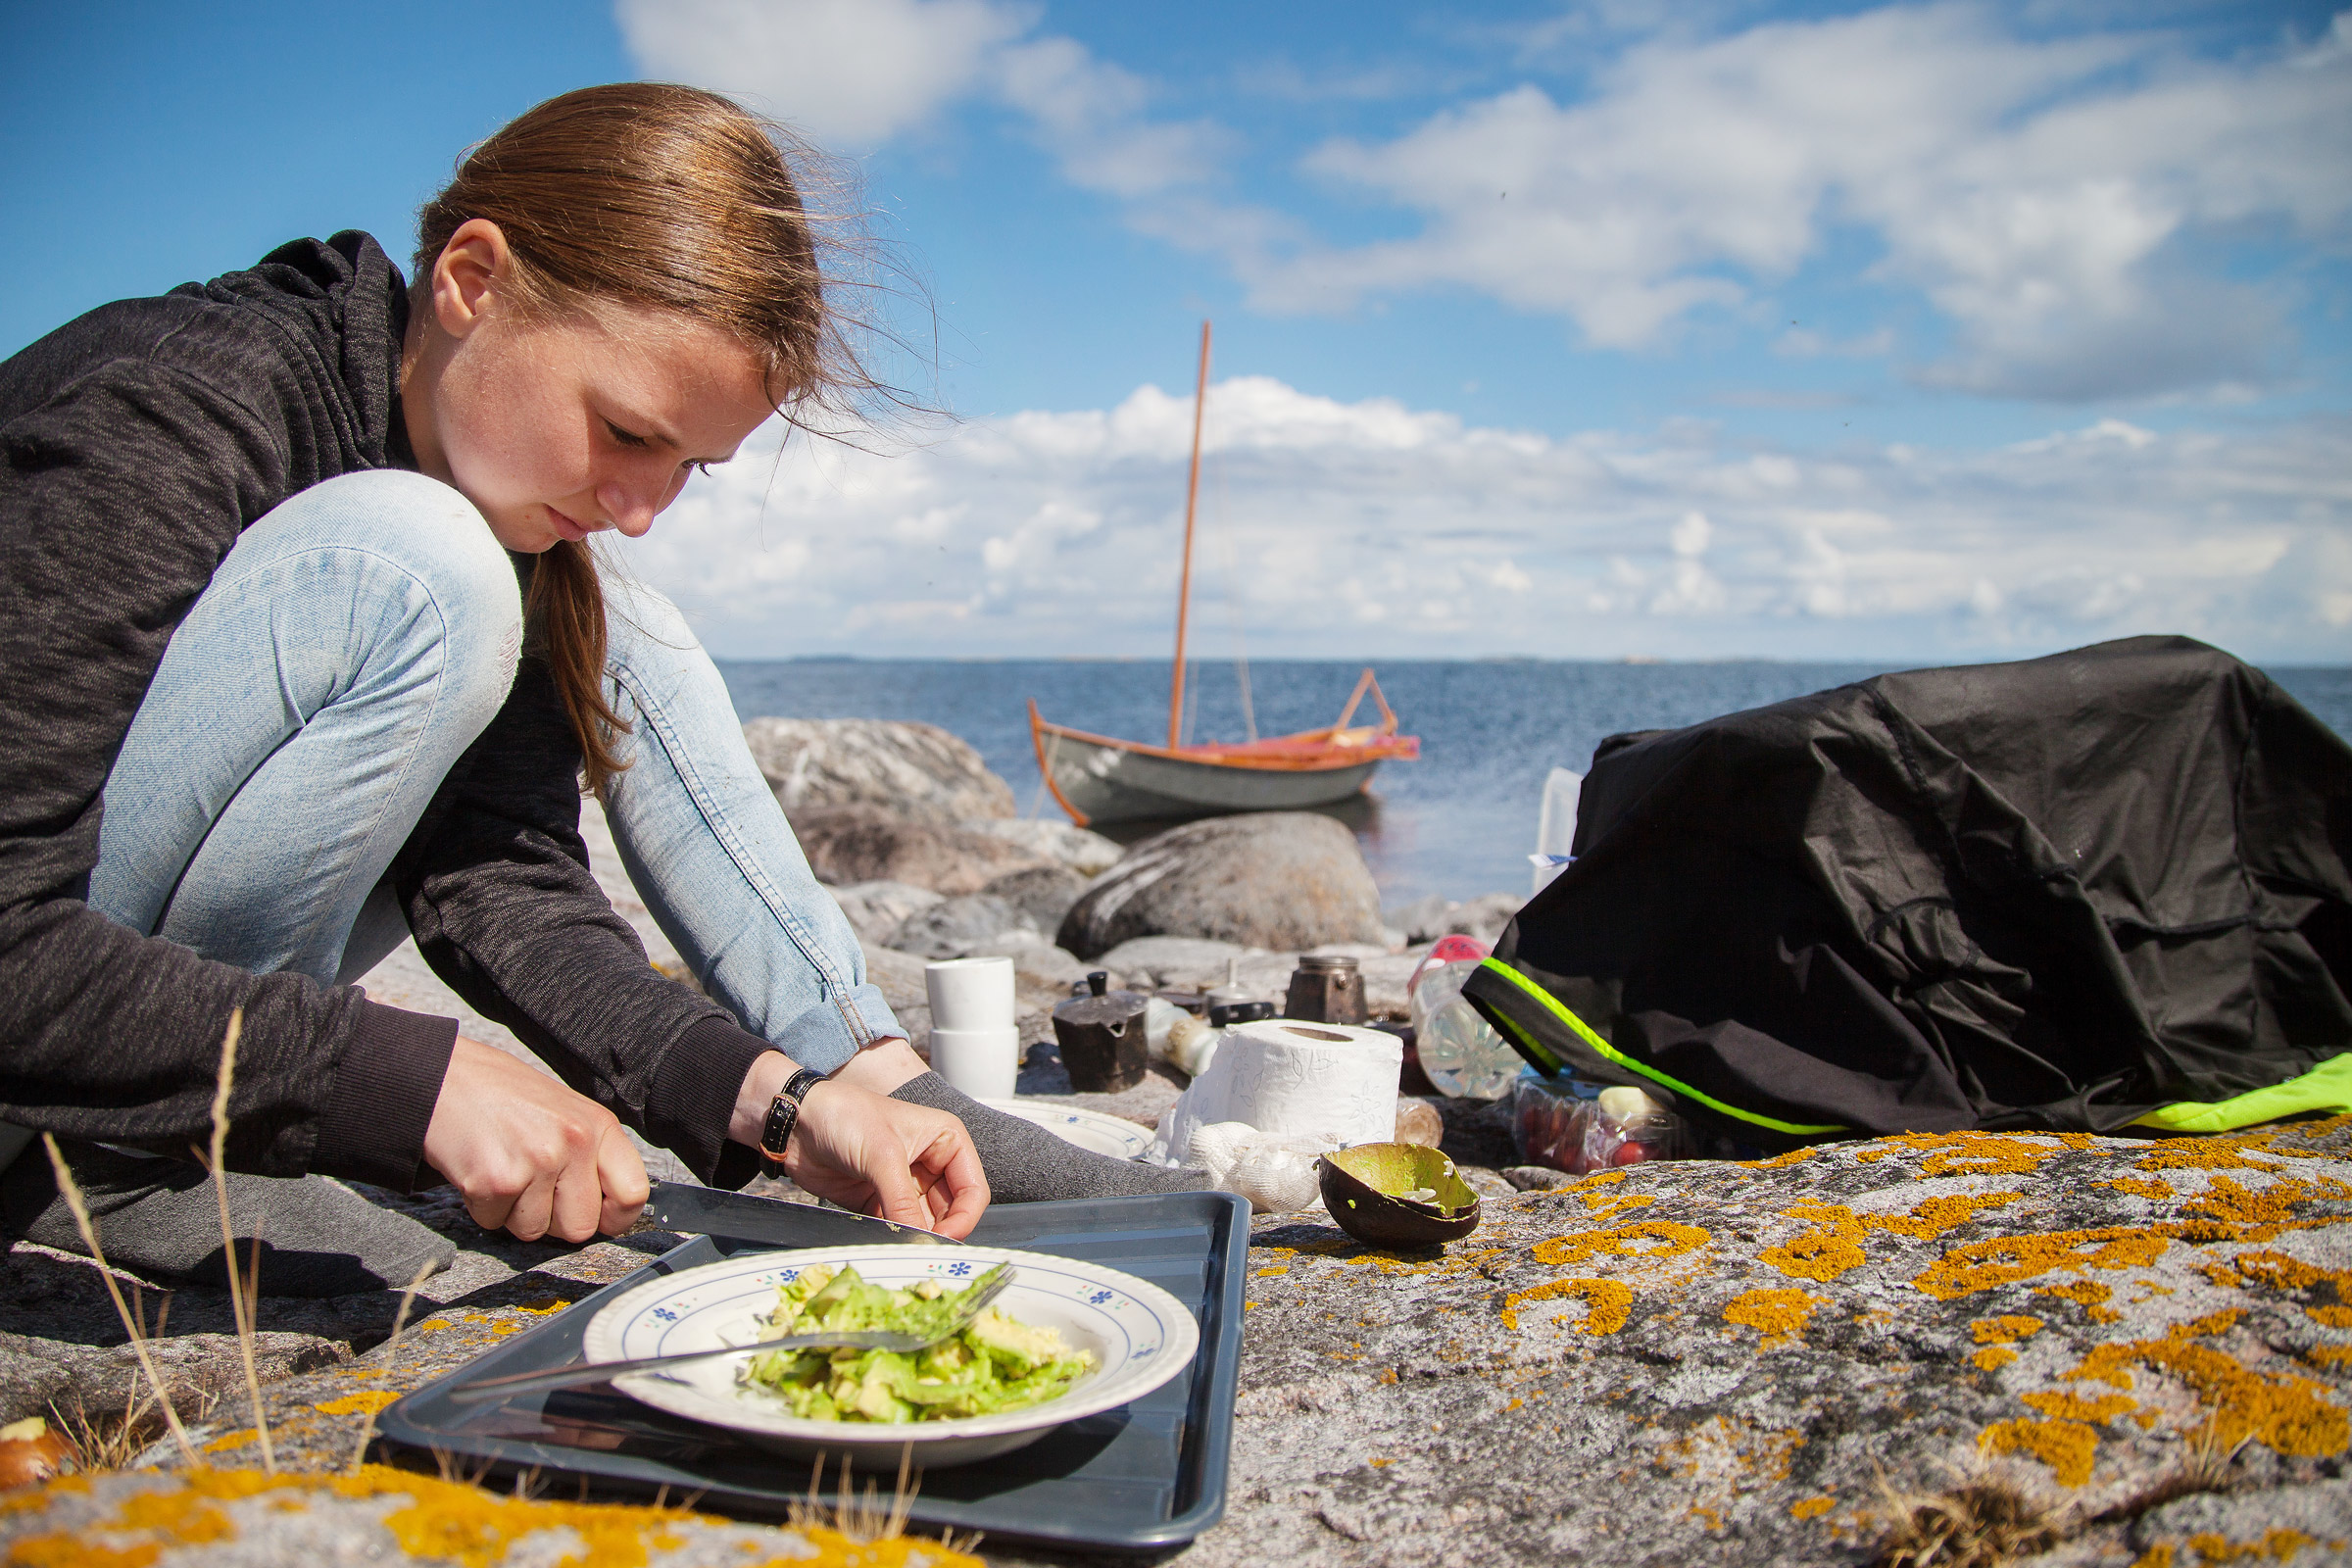
With ELDIR on a close reach with a reefed sail, Inari kept track of our position among an often-confusing cluster of islands outside of Kasnäs Harbor. The brisk westerly wind created a sharp chop which occasionally tossed spray over our loaded boat.
For a moment, our route turned farther east onto a broad reach; ELDIR rode the waves, hissing as she exceeded hull speed and trailed twin rows of foam. We encountered a sloop closehauled temporarily turning into the wind to luff, apparently to take photos of us. We turned to windward and, as there were no more islands close by protecting us, the sharp chop grew, throwing more and more spay into and over the boat. It had been a record-breaking warm June and July and, while the air temperature had dropped into a comfortable 68 degrees, both the water and the granite islands radiated the heat they had accumulated.
Tacking through the chop north of Rosala, we made good speed in the stiff breeze but little progress on our intended southwest heading. Inari and I took turns steering and navigating. From her early years on, she has been a naturally skilled helmswoman. For navigating, we relied on paper charts and compass instead of a GPS. Only the main shipping lanes are marked, but the charts are very accurate, and often the names of the islands are descriptive—Furuskär (Pine Island), Bredskär (Broad Island)—aiding our visual navigation. ELDIR has a draft of only inches, so we could usually see any threatening underwater rocks or shallows from an unusual cresting of waves or the change in color of the sea.
Despite the warm summer the sea had been remarkably clear of algae, at least here in the Archipelago Sea. The Baltic is known to be the most polluted sea of the world: with more than 80 million people living in its drainage area and its average depth only 75′, it is continuously threatened by excessive amounts of nutrients. Several conservation measures have been taken by the countries along the coast, and there has been some improvement during recent years. On our cruise, I clearly saw some promising signs: bladderwrack, a seaweed generally perceived as a sign of a healthy sea, has regrown abundantly after many years of growing scarcer.
Tired from our morning drive and not having had coffee after lunch, I decided to aim for a 100-yard-wide treeless rocky islet coming into view over the bow. As we drew near, we saw the telltale signs of submerged rocks, dropped the sail, and struggled through the labyrinth of rocks by paddling against the wind with one oar. The islet had been inhabited by seabirds and the rank odor of guano hit us even as we secured the boat. I retrieved my mocha pot while Inari took off her wet raingear and stood on the crest of a cliff with her arms spread wide, like a seabird drying out its feathers in the warm breeze.
For our first break, we commandeered a small bare-rock islet from a flock of seabirds. The warm breeze quickly dried our spray-soaked clothes while we had coffee and chocolate.
Refreshed by coffee and chocolate, we left the islet and continued working to windward. Here the islands were closely knit, and we were more protected from the wind and waves coming from the southwest. Inari had been navigating, keeping track of our progress on the chart on her lap. After an hour, she said that we had proceeded only half a mile from our stop at the islet. She had a good point, and I decided we’d call it a day. Only 200 yards away on our port side was a small island, separated by only a 10′-wide channel from a larger island. We tacked into a cove created between the islands and landed on a rocky beach at the base of a steep, pale gray granite cliff. The depth was too much for our small anchor’s 50′ rode to get a grip, and we moved to a spot where the shore met the sea with a gentler slope. Although ELDIR was quite heavy with her load of gear, together we managed to pull her up on a gritty bedrock ledge and tie her to the trunk of an alder tree. We took a breather sitting on a rough granite outcropping that was still warm with the midday heat. To the north, the sky was washed with amber rays of the descending sun, and the distant islands were coal-black silhouettes against the pale-blue sea.
Because there is no tide in the Baltic Sea, we could anchor the boat close to shore and pitch our tent nearby in a place sheltered from the wind. At the end of the first day, we landed on a small island and tried to set an anchor from the stern and a bow rope to shore, but the water was too deep for the rode, so we pulled ELDIR up on a gently sloping shelf.
For dinner we cooked ground-chicken burgers on the Trangia stove and served them on split, toasted rolls with sliced cherry tomatoes, mixed greens, and cucumber mayonnaise. Our cliff-top feast brought a sigh of pleasure from Inari. We found a good spot for the tent, close by our boat and protected from the wind by a group of crooked pine trees.
Sometime during the night, I was awakened from a sound sleep by a peal of thunder. As rain hit the tent I rose and gathered the foulweather gear we had hung up in branches to dry and brought it into the tent.
We woke up to an overcast day and during breakfast I checked the forecast. The gale warning had been downgraded to winds of 14 to 18 knots: we could proceed with the short 2-mile unprotected crossing into the Vänö archipelago as planned. This crossing separates the inner archipelago—where the islands are larger, higher, often with steep rock shores covered with gray lichen and mostly capped with thick stands of pine trees—from the outer archipelago where diminutive islands have copses of alder scattered in small valleys in between cliffs wherever they can find some shelter from the elements and enough soil to grow from. Before the crossing we had some tacking to do into the southwesterly wind, which was bringing dark clouds that threatened rain and high wind. We sailed toward a half-mile-wide island and headed straight for a gentle slope of pale beige and gray granite. We pulled ELDIR ashore and set up our pop-up tent just as the rain started; we lay down inside and listened to the wind and rain rattle the tent.
After lunch and with the rain over, we set sail again and began the crossing in seas only 3’ high and no longer cresting. A few tacks into the crossing the wind eased, and we shook out the reef. Approaching Vänö, the largest island in an archipelago that shares its name, the rain started again, and it was soon dripping from the sails. The wind nearly died, but as we bypassed Vänö we could veer away from the wind and keep ELDIR gliding along through an intricate labyrinth of dull-gray granite islands. After a couple of hours, the rain stopped, and the sun revealed itself and turned the landscape into a palette of bright colors. Bare slopes of granite rising gently from the bright blue sea were washed in muted orange and pink.
Inari Vuorenjuuri
After crossing over to the Vänö archipelago the wind gradually decreased and it started raining, eventually soaking us thoroughly.
Inari and I were thoroughly soaked, and despite the sun, we shivered from the cold. Luckily, our destination for the night was our summer cabin in the Vänö archipelago where I spent most of my childhood summers. After endless tacking in the feeble wind through a knot of islets, some carpeted with low wind-shorn alder trees and others just bare rock, we reached Örskär. My sister and her husband were waiting for us and had already warmed the sauna next to the cabin. They had arrived earlier, having taken the ferry to Vänö and our small open motorboat from there to Örskär. Inari and I settled into the cabin, changed out of our wet clothes, and warmed up. That evening, we relaxed in the sauna, took some refreshing dips in the sea, and had dinner before calling it a day and retiring to the cabin’s bunks for a long and peaceful sleep.
Maria Vuorenjuuri
As Inari and I left Örskär, ELDIR glided westward in a gentle breeze. My sister and her husband, aboard the family outboard skiff, accompanied us and took a few photos.
In the morning, headwinds had been forecast again, but for a moment we enjoyed sailing a gentle southerly breeze on a broad reach. As we approached a narrow channel only as wide as a paved highway east of Borstö Island, the wind turned against us. Rather than short-tack up the passage, we dropped sail and I took to the oars for the first and only time of our cruise. Once we were clear of the channel, the wind picked up, and we raised the sail again. We could bypass Borstö with a single tack and crossed the main fairway leading in an east–west direction from Vänö to Jurmo. This passage is open to winds from the east and west and, beyond Borstö, also from the south. As the wind was increasing, we chose to cross this opening and seek a more sheltered route north of the passage.
After bypassing Borstö, we stopped for lunch in the lee of an island by the open waterway leading to Jurmo. The conditions were too rough to make a direct crossing, so we headed northwest where we could take refuge among the islands.
It was lunchtime as we approached an isolated bare islet the size of a basketball court and found a spot for landing on the lee shore. As I cooked some pasta, Inari prepared a cold sauce from fresh avocado, chopped onion, garlic, lime, and chili. On the windward side of the islet, looking straight into the wind, we could see a faint silhouette of Jurmo on the horizon about 11 miles west. It seemed unreachable, as the wind and waves would keep us crawling and tacking through the maze of islands, north of the straight, open passage toward Jurmo.
While the wind made for some challenging sailing, we wouldn’t let it keep us from eating well.
During lunch the wind increased, and as we continued northwest we encountered escalating seas, although we were somewhat in the better-protected waterways. Even reefed, ELDIR was heeling more and more, and the waves hitting us astern and on the port side occasionally caused water to lap over the leeward rail. Inari, as calm and as upbeat as ever, steered with a steady hand. Her positive spirit made for pleasant company despite the occasionally challenging conditions. We changed our course farther north and aimed for the shelter of Lökholm, an island just one-half-mile across. Now on a beam reach, ELDIR rose steep wave faces to their crests, then doubled her speed on the descent to the troughs, riding one wave after another.
It wasn’t long before we entered the sheltered bay on the northeast side of Lökholm, where a half-dozen private piers and boathouses, painted red and white, were scattered all along the shore. To the south of us was a sandy beach backed by low-growing alder trees where we could land, and we took a tack back to it. As we approached, Inari lowered the sail and I poled with an oar to the beach; we would wait here for the wind to blow off its rough edge. We strolled around the island on a beautifully maintained path meandering in between the cliffs and knee-high fields of heather. The path led to an arboreal tunnel of old alders with trunks 20″ across and shadowy crowns spreading above us some 20′ high. The sun broke through the murky overcast as we passed a few old crofts and courtyards, probably now used as summer houses. Not once during the walk did we glimpse a single person, giving the island an eerie stillness.
By the time we got back to our boat, the sea had calmed and no longer was streaked with white crests, so we set out and beat to the northwest. ELDIR needed more power to get enough momentum to carry through the waves, so we shook out the reef. She pressed her lee side into the sea and started happily hobby-horsing across the swell.
We spent our third night at Örarna. With our boat’s shallow draft, we were able to stop almost anywhere, but preferred sloping rock shelves where we could pull ELDIR out of the water.
We beat along on a passage across Bodö Reach and eventually started feeling that we had had enough for one day. To the south was Örarna, a low, cruciform island made up of four ragged, intersecting peninsulas; it seemed to have a flat, level span of rock on its northern end where we could camp. We sailed ashore and bathed in the honey-colored evening light as we pulled ELDIR up on a ledge. I popped up our tent straight onto the gently sloping rock as Inari started chopping an onion for our dinner, adding chickpeas, rice, garlic, canned cherry tomatoes, and spices.
During the night, a squall passed over us, rattling the tent and pounding the fly with heavy rain. It was still raining in the morning—a good excuse to sleep in. When I got up to make breakfast there was a weak shower, and shortly afterward the sky cleared.
We carried on our battle against the wind along Bodö Reach, and the chop grew bigger as we left the shelter of Trunsö to the south of us. While Jurmo Island was to the southwest of us, our plan was to head west in the lee of a group of islands north of Jurmo Reach and then, conditions permitting, we would make the crossing. If we were lucky and the wind shifted westward, we’d have a chance to make the crossing from the north, without having to fight to windward.
We stopped for lunch just outside Björkö, behind an islet that sheltered a deep natural harbor. I rarely use the anchor, as it’s easier to pull ELDIR ashore on most stops, but decided to drop the hook here. Unfortunately, we lost the anchor—the knot holding it to the rode slipped loose from the hook as we were preparing lunch.
As our fourth day was turning into late afternoon and the brisk wind showed no signs of decreasing, we decided to seek shelter before taking on the crossing to Jurmo. I chose an island with clear views toward the stretch of open water, so we could monitor the conditions.
Before we got under way again I tied in a reef, but shortly after we departed ELDIR did not have enough power to make any real progress through the chop so we shook it out. We pounded to weather, tack after tack, and even by late afternoon the wind showed no signs of waning. I decided we’d seek shelter in a cove formed by a steep, high island called Lotan and a low small islet almost attached to it. We would have more shelter behind the steep cliffs of Lotan, but as it is easy to misjudge the conditions on the leeward side of larger islands, I preferred the low rocky shores of the islet where we would have an unobstructed view toward Jurmo and the crossing.
After we came ashore I was feeling clammy, so I took a dip while Inari sat by the cliff and read a book. We checked the weather again; the forecast was for 18 knots of wind with gusts to 25 knots. I decided that we would wait for the worst of it to blow over. From previous encounters I’d had with Jurmo Reach in bigger boats, I knew that this crossing could be more difficult than any other we had previously made with ELDIR.
Our island provided little protection from the elements, but we eventually found a spot sheltered by a bare rock knoll where our tent would not collapse under the pressure of the wind.
We popped up our tent up on the bare rock but struggled to find a spot where the wind would not collapse it. There was little shelter to be found on the islet, but we found a rock face as high as a minivan, which barely provided enough shelter for our tent. After some salad and sandwiches, we retreated to the shaking tent and set an alarm for 2 a.m. We had roughly a 24-hour weather window to get in and out of Jurmo, and there was little time to waste.
When the alarm went off I got up, but didn’t feel like I had slept at all even though I must have nodded off. I poked my head out of the tent; our map, in a plastic cover, lay just outside the tent, but I could barely see it in the darkness. I said to Inari that it would be better to wait for some morning twilight, and she agreed. We set the alarm for 4 a.m. When it went off, it woke me from a deep sleep. The wind had died down, so we promptly packed our gear and headed for the boat. Dawn and the newly risen moon cast some light on the water, and we felt confident about taking on the crossing.
During the night, the wind diminished to a gentle breeze and the sea had calmed down, so very early in the morning Inari and I took on the crossing to Jurmo. Closehauled, we could sail straight for the island and made slow but steady progress.
Close-reaching, ELDIR glided across the abated sea, as a muted red daybreak painted a glowing background to the dark silhouettes of islands around us. Inari and I sailed without saying a word.
As the sun’s bright disc gained some height above the horizon, laying its warm light on us, we drew near the end of the crossing. Jurmo’s steeply rising northern shore of rocks and sand spread out beyond the bow.
We sailed westward along a steep, boulder-strewn bank of sand. In the frail puffs of wind, we struggled to work ELDIR to weather. It would have taken us an hour or so to reach the harbor; instead, we came about and set a course toward a rocky shore close by where Inari would be staying. When we found a suitable place to get ELDIR up on the steep shore, we were relieved to have reached our destination and a little weary from the several days of arduous windward sailing. We were low on food and water, so we took a walk to the harbor where a small cafeteria and shop operates in a weathered cottage-like building—painted brick red with white trim—that sits at the root of one of the weathered wooden piers.
With the supplies we’d bought in a bag, we hiked back to our boat along a path that took us to the 56′-high summit of the Högberget, Jurmo’s highest point. The view from the top takes in the open Baltic Sea and the island’s landscape, covered in low-growing heather and juniper, that extends on narrowing snake-tail capes that meander far into the sea to the southwest and northeast.
Back at the boat, Inari and I said our farewells to each other and she returned to the harbor to rendezvous with the rest of her company for her stay on Jurmo. It was still early in the day; I tied a hammock under alder trees close by and tried to have a nap, but while I was tired, I was not sleepy. When I felt and heard the wind stirring, I decided to launch.
With an 8-knot westerly and clear skies, the return crossing with a following breeze was a relaxed one. I wanted to position myself on the north side of the eastward open-water passage from Jurmo because the next day’s forecast was for a brisk northerly breeze of 17 to 22 knots; I didn’t want to take that on closehauled. By moving northward now, I’d make the rest of the return passage on a reach or a run, depending on route selection.
Having enjoyed following winds for a change while sailing away from Jurmo, I found a convenient and beautiful campsite sheltered by crooked alder trees on the southeast shore of Skataskär, a blunt-cornered triangle of an island about 300 yards across.
I sailed 7 miles northeast from Jurmo and took a lunch break on a small islet just outside the old fishing village of Trunsö. The smoked salmon I had bought from the Jurmo shop was a welcome change to the menu. Energized by coffee, I proceeded north through the narrow passage on the east side of Trunsö and continued northeast toward Lökholm. Afternoon was turning into early evening when I began to look for a suitable island to spend the night on. I had passed several uninviting high and overgrown islands with steep and rocky shores. After sailing through the channel at Lökholm, I headed toward a cluster of small islands where I hoped to find a haven from the expected northerly. As I bypassed Skataskär’s southern cape and turned northeast, my intuition proved right: before me I saw a beautiful horseshoe bay with rocky shores and a gently sloping ledge toward which I steered ELDIR. Low and crooked alder trees provided shelter from winds, and a flat spot on the ledge where I’d landed was big enough for my tent. My refuge was painted in the soft light of the evening sun while a bank of dense, dark clouds crept in from the southwest, rumbling with thunder. I slept well in my rocky refuge.
In the morning, I woke up to a world shaded by gray clouds, with wind hissing through the alders. Although my campsite was sheltered, I could see gusts of wind changing the colors of the sea. Farther away, waves rose in white crests as they hit and tumbled over shoals and skerries. I took my time with breakfast and then prepared the boat well, anticipating a rough ride.
The first leg of my passage would be a flat run southward, so I started with a makeshift second reef by raising only the yard, leaving the boom to rest on the gunwale. This had worked well previously, when I had encountered conditions in which ELDIR would have been overpowered with only the single reef sewn in the sail. With greatly shortened sail, ELDIR was soon surging with the waves, perfectly under control. As I approached Borstö I had to decide whether to take the marked route, which required a brief tack into the wind, or to continue southeast through narrow channels between small islets. I chose the former and hoisted the yard to raise the sail with its reef tied-in and turned to weather. The wind spilling over and around land was gusting and constantly changing directions; I struggled to tack and soon gave up. I lowered the sail altogether and turned downwind. By occasionally lifting the lugsail’s yard by hand, I navigated the unfamiliar waters slowly, scouting ahead for signs of shoals or rocks.
I turned east and the route I had initially decided against turned out to be fine and sheltered by some islands. I again hoisted the sail with the single reef and was soon exposed to the north wind and waves that had gathered size and force over several miles of fetch. I was able to turn a bit more away from the wind and could feel ELDIR rising on a wave and storming along with white foam fanning out from both sides. In spite of the demanding conditions, I had a peculiar feeling of control. With the high speed the boat seemed to become more stable and needed only minor tweaks on the tiller.
After a while, as I was closing in on a narrow channel, I saw a man standing on a cliff outside a cottage and a moment later a small crowd joined him. They were all watching ELDIR, a tiny, red-sailed, ancient-looking craft riding the swell with white crests flaring from the bow. As I reached the lee of the channel, it was as if I had slammed on the brakes, leaving ELDIR only enough speed to glide gracefully along. Clearing the channel, I turned north and landed on a small bare ledge located in the middle of a sheltered cove on the east shore of Stockhamn. I shook off the adrenalin as I prepared salad and sandwiches followed by coffee. I checked my phone and saw a text from Inari: “Everything okay? I have never seen bigger waves as today on the north shore of Jurmo.”
It was still blowing quite a bit when I got underway again. I sailed in a more sheltered route toward Örskär. Broad- and beam-reaching to our cottage was a blast, although in waters somewhat sheltered by islands on the way, I was doing less surfing. The harbor by our cottage lies on the southern side of the island, and it took quite a bit of tacking to enter it, the wind being gusty and shifting as it passed over the island. I spent a pleasant afternoon and evening enjoying the sauna, dinner, and the company of my sister and her husband.
From Örskär I had only 11 miles left to reach Kasnäs. The weather was docile with bright blue skies and a following wind of 6 to 10 knots. Instead of the regular, more protected routes, I chose to sail northeast from our harbor into a scattering of islands and islets. To navigate through granite skerries and islets, I kept my finger on the map and counted the islands as I passed by.
After half an hour or so I had avoided all the hidden shallows and rocks and was through the Vänö archipelago, sailing open water toward the Rosala archipelago. ELDIR rocked gently in the swell, and my last passage was again more sheltered. I eventually turned north toward Kasnäs Harbor and sailed all the way right up to the boat ramp. Exhausted by six days of challenging sailing, I stepped out of ELDIR feeling very much alive.
Mats Vuorenjuuri is the father of three and has been an entrepreneur making a living in graphic design, photography, freelance writing, and most recently as a boatbuilder as well, offering boatbuilding and maintenance services through Nordic Craft. After sailing various types of vessels,including sail-training schooners, he enjoys the simplicity and pleasures of small boats . He wrote about cruising the Finnish coast in his Coquina in our May 2016 issue and about a Lakeland Row in January 2017.
If you have an interesting story to tell about your adventures with a small boat, please email us a brief outline and a few photos.
For decades I’ve used spiral wraps of slender strips of rubber cut from inner tubes in gluing up oars, paddles, and spars. I used the rubber strips initially because I didn’t have enough clamps for the longer pieces or clamps large enough to span blanks for oar and paddle blades. Even though I now have plenty of clamps, including bar clamps, I still use rubber strips for those particular jobs. The strips are easy to apply and provide plenty of pressure. The rubber weighs next to nothing—a set of clamps is heavy and can cause a workpiece to sag and curve—and hardly occupies any space while doing its job, so the workpiece is easy to set aside while the glue cures.
Photographs by the author
I used to wrap the rubber strips directly on the glue-ups.
The rubber held up for a while, but with repeated use and age it started sticking to the cured epoxy and tearing. That wasn’t much of a problem when inner tubes were readily available and often free for the asking at auto tire stores. With tubeless tires now nearly universal, used inner tubes are not.
Fortunately, new auto inner tubes aren’t expensive (less than the cost of a bar clamp) so the rubber for strips isn’t hard to obtain whether from auto parts stores or online sources. I use scissors to cut the inner tubes in half down the middle, like a split bagel.
To cut each half into strips, I use a technique that I’d read about for making babiche, the leather lacing used for making traditional snowshoes. The device for cutting the strips is a simple arrangement of a board as a base, a razor blade tapped into one end of that board, and a second board clamped to the first as a fence about 1/2″ from the blade. To start the strip, I make an angled cut in the outside edge of the rubber disc. This is the leader to pull between the blade and the fence.
With one hand I pull the leader and the strip that follows it. With the other hand I guide and flatten the disc of rubber, taking care to keep my fingers away from the blade. Pulling down over the edge of the base and slightly toward the fence will produce a long, uniform strip from the inner-tube half.
I also save all my bicycle inner tubes that are beyond patching. I use the road-bike inner tubes for clamping mostly as they are; I just cut the valve-stem section out with scissors. With my mountain-bike inner tubes, shown here, I cut the stem out and then split the rest of the tube in half down the middle.
A pile of rubber strips can take the place of dozens of clamps.
To lengthen the useful life of my rubber strips, I first apply stretch wrap—the flexible plastic film used for packaging and bundling boxes for storage or shipping—to the glue-up. Winding each rubber strip around a short dowel makes it easier to wind it around the workpiece. The spring clamp can hold a stretched rubber strip to free up both hands.
The stretch wrap contains the mess of glue so well that I can take my gloves off and work with clean bare hands.
To start a wrap of rubber, I hold the tail end against the workpiece and overlap it with a tensioned wrap or two. I can then spiral the wrap along. When I get to the end of a strip, I can hold the tension in it and tuck its tail end under a previous turn or wrap the next strip over it. The rubber strips also stay dry making them much easier to handle than if they were slippery with glue. Even if you opt to forgo using rubber strips and use clamps, the stretch wrap can also benefit glue-ups by preventing the spread of glue from workpiece to gloves to clamps.
A spring clamp can come in handy for holding the tail while I get the next strip ready. It takes a couple of turns over itself and the end of the previous strip. Note the bar clamp at left holding the work firmly to the table top.
I finish off with the last tail end tucked under. This paddle blank can easily be set aside while the epoxy cures.
The curing of epoxy isn’t affected by the wrap and when it is fully set, the film peels right off. I just run a sharp blade lightly along one side and remove it in one piece.
For gluing long pieces with laminates that are likely to bend, a 2×3 laminating beam will be included in the wrap to keep the laminates straight. The top of the beam has been planed flat and covered with blue masking tape to keep it from being glued. Three 2×4s clamped to the workbench will provide 360-degrees of clearance for applying the stretch wrap and rubber strips. Wrapping each rubber strip around a dowel is especially helpful when working with long workpieces.
A bar clamp holds the laminating beam steady as it is wrapped with the glued laminates.
Slippery layers of wood are not very well behaved when clamps are applied. The stretch wrap presses the laminates together but not so firmly that they can’t be adjusted. A tap with a mallet or a pinch of the sides with a clamp is all that’s needed to align the pieces flush with each other.
For long workpieces, wrapping a strip around a dowel makes it quicker to wrap.
Shifting the work close to a support and reclamping it can help the laminating beam stay straight when the rubber is pulled downward to tension it.
While a single wrapping of rubber strips can do the job, a second can be wrapped back over the first.
The stretch wrap is transparent, and I can see the glue joints to make sure they are fully closed. If there is an opaque puddle of glue, as there is with Titebond III, obscuring the view, it can be pressed out of the way. To test the effectiveness of the rubber strips, I cleared a window of glue and applied a clamp to that area. No additional glue squeezed out from the joints. With Titebond III, the squeeze-out will accumulate under the wrap and, cut off from air there, it won’t cure. I leave the rubber strips on for the glue’s stated 24-hour cure time and then remove them and the wrap to allow the uncured glue to dry.
The glue lines of this epoxy-glued paddle blade blank are as thin as any glue-up done with clamps.
While the stretch wrap is not reusable, it is recyclable. The roll I bought at Home Depot is made by Pratt Retail Specialties and is made of 100% recycled plastic, and, according to my online research, it can be recycled. Stretch wraps are usually made of linear low-density polyethylene (LLDPE), a category-four recyclable material. It can be recycled along with low-density polyethylene (LDPE), which is also a category-four material, at locations where plastic-film products such as plastic bags are collected. Check with your local recycling programs. The stretch wrap cannot be recycled with the remnants of Titebond on it.
While I haven’t used the stretch wrap on bird’s-mouth spars yet, I will the next time I have the opportunity. I expect the wrap, along with rubber strips and maybe some of the stainless-steel hose clamps I’ve used for past spars, will be a combination that tidies up another very messy glue-up. While it’s often said a boatbuilder can never have too many clamps, there are jobs more easily and just as effectively done without using any at all.
Christopher Cunningham is the editor of Small Boats Monthly.
You can share your tips and tricks of the trade with other Small Boats Magazine readers by sending us an email.
We have five trailers to tow around our armada of small boats, and when we hit the road we carry a roadside repair kit, with one of the most important items being a trailer jack to change out flat tires or bad wheel bearings. For many years we focused on jacking up the trailer frame, which meant a variety of jacks ranging from a repurposed car jack, a 3-ton bottle jack, a wooden 2×6, to a heavy floor jack. Recently we came across a better solution, the Springfield Quick Change Jack, which has no moving parts and lets the towing vehicle do the lifting.
Photographs by the authors
The recess in the jack is set on the trailer axle and towing the trailer a few inches provides the lift. The jack has a capacity of 4,000 lbs.
The jack is a heavy-duty aluminum semicircle that cradles the axle in a notch on one end and uses a cam action to raise the axle, with lifting effort provided by the tow vehicle. It is easy to use. The jack is placed under the axle, close to the inside of the wheel and tire that need to be raised. Seven treads molded on the arc of the jack grip the ground while the vehicle is moved forward or backward, depending on which direction the jack has been placed. Once the tire is raised enough to perform the necessary work, the tow vehicle is placed in park, parking brake set, and, for a belts-and-suspenders approach, a set of wheel chocks is placed around the tow vehicle’s tires. We have found the jack to be just as steady as any of the other jacks that we have used and, in some cases, even steadier because the length of an axle jack is much shorter than a frame jack.
The Quick Change Jack is an aluminum casting and is designed to be used with 10″ to 15″ wheels.
The jack is designed to work on trailers that have round or square axles and wheels that range in size from 10″ to 15″ in diameter, which covers all five of our trailers. The weight capacity of the jack is 4,000 lbs. The jack’s small size and light weight mean that it can be stored just about anywhere, and some similar versions have predrilled holes that allow the jack to be bolted to the trailer frame for everyday carry. We leave ours loose because we have multiple tow vehicles and multiple trailers. When we hit the road we grab the jack, a folding lug wrench, and a spare tire (if the spare is not already mounted to the trailer).
Nothing can ruin a fun day of boating quicker than a roadside breakdown, and the less time we spend raising and lowering a trailer on the side of the road, the better. Fortunately, the Quick Change Jack lives up to its name.
Audrey and Kent Lewis, aka Skipper and Clark, have towed boat trailers across the U.S., from left to right and from top to bottom, with a most memorable experience of burning up a brand-new set of 8” tires in six hours during a daytime dash across Arizona in the summer. Luckily, they had thought ahead and had brought two spares. Their small boat adventures are blogged at Small Boat Restoration.
Once upon a time, a cedar bucket for a head was considered luxury aboard a small boat. L. Francis Herreshoff, in his drawing of his Rozinante, even shows one in use by a Rodin-like Thinker. But no more. “Bucket and chuck it” is a thing of the past. And here on the Maine coast we are strictly Leave No Trace—no cat holes and no digging at all on the islands—so the only alternative is a pack-it-out system, whether used ashore or afloat.
The problem is, of course, that small boats are still small. Portable flush toilets, like the classic Thetford and Dometic toilets, are too large to fit into most open boats. The folks at Duckworks decided to find a solution and produced their Small Boat Head System (SBHS): “The aim for it,” according to Duckworks, “is more for last-resort use than for daily function as a head. The idea was a solution that can be realistically carried on a small sail-and-oar type boat. The inspiration was events like the Salish 100 cruise where it’s unlikely we’ll be away from marinas or campground facilities for more than a day, but where a portable head may well be needed in a pinch. And then of course when not being used as a head it can serve other functions—dry stowage, bucket, campfire seat, etc.”
SBM photographs
The toilet seat fits over the bag and the bucket fits in a non-slip rubberized base that can be screwed in place if desired. The toilet seat is stored separate from the bucket when taken along. The caddy holds the EcoGel and waste bags, which are part of the complete system.
The SBHS is built around a 3.5-gallon cleaning bucket with the same 11-3/4″ diameter as standard 5-gallon buckets, but is just 10-3/4″ tall. The bucket is sturdy, much more so than the somewhat flimsy ubiquitous paint and drywall-compound buckets, and comes with a thick, soft rope handle. The system includes a small toilet seat, a caddy for toilet supplies, a padded bucket-seat top, a rubberized stabilizing base that can be screwed in place, liner bags, and a gelling waste treatment.
Preparing for a week on the Maine Island Trail in my 17′ oar-and-sail boat, I packed the full system and gave it a workout. On my boat, the base isn’t required. The bucket stows nicely and securely without it in between the daggerboard trunk and a buoyancy bag, and therefore doesn’t need the base to keep it from sliding around. I moved the bucket to centerline aft of the center seat to use it. The base also requires a flat surface, and there is too much curve to the floorboards to take it. The bucket and seat top are great; they make a convenient camp seat and support my full weight when I am crawling around in the boat. Their combined height of 11-1/2″ puts the top just flush with the boat’s center seat. I took the toilet seat along, but I didn’t use it. The seat can be a more comfortable perch than the bucket rim, but I found it quite simple to just use the bucket and liner bag without it.
The system includes a caddy to carry toilet paper as well as the system’s gelling agent and bags to line the bucket and hold the waste. The caddy, originally designed to hold cleaning supplies, is 6-3/8″ tall and leaves 4″ of room for filled wasted bags in the bottom of the bucket. You could cut the handle off to leave almost 6″ of room and replace the handle with a length of cord.
The bucket at the heart of the SBHS is sturdier than similar paint buckets. It will carry over 3 gallons of water and with padded lid in place, it makes a good camp seat.
To use the SBHS, you place a bag in the bucket and fold its edge over the bucket rim. The toilet seat snaps on—it’s a tight fit—and holds everything together. Before using the toilet, you sprinkle a bit of EcoGel into the bag. Each packet is good for several uses. Each bag can be used for single or multiple uses, according to your preferences. After use, the bag is removed by taking toilet seat off before tying the top of the bag with an overhand knot. The used bags are stored in the bottom of the bucket; there was plenty of room for me to store a week’s worth (or more) of them.
If the SBHS will get a lot of use, keeping the supplies outside of the bucket will free space in the bucket for waste storage. Plastic airtight ground-coffee containers work well for storing the toilet paper, bags, and gel. I also found some 10″ round Rubbermaid containers that fit nicely inside the bucket and have room for the toilet supplies or for filled waste bags to provide tidier storage inside the bucket or outside. The containers also make it easy to empty the bucket to use it for other purposes. One-gallon plastic paint buckets with the metal handle removed can also safely store used waste bags to free space in the bucket.
The liner bags are biodegradable and work well with the system. They are developed specifically for human waste disposal and work in conjunction with Eco Gel, a powder that deodorizes and gels the liquid waste. Eco Gel is nontoxic and composed of citric acid, lemongrass extract, and sodium polyacrylate, which is the same gelling agent used in diapers and gel cold packs. Sodium polyacrylate is not biodegradable. Used bags and their contents are disposed of in a trash-disposal facility.
My preference for waste disposal starts with a portable toilet that would be emptied at a standard toilet connected to a sewage treatment facility. Second would be a well-maintained campsite outhouse; and third, in keeping with intended purpose of the SBHS, would be bagged waste disposed of in a municipal solid-waste system. Following the principles of Leave No Trace and the prohibition of dumping waste overboard, the SBHS provides a compact and convenient means of taking care of waste in any craft larger than a kayak whenever you’re boating in areas without facilities, leaving them unsullied.
Ben Fuller, curator of the Penobscot Marine Museum in Searsport, Maine, has been messing about in small boats for a very long time. He is owned by a dozen or more boats ranging from an International Canoe to a faering.
The complete Small Boat Head System is available from Duckworks Boat Builder Supply for $79. The “Complete System” includes all the items below including one roll of liner bags but does not include gel packets.
Editor’s notes
My complete system includes, from bottom up: the lid, rubber bands to hold used bags closed, a cord to hold the bag in place, EcoGel with a binder clip to close it; the caddy (with its handle cut off and a cord in its place) holding toilet paper and paper towels, bags and hand sanitizer; and the shortened 5-gallon bucket with a cord handle and a wooden bottom.
After reading Ben’s article, I bought the Small Boat Head System (SBHS) from Duckworks. While the three largest of my boats have room for a portable flush toilet, my other boats don’t. The smallest of them, LUNA, is a sneakbox and a very capable cruiser. I spent 2-1/2 months aboard her during the winter of 1985-86 and used whatever restroom facilities were available on shore, but more often I had to resort to digging catholes. I’m no longer comfortable with that routine; it doesn’t seem fair to get so much pleasure from the wilderness and then use it as my toilet.
I knew the SBHS would be too large to stow under LUNA’s deck and planned on adapting another bucket to fit. The lid, toilet seat, and caddy all fit standard five-gallon buckets, so I cut about 5-1/2″ off the bottom of a Home Depot bucket and installed a 3/4″ plywood bottom in the shortened top part. The only drawback with cutting the classic orange bucket in half was that I lost its Home Depot rallying-cry motto: “Let’s DO this.”
Packed up, my SBHS with the shortened bucket fits under the sneakbox deck, out of the way.
As Ben does, I use my modified SBHS without the toilet seat. The bucket rim isn’t unpleasant to sit on, but without the toilet seat clipped over the top of the bag, I use a cord with a lock to hold the bag in place when I get up (a slightly sweaty bum can be a bit sticky). To open more holding space in the bucket, I cut the handle off the caddy. There are two holes molded into the ends of the caddy’s divider that are just right for adding a handle of 1/8″ braided cord.
Ready to use, the system is a waterside loo with a view.
I’ll carry my shortened SBHS aboard the boats that have never had toilet facilities and use it when I get caught away from public restrooms. It’s a good way to leave no trace.
Is there a product that might be useful for boatbuilding, cruising, or shore-side camping that you’d like us to review? Please email your suggestions.
Jeremiah Gallay’s earliest boating memories are of canoe outings with his dad on the rivers and lakes of Maryland. The experiences made a lasting impression; he took up sailing while studying art in college, and his interest in boats drifted into his studies. Fallen leaves and branches suggested floating sculpture, and he built functional watercraft in organic forms. Years later, Jeremiah created LEAF-BOAT, modeled after a fallen leaf with its edges curled upward. He drew the leaf, modified and scaled the drawings, and built the design as a cedar-strip-on-oak-frame vessel to be paddled by a crew of two.
Photographs by and courtesy of Jeremiah Gallay
After building his first boat in 1994, Jeremiah found ways to combine his newfound love of boatbuilding with his career as a sculptor. LEAF-BOAT is one of four sculptural, tree-inspired boats.
In the early 2000s, when Jeremiah was in his late 20s, he began designing and building a more conventional craft, a 12′4″ gaff-rigged catboat. He created the drawings with a CAD program, constructed a solid keel and frames, and sheathed the hull in marine plywood—except for the forefoot. Plywood couldn’t take its compound curves, so he carved this element from solid blocks of wood. The project was complex and challenging, but after nearly four years of work, the boat was launched and it worked beautifully. Jeremiah named the boat STEADY, reflecting personal values of stability, balance, and perseverance. As an Irish friend used to encourage him, “Steady on, Jer.”
STEADY is the catboat Jeremiah designed and built.
After STEADY and LEAF-BOAT, Jeremiah was considering another project and his dad suggested a motorboat. Since Jeremiah knew less about motorboats than he did about sailboats, he decided to look for an existing design. The search led him to Paolo Lodigiani, an Italian boat designer based in Milan who had launched his company, B.C.A. Demco, nearly 30 years ago. B.C.A. is an acronym for Barche Con Anima, Italian for “boats with a soul,” and Paolo created Demco from the Latin dementia construendi or “the madness of building.” The “madness,” Paolo writes, “is clearly ironic, as I am more and more convinced that boat-building, even if to someone it can appear as a madness, is actually an excellent therapy.” Jeremiah bought plans for Paolo’s Silver 333, a 3.33m (11′) two-person runabout with a beam of 5′ and powered by an outboard of up to 20 hp.
The Silver 333’s plans call for stitch-and-glue construction. Jeremiah and the boat’s designer worked together to adapt the plans for plywood-on-frame construction.
The specified stitch-and-glue construction method didn’t appeal to Jeremiah, so he wrote to Paolo, who sent CAD files to help adapt the Silver 333 to plywood-on-frame construction. The conversion took a bit of work, but Jeremiah eventually produced drawings that he could print at full size for patterns. He started construction in 2017 and continued the work over the next few years.
Jeremiah had two major considerations while selecting a design: it had to include a front-facing steering wheel and it had to be small enough to fit in a compact garage during construction. The 11′ Silver 333 from B.C.A. Demco turned out to be the perfect fit.
Paolo Lodigiani worked with Jeremiah to modify the boat’s method of construction. Paolo said that collaborations like this remind him that, even after 30 years in the business, there is always something new to learn.
On a fall day in 2020, Jeremiah decided to take STEADY out sailing on the Potomac River. The conditions were excellent, and he was able to go farther downriver than usual before stopping for a snack and turning around. Driving home from the marina, he began to experience some chest pain and once home, called for an ambulance. Jeremiah, then only in his late 40s, was having a heart attack. In the interest of expediency the hospital staff didn’t stop to ask his name, but assigned him the name “Hopewell.” After recovering, Jeremiah suggested to his dad that HOPEWELL might be an appropriately uplifting name for the not-yet-finished runabout.
Jeremiah, right, built the boat for his dad, Joel, at left, as a way to spend time together on the water.
A year later, Jeremiah had completed the motorboat and launched it with family and friends, four-and-a-half years after the project began. In a speech he gave at the launching, Jeremiah said:
A boat, for me, is an analogy: we strive to stay afloat in more ways than one. Each of us works to develop an understanding of the world and to find our own way of exploring the unknown. This effort can be challenging, as our vision may be clouded, and our stability may be compromised. Our actions and ideas reflect our curiosity for exploration and our desire for understanding. We move through the environment using our ingenuity and available resources. Boats enable us to go places we could not otherwise go, and to see things around the bend.
With HOPEWELL, Joel and Jeremiah can continue making memories together.
Building the Silver 333 had indeed been “an excellent therapy” for Jeremiah. His experience taught him that “boats can certainly raise our spirits as well as our physical selves.” His runabout’s name carries on the hospital staff’s message that people can overcome challenges with tenacious positive effort—HOPEWELL.
Do you have a boat with an interesting story? Please email us. We’d like to hear about it and share it with other Small Boats Magazine readers.
SYMRA is a classic wooden sloop designed by John Alden and built by the Edison Vocational School in Seattle, Washington. She was launched in 1941, and has been in my family for 66 years.
When I took over her stewardship from my father in 1974, I soon grew extremely frustrated with the quality of the paint lines I was achieving with masking tape. Unless that 1970s-vintage tape was applied with enough pressure, paint would seep under its edge and leave a mess; tape applied with enough pressure to prevent seepage often pulled away small pieces of the underlying freshly applied topside enamel when the tape was removed.
In those days I was masking both the boot top and covestripe. After those early disastrous experiences, it was easy to jettison the accenting covestripe and leave the cove the same shade of white as the hull. SYMRA has relatively low freeboard, and didn’t need this accenting element. But I wanted to keep the boot top, and this presented a different problem.
I solved the boot top problem by scribing in its lines and painting freehand—that is, without masking—to these scribed lines. In the heyday of wooden yachts, this was actually the standard approach to painting waterlines. It yields a line that’s more eye-pleasing, and more repeatable, than a taped one.
Emboldened by my newly developed skill at painting without tape, I soon learned how to paint the enamel surfaces above decks—the cabin sides and trim—without resorting to tape. I now paint everything without tape except for the line where the paint of the cabintop meets the varnished teak trim; for this line, I use automotive detailing tape. Practice has made me a better painter. But one must start somewhere, so here are some fundamental concepts I’ve learned over the years.
SYMRA needed new paint on the cabin sides. That project serves as an example of how I prepare her for painting, and what can be done without tape.
Nancy Bourne Haley
Photo 1—The job begins by removing any hardware that’s easily taken off and later refastened, such as the bronze portlight bezels. To keep track of their wood-screw fastenings, I duct-tape them to the bezels. Painting without hardware in place undoubtedly creates a cleaner edge and keeps paint from building up in the corners, but removing hardware must be balanced against the time required to properly refasten it. Often, cutting a paint line to a piece of hardware, being quicker, is the way to go.
Nancy Bourne Haley
Photos 2 and 2a—The first step in preparing the surface is to chip away loose flakes and bubbles using a putty knife whose corners have been rounded to avoid gouging the wood. Those rounded corners can be used to “open up” an area of loose paint. Following up with a sharp scraper removes any paint that isn’t very well stuck to the surface. I use a teardrop-shaped scraper. Its flat edges work well on the wider expanses of the cabin sides, and if rotated, its radiused profile works nicely on the coved-out area where the sides meet the deck.
Nancy Bourne Haley
Photo 3—With scraping complete, I sand the entire surface with a square-pad orbital sander. I use coarse grits (100–120) for “feathering” the edges of bare spots, and finish the entire surface with 150–180-grit. I’m careful to not over-sand when feathering, as this will only dish-out the bare wood. Certain areas, such as where window glass meets the house sides, must be carefully hand-sanded so as not to scratch the glass.
Nancy Bourne Haley
Photo 4—Tidiness is critical to a good job. When the scraping and sanding stage is complete, I do a good cleanup before moving on to the next step.
Nancy Bourne Haley
Photo 5—In preparation for undercoating, all bare wood is wiped clean with a fast-evaporating solvent that does not leave a residue. Generally, the proprietary thinner you use with your brand of paint is appropriate for this.
Nancy Bourne Haley
Photos 6 and 6a—All bare wood is spot-primed with an appropriate undercoat. This serves a few purposes: it begins blending the bare wood’s color with the surrounding paint, and it provides a surface for the glazing, which will come next. Glazing fills in the “craters” created by the scraped-bare wood, whose surfaces do not match the level of the surrounding areas that are still built up with paint.
Nancy Bourne Haley
Photo 7—Here, the scraped, sanded, and primed areas are being glazed, or built up, to the same level as the surrounding painted surface. The choice of product is important at this step. I use Evercoat Polyester glazing putty with white hardener (not the blue hardener that comes with the can, as this would require additional undercoating to match the finish color) to avoid having to apply two coats of undercoat before painting. Evercoat is a super-smooth, non-shrinking, and easy-to-sand glazing compound that yields a very fine surface. Resist the urge to use Bondo here: it is hygroscopic, meaning that it absorbs water, which can lead to finish failure (at best) and rot (at worst).
Nancy Bourne Haley
Photos 8, 8a, and 8b—I use an orbital sander with a firm pad, fitted with 150-grit paper, to sand the glazed surfaces flat to match the surrounding areas. A round, random-orbit sander works here, too, but the square pad can come closer to intersecting surfaces without damaging them. Tight spots, again, must be hand-sanded. The coved-out base trim is hand-sanded with a sanding sponge. Note the areas of the previously glazed cabin sides around the portlight, which have been sanded flat. Once all glazed surfaces have been sanded smooth and fair, they receive a second coat of primer. This is then hand-sanded smooth with 180-grit paper. If this hand-sanding breaks through to bare wood in any areas, here’s a neat trick to quickly repair them: give them a light spray of an oil-based primer. I use Zinsser Cover Stain, which may be found in almost all paint stores. This will dry in a few minutes and can be painted over with enamel almost immediately.
Nancy Bourne Haley
Photos 9 and 9a—I keep several brushes on hand and select the right-sized one to “cut in” various areas while simultaneously keeping my wet edge advancing. The smallest brushes allow for delicate painting up to bronze hardware. Slightly larger ones—say, 1″—ease the job of cutting in against varnished surfaces or the deck; they hold adequate paint, but don’t dispense it so heavily that it ends up where I don’t want it. But, if it does, a knife point wrapped with a rag can be used to clean the deck or bronze hardware of unwanted wet paint (Photos 9b and 9c). Any drips or excess paint on glass can be scraped off with a razor blade when dry.
Nancy Bourne Haley
Photos 10, 10a, and 10b—While cutting-in the nearby edges, I also paint the flat expanses of the cabin sides. To properly load the brush, I dip it in paint about halfway up the length of the bristles, wipe one side on the edge of the paint pot, and then dab paint onto the surface in a criss-cross pattern next to the so-called “wet edge”—the advancing front of the new paint. I then brush out those criss-crosses to cover the entire section and blend it into the wet edge of the previously painted section. Long, flowing strokes parallel to the grain avoid sags and lead to smooth dried surfaces. Especially in warm weather, I use Penetrol, a paint additive for oil-based finishes; it helps maintain a “wet edge” as the painting progresses, and it helps the paint to “level”—that is, for the brush marks to disappear.
Nancy Bourne Haley
Photos 11, 11a, and 11b—For areas such as the cove where the cabin meets the deck, I first brush paint onto the center of the piece, and then lay a bead of paint along its bottom edge, next to polysulfide deck-seam compound. I then cut in the top using the intersection of the cabin side and trim-piece as a natural “edge” to be followed. Long, smooth paint strokes push paint up to the white cabin side. Note the orientation of the brush: it is skewed slightly, so only its very tip is working along the edge.
Nancy Bourne Haley
Photo 12—Here is the finished job, accomplished without the mess, waste, and potential damage of masking tape.
Mark Haley, who is now in his seventh decade, is a lifelong sailor and racer. He has been sailing on SYMRA out of her home port of Tacoma, Washington, since he was a one-year-old; his father began having him at the helm, on his own, at age 11. He has sailed out of or between five continents.
Painting Scribed Waterlines
A yacht’s waterline is typically scribed into the hull, meaning it is delineated by a shallow, precise, line that’s cut into the wood’s surface. If there is a boot top, then there are two such lines to scribe. These lines do more than record the locations of waterlines; they also provide a means by which one can “cut-in” the paint.
A waterline has to be periodically rescribed after sanding and paint begin to obscure it. If the line is still fair and correctly located, then one can simply tack a batten along it, and then, with light pressure, drag the corner of a saw along it to scribe the line. If the scribe marks have been obliterated, then the scum line, or line of oxidized bottom paint, can serve as a reference provided the boat has been in proper trim. (The bottom paint should reach above the line of flotation for effectiveness as well as appearance.)
The boot top is maintained in the same manner as Mark Haley’s cabin sides: scrape, sand, prime, glaze, sand, prime, and paint. As with Haley’s description of cutting-in the red trim detail against his white cabin side, a scribed waterline provides a natural detail to which to cut. When an observer backs away just a few feet from the boat, the scribe mark is imperceptible to the eye; all one perceives then is the crisply cut waterline. Some painters imagine the scribe mark as a sort of micro-moat. They load the brush with a modest amount of paint, and hold it slightly skewed to its direction of travel so that only the tip is contacting the scribe mark. As the brush moves along the scribed line, paint flows off it and into the “moat.” It takes a steady hand, but the scribed line provides a sure reference. If the amount of paint is, indeed, modest, then the paint will be contained by the scribed line, and a fair and smooth painted line will develop. Other painters see the scribed line as a sort of fence, to be painted up to, but not in to; this has the benefit of not filling in the scribed line with paint. Regardless of which technique you develop, the rest of the area is painted as portions of the line are cut-in.
Mark reports that he used a 1″-square residential painting pad—an “edger”—to paint his waterline, with very good results. —Eds.
Designer Nelson Zimmer based this double-ended shoal-draft ketch design on the highly regarded Mackinaw boats that worked Lake Michigan and Lake Superior during the late 1800s.
The plank-on-frame construction features Northern White Cedar planking and White Oak for the keel, frames, and centerboard trunk.
Her powerful gaff ketch rig carries plenty of canvas and is well spread along the length of the boat.
Being long-keeled, she won’t tack very quickly, but with the right breeze, she’ll provide a good turn of speed.
Clint Chase of Portland, Maine, is far from the first small-craft designer to find inspiration in the marvelous “faerings,” or four-oared boats, of Scandinavia, and he certainly won’t be the last. But with his Drake design of 2009 he seems to have captured the point of the ancient workboat type in a way that works especially well for a particular kind of recreational user today: the oarsman.
He does so by making no pretense of trying to make the boat something that it is not. This boat isn’t going to sail well to weather. Period. The key to successful enjoyment of the type is to refrain from asking or demand- ing that it do so. Trying to graft a modern racing sloop capable of tacking through few compass degrees onto the historical roots of a faering has rarely worked well, and the attempt often merely corrupts the virtues that draw our attention to such fine craft in the first place. This design is for someone who is not at all afraid to break out the oars, since it is, first and foremost, a rowing boat.
Photo by Jake Chase/Jellyhawk Studios
Looking for a seaworthy boat suitable for fast solo or tandem rowing in open water, Clint Chase found his inspiration, as many small-craft designers do, in the faerings of Scandinavia. His lightly constructed plywood-epoxy Drake moves well under oars, but a small lugsail can be shipped for downwind sailing.
Drake is an uncommonly good rowing boat. By pro- viding a fast, comfortable, and enjoyable rowing platform, the boat succeeds in taking advantage of its lean hull shape and long waterline length to do what it does best. Like many good rowing craft, it is probably at its best set up for solo rowing—which some of us take to be an essential of rowing anyway. For going it alone, Drake has bronze outrigger oarlocks that flip out over the gunwale and lock into place, effectively increasing her 4′ 1″ beam by about 10″. Clint uses light and lovely 9′ spoon-bladed oars when rowing alone, with a lead pour in the inboard end serving as a counterbalance. For tandem rowing with his wife or a friend, he has installed four standard top-mount oarlock sockets on pads at the gunwale and uses 7′ 6″ oars.
The boat is open stem to stern, and remarkably clear of obstructions. The forwardmost rowing thwart is fixed and also serves as a mast partner. Two other thwarts—one a little forward of amidships and the other farther aft—are easily removed. The aftermost one comes out when Clint is rowing solo from the center thwart. When rowing in tandem, the crew installs the after thwart, then removes the center one to allow rowing from the forward fixed thwart after the rig has been taken down. In both cases, the boat trims very well fore-and-aft. The thwart transitions are easy, too, since each removable thwart is held by a simple turnbutton on each side. Both removable thwarts come out for sailing, providing a comfortable seating position on the floorboards, which—as is right and proper for a boat of this kind—run athwartships.
Photo by Tom Jackson
Two of Drake’s thwarts are easily removed to clear the cockpit for sailing.
Clint and I went for a tandem row in Great Cove, off WoodenBoat’s waterfront, one fine summer day, and I found the rowing to be easy and the boat very quick and responsive indeed. Rowing in a boat that moves so well always brings a smile to my face. I am convinced the reason people shun rowing in favor of such abominations as inflatable outboard dinghies is that they row boats that are poorly set up, badly designed, or both. It’s the same feeling as using a dull and thoughtlessly tuned hand plane to try to run a fine, fair curve on a plank edge of beautiful wood. The difference is between joy and misery. Rowing Drake counts on the joy side of that equation, and shaping a long, easy turn by merely pulling slightly harder on one side is akin to running the length of a plank with a comfortable block plane. We crossed the half-mile from WoodenBoat to a beach at Babson Island in what seemed to be no time at all.
Drake makes no pretense of being a good upwind sailer, however. The whole idea of these boats in the fjords of Norway was that when the wind was on your nose you’d always be better off getting the rig down and breaking out the oars rather than beating yourself up on tack after tack in narrow confines. What made the combination possible is that the old-time faer- ings not only rowed very well but also sailed well off the wind, too. Whatever their business was out of the fjord (fishing, mostly), the crew knew they would have a sleigh ride home with the westerly wind behind them. Simplicity was the key: often unstayed, their rigs used square, lug, or sprit sails that could be struck quickly and stowed inside the boat. And when the time came, the rig could be set up quickly to take advantage of a favorable breeze, upon which they would sail handily on any point of sail from a reach to dead downwind. In Drake, as no doubt in other faerings and derivatives, the sailor will always be tempted to test the boat’s ability to sail to windward—and then be well-advised to accept it as it is.
Drake’s sailing rig could not be simpler. Clint has merely specified a Shellback dinghy standing-lug sail of 58 sq ft. Shellbacks are ubiquitous and well known, so sailmakers can easily track down specifications if they don’t know them already. Not only that, but sails themselves are readily available—they can even be ordered right off the shelf at The WoodenBoat Store. The hollow spars that Clint has specified are uncomplicated, too. Plus, if you happen to already have a Shellback dinghy—maybe by having built one of the boats from a kit, for example—then you wouldn’t even have to buy another sail. Just transfer the bundled sail, mast, spar, and boom from one boat to the other, and away you go. The rig from a Nutshell pram (especially the larger 9′ version), though a little smaller, would work just as well, and that’s the sail we ended up borrowing on the day of our outing.
Consider Drake’s rig as providing a kind of dessert— a downwind bonus for having gotten your exercise for the day. “The idea is to blast to windward and come back under sail,” Clint says. “It’s the most perfect way to get on the water, to be able to do both without sacrificing rowing qualities. You have to know what you can do; you can’t expect to go to windward. The feel of the boat in a good breeze is definitely reminiscent of an Åfjordsfaering,” a particular type of faering that Clint had sailed on loan from Ben Fuller, a fellow small-craft sailor and curator of the Penobscot Marine Museum in Searsport, Maine.
Since Clint’s boat has no centerboard and a long keel, its pointing ability will surely frustrate racing sailors. Clint took some of his inspiration for this kind of sailing not only from the Åfjordsfaering and modern faering derivatives that he had seen or sailed in Maine, but also from boat designer Paul Gartside’s open-water cruising skiff Bob, a 16-footer that also specifies a downwind-only lugsail. Clint took Gartside’s one-week Boat Design course at WoodenBoat School several years ago, and he came away inspired to try his own hand at design. Drake is the first he has completed that he considers ready to market, but others are in the works. A former high school science teacher, he attended The Landing School in Arundel, Maine, after becoming captivated by boats. Four years ago, he became an instructor at The Compass Project in Portland, teach- ing young people to build boats, which he still does part-time.
Photo by Tom Jackson
Made with 1⁄4″ marine plywood, Drake’s hull is light—about 130 lbs—and easily trailers behind just about any vehicle. Clint Chase uses a lightweight aluminum trailer, which can be detached from the vehicle and readily rolled down to the water singlehanded.
For Drake’s hull, Clint specifies 1 ⁄4″ plywood, either okoume or sapele, the latter being a bit heavier. He painted the plywood, avoiding sheathing to keep it light, though he would advise fiberglass-in-epoxy sheathing on the exterior for anyone grounding regularly on rough beaches. He has two options for flotation—built-in chambers or tied-down airbags—either of which he views as critically important to the safety of this design. “I was going for the aesthetics in this build,” he says, so for his own boat he chose off-the-shelf canoe flotation bags that can be tied down but easily removed to show her uncluttered interior. Construction is glued- lapstrake plywood, with three strakes per side on a Douglas-fir backbone. He emphasizes lightweight woods, perhaps spruce for frames and even cedar for the keelson and thwarts. Glued-lapstrake construction makes it possible to build a strong and light boat— perhaps 130 lbs for her 17’4″ length overall. The boat could be reduced in length to 15′ 5″, but Clint strongly advises keeping the 17’4″ length for optimal seaworthiness and speed.
The only pieces of hardware to speak of in the boat are the rudder pintles and gudgeons, which are silicon- bronze. These aren’t off-the-shelf items, and may present some challenge. An enterprising boatbuilder might learn bronze casting (WoodenBoat School has a course in the subject) to make them, or present patterns or specifications to a foundry or a machine shop, which would have no difficulty at all in fabricating them. Clint is thinking of having castings premade, as well, and he is even considering developing Drake as a kit.
In her handling, Drake’s steering is the only thing that may seem unusual. It involves a loop of line working through a short two-arm yoke mortised over the rudderhead. Many boats use the device of line-steering (see Coquina, page 62, and Beachcomber-Alpha dory, page 28, in this edition for two other examples). In my view, for this boat, no other would do. Sitting amidships is most comfortable, most practical, and puts your weight right where it needs to be. Getting used to the rope steering will take no time at all, and it will allow you to go forward to adjust the downhaul or grab your water bottle or the sunblock without having to abandon the helm.
Photo by Tom Jackson
Rowing works best when going to windward, but Drake sails well downwind or on a beam reach. The lugsail, which is the same as used in Shellback dinghies, is readily available and has uncomplicated rigging.
Clint has used his boat primarily in Maine waters. “I’ve gotten out into some open water outside the islands, with swells, and found it to be remarkably seaworthy,” he says. “The feeling of safety I get is more than I expected. At one point, I was rowing out Casco Bay with the tide with me. I knew there would be a tiderip out there and that it would get a little ‘interesting,’ but I got through that really remarkably safely, without water coming in.” Preparing for the Blackburn Challenge rowing race in Massachusetts (see www.blackburnchallenge.com), he did a 15-mile open-water row. “I learned a lot about rowing downwind with 2′ rolling, whitecapping seas—how much work it is to keep a boat on course. When I was drawing it, I stretched out the forefoot to get the waterline length I was looking for without having it ‘grab’ in following seas. During that row, I realized it was okay. I certainly had to stay focused and square to the waves, but the boat just felt great. The stern lifted up, and it scooted down on the seas, dropped into the next trough, and kept a steady rhythm.”
It all makes me want to go.
Substantial v-shape to her long, lean hull helps Drake track very well when under oars, yet her rocker makes her maneuverable and a good sea boat.
This Boat Profile was published in Small Boats 2010 and appears here as archival material. Plans are available from Chase Small Craft.
Here we have a distinctive, easily built, shoal-draft cruising yawl. The 25’3″ Black Skimmer floats in 10″ of water and sails handily in not much more. She stays with, or ahead of, most stock boats of comparable size on all points (including to windward)…and nearly always outdistances cruisers of similar cost.
Skimmer finds her heritage in the working sharpies of the Atlantic coast. In plain terms, these ancestors can be described as relatively narrow, flat-bottomed skiffs that have grown in length. Properly designed sharpies offer impressive performance in return for modest investments of time and money.
Black Skimmer comes from a happy coincidence of natural design evolution and contemporary materials (plywood and epoxy). The early 1970s found me in need of a shallow cruiser for exploring the hidden creeks that disappear into the shores of lower Chesapeake Bay. The available stock boats seemed too deep, too complex, and too expensive. To my good fortune, the late Philip C. Bolger was writing for Small Boat Journal at the time.
In each issue of SBJ, the Gloucester, Massachusetts, designer presented a “cartoon”…a preliminary boat design created to meet the specific requests of an individual reader. The images often were striking, and the aesthetics sometimes…well, surprising. But the proposed designs always seemed perfectly suited to the clients’ needs. The designer’s essays, which accompanied the cartoons, were filled with sharp wit and clear insight. It occurred to me that working with Mr. Bolger to devise a new boat might prove good fun.
Photo by Mike O'Brian
Black Skimmer awaits her first taste of the Chesapeake Bay’s tidewaters, the marshy and shoal-water environment for which she was designed. The year was 1973, the beginning of a long association between boatbuilder and author Mike O’Brien and designer Philip C. Bolger.
After some thought, I sent him a list of requirements for a sailing cruiser. The new boat should be easily, quickly, and inexpensively built; cruise a crew of two in relative comfort; float in less than a foot of water and sail, really sail, in less than two feet; be self-righting, self-bailing, and have positive flotation; and be able to take the ground absolutely upright without sustaining damage.
After only 10 days of anxious waiting, I found Bol- ger’s first cartoon in our mailbox. A rough sketch, penciled on a sheet of common typing paper, showed a 25′ leeboard sharpie with twin inboard rudders. The proposal looked fine, but the rudders with their purpose-made hardware seemed to conflict with the theme of minimum cost, and the blades likely would snag crab-pot warp all the way to the Eastern Shore and back. We agreed to replace them with a single kick-up rudder mounted outboard on the transom. After due thought, the designer found something in his cartoon that bothered him: the bow was “too prominent.” He lowered it.
The final drawings, which arrived just three weeks after the preliminary sketch, offered a few surprises. Bolger had moved the mizzenmast back hard against the transom and had set it off to one side in order to clear the rudder. The asymmetry seemed to make fine sense, but I worried that the farther-aft location of the sail plan’s geometric center would result in too much weather helm. Bolger explained the change: it seems that some boats of this type had been having lee-helm problems, and he’d warrant that Black Skimmer would have none. Indeed, as things turned out after the boat was built, the yawl balanced perfectly under sail (slight weather helm) with the leeboards hung precisely where the designer had drawn them.
Photo by Mike O'Brien
Leeboards, which give the design its lateral resistance, can be raised and lowered as needed based on conditions, point of sail, and water depth.The boat sails well in less than 2’ of water.
Yet another surprise appeared in the final tracings: a previously unmentioned bow-well appeared forward of the first bulkhead. Keeping any concerns about flooding to myself, I built the well as drawn. In a decade of sailing up and down Chesapeake Bay, that open well never took green water. It did, however, regularly carry dirty ground tackle, the bagged mainsail, and crew members who desired solitude.
Although Skimmer might appear radical to some eyes, she is composed of design elements that have been well tested through the years. Successful flat-bottomed sharpies nearly always show adequate rocker (longitudinal curvature) to their bottoms; and the heels of their stems are carried at, or clear of, the water’s surface. This configuration reduces crossflow at the chines, resulting in better performance in light air. When the breeze comes on, the steering remains docile and predictable. Flat-bottomed boats with insufficient rocker often seem prone to rooting, broaching, and other unpleasant behavior.
For lateral resistance, Skimmer depends upon leeboards, a large rudder, and hard chines with external logs. The leeboards contribute to Skimmer’s performance in ways that centerboards cannot match. Each leeboard needs to work on only one tack, so it can be shaped and positioned for maximum performance. The working board angles away from the hull and presents an efficient, nearly perpendicular face to the water as the boat heels to her sailing lines. A small amount of toe-in relative to the boat’s centerline can increase lift (some designers specify asymmetrical foils for the same reason), but Bolger cautioned against overdoing it. Leeboards don’t intrude on the accommodations, and they remain effective in extremely shallow water long after centerboards have retreated entirely within their trunks.
An idle leeboard, perched on the weather rail, provides 120 lbs of effective and uncomplaining all-weather ballast. Some sailors dislike the appearance of leeboards, but to me they have the look of folded wings when the boat is at rest—and I’m happy to be done with centerboard trunk maintenance.
Photo by Mike O'Brien
A sprit-boomed “leg-o’-mutton” rig makes sail handling easy. Note that the mizzen is offset to starboard to clear the centerline for tiller steering for the transom-mounted rudder. The bow-high attitude of the dinghy astern (a Bolger-designed Gloucester Light Dory) gives a sense of Black Skimmer’s speed.
Skimmer’s construction plan speaks to her designer’s ability to engineer a strong and clean structure. A few bulkheads combine with longitudinal stringers and the plywood skin to produce great rigidity without the clutter of extensive transverse framing. Almost every element in the design adds to the boat’s strength. Sliding-hatch rails support the deck, and leeboard guards strengthen the sides. This rigid box-girder hull could winter on a knife’s edge without distortion.
We’ll assemble Skimmer in “Instant Boat” fashion. Bolger provides drawings that show the expanded shape of the sides—that is, the sides as if taken from the hull and laid flat on the shop floor. We re-create these patterns at full scale directly on the plywood sheets that will sheathe the hull. Then we cut out the sides and wrap them around the bulkheads and transom, which act as molds. True lofting and building jigs are not needed.
This is fast work for experienced hands and easy work for beginners. With the help of two friends, I assembled the hull in one 11-hour workday (after four days spent cutting and finishing various components). Get- ting the prototype completely built and ready for her maiden sail required a total of 700 builder-hours, but she went together outdoors between paying jobs. Working straight through inside a shop, 500 hours should be sufficient to produce a plain but fair facsimile.
How does she sail? Skimmer will match most stock cruising boats of her length when beating to windward; off the wind, she’ll reach and run many of them out of sight. To attain the surprising windward capability, the mainsail should be cut fuller and with the point of maximum draft farther forward than is common these days. Sew the mizzen flat as a bed sheet—this tiny (64 sq ft) swatch of Dacron provides control rather than drive. We’ll often want to strap that sail down hard and forget it.
Considerable tension in the mainsail’s luff is needed for windward work, and the halyard alone cannot supply it. If we attempt to haul on the halyard with too much vigor, we might put an alarming arc into the mast…but the luff still will be too loose. We need to fit a powerful downhaul with at least a 3-to-1 mechanical advantage. When setting the sail, first we two-block the halyard and secure its fall. Then we lay into the downhaul to get the luff taut. Before you argue that this explanation violates several laws of Physics 101, let me say that the key lies in friction and the severe taper to this unstayed mast.
Photo by Mike O'Brien
A simple flat-bottomed shape, inspired by historical sharpies, makes Black Skimmer simple to build in plywood.
Skimmer shares one weakness with many other flat-bottomed sharpies. She does not like sailing in very light air and a slop leftover from the afternoon sea breeze or powerboat wakes. Here, a large headsail might help. The inverted “kite” sail headsail sketched on the plans never worked well. Perhaps a single-luff spinnaker….
This sharpie has no handling vices. Her off-the-wind manners in a stiff breeze and steep sea are comforting. When other monohulls begin their annoying, if not terrifying, rhythmic downwind rolling, Skimmer is rock steady. A powerful rudder and skeg combine with ample rocker and a shallow forefoot to make easy work of it. The self-vanging sprit booms help by reducing sail twist. And that rudder combines with the large leeboards and substantial rocker (with occasional help from the backed mizzen) to ensure reliable tacking. During my 10 years of sailing this sharpie, she never got caught in irons…not even once.
A professional builder should be able to deliver Skimmer for about the same price as a stock 22′ fiberglass cruiser, and she can be home-built for about half that cost. Whether or not that makes for a good investment depends, among other factors, upon how long and how well she’s kept—and upon the availability of buyers who agree with the words you’ve just read.
A preliminary “cartoon” proposed dual rudders allowing the mizzen mast to be stepped on the centerline. For simplicity, the author favored a single rudder; Bolger’s solution was to move the mast aft, hard against the transom and offset to starboard. Black Skimmer’s accommodations are rather spartan but unimpeded by a centerboard trunk thanks to the use of leeboards.
This Boat Profile was published in Small Boats 2010 and appears here as archival material. If you have more information about this boat, plan or design – please let us know in the comment section.
Before I write these From the Editor pieces, I obviously have to come up with something to write about. If nothing comes to mind quickly, I’ll look around my shop, the garage and outdoor places where I keep my boats, my digital photo albums, and the attic where I have all of my slides of boat-related projects and travels. If I come up empty handed in my searches at home, taking a boat out often helps. Visiting a new body of water can provide me with some fresh perspectives, so I may scan the satellite imagery on Google Earth. As I was doing that last week, I noticed Swamp Creek, a small tributary to the Sammamish River. I had rowed, paddled, and motored the river countless times and had never noticed the creek. Its entrance, just a dimple on the right bank, had been all too easy to overlook from the river. I decided to take my Whitehall there to see if I could find and row the creek.
Lake Washington is just 1/3 mile around this last bend in the Sammamish Slough. On this Friday afternoon, I had the launch ramp and the slough to myself.
The public launch for the Sammamish River is 1/3 mile upstream from its meeting with the north end of Lake Washington. The water there is quite still, and only when the bow was resting on the back end of the trailer did the current slowly push the stern downstream. I pulled the boat up next to the ramp on sand that was smooth a few feet up from the water’s knife edge. It must have been washed over by the wake of a boat that had passed long before I had arrived. I parked the trailer, shoved off, and rowed upstream.
This section of the river I’d seen before. A mobile-home park crowds the right bank with double-wides clad in white metal siding and capped by low-pitched roofs. On the left bank there are two-story houses set back from the river behind winter-bare 40′ high weeping willow trees, trunks and branches as jagged as lightning, and slender branchlets seemingly falling like rain.
The bridge for the wetlands restoration project was dropped in place by crane and is supported by concrete blocks set below ground level. There was just enough clearance for me to slip through.
The entrance to Swamp Creek was hard to overlook this time. It was right at the edge of the mobile-home lot and there was a low steel bridge blocking its entrance. On top of the bridge an excavator with orange boom and silvery hydraulic piston rods was pawing at the ground on the south end of the bridge. Containment booms, orange on the left bank and yellow on the right, lined the first 100 yards of the creek.
I stopped a few boat lengths from the bridge eyeing the clearance beneath it There seemed to be just enough room for the Whitehall, so I waited to catch the eye of one of the three workers, who were all wearing white full-brim hard hats and were occupied with something on the left bank. The excavator crept across the bridge and onto the muddy ground on the north side and the bridge was clear, but only for a moment. A tracked dump truck crossed the bridge and stopped at its south end; its cab and dump box swiveled like an Army tank turret to face the opposite direction and it poured out a load of crushed rock. Emptied, it headed back across the bridge.
A worker wearing a Day-Glo lime-green vest looked my way and asked if I wanted to pass through. I saw the excavator heading for the bridge and said I’d wait until its weight was off it. The worker signaled to the excavator operator to stop and motioned me to go through. I hooked my toes under the thwart ahead of me and leaned back over the open space encircled by the sternsheets. The bow slipped under the middle girder, the lowest point of the bridge, with little room to spare. The worker, looking at me face to face as I coasted by, called out “Limbo!” The thick flange at the bottom of the girder passed by 2″ from my face. When I emerged on the other side and sat upright, two workers were watching me. One, dressed in dark-green overalls, asked “What are you up to?”
“I’m a magazine editor and I have to write an editorial this weekend. I haven’t come up with anything yet, so I thought I’d row the creek to see if something would come to mind.”
Upstream from the bridge, on the right bank, there were two more workers, one with a clipboard in hand. Next to them were the tangled roots of a 15′-long tree trunk set on its side, its top sawn off. The trunk was one of a half dozen neatly and evenly spaced on the muddy slope of the right bank. They made it evident that the work being done was a restoration of the stream and the wetlands surrounding it.
I kept rowing facing forward to maneuver around branches of half-submerged trees and piles broken just above the water.
Almost lost in the grass above the right bank is a spring-tine harrow with one chest-high wheel remaining. The spring-steel support that once supported the seat is to the right of the wheel.
The creek ran straight for ¼ mile, and beyond the containment barriers the banks were mantled with thick mats of grass that winter had turned tan and softened so it could no longer stand. Clumps of it at the water’s edge, had been pushed downstream by a past high water and were ragged and curved like old straw brooms. The tips of the grass that touched the water gave the only indication of the stream’s flow—faint ripples that looked like paths left by water striders.
A sparse copse of spindly leaf-bare trees had lengths of corrugated black plastic drainpipe around their trunks, an indication that there were beavers in the area. A second cluster of trees a few dozen yards upstream had been surrounded by a fence of chicken wire and welded-wire mesh, but one of the wooden fence posts was broken and the section of fence it was holding up had collapsed. Only one of the trees in the enclosure was left standing; knee-high stumps were all that remained of the rest.
The end of the navigable section of Swamp Creek was just 1/3 mile upstream from its mouth.
A quarter mile from its mouth, the creek took a 45-degree turn from east to northeast and was cast in shadow by a stand of tall evergreens on the left bank. About 100 yards farther upstream, three locust trees on the right bank leaned across the river at a 45-degree angle, and their branches curved downward in dark lacy arches over the water.
Fallen locust trees were the end of the line for my row.
I slipped past them and in another 20 yards stopped at an impassable barrier of locust trees that had fallen flat across the creek. Their bark was rough and fissured like scored bread crusts. Two branches on the uppermost horizontal trunk were growing straight up, becoming trees themselves with branches of their own reaching out in all directions.
I pulled ashore to examine what appeared to be a path leading into the blackberry brambles. In the distance is the entrance to Swamp Creek, and a crane working on the wetlands restoration there is just visible against the sky and reflected in the water.
On my way back out, I stopped at the crook in the stream where there was a muddy streak leading from the water’s edge to a gap in the blackberry brambles on the left bank. While it looked like a footpath, there were no footprints and the muddied grass was not damaged but only pressed flat like slicked-back hair from the ’50s. It led into the brambles where no person could walk.
Where there were trees at the creek’s edge, the ground was clear but branches crowded overhead.
Another 120 yards farther downstream, I nosed the bow ashore where three blue spruce trees had their branches so thoroughly intertwined that no one tree could be distinguished from another. The ground beneath them was bare but for the umber-colored duff and looked like a good place to come ashore, but when I stepped out of the boat and climbed over the bank, I had to crouch down low to clear the plane of the lowest branches and even then, they scratched heavily across my back like a leaf rake.
On the way out of the creek I saw what must be a lodge for beavers.
There was a clearing beyond the trees, a field of tawny leafed grass with a few clusters still standing and the rest carpeting the ground. I thought I would be able to walk across to the Sammamish, and at first it felt as if I were walking on a mattress but a few yards in the mat yielded even more and soon I could feel myself sinking deeper with each step. I turned around and went back to the boat.
When I approached the creek’s entrance, the bridge was clear so I could get through quickly.
I continued rowing downstream. When I approached the bridge, the worker in the green coveralls was kneeling on the north side of the bridge, his front side bright with the blue-white light of arc welding. I passed under the opposite side and when I emerged, he had stopped welding and had his face shield flipped up over his head.
“What publication do you work for?”
“WoodenBoat.”
“Wind and Boat?”
I knocked on the Whitehall’s varnished gunwale. “WoodenBoat.”
As I rowed off, he flipped his shield back down with a nod of his head and went back to welding.
I shifted around to my normal rowing position, facing aft, and rowed back to the ramp. With the Whitehall strapped to the trailer and my gear in the truck, I drove home, still hoping something would come to mind.
Nelson Zimmer was born in 1922 and by the time he died in 2007, it is thought that he had produced some 500 designs, some of them while working for companies such as Chris-Craft and Toledo Ship Building. In 2018, Zimmer’s Utility Launch caught the attention of Peter Green, then an amateur boatbuilder originally from Ilfracombe in North Devon, England. Peter spent much of his career working in the oil and gas industry all over the world, and while he was based in the U.S., he built a Caledonia yawl. When the time came to move back to the U.K., he sold the boat rather than face the difficulties of shipping it. With a view to building another boat at some point in the future, he perused the designs in Fifty Wooden Boats, published by WoodenBoat. When he found the Zimmer Utility Launch, he immediately bought the plans.
Photographs by the author
Designer Zimmer writes “Since this little launch is only 20′ long on the waterline, it cannot be pushed much beyond seven statute miles per hour, after which she will leave her stern wave behind and begin to squat, to the detriment of increased speed.”
According to Fifty Wooden Boats, Zimmer’s inspiration “came from the many slim handsome launches and cruisers that silently and gracefully passed by his waterside home following the First World War.” He designed his Utility Launch to transport passengers and supplies between towns and remote fishing camps in Canada’s North Woods. It had to be seaworthy enough to deal with the chop it might encounter when crossing large lakes but didn’t have to do so at any great speed. “So, they needed a pretty decent cockpit for six to eight people and some supplies,” said Peter, “and then occasionally, I guess, two people would end up sleeping on board, so there was a cabin with a couple of bunks and a bit of indoor storage for anything that needed to be kept out of the weather.”
Although Peter had never really been into motorboats, he was sensitive to the fact that his wife had “gone off sailing totally,” and he thought that this sort of boat would be the only way to get her afloat. And he very much liked the look of the design.
He was thinking of it as a long-term project and so when, after retirement, he enrolled in the 40-week course at the Boat Building Academy at Lyme Regis, U.K., he had no expectation to build the launch there as he knew it was a fair bit bigger and more complex than the boats that the BBA normally produces. So, Peter was pleasantly surprised by the positive attitude of the academy’s staff; the Zimmer launch would be one of the six boats to be built by the 18 students enrolled in the 2021 40-week boatbuilding course.
Zimmer designed the launch with “an able hull, one which could cope with the chop from a fresh breeze or glide silently through the water to avoid disturbing the fishing grounds.”
The four sheets of plans for the Utility Launch include a table of offsets, lines and construction drawings, and details for the steering and throttle hardware. The original construction is for 5/8″ cedar or mahogany carvel planking on steamed 1″ × 7/8″ white-oak frames. The hull is also well suited to the strip-planking method Peter preferred as well as cold-molding.
Starting with the table of offsets, a full lofting process was carried out. Eleven molds at 2′ spacings were called for, but it was decided to add two intermediate molds at the bow to give one-foot spacing to ensure fairness there.
The molds were set up upside down and construction began. The plans call for a backbone of 3″-sided timbers, but the BBA launch had a sapele centerline that consisted of a keel batten made up of two 1/2″- thick laminations with an additional 1″ thickness over the aft 3′, and an inner stem made up of thirty 3/32″ laminations. The slightly angled 3/4″ transom—batten-seamed oak in the drawings, plywood in the BBA launch—was fitted with sapele fashion pieces around its inside perimeter. Then the 3/4″-thick bead-and-cove Alaska yellow cedar planking was laid around the molds, starting at, and parallel with, the sheer and working up over the bilge, letting it run out naturally over the hog and stem. None of the planks had to be steamed. The outside of the hull was then faired before two layers of biaxial cloth were applied with WEST System epoxy resin.
The outside of the transom was veneered with sapele, and the exterior centerline components were fitted. The outer stem has the same make-up as the inner stem, while the keel and deadwood were made up from pieces of solid sapele. Twin pieces of timber were fitted to leave a ¾″ square hole that would be a starting point for boring the larger round hole for the stern tube. Cheeks paralleling the hole on the outside strengthen the deadwood there. After further fairing, bilge keels—about 5′ long and a maximum of 5″ deep—were fitted. These were not called for in the plans, but Peter wanted to make sure the boat could take the ground satisfactorily.
The plans call for 1 ¾″-thick oak engine beds to support a Norwegian-built single-cylinder Sabb HG diesel of 6- to 8-hp. The floors supporting the engine beds are 1-1/2″ thick, while the rest are 1″ thick.
The helm is well forward in the cockpit, leaving plenty of room for passengers. Zimmer’s plans include a cockpit covering and he suggested “with the mellon hood indicated on the drawings and some camping equipment she can even double as an overnight cruiser.”
Zimmer drew the deck with 3/4″ × 1-1/2″ pine on white oak deckbeams. All of the BBA launch’s deck structure is sapele. The 1-1/2″ × 2-1/2″ sheer clamp was tapered slightly toward the ends and was glued and screwed to the inside of the hull. In the plans, it is fitted to the inside faces of the timbers. The forward cockpit bulkhead is 1/2″ plywood clad in 3/8″ painted sapele to give the tongue-and-groove effect of the 3/4″ V-groove staving the plans called for. Four beams support the foredeck and three support the aft deck. Carlins were jointed into the forward cockpit bulkhead and the next deckbeam forward, and into two deckbeams aft. A subdeck of two layers of 1/4″ plywood followed.
The plans specified a coaming of 5/8″-thick oak, presumably steam-bent around the forward end of the cockpit. Sapele was used at BBA and the curved section was achieved—without steam—with six laminations. Some 3/8″ iroko was used instead of oak for the covering board and for the straight laid decks, originally specified for pine. The 2″ x 1″ rubrail—iroko, opted for in lieu of oak with a metal half oval—had to be steamed over about 5′ of its length forward.
The coach-roof beams are made up of six laminations of sapele, giving a molded depth of 1-1/2″; two layers of 3/8″ plywood were laid over them, and then sheathed with ’glass and epoxy. It’s a more contemporary approach than Zimmer’s tongue-and-groove staving covered with canvas.
The design shows a pair of double-hinged cabin doors to give a particularly wide opening of about 55″ through the forward cabin bulkhead, but with a sliding hatch of the more conventional width of 26″. However, as there were no details showing how this might be constructed while keeping it structurally sound, it was decided to fit a pair of single-hinged doors with the overall width of 39″ for both hatch and doors.
The cuddy was designed not as a cabin but as a place to stow gear and take temporary shelter from a spell of wet or cold weather.
Inside the cabin there are two settees/berths, though their use as seats will be severely restricted by the engine. Zimmer provided footwells only 10″ wide on either side of the engine, and the engine Peter bought for the boat afforded even less room. Peter decided to position the settees farther forward and added trotter boxes in the cockpit to maintain their length for use as berths. Mini bulkheads at the settees’ after ends serve as backrests for sitting while facing forward and create storage space aft.
In the cockpit, the sole was made of iroko instead of pine as indicated in the drawings, and fitted 4″ lower than designed, because Peter felt it would otherwise be too high; and 3/8″ sapele ceiling strips were fitted on non-structural laminated ground timbers glued to the inside of the hull.
Instead of installing the Sabb HG single-cylinder diesel engine called for, Peter found a used Yanmar 2YM 15 two-cylinder diesel with just 44 hours for a good price. He also found a second-hand 16″ three-blade propeller to take the place of the 15″ prop drawn in the plans. The design also specified a pair of cylindrical 12-gallon fuel tanks under the side seats in the cockpit, but Peter has fitted a single 16-gallon plastic tank made by Vetus under the foredeck. The transom-hung rudder is controlled by a steering system which has three-and-a-quarter turns from hard-over to hard-over.
The rudder has a brass pipe for a tiller. It runs through a slot in the transom and is covered by the deck. A line attached to the tiller runs around the perimeter of the boat and takes several turns around a drum connected to the wheel.
After Peter’s launch, MON AMI, was completed, he and a couple of other BBA students took her to her new home in Plymouth, a sea voyage of around 70 nautical miles. He told me that the sea was “mostly like a mill pond but a bit lumpy round Start Point,” the southern tip of Devon, and that the boat behaved very well. This bodes well for his plans to occasionally take her to open sea in the vicinity south of Plymouth Sound. He mostly intends to explore the extensive but more sheltered bays and tributaries around Plymouth, where he and his wife will use her for anchoring, picnicking, and swimming, with the occasional night on board.
I joined him on a calm but cold day for a short trip. MON AMI’s top speed at her maximum rpm of 3,600 is about 6.75 knots. Her stern squats significantly then, but Peter says he won’t often exceed 2,800 rpm. That gives her a speed of 6 knots and a fuel consumption that he thinks will be about 0.8 gallons per hour. At the tickover speed of 900 rpm she does about 1.8 knots.
Peter hasn’t had a chance to weigh his boat, but she is definitely lighter than a carvel version with a Sabb engine would be. She floats high on the designed lines and feels a little tender, so he plans to add some internal ballast—a little at a time until she feels right. It seemed a little strange, at first, steering from so far forward, but I soon got used to it and the view looking forward could hardly have been more unobstructed. I asked Peter if he had felt vulnerable to spray in a chop, but with the rising sheer and flared bow sections, he said that hasn’t been a problem. The Zimmer plans show a spray hood at the forward end of the cockpit, and an overhead cover for the whole of the cockpit; Peter might add the spray hood, although it would certainly restrict visibility from the helm.
It is easy to imagine that the cabin will be very cozy for sitting and sleeping when lying peacefully at anchor, but with the engine noise while underway it could only really be thought of as somewhere to shelter in wet weather.
Nelson Zimmer, apparently, envisioned that the Utility Launch would be a “good, common-sense little boat,” and MON AMI certainly does seem to be just that.
Nigel Sharp is a lifelong sailor and a freelance marine writer and photographer. He spent 35 years in managerial roles in the boat building and repair industry, and has logged thousands of miles in boats big and small, from dinghies to schooners.
I have been obsessed with sailing and building boats for most of my life, but my wife, Luanne, told me when we met that she gets seasick on boats. Lucky for me, she became an accomplished kayaker and a competent co-captain aboard our Outer Banks 26, ROSIE. Living on Salt Spring Island in British Columbia, we are surrounded by water and going anywhere off the island means either a kayak or a ferry. Working around ferry schedules gets tiresome and while a sailboat would be lovely, I had noticed that most of the sailboats in our area travel under power. When Luanne suggested we get a small power skiff to get around more fluidly, it was the first time I seriously considered having a powerboat. It would have to be fuel-efficient and aesthetically appealing, which, to my mind, means traditional lines.
I went online and started searching for a suitable power skiff to build. One of the first boats that came up on my search was a gorgeous 20′ lobsterboat-inspired design by Graham Byrnes of B&B Yacht Designs. It immediately checked the boxes of beautiful and traditional. I found that Graham was known not only for his eye-pleasing boats of all kinds, but also for innovation in design. In 2009, he won a WoodenBoat magazine design competition for a fuel-efficient 18′ powerboat. I was intrigued by Graham’s work and sent for his Outer Banks 20 study plans. After much discussion, Luanne and I decided something a bit larger would be better for multi-week trips. While Graham also had an Outer Banks 24, a slightly stretched version sounded perfect. I asked him about lengthening the 24, and a few weeks later he had designed the Outer Banks 26 from the keel up. I was smitten by the drawings and ordered the plans.
Photographs by and courtesy of the author
The egg-crate construction gives the hull strength without a lot of weight.
The Outer Banks 26 shares many features with the smaller B&B Outer Banks designs with their Carolina-style bows, which look good and help keep water off the deck in a chop. The stern has a nicely curved transom and sweet tumblehome. Graham selected a modest monohedron deadrise of 12 degrees to provide a good balance between a smooth ride and modest fuel consumption. As I pored over the drawings in the plans, the artistry that Graham blends with his technical skills became more apparent: subtle changes in the size of the oval ports to match the proportional changes in the trunk cabin height and a pleasing arch in the pilothouse door are good examples. Some of these features add to the complexity of the build, but the end result is worth it.
I was pleased to see that Graham had specified a 90-hp outboard as the main power source. Compared to most other boats of this size, that is a small power plant. A few of my boating friends shook their heads at the meager outboard that was expected to push a boat of this size on plane. With a designed displacement of 3,360 lbs, the Outer Banks 26 is relatively lightweight, and I could only hope they were wrong. Here are a few words from Graham to explain some of his design philosophy for powerboats of this type:
With a small motor you need less fuel, and with a light hull you can still get a comfortable interior and meet our target speed. Our design interest was to avoid the greed for speed and aim for the best economy accepting a decent cruising speed. I like to make around 20 knots at about 75 percent full power. This should allow you to run fairly flat at about 3 degrees trim and is quieter while not flogging the engine and having another 25 percent reserve power if you need it. A dead-flat bottom is the most efficient planing shape, but it is not very seaworthy or comfortable. I find that with 12 degrees deadrise aft I can keep the twist out of the planing area and get a pretty fine entry angle for minimal pounding in a head sea. The pounding loads between 30 and 45 knots are huge. I design the structure for 30 knots plus a safety factor using egg-crate construction, and follow aircraft techniques. The topsides are more Maine than Outer Banks, with her fairly plumb bow with generous flare blending to tumblehome aft. This shape cannot be achieved in folded ply, but if you care about aesthetics, it is worth the extra work. It also gives the builder better accuracy and control of the shape.
The plans specify okoume plywood for planking and bulkheads, yellow cedar for stringers, and fiberglass and epoxy for sheathing and fillets. The bottom is 12mm in thickness and joins with the egg-crate structure to provide a strong hull. The topsides are planked using the Ashcroft method with two, diagonally overlapping, and staggered layers of 4mm okoume plywood. The exterior and bilge are sheathed with fiberglass and epoxy. Everything has three coats of epoxy to seal the wood.
The pilothouse has plenty of light and lots of storage for comfortable cruising.
Graham provided me with a clean slate for designing the accommodations, so I drew from other boats and my past living aboard experience. B&B liked the arrangements and has incorporated them in the current version of the plans. The cockpit provides seating for four with an outboard-motor cover that unfolds into a small table. Below, to starboard is a compartment for a self-contained composting head. The galley features a Wallas stove/heater, which is one of the best acquisitions we made for comfort aboard. The helm seat hinges forward when not in use, yielding more counter space. To port is a wet locker and a dinette with seating for two. The forward seat changes height and direction from the dinette to become the first-mate’s seat facing forward toward a small chart table with a fold-out writing surface. There is a hanging locker to port and a shelved locker to starboard, sharing storage with some of the electrical circuitry. We have found the amount of storage aboard more than meets our needs. The forward cabin has a large V-berth with ample headroom and exceptionally comfortable sleeping.
The cabin is warm and inviting with Western-red-cedar paneling. Opening a hatch over the berth allows anchoring to be done from inside the cabin.
One of the on-deck features that I asked Graham to include in the design is an anchor well in the bow. Experience has taught me how handy and secure this space is for dealing with ground tackle.
ROSIE, named after my late mom, was launched around three years after I laid her keel. Launch day for a new boat can be equally exciting and frightening. Being the first boat built to a design requires a great leap of faith that your dreams, hard work, and money are going to lead to success.
With a group of friends watching, ROSIE slid gracefully into the water and floated perfectly on her lines. Luanne, a friend, and I motored away toward our slip, which is around 12 miles from the launch ramp. After a few miles of slow, break-in speed I gave the throttle a bit of juice and she was on plane before I knew it, seemingly effortlessly, with no discernible transition point.
A 90-hp four-stroke provides the power. When the boat was at its lightest, before cruising gear was added, it could do 26 knots.
As I became better acquainted with the boat, I became more enamored with her performance. We like to cruise at speeds between 12 and 18 knots and had an initial fuel consumption of 4.4 nautical miles per gallon. ROSIE’s top speed was around 26 knots. Comfort and fuel economy are far more important to us than top speed and quick hole shots (full-power acceleration from a dead stop). When she was launched, ROSIE was the lightest weight she will ever be, thus her fuel consumption and top speed would naturally diminish as we added more toys and gear.
We have had three seasons aboard ROSIE. Since her launch, we have added a 9.9-hp kicker, trim tabs, a 9′ tender and hoist, radar, solar power, two stand-up paddleboards, and more. She carries 44 gallons of fuel in her main tank for a range of about 150 nautical miles, and we often have two to three just-in-case five-gallon jugs of gasoline with us. We also carry 24 gallons of water in four separate jugs dispensed with a foot pump. With these additions, she drinks a bit more fuel. Consumption has increased by around 15 percent and she has lost around three knots of top speed, but ROSIE is still quite efficient and plenty fast for us.
The boat’s shallow draft broadens the anchoring options, often making it possible to get away from the crowd.
We spend a lot of time aboard ROSIE during our cruising season, mostly two to three nights at a time, and have taken her up to Desolation Sound for a three-week cruise. We have found her to be the perfect size for the two of us. After three weeks aboard, neither of us felt cramped or was eager to get off. She provides a very dry and smooth ride. I think Graham has found a sweet spot in design and performance yet again. She seems to strike a chord everywhere we go with other boaters often asking if we have restored this old beauty. I take that as a compliment. I smile almost every time I see ROSIE, and my head is almost always turned toward her when I walk away. I would call her a complete success. She does everything I had hoped for and more.
Ken Katz lives on Salt Spring Island, British Columbia, Canada, with his wife, Luanne. He spends much of his time building, paddling, and cruising aboard the “fleet” he has created. He also builds furniture but has found it doesn’t float well.
Plans for the Outer Banks 26 are available for $420 from B&B Yacht Designs. Inquire about kits. Options include an extension to mount the outboard behind the transom—which extends the overall length but gives more room in the cockpit.
Is there a boat you’d like to know more about? Have you built one that you think other Small Boats Magazine readers would enjoy? Please email us!
As I stood on a mid-morning in July at the edge of the Rock Lake Creek, the sky was a bright blue with not a wisp of cloud and not a whisper of a breeze. The water on this mile-long meandering stretch of the South Madawaska River was clear but tea-stained by tannins and the only ripples were from the aluminum skiffs and canoes that had already left the dock. On the banks, forests of cedar, pine, and birch crowded the river and several trees leaned well out over the water, as if pushed by the trees behind them. The banks themselves were masked by a solid wall of scrub brush growing down to the water’s edge.
Photographs by the author
Derek would use the 32-lb strip-planked canoe I built using blue insulating sheet foam for strips rather than cedar. The canoe in front of me is one of three skin-on-frame versions I built of my Wee Bonnie series. The design has its roots in the Wee Lassie canoes built in 1880 for George Washington Sears—aka Nessmuk—by the Rushton Boat Works of Canton, New York. The dock and ramp at the Rock Lake Access Point serves recreational canoeists and residents of lakeside cabins—their outboard skiffs are limited to 20 hp by Algonquin Provincial Park rules.
My son-in-law Derek and I readied our canoes on the trampled grass at the Rock Lake Access Point set midway on the mile-long section of river between Rock and Whitefish lakes. The gear we shuttled from the car was for our four-day adventure in Ontario’s Algonquin Park; the solo canoes were Wee Bonnies that I had designed and built based on Mac McCarthy’s Wee Lassie II. I would paddle the nylon skin-on-frame boat while Derek would use the fiberglass-sheathed blue Styrofoam version. Our outing was an annual retreat for us, but this year was bittersweet. A third paddling companion, Phil, had to cancel at the last minute, and the fourth member of our usual crew, Rob, who had paddled with us for the past seven years, had passed away in February.
Rock Lake Creek, a section of the South Madawaska River connecting Rock Lake to Whitefish Lake, downstream to the north, made for a very pleasant first leg as Derek and I paddled quietly in the stillness.
We launched and settled into a cadence through Rock Lake Creek, a winding section of the Madawaska that leads to Rock Lake. Our destination for the day was Pen Lake, 3.5 miles downstream from the launch. The slow-flowing creek was still shrouded in the cool shade of morning, while the trees along the western side were in the amber glow of full sunlight. A few water bugs scooted away across the water’s surface as our canoes cut through the still water. Wisps of mist hung in the shaded bends of the river and the still, black water mirrored the thickets on both banks.
We paddled less than 1/2 mile before we entered Rock Lake. A group of paddlers in fiberglass canoes was milling about the gentle arc of sandy shoreline near the Rock Lake Campground. Derek and I headed south past cottages that dotted the western shore—some had solar panels on their roofs; the power grid does not reach the shores of the lake.
Late in the morning, a light breeze puffed up from astern ruffling the lake and making the paddling easier. A mile into the 3-mile-long lake the shoreline curved away to the west and steep red granite bluffs towered up over the water into a massive 100′-high wall draped with gray lichen.
Scattered cumulus clouds ghosted across the sky as the breeze strengthened and scuffed the ripples on the lake into waves that tried to push our sterns sideways. Derek and I paddled up to speed and had fun surfing ahead of the crests.
Roger Siebert
.
The last mile of Rock Lake is a long, narrowing bay occupied by the South Madawaska River, with high bluffs of granite blanketed with white pine, spruce, and eastern red cedar on the east and low wetland with areas carpeted by lily pads on the west. When we heard the rapids tumbling down from Pen Lake and rumbling like distant thunder, we knew we were close to the portage.
We coasted ashore on a low shelf of tawny red granite cross-hatched with fractures. I stepped out of the canoe and carefully shifted my weight onto the slippery, muted-green algae clinging to the submerged slope of rock. A little more than 100 yards to the south, at the end of the inlet, the rapids poured out from the woods, dappling the dark-brown water white with clusters of bubbles.
The low granite ledge made for easy landing at the Pen Falls portage. We’d make the 410-yard carry in two trips, one for the canoes and another for the gear.
The portage to Pen Lake, marked by a yellow vinyl sign that was wrapped around a tree trunk and bore the black silhouette of a single carried canoe, started a few yards away from the water’s edge in the woods. The 410-yard trail was the only portage for us and we were ahead of schedule, so we decided to make two trips. For the first haul we carried packs and then returned for the canoes. A torrential lightning storm had passed through the night before and had left the trail very muddy—ankle deep in places. Long, meandering boardwalks of graying planks set on timbers surrounded by roots and rocks all flocked with moss kept us above the areas that are perennially wet, but we still had to tiptoe through some thick muck on the rain-soaked path. The trail wound around spruce and hemlock trees as it paralleled the rapids a couple of dozen yards downhill from us. Flat rocks rising above the level of the mud often offered dry steps when we most needed them, but they could trip us up, especially when carrying the canoes, if we didn’t pay close attention.
The portage trail had planked walkways over the low areas where mud could be a problem during rainy weather. The short portage was a pleasant walk beneath the canopy of the trees while listening to the sound of the rapids filtering through the brush.
The Pen Lake end of the portage had a wooden dock jutting about 50′ from shore into a long narrow cove with thick brush lining both sides. Launching easily, we pulled out into the cove, staying well away from the channel to our left that flowed into the rapids.
Back in the canoes again after the portage with the sound of rapids toward our port side, we paddled into the narrow entrance of Pen Lake. Some dark clouds started to appear, but the weather didn’t deteriorate.
The 70-yard-wide cove opened into a bay at the north end of Pen Lake, separated from the main body of the lake by a small peninsula and an island, each about 200 yards long. While there is an open passage to the east of the island, we took the shortcut between the island and the peninsula; between the two, at the south end of this shorter passage, there is a barricade-like line of boulders. Paddling in single file, in water only inches deep, we squeezed between two jagged boulders and slipped into Pen Lake’s 3 miles of open water. The wind had continued to build over the course of the day and when funneled between the high bluffs of rock and trees lining both sides, the northerly propelled us down the half-mile-wide lake.
We headed for our intended campsite, concealed somewhere in the unbroken eastern edge of the shoreline forest about three-quarters of the way down the lake, but as we drew near, we could see that some other party had beaten us to it. We paddled back to a campsite we had passed earlier. It was a site veiled by thick brush until we got right up to it and could see how spacious it was. At the water’s edge was a partially submerged row of large granite blocks, once a continuous shelf, now separated by erosion-widened parallel fractures. Above, resting on the ground at the front of the trees surrounding the campsite, was a lone rough cube of granite 5′ high and 7′ wide.
At our campsite there were some large freshly cut logs off to one side, but it was mostly a large open area in the midst of the woods. The stone fire pit was surrounded by log benches which is typical of campsites in Algonquin.
At the back of the campsite a row of fir logs 10′ long and about 20″ in diameter lay in a broken row next to a stool-high stump. The tree had been recently cut and still had some fresh boughs on and alongside of the logs. Usually, any tree that has the potential to topple or has been damaged by a storm will be cleared up by the park crews to ensure the safety of the designated campsites. Eventually these logs will either go to firewood or be positioned around the campfire for seating.
The fire pit, ringed high with neatly stacked stone, had been blackened by countless fires. The ground around the pit was covered with wood chips left by axes chopping firewood. Three bark-bare logs were set up as seating.
The whole campsite area was clear of brush and had a thick blanket of white-pine needles (which seemed strange considering that most of trees were firs, many with trunks more than 2′ in diameter). Any branches within reach had been pulled down for firewood.
Derek set up his tent while I stretched my hammock between a pair of trees. By the time we had finished setting up camp and gathering firewood, we had both worked up a sweat. It was time for a swim. Broad granite ledges at the lake’s edge extended underwater; I edged down to a lower shelf and made a shallow, skimming dive. I gasped as I hit the water; the day’s north wind had churned up the shockingly cold water from the depths of the lake. After our dip, Derek and I climbed out of the water to dry off and warm up on the sun-bathed ledges. On the far side of the lake, less than a half mile away, a hill covered in the luscious greens of cedar, pine, fir, and balsam was flecked with shimmering white and yellow birch. The cove across the lake was a thin, luminous line of grasses and lily pads separating the forest from the water.
As Derek and I lounged in the sun, a few loons swimming just offshore ducked under the water and disappeared. When they resurfaced, they spread their wings as if to shake off the water. A pair of mergansers with rusty-red heads swam toward the base of the rock shelf, saw us, and quickly moved away.
That evening we fired up the camp stove and I warmed up a precooked frozen chicken breast that had thawed during the day’s trip and added a spinach salad with lots of berries; Derek cooked steak and beans. As we prepared our meals, two red squirrels, used to associating campers with food, circled around us getting braver and closer looking to steal any morsel they could.
Supper over, it was time to hang the food bag in a tree well outside our campsite. Black bears and raccoons inhabit the area, so hoisting the bag up 12′ was the safe thing to do.
Before turning in for the night, Derek and I sat at the water’s edge as the color ebbed from the sky and waited for the stars to shine. Planets were the first to emerge from the twilight: Venus gleamed above us and to the northwest Mars was a small glimmer of red. A single satellite, as bright as most stars, made its unwavering passage across the sky. It was not long before the full moon rose and its bright orange glow swept across constellations, making them unrecognizable. Moonlight brought the landscape out of darkness making it brighter by the minute. We decided to hit the sack.
The morning was bright with a clear sky except for the dusty streaks of high clouds. There was not even a breath of wind, and the water was calm. I made a cup of coffee and sat on the granite ledge as the morning air warmed. In the stillness the lake mirrored sky and the silhouette of the far shore. I heard what I thought was a frog croaking, but it was the sudden burst of a large hummingbird darting behind me. An invisible loon on the far shore then let out a loud squawk; a far cry from the haunting, hollow whistle that loons are known for.
I noticed two large animals poke out of the far shoreline and start to wander in and out of the shore brush. They were too light in color to be moose, too big perhaps to be white-tailed deer. Derek joined me and he guessed that we might be seeing elk, which had been reintroduced to the park in 2001.
With breakfast over, it was time to ready the boats for a day trip to check out Clydegale Lake, farther south of Pen. The portage to Clydegale was over a mile away but a pleasant paddle with a north breeze behind us again. We paused near a pair of loons as they dove, disappeared, and resurfaced a dozen yards away.
Behind Derek is the torrent of water crashing from Clydegale Lake to Pen Lake. He left his gear and his canoe at Pen to do some paddling there while I explored Clydegale.
It took just a few minutes to carry my canoe along the 300-yard portage to Clydegale. Derek walked with me without his canoe; I was going to paddle alone on Clydegale while he would do some exploring on Pen. I walked with him back along the trail to go down and explore the rapids of the 1/10-mile-long section of the South Madawaska River that flows from Clydegale into Pen. The thunderous rapids crashed and foamed over blocks of granite. Beneath the thick canopy of the trees overhead, a high rock wall on the opposite side funneled the rapids around a sharp bend above the tumble into Pen.
Venturing out into Clydegale by myself was peaceful. There were only a few camps on the lake, and I saw only one with campers; I welcomed the uncommon sense of just being alone. The occupied campsite was on the east shore and perched about 15′ above the lake on the top of a cliff-like rise. The climb up and down could be a bit tiring, but the great view of the sunset would be worth the effort.
The northeast breeze had strengthened and propelled my canoe quickly down along the east shore and to the end of a narrow, 100-yard-long rocky peninsula fringed with scrub brush. I ducked into the small cove in its lee, and floated untouched by the wind. White pines towered over the point and in the still air of their lee, the sunlight felt very hot on my head and bare arms and the perspiration started to roll down my brow. The water here was dotted with the green circular pads of lilies and their white and yellow star-like flowers. The cove to the west stretched far inland changing from fields of lilies to low grassy wetlands to verdant hills in the distance.
Exploring the rest of the 3-mile-long lake would take hours and the wind would slow the return to the portage, so I paddled toward the west shore on a northwesterly course to avoid going directly into the wind and waves. I pushed hard against the foot brace to get the extra power I needed.
It took a bit of effort to get back to the portage and then another push to paddle upwind on Pen Lake to return to camp. Derek was already there, sitting on the large granite block above the shoreside shelf.
At the end of the portage, I set my canoe down at the muddy entrance into Clydegale Lake. The narrow north end of the lake is a shallow, peaceful place with lily pads almost completely surrounding the passage.
After I pulled my canoe ashore, we searched for firewood to get us through the evening. It had been rainy for the past month, and I worried that there wouldn’t be any dry wood, but we found some well-dried cedar and birch.
Our chores done, we took a quick, brisk swim. The northeast wind made it a bit chilly as we sat to dry off on the ledge. As dark clouds quickly moved in, four loons out in the lake called back and forth. A bald eagle glided past in front of us some 50′ above the water and the loons cried in panic. The eagle soon disappeared in the distance. A blue heron flew toward us only to make a sharp turn away when it saw us sitting on the rocks.
Our camp on Pen was not where we had planned to stay—that site was occupied—but it had plenty of room and great seating for watching the sunsets and stars.
There was a quick shower that evening, and the sky cleared up enough for some stargazing. The clouds that remained blocked the moon enough that the open part of the sky was filled with stars. The Big Dipper was right overhead. We stayed up until 11:30. It was a luxury to sit out in the open air—the mosquitoes were hardly noticeable. In years past, we had to retreat to our tents to avoid them.
The morning was as still as it had been the previous day and we were eager to venture along the far side of Pen Lake to the cove where we had seen the deer or elk the day before, at the mouth of the Galipo River. The cove was covered in waterlilies and bristling with bamboo-like stalks that had had their tops bitten off, probably by moose, several inches above the water.
The expansive cove on the west side of Pen Lake was covered with waterlilies. Paddling the shallow water here required some caution to avoid colliding with deadheads hidden just below the surface.
As I paddled among the stalks, they scraped the canoe’s nylon skin and made a muted version of the sound made by hand-cranked sirens used at hockey arenas to excite the crowd. The paddling became more difficult as I moved into an area of watershield, an aquatic plant with floating leaves like waterlilies that so completely covered the surface of the water that my paddle would bounce off them.
The blockage that deterred the Galipo River’s flow from Welcome Lake into Pen Lake was probably a beaver dam’s tangle of logs, but it had just enough head for the water flow to carve a channel through the lilies and sand and still allow for a crystal-clear view of the channel bottom.
I worked my way along the shoreside wetlands to a 12′-wide channel the river had carved out. The sandy bottom a couple of feet below was clearly visible. I turned into the strong current and paddled upstream toward the sound of falling water. The meandering stream bounced me off the channel edges, which were no more than wetlands of brush and lily pads. Rounding a bend, I found the source of the noise: a large log tangled with branches blocking the river, likely a beaver dam. Water tumbled over and through it, creating plenty of turbulence. I turned around and scooted out with the current. I rejoined Derek and we turned north out of the cove and headed for an island just 50 yards wide, making our way behind it by sneaking through the boulder-strewn shallows that connected it to the mainland.
This small island at the north end of the cove sat just a few dozen yards from shore loosely connected to the mainland by a string of boulders. We were able to paddle between them on our way back into the main body of the lake.
Cutting back across the lake to our camp we pulled the canoes carefully up and away from the rocky shore. We spent the evening warmed by the campfire and did a bit of stargazing before we hit the sack.
Morning came with an overcast sky and a breeze that was just a hint of movement coming from the south. We cleaned up camp, loaded the canoes, and were off with an early start, thinking the southerly might bring some showers or even a storm.
The following breeze made for an easy paddle and felt nice as we headed north. It was not too long before the breeze increased to a steady wind, raising waves we could surf.
On our final day we squeezed through the boulders at the north end of Pen Lake; the 6″ depth of the water was all we needed to make it through. The light southerly breeze helped us to glide through the opening as we headed back to the portage to Rock Lake.
In no time we were cutting between the boulders at the north end of the lake and gliding into the wooden dock of the portage. We had the portage to ourselves and wasted no time getting to Rock Lake for our final push, enjoying the good fortune to have the wind always at our backs.
Phil Boyer retired in 2017 after working 38 years in R&D in the telecommunications industry. He now keeps busy teaching karate at two local clubs and building boats. He has been around boats his whole life, starting with paddling as a kid. At age 11 he built a sailing pram with a bit of help from his father. In 2006 he began building solo canoes and now has four of them, featured in the August 2019 issue. Phil’s interest turned to building SOL CANADA, his solar-electric boat, in 2015. His next build will be a solar-electric version of the Power Cat he read about in the March 2016 issue of Small Boats Magazine.
If you have an interesting story to tell about your adventures with a small boat, please email us a brief outline and a few photos.
At the conclusion of a complex build, the energy, ingenuity, and budget for an elegant floorboard installation is sometimes lacking. In a traditional dinghy it is not unusual, for example, to see floorboards fastened directly to the hull’s steam-bent ribs.
Photographs by the author except as noted
My traditionally constructed Hvalsoe 13, 15, and 16s are cedar-planked lapstrake hulls with 3/8″ by 3/4″ oak ribs bent from gunwale to gunwale across the apron.
A very solid structure is achieved when thwarts are anchored to the centerboard trunk, and to the gunwales with hanging knees. The boats don’t have floor timbers, which provide a flat surface for floorboards in some boats, because they reduce valuable internal depth and stability.
While it may be common practice with plank-on-frame construction of this sort to fasten floorboards to the ribs, the floorboards are then a nuisance to remove, and repeated removal of the screws will damage the oak ribs. I’ve seen this death-by-floorboards phenomena in a few small boats.
A better solution is required to avoid treading all over the cedar hull, and to promote maintenance and longevity. My answer is a set of four easily removable panels conforming to the shape of the hull interior. I make the panels using the same materials that go into the hull construction—3/8″ clear vertical-grain, freshly cut western red cedar, and bending oak identical to the hull ribs.
I begin with center floorboard pieces that mimic the outline of the apron. They are set forward and aft of the centerboard trunk, just touching the hull ribs.
The center floorboards are secured with a minimum number of screws to cleats that are fastened to the apron.
Mahogany “bridge” pieces on each side of the centerboard trunk straddle a hull rib where the floorboard panels will butt together. The bridge pieces will hold the panels out from the trunk and capture the ends of the panel ribs, and stand slightly away from the trunk to avoid creating a trap for water and debris.
caption
At bow and stern, the finished panels are held at the appropriate spacing from the center floorboard by oak tabs fastened to the hull’s ribs. These spacers also align and ensure that the center floorboard pieces easily return to their original position after being removed for maintenance.
The individual floorboards will mimic the curvature of the first three hull strakes, with the overall panel footprint falling somewhere above the third hull strake. Rib stock to join the individual floorboards into panels is first cut roughly to length to cover this area, erring on the long side. Each panel will have four ribs. The floorboard ribs are steamed, then bent freehand until they fit nicely around the bottom of the boat. They are located alongside the hull ribs to prevent forward and aft movement of the finished panel. The tips of these short ribs extend to slip under the center floorboard and bridge piece. I slide them under about 1″ and ease the bottom corner so that the rib can rock up and down a small amount when the panels are removed. For now, the new panel ribs are left long at their upper end. They are clamped to adjacent hull ribs with small shims to provide space that will ensure the panels can be easily removed.
Starting with the first course alongside the centerline and trunk, the individual floorboards are shaped to mimic the run of the first three hull strakes. I use thin plywood for pattern stock, and a combination of scribing, spiling, and eye work to arrive at the shapes. For example, the lower edge of the first floorboard course can be scribed directly alongside the center floorboard.
The top edge of the first course might be spiled, or scribed with an offset block, to roughly follow the garboard/broad. One begins with a general sense of layout and proportion, the eye to follow.
Gary Brewer
I bend the individual planks freehand right out of the steambox. The hot red cedar is quickly molded to shape, first with a twist, then forward-and-aft curvature. This is all done outside of the boat within a few moments.
Gary Brewer
Forward, the floorboards are considerably over-twisted immediately out of the steambox.
There is just time for a couple of test fits before the plank relaxes perfectly into the shape of the hull.
Floorboard planking proceeds, working out from the centerline, and butting forward and aft courses over the ’midship hull rib spanned by the bridge pieces.
While fastening to the panel ribs, the courses are separated by temporary 3/4″ spacers. This is wide floorboard spacing. The gap is keyed to heel rests which I have designed, featuring a tongue projecting below the floorboard to brace against a rib. The 3/4″-wide tongue provides more bearing than a 1/2″ tongue. The floorboard spacing can be whatever suits an individual builder.
After all three floorboard courses are fastened to their respective panel ribs, the completed panel is removed from the hull, and the outboard rib ends are trimmed flush. A slight under-bevel and easing here of the rib end will later help ensure the panel easily slips in and out. With 3/8″-thick cedar and 3/8″-thick ribs, I use 5/8″ screws. I prefer full-thread stainless-steel sheet metal screws for their firm bite.
With the panels in place, 3/8″ by approximately 5/8″ hardwood margin strips are bent in place cold and fastened to the hull ribs just outboard of the panels. While I use about a 1/4″ spacer to set the margin strip clear of the panel, the gap could be even a little less.
The panels should easily lift out, then drop back into place with the lower rib ends tucking under the center floorboards and bridge pieces.
To secure the panels in place and prevent them from being floating by bilge water, I fabricate small swivel tabs out of 1/2″ brass half-oval. The tabs are fastened to the margin strip at each corner of the panels—eight tabs in all. When done right, the panels lie down in the hull without being held by the tabs, but there may be a little spring at one end or the other of a panel.
One element favoring this arrangement is that the hulls of this line of boats are clench-nailed through laps and ribs, so there are no roves obstructing the lay of the floorboards. If your boat has the planks riveted at the frames, you can put the floorboards in place, then tap them against the frames to get the peened rivet heads to dent the floorboards. Use a small gouge to create hollows in the backsides of the floorboards to accommodate the roves. The panels need to slide outboard a wee bit as you remove them. You would need to accommodate for this movement when making these divots on the underside of the floorboards mostly, I think, for those roves closest to centerline.
The panel system prevents damage to the boat’s ribs and planking and offers quick, easy access to practically all of the interior hull. Removing and installing the floorboard panels involves no fastenings, no tools, no guessing, no springing into place, and no errant holes. Maintenance of the boat is encouraged rather than discouraged, and the large area covered by the floorboards is a plus for small boats that are often sailed while sitting on the floorboards.
Eric Hvalsoe grew up in a boating family near Seattle, Washington, and got glimpses of the San Juan and Gulf islands, and northern British Columbia waters, at an early age. He later revisited some of these destinations, including the Broughtons, in sea kayaks and, most recently, traditional sail-and-oar craft. As Hvalsoe Design, Eric has been designing, building, repairing, restoring, and maintaining wooden boats since 1980. His home and shop are located in Shoreline, Washington. Eric teaches traditional boatbuilding and lofting skills at Seattle’s Center for Wooden Boats, where the collection includes some of his designs: the Hvalsoe 13, 15, and 16. His family of sail-and-oar designs has expanded to include the Hvalsoe 18. For a while longer yet, Eric hopes to continue exploring the Salish Sea in non-motorized craft.
You can share your tips and tricks of the trade with other Small Boats Magazine readers by sending us an email.
Skipper and I have trailered and cartopped our assortment of boats from an 8′ punt up to a 22′ Catalina to and from a lot of launch sites across the country, so we know our way around more than a tie-down or two. We have used rope and several different types of webbing straps with varying levels of success and have recently come across an answer for all of our tie-down needs: purpose-made straps from CustomTieDowns.
A well-designed strap for a small boat will secure the load without damaging the boat. We have come to prefer straps of 2″-wide webbing because they distribute loads evenly across the decks and gunwales of lightly-built small boats. A common ratchet strap with 1″ webbing can easily be overtightened and exert forces up to 2,000 lbs across a small contact area. If a narrow strap concentrates too much of a load in the wrong spot, it can damage not only the finish but even the structure of the boat.
Photographs by the authors
A set of 2″ polyester straps provide a strong connection to the trailer while spreading the load out over the points of contact.
CustomTieDowns offers webbing straps in polyester, nylon, and polypropylene. The materials have different ratings for load and UV resistance. Polyester is the best material for straps that will be used in the marine environment, having the highest load ratings, high UV resistance, and good resistance to mildew, rot, and abrasion. It also has the lowest water absorption and minimal stretch. Nylon webbing is mid-grade; it has more stretch when wet and gets tighter as it dries, so it can’t be relied upon to keep a constant tension. Polypropylene is the lowest grade because it has even more stretch, the lowest abrasion resistance, and the lowest load rating.
CustomTieDowns offers polyester webbing straps in widths from 1″ up to 4″ in a variety of lengths and colors. High-visibility orange or red may be good colors to use for gunwale tie-downs to help prevent launching while the boat is still strapped to the trailer (not that we’ve ever done that). CustomTieDowns sews the strap ends with UV-resistant thread, which prevents a weak point that can develop over time. We’ve had a winch strap let go when sun-weakened stitching failed.
CustomTieDowns provides a variety of attaching hardware including S-hooks (with and without retainers), loops, flat hooks, snap hooks, bolt plates, angle-bolt plates, grommets, J-hooks, spring fittings, and spring hooks with D-rings. These options are helpful since trailers and their attachment spots vary. We prefer vinyl-coated S-hooks because the vinyl coating helps protect against dinging a boat’s finish. Vinyl-coated S-hooks are offered with load ratings of 500, 1,500, 3,000 or 5,500 lbs and are made from chromium-molybdenum alloy steel tubes in several diameters. CustomTieDowns matches the hook to the overall strength of the tie-down ordered, unless the higher-strength, larger hook is specified by the purchaser. Other hook material options include 304 stainless and zinc-plated steel.
The quick-release buckles are easier to use than ratchets and not as likely to put too much pressure on a boat.
CustomTieDowns has a variety of buckles to choose from. In the past we have used ratchets, cam buckles, and over-center buckles from other manufacturers. Our favorite CustomTieDowns buckle is the standard quick-release. It’s steel with a resin finish on the frame and zinc on its wire bale. A stainless-steel version is available, but it has a lower working load and breaking strength. The quick-release buckle allows easy adjustment of the strap length and, once the strap length is set with the correct tension for transport to the launch area, it is preset for the return trip home. Skipper also has a much easier time manipulating the quick-release buckle than a ratchet strap. I do not like the metal ratchet mechanism, especially on the narrower straps; it is time-consuming to operate and can be difficult to tighten and release with cold, wet hands.
One good option with any CustomTieDowns buckle is to also order a nylon protective pad for use under the buckle. The fixed-end length of the strap that is sewn to the buckle can be ordered in a length that will put the buckle in a position most convenient for one’s use and keeps its metal edges away from surfaces that could be damaged.
The polyester webbing comes in 11 colors so you can use color coding to differentiate one strap from another and more easily grab the correct strap from a pile in the back of the towing vehicle.
CustomTieDown straps are well made and ship fast from Oregon. Having the right strap for the job gives us comfort in knowing that our boats and gear are secure and saves us time when we are getting ready to haul our boats to and from the water.
Audrey “Skipper” and Kent “Clark” Lewis have traveled with boats to the Pacific Ocean, the Gulf of Mexico, and now explore the littoral areas of the Middle Atlantic states. Their longest trailer haul (so far!) was 1,384 miles. Their messing-about in boats is blogged at Small Boat Restoration.
The model 3108 2″ quick release tie-downs (starting at $12.09) with quick-release buckles and protective pads are available from CustomTieDowns.com along with a wide array of other options.
Is there a product that might be useful for boatbuilding, cruising, or shore-side camping that you’d like us to review? Please email your suggestions.
Many small boats don’t have room enough for storing excess gear, so the best equipment will serve more than one purpose and spend less time just taking up space. Ordinary boat fenders are meant to serve at the dock but the rest of the time they’re only along for the ride. Impact Fenders, a company based in Durango, Colorado, has come up with something different: fenders that make themselves useful not only at the dock but also underway and ashore.
Photographs by the author
The fenders can be bent and then hold that shape to wrap around the rail and provide all-around protection at the dock.
The Impact boat fenders measure 27″ × 12″ × 2″ and have a covering of 32-oz, PVC-coated polyester over closed-cell recycled polyethylene padding. Inside the fender’s foam core there is what the company only identifies as a “pliable material.” It can be bent and hold its shape, a feature that helps protect my boats. The gunwales of my smaller boats are often below the level of the docks that I’ll tie up to, and ordinary fenders, tied to the boat and hanging against the side (beneath the gunwale), leave it unprotected. With Impact’s fenders, I can bend the tops to wrap around the gunwales for full protection.
As a rowing seat pad, the Impact Fender works surprising well.
The fender makes a surprisingly good seat for rowing. I thought the foam might be uncomfortably hard and create hot spots for my sit bones, but it was just right for supporting my weight and relieving the pressure points. The pads are 2″ thick and elevate me more than my other rowing seats, but that doesn’t crowd my stroke much. The fenders cover a wide area, which allows me to shift from side to side if I need to level the boat, won’t slide out of position, and on cold days act as a good insulator and are pleasantly warm. The fenders make an excellent camp seat on shore, too. Unlike my fabric-covered throw cushions, the Impact fender doesn’t absorb water and can easily be wiped dry.
The fenders are ideally suited for kneeling, which I tend to do a lot of while boating and cruising. My knees complain more than they did a few decades ago, and the Impact fenders provide good support and a welcome relief from the discomfort of kneeling on a hard surface.
For lounging, a pair of fenders can make a comfortable and warm seat and backrest.
The 32-oz, PVC-coated polyester material that is used for the fender cover is very tough and holds up well to abrasion. I hand-sanded a small spot on one of the color samples with 80-grit sandpaper for six minutes and, while some of the coating powdered away, I didn’t get through to the woven fabric at the core. I have a heavy-duty dry bag made of similar material that did wear through to fabric at some corners after many trips through airline baggage handling.
The fenders are available in nine different colors.
I used one of the color-sample pieces I received to see what it might take to damage it. I put it on top of some foam to duplicate the structure of the fender. Hitting it hard, repeatedly, with a hammer claw barely scuffed the surface. Stabbing it forcefully with a Phillips-head screw made a minute dimple on the front side and a correspondingly small welt on the back. A straight-blade screwdriver with sharp corners made more of a mark, though smaller than a pinhead, and did not puncture the material. Sharp edges and points—a razor-sharp axe and a pinpoint awl— did penetrate the material, but hazards like that are rare in the outdoors. If a fender does get a hole in its covering, it won’t be any less functional: the closed-cell recycled polyethylene foam will not absorb water and will still be fully functional. And while the covering is tough, keep in mind that it is less than a millimeter thick and will last longer if not abused.
The fenders work well for protecting the bottom of the boat from a gravelly beach. They also keep it in place while a cylindrical fender would let the boat roll downhill.
Impact makes Landing Pads of the same 32-oz PVC-coated polyester. They’re designed to be placed on shore to protect the bow of a boat pulled up onto the land. The fenders can be used for the same purpose. My bright-finished Whitehall needs protection from rocks and grit, and the fenders don’t show any signs of wear from having the boat dragged over them. I’ve used cylindrical inflatable fenders for hauling boats out of the water, but the ones suitable for dockside use are a bit undersized and while they eliminate drag by rolling, they often veer off center. It’s hard to keep the boat on them. The Impact fender offers a more stable protective surface.
Each Impact fender comes with a strap and buckles for the stainless-steel grommet set in each end. The buckles have rubber covers to keep them from damaging finishes. While they work as well as any strap, threading the end through the buckle is a bit fussy. With a line I just have to tie a knot to secure the fender, but I can do that quickly, even in the dark.
Impact Fenders has come up with boat fenders with a difference. It’s a difference that will ensure they spend less time stowed and more time put to good use.
Christopher Cunningham is the editor of Small Boats Magazine.
The Boat Fenders are available from Impact Fenders in two sizes, medium and large. The medium size, reviewed here, is priced at $85.95. [The price listed here was initially in error. The correct price is now shown. —Ed.]
Is there a product that might be useful for boatbuilding, cruising, or shore-side camping that you’d like us to review? Please email your suggestions.
"From an early age,” writes Paul Sesto of Aurora, Ontario, “my father filled my head with dreams of sailing,” and those dreams have stayed with him. Growing up by Lake Erie in Port Colborne, Ontario, Paul learned to sail at 12. At the age of 14 he learned coastal navigation and two years later, celestial navigation. While in high school, he wanted to be a naval architect and design sailboats, but there were no such programs offered in Canada, so his university studies were in science. The doodles in the margins of his class notes—sailboat profiles—made it clear that his thoughts tended to drift in the direction of his dreams. After graduating, he managed an adult sailing school, and at 31, returned to school to study mechanical engineering and did his fourth-year thesis with a prominent sailmaker in Toronto.
Paul designed his boat with a CAD program, which provided patterns for all of the plywood pieces.
Despite his decades of sailing, Paul had never had a boat of his own, not even a canoe, let alone a sailboat, but he found temporary satisfaction in designing and building model sailboats. Some were meant to be sailed, but since they were models he could only take the helm by radio control.
Photographs by and courtesy of Paul Sesto
Paul had access to 3D printers through his job and used one to print a model of his design.
The Flight of the Phoenix, a 1965 film featuring Jimmy Stewart, encouraged Paul to build a real boat. Stewart played the role of Frank Towns, pilot of a twin-engine cargo plane forced by a sandstorm to a crash landing in the middle of the Arabian desert. Everyone on board survived, but there was no chance they’d be rescued. One of the passengers, Heinrich Dorfmann, an aeronautical engineer, proposed making a flyable aircraft from what remained of the cargo plane. Only when the group had finished the project did Towns learn that Dorfmann’s work had been only with model airplanes. Dorfmann defended the cobbled-together aircraft, saying “the principles are the same.” That stayed with Paul and got him thinking that if he could make model boats, he could design and build a boat he could sail.
After the three sections had been assembled, Paul nested them for the first time. They fit together just as they did with the printed model.
The size of his boat would be limited by the space he had available for building it, which was the living room of his one-bedroom third story apartment. And the only place he would have to store the finished boat was the 4′-long, 3′-wide back end of his Toyota hatchback. The boat would have to be sectional.
While TRIO could be assembled in Paul’s living room, there wasn’t much room left for anything else.
He started the project early in 2017 with scale models, working out the sizes and shapes of three pieces that would nest in one another. He further developed the shapes with a CAD program, and to test the nested design he made scale models both in wood and on a 3D printer. His older brother Michael, a 3D graphic designer, offered support for the project with his refined sense of aesthetics and his own knowledge of sailing and design. Michael also bought a 12′ origami-folding kayak so he could join Paul on outings when his boat was finished. Satisfied with the design, Paul used the CAD program to develop the panels and print full-sized patterns.
Nested, TRIO fits in the back of his Toyota Matrix Hatchback, along with a folding cart to roll it to the water.
A sectional boat is usually built in one piece with double bulkheads (where it will be cut into separate pieces), but Paul didn’t have enough unused space in his living room to be occupied by the 12′ boat for weeks, so he built it in three separate pieces. This also avoided having to scarf 8′ sheets of marine plywood to make 12′ panels. He worked on a pair of folding tables and cut sheets of 4mm and 6mm plywood to shape with a Japanese pull saw, then drilled the holes for stitch-and-glue construction with a cordless drill.
The cart and a pair of stands hold the sections at a convenient working height for assembly. The bolts that hold the bulkheads together are all above the waterline.
After the three box-like pieces were finished and tested for fit—both assembled and nested—Paul moved the project to his parents’ garage, two-and-a-half hours away in his hometown, for the remaining woodwork, paint, and varnish.
TRIO was launched as a paddle vessel while awaiting her sailing rig, which Paul (pictured here), would make during the winter following her first season afloat. The inscription on the corner of the transom includes the signatures of Paul, his father Adam, and his brother Michael.
Paul’s 86-year-old father, Adam, had taught both sons to work with tools when they were young, but as they grew up he was occasionally less than enthusiastic about the projects they took on: “Don’t you have anything better to do?” But when he saw Paul’s sectional boat taking shape in his garage, Adam was happy to pitch in. He took on the job of painting and varnishing, which is one of features people admire most about the boat. Paul is quick to mention that it’s his father’s handiwork.
Ontario’s Humber River, only about 20 miles from Paul’s home, winds though many parks on its way to Lake Ontario at Toronto.
In July 2017, TRIO 12, as the boat was christened, was launched. The three sections, from bow to stern, measure 44″, 52″, and 48″ each and came together to make a 12′ hull with a beam of 33″ and a depth of 13″; it weighs 70 lbs. TRIO 12, of course, refers to the three pieces, but also to Paul, Adam, and Michael, the three who invested their time, energy, and pride in her building.
Paul’s 74-year-old uncle, Paul Misner, is a canoeist and offered to take TRIO out so Paul could see how his boat looked while in use.
Paul spent much of that summer taking TRIO 12 out with a double-bladed paddle. He often went with Michael and his kayak, spending time together just as they did in their teens and 20s. During the winter that followed, he put together the sailing rig: mast, leeboard, and kick-up rudder with a push-pull tiller. He bought an Optimist pram sail, rigged it as a lugsail rather than a spritsail, and for additional stability he bought an outrigger kit with inflatable amas.
While Paul had sailing in mind as he designed TRIO, he took a keen interest in fly fishing.
Every year since then, from early May to mid-October, TRIO 12 and her sailing rig and cart have stayed in the back of Paul’s car, ready to go on a moment’s notice. “At 55, I proved to myself I could design and build my own sailboat,” he writes, “The boat has transformed my life, and just like when I was a kid, I can’t wait for the ice to melt and to get out on the water again.”
Do you have a boat with an interesting story? Please email us. We’d like to hear about it and share it with other Small Boats Magazine readers.
It had been nearly 20 years since I stepped into a Penguin when I toted one down to Bristol (Rhode Island) Yacht Club last winter for a day of “frostbite” racing. I had owned a Penguin years earlier, and I had been able to buy it back, intending to restore it to sail with my daughter some day. But in the meantime, a good friend from Long Island offered the use of his Penguin, which had hung from his garage rafters for 15 years. “I’d love to see her sailing again,” he said. I pieced it together that brisk Saturday and made it out to the race course just in time for the first start.
Maybe it was the nostalgia that had me so excited to be surrounded by so much varnish in such a little boat, one of five wooden Penguins on the starting line that day. Or perhaps it was because my co-skipper for the boat, which is sailed double-handed, was Tim Fallon, team race world champion and Beetle Cat guru from Cape Cod. Either way, watching the plumb bow punch through the dark northwesterly wavelets and feeling the windward chine lock into a wave downwind as we leaned out to weather was just plain ol’ fun and more challenging than I had remembered.
The Penguin has been one of the most prolific home-built classes in the country. “Every time I look at one of these beautiful boats, I smile,” said a 70-year-old gentleman on the pier that afternoon who had raced them in the 1950s.
Photo by Peter Airlie
Designed by Philip Rhodes in 1933, the Penguin has had an enduring legacy as a racing dinghy, with more than 9,700 built. The plywood, hard-chined boats are simple to build.
Philip Rhodes designed the Penguin in 1933 as a contender for the frostbiting fleets of Manhasset Bay and Larchmont, New York, but his design lost out to one by Olin Stephens. The boat, 11′ 5″ long with 72 sq ft of sail, has hard chines, making it easy to plank with plywood. In 1938, Rhodes dusted off the design when a group of Potomac River sailors approached him for a frostbiter. They built 12 boats together in their basements and raced on winter weekends.
“Yachting magazine sent a reporter to cover one of the regattas in 1939,” says Charles Krafft, whose father completed hull No. 6 in that original fleet. “The magazine was in competition with The Rudder, which had just published the plans for the Snipe. So they did a piece on the Penguin and told where to get plans. It went from a few fleets to a national class overnight.”
More than 9,700 Penguins have been built. Hull No. 1 is on exhibit at the Chesapeake Bay Maritime Museum. Most of the boats are wood, whether built by amateurs or professionals. The class remained popular for winter racing for more than 40 years, until the advent of self-rescuing fiberglass racing dinghies.
“It’s hard to sell a Penguin as a safe, fast boat,” says Jonathan Bartlett, a Maryland sailmaker who got into the class to teach his two daughters how to race. “If you roll over, you’re done.” Later, fiberglass Penguins based on one built by Bill Burtis had false bottoms that allowed self-rescue. They proved fast in the Long Island fleet, Krafft says, so wooden Penguin owners lost interest. On the Chesapeake, however, class restrictions neutralized the benefits of the ’glass boats, and the fleet remained comparatively strong.
“You hear less about the Penguin now than in the 1980s,” Krafft says. There were 25-boat fleets on any given winter Sunday in western Long Island Sound and 35-boat international championships. “We had a surge in the 1990s with baby boomers who grew up sailing them taking their kids out,” he says. “Now those kids are older.”
Photo by Peter Airlie
Intended as a family-friendly racing dinghy, the Penguin was outshone by light fiberglass boats that came later, yet the design is appealing for teaching sailing and racing, and for daysailing. Frostbite fleets are still active in several states.
Fleets survive in Maryland, Illinois, and Rhode Island, but the design is being rekindled. Bristol Seacraft in Rhode Island started building wooden Penguins in 2008 and is now the only registered builder of what owner Al Nunes sees as a family-friendly classic design. A few years ago, the John Gardner School of Boat Building in Annapolis, Maryland, built a handful of Penguins.
Construction plans, too, are available at $50. The design is the same, Krafft says, except that the rudder profile has been altered. Aluminum masts are allowed, although the rotating wooden wing masts are works of art and are also considered competitive in light breezes. A computer-cut kit for a self-rescuing plywood boat to help spark new interest has also been discussed.
Bud Daily, who has been involved with the class since the early 1980s when he was a sailmaker on Long Island, says the allure of the boats is as much about the people sailing them as the design itself. “The original concept was a family-oriented boat,” he says. “That’s what has always appealed to me. I sail with my wife, and it also gives me an opportunity to teach someone sailing in a competitive environment.” He adds that the boats are not super fast, and with a rotating wing mast and with every sail adjustment leading to the crew, there is a lot to do.
Like many racing dinghies, the boats are easy to sail but hard to sail well. “It humbles a lot of folks,” says Bartlett, referring to the oversized centerboard and hard chines that the boat can trip over in gusty conditions. “If you can sail a Penguin well, you can sail anything.” It is a simple boat. “It’s not a Laser. But for the nostalgia and classic look, it’s hard to beat it.”
Photo by Peter Airlie
A Penguin maststep offers several alternatives for increasing or reducing mast rake, much like more modern racing dinghies.
“It is a classic design,” Krafft says, “very responsive. It doesn’t have the high thrills of other modern dinghies, but it is a beautiful boat to sail for someone who wants to step into a classic little boat.”
Penguins in garages and backyards around the country are just waiting for someone to renew them. Boats in poor condition are often free, and sailable ones can be bought for around $500, but those are snapped up pretty quickly. Pristine boats can sell for $2,000. Some have finely varnished interiors and others have flaking paint and cracked floorboards. For some reason, however, they all sail around the same speed, Krafft says.
The class has weathered the onslaught of new designs over the years by being a keepsake, something you cannot bring yourself to throw away. The fact that stalwarts have maintained the class association while other classes have gone belly-up has also buoyed the reputation of the boats.
Photo by Peter Airlie
Penguins have enough lines to keep active sailors happy. Uncommon in sailboats of today is a continuous line affixed to a tiller-like device so that the rotating mast can be adjusted as needed to improve the sail’s angle of attack.
“We’re trying to protect the integrity of the class,” Krafft says. “It doesn’t matter if you are a racer or use your Penguin for daysailing, we’re a place to ask questions, look for parts, or share experiences.” He says he gets e-mails from California, Washington, New Orleans, Tennessee, New England, and Canada from owners put- ting together or maintaining their boats. Like Bartlett, I bought mine back so I can take my daughter racing in a mellow environment when she’s old enough. I also see it as an opportunity to enjoy sunny winter afternoons with friends and their children, since we rarely race anymore and miss being on the water.
They seem like silly little boats at first, and certainly now are considered obscure. But that seems to be the attraction of many little wooden boats—their uniqueness, and rareness. The best part about the Penguin is that whether you are hiked out with a friend inches away from a competitor or sitting on the floorboards on a lazy summer afternoon, you are surrounded by a little bit of sailing history and a lot of class.
King Boat Works is a name that is synonymous with some of the highest-quality wooden rowing shells available in the world today. Behind the company name is Graeme King, who has been designing, building, and rigging rowing shells for more than 45 years. For the past 23 years, he has been working out of his own shop in Putney, Vermont. This year marks the 25th anniversary of the Kingfisher, a single shell designed by King. A few years later, her sistership, the double Kookaburra, came on the scene. Named for feathered friends from the designer’s native Australia, these birds can fly.
The Kingfisher shell, like her namesake, is sharp-nosed, sleek, and fast. While the kookaburra is not a cousin to the kingfisher in the wild, the double shell of that name mimics the Kingfisher design. Because the Kookaburra is essentially an elongated version of the Kingfisher and most of its elements are identical, I will omit the Kookaburra from much of the following discussion.
Photo by Karen Wales
Graeme King (shown) has devoted his career to designing and building wooden rowing shells. He developed the Kingfisher single for the home builder who desires a fast and elegant recreational shell.
King shells are among the most sought-after shells in the world. The wait for one of Graeme King’s round-bottomed, stressed-skin shells can be years. Not every- one needs—or wants—such a high-end shell, especially for leisure-time rowing. So King designed his V-bottomed Kingfisher with the intermediate-level home builder in mind.
Boat design is a study in compromise. It is in choosing well during the initial stages of the design process and then balancing those decisions with well-thought-out compromises that sets a great designer apart from an average one. Here, King’s gifted eye and long experience with rowing shells come into play. He has been very successful, I think, in finding that sweet spot between making the Kingfisher just wide enough to keep her from being too tippy yet skinny enough (and sharp enough) to slice through flat water like a hot knife through cold butter.
In an apples-to-apples comparison of round-bottomed shells, a beamier hull will usually be slower but will have better initial stability than a skinnier one. Realizing the futility in trying to reinvent the conventional shell’s round-bottomed hull shape for the home builder, King opted instead to employ a V-bottom and hard chine in the Kingfisher design. This makes all the difference to a person with limited boatbuilding skill. It also renders a boat that is easier to use than a conventional shell while giving up only a small percentage of the speed.
Getting into a narrow, round-bottomed shell is no easy task. Some background in tightrope walking and logrolling would be of help—and I am not proficient in either one. The Kingfisher’s V-bottom, hard chine, and generous waterline beam of 1’4″ combine to provide a solid feel underfoot while boarding. She’s still a shell—so it remains important to pay attention—but, by comparison she’s easy to board and to balance in the water, even if you have little or no experience with a sliding-seat rowing shell.
The Kingfisher can be used in less than flat-water conditions, within reason. She’ll do fine on a rippled surface in a breeze. I have read that she has successfully negotiated up to 2′ open-bay swells, but in my opinion, putting her in these conditions is begging to take a dip. Unless you have had a lot of experience with this type of craft, you should avoid using the Kingfisher on anything but glass-smooth water until you get used to the boat.
Photo by Karen Wales
The Kookaburra is a double version of the Kingfisher. Like its predecessor, the Kookaburra double is a fast and able recreational shell. Long, quiet expanses such as straight rivers and oblong lakes provide the best conditions for this type of craft.
While some would argue that any sport could be taken up at any age, few are as practical to take on later in life than sculling. It offers full-body strengthening and an outstanding aerobic workout without overtaxing any of the joints. The Kingfisher is a forgiving and fast shell to row. I can’t think of a better fit for someone who is new to this type of rowing. For a pair of rowers, the same holds true for the Kookaburra.
Years ago, I spent some time working for Graeme. One of the perks of the job was taking the early-morning row in a Kingfisher on the Connecticut River, not far from the workshop. Recently I had the privilege of reliving the experience—now paired with Graeme in the Kookaburra. For me, it was like riding a bicycle built for two behind a skilled racer. We shot downriver at an exhilarating pace. The Kingfisher (or Kookaburra) is, of course, not as fast as her U-sectioned counterparts, but she can attain up to 93 percent of the speed of the best competition shells of similar length. Considering all that she has to offer in terms of ease of construction and seaworthiness, that loss of speed is a small price to pay, particularly for the recreational rower.
Photos by Karen Wales
King builds the specialized sliding-seat mechanism and outriggers required by the Kingfisher and Kookaburra. Lightweight oars are purchased separately.
Both plans and kits are available for these boats. Skin and bulkhead pieces are made from 3⁄32″- and 1⁄8″-thick plywood. King also makes seats, slides, and stretcher fittings as well as welding up his own riggers out of stainless-steel tubing. These riggers yield light and strong suspension platforms that place the oarlocks and their associated point loads far from the hull, then spread the loads into the hull as the oarsman’s powerful stroke levers him along the water’s surface.
Decks are of heat-shrink Dacron. All it takes is a few staples and a household iron to achieve a drum-like quality in these taut-skinned decks. Applying it is simple and satisfying. Later on, varnish will seal the weave and give the deck a smooth, hard finish.
Photo by Karen Wales
Here is hull No.1 of nearly 1,000 Kingfishers that have been built over the past 25 years. Her sapele plywood hull glistens in the afternoon sun.
Using a kit will make the building process easier. It will alleviate some hair-pulling and help ensure that the boat will come in at her proper weight, perform well, and look nice. Even if you’re usually not a kit person, you may wish to reconsider when contemplating building either of these shells. If building from scratch is your preference, I still suggest purchasing riggers and hardware (seat, slides, and stretcher fittings) from King.
A few words about portaging and hauling: Both the Kingfisher (42 lbs) and Kookaburra (65–70 lbs) can handily be carried by two people. Either design lends itself well to portaging. Cartopping is also possible— even for the 27′ Kookaburra—which makes a statement around town, to be sure. For cartopping, either craft should have its own cradle, so that it can be upside down. It must be well anchored to the cradle and the cradle lashed securely to the car. Complete the job by tying lines from each end of the boat directly to the car. Follow this advice, and you shouldn’t have any difficulty in hauling. Just be sure to watch those turns!
Either the Kingfisher or the Kookaburra will offer a challenging and enjoyable building experience as well as a lifetime of fun on the water. Graeme King’s exceptional abilities and his enduring dedication to his craft continue to enrich all of us who are interested in these fine-lined rowing boats. He is a rare bird, indeed.
Keel, stringers, and 3⁄32”-plywood planking are attached to 1⁄8” permanent, bulkhead-type frames. The hull is further strengthened with trusses. Detailed plans include many full-sized patterns and a suggested building jig.
A V-bottom and hard chine give the Kookaburra (and Kingfisher) better initial stability than that of round- bottomed competition shells.This hull configuration makes these shells easier to build, too.
This Boat Profile was published in Small Boats 2010. Plans for the Kingfisher and Kookaburra are available at The WoodenBoat Store.
Subscribe For Full Access
Flipbooks are available to paid subscribers only. Subscribe now or log in for access.
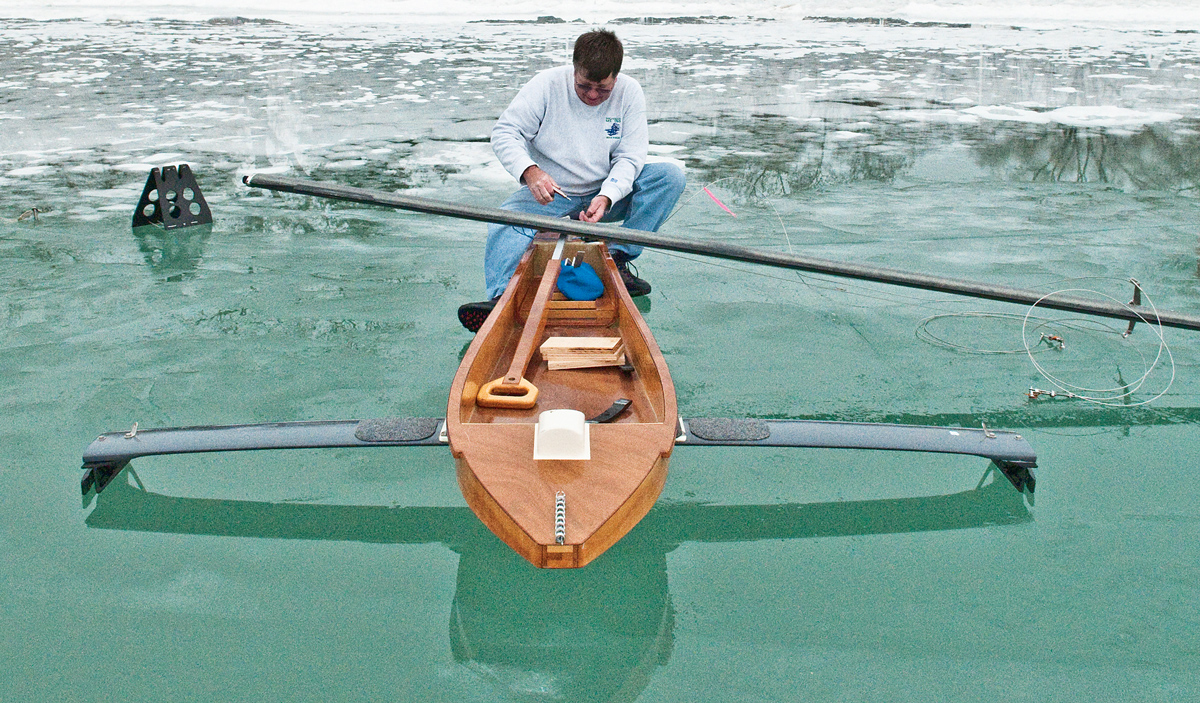 Gretchen Dorian
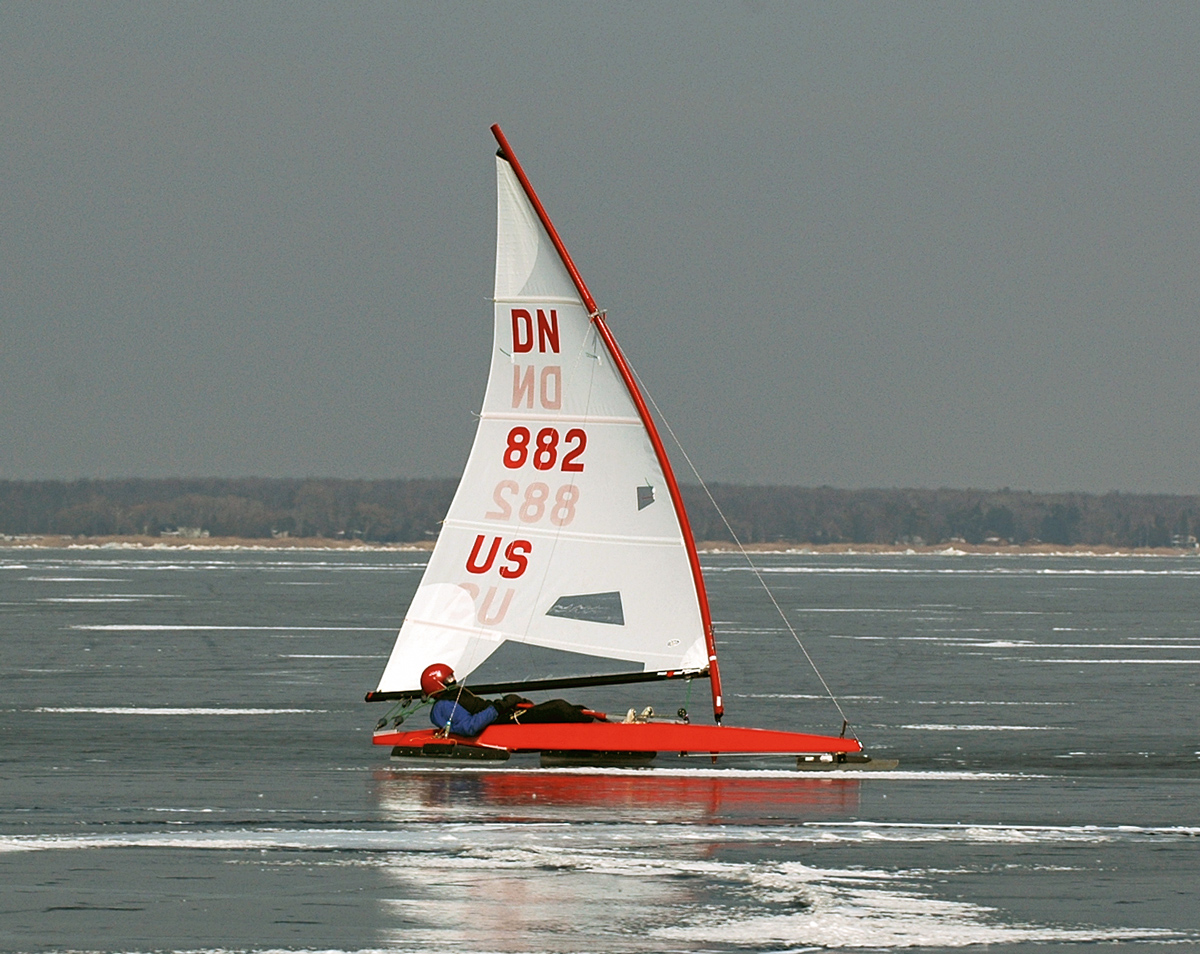 Gretchen Dorian
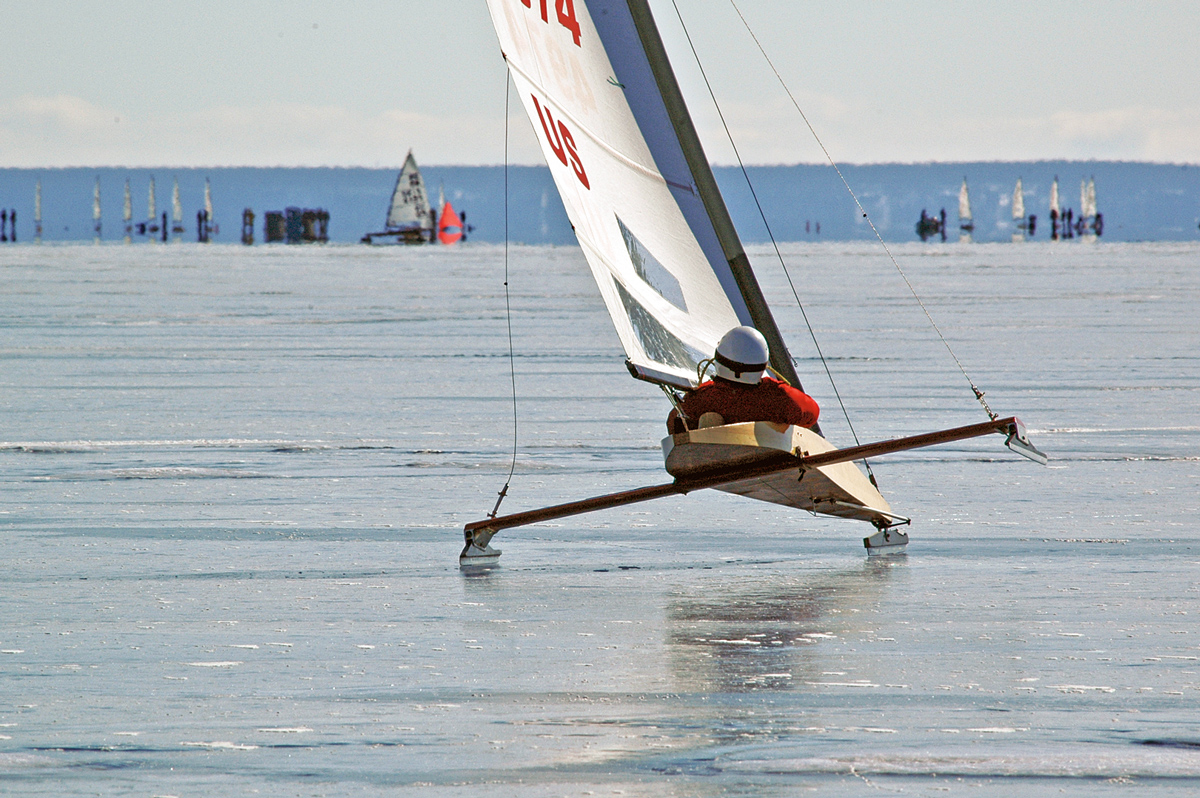 Gretchen Dorian
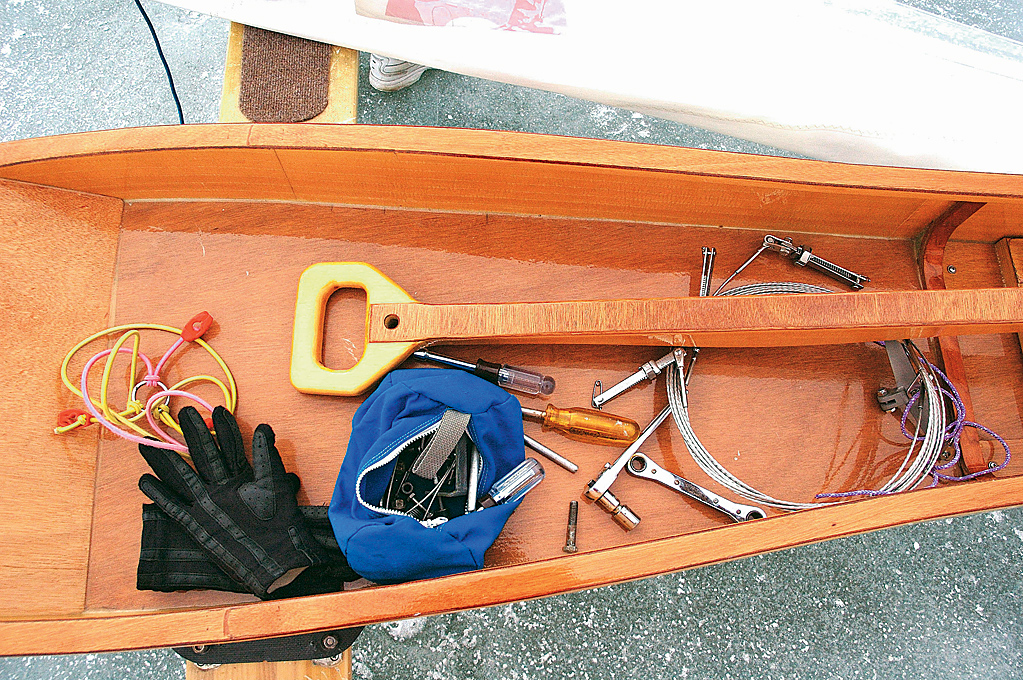 Gretchen Dorian