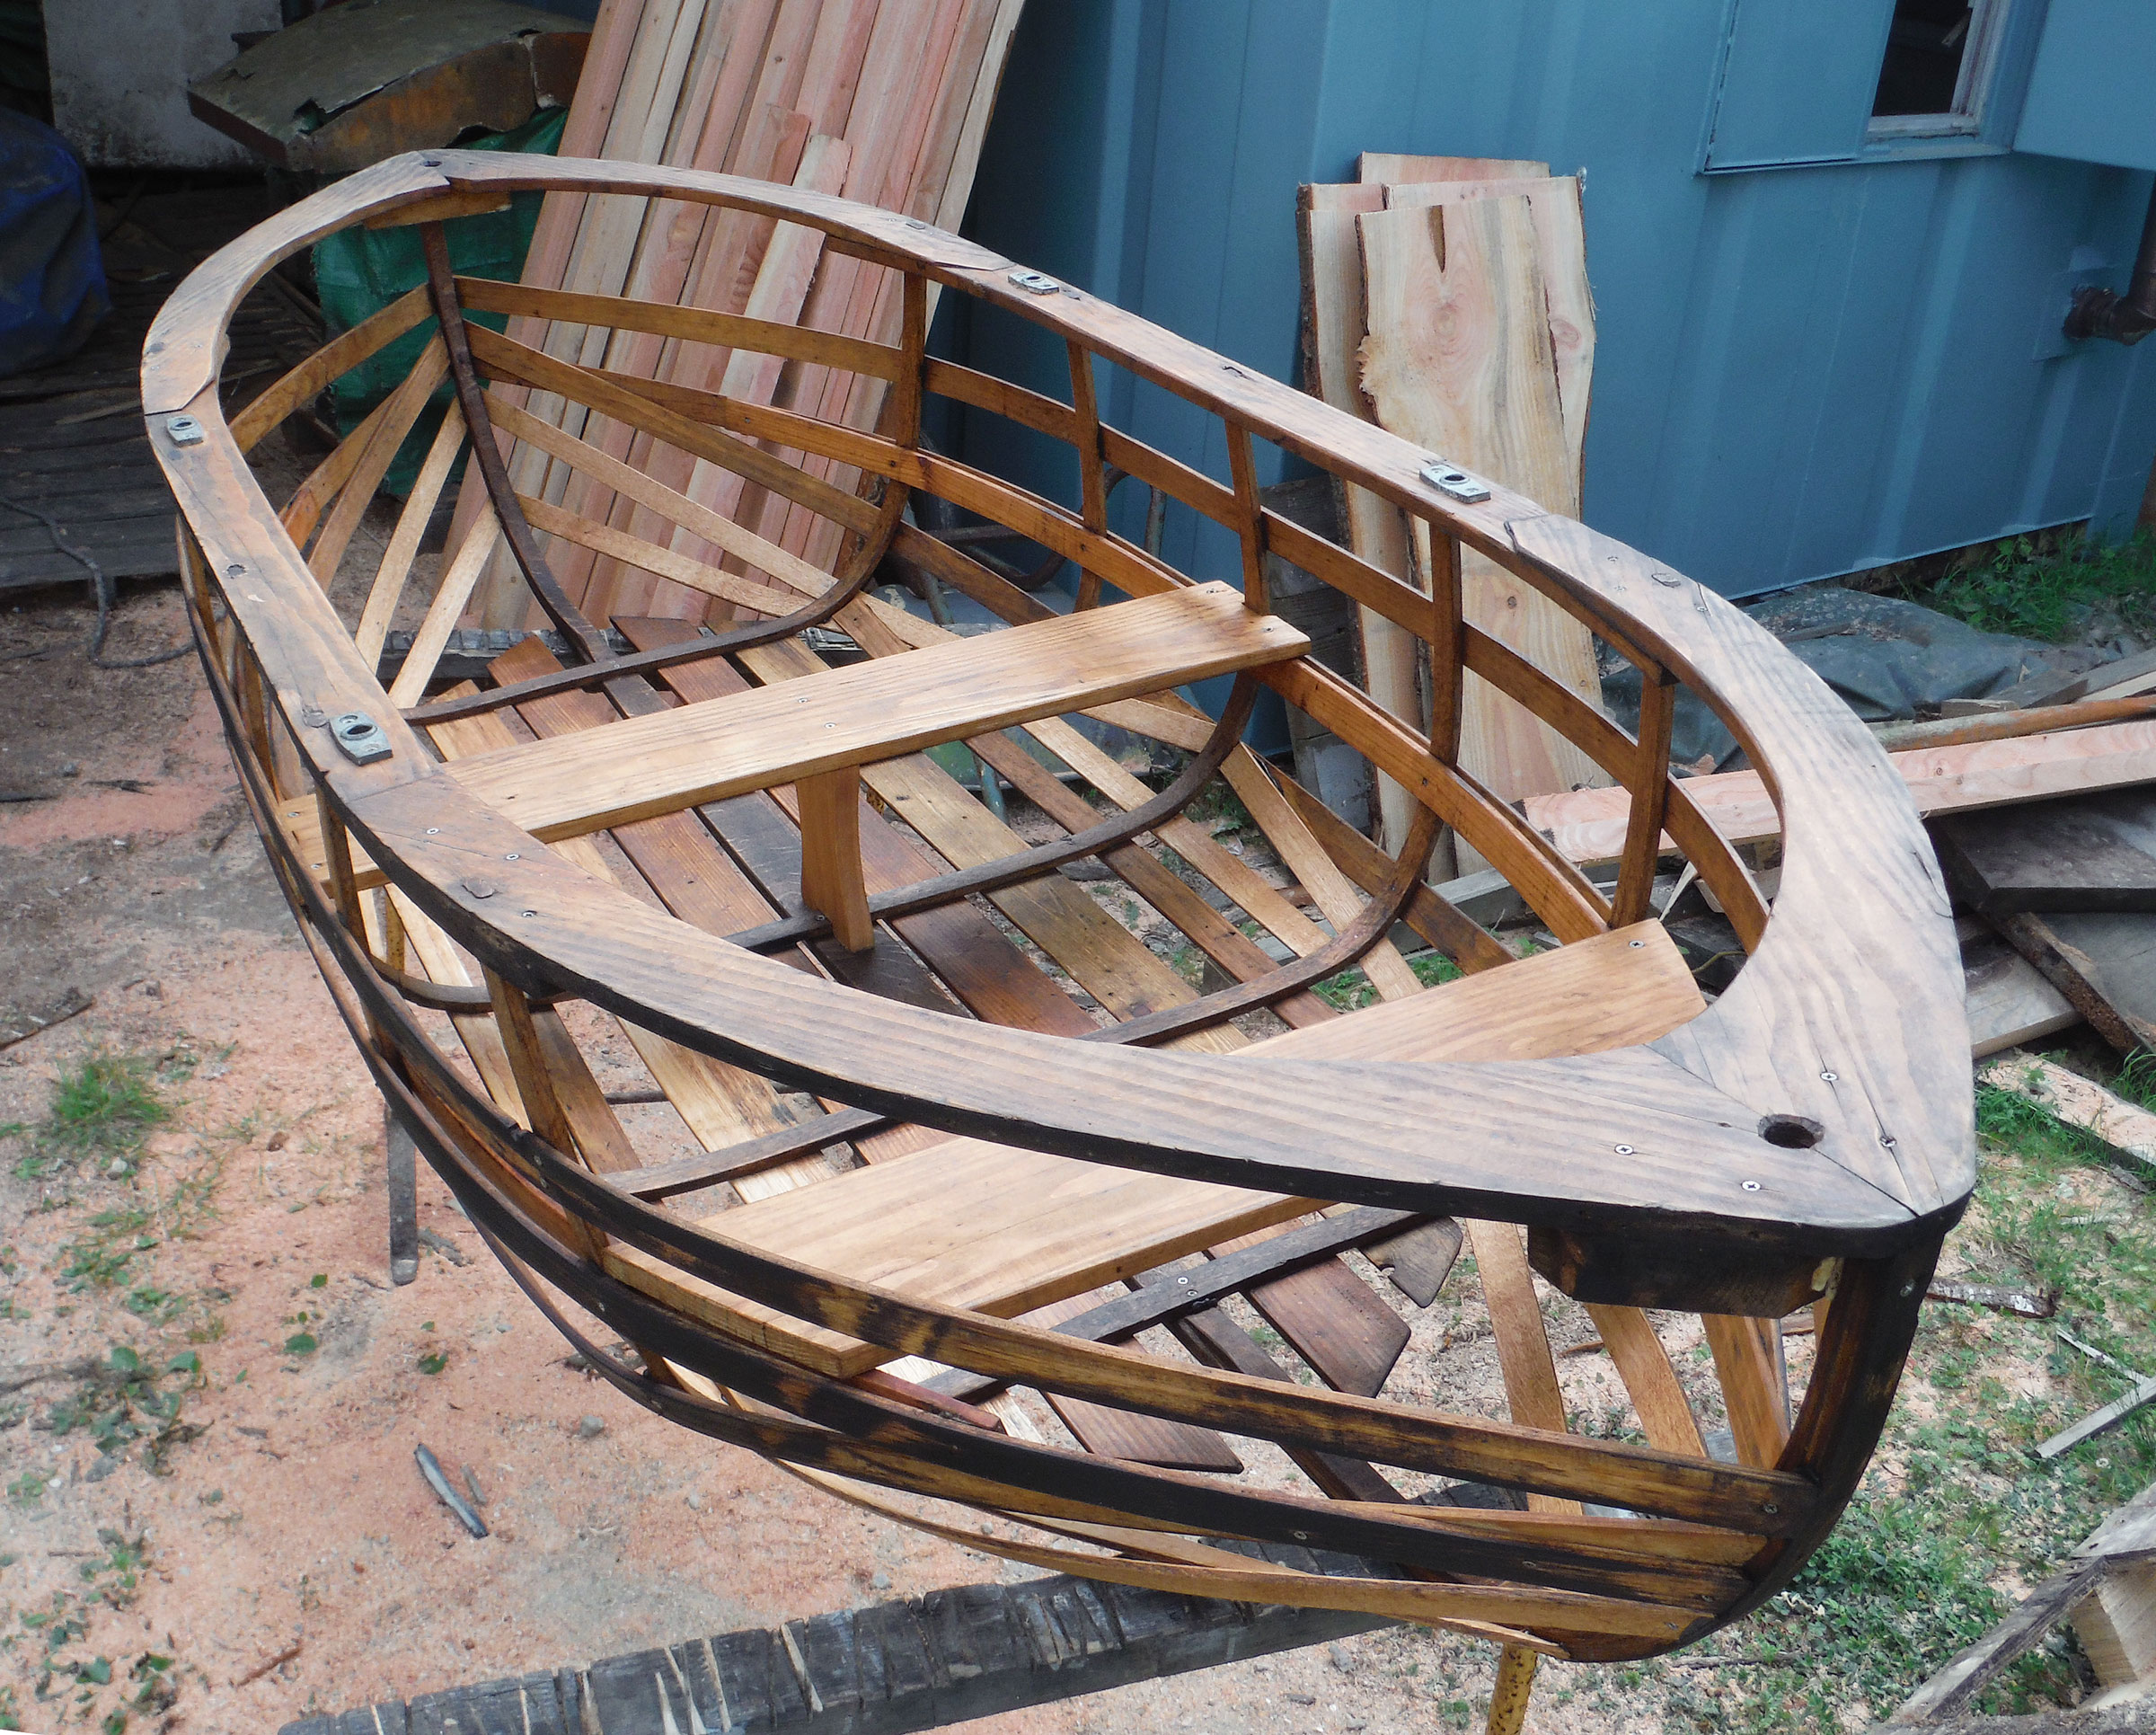
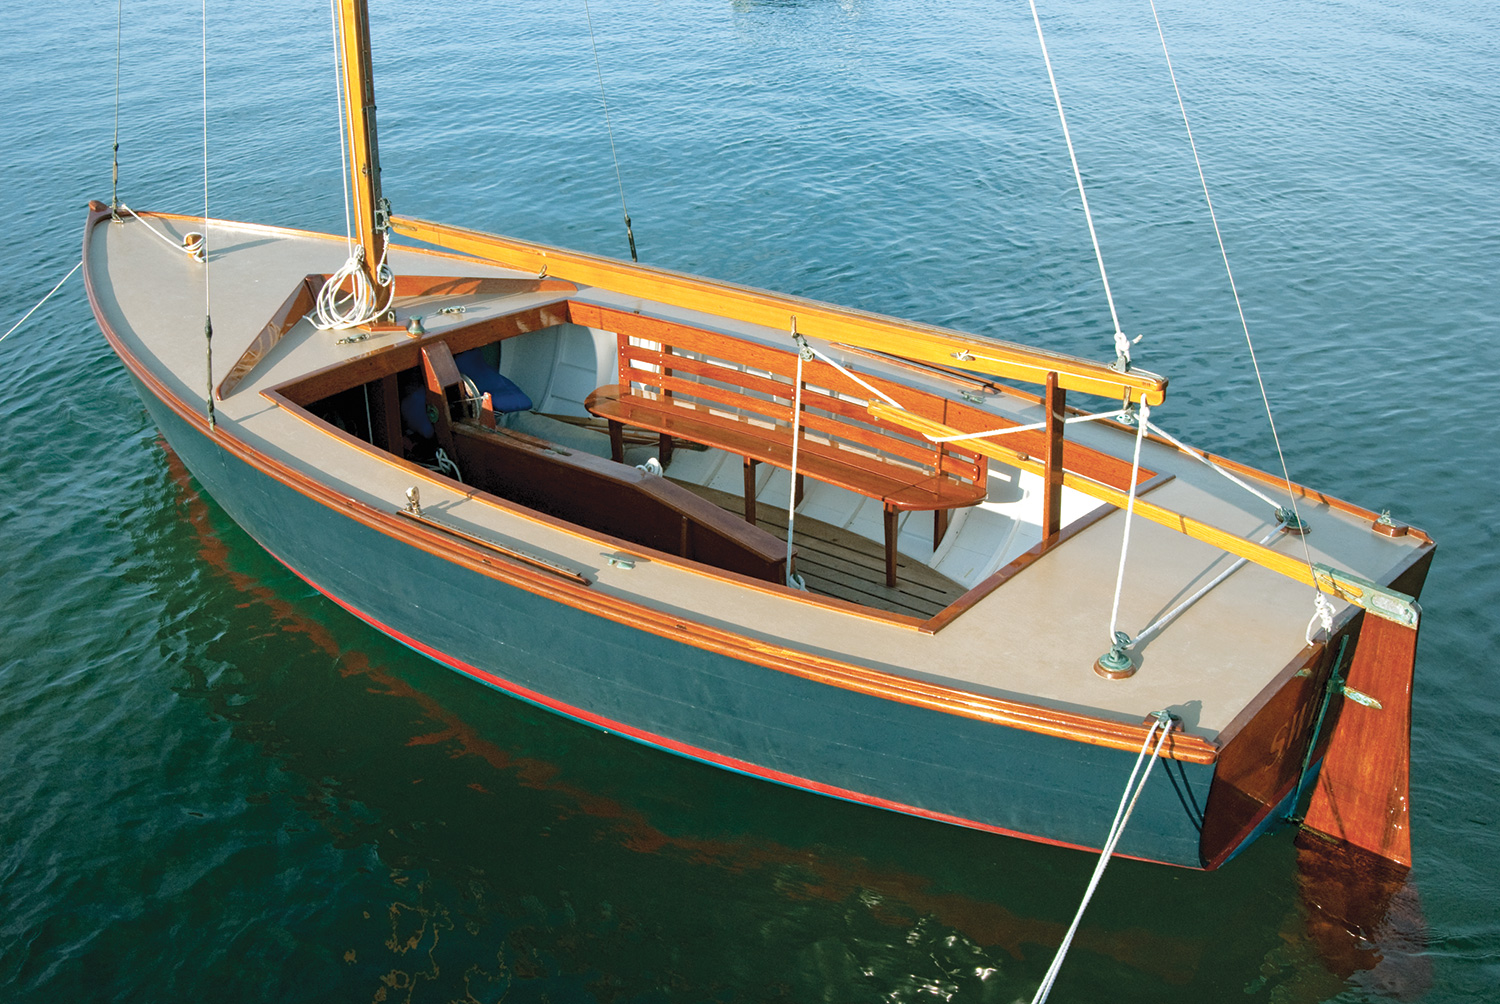
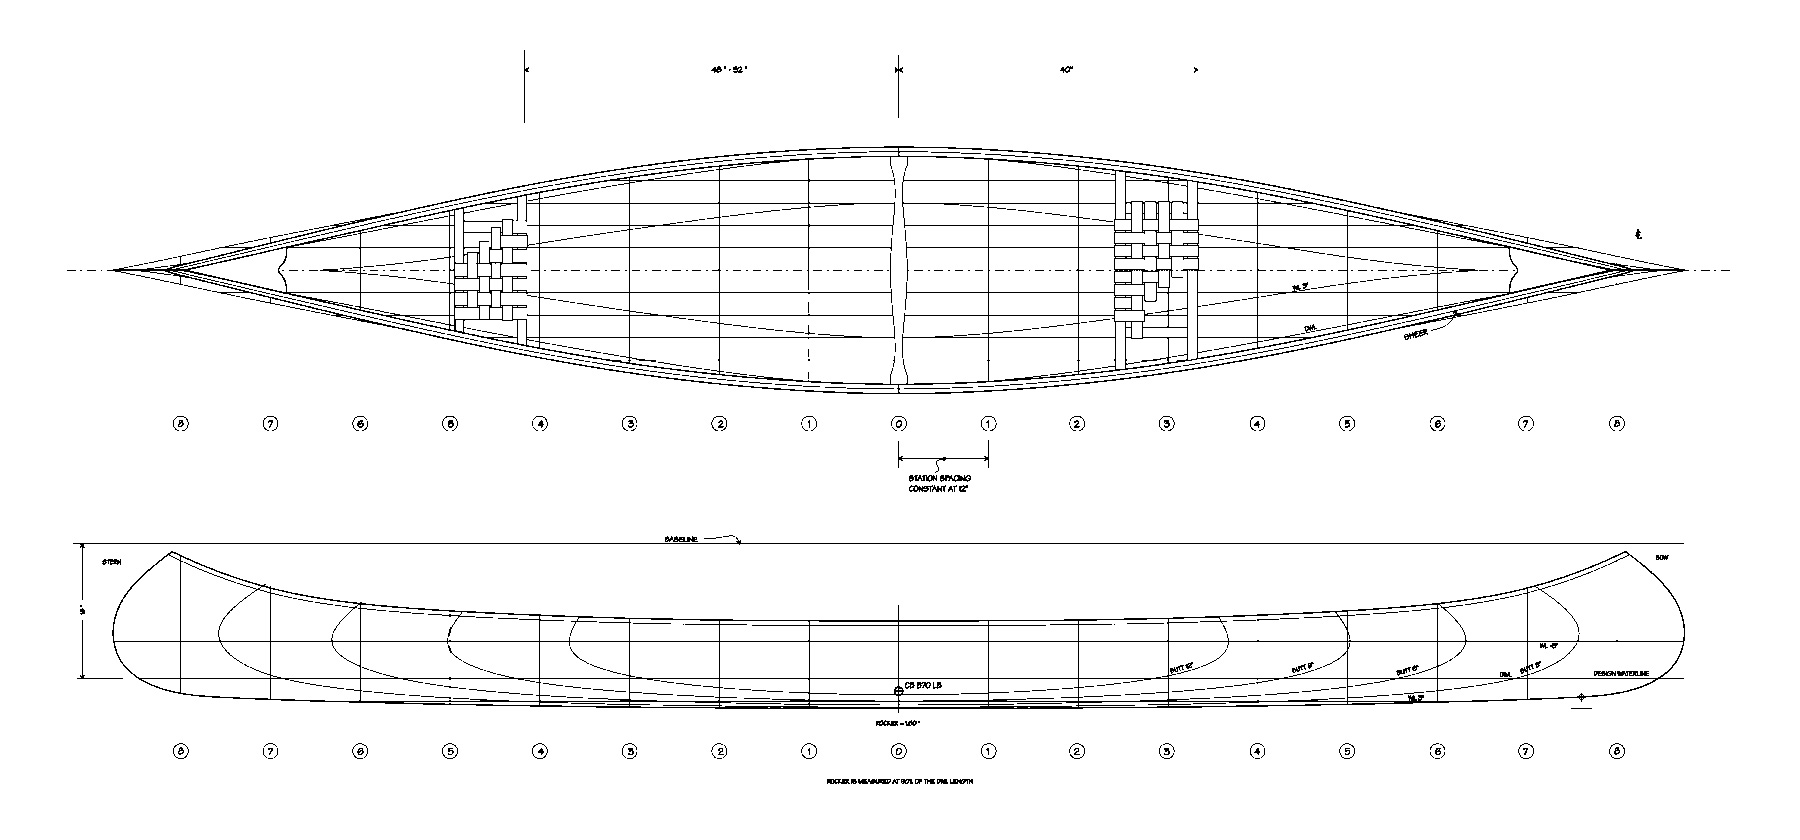
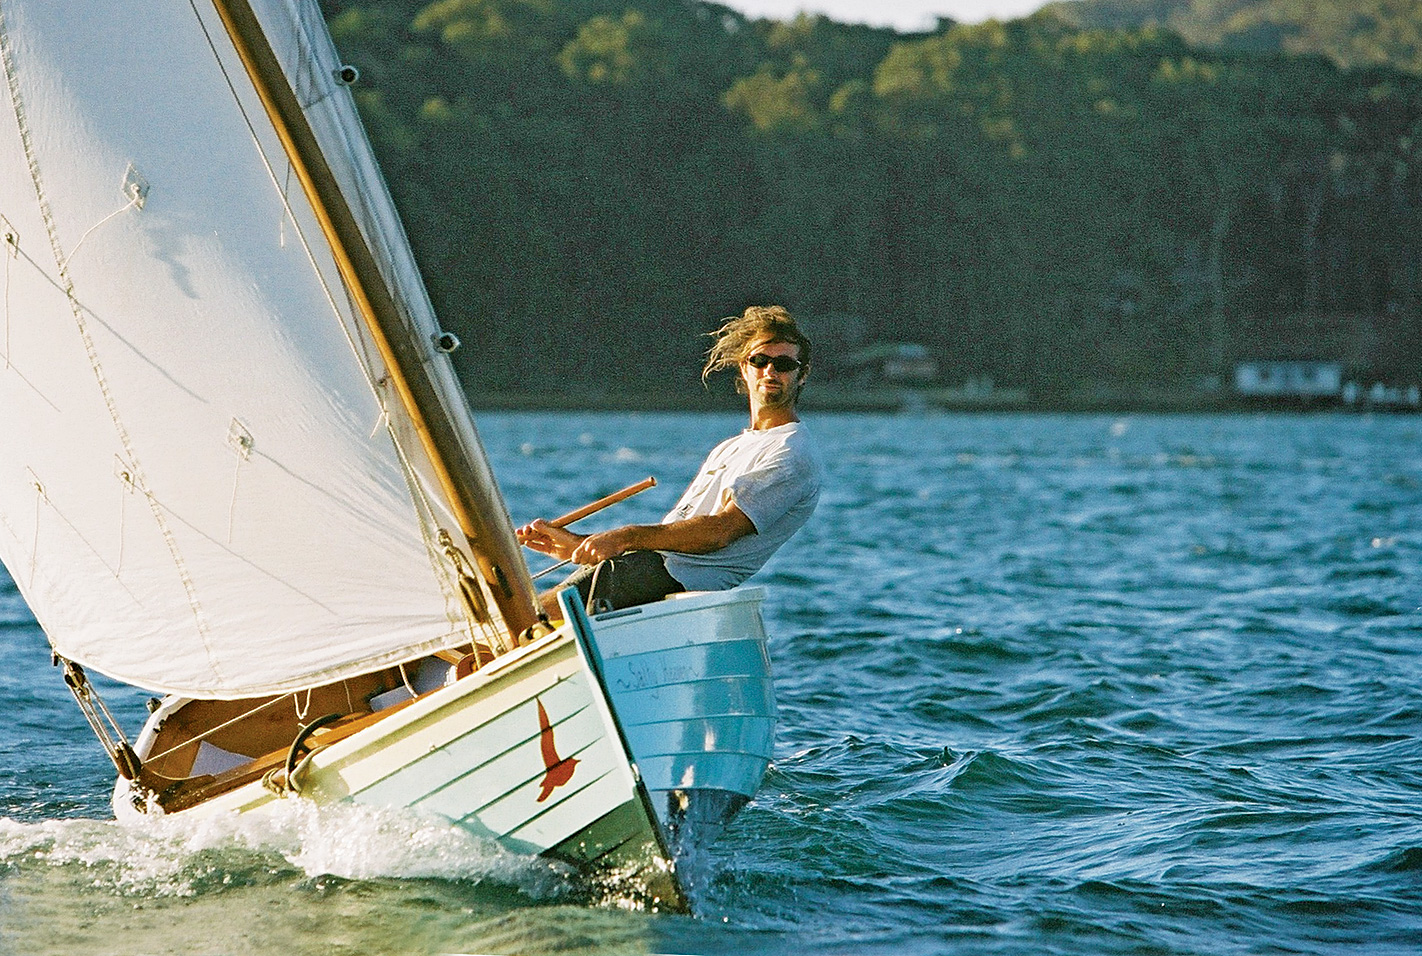
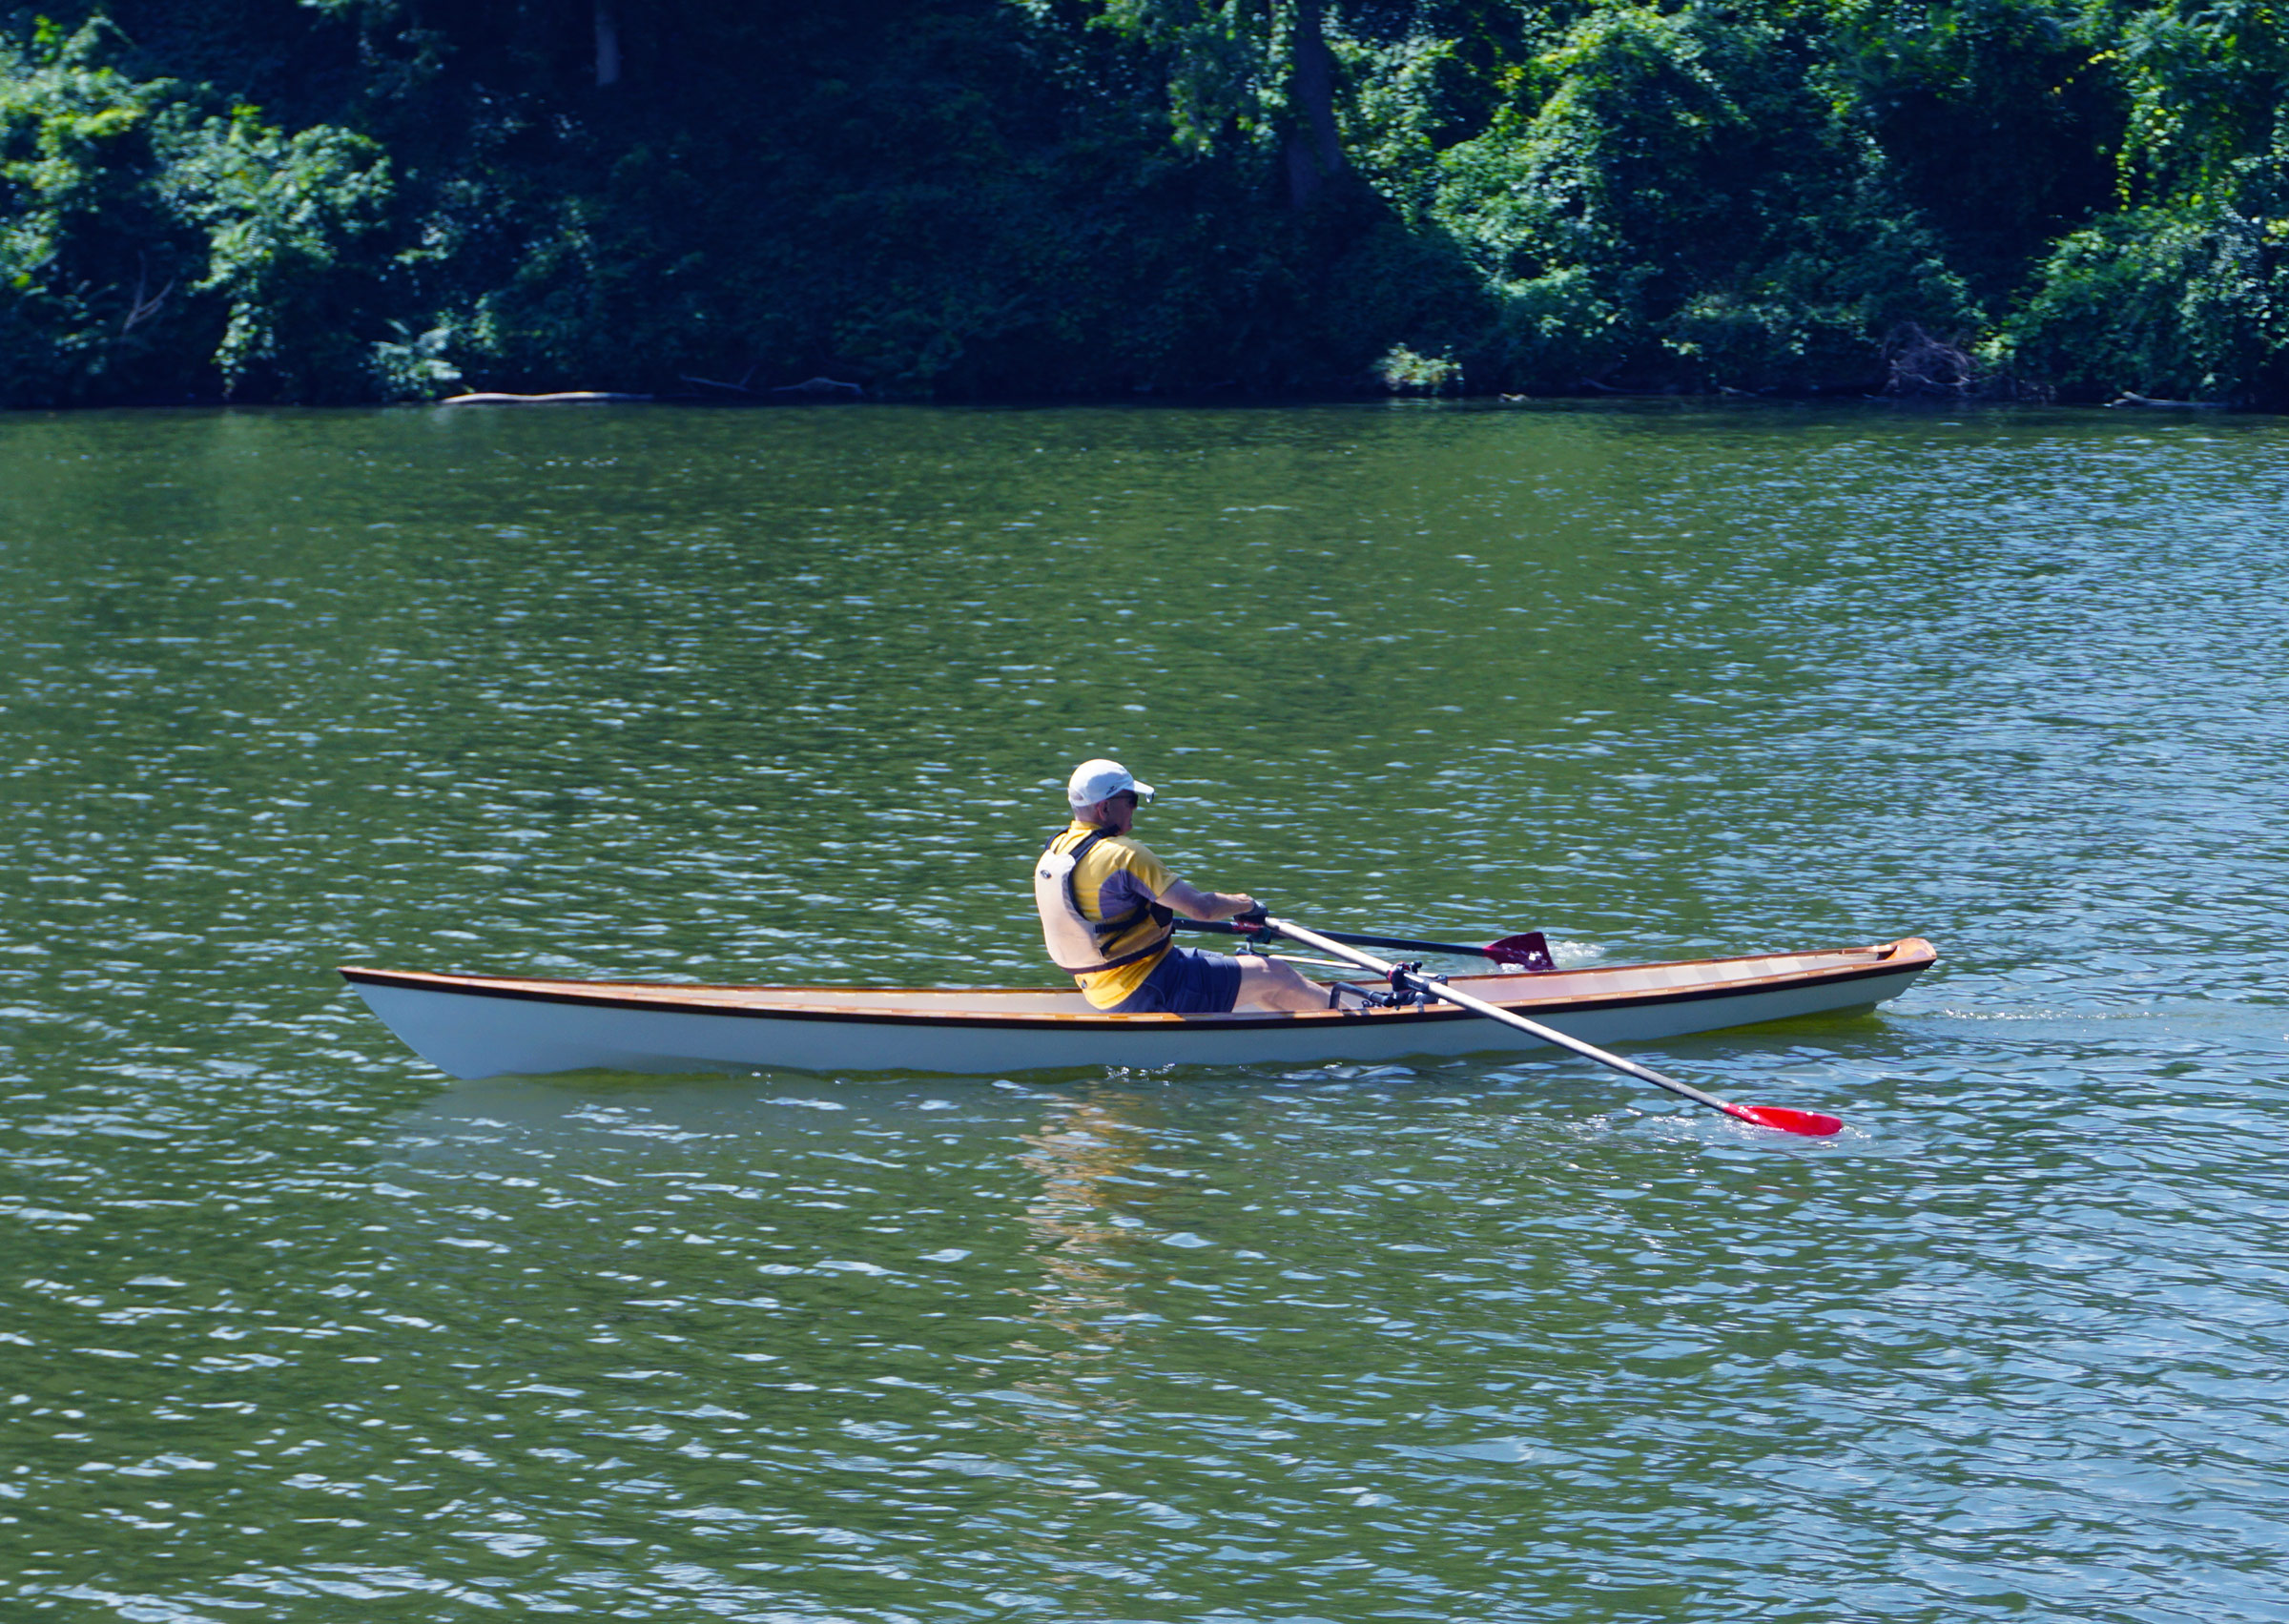
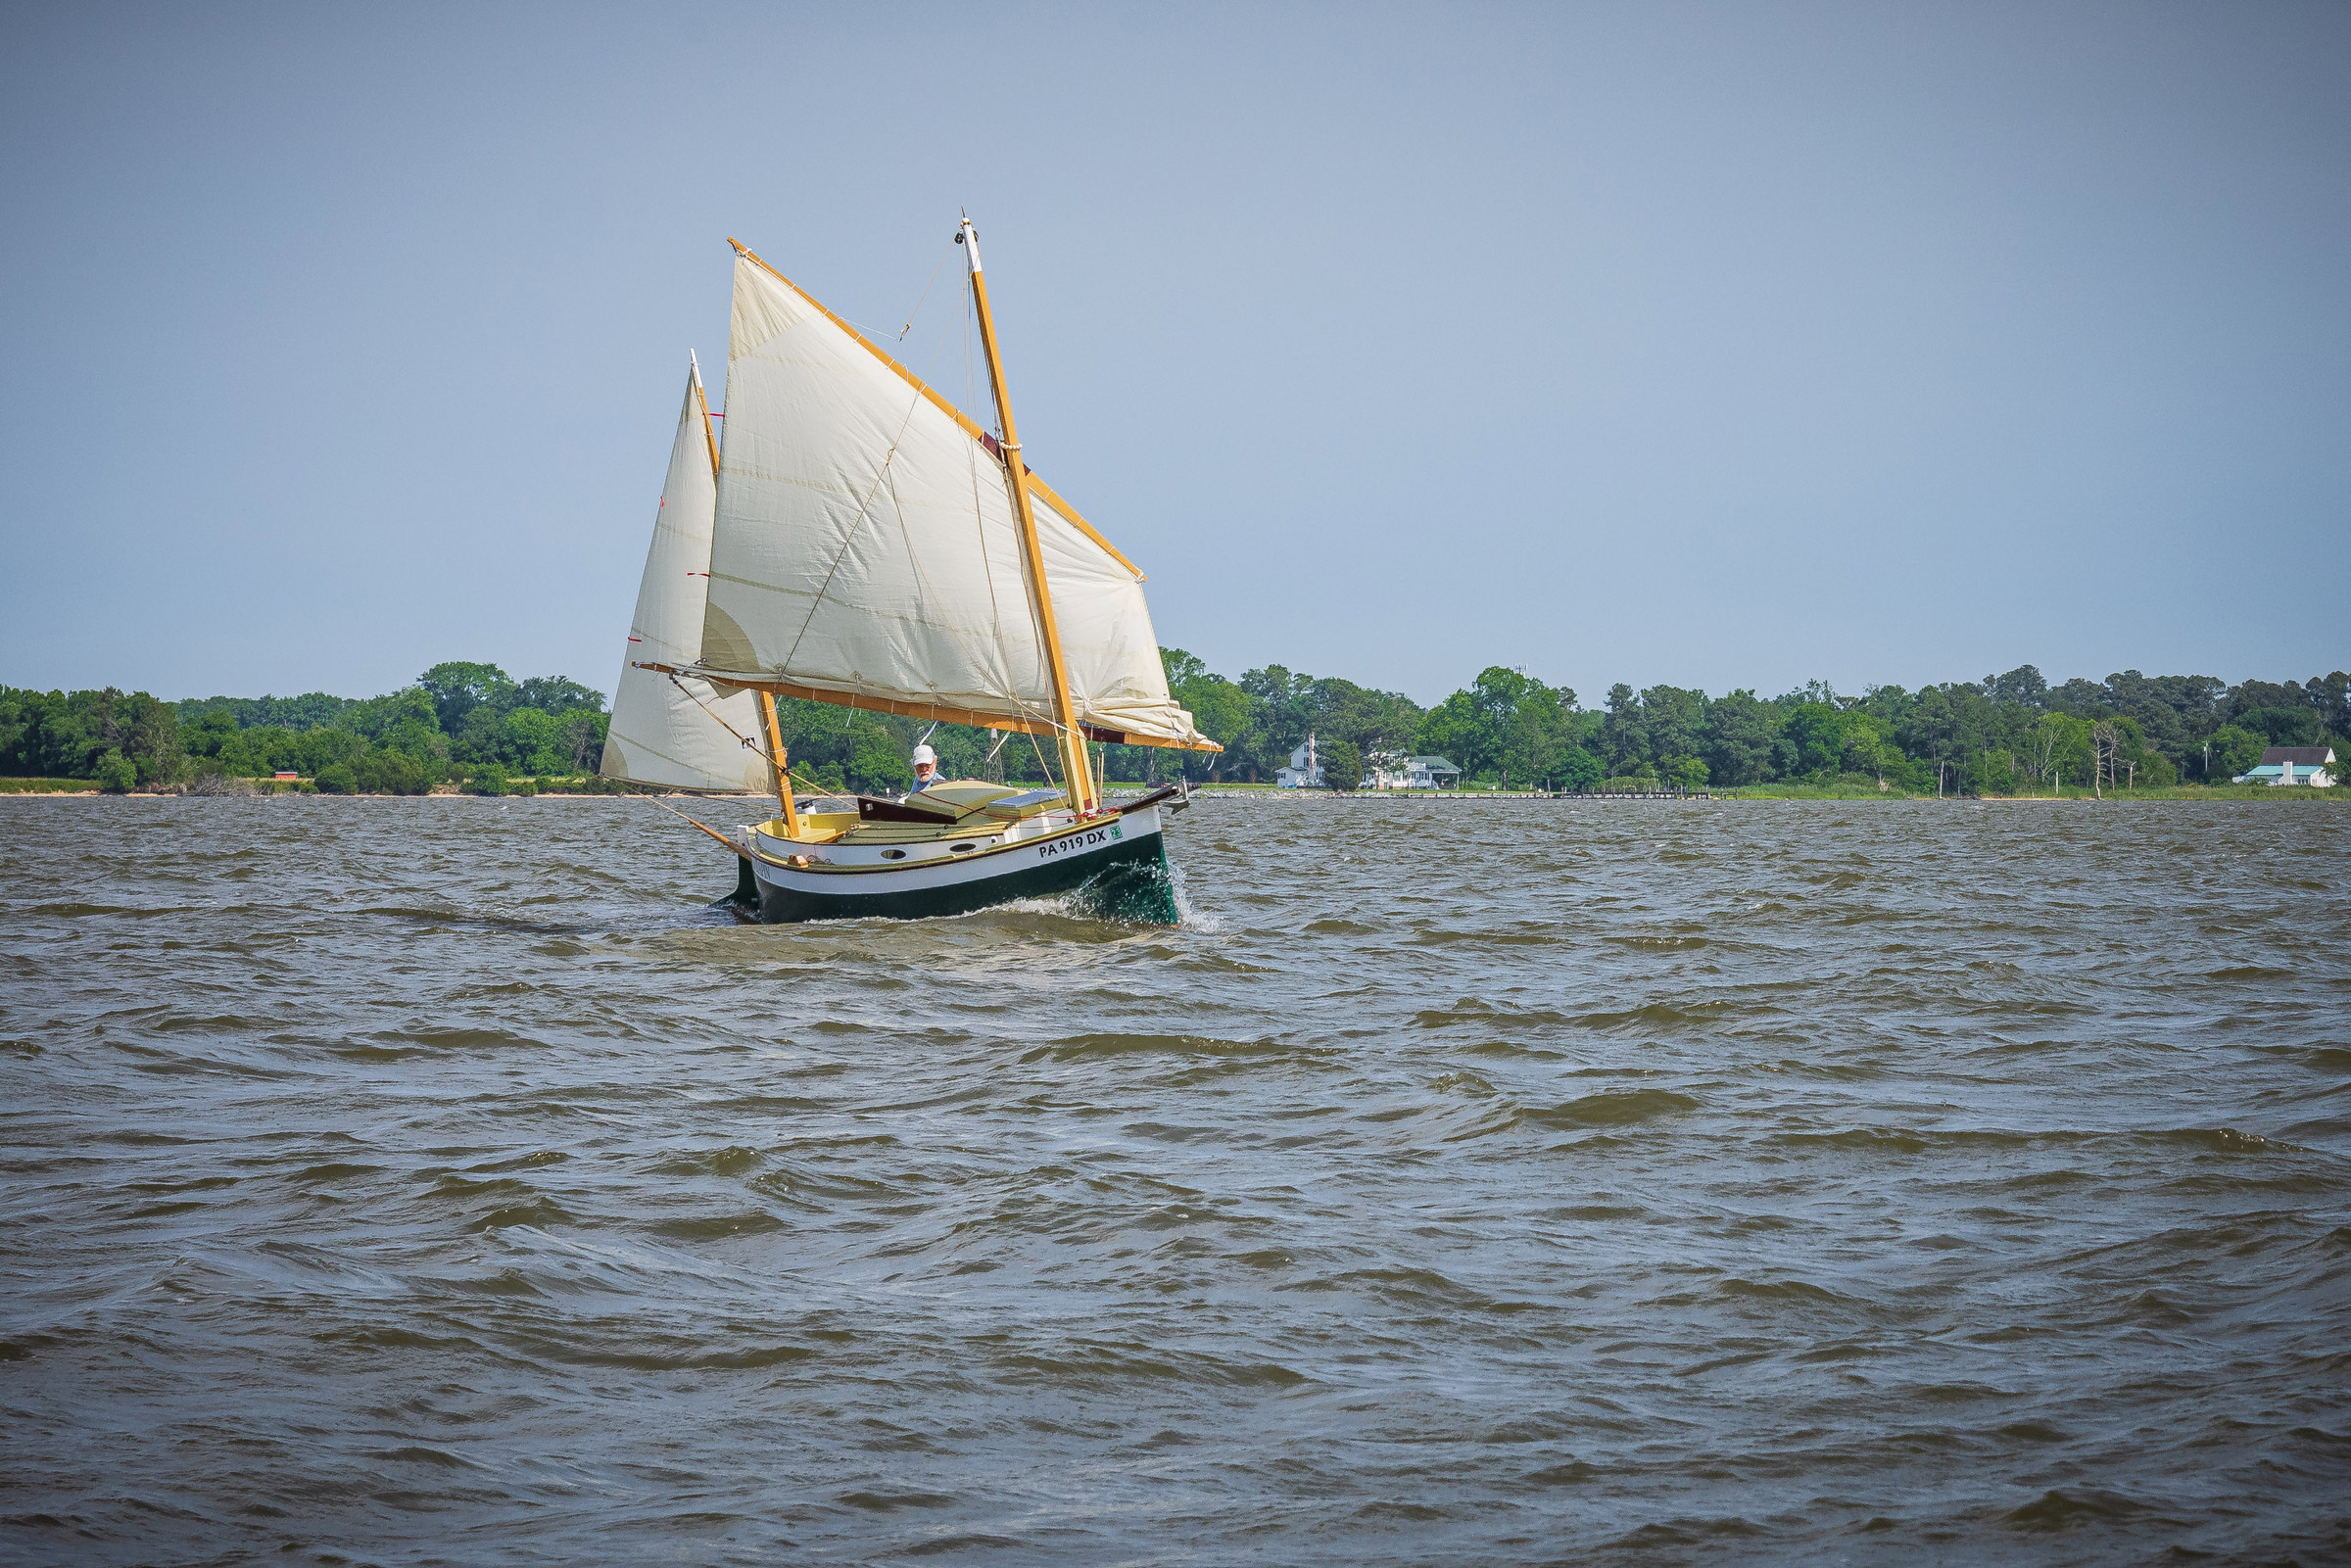
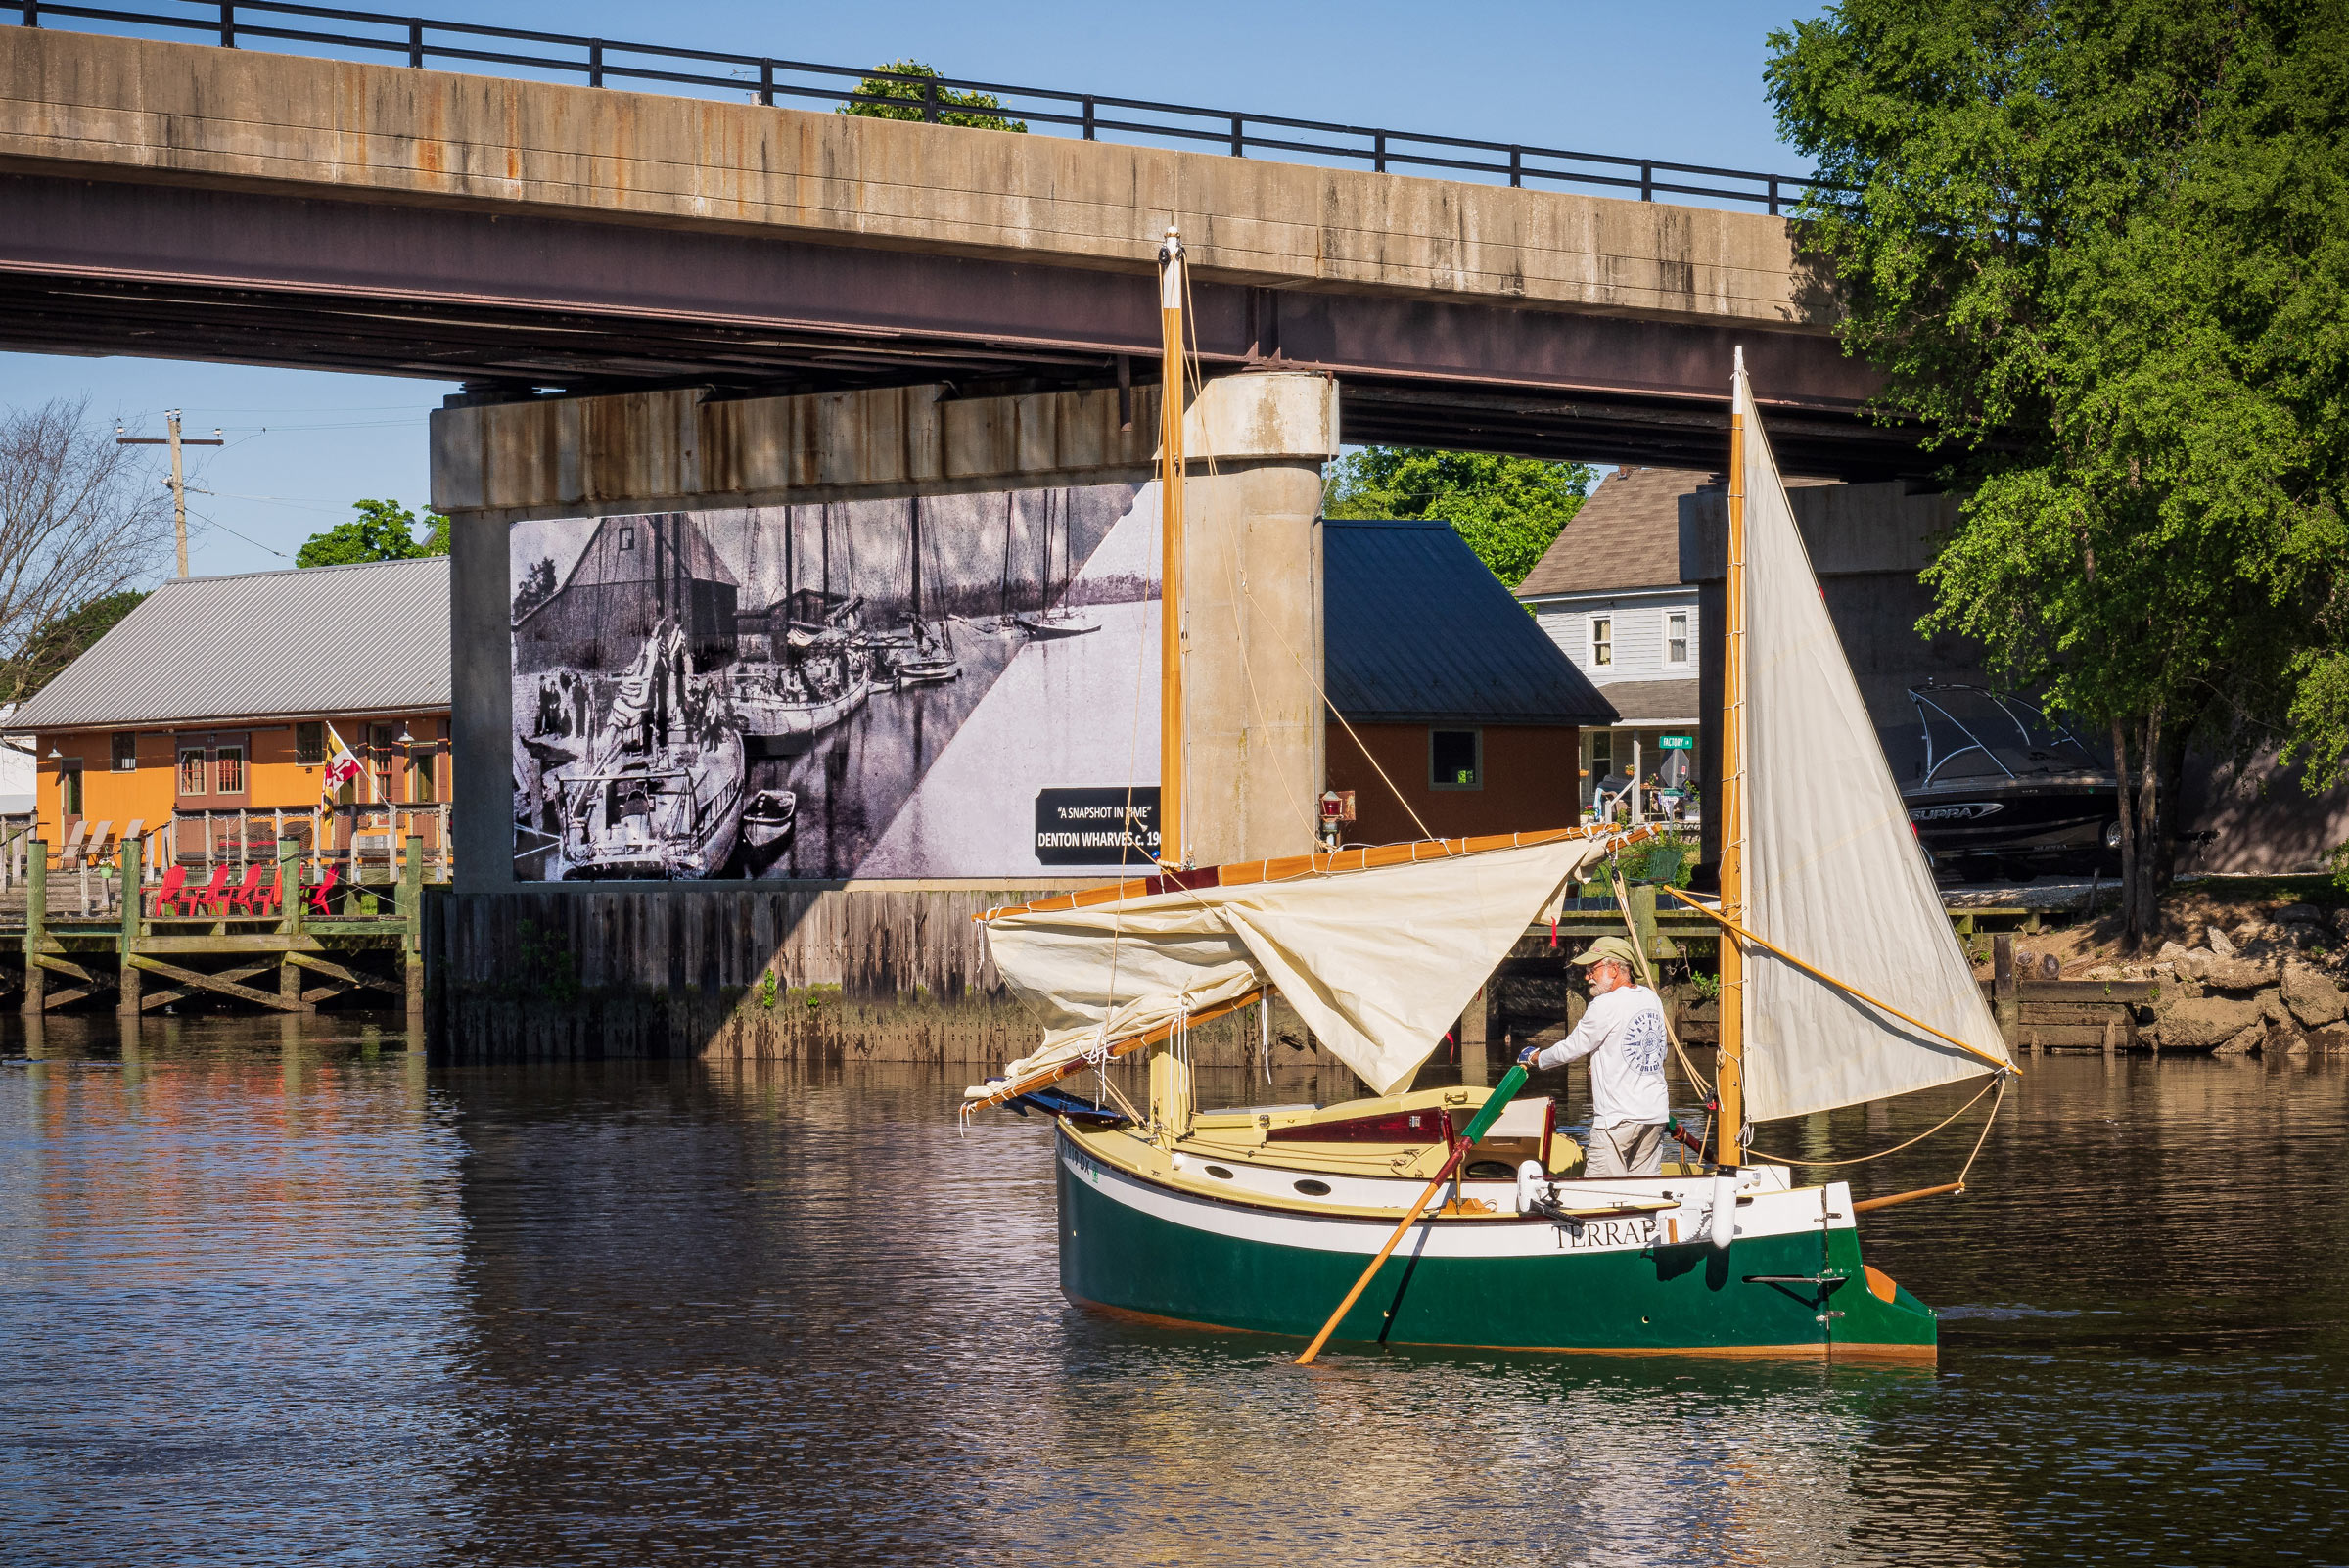
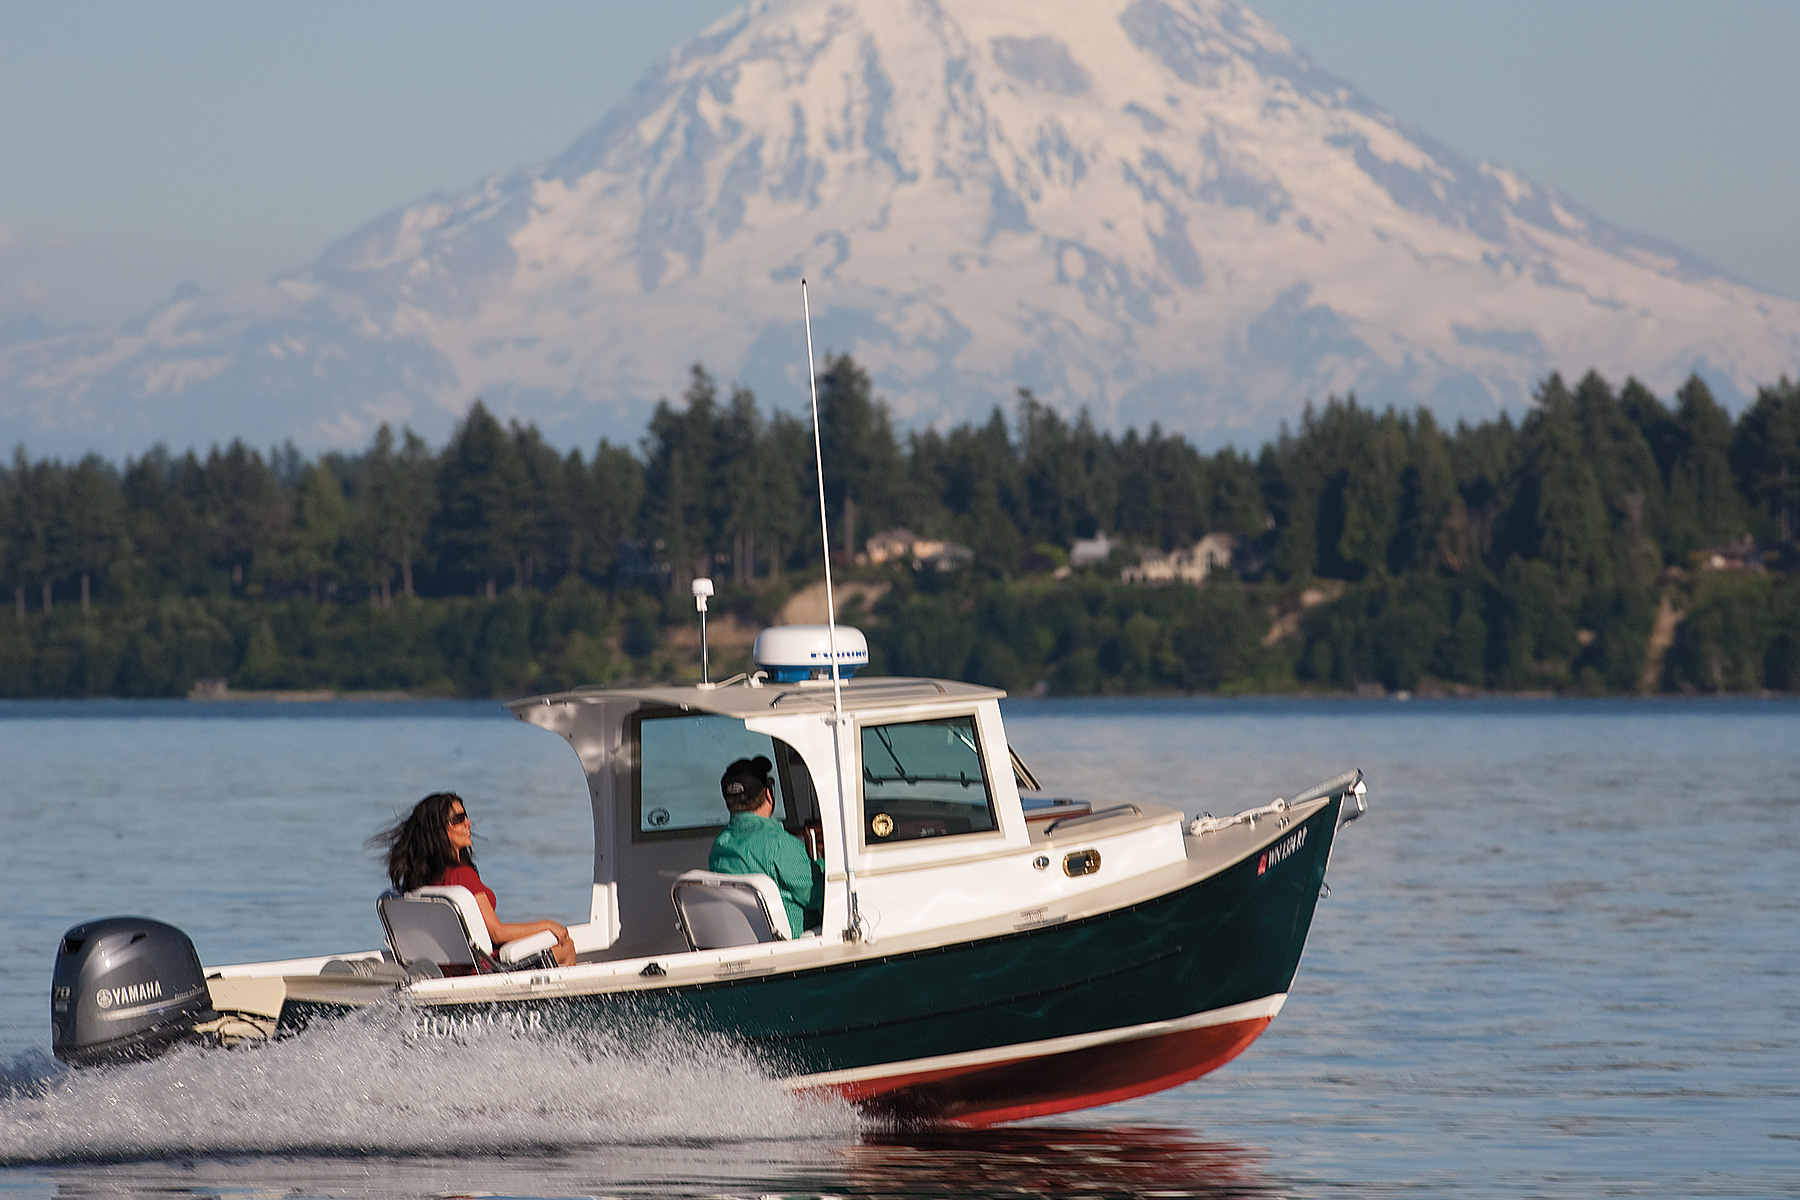
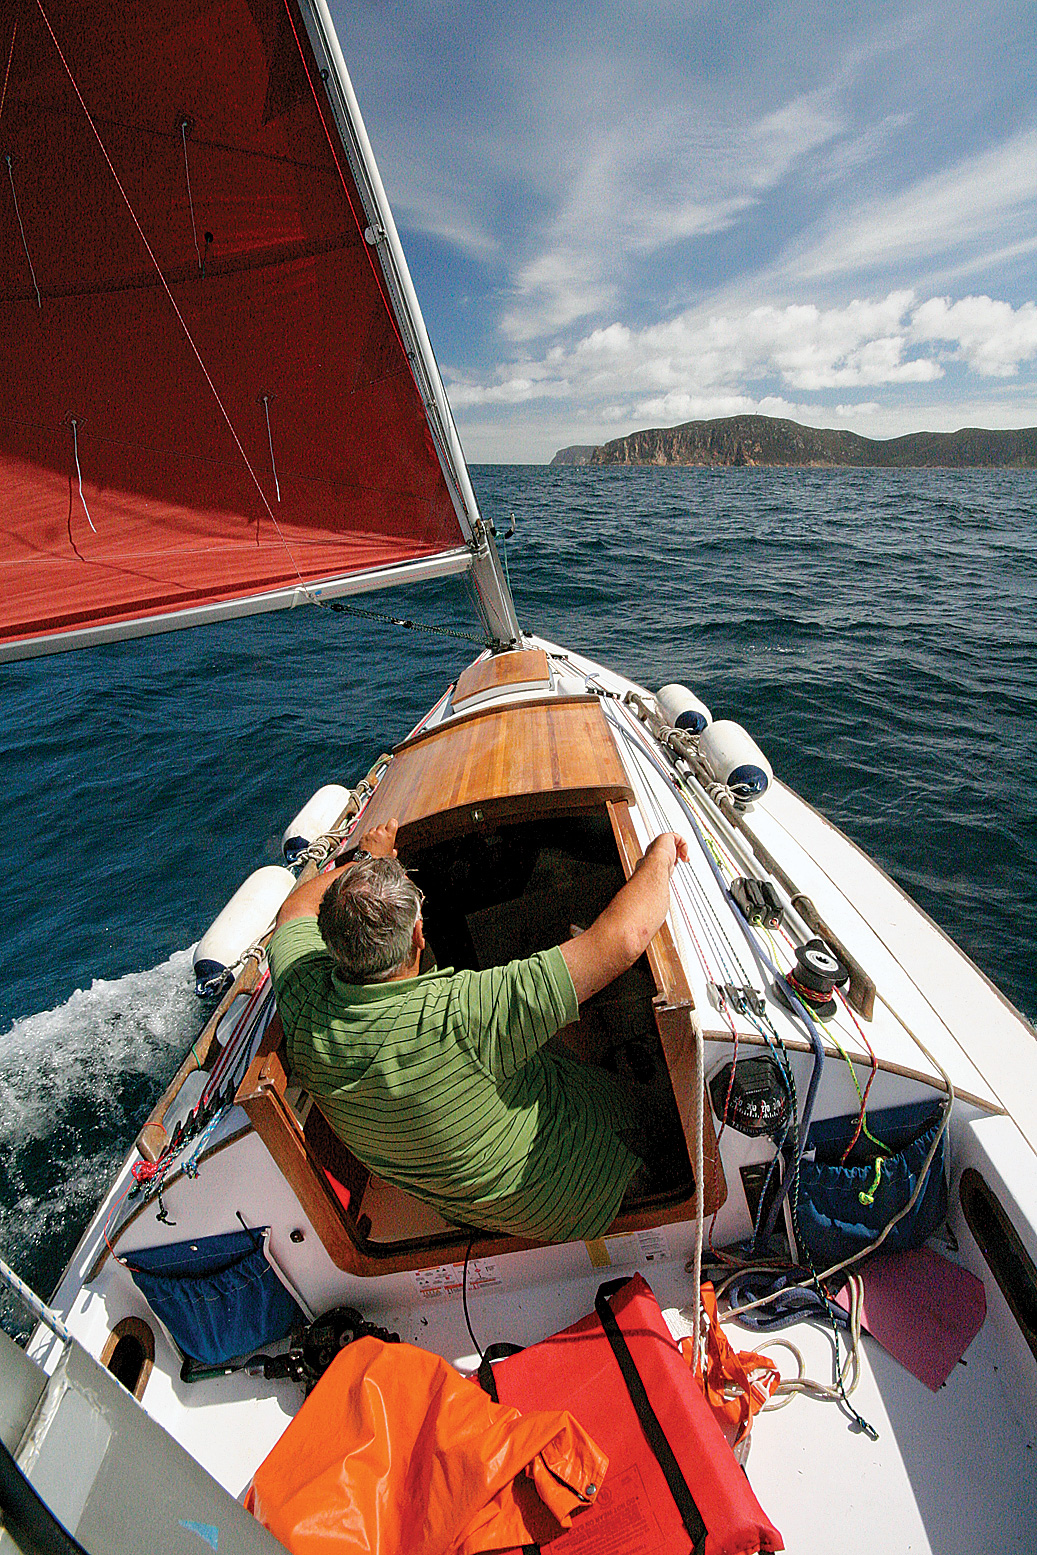
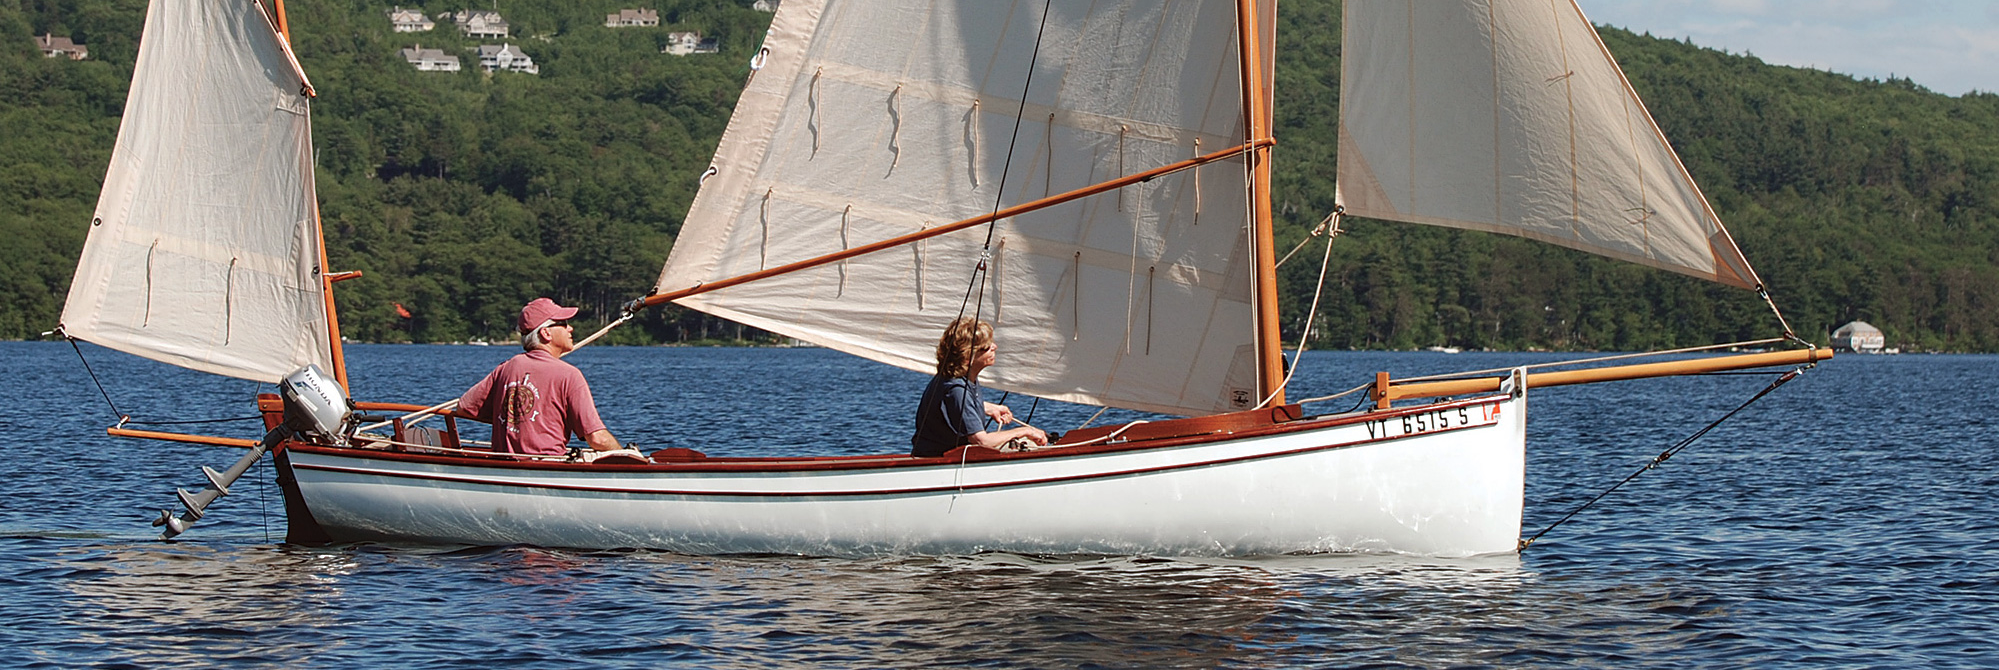
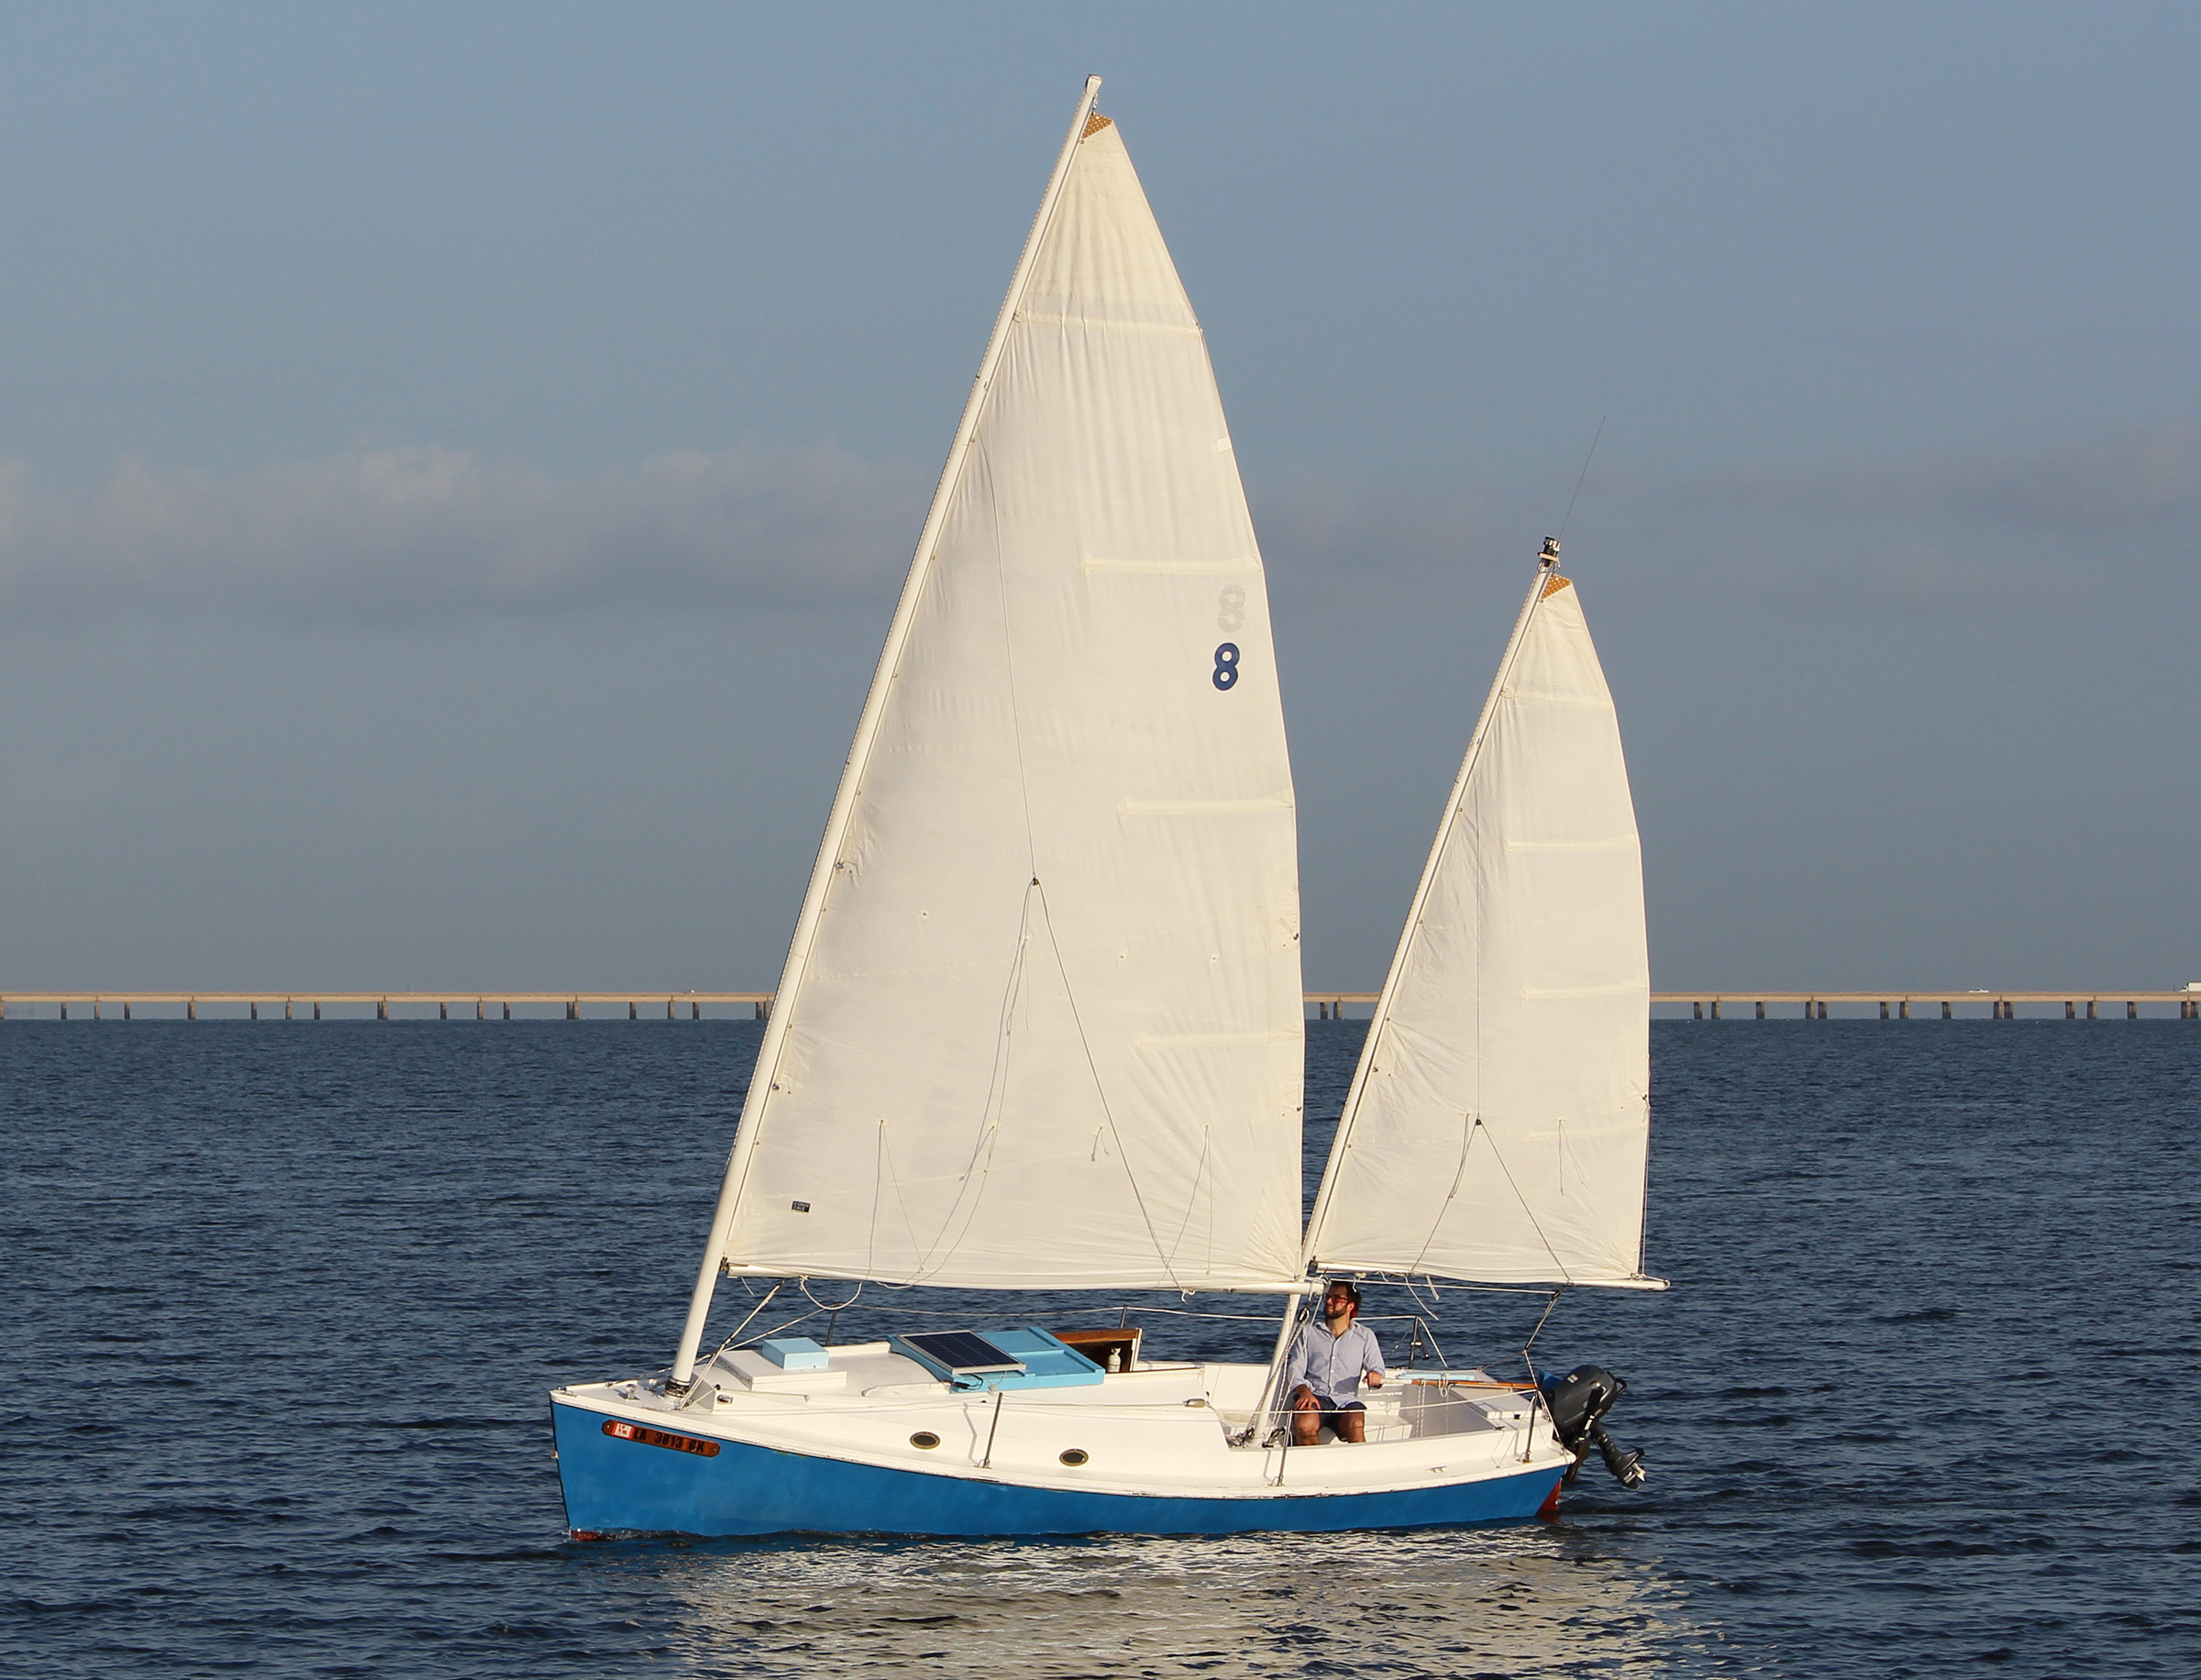
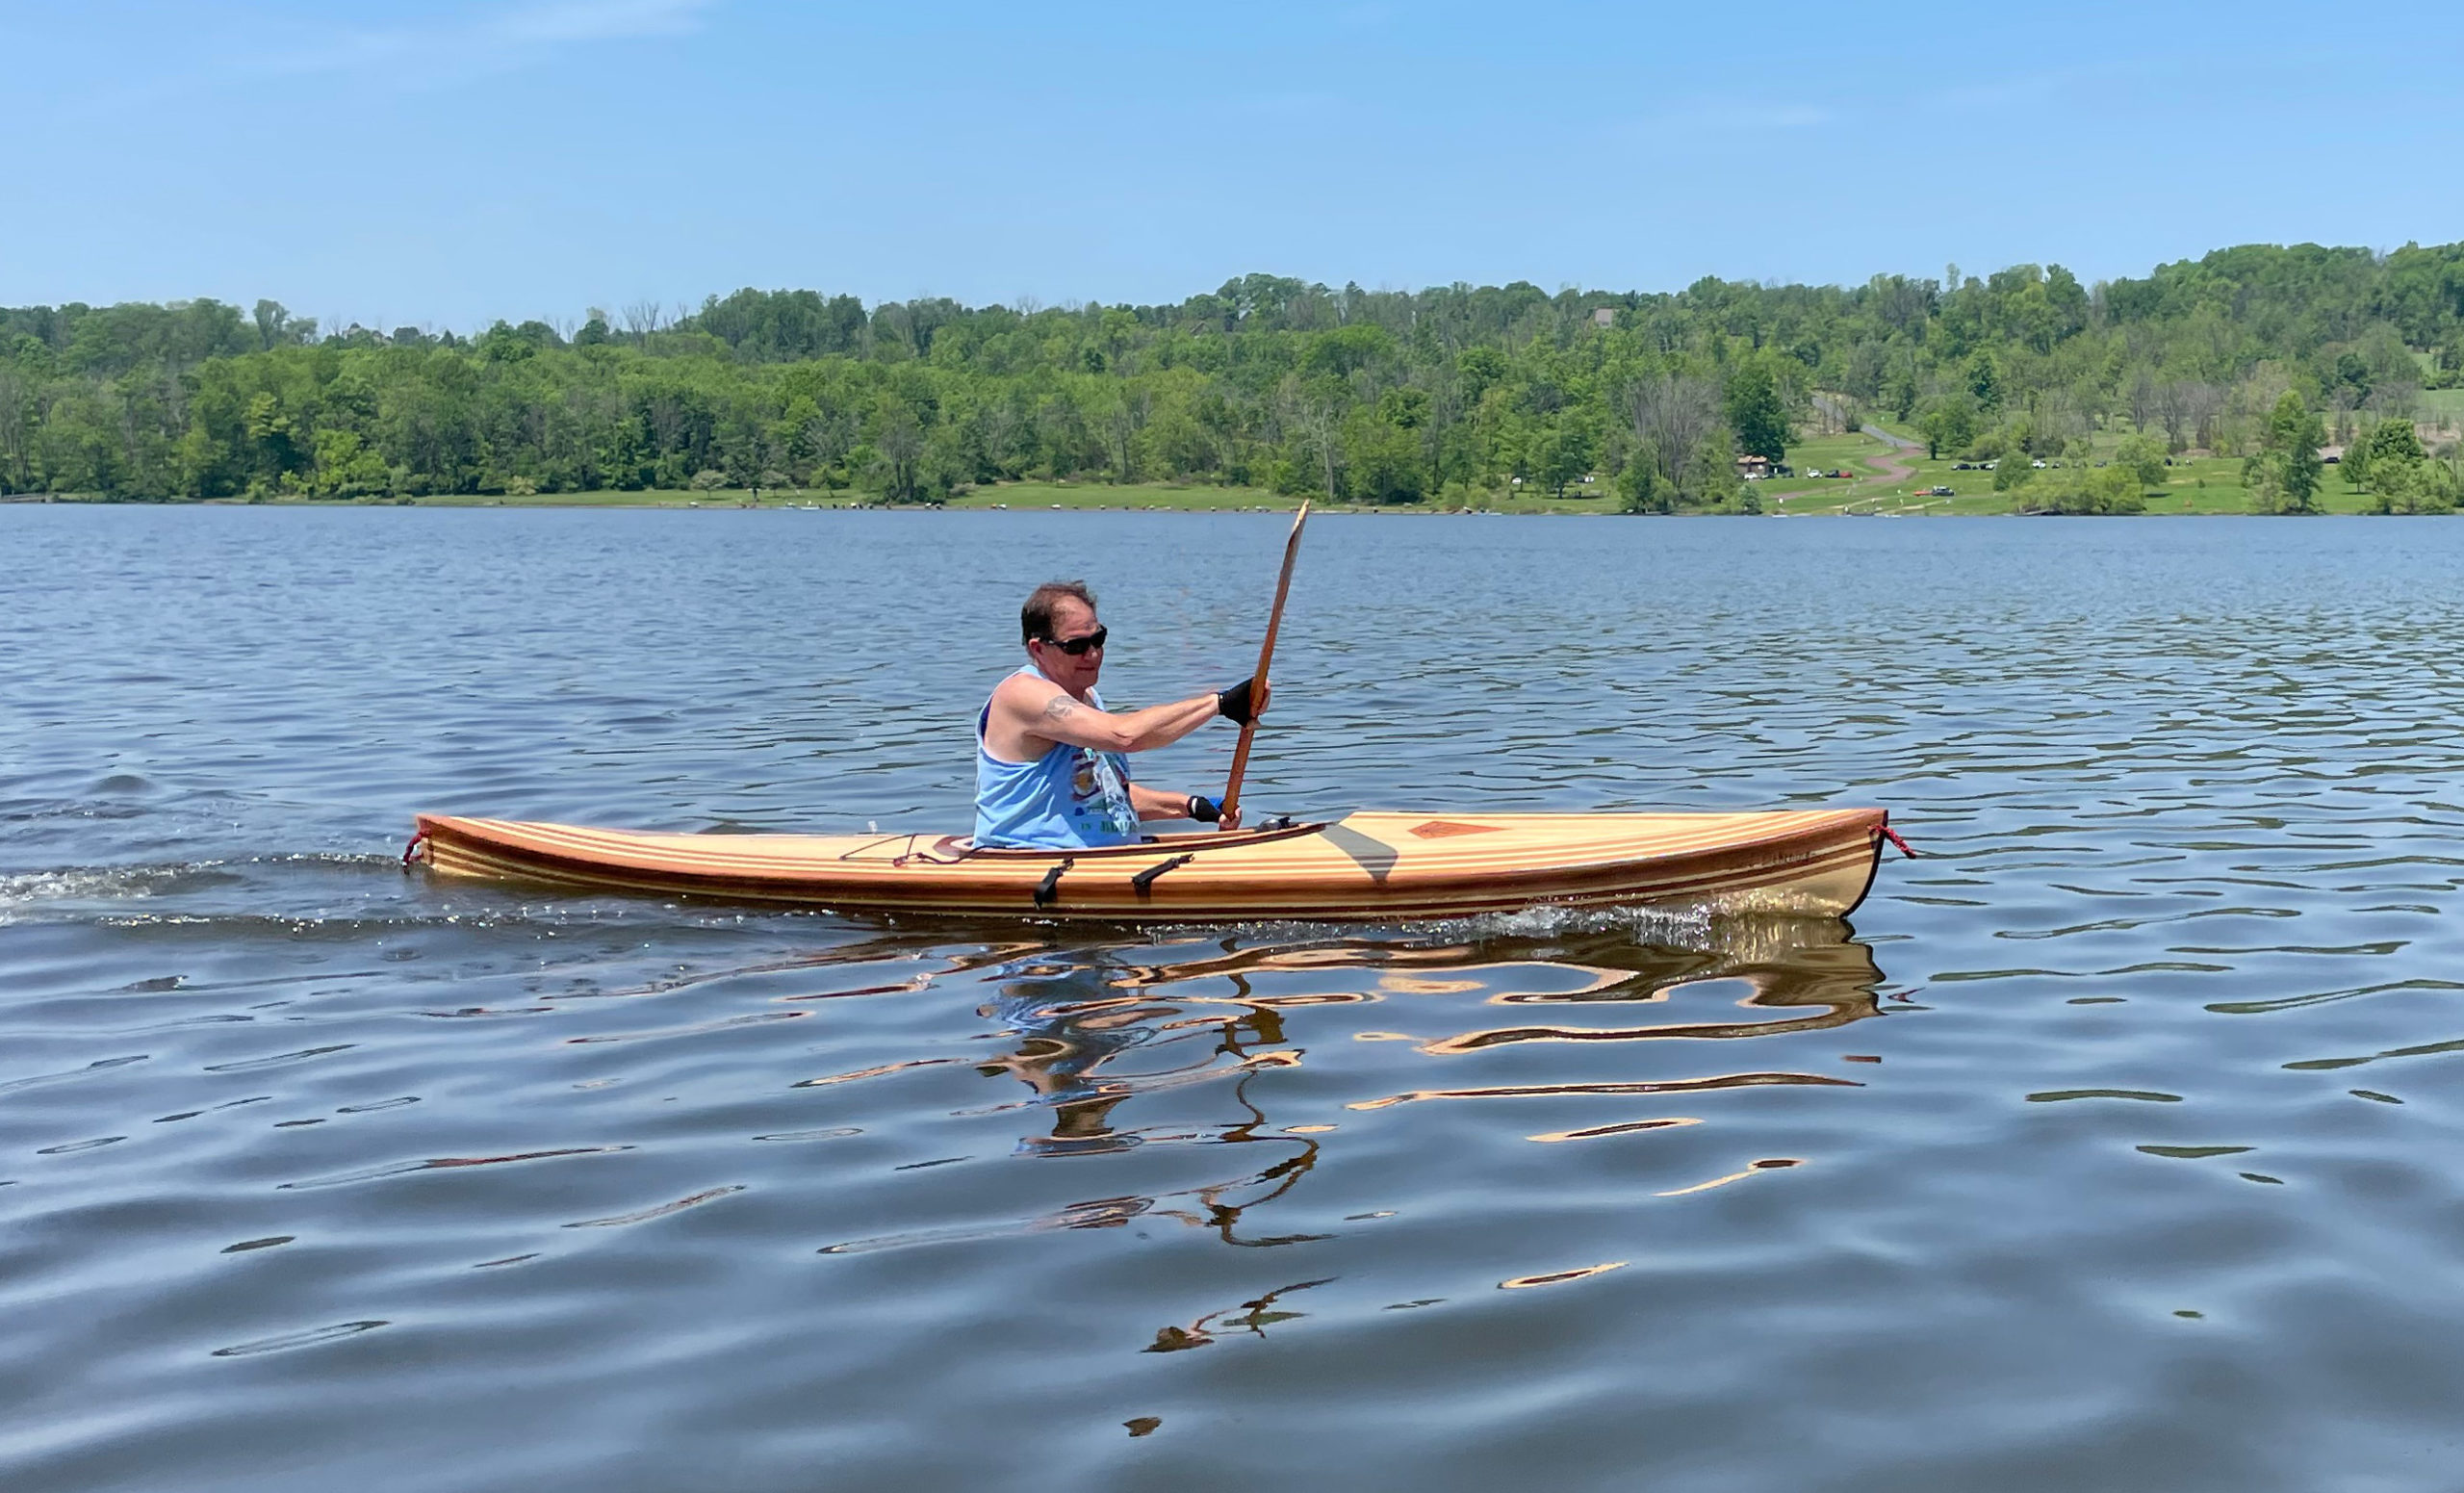
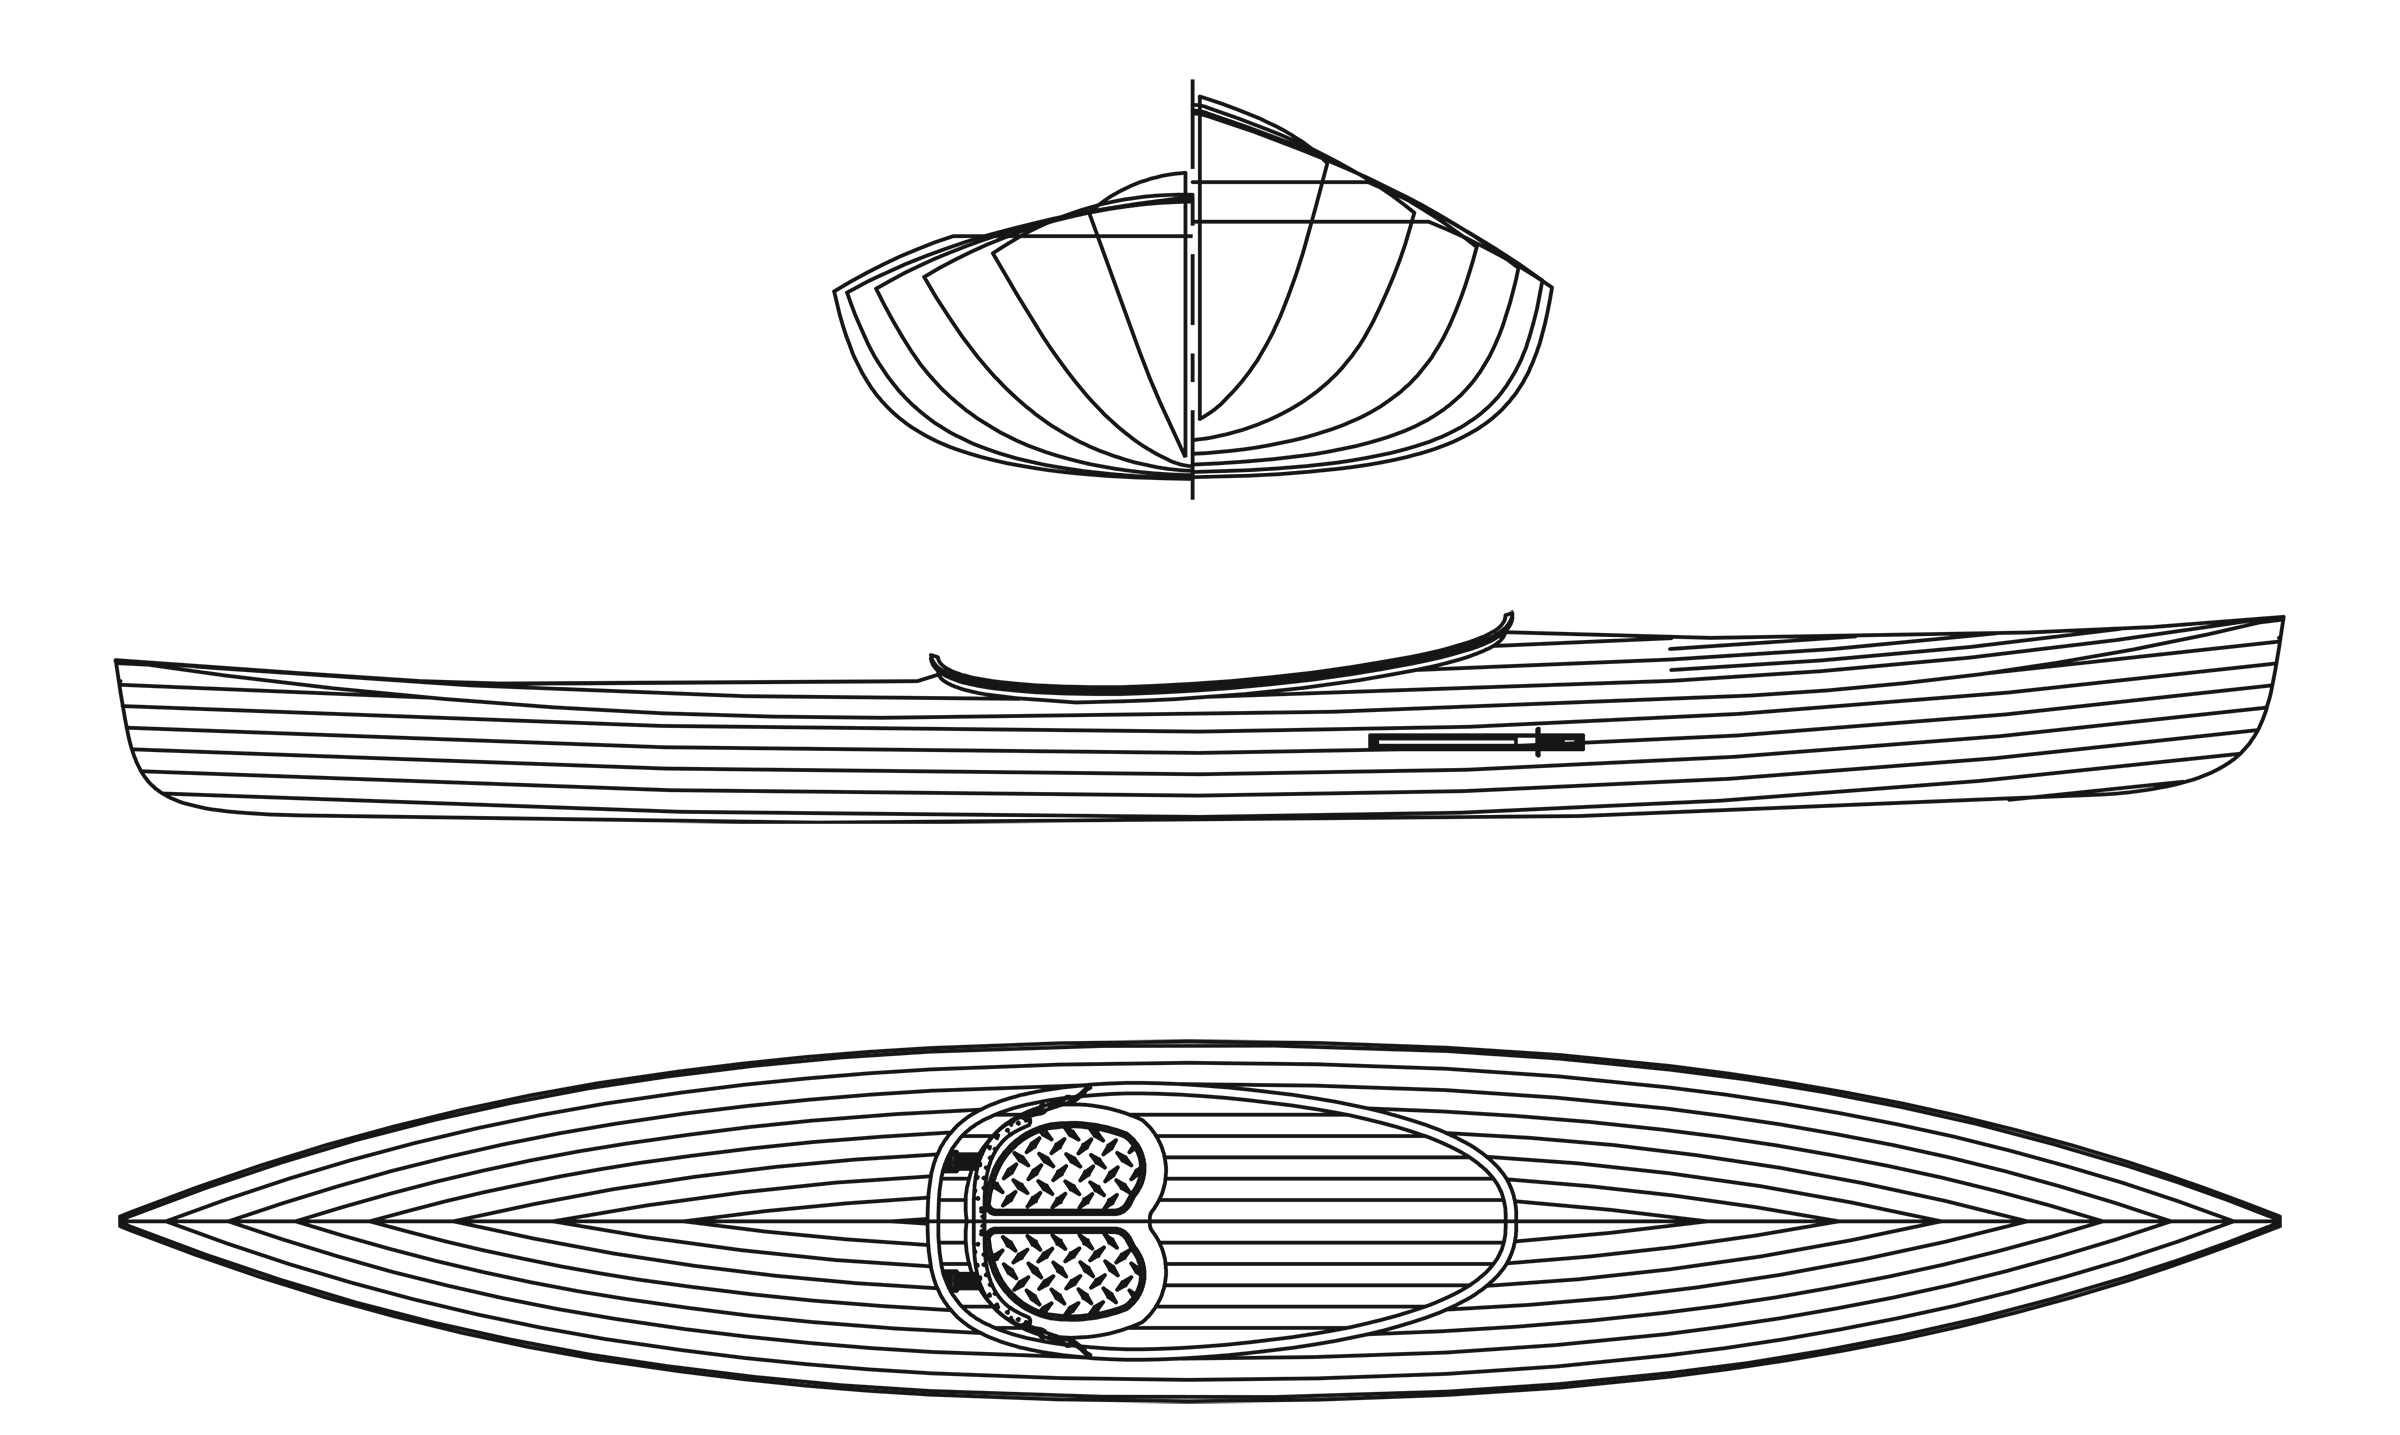
Brooklin, Maine, boatbuilder and designer Doug Hylan is happy to acknowledge that a RIB (rigid inflatable boat) can be a maneuverable, soft-sided, towable, and stable platform for working and transporting people on the water but, for him, a RIB’s appeal ends there. It won’t motor well at slow speeds, can’t sail decently and, famously, rows so horribly that he considers it “an airtight excuse for not rowing.” Doug designed Oonagh “to combine some of the best qualities of inflatables with the advantages of a traditional dinghy and put it into a package that is a little less hostile to the planet.” This 11′8″ x 5′ glued-lapstrake pram is a small, stable utility boat that can row and sail well, and use a small motor without requiring a lot of power (not to mention noise and fuel).
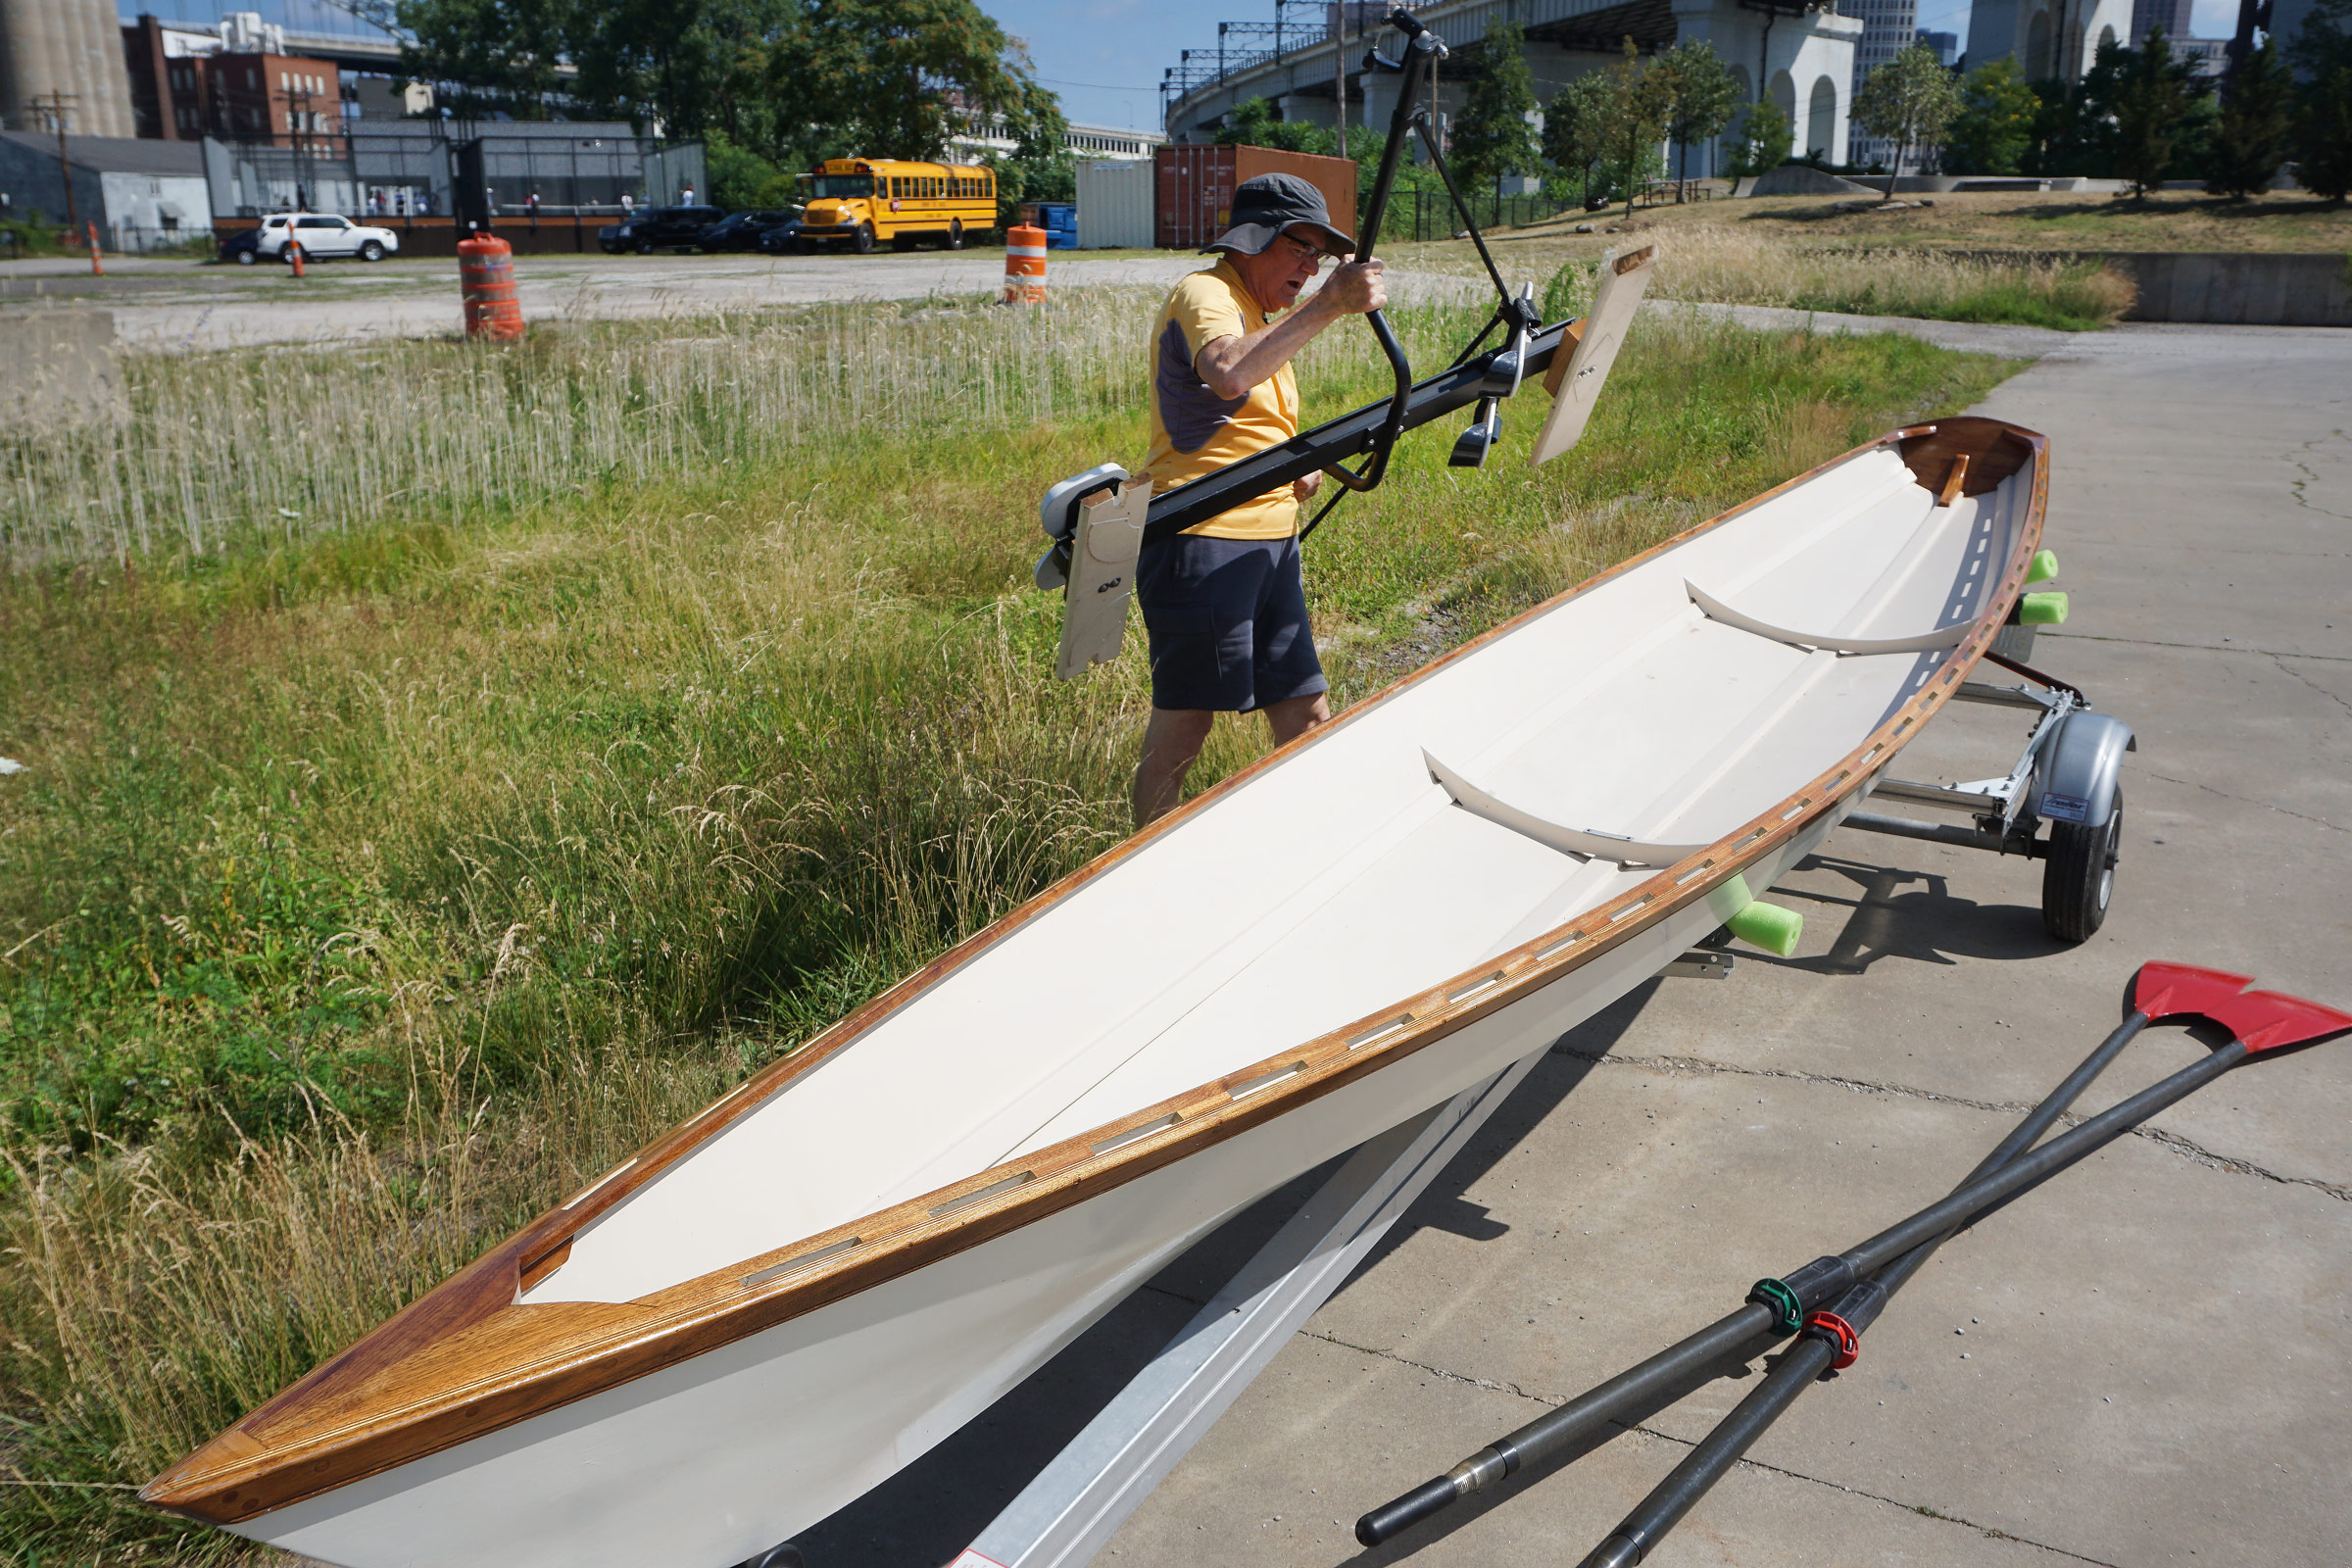
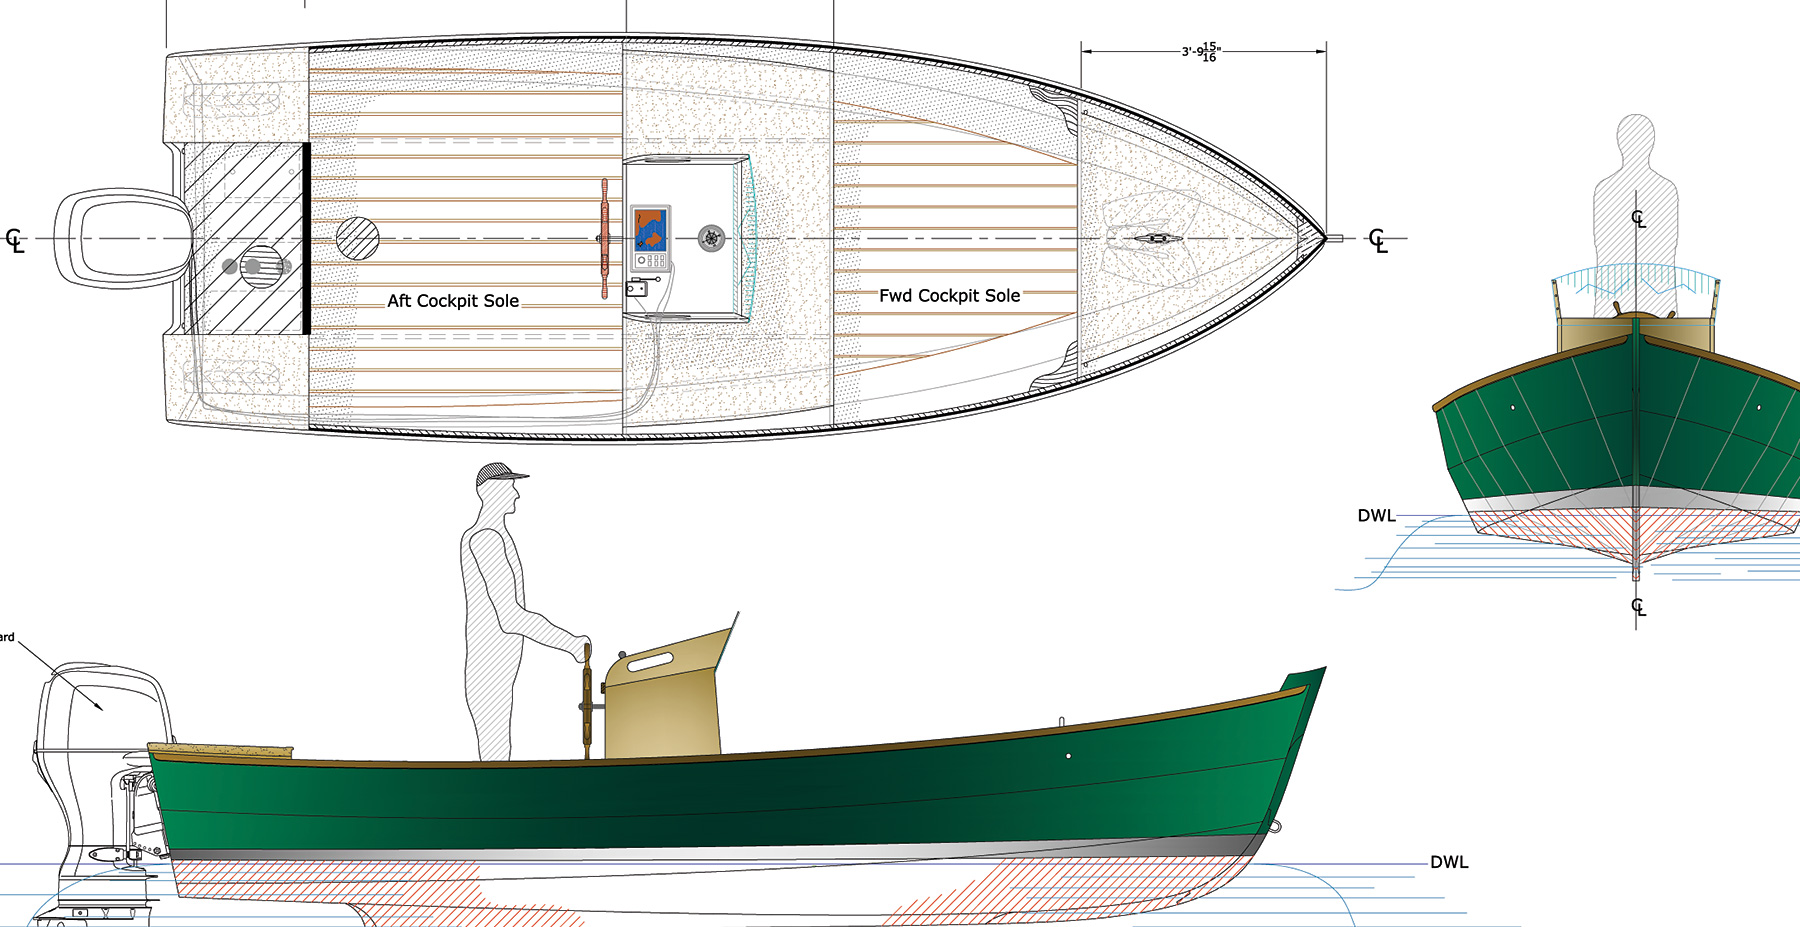
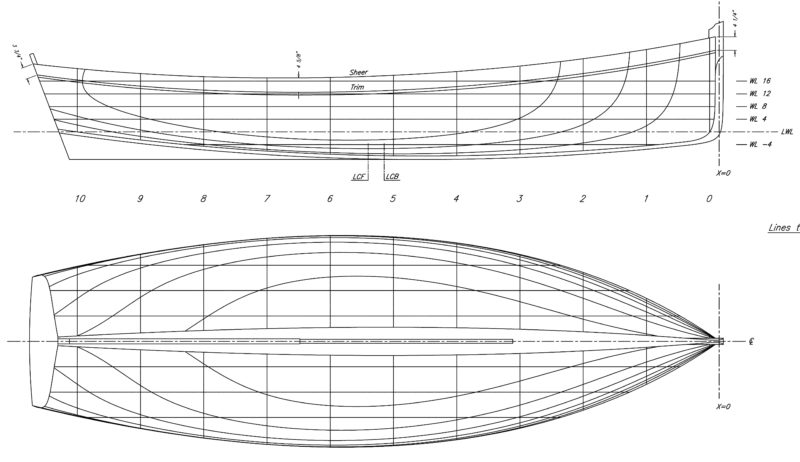
The Oonagh has a look that inspires confidence, which struck me when I first saw it and was an important factor in my decision to have Hylan & Brown build one for me. I have built several boats and, although an Oonagh would have been a perfect project, I lost my shop space when my wife and I moved to a condo. For anyone with the space and time to spare, the boat can be built from plans or a kit. The construction of Oonagh is a doable project for a motivated first-time builder, and a delightful project for a boatbuilder of almost any skill level. The plan’s seven sheets include: lines plan, construction plan, building jig, full-sized patterns, plank layout, and sail plan. No lofting is required, and the frames to which the plywood is attached are easily cut from the full-sized patterns. Kits for the Oonagh are made up of CNC-cut plywood parts. Off Center Harbor, the source for plans and kits, also offers an 18-part series of instruction videos that are so detailed and carefully described that there should be few if any questions as construction on an Oonagh progresses.
Bill Boyd
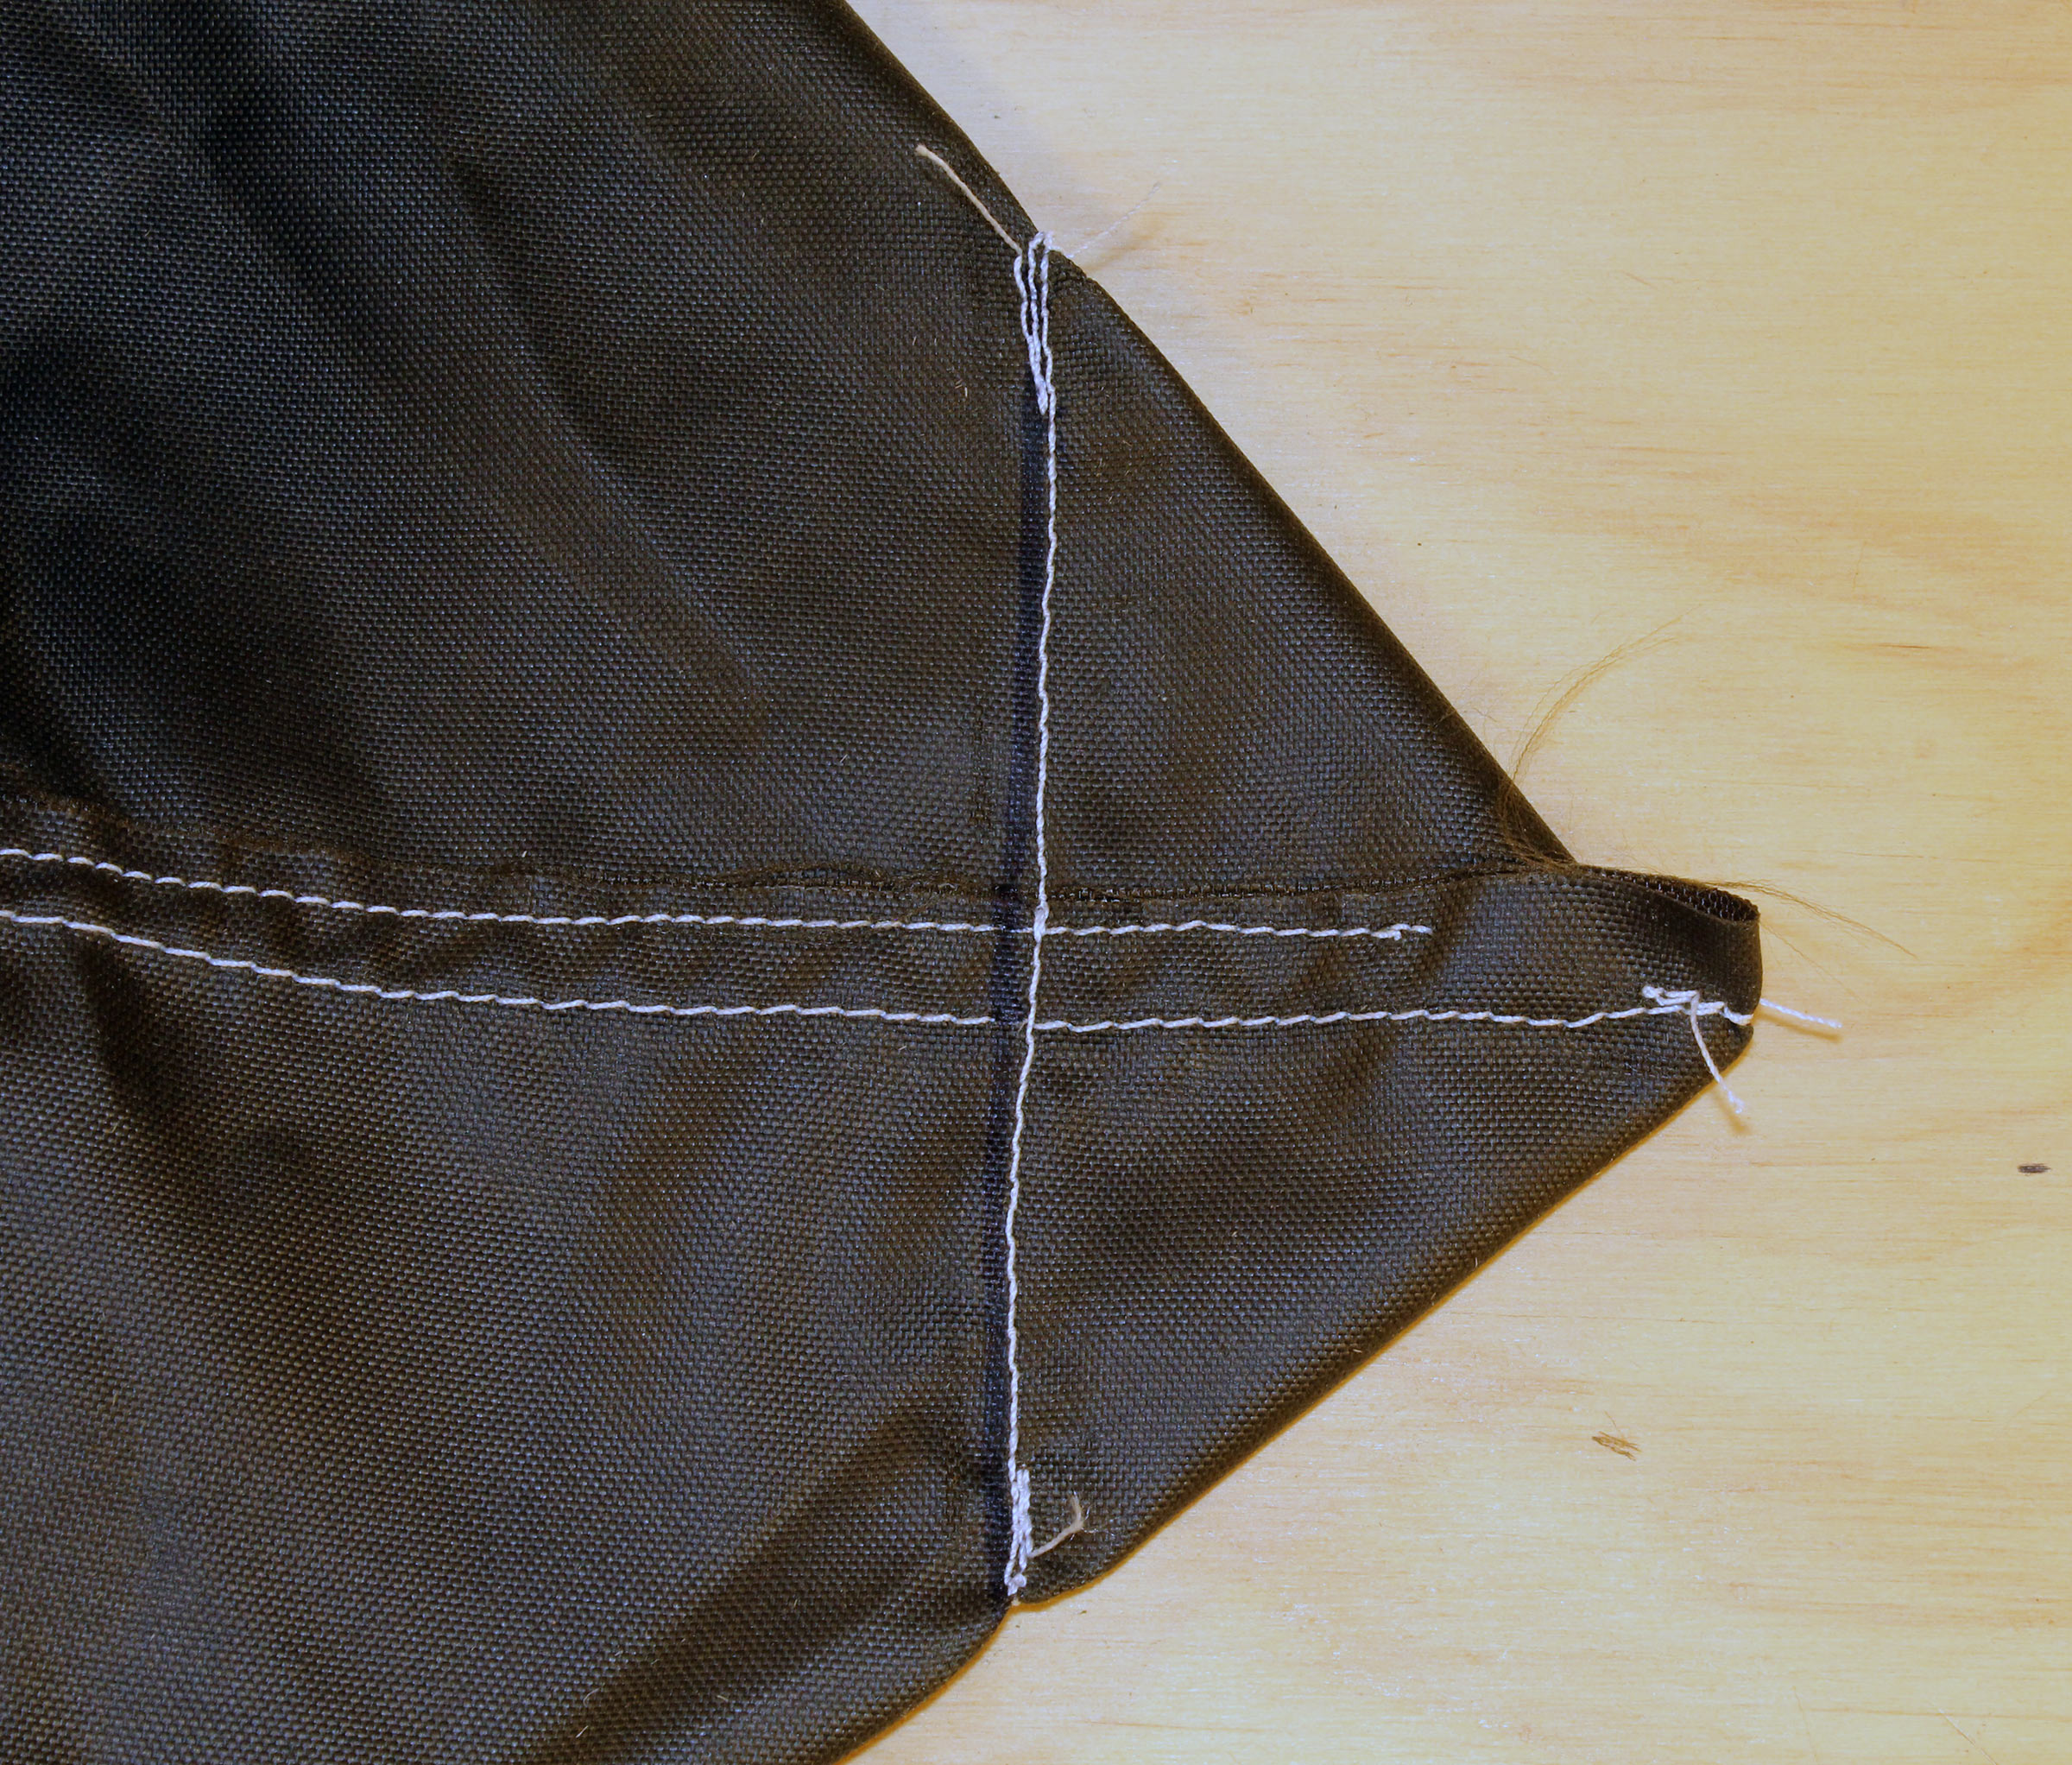
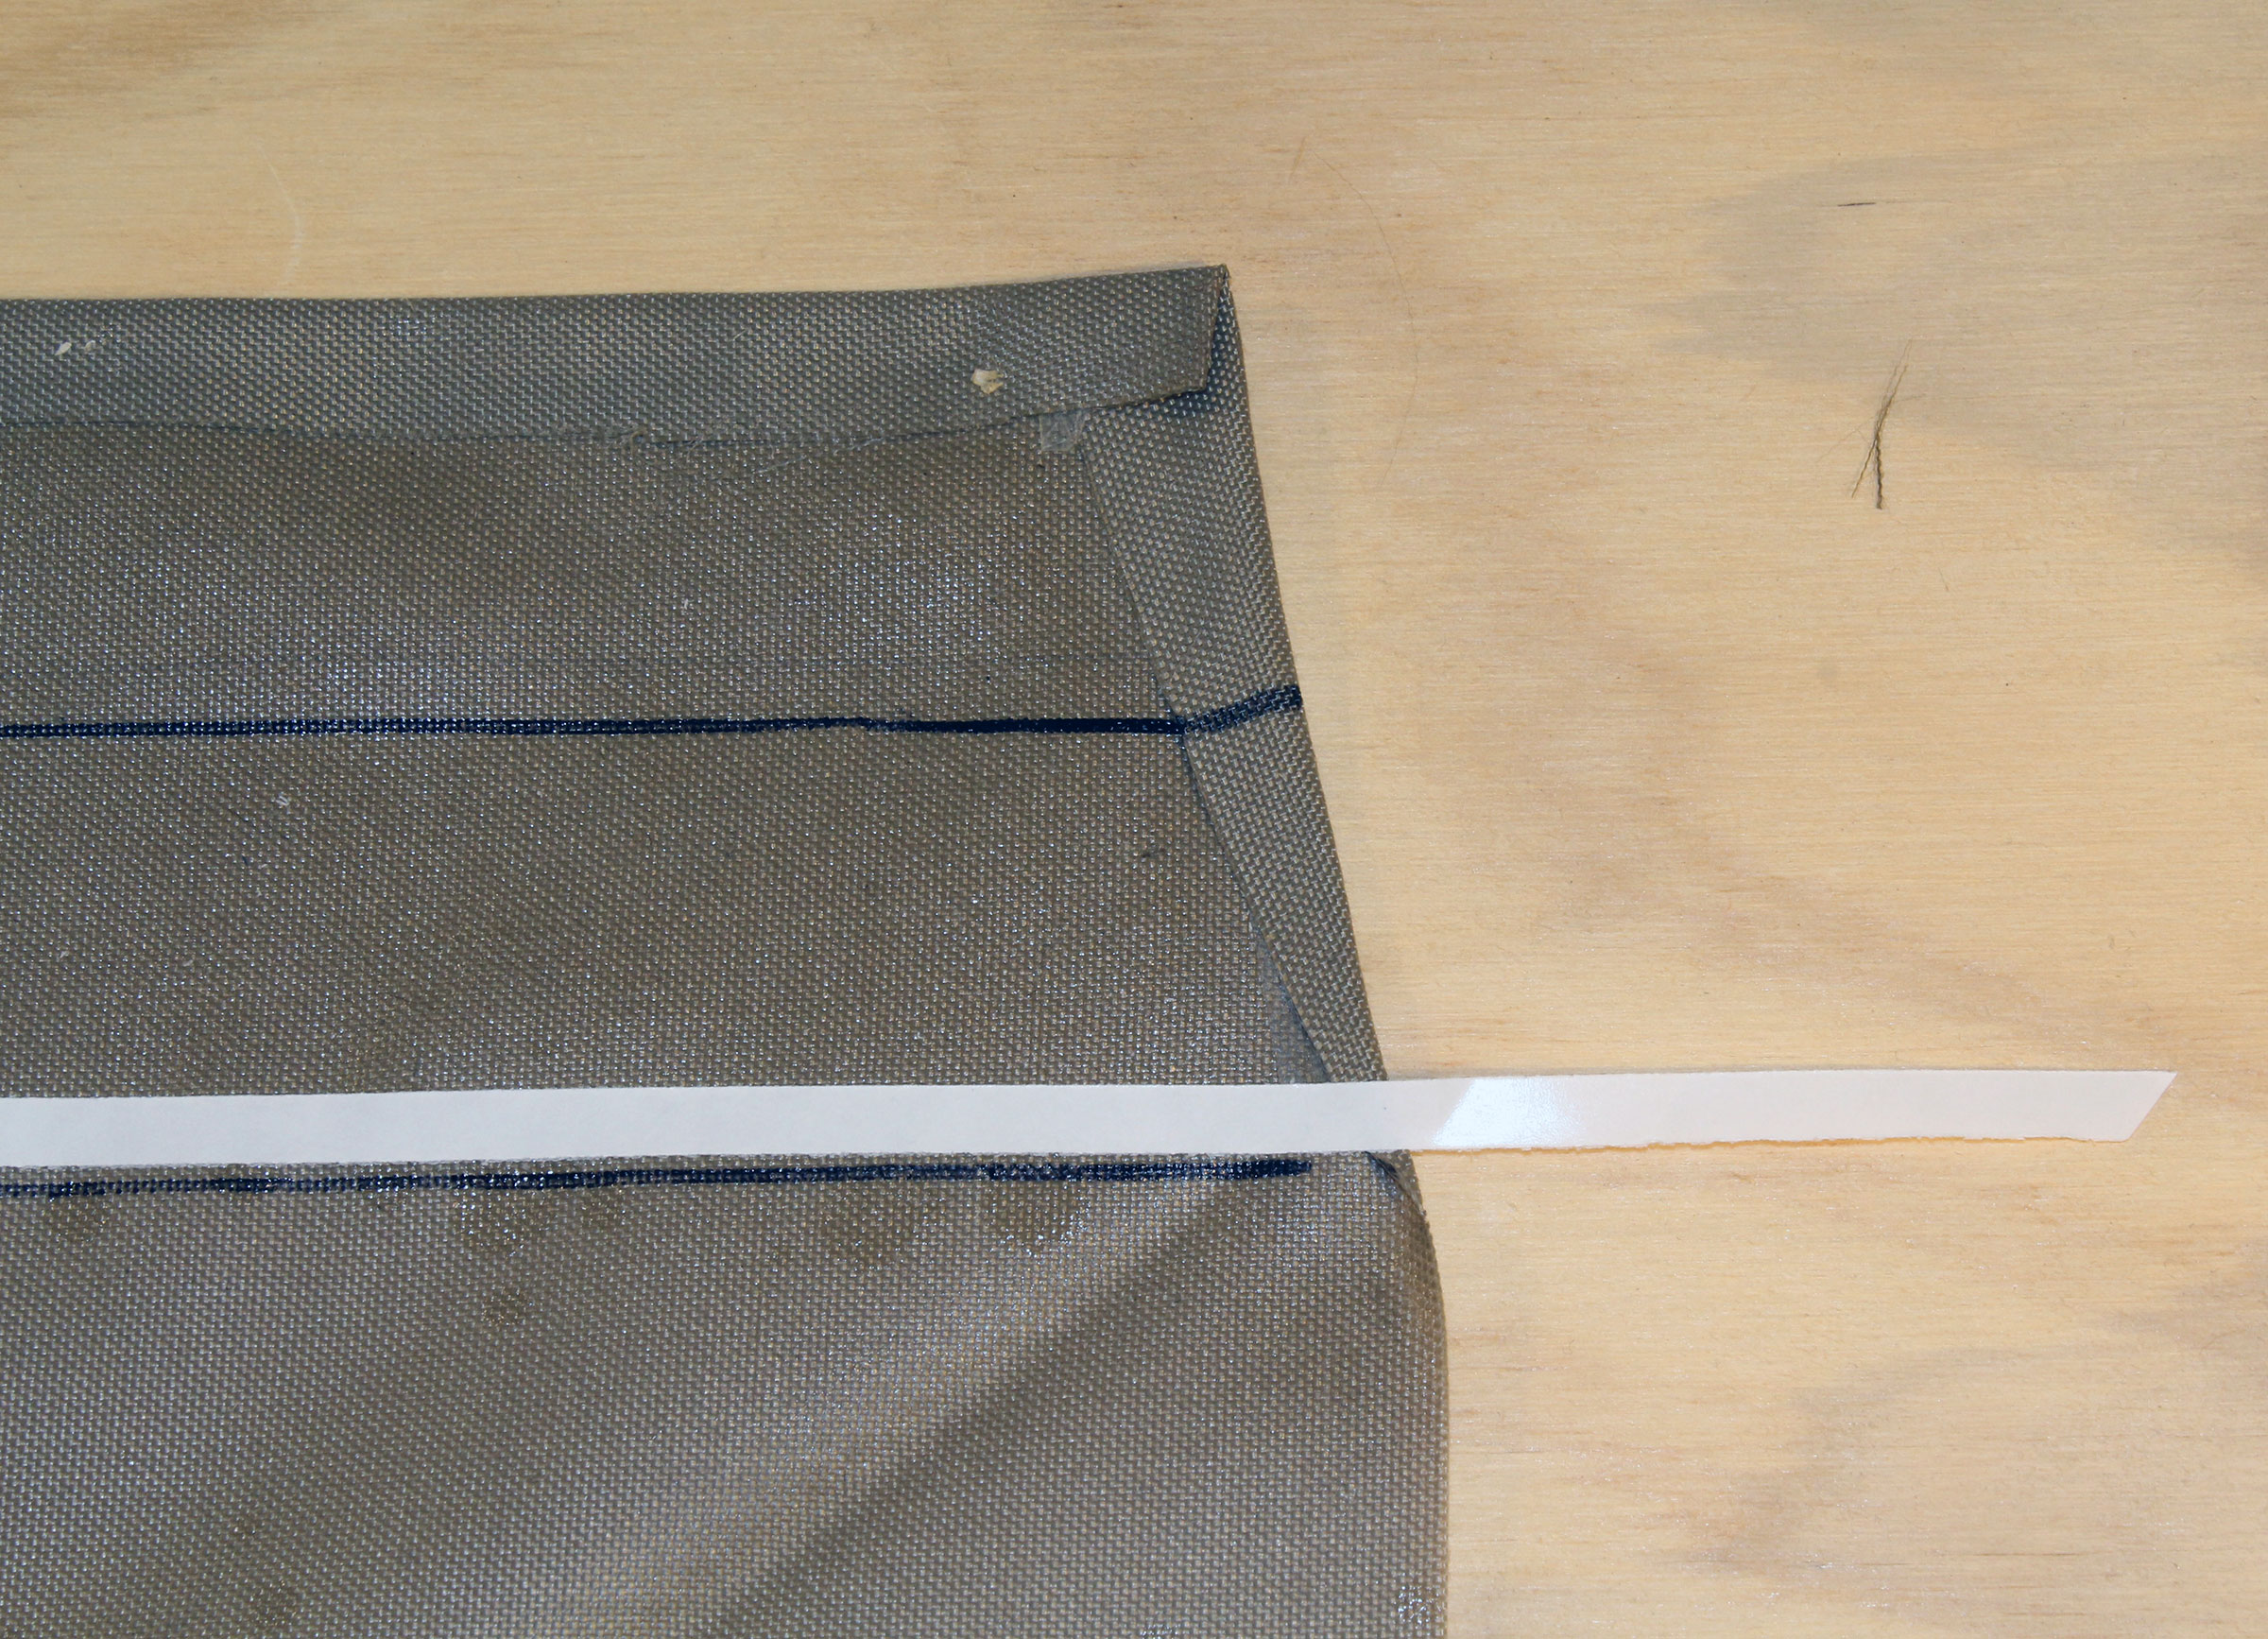
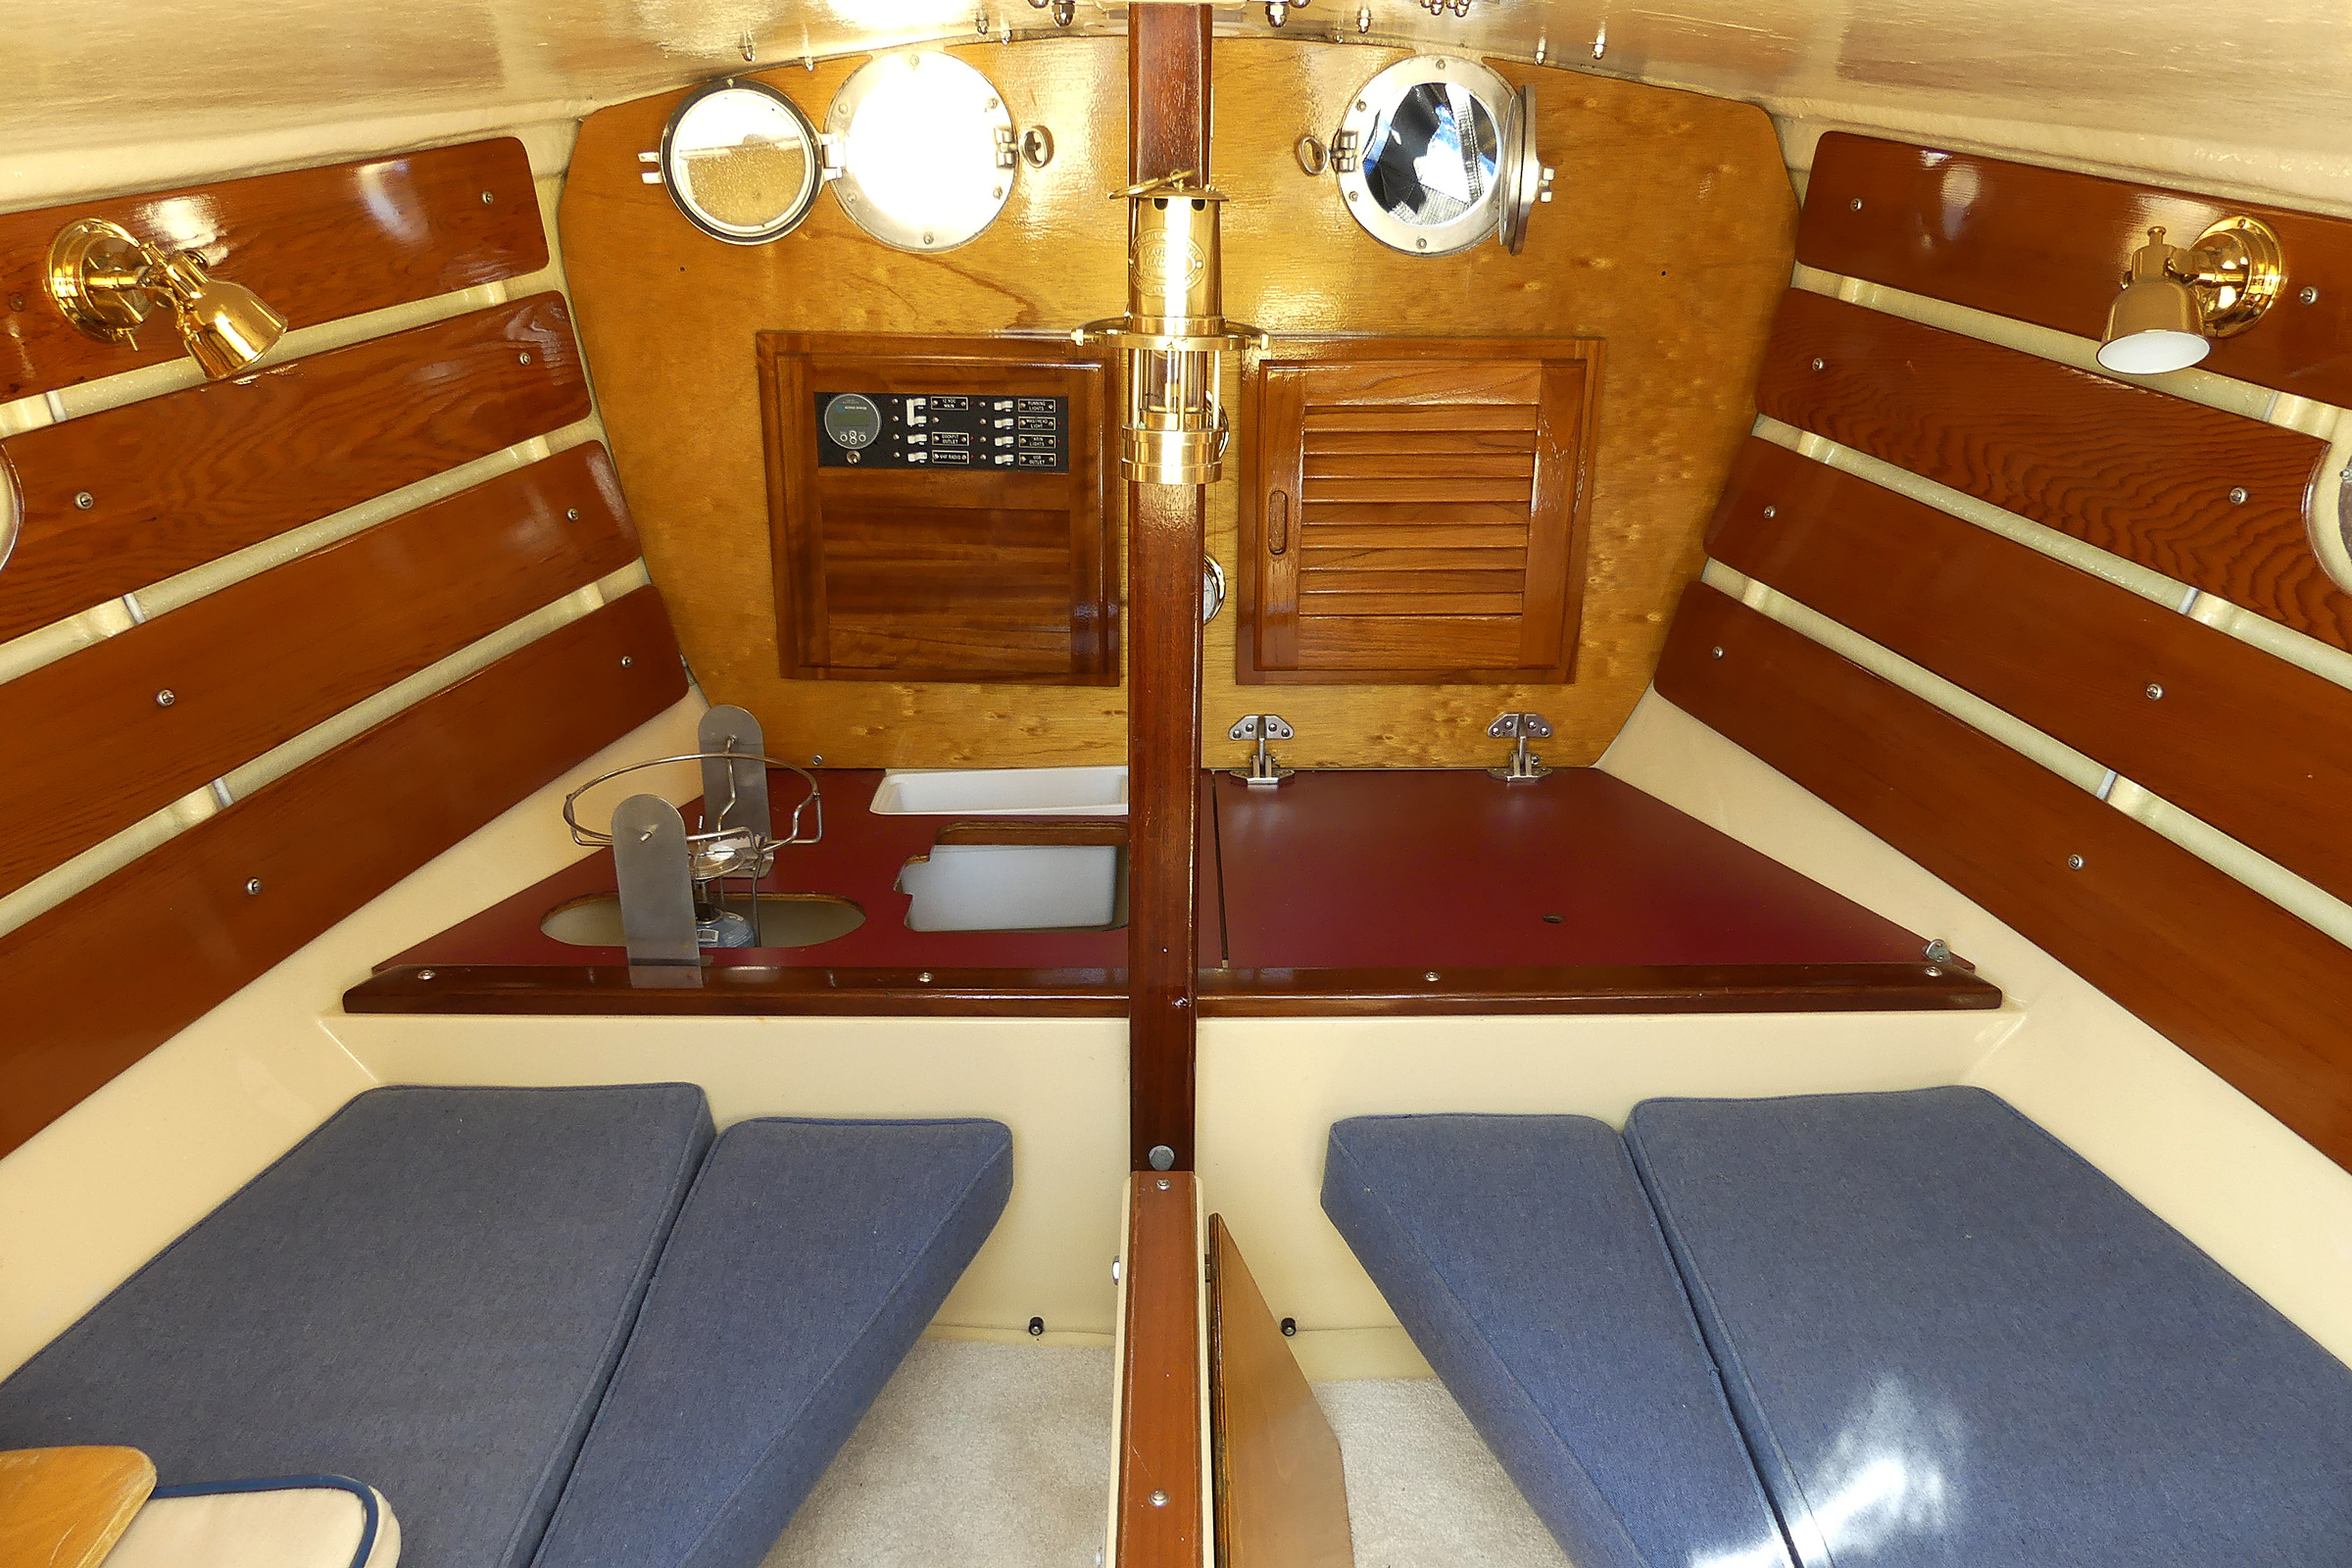
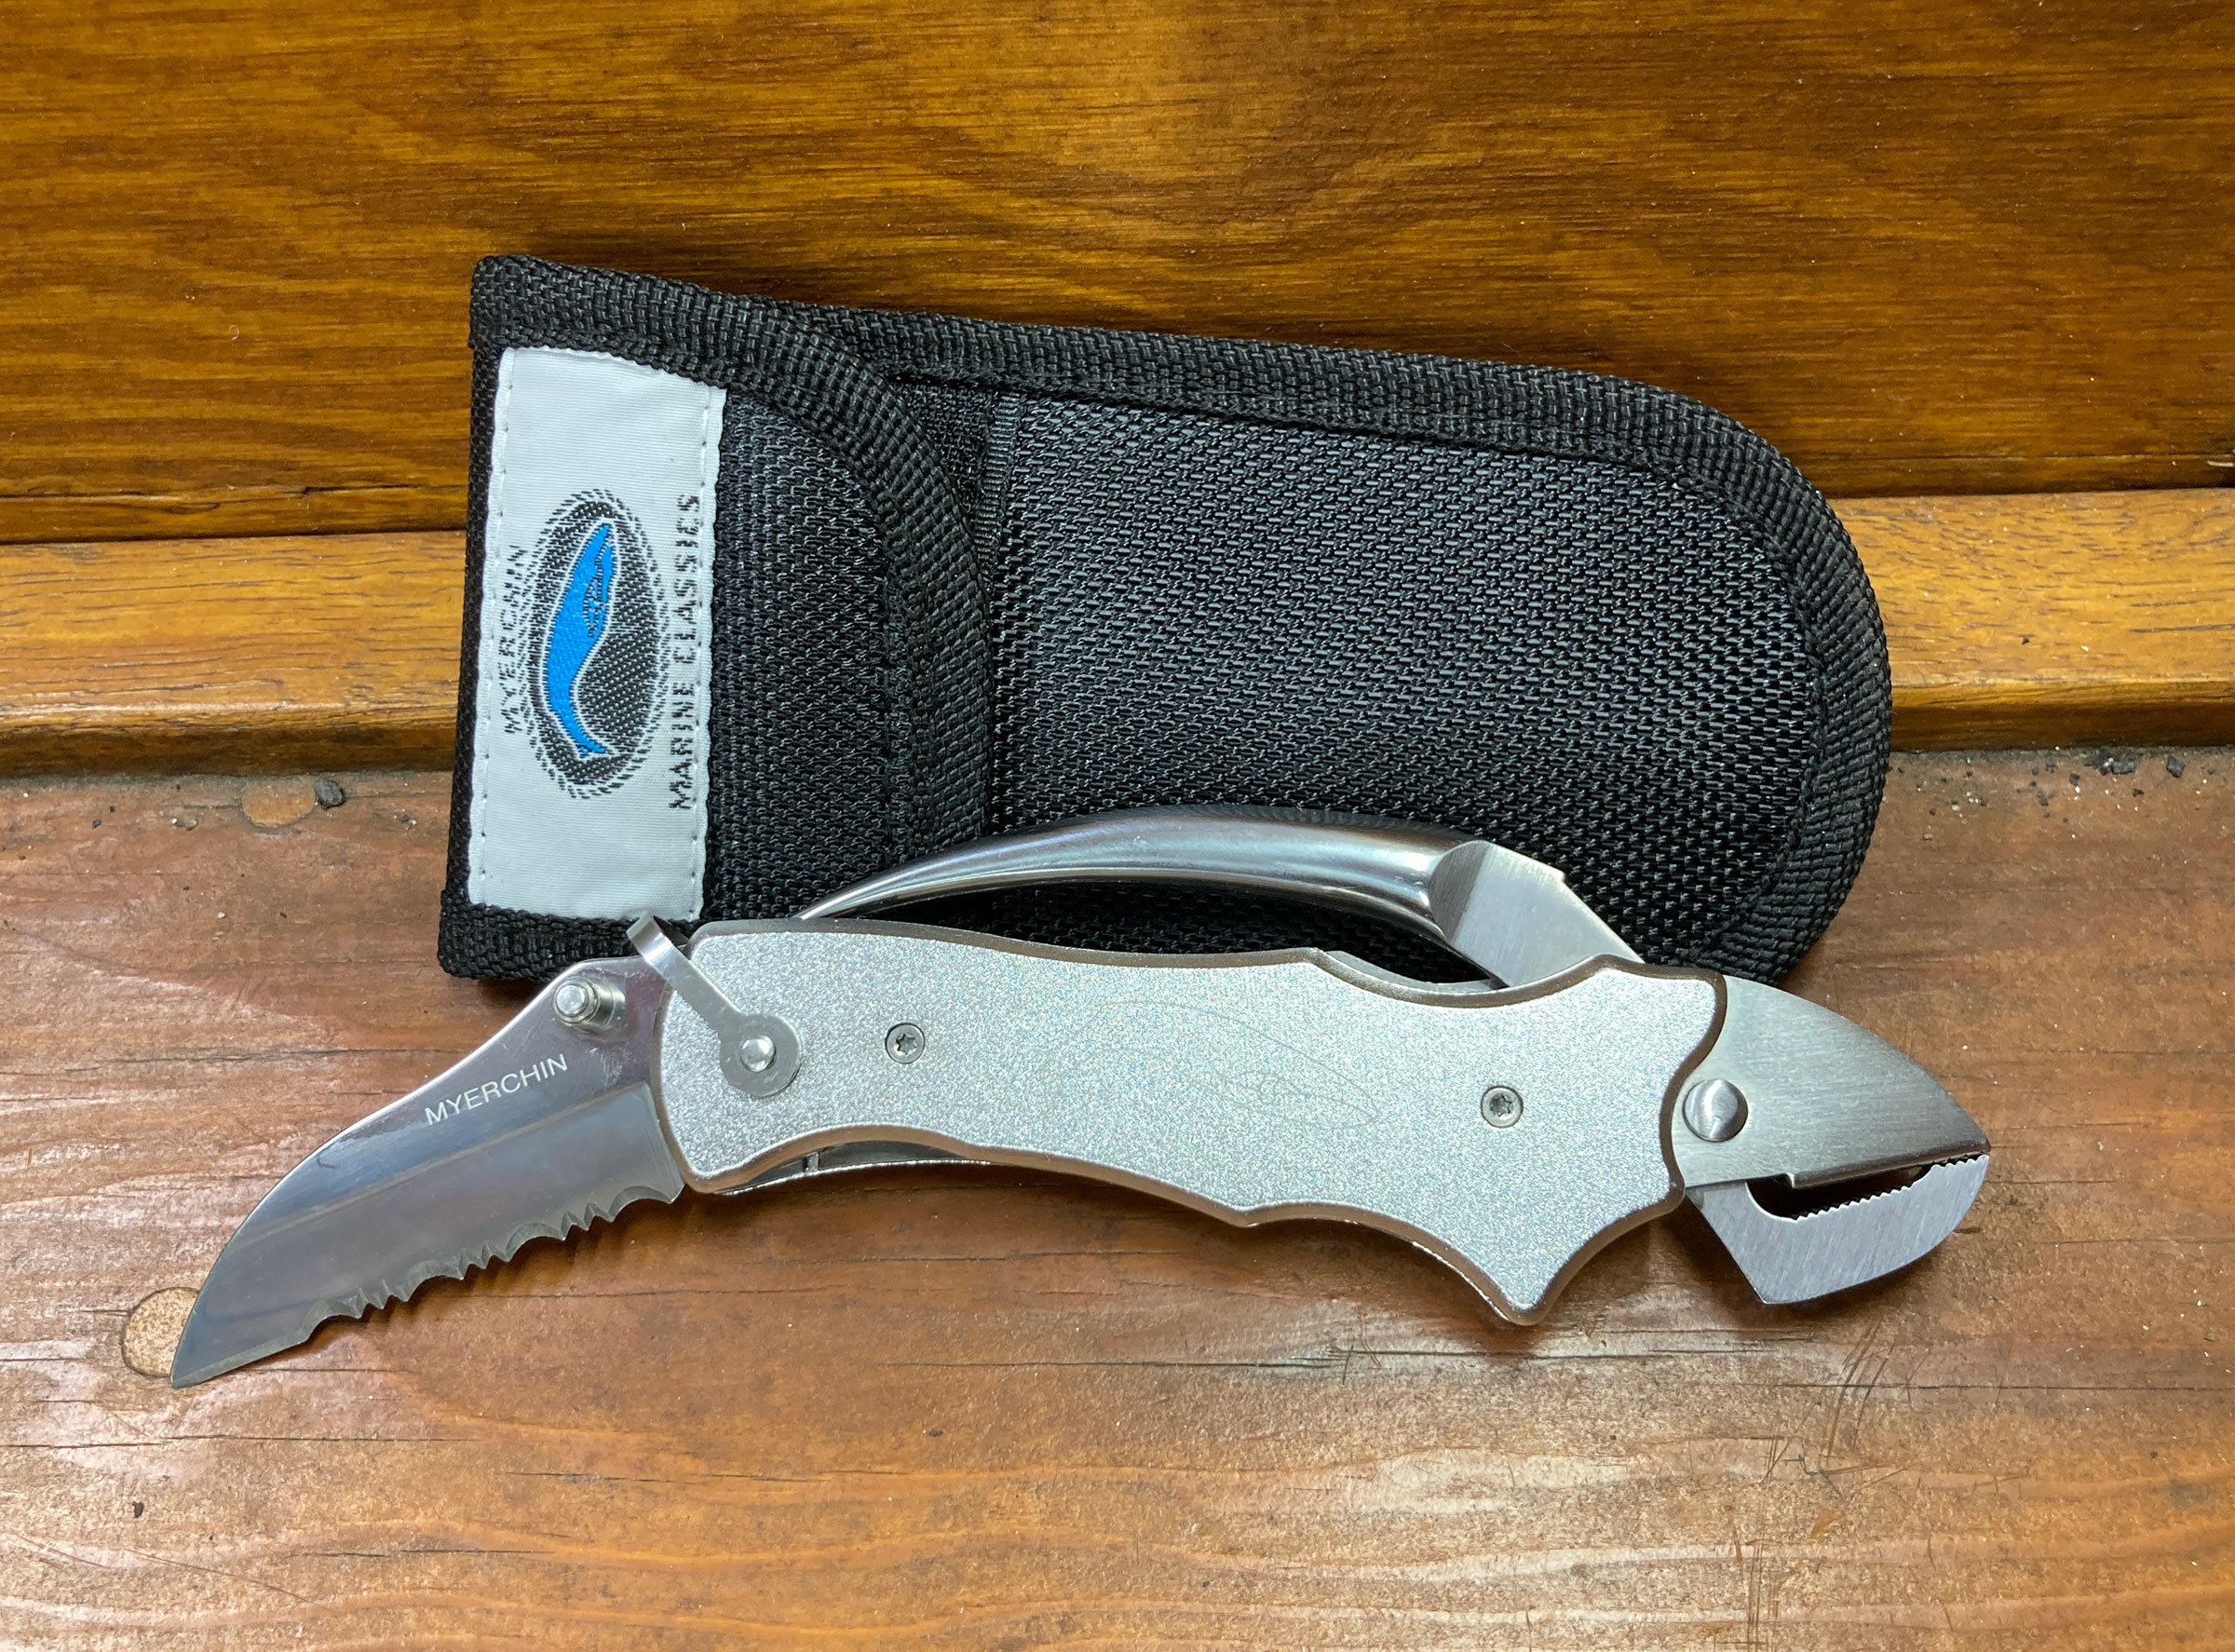
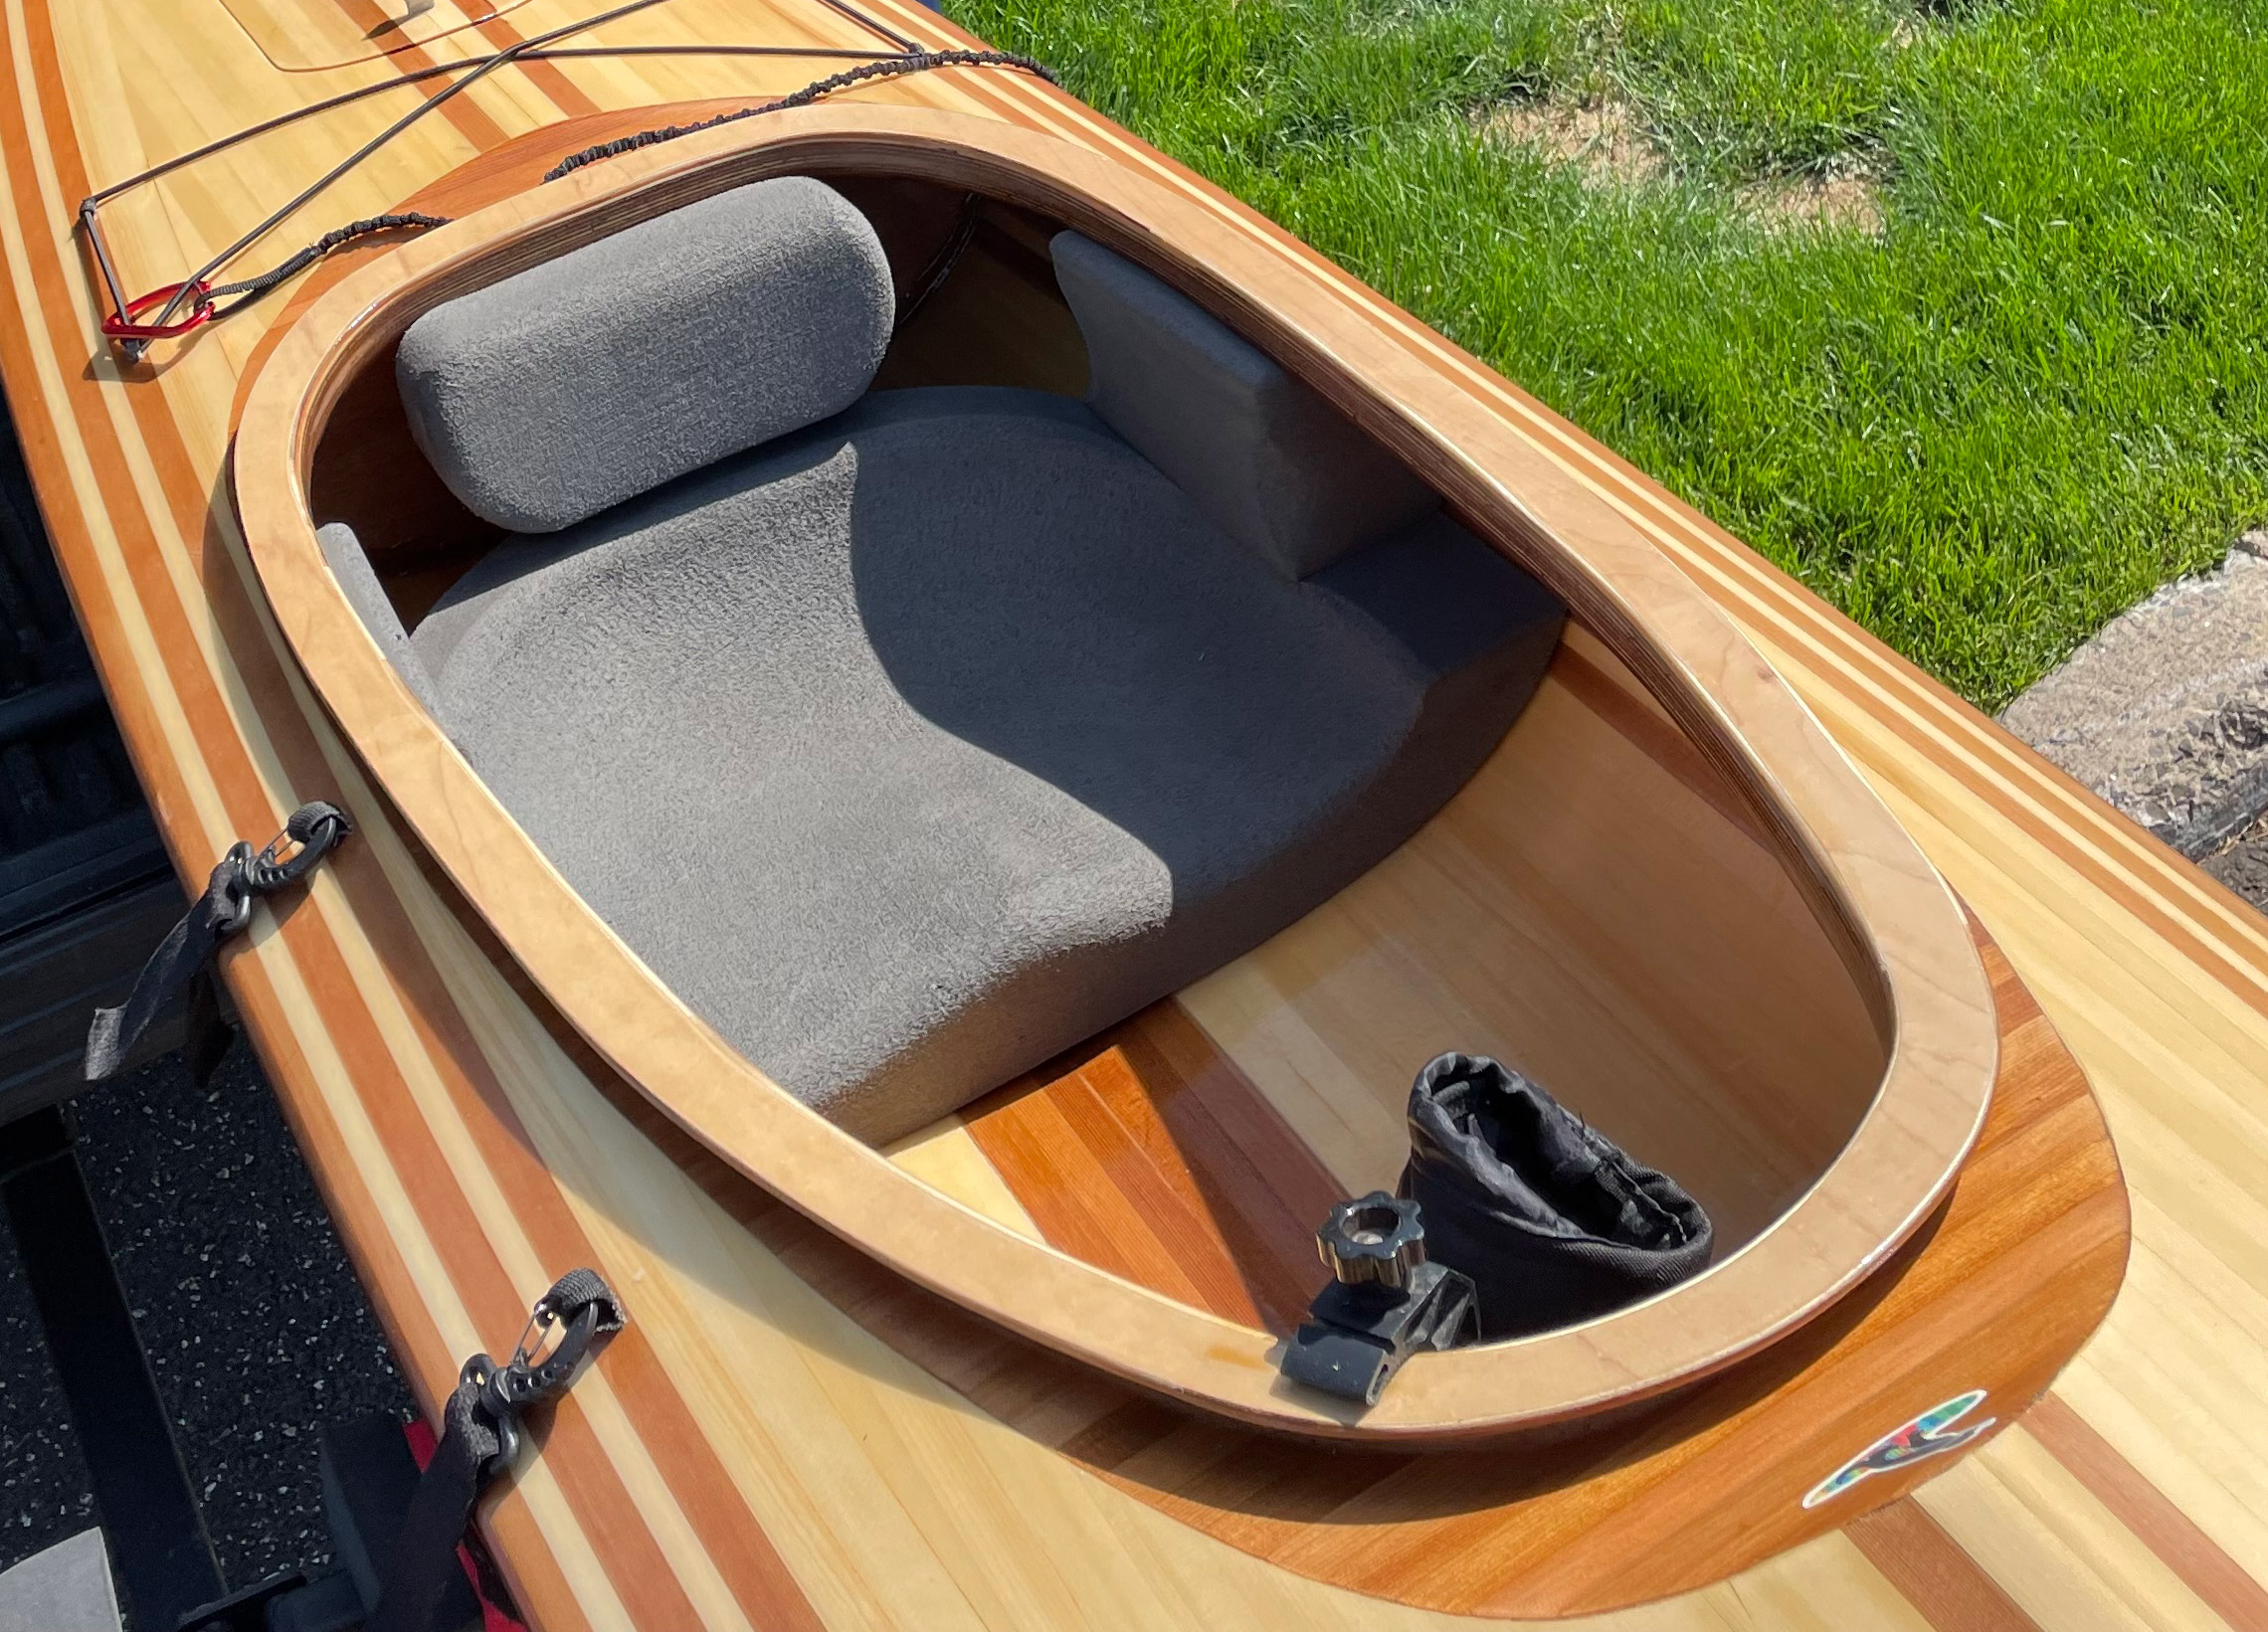
The seating incorporates bulkheads and hatches to create ample storage space, eliminating clutter for the occupants.
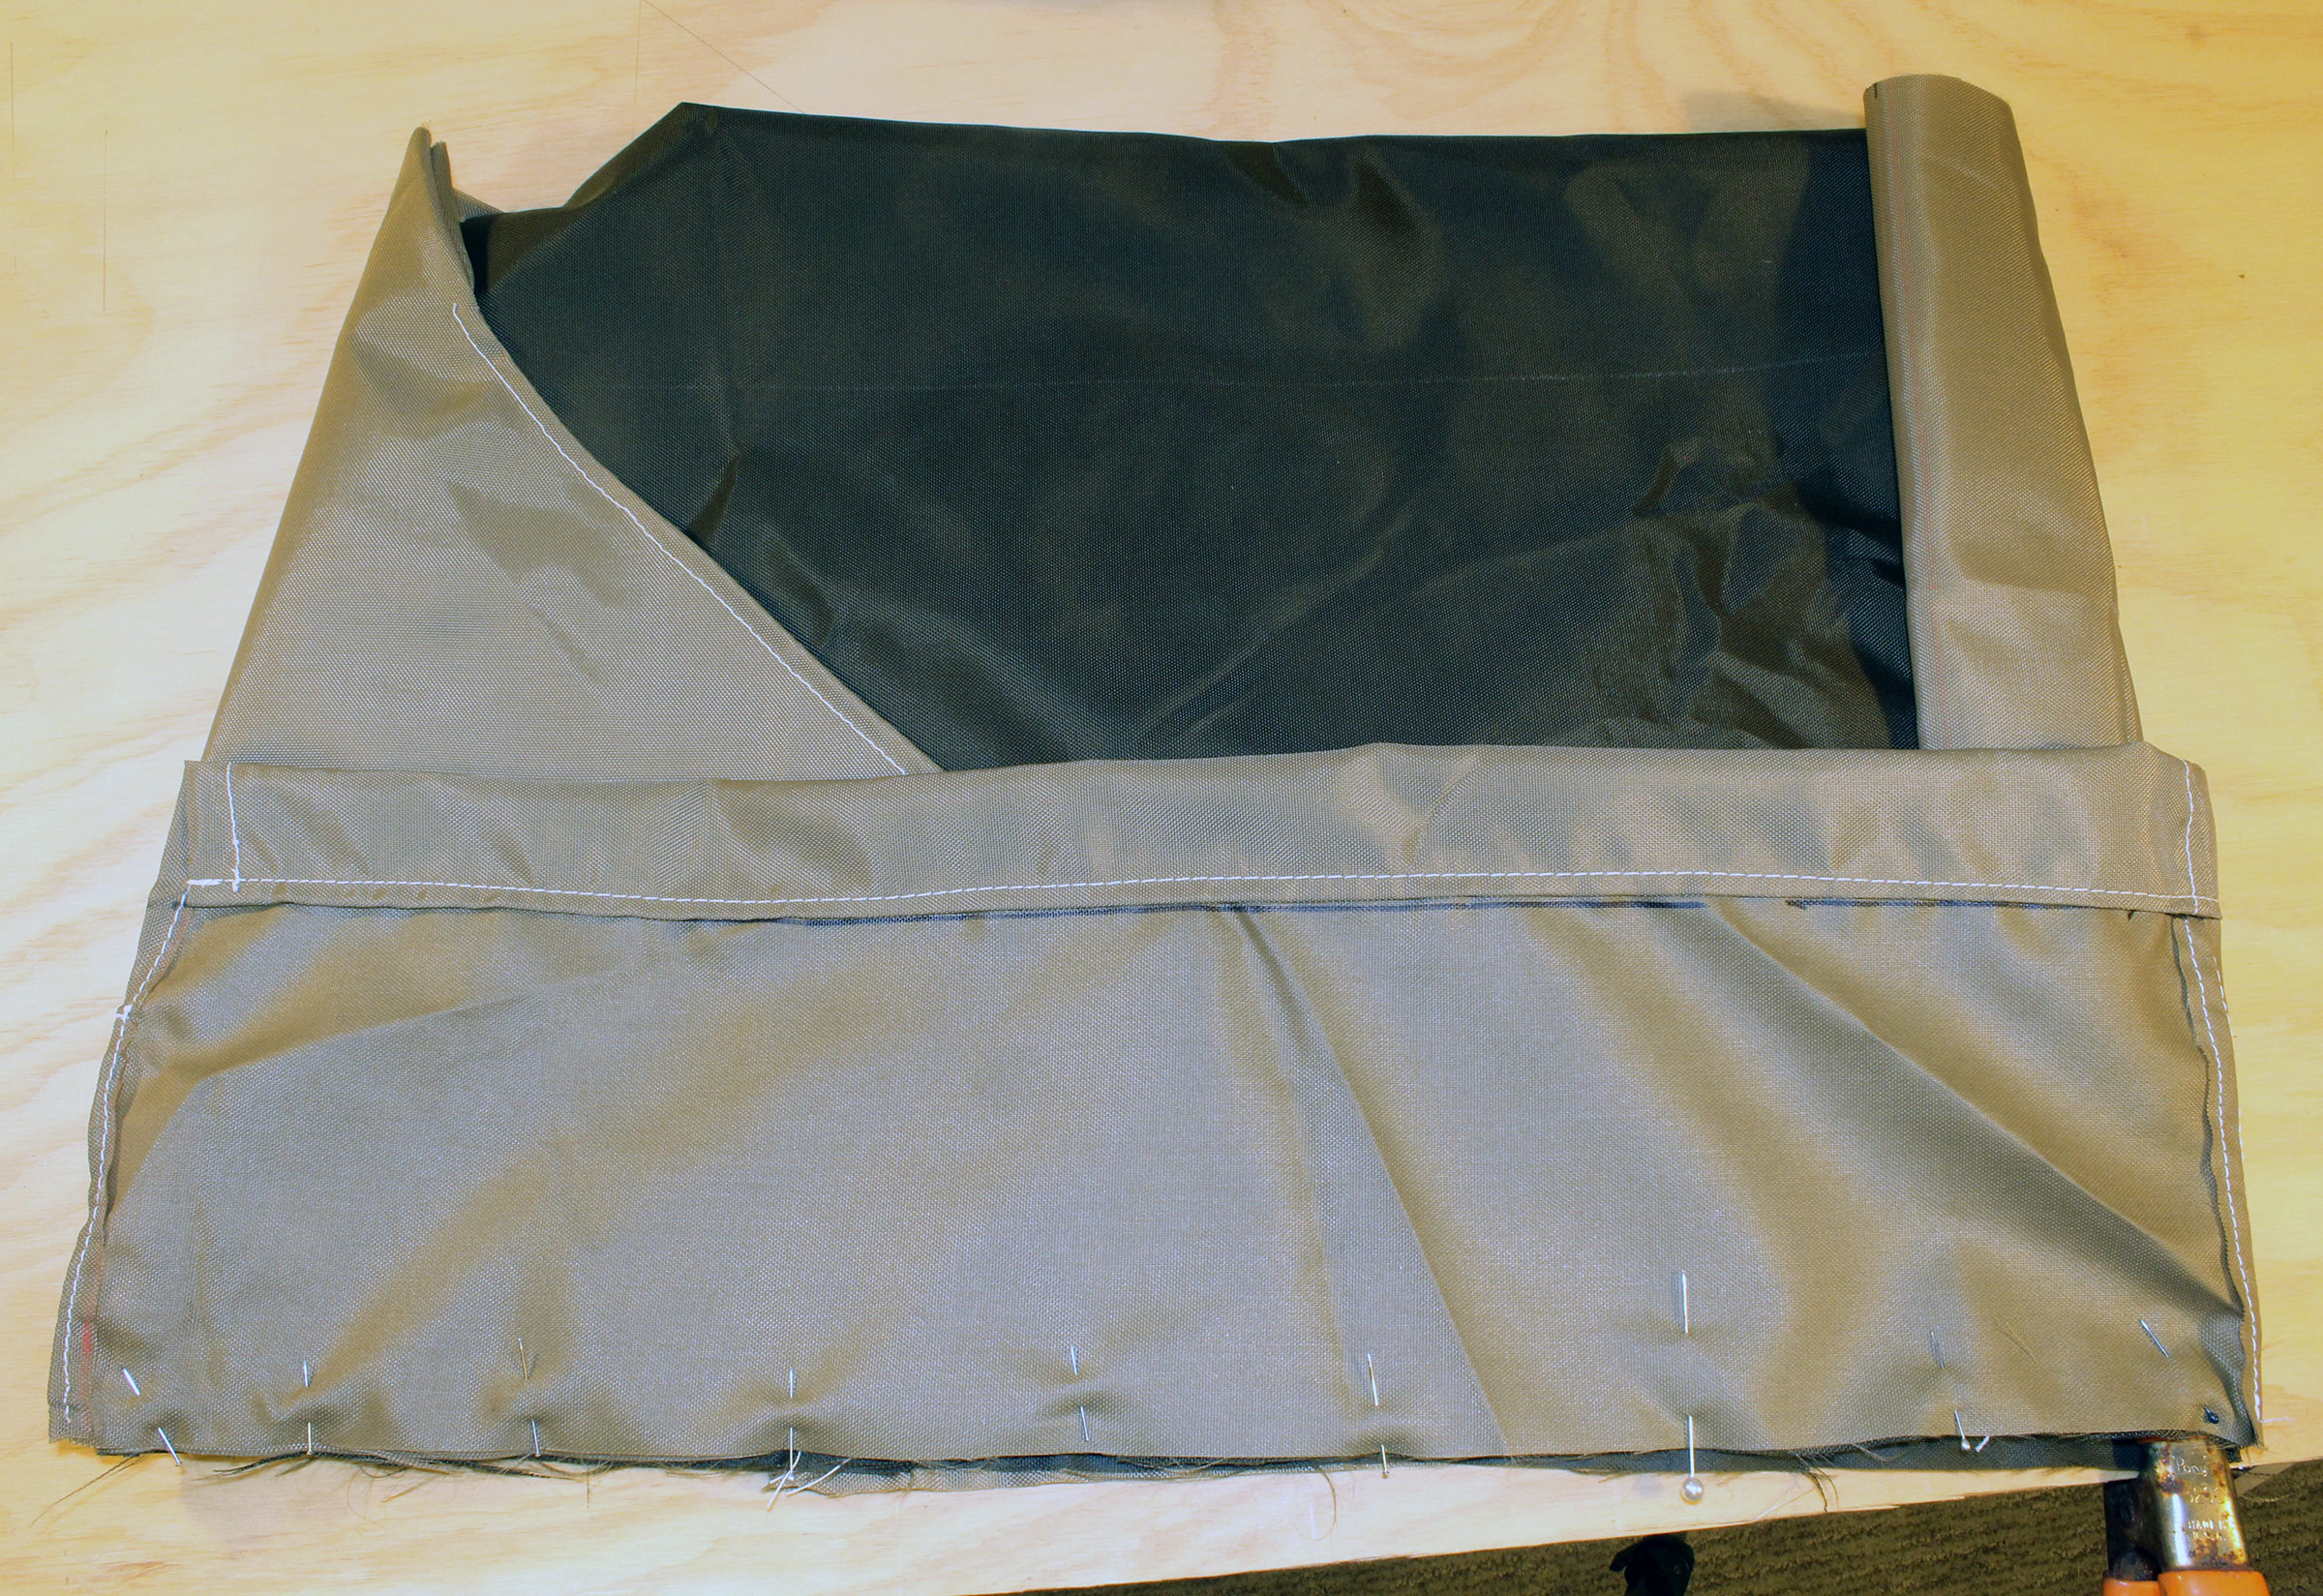
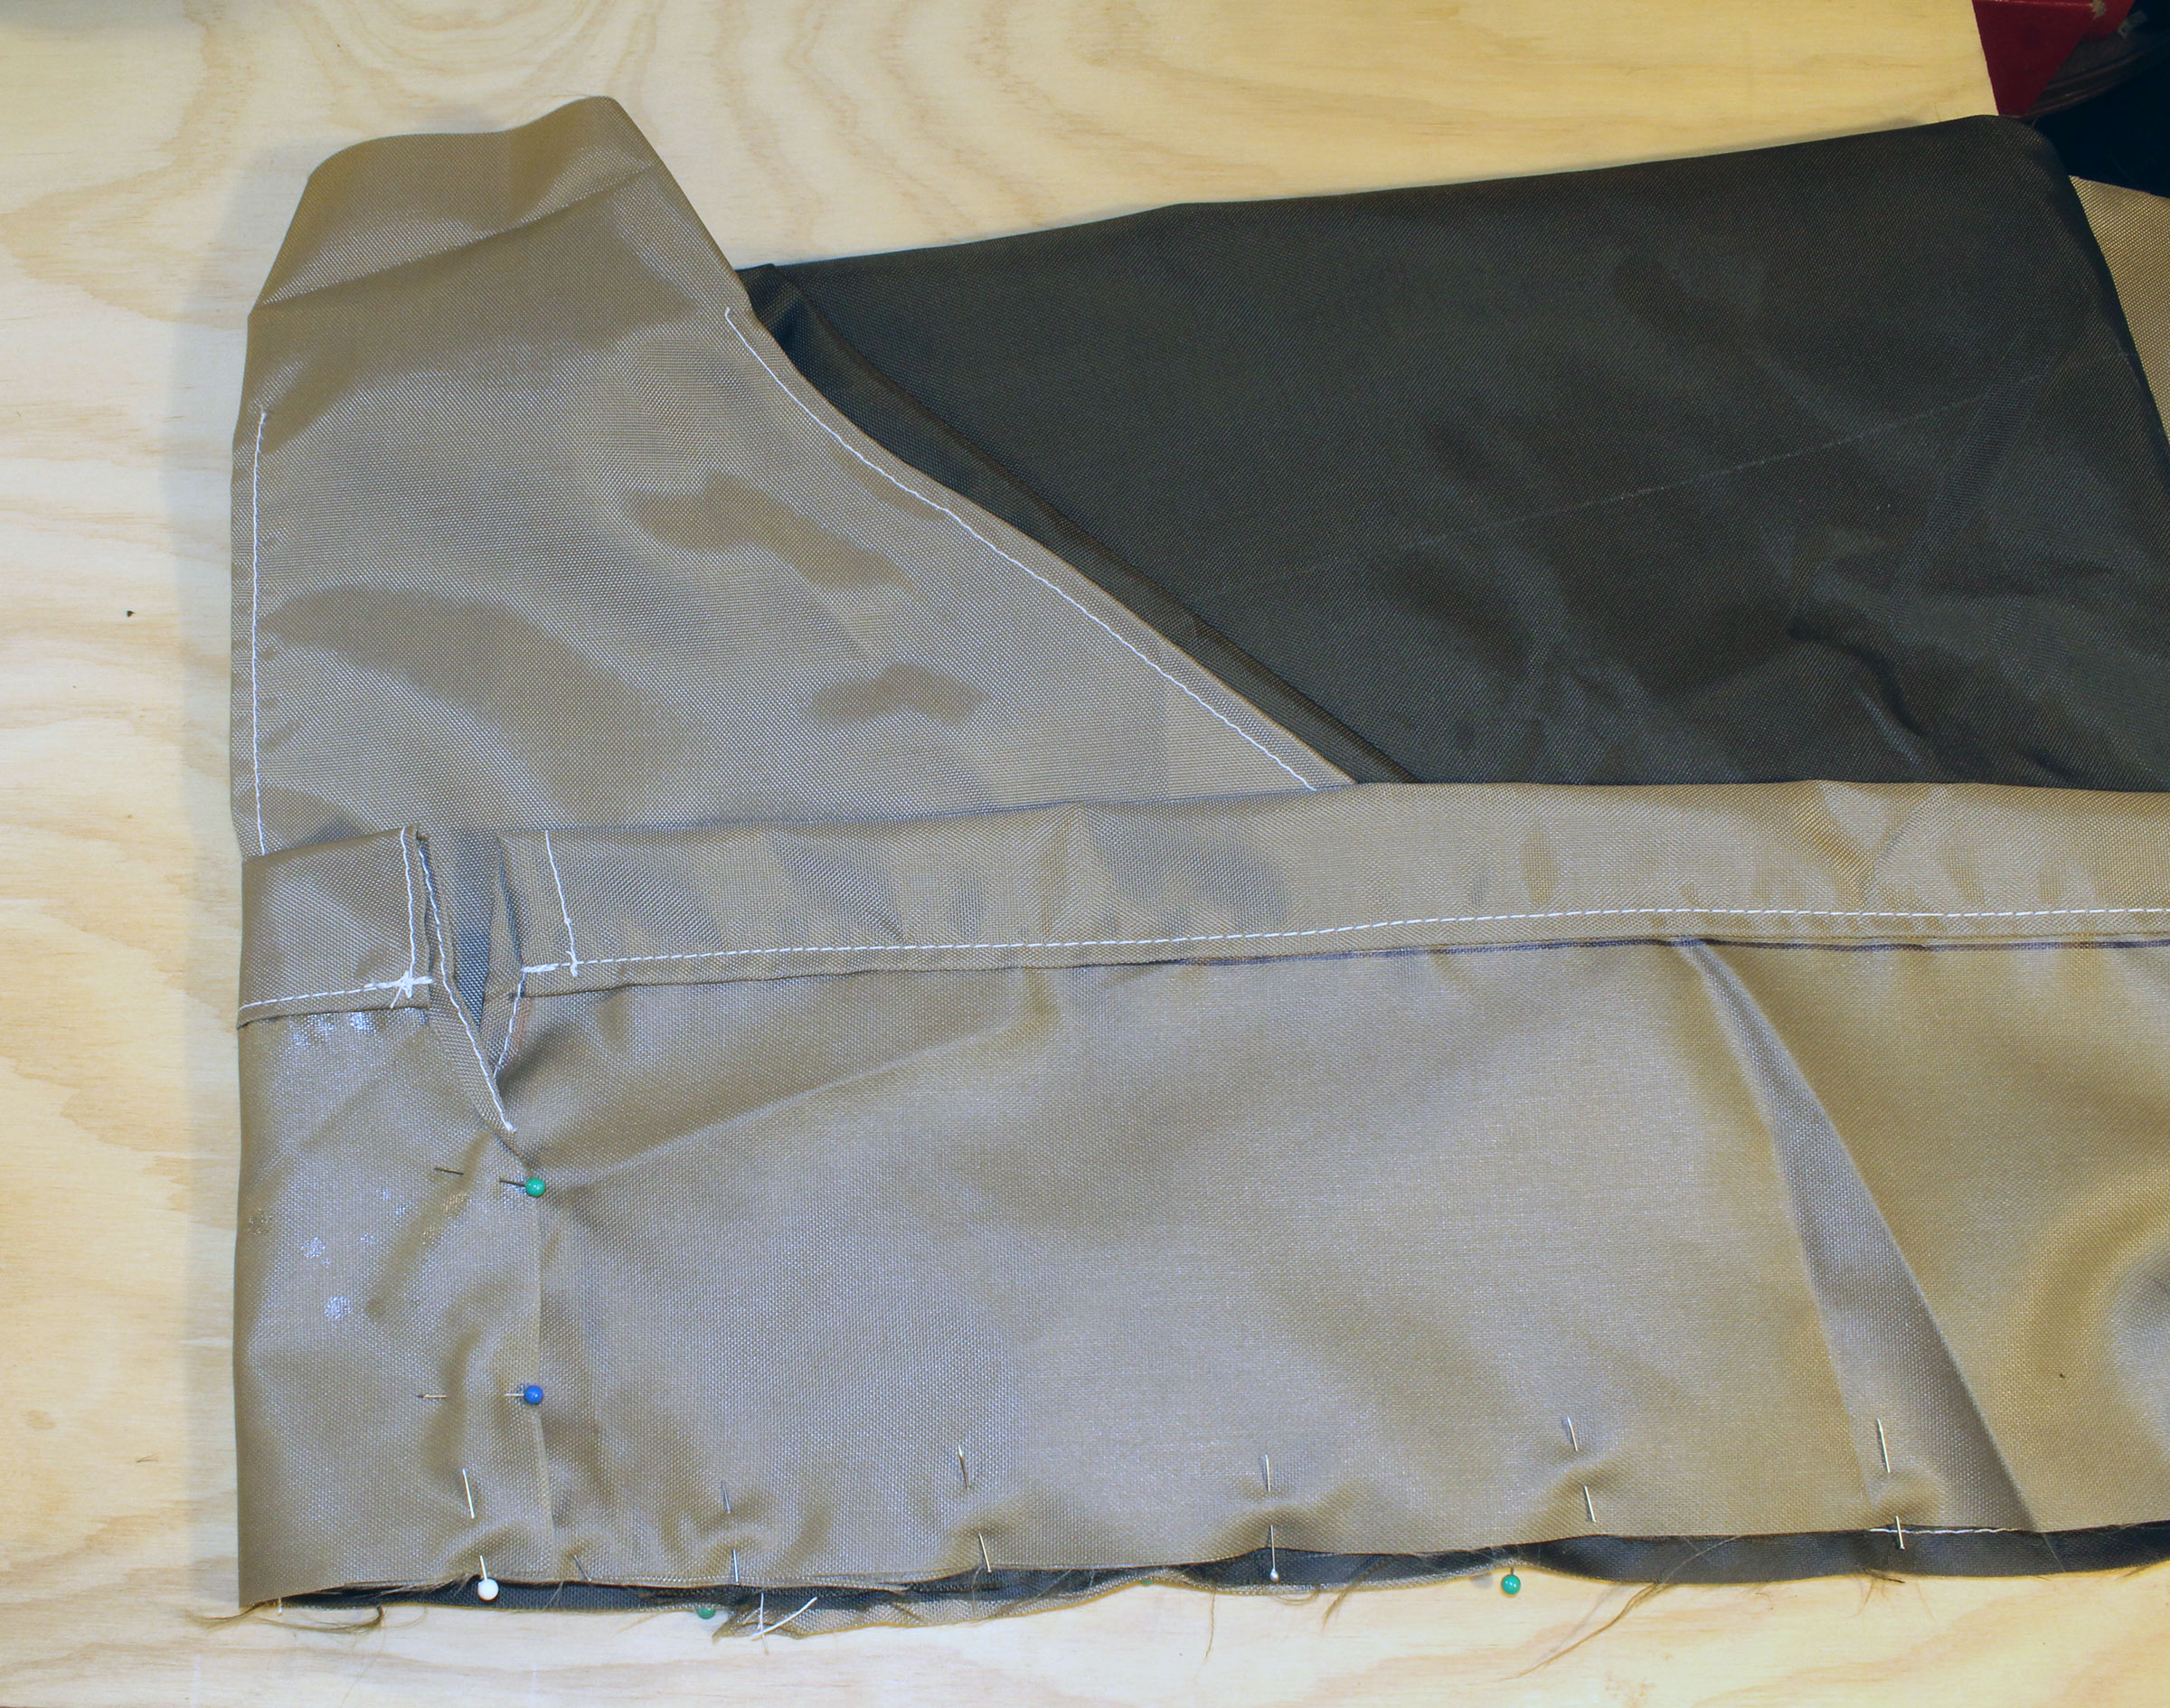
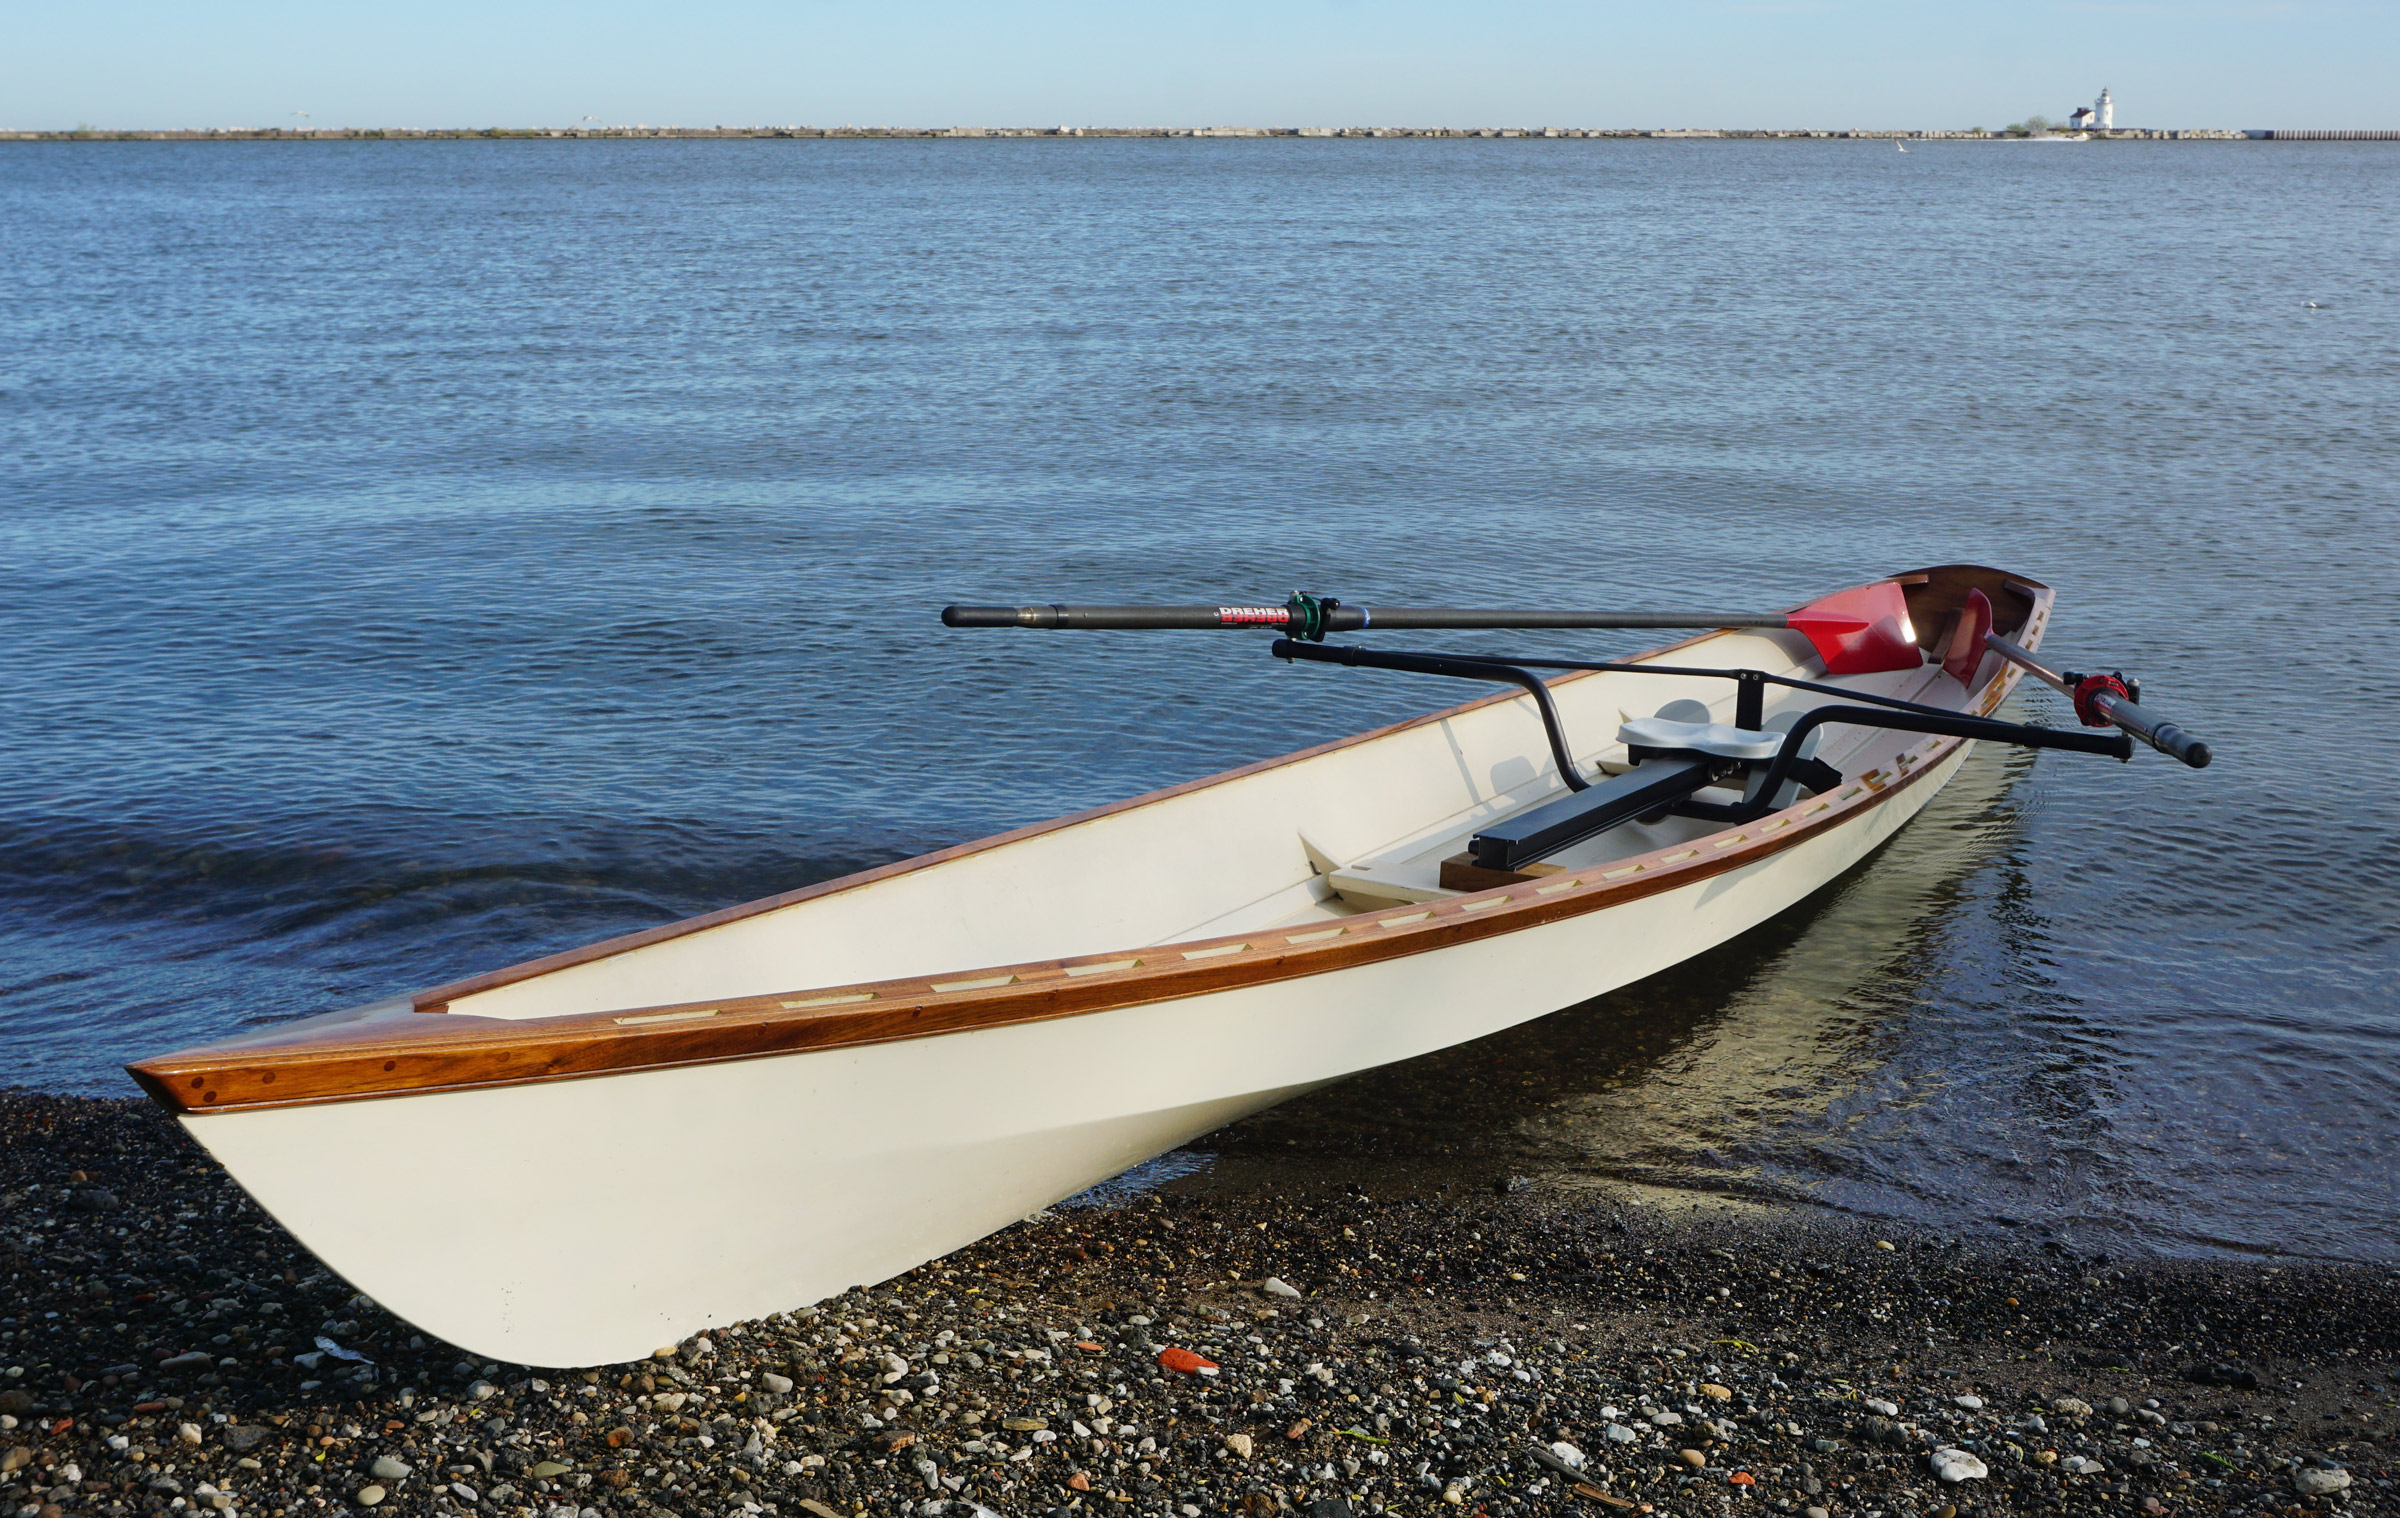
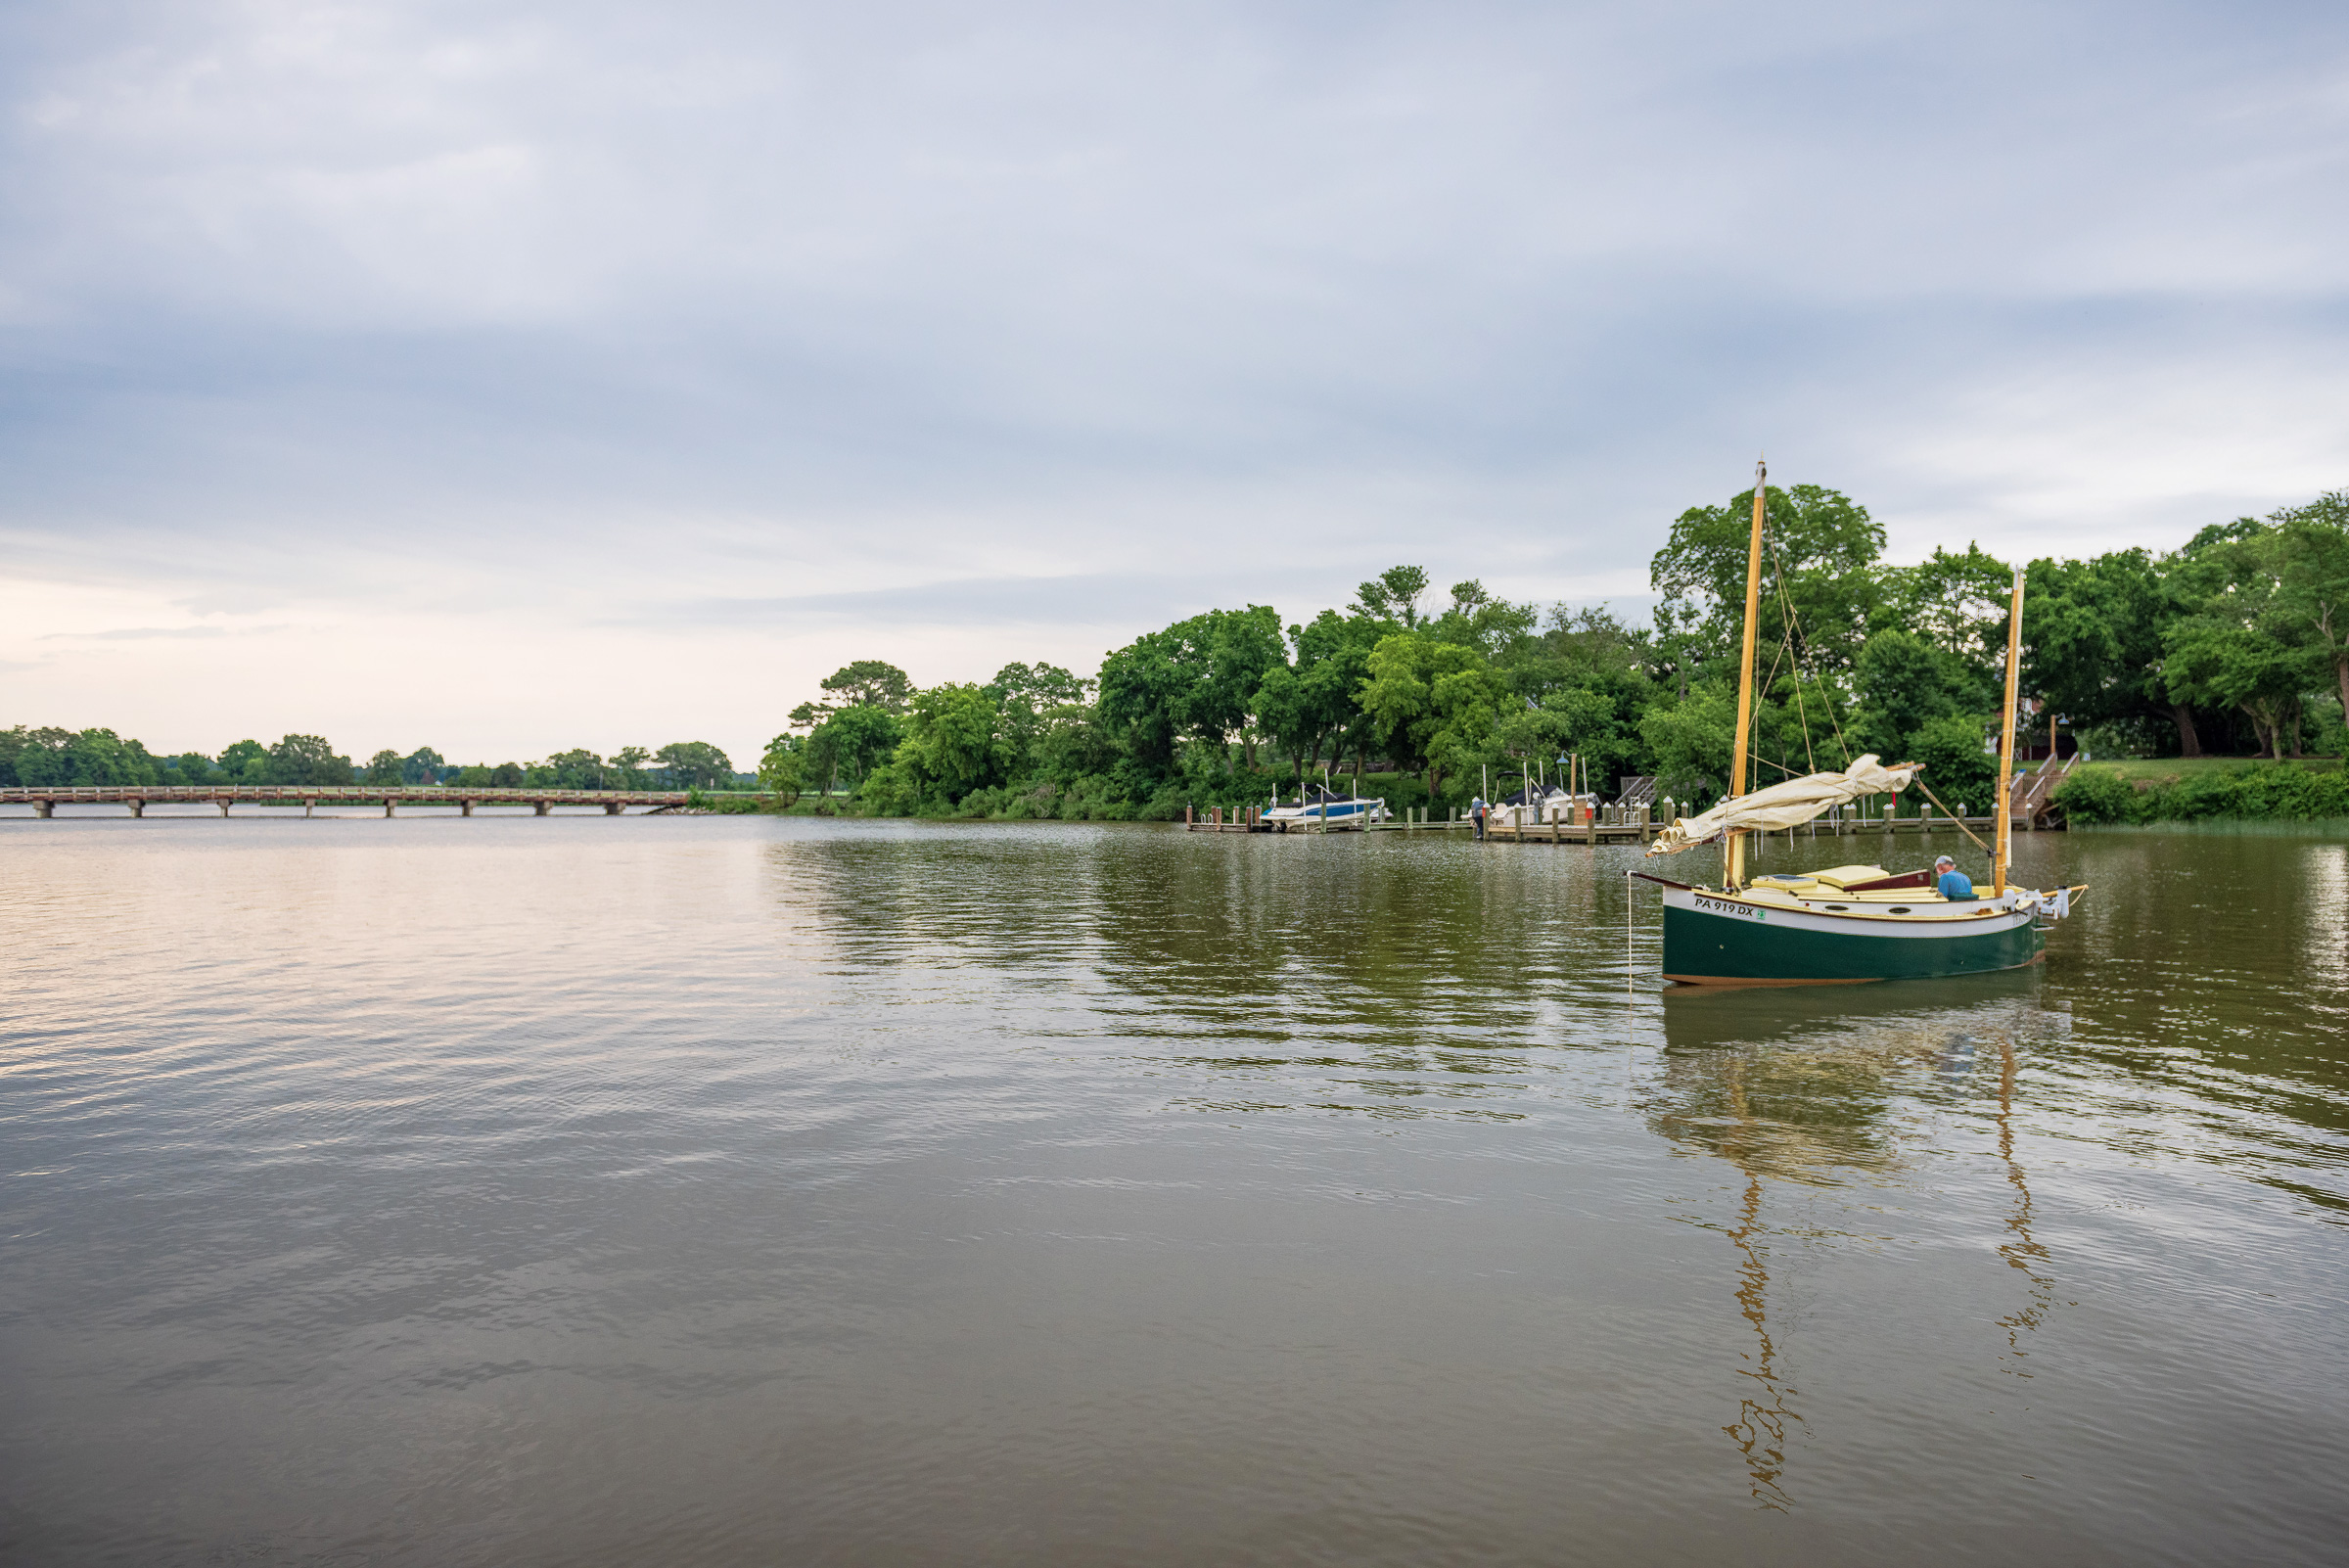
Large seating areas in the bow and stern and two thwarts amidships have lots of enclosed storage space under them, accessed by hinged lids. These spaces are not airtight, so some might choose to include drybags or foam as flotation. The center thwart has a slot for the daggerboard, and the forward thwart accommodates the mast. My Oonagh has “firehose” gunwale guard around the coaming to protect nicely finished boats when coming alongside.
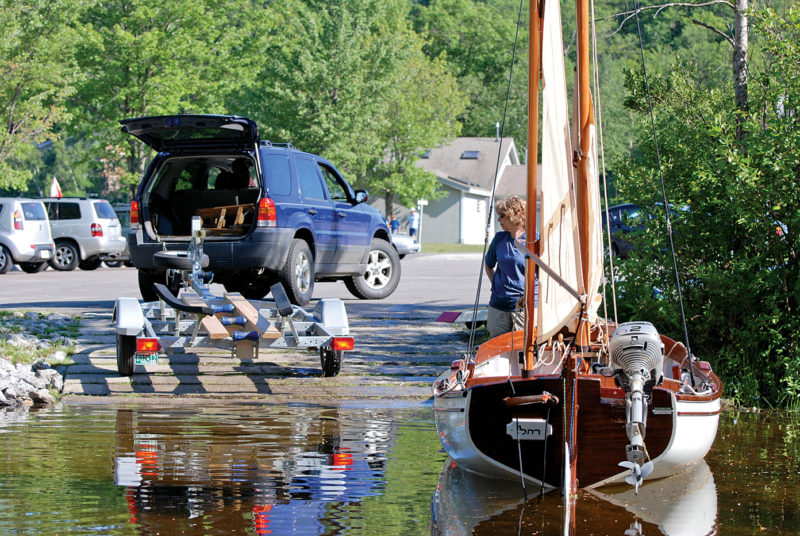
At 170 lbs or so, the Oonagh is not really cartoppable, but it can be easily slipped into a truck bed that is at least 60″ wide. I followed the designer’s recommendation and opted to trailer the boat. A light trailer that was intended for a jet ski proved an uncomplicated and easily maneuverable solution for me, and launching the boat with the trailer is an easy, singlehanded operation.
Bill Boyd
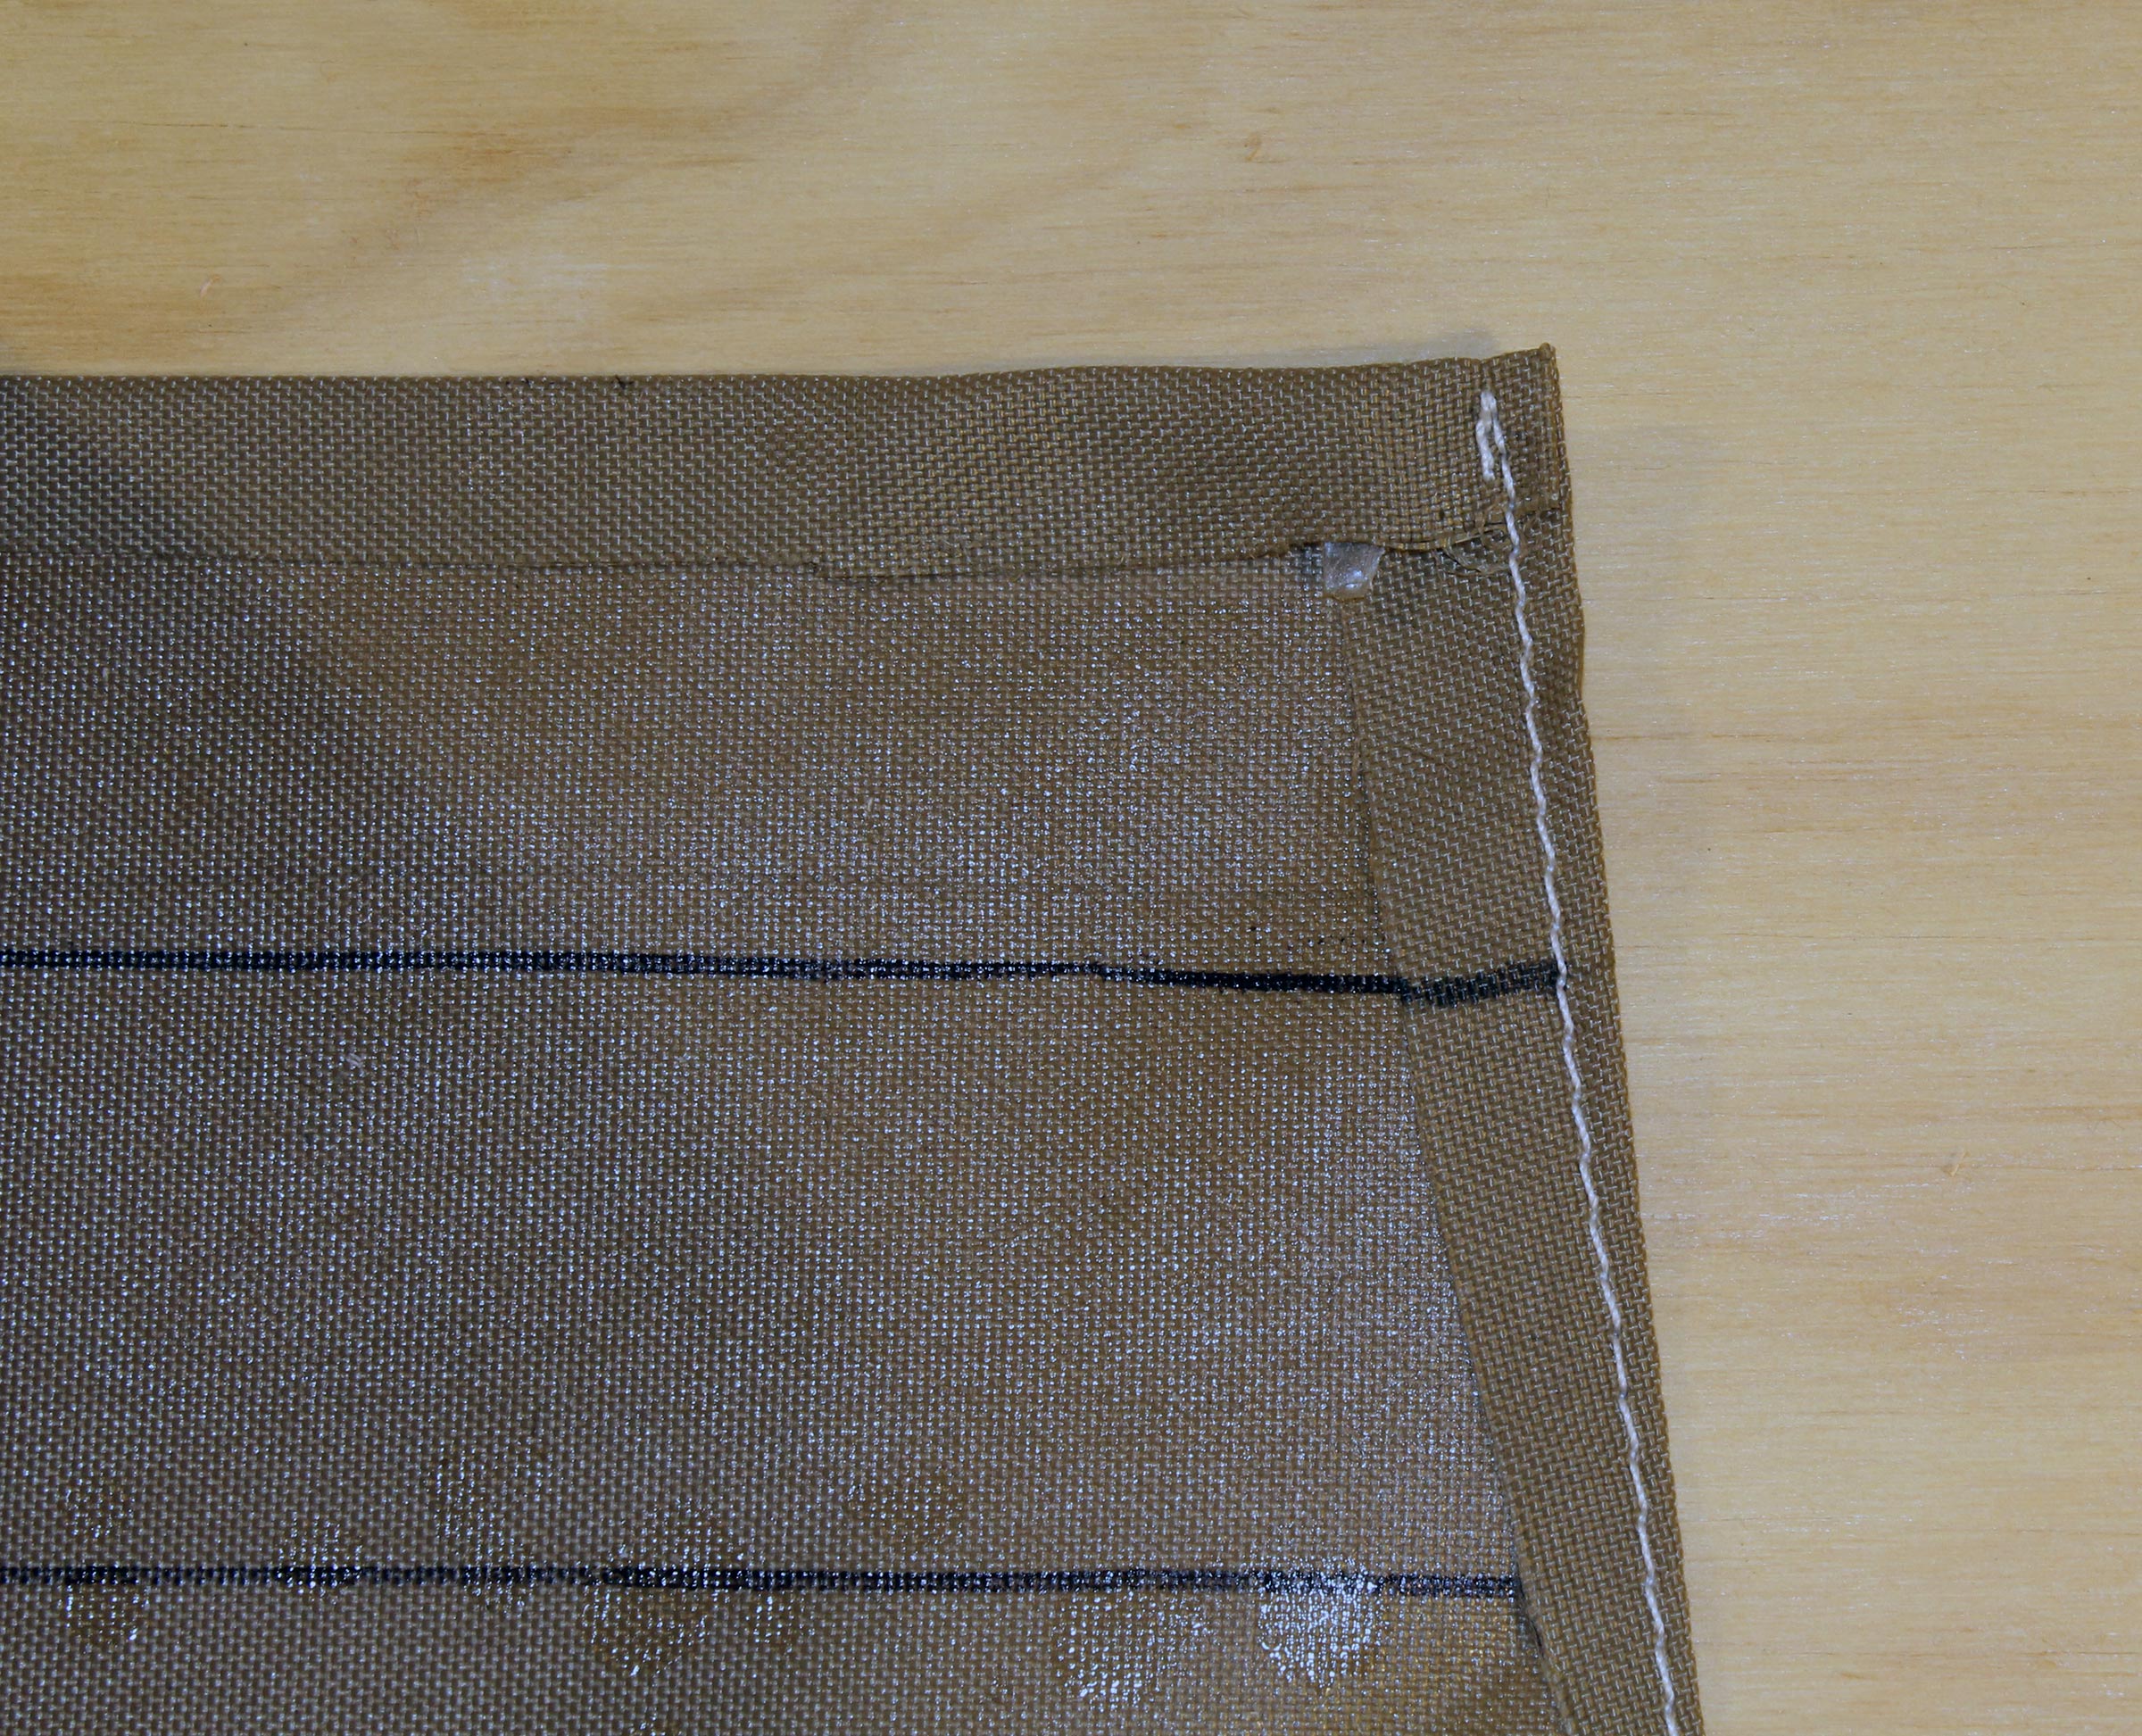
For a sailor seated in the bottom of the boat, the angled sides provide a comfortable backrest.
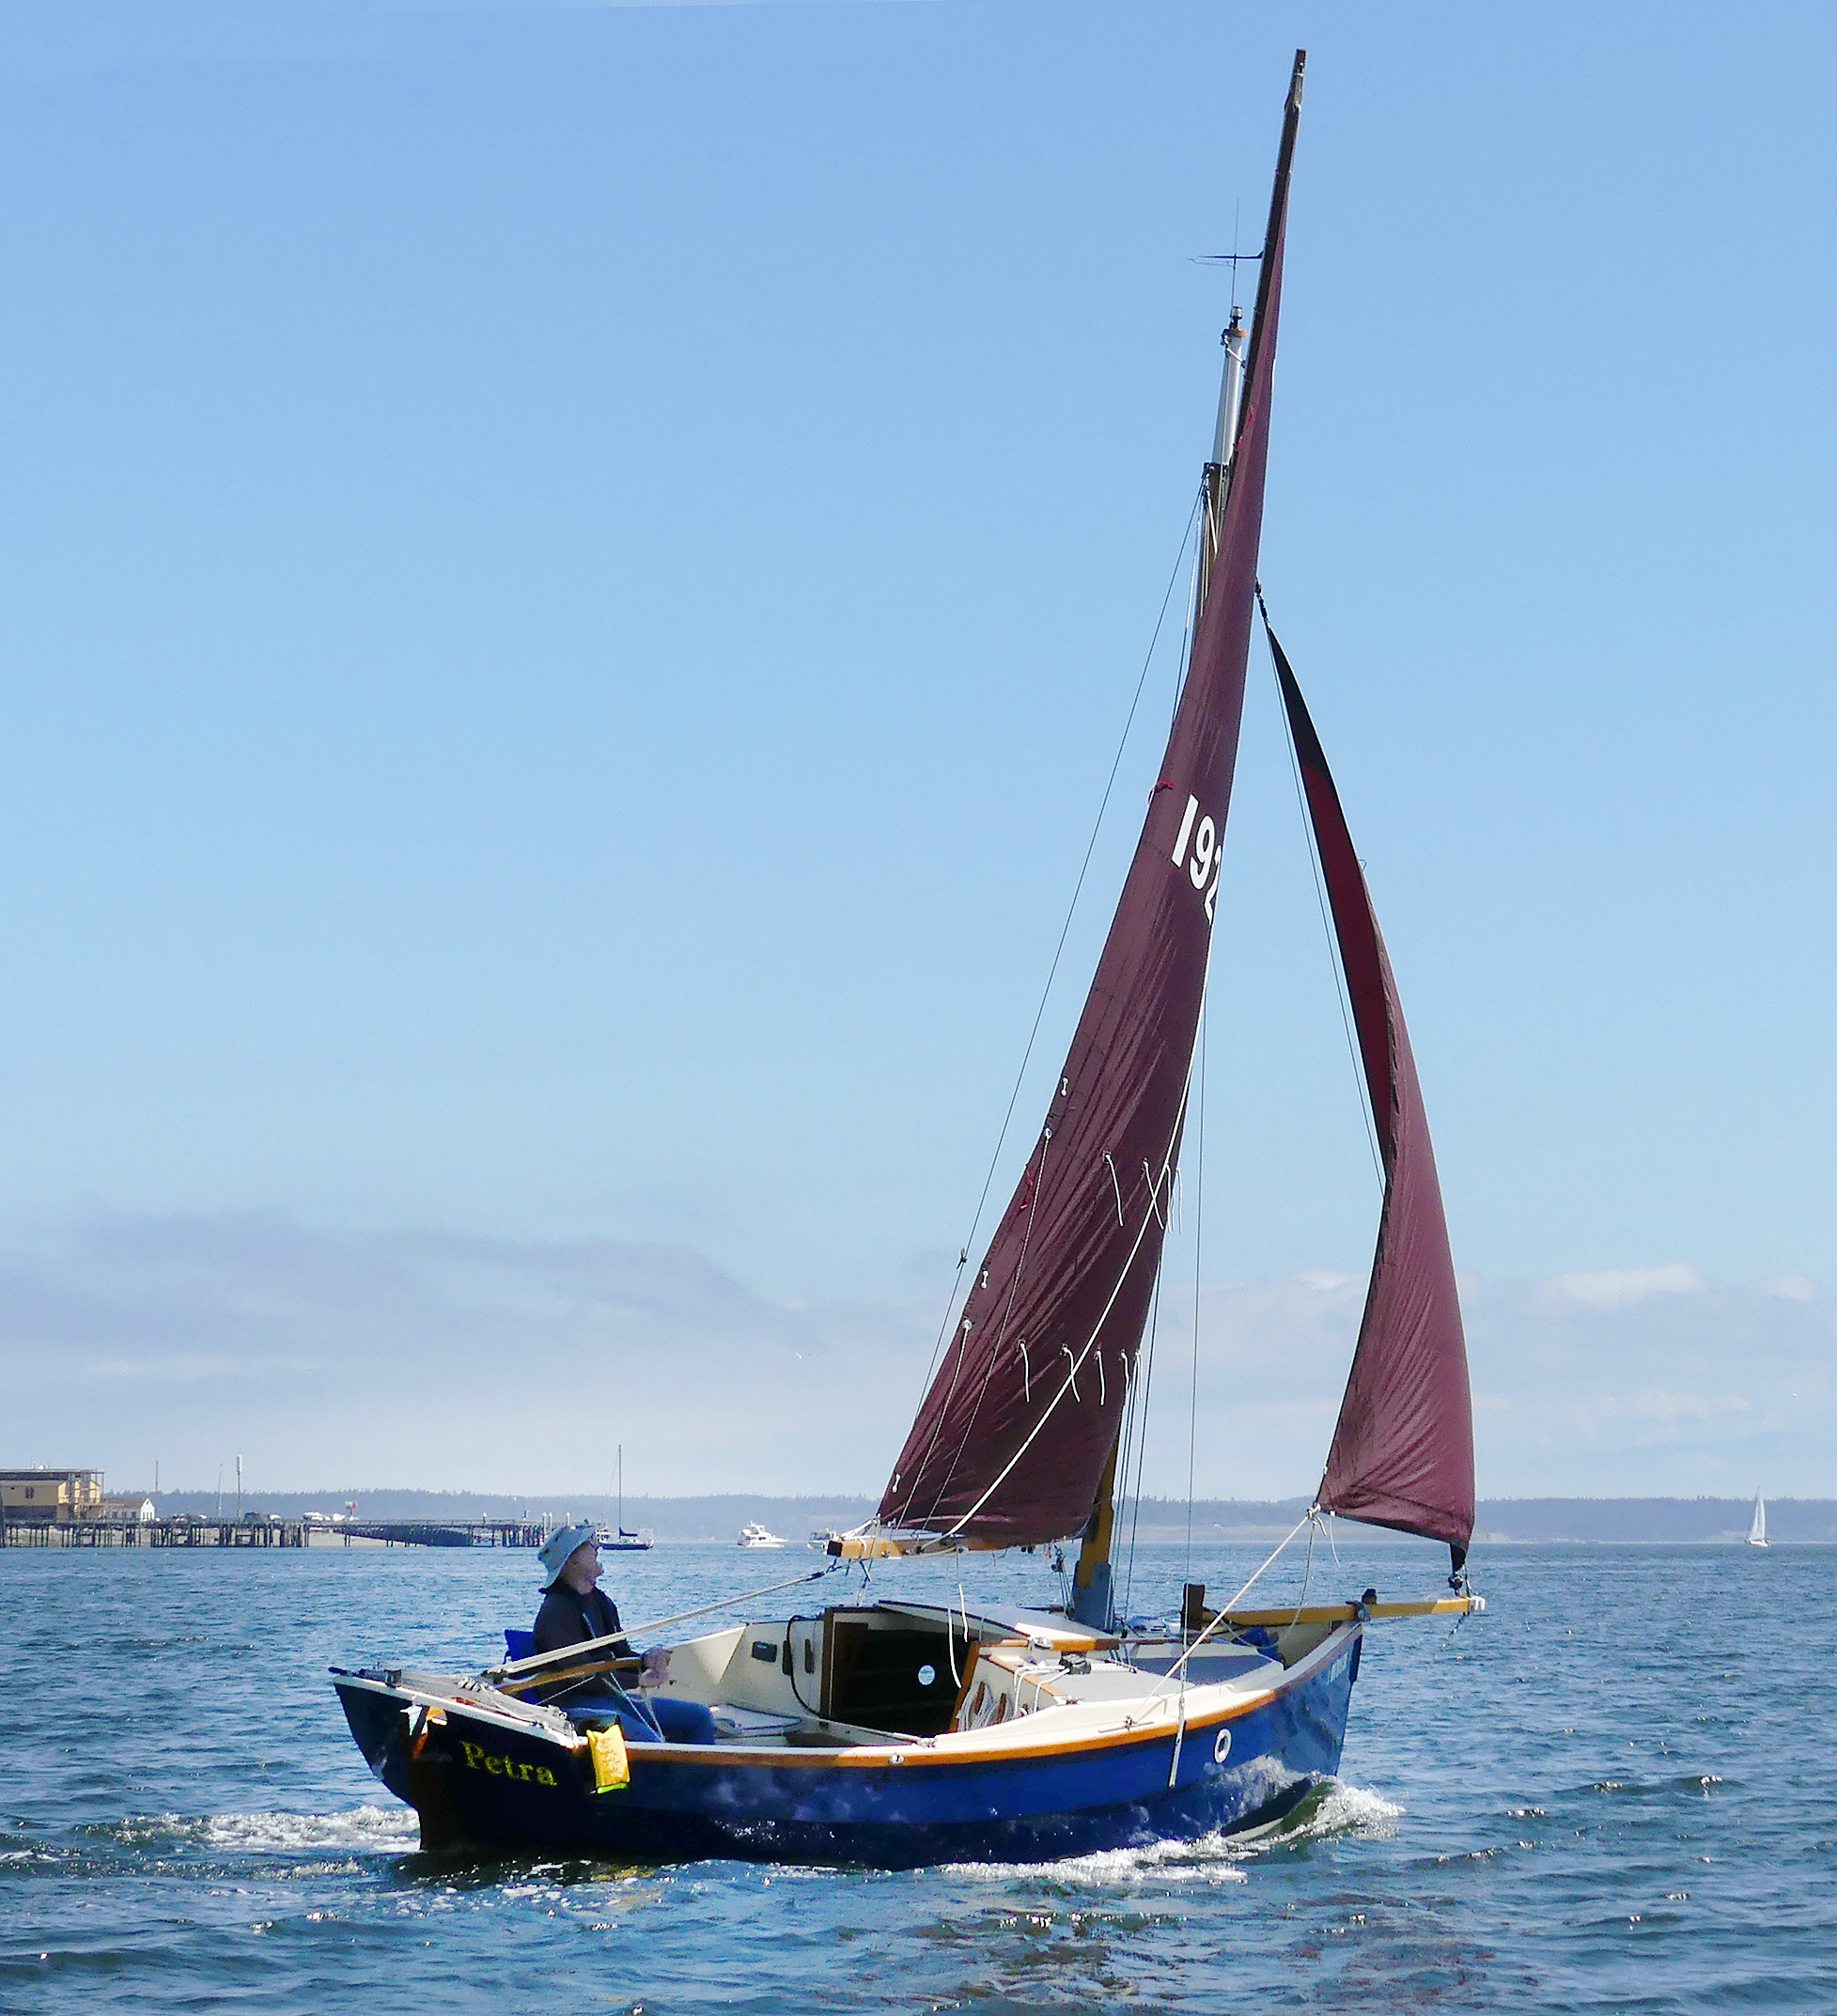
Designs for prams vary widely, but typically the bow is carried well above the water and therefore provides little stability. If you go forward in such a pram, your weight tends to make the boat roll and tip easily, and standing in the bow can be precarious. Oonagh is different. Its bow is relatively wide and low and, therefore, buoyant. The hull’s breadth runs aft to a 5′ wide maximum beam before it tapers slightly to a relatively broad stern. When I climbed aboard for the first time, the bow looked stable, so I boldly stepped down from a height of at least 2′, over the bow transom, and onto the forward deck. I noticed that the boatyard crew nearby grew quiet as I prepared to drop down, but there was no need to worry; the bow dipped slightly under my 200 lbs, but the boat supported me well when I landed. Stability, I found, is an important characteristic of Hylan’s pram, and he notes that an adult can step with some confidence on the gunwale while boarding another boat or climbing onto a dock.
Bill Boyd
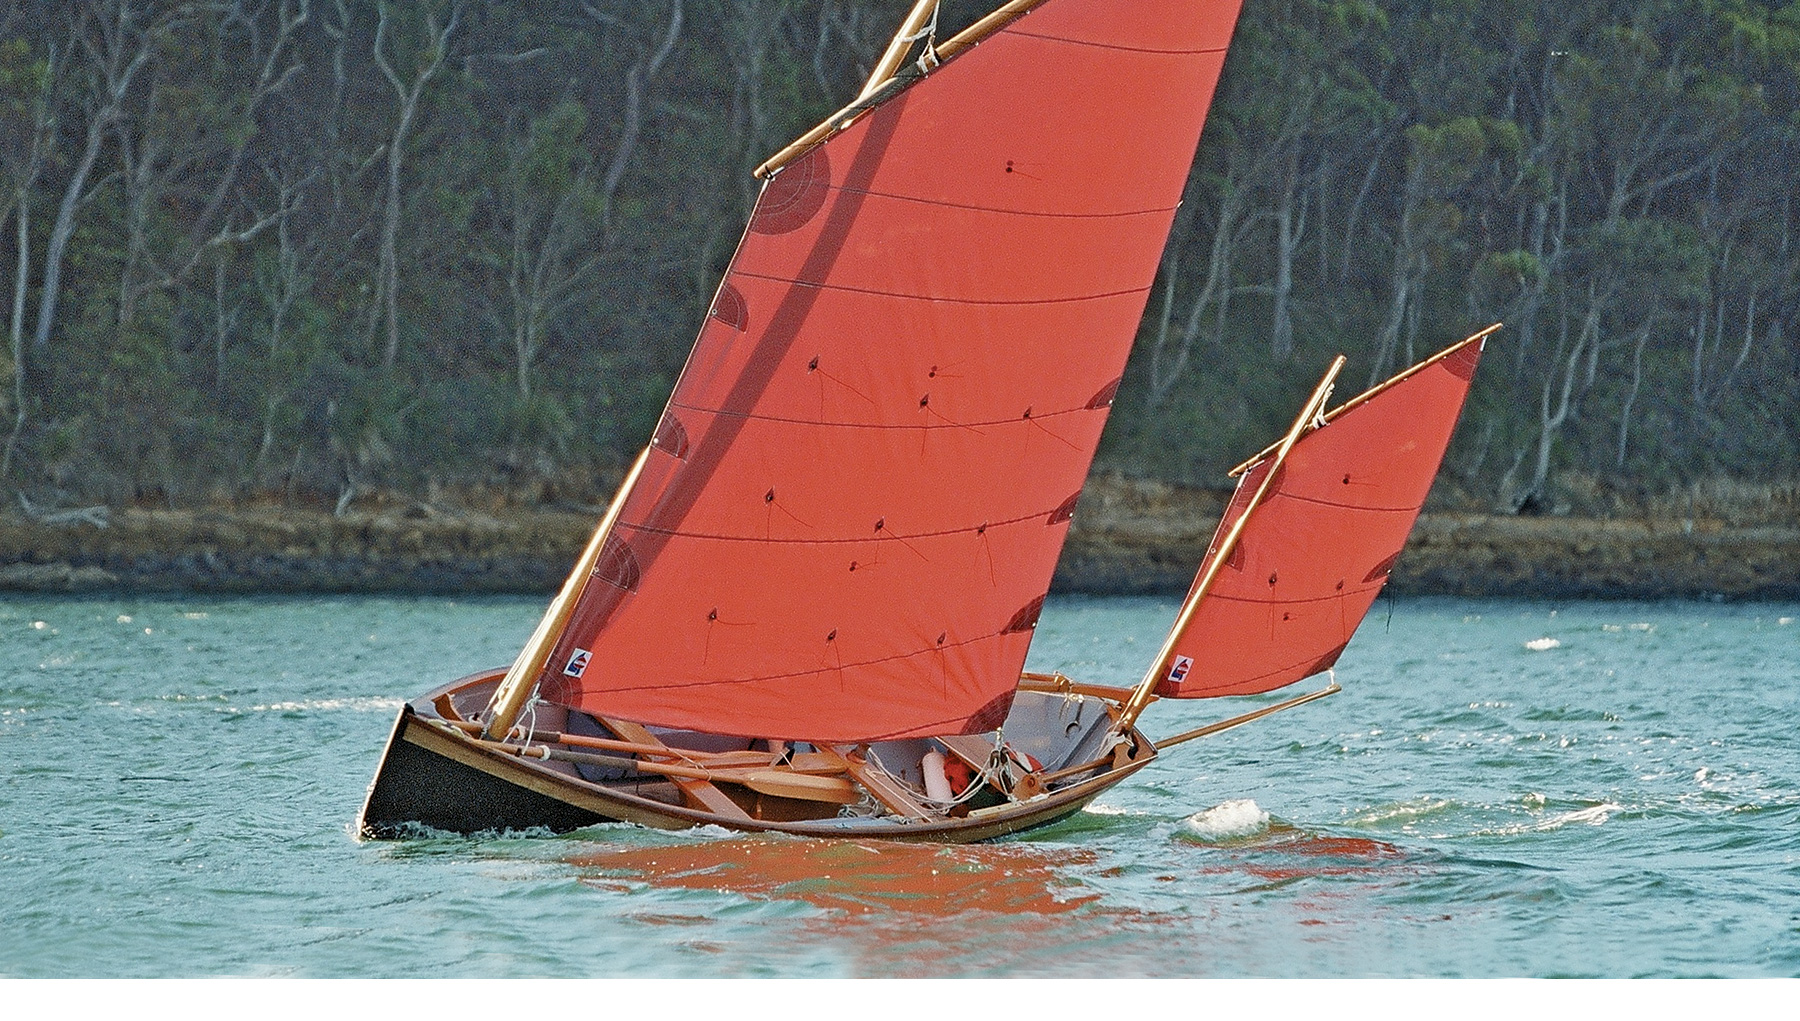
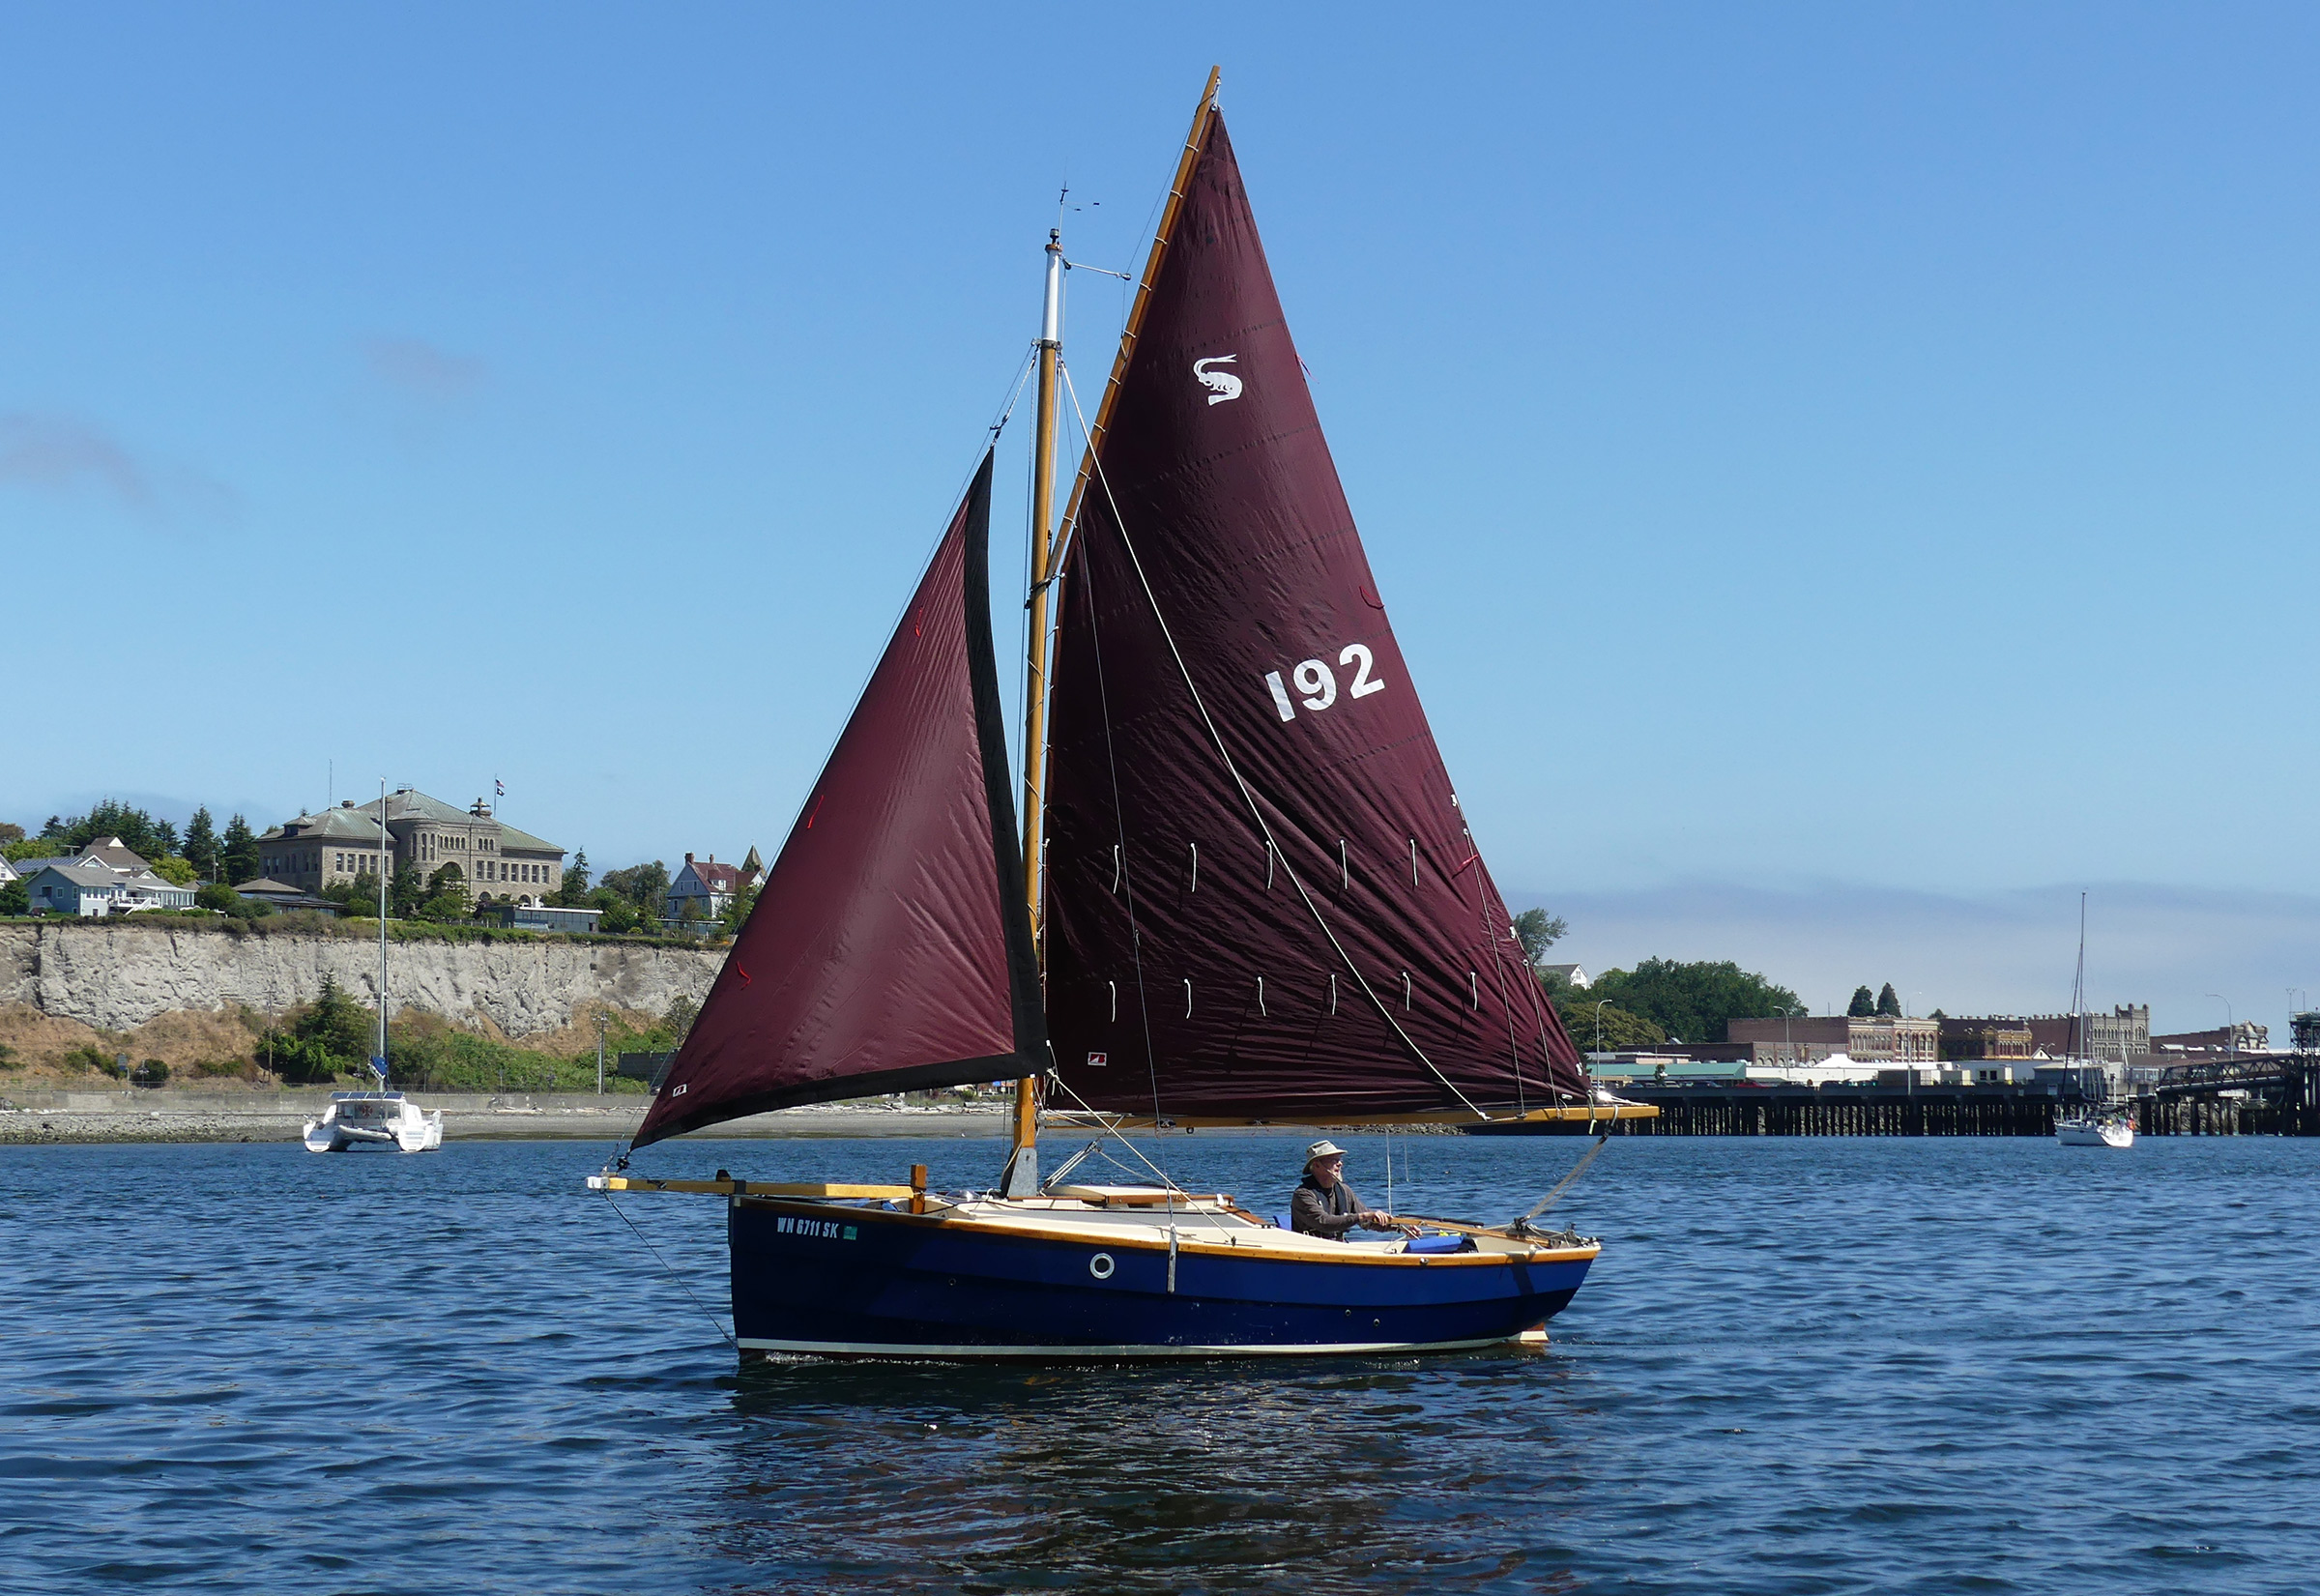
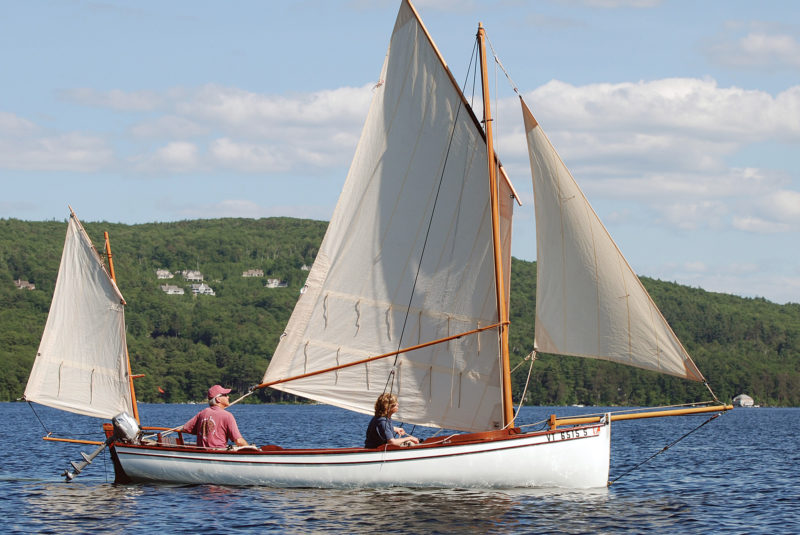
The standing lug rig has a sail area of 68 sq ft.
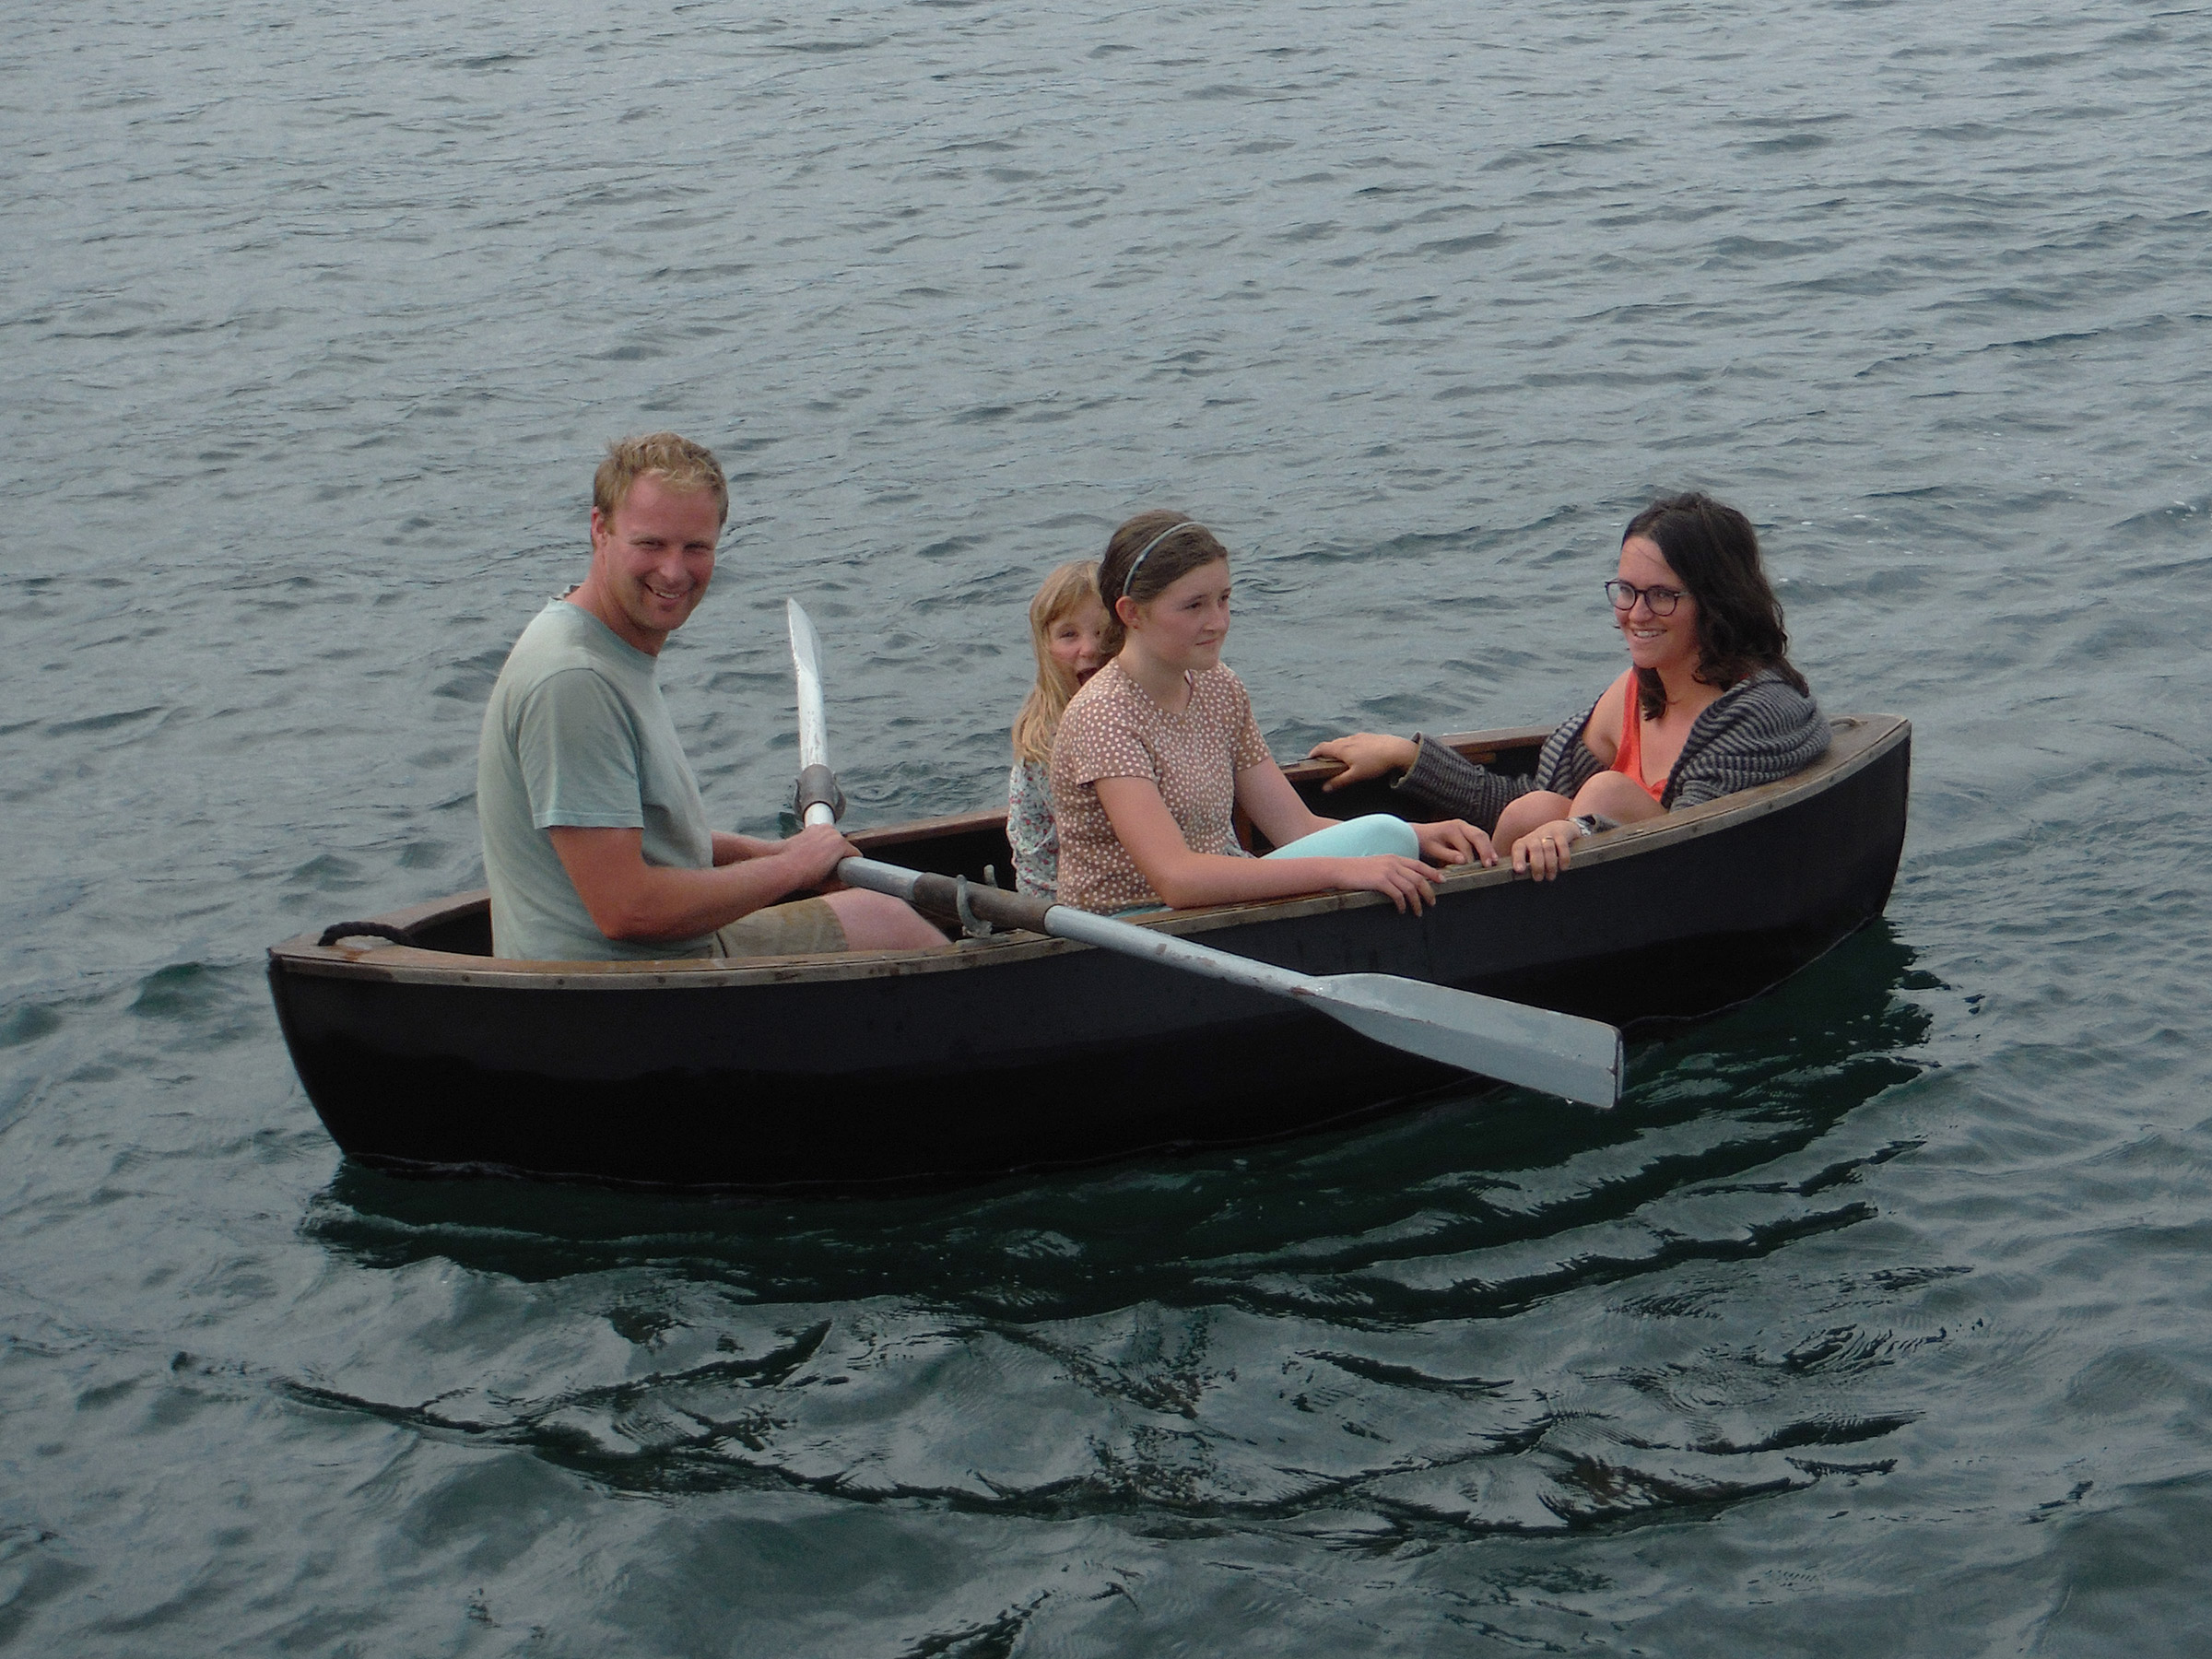
The Oonagh is designed as a family boat, and there is enough space for a family if it’s just two kids and two adults, with the kids in the bow. I find it a little too cramped for four adults, although a sedate trip motoring up the river could be pleasant for four. Considering the boat’s stability, kids can be reasonably safe when they take the boat out to have fun on their own.
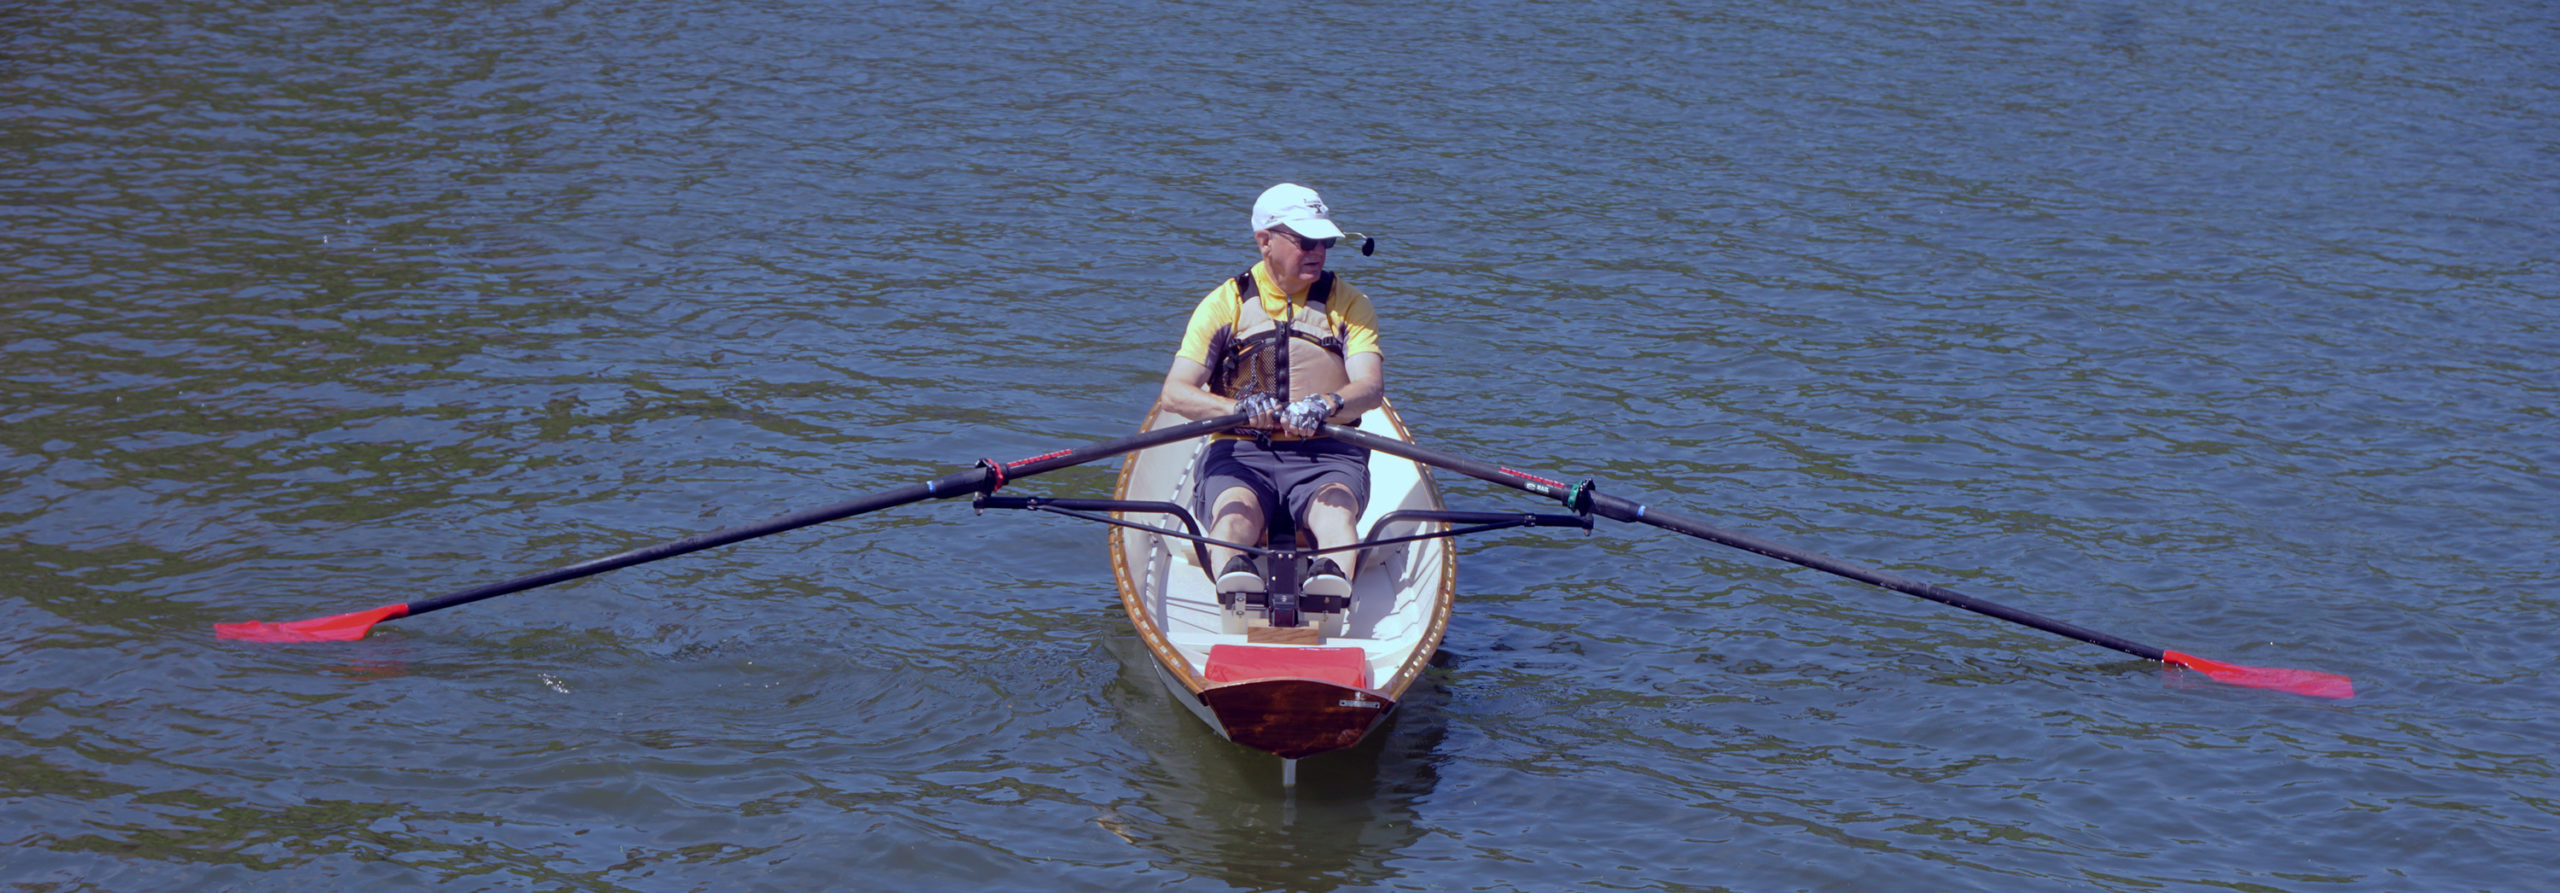
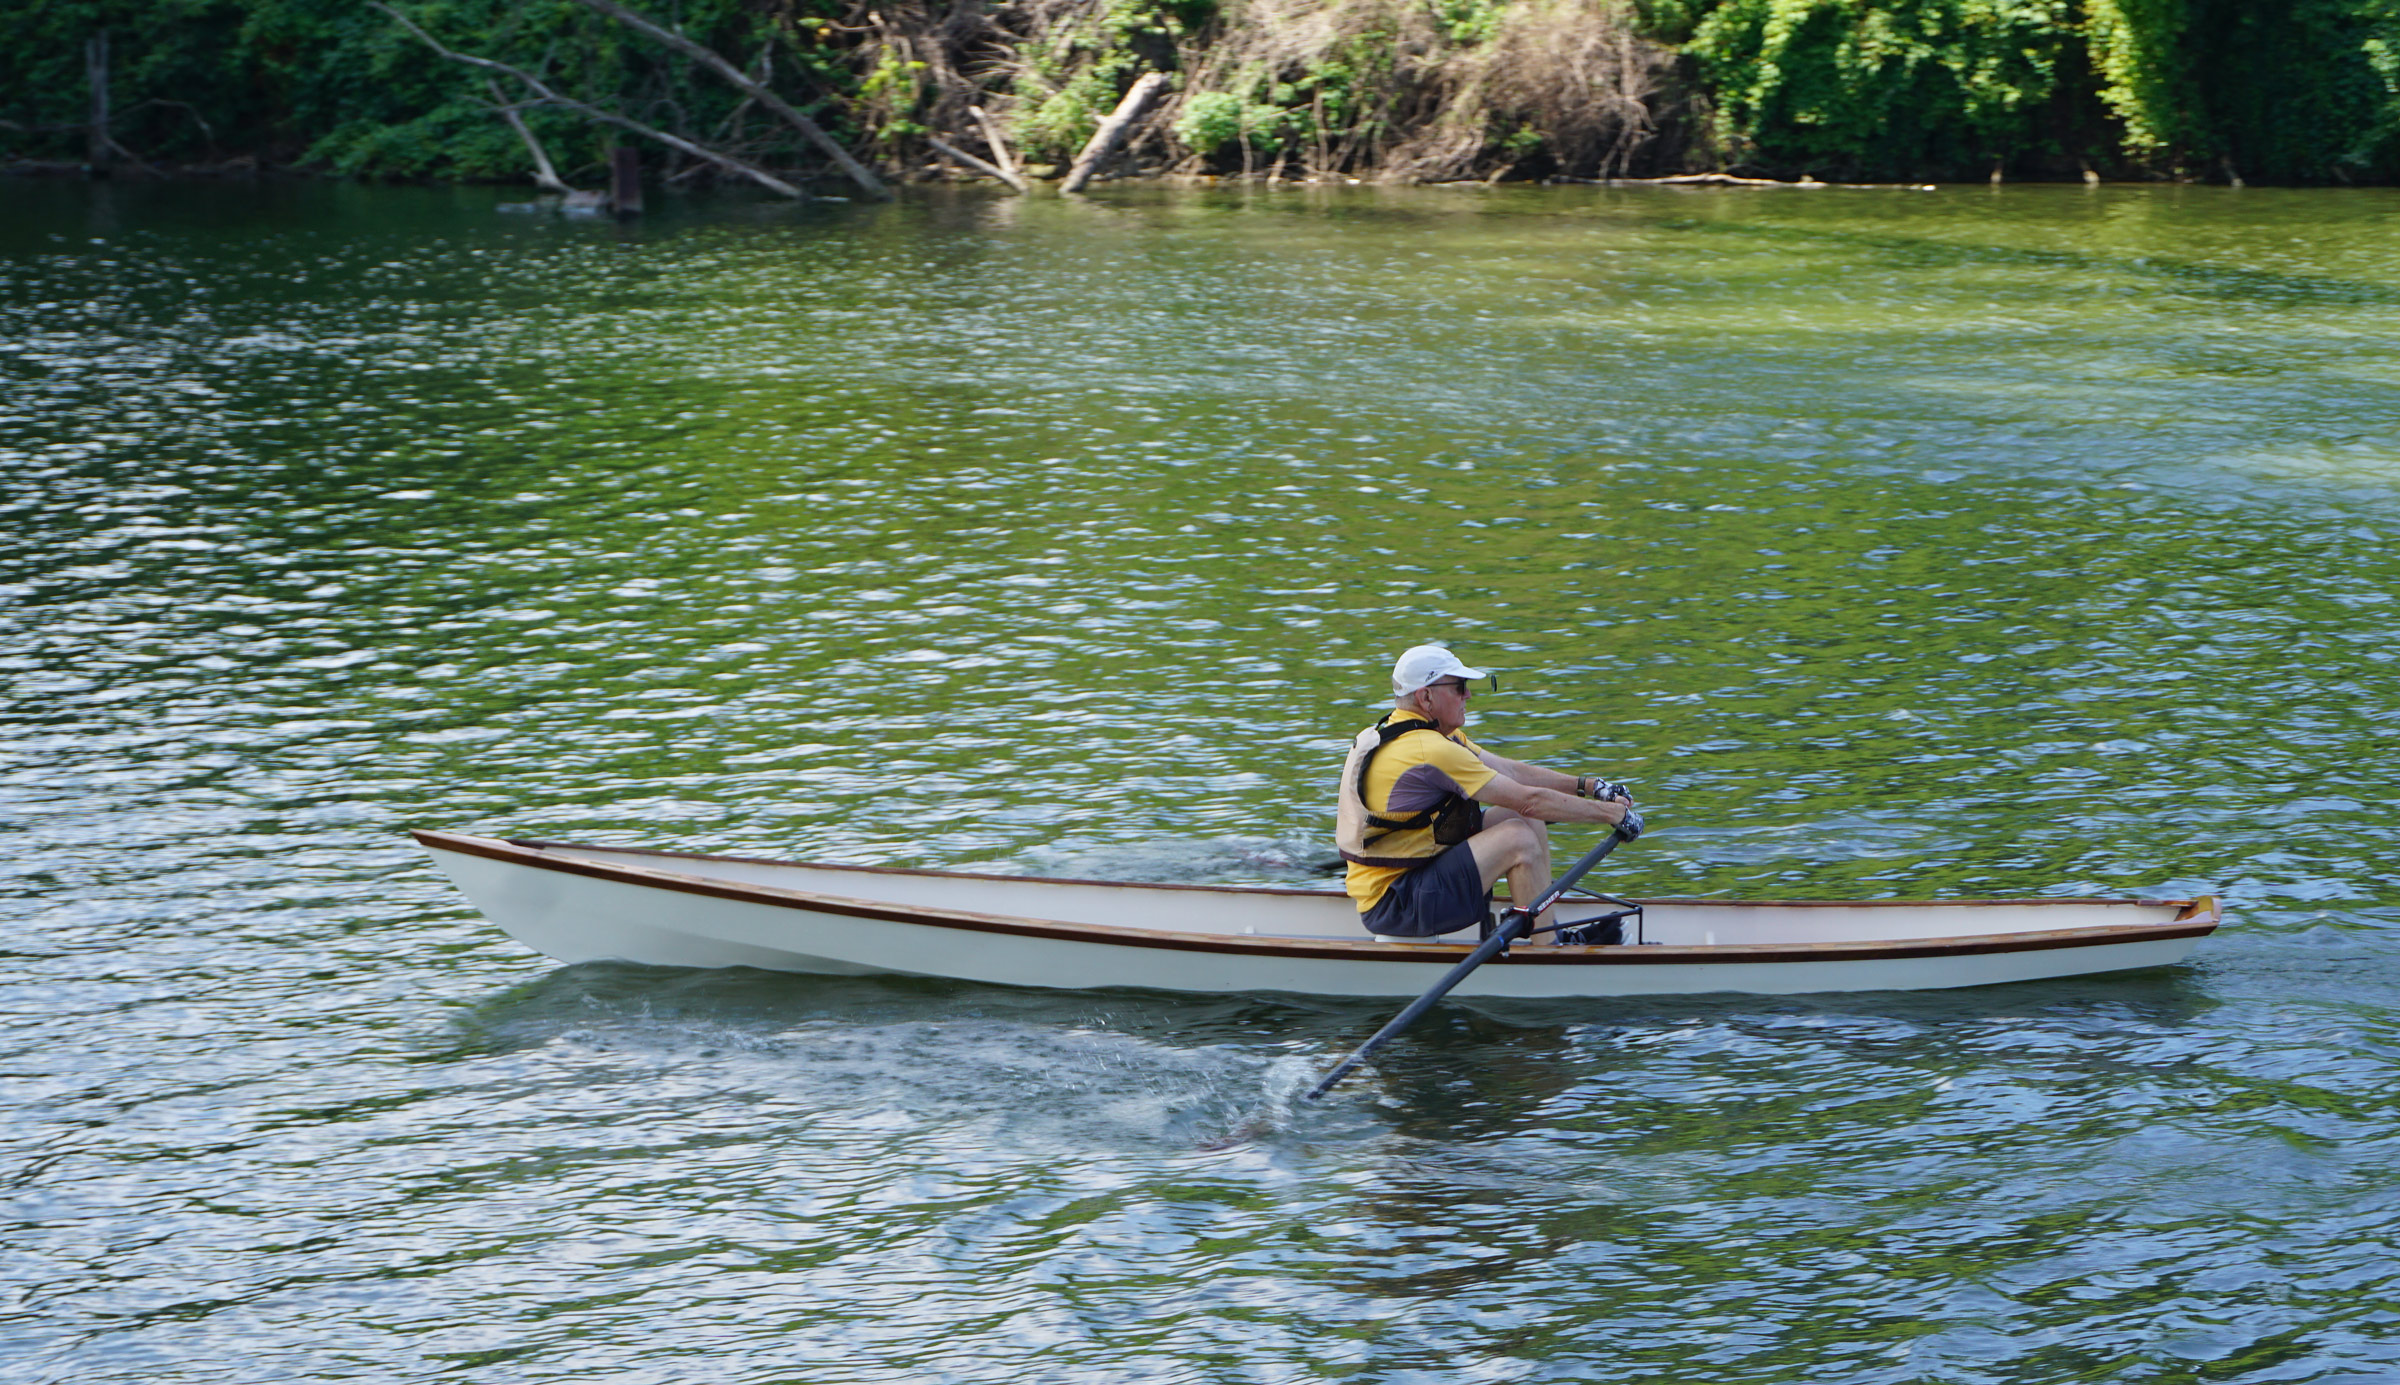
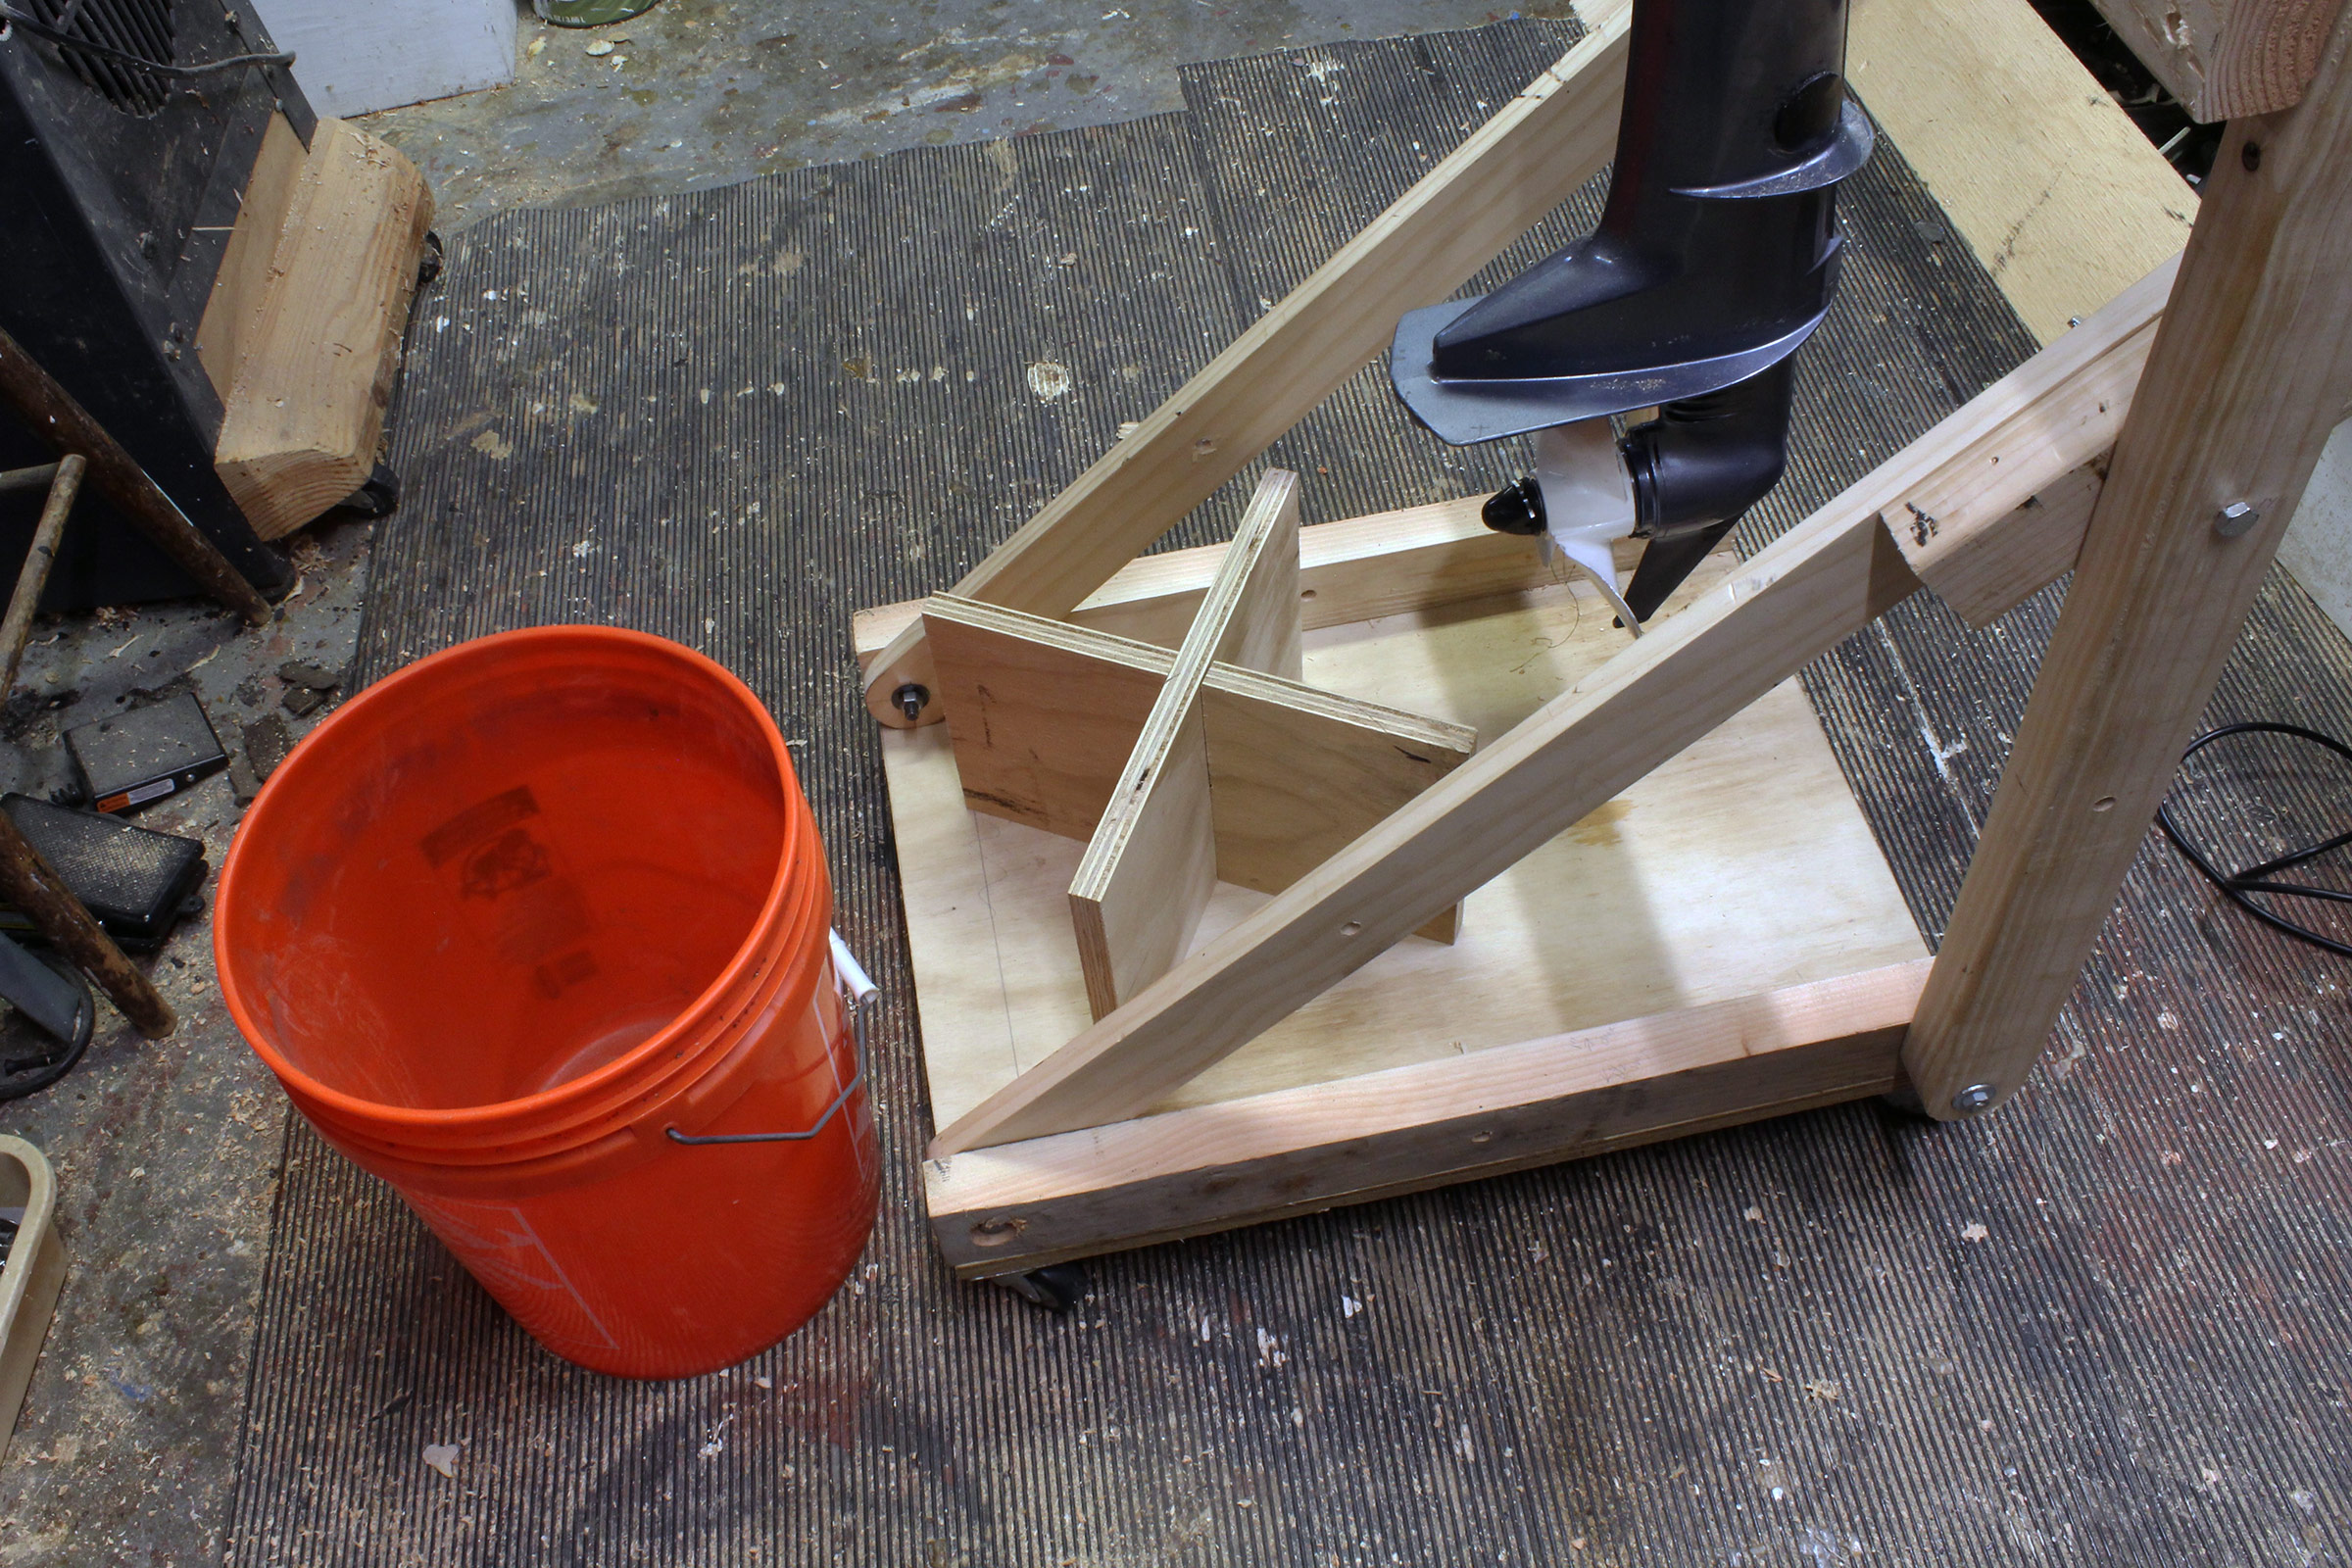
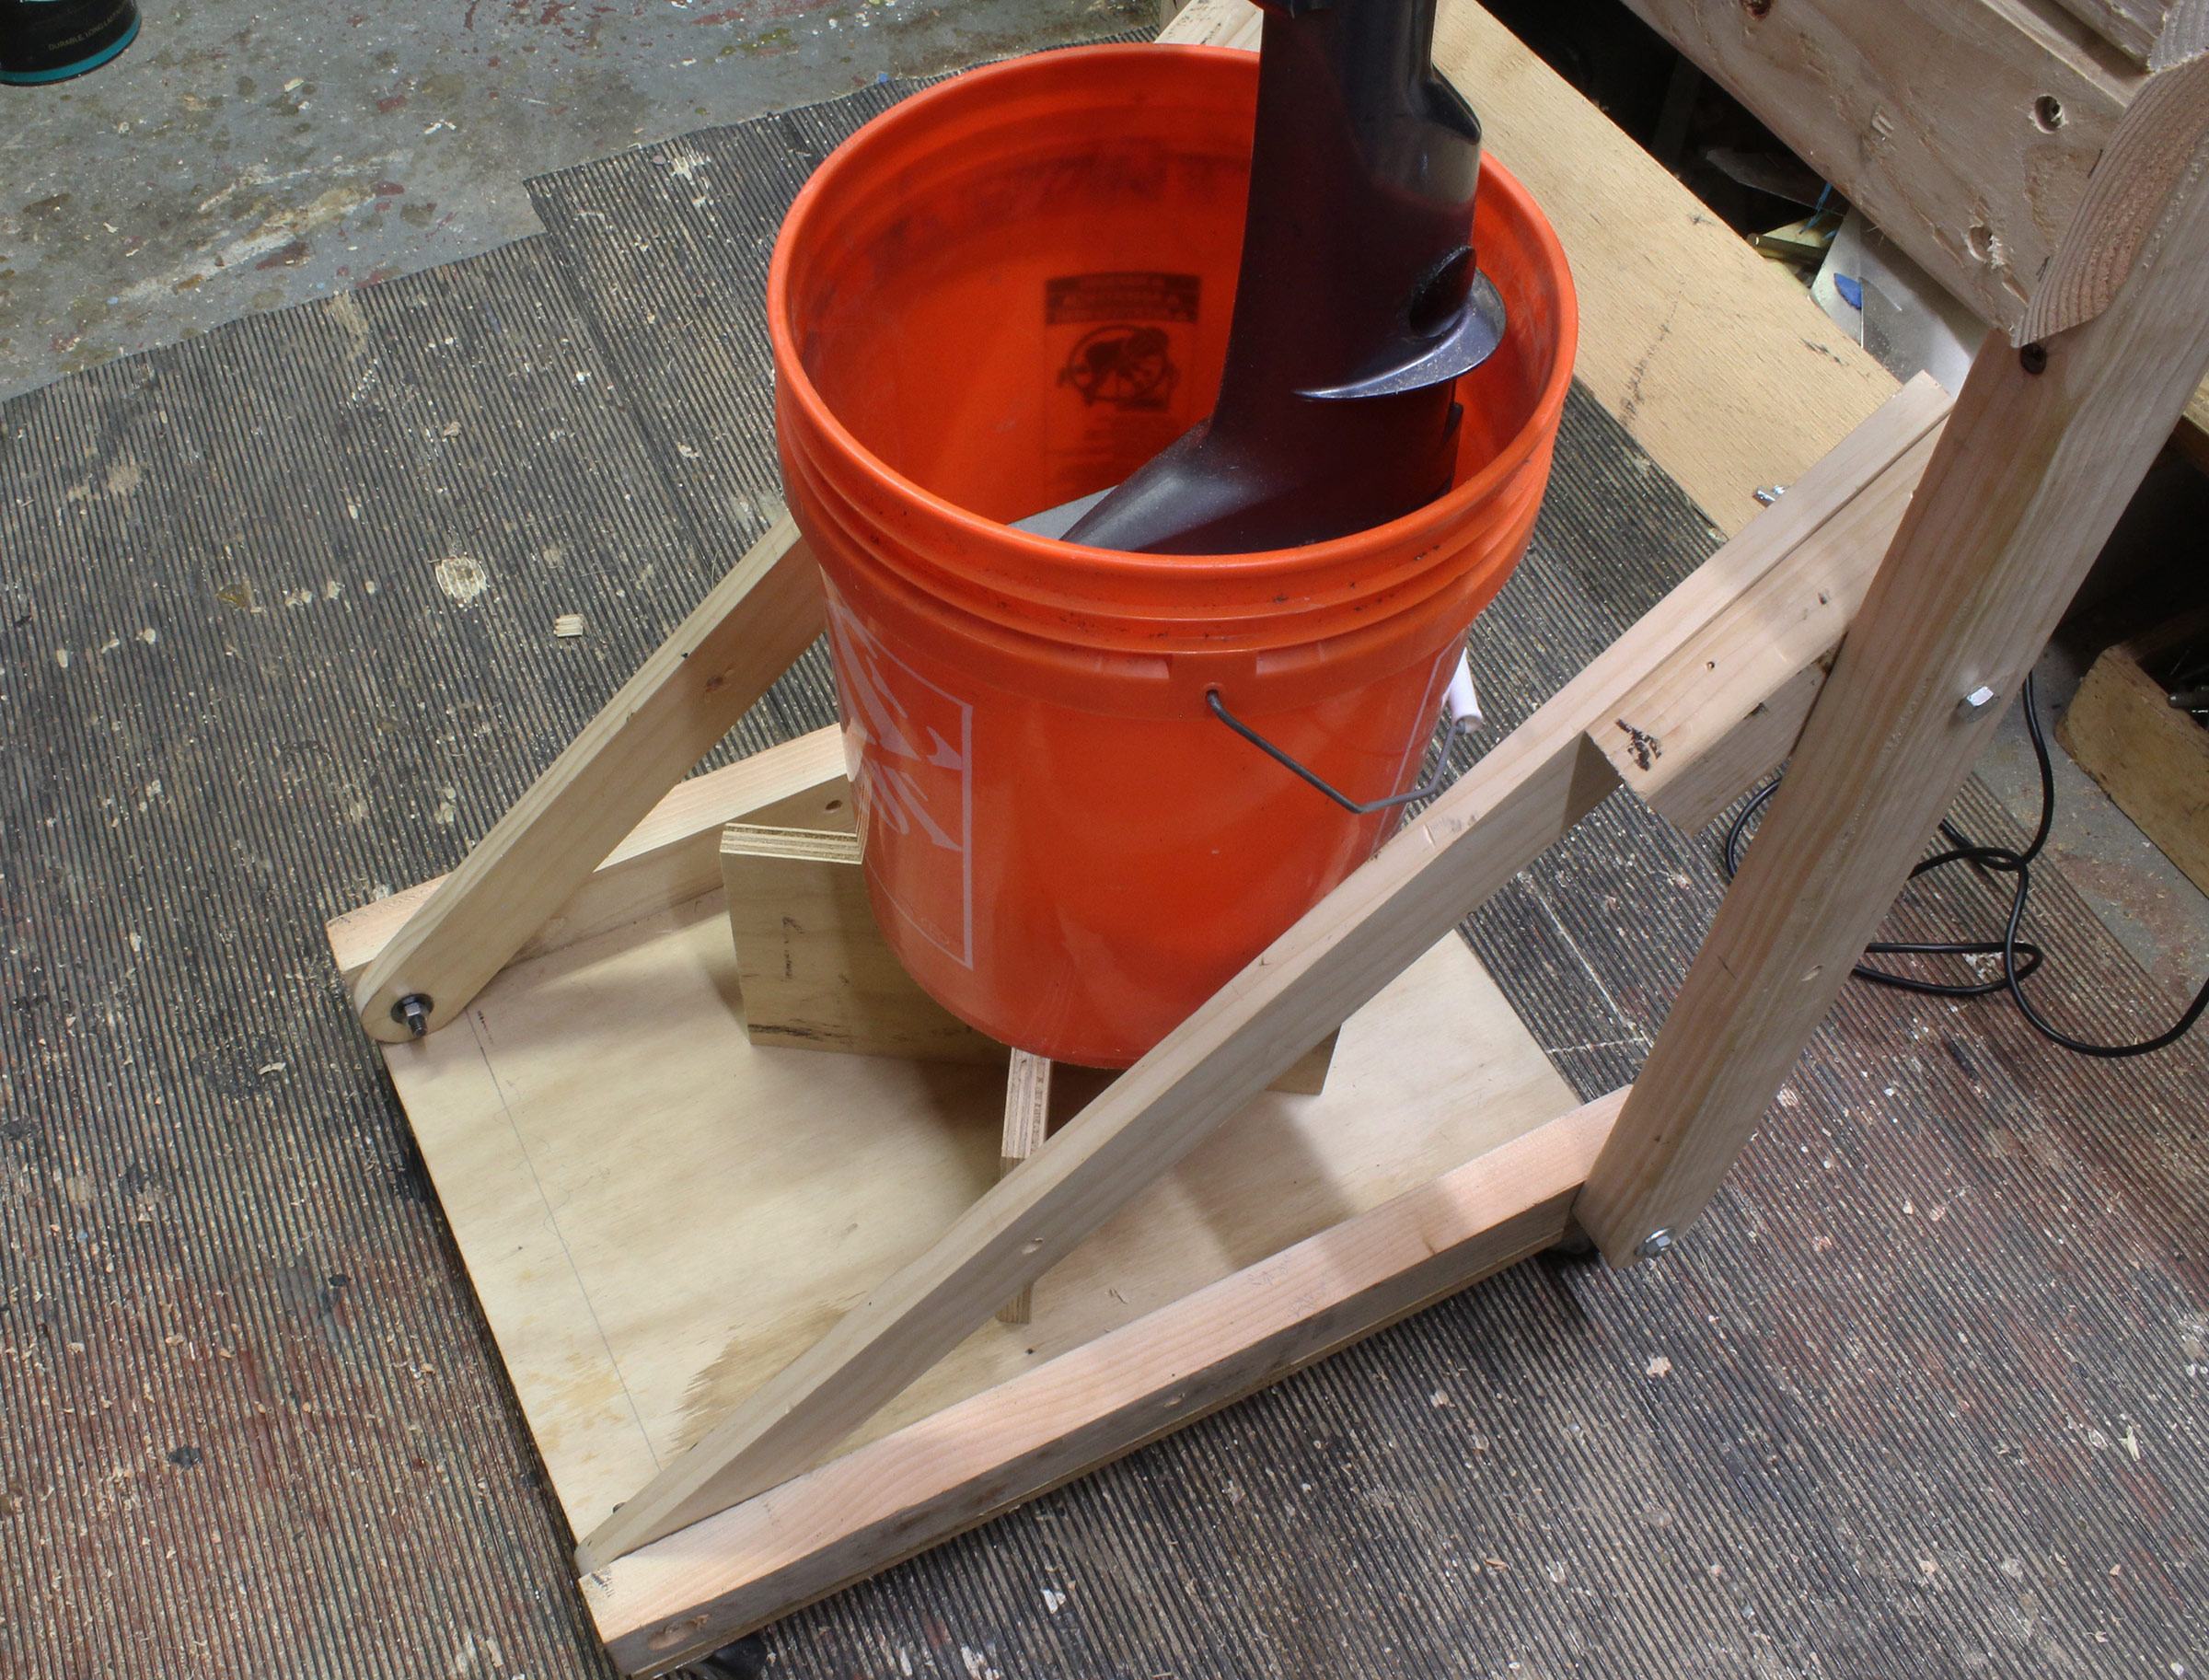
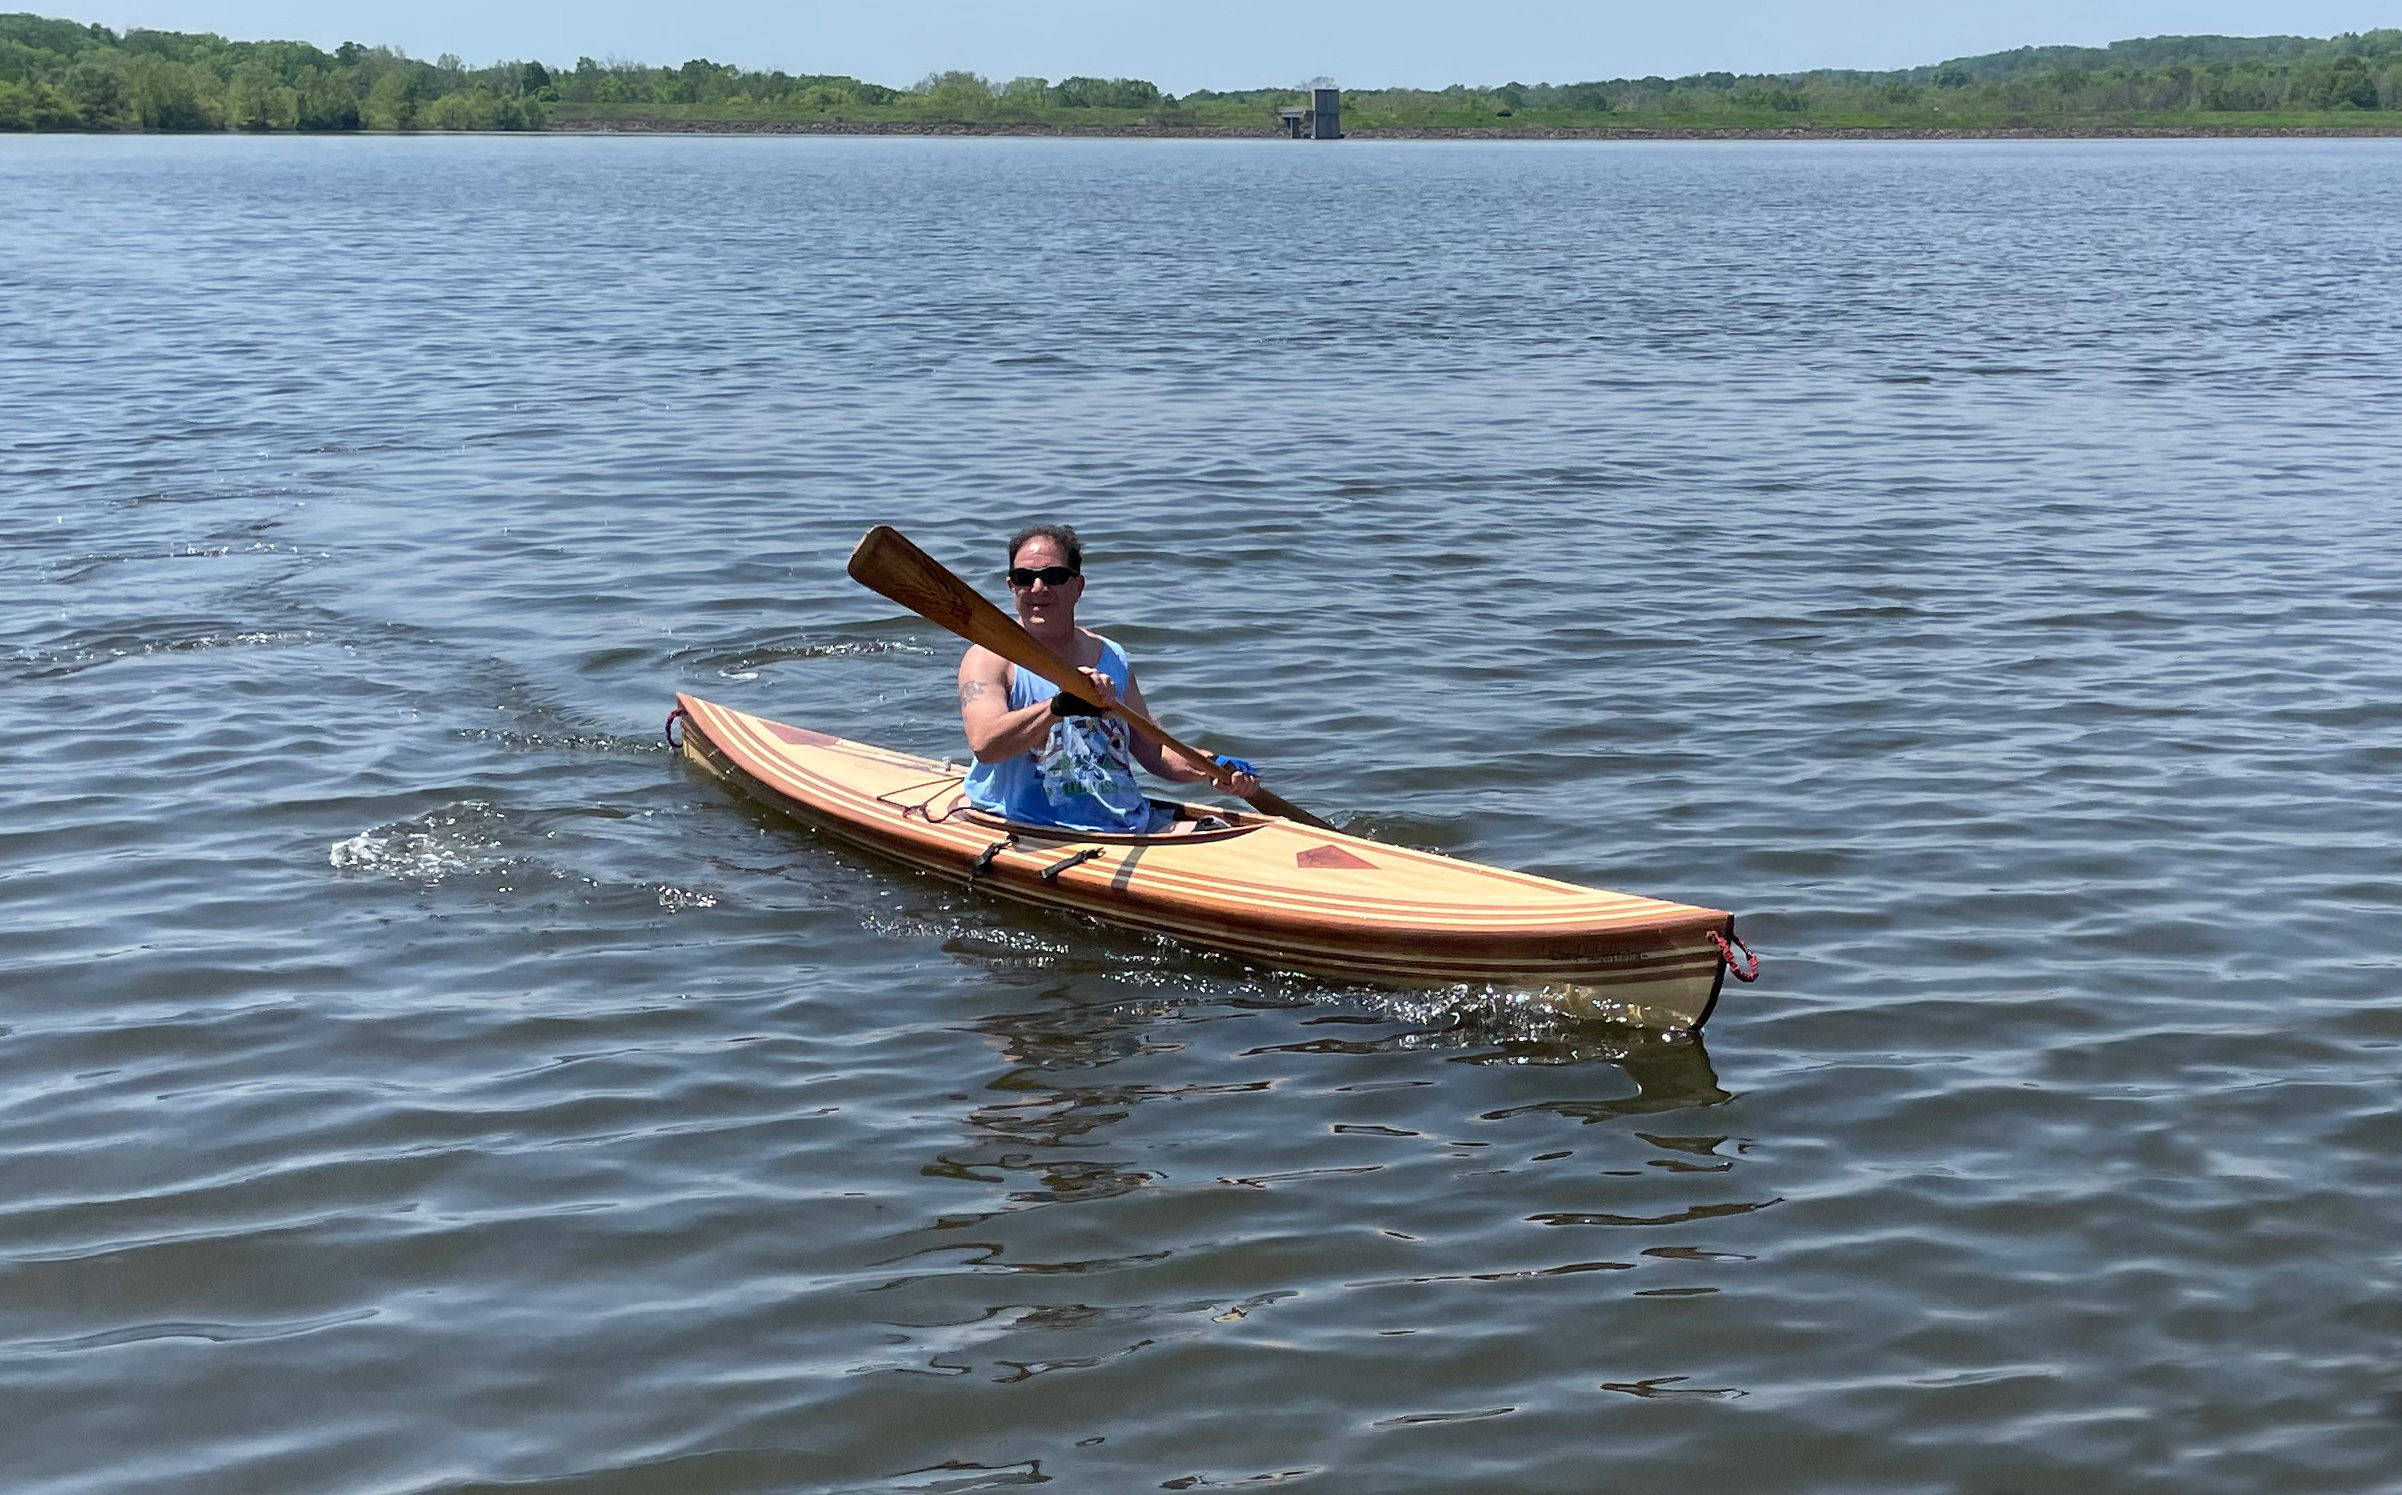
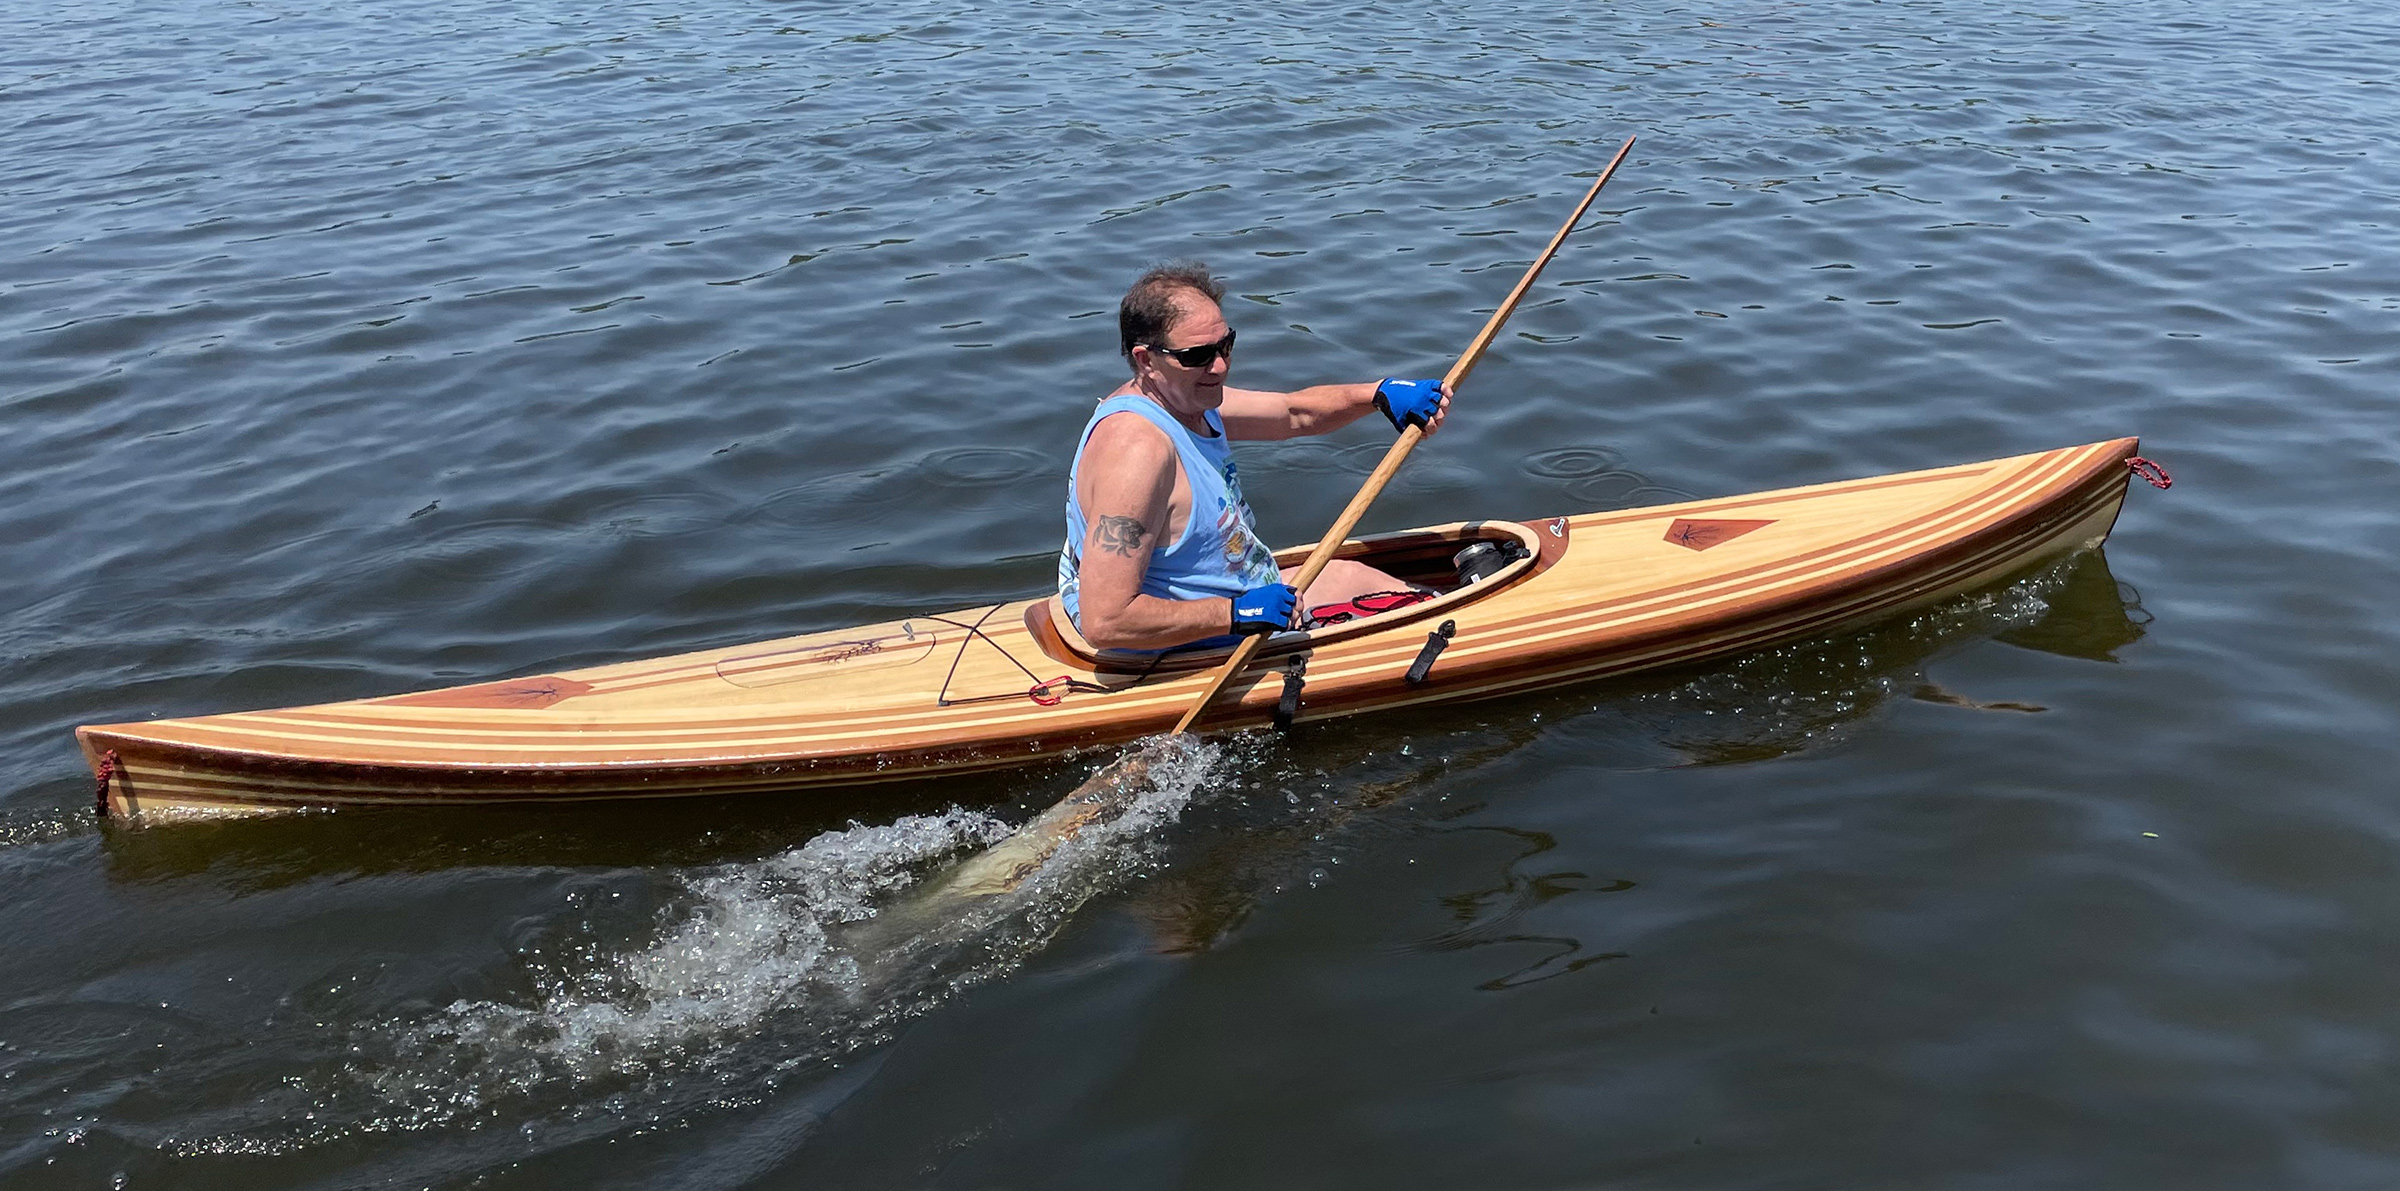
Under oars, the pram tracks very well and has considerable carry between strokes. It pushes through a moderate chop most satisfactorily and is just plain fun to row. I have found 7′ or 8′ oars are the best. There are two rowing stations; you can row from the forward station with a passenger seated in the stern, or solo from the aft station. “The same tucked-up transom that makes for decent rowing will preclude planing,” Doug notes, “so there is no point in putting anything more than 2 horsepower back there. In fact, 1 horsepower is as much as she can really use effectively. This begs the question—why not electric? Why not indeed! A small trolling motor will push her along nicely.” I have a 3-hp Torqeedo electric outboard for outings under power. The motor moves the boat fast enough—5 mph—at full power. I always carry oars as a back-up in case I exceed the battery’s range.
Bill Boyd
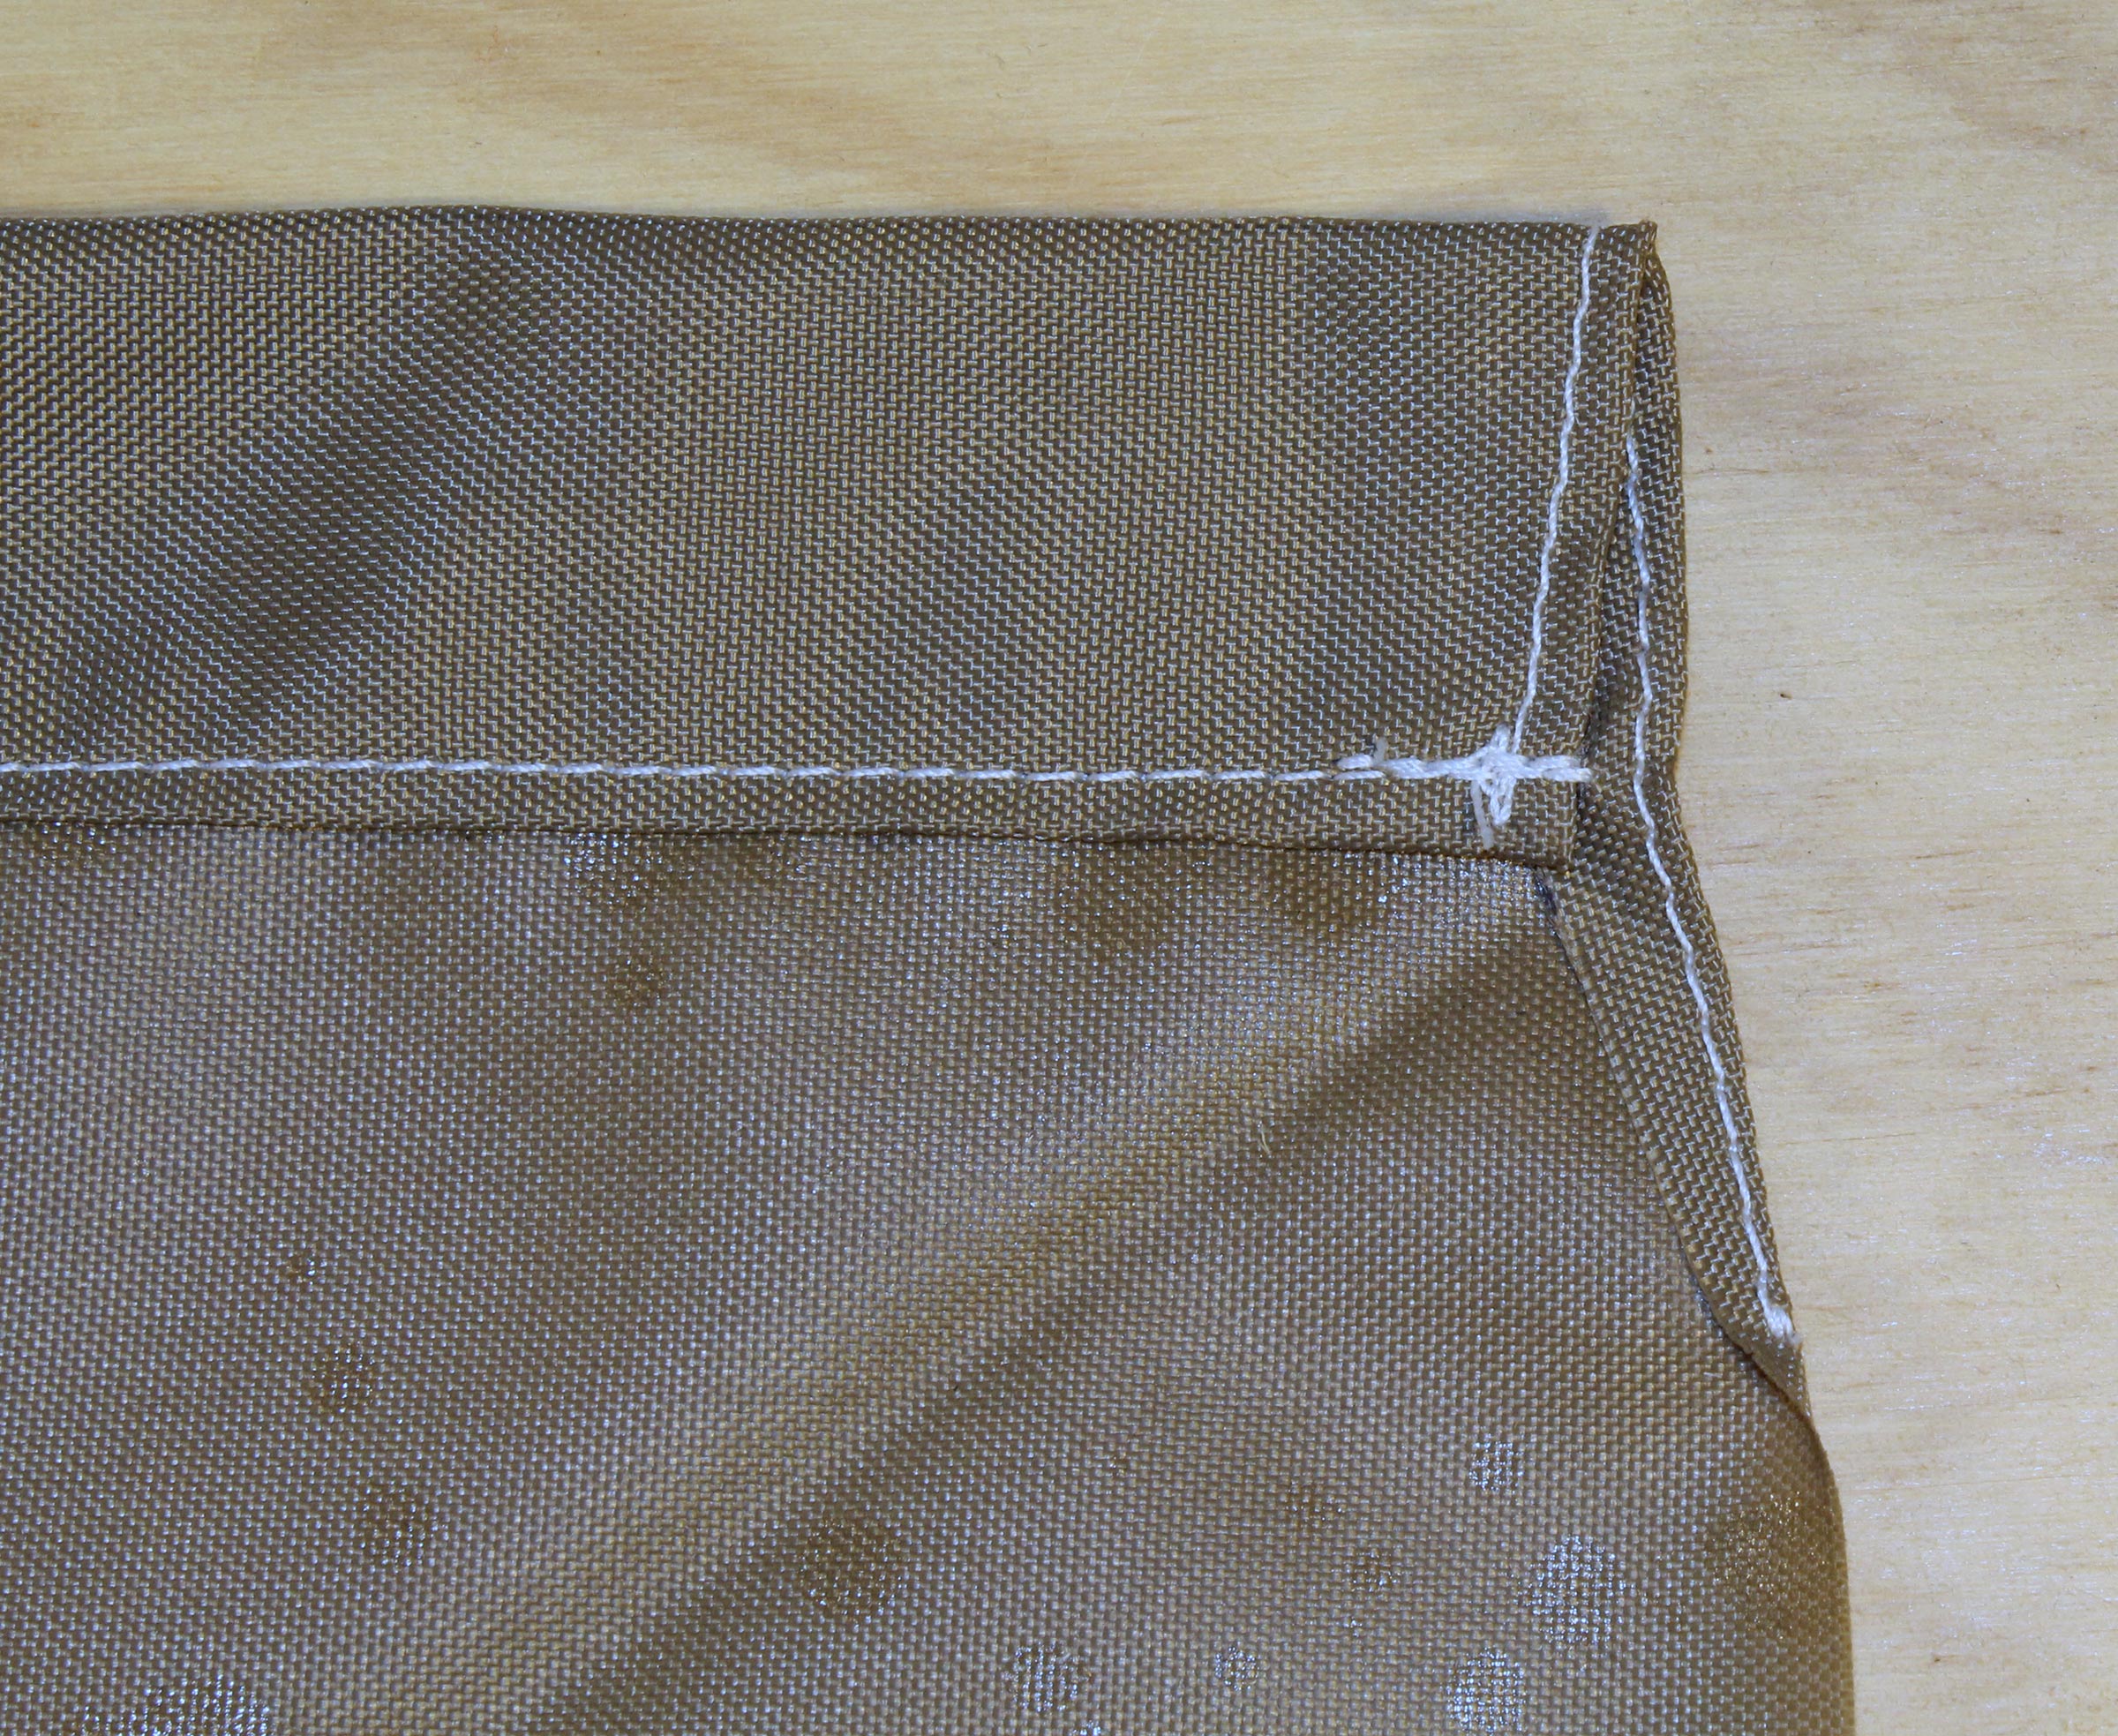
The pram bow gives the Oonagh more volume, buoyancy, and stability forward than a boat with a sharp bow without adding to its length.
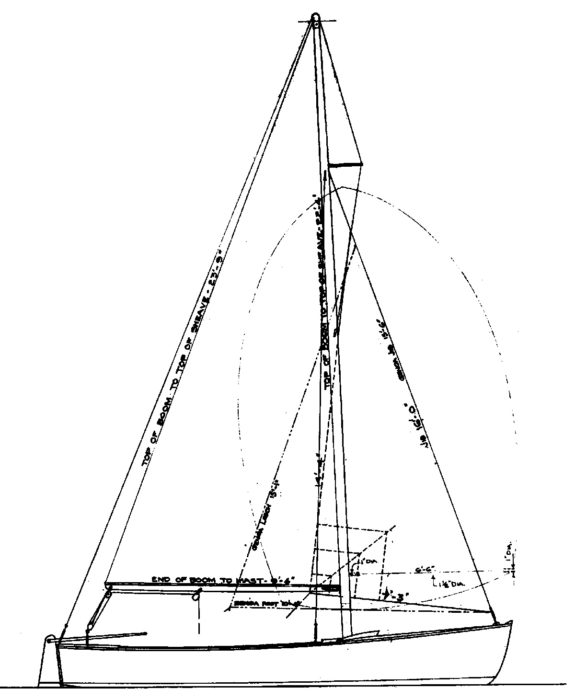
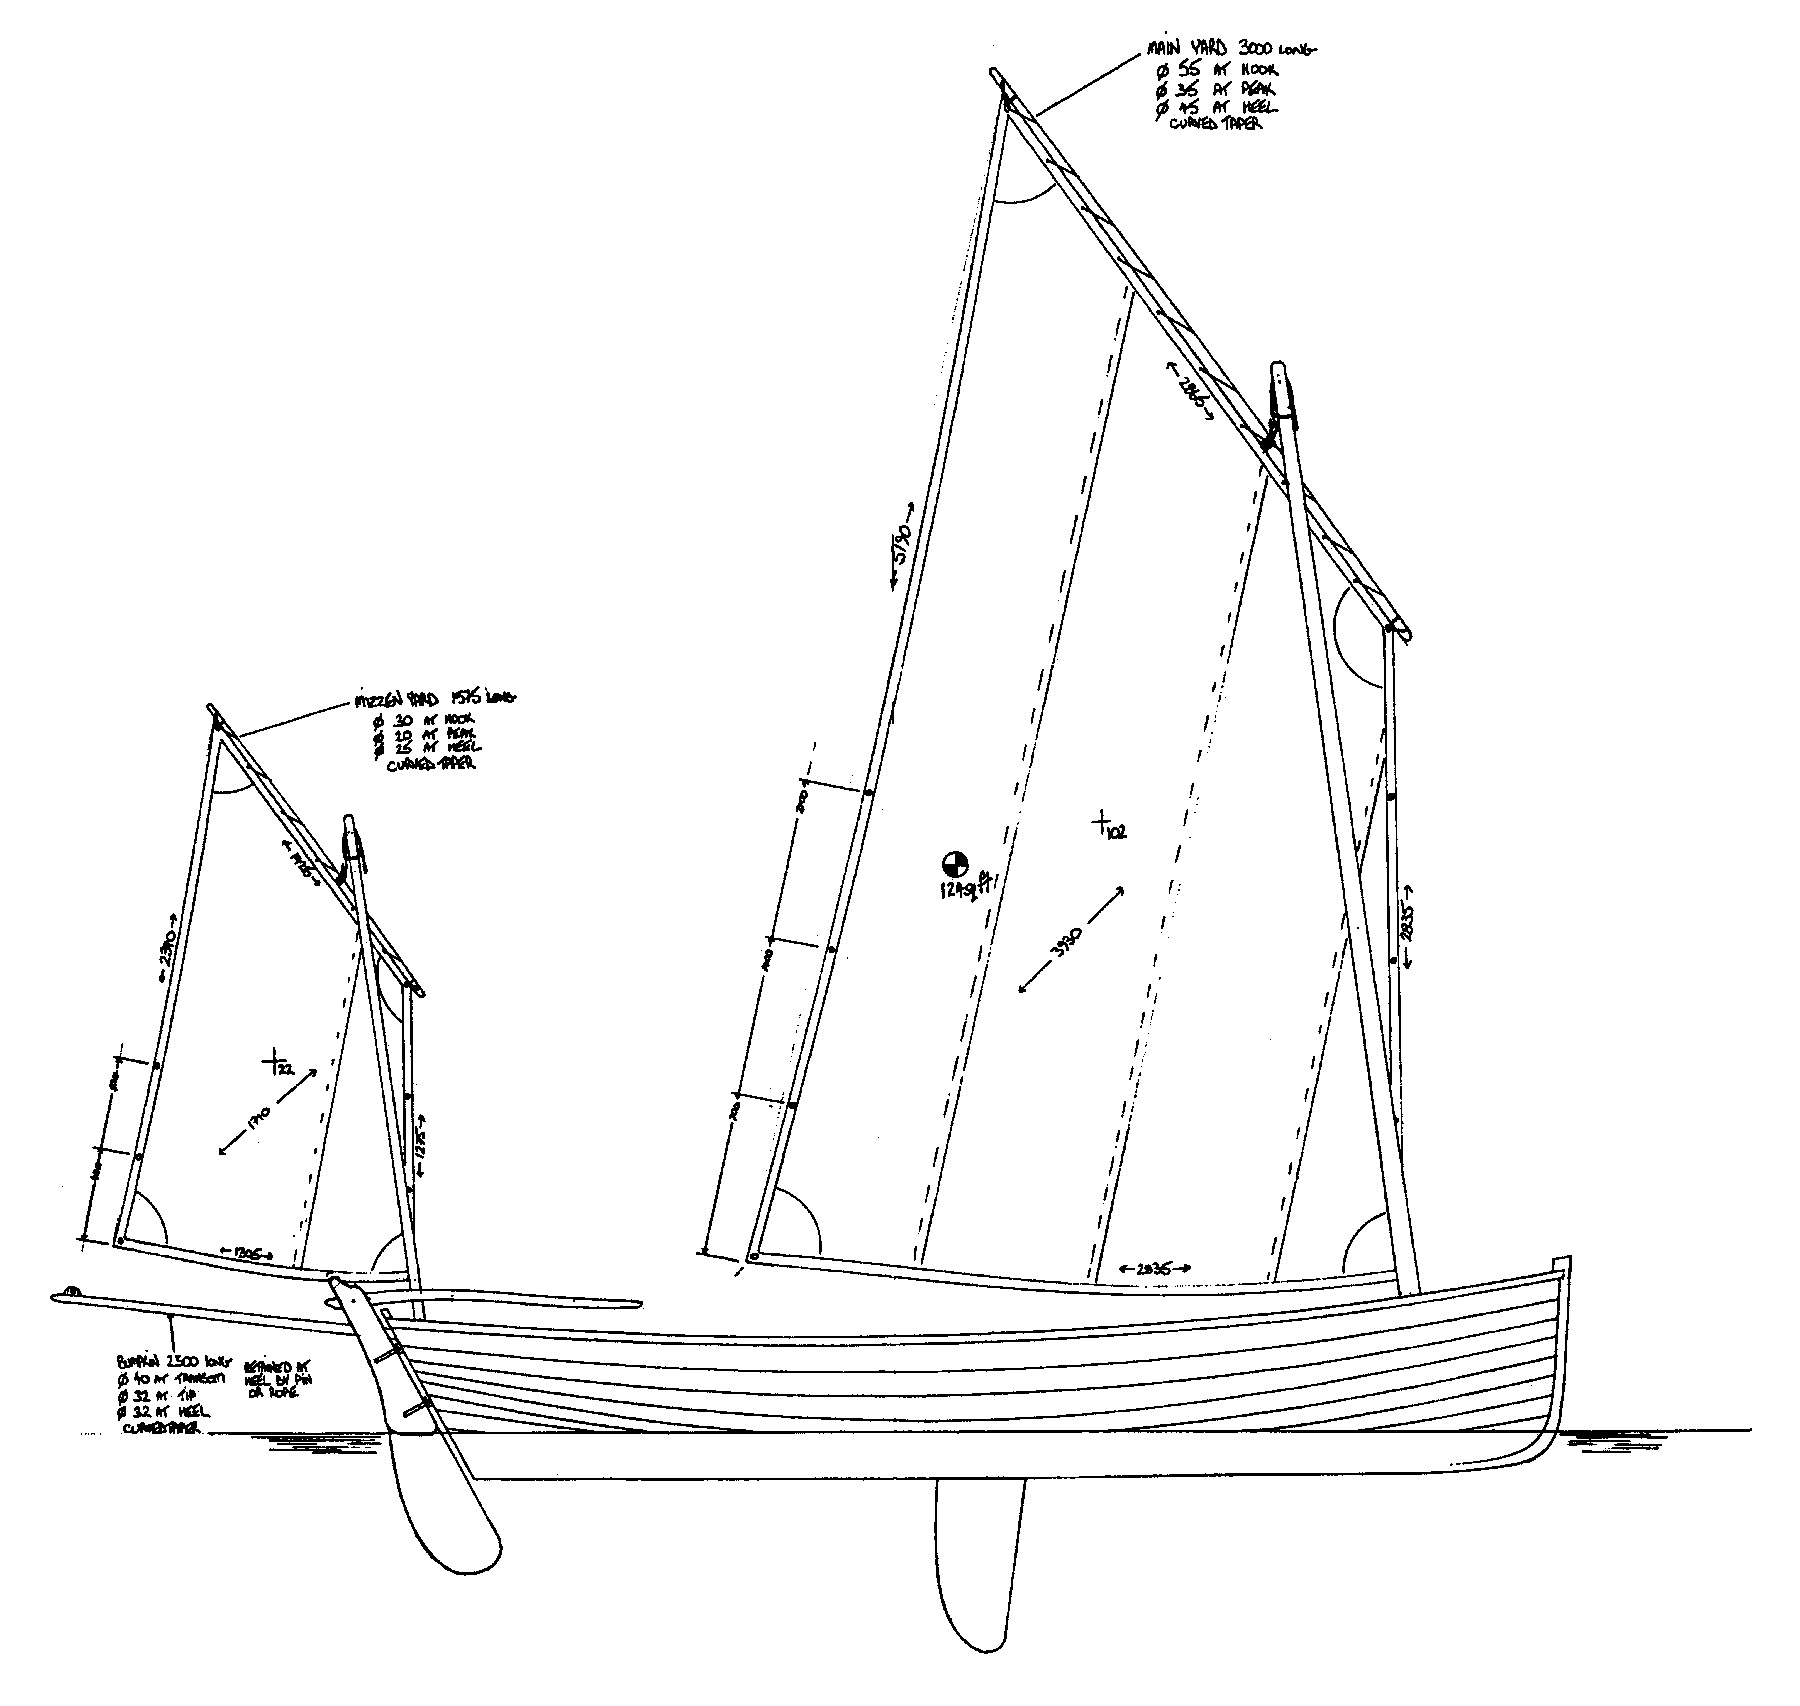
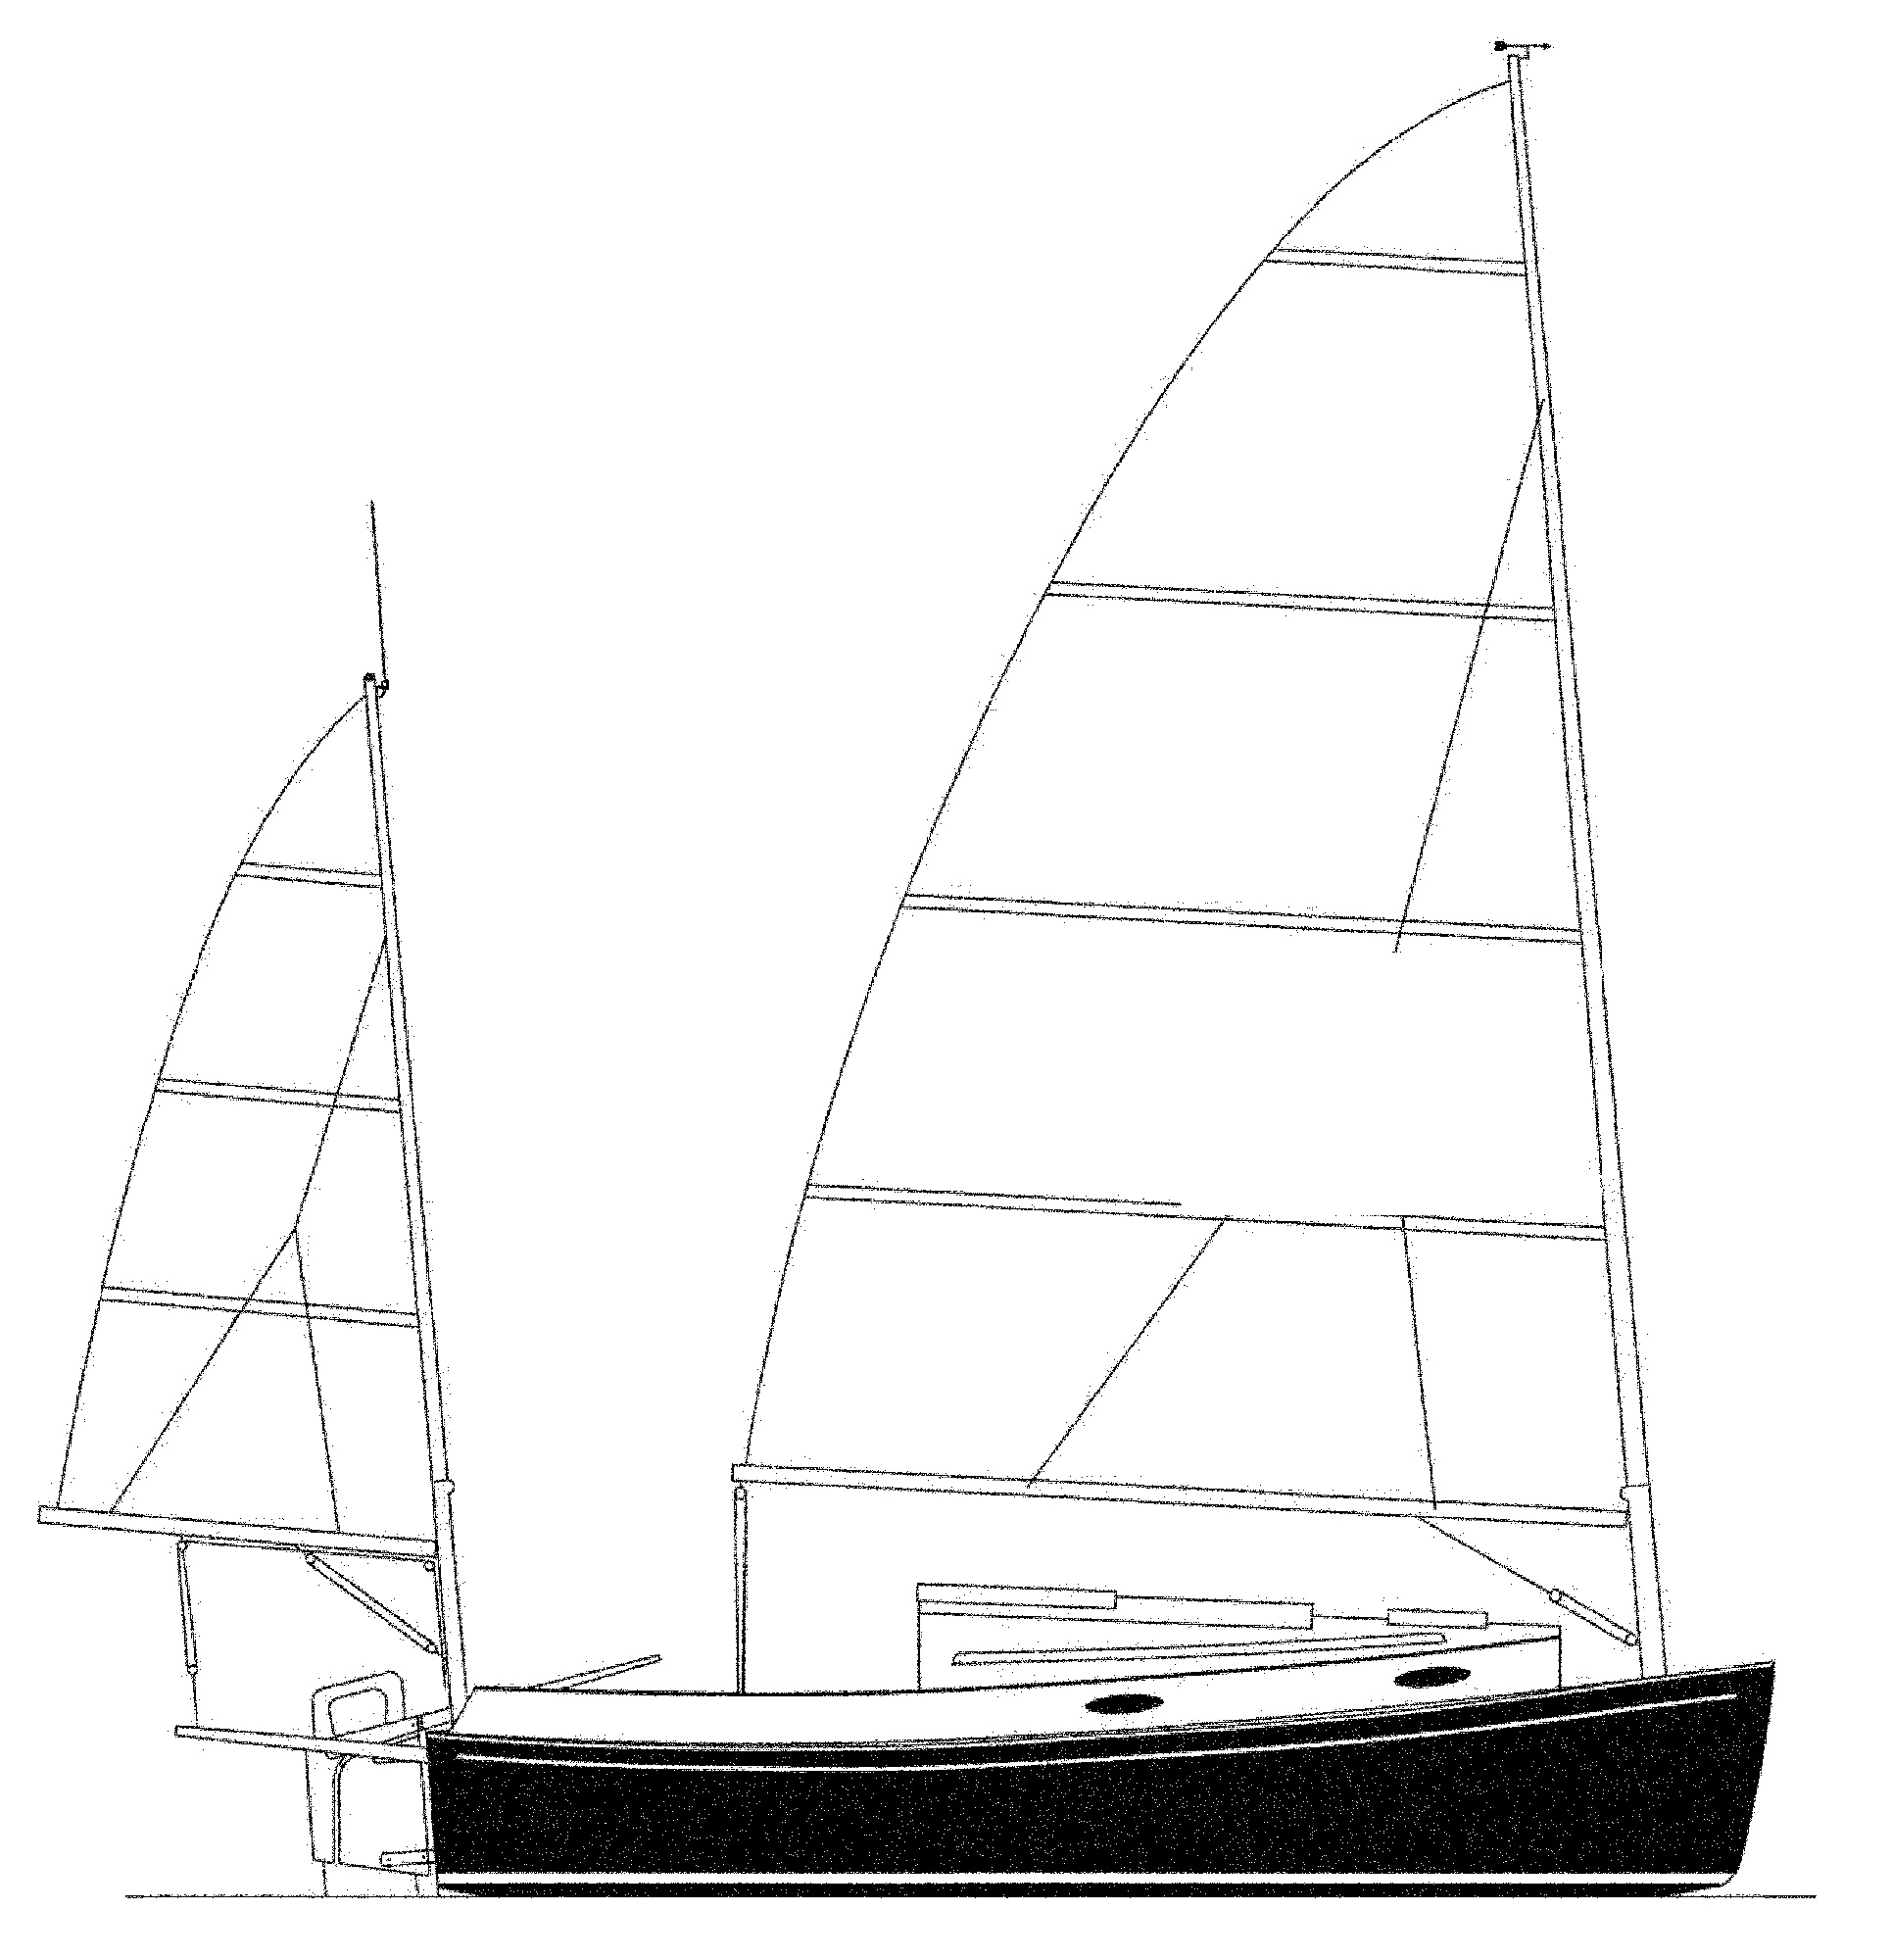
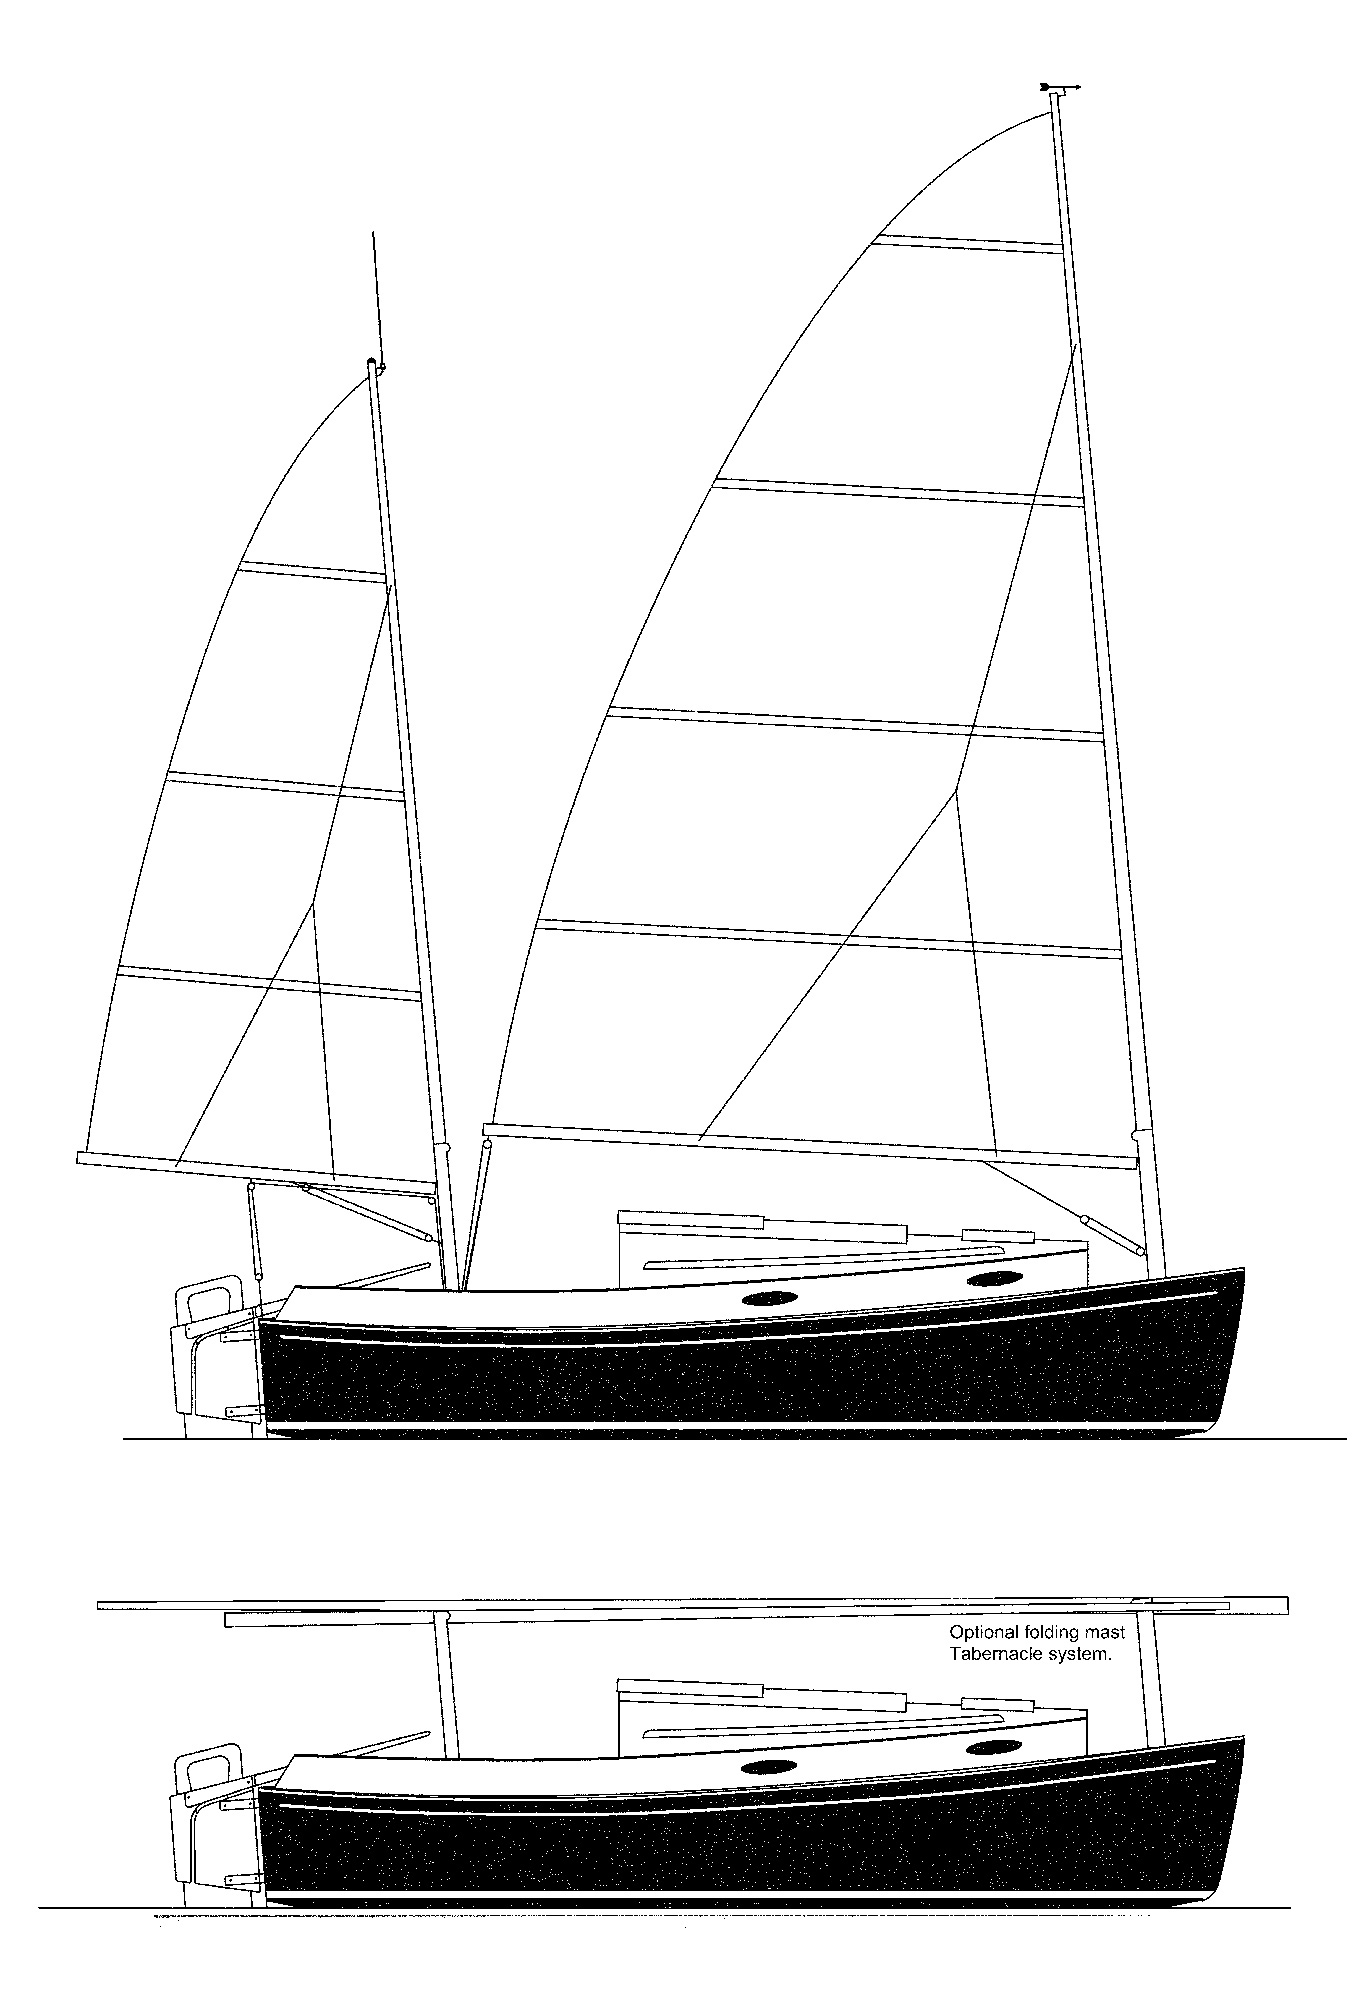
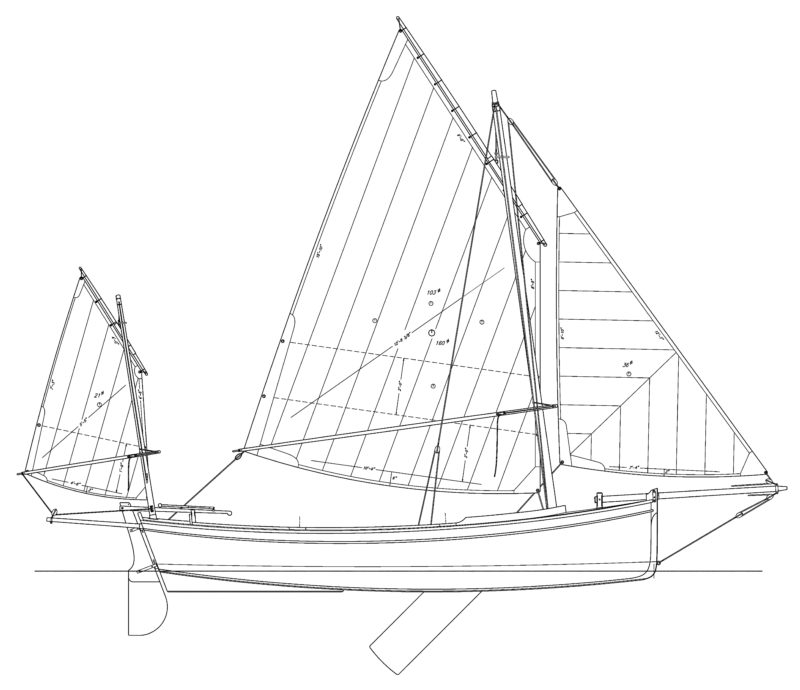
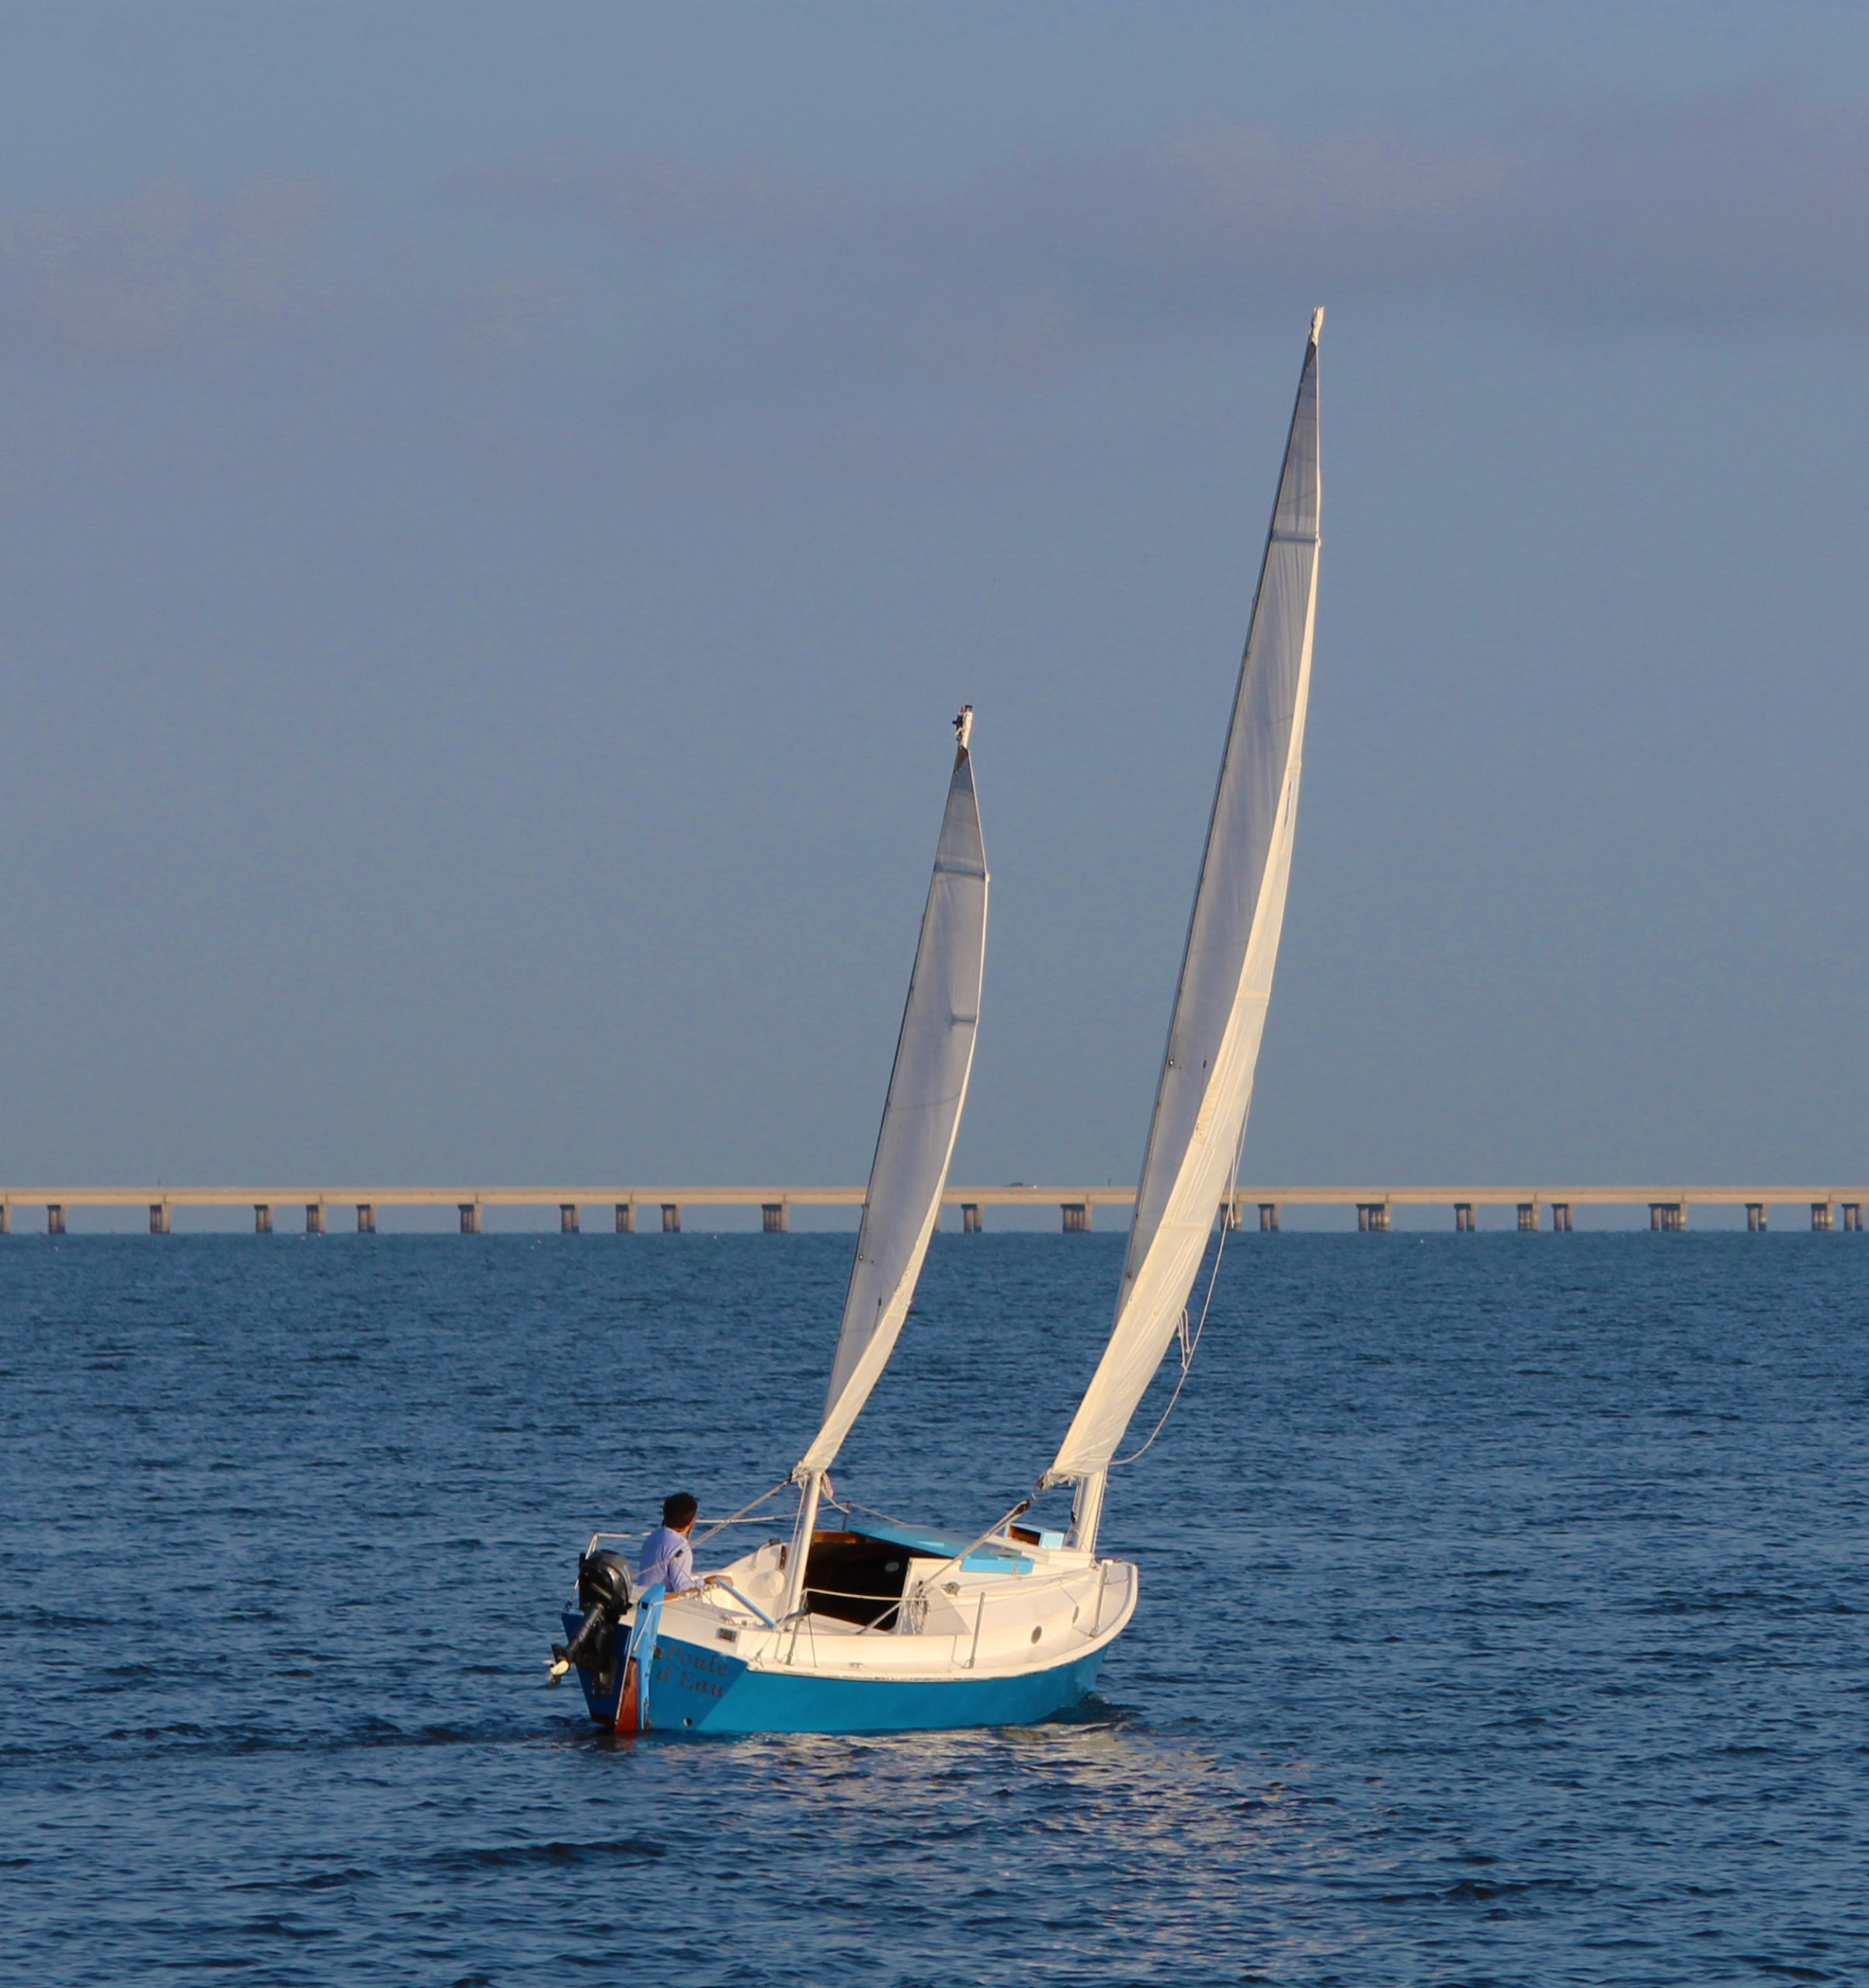
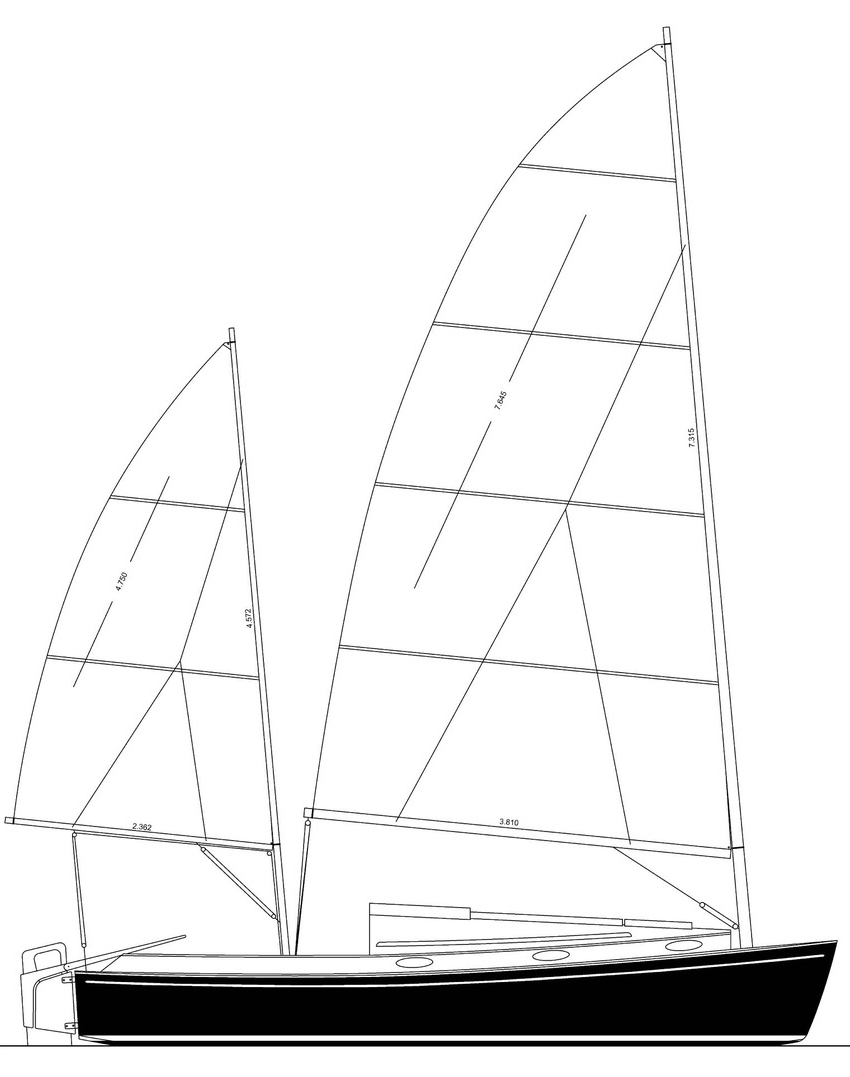
The Oonagh has a standing lug rig, with a boom and yard, which makes the 68-sq-ft sail particularly efficient and easy to control. The spars are all short enough to fit inside the boat for storage and trailering. Sailing the Oonagh is satisfying; it performs like a well-designed 12′ or 13′ sailing dinghy. It tracks quite well and points decently into the wind. Because of the high initial stability, it will heel only slightly, but in a stiff wind the sail will have to be shortened or carefully attended to. In an emergency while sailing, the yard can be dropped quickly along with the sail. The boom is attached to the mast with a single boom jaw and is easily controlled, but the yard can fly away from the mast when halyard tension is released, as it will be when lowering the sail. There are several good ways to prevent this from happening and, overall, the rig is simple and safe; excellent for kids or those learning to sail. When rounding up and coming alongside a float or dock the daggerboard, which draws 22″, makes the maneuver simple and quick, almost like turning on a dime.
Benjamin Mendlowitz
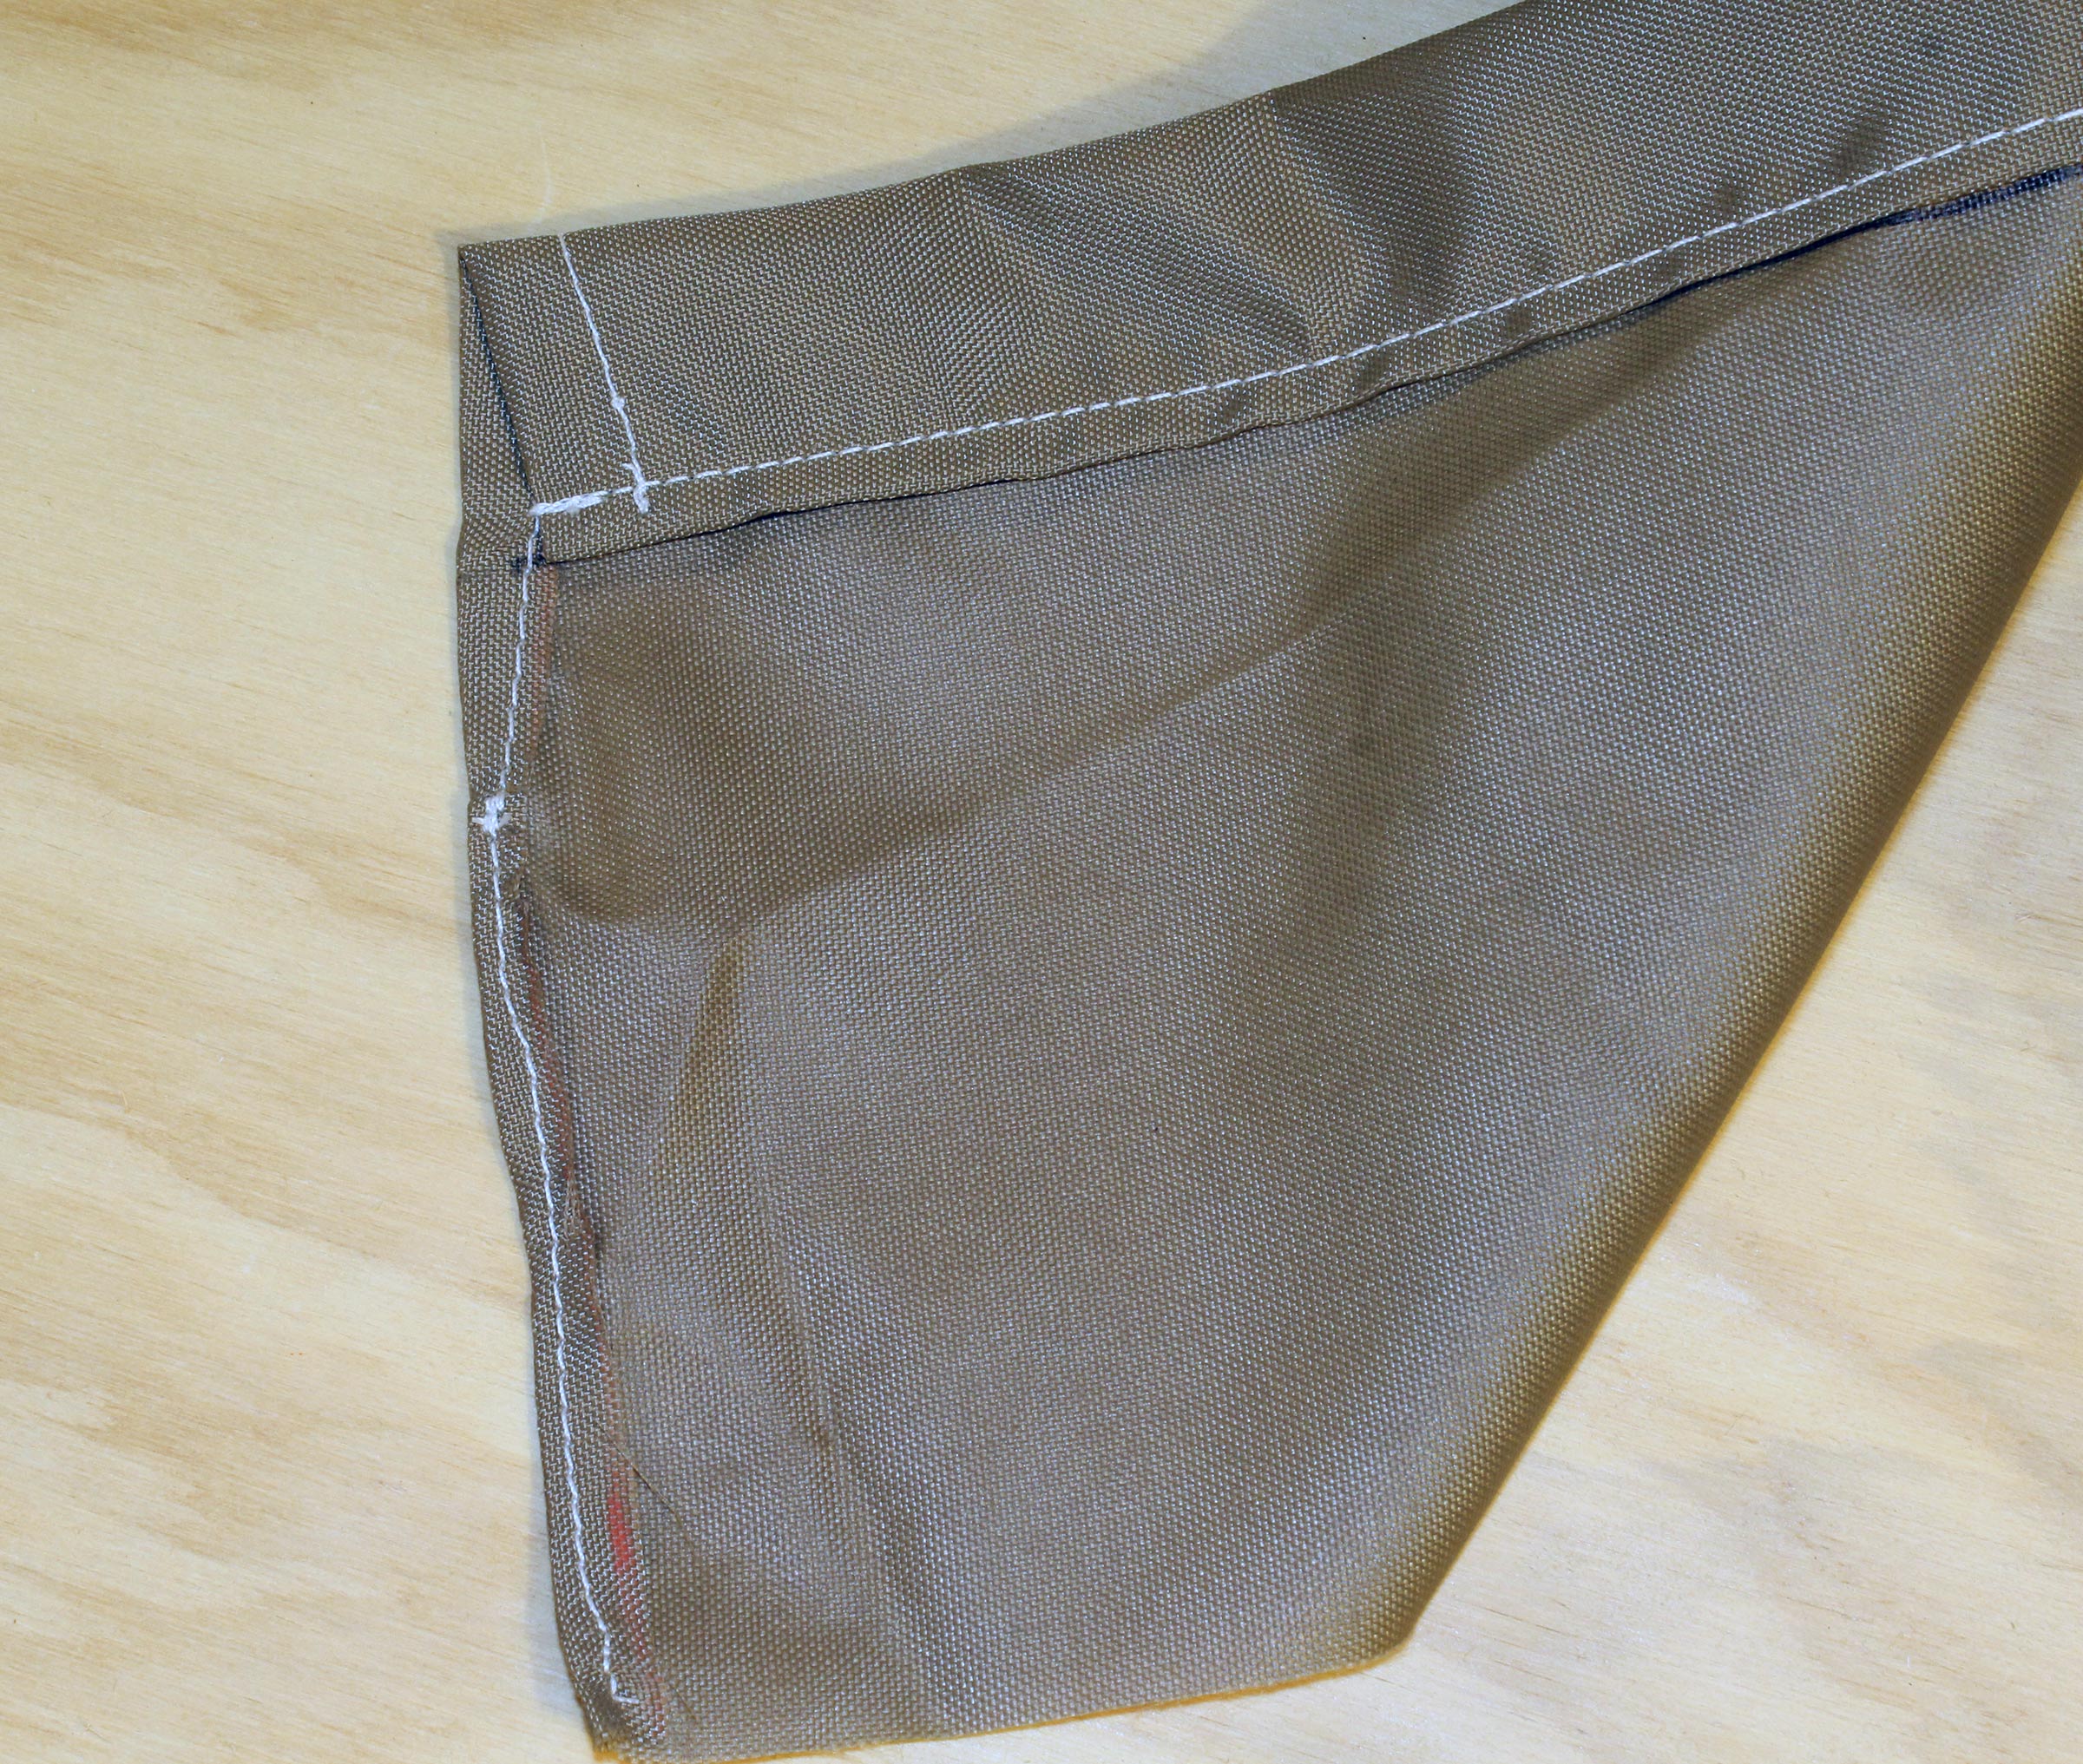
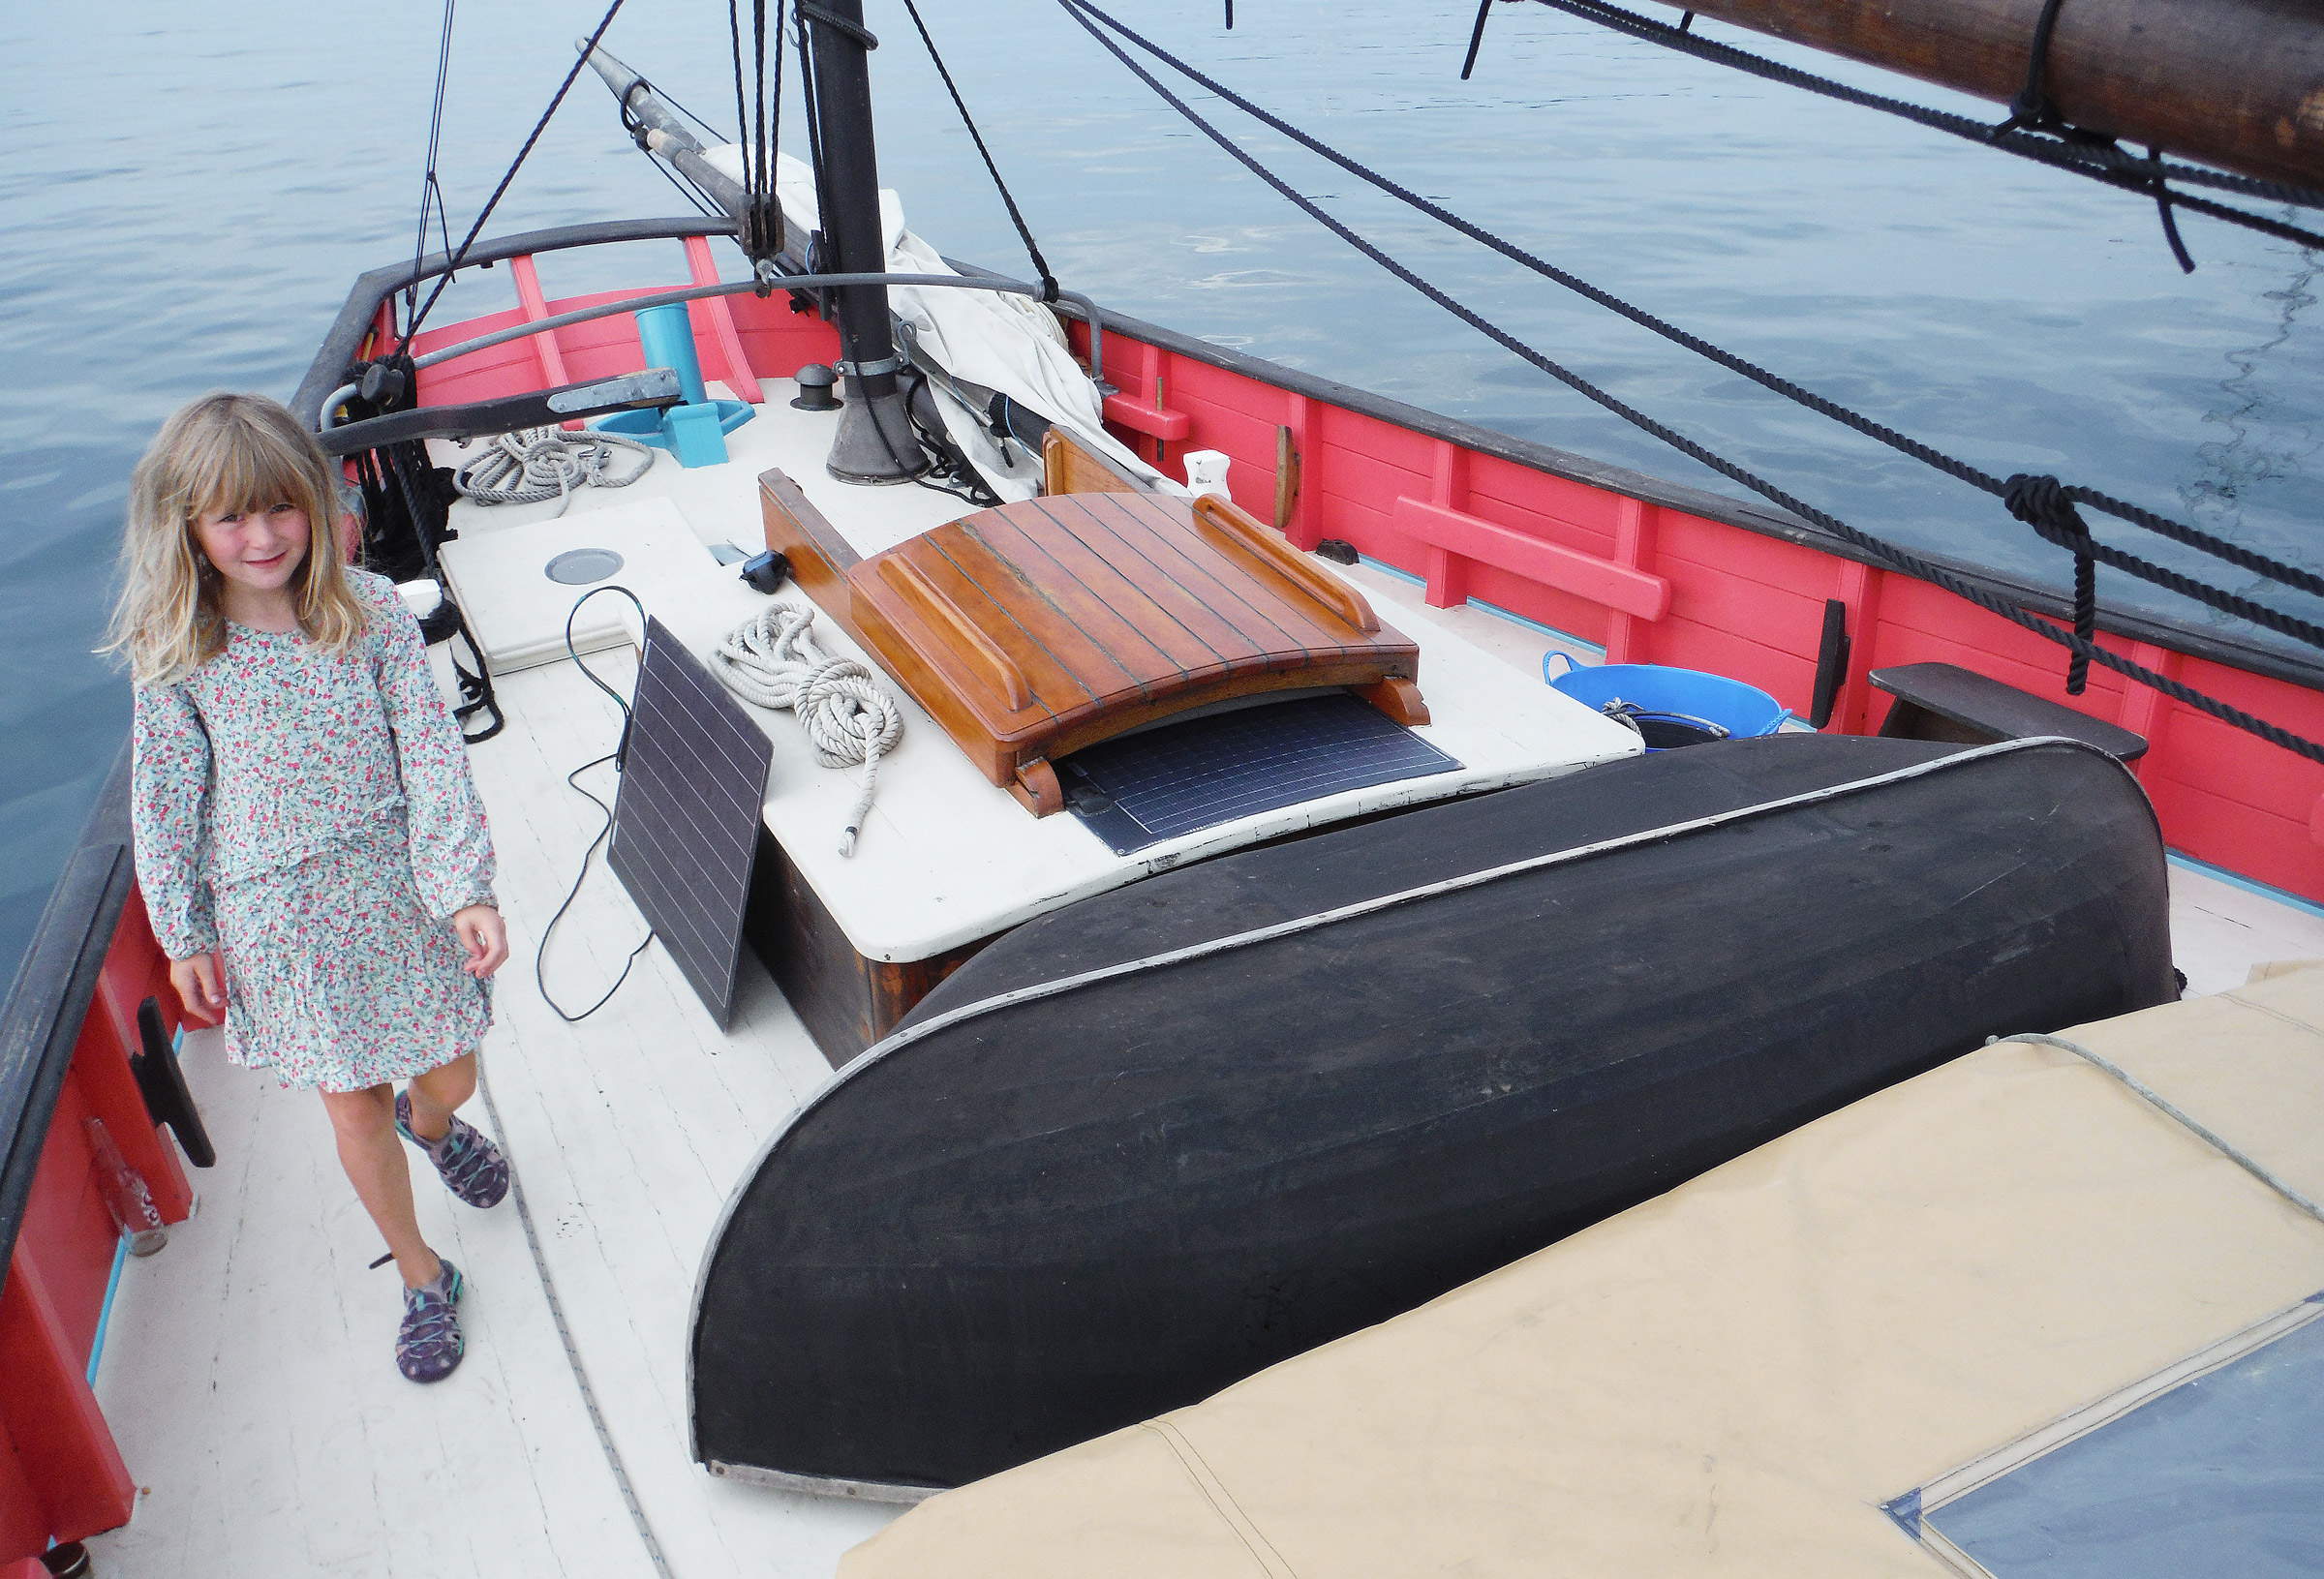
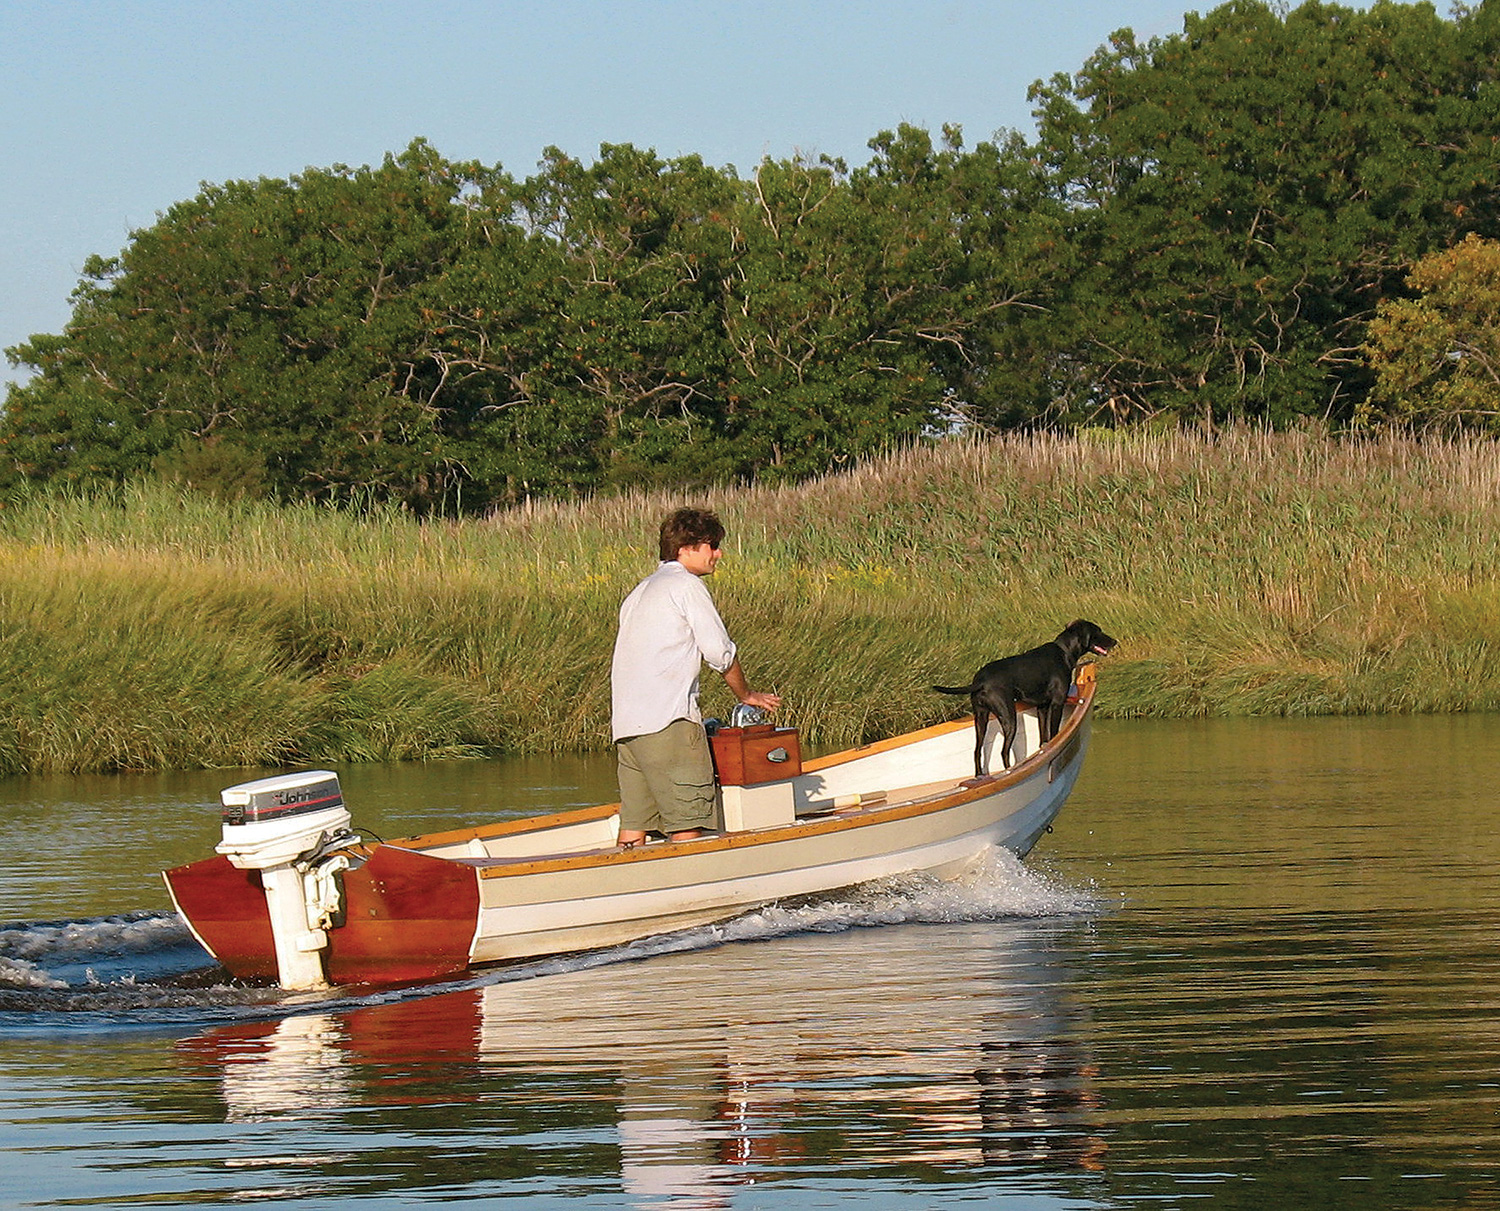
The Oonagh carries its way well when rowed. The notch in the transom can accommodate a small outboard for those so inclined. The designer notes that a 1-hp gas outboard is plenty powerful enough for the displacement hull and that an electric motor would be a good choice.
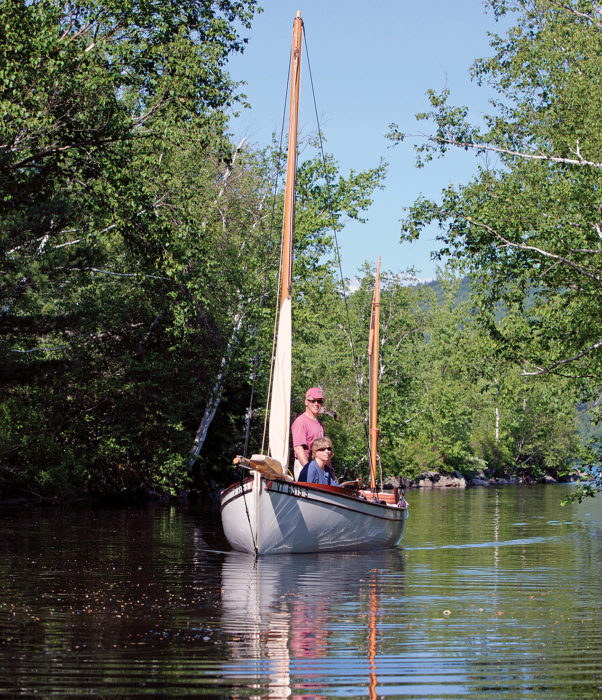
I am a senior citizen, and in the Oonagh I have found a boat that can take care of me as much as I take care of it. Size is not an important factor for me; 11′-plus of length is plenty. Much more important is stability and the sense that, with care, I can stand or move about in the boat with confidence, and that once I find my spot while sailing or motoring, I can’t be easily thrown off balance or moved unexpectedly. It is a wonderful boat to come to terms with: if I sail the boat carefully, the boat will do me no harm. The Oonagh’s “nautical competence” enables me to feel totally comfortable while stretching out my legs while motoring slowly down the river or sailing in semi-protected waters. If I raise the board a bit, I can cruise among the grasses at the edge of the marsh, or I can reach for the oars to go to windward a bit before trimming the sail for the long reach home. I feel confident aboard the Oonagh. I noticed that right from the beginning, and the feeling is with me whenever I put it in the water.
The experience of owning an Oonagh for two years has not diminished my enthusiasm for the boat. I have owned a 19′ Caledonia Yawl, a 14′ catboat, and several double-paddle canoes and kayaks, and I consider myself to have a fairly good sense for performance, seaworthiness, and safety in a small boat. In those three categories I consider the Oonagh to be an excellent and remarkably capable boat.
Edgar “Bill” Boyd was attracted to boats the moment he moved near the Maine coast. He and his family summered for more than 50 years on an island in Eggemoggin Reach across from the WoodenBoat campus. He has built six boats including a Caledonia Yawl and a 22′ Ninigret, a John Atkin–designed bassboat. He and his wife now live in Yarmouth, Maine.
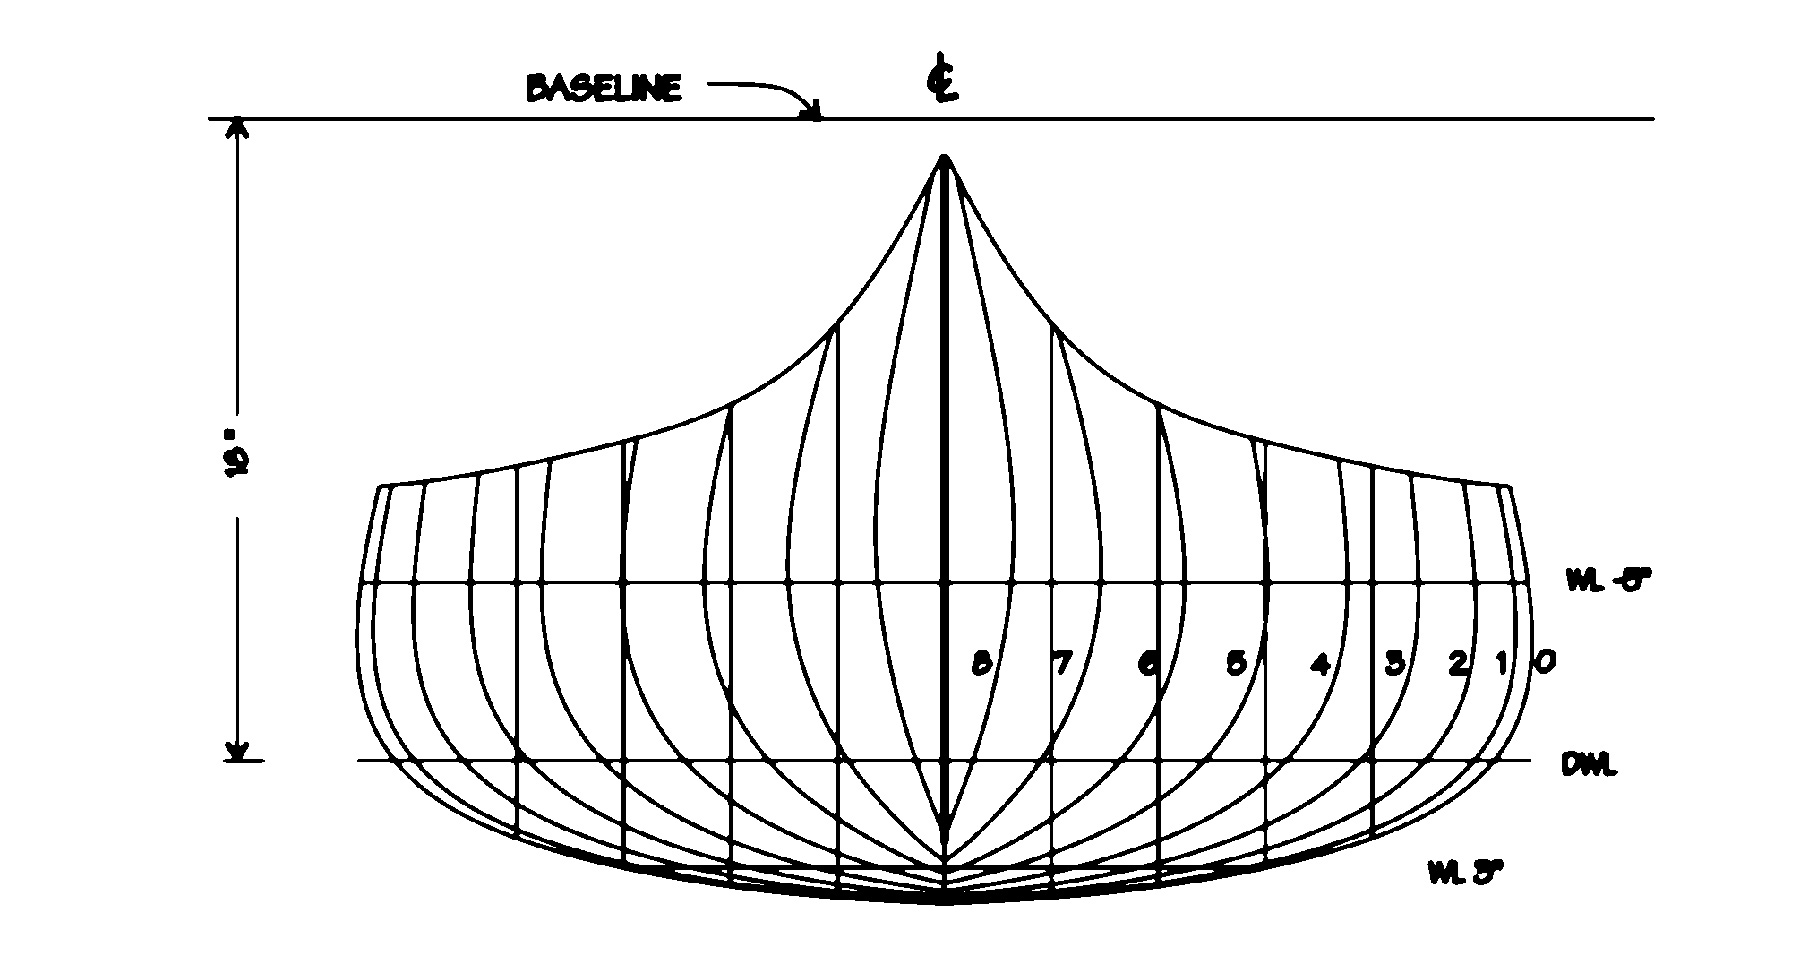
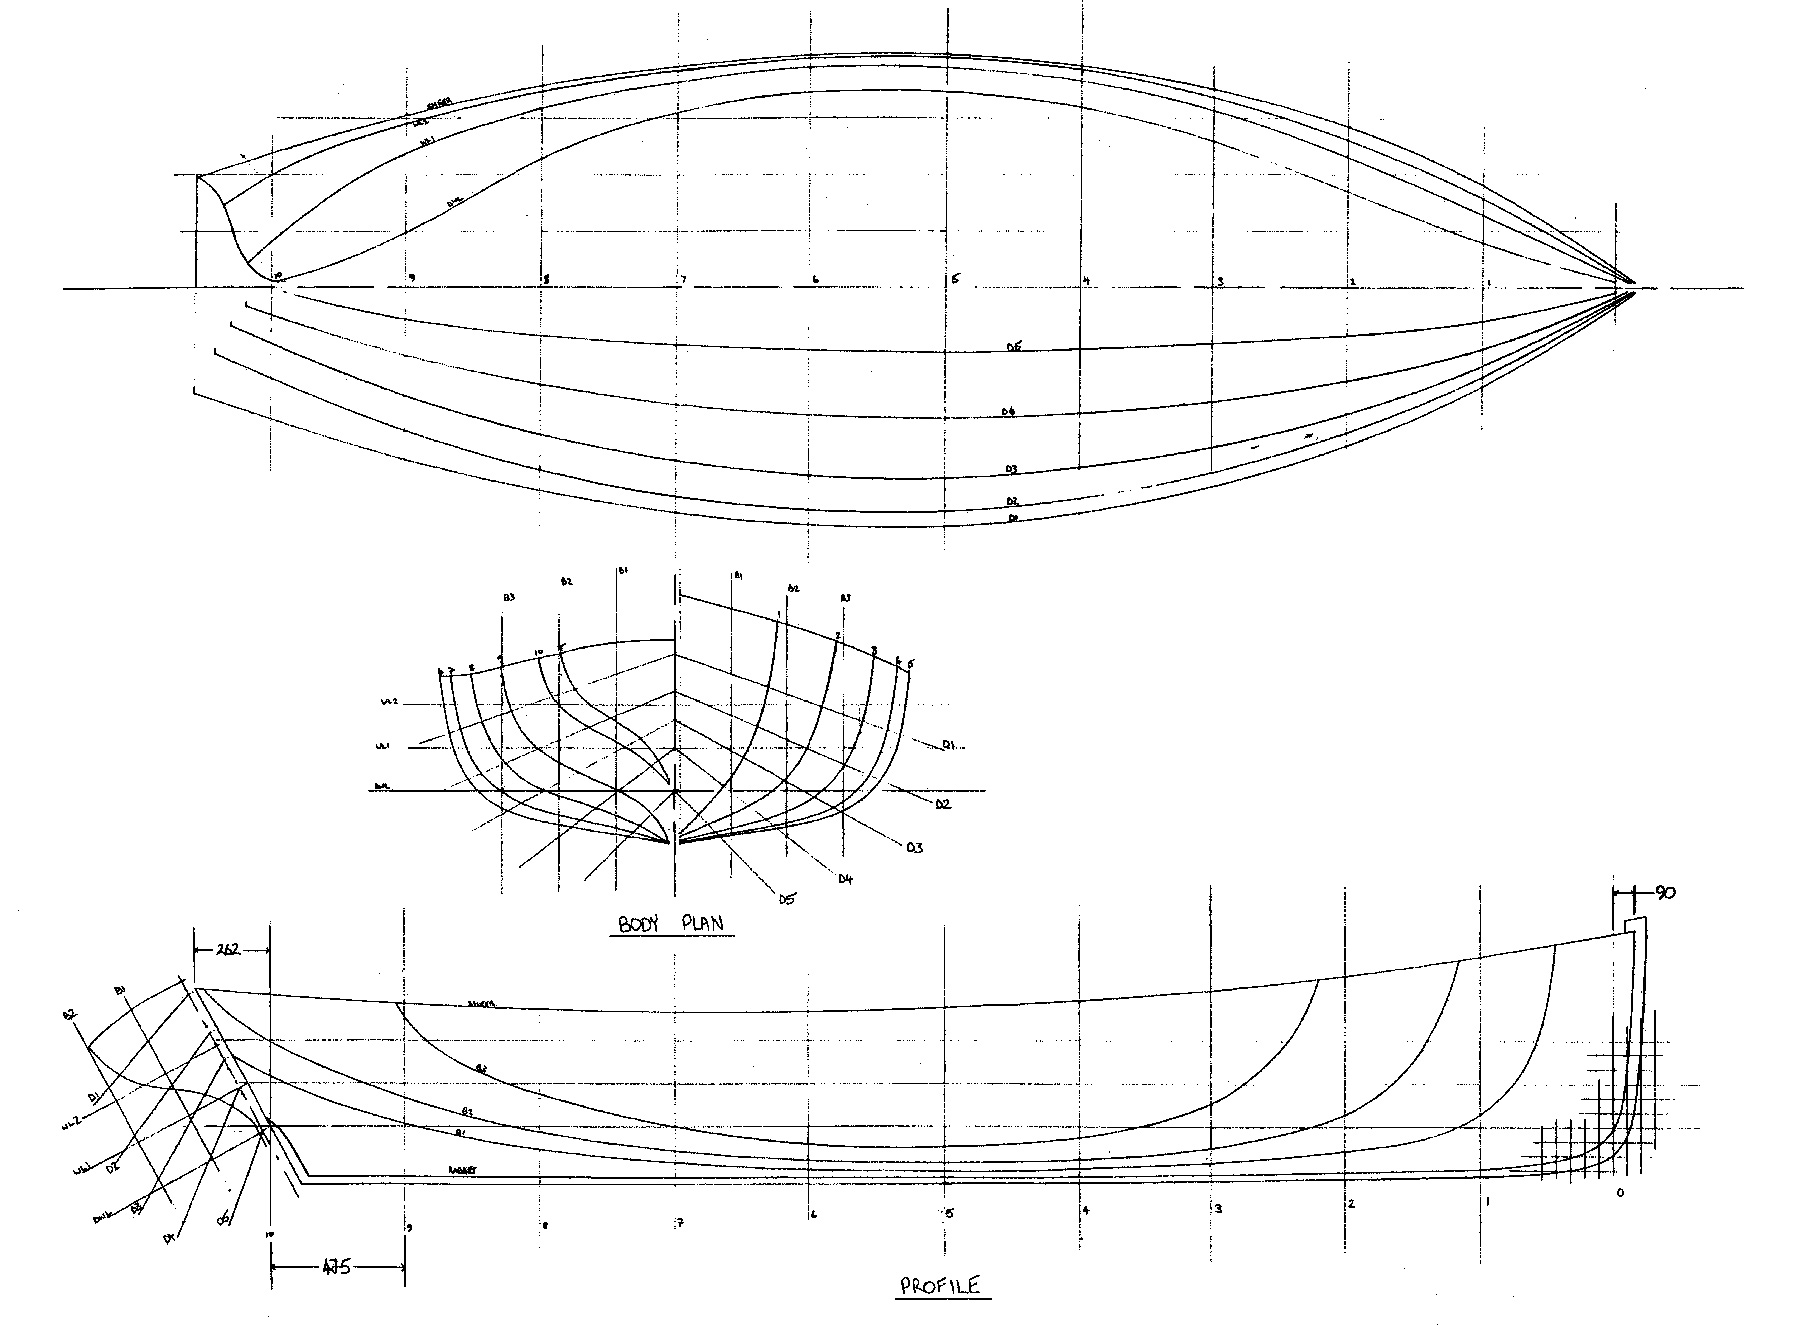
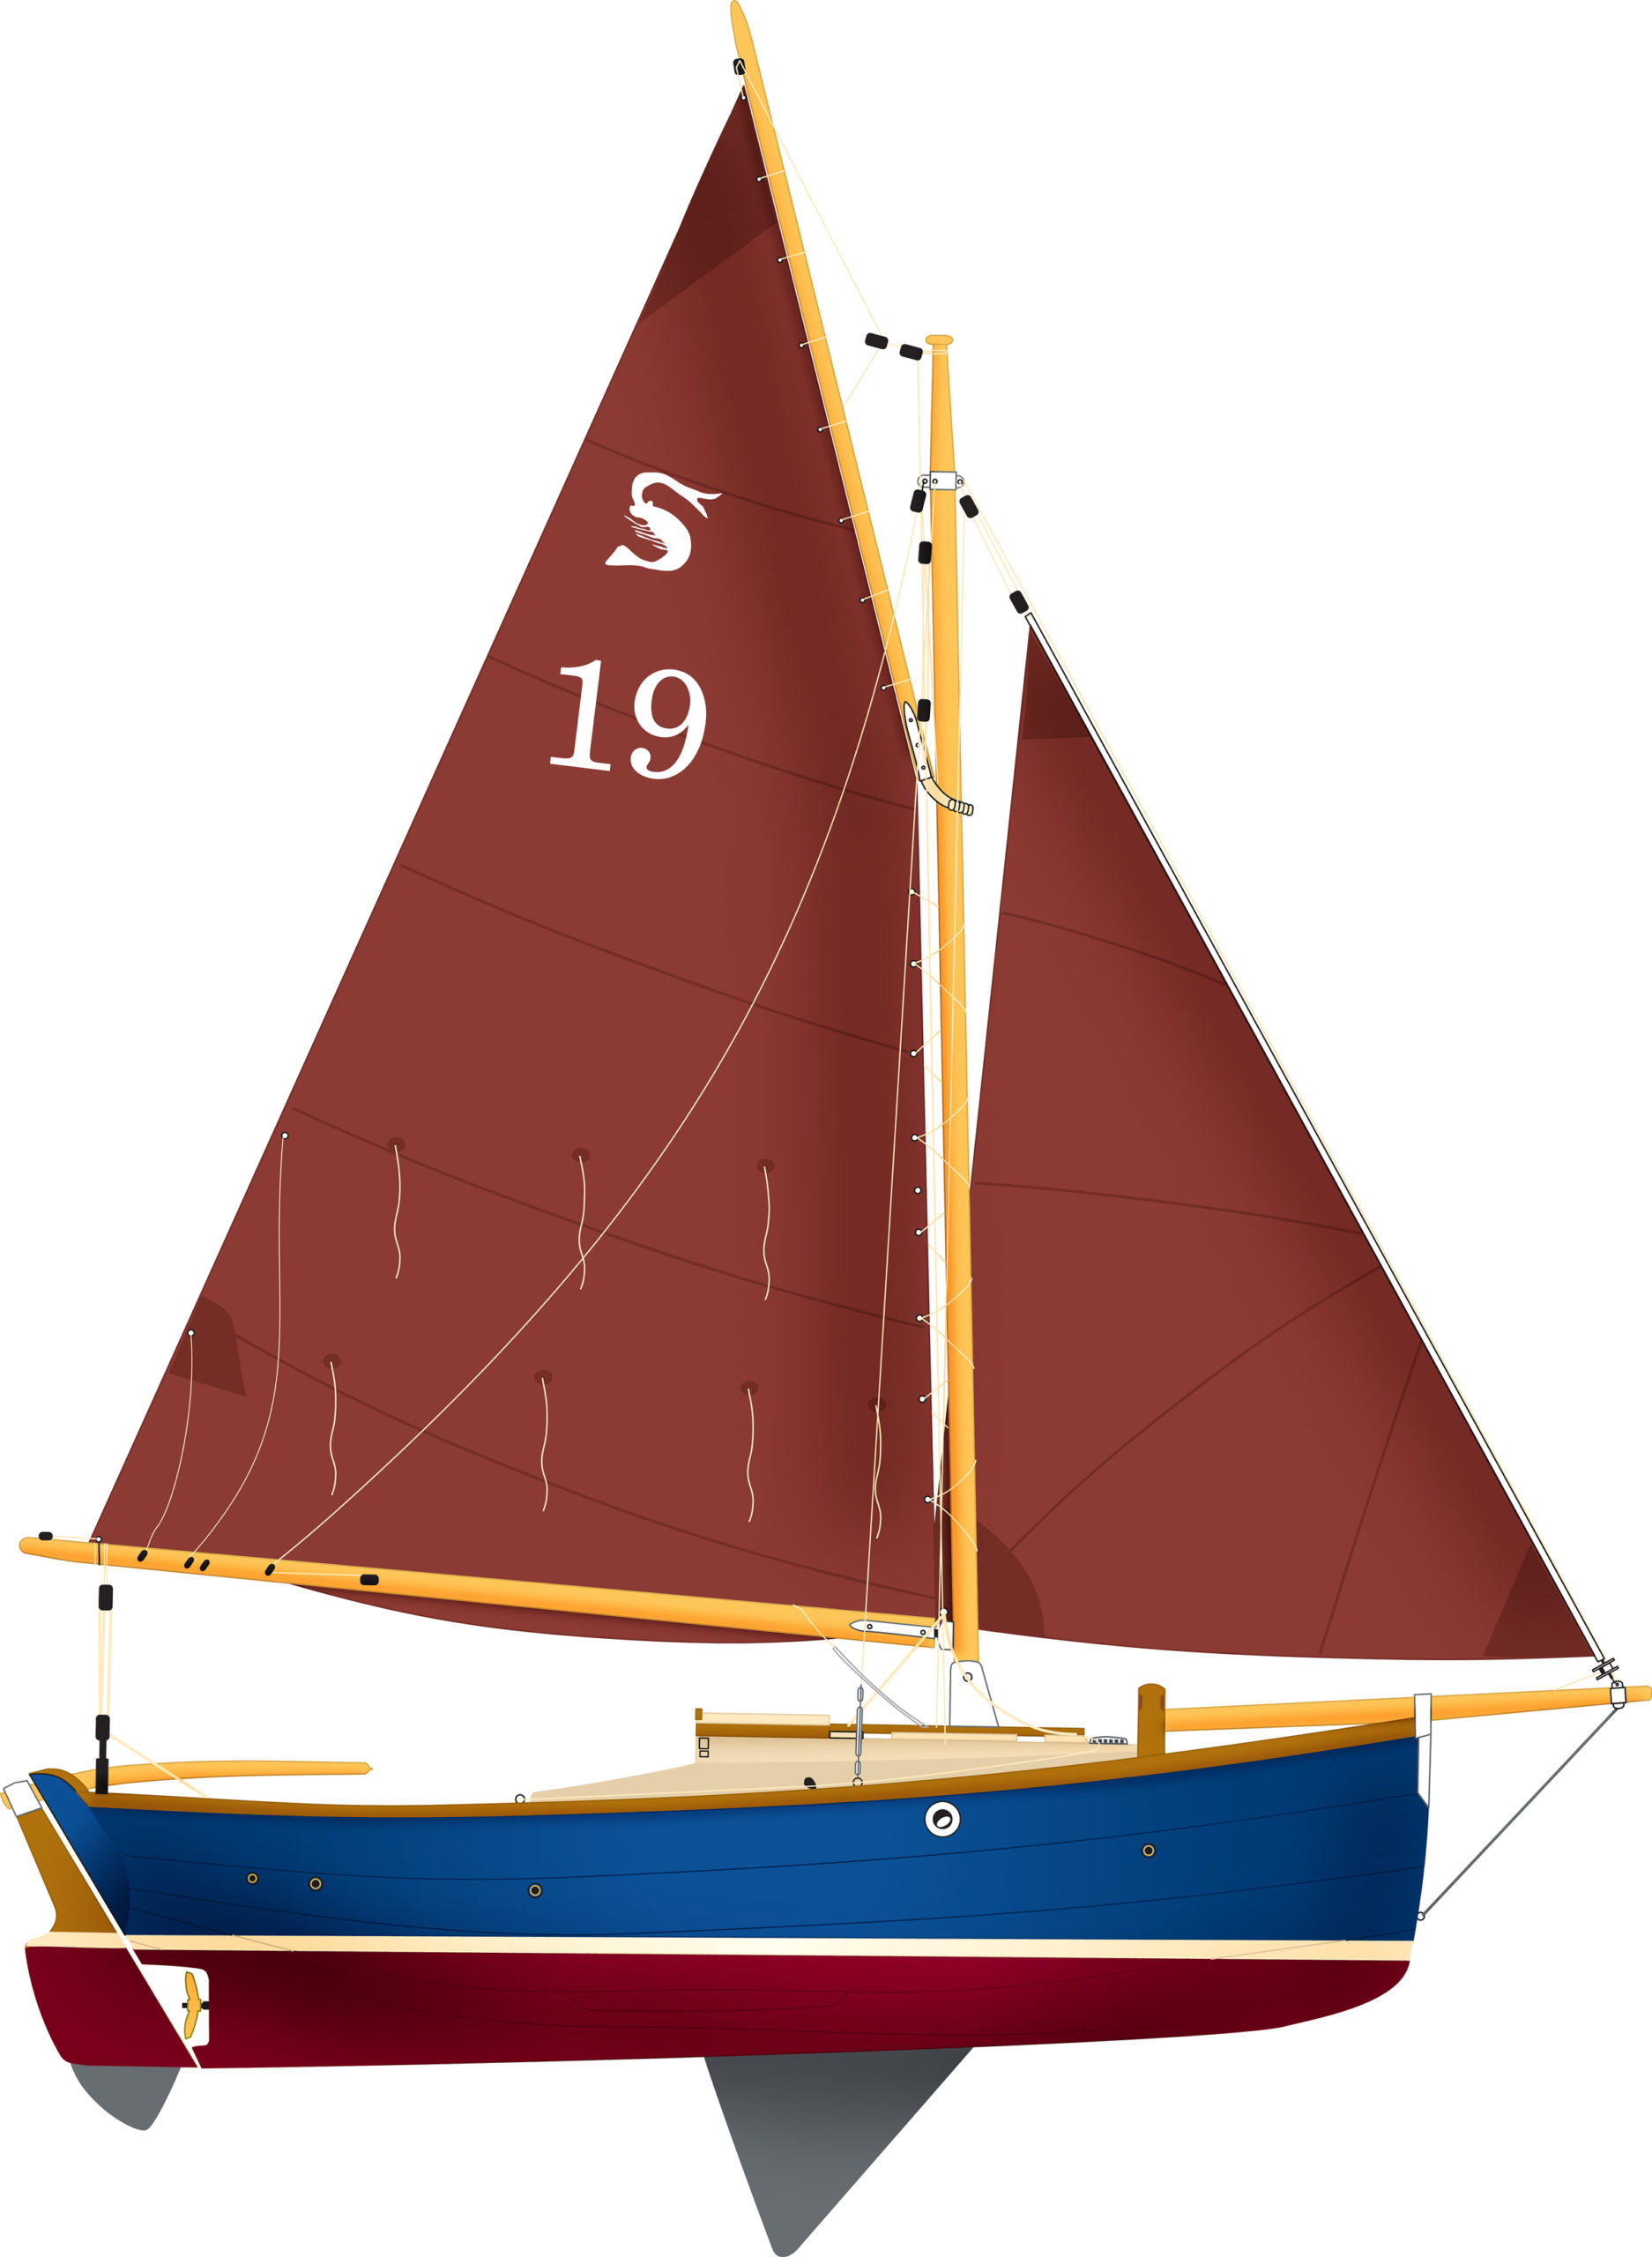
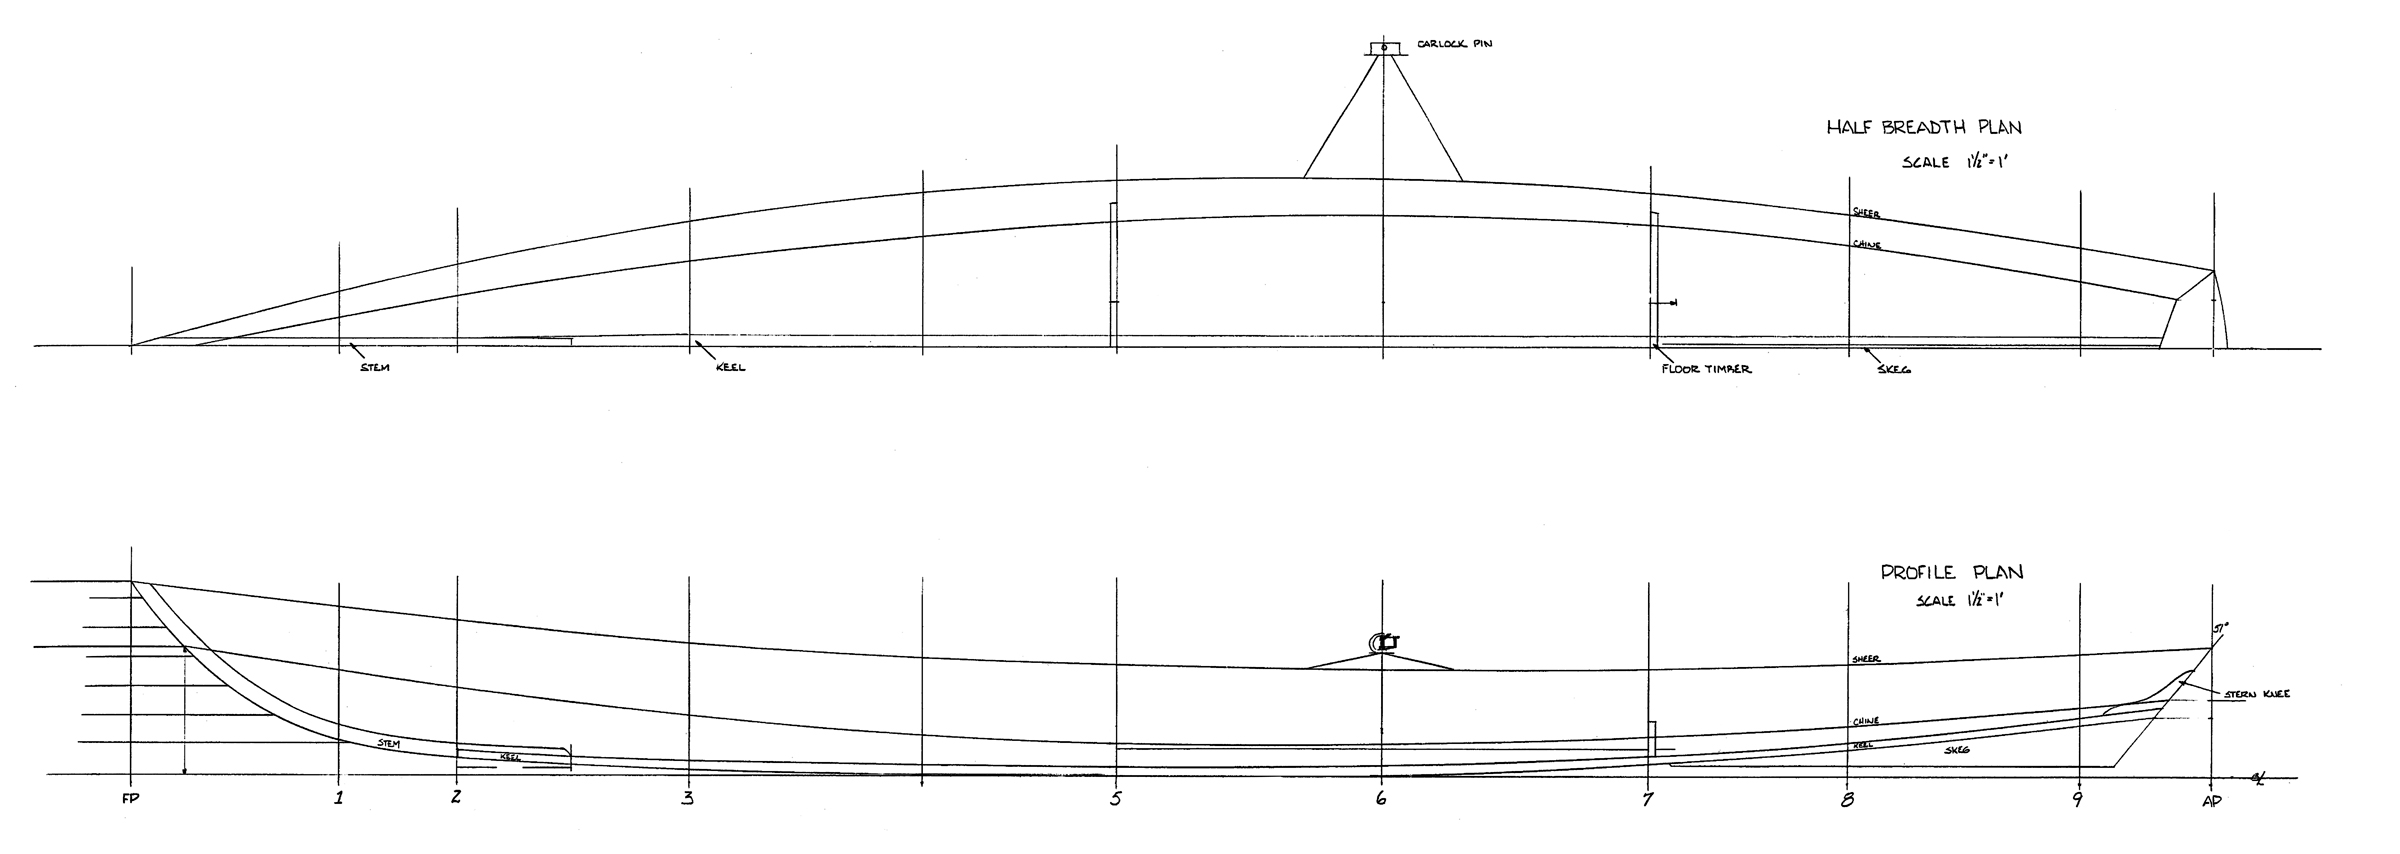
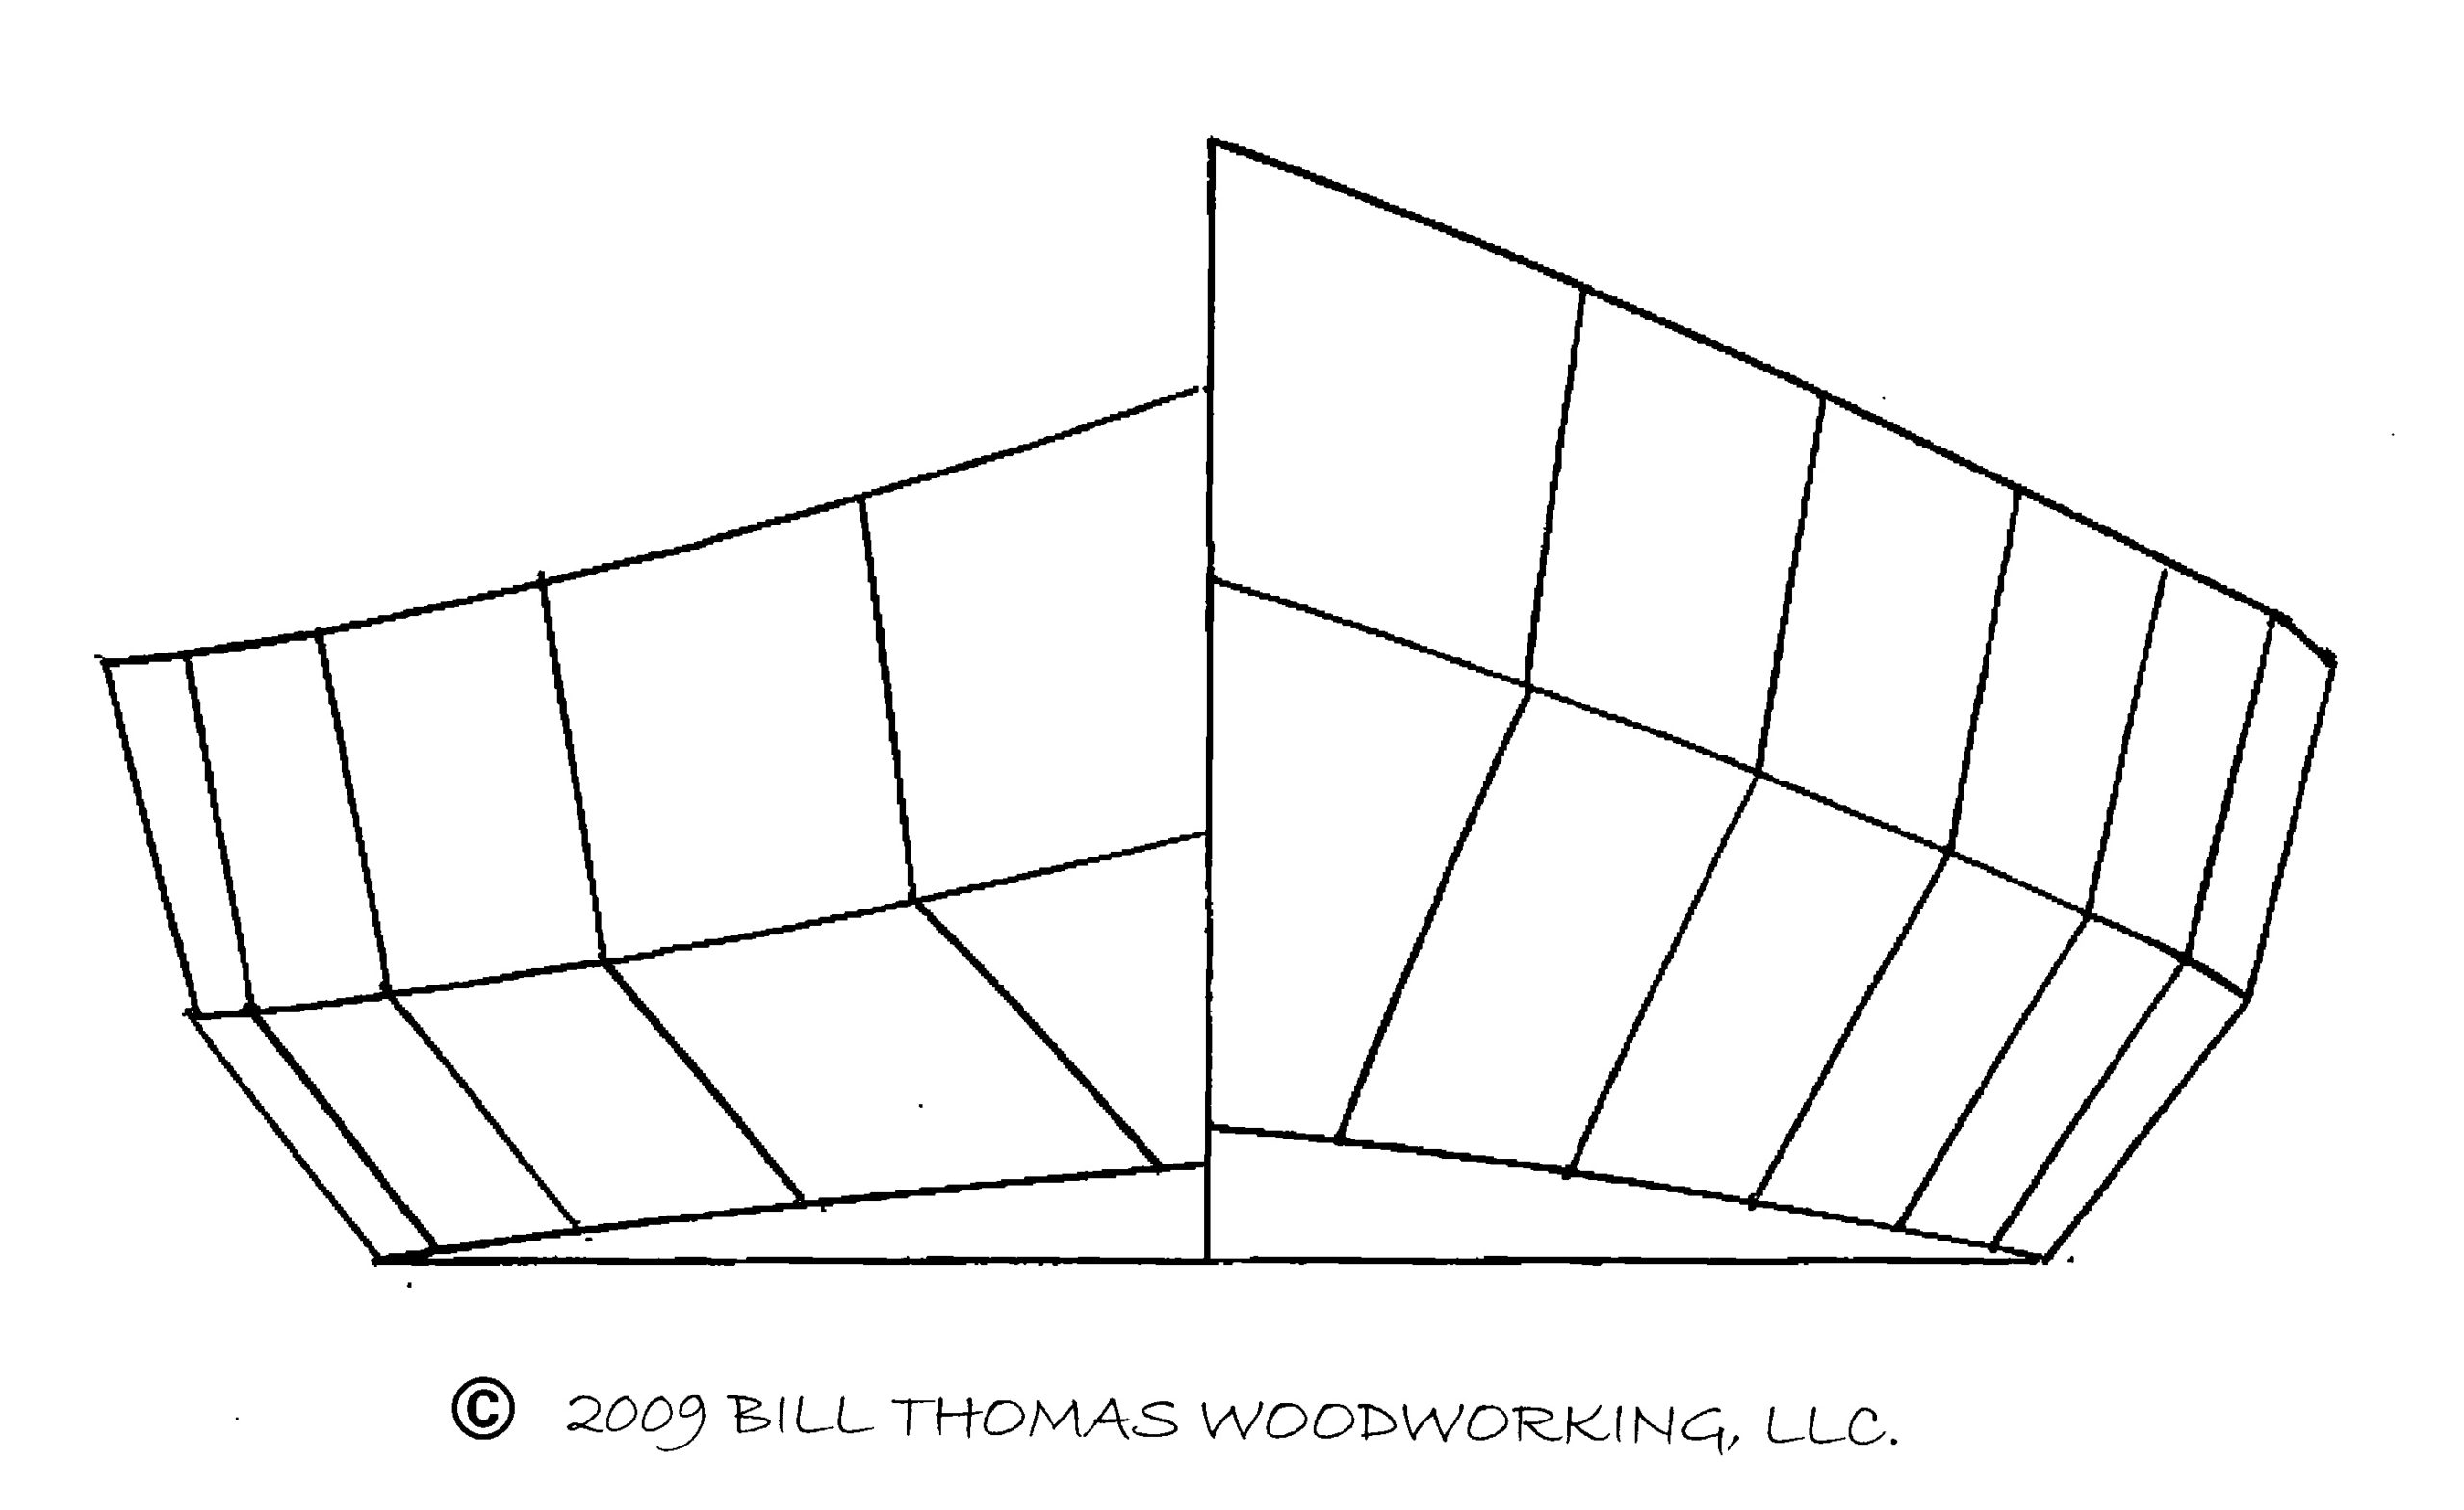
Oonagh Particulars
Length/11′ 8″
Waterline length/9′
Beam/60″
Draft/5″ board up, 22″ board down
Weight/Approximately 170 lbs
Sail area/68 sq ft
Power/electric or gas up to 2 hp
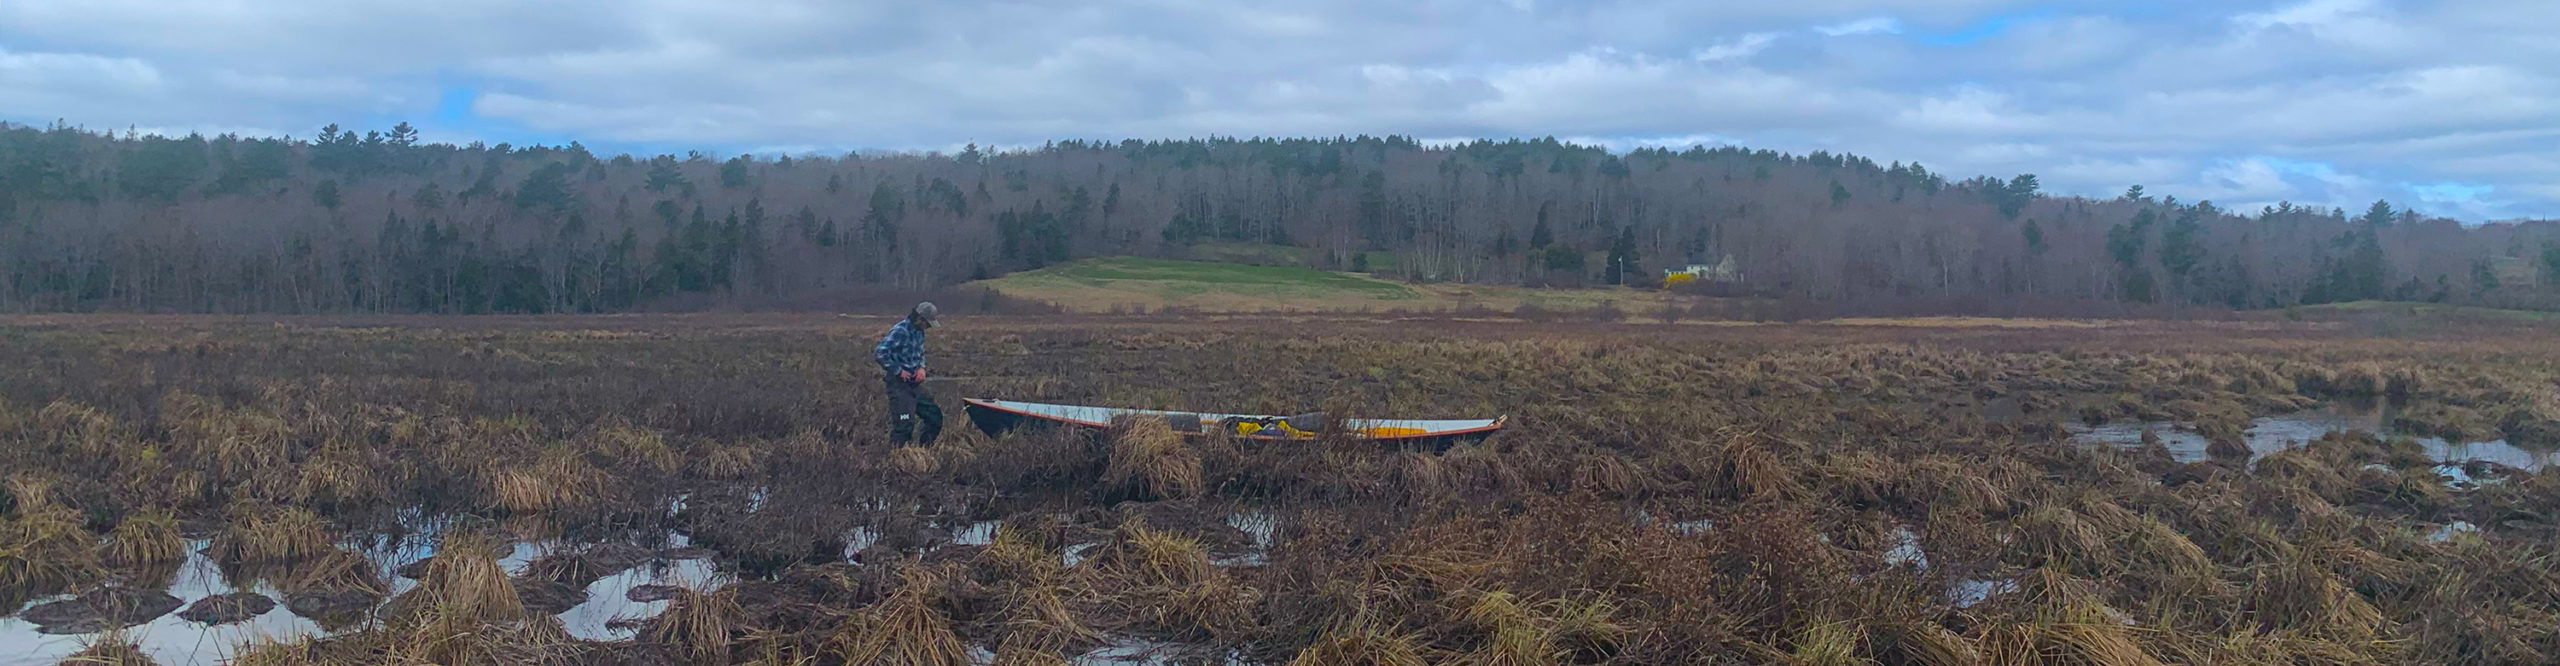
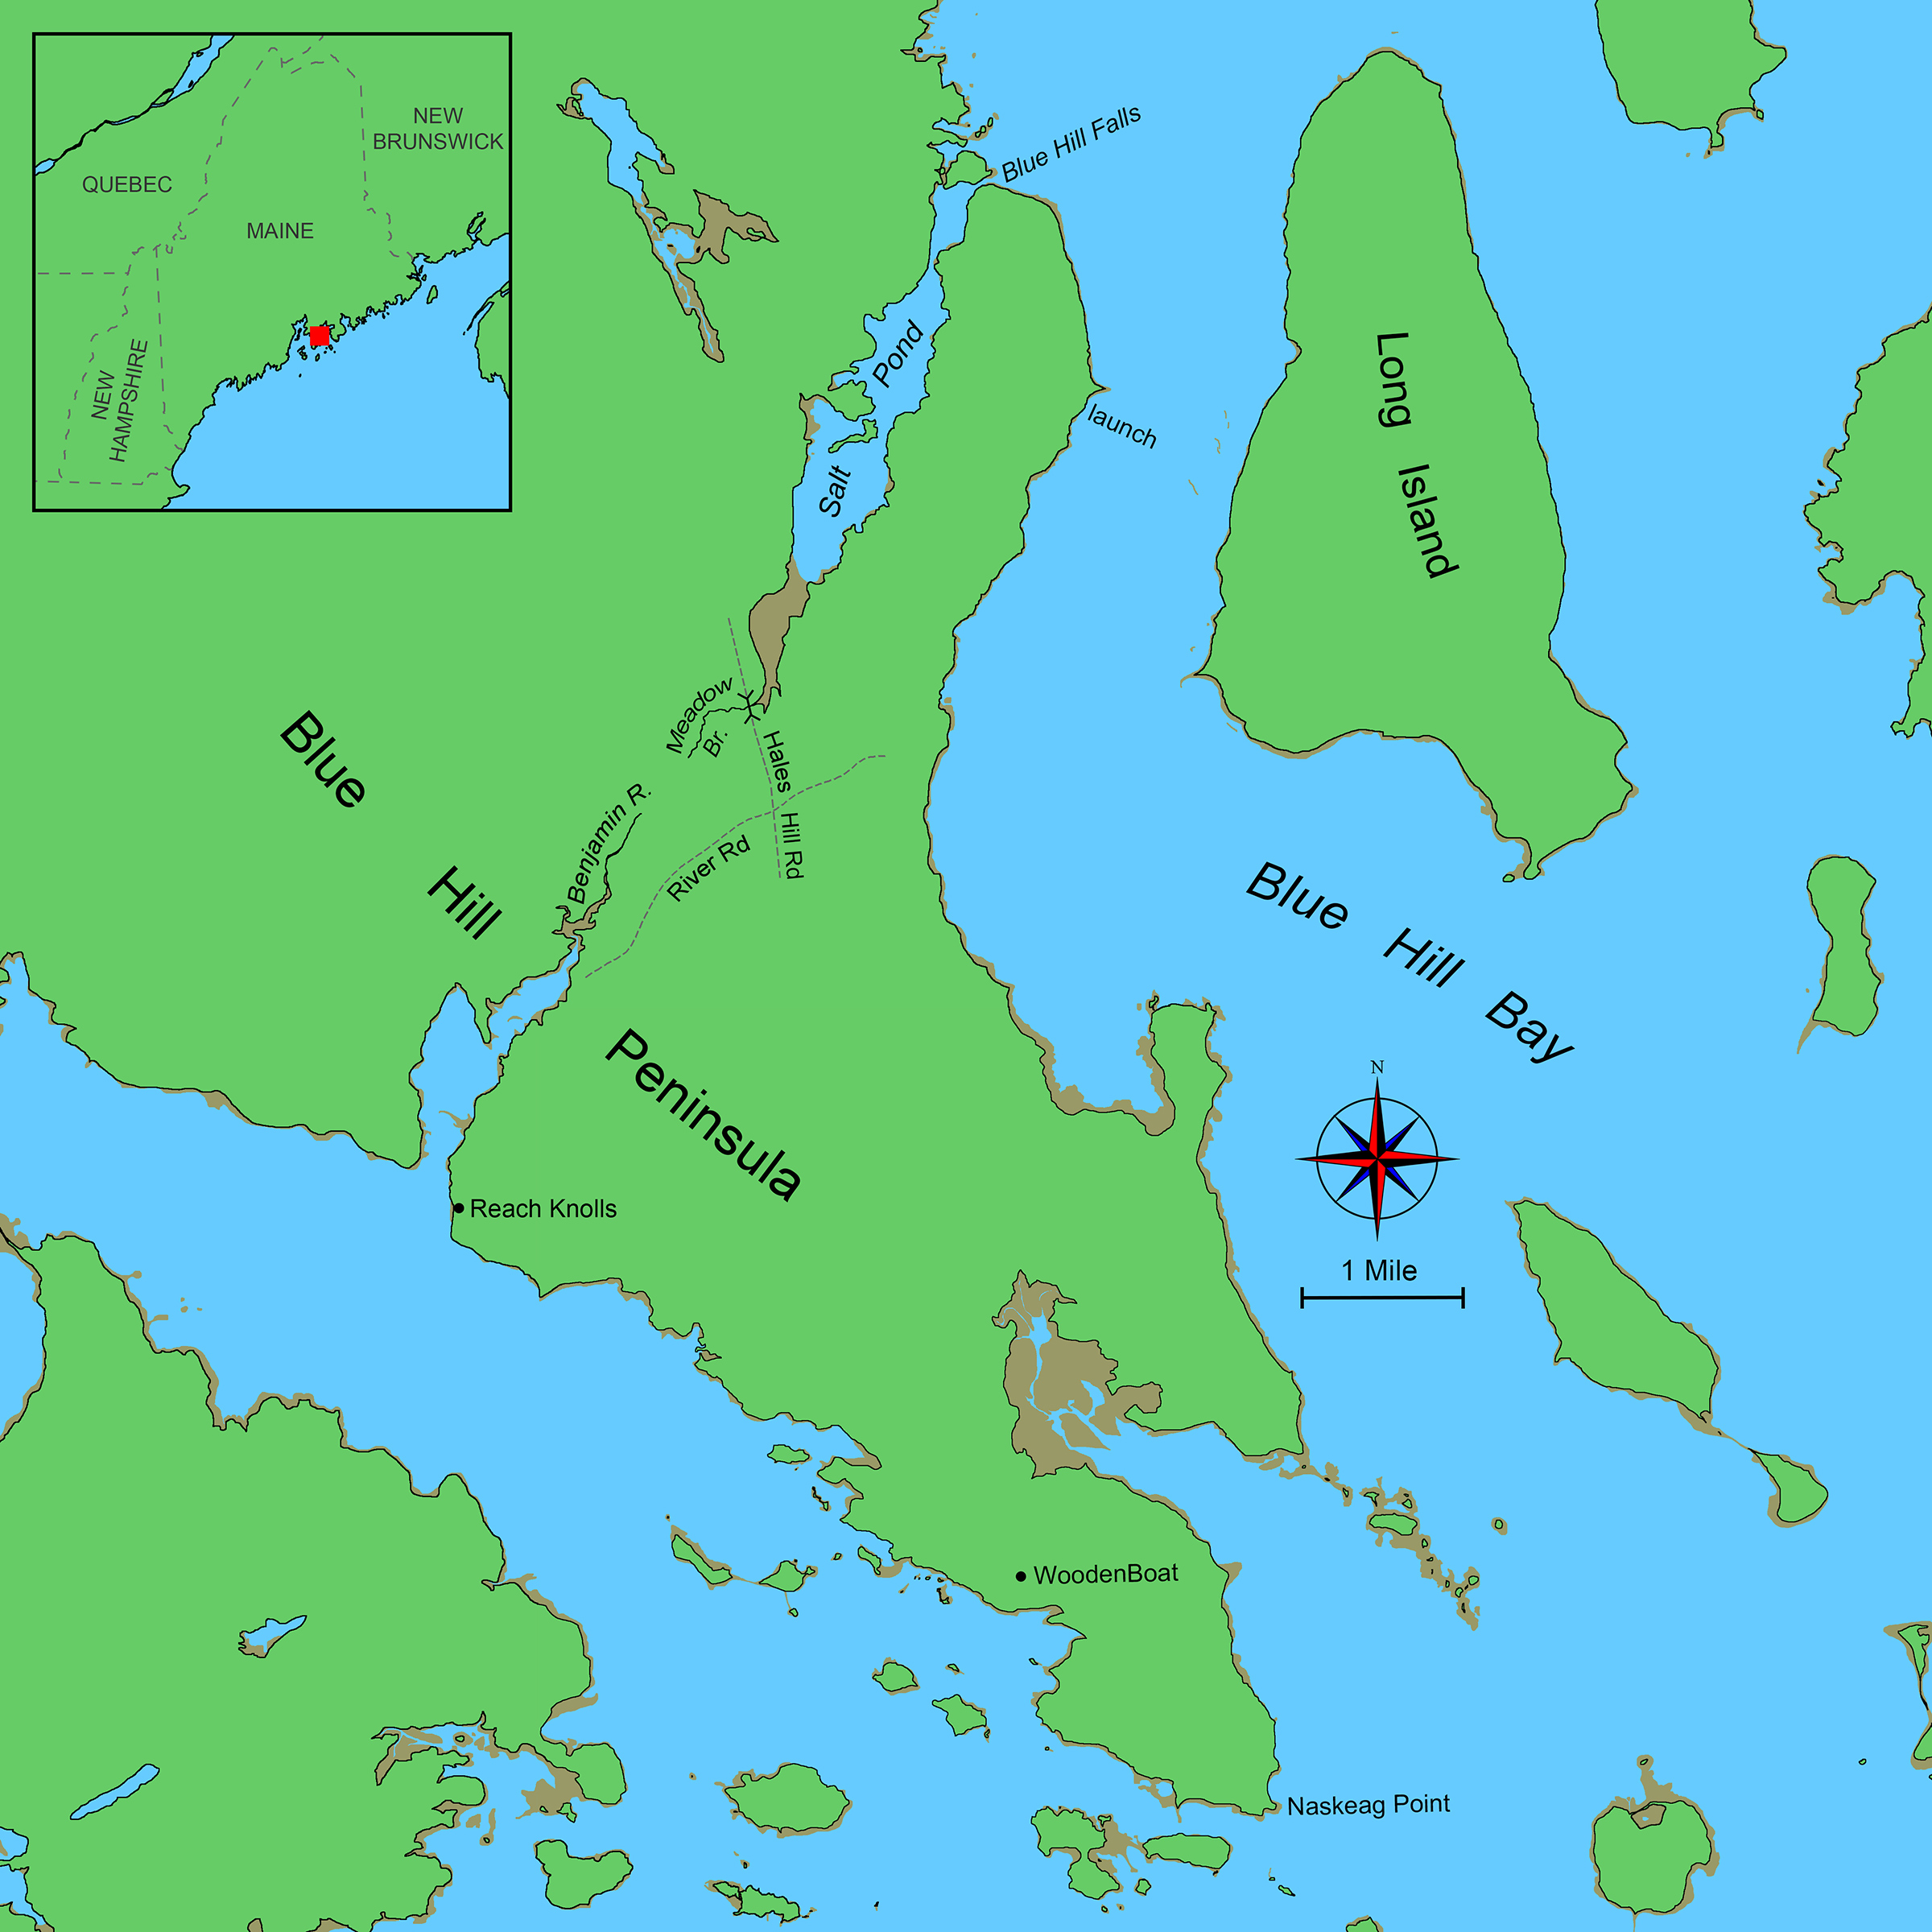
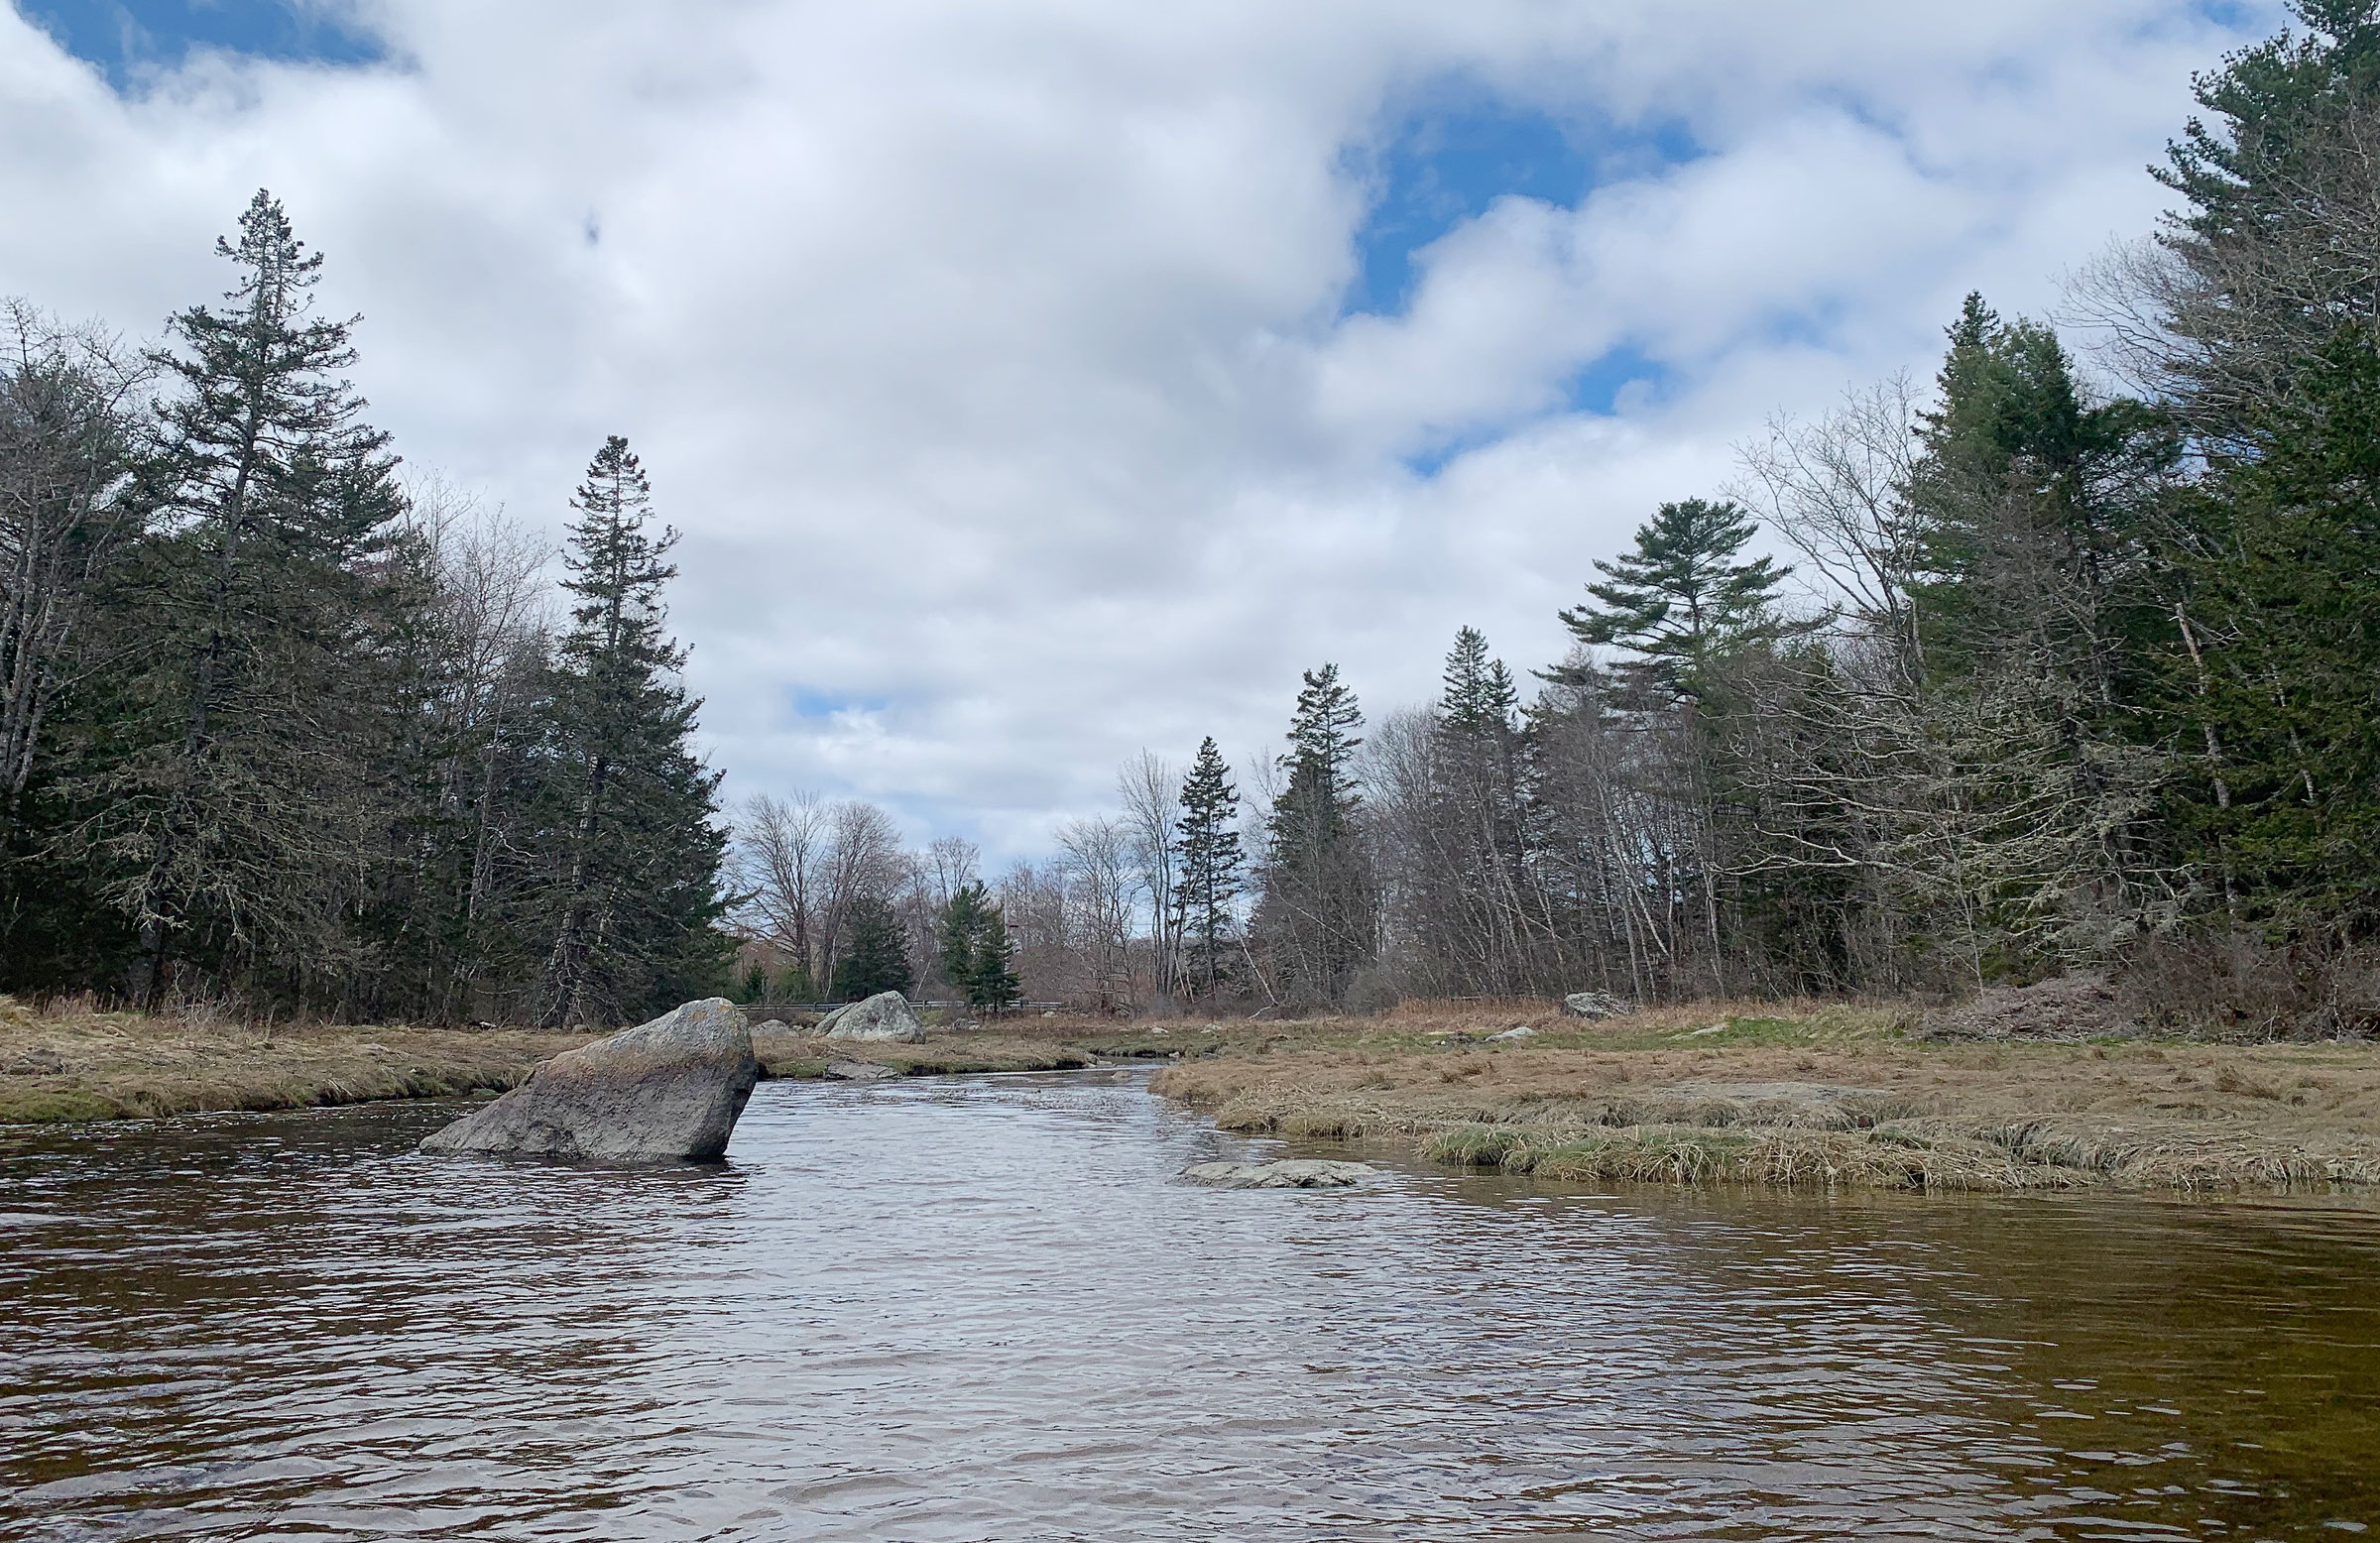
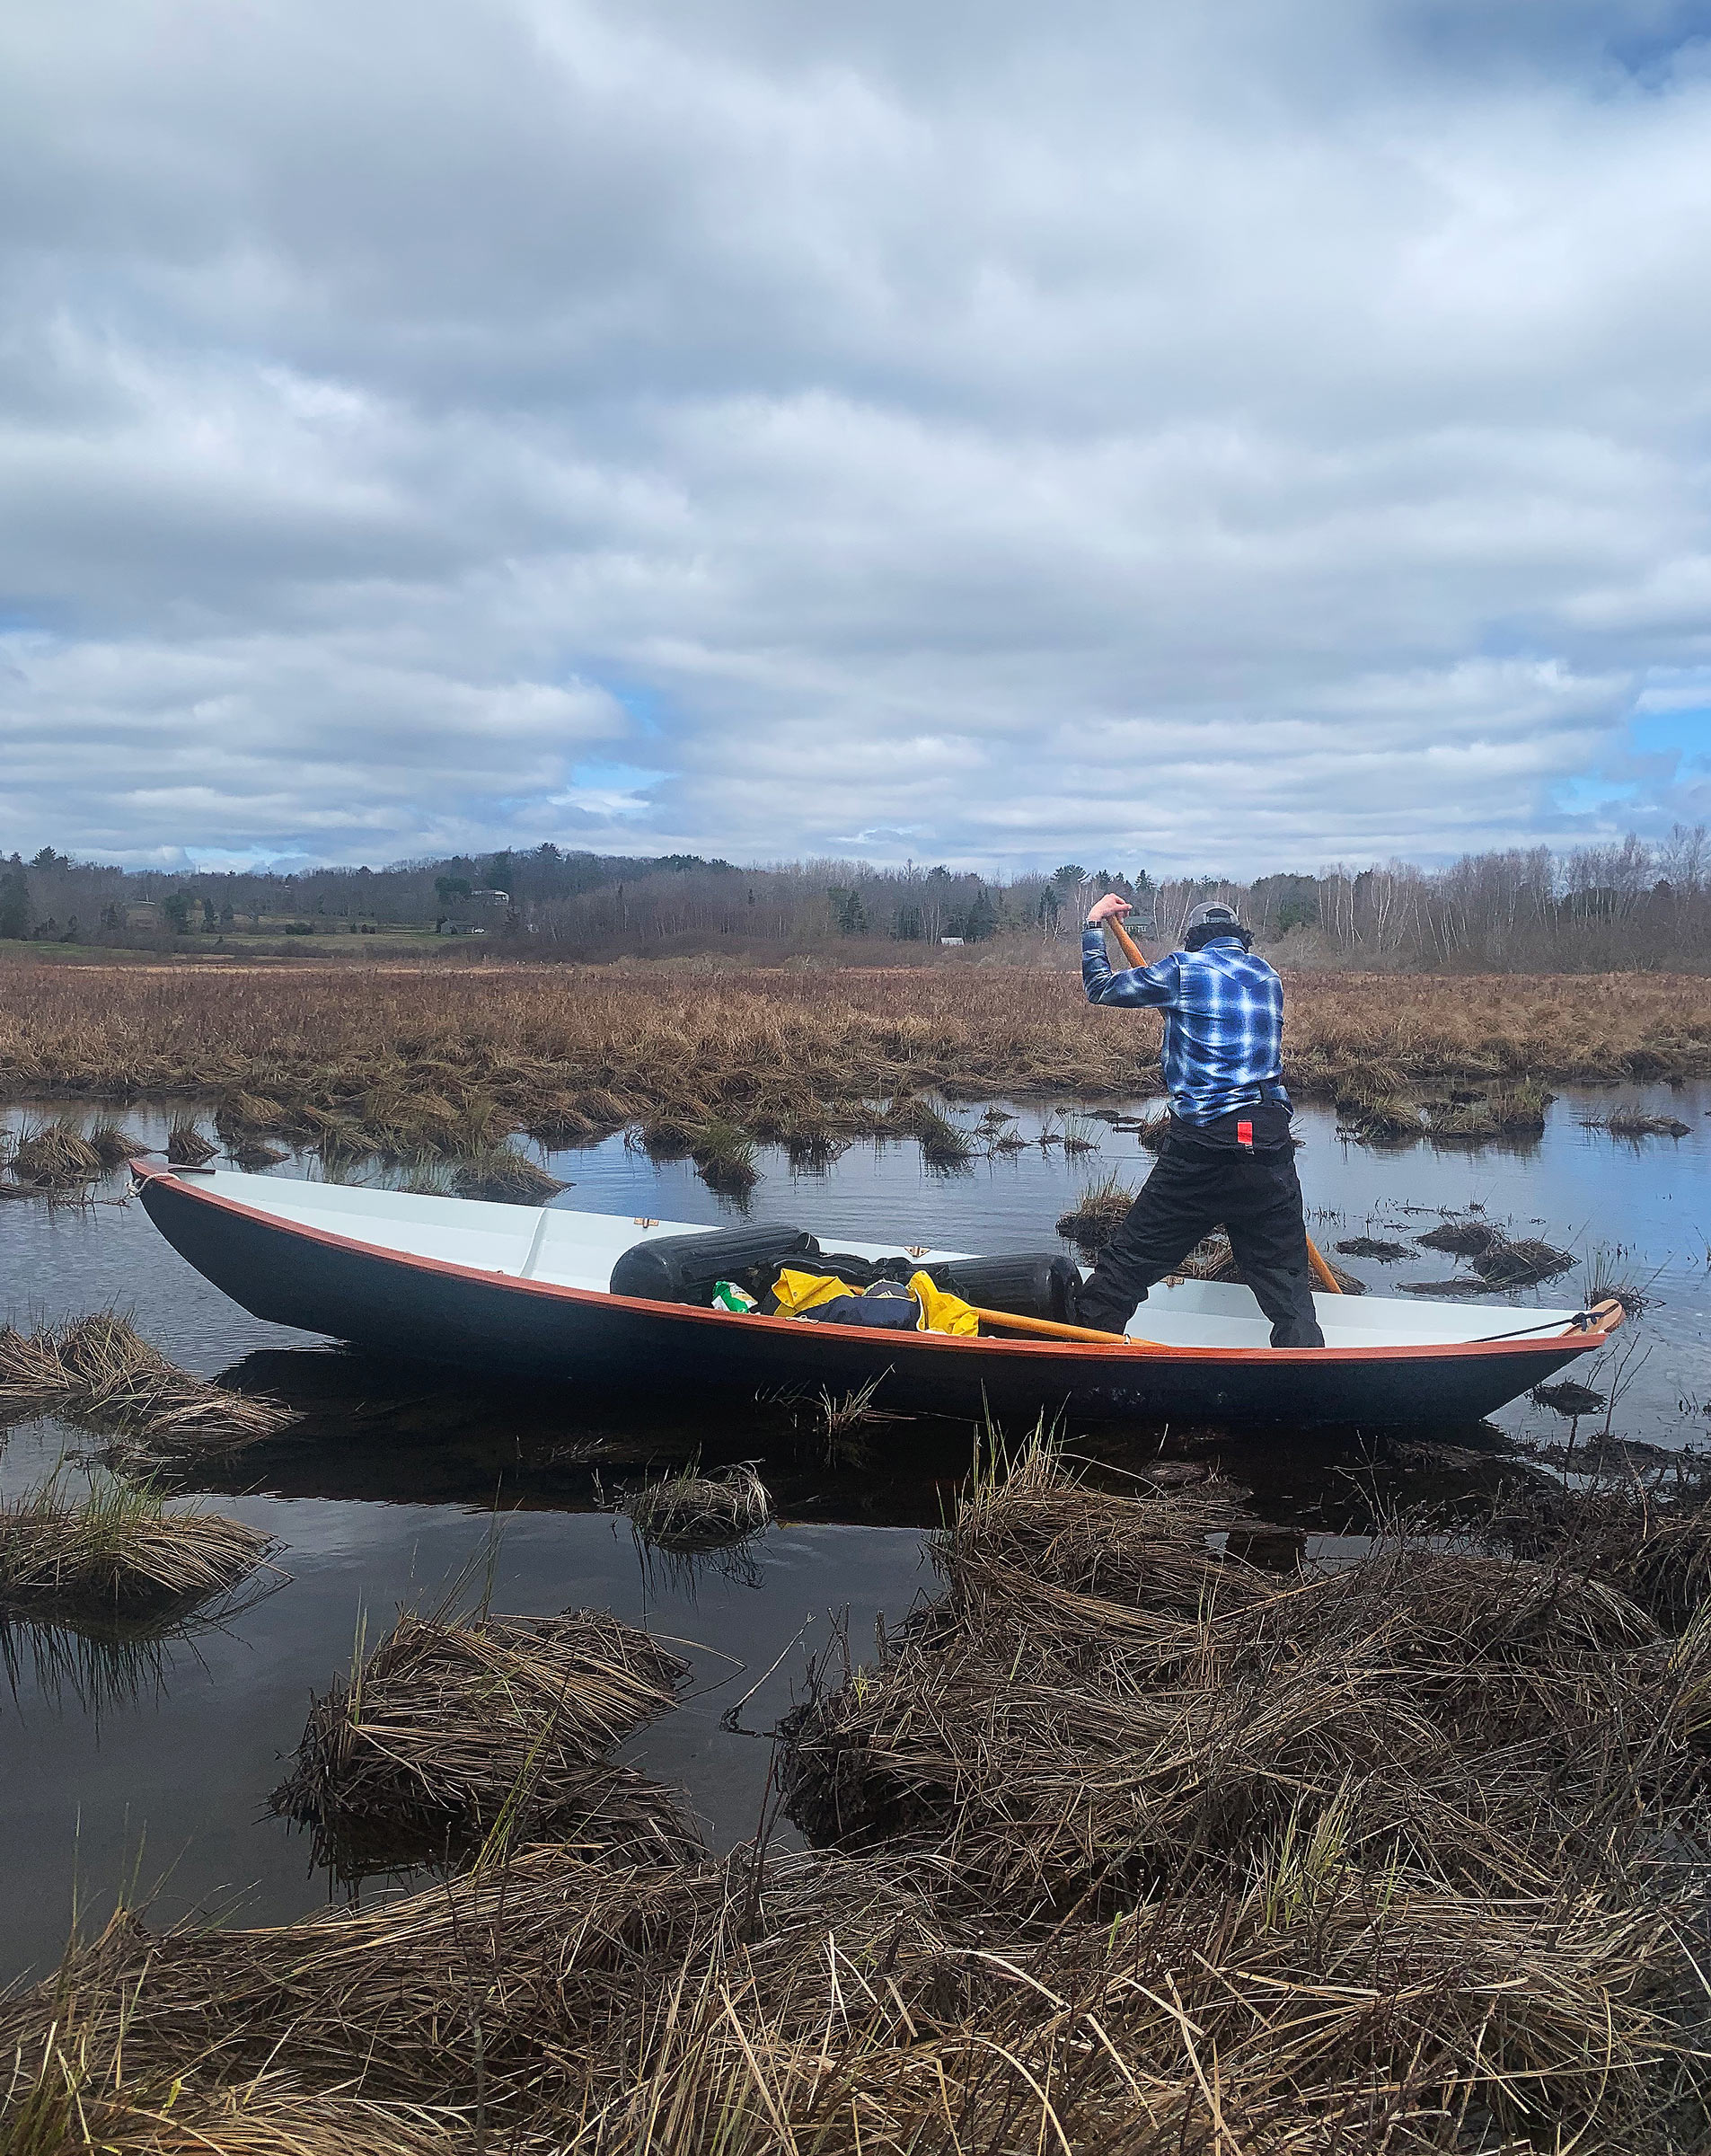
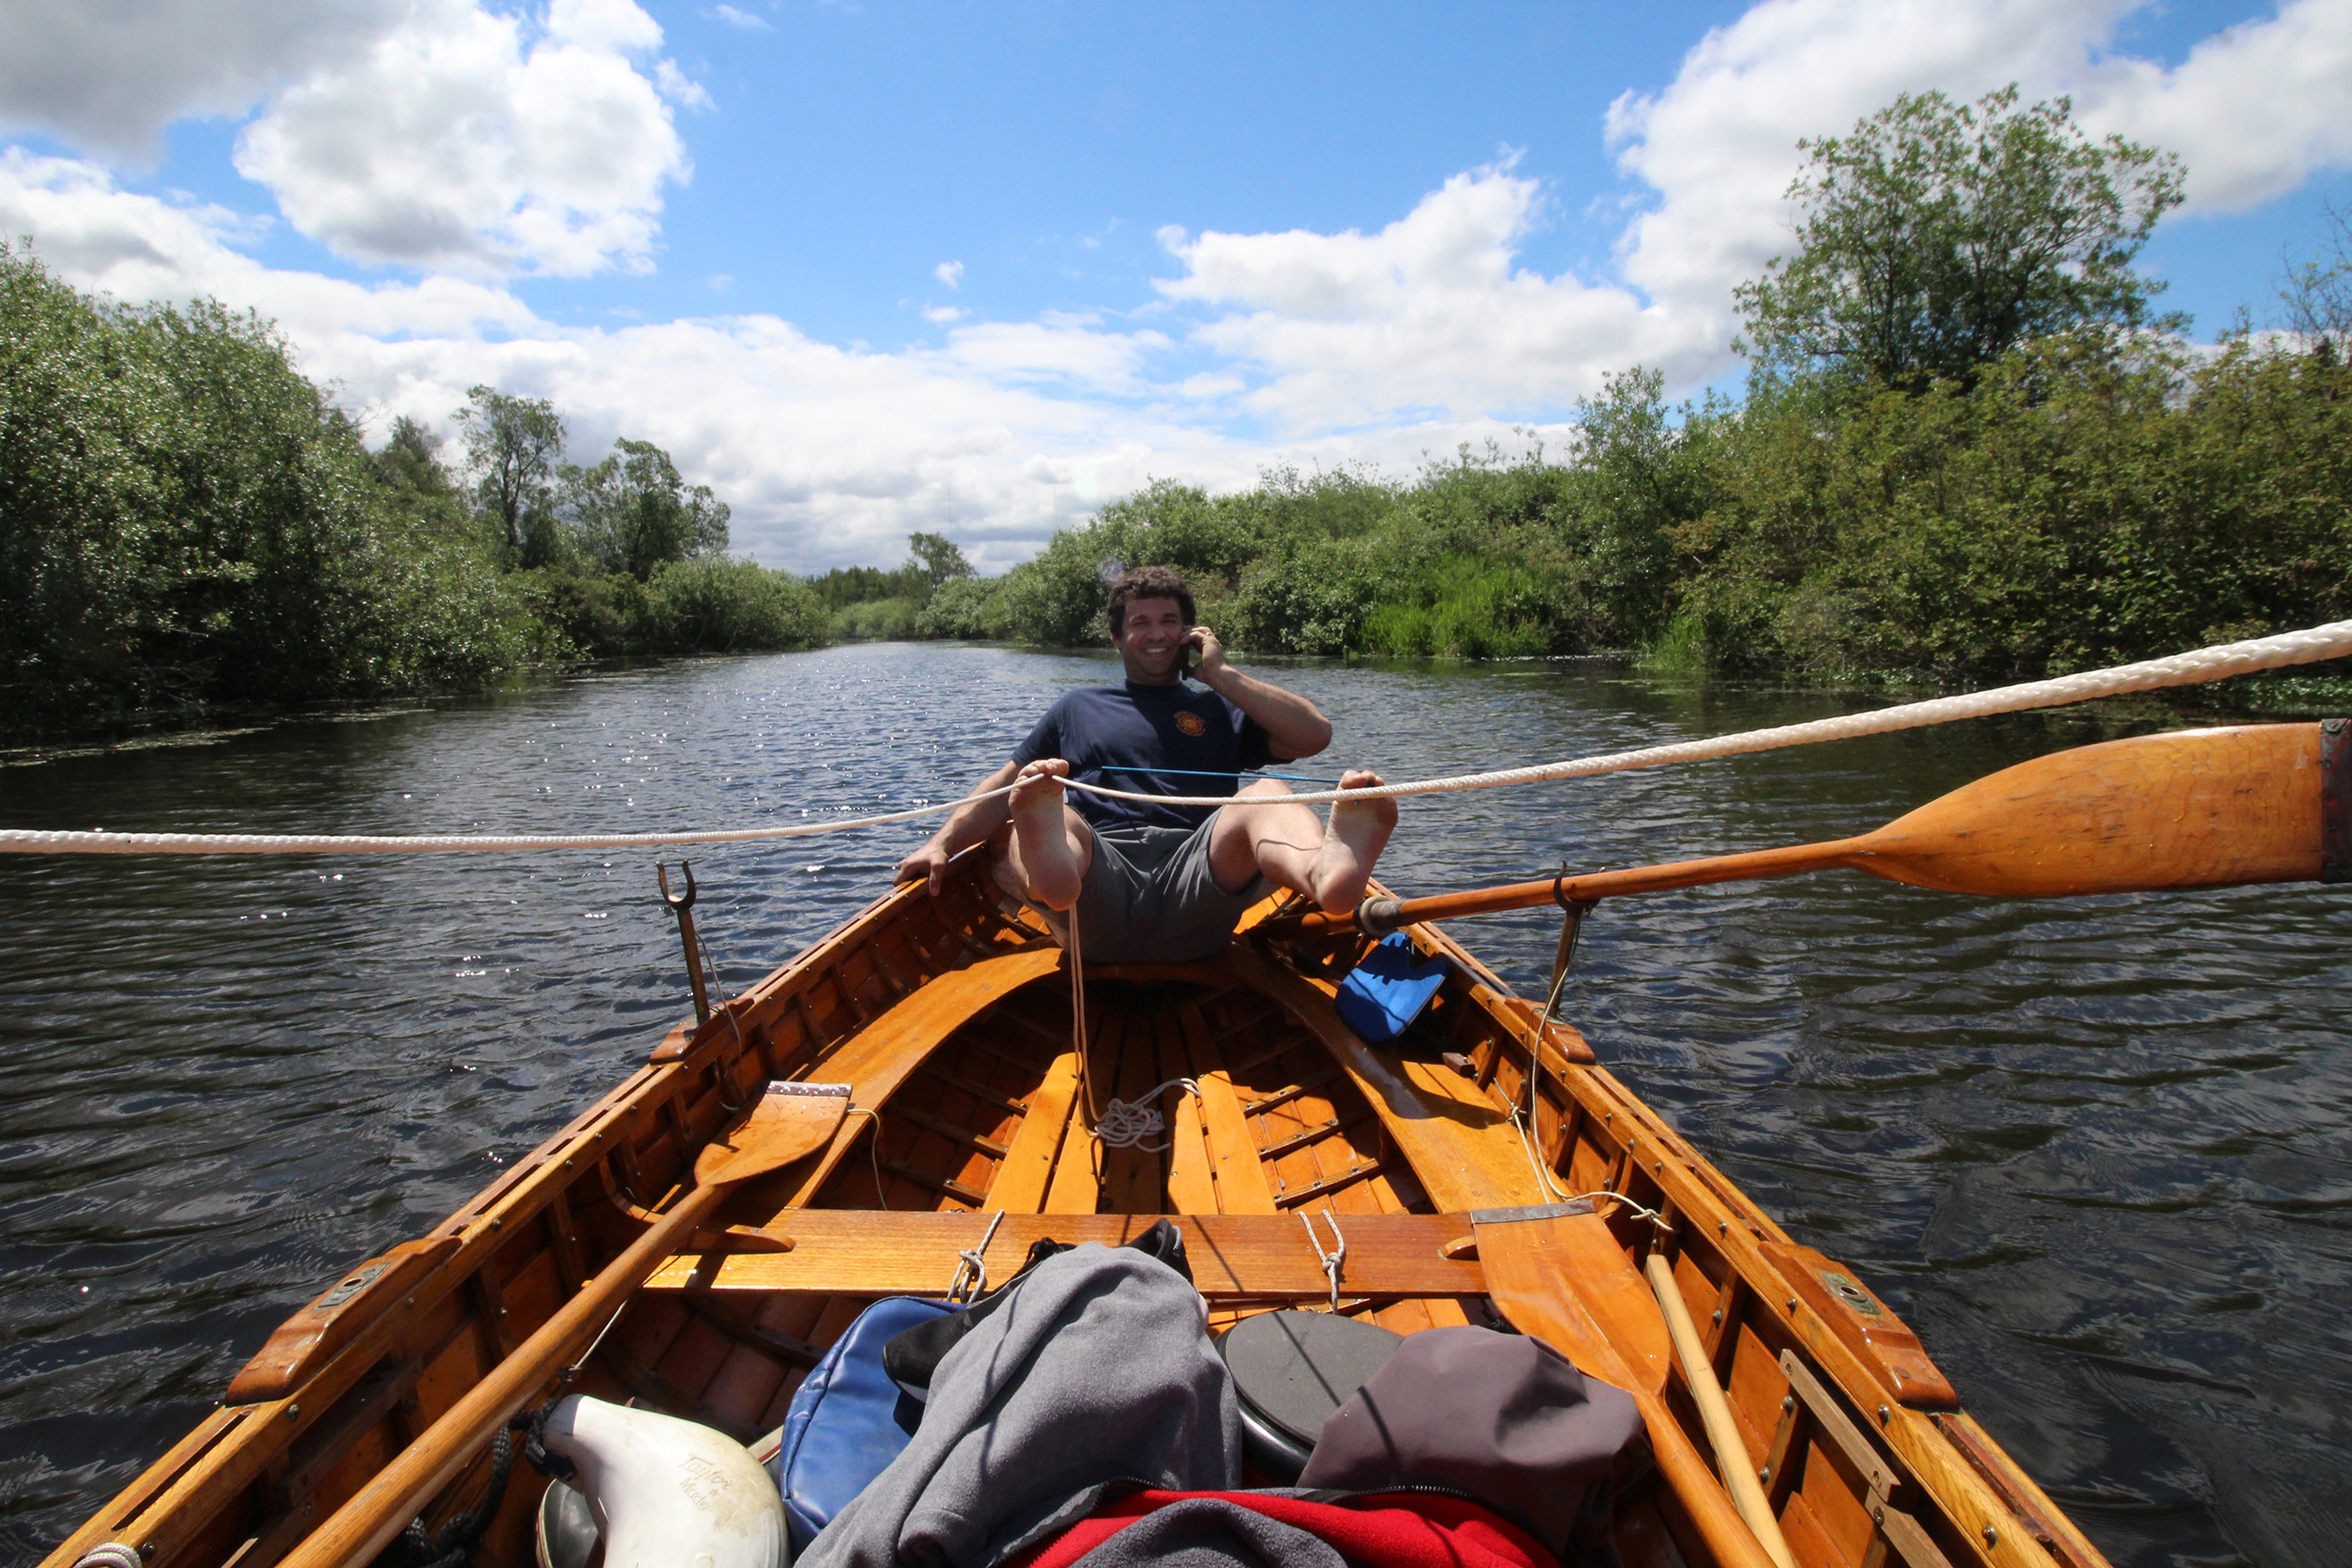
Our plan was simple: on Friday, April 30, 2022, Delaney and I would embark from Brooklin to make a 26-mile circumnavigation of the southern end of Maine’s Blue Hill Peninsula by way of Blue Hill Bay, Blue Hill Falls, and the Salt Pond and Benjamin River with a half-mile haul between the two along what once was an old Wabanaki portage. We were hoping that if we worked hard, we’d be able to make it back to Brooklin in three days, camping along the way on Long Island in Blue Hill Bay and at the Reach Knolls campground at the mouth of the Benjamin River.
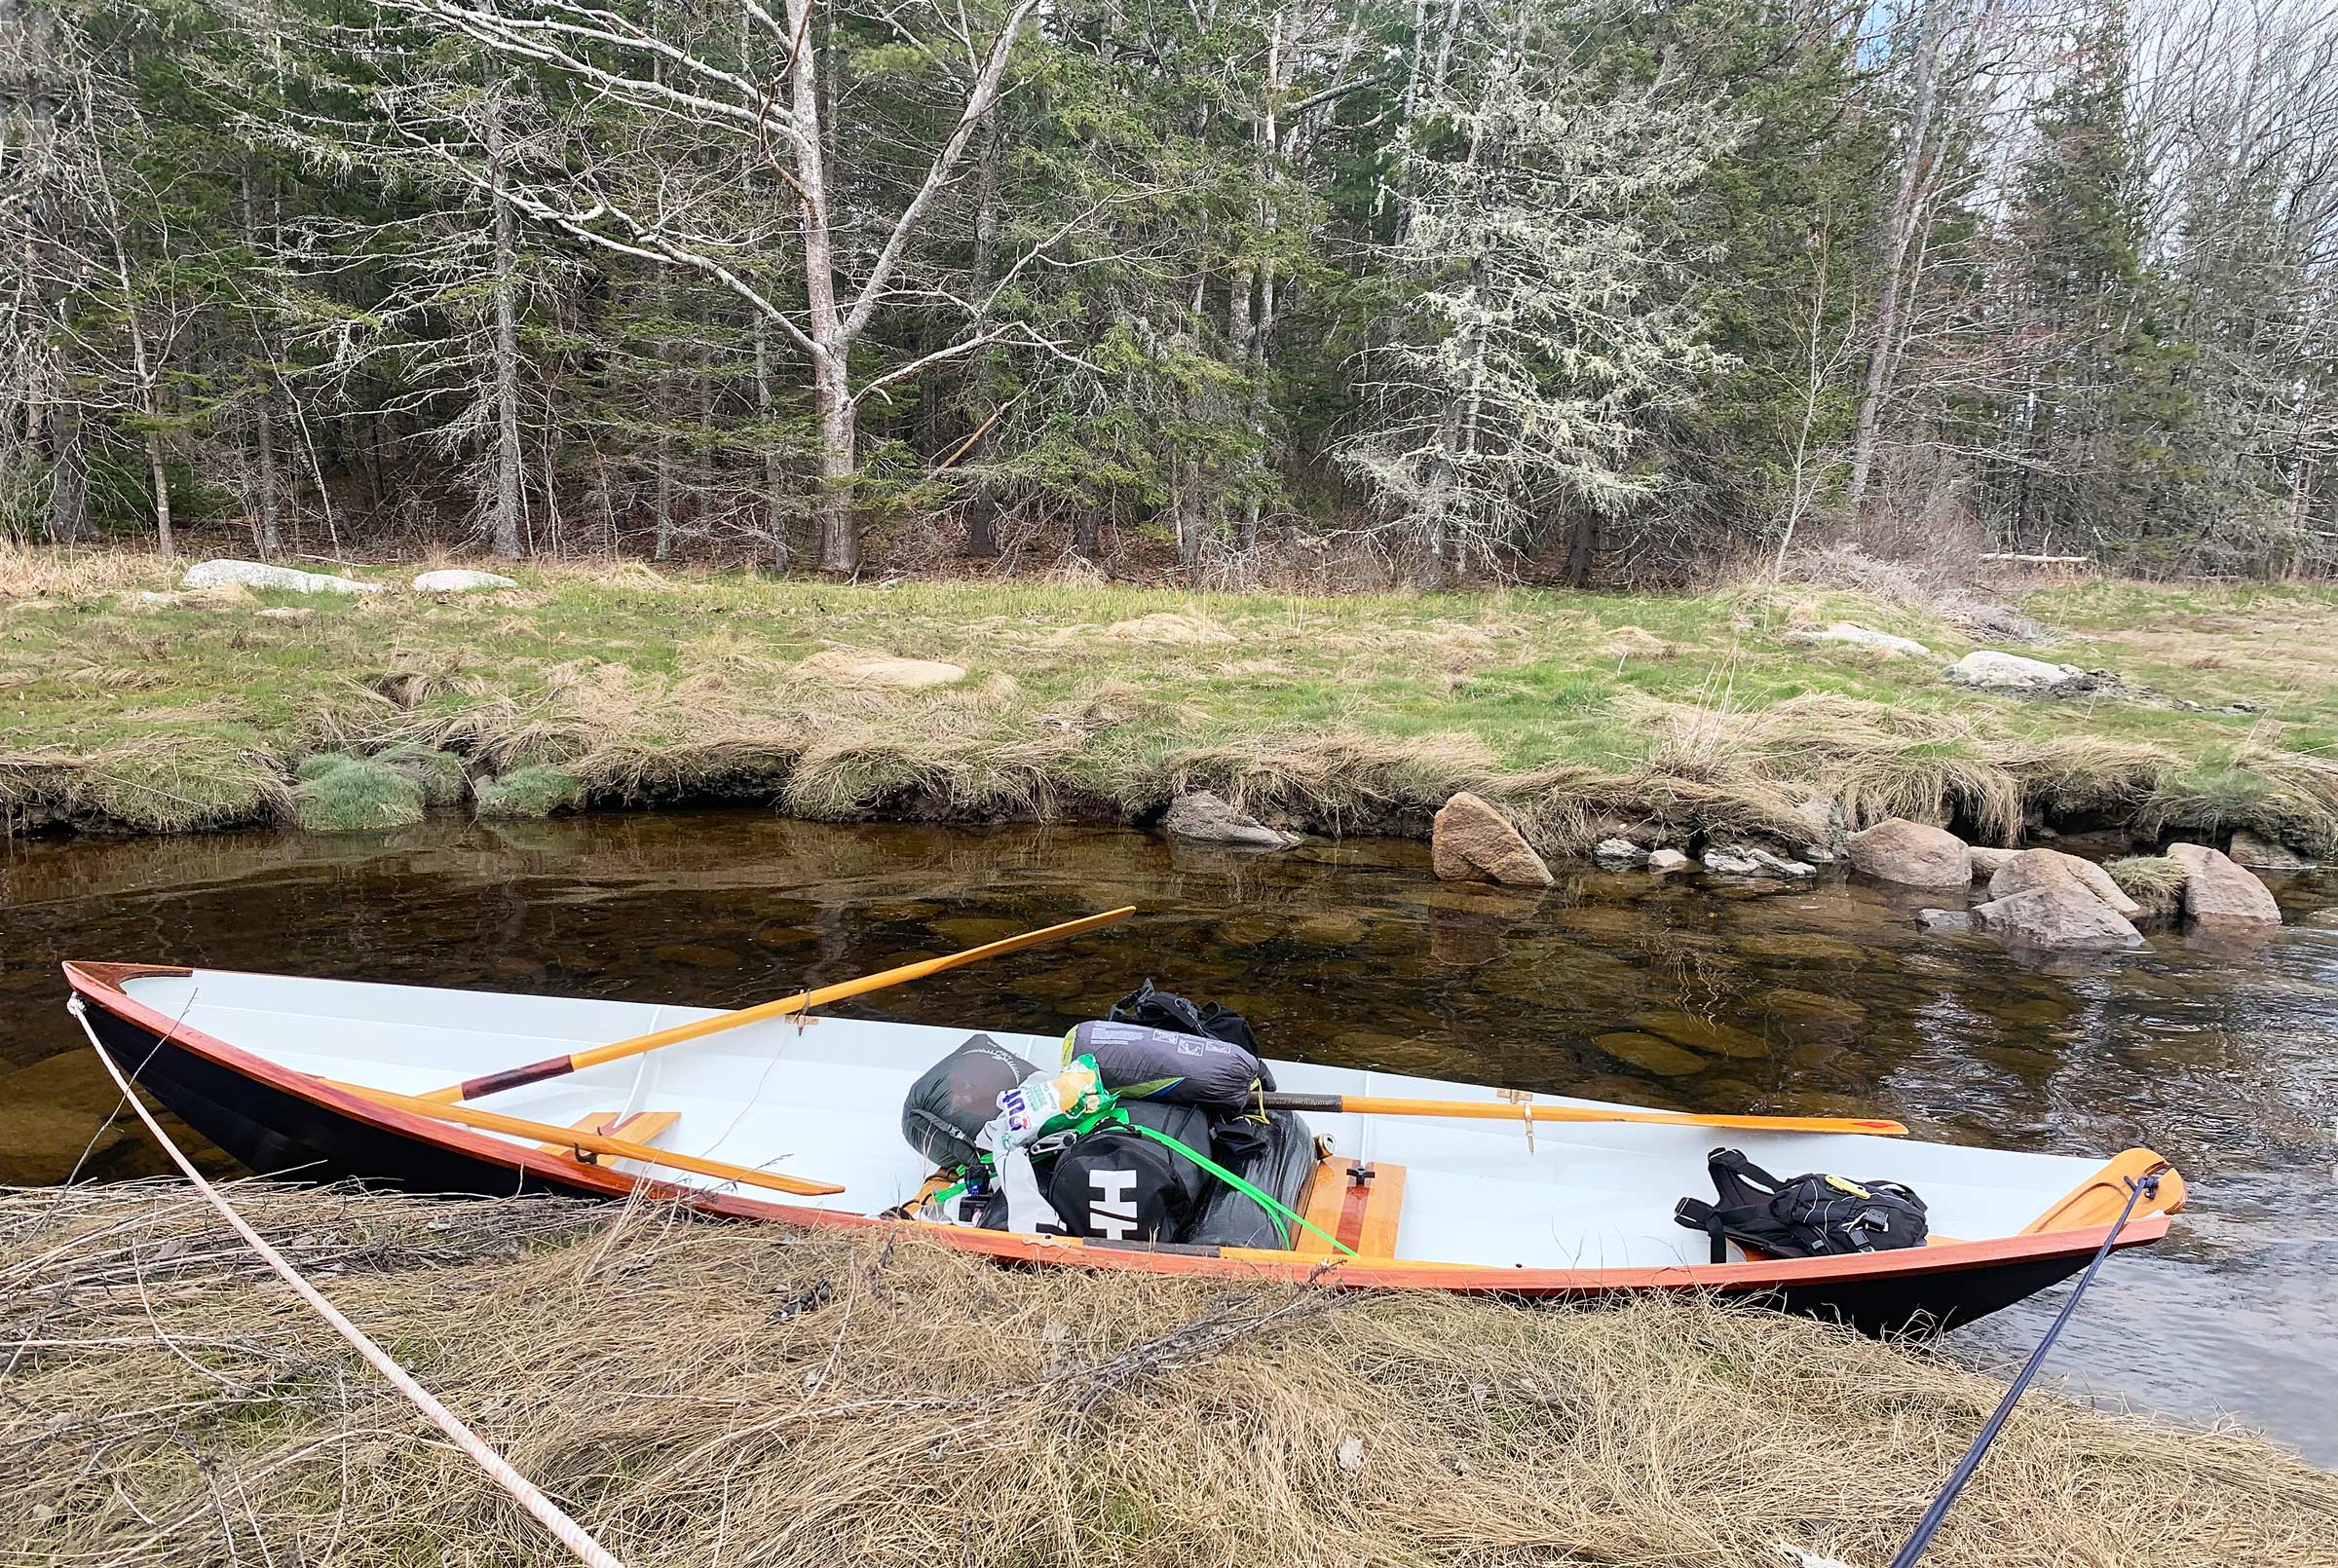
The trip was conceived only a week earlier as Delaney and I stood in my parents’ garage in Worcester, Vermont, and looked at the 17′ Chesapeake Light Craft Northeaster dory my father and I started building in 2014 in a one-week class at WoodenBoat School. He and I thought it would be a boat I could cut my teeth on for boatbuilding and rowing, but we had never finished it. Since the class it had been languishing in the garage for eight years. WHISTLER—as we named the dory for my propensity as a 13-year-old to whistle while building it—looked forlorn as I ran my hands over the dusty hull, but all it needed to be ready for the water was interior paint and varnish on the rail.
Roger Siebert
.
Last year, while working at WoodenBoat School, I’d heard the stories visiting Grand Canyon river guides had told about running dories through rapids, and while WHISTLER is a different kind of dory, I imagined running the Blue Hill Falls tidal rapids at the entrance to Salt Pond. Delaney liked the idea of running the rapids and taking on the circumnavigation, and we decided to cartop the boat, take it with us back to Maine, and get it ready to launch.
We worked on the boat in the shop at WoodenBoat the following week, and by Friday morning the paint and varnish we’d applied had dried. If we were going to do the circumnavigation, we had to start that day, as that last weekend in April was the only time we’d have together for several months, and the tides were perfect. The only problem: the wind was blowing 20- to 35-knots from the north, the worst possible direction for our row from the launch ramp at WoodenBoat School. Still, we were determined, until a small-craft advisory finally convinced us that launching to take on a 12-mile row from Brooklin to Blue Hill Falls would have been not only ill-advised but also rather dangerous. The new plan was to launch on Saturday from the South Blue Hill boat ramp 1-1/2 miles south of the falls.
By 8:00 Saturday morning, Delaney and I were at the oars, bashing WHISTLER into steep swells. I was at the forward station, with Delaney at the aft thwart; we struggled against a 15- to 20-knot wind on Blue Hill Bay. The bow rose over a rolling 2′ wave and when the flat bottom slammed hard into the trough, I felt a painful pinch in my lower back as it compressed. A 20-knot gust brought us to a stop and tugged at my oars even though I had the blades feathered. Each stroke moved us forward only a few feet before WHISTLER butted against the next wave.
I could feel the burning in my forearms even though we had only made it ¼ mile under the steel-gray skies and whistling wind. “Need a break?” I shouted to Delaney. “Not a bad idea,” was the reply, and I turned us toward a patch of beach 50 yards to port with the promise of a calm resting spot drawing us in. We beached on a bed of baseball-sized rocks covered in dark green seaweed and dragged the boat out of the water so it wouldn’t get beaten by the knee-high swell breaking on the beach.
Photographs by Delaney Brown and Tom Conlogue
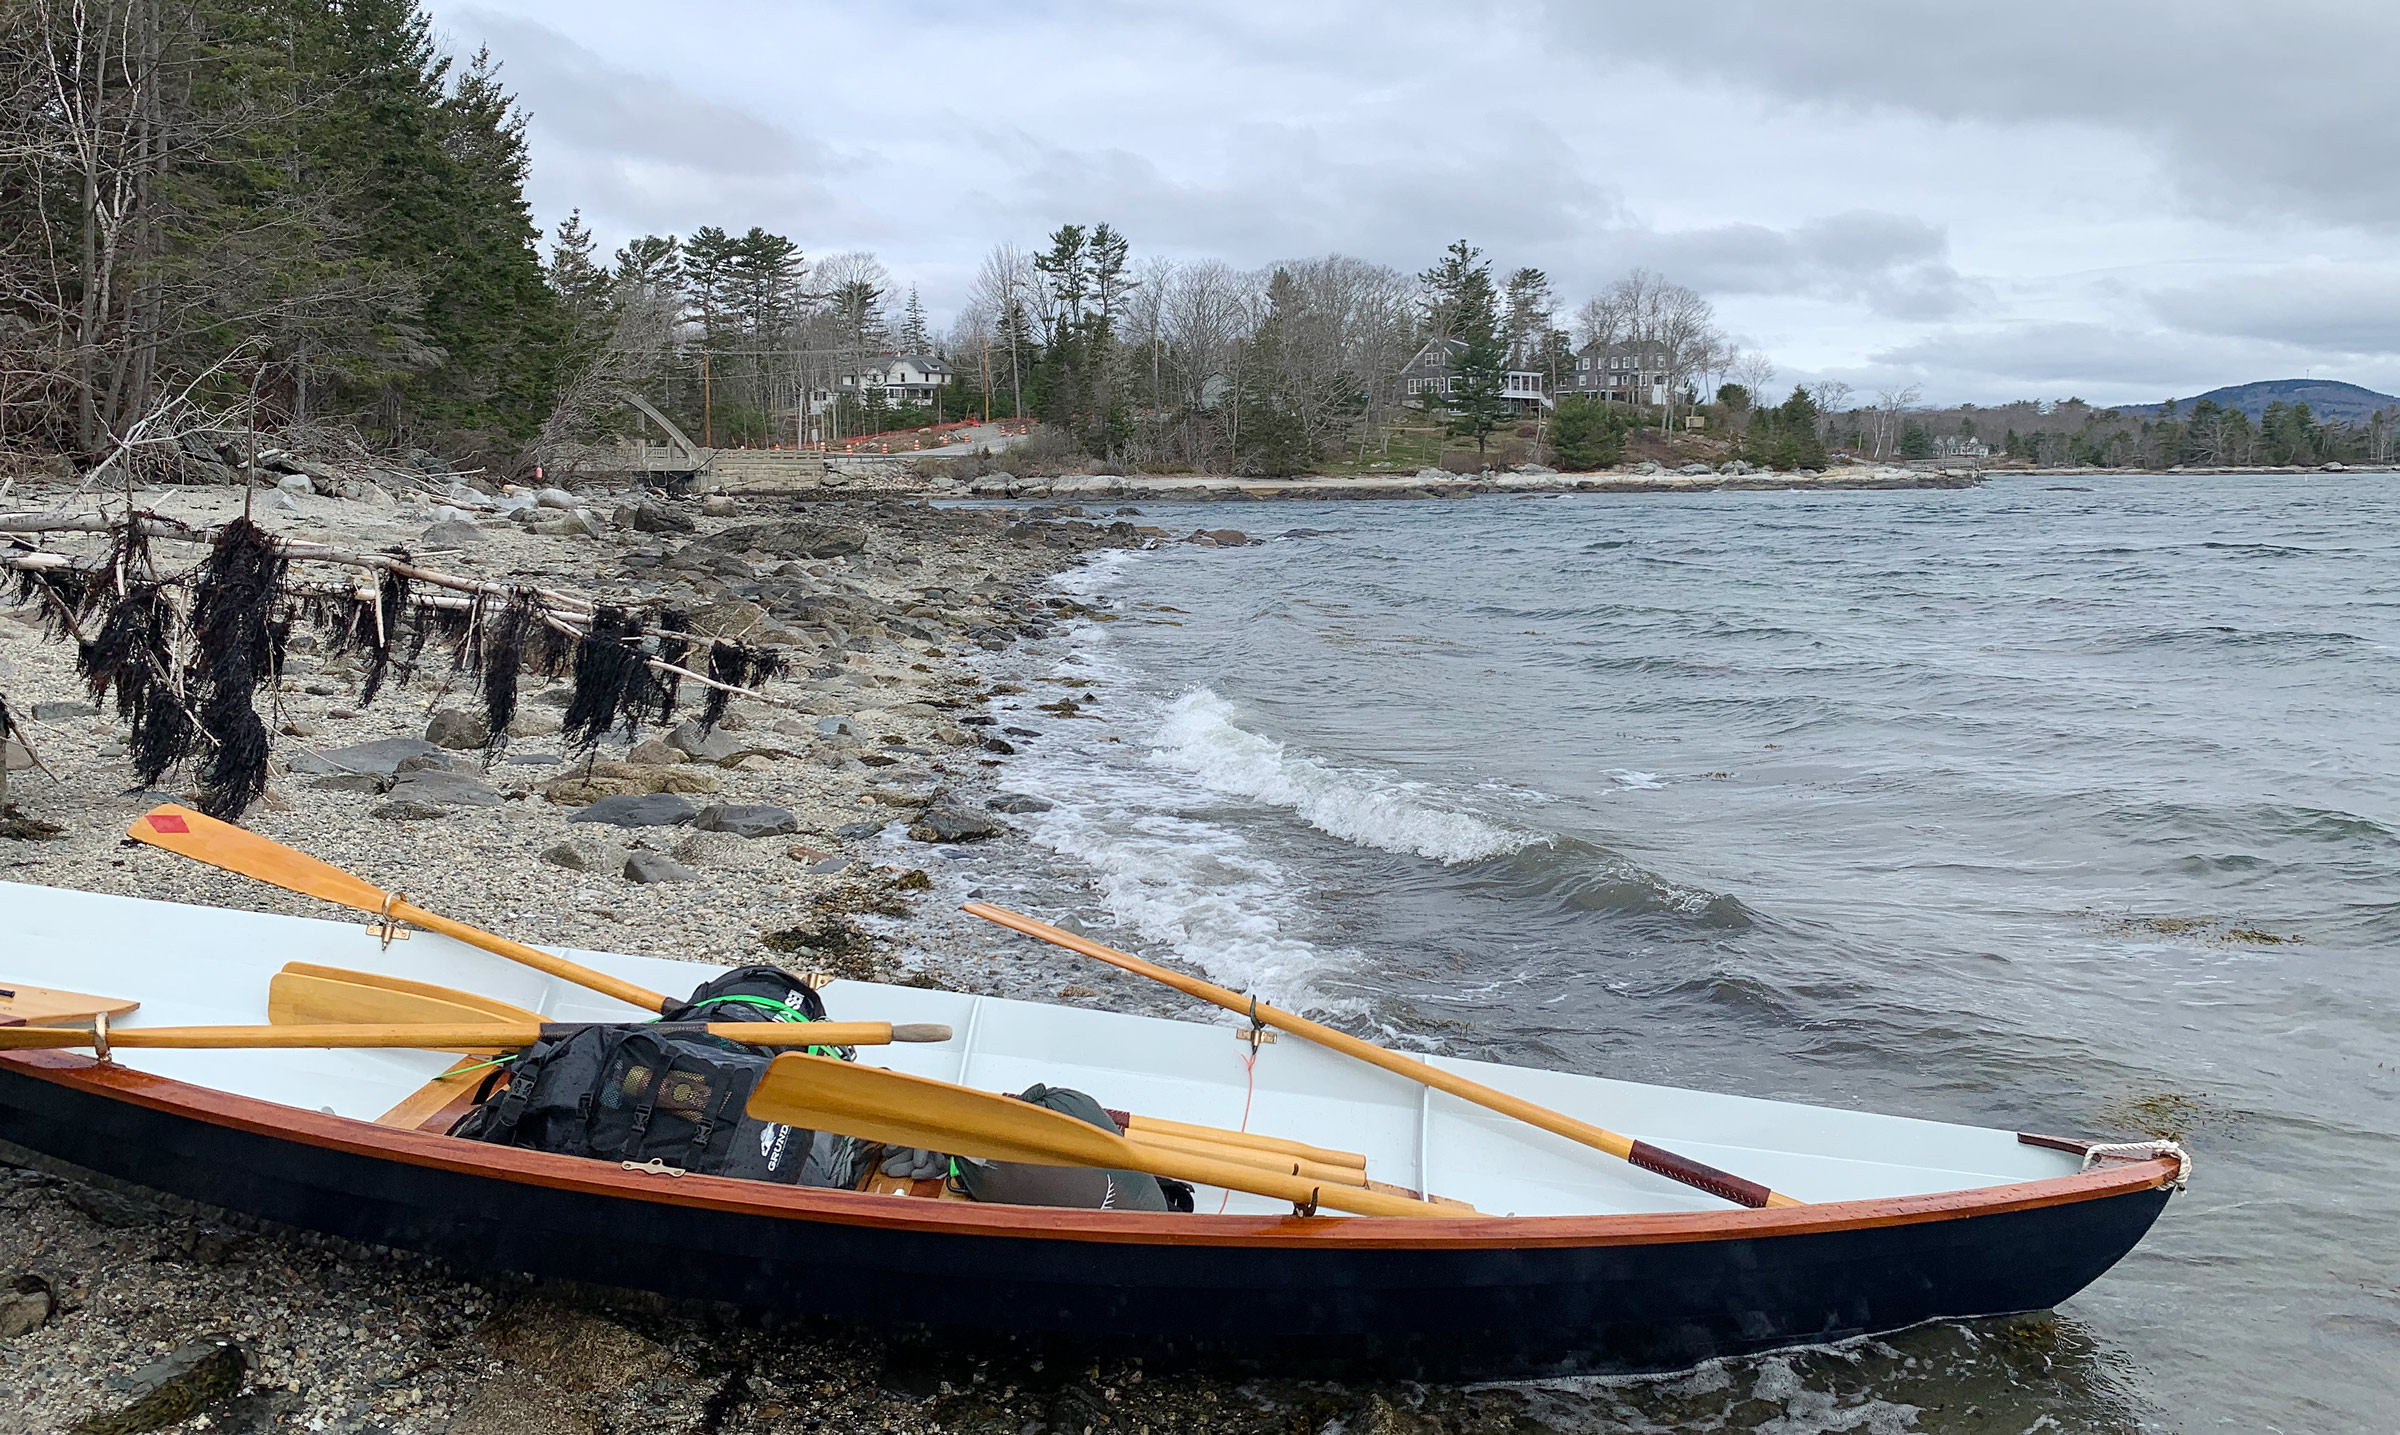
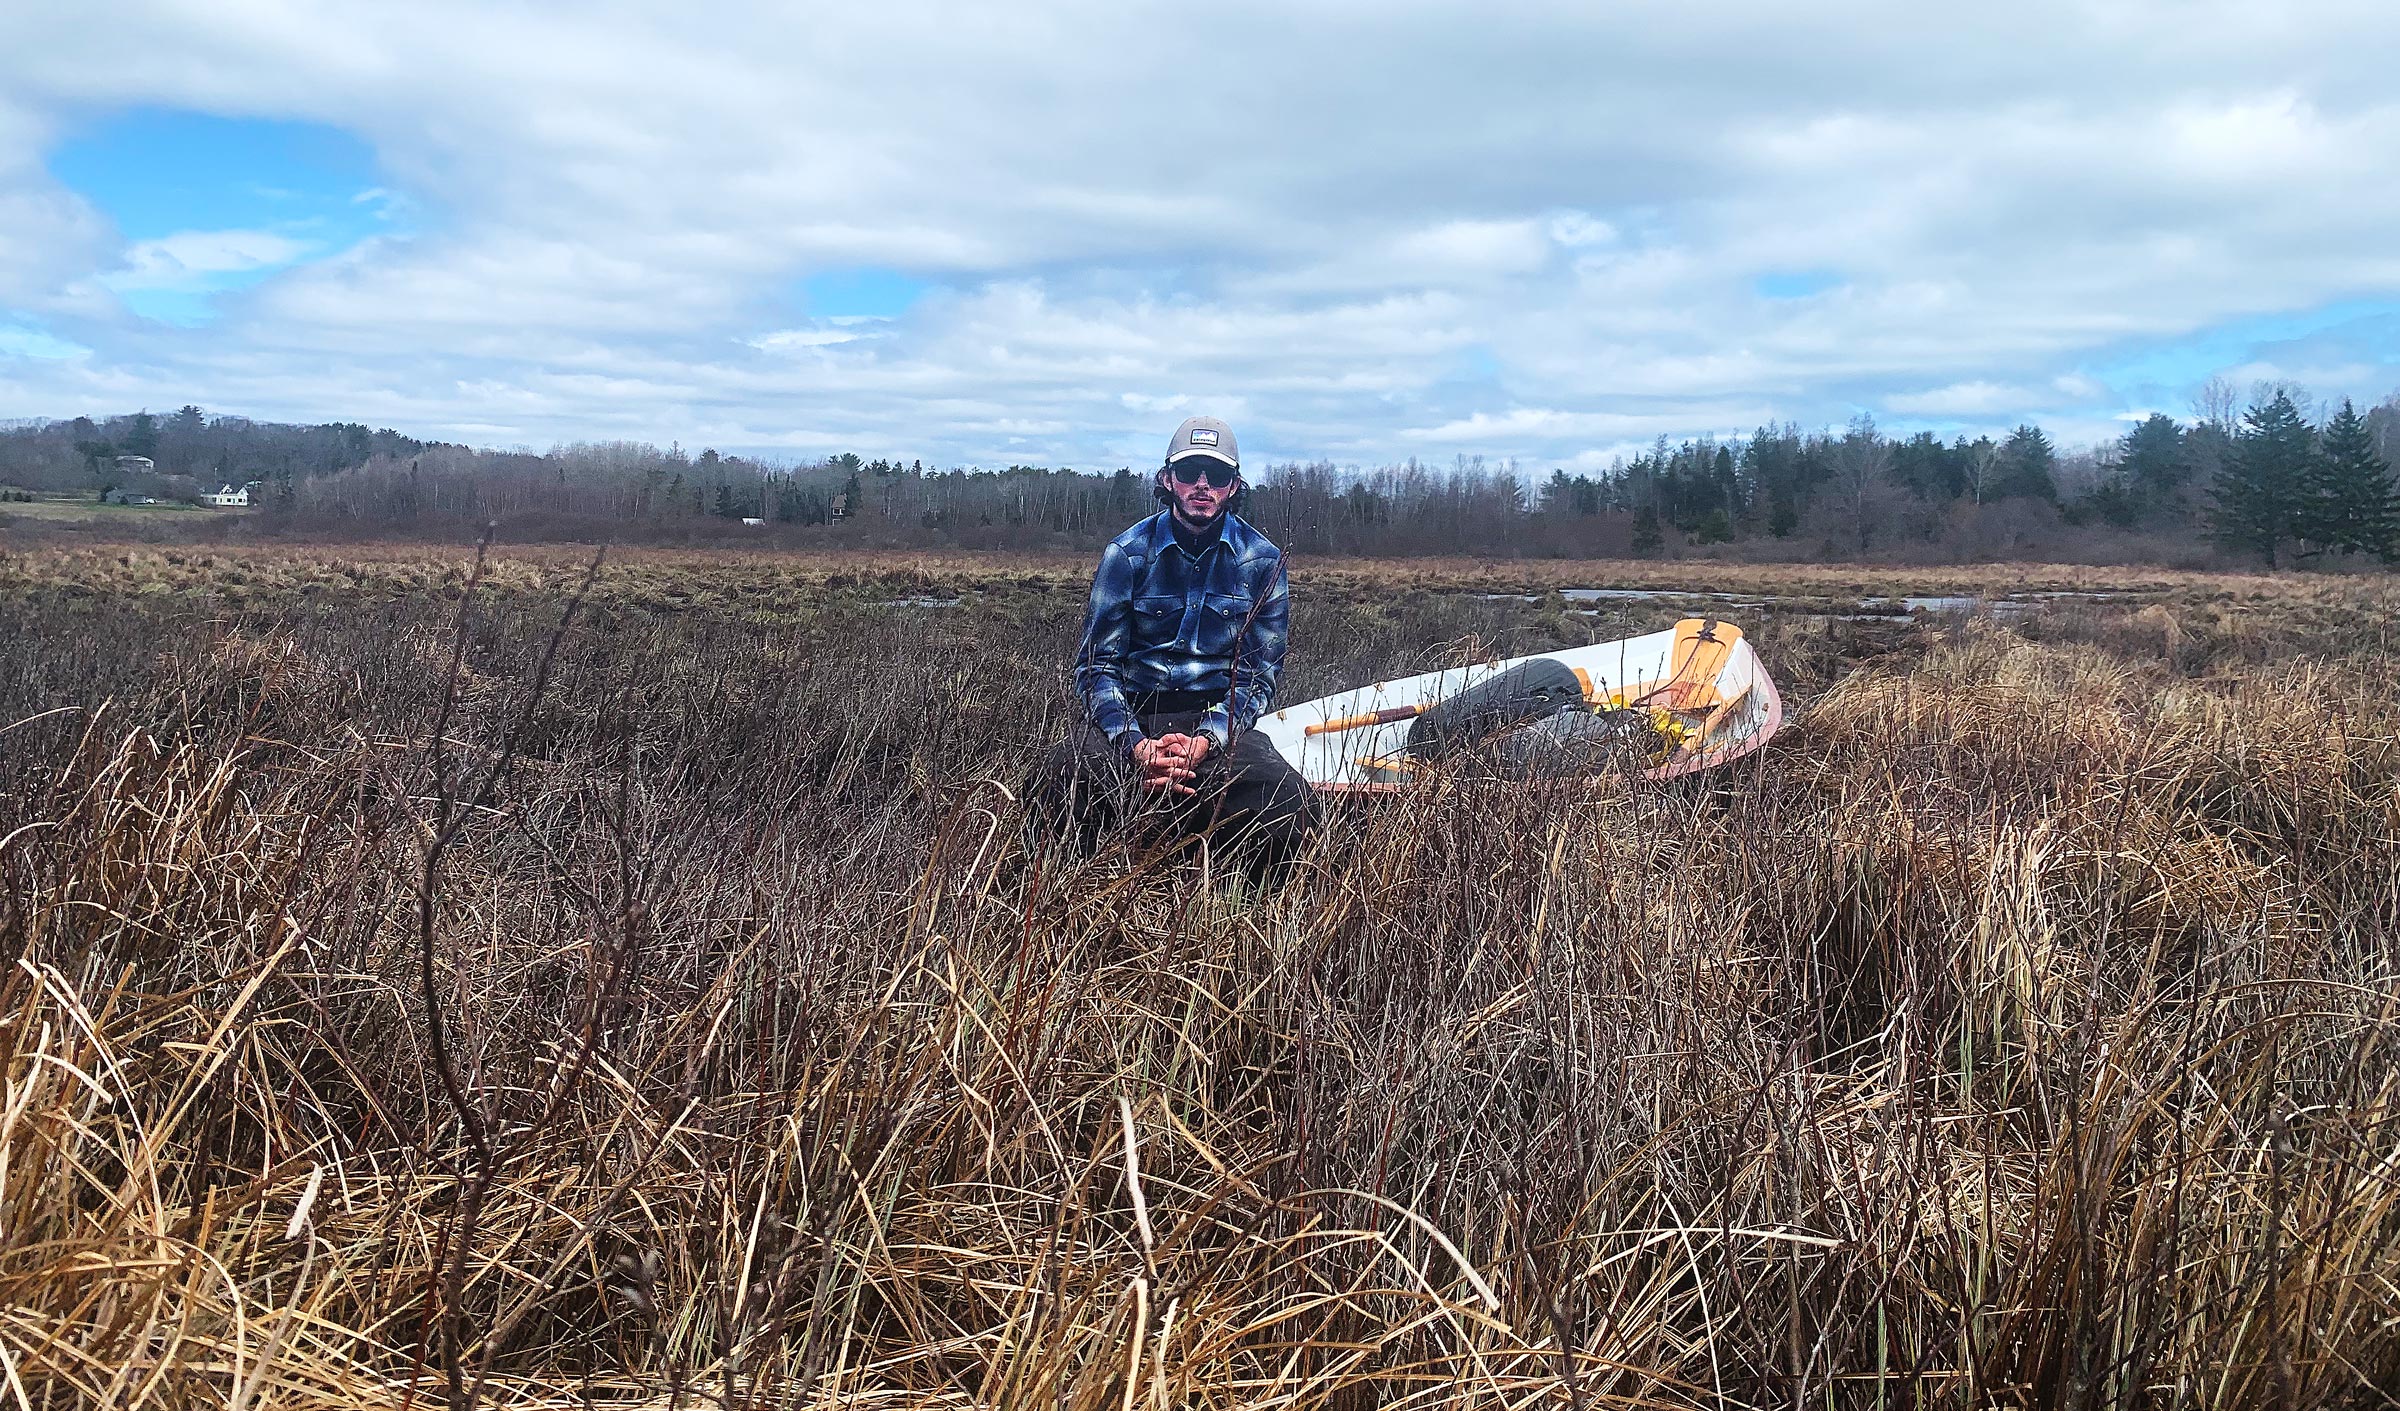
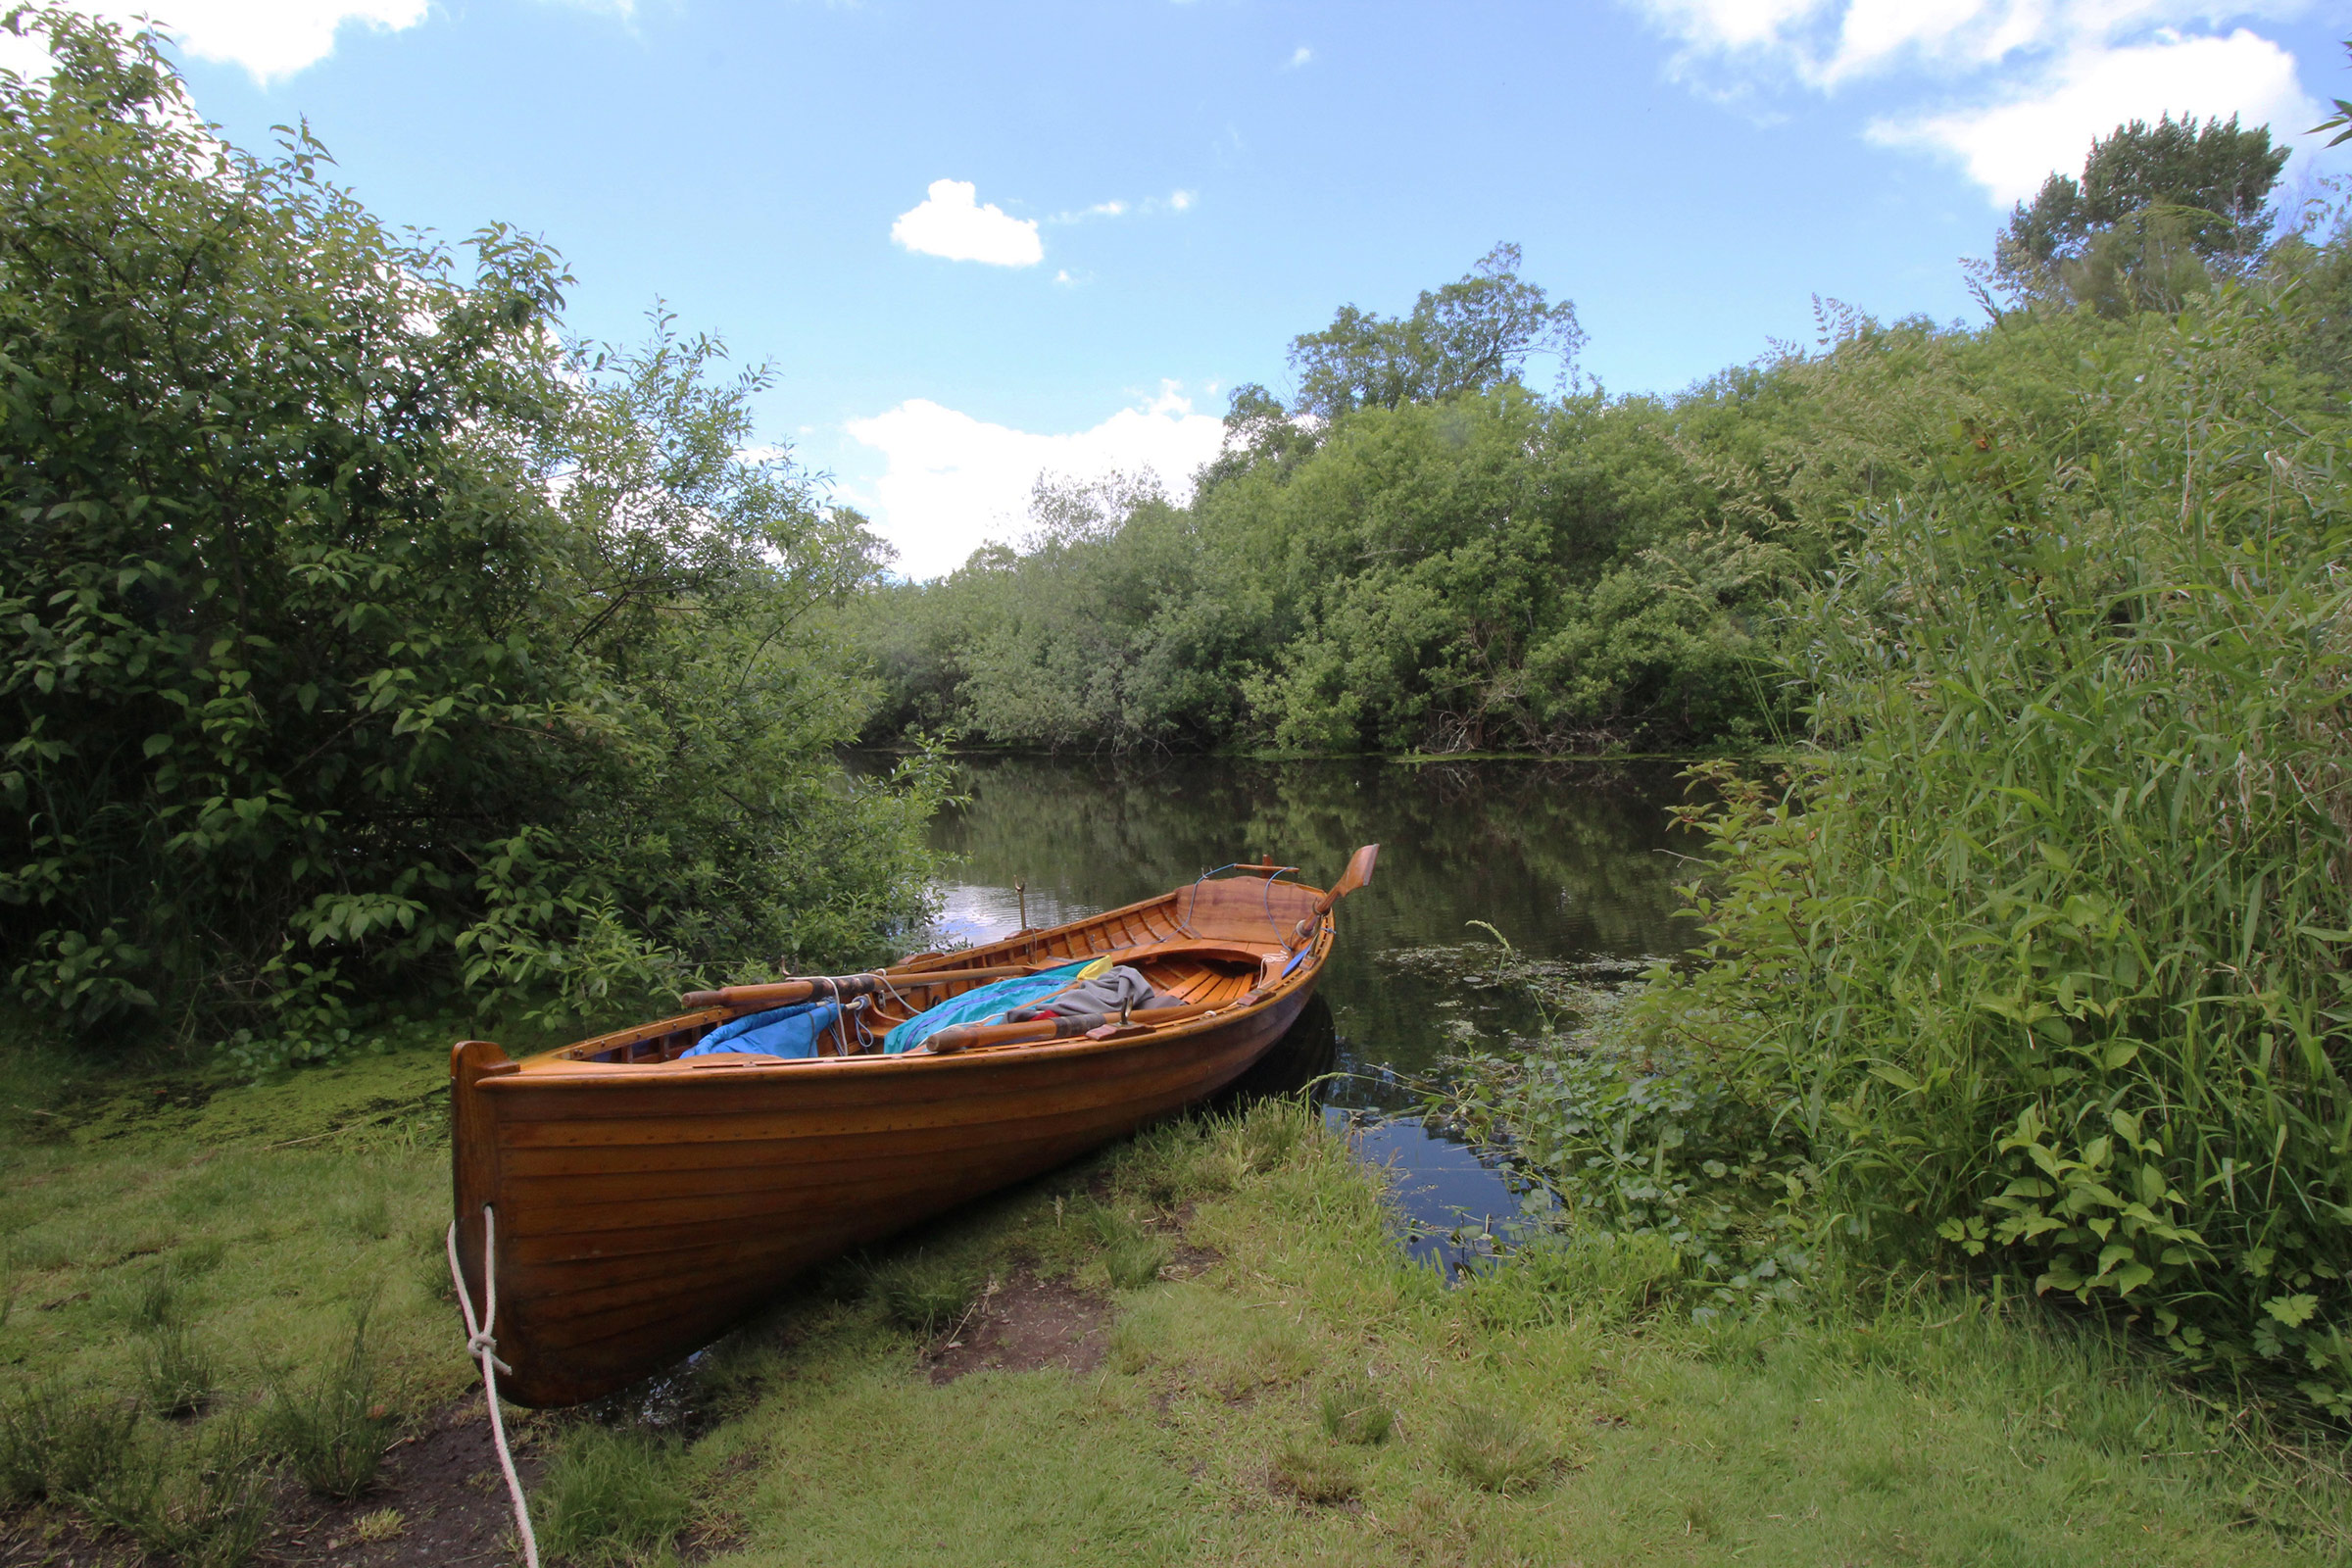
After backing WHISTLER onto the beach, we did a reconnaissance run to the bridge to scope out the falls. The north end of the Blue Hill Falls bridge is visible above the dory’s aft thwart.
We sat on a smooth, waist-high boulder, watching the whitecaps roll by for five minutes, and caught our breath before pushing back out into the grim, green-gray water, white streaks trailing from the wave crests. I took short tugs on the oars to get us moving as Delaney shoved off and boarded over the stern. My oar blades dragged through mats of tangled seaweed until we were two boat lengths from shore. Delaney settled on the aft thwart, slipped her oars out through the locks, and we fell back into our rhythm, working our way to windward at barely over 1 knot. We stayed 30′ from shore, away from the waves as they steepened and crested in the shallows but somewhat protected by the land. Spray flung by the diving bow pelted my back. The water was loud on the hood of my jacket, ran down my back, and pooled around my feet to slosh back and forth between frames.
Delaney’s port oar dug in suddenly, as a wave crest caught the blade and sent it diving for the bottom. The grip was almost wrenched out of her hand as it tried to push her off the thwart. The oar dragged the bow around to port and we were no longer pointing into the wind. As the dory veered toward shore, I quickly pulled hard on my port side to correct our course while Delaney freed her oar from the water. A few strokes later it happened again, on the starboard oar this time. “I’m going to count how many strokes I can get in a row without catching a crab!” she yelled and began counting aloud as we continued to row. With Delaney chanting her stroke count aloud, we laughed every time she had to restart and cheered when she reached a new high score of uninterrupted strokes. After we had rowed for a half hour, I looked over my right shoulder and saw the sandy-gray arches of the Blue Hill Falls bridge, and we made for a beach just south of the bridge.
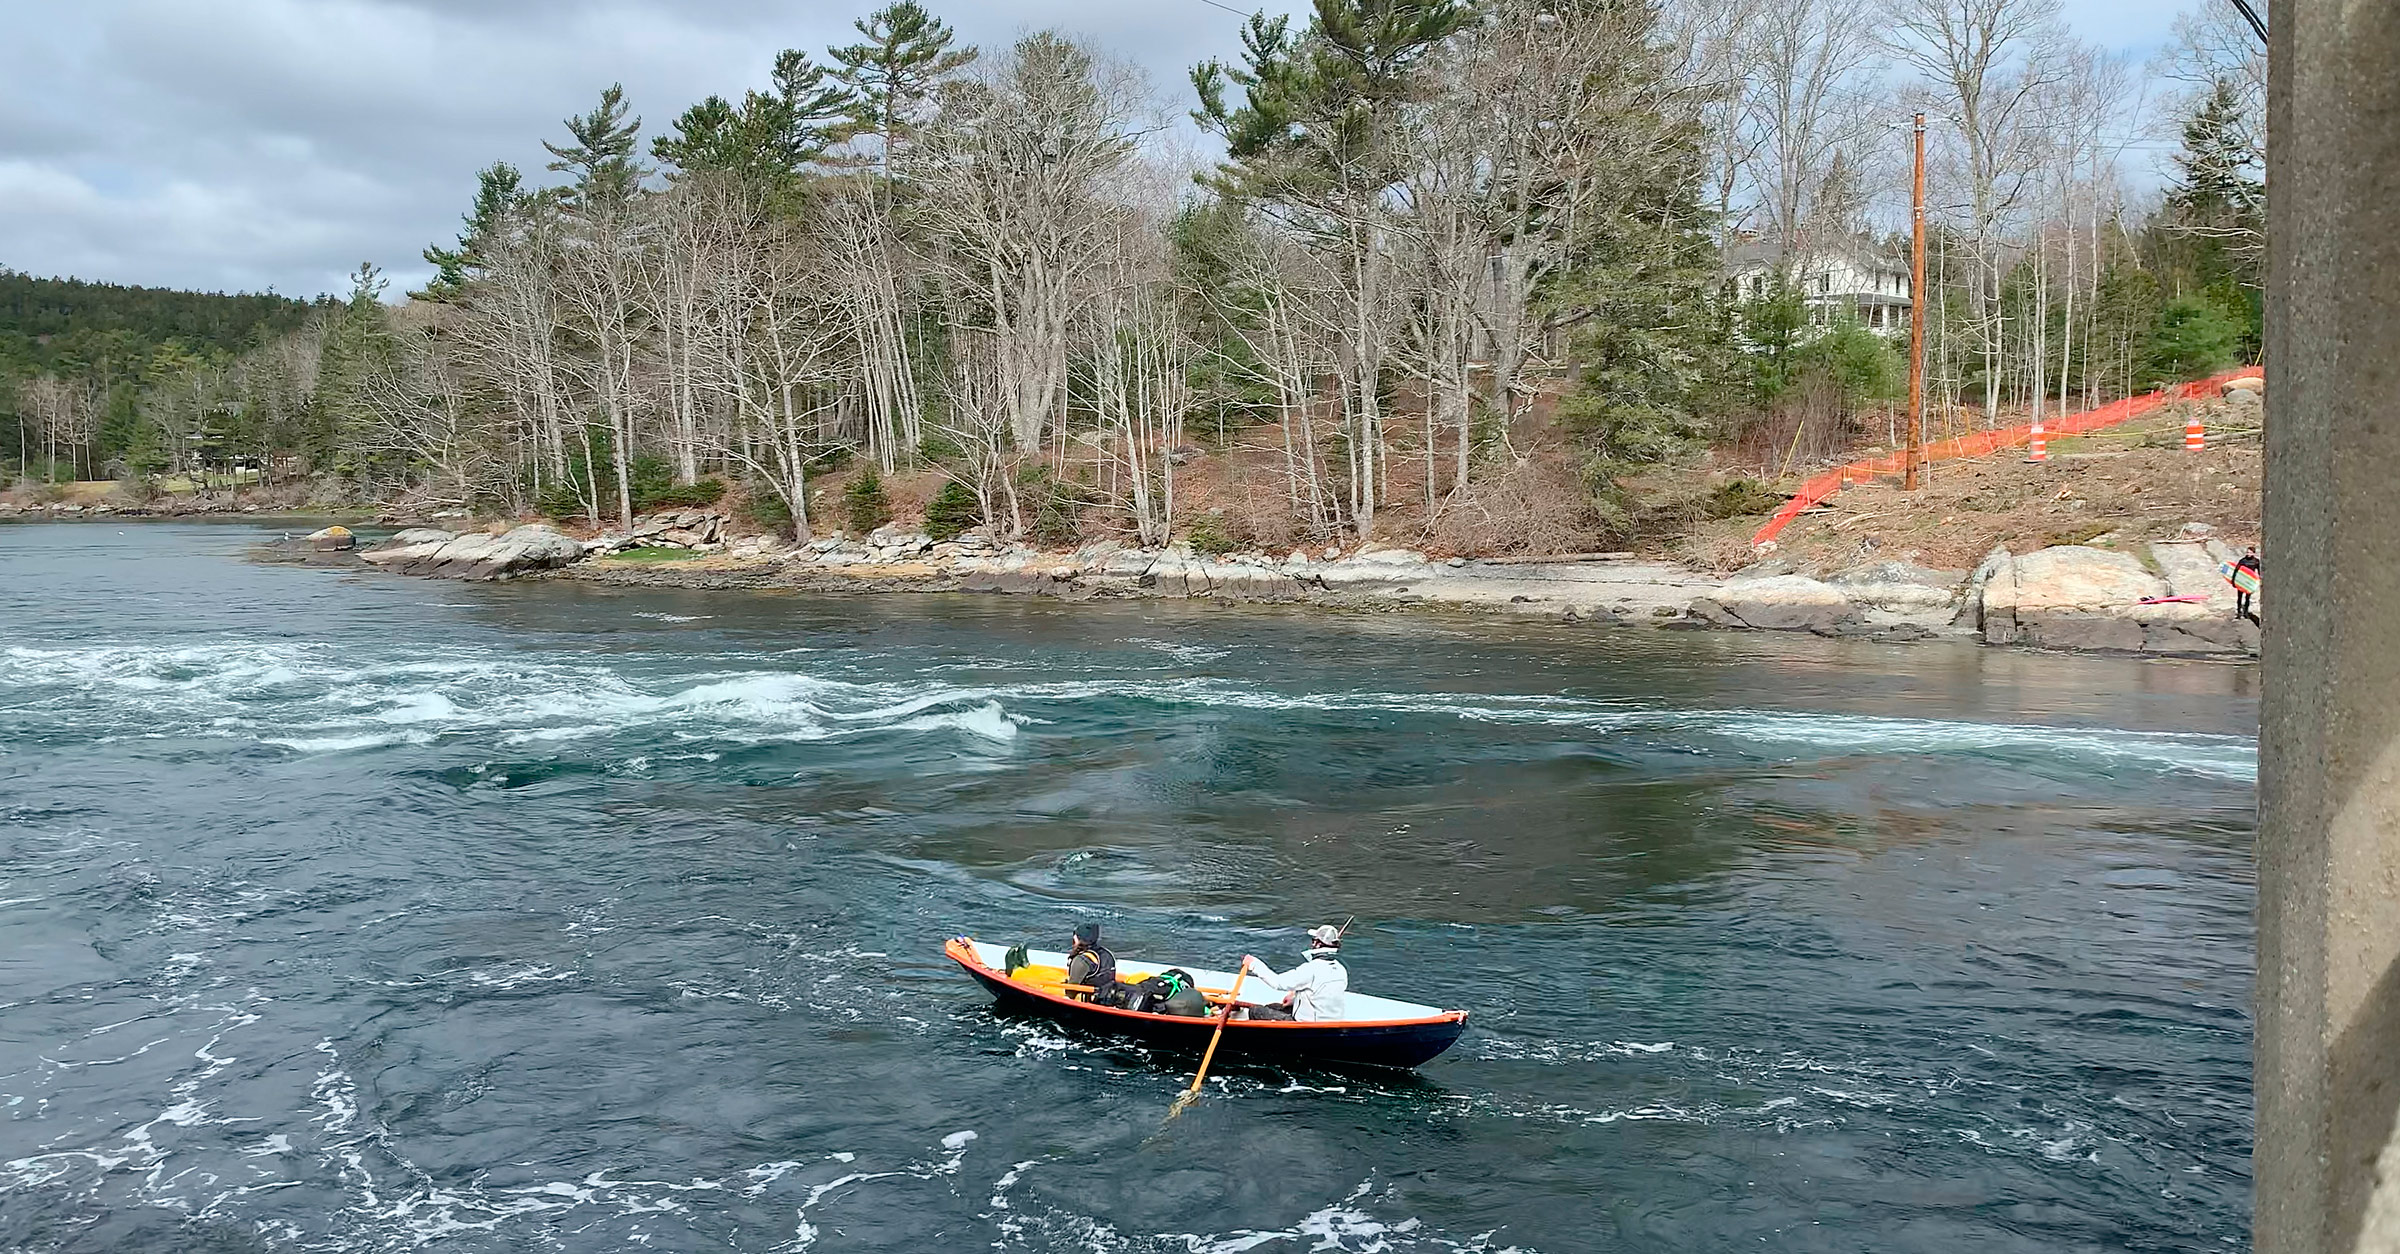
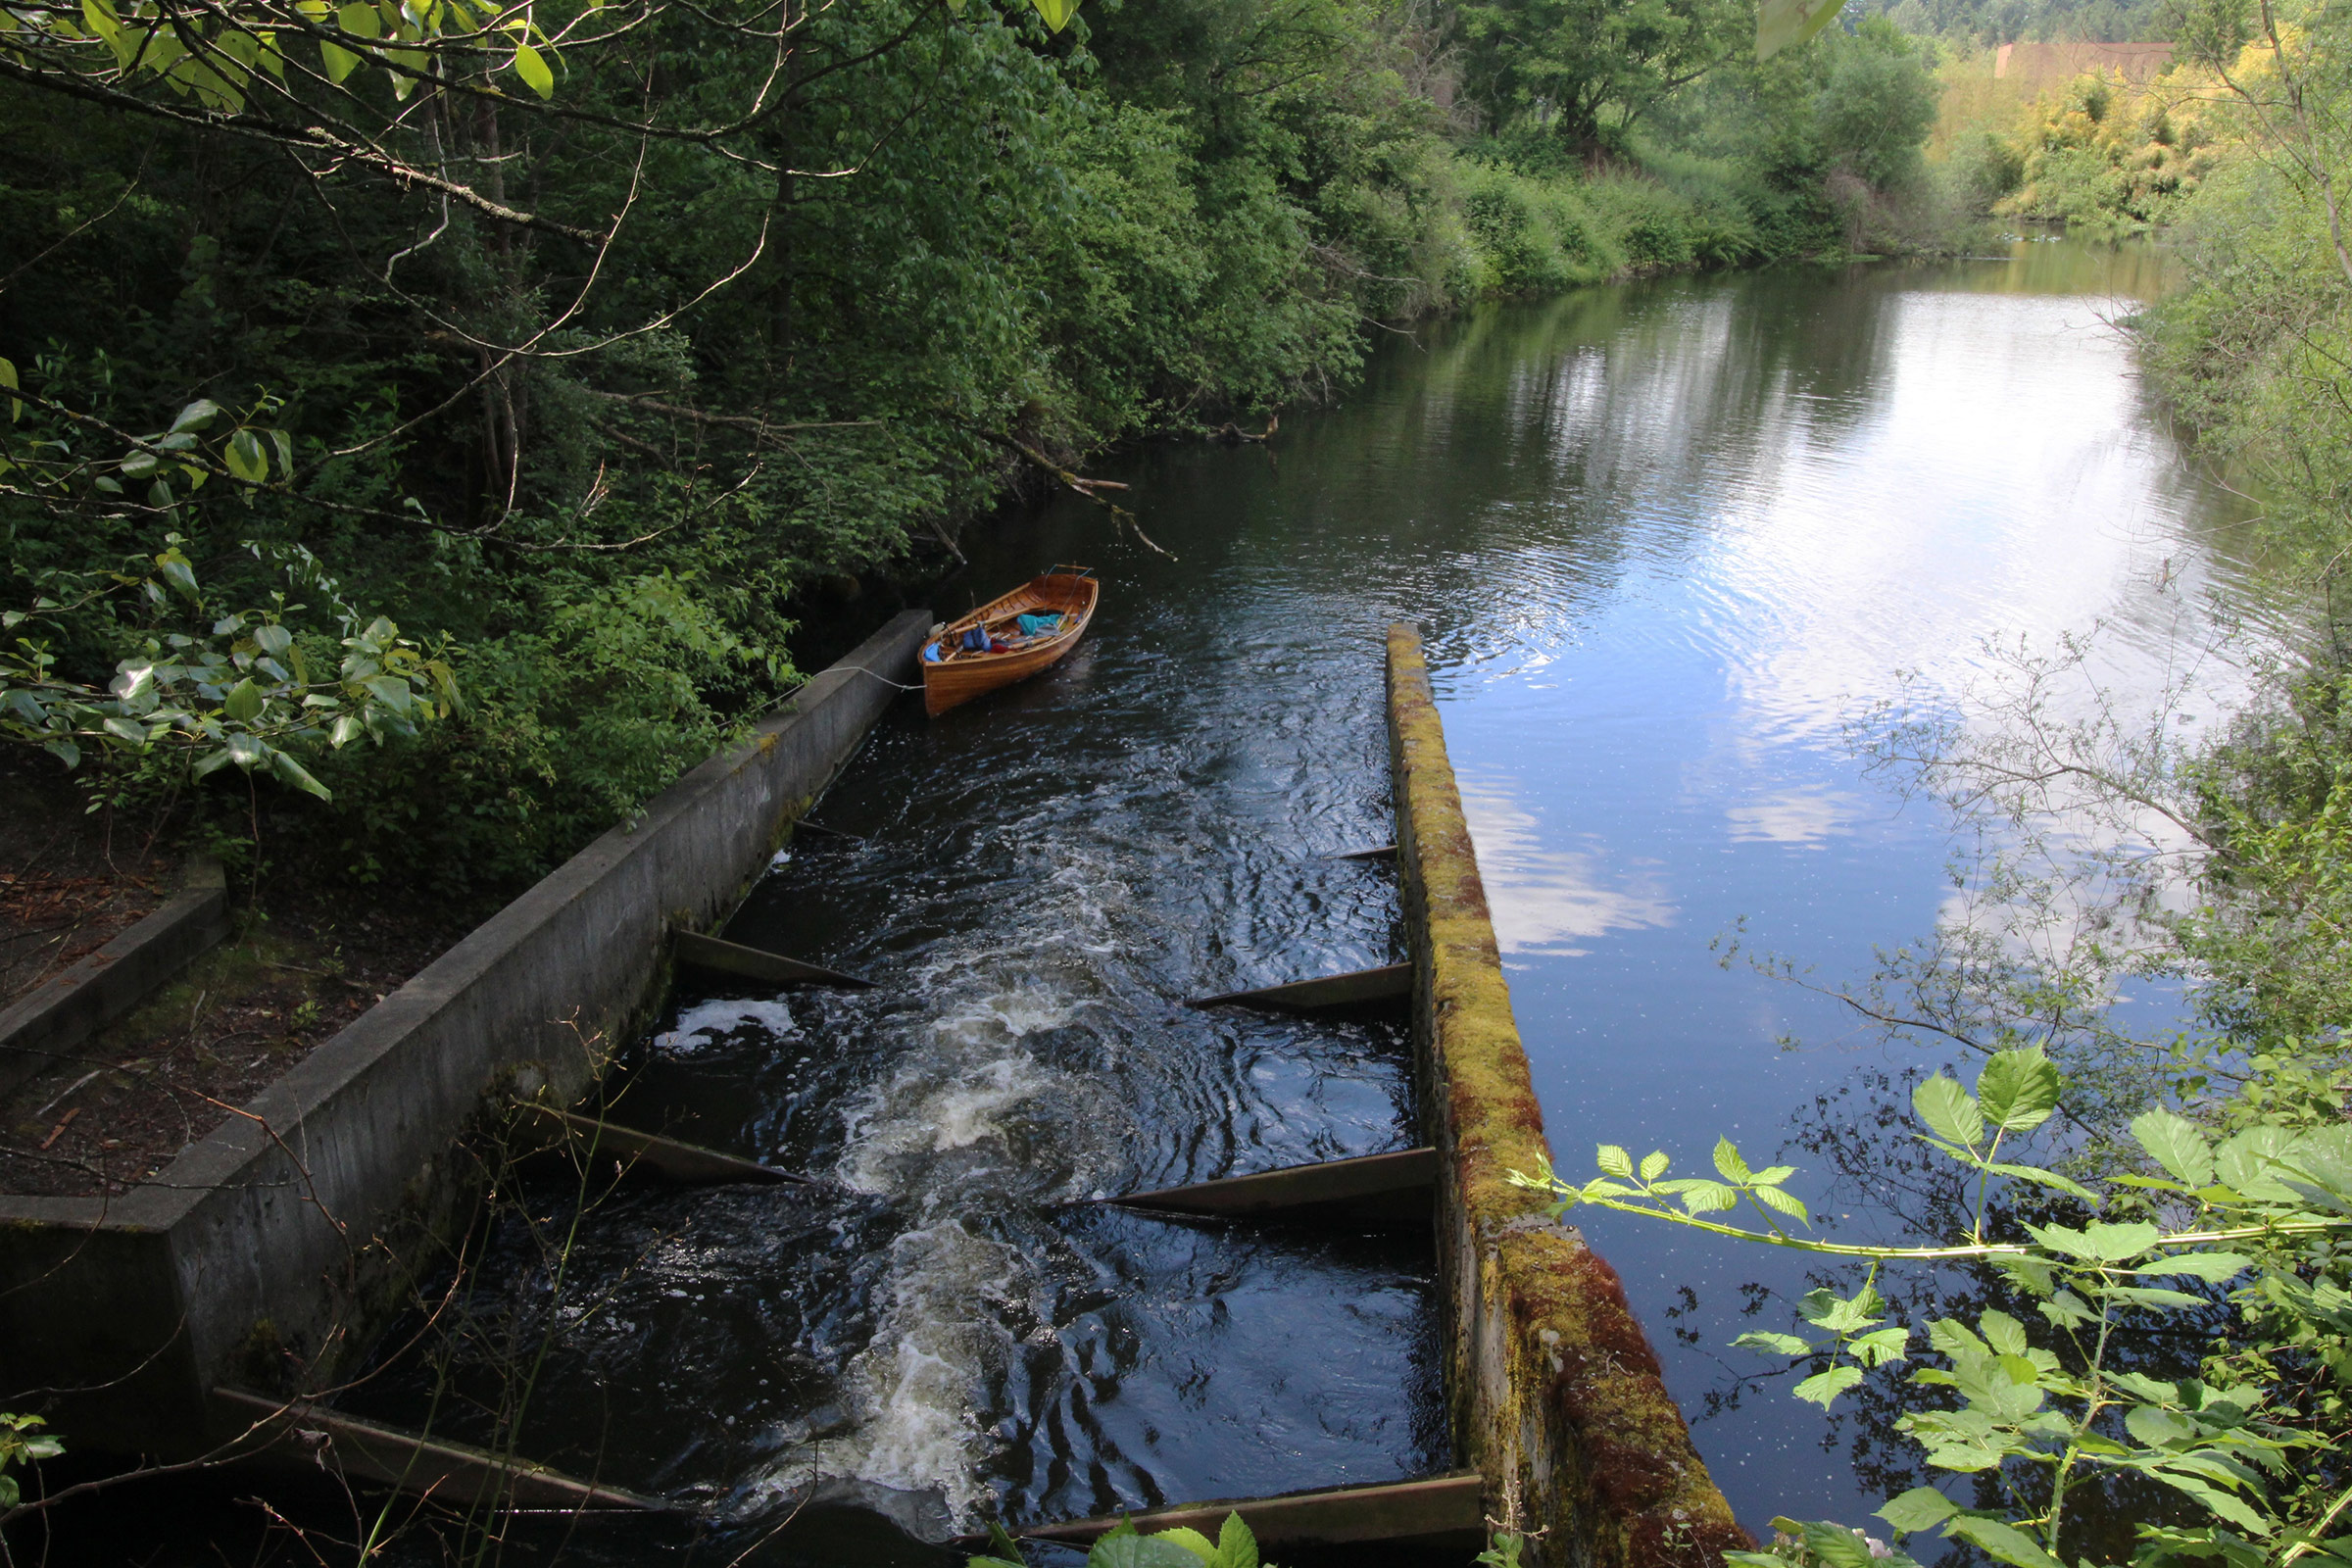
Blue Hill Falls is a short stretch of reversing tidal rapids at the entrance to Salt Pond. Four times a day water pours through the 100′-wide gap beneath the bridge, creating standing waves as the tide floods into and ebbs out of the 3-1/2-mile-long pond. While the safest way through is to wait for slack water, we had decided to go through at the peak of the flood when the current would be strongest and the rising tide would significantly shorten the portage at Salt Pond’s far end.
After beaching the dory and taking a quick water break, we walked over to the bridge to see what we had gotten ourselves into. After clambering up the scree slope at the side of the road and walking to the middle of the bridge, we looked down over its Salt Pond side at the flood tide’s standing waves. My worries about getting capsized instantly evaporated. While the rapid was moving fast, it wasn’t nearly as turbulent as I had remembered. On the north side, the water ran smooth and black under the bridge before plunging into a train of 3′ standing waves, but on the south side there was a straight shot through with only the occasional riffle disturbing the surface.
“This isn’t going to be nearly as exciting as we thought, is it?” Delaney said. “What do you think, should we go straight down the middle?” I replied, “Yep, let’s hit the medium-sized waves.” That approach would avoid the extremes, either too rough or too smooth. We climbed back down the rocks at the end of the bridge and walked gingerly among the softball-sized rocks along the shingle beach to the boat. We pushed off under a sky overcast with low steel-wool-gray clouds and maneuvered stern-first into the current upstream from the bridge.
Delaney took her seat and braced her feet on the sternsheets, and we let the dory get carried under the bridge. As WHISTLER picked up speed, the water turned from gray to dark green as it piled up on the bridge’s concrete footings on either side of us and funneled us through. Pulling occasionally on the oars to keep the stern pointed in the right direction, I steered us in between the fast, clean water off the starboard beam and the tumbling standing waves off the port beam. Below the bridge, we gently rolled over a smooth crest, then rose up the far side and crashed down. Looking past Delaney’s shoulder I saw just a tongue of water lap over the transom, and then we were past the waves and into the pond.
Choosing to take the middle route down provided a smooth ride, although in hindsight the line on the north side of the rapid would have provided a sportier experience.
Just past the Blue Hill Falls bridge, visible at the far right, and onto the Salt Pond, Delaney provided directions and encouragement while I enjoyed the easy rowing, good view, and occasional warmth from the sun.
In its narrow entrance, the wind was calmer and with the sun coming out we needed to peel off some layers, so about 500′ beyond the bridge, we cut diagonally across the current and made our way to the beach. After we took off our spray jackets, we pushed back out and rowed across the upstream current of a back eddy where leafy seaweed on the bottom waved gently toward the bridge. When we reached the main current, it again carried us southwest. Delaney moved to the sternsheets to take a break and watch the scenery slide by as I rowed us down Salt Pond with the wind and current nudging us along at an effortless 4 knots.
A half mile farther along, we skirted a rounded granite boulder that splits a channel where the pond narrows from 1/5 mile to just 80 yards. A half mile farther we saw a field of buoys ahead, arranged neatly in long rows 20′ apart. At the first buoy, Delaney peered over the side into the water at the fuzz-covered ropes hanging straight down and disappearing in the olive-green murk. “Mussels?” she wondered out loud; I shrugged. She did a quick Google search on her phone, which revealed it was indeed a shellfish farm, growing oysters as well as mussels.
By noon we had made it to the head of the Salt Pond, where it turned into Meadow Brook, a channel 10′ wide with grassy banks on both sides. We had timed it perfectly, and arrived at high tide, but the brook was still too narrow for the oars. We climbed out and used the bow and stern lines to guide WHISTLER up the winding stream, our boots crunching softly over the dead grass on the bank.
Nosing up to Meadow Brook, the channel became shallower and we dragged the dory over submerged rocks while avoiding the visible ones. The guardrail of the Hales Hill Road bridge was within sight, beyond the large boulder in the distance.
The brook quickly became too narrow for rowing, so Delaney and I hopped out and lined the dory up the last bit of the way to the beaver dam.
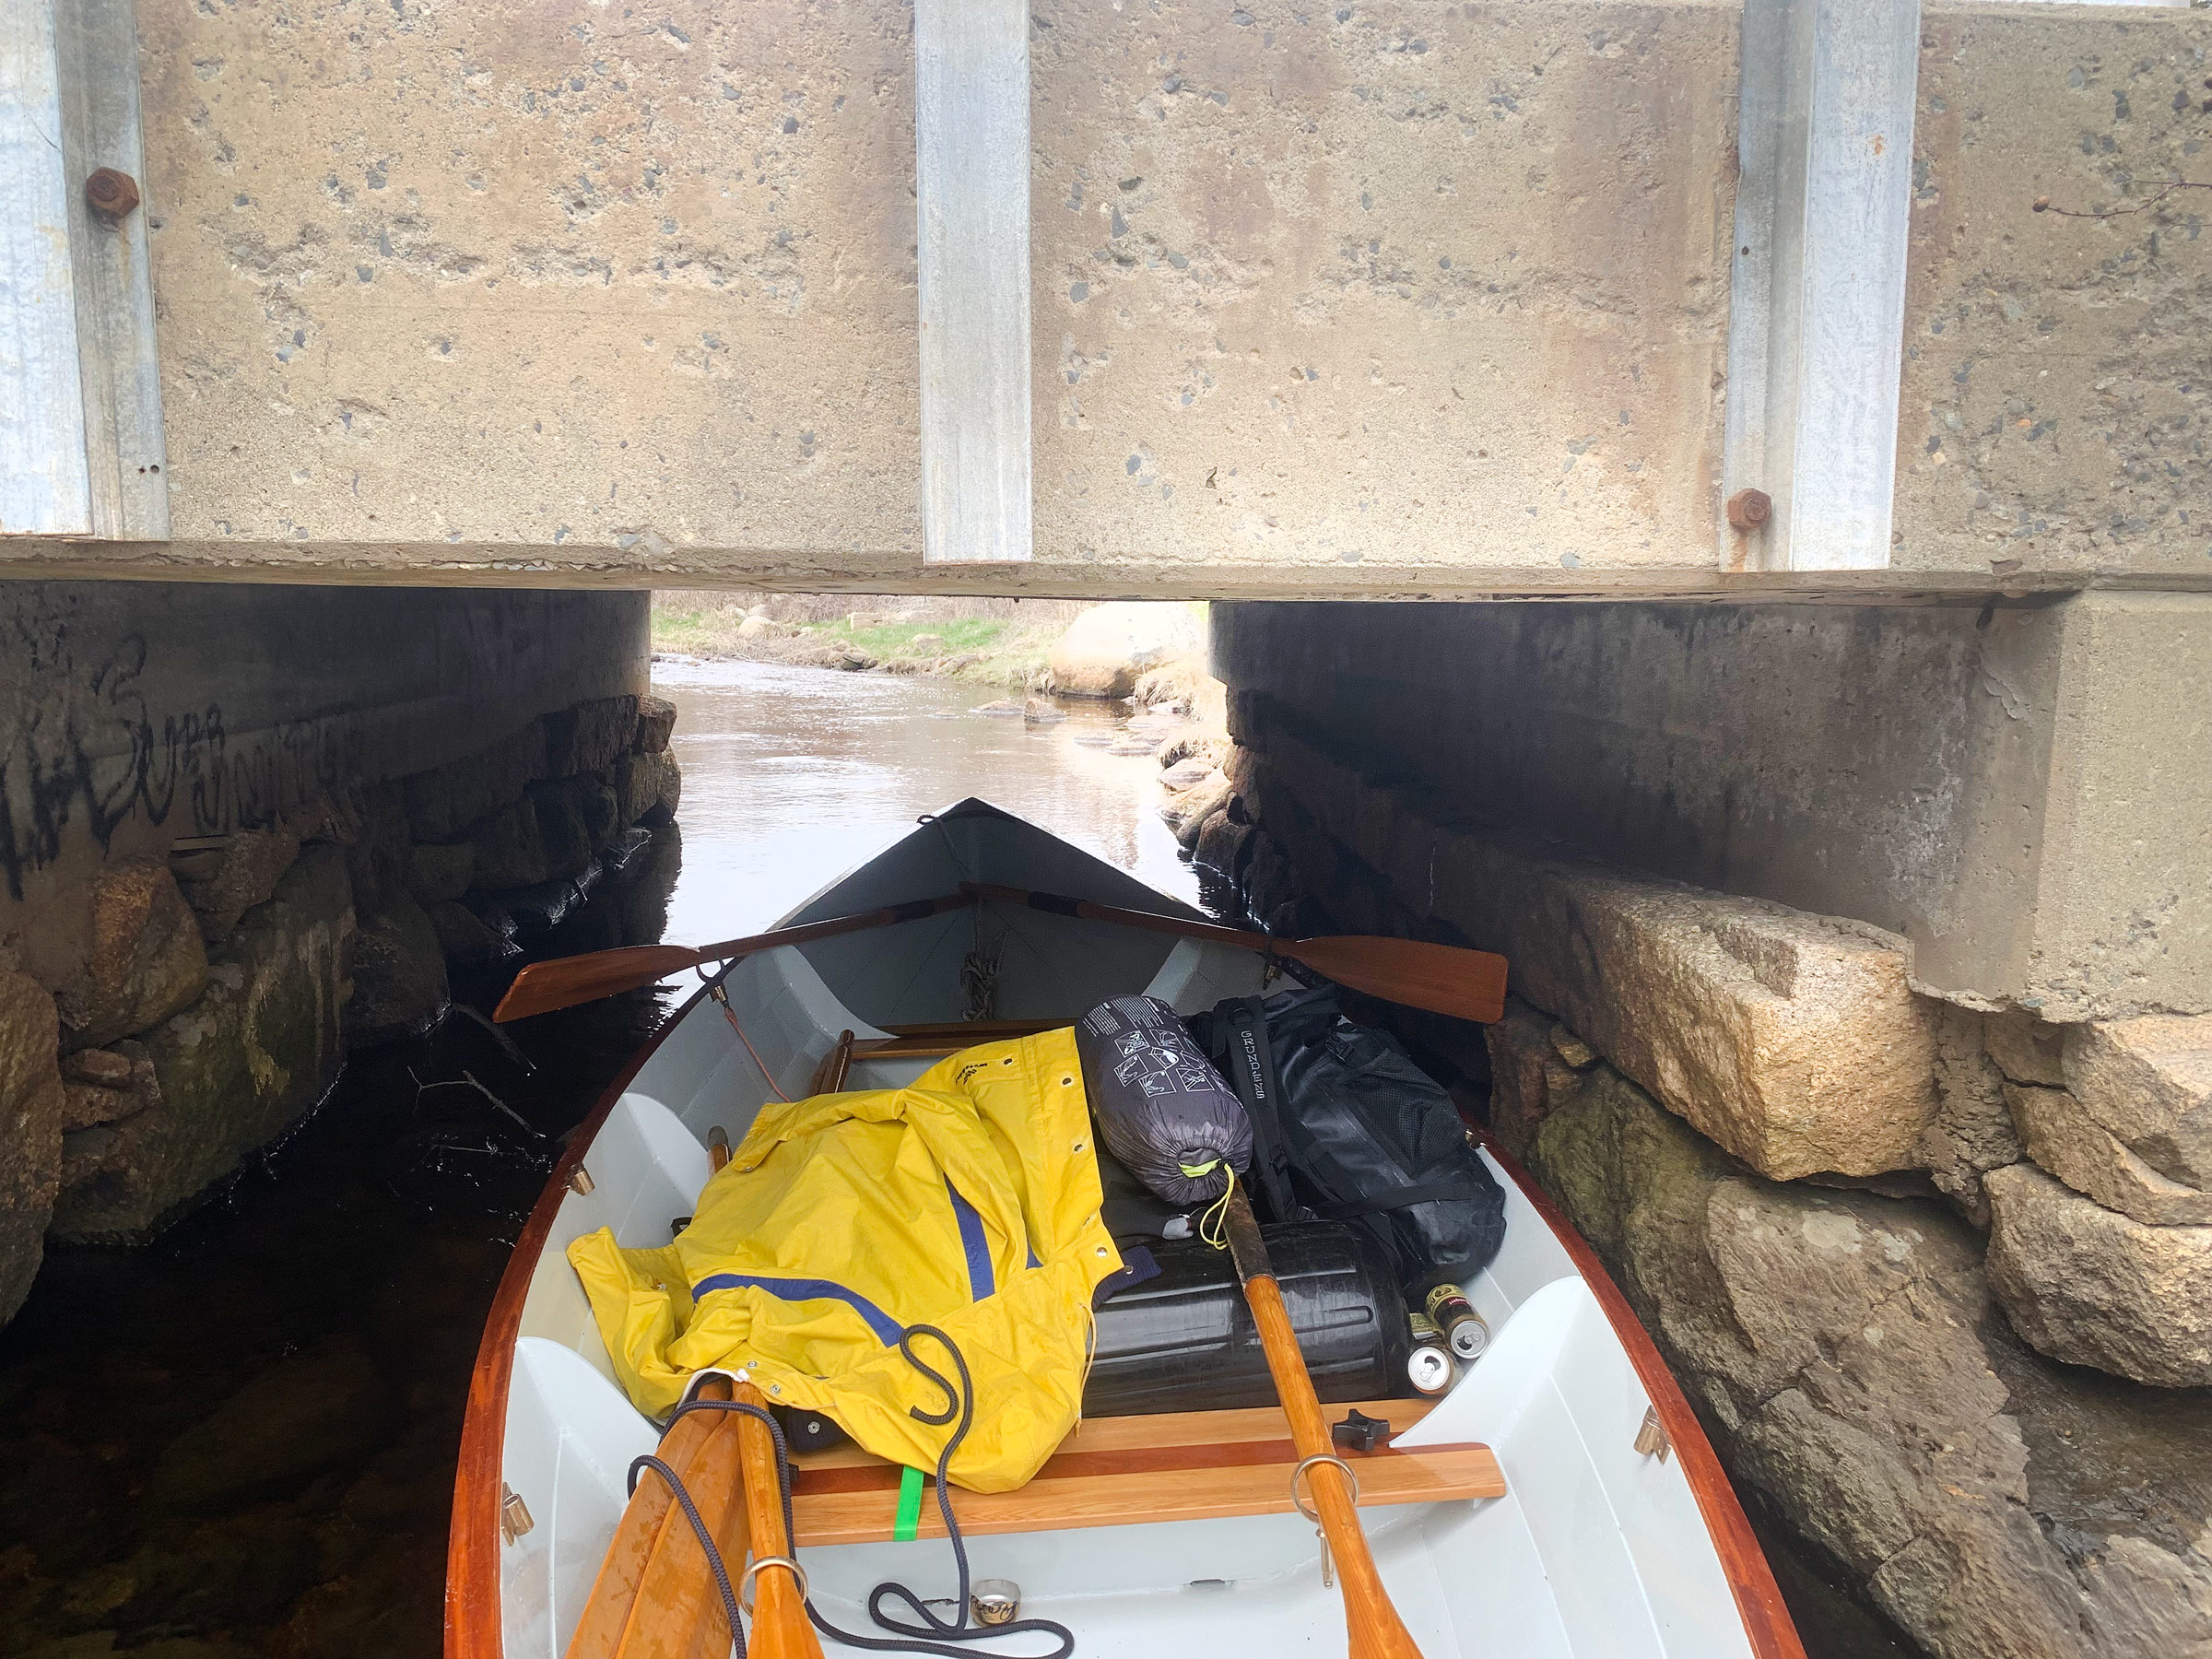
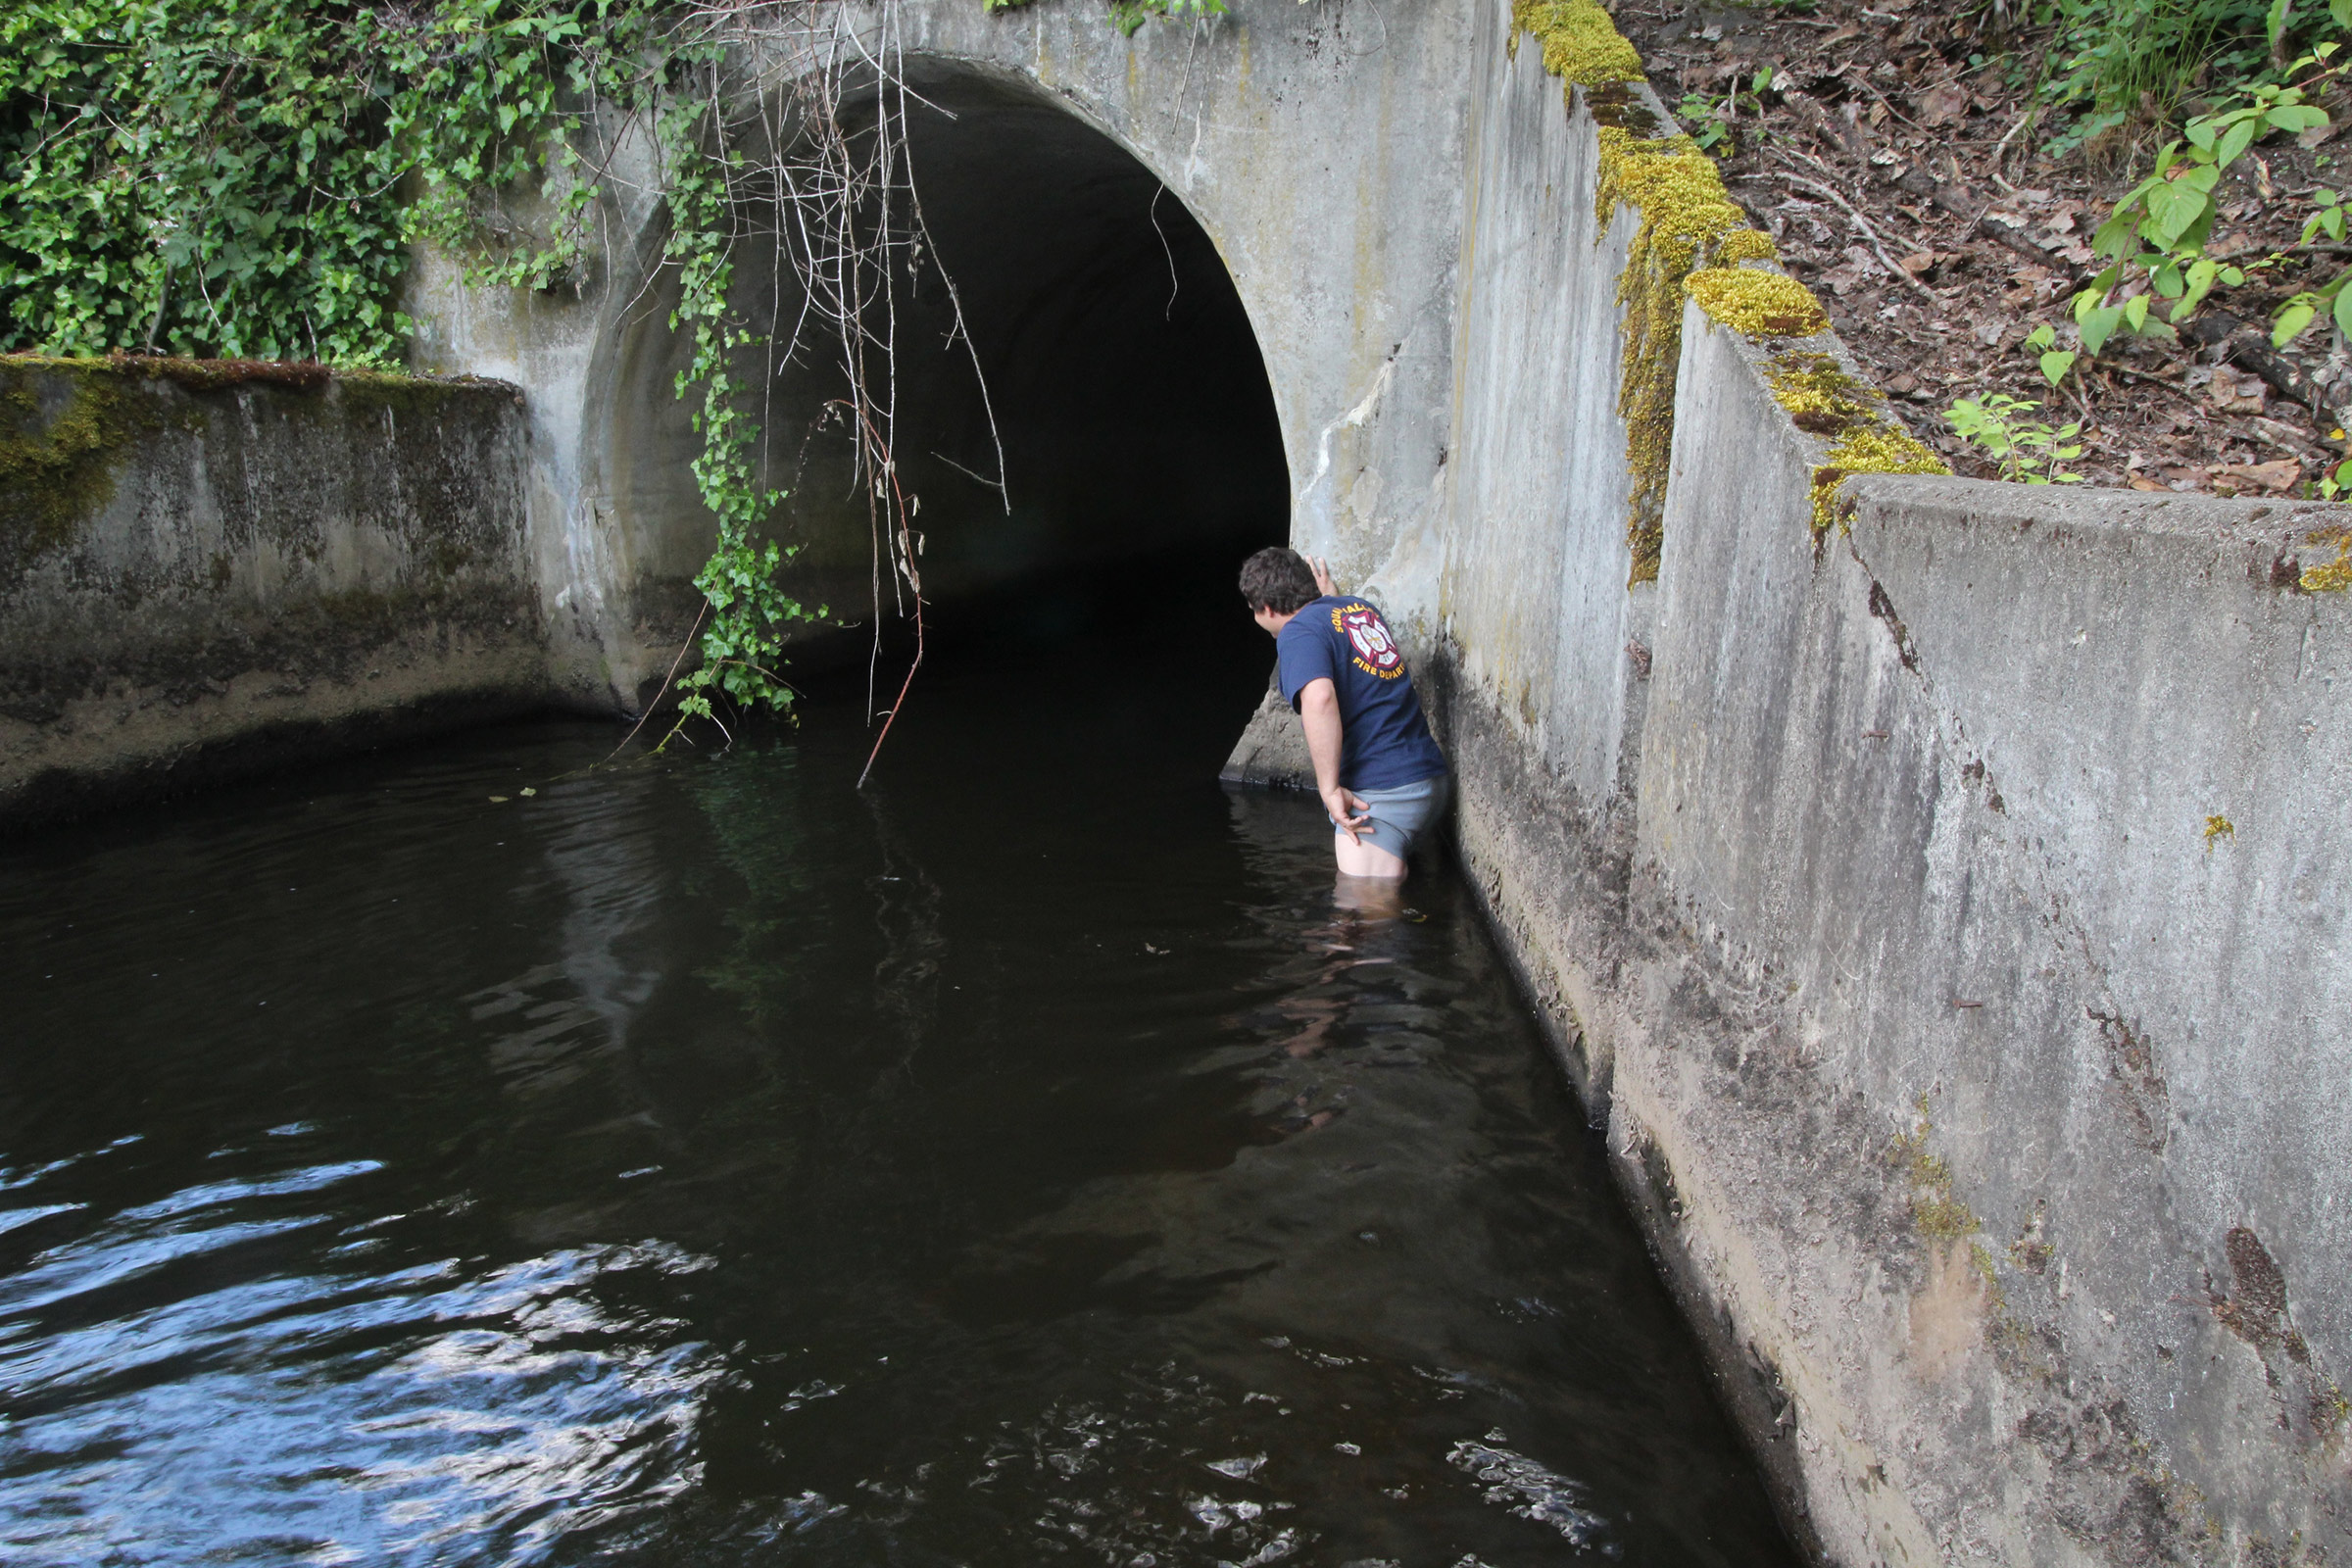
After navigating six bends in 60 yards and crunching the boat on a few submerged rocks, we were at the Hales Hill Road bridge. Its cement slab, supported by stacked rough-hewn stone blocks, spanned an opening just 6′ wide—barely enough room for the boat—and 4′ high, too low for us. The water running through the culvert was more than boot deep. Delaney scrambled up the embankment and crossed the road to the upstream side of the bridge, where she stepped over the metal guardrail, pushed through chest-high raspberry bushes, and poked her head and an arm over the edge above the water, ready to catch the boat. I gave WHISTLER a shove. The boat coasted smoothly upstream through the culvert for a few feet, before veering to port toward the rough-edged wall. Dangling as far out as she could without falling into the stream, Delaney grabbed the breasthook and saved the newly varnished rail from making contact with the rocks.
The water flowing under the Hales Hill bridge was especially deep, so we shoved WHISTLER through unmanned.
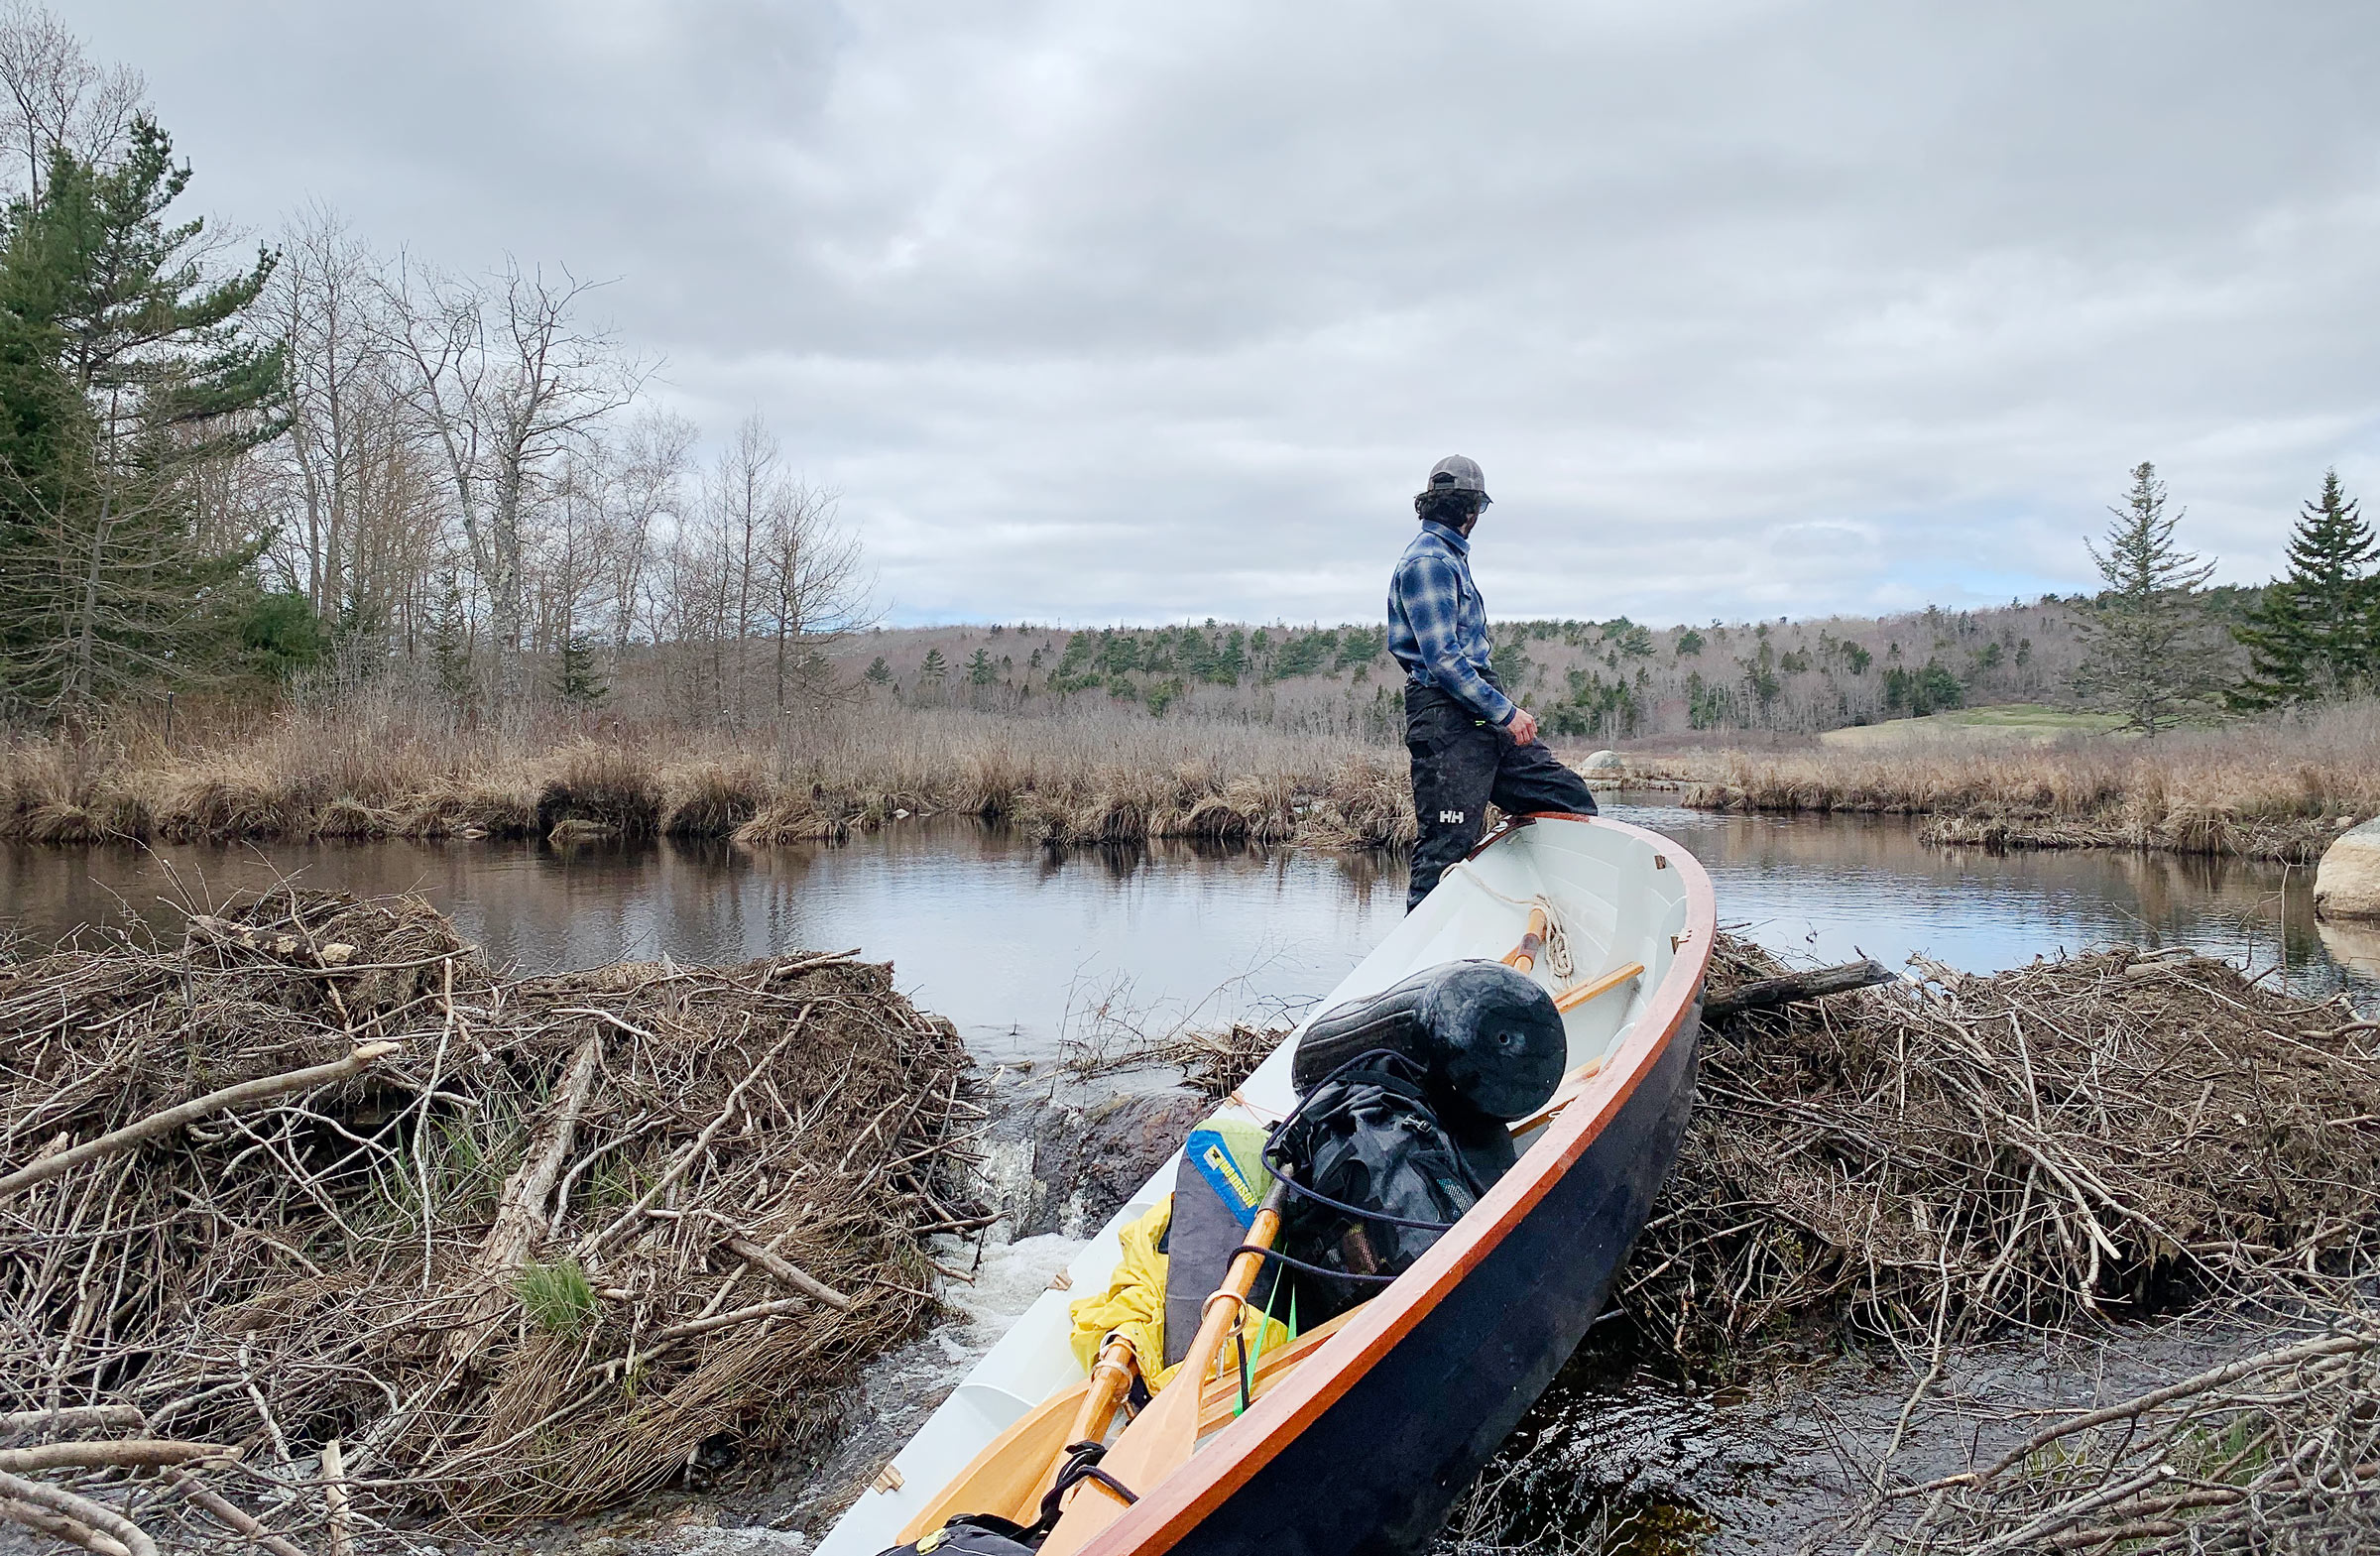
Just 50′ upstream from the bridge, we came to a 3′-high beaver dam of tangled twigs flanked by thick brush. Rounded granite boulders scattered around the dam had tan-colored bands marking the water level when the dam had been about 1′ higher. We had brought two large fenders to use as rollers for just such an obstacle as the dam and deployed them for protection from the rocks. We scooted WHISTLER safely over and into the still, pooled water upstream. Delaney crawled over the transom and stood up forward with an oar in hand, and we paddled canoe fashion up the beaver pond.
The rollers that we brought with us helped us clear the beaver dam with little struggle. Beyond the dam, the water was deep and clear, making the paddling easy.
As the water got shallower, poling became the only way to move forward. Despite the common knowledge that you should never push off the bottom with the blade of an oar for fear of it splitting, the width of the blade proved less susceptible than the handle to sinking into the muck below.
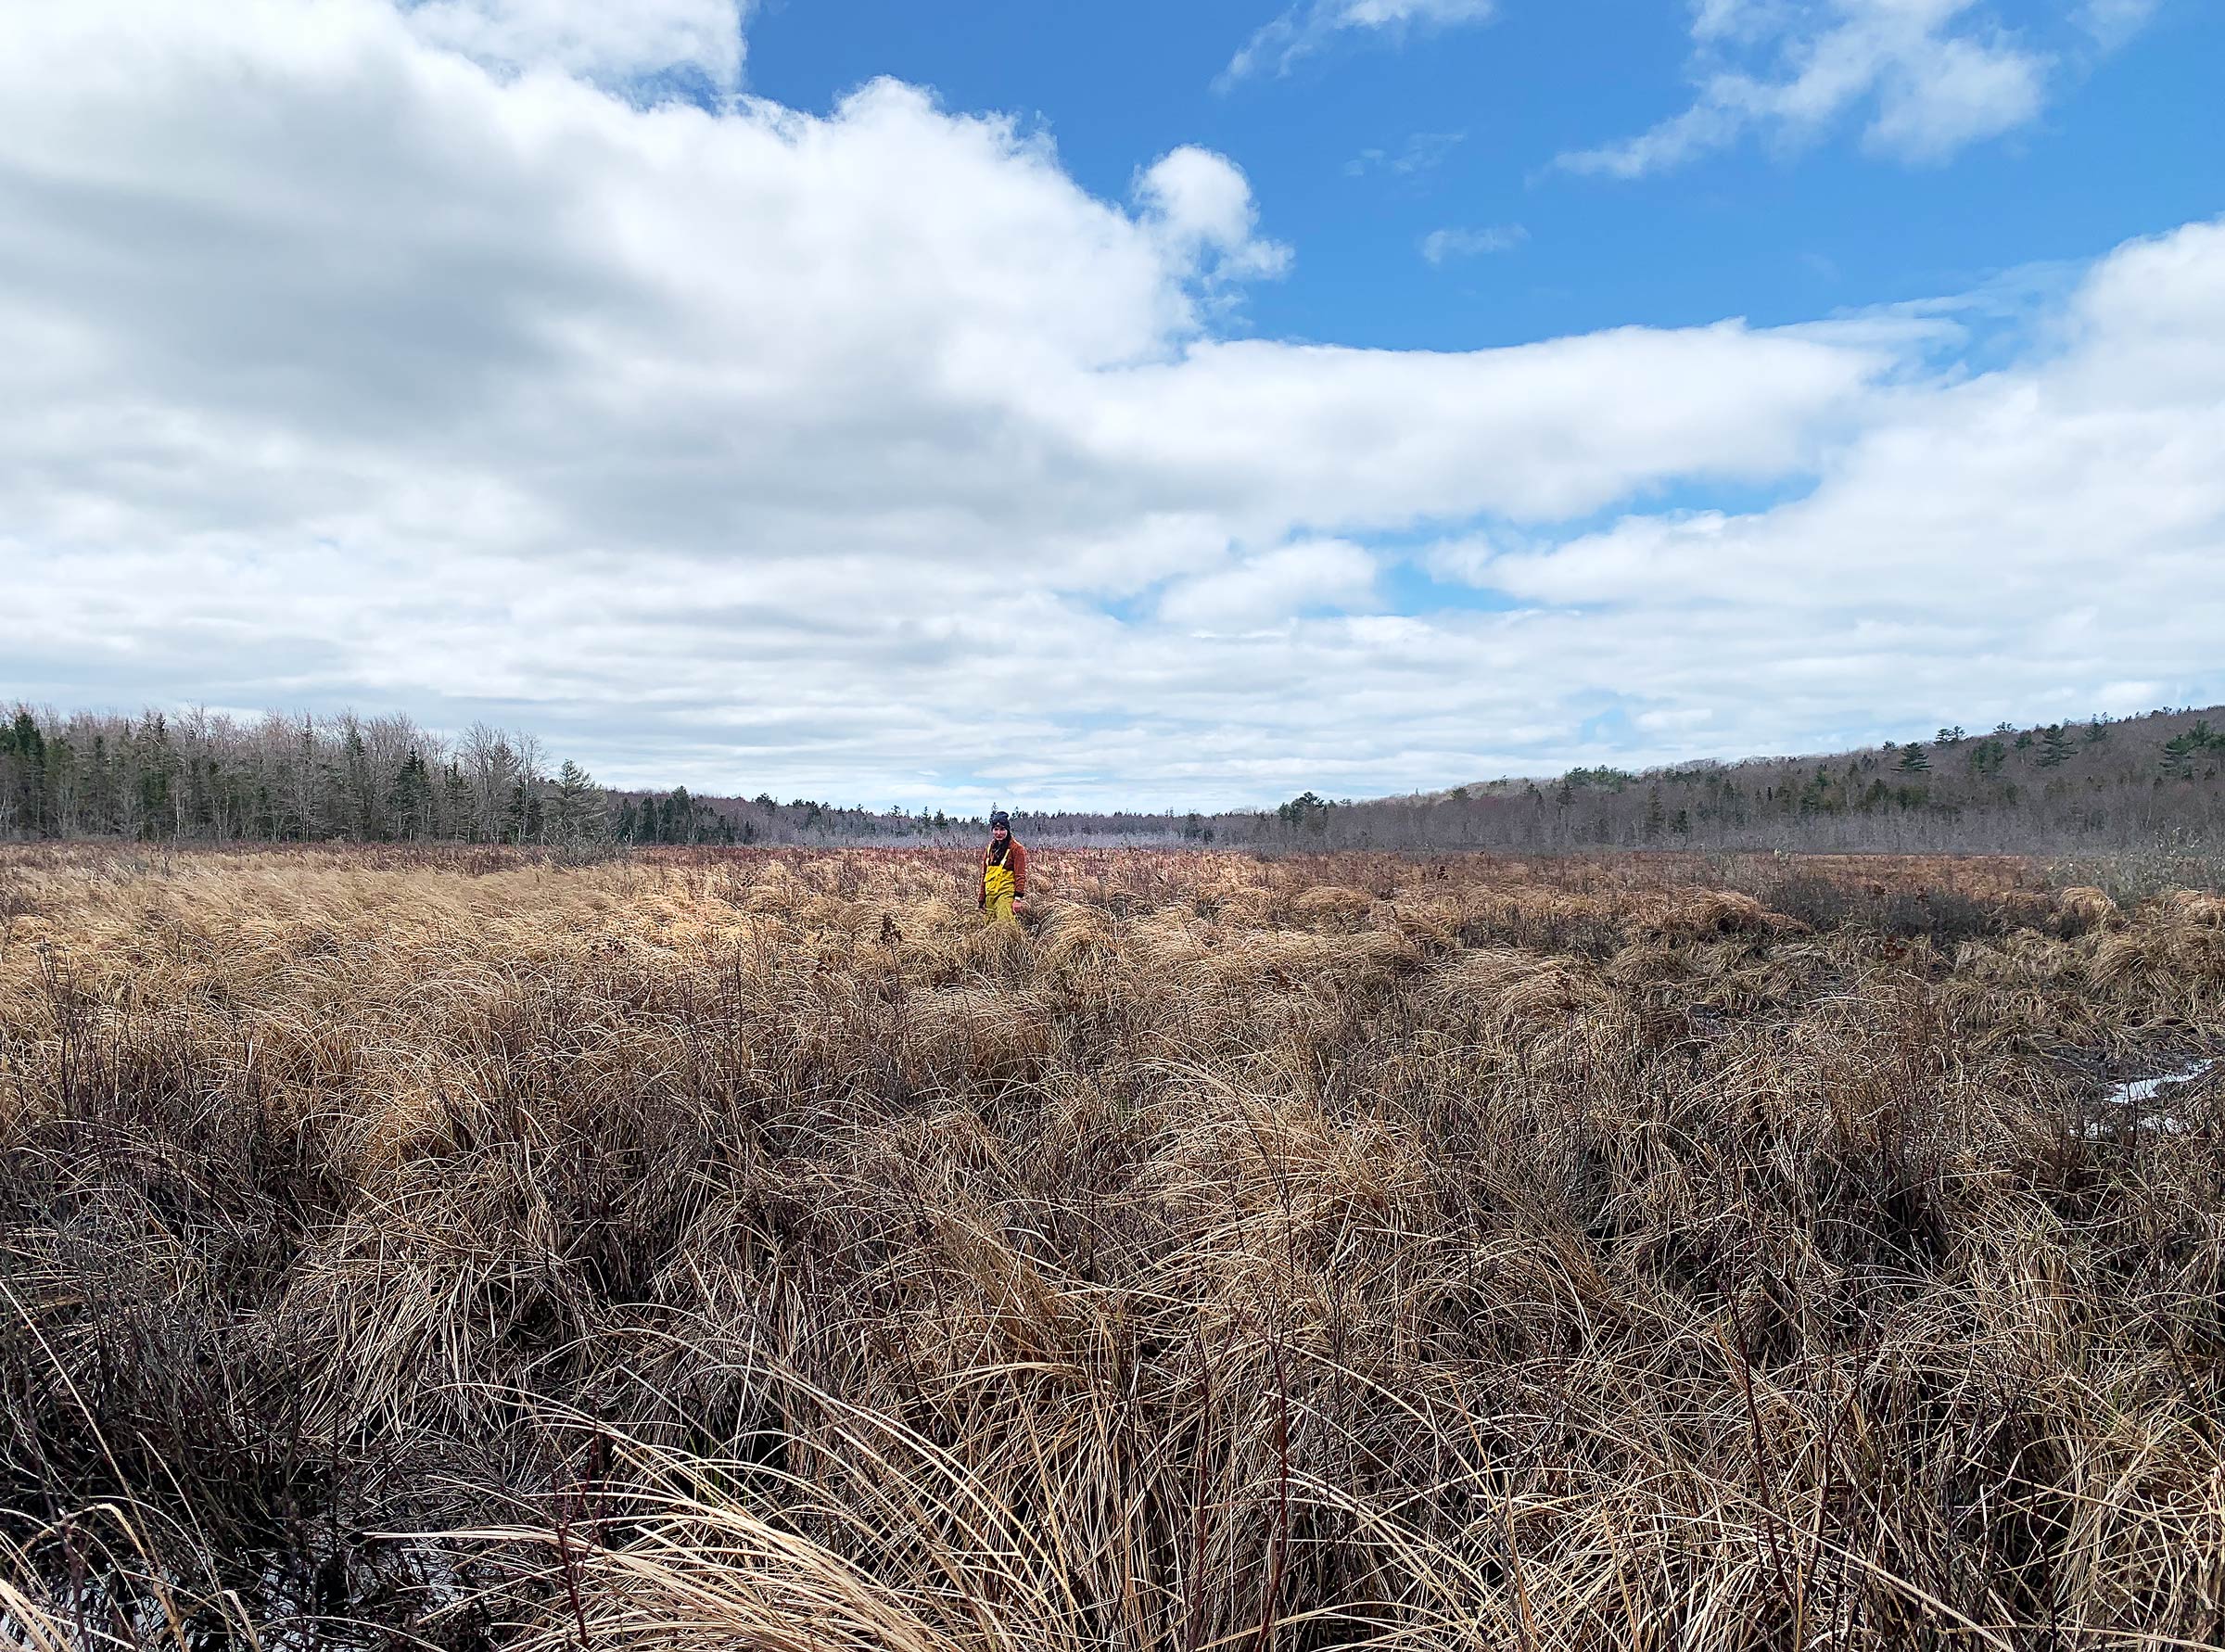
The smooth going was short lived. After only two minutes of paddling, the skeg started to drag in the mud below. We decided the best option was to drag the boat over dry land toward the tree line 1/4 mile away, and Delaney leaped from the bow for the streambank and landed on a tussock of grass. I thought she had made it, but then the tuft sank under her, and she splashed down into knee-deep water with a howl as her boots quickly flooded. She scrambled for firmer ground and eventually found a piece of grass that did not sink immediately. She stood up with a scowl.
I poled the boat a few more feet until the bow was nestled in grass, then gingerly stepped over the rail onto a firm-looking patch of grass. It shifted unsteadily below me. I knew we had to get the boat to firmer footing if we were going to drag it any farther. I braced my feet against two tussocks, grabbed the breasthook, and pulled firmly. The boat lurched forward no more than 1′, and then came to a halt with the screech of dry grass on paint.
From where we had run aground, it was a half mile to where satellite images we’d studied seemed to indicate the portage should have started. Realizing that we clearly were not going to make it to the Benjamin River that day, our new goal was to get the boat to the portage before dark. It was only 12:30, and that seemed like a realistic goal.
Abandoning what was left of the main channel, I began dragging the boat toward the tree line, hopping from one tuft of grass to the next to avoid the deep puddles scattered around them.
Getting ready to schlep the gear to lighten the boat, we took a quick break to feel sorry for ourselves before beginning the first long trudge to the tree line.
I began unloading some of the heaviest items: Delaney’s duffle, the cast-iron skillet, two 1-gallon jugs of water, and my dry bag backpack full of food and camping gear. Delaney worked her way toward me, lifting her legs over the tussocks and pushing through the chest-high grass, falling with almost every other step. Loaded down with gear, we scrambled toward a point in the tree line 1/4 mile away where we would stash everything and eat lunch before coming back for the boat. As soon as we set out, we knew we had made a mistake. What had looked like drier land was in fact just more tufts of grass, surrounded by water. Stepping from one clump to the next, I crushed each tussock down, throwing my balance off and sending me stumbling. Water poured into my boots, and thick mud beneath the water threatened to pull them off. My clothes were damp and sticky and my back prickled with sweat.
In most areas the grass reached Delaney’s chest. As we headed back to the boat after lunch, she gave me a distinctly displeased look amid the expansive grassy landscape.
Delaney, whose legs weren’t long enough to step up on the tussocks, slogged through the mud and water while carrying a gallon jug of water in each hand. Every few steps she fell from one puddle to the next and disappeared behind the tawny grass, but somehow remained smiling. By the time we had made it to the firm, dry ground at the tree line, it was 1:15. The carry with our gear had taken us 45 minutes to traverse a quarter mile, and we hadn’t even brought the boat.
Delaney crawled into the trees leaving a trail of wet socks and spray gear. I pulled a wool blanket out of the duffle and stretched it out on some moss amid the trees, then made BLTs from homemade bread and Delaney’s favorite vegan bacon. Munching on my sandwich, too hungry to care about the fake meat, I looked out over the expanse of undulating golden grass, and my optimism began to increase. “This ain’t too bad after all,” I said, looking at Delaney. She offered a half smile, and I noticed she was shivering in the light early spring breeze blowing through the trees. I scrambled over to my backpack and pulled out the space blanket I had stashed for just such an occasion. She lay down on the wool blanket, I spread the space blanket over her, and tucked the upwind side under the backpack. I curled myself around her back; the shiny silver rustled over our heads. Through chattering teeth, she cheerfully said she would warm up in no time.
Ten minutes later, her shivering hadn’t stopped. “Time to move,” I said. Delaney grumbled but got up and put on her wet spray gear and socks as I packed up our gear and piled it by the edge of the trees. To warm us both up, I set a brisk pace back to the boat; soon we were both sweating again, and once she started cursing again I knew she would be okay. After reaching WHISTLER what seemed like hours later, we sprawled in opposite ends of the boat while we caught our breath. “This may have been one of the worst ideas I’ve ever had,” I said, feeling bad for dragging her on this adventure. “Maybe make the next one an easy trip?” she offered, and we got ready to drag the boat.
It was slow, brutal work. With me pulling and Delaney pushing, we moved the boat only 2′ at a time before it came to a halt or one of us fell into the mire. The sharp bottom edge of the breasthook dug into my hands and the grass under the boat turned from gold to black as it was crushed into the water. Working slowly, we inched toward the tree line, leaving a dark scar through the brush behind us. The effort made my arms burn and left me panting.
A little over an hour later, we made it to the trees. Gasping and saying little, we unpacked the last of the gear and looked for a place to set up the tent. Even though it was only 5:30 and there was plenty of daylight left, this was as far as we were going for the day. We were completely burned out and needed to get out of our wet clothes before we got chilled. We found a flat spot in the trees, and pitched the tent; I crawled inside, lying face down with the warmth of the smooth nylon sleeping bag tempting me to sleep. Delaney joined me, using my back as a pillow and we remained motionless for a while, waiting for our strength to come back so we could make dinner.
At the beginning of the day, while we were launching WHISTLER at the boat ramp, we had met a lobsterman who, after hearing our plan, had invited us to stay on his land if we didn’t make it as far as we hoped. His only direction had been “on the left beyond the bridge at the end of the Salt Pond.” We were unsure if we were in the right spot, but we started gathering wood for a fire, hoping this piece of the woods we had found was on his property.
I kicked loose leaves and grass to the side and made a fire ring of soggy logs, and soon the warmth of the leaping flames provided a welcome relief from the chill of my damp clothes. We heated up dinner, an Indian rice affair, in a cast-iron skillet and scarfed it down as the dark crept in steadily. Fed, watered, and starting to warm, we sat by the fire for hours, socks spread around the flames like fallen flower petals. Around 10 p.m., Delaney did an especially jaw-cracking yawn, so we extinguished the fire and moved into the tent, with the pleasant scent of wood smoke clinging to us like an earthy perfume. In the dark, above the tent’s mesh panels, the sky had cleared to a kaleidoscopic view of stars, and we fell asleep to the sound of spring peepers.
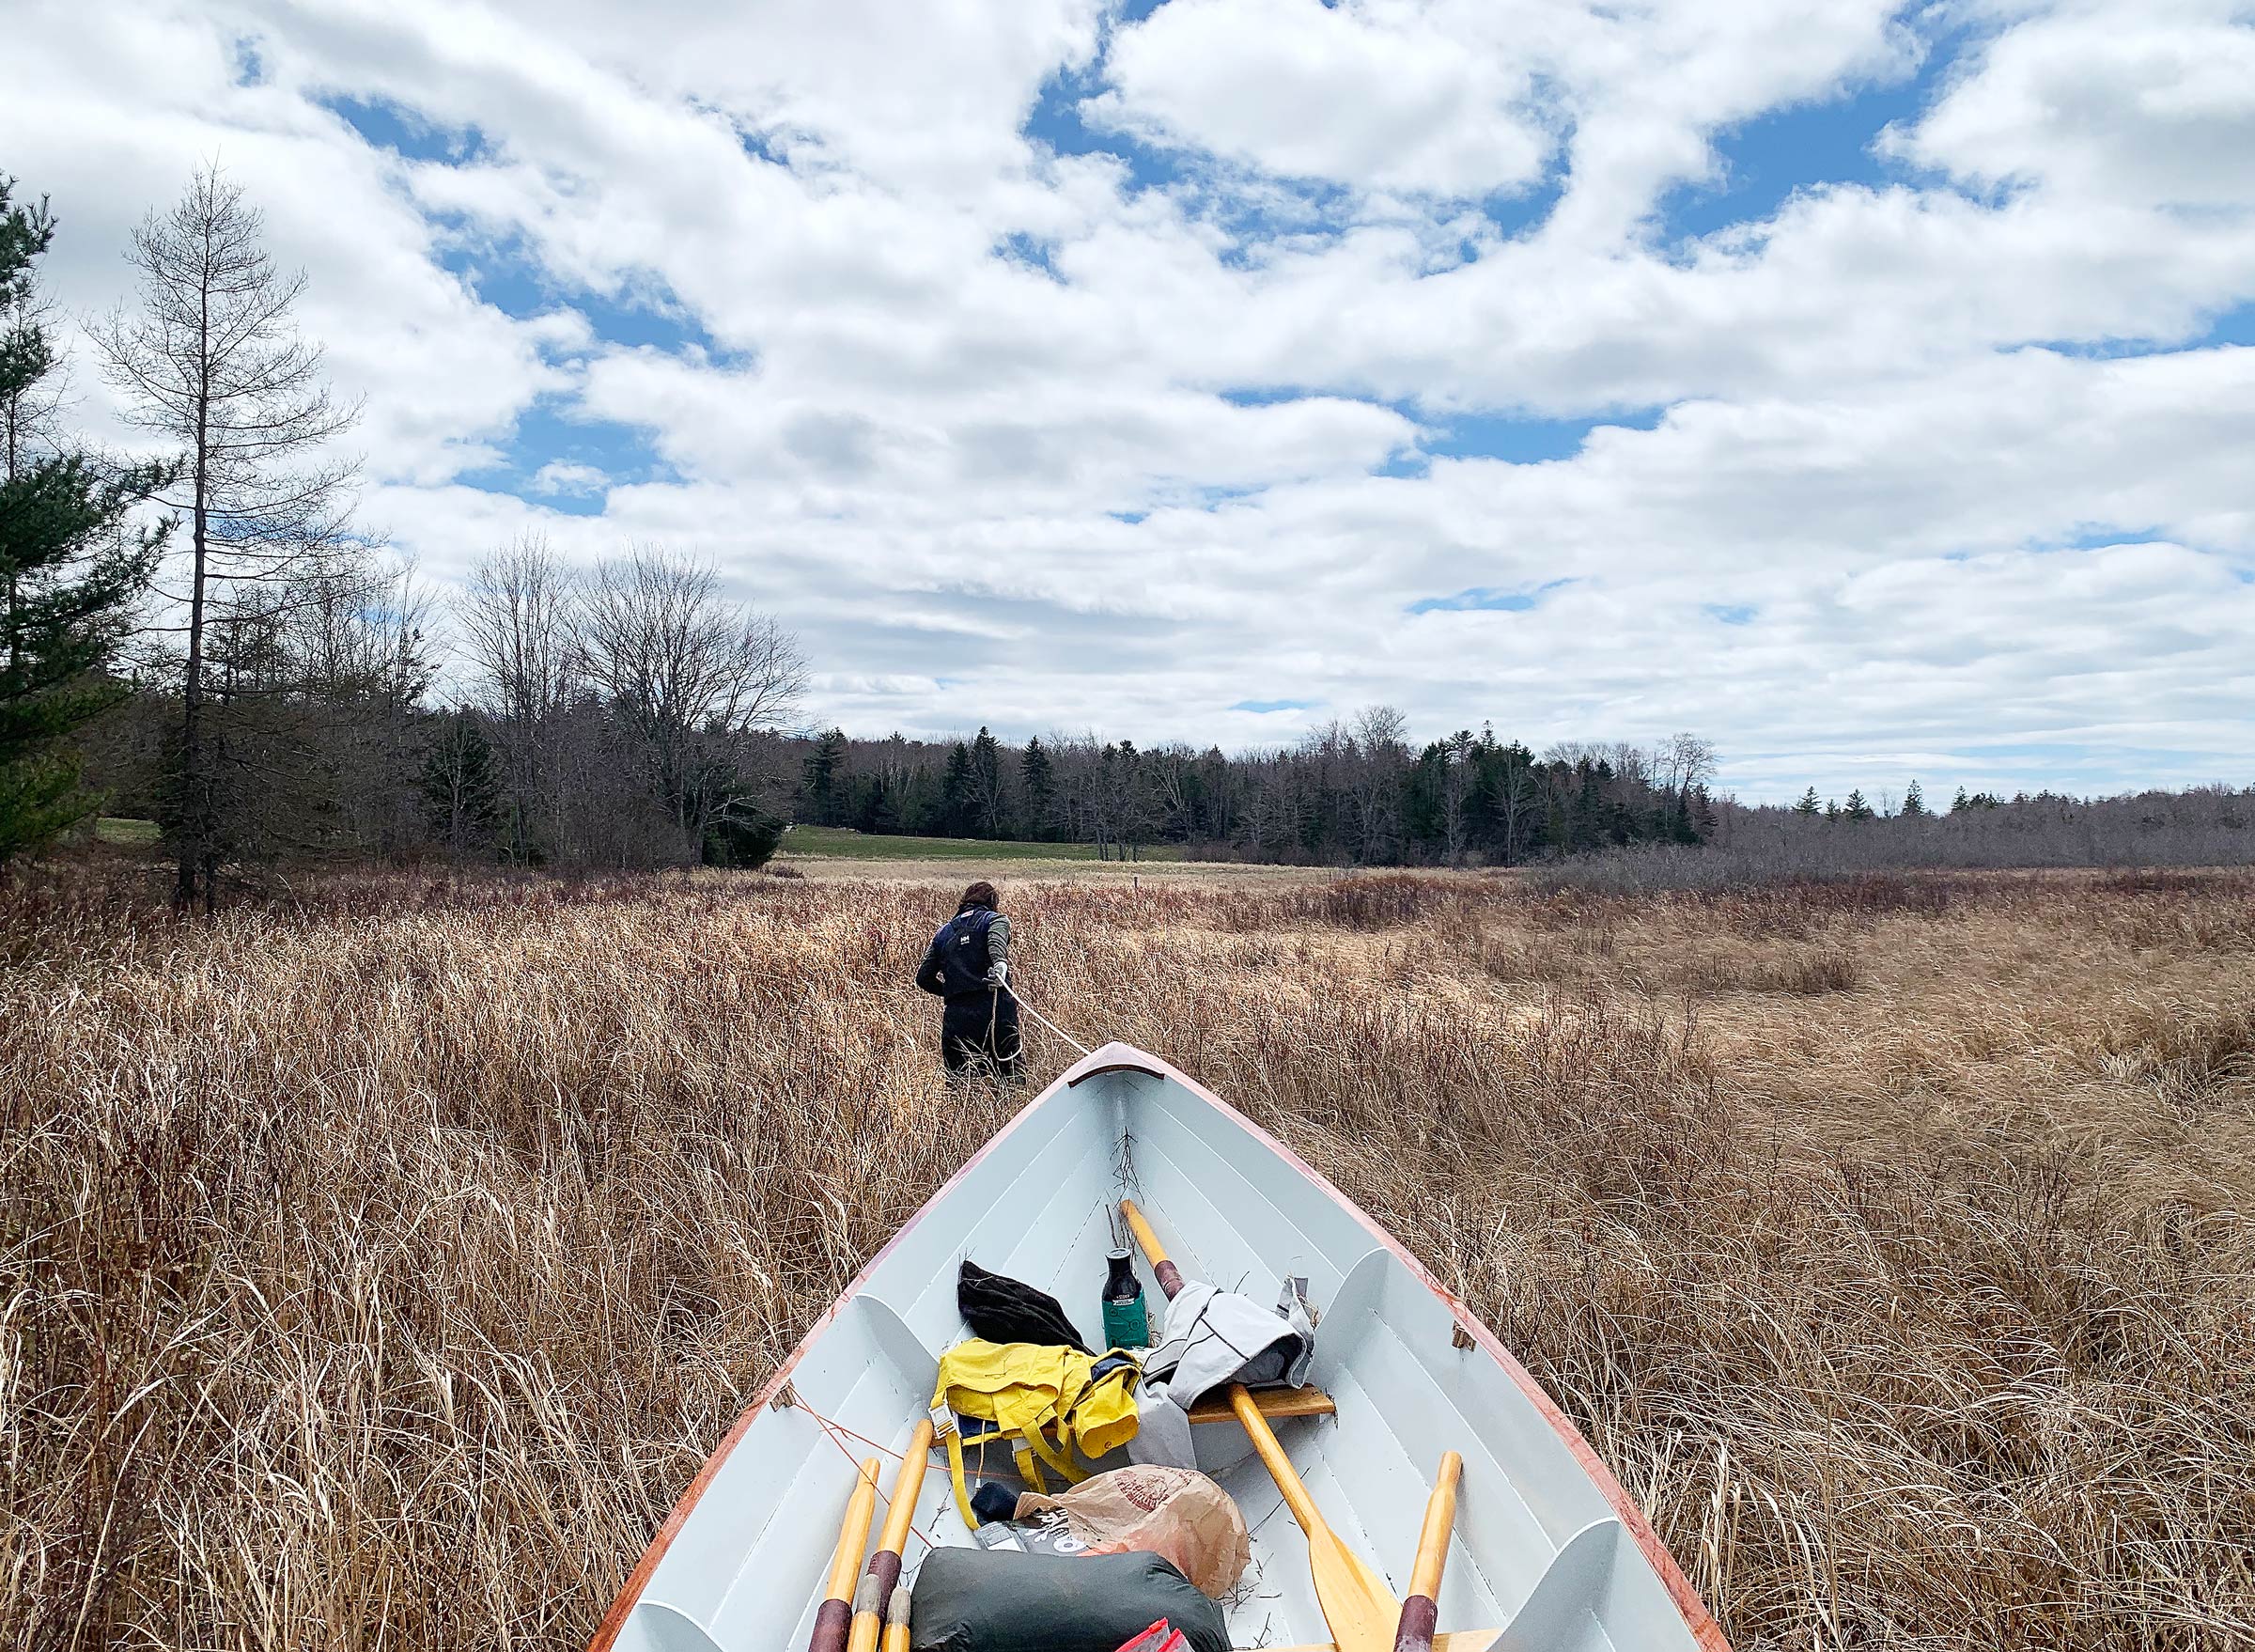
I woke up late the next day, and, gingerly testing my muscles, was surprised to find I hadn’t locked up overnight. The weather began as the day before had with low puffy clouds, with occasional breaks that let the sun through. We packed up and were ready to get underway by 10:30, keenly aware of our dwindling time. Trying something new, we used two fenders as rollers, sticking as close to the tree line as we could where the ground was dry and the going a little easier. Delaney placed the fenders under the bow and pulled while I pushed and threw the fenders forward when they slipped out the back. It was slow going because fenders refused to roll over the hummocks and the dory bottom dragged across them. “Do you think we need these things?” Delaney asked, after half an hour of wrestling with the fenders. We threw them into the boat and dragged it, Delaney leading the bow with the painter while I pushed the stern.
It was a dramatic improvement. Compared to the day before, the sliding was much easier on the dry grass, and we could make it a full 10′ before I ran out of breath and had to take a break. Two hours later, after stopping for a half-hour lunch break in the trees, we had covered a quarter mile. We left the boat next to an abandoned cow pasture and walked up the remaining distance along the edge of the trees to where the portage proper should have started. It wasn’t good. Branches were tangled together in a thick wall and the trees were clustered close together; while a portage was definitely possible with a canoe or kayak, WHISTLER was far too wide to squeeze though. Our options were to go back the way we came, or try to cut up over to River Road, a quarter mile to the southeast.
Delaney led WHISTLER like a recalcitrant mule toward the cow pasture. As the ground evened out, it became easier to move the boat without the rollers and rely on strength and stubbornness.
Since retreating over the difficult ground we’d already covered was not an option—we had run out of time—we walked up the cow pasture toward the road, hoping to find a house with someone friendly enough to let us bring our car to pick up the dory. Walking up a gravel access road off one of the pastures, we strolled past a spent 12-gauge shotgun shell on the ground. Apparently, this was an unusual sight for a Florida girl, and Delaney grabbed my arm. “We’re going to get shot!” she said. “Relax,” I replied, “Most people at least have the courtesy to ask who you are before they shoot you.”
We crossed River Road and walked up to a farmhouse perched on the top of a hill, where a couple in their mid-forties were more than happy to help, insisting we have a drink of water before giving us a ride to our car.
Delaney and I drove back to the cow pasture and threw gear into the car. When we rolled WHISTLER over to lift her onto the roof rack, twigs and grass poured out. The bottom of the boat was scarred where rocks had cut through the epoxy, graphite, and fiberglass, and the topside paint had long pale streaks from brush dragging along the side.
After securing permission from the property owners to bring our car to their field, we faced the last challenge of the trip: hoisting the 100-lb dory onto the roof rack. Delaney apologized to WHISTLER for the rough treatment. At the beginning of this adventure, the hull didn’t have a scratch on it.
We had done only about 6 of the 26 miles of the circumnavigation of the Blue Hill Peninsula we’d set out to do, but we’d had more than our fair share of adventure. We might have made the whole loop if we’d had more time, or a more friendly weather forecast. We had underestimated the difficulty of hauling a 17′ dory to an ancient and inaccessible portage, and if we had done a little more reconnaissance, we might’ve known what we were getting into. But we had made an attempt, and managed to have a good time and keep each other going even while doing something that couldn’t be done.
Tom Conlogue is a former WoodenBoat School waterfront staff member who is currently feeding a crippling boat addiction as a student at Maine Maritime Academy. He can usually be found near some patch of water messing about in small boats.
If you have an interesting story to tell about your adventures with a small boat, please email us a brief outline and a few photos.
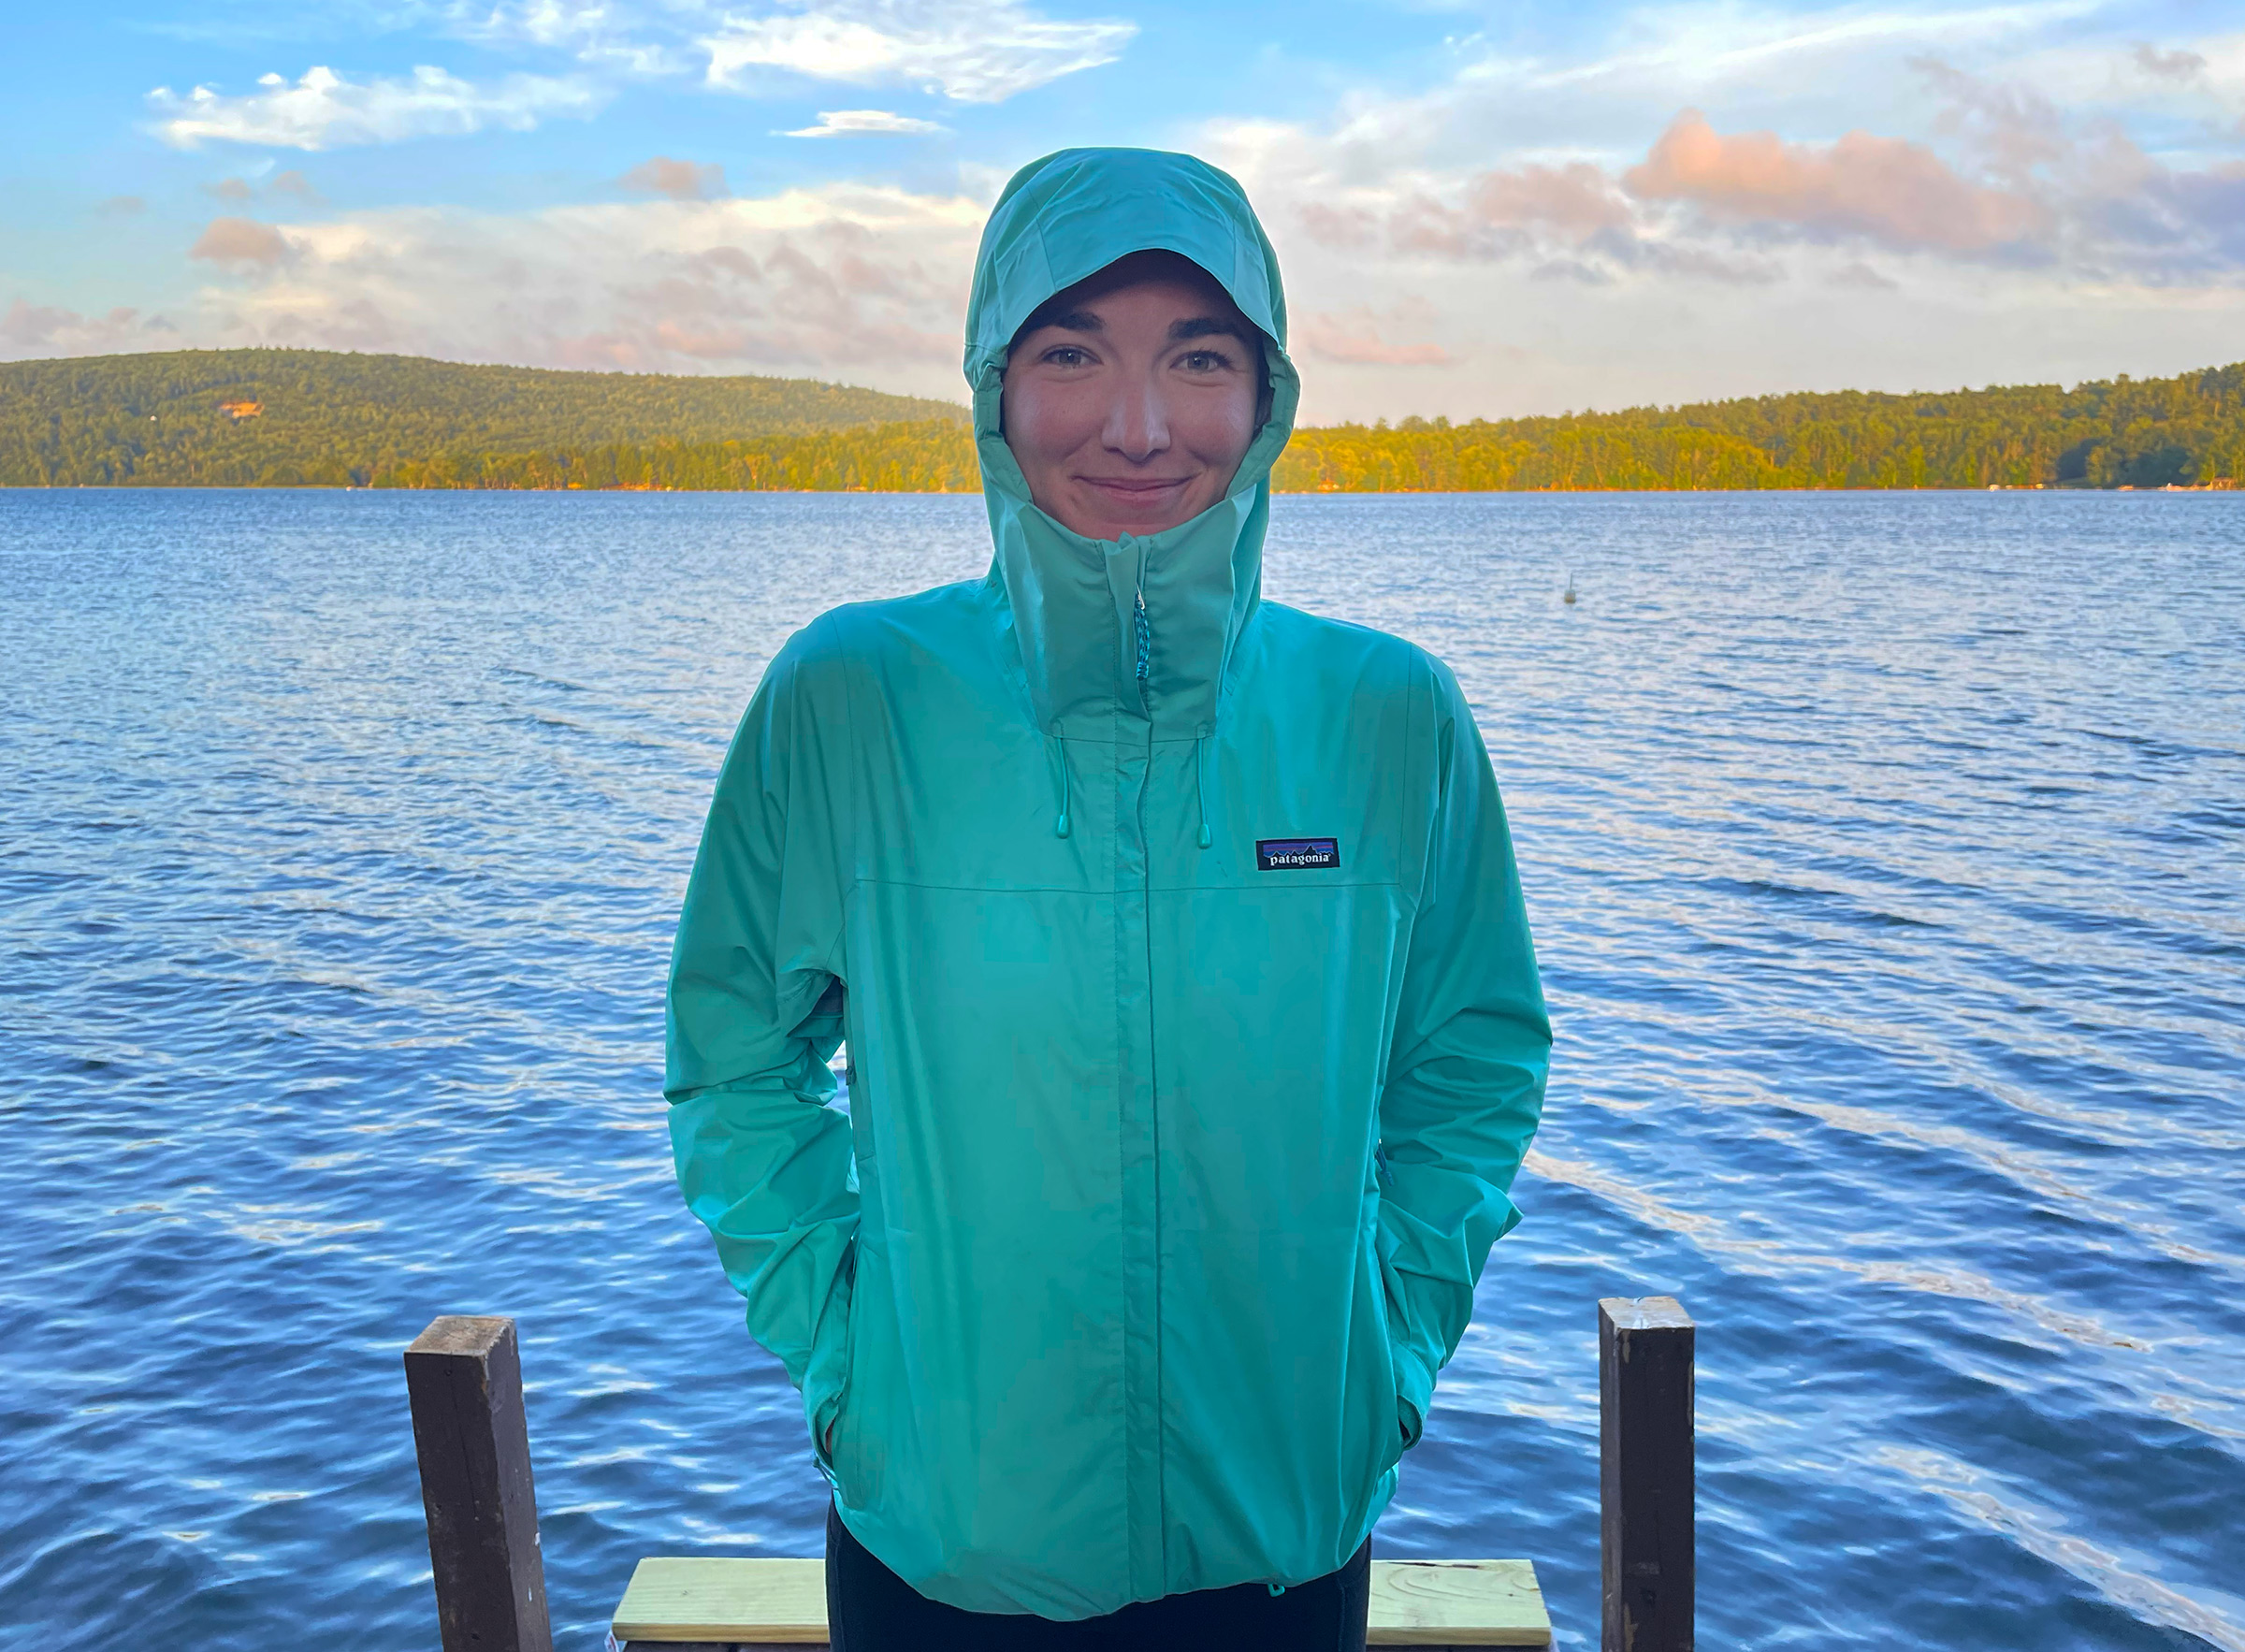
The Patagonia Torrentshell 3L Jacket is a rugged three-layer rain jacket that’s waterproof enough to keep you dry yet breathable enough to provide all-day comfort. The jacket meets Patagonia’s H2No performance standard which tests their proprietary materials and subsequent product on four criteria: waterproofness, breathability, surface repellency, and durability. I’ve now worn this jacket doing a variety of activities in a variety of weather—windy daysailing in coastal Maine, paddleboarding in the Teton Mountains during sun showers, and hiking up shrubby trails in New England’s summer humidity—and have been impressed with its performance and comfort in every condition.
Photos by Tom Conlogue
The Patagonia Torrentshell 3L zips easily in the front and the zipper-garage chin guard prevents painful snags.
The most important considerations for any rain jacket are how well it keeps water out for an extended period and how comfortably it’s able to do so. The Torrentshell 3L is made with a 3.3-oz nylon ripstop face, a polycarbonate polyurethane membrane, and tricot backer and finished with a durable water-repellant (DWR) coating. Many rain jackets are made of just a ripstop outer surface with an internal membrane which can cause clamminess and stickiness. The addition of the tricot backer, a woven nylon inner fabric, helps wick moisture from the body, and I’ve found it to be very effective in this jacket.
When you zip on the jacket, it’s easy to appreciate the attention to detail. The front central zipper has external and internal flaps that prevent leaks. The two-way-adjustable hood has a laminated visor that’s rigid enough to hold its shape in a downpour, which keeps the hood from drooping and drenching your face. The entire hood rolls down and stows with a simplified cord-and-hook design. The sleeve cuffs have Velcro straps to pull the fabric tight to help keep water out and heat in. The two front zippered pockets have an additional layer of insulating polyester stitched in, which helps to warm chilled fingers. When the jacket needs to be packed, it can be stuffed into one of those pockets. And perhaps my personal favorite feature: the 6″-long “pit zips” which can ventilate the area from the lower armpit to mid upper arm. The placement lets air circulate and yet keeps rain out. After wearing other, non-ventilated rain jackets, especially on hot rainy rays in the American South, I can enthusiastically say how luxurious these zippers are.
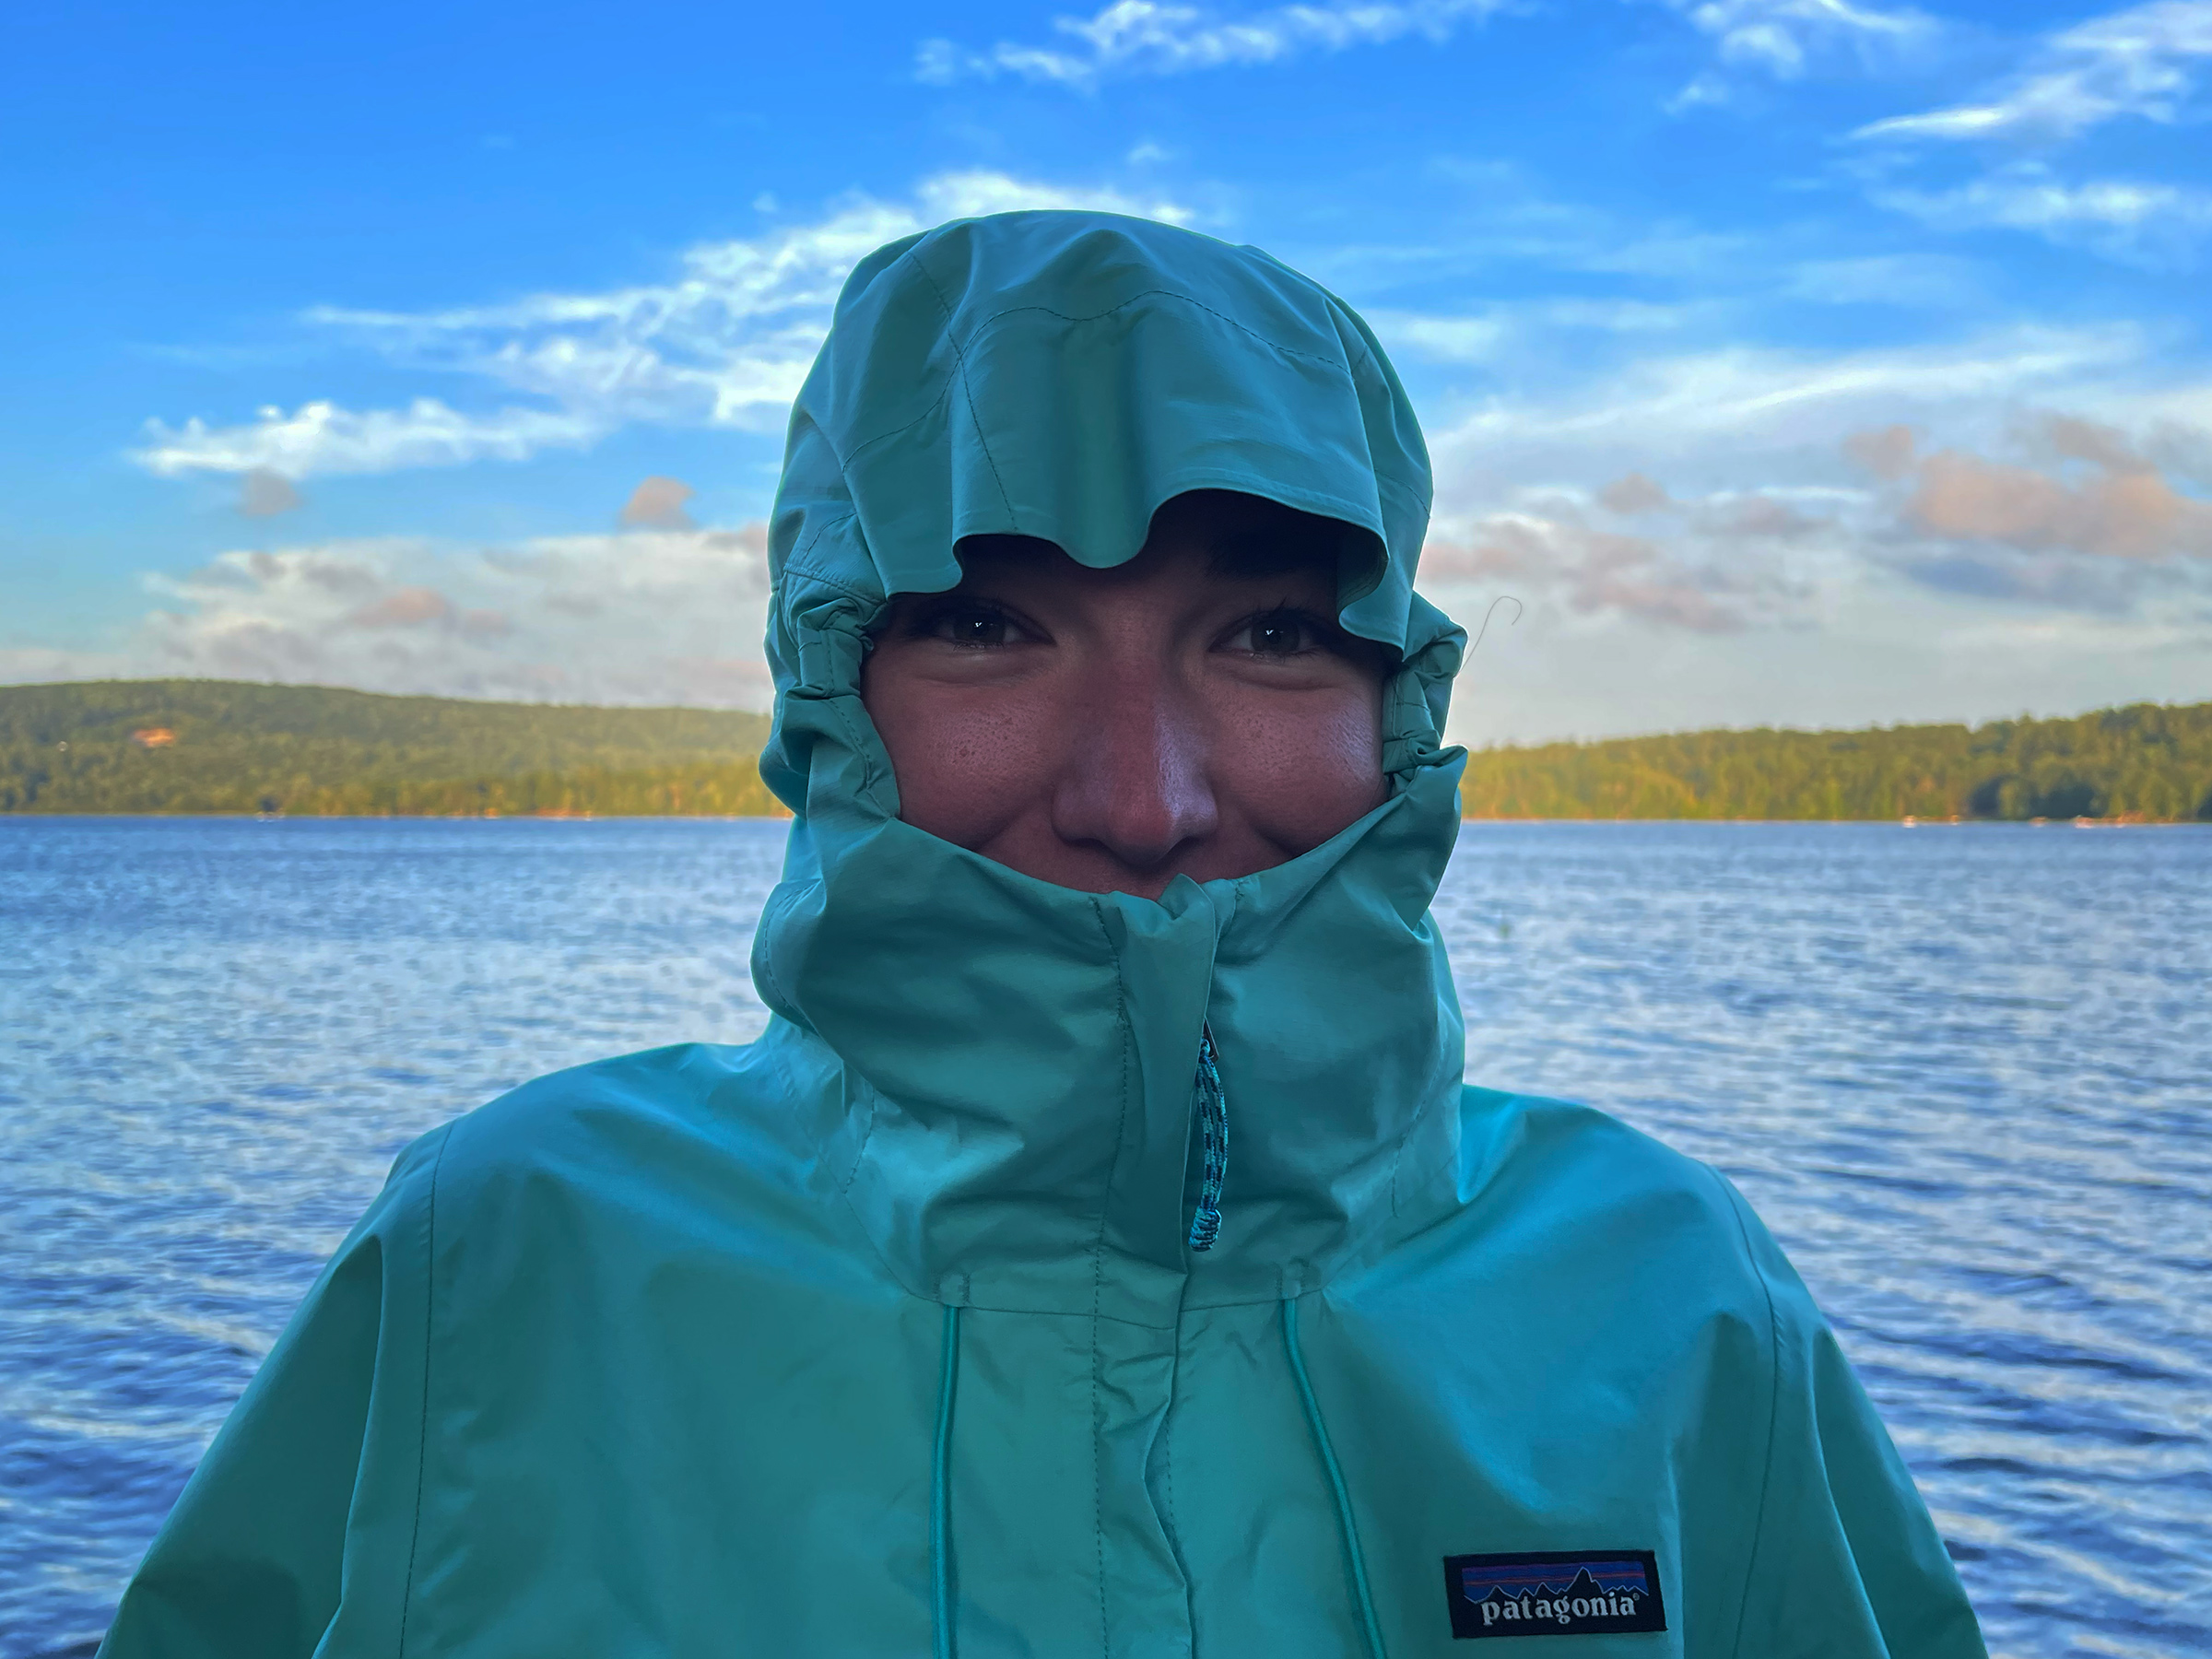
In a real downpour the jacket’s adjustable features make staying dry easy. Drawstrings on the front collar of the jacket cinch the hood’s height while a drawcord on the back of the head adjusts the visor.
The Torrentshell has a loose enough fit in the upper arms, elbows, and torso to accommodate a moderate mid-layer on days when there’s a nip in the air, without feeling oversized and baggy while worn with a thin base layer. While I found the jacket to be comfortable as it was, what really impressed me was just how adjustable it is. A drawcord hem can cinch the bottom of the jacket for a snugger fit. There are also two drawcords on the front of the jacket that can tighten the hood to your face to prevent spray or rain from leaking down the neck, and another drawcord on the back of the hood that pulls the visor back to keep it from obstructing your vision. With all the handily accessible adjustments, I can easily tailor the jacket for whatever conditions I’m in on a given day. When it’s time to pack the jacket, it stuffs into one of the front pockets.
The hood can folded down and secured with a hook when wearing the jacket as a windbreaker.
A noteworthy side benefit to the Torrentshell is Patagonia’s commitment to environmentally friendly materials. Though no new article of clothing can currently ever be truly “green,” the company places a heavy emphasis on using recycled materials in its product line. The Torrentshell 3L is made of 100% recycled materials. I also appreciate the company’s “Ironclad Guarantee,” which is a lifetime warranty. Reusing worn material will always generate less carbon than producing new items, so Patagonia will repair damaged items or re-recycle the material in return for store credit.
Delaney Brown is the associate editor of WoodenBoat.
The Torrentshell 3L Jacket for men and for women is available from Patagonia for $149. Sizes range from S to 3XL for men and from XXS to XXL for women.
Is there a product that might be useful for boatbuilding, cruising, or shoreside camping that you’d like us to review? Please email your suggestions.
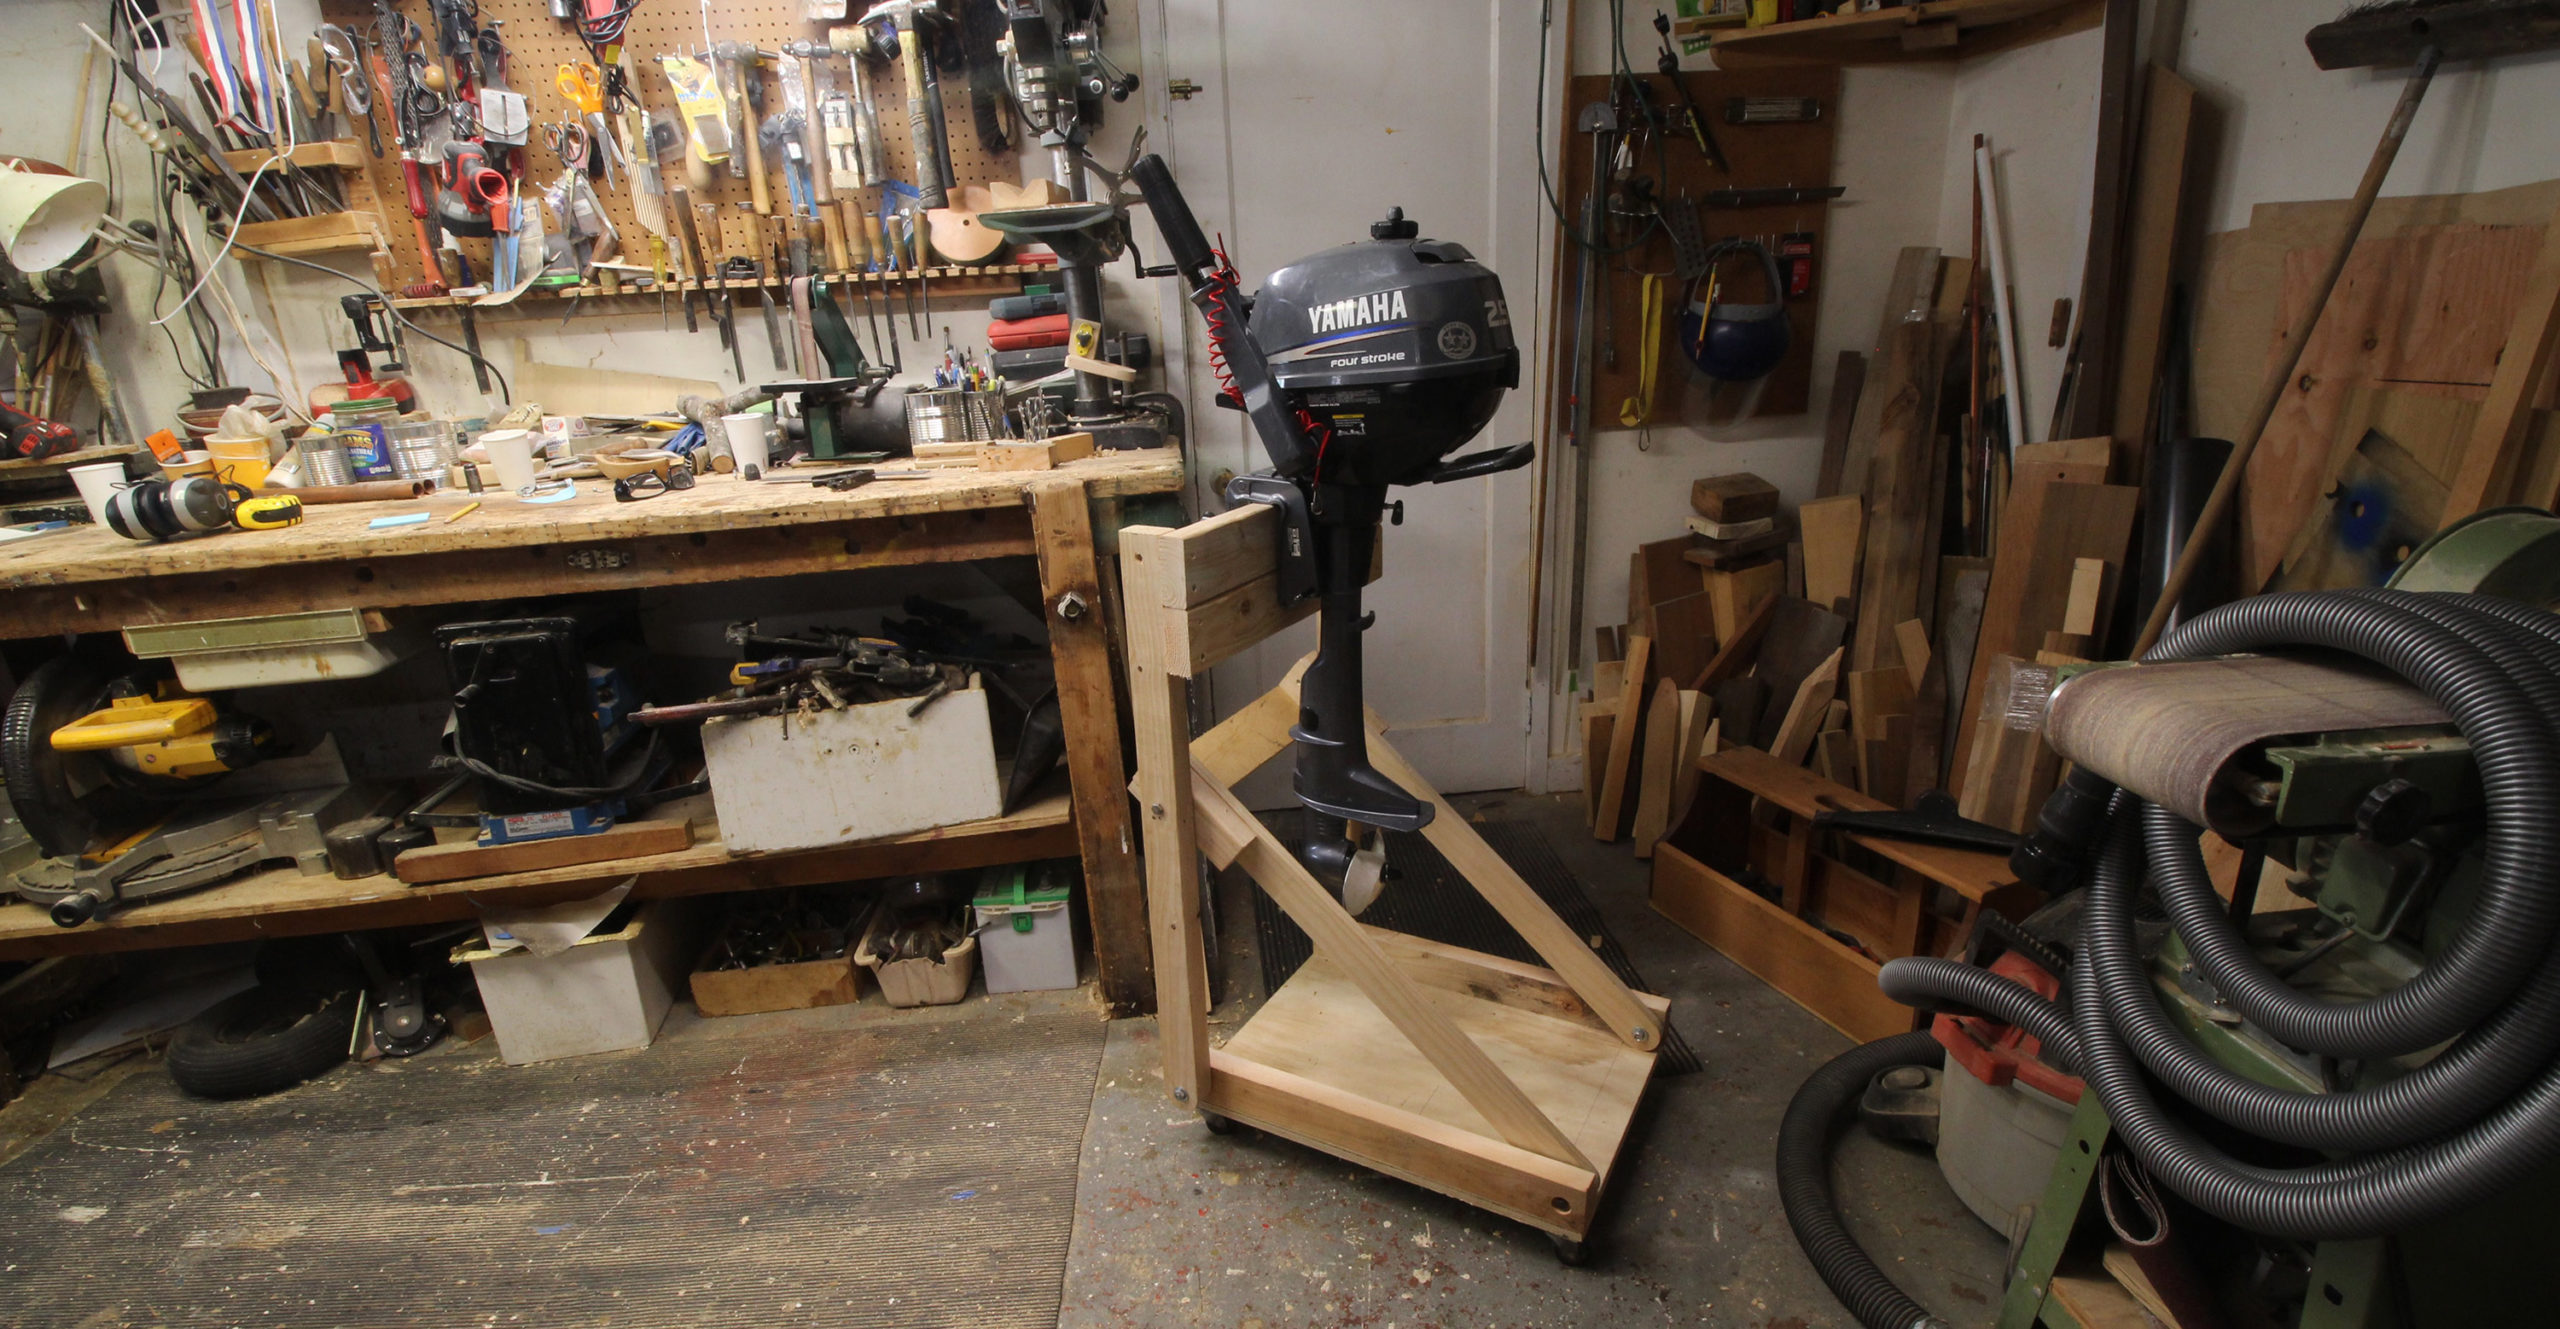
Seems like every time I go boating, I need to carry a lot of stuff. Whether it is an afternoon on the river in a dory, a weekend in a kayak, or perhaps several days on a camp-cruise, the boat needs to get loaded, and I usually need to carry it all on foot and by hand.
For a day trip in the dory or my sailing skiff the gear can include the radio, GPS, chart, compass, flares, foulweather gear, sunblock, lunch, water, first-aid kit, some tools, binoculars, and perhaps an extra sweater, a seat cushion, or oar-leather tallow. For a kayak or multiday camp-cruise, there will be dry bags with food, cooking gear, extra clothing, and shelter.
Marti Wolfe
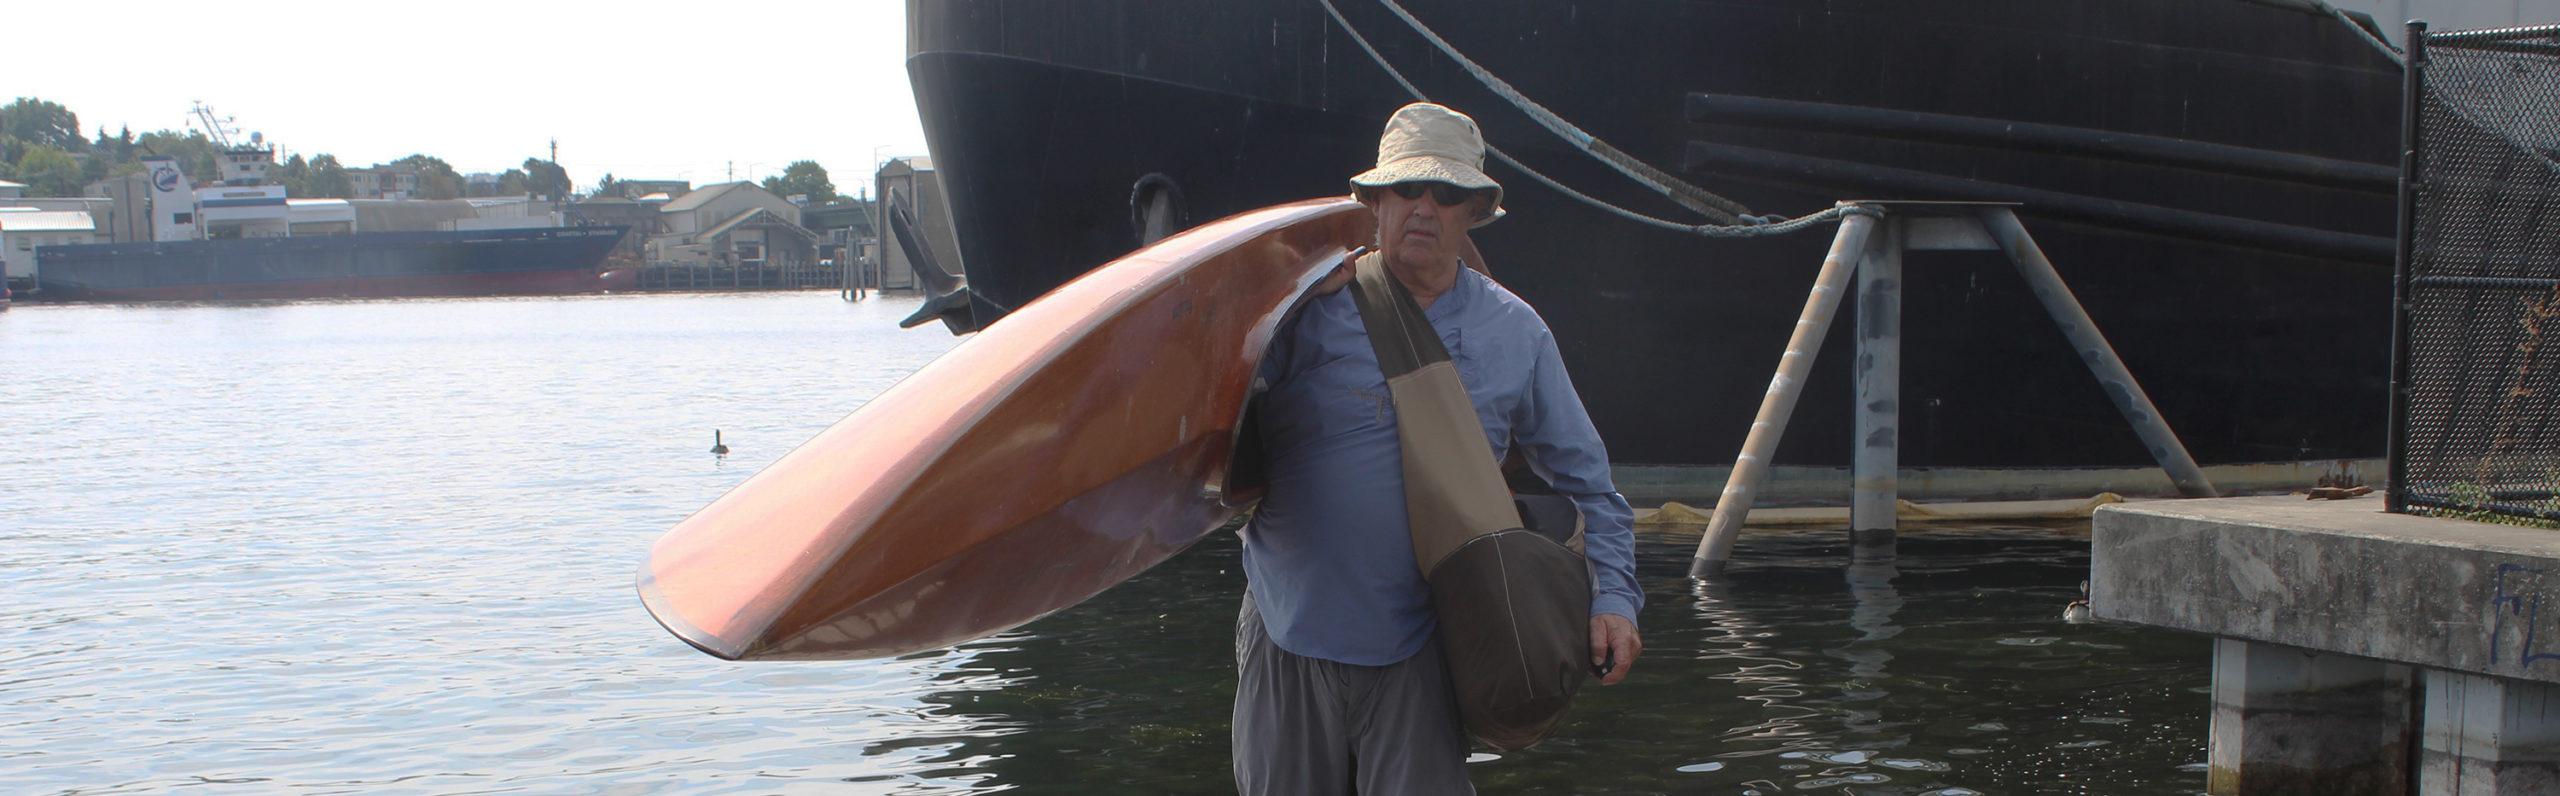
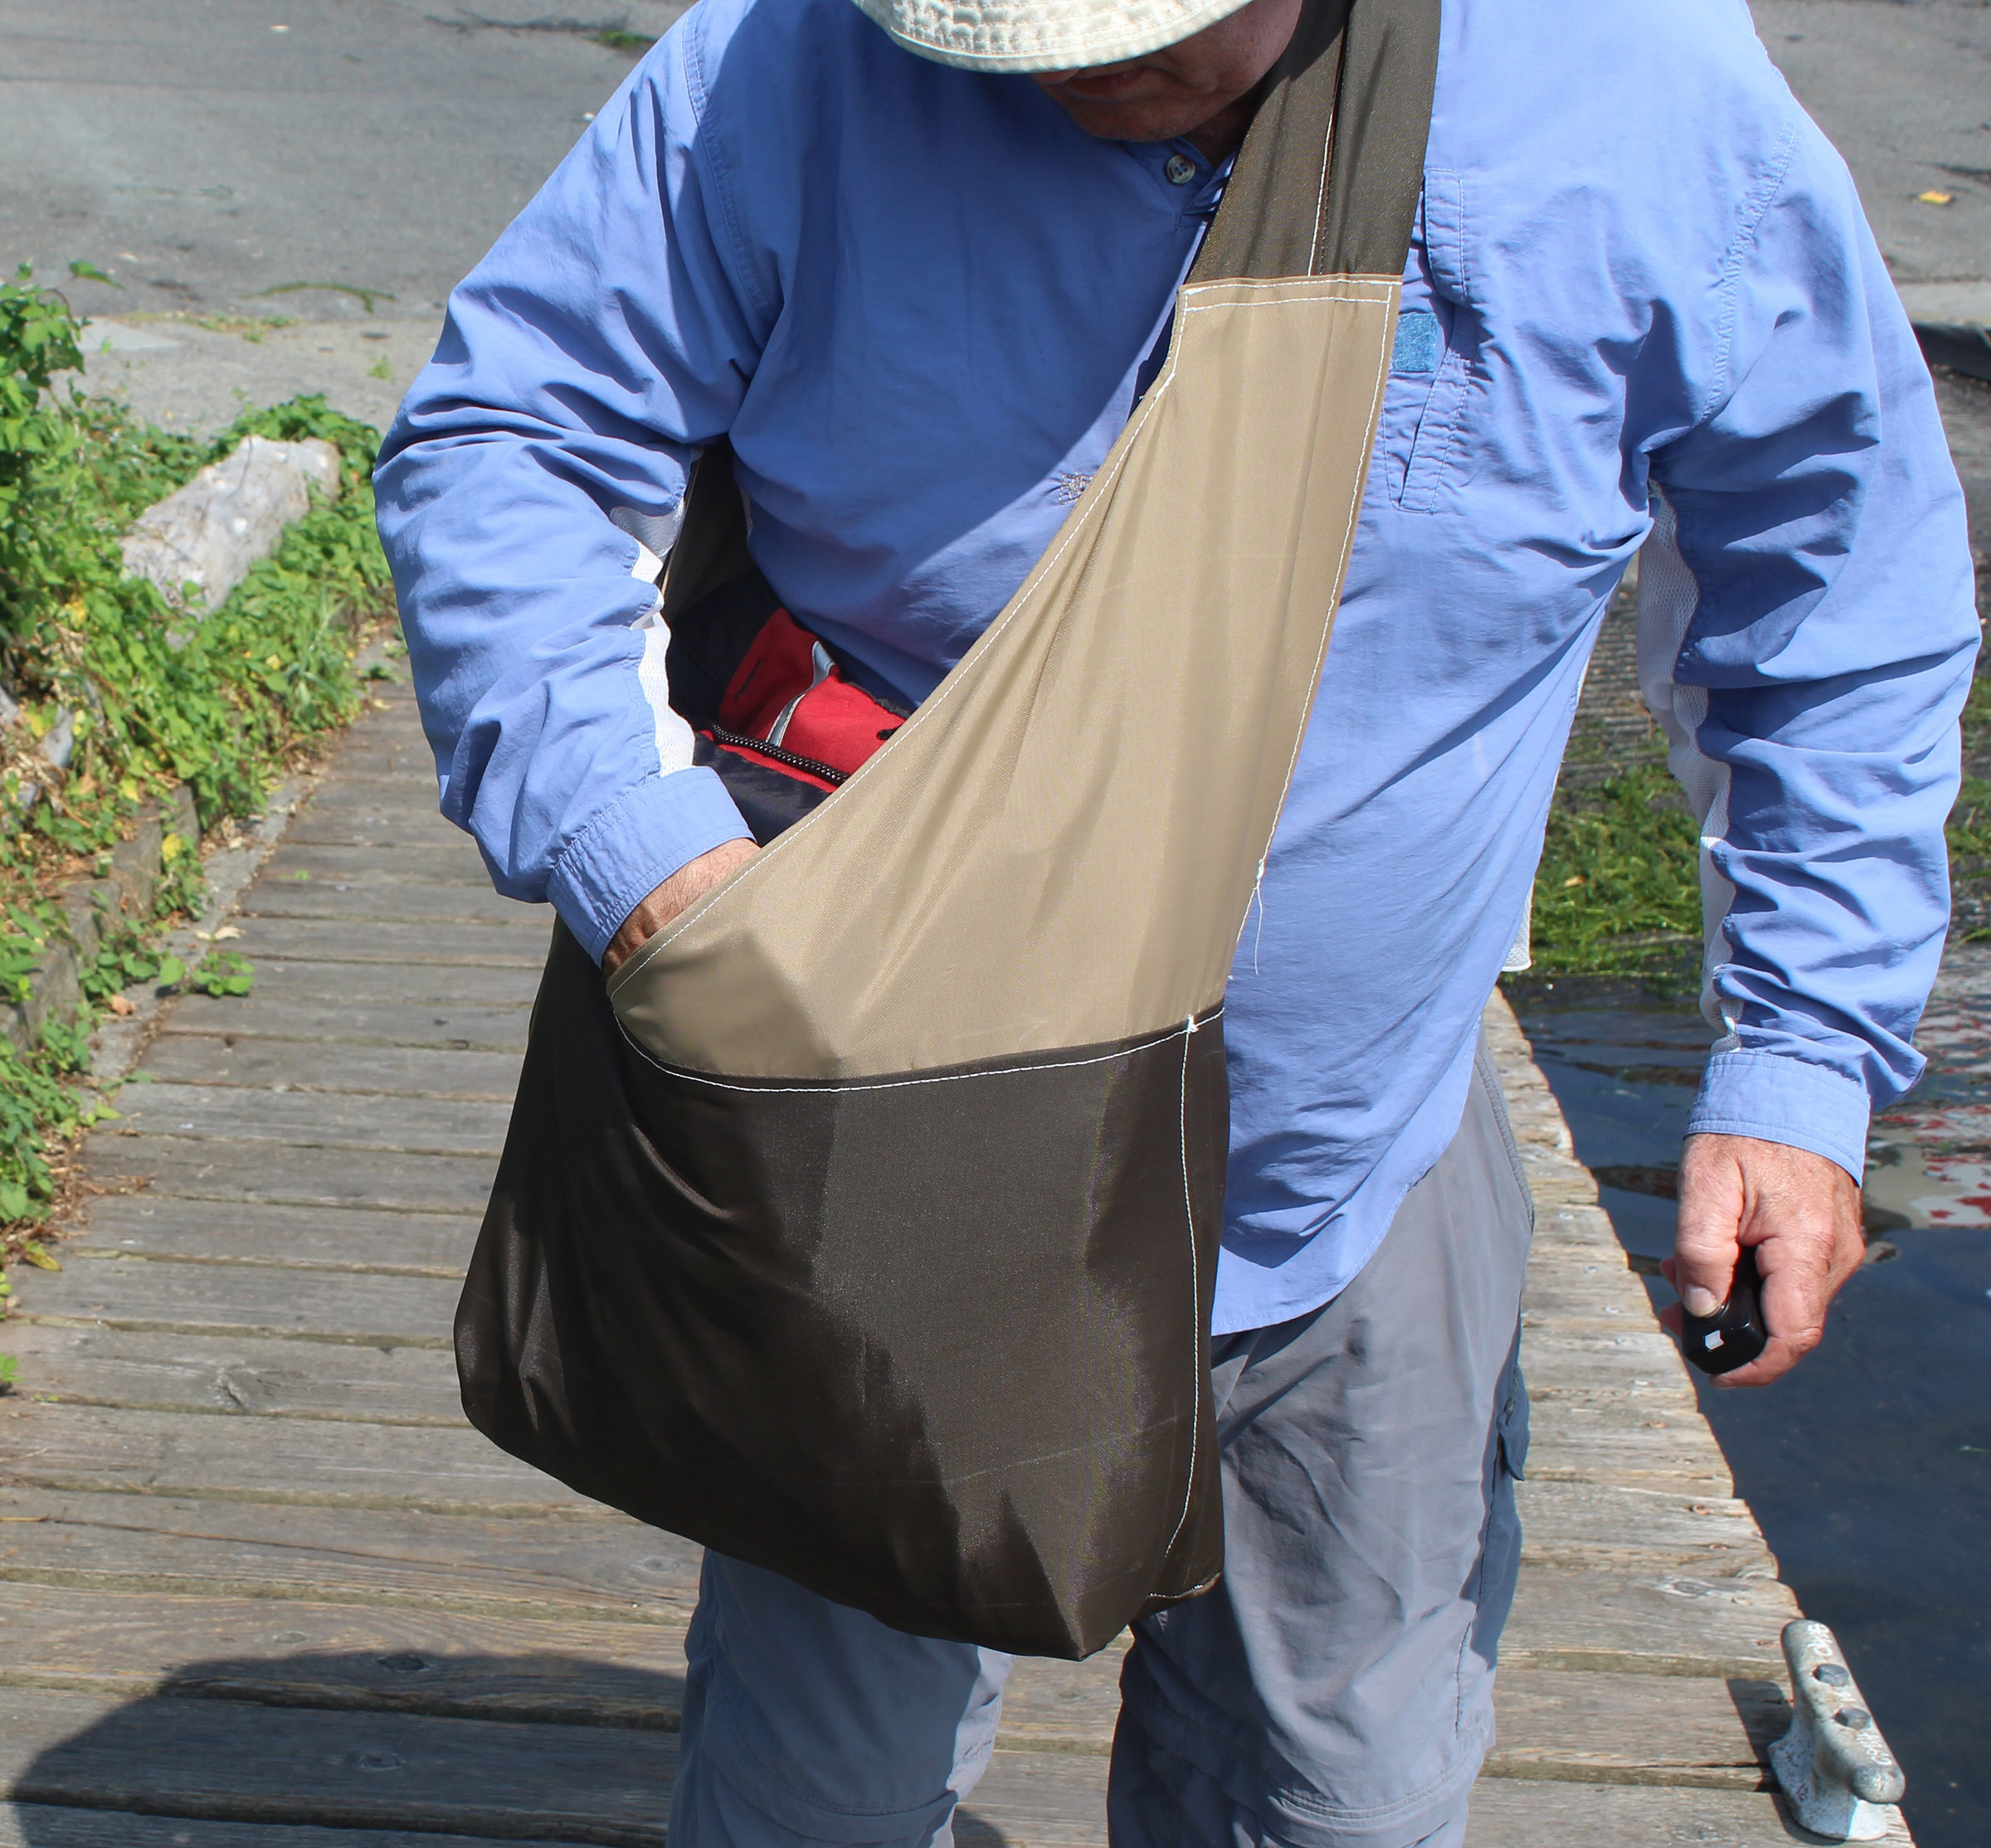
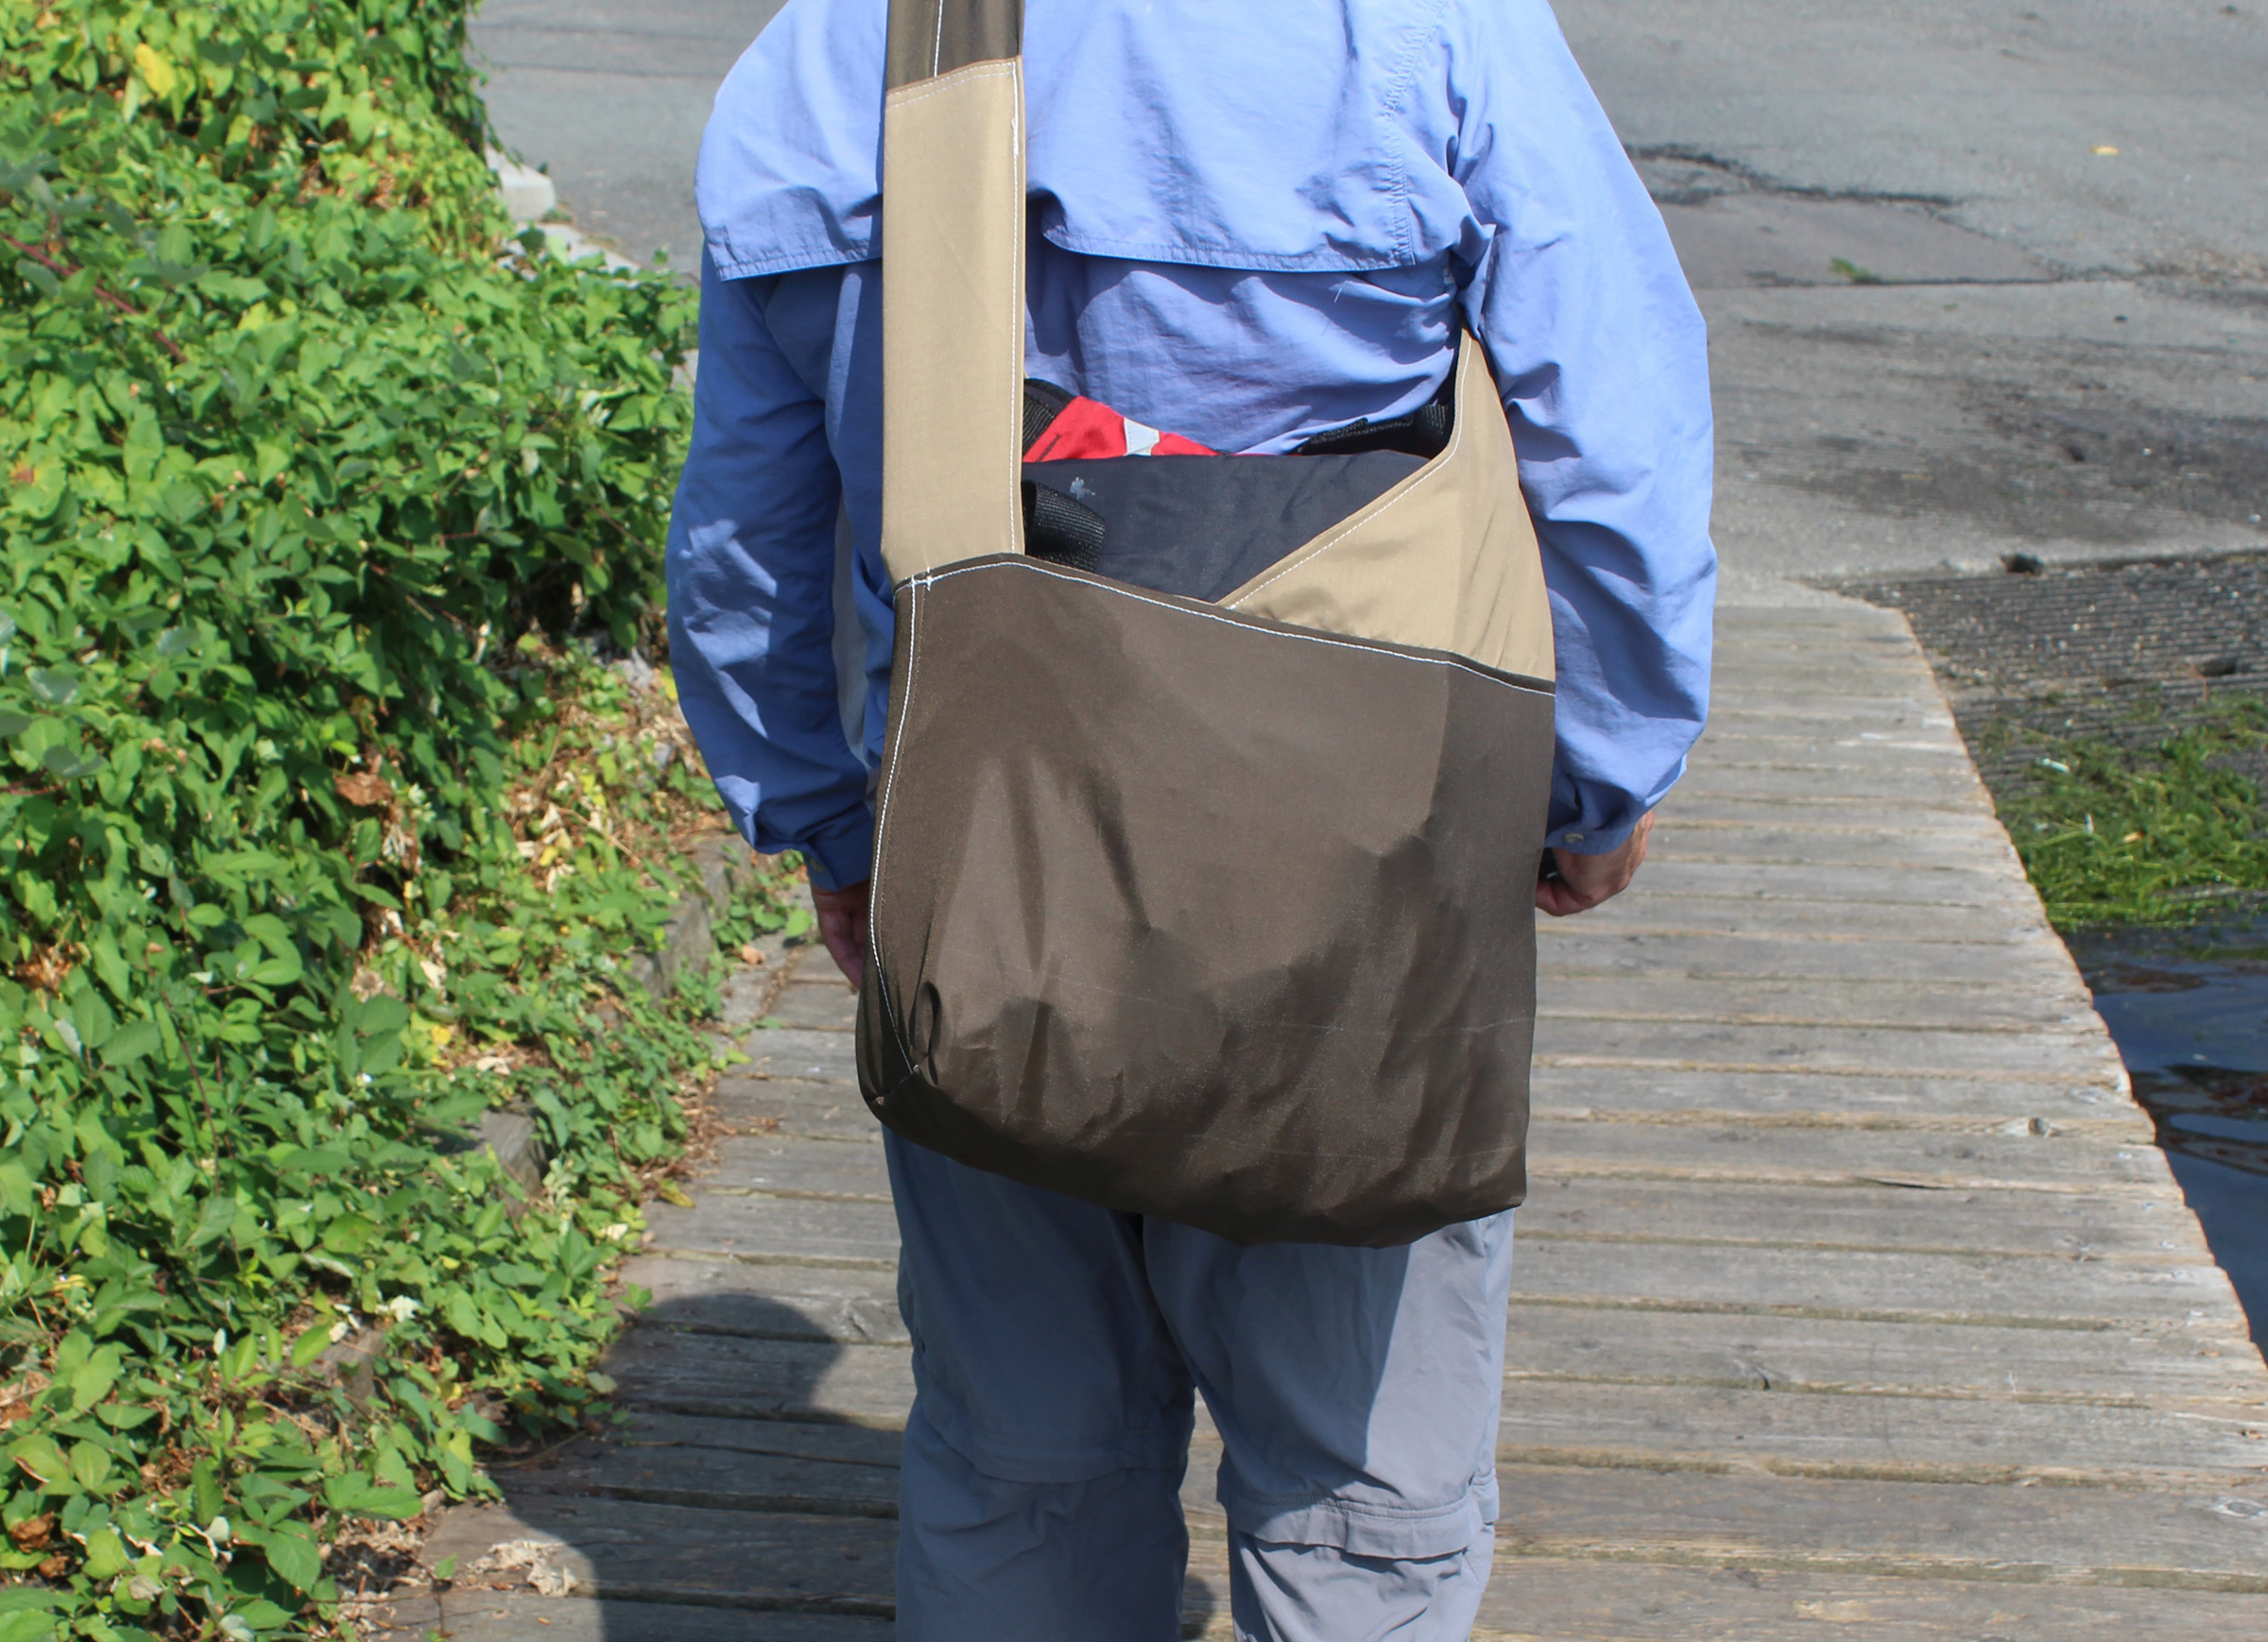
The sling bag by Anchorpak carries all the small items needed for an afternoon row and leaves the hands free for carrying oars and a PFD.
For years, I used plastic shopping bags and fancier totes made of canvas or old sailcloth, but they take hands to carry, often forcing more trips to pick up oars, paddles, buckets, or PFDs. Then I discovered messenger or newspaper bags, high-volume sling bags that go over one shoulder. The one I use is a special simplified promotional version of the Aero Sport made by Anchorpak. It can hold everything I need for a day trip and, with one hand, I can sling it over my shoulder and then have both hands free. It isn’t waterproof (the fabric is, but the seams aren’t sealed), but it shields the contents from spray. I use dry bags for items that I don’t need ready access to or if it is a nasty day out. With a carabiner or a bit of line, I can tie the sling bag into the boat so that the contents are readily to hand.
For carrying dry bags with overnight gear, I like scuba divers’ net bags. Scuba gear is big, bulky, and heavy, and the net bags are designed to get it quickly and easily on and off the dive boat. I use Stahlsack’s Panama Mesh Backpack and Aqualung’s Traveler 250 Mesh Backpack. Both have twin, padded shoulder straps—which help with heavy loads—and drawstring top openings. The Traveler also has a full-length zipper to provide access from the side, which works well when the bag is lashed horizontally in an open boat.
Ben Fuller
Stahlsack’s Panama Mesh Backpack has polyester mesh with a reinforced PVC bottom. Two side handles and padded backpack straps offer options for carrying. Small dry bags carried in the Panama protect those items that need to stay dry.
Ben Fuller
Aqualung’s Traveler 250 Mesh Backpack has both a drawstring top opening and a side zipper, which provide convenient access to the contents.
For kayaking, I carry the kayak to water’s edge, then haul all the gear that I need in a mesh bag in one load. I set the bag in the cockpit to keep it out of sand or mud and stow the dry bags it carried in the watertight compartments in the kayak’s bow and stern. Once unloaded, I fold the mesh bag and tuck it into one of the end compartments.
Over the years, my sling-style tote bag and scuba bags have saved me many steps on shore and freed my hands for carrying an anchor, oars, or bucket and for pulling a boat ashore on an outhaul. When I’m going kayaking, I can carry a bag full of gear as well as my paddles, sprayskirt, and PFD. And for camp-cruising, when I usually have many items that I want to have handy, the bags reduce the clutter by keeping everything together instead of left loose to drift around in the boat.
Ben Fuller, curator of the Penobscot Marine Museum in Searsport, Maine, has been messing about in small boats for a very long time. He is owned by a dozen or more boats ranging from an International Canoe to a faering.
When Ben Fuller proposed an article on bags and totes for carrying gear, I was slow to cotton to the idea. I’d been schlepping boating gear without anything to collect and carry all the miscellaneous bits and was getting along just fine. Or so I thought. I’ve been doing a lot of kayaking for exercise during the summer and from week to week increased the distance and intensity. At the end of a 10-mile, 2-hour outing I’d feel pleasantly exhausted when I returned to the launch site. Normally I’d leave all the gear in the kayak, carry it to the car, and lift it onto the roof racks, but with tired arms, I didn’t at all like lifting so much weight. I changed my routine and left the kayak at the dock while I took an armload of gear to the car. Then the 27-lb kayak was much easier to carry and lift. I began to see the utility of a tote to carry my water bottles, energy bars, seat pad, PFD, sprayskirt, notebook, and the dry bag with phone, wallet, and keys. A tote would put the weight on my shoulders, where I’d scarcely notice it, and lighten the load on my arms.
I went to work drawing a cross-body sling bag and gathering materials left over from other sewing projects. Ben’s scuba bags have drawstring closures, a feature that I liked for containing gear more securely and guarding against splashes, so I added a collar to the bag that would give my tote similar protection. I made the shoulder strap as wide as the bag is front-to-back; that makes for a very comfortable carry with the pressure widely distributed.
The fabric I had on hand was 430-denier coated packcloth. I had considered using leftover canvas but decided against it because it can be very difficult to sew where seams overlap, and the finished bag would be bulky and not easily stowed when not in use. It would also require waterproofing, a process I haven’t yet figured out.
The packcloth is slippery stuff and needs to be pinned before sewing to keep the layers from creeping past one another. I’ve used a stapler for “pinning” sailcloth, but the staples bunch up the packcloth.
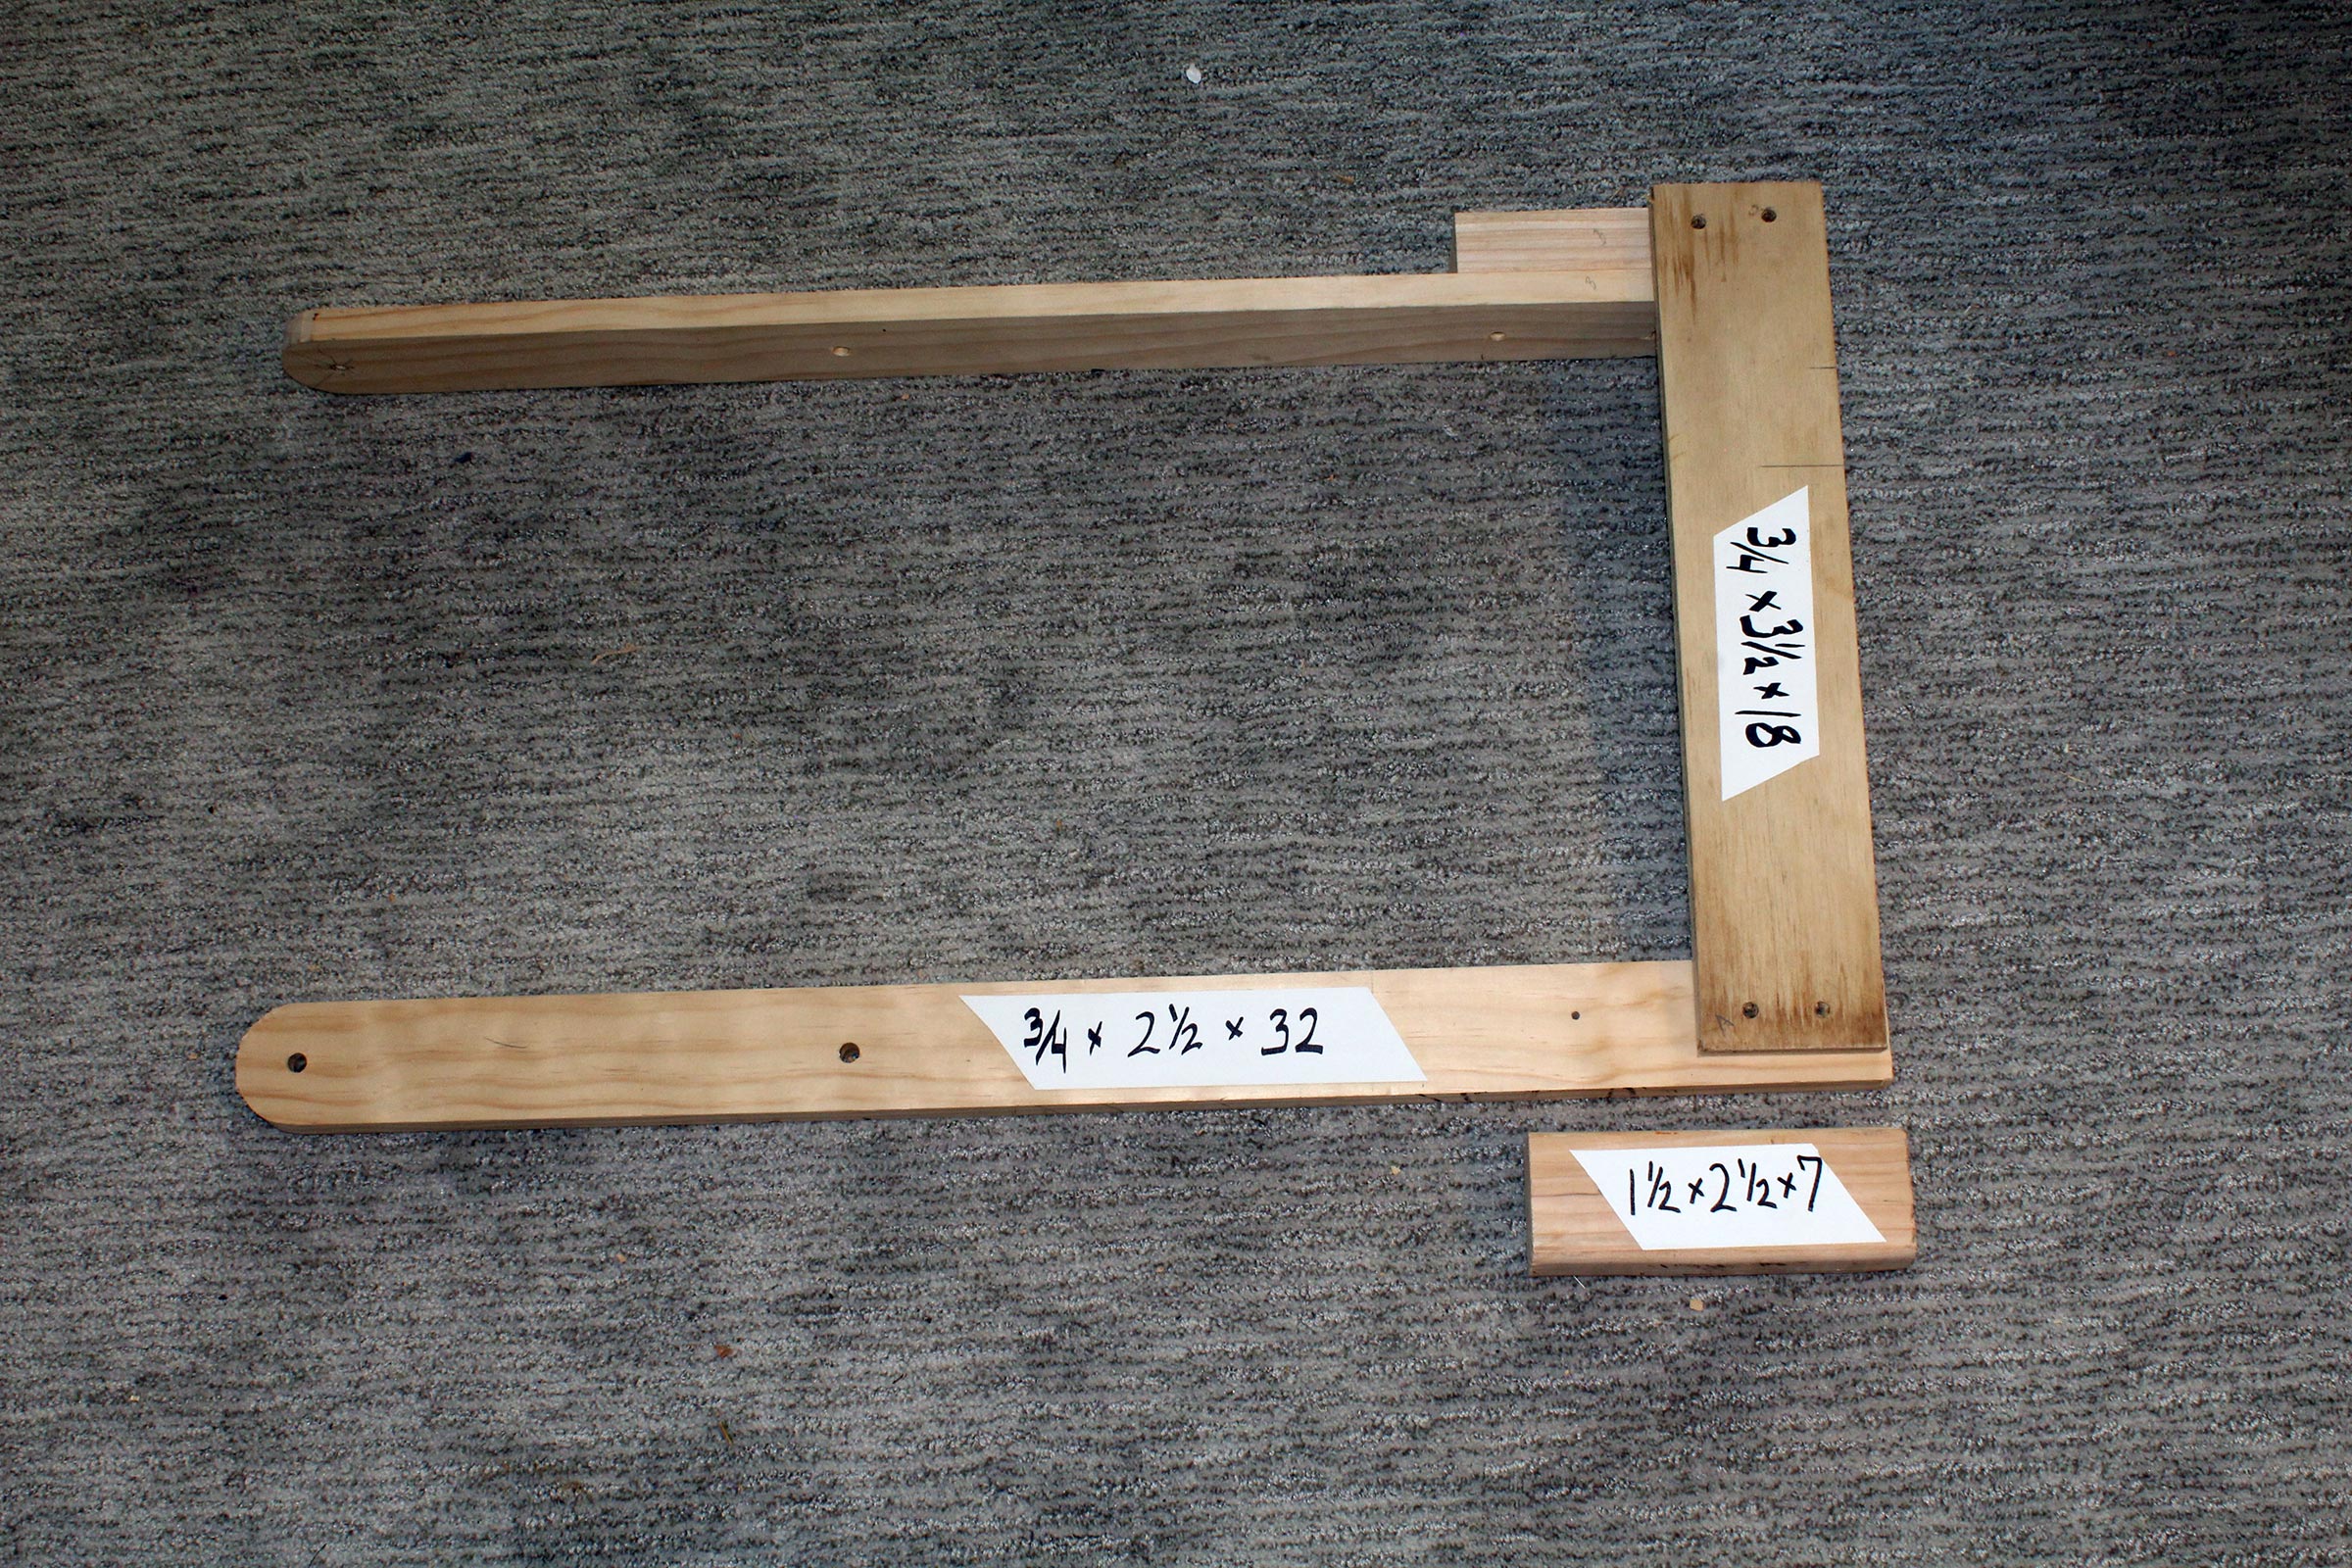
Here’s how to make this sling tote:
Photographs by the author
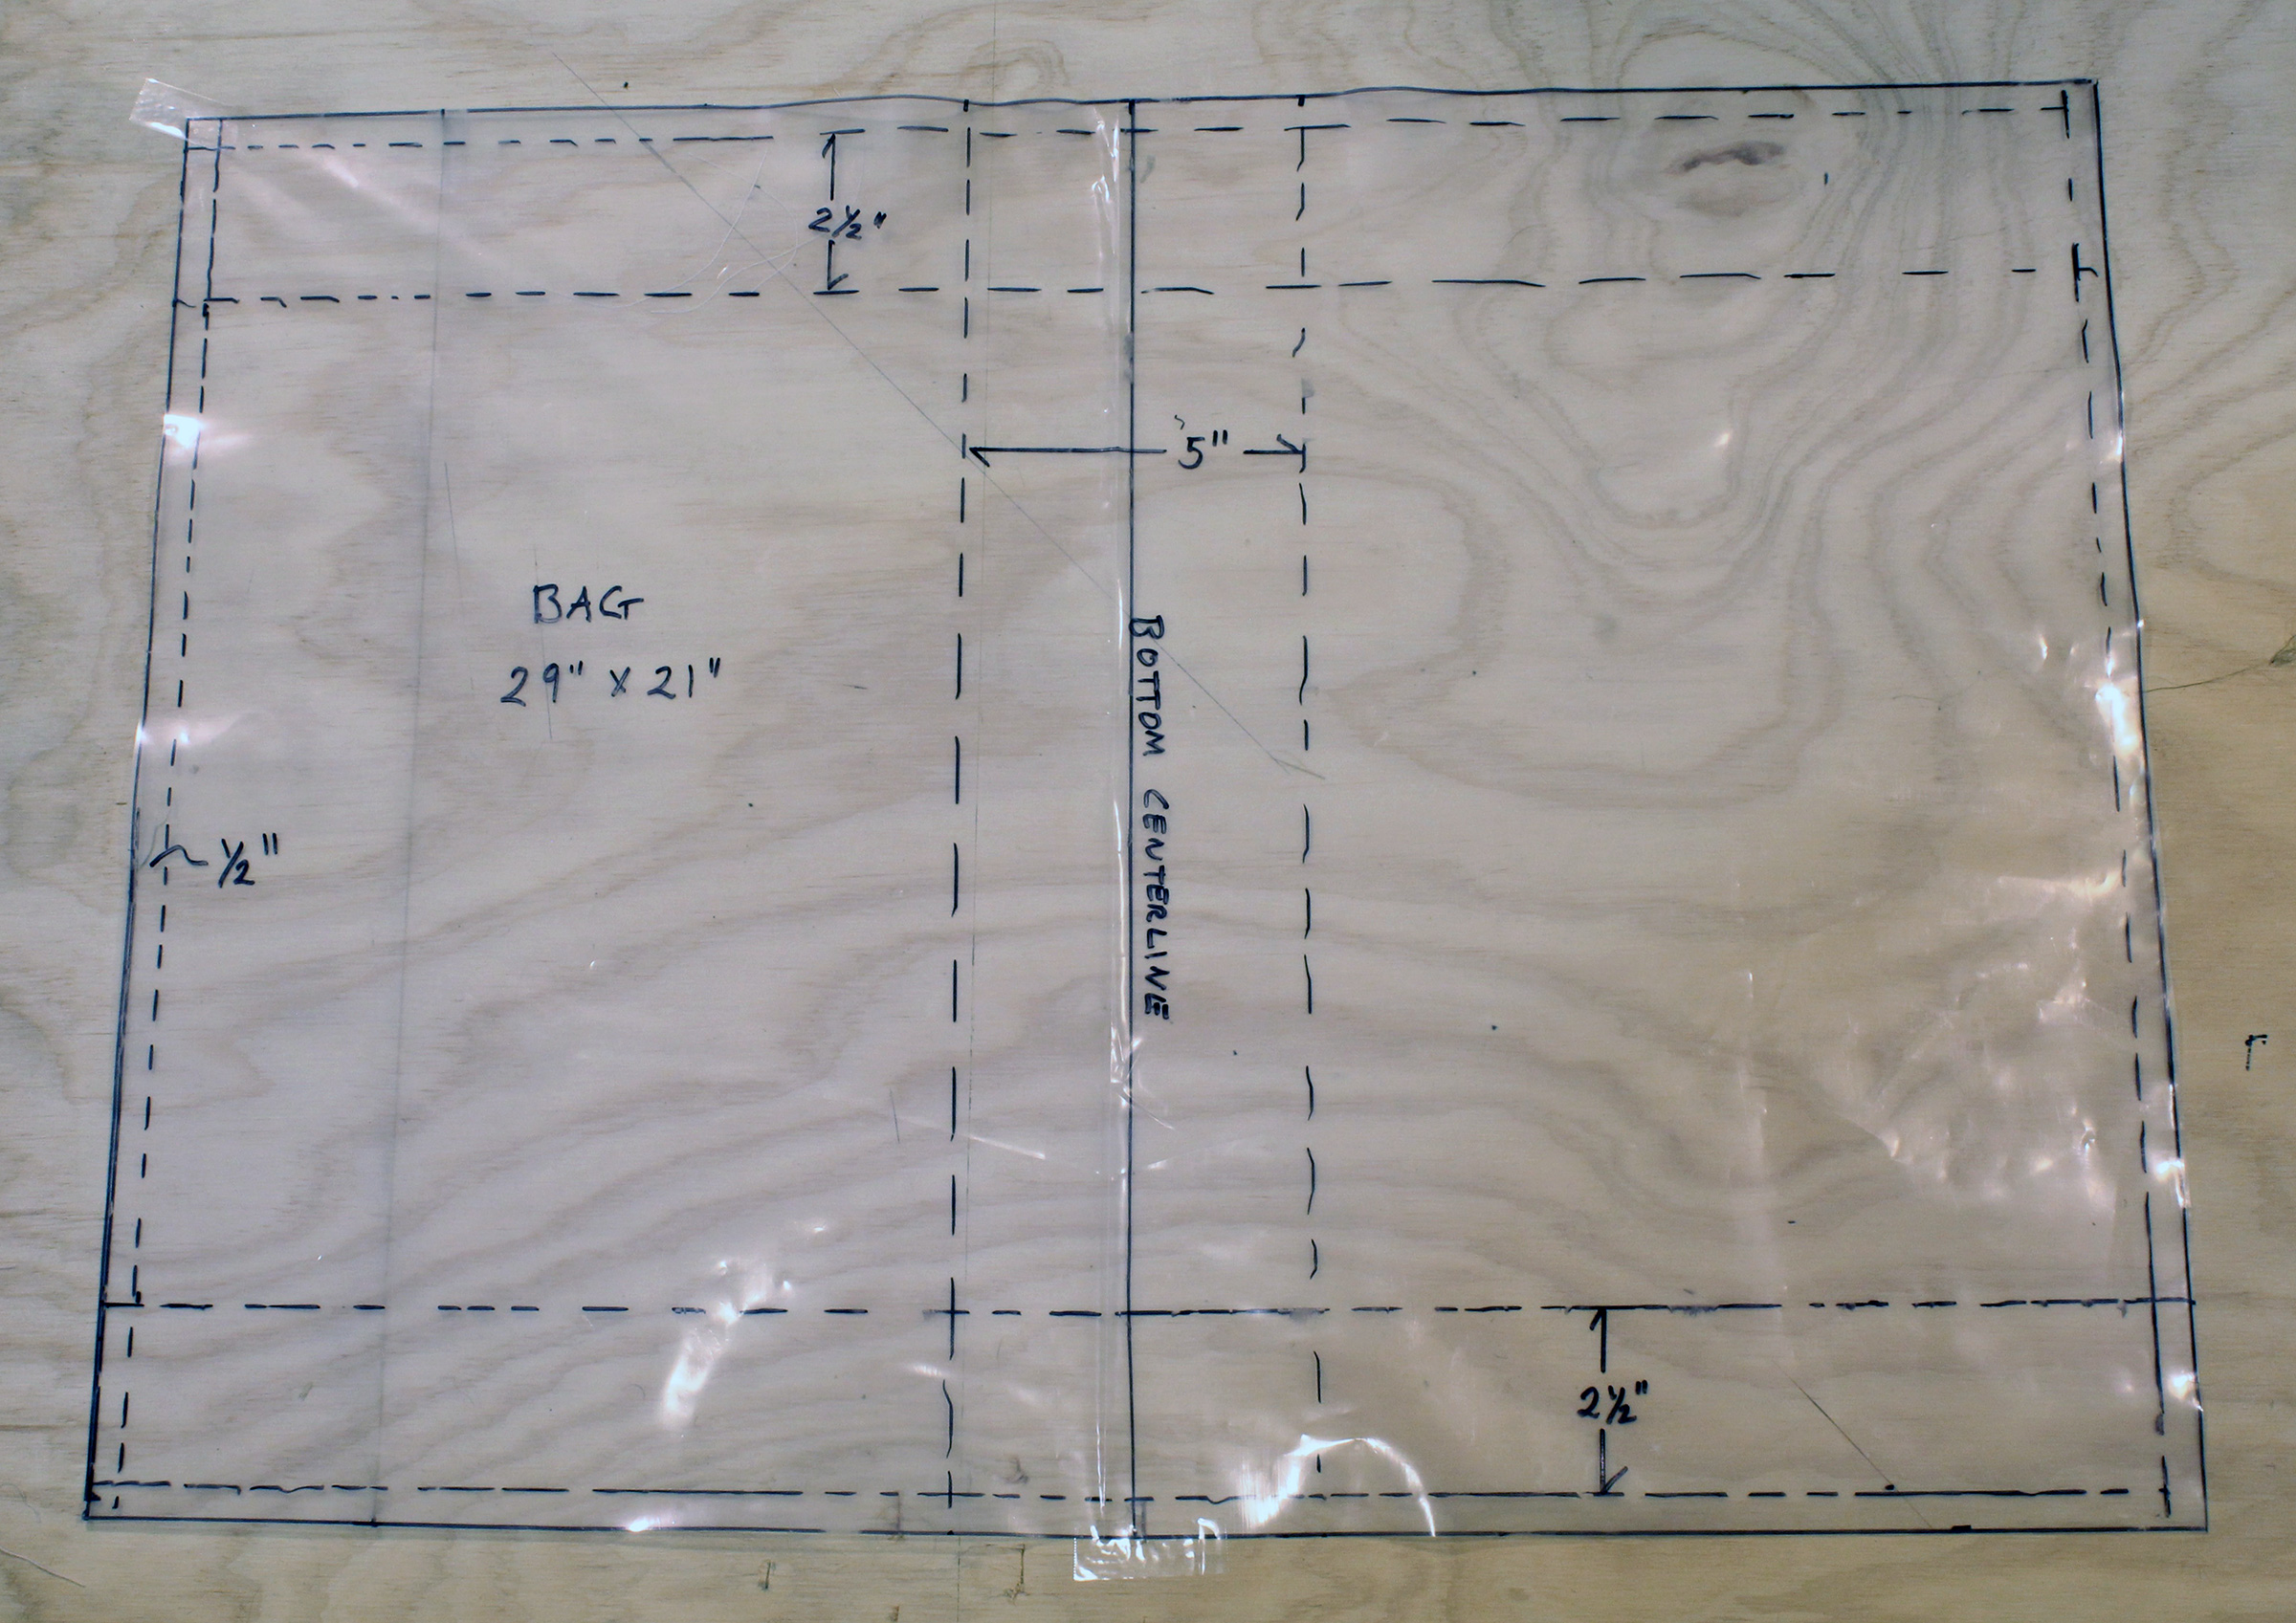
The bag part of the tote starts with a 29″ by 21″ piece of packcloth. This pattern will produce a bag 11-1/2″ tall, 15″ wide, and 5″ front to back. The folds and seam allowances are marked with dashed lines. Seam allowances are all 1/2″. You don’t need to transfer all the lines to your fabric, they’ll take care of themselves during the sewing. The coated fabric will reduce fraying on the edges, but not as much as I’d expected. Heat-cutting the fabric will bond the fibers. I’ll use seam sealer to coat the edges on my finished tote.
The gusset pattern is a half-pattern and requires an area of packcloth 14″ high and 34″ wide. Each of the gussets gets folded in half at the left edge of the pattern. The centerline of the rectangular extension at the top creates a 5″-wide sleeve that the tote strap is inserted into.
The collar gets sewn to the top of the bag and includes a drawcord sleeve that allows the tote bag to be closed. I made the collar from two pieces, and a half-pattern is shown here. If you have enough fabric for a single length it would be 40″ long (two seam allowances for a two-piece collar get subtracted).
Here are the patterns and cut fabric: one piece for the bag, two pieces for the gussets (with their half-pattern), and two pieces for the collar. The strap is not included here.
The packcloth is very slippery and needs to be pinned for sewing. I use a spring clamp at the edge of the work surface to hold one end while I tension the fabric with one hand and pin with the other.
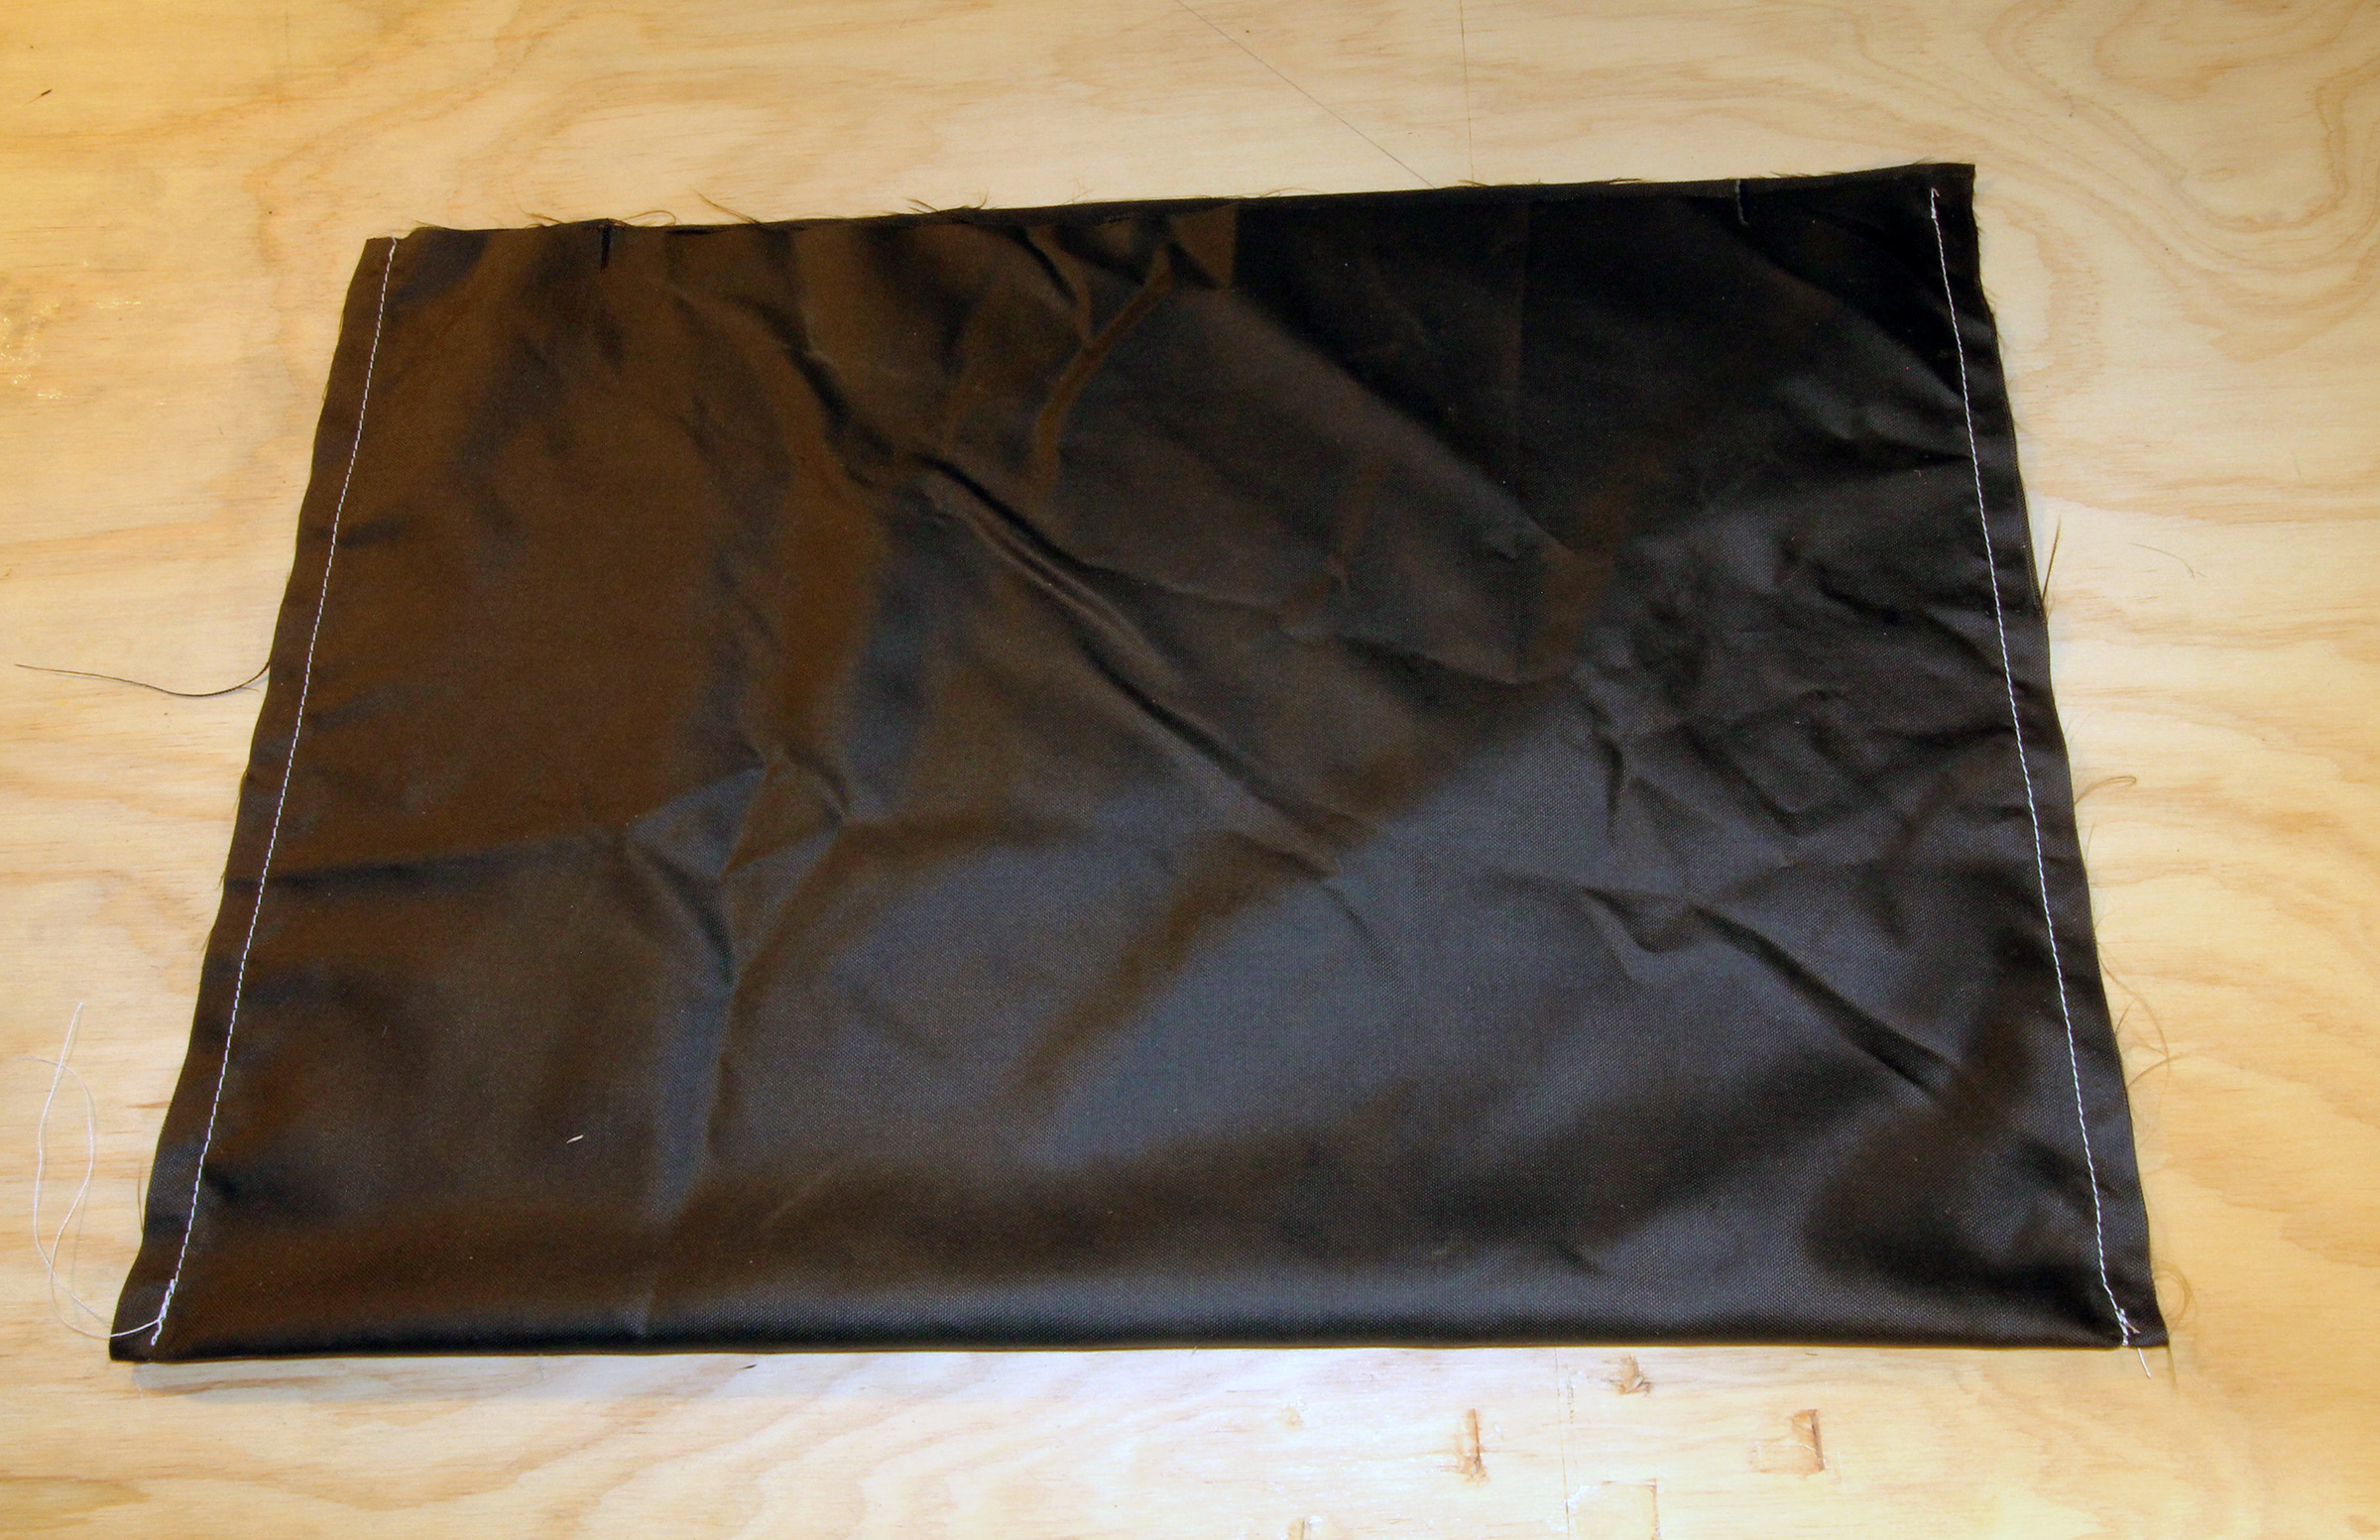
The bag gets folded in half, coated side out, and then sewn along each edge.
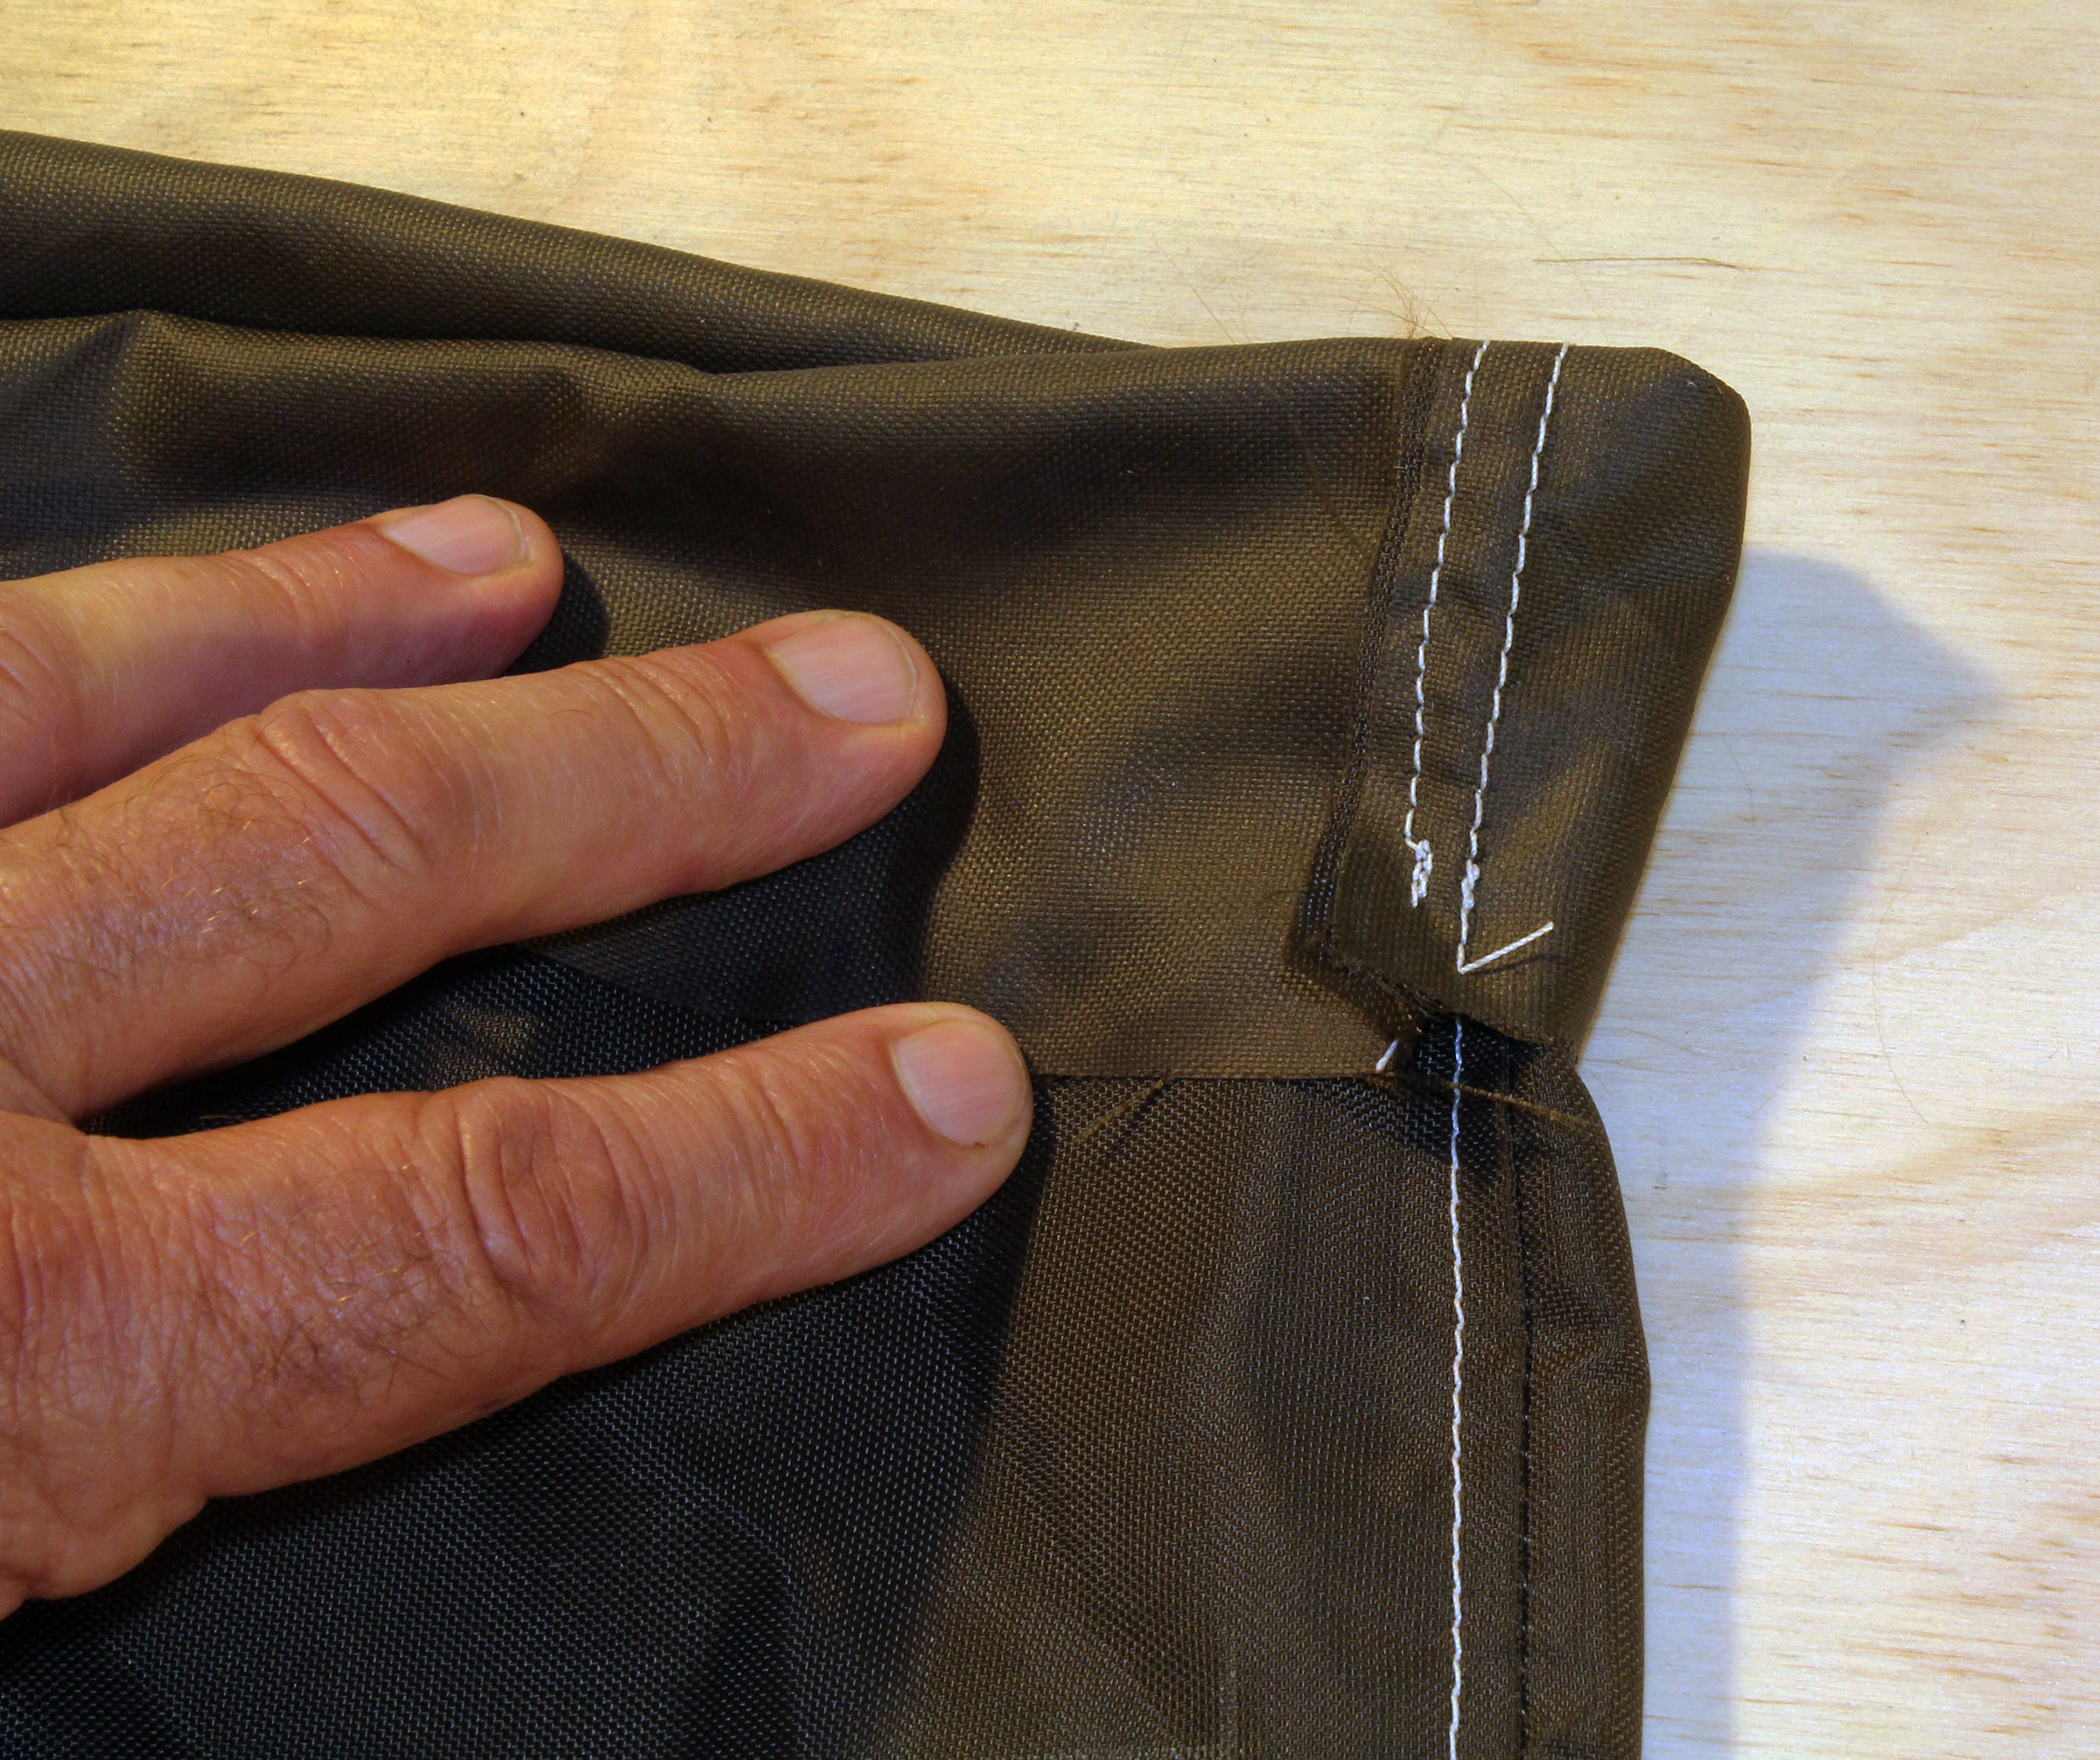
The seam gets flattened on the inside of the bag and then sewn down. It’s not necessary to get that second line of stitching all the way to the bottom corner inside the bag—within 1″ is enough. (In the next photograph you’ll see why.) At the bottom of the photo graph here, the second line of stitching is visible on the outside of the bag.
The bottom corners of the bag get flattened to create a “dog’s ear,” which gets pinned to hold it in place. A ruler marked 2-1/2″ either side of a center mark is used to draw a line for sewing a seam that spans 5″ of the corner. This gives the bag a squared box bottom.
Sew along the 5″ line and backstitch at the ends.
The gussets get folded coated side out and sewn along the diagonal edge and the short vertical at the top. Make a small cut in the 1/2″ seam allowance to bisect the angle from the cut edge to just shy of the stitching. It will help with the sewing that follows after gusset is turned right side out.
With the gusset turned coated side in, the edges below the vertical part at the top are sewn. Sew in the order and direction shown. It will eliminate the problem of fabric creep that would happen if you sew from the fold to the seam.
The gusset (light color) is marked 2-1/2″ from the edge at right. That mark aligns with the seam on the outside of the bag, now turned right side out. The end of the bag will finish at 5″ wide and 5″ of the gusset will cover the bag end. The rest of the gusset gets pinned, wrapped around to the face of the bag, and sewn. The second is pinned to the other side of the bag and sewn in the same manner.
With the bag right side out, the first of the two gussets, aligned as note in the previous photograph, is pinned to the bag edge, then sewn. The second gusset follows.
After its two halves are sewn together, the collar gets folded to create a sleeve for a drawstring. The end of that sleeve is folded at a diagonal to create a fold at the end of the sleeve. The top 1/2″ of the collar is then folded, as shown here. I tried using a fabric adhesive for the work on the sleeve, but it didn’t hold nylon as well as it does cotton. I shifted to the 1/4″ double-sided seam tape that I use for sailmaking. Pinning would also hold the fabric in position for sewing.
The diagonal fold is under the top fold and then sewn.
The finished end of the drawcord sleeve has a folded edge that won’t be unraveled by the drawcord.
One end of the collar should have a fold to conceal the raw edge that would otherwise be visible on the outside. I didn’t do a very neat job here. I should have ripped out some of the diagonal stitching below the sleeve to give myself more fabric to work with.
The collar gets pinned to the assembled bag and gussets. A spring clamp (bottom right) comes in handy for tensioning all the layers of fabric to get them to lie flat against each other.
When the collar is pinned to the entire perimeter of the bag and its gussets, the ends of the collar will meet with an overlap. The end with the hem goes underneath, to be on what will be the outside of the tote.
After the the collar has been sewn to the bag and gussets, the collected seam allowances (at photograph bottom) are all folded down over the bag and sewn flat.
The overlap of the ends of the collar are sewn together, and with a bit of care, more neatly than I have done here. I use contrasting thread to make the sewing clearly visible in photographs, and it makes bad sewing just as clear.
The strap is made from a piece of pack cloth 11″ wide. The length varies to fit the user and is determined by putting the tote on. Pin a strip of scrap fabric into the openings at the tops of the gussets and adjust the height of the bag so you can comfortably reach the bottom of the bag with your arm straight. Add about 4″ to the length of the scrap and cut the cut the strap fabric to that length. I’m 6’ tall and cut a strap 28″ long.
After the strap is folded in half and sewn (as it appears here at right), it gets turned inside out.
Fold the edge of the gusset extension to the inside and insert the sleeve; sew two lines to secure the sleeve and finish sewing the sides of the extension.
The collar’s sleeve gets a cord and a lock. My homemade brass bodkin, as the tool for threading the cord through its sleeve is called, is shown here.
The collar usually hides out of the way inside the bag. When it’s needed to keep gear in or spray out, pull it up and cinch the cord.
A sling bag has a significant advantage over a backpack. It can be pulled around front for easy access to the contents.
This sling tote can carry my PFD, paddling jacket, spray skirt, self-inflating seat pad, hat, water bottle, snacks, and a small dry bag that holds my phone, wallet, and car keys.
Ben was right—a sling bag is a very handy tote. It is comfortable to have on, has a generous capacity, and shifts in an instant from out of the way behind me when I don’t need the gear in it to up front when I do. I expect I’ll get a lot of use from it, whether at the launch site, or going ashore for a walk with snacks, extra clothing, camera, and notebook all at the ready.
Christopher Cunningham is the editor of Small BoatsMagazine.
You can share your tips and tricks of the trade with other Small Boats Magazine readers by sending us an email.
James Baker, his wife, and their two young daughters live aboard LIVELY, a 42′ wooden gaffer that James built in the traditional manner of a turn-of-the-20th-century Cornish workboat and launched in 2015. For a four-month cruise around Ireland and along the west coast of Scotland, planned for the spring of 2019, James thought a single tender wouldn’t give his family and the occasional crew members the flexibility needed for the anchorages they’d visit. There was space on board LIVELY for a second tender 8′ long with a beam of 3′. Whatever was to occupy the space had to be in keeping with the look and feel of the gaffer.
While James and his family live in Penryn on England’s South West Peninsula, he has long been attracted to the curraghs of Ireland. James had built a few skin-on-frame boats—a Geodesic Snowshoe 14 and Kudzu Craft Curlew kayak—and their quick and inexpensive construction was just what the tight timetable and budget of the fast-approaching cruise demanded.
The most common curraghs are about 20′ long and are rowed by a crew of three, but on Ireland’s northwest coast, County Donegal’s paddling curraghs bridge the gap in size between curraghs and coracles. Their bows are nearly round, like half of a coracle, and the rest of the hull extends to a transom typical of curraghs. They have a length of about 8′, right on target for the space on LIVELY. The Donegal curraghs are usually propelled by a paddler kneeling in the bow and using a single-bladed paddle, but since the middle of the last century, some have been equipped with tholepins for rowing.
James settled on building his tender along the lines of a Donegal curragh, but with two sets of oarlocks and as a double-ender that could be rowed in either direction to suit the load carried and the best position for the rower. He lofted the shape of the gunwales to fit the space aboard LIVELY and made each of three pieces in the traditional Irish manner: a straight section in the middle and pieces at the ends that curve to the stems. The curved pieces are beveled where they meet the middle section and set on top of it at an angle, which gives the sheer a bit of shape in profile. The rise at the stem of a traditional curragh can be pronounced, but James made it much more subtle, to be a better fit when the curragh is stowed, bottom side up, against the crown of LIVELY’s deck. A keel and laminated stems were secured to the centerline and five steam-bent frames followed, set over the keel and mortised into the gunwales. The laths and floorboards that support the skin were applied along the lines that required the least twist and fastened at the ends and to the steam-bent frames with stainless-steel screws and polysulfide adhesive caulk. By the end of the first day of construction the thwarts were installed and the framework was finished.
Photographs courtesy of James Baker
The original canvas skin, coated with roofing tar, lasted a few years before the cotton was weakened by age and decay. The frame was inspired by Donegal paddling curraghs but made some departures from traditional construction, which would have narrow mostly parallel slats to support the skin.
The skin was a length of heavy, untreated cotton canvas, stretched athwartships across the straight middle of the framework and pleated at the ends to gather up the excess fabric that accumulates when wrapped over compound curves. The skin was secured with copper tacks along the stems and gunwales, then trimmed. There was time before the end of the second day to give the canvas three coats of water-based roofing tar.
The joints in the three-piece gunwales are made with a long bevel on the undersides of the curved end sections. Set on the flat top of the middle section, they create a little rise at the ends of the boat.
The new polyester skin went on in three pieces. The seams sewn between them eliminate much of the extra fabric that gathers toward the gunwales.
The new skin is protected by an oak strip along the keel; doubling it helped the curragh track better in a crosswind.
The new curragh, christened DREADNOUGHT, looked small when first set in the water and was rather tender when James got aboard, but she was watertight and rowed well. In a breeze, the little curragh sideslipped, but adding a keel strip soon remedied that.
When not in use, DREADNOUGHT is often nestled in the space she was designed to occupy on LIVELY’s deck. The canvas cover with vinyl window (bottom right) covers what would have been the fish hold in the Cornish fishing boats LIVELY was modeled after. The cover is removable, a welcome relief on hot days when her cabin could use a cooling breeze.
James designed and built LIVELY, the 42′ gaffer that he, his wife, and two daughters live aboard. The patch of black next to his right knee is DREADNOUGHT, set on deck upside down.
During LIVELY’s cruise to Ireland and Scotland, DREADNOUGHT handily carried the whole family during trips to and from shore. The girls were then nine and four years old and fit comfortably together on the center thwart. Now that they are three years older, it’s a tight fit. Even so, DREADNOUGHT carried the whole family and a third adult to shore for a recent Christmas Day.
The Baker family is a snug fit aboard DREADNOUGHT but the little curragh ably shuttles them between LIVELY and shore.
The canvas skin lasted a few years before rotting around the gunwales. James replaced it with polyester and roofing tar. For a month, James used DREADNOUGHT to commute to a nearby boatyard that has no access by road. The curragh is so light that he could carry it from the water’s edge to a safe place to leave it while he worked. “For a couple of days’ work, a few scraps of timber and a few yards of cloth,” James says, “DREADNOUGHT has proved to be a very handy little boat.”
Do you have a boat with an interesting story? Please email us. We’d like to hear about it and share it with other Small Boats Magazine readers.
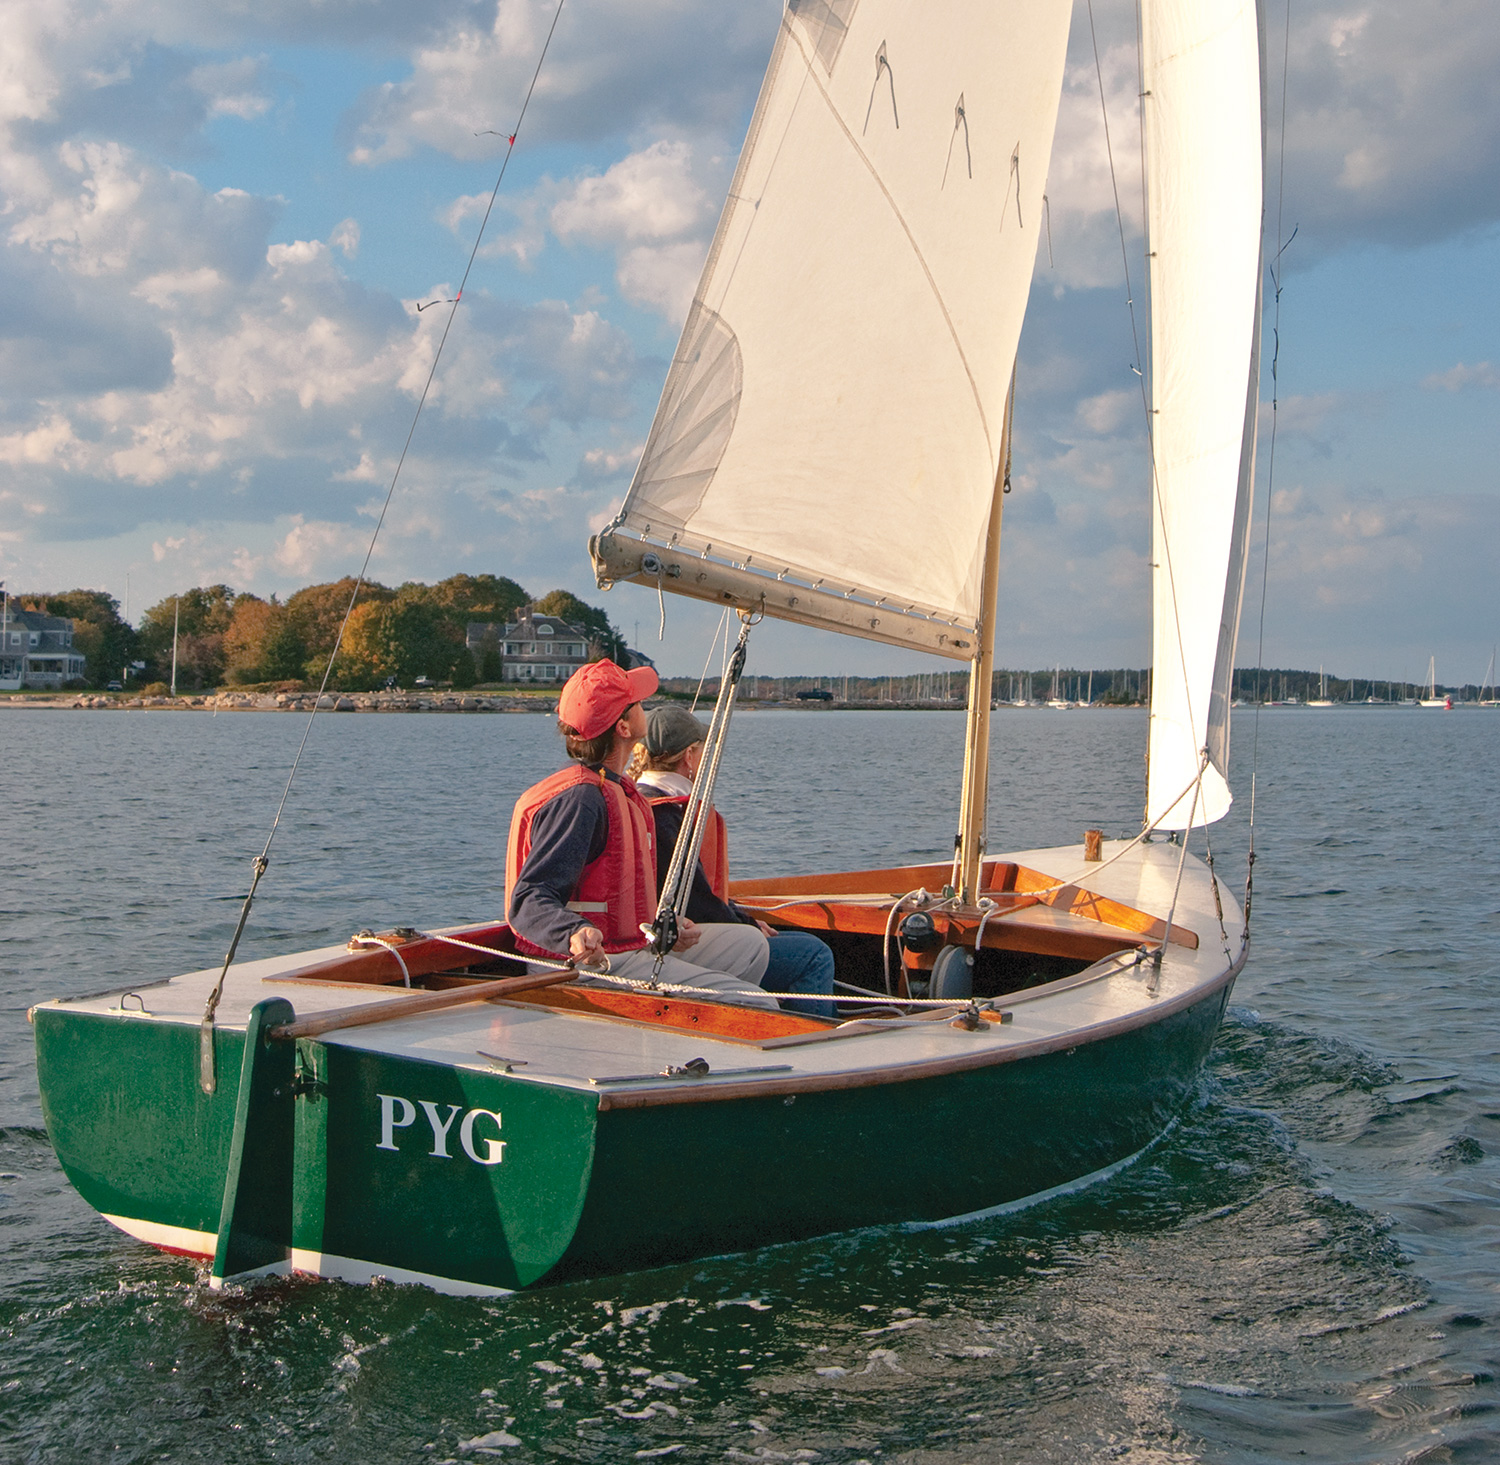
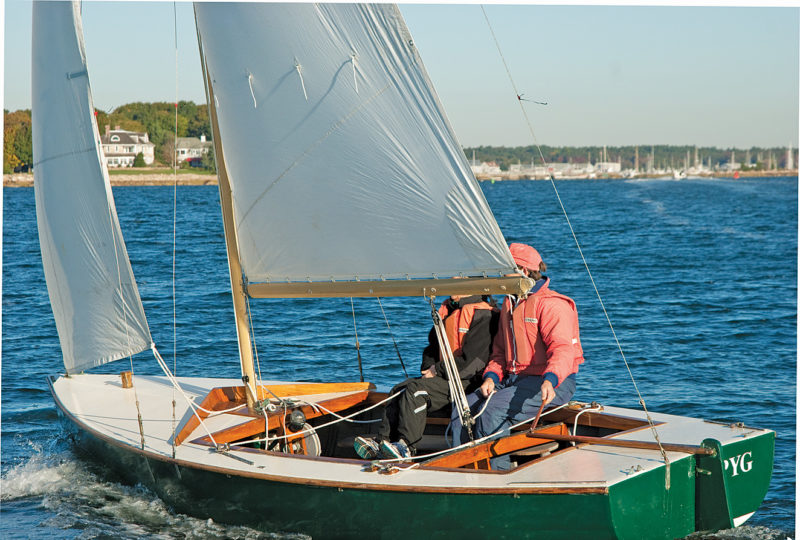
Elegant in its simplicity, the Rhodes 18 has many attributes that have made it a classic among the daysailing and weekend one-design racing classes. Similar in many ways to the Sparkman & Stephens Lightning Class boats I grew up sailing and racing on Long Island Sound, it is dynamic, lively, quick to accelerate, maneuverable, and sails magnificently.
A soft chine and graceful longitudinal rocker contribute to the boat’s maneuverability and great turning characteristics. The outboard rudder, hung with a standard pintle-and-gudgeon arrangement on a transom that is flat and has slight reverse rake, allows the boat to carve tacks and jibes efficiently. A 5″ skeg extends from the bottom of the transom and tapers forward 3′ to ensure good tracking qualities. The graceful bow curve has a soup-spoon shape, which complements the hull form. By my observations, the transom is the only flat surface of the entire hull of the Rhodes 18. From stem to stern and along each station, the boat is as fair as a beach stone.
The Rhodes is the perfect daysailer for up to five people, or it can be raced by a crew of three in one-design fleets. The cockpit is spacious, comfortable, and practically designed, with port and starboard longitudinal benches for comfortable seating for three on both sides of the cockpit. The cockpit coaming lies flush with the deck, which is a significant attribute when you and the crew are hiking out with legs extended over the edge of the cockpit and side decks. The cockpit is set back by about 10″ to the inboard from each side, allowing for significant deck edge immersion, which helps to stave off swamping. The foredeck, which extends from the stem to just aft of the mast, provides a stable platform to pick up the mooring line, set an anchor, or tie off a dockline. From the afterdeck, which is equally ample, such necessary tasks as fastening the boom tent or tying off the tender can be completed.
For a centerboarder, she is a forgiving and relatively stiff 18-footer, which you especially notice when stepping aboard before the centerboard has been lowered. Her initial stability feels reassuring when you move your weight around the boat. Under full sail and in a moderate breeze, the Rhodes 18 is well balanced and easy to rein in.
I came to know the Rhodes 18 because for a number of years I’ve enjoyed sailing PYG, a wooden-hulled boat that my friend Richard Van Voris restored in Massachusetts. With a little review of Greek mythology, I found that PYG is aptly named: According to the myth, the sculptor Pygmalion created a statue so life-like that he fell in love with it. After becoming familiar with the Rhodes 18, I can easily understand how any owner would become so enamored. Michael Warr, PYG’s previous owner, described the Rhodes 18 as “a perfect little lady with no bad habits.” Ultimately, when asked to write about basic sailing techniques in WoodenBoat magazine’s “Getting Started in Boats” section (see WB No. 218), I chose the Rhodes 18 as the model for its all-around characteristics. I tried sailing her alone, without crew, just under the mainsail alone, and PYG remained a gracious silent partner without any noticeable weather helm.
The key to sailing any centerboard boat like the Rhodes 18 is to sail her flat. Those of us who teach sailing preach, “Flat is fast.” On the Rhodes 18, this translates into either hiking harder, adding additional crew for extra ballast, sailing under main alone, or even taking a reef in the mainsail. On the wind or on a reach, the adjustable centerboard position on the Rhodes 18 can be “played” up or down a small amount to change the center of resistance and thereby change the balance of the boat. This adjustment corrects the boat’s tendency to head up into the wind or to fall off away from the wind. Downwind, the centerboard can be raised entirely to reduce drag and increase speed.
The boat is easy to manage on a trailer or to leave on a mooring with a boom tent over her cockpit to keep the water out of her bilges. There is also plenty of storage under the foredeck or under the afterdeck to store necessities.
Donald Sorterup
SWIFT gives an excellent idea of what the Rhodes 18s looked like when the type was new. Peter Eastman, who has won numerous Rhodes 18 national championships, found the boat in a barn and restored her to original specifications.
The Rhodes 18 is the work of yacht designer Philip L. Rhodes (1895–1974), who designed everything from 7′ dinghies to 123′ motoryachts. Arguably his most famous design was the 12-Meter WEATHERLY, the 1962 AMERICA’s Cup winner. According to Richard Henders on’s excellent biography Philip L. Rhodes and His Yacht Designs, the designer drew his 18′ daysailer in 1938 for use as a junior trainer for the Stamford (Connecticut) Yacht Club.
At present, Rhodes 18 racing fleets remain active at Barnstable Yacht Club and Dennis Yacht Club on Cape Cod and at the Biddeford Pool Yacht Club in Maine. The International Rhodes 18 Racing Association (see www.biddefordpool.org/bpyc/public/rhodes_18/rhodes_18.htm), sponsored by the Biddeford Pool Yacht Club, specifies strict rules and regulations for boats and sails that must be followed by racing contestants.
Donald Sorterup
In the original rigging plan, which is retained in SWIFT, the boom has a “T” cross-section, and the mainsheet reeves through deck-mounted turning blocks without a traveler.
The Rhodes 18 fleet quickly adapted to fiberglass construction in the post–World War II era. The Cape Cod Shipbuilding Co. in Wareham, Massachusetts, which advertised a complete wooden Rhodes 18 with mainsail and jib for $718 in 1942, started building fiberglass versions as early as 1948. Since then, the company has launched some 700 of them in both centerboard and keel versions.
The fiberglass keelboat and centerboard Rhodes 18s are raced together. Additional weight is added to the centerboard boats to bring them up to the set minimum weight requirements and to make them equal in weight to the normally heavier keelboats. The fractional-rigged Rhodes 18 is raced with any combination of mainsail, jib, genoa, and spinnaker. According to Peter Eastman, six-time winner of the Rhodes 18 Nationals, about 25 boats turn up for the competition. Eastman is fond of sailing the Rhodes 18 because “it is a family kind of [sailboat] class.”
It is unknown how many wooden Rhodes 18s were built, but they are rare today. Despite all that I have said about the graceful and handsome wooden Rhodes 18, the truth is that the wooden version of this daysailer is a dying breed. According to Eastman, only a handful of them still exist, and only two wooden boats that he knows of are still sailing. Many boatbuilders dream of coming across a rare boat tucked away in an old barn somewhere, but unless you are willing to obtain plans from Mystic Seaport and undertake an extensive building project in wood, a new or used fiberglass Rhodes 18 may be the only realistic way to enjoy this classic daysailer.
Donald Sorterup
Richard Van Voris of Massachusetts completed a fine restoration of PYG, one of a handful of surviving wooden-hulled Rhodes 18s. Philip Rhodes was an early advocate of fiberglass construction, and in 1948 production manufacturing of his 18-footer began in that material.
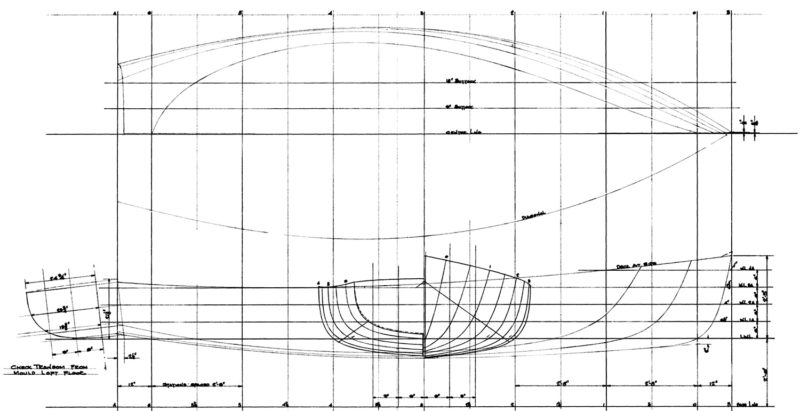
Building anew, of course, is not out of the question for an experienced builder, and constructing a Rhodes 18 could be the experience of a lifetime. To learn more about the construction of the boat, I ventured to the Daniel S. Gregory Ships Plans Library at Mystic Seaport, Connecticut. The collection includes more than 300 designs by Philip Rhodes, including the Rhodes 18, which is his design No. 448 and Mystic Seaport’s Catalog No. 80.132. In 21 separate sheets, Rhodes supplied every necessary detail, although the original construction plan (sheet No. 14) is in very poor condition.
Rhodes’s original specifications called for a 5⁄8″ galvanized steel centerboard or an iron ballast keel. The timber keel was to be either white oak or longleaf pine, with continuous white oak frames 7⁄8″×7⁄8″ on 8″ centers, and with 5⁄8″-thick cedar carvel planking fastened with bronze or Monel screws. He called for varnished mahogany trim, canvas-covered plywood decks, Sitka-spruce spars, stainless-steel rigging, and bronze fittings.
Should time constraints or a lack of experience preclude the “build it yourself” approach, another option might be to save and restore an existing Rhodes 18—if one can be found. This is a quicker way to get out on the water on a wooden Rhodes 18 while retaining some of the hands-on experience of boatbuilding and all of the satisfaction of restoring a classic, as my friend Richard found with PYG. He sistered or replaced frames, replaced her mast and sails, rebuilt her center-board trunk, and duplicated or renewed many of PYG’s wooden structural and trim pieces. Essentially, PYG is as good as new!
Philip Rhodes drew the 1938 plans for the Rhodes 18 for construction by the Cape Cod Shipbuilding Co., which built them initially in wood, starting fiberglass construction, including a later fin-keel variation, in 1948. Like all of Rhodes’s plans, those for the Rhodes 18 reside at the Daniel S. Gregory Ships Plans Library at Mystic Seaport in Connecticut.
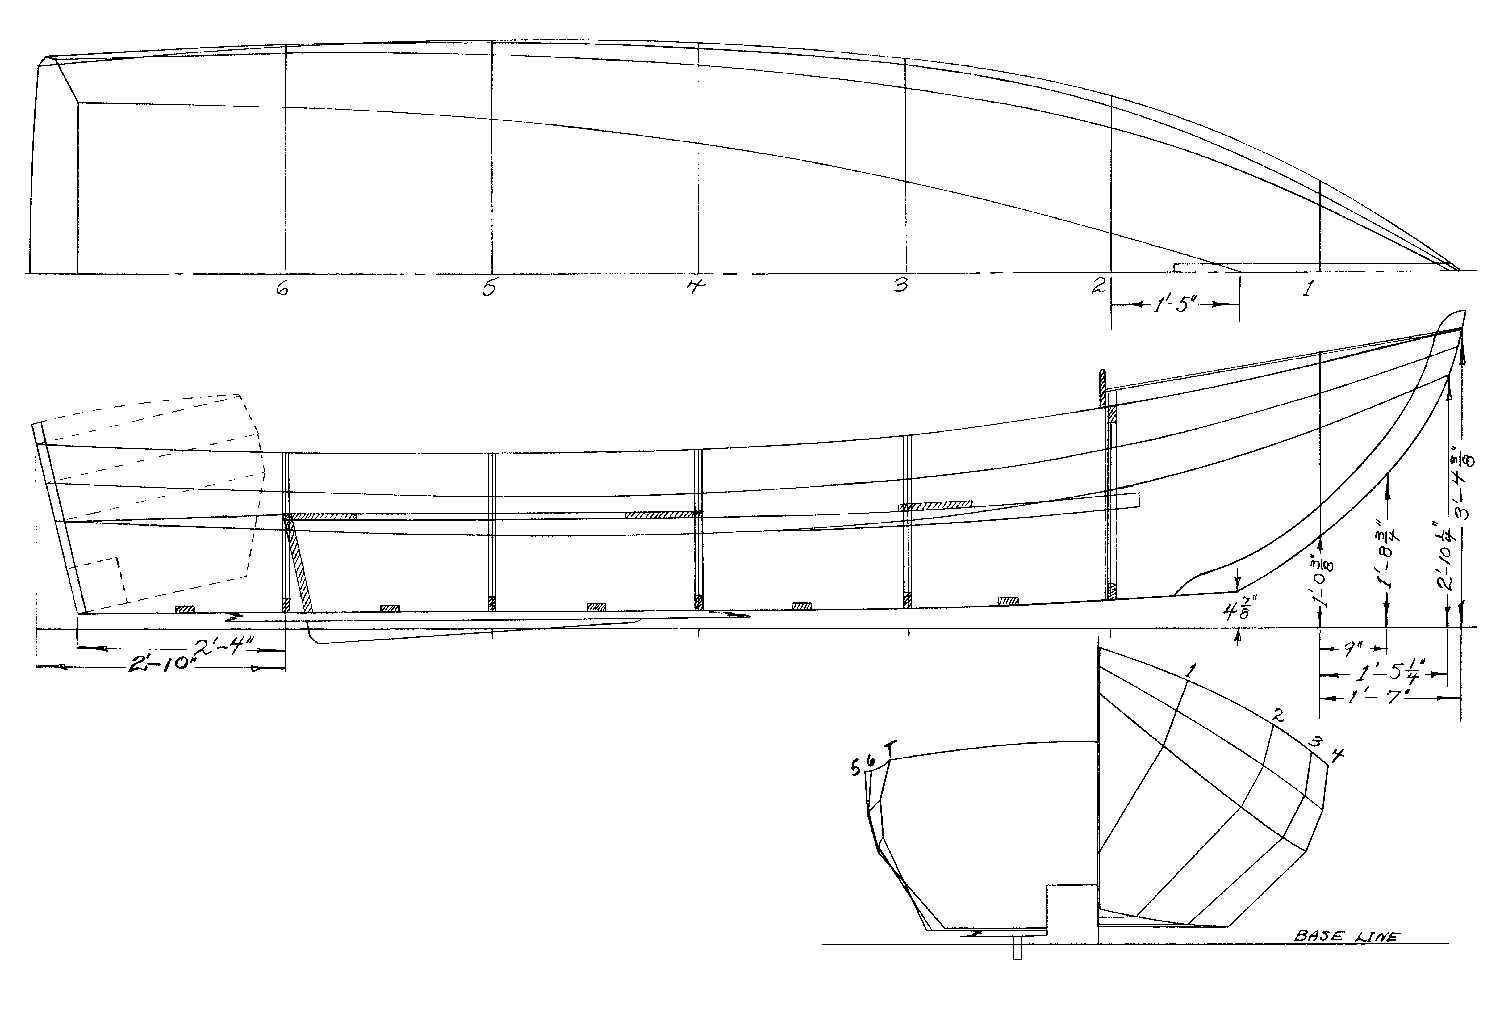
Particulars: LOA 18′, LWL 16′, Beam 6’3”, Sail area 162 sq ft
Dories, dories, dories. Perched above the mighty Merrimack River on Main Street in Amesbury, Massachusetts, Lowell’s Boat Shop is a boatshop built by dories, many thousands of dories over a great many decades. The building one sees today is old in a general sense but, dating to around 1860, it wasn’t erected until about 67 years after Simeon Lowell started building boats on the site in 1793. By the time Simeon’s progeny had more or less perfected dory mass-production methods in the mid- to late-1800s, the shop’s capacity was staggering. Figures burned into a wooden beam indicate that in 1911, 2,029 boats were built, probably a record.
The Lowell model under discussion here might be thought of as the answer to this question: What do you get when you cross a Lowell dory with an outboard motor? Answer: a Lowell Amesbury Skiff.
“Our design,” said the shop’s lead builder, Graham McKay, “is essentially a Lowell Surf Dory from the middle part of the boat forward.” The Surf Dory (see Small Boats 2011) is “round-sided” by comparison to Banks fishing dories. (“Knuckle-sided” is considered a more descriptive term as the frames are not curved but have variously angled flat sections where planks attach.) But what about the Amesbury’s hull shape from amidships to transom? That’s where the skiff part comes in. While the Lowell Surf Dory’s hull narrows to a traditional tombstone transom at the stern, the Amesbury Skiff remains beamy from midsection to stern, and the flat bottom ends at a broad transom. The result is an outboard hull that will plane. It’s a boat type known generically as a “dory skiff” or “semi-dory,” though not all such boats are as decidedly outboard-oriented as this one.
The Amesbury Skiff is offered in models ranging from 12′ to 20′. Like other Lowell models, this one is built upright using the old, original patterns for frames, stem, and bottom, along with the garboard, or lower-most, plank, thus ensuring a certain level of both labor efficiency and consistency. This means, of course, that Lowell’s builds completed boats but does not have plans available, although a similar boat was documented by John Gardner in his The Dory Book, and the plans are reproduced here.
Stan Grayson
Instead of using plans, Lowell’s Boat Shop relies on tried-and-true patterns developed and refined over time for every piece of each type of boat.
What may come as a pleasant surprise to many is that this wooden boat can live happily on its trailer. “What you see,” McKay said, “is essentially a traditional boat atop a plywood and epoxy foundation.” Such newfangled yet useful innovations were introduced after Lowell’s was sold in 1976 to the late Jamieson “Jim” Odell. Odell was an out going, remarkably insightful man who combined business and engineering experience with a passion for wooden boats. Odell introduced epoxy, marine plywood, and fiberglass cloth to the shop’s repertoire of materials. The caulked fore-and-aft bottom planking typical of dory construction was replaced by Lloyd’s-certified meranti plywood. Plywood is also used for the garboard strakes. The outside of the hull is ’glassed with 6-oz cloth from the garboards down. On the interior, the bottom, the lower portion of the frames, and the lap between the gar board and the broad strakes, which are the second plank up from the bottom on each side, are all coated with epoxy.
These maintenance- and leak-reducing innovations are combined with traditional dory construction elsewhere in the hull. The knees and stem are oak, the frames oak or locust. Plank stock is Atlantic white cedar, pine, or cypress, depending on preferences. Bronze ring nails fasten the planks to the frames, while the laps—where one plank overlaps the other—are fastened with copper rivets.
Putting together a boat in this fashion according to techniques practiced by long-gone generations of Lowell craftsmen would be more of a challenge than it is without Jim Odell’s foresight. Odell made sure that longtime builder Fred Tarbox stayed on to teach the “Lowell way,” and the collective wisdom of the past was preserved in a big three-ring binder known at the shop as The Book. “The Book,” McKay said, “was the key to making it possible for those coming here after the Odells to be able to build a boat that carries on the shop’s unique methods. We call those methods ‘Lowellisms.’”
Space doesn’t permit going into detail about Lowellisms, but they describe a basic dory construction in which planks fit flush to the flat portion of the frames only at the laps, resulting in what McKay calls a “certain amount of desirable flexibility.” There is a prescribed method for using a straightedge to measure up from specific points on the bottom as an efficient way of outlining planks. The Book has instructions for how much to “tip out” the forward frames to deliver the desired spray-reducing flare in each hull. A note instructs to alter the rocker—the longitudinal curve of the bottom—to make it slightly “negative,” or bend downward, for the aft end of the 14′ Amesbury Skiff’s bottom, as is done on the other models to improve performance on plane.
Stan Grayson
The larger skiffs, like the 16-footer shown at left, have center-console steering, and this boat also has enclosed storage beneath the forward seat. The boat is stoutly built, with white oak for the stem, breasthook, rails, and stern knees, and with its plywood bottom and cedar topsides, it is tough and easily trailerable.
Each Amesbury Skiff is fitted out to meet individual preferences. The 12′ to 14′ models are tiller steered, but those 16′ or longer are usually set up with consoles. A storage locker is built into the bow thwart and other thwarts as desired. McKay is ever watchful regarding weight distribution. “We just did a 13-footer,” he noted, “and because of the enclosed stowage compartments the owner wanted back aft, we compensated by mounting the battery and fuel tank in the bow locker to even out the weight.”
Three finish levels are offered. The standard all-paint finish includes a primer coat and three top coats. Yacht finish includes varnish on the transom, rails, and thwarts. The shop will also deliver a boat with just the primer coat and encourages some customer participation in a boat’s construction.
We had a chance to use the 16′ model on the Merrimack one splendid day in September. While dories can be tippy when boarding, the Amesbury Skiff is quite stable. That can be particularly important in a family boat that may often have non-boaters aboard. This hull is very easily driven and certainly doesn’t require its rated maximum horsepower—35 hp for the 16-footer—to deliver satisfying yet economical performance. I’m afraid that we rather exceeded the river’s speed limit for a brief period and have it on good authority that 25 hp will drive the 16′ to over 25 mph while 40 hp will push the 18′ to the high 30s or more. Such velocities, however, are largely academic, for this is not a speedboat. The Amesbury Skiff will be at its best for all manner of less frantic explorations, family outings, fishing, and utilitarian purposes.
We encountered no seas on our river journey, only a few wakes through which the well-balanced boat rode smoothly. With the hull banked into a turn, the lapped planks add stability. One gets the impression that the boat possesses enough seaworthiness to venture beyond the river’s mouth in fair weather. Typical of most flat-bottomed boats, this one requires some practice to dock gracefully in a breeze. Twin skegs mounted on the bottom aft certainly are a plus in this regard. This is a boat that will teach the newcomer nuances of powerboat handling and seamanship while rewarding the more experienced with its capabilities. Of course, a pair of good 8′ to 9′ oars should be kept aboard. A 16′ or 18′ Amesbury Skiff is no rowboat, but, if necessary, either can be rowed from the forward thwart.
A wooden “dory skiff” like this, professionally built of both solid lumber and plywood, is a comparatively rare commodity these days. Yet, one can acquire a 16′ model with console for around $11,000 to $13,000 and then have it rigged with the preferred motor. Right now, I’m picturing a white hull with a buff or light gray interior, painted or bright rails and a shiny, white, 25-hp Evinrude with power trim and tilt. A fully equipped 16-footer would probably weigh around 600 lbs, making it readily trailerable behind even a small vehicle. For that reason, a nice-fitting cover should be included in the budget.
The Amesbury Skiff represents good value in a salty boat that will both teach and provide years of stress-free enjoyment. If you’re debating ordering one, remember the words of America’s great poet John Greenleaf Whittier, who lived in Amesbury from 1836 until his death in 1892 and who frequently walked up on Friend Street—sometimes accompanied by his pet squirrel, Friday:
“For of all sad words of tongue or pen, The saddest are these: ‘It might have been.”
The lines plans shown here for a 16’ outboard-powered “semi-dory” were published in The Dory Book (International Marine, 1978) by historian John Gardner, who called it “a big, small boat.” The plans, which are shown for comparison, describe the alternative of an outboard well (which Lowell’s also offers) and the author felt 15 hp would be “useful and normal.” 16′ Outboard Semi-dory Particulars: LOA 16′, Beam 6′ 5″ Lowell’s Boat Shop 16′ Amesbury Skiff (plans not available): LOA 16′ 1″, Beam 6′ 5″, Depth amidships 21″, Weight ~300, Rated hp 35 Note: The boat is available in lengths of 12′ to 20′.
The Redbird canoe has been around for almost three decades. It’s a timeless design that people just keep building. Designer Ted Moores of Bear Mountain Boats first published the plans for this boat in 1983 in Canoecraft, a handy book, still in print, that tells you everything you need to know about building a cedar-strip, epoxy-glued canoe. It includes plans for seven different canoes, including Redbird.
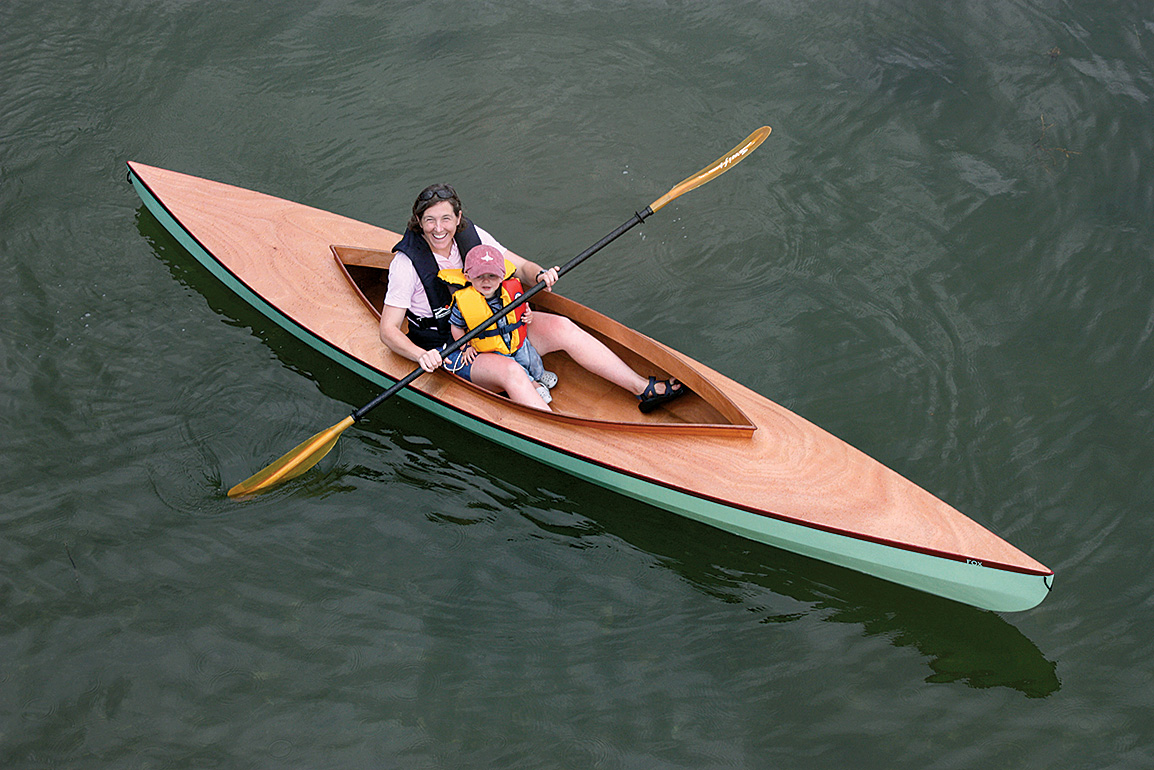
A Redbird canoe is a beautiful thing, with a sweeping sheerline terminating in boldly uplifted ends. Her fine entry widens gently into a moderate vee, giving onto a flattened U-shaped midsection. A slight tumblehome adds lateral strength and allows outwales wide enough to turn aside waves and spray. The boat paddles easily, can carry a mighty load, and tracks straight and true.
Redbird is a touring canoe, which means she doesn’t turn as quickly as more nimble whitewater models. For whitewater maneuverability you would need a canoe with more pronounced rocker. So, if you have in mind such use, with the ability to make rapid changes of direction, a Redbird is not the ideal choice. She doesn’t mind a bit of rough water, though. In his notes accompanying the design, Ted Moores writes: “The Redbird has proved execeptionally seaworthy, even in the heavy seas around the Magdalen Islands in the Gulf of St. Lawrence.”
The Redbird’s sides have a modest tumblehome; this shape adds strength to the hull, and it allows for wide outwales to deflect spray. Jay Burreson built this boat.
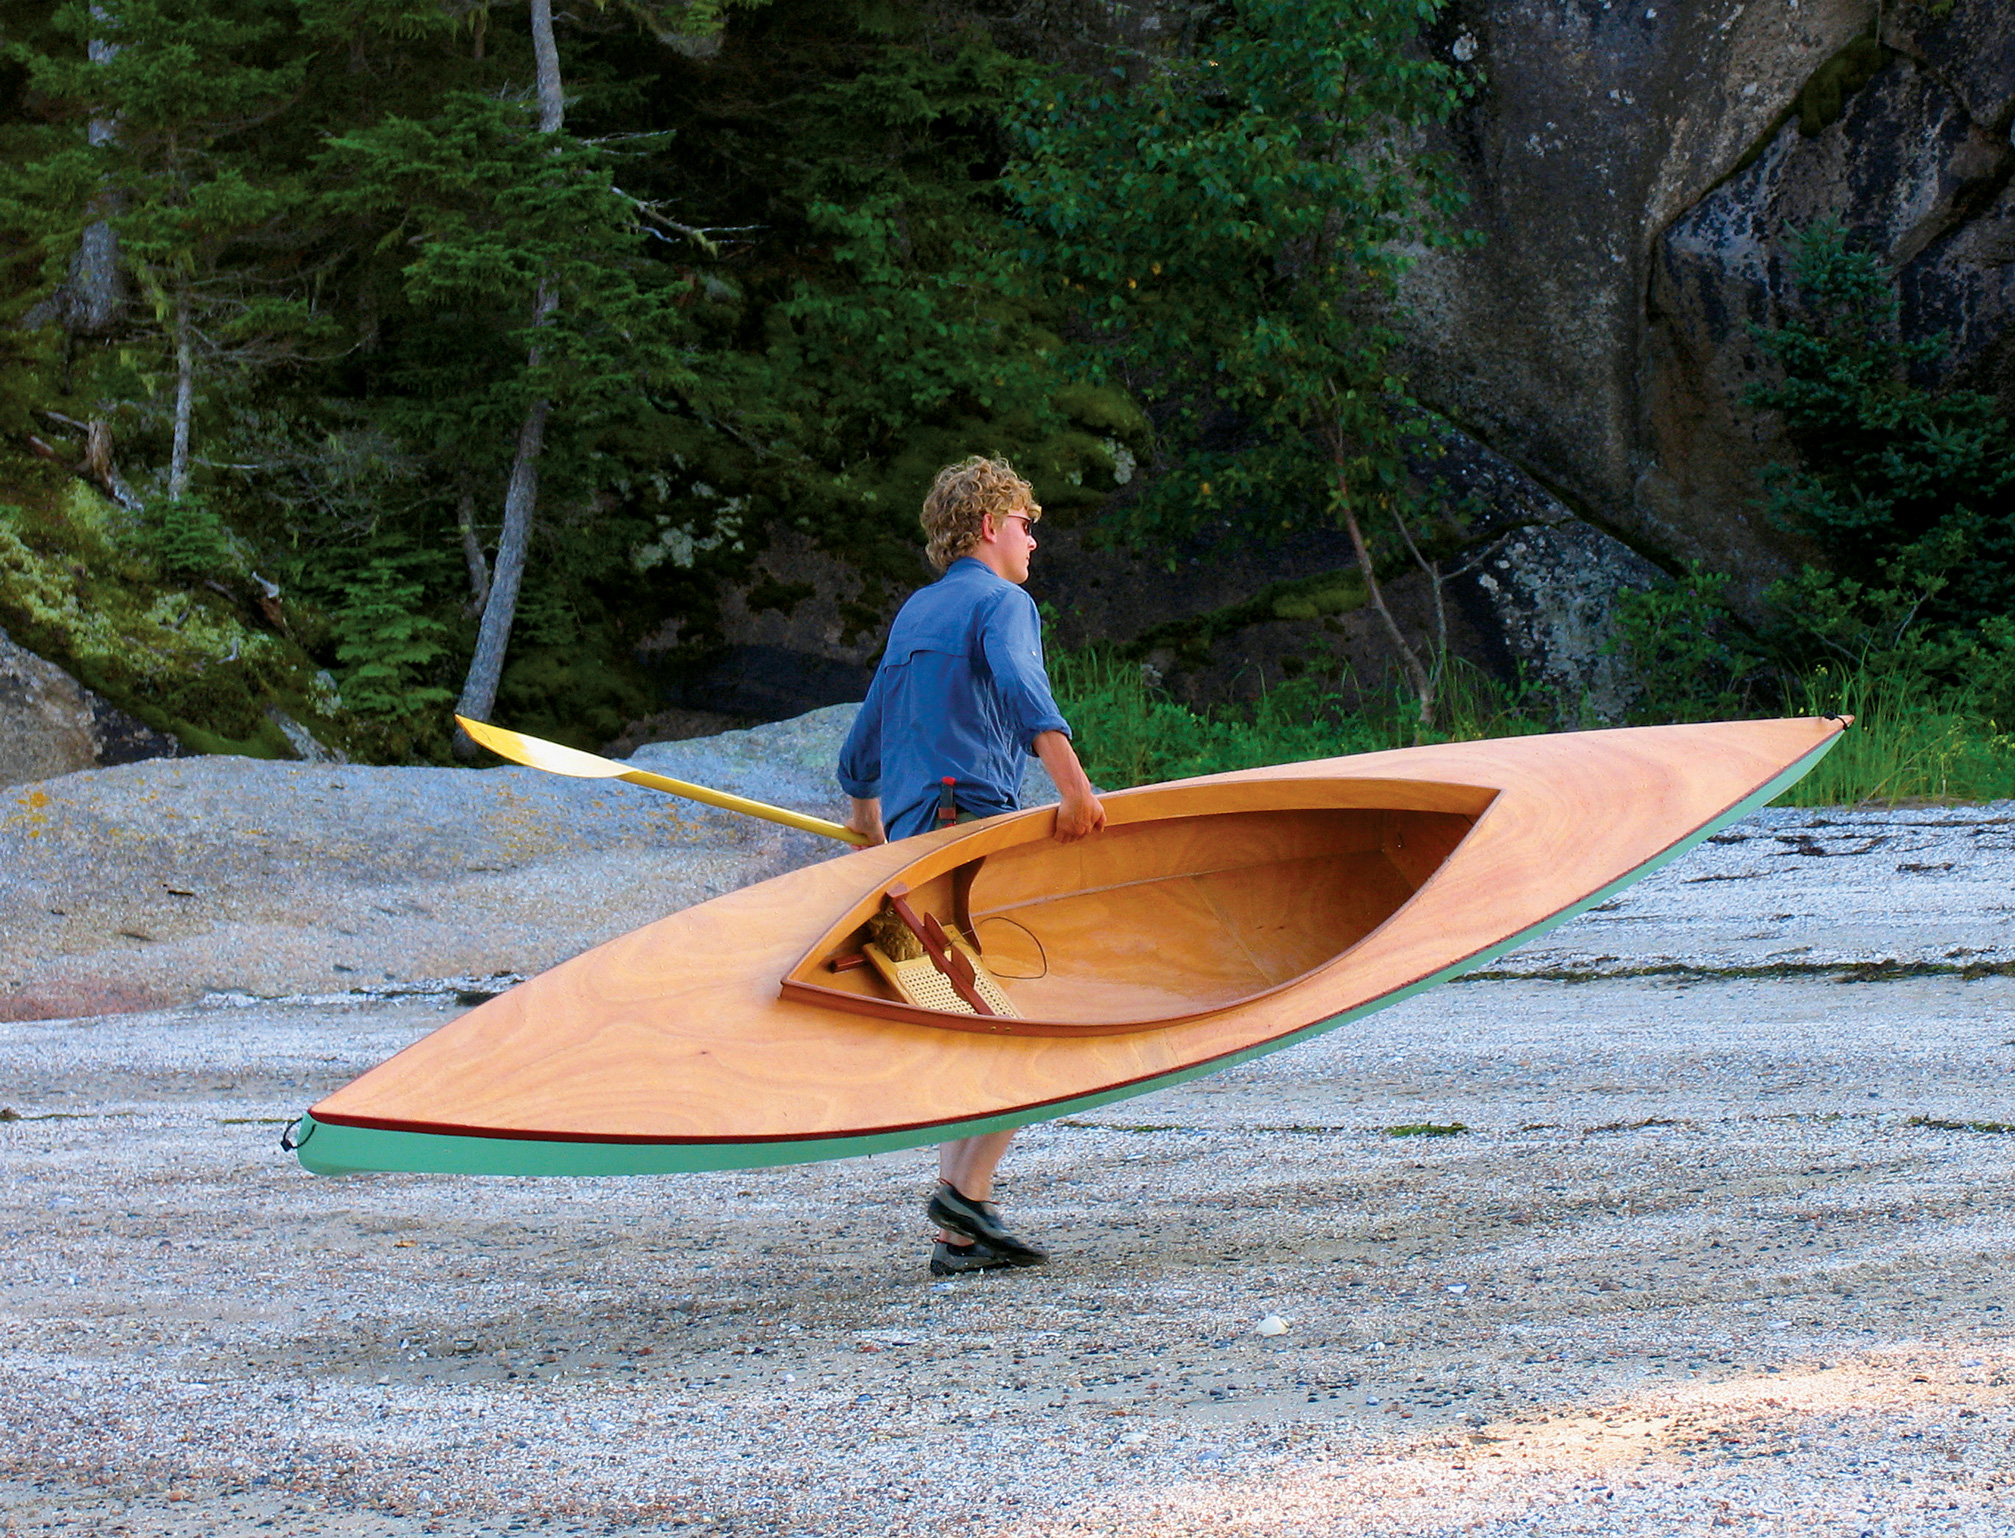
Before continuing, I should present my credentials. I’ve had a lifetime’s experience messing about in boats, from cruising my own boats around Australia and the Pacific to round-the-buoys yacht racing. When I decided to build a canoe 12 years ago, I knew a lot about maintaining boats but I’d never actually built one from scratch; I was handy with woodworking tools, but no master craftsman. In that regard I suspect I may be a typical Redbird owner.
I chose the Redbird because I liked the look of her. I knew I didn’t want to shoot rapids, so her straight-tracking touring qualities seemed right for me. Ted Moores’s book guided me methodically through the building process, from setting up a workshop, to reading the table of offsets, making the molds, gluing up the cedar strips, ’glassing the hull, and finishing off.
All went well except for some minor flaws in the ’glass sheathing. This was not Ted Moores’s fault. His instructions are very detailed and thoroughly illustrated. He does point out, however, that “only experience can teach the proper timing” when wetting out the fiberglass cloth. He’s right there. I ended up with a couple of cloudy areas and some small patches where the epoxy had failed to soak into the wood sufficiently. I could have lived with it, but instead I decided to paint the outside and leave the inside bright. No one knows that I didn’t plan it that way.
Some Redbirds I have seen are works of art, where the builder has carefully selected the color of the cedar strips to add accents, such as a differently colored water-line or cove line. Undoubtedly, one of the most appealing things about this form of construction is that you can finish the boat bright and enjoy the subtle beauty of the wood. With a skillful ’glassing job and the recommended cane seats, a well-built Redbird canoe is akin to a piece of fine furniture.
The Redbird’s cedar-strip construction is within the reach of beginning boatbuilders—especially those who keep Ted Moores’s book Canoecraft close at hand.
Cosmetic flaws aside, my Redbird performs very well indeed. My wife and I have done several camping trips in lakes and slow-moving rivers. With a tent, sleeping bags, air mattresses, fold-up table, two folding chairs, a box of food and utensils, a cooler filled with ice, food, and drink, and a camp stove, we do not travel light. The boat has sometimes been so loaded that there has barely been room for the paddlers. Despite the extra weight, we have been able to paddle for hours on end without the trip being too arduous. Once you get moving, the momentum carries you along. Of course, I’m talking about sheltered waters, as it would be foolhardy to load a canoe like this in rough water.
Paddling two-up without a cargo is a sweet experience. It’s positively therapeutic to glide along close to shore with barely a sound, sneaking up on waterbirds or perhaps surprising a kangaroo who has come down to the shore to drink. I live in Australia, by the way. There are quite a few Redbirds here—and kangaroos.
Lesson number one in solo canoeing is the J-stroke. The paddler thrusts the boat ahead with the paddle. If the paddle were on, say, the port side, the boat would steer to starboard if the stroke ended with that. But, as the name implies, the paddle follows a J pattern, thus compensating for the steering tendency. Once this has been mastered, the boat tracks well—especially with two paddlers. As is characteristic of canoes of this type, paddling alone in a breeze can become more of a challenge: With the paddler kneeling more towards the center and the boat lightly laden, those high ends can make her quite twitchy.
In correspondence with other Redbird owners on Internet forums, some have commented that the boat is a little tippy. One owner added the rider that he is a big man and perhaps his seats were a little high. From my own experience I would not describe the Redbird as “tippy.” I’ve found that in rough water, stability is improved by adopting the standard canoeing technique of kneeling on the bottom to paddle, thus lowering the center of gravity. The difference this makes is quite remarkable.
Redbird Canoes have been built all over the world. Here we see one built by an American diplomat, Jack Diffily, in Belize; the boat is competing in that country’s distance race, La Ruta Maya.
My Redbird weighs about 65 lbs, which makes portaging theoretically possible. I confess that I never have done this, and I wouldn’t like to try it. I think it would be hard work.
Cedar-strip construction can take a lot of punishment. You would have to hit something really hard, such as a rock in fast running water, to hole the hull. If the worst happens and you do hole the canoe, there is a section in Canoecraft devoted to repairs.
Redbirds have been built in the most unlikely places. Jack Diffily, the U.S. Chargé d’Affairs at the U.S. embassy in Belize, came across a copy of Canoecraft at his previous posting in Togo, West Africa. He helped a buddy build his Redbird, and when Jack was posted to Belize he took a bunch of cedar strips and ash with him. Using Ted’s book he built a Redbird of his own.
Jack paddles the canoe on the Belize River. For the last two years a team of American and Belizean embassy staff have entered the Redbird in the annual La Ruta Maya. This is a 180-mile race held over four days on the Belize River. They came sixth in the pleasure craft division out of 76 finishers. Like me, Jack has been delighted with the canoe’s performance. And it’s had an unexpected benefit. “I had no idea the canoe would be such a catalyst for pulling our Embassy folks together and for so many people to have so much fun along the river.”
It’s hard to say how many Redbirds have been built. Certainly hundreds; probably thousands. The sheer number of them in use all over the world is a testament to the design.
The Redbird has a moderate amount of rocker to its bottom, no keel, and a relatively long waterline. These traits combine to makes the boat fast and responsive—though not as nimble as a whitewater boat.
The Salty Heaven is a 17′ by 5′ 9″ cat-yawl intended for day-sailing and camp-cruising. Her Australian designer, Mikey Floyd, is an admirer of traditional working boats, which used to go about their business using a minimum of fancy gadgetry. There are only four strings to pull: two halyards and two sheets. Roll her off the trailer, erect the two unstayed masts, slide the boomkin and rudder into place, hoist sail, and you’ll be on the move within 15 minutes.
The sails are standing lugs, a rig which has proved itself over centuries in working boats, where trouble-free practicality is a commercial imperative. They are carried without booms, which has pluses and minuses. On the plus side, there’s nothing solid to beat passengers over the head during maneuvers. You still need to be careful of the blocks attached to the clew of the main-sail, but their positioning is such that they are generally out of the way of both skipper and crew. Advocates for booms point out that you cannot run directly downwind without them. Indeed, if you try, you risk the dreaded death roll, which on a boat that can capsize is to be avoided at all costs. On a Salty Heaven, you make your way downwind in a series of broad reaches—so-called “tacking downwind.” Modern racing boats often adopt the same tactic; you sail farther, but you get there faster.
A Salty Heaven looks old-fashioned, with a straight stem and a nice sheer terminating at a pretty wineglass transom. Her raked masts give her an air of elegance and purpose. This boat would not have seemed out of place drawn up on the beach beside an English fishing village a century ago. But, look closely: Her lapped marine plywood planks are fastened with glue rather than nails and roves. In fact, thanks to the wonders of epoxy, there are hardly any mechanical fastenings in the entire boat.
Paul Boocock
After reefing, a simple toggle-and-eye makes reattaching the sheet easy. Note rope-stropped block; hardware is kept to the minimum.
Mikey Floyd designed the first Salty Heaven 11 years ago for himself. After a lot of use in a wide range of conditions, subsequent plans were slightly altered. The planking size was beefed up from 1⁄4″ to 3⁄8″, and the seven frames now run from gunwale to gunwale. Previously they were more like extended floor timbers. The original boat had a separate skeg. Subsequent boats are planked down to the heel. The original daggerboard was replaced by a pivoting centerboard.
In keeping with the designer’s wish to keep things simple, there are few bolt-on fittings. Fairleads are fashioned from hardwood. The halyards are made fast on wooden belaying pins, held in place by Turk’s heads. To link the tiller to its extension, a piece of line is passed through the tiller and led to a hole in the end of the extension. It is then knotted at both ends. Even the sheaves in the wood-shell blocks are made from hardwood. The bronze rudder fittings and the oarlocks are the only manufactured items. Of course, a home builder could use more off-the-shelf fittings if desired.
You may suppose that all this old-fashioned technology makes for a clunky sailer, but this is not so. I’ve owned my Salty Heaven, JESS, for nine years and the more I sail her, the more I appreciate her qualities (see WoodenBoat No. 176). She will move in a zephyr and, provided you rig her to suit, she will keep on sailing in up to 30 knots of wind. The first reef goes in at about 15 knots, the second at 20, and the third at 25. If things get desperate there are two rows of reefs in the mizzen as well. Sailing in 30 knots is not recommended in an open boat, but if necessary it is possible. I carry two canvas bags that I can fill with sand to augment the 110 lbs of lead ballast permanently installed. No matter what the conditions, the boat remains well balanced and manageable.
Paul Boocock
Halyards are made fast to wooden belaying pins. Fairleads and the grommet in the tack of the sail (not shown) are also wooden.
As with any open boat, you need to reef in good time and to be constantly alert when it’s blowing hard. Once or twice when I’ve been lazy about reefing, I’ve dipped the rail and shipped a few bucket loads of water. With the mainsheet started, the little mizzen screws the boat around head-to-wind where she waits patiently while her foolish owner bails her out. The design calls for two blocks of foam buoyancy strapped underneath the side seats. Testing these in a deliberate capsize, Floyd confirmed that the boat will float with the top of the centerboard trunk clear of the water.
Going downwind it’s a good idea to raise the centerboard so that the boat will not trip. Once or twice on a hard reach, again with a bit too much sail up, JESS has been on the verge of being overpowered. The trick is to bear away. The boat heels, then skids sideways for a moment or two before the hard turn of the bilge pushes her back on an even keel. During these somewhat nerve-wracking moments, she maintains fingertip control.
Paul Boocock
Designer Mikey Floyd sailing his original SALTY HEAVEN on Pittwater, Sydney, Australia.
In practice, these boats are so forgiving that it would require a catastrophic situation for a complete capsize. Sailed conservatively, Salty Heavens are stable and predictable. I should mention, though, that the crew can get a wet ride going to weather, from spray thrown back over the windward side of the boat.
Salty Heavens are a lot of fun to sail singlehanded. True to their workboat heritage, they are also willing load carriers. Four (or, at a pinch, six) passengers or a big load of camping gear are no problem. In fact, the boat seems to like the extra weight.
The designed draft is 8″. With the centerboard and rudder pivoted into the raised position, you can skim through the shallows into little hideaways that are barred to most boats. When you find that hidden anchorage, if you wish to sleep aboard you will not be able to lie down on the sole; the thwarts get in the way. Sleeping space can be achieved by using inserts between the thwarts.
The boat is intended for use with sails and oars. I suppose you could attach an outboard motor, but it seems to me that that would spoil a graceful design. I have rowed my Salty Heaven for five miles at a stretch in a dead calm, but it’s hard work. You need only the slightest breeze to put away the oars and carry on under sail.
Paul Boocock
A pair of Salty Heavens hard-pressed. Time for the first reef.
Glued lapstrake is a popular and proven method of construction. The pages of WoodenBoat contain hundreds of successful boats that have been built by amateurs using the method. Even so, lapstrake construction is a challenge for a novice. A search of WoodenBoat’s archives will turn up how-to articles, with useful advice on such things as spiling the planks and fitting the gains. Another good resource is the Clinker Plywood Boat Building Manual, by Iain Oughtred, available through The WoodenBoat Store. The book takes you through the whole process step by step with clear instructions and plenty of illustrations.
Much has been written about coating wood with epoxy to seal it off from moisture. The designer, who is a trained shipwright, disagrees, maintaining that the epoxy will eventually crack. When water inevitably soaks into the wood, it may then be trapped. When finishing off the Salty Heaven, he recommends using paint and varnish, and keeping the coatings in good condition. On Mikey’s own boat the varnish has been replaced with a mixture of linseed oil and pine tar.
Why a two-masted rig on a 17′ boat? The spread-out rig keeps the center of effort low, so the boat heels less than if it carried a single, tall stick. Some might argue that the mizzen is so small that it doesn’t earn its keep. If she were ketch rigged, the larger mizzen would sit right in the middle of the working part of the boat, where it would be much in the way. The yawl leaves the space clear. The mizzen is especially useful when reefing. Sheeted in hard, it holds the boat’s head into the wind while you drop the mainsail to tie in the reefs. Salty Heavens carry their mizzen stepped off to one side so as not to interfere with the tiller.
To sum up: The Salty Heaven is responsive and fun to sail, without the demands of a modern high-performance sailing dinghy. She’ll take you for an afternoon solo sail, carry a few friends down the bay for a picnic, or accommodate one crew and a load of camping equipment on a week’s camp-cruising. She’s a good, wholesome all-rounder.
Salty Heaven is a surprising blend of resourcefulness, tradition, and performance. The boat is intended for day sailing and camp cruising, and most of its hardware and fittings are shop-made. Simple lug sails set on unstayed masts
Particulars: LOA 17”, Beam 5’9”, Draft 8”, Sail area 146 sq ft
—-
This boat profile was published in Small Boats 2012 and appeals here as archival material.
Here in Seattle, we ended July with six consecutive days of 90-plus degree heat—a new record. That is by no means as hot as other parts of the world, but it has been a sobering event here. On the first day of the heat wave, I had gone kayaking. The air was cooler by the water and if I got hot, all I had to do was dip my hands and hat in the water. During the last two days of the heat wave, smoke from wildfires in British Columbia tainted the air a blue haze and the faint smell of wood smoke. Kayaking and all other forms of outdoor exercise weren’t advisable so I was stuck at home. I don’t have air conditioning—most old houses in Seattle don’t—so I got by with fans, an air purifier, and a spray bottle for a cooling mist of water. Even so, the heat and the confinement were stultifying. Thinking there might be some truth in the saying “where the mind goes, the body follows,” I pulled out the color slides of the kayaking trip I took in Greenland 20 years ago. Peering through the loupe at the luminous blue icebergs and the chalk-white glaciers provided the escape I needed.
Photographs by the author except as noted
There were nine of us in the group. Here, from left, are Jette and Ole from Denmark, our guide Baldvin from Iceland, and Barbara and Randy from the U.S. They had rafted up for a snack break while paddling north along Sermiligâq Fjord. Randy tried his luck at fishing but never caught anything.
In the summer of 2012, I joined guide Baldvin Kristjansson and seven other paddlers on the southeast coast of Greenland to paddle the 30 miles from the village of Kuummiit to the Knud Rasmussen Glacier. There were icebergs around us from the very start, but they were just bergy bits and growlers—as the smaller floating blocks of ice are called—and few were any larger than the kayaks we paddled. They were interesting as a novelty to me as an outsider, but what captivated me was the color of the water around the kayak. If I looked straight down, the dark reflection of my head obscured the reflections of the clouds and sky, which masked the surface like a film of oil. The water was immaculate, limitless, and a hue of green that I have only seen when I catch a glimpse into the edge of a plate-glass door. It was hard to take my eyes off it.
Collection of the author
Erik, from Belgium, and I paddled one of the Feathercraft folding double kayaks. We were both journalists and constantly taking photographs. We would sprint ahead of the group, stop and take pictures as they approached and passed by, and then dart ahead again.
The closer we got to the glacier-fed north end of Sermiligâq, the more icebergs we saw. Many of the peaks flanking the fjord reached heights approaching 4,000′.
Icebergs that have rolled take on a blue color when the part that has been submerged rises above the water. The blue berg on the left has been undercut, creating an overhang parallel to the water.
In some places, icebergs as big as city blocks were clustered in groups with avenues between them.
On our second day out, we made camp on a tennis-court-sized patch of flat ground on the north side of Iqateq Fjord. Along the shore there were a few blocks of ice as big as washing machines, and as smooth and translucent as molten glass. In the evening, I hiked up the ridge above the campsite. There were no trees anywhere, just a tangle of tightly woven ground cover that didn’t even grow high enough to snag a boot. From the highest point I reached, I had a good view of the fjord where a half-dozen sugar-white icebergs almost imperceptibly drifted with the ebb tide. Qîanarteq Island hems in the far side of the fjord, and its dull brown flanks mirrored the slope I had climbed. A boat motored in from the east, leaving only a faint gossamer streak of white as its wake. The boat itself was just a speck and the sound of its motor was swallowed up by distance. My realization of the scale of the landscape around me changed in a dizzying instant. The land, the water, and the ice were three or four times larger than they had appeared. The icebergs were not as big as gymnasiums as I had thought; they were as big as stadiums. The fjord was not a few hundred yards across; it spanned nearly a mile.
That experience gave me some insight into inukshuks, the stone cairns that the people of the Arctic have built to mark travel routes, campsites, and other resources. The word is made up of inuk (person), and suk (substitute or stand-in). Some were even made to resemble the human form with legs, outstretched arms, and a head. Not only would they have been an easily recognized mark in a treeless landscape, but they would also stand in for a person and any manmade structure to offer a sense of scale and distance.
By the time I got back to camp, I had broken a sweat. While the others in the group were warming themselves in the kitchen tent with hot tea, I chipped some ice from a waist-high bergy bit on the shore and filled my cup with cold water. The ice fizzed as it melted, releasing air that could well have been trapped in it for thousands of years.
After a lunch break at the north end of Sermiligâq, we headed toward Knud Rasmussen Glacier. Judging the scale of Greenland’s landscape is challenging; I couldn’t fathom that the face of the glacier was 1-1/2 miles wide and 4 miles away.
The day that we paddled the last 10 miles to the glacier, we passed dozens of large icebergs. A few times we heard the rush of falling water as a berg began to roll. The ice that had been above the water was white and the once submerged ice that rose to replace it was light blue, as if Windex or mint mouthwash had been frozen into it. When some bergs rolled, ice turned transparent by being underwater revealed streaks of obsidian black inside. Other bergs that rolled had their history incised in them where ice at the water’s surface had melted quickly, leaving overhangs. Some had a few parallel bands created as they rose, lightened by the meltwater dripping from the top during the day. Others had intersecting grooves, a new one carved after every roll.
The north side of the inlet leading to the glacier is guarded by an extraordinary face of near-vertical rock. I often asked our guide Baldvin if he knew the names of the geographical features we encountered. I asked him “What is that big cliff called?” He gave me the Greenlandic name and I asked for the English translation. “Big Cliff,” he said. Most of the places we saw had practical and descriptive names like Windy Point or Camping Island.
The air was still on the afternoon that we paddled to the glacier and the quiet undulations in the fjord stretched the reflections of the escarpment into bar-code stripes of white and gray. The 1-1/2-mile width of the glacier made its height hard to judge. Even if there had been an inukshuk next to the south side of the glacier where we were going to camp, it would have been rendered invisible by the 4-mile distance we had to paddle to get there. I don’t know how far we stayed from the face of glacier; it seemed like a few hundred yards, but it might have been closer to a mile. We didn’t see any massive icebergs calve from the glacier, but when smaller bits of ice broke off and fell, they seemed to drop in slow motion.
As we got closer to the glacier, we could see the river of ice that was calving the icebergs that drifted out of the inlet, driven by wind and tide.
The still water at the glacier face made the wall of ice seem much closer and lower that it was. The cliff of ice was around 180′ high.
The Knud Rasmussen Glacier is fed by a labyrinth of ice-filled valleys. Some of the ice descends from an elevation of over 3,000′.
We didn’t see any large ice falls while we were paddling along the glacier face at a safe distance, but when the ice cracked it sounded like gunshot.
That night, at a campsite a few hundred yards from the glacier, a pale green aurora borealis lit up the sky and the river of ice cracked and boomed as it spilled itself into the sea.
Looking at my slides and recalling my memories of Greenland’s landscape of ice helped me escape from the stuffy summer heat in Seattle. But it worries me to think it was only a glimpse of a time that has gone by and a landscape that now exists only in my handful of slides.
The Cornish Shrimper 19 is a successfully odd little boat. Odd because of its almost-plumb stem, square-shouldered bowsprit, near-vertical hull sides, a flush deck that wondrously scrunches a usable cabin underneath itself, a peculiar pair of deadlights peering like a shark’s eyes from just under the rubrail, a striking profusion of teak brightwork adorning its production fiberglass hull, and a proudly anachronistic gaff rig. But it’s likely these very features are what has made it a success with 1,168 built over a 43-year production run that still hasn’t ended.
British builder Cornish Crabbers says the Shrimper 19 was the best seller in its line of sailboats ranging from 17′ to 30′ for decades, though now the roomier and much costlier Shrimper 21 has ascended to top seller in its lineup. But the manufacturer is still building a handful of the 19s to order every year, says managing director Peter Thomas. It is not an inexpensive boat: current base price is about $40,000 for U.S. customers (not including engine or import duty).
All photographs by the author
The recessed foredeck serves as an anchor well and is self-draining. The Sitka-spruce mast is set in a stainless-steel tabernacle to ease the task of lowering the rig for trailering.
“The viability only comes because of the niche that we created,” Thomas said in an interview. “We have kept up a build quality that exceeds all those around us and not fallen into the trap of building them cheaper. The early boats are still very active and perfectly sound.”
The particular boat profiled here is among those early examples, built in 1985. Its owner for the last six years, Kent Zimmerman of Port Townsend, Washington, keeps it in immaculate condition; there’s no hint that it’s a 37-year-old boat. Zimmerman, a retired U.S. Navy and airline pilot, has owned a number of sailboats, though the progression is rather unusual. He started with a Crealock 37, which he lived on but rarely sailed; proceeded through a 25′ Atkin Eric Jr., a 12′ Beetle Cat, and finally the incumbent Shrimper. Although he enjoyed the Beetle Cat, he wanted a boat that was large enough to sleep on but small enough for comfortable singlehanding. And for reasons that are eternally inexpressible but entirely clear to those of us in the circle of gaff-rig enthusiasts, he just loves gaffers.
“I was just drawn to the Shrimper’s aesthetics,” says Zimmerman. “It’s not a wooden boat, but it really looks at home here in Port Townsend.”
The self-draining cockpit clears water through ports in the footwell and at the corners of the side benches. The low cabin keeps the view forward unimpeded.
Unlike many pocket cruisers, the Shrimper doesn’t strive for self-conscious cuteness; “businesslike” would be a better one-word description. Although its look is unique, it’s not because of a designer’s wayward indulgence: every feature carries an obvious rationale. The upright stem lengthens the waterline and thus enhances the potential hull speed. The squarish bowsprit resonates with the squarish aesthetic established by the stem and vertical hull sides. You understand the advantage of this hullform as you board: a 160-lb person stepping into the cockpit provokes barely a bob, and hints at a very stable ride. There are 700 lbs of ballast, part of it provided by the galvanized steel centerboard. The rudder, a plywood laminate, houses a stainless-steel drop plate to extend its effective area below the keel.
The recessed foredeck provides large, easily accessed anchor and rode storage. The unusual flush-deck cabin is a compromise between living space below and low windage/great visibility above. Whether it’s a workable compromise may depend on your personal dimensions. Cabin headroom is only 43″ in the middle. Seated on one of the quarter-berth settees, my hair is less than 1″ from grazing the overhead—and I’m only 5′ 7″. However, both berths extend through the aft cabin bulkhead and under the cockpit seats for a total 6′ 7″ length. This Shrimper is a Mk I model; the Mk II offers 6″ more headroom.
The forward end of the cabin has accommodations for a compact galley. An optional removable tabletop—the plywood to starboard of the centerboard trunk—sits on top of the trunk for dining.
The advantage of the flush deck becomes evident in the cockpit: a glorious, sweeping, 360-degree view. Even a shrimpy helmsman has no trouble seeing forward. And there’s no difficulty clambering onto the deck to get to the mast and the bow.
Mounting an outboard motor is an everlasting problem with small daysailers and pocket cruisers. The Shrimper addresses it with a well in the cockpit, which easily accommodates one of the single-cylinder 4- to 6-hp outboards from various makers. Keeping the motor’s weight low and inboard helps the boat’s balance, but the Mk I’s transom cutout isn’t tall enough to allow tilt-up. Zimmerman’s 6-hp four-stroke Tohatsu outboard, at 60 lbs, is heavy enough to discourage lifting it out for everyday sailing. The Mk II hasn’t remedied this issue, but the builder does now offer inboard diesel and electric outboards as options.
While the Shrimpers are production boats, they’re built to order and each offers a sprawl of options. The current 19 provides more than 40 choices, including a chartplotter, autopilot, carbon-fiber mast, and custom hull colors and fabrics. It wouldn’t be hard to kick the price beyond $50,000. As with most of the Cornish Crabber line, the gaff rig is not open for negotiation: the builder has an unwavering enthusiasm for it. “At the sizes we are building, the gaff rig is far easier to handle shorthanded than a Bermudan-rigged boat,” Thomas said.
So, let’s go sailing.
The gaff-sloop rig carries 194 sq ft of sail.
As is typical for a gaffer, the mainsail is a bit of a snarl to hoist and set properly, but once it’s sorted, the Shrimper seems to gravitate to its comfort zone and sail with confidence. And the zone is wide and forgiving. The tiller is all but neutral; fingertips are all it wants or needs. We have an 8- to 10-knot breeze, and on a close reach we’re logging 4.8 to 5 knots. The Shrimper’s theoretical hull speed should be 5.6 knots (I suspect the prop drag is robbing us of a few tenths). The Shrimper clearly has no inclination to go racing, but in compensation it’s remarkably well-behaved. In gusts, the Shrimper heels to about 15 degrees and there reassuringly stiffens up. After a while the gusts seem to be intensifying, so we tuck in a first reef (the Shrimper has two). The boat speed drops only 0.2 knot, and the balance doesn’t change.
I have a gaff-rigger very close to this same size (a Devlin Winter Wren), which seems a little faster and slightly more tender than the Shrimper—exactly what I’d expect, since it’s less beamy, some 300 lbs lighter, and its transom-mounted motor tilts to get the prop out of the water. Both boats tack through about 110 degrees. I’m pretty sure I could coax the Shrimper into tighter upwind sailing with more time and practice. It offers a stout hook for a boom-vang tackle on its galvanized tabernacle—a fairly unusual feature on a boat this size. A gaffer typically sails upwind reluctantly because the head of the mainsail twists away from its alignment with the boom, spilling air and reducing lift in its upper area. If a vang is available to tug the boom downward, the tightened leech will force the gaff into improved alignment. The Shrimper also has a mainsheet traveler mounted just forward of the transom and movable jibsheet fairleads, rounding out a dazzling array of fun tools to tweak sail shape.
The Shrimper turns into a tack rather lazily, losing more momentum than it should as it crosses the wind. Zimmerman says that in light wind he’ll leave the jib backwinded most of the way around to help accelerate the bow into the new tack.
As an experiment, we roll up the jib and try sailing on reefed main alone. The Shrimper still tacks, though it’s now very slow on any point of sail—it clearly craves its jib. The cupcake-sized Harken furler spools the canvas around a flexible cable in the jib’s luff rather than around a rigid tube, so partial furling to reef the jib doesn’t really work. It is possible to leave a hankie-sized scrap of jib flying, which can help with a small boat’s helm balance but doesn’t provide useful thrust. There’s a shortage of affordable small furlers with reefing capability—something small-boat sailors would really appreciate.
The Shrimper 19 is well balanced under sail with or without reefs and needs only a light touch on the tiller.
There’s a shortage, too, of production pocket cruisers like the Shrimper. Most manufacturers were dropping out of this market segment around the time that Cornish Crabber was slipping in. The reasons are obvious. Most buyers with $40,000 to $50,000 to spend would rather have a good used 30′ boat than a new 19′ boat. And for the manufacturer, big boats are more temptingly profitable than small ones.
By contrast, there’s a galaxy of plans for the amateur builder drawn by very capable designers. In a quick survey of well-known names, I counted 30 available plans for 18′ to 22′ trailerable sailboats with cabin accommodations. And while it’s deeply satisfying to build such a boat, not everyone has the time, space, tools, or perseverance to take it on. There’s also something deeply satisfying about sailing an excellent production boat like the Shrimper, where professionals have spent years—even decades—refining it.
While its aesthetics might not appeal to everyone’s taste, the Shrimper 19 seems to cover all the bases functionally. It’s so easy to sail casually and so well-mannered that a beginner could enjoy it and quickly build confidence. At the same time, it has enough sail-management tools that an expert could stay happily busy and sail like a demon. All this and a cabin, too? Hard to ask for more.
Lawrence W. Cheek is a journalist and serial boatbuilder (two kayaks and four sailboats to date) who writes frequently for WoodenBoat.
Shrimper 19 Particulars
[table]
Length on deck/19′ 3″
Length overall/22′ 6″
Length of waterline/17′ 7″
Beam/7′ 2″
Draft, centerboard up/1′ 6″
Draft, centerboard down/4′0″
Displacement/2,350 lbs
Ballast/700 lbs
Sail area/194 sq ft
When my wife wrote “Love it!” on the study plans for Ken Bassett’s 18′ Firefly, a performance rowing boat, it seemed I had the green light to build it. My boats had already filled the garage, barn, crawl space, and shed, and my wife, being more reasonable than passionate about my boatbuilding, drew the line at eight boats. When she began to get interested in rowing and having a rowing boat for herself, it became my opportunity to build another boat.
The Firefly, 18′ overall, has a waterline length of around 16′ for performance rowing. Its beam of 34″ means it can easily balance itself without the need for oars to be in the water. The low 7″ of freeboard would present a small profile to the wind, and the long chines and skeg would give it good directional stability. The Firefly has all the attributes for a fast boat appropriate for novices focusing on rowing for exercise or sport. The panel-on-frame construction lends itself to backyard boatbuilding, and the low count of individual parts signals a reasonably quick construction.
I ordered the plans from The WoodenBoat Store. They consist of five sheets of drawings: profile and inboard arrangement; lines, offsets and construction, and rigger details; sliding-seat mechanism, full-sized mold patterns, stem and keel details; and transom pattern, construction sequence, transom dolly, and keel details.
Photographs by the author
The plans include drawings for a sliding seat and outriggers, but a drop-in rowing unit, like the Piantedosi Row Wing here, is a ready-made option. The bare hull, weighing about 85 lbs, can be cartopped, but with a small, lightweight aluminum trailer the heavy lifting can be avoided.
I got to work setting up a strongback and cutting out the molds. The full-sized mold patterns eliminate the need for any lofting. The hull frame is very simple in construction: a laminated stem, a keel, two chines, two laminated frames, a transom, and a knee. The frame is covered by bottom and side panels cut from 6mm marine plywood. A skeg, breasthook, knees, and gunwale complete the hull. I chose Aquatek’s meranti plywood for the panels, spruce for the frame, and local black walnut for the transom, knees, breasthook, and gunwales.
The chine makes a sweeping curve that starts at the stem, drops just below the waterline amidships, and ends at the transom. As the beauty of the boat lies in that line and the sheer, I wanted those chines to be very crisp and fair. The joint of the sheer panel and the bottom panel would have to join in a perfectly smooth, unwavering sweep for about 17′. I knew from experience as the chines get beveled, the pencil-drawn centerline that defines the sweep would get planed away and be tedious to reestablish. I needed a better way.
The 34″ beam provides good stability for getting aboard from either a beach or a dock.
To make a lasting centerline in the chine, I routed a 1/4″ groove about 3/8″ deep down the center of the outer face of each log. I then mounted the chine logs into the molds and planed them to create the bevels for the bottom and side panels. There was enough of each groove left to glue a 1/4″ × 1/2″ wood spline into it. The spline perfectly defined an accurate curve of the chine. Then, rather than butt the planking panels to each other, I butted them to the spline. With the spline carefully planed flush with the plywood, voilà, a perfect chine!
I sheathed the hull in 6-oz fiberglass cloth set in epoxy. After painting, the bare hull came in around 85 lbs. Although I didn’t keep track of time, I would estimate it took 150 hours of off-and-on evenings and weekends work to complete.
The plans detail a sliding-seat setup made of cherry wood and riggers constructed from 3/8″ stainless-steel tubing. Rather than fabricate all that, I chose to purchase a Piantedosi drop-in rowing frame. I thought the off-the-shelf solution would probably be cheaper than finding a metal shop to fabricate and weld the tubing, and I’d eliminate the time making the sliding-seat system.
At the catch, with the rower’s weight at the aft end of the slide, the transom just kisses the water.
At the finish, the bow supports the rower’s weight at the forward end of the slide without the hull going out of trim.
I mounted the rowing frame so that it could be easily detached from the two ribs. Separated, it would fit in the pickup bed and I could hoist the boat, right-side up, onto the boat rack above. With ratcheting tie-down straps and some auxiliary foam wedged around the shallow V-bottom, the boat rode secure. Although the plans detail a transom dolly for moving the boat around inverted, I simply shouldered the hull to the water and then attached the rowing frame to it. Eventually this car-topping approach got awkward, and I purchased a lightweight aluminum trailer to make a simple package for towing and hand launching off the beach.
Getting into the boat off a beach is simply a matter of floating the boat, reaching for the opposite gunwale, and hopping in. The boat keeps its balance while you grasp the oars and get adjusted. No need to rush. Getting off a dock is another matter. The rigger not only positions the boat 14″ away from the dock, but it can also wedge itself into the dock structure in a variety of ways and be quite a nuisance. Attention is necessary to ensure that the boat is not trapped by the rigger. One can step onto the bottom panel and once aboard, the boat balances itself and is as stable as a canoe.
On the water two pulls at the oars brings the Firefly up to speed. That is once you clear the dock or the beach shallows. The 298cm recreational sculls recommended in the plans (racing oars are measured in centimeters, 298cm is 9′ 9-1/4″) and 62″ outrigger spread are amazingly awkward in tight situations. Since the boat has good stability without relying on the oars, I sometimes use a kayak paddle as auxiliary propulsion to help maneuver in and out of tight spots to avoid using the oars.
The boat cruises easily at 4-plus mph, demanding no more effort than a brisk walk, and is surprisingly seaworthy. Once caught out in 1′ to 3′ waves by a sudden change in the weather, the boat found its way through the chop without shipping water. It stays where you point it; it takes a bit of coaxing on the appropriate oar to change direction. Underway, the boat feels fast and nimble, comfortable and stable.
I had no experience in performance rowing and at the time knew no one who had, so I set up the rowing frame according to Piantedosi’s directions. The first few rows were frustratingly awkward and brief, but there were one or two brief moments when it all came together and the boat flew along the water with such grace and ease that it seemed effortless to propel it. I felt a spiritual lift and delight and I had to have more of that. Those brief moments were enough to keep me engaged as I made guesses as to what were issues with the boat, rowing frame, or me. Over time, by trial and error and with incremental adjustments, the Firefly became comfortable for me to row. During the winter, workouts on the gym rowing machine got me in better physical condition. Some coaching tips from an experienced rower got me to the point where I could put miles on the boat.
The drop-in unit has a span of 62 1/2″, just 1/2″ greater than the outriggers drawn in the plans. The sculls used with the Firefly are between 9′ 6″ and 9′ 9″ in length.
The Firefly started out as a boat for my wife, but in the prolonged tune-up phase, I monopolized the boat to make the setup work for my tall stature. I thought I could dial it in for her smaller size, but after seeing me get used to rowing the boat, she was reluctant to take on the learning curve I went through. Casual rowing with a fixed seat and drifting were more to her liking. She’s now talking about a St. Lawrence Skiff, a boat more like what she had in mind from the beginning. No problem, it’s another opportunity for me to build a boat!
Coming from a boating background where each of my boats had multiple uses, it took time to recognize that the Firefly is a thoroughbred: it does only one thing and does it exceptionally well. It is meant to fly across the water in light wave conditions with grace and ease. It has the speed to put the miles behind without exhaustive effort, and when it’s time to rest one can drop the oars, unpack a snack, and comfortably drift while watching the scenery. Back at the beach or ramp the boat’s good looks draw comments from the passersby. The boat’s simple construction will get you on the water quickly and introduce you to lively, nimble performance. I’d call that joy.
Ed Neal of Cleveland, Ohio, started his interest in woodworking as an 11-year-old Boy Scout, whittling neckerchief slides. Twenty-something years ago he came back from a wilderness canoeing trip in Canada wishing to add an outrigger to the canoe for additional safety. He went to the downtown Cleveland Public Library looking for a book that might be helpful. There he fell down the boatbuilding hole and has yet to surface. He is now the executive director of the Cleveland Amateur Boatbuilding and Boating Society.
Firefly Particulars
[table]
LOA/ 18′
Beam/ 2′ 10″
Draft/ 4″
Weight/ 90 lbs
[/table]
Plans for the Firefly are available from The WoodenBoat Store in print and digital format for $60.
Is there a boat you’d like to know more about? Have you built one that you think other Small Boats Magazine readers would enjoy? Please email us!
It was a Thursday in mid-June when Eric Vance and I brought our Chesapeake Light Craft Autumn Leaves solo cruisers to Cambridge, Maryland, at the mouth of the Choptank River. Our goal was simple: sail from the mouth of one of the bay’s many tributaries up to the farm town at the head of navigation. The weather here in the Chesapeake Bay area can be expected to take a turn to a calm, even sultry mood, and we expected to have leisurely sailing.
Sailing to the towns well upstream on the Bay’s tributaries was once routine. Travel up any of the many rivers that empty into the Chesapeake as far as a cargo schooner can go, and you’ll find a town. And in each of these towns, there are stories of the days when the schooners would sail in frequently, bringing goods from Baltimore and picking up wood, grains, tobacco, and other farm products to be hauled back over these myriad watery roads to the city. But what would it be like to do a motorless cruise up one of these rivers today? Eric and I wanted to find out.
Roger Siebert
.
Our boats seemed suitable—shoal draft, nimble under sail, and easy enough to row, while having comfortable accommodations for overnighting. Eric’s boat, INDIGO, had no motor, so he was fully committed to oar and sail. Mine, TERRAPIN, has an electric trolling motor on a bracket, but I was determined not to use it.
At the Choptank’s mouth: Cambridge, seat of Dorchester County and historically one of the principal ports and boatbuilding centers on the Chesapeake. Upriver, at the head of navigation: Denton, seat of Caroline County and through the 19th century a major export point for lumber and farm produce. With 35 winding miles of river between the two ports, it promised to be an interesting challenge for a four-day weekend.
At the ramp on Cambridge’s Eaton Point, where we were preparing the boats to launch, the wind was brisk and out of the south—a wind advisory had already been broadcast. While TERRAPIN was still on her trailer, I tied the second reef in her 150-sq-ft balanced lugsail. Eric was ahead of me, having already put the second reef in his 114-sq-ft jib-headed main.
All photographs by Eric Vance
TERRAPIN showed all the speed she can muster, double-reefed on her way up the Choptank. A small-craft advisory was posted and would remain in effect for days to come.
Once we got under way, we scudded to the northeast on a reach and passed under the 1-1/2-mile expanse of the Route 50 bridge, a gently arching ribbon of concrete girders resting on countless cylindrical piers, and 50 yards farther on, through the gap in the old Harrington Bridge, now a pair of fishing piers. A chop was just developing mid-river. The starboard bow caught the bigger waves, tossing spray into the air, and once or twice, the cool water found my face. It was exhilarating. Less than 2 miles beyond the bridge, we veered north and with the wind now at our backs, everything quieted down. The boats’ motion eased. The weight in the helm, the solid chunk and thump of the wooden hull slashing across the chop, and the strain in the rigging all melted away as we eased the sheets to follow the river through its left-hand sweep. We passed large homes with expansive, immaculate lawns spread along the riverbanks. Signs of the city and highway rumble dropped away.
A few miles on, beyond the outskirts of Cambridge, the estates disappeared and the houses looked like they had been here for quite some years. The river was bounded almost entirely by marsh and woodland; breaks in the trees revealed farm fields beyond the banks. This time of year, the winter wheat is tall and ready for harvest; the corn is just getting a foothold across this low-lying, verdant landscape. In this low country, the subtle irregularities in the horizontal landscape give way to an immense arching, hazy blue sky.
The tide was with us. Our narrow yawls held between 5 and 6 knots hour after hour, churning up fine, frothy bow waves and leaving easy, flat wakes behind their double-ended hulls. As we carved our way up the river, it narrowed, and the nascent chop of the open stretches was left behind. Now, just smooth, easy speed as we slid past the bright green of the saltmarsh cordgrass backed by the mottled and darker greens of the scalloped treeline. The Chesapeake water is usually the color of lightly creamed coffee, but as the day progressed, the sunlight played games over the river—a soft tan coloring the corrugated surface one moment, reflecting the blinding, unfocused glare of an old mirror the next.
A thin cloudbank slid in from the southwest, turning the sun into an orange smudge, softening the riverscape’s textures and muting its tones.
On Thursday evening, I settled in after anchoring in Hunting Creek. We found quiet anchorages in creeks like this one all the way up the Choptank River.
We were making good speed but were in no hurry. When we reached Choptank Landing, we swung east into the mouth of Hunting Creek and nestled into a small cove next to the low bridge that leads into the village of Choptank. The north-facing cove shielded us from the bluster out on the river, and we were well situated for a relaxing evening. A turtle, likely a terrapin, poked its thumb-sized head above the water for a moment. Schools of finger-sized fish churned the surface—first off the bow, then to port, and again by Eric’s boat. To the east, a mourning dove endlessly cooed its low, sad five-note tune. On the opposite bank, a Carolina wren sang its lively soprano trill.
At the anchorage in Hunting Creek, I watched the sun drop. It was just before the summer solstice, and the days were long.
The ever-changing light over the Chesapeake is one of the things that attracts me to the bay. Here, at about 8 p.m., a golden hue is cast over the landscape.
At day’s end we retreated to our snug cabins. We weren’t troubled by biting insects and could leave hatches open through the hot nights.
Friday morning, we rowed over to Choptank’s marina, a modest 70-slip harbor protected by wooden bulkheads. There once was a wharf here, one of many built along the length of the river. The banks of the Choptank are by-and-large low and muddy, often banded by marsh that could not be traversed by horse or cart, so where there was a stretch of solid bank next to deep water, as there is at Choptank, schooners of the 18th and 19th centuries could deliver and load goods.
We tied up and took the opportunity to stretch our legs. A few kids were swimming at the tiny crescent beach next to the marina, but otherwise it was quiet. It was approaching mid-morning and the wind was building out of the west. TERRAPIN, like INDIGO, is well-ballasted and displaces about a ton, but when I stand to row, I can put all my weight into the stroke and get the boat moving. With some effort, we rowed free of the marina and got our boats into deeper water, clear of obstructions. With mizzens set taut to hold our small yawls head-to-wind, we raised sail and were soon able to bear off, under sail once again. Below a blue sky becoming washed by a developing summer haze, the wind was nonetheless brisk, offering relief to temperatures already in the high 80s. We wore light, long-sleeved shirts and wide-brimmed hats. Eric pulled an orange and black bandanna up over his nose. The glare of the sunlight glancing off the river surface was blinding. But the sailing? In this wide, open stretch of the Choptank, the drive was solid and steady; our boats dug in and took off with vigor.
As we approached Frazier Point, the tide was beginning to ebb and we were forced to cover a short leg straight into the wind–a wind that had now become unsure about its speed and direction. Our two Autumn Leaves are rigged differently but sail almost exactly the same. TERRAPIN, with her big standing lug main, shows some advantage downwind.
INDIGO’s jib-headed yawl rig gives her an edge into the wind. But when we attacked the 100-degree bend around Frazier Point, working to clear the point and fall off onto an easy reach, Eric edged well ahead of me, putting more than a quarter mile between us. (That evening, I learned that Eric, a whitewater canoeist well versed in reading currents, had spotted a broad, gentle eddy circling behind Frazier Point, slipped into it, and let it pull his boat halfway around the bend.)
As we headed north, the cordgrass gradually gave way to marshlands with a mix of reeds that thrive in the brackish upstream environment of estuaries. Up ahead, two watermen in an outboard skiff were working a line of crab pots. Their voices and the putter of the motor broke the stillness of the day. We had seen very few boats on the river, which was not my experience in other parts of the Chesapeake. As we followed the river around another bend, the wind jibed the main to port, but left the mizzen out to starboard. I was sailing wing on wing. The Chesapeake schooner captains sometimes called this “reading both pages.”
It was early afternoon and we had reached the bend around Hog Island, a low marshy headland on the inside of a long, quarter-mile curve in the river. On the outside of the bend, the river has carved itself into a high bluff topped with a line of trees. The tide was now driving against us with authority: our tacking angles felt good, but we were barely advancing against the building current. A red buoy marking the starboard turn in the channel teased us–it refused to get closer despite our best efforts to advance on it. I hailed Eric on the VHF and suggested nosing into the steep left bank to escape the wind and take a lunch break. He was quick to agree. Once his hook was set, I dropped sail and rowed over to tie up alongside. As we lunched, a bald eagle glided by. The heat built to 90, then 94. Cumulus clouds formed overhead but offered scant shade. We sweated it out, waiting for the current to abate.
I rowed TERRAPIN around a shoal on the way to the town of Choptank. Contrary to the forecast, the air was calm early in the day.
At 3:30, we decided to get going. Eric commented, “At least it’s not so hot.” I checked my thermometer. “No, still 94. You’re just getting used to it.” The wind was building back to the unvarying forecast: northwest, 15 knots with gusts over 20. We still had the double reefs we’d tied in at the ramp, and we’d leave them in.
Once we cleared the bend around Hog Island, the banks opened up and a tailwind, channeled by the local geography, found its way down to the water. TERRAPIN and INDIGO took off. I was initially ahead, and looked back to see INDIGO throwing up a thick and frothy bow wave, a big wide mustache of water breaking across the river. She heeled to the breeze, her three sails taut and trimmed to perfection.
The breeze freshened further. We were sailing our little cruisers like racing dinghies, sheet in one hand, tiller in the other, working constantly to get all we could from our boats and trading the lead frequently. Where the river turned into the wind, we tacked carefully, playing the puffs for boat speed. Where a wall of trees all but shut down the breeze, the treetops continued to bow, rustle, and swish to the wind, but down on the water it was touch and go for us to maintain momentum.
Another bend and the Dover bridge came into sight at the far end of a widening expanse of the Choptank. It’s a new steel and concrete girder bridge that rises 50′ over the river. Just a few yards upriver, the old steel-truss bridge that it has replaced remains, freshly painted a bright blue, its swing span left open. We slid under the new bridge and then between the bulkheads of the old one.
After clearing the Dover Road bridges, Eric heaved-to in INDIGO to catch photos of TERRAPIN running downwind past the two spans. Overhead, the leading edge of a fast-moving storm cell approached from the southwest.
Eric was a few hundred yards ahead of me when I felt a few drops of rain on my back. Seconds later, Eric was on the radio. “Weather alert. Thunderstorm warning and risk of 35-knot winds.” This, on a day with no mention of rain in the forecast. I checked the chart. There was a 100-yard-wide cove, the entrance to Mitchell Run, just ahead on the river’s left bank. A shallow bar guards the entrance, but it was the only shelter available. I hailed Eric on the radio and told him where to look for it. “I think I see it,” he called back.
INDIGO hit the bar first, slid to a stop, but then shifted forward and worked herself free—Eric would reach shelter in time. I tried closing with the shoreline farther downstream, hoping the bar would be deeper there, but it was not.
TERRAPIN’s bilgeboards kicked up when they contacted the bottom and she stalled out. I dropped the sails, raised the boards fully into their cases, and shipped the oars. Over my shoulder, I could see a tall, thick gray mass of cloud flashing with lightning approaching from the southwest. I pulled hard on the oars. At first, there was little response, but then TERRAPIN began to edge forward. A few more strokes and I was free.
With the wind behind me, it took little time to row into the cove and get the anchor down. The water was shallow and surprisingly clear; I could see the anchor hit the bottom. We were secure close behind a line of trees and as ready as possible for the onslaught.
The thundercloud approached, boomed, cracked, and flashed. Sharp bolts of lightning broke the increasing gloom as the heavy cloud eclipsed the sun. But the storm’s track took it just south of our little haven. I breathed a sigh of relief. Not long after, to the east, the thundercloud, as white as whipped cream, was brightly illuminated by the sun descending to the west.
By 6:30 p.m. the wind had all but died. Even so, forecasts for gusty northwesterlies would persist through the night and the next day. Should the wind return, we could become pinned in Mitchell Run. Eric and I rowed back into the Choptank and found the breeze slackening and the upstream current building. We saw our chance. Steady work at the oars can push TERRAPIN at 1-1/2 knots, but with the current the GPS showed she was moving along at a steady 3 knots. It didn’t take long to cover the mile to the point where Kings Creek empties into the Choptank from a wide marsh. Next to the marsh lies Kingston Landing, another spot of solid ground, once an access to trade but now a single boat ramp. As we rowed past the marsh, dozens of swallows rose and darted across the darkening sky that was first a deep blue, then a muted purple, before all settled down for the evening. Far to the east, the storm clouds had collected in a long band. Lightning flashed erratically as the front swept off to the east, the mountain range of clouds showing its peaks behind the distant treeline.
Anchored about 50 yards apart, we settled into our evening routines. Eric brought real food, fresh goods that require actual cooking, while I took the minimalist approach–boiled water poured into a freeze-dried dinner bag or just cheese, crackers, nuts, fruit, and cookies. After eating, it was time to settle down to the forecast and charts for the next day’s progress, and then opening a book for an hour or two. The Autumn Leaves design includes an especially comfortable reading chair that folds away under the aft end of the berth flat. I settled in to read a few more chapters of Chesapeake Bay Schooners by Quentin Snediker and Ann Jensen, the best account I’ve found about the heyday of commercial sail on the Bay.
The vistas rarely disappointed up the full length of the Choptank. Here, anchored at the mouth of Kings Creek, we had a fine view across a wider stretch of the river.
Saturday morning, I checked the forecast on my cell phone. The small-craft advisory persisted, but I was hard pressed to believe it—the temperature had dropped to 67 degrees and the air was dead calm—but I was not going to shake out the reefs. I stood up in the companionway and saw INDIGO riding to her anchor, reflected in the glassy calm of the morning. Eric was busy readying for our next leg. As we got under way, the forecast began to show itself. Heavy gusts plowed in from the northwest. I looked at the chart. In these conditions, exiting the 90-degree bend at Williston might prove difficult.
By mid-afternoon, it was gusting into the upper 20s, whipping down and across the river at random angles. But the shifts had not brought the wind head-on and we made good time until we encountered the bend at Williston. Eric had been working his way up the river just ahead of me, but as the village came in sight, INDIGO did an odd shuffle into the mouth of Mill Creek, something clearly amiss. Frequent tacks in the erratic air had tangled Eric’s jibsheets on the bow cleat, and he needed to pause to sort them out.
I pressed on, hoping to find a sheltered spot to drop anchor until Eric was ready to move on. But as soon as I followed the river’s turn to the northwest, I felt the full force of the wind the small craft advisory had warned about. I was knocked back on every tack, unable to gain ground before I was across the river and forced to come about once again. Frustrated, I doused sail and dropped the anchor.
The fetch here was short, but the whitecaps were seething and the tide had begun to ebb. Progress was no longer possible. The broad palm of the claw anchor was reluctant to grab the soft, muddy bottom. I fed out more rode. TERRAPIN continued to drag backward 20′, 30′, then took hold. The bow bucked and pounded on the chop and the mizzen, left standing to keep the boat’s head straight, rattled loudly on and off as TERRAPIN swung and fought her anchor but I had a moment to catch my breath.
A hundred yards behind me, Eric had put his anchor down and decided to wait for the tide to ease. His boat came to rest just off a vacant private dock, so he eased her back and tied up alongside.
I had the anchor down after failing to advance against tide and wind at Williston, but TERRAPIN dragged her hook through the mud until she was just off the fallen tree at the right side. The Choptank narrows significantly in this bend, amplifying the effects of the 4′ tidal range.
We sat tight for several hours, watching and waiting for wind and tide to ease. The current began to slacken as the tide approached the low mark, and we were itching to get on our way. The gusting had moderated slightly as well and five turkey vultures that had been sheltering in the trees next to me took flight.
The whitecaps were almost gone altogether, and there was a well-protected anchorage at Watts Creek, about 2 miles upstream. If we could reach it, we would enjoy a peaceful night. But my situation was difficult: I was anchored close to the northeast shoreline and a treeline that periodically blanketed the wind. Halfway across this narrow stretch of the Choptank, there was no protection at all from the still frequent blasts of wind. And spreading out from the far shore lay a mudbank barely covered by the receding tide.
I hauled up the anchor, raised sail, and turned TERRAPIN’s nose across the river. First, there was a gentle nudge from the light air behind the trees. She moved forward two, three boat lengths. Then the next gust hit. She heeled hard to port and began to accelerate. But before there was way on enough to tack back, her port bilgeboard grabbed the mud on the west side of the river. She heeled hard, farther over than I’d ever experienced, then came to a dead stop, still at a sharp angle despite the boat’s flat bottom.
I frantically let the sheet go and freed the halyard from its cleat. The sail swung off to port, but in this wind, friction tied up everything and I was forced to go forward to pull the yard down to the boom, which is supported by lazyjacks. The boat leveled out some, but not until I pulled up the leeward bilge board did she straighten, her belly now flat on the muck.
I looked back down the river to see how Eric was doing. He appeared to be tied up to a bulkhead. Would I be stuck here, glued to the bottom, until the tide freed me?
I shipped my oars and, standing in the cockpit, started pulling astern. The blades locked in the mud and bent alarmingly. I eased off; I didn’t need broken oars, too. Getting back to the rowing with more care, there was some perceptible movement. Then a little more. The wind was still a solid 20 knots, the trees still hissing and swishing, leaves turned bottom-side up, and that pressure was now helping slide the boat along the bottom as I forced it away from the bank. Five minutes of work and she eased free. I raised the main. I was determined to round that bend, but two tacks later, I realized that anything gained through the water had been lost to the still-ebbing tide. Defeated, I sailed TERRAPIN back down around the bend and anchored in the partial lee of a mixed stand of thin, vine-woven trees arrayed along the northwest bank.
Eric had pushed off his dock at the same time I had raised my anchor. INDIGO, rigged as a jib-headed yawl, was promptly spun around by the unpredictable gusts. His attempts to tack proved no better than mine. As his boat was turned, he released the mizzen sheet to regain control, but it didn’t work. INDIGO took another turn, this time twisting the freed mizzen fully forward, where it jammed against the main, locking the sails together. INDIGO was out of control and driven headlong into the aging wooden bulkhead. A few neighbors wandered down the lawn behind it to say hello, unaware that this hot, breezy day was sorely testing our two little boats and their skippers, too.
As the sun dropped so did the wind. Eric was eager to move on to escape the horseshoe turn at Williston. He started rowing into the setting sun. I squinted to watch him disappear into the orange glare reflected off the river. Five minutes later he hailed me on the VHF. “Come on, it’s great!” That was all the encouragement I needed.
After an utterly still night, Sunday dawned cool and calm on Watts Creek, a welcome salve for Saturday’s blisters. This was the best-protected anchorage along the river, but at low tide our boats, even with their 8″ draft, touched the bottom on the way out.
After a second stretch at the oars through the darkening evening, we anchored in Watts Creek, satisfied that we had escaped from the bend at Williston. We rafted our boats together as the day’s last light slipped away. It was a remarkably quiet evening and felt all the more calm in contrast to the day’s relentless wind. We toasted our little success with a shot of rum.
We stirred Sunday morning before the sun was over the trees. The sky was brilliantly clear, the humidity thankfully down and, at that moment, the air light. We had anchored just 2 miles downriver from the landing in Denton and Eric was determined to row the last stretch. He got INDIGO under way first and soon disappeared around the headland at the mouth of Watts Creek.
I savored the adventure, and coffee, Sunday morning in Watts Creek. Eric paddled my inflatable packraft to capture the image.
A few minutes later, I rowed out from the creek to deep water and found just enough breeze to get TERRAPIN moving. Looking upstream, I saw Eric standing between his jib and jigger, swinging the oars steadily. His progress was good and before long he disappeared, first half-obscured by the marsh grass, and then lost around a bend.
The Choptank quickly narrowed from one-third mile at the creek to 150 yards just a half mile to the north. There was a wide stretch of marshland on both sides; thick stands of jade green arrow arum along water’s edge, its broad spiked leaves pointing to the sky, a mottled mix of marsh grass behind it. Beating to windward in this narrow passage to Denton required short tacks all the way. I didn’t dare test the depth close to the exposed mud banks. I needed to maintain boat speed to guarantee the tacks. Twice, I stood to hold the boom out to windward to bring TERRAPIN’s head across. After 1-1/2 miles of this zigzag route up the river, I reached the concrete-and-steel girder bridge at Denton. I sailed to within 10 yards of the span, where the bridge and surrounding buildings killed the wind. I took to the oars to pass under the span and pulled into the wharf. Eric was standing by to grab a line.
I arrived in Denton on Sunday morning. The mural on the bridge piling is an enlargement of a photograph of Denton’s wharves in 1904, the waning days of river commerce under sail. TERRAPIN had already passed under the bridge, and Eric had rowed her against the current to edge her over to the bulkhead. TERRAPIN’s electric motor remained in its stowed position the length of the cruise, and the double reef in the mainsail was never shaken out.
As we secured our boats Mike Reese, a longtime Denton resident and retired boatbuilder, walked down to say hello and have a look at our boats. He said the Choptank has been gradually silting for hundreds of years, ever since the forests were turned to farmland, and the river, which was once deep enough for cargo-laden schooners, is now so shallow that access to the town docks is difficult. Powerboaters still come upriver because the fishing is good. I asked, “Do boats reach Denton by sail anymore?” He said we were the odd exceptions.
David Dawson is a retired newspaperman who has been hooked on boats since he was a boy, when his dad built a plywood pram. He does most of his cruising on the Chesapeake Bay, but has taken a variety of trailerable boats elsewhere to explore waters from New England to Florida. Nearer to home in Pennsylvania, he enjoys kayaking the local rivers, lakes, and bays.
The Choptank River and the Underground Railroad
In the early 19th century, the Choptank River was a busy place. Schooners tied up at Denton’s wharf to take on lumber, wool, tobacco, grains, tanbark, and other cargo to be shipped to Baltimore. A constant stream of sailing vessels ran up and down the river. While the age of sail casts a romantic light on the region, it’s important to remember that the early economy of the Choptank—like the rest of the Eastern Shore—was built largely on slave labor. The cargo carried by those vessels, and even the wood used to build some of those ships, was produced by enslaved people.
During the middle of the 19th century, a network of resources for escapees, known as the Underground Railroad, developed and Caroline County became dotted with safe houses in the area surrounding the Choptank River. But outside the courthouses in Denton and Cambridge, people were bought and sold; inside, severe sentences were handed down to any who helped those who sought their freedom.
In March 1822, American abolitionist Harriet Tubman was born into slavery about 10 miles south of where we launched in Cambridge. She and two of her brothers, Henry and Ben, later worked on a plantation at Poplar Point, just upstream from the town of Choptank, adjacent to the old landing that is now the Choptank marina. On September 17, 1849, she escaped with her brothers, but she returned to the Choptank area several times to help dozens of others escape. The tracks of most of those she helped free ran parallel to the river as the escapees headed north toward Philadelphia and, in some cases, on to Canada.
Our visit to the Choptank fell on the 200th anniversary of Tubman’s birth and we reached Denton on the Juneteenth holiday commemorating the emancipation of those who had been enslaved in America.
If you have an interesting story to tell about your adventures with a small boat, please email us a brief outline and a few photos.
Several years ago, I built a stand for the only outboard I had at that time, and it made itself useful for maintenance and for flushing the cooling system with fresh water after an outing. When I got a second motor, I put off making a stand for it because I was running out of room and had the two motors share the same stand. That was awkward and I soon grew tired of shifting motors around. For off-season storage of the motors, a 2×4 screwed to the studs of the garage could hold the motors in a minimum of space and with no footprint at all on the floor, but the stand still took up a lot of space. If was going to have a stand for each motor, the second one had to fold so I could hang it up somewhere out of the way.
I made a few sketches, bought a few bits of lumber, and after a few false starts, came up with a stand that works well when I need it and takes up very little room when I don’t. I had seen several stands on the web that were made of 2×4s, but I felt that was overkill for the weight the stand needed to support, so I used 2×3 and 1×3 stock. The nuts, washers, and bolts are all 3/8″, though 5/16″ or even 1/4″ could work. The stand is tall enough to take my 2.5- and 4-hp Yamaha four-stroke outboards, weighs under 25 lbs, and can support my full weight.
Photographs by the author
The base is made from 3/4″ plywood, 18″ × 24″, with a pair of 18″ 2×3s (all dimensions in the photographs are measured, not nominal) screwed along the long sides of the plywood. The swivel casters are screwed to the bottom corners. The ends of the 2×3s have 3/8″ holes drilled on the centerline and 1-1/4″ from the end. The holes on one end of the base are countersunk 1/4″ on the outsides, and on the other end the countersinks are on the inside faces.
The uprights are 34″ lengths of 2×3 with a pair of 21″ 2×4 crosspieces screwed at the upright tops. A 21″ length of 2×6 would serves as well for a crosspiece. The bottoms of the uprights are sawn and disc-sanded semicircles with 3/8″ holes at the centers.
The diagonal brace is made of 32″ lengths of 1×3. Each has at its top a 7″ length of 2×3 screwed to the outside face. The crosspiece is 3/4″ plywood cut to a width of 3-1/2″ and a length of 18″. Its ends are screwed to the 7″ 2×3s. The ends are semicircles and have 3/8″ at their centers.
The uprights are connected to the outside of the base’s 2×3s with 3″-long 3/8″ hex-head bolts with nuts and washers on the opposite side of the connection. The bolt heads are recessed in the base’s inside countersinks.
The diagonal brace has its legs bolted to the outside of the other end of the base. The bolt heads are set in the countersinks on the inside faces of the 2×3s.
The upright can be set and angled to match the transom of the boat that uses the outboard. The mark on the white tape is where a hole would be drilled through the upright and the brace. The hole should be oversized to create an easy slip fit for a 3/8″ bolt. I have a 13/32″ drill bit, but widening the hole with a 3/8″ bit or a rat-tail file would work, too.
Because the stand is designed to fold, the 4-1/2″ bolt joining the brace to the diagonal gets a wing nut.
The transoms and motorwells on my boats are all plumb, so I drilled the hole through the brace and upright for a vertical mount.
When the upright and brace are folded flat, the 4-1/2″ bolts hold them against the base’s 2×3s. The hole is drilled at the middle on the base’s 24″ length. These holes also should have a loose slip fit.
To drill the holes accurately, I flipped the folded stand upside down. A piece of 2×3 with a hole drilled on the drill press serves as a guide. It gets the hole started centered and square.
Two 3/8″ holes at the tops of the uprights get a length of cord that is used to hang the folded stand out of the way.
A pail of plywood rectangles with matching slots makes a stand to hold a 5-gallon bucket for a freshwater rinse.
The plywood support is made tall enough to put the bottom of the bucket close to the fin at the bottom of the outboard.
While folded, the stand can be used as a dolly.
.
Christopher Cunningham is the editor of Small Boats Magazine.
You can share your tips and tricks of the trade with other Small Boats Magazine readers by sending us an email.
There is a tool for every use and a use for every tool, maybe multiple uses. That is what we look for when purchasing new tools and equipment for our small-boat fleet. Myerchin’s Sailor’s Tool serves several needs in a small package. Its construction quality is excellent, and it is lightweight and surprisingly affordable.
The P300 Sailor’s Tool Generation 2 was designed for sailors by bluewater sailor John Myerchin, who has designed nautical knives for 38 years. The Sailor’s Tool has aluminum handles on a 440C stainless-steel frame and blade. It weighs 4.5 oz and has an overall length 5″ closed, and 9.25″ with both blade and spike open. The sheepsfoot blade is 2.25″ long and has a liner lock that positively engages the blade to keep it open. The liner lock can also be released one-handed, and there is no spring to snap the blade closed, so accidental injury from closing the blade is minimized. The thumb pin on both sides of the back of the blade is of good size and well placed for smooth one-handed opening. The end of the blade is straight and useful for small work such as cutting whipping twine. The remainder of the blade is serrated and cuts line easily, and the tip shape minimizes accidental puncture of people and gear such as inflatable PFDs and life rafts.
Opening photograph, SBM; all others by the authors
The marlinespike doubles as the upper handle for the Sailor’s Tool pliers. The spike tip is rounded to keep from piercing skin but still serves well as a marlinespike.
The stainless-steel marlinespike is 3″ long. It also opens and closes one-handed, with the fixed jaw of the pliers becoming a convenient thumb rest when open. The spike is curved and along with the scalloped handle shape, we find this gives a more comfortable and secure angle than a straighter folding marlinespike to work into tight knots. The spike point is smooth but not sharp and will not puncture skin unless excessive force is applied.
The spike serves as a handle for the pliers, which have 1″-long plier jaws and are very handy to tighten and loosen shackle pins, saving the spike from shackle abuse. The pliers are also useful to remove small nuts and bottle caps and when pulling a reluctant sailmaker’s needle through several layers of cloth.
The marlinespike, like the knife blade, has a liner lock to keep it from folding unexpectedly. The belt clip can be removed with a Torx-bit screwdriver.
Both the knife and the spike are designed with spring detents to stay closed when not in use. Scalloped edges along either side of the tool’s body provide a secure, comfortable grip. The body of the tool forms an open slot, making it easy to clean and maintain. There is a removable belt clip on one side and a lanyard bail on one end, good to keep the tool tethered to a boat, PFD, or a person. The Sailor’s Tool comes with a ballistic nylon sheath with Velcro closure that also offers one-handed easy opening.
We are impressed with the Sailor’s Tool but don’t know where to keep it—pocket, PFD, boat, or toolbox? Maybe we need four (or more) considering the size of our small armada and how handy this multipurpose knife is.
Audrey—aka Skipper—andKent Lewis are motoring, paddling, rowing, and sailing the Tidewater Region of Virginia in their menagerie of small boats, ranging from an 8′ punt up to Skipper’s 19′ gaff-rigged yawl. Their adventures are logged at www.smallboatrestoration.blogspot.com.
The P300 Sailor’s Tool is available in silver, red, or blue from Myerchin for $44.95. Prices vary with other online retailers.
Is there a product that might be useful for boatbuilding, cruising, or shore-side camping that you’d like us to review? Please email your suggestions.
Power tools are noisy. They can be unpleasant to listen to at best, and at worst they can lead to permanent hearing loss. My hearing has always been pretty good, and I find loud noises painful, so I always put on hearing protectors before I fire up a table saw, bandsaw, shop vac, router, sander, or any other noisy power tool. While foam plugs have good ratings, reducing the sound by 29 to 32 dB, they take time to insert in the ear canals. Muffs are more convenient to put on a moment before I turn on a machine.
For many years I’ve been using AO Safety WorkTunes muffs with a 22 dB noise reduction rating and a built-in AM/FM radio. They have worked well, but they were getting rather beat-up, and I finally got fed up with the painfully loud squeal of the low-battery warning signal.
The 3M WorkTunes have been a pleasing upgrade from my old muffs. They have a 24-dB noise reduction rating and comfortable pads that provide a good seal around my ears. The headband has a soft pad at the top; it’s removable, a nice feature if you like to wear a baseball cap and don’t want that button on top pressed against your skull. The left cup houses the two AA batteries that power the unit. There is an optional lithium-ion battery pack that can be recharged while installed in the WorkTunes by way of a common micro-USB cable.
Photographs by the author
The controls on the WorkTunes are easy to operate by touch. An instruction booklet details all of their functions. The cushions are soft and make a good seal around the ears.
The right cup has a power button that turns the muffs on and off when held for two seconds. Twisted, it controls the volume. When the noise of the tool is loud, the volume in the stereo WorkTunes speakers can be cranked up, but built-in software will protect your hearing by turning the volume down if it is kept too high for too long.
There are also two small buttons on the right side: source and function. The source button makes selection between AM radio, FM radio, Bluetooth, and Line-in. It also controls the music equalizer settings of Flat, Pop, and Rock. The function button will save and recall radio stations and pair Bluetooth devices. A large dial below the button tunes into radio stations; stops, starts, and scrolls through YouTube videos on Bluetooth; and answers, rejects, and disconnects telephone calls.
With each function of WorkTunes a woman’s voice announces the selection. It’s a great improvement over my old muffs’ eardrum-piercing signal.
A rubber cover at the left protects the USB ports for charging the optional lithium-ion battery pack and for a four-pole stereo audio cable.
The WorkTune’s sound attenuation in the workshop takes care of all my loudest power tools and yet I can still hear someone speaking in a normal voice. The fit is comfortable, and I could wear the muffs for a long spell of power-tool use. The sound quality of the integral radio is good, although if the FM is in stereo, I find it hard to distinguish separate sounds coming from left and right. With Bluetooth, YouTube music videos playing on my smartphone have obvious and excellent stereo sound. The WorkTunes can be up to 25′ away from the Bluetooth signal source; beyond that, the signal breaks up. That’s enough to give me free range in my shop.
If a phone call comes in on my smartphone while I have the Bluetooth connection on, I’ll hear the ring tone and I can answer with a press of the tuning dial. I can hear the callers clearly enough, but I come across to them echoey and distorted and the sound of my own voice is muffled. Of course, I’d often be wearing the muffs when making noise in the shop, and that background noise would only make matters worse. The most important thing is hearing a call come in and being able to pick it up. Then I can tell the caller to hold on a second while I shut down the machinery and use the phone normally.
The WorkTunes hearing protectors will see a lot of use in my shop and will almost certainly be at the top of my list of most-used tools. My hearing is good enough to hear a straight pin drop on a rug at ten paces and I intend to keep it that way.
Christopher Cunningham is the editor of Small Boats Magazine.
"I’m a pretty lucky guy,” says Richard Honan, 74, of Winthrop, Massachusetts. He has been building one boat after another since 2002, and in 2020 he had begun work on his 13th boat, a peapod, the Beach Pea designed by Doug Hylan, when the dark cloud of the pandemic hit , it had a silver lining for Richard. “My grandkids couldn’t go to school, and they would spend all that time with me building that peapod. Otherwise it never would have happened to have all day, every day, for weeks on end, for them to come work with me.”
In addition to granddaughters Anna and Emily, one of the boys in Richard’s neighborhood, joined the project. “Christian Buonopane was getting dropped off from school. I didn’t even know him. I introduced myself and said, ‘Do you want to learn how to build a boat?’ He spent a year and a half with me.” Richard’s grandson, Ben, also joined in with the boat building and was instrumental in helping make the mast. “Ben is very quiet, sometimes even withdrawn. I got him to come to the shop to help me make the poor man’s hollow mast. He really got into it and couldn’t believe that with just hand tools, planes, and a sanding belt turned inside out we could make something as perfectly round as we did.”
Photographs courtesy of the Honan family
Christian, one of Richard’s neighbors, took up his invitation to build a boat and stayed with the project for one-and-a-half years.
Richard began building boats in 2002 while he was in business making signs. In 1971, after serving in the Army in Vietnam, he started the Richard Honan Sign Company, specializing in hand-carved wooden signs, hand-painted and often highlighted with gold leaf. Some of the tools in his shop were handed down to him from his father and grandfather.
His first boat was a 7′ 8″ Joel White-designed Nutshell Pram, built with a son-in-law, Elvin (Emily’s father). Elvin didn’t have a lot of experience using woodworking tools before and had never previously built a boat of any kind. They named the boat R&R, for Rodriguez (Elvin’s last name) and Richard to commemorate their time together. The name also recalled the free time Richard had while serving in Vietnam.
Among the other boats Richard built were a 14′ Reuel Parker sharpie, a 16′ Ducktrap Wherry by Walter Simmons, two David Nichols Indian Girl canoes, an Adirondack Guideboat, two kayaks, and a strip-built 16′ Marc Barto gaff-rigged Melonseed skiff, which won the I Built It Myself “Best in Show” at the WoodenBoat Show at Mystic Seaport. “Let me tell ya,” Richard said, “you get Best in Show at Mystic Seaport, and there’s nowhere else to go.”
The peapod was built in the cellar of the building that is the home of the Richard Honan Sign Co. The boat’s only way out of the shop is up the stairs at left. The shop is well equipped and has no shortage of clamps to hold the outwales Christian and Richard glued to the hull.
Two of Richard’s granddaughters, cousins Anna and Emily, were devoted to the peapod project. Using the long-reach planking clamps that Richard made, they secured the sheer-plank guards.
Emily and Anna occasionally worked under the supervision of Adam, a driftwood sculpture Richard made. “He’s life size,” Richard notes. “He was actually modeled after me, although I don’t know if I was that thin even when I was in the Army.”
Richard’s grandson Ben, Anna’s brother, pitched in during the construction of the peapod.
For Richard, there was “nowhere else to go” but back to the shop to build another boat. “I’m lucky I’ve got a wife who is patient with me and doesn’t even know how many boats I have.” While Mary’s glad that all the grandkids have become good swimmers while horsing around with Richard’s boats, “she’s not much of a boater. As far as sailing goes, she thinks that when boats heel, the next thing is you’re gonna die. Even so, Mary has had two boats named in her honor: PROUD MARY, a 24′ 4″ one-design Raven class, which Richard bought before he started building boats; and PROUD MARY II, the prize-winning Melonseed.
Richard has an enthusiastic worldwide following on his social media postings. An old family friend, Charlie Kitson, gave Richard the Atlantic white cedar that became the peapod’s planking. Charlie had planned on building a boat with the wood but, as he told Richard, he was getting too old and recognized “it’s not going to happen, Rich. I’d rather watch a boat get built with stock that I’d provided for you.” He gave the stack of flitches, a whole log’s worth, to Richard. It was more than enough to make all the strips he needed to mill for the peapod. He has also inherited lots of stainless-steel and bronze boatbuilding fastenings they were never going use. “I have boxes of fasteners that look like boxes of gold.” “Someday” he mused, “someday, I’m going to be doing the same thing, donating fastenings and hardware to somebody else.”
The peapod negotiated the trip up the stairs and emerged from the shop, ready for outfitting with the sail rig.
Benjamin, the cocker spaniel Lucky, and Popi—as Richard is known to his grandkids—get ready to trailer the peapod for the launch and christening. WAYLO-WAYLO is the way Richard’s brother Steven used to announce his arrival, whether at the basement shop or at the yacht club. Lucky passed away after the peapod was launched. Richard noted, wryly, “My daughter, who thought I was emotionally unstable without a dog, got me another, named Sunny, that looks just like Lucky. He’s going to be a boat dog too.”
The Honan family and friends gathered at a beach on the outskirts of Winthrop for the christening of the peapod. Richard is at the left edge of the group at the water’s edge. His brother Billy tends to WAYLO-WAYLO.
The peapod was christened WAYLO-WAYLO in honor of his late brother Stephen. Whenever Steve visited Richard at the basement woodworking shop, he’d stop at the top of the stairs and announce himself: “Waylo, waylo!” He’d do the same when he entered the local yacht-club bar to let the regulars know “Steve’s here!” Stephen was not only Richard’s brother, he was Richard’s best friend. He was like a silent partner, helping out with the boat building and helping prepare the boats for launching in the spring. Steve often took visiting friends sailing into Boston Harbor. As they were leaving Winthrop Harbor, they were always curious to know where he was taking them. “Hey, Steve, where are we goin’? Are we goin’ to the harbor islands? Or we goin’ into Boston Harbor by the USS CONSTITUTION? Where we goin’, Steve?” and Steve would say “Where’re we goin’? We’re there! We’re there!”
Bill and Richard celebrated the launch of Richard’s 13th boat. Bill is the lucky recipient of one of the Nutshell Prams Richard built.
At the launching, Richard got Christian underway to enjoy the sailing the boat he helped build. Richard enjoys having his grandchildren and other youngsters sail more than sailing his boats himself.
Richard has now built 14 boats, and while he has kept track of the number of boats he has built in the past, the accounting that matters most to him now is in the boats he’ll build in the future: “I measure my life now in how many boats I have left to build.” He has kept only four of the boats he has built. He sold several for the cost of the materials and he has given others away to family, friends, and boating clubs. He gave a canoe to a neighbor who had some young kids. The neighbor was reluctant to take the boat without paying something for it. “Listen,” Richard told him, “if you have half the fun that my grandkids had in this canoe then it’s a good deal.”
He’s not in boatbuilding to make a profit that can be measured in dollars. “I’m the richest person you know. I’m retired, I have enough money, just enough money to live on. I own my own house. I build boats, create driftwood art, and do stuff with my grandkids. I’ve been married 50 years and I’ve been with my wife 56 years. I’ve got two daughters and five grandkids, and I see them all the time.” That makes him a wealthy as well as a lucky guy.
Do you have a boat with an interesting story? Please email us. We’d like to hear about it and share it with other Small Boats Magazine readers.
Whenever a simple and delicious Mexican idea migrates north across the border, it tends to get fancied up, often to its detriment. Consider the nacho, once an unpretentious tortilla chip crowned with a slice of jalapeño and melted cheese, now a heaping muddle of meat, sour cream, onions, olives, and herbs. Herbs! Sam Devlin’s new Pelicano, a liberal translation of the Mexican panga workboats, has likewise been garnished with such gringo delicacies as windscreen and wheel steering, but it’s hard to complain that it’s been spoiled in the process. Devlin’s version is saucy-looking, efficient, and seaworthy, and still unfancy enough that an ambitious amateur can realistically aspire to building one.
Devlin got acquainted with pangas on his occasional winter trips to Mazatlán, one of which also acquainted him a few years back with a delightful woman named Soitza, who became his wife. Mazatlán glares out at the open Pacific, and Devlin says he was impressed by the pangeros’ willingness to motor out into the big water to fish—at least in the mornings, before the afternoon trades boil up—and then drive the boats right up onto the beach around noon. He liked the pangas’ no-nonsense functionality and tough character, but the all-fiberglass execution left him cold.
For his interpretation, Devlin shortened the hull from a typical 22′ to 18′ 4″ for handier trailering. He added a deck, kept the beam slender at 6′ 6″, and gave the bow an arrowhead-fine entry with a prominently extruded stem. “I’m a big fan of parting the water,” he says. It’s a semi-displacement hull, so its transition to plane is gradual and subtle, and Devlin’s design objective is the best possible compromise between low-speed fuel efficiency and high-speed—well, speed.
Neil Rabinowitz
The Pelicano shrimper offers an impressive level of accommodation and ease for an 18-footer, for it has sheltered steering and bunks for two adults, while also being easily trailered behind a small pickup truck.
Devlin never undertook any formal education in naval architecture, but has quietly amassed 35 years of experience designing everything from kayaks to motor cruisers now threatening 50′. (He recently moved into a vast new industrial park-type shop, in part so he could bid on regional ferry projects—stitch-and-glue ferries, of which he’s already built one.) He loves to riff on historic boat types, everything from melonseeds to classic wooden tugs, but he’s always thinking contemporary practicality, efficiency, and simple beauty. Two things about a Devlin design: You’ll never see any fussy, superfluous gimmickry. And unless you have a practiced eye, you’ll never guess they all start out as a pile of plywood. Devlin’s boats are closer to the sculpture garden than the lumberyard.
Pelicano plans are available in three configurations: center-console, bassboat, and shrimper. The center-console edition shaves the building time by about 150 hours and provides, in effect, tandem cockpits separated by a bridge deck. The shrimper features a tall pilothouse rising over a rudimentary cuddy, and a longish cockpit. Either of these would make a versatile fishing boat. Devlin’s personal favorite is the bassboat, which is really more of a picnic cruiser. The cockpit provides space enough for only three or four people, and the cabin is slightly higher than the shrimper’s, providing sitting headroom for a fireplug-proportioned person and camp-style sleeping room for two. It might be the least versatile of the three, but it’s the most fetching: a simple, exquisitely proportioned classic design that stands proudly aside from transient commercial trends.
Neil Rabinowitz
The Pelicano bassboat (foreground) is Devlin’s preferred layout; it has room for (in addition to two berths) a galley and stowage.
On a crisp, calm summer morning we splash the bassboat into a southern finger of Puget Sound near Devlin’s shop and play for a couple of hours. The wavelets are all of two inches high, so we have no chance to test her in a chop, but Devlin spots a big cruiser and arrows the Pelicano across her wake. It isn’t much of a challenge, but the very steep V of the entry seems to settle the bow back into the water with cushioned delicacy. The hydraulic trim tabs—another unlikely garnish on a Mexican workboat—negotiate the bow downward so we can easily peer ahead over the deck at speed. This boat’s 70-hp Yamaha—about the maximum motor Devlin recommends—yields a 17-knot cruise at 4,000 rpm. Top speed is about 25 knots. A water-skiing indulgence would be a foot beamier and faster on plane, but this hull’s skinniness renders it more efficient at fishing velocities. A 25-hp motor, Devlin says, wouldn’t be a bad choice.
The flat, two-piece windscreen is surprisingly efficient at deflecting the breeze from the cockpit, even for aft passengers. The stem extension poking over the deck makes a jaunty gunsight for holding a course. The one aesthetic quibble I’d present is the factory-made aluminum deck hatch, which seems as appropriate on a wooden boat as an electronic organ in a Baroque cathedral. This Pelicano cries for a handcrafted hatch cover to echo its windscreen frame. Devlin, however, is no sentimentalist. While he’s meticulous about the artistic issues of line and proportion—a home builder will wreak remarkable damage by sneaking an extra inch of height into a Devlin cabin—he doesn’t like anything that causes extra fuss, either in construction or maintenance. His philosophy is: simple, strong, durable. On this boat, sprayed-on polyurea truck-bed liner, which has the texture of lizard hide, covers every square inch of deck, cockpit, and most of the cabin interior. It hardly offers the warm-blooded allure of teak or mahogany, but it’s no trouble, either. “It’s just the coolest stuff,” Devlin raves. “I love how much protection it gives the epoxy.”
In fact, on this Pelicano from Devlin’s shop, only the sapele windscreen frame and companionway slides suggest “wooden boat.” Indeed, most casual onlookers wouldn’t guess that the heart of this boat is wooden, given the high-gloss topside paint and professional-quality fairing. Most amateur builders, however, won’t have that problem: Our fairing will not be so fair, and we’ll be tempted to allow more brightwork than Devlin does, despite the penalty in maintenance. It really distills down to how one wants to balance “boatbuilder” with “boat owner” and “boat user.”
Neil Rabinowitz
Designer Sam Devlin and his wife, Soitza, enjoy an outing in the Pelicano bassboat
Let’s talk about building for a minute. Like all the 90-odd designs in Devlin’s current catalog (www. devlinboat.com), this boat is made of stitch-and-glue plywood with exterior fiberglass-and-epoxy sheathing. The ply is ½”. Unlike many of his earlier designs, however, this hull is intended to be built upside down over four bulkheads on a strongback, then ’glassed and faired before righting. The advantages, Devlin says, are easier fairing and the need to convene neighbors only once for flipping. The keel is a beefy slab of purple-heart, 1¼” thick, capped with a stainless-steel or bronze quarter-round. “Sometime in the life of this boat it’s going to get beached,” Devlin says. “Might as well prepare for it.”
Although this is basically a simple boat, the amateur should not expect to begin building in the fall and happily launch in the spring. Devlin says there are about 1,400 shop-hours in each of the two Pelicanos his crew has built to date, and let’s note that those are professionals’ hours. Based on my own experience building a Pelicano-size sailboat of Devlin’s design (the Winter Wren II), I venture that a typical amateur will need about twice that long, and Devlin readily agrees. However, the cabin is a monumental labor pit on any boat, so the center-console version of the Pelicano should be substantially simpler.
Neil Rabinowitz
Inspired by outboard-powered skiffs—pangas—he’d encountered in Mexico, Sam Devlin drew the 18’ Pelicano hull. He offers three different layouts for the boat: center-console, bassboat, and the shrimper seen here.
As with some other designers, we have our choice whether to commission a Pelicano from Devlin’s shop or buy the plans and attack the task ourselves. The Pelicano teeters on the cusp of being an appropriate first boat for the amateur: probably accessible to the moderately skilled and highly determined, probably not to the woodshop-clueless and easily distracted. The question then becomes one of balancing the prize of flawless finish and detailing against personal growth through accomplishment. Spending a morning with Devlin’s Pelicano made me a little dejected and irritable with my amateur craftsmanship on the Winter Wren, but also determined to keep improving.
Which is exactly what seems to keep Sam Devlin cranking out boat plans. After two boats and a number of long conversations, I know him pretty well, and I’m convinced that he enjoys seeing his customers grow into real boatbuilders at least as much as he savors the beauty—and revenue—of finished boats rolling out of his own shop. “I’m interested in boats, my customers, and making money,” he says. “Probably in that order.”
The Pelicano center console is the simplest of the trio. This boat’s center console is hinged; when it’s pivoted forward, a large cargo hold is revealed in the hull.
Pelicano Particulars: LOA 18′ 4″, Beam 6′ 6″, Draft 12″, Dry weight 1,490 lbs, Recommended power, 25–70 hp outboard
Finished boats and plans for the Pelicanos are available from Devlin Designing Boat Builders. This Boat Profile was published in Small Boats 2012 and appears here as archival material.
The Norwalk Islands Sharpies are the product of more than a century of evolution. Their pre-cursors are believed to have originated in New Haven, Connecticut, where there was a need for light, shallow-draft boats that could carry loads of oysters safely across bars to market. I say “believed” because there is some evidence that similar types were used in Ireland even earlier.
Working sharpies were flat-bottomed, slab-sided center-boarders rigged as cat-ketches with unstayed masts. They were perfectly suited to their environment, so when Bruce Kirby was thinking about a boat to use in his own slowly silting-in waterway at Rowayton, Connecticut, he turned to the local sharpies for inspiration.
The sharpie he drew for himself was a 26-footer (see Small Boats 2007). He was so pleased with her performance that he began designing a range of similar boats in varying sizes. He called them the Norwalk Islands Sharpies, and they’ve been around now for more than 20 years. In 1987 an Australian boatbuilder, Robert Ayliffe, came for a visit. The two hit it off, and when Robert returned home he set up NIS Boats to market the sharpies worldwide. About 250 Norwalk Islands Sharpies have been built from plans, over 60 of them in Australia. Their well-proven success is perhaps not surprising when you consider that they are designed by Kirby, whose credits include such diverse craft as the Laser, the Olympic Sonar class, and various Canadian challengers for the AMERICA’s Cup.
There are six designs in the NIS fleet, ranging from the 18-footer, which I sailed for this article, through 23′, 26′, 29′, 31′, and 43′. All except the two largest can be trailered, although the 29-footer is a ponderous beast on the road.
Traditional sharpies had their drawbacks. Their shallow, radically balanced rudders mounted under the rockered aft end sometimes made them tricky to steer. The NIS boats have retractable blade rudders mounted on the transom. The foil-shaped blades are designed to kick back against a bungee shock absorber if they hit something. You might think that the flat bottom would make the boats pound sailing to windward, but this is not so. They are initially quite tender before the hull shape firms them up, so even in light airs they sail slightly heeled. Owners report that once sailing, the boats present a chine to the waves, and the ride is remarkably soft and quiet.
The shallow draft means that you can take these boats into places that are off-limits to normal yachts. The NIS 18 draws 10″ with the board up. The 31 draws only 12″. In calm, sheltered conditions you can literally run the bow onto the beach and step ashore.
Courtesy of Stray Dog Boatworks
The Norwalk Islands Sharpies are built of readily available marine plywood, and a dedicated amateur should find the project both accessible and rewarding.
It’s probably fair to say that most people do not think of sharpies as seagoing boats. When Robert Ayliffe built his own 23-footer 23 years ago, he had no doubts about their capabilities. He had read the works of Commodore Ralph Munroe, who designed the sharpie yacht EGRET in the 1880s. The Commodore was one of the pioneer settlers of Miami, and his EGRET earned an enduring worldwide reputation while sailing on Biscayne Bay. Ayliffe was particularly impressed by an account of Munroe riding out a hurricane in EGRET without mishap.
Ayliffe’s first offshore passage in his 23-footer, CHARLIE FISHER, was from the South Australian mainland to Kangaroo Island, across the notoriously rough Investigator Strait. He and a companion beat to windward for eight hours in a gale that was recorded locally at 60-plus knots. “It was frightening,” he recalls, “but the boat sailed very well.” When they reached their destination, in true sharpie style they nosed up to the beach to rest and dry out. Other yachtsmen couldn’t believe that the little boat had been out in such weather. That was in 1988. Since then Ayliffe has weathered other Southern Ocean gales, including a protracted 45-knot howler in Bass Strait.
Courtesy of Stray Dog Boatworks
The deceptively sophisticated NIS 18 is easy to build and exciting and seaworthy under sail. The design includes the choice of two rigs: an unstayed gaff and an unstayed, fully battened marconi.
Bruce Kirby commissioned an independent marine consulting firm, Aerohydro Inc., of Southwest Harbor, Maine, to do an analysis of the righting moment of the 31-footer. He asked for righting moments for every 10 degrees up to 180 degrees (upside down). He was pleased and just a bit surprised when the results indicated that the 31 could roll to 143 degrees and expect to come back upright. A point of no return of 110 degrees is considered good for a small cruising boat; 143 degrees is remarkable.
The sharpies have fairly wide side decks combined with a high, crowned cabintop, so if the boat is knocked down the house supplies considerable flotation. The cockpit seats and the enclosed coaming seat backs also add buoyancy. Kirby notes that the self-righting chaacteristic applies to all sizes, but the smaller boats are more affected by crew distribution.
The Aerohydro study assumed that the hatches were closed. Ross Henderson, the Tasmanian owner of a 23-footer, was racing in Bass Strait recently when, through an odd combination of wind and wave, the boat was knocked flat. The masts were lying in the water; Henderson estimates that the boat was lying at about 100 degrees. The cockpit filled with water and, although the main hatch was open, not a drop went below.
While Robert Ayliffe hesitates to urge offshore adventures upon his customers, he says that with proper preparation and a skilled crew he has absolute confidence that these boats are up to the task.
Courtesy of Stray Dog Boatworks
The smaller Norwalk Islands Sharpies are uncluttered by sailbags and poles, since the two sails live on the booms and there are no bagged headsails needing stowage.
The NIS boats are built of marine plywood, sheathed with fiberglass and sealed inside and out with epoxy. Their simple, hard-chined hull shape places them within the abilities of amateur builders.
While the accommodations in the smaller boats is necessarily spartan, it is worth noting that the sails always live on the booms and, since the unstayed rig means that the boom can swing past 90 degrees, there is no need for spinnakers or spare headsails. Therefore, there are no sailbags down below. Some may find the presence of a centerboard trunk obtrusive, but on the 18-footer the accommodations have been left clear by cleverly placing the trunk slightly off-center and hiding it in the furniture. It seems to make no difference to the performance on either tack.
The cat-ketch is about as simple a rig as you can get. With the optional tabernacles, one person can step the unstayed masts easily. While the boat is being trailered, the sails can be left furled on the booms with the lazy-jacks and halyards in place, as the booms are attached to the tabernacles, not the masts. Upon arrival at the launching site, you simply winch the masts upright, slide the boat into the water, and go sailing. The masts on the original Norwalk Islands Sharpies were spun aluminum; there is now a carbon-fiber option, which is 35 percent of the weight of aluminum.
Having no jib, changing tacks on a sharpie is a matter of simply pushing the tiller over. The two sails look after themselves. You can sail these boats around in circles without touching a sheet, though there are control lines—vang, outhaul, and cunningham—for fine-tuning the sails’ shapes.
Courtesy of Stray Dog Boatworks
The Bruce Kirby–designed 18’ Norwalk Islands Sharpie is the latest and smallest in a family of boats ranging all the way to 43’.
The baby of the fleet, the NIS 18, originally had a single mast. The rig was recently reworked so that there is now either a ketch or yawl available. During a recent sail on board the first 18-footer with a ketch rig, I discovered that there were certain idiosyncrasies to get used to. Going to windward, you do not harden the mainsheet right in as you would expect to; instead, you ease it slightly so that the draft from the mainsail does not interfere with the mizzen. I found that the mizzen, sitting right in the middle of the cockpit, gets in the way a bit. The yawl, with the mizzen stepped on the transom, would free up the space nicely. There would be a slight loss of sail area and the sail would have to be sheeted off a boomkin, which could be prone to damage when maneuvering in marinas. At the time of writing, the first two yawls are being built, but none have hit the water yet.
When running wing-and-wing, one might instinctively choose to have the main setting normally and the mizzen slightly by the lee. Experienced NIS sailors do the opposite, running the mainsail by the lee and allowing the main boom to swing about 10 degrees forward of the mast. Wind hitting the mizzen is deflected into the main so that both sails keep filling beautifully.
There’s a lot to be said for a split rig in small cruising yachts. The center of effort is kept low, thereby reducing heeling. There are endless combinations available to balance the boat. One great advantage is that with the mizzen sheeted in hard, the boat will lie docilely head-to-wind while you take in a reef or go below to check the chart. The full-length battens ensure that the sails sit quietly.
These boats move in the slightest breeze. There’s no need for heavy, complicated, space-consuming inboard engines. Auxiliary power comes from an outboard motor mounted on the transom on the 18- and 23-footer, and operating through a well in the larger boats. But these motors don’t log many hours, for the Norwalk Islands Sharpie is truly a boat that is meant to be sailed.
Nothing, absolutely nothing, conveys the joy of being afloat quite so purely as a light paddling boat. We can build the Fox canoe in our garage, carry it atop our car, and paddle it across open water. At the far side of the bay, the little double-ender might take us to the head of a forgotten creek that nature has reclaimed from industrial intrusion.
Bill Thomas
The 14’7” Fox double-paddle canoe, which weighs only 44 lbs, is casually portable. Its 6’8”-long cockpit offers considerable room, yet can be securely sealed with a spray skirt.
Readers of these pages will know that the past three decades have seen kayaks take to the water in great numbers. Indeed, some manufacturers might be tempted to market Fox as a “recreational kayak” in order to boost sales. To his credit, Bill Thomas, designer and builder, describes this nifty little boat as what it really is: a decked double-paddle canoe. At 14′ 7″ in length and measuring more than 30″ ″across the rails (to say nothing of its commodious 6’8″-long cockpit), this is no kayak. It will do things that no true kayak can…or at least it will do them more comfortably.
If you paddle kayaks, the first thing you might notice upon stepping aboard Fox is that you can, in fact, step right aboard. You will find no need to jackknife into a dark wormhole of a cockpit while leaning on a paddle for stability. If any unfriendly creatures have taken up residence in the boat since your last visit, they will be right out in the open. You’ll see the snake before it begins to climb up your right leg.
The caned canoe seat in Fox rests about 1″ above the hull’s narrow, flat bottom. This seat, combined with the flexible slatted backrest, offers hours of good comfort. Although no footrests are provided, we can brace our knees against the cockpit coaming. As an old kayaker, I’d be inclined to install adjustable and removable foot braces in this boat. They would add power to our paddling stroke and enhance feelings of security in rough water.
Bill Thomas
This stable canoe comfortably accommodates a mother and child.
Part of the comfort and ability of this boat results from its relatively generous freeboard. The point where our paddle shaft crosses the coaming measures about 13″ above the floor. We’ll likely hit it with our knuckles if we employ our favorite short kayak paddle. Let’s buy, or make, a wooden paddle with a long shaft and small blades.
How long should the paddle be? A few rules of thumb exist for determining paddle length, but experience has shown that they’re not worth repeating here. If we’re making our own paddle, we can put together a rough preliminary version that will let us experiment with shaft length, blade shape, and angle of feather. If we’re purchasing a paddle, we can test-drive several models at the local outfitter’s pond. For this boat, I’ll wager that we’ll favor a paddle that measures 8′ to 8 ½’ in length.
Designer Thomas has given Fox a multi-chined hull with a flat bottom that shows just a little rocker (longitudinal curvature). The resulting stability curve seems friendly. As we lean to the side, this canoe heels easily at first. Then it stiffens up nicely. A relatively long waterline and fine entry allow the boat to move right along. Can we keep pace with the local kayak fleet? Well, that depends. Yes, we can cruise easily alongside most sea kayaks, and carry a bigger lunch as well. But we cannot change the laws of hydrodynamics, so let’s not get drawn into racing against one of those 20′ × 18″ torpedoes.
Fox appears to have just the right amount of directional stability. It likes to keep going where we point it, yet it turns easily and predictably. This canoe needs neither a skeg nor a rudder, and our paddling technique will improve if we travel without these complications. The good maneuverability lets us play in river currents and on the faces of standing waves. Most of the time, we’ll feel no need for a sprayskirt, yet the tall cockpit coaming will easily accept one—inexpensive insurance against a wet lap, or a cockpit full of water. Should the worst happen, large watertight compartments forward and aft will keep the flooded boat afloat. They will hold plenty of food and gear as well.
At the end of the day, we can bed down in the huge cockpit. I’ve spent many nights sleeping in the bilge of my 17′ sea kayak, and the accommodations aboard Fox seem plush by comparison.
Bill Thomas
This canoe also comfortably accommodates designer-builder Bill Thomas and all his camping gear.
We’ll build this canoe in stitch-and-glue fashion. The plans set includes full-sized patterns for almost all the pieces, and a particularly well-illustrated 36-page Builders Guide comes along as well. No true lofting will be required. After transferring the paper patterns to sheets of okoume plywood (4mm for hull sides, deck, and bulkheads; 6mm for bottom and deckbeams), we’ll cut out the parts. Then we’ll drill holes along the edges of the sides and bottom, and pull the pieces together by twisting 3″ lengths of 18-gauge copper wire that’s been poked through the holes. This is quick work. After cutting out the parts, we can assemble the hull in less than a day. The cockpit coaming and deck will follow.
Then comes a lot of filleting (with filled epoxy), sanding, fiberglassing, sanding, priming, painting, and yet more sanding. This little canoe has a nice shape, and time spent obtaining a yacht finish would seem well spent. The process should move along at a satisfying pace.
Thomas teaches a class in how to build the Fox canoe at WoodenBoat School here in Brooklin, Maine. Starting with kits, the students put together their own boats. At the end of the six-day course, the boats are essentially complete and require only final finishing before hitting the water.
Decked double-paddle canoes are nothing new. John MacGregor, a Scotsman, usually received credit for the introduction and early development of these light double-ended boats. He might have taken inspiration for his well-known Rob Roy canoes from kayaks he had studied while traveling near the Bering Sea in 1859. During the late 1800s and early 1900s, the type enjoyed great popularity. Later in the 20th century, L. Francis Herreshoff, from whose drawing table floated the 72′ TICONDEROGA (all 108,300 elegant pounds of her), took much of his waterborne pleasure in double-paddle canoes of his own design.
Compared to sea kayaks, these canoes offer greater stability and comfort. For inexperienced paddlers, they can prove safer. Folks who have no intention of learning more than the first 180 degrees of the Eskimo roll, might be better served by double-paddle canoes. Compared to the common open “Indian” or “Canadian” canoes (usually driven by single-bladed paddles), Fox and its relatives offer better rough-water capability. In addition, double-bladed paddles tend to be inherently efficient, as our power strokes are virtually continuous. Nothing is lost to recovery.
In drawing Fox, Bill Thomas has created a capable and forgiving boat that will take us on grand adventures. Perpetually watertight and coated with epoxy, it will prove easy and inexpensive to keep. At 44 lbs finished weight, it is casually portable. If we build Fox, we certainly will paddle it—and more often than we might think.
Plans, kits, classes, and completed boats are available from Bill Thomas Maker. This Boat Profile was published in Small Boats 2012 and appears here as archival material.
It is hard to know why a particular style of boat appeals to a sailor. A hardcore racer looks at Paper-Jet and can’t wait to strap it on, a khaki-clad prepster can’t see beyond white hulls and varnished mahogany, and a dreadlocked steampunk needs linseed-oiled interiors and a three-day grunge to feel authentic. But the nascent 19th-century romantic responds to lots of rope, multiple sails, and belaying pins, and those of us so wired are the audience for Don Kurylko’s D-18 Myst design (18′ 3″ LOA, 5′ 7″ beam). I think I can see why. The designer has worked up a robust, capable camp-cruiser or adventure expedition boat with the aesthetic appeal and features of a British working boat of a certain age.
Geoff Kerr
The D-18 Myst has a striking profile and sail plan, and her general appearance prompts thoughts of British fishing boats of the late 19th and early 20th centuries.
She grabs you with her distinctive profile, offering the nicely scaled features of a much larger boat. The plumb stem and the bowsprit mimic those of the late 19th and early 20th centuries, but rather than twee whimsy they are the most obvious features of a very deliberately functional boat whose dominant impression is its low yawl rig. This setup drives her character and her purpose, giving a skipper many, many options for matching sail area and configuration to the wide variety of conditions one will encounter when cruising. That the design hearkens to the 19th century is less a romantic appeal than it is recourse to the days when sail was at the height of its commercial development.
Geoff Kerr
D-18 Myst is meant for adventure and exploration. Her owners, Ted and Ruth Cody, are seen here moving up a waist-deep, winding creek seeking shelter and a perfect campsite.
The D-18 Myst’s 160-sq-ft sail area is generous for a boat of this size. Ballast and her low rig keep her on her feet, and at 100′ her mainsail is man ageable singlehanded and without winches. Her relative narrowness and shallow draft (a mere 9″ with her centerboard up) make her versatile; easy trailering, storage, and rowability are desirable elements in a camp-cruiser. The tiny mizzen might appear silly until one discovers the myriad advantages of that 20′ sail when heaving to, balancing the helm, using it as a riding sail, and in helping to tack the boat in a hard chance.
An important test for the practicality of a camp-cruiser is the complexity of launch and recovery. The D-18 scores well here, with simple deck cradles for the mainmast, and all the rest of the gear simply stowed in the cockpit. Her height on the trailer makes setup possible without a ladder, with much of it, other than stepping the main, being accomplished from the ground. Only a wrench for a couple of nuts and a pair of pliers for a stubborn shackle were needed. The trailer package is clean and neat, and aerodynamic, so no cover is needed to keep gear in the boat. The rig is compact and light enough to be drawn by a sensible vehicle. The logistics on my visit were at a minimalist ramp with about 30″ of water; shallow draft and a long bowsprit for a handle make such launches a breeze. And a practical note for boat owners: a pair of 2 × 6s mounted on the trailer make great walkways. You still get your feet wet, but not much more, and you won’t stumble over axles and sea monsters.
In preparation for a daysail, the owner can do his bowsprit work in the parking lot while the boat is still on the trailer. Once rigged, the jib is set and struck, flying from the cockpit. Frankly, the rig looks (and is) busy. Sheets, halyards, running backstays, outhauls and downhauls, and cleats and belaying pins—all those components that make her a marlinespike codependent’s dream—probably make her a bit fiddly for those who are out for a mellow, social sail. The fact is, this is a real working rig, and that web of sails and control lines render Myst capable of some serious sailing. She will be upright and making progress when most boats her size have called it a day.
Auxiliary power comes in the form of oars or a small outboard. The boat’s weight and the owner’s experience call for rowing her double if an actual passage is to be made. As such the boat’s owners make regular use of a 2-hp outboard mounted on the transom. This setup moves the boat admirably, and the motor remains well out of the way perched back there. In the limited space available on this narrow transom, one must give up any thoughts of a larger engine or indeed steering with the engine rather than the rudder, so don’t plan on reverse or a sharp turn.
The designer put a lot of thought into the boat’s interior layout. There seems to be not a single square foot of space without some sort of furniture-type accommodation built into it. Thwarts double as storage lockers and the forward side benches hide bays for flotation bags or duffels, then hinge over to complete a full-beam berth flat or lounge deck. The short decks forward and aft have bulkheads forming flotation chambers large enough to compensate for the ballast. These individual features are sensible and practical for hardcore camp-cruising, albeit a bit overwhelming in the aggregate. The interior, like the rig, is busy—perhaps too busy for a sunset cruise. The owners and I sailed the boat in variable light air on a New Hampshire lake, with the furniture in the sprawling mode. I never quite found my joy, as the coaming and rail are too low to be much of a backrest, but surrendering to the supine in the sunshine was pretty sweet. Skippering aft was much more conventional and comfortable, with an ample well for feet and legs.
The nicely modeled hull is intended to be strip built, which is a practical construction choice for both hard use and the home builder. That home builder will find a complete and very detailed set of plans; Kurylko includes full-sized Mylar patterns for key components such as the molds. His drawings are logically organized and presented, with instructions that outline logical sequences and provide helpful hints. He gives manufacturers’ stock numbers and scaled details for the fabricator for such arcane bits as the cranse iron. Ted Cody, the builder of the boat I sampled, chose to mill his own square-section strips and edge-nail them, and then opted to sheathe the hull in fiberglass—a wise choice for an adventure-bound boat. This four-year undertaking by a minimally experienced boatbuilder is a testimony to the design, not to mention Ted’s patience and chutzpah.
Geoff Kerr
A centerboard, a kick-up rudder, and an easily unshipped bowsprit make launching and recovery simple. Note the modest-sized tow vehicle and stock trailer customized with 2×6 walkways.
As built, the boat carries a heavily ballasted centerboard (75 lbs), requiring a multi-part pendant, and movable lead “muffins” in vinyl bags under the floorboards, totaling about 120 lbs. Their combined effect is a stable, comfortable boat—still subject to crew trim—but deliberate rather than flighty underway.
The D-18 Myst cannot be to everyone’s tastes. But she merits high credit and consideration for aspiring camp-cruisers and adventurers. She is dramatically more functional than a “character” boat, much more complex and capable than a daysailer, and she offers plenty of strings, jewelry, and challenge to satisfy the inner shipwright and master mariner in all of us.
Plans for the D-18 Myst are available from Duckworks. This Boat Profile was published in Small Boats 2012 and appears here as archival material.
The Whitehall I built in 1983 is the finest bit of boatbuilding I’ve ever done. It began with a commission, so I wasn’t driven by daydreams of cruising as I had been with other boats I had built. For the Whitehall, I focussed on craftsmanship. Halfway through the project, my customer backed out on the deal, but at that point it didn’t change the nature of the work—I was building the boat for boatbuilding’s sake. I was deeply committed to traditional construction and put my best work into the best materials I could find: Port Orford cedar for the planks with mahogany for the sheerstrake, white-oak for the frames, and copper and bronze fastenings. I fashioned the breasthook, quarter knees, and boom jaws from crooks that I gathered and cured. The fruitwood crook that provided the book-matched pair of quarter knees was a once-in-a-lifetime find, perfectly suited to the angle and the curves.
I finished the Whitehall bright. The wood was too pretty and noteworthy in its rarity to hide under paint and I didn’t want to conceal the work I had taken such pride in. I launched the boat without christening it, leaving the naming to a buyer I hoped to find. A young couple living in one of the tonier parts of the Seattle metropolitan area purchased it and over the years I lost track of them and the Whitehall.
Thirty years later it resurfaced when its second owner sought me out. He’d had the boat for several years and loved it but was no longer able to use it. Feeling very strongly that it belonged back with me and my family, he let me buy it at a fraction of its value. Its transom had remained just as I’d made it, unadorned; the Whitehall was still without a name.
Between 1980 to 1987, four other boats I had built for months-long cruises got me through all the adventures that had captured my imagination and ambitions, and I was ready to settle into a career and raising a family. When I brought the Whitehall home in 2014, my kids were on their own and I had just been hired by WoodenBoat. Later that year, the Whitehall became a valuable asset for my work as the editor of Small Boats. It made its first appearance in the November 2014 issue in an article on Beaching Legs and has since appeared in one way or another in at least 54 more articles.
I enjoyed the attention the boat attracted at the launch and in my driveway, but all too often I treated the Whitehall very much like a trophy, brought out only for show and for polishing. That was until Nate and I spent this year’s Father’s Day together aboard it exploring Mercer Slough, a backwater surrounded by a park just south of downtown Bellevue, Washington.
The entrance to Mercer Slough lies under the spilled-spaghetti tangle of elevated off-ramps, on-ramps, and through lanes of Bellevue Way and Interstates 90 and 405. Beneath the widest expanse of concrete, the air is still but the traffic sounds like a gale blowing.
We started out from the launch ramp rowing tandem, but once we reached the slough it was best to take it in with a slower pace. We took turns rowing from the forward station and steering from the sternsheets. The nearest bridge here is part of a bike path that I’ve crossed often, looking down at the slough and wishing I were rowing or paddling rather than pedaling.
The center section of the slough runs straight for 1/2 mile and offers a glimpse of high-rises 2 miles away in downtown Bellevue, visible here just above Nate’s right elbow. At the next bend the city disappears from view.
Like me, Nate is eager to raise sail whenever there’s a breeze that can be put to good use. The spinnaker I made to fly from an oar stepped as a mast has become an essential bit of our kit.
Nate quickly took to stand-up rowing with oarlock extensions. To his left, on the far side of the fence is a blueberry farm that operates within Bellevue’s Mercer Slough Nature Park. Blueberries have been cultivated in the area since 1933.
Nate was in the stern, sailing the Whitehall, when my daughter Alison called to wish me a happy Father’s Day. When I handed my phone to him so he could talk with his sister, he took the phone in one hand and with the other slipped the spinnaker sheets between the toes of his right foot and the tiller-yoke lines between the toes of his other foot.
One of the trails that meander around the park curves through this atypical clearing at the edge of the slough. Nate and I pulled ashore and took a lunch break at a bench situated there. The grass beneath the boat grows on floating sod that sinks when stepped on. I took a short walk along the trail to look in the woods for windfalls that might make a taller mast for the spinnaker. The growth was too thick to venture into and I returned to the boat empty handed.
The upstream extremity of the slough leads to the concrete-and-steel Kelsey Creek fish ladder. It climbs to a culvert that was large enough for the Whitehall, but the baffles in the ladder leading up to it were impassible. (There were no signs of any fish.)
Nate took a close look at the culvert. At the far end, about 40 yards away, there were signs of a cattail marsh. The water was cold, and we decided to turn back.
On our way back from the fish ladder we found a stand of bamboo on land outside of the park boundary. Two of the stalks had fallen and were half submerged. A third arched out just a few feet over the water and I used a serrated folding knife to cut it off a few feet from shore. Nate and I trimmed the branches and we had our new mast.
The north end of the slough loops back to itself around a 1/2-mile-long island. Just 100 yards into our return along the alternative route, we passed under a concrete bridge, low enough that we had to duck to pass under it. Between the concrete girders were steel pipes within easy reach and Nate abandoned ship.
On our passage south back down the slough we found the breeze had switched directions since we last sailed it. The spinnaker went up on the new 9′ bamboo mast to catch the breeze above our heads and pull us part of the way home.
The change in my feelings about the Whitehall and my relationship with it happened as Nate and I tethered it at the bottom of the Kelsey Creek fish ladder. I had only one fender and, before I could get it properly situated, the gunwale grated against the rough concrete wall. The gouge in the oak outwale would leave the boat scarred, but I realized that it would be a memento of a day I’d be happy to remember. My own scars have made the events that created them impossible to forget: the crescent scar on my left index finger I got while learning to whittle when I was 10 years old, the stitch-puckered scar on my right knee where a scalpel-sharp flake of obsidian sliced into it while I was making arrowheads at 14, and the pale V at the base of my right thumb I got at 23 when I was running around Green Lake, tripped and tumbled, gored my hand on a jagged edge of broken concrete, and fell into the lake.
The only scar the Whitehall had carried before Mercer Slough is one that you might not notice. It’s a scarf joint 18″ back from the forward end of the third plank up from the garboard on the port side. I’d split the plank’s hood end while trying to nail it into the stem rabbet without steaming. I had to patch on a new piece. For the 39 years after I’d launched theWhitehall, it had been so gently used and so well maintained that there wasn’t another scar anywhere, no visible sign the boat had ever been subject to the mishaps that are inevitable when venturing out into the world. It’s tempting to coddle beauty, but it comes at the expense of character.
My other boats have scars that bring their histories to life. My sneakbox LUNA has a patch on the bottom where I hit a submerged rock when I stopped on the muddy Kentucky shore of the Ohio River to meet Shantyboat legends Harlan and Anna Hubbard. My Gokstad faering ROWENA has a gouge in the garboard where she slipped off a rail cart at the end of a remarkable portage across Alaska’s Admiralty Island. One of my Greenland kayaks has a patch where a harpoon I’d thrown during a traditional skills demonstration didn’t make it past the foredeck.
I’ll still take good care of the Whitehall, but I’ll seek out more opportunities to enjoy using it with my kids and those close to me. We all have scars, boats and boaters alike, and with its recently gouged gunwale the Whitehall seems more like a member of the family just like BONZO, HESPERIA, and ALISON, the other boats in our fleet that share in making memories. It may be time to give the Whitehall a name.
I first got interested in sharpies after building an Arch Davis-designed Laughing Gull and sailing it for some 10 years. I became enamored with its speed and shallow draft. When I moved from Miami to New Orleans, I found that the best sailing here is during the cooler months, but it was hard to find crew willing to take spray on that 16′ open boat on chilly days. I needed a bigger boat, and I wanted it to be a sharpie.
When I discovered the Norwalk Islands Sharpie 23 (NIS 23), I knew that it was the one for me. The NIS class ranges from 18′ to 31′ and was designed by the late Bruce Kirby, who is best known for creating the globally popular Laser. He deemed his Sharpie-class boats “cruising Lasers for grown-ups.” Kirby’s sharpies are flat-bottomed, centerboard cat-ketches with unstayed masts. Prior to getting my hands on a Norwalk Islands Sharpie 23 for myself, I read an article by Robert Ayliffe, arguably the world’s foremost advocate for the class, in Australian Amateur Boat Builder in which he described crossing the treacherous Bass Strait in his NIS 23 and reaching 17.5 knots surfing down swells. The NIS 23 seemed like an affordable way to have a high-performance cruising boat, and I wanted to experience this speed for myself.
W. Peter Sawyer
The mainsheet is anchored to a traveler forward of the mizzenmast, and the mizzen’s sheet leads forward to the base of its mast. Both are within easy reach of the helm.
My NIS 23 was built in 1996 at Sea Island Boat Works in South Carolina, though many have built their Norwalk Islands Sharpies at home. The single-chine plywood hull is built over plywood frames and sheathed in one layer of epoxied fiberglass. Ballast is supplied by 2″ of lead that surrounds the centerboard slot on the bottom of the boat, reportedly weighing about 600 lbs. The centerboard is made of aluminum. The construction is solid, and I have felt secure in all conditions.
I keep my NIS 23 in the water, but it is easily trailered. Since it has a centerboard and flat bottom, it comes up on the bunks with no trouble at all. I have towed mine with a Honda Pilot, but I feel much safer on the road when it is behind a pickup truck.
Early versions of the Norwalk Islands Sharpies had aluminum masts; later ones, like mine, carry carbon-fiber ones. They’re stepped in tubes just as you would drop in a mast on a Laser. There are no stays. The mainmast can be stepped by just two people, who are always relieved when it is in—and not lying fractured on the pavement. Ayliffe has designed an optional tabernacle system that would greatly reduce the stress associated with getting the masts into place. Maintenance has been easy—with its simple cat-ketch rig, there is not much to keep up. Varnished wood is at a minimum. Getting the boat from highway and ready for sailing from the dock takes about an hour and a half.
The boat is tender at the dock. When welcoming guests on board, I always stand on the opposite side of the boat so their side does not settle in the water so much when they step in.
The cockpit is generous for a boat of this size, and four adults can sit comfortably forward of the tiller. When out for a sunset cruise carrying a conservative amount of sail, the cockpit remains comfortable even while heeling. If I’m looking to maximize speed, I release the lifelines and sit on the gunwales. A short hiking stick is needed. Visibility from the cockpit is excellent.
W. Peter Sawyer
The custom forward V-berth for two, here with cushions in place, is spacious and frees up the aft part of the cabin for storage. The berths flanking the centerboard trunk e have had the cushions of third and fourth berths removed to reveal the plywood panels that cover the footwells either side of the trunk.
Once underway, the NIS 23 is simple to sail. Being a cat-ketch, it does not carry a jib, but rather a main and mizzen. Both sheets can be managed by the skipper. Tacking involves merely pushing the tiller to the lee side of the boat. With no jib, no handling of sheets is required. I’ve had difficulty making it through irons only in winds above 20 knots and with a steep chop.
The NIS 23 carries plenty of sail, and I am quick to put in a reef if upwind sailing is required. I have two reefing points on the main and one on the mizzen. When the windward chine lifts from the water, it is time to reef. Most NIS have a reefing system that can be controlled from the cockpit. I’ve not taken the time to set it up on mine, but should.
The boat does not love to go upwind—it points to about 55 degrees off true wind and, in a chop, it needs another 10 degrees or so off to maintain boat speed. That said, the NIS 23 will make 5.5 to 6 knots on a closehaul in as little as 12 knots of wind.
Emily Woodruff
The NIS 23 carries a 150-sq-ft mainsail and a 64-sq-ft mizzen.
The boat shines on a beam reach to broad reach when it maintains 6.5 knots boat speed in about 12 knots of wind. It can carry considerably more sail downwind. Its maximum speed I’ve seen was 10.7 knots running a broad reach in 20 to 25 knots of wind with full sails up. It becomes easier to control the boat after coming up on plane, though she only stays on plane while surfing down a wave. When not on plane, the boat’s weather helm is an annoyance. This can be reduced by dropping the mizzen and reefing the main, though the thrill of getting on plane means I don’t use this option much downwind. However, in 30 knots of wind, I’ve made 10.4 knots with the mizzen alone (though the carbon-fiber mizzenmast was bent like a parenthesis).
If the wind is more than 15 knots, the NIS 23 likes being on a run, too; the cat-ketch sail plan makes running wing-on-wing straightforward. If the wind is less than 15 knots, trading broad reaches is faster and more enjoyable. I keep the centerboard down for stability while running downwind.
I’ve sailed the boat extensively on the north Gulf Coast, particularly in Mississippi Sound, in winds up to 40 knots. With two on board, it can continue sailing on all points of sail up to about 20 knots with a double-reefed main and single-reefed mizzen. Upwind, I drop the mizzen at 25 knots and sail with just the double-reefed main. Caught in a squall, alone, I had to go to bare masts when the winds pushed over 35 to 40 knots.
With its flat bottom and centerboard, the boat’s motion in heavier seas is surprisingly comfortable. There is none of the laborious lumbering that’s felt on keel boats.
The sharpie is stable under sail, and I’ve never worried about a capsize. However, it is quick to heel, making early reefing important. The carbon-fiber masts mitigate gusts by flexing and thus dumping excess wind, reducing heel. Crew can move about while underway, but not without being alert. This is particularly the case when sailing upwind.
Despite their flat bottoms and relatively high-placed ballast, the Norwalk Islands Sharpies are claimed to be self-righting. I have never felt remotely close to a knockdown in mine, even while carrying too much sail in high winds.
The mizzen is an excellent sail for maneuvering in the marina. After getting comfortable with how far the boat drifts, I rarely use the engine for anything but backing out of my slip. When returning, I drop the powerful main about 100 yards from the dock and then amble toward the slip under mizzen alone. The mizzen is easily doused while holding the tiller, and I do this about 10 to 40 yards from the slip, depending on the wind. We then glide into the dock, and I arrest the remaining motion by placing a hand on a piling.
Emily Woodruff
The aluminum centerboard and 600 lbs of interior lead ballast help the NIS 23 stand up in a breeze.
Overall, I rate the NIS23’s sailing performance as nothing short of thrilling on a beam reach or broad reach. She is fair upwind and strong on a run—as long as you have a stiff breeze. My favorite characteristics of the boat are its speed and the shallow draft that enables the exploration of marshes and flats.
I have a 6-hp outboard on a bracket off the stern, which is more than adequate. The boat doesn’t need more than half-throttle to reach hull speed, which is around 5.5 knots.
At anchor, the NIS23 is pleasant. I have so far spent about 45 nights on board and, while many have criticized sharpies for pounding at anchor, that has not been my experience. Its extremely shallow draft of just 8″ allows access to very protected anchorages inaccessible to deeper-draft boats. In my cruising grounds, marshes are abundant. My approach is to anchor just 50′ or so off the windward marshland or even in a narrow marsh creek.
One night while anchored off Cat Island, Mississippi, a large storm brought 45-knot winds. Despite my taking cover in a marsh creek, the winds whipped the boat back and forth at anchor all night, making sleep all but impossible. Around 3 a.m., I awoke, and while the wind roared, my berth was paradoxically motionless. Fearing that the anchor had dragged and the boat had been driven into the marsh, I peered out of the hatch. My headlamp illuminated black mud all around me. The wind had driven about 3′ of water out of the marsh and the boat was resting contentedly on its flat bottom. I slept well the rest of the night, and then had to wait about 8 hours for the water to come back.
Accommodations in the cabin are limited; I liken the experience of time spent in the cabin to a spacious, floating tent rather than a yacht. If your NIS 23 don’t have the curved-hatch option, which provides 5′ 11″ of headroom, don’t count on standing up. In the after part of the cabin, there are two full-length single berths; I removed part of the cabin’s forward bulkhead to allow for a V-berth for two more crewmembers. Kirby’s drawings have options for a similar arrangement of four berths as well as sleeping accommodations for two with open space for a galley and a head. I have three overhead lights and a ventilation fan powered by a solar panel/battery. For cooking, I bring along a Coleman stove and place it in front of the cabin hatch in the cockpit, which is a good arrangement even when it is raining. Even for a nine-day Gulf Coast cruise, there was plenty of space for provisions and enough sleeping area for two.
The Norwalk Islands Sharpie 23 is a simple, fast boat with exceptionally shallow draft. I bought mine after having done quite a bit of camp-cruising in a 16′ open boat, and while the NIS 23’s cabin is nothing fancy, it is quite nice to not have to worry about finding a campsite at the end of the day, just a protected spot of water.
Peter Sawyer is a general surgery resident in New Orleans, Louisiana. He learned to sail when he was 11 years old at Camp Sea Gull, a seafaring summer camp on the North Carolina coast. He has been at it ever since.
Norwalk Islands Sharpie 23 Particulars
[table]
Length/23′
Load waterline/18′ 9″
Beam/7′4″
Draft, board up /8″
Draft, board down/4′ 6″
Weight/1,540 lbs approx.
Sail area, main/150 sq ft
Sail area, mizzen/64 sq ft
Sail area, total/214 sq ft
Power, outboard/ 2 to 3.5 hp
[/table]
Plans for various arrangements for the NIS23 are available from Norwalk Islands Sharpie. Options include plans for a “from scratch” build, a precut “plywood only” kit, and an “everything you will ever need, including trailer” kit.
Is there a boat you’d like to know more about? Have you built one that you think other Small Boats Magazine readers would enjoy? Please email us!
After seeing a strip-built kayak being paddled many years ago, I started dreaming of building one for myself. When the COVID-19 pandemic hit, I found myself working from home with a little extra time on my hands: it was my opportunity to fulfill my dream, and I started looking seriously at companies that offer complete kits. I had little woodworking experience and wanted a basic beginner-friendly kit, as I had no interest in lofting, building from scratch, cutting lumber, milling strips, etc. I had dreamed of this for years, but strictly as daydreaming. The idea of building my own boat was intimidating, and I never thought I would have the time or skills to make the dream into a reality.
After spending many hours on the water over the last 15 years, I consider myself an experienced kayaker and knew I wanted a recreational boat for easy paddles on my local lake. I am a fair-weather paddler who does not look for whitewater adventures—just lazy days on the water with a sandwich and a few cold drinks. After comparing kayak kit packages and manufacturers, I decided on the 12′ 8″ Excursion model from Newfound Woodworks of Bristol, New Hampshire.
I had many questions about the build process, no prior working experience with epoxy and fiberglass, and was interested in building my first boat in a classroom setting, but when the pandemic hit, all in-person classes were canceled. I really wanted some hands-on experience before taking on the build, and the folks at Newfound, Alan Mann and Rose Woodyard, listened to my concerns and scheduled a day of one-on-one instruction with me. They shared techniques and tips as we worked with the materials, which gave me the confidence to tackle the project and was key in my decision-making process.
Photographs by and courtesy of the author
Built according to the instructions, the Excursion can weigh as little as 37 lbs. Extra fiberglass on the author’s kayak brought its weight up to 44, which is still easy for him to carry to the water’s edge and back.
A Newfound “Pre-Kit” arrived first with instructional DVDs that demonstrated and clearly explained the construction methods step by step; the DVDs proved to be invaluable.
The pre-milled cove-and-bead strips arrived in a 14′-long plywood shipping crate designed to be used as the box-beam stand during the build–a great way to save time compared to building one from scratch.
The Newfound Ladder-LOC Strongback system of brackets and forms was easy and straightforward to assemble—just center each form and square up. The forms are precision-cut from MDF (medium-density fiberboard) on a CNC machine and milled with a slot in the perimeter for clamps, so the boat is stripped without using staples. To me, the finished boat looks much nicer without staple holes.
I wanted full-length strips for appearance’s sake—there would be no joints on the finished boat—and to eliminate spending time to scarf-join every strip. I also ordered extra strips to cover anticipated mistakes. I purchased many of the tools and supplies that I needed from Newfound. Rose and Alan have simply been great folks to work with: always available by phone to discuss concerns, answer questions, offer great advice, and happy to share their knowledge and experience. They’re an invaluable resource for a novice builder.
With an overall length of 12′ 8″, the Excursion is not designed for a high top-end speed, but with its light weight it is quick to accelerate and carries satisfying speed.
For the most part, I stayed true to the Excursion design and did not modify the hull. I deepened the recess for the cockpit coaming by a couple of inches for ease of entry and exit. The cockpit is now large enough that I can bring my feet and legs out and recline in my seat with my feet up on the front deck and my head resting on a rolled towel on the rear deck just behind the cockpit. My foredeck is a bit more peaked than designed—an unintended amateur mistake on my part—but it made it a little roomier under the deck for my cooler bag and I can stretch my legs out. I used magnets in the hatch coaming and flush-mounted the hatch cover to minimize deck hardware and keep the deck as clean and open-looking as possible. The rear bulkhead is marine mahogany plywood, supplied with the kit, but I omitted the front bulkhead for extra legroom and open storage under the foredeck. I can add inflatable float bags when needed
The kit package includes a mini-cell seat bottom pad and a back band, which is mounted to the cockpit coaming, but I wanted a one-piece seat and minimal hardware. I researched various seats and back band combinations but did not find anything on the market that I really liked. However, Redfish Kayaks offers custom seats made from a few pieces of minicell foam glued together and shaped to fit. Its molded sides and good backrest eliminate the need for a separate back band and hip braces. I have not added thigh braces under the deck. The seat is comfortable to sit in for hours on the water and is easy to clean and maintain. It easily pops in and out of the kayak when I want to hose off and wipe down the boat after use.
While the standard Excursion kit includes a seat and back band, the author opted for a custom-made foam seat from Redfish Kayaks. The cockpit coaming will hold the optional Newfound Woodworks spray skirt securely in place.
I added several types of wood as accent and trim pieces, including a nice piece of curly maple plywood for the cockpit coaming, teak veneers for the hatch lip coaming, and Spanish cedar pieces for inlays that I decorated with high-voltage electrical-current burn patterns (see LAZY LIGHTNING). The bow stem is western red cedar and the stern stem is red oak.
With the Newfound Woodworks construction system, the strips are held to the molds with clamps rather than staples, so the finished kayak isn’t marred by speckled bands of staple holes.
The kit kayak as designed should weigh around 36 lbs, but with extra layers of ’glass on the hull bottom and stems, my finished boat is about 44 lbs.
I use my pickup truck to transport the Excursion and can load and offload it by myself, but it is easier to handle with someone to help. I have never had to portage over distances or obstacles, but the kayak is easy to balance on my shoulder and solo carries over short distances are no problem.
The 36″ × 17″ cockpit opening is large and the Excursion has a 24″ beam, making it easy to get in and out. The kayak is very stable and makes a good platform for fishing, photography, birdwatching…or just daydreaming and floating the afternoon away. The Excursion is fast and glides well; it’s a sports car compared to my 12′ 8″ rotomolded plastic kayak. It tracks nicely and handles a cross breeze well for a shorter boat. Newfound notes that the Excursion is “designed to be used in a recreational setting such as day trips on inland lakes and quiet water.” I would not choose to take it out in rough weather, but it does okay in a stiff breeze on the open water of my local lake (I have been out in swells and a couple of feet of chop, and the kayak rides nice and high).
The Excursion has a long cockpit, and paddling without a spray skirt is appropriate for the quiet waters the kayak is designed for. While it has good stability, in the event of a capsize, the large opening makes it easy to exit the cockpit.
I cannot speak to rolling, self-rescue, or wet exit as I have no experience with these maneuvers. As a 60-year-old man, I am strictly a lazy-day-on-the-water paddler and too old for rough water, rapids, or whitewater. More important, I don’t want to bang up my boat, so—no rocky streams.
The whole experience of building the Excursion was interesting, enjoyable, and I couldn’t be happier with how it turned out. The custom kit package enabled me, a complete novice, to build a beautiful recreational kayak that I am proud of and will be happy to paddle for years to come.
A Philadelphia kid at heart, Dave Feder discovered his love of water while spending childhood summers at the Jersey shore and as a young sailor in the U.S. Navy. He has been a recreational kayaker most of his adult life. An electrical engineer by profession, he also enjoys hiking and trail-walking with his dog and playing with his grandkids. In his spare time, he is an amateur woodworker. Building his own boat was a longtime dream.

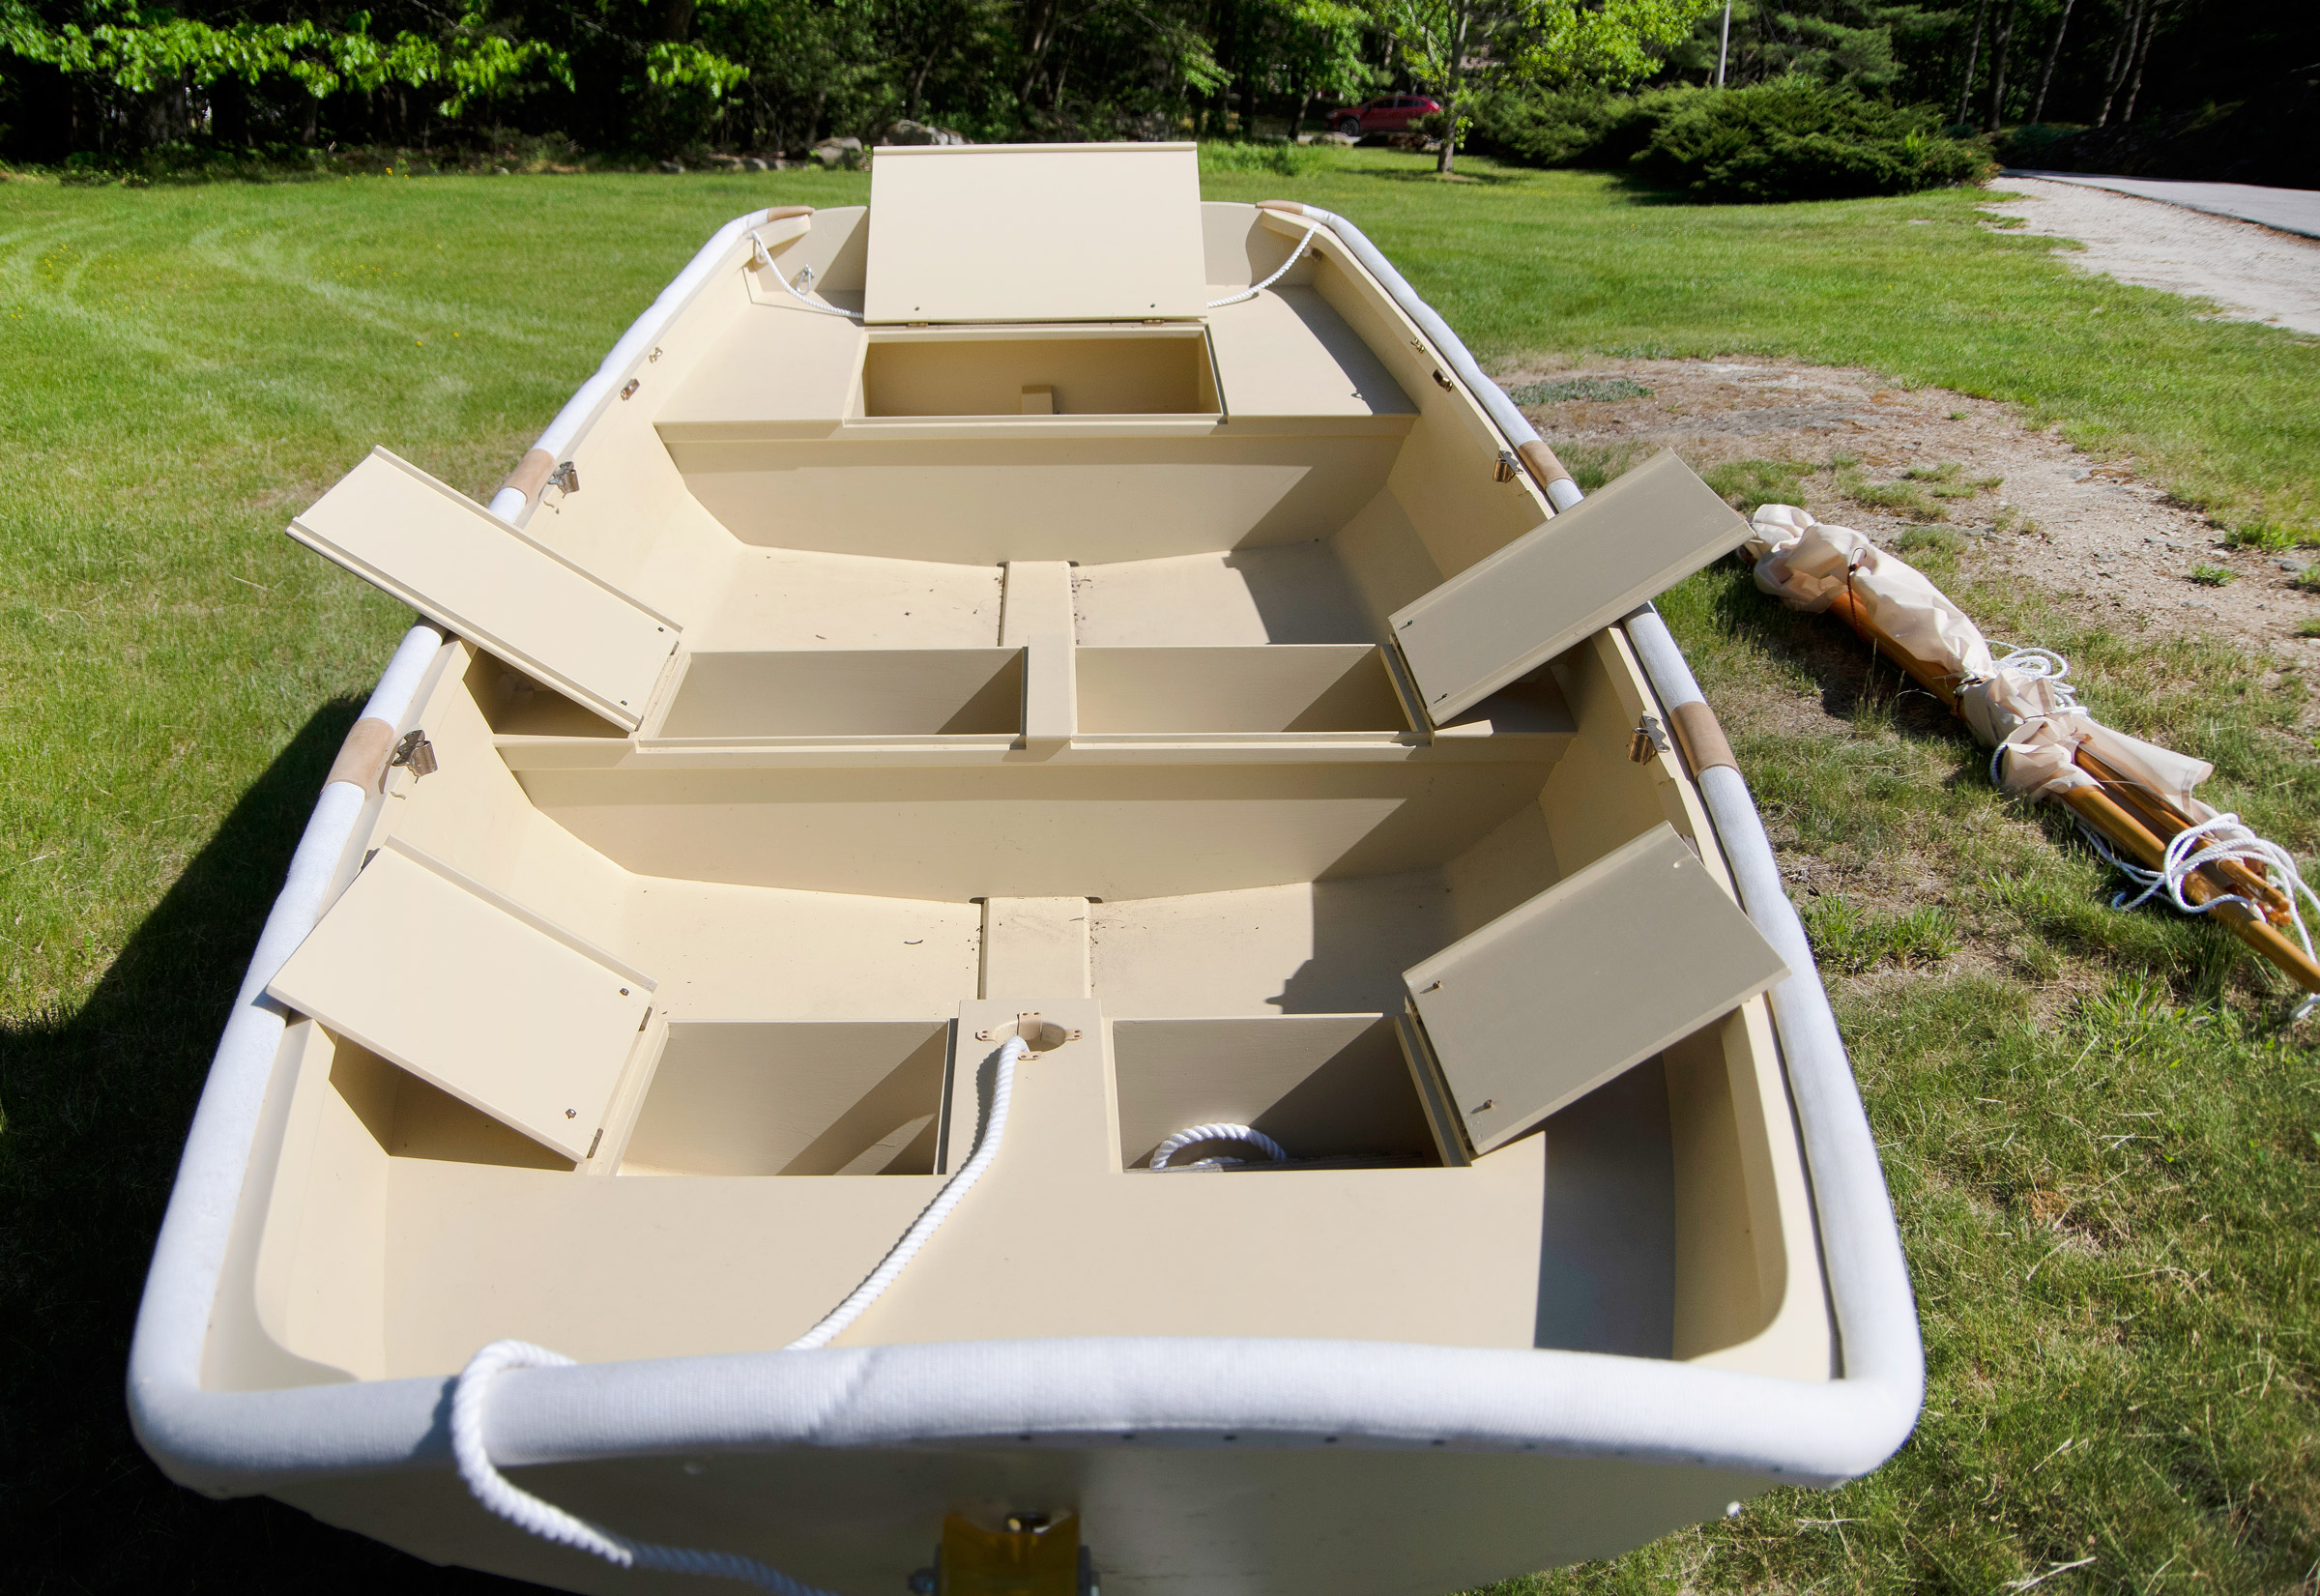 Bill Boyd
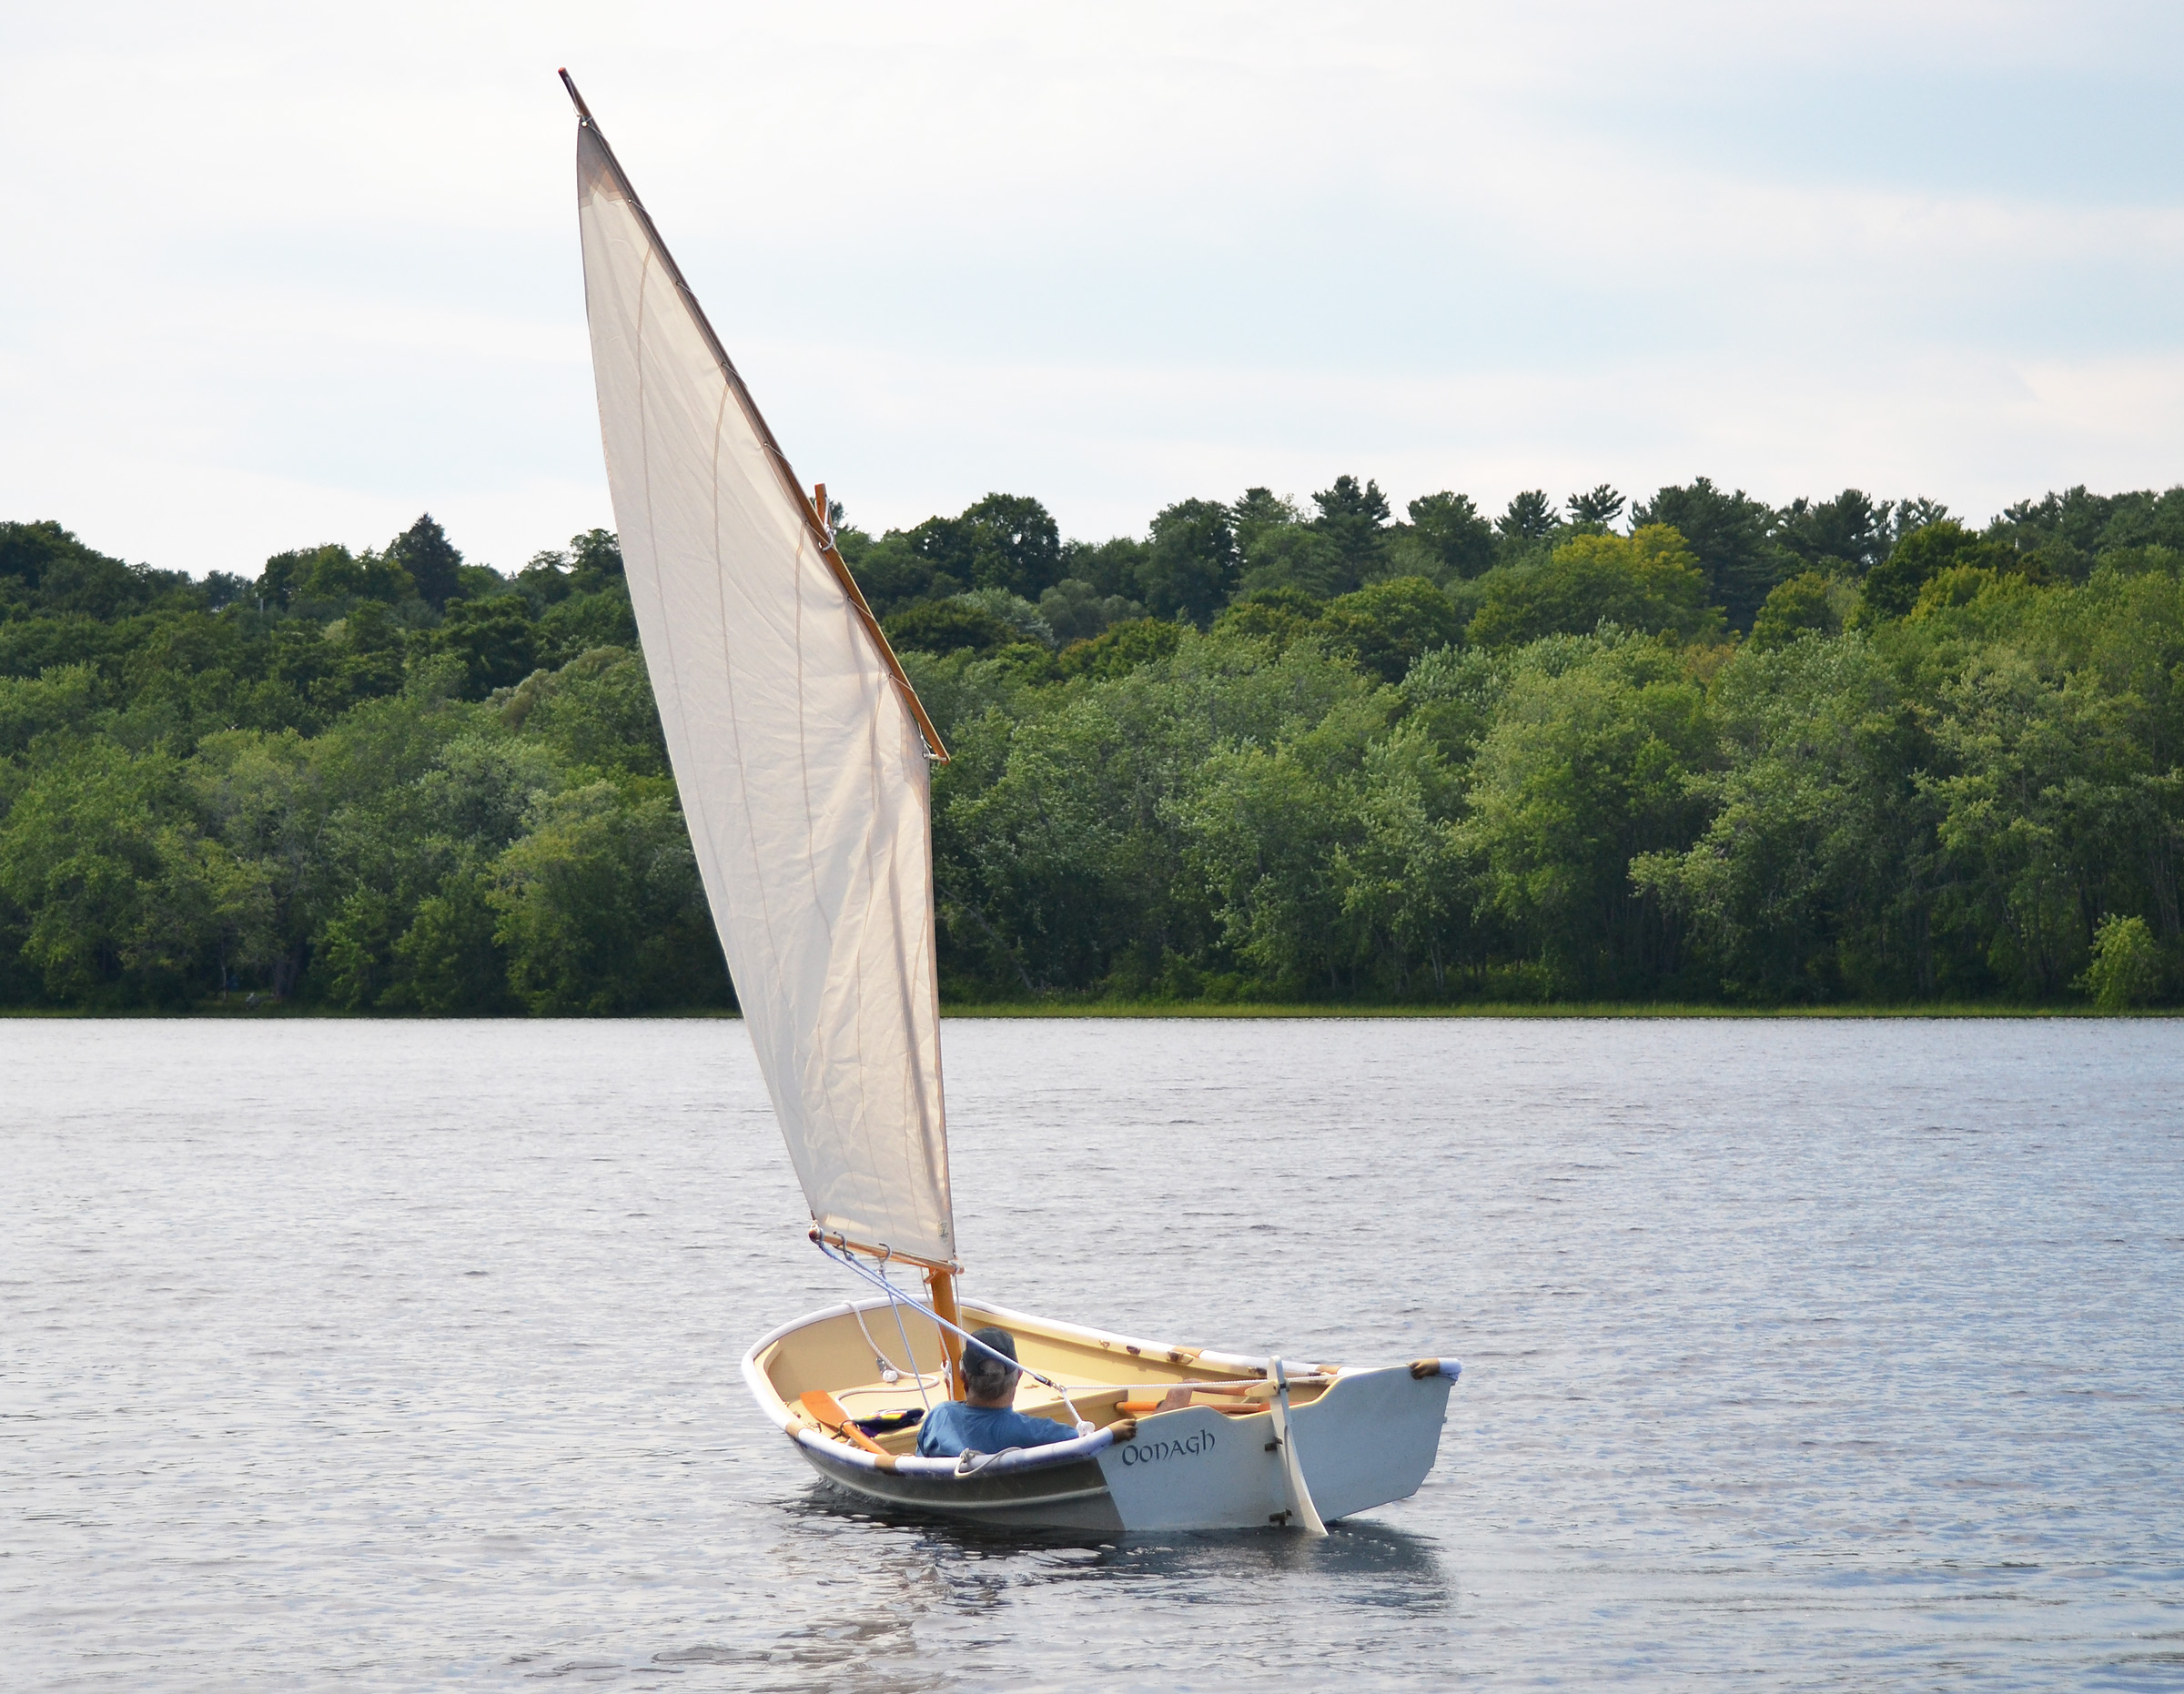 Bill Boyd
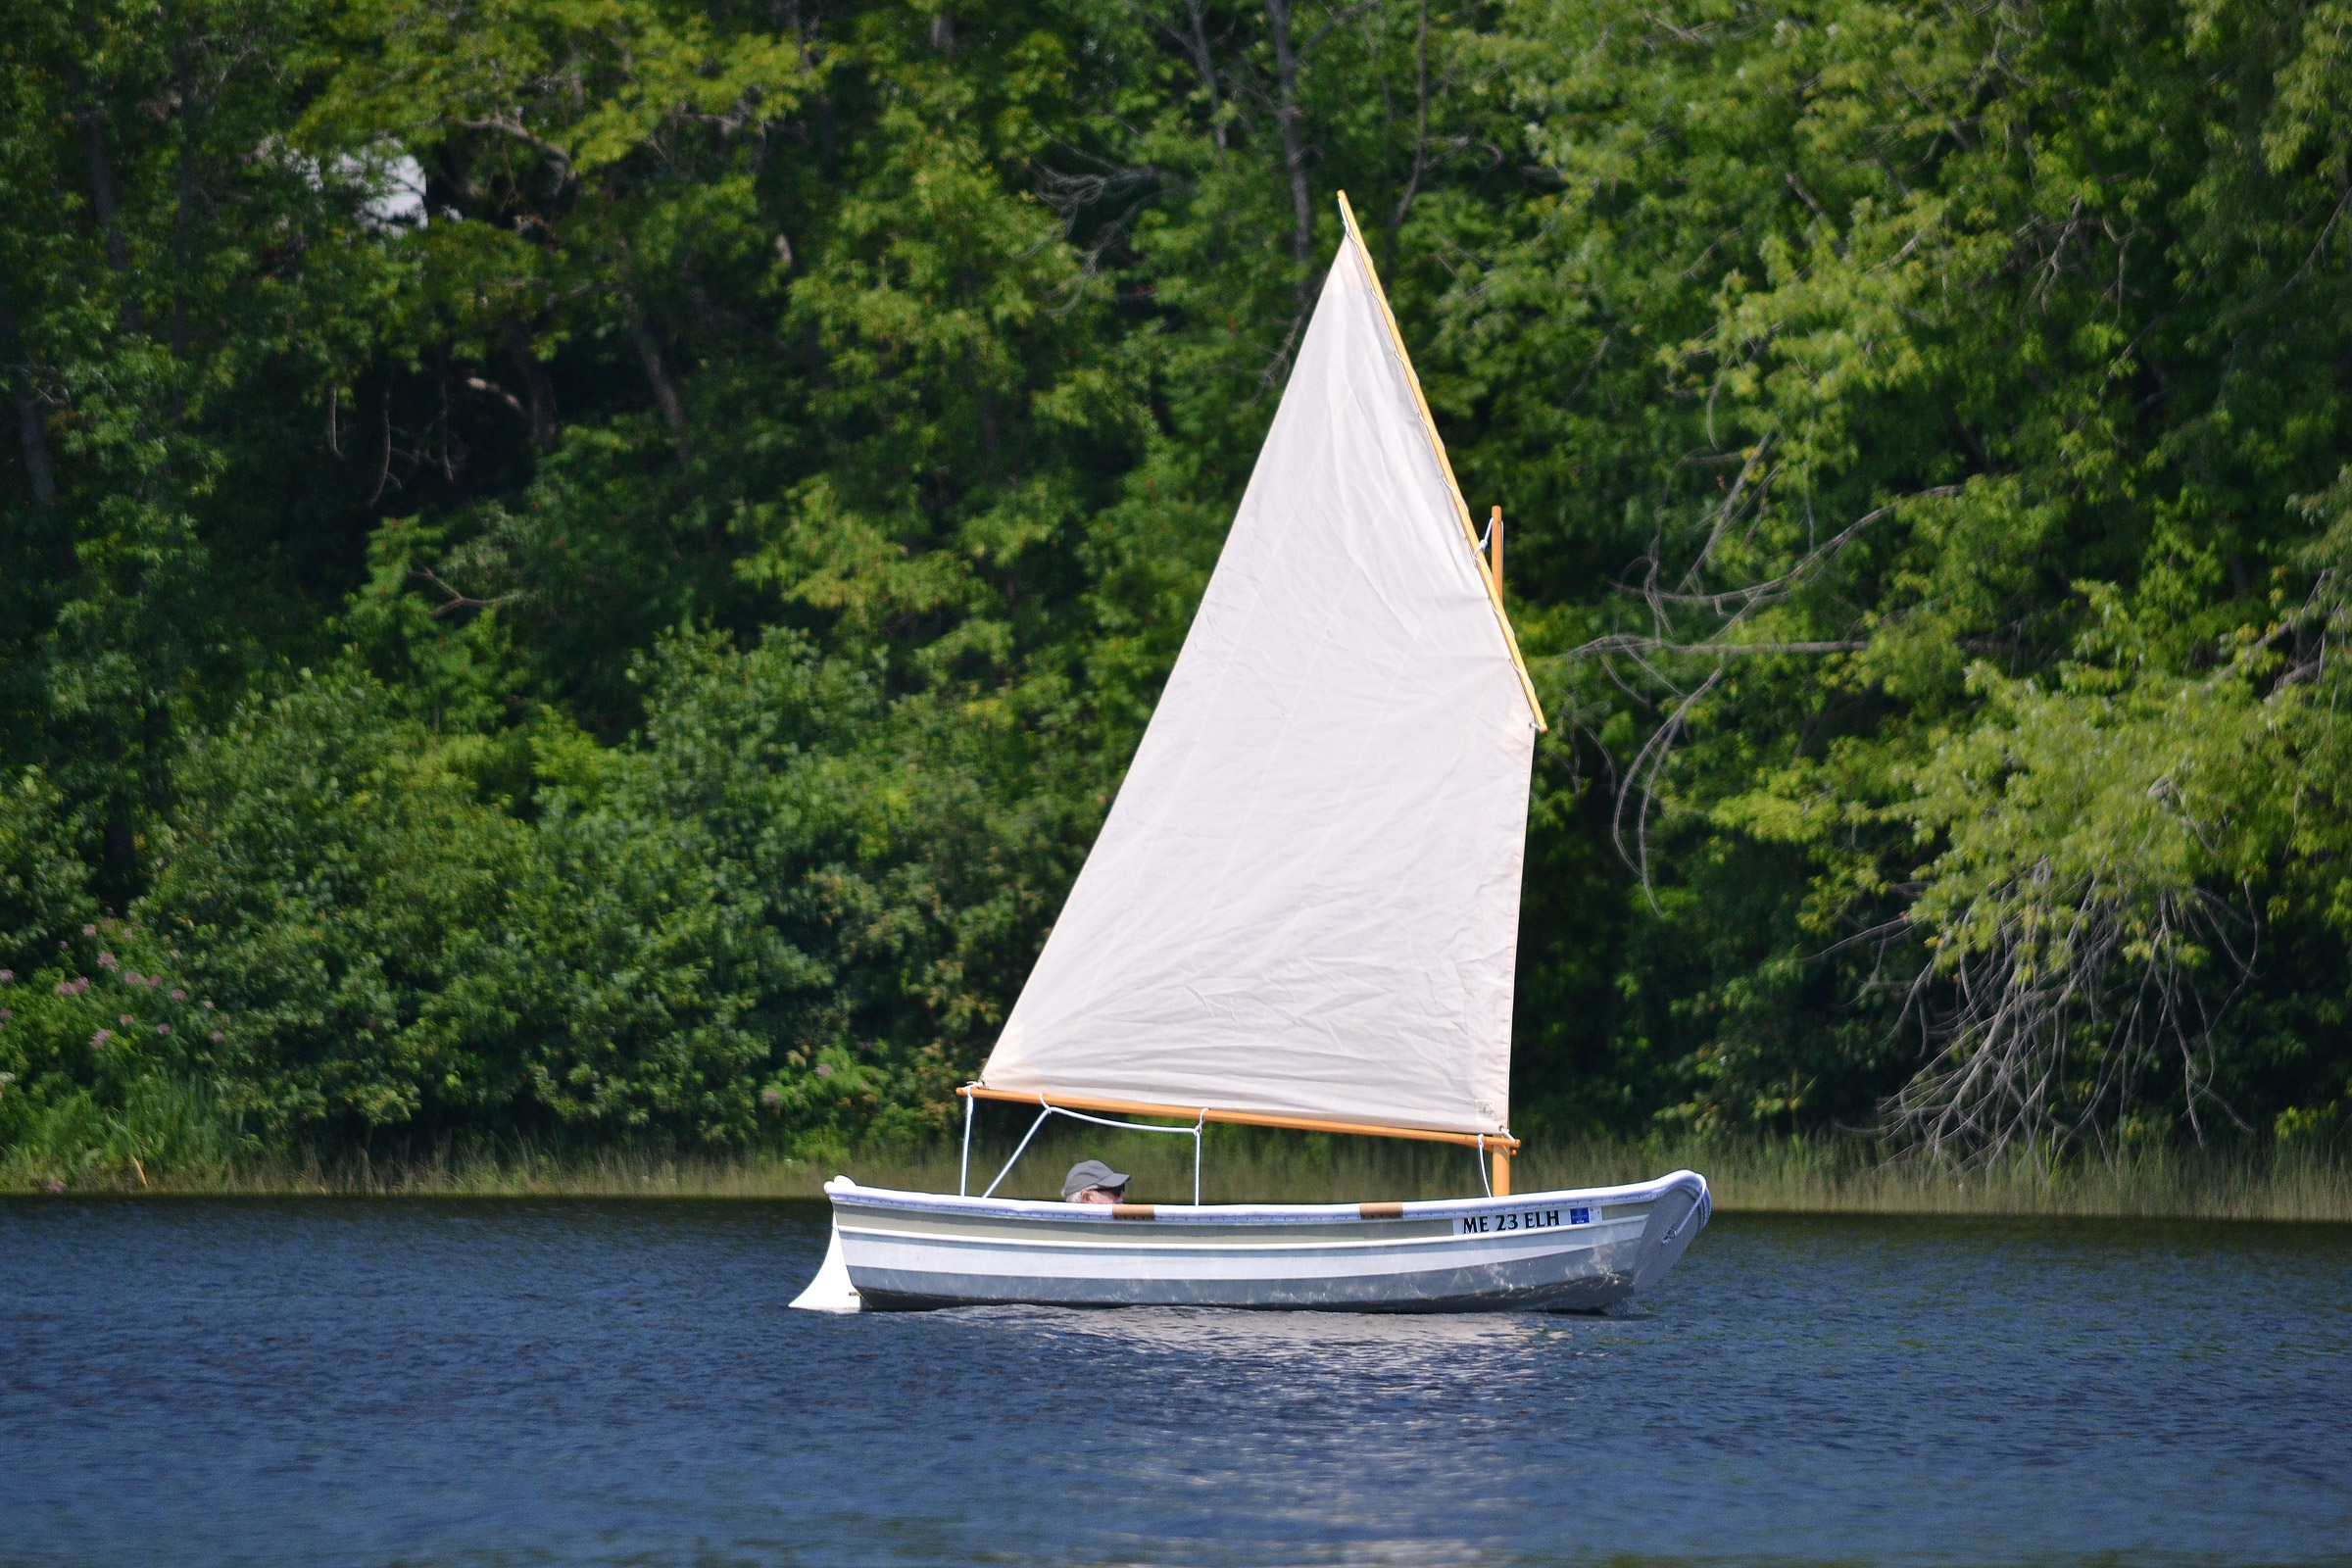 Bill Boyd
 Bill Boyd
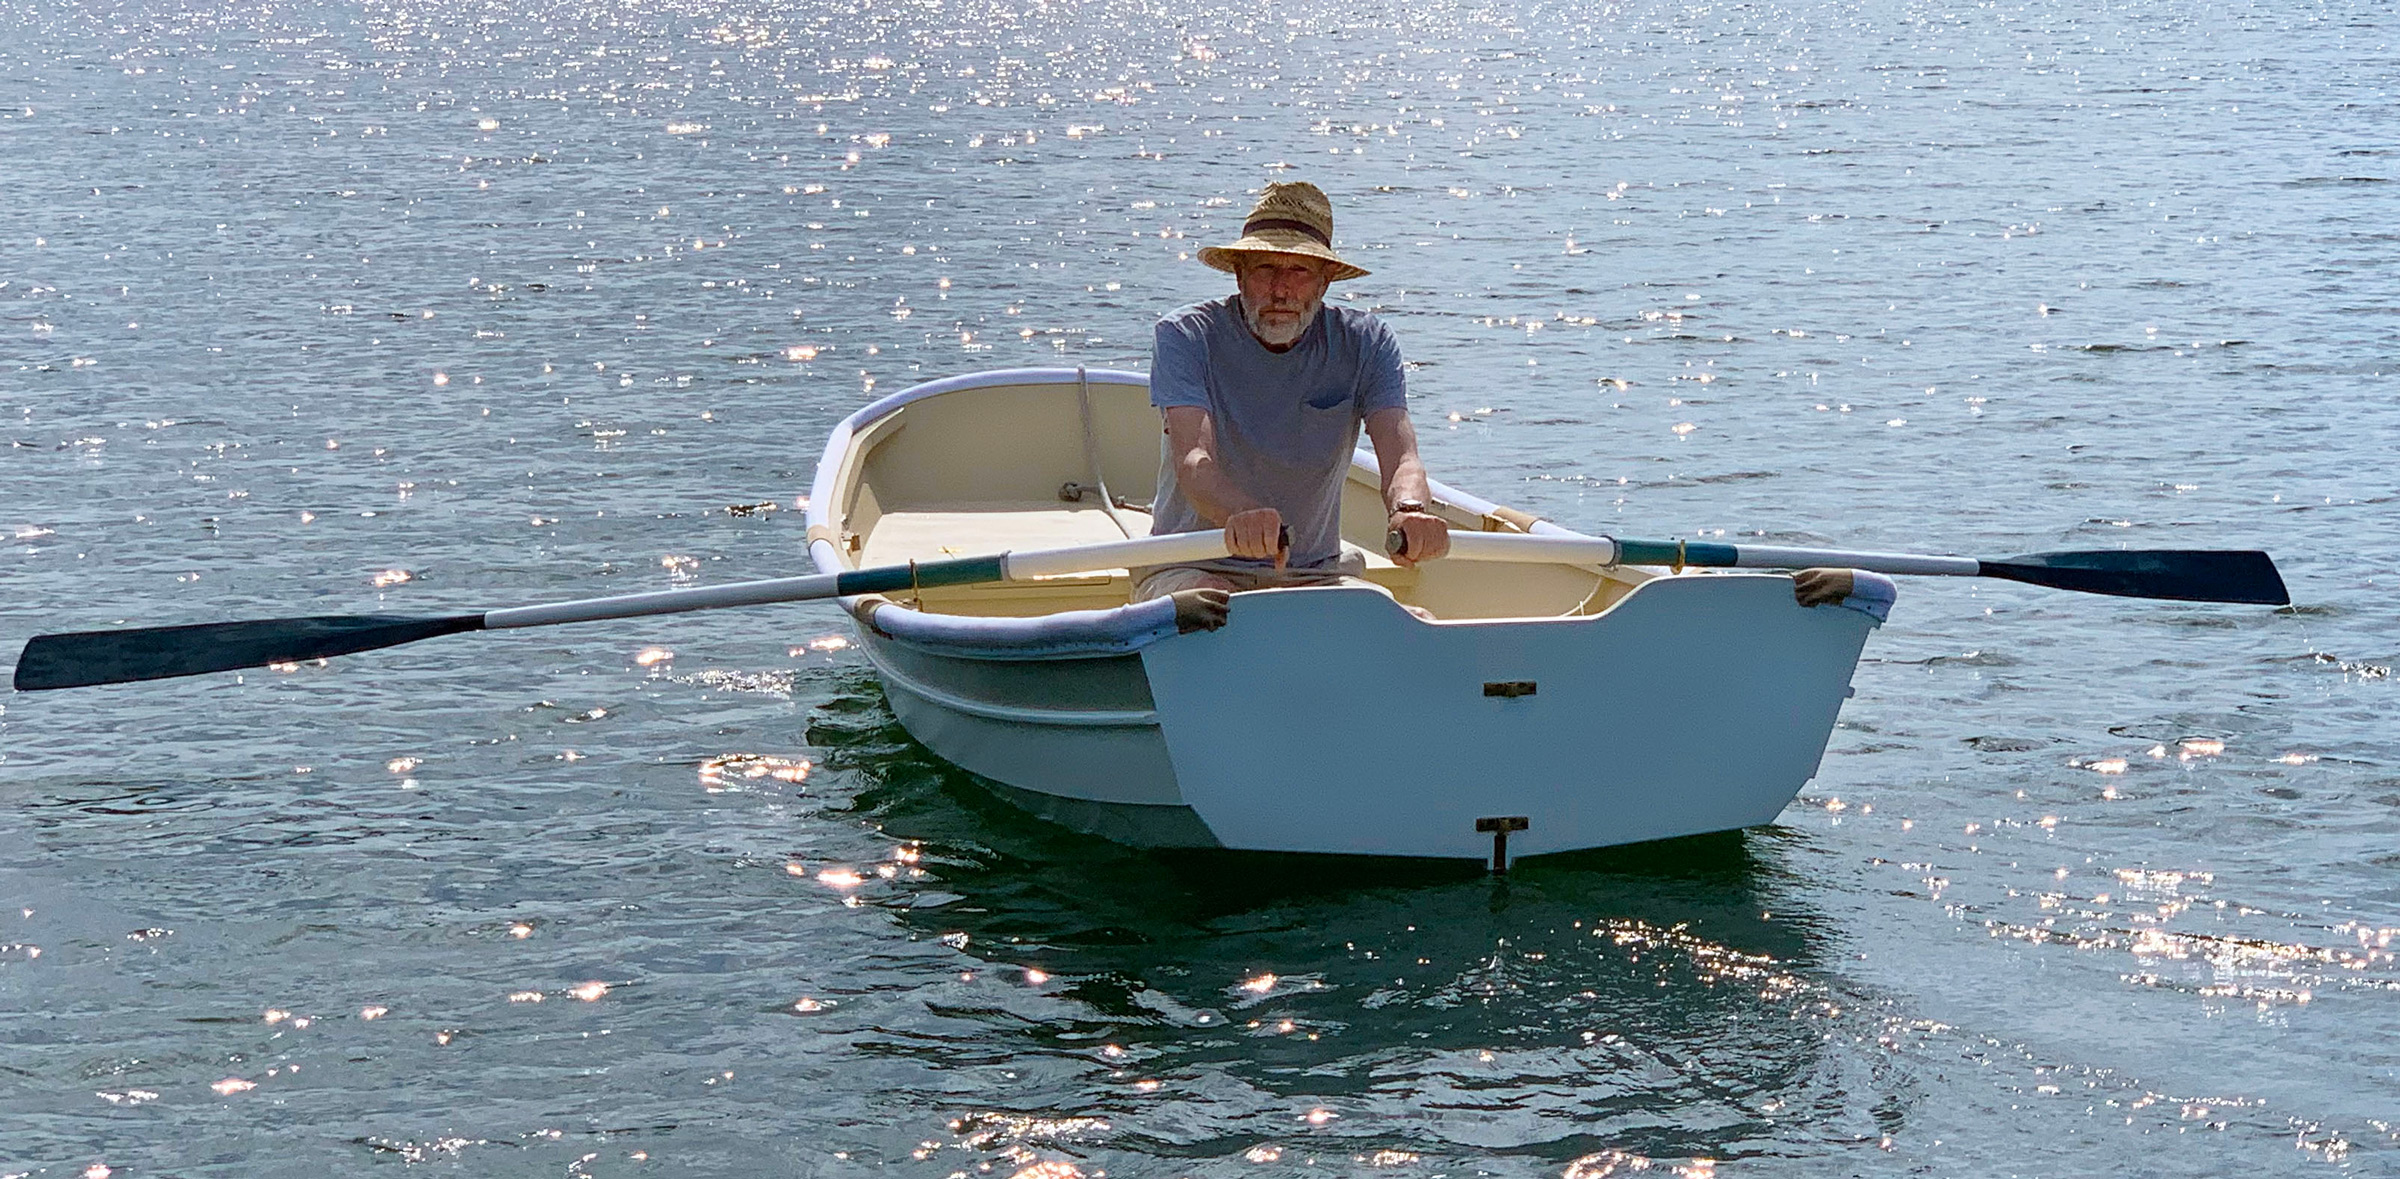 Benjamin Mendlowitz