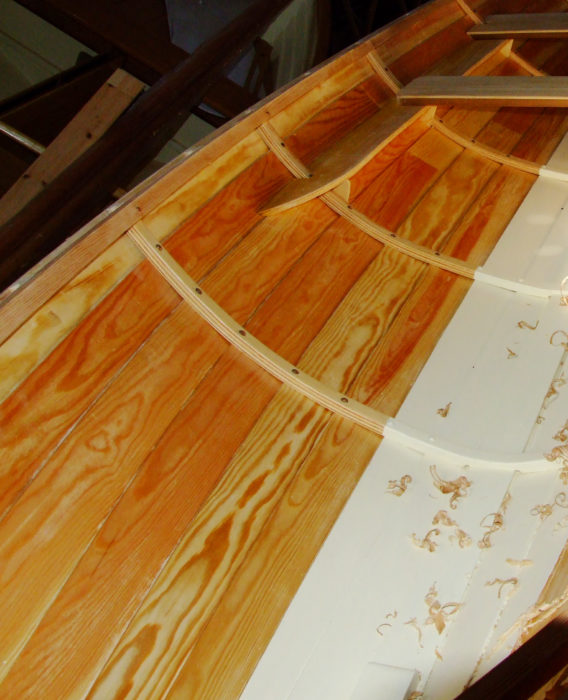
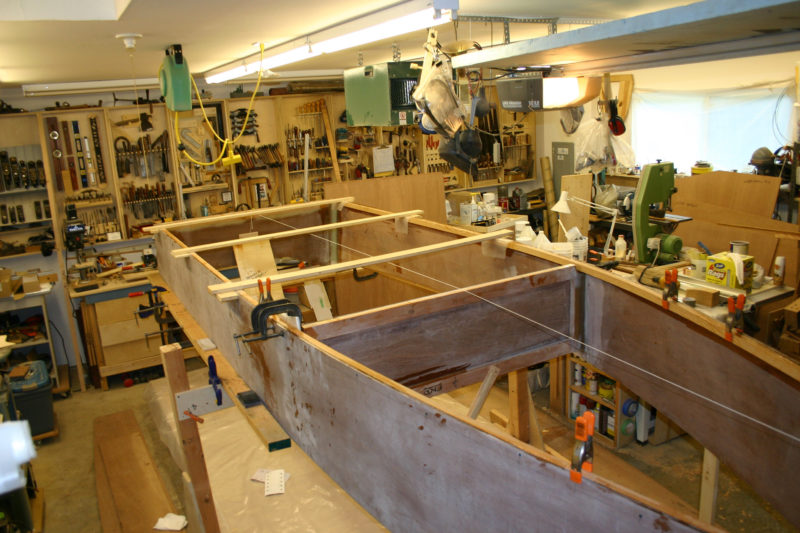
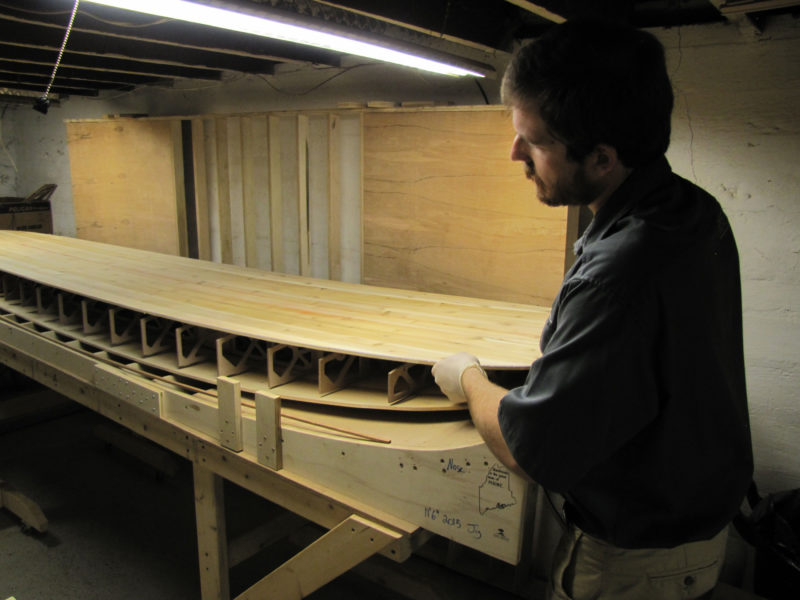
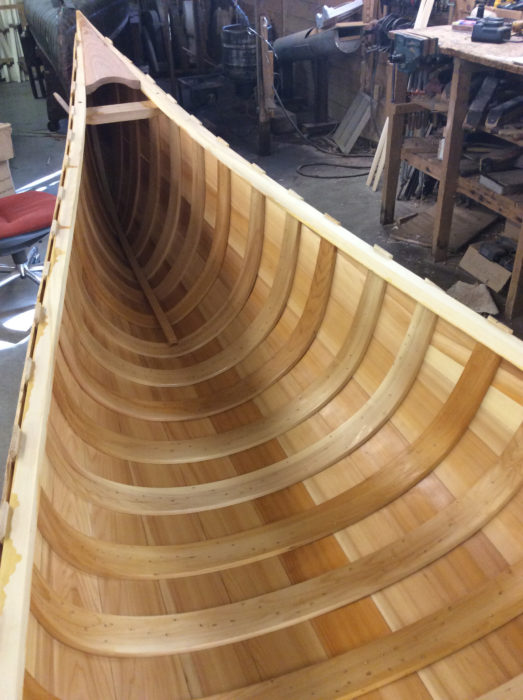
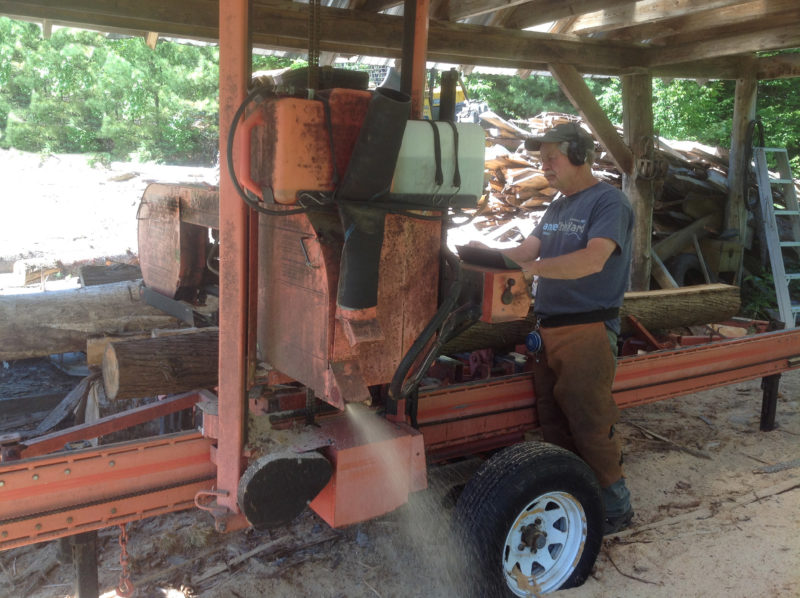
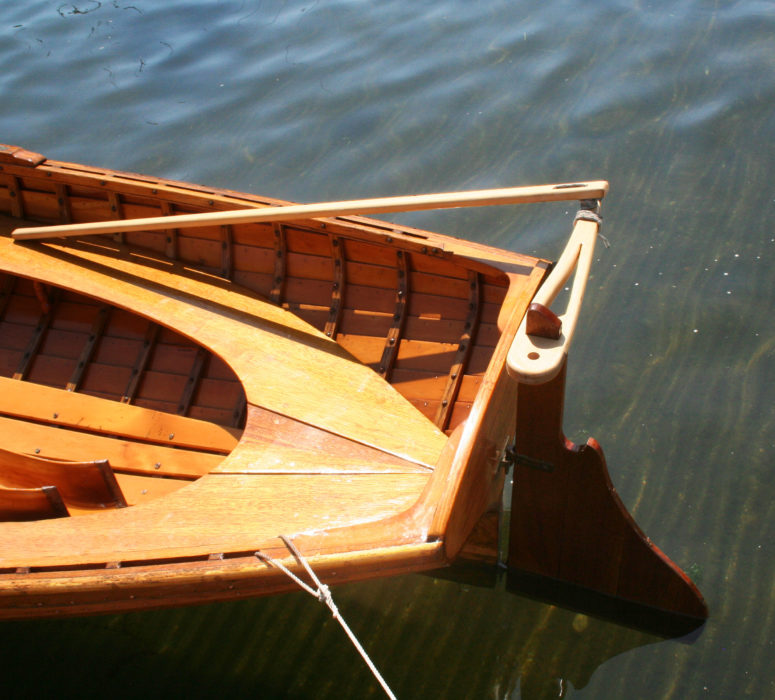
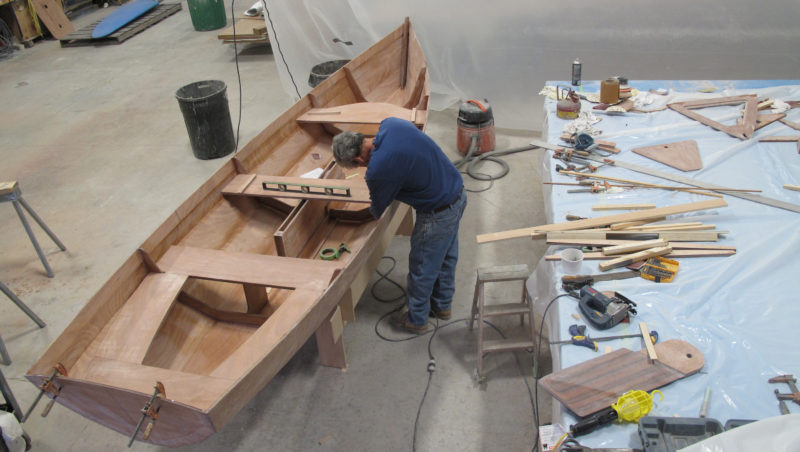
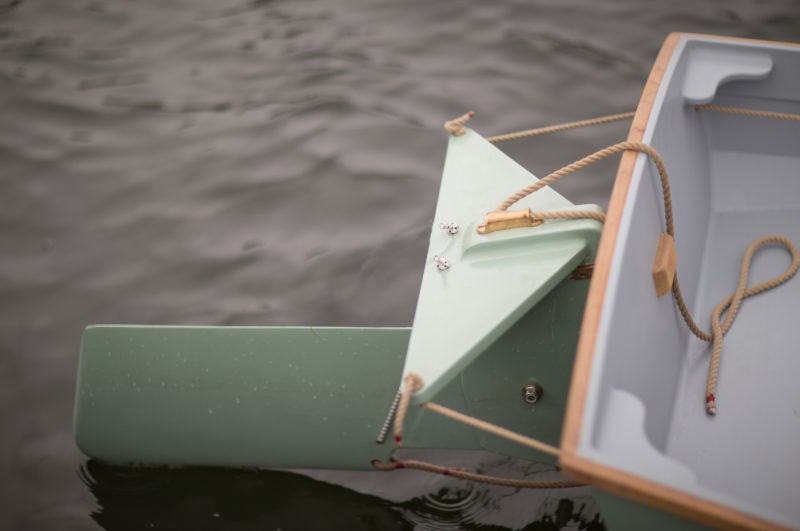
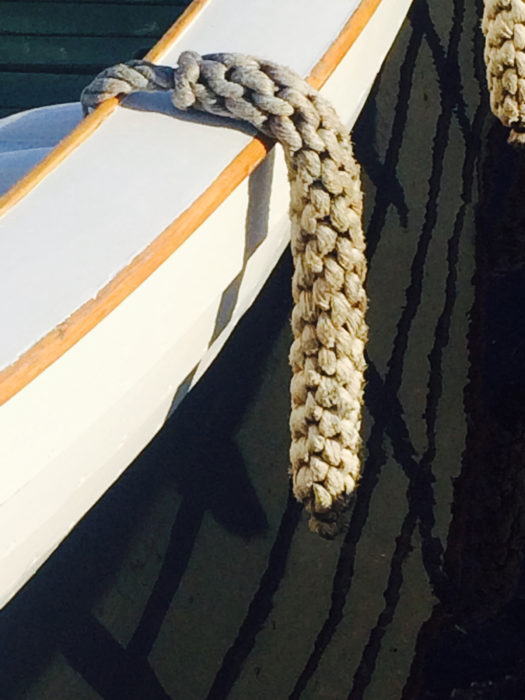
The 6mm Vendia planking has four of its five veneers running lengthwise; it easily twisted to meet the stems.
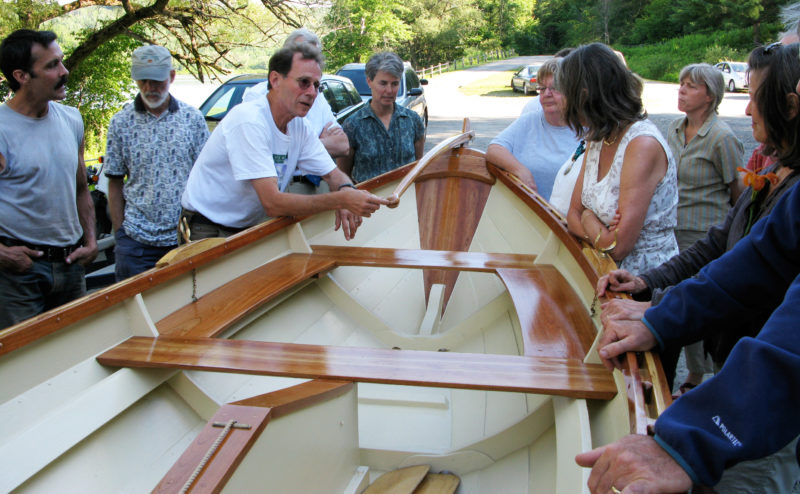
Adrian Morgan builds traditional boats by the shores of Loch Broom, a long inlet on Scotland’s west coast. He does business as Viking Boats of Ullapool, and has devoted himself to preserving traditional forms and methods, so it was quite a departure for him to use a recently developed laminate for planking instead of locally harvested larch and oak to build a rowing skiff for his friend Jan.
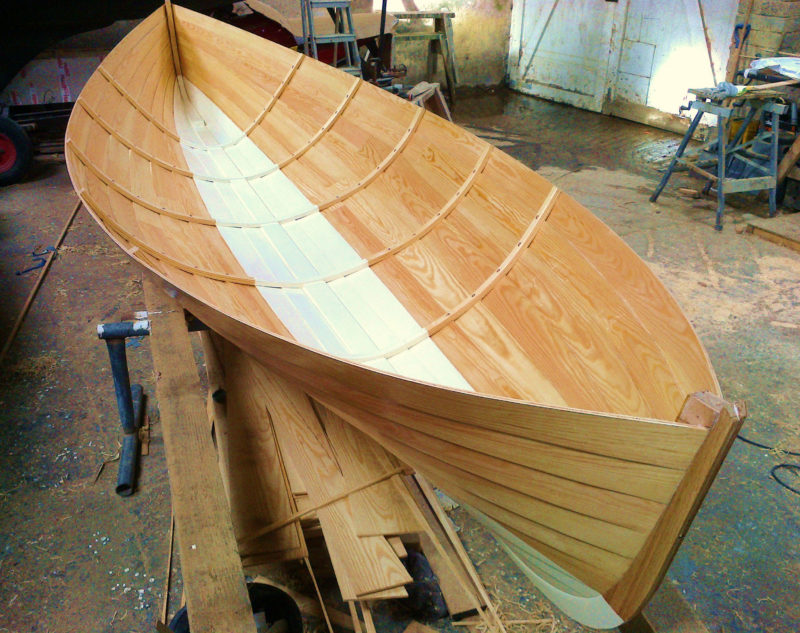
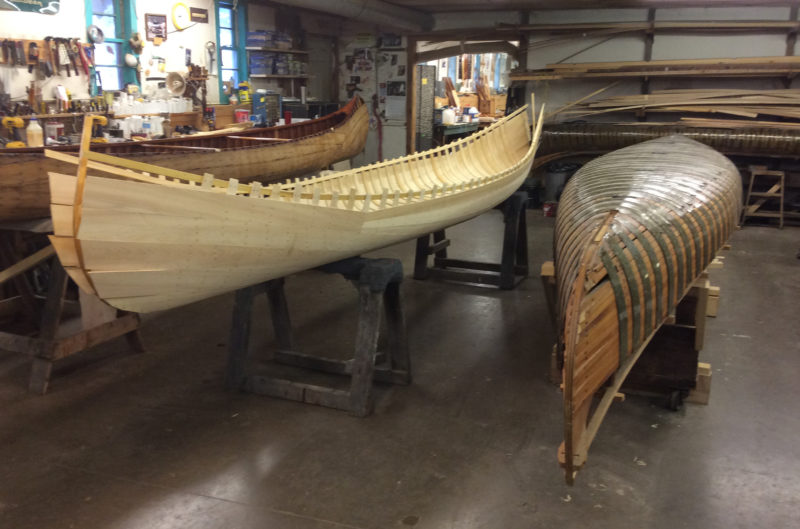
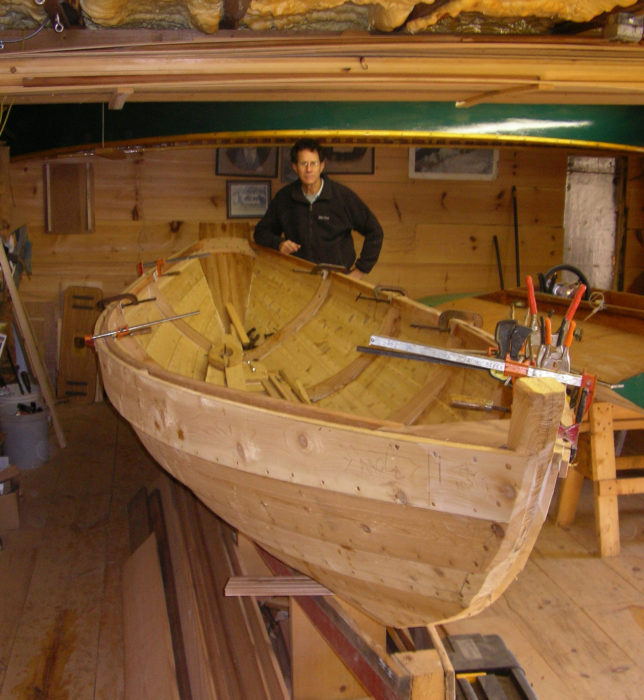
The design chosen for the boat was Paul Gartside’s 16′ Bob, a double-ended beach cruiser. While the plans were drawn up for strip planking, glassed inside and out, for Adrian “there was only one method: lapstrake. That would entail radical departure from the beautifully drawn plans. The planking, framing, and stiffening would have to be worked out from scratch.”
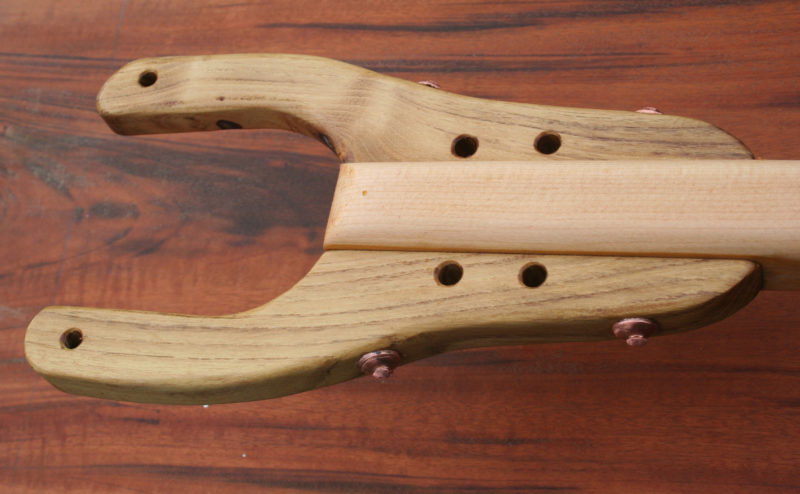
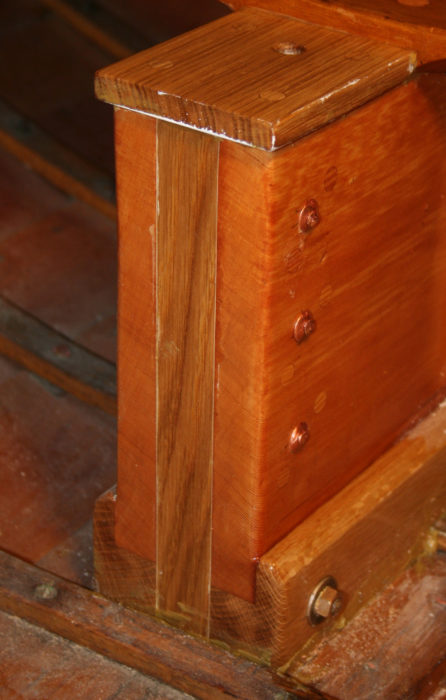
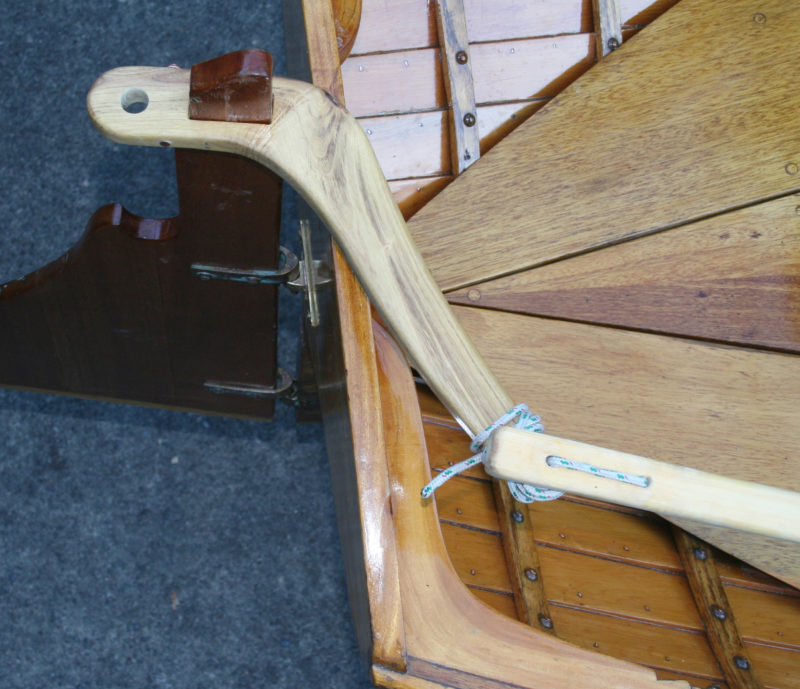
The frames are laminated from off-cuts from the planks. Their rivets are the only fasteners set in the laps.
While the conversion would take Adrian back to familiar territory, his choice for planking material would venture into new ground. Vendia is a laminated boatbuilding material made in Finland. Unlike rotary-cut plywood, it is made from veneers cut, rather than peeled, from logs with either vertical grain of flat grain, just like sawn lumber. That limits the width of the laminations—they can’t be made as wide as plywood sheets created by peeling a continuous veneer from the log—but provides the look of lumber and veneers less prone to cracking. Vendia laminates have all, or nearly all, of the veneers running lengthwise so it works like lumber and even has the fragrance of the pine it’s cut from.
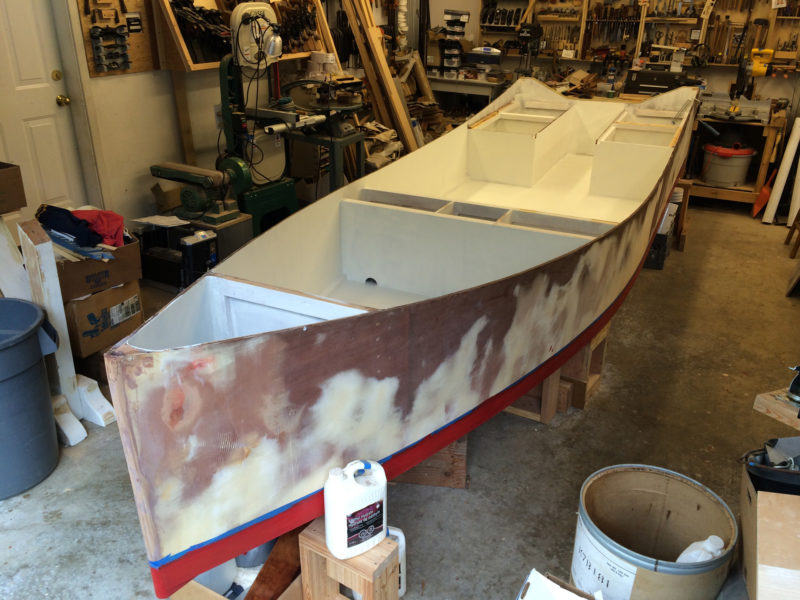
The Vendia planking looks like sawn lumber but can have flat grain on one side and vertical grain on the other.
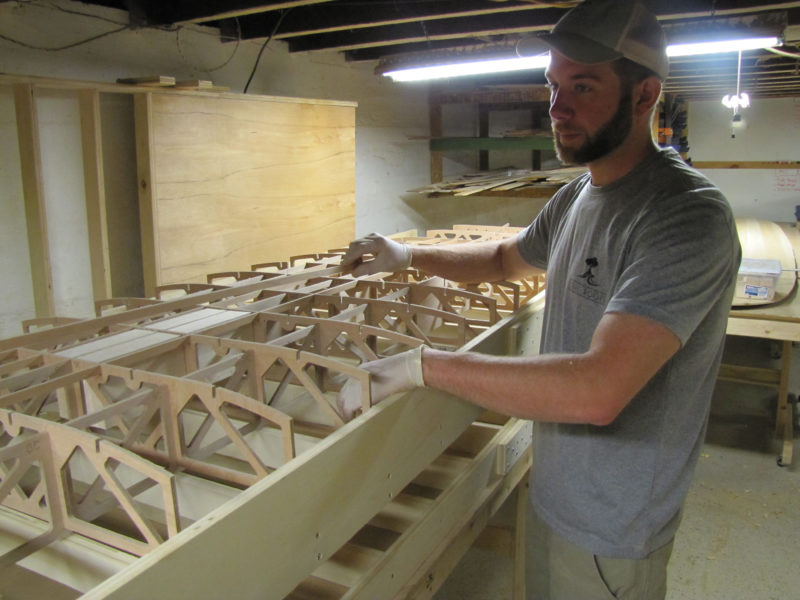
With Vendia, Adrian could build the Bob as a glued-lapstrake boat and forgo fastenings at the plank edges. For an adhesive “rather than using epoxy, a glue I hate with a passion for its mess, mixing, and waste, I have been using Collano Semparoc on a number of glued-lapstrake boats. It sets hard, almost as hard as epoxy, cures in about the same time, can be sanded, and needs no mixing or fillers. And as it expands it has a limited but strong gap-filling effect.” Adrian used planking offcuts for making frames—he laminated three layers of the 6mm Vendia using the building molds as jigs.
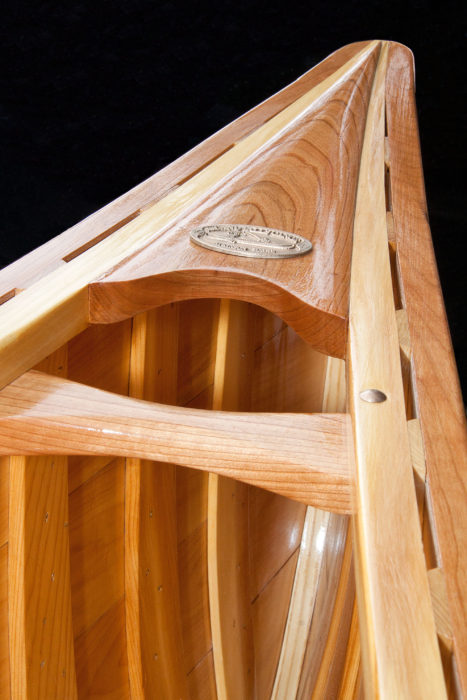
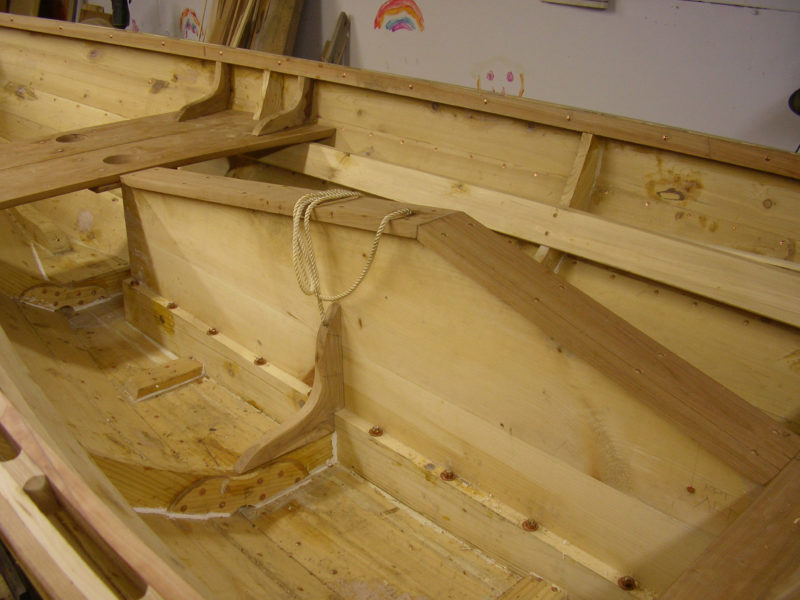
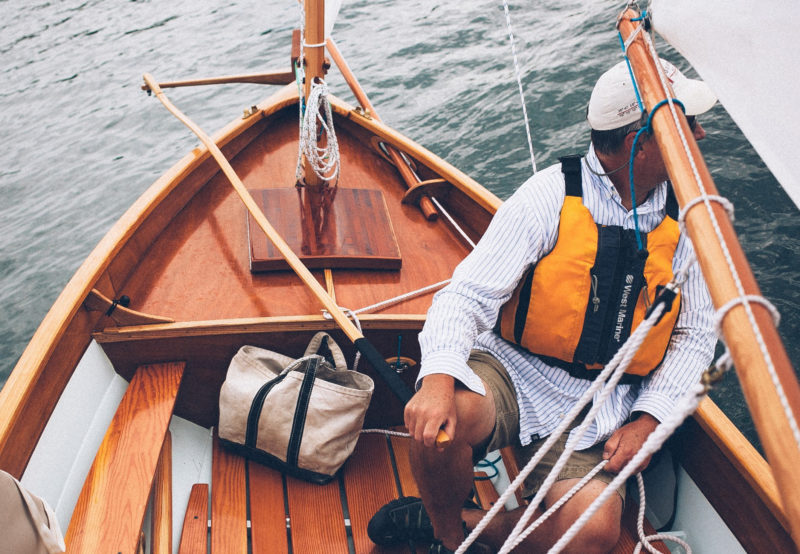
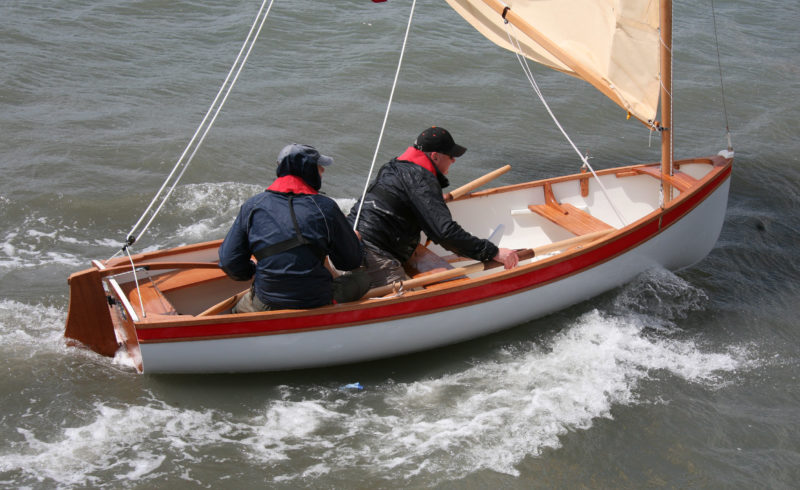
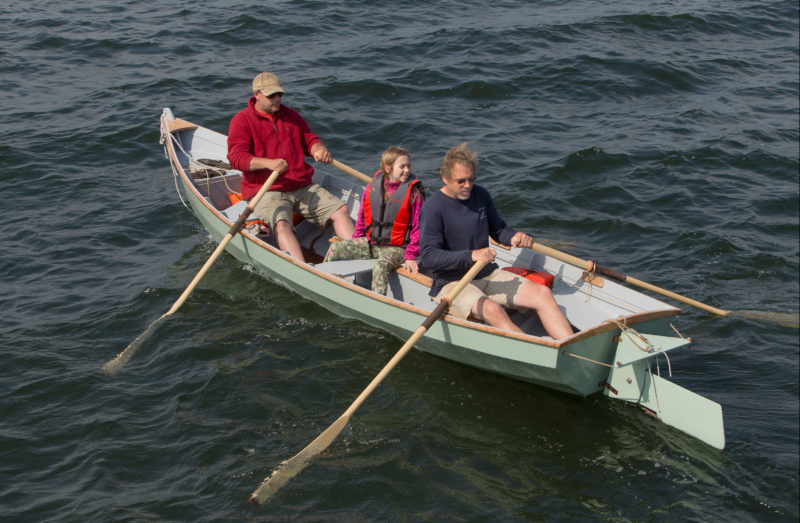
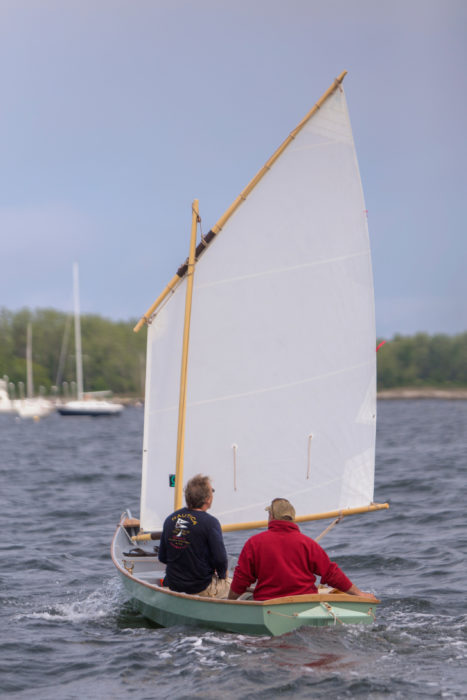
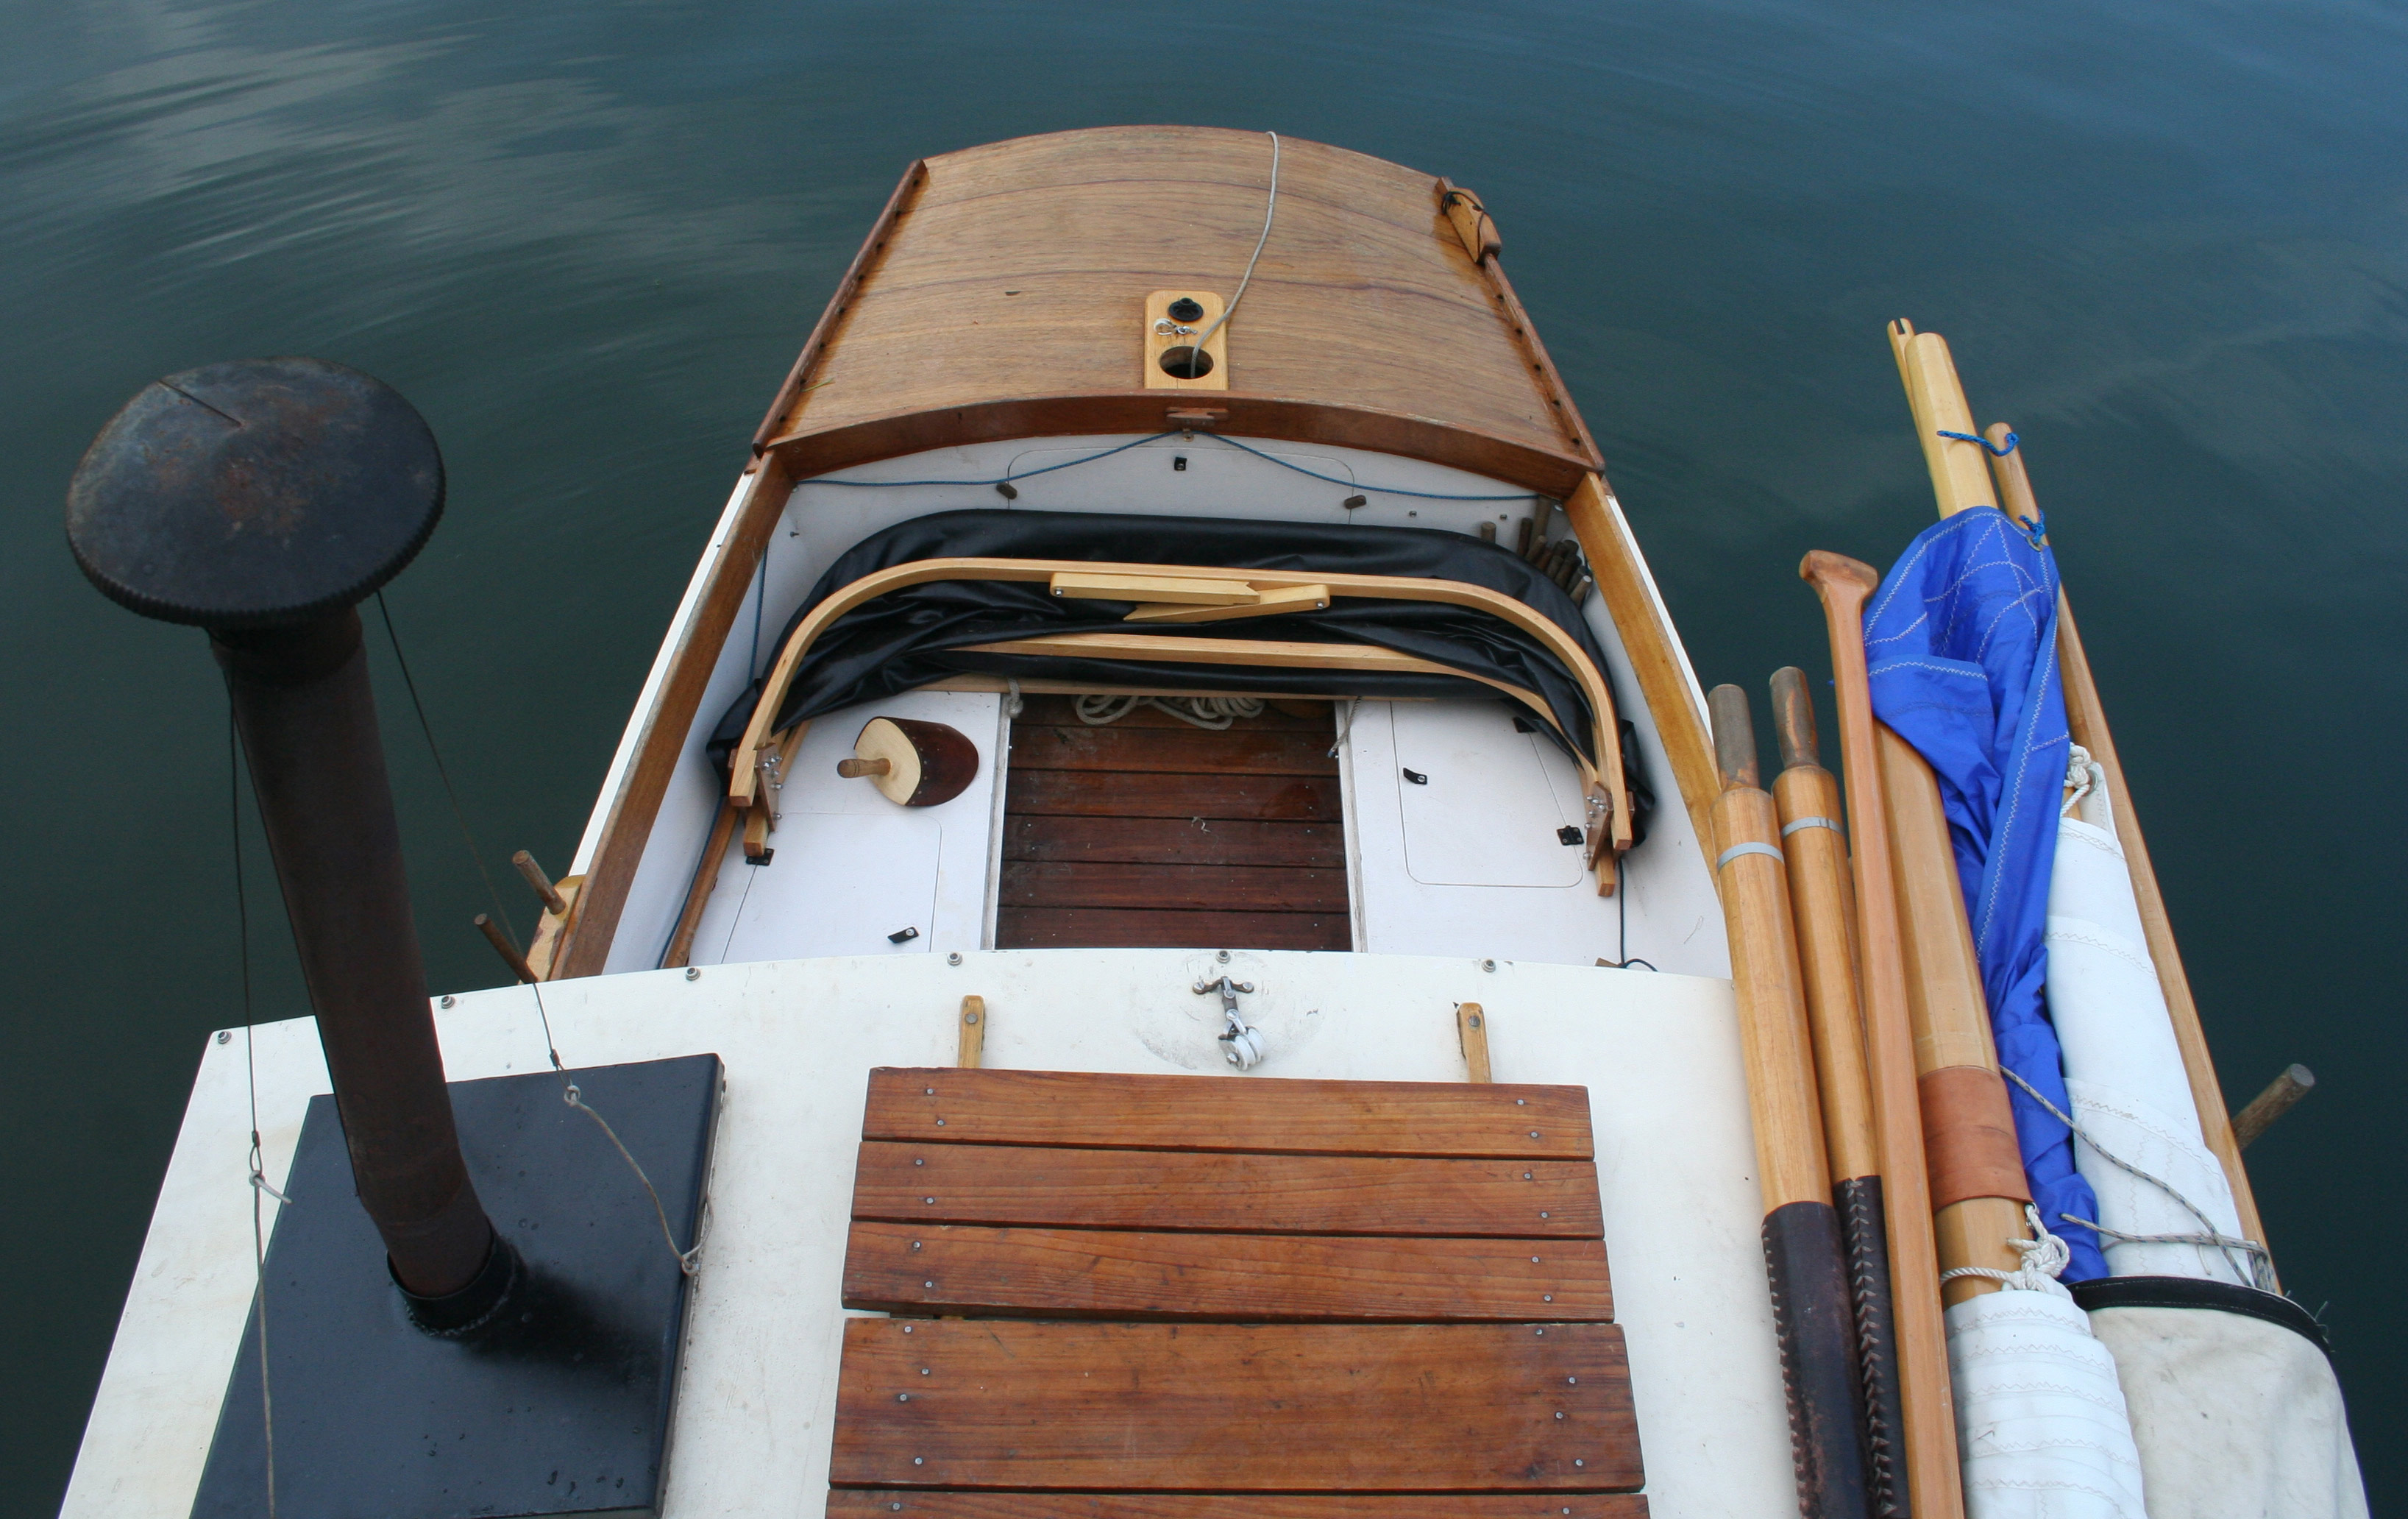
The thwart set here in the amidships position for solo rowing can be moved aft for tandem rowing.
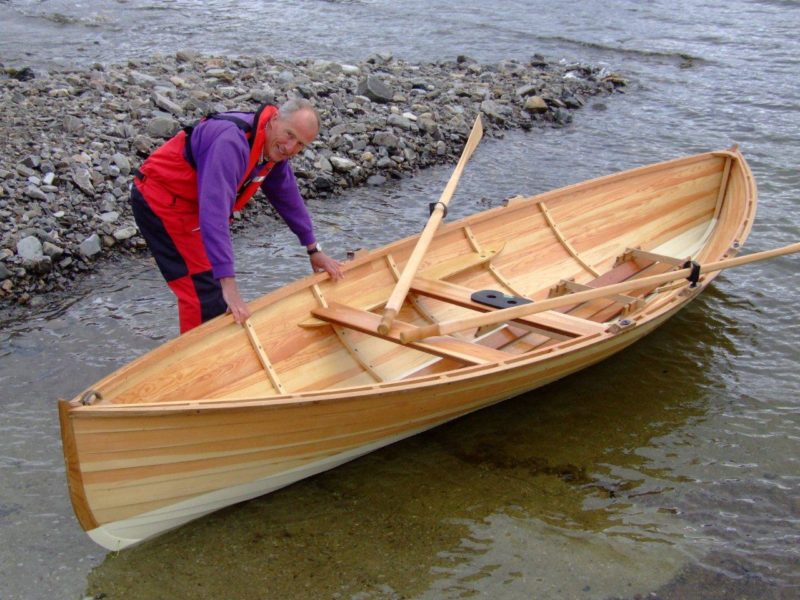
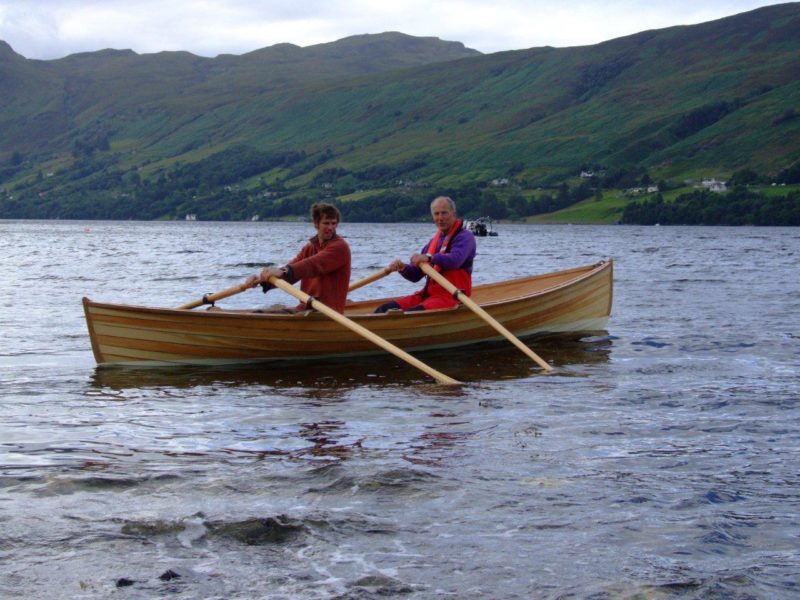
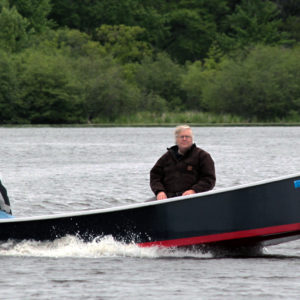
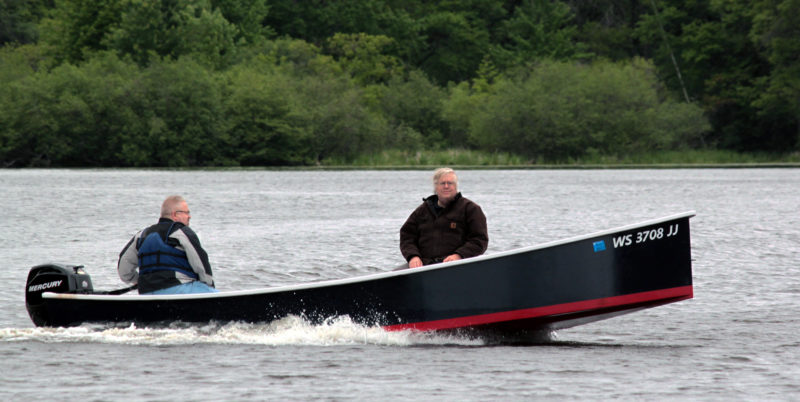
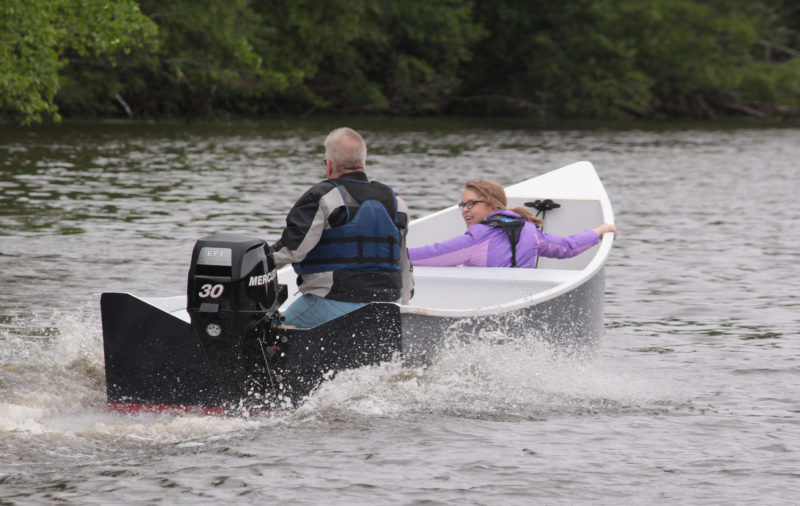
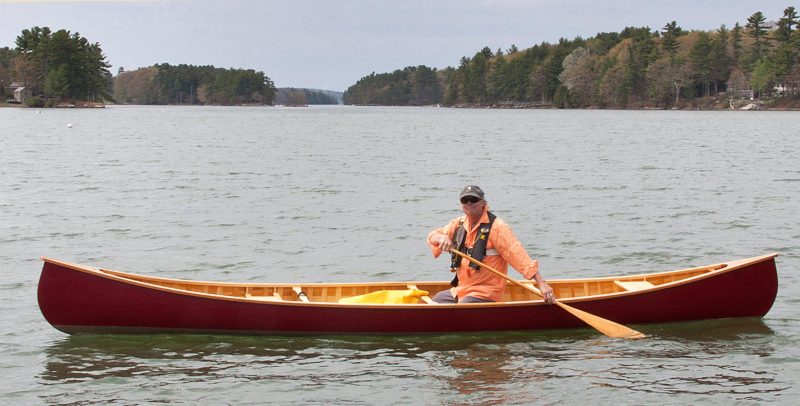
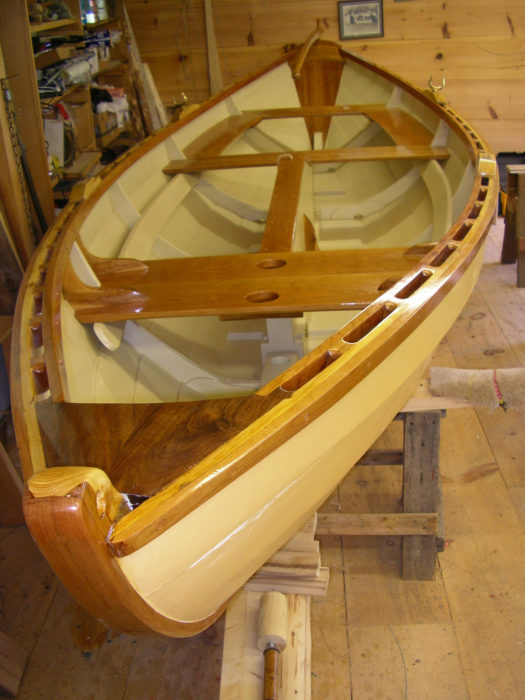
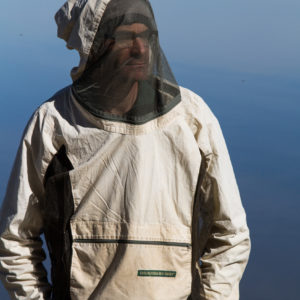
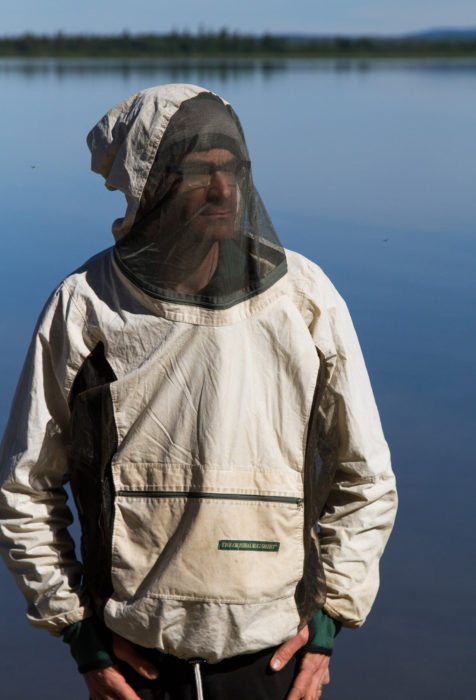
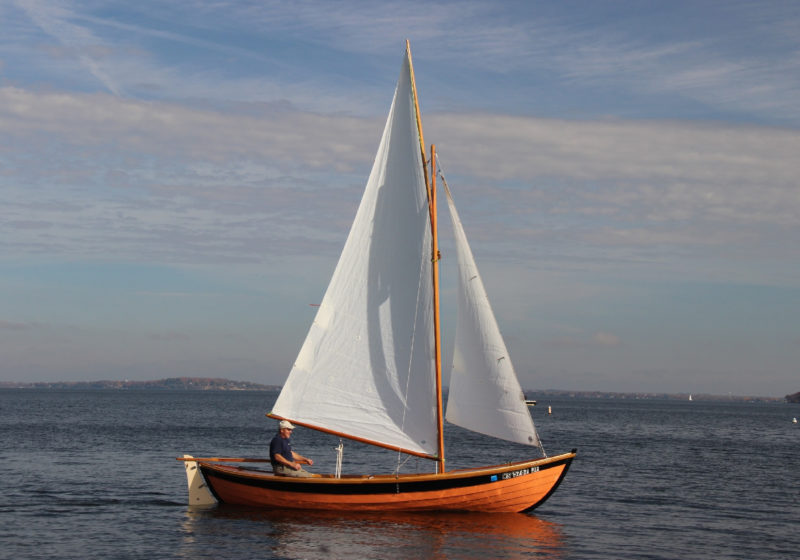
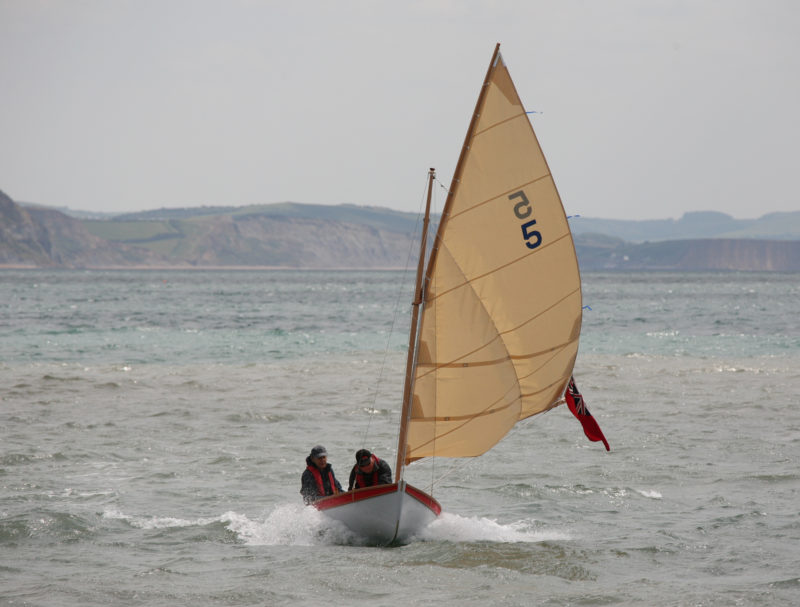
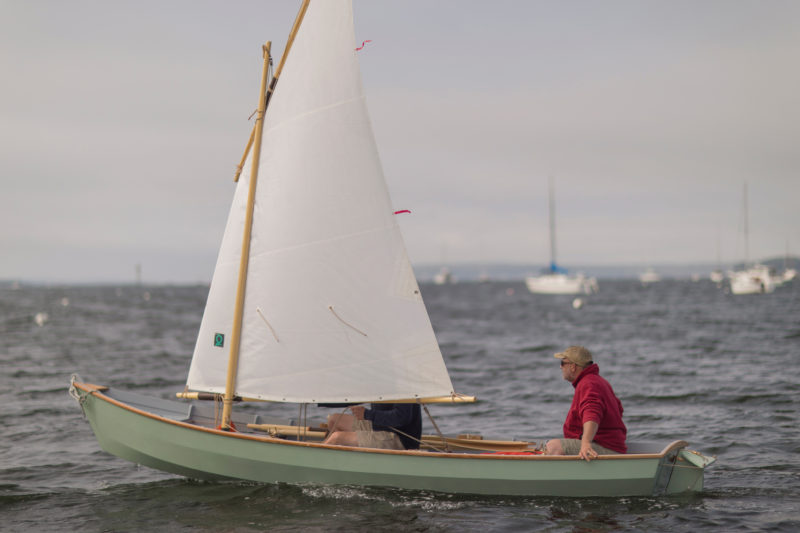
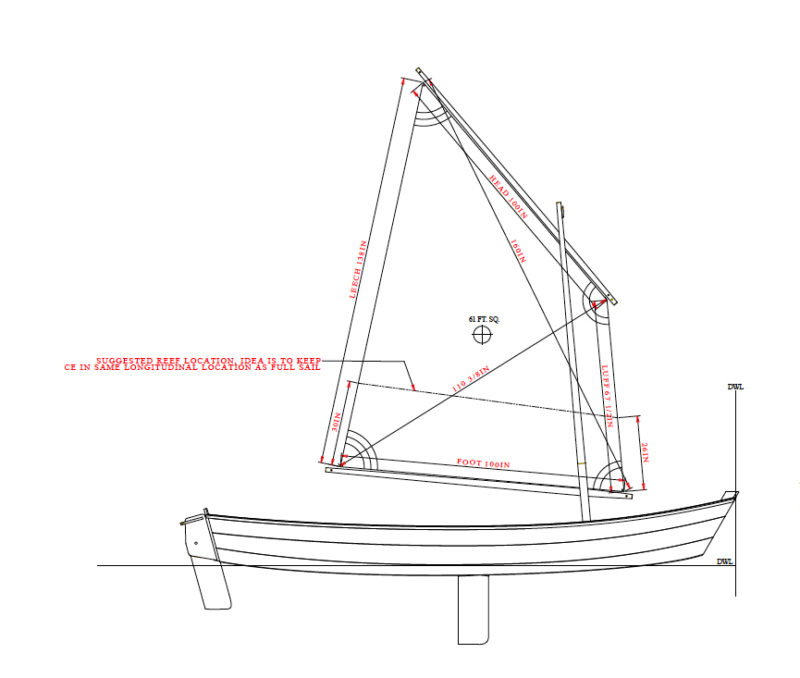
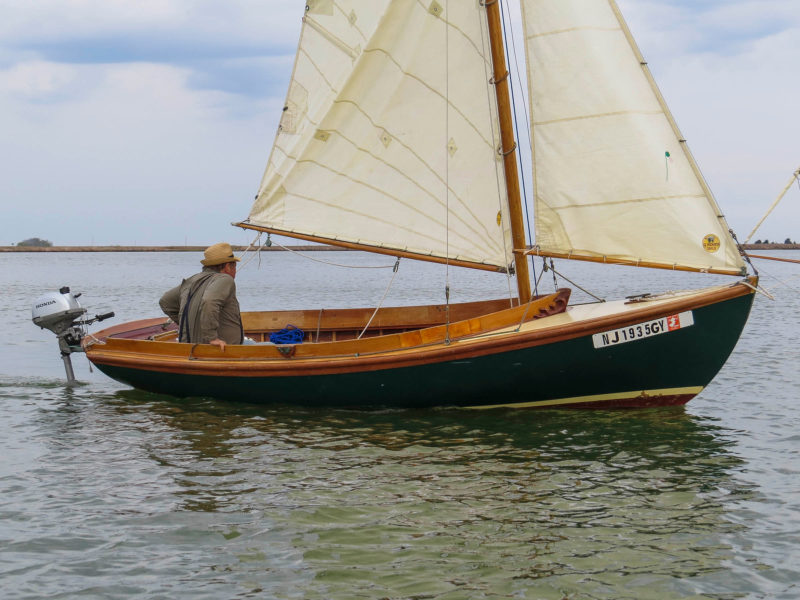
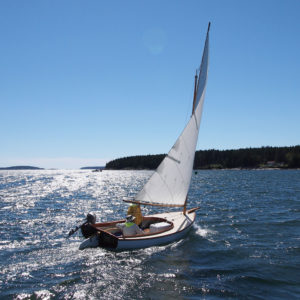
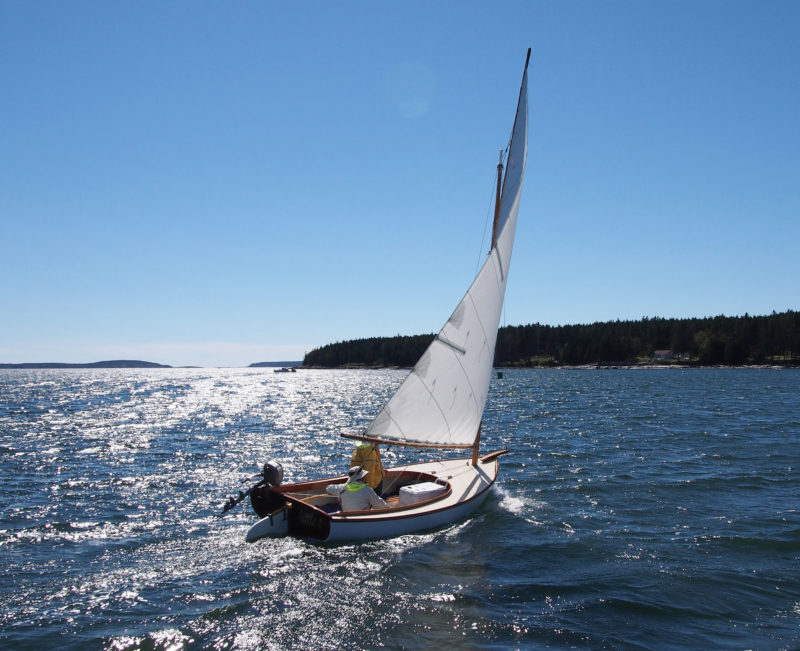
WENDY was outfitted as a rowboat, leaving the rudder and lug rig perhaps for a later time. (The boat was designed without a centerboard, reasoning that upwind progress would be better made under oars.) The bright-finished Vendia looked like traditional planking without the hundreds of lap fastenings. Adrian had no doubt the boat would row well. He said, “Some boats look sweet and fast before they hit the water, and the Bob certainly falls into that category—fine-lined and slippery.” Regarding her performance, he said “She did not disappoint, accelerating with minimal effort to cruising speed.” WENDY floated right on her lines with one or two rowers aboard and tracked well thanks to the long, nearly straight keel.
The 9′ 3″ oars were just the right length and the Australian Gaco oarlocks were virtually frictionless and allowed the trapezoid oar looms to be feathered.
Adrian’s experiment with modern materials was a success. “Vendia,” he said “brought together a new material with an old method. Light, strong, easily worked, and above all capable of taking a clear finish to look like solid timber, it was a material I looked forward to using in all my future boats.”
Soon after Adrian launched WENDY, Vendia abruptly announced that it had discontinued production of its Marine Plank due to insufficient demand. The ensuing outcry seems to have caused some rethinking of that decision, however, and the company is seeking a way to keep the product going. Interested readers should visit the company’s web site for the most up-to-date news. [Editor’s note, January 2021: Vendia’s web site is now offering the planking again.]
“Vendia,” Adrian said, “was the only reason I decided to keep building boats. If it’s plywood from now on, then I’m out of it.” But, a month later, the shock had worn off and he had started building an Auk dinghy—in traditional materials. (You can track his progress on his blog: thetroublewitholdboats.blogspot.com)
Have you recently launched a boat? Please email us. We’d like to hear about it and share your story with other Small Boats Monthly readers.
I’ve had a copy of Phil Bolger’s book Boats With An Open Mind for a long time, and I’ve always liked the looks of the Clam Skiff he designed for Harold “Dynamite” Payson. Payson, writes Bolger, “was a lobsterman before he began to write and teach. His orders for this design were for a solid skiff that could stand generous power, carry a big load, and have flat footing right out to the side. Nothing about it should be hard to explain.” At 18′ long and 5′3″ wide, the skiff will carry 1,100 lbs and draw just 3″; it seemed to me that it might be a very good companion for fishing trips in the North Country. When my brother Jon expressed an interest in a fishing boat, one he could easily trailer behind the family car and reach the many lakes and rivers in his part of Wisconsin, it didn’t take me long to talk him into the Clam Skiff.
I called Payson and ordered Bolger’s plan #606, called there a Workskiff, which came practically in the next mail. The drawings were clear and very easy to understand. After buying epoxy, plywood, and Douglas-fir lumber, I built a jig to make it easier to scarf the plywood sides. That turned out to be a waste of time, and I ended up scarfing the plywood by hand: I arranged the pieces for the sides stair-step fashion and cut the 8:1 scarfs using a power plane, a remarkably fast way to do it. A long, flat piece of 2×4 edged with sticky-backed 80-grit sandpaper flattened things out nicely.
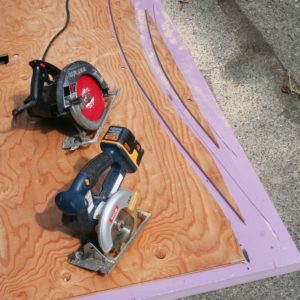
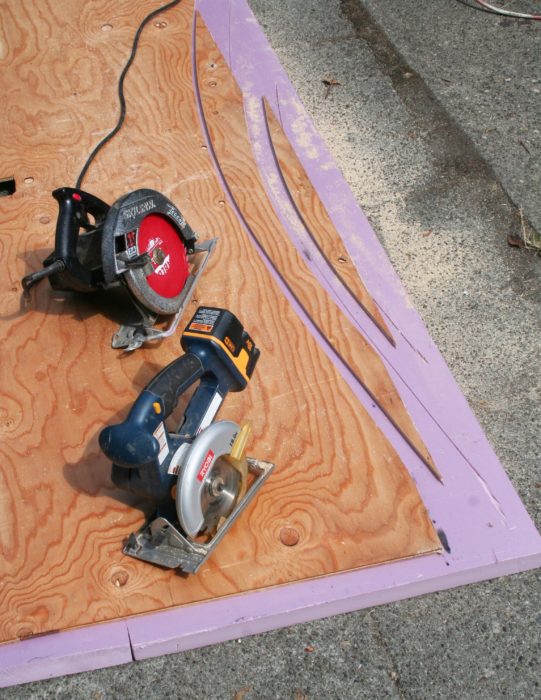
I cut the various plywood parts out with a circular saw with the plywood set on a sheet of 2″-thick rigid foam that later ended up as flotation in the boat. The transom is built up of four layers of ½″ plywood. Like the bulkheads, it is edged with Douglas-fir to give the builder something more substantial than plywood edge-grain to hold the screws that secure the sides. I scarfed together the plywood sheets to make the sides. I clamped the full-length panels together, then cut out the sides with the circular saw. While the bottom edges of the sides are nearly straight, the top edges have more shape, but the long curve of the sheer was easy to cut out with the circular saw. After I planed the sides up to the lines, I separated them and glued Douglas-fir chine logs along their bottom edges. I had cut the chine logs square and realized later that they’d hold water; next time, I’d cut a bevel on the top of them to let any water to roll off. Assembling the transom, sides, bulkheads, and stem was a two-person job and used just about all the clamps in the shop. Deck screws served as extra clamps when needed, and with two screw guns, things came together faster than anticipated.
Peter Leenhouts
The sides, sprung to the transom, bulkhead, and stem, and constrained by a pair of temporary spreaders, determine the shape of the bottom.
There are two layers of ½″ marine plywood on the bottom, and the pieces are assembled and their scarfs glued-up on the boat. The bottom panels get cut slightly oversized and then trimmed flush with the sides at the chines. Bolger’s suggestion of installing temporary braces—2x4s laid on edge running from the transom to the center bulkhead—ensured the broad, flat bottom plywood panels did not sag.
After ’glassing the bottom and sanding everything, a shoe built up of two layers of ½″ marine plywood went on and was ’glassed with 9-oz fiberglass, and exposed end-grain was sealed and protected with three coats of epoxy. After I painted the bottom of the boat with a deep red polyurethane paint, the boat was ready to turn over. It took two older men, two women, and one boy to lift the boat off its sawhorses and walk it out to the lawn. My wife and I then turned it over using our truck and a towing strap. With the boat right-side up and back in the shop, I installed a second amidships bulkhead and built the four compartments in the aft end of the boat. I radiused everything and made small fillets along the chines and all of the bulkheads to ensure that the boat would be easy to clean.
Peter Leenhouts
Compartments in the bow. stern and amidships provide flotation. Scuppers through the center bulkheads allow water to drain aft.
After the gunwales and drain-plug tube went in, all that was left was to finish the painting. The noted New Zealand designer John Welsford had taught my wife and me how to roll and tip paint, and the finish came out beautifully. In dark blue, the boat looks fantastic. After taping off the inside of the boat and applying the first finish coat of white, a friend showed me how to get a good non-skid surface. He laid a 1″- deep layer of clean washed beach sand right on the wet paint, let it dry overnight, then vacuumed up the excess and painted the entire inside of the boat with two layers of finish paint. The painted beach sand provides an excellent nonskid surface for very little cost, and it looks great.
Life tends to get in the way of projects, so it took me five years, working occasionally, to build the boat. Payson said the Clam Skiff could be built in a month of weekends, and I’d have to agree with him. You could, as he did, save on the cost of materials by building the boat out of lumberyard ACX plywood, ’glassing only the chines, and painting the boat with latex porch paint. I doubt you’d notice any real difference other than the boat might be a bit lighter.
Peter Leenhouts
Out of the shop and onto the road, the skiff traveled 2,000 miles to get to its launching.
I towed the boat 2,000 miles from my shop in Washington State to deliver it to Jon in Wisconsin. With a used Mercury four-stroke 30-hp outboard engine bolted to the transom, he christened the boat FAMILY AFFAIR and launched her on a small lake near his home. Bolger said the boat could take up to a 40-hp engine, but I figure he had in mind a lighter two-stroke engine. The Mercury outboard my brother put on the boat weighs about 175 lbs, which worried me a little, but the boat sat right on its lines with the Merc, the operator at its tiller, and the 5-gallon portable gas tank aboard. Jon has since added a marine battery and a transom-mounted Minn Kota electric trolling motor with no appreciable difference to the way the boat sits in the water.
Sonja Leenhouts
With his brother at the helm, the author enjoys the results of his 5-year project.
Launching and retrieving the boat with the trailer is very easy. While an extra pair of hands is always appreciated, the boat’s light weight makes it easy to manage alone. Powering up, the skiff climbs up and out of “the hole” quite quickly, and gets on a plane with no extreme rising of the bow. Similarly, when suddenly cutting the throttle from full speed, the skiff has a smooth runout and settles quickly without having the wake climb over the transom. Jon finds that opening the throttle about halfway provides a very comfortable ride in flat water or in a slight chop. At full throttle the stem rises up out of the water and the bow partially obscures forward vision from the from the operator’s station in the stern, so it’s important to keep a close watch on traffic or navigation hazards ahead. Having some additional weight in the bow improves visibility forward, so a passenger or a couple of sandbags will go there. The boat tracks straight and true and responds well to steering. Turning underway at any speed, the skiff remains flat without any uncomfortable heeling or rolling.
Sonja Leenhouts
Jon and his daughter Keri take off. The tall transom, even with the notch for the outboard, requires a long-shaft motor.
While the boat is trolling or at anchored, two or three adults can easily move around without having it tip or roll, which is nice when you’re sharing a look at the fishfinder. From the transom 8′ forward of the bottom is dead flat, so moving about inside very easy and comfortable and the feel is solid and balanced. This is especially important when standing at the gunwale recovering an anchor—the boat just doesn’t want to heel. That said, there is little reserve stability in a boat with vertical sides, so, as always, caution is indicated until one gets the feel of the boat.
Phil Bolger’s Clam Skiff is a very simple, forgiving boat to build and use. It is elegant and tolerant on the water, and draws plenty of attention from others who admire its clean, functional lines. All in all, it is much more than what we both could have hoped for when I bought the plans.
Pete Leenhouts, a retired naval officer, lives on Washington State’s Olympic Peninsula where he enjoys building, restoring and using his boats. His article on using rigid foam as a base for sawing sheets of plywood also appears in this issue.
I was paddling on a placid Royal River with my four-year-old son Noah kneeling in front of me on a wooden Tidal Roots stand-up-paddle (SUP) board. The water hissed quietly as it slipped under the bow. The peaceful scene was disrupted by a paddler yelling, “That is a gorgeous board!” While I’d heard praise like that more than once while using the Maine-built, bright-finished Tidal Roots board [The company is no longer in business.—Ed.] It’s not something I ever hear when I’m paddling my fiberglass-and-expanded-polystyrene-foam board made in China.
Tim Greenway
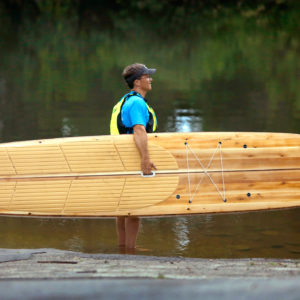
Bookmatching the northern white cedar turns the variations in the wood’s grain and color into appealing patterns.
Kyle Schaefer and Kent Scovill of Tidal Roots make SUP boards in a weathered, three-bedroom house in Eliot, Maine. Both are avid fly fishermen, and four years ago, when a friend of Schaefer’s left a paddleboard with Kyle, they immediately used the board to give them a better way to find fish. A light went on: What if they designed an SUP board for stability rather than speed, one that was built in Maine out of local materials, and built it of wood? They set about designing their first standup paddleboard. Building it took “forever,” but paddling it for the first time, Kent recalls, “was the best day ever.” Kyle and Kent are now producing about 36 boards a year.
Work on a Tidal Roots board begins in an old barn—warmed by a wood stove—where wood is rough cut and planed. The house’s basement, their principal workshop, is 750 sq ft and cramped; their workshop tables, by necessity, are on casters. The day I dropped in on them, they were building a Shoal, an 11′6″ board, a refinement of their first board, thicker and with less rocker to the nose. Kent says it has less plow, more glide.
Peter Van Allen
Tidal Roots boards have between 24 and 28 CNC router-cut pieces in the framework. The solid balsa blocking to the left provides a backing for the recessed hand-grip installed later.
The Tidal Roots boards have a spar-and-rib interior framework like that of an airplane wing. The patterns for the interlocking pieces were designed on a CAD system by Jon Deschenes, a friend in Tennessee, and two shops—one in Dover, New Hampshire, and one in Amesbury, Massachusetts —cut the pieces from ¼″ marine-grade plywood using CNC machines. The boards’ exteriors are northern white cedar, and about 95 percent of it is supplied by Bruce Tweedie of Thorndike, Maine.
For the bottom and top of a board, Kyle and Kent edge-glue 3″ to 4″-wide book-matched boards of northern white cedar. The glued-up sheets start at ⅜″ and are taken down to a fat ¼″ with a 43″-wide thickness sander. The frame pieces are assembled with interlocking joints, and the builders glue balsa blocks to the spars and ribs where cuts will later be made for a fin box, a handhold, and several tie-down fittings.
With the bottom panel on the workbench, a chalkline is snapped down the center from nose to tail. Along the line they lay a template made of cardboard and edged roughly, it seems, in black duct tape. “We’re not building spaceships down here,” Kyle quips. The template’s precut notches show where the ribs will match up. They trace out where the ribs will be positioned and where adhesive caulking needs to be applied prior to assembly.
Peter Van Allen
After adhesive is applied and the framework sandwiched between the top and bottom panels, a two-part press (the bottom shown here) gives the board its shape.
The top and bottom panels and the plywood frame are all glued together at the same time. Kent and Kyle place the marked bottom panel on a purpose-made press that will join and mold the bottom, framework, and top. They squirt on a sub-floor adhesive on the bottom panel and then lay the spar-and-rib assembly on top of that; more adhesive is applied to join the top panel. The top of the press is put over all and the press halves are drawn together with bar clamps, bringing the top and bottom panels to their curved shapes against the interior framework.
“Rail strips” made of straight-grained western red cedar are bent along the panels from nose to tail and serve as chine logs and sheer clamps. The sides, or rails, of the paddleboard add substantially to the labor of the board: northern white cedar “rail blocks,” roughly 1½″ wide are applied vertically one at a time, side by side.
To trim the ends of the board for the nose and tail blocks, Kent uses a Festool track saw, a circular saw with an integral guide. The nose block’s stock is northern white cedar sandwiched around western red cedar. It gets mitered and epoxied to the angled forward end of the board. The Shoal’s straight tail block has the same laminated wood structure. Once the epoxy has set, Kent uses a power planer to get the approximate shape, then a hand plane, and finally a sander.
The board is finished with fiberglass and epoxy. The ’glassing is done by Keith Natti of Twin Lights Surf Company in Gloucester, Massachusetts. They use a surf industry-inspired epoxy with a UV inhibitor built in. A pad is glued to the deck to keep the feet from slipping. Each board has a vent equipped with a waterproof/breathable membrane that allows the board to equalize atmospheric pressure and avoid damage when the board sits for an extended period; the vent is closed before the board hits the water.
Each Tidal Roots board has a conventional fiberglass fin, like those you’d see on conventional SUPs, set in in a fin box. A purist might want to have a ’glassed-on fin made of marine ply or laminated wood. Other deck fittings include anchor points for an ankle leash and equipment tie-downs, and twist-on adapters for RAM Mounts to hold GPS, camera, or fishing rod.
For do-it-yourselfers Tidal Roots offers kits that include spar-and-ribs parts, instructions, and recommendations for the tools and materials required. The long fore-and-aft spars have jigsaw-puzzle joints to allow them to be shipped in shorter sections.
Tim Greenway
A handhold at the board’s balance point makes carrying easy.
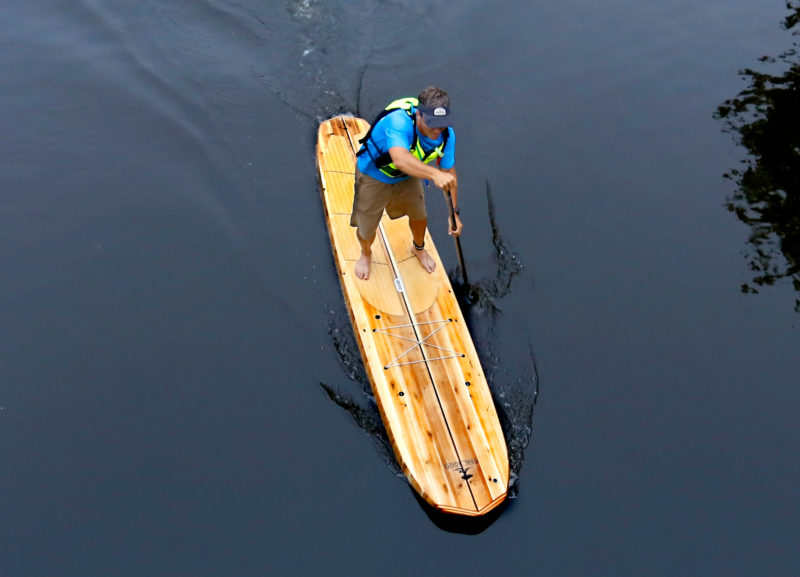
The Sand Bar model I tried is a 12′ board, the longest and fastest of the Tidal Roots models. It weighs 40 lbs; smaller Tidal Roots boards tip the scales at 38 lbs. Each Tidal Roots board is equipped with a handgrip that is well balanced and comfortable when toting the board from car to water.
The Sand Bar paddled smoothly on the flat water of the Royal River in Maine. At 28¾″ wide and 5″ thick, it’s stable enough to carry a small child just ahead of the paddler. I’m 170 lbs and my son adds another 40. The Sand Bar could just as easily carry 40 lbs of gear in dry bags for extended day trips and overnighters. The Sand Bar would be a stable platform for fishing or even yoga, though Tidal Roots’ Harbor Seal model, at 10′ x 33¾″ x 5¾″, is specifically designed for yoga.
Eager to get it into rougher conditions, I paddled on a windier day down the saltwater portion of the Royal River toward Casco Bay. Paddling into the wind is a challenge on any SUP, but the Sand Bar held its own. When a motorboat whizzed by, the board chugged right through the wake, easily rising and falling with the waves and feeling stable and controlled. While some would argue that the wood absorbs vibration and energy, I honestly didn’t see a huge difference going from foam-and-fiberglass to wood. I felt like the deck was more forgiving, which is easier on my old knees, but the hull is as stiff and strong as any board I’ve ridden.
With the stock fin from Futures Fins, the Sand Bar tracks well yet also turns easily. It’s not a speed machine, but it would be a comfortable board for a journey of several miles. Kyle reports that he’s paddled the Sand Bar 10 miles comfortably, and I think that if you’re used to extended trips, this board will get you there in comfort and with relative ease.
To duck out of the wind, I paddled the board into the tidal marsh, and it was there that the board excelled. I followed a tidal creek and the board turned easily with the bends in waterway where I was sheltered from the wind. Suddenly, some baitfish broke the surface, and I could now see the appeal for a fly-fishing paddler. It is indeed a gorgeous board, but its advantages are more than cosmetic. It’s durable, made with products that are sustainable, and will get you where you want to go—in style.
Peter Van Allen is a fanatic for small craft that keep him close to the water, whether it’s a surf ski, a sea kayak, a paddleboard, or a single-fin surfboard. He is based in Yarmouth, Maine.
Sand Bar Particulars
′
Update: Tidal Roots is no longer in business. The article appears here as archival material—Ed.
Is there a boat you’d like to know more about? Have you built one that you think other Small Boats Monthly readers would enjoy? Please email us!
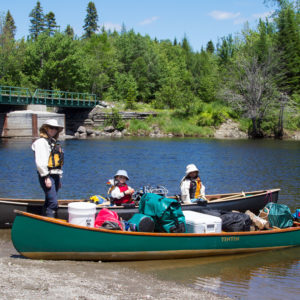
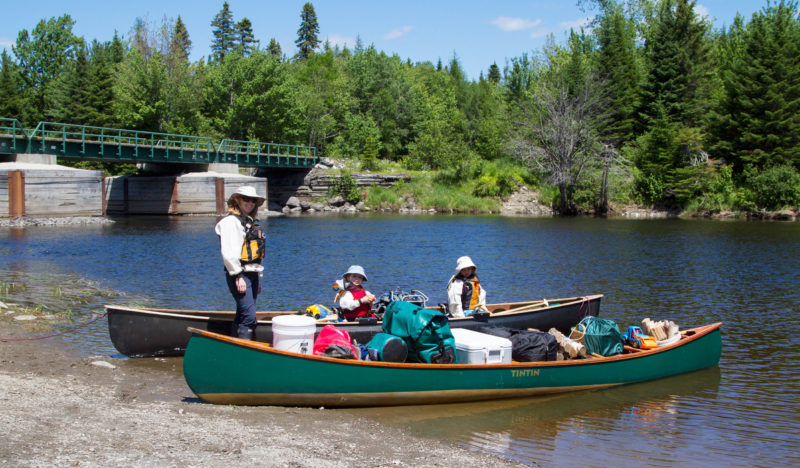
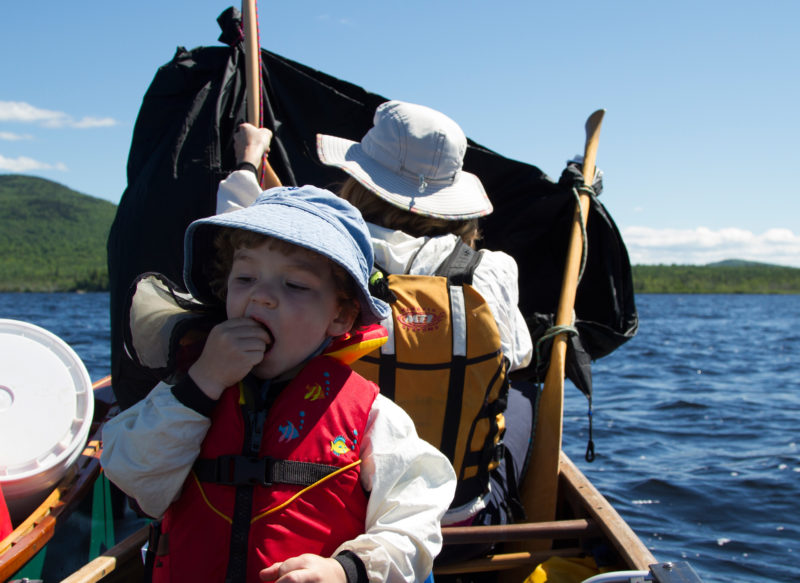
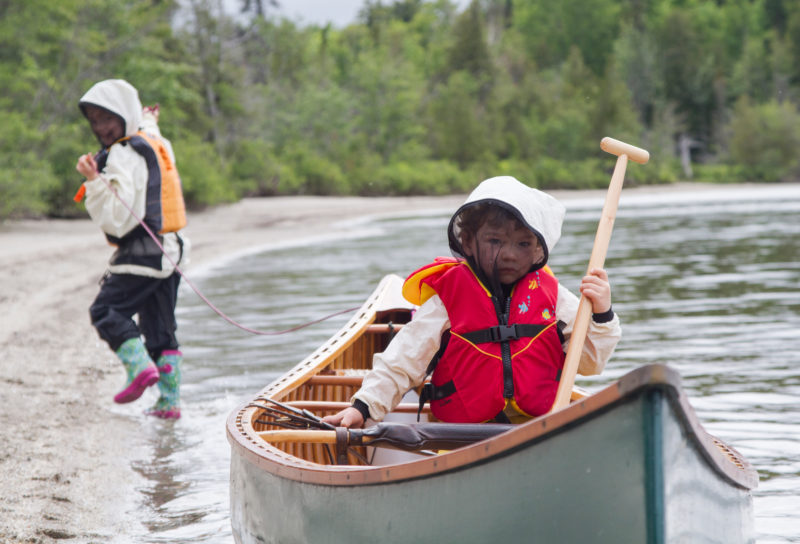
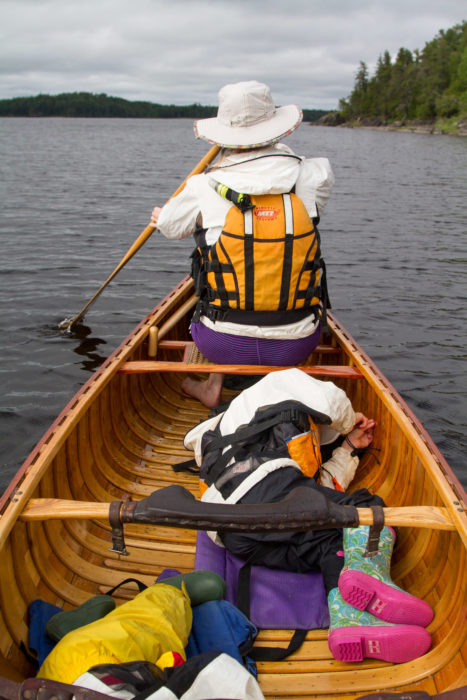
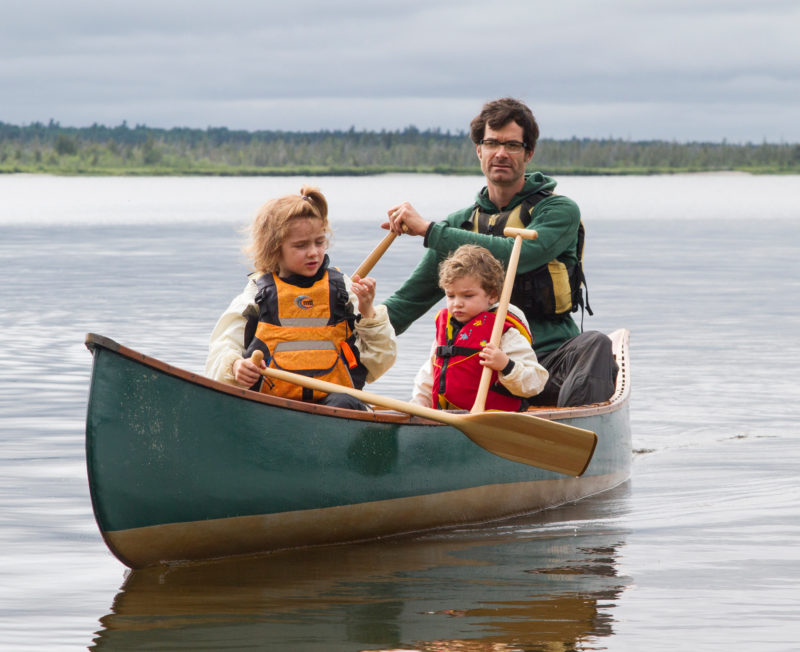
"Come TINTIN, come,” my four-year-old daughter hollered, then broke into a giggle. Her two-year-old brother threw back his head and let rip with his best belly laugh. We paddled, a family of four snug in a fully loaded 17′ canoe, up Lobster Stream in northern Maine. Tall conifers lined the banks on either side and funneled a mild headwind against our bow. Tethered to our stern, TINTIN, our 16′ wood-and-canvas canoe also teeming with gear, kept slipping broadside to our progress, creating drag like an anchor. I fiddled with the length of the line to no avail. I had built TINTIN 15 years earlier for a 700-mile paddle adventure across the Northeast. Before marriage and children, that trip had turned canoe and boy into an inseparable duo, but fast-forward to our inaugural and long-anticipated family canoe trip, and TINTIN had been demoted to service as a barge. What better way, I had naïvely thought, to instill a bond between my beloved TINTIN and the next generation than a family adventure— yet, 20 minutes into our first day, the kids were treating TINTIN like a goofy pet.
Donnie Mullen
The put-in on Lobster Stream is just upstream of its confluence with the West Branch of the Penobscot River. We were all excited, a tad anxious, and already tired following the long journey from home. The 2-mile paddle up to Lobster Lake is, strictly speaking, upstream but in practice it’s an easy flat water trip. TINTIN, in the foreground, carries gear for a family of four.
I was embarrassed to admit that I had stooped to the ignoble act of towing another canoe, but the previous week had been such a chaotic blur that finding the put-in, loading the boats, and shoving off felt like an accomplishment akin to a space-shuttle launch. A month earlier, during a heartfelt and late-night talk with my wife Erin, we agreed that, spring bugs and proper sleep be damned, the children were ready to experience true camping. Erin and I had met while working for Outward Bound and shared a long history of outdoor adventuring, running the gamut from a month-long paddle trip into the wilds of Quebec and Labrador to taking a reflective escape aboard TINTIN on our wedding day. Of course, our late-night declaration required of us a Herculean task: to find, organize, update, and pack the gear required. Then menu planning, shopping, and parceling out the food—which Erin largely executed herself, while also managing the children—as I busied myself with work, a handy camouflage for my being overwhelmed by the complex task of packing for a family of four, one still in diapers. My singular contribution, other than packing my own few clothes, was to mount the two canoes on the roof of our truck in a towering jumble that just might survive Maine’s punishing logging roads.
Erin and I had been to Lobster Lake years earlier, for a single night during a much longer trip, but it had remained in my memory as a tucked-away gem accented by sand beaches, smooth rock ledges, and old-growth pine all resting peacefully below the distant height and length of Mount Katahdin, Maine’s crown peak. The lake seemed like the perfect destination for a family. Our plan: set up camp for four nights and fill our days with short excursions, camp play, and nice meals.
Donnie Mullen
Prior to the trip, the kids had taste-tested the various snack options and Sumner declared that the sesame sticks tasted like dog food. At Lobster Lake the kids and I came to call them “dog bones” which always elicited giggles but spoiled them for Erin. Sum munched away while Erin held a tarp as a sail.
When we hit the lake, we aimed for the largest beach on the horizon. The wind had picked up, and we decided to lash the boats together as a catamaran. Simultaneously, Erin and I berated the kids for sticking hands in between the gnashing gunwales.
“I’m hungry,” Sumner complained.
Erin wanted to give sailing a try.
“Is it worth the effort?” I grumbled, but what I really thought, a holdover from my Outward Bound days: it’s cheating. Nonetheless, we dug out the tarp—and a snack.
We landed at the beach and it was a hectic moment as we unloaded the kids and the heaviest gear while the boats slopped around in the breaking waves. Standing between the boats, with a hand on either gunwale, a swell sloshed down my left boot. “Already?!” I held back a curse.
Erin tossed the beach toys into the sand. Without delay, Sumner put his front-end loader to work. Ceri lingered, watching us, wanting to help, but I’d told her to stay clear of the commotion. As the gear accumulated on dry ground, she carried or dragged it toward the campsite, at the high end of the beach. Once we had the boats out of the water, and most of the gear up to camp, Ceri joined Sumner at the shore. She tore up and down the beach, gripped by song, jumping, raising her arms and at times, letting her feet flick through the water.
Donnie Mullen
During the trip, we kept a running list of camp items, that—forgotten or overlooked this time around—would enhance subsequent adventures: binoculars, a brush to sweep out the tent, a Dutch oven hook, a small saw, Cholula hot sauce, and better rain jackets. Of course, foremost on our list, added with an eye to improving travel with young children, was a second tent.
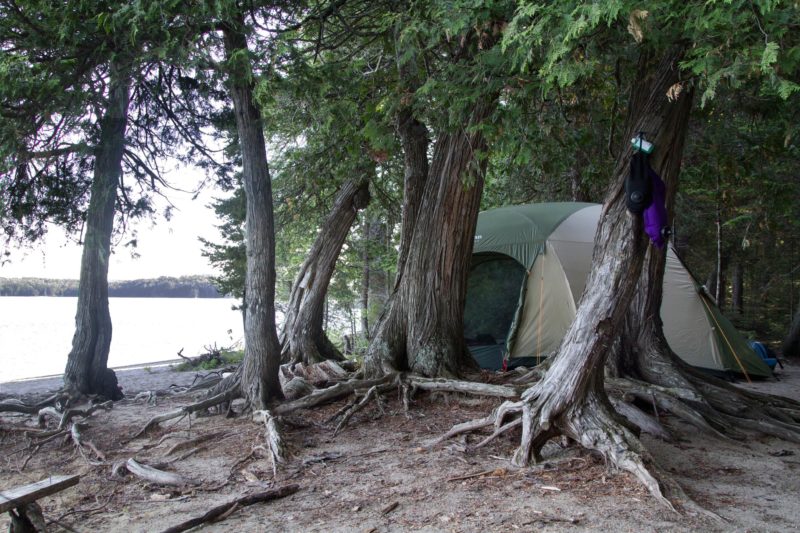
In a pleasant cedar grove, I started in on the tent while Erin began to pull out the dinner stuff and erect the kitchen. At one point, we crossed paths and exchanged tired smiles. The kids were playing happily, down below, giving us the freedom to bust through the initial camp setup.
“Wow,” Erin said. “It’s working.”
Donnie Mullen
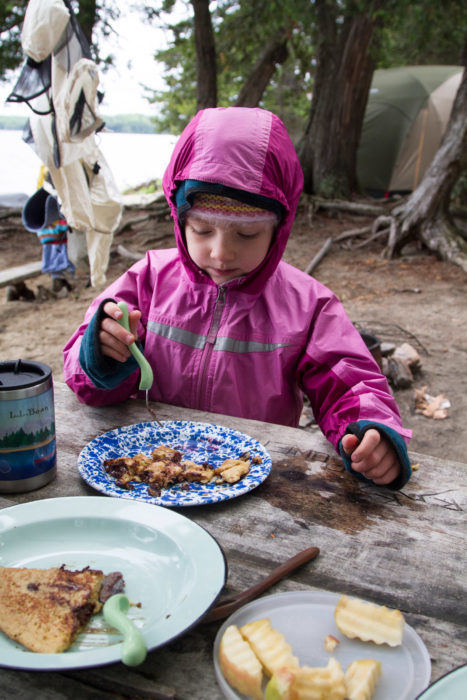
Good food was appreciated by everyone, and definitely helped sell the kids on the trip. Whether it was chocolate-chip pancakes on an overcast morning or Dutch-oven pizza for dinner, mealtime made everyone happy.
After a while, the kids charged up the beach to the camp kitchen, hungry. While they snacked, I noticed that Ceri’s long johns, her only pair, despite being rolled up, were dripping wet. On autopilot, I scolded her and then immediately felt like a heel. Here she was showcasing creative play, that same free spirit, inherited from her mom, which had hooked me all those years ago, and all I could come up with was with a criticism? Oh camping, please settle my nerves.
The onshore breeze was stiff come dinnertime. I slapped up the tarp semi-vertical to try and shield us, but it didn’t accomplish much. We huddled at the picnic table and gobbled. Ceri kept rising, trying to tighten the flapping tarp. The wind stopped at sunset. Then, yikes, mosquitoes. We retreated to the tent.
Donnie Mullen
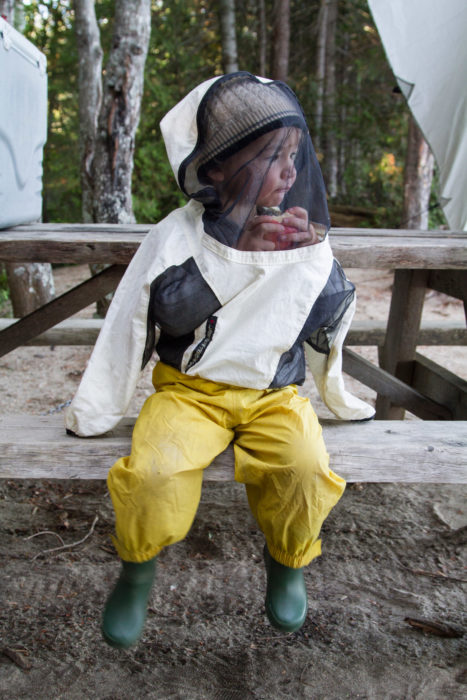
Ceri, was a perfect age for camping but we could never let Sumner get out of sight. At some times he surprised me with his endurance at sand play and coiling rope, and at others he required constant redirection. He was always hungry and cried if anything other than peanut butter and jelly was served for lunch.
Sumner and I emerged from the tent early the next morning (on his accord, not mine). He beelined to the picnic table and dug out an apple, then dropped it twice in the sand as he walked about. Each time, I washed it clean and requested he sit. Eventually, he did; I wandered off to take pictures. Some minutes later, he called:
“Daddy, come back.”
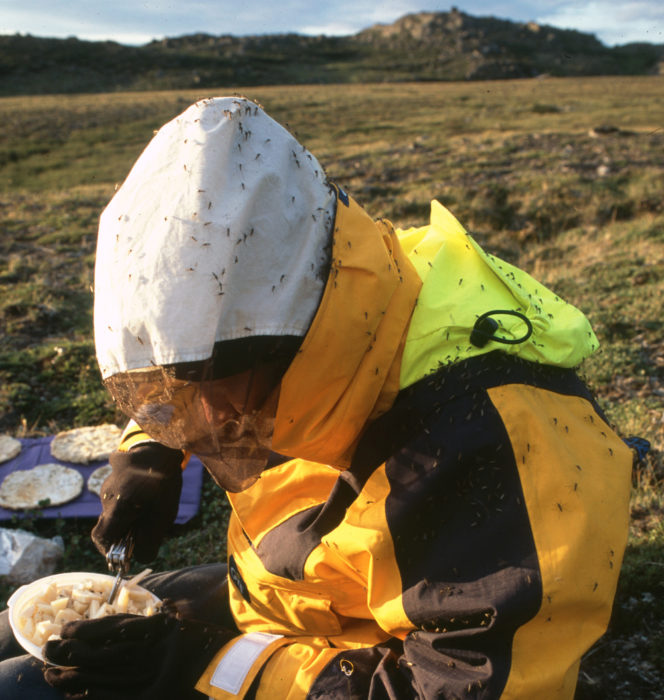
I returned to find him methodically swatting blackflies. Feeling the absent-minded dad, I quickly helped him to pull on his bug-net shirt, yet he whined when the mesh interrupted his eating. I taught him a skill that Erin had imparted years before on our bug-crazed Labrador trip—lunch inside your bug shirt. He swung his legs gleefully and resumed his eating with his hands and apple safe behind the mesh. Before long, he looked up at me with a mischievous glimmer. “I can’t drop my apple,” he cooed. He promptly slipped off the bench and headed for his toys.
Donnie Mullen
Despite their goofball sleep-deprived antics, the kids really did play well together. They shared the few toys we carried and collaboratively put to use found material, such as sticks for pre-bed jousting. Okay, it’s a bad example. When they began to incorporate TINTIN into their shared play I imagined a bond forming that would link my youthful spirit to theirs.
We dawdled away the remainder of the morning, while our intent of a proper outing floated like a pillow cloud overhead; camp details descended. Erin and I took turns at the outhouse. Ceri stuck her nose into the woodsy privy and decided in favor of the toddler potty we carried. Then Sumner needed a diaper. Damn, I still hadn’t made coffee. The mosquitoes passed, only to be replaced by horseflies. The kids made a sand-mound village accented with pinecones and sticks. As the day heated up, we peeled off our morning layers, hung our wet clothes out, and applied sunblock. Breakfast dishes were still wet when a peckish Sumner lurked for lunch. After his call went unheeded for too many minutes, he pulled down his diaper.
“LOOK, my bum!” he chortled.
“Christ,” I kvetched to Erin. “Can’t lunch wait?”
Glancing down at the shore, I couldn’t pull my camera out fast enough. Ceri had set her camp chair in the water. Tiny waves lapped at the chair legs while she kicked at the shallows with her boots. The shining blue lake stretched out before her. I loved this about her: her ability to design her own time. At home, she could pour herself into a collage or painting for an hour. Maybe she was just pushing the envelope with the “keep it dry” request, but even so it had flair. This time I was smart enough to praise her initiative when she pranced up from shore.
A while later, Erin tore from the tent, at her wit’s end after an hour of trying to put Sum down for a nap.
“We’re going hiking,” she declared.
Donnie Mullen
Sumner was the wildcard of the trip. He had many moments of happy play and even helped with the dishes a few times, but then he could spiral into unabated silliness. Was he too young for canoe camping? At Outward Bound we often said “Hard isn’t bad. It’s just hard.” And as long as the hard is balanced by a few glorious moments, I can accept it every so often.
We rallied, hastily packed the canoe, put hats on, zipped and clipped PFDs, and grabbed water, snacks, and the child-carrying backpack. Oh, camera bag. And then another jaunt up the beach to find our hiking boots. I ran down to the water, arms full, and we shoved off. To reach the trailhead for Lobster Mountain, a steep wooded face that loomed behind our beach site, we would have to paddle around the ledges of nearby Ogden Point into a neighboring cove.
As we paddled along the shore, we were reminded that without much gear aboard, TINTIN’s initial stability was a tad wobbly. Erin and I said as much, and Ceri latched onto the hint of anxiety. I hoped she wouldn’t notice TINTIN’s other curiosities: extremities that still leaked even after being recanvased, and the hull bumps from old collisions that never quite got replanked away. For me, these traits were part of his character, and reminded me of our adventures together. Yet, to Ceri, he was an old wooden thing that made her laugh first, and now had turned her nervous.
The brief trip Erin and I had made to Lobster Lake years previous hadn’t given us time to explore, so I was not expecting a vista as we rounded the point. All at once, shorelines green on either side, our gaze shot toward the immense emerald block of Big Spencer Mountain rising neatly above a sandy spit that reached into the lake. Our paddle blades hung in the water.
“Paddle, please,” Ceri requested, clearly uncomfortable with our drifting arc. After we lingered some more, and the bow got a little closer to the shoreside brush, she hollered, “Paddle!” Okay. Okay, but I was just starting to relax.
We found the trailhead, but the sign there indicated a 2-mile trail, one-way. It was humid and sweltering. Sumner’s head bobbed in and out of sleep, and Ceri whined as the mosquitoes flushed from the woods and found us. No sooner had we dragged the boat to shore, than it had to go back into the water. We paddled frantically into the middle of the lake, swatting all the while. Erin had Sumner in the bow, and before long he was cradled in a bundle of PFD and beach towel, fast asleep. Ceri slumped atop a collapsible camp chair and followed suit. With Big Spencer glowing at our backs, Erin turned to me with the widest grin I’d seen in days. “Canoe drive?” she said. At home, we often resorted to taking a drive in the car to wrestle Sumner down. Without his nap, he turned into a punch-drunk bear cub. Even life with Ceri, who had long ago outgrown her interest in daytime sleep, was easier if she napped. We took a final look at the mountain before returning to our strokes and the rhythmic creaking of TINTIN’s joints.
Donnie Mullen
The “canoe drive” really turned out to be a viable method to settle the kids. Jerry Stelmok, master wood-and-canvas builder, once said that he never tired of gazing at the interior of a nicely finished boat. It’s true, the swirl and warmth of varnished cedar can mesmerize, and occasionally inspire a welcome dozing.
We reached camp and Ceri stayed asleep even as Erin transferred her to the tent. Then mom crashed alongside daughter. Sum, however, had awoken and upon landing had picked up a stick and was thundering around honing his inner screech owl. I gazed at him befuddled. He needed a calming activity. It took me a while, oddly enough, to think up taking him on another paddle. I plopped him back in TINTIN and handed him an apple. He fell silent and noshed. I quickly forgot about his restless state and we just paddled, father and son; wood and canvas—little on board that wasn’t born of the earth.
His body swayed with each of my strokes as we crossed the cove. We paddled to another beach, but didn’t go ashore. We glided, surrounded by the forest’s soldiers of green and eroded Swiss-cheese-styled stone. I looked back at our camp hidden among the trees, above that perfect beach, and wondered if Ceri and Erin were up. As the boat drifted, Sum exclaimed.
“If we don’t paddle, wind take us where wind want to!”
Donnie Mullen
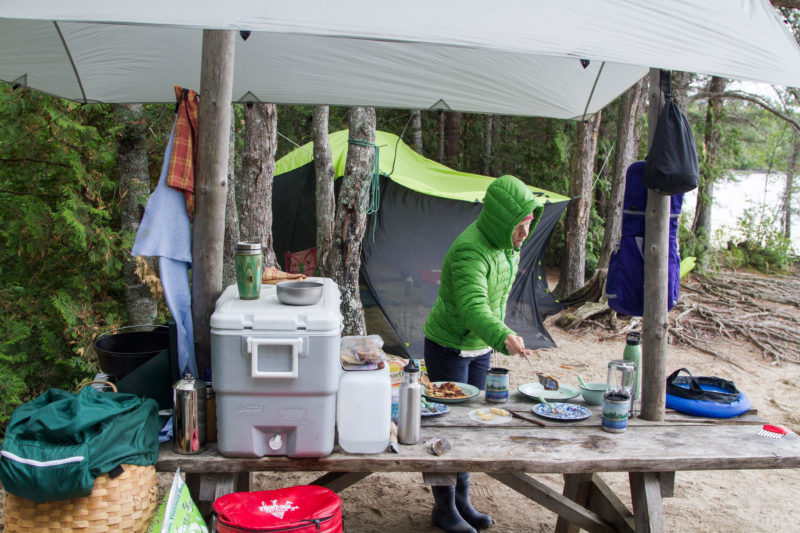
The camp kitchen is our central gathering area. I’ve always taken pride in keeping it neat and clean, but parenthood has required an adjustment from my persnickety past. I don’t often have the time for the perfect tarp setup or keeping the kitchen pack basket organized. Just getting the dishes done before the next meal is a success.
On Father’s Day morning, with just one eye open to the world, I watched Erin, clad in raingear, pick her way over our sleeping bags. Moist air and gray light filled the tent. It was far too early to be awake, yet I knew she was headed out to make a special breakfast for me. The night before I’d had a simple and silent wish to sleep in. The likelihood seemed so preposterous I had chuckled aloud. Yet, somehow, it was unfolding. Flocked by sleeping cherubs, I let my bones settle. Once more, I was lying dry while a rainy day let loose inches away. Too elated to fall back to sleep, I pondered my good fortune. Should I read? Take notes? Instead, I remained lost in thought. The kids awoke, snuggled in, and even agreed on what book to read.
Later, we hunkered down in our camp chairs, safe under the bug tarp. Our clothes were damp, particularly Erin’s. She had been cooking for over an hour beneath a not-quite-wide-enough kitchen tarp. Our hair was matted and we scratched bug bites, but we were together in a beautiful place, all smiles, about to share a breakfast of comfort food cooked over an open fire. Erin handed me a hot mug of coffee before sliding the lid from the Dutch oven. A puff of cinnamon-bun sweetness filled our meshed-in space. The kids wiggled in their chairs.
“I have a big mouth, so I have a big frosting,” Sumner declared.
“I need the largest one,” Ceri countered.
After minutes of eating in a silence broken only by wind in the branches and a spatter of wetness against the tarp, Ceri spoke up.
“I think every year for Father’s Day and Mother’s Day we should come here and eat these,” she announced. Then she added with a sticky grin, “I love this day!”
During a digestive lull, Ceri turned to me. “Do you want to go on a paddle with me? On the same route as Sumner.” My affirming reply was nearly a shout.
Donnie Mullen
Ceri started carrying around birch bark after I told her that the native peoples built canoes with it. I think she was plotting her own one-off. Birch bark also meant campfires and having “for real and true” (Ceri’s phrase) s’mores over the campfire. Weeks after the trip, when asked to describe the adventure, Ceri answered: “campfire…marshmallow…CHOCOLATE.”
Later that day, while we prepped dinner, Erin turned to me. I was still thinking about my paddle with Ceri and how she had leapt from TINTIN, cove after cove, eager to collect freshwater mussel shells. The rain was gone, though the sky was still overcast. “It’s a lovely lake…but the bugs,” Erin said. Her tired eyes lingered on mine.
I was tired too. Our sleep routine hadn’t improved as we had hoped it would. The previous night Sumner had been running around barefoot, hours after his normal bedtime, howling like a feral imp. Even still, I didn’t want to entertain leaving a night early.
“I’d kinda like to follow through with our plan.” I said, as a surge of guilt shot through me. It being Father’s Day, I knew my vote carried an unfair advantage.
“Okay,” she hesitated. “Let’s ask the kids.”
Ceri didn’t have to think about it: “I never get to play on the beach this much.”
Sumner nodded happily, then added: “Can…can I play my truck, possibly, again?”
Erin Mullen
I built TINTIN in 2000 to paddle the Northern Forest Canoe Trail and together, TINTIN and I made the first known complete passage of the 700-mile route. When I became a parent I left TINTIN behind for a while, but a mingling of my canoe and my children has begun. Aside from romantic notions about raising a new generation of wood-and-canvas aficionados, I hoped our canoe trip would make lasting memories and contribute to their balanced upbringing.
On our last evening, we all gathered in the sand as the heat of the day was finally lifting. The warmth of the sun after the recent inclement weather was a gift we all felt. Sum, caked in sand dust and flush from hard play, leaned against his mom. Peanut butter was smeared across both cheeks. He patted her on the thigh. Ceri, in her pajamas and slippers, fresh from beachcombing, touched down beside me for no more than a minute.
I noticed her looking at TINTIN, who was overturned nearby. The shellac on the two-tone hull was ablaze in the late-day sun.
“Dad,” she said. “You’re gonna have TINTIN a long time.”
I nodded.
“Like 20 years probably,” she added, confidently.
“For sure,” I agreed. “Someday, you’ll get him.”
Without responding, she dashed off to the water’s edge, and I tried not to tread too deep into my hope that one day she or her brother just might really want him.
Donnie Mullen is a writer and photographer who lives in Camden, Maine, with his wife Erin and their two children. In the winter of 1999-2000, he built TINTIN and christened the canoe the following summer during his voyage along the 740-mile Northern Forest Canoe Trail, the first modern-day passage.
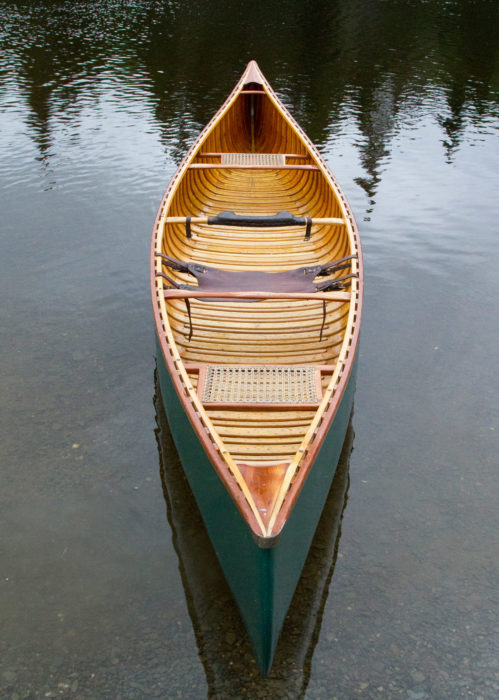
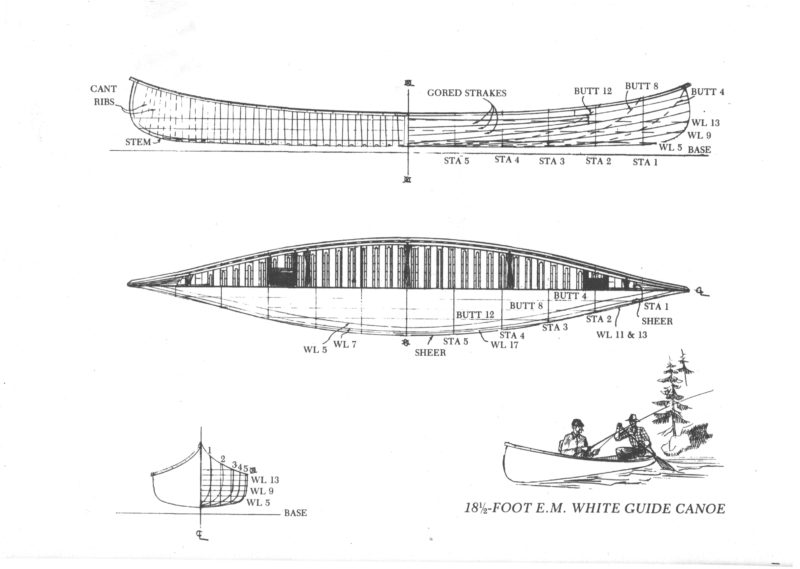
The E.M. White 16’ Guide canoe
In the winter of 2000, I built TINTIN under the expert counsel of master craftsman Jerry Stelmok. Stelmok runs Island Falls Canoe in Atkinson, Maine, where he builds wood-and-canvas canoes using the original E.M. White forms. TINTIN was constructed upside down on a form more than 70 years old. My 16′ Guide was adapted slightly by Stelmok from the E.M. White Scout, a more recreational design. He added 2″ of depth amidships (total depth, 13″) and replaced the “sport bow” with the stem from the larger Guide models. The 16′ Guide has a relatively flat bottom and an inch of rocker fore and aft. It has a 33″ beam and weighs 65 lbs when dry.
Wood-and-canvas canoes are uniquely American in origin, having descended from the bark canoes of Maine and New Brunswick. The eastern Wabanaki tribes—Penobscot, Passamaquoddy, Maliseet, and Mik’maq—built some of the most exquisite bark canoes in North America. Bark canoes are constructed right-side up on the ground, starting with the bark skin, whereas wood-and-canvas are built upside down atop a form, starting with the ribs and inwales. Canvas-covered canoes were found easier to keep watertight, and the use of the form streamlined production, so as adequately sized bark grew scarce in the late 1800s, the transition to canvas was a logical one.
Donnie Mullen
Back when I frequently paddled TINTIN solo, I used an Original Saddle Seat. Designed for open-gunwale canoes, it is as handsome as it is useful and a perfect seat for children.
The first commercial wood-and-canvas canoe builders began in the late 1800s in or around Bangor, Maine, at the time “the lumber capitol of the world.” By 1882, Evan H. Gerrish, who had experimented with canvas-over-bark canoes—the proprietor of the first commercial outfit— built around 25 canoes a year, selling them for $25 each. E.M. White began building canoes in 1888. White, a guide and craftsman, was completely taken by the novel alternative to his difficult-to-maintain bark canoe when he came across Gerrish paddling a wood-and-canvas on the Penobscot River.
Wood-and-canvas reached its height of recognition and popularity in the 1920s. The Depression and World War II created a sharp decline in canoe construction and recreation. After 1945, the introduction of the Grumman aluminum canoe generated a resurgence in the sport. In the 1970s, fiberglass and plastic took over. The wood-and-canvas canoe underwent a renaissance in the mid-1980s and early 1990s, and has since settled into a healthy niche. —DM
(Portions of this sidebar appeared previously in a 2007 Maine Boats, Homes and Harbors article written by Mullen entitled “Jerry Stelmok: A Builder, His Student, and Their Craft.”)
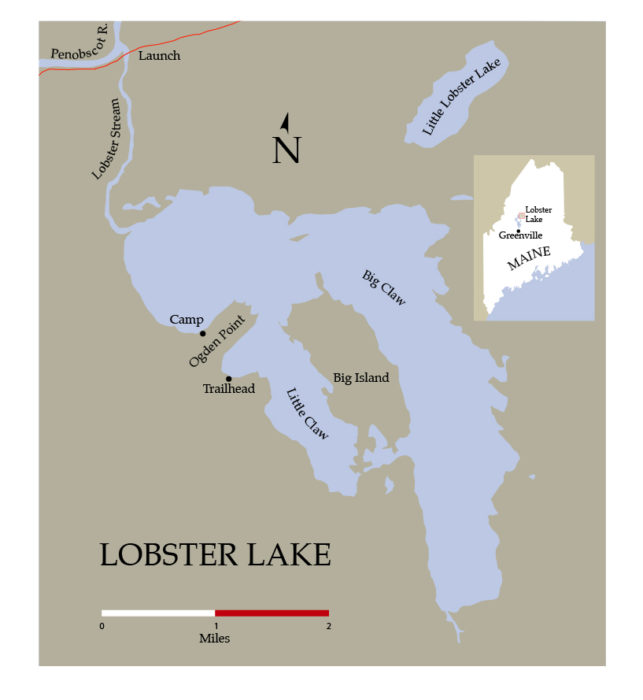
Lobster Lake
Lobster Lake is part of the Penobscot River Corridor. Lobster Stream flows from the northwestern end of the lake for a couple miles before meeting up with the West Branch of the Penobscot River. Just upstream of this confluence, the Northeast Carry Road (or Lobster Trip Road in The Maine Atlas and Gazetteer) crosses Lobster Stream. The put-in for Lobster Lake is on river left, just upstream of this bridge. The launch is hard-packed dirt and amply sized for a trailer. The parking area above the launch is dirt and grass. An information kiosk and outhouse are at the entrance to the parking area.
To reach the Lobster Lake put-in from Greenville, head north on the Lily Bay Road toward Kokadjo. After Kokadjo the road turns to dirt; bear left. At the junction with Spencer Bay Road (you’ll see a sign for Spencer Pond Camps), stay straight. At the Medawisla Sporting Camp sign, continue straight. (In the Gazetteer, this is the Smithtown Road junction.) At the Sias Hill intersection either direction is viable, though the Sias Hill Cutoff Road, to the left, is in better shape and less steep. If taking the cutoff road, stay straight at the next intersection. After the tiny guardrail-less bridge over Bear Pond Brook you’ll pass the Culvert Road intersection; stay straight. (The Big Spencer Mountain trailhead is to the left.) When you reach the T intersection with the Golden Road, take a left. The Golden Road is wide and well surfaced. After a few miles of skirting Caribou Lake, you’ll need to stop at the Caribou Checkpoint, staffed by North Maine Woods to pay entrance and camping fees. About 9 miles after the checkpoint, take a left onto the Northeast Carry Road (Lobster Trip Road in the Gazetteer). Travel until you cross the bridge over Lobster Stream (about 4 miles). You’ll find the boat launch on your left, after the bridge. The drive from Greenville will take between an hour and a half to two hours.
The logging roads of Northern Maine should not be taken lightly. Always yield to logging trucks. Quite literally, they own the road. Surface quality varies, and refueling and supply stations are virtually nonexistent. Start your trip early in the day and leave with a full tank of gas. Have a Maine Atlas and Gazetteer and a compass on hand. Cell reception is limited. Travel with a four-wheel-drive vehicle is preferable. Bring a solid spare and a good jack. In Northern Maine, the adventure begins when your vehicle leaves pavement behind.
The Penobscot River Corridor is among the 3.5 million acres of land in Maine managed for public access by North Maine Woods on behalf of over two dozen entities, including families, corporations, conservation organizations, and managers of state-owned land. Frequent travelers to Maine’s North Woods are accustomed to stopping at one of NMW’s nine checkpoints to pay visitor fees.
Greenville, nestled at the foot of Moosehead Lake, Maine’s largest lake, is a frontier town with a single yellow traffic light and a preponderance of bookshops. Greenville offers an easy place to ration up or spend the night before hitting the trail. When arriving to Greenville from the south, cresting Indian Hill you’ll find an idyllic view over the southernmost reaches of Moosehead Lake. Here, you’ll also find the trading post and supermarket. If spending the night, Chalet Moosehead Lakefront Motel offers clean, reasonably priced shorefront accommodations. If camping, Lily Bay State Park, 9 miles north of Greenville, comes highly recommended. Other Greenville attractions: Auntie M’s for breakfast; lunch at the Café Crepe food wagon; ice cream stop at the Dairy Bar; a final latté or piece of gear at Northwoods Outfitters. If time allows, take a lake tour aboard the historic steamboat (now diesel) KATAHDIN and conjure the spirit of Thoreau who set off from Greenville by steamer on his 1853 Maine Woods adventure.
It’s worth mentioning that a visit to Lobster Lake is an easy addition to the ever-popular West Branch trip. The Northeast Carry put-in on the West Branch is a few miles upstream from the West Branch and Lobster Stream confluence, and Chesuncook Village (and the entrance to Chesuncook Lake) is 15 miles downstream.—DM
If you have an interesting story to tell about your adventures with a small wooden boat, please email us a brief outline and a few photos.
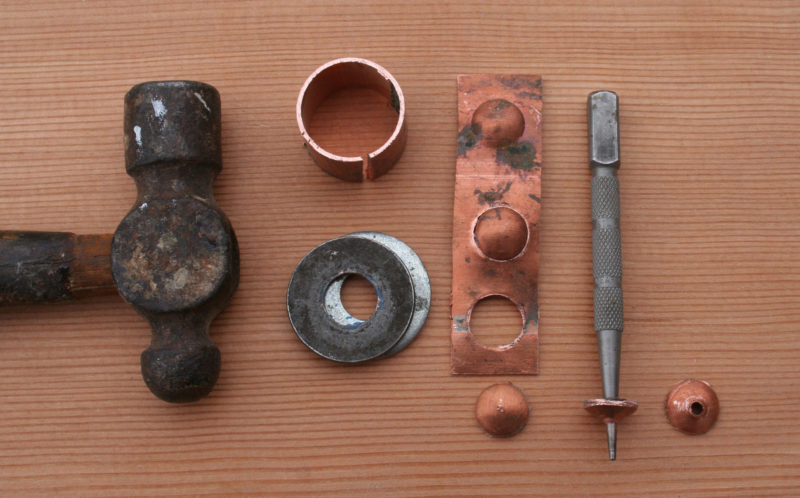
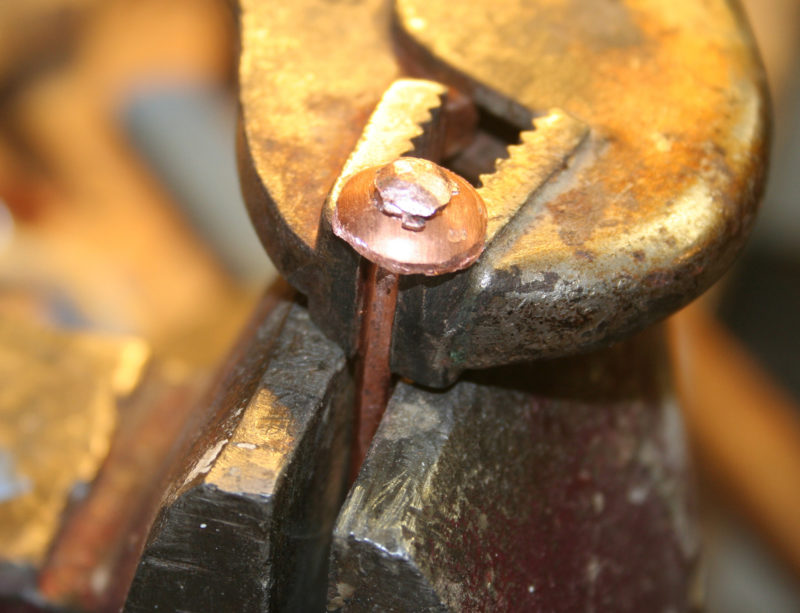
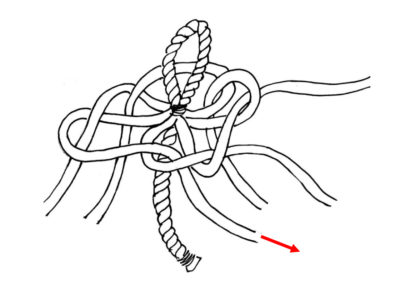
The locust-crook jaws for my Whitehall required a couple of extra-long rivets.
I recently needed a handful of long rivets to secure the sides of a centerboard trunk to its ledges and to fasten jaws to a boom. Even if I could even buy just 8 rivets, I didn’t want to wait several days for an online order so I decided to make my own. I started with some copper water pipe I had on hand and some 6-gauge copper grounding wire (about 5/32″ in diameter) sold by the foot or in coils from the electrical department of the local home-improvement store.
There are two things wrong with the wire as it comes off the spool: it’s round and it’s soft. Boat rivets are square to keep them from rotating as the wood around them moves; leaks would follow the slow wearing away of the wood. By hammering the wire I could make it square and at the same time work-harden the copper to make it rigid enough to drive into the slightly undersized holes I’d drill in the wood pieces I was assembling.
Hammering flat faces on household grounding wire work hardens the copper to make a rigid rivet shaft.
I hammered lengths of wire on the anvil at the back of my vise. A small pair of vice grips holding one end helped me orient the wire in 90° turns to hammer four flat faces. The wire curled as it stiffened but it was easy to straighten it by pinching it in the vise. Rather than try to form a head on one end I opted to put a rove on both ends of the squared copper rod.
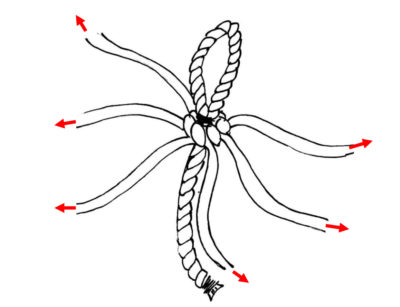
With a ball-peen hammer, a piece of copper water pipe, a couple of washers, and a nail set you can make your own dished roves.
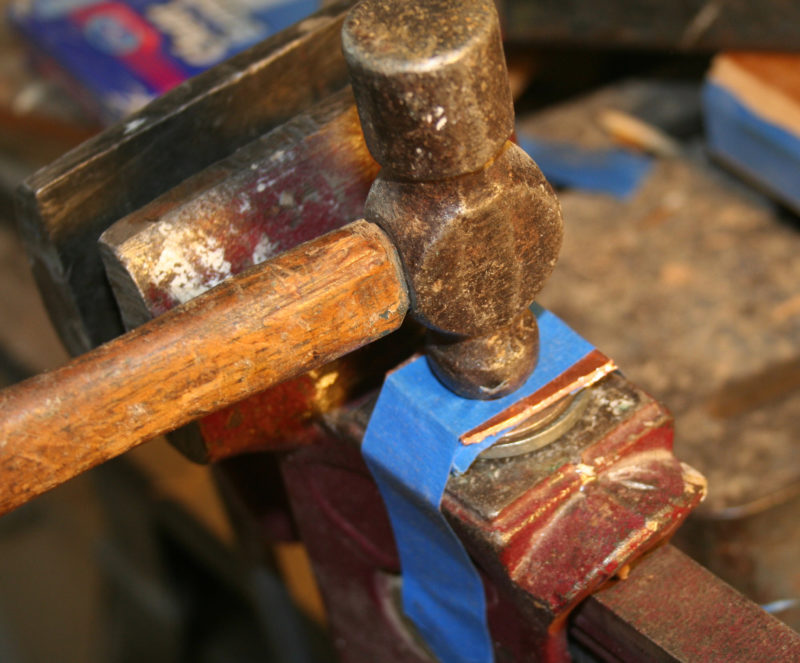
I made roves from a short piece of copper 1″ pipe. (If you can’t buy a short piece, get a straight coupling.) I sawed through the pipe lengthwise, pried it open with pliers and hammered it flat on the anvil. To shape the rove I taped two 1/2″ washers (inside diameter 9/16″) on the anvil, with the face of the washer with the sharpest edge on top.
The hammer’s peen dishes the copper and ultimately punches it through the steel washers.
Two washers are required to provide clearance for the dishing of the rove. I taped the copper blank and the washers to keep everything in position during hammering. I set the peen of a ball peen hammer on the copper over the hole in the washers and hit it, face to face, with another hammer. Initially, fearing that one steel hammer might chip another and send shards flying, I used a wooden mallet but it didn’t completely shear the rove free. A second steel hammer was much more effective and neither hammer chipped. Naturally, I wore safety glasses. Taping a third washer on one hammer face will keep the two tempered hammer faces from making direct contact and still provide the sharp impact the copper requires.
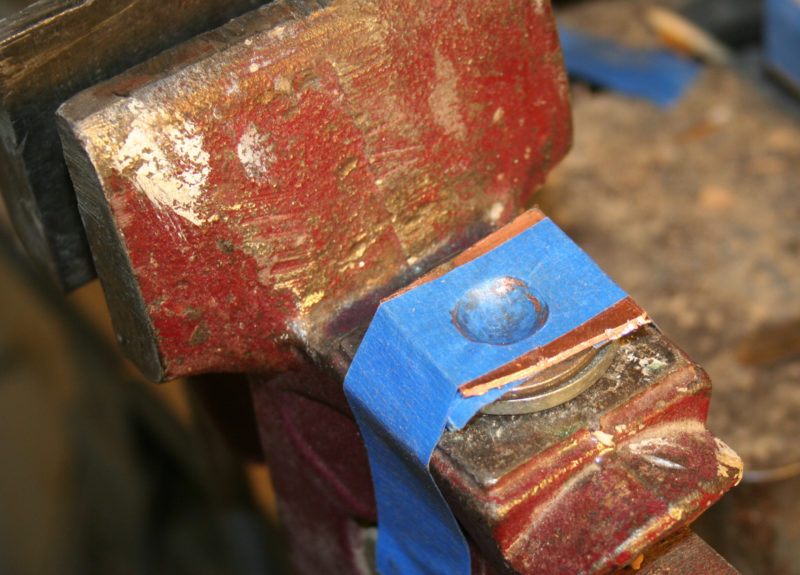
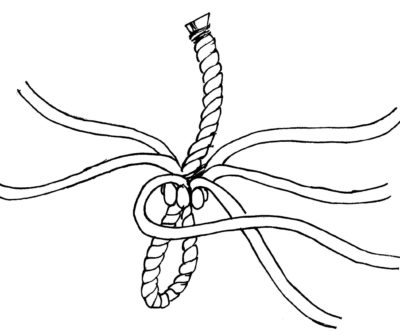
The copper is dished at this point and additional strikes of the hammer on the ball-peen will shear it from the copper blank.
The first blows dish the copper into a nice shape and work-harden it. A few more whacks shear it away into the hole in the washer. I used a fine-point nail set to tap a hole in the rivet’s concave side. A tap on the set with the rove on the anvil got it started; I finished driving the nail set through into a rove setting tool.
Fixing a rove on one end of the rivet gives it an easily made head. Vice grips keep the rivet shank from slipping during the peening.
The first rove goes on the rivet while it’s held in the vice. To keep the rivet from slipping through my vise’s smooth jaws as I peened the end, I squeezed vice grips on the rivet. Putting a point on the other end of the rivet is easily done with the same nippers you’ll use to clip the excess length of the rivet. One diagonal snip is all it takes. It’s also easy to create a point with a file, disk sander or grinder.
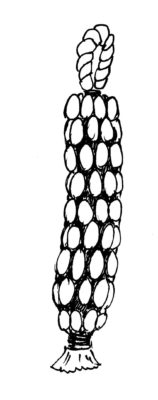
While I had already fastened the centerboard trunk sides to the ledges, I added rivets for an extra measure of strength in the fastening.
Now the rivet is ready to use on the wood pieces. Proceed as you would with a store-bought rivet: drill, drive, apply the rove, nip the rivet, and peen the end.
Christopher Cunningham is the editor of Small Boats Monthly
You can share your tricks of the trade with other Small Boats Monthly readers by sending us an email.
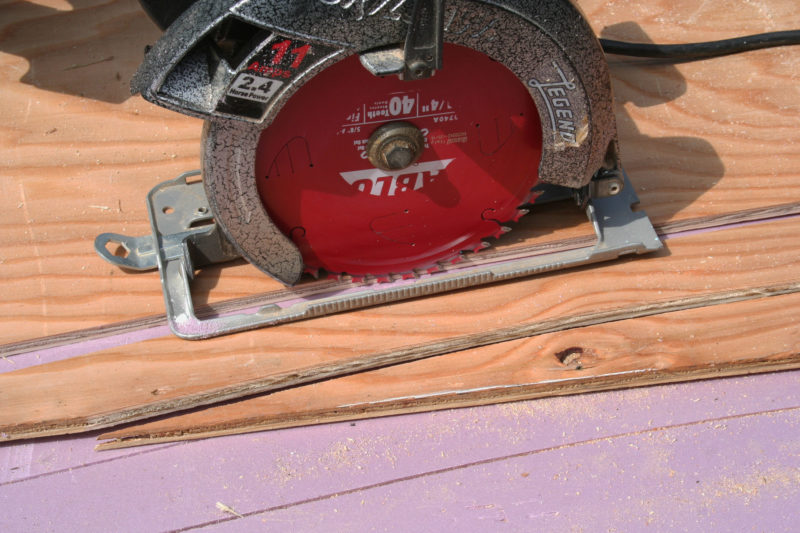
Sawing a sheet of plywood is quick and safe when it’s resting on a sheet of rigid foam insulation.
Most of us who build boats at home do not have the facilities needed to handle 4′ x 8′ sheets of marine plywood with ease. I’ve always found it challenging to put a sheet of ¾″ or even ½″ marine plywood up onto the tablesaw to cut it to size. Thinner plywood may weigh less, but it doesn’t have the stiffness to lie flat on the tablesaw top. Roller stands, while useful in supporting the plywood, do not make it much easier to avoid binding the saw and the inevitable kickback. Besides, many of the cuts I want to make are curves—not an option with a tablesaw.
Building any boat that involves sheets of plywood is made much easier when using a technique taught to me by boatbuilding instructor Pat Mahon, now the executive director of the Great Lakes Boatbuilding School in Cedarville, Michigan.
Pat’s technique is simplicity itself: Use a 4′ x 8′ sheet of rigid foam, the type used to insulate buildings under construction, to support the plywood and then cut through the plywood and into the foam. The sheet I have in my shop right now is Corning Foamular 250, a 2″-thick sheet of extruded polystyrene (XPS) insulation (1½” XPS is shown in the photos) that weighs under 8 lbs and costs about $31. The XPS panels are stiffer and more resistant to compression than the other common insulation panels—expanded polystyrene (EPS) and foil-faced Polyisocyanurate (Polyiso)—so it won’t get badly crushed if you put your weight on it, especially if you have the plywood on top of it.
I’ve occasionally used sawhorses to elevate the foam sheet and the plywood, but it’s easier to flop the foam and plywood down on the floor than to get out the sawhorses and set everything up only to take it down 10 or 15 minutes later. Set the foam on the floor and put your plywood, best-side down, on top of the foam. If you don’t have room in the shop to do the cutting, you can use the foam sheet outside in the driveway. It will protect the plywood from grit and pebbles that would otherwise damage the plywood.
If the saw blade is set to cut slightly through the plywood, the foam will last quite a while and you’ll be able to make curved cuts.
Set your circular saw to the thickness of the plywood and add an extra 1⁄8″ to ¼″ to ensure you cut all the way through it without causing excessive damage to the foam. The foam offers little resistance to the saw blade and helps reduce tear-out on the plywood face that rests against it. Make the cuts you need. That’s really about it.
A circular saw set to cut just barely through the plywood will cut a gentle curve without binding. By using a sharp thin-kerf carbide-tipped plywood blade (I use Diablo blades, and I’m sure there are other equally good manufacturers), you can cut extremely close to the line and minimize the amount of time you will need to clean up the curve with a block plane and sandpaper.
Two circular saws and the curves they cut through common 3/8″ CD plywood: The smaller blade of the cordless saw made the cut at right with a tighter radius.
A small cordless circular saw with a 5 ½″ or a 6 ½″ blade can cut an even tighter curve than a standard saw with a 7 ¼″ blade. In one of Pat’s classes we could get 10 or 15 minutes of operation from the small circular saw we used, more than enough to cut the curves needed to shape each plank for the Caledonia yawl we were building.
I store my foam sheet above the overhead retractable door of my garage/boatshop. The foam sheet is easy to lift up there, and it is out of the way until it’s needed. If you don’t have space for the full sheet, cut it in half or even in quarters.
An added advantage to using a sheet of foam for a cutting surface is that you can put the foam to use in other ways after you’ve finished using it. You can cut it up with a craft knife or circular saw and use it as flotation in the boat you’ve built or glue pieces together to make a highly efficient cooler.
Pete Leenhouts, a retired naval officer, lives on the Olympic Peninsula where he enjoys building, restoring, and using his boats. His review of a clam skiff also appears in this issue.
You can share your tricks of the trade with other Small Boats Monthly readers by sending us an email.
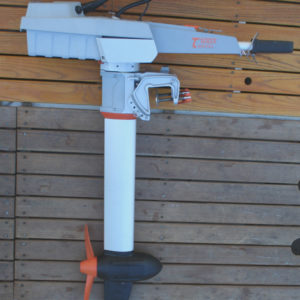
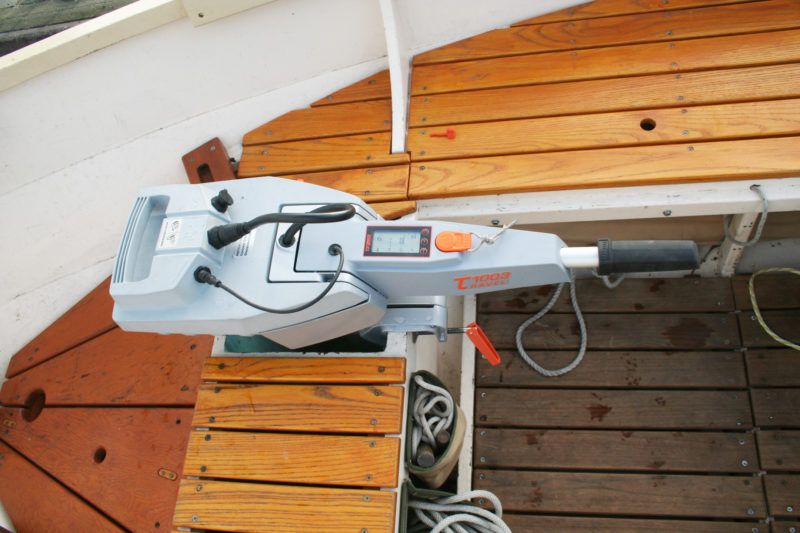
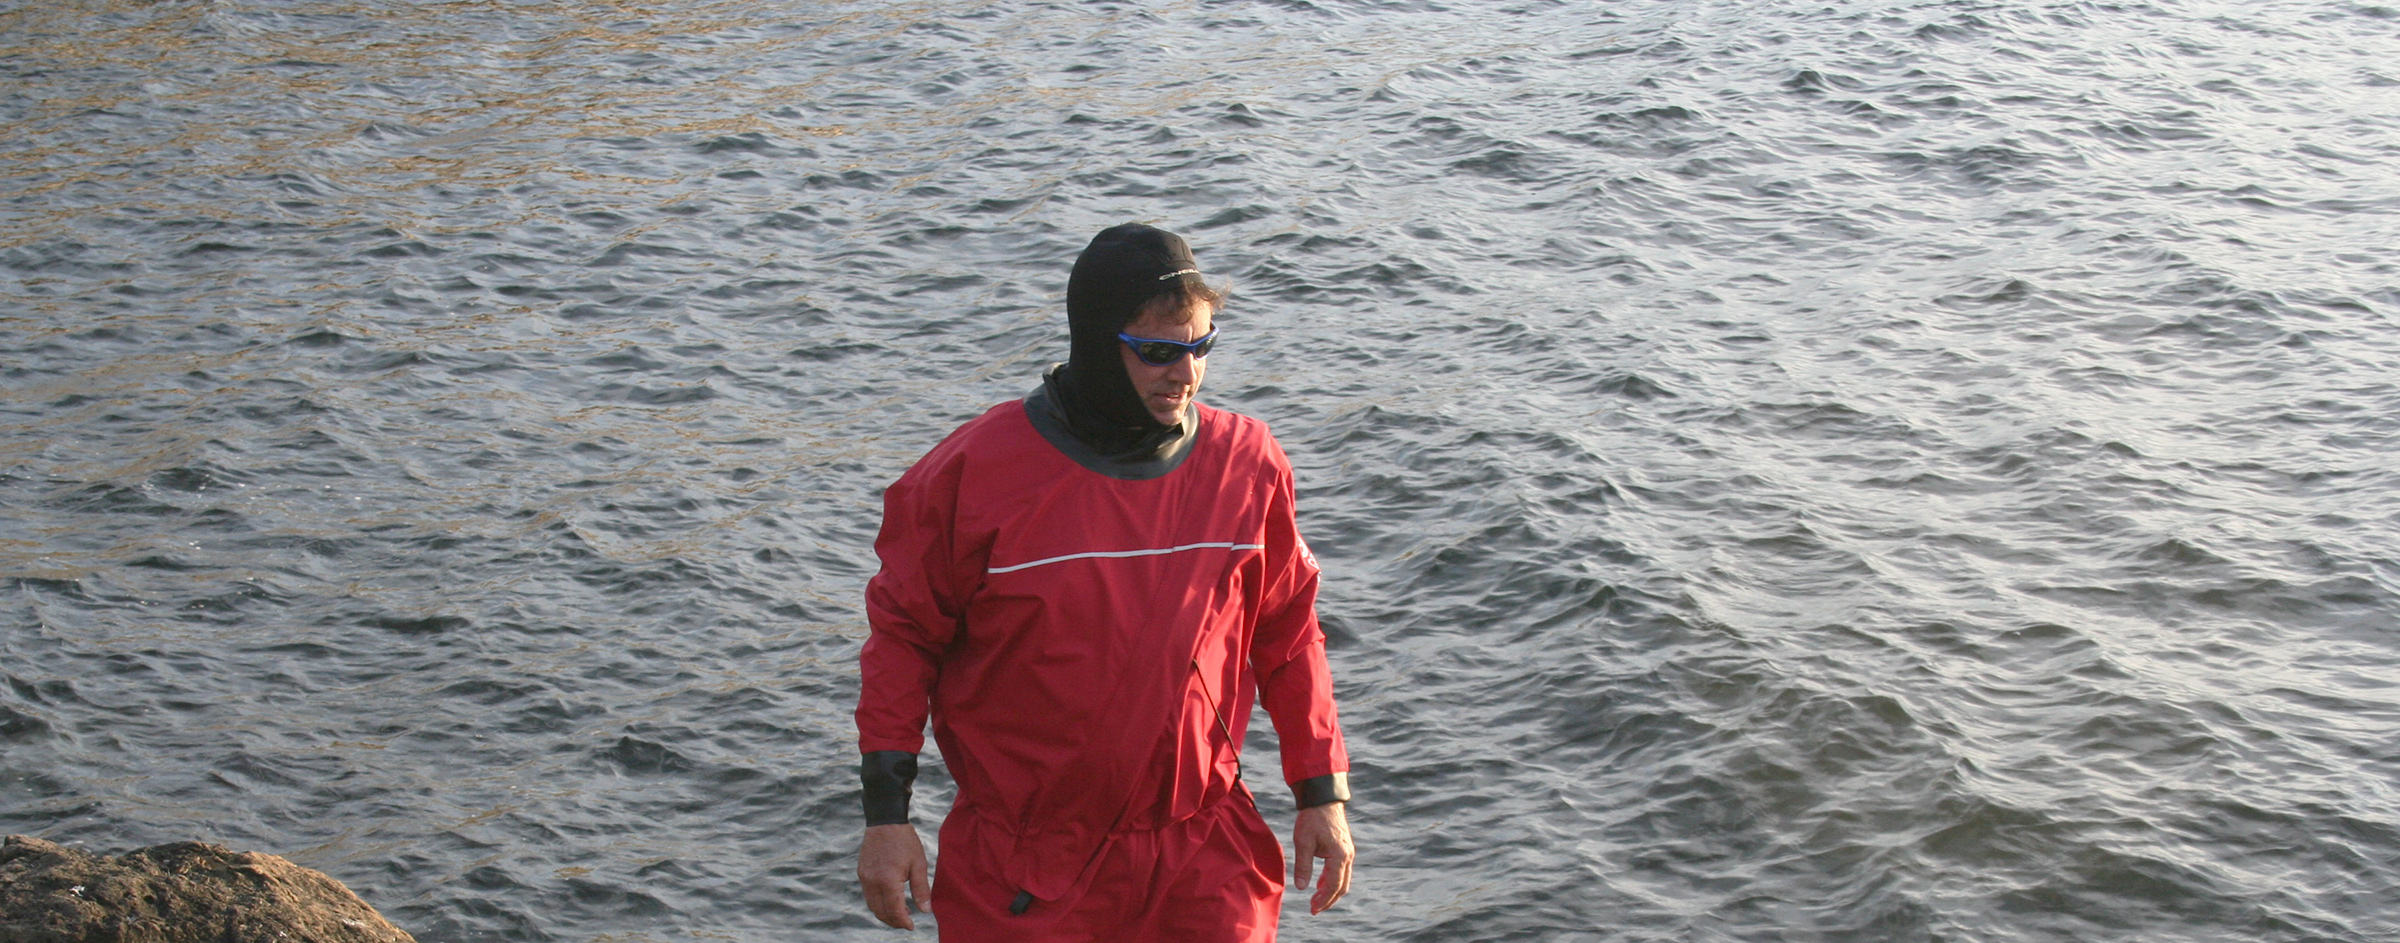
Torqeedo’s outboards with ratings up to an equivalent of 8 hp are designed without anti-ventilation plates. The foil-sectioned shafts on all but the smallest outboard aid in keeping surface air from getting to the prop.
For decades I resisted boating under power and took pride in getting where I wanted to go under my own steam or under sail. That changed when I had kids: they were too young to help with rowing, the summer winds are usually too light for getting anywhere by sailing, and the joy of hanging out with them meant more to me than manning the oars. I built a Caledonia yawl with them in mind and installed a motor well. I bought a small 2.5-hp Yamaha outboard—a four-stroke to avoid leaving behind a cloud of stinky blue smoke typical of two-stroke outboards—but it still had an environmental impact in both the fuel it consumed and the peace it disturbed. For the past 11 years, Torqeedo has worked to eliminate both with their electric motors. In 2010 I tried the smallest motor they produce, the Ultralight, on a kayak. The equivalent of a 1-hp motor, the Ultralight would drive the kayak at an impressive 4 ¼ knots and an exciting 5 ½ knots after I added a foil-shaped fairing to the tubular shaft.
The two Travel motors are the smallest of the Torqeedo outboards. The Travel 503 is rated as the equivalent of a 1.5-hp gas motor; the Travel 1003, the equivalent of a 3-hp. I tried the Travel 1003S (S for short shaft) on three different boats: the Caledonia yawl, a Whitehall, and an Escargot canal boat. Torqeedo lists the shaft length for the Travel 1003S at 62.5 cm (24 5/8″), a measurement from the bearing surface of the mounting bracket to the center of the prop. On gas outboards the shaft length is commonly measured to the anti-ventilation plate, not the propeller axis; the Travel 1003 has no anti-ventilation plate, but I measured 46.5 cm (18 ¼″) to where one would be. That’s roughly the maximum span between the bottom of the hull and the site for the mounting bracket. The shaft length for the Travel 1003L is listed as 75cm/29.5″.)
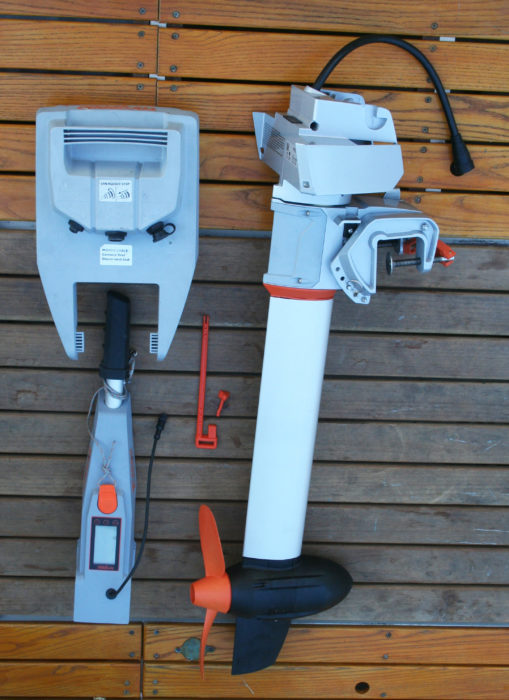
Disassembling the motor makes it much easier to stow out of the way when it’s not needed. The long pin locks the battery pack in place.
The Travel 1003 weighs 30 lbs, 7 lbs less than my Yamaha, and it separates into three pieces—the tiller and its computer just shy of 2 lbs, the battery at 12 lbs, and the lower unit about 16 lbs—making it a whole lot easier to move around, mount, and stow.
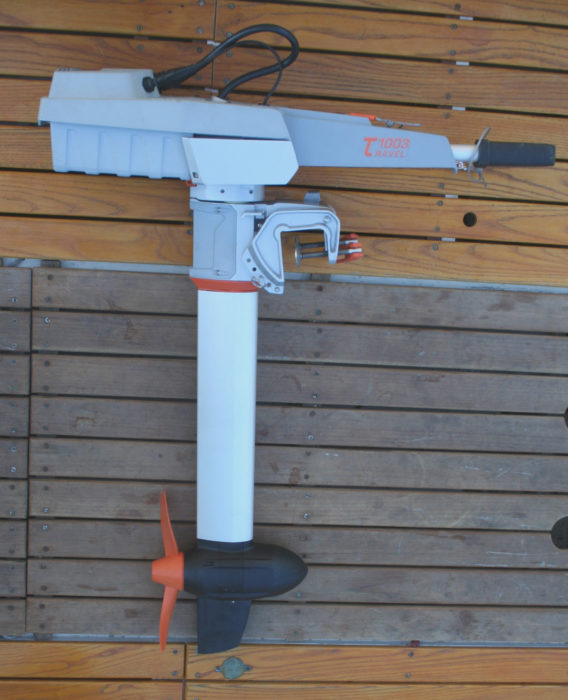
Set in the motor well of a Caledonia yawl, the Travel 1003 S reached a maximum speed of 5 knots. The orange pin on the bench locks the shaft when the boat’s rudder is used for steering. The orange tab on the tiller is a magnetic kill switch.
I used the Travel 1003 first on my Caledonia yawl, a 19′ 6″ x 6′ 2″ double-ender. With the motor at full throttle, the yawl peaked at 5.0 knots. My Yamaha logged a top speed of 5.8 knots. (I have an electric trolling motor rated at 40 lbs of thrust, but it falls so far short of the Travel 1003 that I don’t bother including it in these trials.) A built-in computer with GPS shows the percentage of battery charge and the distance it will take you at the speed indicated. At full speed a full charge had a cruising range of 2.4 nm. At 4 knots that range increased to 6.3 nm, at 3 knots 9.5nm, and at 2 knots 15.6 nm. The speeds and ranges I recorded were consistent with Torqeedo’s data for the Travel 1003.
Ranges predicted by the Travel 1003 for a full battery charge with three boats at various speeds
There is a slight lag in the response to the throttle, and the motor will ramp up to the selected speed rather than apply full power immediately. That keeps the boat from lurching about, and, I imagine, prolongs the life of the motor and the boat. Even with the lag and ramp-up, I was impressed with how quickly the Travel 1003 could bring the yawl from 5 knots at full speed ahead to a dead stop: just 3 seconds and less than two boat-lengths.
The Travel 1003 operates in reverse, and a latch keeps the shaft locked down to prevent the prop from climbing. The yawl made 3.5 knots with the Travel 1003 in reverse at full throttle. (The Yamaha does not have reverse but rotates through 360 degrees, as does the Travel 1003.) Releasing the latch allows the motor to kick up over obstructions while moving forward and to be raised to reduce the drag while rowing or sailing. A removable pin will lock the Travel 1003 facing straight ahead for steering with a boat’s rudder.
The Travel 1003 is quiet but not completely silent. It has a whine that rises in pitch and volume as the throttle gets cranked up, but even at its loudest it is neither an impediment to a conversation nor anywhere near as loud as my gas outboard. It doesn’t vibrate either, so there’s no rattling anywhere on the boat. Its relatively quiet operation at low-to-moderate speeds is great for dinner cruises. I’m used to gauging speed by the racket my gas motor makes when moving along at a good clip, but even at full throttle, the sound the Travel 1003 makes belies how fast the boat is moving; it’s more like sailing than motoring.
On my 14′ lapstrake Whitehall the Travel 1003 peaked at 5.5 knots. (I didn’t—and wouldn’t—try to mount the heavier Yamaha on the transom—there’s little buoyancy in the stern.) I also did trials with my son’s 19′ 6″ x 6′ Escargot canal boat, weighing over a half ton with gear and two of us aboard. It brought the canal boat up to 4.4 knots, just slightly slower than the Yamaha at 4.7 knots.
Torqueedo claims on its website that the Travel 1003 “can do everything a 3-hp petrol outboard can, plus it’s environmentally friendlier, quieter, lighter, and more convenient.” The latter half of that is certainly true, but I’d suggest the former isn’t a good comparison to make. According to the owner’s manual, my Yamaha has a maximum output of 2.5 horsepower or 1.8 kW at 5,500 rpm, while the Travel 1003 display reads 1,000 watts (1.0 kW) at full throttle with maximum propeller speed listed by Torqeedo at 1,200 rpm. Going by the numbers gets murky. The Yamaha rating is for propeller-shaft horsepower, and the Torqeedo rating is for input power with propulsive power at 480 watts; static thrust is listed as 68 lbs, but that’s not calculated the same way as it is for trolling motors. Torqeedo offers some clarification on the terms and their equivalence with gas outboards, but my sea trials for top speed didn’t bear that out for the Travel 1003, even up against a 2.5-hp instead of a 3-hp gas outboard.
I haven’t made precise mileage calculations for my gas outboard, but one measurement I made on Google Earth for a passage on a full tank of gas (0.24 gallon) was 6 miles, running at about two-thirds throttle. That’s 25 miles per gallon. At a comparable speed the Travel 1003 will cover about the same distance. To extend the range of my gas outboard, I’ll carry two 2.5-gallon gas cans for a range of 125 miles. For the Travel 1003, an extra battery, at $650, brings the range to 16 miles. For charging away from home, Torqeedo offers a 50-watt solar charger for the Travel 1003, and it is possible to recharge its battery from an in-board 12-volt system. In my experience recharging was an overnight process, only slightly more than the 14 hours listed by Torqeedo; the latest models have cut that time in half. While I don’t have to think much about my range with my gas outboard, the Travel 1003 would require some thoughtful planning to achieve the same range for an extended cruise. If your outings with the Travel 1003 aren’t pushing the limits of its range, you can use the energy for other purposes: its battery has a port you can use to charge electronic devices.
While Torqeedo notes that the Travel 1003 is the equivalent of a 3-hp gas motor, focusing only on range and maximum speed is to overlook their product’s best features and to suggest poorly suited applications. My gas outboard allows me to take five-day island-hopping cruises, but I don’t take it on the vast majority of my outings. For day trips I’m content to row, paddle, or sail short distances in peace and quiet, and with the Travel 1003 I’d be tempted to motor too. I enjoy taking friends and family out on the water for dinners, but my Yamaha is noisy and its fuel messy and smelly; it would be great to be underway with the Travel 1003 during the evening when the sun sets and the city lights come on. I don’t fish, but having an electric motor with the oomph to get to the fishing hole and the quiet operation for trolling would be a boon. I’d also feel much better knowing that my boating under power didn’t add to the burden borne by the waters that carry me and by the air that I breathe. To that end, the Travel 1003 has the clear advantage.
Christopher Cunningham is the editor of Small Boats Monthly.
Torqeedo distributes its products through a network of dealers and offers the Travel 1003 for $1,999 with a two-year warrantee.
Thanks to reader Elliot Arons for suggesting this review.
A Cautionary Tale
When I tested the Travel 1003 on my Whitehall, I put thin plywood pads on the varnished transom to protect it from the motor’s mounting bracket and turned the screws down as tight as I could, knowing they wouldn’t leave their mark on the mahogany. The Whitehall isn’t meant to carry an outboard, let alone maintain trim with the weight of a motor and its operator well aft, so I sat as far forward as I could and still keep a hand on the motor’s tiller. I made a few runs, back and forth in a protected canal, some at full speed. On the last run, while at full power, the tiller slipped suddenly from between my fingers and the motor turned 90 degrees, pushing parallel to the transom. It then twisted almost to horizontal and then slipped off the transom. I lunged for it as it went overboard and got a hand on the tiller. The magnetic kill switch disengaged and the prop stopped turning. I thought I had averted disaster, but as the boat carried forward, the angle between the tiller and the motor opened up and they parted, just as they’re meant to do if you’re disassembling the pieces for transport or storage. The cable from the tiller didn’t have a connection strong enough to hold the battery and lower unit, and down they went. I was left holding the tiller, a bit stunned.
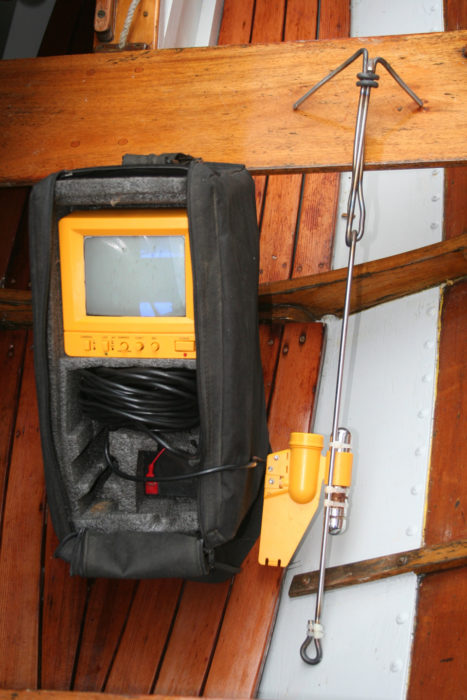
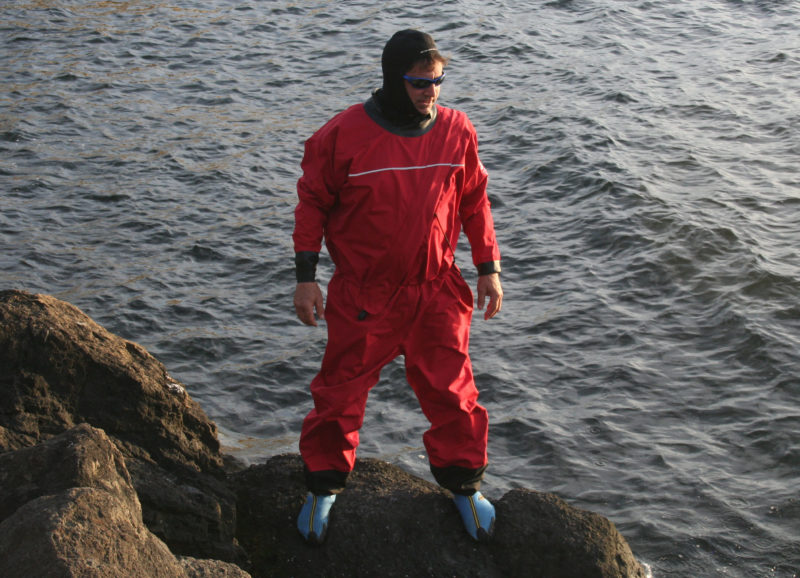
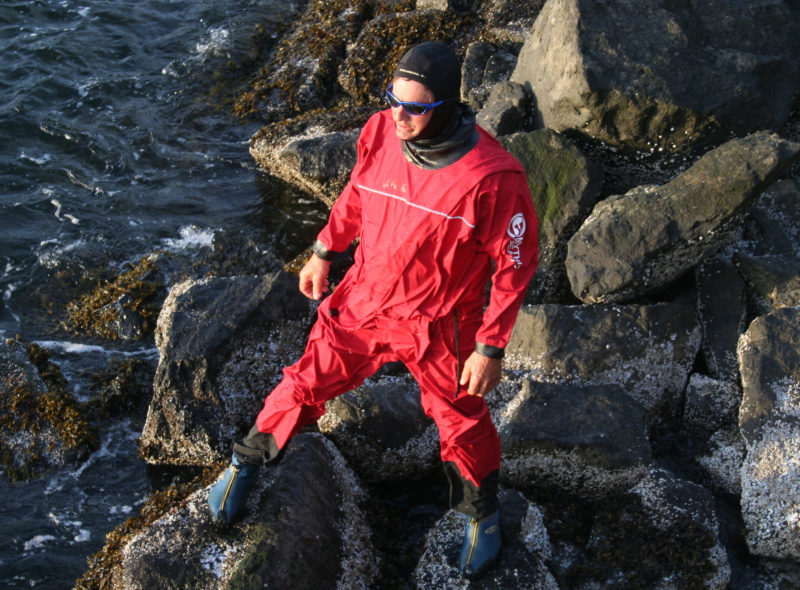
To recover the motor I needed to find it first, then snag it. The underwater video system and a hastily made grappling hook did the job.
I went home and made a grappling hook out of steel rod and connected it to my Harbor Freight underwater video camera. I was feeling hopeful about recovering the motor—it had gone down in a narrow stretch of water, and I had a pretty good idea of where it would have come to rest. Unfortunately, the water in the area was about 25′ deep and the light on the bottom was dim, so the video camera could show only a narrow swath of the sandy bottom. The next day I tried again, but it was too difficult to manage the boat and control the depth of the camera at the same time. I returned with my son Nate, and we were about to give up when he spotted the motor. It went in and out of the camera’s view, but after 20 minutes he got the hook on the power cable and brought the motor and battery up.
The Travel 1003 has an IP67 rating and is waterproof for 30 minutes at 1 meter, but not for two days at 25′. The red indicator light on the battery case blinked on a few times, and that was its last sign of life. I opened the case to get the water out of it and the damage to the batteries and the circuit board was evident.
I can’t fault the Travel 1003. I’m not sure what caused the sudden turn, but with the motor running at full power I should have had a firm grip on the tiller. The Travel 1003 can rotate 360 degrees and can be oriented parallel to the transom. My Yamaha is the same way and has, on two occasions, twisted its bracket a bit out of position when turned 90 degrees and gunned for tight maneuvering. Larger outboards may have stops to limit their steering range and lessen the chances of prying themselves off a transom. The plywood pads I used to protect my Whitehall’s transom may have lessened the Travel 1003’s grip, but if my calculation for the torque created—140 ft-lbs—is correct, it may have dislodged itself even without the pads.
Three precautions come to mind for small outboards that can rotate to 90 degrees on either side. A solidly anchored cleat along the edge of the transom where the motor is attached would serve as a stop for the clamps on the inboard side. Some commercially made pads for the inside face of the transom have a lip at the top meant to keep a loosened clamp from slipping off. (They require more time to get the motor in place; a couple of slots cut off-center alleviate that problem.) Secondly, a safety cable or chain can tether the motor to the boat. My Yamaha has a hole in the mounting bracket meant for a cable and includes a recommendation in the instruction manual to use it. The Travel 1003 has holes in the clamp screw handles that can serve as safety-cable attachment points; a note about using them as such would be a worthy addition to its user manual. Finally, hang on to the tiller.—CC
Epilogue (October 2, 2015)
While it was clear to me that an outboard capable of rotating through 360° has the potential to turn to 90°—parallel to the transom—and wrench itself out of position or tear itself off entirely, I didn’t understand what had caused the motor to turn in the first place. I found a likely explanation in the September/October issue of WoodenBoat magazine. That issue’s “Getting Started in Boats” feature is “A Small Outboard Motor Primer” by Jan Adkins. Jan describes “The Death Spiral,” a common accident in which the operator of an outboard skiff is thrown overboard by a sudden turn and often severely injured when the boat circles around. Here’s the cause of the spiral: “For any reason (inattention, slippery hands, a reflex to reach for something) the helmsperson’s steering hand leaves the outboard tiller/handle. Unequal resistance between the deep propeller blade and the shallow propeller blade exerts torque that twists the outboard to port. The small boat turns violently to starboard….”
In my case, I had a loose grip on the tiller and the motor twisted itself off the transom rather than cause a sharp turn to starboard. Because the boat hadn’t turned violently and I had been looking over the bow at the time, I don’t have a clear memory of which way the motor had turned (and I had revarnished the transom of my Whitehall) but the slight scars that remained indicated that the motor had indeed twisted to port. (The Travel 1003’s propeller has a right-hand rotation—clockwise when viewed from astern—typical of outboards and would twist to port. A left-hand prop would cause a boat to turn to port.)
My Yamaha has a screw that increases the friction in the mount to lock the motor in position if I’m using a rudder to steer. If I’m steering with the motor I maintain a little friction so I can steer well but don’t have to “micromanage” the tiller. The Travel 1003 uses a pin to lock the motor for using a rudder to steer and without the pin the motor can rotate freely. Even though the Yamaha can be adjusted for turning friction, I’ll be much more careful with both motors when using them to steer.—CC
The sail SAOIRSE carries is easily furled and the rig dropped to allow passage under a low bridge on the way home.
Kevin Moroney grew up in South Salem, New York, not quite 10 miles south-southwest of Danbury, Connecticut; his home was near Truesdale Lake, a finger of water just shy of a mile long. He watched rowing and sailing boats plying the lake and longed to have a boat of his own, but only the homeowners with lakefront property were allowed to have them. He carried a dream of building a boat for himself for half a century.
Chris Chapman
Kevin takes to the oars on his way out to sail the waters around Cape Coral, Florida
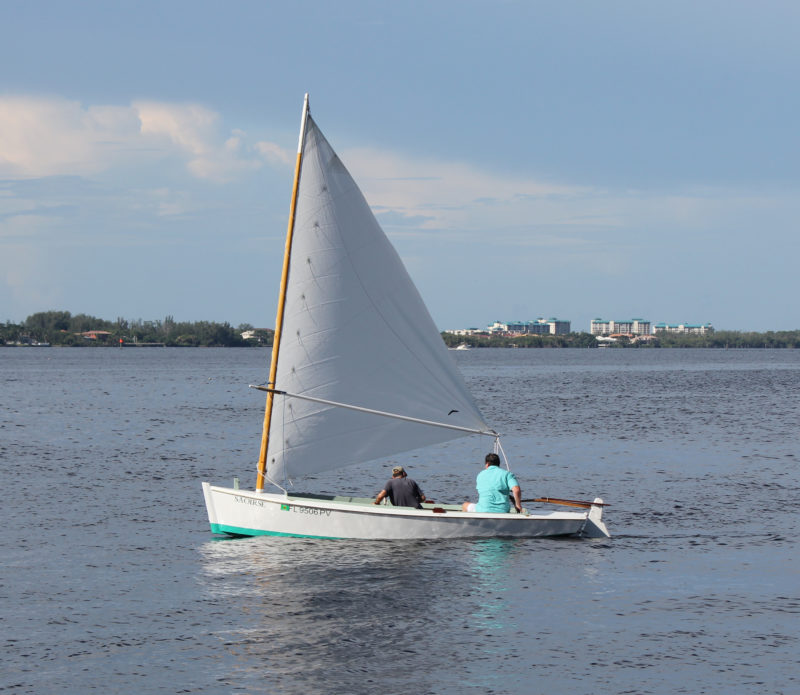
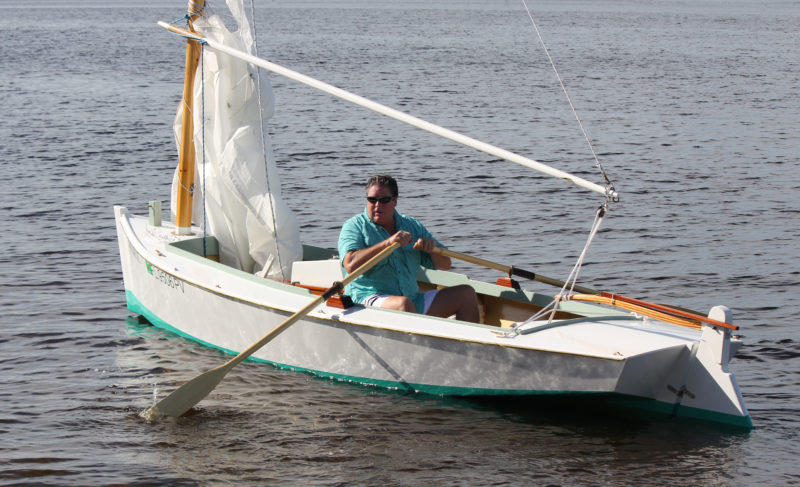
Kevin watched as his lifelong friend Robert Greco built a 16′ Glen-L runabout with his father and another smaller runabout for his grandkids, and seeing that it was possible to build a boat, he decided it was finally time to start. He and his wife Jennifer live on Florida’s west coast where the waters are fringed with shallow bays and dotted with oyster beds and islets, so he needed a shallow-draft boat. Their home is on one of the many canals in Cape Coral, and to get to the Caloosahatchee River and out to open water the boat would have to pass under a low fixed bridge. It had to have a mast he could easily step and unstep by himself.
His search for a suitable boat led him to sharpies. Like Kevin, sharpies got their start in the Connecticut and New York area and made their way south to Florida. He read about Commodore Ralph Munroe and the two New Haven–style sharpies he had built on Staten Island and brought to Florida: KINGFISH in 1881 and EGRET in 1886. Kevin then read Reuel Parker’s The Sharpie Book. In it he found a Modified Sharpie Skiff. At 17′10″ by 5′6″, it was the largest boat in the book that would fit in his 20′ garage. The skiff is unusual among sharpies as it has a V-bottom for its entire waterline length. Similar boats appear in Chapelle’s American Small Sailing Craft and are categorized as (Chesapeake) Bay skiffs: “The one-sail skiffs were single-handers and were very frequently smart sailers, though not heavily canvased.” Kevin knew he would build only one boat in his lifetime and wanted it to be the right one. The Sharpie Skiff had a rich history and tradition behind it and was well suited for his home waters.
Jennifer Moroney
The bulkheads show the shallow V in the bottom of the sharpie.
Starting a boatbuilding project in earnest is often the hardest part, but Kevin found a solution for that: “Just order the lumber and when it shows up at the front of your house, you’ll look like an idiot if you don’t start building.” When his pile of plywood arrived, he set to work. The sharpie’s hull is marine-grade Douglas-fir plywood (½″ on the bottom, 3/8″ on the sides), the deck ¼″ okoume plywood, all sheathed in 6-oz fiberglass cloth and epoxy. The centerboard trunk and stern sheets are sapele; the laminated mast is southern yellow pine. He built the boat mostly by himself, but Jennifer and a few friends pitched in when two hands weren’t enough for the tasks. His friend Patrick, from Ireland, “helped me fit the stern on the strong back, rip some wood, and described what a good beer should taste like. He also helped me understand my Irish wife.”
Kevin Moroney
After finishing the boat, Kevin showed it at a the Thomas Edison and Henry Ford Wooden Boat Festival in Fort Myers, Florida. He launched for the first time a few days later.
After working on the boat off and on for 26 months, it was ready to launch. He christened the boat SAOIRSE. Pronounced seer-sha, it’s an Irish feminine given name meaning freedom.
Have you recently launched a boat? Please email us. We’d like to hear about it and share your story with other Small Boats Monthly readers.
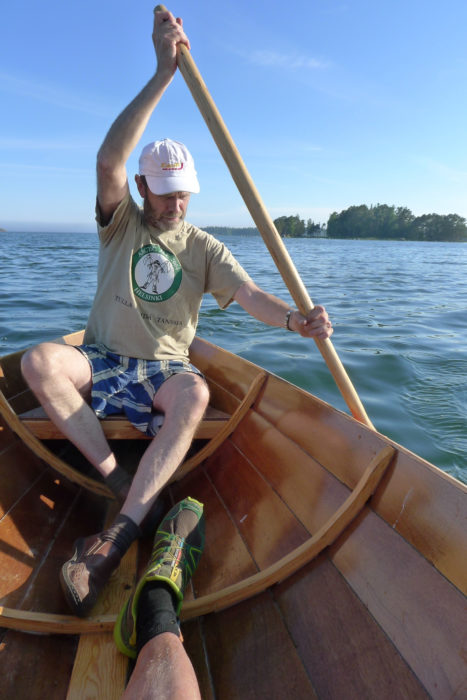
In Finland and much of the eastern Baltic region, networks of interlocking lakes were once the only links between settlements and farms; boats were the only form of transportation. The endless miles of lake shore are littered with rocks and navigating these waters has always required a wary eye and a responsive boat. For centuries fishermen-farmers tending nets and traps had double-ended working boats with a broad beam and plenty of space for handling cargo as well as good maneuverability. They often rowed with one person amidships at the oars and another seated in the stern facing forward and using a single-bladed paddle. The paddler augmented propulsion and did the tight maneuvering needed to attend nets and navigate through rocks. In days gone by, the husband of a rural household would steer and handle the heavy hauling work while his wife sat amidships and took care of the rowing. A similar type of traditional working boat, the keluvene, was used to manage logs brought in rafts to lakeside lumber and paper mills. Assembling the logs at the forest and later sorting them at the mill required maneuverability and durability. In a church I visited near the mills I found a 1:2 scale model of a keluvene; located amidships was a large hand-operated windlass for managing logs, leaving space for a single oarsman on the front bench.
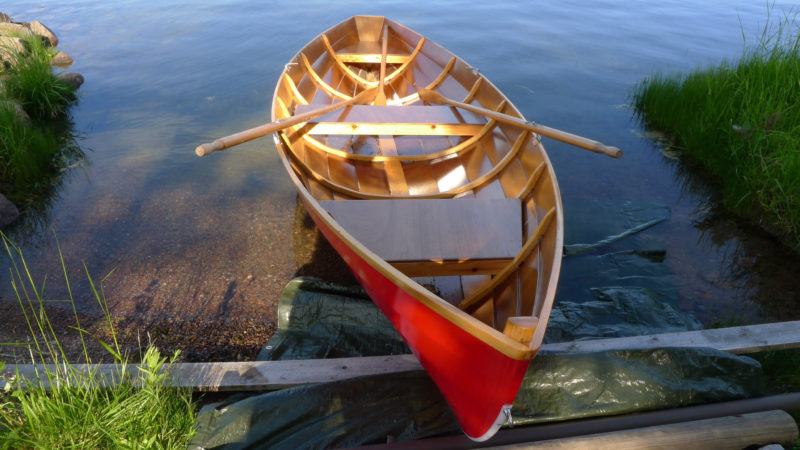
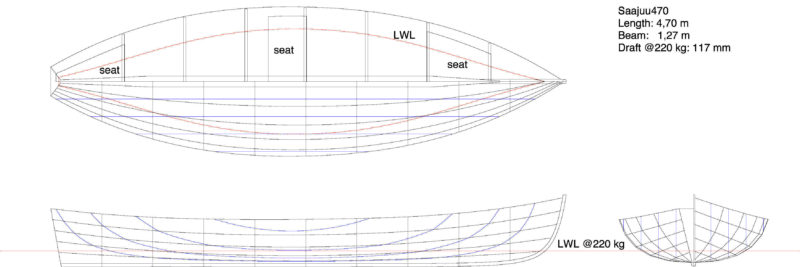
Ruud van Veelen combined elements of these traditional Finnish boat designs with modern technology to create the Saajuu 470, a lightweight and versatile lapstrake skiff. Ruud, a transplanted Dutchman doing business as Puuvenepiste, (Wood Boat Center), lives in Sulkava, a village in eastern Finland just 50 miles from the Russian border and famous for hosting the Sulkava Rowing Race, Finland’s largest annual gathering of wooden rowboats. The race has as a many as 7,000 rowers and courses ranging from 2,000 meters to 70 kilometers. Ruud developed a reputation among local competitive rowers by building an arguably revolutionary design of a racing Churchboat, a modern version of a kirkkovene, the type of long lapstrake boat once used to ferry congregation members to and from church. Ruud’s 12-meter, five-chine, plywood boat for 14 rowers and a coxswain was nearly 440 lbs (200kg) lighter than other boats in the long-boat racing class. He later used the same transition to plywood, epoxy, and computer-aided design to create the Saajuu 470, a multipurpose skiff based on the region’s traditional general utility boats.
The Saajuu 470 is 4.7 meters (15′ 5″) in length with a beam of 1,385 mm (53 ½″). The five strakes of glued-lap planking are 9mm okoume plywood; the stems and laminated frames are pine or spruce. The woodwork is bonded with epoxy and finished in either five layers of varnish or two layers of epoxy primer and three coats of high-gloss paint. Optional expanded polystyrene blocks secured under each of the three benches provide flotation (and meet the requirements of the European Recreational Craft Directive, category D, for sheltered waters). The interior has nothing extra, and isn’t burdened by the unnecessary weight of floorboards, risers, or inwales. In a departure from the traditional double-ended form, Ruud added a narrow transom to take a small gas or electric outboard.
all photographs by Simon Allston
Traditional Finnish rowing boats had closely spaced steam-bent frames. The Saajuu’s glued-plywood lapstrake construction allows the use of widely spaced laminated frames. The folding tholes set the oars on the gunwales when not in use.
The Saajuu 470 is outfitted with two pairs of Puuvenepiste’s Sarana oarlocks, folding stainless-steel thole pins. The pins are bent in an L shape, with the vertical leg going through a hole in the oar and the horizontal leg pivoting in a sleeve that’s welded to a bracket fixed to the gunwale. A flange on the vertical leg keeps the oar from wearing on the gunwale and a hole at the top for an R pin keeps the oar from slipping off unintentionally. The hole in the oar fixes the blade angle and has a nylon bushing to reduce friction and wear. Like most Finnish oarlocks, the Sarana locks don’t let you feather the oars. Racing boats are not allowed by Finnish Wooden Boat Rowing Association rules to have feathering oars and their most common fitting is a fixed upright metal thole that fits a cleat through-bolted on the aft-facing side of the oar shaft. The top of the thole pin is curved aft to prevent the oar from accidentally unshipping. The folding Sarana locks, also favored by racers, have the advantage of rotating the blades flat and bringing the looms inboard to rest the oars on the gunwales.
With a single rower aboard, the Saajuu is perfectly trimmed. The rocks in the distance are common along Finnish lake shores and require boats like the Saajuu to be easily and quickly steered.
The lakes in this region of Finland are many and often expansive; waves reaching 5′ to 6′ are not uncommon. The upswept sheer at the bow helps the Saajuu ride high over waves rather than cutting through them, as the Puuvenepiste racing skiffs are designed to do. The Saajuu has rowing stations at the center thwart and the bow thwart and there’s space enough between them for rowing double. With a single 176 lb (80kg) rower at the center thwart the Saajuu sits perfectly trimmed and handles easily even with a passenger/paddler in the stern.
Without a passenger or a load aboard the Saajuu is very lively and easy to maneuver. The boat is so light, just 132 lbs (60kg) including oars and paddle, that the addition of a passenger feels like a dramatic increase in weight. When I rowed as the only occupant in the front position, the trim of the Saajuu was off with my weight so far forward, but even so it handled and tracked well. On the beach, the boat was not too heavy to handle on my own, and with a second pair of hands it can be lifted easily and carried to and from the water. The light weight and the 54 ⅜″ (1,385 mm) beam make the Saajuu quite convenient for cartop transport on a standard family-size sedan.
A paddler seated aft can contribute power and a high degree of maneuverability. The traditional paddle is long and has a grip like that of an oar.
When I sat in the stern seat with the paddle while my photographer Simon was rowing, the boat was remarkably easy to maneuver from the stern with the 5′-long paddle. The paddle, typical of those used in racing, had a grip like an oar rather than a T-shaped grip common on canoe paddles. Facing forward, of course, I had a good view of what was ahead so Simon didn’t have to twist around to see over the bow. Paddling in synch with the rower keeps the boat moving smoothly and shares the load at the catch. Switching sides while paddling forward makes gentle course corrections without slowing the boat or putting a strain on the rower; ruddering and braking with the paddle is an option when quick maneuvering is required. While the Saajuu 470 has a fair curve to its sheer, racing shift or switch boats have gunwales that run absolutely straight over the rear 5’ or 6’, and the narrowed beam makes it easier to reach the water and paddle more powerfully. In the popular Finnish shift- or switch-rowing racing class, the two-person crews deftly swap positions on the fly every few minutes: Rowing and paddling use different sets of muscles and, as the saying goes, the change is as good as a rest.
The Saajuu’s plywood construction and minimal interior outfitting keep its weight low.
The paddle stows easily between the benches in the aft working area, where there is plenty of storage space for cruising cargo as well as fishing equipment, though it needs to be secured to keep it from getting in the way of the rower’s legs. While I was rowing I braced my feet against one of the spruce ribs. This wasn’t a problem during the short trial journey I undertook but I would have preferred an adjustable foot brace to save wear from shoes resting on the ribs of the hull and to provide a firm platform for the balls of my feet. Puuvenepiste offers sliding seats and while installing a sliding seat in a Saajuu would make it quite a competitive racing craft, this would require removing the central thwart and a little compensatory carpentry; not too difficult, but the alteration would compromise the flexibility of the craft’s general-purpose design. Puuvenepiste’s Savo 650 and Savo 575 are specifically designed for sliding-seat rowing whether for racing or cruising.
The Saajuu’s transom is wide enough to take a 3- or 4-hp outboard. The owner of my test boat used a small electric motor for trolling silently at slow speeds, although the same motor can propel the Saajuu forward at up to 4 miles an hour.
The Saajuu 470 is a very attractive craft, combining visual appeal with traditional lines and admirable handling features. At present it’s only available as a finished boat built in Finland, but Ruud promises that a kit package will be available from Puuvenepiste soon.
Anthony Shaw is a former school rower who has rediscovered the pleasures of “slightly competitive” rowing after a hiatus of nearly 40 years. He has lived half his life in Finland.
Saajuu 470 Particulars
[table]
LOA/15′5″
Beam/54.5″
Depth/23.9″
Weight, equipped/132 lbs
Recommended outboard engine/up to 4 hp
[/table]
A Finnish TV program video provides a good look the Sulkava Rowing Race with a shift-boat race start at 4:24 and a team trading places at 3:00. During the switch the boat loses less than a boat length to other racers. A church boat races starts at 6:00.
Scenes filmed in 1938 show a rural couple getting aboard a skiff (1:09) equipped with horned rowlocks, but the man doesn’t feather his blades. The woman sits with a paddle resting across the gunwales. A church boat (3:10) is equipped with 20 oars held by lanyards against single flat tholes. The helmsman steers with a paddle.
Finished boats (but not plans) are available through Ruud Van Veelen of Suomen Puuvenepiste Oy. An authorized builder of Van Veelen boats in the United States is Walter Baron of Old Wharf Dory Company.
Is there a boat you’d like to know more about? Have you built one that you think other Small Boats Monthly readers would enjoy? Please email us!
Not long after our first wedding anniversary—celebrated with an overnight canoe trip on the Narraguagus River in Maine—Sharon and I acquired our first boat, an 18′ Grumman aluminum canoe, complete with transom mount and matching wooden paddles. We are now happily approaching our 40th anniversary and after a lifetime of boating and camping, we felt the urge to semi-retire the old Grumman for a new and special canoe: a long-desired 18′ 6″ wood-and-canvas E.M. White Guide model.
Early wood-and-canvas canoes evolved from Native American birchbark canoes that were in common use in northern New England. Bark canoes were popular, so much so that Maine builders were eventually forced to range farther afield in their search for usable birchbark. The experimental use of readily available, cheaper, and more durable canvas marked the beginnings of a sea change in canoe construction. Early Maine canoe builders developed forms with metal straps where the ribs would be placed. After the ribs were steamed and bent over the form, the planks were applied and then secured with brass tacks. The metal straps on the form clenched the tack points, turning them back into the ribs. The new forms allowed consistent mass-production of canoes at low cost. In the late 1800s, a number of small canoe-building companies formed in and around Old Town, Maine. One of the early successful builders was E.M. White, who modeled his signature canoes after Native Penobscot birchbark designs.
The E.M. White Guide canoe that Sharon and I built is 18′6″ in length overall and has a beam of 37 1⁄4″ and a depth amidships of 13″. Unlike our old Grumman, the symmetrical Guide has a finer entry, making things much easier for the bow paddler. The canoe is slender, with a gorgeous sheerline that distinguishes this canoe from its modern fiberglass or plastic cousins. By omitting intermediate half-ribs but using a keel, floorboards, and lightweight canvas, we brought the overall weight down to just 83 lbs. We wanted to use locally sourced materials as much as possible in our canoe’s construction. The ribs and planking are of northern white cedar. The outwales, handles, and decks are cherry; the inwales are of red spruce, and the seats and thwarts are fashioned of white ash.
Building this “anniversary” canoe ourselves would make it more special. With some past boatbuilding experience, I knew that building a one-off wood-and-canvas canoe could be difficult in part because of the need to first fabricate a rather involved building form. Unless you plan to build a lot of canoes, it is hard to justify the investment of time and money in such a form, which perhaps explains why strip-built canoes are a more popular amateur project.
Fortunately for us, Island Falls Canoe Shop in Atkinson is located less than 15 miles from our home. Island Falls had the forms and jigs we needed to build a White Guide—in fact, Island Falls has many of the original White forms on site, some more than 120 years old. Equally important, Jerry Stelmok and his crew, Keith Stockley and Andrea Myers, have deep experience in building, documenting, and restoring these and other wood-and-canvas craft. We were fortunate to have them as our suppliers and mentors. I began construction, as their student, in November 2014. The project would turn out to be a great way to pass the historically cold and snowy Maine winter of 2014–15.
The definitive book on the construction of the E.M White Guide is Stelmok’s 1980 book, Building the Maine Guide Canoe. I followed this book step-by-step, and began the project in the milling room shaping and sanding ribs, decks, inwales, and stem blanks, creating a “kit” of parts to use in subsequent assemblies. Jerry sawed out the thin (5⁄32″) cedar planking, and together we ran the planking through the thickness sander.
Assembly of the canoe began with bending the ribs—a warming job on a cold winter’s day. The shop was filled with pleasant smells as the ribs steamed. Then ribs were bent on over the form and nailed to inwales previously clamped to the form. When we finished, I had my first peek at what our canoe was going to look like. After fairing the ribs, planking was the next step, and it too was an enjoyable task. Unlike the boatbuilding that I was familiar with, it was a delight to work with such light and easily shaped materials.
Paul LaBrie
The partially built canoe has just been removed from the form. The ends are left unfastened to allow the canoe body to be spread out slightly to ease its removal from the form.
After removing the canoe from the form, it was on to finishing the rest of the hull, including resetting every tack—over 2,000 of them—with hammer and clenching iron. We then installed cant ribs—the small ribs in the extreme bow and stern of the canoe—and the single-piece, breasthook-like decks. We installed temporary thwarts so the canoe would keep its shape during the remaining phases of construction. After getting a few coats of varnish applied to the interior and a coating of oil on the exterior, the canoe moves on to canvasing.
Paul LaBrie
The first base coat of thinned varnish provided good preview of what the finished canoe was going to look like.
A long piece of canvas folded in half lengthwise and stretched between a wall and a post created a tight “hammock” into which we placed the canoe. With specialized pliers we stretched the fabric over the sheer and stems, and tacked it along the edges. After a once-over with a torch to singe the fuzz from the canvas, we applied three hand-rubbed coats of a special filler that waterproofs the canvas and fills its weave to produce a smooth surface. We left the canoe to let the filler dry. That takes at least one month, and in our case this cure time conveniently coincided with the holiday season.
When we returned to the project, the final installation was a straightforward process of fitting finished seats, thwarts, and handles, as well as the construction and fitting of the floorboards. Bringing all of the woodwork to a fine finish required a great deal of sanding and multiple coats of varnish. Over the filled canvas we applied several coats of burgundy-colored paint. We were delighted with the results.
Rosemary Wyman
The final step in canoe construction is adding the shop badge to the deck of the canoe. The folks at Island Falls Canoe say this step is optional, but I thought the badge was a necessary addition. It will always remind me of the project and of the guidance and camaraderie I enjoyed there.
We first launched our new canoe at the Downeast Chapter of the Traditional Small Craft Association spring 2015 gathering on the New Meadows River in Bath, Maine. Spring is a wonderful time to show off a winter’s project to good friends and it helps having knowledgeable folk around to assist with the maiden voyage of any new craft.
First getting into the newly launched canoe, I noticed it was really quite stable—not as stable as our flat-bottomed Grumman, but not tippy either. The gentle roll was to be expected of the semi-oval bottom shape of the White Guide, but I credited the otherwise good nature of the canoe to its length. A shorter canoe would not have been as stable.
Rosemary Wyman
The White Guide is a great solo paddling canoe. White Guides can be built with or without a keel. Those built without keels are more maneuverable and typically used in quick or white water. Our canoe has a keel as my wife Sharon and I tend more to flatwater paddling.
Paddling solo from a kneeling position slightly forward of amidships and with my weight cheated to the side I was paddling on, I was able to make headway into the freshening breeze coming from downriver. The keel enabled the canoe to track well. In short order, however, my 62-year-old knees and legs—not helped by a winter of inactivity—rebelled against my kneeling position. This was not the canoe’s fault. After I took a brief tow from Dave and Rosemary Wyman in their Doug Hylan-designed Beach Pea, experienced paddler Betsy Miller Minott offered her help. With a mid-cove transfer from boat to canoe, Betsy was aboard to paddle the bow position, allowing me to move to the stern seat and paddle from that comfortable perch.
Rosemary Wyman
The White Guide is at its best with two paddlers. I’m paddling with fellow Downeast TSCA member Betsy Miller Minott
With two paddlers aboard, the White Guide flew with easy effort on our part, and we soon passed all of the boats in our Saturday fleet. Windage wasn’t an issue, and the White Guide showed good potential. We quickly reached our island destination, beached the canoe, and settled down for a group lunch.
The tide went out quite a ways during lunch, and our boats were left high and dry. The canoe, thanks to its light weight, was easy for us to carry to the water’s edge. Later in the day, we had an opportunity to save ourselves a lot of paddling by portaging the canoe over a patch of interisland clam flats. Lightness pays dividends at times.
When I arrived back home, I gave the canoe a quick rinse with fresh water and put it safely back in the garage. It’s often been said that simple boats are used more often than larger, more complex ones. For Sharon and me, our experience is that versatile canoes get the most use of all.
After a career in academic technology management, Paul LaBrie operated LaBrie Small Craft, a small boat design, build and restoration company, as a hobby business for 9 years. Paul is currently Treasurer of the Small Reach Regatta and is a member of the Traditional Small Craft Association.
Island Falls Canoe in Atkinson Maine, builds, repairs, and restores wood-and-canvas canoes. The shop also conducts classes for those interested in building their own canoes. The White Guide is one of many canoes they have molds for.
Is there a boat you’d like to know more about? Have you built one that you think other Small Boats Monthly readers would enjoy? Please email us!
I have always loved wooden boats of all kinds, but especially dories, for their elegant simplicity of design, the way they look upon the water, the way they handle in a heavy sea, and their rich and rugged history. I had known some in my youth on Cape Cod—tender, unadorned, straight-sided workboats with pine planks hammered together with clenched nails. They were appealing to me who, in a boyhood self-delusion of becoming a fisherman, saw a kind of beauty in old, scarred skiffs that was quite apart from gleaming hulls of thoroughbreds trimmed in teak and mahogany.
I never became a fisherman, but a lifetime later I awakened the long-dormant dream of building a boat of my own. I enrolled in a Greg Rössel course at WoodenBoat School to begin acquiring the necessary skills. There I saw, in an open shed and resting quietly among other boats in various stages of construction, a dory of a different sort. Compared to the working dories I’d known, it had a more refined, even genteel, look, gracefully bellied, the flat bottom narrow and lanceolate. The strake laps were studded with neatly peened copper rivets. The gunwales, thwarts, and tombstone transom were mahogany, lustrous even though awaiting the glow of varnish. I was smitten.
John Gardner, legendary small boat designer, builder, and author, was similarly smitten. He wrote in The Dory Book: “…the dories I had rowed and sailed on the upper reaches of Maine’s Passamaquoddy Bay were not the dories I found on the Lynn and Swampscott beaches, along the shores of Marblehead, Salem, and Beverly, and at the Cape Ann towns of Gloucester and Rockport. The round-sided dories … were a choicer breed than the straight-sided Bank dories used by fishermen elsewhere on the New England coast. The sweet lines of some of them all but took my breath when I saw them for the first time, out of the water in all their naked elegance. I reveled in their good looks and desired them as much for their beauty as for their use.”
Stephan Syz
John Gardner wrote: “These Swampscott boats are the aristocrats of the dory clan. Here is a Swampscott dory that is not too large for one man, or even a strong boy, to handle, yet large enough to retain all of the excellent qualities for which the type is noted.” While Gardner’s plans called for a sprit rig, I substituted this standing lug rig so that in an emergency while sailing alone I could drop the sail quickly while still at the tiller. The spars are all of solid red spruce (Picea rubens) and the tanbark sail is Dacron.
Upon first sight, this specimen of a Swampscott dory at the school, a cross between workhorse and thoroughbred, was what I wanted. I read books about these dories and their history, looked at photos online, and studied plans. Then, fortuitously, WoodenBoat School offered a weeklong course, “Building a Dory.” I signed up immediately.
Our instructor, Robert Elliott, had worked for years in Lowell’s Boat Shop in Amesbury, Massachusetts, where they have been turning out dories continuously since 1793. In class, Robert was sharp-eyed but soft-spoken, endlessly patient, deliberate without seeming so. He was also a philosopher—a requisite, it seems, for wooden boat builders in general. For example, when we were struggling mightily to make a joint fit absolutely perfectly, he stopped us and said, “You know, there are two kinds of ‘perfect.’ One, you see a flawless inlay, and say ‘perfect.’ Or, you’re in a boat that’s sprung a leak and is sinking and you don’t have a bailer, and someone hands you a battered bucket; ‘perfect’ you say, relieved. So, you have to decide which ‘perfect’ you want or need.”
As much as possible, Robert used hand tools—he had made many—and local materials to carry on Yankee traditions of thrift, practicality, and pride of workmanship. As I listened to him and watched him, his philosophy became my own, and I hatched my plan to build a dory: I would use native wood from my home state of Vermont, from trees I harvested and milled myself; I would use hand tools whenever I could; and I would make the sail myself, from traditional fabric. These were all things, of course, that New England boatmen used to do by necessity.
I would work close to home and close to the bone, and demonstrate that a beautiful and seaworthy boat (assuming it would turn out to be both) could be fashioned from wood of our own land, instead of exotic species that came from god-knows-where, with god-knows-what environmental impacts. I preferred to add “build a boat locally” to mantras of our times—“eat locally,” “buy locally”—for the same considerations of economy, ecology, community, and pride. When I eat game I have killed myself, or eat vegetables from my garden, I have an attachment to the food; it means something beyond that which merely tastes good or fills the stomach. I become aware of a shared history and feel the living on the same land. So too, building a boat this way would connect me to my home and feed my soul. Robert understood, of course, gave his blessing, and advised me on which woods to use and which not to.
In John Gardner’s Building Classic Small Craft, I chose the turn-of-the-20th-century Modified Swampscott Dory for its pleasing lines, the “certain minor modifications…to adapt it for amateur construction and to permit the use of materials currently to be had at most retail lumber dealers,” and an “overall length…not so great as to require building space in excess of what is available to most home workshops.” In addition to lines and offsets, there were also scantlings for everything, patterns for planks, and detailed drawings of the stems, transom, centerboard trunk, spars, and sail—all reassuring for someone who had never lofted or built a boat on his own.
Charles Johnson
Landowner Bill Manning fells a tamarack (Larix laricina), for use in the stem, frames, gussets, transom knee, and centerboard trunk bedlog, in locations where the species’ rot-resistance and durability are vital.
I had no suitable timber on my own land, and none of the big machinery nor the skills to harvest, haul, and process logs into lumber. Just as Robert Elliott had appeared just at the right time, Bill Manning was there when I needed his help. Bill and I have been close friends for decades, brought together through our work in conservation, he in the private sector and I in the public. He has lived and worked close to the land and sea most of his life: as a boy on his family tree nursery in Massachusetts (his great-grandfather brought the Colorado blue spruce to the East and was the first to propagate the Concord grape), in college by the coast of Wales, and later running outdoor programs at various institutions, even a couple he created himself, overseeing natural resources in Vermont. Bill, as rugged as he is slender, is vision-driven and his hands are always busy at or near the ground while his eyes are always on some project in the distant future. In the guise of north-country logger, he is an entrepreneur of rustic and rural enterprises. There is a common denominator to all his ventures (some would call them adventures): Provide the kind of ethics, education and training that allow people to conserve their land while being able to make a living on it and from it. He, like Robert, lives his philosophy.
Charles Johnson
Northern white cedar (Thuja occidentalis) harvested for the planking. These 12’ logs will be milled and planed, then scarfed to attain adequate length for the planks.
Bill owns 700 acres of timberland, from which he harvested and processed all the lumber for his home, barn, outbuildings, and the big central building of his self-started natural-resources education enterprise, the Vermont Leadership Center in East Charleston. Not one to dawdle, he readily offered his trees, equipment, and himself in my service. “What better way,” he said, “to demonstrate what you and I believe in.” He added, with a wry smile I knew well, “We’ll get to spend more time together, too.” Meaning: “You can help me later with some projects I have in mind.”
Charles Johnson
Bill skids tamarack logs to his portable sawmill site, in preparation for milling into lumber.
In 2003 Bill and I went out to get the trees, cutting plenty of extras to make up for unseen defects or mistakes I would no doubt make later in construction. We felled northern white cedar, as tall, wide, and clear as we could find for the planking, and tamarack for the stem, frames, and stern knee. Tamarack cut green would twist impossibly as it dried, so we cut dead ones after we made sure that they were not the home of any cavity-dwelling birds or mammals. Black cherry heartwood mimics the color of mahogany and would serve for the gunwales, transom, thwarts and rudder. Bill had plenty of air-dried and milled cherry in his barn, so what we cut would replace the wood we pulled from his stockpile. We limbed the logs and with his skidder dragged them to his portable Wood-Mizer sawmill. Bill taught me how to operate the gas-powered horizontal bandsaw and after I practiced on several low-quality logs, butchering a few of them, I milled 5/4 planks and Bill moved them with his tractor into the drying shed. The cedar would need only six months to dry enough for planing.
Charles Johnson
A Wood Mizer portable sawmill mills planks of white cedar. The rough planks are milled at 5/4”, to be planed later to final strake thickness of 9/16”.
Bill’s northern forest property did not have the right species for certain components, so I went off in pursuit of other quarry. I wanted apple crooks for the knees and found them in Montpelier. Another old friend, Warren Kitzmiller, and his wife had planted a crabapple in their front yard years ago when they moved into their house, and over the years it had grown large. Decades later, the apple was dying, a sad reminder of the wife he had lost earlier to cancer. With a heavy heart he cut it down. As he gave me the wood, he said, “It will be a fitting memorial.” At home I made a jig to hold the crooks and with my chainsaw cut them into slabs—thick pages of a precious memory book, they seemed—and lay them to dry atop the firewood pile in my shed.
Another friend in my town, forester-logger Paul Cate, took an interest in my project. He too loved wood, from standing trees to raw wood ready to be worked, and had the hand tools to fashion it. Among his admirable collection of carefully stickered boards of different species was the black locust I sought for oarlock pads, boom jaws, and little blocks for the running gear. It’s a very hard, dense, and rot-resistant wood that finishes to a beautiful, dark, butter-yellow. On his property Paul also had a grove of straight, medium-sized red spruce trees suitable for the spars; we cut several, thinning his stand in the process. At home I peeled the bark with a drawknife and set the naked poles under cover to dry.
For the tiller I wanted to use hophornbeam. It’s a tough and flexible wood used for axe and pump handles, befitting of its other names, ironwood and leverwood. I knew hophornbeam grew on a neighbor’s property where some logging was taking place, and asked the logger if he could put a piece aside for me. One morning there was a plank of it, roughed out by chainsaw, outside our front door.
I cut and carved a pair of oars from rough-cut white ash I bought at a local sawmill. For the centerboard I found white oak at a local woodworker’s shop, and for the centerboard trunk I salvaged wide white pine boards from the scrap pile of another neighbor’s house undergoing renovation. I was almost done scrounging for my mongrel collection, but had one more item to find. For sentimental reasons, I made an exception to my rule about using only Vermont-grown wood for one piece, the breasthook. It would be black walnut from a giant tree cut down a half century ago in the back yard of my boyhood home in Illinois. Decades later, a furniture-making friend in Montpelier designed and built a desk of that walnut, and gave me the leftover pieces, one of which became the breasthook, a little keystone holding together not just the boat but my past and present. I’m glad I didn’t know then that black walnut is considered bad luck in a wooden boat—it’s said to attract lightning.
Six months passed while my lumber dried. Bill and I loaded the cedar, cherry, and tamarack planks on a flatbed trailer and I towed the load to the Vermont Outdoor Furniture shop in Barre, a few miles from home. The owner, Bruce Gratz, had been building a magnificent oak and cypress catboat in a shed attached to the shop. I had stopped by several times to see his boat in progress, and he’d offered to run my planks through his industrial-sized planers when the time came. The time had come, and within a couple of hours, amid the whirr of machinery and the scent of cherry, cedar, and tamarack sawdust, we were done, and off I drove with my precious cargo to the next destination—the shop where I would put all the pieces together.
Lori Barg lives in the hills outside Plainfield, 8 miles from my home, in an old Vermont farmhouse she had renovated herself, including an attached building she had turned into boat shop. I had worked in that shop before, fumbling with a Shellback dinghy kit and making oars, using bandsaw, drawknives, and spokeshaves under her direction. A statuesque, earthy woman, she had worked many professions, sometimes all at once: woodworker, house builder, innovator of small hydroelectric generation, gardener, pick-your-own commercial berry grower, and builder and sailor of boats, canoes, and kayaks. Now I was taking my wood to her shop again.
Lori Barg
With strakes copper-riveted together, planking is complete. Next steps: fit the false stem, outwales, and inwales. I added through-riveted spacers at regular intervals between the outwales and inwales to help stiffen the hull. I bored out loose black knots, and plugged the holes; I left the solid green knots. I built the boat right-side up instead of the traditional upside-down, so I could rivet the strakes by myself, using a leg to support the bucking iron.
For the next three years, off and on, Lori and I worked side by side: I lofting my dory on newsprint paper; she re-canvassing a canoe and building a lightweight sailboat without plans. (She had once lived in Bolivia, where she admired boatbuilders on a beach using only a few hand tools to construct beautiful craft, from memory, using techniques passed down through generations.) In summer, the big doors of Lori’s shop were open to the scents and sounds and views outside, across broad meadows to distant hills. We listened to music or talk shows on the radio; we mused about our lives and about wooden boats. In winter, we would start the woodstove in the morning, and work in coats and hats and sometimes gloves until the room warmed up. Neighborhood dogs would stop by and lie next the stove, and once in a while someone would drop in to see what we were doing, or just to chat.
Charles Johnson
The centerboard trunk has a black cherry (Prunus serotina) cap, white pine (Pinus strobus) sides, tamarack bedlog, and apple (Malus spp.) knees. The bedlog is affixed to bottom with silicon-bronze carriage bolts.
My boat slowly took shape, the pile of lumber and odd chunks of wood metamorphosing into recognizable structures, then the structures into a whole. Progress was halting and mistakes were common: Sometimes a day’s work would have to be undone the next, then redone the day after. I found myself often saying, “Thank God for epoxy.” It fixed errors that in earlier times might have meant tossing long-labored-over pieces into the firewood pile. I kept a list of all the mistakes I made, thinking that someday I might turn it into an amusing story. Lori lent a hand to position awkward pieces, looked on with experienced eyes to solve problems, gave a kind or corrective word, and lifted flagging spirits.
Charles Johnson
Ready for the water. Gleaming under the varnish is cherry (false stem, thwarts, gunwales), black walnut (Juglans nigra, breasthook), black locust (Robinia pseudoacacia, oarlock pads), and apple (knees). Note the two holes at the mast-partners—the mast can be shifted fore or aft depending on the boat’s load.
Four years after I began, my dory was done, gleaming with its new coats of paint and varnish. On the inside top of the transom I tacked on an oval bronze nameplate etched with the name I had given her, NONA BELLE, to honor my wife, Nona née Bell.
Warren Kitzmiller
Family and friends joined me on launch day at Wrightsville Reservoir, central Vermont. At far right, wearing the orange flower, is my wife Nona, after whom the boat is named.
The day we launched NONA BELLE at a local reservoir was sunny and warm after the rain the day before, and many family members, friends, and onlookers were at the ramp as my wife christened the boat with soda water from a plastic bottle, avoiding broken glass and wasted champagne. I backed the trailer into the water and NONA BELLE glided out to the cheers of the crowd. She rocked gently in her new world, the painter like an umbilicus reaching to the shore. A birth indeed.
John Lazenby
On launch day, I was a happy builder aboard NONA BELLE. The oars are solid (not laminated) white ash (Fraxinus americana), and fashioned from two 8′ rough-cut, full 2”-thick planks. I sewed the leathers and buttons together with sail twine—no brass tacks used—to avoid putting holes in the wood.
As I watched the water-light dappling over her sides, I hardly believed that such a thing had come to pass. NONA BELLE had attained both of Robert Elliott’s kinds of perfection: perfectly beautiful and perfectly functional. But she was not my creation alone. She had come from many others: John Gardner, his wisdom and inspiration; Robert Elliott, his craft and tradition; Bill Manning, his land and trees; Lori Barg, her advice and companionship; Bruce Gratz, his careful finishing of the lumber; Paul Cate, his spruce for spars; the leverwood logger; my wife Nona, her spirit and her energy; Vermont’s enduring forests, their giving of the raw materials. All were there in NONA BELLE, floating on the water, waiting for me.
Epilogue: A concession to the modern age
With the help of an expert, I made a compact solar array for recharging my hand-held VHF radio and batteries for other devices (hand-held GPS, AM/FM radio, flashlights) and for running an automatic bilge pump.
Charles Johnson
NONA BELLE’s electrical system conceals most of its elements under the aft thwart and behind sealed covers.
When in place, the frame holding the small photovoltaic panel sits across the gunwales near the transom. The panel sends DC power to a controller (to prevent overcharging), then to a 12V DC deep-cycle marine battery (not seen, under thwart forward of fuse/breaker box). The battery delivers power, via the fuse/breaker box, to two outlets (black caps) where the devices are plugged in. Though small, the battery can produce adequate power up to seven days without sunshine. To waterproof the box openings, I fitted the doors with rubber gaskets made from old inner tubes, and plugged the through-fittings for the wires with silicone sealant. The diminutive mast step and partners are for a post that supports the boom as a ridgepole for a tent-like cover I set up if I have to sleep aboard.—CWJ
Charles W. Johnson is the former Vermont State Naturalist, a 20-year veteran of the U.S. Coast Guard, and author of The Nature of Vermont, Bogs of the Northeast, and most recently Ice Ship: The Epic Voyages of the Polar Adventurer Fram. He is co-author of The Vermont Life Book of Fall Foliage and In Season: A Natural History of the New England Year. He has rowed and sailed on the coast of Maine and Cape Cod, and in Lake Champlain, Adirondack lakes, and Vermont lakes and ponds. He lives in East Montpelier, Vermont.
If you have an interesting story to tell about your adventures with a small wooden boat, please email us a brief outline and a few photos.
The C-clamps I’ve been using for a few decades now have seen more than their fair share of epoxy, either dripping out of the joints or dabbed on by the gloves I wear for gluing up. The accumulation of cured epoxy has coated the screws and the handles, limiting their range of motion if not seizing them up altogether. I’ve used a heat gun to soften up epoxy for removal, but that method creates a lot of unhealthy fumes and handling clamps individually takes quite a bit of time. Cured epoxy softens at around 200°F, but with a heat gun I have no way of knowing if I’m applying too little heat or too much, and while I’m heating up one spot, the rest of the clamp is cooling off.
photographs and videos by the author
A batch of epoxy-fouled clamps going into my foam steam box will be ready for cleaning in about 10 minutes.
The temperature of steam and boiling water is 212°F, just on the high side of the temperature required to soften epoxy, so I’ve boiled my clamps in a rectangular stainless-steel cake pan on the stovetop and heated them up in my steambox.
Poached clamps: A cake pan full of water will heat several clamps quickly and uniformly. When the water comes to a vigorous boil, the epoxy is hot enough for removal.
Both methods work equally well, and neither produces the strong smell of epoxy that a heat gun does. After a few minutes steaming or boiling, the entire clamp comes up to a uniform 212° and holds that heat long enough to remove a lot of gunk.
A cheap plug cutter and a cordless drill make it easy to spin the screw to strip the epoxy from the threads.
I don’t bother much with cleaning the body of the clamp. The moving parts—the screw and the sliding handle—are the only pieces that need to be free of glue to operate properly. I wear a rubber glove on my left hand to hold the clamp and with the other hand tap the handle back and forth with a mallet or hammer, and the glue strips away. The threads clean themselves when the screw is run back and forth a few times. Turning the screws by hand gets tedious, and the epoxy requires occasional reheating as the clamp cools.
A cheap plug cutter chucked in my cordless drill fits over the head of the screws on smaller clamps and straddles the handles, allowing me to spin the screw back and forth quickly. On larger clamps, the plug cutter doesn’t fit over the head of the screw, but it can straddle the handle; I can spin the screw easily, albeit with a manageable amount of wobbling. With the clamp reheated, a wire brush takes care of any remaining epoxy.
Before cleaning, this clamp had lost its full range and its smooth action.
After cleaning, the clamp is fully functional.
After cleaning, the clamps hold enough heat to dry themselves. Shifting the screw takes care of the water trapped inside the clamp’s threads, and a squirt of a spray lubricant finishes the job. Any other tools that you use when gluing up can be cleaned up quickly as long as they can tolerate the moisture and the heat. The next time you’re steaming wood for bending, throw some of your gummed-up clamps into the steambox and get them back in working order.
Speed clamping
With my clamps working smoothly I can use my cordless drill to spin clamps onto work I’m gluing up. To spin the bigger clamps smoothly I made a device that fits over the screws of all but my two largest clamps.
A 5/8″ socket with grooves cut in it will fit over most clamp screws and engage the handle.
I took an angle grinder to a 5/8″ wrench socket and cut slots to engage the clamp handles. A hex-drive bit with a ½″ socket driver connects the modified socket to my cordless drill. I can adjust the clutch on the drill to take the clamps uniformly up to the right pressure.
Manufacturers of architectural laminated wood beams use pneumatic drivers to spin clamping screws and the screws have square ends for that purpose; with a modified socket it’s possible to apply power to common C clamps too for speedier work.
Christopher Cunningham is the editor of Small Boats Monthly.
You can share your tricks of the trade with other Small Boats Monthly readers by sending us an email.
When it came to selecting a tiller for the rudder of my Sooty Tern, UNA, I had to consider the two options designer Iain Oughtred provided for getting around the mizzen mast: a wishbone tiller that divides around the mizzenmast, or a Norwegian tiller, a short tiller set at a right angle to the rudder and operated with a push-pull stick. The former would provide the same feel as a conventional tiller; the latter would clearly take some getting used to.
Common to faerings (double-ended Scandinavian workboats), the Norwegian tiller traces its ancestry to the Vikings, and has been used for ages. It consists of the transverse tiller, an extension that reaches forward, and a flexible or articulated connection between the two. The connection can be simple or complex, anything from a rope with a tensioning cam cleat, two eyebolts interlocked, an oarlock modified with socket, or an off-the-shelf or custom-built tiller universal joint.
Unlike a conventional tiller that may sweep across the boat from rail to rail—and preventing anyone from sitting in the stern—the tiller extension of the Norwegian tiller moves only along its own length, taking up very little space even when the helm is put hard over in either direction. The helmsman can steer easily anywhere within reach of the extension. With an extra-long telescoping extension, it would even be possible to steer from the bow.
Leney Breeden
The author at the helm of his Sooty Tern, UNA. The laminated tiller extension arches over the gunwale to keep it from chafing the varnish.
The helmsman can shift his or her weight as the boat heels without the awkwardness that often comes with a conventional tiller. Sit, stand, hike out, or lie down; you’ll always find a comfortable way to hold the extension. If your boat has a neutral helm, you can rest the tiller extension in your lap, over the shoulder, or draped along the rail or held there to self-steer. At anchor it is readily lashed to the gunwale, out of the way.
Leney Breeden
UNA’s tiller uses an eyebolt to create a pivoting connection to the extension. To the port side of the rudder you can see the head of the wedge that locks the tiller to the rudder. The mortise it gets tapped into extends slightly into the rudder head to ensure that the wedge will come home against the rudder for a tight connection.
The transverse tiller can be square and mortised through the rudder head with a wedge to hold it tight, or round and set in an easily drilled hole and allowed to rotate so only a simple hinge at the outboard end of the tiller is required to provide the lateral range of motion. Allow about 1″ of tiller length for every foot of boat. My 20′ boat has a 20″ tiller. Its leverage may be less than that of a standard tiller, but with balanced sail trim for a neutral helm, the short lever arm is quite adequate. The extension can be as long as is practical. UNA’s is 8′ long, short enough to clear the main sheet when tacking, and long enough to let me stretch my legs near amidships when sailing.
Using the tiller requires some mental rewiring, but after an hour it’ll become second nature. I dare say this tiller may be adapted to any well-balanced boat with a rudder. Tested for centuries, it really works. It was the best choice for my boat and has been a joy to use. Give one a try, and see what you’ve been missing.
Eddie Breeden grew up racing Moths and Lasers and has a bit of offshore sailing—Bermuda and Block Island—to his credit. A native Virginian, he’s an architect, married with four children. As an amateur boatbuilder he has built a Sooty Tern, an Eastport Pram, a cedar-strip kayak and a couple of skin-on-frame kayaks, all described on his blog, Lingering Lunacy.
Editor’s notes:
When Eddie first suggested this article I didn’t believe that readers with boats already outfitted with conventional tillers would make the switch to a Norwegian tiller. At the time, I was refinishing a 14′ lapstrake Whitehall that I’d built and sold in 1984 and had come back to me after two owners. Its rudder was equipped with a yoke for steering while rowing and a tiller with a pivoting extension for sailing. When I got the boat back on the water and under sail, the tiller and extension proved awkward to use and prevented having anyone sit astern of me.
Christoper Cunningham
This tiller, angled forward, made turning to starboard less positive than turning to port. I discarded it.
I made a transverse tiller with a locust crook and while it had a nice trim look, it put the pivot point of the extension forward of the rudder’s pintles and gudgeons, making turns to starboard (the tiller side) less effective. Even so, the Norwegian style was clearly an improvement over the conventional tiller.
Christopher Cunningham
A straight transverse tiller long enough to extend past the transom opens up the stern sheets for a passenger. The hole in the tiller on the port side of the rudder head is for a flagstaff.
I made a second transverse tiller that was perpendicular to the rudder head and extended just past the transom. With it the steering was positive in both directions and I could sail steer a passenger in the stern.
Christopher Cunningham
A simple rope connection can be made quite tight to eliminate play.
Some fans of the Norwegian tiller prefer not to use rope to join the extension to the tiller because it gets slack and introduces a disconcerting amount of play in the steering linkage. My solution is to thread a ¼″ braided nylon rope up through holes in the tiller and extension and pull it tight against a figure-8 knot on the end. The other end passes through a second hole in the extension, is drawn tight, and then wrapped around the cord between the tiller and extension. The wraps force those two pieces apart, putting the line between them under great tension. After a half-dozen turns, the tail end of the line gets half-hitched several times around the tiller, holding the tension. The wraps of the cord form a flexible but firm connection that has no detectible play. It’s cheap to make and easy to repair or replace in the field. —CC
You can share your tricks of the trade with other Small Boats Monthly readers by sending us an email.
The mosquitoes the author and his future wife encountered during their 2003 Quebec-Labrador wilderness trip were not to be taken lightly. The Bug Shirts are designed to be cool in warm weather, so additional layering is required when it gets cold.
Back in my Outward Bound days, I couldn’t wait for my inaugural visit to the school’s northernmost outpost in Maine. I was a young, impressionable paddle geek, and the school’s Greenville base beckoned, with its maverick instructors and easy access to some of the state’s finest paddling. Upon arriving, one of the first things I noticed was that everyone owned the same bug shirt. In a region where biting insects vastly outnumber their mammalian brethren, this was no small detail. I ordered mine the next day. Since then, I have donned my Original Bug Shirt hundreds of times.
The fabrics used in the Original Bug Shirt have an exceptionally tight weave that stops mosquito bites; the microfiber is 100% effective and the cotton, 99%. Both fabrics are also virtually windproof and block 98.9% of UVA and UVB rays. The microfiber is available in four colors: Sandstone (the company’s best seller), Ivy Green, and Camouflage; cotton is offered in Natural. The Natural and Sandstone are considered the least attractive to bugs. Cotton is more moisture-absorbent than microfiber and thus might be considered cooler, but if it gets wet it stays damp longer. Personally, I prefer the cotton as it wafts a comforting sweetness, even after weeks of continuous use.
Erin Spencer-Mullen
The author’s Original Bug Shirt is still going strong after 17 years. Folded up, the shirt fits in the zippered front pocket.
The Original Bug Shirt comes in two styles: Original and Elite. Both feature high-quality construction and in each the densely woven protective fabric is used where the shirt drapes over the chest, back, and arms. Panels of polyester no-see-um mesh are used at the sides and underarms for venting. When it gets hot, I’ll often wear my bug shirt without an undershirt; I find this comfortable—the mesh panels keep me cool—and effective—I’m still fully protected.
Donnie Mullen
Wearing the Elite model, the author’s wife Erin has the face mesh unzipped and tucked into the collar.
The same mesh is used at the front of the hood to cover the face. The mesh is black to make it easier to see through, but observing the world through it can take some adjustment; I’ve come to think of the diffused view as a pleasing ethereal sheen to all that I see. When the bugs abate, the face panel can be unzipped and tucked out of the way, above your face in the Original and below in the Elite. The hood is designed with enough extra room for a visored hat, which will keep the mesh a bit farther from your face. The shirts are made long to allow for tucking in, though the adjustable waist cord is non-stretch, so it stays put if you cinch it up outside of your pants. The shirts stuff into their zippered front pockets to keep them compact and handy when not being worn.
The Elite has several design updates over the Original. The zipper for the mesh face panel has two sliders, allowing for incremental opening at any point along the zipper line to better accommodate eating and using binoculars or a camera. (However, if the bugs are still fierce when you get hungry, I recommend experimenting with eating lunch inside your shirt!) The Elite also has an adjustable knit cuff, which creates a better seal around the wrist. My favorite Elite update is the addition of an adjustment cord at the back of the hood, which addresses the only complaint I have of my 17-year-old Original: When I don’t wear a cap, the hood has a tendency to slip into my line of sight, requiring regular correction.
Early in our courtship, I convinced my wife to accompany me on a paddling trip deep into Quebec and Labrador. We wore our Original Bug Shirts for 30 days straight and, simply put, they saved our hides!
Donnie Mullen is a writer and photographer who lives in Camden, Maine, with his wife, Erin, and their two children.
The Original Bug Shirt Company sells the Elite online for $69.95 in microfiber, $75.95 in cotton, and $79.95 in Camouflage. The Original sells for $59.95 in cotton and $65.95 in microfiber. A shirt sized for children and pants are also available.
Is there a product that might be useful for boatbuilding, cruising or shore-side camping that you’d like us to review? Please email your suggestions.
The gunter sloop rig can point well into the wind and is easy for one person to sail.
Retirement can be hazardous to your health, but you can improve your chances of staying mentally and physically healthy by keeping happily occupied after you leave your job. Buzz Menz of Middleton, Wisconsin, started planning his exit strategy a decade before he retired: “I decided to build three boats to keep me busy, thinking that 10 years would be plenty of time. The plan was to start with a small row boat, then a larger sailboat, and finally a weekender type of sailboat.” By the time he brought an end to his career, he’d be ready to sail off, hale and hearty, into his sunset years. He had worked with wood for most of his life but knew that boatbuilding set a higher standard. “A boat is a different animal altogether, and considering it is the only thing between you and the sea, potentially holding your life in its cockpit, it is important to build it right. One of my biggest challenges was knowing when a particular construction detail was good enough.”
He liked the look of Steve Redmond’s Whisp, a 15′ 7″ sharpie skiff for oar and sail, ordered plans, and began building. He’d previously built a strip canoe, but that experience didn’t prepare him for the more challenging work required by the Whisp. “I was starting to have some doubts about my chosen path to retirement.” Enrolling in a boat building class taught by Karen Wales at the Penland School of Arts and Crafts, in North Carolina, boosted his confidence and he learned that even with boatbuilding’s high standards, perfection was not only unattainable, but an impediment to progress. Each step has a point at which it is good enough and it’s time to move on. After the two-week class Buzz returned to the Whisp and finished it.
Before moving on to the next boat on his list, the sailboat, Buzz built stitch-and-glue kayaks for himself and his wife. Three years down and seven to go.
His search for a sailboat project led him to Iain Oughtred’s Caledonia yawl. By chance he saw one sailing on Lake Mendota, the lake just a mile from his home. He spoke to the owner and learned that the Caledonia yawl sailed well with full sail in light air and reefed in a blow, had good stability, and was easy to sail single handed. The owner and his partner had built the yawl in a little over a year.
Buzz ordered the plans from The WoodenBoat Store. His garage wasn’t big enough for building the 19′ 6″ boat so he either had to rent or build a larger space. He decided to build an oversize garage next to his office, just a few blocks from home. A year went by before he could start the yawl. Six to go.
Buzz Menz
Although Buzz was first smitten by Oughtred’s original four-strake hull, he opted for the newly-updated plans for the seven-strake version.
He got a letter from Iain about an updated version of the Caledonia yawl with seven strakes instead of four, more volume, better stability, and other improvements. Buzz ordered the new plans and when they arrived he was ready to start.
It took two years to get the boat planked and ready to roll upright. He thought the greater part of the job was behind him but in retrospect decided “whoever said you are half way to done when you turn over the hull must have been building a canoe.”
Buzz Menz
GOOD’NUFF’s sheets and halyards are all led aft to ease single-handed sailing.
For the interior he came up with his own layout and installed decks fore and aft, bulkheads at either end of the cockpit, and enclosed benches for storage and additional flotation. To dress up the decks he milled up some cherry that had been gathering dust in his garage at home. He glued cherry strips to 4mm okoume plywood and was pleased with how strong the decks would be but daunted by the effort it would take to sand them down smooth. “I was having some wood floors refinished that week at my office, so borrowed their floor sander to grind all the strips down to a uniform thickness and finished up with a belt sander and finish sander. Once I fiberglassed and epoxied the cherry side, the results were stunning.”
With the pieces all assembled Buzz spent two months sanding, painting, and varnishing. The dust was still flying when his 10 years had elapsed.
Jim Forrestal
The aft compartment conceals the motor well on the port side and provides hidden storage for the motor on the starboard side.
A month after he retired, he launched the boat, alone fortunately, because he discovered a leak between the centerboard case and the keelson. That problem fixed, he returned to the lake for another launch and a maiden voyage. He motored out from the ramp with his brand new 2.5 HP Yamaha outboard in the motor well.
Buzz Menz
Buzz has had GOOD’NUFF out in some fierce wind on Lake Mendota and reports she handles the gusts well. He has had her up on the rail a few times, but wasn’t concerned about going over as she weather-helms nicely when everything is eased.
Clear of shore, he set sail. “Once I had the two sails set, the boat responded well quartering into the wind. I put it through all angles to the wind to see how it behaved and was pleasantly surprised. The boat responded the way it was supposed to respond. This was great, since I had just spent 5 years on and off building this boat, it was a relief to know that the finished product met my expectations.” GOOD’NUFF, as he christened his boat, was, after all, good enough and Buzz set sail, leaving his career in her wake.
Have you recently launched a boat? Please email us. We’d like to hear about it and share your story with other Small Boats Monthly readers.
When the now-defunct magazine The Boatman was launched in the early 1990s, one of its objectives was to provide boat plans suitable for amateur construction. One such boat was the Mallard, the first of which was launched in 1994. The magazine’s initial brief to designer Andrew Wolstenholme was to produce a modern version of SWALLOW, one of the boats in Arthur Ransome’s book, Swallows and Amazons. The brief called for a “boat-shaped boat which will genuinely sail” and with “considerable visual appeal to inspire the builder in the first place and along the way.” It should be big enough for two adults and small enough to be easily handled ashore and to be built in an average domestic garage—a length of 12′ would satisfy these requirements.
The SWALLOW described by Ransome in his popular works of fiction had a long, straight keel and no centerboard, but Andrew wanted to give the new design “a sailing performance that meets today’s expectations” while retaining “the aesthetic feel of SWALLOW.” So he based his Mallard’s hull shape on his earlier design, the 11′ Coot, giving it “a rockered keel to ensure good turning, an efficient airfoiled centerboard and rudder for good windward performance and maneuverability, and a skeg aft to ensure good tracking under oar.”
all photographs by the author
Tim Harrison’s Mallard, newly christened TUCANA, was the only boat to brave the strong wind and rough water on Boatbuilding Academy launch day.
The Mallard was designed primarily for glued plywood construction—this satisfied the magazine’s aim to produce designs for the “more experienced, or more ambitious, builder”—but would also be suitable for cold-molding or strip-planking.
Although Jenny Bennett, the magazine’s editor, agreed with Andrew’s view that a gunter sloop rig would satisfy both the “sailing performance” and “traditional look” criteria, she also asked him to produce an alternative lugsail design. Ideally the mast for the lug version would have been unstayed and stepped through the forward thwart, but a further requirement was that the mast for both rigs be short enough to be stowed inside the boat when trailering. To do that without reducing the height of the sail plan, the mast was stepped on top of the forward thwart with shrouds to support it. This caused difficulties which Andrew foresaw and which the magazine’s own tester wrote about after sailing the prototype: “The problem is that the stays can interfere with the ability of the yard to swing well out or even forward of the mast when running.” A few years later Andrew had a specific request to design a cat rig for the Mallard (his Coot is also cat-rigged). The cat rig looked good and put the mast farther forward, opening up space in the cockpit for passengers. Adding mast partners at gunwale level close to the bow also allowed the forward rowing position to be used without unstepping the mast.
The mahogany gaff jaws were laminated to give strength to their curved shape. The gooseneck is an off-the-shelf fitting for a Mirror dinghy.
Tim Harrison is an ex-merchant seaman who also worked in the United Kingdom’s Hydrographic office, and when he retired he enrolled in the nine-month Boat Building, Maintenance, and Support course at the Boatbuilding Academy, Lyme Regis, U.K. He decided that while he was there he would build a boat that would be suitable to trailer all over southern England, and to sail with friends, his grown-up children, and his anticipated grandchildren—“real Swallows and Amazons stuff,” as he puts it—and the Mallard seemed to fit the bill. Having previously owned a glued lapstrake boat that he’d helped build, he decided that he would prefer “a smoother hull and a more modernish construction” and therefore would strip-plank his Mallard.
He ordered the plans from Andrew Wolstenholme, and although full-sized patterns were included, he lofted the boat in accordance with Academy course requirements. The package supplied by Andrew included CAD files, and Tim’s course tutors agreed, for convenience’s sake, that he could get the 10 molds CNC-cut by a local company rather than work them up from his lofting. The molds and the 7/8″-thick sapele transom were set up, upside down, on a structure raised to a comfortable working height. A solid sapele hog and a laminated khaya apron were fitted into recesses in the molds. Tim milled Western red cedar into 3/8″x 7/8″ strips and then started planking, a process he found to be relatively straightforward. He started at the sheer and worked toward the centerline, edge-gluing the strips with polyurethane glue and temporarily screwing them to the molds.
After cutting the centerboard slot through the planking and hog, he faired the outside of the hull and covered it with epoxy and 200gm (7-oz) fiberglass cloth. The hull was faired again after the epoxy cured. Tim then laid a 1/8” khaya veneer over the transom, and fitted the laminated khaya outer stem, the sapele 2 ¾″ x 7/8″ full-length keel, and a 1″-thick skeg. All but the top coat of two-part polyurethane paint was then applied before the hull was turned over to begin outfitting the interior structures.
After the inside was cleaned up, it was sealed with epoxy and 200gm cloth. The ¾″ plywood centerboard box was fitted, followed by the six ¾″-thick sapele floors to support the cockpit sole. The khaya gunwale cap was glued up with three sections: one inside the hull, one outside, and the third across the top. The top piece couldn’t be curved by edge-setting; it was cut to shape to match the plan view shape of the sheer. The completed cap gives the appearance of coming from one piece of 1 ¾″ x 1 1/8″ timber. Tim set a ¾″ x ½″ rubbing strake just below the sheer and painted the space between these two khaya strips red to give it the look of a sheerstrake above the white hull.
Originally, after some debate as to whether the Mallard should have side seats aft or whether people would prefer to sit or kneel on the floorboards to steer, Andrew included the seats in his drawings on the basis that individuals could always choose to leave them out. Tim opted to fit them along with the three thwarts, two of which would provide rowing positions, all in 7/8″-thick khaya.
Other khaya pieces included the hanging knees, lodging knees, and breasthook—all 1″ thick—and the centerboard trunk cap. Douglas-fir served for the floorboards and the mast; the boom and gaff are spruce. Tim made the sail himself—with the help of most of the other students—as part of the Academy’s five-day sailmaking course.
Finished with her first sea trials, TUCANA makes good speed on the return to the harbor.
As I drove into Lyme Regis on the morning of the Academy’s Launch Day I saw that, as forecast, there was a blustery breeze blowing from the east, straight into the harbor. I wondered how many of the seven new boats would venture out onto open water and if any of them would manage to sail. Tim’s Mallard, christened TUCANA, was the only boat to do both. Initially Tim and his crew Peter Holyoake, who also helped him throughout the build of the boat, rowed TUCANA out of the harbor and alongside a pontoon where they hoisted the sail. They then enjoyed a lively sail in the choppy waters of Lyme Bay. Tim is an accomplished dinghy sailor and he controlled the boat well, frequently planing downwind and occasionally spilling the sail going upwind. Not surprisingly TUCANA shipped some water, which Peter bailed out. Before launching, Tim told me that he might “scandalize” the sail to depower it when running back through the narrow harbor entrance, and I was slightly surprised to see that he did so by raising the boom with the topping lift. When he got ashore I suggested it might have been better to lower the outer end of the gaff and he agreed, but said that the peak and throat halyards were made off on the same cleat and he was worried that Peter might have inadvertently let everything go.
After a wet and wild maiden voyage, TUCANA brought her builder and crew safely back into the harbor.
Safely back in the harbor, Tim seemed to want to adopt a “quit while you’re ahead” strategy, but I persuaded him to have another sail with me, although we agreed that this time TUCANA would stay in the harbor. I took the tiller and immediately felt that she was exciting but controllable, although there was a bit of play in the rudder and tiller. (It would have been surprising if there were no teething problems and this was a very minor one.) It felt natural to sit on the side seats, and I am not sure if it would have been particularly comfortable kneeling on the bottom boards. Just as we started to tack, I noticed that the tiller had been mistakenly set above the mainsheet traveler rather than under it. Inevitably this meant that the rudder lifted off its pintles as we tacked through the wind, which resulted in a few moments of unwelcome excitement as I reached over the transom to replace it and get the tiller where it belonged. We were soon enjoying some more fun reaching in the harbor before returning to the shore.
While the builder mans the helm and the sheet, the crew keeps his weight aft and is ready to respond to gusts.
If I had been Tim, I’d have thought twice about sailing TUCANA in those conditions in Lyme Bay on her maiden voyage, especially when so many other sail-and-oar boats were staying inside the sheltered harbor and none were hoisting their sails, but the new Mallard met the challenge head-on and offered many pleasant surprises.
Nigel Sharp is a lifelong sailor and a freelance marine writer and photographer. He spent 35 years in managerial roles in the boat building and repair industry and has logged thousands of miles in boats big and small, from dinghies to schooners.
Mallard Particulars
[table]
Length/12′
Beam/5′
Draft, board up/6 ½″
Draft, board down/3′ 1″
Sail area/83 sq ft
[/table]
The cat rig
The gunter sloop rig
Andrew Wolstenholme, designer, notes: “The stays are no problem with the gunter rig but less than ideal with the yard of the lug rig—the boom is OK but the yard has to swing in the narrow gap as the shrouds are closing on the mast toward the head. I have now drawn a longer, unstayed, hog-stepped mast for those keen on the lug-rig sail plan. I am generally not keen on that lug rig—too much of a compromise. The cat rig was designed for an early customer who had his Mallard professionally built and is a larger version of that on Coot with a proper high-peaked gaff rig with peak and throat halyards. A high-peaked lug rig similar to the International 12 would work well on that mast but I have not yet drawn it. For Coot and Mallard I suggest that boats sailing in open water should fit shrouds as preventers to stop the mast whipping in the event of hitting powerboat wash (irregular waves) when running or reaching in a breeze, and I see that the Lyme boat in this review has these. Otherwise just a forestay is fine as with the normal catboat rig.”
Plans for the Mallard are available for £110 (approximately $175) plus shipping. Jordan Boats will also develop kits for the Mallard subject to demand.
Is there a boat you’d like to know more about? Have you built one that you think other Small Boats Monthly readers would enjoy? Please email us!
ZO Boats is a new company started by Bill Koffler and Scott O’Connell, partners in Aquidneck Custom Boatbuilding, a company specializing in high-tech composite construction. [Note: This review is now archival material. The company is no longer in business.—Ed.] Involved in modern yacht construction for many years, they came up with a decidedly simple idea for ZO Boats: to offer small-boat kits that allow the novice home builder to produce professional results. The boats were to be as simple to use as they were to build, with no sacrifice of performance or beauty. Dave Walworth, a naval architect, drew up the designs in collaboration with Bill and Scott and now ZO Boats offers three models: the goZO, an 8′ pram designed for the true beginner; and the rowZO and sailZO, both versions of a 15′6″ flat-bottomed skiff design. I was lucky to have a morning with Bill, rowing and sailing the sailZO in the waters around Bristol, Rhode Island.
The sailZO is a 15′8″ double-chined skiff with a beam of 4′5″, designed to perform well under both oar and sail, carry three adults, and afford a couple or a small family the opportunity to explore coastlines and lakes, whether for an afternoon, or an overnight camp-cruise. The boat has three thwarts, each with a set of rowlocks, as well as a bow seat and sternsheets. With the centerboard and rudder retracted, the hull draws mere inches and under oars can poke into backwaters and glide over shoals. For sailing, the boat uses a simple free-standing lug rig stepped through the forward thwart. This was chosen for its ability to generate ample power while keeping the center of effort low, and to complement the traditional look of the boat. A high-aspect-ratio centerboard is enclosed in an unobtrusive trunk that spans between the second and third thwarts. The rudder is a kick-up type and steering it is accomplished by means of a continuous rope which passes through fairleads in the frames around the interior of the boat a few inches below the gunwale. The ends of the steering line pass through the transom and are made fast to the rudder’s yoke. This arrangement enables one to steer from anywhere in the boat.
courtesy of ZO Boats
The kits include all of the precision cut okoume plywood parts for the boat—including foil-shaped rudder and centerboard blades—and for the strongback, with legs to bring it up to a convenient working height.
There are two kits available, basic and complete. The basic kit includes all the plywood parts needed to build the hull, including seats, centerboard trunk, and rudder. The supplied hardware includes screws, binding wire, pivots for the centerboard and rudder, as well as copper tubing and a flaring tool to make up the steering-line fairleads through the frames. A plywood building jig, as well as a scarfing clamp, are included. All plywood parts are CNC cut and ready to assemble. The long pieces require scarfing, but the joints are precut hook scarfs, and in conjunction with the scarf clamp, result in precision joints without much fuss. The planking is sprung over the frames, stem, and transom—all aligned on the jig—and secured with screws. Bill assured me that their precision-cut planks require no trimming or bevels, and that the planks lie nicely over the frames right out of the box. He did mention, however, that an occasional wire stitch does help with the alignment, but many fewer stitches are used than in typical stitch-and-glue construction. Once the planking is in place, the seams are joined with epoxy fillets inside and out, and the whole hull is coated in epoxy. The kit includes 6-oz fiberglass cloth to give the exterior abrasion resistance and stiffen the hull.
courtesy of ZO Boats
The sailZO’s frames are placed in slots in the strongback (covered by tape) and supported by molds that extend to the floor.
After the hull is lifted from the building form and turned right-side up, the precut seats and other interior plywood parts are fitted using the same technique applied to the planks. Solid wood parts are not included, and lumber for the breasthook, rubrail, and oarlock pads to finish the hull must be procured by the builder. Plans for the sailing rig are also included in the basic kit, but the builder must supply his own stock and hardware for the mast, boom, and yard, as well as the sail and all hardware and running rigging required.
courtesy of ZO Boats
The hull is quite stiff after being glued and glassed; once it is off of the jig it will keep its shape without spalls to hold the beam.
The complete kit is includes all of the parts in the basic kit, along with a complete set of spars, sail, and all lines; two pairs of spoon-bladed oars and related fittings; and all hardware necessary to complete the boat, except for solid wood trim parts, epoxy, and fastenings.
John Robson
The light weight of the sailZO makes launching and retrieval easy, even when it can’t be floated off and on the trailer.
Bill and I trailered the sailZO down to the ramp and launched it into Bristol Harbor. The tide was low, and we didn’t have quite enough ramp to float it off the trailer, but this wasn’t a problem because the hull only weighs 150 lbs. A quick push freed the boat from the trailer bunks and left her floating in less than 6″ of water. Her narrow bottom had me slightly concerned when I first clambered aboard and took the forward thwart, but the sailZO proved to be quite stiff.
Bill gave one good push as he boarded, and the boat glided nicely out of the shallows as he settled in to the stern rowing position. We shipped the Shaw & Tenney spoon-blade oars and started pulling for open water. The boat had other ideas, and turned 90 degrees into the mild breeze within a few strokes. Unlike the rowZO version, the sailZO has no skeg aft, and directional stability was, well, anything but. The remedy was a simple one: we dropped the centerboard a few inches and set off again. The boat tracked true and straight, regardless of wind direction. Bill mentioned that the rudder was also very useful in helping the sailing hull track under oar, noting that friction from the steering line gave just enough resistance to hold the blade in proper orientation once set.
John Robson
The sailZO has three rowing stations and can be rowed with one, two, or three people at the oars.
My tandem rowing skills were a bit rusty, but a few off strokes aside, we had a fine time rowing through the anchorage. The boat is both fast and agile; the light weight allows her to respond quickly to each stroke. Rowing on my own was also a rewarding endeavor. The sailZO is a nice size for two, but certainly didn’t feel too big for one, either. In general, she gave us no surprises and performed well under oar power.
We returned to the beach next to the ramp and stepped the rig while the bow was nestled in the sand. The sailZO’s balanced lug rig is a thing of simple beauty, made up of the sail and three short spars—mast, yard, and boom—all of which fit in the boat for trailering. The sail is stored rolled around the boom, and its head left bent to the yard. To rig the boat, the free-standing mast is stepped through the forward thwart. The halyard is made fast to the yard, and then the yard is loosely affixed to the mast with a parrel. The sail rolls off the boom as the halyard is hauled. Once the yard is raised peaked, a second parrel holds the boom to the mast. Finally, the downhaul is tightened, and the two-part sheet is run through a block on the boom. The whole operation is very simple, and, with a little practice, very quick.
John Robson
The author goes along for the ride as ZO Boat’s Bill Koffler, seated amidships, manages the sheet and steers with the tiller lines.
Once rigged, we pushed off yet again. This time I took up station in the sternsheets, while Bill chose the thwart forward of the centerboard trunk. Bill let the sail luff while I worked the lines to lower the centerboard and rudder. The centerboard is unweighted, and requires one line to pull it down, another to raise it.
John Robson
The rudder is controlled by a line threaded through the transom and frames, allowing the boat to be steered from any position in the boat.
The rudder blade is deployed by a single line; pulling the line lowers the blade, while a bungee loop raises it when the line is released. With the rudder line that runs the perimeter of the boat, the sailZO can be steered from either side, or from both sides simultaneously if two hands are used. A push forward on the line will cause the boat to steer toward that side.
John Robson
The spars included with the complete kit are spruce and made by Shaw & Tenney. Leathers on the yard and boom protect the mast’s varnish.
Bill sheeted the sail in and we spirited away on beam reach, slightly erratic because of my unfamiliarity with the steering system. The breeze was mild, perhaps 8 knots or so, but the sailZO responded nicely. It was quick to accelerate, and somewhat quick to heel, though it hardened up well as we pressed along. Its narrow beam makes live ballast essential, and we both scooched to windward a little as she picked up speed.
The sailZO handled well on all points of sail, although Bill, in his forward seating position, did get a little wet while beating into the breeze through the harbor chop. For me, the most difficult part was the steering line, which demanded most of my concentration in order to keep the boat going straight in the direction I wanted to go. Like all things, I’m sure I would get better with practice. I’m also sure that the rudder design could be easily modified to include, or be replaced by, a traditional tiller. Although I did find it tricky, I will also say that it does open up some wonderful possibilities in small boats. Bill and I were able to hand off the steering and sheet to each other without changing position during our sail, and I think once mastered, the rudder line increases the number of tasks that can be performed safely while underway, as well as allowing a solo skipper more trim choices on different points of sail.
All in all, the sailZO is a right smart little boat that can be both built and sailed with an easily attained level of skill and effort.
Christian Smith is a third-generation boatbuilder, and a circumnavigator, chainsaw artist, and general Renaissance man who classifies himself a “new old-school Yankee.” He founded the New Bedford, Massachusetts-based youth boatbuilding program Greenfleet, and he cures his own bacon.
sailZo Particulars
[table]
Length/15′7 ¾″
Beam/4′4 ⅝″
All-up weight with rig, oars and sail/230 lbs
Sail area/61 sq ft
Draft/4″
Draft, board down/ 2′ 3 ⅝″
[/table]
Editor’s Note: 8/21/20 The ZO boat website is no longer active and the company is presumed closed.
Is there a boat you’d like to know more about? Have you built one that you think other Small Boats Monthly readers would enjoy? Please email us!
The Chesapeake Bay is full of islands, though most are only technically islands. Most are separated from the mainland by narrow creeks and marshes and connected by permanent bridges, so they don’t feel like islands. Surprisingly few are true islands at some distance from shore, and fewer still are places people call home; people have lived on Smith and Tangier islands for centuries, since the earliest Europeans sailed up the Bay.
From the end of the town dock, at the end of Main Street in Crisfield, Maryland, you can’t actually see Smith Island. You will think you can. Refraction makes the trees and houses of that place float above the horizon in a shimmering line. Sometimes it’s sharp and clear, others it’s a smudge of smoke that comes and goes as light and air change throughout the day, and still others it’s just a ripple at the waterline.
all photos and videos by the author
The fleet leaves Crisfield for the crossing to Smith Island.
You can see Tangier Island from Smith in this same way. The two islands are really just exposed parts of a single island mostly submerged. Six miles of shallows connect them, with water so thin you could almost wade from one to the other at low tide. The shallow flats are a garden of sea grasses, and that garden makes this one of the best places on earth for blue crabs. From the southern end of Smith, telephone poles march resolutely across the flats and over the horizon on the way to Tangier, linking the two. When a curtain of rain or fog closes off the distance, the poles are a reminder to each island that the other is still there.
We tack down and out the narrow canal that separates Janes Island from the Maryland mainland, come about leaving the mouth of Crisfield’s harbor, and then fan out across Tangier Sound. By mid-afternoon, five boats are scattered across the sound headed for Smith Island—two Joel White Marsh Cats, an Iain Oughtred Sooty Tern, a Howard Haven 12 ½, and a John Welsford Navigator, all hand-made, most of them owner built.
Tangier Sound has a bad reputation among the locals. With a long north–south fetch, conditions can change quickly. There’s a deep, steep-sided trough down the middle of it over an ancient and submerged Nanticoke River bed, and shoals line both of its sides. Rolling waves build up coming down the trough, then pitch fits when they collide with the shallows. We’ve set aside five days for the trip to account for bad weather. In the Middle Atlantic region, weather systems tend to blow themselves out in 24 to 48 hours. With a big enough window between them, a couple of days’ good sailing is almost guaranteed.
Today is an easy sail across, with a light southerly breeze at slack tide, though a storm front is expected sometime tomorrow. Heading due west, we follow smudges of the island that come and go; when in doubt, we aim for buoys, lights, and day markers. Halfway across, the wind fades and the sea turns a slick, burnished brass in the afternoon light. The wind returns, light but steady, and holds for the rest of the crossing, and all five boats converge again near the island.
Spotting the mouth of the main channel, known as the Big Thorofare, is a challenge. Land here is so low there’s little difference between what is water and what is not. And Smith isn’t a single big island, it’s a spatter of small ones, hundreds of them. It’s an archipelago of marshes and winding creeks that disappear and reappear with tides. Salt grass and shoals stretch out for miles north and south.
The low-lying land of Smith Island keeps it well hidden from the mainland some five miles away.
Once in Big Thorofare the water is wide, though the channel is not; depths marked on charts are overly optimistic. A rising tide helps here. With few landmarks tall enough to rise above the grass, straying from a marked course could easily get a stranger lost. All the creeks look the same so it’s good to steer by GPS or compass, and to have a shallow-draft boat.
The two Marsh Cats—Kevin MacDonald’s LITTLE T and Pete Peter’s OBIDAIAH— are in their natural element here. They’re wide, flat-bottomed, stable, and heavy and stable, with tall rigs that reach above the grass to catch the wind. The Sooty Tern—Eddie Breeden’s UNA— is graceful and nimble as a dancer, and glides along effortlessly. Kevin Brennan’s Navigator SLIP JIG is a biggish small boat; though it weighs only 300 lbs empty, it may be the most versatile in the fleet. Mike Wick’s JACKAROO is a Haven 12 ½ weighing over 1,409 lbs. With a deep keel and a fine bow, she’s the best suited of all for a rough crossing in steep chop, but here must pick her way carefully: though drawing only 1½′ with the board up, half the water within the island is less than that at low tide.
UNA and LITTLE T take advantage of the breeze in the Big Thorofare.
Once we’re in the main channel, the course bends to the northwest past the wreck of an old fish house hard aground at the edge of the marsh grass. Houses on the island are built like boats, by boatbuilders, and often meet the same end; undone by seas and storms, they’re left to crumble where they fall. Two miles in, the water opens up in a broad shallow basin. This is North End Bottom, a big beating heart at the center of the island, a mile wide, that pulses with tides and boat traffic.
On Smith Island there are three villages clinging to hummocks of land, separated from each other by marsh and water. Ewell and Rhodes Point are a mile and half apart. They are connected by a single-lane road that wobbles between them, when the water isn’t high, built on a bed of mud dug from the marsh. Tylerton is set off on its own to the south, accessible only by boat. All three are within sight of each other, and this helps diminish the sense of isolation.
At day’s end, the fleet rafts up for dinner at North End Bottom.
At North End Bottom we turn south toward Tylerton, tacking into a gentle current, sailing now for the pure pleasure of it. The light and the wind are fading quickly; we cross tacks in close quarters along the marsh until we run out of both. We anchor at the main intersection of North End Bottom, Tyler Ditch, and Big Thorofare, well outside traffic lanes, in the lee of a spoil heap covered with grass and seabirds.
LITTLE T, SLIP JIG, and UNA sort themselves out for spending the night at anchor in the lee of a ridge of dredge spoil.
This long hill of sand, dredged from the channels and piled high, is undoubtedly the highest point of land on the island, and good protection from the wind. The sun goes down and lights of the three villages twinkle on. It’s a beautiful night, with little to compete with stars overhead. This far from civilization, surrounded by shoals, there’s no disturbance from speedboats or commercial shipping wakes. Watermen go to bed early, so it’s quiet here. Laughing gulls and oystercatchers call all night; in the morning, a loon.
Waterways are the real roads on Smith Island. Not only do you reach the island by boat, but you must also travel within it by boat, as well. Laced with creeks, canals, guts, and ditches that intertwine from one end the other, these equate to busy avenues and side streets on the mainland. Names like Big Thorofare and Little Thorofare make the analogy obvious. Before dawn the watermen rumble out in big diesel-powered deadrises to tend their crab pots. A small private ferry comes in with mail, supplies, and some passengers.
After coffee, we up anchor one by one and head down Tyler Ditch, an inelegant name for such a pretty place. Tylerton lies at another big water intersection. To port is the working harbor; to starboard Tyler Creek, the main avenue that leads south to the crabbing flats, and beyond that to Tangier. Everything—houses, churches, a general store—is built a few feet back from high water, or over it. Crab shacks, where peeler crabs are tended until they shed their shells, extend out over the water on spindly poles. Boys here learn to row before they can ride a bike. Young girls trade dreams of horses for outboard skiffs that gallop through pastures of cordgrass and rushes.
UNA and LITTLE T tack up “main street” past Tylerton.
Barriers of water make distances more pronounced. Though related by history and a common ancestry going back centuries, each village on Smith Island has a unique character and residents identify strongly with the one they are from. Each has its own Methodist church, though they share a minister. Tylerton is detached from the others, and perhaps the most independent and self-contained, an island unto itself. Ewell is the largest, almost a town, and has done the most to welcome visitors with a ferry landing, some restaurants, and places to stay. Both Tylerton and Ewell are compact and cohesive. You could lift them up and set them down anywhere, and they would still hold together.
JACKAROO and SLIP JIG leave Sheep Pen Gut, headed for Ewell. The deadrise next to the shack is typical of the Smith Island workboats.
The village of Rhodes Point is on the west side of Smith. The smallest of the three, it looks worried. We reach it heading west from Tylerton into Rhodes Point Gut. At the bend we turn north into Sheep Pen Gut and coast downwind in light air, in a thin piece of water little more than a ditch that serves as Main Street to the village. Strung out in a long line, the houses face the gut, and across that a low marsh. Beyond the marsh you can see the broad waters of Chesapeake Bay. It feels exposed and tenuous here, like the gut is a moat and the marsh a door mat between the village and an ill-tempered landlord. Some houses have been lovingly maintained, shining with fresh paint. Others are in dire disrepair.
We pass a working boatyard, surprisingly large for such a small place. Watermen patch up last year’s abuses and prepare for the soft-shell crabbing season, which opens in a few days. Further on, women and kids stand on a dock with cameras and take photos as we pass. It’s so quiet we converse easily across the water. They say they’ve never seen anyone sail up their ditch. The view of our sails gliding past in the morning light clearly delights the group. There’s an appreciation for classic old boats in this place. A man hollers from a crab shack, saying we picked a good time coming through on the flood tide, which he pronounces “toyd.” “At low toyd,” he says, “’at ’ere ditch is all mud.”
JACKAROO needed the outboard to pick her way through the shallows.
A church, looking starched and pressed, more houses, crab shacks to port and starboard. Crabbing skiffs and workboats parked in slips like pickups in suburban driveways. Out the north end of Sheep Pen Gut it’s a mile jog up the Bay to the channel entrance for Ewell. A pair of long rock jetties protecting the harbor extend nearly half a mile into the Bay, like the pincers of a crab claw. They’re low, covered with water at high tide, and we almost don’t see the near one until we’re right on top of it; we veer wide at the last minute to swing around. Inside, what is marked on the chart as marsh is now open water, though shallow. We cut straight across with centerboards up, shadows of the boats visible on the sandy bottom. The Haven 12 ½ runs aground, unshipping the rudder. Mike drops sail and turns back under outboard power.
OBADIAH and SLIP JIG arrive at the canoe dock in Ewell.
Ewell has a main street of water, too. We cruise the waterfront looking for a place to dock, and for Ruke’s, a seafood restaurant famous for crab cakes and fried soft-shell crabs. Opposite an island that appears owned by feral goats, we find a canoe and kayak ramp between workboats and crab shacks, with new docks on either side to tie up. A man says hello, says Ruke’s is closed, as are all the restaurants until the weekend when the season officially opens. He offers to walk with us to the one place we can get lunch: the post office.
The town is quiet. He leads us along narrow streets, down alleys and, when those give out, across bouncing plank catwalks that span the wet spaces between backyards and lots paved with oyster shells. The restaurants are on piers, as is a hotel and the island museum. Houses, too, are built on piles, some with front yards of brackish water.
We arrive at what is indeed a post office, and general store, and café with tables out on the docks. Inside we find the family who photographed us in Rhodes Point, happy to see us again. The shelves in the store are mostly empty, and the food not famous, but we are glad to have it, and glad to have a table looking out on the water. Workboats go by—deadrises stacked high with crab pots. A fuel barge pushed by a tiny tug makes the turn into the harbor and glides past.
Water is God on these islands: It giveth, and it taketh away. Marginal places like this are the most fertile. The water around Smith and Tangier has provided a livelihood for people since the 1600s. Crab, oysters, fish, fowl, and fur have been harvested in astounding volumes. Proximity to the fishing grounds is what made the islands a desirable place to live, but Smith Island has lost over 5 square miles to the same water over the last century, succumbing to erosion as the water rises and the land subsides. Water covers some streets here during spring tides. Holland Island, to the north, once a thriving third inhabited island like Smith and Tangier, is now completely gone. The population is eroding too, dropping by a quarter between 2000 and 2010.
Neither God nor water are ever far from minds of the people who live here. Over crab cakes and fries at the post office we chat with the man who met us at the dock. He grew up on the island, and his family have been islanders for generations. He now lives on the mainland. He says there’s never been any formal government on the island. The church always served in its stead, the place where news is shared and decisions are made collectively. He relates the story of a new minister addressing a “crime wave” that involved a stolen bicycle. That’s the extent of crime on the island, apparently. He adds that it’s very hard to use a stolen bicycle on an island that only has two roads and fewer than 300 people. There is no alcohol served anywhere on Smith or Tangier, which probably plays no small role in keeping trouble at bay.
Still, in a place where passions run high, and extended families are large and related, feuds are not unheard of. Justice can be swift and harsh. A sign on Tangier describes an incident where a young man was shot and wounded by an overzealous deputy enforcing a Sabbath prohibition against loitering. The deputy was later himself shot and killed, and the identity of the shooter, likely known to many islanders, was never revealed.
It’s getting late in the day. A text message comes through from my wife, Terri, saying a storm knocked the power out at home. Whatever did that is coming our way. We pay the tab and head back to the boats to cast off for the mainland. We hear on radio the front is approaching from the southwest, with rain and gusts expected to 30+ knots. We tie in reefs and hope to get across before conditions become unpleasant.
The tide has slipped out and the boats touch bottom several times when tacking across the channel of Big Thorofare. Short-tacking into a headwind delays us and gives the wind time to pick up. By the time we turn east we’re in full foulweather gear. We have a crossing that will take at least an hour. A lot can happen in an hour. Waves roll up the sound, it’s spitting rain, and the wind is clocking around steadily from southeast to southwest. Fortunately, we’re in the lee of Tangier and the flats, and they block the long fetch across the Bay.
We have a long, vigorous romp on a broad reach back to the mainland. Whitecaps appear from the south. The wind is not yet dangerous, but building. Those of us delayed by the bumpy exit from Smith stick together, sailing yards apart, but we lose sight of the other boats in the blowing snot. Partway across we meet friends who wisely turn back with us to Crisfield and Janes Island.
By the time the boats are secured and battened down at the docks, the wind is whipping the treetops and rain comes and goes. At a restaurant in Crisfield we watch the storm. The islands have disappeared behind sheets of rain, but we know they’re out there.
Barry Long is a writer, photographer and media-arts professional from the Chesapeake Bay region, where he sails a pair of Melonseed skiffs. He keeps a blog at eyeinhand.com.
Getting there
The town of Crisfield lies due east of Smith Island on Maryland’s Eastern Shore, and is a good base camp for trips to both Smith and Tangier islands. Passenger ferries run to both from the municipal docks most of the year, but check the schedules. Crisfield is a small town with some form of most necessities: restaurants, hotels, hardware stores, etc. At the edge of town is Janes Island, an excellent state park with camping, cabins, bathrooms with showers, docks, and a good launch ramp. The gates are locked after dark, so it’s safe to leave vehicles there overnight. It’s also a popular place for kayaking in the surrounding marshes, and it can be busy on weekends in the summer. Spring and fall are pretty quiet. From the ramp at the park, it’s half a mile down a narrow canal to Crisfield and open water. Though it’s wide enough for small boats to tack upwind, if conditions are not favorable, and rowing or motoring is not an option, there are other ramps nearby at Little Boat Harbor, Jenkins Creek, and Somers Cove Marina in Crisfield’s harbor. Some are free; some charge a small fee.—BL
If you have an interesting story to tell about your travels in a small wooden boat, please email us a brief outline and a few photos.
In the southeast part of Norway lies the beautiful little village of Stavern. Once a thriving community where fishing was the main source of income, today the town hosts the country’s largest collection of once dominating double-ended motor boats called Sjekte. The sjekte is a local name for the more common snekke boat type.
Most of the sjektes of Stavern wear manila rope fenders that serve to both adorn and protect the boats. It is said that during whale-hunting days, discarded towing lines were put aside by crewmen aboard the whalers. In their spare time, they used these spent lines to produce fenders according to the following design. The design is both simple and effective, and fenders can easily be made at home. There are many theories on how to hang them, their proper size, etc, but the following is my take on how it should be done, based on 30 years of scrutiny of the authentic fishing boats residing in the Stavern Canal.
Opening photo by Paal O Solberg. All other all photographs and drawings by the author
All of the sjektes in this harbor are outfitted with traditional rope fenders.
Before the advent of nylon, natural fiber was the only option when purchasing rope for mooring. Rope could be made from grass, hemp, or other materials. Today manila is more or less the only classic rope available in Norway. Any well-stocked marine supply store should be able to provide the correct rope for the fenders, but prepare to open your wallet. Fenders should be sized proportionately to the boat. Fenders that are too large or too small will not look right or work properly, so rope diameter is critical. The “calf” is the core of the fender, and its length determines the final overall length of the fender. The calf is cut from the same diameter rope as the strands that will be used to braid the fender. The following table of has guidelines for selecting the correct size for sjektes.
The grading by the number of dry planks—strakes that are above the waterline when the boat is moored—is a local traditional measure of freeboard. The planks are typically about 5″ to 7″ wide and freeboard ranges from 15″ to 20″.
The rope’s diameter must be carefully proportioned to the length of the fender. If the rope is thicker than necessary for the fender’s length, or if the fender is too short for the rope used, the fender won’t lie properly against the outboard profile of the boat.
The length of each fender is matched to it position on the boat so that they all come about 3″ from the water no matter how much freeboard there is at its location. It is important that the fenders not be tightly woven. They must be loose enough to bend around the sheer and hang straight down.
There may be many ways to hang a fender, but the distance from the end of the fender to the surface of the water is the most important factor. The bottom of the fender should be about 3″ off the surface of the water. Higher than that and the fender may be pushed up out of position by the neighboring boat when moored; lower and the rope will start to wick water, causing the fender to rot prematurely. The fender’s first splice, called the crown, should rest on top of the washboard or side decks, just inboard of the rub rail. As the fender stretches over time, its eye can be pulled in farther to keep the lower end at the correct height, but there is no point in having the thick part of the fender protecting the side deck. Rigging the fender like this may jocularly be called “preparing for helicopter landing.”
For an average fender, you need 14′ to 16′ (4 to 4.5 m) of rope for braiding. In addition, you will need 16″ to 20″ (0.4 to 0.45 m) of rope for the calf at the core. A typical sjekte of about 23′ will carry eight fenders with an average of 15′ of line per fender; roughly 120′ of rope will be required in total. You will need 1/16″ marline or whipping twine for the ends and other uses. You may choose to use nylon or modern fiber for the calf; it will be completely covered by the braid and consequently no one will spot it.
Start by measuring for the fenders. It is common to have two different lengths, longer fenders forward where the sheer is higher, and shorter ones aft. Cut the calf to the appropriate length. If it is your first attempt, be prepared for the eventuality that the first fender may end up on the wall of your den instead of on the boat. Do not cut all your rope to length before starting to splice your first fender; you may wish to adjust lengths as you go.
For a calf of 18″, cut the rope for the eye and braiding at 16′. Find the midpoint. Bend the rope in half to make an eye, about 3″ to 4″ in length. Use a length of marline to seize the eye, nice and solid with 8 to 10 turns. Unlay both free ends of line up to the seizing. Tape the strand ends to prevent them from unraveling. The unlayed strands will make the rope look like a six-armed octopus.
Cut a suitable length for the first calf and whip both ends. Feed two 2′ lengths of marline in between the strands just below one whipping. Pull them through the calf strands until you have four loose 1’ strands of marline at one end of the calf.
A simple whipping
If you’re right-handed, hold the calf in your left hand. Put the octopus on top of the calf with its imaginary “beak” pointing down. (Note: Anyone who has read 20,000 Leagues under the Sea knows where the octopus has its beak. If you didn’t read it, do so before continuing!) Pull the calf’s marline lines over the whipping of the main rope and make several turns around the whipping.
Then secure the marline ends together with square knots, pulling them as tight as possible. This is essential to keep the calf secured inside the fender, preventing it from breaking loose and thus allowing the fender to sag in a year or two.
Hold the calf with your left hand again. Lift the strand to the left of your thumb around the thumb and over the next strand to the right, as shown in sketch.
Lift the second strand over the first and third.
Continue like this around the fender.
In the end there is just one strand left.
That last strand goes down through the starting loop that you first laid around your thumb.
Tighten the strands evenly and in many steps, until you have a symmetrical crown around the eye. Twist the individual strands as you pull to counteract the tendency for the strands to unravel.
Now, turn the fender upside down. You can now hold onto the eye in the same manner as you first held the calf.
Repeat the procedure as you did with the first full round. While the first crown brings the strands parallel with the calf, the second crown, and all subsequent crowns, will result in the strands pulled outward from in between crowns and at right angles to the core. Make sure to tighten all the strands equally.
Repeat the procedure ad nauseam. If you lay the strands counterclockwise around the calf every row, you will see a spiral pattern in the braiding when it is complete. I prefer to switch direction between each layer, alternating between clockwise and counterclockwise layers. The resulting braid looks quite different, but the function of the fender remains the same.
After 22 turns, more or less, you should have covered the calf all the way to the lower end. If you were careful tightening the strands equally, all the remaining strands should be about the same in length and there should be about 10″ of each strand left.
Finishing is very simple. Collect the strands below the calf and put a solid whipping over all of them below the lower end of the calf. This is a utilitarian work-boat fender, so any elaborated braiding to finish it looks out of place. This whipping should be sewn tight and is best done with a sailmaker’s palm and needle. Cut all the strands about an inch below the dressing, spread out the fibers, and voilà! You’re done.
When made and installed properly, the fenders will protect the sheer and resist riding up out of place when boats jostle against one another.
Braiding your own fenders is hard work—don’t plan for more than one or two a night—but the satisfaction of hanging your own fenders lingers on for a long time.
Lars Solberg is an engineer living in Stavern, Norway. This article is an excerpt from his recently published Sjekteboka. An English version, Sjekte Book, is in the works for publication in 2016.
You can share your tricks of the trade with other Small Boats Monthly readers by sending us an email.
The Matsu I tested was sized to fit my disproportionally large chest and feet; the loose fit elsewhere was scarcely noticeable once the excess air was “burped” out through a gasket.
One of the great things about Puget Sound, my home waters, is that you can go boating in the middle of winter—the temperature of its waters is never far from 50°F. One of the not-so-great things about the Sound is that when you go boating on in the middle of summer the temperature of its waters is never far from 50°.
Many years ago my father was sailing a small boat far from shore when he capsized. The skipper of a cabin cruiser motoring nearby had seen the boat turn turtle, pulled up alongside, called out “You know you can only live 15 minutes in that water,” and then hauled Dad aboard. If you wind up in 50° water, dressed in street clothes as my father was, you may last longer than 15 minutes, but if you aren’t able to recover from a dunking on your own or get rescued, your time is as good as up. In short order your thinking will get muddled and your hands will become almost useless.
A drysuit, combined with insulating layers worn underneath it, can protect you from the detrimental effects of cold water. You’ll be much more comfortable in one made with waterproof/breathable material that can transfer moisture from your skin to the outside and keep you much drier than one made of non-breathable material, but the cost of such drysuits—from $700 to $1,000—may be prohibitive to many. Mythic Gear set out to lower that price barrier and now offers drysuits in a range of $250 to $395.
Mythic’s drysuits are made only in stock sizes, one of the ways of keeping the price low. The Matsu model I reviewed was an XXL, the size I needed to fit my 49” chest and my size 13 feet. An XL would have been a better size for the rest of me, but the extra fabric wasn’t much of a problem; the loose fit provided plenty of room for insulating layers underneath and enough slack for a free range of motion. The Matsu has an adjustable elastic waist cord to keep it from drooping, but by squatting or wading out into the water, I could bleed extra air out of the suit by lifting the edge of a gasket, and with the suit a bit “vacuum packed” around me, it didn’t feel at all bulky.
Even with most of the air intentionally vented while in the water, the Matsu still offered plenty of warmth, buoyancy and a full range of motion.
The Matsu, like other Mythic suits, doesn’t have all the details often found in other, more expensive drysuits— multicolor styling, pockets, reinforced seat and knees, and Velcro-cinched overcuffs at the ankles, wrists and neck—but the basics are all there. The sewing is first-rate, and the seams are all backed up by heat-sealed tape. The latex gaskets are supple and stretchy and, as expected, just needed a bit of trimming to customize the fit. The neck gasket has a pronounced bulge molded in; with the extra material I could turn my head to look over my shoulder without having the gasket tug at my neck. The integral socks have an extra layer of Oxford cloth and are seam-sealed inside and out, nice touches for an area susceptible to wear. The waterproof entry zipper does its job of keeping the water out. While a short relief zipper is a feature on other Mythic suits, there isn’t one on the Matsu. I didn’t miss it—I have a relief zipper on one of my other suits and I rarely use it.
Floating in a drysuit, even in cold water, can be as relaxing as resting on a waterbed, but my bare hands chilled quickly and became painfully cold, in sharp contrast to the comfort provided by the Matsu suit.
When I took the Matsu for a dip in Puget Sound, the water was painfully cold on my bare hands but, the drysuit did its job well, keeping water out and warmth in. I had a full range of motion for my arms to swim. The water-repellent treatment on the outer laminate of fabric does a great job shedding water, allowing the fabric to breathe better and reducing evaporative cooling when exposed to the wind.
At $325, the Matsu has a price that should encourage more boaters to invest in a piece of equipment that provides comfort and safety in foul weather and cold water.
UPDATE: 12/12/19 Mythic Gear’s web site URL is no longer valid and it appears that the company is no longer in business.
Mythic Gear has a one-year warranty for its drysuits and sells the Matsu for $325.
Christopher Cunningham is the editor of Small Boats Monthly.
Is there a product that might be useful for boatbuilding, cruising or shore-side camping that you’d like us to review? Please email your suggestions.
A campfire for cooking doesn’t need to be any larger than the pot it’s heating. The Emberlit keeps the fire small and contained, minimizing the impact on the wilderness.
Self-sufficiency is among the many satisfactions of camp-cruising in a small boat, and there’s a very satisfying level of independence that comes with using a wood-burning stove. Emberlit makes a line of lightweight, compact wood-burning stoves that disassemble to fit into a carrying case about the size of a large slice of bread. The stoves fire up with any burnable material at hand; for most of us, that’s small branches, sticks, and even dry leaves. At about 11oz, the weight of the stainless-steel Original model (reviewed here) won’t be noticed by the average boater, but when every ounce matters, a 5-oz titanium model is available for about twice the price.
The stove is constructed of four side panels that link together with slotted tabs around a bottom plate. The sides slant inward—creating a chimney that concentrates the flames—and are topped by two crossbars that provide a stable surface for pots of all sizes. Assembling the stove is easy and takes just one minute.
The stove pieces slip together with slotted tabs. Taken apart for packing, they occupy very little space.
Over the years I’ve used a number of white-gas and alcohol stoves and some tend to flare up frighteningly, while others run out of fuel at inopportune moments. I found the Emberlit to be comforting and straightforward. Because it’s essentially a tiny, enclosed campfire, organizing material inside the stove is critical. As with any campfire, small, easily ignited tinder goes in first, followed by twigs, then finger-sized sticks. After getting my fuel arranged properly, I can light a cooking fire with a single match. Once the tinder is burning, larger, longer sticks are inserted through the opening in the front panel and gradually fed into the stove as they’re consumed by the flames.
The Emberlit needs to be tended while cooking, but its wide base makes a stable platform and I never worried that the pot would tip off the cooking surface while I was feeding wood into the fire. Boiling a pot of water was simple and reasonably fast. A high-tech canister stove will boil water faster, but if you’re out camping, what’s the rush? To cook a meal in a pan without scorching it, I had to control the flames carefully by adding just the right amount and size of wood. When the cooking was done, the interior of the stove and my pots were, predictably, coated with soot and needed to be cleaned or wrapped in a rag to avoid soiling other equipment.
Because it can only contain a small mass of wood, if the Emberlit is left alone too long, the coals cool down and take some coaxing to reignite with new wood. While I enjoyed tending the stove, the necessity for constant maintenance might irk some. Just think of the Emberlit as pleasantly “interactive” and a fair trade-off for a cooking system that doesn’t rely on fossil fuels, won’t scar the landscape, and doesn’t consume as much wood as a campfire. I’d pack the compact, durable, and fun Emberlit anytime.
Bruce Bateau sails and rows traditional boats with a modern twist in Portland, Oregon. His stories and adventures can be found at his web site, Terrapin Tales.
Designer Karl Stambaugh found the inspiration for his Redwing 18 design in the Camp Skiff designed by Howard Chapelle.
Dr. Don Lewis liked the looks of Karl Stambaugh’s Redwing 18 from the first time he saw the boat’s lines 14 years ago, leafing though an issue of WoodenBoat magazine. It looked like just the right boat for cruising his home waters on the Rock River in Illinois and poking into the sloughs, creeks, and streams on the fringes of the river. For months the boat slipped into his dreams, and he eventually ordered the plans and set the project in motion. The Redwing was his first boatbuilding project. He had a workshop and woodworking tools, but he needed knowledge and lumber. For the former, he haunted libraries for boatbuilding books; for the latter, his local lumberyard for their best oak boards and sheets of marine plywood.
A month after the plans arrived, he was ready to begin work. The hull went together with bronze screws, thickened epoxy, and fiberglass tape. A year and a half later, the 18′6″ by 6′6″ hull was finished and ready to be rolled upright. The task was accomplished with a pair of plywood semicircles, a block-and-tackle, a truck, eight friends, and a case of beer.
PILGRIM’s 15-hp 4-stroke outboard is housed in an insulated compartment that keeps its noise from interfering with conversations in the cockpit.
With the hull back in the shop, Don installed the cabin, bulkheads, decks, and the engine compartment for the 15hp four-stroke Honda. Fiberglass and epoxy sheathing covered the completed topsides. In the final stages of construction, Don installed kerosene lanterns as running lights. The throttle and shift controls for the outboard were mounted on the starboard side of the cockpit, and the pulley-and-cable steering system was linked to an 18” wheel mounted on the forward side of the soundproofed motor compartment.
The wheel, mounted on the engine compartment, allows the skipper to steer without having his back turned to his passengers.
After PILGRIM was launched, Don reported that she “is a dream to conn.” The boat’s flat bottom provides plenty of stability, a blessing as long as the water is flat, but that high stability likes to keep the hull parallel to the surface of the water, so a bit of maneuvering is required for negotiating big boat wakes. “As long as I turn into the wake, all is fine. I try to meet the waves at 35–45 degrees, and there will be one slap and two-and-a-half rocks, and then we are all calm again. It is sort of a game.” Don and his wife Ann often explore the backwaters that the wake-throwing powerboats avoid. Even with just a 12” draft PILGRIM will run aground now and again, but the hull has enough rocker that shifting weight aft will get the bow unstuck and she can be easily backed off.
Over the years Don has done some additional work on the boat. Her replaced the kerosene lights with a 12-volt system, replaced the seats twice, and made repairs to the wear and tear of regular use. The work isn’t a burden for him: “Repainting and repairing a wooden boat is its own sort of Zen experience.” PILGRIM gets launched every year in April or May and gets hauled out for the winter in October.
PILGRIM sleeps two and is equipped with a galley and a small marine head.
For the summer season that she is afloat, Don and Ann will take her out as often as five times a week. “Every trip is an adventure, whether just a few miles on the Rock River, or putting in at a lake or a different river. If we get tired, we can always toss out the anchor, put on some coffee, have a snack from the little stove, or even take a nap in her comfy berth.” Every time they go out, PILGRIM draws compliments, and equally often Ann says to Don, “This is the best thing you have ever built.”
When the Rock River gets crowded with other boaters, PILGRIM’s 12″ draft allows her to explore quieter backwaters.
Don is a surgeon and a scientist and not prone to stray from demonstrable facts, but says, “I am blessed to be able to buy almost any small boat I want, yet I wouldn’t even get or build another, because that might hurt PILGRIM’s feelings. PILGRIM has a soul.”
Have you recently launched a boat? Please email us. We’d like to hear about it and share your story with other Small Boats Monthly readers.
A century ago Nathanael Herreshoff designed a 16′ keelboat known widely as the H 12½ after its 12′6″ waterline length. She was intended to handle the steep chop and strong winds of the Eastern Seaboard, and to serve as a sailing trainer for the young men of the Buzzards Bay Yacht Club. The late Joel White drew a shoal-keel version of the H 12½ that proved even more widely popular than the original, despite the fact that, with carvel planking on steam-bent frames, it is not generally regarded as an easy boat to build. John Brooks, after many requests from his students at WoodenBoat School, drew up plans for a glued-lapstrake version, and in 2002 launched RED SKY, the first Somes Sound; eight years later he offered his plans for sale. When I came across photos of the Somes Sound, I knew I had to build one. John’s plans for lapstrake construction eliminated many of the obstacles that would discourage the average boatbuilder from attempting to build this most beautiful sailboat. He employs a number of methods for decreasing the time and skill required to build the Somes Sound: planks are cut in one full-length piece from pairs of marine plywood sheets scarfed together end to end; using an inner and outer stem eliminates the need to cut a rabbet in the stem; and the garboards are planed flush with the keelson, then capped with the deadwood and the lead keel.
David Johnson
Canted benches and a broad, carefully angled coaming offer secure and comfortable seating while under sail.
John’s plans are very detailed and are accompanied by an extensive building manual. The boat is built upside-down on a building jig that keeps everything in alignment. To accommodate the rocker of the hull, the keelson has to be built up from two pieces. I made a vertical guide fence, an infeed table and an outfeed table for my bandsaw, and resawed 4/4 stock in half. Planed smooth into two 3/8″ boards, the two keelson halves were epoxied back together upon installation on the molds.
Building a boat with a full bilge and overlapping planks provides the builder with challenges as well as opportunities to learn new skills. Spiling strakes, cutting gains, planing rolling bevels, laminating inner and outer stems, building spars, and pouring a lead keel, all may be unfamiliar tasks to many but provide newfound pride when completed. In numerous blogs and comments by fellow amateur boatbuilders, I find one common theme runs through their experiences with the Somes Sound: All take great satisfaction and pride in learning new skills that they never dreamed they could master.
David Johnson
The centerboard was designed to set the trunk lower in the cockpit and make it less obtrusive.
The most challenging prospect for my building of the Somes Sound was the lack of a helper. I learned quickly that clamps and homemade jigs are the solo boatbuilder’s best friend. Wrestling a wobbly 15′ plank into place requires planning, an ample supply of clamps, and some homemade support brackets to keep things in place during alignment. Screws inserted into predrilled holes in the joint laps and anchored into backing battens align the strakes and produce epoxy squeeze-out to ensure a good bond. Epoxy is very slippery stuff even when thickened, so having an alignment system is critical.
By far the most daunting prospect for me was building a mold for the keel and then melting and pouring hundreds of pounds of lead into it. By scribing 1/8″ plywood to the keel and deadwood the keel, I transferred the contour to stacked 2×8s and cut them to shape on the bandsaw to form the bottom of the mold. The sides of the mold were ¾” plywood, and all of the surfaces that would come in contact with the molten lead were lined with a ceramic-fiber fire-resistant paper. Copper pipes created shafts for each through-bolt. When I had finished the pour, the mold had taken nearly 640 lbs of lead.
Another challenge was to figure out how to install that heavy lead keel by myself. The solution was to raise the keel and install it prior to turning the hull over. My biggest concern was the structural integrity of the steel canopy of my boat shed that would take the load. I attached a 2×12 to the steel rafters to spread the weight. After I’d removed the lead from the mold and cleaned it up, I lifted it using two ½-ton chain hoists. The copper bolt shafts provided alignment for drilling through the keelson. I did a dry-fit with the bolts inserted and tightened and, satisfied with the seam, I raised the lead, applied epoxy to the joint, and permanently bolted the keel to the hull.
David Johnson
Rolling the hull upright required three chain hoists: two for the slings that rotated with the hull and a third to ease the lead keel past the tipping point on its way to the shop floor.
Then the question arose: How do I turn the hull over while it’s still attached to the building jig and has over 600 lbs of lead attached? I wrapped wide nylon straps around the hull and raised it using the two chain hoists. I used a third hoist to control the lead keel during the rollover. When the hull was high enough, I removed the molds from the hull, and took the legs off the building platform to allow it to rest directly on the floor. The nylon straps supporting the hull were slippery enough to slide through the chain-hoist hooks, so I could lift upward on the starboard sheer and rotate the hull. Once the weight of the lead passed the tipping point, a third hoist controlled the rotation until the hull was upright and the keel was centered over the building platform. I lowered the hull onto the jig and installed braces to stabilize it. I had made the platform frame from 2×12s so the height was ideal for finishing out the interior. Later I used the slings and chain hoists to lift the boat and set it on its trailer.
For those who are not inclined to tackle the task of melting lead, the Somes Sound 12 ½ uses the same lead keel as the Haven 12 ½, and ready-to-go lead keels are offered by several foundries nationwide. For builders who aren’t close to a foundry that casts Haven lead keels, building the keel mold from the optional Somes Sound keel plan, then having a local foundry cast the keel is another option.
If you are contemplating building a Somes Sound, I encourage you to read John Brooks’s book How to Build Glued-Lapstrake Wooden Boats. If you want to peruse the construction process on the web, John has a photo series (mixed with other photos over two pages) on his website, or you can check out my blog.
Huguette Johnson
The Somes Sound’s mast is set farther aft than that of Herreshoff’s 12 1/2, shifting some sail area from main to jib for better windward performance.
Building the Somes Sound was truly a rewarding experience, and sailing the boat has been the frosting on the cake. I have sailed a wide variety of different boats over the past 50-plus years, but my Somes Sound, christened L’ETOILE DU MATIN (MORNING STAR) by my French-born wife Huguette, is truly my favorite.
I opted for the gaff rig John drew for the Somes Sound rather than the marconi. The mast for the gaff rig is 18′ long, making it easy to fit the trailered boat, with the mast laid on top, in my garage. The shorter mast and lower rig also gives the boat excellent stability. The hollow bird’s-mouth construction of the mast makes it light enough for me to step singlehanded. At the launch ramp it takes me about 45 minutes to step the mast and rig the sails. I installed side guides on the trailer so launching and retrieving is also a one-person job.
I sail solo on most occasions, and having a boat that does not involve a complicated rig was a high priority. Once the self-tending jib is adjusted, the only activity for me is to steer and keep the mainsail adjusted. L’ETOILE DU MATIN is so responsive she can turn 180 degrees in a radius of one boat-length. The lead ballast makes her stiff in a strong breeze, and the large weighted centerboard gives her excellent upwind tacking ability.
Huguette Johnson
With over 600 lbs of lead attached to its keel, the Somes Sound 12 1/2 carries its way well and does much of the work keeping upright so a solo sailor can stay comfortably seated inboard.
After a frustrating season of sailing in the Nevada County foothill reservoirs—where wind is the exception, not the rule—I took L’ETOILE DU MATIN to Southern California and sailed her out of Ventura Harbor. From late spring to fall there is a dependable onshore breeze every afternoon. It usually reaches 15 to 20 miles per hour, perfect sailing weather for a Somes Sound. The harbor offers both sheltered water in the inner channel and a full onshore breeze as you sail out the entrance channel. Because large swells are common to the Pacific coast, I have thus far opted to stay behind the shelter of the outer breakwater, but even there I have nothing to complain about; it’s a joy tacking into a strong breeze. Both with a crew and solo, L’ETOILE DU MATIN has shown herself to be an able sailer.
David Johnson retired in 2005 after 30+ years as a general contractor. After two years of remodeling his home in Grass Valley, California, he decided to try building a boat. His first sailboat was a 16’ single-chine cutter; that got him hooked. His next build was the Somes Sound 12 ½, his crowning achievement. He is presently building a Rundgatting Snipa that has morphed into a small Viking vessel.
I had spent a long time looking for a boat that I could build to sail the waters of Chesapeake Bay and beyond. The boat would need to be able to carry four for daysailing, accommodate two for camp-cruising for up to two weeks, offer good sailing performance, have a shallow draft for exploring backwaters, and carry a small outboard for auxiliary power. It had to be small enough to be built and stored in a two-car garage, easily trailered, simple enough to be built in a reasonable amount of time, quick and easy to rig at the launch ramp, and have the good looks of a classic wooden boat. Although my list of requirements seemed to grow as I browsed through books of boat plans, my focus narrowed down to catboats. Their generous beam, sometimes almost half their length, offers lots of room, and their single sail is as simple as rigs get. In the book Forty Wooden Boats, I finally found the boat I wanted to build, the Marsh Cat by Joel White.
Kevin MacDonald
The Marsh Cat’s broad beam makes the cockpit sole wide enough to sleep two flanking the centerboard trunk. A boom tent provides cover.
At 15′ long and with a beam of 6′11″, the Marsh Cat has a spacious cockpit. With that much breadth, there would be ample room for sleeping comfortably on the floorboards on either side of the centerboard case. The 152-sq-ft sail set on a high-peaked gaff rig supplies the power. The 1,309-lb displacement assures easy trailering and launching, and the 9″ draft, with the centerboard up, makes exploration of the Chesapeake Bay’s shallow estuaries possible. The Marsh Cat plans from The WoodenBoat Store offered all the detail needed for a first-time builder. The full-sized patterns for molds, stem, and transom eliminate the need for lofting.
Phil Maynard
Sailed level, the Marsh Cat has very little weather helm and can clip along at 5 to 6 knots.
The round-bilged hull can be cold-molded, or carvel-, lapstrake-, or strip-planked. I chose to strip-plank the hull with 5/8″ x 1″ western red-cedar strips. The hull is constructed upside down on a strongback supporting molds cut from 5/8″ OSB (oriented-strand board). The keel gets laminated in place over the molds, and the 1 ¼″ mahogany transom and laminated stem are secured to it. Starting at the sheer, I sprang the cedar strips around the molds and attached their ends to the stem and transom with bronze wood screws. I started with bead-and-cove strips, which nest together edgewise on the curving sections of a hull. but eventually I switched to making them with a rectangular cross-section, which saved time and wasted less material in the milling process; the rectangular-sectioned strips also seemed easier to bend. There are no tight curves in the hull, so the gaps between strips were minimal and easily filled themselves with the epoxy that squeezed out as I glued them in place.
With all of the strips in place, I removed the drips and runs of cured epoxy from the hull with a heat gun and scraper. I cut the centerboard slot, faired the hull, and ’glassed the exterior with 10-oz fiberglass cloth for a low-maintenance, watertight structure. The outer keel was then attached with epoxy and bronze screws. Priming and painting the hull revealed the sweet lines Joel had drawn. After turning the hull over I gave the interior the same cleaning, fairing, and ’glassing. I spiled, laminated, and installed the sheer clamps, then built the centerboard trunk with ¾″ okoume plywood sides and Douglas-fir head ledges. The molds used to form the hull served as patterns for the floors that I set in the hull with epoxy and fiberglass. The laminated Douglas-fir deckbeams, set in notches cut in the sheer clamps, were canted slightly from vertical and set square to the deck so the top faces wouldn’t have to be beveled. The ½″ okoume plywood deck easily took to the slight compound curve created by the deckbeams, a great relief. I laminated the coaming with three 1/8″ x 8″ mahogany pieces sprung into place; after the epoxy cured I removed the lamination and cut it to shape before installing it permanently. For the floorboards I chose ipe, a dense hardwood that is very durable but equally hard to work; I took great pains to install them with the holes for the screws drilled, countersunk, and plugged.
After I’d finished the boat, I turned my attention to the spars and rigging. I used Sitka spruce for the spars, but there’s no reason Douglas-fir couldn’t be used; there are valid arguments for both and, in my opinion, either is fine. When money is more important than shaving ounces, Douglas-fir is the less expensive option, with the added benefit of being more durable. I ordered my sail from Stuart Hopkins of Dabbler Sails, a company specializing in classic small-boat sails. The running rigging is all Sta-Set, a braided polyester line with low stretch, and the standing rigging is 3/16″ stainless-steel 1 x 19 wire with Sta-Lok terminals. If I had it to do over again I would use 5/32″ wire and terminals to save a little weight.
After 800 hours of work, my Marsh Cat was ready for launching. My wife Teresa and I trailered the boat to St. Michaels, Maryland, for its shakedown voyage. After arriving at the ramp we spent a long time rigging the boat, only because we were constantly interrupted by lookers-on with lots of questions and compliments. I backed the trailer down the ramp and LITTLE T slid effortlessly off the trailer into the water. After my usual scramble to secure the forgotten drain plugs, two of them, it was a relief seeing that she floated on her lines.
Kevin MacDonald
With a reef in her 152-sq-ft sail for a fresh breeze, LITTLE T’s 9″ draft allowed her to take a break in some thin but well protected water.
It was a hot, humid summer day without a whisper of wind, and we motored the newly christened LITTLE T around the St. Michaels harbor and past the Chesapeake Bay Maritime Museum. Several people shouted their approval from the shoreline, adding to our already swelling sense of accomplishment. As the day progressed, the clouds began to build and a breeze finally showed up. We raised the sail and were sailing at last, but the skies soon turned black and the wind increased markedly. We should have taken cover in a cove and waited out the storm, but we opted to travel out into the open Miles River with 6 miles to go to get back to the ramp. LITTLE T was really going to get a test. The wind howled and a torrent of rain came down. We bailed constantly to keep up with the rainwater pouring off the sail and into the boat. We made it back to the ramp in about an hour, glad that the maiden voyage and sea trial was over. The conditions for our first outing were quite challenging, but the Marsh Cat came through with flying colors.
It has now been six years since that initial launching, I have sailed my Marsh Cat about 4,000 miles, and in that time have gained a great deal of respect for the boat’s abilities. Catboats are known for their weather helm in stiff winds, and the Marsh Cat is not immune to this, but with a little experience and a proper reefing schedule it can be minimized. The Cat likes to sail level and the weather helm is all but eliminated when it is. With a single reef and a slackening of the mainsheet in gusts, it remains docile and in control in winds of about 14 knots. As the wind builds to about 18 knots, it’s time for the second reef. Above 25 knots, it’s time to head for the barn unless you have crew. I’ve sailed my Marsh Cat in the Florida Keys with a competent crew member aboard in 30+ knots of wind with a double reef and both of us—over 500 lbs—hiked out over the rail. In gusts we buried the leeward rail but were still in control and felt no need to return to shore. Beating into the wind, it is common to make 5.25 knots; 6.5 knots running before the wind. I have seen peaks of 9 knots surfing down waves. When the wind is down, a 2-hp outboard pushes the Marsh Cat easily to a slow cruise of 4 knots or well over 5 knots if need be.
Barry Long
The Marsh Cat was designed without arrangements for seating other than an expansive sole to stretch out on and a wide coaming to lean against. Some builders have added low benches.
It is often said that all boats are a compromise, but the Marsh Cat has met all my requirements and then some without any significant shortcomings. Simplicity is certainly one of its most appealing traits. The single sheet and sail make solo sailing a breeze. There is no interior furniture to get in the way: The sole is my seat and the coaming is my backrest. It can handle heavy loads and stay out when the rest of the fleet is heading for shelter. Its spacious accommodations are a delight when camp-cruising. A setup time at the ramp of less than half an hour isn’t an impediment to frequent use or going sailing on a whim. I sail backwaters of Chesapeake Bay often, and I’ve trailered LITTLE T from my home in Maryland to Maine to sail to Matinicus Island, over 11 miles from the mainland shore. I’ve sailed her along the Florida Keys and made the 45-mile passage to the Dry Tortugas. A crossing from Florida to the Bahamas is in the planning stages. From gunkholing to open-water sailing, the Marsh Cat can do it all.
Since early childhood, Kevin MacDonald has been involved in boating activities ranging from water skiing to offshore fishing. Small-boat sailing and camp-cruising became his water sport of choice 8 years ago. The lack of suitable production boats for camp-cruising necessitated his building of LITTLE T.
I had timed my launch for the afternoon slack tide; it was a late start, but at midday the ebb pouring through Rosario Strait would have been running against me at close to 3 knots. There were 18 miles to go to reach Matia, Sucia, and Patos, three small islands that crown Washington state’s San Juan archipelago, but I’d make good speed with the flood in my favor and my 2.5-hp, four-stroke outboard pushing HESPERIA, a 17′ camp cruiser I’d designed and built. My course paralleled the undulations of Cypress Island’s west shore up to the cusp at Tide Point and there I began a diagonal crossing of the strait to Orcas Island. In the open water the tide was with me but the wind was not and as light as it was, it still made a mess of the water. All around the buoy at Buckeye Shoal the waves were as ragged as rasp teeth. It wasn’t the kind of water that agrees with HESPERIA’s pram bow and shallow-V forward sections. At first I took just a bit of spray over the bow so I just partially unfolded FAERIE—my 4′8″ collapsible, coracle-like tender—like a dodger to keep myself dry. I soon retreated through the cabin to get my weight out of the bow and steered standing in the open hatch. It was still an uncomfortable ride so I veered west toward a bit of flat water on the downstream side of North Peapod, the largest of a cluster of rocks a half mile out from Orcas. I considered abandoning my plan and seeking the more sheltered waters between Orcas, Blakely, Lopez and Shaw Islands but just north of Lawrence Point there was an end to the chop.
Passing within 75 yards of Little Sister, a ragged islet bare but for a few patches of wind-shorn scrub, I steered between mushrooming boils and dimpled eddies toward Barnes Island. Beyond Barnes, the four-mile crossing to Matia offered smoother waters that slipped docilely under the bow. I didn’t turn on my GPS to check my speed; the overlapping hills of Orcas Island showed HESPERIA was making progress and that was enough: There was plenty of daylight left, I was where I wanted to be, and it didn’t matter how fast I was going. Matia and Sucia were drawing near while behind me the Cascade mountain range, a dusty blue deckle edge spanning the eastern horizon, was flattened and faded by distance.
I had been to Matia a few times before and had hiked by a small pocket cove on the south side of the island. A few dozen yards from the mouth of that cove I cut the motor and cocked it up, crouched through the cabin, and rowed to a band of gravel nestled in a 30′ gap between rock outcroppings. With HESPERIA pulled up just high enough to keep her from floating away, I picked my way across a tangle of sun-bleached driftwood. Among the long bark-bare poles and fluted trunks, two baguette-sized sticks caught my eye. I pried off long slivers to get beneath the silver-gray punk on the outside. The sticks were, as I’d suspected, both cedar, one western red and the other Alaska yellow. I took them back to HESPERIA as much for their fragrance as their usefulness as kindling.
The little cove, I’d decided, was too close to open water to afford much protection for anchoring overnight so I rowed around the southeast corner of the island and into Hermit Harbor.
All photographs and videos by the author
Once the cabin top is raised, the saloon has 17 windows though which to take in the view. The lower pair here open onto the aft cockpit.
There was plenty to do before I turned in for the night. To raise the cabin roof, the spars came off and were set across the cockpit. I lay down in the cabin, put my feet against the ceiling and pushed the cabin top up until the hinged struts in the corners swung down and supported it. With the stovepipe in place I could start a fire in the wood stove. The cedar kindling lit quickly and orange flames were soon glowing through the stove’s mica window. With the middle sections of the cabin doors in place, the cabin warmed up. Not wanting to take time to make a proper dinner, I set a pot on the stove to boil water for a camping meal that cooks in its zip-lock bag. I set the floorboards on the ledges that hold them flush with the benches, rearranged the cushions and made the bed: clean sheets, a down comforter, and the pillow I use at home.
Inside each bench cushion there is 3” of camper-pad foam on top of ¼” of closed-cell foam—good enough for sitting—but for sleeping, 1½” Therma-rest pads slipped underneath the cushions add a welcome measure of comfort.
By the time I was ready to push off the beach and anchor, it had grown dark and the woods that wrapped around the cove were a sooty fringe for a starlit sky. The first dip of the oars in the water set the blades aglow with pale blue light. About 50 yards out, I slipped the anchor over the bow and watched the bioluminescence wrap around it like an alcohol flame.
In the morning I unfolded FAERIE, put her over the side, and paddled ashore. The half-mile trail across Matia meanders around tall cedars and pines that knit a lofty canopy so tight that only speckles of sunlight reach the forest floor. Olive-drab and licorice-black slugs traced cellophane-clear tracks across the trail and moss flocked the tree trunks and boulders. The dock at Rolfe Cove at the west end of the island was empty; I had Matia all to myself.
With HESPERIA at anchor, I paddled my folding tender FAERIE ashore on Matia Island.
Back aboard HESPERIA, I spent a leisurely morning getting ready to row to Sucia Island. After breakfast I stowed the bedding, did the dishes, polished some of the silver, and shook the rugs out. The water in the cove and as far as I could see beyond it was slick and bright; without any wind in the offing I could leave the cabin up, snap the canopy in place over the cockpit and row to Sucia in the shade.
The south side of Matia is a band of ragged cliffs about 20′ high, not quite as tall as the trees perched on top of them. Eroded sandstone walls are pocked with irregular cavities arrayed like hollows in airy leavened bread. In the currents swirling off Eagle Point, the western extremity of the island, an outboard skiff drifted slowly with four fishermen aboard, each occupying a corner of the cockpit with his back to the others, a rod in hand, and head bowed as if in prayer.
Decked out for a day in the sun, HESPERIA has her canopy in place over the cockpit, a shower bag hanging from the gallows, and two solar panels charging overhead.
There was a slight current setting me to the south as the ebb sifted itself through the islands so I angled the bow northward to keep on course. Harbor porpoises worked the tide rips, showing only their backs, curved like ulu blades cutting upward through the water. I reached Sucia at its southeast corner where its slender peninsulas and islets are arrayed like the tines of a fork. As I entered Echo Bay the current grew stronger so I hugged the shore, keeping my starboard oar just a few feet from the rocks. I crossed to the Cluster Islands that separated the bay from Ewing Cove; the low water had joined several of the islets into a peninsula but there was a gap just wide to get through, though I’d have to hop my port oar blade over an ottoman-sized rock that sat in the narrowest part of the passage. The current was strong but I’d built up enough momentum to carry past the rock, get the port oar back in the water and keep working my way upstream.
Ewing Cove is well separated from Sucia’s more heavily used anchorages and campgrounds. It gets lots of visitors during the day but few, if any, stay the night.
Ewing Cove’s shallows were covered with chocolate-brown fronds of seaweed that reflected the sunlight in glimmers of iridescent blue. I found a patch of sand for the anchor and back-paddled at the end of a short rode until the flukes had buried themselves. After paddling FAERIE ashore I walked 1½ miles along the dirt path that weaves in and out of the woods along the margin of Echo Bay.
Back aboard HESPERIA I set to work making dinner. It would be a bit more elegant than the last night’s meal out of a bag and I eventually sat down to a tuna steak, pan-seared with sun-dried tomatoes; steamed asparagus spears under a thick pat of butter; a green salad with kale, dried cranberries, toasted pumpkin seeds, and poppyseed dressing; coconut water with bits of coconut meat; and a small chocolate truffle cheesecake.
It’s well known that even the plainest meals taste better in the wilderness and it should, of course, go without saying that sterling silver is an unnecessary extravagance aboard a small boat. Silver plate is more than adequate.
The solar heated shower bag that had been out all day had warmed up a couple of gallons of fresh water, and now that all of the kayakers and walkers who’d visited the cove during the afternoon were gone, I could shower in the cockpit and then retreat to the cabin to dry off in the heat of the stove.
On the north side of Ewing Cove there’s a 75-yard wide gap between Sucia and tiny Ewing Island and the tide flushing through creates an eddy running parallel to the beach that would set HESPERIA beam-to waves entering the cove from the east. To keep her from rocking all night as she would surely do even with sets of small waves, I tied the main sheet, the mizzen sheet and a few other lengths of line together as a stern line and paddled FAERIE ashore with it. Pulled tight and tied to driftwood, the line set HESPERIA across the current with her bow facing the entrance to the cove. The difference was quite noticeable—HESPERIA was serenely steady—and I would have slept soundly the whole night through if not for the midnight squabbles of Canada geese.
A mahogany cover converts the sink into a breakfast nook. The gypsy flowers, hastily carved of red cedar and yellow cedar driftwood, were as fragrant as any blossoms. The spork is, I confess, a silly affectation. I have plenty of room aboard HESPERIA to carry a separate spoon and fork and needn’t put on airs as if I were through-hiking the Pacific Crest Trail. The spork was, I should add, utterly useless for eating a fried egg, over easy, on a toasted bagel half.
In the morning, after breakfast, I got a fire going, set a collapsible water jug on the cabin roof to supply HESPERIA’s plumbing, and filled the sink with hot water for a shave. I’ve tried going without shaving on previous cruises but my encounters with strangers led me to understand that a few day’s growth make me look more feral than outdoorsy and clean-shaven I elicit kindness more than fear.
Only the sink is plumbed for hot (via a heat exchanger on the wood stove) and cold running water. The head, stowed out of sight in a compartment in the cockpit, is a portable rig with its own water supply and the bathtub, a soft-sided PVC liner for the cabin footwell, is used in conjunction with pots of stove-warmed water.
My plan was to continue west to Patos Island and spend my last night there. The crossing from Sucia is a short one, only 1 ½ miles, but when I motored along Ewing Island on my way out of the cove I saw a small outboard cruiser right where I was going to make the turn to head east to Patos. It was pushing a foaming white bow wave but making barely 2 knots over the bottom. My little 2.5-hp outboard would be no match for the current so I turned south across Echo Bay to consider my options. The wind coming across the bay was from the northwest and perfect for beginning my homeward leg. I killed the motor and went forward to raise the main mast; for the downwind run I’d leave the sprit main wrapped around it and use the jib halyard to raise the square sail. It billowed forward and HESPERIA steered herself, setting a course for the far corner of Orcas Island, exactly where I wanted to go. I stretched my legs out on the starboard bench and leaned up against the cabin, keeping only a light touch on the tiller line. Matia slipped by to port and Mount Baker’s sugar-white flanks gleamed under the lower yard.
The wind was light at first but halfway through the nearly 9-mile run to Lawrence Point, it strengthened, and HESPERIA was making 5 1/3 knots. After picking up a bit of ebb beyond the point we passed Buckeye Shoal making 7 knots over the bottom. The wind carried HESPERIA as far as the north end of Cypress. The square sail had made quick work of the 13-mile run and left me with only 2 miles of motoring to reach Eagle Harbor.
Cypress Island’s Eagle Harbor has broad mud flats at the head of the cove. While there were a dozen or more boats anchored nearby, no one else, oddly enough, had come ashore.
There were several boats anchored at the mouth of the bay but no one had ventured into the shallows. Perched on the foredeck I paddled ashore, stepped off, and post-holed across the mud flats with a long painter and a stake in hand. With HESPERIA tethered, I crossed the beach and walked a path so hemmed in by trees and brush that there wasn’t much to see; after just a few hundred yards I turned around. I gathered some nettles on my way back to the boat. They’re the limit of my foraging skills: I’m never sure about plants I think I know on sight, but nettles picked with bare hands provide an unmistakable sting.
I thought I could do better than labor through the mud back to HESPERIA and did a little beach combing for materials to cobble together some snowshoe-like footwear to keep me from sinking. I found a short length of line and two slats of driftwood. I unlaid the line and used two of the strands to tie the slats to my feet. They worked like a charm and kept me right up on the surface for most of the length of the mud flats but then got progressively stickier. With each step the trailing foot was harder to pry free, and the more I pulled, the more deeply I mired my lead foot. Soon I had both feet firmly glued in place, just two yards from the edge of the rapidly advancing tide. I had tied the line as tight as I could to keep the slats from falling off and didn’t have enough length to slip any of the knots. The knots were over my heels so I couldn’t see what I was doing and my fingertips, still stinging from my nettle harvest, were, in essence, quite numb. I stood up, a bit perplexed, thinking about a pen-and-ink illustration I’d seen in a WoodenBoat magazine article on shoal-draft cruising. It showed a boy running across the mud wearing splatchers, a fancier shop-made version of what was, at the moment, using me as bait for the incoming tide. All too often I’ve gone ashore without a knife, an oversight that I’d often regretted, but never more than now. I patted myself down and discovered a small folding knife in my pants pocket; I cut myself out of the bindings, stepped off the slats into shin-deep mud and slogged back to the boat.
After paddling out to anchor, I picked a spot in the shallows, well away from the other boats. The sun had not yet pushed the shadow of Cypress’s ridge across the cove so I set up the kitchen in the cockpit, steamed the nettles, cooked up a stir fry, and took my dinner al fresco. The nettles were a disappointment; they had neither the peppery attack nor the buttery artichoke finish they would have had a month earlier.
Setling in for the night, I fired the stove with the yellow cedar gathered on Matia; it put out so much heat I had to open the cabin doors and the hatch and step outside to cool off. Eagle Harbor was so still that I could get a good look at Jupiter through my binoculars and make out two of its moons. When the cabin was comfortably warm I was in no rush to crawl into bed and sat on the comforter with my pillow at my back, stared at the orange glow of embers behind the stove’s widow, and idly worked my way through a bag of pistachios. When I began to feel drowsy I tossed the mound of shells into the stove, turned out the lights and slipped under the covers.
There wasn’t a breath of wind when I left Eagle Harbor, but I set sail and motored out to find a breeze.
I was up early. The rapid knocking of a woodpecker somewhere in the woods was the only sound and it filled the cove. After a long silence an owl hooted its two-note ooo-hoo, clear and loud although more than 100 yards of water separated me from the woods. There was not a breath of wind but I rigged for sailing in the hopes of finding a breeze somewhere around Guemes Island. With main, jib, and mizzen up, I motored out into Bellingham Channel. Halfway across there was a patch of water scuffed by a breeze; I motored into it and sailed on a reach the remaining distance to Guemes. After rounding the north end of the island I had the wind behind me; it was light, and HESPERIA ghosted along under a high haze that put a faint rainbow ring around the sun. The jib didn’t have enough wind to draw its sheet tight so I dropped it and used the halyard to raise the square sail. It filled and drew nicely even though half of it was blanketed by the main. I thought I could get more of the sail out where it could do some good by slipping the lower yard to port through the loosely tied truss holding it against the mast. It worked and when the wind freshened I was making 4 ½ knots.
Saddlebag Island lay a mile to the east of Guemes, and although the wind had dropped enough to leave the water glassy, I made good headway on a reach under main and mizzen. When I arrived at the cove notched in the island’s north side I let the sheets loose and aimed for the beach. It appeared to be sandy, but I sat on the foredeck as I came in to keep an eye out for rocks. There were many and I slipped off the bow before running aground and held HESPERIA off. Behind me someone spoke my name. It was my friend Ted, an experienced paddler and a fixture in the local outdoor recreation industry. He and a friend waded in and held on to HESPERIA. I was going to have to anchor to visit the island and invited them both to climb aboard. We paddled out about 20 yards and dropped the hook. To get us all back to shore I unfolded FAERIE and had them paddle in one at a time, trailing a long tether so I could pull FAERIE back. I came ashore last, visited a while, and took a brief walk across the island’s wasp waist to the cove on the south side.
When I left Saddlebag there wasn’t any wind; as I motored west I dropped the rig and stowed it on the cabin roof. With the current in my favor I made 6 knots over the 7 miles back to the launch ramp Washington Park and when I arrived there, HESPERIA had carried me in comfort for 55 miles. By dusk, I’d be back home, in a house that hasn’t moved an inch in 88 years, and HESPERIA would be in the driveway, covered by a tarp.
Christopher Cunningham is the editor of Small Boats Monthly. He built a Chamberlain dory skiff in 1979 and rowed and sailed it 700 miles up British Columbia’s Inside Passage. In the fall and winter of 1983 he paddled 2,500 miles from Quebec to the Gulf of Mexico in a canoe he’d made of laminated paper. Two winters later he rowed a sneakbox 2,000 miles from Pittsburgh to New Orleans and continued another 400 miles under oars and sail to Florida. For a 1,000-mile rowing/sailing trip up the Inside Passage in 1987, he built a replica of the ninth-century Gokstad Faering.
HESPERIA
I’ve cruised thousands of miles in small boats and endured some miserable conditions, but I never had a Scarlett O’Hara moment: “As God is my witness, I’ll never be hungry again.” I was slow to catch on; the adventures that made me hungry, cold, wet, and tired only gradually lost their appeal and with each new boat I built for cruising I incrementally eliminated sources of discomfort and displeasure. I was quite happy with my Caledonia yawl ALISON as a camp-cruising boat until my son built BONZO, an Escargot canal cruiser. I decided I needed a cruiser like BONZO with a cabin, windows, and woodstove, but one that I could sail, motor and row like ALISON. I gave up the Caledonia’s rough-water ability for a boxier hull that could stay on a nearly even keel no matter where weight was placed, especially for dining and sleeping. I was drawn to Phil Thiel’s APHASIA, which he describes as a sampan-type hull. I enlarged the hull by 8 percent and modified the bottom to put some vee in the forward sections. It was a roundabout way of arriving at a garvey hull.
The hull went together quickly and I designed the interior as I went along, occasionally making sketches but more often using sticks and cardboard to mock up the accommodations. I had to get the hull out through a door, so the cabin was made to be removable. The centerboard trunk is placed off-center to keep it out of the way; it’s incorporated into the benches in the cockpit and cabin.
The cabin is built like a pop-top camper shell for a pick-up truck. Lowered, it provides a clear line of sight aft while I’m rowing; raised, it has good clearance for sitting in the cabin. I raise and lower the top by lying on my back and pushing the ceiling with my feet. Hinged support struts in the corners fall into place when the cabintop is raised. The doors have a removable center section to accommodate the 11″ of the cabintop’s travel.
In one corner of the cabin, a shelf supports a wood-burning stove I welded together from sheet steel; in the other corner there’s a small sink. A collapsible water jug set on the roof connects to the cabin’s plumbing and a heat exchanger made of copper pipe butts against the stove to provide hot water for the sink.
The passageway down the center of the cabin and cockpit has parallel sides and ledges to hold floorboards flush with the benches to create sleeping platforms in both the cabin and cockpit. Grabrails on the cabin roof are spaced to fit the cleats under the floorboards so they can be used as a catwalk or a sun deck.
A tiller line runs through the cabin and around the cockpit and another line connects to the outboard’s kill switch. Having the motor and cockpit separated by the cabin cuts down on the noise. The cabin sides have ports that open to thole-pin pads for rowing indoors in cold, wet weather.
The masts and the main’s sprit and boom are all about 12′ long and can be stowed in the boat. The cabin’s windage gave the sail plan I’d drawn more of a weather helm than I like so I added a self-tending jib on a club for better balance. The jib, main and mizzen were all cut from the protected Dacron in the middle of a weathered roller-furling jib discarded by a larger sailboat.
The square sail was inspired after taking this same San Juan Island trip with my ladyfriend Rachel. I had, as is my habit, loaded the boat and set out without stowing things properly. We were motoring along Rosario Strait when a strong following wind developed. Rachel was napping in the cabin and I tried to set the sprit main by myself without first setting the mizzen and luffing. Every time I tried to clip the main sheet into the boom, the boat would veer off course. In my struggle I didn’t realize that I’d stepped on our dinner—a deli box of hot polenta—until I felt the corn mush squeezing between my toes. Tangled up in the main sheet, I decided to sit down and give up before I got pitched overboard. Rachel appeared in the cockpit with a spoon, reshaped the box, carefully scraped the polenta from my foot and the floorboards and put it back in the box, assuring that we wouldn’t go hungry that evening. After that trip I made the square sail specifically for taking advantage of an unexpected following wind: It goes up in an instant and the boat practically steers itself.
LOA: 17′
Beam: 6′
Depth: 25 ¾″
FAERIE
HESPERIA, laden with cruising gear, is too heavy to move if the tide goes out from under her, and with tides in my area ranging up to 14′, constant tending is required when she’s nosed up to a beach. I’ve used a few systems to put the boat at anchor from shore, but they are all time-consuming and require very long lines. I wanted a folding dinghy that I could stow out of the way in the cockpit, so the fit there determined its dimensions. The only boat I knew of that small was a coracle but while studying the type I came across the Fliptail, a dinghy that was very close to what I had in mind: a skin boat with a folding frame. I laminated bows that would fit the forward end of HESPERIA’s cockpit.
Folded, FAERIE tucks into the forward end of the cockpit, taking up a minimal amount of space. Grab rails on the roof hold cabin floorboards in place.
The Fliptail uses hinges, but I couldn’t find any that were the right size, shape, material, and price. I sketched many schemes for using bolts as pivots before figuring out the geometry that would do the job. The skin is Hypalon I had from an old pool liner. A plank set across the gunwales serves as a seat and if I need floorboards for a passenger or cargo, HESPERIA’s dining table is a perfect fit. The high freeboard gives FAERIE surprising carrying capacity. I’ve paddled with my son sitting in the stern, and our combined weight is about 415 lbs.
FAERIE feels a bit tippy with the paddler’s weight carried so high, but I haven’t yet capsized her. On beaches with a moderate slope I can paddle up to the water’s edge, lean back quite confidently and set the bow just barely up on the land and step out with dry feet. I used a zig-zag sculling stroke at first but later discovered old film footage of coracles ( Boyne Coracle, A Bygone Craft, and Peeps though a Window of the World) being paddled with a draw stroke and the blade slashing in an out of the water from one side. It provides much more power and drives the little hull as fast as it’ll go, which is about 2 knots.—CC
LOA: 56″
Beam: 40½″
Depth: 14½″
If you have an interesting story to tell about your travels in a small wooden boat, please email us a brief outline and a few photos.
Subscribe For Full Access
Flipbooks are available to paid subscribers only. Subscribe now or log in for access.
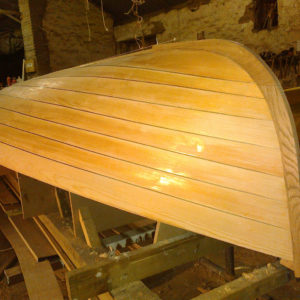
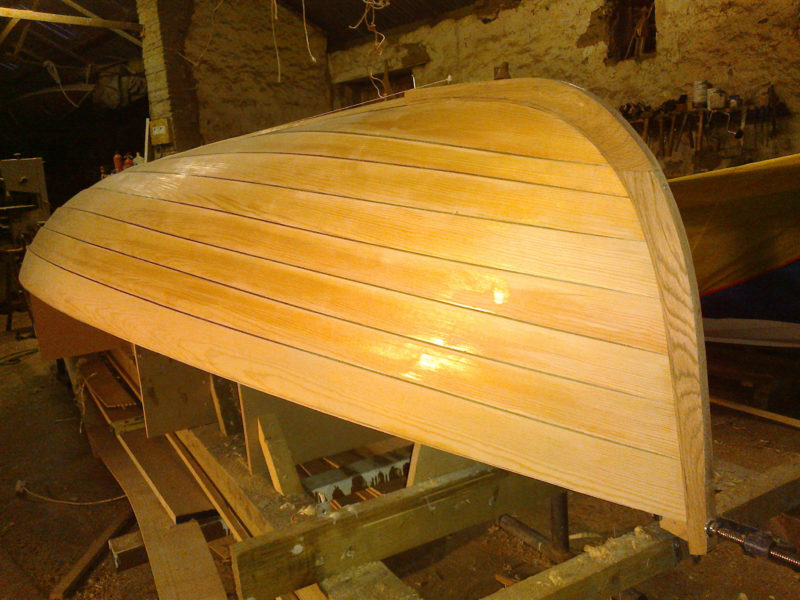 all photographs by Adrian Morgan