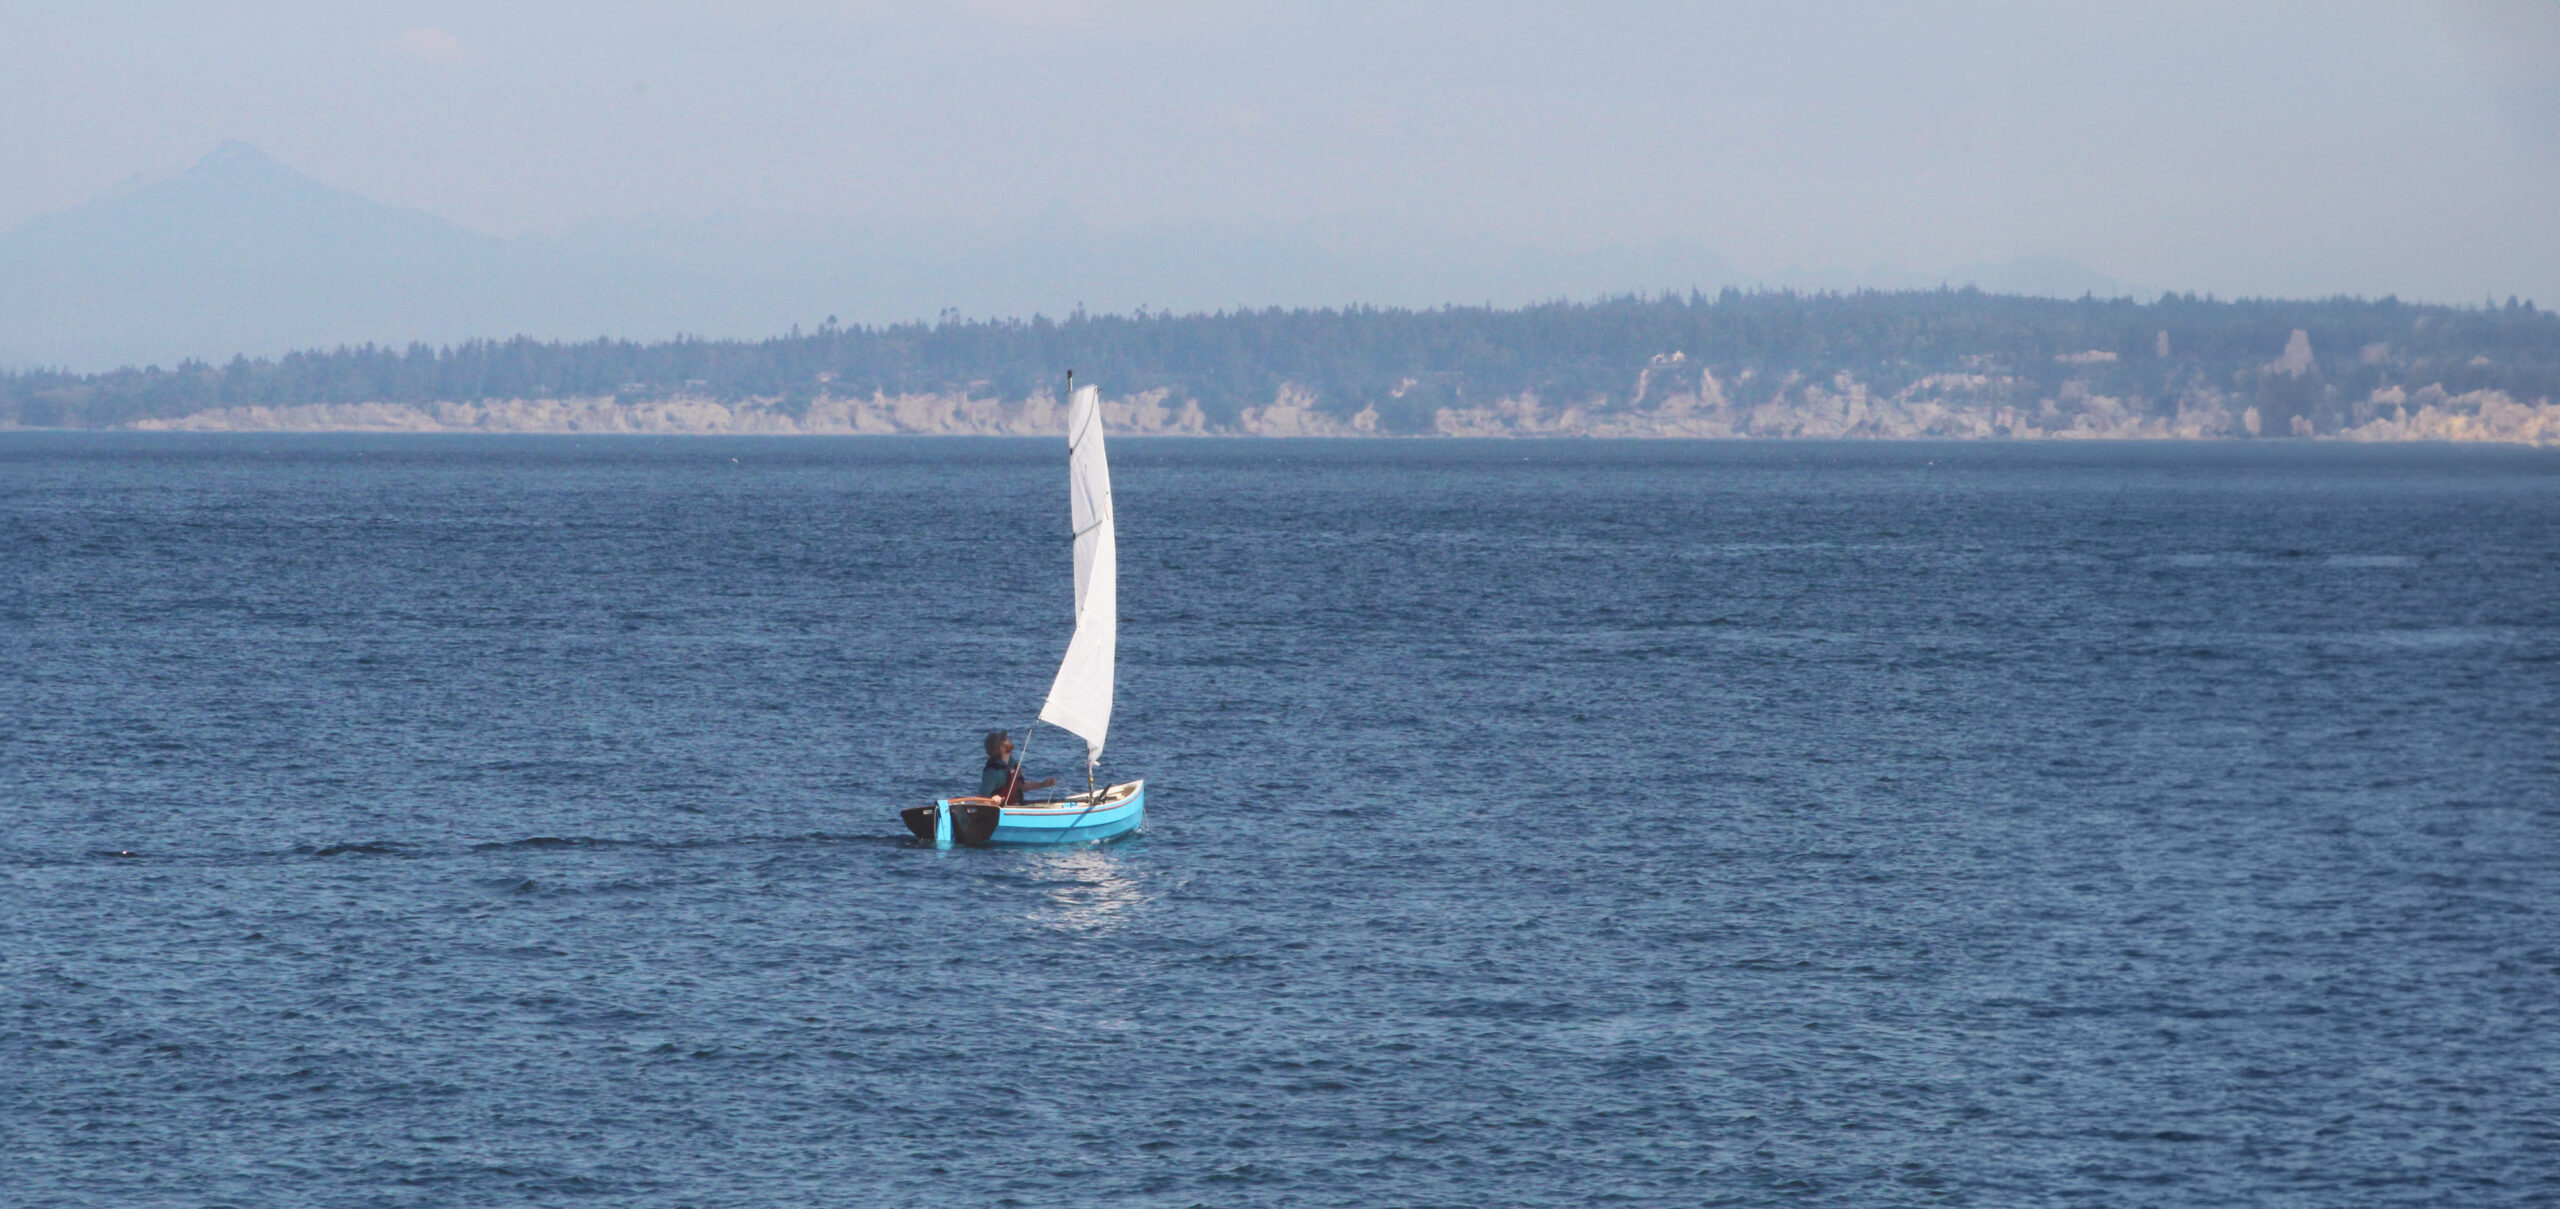
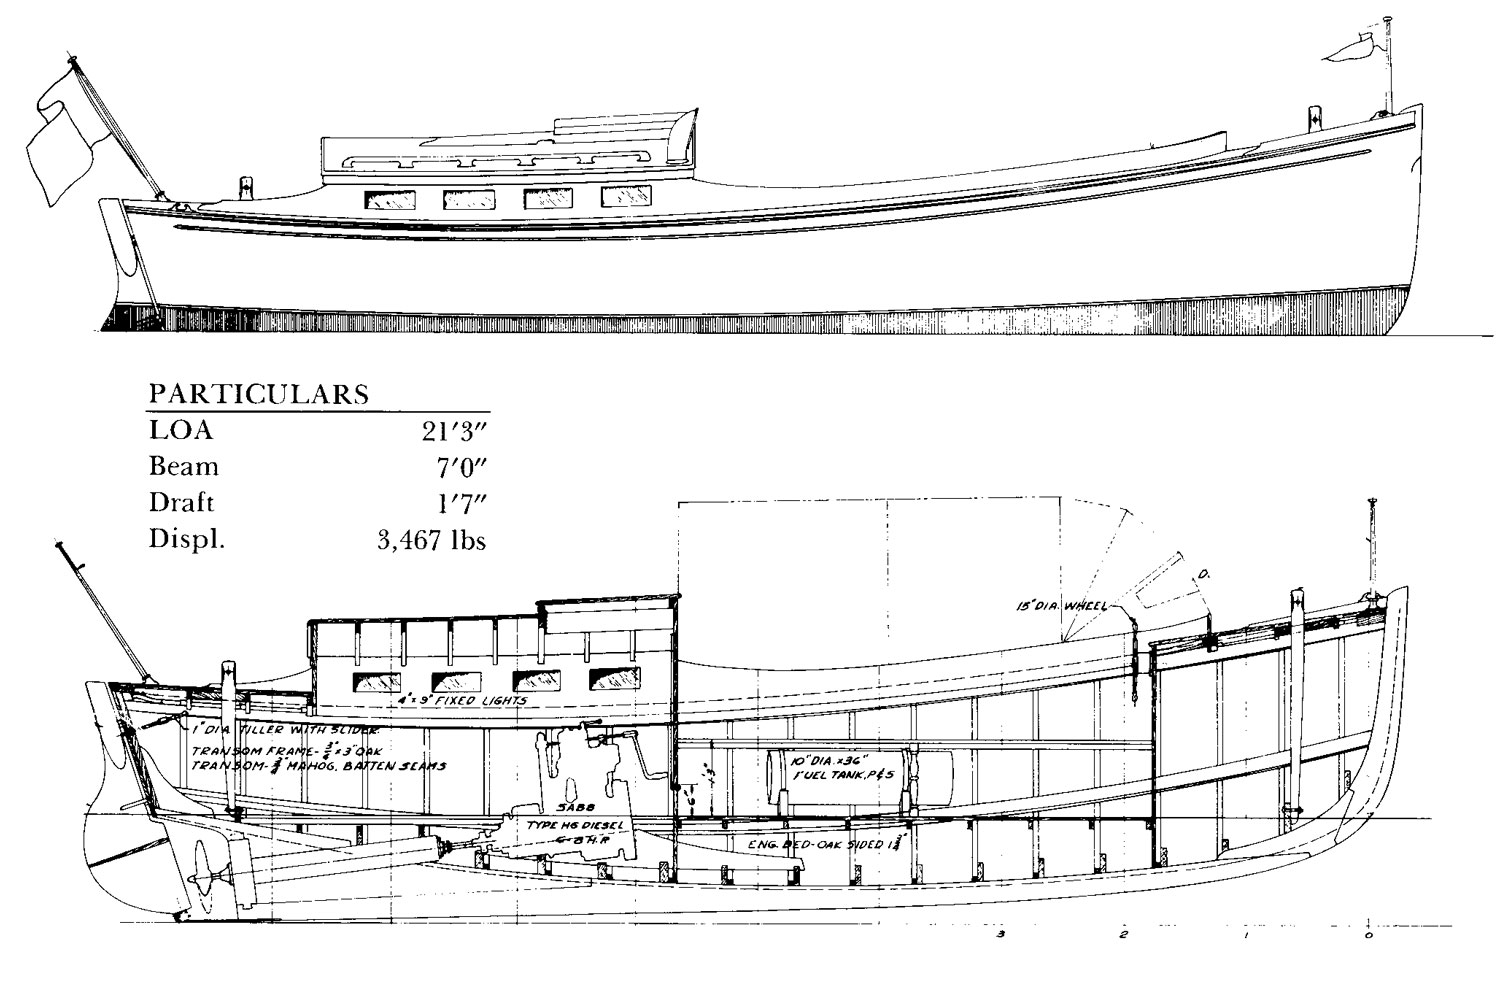
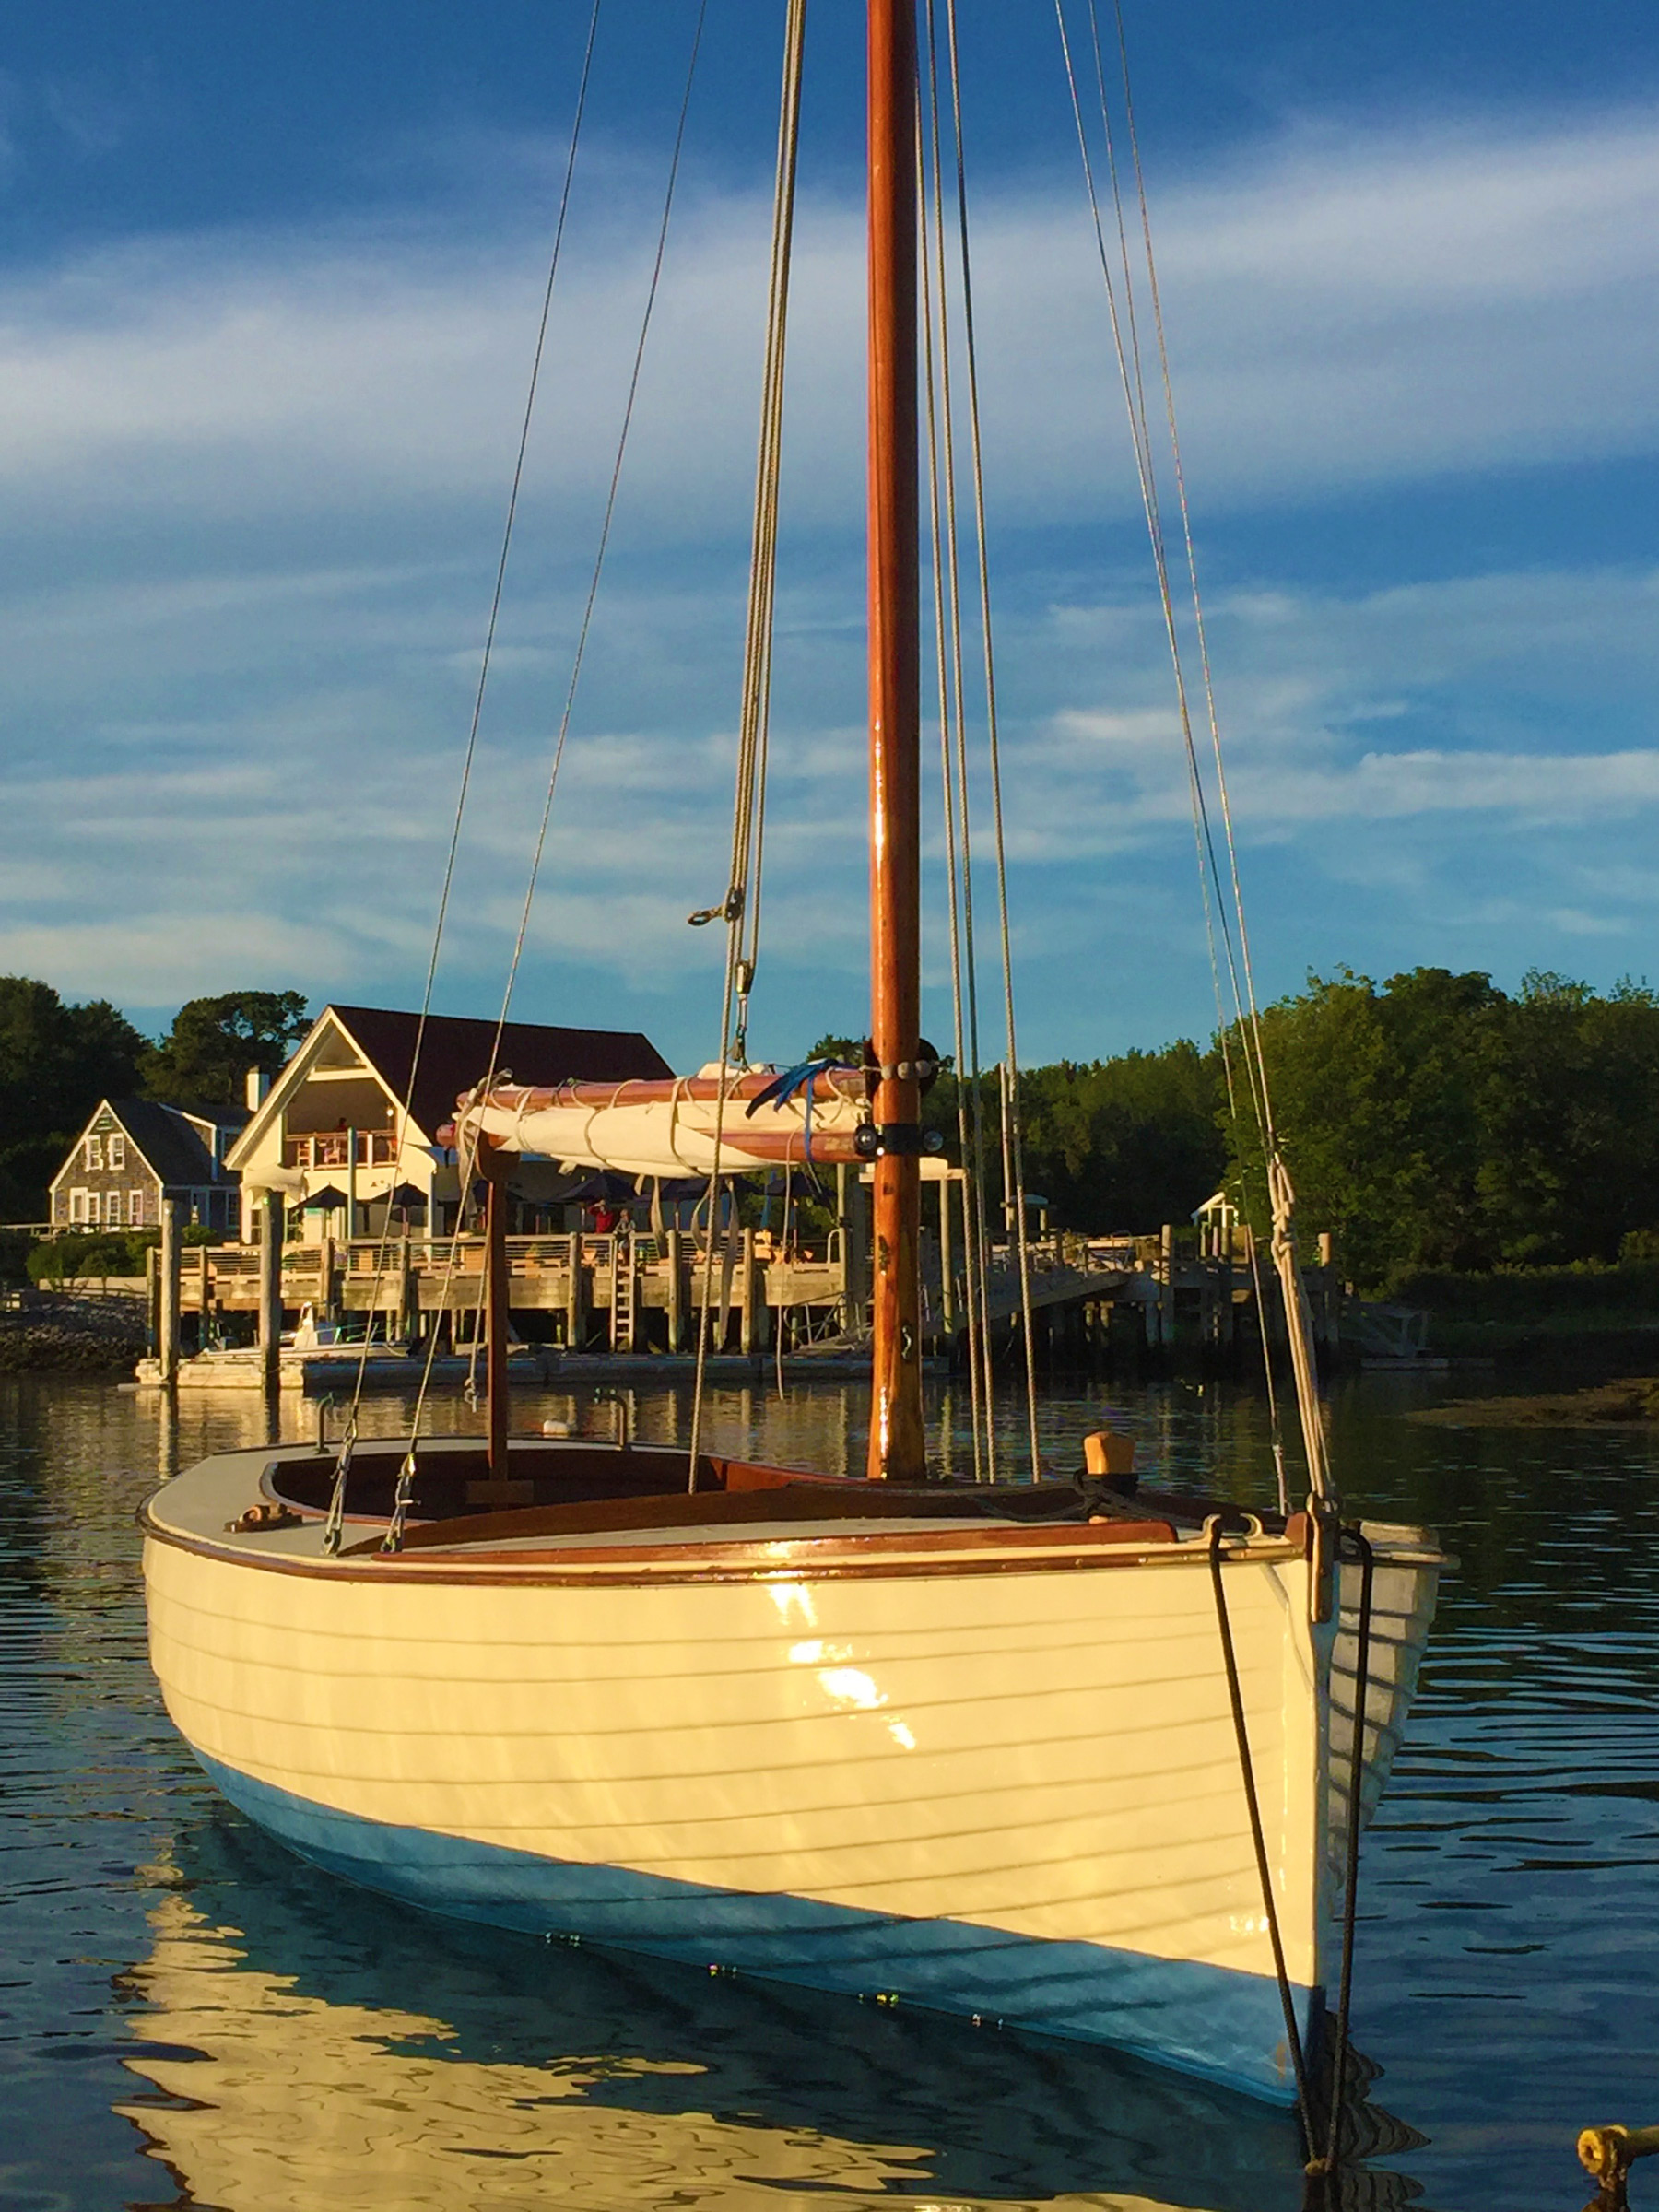
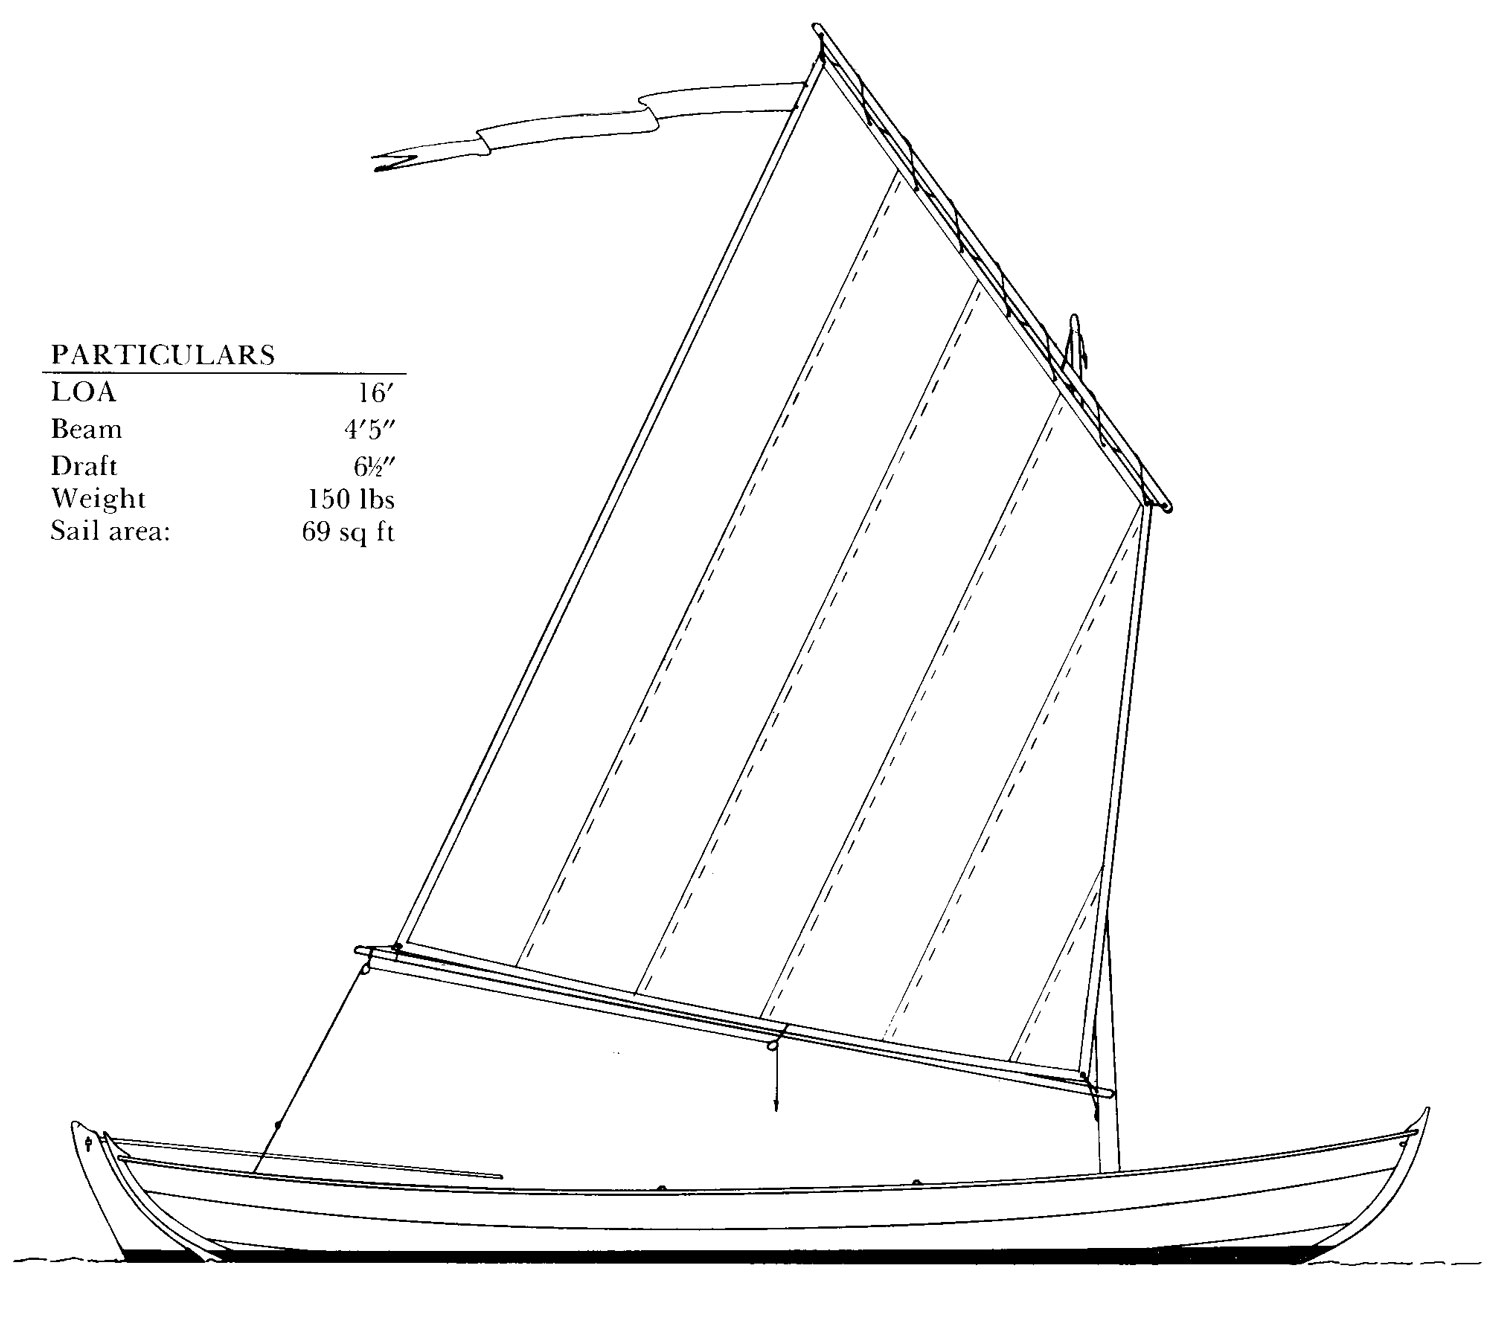
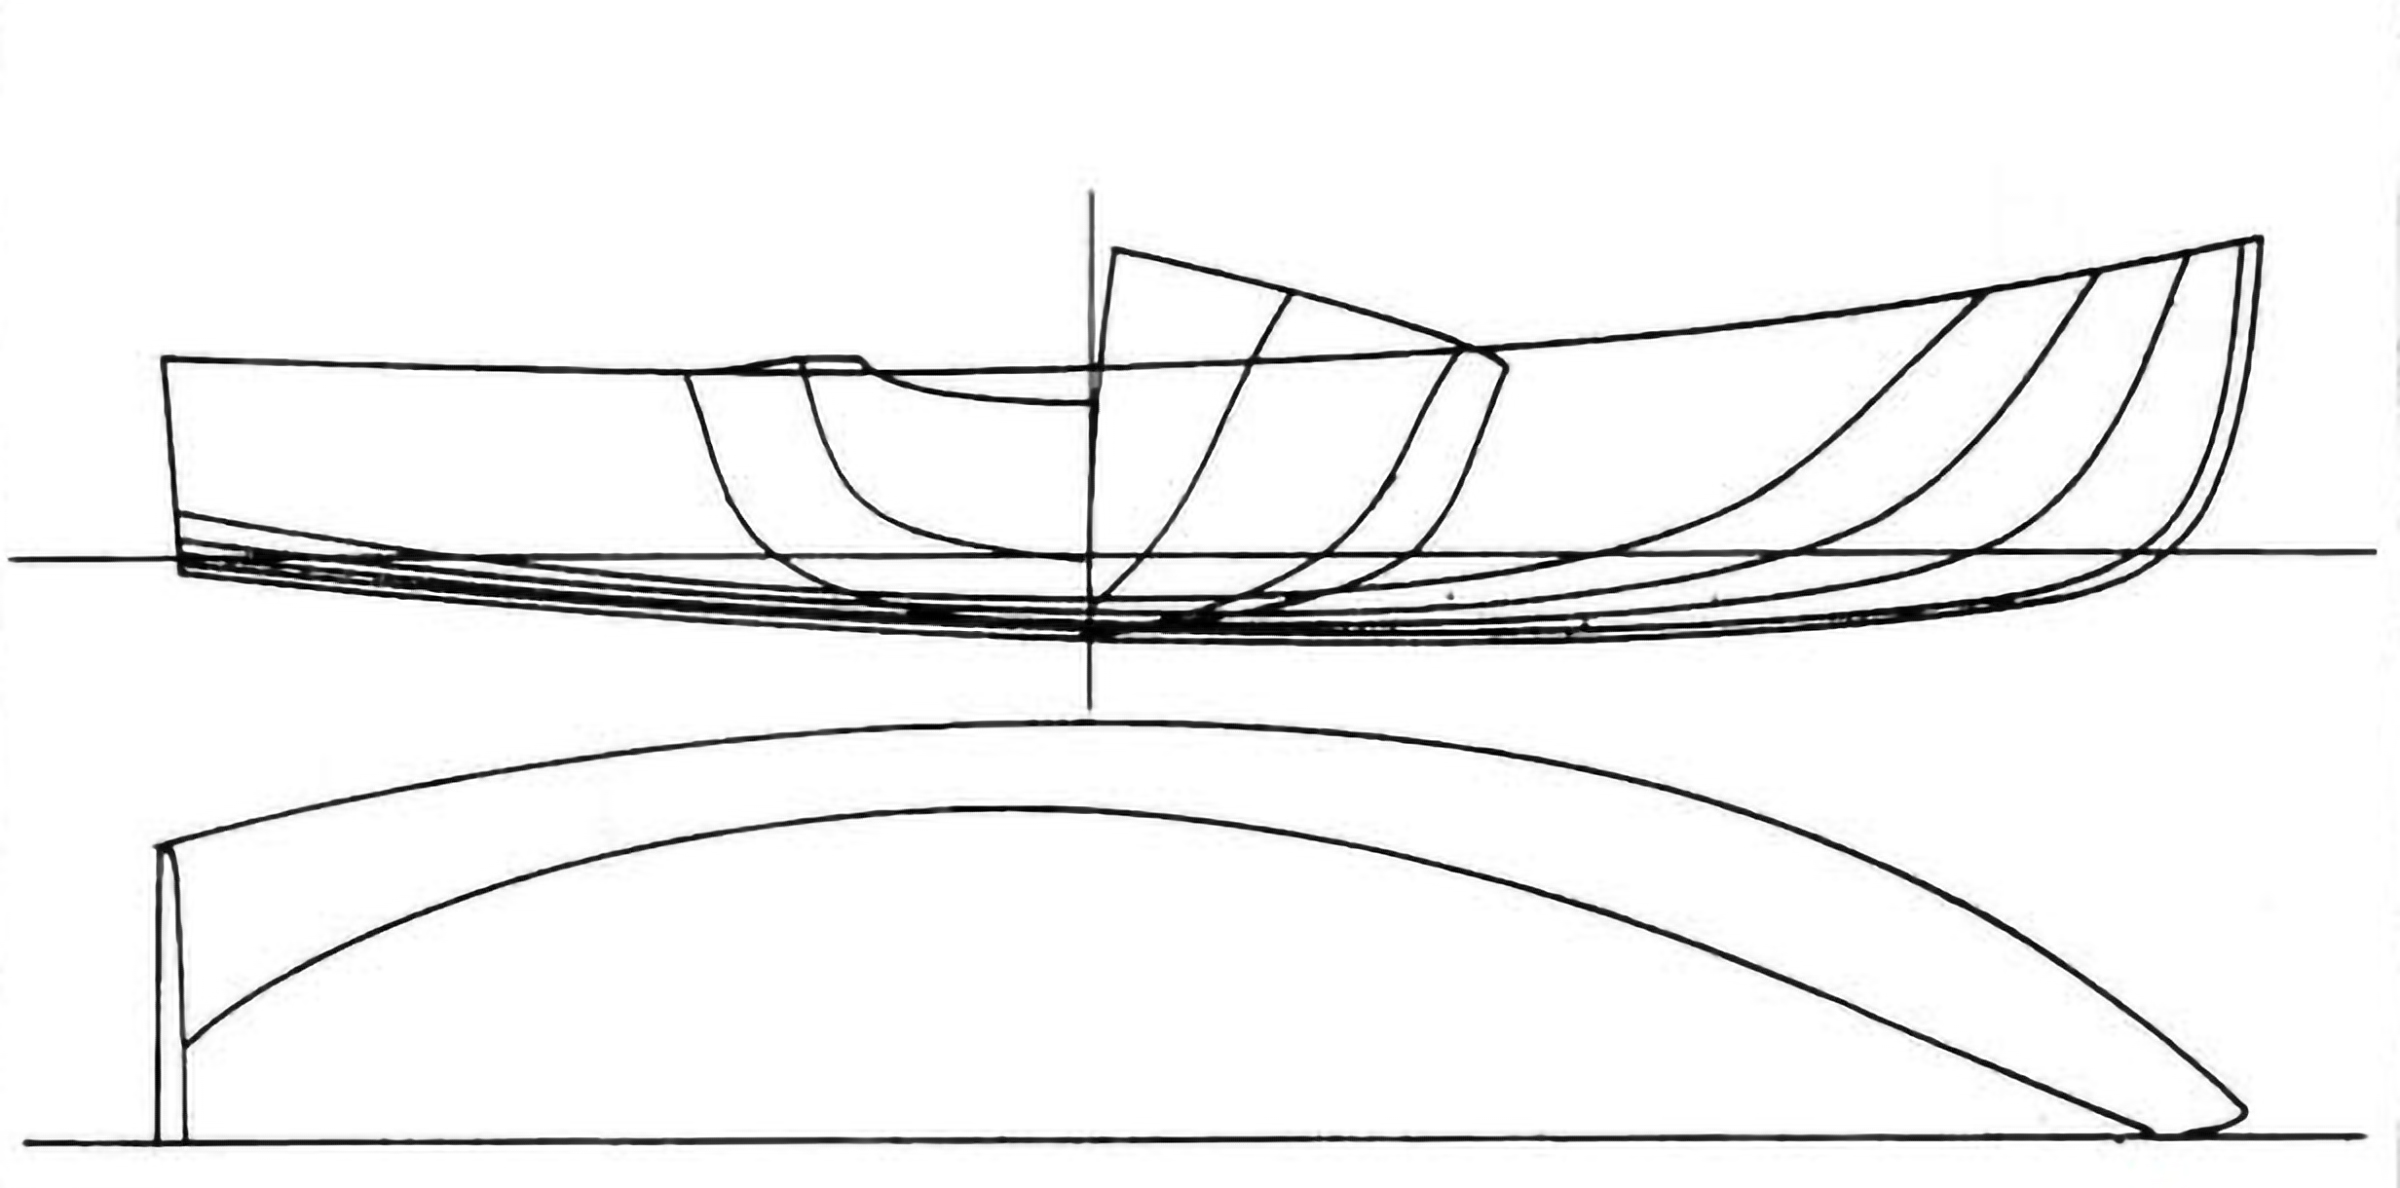
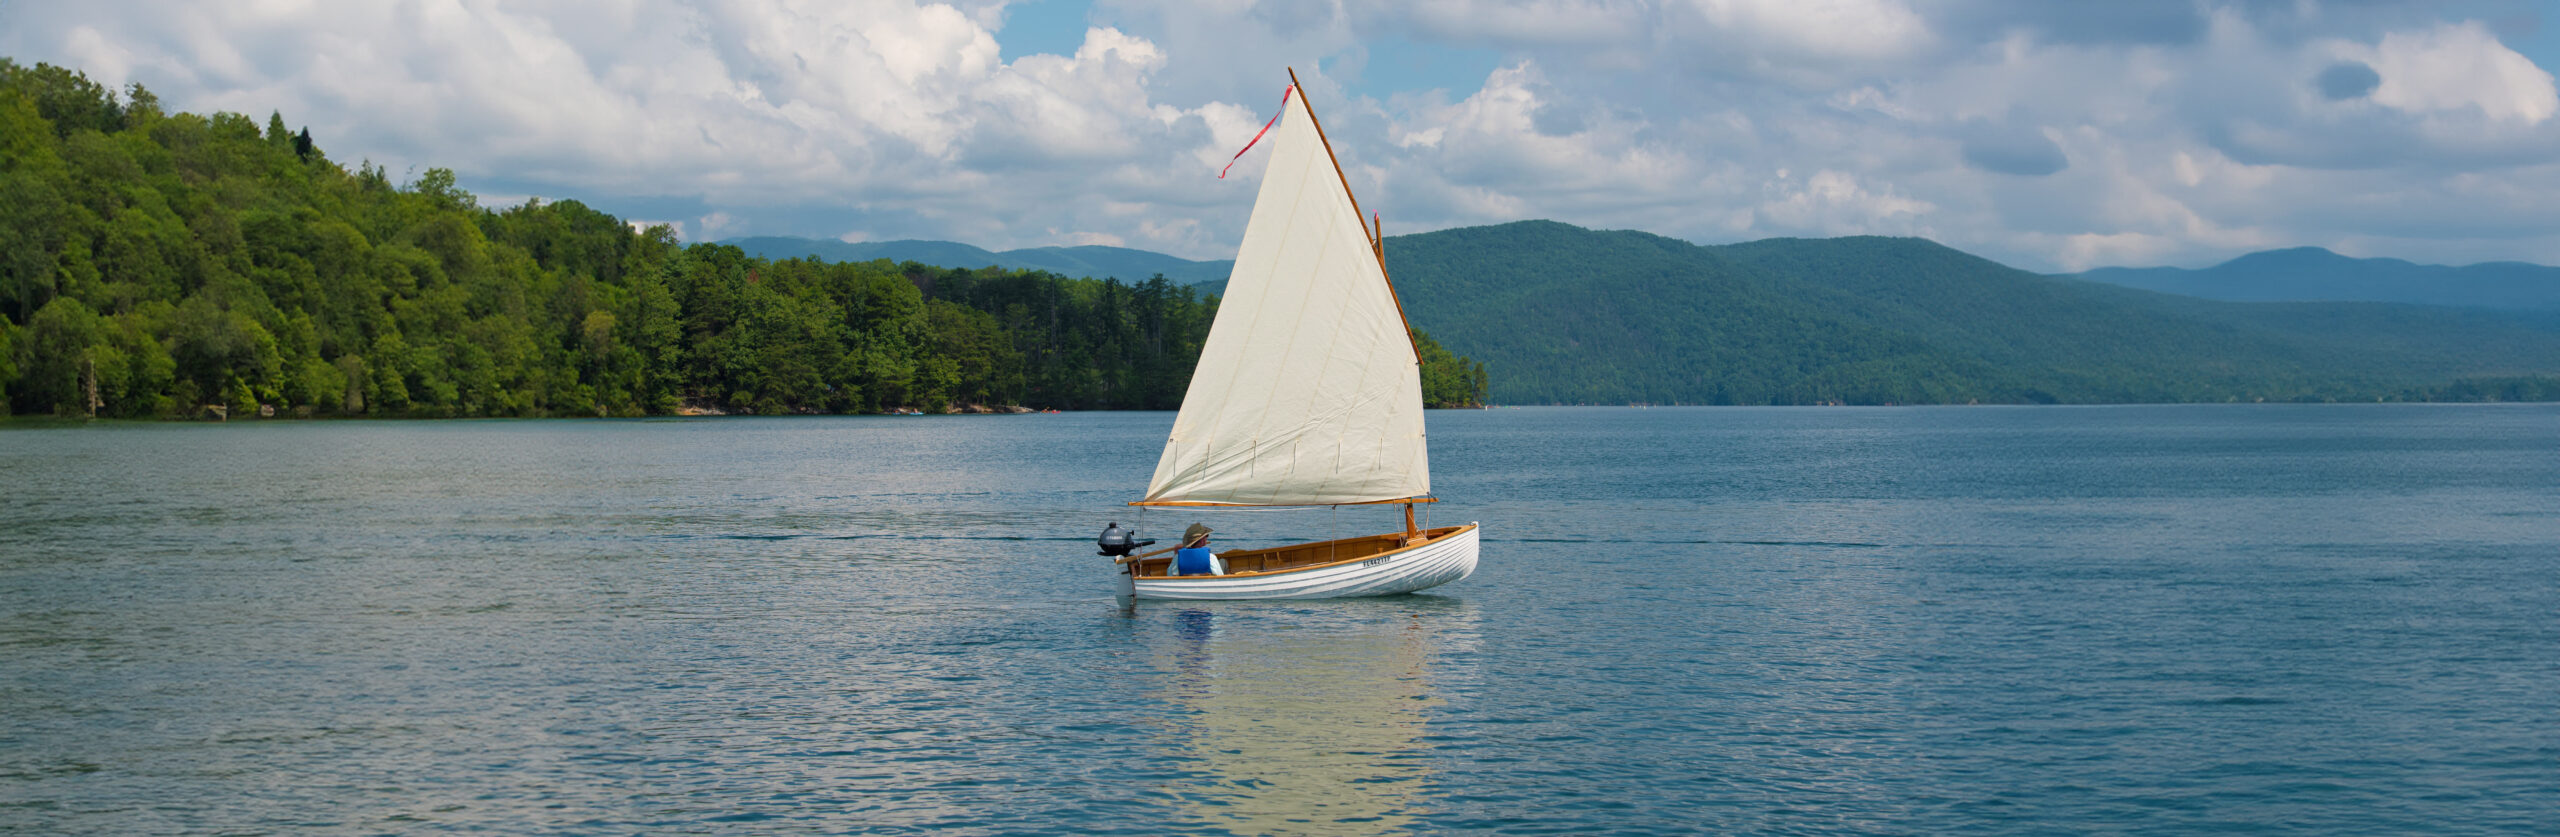
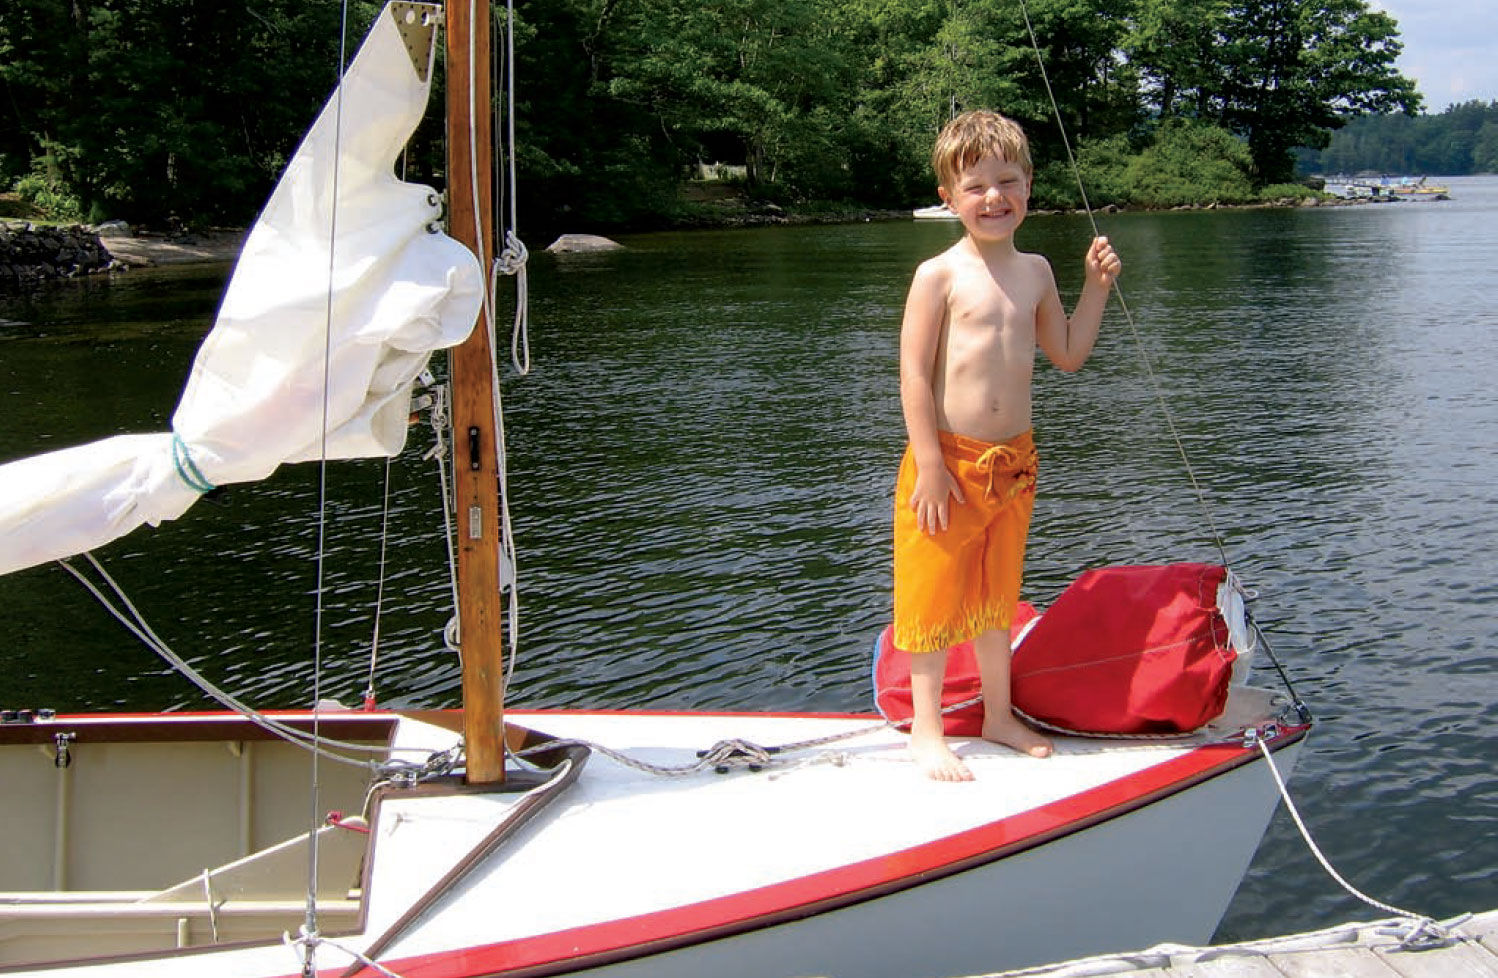
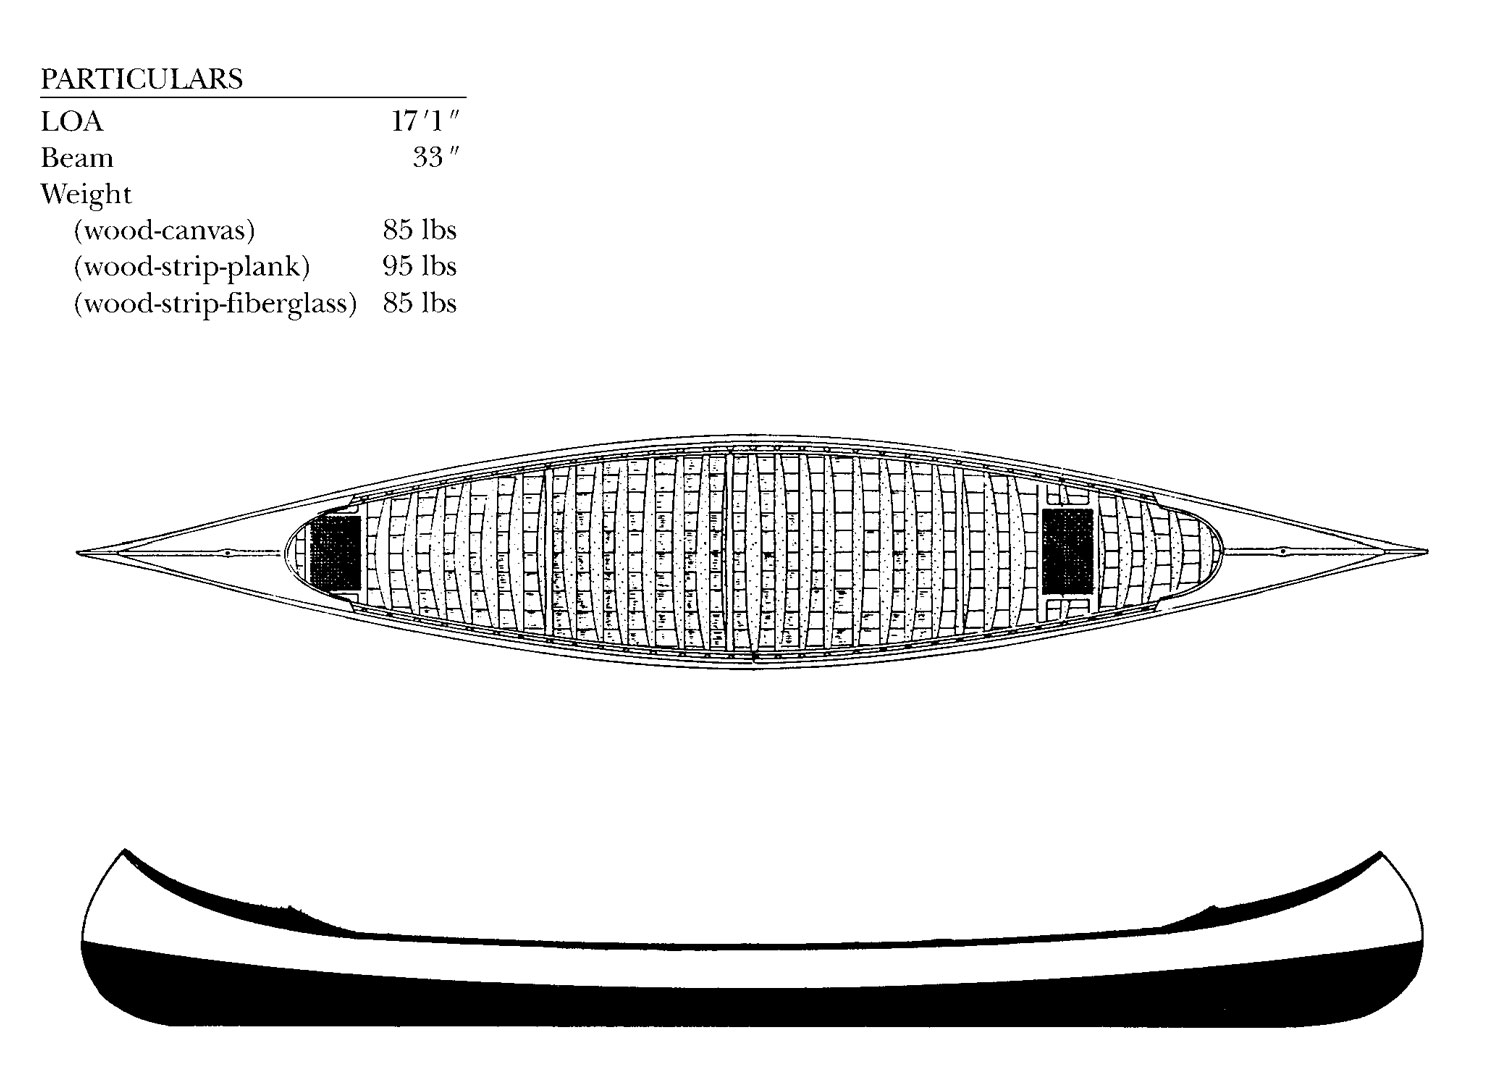
Nathanael Greene Herreshoff designed the original Coquina for his own use. Excellent balance and sailing characteristics—and above all, simplicity—made the 16’8” LOA boat one of his favorites.
It can be a bit difficult sometimes to get beyond the mystique of a great yacht designer’s hallowed reputation, never more so than with Nathanael Greene Herreshoff (1848–1938). “Genius” is appended to his name as routinely as it is to Mozart’s. It’s best, if you can, to try to forget the history surrounding such a designer’s boat—like trying to listen to a famous string quartet as if you were hearing it for the first time. Instead, get inside his mind by using the boat plainly and simply for what it was meant to do. And when it comes to N.G. Herreshoff, no design makes that easier than a Coquina.
Like all of Herreshoff’s designs, formal lines drawings never existed for this 16’8″ LOA hull because he measured his own half models to develop tables of offsets that he handed directly to his yard’s boatbuilders for lofting the hull full-sized. The Herreshoff Mfg. Co. built the first boat of this design in 1889 for Herreshoff’s own use, and only one other was built in the designer’s time.
The absence of lines drawings has complicated replica construction in the modern era for any but the most experienced builders, who have had to analyze papers and photographs in the Hart Nautical Collections at the Massachusetts Institute of Technology Museum—MIT being Herreshoff’s engineering school alma mater and its museum the custodian of the Herreshoff company’s drawings and offset tables. However, several years ago boatbuilder and designer Doug Hylan teamed up with this magazine’s technical editor, Maynard Bray, both of Brooklin, Maine, to develop a detailed building plans package for the boat (see also WoodenBoat magazine No. 187).
“Regardless of whether the boat is built in plywood or the traditional cedar, sailing a Coquina is an undoubted pleasure.”
Working under license from the MIT Museum, they based Doug’s drawings on Maynard’s research. But they also added extensive detail and instructions to bring the boat within grasp of talented amateur builders. The resulting plans are uncommonly well detailed, running to 11 sheets, specifying either traditional planking or glued-lapstrake plywood construction, all supplemented by an instructional CD with 550 photos documenting the construction.
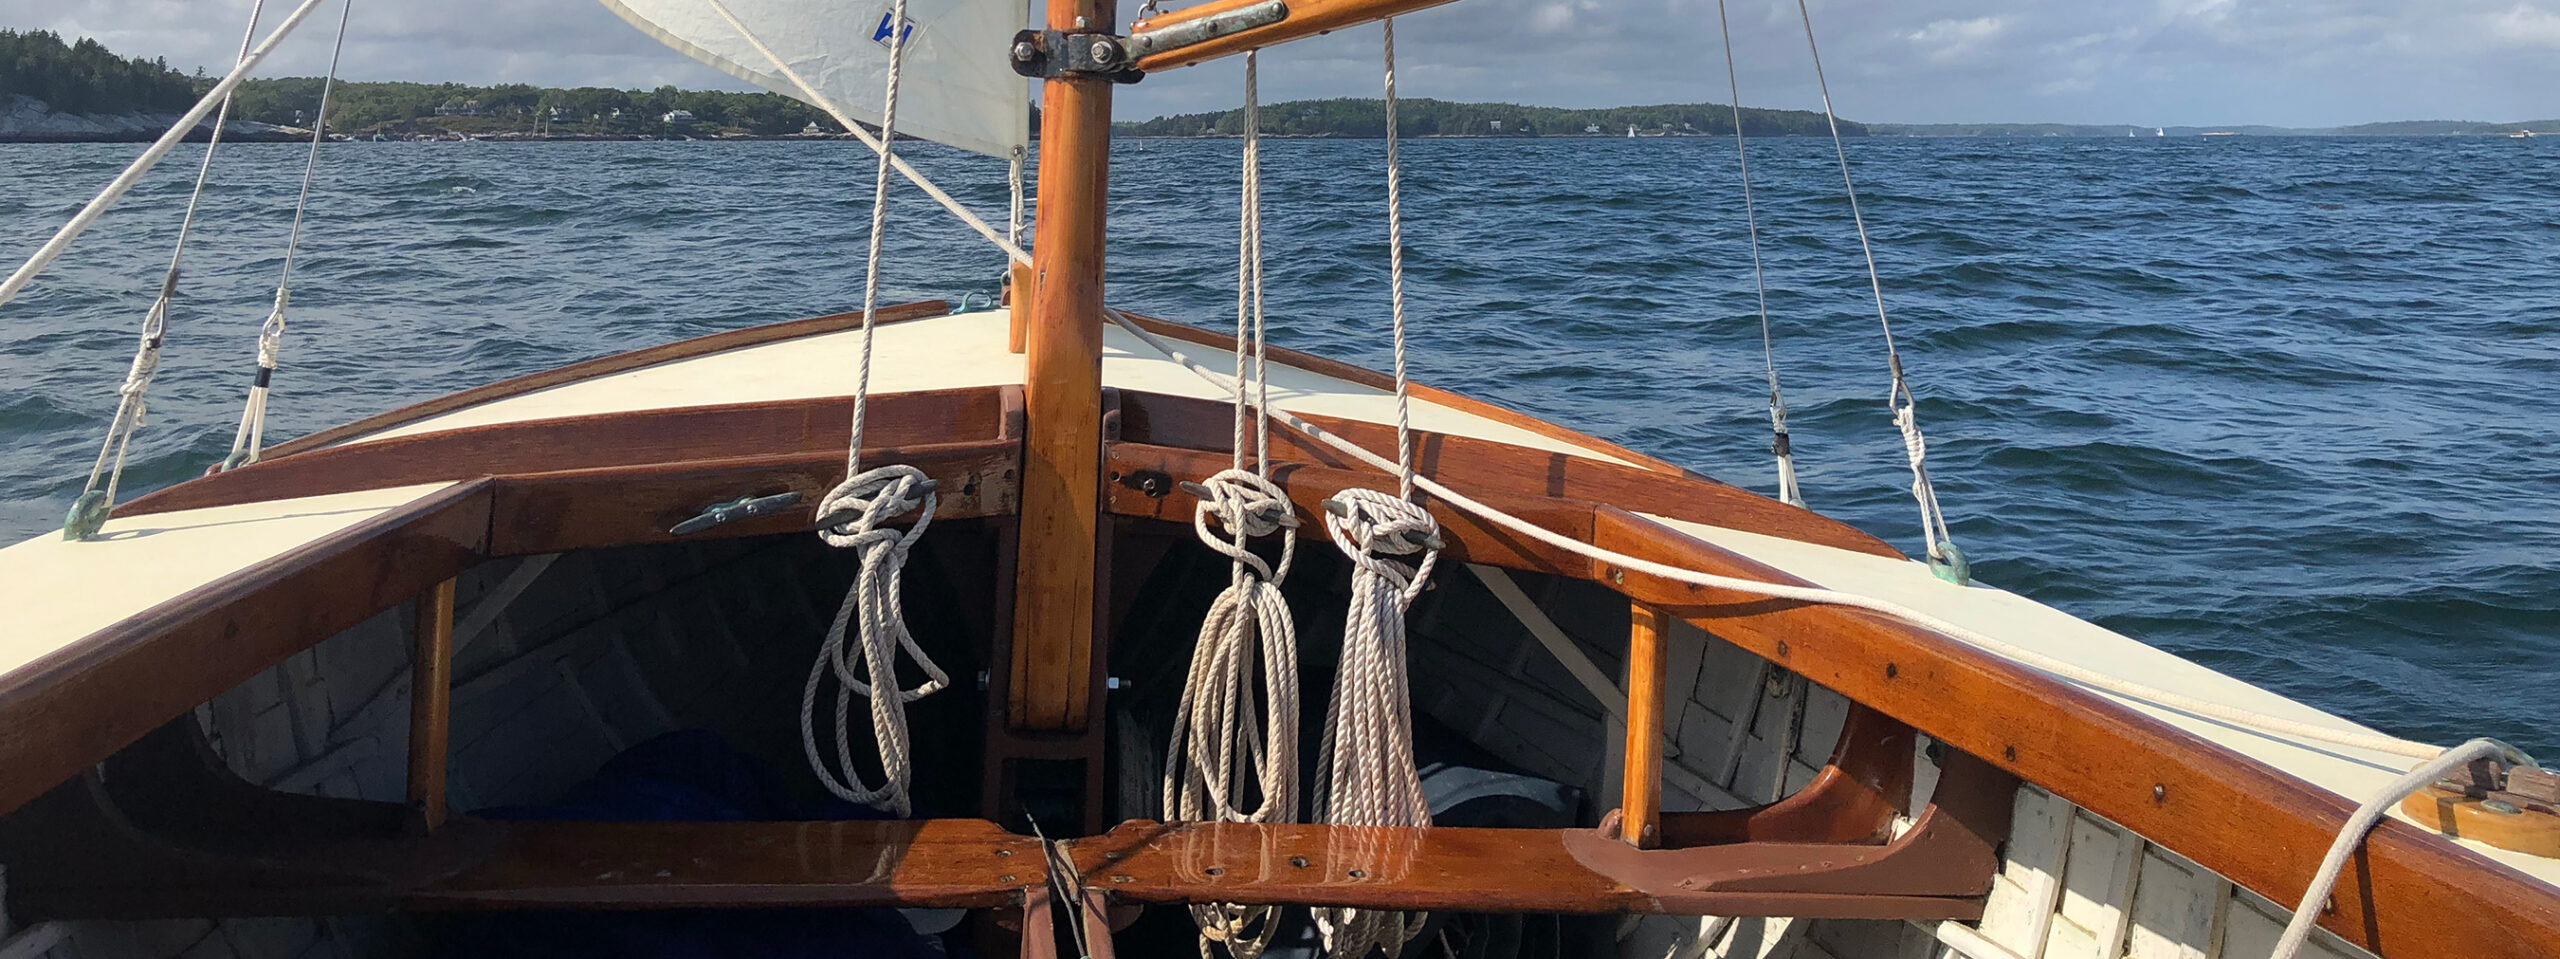
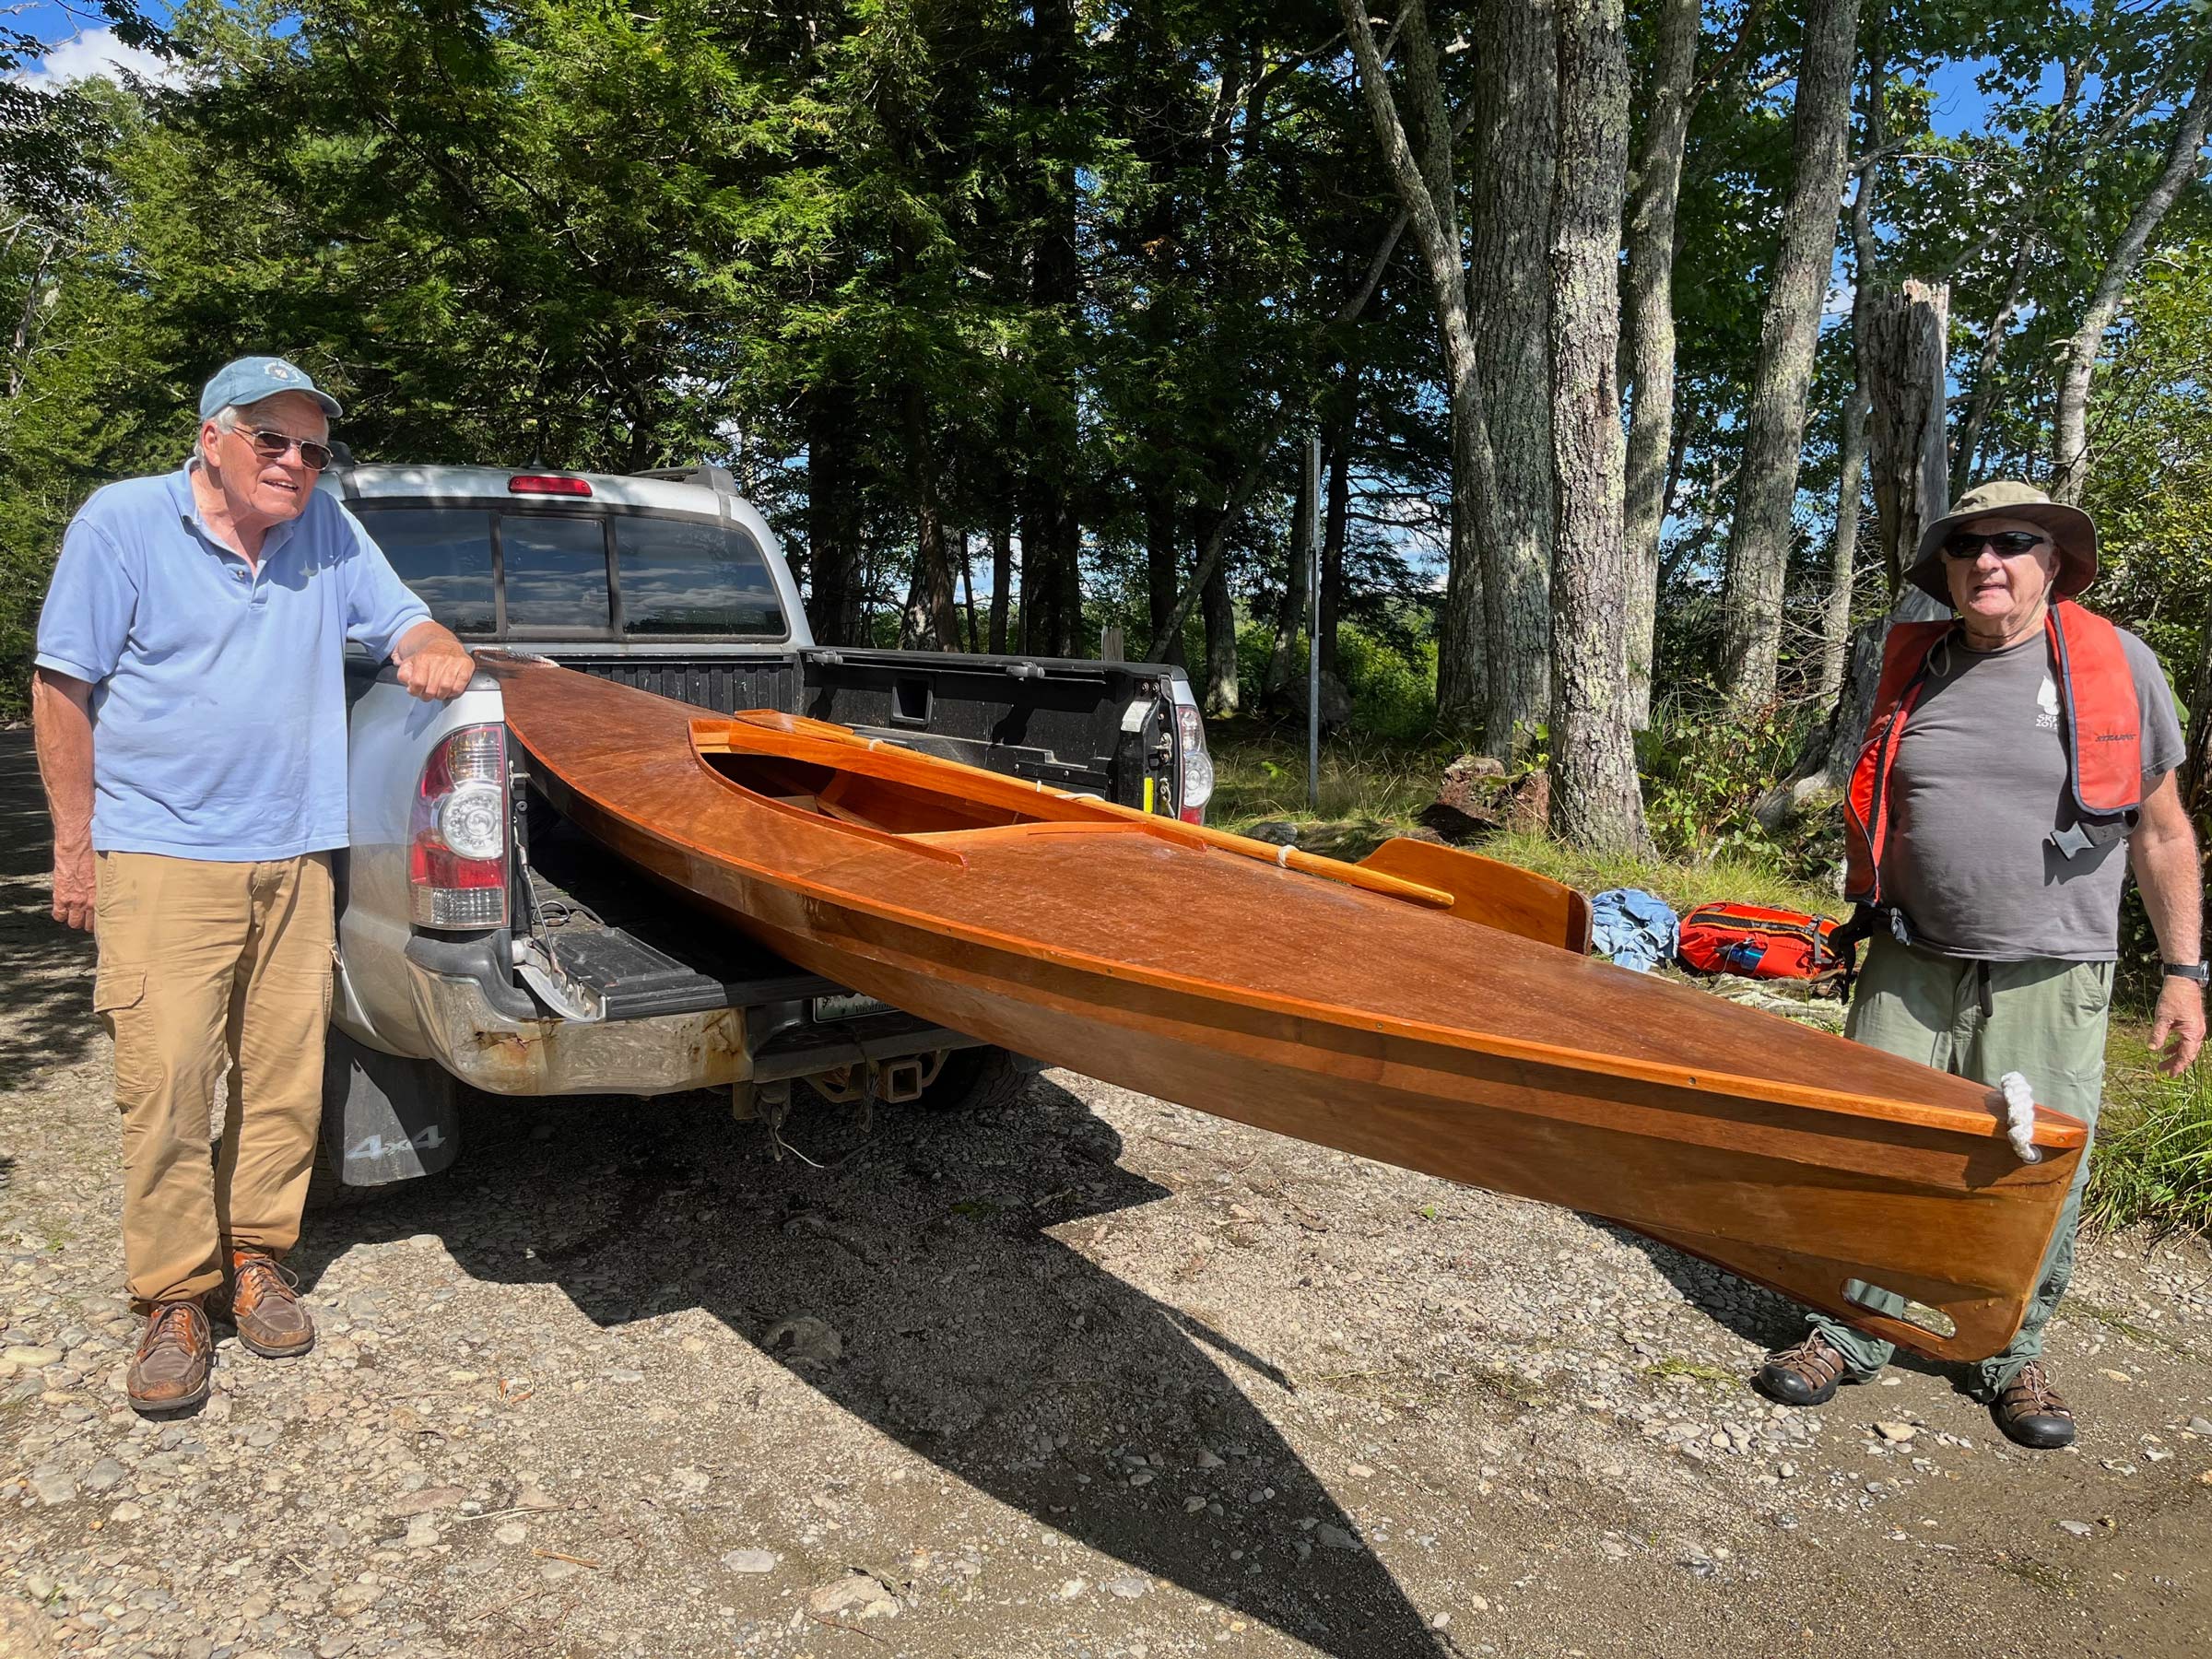
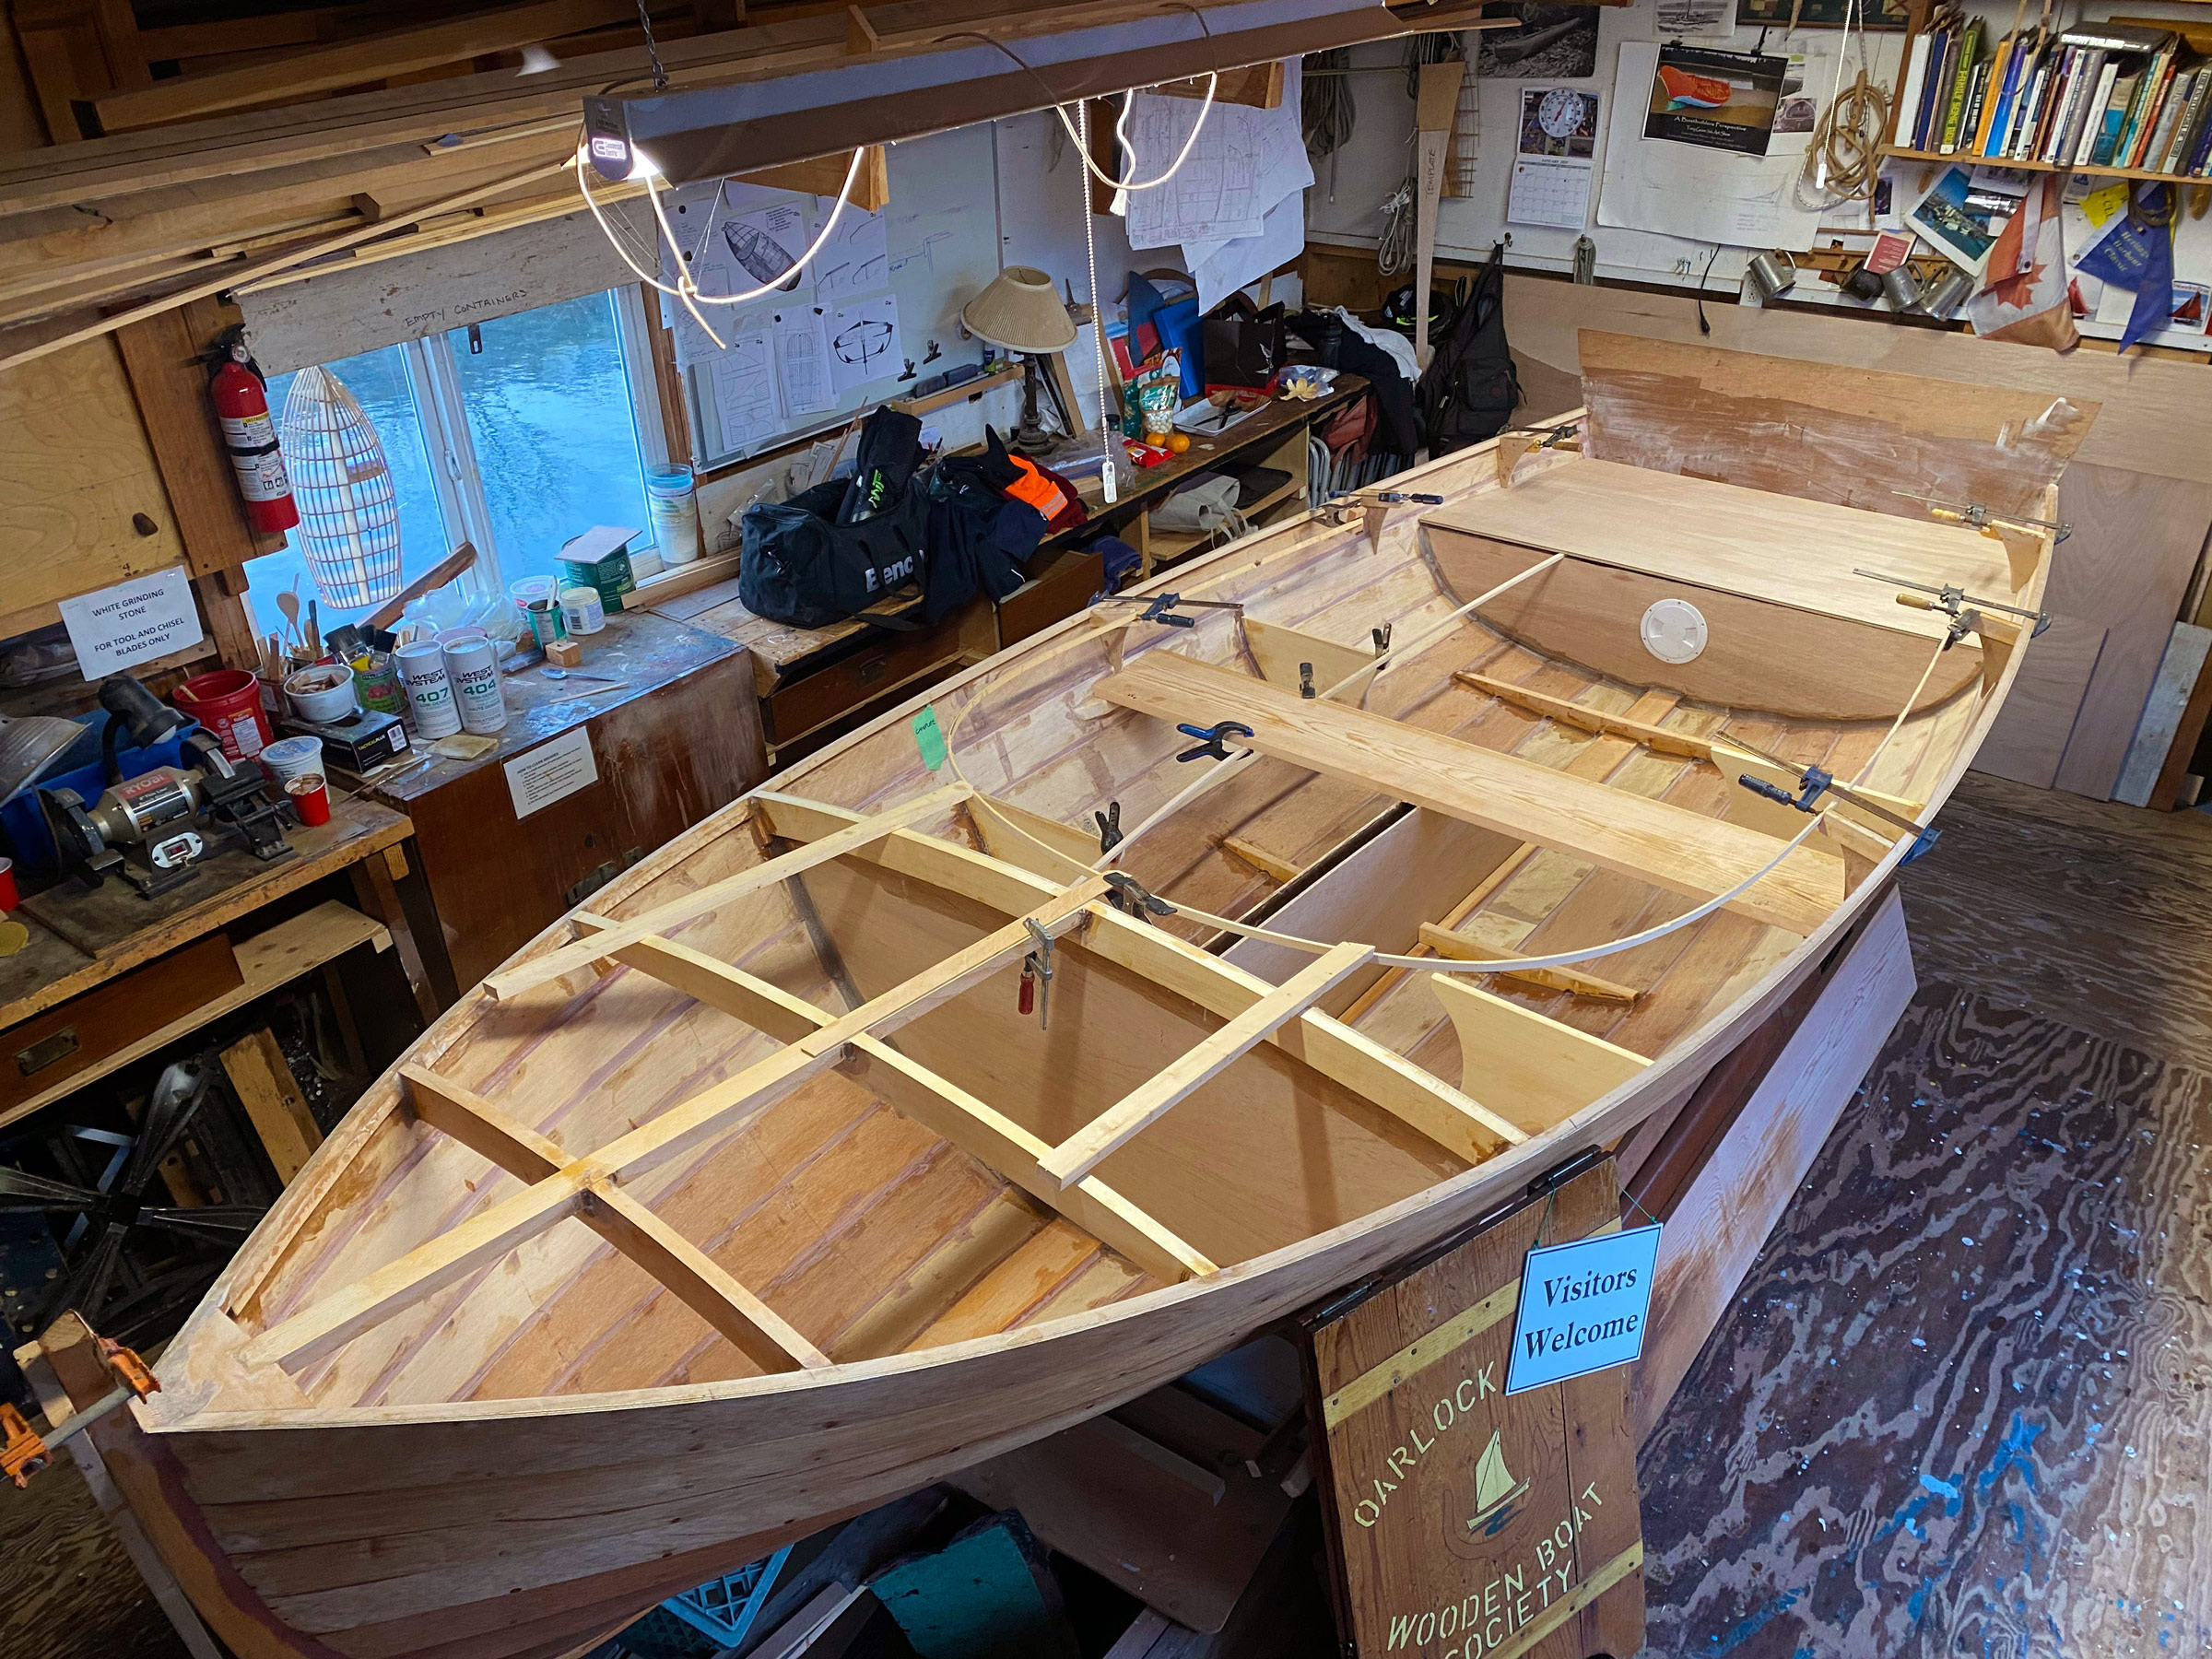
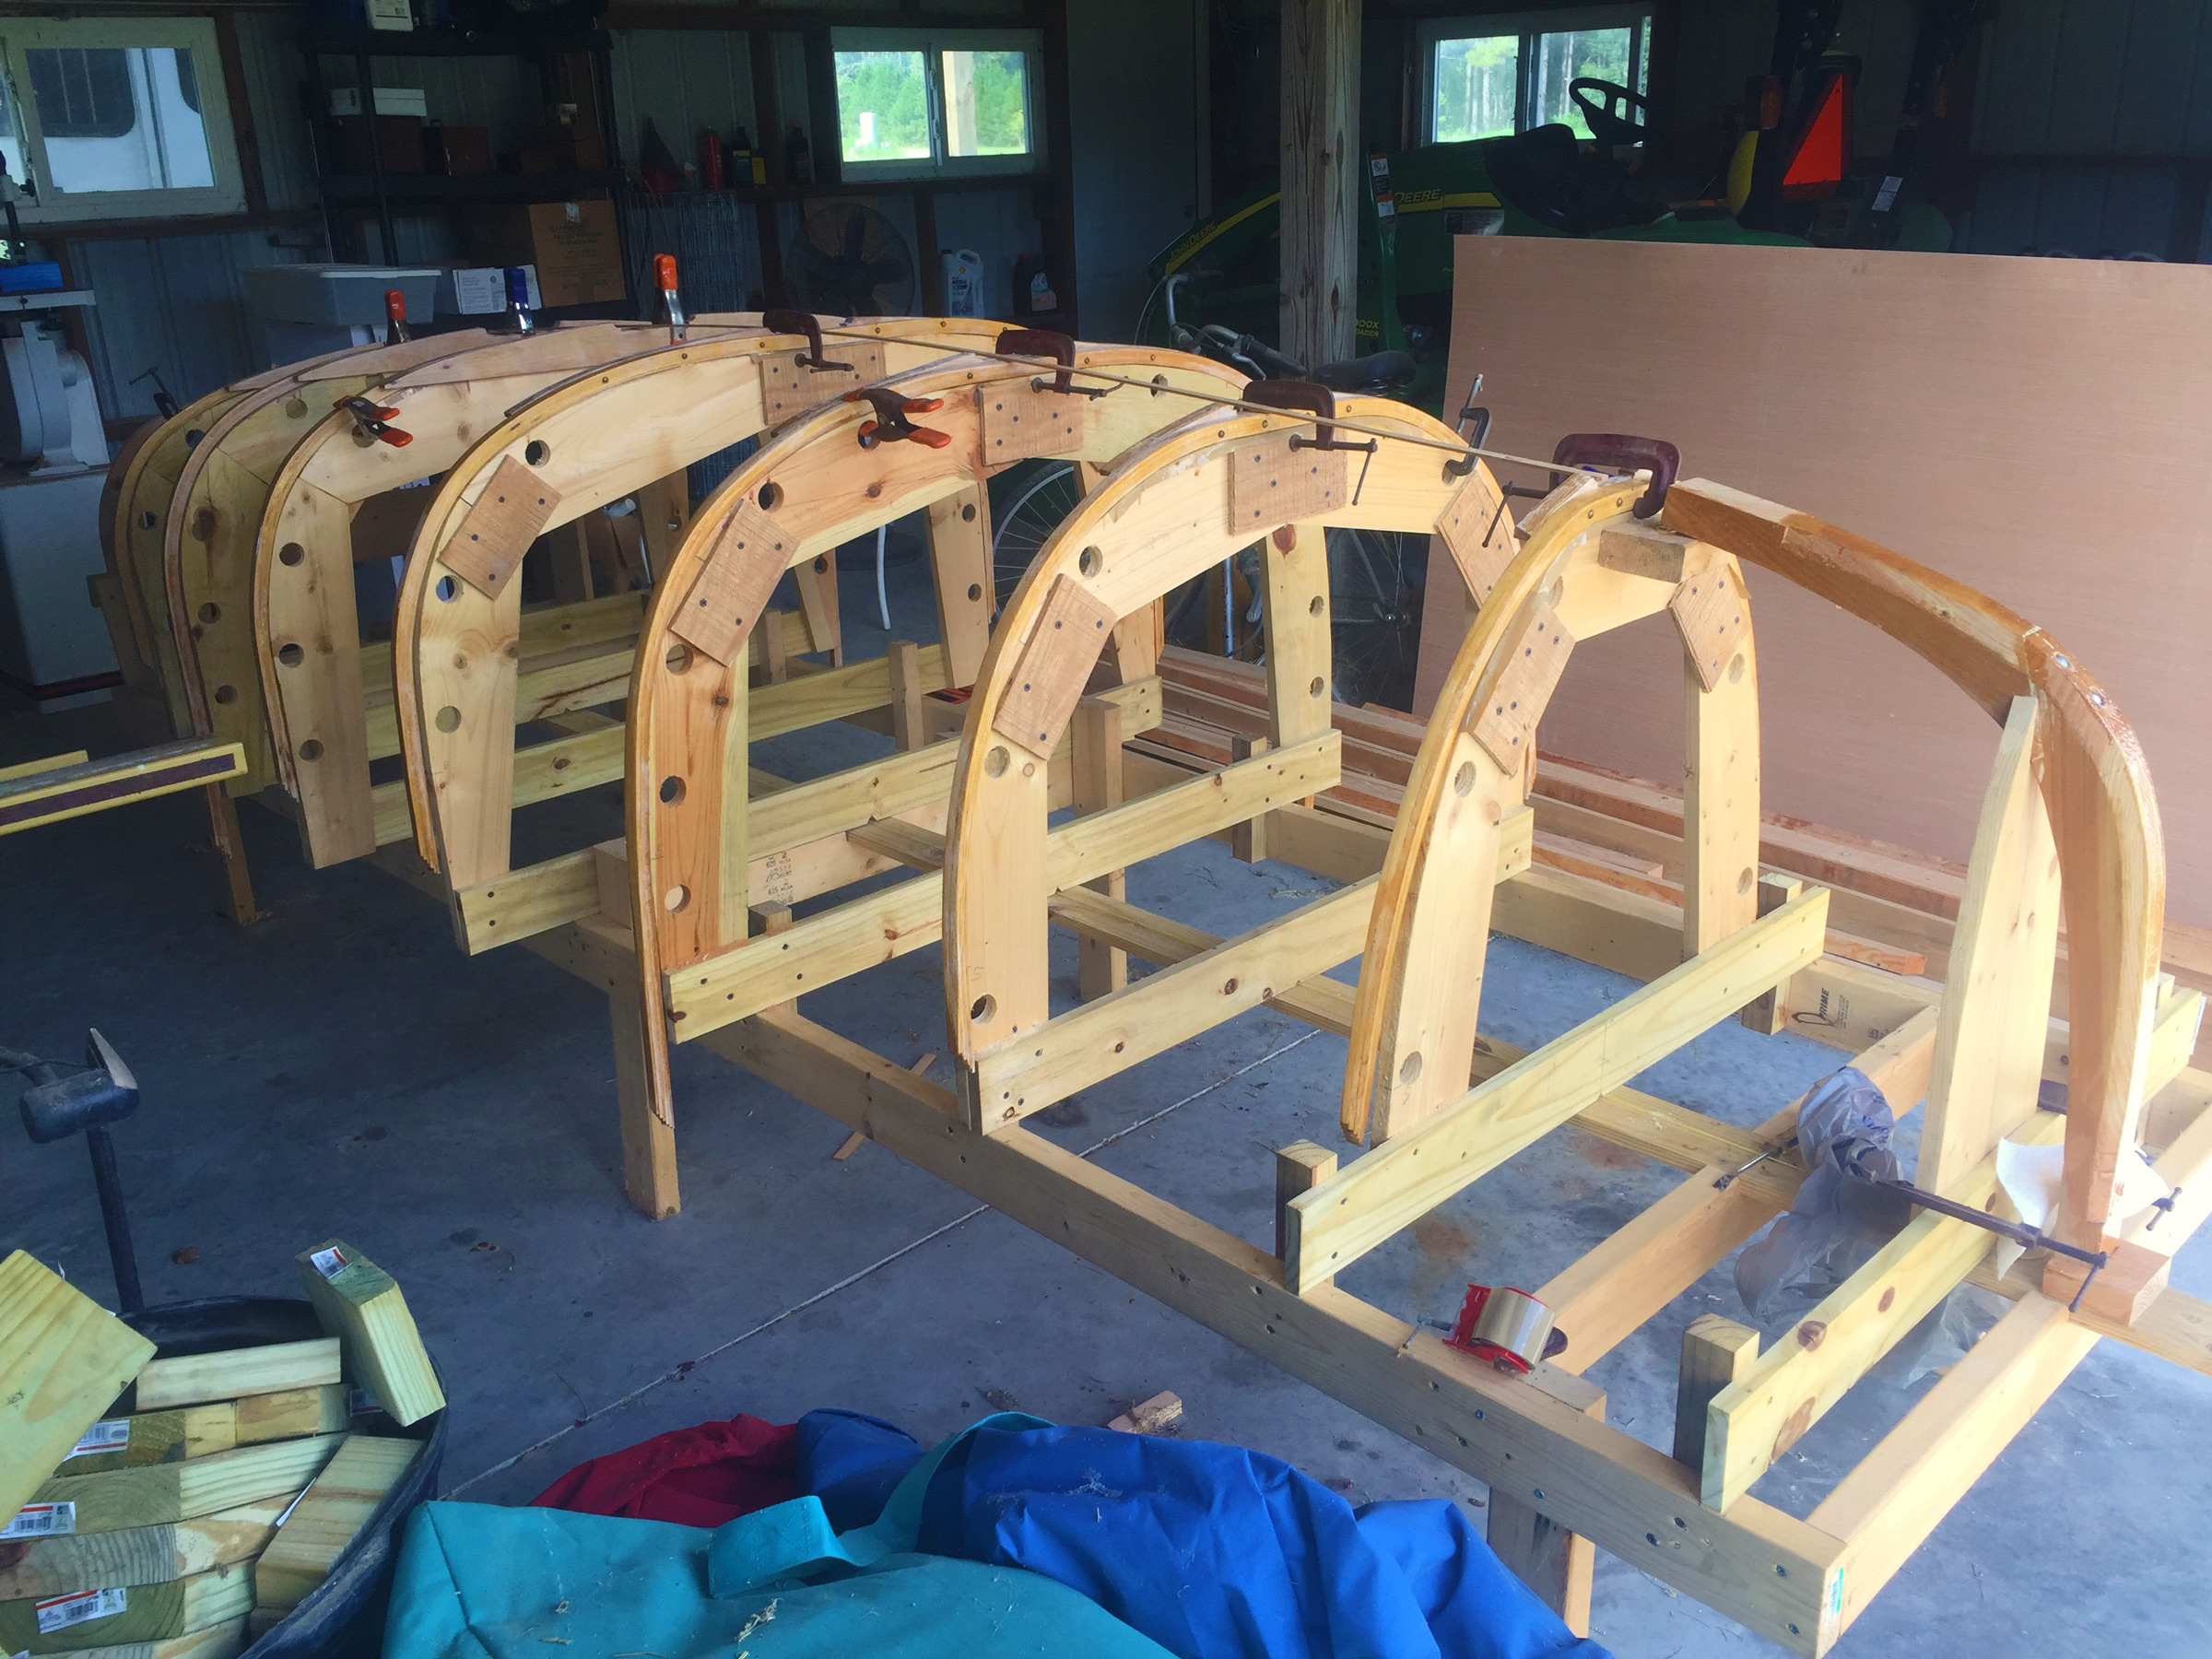
I had seen Coquinas under sail and at rest many times but never sailed one myself before scheduling an outing aboard WIZARD with Vagn Worm. Vagn has a summer place on the Benjamin River neighboring the D.N. Hylan & Associates yard, where the pieces for WIZARD were assembled. Doug not only sells plans but also builds completed boats, bare hulls, and kits like the one Vagn purchased. Vagn was looking for a daysailer to take advantage of the afternoon breezes he could see from his porch, and he quickly settled on a Coquina, having seen the first two boats of this design come out of Hylan’s yard.
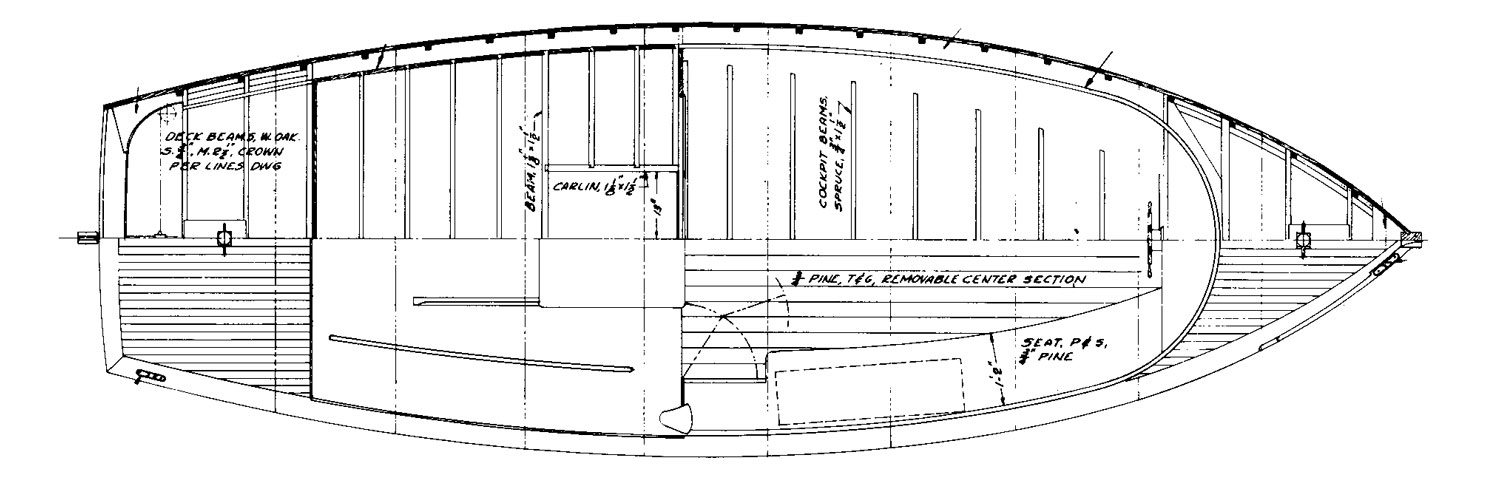
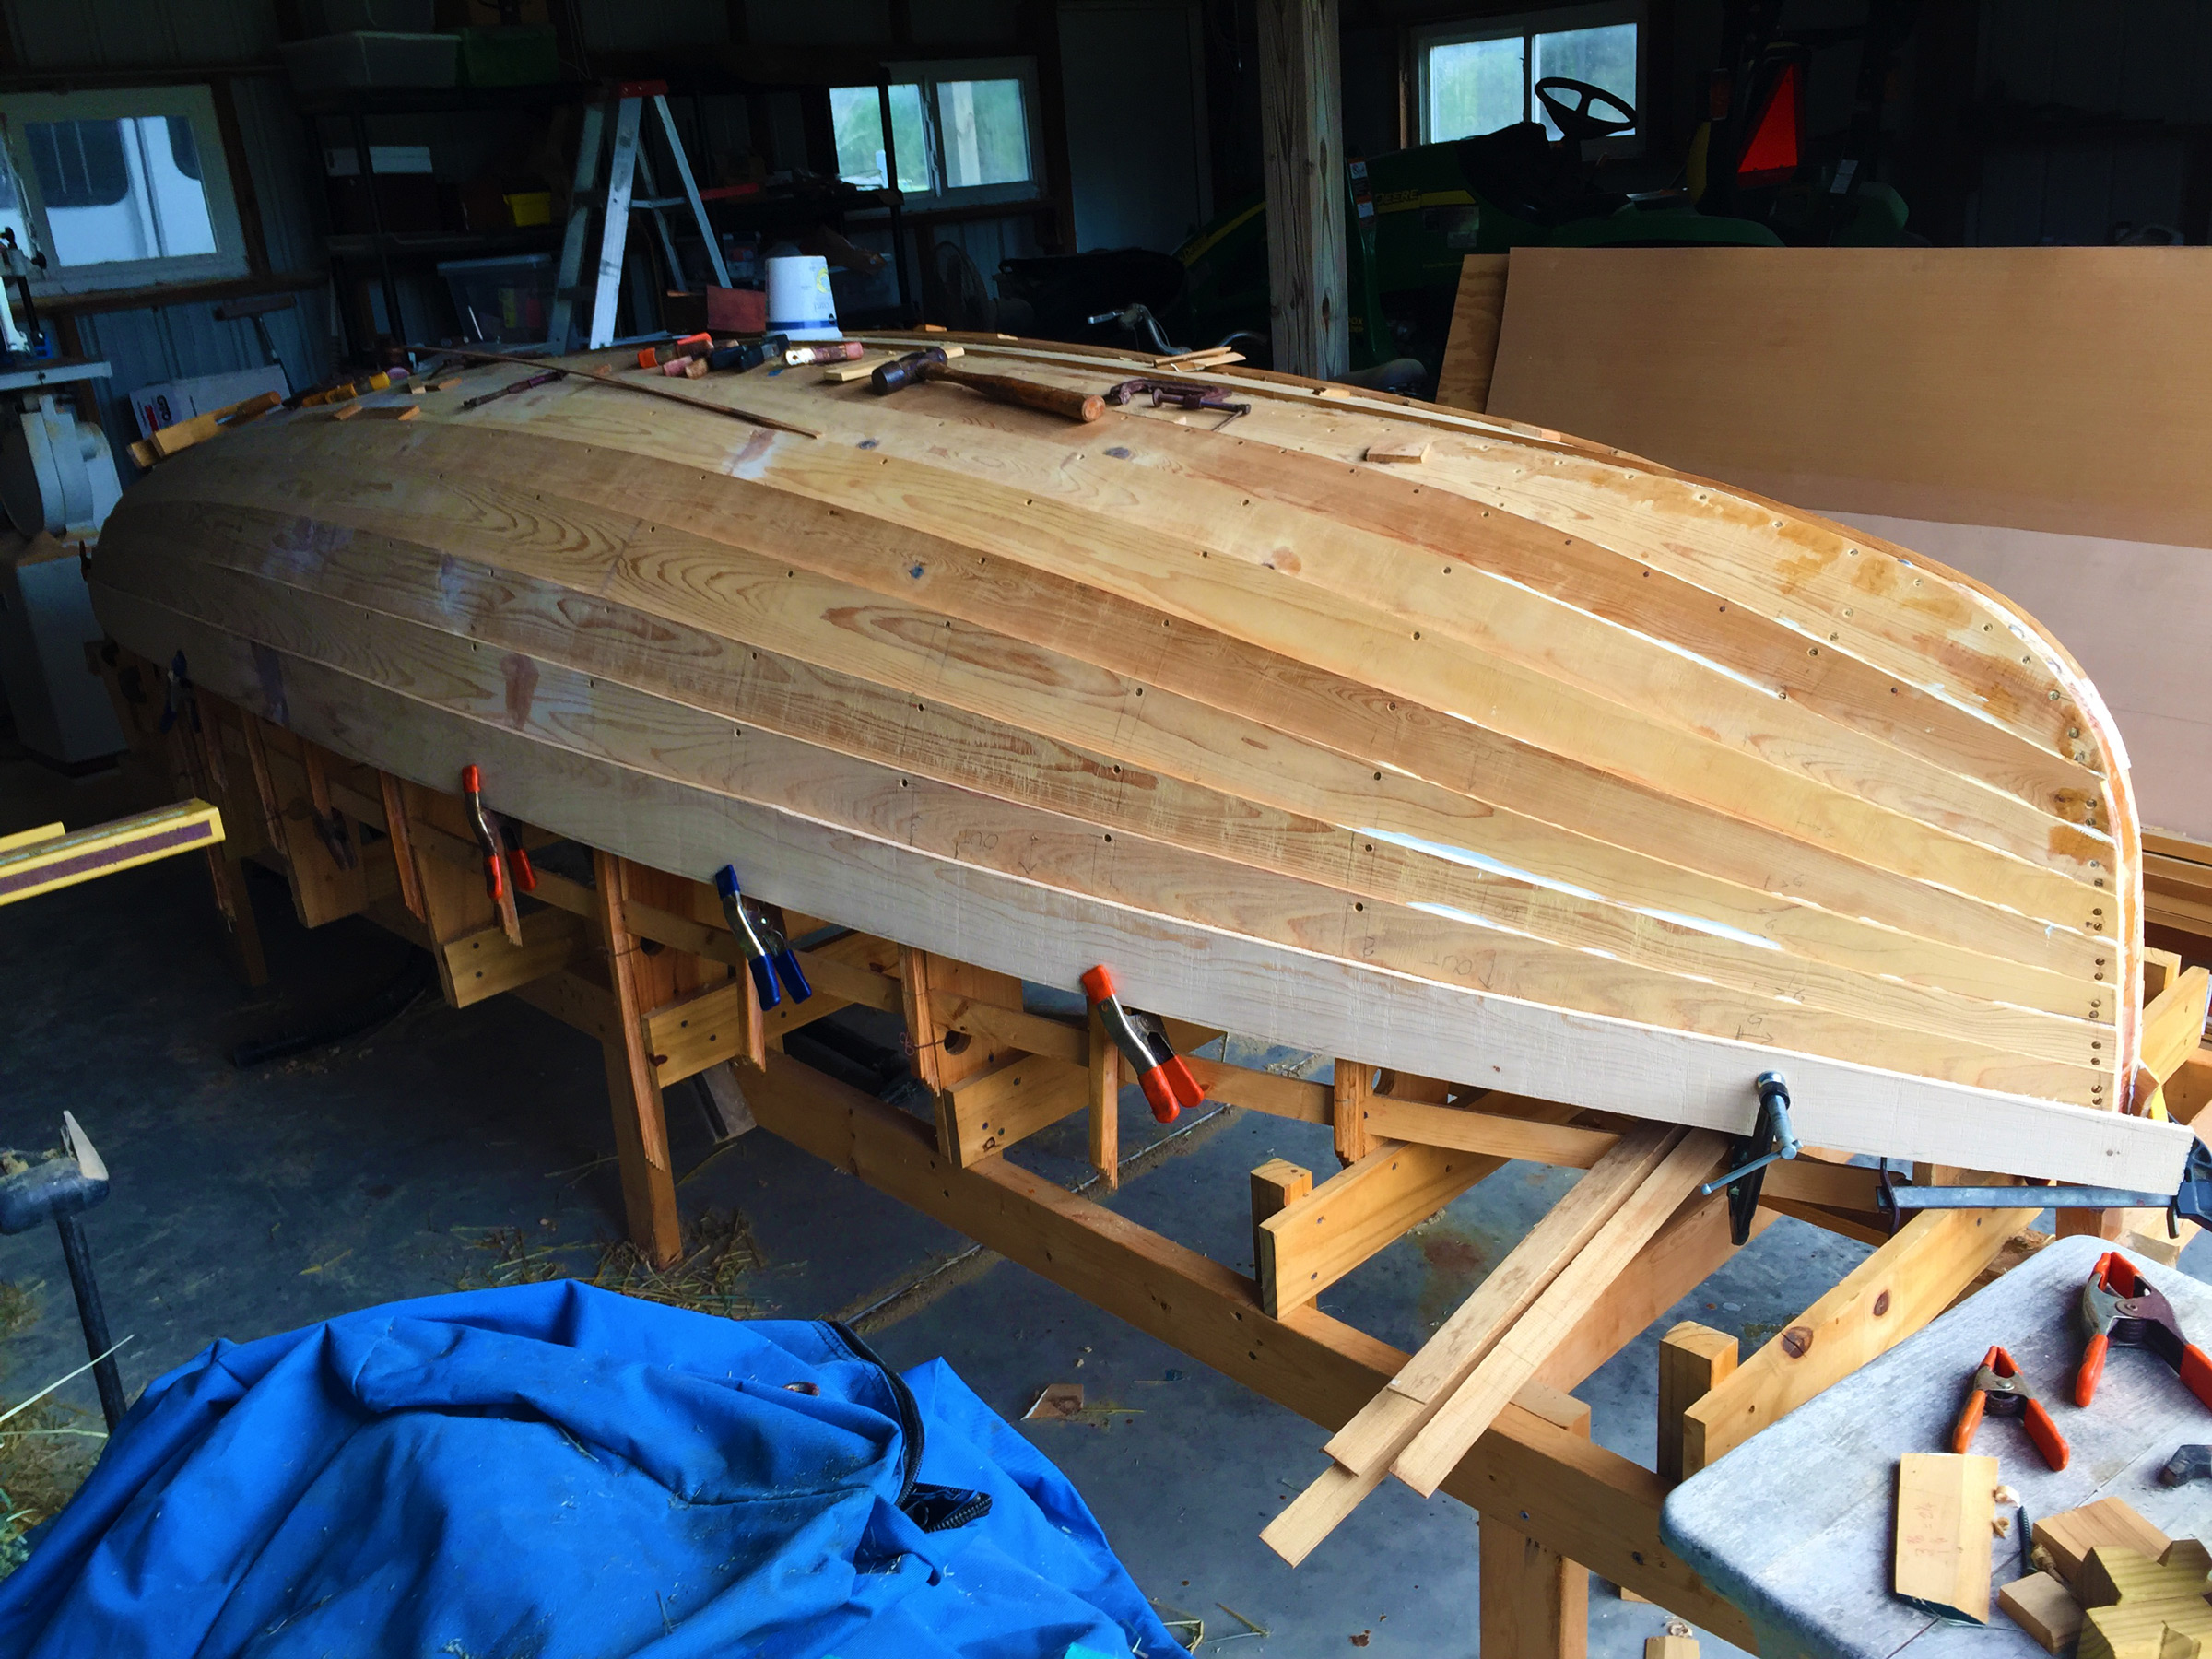
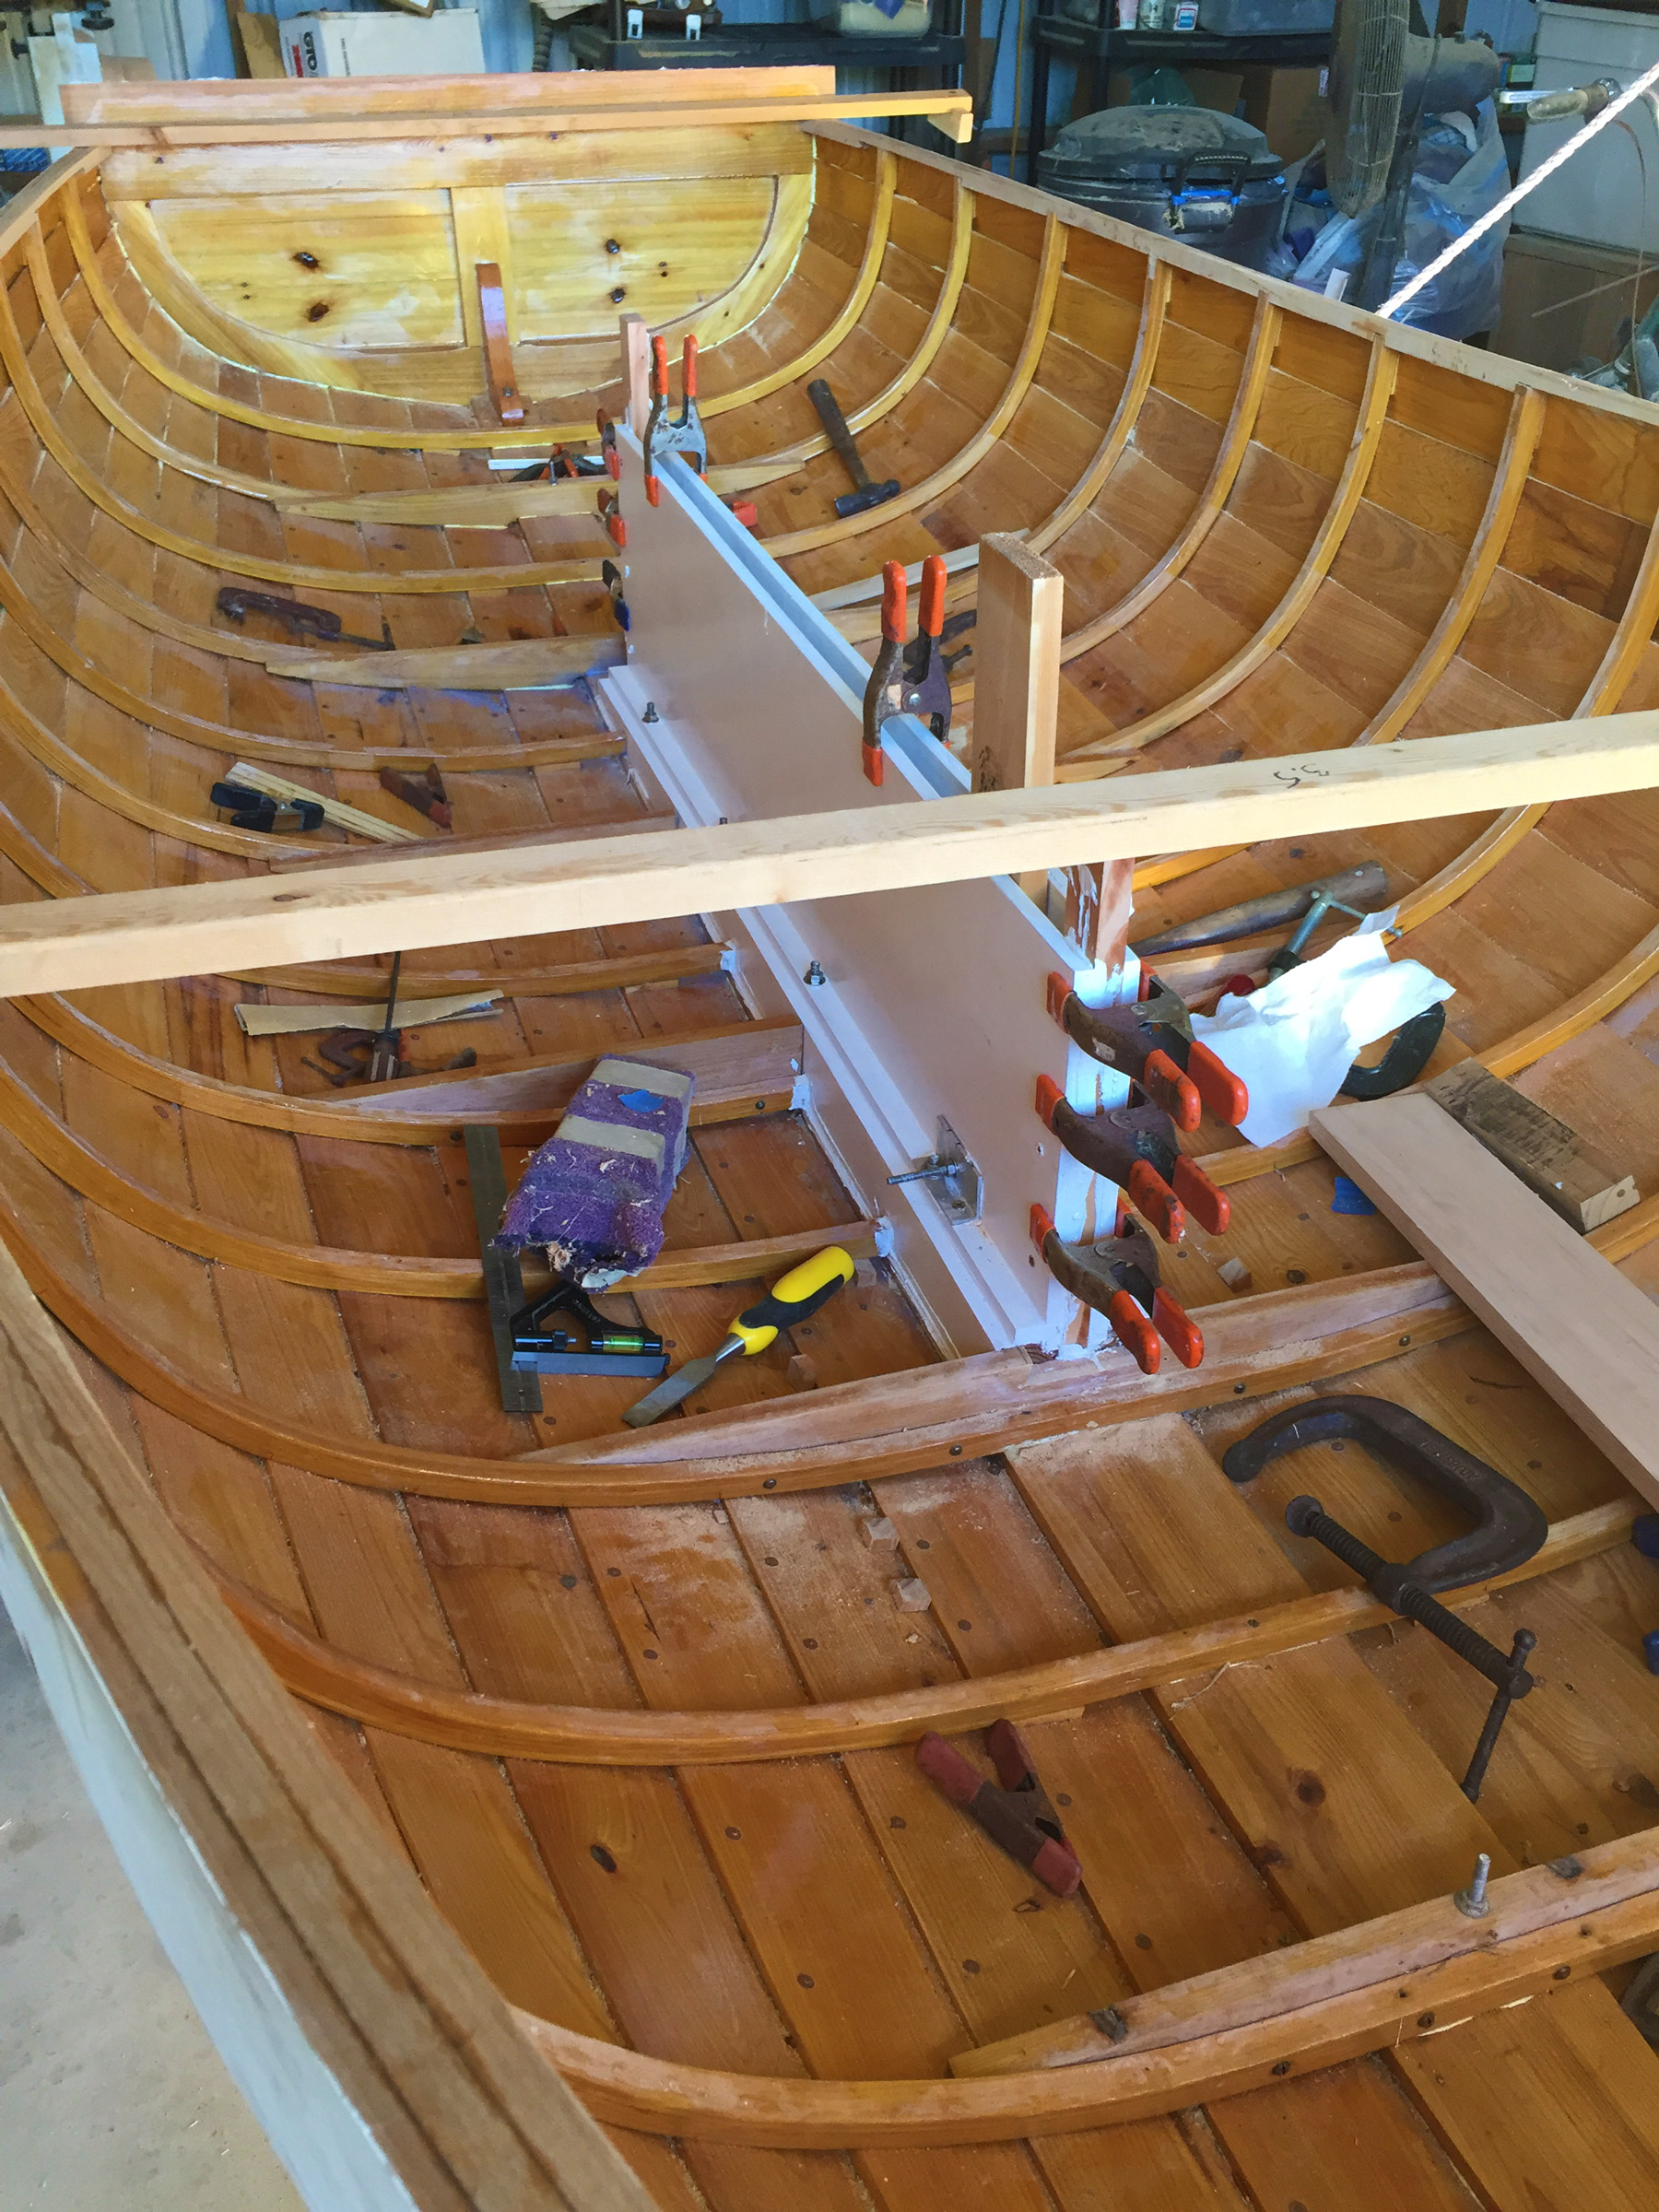
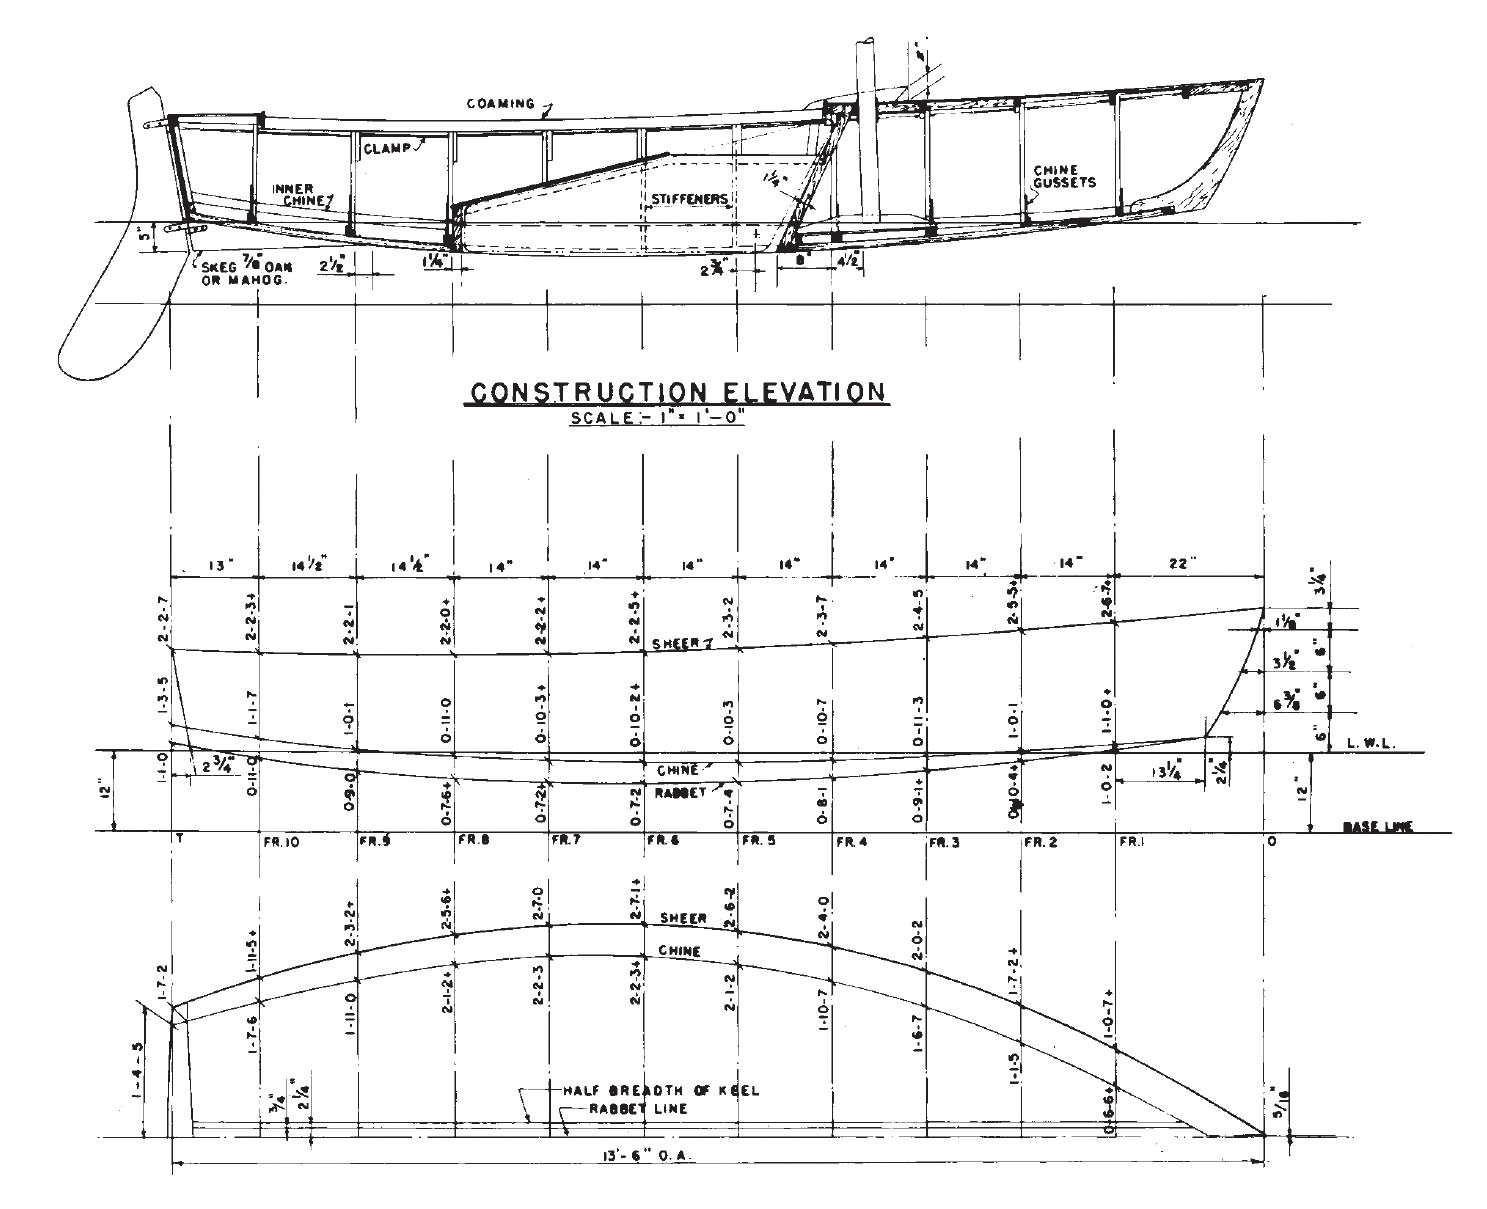
Building this boat, no matter what method, would be a real joy. The planking lines are a pleasure to look at, and instead of the careful lining-off that would be required in building from original plans or tables of offsets, Hylan’s plans specify plank locations at each mold. He also provides specific layouts for each individual plank. With the boat’s fine, easy lines and its thin planking stock, the work should go very easily and pleasantly. The masts and spars would present some opportunities for working with fine stock—the boat is crying out for varnished clear spruce spars—but the quantities involved would not be so large as to be completely ruinous to the bank account. Careful attention to detail and to finishes would yield a stunning result, whether in traditional planking or plywood, bright-finished or painted.
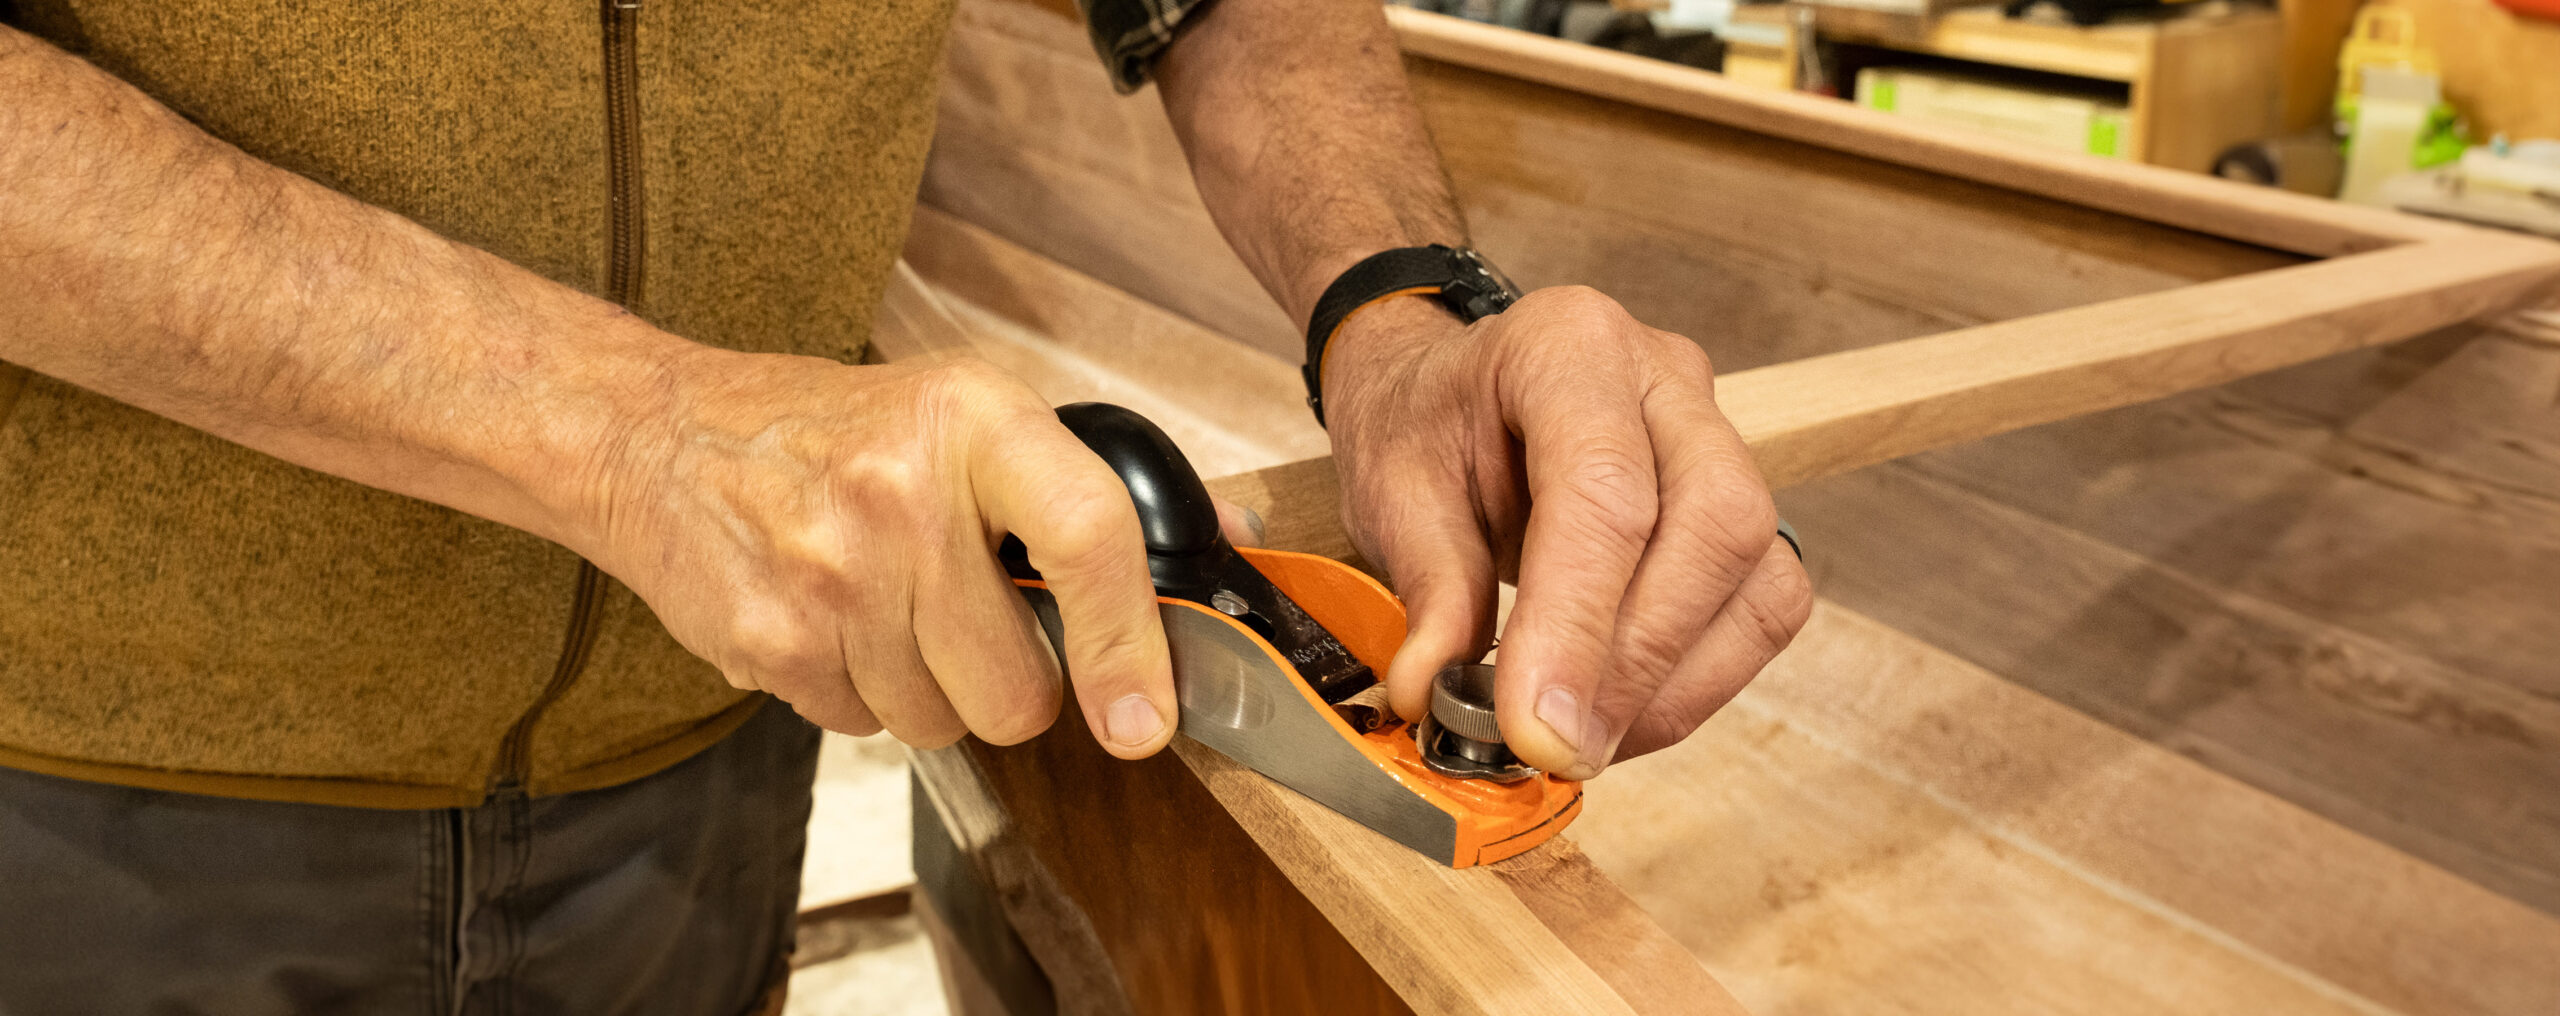
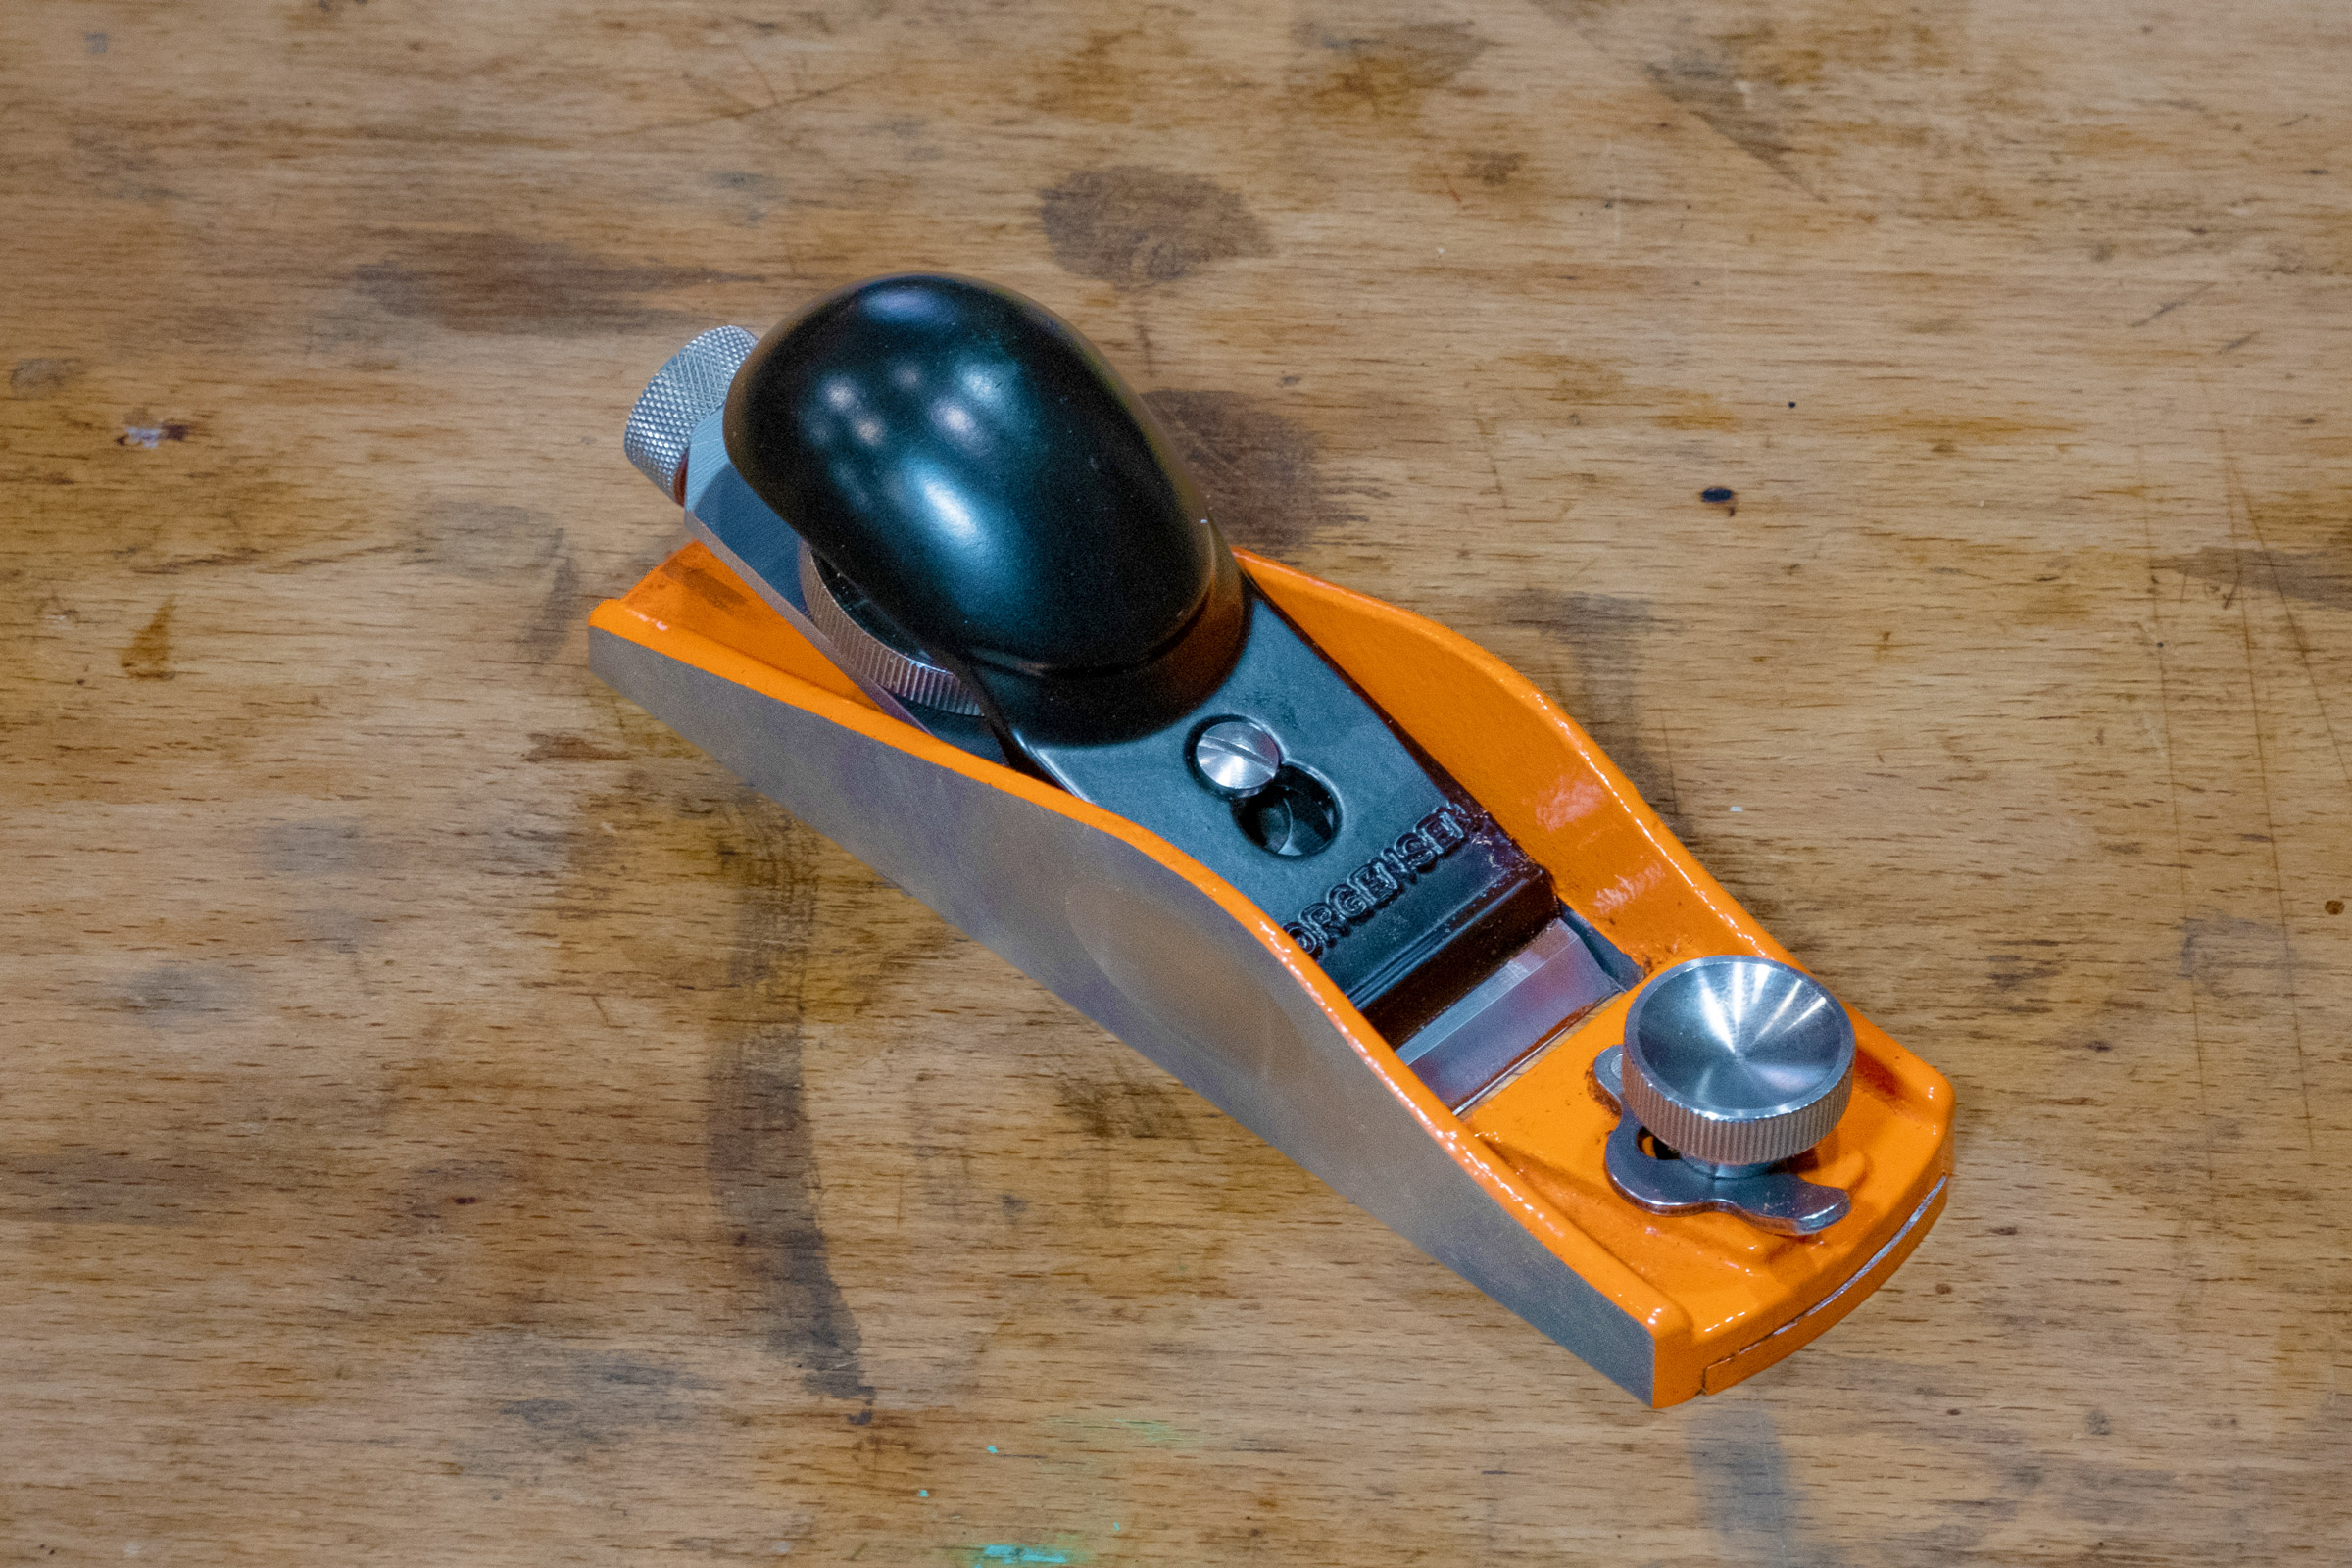
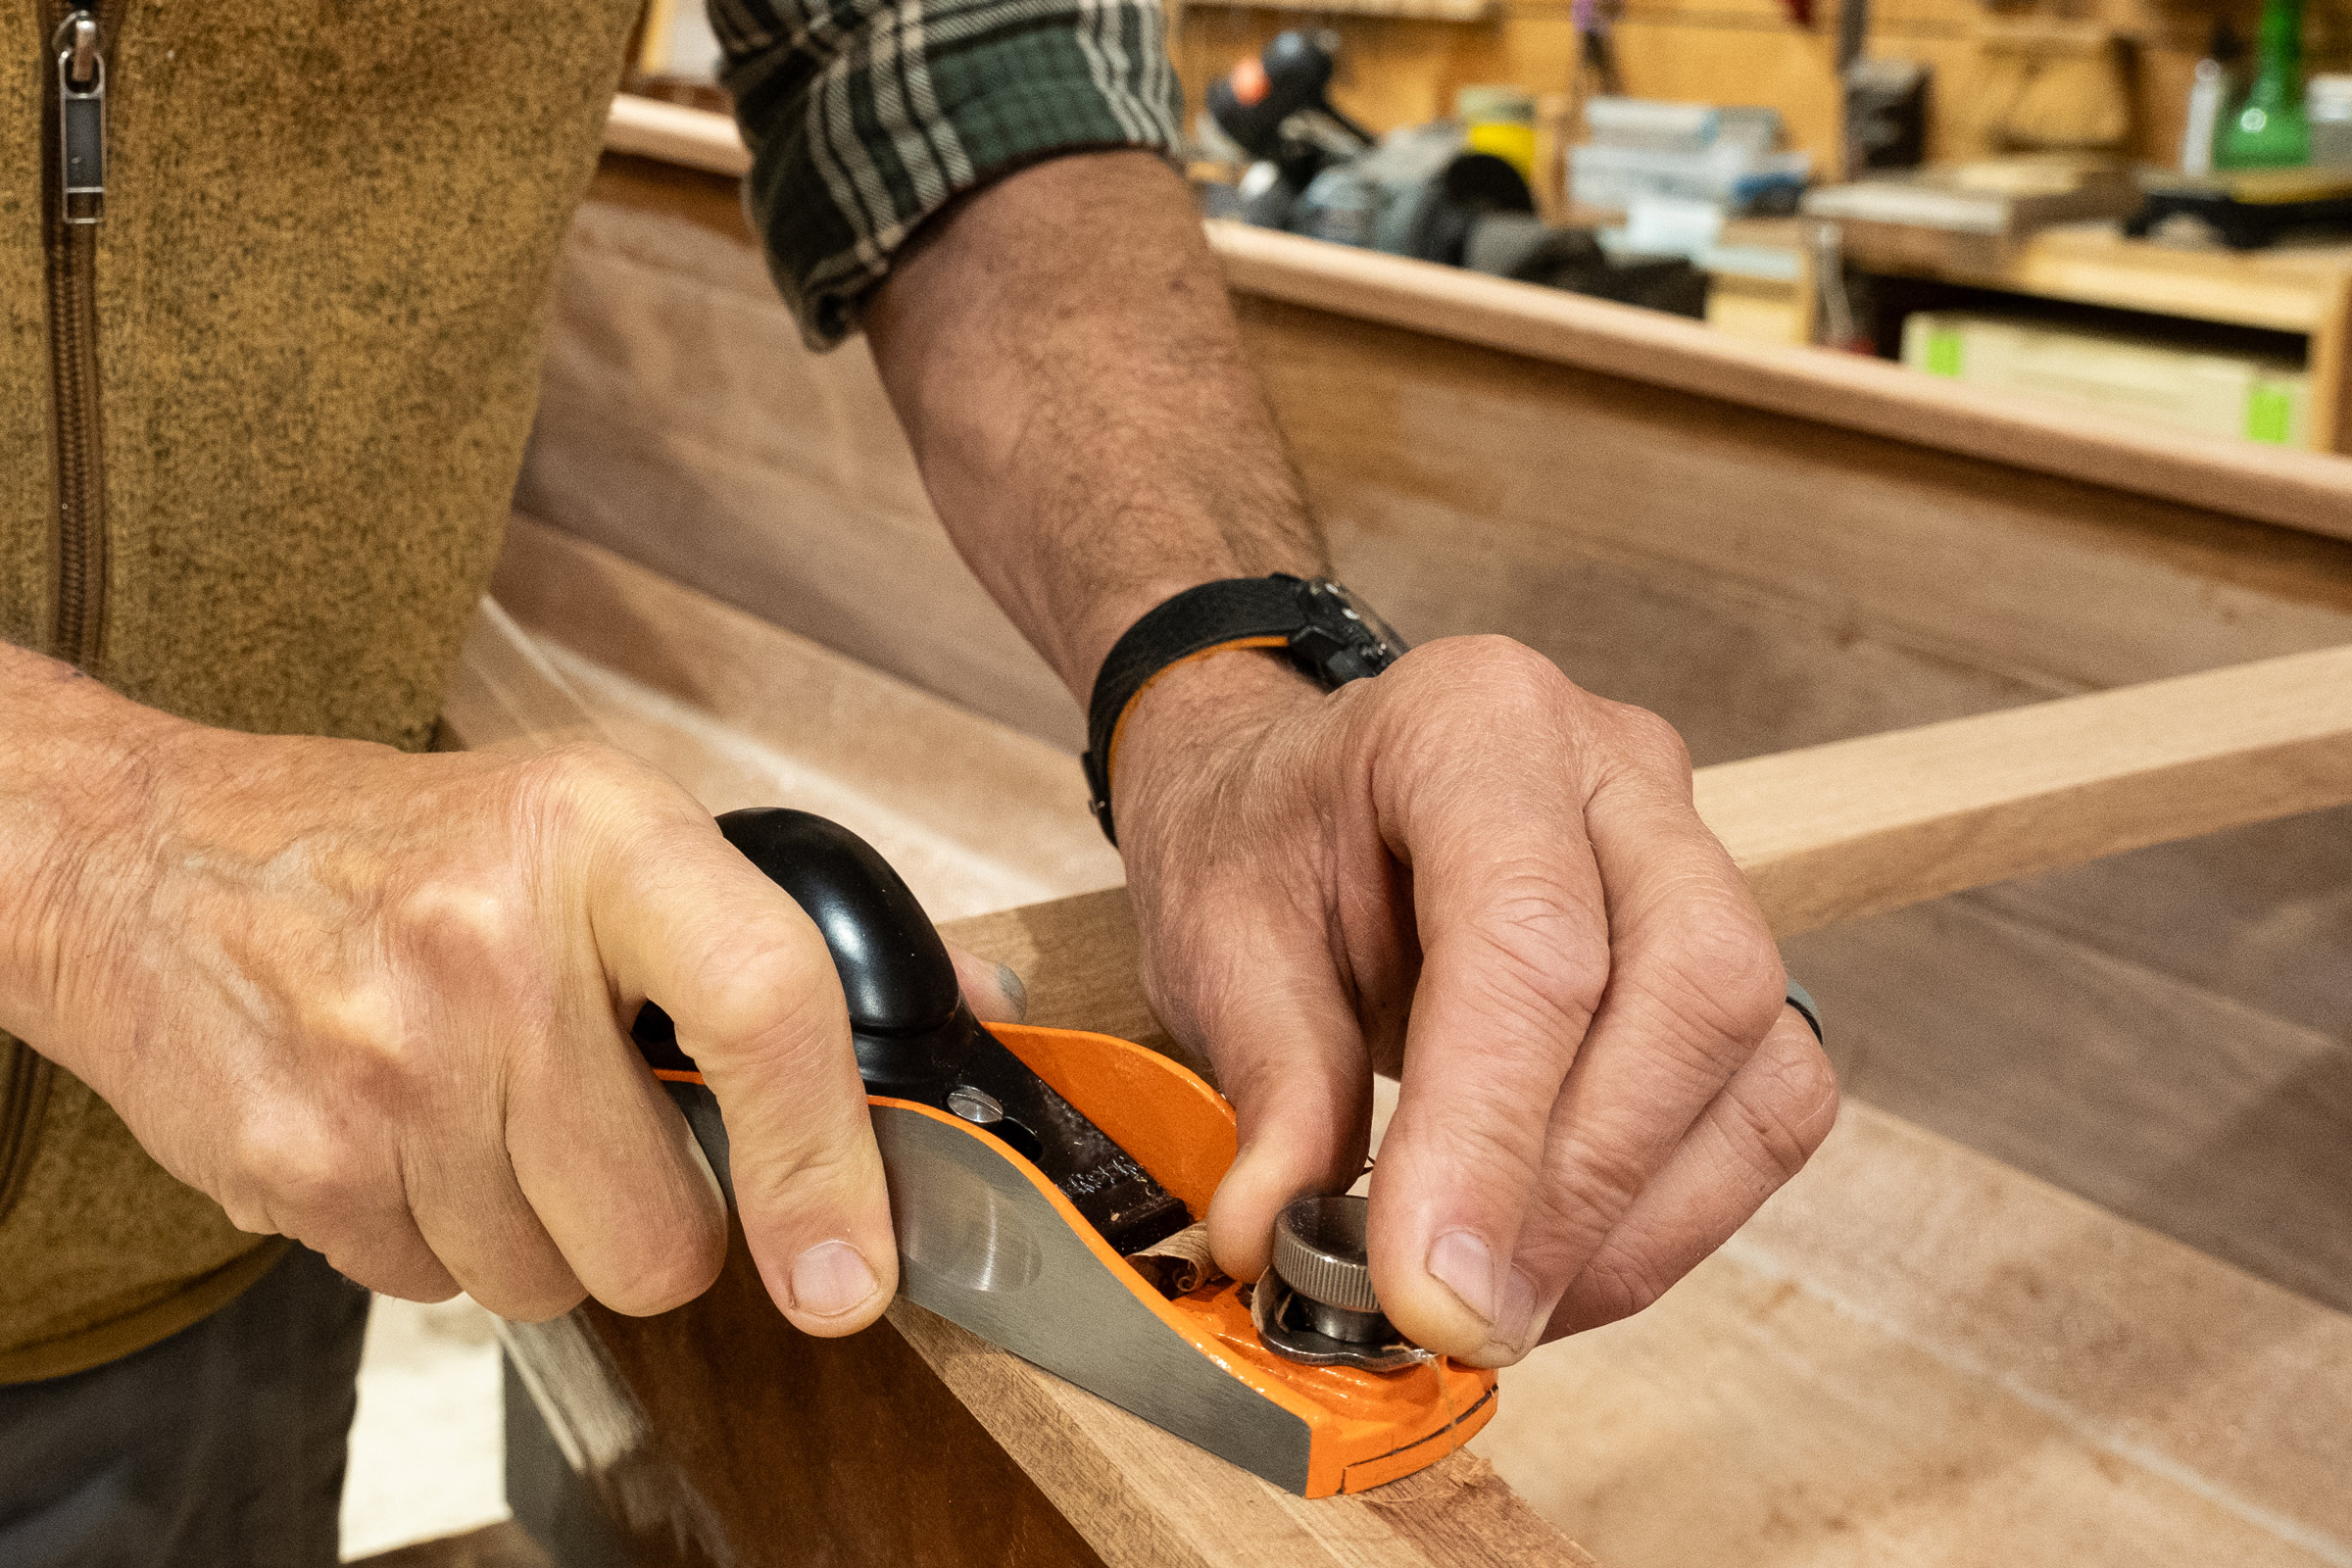
I’m aware that most people would likely choose plywood planking these days, for easy availability if nothing else. For my money, though, I would go with traditional cedar planking. It would be a great pleasure to run those gently curving plank edges with a hand plane and work in the “gains” at the plank ends with truly sharp edge tools to fit perfectly in the stem rabbet. Such work on a lapstrake boat is one of the great joys of life. The result would probably be heavier than a glued-plywood construction, but in my view ever-lighter weight as a holy grail of boatbuilding is highly overrated.
Thinking of building a Coquina of your own? Check out this Reader Built Coquina for some inspiration.
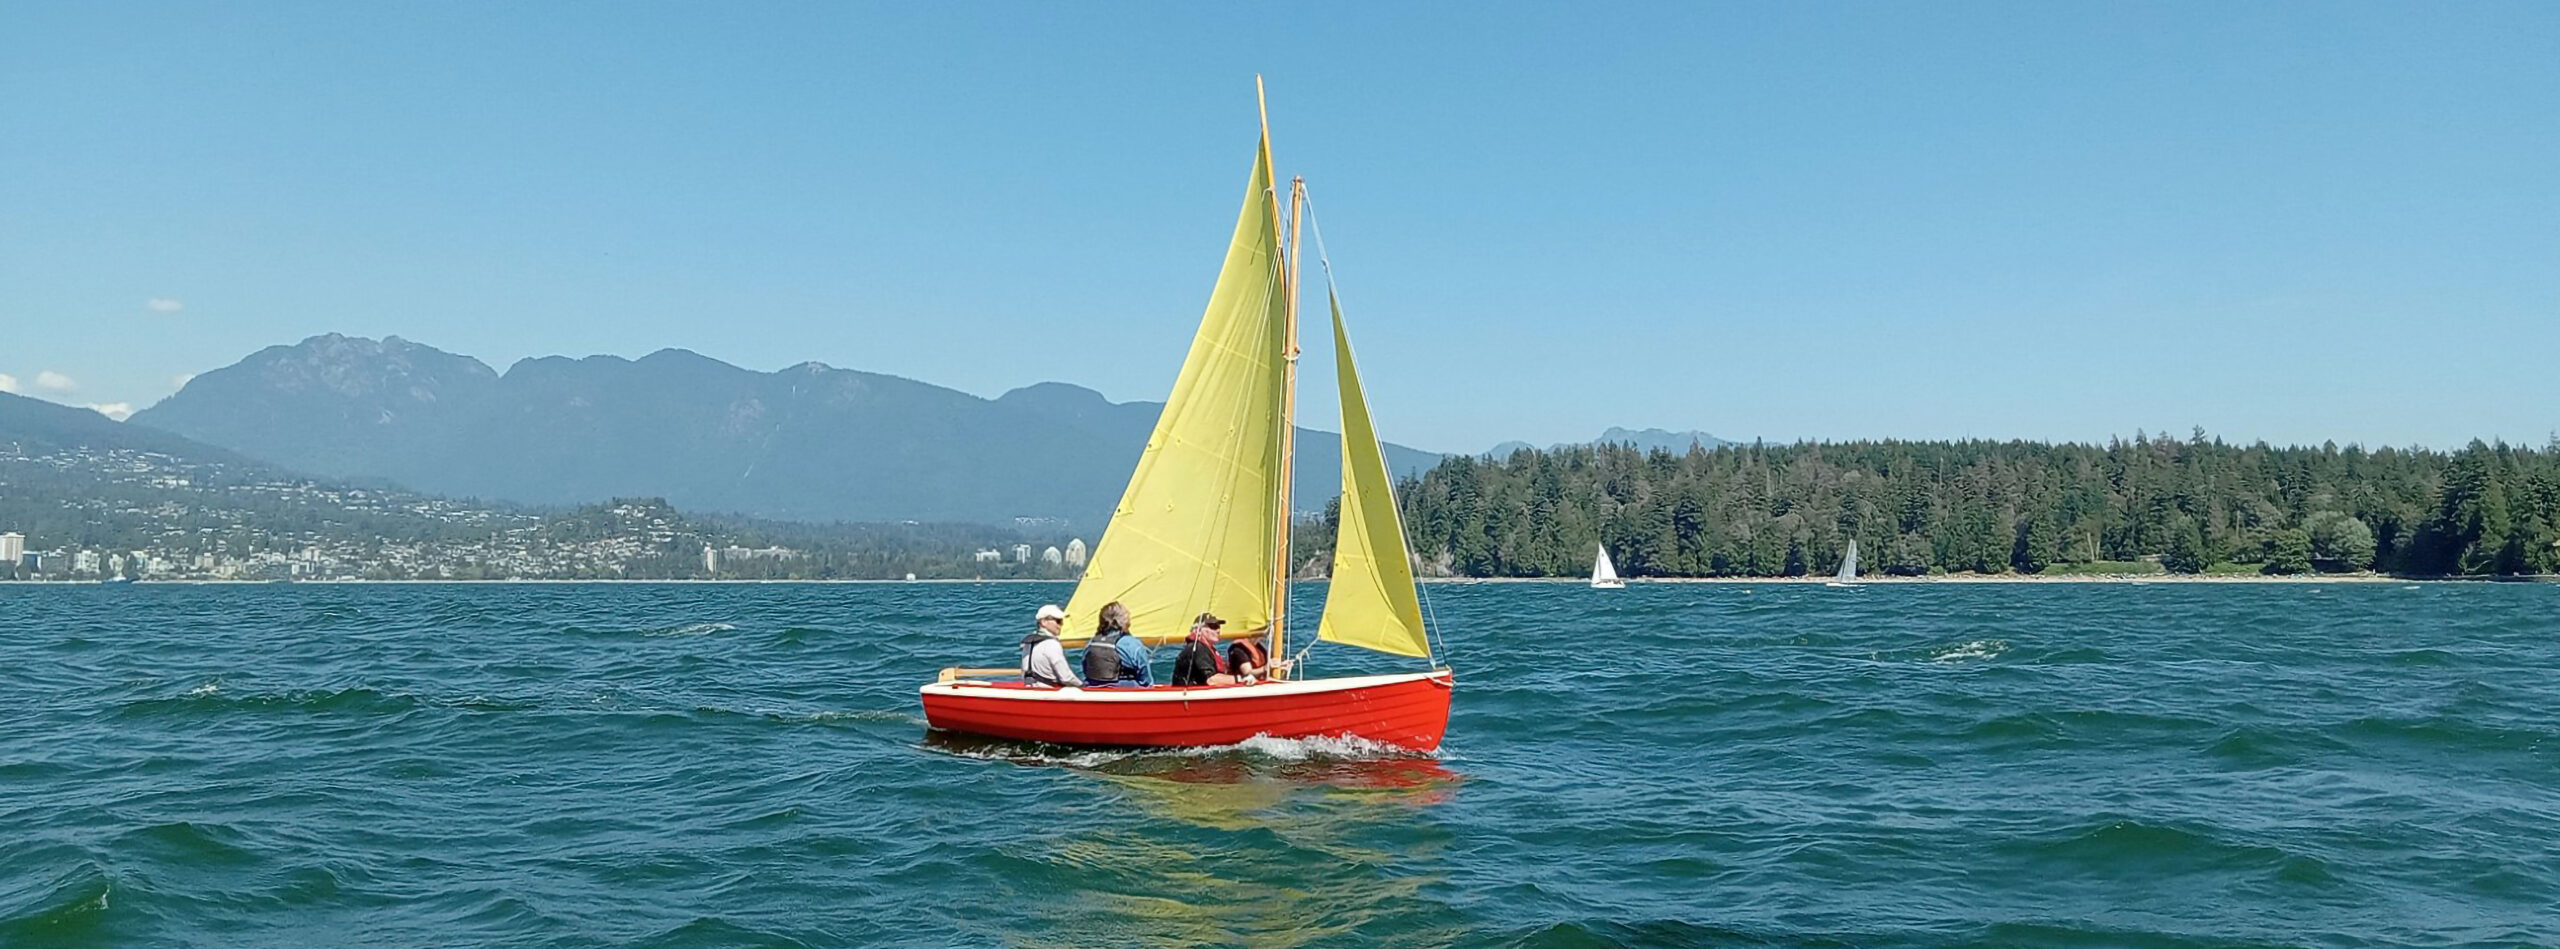
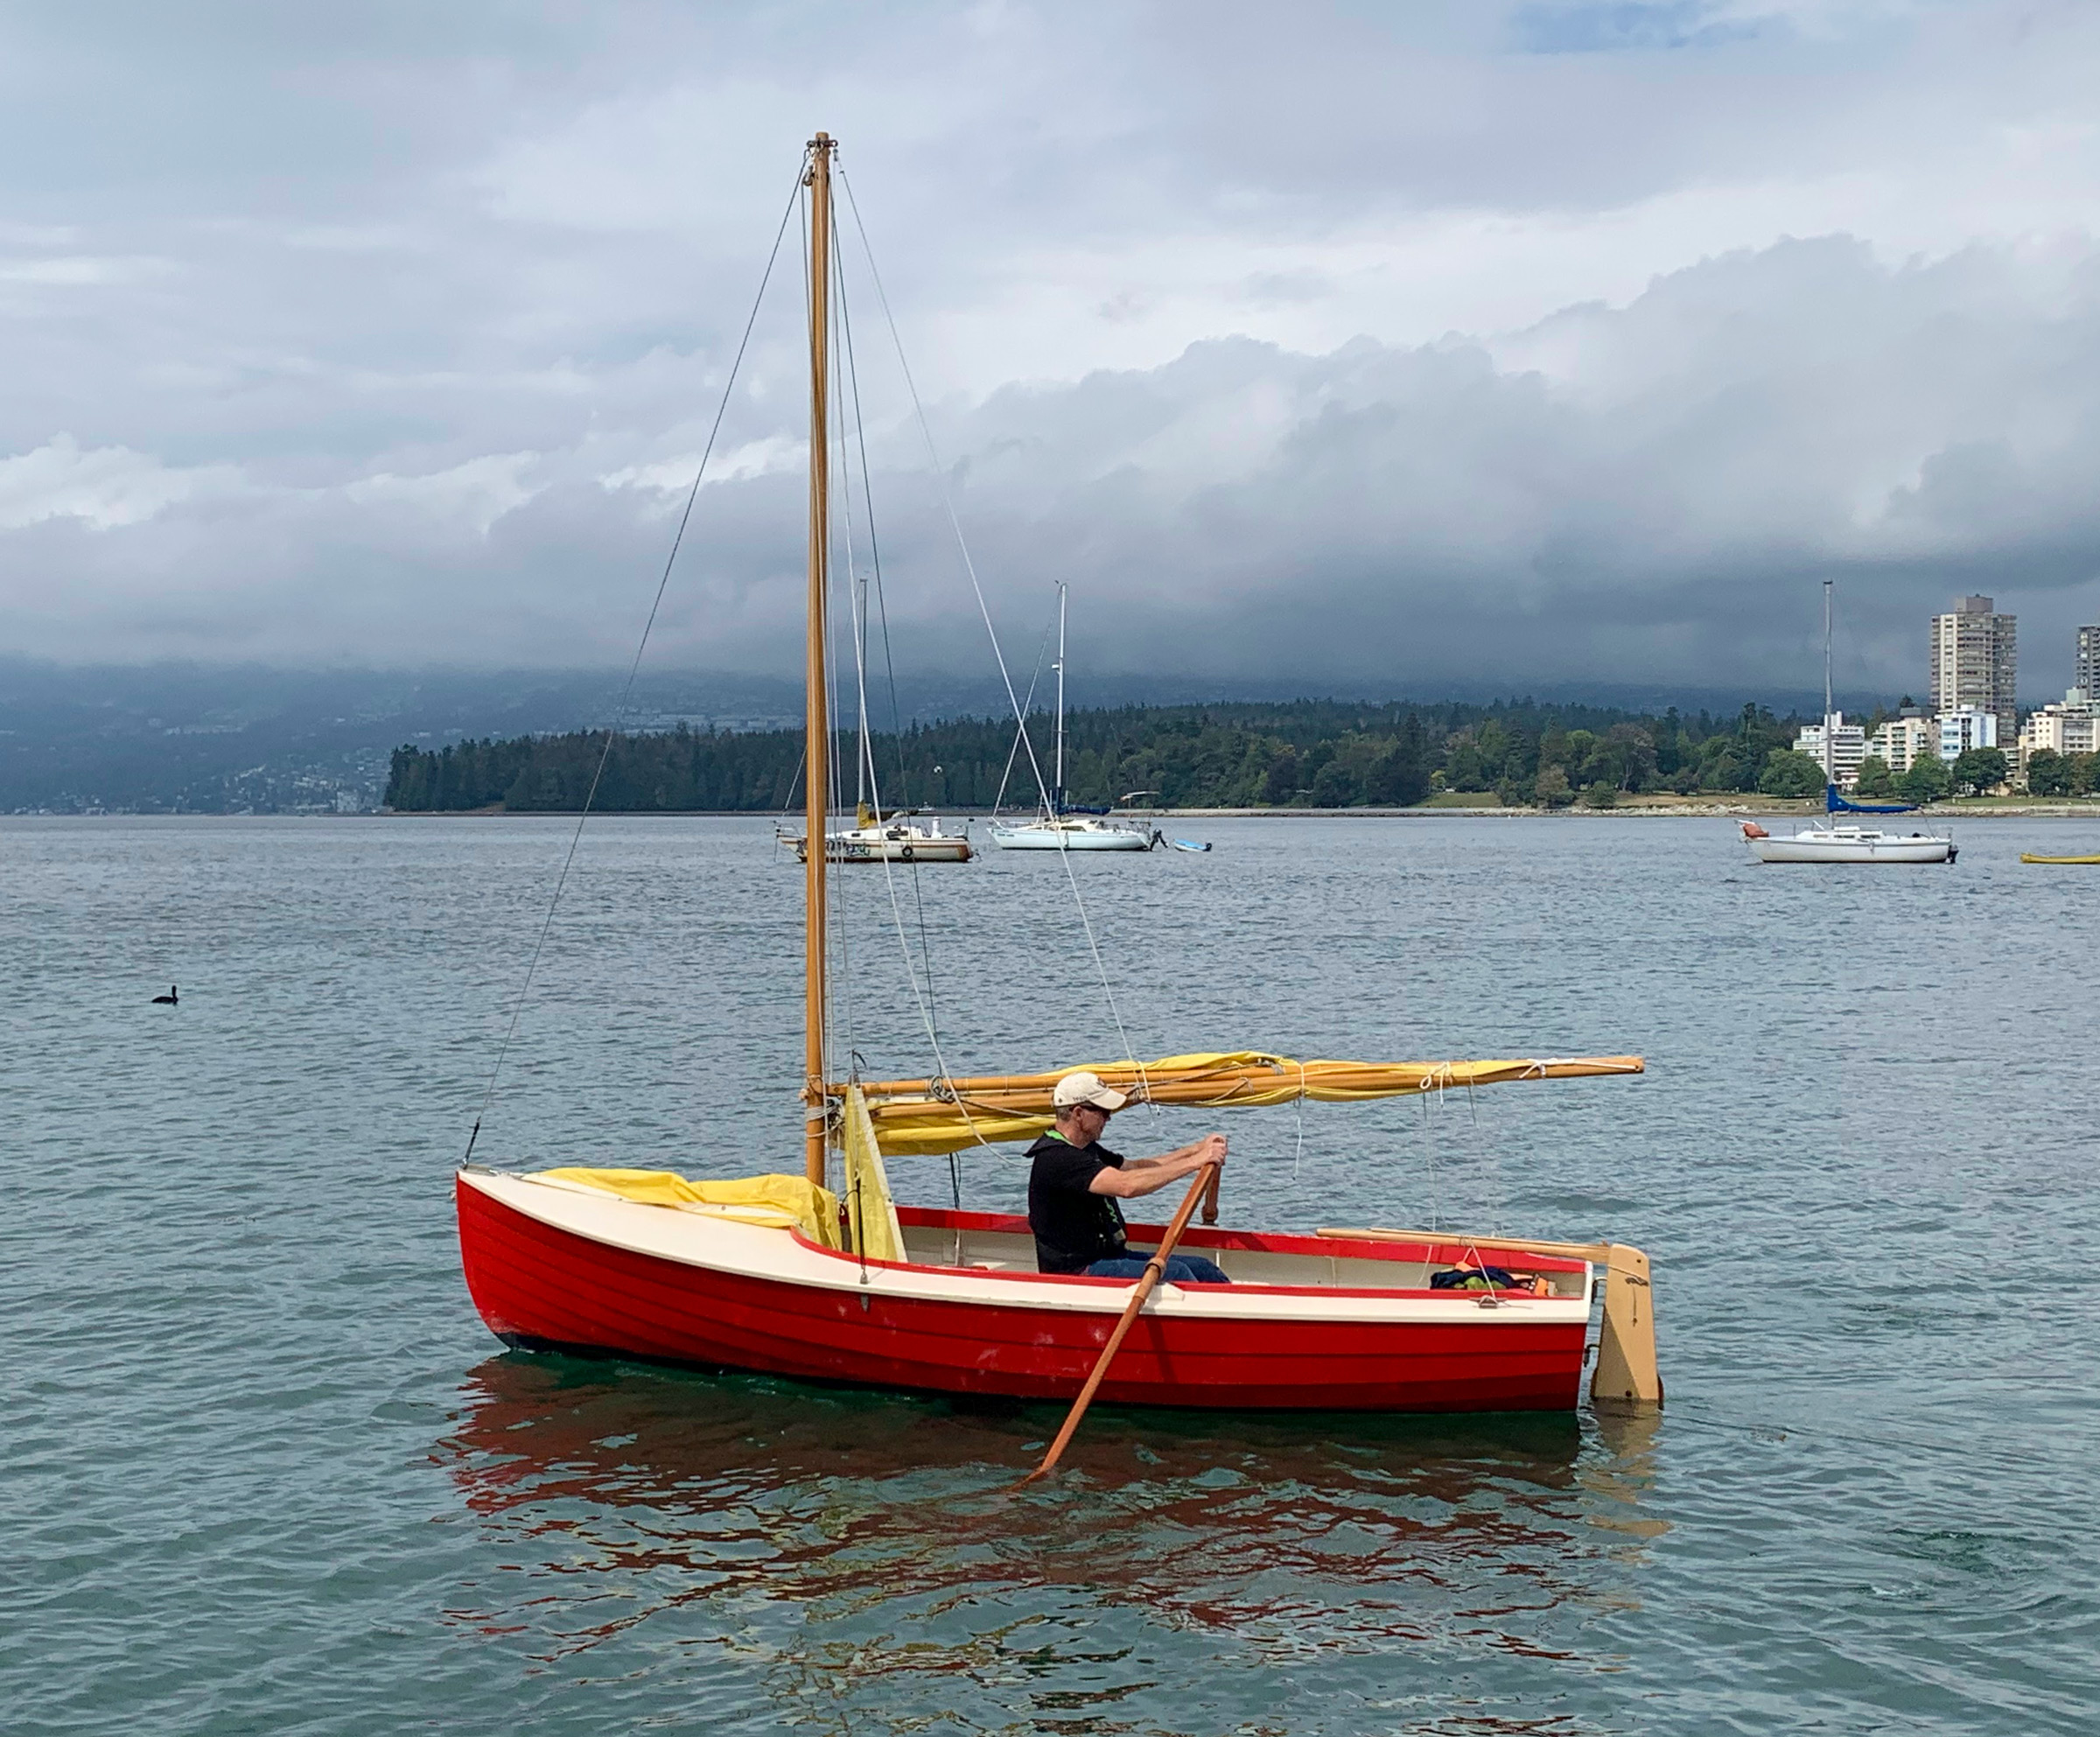
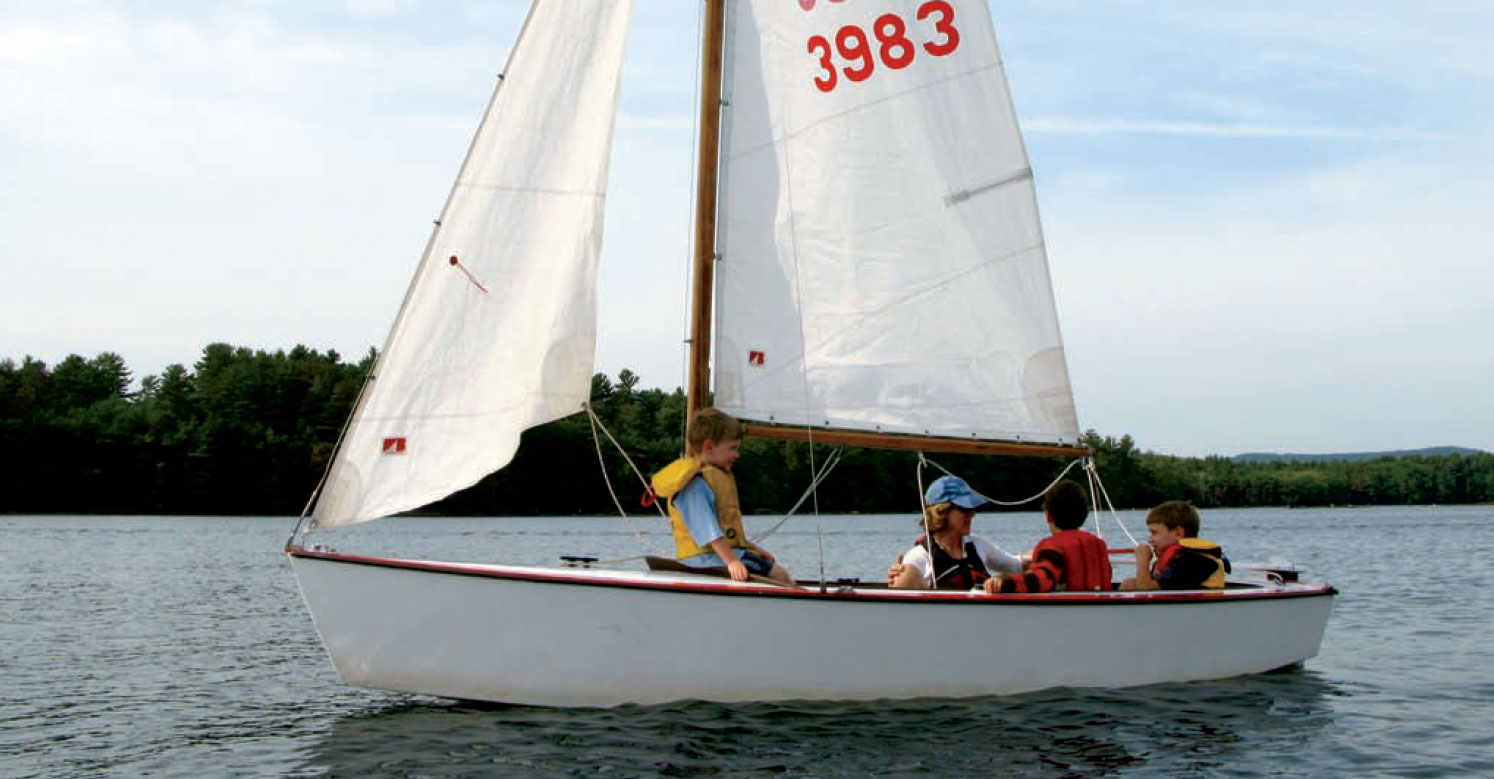
Regardless of whether the boat is built in plywood or the traditional cedar, sailing a Coquina is an undoubted pleasure. In our first outing, Vagn and I were slammed by a dark-souled squall line carrying something more than 25 knots of wind with it. We got the rig down in a hurry and I took to the oars, barely able to make headway against the wind and waves of some 3′. Though the boat never felt in peril, with a lee shore looming we ultimately took a tow from a neighborly lobsterman.
Tom Jackson
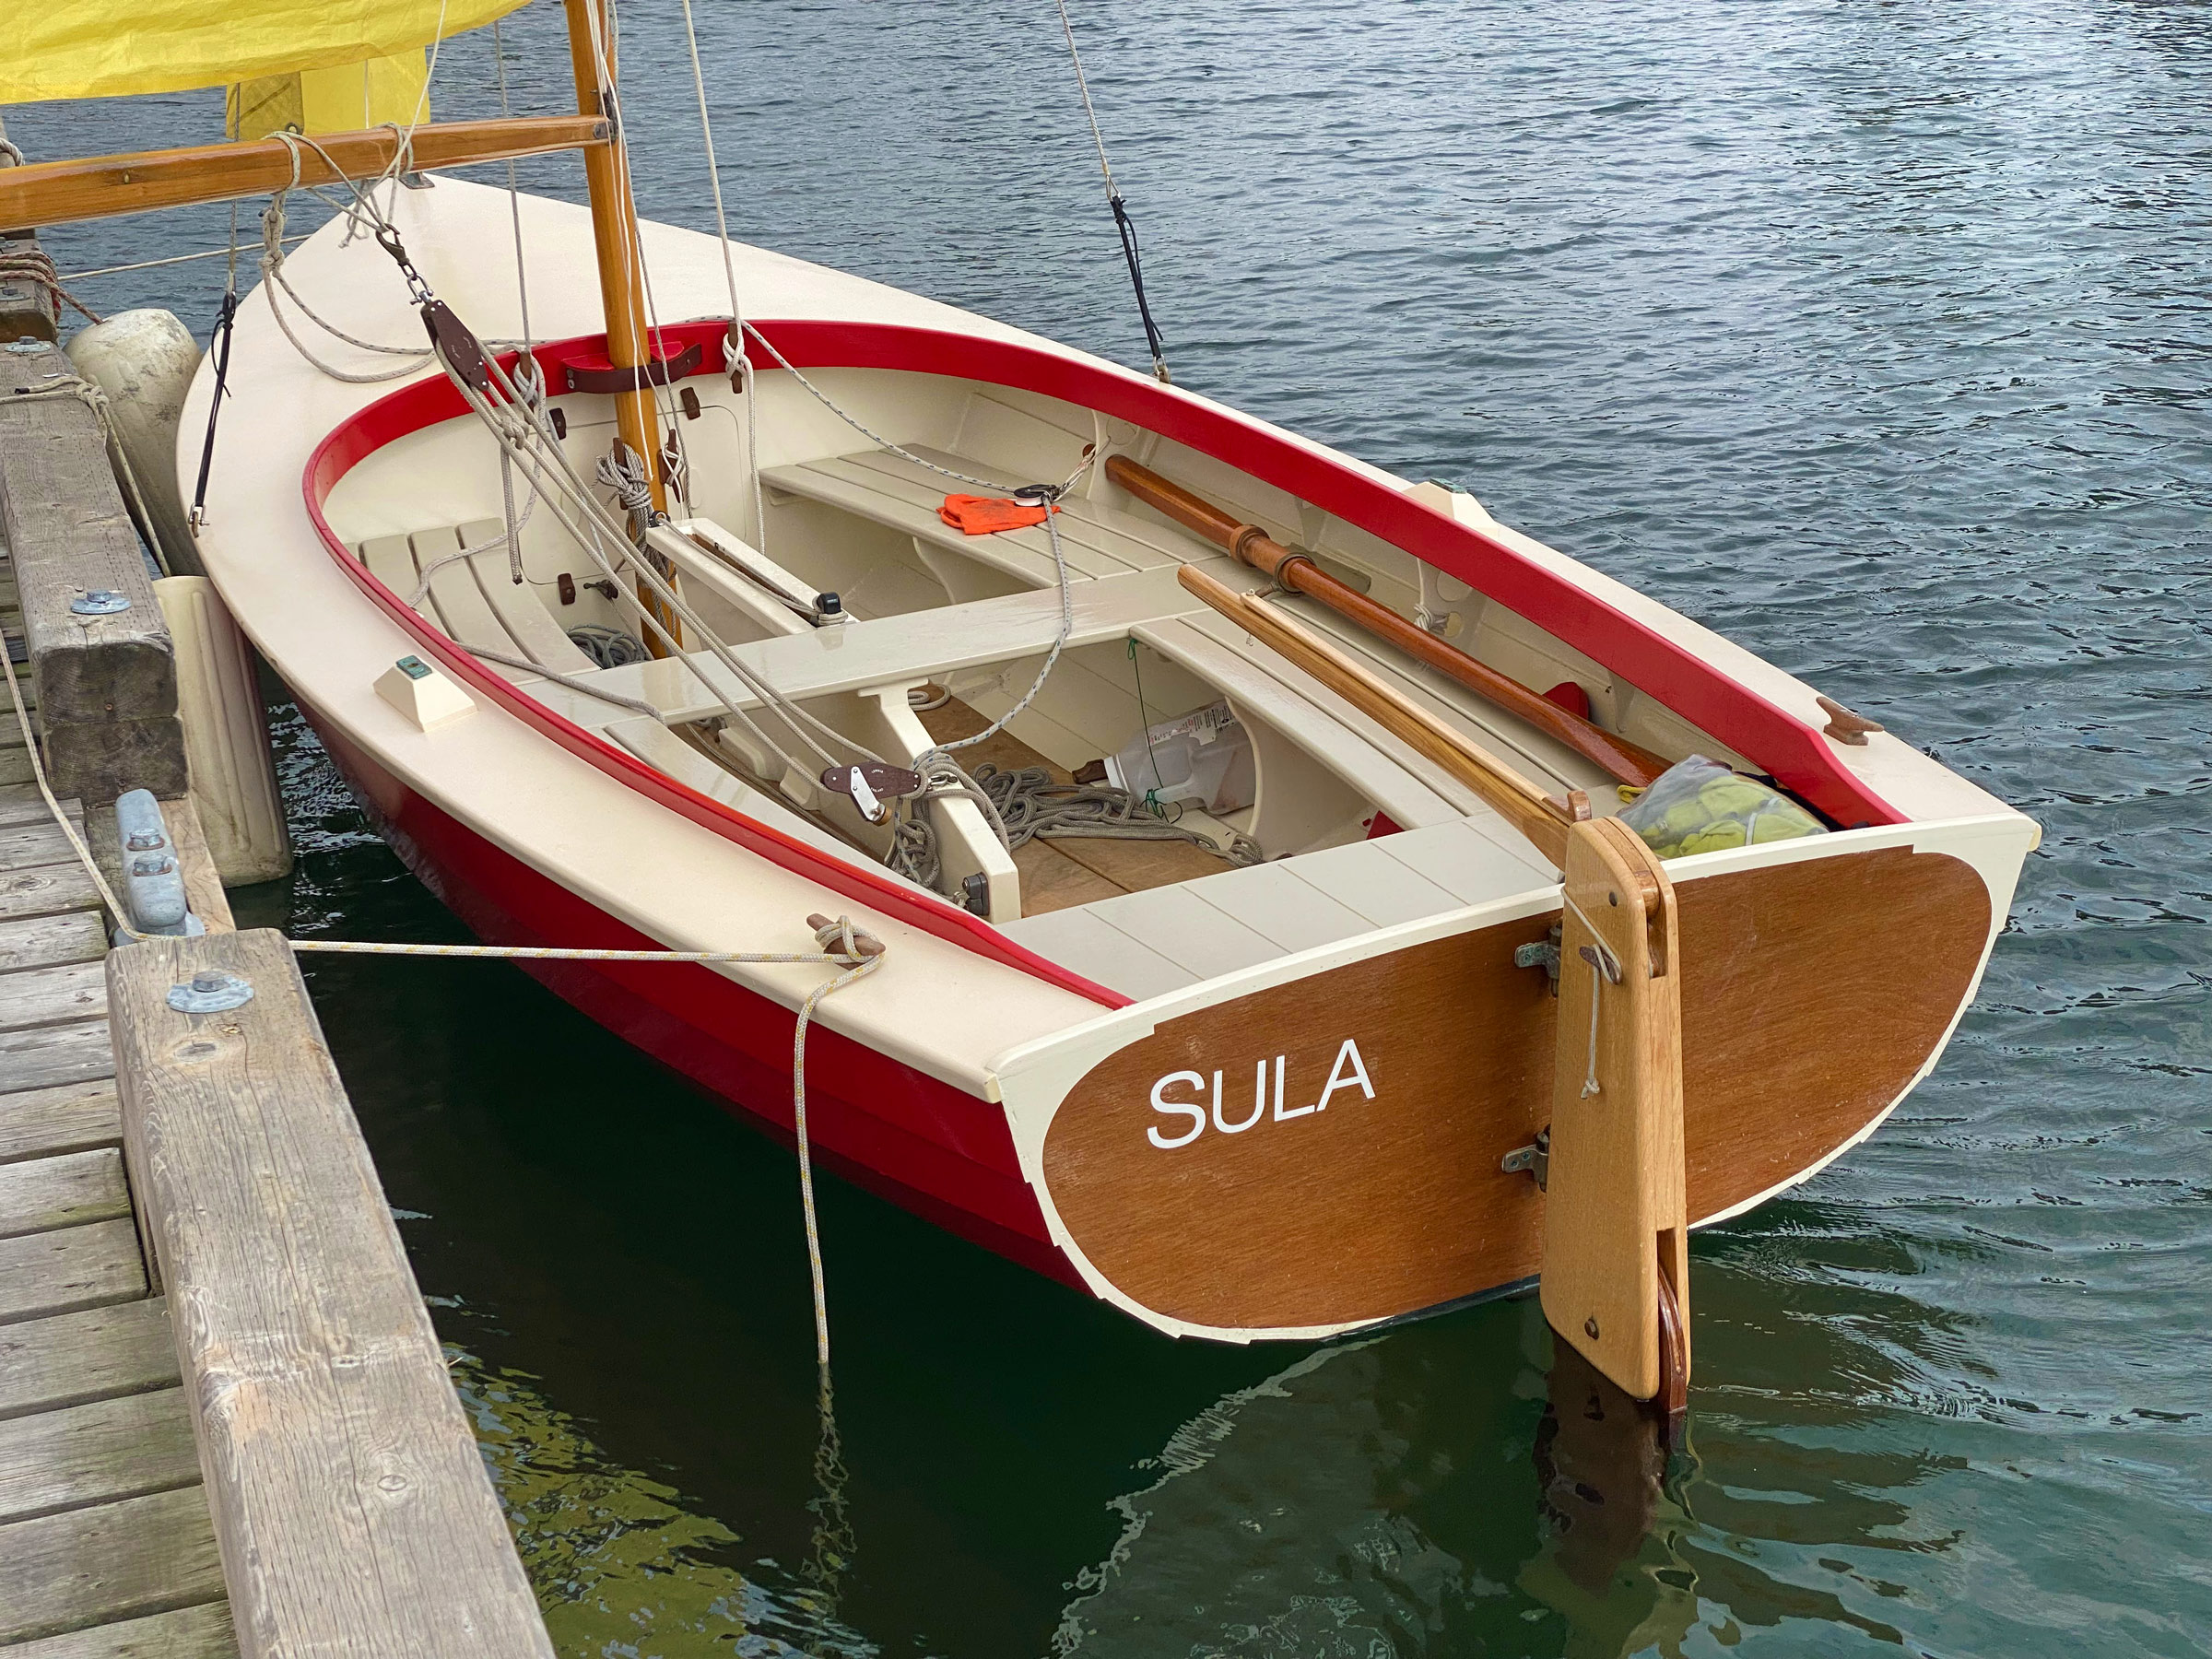
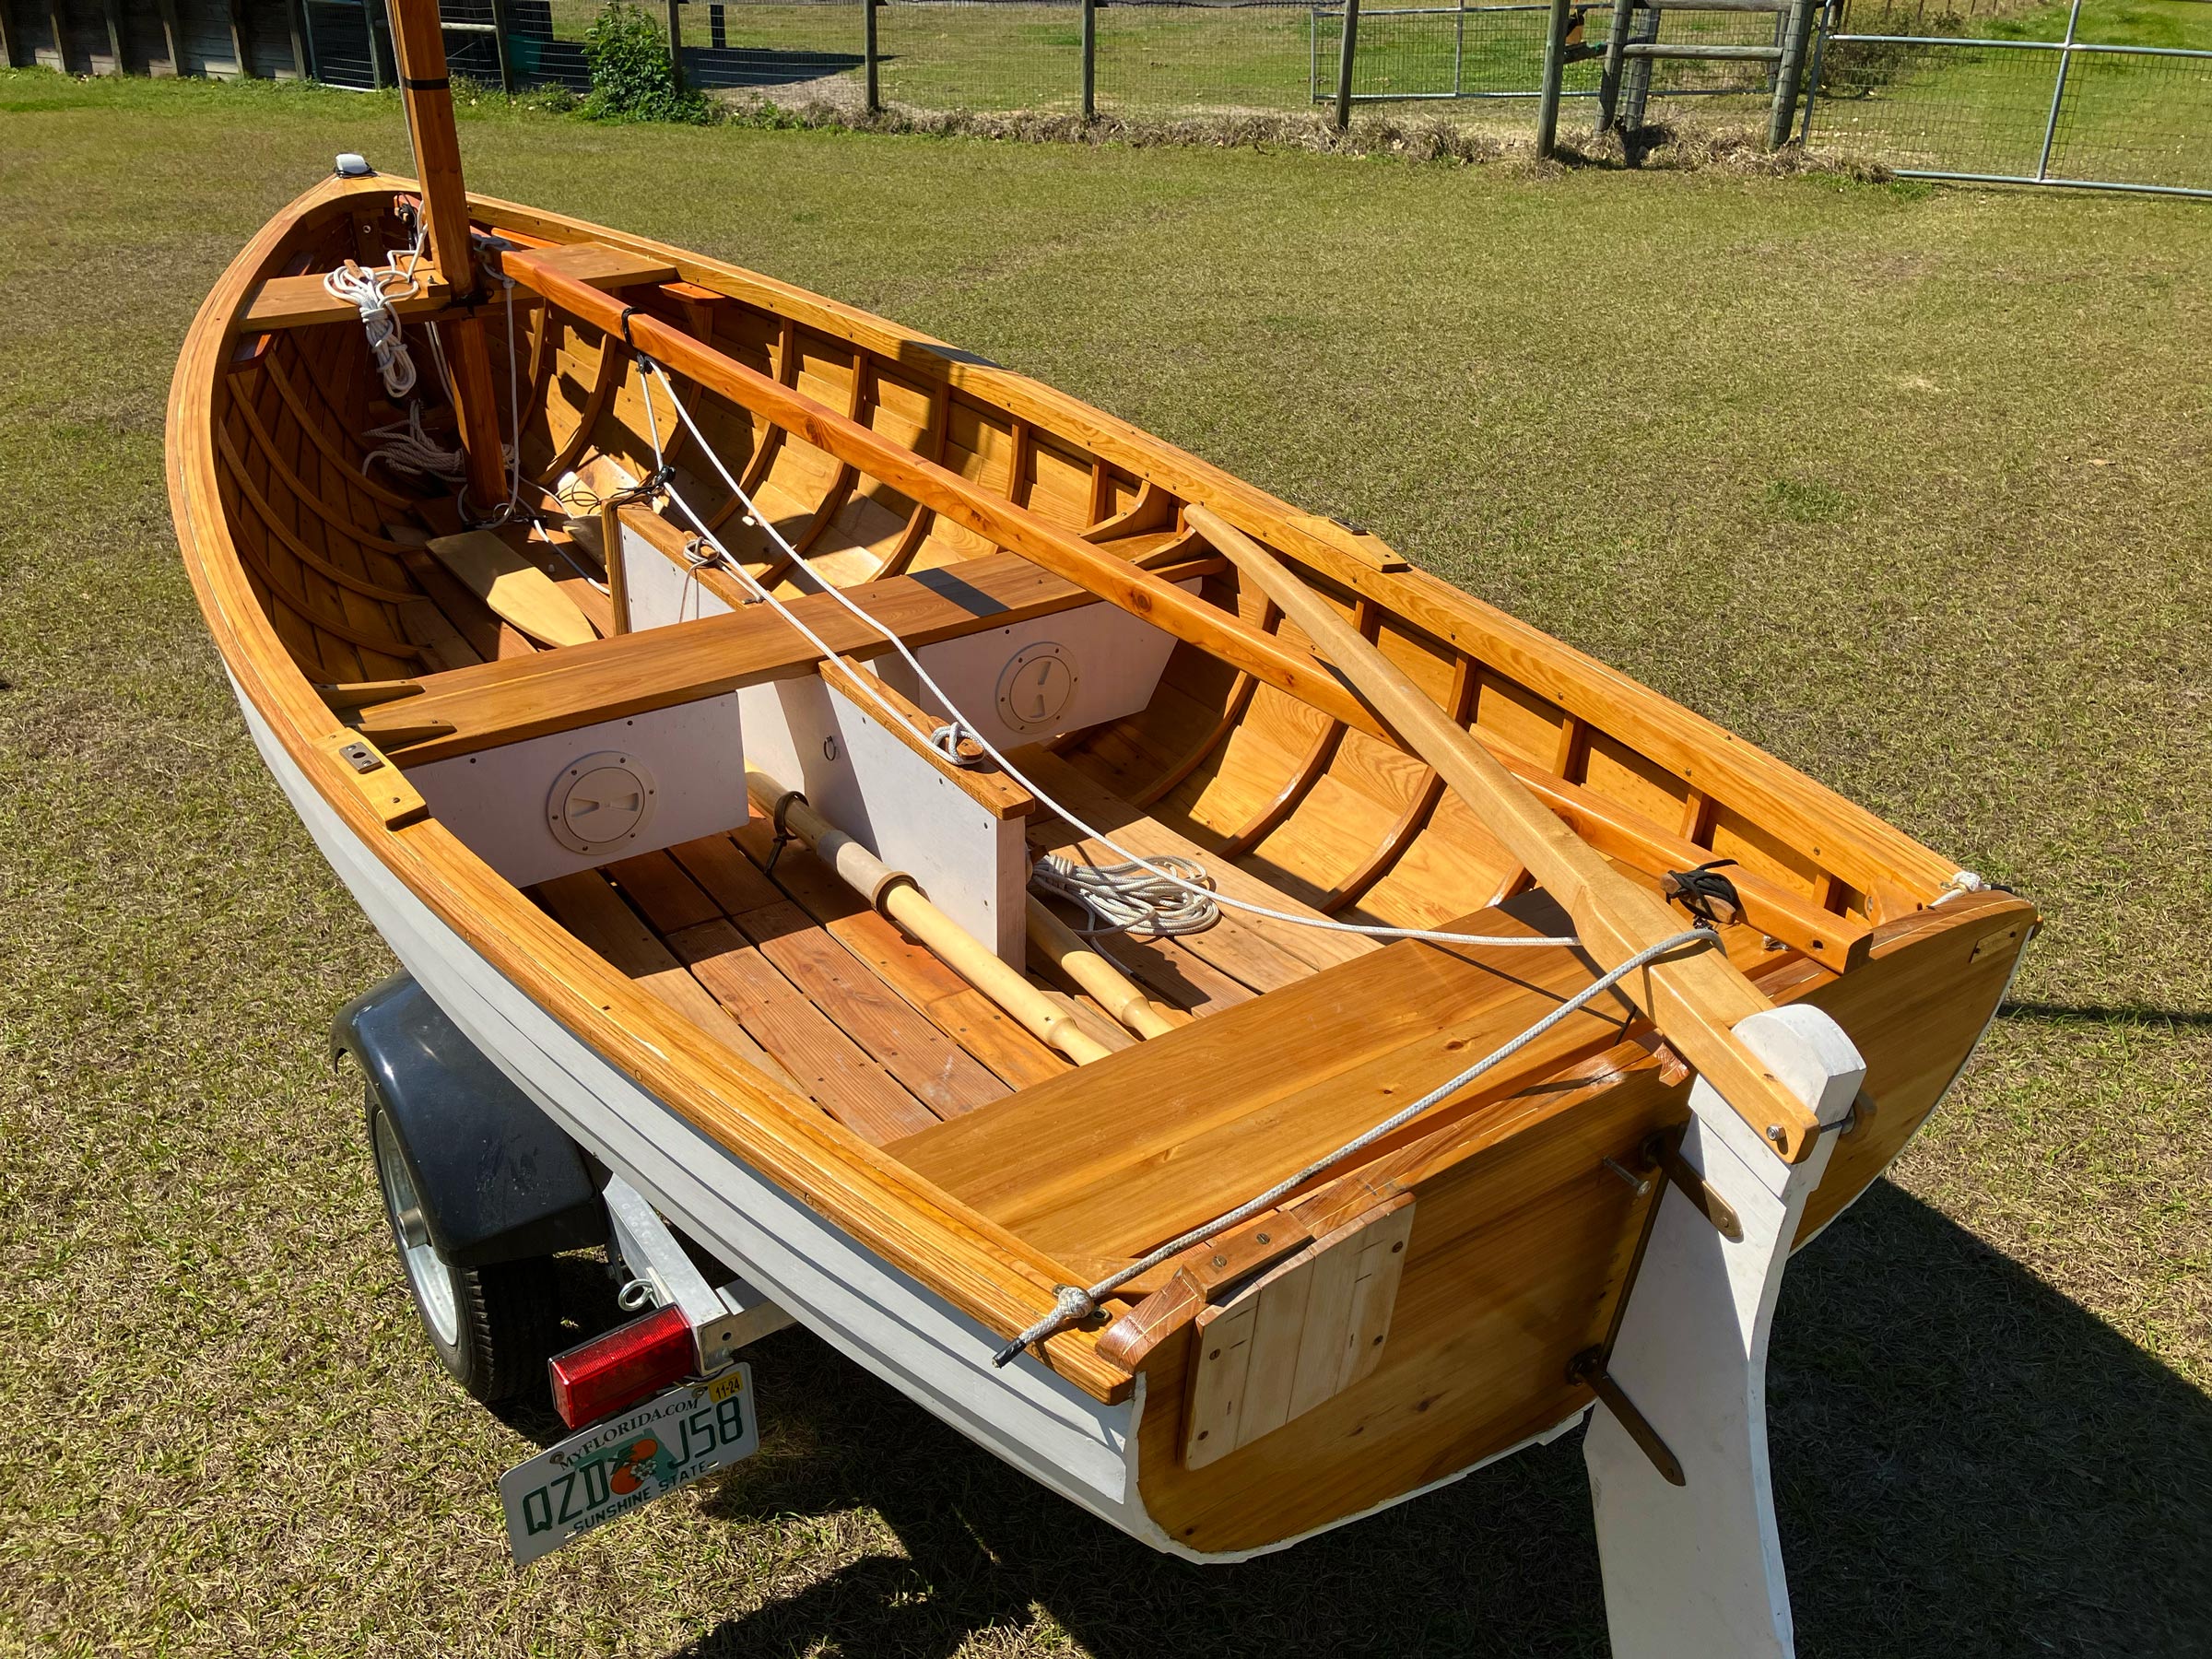
Vagn Worm keeps his kit-built WIZARD on a mooring, so all he needs to do after an afternoon sail is tend the sails and raise the centerboard. To furl the mizzen, he rotates the boom all the way forward for easy access.
A break in the weather for our second attempt a week or so later gave us a pleasant late-August breeze of about 12 knots and mostly sunny skies—a picture-postcard day tailor-made for this boat, it seemed. For the new guy—me—it would have been nice to have had this weather in reverse, with the pleas- ant day as a warm-up for the screaming banshees later.
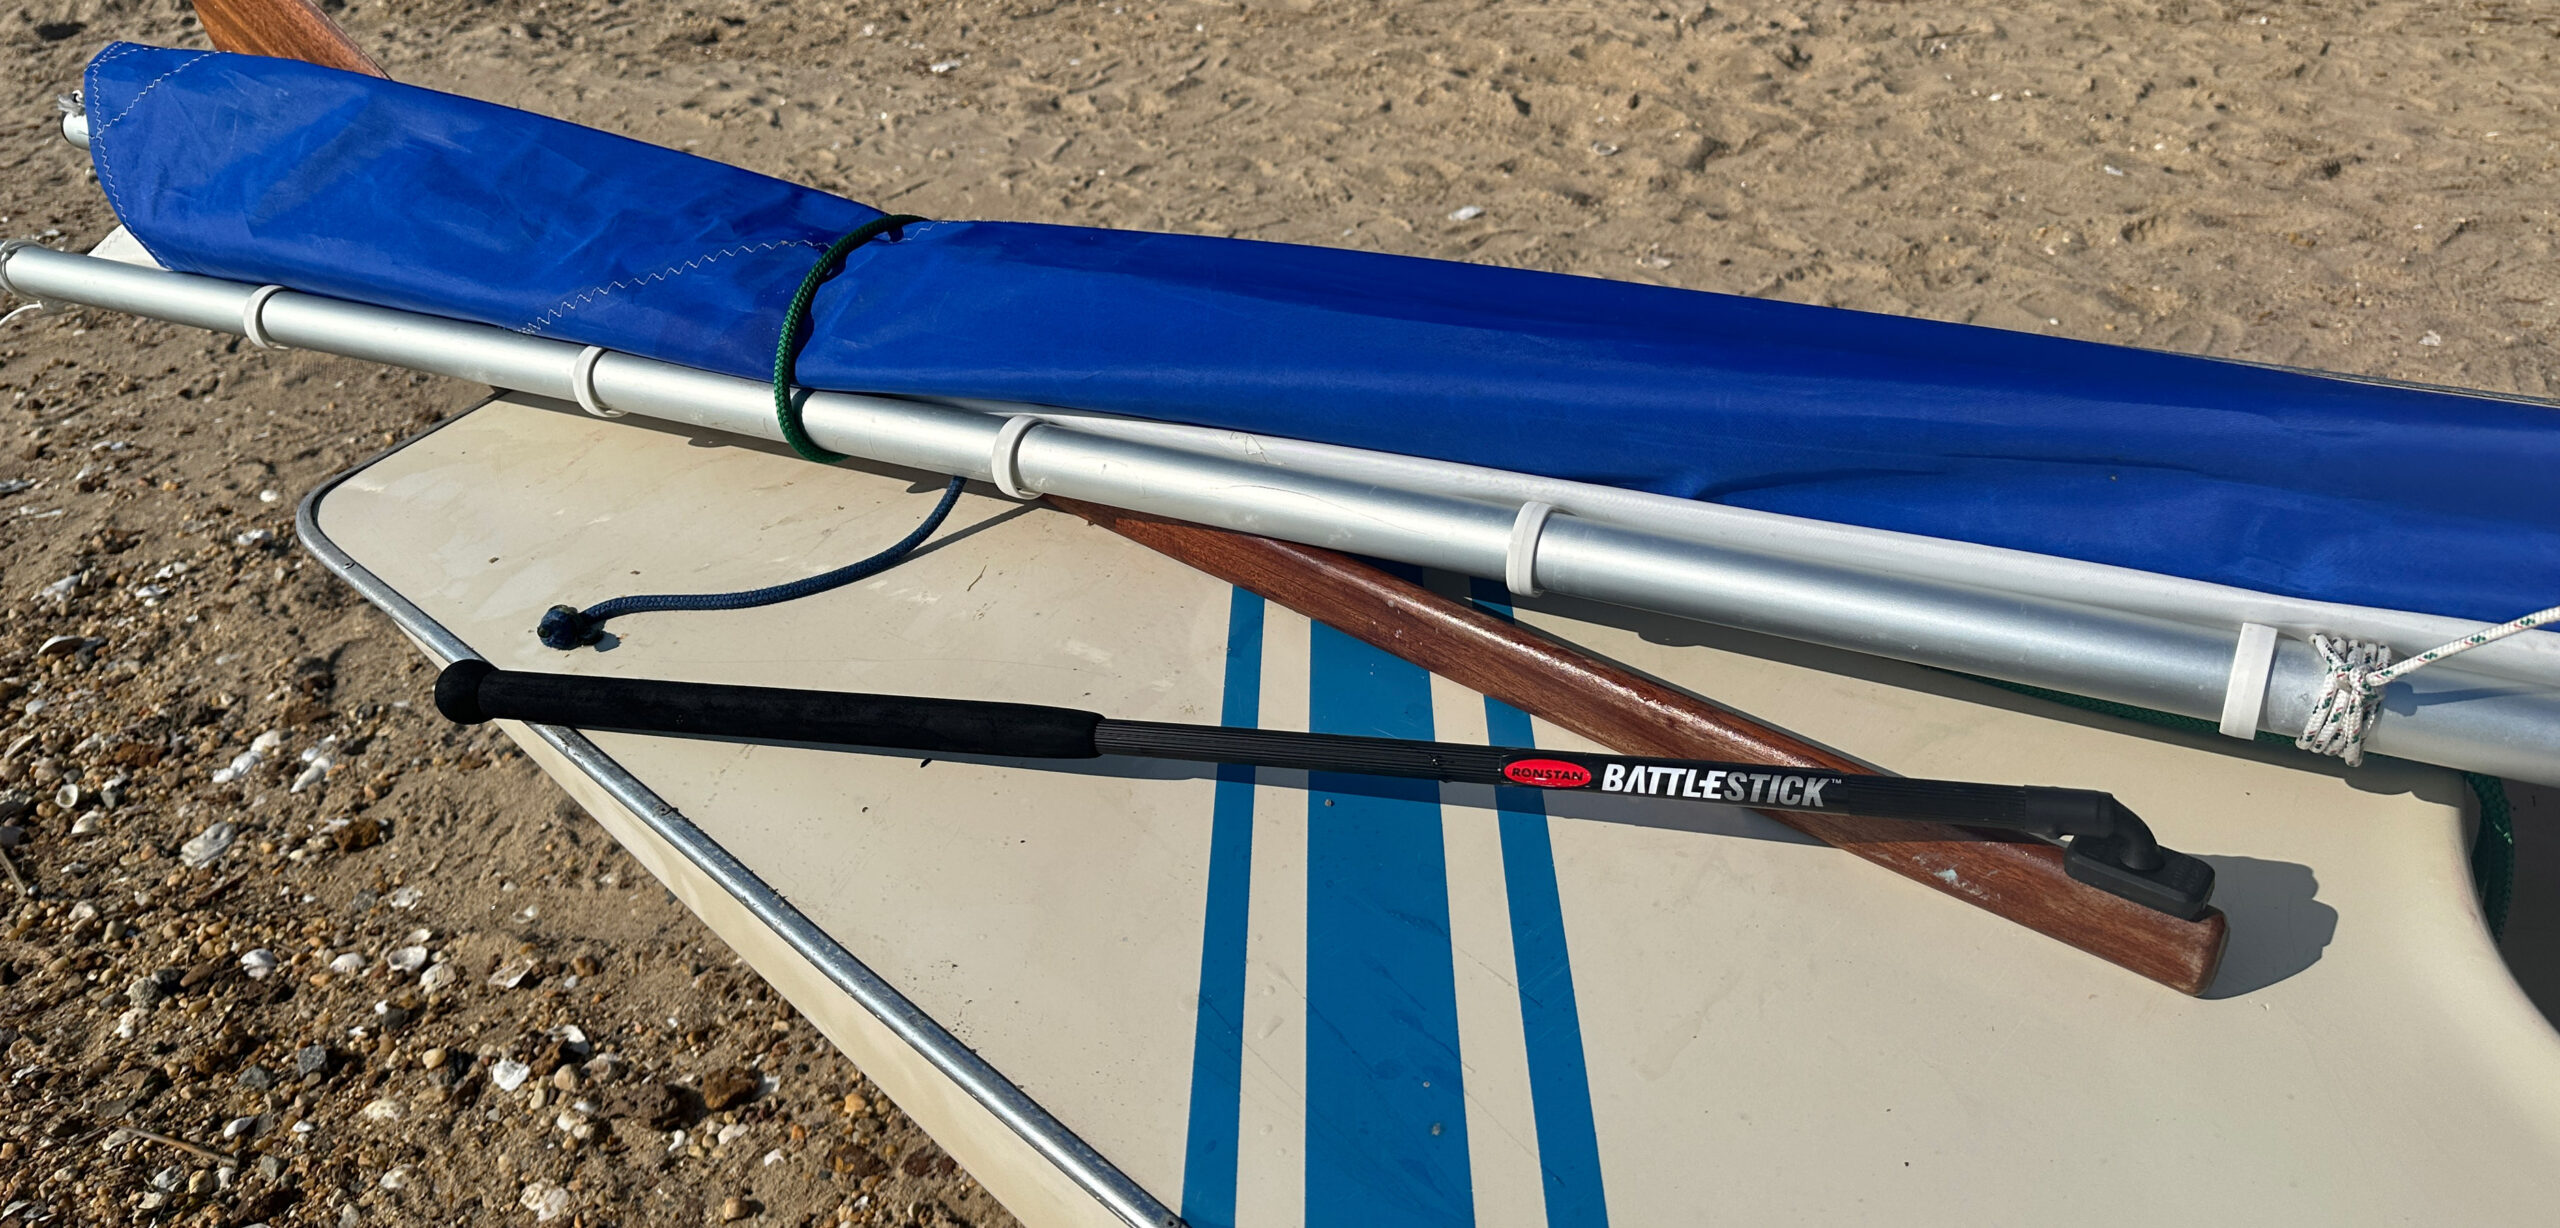
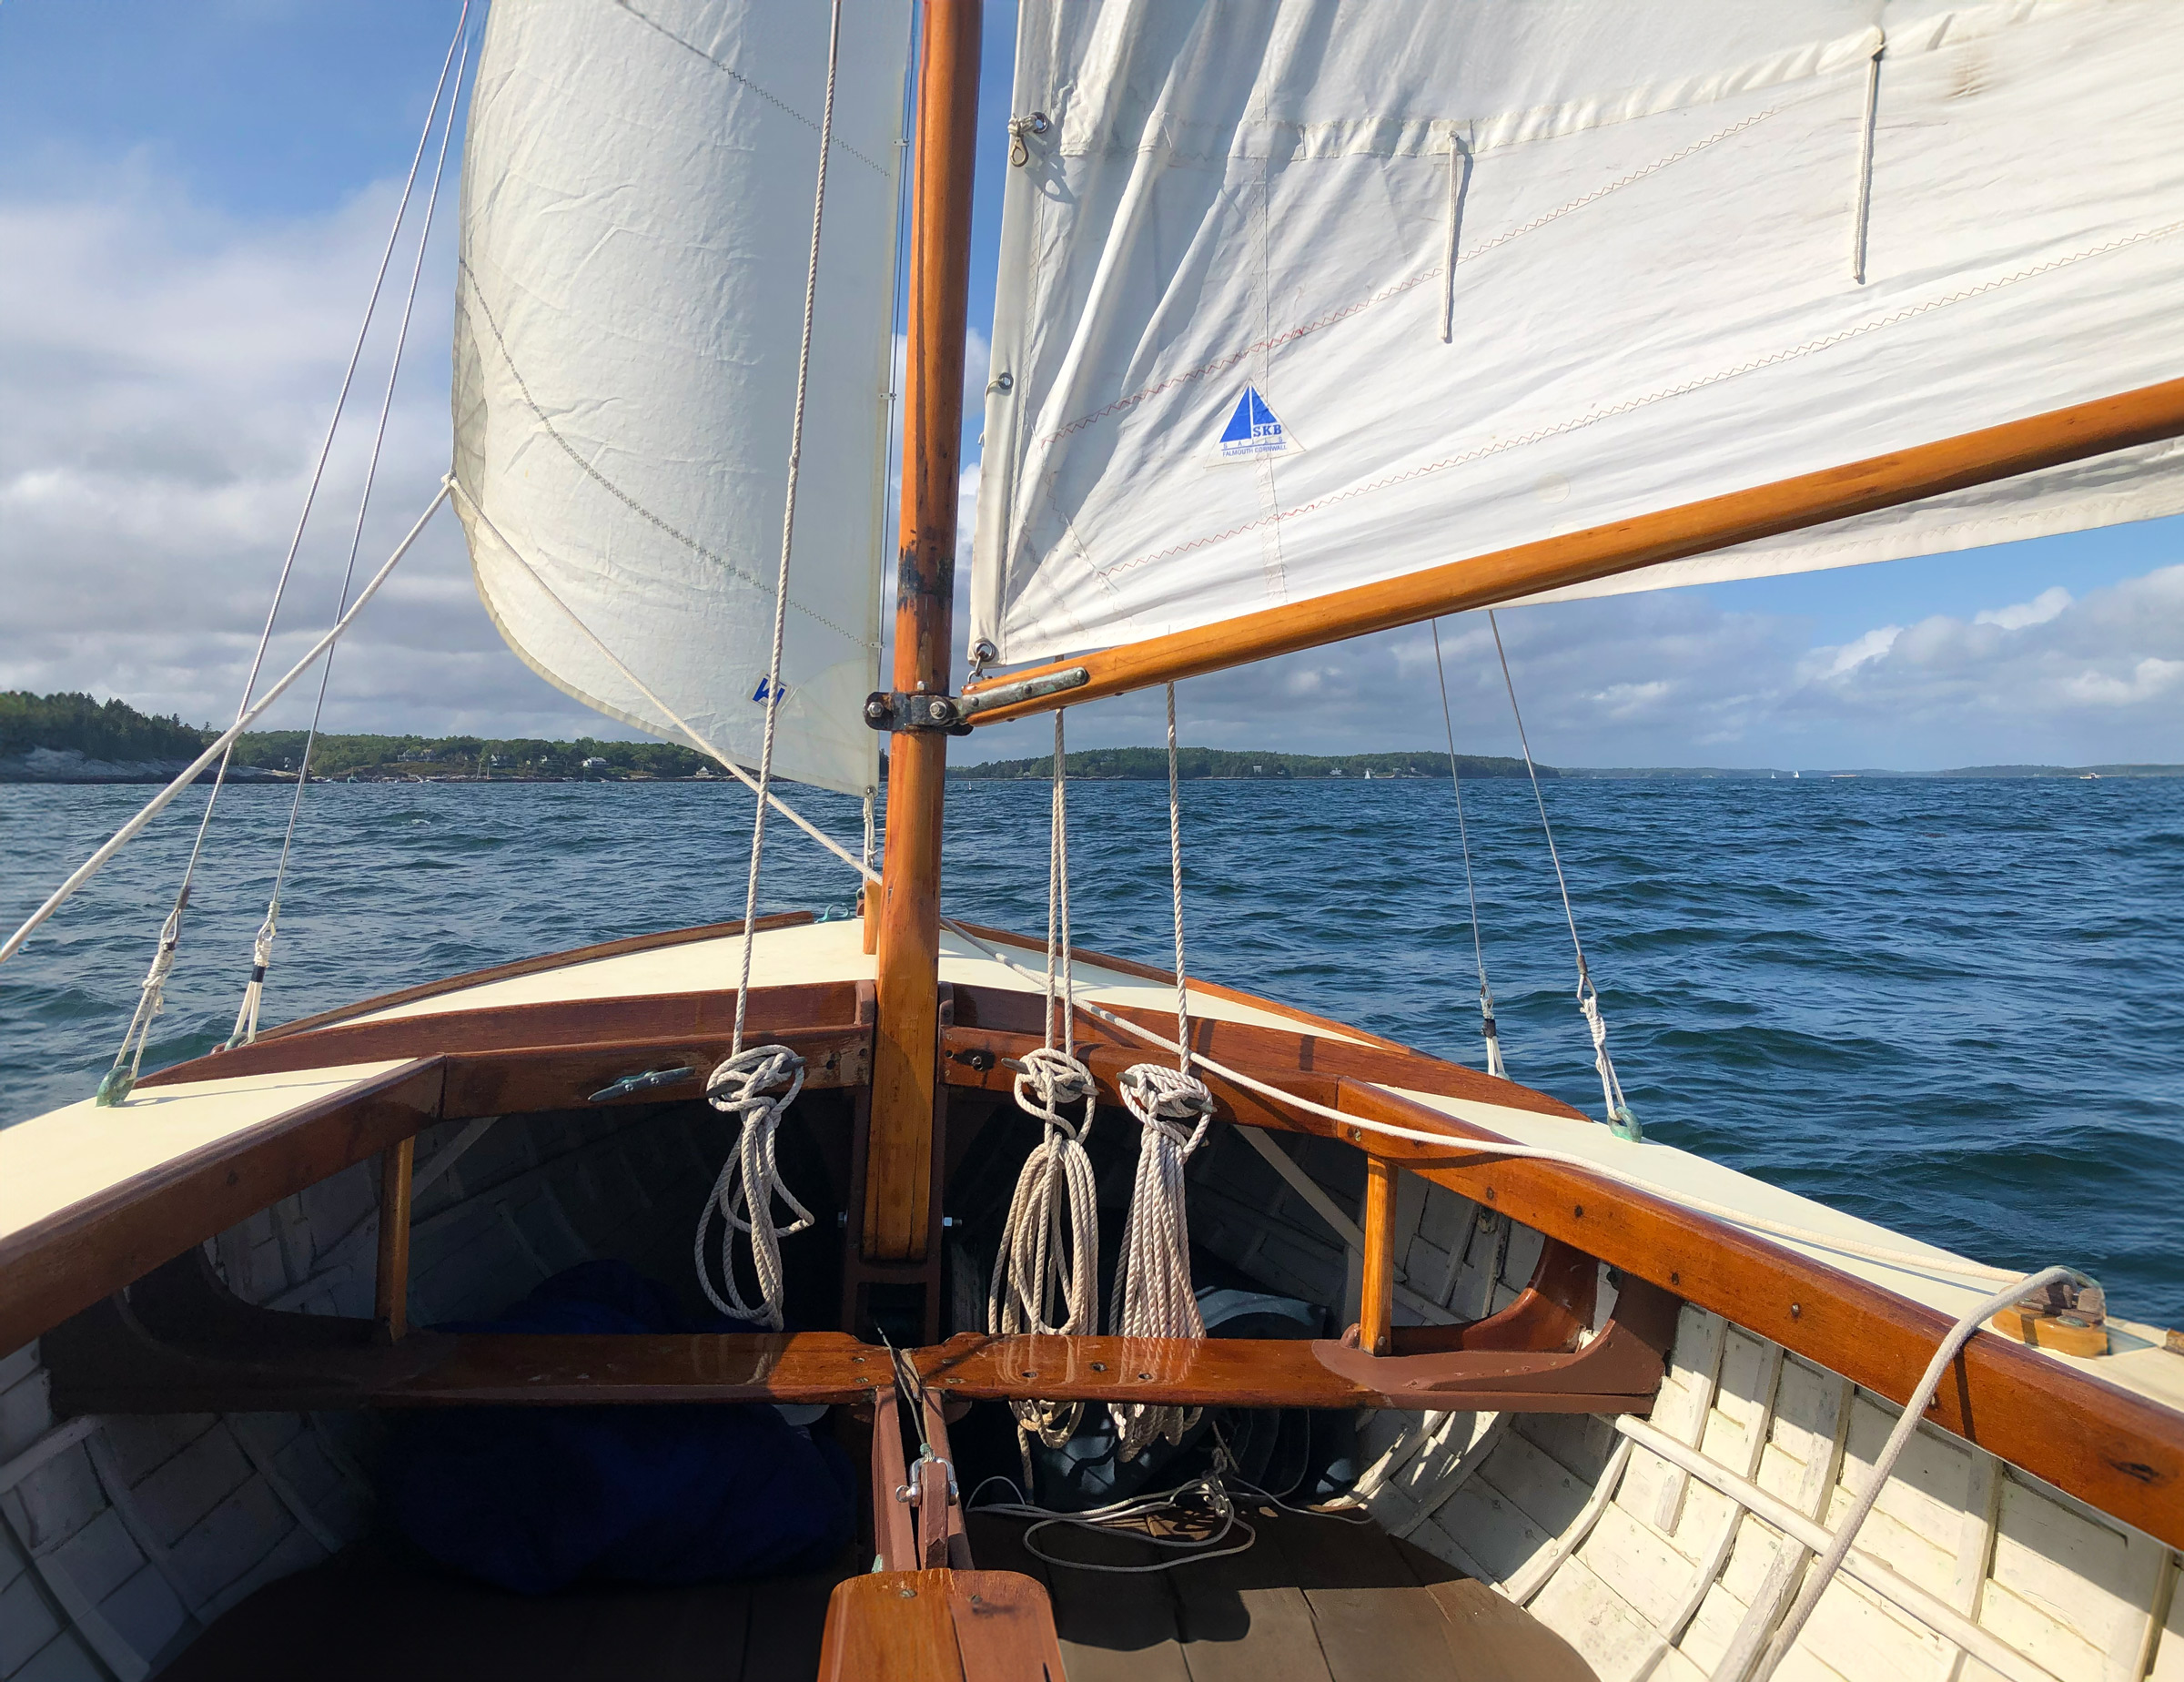
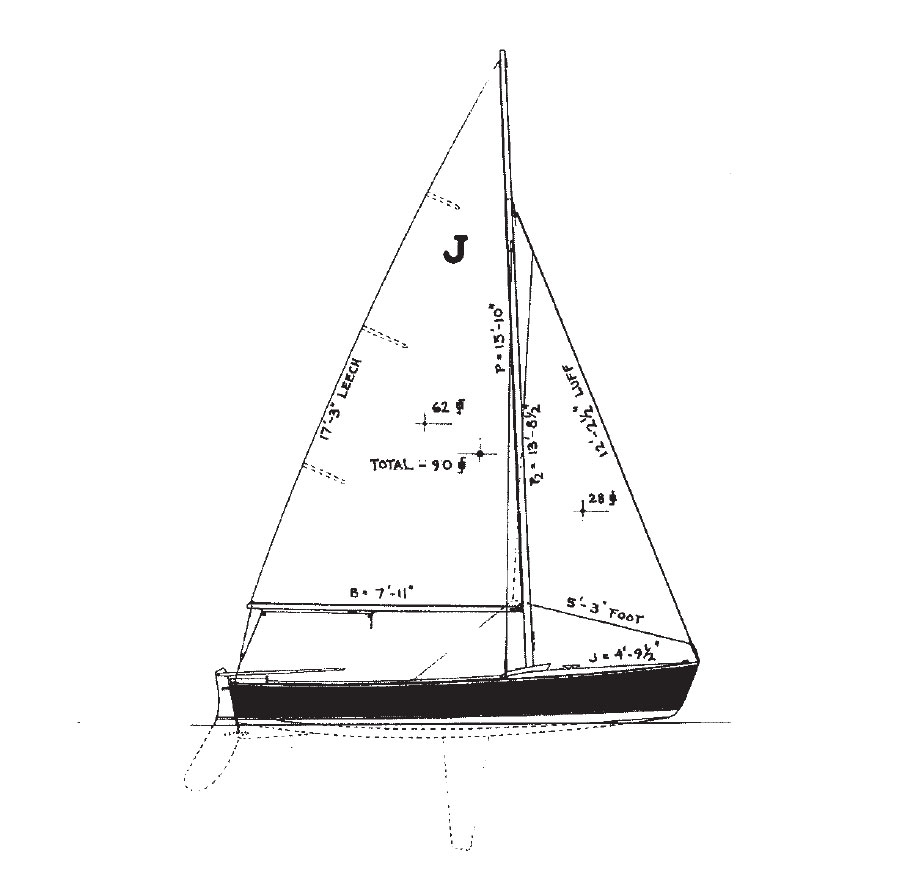
Making sail is uncommonly easy in a Coquina. Both main and mizzen are gaff-rigged. Hauling the throat and peak halyards together (mizzen first, then main) takes the gaff aloft level to the waterline until the luff is taut. After making off the throat halyard, you peak up the gaff until a crease shows in the sail from tack to peak, then make that halyard off, too. Vagn brings his mainsheet aboard through a swiveling cam cleat mounted on the centerline of the after thwart.
The mizzen sheet reeves through a cam cleat mounted on the forward edge of the afterdeck, a little to port to clear the mast. Granted, the masts were already up and the boat was already at the mooring when we embarked, but the setup was as easy as taking off the sail stops, lowering the centerboard, raising sail, and casting off. This boat’s hull form, however, clearly would make the alternative of launching from a trailer very simple. Without stays or shrouds, the mast and rig setup wouldn’t take much longer when trailer-launching than it does at the mooring. The rudder is not so deep that it would have to be removed—depending on the trailer setup and the con- figuration of the launching ramp, of course.
Without doubt, the steering system is the most unusual aspect of the boat. In the design specifications, one line per side is made off to the rudder and reeves through a fairlead “beehole” in the transom. This line then operates through a three-part mechanical advantage under the afterdeck and then passes through a fairlead beehole in the after bulkhead. Then it runs through fairleads under the narrow side decks. The ends of these two lines are spliced together to make a continuous loop running around the interior of the boat. Some prefer to have the line cross the hull at the forward thwart, but others take the line all the way to the stem, as Vagn chose to do.
However the steering line is led, this system isn’t uncommon (see our Beachcomber-Alpha dory profile for a variation on the concept). This one, however, does present some differences. For one thing, you can’t see the rudderhead, so checking whether the rudder is amidships has to be done by feel. Now, there’s nothing wrong with this—I’m a great advocate (to my wife, crew, and anyone else who might be listening) of sailing and steering by feel more than by indicators of one type or another. I believe this is the best and most thorough way to learn a boat’s characteristics, and this boat would teach you well and quickly. But this steering system does take some getting used to, and I would probably always miss a tiller, with its continual feedback about exact rudder angle.
Tom Jackson
Coquina steers by a continuous line attached to the rudder, and in this case the line passes through fairleads under the side decks all the way forward to the stem. Blocks giving three-part mechanical advantage are hidden under the afterdeck. Molded sheerstrakes are one design detail the daysailer has in common with larger Herreshoff yachts.
During our first outing, while Vagn and I had to get the rig down in the blow, the boat slipped backward, pushing the rudder to one side and hard against the transom. In this state, the steering lines don’t have sufficient leverage to bring the rudder back amidships— you’ve got to either reach over the transom to give the rudder a push by hand or start rowing to gain enough steerageway for the rudder to start its swing. In 3′ seas, it took considerable effort at the oars to get up the necessary speed.
I would think that stopper knots in the steering line set to ride against the bulkhead fairleads might prevent this from happening, with the benefit of also preventing oversteering during tacks. Some sort of an indicator in the line—one whipping per side referenced to a known location, such as a knee, for example— might give a quick visual check to see when the rudder is amidships. For someone new to this system, turning the wrong way is a problem relatively quickly overcome, but getting a feel for how much to steer takes longer. Eventually you settle on the right amount of tension to keep on the line to counteract the boat’s slight weather helm, neither pulling the line nor easing it too much as the boat reacts to the seas. It’s a little bit like playing a fish with a rod and reel.
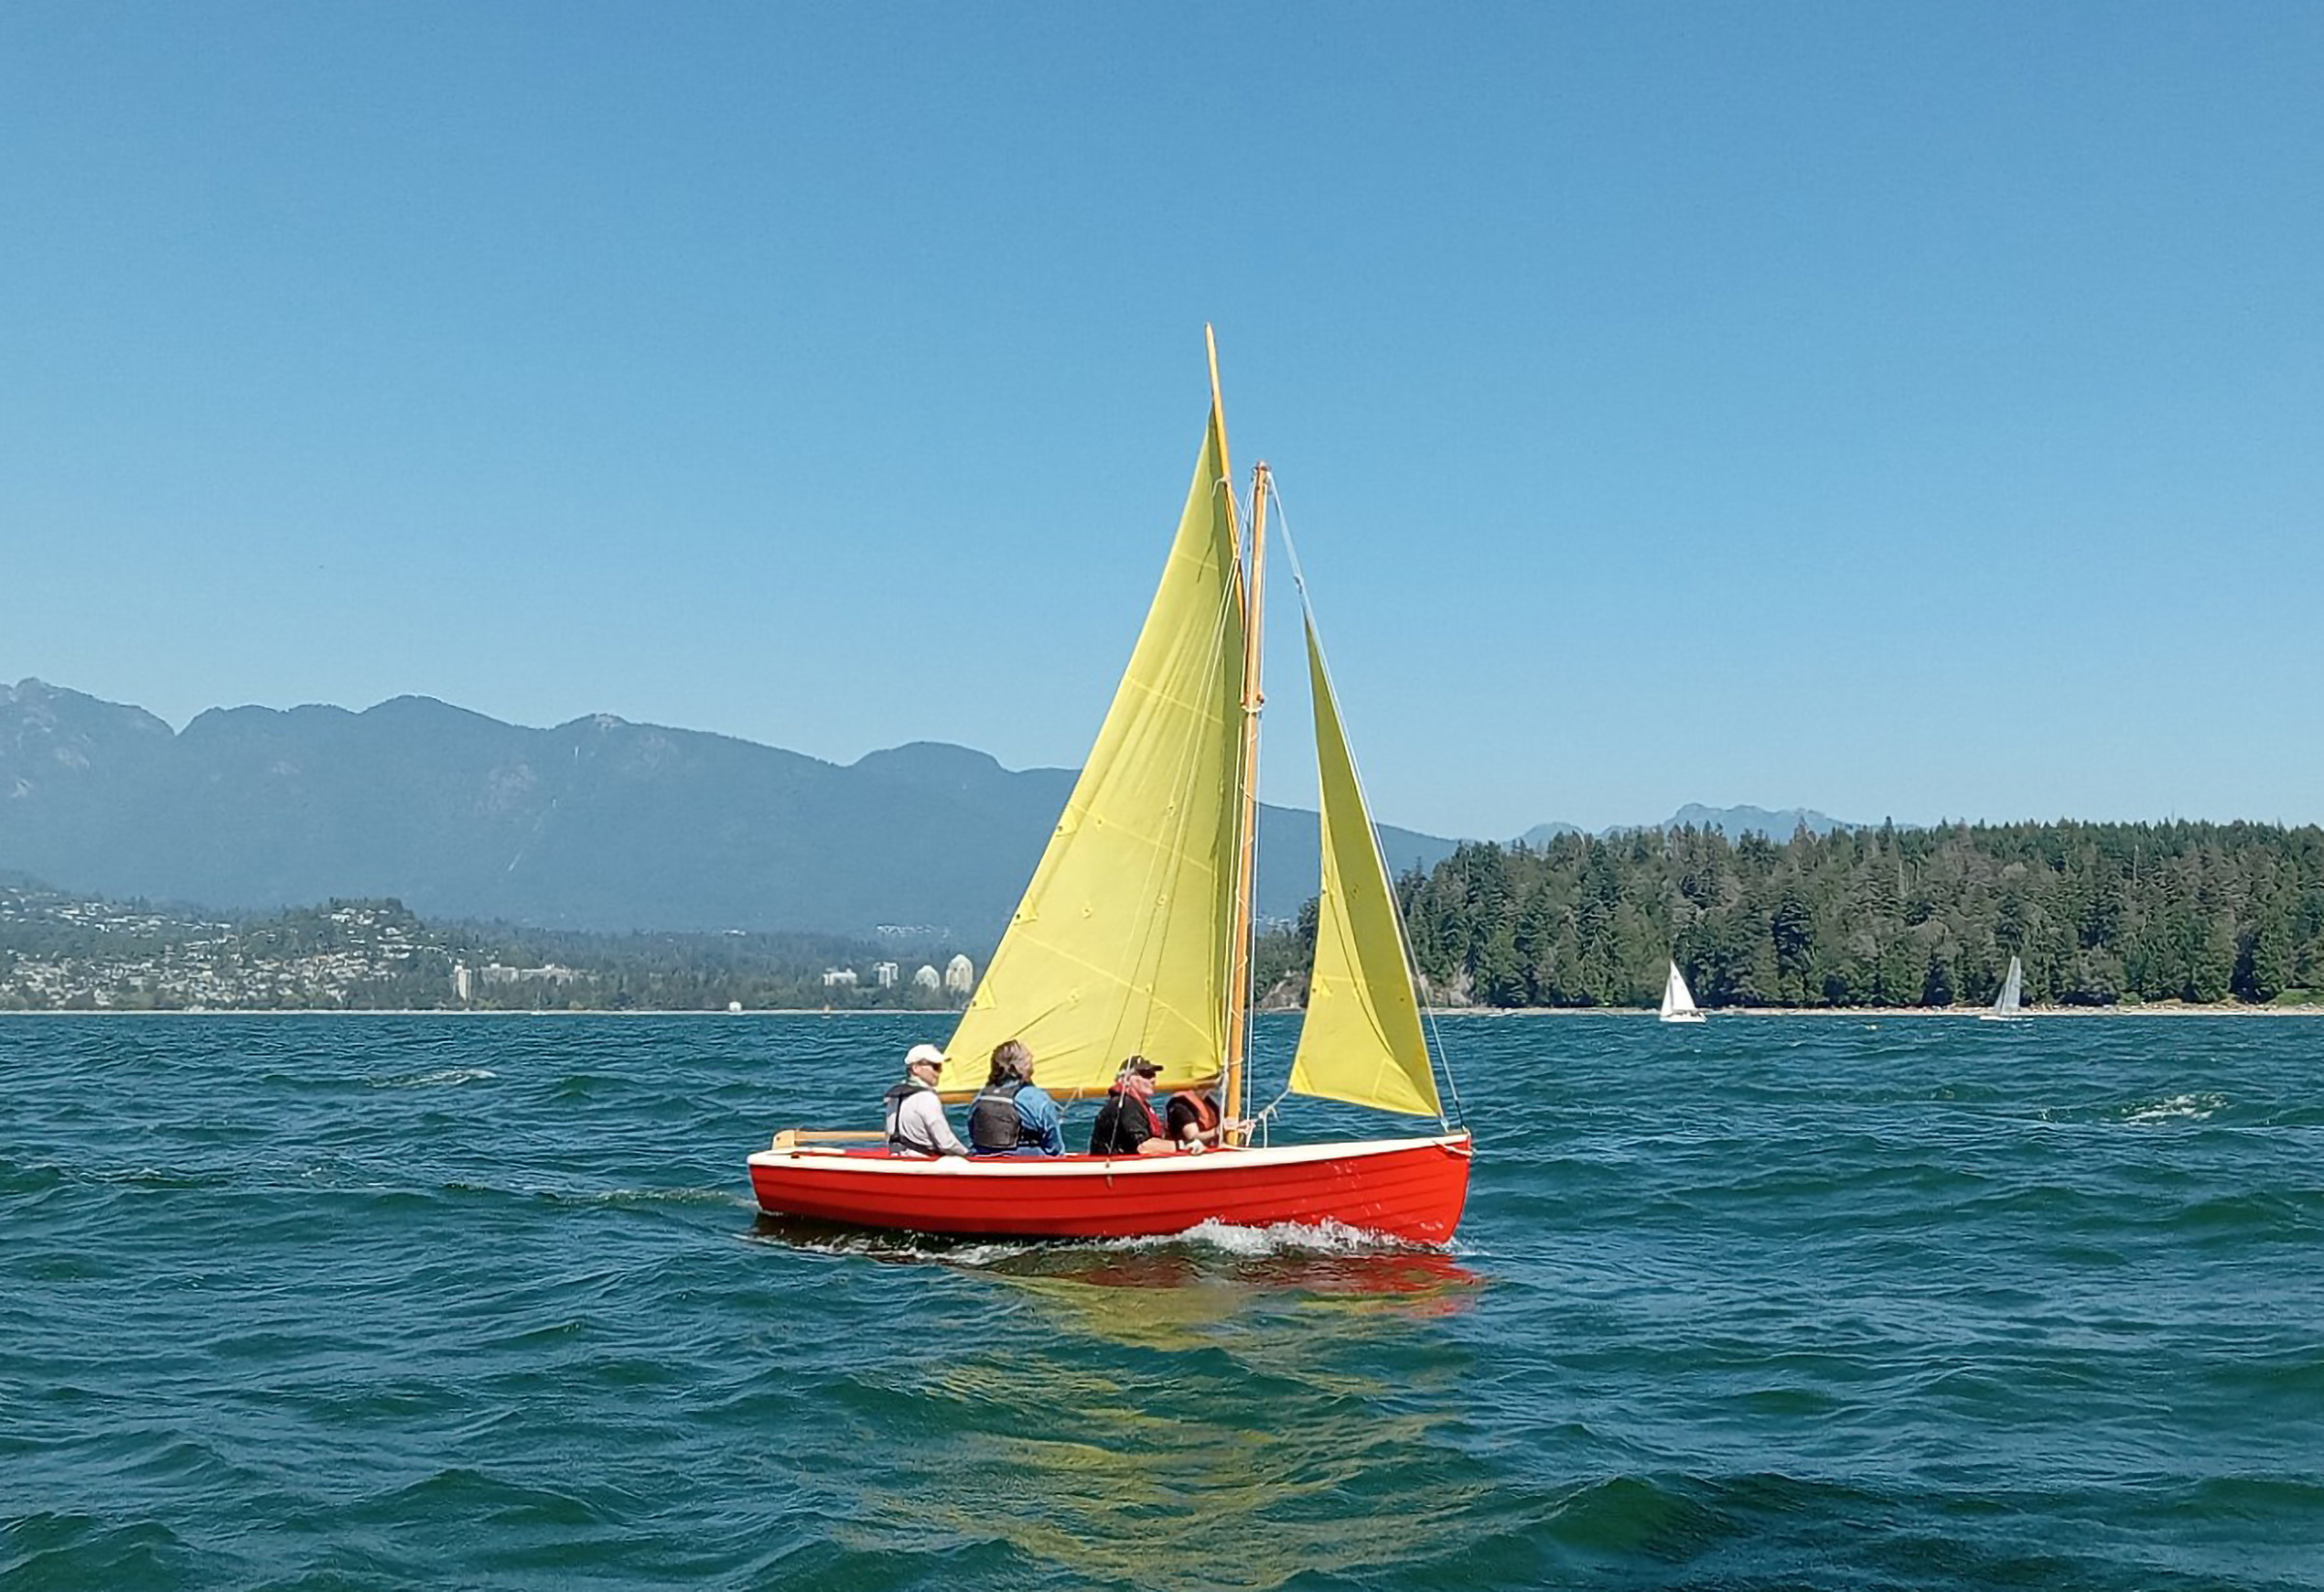
In 12 knots of breeze, the boat was perfectly at home, with an easy and highly responsive motion. Vagn compares the boat’s handling to a racing dinghy, often needing crew weight on the weather rail to keep her on her feet, despite the fact that he keeps 50 lbs of inside ballast under the floorboards. (For the record, Herreshoff himself recommended 140 lbs of inside ballast.)
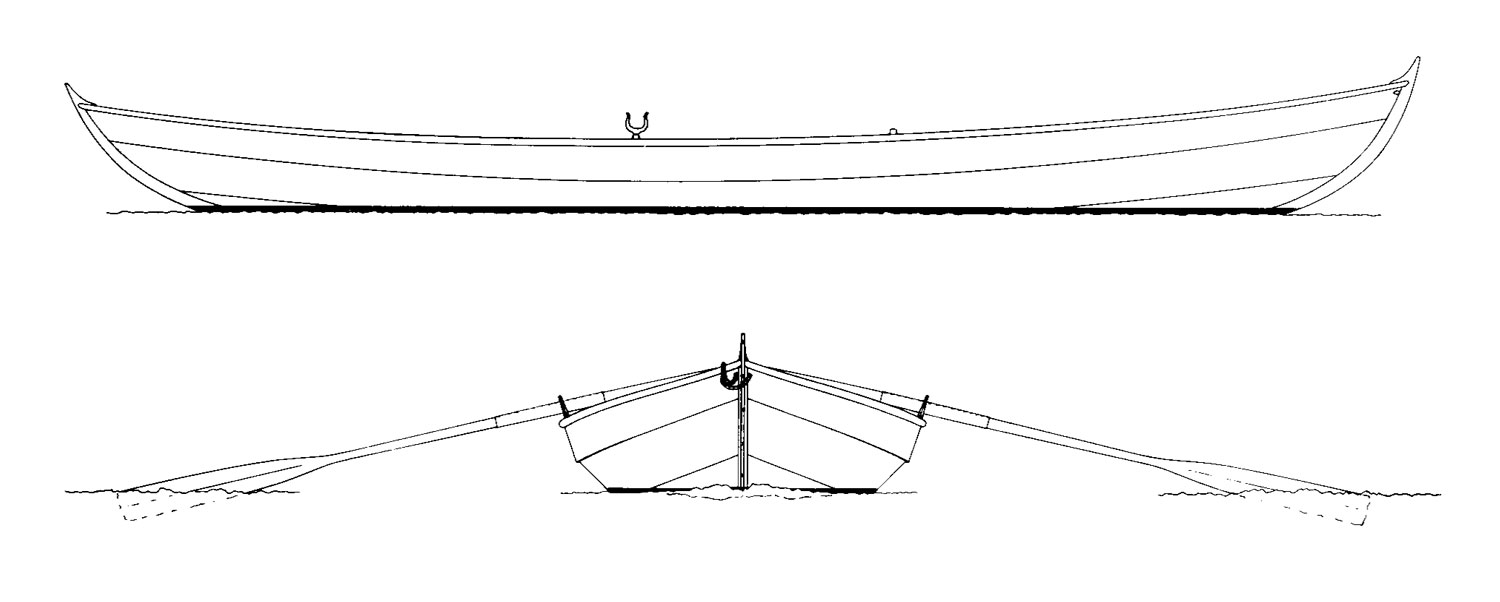
The very low coaming capping the side decks makes it easy and comfortable to hike out when necessary. One benefit of the loop steering system is that a solo sailor can be well out on the weather rail and still reach the steering line. Also, he can adjust weight forward or aft, or he can move around the boat as needed to adjust a downhaul or halyard, prepare an anchor, reef, or grab his lunch, and all while still being able to steer. Those are excellent advantages.
I found it very easy to “read” Coquina’s sails. If you are pointing a hair too close to the wind, the balance response is immediate, so it’s easy to find the sweet spot. When you do, her speed picks up noticeably. If you go too far off the wind without easing the sheets, her stall is also readily perceptible. This makes it very simple to feel when the boat is on the knife-edge of efficiency and when it is being headed or lifted by variable breezes.
Coquina is well-suited for solo cruises as well. Read of one Adventure from The Isles of Finland.
She seems to point very well to windward. Tacking is effortless. Really, nothing needs to be done—just put her over and find the new tack based on sail trim. When jibing, all you need to do is haul the mainsheet and then let it run out gently to the new trim. The mizzen takes care of itself. The boat seems to settle very nicely into wing-on-wing sailing, making that often-troublesome point of sail easy to hold—which can’t be said of all boats. When jibing the mizzen, I found it simple enough to just reach aft, grab the boom, and push it to the other side, restraining it a bit to prevent shock loading. Her split rig gives her excellent balance downwind.
The boat is set up with one rowing station, but in my view this boat is all about sailing—rowing isn’t particularly easy or enjoyable and merely gets you home if the wind utterly fails. With her 130 sq ft of sail, lean shape, and great all-around handling, she promises to move well in light air. The oars would be the last resort on a day of the faintest breeze or a bothersome current.
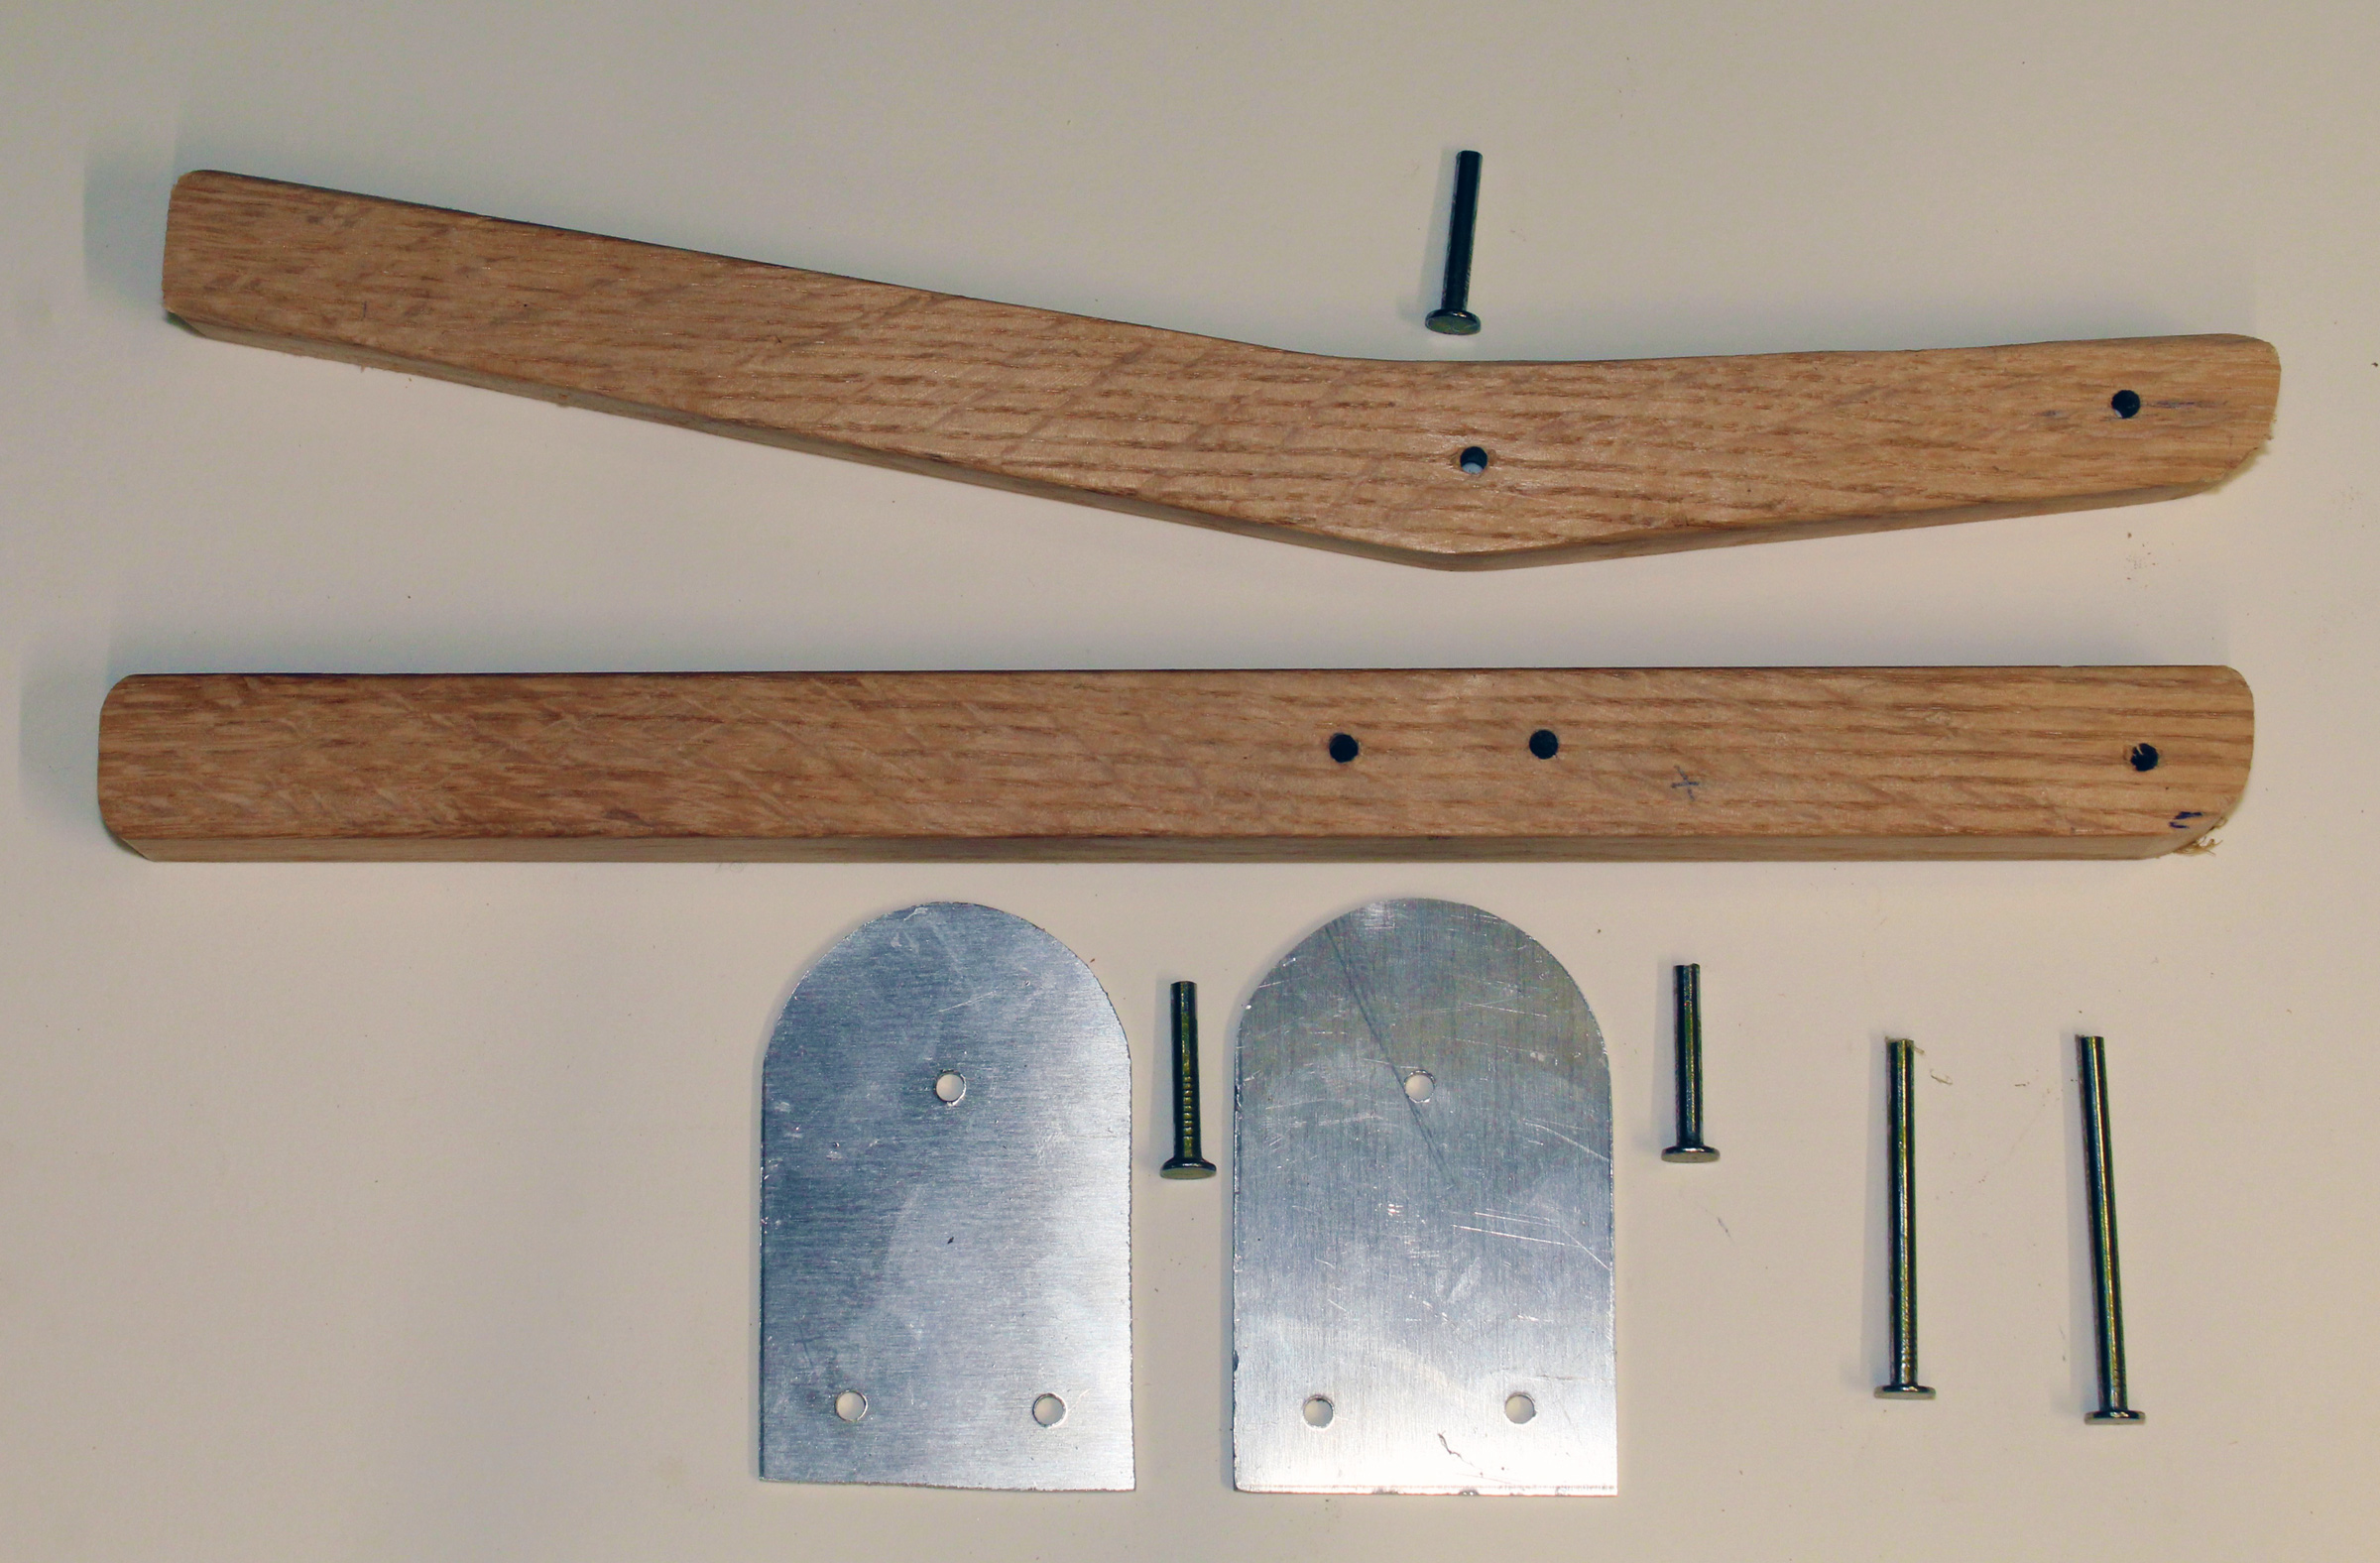
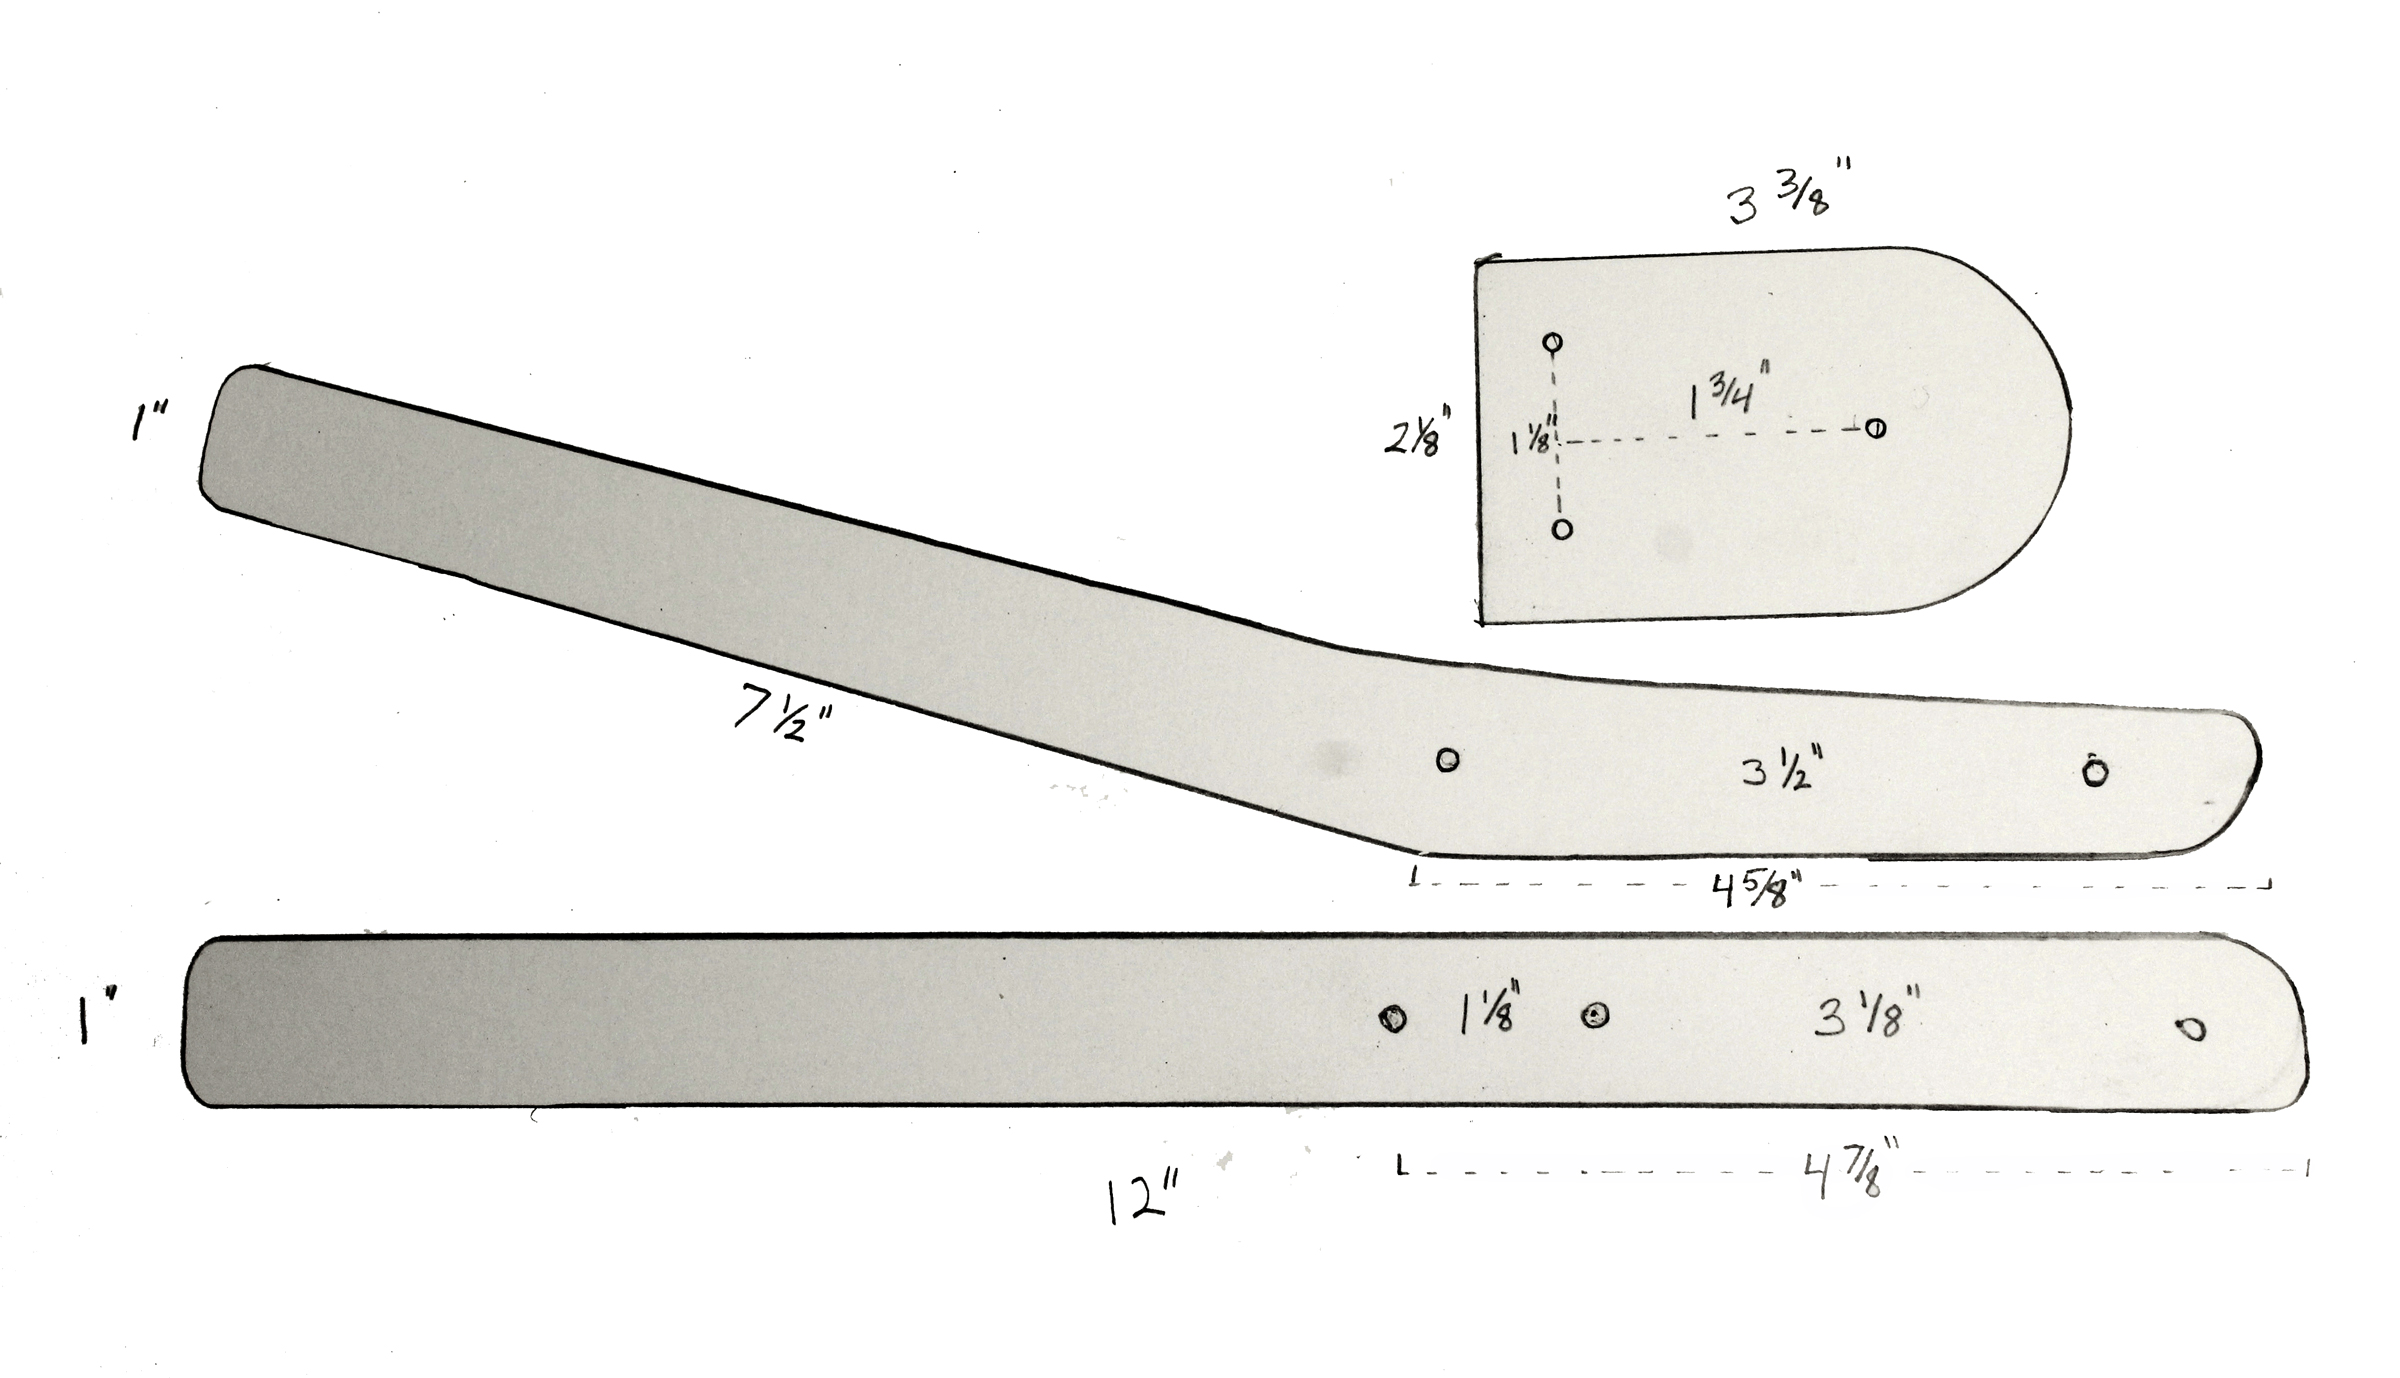
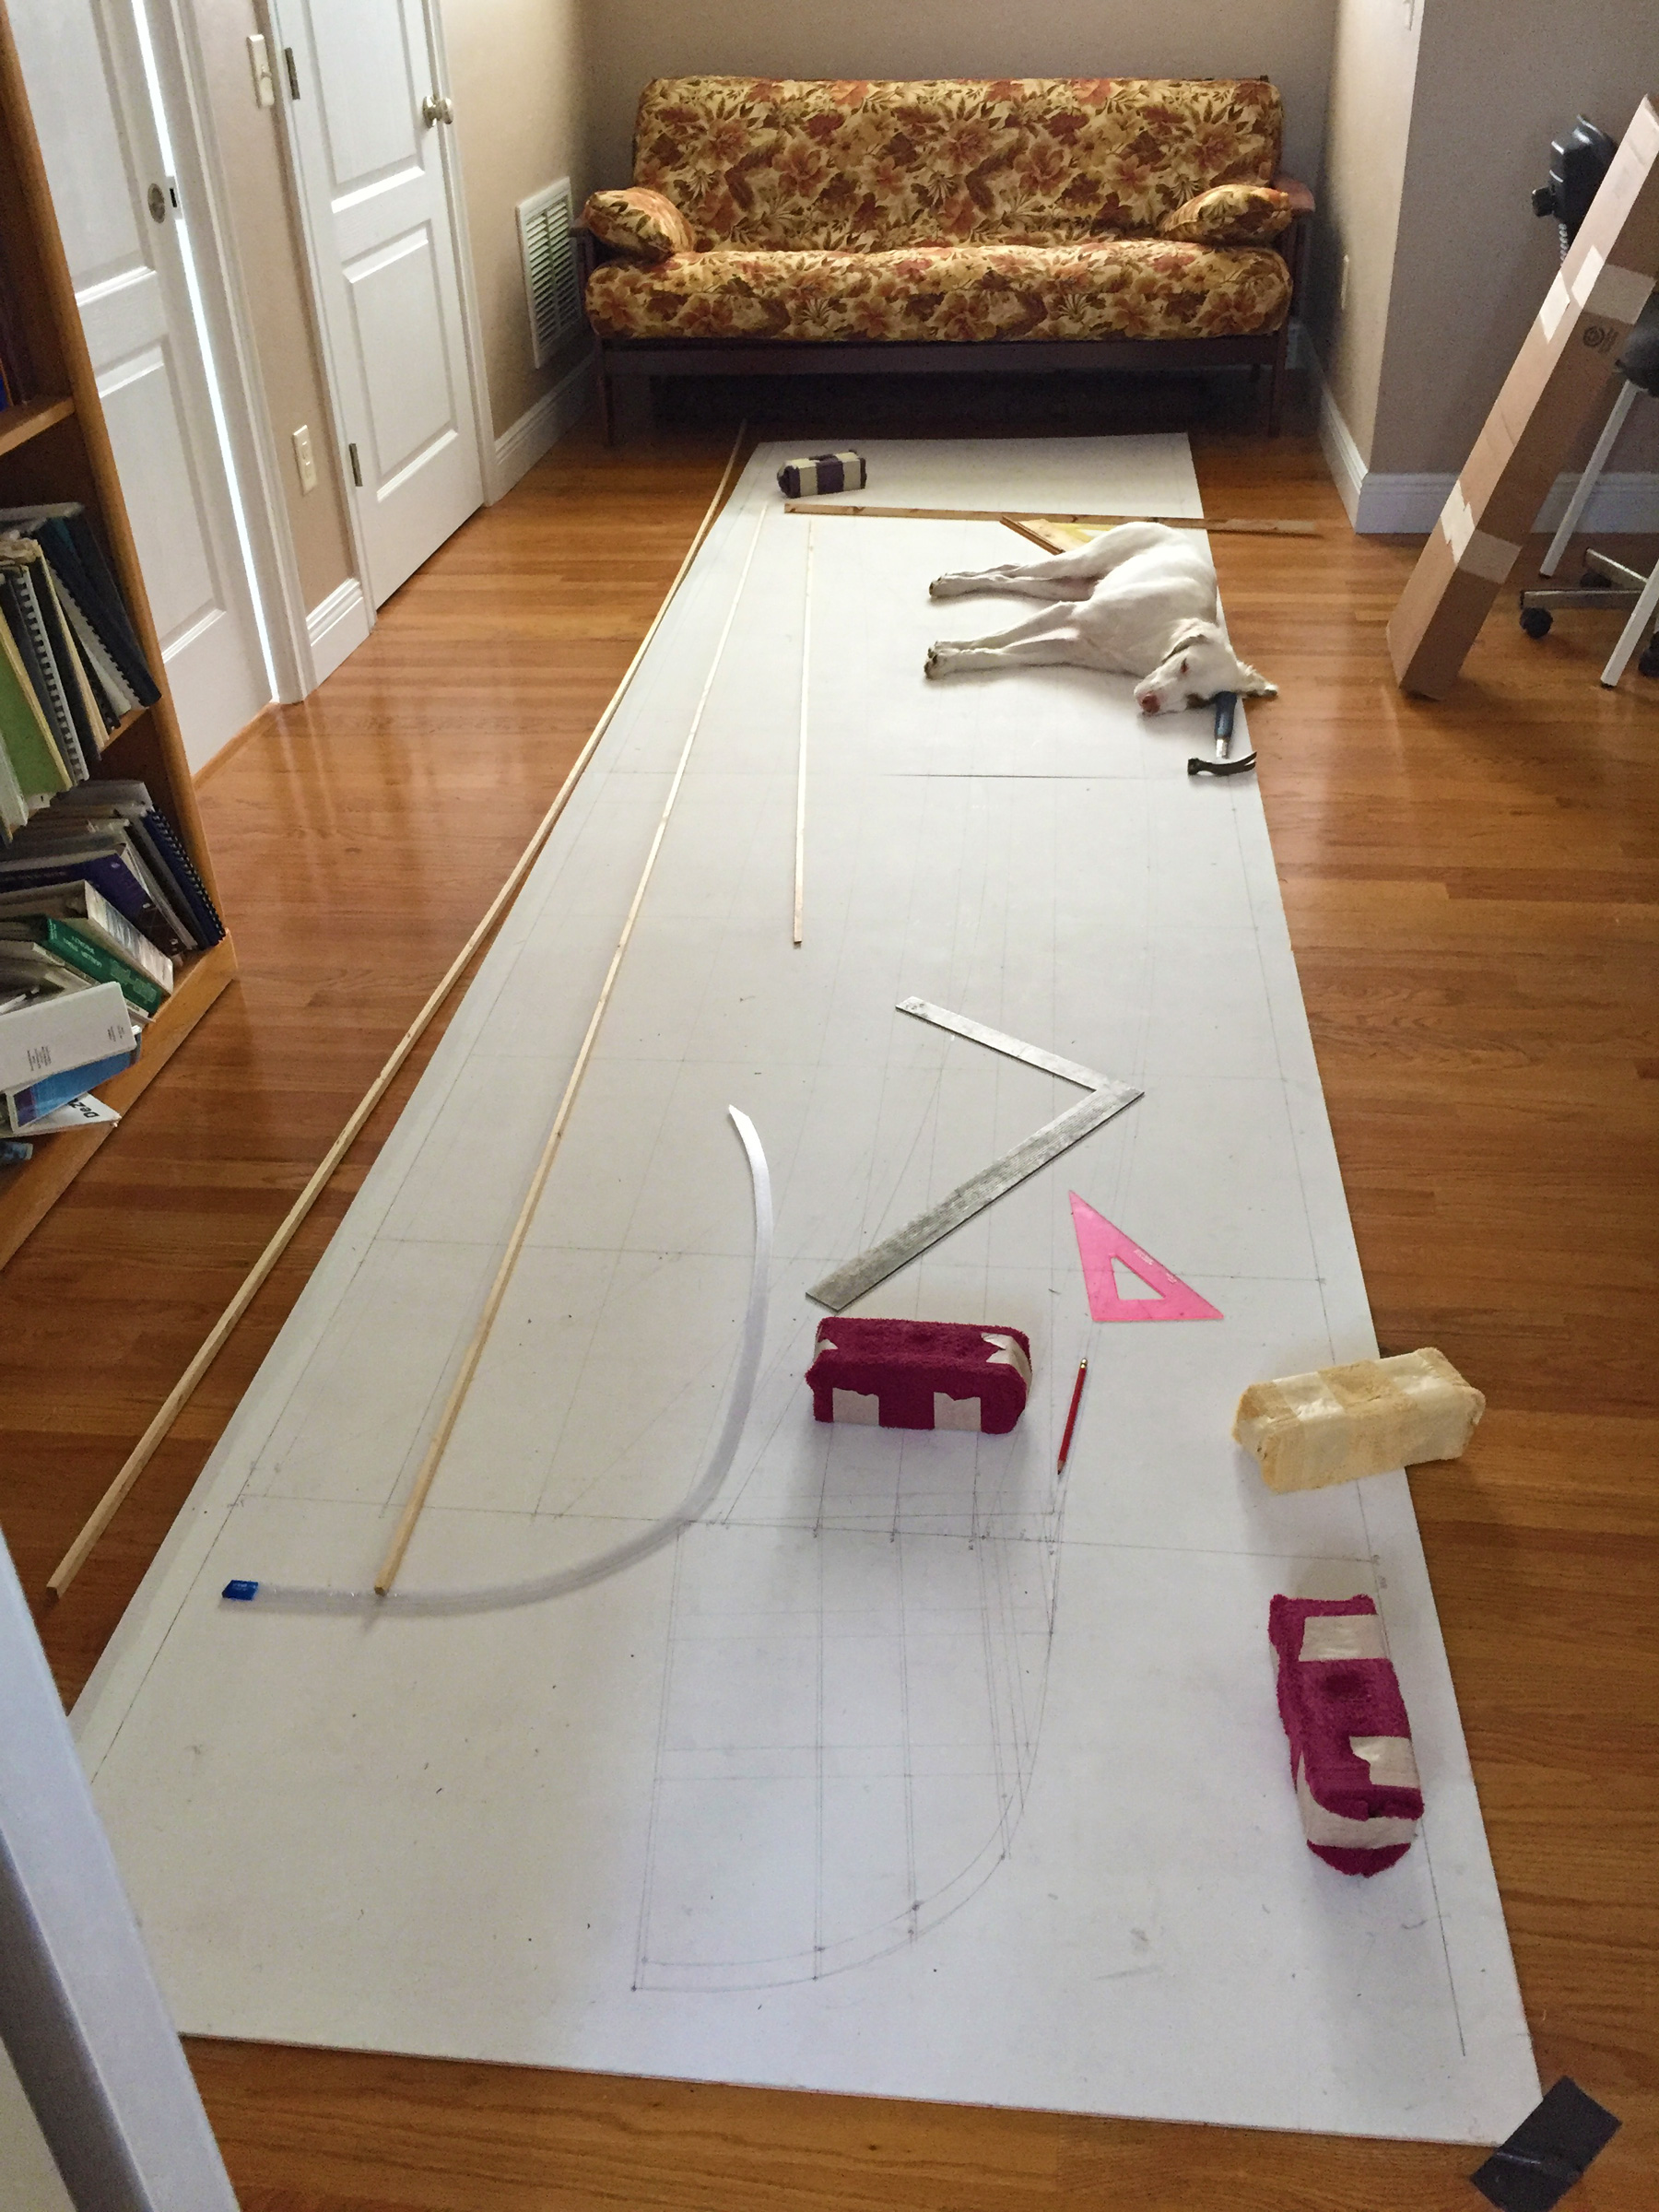
Doug Hylan
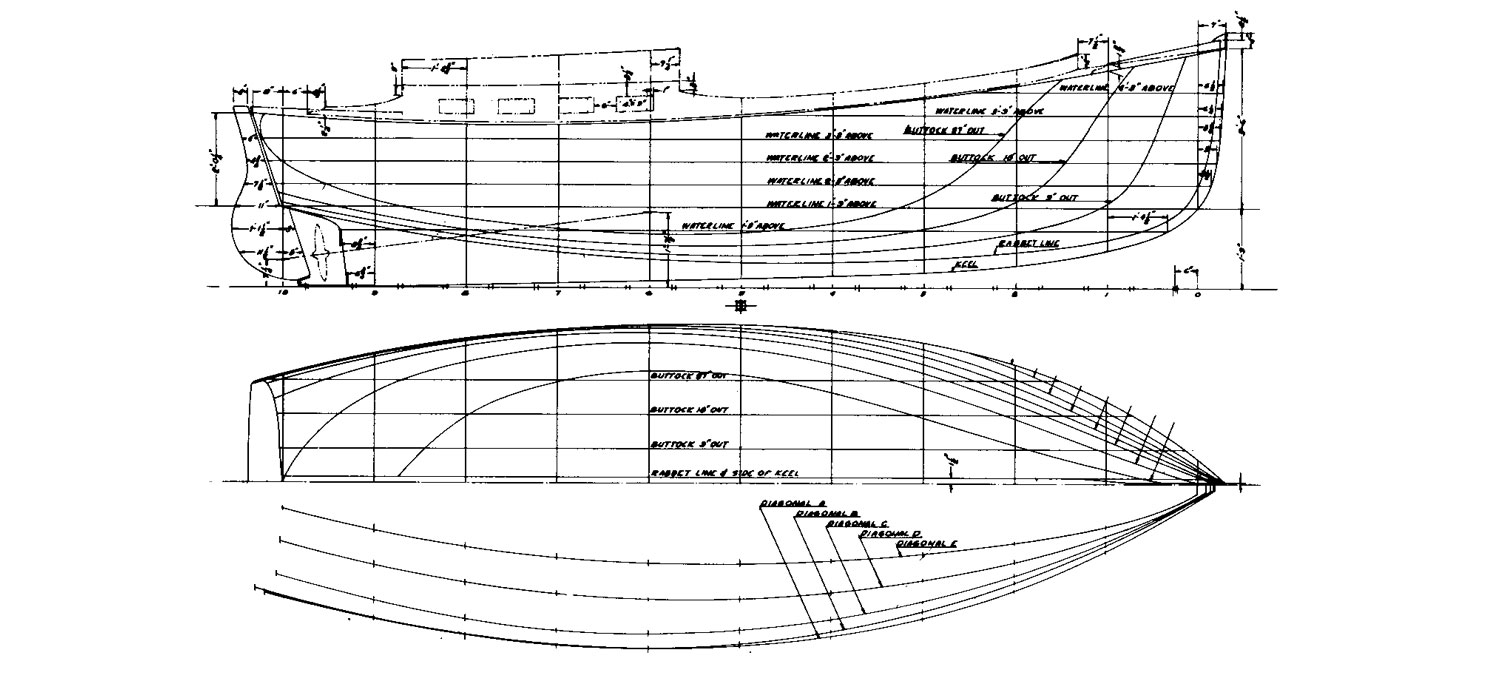
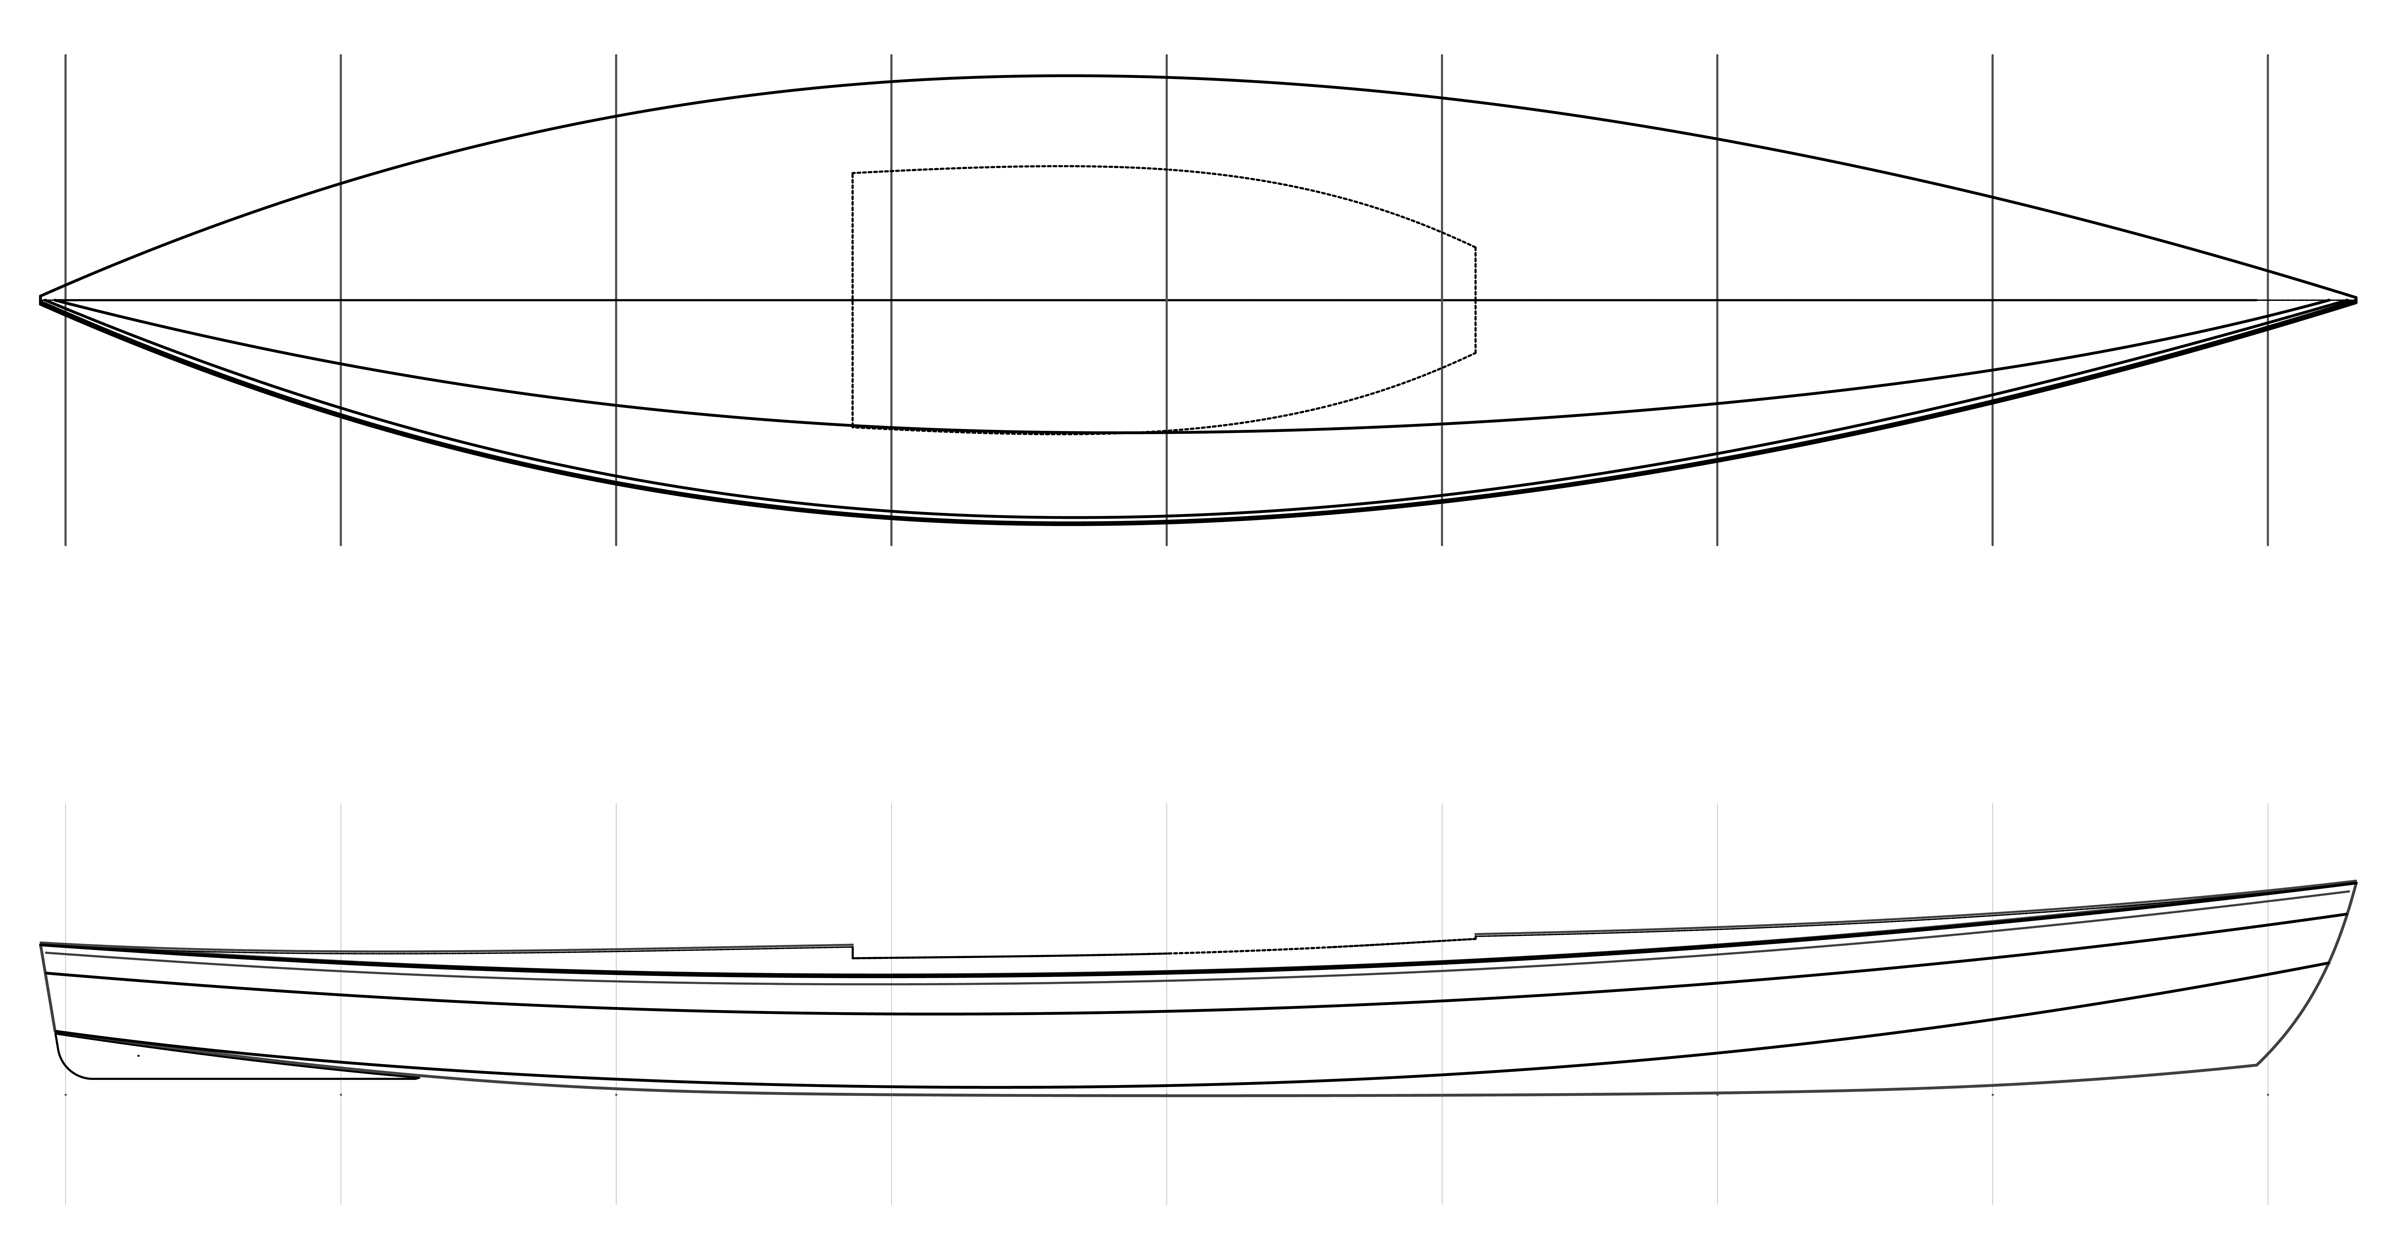
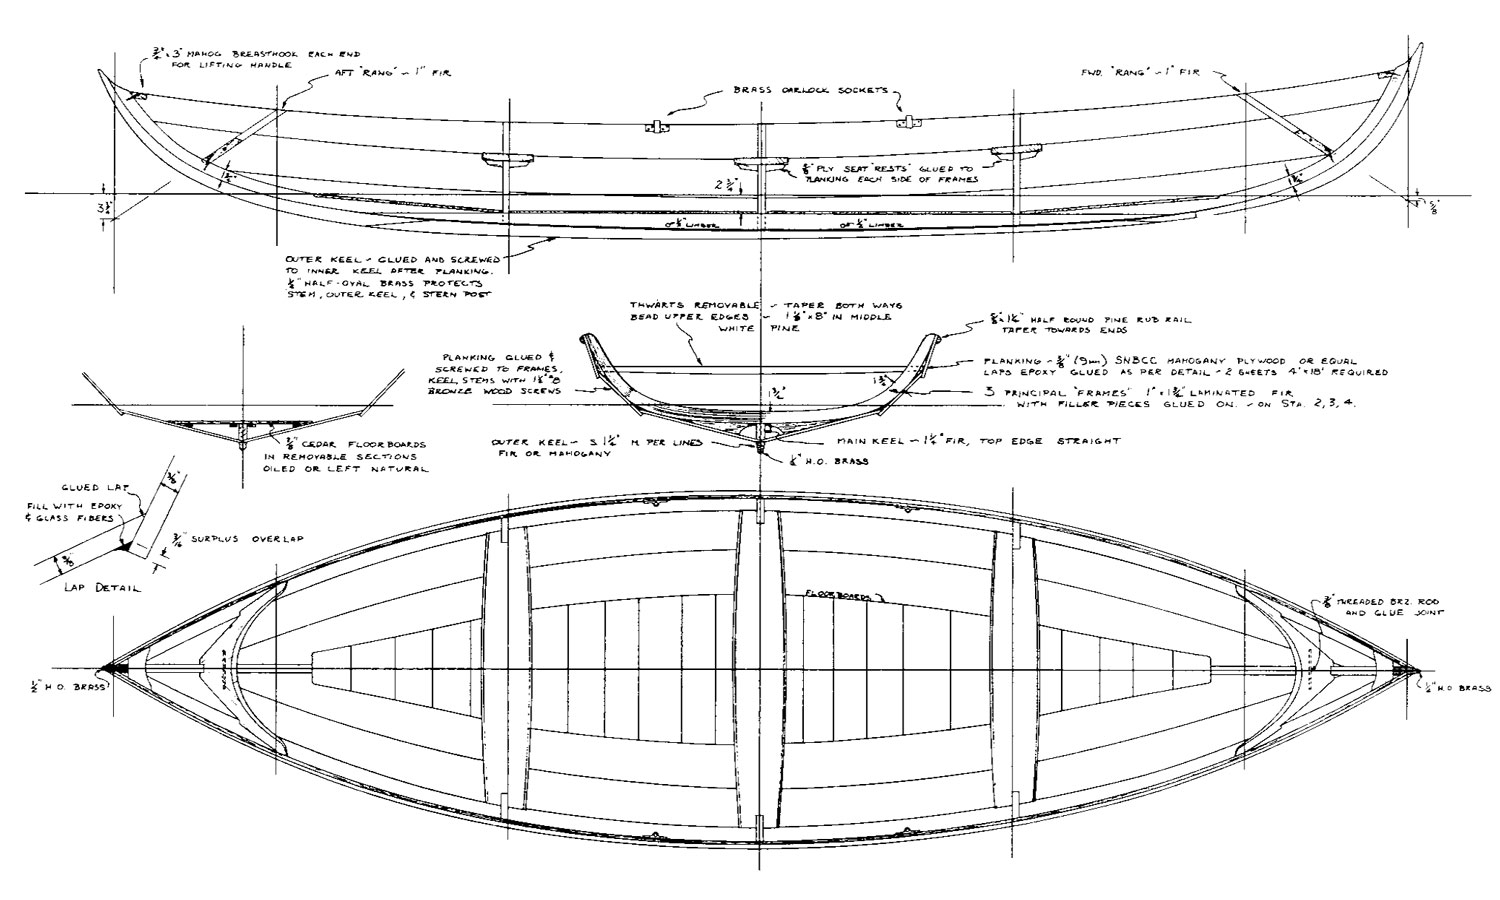
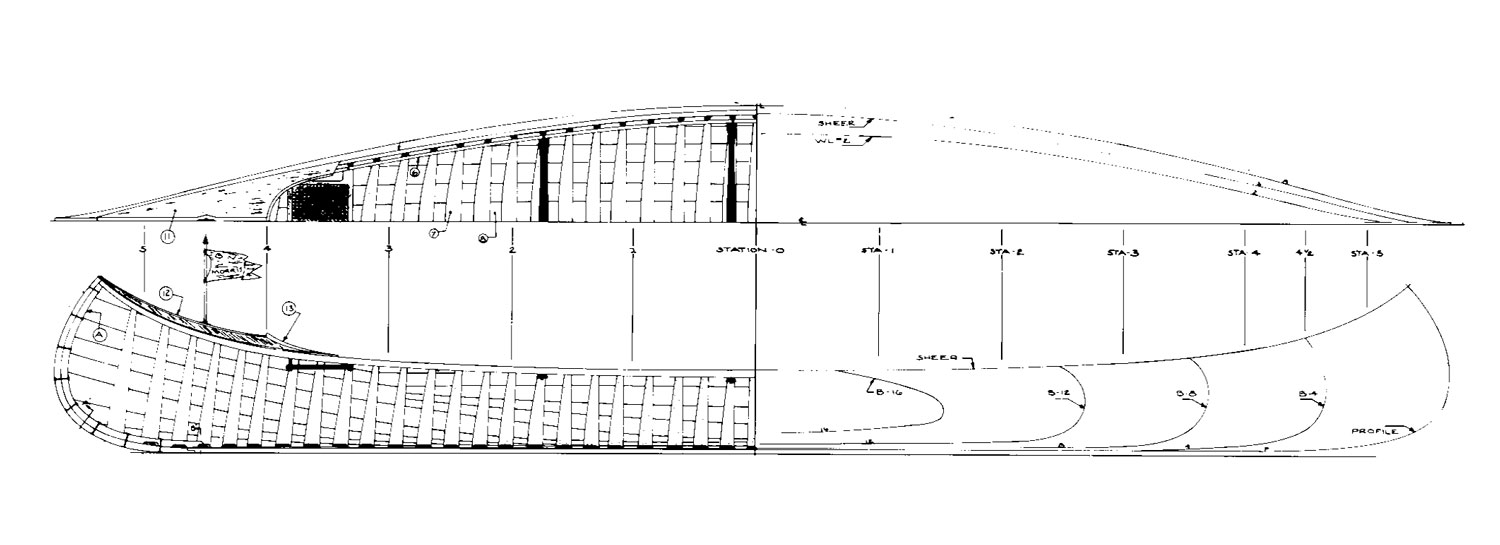
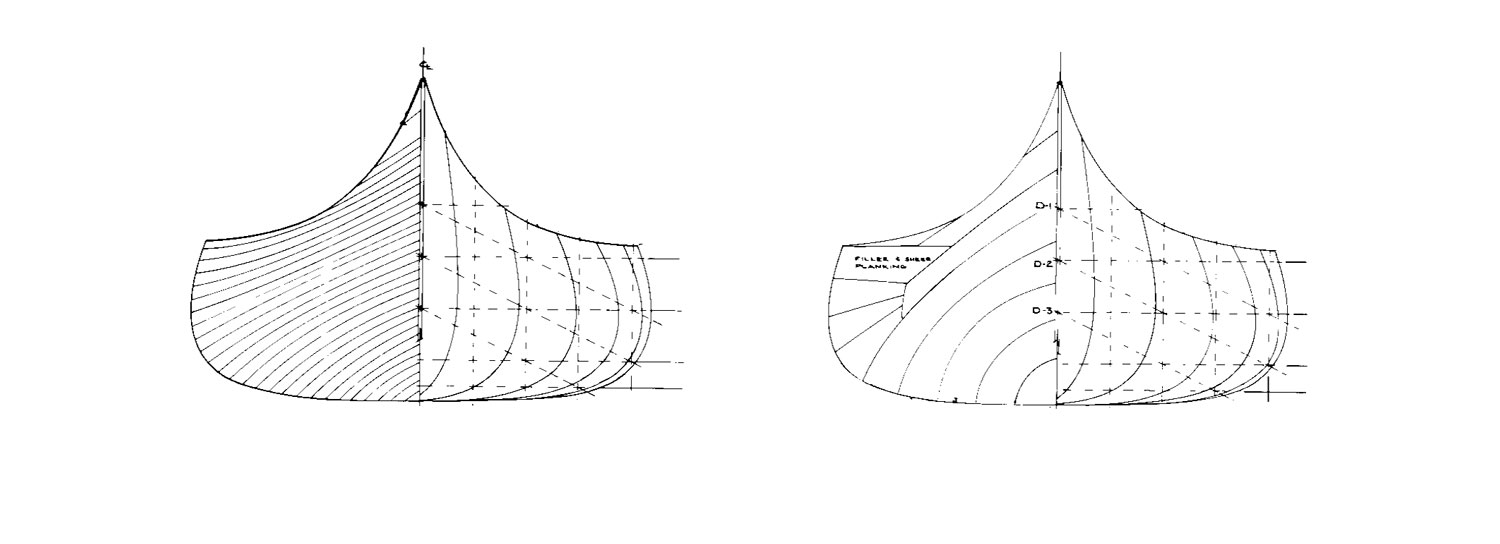
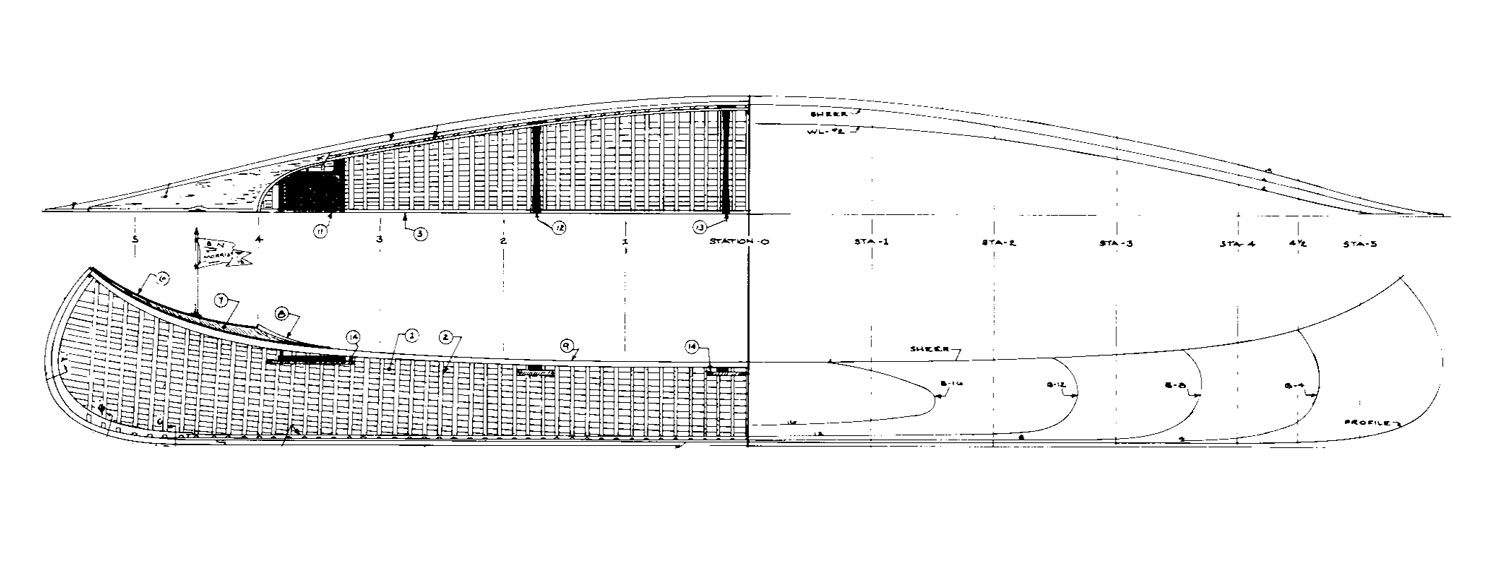
Doug Hylan’s re-created lines for Coquina are lovely to look at. Lofting isn’t required, since the 11 sheets of details include full-sized mold patterns, which exactly specify plank edge locations.
When he was up in years, Herreshoff recalled that this diminutive daysailer was the boat he liked to use more often than any other during his lifetime in spectacular boats. In a way, this is not surprising, since it seems to be a universal law that the amount of use a boat gets is inversely proportional to its length. But Herreshoff had boats galore and access without end, so his fondness for this particular daysailer had to have been heartfelt.
The original boat was delicately built—with only 5⁄16″ cedar planking—by one of the best craftsmen at Herreshoff Mfg. Co. For decades, it was kept in davits in a boathouse adjacent to Herreshoff’s Love Rocks home in Bristol, Rhode Island. He used it often, in every season, even on fine winter days. His equally famous son L. Francis wrote that COQUINA was the first boat he could remember sailing in. The boat, sadly, was destroyed when the boathouse was carried away by the famous 1938 Hurricane that devastated New England coastlines.
Boats that designers create for themselves, free from influence of racing rules, client demands, or market expectations, offer unique insight into the designer’s thinking. Sailing a boat that N.G. Herreshoff liked so much and suited his needs so well inspires respect that can take you directly to the root of why he attained his resilient and enduring fame. It really is like hearing a Mozart concerto for the first time.
Over the years, one constant amongst our readers and contributors that has always impressed me is the shared spirit of “get up and do.” It permeates our community and is reflected in countless stories of adventures big and small, in articles that share ingenious solutions to problems, in reviews of boats used, admired, and often built by the authors, and in the personal, sometimes deeply affecting glimpses of life stories revealed in articles across each issue and perhaps most especially in the Reader Built Boat stories.
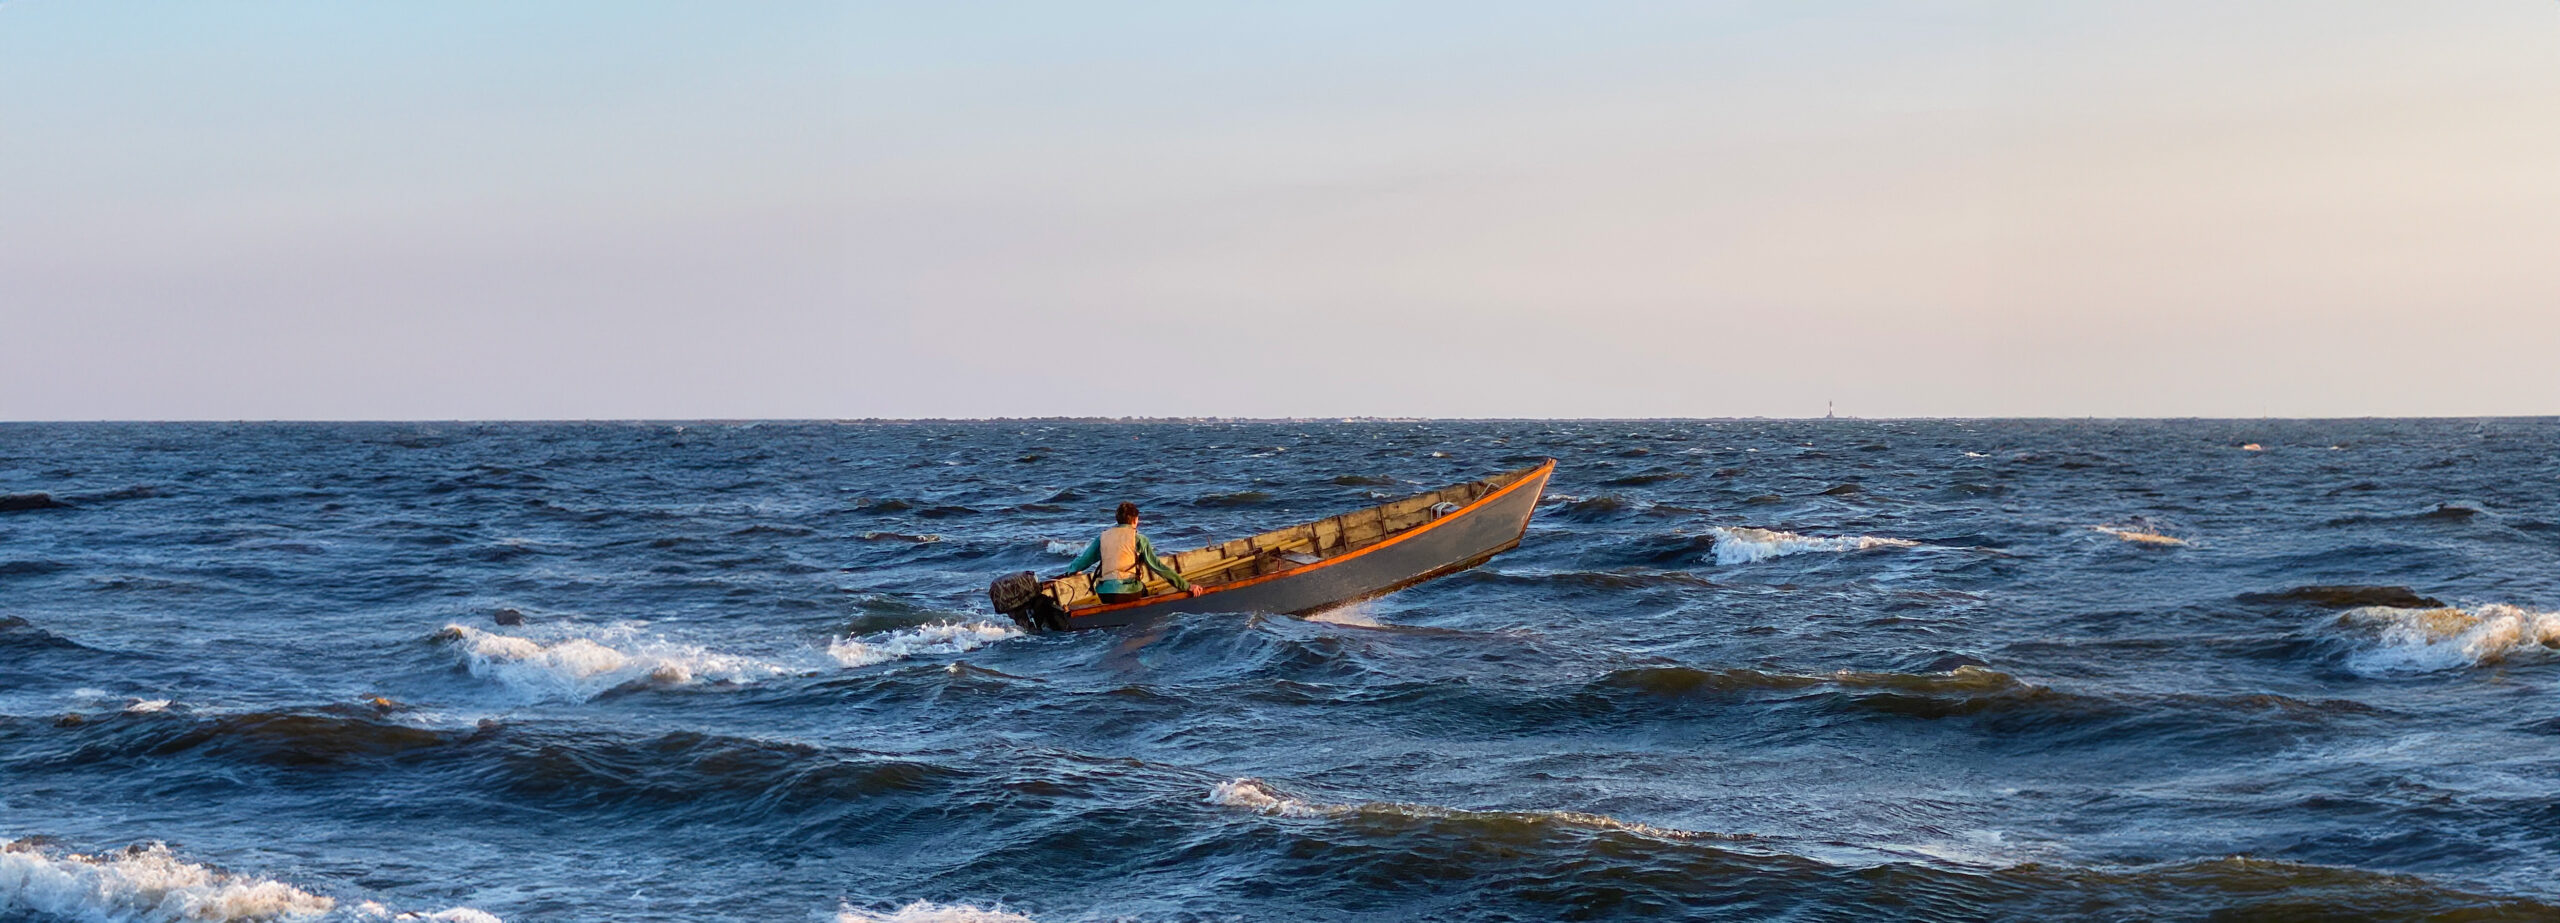
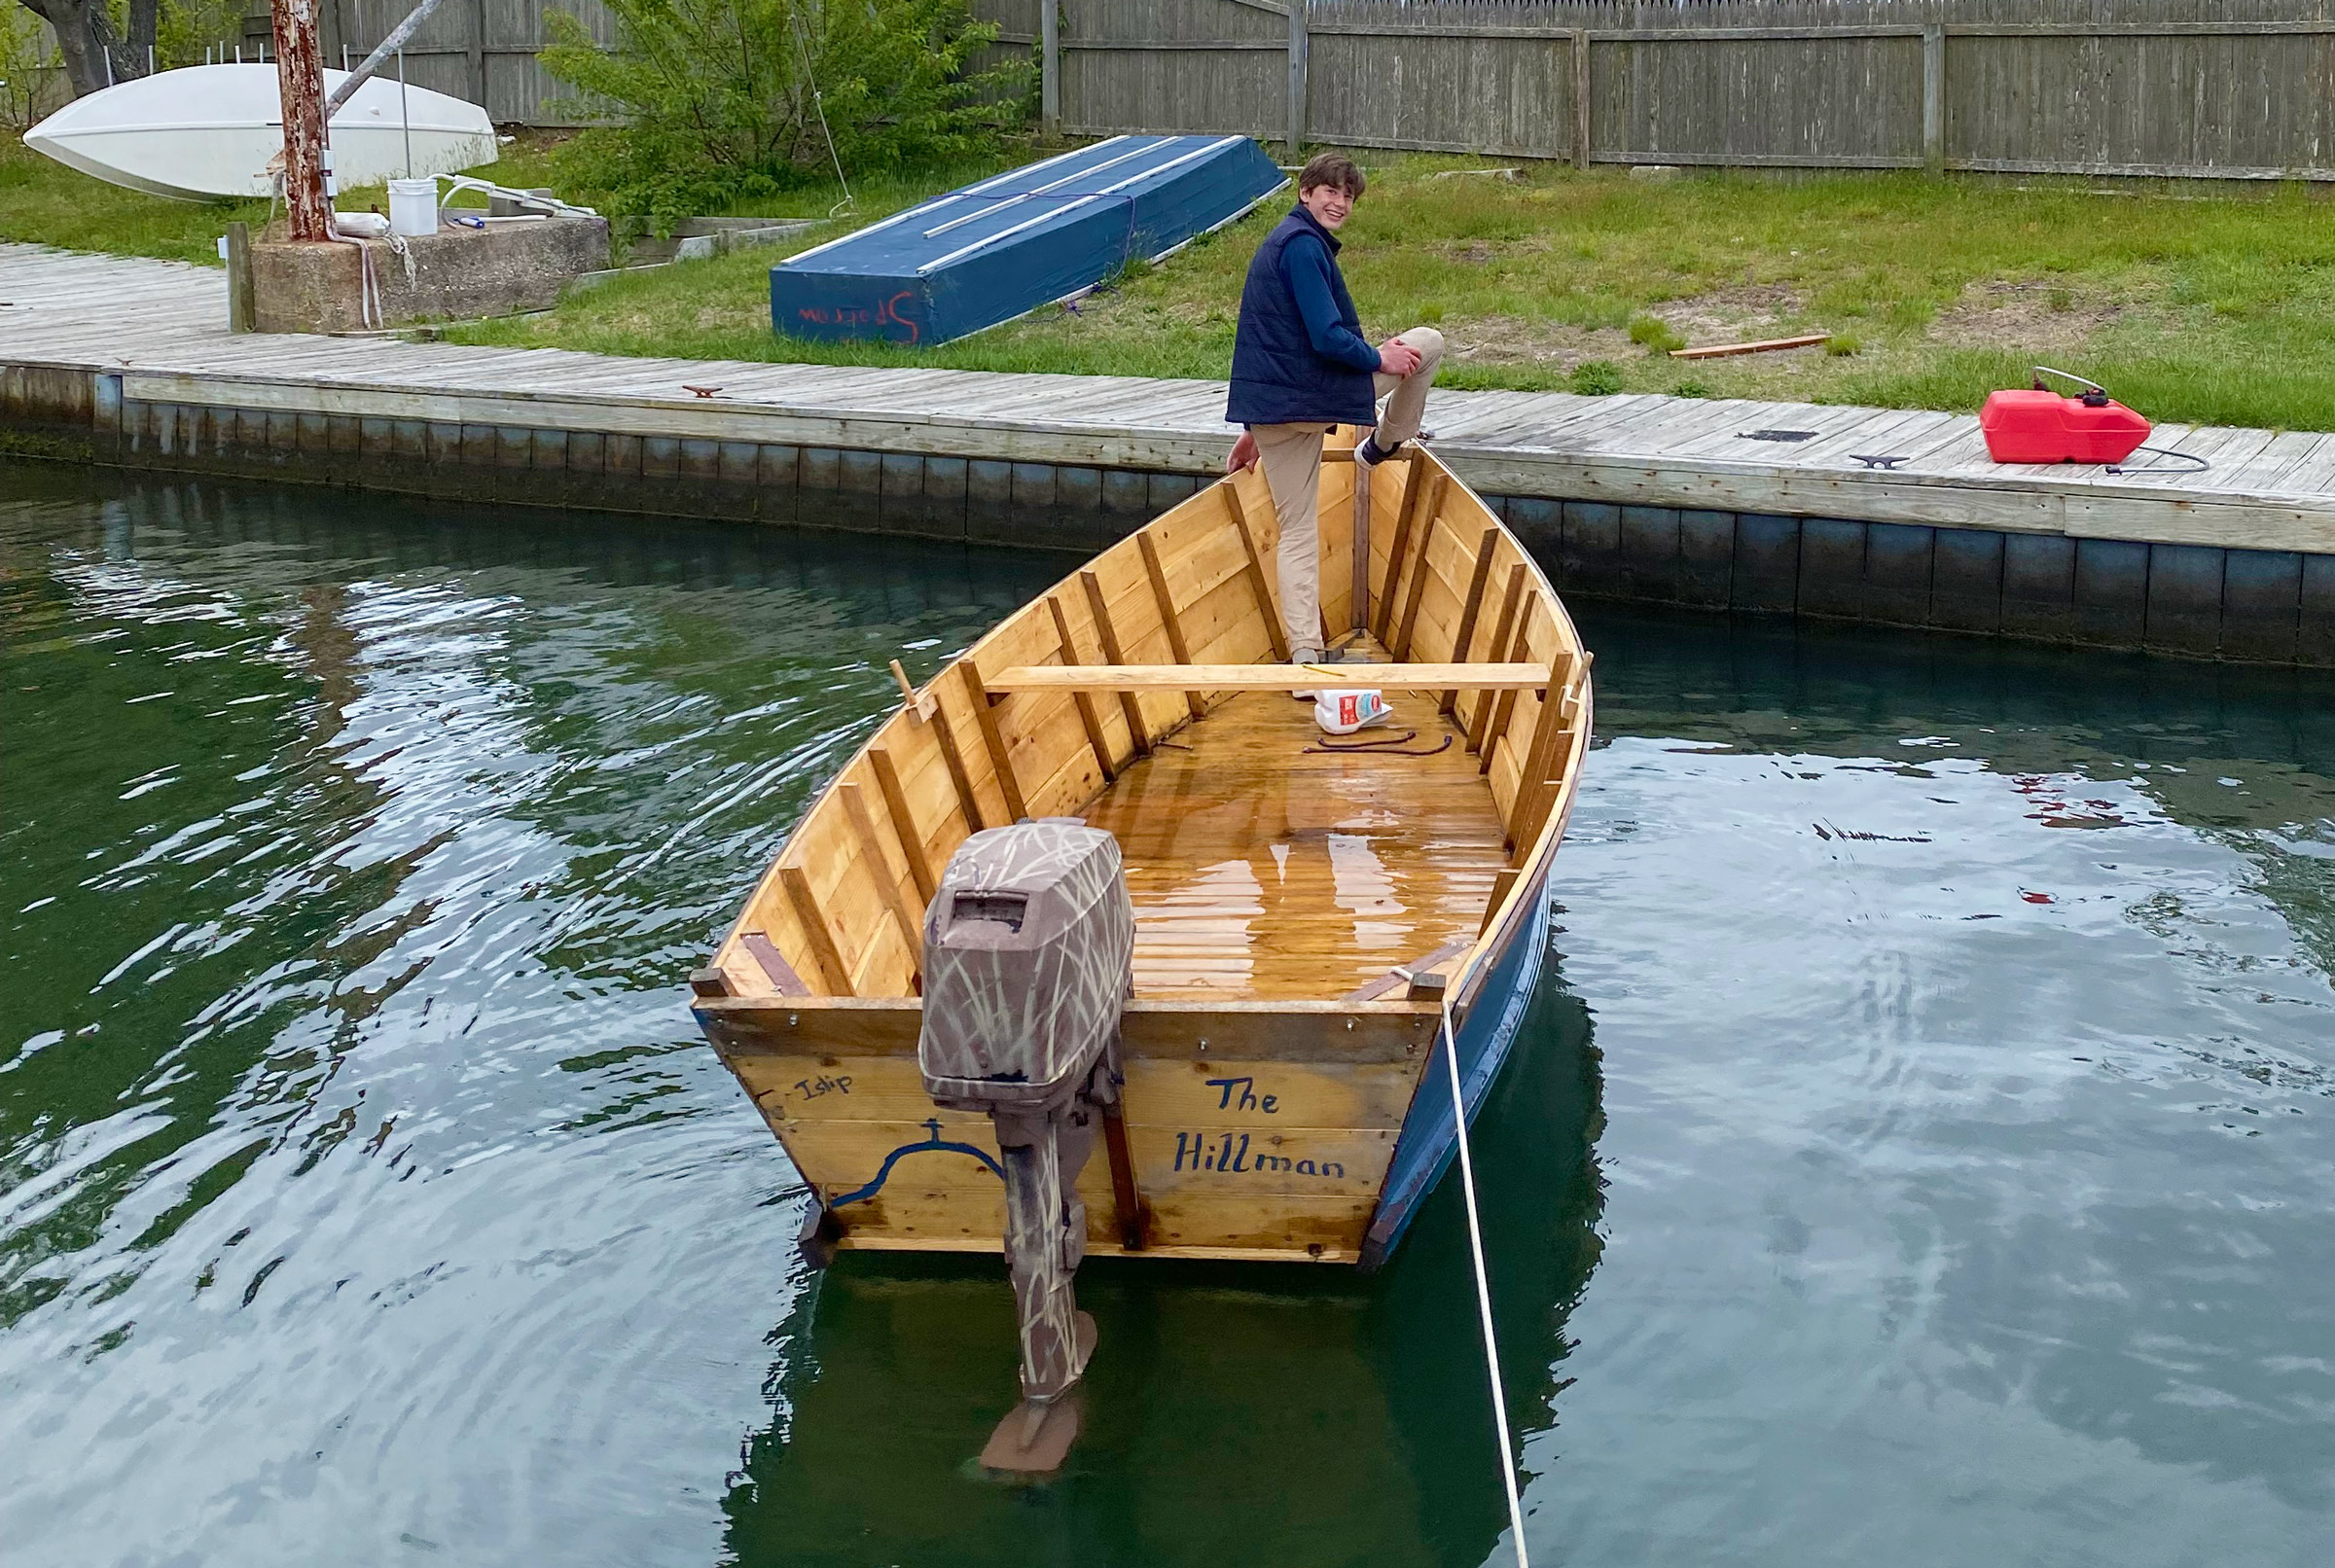
There is, indeed, an indomitable spirit of can-do, of rising to a challenge, that enriches Small Boats, as well as an openness and welcoming attitude within the community that time and again inspires newcomers to give it a go. In this issue, we meet young Liam McEvoy, a 16-year-old from Long Island, New York, who went from daydreaming to searching for free boat plans online, to building his own boat in the family driveway. He was helped along the way by Bob Hillman, a boatbuilding mentor 70 years his senior and for whom he named his boat, HILLMAN. Today, Liam is the proud owner of an 18′ skiff in which he fishes for crabs in Great South Bay, or simply goes out on the water to test himself and his boat in the wind and the waves.
Like Liam, Al Watts, who writes about the Wittholz 15, had never built a boat. He had years of sailing experience behind him but wanted to downsize from his much-loved 30-footer. After an extensive search for the right boat, he was inspired (perhaps persuaded) by an experienced friend to build his own. It wasn’t always an easy project, but with the help, guidance, and encouragement of the friend, Al worked through the challenges and today is happily sailing and trailering his very own catboat.
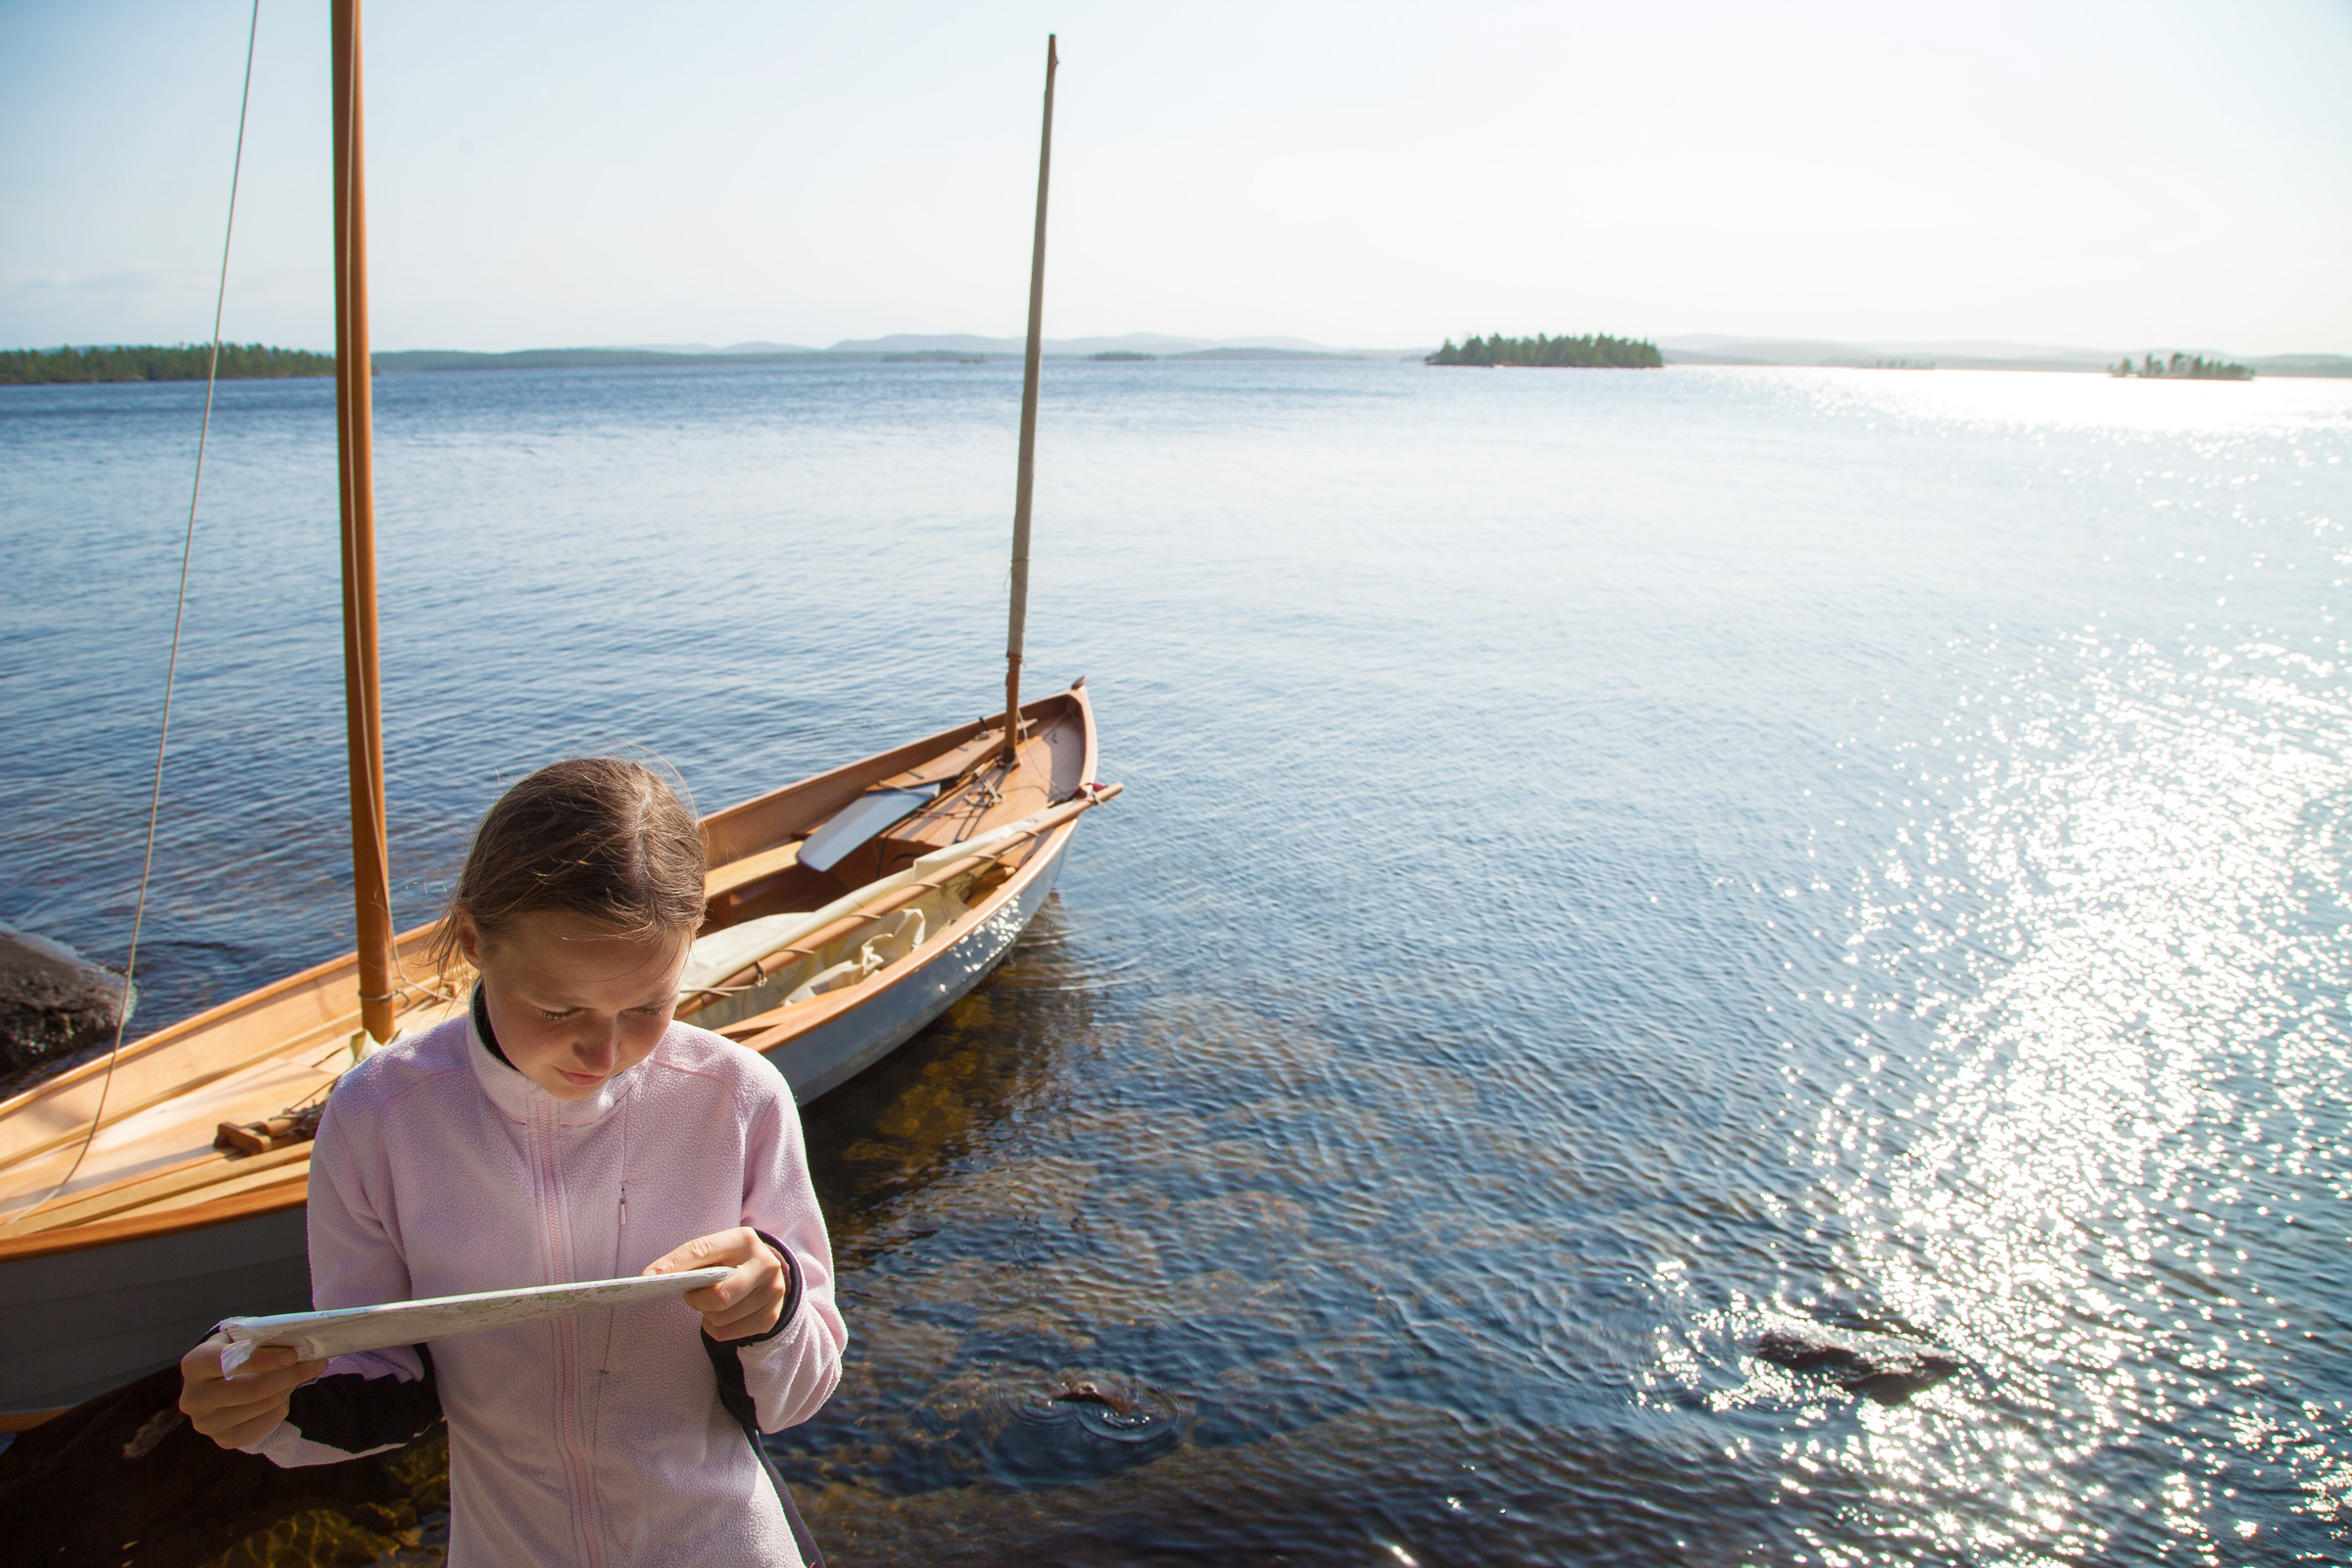
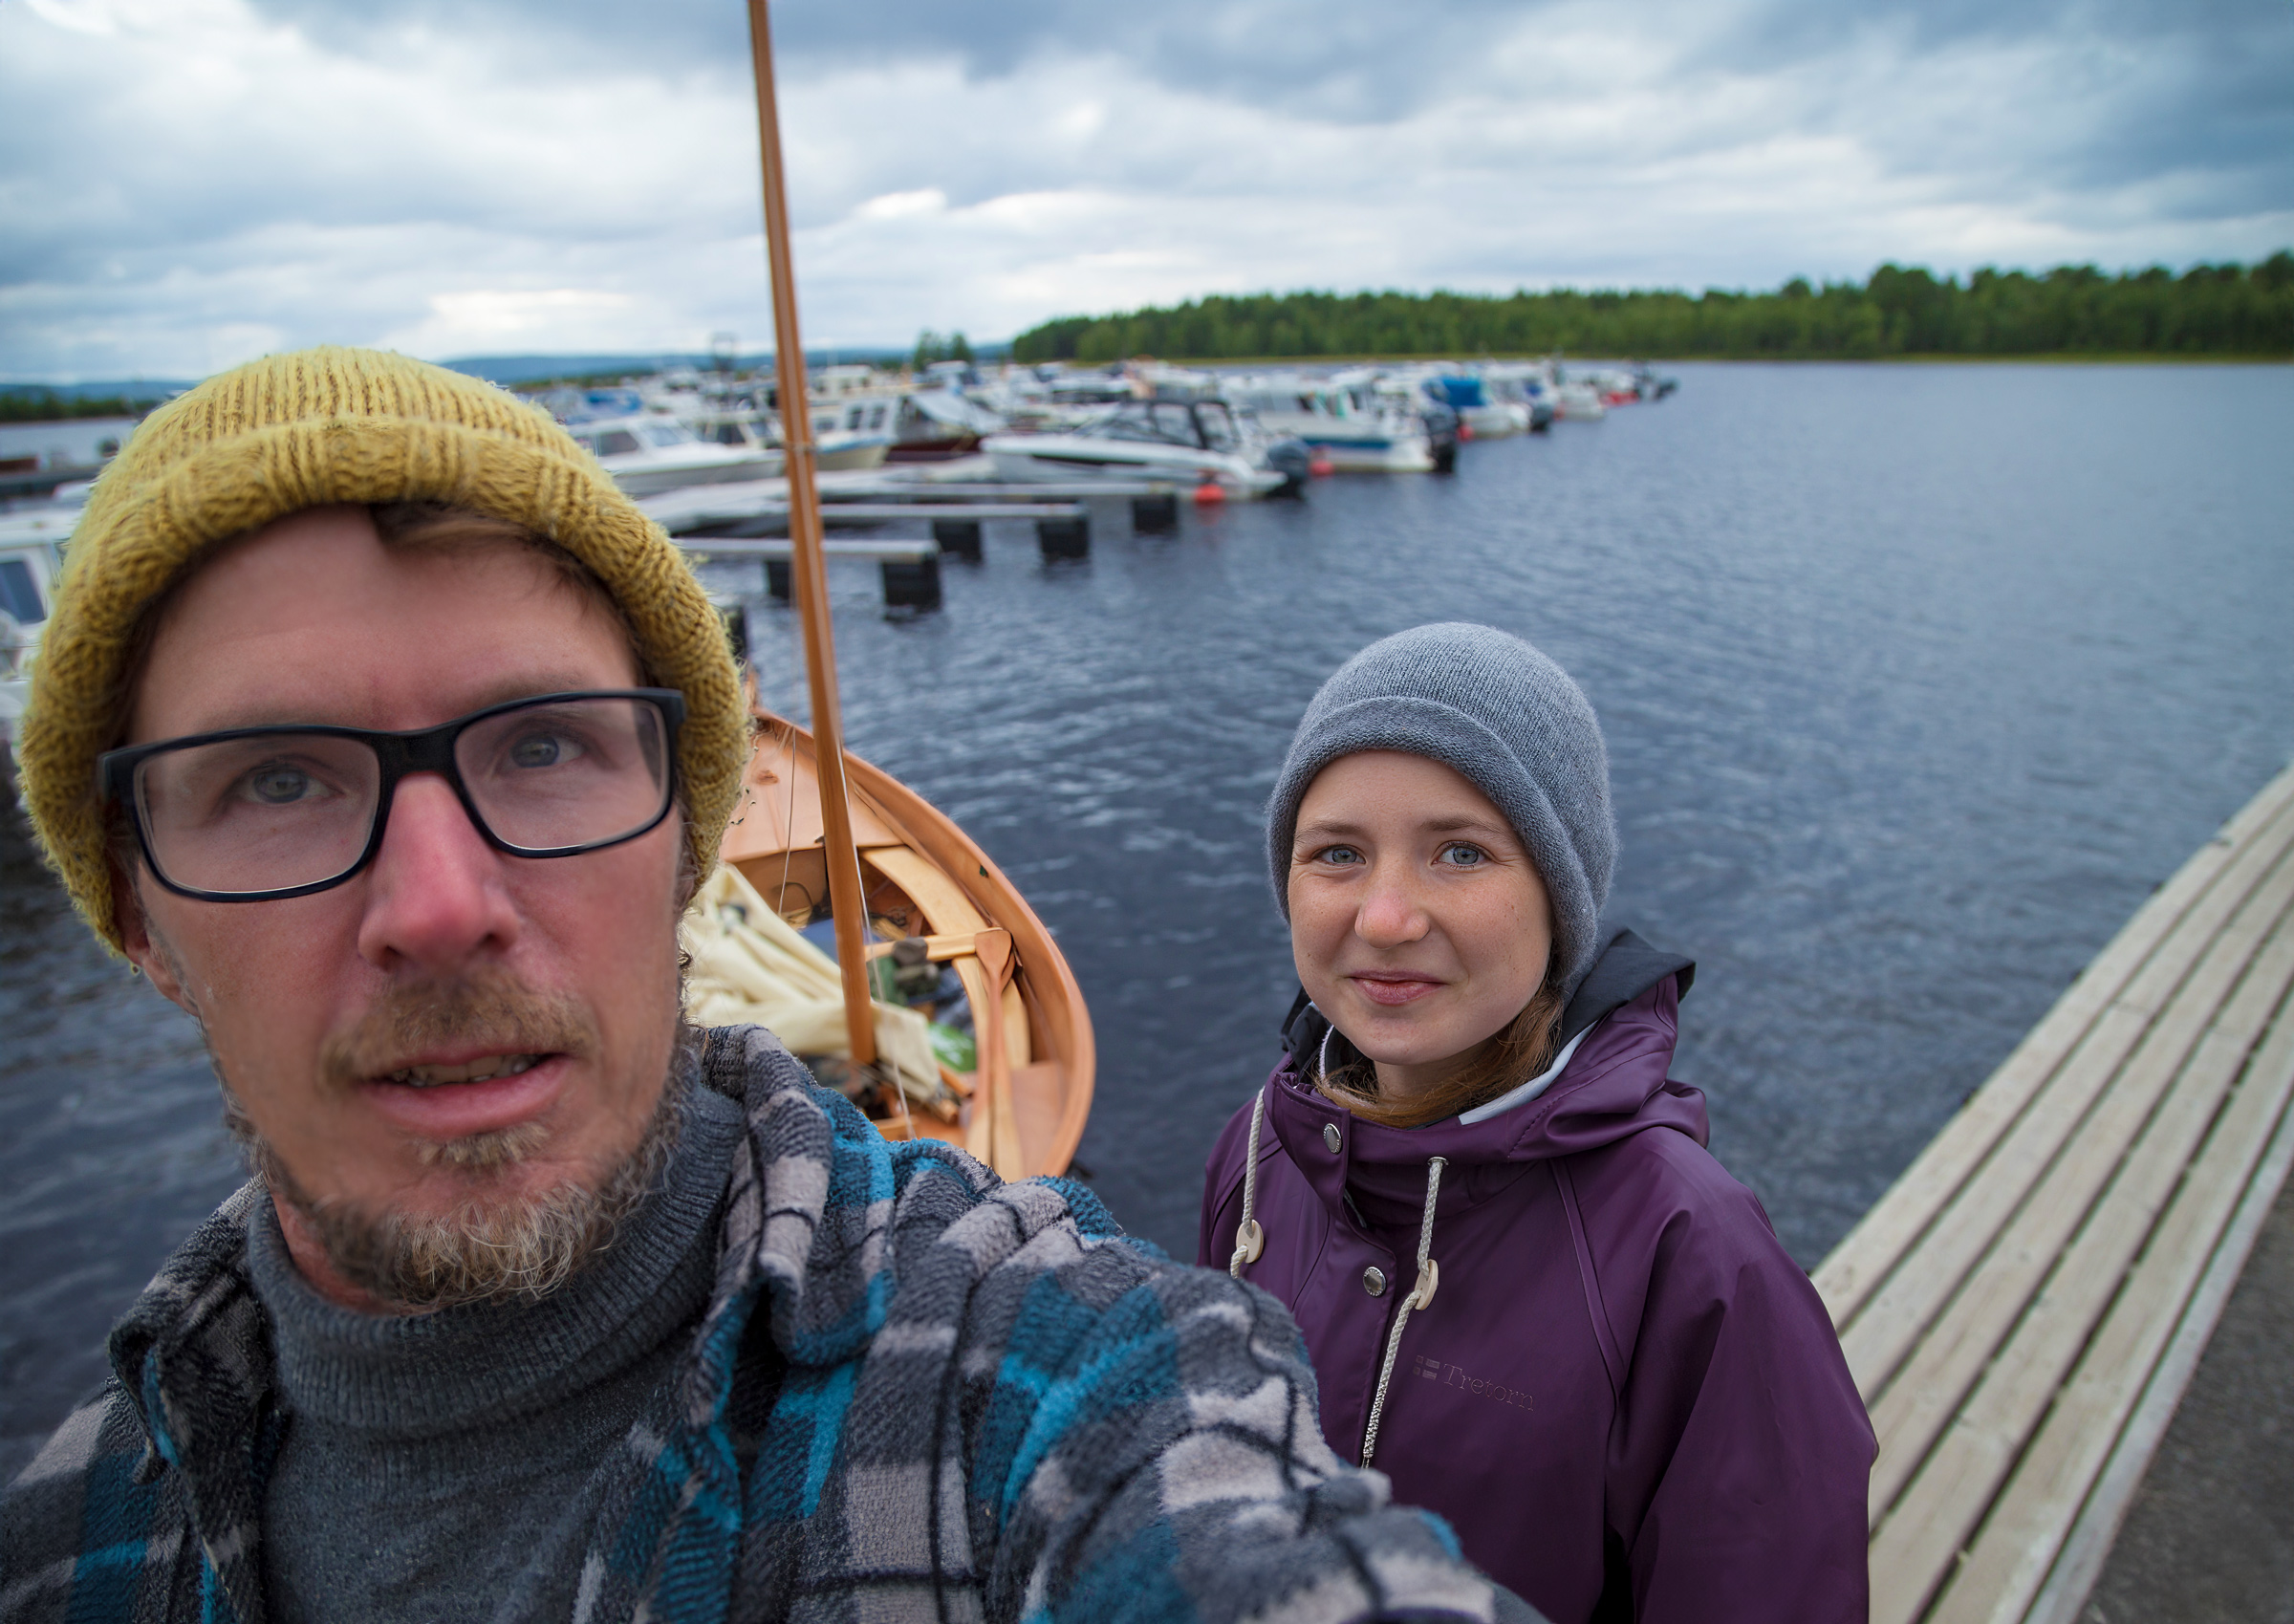
And it’s not only the newcomers who find themselves facing new challenges. Mats Vuorenjuuri is no stranger to small-boat building and cruising, and he’s no stranger to the pages of Small Boats, having shared his Nordic adventures with us in the past. In late July this year, Mats and his daughter embarked on a four-day cruise above the Arctic Circle on Finland’s third-largest lake, Lake Inari. They knew their boat and its capabilities, knew each other and their strengths with sailing and navigating, and Mats had sailed the waters before. What neither of them probably expected was a voyage of almost constant strong winds that forced them to improvise a reduced rig, modify plans, and accept that even the most experienced of us needs to be prepared for the unforeseen.
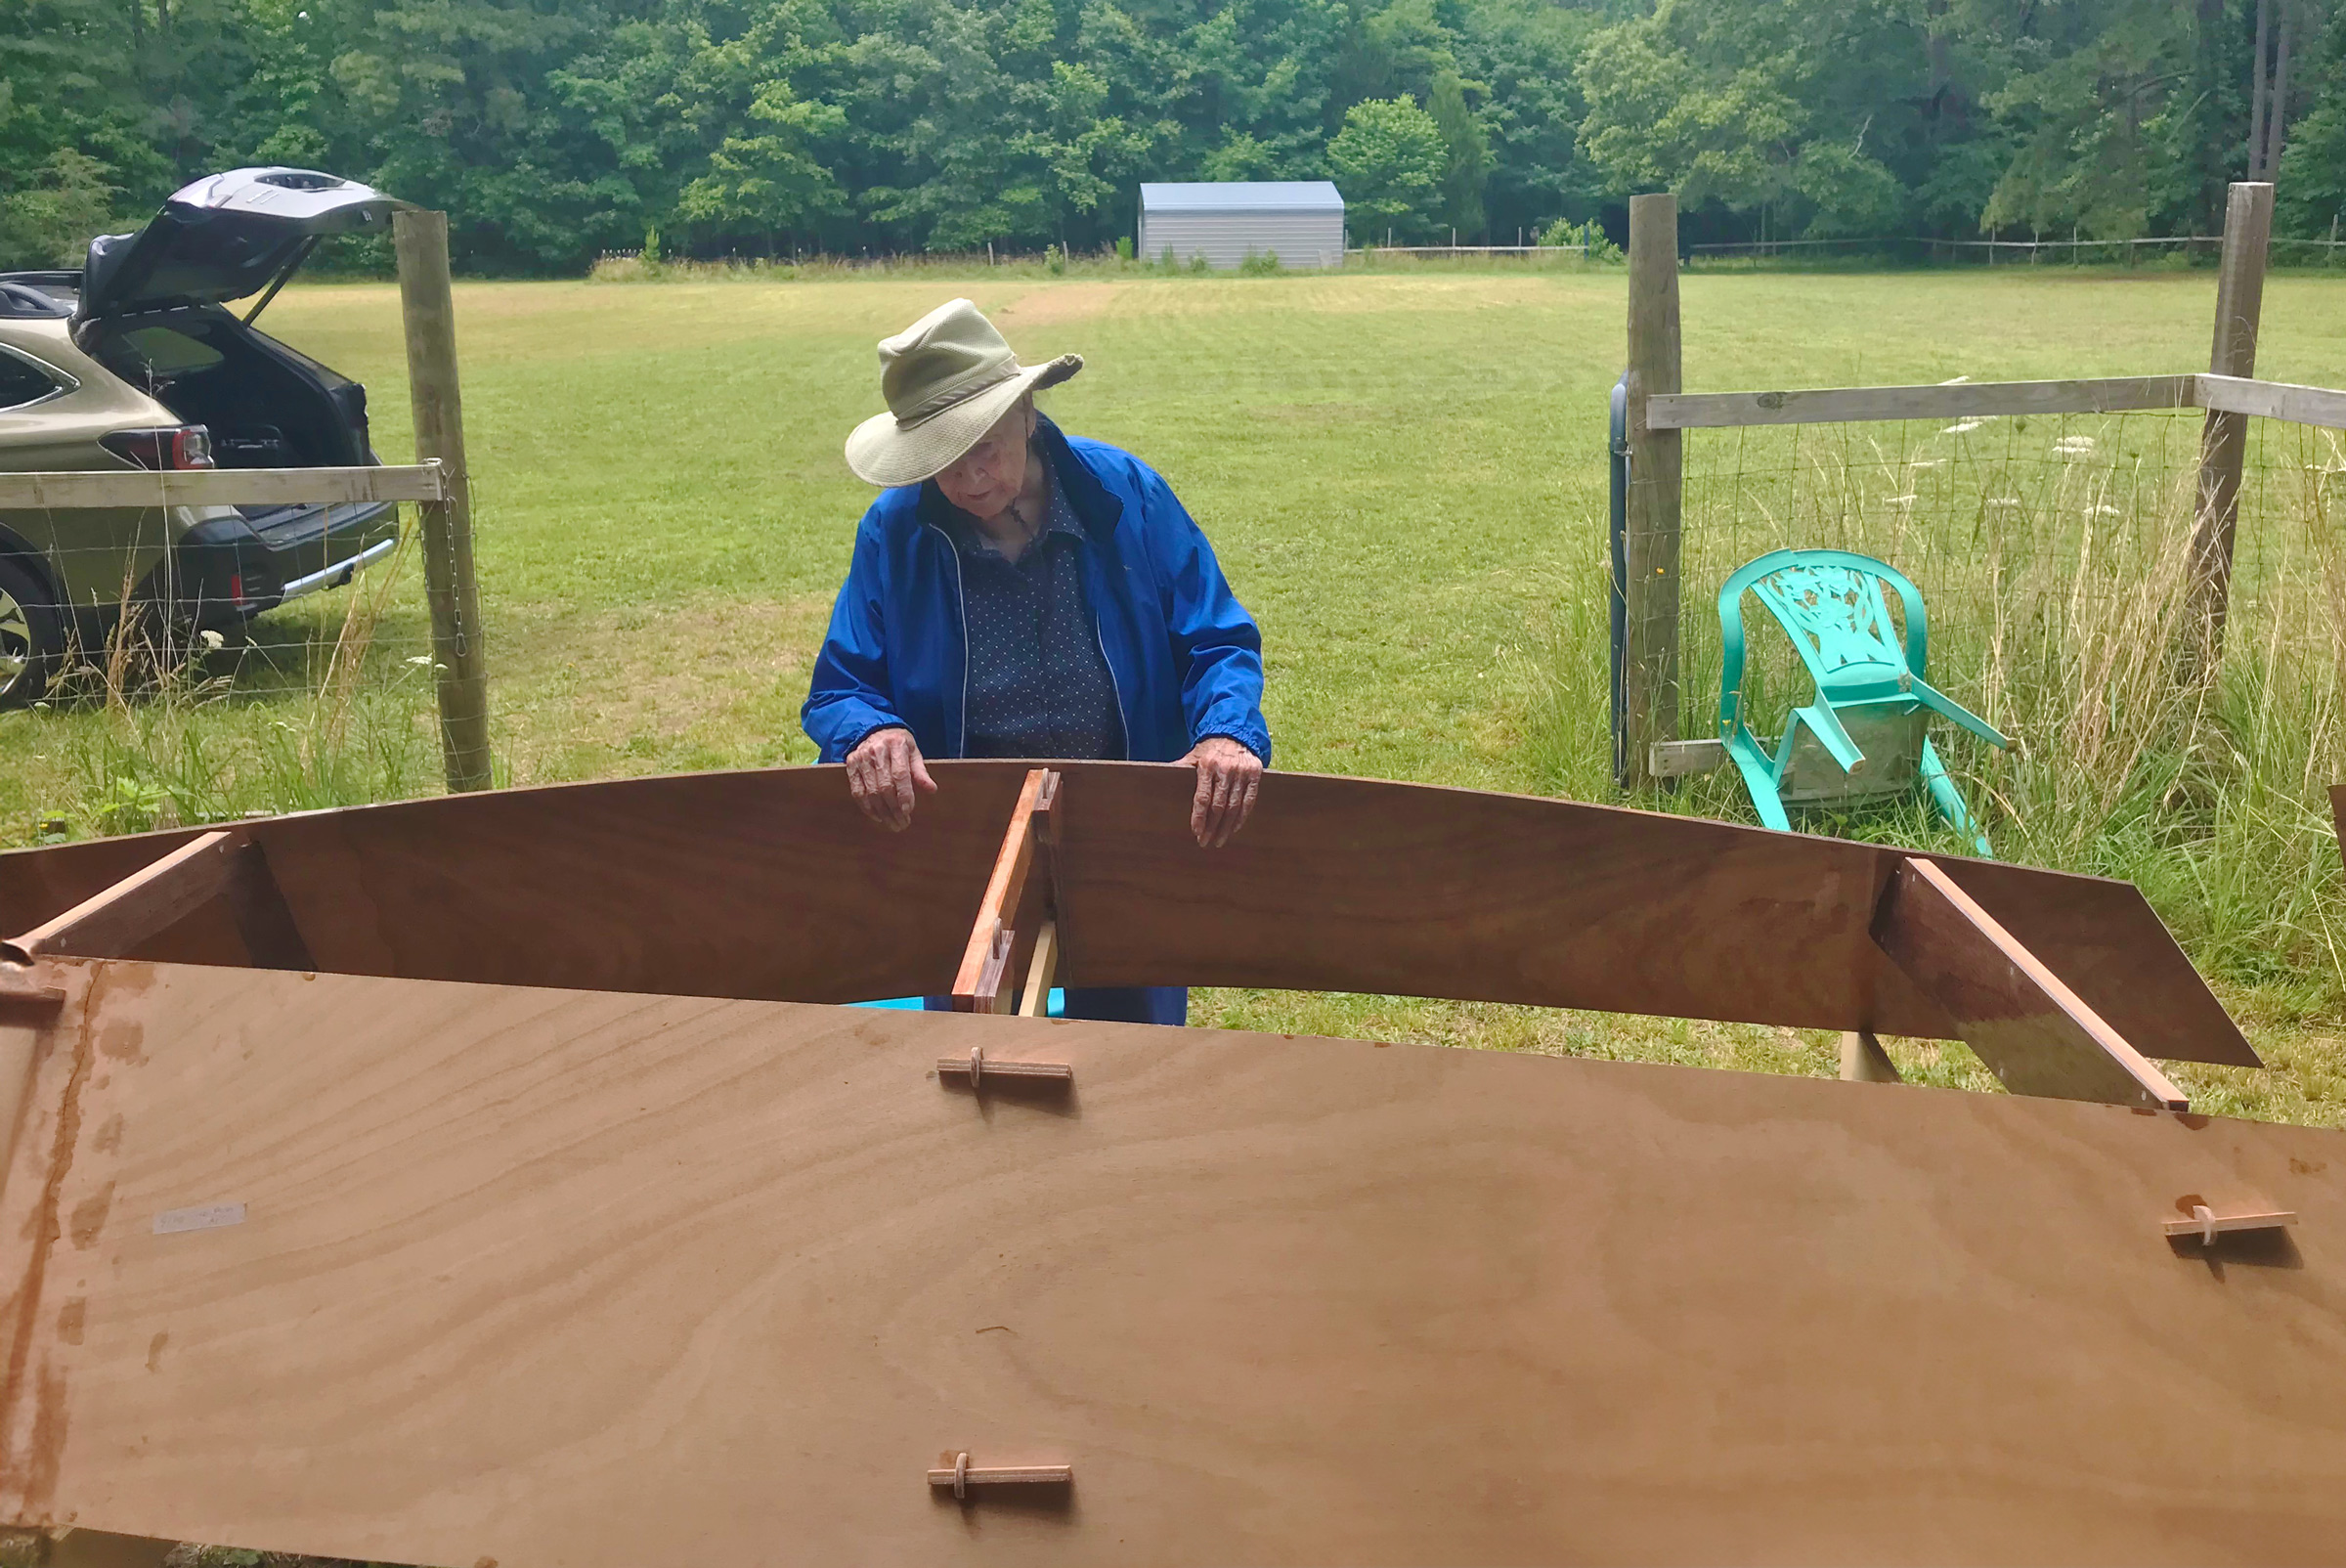
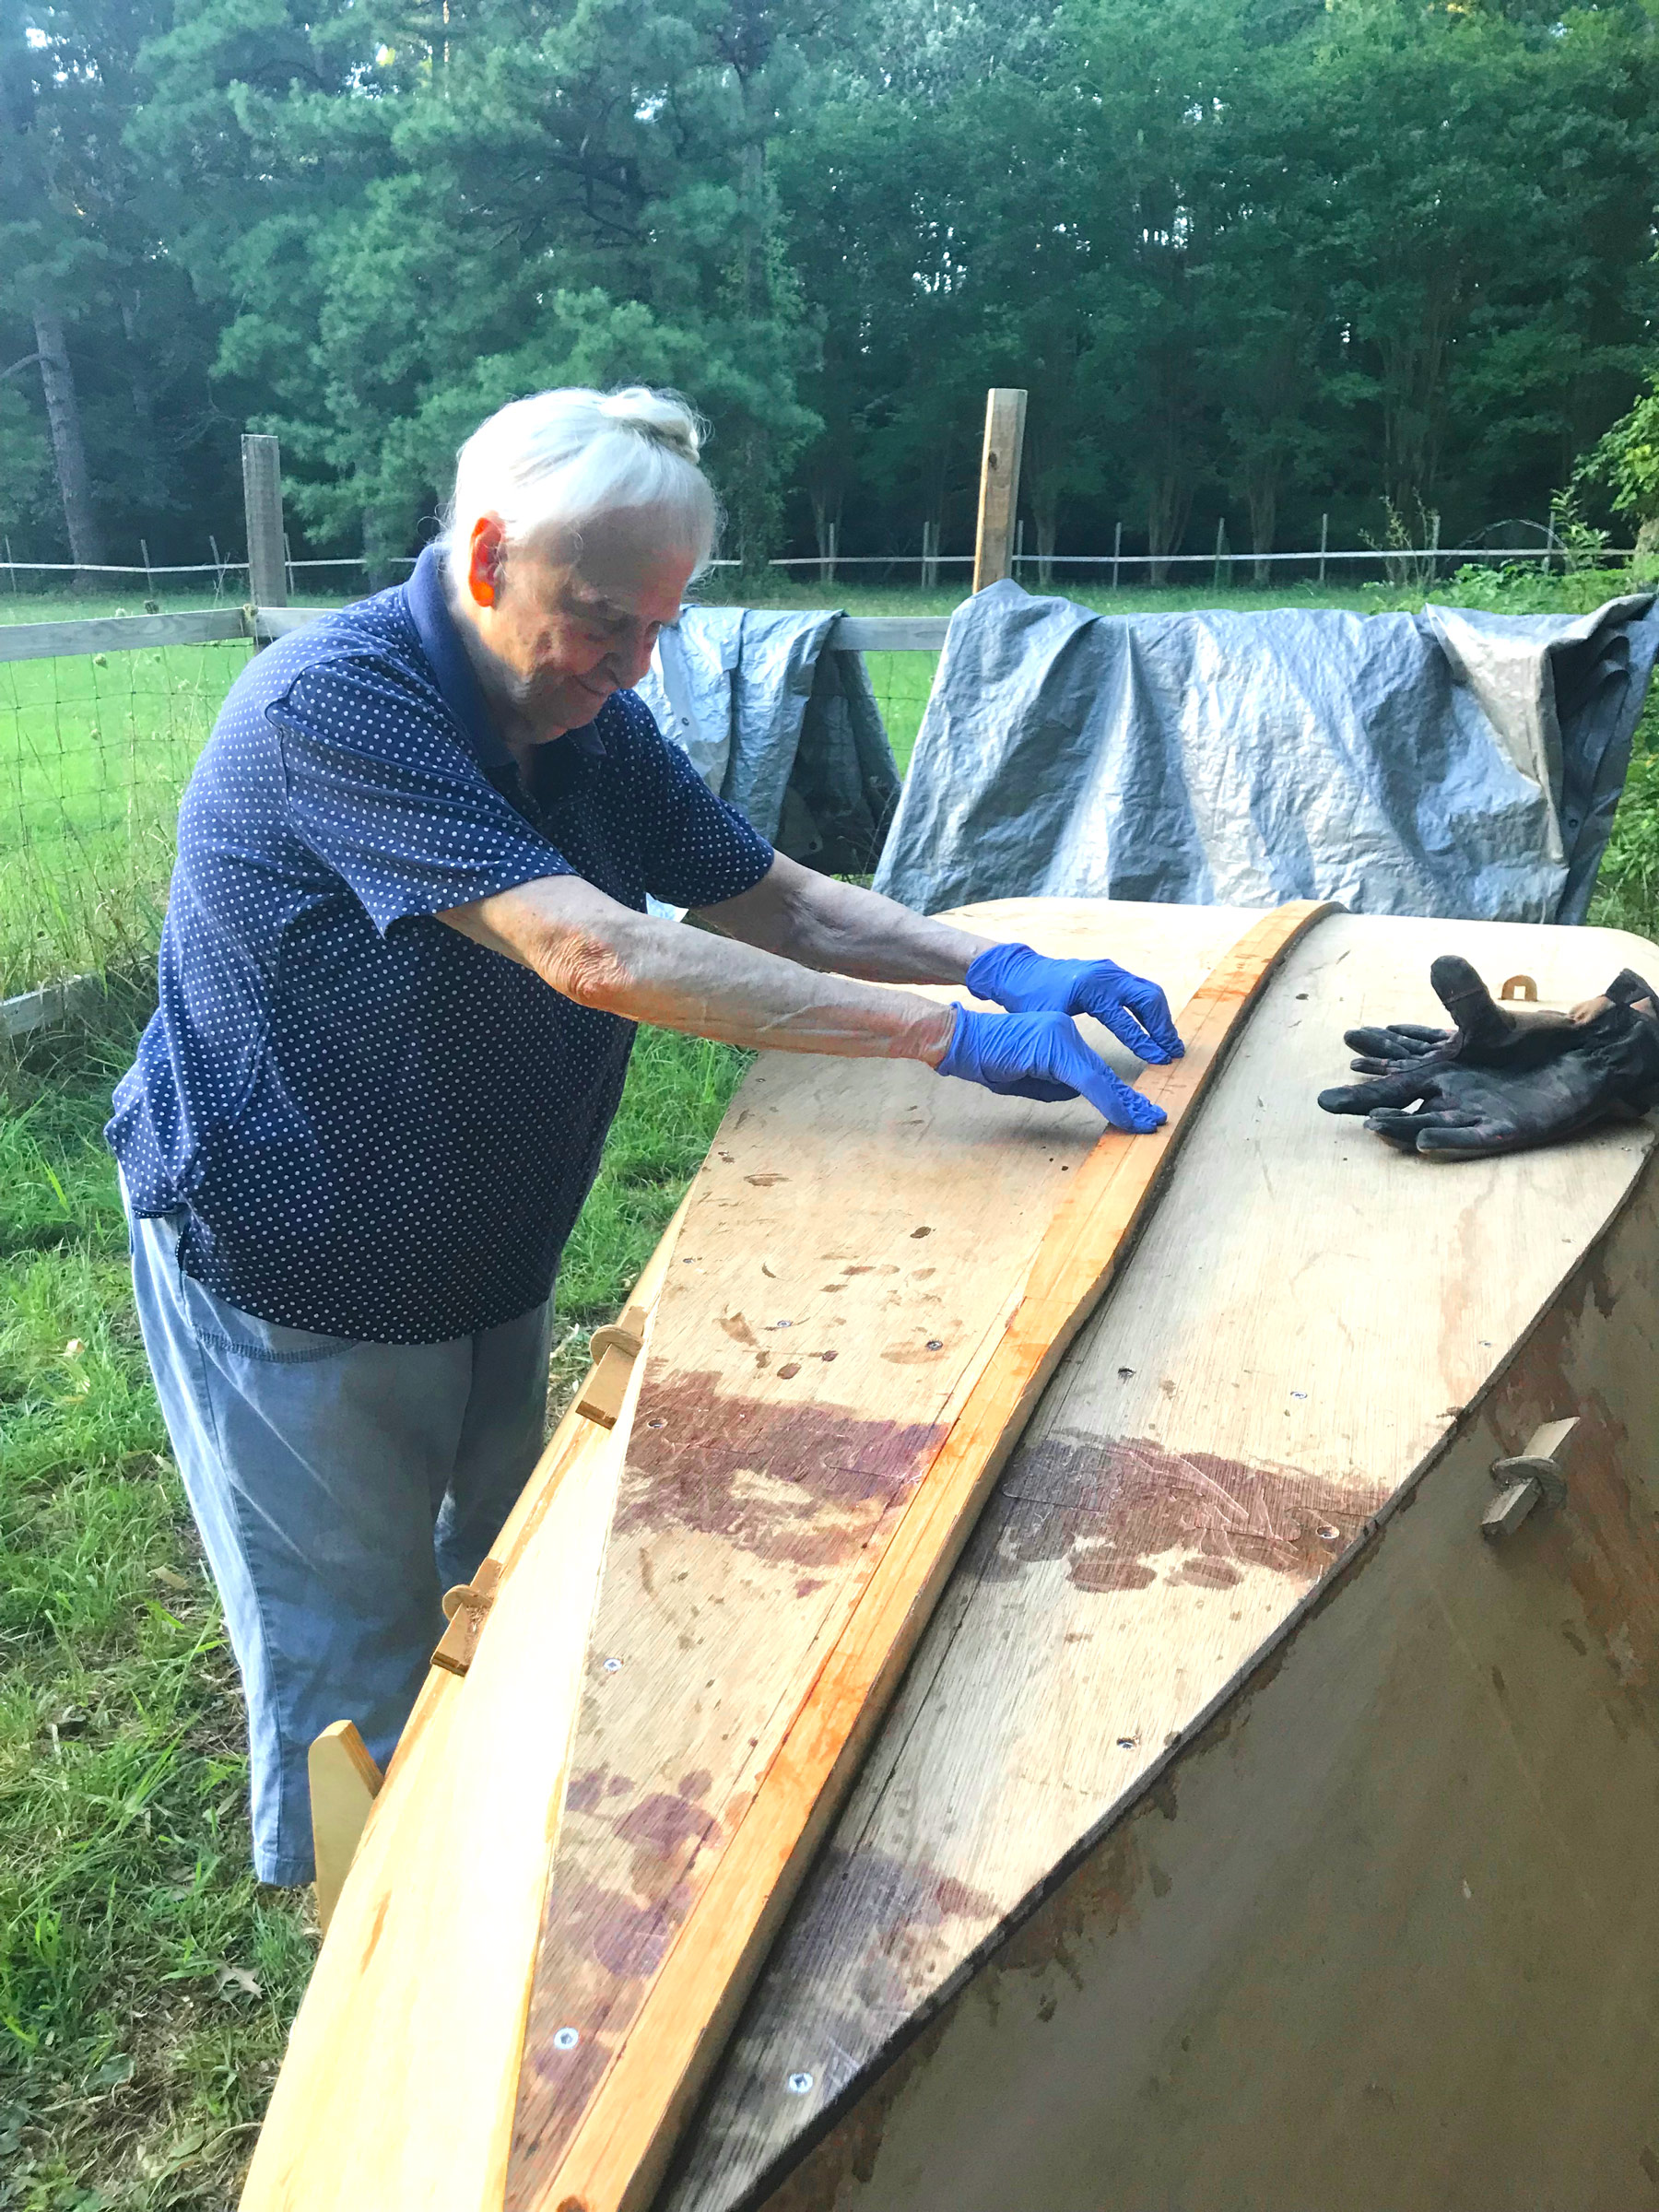
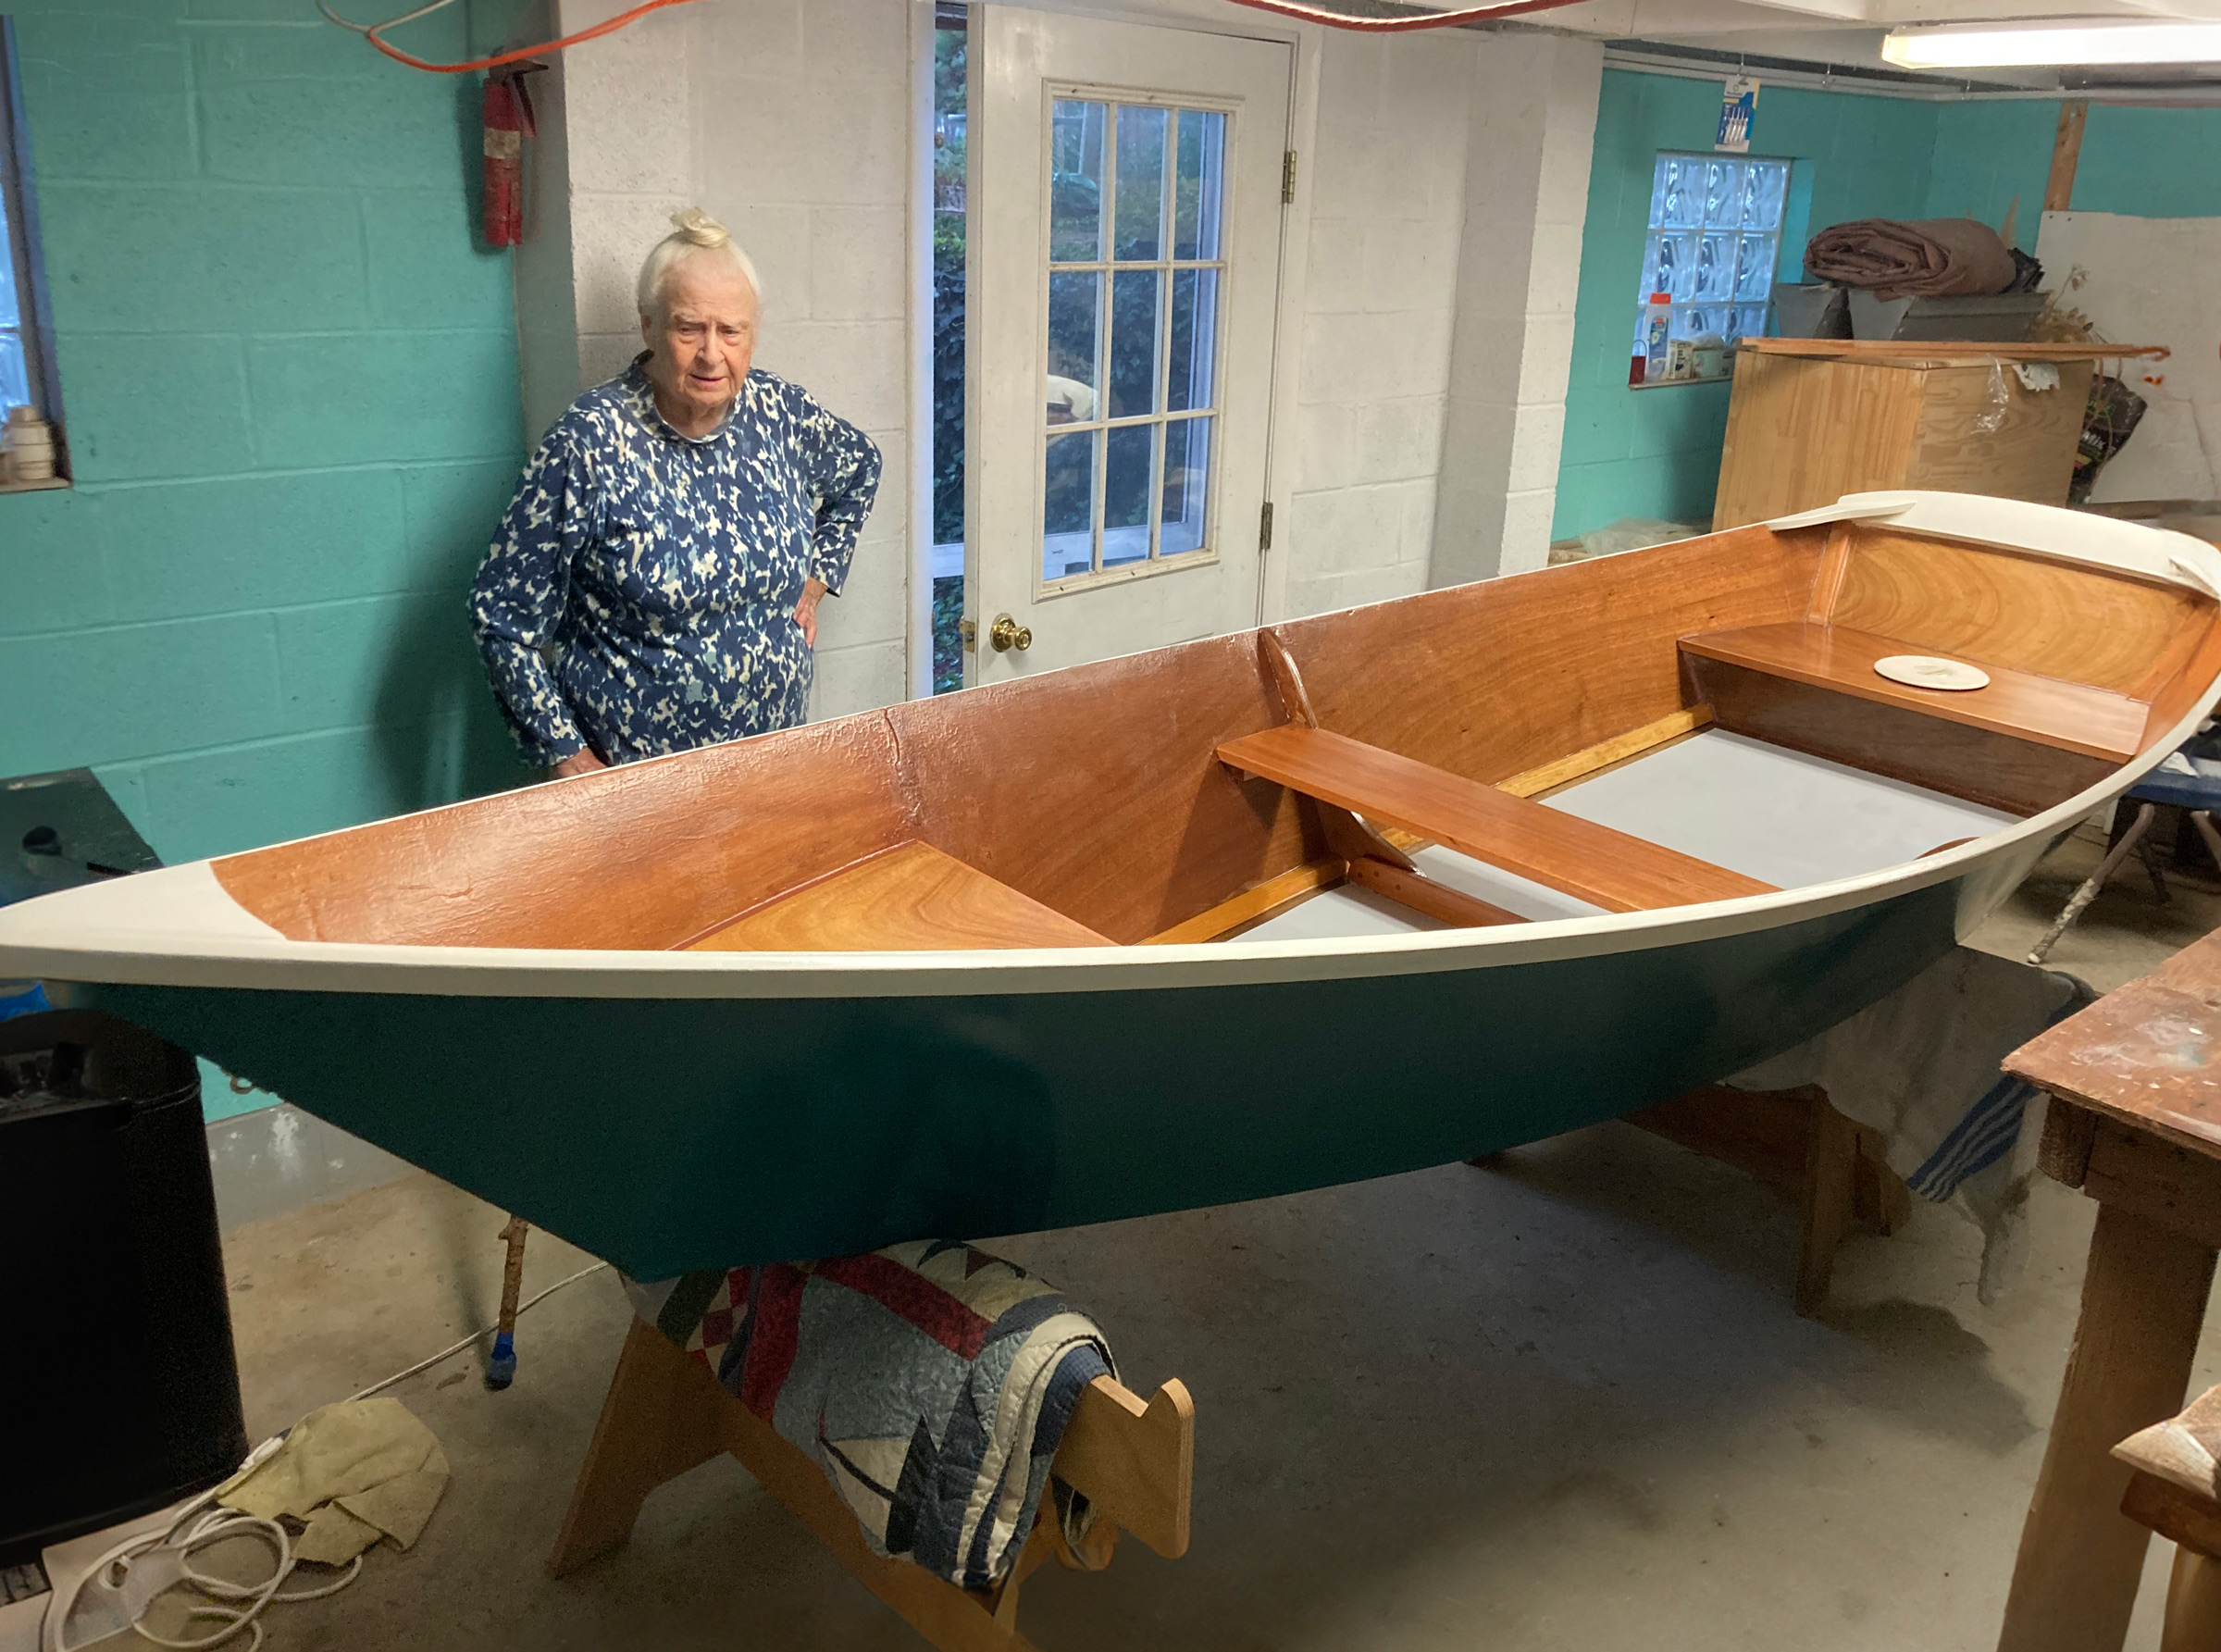
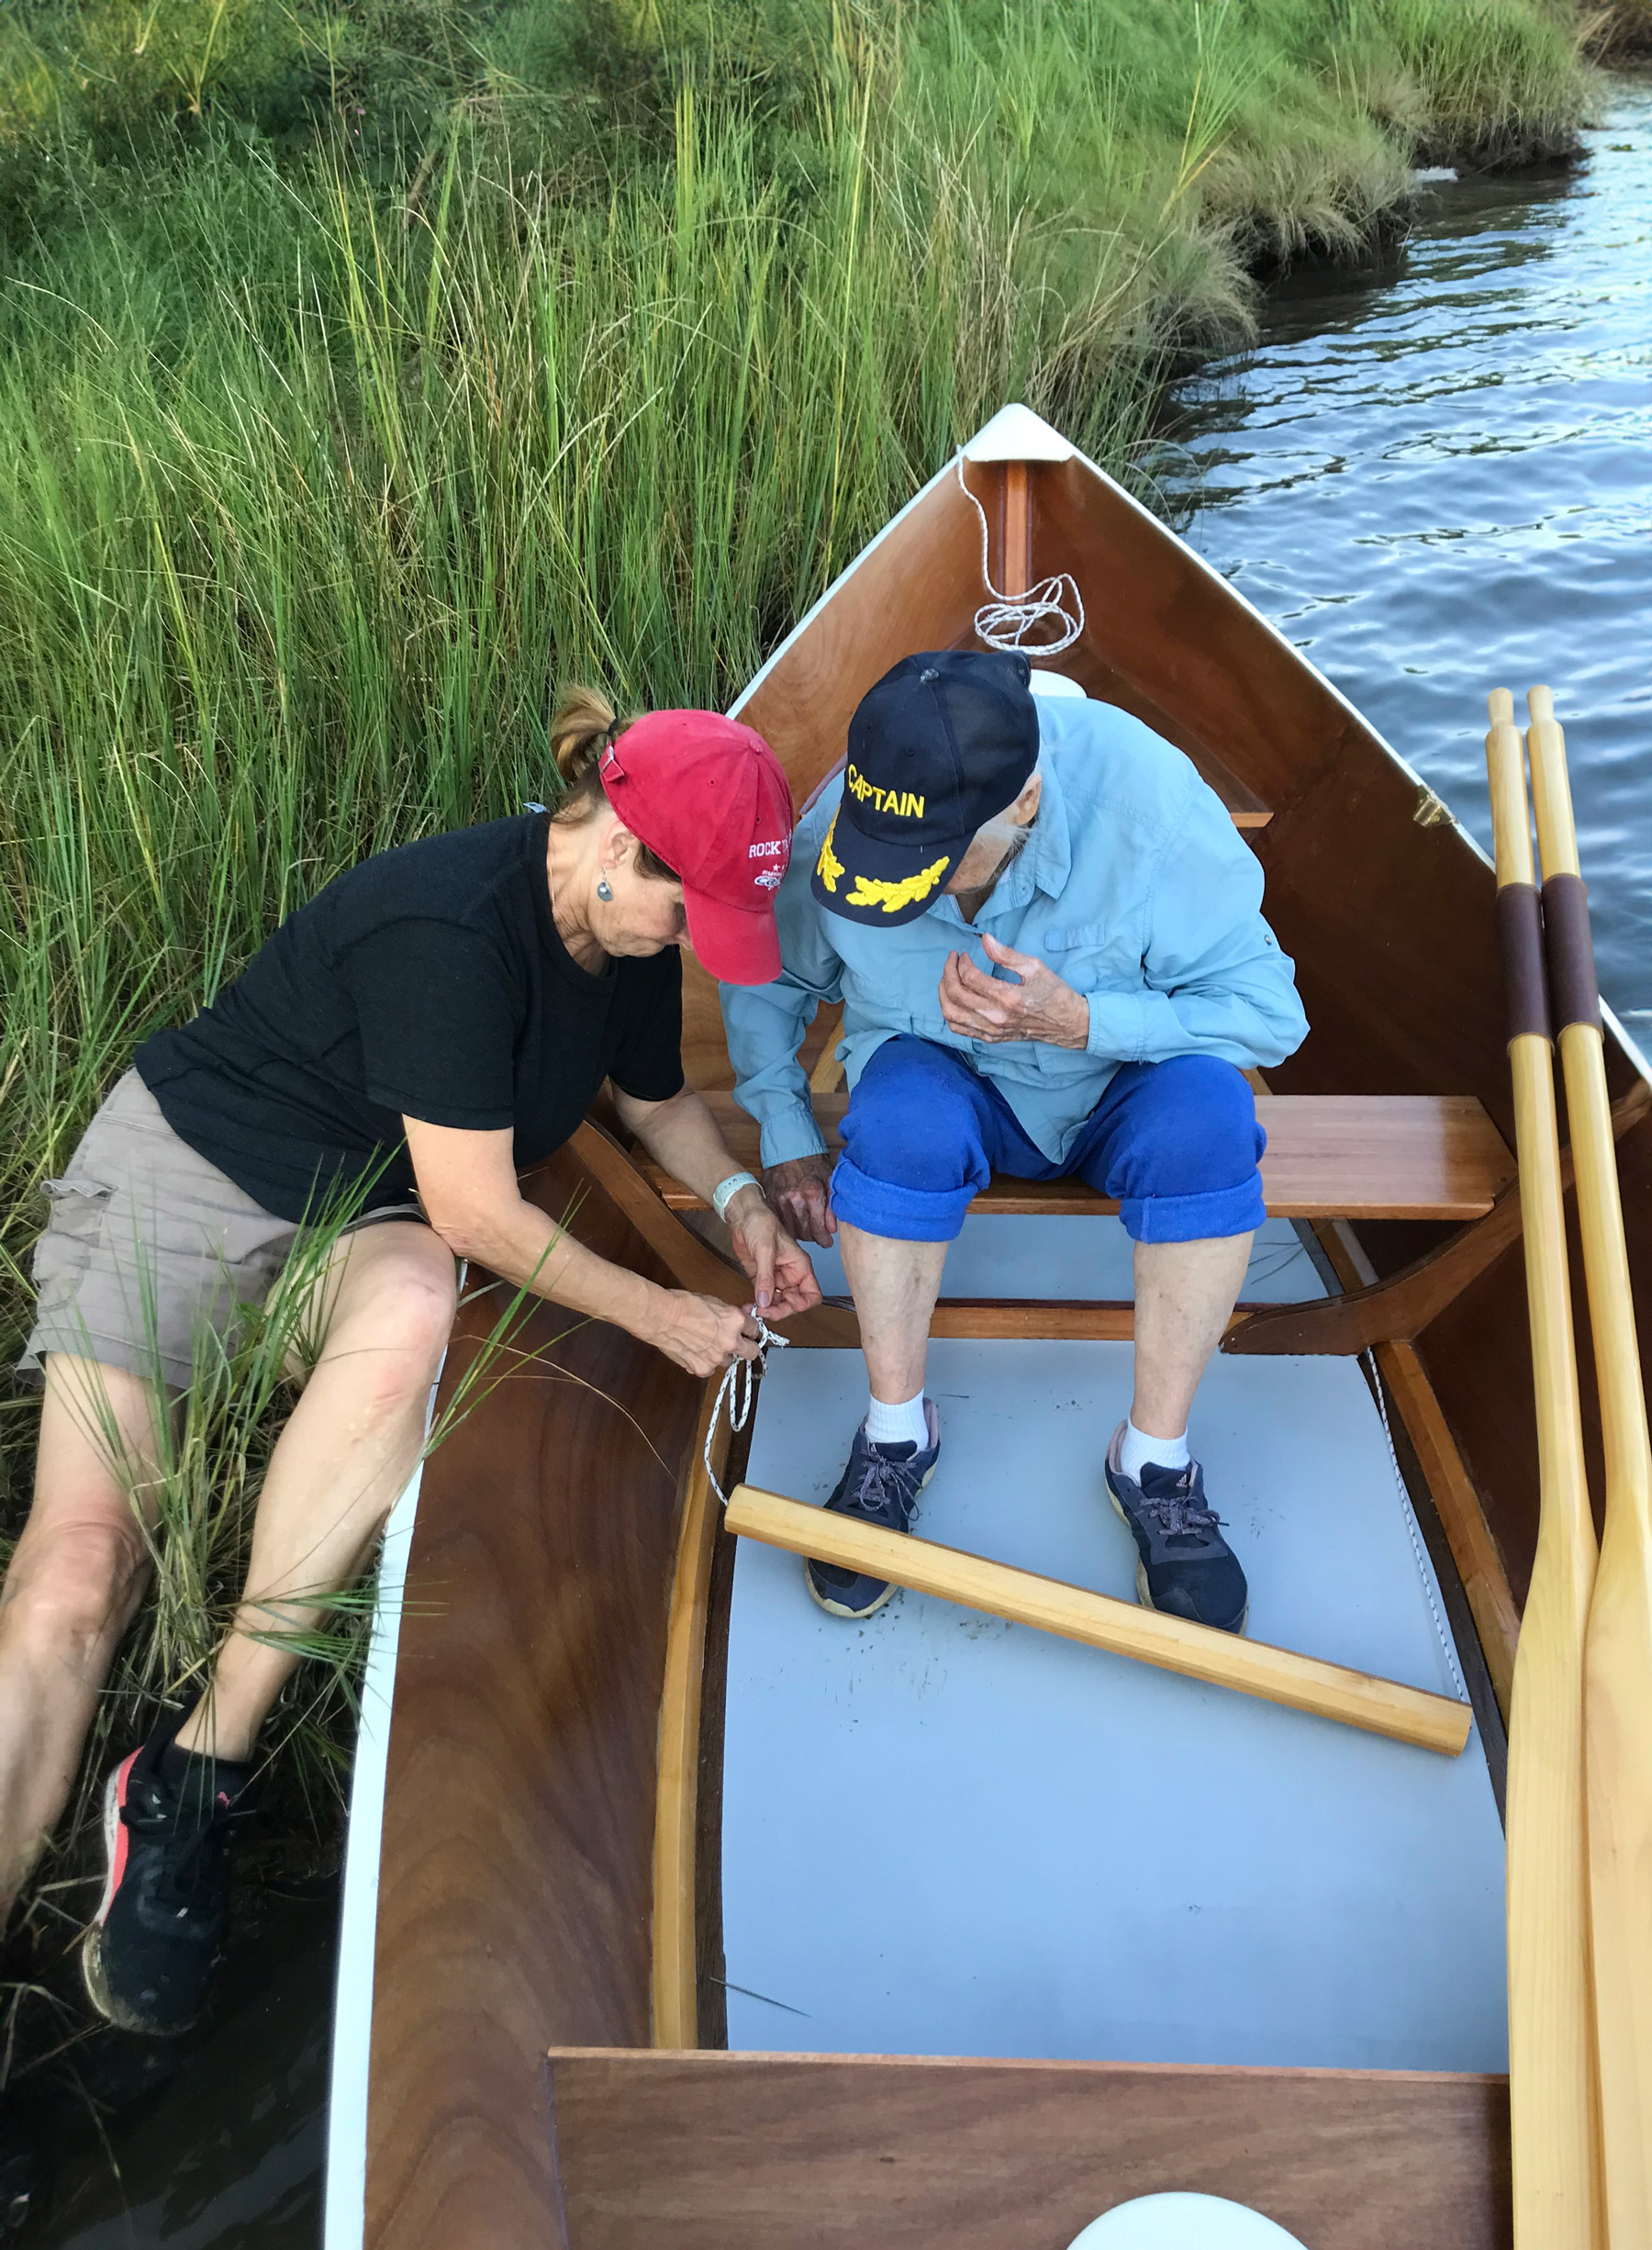
But perhaps the final article in this issue is the one that, for me, speaks loudest and most clearly of the enriched relationships and the dreams fulfilled that come out of small-boat adventuring and building. Pam Ayres was 92, had owned and messed around in small boats for much of her life, but had never had her own rowboat. Her daughter, Rebecca, and son-in-law Eric, resolved to change that. When they couldn’t find a boat to buy, they decided that, with Pam’s help, they would build one. None of them had built a boat before, but Pam was an amazing woman with a spirit of adventure, an independent personality, and a love of learning that she carried into her 90s. She had no doubts that together, she, Rebecca, and Eric could pull it off. And so they did. Working weekends, learning as they went, and seeking outside advice when they weren’t sure, the three of them built THE PUNGOTEAUGE PAM.
Across these stories is a thread of uninhibited learning, of cooperation, of collaboration. And more than that, there is a thread of adventure. No one would doubt that embarking on a small-boat voyage on an Arctic lake would lead to adventure. But you will just as surely find it from the moment you first loft a frame or dip your oar in a creek.
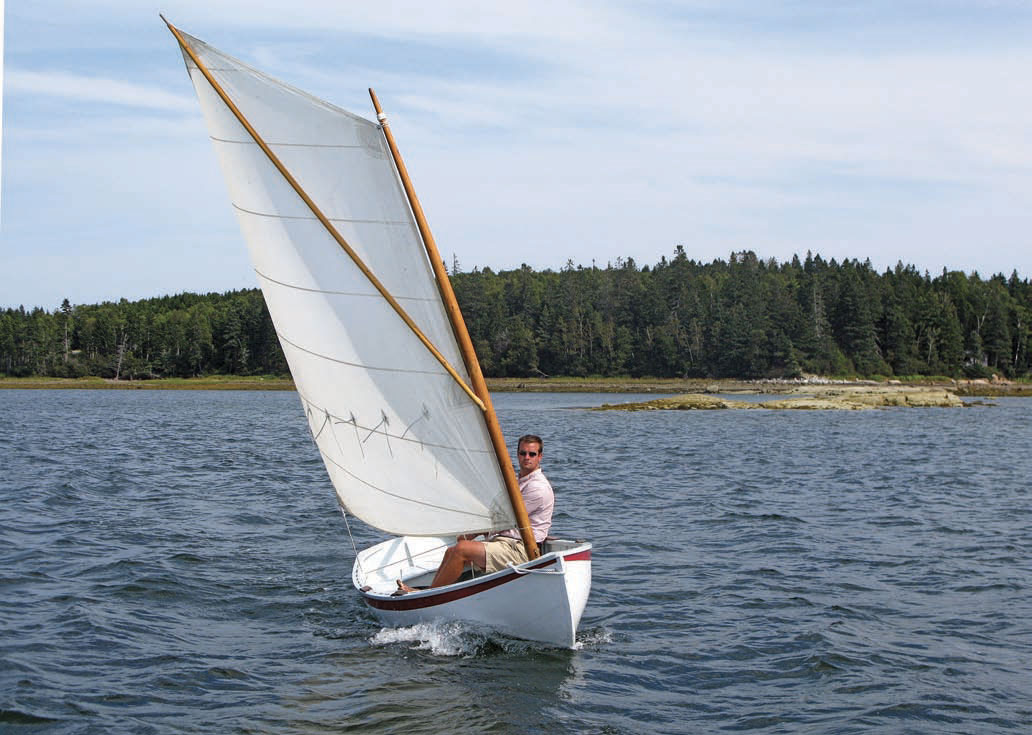
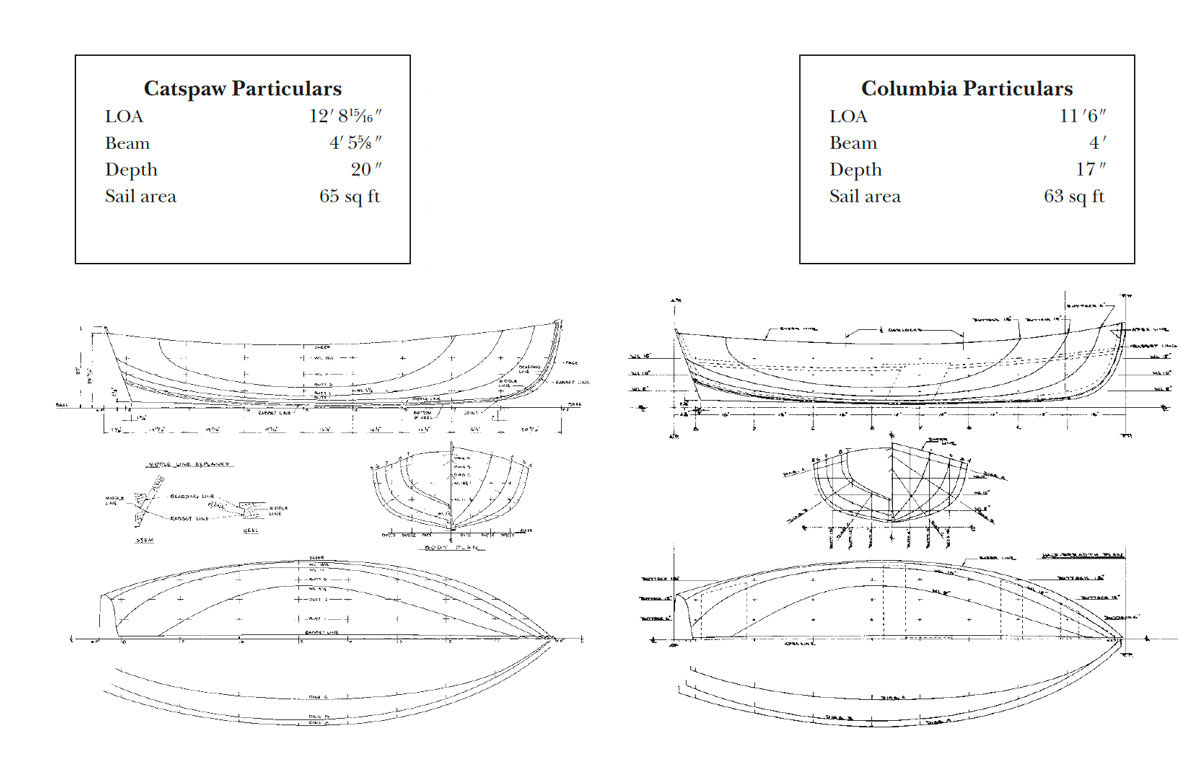
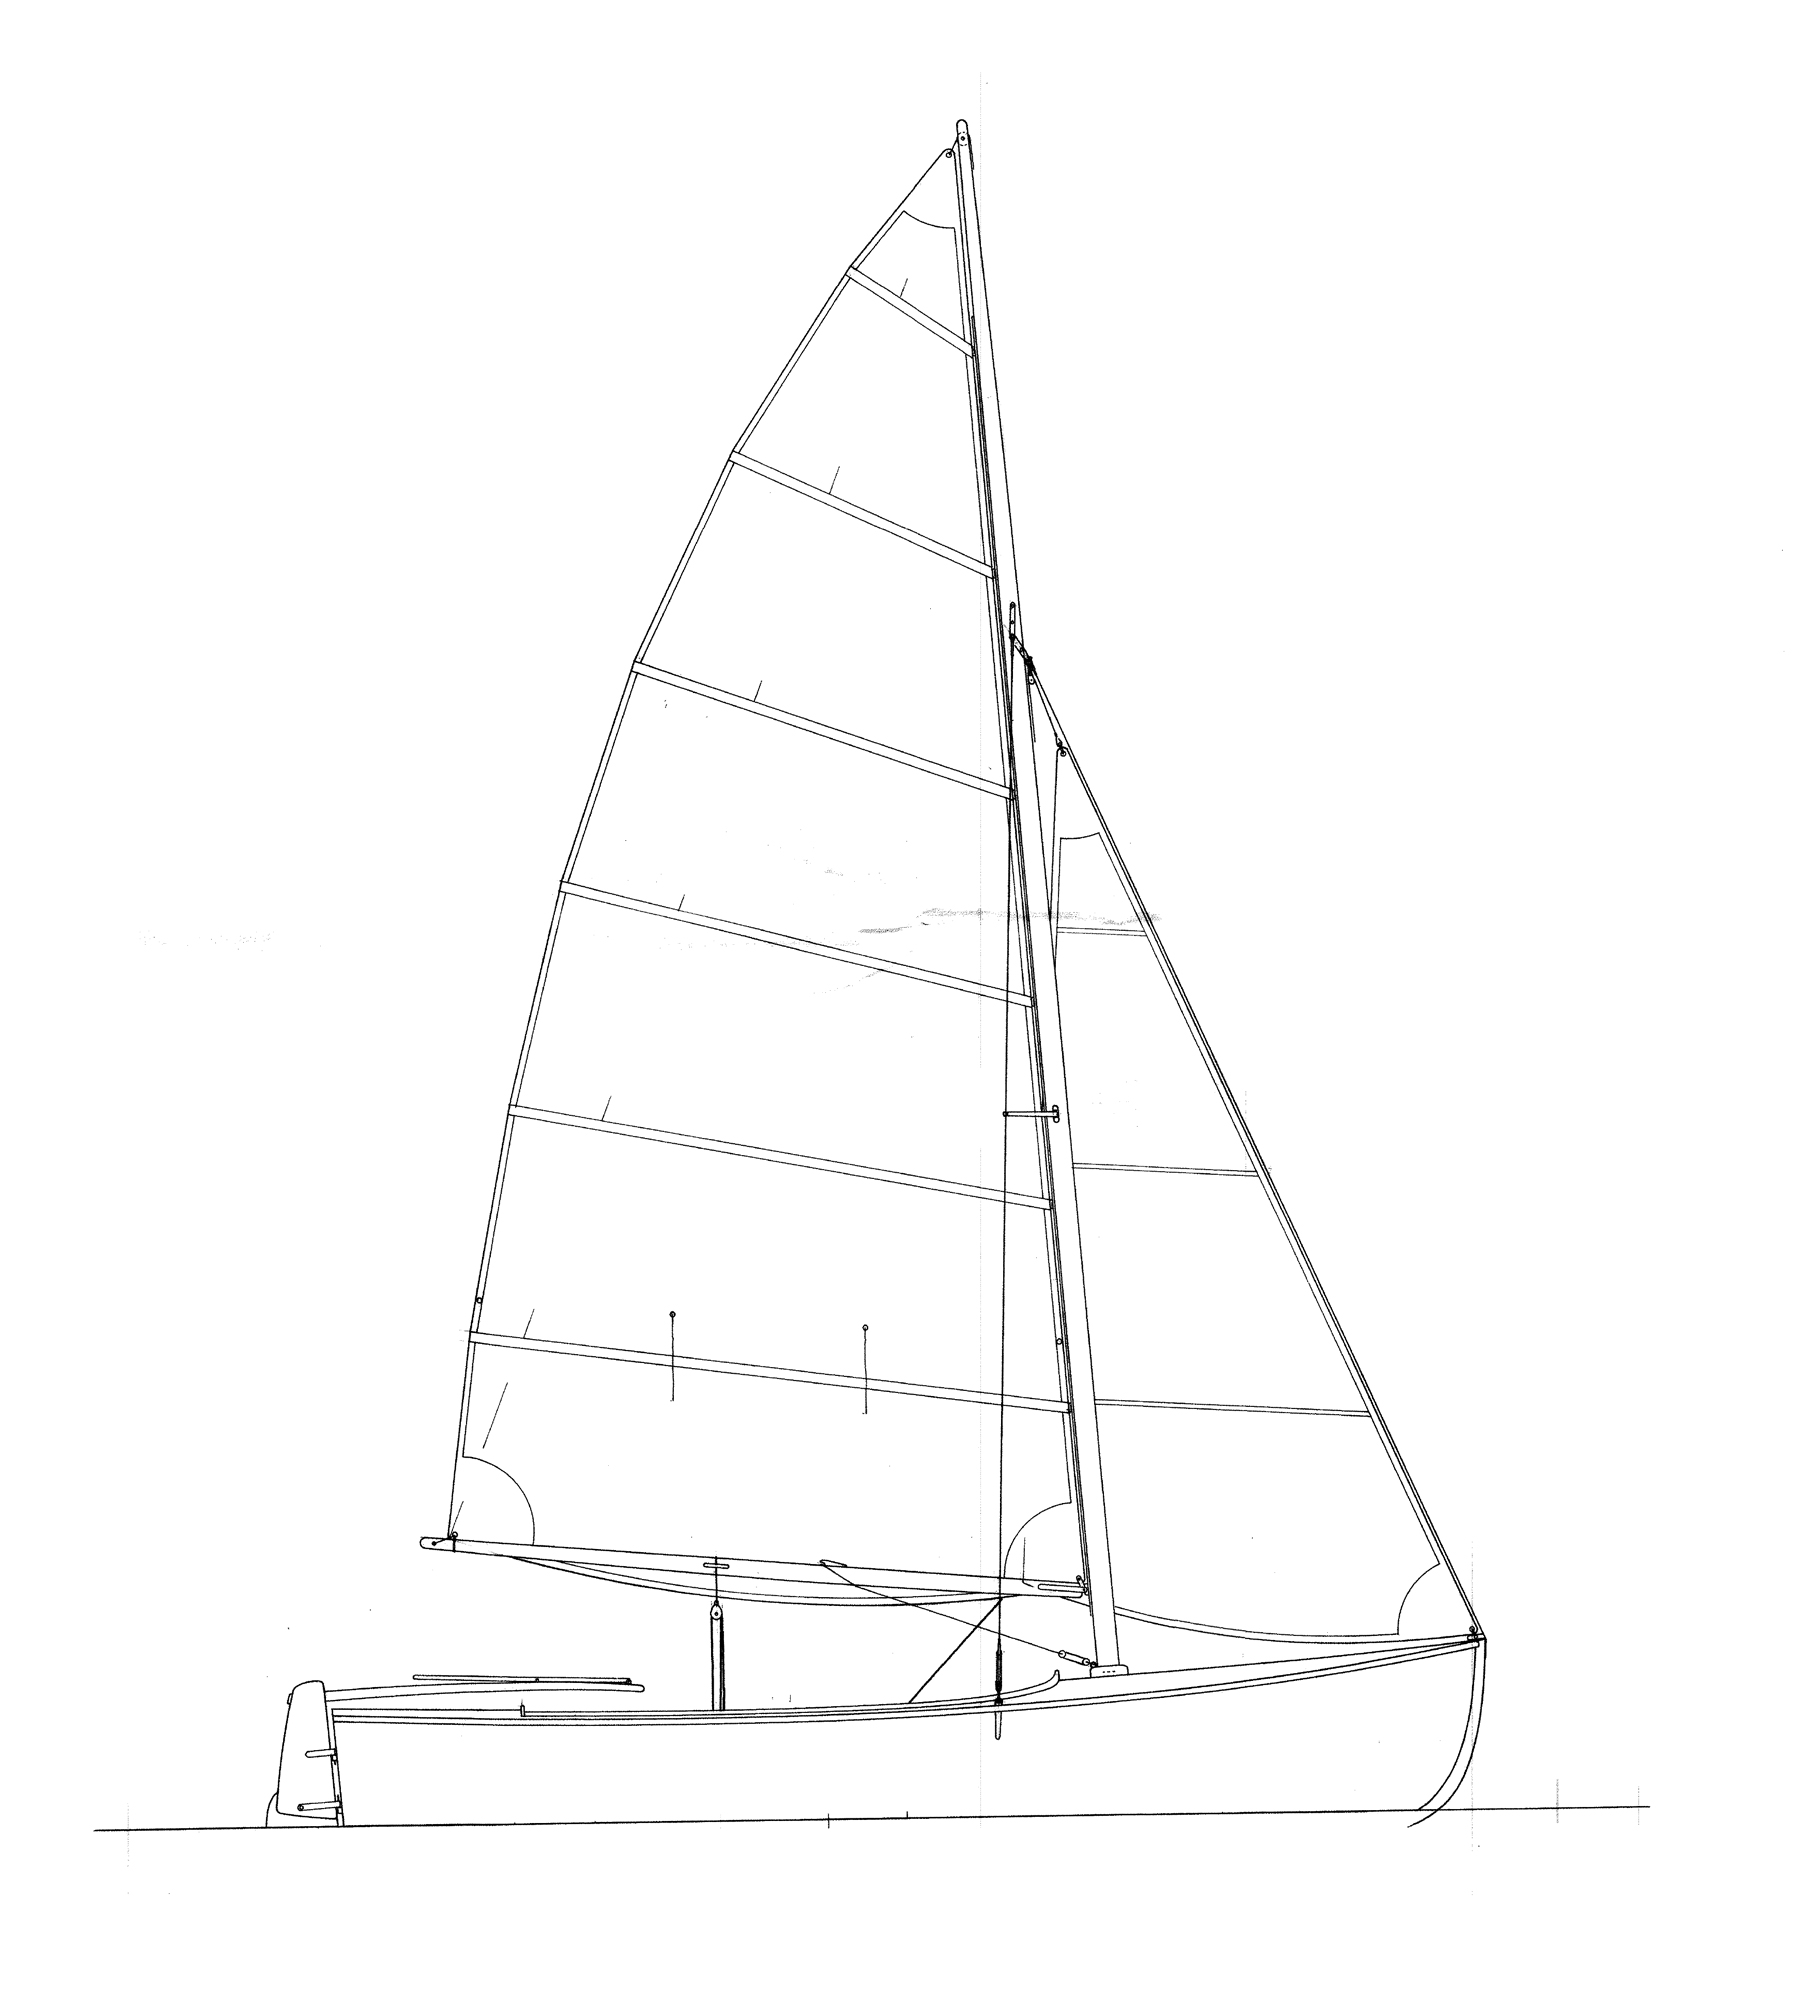
The Catspaw dinghy, Joel White’s adaptation of an 1899 Nathanael Greene Herreshoff design, is an excellent all-around daysailer that is stable, sails well, rows well, and tows well.
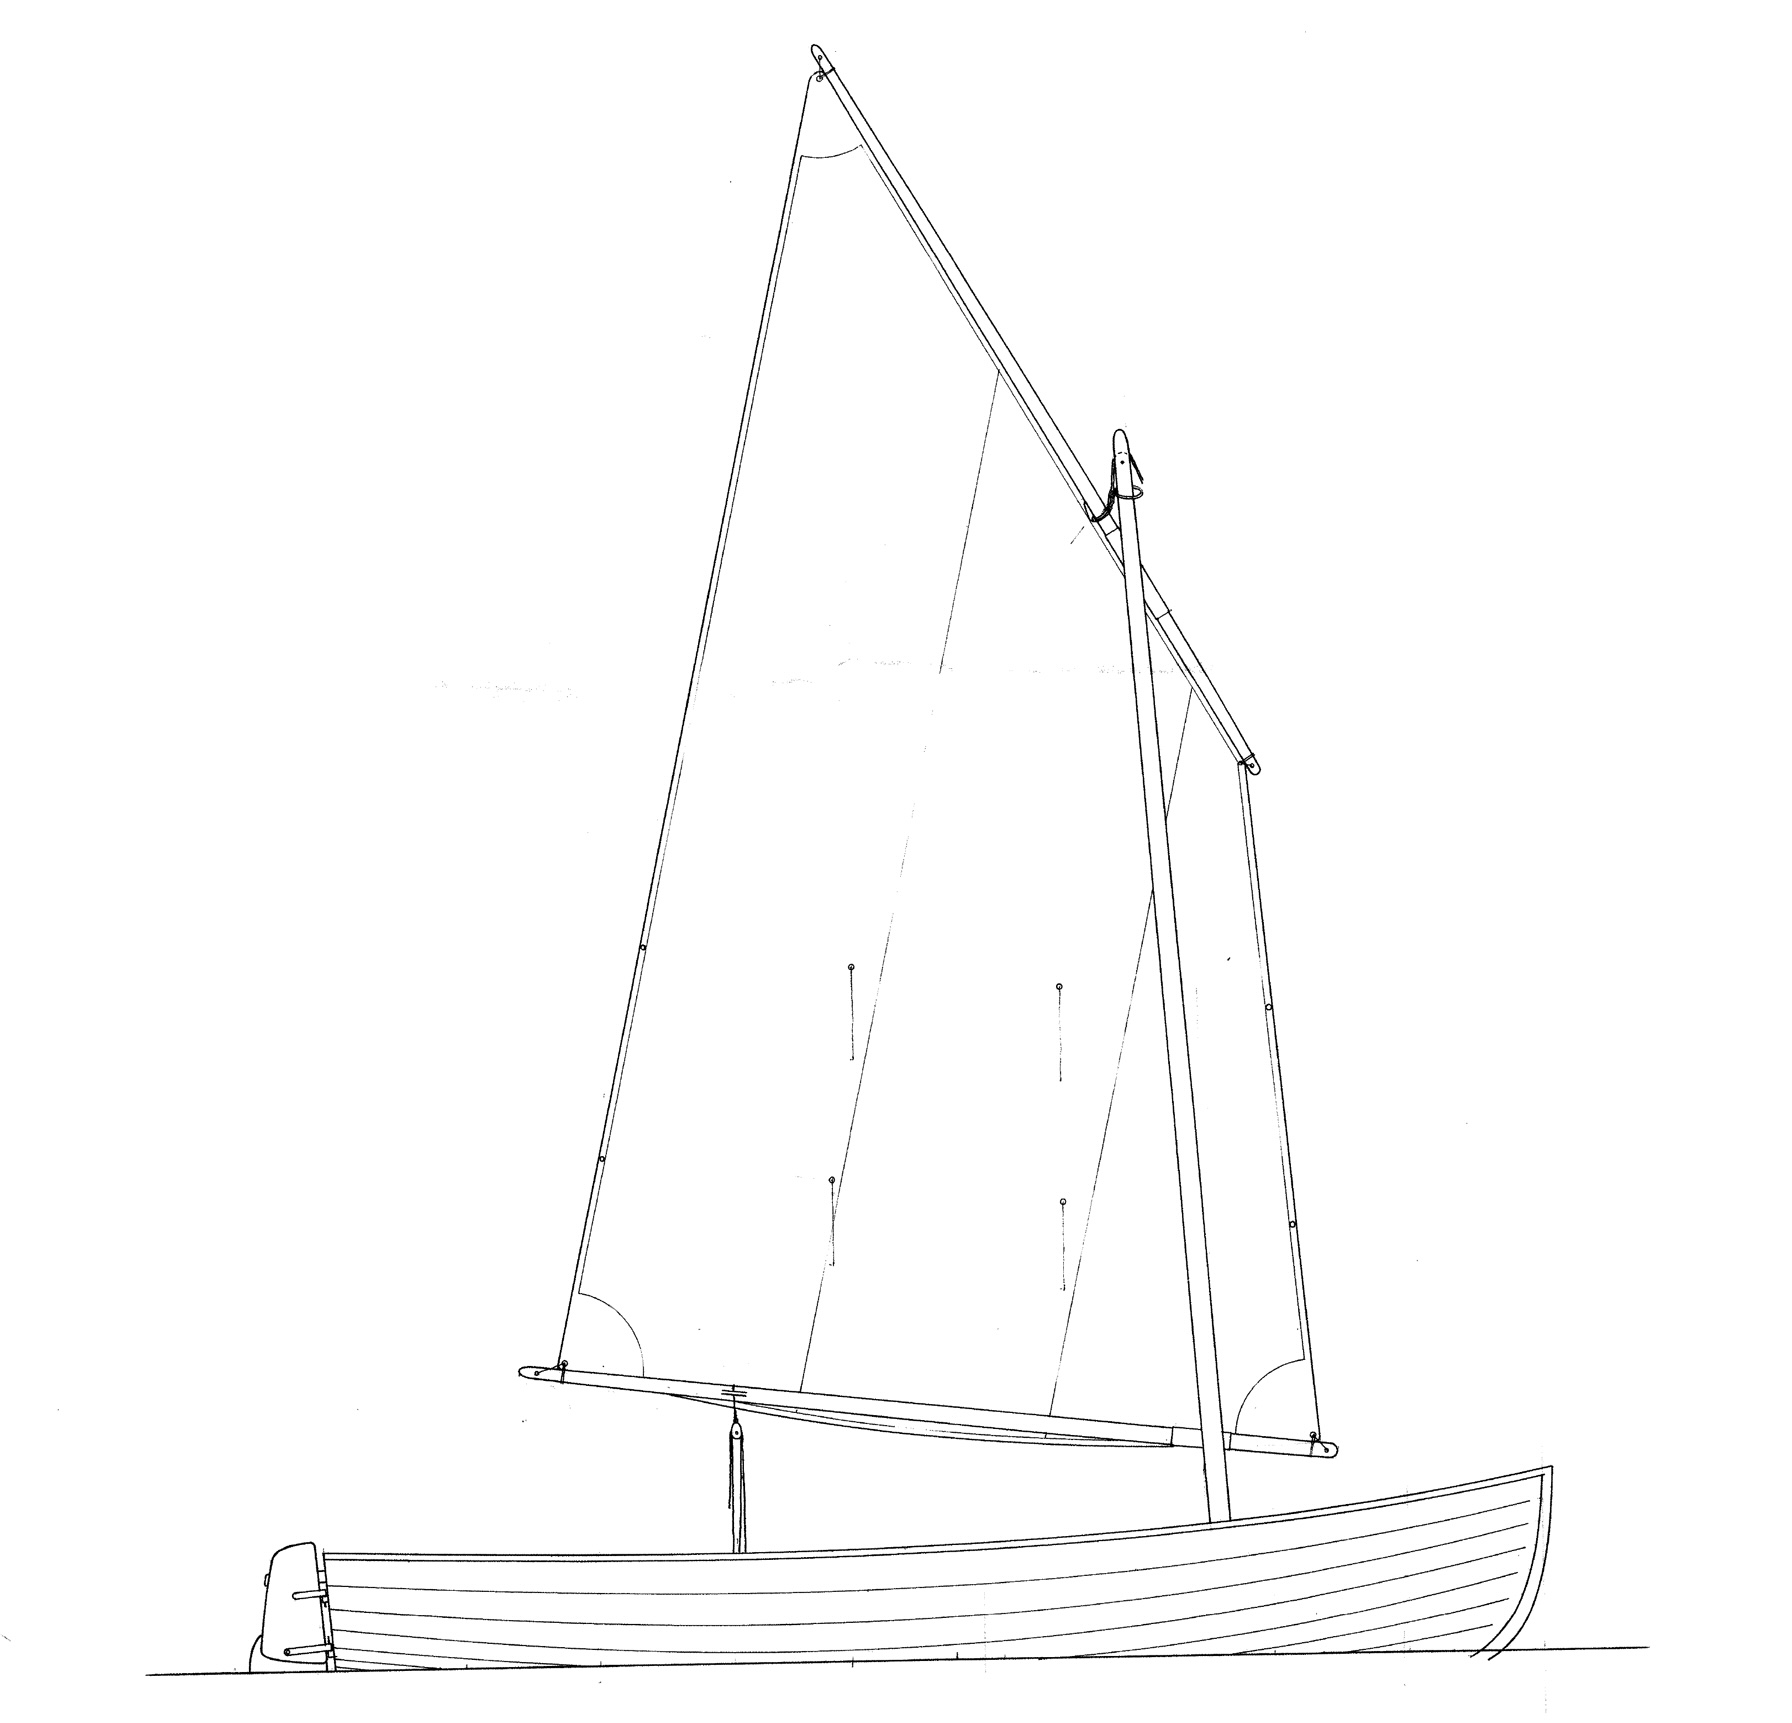
Good boats almost never fail to beget more good boats. Here’s a pairing of ancestor and offspring that proves the point as well as any could: the Columbia tender developed by Nathanael Greene Herreshoff in the last year of the 19th century and the Catspaw dinghy drawn by Joel White in the 1970s. The similarities are striking, but the differences are clear—nevertheless, either boat would be a fine choice for construction and use.
The tale must begin at the beginning. N.G. Herreshoff worked up a fine yacht tender—with lifeboat-style watertight chambers forward and aft—for COLUMBIA, which won the America’s Cup in 1899 and 1901. Amid the hoopla, somehow the lifeboat was so universally admired that it became a staple offering of the Herreshoff Mfg. Co. in Bristol, Rhode Island, for decades. A dizzying array of variations were built. Mystic Seaport in Connecticut has two of them in its watercraft collection, one a 1929 boat 12′ 6″ LOA with a 4′ 10″ beam with lifeboat-style chambers and the other an 11′ 6″ open boat from 1905. The latter was documented and replicated by Barry Thomas, then of the museum’s staff, in a noteworthy 1977 pamphlet, Building the Herreshoff Dinghy: The Manufacturers Method. For a grateful audience of small-boat craftsmen and for posterity, the book also recorded a surviving Herreshoff boatwright’s memories of the building technique and some specialized tools he used.
“This is the best model for a tender I have ever seen,” the designer’s equally famous son, L. Francis, wrote in 1948 in The Common Sense of Yacht Design. “They row well, sail well, and are good dry sea boats, and will tow through anything.” This was high praise, so it is small wonder that more than a century later the type still attracts considerable interest.
Thank goodness that not all yacht owners these days insist on dragging an embarrassing battleship-gray inflatable astern in order, it seems, to avoid rowing at all costs or under any circumstances. In 2008, a group of like-minded yachtsmen gave us an extraordinary example of excellent taste in tenders. For simultaneous restorations of four Herreshoff Buzzards Bay 30s—three of them side-by-side at the French & Webb shop in Belfast, Maine, and one in Darling’s Boatworks in Vermont (see WoodenBoat No. 203)—three of the owners carried their vision through to a fine conclusion by ordering Columbia dinghies as tenders. Named for their waterline lengths, the Buzzards Bay 30s are magnificent yachts, magnificently restored, and their tenders superbly complement the yachts themselves.
Tom Jackson
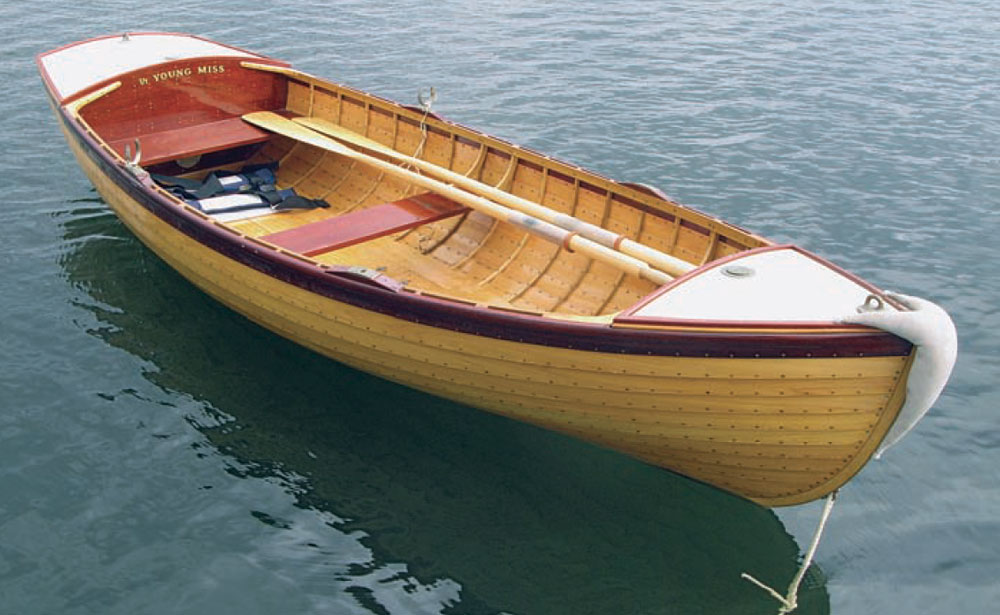
Built by Taylor & Snediker Woodworking of Pawcatuck, Connecticut, the bright-finished Columbia tender for the Buzzards Bay 30 YOUNG MISS is a lovely construction, light yet strong.
Two of these tenders were for oars only and were fitted with lifeboat chambers fore and aft. The other was an open boat, set up for sailing. At 11′ 6″ LOA and 3′ 11″ beam, they are slightly smaller than the 14′ original lifeboat. All three were built the Herreshoff way by Taylor & Snediker Woodworking in Pawcatuck, Connecticut. (David Taylor, who worked with Ed McClave of MP&G in Connecticut on the research for the three dinghies, presented a paper on the boats to the 2009 Classic Yacht Symposium at the Herreshoff Marine Museum in Bristol, Rhode Island. More Columbia dinghies came later: a full-sized version was constructed to exacting standards at Stonington Boat Works in 2009 for the restored Herreshoff New York 50 sloop SPARTAN, restored by MP&G in Mystic, Connecticut, and Taylor & Snediker built a 15′ 6″ version for a 163′ ketch built in New Zealand.)
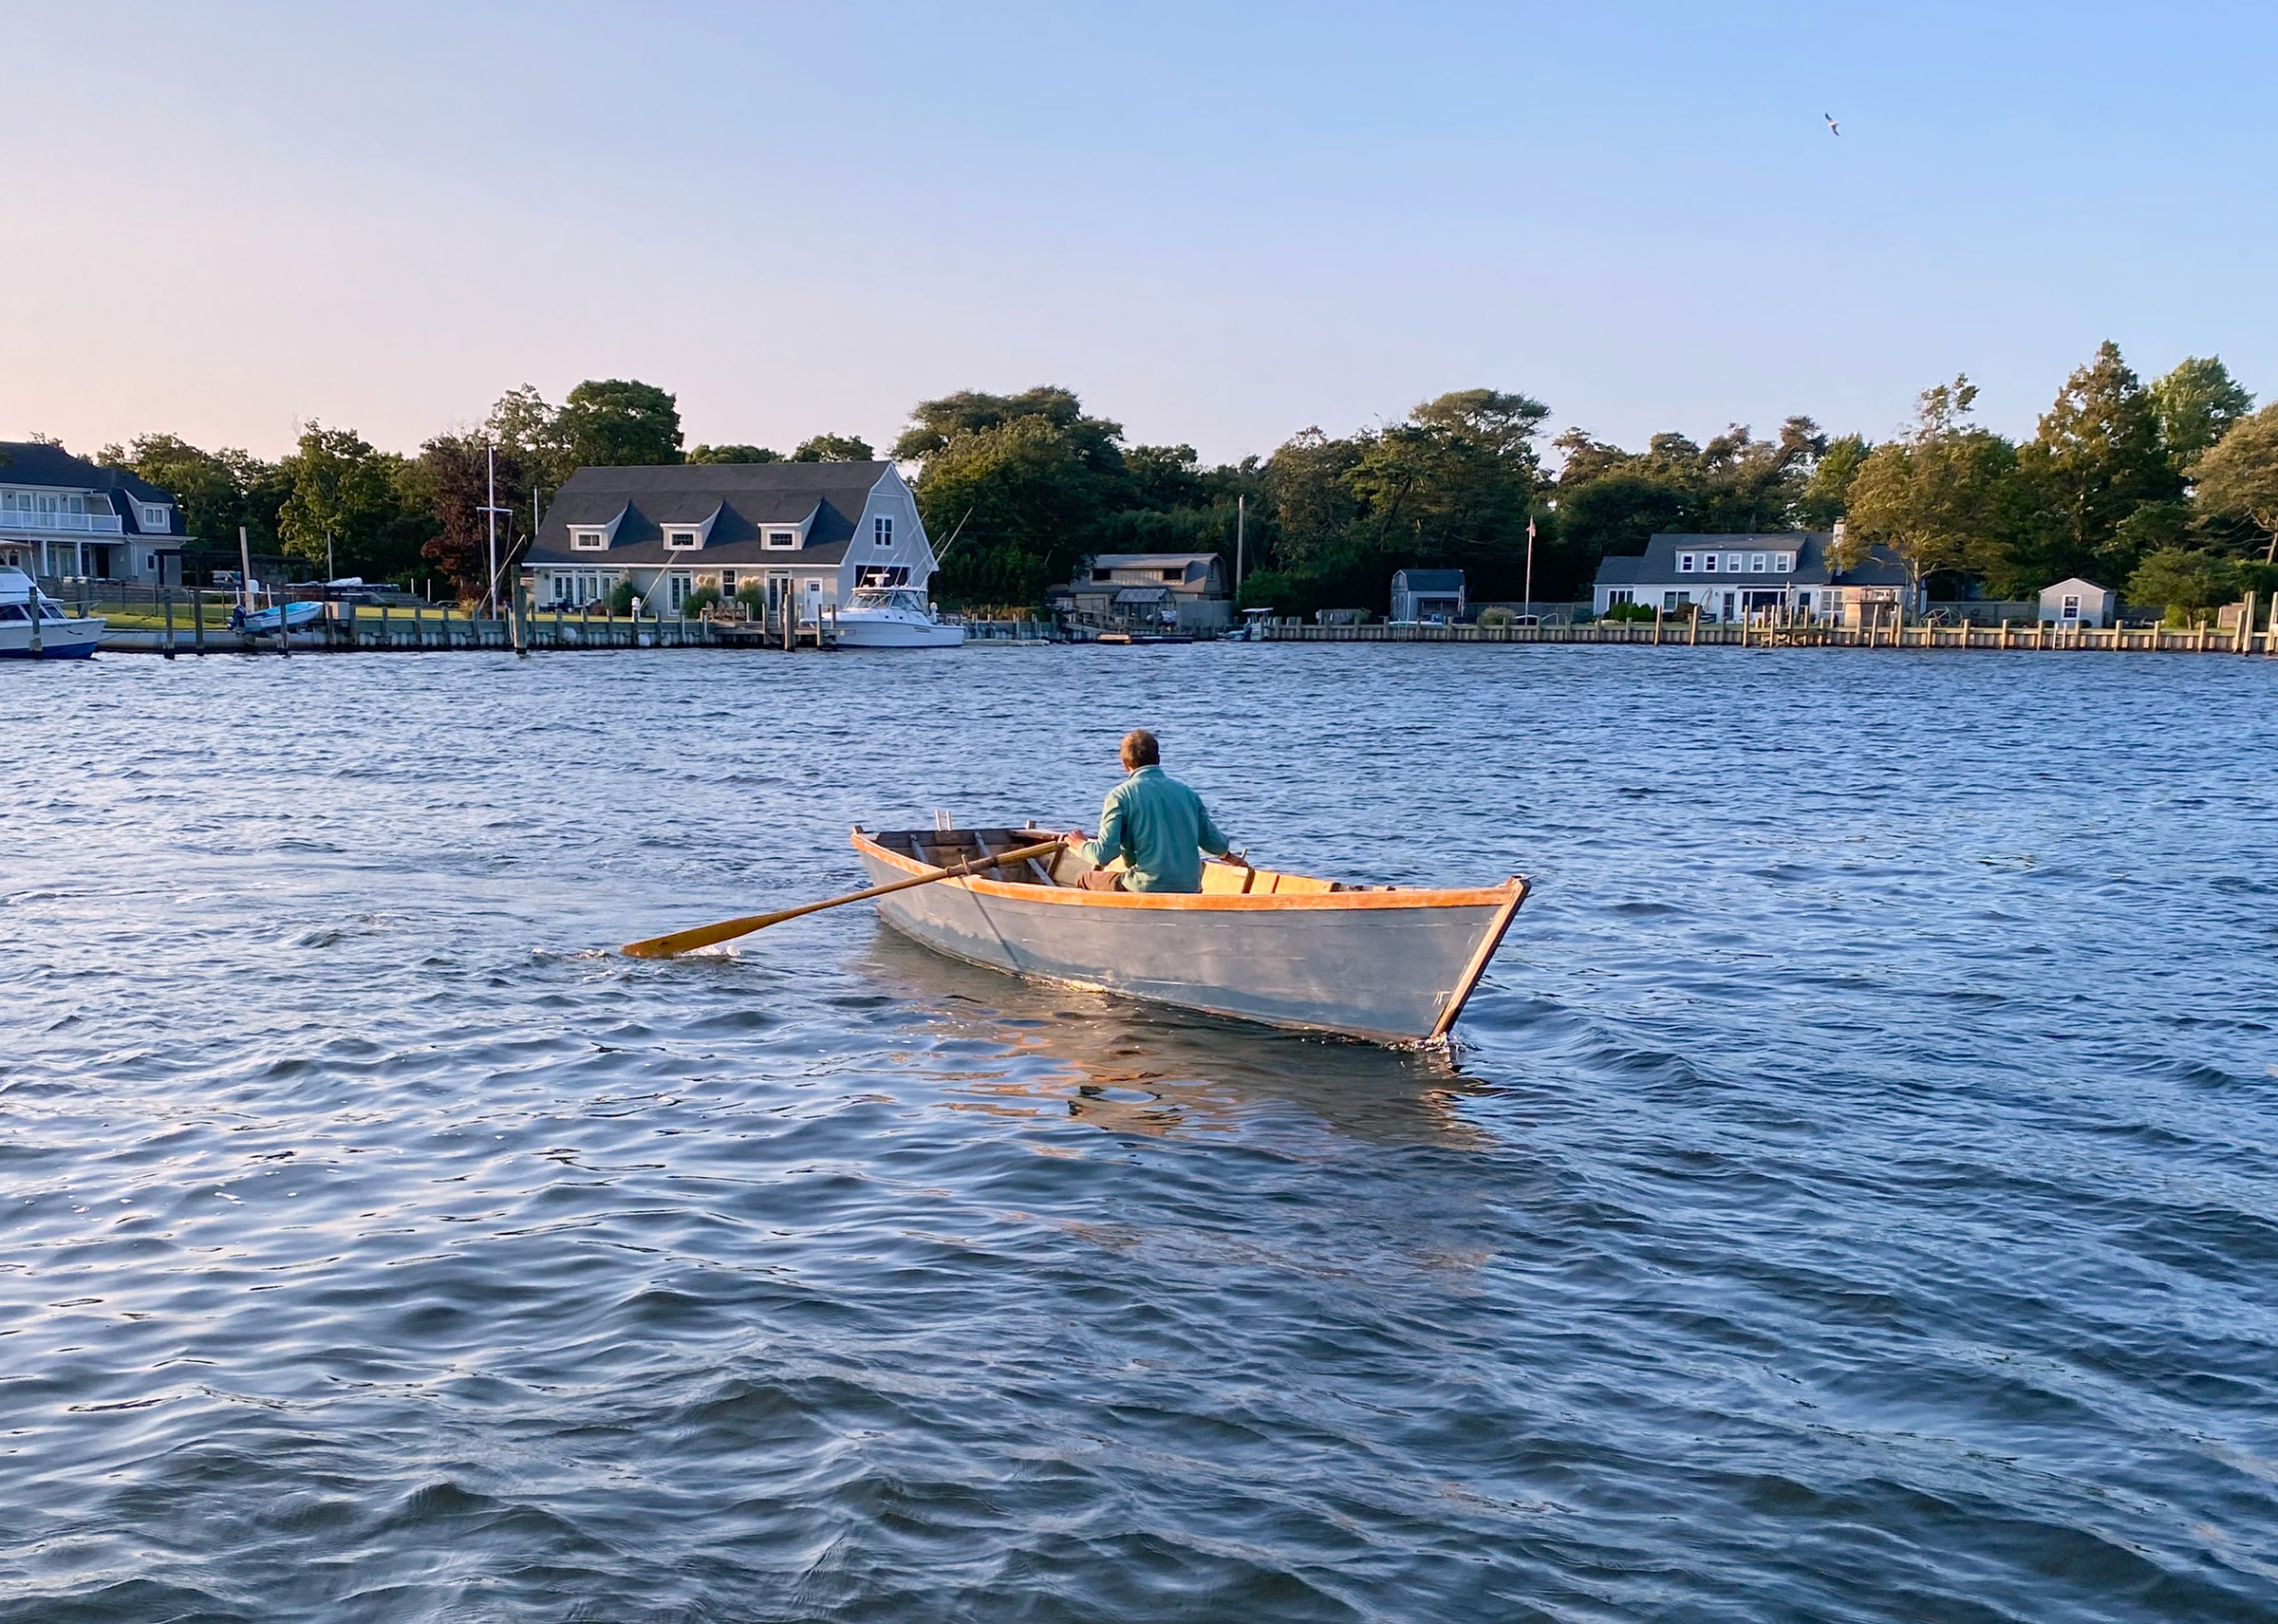
When I took YOUNG MISS’s tender for a row around Belfast Harbor, the first thing that struck me was the boat’s delicate construction. Her steam-bent white oak frames are only 1⁄2″ × 1⁄2″, and her Atlantic white cedar planking a mere 1⁄4″ thick. With her mahogany sheerstrakes molded in the Herreshoff manner (see WoodenBoat No. 208) and mahogany trim, she is fine-looking under any circumstance, but never more so than when alongside the mother yacht herself. True to Herreshoff’s original, this one has watertight chambers fore and aft. The after bulkhead doubles as a seat back for the passenger’s thwart and in time-honored fashion carries the name of the yacht in gold-leaf lettering. Bronze lifting rings are fitted on the centerline near the stem and the transom. With these fine details and her all-varnished interior and topsides, the tender is a very handsome boat in her own right, regardless of what yacht she may be nestled against.
Beyond her appearance, however, is her performance. She is a delight to row. The boat has quite high freeboard, but with oars of the proper length—these were 7 1⁄2-footers—she moves very comfortably. She is also incredibly stable. I walked around in the boat with no worries about balance. Soon I noticed that the boat doesn’t seem to appreciate aggressive rowing, but you can readily settle in to an all-day pace. She will move so steadily at this rate that you begin to feel that you’re merely along for the ride, accompanied by the cheerful chortling of water against her plank laps. I can’t recall a more comfortable rowing setup than this one in a boat of this type, nor a greater feeling of security. I’ve no doubt the boat would sail in comfort as well.
A boatbuilder with experience could readily build such a boat. Rather than plowing through the historical records to try to reconstruct original lines—a daunting task even for professionals—the builder would be well-advised to work from existing plans. R.A. Pettaway’s detailed lines, table of offsets, Bermudan-rig sail plan, and construction plan for Mystic Seaport’s 11′ 6″ boat were included in Barry Thomas’s pamphlet, which is still readily available. This boat, I should note, did not have the lifeboatstyle chambers, so building-in such flotation would require additional planning and judgment on the part of the builder desiring them.
A serious builder could replicate Herreshoff’s methods if so inclined—which for this boat most notably called for a building mold at every second frame position, or 10 molds altogether. Frames were steam-bent directly to these molds, the rest installed after planking. An experienced builder could also devise a typical building jig—with ribbands sprung over fewer molds. There’s also no reason why the hull couldn’t be planked in glued-lapstrake plywood.
The story of the Columbia lifeboat would have been a fine one—a classic—even if it ended there. But it didn’t. The story took a new turn with Joel White.
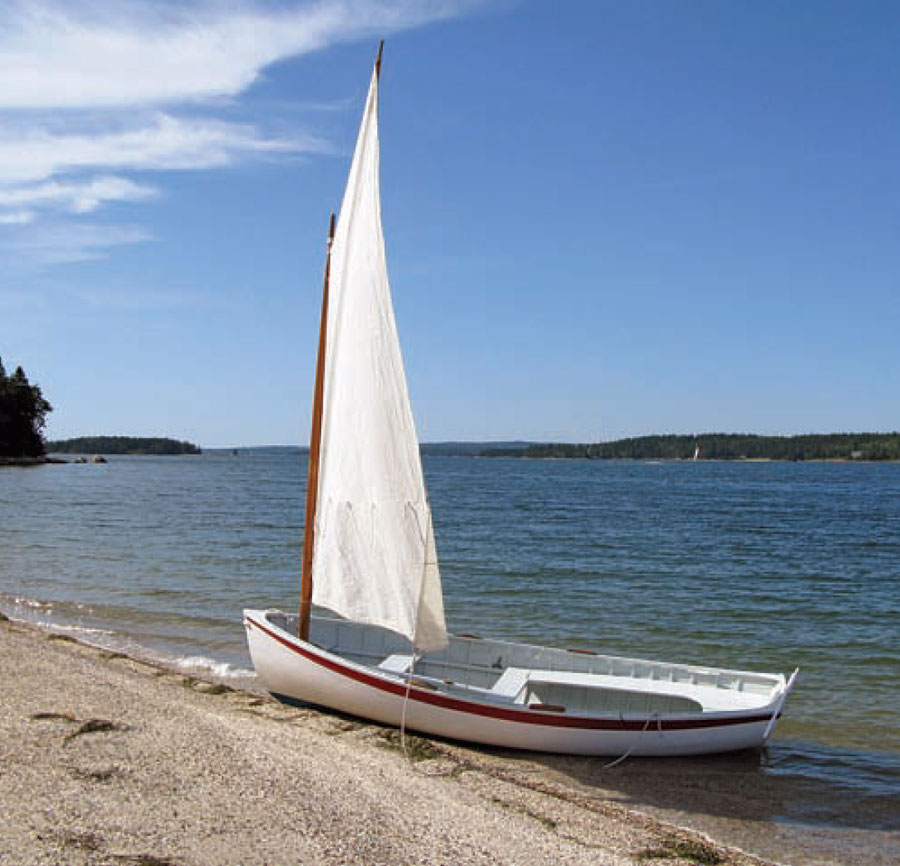
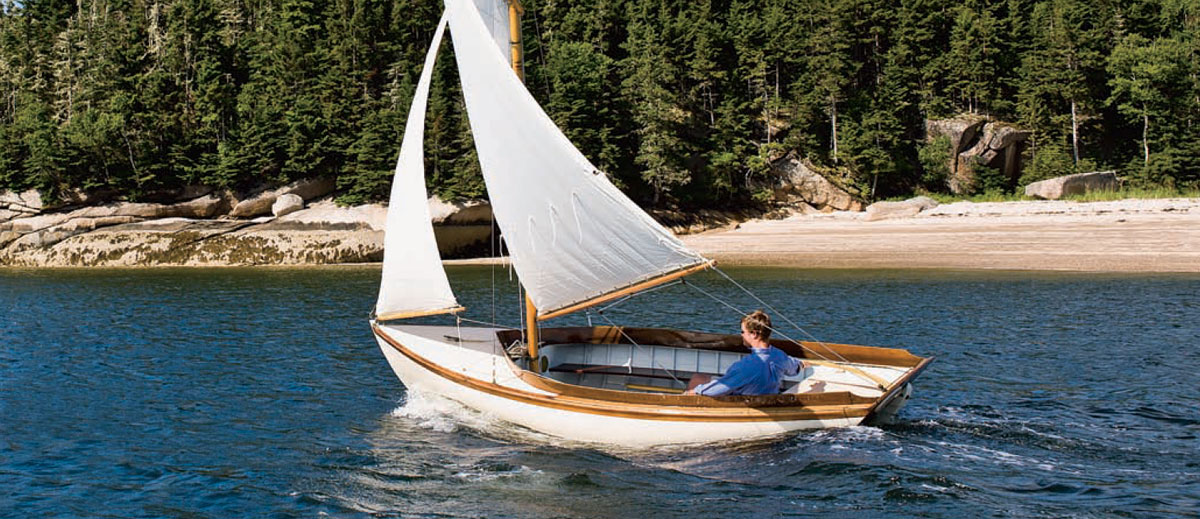
White, often inspired by Herreshoff boats, worked here in Brooklin, on the granite-bound coast of Maine. Among his successes was the famous Haven 12 1⁄2, a centerboard version of the Herreshoff 12 1⁄2. When a client came to White looking for something like a Columbia dinghy, White thought to preserve the design’s essence while applying the logic imposed by this environment. Here, the boat would not spend a good deal of its life hoisted aboard a yacht or at a yacht club dinghy dock. Instead, it would ground out routinely on stony beaches and might often be dragged up above the tide line. Varnished topsides would be a mistake. Thin planking could easily be damaged. The original boat’s great all-around performance could be retained, but the hull would need to be more resilient.
White named his resulting design the Catspaw dinghy, completing the work in 1977. The boat, which was the subject of the first thoroughgoing, multi-part “how to build” series in WoodenBoat magazine (WoodenBoat Nos. 26, 27, and 28), became widely popular. For years, the design has been, and continues to be, one of the staple boats of WoodenBoat School’s Fundamentals of Boatbuilding course. Hundreds of plans have been sold, and who knows how many have been built.
What’s different? For starters, the Catspaw is a carvel, or smooth-skin, construction. Instead of riveted, overlapping planks, these are riveted to the frames only, and where the plank edges butt against one another, the seams are caulked in the traditional way with cotton. The planking has to be 1⁄2″, instead of 1⁄4″, for this type of construction, so the boat is heavier. White also made it 10 percent longer—12′ 9″ instead of 11′ 6″—to better accommodate family daysailing. Reasoning that the original’s daggerboard could damage the hull if it smacked hard into a submerged rock, White used a centerboard instead, which would pivot upward and spare the hull itself any harm. He drew a simple sprit rig, which has no boom and poses no risk of knocking heads when tacking. Like Mystic Seaport’s original 1905 version, White’s boat omitted the lifeboat-style chambers but retained the simple interior arrangement.
Tom Jackson
Being able to run up on a beach in Maine—definitely a desirable trait—calls for the stouter 1⁄2″ planking used on the Catspaw dinghy. For hoisting Columbia dinghies aboard a yacht, the light weight of the original light lapstrake construction was preferred.
These days, some people may be tempted to look at something other than carvel construction for the Catspaw. It could be built handsomely in lapstrake construction. Strip-building would work. But I suspect that many intending to launch from a trailer for each outing will look to cold-molding, using glued-up overlapping layers of wood veneer. Carvel-built boats have to be given some days to “take up” after launching, and until they do, they will leak, sometimes considerably. For those without access to a mooring, marina, or dinghy dock, cold-molding would be a reasonable choice. Builders choosing this method will have to make adjustments to the mold patterns for their setup, and those unfamiliar with the technique would need to do considerable study, or perhaps take a course. Builders I respect also caution assertively against making such a hull too light.
For all of the 12 years that I’ve worked at WoodenBoat, the Catspaw dinghy JESSE—carvel-built at The WoodenBoat School in the mid-1980s—has been quietly riding to her mooring off our waterfront. To renew our acquaintance, I took her out in a pleasant 10 to 12 knots of breeze. The rigging is as simple as it gets. With no stay or shrouds, the mast stepped quickly while the boat was alongside the float. The sprit slips into a loop at the peak of the sail and its heel fits into a kind of sling called a snotter, which hauls taut and is made off to a cleat on the mast. The only other line is the single sheet, which takes a turn around a thumb cleat well aft on the rail. To tack or jibe, you just free the sheet from this cleat and take a turn on the corresponding cleat on the opposite side. The plans call for two such cleats per side for more control over the sheeting angle depending on the point of sail—a good idea.
I rowed JESSE a few days later, choosing a breezy day with gusts to perhaps 16 knots. The characteristic I noted on YOUNG MISS’s Columbia dinghy I saw again—she doesn’t like to be pushed too hard. The all-day pace works best. I easily made steady headway into wind and tide, and seas of a couple of feet posed no problem at all. The boat felt a little heavier than YOUNG MISS’s tender, but not enough to be a bother. One quibble I had with both boats is that they really should have foot braces for rowing; neither had them, and both would benefit.
Joel White and R.A. Pettaway/Mystic Seaport
Though their construction methods are completely different, the larger Catspaw dinghy, left, and its predecessor, the Columbia dinghy, right, have very similar hull shapes.
Both in sailing and in rowing, JESSE seemed extremely secure, with ample freeboard and loads of stability. When I was putting the rig away, I did something I like to do with sprit-rigged sails. I freed the sprit heel from the snotter, swayed it aft, folded the leech of the sail around it, rolled the sail up tight in the sprit until it was up against the mast, then tied it all off with the sheet to hold it there, making a self-contained bundle. From YOUNG MISS’s tender I knew something about this hull’s stability, but I was a bit astonished at how steady the Catspaw remained even while I was way up forward in the “eyes” of the boat, manhandling the bundle out of the mast step and partner for stowage. That sense of security is a high recommendation for a boat and inspires confidence in her ability to handle just about anything that comes her way.
She does everything well, but nothing to a fare-theewell. She rows steadily, but she is not a racing shell. She sails efficiently, but she is no close-winded sloop. She’s no cartopper, but she’s not unduly heavy, either, and would trailer handily. Her freeboard is ample but not so much as to make her look clumsy, which she distinctly does not. She could carry a load of people or gear or both. She is, in short, a worthy successor to the Columbia’s character as an “all-around” good boat.
All in all, it’s a story with a happy ending—but for the builder of either of these fine dinghies, the story would be just beginning.
Plans for the 11′ 6″ Columbia dinghy have been published in Barry Thomas’s book, Building the Herreshoff Dinghy: The Manufacturers Method (Mystic Seaport Museum, Connecticut, 1977). That book and two others mentioned in this article—How to Build the Catspaw Dinghy: A Boat for Oar and Sail, WoodenBoat Editors (WoodenBoat Publications, Brooklin, Maine, 1980); and Mystic Seaport Museum Watercraft, Maynard Bray, Ben Fuller, and Peter Vermilya (Mystic Seaport Museum, Connecticut, 2008)—are all available from The WoodenBoat Store.
Contact Taylor & Snediker Woodworking at 22 Mechanic St., Pawcatuck, CT
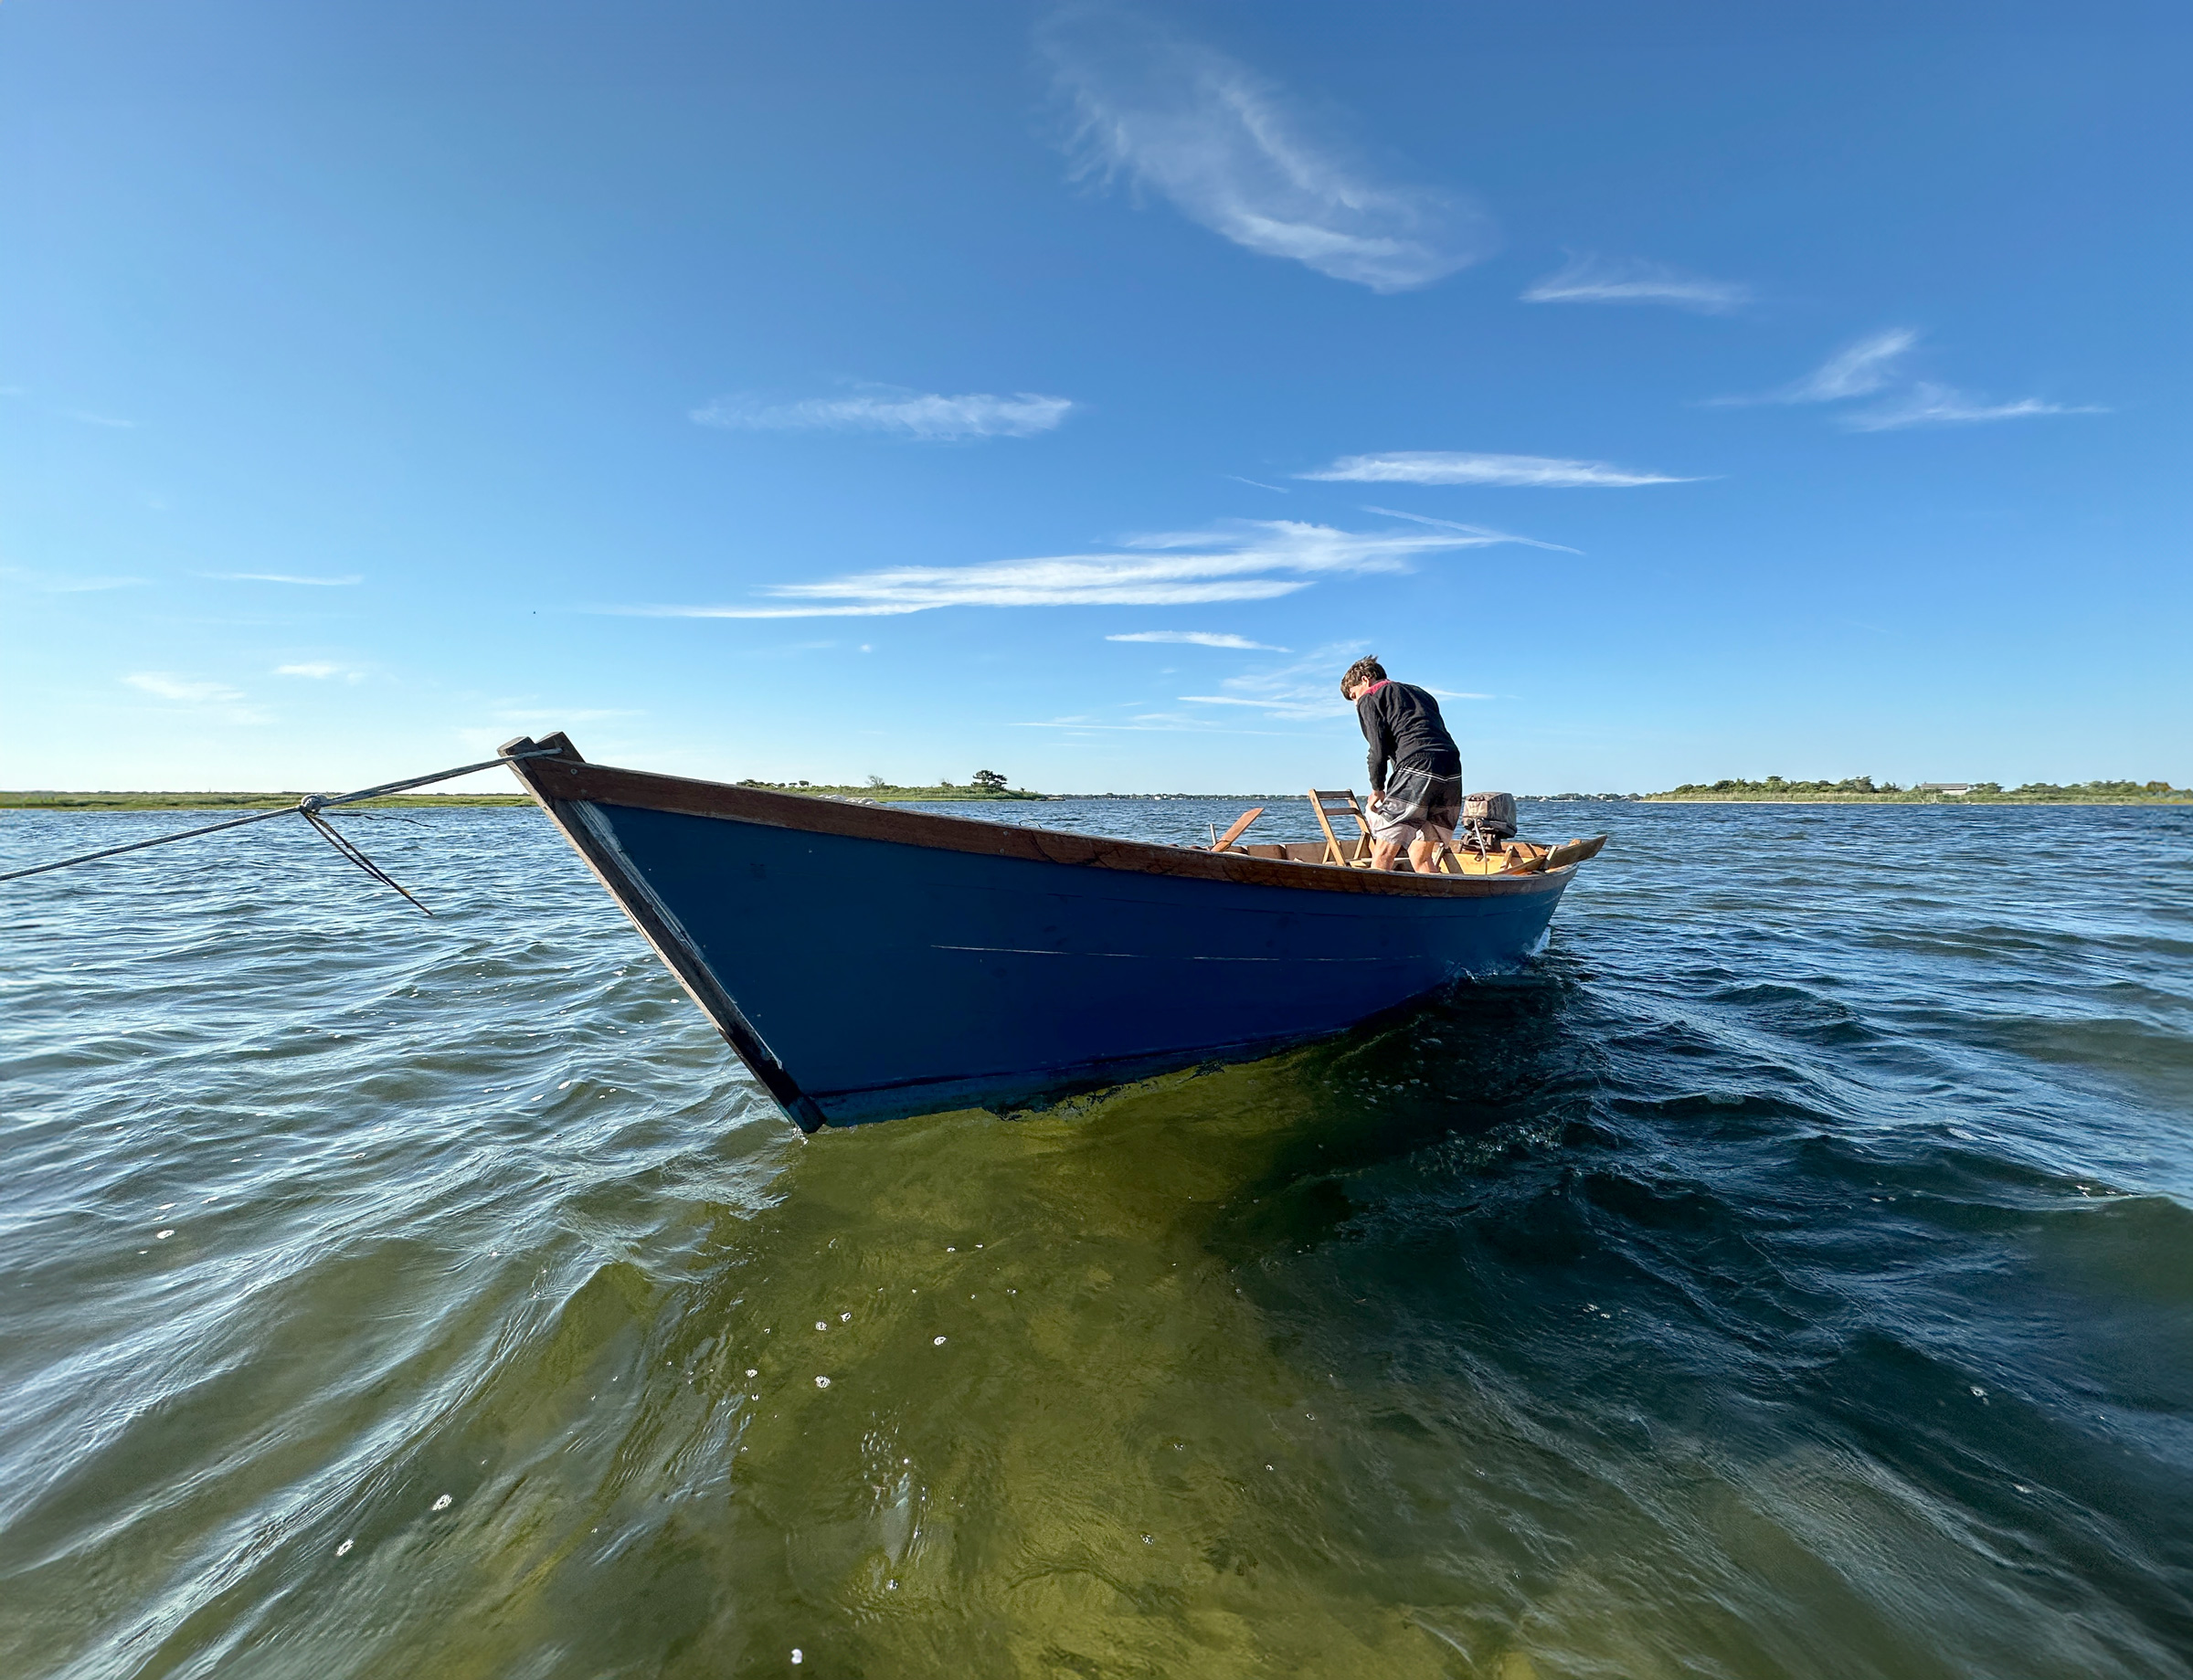
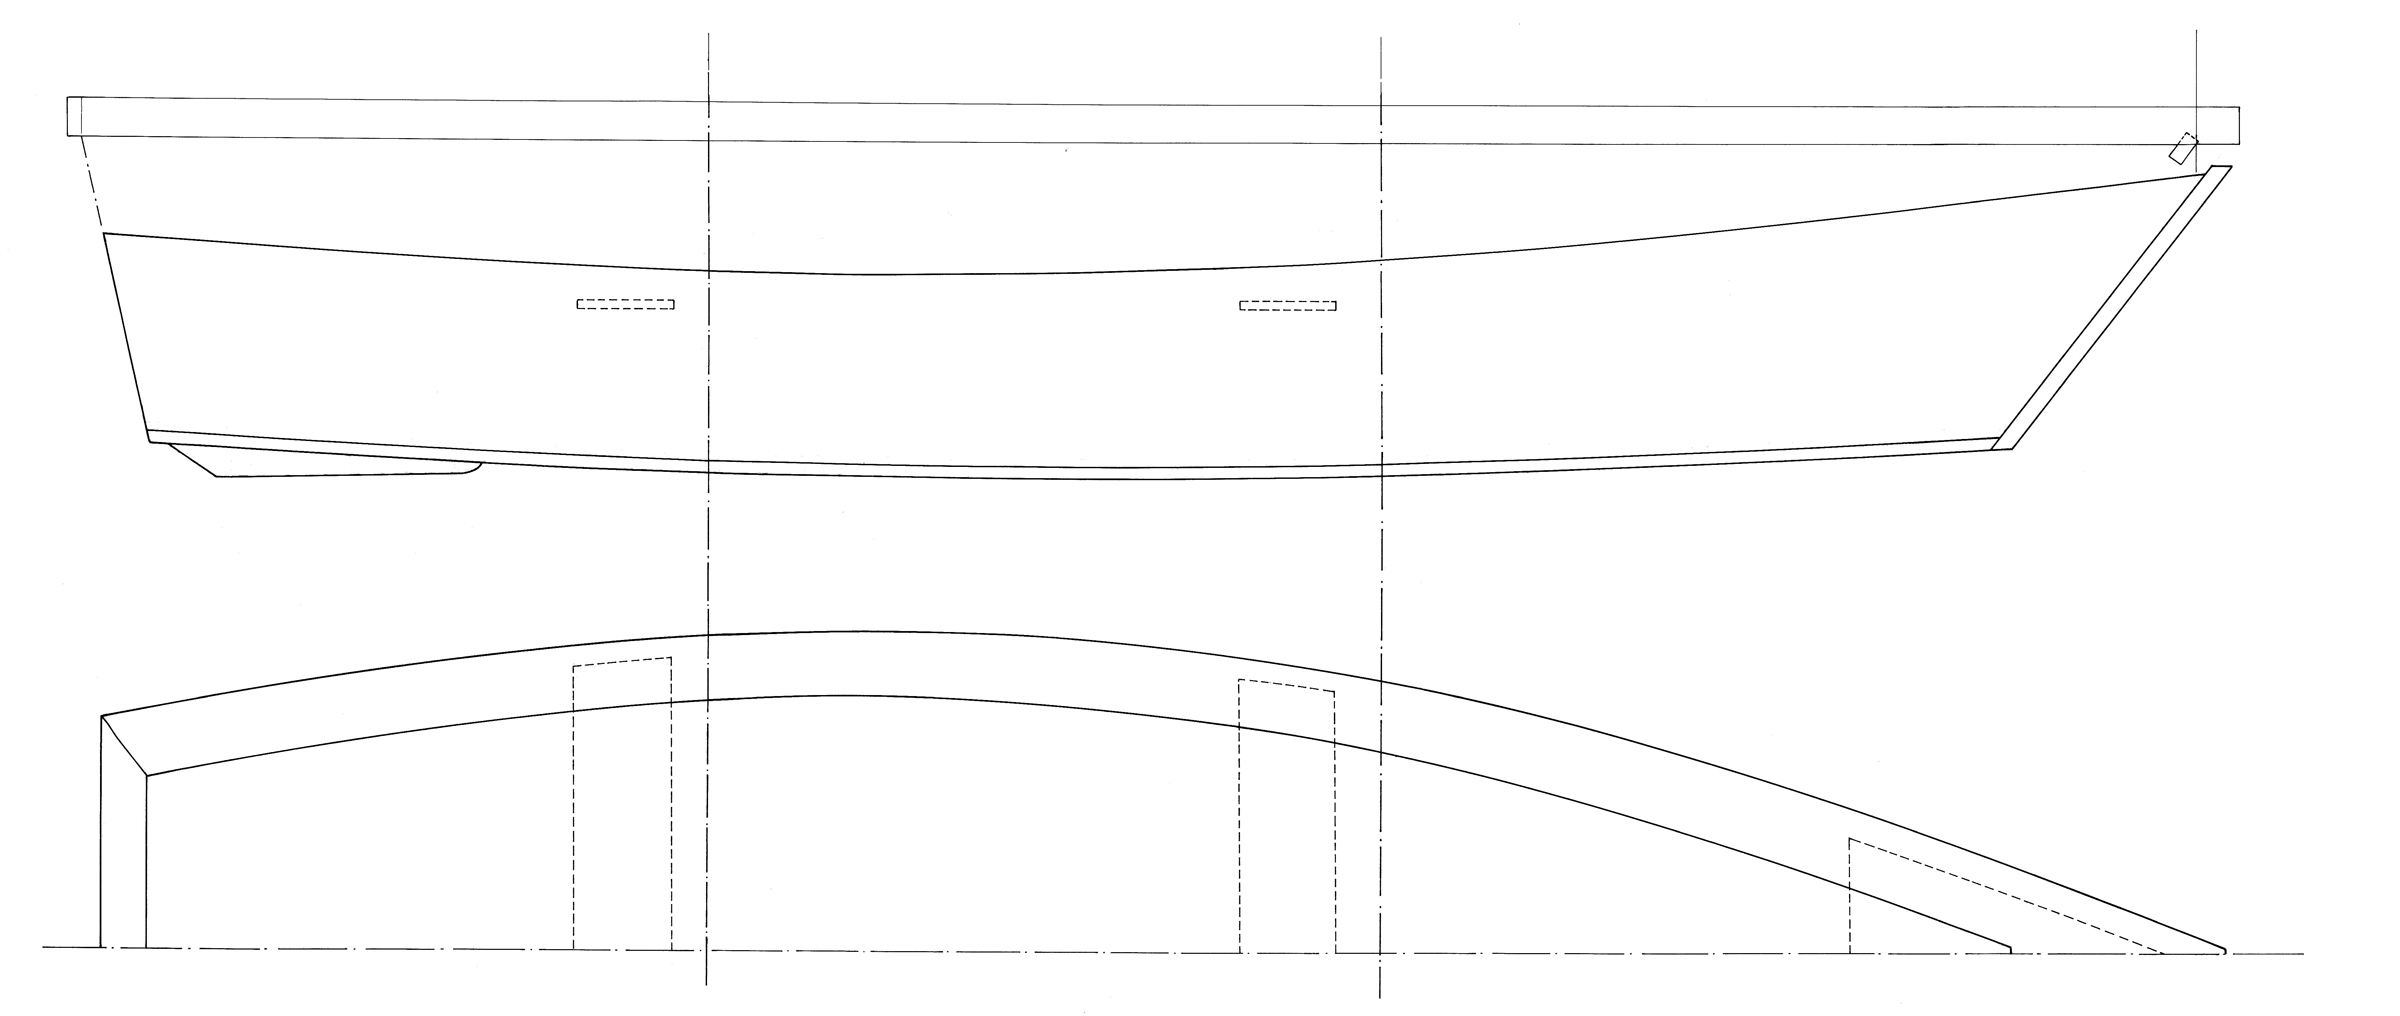
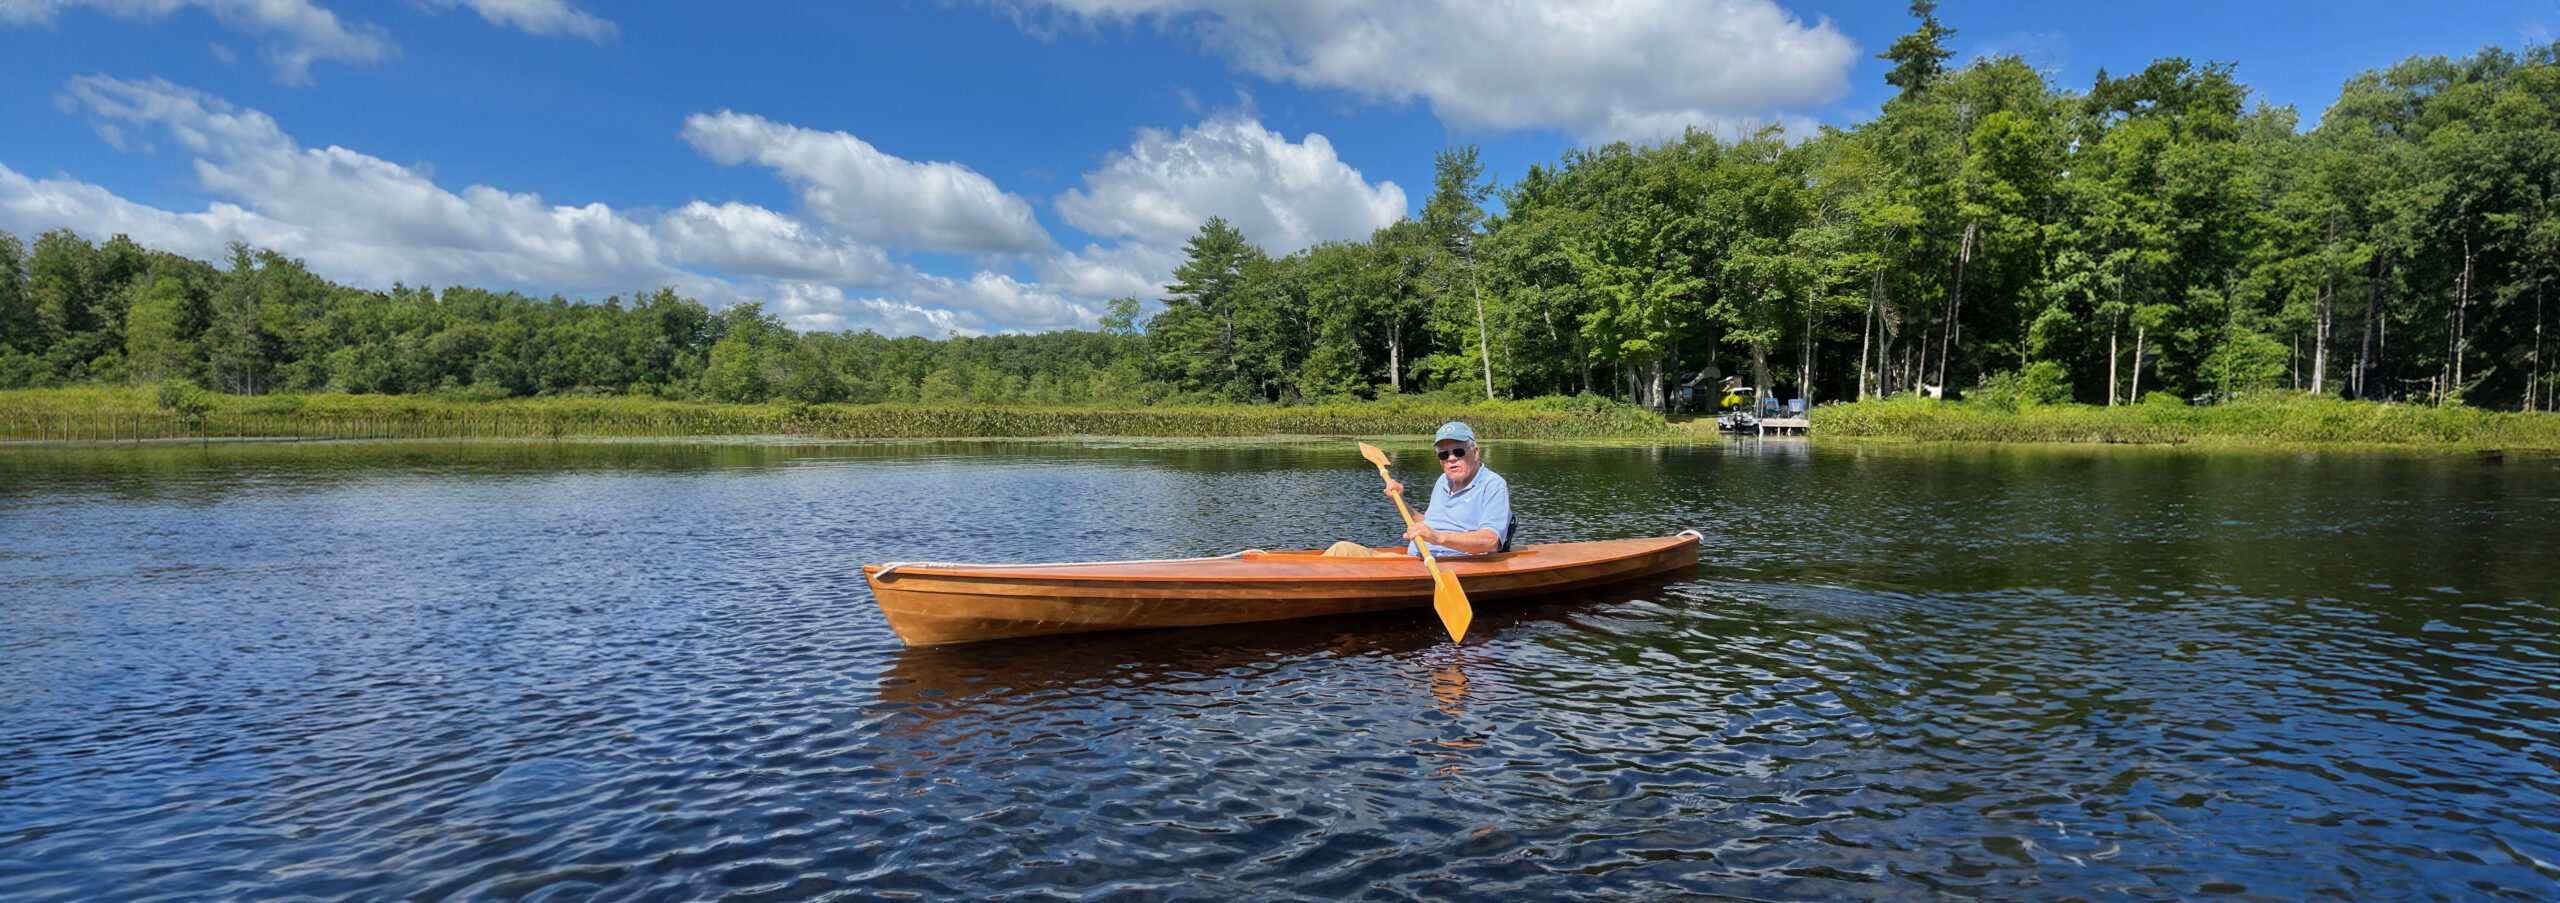
The 5.40m Flat Bottom Boat was designed in 1971 by Oyvind Gulbrandsen of the Food and Agriculture Organization of the United Nations for use on Lake Malawi in southern Africa. The plans are posted as a free design in their Fishing Vessel Design Database. I built the United Nations Flat-Bottomed Skiff last year, when I was 16, and it has performed well, no matter the conditions on my home body of water, the Great South Bay, Long Island, New York.
The seven pages of metric-measured plans for this 17′ 9″ flat-bottomed outboard skiff include drawings for the transom, the two molds, and the stem, all of which are straight-sided. The plans mention only some of the materials used in the construction—screws and galvanized nails for fastenings, and cotton caulking and bitumastic compound for sealing seams; the wood is given in dimensions only, not by species. That was only a minor inconvenience, as it didn’t take me long to find the wood I needed from local sources. For every structural member—transom, stem, frames, keel, and keelson—I used oak; for the side and bottom planking I used pine. Wherever the plans lacked detail, I turned to Pete Culler on Wooden Boats and Howard Chapelle’s Boatbuilding.
Liam McEvoy
For a first-time builder the 5.40m is a straightforward project using easily sourced materials. I built mine in the driveway using pine for the planking and oak for the structural members.
Construction of the skiff is straightforward; no lofting is required and the 20mm (3⁄4″) planks need no spiling. The boat is built upside down. The 150mm x 20mm (6″ × 3⁄4″) sheer planks, installed first, and the two strakes that follow, are all straight, parallel-sided, and butted edge-to-edge. The 200mm-wide (approximately 8″) garboards are installed last and are butted against the preceding planks—straight edge to straight edge. On their other side they are trimmed down to the chine curve, established by the transom, molds, and stem.
The side planking went quickly, but when I had built to the last plank, I was presented with a serious problem. Where I should have been able to fit an 8″ garboard—as suggested by the design—I found that I would need a plank that was 12″ wide at the bow and 3″ in the stern. That, unfortunately, was far wider than any board I had to hand. I had unwittingly used nominal 1×6s where the metric plans called for 20mm × 150mm, or actual 1×6s. As a result, the three planks I’d used on each side ended up spanning a total of 3 3⁄4″ less space than they should have. Of course, I only discovered this after I had installed the sheer and topside strakes. I scrapped the initial plan and, instead, used a 1×6 for the garboard and filled the voids at the bow with wedge-shaped planks, known as stealers. I would recommend this method for builders who only have access to narrower planking stock. The stealers worked beautifully; their sharp and vulnerable aft ends are protected by the oak chines, which were installed after the planking was complete, and were beveled flush with the garboards prior to planking the bottom.
Margaret McEvoy
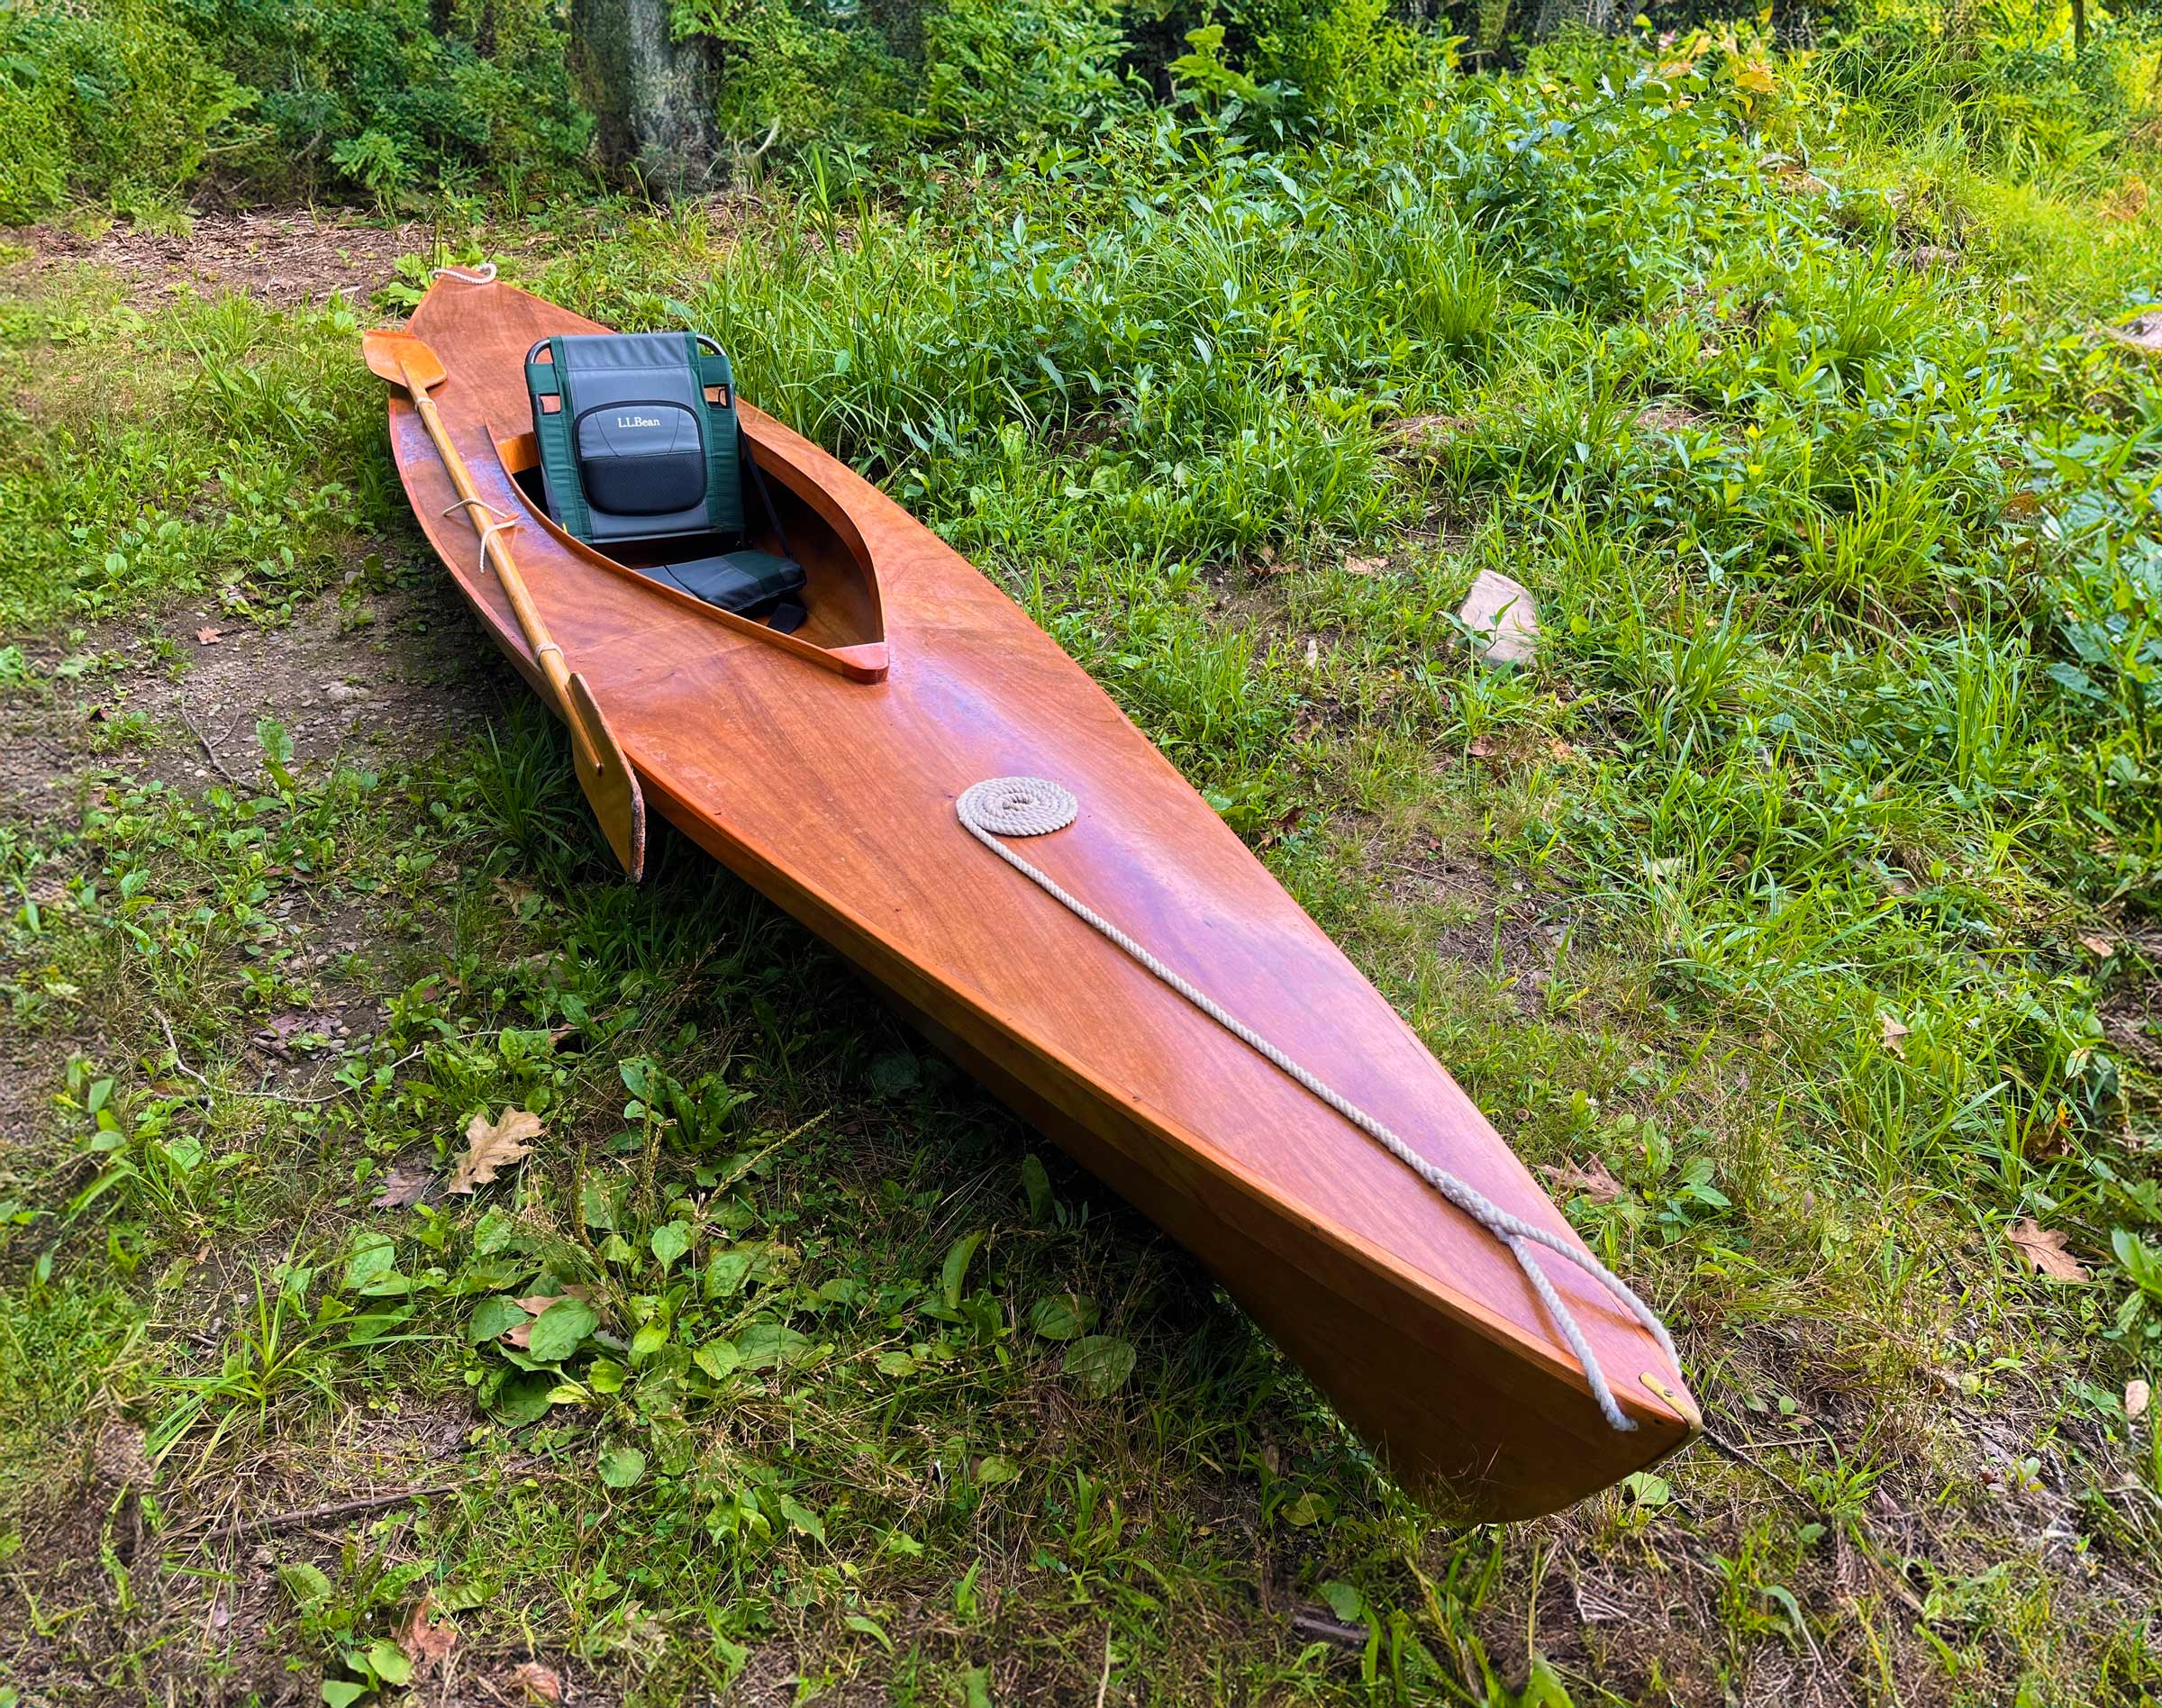
Thanks to her generous freeboard and frames that don’t span the bottom, the 5.40m is deep and roomy. The only leaking on launch day was through a poor fit between the transom and its adjoining bottom plank. I left the chines long at the stern so I could use them as a step when getting back into the boat from the water.
For the bottom, I used conventionally dimensioned 1x4s in lieu of the wider 20mm x 150mm (3⁄4″ × 6″) boards noted in the plans. At the suggestion of a shipwright mentor, I used pine, which has worked well. The plans call for caulking all of the seams—topsides and bottom—and filling them with bitumastic compound. I used butyl rubber and light-cotton wicking, although if I were to build the skiff again I would go without the bottom caulking—to simplify and speed the installation of the cross planks—and instead rely on tight edge-to-edge joints. The cross planking has not leaked; the only leaks have been from a poor fit between the transom and its adjoining bottom plank.
For a quicker build, the bottom could be of plywood, either canvased or fiberglassed. This would have the added advantage of being immediately watertight without needing to swell.
The plans call for a dozen frames that span the side planks from the chine to the sheer on each side; they do not span the bottom, which is left unobstructed. For fastenings, I used 2″ marine-grade stainless-steel screws instead of the galvanized nails suggested in the plans. They were more expensive but well worth it for the improved strength and corrosion resistance.
Margaret McEvoy
The 5.40m is designed with thole pins for both rowing and sculling. The high freeboard does mean that the boat is not easy to row in any wind above about 10 knots, but it’s good to have the option of the back-up propulsion.
The plans show only two thwarts and a small foredeck, but the simplicity of the 5.4 lends it to custom outfitting. I intend to switch from a tiller-operated outboard to a center console, which should be easily built and installed. The plans specify a maximum of 6-hp for any engine, but with a few simple structural changes the skiff can handle more. For example, to accommodate my 10-hp two-stroke engine I added knees, brackets, and braces to the transom and made the chines from 1 1⁄4″ stock instead of the 20mm (roughly 3⁄4″) stock called for.
I built the boat as a two-month after-school project that took around 140 hours of work. The materials cost $800, and the outboard cost another $800—not a lot of work or money for an 18′ powerboat.
I haven’t yet had to trailer the skiff, but a trailer with adjustable bunks for the bottom or a flat-bed with some dunnage (to account for the boat’s rocker) would fit the bill and take advantage of its flat bottom.
Margaret McEvoy
Like the molds and transom, the stem is straight-sided. As per the plans I caulked all the seams with cotton and butyl rubber. The skiff could also be built of fiberglassed plywood, which would likely result in a quicker but more expensive build.
The 5.4 can be rowed, and tholepins indicated on the drawings are handy, even though the high freeboard, which makes the skiff a great motorboat, can make it hard to row in a stronger head- or crosswind. In calm conditions, it can move along at around 4 knots under a single pair of 9′ oars, but even as little as a 10-knot breeze can make for some hard rowing. The real value of the oars is as backup to an older, unreliable outboard; indeed, they have gotten me out of a fix or two when the engine has sputtered and died.
In the short, choppy swells of shallow waters, such as those in Great South Bay, the 5.4 is an able boat. It can handle up to 3′ whitecapped swells—if I’m smart about it—but a protracted battle with 3′ breakers is not fun, and I have learned that it’s best to stay ashore on such days. The boat is a match for 2′ waves and in 1′ waves can provide a comfortable ride.
Margaret McEvoy
Even in a strong wind and choppy seas, the 5.40m has proven very stable and it tracks well. It can handle up to 3’ waves and in 2’ or lower waves provides a comfortable ride.
In suitable conditions the 5.4 is very stable and tracks remarkably well. With my long-shaft outboard it draws 8″ with the engine down and 4” with the engine up. Because of the shoal draft, I have rarely operated in the channels with the rest of the boat traffic, but instead race over the shallowest of sandbars. Since launching the boat, I have been more than happy with its performance. It handles my local waters well and provides a safe and steady ride even at its modest top speed of 10 knots. The 5.4 is a handsome, seaworthy vessel and a simple project for a beginning boatbuilder.
Liam McEvoy lives on the south shore of Long Island, New York. He is grateful to his artist father and mother for teaching him about the beauty found in the old arts, such as sailing, classical music, and boatbuilding (as well as their tolerating the wooden boat in the driveway). He thanks Bob Hillman, an 86-year-old woodworker and owner of several wooden boats, who guided him through building the 5.4 and after whom he named it, HILLMAN. Liam is hoping to build more boats and has recently set up his own website for Clam Island Shipwrights.
Is there a boat you’d like to know more about? Have you built one that you think other Small Boats readers would enjoy? Please email us your suggestions.
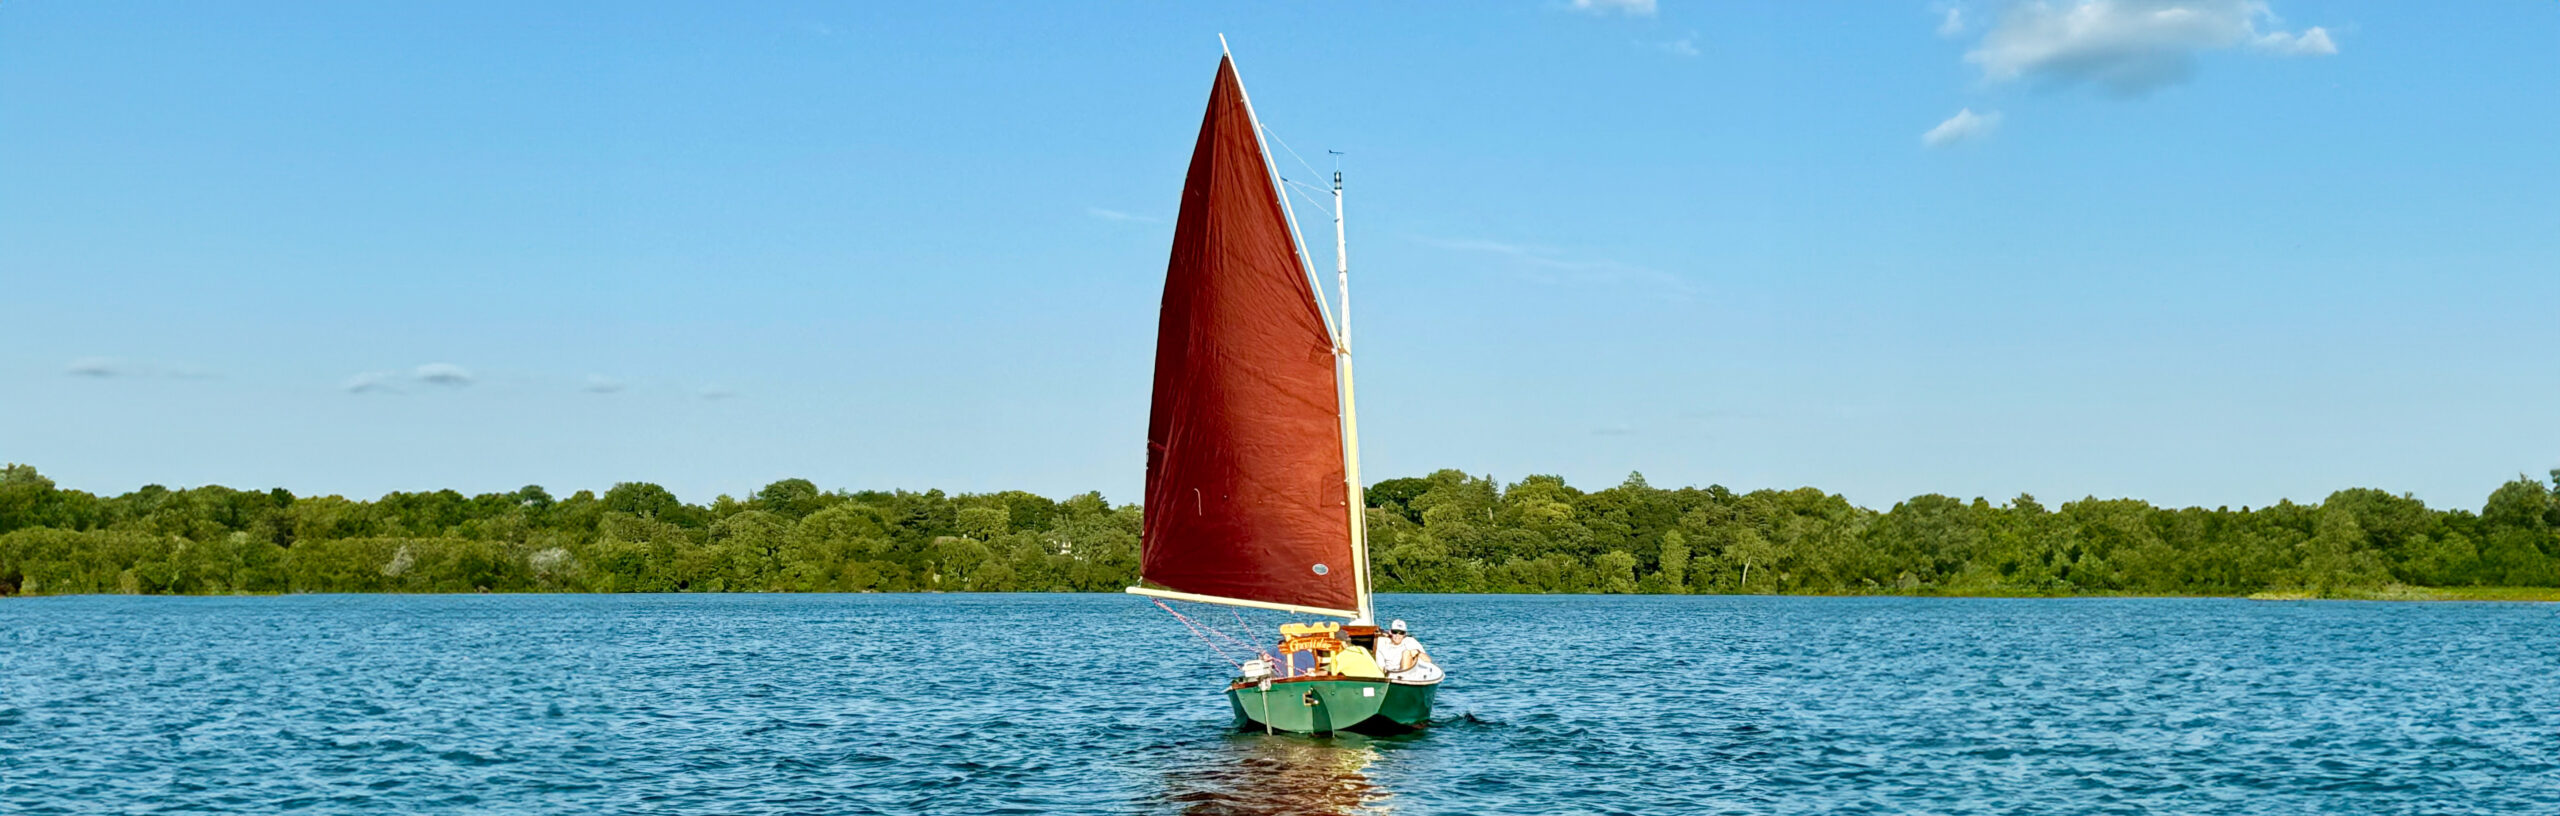
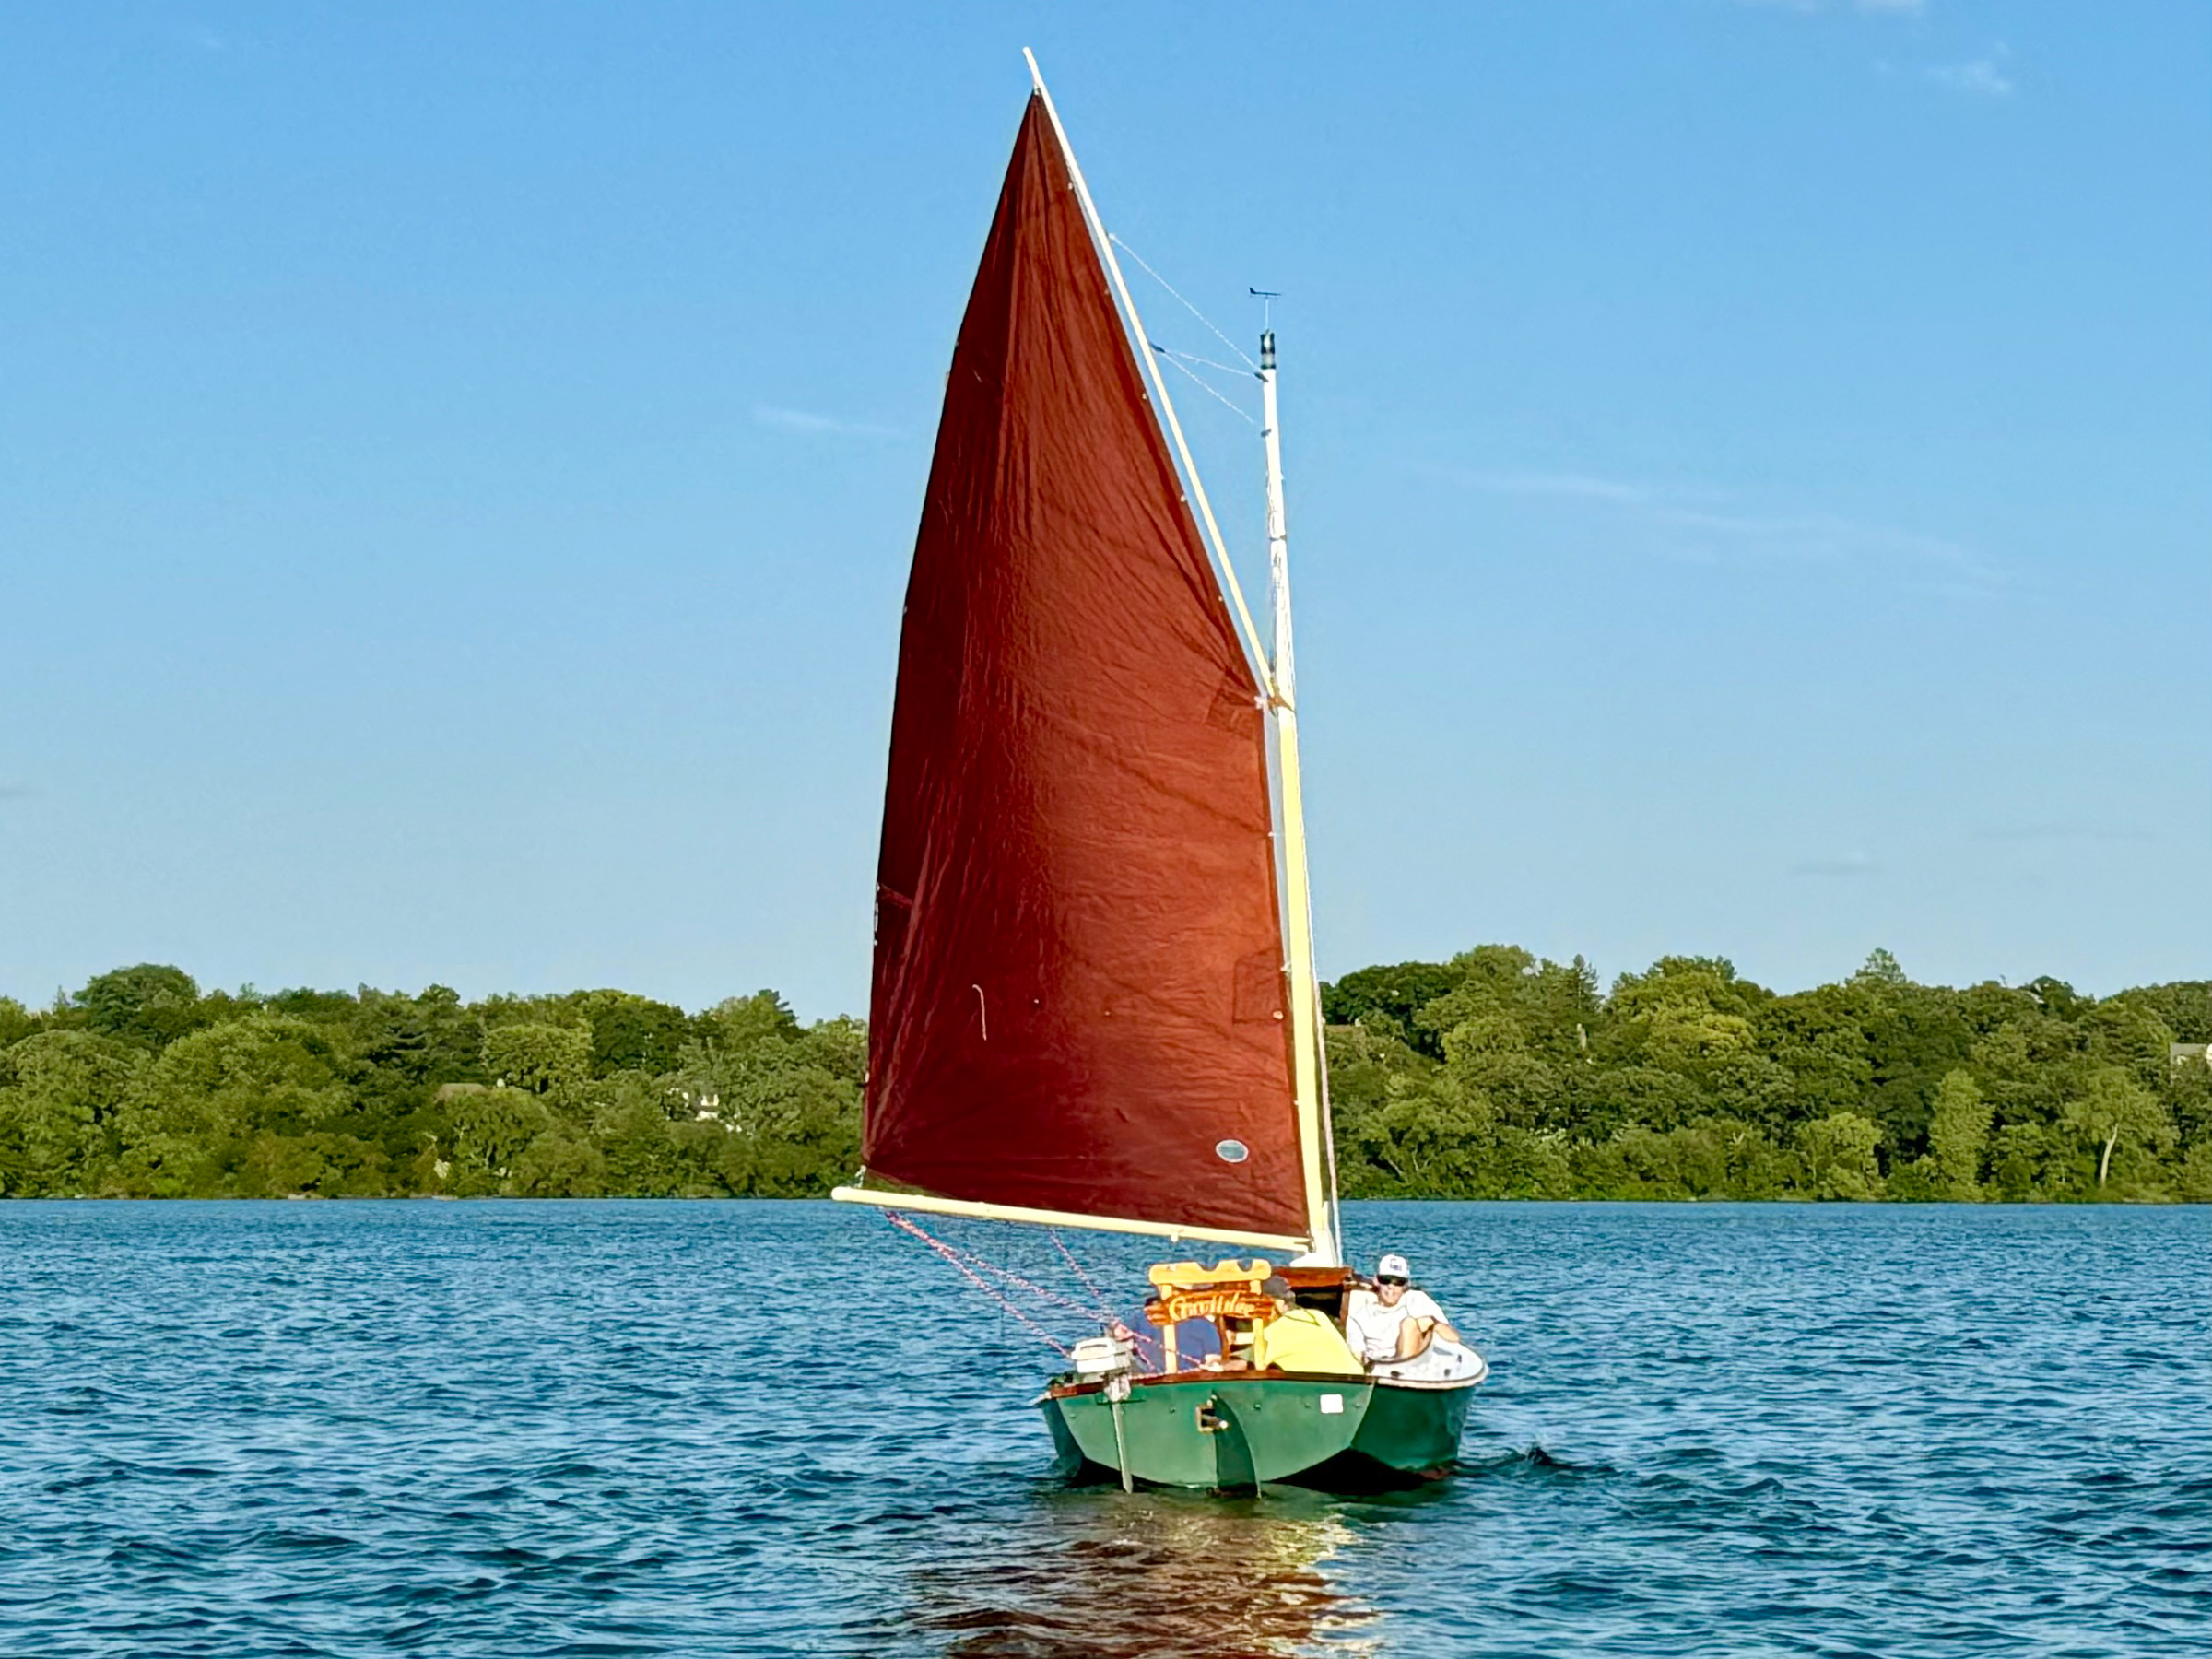
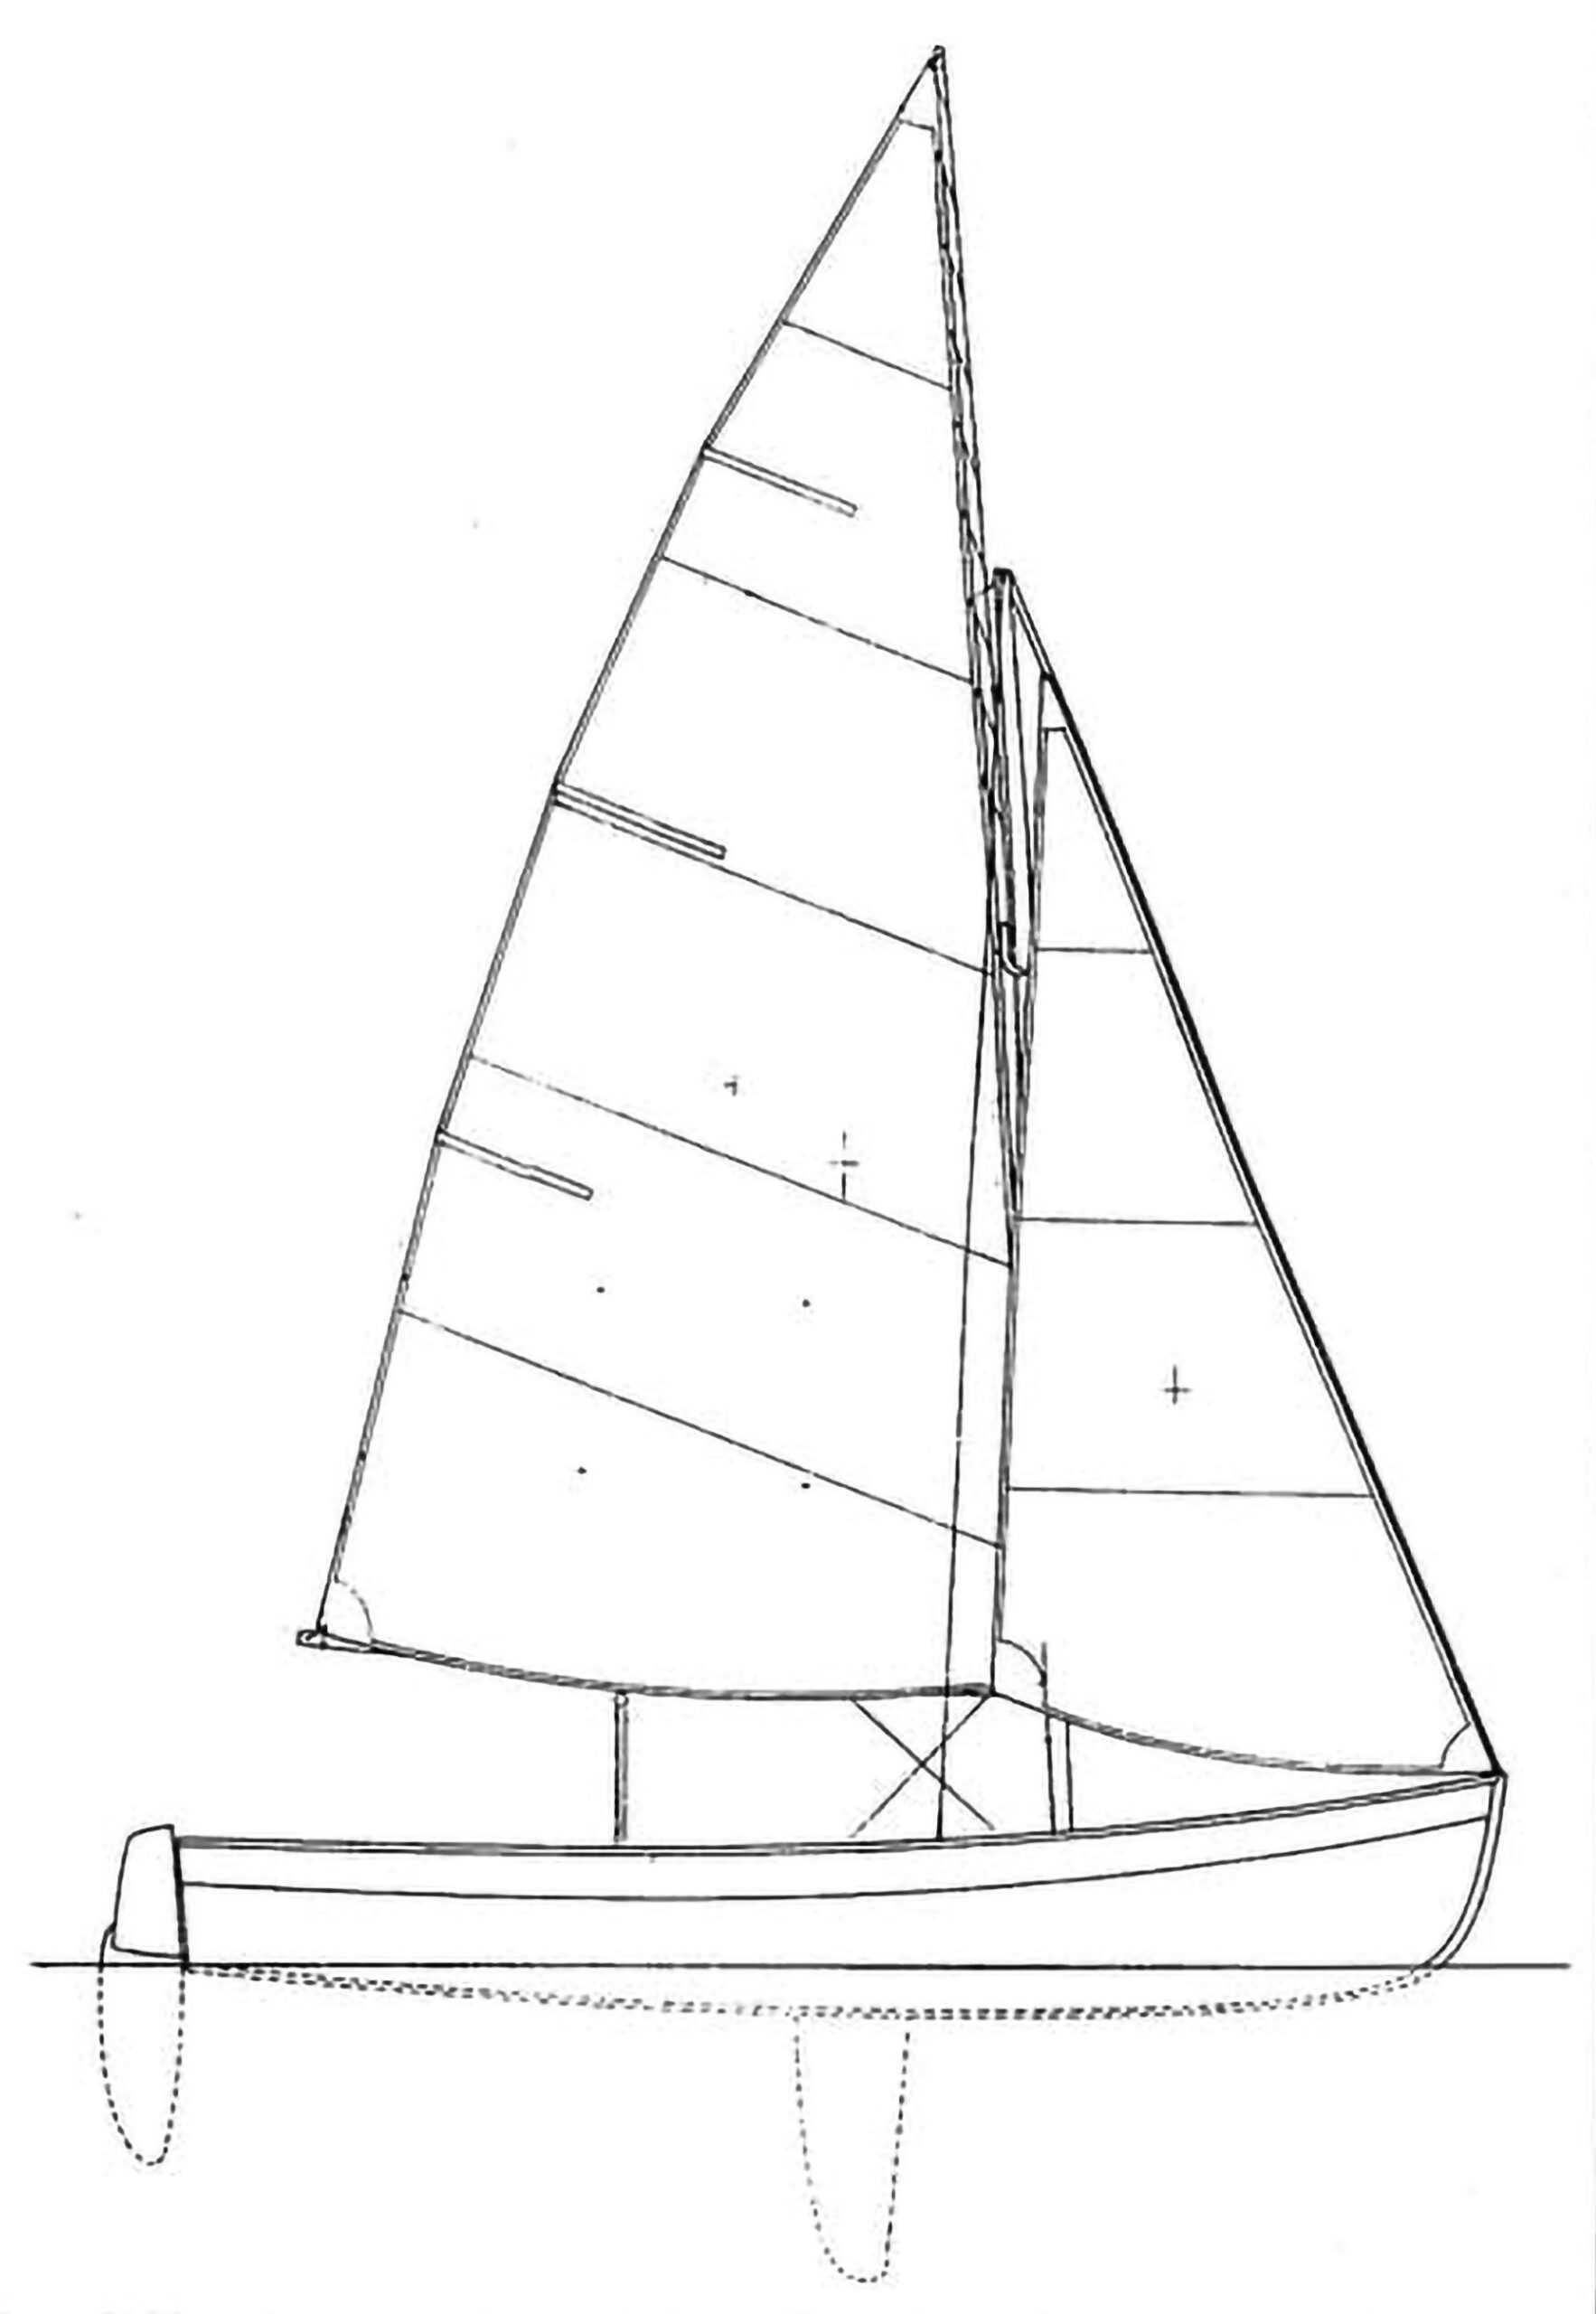
After years of sailing Lake Superior and the Apostle Islands in my 30-footer, I was looking for a trailerable boat that I could sail summers in Minnesota and winters in Florida. My boatbuilding friend Jim Wagner suggested building one—an undertaking I would not have tackled on my own—and so I settled on Charles Wittholz’s “15 Foot Plywood Catboat.”
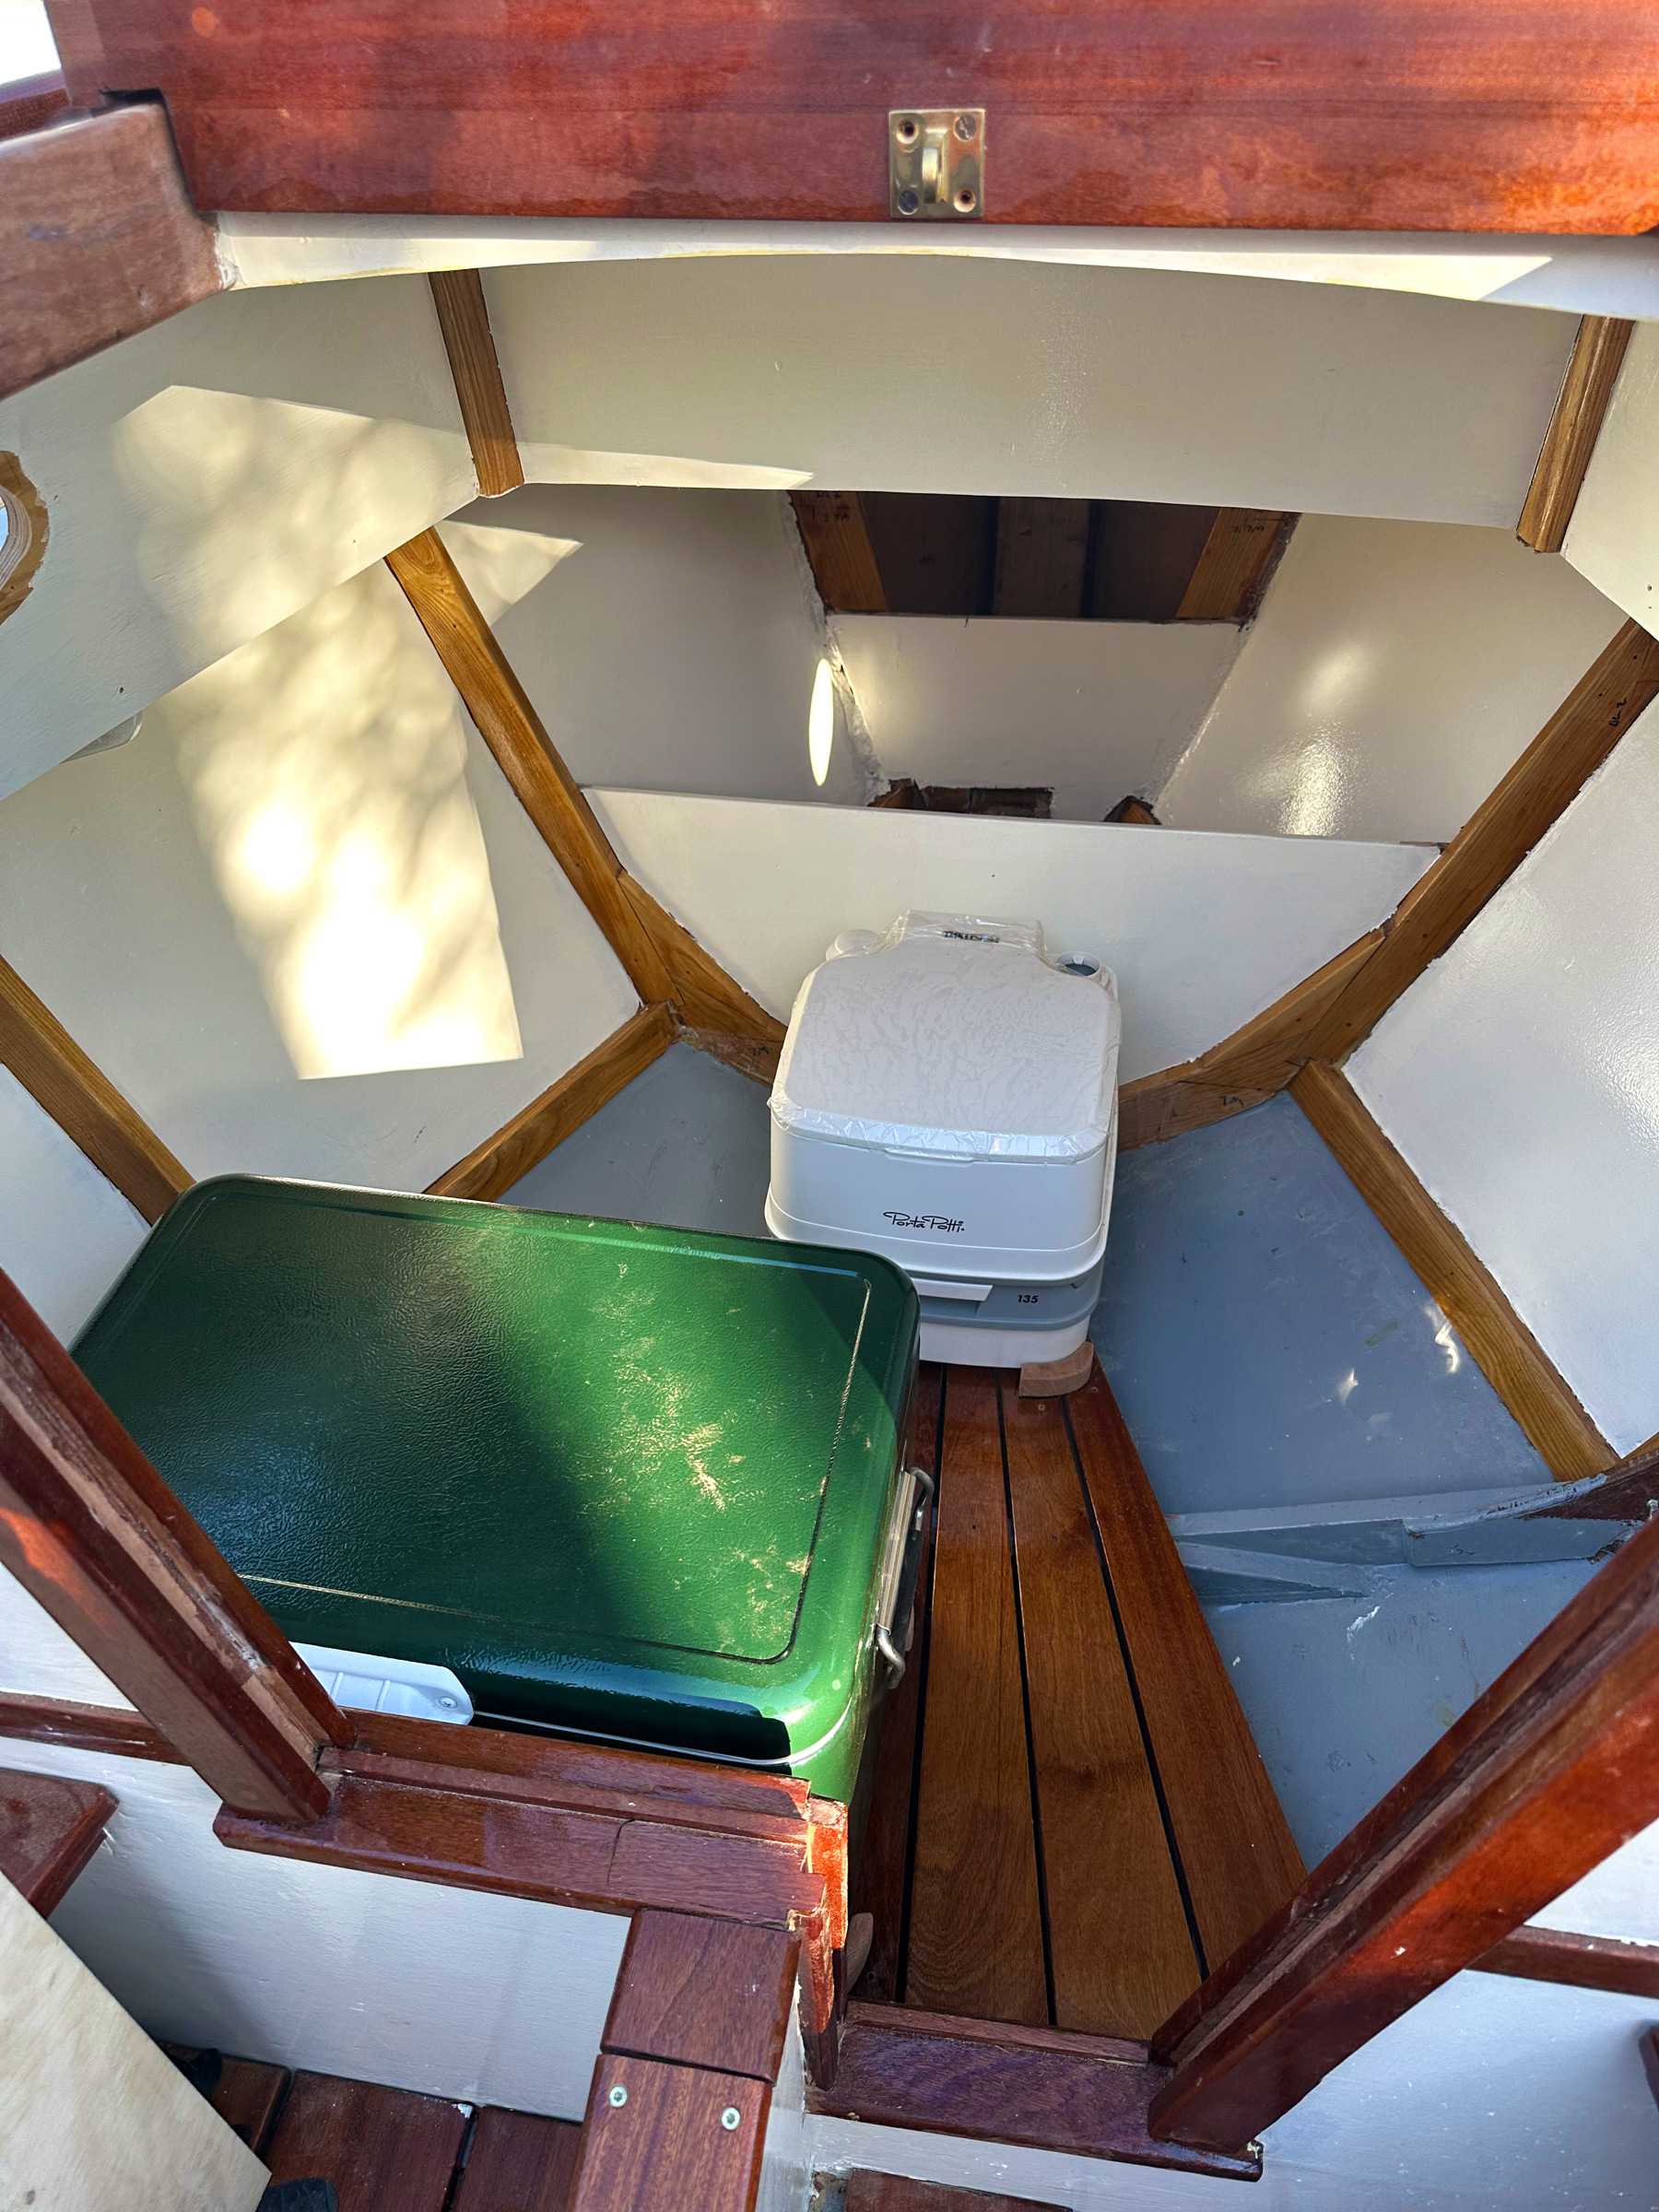
Its gaff rig allows for plenty of sail area (170 sq ft) on a mast only 20′ long. The shallow draft of 18″ (with the centerboard up) is a good match for both Florida’s shallow Gulf waters—where my wife and I sail in the winter—and the city lakes around our summer home in Minneapolis. The mast is stepped far forward, allowing for a generous cockpit that can accommodate six, and a small cuddy cabin with room for a portable head, a large cooler, and storage. A catboat’s beam is traditionally half its length, and our boat follows this rule: 7′ 4″ on her almost 15′ length. A hard chine contributes to the cockpit’s roominess and the boat’s overall stability.
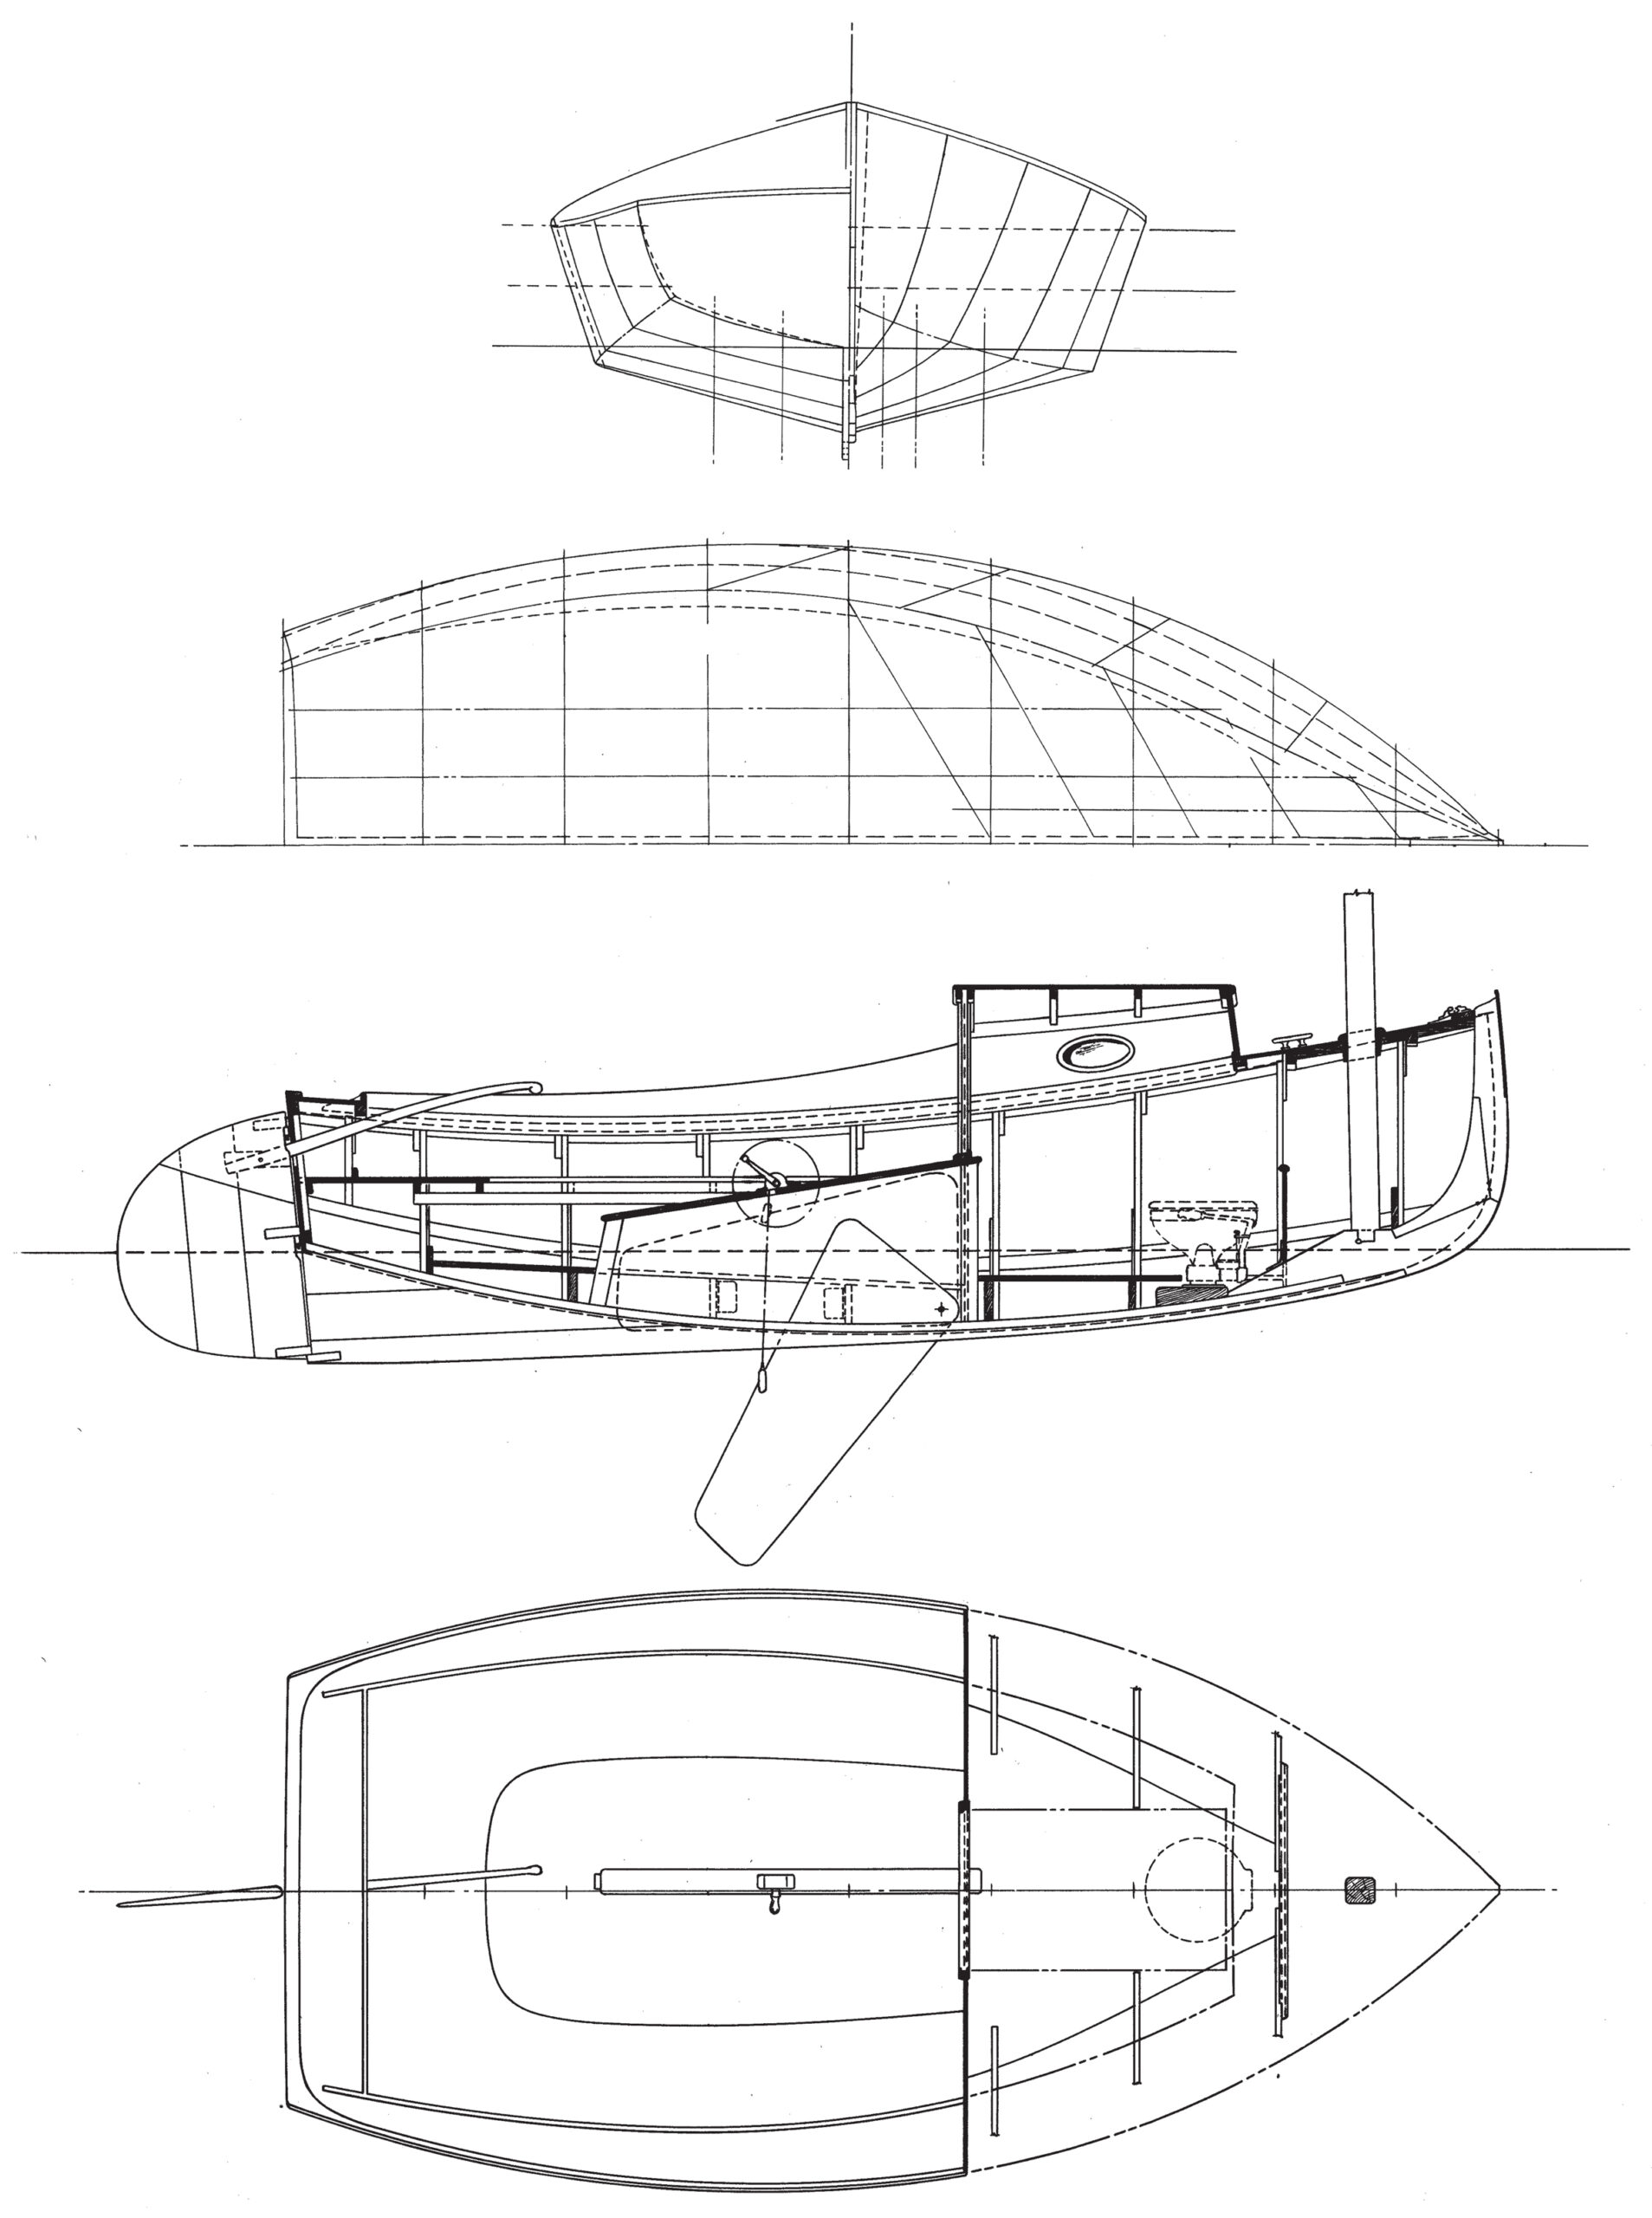
The plans, purchased from The WoodenBoat Store, include a page of notes from the designer and seven sheets of drawings with instructions, two sail plans, offsets for lofting, and options for inboard-engine and fixed-keel versions.
Al Watts
The hull was built upside down of 3⁄8″ okoume plywood on ash. The plans show the stem built in three pieces—stem, knee, and gripe—but we assembled it in one piece and shaped it with chisels and power planes.
Building the Wittholz 15
After Jim and I had built the strongback, we lofted the frames onto a 4′ × 8′ plywood sheet from the provided offsets. We used a different-colored marker for each frame and drew out the patterns from which to fashion and assemble the nine frames.
Once the frames were assembled, we temporarily fastened them to the strongback, then fitted the chines, sheer stringers, and keelson, for which we used ash in lieu of the Douglas fir or Philippine mahogany specified in the plans. The catboat’s stem is drawn with three pieces—stem, knee, and gripe—but we made it in one piece by stacking five layers of ash with staggered butt joints. Lots of chiseling and power planing were required to rough out the bevels for the plank ends.
While the detail of the plans and instructional notes were sufficient, some things are left to the builder’s choice. This was no problem for my boatbuilding partner, Jim, but it would have left an amateur like me scratching my head. However, under Jim’s guidance I was able to fill in the gaps in the information and even to make some of my own modifications.
Asli Iskeceli
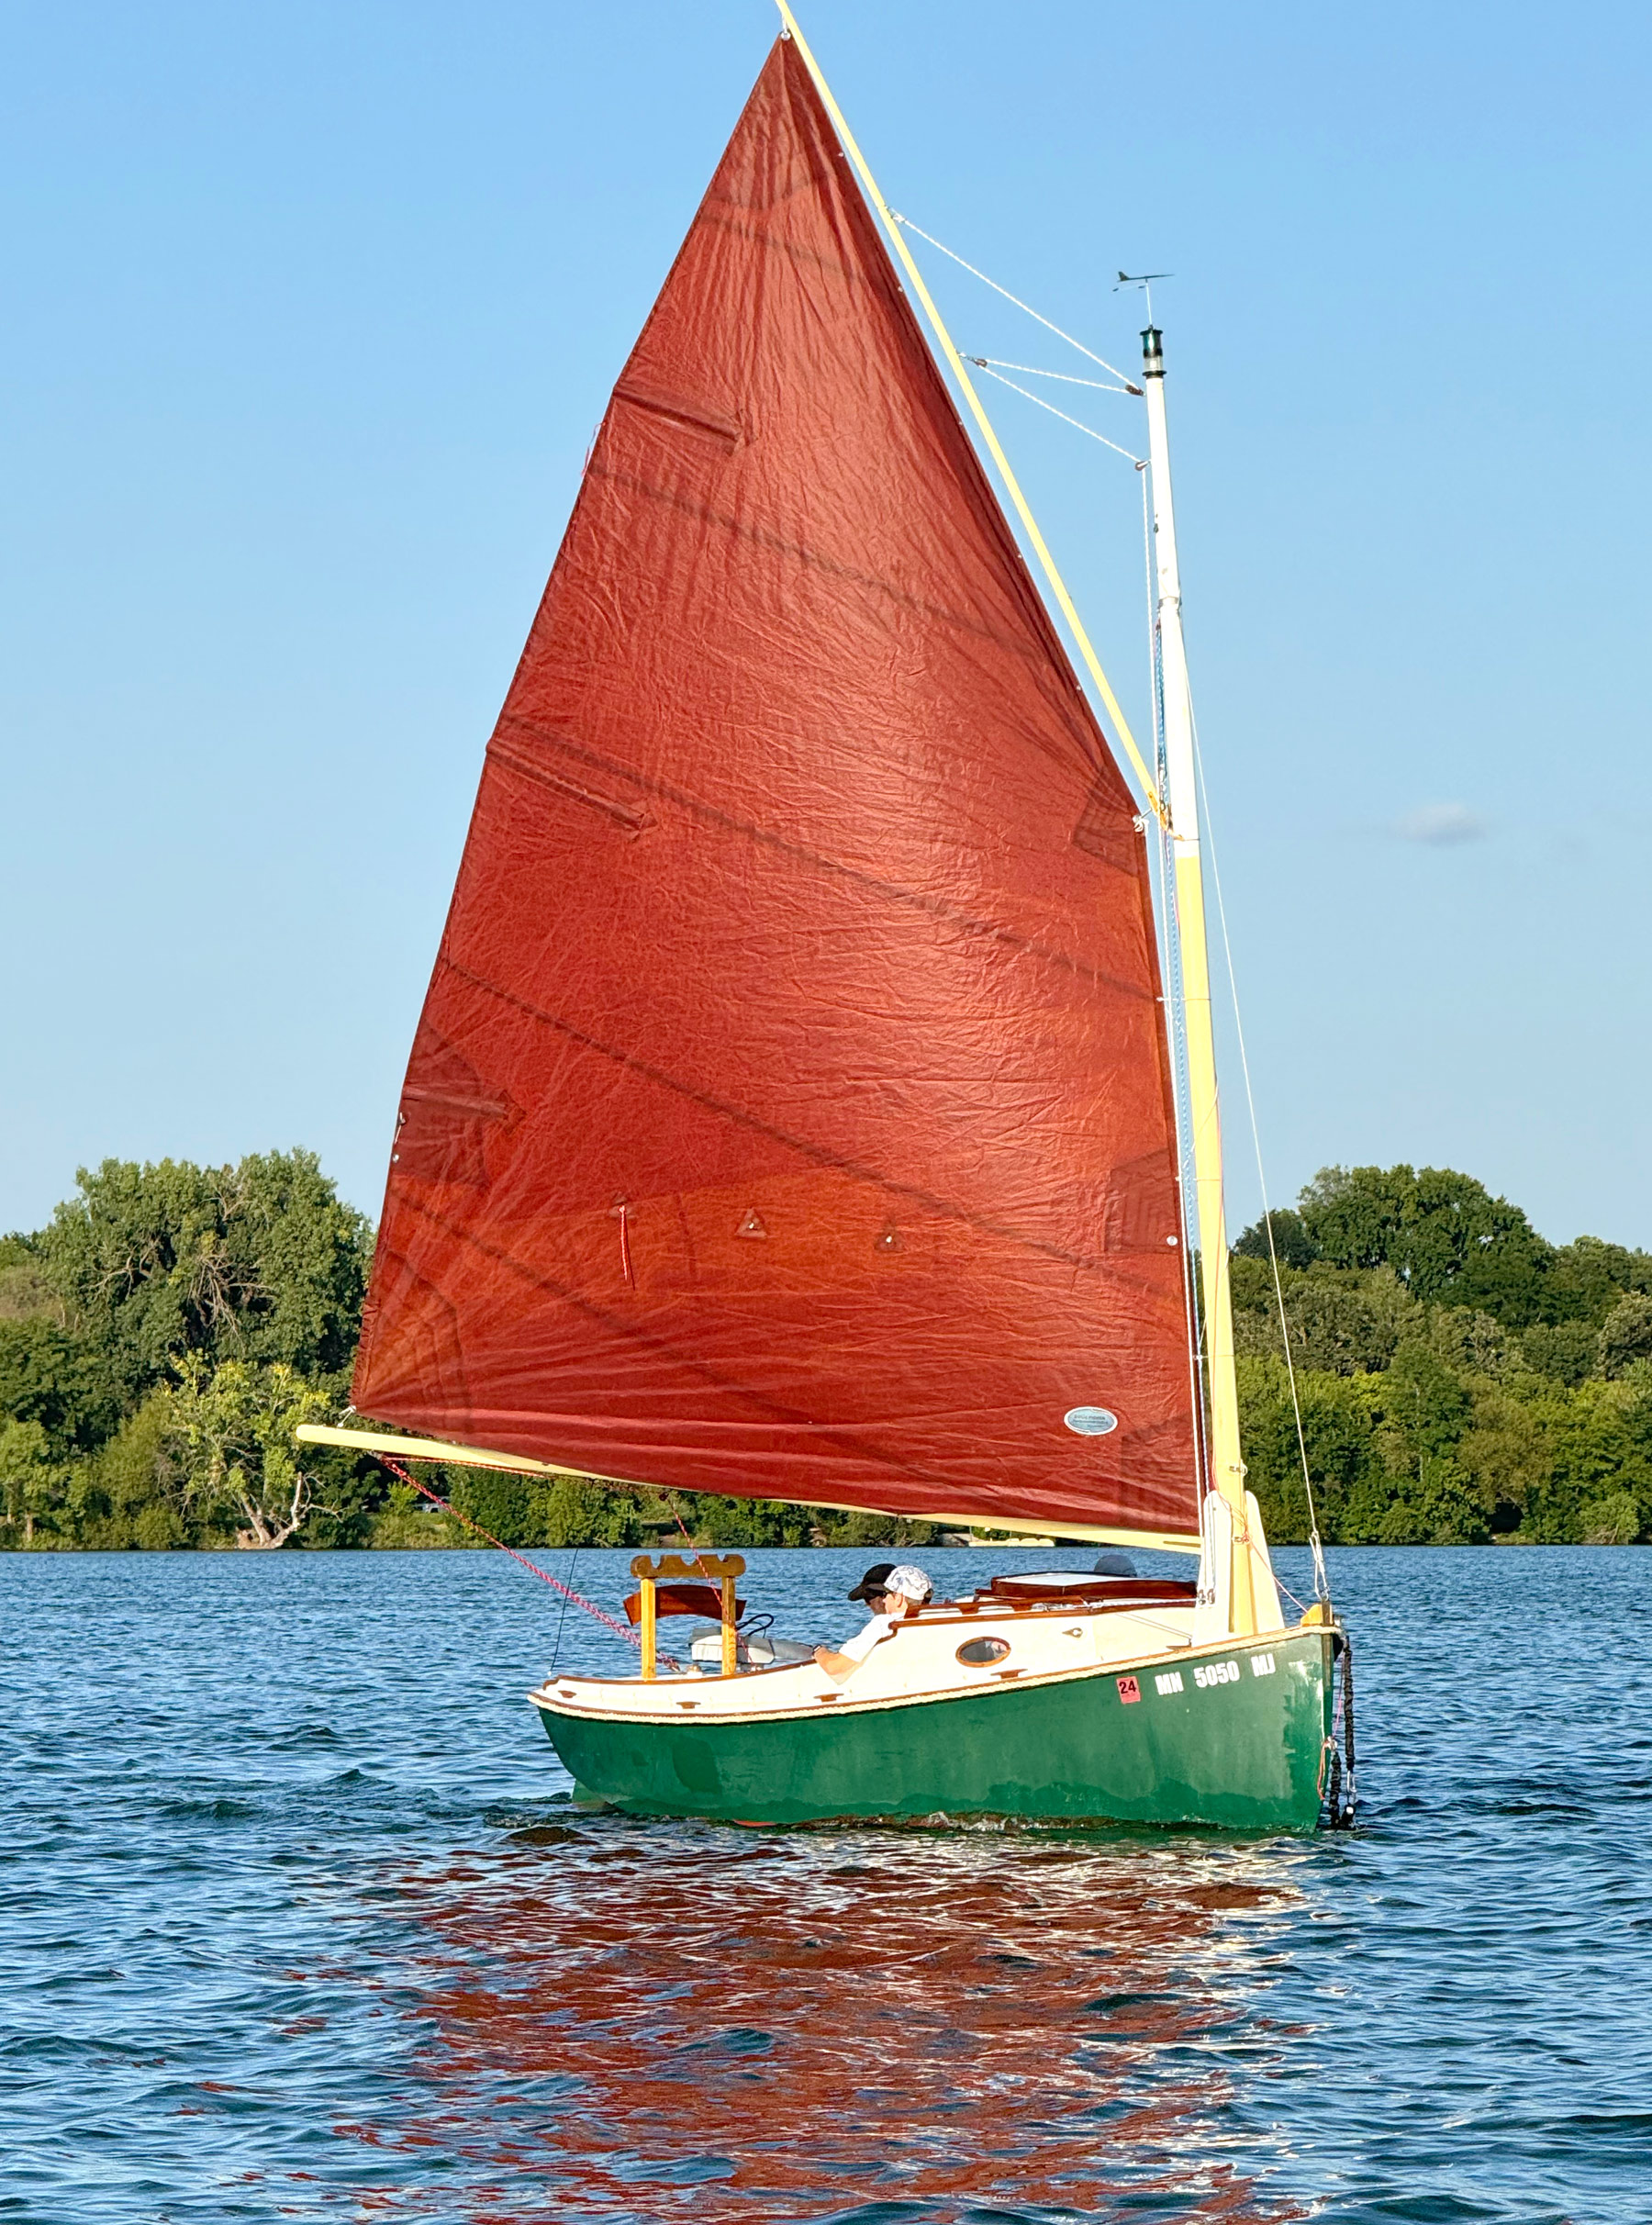
The plans offer lug or gaff sail plans. We chose the latter and have found the boat to be responsive, stable, and remarkably close winded.
The plans called for a 100-lb retractable 3⁄8″ galvanized steel-plate centerboard; we replaced it with one made of epoxied ash sections. We routed out a hole at the bottom of the board into which we poured 20 lbs of melted lead. I’ve found that this weight is sufficient to lower the board, and light enough that we don’t need a winch to lift it back up.
Wittholz specified traditional Sitka-spruce mast and spars, but instead, I custom-ordered a carbon-fiber mast and spars from Forte, a carbon-fiber tubing manufacturer in Ledyard, Connecticut. This reduced the mast’s weight from more than 50 lbs to around 20 lbs, which allows me to raise and lower it on my own.
The catboat’s transom is 1⁄2″ plywood framed with 7⁄8″ ash. The sides and bottom of the hull are planked with six sheer-to-chine and chine-to-keelson sheets of 3⁄8″ okoume plywood—two sheets for each side and two for the bottom. To build the hull, we first bent inexpensive thin plywood sheets onto the strongback and frame and cut them to create templates. Then, using the templates, we cut the hull bottom and side panels out of the 3⁄8″ okoume plywood. We then temporarily fastened the okoume panels into place, traced the fastening surfaces along the longitudinals, and then removed the panels.
Al Watts
The cuddy cabin provides shelter from inclement weather, some stowage space, and privacy when using the head.
Wittholz designed the boat in the 1960s, before the popular use of epoxy, and his plans called for bedding compound on all faying surfaces. We applied thickened epoxy to those surfaces before reinstalling the panels, again temporarily fastening them to the longitudinals with construction screws. Once the epoxy had hardened, we removed the screws. Construction of the keel followed, again using laminated ash with staggered butt joints.
About 400 hours into our build, we freed the hull from the strongback and flipped it right-side up onto the trailer for completion. This included construction of the centerboard trunk and barn-door rudder. For the rudder, the plans indicate three vertical pieces of 2″ mahogany or white oak, edge-bolted together and then tapered to a 1⁄2″ trailing edge. We edge-glued seven shaped horizontal pieces of 2″ ash, finishing the blade with a power planer and lots of sanding.
Al Watts
Six people can sit in the cockpit in comfort and even the centerboard trunk doesn’t get in the way. Yet, when sailing singlehanded everything is within easy reach. The boom crutch has been a useful addition when raising and lowering the sail, and we fitted lazyjacks to catch the sail and keep it out of the cockpit as it comes down.
Any permanent screws used in the construction were stainless-steel, or bronze if they were visible. J.M. Reineck and Son fashioned the catboat’s gooseneck, and the rudder’s pintles and gudgeons. The Wittholz 15 plan calls for 300 lbs of ballast in small lead pigs placed between frames 5 and 6. Lead is expensive, but I was fortunate that a friend of Jim’s had just retired his larger boat and offered us whatever lead bricks we needed. We positioned ten 30-lb bricks in the bilge with ash supports to prevent ballast movement; straps secured each brick in place and allowed for easy removal for maintenance. Durable Tufnol blocks from R&W Rope were a fraction of the cost of wooden blocks and require little maintenance. The rest of the hardware and fittings were readily available from West Marine and local hardware stores.
Launching the Wittholz 15, GAVIIDAE
The catboat first touched water in a Wisconsin lake before completion and without its rig; it was watertight and glided along nicely, powered by its auxiliary Torqeedo 1103, a 3-hp electric long-shaft outboard. While trailering it to Florida for completion, hardly a stop for gas went by without drawing admiration, curiosity, and questions.
By the time we returned to Florida for our second winter there, we had completed the rig and were finally able to raise the catboat’s tanbark sails from Performance Sailing. All that remained was to paint the interior of the cabin, varnish the mahogany seats, flooring and trim, make some rigging adjustments, attach the catboat’s decorative nameboard, paint the spars, and install the homemade mahogany cleats.
Asli Iskeceli
We christened the boat GAVIIDAE (from the Latin genus, Gavia, and family, Gaviidae, for members of the loon species) and sail her on both lake and Gulf Coast waters. Her large sail moves her in all but the slightest of breezes, and the 3-hp Torqueedo 1103 gives us good auxiliary power when the wind fails completely or we’re maneuvering alongside a dock or into a ramp.
Our Wittholz catboat took her first sail in Charlotte Harbor, Punta Gorda, Florida. In an 8- to 10-mph wind, she performed beautifully, achieving about 5 knots with a moderate heel, she was very stable and tacked surprisingly close (we estimated about 30°) to the wind. When we dropped the sail, it bunched over the boom and fell into the cockpit, limiting our visibility, so we later added lazyjacks.
On our return to the Midwest, we installed electrics including bronze navigation lights from J.M. Reineck, and a tricolor masthead light, all powered by a 12V battery. Back on Lake Superior, two other couples joined us for a sail, and we found the cockpit plenty spacious and comfortable for six people.
Building the catboat was an investment of money and time, but the experience was priceless. As a beginner boatbuilder I definitely needed the experience and assistance of my friend, as well as access to his well-appointed shop. The boat’s performance has lived up to all my hopes. If you are looking for a generous cockpit, a small cabin for storage, privacy, and shelter from bad weather, a boat that you can singlehand, that has classic lines, and is well suited to trailer-sailing, then Charles Wittholz’s “15 Foot Plywood Catboat” is the ideal boat.
Al Watts tapped a lifelong interest in sailing later in life, first learning on small lake scows, then getting certified for bareboat chartering, then sailing his own sloop, LOON, on Lake Superior. He, his wife, and friends sail GAVIIDAE on Lake Harriet in Minneapolis and Florida’s Gulf Coast bays. Members of his Twin Cities Sailing Club enjoy the experience of a Cape Cod catboat, highly unusual in Minnesota waters.
Is there a boat you’d like to know more about? Have you built one that you think other Small Boats readers would enjoy? Please email us your suggestions.
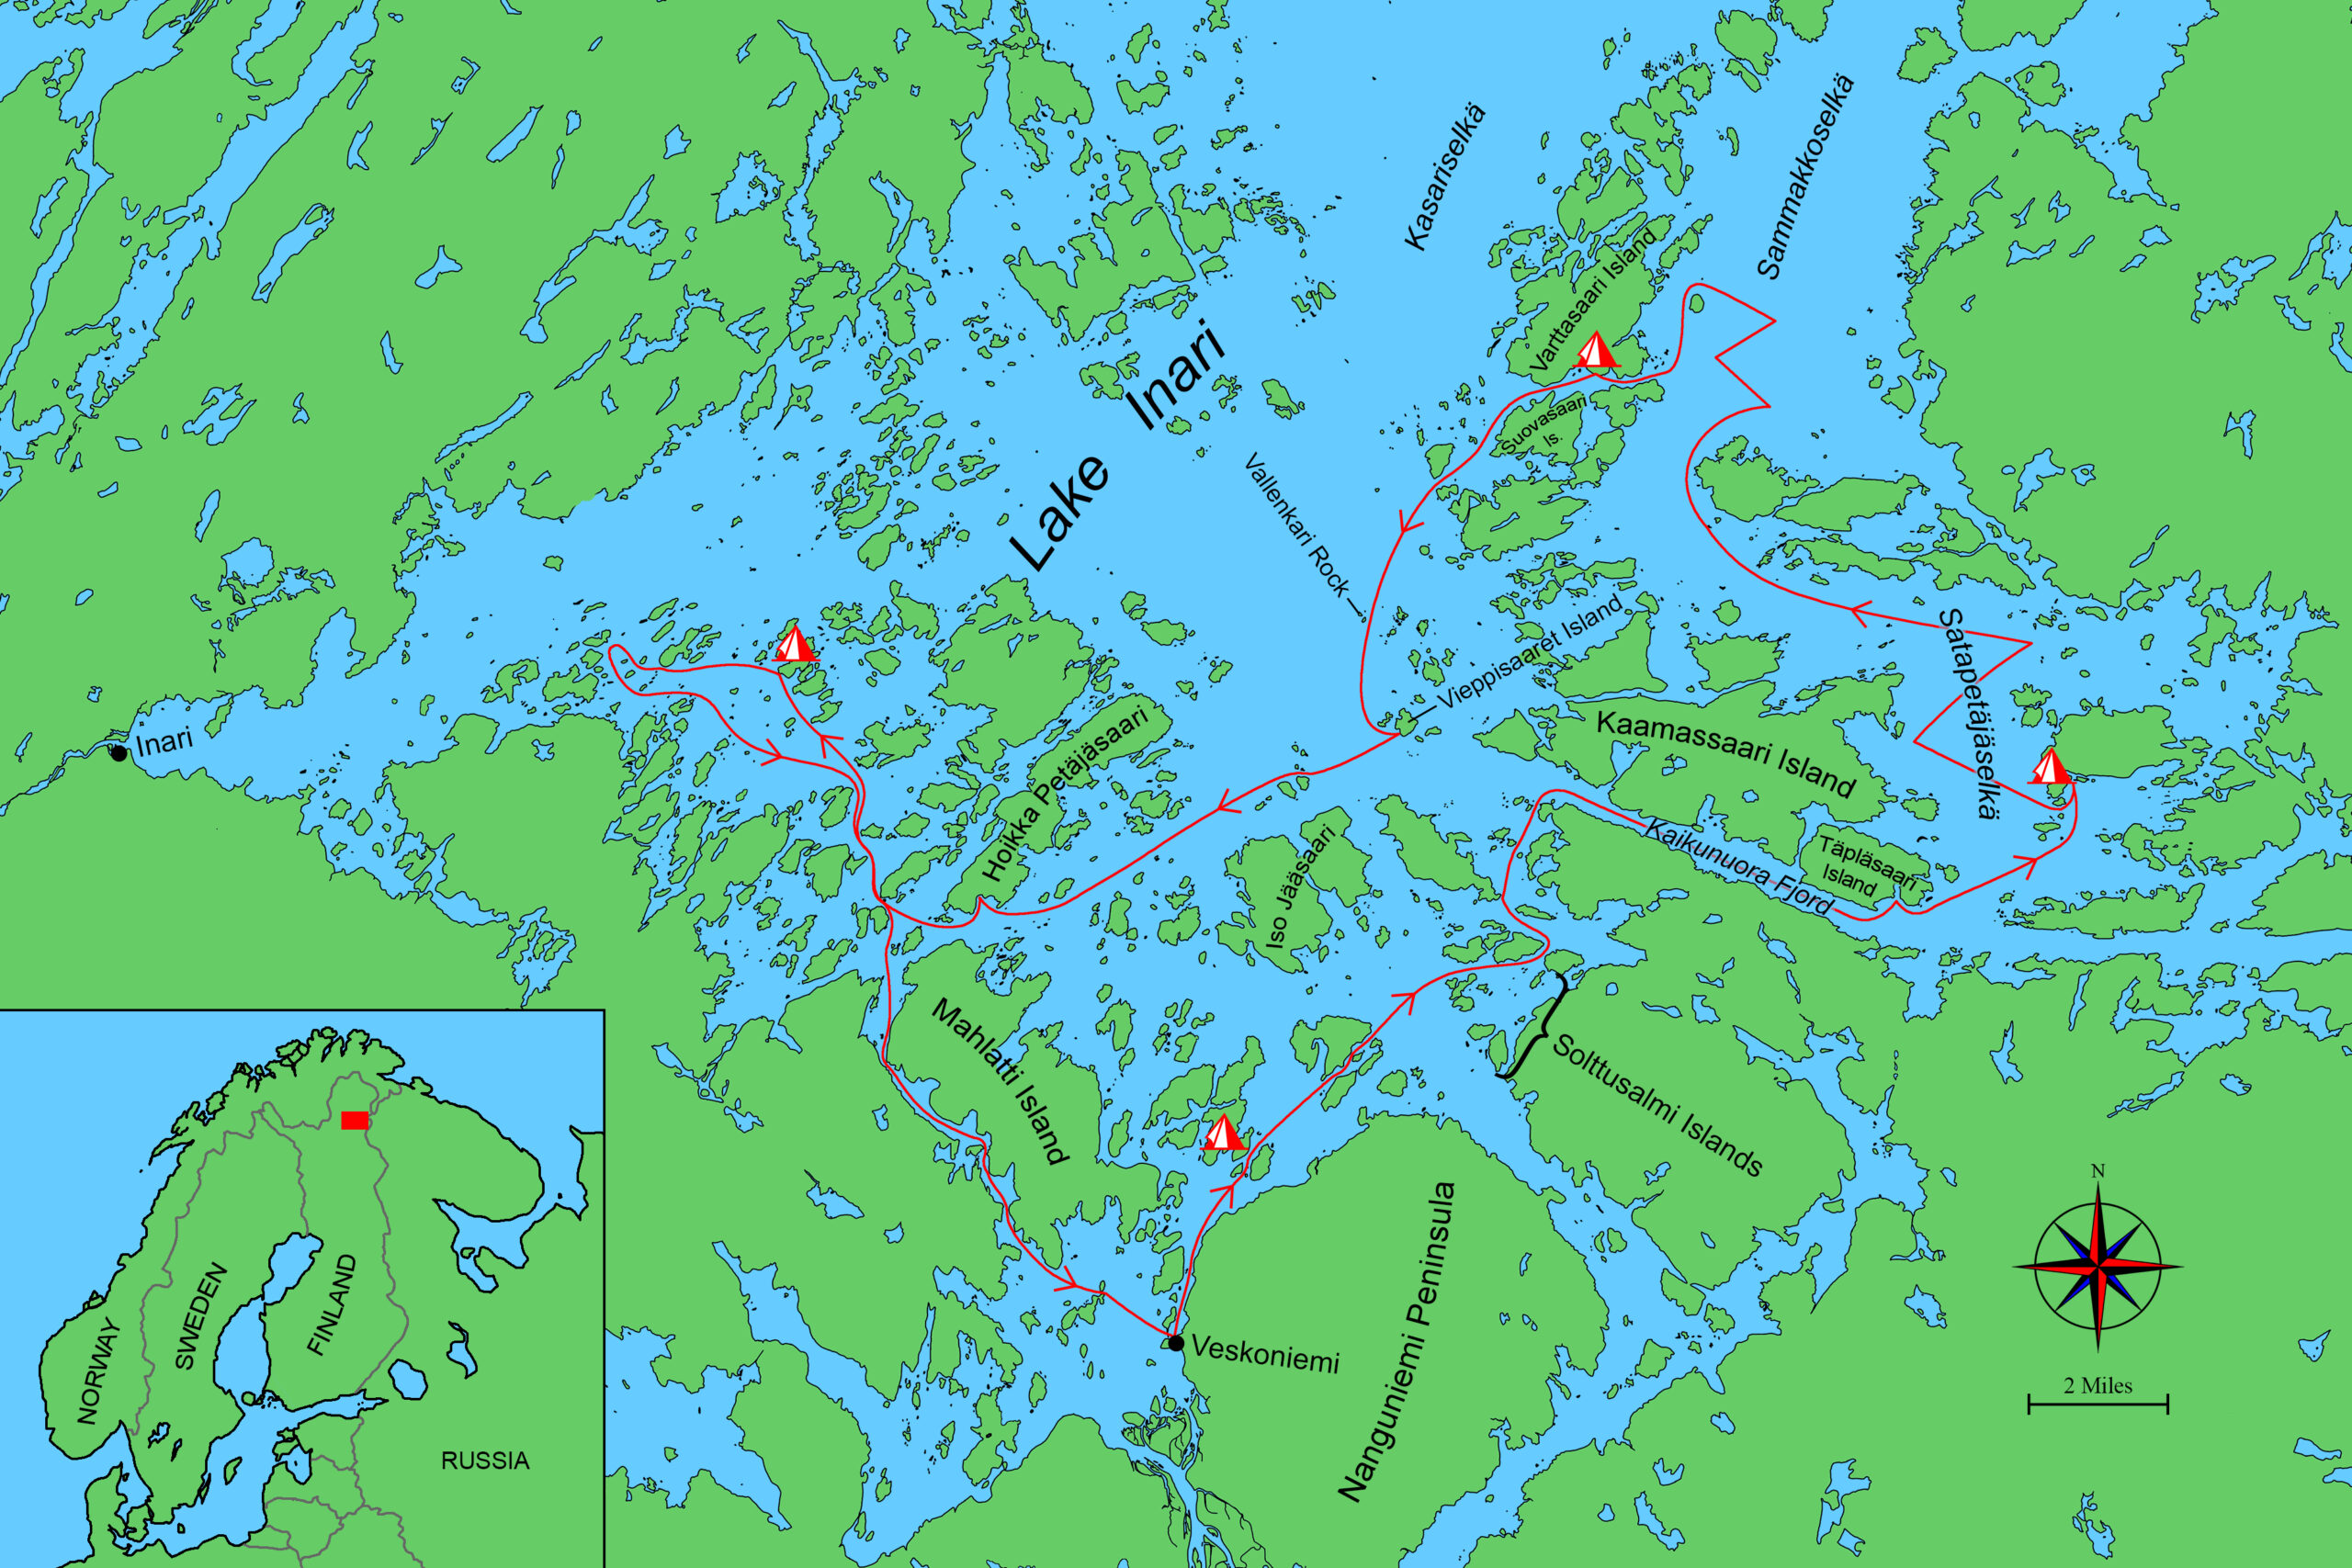
After more than 12 hours’ driving, plus an overnight camping stop on route, my daughter and I finally arrived at the small remote harbor of Veskoniemi on the southern shore of Lake Inari—our cruising ground for the next four days. Lake Inari is the third largest lake in Finland and lies above the Arctic Circle in Northern Lapland. Its 420 square miles stretch from the village of Inari in the west to the Russian border in the east, and to the Vätskär wilderness reserve 43 miles northeast of Veskoniemi. The lake is dotted with more than 3,000 islands and has several wide-open stretches of water that can be hazardous for small vessels in strong winds.
I had visited the lake by myself once before, when my daughter and namesake of the lake, Inari, was three years old. I had vowed to return with a suitable sailboat and to bring Inari with me so she could experience for herself the beauty, size, and untamed wilderness of the lake. The water is clear and drinkable with a healthy fish stock; the islands and shores are austere and unspoiled.
Photographs by the author
We set sail from Veskoniemi in the late afternoon after a 12-hour drive. It was the perfect weather for our departure, and even though it was already after 5 p.m. there would be about six more hours of sunlight.
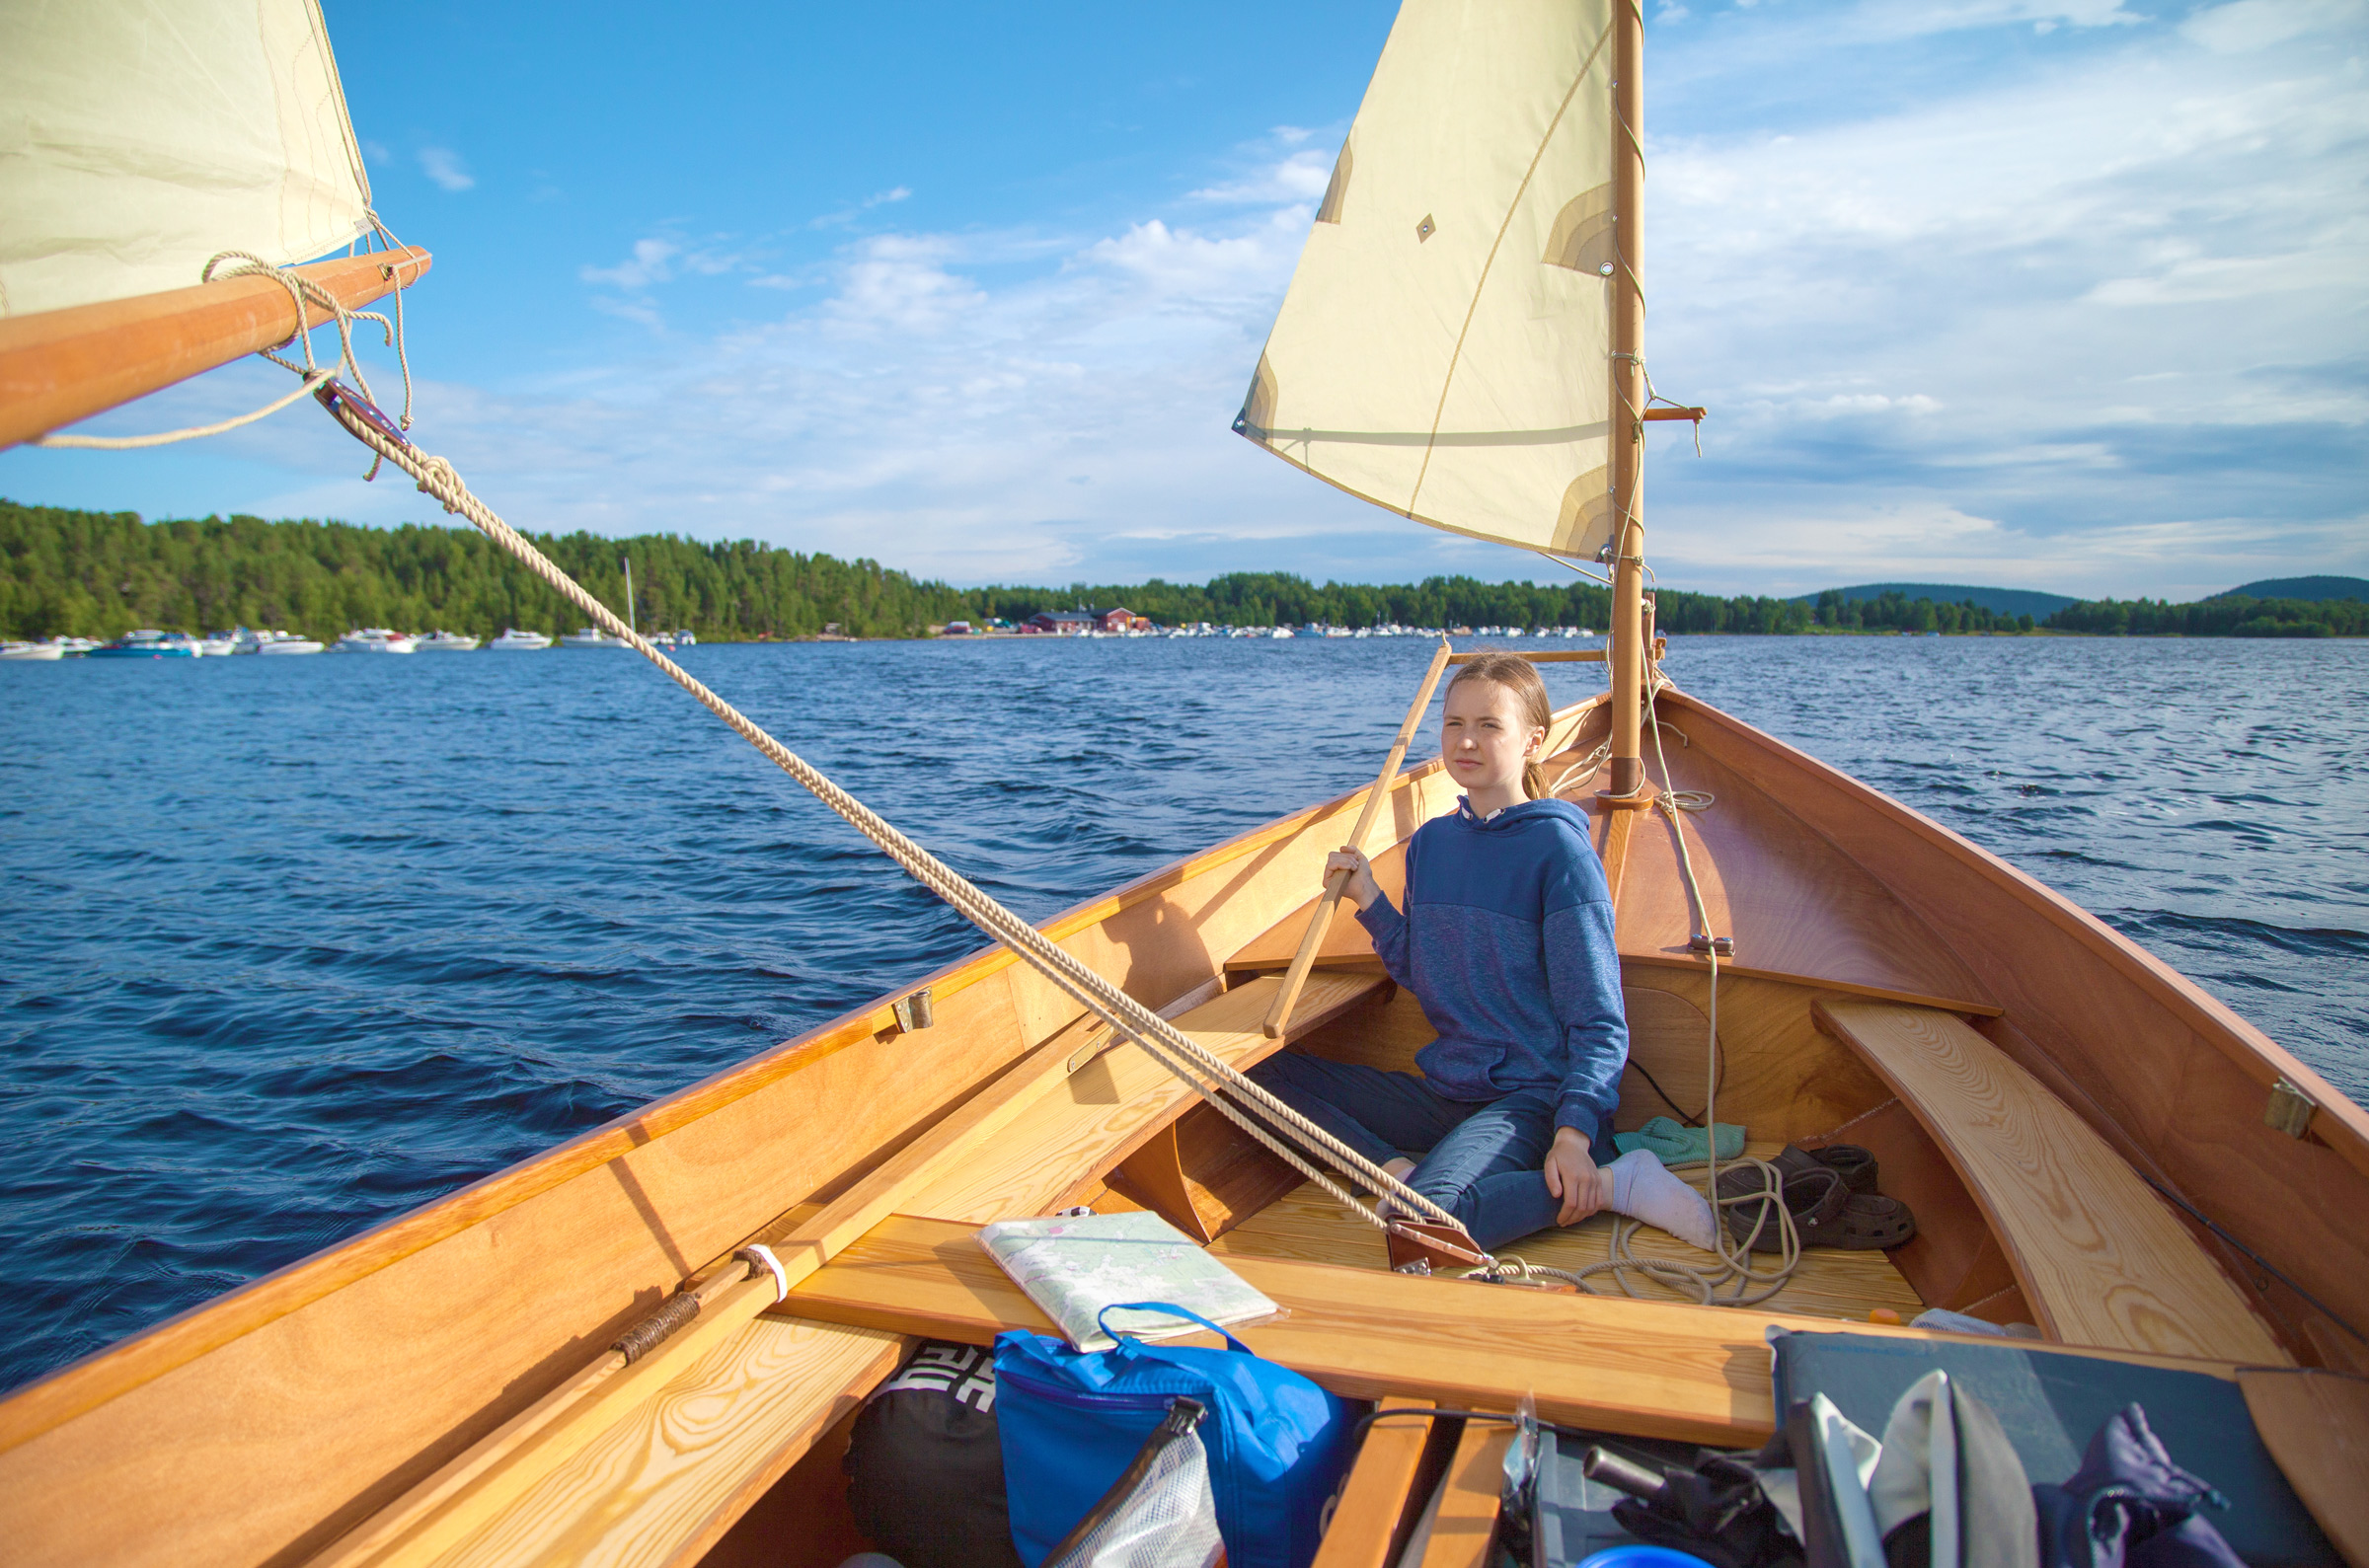
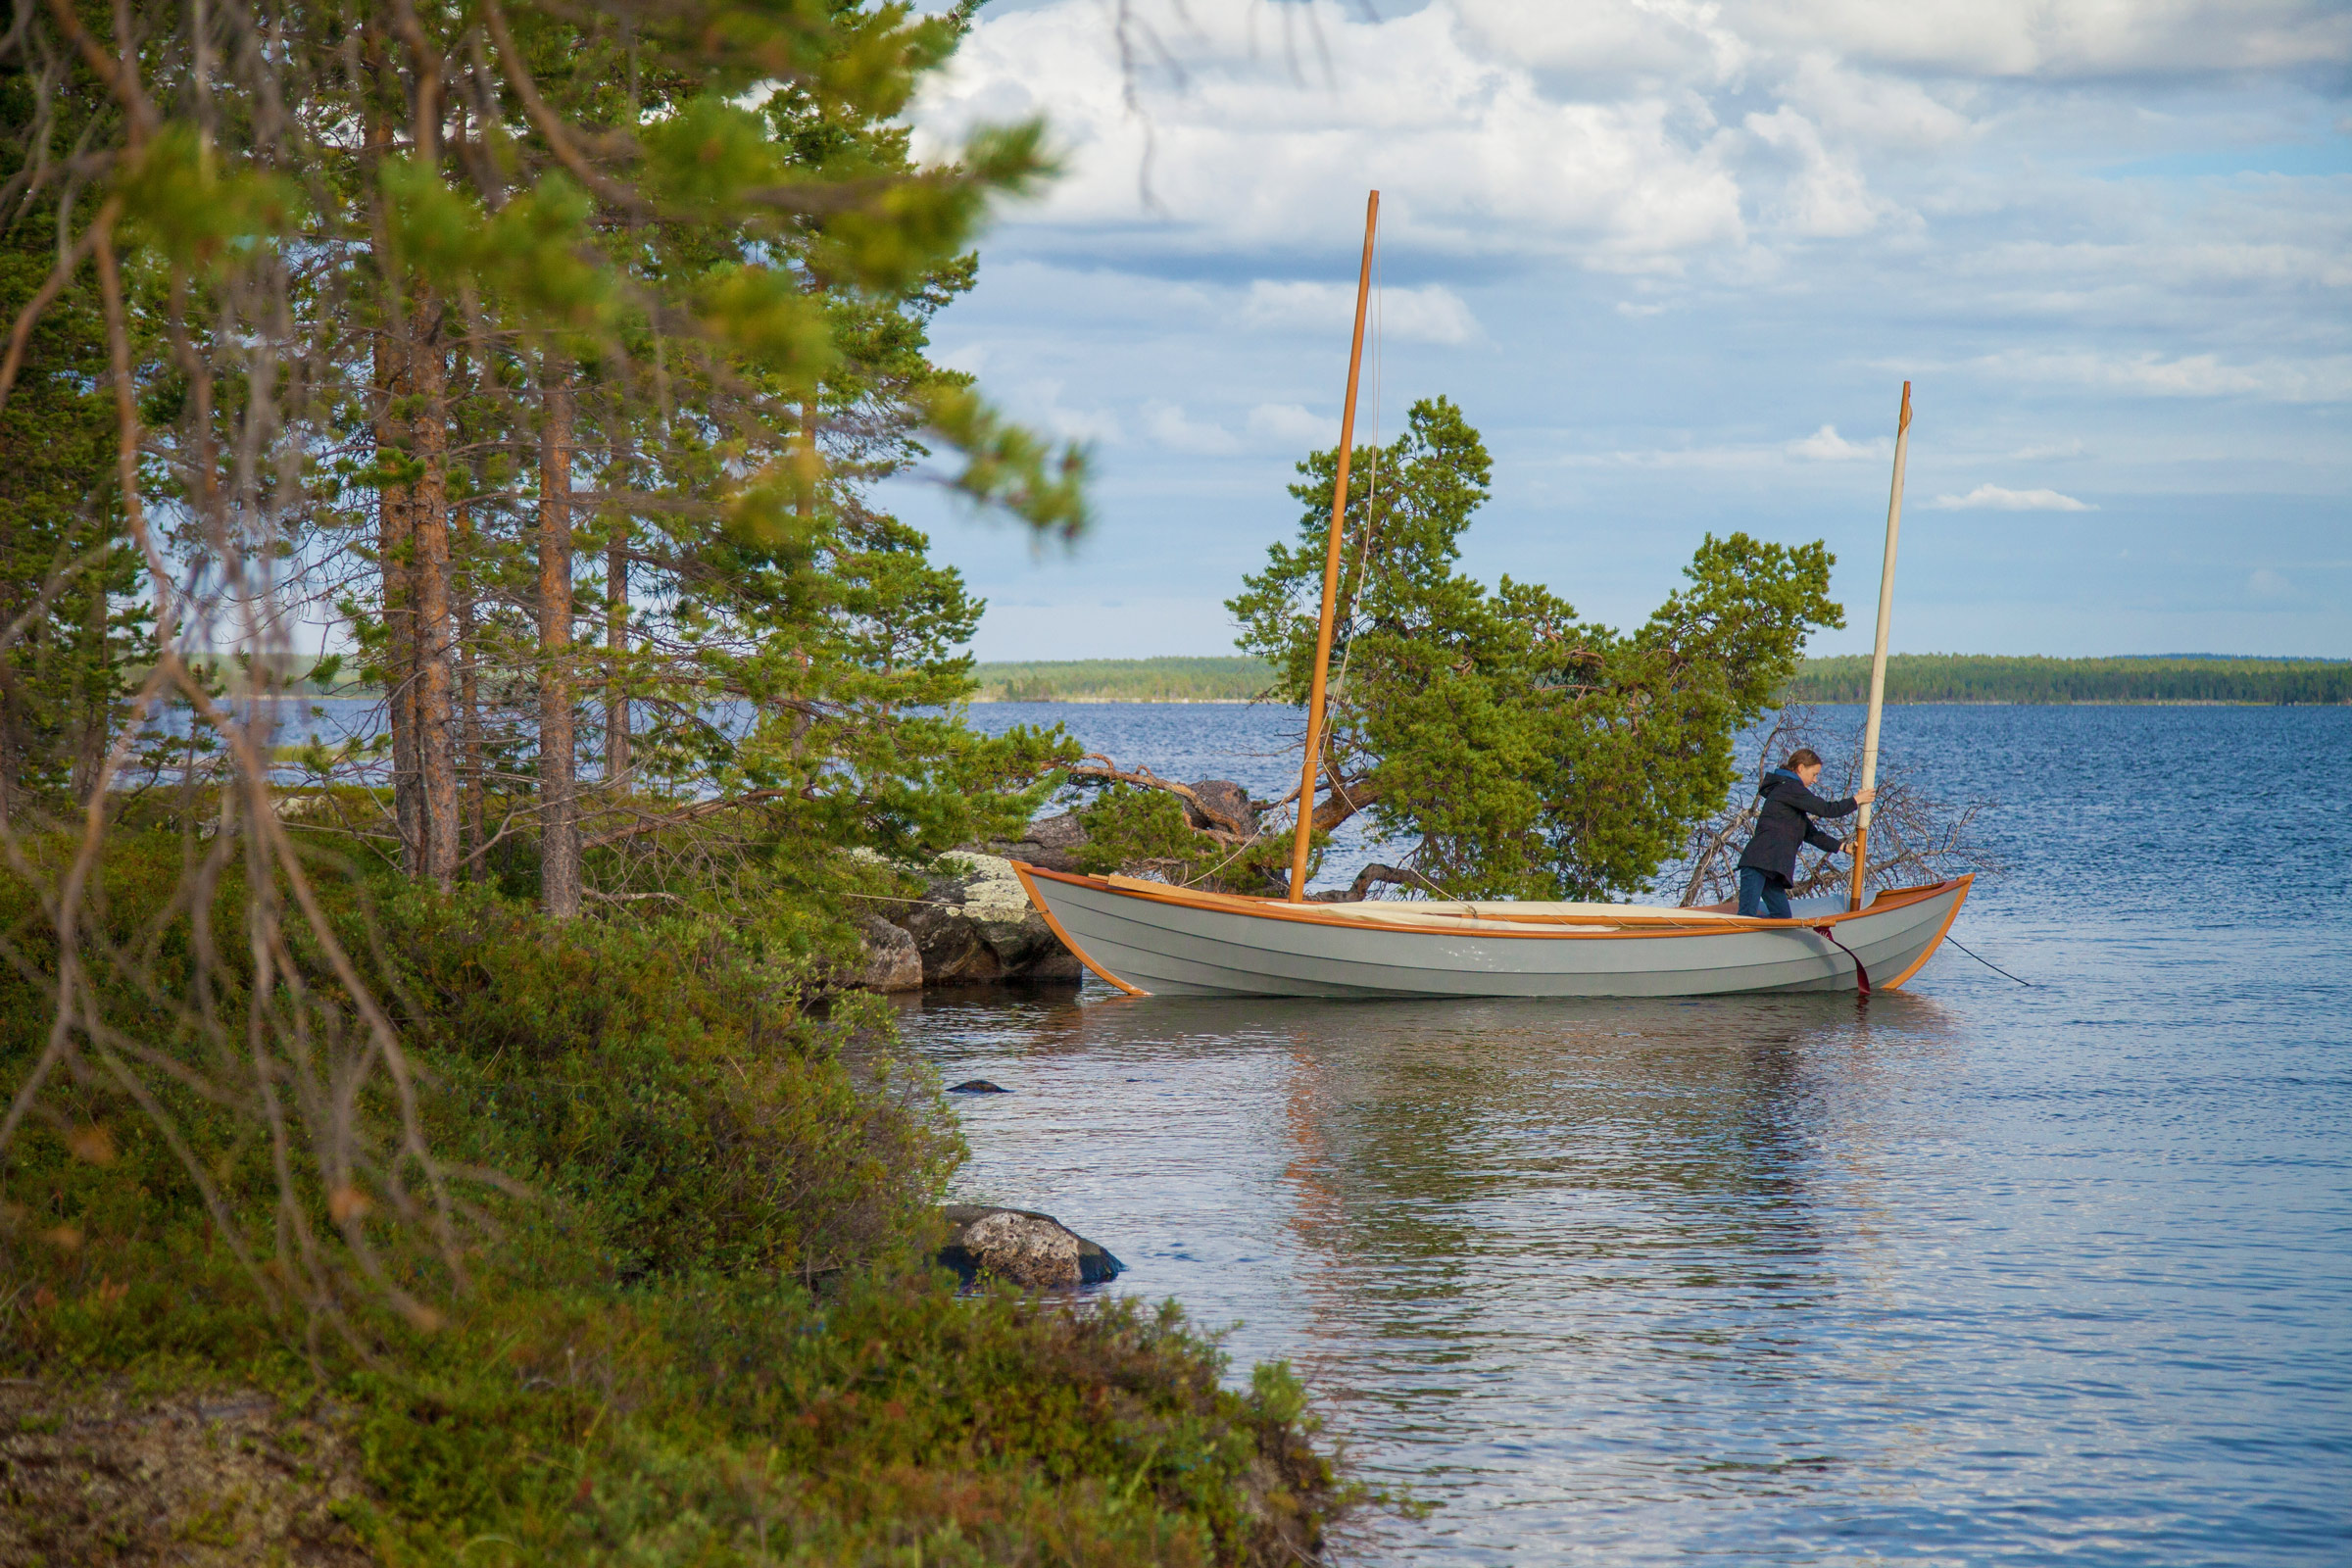
We loaded our Ness Yawl NESSIE with camping gear, water, and food and readied her for sailing. We were 140 miles north of the Arctic Circle, but it was the end of July, so we had missed the midnight sun. Nevertheless, the days were still long, the sun setting at about 11:30 p.m. and rising again at 3 a.m. By the time we were ready to embark, it was late afternoon, and we were excited to swap the car for the boat.
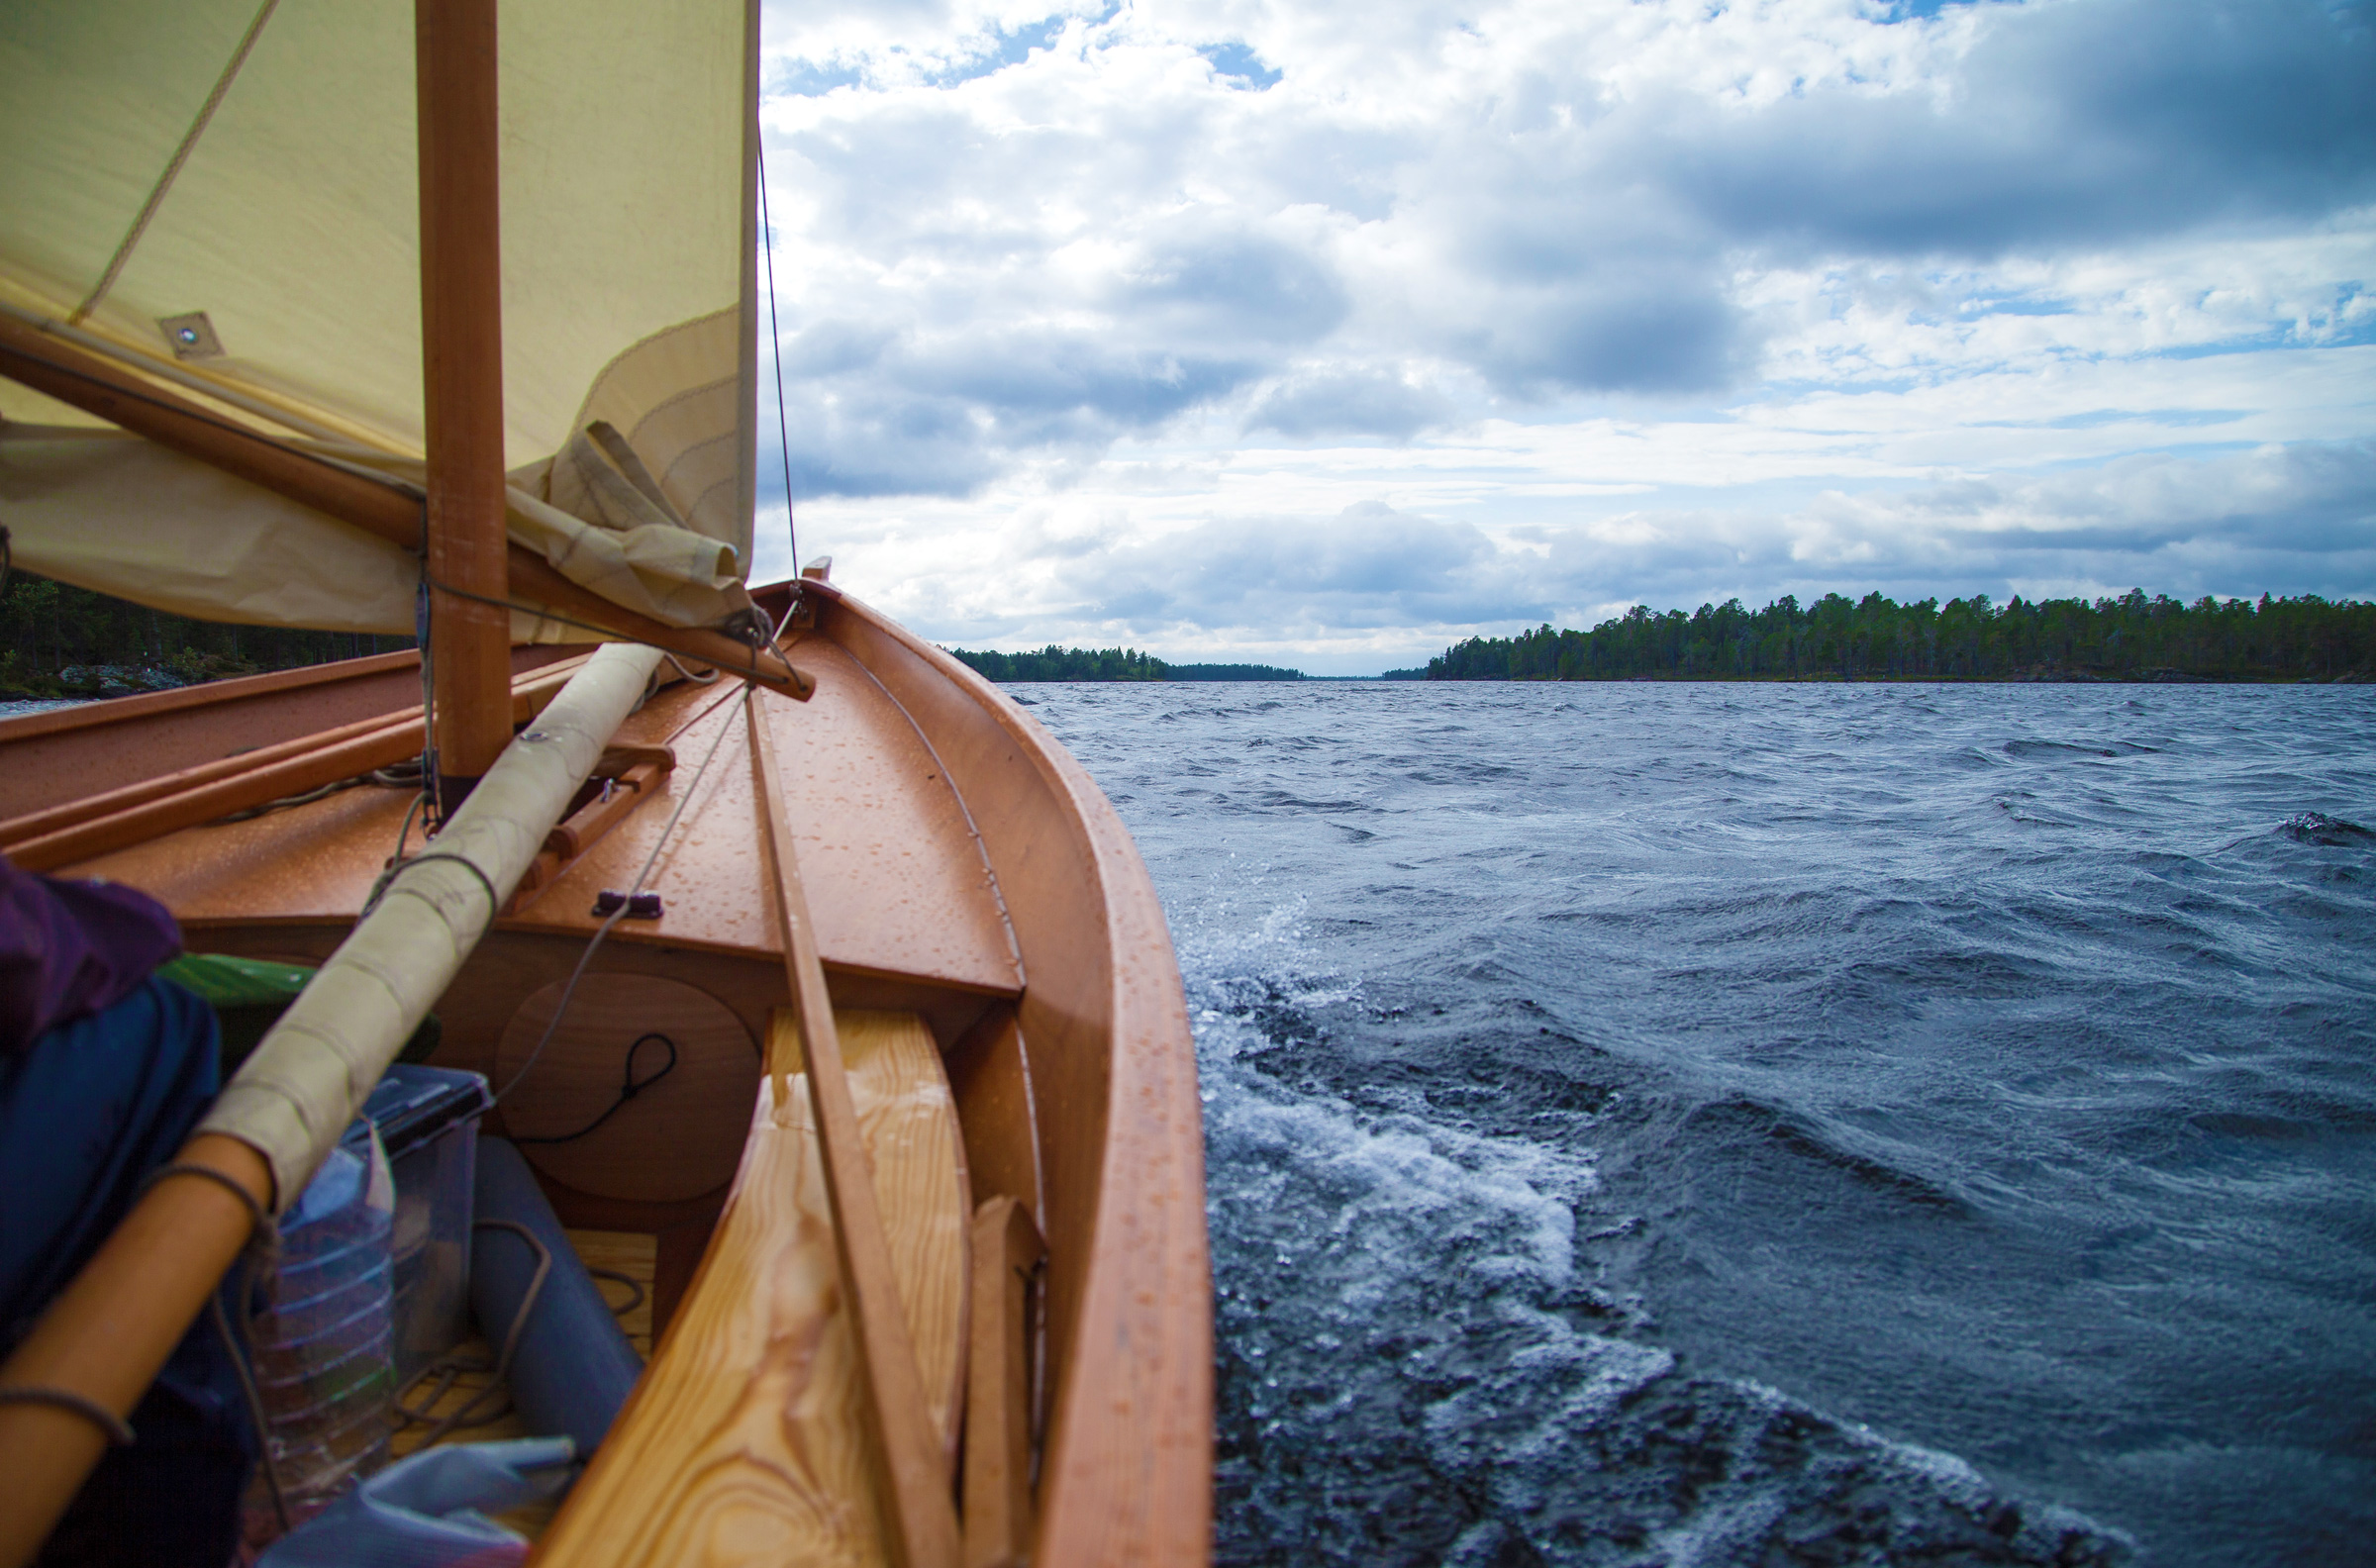
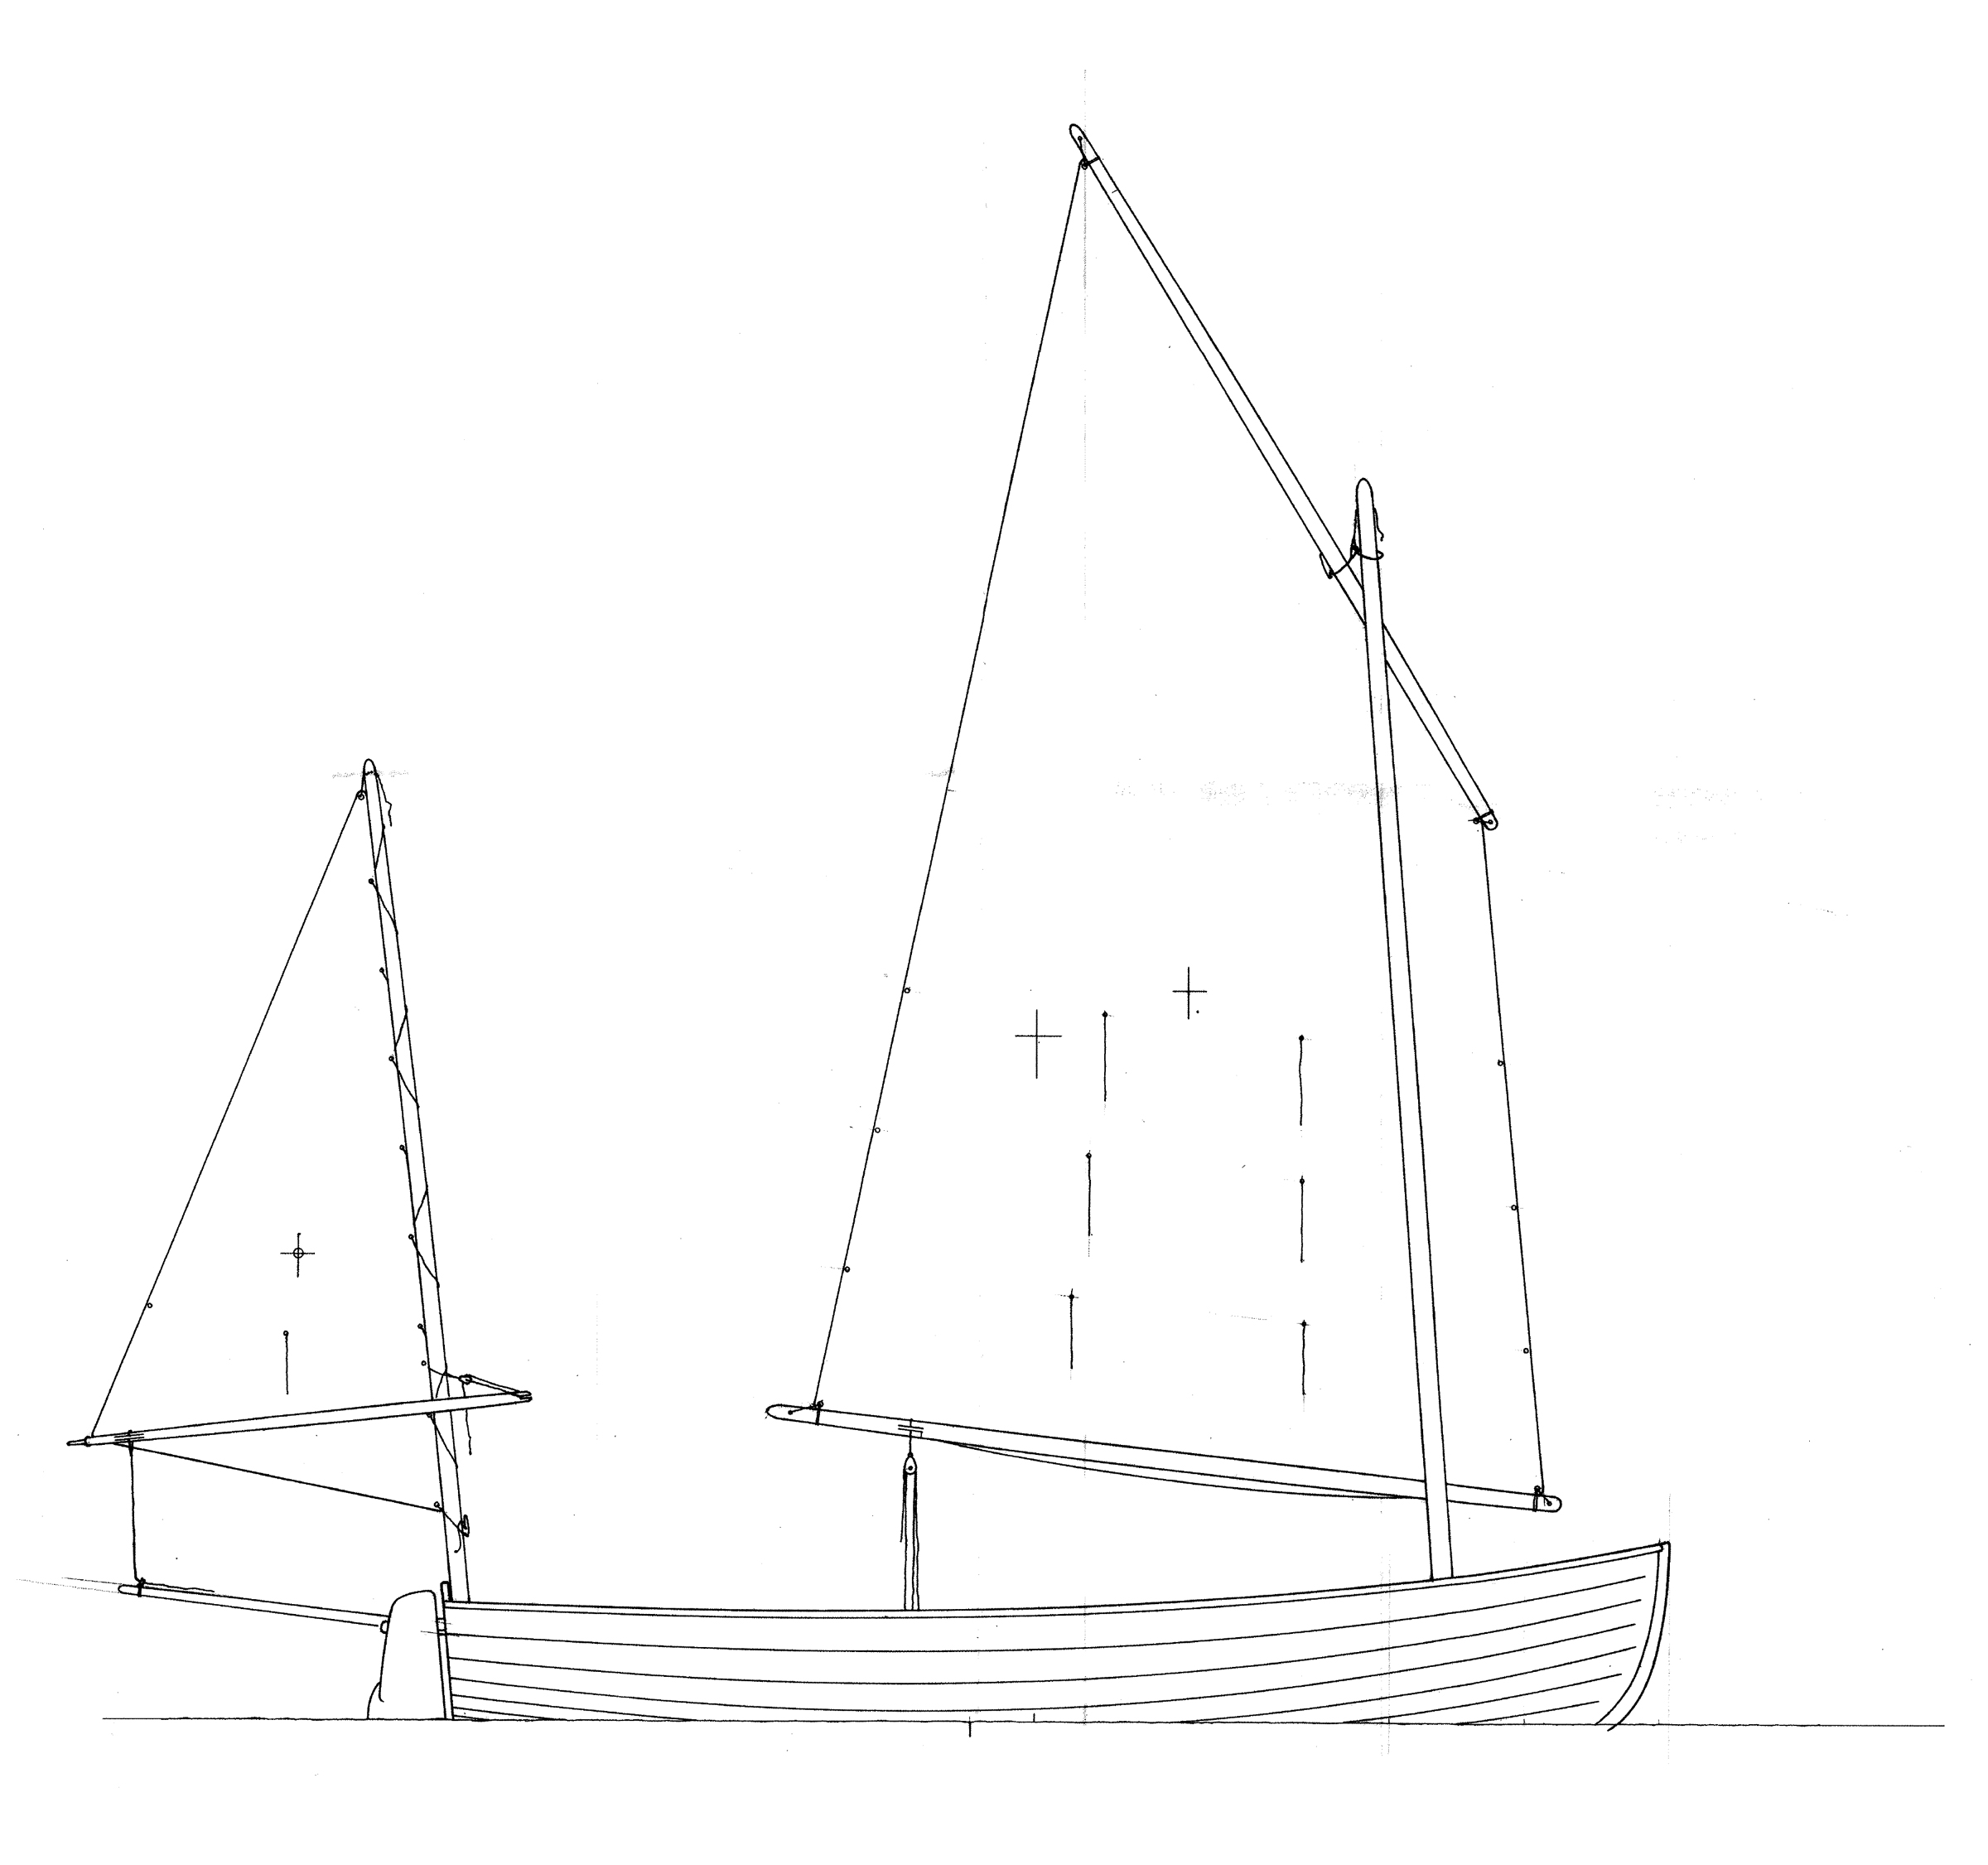
The forecast was not ideal—we were headed north into an expected northerly wind—but that first evening there was still a gentle southerly breeze, perfect for our first forays into Lapland’s great wilderness sea. The harbor of Veskoniemi was quiet with only a few people around as we hoisted the balance-lug mainsail and small leg-of-mutton mizzen.
NESSIE quickly picked up speed to sail downwind through the narrow channel between the Nanguniemi peninsula and the offshore pine-forested islands. The warm rays of the evening sun danced on the water, and on the horizon the distant hills stood dark against a light-blue sky dotted with chalk-white clouds.
Roger Siebert
.
A couple of miles from the harbor we passed an island no bigger than perhaps two acres. It was covered with pine trees and low wild bilberry, crowberry, and rosemary bushes. The forests on the lake’s small islands are not dense, and the lower limbs of the trees have typically fallen, so walking through them is easy.
Because of the openness of the vegetation, the woods offer little barrier to the wind and, with a fairly constant breeze, at this time of year there is little trouble from mosquitoes. By contrast, the middle of summer brings swarms of mosquitoes and gnats. On the western side of the island, we spotted a cove no more than 40’ wide and decided to call it a day. There were hidden rocks in the shallow water, so we lowered the sails, raised the rudder and centerboard, and poled with an oar into shore.
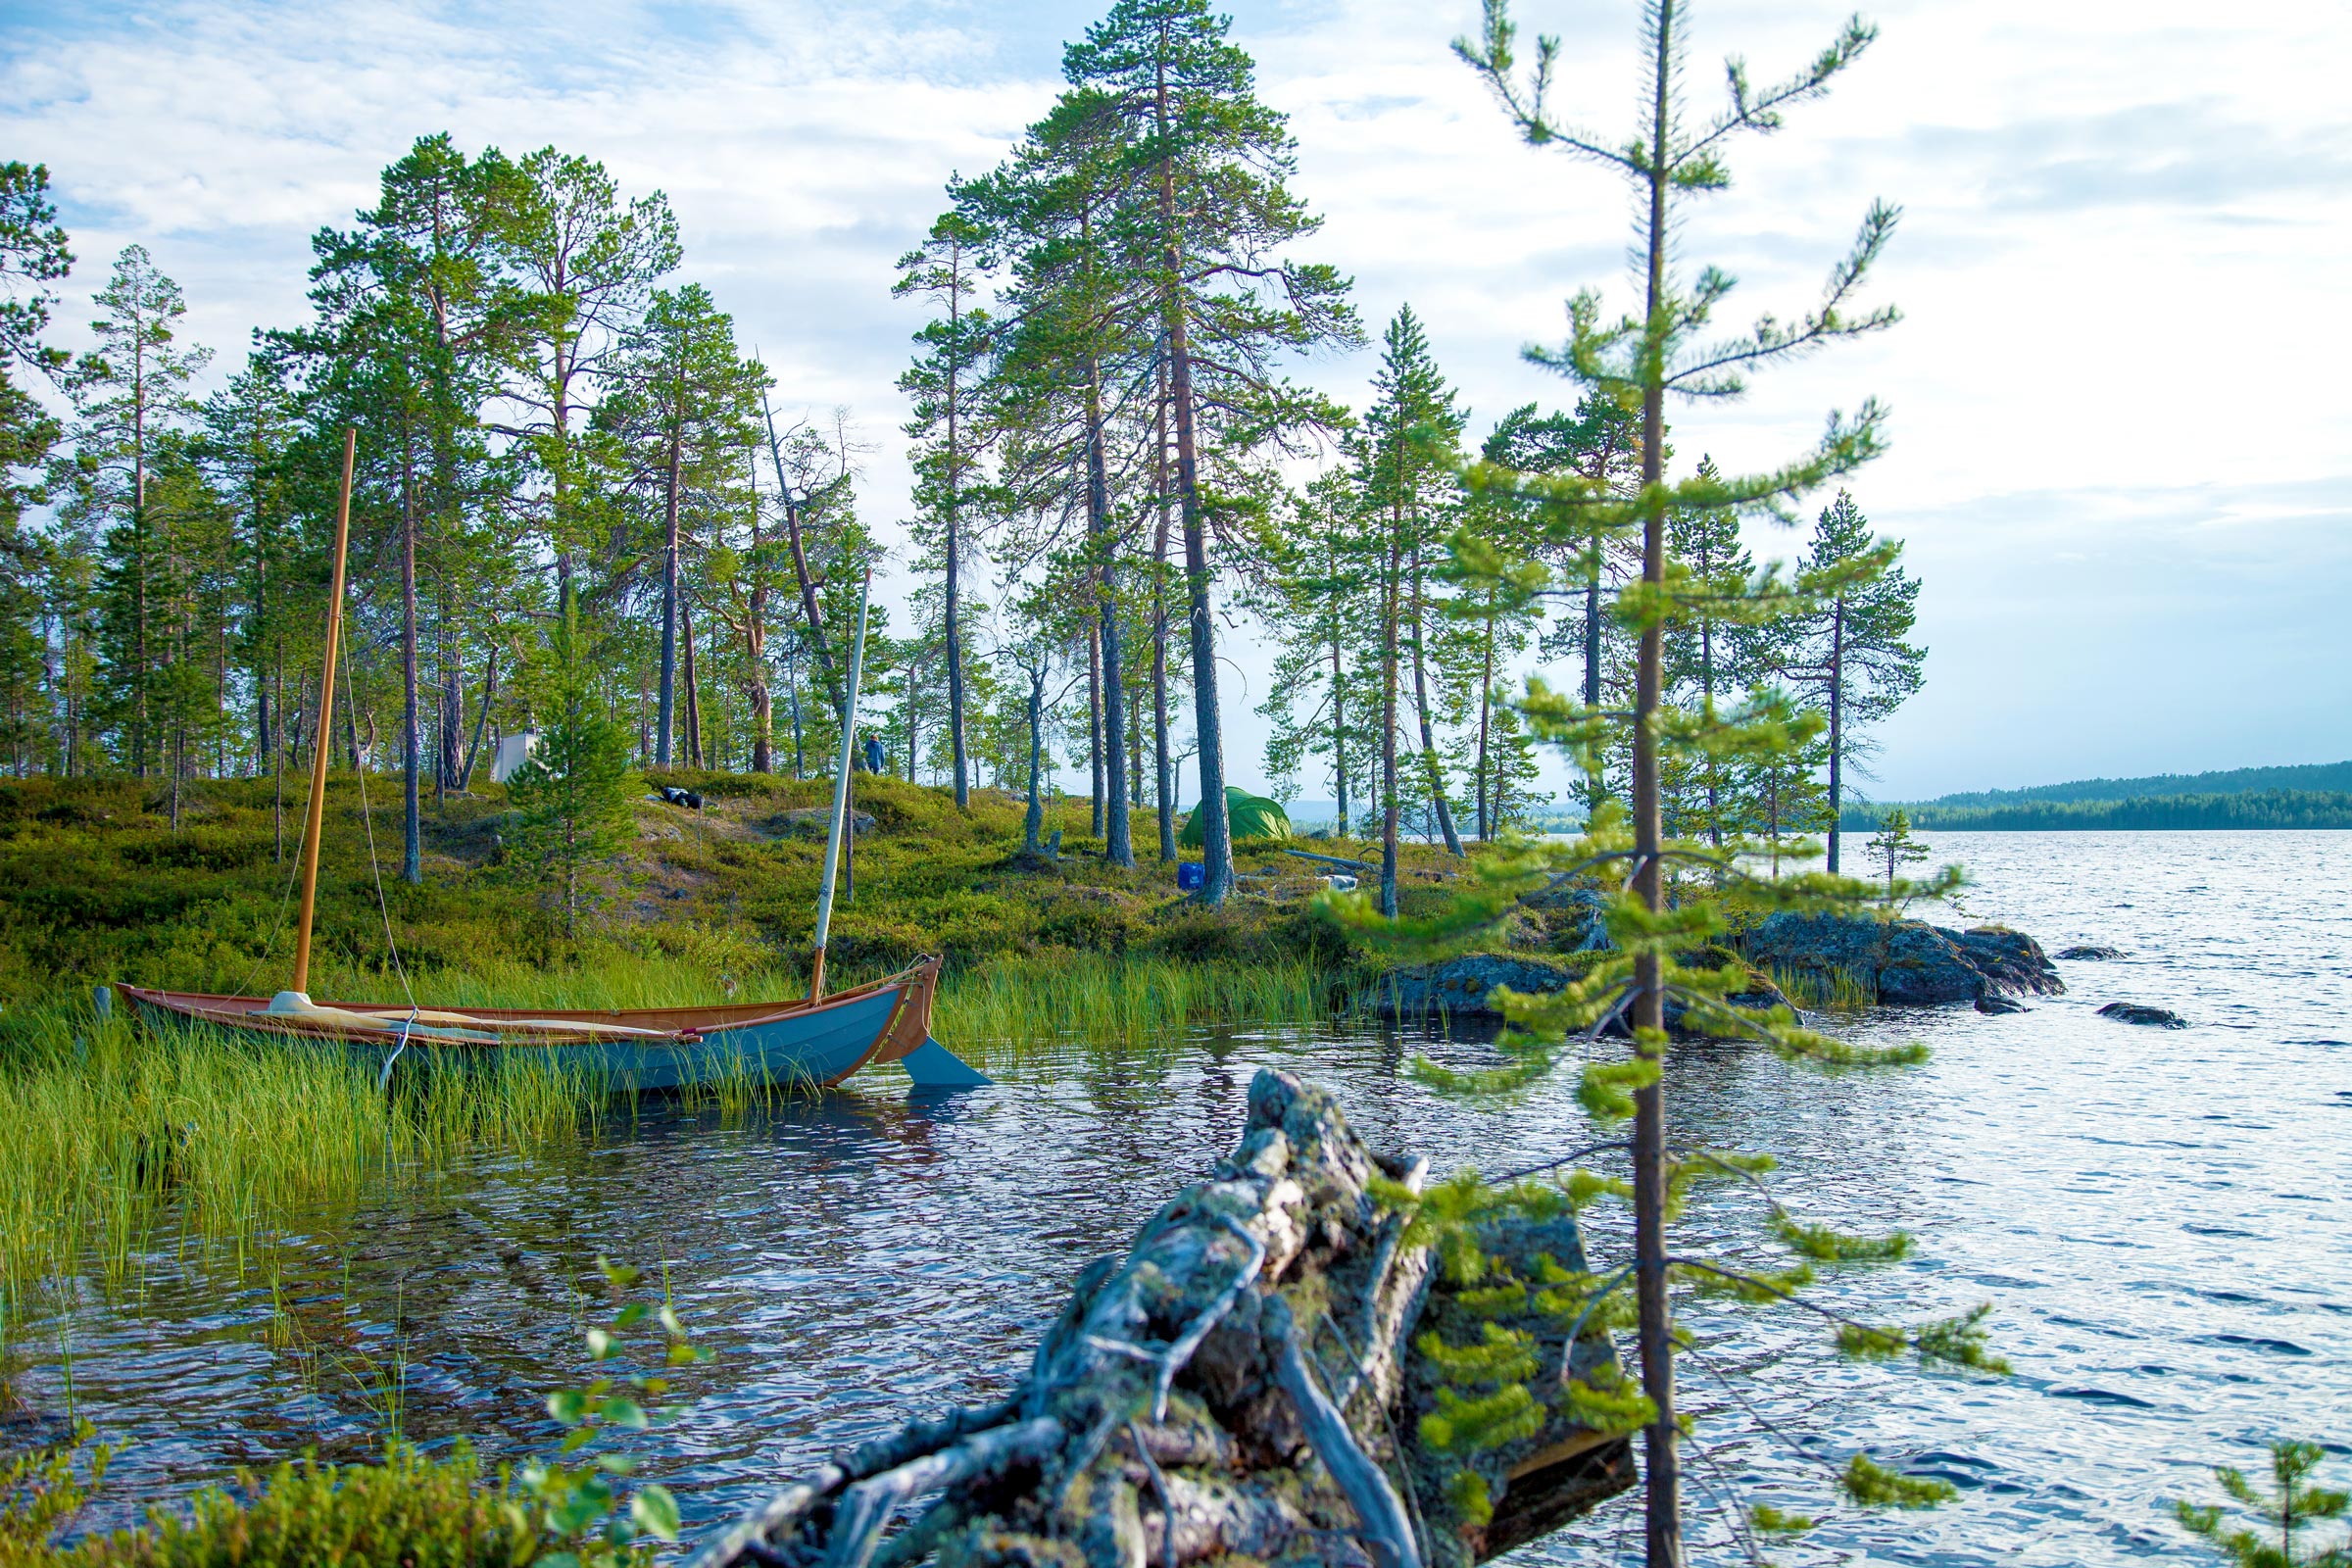
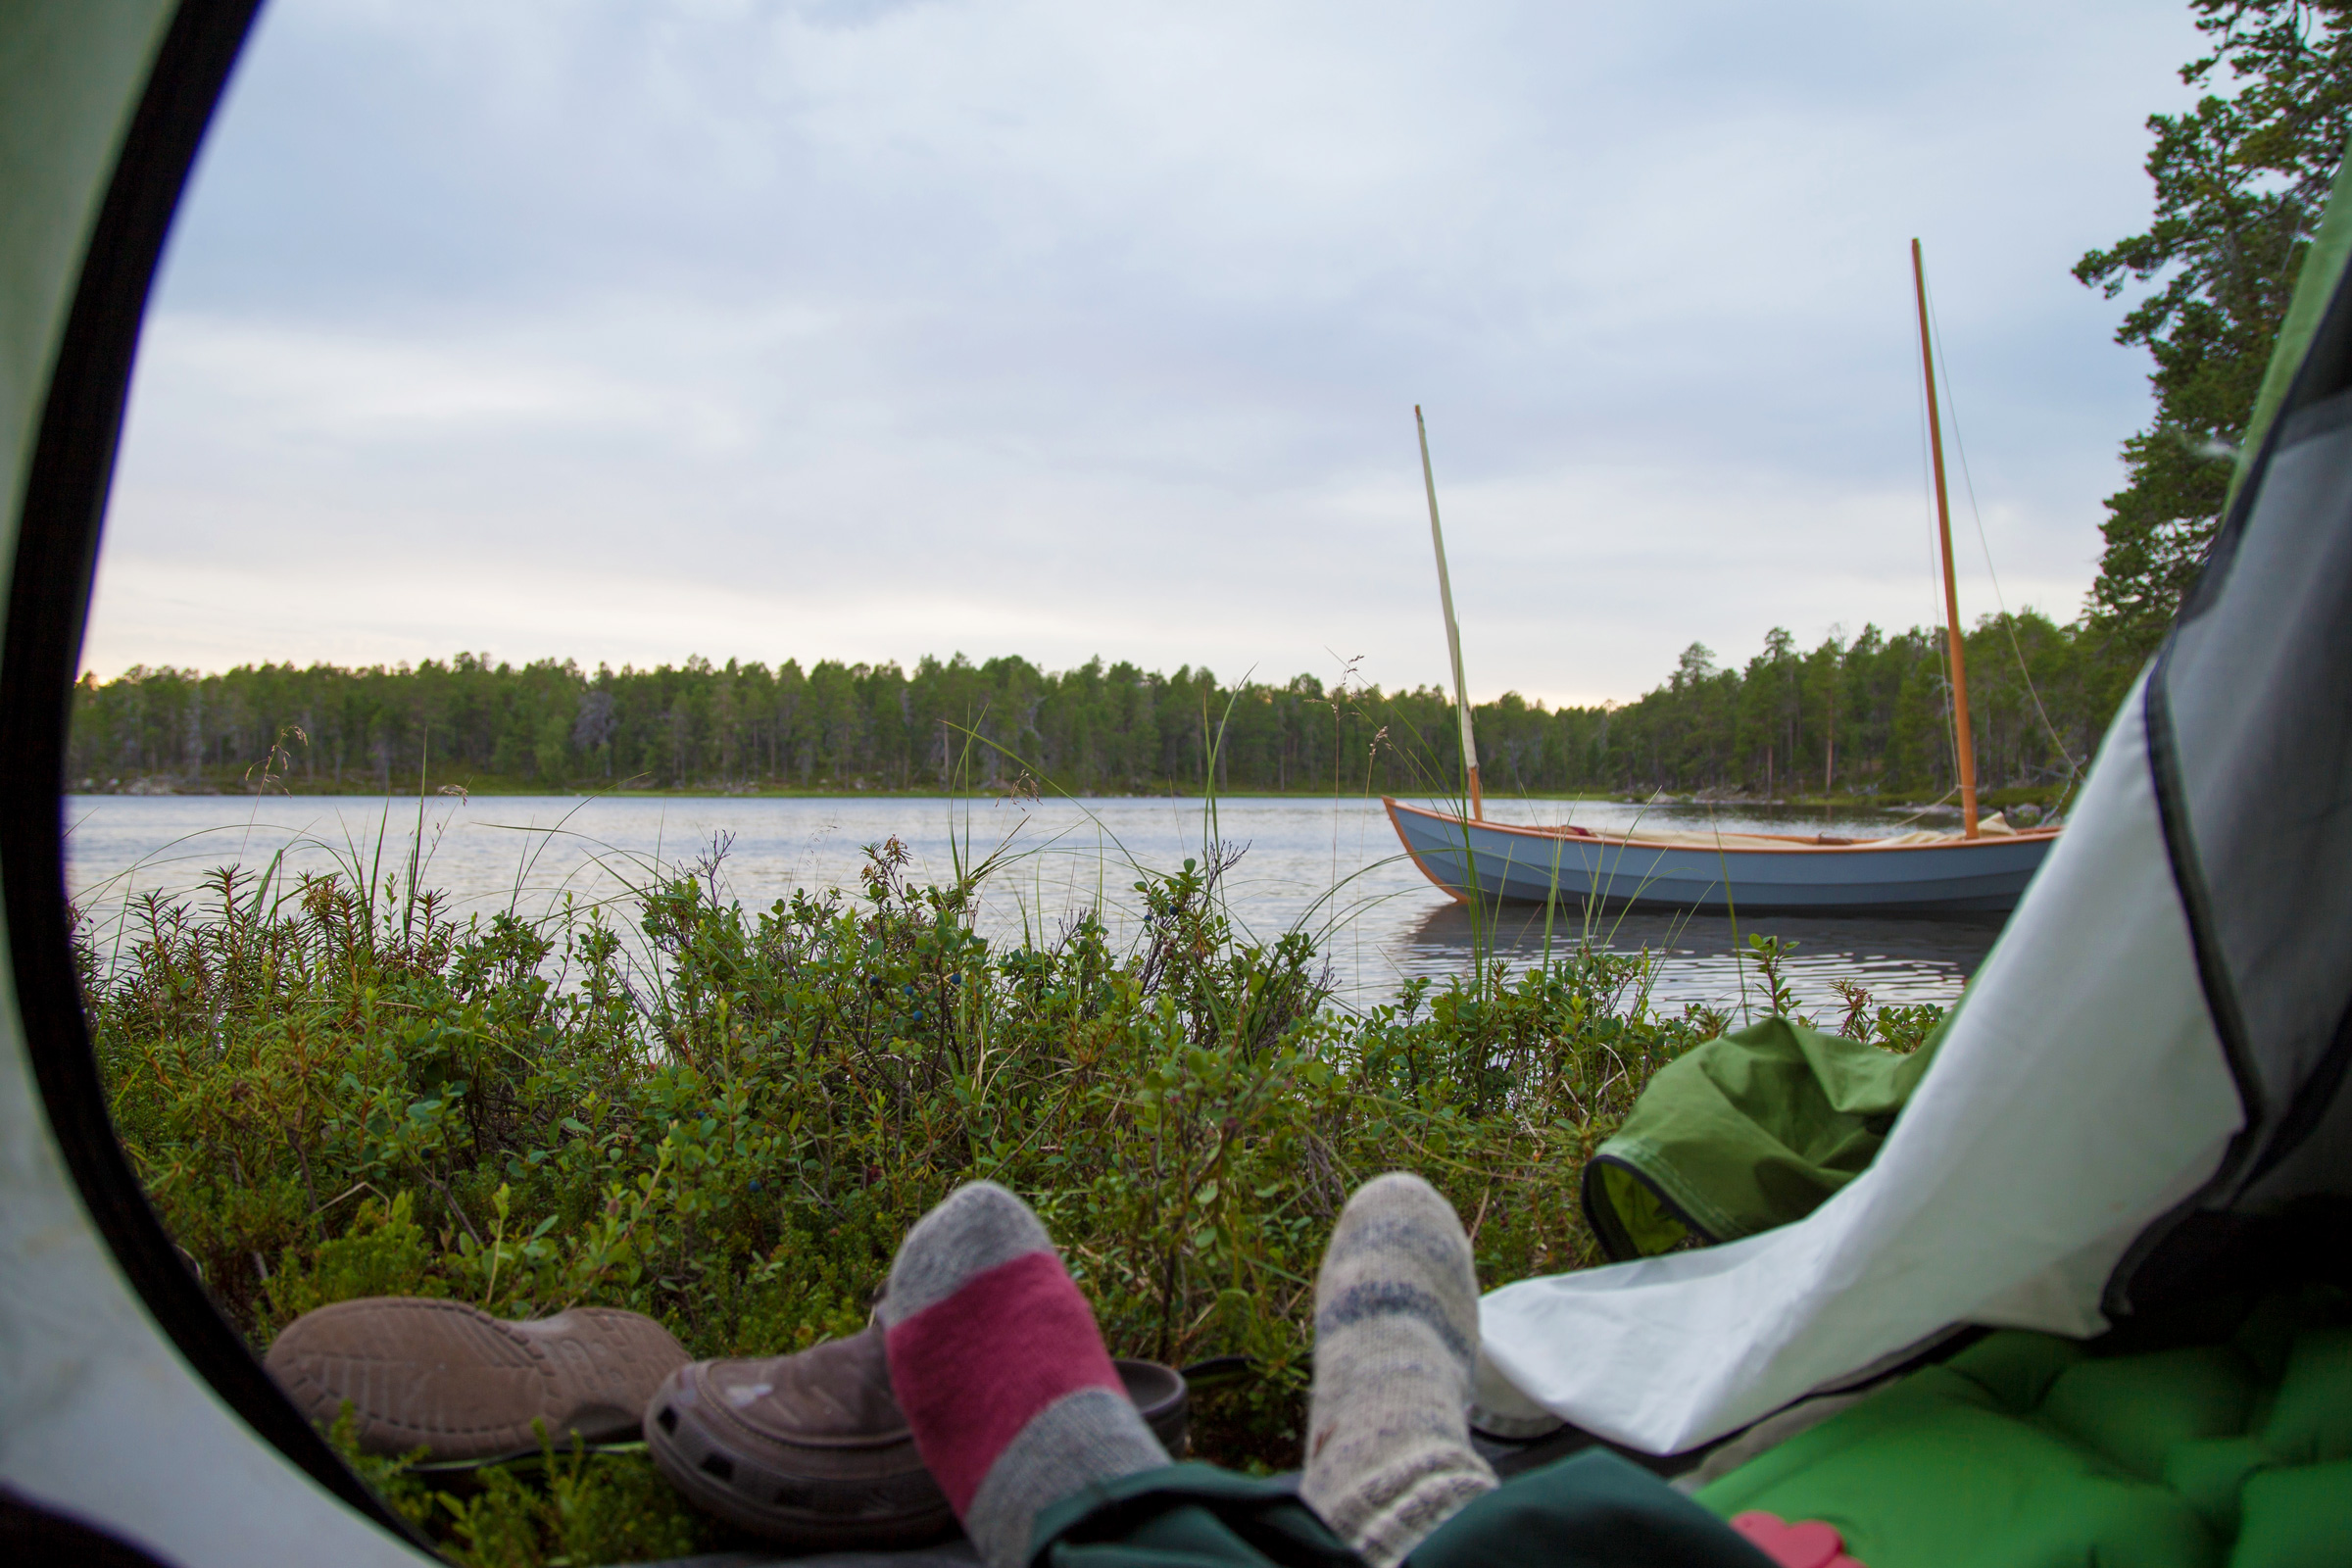
We tucked NESSIE tightly into a small bed of reeds at the deepest end of the cove, happy that there was no need for the anchor. We were not the first to have made use of this natural harbor—someone before us had left an old pallet to serve as a pier, and a log stuck into the rocky bottom near the shoreline to be used as a mooring bollard. It was 6 p.m. and, with the sun still high in the sky, we had plenty of light and time to set up our camp.
We hadn’t sailed far since launching, but when we spotted a sheltered little cove with a flat area for our campsite, we called it a day. The evening was calm, the air still warm, and we were surrounded by the gentle sounds of island life—the lapping water, the gentle breeze in the trees. We tucked NESSIE’s bow into a soft bed of reeds and set up our camp.
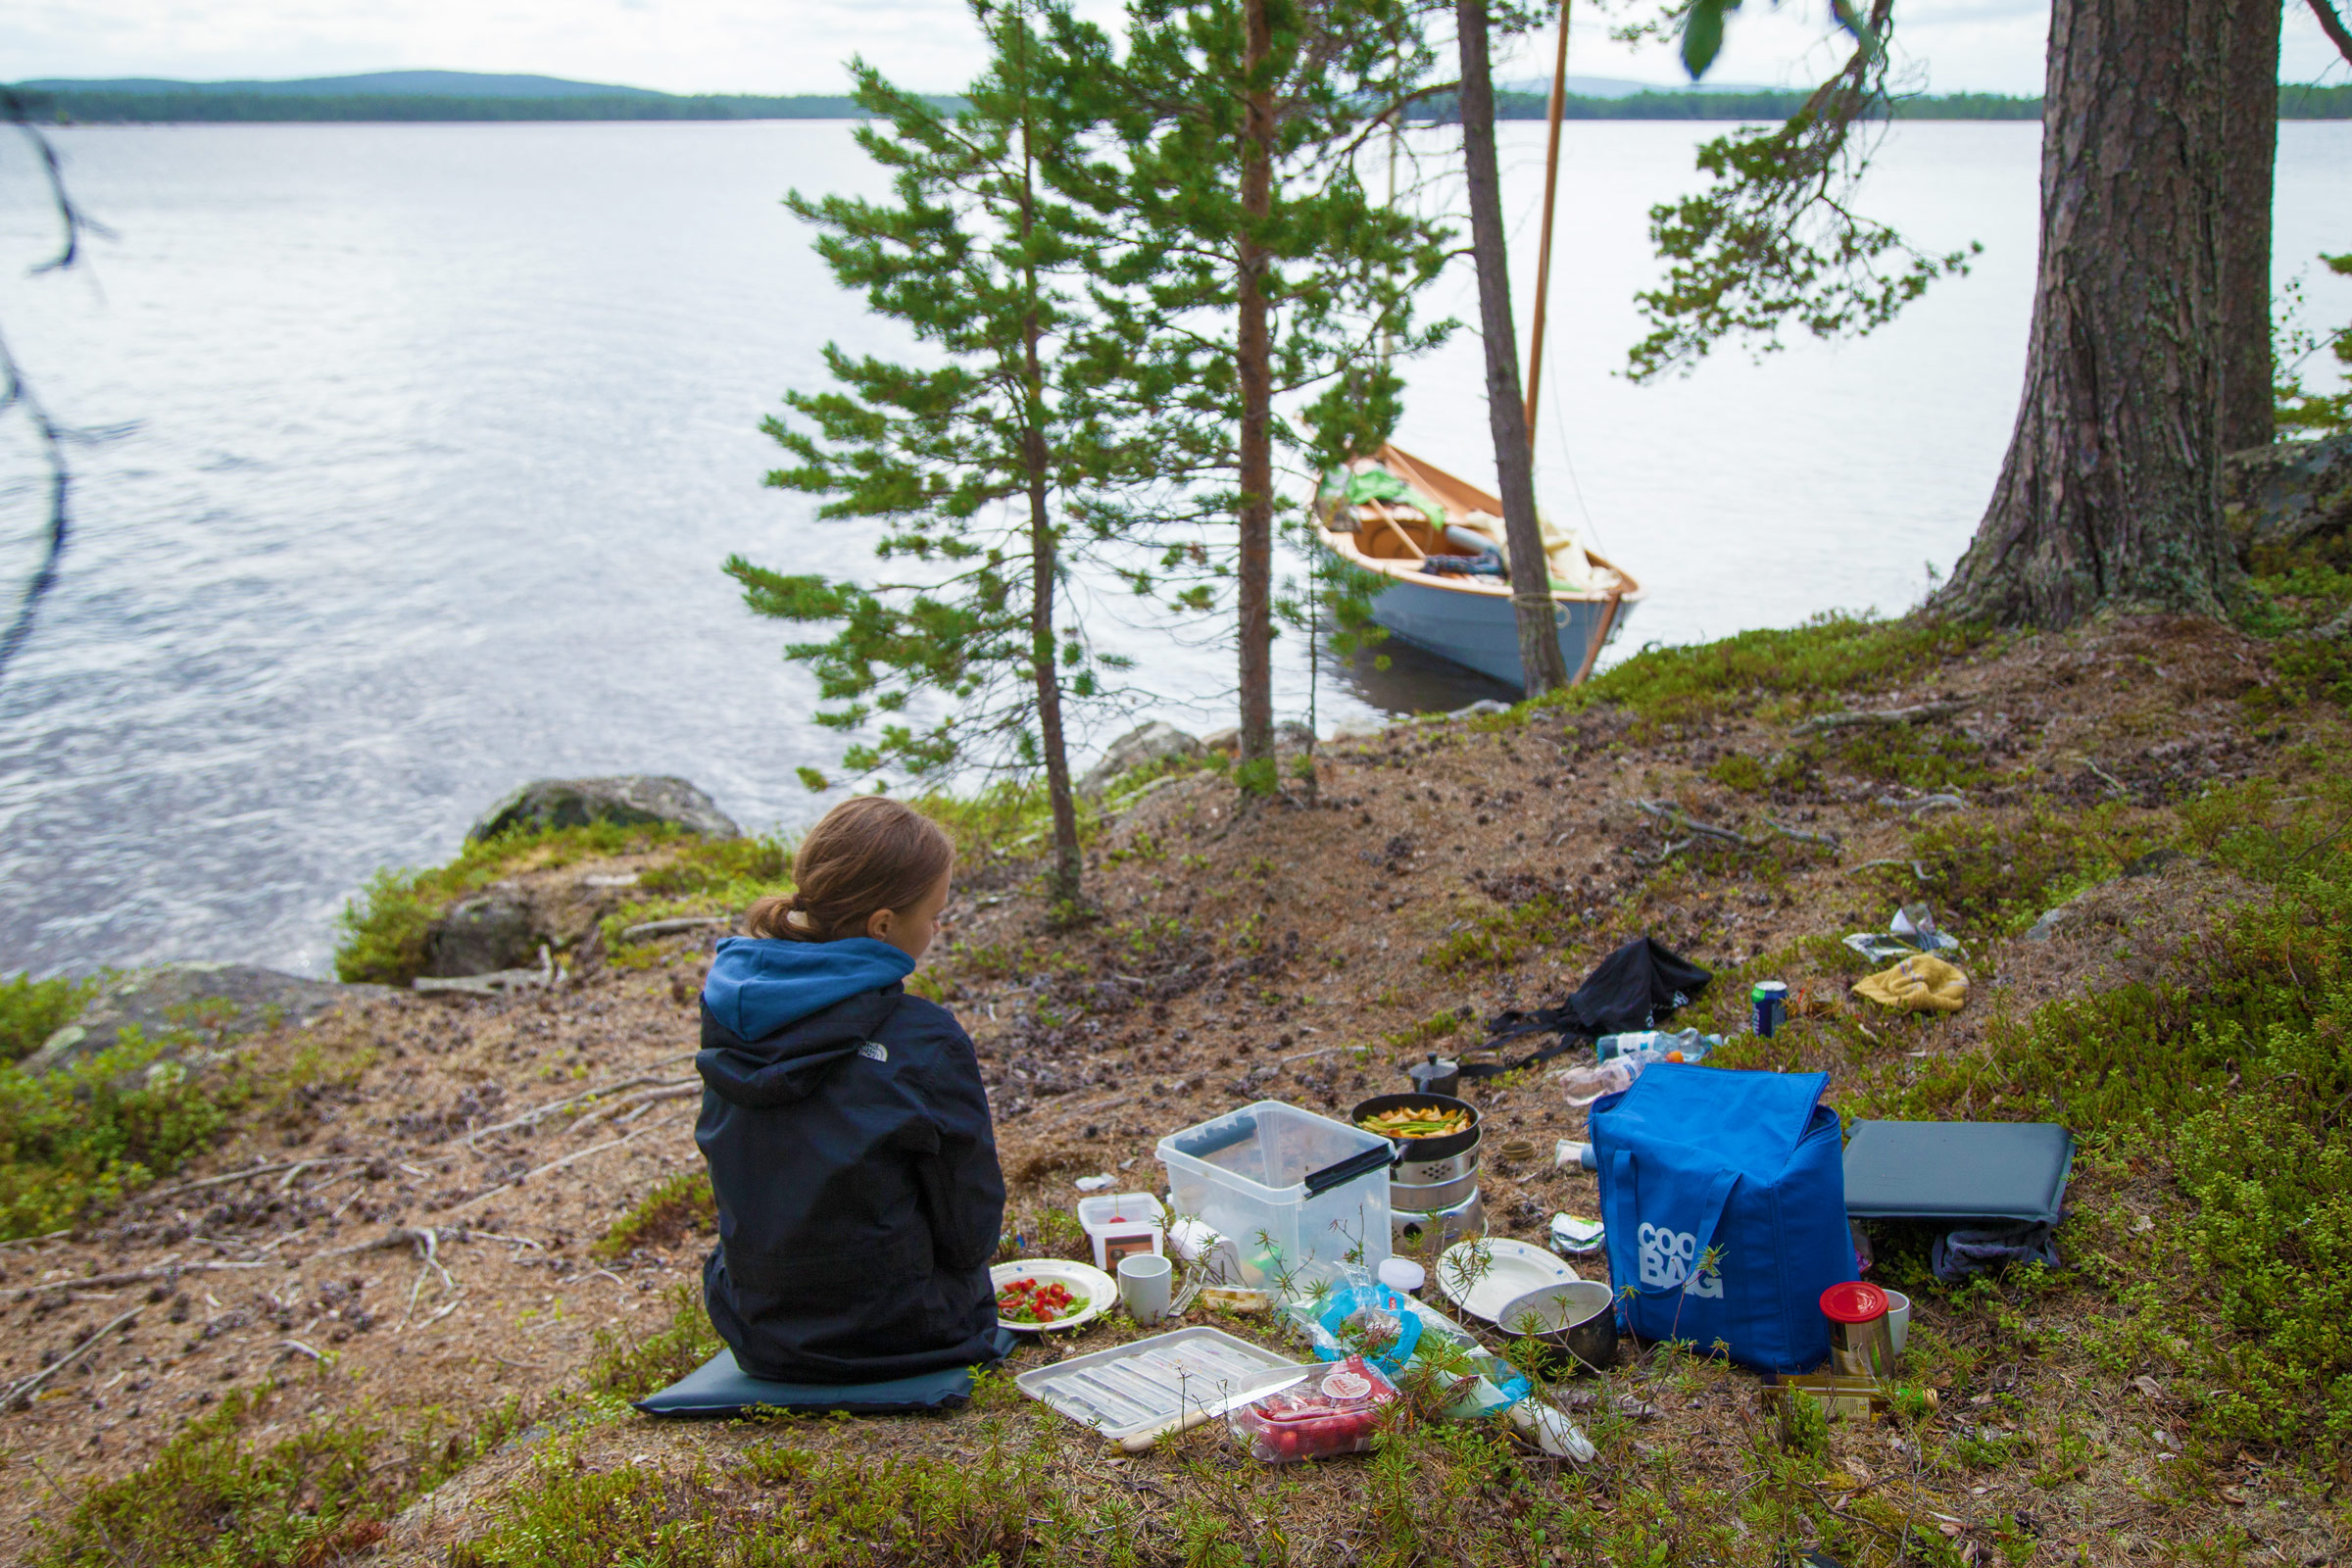
We tossed our camping gear ashore and prepared for dinner. Sitting on the dense cushion of bushes and moss I lit the alcohol stove, and we cooked up pasta with fresh avocado sauce, spiced with chili, garlic, and lime. Inari gathered some cloudberries for dessert. We were still only a couple of miles from Veskoniemi, and as we sat and ate, we saw a few sport fishermen and even a tandem canoe pass by, returning from the lake. As the sun got lower, the wind fell, the cool air enveloped us, and we fell asleep in the stillness of the northern night.
When I woke around 8 a.m. I could hear small waves slapping against NESSIE’s lapstrake hull. The wind had turned north and was building. Inari returned from a morning stroll and told me that at 5 a.m. it had been dead calm. Together we walked across the island through the sparse forest, stumbling over the low-growing bushes. As we reached the east side of the island the dense scent of wild rosemary gave way to the freshness of water over loose shingle, and we emerged from the trees to discover a secluded beach with silken sand. We both took a dip in the arctic water, which was slightly warmed by the recent heatwave but still chilly.
The wind built steadily through our first morning. The forecast predicted a 17- to 20-knot breeze, so we set sail with a single reef and no mizzen. We were headed north, away from Veskoniemi, and the lake seemed devoid of human life.
Refreshed, we returned to our camp for breakfast, packed up the boat, and checked the weather forecast on the Norwegian Meteorological Institute service, Yr.no, which covers all of Scandinavia and beyond. For this trip we could select both the village of Inari and Inari lake, which gave us an accurate on-water forecast. That day, Yr.no was predicting 17- to 20-knot winds. Time to bend-in one reef and unstep the mizzenmast.
We set sail in the overcast morning and headed north to tack through a maze of low islands, some a half-mile long, others barely 200 yards end to end. Between the islands, the channels were narrow, averaging no more than 300′ across, and the wind was gusty, its direction shifting. Sometimes it blew up and over the islands, sometimes it veered around the headlands to funnel down the narrow fetches. I had only previously sailed NESSIE solo and lightly loaded. Now, with the weight of camping gear, food, water, and a second person, she had improved stability, and better tracking and tacking performance; I was pleased.
Each day we stopped for breaks and lunch. We supplemented the ingredients we had brought with foraged foods such as cloudberries and brittlegill mushrooms from the island forests.
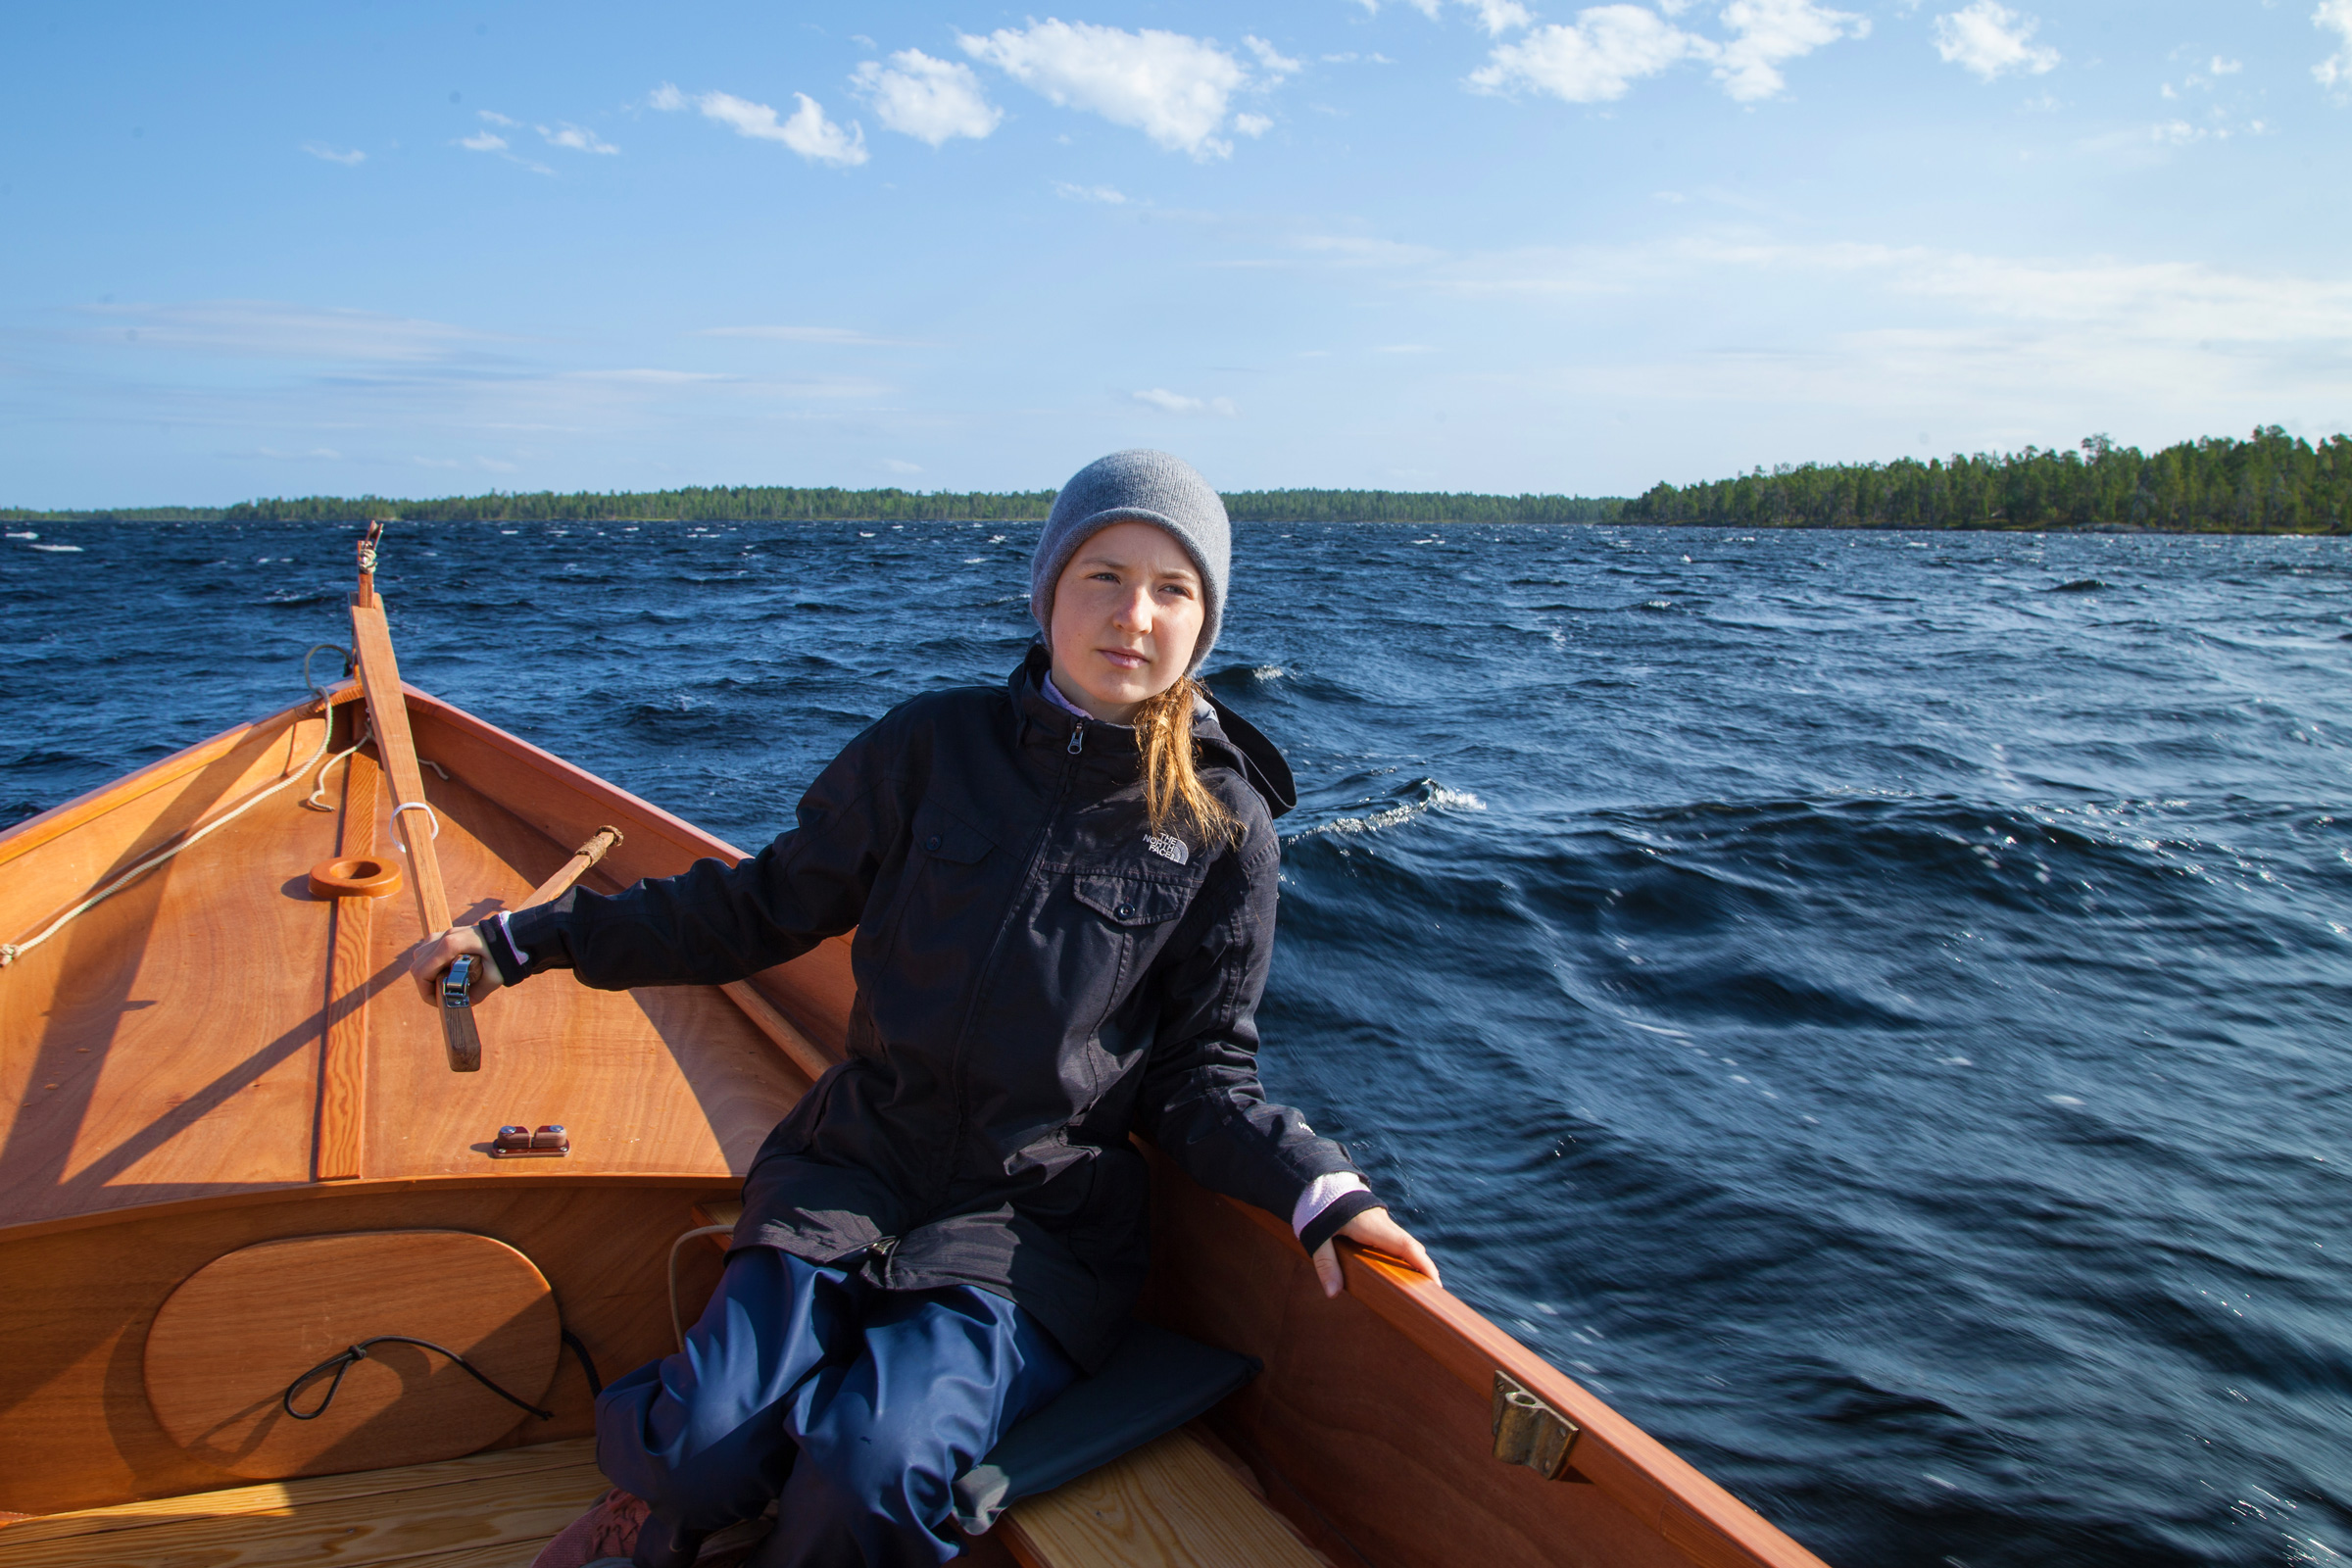
We took turns navigating and steering. It had been a couple of years since we had cruised together, but from an early age Inari has always been a trustworthy helmswoman; now turned 19 she had also gained confidence in navigating.
After tacking our way up the narrow, but marked, channel through the Solttusalmi islands we turned southeast into the Kaikunuora fjord.
There are several fjords between the larger islands on Lake Inari, and they can often drastically affect the wind direction. Today we were lucky; the wind held from the north-northeast, and we sailed down Kaikunuora on a fast beam reach. It was a welcome break. Clouds gave way to the sun, its rays warming us as we sailed along the fjord, its shoreline strewn with large boulders beneath steeply rising slopes topped with dense pine forest. The fjord is barely a half-mile wide, and its 5-mile length seemed endless, but eventually we reached the eastern end and stopped for a break on a small headland on Täpläsaari island.
On our second night there was no soft reed bed to pull into, so instead, we tied NESSIE’s painter to a tree and put out a stern anchor to keep her from swinging around onto the rocks.
Sailing through the morning we had amused each other by reading aloud the names of islands, fjords, and peninsulas marked on the chart in both Finnish and Sámi, the language of the indigenous people of the Scandinavian north and the Kola Peninsula in Russia. Some of the place names were unlike anything we had heard before. Some creatively described the appearance of an island, others clearly referenced a meaningful event in someone’s life such as Lost Pulley Island, and Oar Bending Island.
Leaving the fjord and heading northeast across the stretch of open water known as Satapetäjäselkä (in Finnish selkä means open water), our progress to windward was slow. We were sailing directly into a short, sharp chop that was building against us. We began looking for a suitable campsite. Here the waters around the islands are shallow, but with our centerboard and rudder raised, we could coast into just about anything.
We landed on a low and narrow island little more than 100 yards long or wide. It was covered with low-growth berry bushes, and we pulled in beside a living but crooked old pine tree that stretched out horizontally over the water. The island’s vegetation was sparse—widely spaced crooked pines over the low-growing berry bushes—and there was no natural windbreak. But, along the shoreline a soft, low-rolling bush-and-moss bed gave just enough shelter for our tents and to light a fire near the water.
Before eating, we explored our surroundings. The trees were all small. Among the more common, though markedly misshapen, pine trees were the more unusual dwarf birch, rarely exceeding 7′ in height. The living trees were interspersed with gray, bleached, dead ones, some still standing, some long fallen. Here, as on all the islands we visited, the only sign of human life was the firepit near the obvious landing spot. We returned to our camp and spent the evening by the fire, eating, swapping stories, and watching the brightness of the day fade as the sun sank low to the west.
Leaving the comparative shelter of Satapetäjäselkä and sailing into the open waters of Sammakkoselkä, we continued without the mizzen and took in a second reef. We stowed the mizzen, oars, and Norwegian tiller as far forward as possible, so they were not in our way in the cockpit.
We awoke the following morning to cloudy skies and a light drizzle. The wind was still blowing 15 knots, so we continued with our reefed main and no mizzen, crawling our way north against the wind and the chop. Once more crossing the open water of the Satapetäjäselkä, we had plenty of space for tacking and NESSIE obediently rose up and over the waves, occasionally tossing spray over our heads.
As we reached the northern end of the Satapetäjäselkä, we were able to head northwest on a single tack along a wide channel between a group of unidentified islands to the north and the island of Kaamassaari to the south. For a while the wind eased, and we shook out the reef—for a rare moment we sailed under full main. But within 15 minutes the wind was rising again, and we took in first one reef and then a second.
As we approached a line of islands, just yards across, I suddenly spotted a rock dead ahead, and we threw in a hurried tack. We had misread the chart and were headed to an island south of the one we had planned to reach. We adjusted our route and came around one more island. To our north several mile-wide islands provided shelter from the worst of the wind, and we decided that, before we left them behind for the open water of Sammakkoselkä, we would stop for lunch. We pulled into an island the size of a tennis court and landed straight into a bed of moss edged by tiny crooked pine trees. We were both a little chilled and wet from the drizzle and spray, so we gathered up some dry branches and lit a fire. In minutes, we were being warmed by corn soup and toasted bread, and after cups of coffee and tea were ready for another challenge of open water.
As we left the shelter of the islands and rounded into the Sammakkoselkä the chop built quickly—we eased the sheet and fell off the wind slightly to maintain our speed against the building 4′ waves. We tacked across Sammakkoselkä a couple of times but were reluctant to continue fighting our way north. Instead, we decided to follow the route of a channel that threaded through a group of islands in the middle of the lake. We headed toward a cairn, a 6′-high pile of stones painted white, but as we came close, we realized there were two cairns approximately 1 mile apart and we were mistakenly headed for the more northern of the two marked on the charts. We rounded the head-shaped 300′-wide island called Head Spinner and turned south toward the channel.
On Varttasaari Island we found a sheltered cove for our third night. At the end of a long day’s sailing crouched in the boat, it was good to stretch out on a soft mattress. NESSIE was so close we could hear the wavelets lapping her hull planking.
As we dipped between the islands, the water immediately became smooth. The first island we passed to the south of us had one of the few cabins on the lake that are free for anyone to use, but the pier and shore were exposed to the northeast wind, so we sailed on by. Not much farther on, a sheltered bay on the coast of Varttasaari island opened up.
We rounded a headland and landed under sail, tying the painter off to a convenient pine tree and throwing out a stern anchor. The clouds were making way for clear skies; we spread our gear out to dry and bailed the small amount of water that had collected in NESSIE from the spray of the bow waves. I refreshed myself with a swim in the crystal-clear and pleasantly warm water, and sipped a beer, relishing its taste as I admired the unspoiled beauty and stillness of the bay and the channel leading southwest, its wind-tossed blue water framed by the rugged rocky beaches and ancient pine trees.
Near our landing spot there was a fire pit, and level dry ground on which to cook and camp. There were few signs of human life, no trash, just a small amount of firewood waiting for fellow travelers, as is the custom here in the northern lands. We strolled inland, through the forest. The sunlight threaded through the sparse canopy of the old pine trees illuminating the bed of crowberry, blueberry, and wild rosemary, their distinctive aromas rising up as we trod the bushes beneath our feet.
In a couple of small valleys where the air and ground were damper, cloudberry bushes joined the mix. The summer had been dry, so the berries were smaller than the tips of our fingers, but Inari nevertheless managed to gather enough for a good dessert. We also found some brittlegill mushrooms—a welcome extra ingredient for our dinner.
Leaving the sheltered Varttasaari channel, we entered the unprotected waters of Kasariselkä. This would be the windiest stretch on the windiest day of the voyage. Again, we sailed with a heavily reefed mainsail and no mizzen. Inari again switched out the Norwegian tiller for the fore-and-aft tiller with extension. She became expert at controlling NESSIE down the waves.
The morning was clear when we woke and checked the weather. The forecast was for 20 to 27 knots of wind continuing from the north–northeast. We considered our route and decided to avoid crossing Kasariselkä, the largest stretch of open water on the lake, and instead to turn south after the channel, where we hoped we would be somewhat sheltered by the large group of islands in the middle of the lake to the northeast. We packed up and left our camp under two reefs in the mainsail and without the mizzen sail.
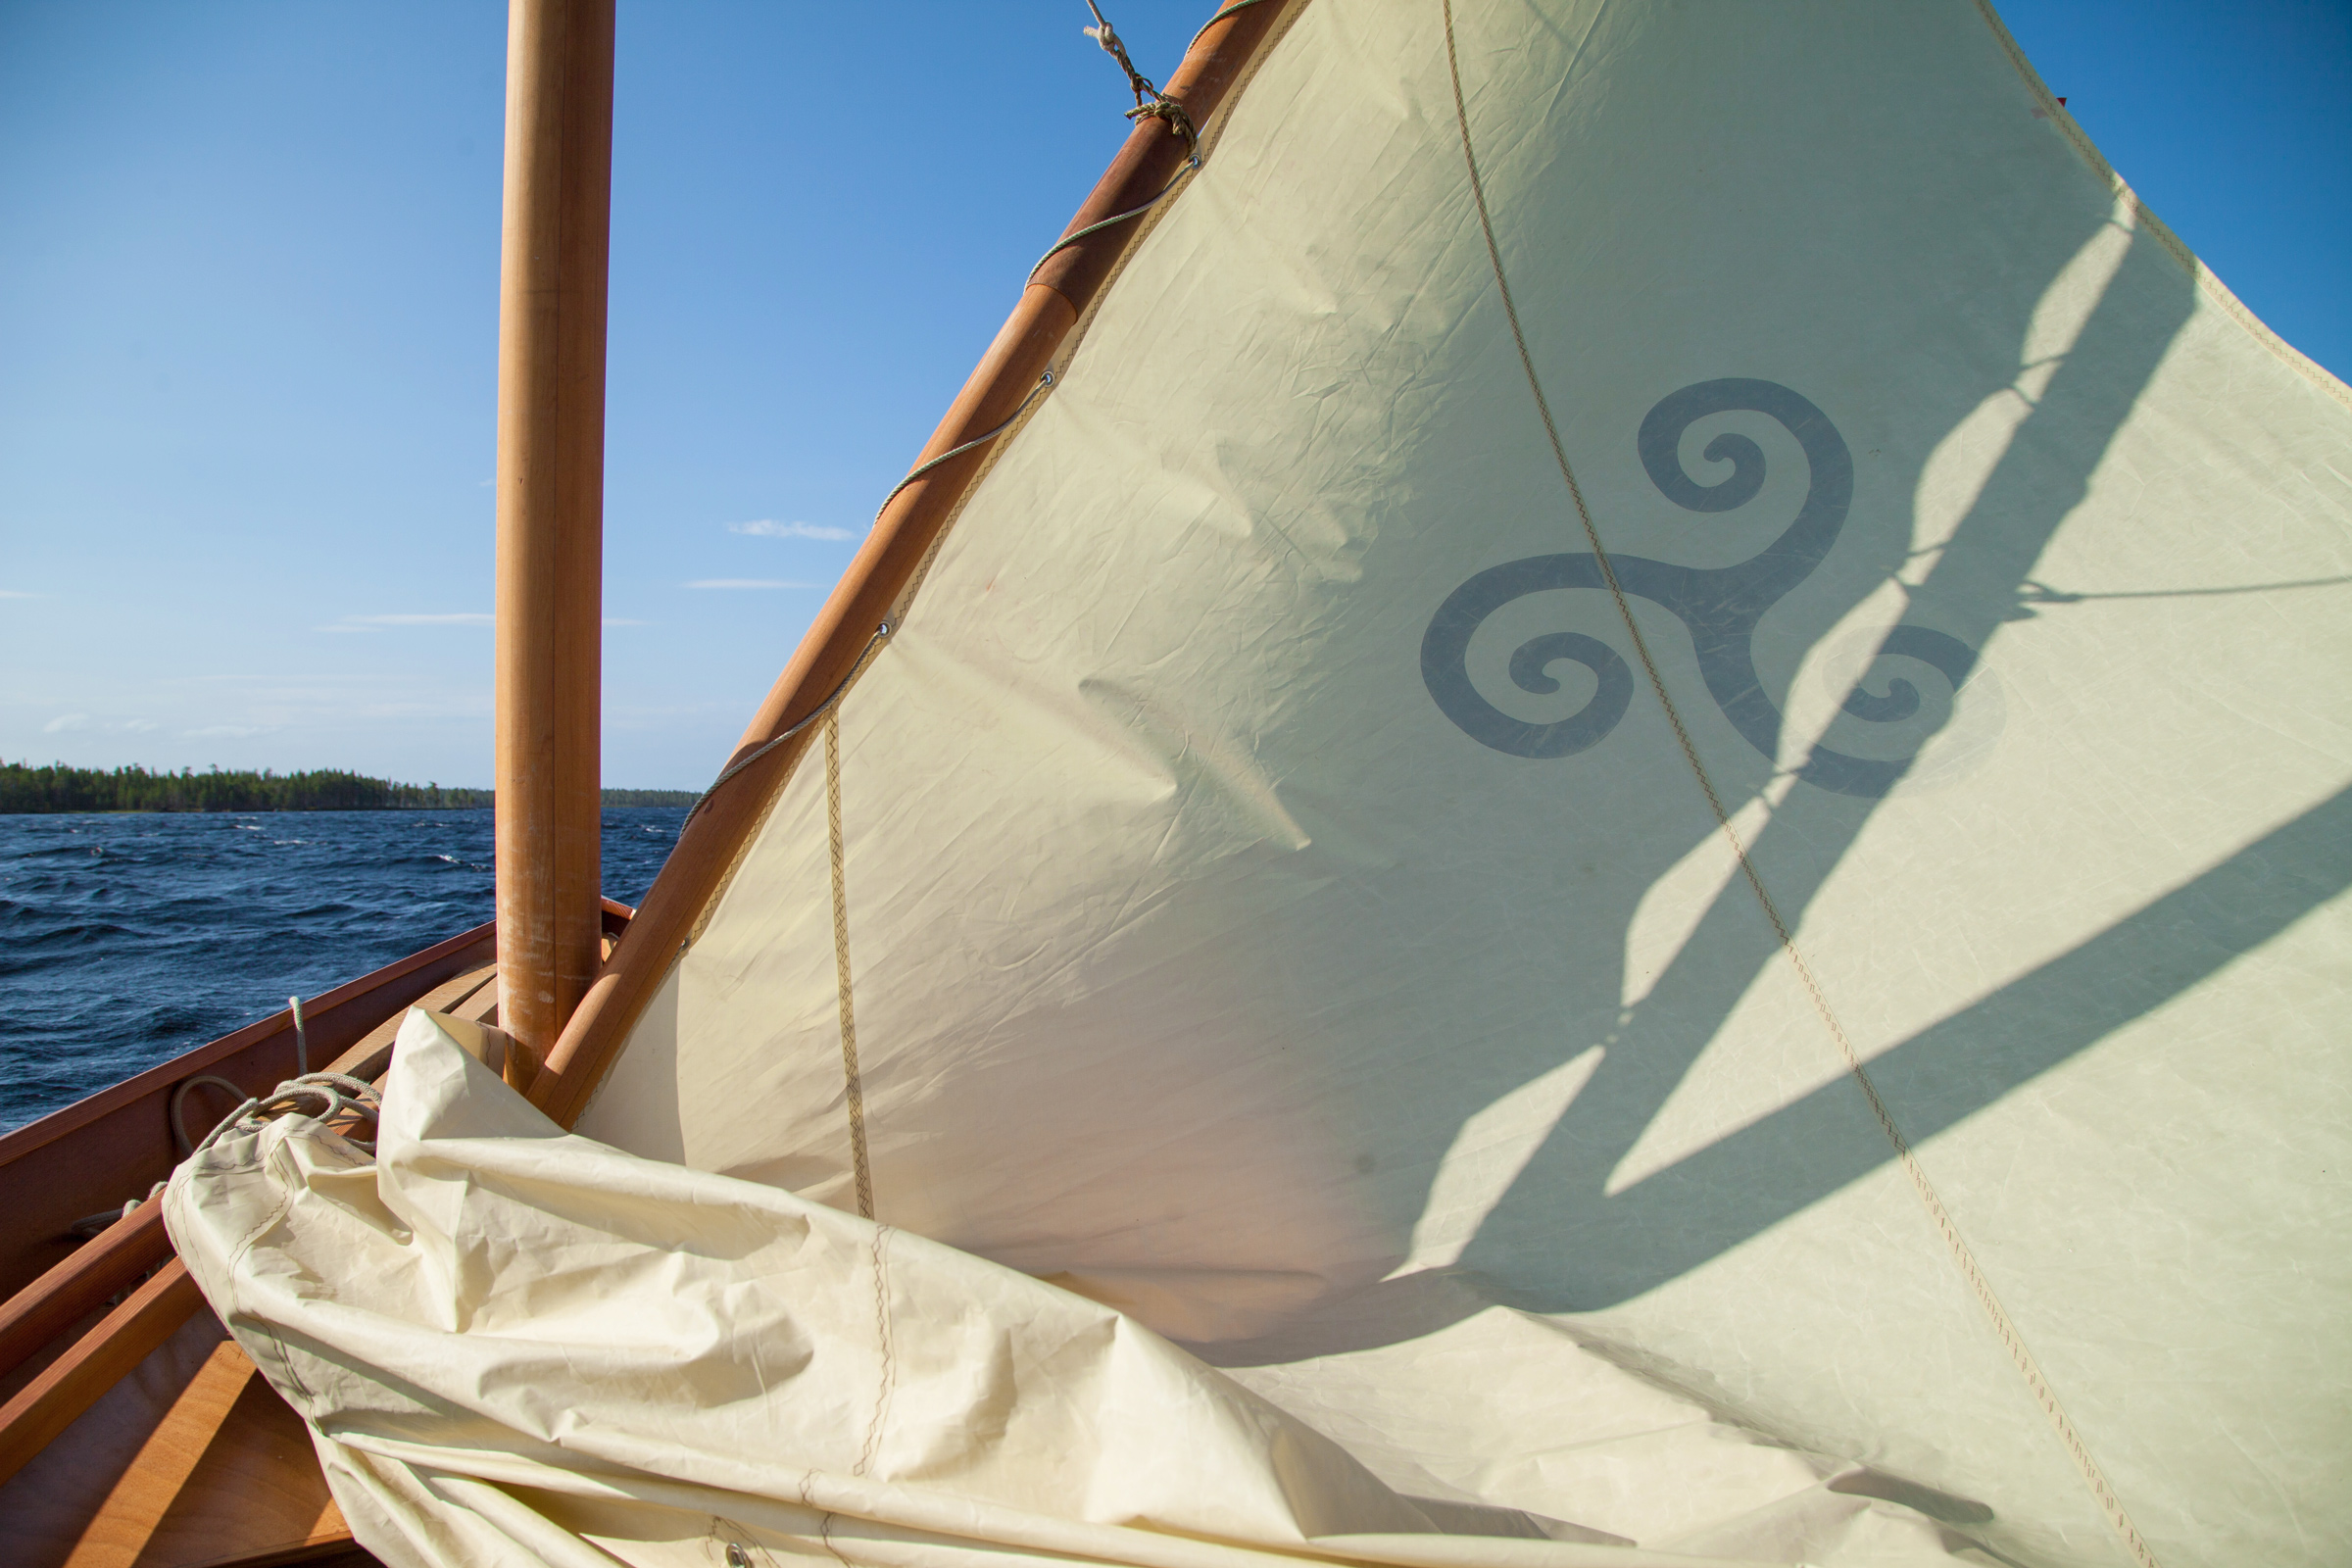
NESSIE charged southwest down the channel—the water was smooth, the feisty gusts wiping the surface but not yet stirring up a chop. As we cleared the channel and turned south, we switched into our “survival” mode for rough downwind sailing: we dropped the main and tied the foot of the yard into the foot of the mast. With the yard thus held in place, we raised the halyard to hoist the head and uppermost third of the sail, leaving the boom and the rest of the sail in the boat. The small triangle of sailcloth gave us plenty of speed but lowered the center of effort so that we now had good control of NESSIE even in the hardest of gusts.
As we paralleled the dark-green coasts of Suovasaari and Varttasaari, Inari took the helm while I carefully followed our progress on the chart. From time to time we had to jibe away to avoid the shallows and rocks. With the scandalized sail we had to follow an intricate procedure to ensure that we maintained enough speed for Inari to keep control of the boat: drop the sail; alter course; lift the yard, boom, and sail over our heads to the new leeward side; raise the sail.
The strong winds forced us to switch to our previously proven heavy-weather sail plan. We raised the lug yard but tied its foot into the foot of the mast. This gave us a decent sail shape and enough power downwind, but we had to contend with the rest of the sail and the boom lying in the cockpit.
As we cleared the islands and shallows, our route now lay in the more open waters of the lower part of Kasariselkä. The waves grew bigger, rising to almost 5′, and NESSIE surged forward as she surfed down them, the water hissing close to the gunwale each time we rose over a crest. For a moment I glanced at the GPS—we were averaging 6.9 knots over the ground. As we sailed past the cairn on Vallenkari rock—a white wooden sign marked with the letter K—we jibed once more and set a heading of 160° toward another group of islands.
The conditions demanded our full focus. We were both excited and fueled with adrenalin, but nevertheless felt in control. At the tiller, Inari maintained her steady nerves, pulling firmly on the tiller as each wave picked up the stern and threatened to push us off our course. At last, we pulled into the moss-covered ledge on the shore of Vieppisaaret and I threw out our stern anchor while Inari tied our bowline to a small birch. In the shade of the pines and dwarf birch, we sat down with some refreshments and our chart.
As we snacked on salted nuts and dried fruit, we planned our next step. A relatively sheltered route through a group of islands, each little more than an acre in size, and Iso Jääsaari (Big Ice Island) to the south would lead us first southwest and then northwest to Suovasaari, an island with an outhouse and a simple cabin that was our destination for the night. The first mile would be in open water, but after that we’d be in the lee of the islands and should be able to maintain a close or even beam reach in the relatively sheltered waters.
We set off on a broad reach with just our reduced sail, but as we sailed, I worked on a better arrangement for the sail that would give us more power and greater stability when we came back to closehauled. I pulled in the second reef clew but brought the sail’s throat cringle down to the boom as the new tack. The resulting sail had the appearance of a small lateen. The clew was low and the boom very close to the gunwale, but we could sheet it in, and the sail shape was good. I was happy with it, but as low as it was, I knew it would not be a safe arrangement if we needed to jibe.
On Suovasaari we relaxed after a hard day. The wind eased, and we were sheltered by the island. For the first time that day we shed our foulweather clothes, and Inari took time to read the chart, considering where we had been and what our plans could be for the next, and final, day.
Once we were south of Hoikka Petäjäsaari, it was lunchtime. The island is almost 4 miles long but less than 1 mile wide; it rises to about 500′ above the lake and towers over its low-lying, diminutive neighbors. We anchored NESSIE and tied her up to a rock. The shore was steep and rocky, and we had to climb to find a flat spot on which to cook. From our height on the hill, we could see for miles. Crooked pine trees—some still living and dark green, others long dead, their gray and silver limbs contrasting with their healthy neighbors—framed the lines of islands and eventually the dark mass of the mainland, and all around, the windswept waters of the lake ranged in hue from gust-darkened steely gray to blinding white.
Refreshed by pasta, coffee, and tea we headed out once more and turned northwest under our jury-rigged third reef. Progress was slow, but island by island, we crawled onward to Suovasaari. At last, sailing up a channel no more than 200 yards wide that led straight upwind, we approached the pier and cabin. The wind funneled down the channel tossing us back and forth. We decided to cut our losses and to land instead on the southwest shore of the island some few hundred yards away.
We still had to tack up to the shore, so we shook out the third reef to improve the sail’s set and our performance, and headed in. We tied the bow to a gray, semi–submerged tree stump that had been cut off below its branches but still had its roots planted firmly in the rocky bottom of the island’s shallows. Once more our landfall was sloped and forested, and it was some time before we found a flat spot where we could pitch our tents. The dull gray clouds were at last breaking up, and in our fatigue from the day we welcomed the warm rays of the evening sun. After dinner I crawled into my tent, sheltered from the elements by the pine trees growing up the steep hill behind us. Out of the noise of the wind and separated from the sounds of the waves, I relaxed, perhaps for the first time that day, and slept the sleep of the carefree.
The following morning was again overcast. The forecast was not what we had hoped for: 20 knots of wind with gusts of almost 30 knots expected through the morning. But it was still early. We decided to take things easy, slow down for a few hours, and leave later in the morning by which time the wind should have died down a bit. We were not far from Veskoniemi, where we had launched and where we would pull out. We could have gone straight there, but I suggested that when things had calmed down some, we could extend our day’s sail by going just a couple of miles farther northwest to visit Ukko (the Old Man), an island sacred to the Sámi people. Ukko is only a couple of hundred yards long but climbs steeply to a height of 98′, giving it a distinctive appearance amongst the mostly low-lying islands of the lake.
After 10 a.m. we set off to the west with two reefs in the main. On a broad reach, NESSIE charged through flat waters but strongly gusting wind. Soon we were approaching a gap through a group of islands from where we hoped to catch a glimpse of Ukko. I looked at the chart to establish our position and realized I had been in error: there was no way we would see Ukko from here; it would be totally obscured by an adjacent island, Palo-Ukko. To catch even a glimpse of the Old Man we would have to sail once more into open water, but the wind was still strong, and the gusts were severe. It would be foolish to leave the comparative shelter of our island passage. We turned back. Ukko would have to wait for another time.
Once more, we reduced sail to my improvised third reef. Now we were tacking rather than jibing, and the maneuver required careful execution and timing. Inari steered, and when I thought we had enough speed to keep our way on against the wind and vicious chop, we would tack. In the eye of the wind, I loosened the sheet, raised the boom with my hand, pushed it against the wind to backwind the sail and force NESSIE around onto a new tack. Then I would lift the boom over myself and Inari, and we’d set sail on our new heading.
It worked well, but the timing was critical. On one tack, we were approaching a rock and a shallow to our lee and agreed that it was time to turn again. I made ready, shouted to Inari to go for it, felt the bow turn toward the wind, prepared to back the sail, but… at the last minute a wave stalled us; we didn’t make it into the eye of the wind. We were in danger of getting into irons.
We needed to fall off, pick up speed, and try again. But there was no room. In a split moment I made the only choice open to us: we had to jibe. I yelled at Inari and with no hesitation she pulled the tiller hard to windward. As the bow fell off, I remembered the third reef: the boom was low; it would be as a scythe coming across the boat. As I struggled to think what to do, a gust of wind whipped the sail and boom across the boat with a speed and violence I never wish to see again. To this day I am haunted by what might have happened; to this day I cannot figure out why neither of us was hit.
We came into Veskoniemi and pulled up alongside the dock under full mainsail. It had been an exciting few days and we were tired, but Inari, NESSIE, and I had made a good team.
We came through the jibe, rounded up, and continued on a new tack. Dumbfounded by my recklessness and shaken by the near miss, I lost track of our position on the chart. About 2 miles to our east, we could see a cairn. Taking a bearing and praying that I knew what I was looking at, we reoriented ourselves on the chart and considered our route. If we sailed east toward the cairn we would pass through a maze of shallows and islands, but there was a safe channel (albeit a narrow one) and we could get to the cairn in one tack. We went for it. I breathed more easily: our tacking duel with the wind was over.
As we came to the cairn, we fell off onto a beam reach and toward the even more sheltered channel between the mainland to the southwest and the 4-mile-long hilly island of Mahlatti to the northeast. We pulled into Mahlatti for a late lunch. From here to Veskoniemi there was but one last hop of a couple of miles, along which we would be sheltered by the hills and forests of Mahlatti. For the last time, we pushed off under one reef. Before long we shook out even that one. Under full sail NESSIE carried us to the Veskoniemi dock, heeling only occasionally in a stray gust that made it through the Mahlatti forest. It was a fitting end to our time on Lake Inari. We were tired, windblown, and wet but we were happy with ourselves, with each other, and with our steadfast boat. In the last mile, NESSIE steadily gained speed, and as we pulled into Veskoniemi her bow was slicing effortlessly through the arctic water.
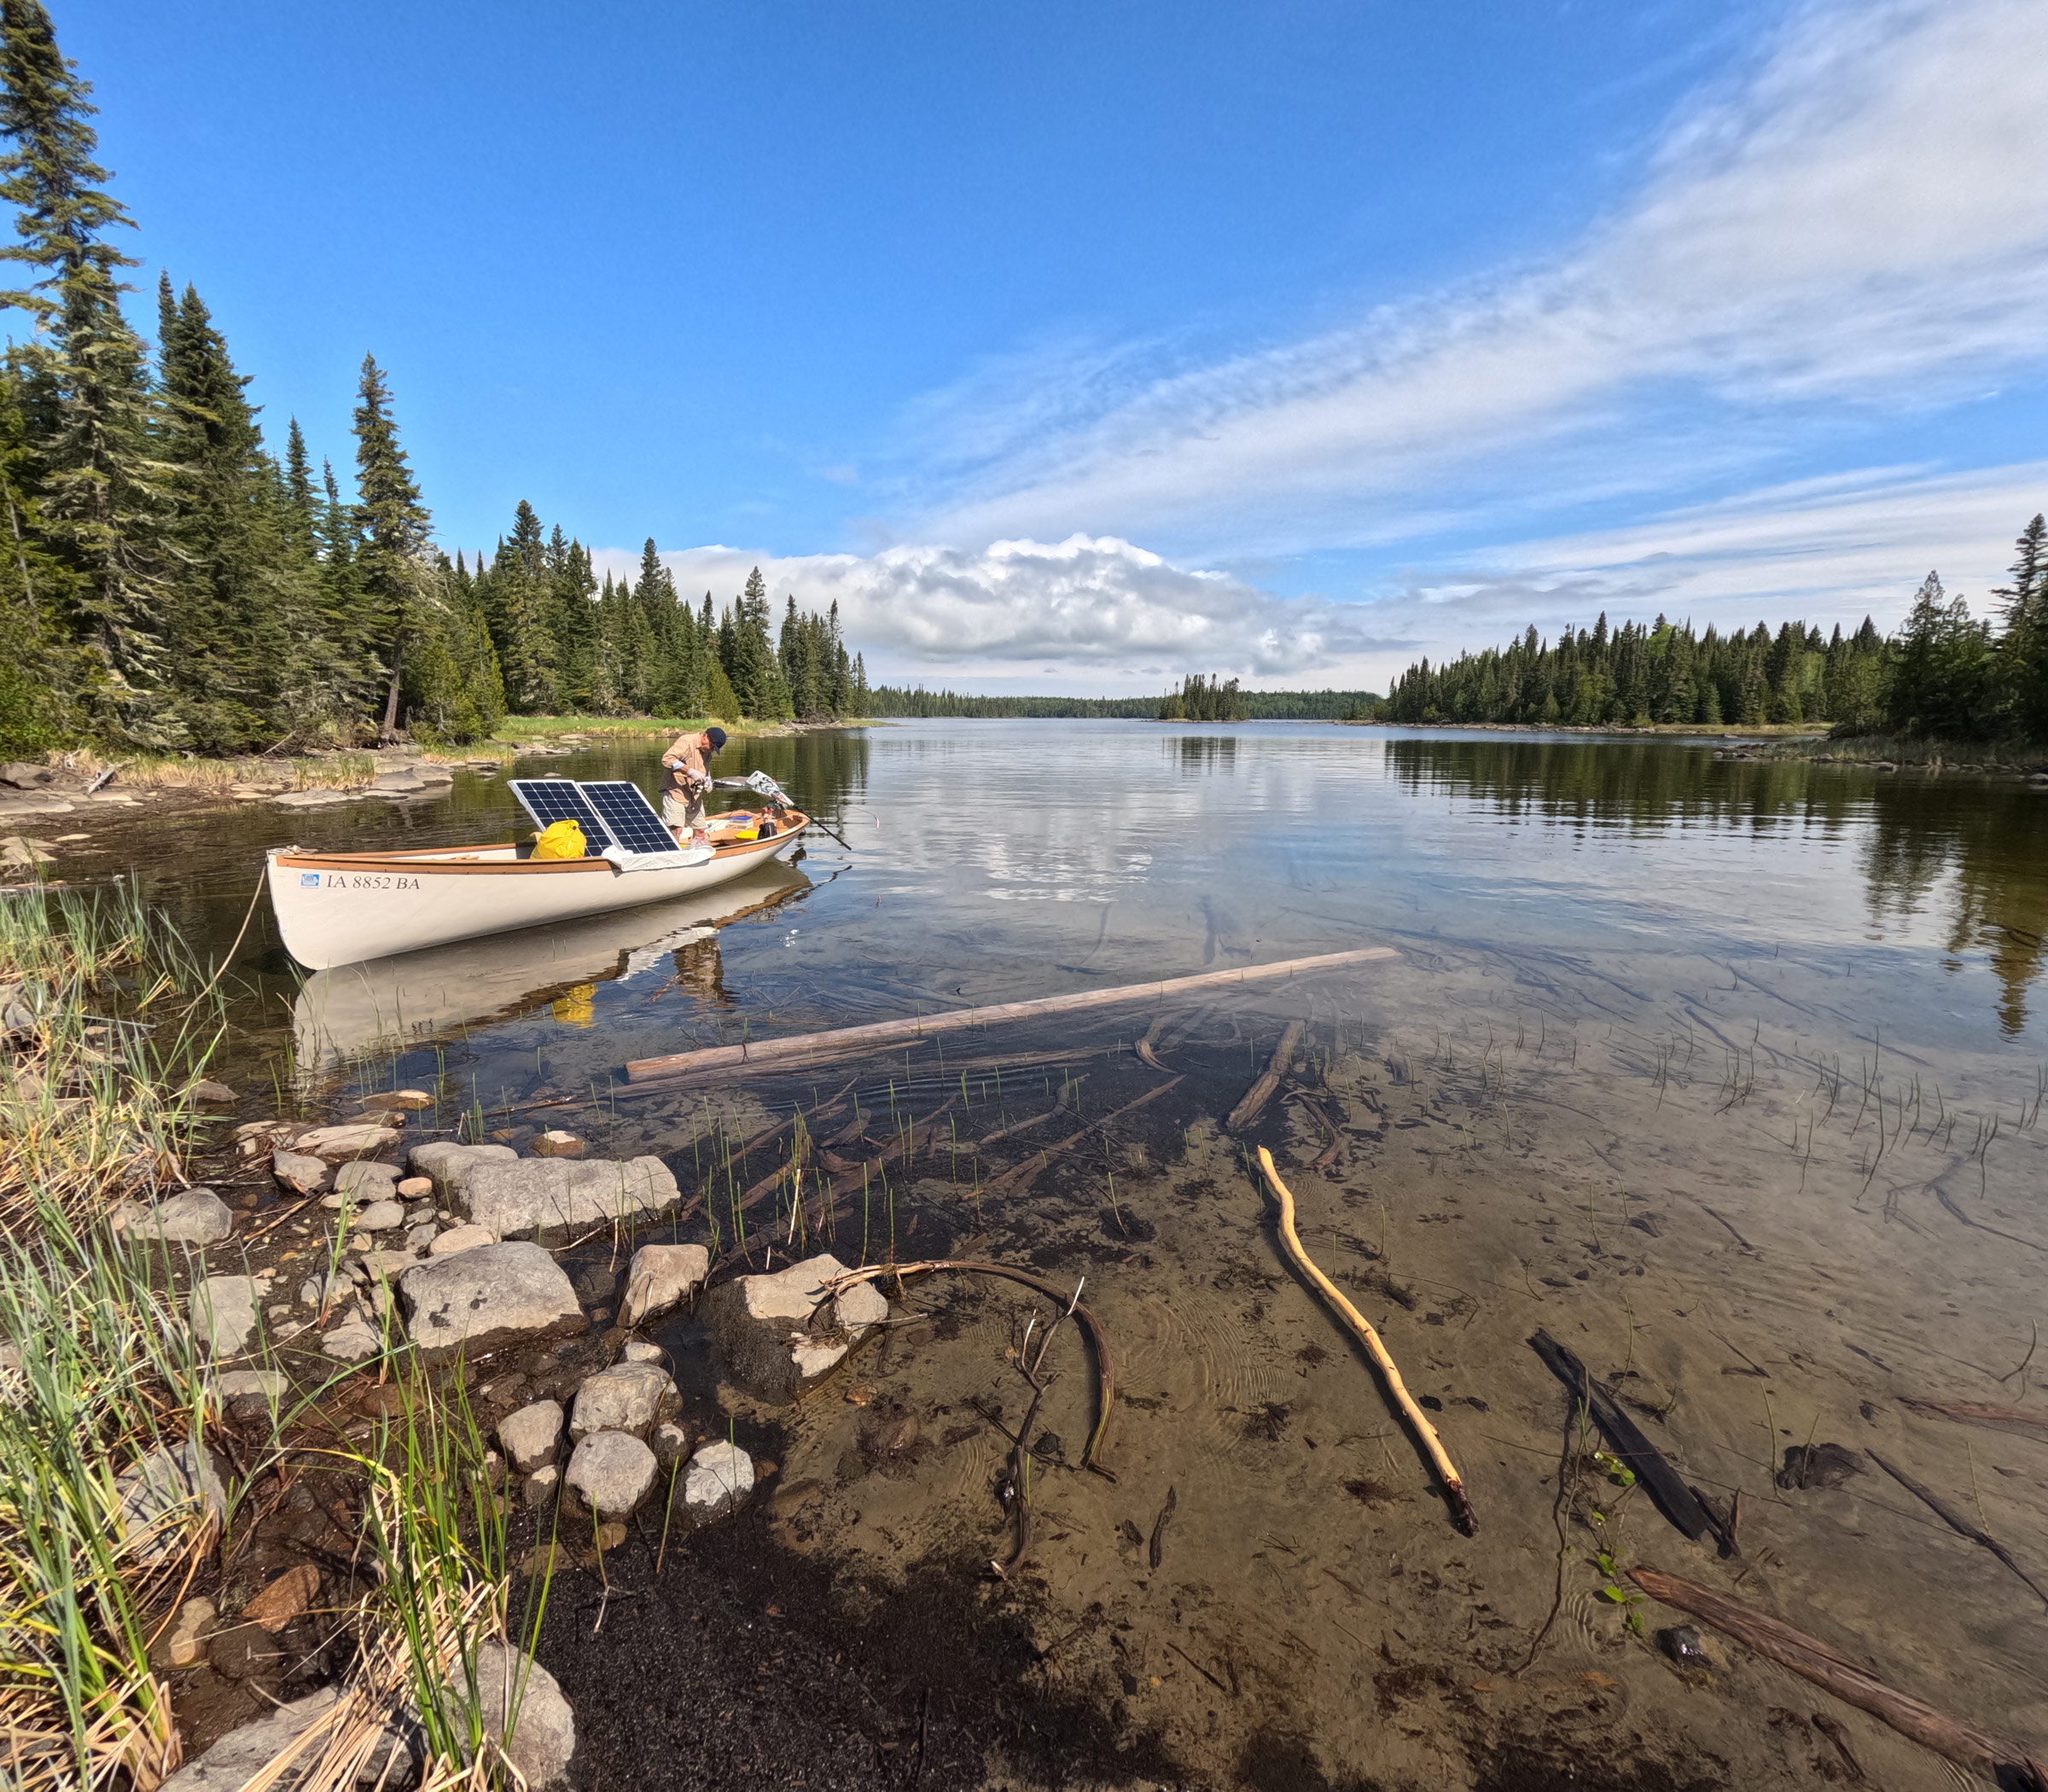
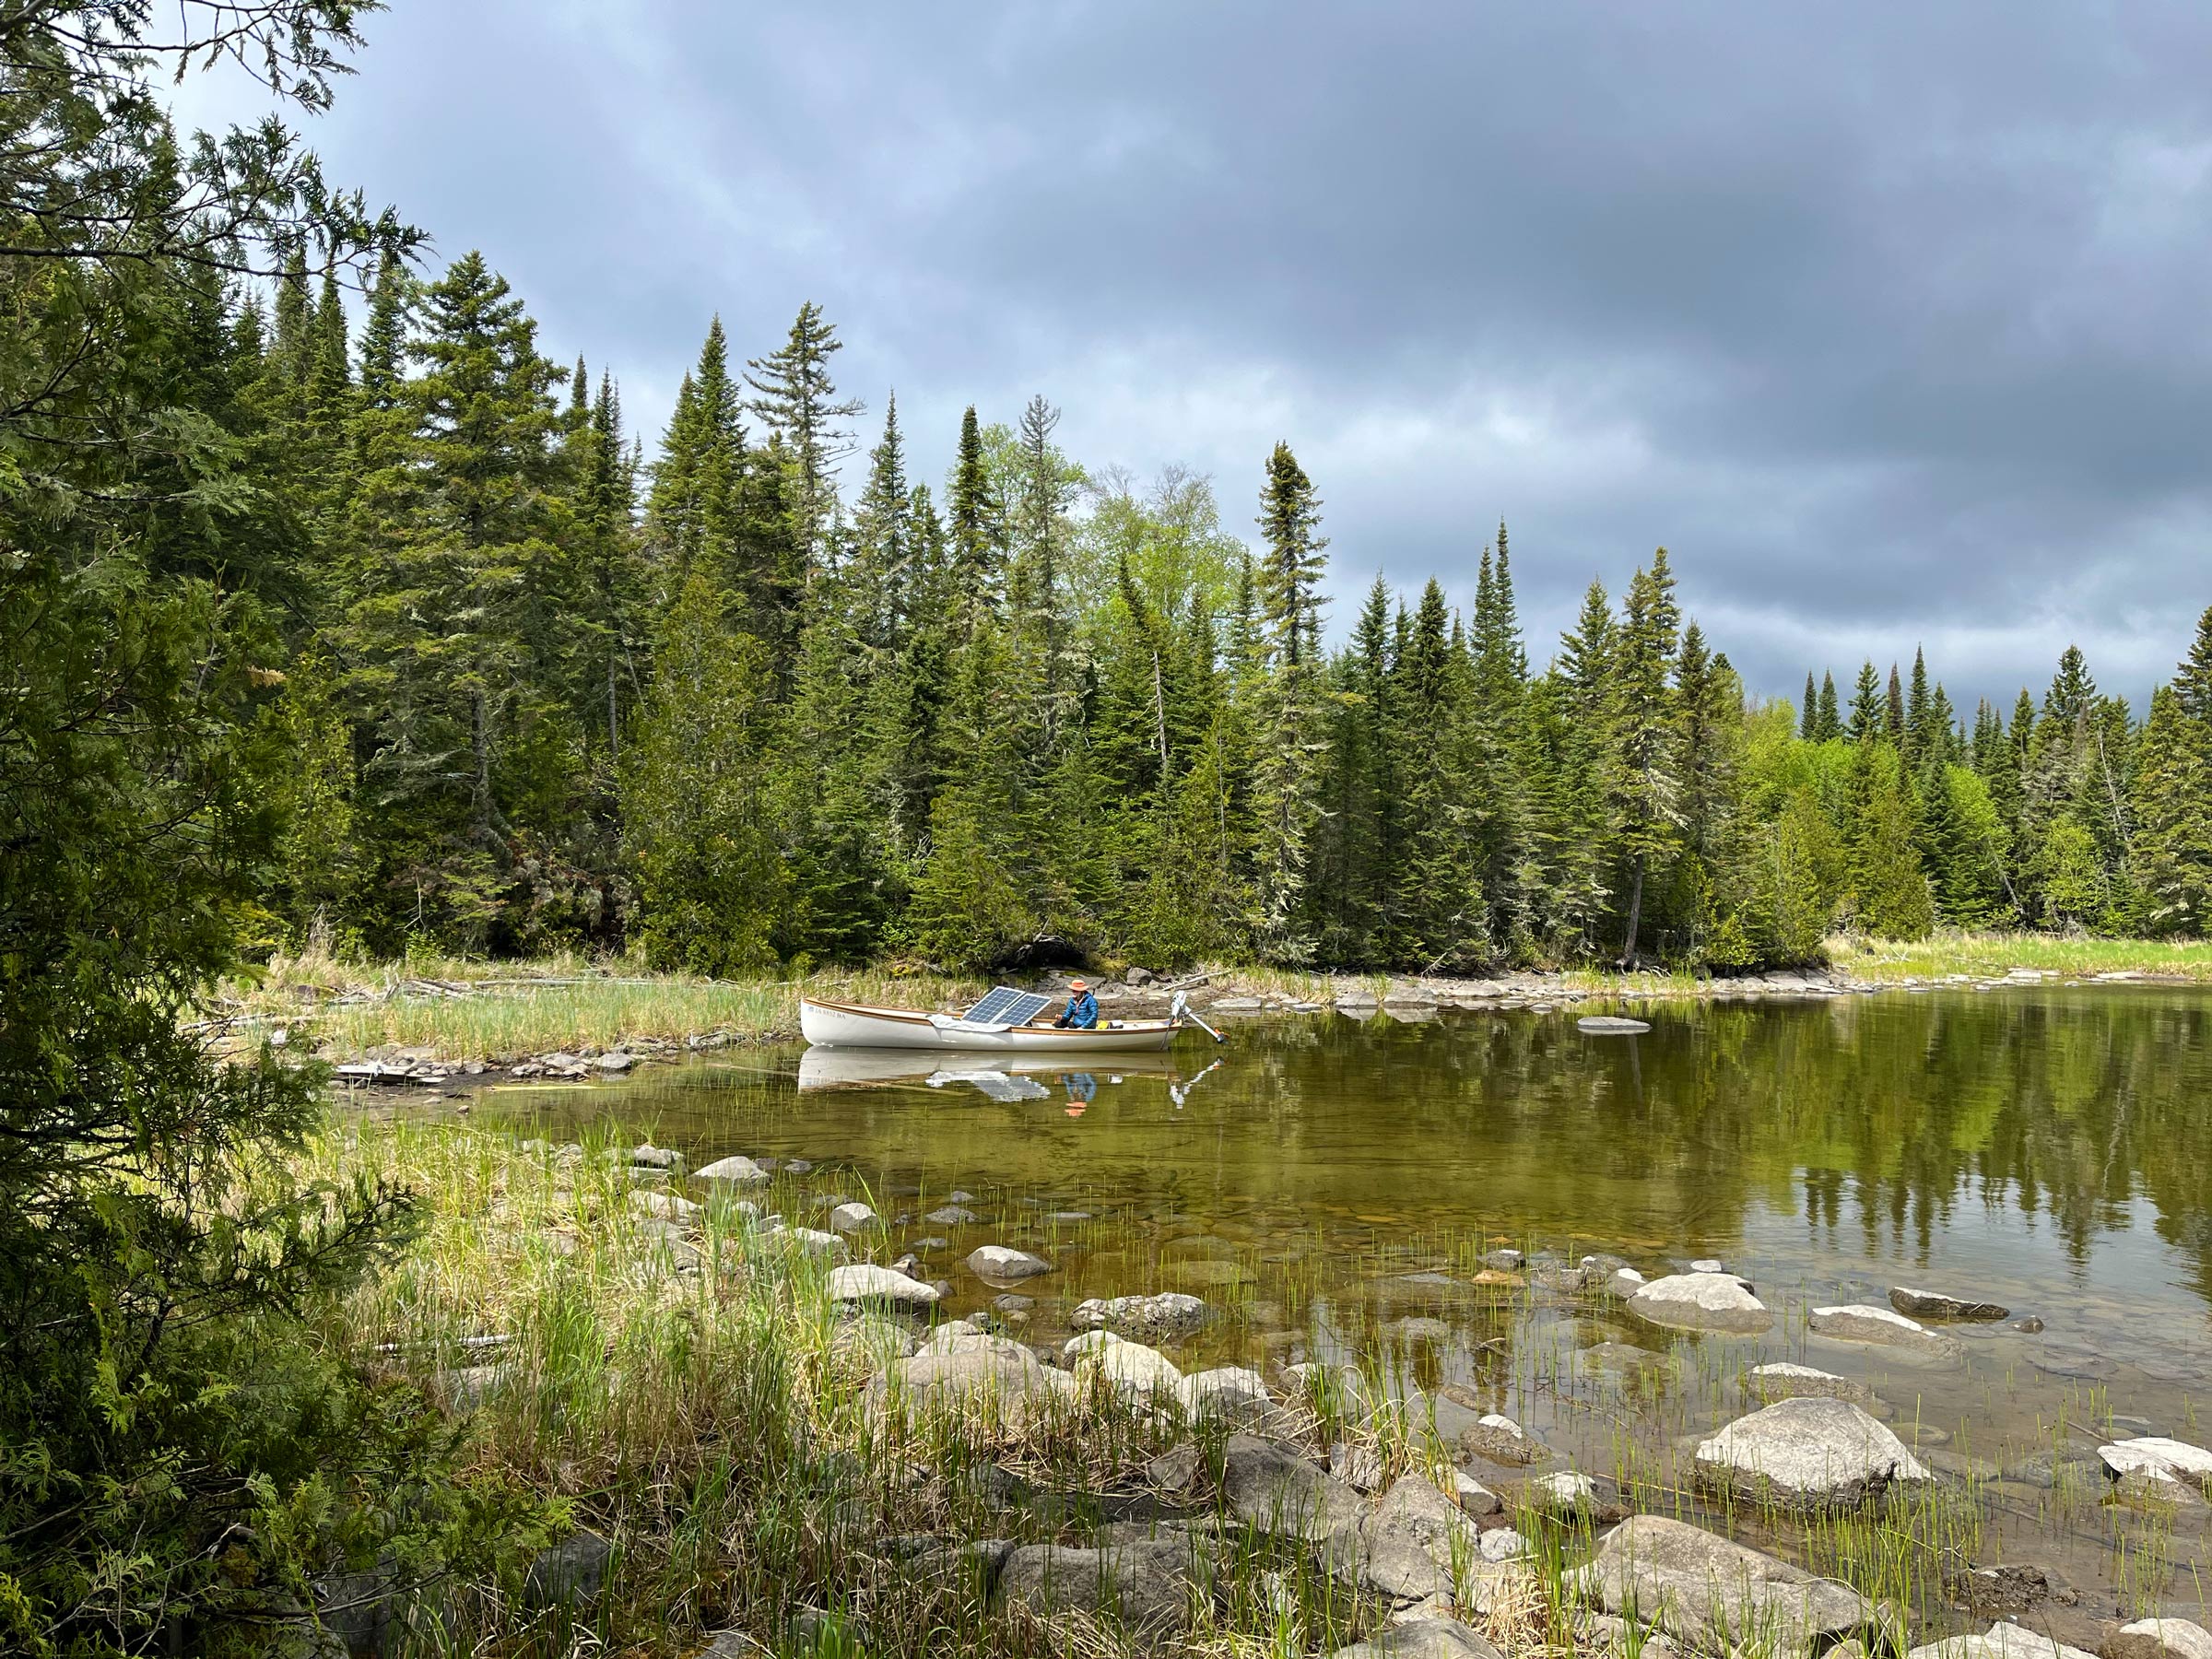
Mats Vuorenjuuri is the father of three and has been an entrepreneur making a living in graphic design, photography, freelance writing, and most recently as a boatbuilder, offering boatbuilding and maintenance services through Nordic Craft. After sailing various types of vessels, including sail-training schooners, he enjoys the simplicity and pleasures of small boats. He wrote about cruising the Finnish coast in his Coquina in our May 2016 issue, a Lakeland row in January 2017, and an archipelago cruise with Inari in March 2022.
If you have an interesting story to tell about your adventures with a small boat, please email us a brief outline and a few photos.
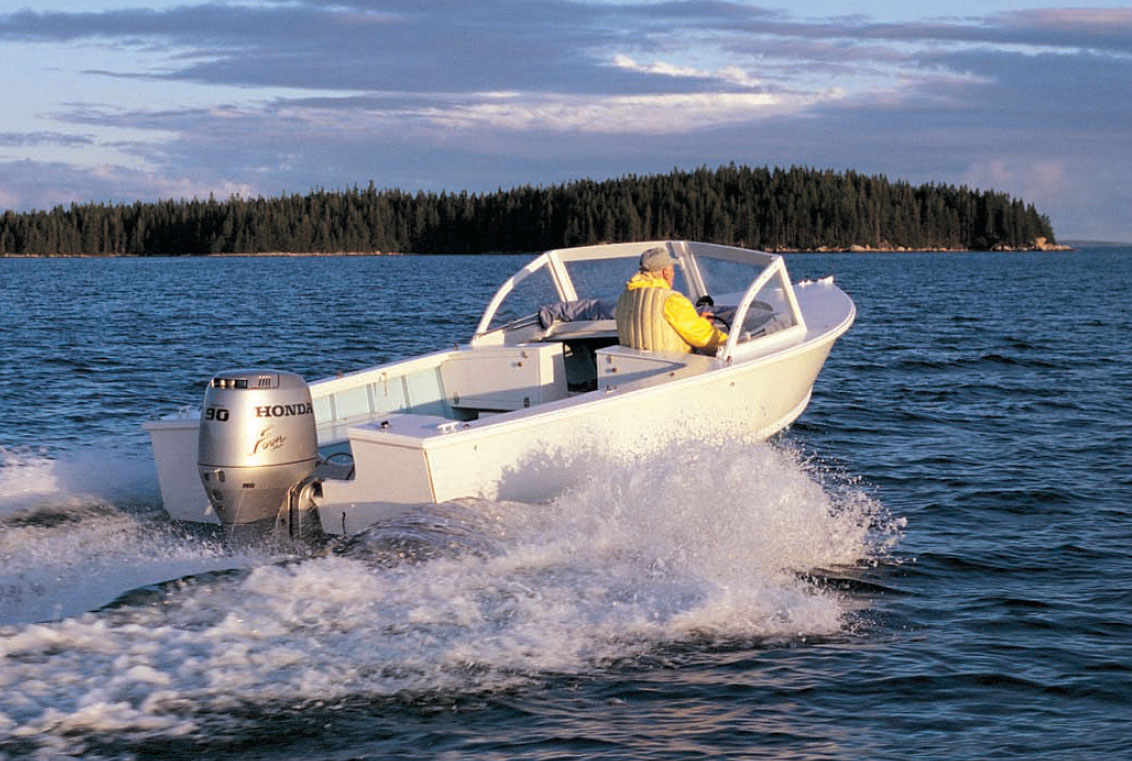
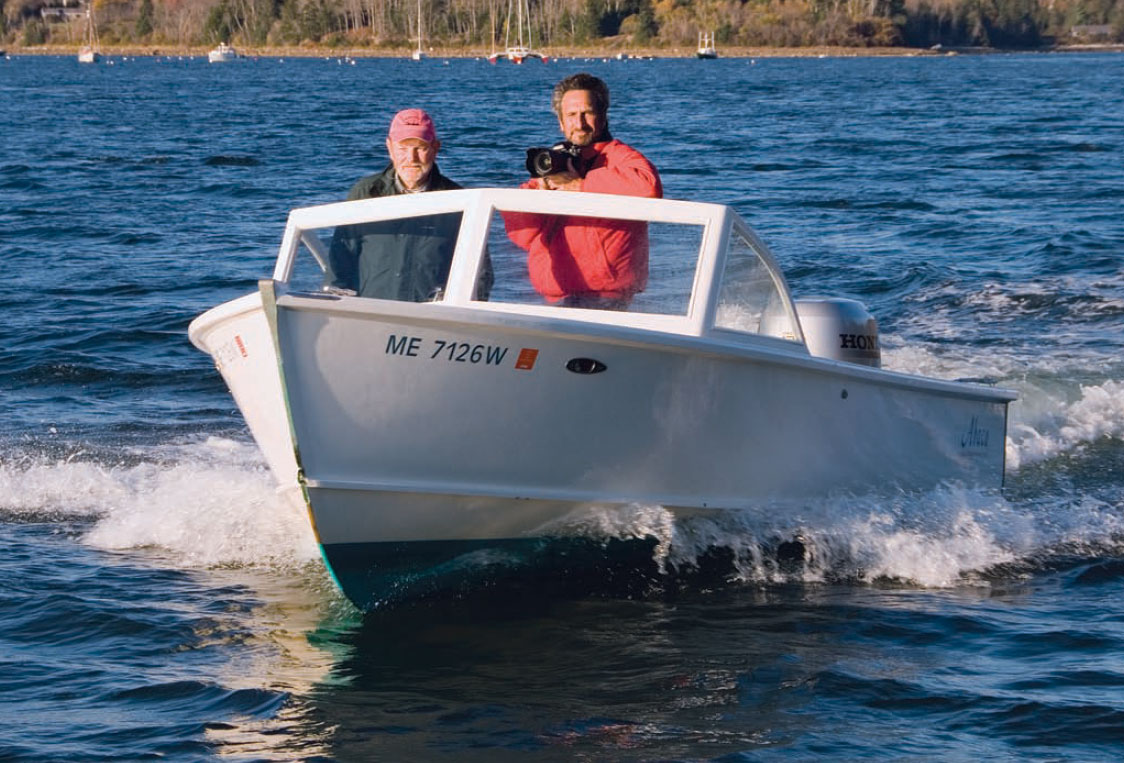
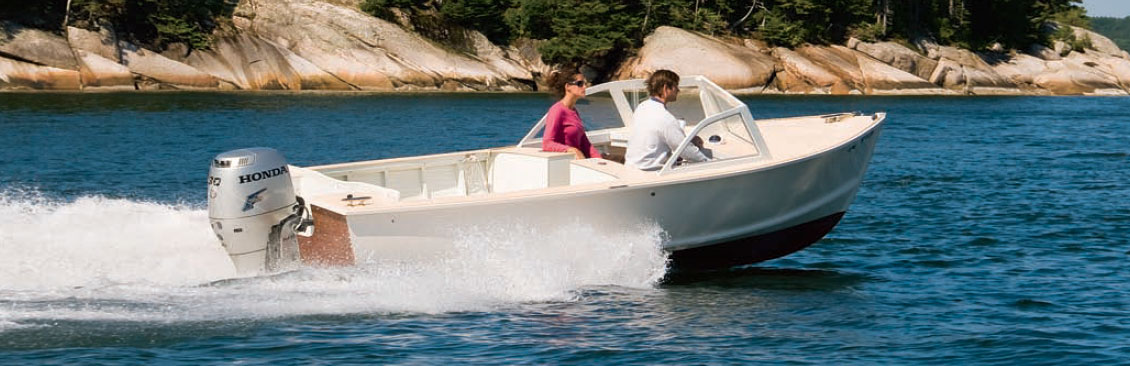
This is the best fast outboard boat of its size that I know of. Brooklin, Maine–based photographer Ben Mendlowitz, who owns one named ABACO, would agree. It features the rare and magical combination of a Mercedes-like ride with Porsche-like maneuverability. Ben’s ABACO has covered hundreds of miles in all kinds of weather since arriving in Maine 13 years ago, mostly with Ben alone searching out camera subjects, but often with me steering and Ben shooting photos.
Benjamin Mendlowitz
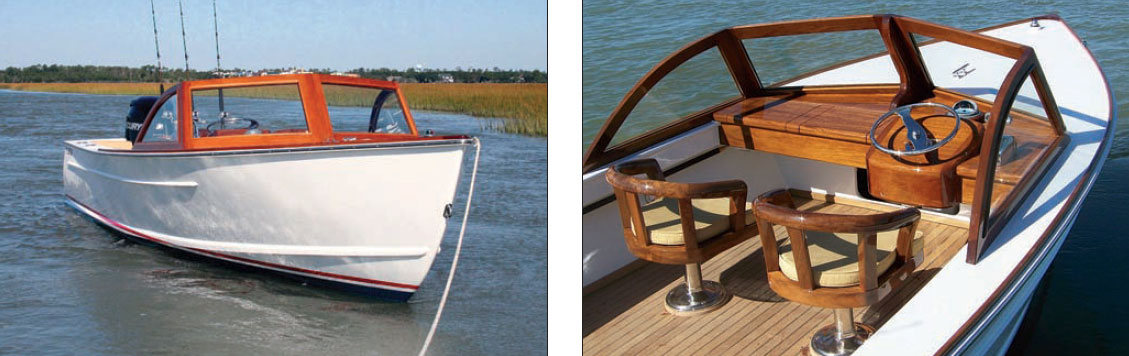
The Albury runabout is a sturdy, stable, yet surprisingly nimble runabout for her size (almost 20’ LOA). She can be strip-planked or cold-molded.
Together, in April and May of 1996, with a brand-new 90-hp Honda four-stroke for power, we ran ABACO 1,200 miles up the Intracoastal Waterway from West Palm Beach to Georgetown, Maryland. Even earlier, Ben had fallen for Albury outboard boats, especially this one, through chartering in the Abacos. In all her traveling, ABACO has seen her share of rough seas, both driving into them, and with the waves coming at her from abeam and astern. She feels solid, and indeed she is. For her type, she’s fairly heavy, weighing in loaded at 2,400 lbs., so pushing her fast takes power.
ABACO’s current engine is a 115-hp four-stroke Yamaha, with which she tops out at 38 mph. (Her earlier 90-hp yielded 4 or 5 mph less.) But her weight is part of what keeps her so steady and gives her that smooth ride. When other outboard boats are bouncing around so badly they have to be slowed way down, the Alburys, like the Energizer Bunny, just keep on going.
Their soft ride also comes from the rounded bilge, which for outboard boats is unusual; most are hard-chined. She rides nearly level so that her sharply V-shaped forebody stays in the water where it can split the waves and toss them aside before the flatter stern sections come into contact. The full-length, external keel keeps her steady on the helm, and those external spray rails assist with sharp turns as well as in knocking down the spray.
“I’ve heard ‘magic carpet’ describe Albury runabouts. In my mind, it fits them perfectly.”
When you push ahead on ABACO’s throttle, she seems to lift bodily to planing speed with very little change in trim—only 8 degrees before she levels out, according to one report. Trim at higher speeds can be noticeably altered by changing the motor’s tilt angle.
Willard Albury built ABACO in 1984 in his shop on Man O’ War Cay in the Bahamas as one of many near sisters and one of his last built of wood. He and his brother Ben Albury began production back in the 1950s using hand tools. When deep-V bottom configurations came into use, the Alburys recognized their non-pounding, seakeeping advantages and reshaped their boats’ underbodies to have approximately 16 degrees of deadrise.
Despite switching to fiberglass and being joined by two sons and one or two helpers, the shop’s one-boat-a-month output never satisfied the demand— even for locals. Because of that limited production and the hassle of importing to the U.S., Willard Albury licensed Jeff Lichterman to build identical boats in Florida’s Riviera Beach. That operation, now called Albury Brothers Boats, Ltd., has proven a great success, having built over 100 runabouts since beginning operation in 2003. But both the new Florida shop and the original one in Man O’ War build now only in fiberglass. For a wooden Albury, you have three alternatives: build it yourself, commission one from a professional builder, or buy it used—if you can find one.
Recognizing how nice the boats are and anticipating that a few aficionados might still want to built them in wood, Doug Hylan, with Willard’s okay, measured ABACO and prepared his usual fine and complete set of drawings (there are six sheets in all), subsequently making arrangements for WoodenBoat to sell them on a royalty basis. ABACO, built near the end of an evolutionary chain, embodies what Willard considers his boats’ best features.
Matthew P. Murphy
Here’s a behind-the-scene’s look at how many a WoodenBoat cover and calendar have come to be. Maynard Bray (left) mans the helm of ABACO while photographer Benjamin Mendlowitz does his magic behind the camera. The Albury runabout’s steadiness and agility make her Mendlowitz’s boat of choice for this work.
Benjamin Mendlowitz
To comply with present regulations, the motor should be separated from the cockpit by a watertight bulkhead as shown here. Bill Boyd and his son built this Albury runabout for summertime fun around Brooklin, Maine.
She’s straightforward all the way, yet well proportioned, as most fully evolved creations are. The platform has no steps to trip over, and its only obstruction is the split forward seat. Fuel tanks are out of the way within the seat enclosures, and there’s dry storage under the foredeck as well as inside the built-in aft seats. You could substitute a steering console amid-ships, as the newer fiberglass boats are being built, but for me, relinquishing the shelter behind the windshield doesn’t make sense. If you need to see better or want to feel the wind in your face, it’s easy enough to perch on the generously wide seatbacks with a cushion under your butt and steer from there. This is where we drive from when shooting photos. Ben fitted ABACO’s steering wheel with a spinner—a welcome improvement for low-speed maneuvering.
Because of her spartan layout, she not only cleans up and paints up easily, but she’s free of nooks and crannies where moisture collects (leading to rot). For the frames of his wooden outboards, Willard Albury used to harvest madeira crooks locally, just as Man O’ War builders always did. Doug’s drawings offer a laminated Douglas-fir or mahogany alternative, which most builders will utilize. The skin is unchanged, consisting of 3⁄4″ × 1 3⁄8″ epoxy-glued strips of cedar or Philippine mahogany. There’s also a cold-molded option for builders who have that preference. The 2 1⁄4″-thick transom is made up of layers, either all plywood or a combination of planks and plywood. In all constructions, plywood is used for deck and cockpit sole.
To date, we know that several boats have been built, one of them by Bill Boyd and his son for use in Brooklin, where there’s an occasional meeting with ABACO. I think Chris Wick made first use of Doug’s drawings, and Shearline Boatworks of Morehead City, North Carolina, built the most recent one we know of using cold-molded construction, stretching her length to 22′ and giving her 200 hp. Within the last few years, The WoodenBoat Store has sold nearly 100 sets of plans. So we know there are many more. I’ve heard “magic carpet” describe Albury runabouts. In my mind, it fits them perfectly.
Chip King (Shearline Boatworks)
Though some may prefer the looks and the utility of a simple arrangement and paint throughout, a varnished windshield, handsome and comfortable bucket seats, a rod holder, and a teak platform (walking deck) show how nice this design can look when she’s all dressed up.
Want to Build the Albury Runabout Yourself?
Get to know the Albury Runabout first by reviewing the study plan. We review the basics and the line drawings like the ones below, and give you a direct link to where you can purchase the full set of plans.
The straight and level-running buttock lines allow the Albury runabout to achieve a quick plane when the power is commensurate with her as-built weight. Her sheerline is very pleasing, both in profile and plane.
You may have heard that when it comes to building a boat, you can never have too many clamps. While that’s true, a large collection of clamps can be expensive and take up a lot of room in the shop. Fortunately, there are shop-made spring clamps that cost only pennies and are small enough for dozens to fit in a gallon bucket.
Photographs by the author
I used a chop saw to cut the 2″ PVC pipe. A scrap-wood stop clamped to the saw’s fence set the width of the pieces for the clamps at 1″. Almost any wood-cutting saw and hacksaw can be used to cut the PVC.
These spring clamps are cut from Schedule 40 PVC (polyvinyl chloride) pipe, which is made in white for plumbing and gray for electrical conduit. (The black Schedule 40 ABS pipe used for drains doesn’t have the spring-like quality of PVC and isn’t suitable for use as clamps.) I have more than 100 clamps made from 1 1⁄2″ and 2″ PVC pipe.
A bandsaw makes quick work of cutting through the PVC rings so they can open to clamp things. With the wide blade I could make the cut and pull the pipe back before it closed behind the blade, which would make it more difficult to remove the ring.
I cut the 1 1⁄2″ pipe in 5⁄8″ widths and the 2″ pipe in 1″ widths. The PVC cuts easily with power tools, but the pipe’s slick cylindrical shape requires care to keep it in place during the cut. A chop saw makes the cuts quickly, and I can hold the pipe in place against the table and fence. When using a table saw, I employ a sled. I have also used a bandsaw but a block with a groove to cradle the pipe is required to keep the saw teeth from catching the pipe at the beginning of the cut and rotating it. Whichever power tool I am using, I stop cutting while I still have enough pipe to hold it securely in place. If you don’t have access to a suitable power tool, you can use a hacksaw to cut the pipe; it just takes time. Once you have cut your rings of pipe, the last step is to cut through each one so it can open. I do that on the bandsaw. Again, you can use a hacksaw.
I used a hanging scale to measure how much force is required to open the clamps to measured increments. The force required to open the clamp is also the force the clamp exerts when in use.
PVC spring clamps can be applied by hand if they’re not too hard to open. The clamps I cut from the 1 1⁄2″ pipe take 5.5 lbs of force to open them 1⁄2″ and 16 lbs to get to 2″. The clamps cut from 2″ pipe take 7 lbs to open them 1⁄2″ and 18.75 lbs to open them 2″. These numbers are also measures of the clamping force of the pipe clamps. As a comparison, a Pony Jorgensen 2″ spring clamp applies roughly twice the amount of pressure at the ends of its jaws. Iron C-clamps can apply even more pressure, but that’s not necessary for working with epoxy when glued joints need only to be pressed just tight enough for the excess epoxy to be squeezed out, while leaving a thin film in the joint—excessive pressure starves the joint of epoxy and weakens the bond. I’ve used PVC clamps for countless epoxy glue-ups and have never had a joint clamped with them fail, so they’re evidently not squeezing too tightly.
My 1 1⁄2″-pipe clamps don’t take too much strength to open. However, to open and apply my 2”-pipe clamps easily, I made a tool.
However, applying the clamps can be a chore once my gloves become slippery with glue, and if I have a thick stack of pieces to be glued, it’s hard to open the clamps wide enough to apply them. Opening them by hand to 2″ is too much of an effort for me, especially when I need to work fast and finish before the epoxy kicks off.
I have seen some pipe clamps equipped with handles—either nails or machine screws—that open the clamp when squeezed together. They may work on wide pieces of pipe, but when I drilled holes in my spring-pipe sections, I significantly weakened the clamp. And, installing handles in every clamp adds time, expense, and bulk.
The reverse-action pliers are simple to make and require common materials: two 12″ lengths of hardwood, two small pieces of aluminum, steel, or 4mm plywood, and a handful of 16D nails, here already cut to length and ready to be inserted and peened.
Instead, I came up with a pair of DIY reverse-action pliers. The business ends of the pliers spread apart when the handles are squeezed together, and not only does the geometry provide a mechanical advantage, but the tool also takes advantage of my grip strength, which is more powerful than using two hands to pull something apart. Because the handles don’t cross each other, which would require a complicated pivot point, reverse-action pliers are easy to make.
Pliers made to these dimensions work well with clamps made from 1 1⁄2″ and 2″ PVC pipe. They can open the smaller clamps to 2 1⁄2″ and the larger clamps to 2″. I used 1 3⁄4″-thick white oak for the handles. The upper, moving handle has an angle of 16° between the handle and the jaw and can be cut out of a piece of wood 12″ long and 1 5⁄8″ wide.
I used 3⁄4″-thick white oak for the plier handles, 12-gauge (0.08″) aluminum for the side plates (4mm marine plywood would work as well), five 16D sinker nails, and rubber bands to make the pliers self-closing. I used a 5⁄32″ bit to drill all the holes for the nails. Three of the nails are used as rivets to hold the aluminum plates in place. After hammering, the ends of the two nails on the straight handle are cut by either hacksaw or bolt cutter approximately 1⁄16″ proud of the plate and are then hammered to flare them until the plates are tight against the wood. Before applying the third nail, which fixes the plate to the angled handle and holds the two handles together, a thin metal shim—a piece cut from a soft-drink can works well—is inserted between the plate and the wood. The nail is then flared as before, but when the metal shim is removed there is enough open space between the plate and the handle for the handle to move freely. The finishing touch is to stretch a couple of rubber bands over the pliers’ handles in front of the plates to make the pliers self-closing.
The nails that fasten the metal plates are cut to length and peened to secure them. On the side shown here, the nail serving as the pivot for the angled handle is peened. The two nails on the straight handle are peened on the other side; their heads can be seen on this side.
The two nails at the business end of the pliers will be glued in place, so sand or file the vinyl coating off each one and roughen the underlying steel. I’m right-handed, so I inserted the nails on the left side of the pliers so I can grip the tool with my right hand and apply the clamps to it with my left hand. The nailheads should stand 1 1⁄16″ above the wood to provide enough space for PVC spring clamps cut in 1″ widths. Once the nails are in position, drops of CA glue—the thin stuff that will pull itself into the perimeter of the hole—will lock them in place. When a clamp is opened by the pliers, the nailheads prevent it from flying off. An opened clamp stores a lot of potential energy, so the shop rule—wear eye protection—applies here, too.
The pipe clamps work well when assembling the various layers for deck hatches. Here they’re holding a 1⁄2″-wide plywood coaming. When using a right-handed tool, seen here, the clamps should be applied from left to right so that they can be spaced close together but not impede the removal of the tool.
The 2″ pipe clamps didn’t have the capacity to span the gunwale of this lapstrake canoe—2 1⁄2″ from spacered inwale to outwale. I cut about 1⁄2″ from one end of each clamp, which allowed me to open the clamps to the desired width without having to modify the pliers.
In the decades since I started building boats, I’ve acquired a multitude of clamps, but there are some jobs that are best done with PVC spring clamps. They’re much quicker to apply than other clamps, they weigh next to nothing, they don’t stick to epoxy or get jammed by cured glue, and you can make as many as you like without breaking the bank or crowding the shop.
Christopher Cunningham is editor-at-large of Small Boats.
You can share your tips and tricks of the trade with other Small Boats readers by sending us an email.
When I teach boatbuilding and woodworking at WoodenBoat School and other venues, I send out a list of tools students might like to bring with them, including hand planes. I teach mostly introduction-level courses and encourage students to bring some of their own tools when they can. This past summer, a couple from California arrived with two new Jorgensen No. 60-1/2 low-angle adjustable-mouth block planes. I like 60-1/2 low-angle block planes in general but had not seen the Jorgensen before. It turned out to be a well-made and useful tool.
Photographs by the author
The interior of the Jorgensen No. 60-1/2 low-angle block plane is painted the company’s distinctive orange. The edges are smooth, and the lever cap is rounded so that it nestles comfortably against the underside of the operator’s index finger
The Jorgensen company was founded in Chicago in 1903 as the Adjustable Clamp Company. It persevered through two world wars, recessions, and depressions for 113 years, finally closing its doors in 2016. The name endures, but all the products are now made in China.
Once back in my shop I ordered one of the Jorgensen planes for myself and was pleased that the quality of the two I had seen in the summer class was not a fluke. The Jorgensen plane measures 6.3″ × 1.75″, has a 1 3⁄8″-wide blade, and weighs 1.48 lbs. The feel and function of the Jorgensen match that of any of my older No. 60-1/2s. It fits nicely in my hand and the edges are smooth. One notable improvement is that the opening throat locks down, making it less prone to slipping. The ductile iron body is finished in a bright orange. The sides are 90° to the sole, and the sole itself—while not perfectly flat—was well within acceptable tolerances. I polished the bottom and sides with 600-grit wet/dry sandpaper on a thick piece of glass, and each time I sharpen the iron I will continue to polish the bottom of the plane—soon the sole will be dead flat.
The knob for locking the adjustable throat opening doubles as a hold for the guiding hand, allowing the operator to both direct the plane and apply the necessary pressure to the blade.
The iron was also sharp enough to use right out of the box, which is not typical. The primary bevel was dead-on 25° and only required a bit of polishing on a 1,000-grit water stone to cut really well. The addition of a higher angled micro bevel applied with an 8,000-grit waterstone improved the edge even more, but this is not a necessary step for most woodworking tasks. The edge seems to hold up well while cutting both hard- and softwoods. The manufacturer says the blade is 01 tool steel hardened to Rockwell 60–64; it’s a full 3mm thick—typical of better hand planes.
The mechanism for setting the blade consists of a rectangular slot at the top end of the blade and a corresponding flange at the bottom of the knurled depth-adjuster wheel. It lacks lateral adjustment or multiple slots to attach the blade to the adjuster, but here simpler is better. The overall design has few moving parts. Once the blade has been adjusted, the cap iron’s large, easily operated spinwheel applies pressure on it to hold it in place.
The adjustable throat is a nice feature; it adjusts easily and locks firmly. When planing plank lands for lapstrake boats, and for most general boatbuilding and woodworking tasks, I keep the opening wide most of the time. When flushing up joinery or working on figured wood, I narrow the opening to prevent tearout. In both settings, the plane works well.
The Jorgensen plane has few moving parts. The blade position is set by a rectangular slot at its top end and a flange at the bottom of the depth-adjustment wheel (in the foreground of this picture). There is no lateral adjustment lever, but the slot is long enough to allow the blade to be oriented with its edge parallel to the sole. The spinwheel, beneath the lever cap, applies pressure to hold the blade in place. The throat opening is easily adjusted and held in place by the front knob.
Overall, the action of the throat, the travel and adjustment of the blade, and the wheel that locks the blade in place are just fine. Each time I sharpen the blade (which might be often as this seems to have become my new everyday plane) I’ll polish and tune-up the surfaces until the action is even better. This inexpensive little plane has impressed me and found a permanent place in my toolbox.
Bill Thomas has been a custom woodworker, designer, boatbuilder, and teacher for over 40 years. He lives and works in South Berwick, Maine.
Our small-boat fleet includes several sailing dinghies, which are sensitive to weight distribution. Depending on the number of crew and the wind conditions, we’ve found that a tiller extension is often useful for attaining good balance and trim while maintaining precise control of the rudder. The most versatile extension that we have come across is the Ronstan Battlestick with its fully articulated universal joint.
Photographs by the author
Assembly of the Ronstan Battlestick is straightforward. First the mounting plate is screwed onto the tiller. Next the rubber sleeve (seen here, flattened, at bottom left) is fed onto the extension stick. The mounting-plate cap is then slid onto the swivel joint (bottom right), which in turn is fed into the end of the extension stick and held in place with the stainless-steel pin. The sleeve is worked down and over both the pin and the end of the extension stick to lock and protect the connection. Thus assembled, the swivel joint is slotted into the mounting plate and locked in place by the cap that snaps down onto it. The Battlestick can be removed from the tiller simply by prying the cap off the mounting plate.
The Battlestick is a lightweight fluted aluminum-alloy shaft available in a range of lengths with a comfortable EVA-foam grip—a non-slip, waterproof material resistant to UV exposure and other harsh elements of the marine environment. The extension, including the soft grip, is 1″ in diameter, large enough to feel good in the hand, but small enough that you can hold it and gather line in the same hand while sheeting in. There is a knob on the grip end so you can feel the end of the extension without looking, which helps to prevent the extension from slipping out of your hand.
Fully assembled, there are no exposed moving parts, making the connections between the Battlestick, the mounting plate, and the tiller clean and stable.
The urethane universal joint allows for smooth movement in any direction. It is securely attached to the tiller with a flat mounting plate and provides excellent fine-control movements with no slop. A curved mounting adapter is also available so the extension can be mounted on a round tiller. The extension is easily removed when not needed: the quick-fitting universal joint slides in and out of the tiller-mounted plate and is held in place by a snap-on cover. If you don’t want to remove the extension completely, but don’t need to use it all of the time, it can also be folded back along the top of the tiller and held in place by either an optional Ronstan retainer clip or a simple piece of line or paracord looped around the tiller.
The Battlestick comes in lengths from 24″ to 98″, and Ronstan also offers telescoping Battlesticks, which would be useful in small sail-and-oar dinghies.
The Battlestick comes in various lengths. For the Sunfish, the 33” fixed extension is the perfect length, allowing the helmsperson to move their body weight both forward and out to balance the boat.
For our Sunfish, we chose the 33″ fixed-length extension. It allows us to use a shorter tiller when we’re sailing with two people, but to introduce extra length when sailing solo. On windy days, the extension, plus the secure fitting of the universal joint, is great for rudder control when hiking out. The Battlestick is also fun when it’s a ghosting day: I can sit in the cockpit with my feet stretched out on the deck and prop the Battlestick over my shoulder to steer—often with no more than a nod of my head. We plan to fit a telescoping Battlestick on our Penobscot 14. It will be useful for solo sails, when it’s best for me to move my body weight forward to almost amidships, but we’ll be able to retract it when Skipper and I are both on board and she takes the helm and needs to sit farther aft.
For many years the Ronstan Battlestick has been popular among dinghy-racing fleets, and while we may not be out there racing, we’re enjoying the versatility and control it brings to our boats.
Audrey “Skipper” and Kent Lewis mess about in the Tidewater Region of Virginia with their fleet of small boats. Their adventures are logged at smallboatrestoration.blogspot.com
The Ronstan Battlestick with Universal Joint is available from Ronstan and other online retailers. Prices start at $63.54 for the fixed-length 610mm (24″) extension.
Is there a product that might be useful for boatbuilding, cruising, or shore-side camping that you’d like us to review? Please email your suggestions.
Pam Ayres was born in January 1929 and grew up in Onancock, Virginia. Her daughter, Rebecca, recalls her as a talented artist who “could build just about anything.” Pam designed the home she and her husband Charlie built on Pungoteague Creek on the Chesapeake Bay, near where she had grown up, and built most of the wooden furniture in it. She kept horses and many other animals that she rescued and nursed back to health. With the help of Rebecca’s two older brothers, Pam built the stable, sheds, and pasture fences—to say nothing of the seawall and dock they constructed with wood discarded by the local lumberyard. She loved to travel, grew vegetables and flowers, and, says Rebecca, “was always fiercely independent, maintaining her 18-acre property long after my dad died in 1989.”
When Pam was a young girl, her grandfather, who had been a member of a New York City rowing club in the early 1900s, taught her to row. Yet, in Rebecca’s childhood on the Chesapeake, she recalls family canoes, outboard boats, and kayaks, but never a rowboat. “Mom always talked about getting a rowboat one day, but for some reason, we never did,” she says.
Rebecca Ludden
While the weather was good Rebecca, Eric, and Pam were able to work outside. When winter came, they were forced inside to Pam’s basement where they had heat but much less space.
In 2021, when Pam was 92, she announced that she really wanted a rowboat. Rebecca and her husband, Eric, started a search for the perfect boat. They intended to buy one but couldn’t find the right thing. Then, in December of that year, while vacationing in Maine, they heard about Clint Chase and the kits he sold through Chase Small Craft in Saco. They called him up.
“Clint told us about the Echo Bay Dory Skiff and assured us that Eric and I, two high school teachers with no building experience, could pull it off. Mom was the one with the building skills,” Rebecca says. “It would be a project we could all do together.” They ordered a kit.
Rebecca Ludden
Throughout the build Pam was a willing participant. In fact, says Rebecca, she was the most experienced of the three builders.
In the spring of 2022, when the pallet arrived with all the materials needed to build the 11′ 7″ skiff, Rebecca admits that she and Eric were overwhelmed. But Pam was thrilled and never doubted they could build it. “We were both teaching,” says Rebecca, “and we lived four hours away, so the building process took a long time—over a year. We’d work on the boat on weekends, but often we’d only be able to make it there one weekend a month. But Mom never worked on the boat when we were away. I’m sure she could have, but this time, she said, she was our apprentice.”
They started the project in an outbuilding that Pam had set up for rescued horses. They laid out and organized the materials in the stalls and got to work. “It was fine for the first few months,” says Rebecca. “But when winter came it was too cold out there, so we had to move into Mom’s basement, which had very limited space.”
Rebecca Ludden
Pam admired the grain of the wood, so Rebecca and Eric decided to leave the inside of the skiff bright finished. They painted the exterior teal, Pam’s favorite color.
Nevertheless, the project continued apace, and Pam became more and more excited every time Rebecca and Eric came for a building weekend.
“Clint told us we could call whenever we needed help, and we did have a lot of questions. When we began,” Rebecca admitted, “we didn’t know a transom from a skeg.”
They had some mishaps along the way, Rebecca says. “One of the rubrails split in the dry-fitting process, likely because of the cold temperatures and because we hadn’t planed it thin enough. And we accidentally epoxied-in some screws that were supposed to be removed. But it didn’t matter, and Mom was just more and more pleased. After we applied the first coat of epoxy, she couldn’t believe how beautiful the wood grain looked.”
Eric Ludden
Rebecca helps Pam to install and adjust the fit of the simple foot brace on launch day.
When the construction was complete, Pam decided she would no longer be involved. She wanted the finished boat to be a surprise, and left Rebecca and Eric to choose and apply the paint and varnish by themselves. Instead, she would “work on plans for building a proper boathouse with a boatlift for her new boat.”
By late summer 2023, the boat was ready. The outside of the hull was teal—Pam’s favorite color—with white trim, and the inside was bright-finished so she could see the wood grain she had so admired during the build. Pam started talking about proper rowing techniques and how much she just wanted to get in her new boat and go.
August 20, 2023, was designated launching day. Pam came out of the house in her captain’s cap and with Rebecca and Eric christened the boat THE PUNGOTEAGUE PAM. She climbed aboard and rowed up and down the creek enthusiastically, praising how well the boat handled.
After rowing on her own for a while, Pam invited Rebecca out for a ride. Then it was Eric’s turn, and finally she rowed with both of them aboard, showing them how to hold the oars, how to pull through the strokes, and smiling all the while. “She loved everything about it and looked like a much younger woman,” Rebecca says. Pam was then 94. She had waited a long time for her own rowboat, and on that sunny day in August, on a little Chesapeake Bay creek, her daughter and son-in-law turned her dream into a reality.
Pam Ayres continued to enjoy THE PUNGOTEAGUE PAM through the summer of 2023. Rebecca and Eric joined her as often as they could. In March 2024, at the age of 95, Pam died in a kayak accident. Rebecca writes: “She was so thrilled with her rowboat and if she had taken that out instead of the kayak, I’m sure she would still be with us. She was an extremely independent woman, and she lived life to the fullest. She took out her kayak alone on a very windy day and got stranded on a bank away from her dock. We are all heartbroken, but also realize that she left us doing exactly what she wanted. She loved being on the water and just being outside.”—JB
Jenny Bennett is editor of Small Boats.
Do you have a boat with an interesting story? Please email us. We’d like to hear about it and share it with other Small Boats readers.
Joel White adapted the iconic Herreshoff 12 1/2—a small, full-keeled daysailer—for trailering in 1985. A centerboard pivoting in a slotted lead ballast keel replaced the original keel, and the boat grew wider to offset the loss of stability. In appearance and performance, the boats are nearly identical.
Any discussion of the Haven 12 1⁄2 must begin with the Herreshoff 12 1⁄2—considered by many to be the best all-around sailboat of her size ever designed. Measuring 12′ 6″ on the waterline, 15′ 10″ overall, with a beam of 5’10” and a draft of 2’6″, the Herreshoff boat is known for its excellent sailing characteristics, its speed, and its responsiveness.
Designed and built in 1914 by Nathanael Herreshoff, the daysailer became a rapid success. Between 1914 and 1943, Herreshoff Mfg. Co. in Bristol, Rhode Island, built around 390 Herreshoff 12 1⁄2’s. After World War II, Cape Cod Shipbuilding Company of Wareham, Massachusetts, obtained the building works and built another 30 boats in 1947–48. At the same time, an additional 20 or so were built at the Quincy Adams Yacht Yard in Quincy, Massachusetts. These were the last wooden 12 1⁄2 s built, with the exception of a few that were privately constructed.
Variations on Herreshoff’s original design evolved in years to come and led to the Cape Cod Bullseye and the Doughdish, both built in fiberglass. These two designs attracted their own audience, gained acceptance by the Herreshoff 12 1⁄2 class association, and helped keep the class alive. The Herreshoff 12 1⁄2, Bullseye, and Doughdish were all favorites for club racing, as they were easily handled under a gaff or marconi rig, very competitive, and reasonably priced. In their early years, a Herreshoff 12 1⁄2 could be purchased for a little more than $400, fully equipped; today, these boats routinely sell for tens of thousands of dollars.
The original wooden Herreshoff 12 1⁄2 fleet remains strong to this day due to the love and dedication of their owners and admirers. In fact, many of the boats still belong to their original families, sailed by the grandchildren and great-grandchildren of their original owners. Over 250 of the original boats are sailing or in the process of being repaired or restored, and most are found on Buzzards Bay and throughout much of New England. Each year, nearly two dozen vie for honors in the national championship regatta hosted by top yacht clubs on the East Coast.
WoodenBoat School
WoodenBoat School in Brooklin, Maine, has built several Haven 12 1/2s—in both carvel planking, as seen here, and cold-molding.
In 1985, Joel White, the late owner of Brooklin Boat Yard and a well-known yacht designer, was approached by a client who was interested in a boat similar to the classic Herreshoff 12 1⁄2 but with shoal draft and trailerability for easy transport and storage. Joel decided that the Herreshoff 12 1⁄2 was such a great design that it made sense to stick with the original concept but to reduce the draft. He retained the profile, sheer, stem, and stern profiles, along with the rig.
The draft was reduced from 2′ 6″ down to 1′ 6″ and a centerboard was added. To ensure the new design had the same stability as the original, Joel increased the beam by 3″ amidships and 1 ½” at the stern. He also kept the original longitudinal center of buoyancy so that the new boat would float and conduct itself exactly as the Herreshoff design. The Haven class, like the Herreshoff, is 12 1⁄2 ‘ on the waterline and 15’ 10″ overall. A lead ballast keel brings her total weight to approximately 1,500 lbs.
The Haven is big enough to sail comfortably with four people, but is also easily singlehanded. In terms of sailing ability and aesthetics, the design has proven to be virtually identical to her predecessor. At WoodenBoat School, we have a mixed fleet of both Havens and Herreshoffs; we constantly daysail them in company and often race them as one fleet, and we haven’t been able to decipher any real differences in their performance. If there is any variation, it can usually be traced to the quality of sails or crew.
WoodenBoat School
WoodenBoat School maintains a fleet of Haven 12 1/2s—and a few original Herreshofffs. The school’s elementary seamanship courses are taught in these boats.
Interest in building the Haven has been high ever since the design made its debut and plans became available. It is one of the more popular designs carried by WoodenBoat; well over 200 sets have been sold in just the past five years. There’s also plenty of interest in understanding the construction method, as evidenced by sales of Maynard Bray’s book How to Build the Haven 12 1⁄2-Footer, with over 12,000 copies in print. And the six-page study plans are one of the most popular items on WoodenBoat’s ever-growing Instant Digital Download site.
Hundreds of Havens have been built by both amateur and professional builders. But be forewarned: building a Haven 12 1/2 footer is not an easy project. Although the construction process is well documented in Maynard’s manual, prior boatbuilding or advanced woodworking experience is strongly recommended. The boat is designed to be built using the Herreshoff method, which calls for a timber mold for every one of the hull frames, 22 total. While this procedure involves a lot of work, the result is a very fair hull and a strong boat. Since the plans include full-sized patterns for all 22 construction molds, lofting is optional and skipping this process saves the builder a good deal of time.
Although the Haven was designed for traditional plank-on-frame construction, many builders have chosen cold-molding, for a variety of reasons: easy availability of veneers and epoxy, the peril of placing a plank-on-frame hull in warm worm-infested waters, and limited access to the water necessitating the boat being stored dry on a trailer (cycling between water and land is hard on a plank-on-frame hull, as the wood shrinks and expands).
Peter Chesworth
Can you tell them apart? Here, a Herreshoff and three Haven 12 1/2s sail in company at WoodenBoat School. (The boat to the far right is the Herreshoff 12 1/2 WE THREE; the others (from right) are the Havens ALLENE, CONNIE and IOLANTHE.)
Eric Dow has been building boats in Brooklin for over 30 years and specializes in construction of the Haven. His first, in 1987, was for a gentleman from Texas who stopped by his shop unannounced looking for a daysailer; the man decided on Joel’s design that very day after listening to Eric’s recommendations.
Eric’s first 10 or 11 Havens were built plank-on-frame, and he and his crew would turn out two or three a year. Eventually, he had a request to construct a cold-molded hull and he decided to give it a go. A mold was built, changes in construction details were made, and the boat was a success. Eric described it as “a learning experience” and admitted that it took him and his talented crew eight more cold-molded hulls before they really felt comfortable and efficient with this approach.
When asked whether he favors the traditional plank-on-frame method of construction over cold-molding, Eric is flexible. “We’re set up in our shop to build either way. Patterns exist for every piece of the boat, and we can complete one in fewer than 800 hours from setup to painting, whether it’s planked traditionally or cold-molded. For the amateur builder, however, I’d recommend the traditional method since that’s what the plans call for.” Eric also notes that “There’s a lot of sanding and prep work required on an epoxy-laminated hull. I can fair a traditionally planked hull in a half-day with my smoothing plane, but it takes lots more time fairing out a cold-molded one.”
Haven Nos. 50 and 51 left Eric’s shop this past summer. In 22 years of building this design, he sent them to ports near and far: four to Japan, five to South America, and the rest sailing in waters throughout the United States. Over a dozen of his Havens call Brooklin home. Each one of Eric’s boats is a work of art, reflecting the highest of standards, and his crew’s craftsmanship is nothing short of superlative. Joel White would be proud.
The design also plays a key role in the Small Boats Course at The Landing School in Kennebunkport, Maine. Instructor Paul Barton likes the fact that the Haven offers students “a lot of boat in a small enough package that can be built in a reasonable period of time.” Each January, teams of three to four students per boat begin the project that will encompass all aspects of construction from lofting and setup through all of the various boatbuilding and woodworking procedures to rigging, hardware installation, and sea trials in June.
From the outset, Joel White hoped the Haven would resemble the original Herreshoff boats. After sea trials, he wrote, “If you see this boat on the mooring or out sailing from a vantage point that obscures the centerboard trunk, I don’t think you can tell the new class from the old. What also pleases me is that the performance of the two classes seems to be exactly the same, both off the wind and to windward. So let the credit for the excellence of these boats go where it is due— to the Wizard of Bristol, N.G. Herreshoff.” Thanks to the genius of these two gifted designers, the Haven has gained a reputation for being a versatile beauty ideal for racing, family sailing, and coastal exploring. It is difficult to imagine a small boat design that affords more pleasure to the eye—or more pleasure to sail.
While she’s a complex boat to build, the Haven 12 1/2 has unusually detailed plans and support materials. Many first-time builders have done an admirable job of bringing this design to life.
The Delaware ducker is a deceptively simple boat. It’s 15′ long, has a 4′ beam, and is low sided with side decks so that structurally there is no need for thwarts. There is a choice of rigs, depending on the crew’s intentions and abilities; they range from a 56-sq-ft gunning sail (as its name implies, the boat was developed for duck hunting) set with a sprit and a boom, to a 115-sq-ft gaff-headed racing rig.
The ducker is like a canoe: You need to step pretty close to the centerline when you board from the side. You need to have your hands on the coaming when you push off from the beach. And, if the wind is gusty, you must move from sitting or kneeling in the middle of the boat to the rail, where it seems you spend a goodly amount of time sitting on the low coaming. In short, it’s a sensitive boat that makes you move around.
Maynard Bray
The Delaware Ducker evolved as a bird-hunting boat on the tributaries of Delaware Bay. A study in simplicity and performance, it deserves close attention as a recreational boat.
If you have a passenger, the passenger can’t really row effectively unless you are working down a marsh and need someone to push-row looking ahead. Only if you are using the 65-sq-ft summer rig or the large racing rig can the passenger help balance the boat. So, the ducker is basically a singlehander, capable of carrying a passenger—a passenger who must move around to keep her moving. This is not a prescription for a highly marketable boat.
Still, the Ducker has some great virtues: It is one of the very few, perhaps the only, traditional working boat that would appeal to modern dinghy sailors—people used to boats that are tender and sensitive, boats that sail fast. There are no traditional boats that I know of that row as well as the ducker and can be sailed as well. It is one of the few traditional boats that will plane. It can be a demanding boat, but demanding boats are rewarding. There are boats that row faster and boats that sail faster, but there are few that will do both equally well.
I’ve owned my ducker, JOSEF W, for 30 years. She was built by Joe Liener in 1978 when he was an adviser to the Chesapeake Bay Maritime Museum, where I worked at the time. She is a copy of Joe’s own boat, GREENBRIAR. In honor of JOSEF W’s three decades, I had Nat Wilson replace her gunning sail last winter. He’d built the original sails, and the gunning sail had gone gray with age; patches were starting to go onto patches. With that new sail, I have been rediscovering the boat.
My first outing with the new sail on a local lake had fog and light wind. The 10-knot puffs coming through accelerated the boat to better than 4 knots, measured on the GPS. She’d ghost for a while as the puff died. When the breeze backed off, I needed to move from the side deck to the boat’s center in a hurry. Later, I took the boat out to my sister’s camp on a western Maine lake, rowing my wife the halfmile to the camp. A movable gunning box provides the rowing seat.
Ben Fuller
The Ducker we see here is JOSEF W, author Ben Fuller’s 30-year-old copy of GREENBRIAR, whose plans reside at the Independence Seaport Museum in Philadelphia.
Later, when the wind came up, I rowed back to pick up the rig and sailed for a while that day with a passenger who sat amidships on the bottom. The floorboards are a single structure—a “floor flat” that comes out in one piece and has cleats on it to position the gunning box. The box houses the oarlocks, compass, and other loose gear. The side decks are supported by metal rods that double as oar stowage. There is a removable V-shaped lunch platform that lives under the stern deck, and a removable stern seat for a passenger. My passenger and I used the gunning rig that day.
For singlehanding, the gunning rig is pretty versatile. It will move you in a drifter, when you think oars might be a better way to go. Its spars are short enough so they will stow in the boat or can easily be carried. I have sailed this rig in Force 6 winds and 4′ seas— conditions that push the ducker to its limits. With the low sides and the big open cockpit amidships, spray climbs aboard and from time to time you must bail. If your conditions are generally a short chop, this is not as much of a problem. A canvas rough-water deck would be easy to add. And in a breeze, when you turn onto a reach, you will see that planing this double-ender is quite possible.
The ducker will capsize or swamp. Water on the side decks gives you some warning, and turning loose sheet and tiller will let the boat ride neatly broadside to wind and sea. I have not capsized but have seen it done, jibing in a breeze. She will float crew and gear but not high enough to bail. For more demanding conditions I put canoe float bags under the stern and bow decks, and we have rigged at least one of the duckers with side flotation bags. These would give you a chance at bailing the boat.
When rowing without gear and rig, 4 knots is achievable in most conditions, and 3 knots is easy cruising. The Blackburn Challenge is an annual distance rowing race in Massachusetts, and I have done three of them in JOSEF W and finished with no more than 10-minute differences in varying weather. The boat even won the Blackburn in 1989. One must pull from the after rowlocks, as the boat trims bow-down when rowing from amidships, making the boat hard to handle. As an experiment I added a small rowing frame with a wheeled platform on which I can put the gunning box so that I can use a sliding-seat boat. While I don’t go significantly faster with this rig, I do get to use more muscles.
When you are sailing, the ducker demands your attention. But with the sail brailed up or just drifting under oars, that nice open cockpit is ideal for napping. She would easily carry singlehanded camping gear and a tent over cockpit, something that was done often on the Delaware in the original boats.
Ben Fuller Collection
The Ducker is ideal for double-handed daysailing or for singlehanded camping—which was one of the boat’s historical uses.
Sometimes, the sprit rig is the first element of this boat that captures people’s attention. The boom jaws are close to the deck, but the sail is cut with a high clew, so the tip of the boom easily clears the head of the sailor. There is also a furling line that runs from the head down around the boom, then back up and down the mast. One yank, and the sail, boom, and sprit are a bundle ready to be lifted out.
The hardware is elegant and functional. The rudder hardware is fitted to a curved rudder with a standard pintle-and-gudgeon arrangement at the bottom and two mating gudgeons at the top with a pin to connect them. There are small turning blocks on the foredeck to lead the snotter and furling line back to the cockpit for the larger sprit rig. The oarlocks sit on bronze pedestals that look like inverted cones, and the shank of the traditional oarlock is a little longer to fit them. Several padeyes are riveted into the boat’s bottom; they pass through holes in the floor flat. Traditionally, these eyes were used for hiking lines—short lines with T handles that support the hiker. I have rigged them with a toe strap, and added a hiking stick made from a bamboo ski pole to the tiller.
Joe Liener is no longer with us. He had retired to a spot near the Chesapeake Bay Maritime Museum from managing the Philadelphia Naval Yard’s small-boat shops, rising from a 3d class journeyman. His ducker, GREENBRIAR, is part of the CBMM collection, and the museum is making the ducker the centerpiece of their small-boat building program. If you don’t want to build one yourself, they would be happy to build one for you—as would the Apprenticeshop in Rockland, Maine, whose lead instructor, Kevin Carney, built mine. Another Apprenticeshop instructor, Brian McClellan, led the building of what may be the finest reproduction that has been built. You can do it yourself, too: using modern materials, the easy plank lines make glued-lap or strip-planking pretty painless. Glued-lap can be done in 5⁄16″ plywood, which is what Joe used to build GREENBRIAR.
Ben Fuller Collection
Duckers were once ubiquitous. Given their recreational possibilities, it’s puzzling that we don’t see more of them.
It’s a little puzzling why we have not seen more duckers built in recent years. There have been perhaps half a dozen traditional ones built, mostly in museum and apprentice programs. Steve Clark, a highly experienced dinghy and sailing canoe sailor, saw the potential and built several cold-molded versions—and a mold for fiberglass hulls. People loved them at boat shows, but they did not buy. To my knowledge, one glued-lap version was built, taking the weight from around 150 lbs to 100 lbs; the cold-molded versions were as light as 60 lbs.
Were you to build, you’d have a choice of plans. Dave Dillion drew two splendid sets. Those for GREENBRIAR are in the collection of the Independence Seaport Museum in Philadelphia. She has more deadrise and a flatter sheer than the other ducker that Dave drew— a boat given by John York to Mystic Seaport Museum. The York ducker is a bit steadier underfoot; this is the model used to build the cold-molded duckers.
JOSEF W may not be used as much as she once was. But I have worn out one set of oars and one sail, and there was a time that I commuted in her. Now she spends more time than she should hanging in the garage waiting to have a go. Perhaps she will if we can get more of these worthy craft built.
Dave Dillion
The plans for GREENBRIAR, drawn by Dave Dillion and sold by the Independence Seaport Museum, specify two rig options: a small gunning sail and a larger racing sail.
Plans for the Delaware Ducker GREENBRIAR, and others, are available from the Independence Seaport Museum, Penn’s Landing, 211 South Columbus Blvd. & Walnut St., Philadelphia, PA 19106; 215–413–8638.
In developing this design, Nelson Zimmer tells us his inspiration came from the many slim, handsome launches and cruisers that silently and gracefully passed by his waterside home in the days following World War I. Then, three horsepower served an 18′ launch admirably, and a 28′ cruiser might have had a 15-hp Kermath beneath her bridge deck. Because these engines were by today’s standards slow turning and low powered, they ran, if not silently, at least with a gentle, low-key rhythm that could even be called soothing.
Particulars and profile line drawings
But with the advent of power created by marine adaptation of the cheap, mass-produced, fast-turning automobile engine with its high (but sometimes questionable) power ratings, along with the blandishments of Madison Avenue and the stylists, the moderate launches and cruisers became obsolete in the eyes of most owners-but not extinct.
A case in point is the example shown. Designed as a tender to a Canadian north-woods fishing camp, the principal task of the Zimmer utility launch is to ferry passengers and supplies between the camp and town, some miles across a rather large lake. Great speed was not desired; what was wanted was an able hull, one that could cope with the chop from a fresh breeze or glide silently through the water to avoid disturbing the fishing grounds.
Body plans
In the interests of economy and the conservation of limited fuel supplies, the boat was designed to use the splendid little Sabb single-cylinder, 6- to 8-hp diesel, a true marine engine, remarkably free from the vibration that plagues most one-Jungers.
Since this little launch is only 20′ long on the waterline, it cannot be expected that she can be pushed much beyond 7 statute miles per hour, after which she will leave her stern wave behind and begin to squat, to the detriment of increased speed. But it should be noted that her top speed is achieved at about half throttle, when the standard 2:1 reduction gear gives a shaft speed of about 700 turns, providing plenty of torque to swing a big efficient wheel. At that rate, fuel consumption is a little under four-tenths of a U.S. gallon per hour, which translates to about 18 mpg-not bad, even from an automobilist’s point of view.
Construction drawings
This little 21×7′ hull has a shape that is easy to frame and build, and her light scantlings make for economy of material. Backbone and framing is white oak, planking is cedar or mahogany, screw fastened or copper riveted.
The cuddy aft provides a safe place to stow gear and offers shelter against a passing rain squall or a chill breeze, while with the canvas hood indicated on the drawings and some camping equipment, she can even double as an overnight cruiser. All in all, a good, commonsense little boat.
Arrangement plan
Zimmer utility launch design plans consist of four sheets, including lines, offsets, construction, and metalwork details. WB Plan No. 21. $105.00.
21′ Zimmer Utility Launch Design Plan Details
DESCRIPTION
Hull type: round-bottomed
Construction: Carvel planked over steamed frames
Featured in Design Section: WB No. 43
PERFORMANCE
Suitable for: Somewhat protected waters
Intended capacity: 6-8 day running, 2 cruising
Trailerable: With difficulty
Propulsion: 6- to 8-hp single-cylinder diesel
Speed (knots): Up to 7
BUILDING DATA
Skill needed: Advanced
Lofting required: Yes
Alternative construction: Cold-molded, strip
No. of sheets: 4
Level of detail: Average
Cost per set: $105.00
WB Plan No. 21
When Matt Murphy, editor of WoodenBoat, called me to say that Christopher Cunningham was retiring from the editorship of Small Boats, my response was immediate: What did he mean Chris was retiring? I’d worked with him for only two years as Small Boats’ managing editor, and I’d loved every minute; I wouldn’t get any more time with him?
But then Matt asked a question: Did I want the job?
I didn’t have to think about that one. Of course, I wanted the job. Chris Cunningham’s shoes would be big ones to fill, but I was excited to step into them.
Photographs from the author’s collection.
KOOKABURRA, the International Cadet bought for my older sister and brother. In time I would inherit her as my siblings graduated on to bigger and faster options. The 10′ 6″ Cadet was designed as a racing dinghy too small for adults to sail, and came with a spinnaker, tiller extension, and hiking straps. After the pram dinghy on which I’d learned to sail, she seemed the epitome of “cool.”
As I was growing up in Devon, England, my family had a string of small boats. First there was the 14′ Mayflower dinghy WENDY ANNE, and then THE POTTER, a 14′ plywood sloop with a tiny cabin. She lasted less than a season and was sold after capsizing with my father at the helm and my then young sister and brother in the cockpit. There was SACKBUT—a 15′ plywood Bermudan sloop—so named because of the strange trumpeting noise that emitted from the centerboard trunk on certain points of sail. Then OSPREY, a beamy 16’ clinker-built gaff sloop with an inboard diesel. I’m sure the engine had sounded like a good idea, but it gave nothing but trouble and ultimately caused OSPREY’s demise when it failed on a lee shore. By the time my father looked up from the engine box, it was too late to escape the rocks.
For five months of the year, the Cook’s One Design, KIWI, was moored on an outhaul below the house. In the winter she sat on a trailer in the single-car garage, which was so narrow my mother had to pull her outside to work on her.
The last sailboat in the string was KIWI, a 14′ Cook’s One-Design from Wivenhoe in Essex, a type that I later learned was a favorite of the legendary maritime historian, John Leather. Bright-finished inside and out with narrow lapstrake planking, a small foredeck, and short bowsprit, KIWI had a high-peaked gaff sail that never seemed to set right, and in the local Wednesday-evening dayboat races she invariably finished in the bottom three. The logo on her sail was a chef’s hat, honoring the man behind the design, but in truth it looked more like a mushroom than a hat and gave rise to many amused comments from family and friends. For all that, KIWI was beloved—especially by my mother who was solely responsible for her annual upkeep—and was the longest-lasting boat member of the family. She was sold only when my parents, in their early 80s, decided that maintaining even a small wooden boat was no longer fun.
My mother at the helm of KIWI soon after my parents bought her.
My siblings and I had our own boats. NEMO, a stumpy fiberglass pram dinghy with a gunter rig—the training boat for all three of us—was followed by an International Cadet, a couple of Fireflies, a Scorpion, a Mirror, and finally a Laser. The boats came and went as we grew up or as the local yacht club’s fleets waxed and waned. We sailed them daily through the summer vacations and gained a taste of independence that can only come from being a young child in a small boat wholly unconscious of the benevolent adult keeping a distant watch.
When I was in my teens, it seemed that the parents of all my sailing friends had yachts, and I was jealous of the size and sleek lines of those sparkling fiberglass hulls as they swung to their moorings. I asked, once, why we didn’t have one. My mother replied with neither apology nor irony, “Because we like to use our boats.” Only later did I understand her meaning: those yachts sat at their moorings week after week and rarely set sail. In contrast, there was barely a summer’s day when my parents weren’t afloat for at least an hour or two, out in the bay trolling for mackerel under sail, or pottering up the river in time to sail home on a gentle evening tide.
Built as a one-off in Devon, England, possibly in 1924, the 16′ sloop ELAINE came to the United States in a container in 2015. When she emerged from the delivery truck, it was obvious that the years were finally catching up with her and it was time for a refit. Paul Rollins of York, Maine, performed miracles, fairing the planks, ’glass-sheathing her exterior, building a new centerboard and centerboard trunk, and replacing her decks.
As I messed around in the small boats of my youth, I had no idea that I was destined to continue sailing for decades to come, not just for pleasure but also for work; that in a few short years I would be writing for Classic Boat magazine as its sailing editor, and would go on to edit The Boatman, Maritime Life and Traditions, WoodenBoat (as managing editor), and now Small Boats.
Since the 1980s, I have traveled to some extraordinary places thanks to small boats—from England to Australia, Brittany, Greece, Scotland, Canada, and all over the United States. Small boats have introduced me to some wonderful people, from fellow boatowners, to builders and designers, historians and teachers. They have opened conversations and led me to some of the warmest, most generous, straightforward people I’ve known.
I first sailed ELAINE as a teenager in the late 1970s, teaching kids, and later adults, to sail. Even though she’s only 16′ long, with her straight ends and generous beam, there’s cockpit space for as many as six, but she’s also the perfect boat for singlehanding. More than 40 years after I first helmed her out of the harbor, she’s still the best place I know for sloughing off the stresses of a day.
I have continued to own small boats—just now I have three. I’ve occasionally joined friends on longer big-boat cruises, have even sailed some transatlantic crossings, but I’m never happier than when I climb aboard ELAINE, my 16′ gaff-rigged sloop, and contemplate a short (or long) sail around the islands of the Sheepscot River in my adopted home of Maine. To now become the editor of Small Boats, to continue working with Christopher Cunningham (staying on as our editor-at-large), and to be part of a thriving community of fellow enthusiasts willing to share stories, swap knowledge, and keep alive a common simple love of small boats everywhere, is a dream come true.
Greenlanders would call the Hatch Cove Kayak—the newest design from David Wyman—a qajariaq, a “kayak-like” boat. Noted designer L. Francis Herreshoff would have called it a “double-paddle canoe.” But perhaps the best description for us might be a recreational touring kayak or “RTK.”
I first paddled (all too briefly) David’s prototype of the design just after he launched it in 2023. I brought with me the skepticism of decades of being a hard-core sea-kayak paddler and whitewater racer, to say nothing of my experiences of building and paddling skin-on-frame Inuit kayaks. I was (and still am, I suspect) a kayak snob: if it wasn’t long and skinny, and capable of being rolled, I wasn’t really interested.
David Wyman is a naval architect and boatbuilder who, for many years, was professor of naval architecture at Maine Maritime Academy, and is well known for his work with traditional sailing vessels. His personal boats range from small oar-and-sail cruisers to peapods and skiffs. He’d purchased some off-the-shelf small RTK’s to play with on ponds and rivers and to poke around in the waters near his home in Castine, Maine. But, never entirely satisfied, he decided to design one for his own use and to work with Clint Chase of Chase Small Craft to cut the parts for assembly in David’s home shop.
Ben Fuller
The choice of seat is left to the individual. David uses an upright canoe seat from L.L.Bean, but a foam seat with back band would serve as well. He created a “paddle park” by feeding a bungee through the deck to loop over the paddle to a simple hook. The arrangement holds the paddle when transporting the boat; David also uses it on the water when he wants to take a break from paddling.
David’s basic requirement was that he could solo the new boat in and out of the back of his pickup, and then could easily get in and out of it. David is a pretty big guy and has the stiffness that so many of us have when we enter our fourth quarter-century. The boat’s overall weight needed to be under 50 lbs, it must be short enough to ride in a pickup, even if overhanging the back, and it had to have enough initial stability to be boarded dry-shod from a bank.
Then there were David’s on-water requirements: he wanted the boat to have some decking to help keep things dry in a chop, but not to suffer from the typical windage he’d experienced in the RTKs he’d been paddling. It must have enough buoyancy to float him and his cargo (he wanted to be able to carry camping gear), and he had a target smooth-water speed of 3 to 4 knots. It also had to track well and, with wind on the beam, hold a straight course without weathercocking.
Ben Fuller
The hand-hold in the skeg is useful when moving the kayak around on land; it may also contribute to the boat’s maneuverability in turns. Forward of the skeg can be seen the tabs that locate the after bulkhead—the tabs are integral to Chase Small Craft’s Tab-n-Lock construction system.
Working with Clint, David designed the boat so the parts could be cut on a CNC machine. It is built over four molds that are tabbed into precut slots in the boat’s bottom using Clint’s Tab-n-Lock system; once construction is complete, the molds remain in the boat as integral frames. There are three planks of 4mm okoume plywood on 6mm frames with select spruce coamings and hardwood trim. The 4mm plywood is strong, but thin enough to accommodate the twist in the sharp bow and stern. For extra strength, in the cockpit area, there is a second layer of 4mm plywood to reinforce the bottom planks. In the ends of the boat, watertight bulkheads provide buoyancy chambers fore and aft that are enough to float the boat and its payload. These are in lieu of larger bulkheads, set at either end of the cockpit to create cargo compartments with hatches on deck. David will carry his camping kit in dry bags stowed under the decks in front of and behind the cockpit. If one prefers camping gear to fit through deck hatches, the frames closest to the cockpit could be cut not as ring frames but solid, to serve as watertight bulkheads. Hatches for access could be cut into the deck or the bulkheads themselves.
When I was invited to revisit David and his prototype Hatch Cove a month or so ago, I was excited to take it out for a serious spin on a local lake. I used an adjustable-length conventional paddle set at 220cm. The prototype doesn’t have adjustable foot braces and since I’m a good bit shorter than David, we improvised a temporary brace with a block of 4×4 set against the forward ring frame. David has been using a simple high-back canoe seat from L.L.Bean. I am more familiar with foam seats and low back bands so was expecting to be uncomfortable but, once out paddling, I was impressed by the seat: it allowed me to execute a full body twist as if I were in a racing seat more typical of sprint kayaks. For people who want a secured seat, a foam seat and a back band could be fitted. Clint Chase recommends seats as sold by Newfound Woodworks.
Ben Fuller
David Wyman (seen here, left, with photographer Harvey Bell) designed the Hatch Cove Kayak so he could lift it into and out of his pickup on his own. With the tailgate down, 8′ of the boat is supported by the truck, while the remaining 5′ overhangs. David lashes the boat in place and ties a red flag to the stern for transport.
To get into the kayak, I used the paddle as a brace to the shore and just stepped into the center and sat down, dry-shod. David carries a short stick and uses it as a cane in shallow water to help steady the boat and himself when climbing aboard; once on board, he stows the cane in his bungee paddle carrier. Getting out of the boat, I couldn’t reach the forward edge of the long cockpit, so I did what David does: I grabbed hold of the painter, pulled myself up to stand, and stepped out.
It was easy to paddle the Hatch Cove Kayak at 3 knots, and to get to 3.5 knots and 3.7 knots with just a little added pressure. In a flat-out sprint I could hit 4 knots briefly, but the kayak’s waterline length isn’t meant to go that fast. There wasn’t much wind, so I was unable to see if the boat weathercocked in a cross wind, but in the light breeze it was unaffected. David has tried the boat in a variety of conditions and reports that it tracked straight in as much wind as he cared to paddle: a nice 10 to 12 knots of breeze with a distinct surface chop.
Harvey Bell
I leaned well over to test the stability of the kayak. Even with my head over the sheer, the water was still a few inches from the cockpit coaming. At this point I was applying no pressure on the Greenland paddle. To heel the boat any farther would have taken considerable effort.
To give the kayak innate tracking ability, David designed a sharp stern with a skeg. The skeg incorporates a generous hole so that it doubles as a carrying handle. But that hole may well contribute to the boat’s maneuverability. I had anticipated that it might be hard to spin with that sharp stern, but it wasn’t. I could spin the boat through 360 degrees with four pairs of sweep/reverse-sweep strokes—about the same as spinning a much longer sea kayak.
The boat has a slight V-bottom and a relatively long straight bow. The sheerstrakes overlap the middle strakes, to work as a spray rail, and David says it works well to keep spray down when paddling into a chop. I would also want a spray skirt—mostly to keep the paddle drip out of my lap—which would require a lip to be glued to the top of the coaming.
Ben Fuller
David Wyman (seen here in his Hatch Cove Kayak prototype), has designed a boat that is easily transported, easy to get into and out of, can carry him and his camp-cruising gear, and can reach smooth-water speeds of 3 to 4 knots.
The deck at the sides of the coaming is quite wide. My knees stuck up above the coaming and my lower legs braced against it comfortably. This allowed me to heel the boat to steer it— heeling down on the side opposite the direction that I wanted the boat to go.
I wanted to see how stable the boat felt when I shifted my weight out to the side. I could put my head and shoulders over the sheer and the coaming came within a few inches of the water. It would take real work to capsize. I did not get a chance to see what it was like fully swamped and whether I could bail it out but am confident that it would float me.
As a nimble, light, recreational touring kayak, this is as nice as anything I’ve seen on the market. For fishing, photography, working down a narrow creek, or exploring twisty saltwater coves or marshes, it’s ideal. And, it can cover miles when pushed.
Ben Fuller, curator emeritus of the Penobscot Marine Museum in Searsport, Maine, has been messing about in small boats for a very long time. He is owned by a dozen or more boats: kayaks, canoes, a skiff, a ducker, and a sail-and-oar boat.
Is there a boat you’d like to know more about? Have you built one that you think other Small Boats readers would enjoy? Please email us your suggestions.
Another in the series of lapstrake plywood small craft designed by Joel White especially for WoodenBoat, Shearwater combines the style of the wonderful open boats of western Norway and the performance of a Maine peapod with the ease of construction and durability of lapstrake plywood.
She’s narrow at the waterline, for a long, lean shape below that lets her glide through the water without fuss; yet, her topsides flare out to give lots of reserve stability and enough beam at the rail so that long oars can be used. Underwater, her bow and stern rise up so that she’ll turn quite quickly under oars, and not trip on her forefoot to become a liability when towed as a tender behind a larger boat in a following sea.
Shearwater sails well in light and moderate air. In a breeze of wind, leave the rig ashore.
Her hull, elegant and shapely as it is, is a study in simplicity, consisting of a backbone, three frames, and six planks-three to a side. Drawings for a sailing version are included, showing how to build the centerboard and trunk, rudder and tiller (she steers with a Norwegian-style cross-arm and push-pull tiller), and spars. We’ve found her to be unusually fast under sail and great fun in moderate seas, but because of her speed under sail, her low freeboard, and undecked hull, she’s not a sailboat for all weather. When it gets rough, she’s drier and safer under oars at speeds slow enough for her to rise to meet the oncoming waves.
Outboard profile
At 16′ overall and 150 lbs, the Shearwater boat is suitable for cartopping and, at the same time, suitable for carrying a sizeable load. Because she’s of plywood, she won’t dry out in the sun when not waterborne. And because her interior is uncluttered with the usual frames, chines, seat risers, and inwales, she’s very easy to keep clean, to sand, and to paint. Her seats and floorboards are easily removed—they just lift out—making the task of caring for her even easier. There’s no doubt about it, Shearwater is a wonderful combination of beauty, simplicity, versatility, and performance.
Construction plan
Shearwater design plans come in eight sheets, and include sail plan, profile and oars plan, building jig details, construction plan, lines and offsets, plus three sheets of full-size patterns. WoodenBoat Plan No. 58. $75.00.
A group of us in the Oarlock & Sail Wooden Boat Club in Vancouver, British Columbia, were looking for a new boat to build. Our requirements included room for more than two crew, stability, self-rescue capability, and exciting performance—along with beauty, of course.
Our search naturally led us to the designs of the late Iain Oughtred, and we chose his Gannet, the middle size of his trio of planing dinghies. At 14′ 5″, Gannet is 2′ longer than the longest of the other club-owned boats, so would offer more space and thus more opportunity for people to enjoy sailing.
Gannet is available in kit form, but we chose to build from plans and ordered a set from Oughtred Boats. The drawings, in Oughtred’s able hand, are gorgeous to look at and include full-sized drawings for molds and stem, Bermudan- or gunter-sloop, and lug or lug-yawl rig variations, as well as options for an open or half-decked hull. The plans are full of rich detail, while, at times, leave things open to interpretation—there we were aided by Oughtred’s Clinker Plywood Boatbuilding Manual.
Daniel Friesen
Once the hull was fully planked, we could turn it over and begin work on the interior. As the build came together it was exciting to see the cockpit layout unfold. Oughtred’s plans allow for personal choices, and we made good use of battens and clamps to test shapes and sizes before deciding on final configurations.
We chose the half-decked gunter-sloop version of the Gannet, with some modifications. We lowered the aft deck so that the top of the flotation chamber was at seat height and gave us an additional 18″ of seating, and we reduced the size of the foredeck so that the bulkhead, deck, and coaming were all forward of the mast, lengthening the cockpit space by some 12″. The change in the foredeck meant that the stayed mast was no longer deck-stepped as specified in the plans, but instead was keel-stepped. We keep our club boats in the water year-round, so rigging time is not a concern for us, but in the interest of simplifying the rigging process and to introduce stability, we fit a simple wooden mast partner enclosed by a leather strap that holds the mast to the cockpit coaming—it helps to steady the mast before the shrouds and forestay are rigged.
The gunter rig has a 14′ 6″ mast, shorter than the 19′ 8″ Bermudan option, and even with the 2′ 2″ additional length required for stepping it on the keel we were able to get it and the boom and yard out of some Sitka spruce that we had on hand. Oughtred’s sail plan calls for an 88-sq-ft mainsail and a 32-sq-ft jib. A set of donated sails—made by Macken Sails of Vancouver around 50 years ago—fit our boat nicely. The mainsail is more like a high-peaked gaff than a gunter, so we probably lose a little upwind performance, and the combined sail area is undersized by about 20 sq ft—the mainsail is 77 sq ft, the jib is 32 sq ft. Despite the smaller sails, we built our spars full size so we can upgrade to the designed sail plan if we ever decide it’s necessary. Reef lines are on our to-do list, but we haven’t needed them yet—even singlehanded, the Gannet stands up to an estimated 12- to 14-knot breeze if you’re prepared to hike out.
We considered building the boat in traditional lapstrake (one of the options offered in the drawings) with yellow cedar on steam-bent white oak. Our last couple of new builds have been built this way, but for the Gannet we questioned the traditional construction with the built-in flotation compartments: would a sealed chamber provide adequate ventilation, or would it lead to premature rot? In the end, we decided to go with Oughtred’s preferred glued-plywood lapstrake, both for its light weight and ease of including built-in flotation. Also, it’s a boatbuilding method that our members might be more likely to try if building a boat of their own. For planking and decks we used 1⁄4″ marine plywood, either okoume or meranti; the transom is 3⁄4″ meranti, and the aft deck is 1⁄2″ okoume. The centerboard is two layers of 3⁄4″ meranti, and the rudder is two layers of meranti, one 3⁄4″ the other 1⁄2″. The keel is Douglas fir, the stem is black locust, and the deck framing and floorboards are yellow cedar. Oughtred’s plans do not include material specifications, but the accompanying construction information includes a list of recommendations.
Daniel Friesen
By lowering the aft deck to seat level and shortening the foredeck we increased the cockpit space so that it will comfortably accommodate four adults under sail. We cut holes in the knees so we could tie things to them—by happy coincidence those same holes were perfect locators for the oars.
Construction went smoothly, and planking progressed quickly—we employed the lattice pattern/spiling or “ladder truss” method of picking up the plank shapes. This method has been described on the WoodenBoat Forum and other online resources, and is mentioned briefly in Oughtred’s manual. Battens are temporarily fastened or clamped to the molds—one along the top edge of what will be the next plank, and one along the bottom. These two battens will define the shape of the plank. They are held in place, relative to each other, by a series of short sticks hot-glued to both and laid zigzag to form a truss. The resulting pattern can then be lifted off the molds and laid flat on the planking stock for the plank to be marked out and cut. We used one pattern per each of the eight pairs of planks and made the patterns alternating on either side of the hull to avoid accumulation of error. When we fitted the planks, we used temporary screws, rather than clamps, along the laps, so that we did not have to wait for the epoxy to cure before starting on the next plank’s pattern. Later, we removed the screws and filled the holes.
With the ample aft flotation chamber and side benches extending the full length of the cockpit as well as a single thwart, the Gannet has plenty of seating options for optimal balance but also enough room to move around. The plans show options for a letterbox slot through the transom for the tiller, or a higher rudderhead that places the tiller above the transom and deck. We chose the taller rudderhead so that we could use a lifting tiller to ease side-to-side movement when the boat is full of crew. As drawn, the tiller is long enough to reach well into the cockpit.
Throughout the construction process we used a 3D computer-modeling program called SketchUp so we could visualize what we were doing before we did it. We imported scans of the lines and construction plans to model the hull by tracing. However, a table of offsets is included on the lines plan for anyone who prefers to loft the lines. We used the computer software initially to consider color schemes for the finish, but then also found it helpful in configuring the floorboard plan, picturing what the revised cockpit would look like, and testing oar length.
It took our club members a little more than 20 months to build the Gannet, with anywhere from six to eighteen people working on the project for a few hours each Saturday. We enjoyed the challenges of the construction (if not the sanding), and Iain Oughtred’s drawings, with all the elements drawn and dimensioned, provided enough information to keep us going; further help was easily found in Clinker Plywood Boatbuilding Manual and online. Having some previous boatbuilding experience was beneficial.
Getting the Gannet ready for sailing is straightforward. We keep it in the water, so the mast is already stepped and rigged. The boom is mounted to the mast with a gooseneck, we have a bridle on the yard and a single halyard, and we have a cunningham to tension the luff. When we return from sailing, we have a topping lift with lazyjacks so that we can support the boom and catch the sail as it is lowered. This makes for an easy harbor furl and keeps the sail out of the cockpit. Stability is excellent when moving around within the cockpit, and although going forward to bend on the jib does cause some tippiness when the crew member goes around the mast, this can be minimized by keeping weight low and movements slow.
The narrow, thin-profile rudder and centerboard were both shaped using NACA (National Advisory Committee for Aeronautics) foil templates as a guide, and under sail the Gannet is extremely responsive to the helm. The drawings show the outline of the rudder and centerboard, but the shaping is left to the builder. The keel is only 3⁄4″ deep and offers little resistance to tacking; if the skipper and crew are in sync, the maneuver can be done in a heartbeat, the boat barely slowing.
Rob O’Dea
When rowing, the lazyjacks contain the mainsail, and a bungee holds the tiller amidships. The mainsheet block is located on the centerboard trunk and gets in the way of the rower; to overcome this we unhook it from the boom and stabilize the boom with a temporary line cleated off in the stern.
Vancouver’s outer harbor, where our club members sail, is busy with recreational, fishing, and whale-watching boats, which can generate confused seas. We’ve sailed our Gannet in a variety of conditions, both singlehanded and with as many as four people aboard. With a full crew, as the wind and chop increase, some water does make its way over the forward quarter. With a crew of four in a 13-knot wind gusting to 18 knots and with particularly heavy boat traffic, we maintained a boat speed of 5 to 5 1⁄2 knots. We encountered one particularly large wake with a 3′ trough and took water over the bow, but typically the Gannet takes larger wakes well and, at a decent speed, makes it over waves without porpoising. With only one or two people onboard, it remains dry.
The Gannet is easy to keep flat and is very responsive to weight shifts. We get the best performance with crew weight well forward. We’ve added a simple tiller extension, which makes it possible for the skipper to hike out effectively. We haven’t added hiking straps yet, but so far, hooking our feet under the thwart or the centerboard-trunk rails is serving the purpose.
For rowing, we already had a pair of 8′ 2″ oars that fit the boat nicely. Stowing oars in a small boat can be a challenge, but we discovered that the holes we had cut in the deck knees for securing things just happened to fit the handles of the oars, which then tuck beneath the side deck perfectly.
Arnt Arntzen
The Gannet may only be 14′ but can accommodate four adults in comfort. We have found that with four on board in a stiff breeze with a choppy sea it can be a little wet, but with a crew of two she stays dry whatever the conditions.
Rowing is best done with the centerboard and rudder at least partly lowered because the keel is too shallow to offer any tracking stability on its own. We have found that rowing with the mainsail raised is a challenge. The mainsheet, led to a block mounted on the centerboard trunk, fouls the oars, but we have overcome the problem by running a temporary line farther aft, and unhooking the mainsheet from the boom.
We are more than pleased with the boat, and its ability to carry a crowd. With a lighter load, we’ve been on the verge of planing speed a few times and have enjoyed surfing some larger wakes and waves. We still plan to test the self-rescue behavior, but in the meantime the stability and the way the Gannet handles the winds make us confident that we’re able to avoid the need. The spacious cockpit has some club members dreaming about camp-cruising excursions, and indeed, a drop-in infill between the aft seats would provide a roomy bed. Until then we will enjoy day sails in the harbor, whether relaxing light-wind picnic cruises or more thrilling gallops around the bay!
Daniel Friesen has been a member of Oarlock & Sail Wooden Boat Club for nine years, since first joining and discovering the beauty and satisfaction of being part of building a boat from scratch and then getting out on the water to enjoy it. On the Gannet build he served as lead builder, planning the weekly tasks, arranging for supplies, and ensuring that members were as involved in the work as they wished to be.
Plans for Iain Oughtred’s Gannet are available from Oughtred Boats priced at $229AUD (within Australia) and $254AUD (the rest of the world); Oughtred Boats also offer Gannet kits starting at $5,888AUD. In the United States kits are available from Hewes and Company, priced at $3,518 for 6mm planking and $3,843 for 9mm planking.
Is there a boat you’d like to know more about? Have you built one that you think other Small Boats readers would enjoy? Please email us your suggestions.
My friend Eric and I were aboard my 20′ Whitehall as we slipped out of High Hill Harbour on the southeast side of Ontario’s Lake Nipigon. With a 3-hp electric motor providing power, we glided quietly between 300’-high rock hills clad in boreal forest, and out into the wide expanse of the lake. The sky was a low, flat, winter gray; there was a modest north wind on our starboard beam, and steely gray light glimmered off the faces of the waves. I pulled the flaps of my snow hat down over my ears and turned my face from the wind. The air temperature was 41°F, and the little display screen of the portable fishfinder at my side showed a water temperature of 36° and 255′ of cold, dark water beneath us. It was the third week of May, and the winter ice had cleared only two weeks earlier. This would be no summer idyll, but the early season should be good for fishing.
Eric sat stiffly at the bow wearing a down jacket and an orange rain hat pulled down over a cloth head covering. A stubble of white beard showed below his sunglasses. Between us were two 110-W solar panels spread out on deck amidships along the starboard rail—their glossy black squares and stark white border looking out of place against the sweeping curve of the teak gunwale.
I turned the tiller throttle until we reached 4 mph by GPS and set the boat on a course that would take us west-southwest across 10 miles of open water to the nearest of the Macoun Islands—then barely visible as a thin, unbroken line of misty gray on the western horizon. With the course set, and the boat moving at a good trolling speed for lake trout, I propped a fishing pole against my seat, planted my foot against the cork-covered handle, opened the bail of the reel to let the line stream out astern, closed the bail, and watched the line pull tight and both pole and line vibrate softly as the lure wobbled below the surface far astern.
Photographs by the author
Eric tended the boat and set up his GPS for tracking while I parked the van in the gravel lot next to the boat ramp. No one else was using the ramp, and we encountered only two other boats throughout our 15 days on the water.
An hour into the crossing, I saw that the “house” battery, which stores the power from the solar panels, was not feeding the motor battery as it should to replace the power drawn by the motor. I turned the motor off and inspected all the electrical connections while Eric checked the fuses. Nothing seemed amiss. I dug the clamp meter out of the port seat locker and began testing each part of the electrical system. The meter’s digital readout showed that the solar panels were feeding the house battery properly, and the house battery was fully charged, but no power was going from the house battery to the motor battery.
We looked dumbly at each other for a long moment as the boat rocked awkwardly in the waves. We had exhausted our limited electrical know-how, and we both knew we couldn’t continue the trip if the motor battery couldn’t recharge. We began checking everything again…and again…testing and pondering and cursing in vain as the boat drifted broadside to the waves.
With no other options left, we tried the one thing that we both had agreed at the start could notpossibly be the problem—we disconnected the auxiliary cigarette-lighter connection cable that I had added to the house battery so we could power an electric kettle and charge phones and satellite gizmos without disconnecting the motor. Tightening the terminal bolts back down on the house battery, I looked over my shoulder and saw the electric motor’s red charging light blink on. With a twist of the tiller handle, we were on our way.
We found a quiet anchorage that evening in one of the small, unnamed islets of the Macoun Islands, which we christened “Fishhook Island” because of its shape. Inside the hook, at its south end, was a shallow, soft-mud-bottomed bay 60 yards wide and open only to the northwest. I might have avoided an anchorage open in that direction, but the internet forecast for that night and the following day had been for light south-to-southwest winds, and though we were now out of cell range, my sailor friend Jack had offered to text new forecasts each morning and evening to my handheld satellite gizmo, so we would have advance warning if the weather might change. Gone are the days of relying solely on reading the sky.
Roger Siebert
.
After we positioned the boat in the center of the anchorage, Eric lowered the 8-lb anchor gently into 3′ of water just as a loon paddling close by let out its lonely oboe cry and a second loon quickly answered farther up the bay. We scanned the shoreline and saw no sign of a nest, but we guessed we had disturbed a late-spring matrimonial encounter. Indeed, when we returned to the same anchorage two weeks later, we found the loons alternately guarding and sitting on a shaggy nest built on shoreline rocks just inches above the water and hidden from above by tall grass that had sprouted on the bank.
I began setting up the Conestoga-style tent I’d made of Tyvek stretched over fiberglass tent poles. The tent extends the full length of the boat, and I showed Eric how to manage the snaps and poles as I worked aft from the bow. The evening was clear and there were no bugs, so we left the cockpit open. We laid our bedrolls across the seats and plywood inserts that formed the central platform, where the 5′ 6″ beam gave us plenty of room, and then sat out in the open cockpit breathing in the fragrance of the cedar, spruce, and fir trees that nearly encircled us.
Darkness came early under the low clouds, and the temperature hovered in the low 40s, but there was not a puff of wind in the little bay. The two loons glided back and forth 25 yards off the stern, their bodies riding low in the water with only their heads, long necks, and the tops of their backs visible above the surface as their silvery wakes carved Vs into the shoreline reflections.
I heard rain on the tent sometime during the night, but it had stopped by the time I awoke at first light. I pushed away the down vest that covered my head and raised myself on one elbow to peer out the clear plastic “porthole” at the low clouds, then clambered stiffly from under my two sleeping bags. Eric’s digital thermometer read 37°F.
When we set up the Tyvek tent, we folded the two 110W solar panels and stowed them upright along the port gunwale. The “house” battery (seen lower left) doesn’t quite fit under the seat. I carried two bulky sleeping bags and other gear in the yellow dry bag. The two black yoga mats were mainly to protect our knees from the temporary plywood deck as we moved around the boat. No standing was allowed on the deck or seats while we were underway because of the potentially dire consequences of falling either into or out of the boat. For sleeping we added inflatable camping pads on top of the foam ones.
Our immediate task each morning was to make coffee. I first checked to see that the red LED light on the motor battery was glowing solid red—indicating that the battery had fully charged overnight—and then disconnected the charging cable from the house battery, plugged the electric kettle into the cigarette lighter connector, and ground fresh coffee beans in the hand mill.
Soon Eric and I had taken our positions on the aft seats—still inside the tent and comfortable enough wearing winter hats pulled down over balding heads, and winter coats pulled on over puffy down vests. We wore fingerless gloves as we each gripped a stainless-steel mug of fragrant, steaming coffee. I leaned back in the cockpit to peer out through the mosquito net at the aft end of the tent so I could get a partial view of the lake out beyond the entrance to the bay. The water there appeared to be calm, and the dark tops of the 100′-tall spruce trees stood motionless along the skyline.
We took the tent down when the air had warmed to the low 40s, but we still dawdled. Eric finally pulled the anchor late that morning—stripping the cold water from the nylon line with one hand as he laid 15′ of coils onto the teak floorboards just behind the bow seat. When the anchor reached the gunwale, he was quickly introduced to the dense, greasy clay that lies beneath the brown muck in the quiet bays of Lake Nipigon. He tried to wipe away the 3″ layer of gray clay stuck to the anchor but mostly just transferred it to his hands.
Motoring slowly out of the anchorage with no sun above us, we strained to see beneath the surface glare more than a few feet in front of the bow. The topographic maps of the lake area show land contours but little or nothing below the surface of the water, and where our map showed a rock awash outside the anchorage, we instead found a 100-yard-long reef of rock slabs and boulders that eons of winter ice had crushed and bulldozed into a level shelf just inches below the surface. I raised the motor before the prop hit anything, and we pulled out paddles. Eric paddled kneeling on the bow seat as he peered into the water in front of him, and I stood on the floorboards in the stern using a 6′-long paddle I carried for just these circumstances.
The 20’ sailing Whitehall was designed by Bruce King with a bit of rocker and a slightly cutaway stem to improve handling for recreational use. The hull is easily driven—the 3-hp electric motor pushes the hull at well over 6 knots, and paddling is an option over moderate distances. The electric motor weighs only 35 lbs, which suits the narrow stern of the Whitehall better than the much heavier weight of a comparable four-stroke engine.
Once clear of the reef, we motored along a shoreline where a bold band of black rock 3′ high had been scoured clean by waves and ice—evidence that the lake was unusually low this year. Above the band of clean rock, loose boulders, and solid bedrock were mottled with lichen of gray, pale green, and rusty orange.
To starboard, alder bushes and pale-green cedar trees 60′ high grew along the shore on shelves of dark granite. Behind them loomed much taller and darker spruce and fir with pointed tops. Close along the shore, gray-beard lichen covered the lower trunks and branches and the bleached and broken limbs that lay beneath them.
For the next two days we would meander about the Macoun Islands and west across the narrow channel to 8-mile-long Shakespeare Island. We trolled slowly in shallow waters along the island’s eastern shore and ducked into little bays and cuts to cast for brook trout over cobblestone reefs tight against the shore. When the sun came out, its warm light played off algae-covered cobbles in shallow water.
Tucked into a quiet channel between two sand beaches at midday on that first full day, with a brilliant sun overhead, we fried bacon and then blueberry pancakes on a cast-iron griddle over a propane burner set up in the cockpit. After our pancake lunch, I splashed through a quick bird bath in 45° water, stirring up the bottom muck as I hurried in and out of the shallows.
The morning at Twin Harbour was cold and threatening rain, so we opened only the bow and stern sections of the tent. We could handle the anchor, paddle to shore, and get in and out of the boat without taking the tent down entirely. The unusually low water level had exposed the bottom mud along the shore and left the flattened grass and last year’s cattails far from the water’s edge.
We anchored the first two nights at Fishhook Island, and both nights produced heavy rain, but the days were sunny and dry. The daytime air temperature held in the low to mid-40s except when we ventured across the strait to the south side of Shakespeare Island. Out in the deep, open part of the lake, water temperatures in the high 30s kept the air even colder, and the slightest breeze forced us to put on our winter hats and coats.
Once inside the protected bay of Mink Harbour on the south coast of Shakespeare, we pared down to flannel shirts and windbreakers as we alternately paddled and motored slowly over the shallows, casting here and there for pike. The soft, muddy bottom was dotted with sunken driftwood, fist-sized clams, and the dormant brown stubble of last summer’s weed growth. In the sandy shallows at the head of the bay, we came upon a cloud of reddish algae close to shore where the water had warmed.
Back out in the open lake, we paralleled the south shore under low clouds until we rounded the southwest point of Shakespeare and faced the wind as we wound our way through a scatter of small rock islets. On the wooded shore a half-mile ahead of us appeared a very large, oddly shaped, black and white object that appeared to be right on the shore. As we drew nearer, we saw that it was a freshly painted commercial fishing boat—a 40′ steel tub, looking very much self-designed and self-built, had been pulled up bow-first to the shore.
Just then we spotted a little white buoy with a faded orange flag 100 yards ahead of us. Assuming that it marked a fishing net but not knowing whether the net was strung along or across the channel, we headed straight for the buoy until we were about 10 yards from it. The lake was only a few feet deep over a sandy bottom, but the wind in our face was roiling the water such that we couldn’t see anything below the surface. We motored cautiously right up to the buoy until we could finally see a net and a series of small, half-submerged cylindrical floats strung out up the channel in front of us toward another small buoy just visible 100 yards ahead. We headed slowly north, running parallel to the mile-long series of nets.
Because of the low water level, the beaver channel in the foreground was only a few inches deep—not nearly deep enough to protect the beaver from the wolves, bears, and other predators that inhabit the area.
We stopped to fill our water jug in deep water outside a double bay we called “Twin Harbour.” Small harbors in the northland are almost always populated by beaver, which can carry giardia, so we were careful to top up our water jug before we entered. This is nature’s own water and safe to drink here and elsewhere in the Canadian North as long as one avoids drawing water near beaver lodges (and the odd uranium mine). We anchored in the north lobe of the double bay facing a low, swampy section with stunted trees that did little to block the north wind. Distinctive “beaver sticks,” stripped of bark, their ends chopped through by beaver teeth, floated near the shore, and we could see clams and a line of moose tracks in the tan mud under the boat. To windward, at the west end of a soggy beach backed by last year’s decaying cattails, a beaver channel not more than 1′ deep wound back through the grassy marsh toward a stand of alder and birch. The first few mosquitoes we had encountered buzzed around our heads as we put up the tent and, from inside, sealed the mosquito net to the transom with Velcro.
Rain was snare-drumming off the tent when we awoke the next morning. Eric reported the air temperature inside the tent was a tolerable 47°, and the fishfinder showed the water temperature in the shallow bay was 41°. The cold was not all bad as it provided great refrigeration for our fresh food supplies. I had been using powdered whole milk for coffee and cereal the last few days, but that morning I discovered a forgotten carton of milk at the bottom of the starboard seat locker—the milk was still as fresh as when I had opened the carton five days earlier. My coffee and cereal were especially good that morning.
I looked out the back of the tent and saw a bald eagle swoop down low over the marsh and pluck something big out of the water with its talons. Not until the eagle rose over the silhouette of the treetops could I see it had not captured a fish but was carrying a soggy clump of decaying reeds that swung out behind the bird as it flew low over the trees.
The day continued cold and rainy, so we passed the time under our sleeping bags napping or reading until early afternoon when the skies began to clear, and the wind dropped to 8 knots from the north-northwest. After stowing our gear and rolling the tent against the port rail, we headed out of Twin Harbour heading northwest across 6 miles of open water toward a bay called Charlie’s Harbour at the northeast end of a mainland peninsula that protrudes into the main lake.
We enjoyed a bright, cloudless sky and flat-calm water on our transit from Charlie’s Harbour through the Ursel Islands and across open water to Caribou Island, but the air was still cold enough that we wore winter coats, hats, and gloves.
Charlie’s Harbour is more than 1⁄2 mile long and 1⁄4 mile wide, opening to the north-northeast, with a generally smooth shoreline that provides little protection for a small boat. Away from shore the bay is too deep to anchor, so we pulled up very close behind a tiny sand point not far from the entrance and just 20′ off a narrow sand beach. We set one anchor right on the beach and another running perpendicular away from the shore in 6′ of water; between them they held the bow facing directly into a light north breeze.
The sky had cleared to a deep, cloudless blue, and the air had warmed, so we went ashore to explore. On the beach we found more moose tracks along with clam shells and the chalky-white scat of some animal (perhaps an otter) that seemed to have a steady diet of clams and fish.
I ducked down under the lower branches of the cedar and fir trees behind the beach. Under the dark canopy, I found the remains of some long-ago campsite whose visitors had left behind their trash. I picked a rusty can of bug spray from the tangled weeds, then a 16-oz beer can of faded blue, a plastic soda bottle, and a broken plastic pail. I stood on each in turn to flatten them, then waded out to the boat and stuffed them under my berth into the plastic shopping bag that was beginning to bulge with our own trash.
Next morning Eric and I sat in the open cockpit with our mugs of coffee as bright sunlight flooded through the tops of the trees, casting long shadows over us and out over the calm water of the bay. Small fish dimpled the surface near the beach, and four different songbirds sang their sweet melodies from unseen perches in the trees on shore—each appeared to be the sole example of its kind.
The entrance to Henry’s Harbour is protected by a rocky peninsula. We anchored in shallow water and waded ashore through the rocks and decaying remains of last year’s weed growth.
After packing up our gear and stowing the anchors in the bow, we made a smooth 12-mile passage north under sunny skies past the 200′-high rock cliffs of Grand Cape, then west through the low-lying Ursel Islands with their gently sloping sand beaches, and finally west-northwest across open water to an anchorage inside the enclosed bay at Caribou Island. The next day we fished for brook trout under sunny skies along the western shore of Caribou Island before continuing north past the black sand beaches at Champlain Point on the mainland and west across the entrance to Gull Bay toward the mile-wide and nearly circular Pike Bay.
A southwest wind was blowing 15 knots, gusting to 20, as we approached the entrance from the southeast, and the boat rolled awkwardly as waves rose and fell under the port quarter. The day was sunny, though, and I thought the generally shallow, sandy Pike Bay would be a good place to practice using the emergency mast and sail that I carried to provide one way of getting back to the boat ramp if the motor conked out. The Whitehall has a full sailing rig, rudder, and tiller, but it’s too much to carry as backup on a solar-powered motor cruise. Instead, we carried only the jib—complete with wire forestay, halyard, and sheets.
On a wilderness trip several years ago, my son and I had cut and rudely shaped a small pine tree and stepped it as a full-length mast to which we set the jib vertically in its normal position. On this trip, however, I carried an 8′ × 1 5⁄16″ laminated wood dowel I had picked up at a hardware store to act as a short mast for the jib, which would be set upside-down. The tack of the sail would be set at the bow where it usually is, but the head of the sail would be pulled aft along the rail with the halyard attached to act as the sheet. The clew of the sail would be hauled up by one of the attached sheets to the top of the makeshift mast. The 8′ dowel was fitted-out with a few odds and ends to make it fit somewhat snugly in the partner and step meant for the spruce mast. I had tried out this same rig with great success while on a solo trip to Nipigon the previous year. The wind had been strong that day, too, and the boat had fairly skimmed along at 3.5 mph on a broad reach. I expected to fare as well in Pike Bay.
With the wind blowing strongly into the bay from the southwest, we stopped to assemble the rig in calm water close in the lee of a small island that sat in the middle of the entrance. From there, I planned to sail on a broad reach along the south shore of the bay in the lee of a long, low peninsula, where we would be protected from the strongest wind and waves.
In 2023, when this picture was taken, I tested the upside-down jib as auxiliary power on a solo trip to Lake Nipigon. I rigged it using one of the sheets as the halyard and the other cleated down to port as a backstay. When Eric and I tried the same rig this year in Pike Bay, I forgot to rig the backstay and the dowel mast snapped.
I lowered the centerboard several inches and raised the sail, but we didn’t move, so I paddled a few strokes. Edging forward out of the lee, the sail filled with the wind on the port quarter, but the boat was sluggish with all the weight she carried. When we finally ghosted out of the lee and headed into the bay, powerful gusts hit the boat.
I sat in the starboard quarter holding the sheet taut in my left hand as my right hand gripped the handle of a paddle that I levered against the side of the boat to help steer. The mast bowed more and more with each gust. The boat was just beginning to plow through the whitecaps when an especially strong gust hit the sail. The dowel bowed ominously and then snapped with a loud crack, and the sail tumbled over the side. I had forgotten to cleat the second jibsheet down as a running backstay!
With no harm done other than a broken dowel, we had a good laugh, quickly stowed everything, and motored across the turbid shallows of the bay to a broad river mouth at the southwest shore. We set out two anchors, port and starboard, to hold the boat between little flat islands ringed with water reeds and topped with cattails.
The first blackflies of the season discovered us there the following morning. It was the first day of June, the wind had died, the sun was bright and very warm, and we had stripped down to T-shirts and long pants. The water in the river mouth was already too warm to hold fish, so we motored out of Pike Bay heading northeast into the cold, deep, open part of the lake.
A 10-mile passage carried us to the western end of Kelvin Island where we anchored off a marsh deep at the head of a bay identified as Henry’s Harbour on the topo map. Our hope in visiting Henry’s Harbour was to see a moose in the large marsh and alder thickets that fill the head of the bay, and as we anchored the boat, we could see tracks the size of soup plates crisscrossing the muck below.
Eric soon spotted a moose walking chest deep through the water just 200 yards away. We quickly pulled the anchor and began motoring slowly at an oblique angle that we hoped would get us closer to the moose without spooking it. The moose just craned its lumpy, antlerless head with its donkey ears, looked over its shoulder at us for a moment, and then turned to resume its leisurely walk toward shore—lifting one bony leg after another half out of the water as it splashed slowly forward. We approached closer but were still 80 yards away when the moose gathered pace and, with more purpose, trundled off to the shore, lurched up the bank, and turned amid the cattail stalks to look directly at us before turning back and cantering away into the alder thicket.
From Henry’s Harbour, we traveled north under sunny skies and light winds along the northwest coast of Kelvin Island, around the island’s northern point, then southeast and finally south into a half-mile-wide bay called Moose’s Harbour on the eastern side of Kelvin. We searched the entire circumference of Moose’s Harbour for a protected place to anchor a small boat but found nothing suitable.
With darkness coming on and clouds and bad weather moving in, we motored around the point that formed the eastern shore of the bay to a tiny, round cove that opened through a narrow, dog-leg channel to the main lake. We called the anchorage “Sock Harbour” because of its shape. At its toe, the little cove was only 50 yards wide and 2′ deep with a marsh at its northwestern end and rock ledges topped by cedar trees opening to the crooked channel on its eastern side.
Having used most of our battery capacity on the foggy transit from Kelvin Island to Shakespeare Island, Eric checked the flow of amps that evening to see if it was worth leaving the solar panels deployed a little longer.
Rain began drumming on the Tyvek tent late that night and didn’t stop until the following afternoon. The clouds finally cleared in the evening, but we awoke early the next morning in a dense fog; the tent was wet inside and out from condensation. We hurried through our morning routine and set out through the fog heading for the northwest corner of Shakespeare Island—15 miles to the south.
The lake was glassy calm. The only sound at our stern was the prop churning quietly under the transom, and the Whitehall left virtually no wake. The only sound forward came from a 2″ bow wave that gurgled softly as it passed along the hull. Fog lay on the horizon all around us, and the dark mass of Kelvin Island was barely visible half a mile to starboard, but the sky was bright blue above us and to the north. As we cleared the southernmost point, a white fogbow appeared where the sun shone directly into the haze—the glowing band of white light arching over the water like half a smoke ring until its two ends plunged into the cold water.
Eric and I were comfortable in our coats and hats as we motored along at an efficient 3.6 mph to save battery power on the long crossing, but the air registered only 47°, and the surface water temperature was only 39° over 283′ of deep blue. As Kelvin Island disappeared in the fog behind us, we could see nothing to steer by but the compass. We heard no sounds, saw no wakes from distant boats: no one was out there but the two of us.
A lone gull cried overhead as Shakespeare Island finally came into view through the fog. Ravens cawed from a wooded island somewhere off the port bow as we approached the entrance to a crooked bay we called “The Hook” on the northwestern corner of Shakespeare. After inspecting the anchorage, we moved back outside to cast for brook trout over rocky shoals at the mouth of the bay—twice running straight up on boulders hidden beneath the reflected glare of the sun. Striking more rocks than fish, we soon nosed the boat onto a gray sand beach, unfolded the solar panels on deck to charge the house battery, and set an anchor in the dry sand of the beach.
We spent our last two nights anchored at Fishhook Island where the bay is protected in all directions except through the narrow entrance channel to the northwest. In the foreground is a “beaver stick” (in this case, an alder branch) with its bark eaten away to reveal the white sapwood beneath.
On the 15th day of our trip, we returned to our first anchorage at Fishhook Island having traversed 165 miles around the lower half of Lake Nipigon. We were trolling slowly southward toward the island in a flat calm when suddenly a strong puff of cold air at our backs presaged the approach of weather from the north. We continued trolling all the way to the island and carefully avoided the rock shoal, barely detectable as a slight browning of the water’s color on the south side of the entrance. A northwest wind of 8 to 10 knots was blowing directly into the cove, so we tucked into a little V-shaped notch at the northeast corner and put out two anchors on tight lines from the bow with our stern 10 yards from shore and the keel floating just 2″ above the mud bottom.
That evening we cooked dinner in the open cockpit with the tent protecting the propane stove from the wind as we watched luminous, silky-smooth cumulus clouds build over the western horizon. No rain threatened, so we sat outside until 9:30 when the sun finally dropped behind the clouds, quickly chilling the air. An undisciplined chorus of little frogs peeped from the nearby marsh, and our two loons called their oboe-like notes to each other from across the cove. Two new loons dropped down to the relatively calm water of the outer cove but soon departed—taxiing away down the channel with their wings flapping and their webbed feet slapping the water loudly until they finally gained enough speed and altitude to fly. For a moment, a tiny flash of sunlight reflected off their wet backs as they disappeared across the lake.
The night soon turned blustery with rain and 20-mph winds. On shore, the dark forms of spruce and fir trees swayed in the wind—each to its own rhythm—but with two anchors set on opposite sides of the bow, we pointed neatly into the wind, and the boat sat nearly motionless as 1″ to 2″ wavelets passed along the hull.
The wind came up from the northwest on our last night at Fishhook Island, so we tucked in very close to shore in a tiny cove where a low, rocky point protected us from the waves but not the wind.
Our final morning on the lake dawned cold and calm. We needed a favorable wind for our 10-mile run across the open lake to High Hill Harbour. My friend Jack texted the forecast from his house in Maine as we sat in the shelter of our tent. The early morning would likely be dry and partly cloudy with a light southwest breeze building to 20 knots after midday. It was a call to action; we heated coffee water in the electric kettle and began packing our gear quickly inside the tent as patches of blue sky appeared through the portholes.
Soon out on the open lake, we headed east-northeast toward High Hill Harbour, which lay unseen below the eastern horizon, our bow parting a heavy dusting of tree pollen that covered the surface of the lake and left yellow swirls in our wake. A line of rain squalls was developing over the mainland to the southwest and appeared to be moving northeast to intersect our course. Another line of squalls appeared on the horizon to the northwest and another over the mainland to the northeast. I checked the charge indicator on the motor battery and turned the throttle up until we were skimming along at 6 mph, trying to beat the showers.
Halfway to High Hill Harbour, we could just make out the shapes of two cell towers standing atop a darkly forested ridge in the direction of the outpost town of Beardmore and the highway that would take us away from the lake. We were almost there, and the modern world was waiting… Neither of us reached for our phone.
Tim O’Meara grew up sailing and otherwise mucking about in small wooden boats on Lake Okoboji in northern Iowa during the 1950s and ’60s. In college he was fortunate to sail 30′ sloops on San Francisco Bay as a junior member of a club team, and during two summer breaks crewed on a wooden 50′ Rhodes cutter off the California coast and then around the Hawaiian Islands and back to San Francisco. After graduating in 1970, he set off with two friends and a brother and sailed around the Caribbean for a year in an aging fiberglass sloop. A lost year soon followed during which Tim built a cold-molded version of the tender for Herreshoff’s yacht COLUMBIA; the tender now hangs in his garage above the 20′ Whitehall. Three graduate degrees in archaeology and anthropology were followed by 13 years of teaching at universities in the United States and Australia and then 25 years working as a consultant on economic development projects focused on the Pacific Islands where he learned to sail traditional wood canoes: in 1973 on the island of Taha’a in the Leeward Society Islands, and in 1988 and again in 1993 on Ifaluk Atoll in the Western Caroline Islands. Tim is now retired and spending as much time on the water as possible. He described an earlier voyage in his 20′ Whitehall in “An Electric Journey to Knight Inlet.”
If you have an interesting story to tell about your adventures with a small boat, please email us a brief outline and a few photos.
There are few techniques as efficacious and expeditious as using steam to plasticize wood—especially when bending planks. The technology is simple: you need a steambox, a high-capacity steam generator, plenty of fast-action deep-throated clamps, a gaggle of small wooden clamping pads, and hopefully, some reliable helpers to assist with bending the plank to the vessel. Once planks are removed from a steambox, they immediately begin to lose their pliability, and every second counts. For two or more people working in concert, this can lead to a bit of a scramble—even with extensive preparation and experience. For a lone builder, it can be a nightmare.
As luck would have it, there’s an alternative—the trusted, boil-in-the-bag technique where you bring the steambox to the boat, not the plank to the steambox.
For most small craft, the critical twist in a plank is at one end, typically the bow (or in both ends if the boat is a double-ender). In the middle, the run is relatively flat and straight. Thus, when it comes to steaming, you don’t need to work on the whole length of the plank but only on the hood ends (where the plank fits into the stem or sternpost rabbets).
To steam your plank ends singlehanded, you will need a contractor trash bag, or any long closable plastic “sock”; some string or masking tape; heat-resistant gloves, such as welding gloves; a 5-gallon bucket; and a steam generator such as an electric wallpaper steamer or purpose-built wood steamer with a long hose.
Photographs Isaac Robbins
The new plank is clamped in place, its hood end sticking out at a tangent. To bring it into the stem rabbet requires considerable bending, which if done cold will undoubtedly split the wood.
Step 1.
Clamp the pre-fashioned plank in its proper location on the hull. To align the plank, it helps to make an index line on it to indicate a station mold or frame.
Step 2.
Assemble the necessary clamps and pads that will be used to hold the plank once it is bent into place.
Step 3.
Slide the bag over the hood end of the plank, which is likely sticking out from your setup at a bit of a tangent. Slide the end of the steam hose into the bag along with the plank, then close the bag around the hose and the plank with string or masking tape. Make a couple of holes in the top and bottom of the bag. The top ones will allow the cooled vapor to escape the bag; the lower ones will allow the condensed steam to drip out. Place the bucket beneath the bag to catch the drips.
Step 4.
Plug in the steamer and set your timer for the requisite time—typically 1⁄2 hour for a 1⁄2″ plank, 3⁄8 hour for 3⁄8″, and so on. This timeframe is consistent for both hard- and softwood, although most small boats will be planked in softwood. As the steam fills the bag it will inflate like a hot-air balloon. Adjust the position of the bucket to catch the drips. Sit back, have a cup of coffee, and wait for the magic to unfold.
The plank is wrapped in plastic, the steamer’s hose fed into one end. Steam has been filling the bag and, as it cools, it has condensed and pooled inside. If holes had been made in the bottom of the bag, the condensation would have dripped away. Now, however, the builder must be careful not to spill the pooled condensation while removing the steamer and bag from the plank.
Step 5.
Once the time is up, don your heat-resistant gloves (the bag and its contents will be plenty hot), release the closure, and slide the hot, waterlogged bag into the bucket. Twist and press the now-limber plank into place and clamp it down. Let it cool into shape.
Step 6.
Make any final clamping adjustments to snug the plank into its correct location, add bedding between the stem and plank, and fasten.
After steaming, the pliable plank can be twisted and clamped into place. It is then allowed to cool before being permanently bedded and fastened into the stem.
For small boats where a false stem is added later in construction (for example, dories, semi-dories, skiffs), the plank can be run past the stem to be trimmed off later.
For carvel planking, pay special attention to the placement and clamping of the plank: the end of the hood can run long, landing on the face of the stem beyond the rabbet instead of in it. To avoid this, when you clamp the plank into place, set it roughly 1⁄4″ aft of its index location (see Step 1), then steam and bend in the plank. Once it is cool, slightly back off the clamps and, with a wooden mallet, lightly tap the aft end of the plank to advance it to its final resting place in the rabbet. Retighten the clamps, snug up the plank, and fasten it into place.
This simple steaming technique can prevent disaster in many boatbuilding operations: when a partially fastened but reluctant outwale is threatening to snap, or cranky chines just won’t make the final bend, or the “other” end of a peapod’s plank won’t fall into place, the mobile steamer and bag will save the day. All it takes is thinking out of the (steam) box.
Greg Rössel is a builder of small boats and a long-time instructor at WoodenBoat School. He is the author of Building Small Boats, Boat Builder’s Apprentice, Half Hull Modeling, and a regular contributor to WoodenBoat magazine. He is also a member of WoodenBoat’s Mastering Skills video crew, and the presenter of World of Music on WERU-FM.
You can share your tips and tricks of the trade with other Small Boats readers by sending us an email.
At last year’s Wooden Boat Festival in Port Townsend, Washington, the only places I found to change into and out of my boating clothes were the portable restrooms—exceptionally awkward and unpleasant changing spaces. In anticipation of this year’s gathering, I shopped online for pop-up camp shower tents. I bought one, but it was too bulky and heavy when folded and provided much more room than I needed when set up. I continued my search and found Pankay’s offering, billed as a “Pop Up Privacy Tent, Portable Outdoor Camping Bathroom Toilet Tent, Collapsible Shelter for Camping & Emergency.”
Photographs by Christopher Cunningham
Most privacy tents are made to accommodate stand-up showering—this one is 74 1⁄2″ tall, and much larger than what I was hoping to find. When stowed in its 23 1⁄2″ bag (seen here on the ground to the right), this larger tent weighs 4 lbs 10 oz. By contrast, the 51″-tall Pankay pop-up tent, which fits into the smaller green bag seen here, folds down to 14″ in diameter and weighs just 1 lb 1 oz.
The tent is made of a lightweight 190T (T = threads per inch) polyester fabric. The sides are 51″ tall and the top has a diameter of 36″. The hat-like crown adds about 2 1⁄2″ to the overall height and rests on top of the occupant’s head without restricting mobility—I can easily turn my head to see out in every direction without having the whole tent rotate. A 2″-tall band of black mesh between the top and sides provides ventilation and a view out without compromising privacy. There is a webbing strap over the crown so that the tent can be hung up if a fixed location is desired. Three flexible hoops give the tent its cylindrical shape; the touch of a magnet indicates they are all made of steel.
The Pankay pop-up is just the right size to carry on board a small, open boat. It takes only 20 seconds to set up, from opening its bag to having it in place. Taking it down and getting it zipped back in its bag takes 40 seconds.
When the tent is collapsed to be put away, the side’s three hoops, brought together, can be twisted and folded to reduce their diameter from 36″ to about 14″. Pankay provides an illustration and a video on the folding technique: it’s a bit like folding a bandsaw blade but different enough that it took me a while to get the knack. In its zippered storage bag, the tent makes a compact, easily stowed package that weighs under 17 oz.
The tent, along with my retractable portable toilet as a seat, made a very comfortable dressing room at the boat festival. I set up behind a booth, out of the main flow of foot traffic but not entirely hidden from view. While I was seated, the sides of the tent rested on the ground, providing complete coverage. Having the tent resting on my head wasn’t at all a nuisance. I could pull T-shirts off and on without trouble.
While the green tent required only seam sealer applied to the crown’s seams, the black pop-up’s top wasn’t made from waterproof material and needed an application of water-repellent treatment to keep the inside dry when subjected to a garden-hose shower.
While I was using the tent I discovered that it was a rather pleasant place to be. The air inside was still, and the mesh provided an all-around view. After the festival, I used it to sit in the rain and enjoyed the tent’s warm interior and the sound of the raindrops on its top. On other occasions I discovered how easy it was to use my phone while I was shielded from the glare of the sky, whether it was clear or cloudy. In that small, protected space with my hands free, I could comfortably have a bite to eat, write notes, or work with my camera. All I needed to shoot photos was to create a small circular hole in the side, so I used a hot knife to cut and seal the fabric edge. There was room in the tent for me to set up my camera on its tripod to hold the lens at the hole while I viewed its display screen. The hole hasn’t been a problem in my rainfall tests, so I’ve left it without a cover.
The tent is available in both green and black. I bought both, believing the company’s promotional material indicating that both versions were waterproof. The tents did, indeed, keep a light rainfall at bay, but when I later created an artificial deluge with a garden-hose sprayer in my backyard, the seams of the crowns, which are neither taped nor coated by the manufacturer, quickly leaked.
I cut and sealed a small hole in the side of the black tent for taking photos, thinking I might get some good wildlife shots while hidden from view. I plan to make a similar hole in the green tent for safely using my camera when it’s raining.
I first tried a water-based urethane seam sealer without good results and scrubbed it off. I did achieve leak-free seams using GearAid’s Aqua Seal +FD although this thicker sealant doesn’t flow into the seams and needs to be brushed on thoroughly. After the first application, shower tests revealed a few stray leaks that required a second application of the Aqua Seal. (It’s important to dust cured Aqua Seal to keep it from sticking to itself; I used crushed blackboard chalk.)
With the crown seams fully sealed, my home-made monsoon tests were successful for the green tent. Water streaming off the tent’s top flowed over the edge, away from the mesh, leaving the interior dry. Angled spray, simulating wind-blown rain, could be kept out of the tent by tilting the top in the direction of the spray to block it.
I made a rain canopy for my Whitehall, but it takes a lot of time to set up and take down. The pop-up tent is much quicker to assemble and provides better protection from the elements.
The seams of the black tent no longer leaked, but the underside of the brim glistened with minute beads of water. There were no drips, but the fabric was evidently not as waterproof as the brim of the green tent. I took a deeper look at the technical details and for the black version there were these two lines: “Water Resistance Level/Waterproof” and “Is Waterproof/False.” The details for the green version had “True” instead of “False.”
To increase the black tent’s effectiveness in wet weather, I treated the top with a water-repellent spray that is free of silicone and PFOA (Perfluorooctanoic acid, a harmful “forever chemical”). The spray dries quickly, and I applied it twice. While that seems to have remedied the transmission of water, I’d recommend the green tent.
In weather foul or fair, the green version of Pankay’s collapsible shelter is a good match for small open boats. Easily stowed and deployed in seconds, it will provide privacy and a refuge from the elements. If you think you’ll look silly using the pop-up, you can avoid embarrassment by fleeing the scene while continuing to wear it, thus making your escape unrecognized.
Christopher Cunningham is editor at large for Small Boats.
Pankay’s Pop Up Tent is available from Amazon for $18.79 in two colors: green (waterproof) and black.
Is there a product that might be useful for boatbuilding, cruising, or shore-side camping that you’d like us to review? Please email your suggestions.
When I was growing up in the 1960s and ’70s, one of my best friends had a Victorinox Swiss Army Knife. He was justifiably proud of it, and I coveted it for its bright red color, multiple blades, the toothpick and tweezers that slotted into the end of the case, the folding scissors…and that Swiss-flag shield logo gave it a touch of European class.
Despite my early longings, I have never owned a Swiss Army Knife, but some years ago I discovered that Victorinox makes other knives of lesser complexity, and I am now the proud owner of five.
Photographs by the author
The fixed-blade knives can be safely stowed in the made-for-purpose pouch, while the folding picnic knife offers a more compact solution.
Five years ago, on a visit to a local boatyard store, I spotted samples of a fixed-blade knife with a serrated stainless-steel blade and a bright-red polypropylene handle. I asked about them and was told they were Victorinox Swiss Classic Paring Knives, a favorite with local commercial fishermen and the yard’s own crew, and that they would cut through almost anything. The price tag was around $5. I bought one.
I still have it. It lives in a bucket on my 16′ sailboat and has been used for cutting everything from nylon three-strand rope and small bits of softwood to apples and rags. It remains sharp, and its handle has retained its vivid color. A couple of years after buying that first one, I found a second, tangled up in a pile of seaweed in the tidal zone near our mooring. It’s in equally good shape despite the unknown time it spent slewing around in the saltwater. It lives in the car. There is a third one in the kitchen that has become a family-favorite prep knife, and a fourth lives in the garage toolbox.
The paring knife’s handle is polypropylene with a molded valley along its length that fits my thumb when cutting. It feels comfortable in the hand and its textured finish is just enough to make the grip secure even when it’s wet. The overall length of the knife is 7 1⁄8″, the cutting edge is 3 3⁄16″ long, and at its maximum width the blade measures 1⁄2″. The blade is 1⁄16″ thick at the shaft, and the overall weight is just 0.6 oz.
The Swiss Classic Paring Knife comes in a wide range of handle colors, and a variety of blades: edges can be straight or serrated (called “wavy” by Victorinox), and the blade profiles are either spearpoint or sheepsfoot. My two fixed-blade paring knives (both serrated, but each of the different blade profile) reveal an evolution in Victorinox’s handle design: my original knife’s handle is almost straight along its upper edge, while the more recent acquisition has a pronounced curve, which is more comfortable to hold.
The three knives are clearly of the same family but with variations. From top to bottom are the serrated spearpoint knife, which after five years of use both on and off the boat is only slightly less sharp than it was when new; the sheepsfoot knife was found in the tidal zone and is as good as new except for some slight discoloring of the blade at the handle end; the picnic knife with serrated edge and rounded end is good for both cutting and spreading.
Thanks to the bright color of the knife’s handle, it is easy to spot in the dark recesses of a toolbox or drawer, and for anyone who wants a touch of safety there is an optional extra nylon sheath (or pouch) that has a covered metal tension belt clip, and an inner plastic liner. It is designed for the Victorinox paring knives but would fit any knife with a blade length of up to 3 1⁄4″, and an approximate width of 5⁄8″.
The most recent addition to my Victorinox collection is the Classic Picnic Knife, a foldable version of the paring knife. Made with the same polypropylene handle and stainless-steel serrated edge, the knife weighs 1.525 oz. Its blade is 4″ long with a rounded tip, 11⁄16″ at its widest, and folds into a 5 1⁄8″-long handle. It has the same excellent cutting quality, but with its blunt end is well suited to spreading. The liner lock that holds the blade open is more easily operated left-handed and was a little awkward to operate at first.
All Victorinox knives are Swiss made and guaranteed for life. They remain my go-to knives and are still the most affordable either on the boat or in the kitchen.
Jenny Bennett is editor of Small Boats.
Victorinox Swiss Classic Paring Knives are available through many marine stores, including Hamilton Marine where they are marketed as Net and Twine Knives, or direct from Victorinox. The classics are priced at $8, the pouch is $9, and the folding picnic knife is $24.
Is there a product that might be useful for boatbuilding, cruising, or shore-side camping that you’d like us to review? Please email your suggestions.
From childhood, Geoff Hart has been interested in boats and boatbuilding. His father, an amateur builder of small boats, built a skin-on-frame boat that he kept upside down in the yard of the family home in Miami. “A neighborhood kid, a little older and bigger than me,” recalls Geoff, “was running up and down on the upturned boat and put his foot right through the bottom. My father was fit to be tied. After that he only ever built in plywood.” Indeed, his father went on to build a couple of sailboats, an outboard runabout, and a 9′ pram dinghy with a Bermudan rig that he built for Geoff as a Christmas gift. As a teenager, Geoff helped his father from time to time and remembers that he “never bothered with lofting but instead would work straight from the table of offsets.”
Geoff took his first class at WoodenBoat School more than 20 years ago, joining a team of students building a traditional Norwegian pram with Bob Elliott. He returned some years later for the Fundamentals of Boatbuilding and then Advanced Fundamentals of Boatbuilding with Greg Rössel. He followed those with Elements of Boat Design with Paul Gartside, and finally Bronzecasting for Boatbuilders with Michael Saari, commenting, “Casting is like snow-skiing—way more difficult than it looks.”
Geoff Hart
Geoff’s office floor became the ideal space for lofting, although the family English setter was not always the most efficient assistant.
While he was accumulating knowledge through the classes, Geoff was building and dreaming on his own. He built a strip-planked Wee Lassie but wanted to try his hand at traditional construction. He acquired some rudimentary plans for a 12′ × 4′ 7 1⁄2″ Snow Bird, a 1932 Frostbite dinghy designed by C.D. Mower. They had been published in a 1955 issue of How to Build 20 Boats by the editors of The Rudder magazine (reprinted from the April 1933 issue of the magazine itself), and consisted of offsets and drawings on two 6″ × 9″ pages along with the advice that “Anyone who has had any experience building round-bottom clinker-built dinghies will find sufficient information on these pages to enable him to build a Snow Bird for himself.”
Geoff had no “round-bottom clinker-built” experience but decided to give it a go. He enlarged the plans. “In the originals,” he says, “some of the numbers were so small you couldn’t possibly read them. Even enlarged, the plans were very basic. What was there was good, but there was almost no detail.” Geoff thought back to his father’s habit of building from offsets and decided, “There was no way. I would have to loft it full size.” He laid out several sheets of plywood on the floor of his office and spent “a couple of weeks wearing kneepads, crawling around on the floor, and shifting the sleeping English setter who kept me company.”
Once lofted, he moved the project out to a bay in the barn near the house. It would be there for the next four years. “I’d leave it for a couple of months here and there, but it was very involved and there was a steep learning curve at every stage.”
Geoff Hart
Geoff set up the molds and then laminated frames around them. Subsequently he set up ribbands and installed the remaining laminated frames at 8 1⁄2″ centers.
Geoff built the hull upside down on molds. The plans suggested white oak for the keel and frames and cedar for the planking. But, unable to find white oak locally, Geoff decided to laminate the frames out of bald cypress. “They’re 3⁄4″ × 3⁄4″ spaced at 8 1⁄2″ centers, and there are a lot of them,” he says. “But not as many as the original—those were narrower and spaced every 6″. I made mine wider so I could screw into them.” He also added floor timbers at every other frame. “I wanted extra strength in the bottom, mostly because the boat was going to live on a trailer.” For the planks he used 5⁄16″× 6″ cypress boards, nearly all of which had to be scarfed for length.
For Geoff, the project was constantly challenging. “I truly did spend as much time thinking as I did building. The first time I attempted to fit the garboard, it broke. I remembered Greg Rössel’s steaming tips and bought a wallpaper steamer.” But before he even started planking, Geoff had to figure out how many planks he was going to need. He drew a full-scale diagram and figured out he could use 9, 10, or 11 planks per side. “If I’d used 11, they would have been too narrow to take two screws to the stem, and nine planks would have been too wide in the garboard and at the turn of the bilge.” He settled on 10 per side.
The original boat was very lightly built, Geoff says. The planking was in cedar and Geoff’s cypress would be slightly heavier but also stronger. He decided not to rivet the entire hull. “I knew where the stress would be greatest, so I riveted the full length of the garboard and two broadstrakes, but the other planks I riveted only from the bow to just aft of the maststep.” His wife stepped in to help with the riveting in the bottom of the hull. “A little of that went a long way with her,” he says. “She told me she was going to file a grievance with the Under-Boat Workers of America.”
Geoff Hart
The planking almost complete, the sheerstrake is clamped in place. Riveting has also begun in the bottom planks.
Geoff fastened all the plank laps to the frames with bronze screws (mostly inherited from his father) and, on the outside of the hull, applied adhesive caulk to the inside corners of the laps to seal the seams. “The climate here in Florida is pretty humid—wooden boats don’t dry out like they might in the Northeast if you haul them for the winter. I wasn’t worried about the planks splitting.” When he launched SNOW BIRD, Geoff says, “she didn’t leak a drop.”
Knowing that his choice of wood had added weight to the hull, Geoff sought ways to reduce weight elsewhere. The transom, he says, was designed for 3⁄4″ oak; he used 7⁄16″ cypress. He fashioned the centerboard from fiberglass, 7 lbs lighter than the specified metal. He hand-laid the board on a mold to the same basic dimensions as the original. When finished, it weighed 16 lbs, which he thought would be heavy enough to overcome its own buoyancy. “At the dock it went down just fine, but once I got going, the board just wouldn’t sink.” He took it out, cut a 6″-diameter hole near the bottom, and had a local metal shop fabricate a 3⁄8″-thick mild-carbon steel plate, which he ’glassed into the hole. It added 2 lbs of weight and, says Geoff, “worked like a charm.”
Geoff Hart
With the hull fully planked up, Geoff turned the boat over and began the fit-out. He built the centerboard trunk to the plans although, knowing he would be laying up a fiberglass board with squared off bottom edge, he also squared off the aft end of the trunk.
Mower’s design adhered to the 1930s Frostbite class rules. The boats were required to have three thwarts plus a mast thwart. “In a 12′ boat that’s pretty tight. It doesn’t leave room to turn around. I took out the forward thwart. The rules also specified small buoyancy tanks. They were probably big enough to keep the boat stable and upright after a capsize, but I decided to increase them, making them as large as possible while still fitting under the center thwart.”
The rig, says Geoff, is essentially as designed, although he increased the sail’s luff by a foot, which changed the area from 72 sq ft to 80 sq ft but didn’t alter the longitudinal center of effort. He also lengthened the mast from 11′ to 12′ 6″ to accommodate the taller sail. “I built it box-section out of Douglas fir rather than the original solid spruce, so it’s lighter but stronger. It’s tapered in both directions, which made it hard to build. I had one joint that was horrible, and I decided I couldn’t live with it. I spent four hours with a heat gun popping the epoxy glue loose and taking it apart so I could clean it out and redo it.”
Patty Hart
The original Snow Bird design showed smaller buoyancy tanks, more frames, and a removable forward thwart, otherwise Geoff’s new build would have looked like her sisters of the early 1930s.
While Geoff has been sailing since he was a child, the lug rig was new to him and, like everything else in this project, “involved a lot of learning. I’m still fiddling with it, trying to get it just right. Every time we use the boat, I raise the sail a little higher and adjust the downhaul, looking for that perfect set.”
Sail-setting aside, SNOW BIRD has more than lived up to Geoff’s hopes. After four years in the barn, she emerged and was launched in the summer of 2023, and, two summers on, Geoff is very happy with her. “I haven’t sailed her in more than 10 knots of wind,” he says, “but she’s surprisingly fast on a close reach.” When sailing, he sits on the cockpit sole, “because that’s how I learned.” He uses the center thwart when rowing, and the sternsheets when motoring. He has made the aft thwart removable. “If I didn’t have the motor, I’d probably just take it out, but it is nice if there are two people and one is rowing, it’s somewhere for the passenger to sit. We’ll see.”
Patty Hart
Geoff increased the sail’s luff by a foot, which increased the sail area by 8 sq ft—that extra canvas helps SNOW BIRD to move in even the lightest of breezes.
Like so many other builders of small boats, Geoff will no doubt go on tinkering and looking for things to improve, adjust, or tweak. But that is surely part of the fun. For now, SNOW BIRD sits on her trailer ready to go for a sail whenever the skipper and the riveter have some free time.
Jenny Bennett is editor of Small Boats.
Do you have a boat with an interesting story? Please email us. We’d like to hear about it and share it with other Small Boats readers.
The Blue Jay–class sloop was designed in 1947 as a junior trainer. Today, the fleet numbers over 7,000, and the boats are sailed by adults and kids alike.
It was blowing like stink, and my perch on the bow of the modern go-fast raceboat was precarious. The spinnaker jibe was not going well. I looked back at Randy, the skipper, who was grinning through the chaos; it was the same grin he had on his face when we capsized my Blue Jay–class sloop nearly 45 years before. I realized then that we’d live through this particular screw-up just like we’d lived through that one. And eventually we’d laugh about it.
If the only thing that Blue Jay taught me those many years ago was to laugh through the small calamities, it would have been enough, but I learned much, much more. Most important, I learned the love of sailing and the love of the Blue Jay class of sailboat. BANZAI, my Blue Jay, has proved to be the boat of a lifetime.
History of the Blue Jay-Class Sloop
The Blue Jay is a classic little sloop designed by Sparkman & Stephens (S&S) in 1947. It’s a hard-chined daysailer, 13′ 6″ long, 5′ 2″ at the beam, and weighs a minimum of 275 lbs. It carries 90 sq ft of sail in a main, jib, and spinnaker. While its sheer is relatively flat, its bottom is slightly veed and sweeps up nicely toward the stern. It is a very pretty little boat both under sail and at a mooring. While the design is now 60 years old, the Blue Jay’s appearance is still up-to-date.
S&S forged its reputation with fast, deep-draft ocean-crossing yachts, but they designed smaller boats, too. Their Lightning-class sloop is a 19′ centerboarder designed in the days before World War II; it found immediate favor with the growing numbers of middle-class families drawn to sailing, and boats are still being built to this design for active class-racing worldwide. In 1947, S&S designed the Blue Jay as a “baby Lightning”—a junior trainer for the growing hordes of baby-boomer sailors. My twin sister and I were a part of those hordes.
We grew up on the Shrewsbury River, Monmouth County, New Jersey. The Shrewsbury is a shallow river separated from the ocean by a string of sandbar towns. It joins the Navesink River, and the two flow into Sandy Hook Bay just south of New York City. During the mid-1960s, there were fleets of Blue Jays on both rivers, and the annual Junior Sweepstakes Regattas held on the Navesink were drifting matches with dozens upon dozens of Blue Jays, and double the dozens of young teens testing their skills against each other. Lifelong friendships like mine with Randy were formed in regattas like this one.
Ours wasn’t a family of sailors. But we lived on a river, and my parents thought that sailing was something the kids should learn. In 1963, we drove down to Bay Head, New Jersey, to the Hubert Johnson Boat Yard. The unfinished Blue Jay we went to look at that day was the yard’s first, and it looked little compared to the other boats in the shop; a deal was struck, and months later BANZAI was delivered.
The International Blue Jay was built by many small yards like Hubert Johnson, and by many individuals as well. A significant chapter in the early history of the Blue Jay class was community boatbuilding. The boat was designed to be built in plywood over sawn frames and chines. From the late 1940s through the ’60s, yacht clubs, youth groups, camps, and neighborhood families built many boats for their sailing programs. While most of these boats were intended for children, a number were for adults from the beginning.
The Blue Jay is a great junior trainer. It can be raced with two teens, sailed with three or four littler kids, or a parent and a couple kids. It is rigged with a main, jib, and spinnaker and in the right wind and in the right hands, it can really get up and go. The cockpit is big and deep, and long enough for the not-so-tall to stretch out and sleep. While most of my early time in the boat was spent racing or training for racing, some of my favorite memories have BANZAI beached on a sandy island.
While the boat is a thoroughbred one-design with great balance, and is close-winded and quick, it is also fairly forgiving—though as my young friend Randy and I learned on that gusty day 45 years ago, it is not a totally forgiving boat. A moment of inattention left us upside down with the mast stuck in the soft Shrewsbury River mud. After learning that insurance would cover most of the damage, and when the blood returned to my father’s face, we could laugh about our misadventure.
Our family kept the Blue Jay for a few years. In that span of time, I had become totally boat-besotted and under the spell of the great Danish sailor Paul Elvstrom, who had won four consecutive Olympic gold medals in the singlehanded sailing events. I had to have a Finn dinghy like him. The Blue Jay was sold. I went to college and my dreams of representing the U.S.A. at the Olympics drifted away into the haze.
Jamie Bloomquist
Drake Sparkman, one of the founding partners of the venerable design firm Sparkman & Stephens, specified wood construction for the Blue Jay. In the 1960s, the fleet began to allow boats built of fiberglass—though wooden boats are still being built, too.
During the 1970s, the Blue Jay lost its preeminent position as the junior sail trainer to the fiberglass 420. This French design was faster than the Blue Jay, and it had a trapeze. It was modern, it was hip, it was ’glass. The Blue Jay, although now available in fiberglass, seemed like it was beginning to become passé—though many clubs have stayed with the boat because of its good manners and versatility.
Rediscovering the Blue Jay
Many years after we sold BANZAI, my mother found her on the side of the road, looking forlorn and with a hole in the bottom. We got it back for free. I loaded the boat into the back of my beat-up yellow Ford truck and brought it back to Maine, where I was now living. With subsequent renovations BANZAI was able to race again and we finished third in the WOOD Regatta series at the 1992 WoodenBoat Show. Today, we still do some fun races, but most often we daysail—usually with crews of kids and dogs. Sometimes I sail gloriously alone.
I’m not alone in my experience: many adults who were brought up in the Blue Jay are being attracted back to the boat. On the class’s website are requests from people across the country trying to find the boats they used to own, or ones of the same vintage.
The big cockpit that swallowed up all those little kids is just right for a couple of getting-larger middle-aged folk to have a comfortable day sail. I find it still has the same sprightly performance I recall from childhood, although the tiller seems to be a lot lower today. Adult newcomers enjoy the boat, too.
John Hanson
Many sailors who were raised in the Blue Jay class are today trying to relocate their childhood boats. Sam Hanson, seen here, is lucky: His dad found his old boat, inspiring a new generation of Blue Jay aficionados in the Hanson family.
The Blue Jay has a few faults. The plywood construction of the past did not have the benefits of modern epoxies, and the decade-old plywood panels can get a little beat. It is hard to fix the centerboard trunk leaks brought on by old age. If you are looking at older boats, look for signs of delamination and ask a professional to check the boat over. Don’t let a little damage kill a good deal, though: a lot of age-related deficiency can be repaired with a little skill, money, or both.
On the water some of the boat’s benefits are drawbacks as well. The big, beautiful deep cockpit is not self-bailing, which means rainwater can be a pain, and with the narrow side decks and no flotation, the boats can capsize. While they will not sink completely, older Blue Jays cannot be sailed out of a capsize as can, say, a Laser or a 420. The up-side is that this does teach caution.
These flaws are minor compared to the joys of owning and sailing a classic yacht from the boards of one of the world’s most prestigious yacht design firms. Today on the classic-yacht-racing circuits of Europe, sailing a Sparkman & Stephens boat is ne plus ultra. You can’t get much better. Olin Stephens, the firm’s cofounder, died at age 100 in September. With an International Blue Jay, you too can be pretty swank, sailing your own Sparkman & Stephens classic. And you can laugh about it.
Designer/builder Rollin Thurlow took the lines shown here from a surviving 17′ B. N. Morris canoe (Model A-64, Type 3) that had been built in 1908. According to the builder’s catalog, the Morris Model A canoe combined “the most important features that are required in an all-round canoe … great stability, good speed, good paddling qualities, together with a remarkable carrying capacity on slight draught.” “Type 3” indicated that this canoe had longer decks and other details that marked it as being top of the line.
The 1908 Morris A-64, Type 3: perhaps the canoe in which Grandpa courted Grandma.
Paddlers with salt water in their veins might question this design—and, for that matter, most other “Indian” or Canadian canoes. Look at all that tumble home (the sides curve toward the boat’s centerline as they near the rails). Won’t it invite green water aboard, and won’t it reduce secondary stability? And what about the seats located high up in the ends of the boat? Doesn’t this arrangement put the paddlers’ weight up where it shouldn’t be for rough-water work? The answer to all of the above is, “Yes, but….”
Wood-and-canvas construction. The distinctive lay of the planking allows fast and economical building.
Tumblehome keeps the rails clear of the paddlers’ knuckles, and this allows more efficient strokes. Also, the hull tends to be structurally stiffer because it approaches the tubular configuration of a decked canoe. As for the seats, their height permits more powerful strokes. And their far forward and aft locations provide better steering.
Body plans
This historic Morris canoe will carry a larger load than any comparable decked competitor, and it will do so while giving sharp control in shallow and tight streams. Most necessary repairs can be made with materials at hand. Used in its native inland Maine waters for its intended purposes, old Model A-64, Type 3 seems to approach perfection.
All-wood, strip-on-frame Peterborough construction is elegant and labor-intensive.
Thurlow’s beautifully detailed drawings describe three different construction methods for this canoe: traditional wood-and-canvas; all-wood strip-on-frame; and wood-strip fiberglass. Plans for the B.N. Morris canoe consist of eight sheets and include full-sized mold patterns and construction details for each canoe, as well as lines and offsets for the wood-and-canvas and allwood strip-on-frame versions. WoodenBoat Plan No. 96, $60.00.
PERFORMANCE
* Suitable for: Protected waters
* Intended capacity: 1-3
Trailerable or cartoppable
Propulsion: Paddle, pole
BUILDING DATA
Skill needed: Intermediate
Lofting required: No
* Alternative construction: As described
PLANS DATA
No. of sheets: 8
Level of detail: Above average
Cost per set: $60.00
WB Plan No. 96
* See page 96 for further information
Completed B. N. Morris Canoe Images
Poling is a popular pastime among canoe enthusiasts.The Morris’s weight combined with her relatively flat bottom gives her good initial stability.This makes her an excellent choice for poling or for general use in calm waters.
Subscribe For Full Access
Flipbooks are available to paid subscribers only. Subscribe now or log in for access.
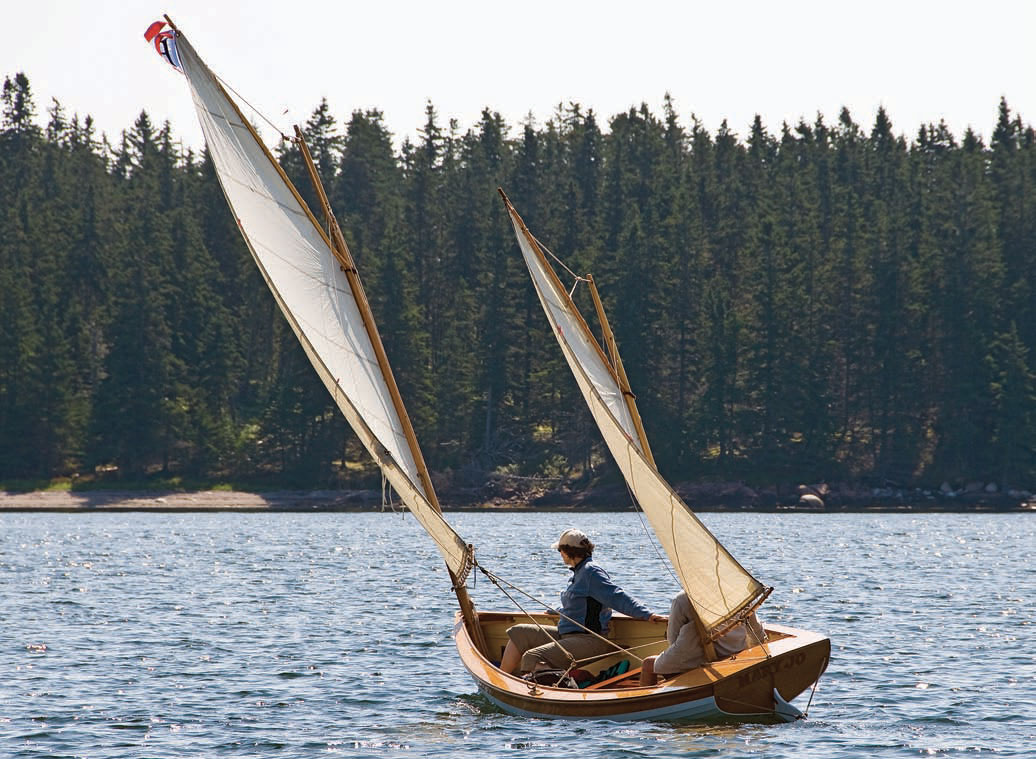 Benjamin Mendlowitz
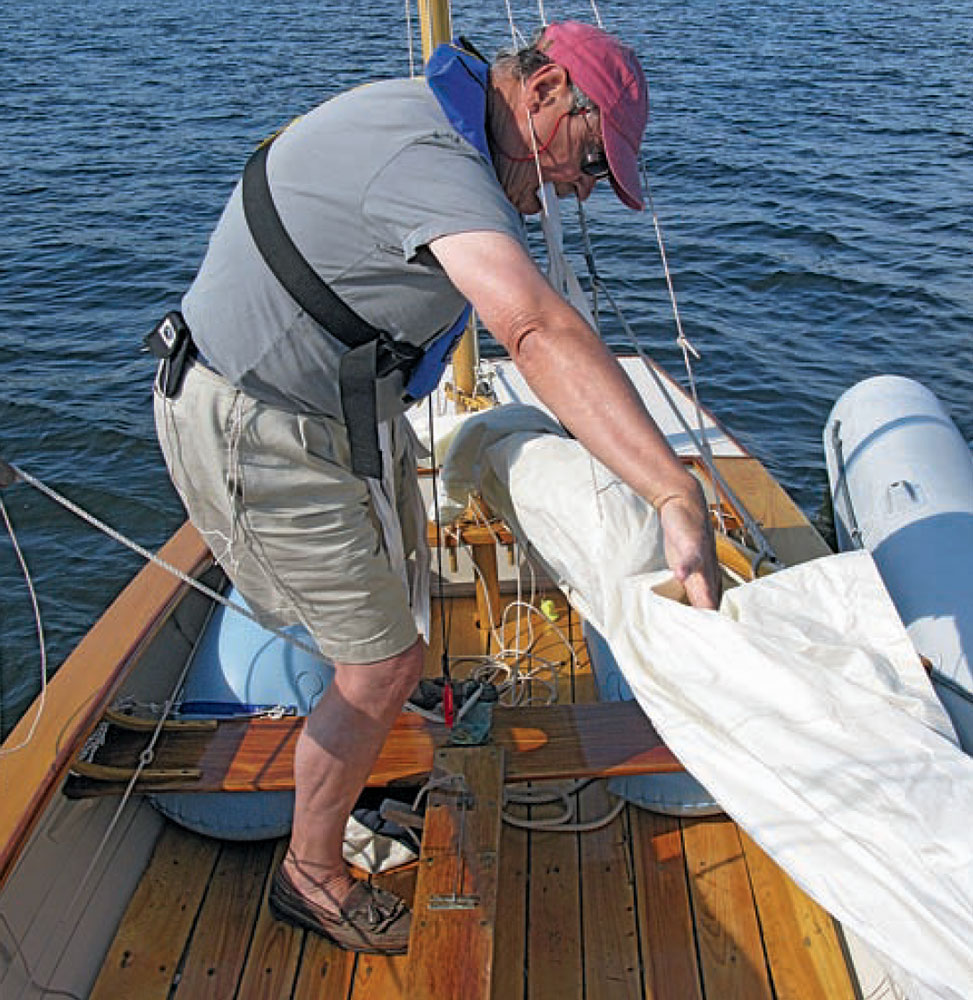 Tom Jackson
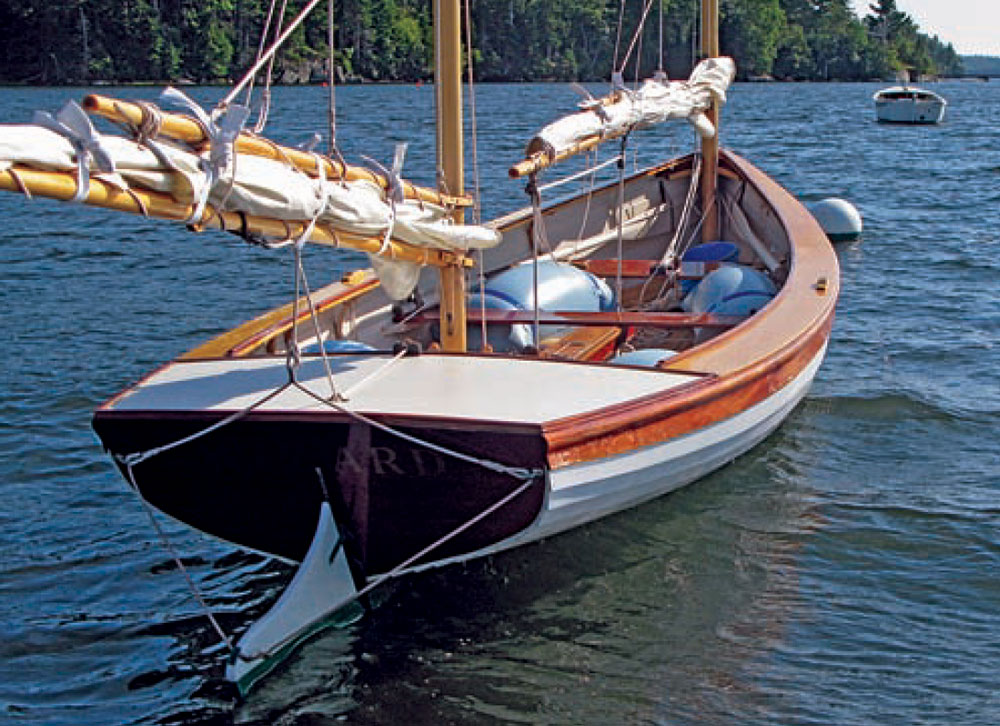 Tom Jackson
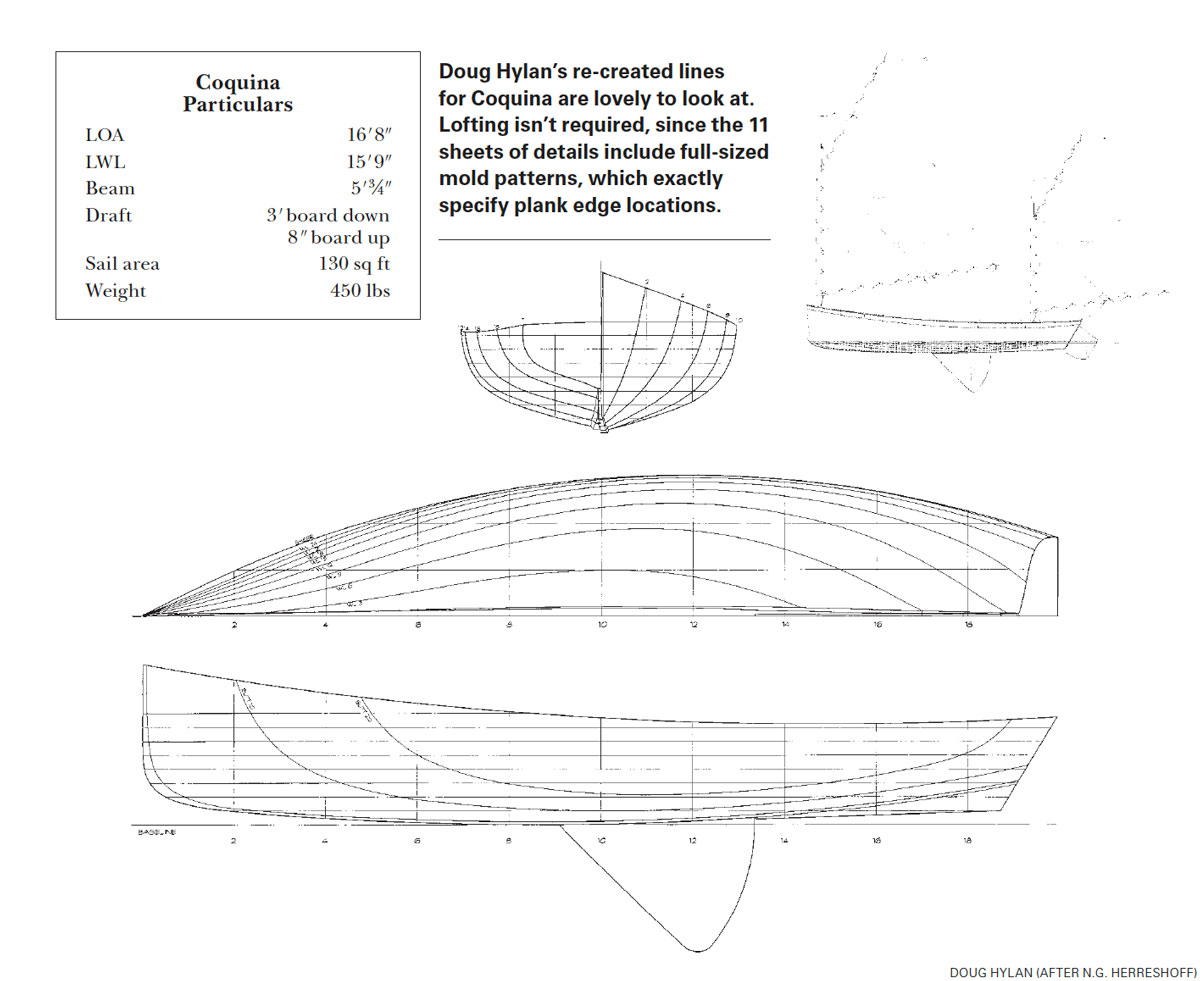 Doug Hylan